Climax Technology Co MP Mobile Pers cellular medical alarm system User Manual
Climax Technology Co Ltd Mobile Pers cellular medical alarm system Users Manual
Users Manual
26-Feb-2013
Table of Contents
1. INTRODUCTION .................................................................................................................... 1
1.1. MOBILE PERS SERIES ........................................................................................................... 1
1.2. WHAT’S IN THE BOX .............................................................................................................. 2
1.3. OPTIONAL SOFTWARE AND ACCESSORIES .......................................................................... 3
2. SYSTEM OVERVIEW ............................................................................................................ 4
2.1. IDENTIFYING THE PARTS ....................................................................................................... 4
2.1.1. Base Station .................................................................................................................. 4
2.1.2. Mobile Unit ..................................................................................................................... 8
2.1.3. Usage Advice .............................................................................................................. 10
2.2. POWER SUPPLY .................................................................................................................. 13
2.2.1. Base Station ................................................................................................................ 13
2.2.2. Mobile Unit ................................................................................................................... 13
2.2.3. Battery Life .................................................................................................................. 14
3. GETTING STARTED – INSTALLING MOBILE PERS ...................................................... 15
3.1. SETTING UP THE BASE STATION ......................................................................................... 15
3.2. SETTING UP THE MOBILE UNIT ........................................................................................... 16
4. PROGRAMMING MOBILE PERS....................................................................................... 17
4.1. INSTALLING USB DRIVER ................................................................................................... 17
4.2. PC PROGRAMMING TOOL ................................................................................................... 24
4.3. SMS REMOTE PROGRAMMING ........................................................................................... 50
5. DEVICE MANAGEMENT ..................................................................................................... 56
5.1. LEARNING IN PENDANT #1, PENDANT #2 AND OTHER DEVICES ....................................... 56
5.2. REMOVING PENDANT #1, PENDANT #2 AND OTHER DEVICES .......................................... 57
6. OPERATION ......................................................................................................................... 59
6.1. MOBILE UNIT ....................................................................................................................... 59
6.1.1. Normal Mode ............................................................................................................... 59
6.1.1.1. Answering Incoming Calls ........................................................................................... 59
6.1.1.2. Battery Checkup ............................................................................................................. 60
6.1.2. Alarm Activation ......................................................................................................... 60
6.1.3. Voice Prompts ............................................................................................................ 64
6.1.4. Rebooting the Mobile Unit and Factory Reset ................................................... 64
6.2. BASE STATION .................................................................................................................... 66
6.2.1. Idle Mode ...................................................................................................................... 66
6.2.1.1. Answering Incoming Calls ........................................................................................... 66
6.2.1.2. Non-Emergency Calls ................................................................................................... 67
6.2.1.3. AC Power Checkup ........................................................................................................ 67
6.2.1.4. Base Station Low on Battery ....................................................................................... 68
6.2.1.5. Base Station’s Battery Disconnected ....................................................................... 68
6.2.1.6. Devices Low on Battery ................................................................................................ 68
6.2.1.7. Automatic Check-In Reports ....................................................................................... 69
6.2.1.8. Inactivity Timer ............................................................................................................... 69
6.2.2. Alarm Activation ......................................................................................................... 70
6.2.3. Arming/Disarming the System ............................................................................... 75
6.2.4. Voice Prompts ............................................................................................................ 76
6.2.5. Walk Test (Range Test) ............................................................................................. 77
6.2.6. Factory Reset .............................................................................................................. 77
7. APPENDIX ............................................................................................................................ 79
7.1. CONTACT ID EVENT CODES ............................................................................................... 79
7.2. SCANCOM EVENT CODES ................................................................................................... 80
7.3. TUNSTALL TTNEW EVENT CODES .................................................................................... 82
7.4. CLIMAX CPC DIALECT EVENT CODES ............................................................................... 83
7.5. FRANKLIN EVENT CODES ................................................................................................... 84
1
1. Introduction
1.1. Mobile Pers Series
Mobile Pers is a portable and richly featured Cellular Medical Alarm System
with GSM or 3G network that protects the user wherever he goes. Patented in
the United States and Europe, this system includes a Base Station and a
Mobile Unit that works both inside and outside home. The Mobile Unit is a
complete Medical Alarm System in itself, using multiple built-in reporting
formats to directly communicate with the Central Monitoring Station (CMS).
Mobile Pers enables the CMS to send assistance to its user efficiently in the
event of an emergency. This system further provides security functions to
protect the safety of your family members.

2
1.2. What’s in the Box
Your Mobile Pers sample package includes the following items:
For whom Item
For the Mobile Pers user Base Station
Mobile Unit
Protective jelly case with a lanyard (for the Mobile Unit)
AC power adapter (CT-1)
Installation Kits* for the
installer
USB cable
CD-ROM containing
- Mobile Pers Installation and Operation Guide
- USB Driver for Mobile Pers
- PC Programming Tool
-
*The Installation Kits package can be purchased alone. It does not include the
Base Station, the Mobile Unit, the protective jelly case and the AC power
adapter.

3
1.3. Optional Software and Accessories
You can purchase the following software or accessories separately from the
Mobile Pers package:
Item
Usage
SMS iWizard
SMS iWizard is designed to facilitate SMS remote programming
via a PC. You can use this tool to conveniently configure Mobile
Pers on your PC without sending SMS text messages from a
mobile phone.
Mobile Updater (CT-2)
Mobile Updater (CT-2)
CD-ROM containing
- CT-2 User Guide
- Mobile Unit Firmware Update Tool
- USB Driver for CT-2
Travel Charger (CT-1) To charge the Mobile Unit when the user is traveling
4
2. System Overview
2.1. Identifying the Parts
2.1.1. Base Station
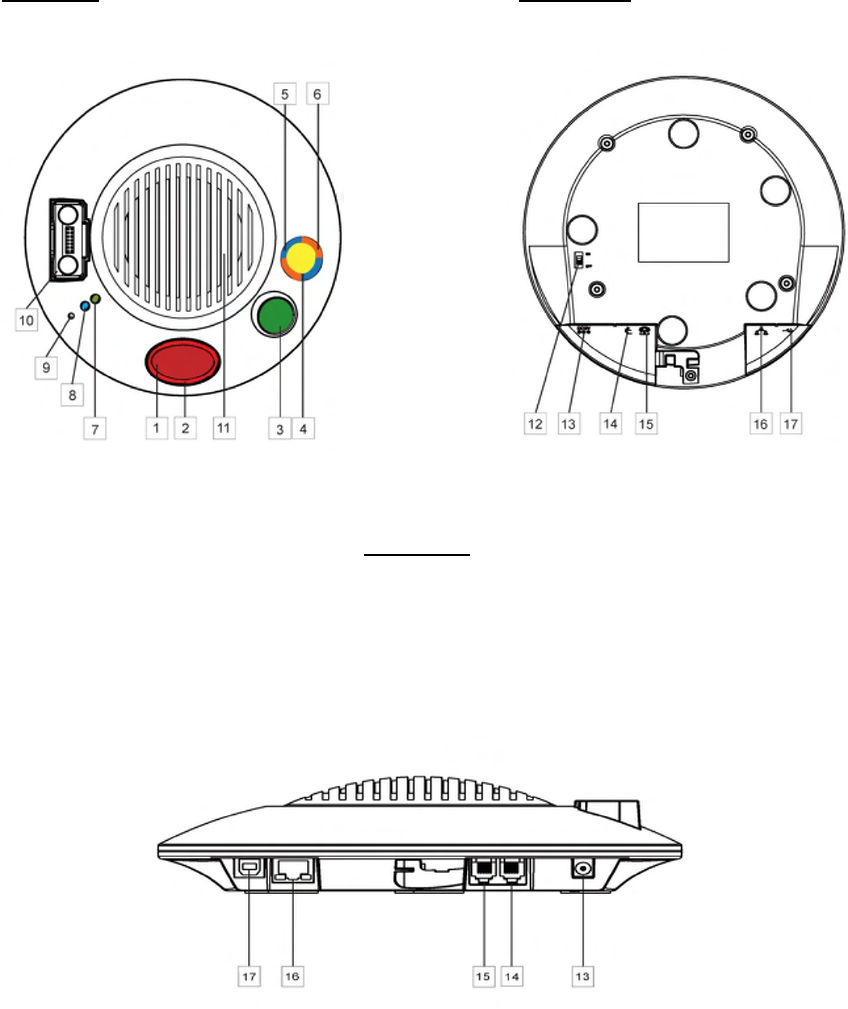
Top View Back View
S
Side View

5
Base Station Definitions
Button/LED/Component
Behavior Function/Indication
1 Red Help Button Pressed in idle/normal mode
To summon emergency help
Pressed once in learning
mode
To select Pendant #2
Pressed for 3 seconds in
learning mode
To delete a selected pendant
2 Red Backlight Dimly lit Idle/normal mode
Blinking 1. Guard time
2. Pauses during retries of
alarm reporting
Brightly illuminating 1. Busy with alarm
reporting
2. After an alarm report
receives a callback and
until the call is hung up
3 Green Reset Button Pressed in idle/normal mode
1. To reset the inactivity
timer
2. For the Base Station to
report all the fault
problems it is
experiencing via voice
prompts
Pressed once before the
Base Station dials out for
alarm reporting
To cancel the alarm reporting
Pressed once during or at
the end of a two-way
communication
To terminate the two-way
communication
Pressed for 3 seconds in
idle/normal mode
To make a non-emergency
call (whether or not the
yellow button is programmed
as an away/home button)
Pressed for 10 seconds in
idle/normal mode
To reset the Mobile Unit
Pressed once in learning
mode
To select Pendant #1
4 Yellow Away/Home
Button
(Non-Emergency Call
Button)
Pressed once when serving
as an away/home button
To toggle on/off the inactivity
timer
Pressed once when serving
as a security button
To arm the system
Pressed once when serving
as a non-emergency button
To make a non-emergency
call
Pressed for 3 seconds To enter learning mode
Pressed once in learning
mode
To exit learning mode
5 Blue Backlight Steady on The inactivity timer is on.
Off The inactivity timer is off.

6
Button/LED/Component
Behavior Function/Indication
5 Blue Backlight
Blinking
The Base Station is in
learning mode.
6 Orange Backlight
Steady on 1. After a non-emergency
call is dialed out and until
the call is hung up
2. Busy with status
reporting
Off 1. Idle mode
2. Pauses during retries of
status reporting
Blinking The Base Station has a line
fault problem.
When the inactivity timer is on and one of the conditions
under the orange backlight takes place, the yellow
away/home button’s backlight will turn purple.
7 Green LED (Volume
Switch)
Steady on AC power is on.
Blinking twice every second AC power fails.
Blinking every 2 seconds The Base Station or a device
is lower on battery.
Pressed once To increase the speaker
volume
8 Yellow LED (Volume
Switch)
Blinking every second The Mobile Unit is being
charged.
Steady on
The Mobile Unit is fully
charged.
Off The Mobile Unit is not
inserted in the Base Station’s
charging base.
Blinking rapidly (4 times per
second)
The Mobile Unit cannot
charge because of its poor
contact with the Base
Station’s charging base.
Pressed once To lower the speaker volume
9 Microphone
10 Charging Base To charge the Mobile Unit
11 Speaker
12 Battery Switch On/off
13 DC Jack
Connects to a DC 12V 2A switching power adapter.
14 Phone Jack Marked
Connects to a phone line from the wall (on MP-2 and MP-5
only).
15 Phone Jack Marked
Connects to a telephone unit (on MP-2 and MP-5 only).

7
16 Ethernet Port (On MP-3 and MP-5 only)
17 USB Port
8
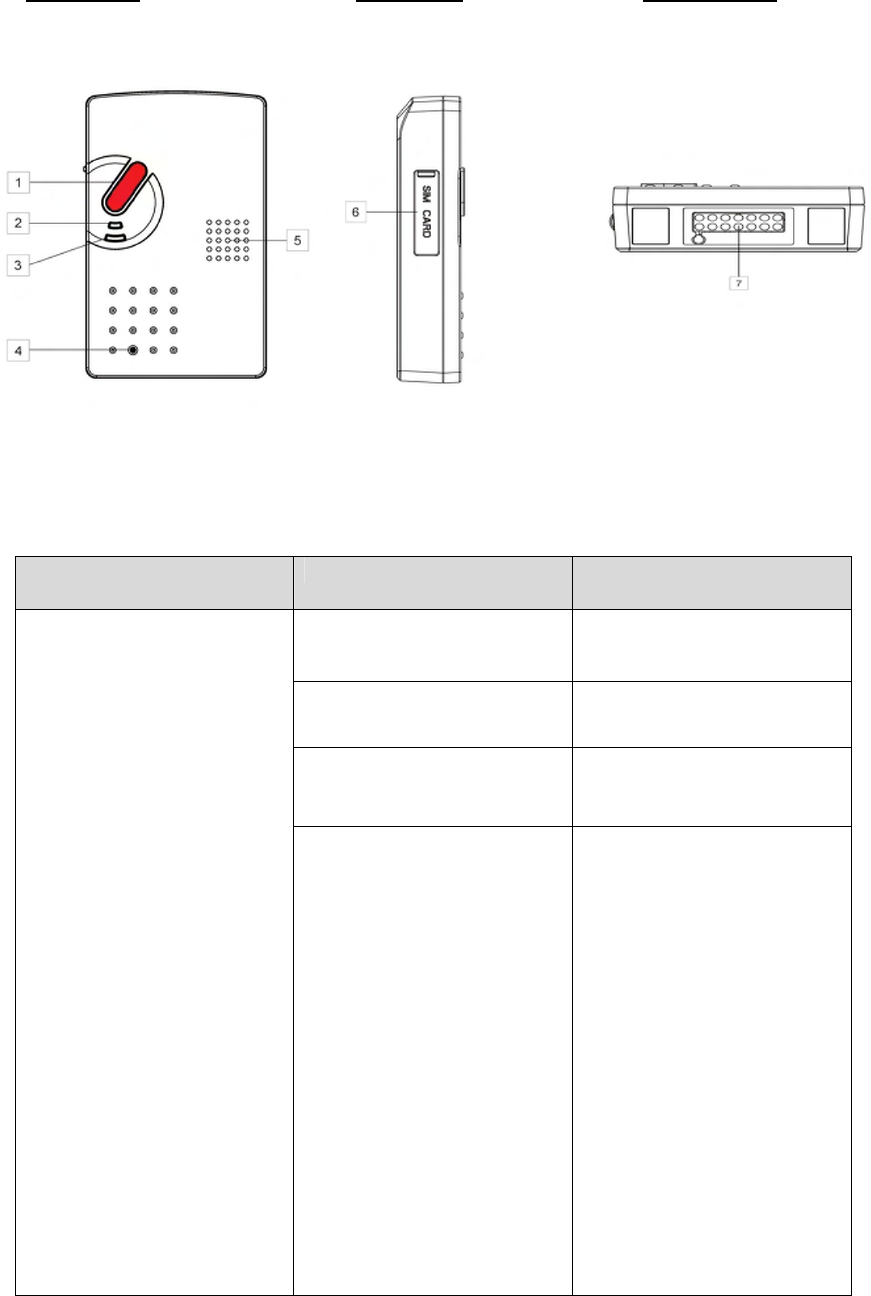
2.1.2. Mobile Unit
Front View Side View Bottom View
Mobile Unit Definitions
Button/LED/Component
Behavior Function/Indication
1 Red Help Button
Pressed once when the
Mobile Unit is ringing
To pick up the call
Pressed for 5 seconds
during a call
To terminate the call
Pressed once (when off the
Base Station and in normal
mode)
To trigger a panic
report/summon emergency
help
Pressed for 15 seconds in
any mode
To enter reset mode: All the
Mobile Unit’s LEDs will be on
for 1 second and go off. The
Mobile Unit will enter reset
mode for 10 minutes. Now
you can:
1. Press the red help button
once to reboot the
Mobile Unit. Or
2. Give the red help button
2 quick presses to
restore the Mobile Unit to
factory settings (the 2
presses must be
completed in 1 second).

9
Button/LED/Component Behavior Function/Indication
2 LED 1A (Green)
Blinking every 2 seconds The Mobile Unit is being
charged.
Steady on The Mobile Unit is fully
charged.
Blinking every 5 seconds The Mobile Unit is in normal
operation.
2 LED 1B (Orange)
Blinking every 3 seconds The Mobile Unit is low on
battery.
3 LED 2A (Red) Blinking every second Guard time/retrying
reporting/pauses during
retries
Steady on The Mobile Unit is reporting.
3 LED 2B (Orange) Blinking quickly (every 0.4
second)
To signal a GSM fault
4 Microphone
5 Speaker
6 Micro SIM Card Slot
7 Charging Port (Docking
Connector)
10
2.1.3. Usage Advice
Please follow the usage advice below to avoid operational glitches.
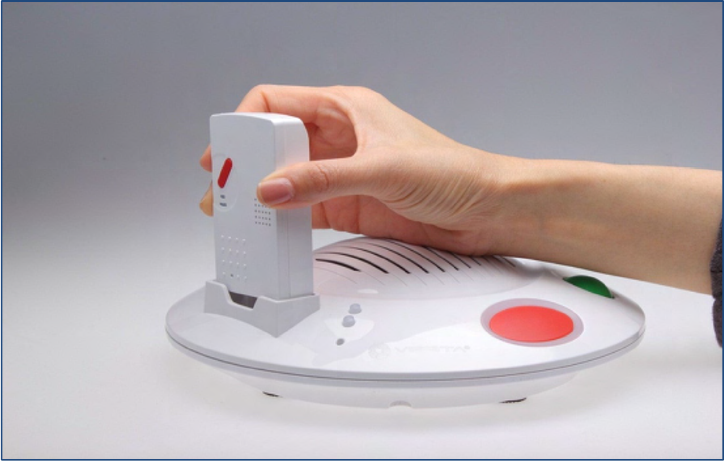
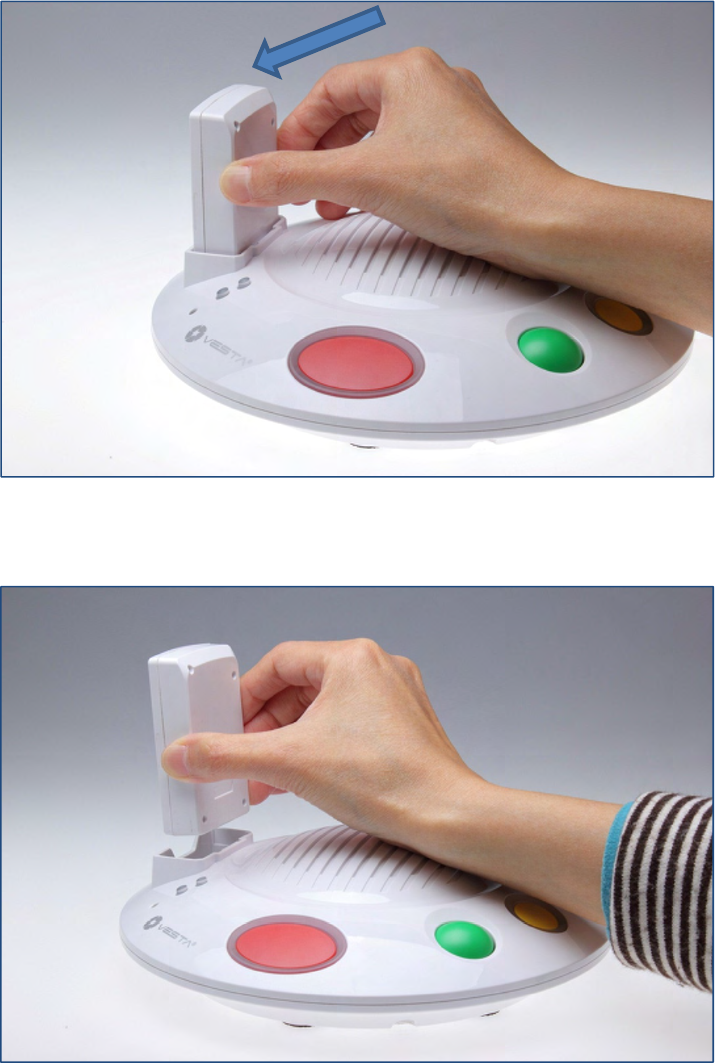
Inserting the Mobile Unit: When you insert the Mobile Unit into the
Base Station, please press your hand softly on the speaker area of the
Base Station to keep the Base Station staying stable on the table.
11
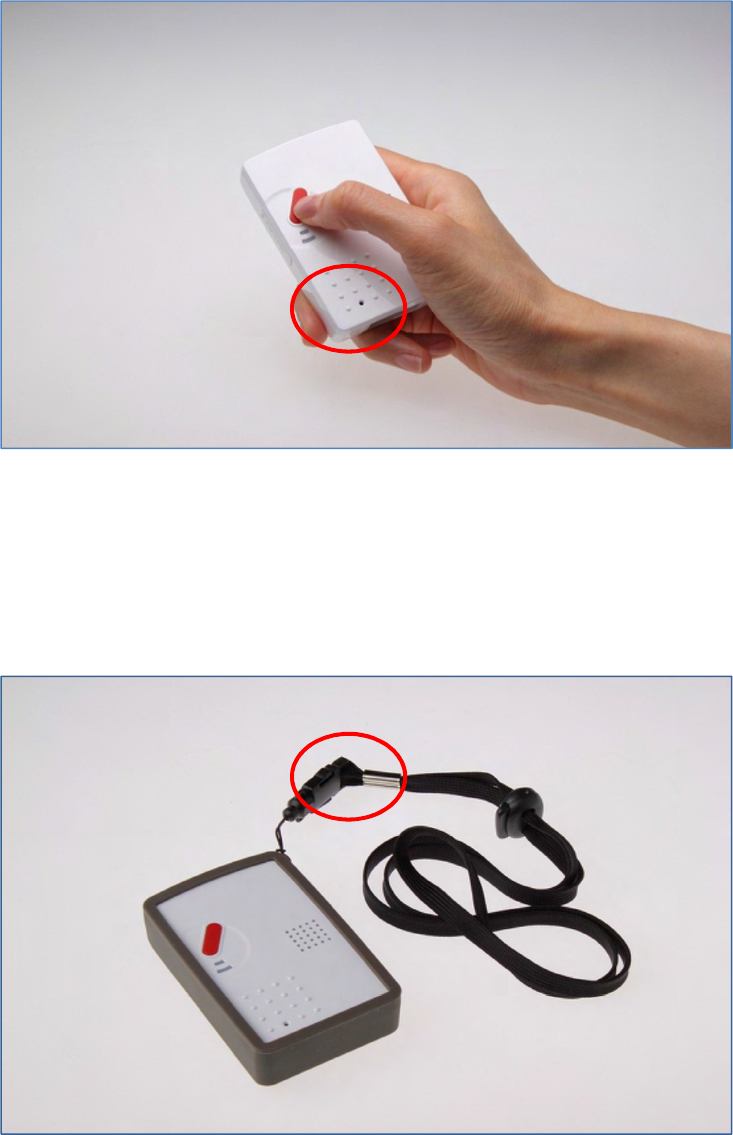
Taking out the Mobile Unit: When you take out the Mobile Unit from the
Base Station’s charging base, please press your hand softly on the
speaker area of the Base Station to keep the Base Station staying firm
and stable on the table. Push the Mobile Unit forward as shown below
before taking it out.
Then you can gently pull the Mobile Unit out of the charging case.
12
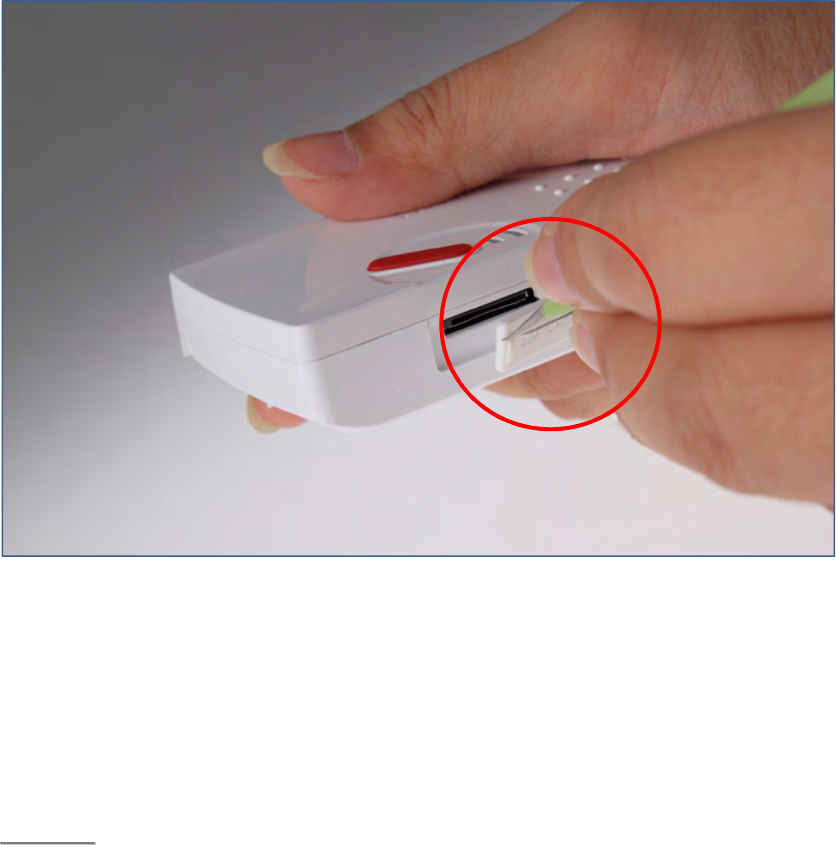
Using the Mobile Unit: When you press the Mobile Unit’s red button to
summon help, please make sure that your hand does not cover the area
with white dots. Please hold your Mobile Unit as shown in the photo
below. The Mobile Unit’s operating temperature ranges from 0°C to 45°C.
Mobile Unit Case: A protective jelly case for the Mobile Unit is provided
in your Mobile Pers package. Please remember to take the Mobile Unit
out of the jelly case, fully charge it, and return it to the protective case
before usage. Put your Mobile Unit in this case for its protection and for
your convenience of using and carrying around the device.
13
2.2. Power Supply
2.2.1. Base Station
Plug the AC power adapter into the Base Station’s DC jack and connect to
the mains power. Make sure that you use an adapter with the appropriate
AC voltage rating to prevent component damage. An AC-DC 12V/2A
switching power adapter is generally used to power the standard version
of the Base Station.
In addition to the AC power adapter, a rechargeable battery is installed
inside the Base Station to serve as a backup in case of a power failure.
During normal operation, the AC power adapter is used to supply power to
the Base Station and at the same time recharge the battery. It takes
approximately 72 hours to fully charge the battery.
If the battery switch is set as OFF, the battery will not be charged when
AC power is connected and nor will it serve as a backup power source
when AC power is missing. You need to switch the battery to ON for it to
be charged when AC power is connected and serve as a backup power
source when AC power is missing.
When the Base Station is experiencing an AC power failure or low on
battery, it will not charge the Mobile Unit.
2.2.2. Mobile Unit
Charge the Mobile Unit battery by inserting the Mobile Unit in the charging
base on the Base Station. In addition, a travel charger (to be purchased
separately from the Mobile Pers package) can be used to charge your
Mobile Unit when you are away from home.
When the Mobile Unit is being charged, LED 1A (green) blinks every 2
seconds. When the Mobile Unit is fully charged, LED 1A (green) is steady
on.
The Mobile Unit needs to charge for 4 consecutive hours for its low battery
status to return to normal battery status. Please use the Mobile Unit after
LED 1A (green) and the Base Station’s yellow LED are both steady on to
indicate the Mobile Unit has fully charged.
When the Mobile Unit is low on battery, LED 1B (orange) blinks every 3
seconds.
The Mobile Unit makes a low battery report to the CMS when it is running
low on battery.
The Mobile Unit makes a battery restored report to the CMS when its
battery is fully recharged.
When the Mobile Unit is low on battery, it plays the voice prompt: “Mobile
Unit battery is low. Please charge it.”

14
2.2.3. Battery Life
Comparing the battery life (1100mAh battery) of different models:
433AM 868FM
Mobile Unit Base Station Mobile Unit Base Station
MP-1 Classic 46 hrs 24 hrs 62 hrs 18 hrs
MP-2 Classic 53 hrs 21 hrs 69 hrs 16 hrs
MP-3 Classic 46 hrs 24 hrs 62 hrs 18 hrs
MP-5 Classic 53 hrs 21 hrs 69 hrs 16 hrs
15
3. Getting Started – Installing Mobile Pers
3.1. Setting up the Base Station
Step 1. Choose a suitable location for the Base Station. The Base Station
requires the mains power and PSTN/Ethernet connections (PSTN for
MP-2 and MP-5; Ethernet for MP-3 and MP-5) and should be easily
accessible. It should not be placed in a damp location such as a
bathroom or close to a heat source like a microwave oven, which
could reduce signal strength.
Step 2. Plug the USB cable into the Base Station’s USB port and connect to a
PC for Mobile Pers programming.
Step 3. Connect a PSTN line and a telephone line to the Base Station for
Mobile Pers to operate via PSTN (MP-2 and MP-5 only).
Step 4. Plug an IP cable into the Base Station’s Ethernet port and connect to
an Ethernet network for Mobile Pers to operate via Ethernet (MP-3
and MP-5 only).
Step 5. Plug the AC power adaptor into the Base Station’s DC jack and
connect to the mains power. The Base Station will emit two beeps to
indicate the system is now ready for further operation.
16
3.2. Setting up the Mobile Unit
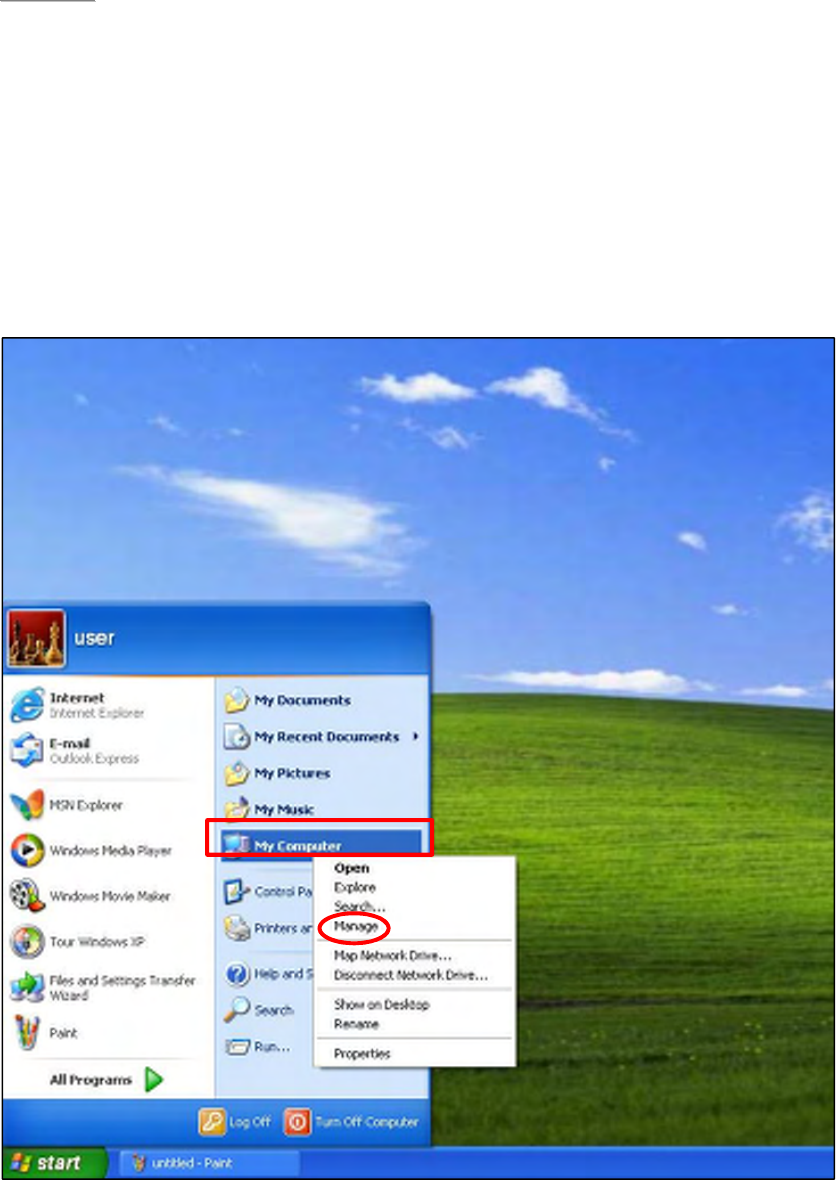
Step 1. Please take the Mobile Unit out of the protective jelly case and use
tweezers to pull open the rubber cap covering the SIM card slot.
Step 2. Hold the Mobile Unit with its front side facing you. Insert a micro SIM
card into the SIM card slot on the side of the Mobile Unit with the chip
side of the SIM card facing you. Please make sure that the micro SIM
card PIN code is deactivated and all SMS messages removed before
insertion.
Step 3. Insert the Mobile Unit into the charging base on the Base Station to get
its battery charged.
<
<N
NO
OT
TE
E>
>
The Mobile Unit must be inserted on the Base Station when you configure
the Base Station and the Mobile Unit via USB PC programming or SMS
remote programming (SMS programming is optional).
17
4. Programming Mobile Pers
4.1. Installing USB Driver
Please first install the USB Driver provided in your CD-ROM on your PC.
<
<N
NO
OT
TE
E>
>
It is recommended that you use Windows XP or Windows 7 operating
systems.
Step 1. Plug the USB cable into the Base Station’s USB port and connect to a
PC. Make sure that the Mobile Unit is inserted in the charging base
on the Base Station.
Step 2. Insert the supplied CD-ROM into your CD-ROM drive and find the
“USB Driver” folder (you may copy and paste the folder to your
desktop for later use). Click the “Start” button at the bottom left-hand
corner of the screen and then click “My Computer” and “Manage.”
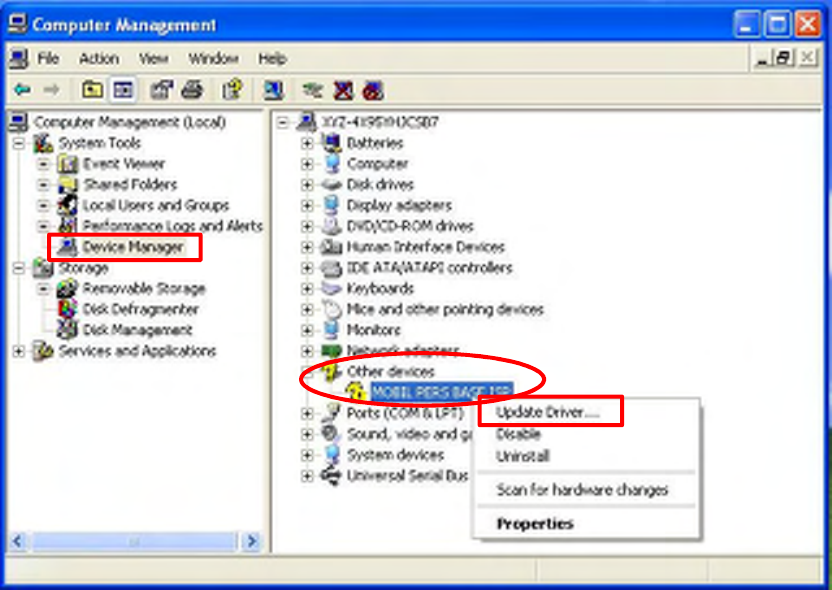
18
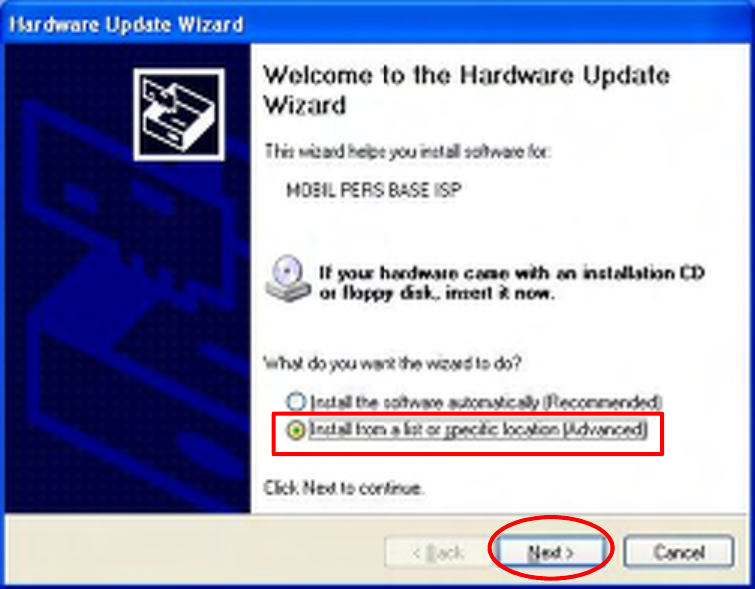
Step 3. Click on the “Device Manager” icon and find “MOBILE PERS BASE
ISP” under “Other devices.” Click “Update Driver.”
19
Step 4. When the Hardware Update Wizard window pops up, select “Install
from a list or specific location (Advanced)” and click “Next.”
20
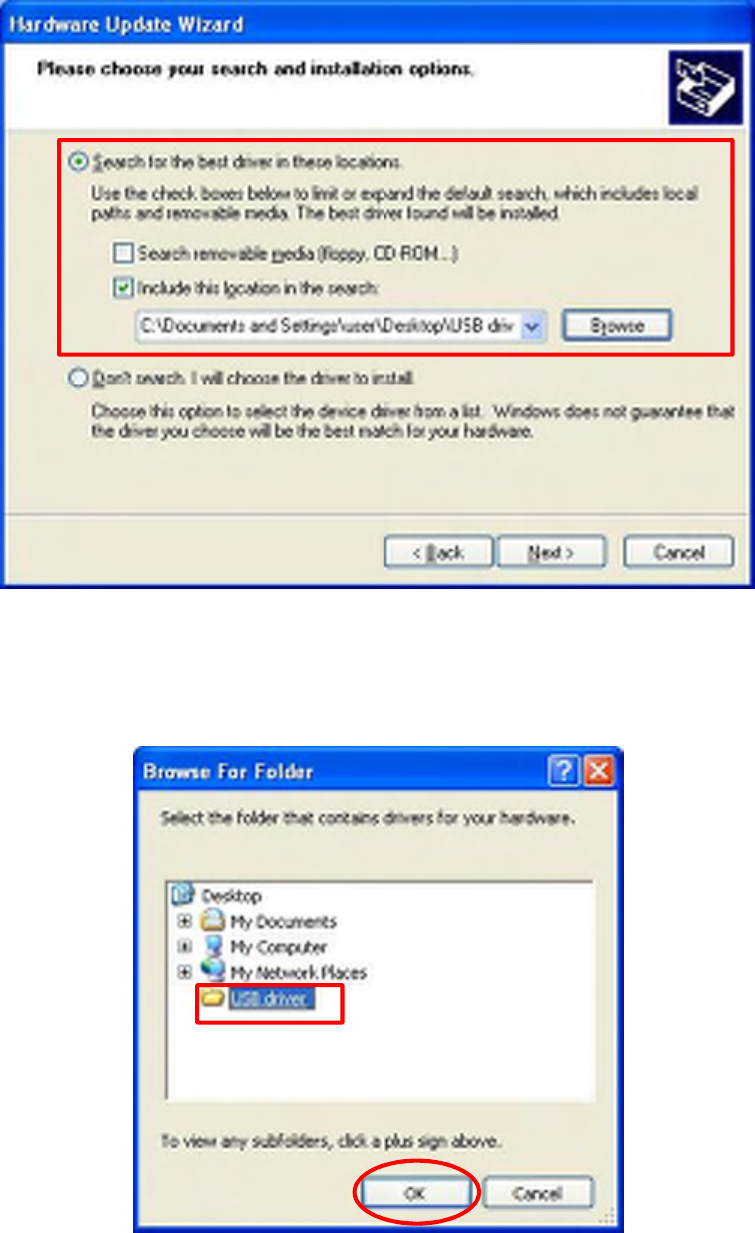
Step 5. Search for the USB Driver folder. If you have copied and pasted the
USB Driver folder to your desktop, tick “Include this location in this
search” and click “Browse.”
Step 6. Select the “USB Driver” and click “OK.”
21
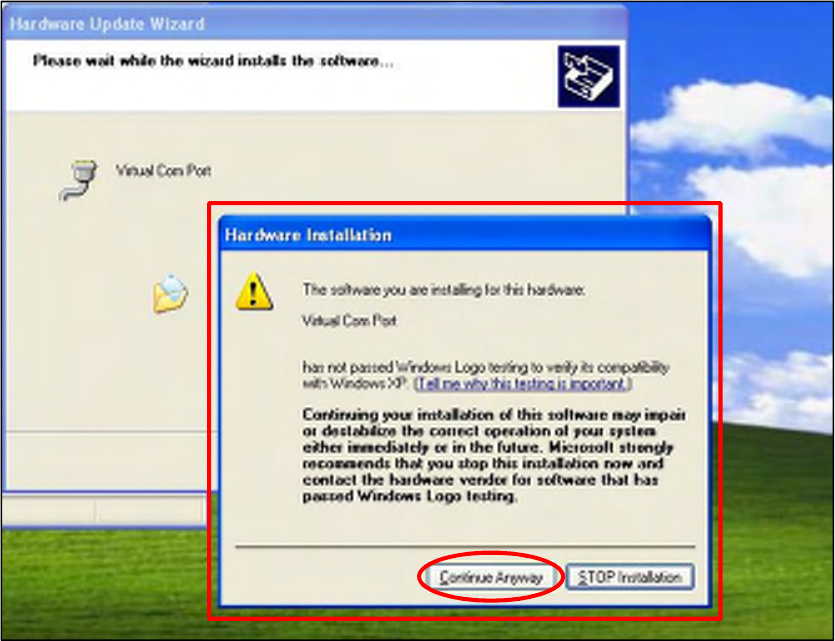
Step 7. It takes a short while for your PC to install the USB Driver. If the
Hardware Installation warning window pops up, please click
“Continue Anyway.”
22
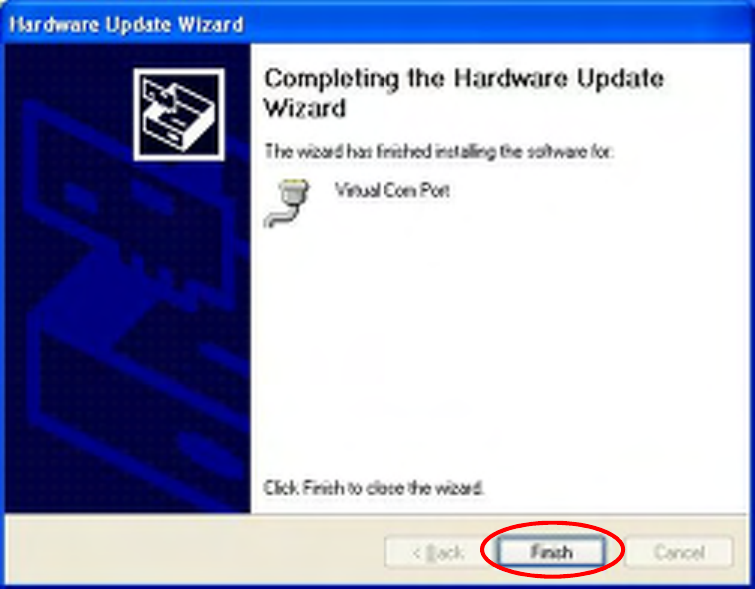
Step 8. When the installation has been completed, click “Finish” on the
Hardware Update Wizard window to close the wizard.
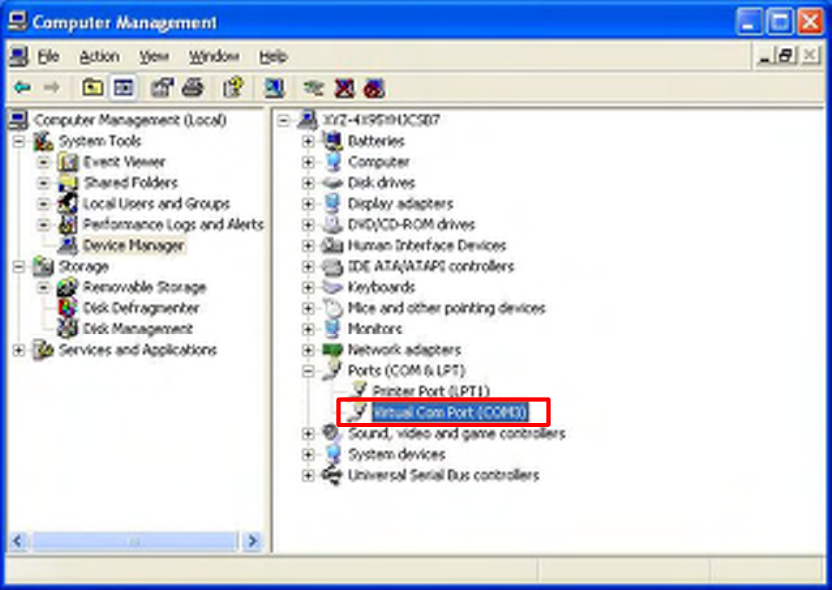
23
Step 9. Please remember the COM port number of Mobile Pers as shown in
the “Device Manager” section. You will need the COM port number
when doing PC programming.
Now that the USB Driver has been successfully installed, you can
proceed with PC programming of Mobile Pers.
24
4.2. PC Programming Tool
You can easily configure both the Base Station and the Mobile Unit via the PC
Programming Tool provided in the CD-ROM.
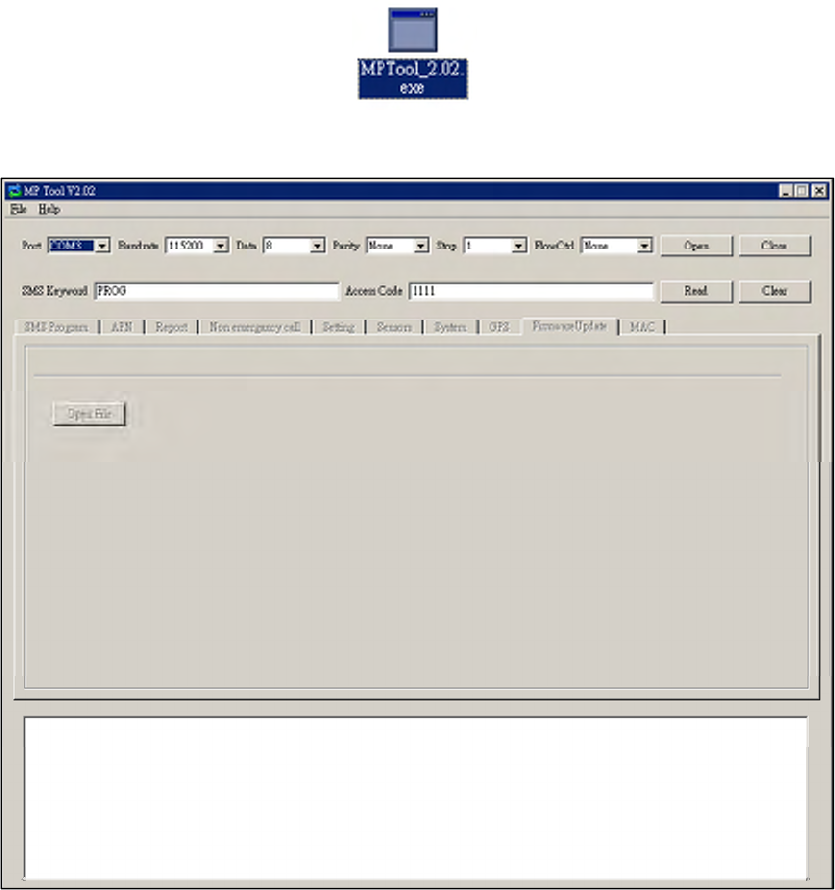
Step 1. Find and open the “PC Programming Tool” folder in the supplied
CD-ROM. Click “MPTool_x.xx.exe” to execute the programming tool.
The following configuration screen will be opened.
25
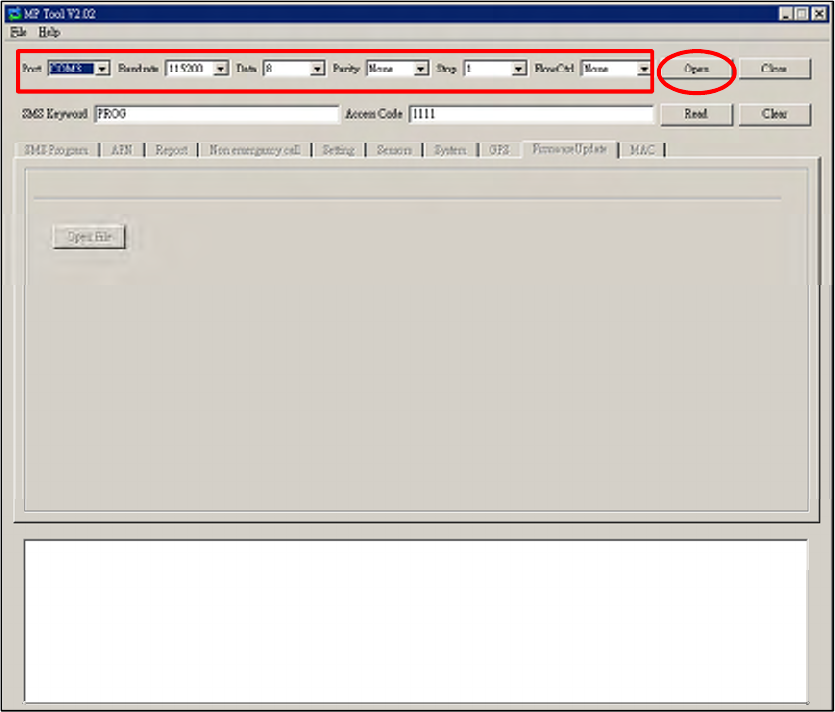
Step 2. Select the following settings in the top section of the configuration
screen and click “Open.”
Port: Select the COM port generated for Mobile Pers after
installing the USB Driver (the USB port connected to Mobile
Pers).
Baud rate: 115200
Data: 8
Parity: None
Stop: 1
FlowCtrl: None
26
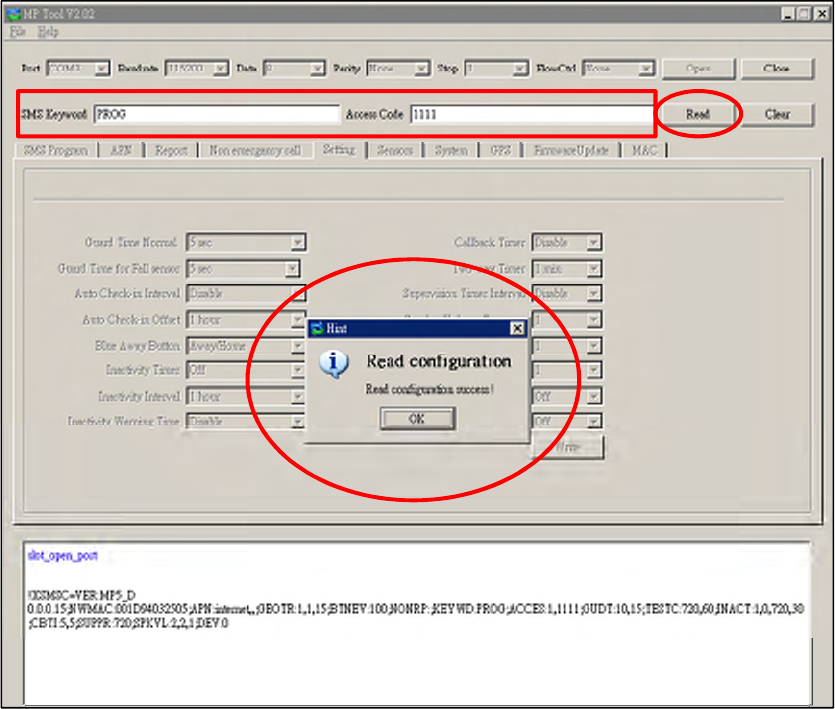
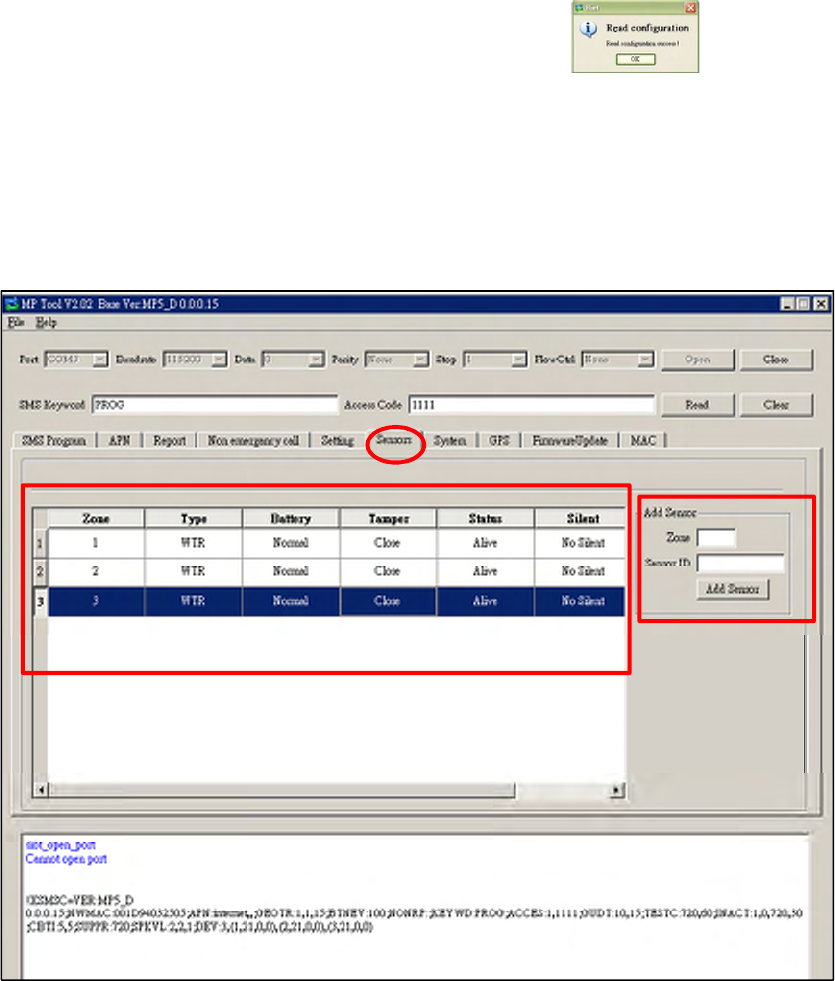
Step 3. Enter SMS Keyword and Access Code and click “Read.” When a
pop-up window shows “Read configuration success,” the
configuration page below will be opened and you can proceed with
the programming of Mobile Pers.
SMS Keyword: PROG (default)
Access Code: 1111 (default)
27
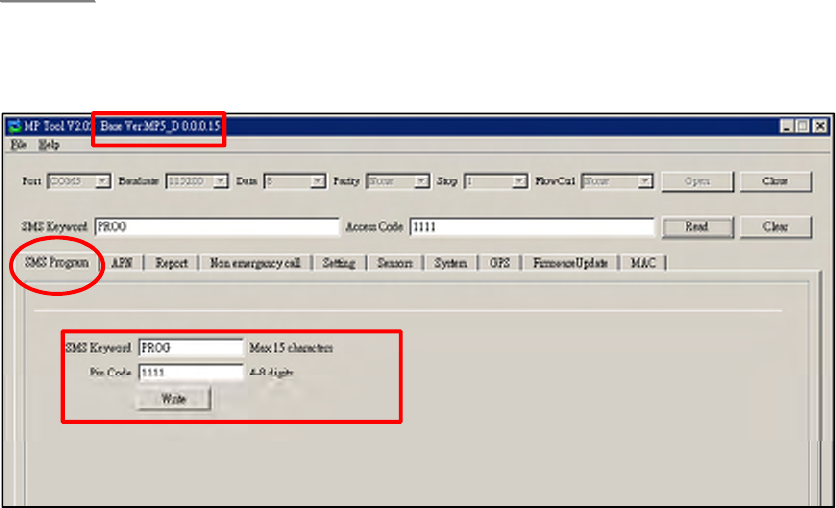
Step 4. SMS Program
Click “SMS Program” to set a SMS Keyword (15 characters max.) and a PIN
Code (4-8 digits) and click “Write.” Please note that the SMS Keyword is
case-sensitive.
<
<N
NO
OT
TE
E>
>
The version of your Mobile Pers model will be shown on the top of the
screen.
28
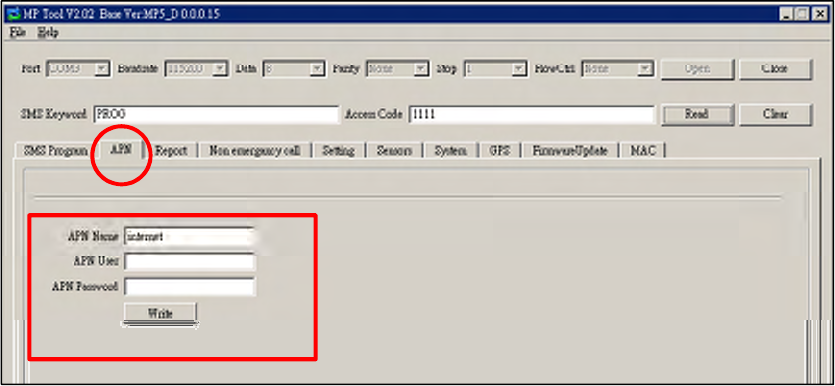
Step 5. APN
Click “APN” to set APN Name, APN User and APN Password and click “Write.”
Access Point Name (APN): The name of an access point for GPRS.
Please ask your SIM card service provider for your APN.
Username: Offered by your SIM card service provider. Please ask your
service provider for your GPRS username. If no username is required, you
may skip this step.
Password: Offered by your SIM card service provider. Please ask your
service provider for your GPRS password. If no password is required, you
may skip this step.
29
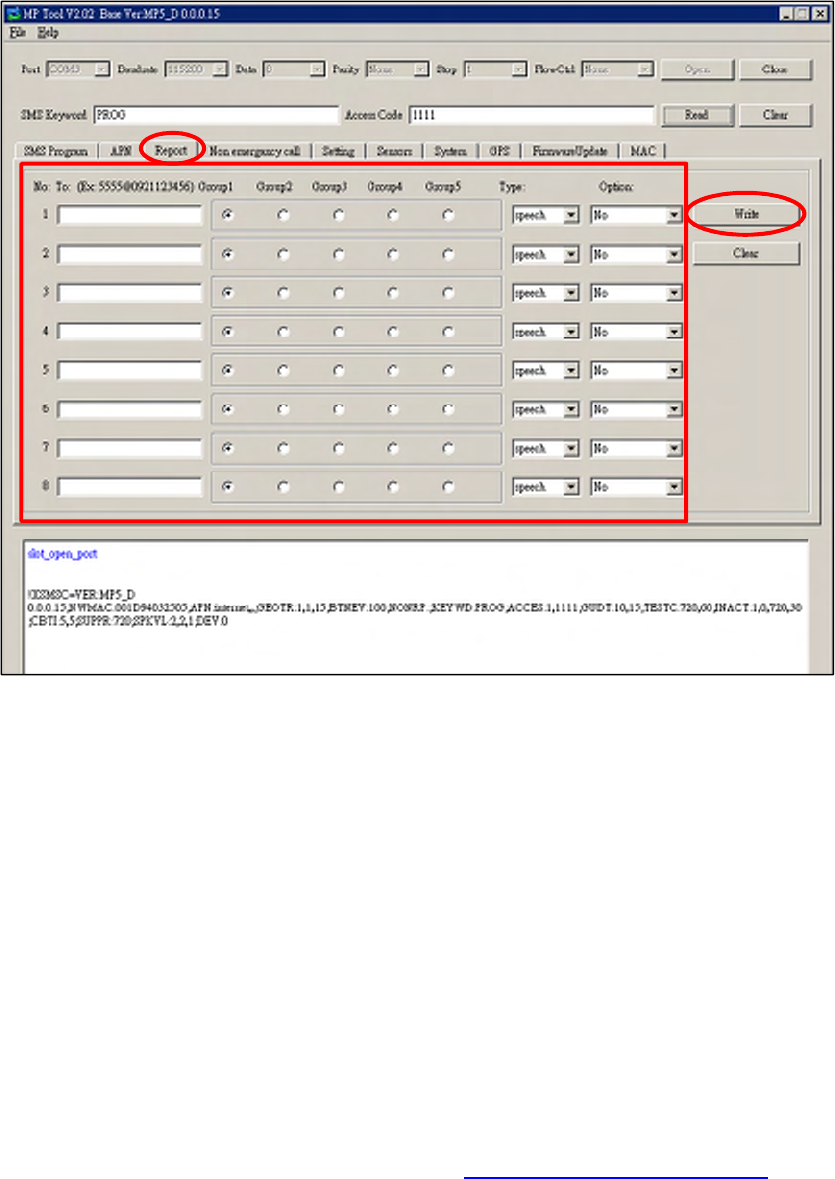
Step 6. Report
Click “Report” to program reporting numbers and communication
formats/options for alarm reporting and status reporting. Click “Write” after you
have completed the settings.
The procedure and details are as follows:
1. See Group 1, Group 2, Group 3, Group 4 and Group 5. Each group stands
for a report destination.
For example, Group 1 = the CMS, Group 2 = hospital, Group 3 = fire station,
Group 4 = ambulance service and Group 5 = Mr. Smith.
2. Enter the first reporting number, click the group to which it belongs, and
select the reporting number’s communication format in the “Type” section
and reporting method in the “Option” section. Program the following
reporting numbers in the same manner.
The setting of each reporting number shall be in conformity with the
reporting number’s communication format. Examples of reporting
formats are as follows:
- Reporting over IP (Ethernet or GPRS) in CID/SIA formats:
Account@server:port (example: 0001@59.124.123.66:50123)
- Reporting over the phone in CID/Scancom/Tunstall/CPC/SMS
30
formats: Account@phone number (example: 0001@0912345678)
- Speech reporting over the phone: phone number (example:
0912345678)
Each group can have more than one reporting number.
If a reporting number contains digits in parentheses like (02)27940559,
the Base Station will not dial the digits in the parentheses when
reporting via PSTN (it will only dial 27940559) but will dial the digits in
the parentheses when reporting via GSM (it will dial 0227940559).
Reporting sequence goes from Group 1 Group 2 Group 3
Group 4 Group 5. If one group has more than one number, the
reporting will go through all of this group’s numbers before moving on
to the next group’s number(s). The reporting will go through a group’s
phone numbers according to the numerical sequence to which the
phone numbers are assigned. For example, when phone numbers 4
and 8 are assigned to Group 2, the reporting will dial phone number 4
first and then phone number 8.
One complete round of dialing for the system means dialing from
Group 1 Group 2 Group 3 Group 4 Group 5 and going
through all the groups’ phone numbers. The system will keep dialing
the rounds of phone numbers until one call has been received
successfully. However, if the successful call takes place in the middle
of a round (for example, if a number of Group 2 is received
successfully), the system will continue to dial the rest of the numbers in
the round before stopping reporting.
If the “Type” of any reporting numbers is set as “SMS_TEXT” or
“SMS_CID,” these numbers will be reported to only when an event is
triggered on the Mobile Unit’s side. These numbers will not be reported
to when an event is triggered on the Base Station’s side.
Jamming reports can only be sent in the CID format and not in the
Scancom or Tunstall format.
31
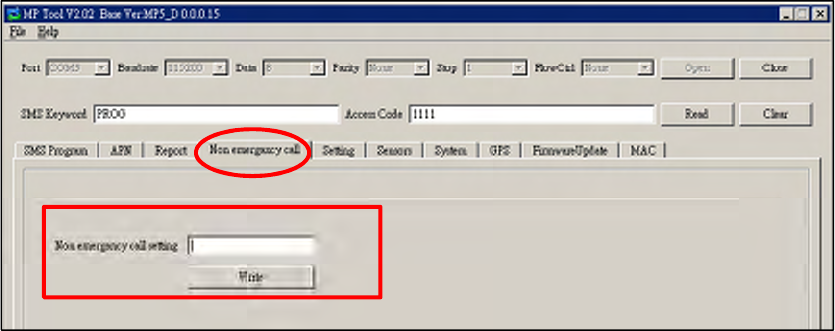
Step 7. Non-Emergency Call
Click “Non-Emergency Call” to program the non-emergency call number
and click “Write.”
When the Base Station is in normal mode, you can make a
non-emergency call by pressing the green reset button for 3 seconds or
press the yellow button once (if the yellow button has been programmed
as a non-emergency call button). The Base Station will emit 2 beeps and
automatically dial the programmed non-emergency call number for
two-way communication.
During the conversation of a non-emergency call, you can enter the
following DTMF commands:
- Enter (1) to talk only.
- Enter (2) to open two-way voice communication.
- Enter (3) to listen in only.
- Enter (9) to hang up. You can also put the handset back to the base
cradle to end the call.
During the conversation of a non-emergency call, you can extend the
communication by entering DTMF command (1), (2) or (3).
At 20 and 10 seconds before the communication time expires, 1 beep will
be emitted via the telephone handset to alert the user. When the
communication time is up, the call will be automatically terminated.
The communication time of non-emergency calls is conditioned by the
two-way timer function.
32
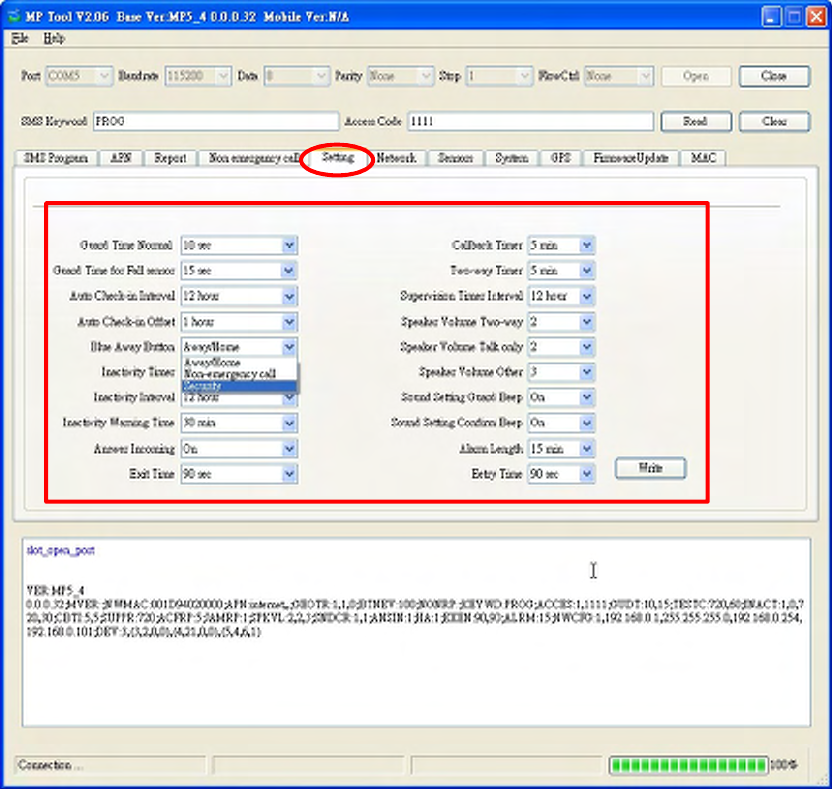
Step 8. Setting
Click “Setting” to program “Guard Time Normal,” “Guard Time for Fall Sensor,”
“Auto Check-In Interval,” “Auto Check-in Offset,” “Yellow Away/Home Button,”
“Inactivity Timer,” “Inactivity Interval,” “Inactivity Warning Time,” “Callback
Timer,” “Two-Way Timer,” “Supervision Timer Interval” and “Speaker Volume
Two-Way,” “Speaker Volume Talk Only,” “Speaker Volume Other,” Sound
Setting Guard Beep,” “Sound Setting Confirm Beep,” “Answer Incoming,”
“Alarm Length,” “Exit Time” and “Entry Time.”
Click “Write” when you have completed these settings.
Details regarding the settings are as follows:
1. Guard Time Normal:
Guard time normal is designed for any compatible sensor except for
Fall Sensor (fall detection).
A voice prompt announcing “help call in progress” will be played every
2-3 seconds during guard time to alert the user.
If a false alarm is triggered, it can be canceled during guard time.
33
An emergency alarm cannot be cancelled after guard time has
expired.
If an emergency alarm is triggered by Fall Sensor, guard time will be
determined by the setting of Fall Sensor instead of the setting of guard
time.
2. Guard Timer for Fall Sensor:
You can set a guard time period for Fall Sensor. A voice prompt
announcing “a fall has been detected” will be played every 2-3
seconds during Fall Sensor’s guard time.
If a false alarm is triggered by Fall Sensor, it can be canceled within
the guard time period.
This function is used when a fall is detected.
3. Auto Check-In Interval:
You can select the length of the interval between auto check-in reports.
There will be no auto check-in report if you select “Disable.”
Whenever programming mode is accessed, the Base Station will reset
the auto check-in timer.
4. Auto Check-In Offset:
After power is supplied to the Base Station, the system will start
counting the time for a check-in report.
The Base Station will send a check-in report once according to the
setting of offset time. Afterwards it will send reports according to the
setting of auto check-in reports unless the Base Station restarts or the
offset time is reset.
When offset time is reset in programming mode, the system will
recalculate the time for a check-in report.
Whenever programming mode is accessed, the Base Station will reset
the offset timer.
5. Yellow Away/Home Button:
You can set the yellow button on the Base Station as an away/home
button to toggle on/off the inactivity timer or as a non-emergency call
button.
6. Inactivity Timer:
If you set the inactivity timer as “on,” the blue backlight of the yellow
away/home button on the Base Station will be steady on to indicate
that the inactivity timer is on. If you set the inactivity timer as “off,” the
blue backlight will be off.
34
If the setting is “off,” no code will be sent to the CMS.
When the Base Station is in idle mode, you can toggle on/off the
inactivity timer by pressing the yellow button once (if the yellow button
has been programmed as an away/home button).
7. Inactivity Interval:
This function monitors user movements and sends an inactivity report
to the CMS if the user fails to reset the inactivity timer before the
interval expires. This setting is for you to select the countdown period
for the inactivity timer.
The inactivity timer can be reset by pressing the reset button once on
the Base Station, by inserting the Mobile Unit on the Base Station, or
by an action from any device with a button.
When the inactivity timer expires and no reset signal is received, the
Base Station will start to play a voice prompt every five minutes to alert
the user during warning time. If a reset signal is still not received after
warning time expires, an inactivity alarm report will be made.
The reporting method for an inactivity alarm is the same as that for an
emergency alarm. The report will be sent based on your reporting
methods after the warning time expires.
8. Inactivity Warning Time:
Inactivity warning time is the interval between the expiry of the
inactivity timer and the Base Station’s sending an inactivity alarm
report to the CMS.
The Base Station will play a voice prompt upon the expiry of the
inactivity timer. Afterwards the voice prompt will be played every 5
minutes during warning time as a reminder to the user until the expiry
of warning time.
If warning time is disabled, an inactivity alarm report will be
immediately sent to the CMS upon the expiry of the inactivity timer.
9. Callback Time:
This setting is for digital reporting methods. After reporting
successfully to the CMS, the system will automatically hang up the
line and start a waiting period (=callback time) to auto answer any
incoming calls from the CMS.
When the CMS calls back within callback time, the system will auto
answer the call after the first ring and wait for the entry of the proper
Access Code followed by the (#) key within 15 seconds.
When the correct Access Code is received, the system will open
full-duplex communication to allow the call recipient to speak to the
CMS directly. You can use DTMF commands to switch
35
communication methods.
The Access Code must be entered within 15 seconds, otherwise the
system will disconnect the call automatically.
Press DTMF (9), the red help button on the Mobile Unit for five
seconds or the reset button on the Base Station to terminate the call.
When callback time is up, the system will automatically exit the
waiting mode and return to idle mode.
The callback function is automatically disabled during an AC power
failure period.
10. Two-Way Timer:
After the system makes a report to the CMS, it will immediately enter
a two-way communication period as programmed by this setting.
This will enable the user to speak directly with the CMS personnel.
Pressing an assigned DTMF key can extend the two-way
communication by another two-way period.
11. Supervision Timer Interval:
This function is not available for Scancom and speech reporting.
When this supervisory function is enabled, the Base Station will be
able to receive check-in signals from Wrist Pendants (WTR-),
Smoke Detector, Fall Sensor and Passive Infrared Motion Detector
that indicate the proper operation of the devices.
When the supervision timer expires and no supervision signal is
received from WTR-, Smoke Detector, Fall Sensor or Passive
Infrared Motion Detector, a supervisory report will be made.
The reporting method for a supervisory report is the same as that for
an emergency alarm. The report will be sent based on your reporting
method without guard time waiting.
12. Speaker Volume Two-Way:
Select a preferred speaker volume level for two-way mode.
13. Speaker Volume Talk Only:
Select a preferred speaker volume level for talk-only mode.
14. Speaker Volume Other:
Select a preferred speaker volume level for other operations.
15. Sound Setting Guard Beep:
Select “on” to enable beeps during guard time or “off” to disable the
beeping sound during guard time.

36
16. Sound Setting Confirm Beep:
Select “on” to enable confirmation beeps during reporting or “off” to
disable confirmation beeps during reporting.
17. Answering Incoming [Calls]:
When this function is set as “on,” the Base Station rings for incoming
calls. You can answer an incoming call by pressing the red help
button on the Base Station.
When this function is set as “off,” the Base Station remains silent
during incoming calls. Incoming calls will be directly hung up.
18. Alarm Length:
Select the built-in siren duration when an alarm is activated.
19. Exit Time:
Select the length of the exit time before your system enters armed
mode upon your departure from home.
20. Entry Time:
Select the length of the entry time before the system changes from
armed mode to disarmed mode upon your arrival at home.
<
<N
NO
OT
TE
E>
>
The settings of “Alarm Length,” “Exit Time” and “Entry Time” are functional
only when the yellow button on the Base Station is programmed as a
security button.
37
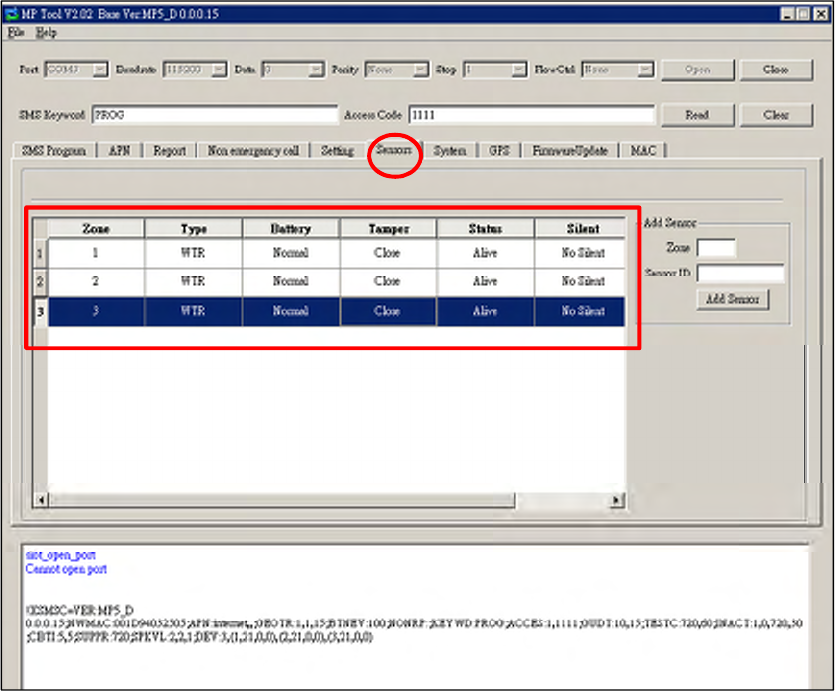
Step 9. Sensors
1. Viewing the data of sensors:
When you have learned sensors into the Base Station via the local
learning method (see 5.1. Learning in Pendant #1, Pendant #2 and
Other Devices), you can click “Sensors” and “Read” to view the zone
numbers, types, battery status, tamper conditions, operating status and
sound attributes of all of the sensors that have been learned in.
38
2. Adding sensors:
In addition to the local learning method, you can also use the “Add
Sensor” section on the “Sensors” page to learn sensors into the Base
Station.
Enter the zone number (Zone 1~Zone 100) to which you wish to assign
a sensor and the Sensor ID, which is the barcode on the back of the
sensor, and click “Add Sensor.”
If the sensor is successfully added, this sign will pop up
on the screen. An “OK” will be shown at the bottom left-hand corner of
the screen and the newly added sensor will appear on the sensor list.
If you click “Add Sensor” and the word “Error” is shown at the bottom
left-hand corner of the screen, you may check whether the Sensor ID
is correct and whether the zone to which you assigned the sensor has
been occupied.
39
3. Editing and removing sensors:
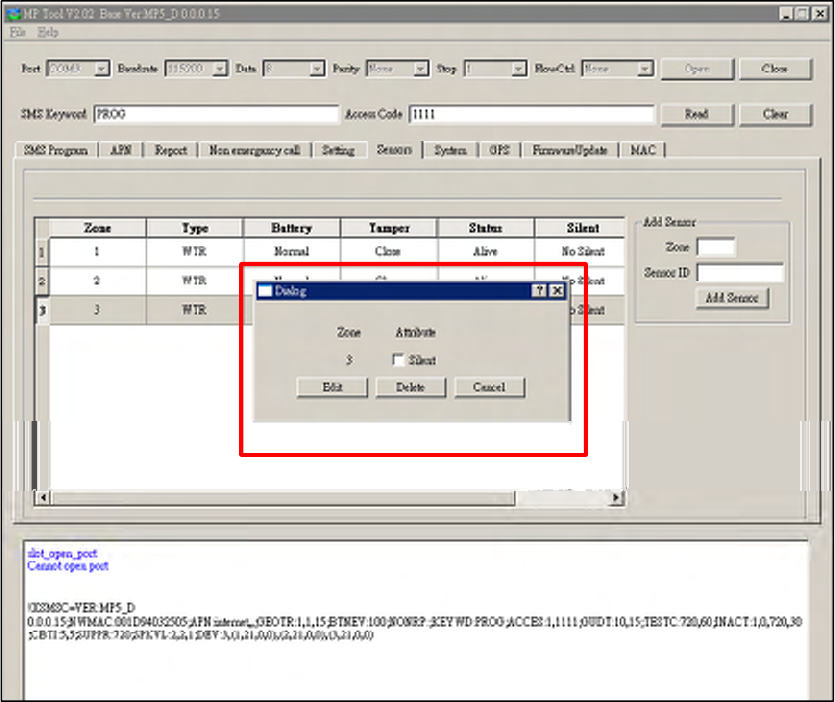
Editing the sound attribute of a sensor: Click any box in the section of the
sensor that you wish to configure. For example, if you wish to edit the
sound attribute of the sensor in Zone 3, you can click any box in the Zone
3 section. The “Dialog” pop-up window will be shown.
If you want the sensor in Zone 3 to be silent, tick “Silent” and “Edit.” If you
don’t want the sensor to be silent, leave the box in front of “Silent” blank
and tick “Edit.”
Removing a sensor: If you want to remove the sensor in Zone 3, click
“Delete” on the popup window and the sensor will be removed. All devices
can be removed via PC programming.
Click “Cancel” to close the “Dialog” popup window.
40
Step 10. System
When you click “System” to enter the “System” screen, you can carry out the
following operations:
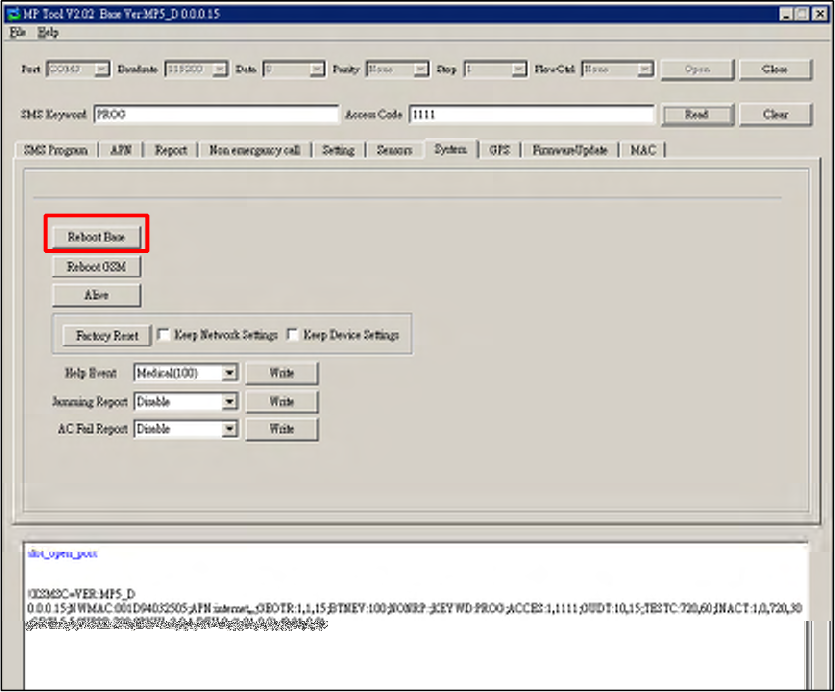
1. Rebooting the Base Station:
You can click “Reboot Base” to reboot the Base Station. The Base
Station will emit 2 beeps about 2 seconds after you click the “Reboot
Base” button. The following screen will be automatically closed and
you will need to restart the PC Programming Tool for further operation.
Rebooting the Base Station will not affect the Base Station’s
programmed parameters.
41
2. Rebooting GSM:
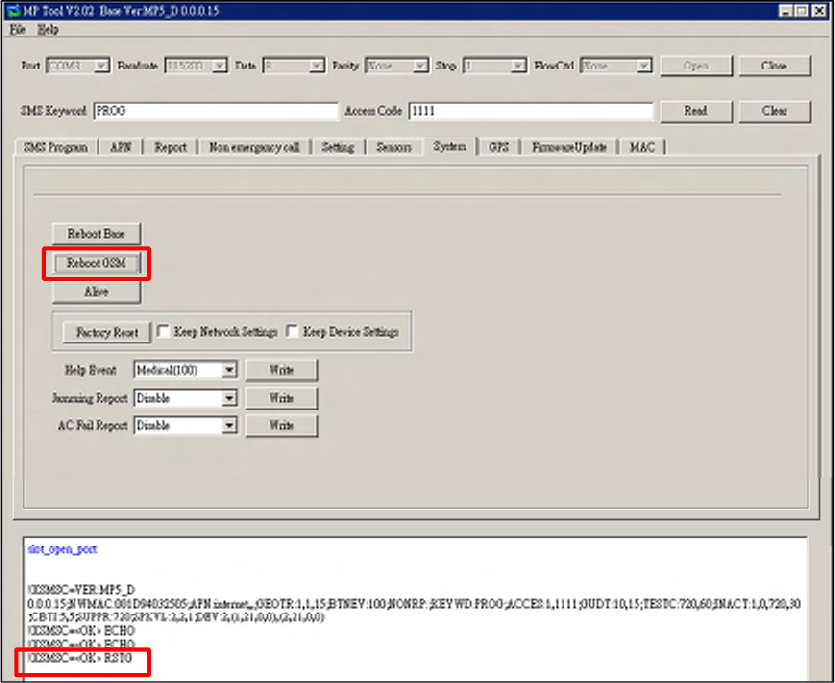
You can reset the u-blox in the Mobile Unit by clicking “Reboot GSM.”
This function is available only when the Mobile Unit is inserted in the
charging base on the Base Station.
If this command is successful, the message “!XSMSC=<OK>RSTG”
will be shown at the bottom left-hand corner of the screen.
Rebooting the Mobile Unit will not affect the Mobile Unit’s programmed
parameters.
42
3. Checking the condition of the Base Station:
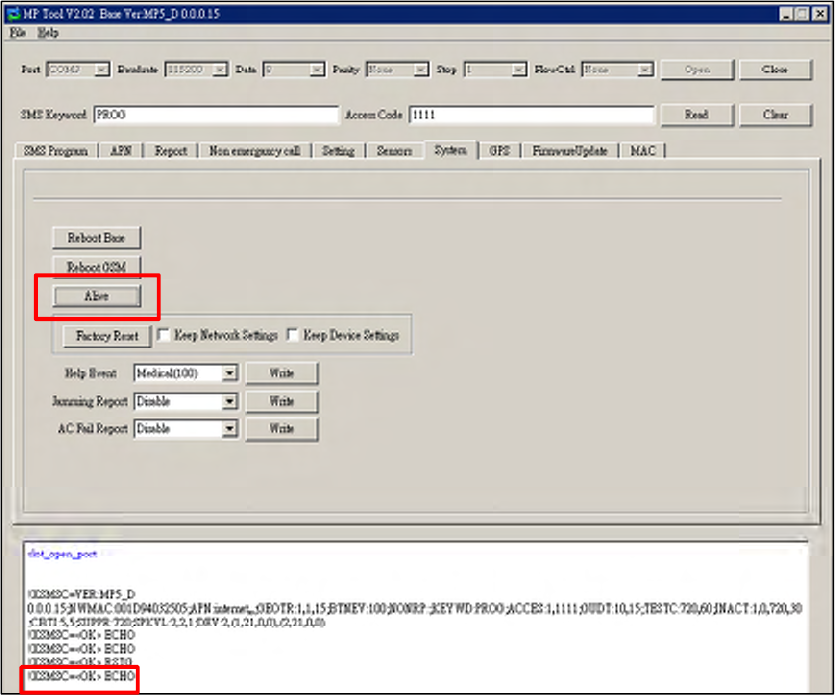
You can click “Alive” to check if the Base Station can respond to your
commands properly.
If the Base Station responds properly, the message “!XSMSC=<OK>
ECHO” will be shown at the bottom left-hand corner of the screen.
43
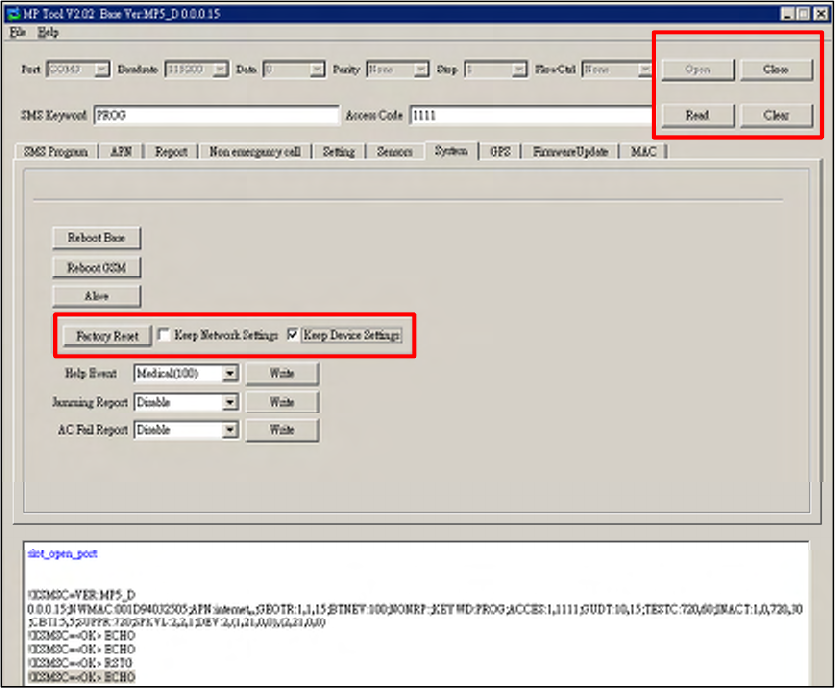
4. Restoring the system to factory settings:
You can click “Factory Reset” to restore the system to factory settings.
The system will immediately restore all programmed parameters to
factory settings and the Base Station will emit 2 beeps after you click
the “Factory Reset” button.
If you want to keep your network settings and/or device settings,
please click the box(s) before these specifications before clicking
“Factory Reset.” Your network settings and/or device settings will then
be preserved while other programmed parameters are restored to
factory defaults.
Please do not close the configuration screen while the system is being
restored to factory defaults. It will take at least 3 minutes for the system
to complete this step.
After the system has been restored to factory settings, you have two
options to proceed with further operation:
- You can close the PC Programming Tool and restart it, or
- You can click “Clear” and then “Read” to view the renewed settings.
44
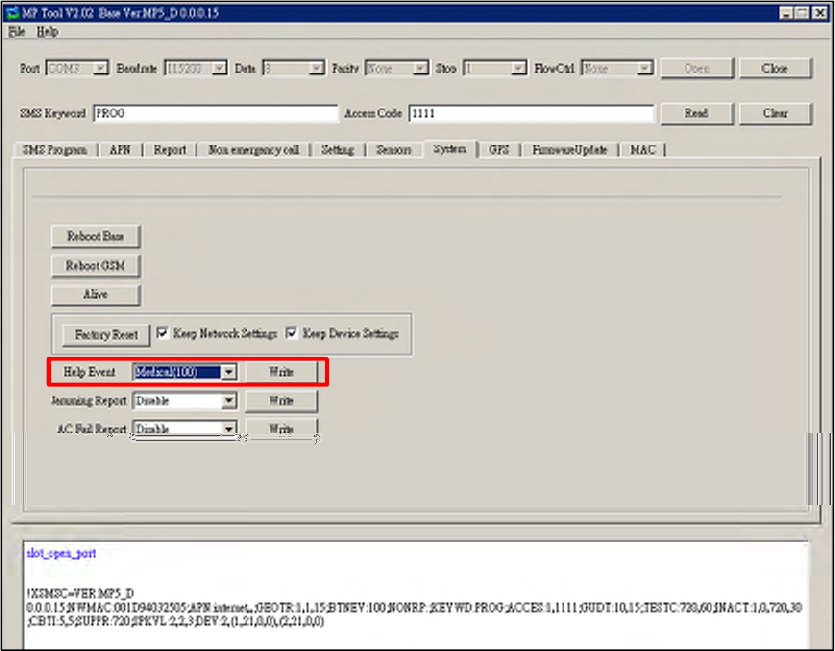
5. Selecting an event code:
You can select the event code to be sent to the CMS when either the
red button of the Base Station or the red button of the Mobile Unit is
pressed. Choose your preferred event code in the box after “Help
Event” and click “Write.”
There are four options for the event code:
- 100: Medical
- 101: Emergency
- 130: Burglary
- 120: Panic
45
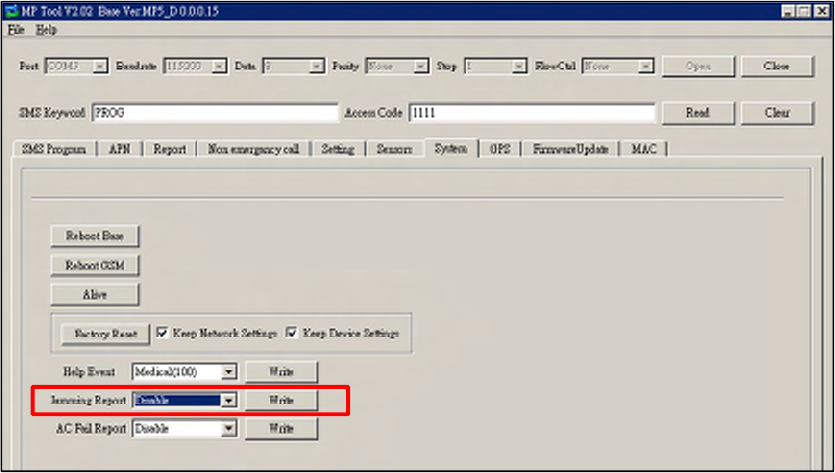
6. Jamming reports:
You can select to enable or disable jamming reports. Select your
setting in the box after “Jamming Report” and click “Write.”
Jamming reports can only be sent in the CID format and not in the
Scancom or Tunstall format.
46
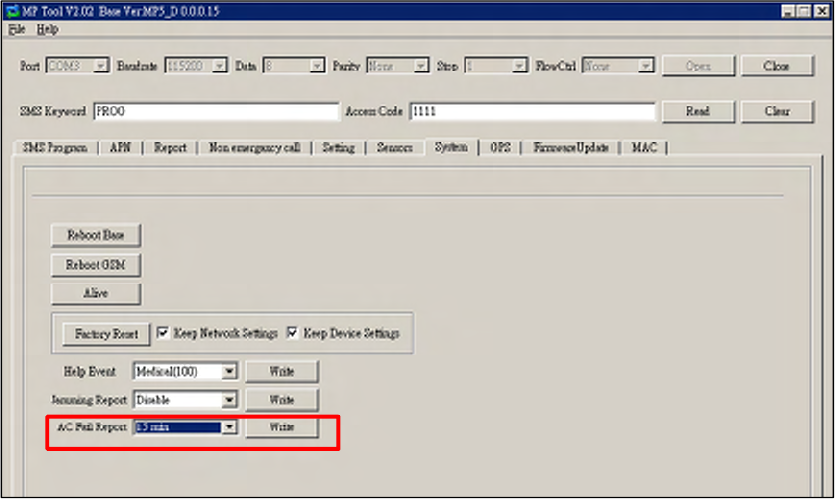
7. AC power failure reports:
You can disable AC power failure reports or set the interval between
an AC power failure and the reporting of the power failure. Select your
setting in the box after “AC Fail Report” and click “Write.”
47
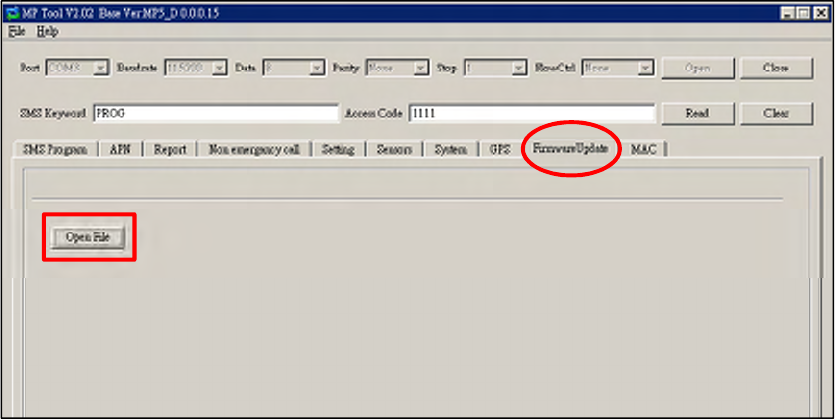
Step 11. Firmware Update
You can enter the “Firmware Update” page to update the firmware of the Base
Station.
1. Click “Open File” to select the intended firmware.
48
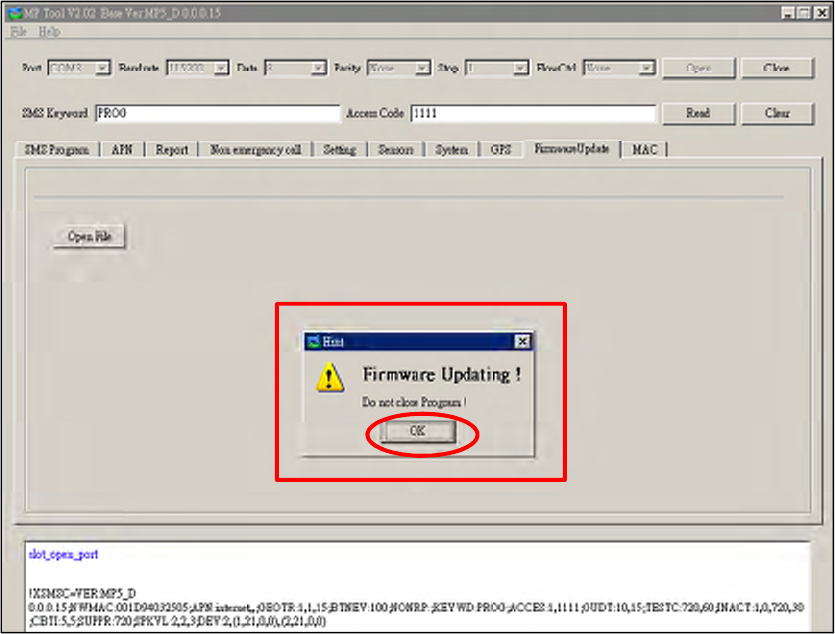
2. When the system is updating its firmware, a pop-up window will remind you
not to close the PC Programming Tool while the firmware is being updated.
Click “OK” and the system will start the firmware update. Updating the
firmware will take a few minutes.
49
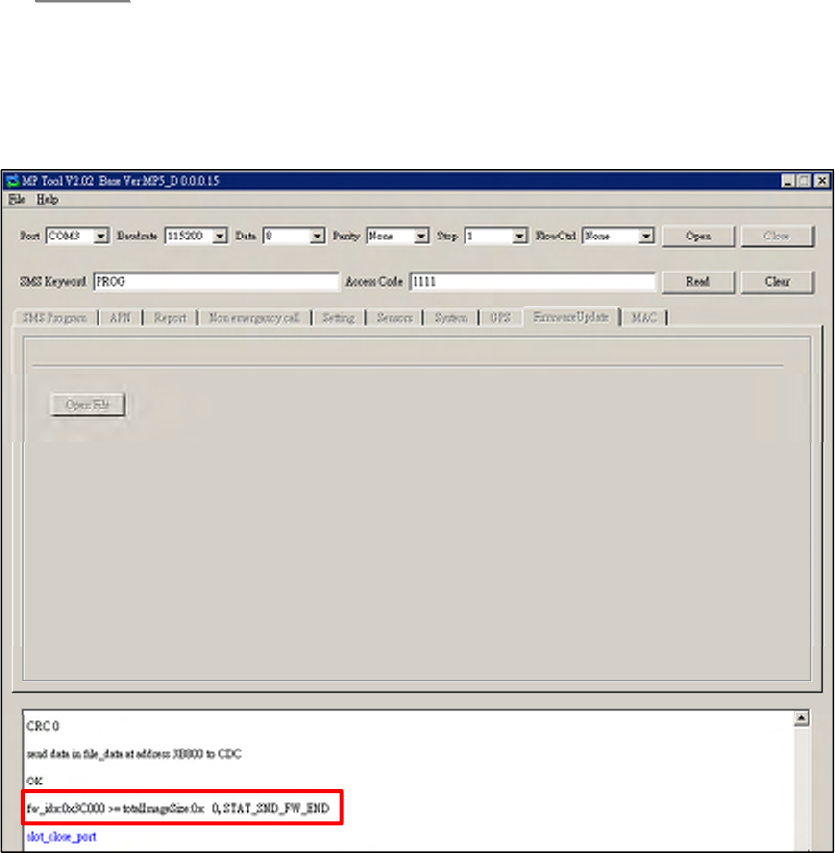
3. When the firmware update is completed, the message
“STAT_SND_FW_END” will be shown at the bottom of the screen and the
Base Station will emit 2 beeps. Please carry out a manual factory reset (not
the factory reset via this PC Programming Tool) according to the following
steps after the completion of the firmware update.
Step 1. Unplug the power cord from the DC jack of the Base Station.
Step 2. Use a pen or screwdriver to slide the battery switch of the Base
Station to the off position.
Step 3. Plug the power cord into the DC jack while pressing both the help
button and the reset button of the Base Station until one long beep
is emitted to indicate the factory reset has been successfully
executed.
Step 4. Release both buttons.
Step 5. Slide the battery switch back to the on position.
<
<N
NO
OT
TE
E>
>
Once a factory reset is executed, all programmed data will return to
their default values and all learned-in devices will be removed. You will
have to do the programming and learn the devices in one by one
again.

50
4.3. SMS Remote Programming
You can do SMS remote programming via a mobile phone or SMS iWizard.
Make sure that the Mobile Unit is inserted in the charging base of the Base
Station before you proceed with SMS remote programming, which is effective
only when the Mobile Unit is inserted in the Base Station’s charging base.
SMS Remote Programming via a Mobile Phone
<
<N
NO
OT
TE
E>
>
Please change the language setting of your mobile phone to English
before you proceed with SMS remote programming.
Please insert the Mobile Unit on the Base Station to configure both the
Mobile Unit and the Base Station via SMS remote programming.
Step 1. Enter the SMS screen on your mobile phone or smartphone.
Step 2. Enter the programming command (see the SMS remote programming
commands tables below).
Step 3. Enter a colon (:).
Step 4. Enter SMS Keyword (default is PROG).
Step 5. Enter a comma (,).
Step 6. Enter the Access Code (default is 1111).
Step 7. Enter a comma (,).
Step 8. Enter the parameter(s).
Step 9. The composition of the command is completed. You can send the
command to the Mobile Pers system now.
Example: To set 720 minutes for the supervision timer, you can send the
following command:
SUPPR:PROG,1111,720
SUPPR
=
Programming command
: = Colon
PROG
= SMS Keyword
, = Comma
1111 = Access Code

51
, = Comma
720 = Programmed parameter
<
<N
NO
OT
TE
E>
>
You can compose multiple commands in one SMS text message by using
“;” to separate each command.

52
SMS Remote Programming Commands Table (for the Mobile Unit)
Item Command Example & Usage Default
Sounding the
Mobile Unit
SCREAM Scream:PROG,1111,60
To set the length of the Mobile Unit’s beeping period (0~60
seconds) to help the search for the Mobile Unit when the
device is lost
--
Resetting
u-blox
RSTG RSTG:PROG,1111
To reset u-blox
--
SMS Remote Programming Commands Table (for the Base Station)
Item Command Example & Usage Default
GPRS APN,
username &
password
APN APN:PROG,1111,internet,,
To set GPRS APN, username and password (31 characters
max. for APN, 31 characters max. for username, 31
characters max. for password)
APN: Internet
Username and
password:
empty
Report settings
RPT RPT:PROG,1111,1,0933111222,1,0,1
To configure report settings (index number, report
destination, group, type and option)
Index number: 1~20
Report destination: Depending on the reporting format
Group: 1~5
Type: 0 = Speech, 1 = CID, 2 = Scancom, 3 = Tunstall, 4 =
Franklin, 5 = CPC1, 6 = CPC2, 10 = CID_IP, 11 =
CID_SIA_IP, 30 = SMS_CID, 31 = SMS_TEXT
Option: 0 = No, 1 = Voice, 2 = Talk only, 3 = Listen in only
No report
destination
Checking the
Base Station
ECHO ECHO:PROG,1111
To check whether the Base Station can respond properly
--
Rebooting the
Base Station
RESET RESET:PROG,1111
To reboot the Base Station
--
Keyword setting
KEYWD KEYWD:PROG,1111,IPOG
To set the keyword
15 characters max. for the keyword
PROG
Non-emergency
call settings
NONRP NONRP:PROG,1111,0912345678
To program the non-emergency call number
15 digits max. for the phone number
--
Access Code ACCES ACCES:PROG,1111,1,1234
To set the Access Code (index number, code)
8 digits max. for the Access Code
1111 for user 1
Guard time
settings
GUDT GUDT:PROG,1111,10,15
To set the length of guard time periods (system: 0~180
seconds, fall sensor: 0~180 seconds)
10, 15
Auto check-in
reports
TESTC TESTC:PROG,1111,720,60
To configure the settings of auto check-in reports (interval:
0~21600 minutes, offset time: 0~1440 minutes)
720, 60

53
Item Command Example & Usage Default
Inactivity timer
INACT INACT:PROG,1111,1,0,720,30
To configure settings of the inactivity timer (function type of
the yellow button, on or off, interval: 0~1440 minutes,
warning time: 0~60 minutes)
Button function type: 1 = away/home button, 2 =
non-emergency call button
On = 1, off = 0
1, 0, 720, 30
Callback time CBTI CBTI:PROG,1111,5,-1
To set callback time (duration: 0~1400 minutes, two-way
time: 1~60 minutes or -1 = no limits)
5, 5
Supervision SUPPR SUPPR:PROG,1111,720
To set the supervision timer (0~10080 minutes)
720
Speaker
volume levels
SPKVL SPKVL:PROG,1111,3,3,3
To set speaker volume levels (two-way: 1~5, talk only: 1~5,
others: 1~5)
2, 2, 3
Factory reset FTSET FTSET:PROG,1111,0,0
To execute a factory reset (to keep or not to keep NET
configurations, to keep or not to keep all devices and their
programmed attributes)
To keep NET configurations = 1; not to keep NET
configurations = 0
To keep all devices and their programmed attributes = 1; not
to keep all devices and their programmed attributes = 0
--
To set the CID
event code for
the red help
buttons
BTNEV BTNEV:PROG,1111,100
To set the CID event code sent when the Base Station’s red
help button or the Mobile Unit’s red help button is pressed.
100 = medical event
101 = personal emergency
120 = panic report
130 = burglary
100
To enable/disable
voice prompts
during guard time
and confirmation
beeps
SNDCR
SNDCR:PROG,1111,1,1
To enable/disable voice prompts during guard time and
confirmation beeps
1 = enable
0 = disable
1, 1
RF jamming
reports
JAMRP JAMRP:PROG,1111,1
To enable/disable RF jamming reports
1 = enable
0 = disable
1
AC power
failure reports
ACFRP ACFRP:PROG,1111,5
To disable AC power failure reports or to set the interval
between an AC power failure and the reporting of the power
failure
0 = disable
1-60 = 1~60 minutes
5

54
Item
Command
Example & Usage Default
Answering
incoming calls
ANSIN ANSIN:PROG.1111.1
To allow or disallow incoming calls to be answered
by pressing the
Base Station’
s red help button or a pendant button (1 = allow, 0 =
disallow)
1
Network
configuration
NWCFG
NWCFG:PROG,1111,1,192.168.0.1,255.255.255.0,192.168.0.254,192.
168.0.101
To modify the local network configuration
DHCP: 0 = disabled (using static IP), 1 = enabled
IP, subnet mask, gateway, DNS address for static IP
1,192.168.0
.1,255.255.
255.0,192.1
68.0.254,19
2.168.0.101
55
SMS Remote Programming via SMS iWizard
Mobile Pers is compatible with Climax’s SMS iWizard, which is designed to
facilitate SMS remote programming via a PC. This tool allows you to
conveniently program Mobile Pers from your PC without sending SMS text
messages from a mobile phone.

56
5. Device Management
You can use the local learning method to learn 100 devices into the Base
Station. These devices include:
Door Contact: DC
Water Sensor: WS
Panic Button: PB
Wrist Transmitter and Pendant Transmitter: WTR
Passive Infrared Motion Detector: IR
Smoke Detector: SD
Gas Detector: GAS
Carbon Monoxide Detector: CO
Heat Detector: HD
Glass Break Detector: GLS
Fall Sensor: FALL
5.1. Learning in Pendant #1, Pendant #2 and Other Devices
Step 1. When the Base Station is in idle mode, press and hold the yellow
button for 3 seconds to enter learning mode.
Step 2. The Base Station will emit 1 beep once the yellow button is pressed.
Release the yellow button when you hear 2 beeps, which indicate the
Base Station is now in learning mode. The blue backlight begins to
blink.
Step 3. Press the green reset button once. The Base Station will emit 1 beep.
Step 4. Press the button of Pendant #1 until the Base Station emits 2 beeps to
indicate Pendant #1 has been learned into Zone 1.
<
<N
NO
OT
TE
E>
>
Only WTR and Fall Sensor can be learned into Zone 1 and Zone 2.
If the Base Station emits 3 beeps, that means a sensor has been
previously assigned to Zone 1.
Step 5. Press the red help button once. The Base Station will emit 1 beep.
Step 6. Press the button of Pendant #2 until the Base Station emits 2 beeps to
indicate Pendant #2 has been learned into Zone 2.
<
<N
NO
OT
TE
E>
>
If the Base Station emits 3 beeps, that means a sensor has been
previously assigned to Zone 2.
The green reset button assigns a pendant to Zone 1 and the red help
button a pendant to Zone 2. If the green reset button or the red help button

57
is not pressed, the device will be automatically assigned to Zone 3~Zone
100 by sequence.
Step 7. Proceed to press the button of the next device until the Base Station
emits 2 beeps to indicate the device has been learned in. Please
repeat this procedure to learn in the rest of your devices. These
devices will be automatically assigned to Zone 3~Zone 100 by
sequence.
Step 8. After you have learned in all the devices, press the yellow button once
to exit learning mode (1 beep will be emitted), or the Base Station will
exit learning mode automatically after 5 minutes of inactivity. The blue
backlight will stop blinking upon the Base Station exiting learning
mode.
<
<N
NO
OT
TE
E>
>
Please refer to 6.2.3. Walk Test (Range Test) if you want to test the
operational ranges of your devices.
You cannot learn in the same device twice. The Base Station will emit 1
long beep to remind you that the device has been learned in previously.
5.2. Removing Pendant #1, Pendant #2 and Other Devices
All devices (those assigned to Zone 3~Zone 100) can be removed via PC
programming but only Pendant #1 and Pendant #2 can be removed by the
local removing method. Please refer to Step 9. Sensors of 4.2. PC
Programming Tool for details of how to delete devices via PC programming.
Removing Pendant #1 and Pendant #2 via the local removing method:
Step 1. When the Base Station is in idle mode, press and hold the yellow
button for 3 seconds to enter learning mode.
Step 2. The Base Station will emit 1 beep once the yellow button is pressed.
Release the yellow button when you hear 2 beeps that indicate the
Base Station is now in learning mode. The blue backlight begins to
blink.
Step 3. Press the green reset button once to select Pendant #1. The Base
Station will emit 1 beep when the green reset button is pressed.
Step 4. Press the red help button of the Base Station for 3 seconds to delete
Pendant #1. The Base Station will emit 1 beep once the red help
button is pressed. Release the red help button when you hear 2
beeps that indicate Pendant #1 has been removed.
Step 5. Press the red help button once to select Pendant #2. The Base Station
will emit 1 beep when the red help button is pressed.
Step 6. Press the red help button of the Base Station for 3 seconds to delete
58
Pendant #2. The Base Station will emit 1 beep once the red help
button is pressed. Release the red help button when you hear 2
beeps that indicate Pendant #2 has been removed.

59
6. Operation
6.1. Mobile Unit
The Mobile Unit enables the Mobile Pers user to summon emergency help
anytime, anywhere.
6.1.1. Normal Mode
When the Mobile Unit is in normal mode, it is ready to execute the following
functions.
6.1.1.1. Answering Incoming Calls
The Mobile Unit rings for an incoming call.
The user can press the Mobile Unit’s red button to pick up the call.
Once the Mobile Unit has answered the call, it will open two-way voice
communication.
<
<N
NO
OT
TE
E>
>
Press a DTMF key for over 1 second to enable a designed shortcut
function.
- Enter (1) to talk only.
- Enter (2) to open two-way voice communication.
- Enter (3) to listen in only.
- Enter (9) to hang up. You can also put the handset back to the base
cradle to end the call.
Press the Mobile Unit’s red button for 5 seconds to hang up.
The caller can press DTMF (9) or put the handset back to the base cradle
to hang up.
Five minutes are allowed for each call (factory default is 5 minutes). If the
Mobile Unit is inserted on the Base Station, 5 minutes are allowed for
each call. The calls are extensible.

60
6.1.1.2. Battery Checkup
The Mobile Unit uses its LEDs and voice prompt to remind you of its battery
condition.
LED indicators:
LED Behavior Indication
LED 1A (Green)
Blinking every 2 seconds The Mobile Unit is being
charged.
Steady on The Mobile Unit is fully
charged.
Blinking every 5 seconds The Mobile Unit is in normal
operation.
LED 1B (Orange)
Blinking every 3 seconds The Mobile Unit is low on
battery.
LED 2A (Red) Blinking every second Guard time/retrying
reporting/pauses during
retries
Steady on The Mobile Unit is reporting.
LED 2B (Orange) Blinking quickly (every 0.4
second)
To signal a GSM fault
Voice prompt: When the Mobile Unit is low on battery, it will play this
voice prompt twice to remind you of its battery condition: “Mobile Unit
battery is low. Please charge it.”
6.1.2. Alarm Activation
When the user presses the Mobile Unit’s red button for help, the Mobile
Unit will play this voice prompt once: “Emergency call was pressed.” Then
it enters guard time and plays this voice prompt once every 2-3 seconds
during guard time: “Help call in progress” while LED 2A (red) begins to
blink every second.
You can cancel the alarm reporting by pressing the Mobile Unit’s red
button for 5 seconds during guard time. The Mobile Unit will play this voice
prompt once: “Help call cancelled” and return to normal mode.
You cannot cancel the alarm reporting by pressing the Mobile Unit’s red
button after guard time has expired.
Voice Prompt and Confirmation Beeps
After guard time expires, the Mobile Unit will summon help based on the
programmed reporting methods. When the Mobile Unit reports or retries
via GPRS or SMS, confirmation beeps (about 1 beep every 2 seconds)
will be heard after the Mobile Unit dials out to inform you that the call is in

61
progress. Confirmation beeps will last for 15-20 seconds.
If two-way voice is selected, the Mobile Unit will not emit beeps but will
play this voice prompt: “Alarm received, please stand by” to remind the
user to prepare to answer the call.
GPRS Reporting Method
Access Point Name, Username and Password need to be set via SMS
remote programming before GPRS reporting is activated.
Access Point Name (APN): The name of an access point for GPRS.
Please ask your SIM card service provider for your APN.
Username: Offered by your SIM card service provider. Please ask your
service provider for your GPRS username. If no username is required,
you may skip this step.
Password: Offered by your SIM card service provider. Please ask your
service provider for your GPRS password. If no password is required,
you may skip this step.
<
<N
NO
OT
TE
E>
>
SMS remote programming is effective only when the Mobile Unit is
inserted on the Base Station.
Digital Reporting Method
Callback Operation
After the alarm reporting has been successfully received by the CMS, the
Mobile Unit will follow your programmed choice to enter follow-on and/or
callback mode.
<
<N
NO
OT
TE
E>
>
If a trigger takes place on the Mobile Unit’s side, the Mobile Unit will enter
callback mode only after all groups have been reported to successfully.
The Mobile Unit’s LED 1A (green) will blink to indicate the dialing process
has been concluded.
If your choice is callback or follow-on & callback after alarm reporting, the
Mobile Unit will wait 5 minutes for CMS personnel to call back after
reporting (available callback interval settings are 3
mins/5mins/10mins/15mins/20mins/30mins/1hr; factory default is 5
minutes).
When the CMS calls back within the 5-minute period, the Mobile Unit will
auto answer the call after 2 beeps and wait for the proper entry of the
Access Code (default is 1111) followed by the (#) key in 15 seconds.
Please enter the Access Code at the normal operational speed.

62
Upon reception of the correct Access Code, the Mobile Unit will open
full-duplex communication between the call recipient and the Mobile Unit
user. You can use the following DTMF commands to switch between
speech modes:
- Enter (1) to talk only.
- Enter (2) to open two-way voice communication.
- Enter (3) to listen in only.
- Enter (9) to hang up. You can also put the handset back to the base
cradle to end the call.
- Press any DTMF key except for the designed hang-up key (9) to add
another preset communication period. When a DTMF key is pressed,
its designed shortcut function will be executed and the communication
time extended simultaneously.
<
<N
NO
OT
TE
E>
>
If you wish to enable a designed shortcut function, please press the DTMF
key for over 1 second to enable the function.
When your programmed choice is follow-on or follow-on & callback, what
follows will be two-way voice communication, listen-in, or waiting for
commands depending on your setting.
Follow-On Operation
During the follow-on period, the CMS can remotely control the Mobile Unit by
the following DTMF commands:
1. Contact ID/Scancom/Tunstall formats:
Enter (1) to talk only.
Enter (2) to open two-way voice communication.
Enter (3) to listen in only.
Enter (9) to hang up. You can also put the handset back to the base cradle
to end the call.
Press any DTMF key except for the designed hang-up key (9) to add
another preset communication period. When a DTMF key is pressed, its
designed shortcut function will be executed and the communication time
extended simultaneously.
<
<N
NO
OT
TE
E>
>
If you wish to enable a designed shortcut function, please press the DTMF
key for over 1 second to enable the function.
2. CPC format:
Send code (C0603BD) to open two-way communication.

63
Send code (C0601BD) to hang up or put the handset back to the base
cradle to end the all.
Speech Reporting Method
If the speech reporting method is selected, the Mobile Unit will after dialing
open two-way voice communication between the call recipient and the
Mobile Unit user for 5 minutes.
At 20 and 10 seconds before the communication time expires, the Mobile
Unit will emit 1 beep via the telephone handset to alert the user.
If the call recipient needs more talk time, he can press any key except for
(9) to add another 5 minutes.
Press either DTMF key (9) or the Mobile Unit’s red button for 5 seconds to
terminate the call.
If no DTMF command is pressed during the speech period, the call will
automatically hang up and be recorded as an unsuccessful one. Each
phone number will be retried up to a maximum of 3 times accordingly.
Call Sequence
Call sequence goes from the number(s) of Group 1 Group 2 Group 3
Group 4 Group 5.
If one group has more than one number, the reporting will go through all of
this group’s numbers before moving on to the next group’s number(s).
The reporting will go through a group’s phone numbers according to the
numerical sequence to which the phone numbers are assigned. For
example, when phone numbers 4 and 8 are assigned to Group 2, the
reporting will dial phone number 4 first and then phone number 8.
One complete round of dialing for the system means dialing from Group 1
Group 2 Group 3 Group 4 Group 5 and going through all the
groups’ phone numbers.
The system will keep dialing these rounds of phone numbers until one call
has been received successfully. However, if the successful call takes
place in the middle of a round (for example, if a number under Group 2 is
received successfully), the system will continue to dial the rest of the
numbers in the round before stopping reporting.
<
<N
NO
OT
TE
E>
>
If the system dials a phone number under a certain group and the call is
received successfully, the system will not go on to dial the phone numbers
under the groups which have previously failed to receive the calls.

64
Retry Method
Retry cycle: Each phone number can be retried up to 3 times in one round.
If one GPRS or SMS reporting fails during the retry cycle, the Mobile Unit
will make a 10-second pause before starting another reporting. If any
reporting other than GPRS or SMS reporting fails during the retry cycle,
the Mobile Unit will make a 1-minute pause before starting another
reporting. This cycle will repeat until one reporting has been answered
successfully.
When one full round’s numbers (all numbers under Group 1 to Group 5)
have all failed, the Mobile Unit will make a 5-minute pause before starting
another retry cycle.
<
<N
NO
OT
TE
E>
>
The Mobile Unit cannot play voice prompts during the 10-second pauses.
6.1.3. Voice Prompts
Below is a quick reference chart of all the Mobile Unit’s voice prompts and the
conditions under which they are played.
No Voice Prompt Condition
1 Emergency call was pressed. Played once when the Mobile Unit’s
red button is pressed
2 Help call in progress Played once every 2-3 seconds during
guard time
3 Help call cancelled Played once when the Mobile Unit’s
red button is pressed during guard
time
4 Alarm received. Please stand by. Played once upon kiss-off
5 Mobile Unit battery is low. Please charge it. Played twice when the Mobile Unit is
low on battery
6.1.4. Rebooting the Mobile Unit and Factory Reset
1. Rebooting the Mobile Unit
Step 1. Press the Mobile Unit’s red button for 15 seconds in any mode to enter

65
reset mode. All the Mobile Unit’s LEDs will be on for 1 second and
then go off.
Step 2. Press the red button once within 10 minutes. After 3-5 seconds, all
LEDs will be on for 1 second and LED 2B (orange) will blink to
indicate the Mobile Unit’s GSM module has been reactivated.
<
<N
NO
OT
TE
E>
>
These steps will only reboot the Mobile Unit and will not remove any
programmed parameteres in the device.
2. Factory reset
The Mobile Unit will clear all programmed parameters when the following steps
are taken.
Step 1. Press the Mobile Unit’s red button for 15 seconds in any mode to enter
reset mode. All of the Mobile Unit’s LEDs will be on for 1 second and
go off.
Step 2. Give the red button 2 quick presses within 10 minutes to restore the
Mobile Unit to factory settings. The 2 quick presses must be
completed in 1 second. After 3-5 seconds, all the Mobile Unit’s LEDs
will be on for 1 second. Afterwards LED 2B (orange) will blink to
indicate a factory reset has been performed.
<
<N
NO
OT
TE
E>
>
All reporting settings in the Mobile Unit will be removed after a factory
reset. You will have to insert the Mobile Unit in the Base Station’s charging
base to program the settings again.
When the Mobile Unit is inserted in the Base Station’s charging base to
get charged, its reporting settings will automatically be renewed.

66
6.2. Base Station
6.2.1. Idle Mode
When the Base Station is in idle mode, it is ready to execute the following
functions.
6.2.1.1. Answering Incoming Calls
The Base Station emits cycles of 2 quick beeps for an incoming call.
The user can answer the call by pressing the pendant button or the red
help button on the Base Station.
Once the Base Station has answered the call, it will open two-way voice
communication. You can use the volume switches on the Base Station to
adjust the speaker volume level (please refer to the buttons numbered 7
and 8 on page 4).
<
<N
NO
OT
TE
E>
>
Press a DTMF key for over 1 second during the two-way communication
to enable a designed shortcut function.
- Enter (1) to talk only.
- Enter (2) to open two-way voice communication.
- Enter (3) to listen in only.
- Enter (9) to hang up. You can also put the handset back to the base
cradle to end the call.
- Press (6) or (4) to increase or decrease the speaker volume level in
two-way communication mode.
- Press any DTMF key except for the designed hang-up key (9) to add
another preset communication period. Communication periods are
conditioned by the two-way timer function.
- When a DTMF key is pressed, its designed shortcut function will be
executed and the communication time extended simultaneously.
If the speaker volume level is adjusted in two-way communication mode,
the adjusted value will be kept for the next usage.
Press the pendant button or the reset button on the Base Station to hang
up.
Five minutes are allowed for each call (factory default is 5 minutes). The
calls are extensible.
At 20 and 10 seconds before the communication time expires, 1 beep will
be emitted via the telephone handset to alert the user.

67
6.2.1.2. Non-Emergency Calls
Step 1. Press the yellow button once or press the green reset button for 3
seconds when the Base Station is in idle mode. One short beep will
be emitted and the Base Station will dial the programmed
non-emergency call number.
<
<N
NO
OT
TE
E>
>
The yellow button can be used as a non-emergency call button only after it
has been programmed as a non-emergency call button.
Step 2. If the call is successful, the Base Station will open two-way
communication between the call recipient and the Base Station. The
factory default of the communication time is 5 minutes. The
communication time is conditioned by the two-way timer function. The
orange backlight illuminates during the conversation.
<
<N
NO
OT
TE
E>
>
Press a DTMF key for over 1 second during the two-way communication
to enable a designed shortcut function.
- Enter (1) to talk only.
- Enter (2) to open two-way voice communication.
- Enter (3) to listen in only.
- Press any DTMF key except for the designed hang-up key (9) to add
another preset communication period. Communication periods are
conditioned by the two-way timer function.
- When a DTMF key is pressed, its designed shortcut function will be
executed and the communication time extended simultaneously.
At 20 and 10 seconds before the communication time expires, 1 beep will
be emitted via the telephone handset to alert the user.
Step 3. Press DTMF (9) or the non-emergency call button to terminate the call.
The orange backlight dims and the Base Station returns to idle mode.
6.2.1.3. AC Power Checkup
If an AC power failure is detected to have lasted for 10 seconds or longer,
the green LED starts to blink as a visual warning to the user. 3G modules
will then be powered off, so SMS remote programming will become
unavailable. 3G modules will be powered on only during times of reporting.
An AC power failure report will be sent to all reporting numbers except for
the phone numbers programmed for speech reporting.
When AC power is restored, the green LED will be steady on again.
If an AC power failure has lasted for 5 minutes, the Base Station will send
an AC failure report to the CMS.
<
<N
NO
OT
TE
E>
>
68
The interval between an AC power failure and the Base Station’s sending
the AC failure report (factory default is 5 minutes) is programmed as
explained in Step 10. System of 4.2. PC Programming Tool.
After AC power has been restored for more than 5 minutes, the Base
Station will send an AC power restored report to the CMS.
When the Base Station is experiencing an AC fault, it will not charge the
Mobile U nit. It will charge the Mobile Unit only after its AC power has been
restored.
6.2.1.4. Base Station Low on Battery
When a low battery condition has lasted 4-6 minutes, the Base Station will
report to the CMS and the green LED blinks every 2 seconds. The report
will be sent to all reporting numbers except for the phone numbers
programmed for speech reporting.
After the battery voltage is restored and has lasted 5 minutes, the Base
Station will send a battery power restored report to the CMS and the green
LED will be steady on again.
6.2.1.5. Base Station’s Battery Disconnected
The Base Station detects battery absence in the following situations:
- Battery switched off
- Battery not connected
- Battery failure
When battery disconnection has lasted 30 minutes, the Base Station will
report to the CMS and the green LED blinks slowly.
After the battery is restored and the restoration has lasted 30 minutes, the
Base Station will send a battery restored report to the CMS and the green
LED will be steady on again.
6.2.1.6. Devices Low on Battery
When a device is low on battery, the Base Station’s green LED blinks
every 2 seconds (please refer to the figure on page 4 and the chart on
page 6).
After the faulty battery is replaced, the Base Station will instantly send a
battery restored report to the CMS regarding the particular device.
If multiple sensors are running low on battery, the green LED won’t stop
blinking until all the sensors’ low battery status has been cleared.

69
6.2.1.7. Automatic Check-In Reports
When the Base Station is programmed to send auto check-in reports, it
will dispatch the reports to the CMS accordingly.
After the Base Station is powered on, the first auto check-in report it sends
will be conditioned by the setting of the offset timer. Afterwards auto
check-in reports will be sent according to the setting of the auto check-in
timer.
The auto check-in timer will be reset whenever programmed mode is
entered.
<
<N
NO
OT
TE
E>
>
If the setting of the offset timer or the auto check-in timer is changed, the
next auto check-in report will be sent according to the setting of the offset
timer. Afterwards auto check-in reports will be sent according to the
setting of the auto check-in timer.
6.2.1.8. Inactivity Timer
When the inactivity timer is enabled (the blue backlight of the yellow
button will be on), its countdown period starts immediately after the Base
Station is powered on or when the Base Station exits programming mode.
When the inactivity timer is not reset, the Base Station will send an
inactivity timer expired report to the CMS after warning time expires.
The inactivity timer can be reset by pressing the reset button once on the
Base Station, by inserting the Mobile Unit on the Base Station, or by an
action from any device with a button or from Passive Infrared Motion
Detector.
You can disable the inactivity timer by programming it as “off.” The blue
backlight will be off.
When the inactivity timer is enabled and toggled on by pressing the yellow
button, the blue backlight will be on. When the inactivity timer is enabled
and toggled off by pressing the yellow button, the blue backlight will be off.
When the yellow button is programmed as a non-emergency call button,
the inactivity timer can still be running. In this case you will have to disable
or enable the inactivity timer via programming, for you cannot toggle on/off
the inactivity timer by pressing the yellow button.
<
<N
NO
OT
TE
E>
>
If no movement is detected during the preset inactivity time, the Base
Station will send CID event code 641 with a fixed zone number regardless
of the zones the triggered motion detectors occupy.

70
6.2.2. Alarm Activation
When an alarm is triggered, the Base Station will enter guard time. Both
the orange backlight and the red help button’s backlight will turn steady on.
A voice prompt announcing “help call in progress” will be played every 2-3
seconds during guard time to alert the user.
You can cancel the alarm reporting by pressing the reset button on the
Base Station during guard time. The Base Station will return to idle mode.
You cannot cancel the alarm reporting by pressing the reset button on the
Base Station after guard time has expired.
<
<N
NO
OT
TE
E>
>
When the Mobile Unit is not inserted in the Base Station’s charging base,
the Base Station (MP-2 and MP-5) will not report to the phone numbers
with their “Type” set as “SMS_ID” or “SMS_TEXT” via PSTN. However, if
a trigger takes place on the Mobile Unit’s side, these phone numbers will
be reported to.
Confirmation Beeps
After guard time expires, the Base Station will summon help based on the
programmed reporting methods. Beeps (about one beep per second) will
continue to be heard after the Base Station dials out to inform you that the
call is in progress (no matter which reporting method is adopted).
Confirmation beeps stop after 2-3 minutes.
GPRS Reporting Method
Access Point Name, Username and Password need to be set via SMS
remote programming before GPRS reporting is activated.
Access Point Name (APN): The name of an access point for GPRS.
Please ask your SIM card service provider for your APN.
Username: Offered by your SIM card service provider. Please ask your
service provider for your GPRS username. If no username is required,
you may skip this step.
Password: Offered by your SIM card service provider. Please ask your
service provider for your GPRS password. If no password is required,
you may skip this step.
<
<N
NO
OT
TE
E>
>
SMS remote programming is effective only when the Mobile Unit is
inserted on the Base Station.

71
Digital Reporting Method
Callback Operation
After the alarm reporting has been successfully received by the CMS, the
Base Station will follow your programmed choice to enter follow-on and/or
callback mode.
<
<N
NO
OT
TE
E>
>
If a trigger takes place on the Base Station’s side, the Base Station will
enter callback mode once a call to a group is received successfully (the
callback time will be renewed with every successful call to a group).
If your choice is callback or follow-on & callback after alarm reporting, the
Base Station will wait 5 minutes for CMS personnel to call back after
reporting (this waiting period is conditioned by the callback timer and its
default is 5 minutes).
When the CMS calls back within the 5-minute period (this waiting period is
conditioned by the callback timer and its default is 5 minutes), the Base
Station will auto answer the call after 2 beeps and wait for the entry of the
proper Access Code (default is 1111) followed by the (#) key in 15
seconds. Please enter the Access Code at the normal operational speed.
Upon reception of the correct Access Code, the Base Station will open
full-duplex communication to allow the call recipient to speak to the Base
Station. You can use the following DTMF commands to switch between
speech modes:
- Enter (1) to talk only.
- Enter (2) to open two-way voice communication.
- Enter (3) to listen in only.
- Enter (9) to hang up. You can also put the handset back to the base
cradle to end the call.
- Press (6) or (4) to increase or decrease the speaker volume level in
two-way communication mode. You can also press the volume
switches on the Base Station to adjust the speaker volume level.
- Press any DTMF key except for the designed hang-up key (9) to add
another preset communication period. When a DTMF key is pressed,
its designed shortcut function will be executed and the communication
time extended simultaneously.
<
<N
NO
OT
TE
E>
>
If you wish to enable a designed shortcut function, please press the DTMF
key for over 1 second to enable the function.
When your programmed choice is follow-on or follow-on & callback, what
follows will be two-way voice communication, listen-in, or waiting for
commands depending on your setting.

72
Follow-On Operation
During the follow-on period, the CMS can remotely control the Base Station by
the following DTMF commands:
1. Contact ID/Scancom/Tunstall formats:
Enter (1) to talk only.
Enter (2) to open two-way voice communication.
Enter (3) to listen in only.
Enter (9) to hang up. You can also put the handset back to the base cradle
to end the call.
Press (6) or (4) to increase or decrease the speaker volume level in
two-way communication mode. You can also press the volume switches
on the Base Station to adjust the speaker volume level.
Press any DTMF key except for the designed hang-up key (9) to add
another preset communication period. When a DTMF key is pressed, its
designed shortcut function will be executed and the communication time
extended simultaneously.
<
<N
NO
OT
TE
E>
>
If you wish to enable a designed shortcut function, please press the DTMF
key for over 1 second to enable the function.
The adjusted volume level will be kept for the next usage.
2. CPC format:
Send code (C0603BD) to open two-way communication.
Send code (C0605BD) or (C0606BD) to increase or decrease the speaker
volume level.
Send code (C0601BD) to hang up or put the handset back to the base
cradle to end the all.
Nurse Arrival
There are four scenarios for the function of nurse arrival.
Scenario 1:
Step 1. The user presses the red help button on the Base Station to summon
help. The Base Station sends CID code 100 to the CMS.
Step 2. The nurse arrives and presses the green reset button on the Base
Station once to signal that help has arrived. The Base Station sends

73
CID code 1-661 to the CMS.
Step 3. After the nurse has helped the user and completed his/her job, he/she
presses the green reset button on the Base Station again to signal
that his/her job has been completed. The Base Station sends CID
code 3-661 to the CMS.
Scenario 2:
Step 1. The user presses the red help button on the Base Station to summon
help. The Base Station sends CID code 100 to the CMS.
Step 2. The nurse arrives and presses the green reset button on the Base
Station once to signal that help has arrived. The Base Station sends
CID code 1-661 to the CMS.
Step 3. The nurse needs more help and presses the red help button on the
Base Station to summon help. The Base Station sends CID code
1-662 to the CMS.
<
<N
NO
OT
TE
E>
>
If the green reset button on the Base Station is not pressed to signal that
help has arrived within the 15 minutes after the nurse presses the red help
button to summon more help, the Base Station will resend CID code 1-662
to the CMS. The Base Station will keep resending CID code 1-662 to the
CMS every 15 minutes for an hour if no help arrives.
Step 4. When the help the nurse needs arrives, the green reset button on the
Base Station should be pressed once to signal that help has arrived.
The Base Station sends CID code 1-661 to the CMS.
Step 5. After the nurse’s job is completed, he/she should press the green reset
button on the Base Station again to signal that his/her job has been
completed. The Base Station sends CID code 3-661 to the CMS.
Scenario 3:
Step 1. The user presses the red help button on the Base Station to summon
help. The Base Station sends CID code 100 to the CMS.
Step 2. The nurse arrives and presses the green reset button on the Base
Station once to signal that help has arrived. The Base Station sends
CID code 1-661 to the CMS.
Step 3. The nurse finds that the user actually has no problem, so he/she gives
the green reset button two quick presses to signal that the case is
closed. The Base Station sends CID code 663 to the CMS.
Scenario 4:
Step 1. The user presses the red help button on the Base Station to summon
help. The Base Station sends CID code 100 to the CMS.
Step 2. The green reset button on the Base Station has not been pressed to

74
signal that help has arrived with the 15 minutes after the red help
button is pressed to summon help. The Base Station will keep
sending CID code 1-662 to the CMS every 15 minutes for an hour to
signal that no help has arrived.
Speech Reporting Method
If the speech reporting method is selected, the Base Station will after
dialing open two-way voice communication between the call recipient and
the Base Station for 5 minutes. This communication period is conditioned
by the two-way timer.
At 20 and 10 seconds before the communication time expires, the Base
Station will emit 1 beep via the telephone handset to alert the user.
If the call recipient needs more talk time, he can press any key except for
(9) to add another 5 minutes.
Press either DTMF key (9) or the reset button on the Base Station to
terminate the call.
If no DTMF command is pressed during the speech period, the call will
automatically hang up and be recorded as an unsuccessful one. Each
phone number will be retried up to a maximum of 3 times accordingly.
Call Sequence
Call sequence goes from the number(s) of Group 1 Group 2 Group 3
Group 4 Group 5.
If one group has more than one number, the reporting will go through all of
this group’s numbers before moving on to the next group’s number(s).
The reporting will go through a group’s phone numbers according to the
numerical sequence to which the phone numbers are assigned. For
example, when phone numbers 4 and 8 are assigned to Group 2, the
reporting will dial phone number 4 first and then phone number 8.
One complete round of dialing for the system means dialing from Group 1
Group 2 Group 3 Group 4 Group 5 and going through all the
groups’ phone numbers.
The system will keep dialing the rounds of phone numbers until one call
has been received successfully. However, if the successful call takes
place in the middle of a round (for example, if a number under Group 2 is
received successfully), the system will continue to dial the rest of the
numbers in the round before it stops reporting.
<
<N
NO
OT
TE
E>
>
If the system dials a phone number under a certain group and the call is

75
received successfully, the system will not go on to dial the phone numbers
under the groups which have previously failed to receive the calls.
Retry Method
Retry cycle: Each phone number can be retried up to 3 times in one round.
During the retry period, the red backlight will be steady on.
If one GPRS or SMS reporting fails during the retry cycle, the Base Station
will make a 10-second pause before starting another reporting. If any
reporting other than GPRS or SMS reporting fails during the retry cycle,
the Base Station will make a 1-minute pause before starting another
reporting. This cycle will repeat until one reporting has been answered
successfully.
When one full round’s numbers (all numbers under Group 1 to Group 5)
have all failed, the Base Station will make a 5-minute pause before
starting another retry cycle.
6.2.3. Arming/Disarming the System
The Base Station’s security functions are activated only when the Base
Station’s yellow button is programmed as a security button.
When the Base Station’s yellow button is programmed as a security
button, you can arm/disarm your system following the procedures below:
- Arming the system: You can arm the system by using a Remote
Control (RC) or Keypad (KP) or by pressing the yellow button on the
Base Station. The Base Station will start the exit time countdown and
emit beeps during the countdown. During the last 10 seconds of the
exit time, the Base Station will emit two quick beeps every second to
urge you to leave the house as soon as possible. After the exit time
expires, the Base Station will emit a long beep to signal that the
system has entered armed mode.
<
<N
NO
OT
TE
E>
>
When you press the Base Station’s yellow button to arm the system and
the Base Station emits four beeps, the beeps signify the presence of
device fault(s). In this case the Base Station will not immediately start the
exit time countdown. If you want the Base Station to start the exit time
countdown immediately, please press the yellow button again and the
Base Station will enter exit time.
- Disarming the system: You can use a Remote Control (RC) or
Keypad (KP) to disarm the system. You can also disarm the system by
pressing the yellow button on the Base Station and then pressing a
Wrist Transmitter and Pendant Transmitter (WTR) button within 5

76
seconds after the yellow button is pressed. The Base Station will emit
two beeps to signal that it has entered disarmed mode.
<
<N
NO
OT
TE
E>
>
Please disarm your system during entry time. Failure to disarm the system
during entry time will trigger an alarm.
6.2.4. Voice Prompts
The Base Station plays voice prompts on important occasions to report its
condition or remind you to take a specific action. Information on voice prompts
is provided in the chart below.
The Base Station’s Voice Prompts
No
Voice Prompt Condition
1
Emergency call was pressed. Played once after the red
help button on the Base
Station is pressed
2
Help call in progress Played once every 2-3
seconds during guard time
3
Help call cancelled Played twice when the green
reset button is pressed during
guard time
4
Alarm received. Please stand by.
Played once upon kiss-off
5 Telephone line problem. Check telephone connection.
Played twice when there is a
telephone line problem
6
Telephone line restored Played once when a
telephone line problem is
fixed.
7
Line problem. Check line connection. Played twice when there is a
line problem
8
Line connection restored Played once when the
Ethernet connection is
restored
9
Power failure. Check power cord. Played twice when a power
failure takes place
10
Power restored Played once when power is
restored
11
Please charge your Mobile Unit.
Played twice when the Mobile
Unit has left the Base Station
for 24 hours. However, the
Base Station will not play this
voice prompt if the inactivity
timer has been disabled.
12 Connection problem
Played twice when the Base
Station’s red help button is
pressed and the Mobile Unit
is not inserted on the Base
Station (for MP-1 Classic
only)

77
No Voice Prompt Condition
13
Inactivity timer expiring. Please reset. Played upon the expiry of the
inactivity timer and once
every 5 minutes afterwards
for 6 times (over a 30-minute
period). After the 30 minutes,
the Base Station will start
reporting (this warning period
is conditioned by the inactivity
warning timer and its default
is 30 minutes).
14
A fall has been detected. Played every 2-3 seconds
during the guard time of a fall
sensor
15
Fall detection has restored. Cancelling help call. Played after the reception of
a fall sensor’s cancel code
<
<N
NO
OT
TE
E>
>
When the green reset button is pressed, the Base Station will report all the
fault problems it is experiencing via voice prompts.
6.2.5. Walk Test (Range Test)
Set the Base Station in learning mode to test the operational ranges of
devices.
Step 1. Press and hold the yellow button for 6 seconds when the Base Station
is in idle mode.
Step 2. Release the yellow button after you hear double beeps. Afterwards a
short beep will be emitted to indicate the Base Station is now in
learning mode. The blue backlight begins to blink.
Step 3. Move the device to a desirable location in the house and press the test
button to observe the device’s operational range.
Step 4. If the Base Station responds with a long beep, it means the device is
within the operational range.
Step 5. Press the yellow button once to exit learning mode, or the Base Station
will exit learning mode automatically after 5 minutes of inactivity.
6.2.6. Factory Reset
The Base Station will clear all programmed parameters when the following
steps are taken.
Step 1. Unplug the power cord from the DC jack.
Step 2. Use a pen or screwdriver to slide the battery switch to the off position.

78
Step 3. Plug the power cord into the DC jack while pressing both the help and
the reset buttons until one long beep is emitted to indicate the factory
reset has been successfully executed.
Step 4. Release both buttons.
Step 5. Slide the battery switch back to the on position.
<
<N
NO
OT
TE
E>
>
Once a factory reset is executed, all programmed data will return to their
default values and all learned-in devices will be removed. You will have to
do the programming and learn the devices in one by one again.
79
7. Appendix
7.1. Contact ID Event Codes
100 – Base Station Emergency
When the red help button on the Base Station is pressed.
101 - Personal Emergency
When Wrist Transmitter/Emergency Pendant (WTR) or Fall Sensor is
pressed.
102 - Inactivity
An inactivity code will be sent to the CMS if there is no movement
during guard time after fall detection.
111 - Smoke Emergency
When Smoke Detector (SD) is triggered.
When the test button of Smoke Detector (SD) is pressed.
120 - Fall Emergency
When Fall Sensor is triggered.
130 - Burglary
(Defined by the installer/user)
147 - Supervisory Failure - Sensor
When the Base Station is unable to receive a signal transmitted from a
sensor for a period preset by the supervision timer.
154 - Water Emergency
When Water Sensor (WS) is triggered.
162 - Carbon Monoxide Emergency
When Carbon Monoxide Detector (CO) is triggered.
When the test button of Carbon Monoxide Detector (CO) is pressed.
301 – AC Power Failure in the Base Station
When the Base Station’s AC power fails for more than 10 seconds, the
green LED blinks every second.
302 - Base Station Low on Battery
When the Base Station is low on battery, the green LED blinks every 2
seconds.
311 - Base Station’s Battery Disconnected
When the Base Station’s battery is not connected, the green LED
blinks every 2 seconds.
344 – Jamming Detected
When the Base Station detects a jamming condition.

80
383 - IR Tamper Open
When an IR tamper is opened.
384 - All Devices Low on Battery
When all devices are low on battery, the green LED blinks every 2
seconds.
602 - Auto Check-In Report
When the Base Station makes an auto check-in report to the CMS.
606 - Follow-On Operation
When the Base Station receives a kiss-off from the CMS to open the
speech channel.
641 - Inactivity
When the Base Station makes an inactivity timer expired report.
<
<N
NO
OT
TE
E>
>
This event code will be sent with fixed zone number 072.
661 – Nurse or Help Has Arrived/Nurse’s Job Completed
When the green reset button on the Base Station is pressed to signal
that a nurse or help has arrived (1-661).
When the green reset button on the Base Station is pressed to signal
that the nurse’s job has been completed (3-661).
662 – Help Still Needed
When the red help button on the Base Station is pressed to signal that
help is still needed.
663 – Case Closed by the Nurse
When the green reset button on the Base Station is pressed twice
quickly to signal that the nurse closes the emergency case because
the user actually has no problem.
7.2. Scancom Event Codes
515555517 - Base Station Emergency/Pendant #1 Emergency/Fall
Emergency/WTR Emergency/PB Emergency (when two-way mode is
set for follow-on operation)
When the red help button on the Base Station is pressed.
When Pendant #1 is pressed or triggered.
When Fall Sensor is pressed or triggered.
When WTR (Pendant #1) or PB is pressed.
515555557 - Base Station Emergency/Pendant #1 Emergency/WS
Emergency/Fall Emergency/WTR Emergency/PB Emergency (when
two-way mode is not set for follow-on operation)
81
When the red help button on the Base Station is pressed.
When Pendant #1 is pressed or triggered.
When Water Sensor is triggered.
When Fall Sensor is pressed or triggered.
When WTR (Pendant #1) or PB is pressed.
555155517 - Pendant #2 Emergency
When Pendant #2 is pressed or triggered.
515555518 - Pendant #1 Emergency (Low Battery)
When Pendant #1 is pressed or triggered when low on battery.
555155518 - Pendant #2 Emergency (Low Battery)
When Pendant #2 is pressed or triggered when low on battery.
551555517 - Inactivity
When the Base Station makes an inactivity timer expired report.
An inactivity code will be sent to the CMS if there is no movement
during guard time after fall detection.
555555558 - Base Station’s Battery Voltage Too High/Base Station
Low on Battery/Base Station’s Battery Disconnected
When the Base Station’s battery voltage is too high.
When the Base Station is low on battery.
When the Base Station’s battery is not connected, the green LED
blinks every 2 seconds.
555551557 - AC Power Failure in the Base Station
When the Base Station’s AC power fails for more than 10 seconds, the
green LED blinks every second.
555553557 - AC Power Restored/Base Station’s Low Battery Status
Cleared/Base Station’s Battery Disconnected Status Cleared
When AC power is restored to the Base Station.
When the Base Station’s low battery status is cleared.
When the Base Station’s battery disconnected status is cleared.
515555559 - WTR Supervision Failure
When the Base Station is unable to receive a signal transmitted from a
sensor for a period preset by the supervision timer.
555555559 - Auto Check-In Report
When the Base Station makes an auto check-in report to the CMS.
535555557 – WTR’s Supervision Failure Status Cleared/WS’
Emergency Status Cleared
When WTR’s supervision failure status is cleared.
82
When WS’ emergency status is cleared.
555555558 - Device Low on Battery
When a device is low on battery, the green LED blinks every 2
seconds.
555555557 - Device’s Low Battery Status Cleared
When a device’s low battery status is cleared.
155555517 – SD, CO or HD Emergency
When Smoke Detector (SD) is triggered or its test button pressed.
When Carbon Monoxide Detector (CO) is triggered or its test button
pressed.
When Heat Detector (HD) is triggered or its test button pressed.
7.3. Tunstall TTNEW Event Codes
D#1011 - AC Power Restored to the Base Station
When AC power is restored to the Base Station.
D#1012 - Auto Check-In Report
When the Base Station makes an auto check-in report to the CMS.
D#1013 - Supervisory Failure - Sensor
When the Base Station is unable to receive a signal transmitted from a
sensor for a period preset by the supervision timer.
D#1014 - Device Low on Battery
When a device is low on battery, the green LED blinks every 2
seconds.
D#1015 – Inactivity
When the Base Station makes an inactivity timer expired report.
An inactivity code will be sent to the CMS if there is no movement
during guard time after fall detection.
D#1016 - Personal Emergency or Fall Emergency
When Wrist Transmitter/Emergency Pendant (WTR) or Fall Sensor is
pressed.
When Fall Sensor is triggered
D#1017 - Base Station Emergency
When the red help button on the Base Station button is pressed.
When Water Sensor is triggered.
D#1018 - Smoke Emergency
When Smoke Detector (SD) is triggered or its test button pressed.
83
When Carbon Monoxide Detector (CO) is triggered or its test button
pressed.
D#1019 - AC Power Failure in the Base Station
When AC power fails for more than 10 seconds, the green LED blinks
every second.
D#1019 – Base Station Low on Battery/Base Station’s Battery
Disconnected
When the Base Station is low on battery, the green LED blinks every 2
seconds.
When the Base Station’s battery is disconnected, the green LED blinks
every 2 seconds.
7.4. Climax CPC Dialect Event Codes
55 – Base Station Emergency
When the red help button on the Base Station is pressed.
When Pendant #1 is pressed.
When Fall Sensor is triggered or pressed.
54 - WTR Emergency
When WTR or Fall Sensor is pressed.
29 - SD Emergency
When Smoke Detector (SD) is triggered.
58 - Fall Emergency
When Fall Sensor is triggered.
14 - Inactivity
An inactivity code will be sent to the CMS if there is no movement
during guard time after fall detection.
21 - WTR Supervision Failure/No WTR Learnt in
When the Base Station is unable to receive a signal transmitted from a
sensor for a period preset by the supervision timer.
When the Base Station has no WTR learnt in.
19 - AC Power Failure in the Base Station
When AC power fails for more than 10 seconds, the green LED blinks
every second.
20 - AC Power Restored
When AC power is restored to the Base Station.
42 - Base Station Low on Battery/Base Station’s Battery
Disconnected
84
When the Base Station is low on battery, the green LED blinks every 2
seconds.
When the Base Station’s battery is disconnected, the green LED blinks
every 2 seconds.
18 - Base Station’s Low Battery Status Cleared/Base Station’s Battery
Disconnected Status Cleared
When the Base Station’s low battery status is cleared.
When Base Station’s battery disconnected status is cleared.
11 - Device Low on Battery (Except for WTR)
When any device (except for WTR) is low on battery, the green LED
blinks every 2 seconds.
16 - WTR Low on Battery
When WTR is low on battery, the green LED blinks every 2 seconds.
26 - Auto Check-In Report
When the Base Station makes an auto check-in report.
39 - CO Emergency
When Carbon Monoxide Detector (CO) is triggered.
38 - WS Emergency
When Water Sensor (WS) is triggered.
14 - Inactivity
When the Base Station makes an inactivity timer expired report.
30 - Door Opened
When Door Contact (DC) is triggered.
32 - RF Jam Detection
When the Base Station’s RF signal is interfered.
7.5. Franklin Event Codes
(“X” below represents the zone number of a device)
10 - Medical Help Needed
When the red help button on the Base Station is pressed.
1X - Personal Emergency
When Fall Sensor, Wrist Transmitter (WTR) or Emergency Pendant is
pressed.
2X - Help Needed Due to Detected Fire, Smoke, Gas, Carbon
Monoxide or Water Leakage
When fire, smoke, gas, carbon monoxide or water leakage is detected,
SD, CO and WS will be triggered.
85
4X - Crisis of Fire, Smoke, Gas, Carbon Monoxide or Water Leakage
is relieved.
When a crisis of fire, smoke, gas, carbon monoxide or water leakage is
relieved.
61 - AC Failure
When the Base Station’s AC power fails, the green LED blinks twice
every second.
62 - AC Power Restored
When AC power is restored to the Base Station.
64 - Base Station Low on Battery
When the Base Station is low on battery, the green LED blinks every 2
seconds.
65 - Base Station’s Low Battery Status Cleared
When the Base Station’s low battery status is cleared.
71 - Inactivity
When the Base Station makes an inactivity timer expired report.
72 - No WTR Learnt in
When the Base Station has no WTR learnt in.
8X - Fall Emergency
When Fall Sensor is triggered.
91 - Auto Check-in Report
When the Base Station makes an auto check-in report to the CMS.
BX - Low Battery (IR/SD/WTR/CO/WS)
When Passive Infrared Motion Detection (IR), Smoke Detector (SD),
Wrist Transmitter (WTR), Carbon Monoxide Detector (CO) or Water
Sensor (WS) is low on battery, the green LED blinks every 2 seconds.
CX - Low Battery Status Cleared (IR/SD/WTR/CO/WS)
When the low battery status of Passive Infrared Motion Detection (IR),
Smoke Detector (SD), Wrist Transmitter (WTR), Carbon Monoxide
Detector (CO) or Water Sensor (WS) is cleared.
DX - Fall Inactivity
An inactivity code will be sent to the CMS if there is no movement
during guard time after fall detection.
EX - Sensor Supervision Failure
When the Base Station is unable to receive a signal transmitted from a
sensor for a period preset by the supervision timer.
FX – Sensor’s Supervision Failure Status Cleared
When a sensor’s supervision failure status is cleared.
Federal Communication Commission Interference Statement
This equipment has been tested and found to comply with the limits for a Class B digital device,
pursuant to Part 15 of the FCC Rules. These limits are designed to provide reasonable protection against
harmful interference in a residential installation.
This equipment generates, uses and can radiate radio frequency energy and, if not installed and used in
accordance with the instructions, may cause harmful interference to radio communications. However,
there is no guarantee that interference will not occur in a particular installation. If this equipment does
cause harmful interference to radio or television reception, which can be determined by turning the
equipment off and on, the user is encouraged to try to correct the interference by one of the following
measures:
. Reorient or relocate the receiving antenna.
. Increase the separation between the equipment and receiver.
. Connect the equipment into an outlet on a circuit different from that to which the receiver is connected.
. Consult the dealer or an experienced radio/TV technician for help.
FCC Caution: To assure continued compliance, any changes or modifications not expressly approved by
the party responsible for compliance could void the user's authority to operate this equipment. (Example
- use only shielded interface cables when connecting to computer or peripheral devices).
This device complies with Part 15 of the FCC Rules. Operation is subject to the following two
conditions:
(1) This device may not cause harmful interference, and (2) This device must accept any interference
received, including interference that may cause undesired operation.