Cobra Electronics 29BT2K17 BLUE TOOTH MODULE User Manual Part 2
Cobra Electronics Corporation BLUE TOOTH MODULE Users Manual Part 2
Contents
- 1. Users Manual Part 1
- 2. Users Manual Part 2
Users Manual Part 2
Operation
Operation
21
20
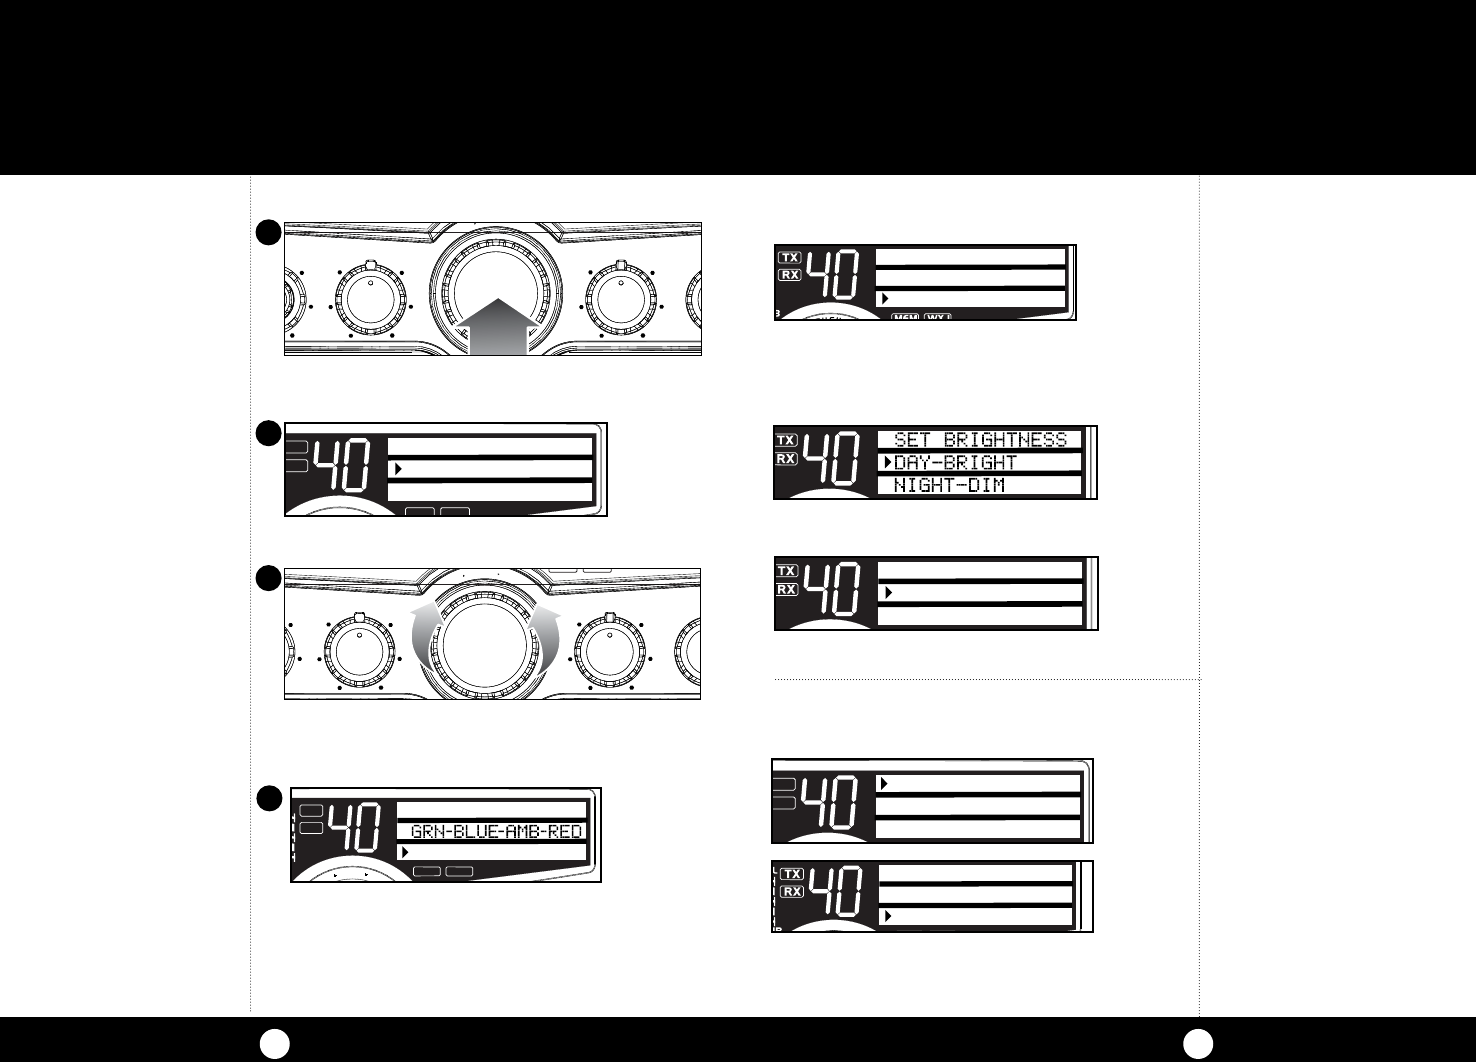
Setting Brightness Mode
Press Menu/Enter knob to select Brightness
Press the Menu/Enter knob to select Brightness. Press the
Menu/Enter knob to select Day-Bright. Turn Menu/Enter
clockwise to increase brightness and turn counter-clockwise to
decrease brightness.
To set the Night-Dim level, select Night-Dim then
repeat instructions above.
Press Menu/Enter knob to save and exit routine. Press
DIM/ESC to exit menu without saving.
WX AUTO SCAN
DISPLAY COLOR
BRIGHTNESS
Note
Exit will return to the previous
menu mode. Use DIM/ESC
button exit and return to CB
Standby.
Setting the Display Color Mode
Press the Menu/Enter knob and select Display Color.
Press and release Menu/Enter to set the color.
Rotating the Menu/Enter knob changes the display
color from green to blue to amber to red then back to
green.
Press the Menu/Enter knob to save and exit and set
the Brightness mode.
SWR/CAL
NB/ANL
VOL SQ DYNAMIKERF GAIN DELTA TUNE T BACK SWR
CAL
OFF MIN MINOFF
MAX
ESC
MEM SCAN
S/RF
M
E
N
U
P
U
S
H
E
N
T
E
R
SIG
RF
+30dB
1
1.5 23CAL
3579
SWR
TX
RX
NB/ANL
MEMWX !
ANL
S/RF
SWR
CAL
CH 9/
19
CB/WX
DIM
SCAN
WX AUTO SCAN
DISPLAY COLOR
BRIGHTNESS
SWR/CAL
NB/ANL
VOL SQ DYNAMIKE RF GAIN DELTA TUNE T BACK SWR
CAL
OFF MIN MIN OFF
MAX
ESC
MEM SCAN
S/RF
M
E
N
U
P
U
S
H
E
N
T
E
R
SIG
RF
+30dB
1
1.5 23CAL
3579
SWR
TX
RX
NB/ANL
MEM WX !
ANL
S/RF
SWR
CAL
CH 9/
19
CB/WX
DIM
SCAN
SAVE AND EXIT
SET COLOR
1
2
3
4
Turn NightWatch Illumination On-Off-Hi-Low
Press the Menu/Enter knob and scroll down to select
NW Lighting.
Rotate the Menu/Enter knob clockwise to change the
setting to HI-LOW or OFF.
Press the Menu/Enter knob to save and exit.
NW IS SET HI
HI-LOW-OFF
SAVE AND EXIT
SWR/CAL
NB/ANL
VOL SQ DYNAMIKERF GAIN DELTA TUNE T BACK SWR
CAL
OFF MIN MINOFF
MAX
ESC
MEM SCAN
S/RF
M
E
N
U
P
U
S
H
E
N
T
E
R
SIG
RF
+30dB
1
1.5 23CAL
3579
SWR
TX
RX
NB/ANL
MEMWX !
ANL
S/RF
SWR
CAL
CH 9/
19
CB/WX
DIM
SCAN
NW LIGHTING
CONTRAST
RADIO CHECK
Note
To select HI-LOW-OFF, rotate
Menu/Enter knob to change
the setting. Press and release
the Menu/Enter knob to set the
Nightwatch® illumination level,
save and exit.
SIG
RF
+30dB
1
1.5 23CAL
3579
SWR TX
RX
NB/ANL
MEM WX !
ANL
S/RF
SWR
CAL
NB/ANL S/RF
SWR/CAL
ESC
MEM SCAN
SCAN CH 9/19
DIM
CB/WX
M
E
N
U
P
U
S
H
E
N
T
E
R
VOL
DYNAMIKERF GAIN
DELTA TUNE T BACK SWR
CAL
OFF
MIN MIN
OFF
MAX
SQ
SIG
RF
+30dB
1
1.5 23CAL
3579
SWR TX
RX
NB/ANL
MEM WX !
ANL
S/RF
SWR
CAL
NB/ANL S/RF
SWR/CAL
ESC
MEM SCAN
SCAN CH 9/19
DIM
CB/WX
M
E
N
U
P
U
S
H
E
N
T
E
R
VOL
DYNAMIKERF GAIN
DELTA TUNE T BACK SWR
CAL
OFF
MIN MIN
OFF
MAX
SQ
SET BRIGHTNESS
SAVE AND EXIT
Note
Dual Point Bluetooth:
For team drivers, two cell phones
can be paired, however; only one
phone can be used at a time.
Bluetooth®
Calls on a Bluetooth® enabled cell phone can be routed
through the 29 LX MAX speaker or external speaker
accessory.
2322
Operation Operation
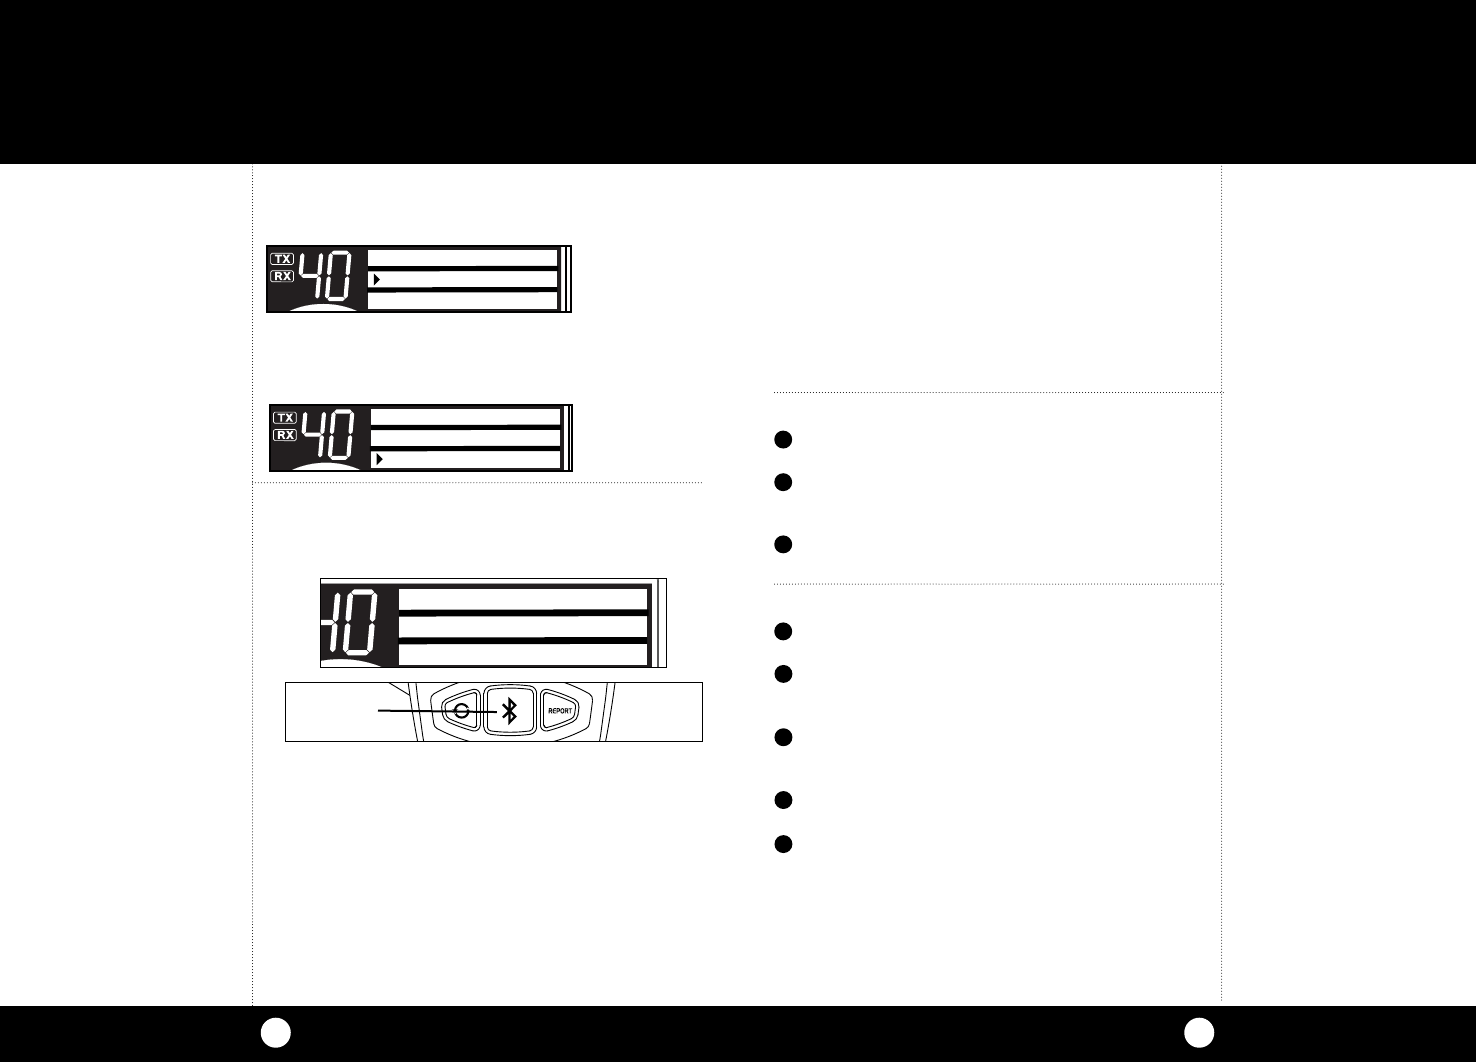
To Pair with a Cell Phone
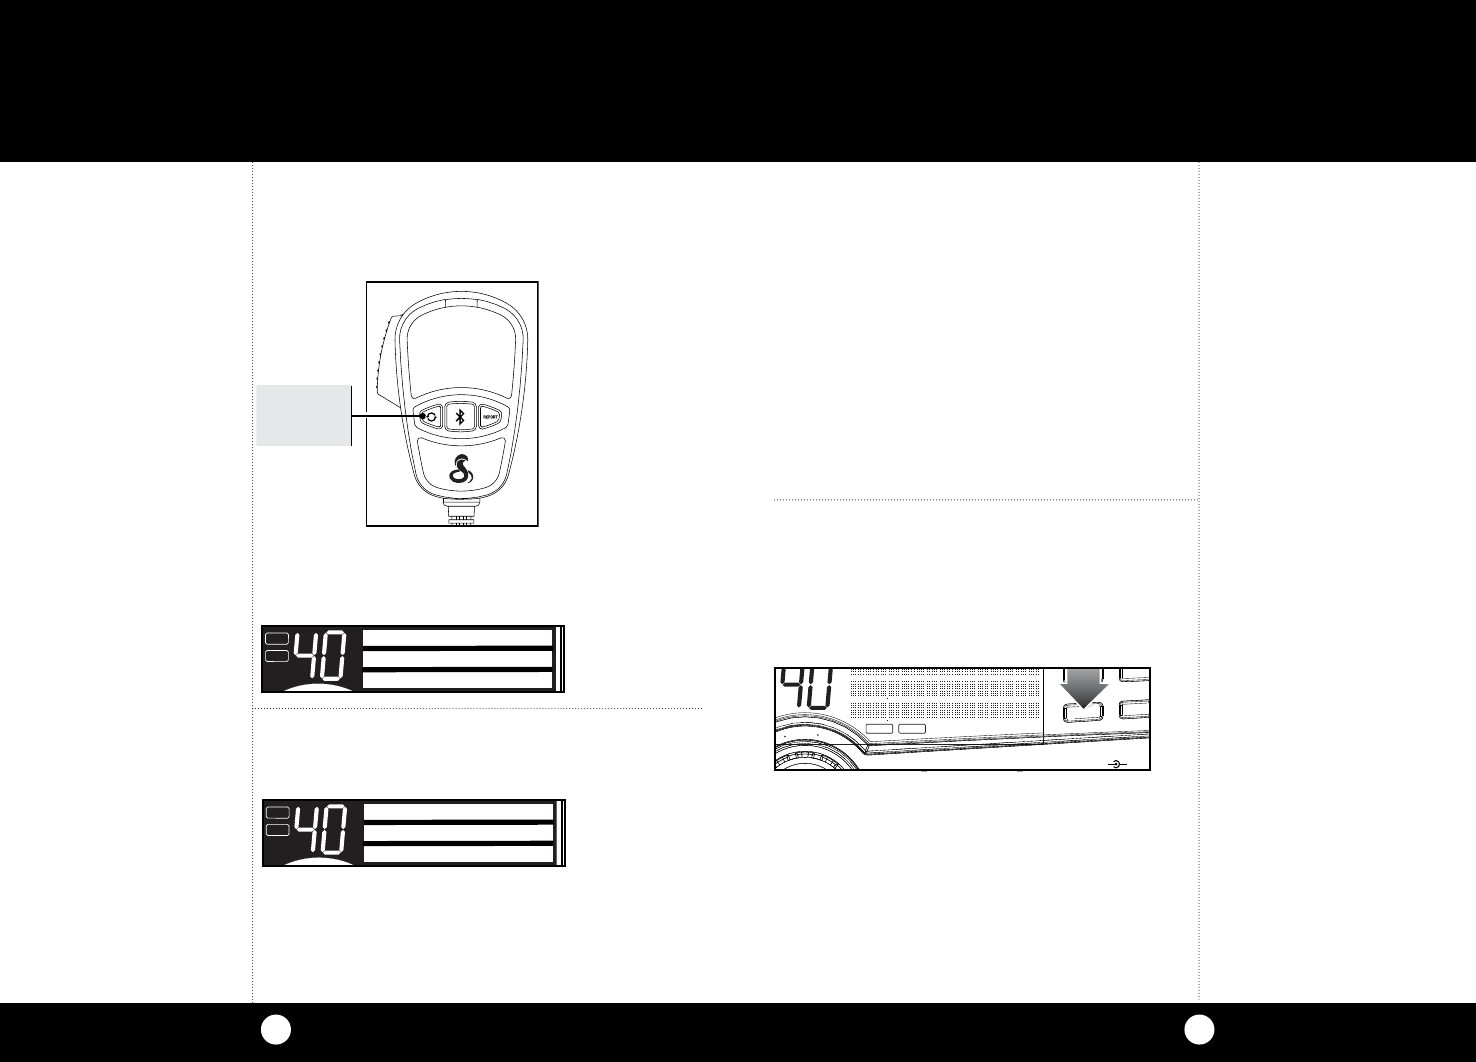
Press and hold the BT Button for six seconds to enter
Ready For Pairing mode. A tone will sound to confirm
entry to pairing mode.
A. First time pairing with a cell phone:
I. A tone will sound to confirm Pairing mode.
II.
Follow the cell phone manufacturer’s instruction to
enable its Bluetooth function. Select 29 LX MAX from
the list of Bluetooth devices. Enter the PIN (Personal
Identification Number) 0000 if required. Most smart-
phones no longer require a PIN entry.
Note
If no further pairing steps are
taken, the unit will time-out
and return to Standby after 90
seconds. During the pairing
process, press and release the
BT Button or DIM/ESC to
cancel the pairing process.
Note
For Text-to-Speech conversion,
an app should be downloaded
to your cell phone.
Note
When cell phone calls are in
progress using the Bluetooth
features, the CB functions of
the unit are disabled unless the
phone call is put on hold (see
page 27).
Setting Contrast Mode
Press the Menu/Enter knob and rotate clockwise to select
Set Contrast.
Rotate the Menu/Enter knob clockwise to increase
contrast, counter-clockwise to decrease contrast.
Press the Menu/Enter knob to save and exit and continue
settings or DIM/ESC to exit Menu mode.
SET CONTRAST
------
SAVE AND EXIT
III. Successful pairing will be indicated by
a tone to confirm entry to Connected
mode. A pair record will also be established for
subsequent connections.
B. Subsequent pairings with a cell phone:
I. Follow the cell phone manufacturer’s instruction,
to enable it’s Bluetooth
®
function.
II.
Successful pairing will be indicated by a tone to
confirm entry to Connected mode.
SWR/CAL
NB/ANL
VOL SQ DYNAMIKERF GAIN DELTA TUNE T BACK SWR
CAL
OFF MIN MINOFF
MAX
ESC
MEM SCAN
S/RF
M
E
N
U
P
U
S
H
E
N
T
E
R
SIG
RF
+30dB
1
1.5 23CAL
3579
SWR TX
RX
NB/ANL
MEMWX !
ANL
S/RF
SWR
CAL
CH 9/
19
CB/ WX DIM
SCAN
READY FOR
PAIRING
PW 0000
BT Button
NW LIGHTING
CONTRAST
RADIO CHECK
1
2
3
To Answer Calls
Press and release the BT Button when the cell phone ring is
heard through the 29 LX MAX speaker.
Speak into the 29 LX MAX microphone. The CB function
of the unit and PTT Button will be disabled while a call
is in progress.
Press and release the
BT Button
to end the call.
A tone will sound.
To Initiate Calls
To initiate the phone’s voice assistant, if supported,
press and release the
BT Button
twice.
Dial a number according to the cell phone manufacturer’s
instructions. The key press and other tones will be heard
through the 29 LX MAX speaker.
Press Send on the cell phone, you will hear the ring
tone for the number you dialed on the CB speaker.
Once connected, speak into the microphone.
Press and release of the
BT Button
to end the call.
A tone will sound.
Press and hold the
BT Button
for two seconds to redial
a number. A tone will sound; and after a few seconds,
you will hear the ring tone for the number you dialed.
1
2
3
4
5
Note
When dialing a phone number
on your phone’s keypad, it is
recommended that you dial
when the vehicle is not in
motion.
Note
The external microphone (see
accessories on page 35) can be
plugged into the rear of the
unit and clipped to a pocket
or lapel for hands-free speech
during calls.
When the external microphone
is plugged in, the main micro-
phone will not pick up speech
during calls but will be fully
functional for CB operation.
Operation Operation
2524
For optimal performance and access to all this radio’s
advanced features, you should download the iRadar app.
To download the app you must enter the iOS App Store or
Google Play Store and search for “Cobra iRadar”. Follow the
onscreen instructions to download and install the Cobra
iRadar app.
Make sure to check out the Tutorial for a full explanation of
app features. The Tutorial can be accessed from the Menu.
Information on specific settings and explanations of
radar bands can be found by pressing the green info icons
in the settings menus. The iRadar app can also be used to
change and easily adjust the alert settings.
Downloading the iRadar App
Note
The radio will not alert when
police are monitoring speed
with radar or laser guns.
Pairing/Connecting With Your Radio continued
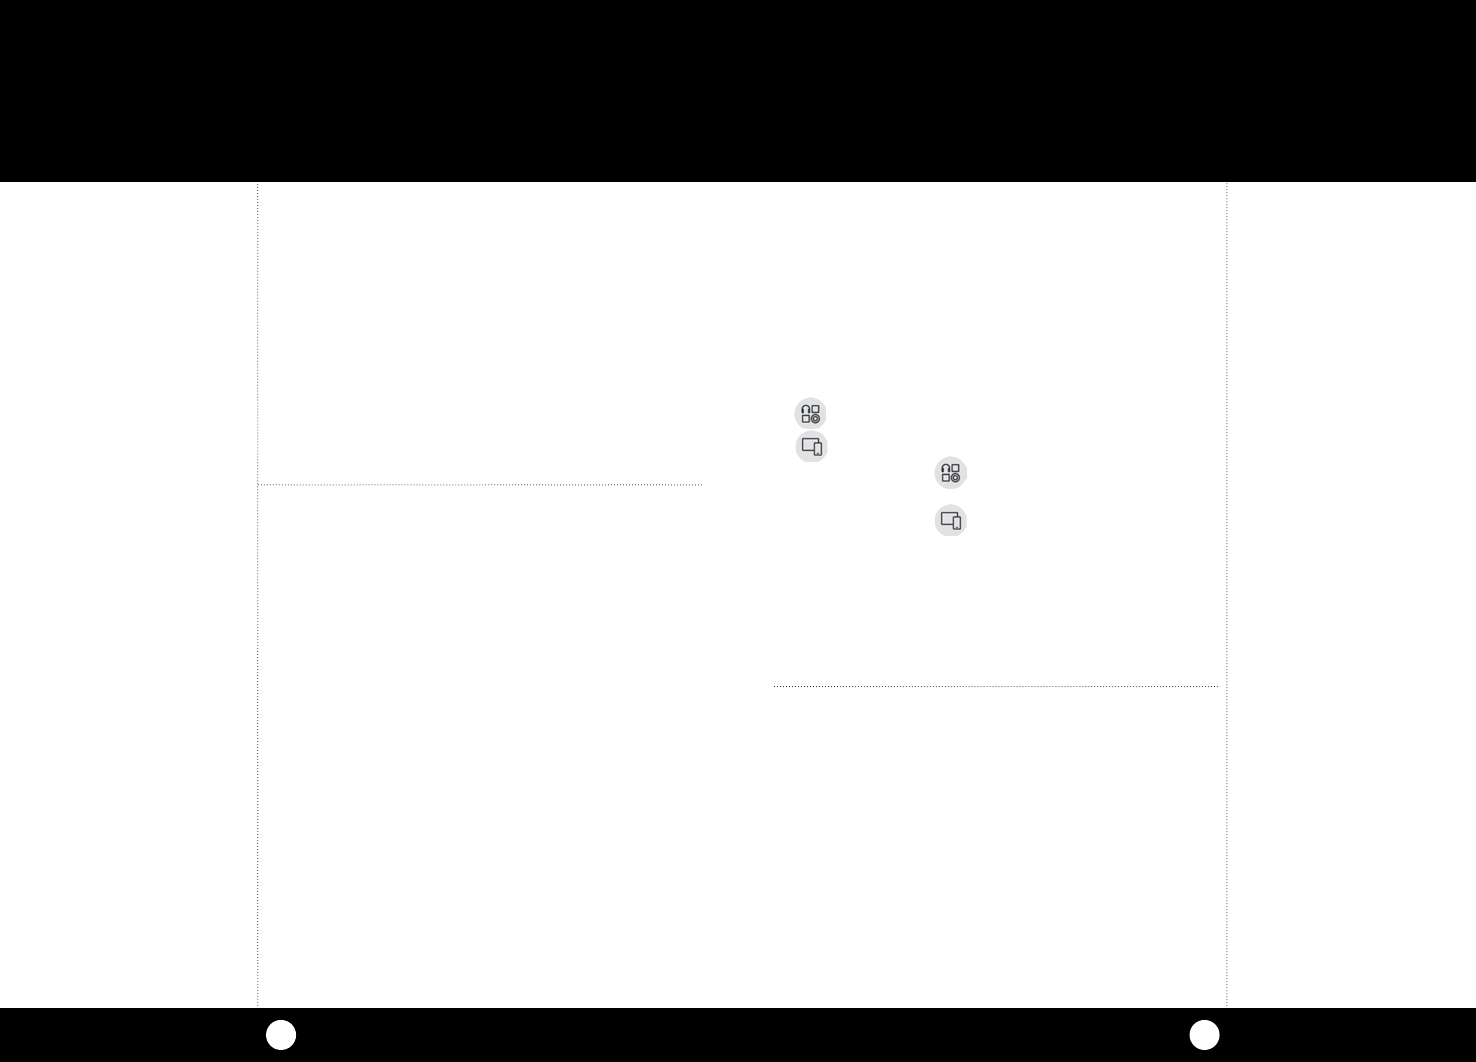
For Android™ :
a. Power on the CB radio.
b. Make sure your Android™
Bluetooth®
is turned On.
Press and hold the
Bluetooth®
button on the micro-
phone to put the radio into Bluetooth pairing mode.
c.
Select Bluetooth® from SETTINGS on the Android device.
The Available Devices list should contain the following:
DEVICES:
29 LX MAX (phone functionality)
29 LX MAX (iRadar app functionality)
d. Select 29 LX MAX to pair and connect to the
29 LX MAX phone call feature.
Select 29 LX MAX for pairing to the iRadar app.
The phone might show “Paired but not connected”
in this menu. That’s OK as the connection will be
completed after opening the iRadar App.
e. Enter the iRadar App to complete the connection.
f.
From the main menu, 29 LX MAX - CONNECTED
appears.
Note
For more information on pairing
with Bluetooth
®
devices consult
your phone’s owners manual.
If you are having trouble
initializing or maintaining
your Bluetooth
®
connection
completely turn off your
smartphone and the radio
device, wait 30 seconds, and then
turn them back on.
Pairing/Connecting With Your Radio to Use
with the Cobra iRadar App
GPS and iRadar-based features require connection to a
Bluetooth® device and the Cobra iRadar app. For a full list
of compatible Bluetooth® devices visit www.bluetooth.com
Please note, this is a newer Bluetooth
®
low-energy
technology and pairing is not always done in the same
manner and menus as conventional
Bluetooth®
. This
radio will NOT
APPEAR in the
Bluetooth®
Settings menu of your iPhone
®
.
For iPhone
®
5s and later:
a. Power on the CB radio.
b. Make sure your iPhone
Bluetooth®
is turned On.
c. Start the Cobra iRadar application. Press the Menu
icon (three horizontal bars) in the upper left corner of
the app and select Devices. Select 29 LX MAX from
the devices list. A successful connection shows under
the paired devices list as 29 LX MAX CONNECTED.
d.
From the main menu, 29 LX MAX - CONNECTED
appears.
Your radio is capable of providing you with LBAs and iRadar
Community threat sharing data when connected to phone
running iRadar. The radio uses the GPS in your smartphone to
connect to and obtain the latest LBA’s and alert you to them.
Vehicle speed uses your phone’s GPS as well.
AURA® Location-Based Alerts (LBAs)
and iRadar Community
2726
Operation Operation
To Place a call on Hold
During a call the display will show:
Press Menu/Enter knob. This puts the call on hold
allowing CB communication.
To Return to Phone Call
While a call is on hold the display will show:
Press Menu/Enter knob to resume the call.
SWR/CAL
NB/ANL
VOL SQ DYNAMIKERF GAIN DELTA TUNE T BACK SWR
CAL
OFFMIN MINOFF
MAX
ESC
MEM SCAN
S/RF
M
E
N
U
P
U
S
H
E
N
T
E
R
SIG
RF
+30dB
1
1.5 23CAL
3579
SWR TX
RX
NB/ANL
MEMWX !
ANL
S/RF
SWR
CAL
CH 9/
19
CB/WX
DIM
SCAN
TO HOLD CALL
PRESS ENTER
AND GO TO CB
SWR/CAL
NB/ANL
VOL SQ DYNAMIKERF GAIN DELTA TUNE T BACK SWR
CAL
OFF MIN MINOFF
MAX
ESC
MEM SCAN
S/RF
M
E
N
U
P
U
S
H
E
N
T
E
R
SIG
RF
+30dB
1
1.5 23CAL
3579
SWR TX
RX
NB/ANL
MEMWX !
ANL
S/RF
SWR
CAL
CH 9/
19
CB/WX
DIM
SCAN
RETURN TO CALL
PRESS ENTER TO
Note
If the call is dropped while
on hold, you will hear a beep
and the CB radio will return to
standby.
Allows your phone’s audio
to be routed through the CB
radio. This way third-party
apps that output audio (such
as music players, text message
and email readers, or Caller
ID annunciators) will play
through the radio.
Note
BT PHONE is for hands-free
calling.
BT MEDIA is for routing other
audio through the radio.
To Turn Bluetooth ON/Off on the Radio:
Press Menu/Enter and select
Bluetooth®
:
Press Menu/Enter again to select
Bluetooth®
Phone
ON or OFF:
Press Menu/Enter again to select
Bluetooth®
Media ON
or OFF:
SWR/CAL
NB/ANL
VOL SQ DYNAMIKERF GAIN DELTA TUNE T BACK SWR
CAL
OFFMIN MINOFF
MAX
ESC
MEM SCAN
S/RF
M
E
N
U
P
U
S
H
E
N
T
E
R
SIG
RF
+30dB
1
1.5 23CAL
3579
SWR TX
RX
NB/ANL
MEMWX !
ANL
S/RF
SWR
CAL
CH 9/
19
CB/WX
DIM
SCAN
SET BT PHONE
BLUETOOTH ON
SET BT MEDIA
SWR/CAL
NB/ANL
VOL SQ DYNAMIKERF GAIN DELTA TUNE T BACK SWR
CAL
OFFMIN MINOFF
MAX
ESC
MEM SCAN
S/RF
M
E
N
U
P
U
S
H
E
N
T
E
R
SIG
RF
+30dB
1
1.5 23CAL
3579
SWR TX
RX
NB/ANL
MEMWX !
ANL
S/RF
SWR
CAL
CH 9/
19
CB/WX
DIM
SCAN
ON
PHONE ON
OFF
A2DP Audio
Streaming
SWR/CAL
NB/ANL
VOL SQ DYNAMIKERF GAIN DELTA TUNE T BACK SWR
CAL
OFFMIN MINOFF
MAX
ESC
MEM SCAN
S/RF
M
E
N
U
P
U
S
H
E
N
T
E
R
SIG
RF
+30dB
1
1.5 23CAL
3579
SWR TX
RX
NB/ANL
MEMWX !
ANL
S/RF
SWR
CAL
CH 9/
19
CB/WX
DIM
SCAN
ON
MEDIA ON
OFF
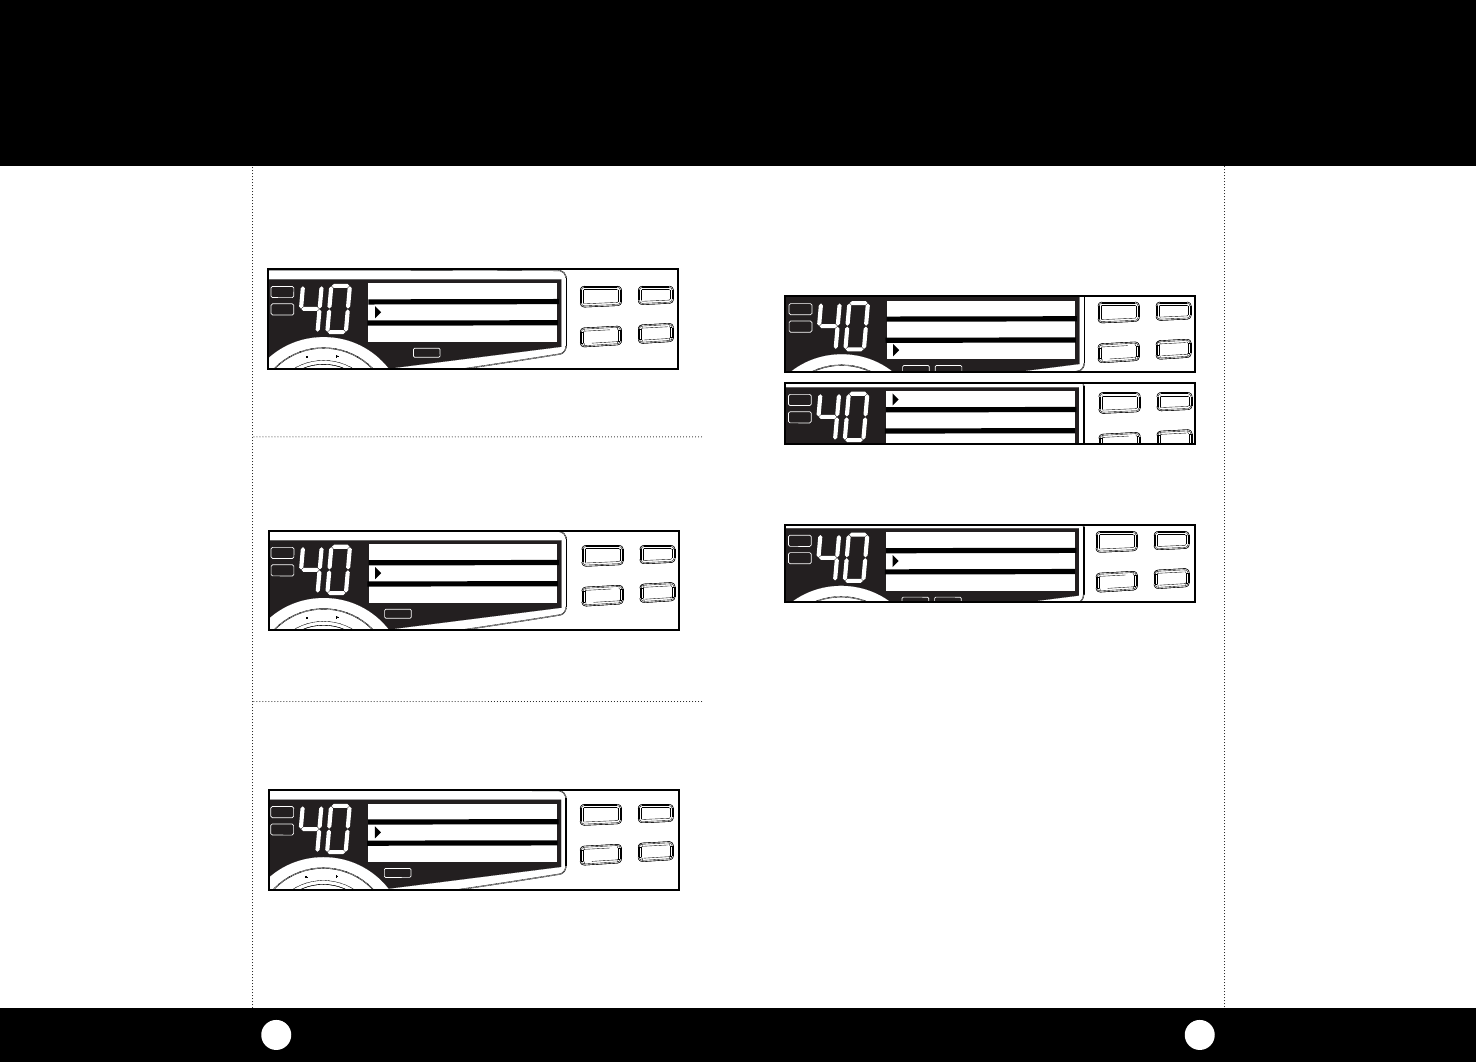
Using the Report Button
You can report to the iRadar Community locations where you
see active police enforcement or a caution area by
pressing the REPORT button on the microphone.
To report Live Police, press and release the REPORT button.
To report a Caution Area, press and hold the
REPORT
button for 2 seconds.
A double beep confirmation tone will be heard.
When receiving an alert you can mark the alert TRUE or FALSE by
pressing and releasing the REPORT button.
• To mark the alert TRUE, press and release the REPORT button.
• To mark an alert FALSE, press and hold the REPORT button for
2 seconds.
A double-beep confirmation tone will be heard.
1
2
When other iRadar users detect a radar or laser signal the
alert information is anonymously sent to Cobra’s cloud
servers. Within seconds, that information is processed and
displayed on your map as part of a Threat Area.
iRadar users can also report live police, red light cameras,
caution zones, etc. These are also sent to Cobra’s cloud
servers and displayed on your map and on the radio as user
reported Location-Based Alerts (LBA).
AURA and iRadar continued
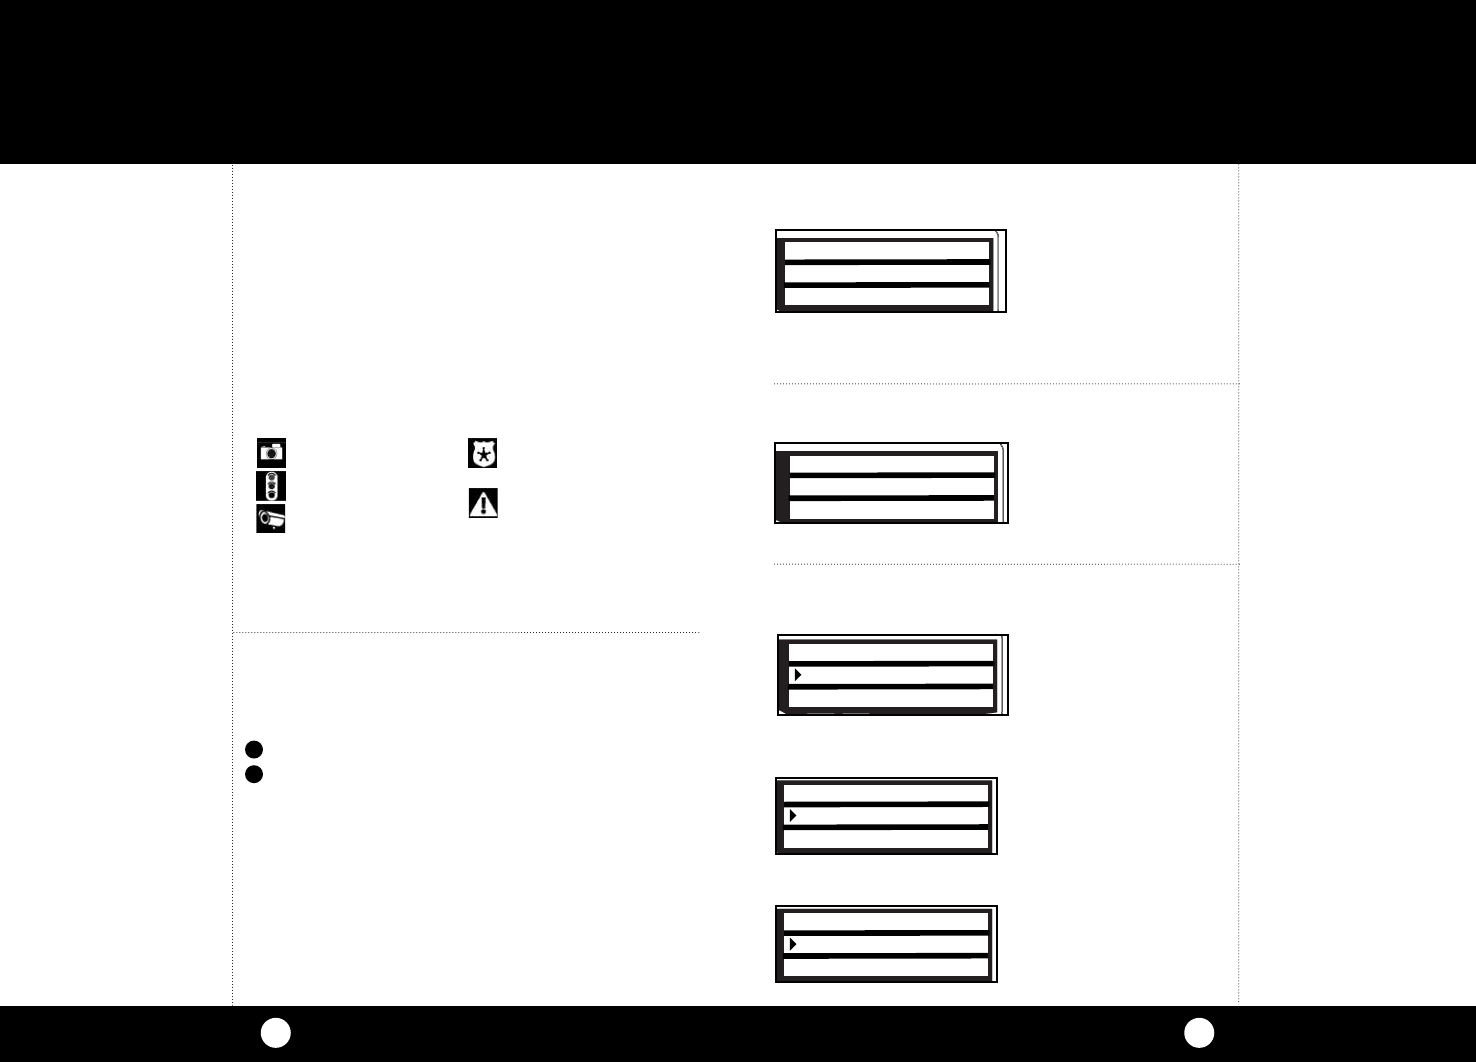
The distance will count down as you approach the Location-
Based Alerts (LBA) Area. The alert types are:
Photo-Enforced Areas
Red-Light Cameras
Speed Cameras
As you approach a threat area, the iRadar app and the 29 LX MAX
will display the type of threat (laser, radar, radar band, etc), the
threat level, and when the threat was reported.
Known Speed Trap
Areas
Caution Areas (High
Accident Areas)
Note
Caution Areas may include:
Car on the side of the road,
traffic slowdowns,
hazard on road, etc.
Operation Operation
2928
Weather
Information
Note
If you wish to receive a
listing of NOAA ‘Weather Radio
Transmitter locations, contact
your nearest National Weather
Service Office or write to:
National Weather Service
(Attn: W/OM11) NOAA
Silver Springs, MD 20910.
For ideal weather reception use
a dual band antenna (center
load/baseload).
Weather Alert
What You Should Know About Weather
If threatening weather is nearby, the National Weather
Service may broadcast a 10 second alert tone. This
tone will be heard through the CB, even if the CB/WX
Control is in the CB mode or the unit is turned off.
This enables you to monitor CB frequencies and still be
warned by the National Weather Service Emergency
Alert. When you hear the alert, press the CB/WX button
in the WX mode. You will then be able to listen to the
Weather Warning Broadcast.
Your 29 LX MAX has a special auto squelch circuit for
weather transmission which disables your squelch
control.
Weather
Channels
Weather Alert Scan
The unit will continually scan all 10
WX
channels for the
(1050 Hz) alert tone. If the tone is detected the unit will
activate
WX
mode on the channel with the tone.
Default is Off. Go to Menu mode to choose On/Off
(see page 30):
What is Weather Radio?
NOAA Weather Radio (NWR) is a
service of the National Oceanic
and Atmospheric Administration
(NOAA), of the U.S. Department of
Commerce. 380 NWR stations are in
operation by the U.S. Government
in addition to several NWR stations
that are maintained by private
interest groups. The capability is to
supplement warnings by sirens and
by commercial radio and television.
The 10 National Weather Channels
provide full coverage to keep you
informed of weather conditions, 24
hours a day, 7 days a week.
Weather Auto Scan
If active while in CB mode, will determine if the present
WX
channel is active. If the present
WX
channel is not
active, will search for the strongest
WX
channel and auto
change to that channel. Default is Off. Go to Menu mode
to choose on/off (see page 30).
SIG
RF
+30dB
1
1.5 23CAL
3579
SWR TX
RX
NB/ANL
MEM WX !
ANL
S/RF
SWR
CAL
NB/ANL S/RF
SWR/CAL
ESC
MEM SCAN
SCAN CH 9/19
DIM
CB/WX
M
E
N
U
P
U
S
H
E
N
T
E
R
VOL DYNAMIKERF GAIN DELTA TUNE T BACK SWR
CAL
OFF MIN MIN OFFMAX
SQ
Rewind-Say-Again®
Your 29 LX MAX allows you to play back the last
transmission received over the airwaves and record a
10 second memo to be played back at any time.
To Playback the Last Transmission
Press and release the Rewind-Say-Again button on the
mic. The last transmission (up to 10 seconds) that the
radio received will be heard over the speaker.
To Record a 10 Second Memo
Press and hold the Rewind-Say-Again button on the
mic for the duration of the 10 second recording.
Speak into the microphone to record the Memo.
To play back the recorded memo, double press and
release the Rewind-Say-Again button. The Memo will
be heard over the speaker.
PUSH &
RELEASE
Note
The previous Memo recording
will be erased when a new one is
recorded.
SWR/CAL
NB/ANL
VOL SQ DYNAMIKE RF GAIN DELTA TUNE T BACK SWR
CAL
OFF MIN MIN OFF
MAX
S/RF
M
E
N
U
P
U
S
H
E
N
T
E
R
SIG
RF
+30dB
1
1.5 23CAL
3579
SWR
TX
RX
NB/ANL
MEM WX !
ANL
S/RF
SWR
CAL
RWD-SAY-AGAIN
10 SECONDS
ESC
MEM SCAN
SCAN CH 9/19
DIM
CB/WX
SWR/CAL
NB/ANL
VOL SQ DYNAMIKE RF GAIN DELTA TUNE T BACK SWR
CAL
OFF MIN MIN OFF
MAX
S/RF
M
E
N
U
P
U
S
H
E
N
T
E
R
SIG
RF
+30dB
1
1.5 23CAL
3579
SWR
TX
RX
NB/ANL
MEM WX !
ANL
S/RF
SWR
CAL
RECORDING MEMO
10 SECONDS
ESC
MEM SCAN
SCAN CH 9/19
DIM
CB/WX
Operation
30
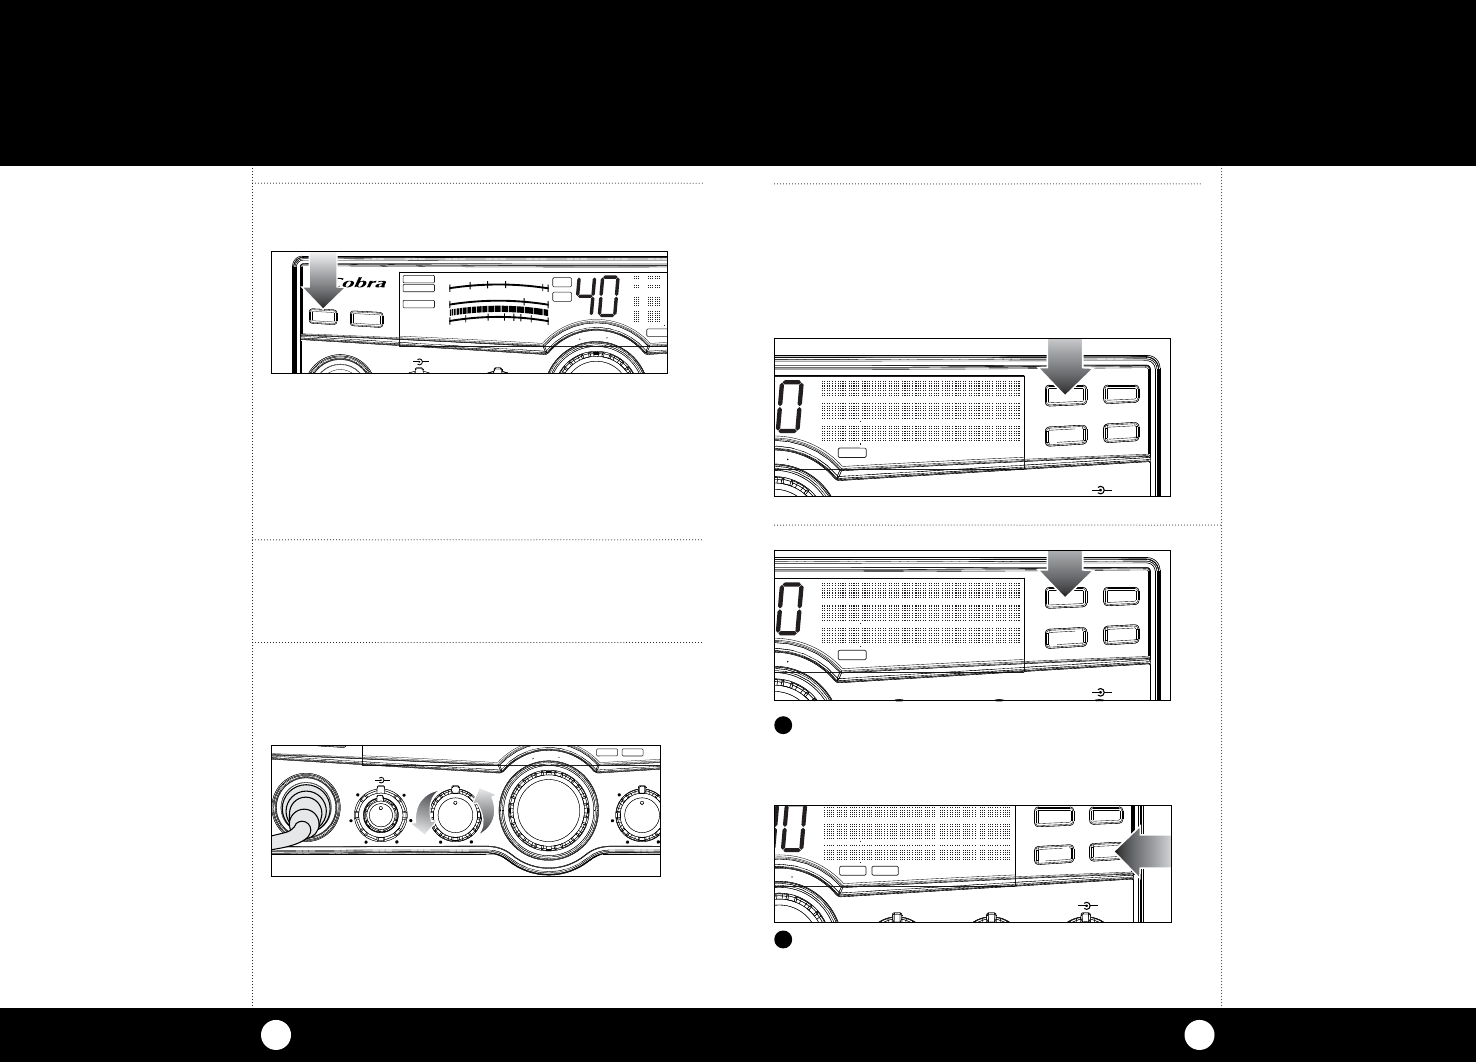
Setting Weather Auto Scan
Press the Menu/Enter knob and rotate clockwise to WX Auto
Scan. Press the Menu/Enter knob to select On/Off.
Press the Menu/Enter knob to select On/Off and exit to
the main menu.
SWR/CAL
NB/ANL
VOL SQ DYNAMIKE RF GAIN DELTA TUNE T BACK SWR
CAL
OFF MIN MIN OFF
MAX
S/RF
M
E
N
U
P
U
S
H
E
N
T
E
R
SIG
RF
+30dB
1
1.5 23CAL
3579
SWR
TX
RX
NB/ANL
MEM
ANL
S/RF
SWR
CAL
ON
OFF
AUTO SCAN IS OFF
ESC
MEM SCAN
SCAN CH 9/19
DIM
CB/WX
Setting Weather Alert Scan
Press the Menu/Enter knob and rotate clockwise to
WX Alert Scan. Press the Menu/Enter knob to select On/Off.
Press Menu/Enter knob to select On/Off and exit to the
main menu.
SWR/CAL
NB/ANL
VOL SQ DYNAMIKE RF GAIN DELTA TUNE T BACK SWR
CAL
OFF MIN MIN OFF
MAX
S/RF
M
E
N
U
P
U
S
H
E
N
T
E
R
SIG
RF
+30dB
1
1.5 23CAL
3579
SWR
TX
RX
NB/ANL
MEM
ANL
S/RF
SWR
CAL
WX! SCAN OFF
ON
OFF
ESC
MEM SCAN
SCAN CH 9/19
DIM
CB/WX
Setting Weather Alert Mode
Turns WX Alert On/Off. Default is Off.
Press the Menu/Enter knob to select Set WX Alert.
If Weather is On, WX Alert Icon will be displayed.
Press the Menu/Enter knob to select On/Off and exit to
main menu.
SWR/CAL
NB/ANL
VOL SQ DYNAMIKE RF GAIN DELTA TUNE T BACK SWR
CAL
OFF MIN MIN OFF
MAX
S/RF
M
E
N
U
P
U
S
H
E
N
T
E
R
SIG
RF
+30dB
1
1.5 23CAL
3579
SWR
TX
RX
NB/ANL
ANL
S/RF
SWR
CAL
WX! ALERT OFF
ON
OFF
ESC
MEM SCAN
SCAN CH 9/19
DIM
CB/WX
WX !
Note
Press DIM/ESC button to return
to CB mode.
Note
If an alert is detected the unit
will activate WX mode on the
channel with the alert.
Operation
31
Software Version/Factory Settings
Displays current software version and returns unit to
original factory settings. To view the software version,
press the Menu/Enter knob and select Setting then
Software Version.
To restore default settings, Press the Menu/Enter knob
and select Settings then select Go To Rest. Defaults.
Press the Menu/Enter knob to restore default settings.
Choose No to maintain present settings with no change.
SWR/CAL
NB/ANL
VOL SQ DYNAMIKE RF GAIN DELTA TUNE T BACK SWR
CAL
OFF MIN MIN OFF
MAX
S/RF
M
E
N
U
P
U
S
H
E
N
T
E
R
SIG
RF
+30dB
1
1.5 23CAL
3579
SWR
TX
RX
NB/ANL
MEM WX !
ANL
S/RF
SWR
CAL
CONTRAST
RADIO CHECK
SETTING
ESC
MEM SCAN
SCAN CH 9/19
DIM
CB/WX
SWR/CAL
NB/ANL
VOL SQ DYNAMIKE RF GAIN DELTA TUNE T BACK SWR
CAL
OFF MIN MIN OFF
MAX
S/RF
M
E
N
U
P
U
S
H
E
N
T
E
R
SIG
RF
+30dB
1
1.5 23CAL
3579
SWR
TX
RX
NB/ANL
MEM WX !
ANL
S/RF
SWR
CAL
REST. DEFAULTS
YES
NO
ESC
MEM SCAN
SCAN CH 9/19
DIM
CB/WX
SWR/CAL
NB/ANL
VOL SQ DYNAMIKE RF GAIN DELTA TUNE T BACK SWR
CAL
OFF MIN MIN OFF
MAX
S/RF
M
E
N
U
P
U
S
H
E
N
T
E
R
SIG
RF
+30dB
1
1.5 23CAL
3579
SWR
TX
RX
NB/ANL
MEM WX !
ANL
S/RF
SWR
CAL
SOFTWARE VER
REST. DEFAULTS
ESC
MEM SCAN
SCAN CH 9/19
DIM
CB/WX
Note
Default display color is blue.
3332
Operation Operation
When switched to ANL mode the Automatic Noise
Limiter is
activated. This helps reduce noise created by
the vehicle’s
electronics.
When switched to NB/ANL mode the RF Noise Blanker is
also activated, providing increased noise filtration.
When switched to Off, all noise filtration will be turned off.
RF Gain Control
The RF Gain is used to optimize reception in strong or
weak signal areas.
Note
The RF noise blanker is very
effective in reducing repetitive
noises such as ignition
interference.
Rotate the RF Gain knob counterclockwise to reduce gain
in strong signal areas. In weak signal areas turn clockwise
to increase gain.
NB-ANL/OFF (Noise Blanker/Automatic
Noise Limiter) Button
SIG
RF
+30dB
1
1.5 23CAL
3579
SWR TX
RX
NB/ANL
MEM WX !
ANL
S/RF
NB/ANL S/RF
SWR/CAL
ESC
MEM SCAN
SCAN CH 9/19
DIM
CB/WX
M
E
N
U
P
U
S
H
E
N
T
E
R
VOL
DYNAMIKE
RF GAIN
DELTA TUNE T BACK SWR
CAL
OFF MIN MIN OFFMAX
SQ
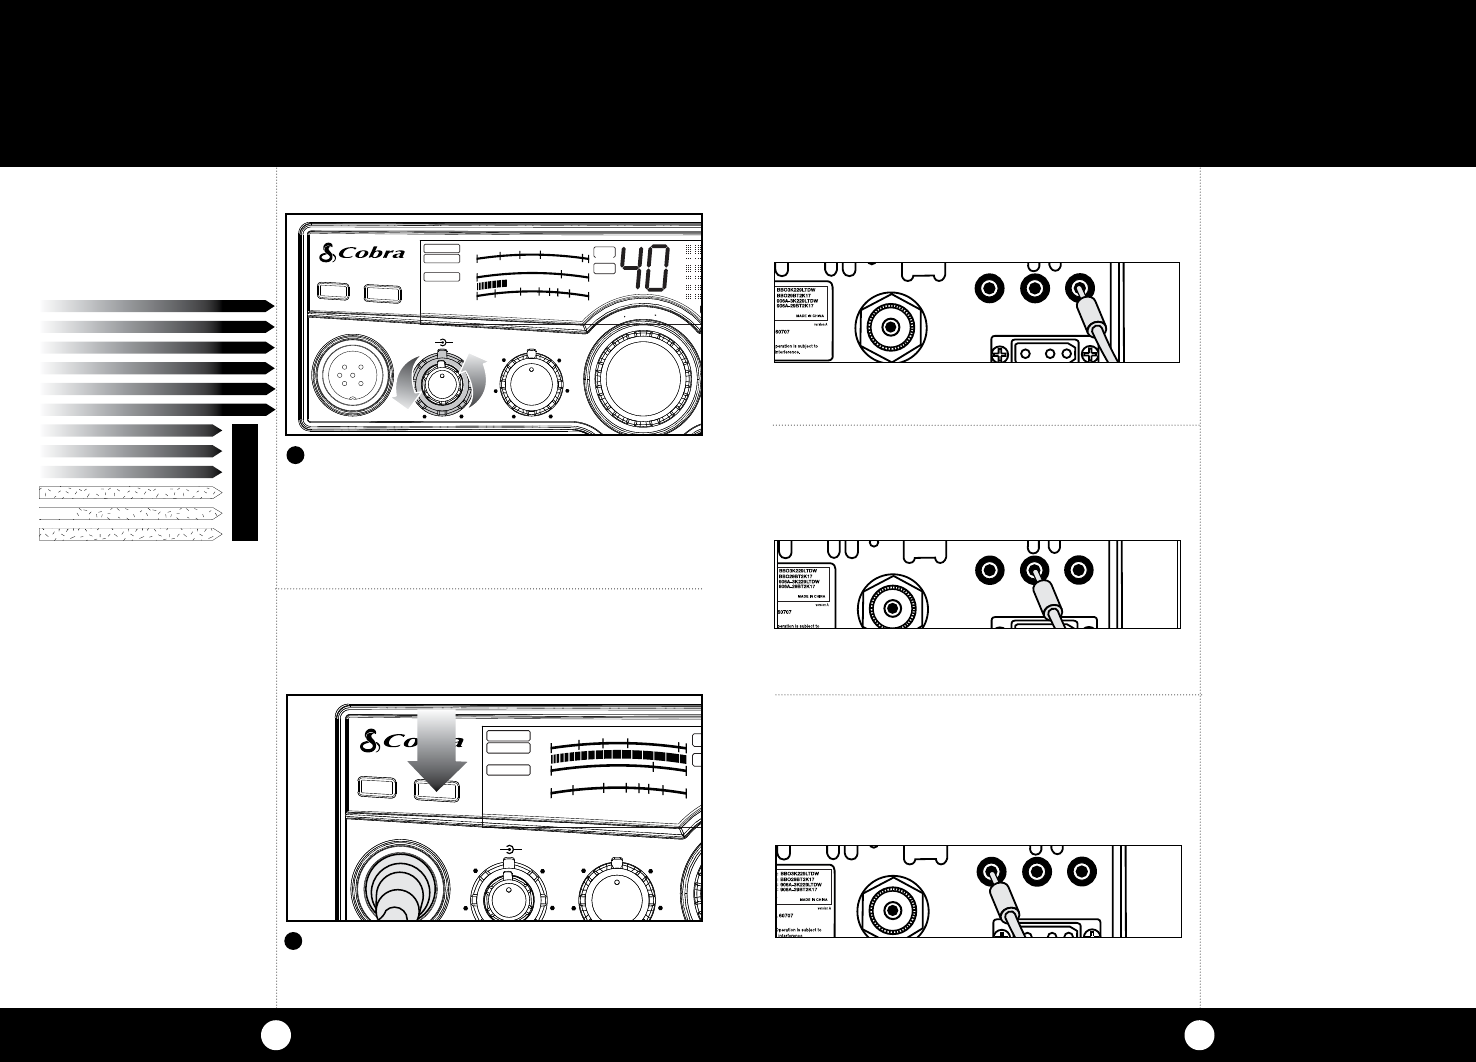
Pressing the SCAN/MEM-SCAN button toggles from
Off to Scan All Channels to Memory Channel Only
Scan and back to Off.
Press the DIM/ESC button to end Scan and
return to CB mode.
1
SIG
RF
+30dB
1
1.5 23CAL
3579
SWR TX
RX
NB/ANL
MEM
ANL
S/RF
SWR
CAL
NB/ANL S/RF
SWR/CAL
ESC
MEM SCAN
SCAN CH 9/19
DIM
CB/WX
M
E
N
U
P
U
S
H
E
N
T
E
R
VOL
DYNAMIKE
RF GAIN
DELTA TUNE T BACK SWR
CAL
OFF MIN MIN OFFMAX
SQ
Note
If more than 10 channels are
attempted to be programmed,
3 error beeps will be heard and
“Memory Full” will be displayed
for 10 seconds or until any
button is pushed.
2
SIG
RF
+30dB
1
1.5 23CAL
3579
SWR TX
RX
NB/ANL
MEM WX !
ANL
S/RF
SWR
CAL
NB/ANL S/RF
SWR/CAL
ESC
MEM SCAN
SCAN CH 9/19
DIM
CB/WX
M
E
N
U
P
U
S
H
E
N
T
E
R
VOL
DYNAMIKE
RF GAIN
DELTA TUNE T BACK SWR
CAL
OFF MIN MIN OFFMAX
SQ
Note
The radio should be
squelched before scan
features are activated.
Note
Keying the microphone will stop
the scan feature.
Set first channel. Press and hold the SCAN/MEM-SCAN
button. The Memory icon will appear. Select a second
channel, press and hold the SCAN/MEM-SCAN button
again until the Memory icon appears. Repeat above steps
to enter up to 10 channels in memory.
Program Memory Channels
SIG
RF
+30dB
1
1.5 23CAL
3579
SWR TX
RX
NB/ANL
MEM
ANL
S/RF
SWR
CAL
NB/ANL S/RF
SWR/CAL
ESC
MEM SCAN
SCAN CH 9/19
DIM
CB/WX
M
E
N
U
P
U
S
H
E
N
T
E
R
VOL DYNAMIKERF GAIN DELTA TUNE T BACK
SWR
CAL
OFF MIN MIN OFFMAX
SQ
Note
To remove a channel from
memory, go to the unwanted
memory channel then press and
hold the SCAN/MEM SCAN
button until the MEM icon
turns off.
SIG
RF
+30dB
1
1.5 23CAL
3579
SWR TX
RX
NB/ANL
MEM WX !
ANL
S/RF
SWR
CAL
NB/ANL S/RF
SWR/CAL
ESC
MEM SCAN
SCAN CH 9/19
DIM
CB/WX
M
E
N
U
P
U
S
H
E
N
T
E
R
VOL
DYNAMIKE
RF GAIN
DELTA TUNE T BACK SWR
CAL
OFF MIN MIN
OFF
MAX
SQ
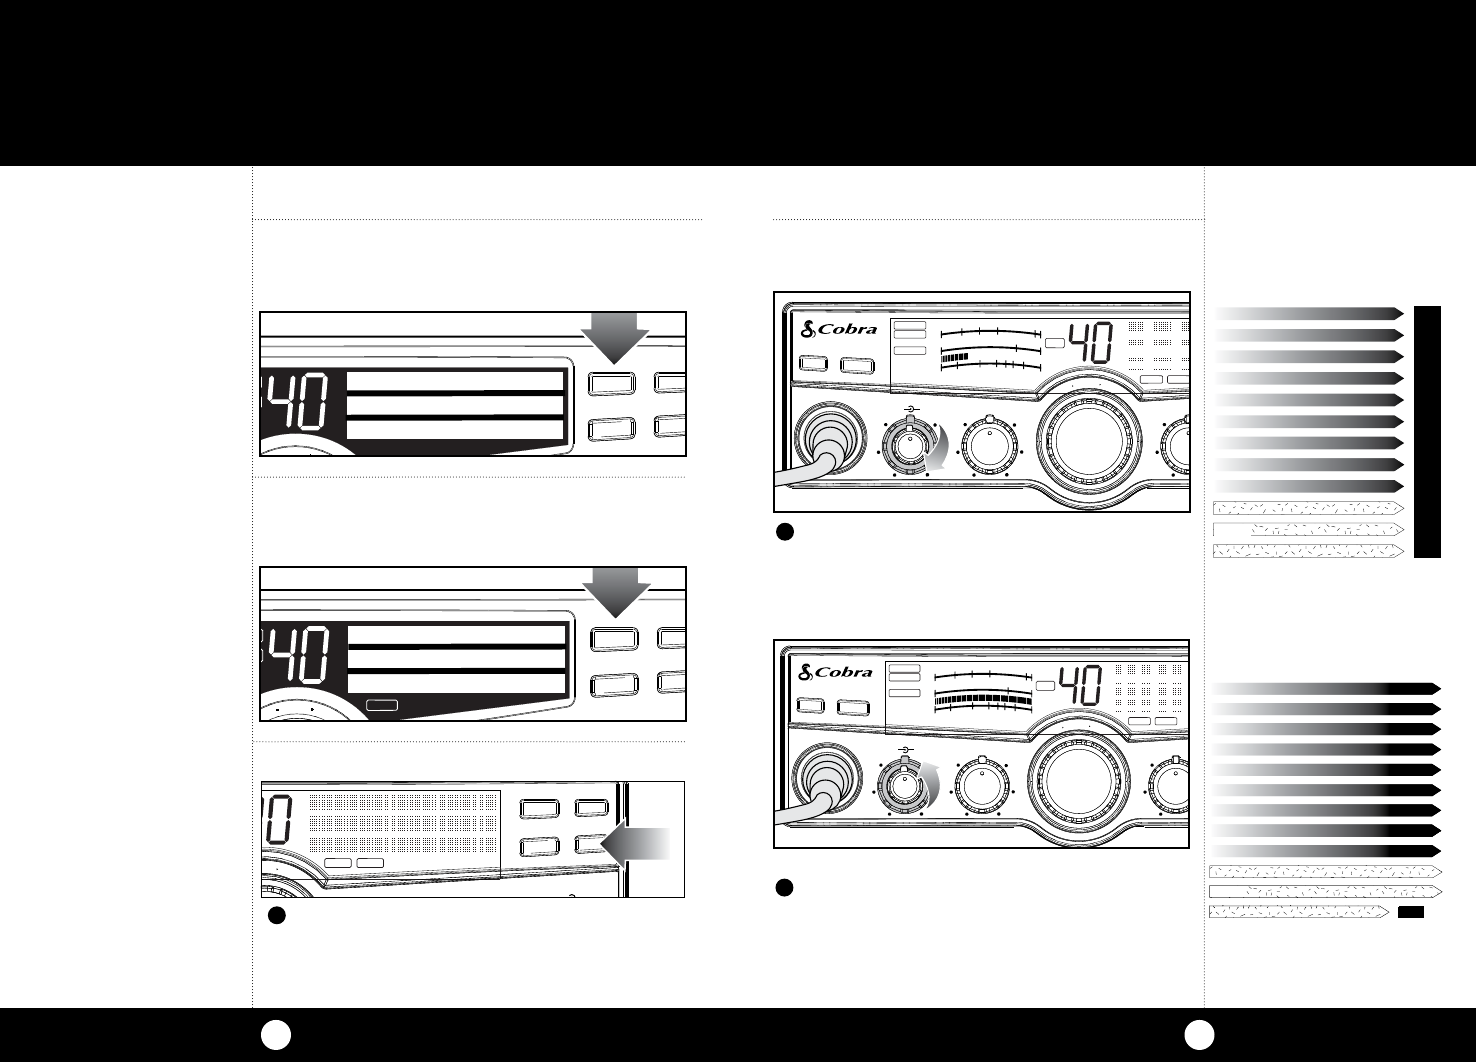
Setting Delta Tune
Rotate the Delta Tune knob to the center position for
optimum tuning.
Operation
Operation
35
34
Full clockwise rotation closes the gate
allowing only very strong signals to enter.
Full counterclockwise rotation opens the “gate”
allowing all signals in.
Dimmer Control
Setting Squelch
Squelch is the “control gate” for incoming signals.
1
2
1
Press the DIM/ESC button to toggle between day and
night settings.
See setting instructions on page 21.
NOISE
WEAK SIGNALS
MEDIUM SIGNALS
STRONG SIGNALS
NOISE
WEAK SIGNALS
MEDIUM SIGNALS
STRONG SIGNALS
GATE
OPEN
NOISE
WEAK SIGNALS
MEDIUM SIGNALS
STRONG SIGNALS
Gate open
NOISE
WEAK SIGNALS
MEDIUM SIGNALS
STRONG SIGNALS
GATE CLOSED
Gate closed
SIG
RF
+30dB
1
1.5 23CAL
3579
SWR TX
RX
NB/ANL
MEM WX !
ANL
S/RF
SWR
CAL
NB/ANL S/RF
SWR/CAL
ESC
MEM SCAN
SCAN CH 9/19
DIM
CB/WX
M
E
N
U
P
U
S
H
E
N
T
E
R
VOL DYNAMIKERF GAIN DELTA TUNE T BACK SWR
CAL
OFF MIN MIN OFFMAX
SQ
Scan CB Channels
To scan all 40 CB channels, the unit must be squelched.
Press and release the SCAN/MEM-SCAN button once.
SWR/CAL
NB/ANL
VOL SQ DYNAMIKE RF GAIN DELTA TUNE T BACK SWR
CAL
OFF MIN MIN OFF
MAX
S/RF
M
E
N
U
P
U
S
H
E
N
T
E
R
SIG
RF
+30dB
1
1.5 23CAL
3579
SWR TX
RX
NB/ANL
ANL
S/RF
SWR
CAL
CB SCAN
27.405
ESC
MEM SCAN
SCAN
CH 9/19
DIM
CB
/
WX
Scan Memory Channels
To scan memory channels, press and release the
SCAN/MEM-SCAN button twice.
SWR/CAL
NB/ANL
VOL SQ DYNAMIKE RF GAIN DELTA TUNE T BACK SWR
CAL
OFF MIN MIN OFF
MAX
S/RF
M
E
N
U
P
U
S
H
E
N
T
E
R
SIG
RF
+30dB
1
1.5 23CAL
3579
SWR TX
RX
NB/ANL
MEM
ANL
S/RF
SWR
CAL
CB MEM SCAN
27.405
ESC
MEM SCAN
SCAN
CH 9/19
DIM
CB/WX
SIG
RF
+30dB
1
1.5 23CAL
3579
SWR
RX
NB/ANL
MEM WX
!
ANL
S/RF
NB/ANL S/RF
SWR/CAL
ESC
MEM SCAN
SCAN CH 9/19
DIM
CB/WX
M
E
N
U
P
U
S
H
E
N
T
E
R
VOL
DYNAMIKE
RF GAIN
DELTA TUNE T BACK SWR
CAL
OFF MIN MIN
OFF
MAX
SQ
SIG
RF
+30dB
1
1.5 23CAL
3579
SWR
RX
NB/ANL
MEM WX !
ANL
S/RF
NB/ANL S/RF
SWR/CAL
ESC
MEM SCAN
SCAN CH 9/19
DIM
CB/WX
M
E
N
U
P
U
S
H
E
N
T
E
R
VOL
DYNAMIKE
RF GAIN
DELTA TUNE T BACK SWR
CAL
OFF MIN MIN
OFF
MAX
SQ
Note
If in WX mode the unit will scan
Weather channels.
Operation
Operation
37
S/RF Meter
This meter swings proportionately to the RF
output (outgoing signal) while transmitting.
External Speaker
The external speaker jack is used for remote receiver
monitoring.
The S/RF-SWR/CAL button must be in the
S/RF mode.
1
Note
The external speaker should
have 8-ohm impedance and
be rated to handle at least 4.0
watts. When an external speaker
is plugged in, the internal speaker
is automatically disconnected.
Note
Cobra external speakers are
rated at 10 watts.
Connect an external speaker to the external speaker
jack on the rear panel.
36
To achieve the Desired Squelch Setting (DSS),
rotate the Squelch knob counterclockwise until you
hear noise. Now rotate the knob clockwise just until
the noise stops. This is the DSS setting.
3
NOISE
WEAK SIGNALS
MEDIUM SIGNALS
STRONG SIGNALS
GATE
Gate set to Desired
Squelch Setting (DSS)
Continued
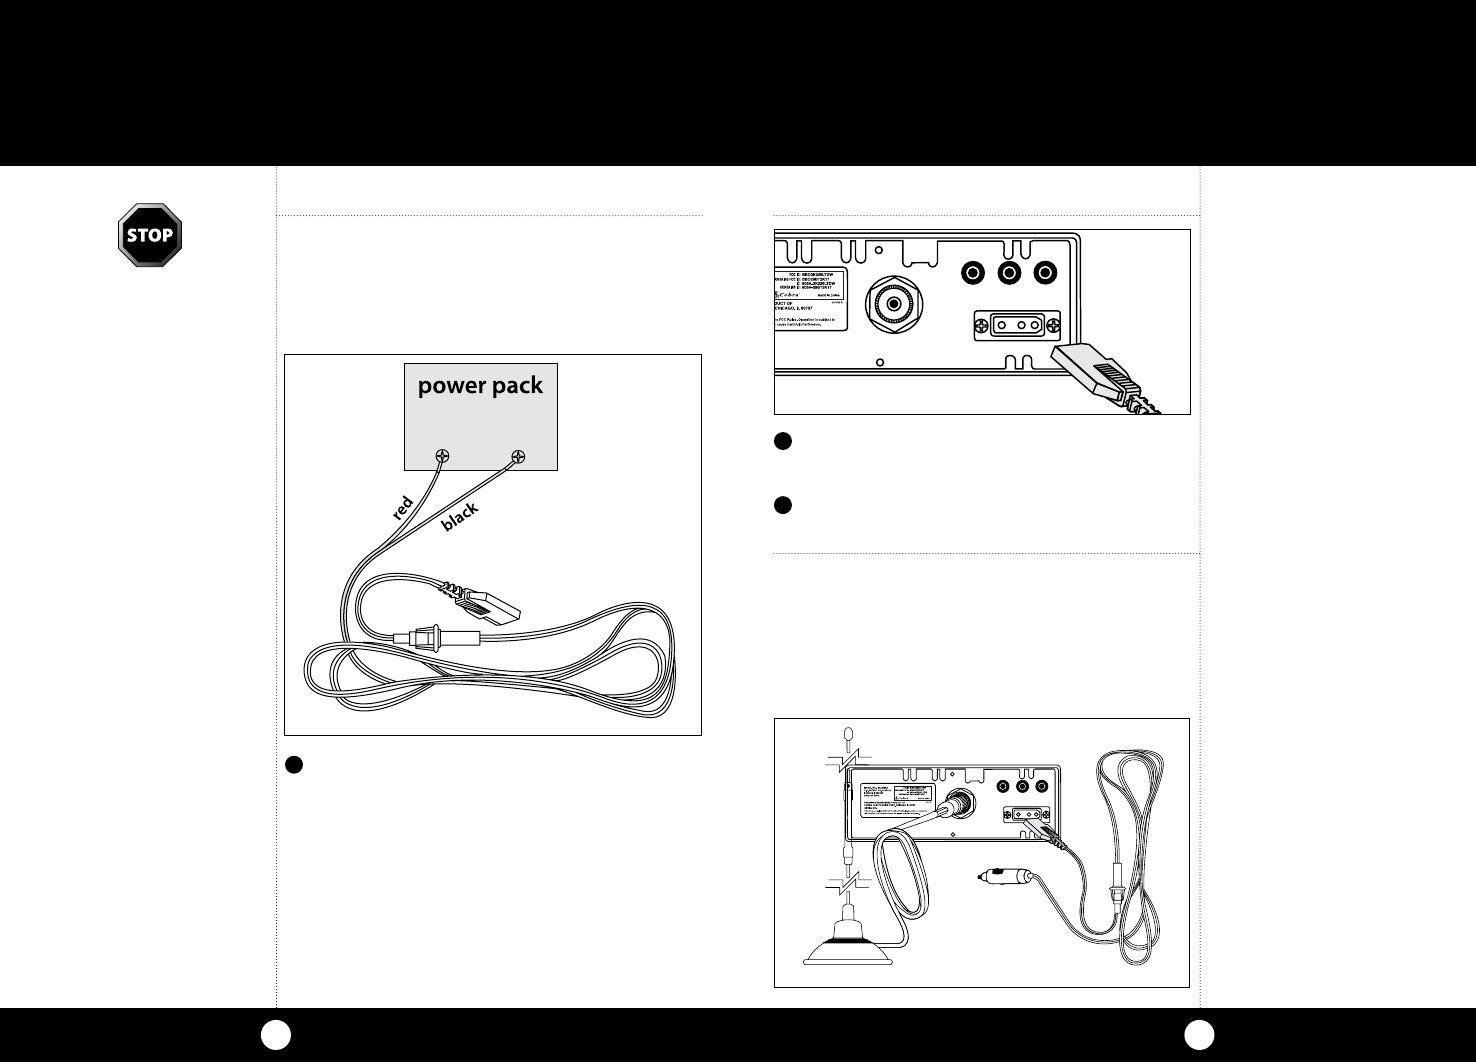
ANT EXT MIC EXT. PTT EXT.SP.
+POWER–
SIG
RF
+30dB
1
1.5 23CAL
3579
SWR
TX
RX
NB/ANL
MEM WX !
ANL
S/RF
NB/ANL S/ RF
SWR/CAL
ESC
MEM SCAN
SCAN CH 9/19
DIM
CB/WX
M
E
N
U
P
U
S
H
E
N
T
E
R
VOL
DYNAMIKE
RF GAIN
DELTA TUNE T BACK SWR
CAL
OFF MIN MIN OFFMAX
SQ
SIG
RF
+30dB
1
1.5 23CAL
3579
SWR
RX
NB/ANL
MEM WX !
ANL
S/RF
NB/ANL S/RF
SWR/CAL
ESC
MEM SCAN
SCAN CH 9/19
DIM
CB/WX
M
E
N
U
P
U
S
H
E
N
T
E
R
VOL
DYNAMIKE
RF GAIN
DELTA TUNE T BACK SWR
CAL
OFF MIN
MIN OFF
MAX
SQ
ANT EXT MIC EXT. PTT EXT.SP.
+POWER–
External Push-To-Talk Jack
The external Push-To-Talk (PTT) jack is used for remote
transmit function with optional PTT (see accessory page
50) and when the external microphone is connected.
Connect an external PTT device to the external PTT
jack on the rear panel.
ANT EXT MIC EXT. PTT EXT.SP.
+POWER–
External Microphone Jack
The external microphone jack is used to connect the
supplied external microphone for phone use only.
When the external PTT (above) is connected, the
external microphone can be used for both CB and
phone voice transmissions.
Connect the external microphone (included) to the
external microphone jack on the rear panel.
Setting Squelch continued
Temporary Mobile Set-Up
Home And Office Set-Up
3938
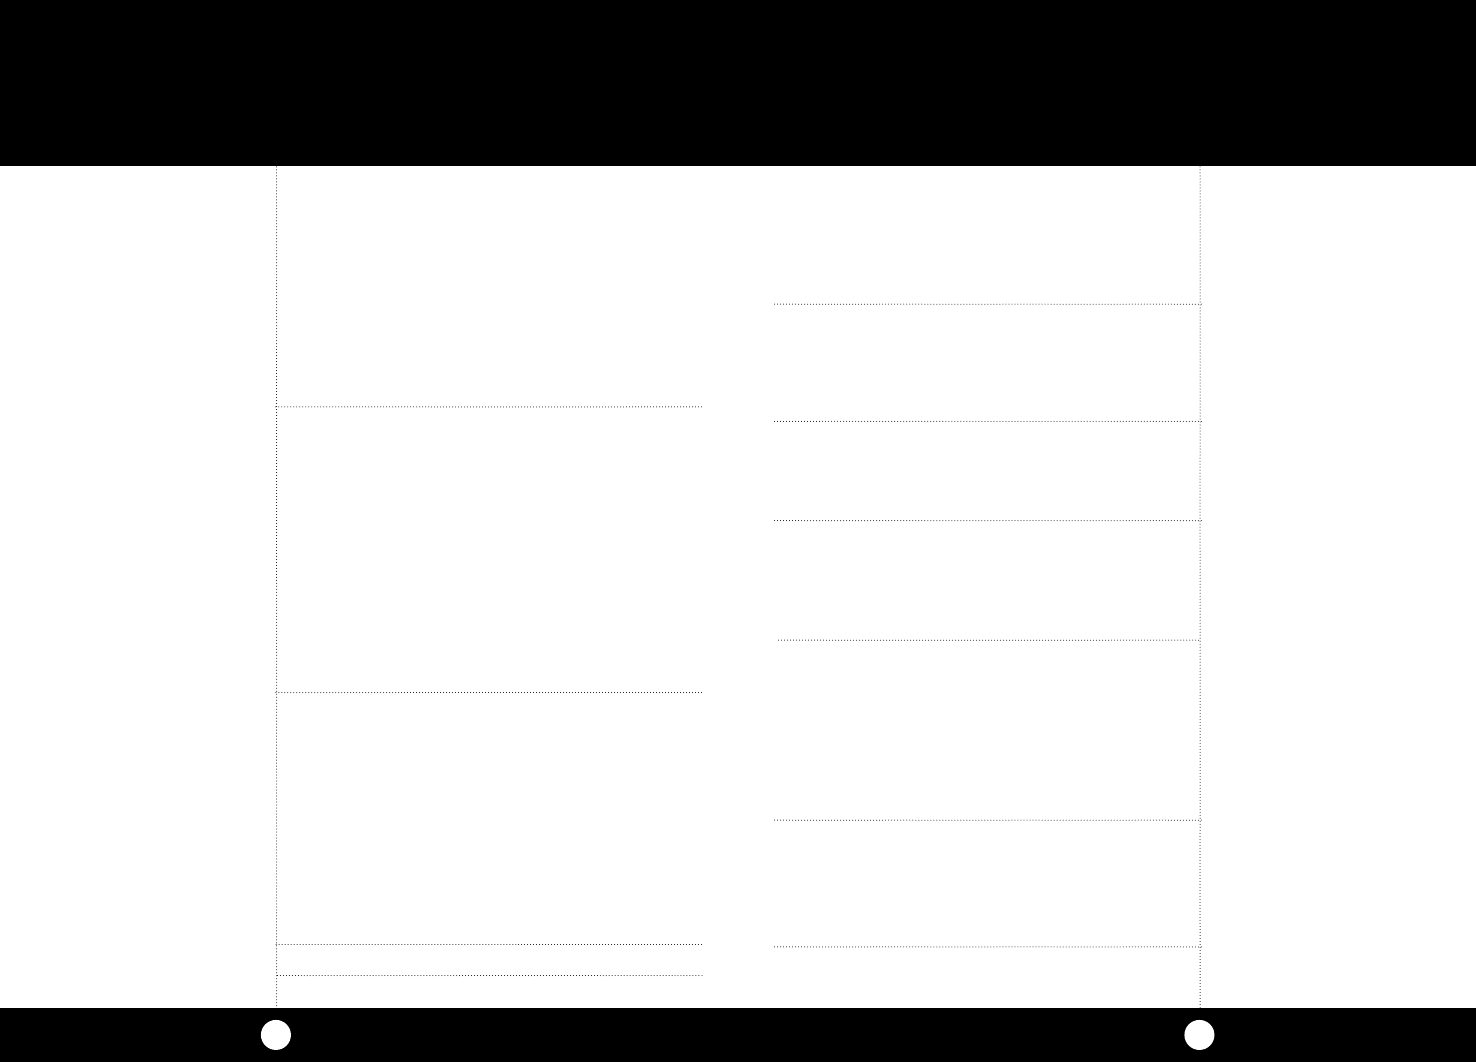
Temporary Mobile Operation
For temporary mobile operation you may want to
purchase an optional cigarette lighter adapter from
your COBRA dealer. This adapter and a magnetic
mount antenna allow you to quickly “install” your
transceiver for temporary use.
ANT EXT MIC EXT. PTT EXT.SP.
+POWER–
Base Station Operation
To operate your transceiver from home or office
you will need a 13.2 volt DC Power Pack rated at a
minimum of 2 amps, and a properly installed base
station antenna.
Warning!
Do not attempt to operate this
transceiver by connecting it directly
to 120V AC.
Note
For further information call Cobra
Customer Service 1.773.889.3087.
1
Connect the properly installed and matched base
station antenna.
Simply connect the red (+) and black (-)
leads of the transceiver to the corresponding
terminals of the power pack.
Plug the power cable into the back of the unit
marked “Power”. Be sure to observe the polarity
markings.
2
3
ANT EXT MIC EXT. PTT EXT.SP.
+POWER–
+—
• Warn of traffic problems
• Provide weather and road data
• Provide help in event of an emergency
• Provide direct contact with home or office
• Assist police by reporting erratic drivers
• Get “local information” to find destination
• Communicate with family and friends
• Suggest spots to eat and sleep
• Keep you alert while traveling
A Few Rules You Should Know
A. Conversations cannot last more than 5 minutes with
another station. A one minute break is required to
let others use the channel.
B. You cannot blast others off the air by use of
illegally amplified transmitters or illegally
high antennas.
C. You cannot use CB to promote illegal activities.
D. Profanity is not allowed.
E. You may not transmit music with a CB.
F. Selling of merchandise and/or services
is prohibited.
How Your CB Can Serve You
4140
How Your CB Can Serve You
The FCC gives these examples of permitted and
prohibited messages for channel 9. These are only
guidelines and not all-inclusive:
Permitted Example Message
Yes “Tornado sighted six miles north
of town.”
No “Post number 10.
No tornado sighted.”
Yes “Out of gas on I-95 at mile
marker 211.”
No “Out of gas in my driveway.”
Yes “Four car accident on I-94 at
Exit 11. Send police and
ambulance.”
No “Traffic moving smoothly on I-94.”
Yes “Weather Bureau has issued
thunderstorm warning.
Bring sailboat into port.”
No “Attention motorists.
Weather Bureau advises snow
tomorrow will accumulate
4 to 6 inches.”
Yes “Fire in building at 539 Main,
Evanston.”
No “Halloween patrol number 3.
All quiet.”
1. Set to channel 9 for emergencies
Be sure antenna is properly connected.
2. CB Distress Data
When transmitting an emergency, you should
request a “REACT BASE” and provide the CB
distress data (called CLIP):
C all Sign Identify yourself.
L ocation Be exact.
I njuries Number. Type. Trapped?
P roblem Give details and help needed.
Transmit CLIP repeatedly so any monitor can assist.
Note
If no response on channel 9,
try channels 19 or 14.
How Your CB Can Serve You
4342
Code Meaning
10-29 Time is up for contact
10-30 Does not conform to FCC rules
10-33 Emergency traffic
10-34 Trouble at this station
10-35 Confidential information
10-36 Correct time is
10-37 Wrecker needed at
10-38 Ambulance needed
10-39 Message delivered
10-41 Turn to channel
10-42 Traffic accident at
10-43 Traffic tie up at
10-44 Have a message for
10-45 All units within range please report
10-50 Break channel
10-60 What is next message number?
10-62 Unable to copy. Use phone
10-63 Net directed to
10-64 Net clear
10-65 Awaiting your next message/assignment
10-67 All units comply
10-70 Fire at
10-71 Proceed, transmission in sequence
10-77 Negative contact
10-81 Reserve hotel room for
10-82 Reserve room for
10-85 My address is
10-91 Talk closer to mic
10-93 Check my frequency on this channel
10-94 Give me a long count
10-99 Mission completed, all units secure
10-200 Police needed at
CB 10-Codes
Citizen Bands have adopted the “10-CODES” for stan-
dard questions and answers. These codes provide
quick and easy communication, especially in noisy
areas. Following are some of the more common codes
and meanings:
Code Meaning
10-1 Receiving poorly
10-2 Receiving well
10-3 Stop transmitting
10-4 OK, message received
10-5 Relay message
10-6 Busy, stand by
10-7 Out of service, leaving
10-8 In service, subject to call
10-9 Repeat message
10-10 Transmission completed standing by
10-11 Talking too rapidly
10-12 Visitors present
10-13 Advise weather/roads
10-16 Make pick up at
10-17 Urgent business
10-18 Anything for us?
10-19 Return to base
10-20 My location is
10-21 Call by phone
10-22 Report in person to
10-23 Stand by
10-24 Completed last assignment
10-25 Can you contact
10-26 Disregard last info
10-27 Moving to channel
10-28 Identify your station
29 LX MAX Specifications
4544
Frequency Ranges
GENERAL
CHANNELS CB - 40 CH
FREQUENCY RANGE CB - 26.965 TO 27.405 MHZ
WX - 162.400 TO 162.775 MHZ
FREQUENCY TOLERANCE 0.005 %
FREQUENCY CONTROL PLL (PHASE LOCK LOOP) SYNTHESIZER
OPERATING TEMPERATURE
RANGE -30° C TO + 50° C
MICROPHONE Plug-in Electret
INPUT VOLTAGE 13.2VDC nom. negative ground
Current Drain Transmit: AM full mod., 1.5A (maximum)
Receive: Squelched, 0.3A;
full audio output, 1.2A (nominal)
Size ..............................................................8-5/8” D x 7-9/32” W x 2-13/63” H
Weight ..........................................................4 lbs.
Antenna Connector .................................UHF; SO-239
Meter .............................................................Indicates relative
power output received
signal strength, and vswr
TRANSMITTER
Power Output ............................................4 watts
Modulation .................................................AM (Amplitude Modulation)
Frequency Response ...............................300 to 3000 Hz
Output Impedance ..................................50 ohms, unbalanced
RECEIVER
Sensitivity ....................................................Less than 1 µV for 10 dB (S+N) /N
Selectivity ....................................................6 dB @ 7 KHz, 60 dB @ 10KHz
Image Rejection ........................................80 dB, typical
Adjacent-Channel Rejection ................60 dB, typical
IF Frequencies ...........................................Double Conversion: 1st: 10.695 MHz
2nd: 455 KHz
Automatic Gain Control (AGC) ............Less than 10 dB change in audio
output for inputs from 10 to 50,000
microvolts
RF Gain range ............................................40 db
Noise Blanker .............................................RF type
Squelch ........................................................Adjustable; threshold less than 1µV
Audio Output Power ...............................4 watts
Frequency Response ...............................300 to 3000 Hz
Distortion ....................................................Less than 7% @3 watts @ 1000 Hz
Built-in Speaker .........................................8 ohms, 5w
External Speaker (Not supplied)............ 8 ohms; disables internal speaker
when connected
(SPECIFICATIONS SUBJECT TO CHANGE WITHOUT NOTICE)
The Cobra 29 LX MAX transceiver represents one of the
most ad vanced AM two-way radios used as a Class D
station in the Citizens Radio Service. This unit features
advanced Phase Lock Loop (PLL) circuitry providing com-
plete cov er age of all 40 CB chan nels.
1 26.965 21 27.215 1 162.550
2 26.975 22 27.225 2 162.400
3 26.985 23 27.255 3 162.475
4 27.005 24 27.235 4 162.425
5 27.015 25 27.245 5 162.450
6 162.500
6 27.025 26 27.265 7 162.525
7 27.035 27 27.275 8 161.650
8 27.055 28 27.285 9 161.775
9 27.065 29 27.295 10 163.275
10 27.075 30 27.305
11 27.085 31 27.315
12 27.105 32 27.325
13 27.115 33 27.335
14 27.125 34 27.345
15 27.135 35 27.355
16 27.155 36 27.365
17 27.165 37 27.375
18 27.175 38 27.385
19 27.185 39 27.395
20 27.205 40 27.405
Channel Channel
CB Freq. CB Freq. WX Freq.
Channel In MHz Channel In MHz Channel In MHz
4746
Optional Accessories
COBRA ELECTRONICS CORPORATION warrants that its
Cobra CB Radios, and the com po nent parts thereof, will be
free of defects in workmanship and materials for period
of two (2) years from the date of first consumer purchase.
This war ran ty may be enforced by the first consumer
pur chas er, pro vid ed that the product is utilized within
the U.S.A.
Cobra will, without charge, repair or replace, at its option,
de fec tive CB radios, products or com po nent parts upon
de liv ery to the Cobra factory Service Department, ac com-
pa nied by proof of the date of first consumer pur chase,
such as a du pli cat ed copy of a sales receipt.
You must pay any initial shipping charges required to ship
the product for warranty service, but the return charges
will be at Cobra’s expense, if the product is repaired or
replaced under warranty.
Exclusions: This limited warranty does not apply:
1) to any product dam aged by accident; 2) in the event
of misuse or abuse of the product or as a result of un au-
tho rized alterations or repairs; 3) if the serial number has
been altered, defaced or re moved; 4) if the owner of the
product resides outside the U.S.A.
All implied warranties, including war ran ties of
mer chant abil i ty and fitness for a par tic u lar purpose
are limited in duration to the length of this warranty.
Cobra shall not be liable for any incidental, con se quen-
tial or oth er dam ag es; including, without lim i ta tion,
damages re sult ing from loss of use or cost of in stal la tion.
Some states do not allow limitations on how long an
implied warranty lasts and/or do not allow the ex clu sion
or limitation of incidental or con se quen tial dam ag es, so
the above lim i ta tions may not apply to you.
Cobra Electronics
Corporation
6500 West Cortland Street
Chicago, Illinois 60707
www.cobra.com
Limited Two Year Warranty
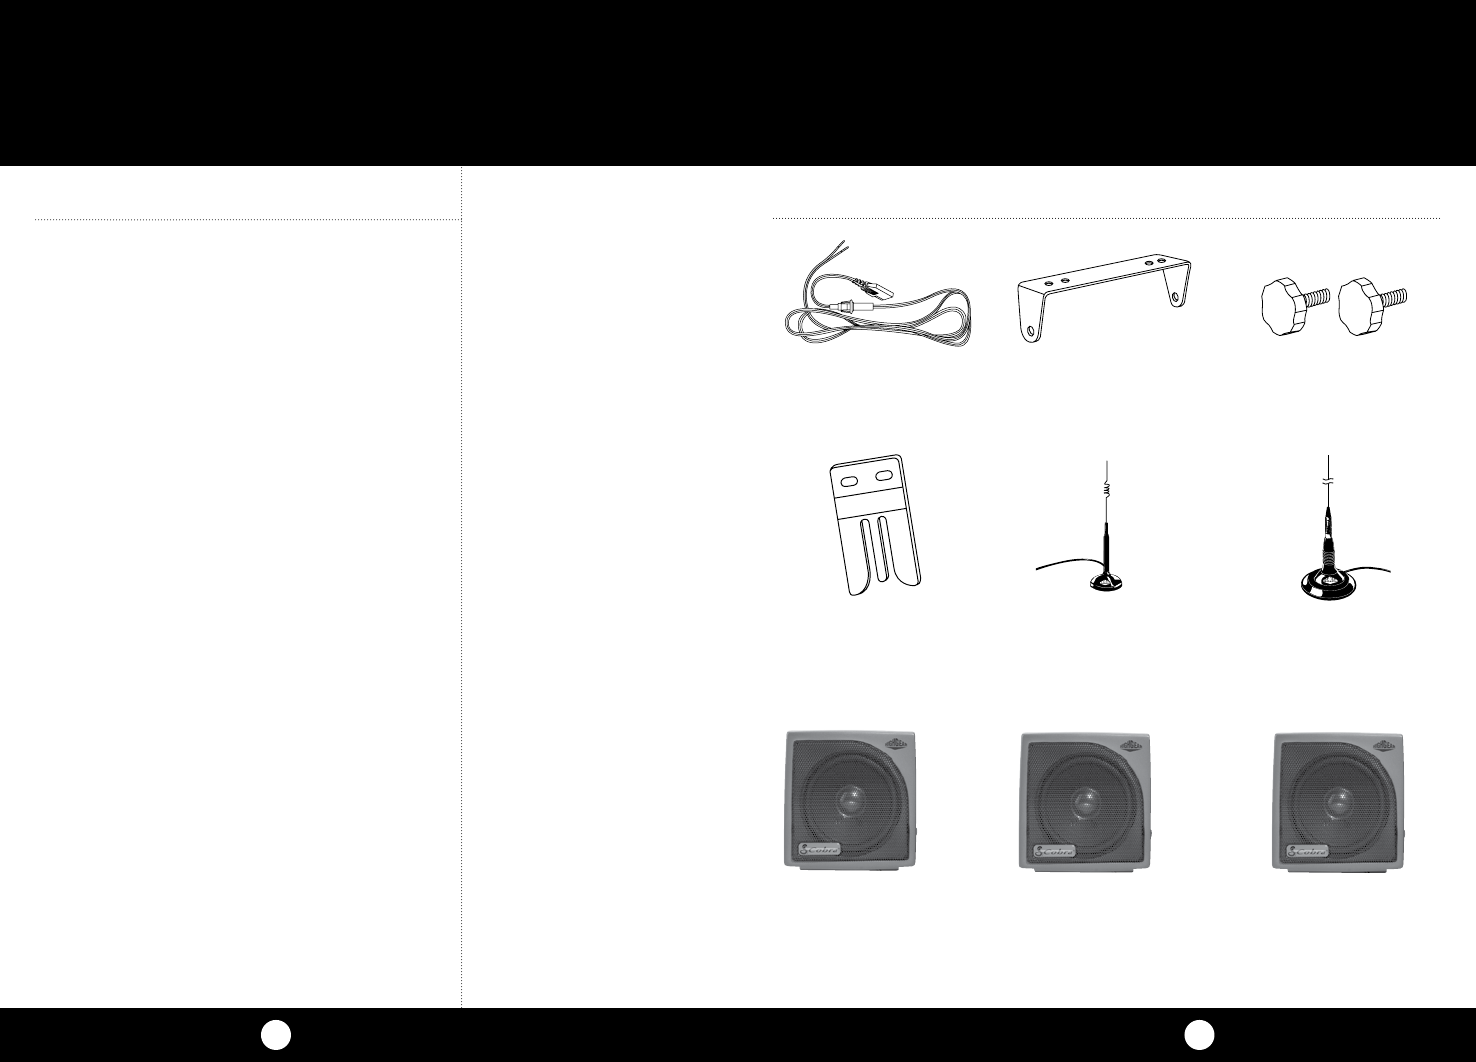
Replacement DC Power Cord
For in vehicle use
426-002-N-001
Replacement Mounting
Bracket
For in vehicle use
251-353-9-001
Replacement Thumb Screws
For in vehicle use
634-081-9-001
Replacement Microphone
Bracket
For in vehicle use
741-080-9-001
21” Base Loaded Magnet
Mount Antenna
HG A1000
38” Base Loaded Magnet
Mount Antenna
HG A1500
Dynamic External
Speaker
HG S100
Noise Canceling
With Talk Back
External Speaker
HG S500
Noise Canceling
External Speaker
HG S300
You can find quality Cobra products and accessories at your local Cobra dealer, or in the
U.S.A., you can order directly from Cobra. See ordering info on page 44.
4948
FCC Part 15.19 Warning Statement
THIS DEVICE COMPLIES WITH PART 15 OF THE FCC RULES. OPERATION IS SUBJECT TO THE
FOLLOWING TWO CONDITIONS: (1) THIS DEVICE MAY NOT CAUSE HARMFUL INTERFERENCE, AND
(2) THIS DEVICE MUST ACCEPT ANY INTERFERENCE RECEIVED, INCLUDING INTERFERENCE THAT
MAY CAUSE UNDESIRED OPERATION.
FCC Part 15.21 Warning Statement-
NOTE: THE GRANTEE IS NOT RESPONSIBLE FOR ANY CHANGES OR MODIFICATIONS NOT
EXPRESSLY APPROVED BY THE PARTY RESPONSIBLE FOR COMPLIANCE. SUCH MODIFICATIONS
COULD VOID THE USER’S AUTHORITY TO OPERATE THE EQUIPMENT.
FCC Part 15.105(b) Warning Statement
NOTE: This equipment has been tested and found to comply with the limits for a Class B digital
device, pursuant to part 15 of the FCC Rules. These limits are designed to provide reasonable protec-
tion against harmful interference in a residential installation. This equipment generates uses and
can radiate radio frequency energy and, if not installed and used in accordance with the instructions,
may cause harmful interference to radio communications. However, there is no guarantee that inter-
ference will not occur in a particular installation. If this equipment does cause harmful interference
to radio or television reception, which can be determined by turning the equipment off and on, the
user is encouraged to try to correct the interference by one or more of the following measures:
- Reorient or relocate the receiving antenna.
- Increase the separation between the equipment and receiver.
- Connect the equipment into an outlet on a circuit different from that to which the receiver
is connected.
- Consult the dealer or an experienced radio/TV technician for help.
FCC Statement
IC RSS-GEN, Sec 8.3 Warning Statement
ENGLISH: This radio transmitter (identify the device by certification number, or model number
if Category II) has been approved by Industry Canada to operate with the antenna types listed
below with the maximum permissible gain and required antenna impedance for each antenna
type indicated. Antenna types not included in this list, having a gain greater than the maximum
gain indicated for that type, are strictly prohibited for use with this device.
Immediately following the above notice, the manufacturer shall provide a list of all antenna types
approved for use with the transmitter, indicating the maximum permissible antenna gain (in dBi)
and required impedance for each.
FRENCH: Le présent émetteur radio (identifier le dispositif par son numéro de certification ou son
numéro de modèle s’il fait partie du matériel de catégorie I) a été approuvé par Industrie Canada
pour fonctionner avec les types d’antenne énumérés ci-dessous et ayant un gain admissible
maximal et l’impédance requise pour chaque type d’antenne. Les types d’antenne non inclus
dans cette liste, ou dont le gain est supérieur au gain maximal indiqué, sont strictement interdits
pour l’exploitation de l’émetteur.
IC RSS-102, Sec 2.6 Warning Statement
The applicant is responsible for providing proper instructions to the user of the radio device,
and any usage restrictions, including limits of exposure durations. The user manual shall provide
installation and operation instructions, as well as any special usage conditions, to ensure
compliance with SAR and/or RF field strength limits. For instance, compliance distance shall be
clearly stated in the user manual.
The user manual of devices intended for controlled use shall also include information relating to
the operating characteristics of the device; the operating instructions to ensure compliance with
SAR and/or RF field strength limits; information on the installation and operation of accessories
to ensure compliance with SAR and/or RF field strength limits; and contact information where the
user can obtain Canadian information on RF exposure and compliance. Other related information
may also be included.
IC RSS-GEN, Sec 8.4 Warning Statement
ENGLISH: This device complies with Industry Canada license-exempt RSS standard(s). Operation
is subject to the following two conditions: (1) this device may not cause interference, and (2) this
device must accept any interference, including interference that may cause undesired operation
of the device.
FRENCH: Le présent appareil est conforme aux CNR d’Industrie Canada applicables aux appareils
radio exempts de licence. L’exploitation est autorisée aux deux conditions suivantes : (1) l’appareil
ne doit pas produire de brouillage, et (2) l’utilisateur de l’appareil doit accepter tout brouillage
radioélectrique subi, même si le brouillage est susceptible d’en compromettre le fonctionnement.
SIG
RF
+30dB
1
1.5 23CAL
3579
SWR TX
RX
NB/ANL
MEM WX !
ANL
S/RF
SWR
CAL
NB/ANL S/ RF
SWR/CAL
ESC
MEM SCAN
SCAN CH 9/19
DIM
CB/WX
M
E
N
U
P
U
S
H
E
N
T
E
R
VOL DYNAMIKERF GAIN DELTA TUNE T BACK SWR
CAL
OFF MIN MIN OFFMAX
SQ
cb tranceiver
The Citizens Band lies between the shortwave
broadcast and 10-meter Amateur radio bands,
and was established by law in 1949. The Class D
two-way communications service was opened in
1959. (CB also includes a Class A citizens band
and Class C remote control frequencies.)
FCC Regulations
FCC regulations permit only “transmissions”
(one party to another) rather than “broadcasts”
(to a wide audience). Thus, advertising is not
allowed on CB Channels because that is “broad-
casting.”
FCC Warnings
All transmitter adjustments other than those
supplied by the manufacturer as front panel
operating controls, must be made by, or under
the supervision of, the holder of an FCC-issued
General Radio-Telephone Operator’s License.
Replacement or substitution of transistors, regu-
lar diodes or other parts of a unique nature, with
parts other than those recommended by Cobra,
may cause violation of the technical regulations
of Part 95 of the FCC Rules, or violation of Type
Acceptance requirements of Part 2 of the Rules.
You should read and understand Part 95 (included
with this unit) of the FCC Rules and Regulations,
before operating your Cobra radio, even though
the FCC no longer requires you to obtain an oper-
ator’s license.
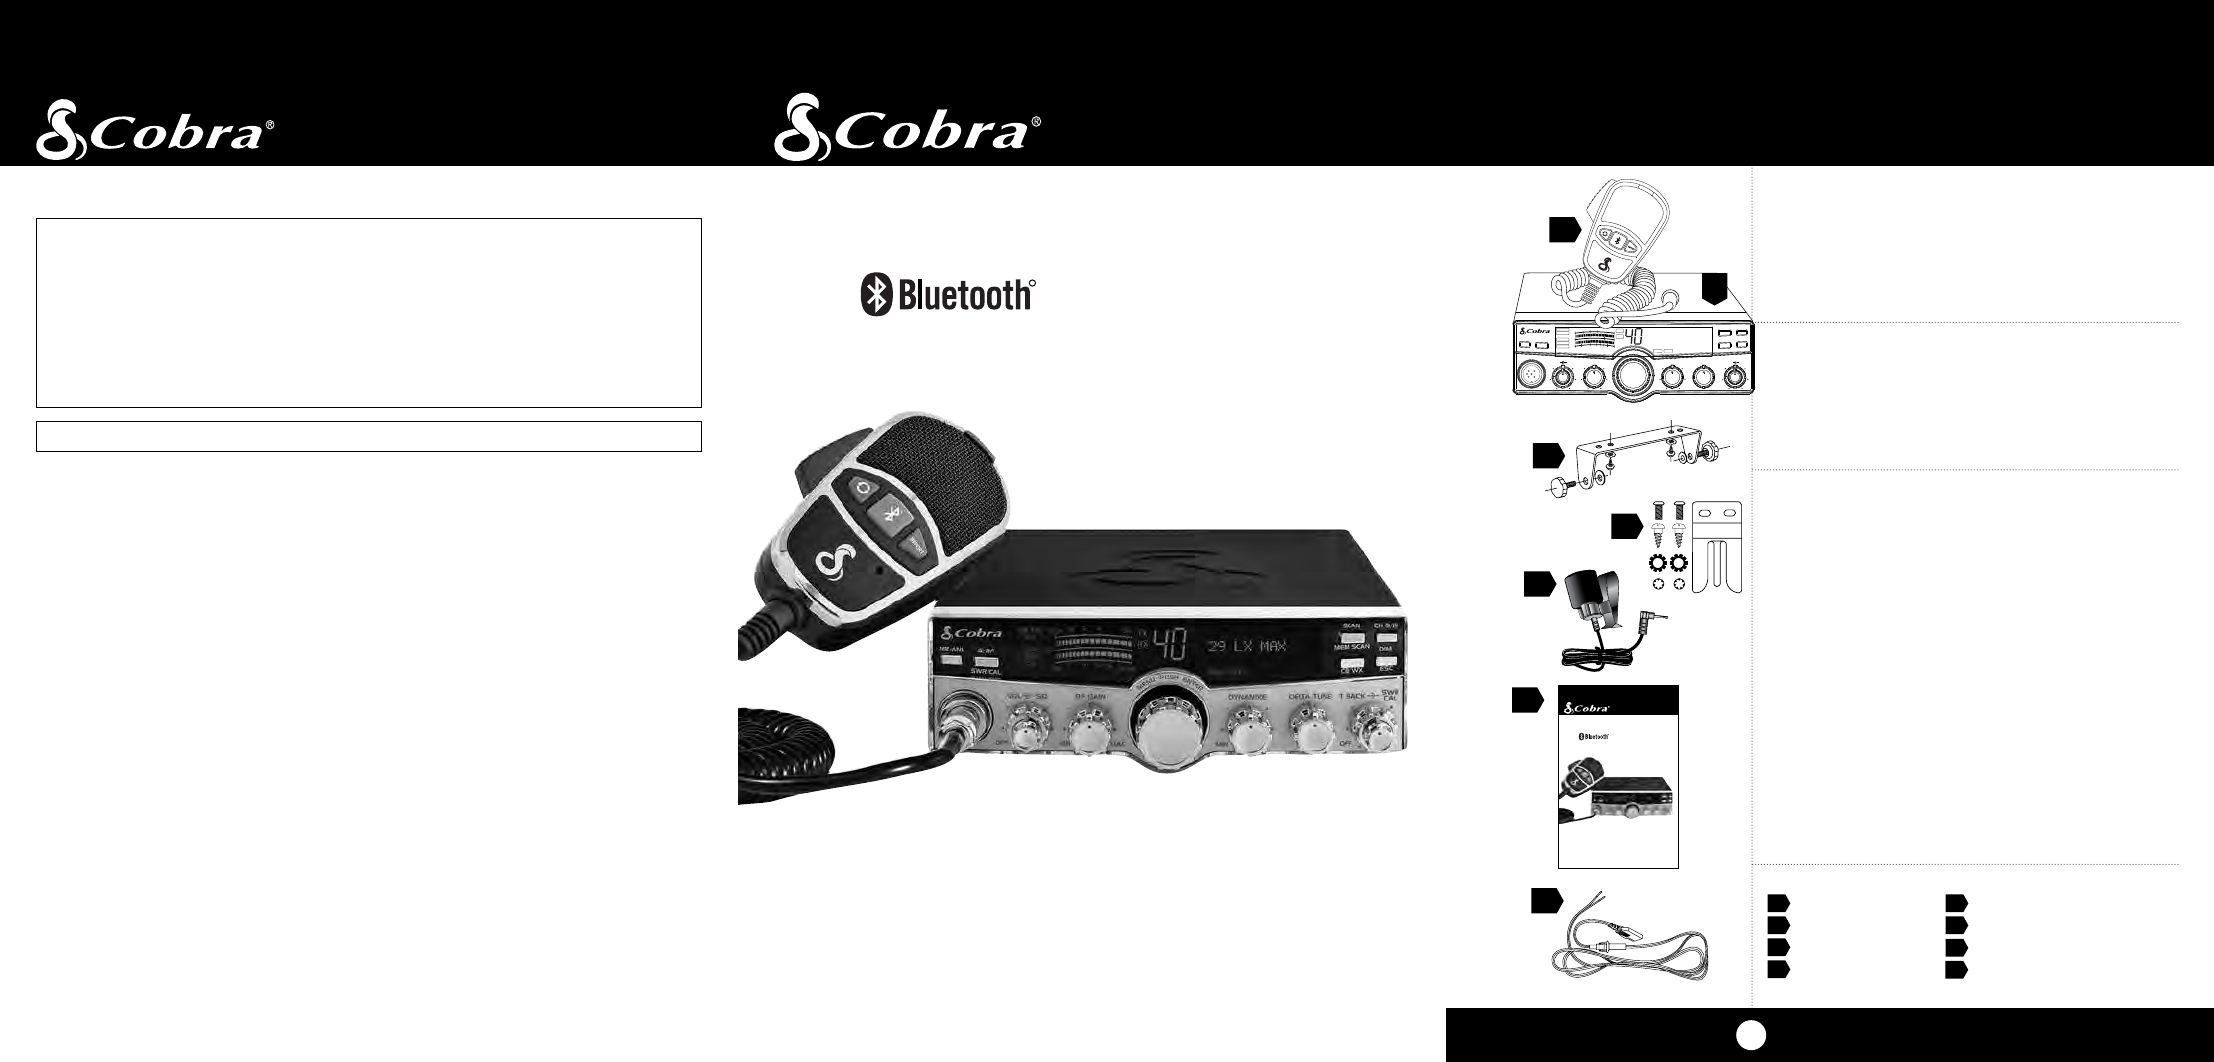
What’s Included with Your 29 LX MAX
1. CB transceiver 5. External Microphone
2. Microphone 6. Operating Manual
3 Transceiver bracket 7. DC power cord
4. Microphone bracket 8. FCC rules (not shown)
29 LX MAX
©2016 Cobra Electronics Corporation
Printed in China
Part No. 480-1077-P Version A
Nothing Comes Close to a Cobra®
Operating Instructions For Your
Cobra 29 LX MAX CB Radio
With Wireless Technology
The CB Story
A1
For technical assistance, please call our Automated Help Desk which can assist
you by answering the most frequently asked questions about Cobra products.
(773) 889-3087
24 hours a day, 7 days a week.
A Consumer Service Representative can be reached through this same number
8:00 am - 5:30 pm, Monday through Friday, Central Time.
Technical assistance is also available on-line in the Frequently Asked Questions (FAQ) section at
www.cobra.com or by e-mail to productinfo@cobra.com
If you think you need service call 1.773.889.3087
“If your product should require factory service please call Cobra first before sending your unit in.
This will ensure the fastest turn-around time on your repair.”
You may be asked to send your unit to the Cobra factory. It will be necessary to furnish the following
in order to have the product serviced and returned.
1. For Warranty Repair include some form of proof-of-purchase, such as a mechanical reproduction
or carbon or a sales receipt. If you send the original receipt it cannot be returned.
2. Send the entire product.
3. Enclose a description of what is happening with the unit. Include a typed or clearly print name
and address of where the unit is to be returned.
4. Pack unit securely to prevent damage in transit. If possible, use the original packing material.
5. Ship prepaid and insured by way of a traceable carrier such as United Parcel Service (UPS) or First
Class Mail: to avoid loss in transit to: Cobra Factory Service, Cobra Electronics Corporation, 6500
W. Cortland St., Chicago, IL 60707.
6. If the unit is in warranty, upon receipt of your unit it will either be repaired or exchanged
depending on the model. Please allow approximately 3 to 4 weeks before contacting us for
status. If the unit is out of warranty a letter will automatically be sent informing you of the
repair charge or replacement charge. If you have any questions, please call 1.773.889.3087 for
assistance.
Trademark Info
Cobra®, AURA®, Dynamike®, iRadar®, NightWatch®, Nothing Comes Close to a Cobra®,
Rewind-Say-Again®, and the snake design are registered trademarks of Cobra Electronics
Corporation, USA.
Cobra Electronics Corporation™ is a trademark of Cobra Electronics Corporation, USA.
iPhone® is a trademark of Apple Inc., registered in the U.S. and other countries.
The Bluetooth® word mark and logo are registered trademarks owned by Bluetooth SIG, Inc.
If You Think You Need Service
3
2
5
6
1
29 LX MAX
©2016 Cobra Electronics Corporation
Printed in China
Part No. 480-1077-P Version A
Nothing Comes Close to a Cobra®
Operating Instructions For Your
Cobra 29 LX MAX CB Radio
With Wireless Technology
U.S. Patent No. 8078120, D630202, D630625
R
4
U.S. Patent No. 8078120, D630202, D630625
R
7
SIG
RF
+30dB
1
1.5 23CAL
3579
SWR TX
RX
NB/ANL
MEM WX !
ANL
S/RF
SWR
CAL
NB/ANL S/RF
SWR/CAL
ESC
MEM SCAN
SCAN CH 9/19
DIM
CB/WX
M
E
N
U
P
U
S
H
E
N
T
E
R
VOL DYNAMIKERF GAIN DELTA TUNE T BACK SWR
CAL
OFF MIN MIN OFFMAX
SQ
Thank you for purchasing the Cobra 29 LX MAX
CB Radio with Bluetooth® wireless technology.
Properly used, this Cobra product will give you
many years of reliable service.
Customer Support
Should you encounter any problems with the
product or not understand its many features,
please refer to this owner’s manual. If, after
referring to the manual, you still need help,
call Cobra Customer Service at 773.889.3087.
Controls and Indicators
Cobra Customer Service
Live operators are available
M-F 8:00 am - 5:30 pm Central
Time at: 773-889-3087
Automated Technical
Assistance available 24 hours a
day, seven days a week. E-mail
questions to:
productinfo@cobra.com
Cobra on the World Wide Web:
Frequently Asked Questions
(FAQ) can be found on-line at:
www.cobra.com
Our Thanks to You
A3
A2
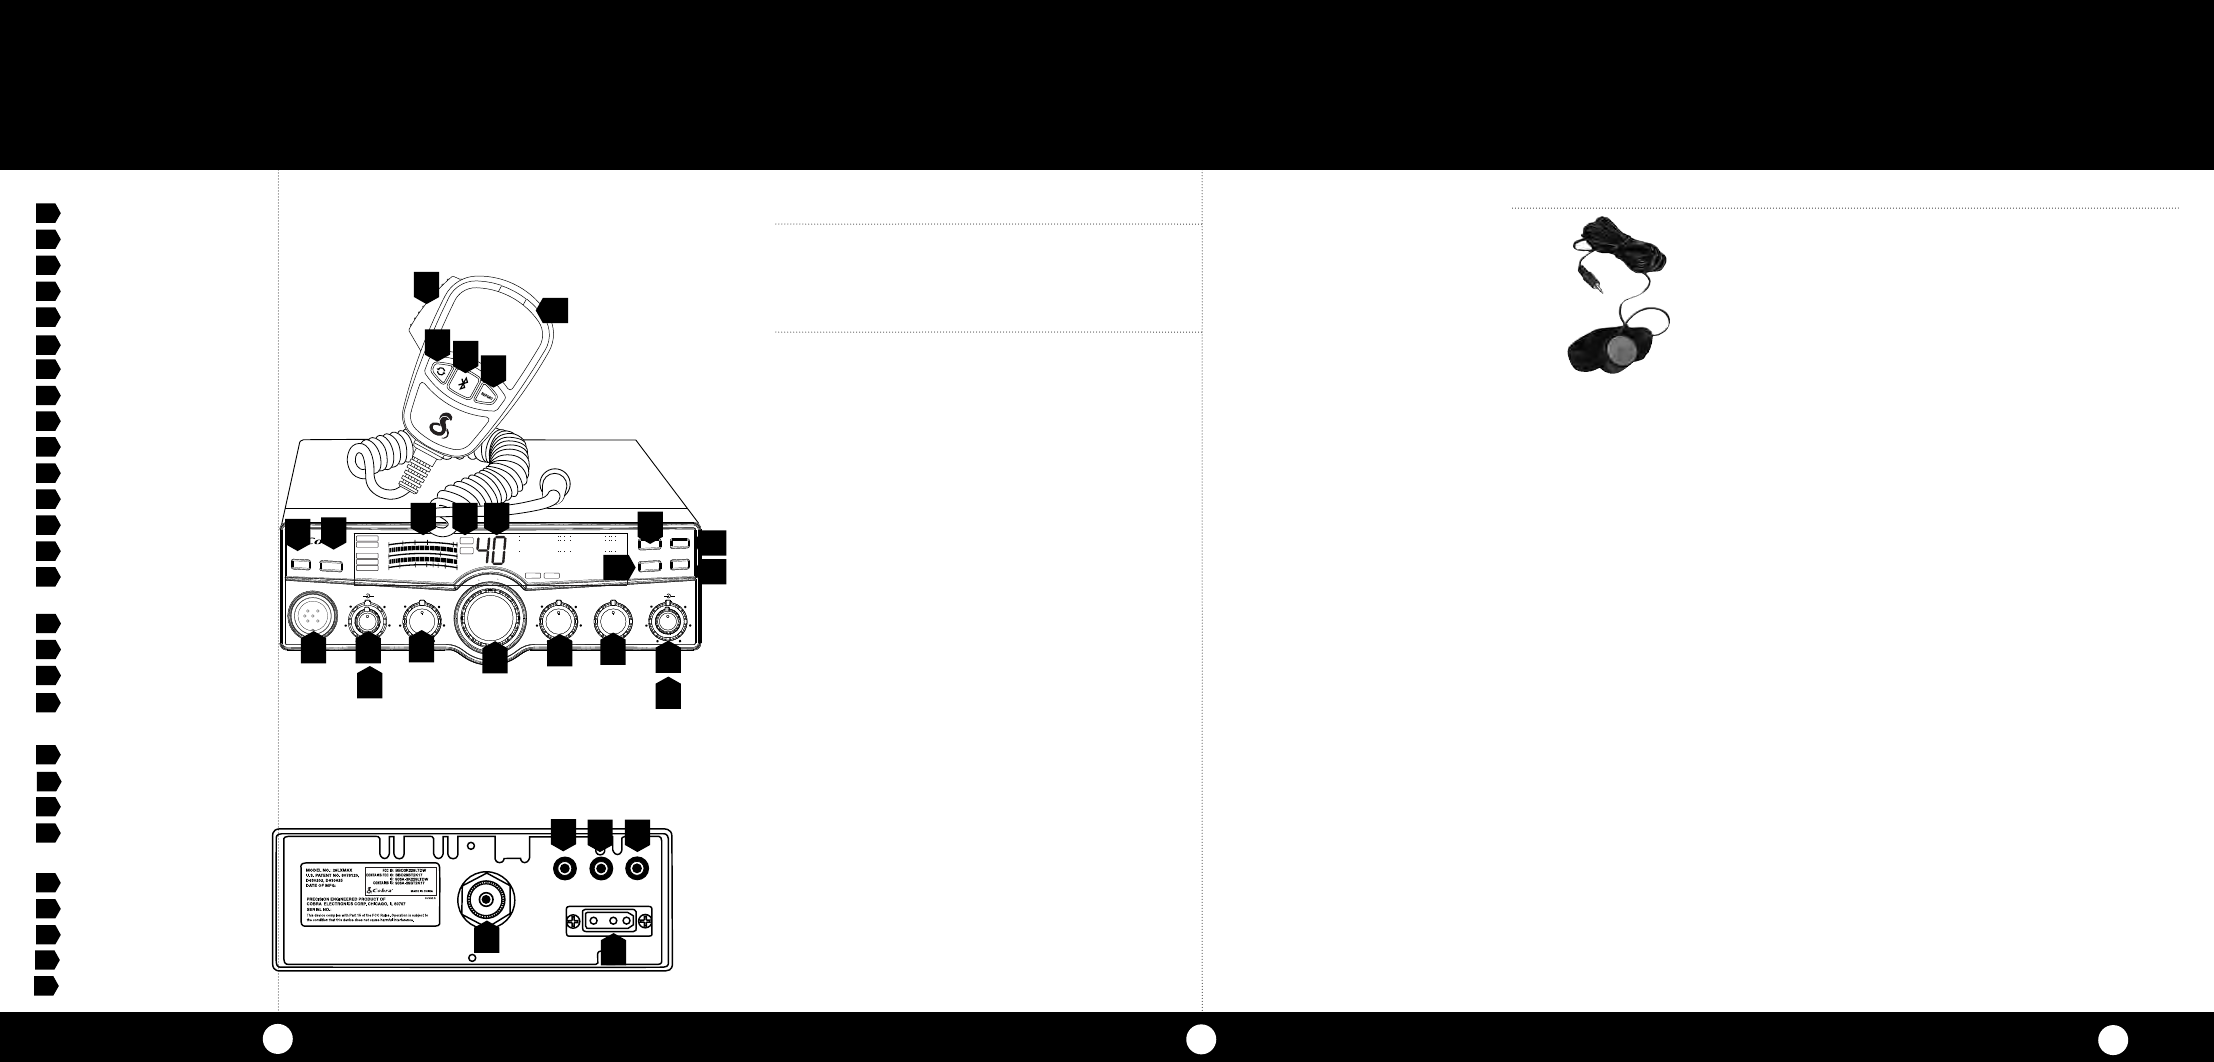
1. 6-Pin Microphone Connector
2. Power On/Off, Volume
3. Squelch
4. RF Gain
5. Menu/Enter/Channel Selector
6. Dynamike
7. Delta Tune
8. Talk Back Control
9. SWR Calibration
10. Dim/Escape Button
11. Channel 9/Channel 19 Button
12. Scan/Memory Scan
13. CB/WX Weather Button
14. LCD Display
15. RX (Receive)/TX (Transmit),
Indicators
16. Signal Strength Meter
17. S/RF SWR CAL Button
18. NB/ANL Button
19. Microphone
On Microphone
20. Push-To-Talk (PTT) Button
21. Rewind-Say-Again™ Button
22. Bluetooth® Button
23. Report Button
Back Side
23. External Microphone Jack
24. External Push-To-Talk Jack
25. External Speaker Jack
26. Antenna Connector
27. Power Jack
2
3
478
10
12
14
15
16
19
ANT EXT MIC EXT. PTT EXT.SP.
+POWER–
6
5
1
11
13
18
20
21
27
26
9
50
Optional Accessories
Ordering From U.S.A.
Call 773-889-3087 for pricing or visit www.cobra.com.
For Credit Card Orders
Call 773-889-3087 [Press one from the main menu] 8:00 a.m.
to 5:30 p.m. Central Time, Monday through Friday.
Make Check or Money Order Payable To
Cobra Electronics, Attn: Accessories Dept.,
6500 West Cortland Street, Chicago, IL 60707 U.S.A.
To Order Online
Please visit our website: www.cobra.com
Front Side
24
External Push-to-Talk Assembly
For in vehicle use
CA MS4 PTT
17
22
25
23
23