Cobra Electronics 8500PRO Navigation Device User Manual
Cobra Electronics Corporation Navigation Device
user manual

EnGIS Technologies, Inc.
8500 PRO HD
Truck Navigation Device
User Manual
Version 0.3
FCC ID:BBO8500PRO
IC: 906A-8500PRO

2 | P a g e 8 5 0 0 P R O H D U s e r M a n u a l
CONTENTS
1. Getting Started ........................................................................................................... 5
Powering on your device ............................................................................................. 5
Caution Screen .............................................................................................................. 5
Map screen features – Driving Guidance Mode ...................................................... 7
Route Preview ................................................................................................................ 7
2. Menu ........................................................................................................................... 8
3. Quick Tabs .................................................................................................................. 9
Zoom Tab ........................................................................................................................ 9
Information Tab .............................................................................................................. 9
Services Tab .................................................................................................................... 9
Route Tab ...................................................................................................................... 10
4. Plan a Route.............................................................................................................. 11
All search options ......................................................................................................... 11
Address .......................................................................................................................... 12
Intersections .................................................................................................................. 14
POI .................................................................................................................................. 15
Favorites ........................................................................................................................ 20
Recent List ..................................................................................................................... 21
Current Location .......................................................................................................... 22
Coordinate ................................................................................................................... 22
Multi Route .................................................................................................................... 24
Map view ...................................................................................................................... 25
5. Guidance while Driving ........................................................................................... 26
Lane Guidance ............................................................................................................ 27
Signposts ........................................................................................................................ 27
Junction View ............................................................................................................... 27
Alerts .............................................................................................................................. 28
Turn by Turn (TBT) .......................................................................................................... 31
List of Turns ..................................................................................................................... 31
Turning off the device before journey is complete. ................................................ 31

3 | P a g e 8 5 0 0 P R O H D U s e r M a n u a l
6. Manage your Route ................................................................................................. 33
Create Route ................................................................................................................ 34
Edit Route ...................................................................................................................... 35
Detour ............................................................................................................................ 36
Route Summary ............................................................................................................ 37
7. Trucker Tools ............................................................................................................. 38
Mileage Log .................................................................................................................. 38
Trip Computer ............................................................................................................... 38
Backup/Restore............................................................................................................ 38
On Duty Timer ............................................................................................................... 38
My Truck ........................................................................................................................ 39
Calculator ..................................................................................................................... 40
8. Traffic ......................................................................................................................... 41
Traffic Connection Status ............................................................................................ 41
Traffic On Route ........................................................................................................... 43
Traffic Map .................................................................................................................... 44
Traffic Flow .................................................................................................................... 45
Traffic Details ................................................................................................................ 46
Traffic List ....................................................................................................................... 47
Traffic Event Classes .................................................................................................... 48
Traffic Settings ............................................................................................................... 49
Predictive Traffic ........................................................................................................... 49
9. Weather..................................................................................................................... 50
On Map ......................................................................................................................... 50
At Your Location .......................................................................................................... 50
At Destination ............................................................................................................... 51
10. Fuel Prices ................................................................................................................. 52
At Your Location .......................................................................................................... 52
Along Route .................................................................................................................. 52
At Other Location ........................................................................................................ 52
11. Settings ...................................................................................................................... 53
Display Settings ............................................................................................................. 54

4 | P a g e 8 5 0 0 P R O H D U s e r M a n u a l
Guidance Settings ....................................................................................................... 56
Language Settings ....................................................................................................... 59
Routing Options ............................................................................................................ 60
Home and Office ......................................................................................................... 61
Traffic Settings ............................................................................................................... 61
Exit navigation .............................................................................................................. 61
12. User information and precautions .......................................................................... 62
13. Copyright .................................................................................................................. 64
14. Contact ..................................................................................................................... 65

5 | P a g e 8 5 0 0 P R O H D U s e r M a n u a l
1. Getting Started
Powering on your device
Press and hold the power button on the top left hand corner of your device.
Caution Screen
<PLEASE DRIVE SAFELY SCREEN HERE>
After your device starts up, you will see the above screen. You must select your vehicle
type (car or truck) and agree to the safety terms and conditions in order to use the
navigation device.
When selecting a truck as your vehicle type you will be automatically prompted to
enter the truck parameters (if there is only one truck in your saved vehicles), or, select
your desired truck from a list of all saved vehicles (if there is two or more trucks in your
saved vehicles).
Please note that when selecting car as vehicle type, there will be no warnings for
physical or legal truck restrictions and routing will not take truck information into
account.
6 | P a g e 8 5 0 0 P R O H D U s e r M a n u a l
Charging the Unit
To charge the unit, connect either the AC or DC power adapter. The battery light will
illuminate and will take approximately 3 hours to charge. When the battery is fully
charged, the red LED will turn off. Once fully charged the battery will last for
approximately 2 hours during normal use.
GPS
The navigation application automatically locates your current position on the map by
receiving GPS signals. When you first start the navigation application, there may be a
small delay in finding your GPS position and showing your current location correctly on
the map.
If the navigation application does not locate your position correctly on the map, there
may be an external factor interfering with the GPS signal. Please see USER INFORMATION
AND PRECAUTIONS section for further information on GPS.
<MAIN MAP SCREEN WITH GPS ICON HIGHLIGHTED
HERE>
You may tap the GPS icon to on the main map to check the GPS status.
<GPS STATUS SCREENSHOT HERE>
Good Signal
Weak Signal
No Signal
7 | P a g e 8 5 0 0 P R O H D U s e r M a n u a l
Map screen features – Driving Guidance Mode
<MAIN MAP SCREENSHOT WITH LABELS FOR ELEMENTS (1-17) HERE>
1
Current time
10
Alert Display
2
GPS (Tap to go to GPS screen).
11
Zoom tab (tap to open zoom tab)
3
Mute voice guidance
12
Information tab (tap to open
information tab)
4
Second Turn-by-Turn instruction,
indicates the turn direction that
comes after the next turn
direction
13
Services tab (tap to open services tab)
5
First Turn-by-Turn instruction:
Indicates the next turn direction
14 Route tab (tap to open route tab)
6
Current street name / Destination
15 Name of next street in route
7
Distance To Go and Total
Distance
16 Lane guidance
8
Estimated Time of Arrival (ETA)
and Time To Go
17 Menu
9
Traffic Bar
Route Preview
The route preview screen will appear each time you set a new destination or enter a
new route.
The route preview screen may also be accessed from the map screen via the route tab.
<ROUTE PREVIEW SCREENSHOT WITH LABELS FOR ELEMENTS (1-8) HERE>
1
Destination address.
5
When the route type has been
selected, tap the [NEXT] button to
begin guidance using this route type.
2
Route Preferences.
6
Route distance.
3
Sunrise/Sunset times at
destination.
7
Route time.
4
Toggle between faster time and
shorter distance route.
8
Route cost.

8 | P a g e 8 5 0 0 P R O H D U s e r M a n u a l
Please note that the information provided for route distance, time and cost are
approximations and may be incorrect.
2. Menu
The main menu can be accessed by tapping the [MENU] button on the map screen.
<MAIN MENU SCREEN HERE>
The main menu allows access to all search options as well as route management, live
services (traffic, weather, fuel prices), trucker tools and settings.
9 | P a g e 8 5 0 0 P R O H D U s e r M a n u a l
3. Quick Tabs
Quick tabs provide quick and easy access to many commonly used functions directly
from the main map screen. The quick tabs can be accessed on the right hand side of
the main map screen.
<MAIN MAP SCREEN HERE WITH QUICKTABS CLOSED – 4 LABELS ONE FOR EACH QUICK
TAB>
1
Zoom tab.
3
Services tab.
2
Information tab.
4
Route tab.
Zoom Tab
The zoom tab provides access to map controls.
<MAIN MAP SCREEN HERE WITH ZOOM TAB OPEN – 4 LABELS ONE FOR EACH ELEMENT OF
TAB>
1
Zoom in.
3 Change map orientation.
2
Zoom out.
4 Map scale display.
Information Tab
The information tab provides access to location specific information.
<MAIN MAP SCREEN HERE WITH INFORMATION TAB OPEN – 6 LABELS ONE FOR EACH
ELEMENT OF TAB>
1
On duty time.
4
Search for nearest rest area.
2
Current location information.
5
Search for nearest weigh station.
3
Mile marker display.
6
Search for nearest travel center.
Services Tab
The services tab provides access to live information services.
<MAIN MAP SCREEN HERE WITH SERVICES TAB OPEN – 3 LABELS ONE FOR EACH ELEMENT
OF TAB>
1
Traffic information.
3
Fuel price information.
10 | P a g e 8 5 0 0 P R O H D U s e r M a n u a l
2
Weather information.
Route Tab
The route tab provides access to route specific functions and information.
<MAIN MAP SCREEN HERE WITH ROUTE TAB OPEN – 6 LABELS ONE FOR EACH ELEMENT OF
TAB>
1
Clear current active route.
4
Display list of all turns in current active
route.
2
Detour by distance or avoid part
of a route.
5
Display route preview screen.
3
Multi route to save a route with
multiple destinations.
6
Display trip computer screen.

11 | P a g e 8 5 0 0 P R O H D U s e r M a n u a l
4. Plan a Route
All search options
A destination may be searched for through any of the following options.
ADDRESS
Search by entering an address in steps: City > Street >
House number.
INTERSECTIONS
Search by entering an intersection.
RECENT LIST
View a list of previously searched locations.
FAVORITES
Tap this button to route to a location that was
previously saved as a favorite (including
Home/Office).
POI
Search for a POI (Point Of Interest), such as a
restaurant or hotel.
CURRENT LOCATION
View details on your current location (needs a valid
GPS signal).
COORDINATE
Coordinates
Enter
coordinates
to route to
an exact
location on
the map.
There are two steps involved
in entering coordinates. You
must first enter the Latitude
Enter a destination by coordinates.

12 | P a g e 8 5 0 0 P R O H D U s e r M a n u a l
and then the Longitude. The
navigation application
supports several coordinate
formats. Choose the format
that you prefer.
Step 1
Enter the
Latitude in
one of the
formats
supported.
<COORDINATE
(lat)
SCREENSHOT
HERE>
Step 2
Enter the
Longitude
in one of
the formats
supported.
<COORDINATE
(long)
SCREENSHOT
HERE>
The
application
shows a
map of the
location
and an
address, if
available,
at the top
of the
screen.
<COORDINATE
(map)
SCREENSHOT
HERE>
Note: See the on-screen
examples to ensure the
coordinate you enter is in a
valid format.

13 | P a g e 8 5 0 0 P R O H D U s e r M a n u a l
Multi Route
<ICON
HERE>
Multi
Route
Save and restore
commonly used
routes.
The Multi Route interface
allows you to save and
restore routes that you
commonly use.
When Multi Route is opened
you will see a list of any saved
routes that you currently have
(the first time you use the
device this list will be empty).
<MULTI ROUTE LIST
SCREENSHOT HERE>
To load a route simply select it
from the list and tap [NEXT]
the route will now be
calculated and you will be
guided to your destination (or
first waypoint in route).
To save a route to the Multi
Route list tap [CREATE ROUTE]
and then tap [ADD], you can
then add locations to your
route as required. Once you
have added all the required
locations to your route, tap
[NEXT] and you will be
prompted to enter a name
for your route, tap [NEXT]
when you have entered the
name for your route, your
route will then be saved to
the Multi Route list, the route
preview screen will then be
displayed to provide an
overview of your route details.

14 | P a g e 8 5 0 0 P R O H D U s e r M a n u a l
Note: If you would like to
save your current active
route to Multi Route you can
use the [SAVE] function in
[My Route] > [Edit Route].
MULTI ROUTE
Save and restore commonly used routes.
Address
Address
Tap the [ADDRESS] button on Main Menu to plan a route by entering
an address.
1. Select ‘Address’ on Menu
screen.
<MAIN MENU SCREENSHOT HERE>
2. Select State or province.
The default state/province is
based on your current
location. For subsequent
searches, the last used
state/province name and
city name are shown. If you
would like to change
state/province, tap the
State Name button. For
State/Province search, you
can search by either the full
name (e.g. New York), or the
abbreviation (e.g. NY).
<ADDRESS ENTRY (STATE/PROVINCE) SCREENSHOT HERE>

15 | P a g e 8 5 0 0 P R O H D U s e r M a n u a l
3. Search for a City name or
Zip Code by typing letters.
Then choose it on the result
list.
<ADDRESS ENTRY (CITY) SCREENSHOT HERE>
4. Search for a street name
by typing letters then
choose it on the result list.
<ADDRESS ENTRY (STREET) SCREENSHOT>
5. Type the House number,
and tap [NEXT] button.
See below for information on
hiding or showing the
keyboard.
<ADDRESS ENTRY (HOUSE NUMBER) SCREENSHOT HERE>
6. Confirm the
state/province, city, and
street choices on the top of
the screen and refer to map
of the location. Tap [Go] if
you wish to route to this
location directly.
<ADDRESS ENTRY (MAP VIEW) SCREENSHT HERE>

16 | P a g e 8 5 0 0 P R O H D U s e r M a n u a l
Hide / Show Keyboard: The keyboard may be hidden or shown at any time during
address entry. You may wish to hide the keyboard to see all items in the result list.
Simply tap the keyboard icon on the top-right of the screen, or tap anywhere in the
visible area of the result list area.
Keyboard Language: You may change the language for your keyboard by tapping
the ‘world’ icon to the right of the spacebar. This will allow you to type diacritics and
special characters for your chosen language: e.g. ä, ü, ö.

17 | P a g e 8 5 0 0 P R O H D U s e r M a n u a l
Intersections
<ICON HERE>
Intersections
Tap the [INTERSECTIONS] button on Main Menu to plan a
route by entering an intersection.
As per the address search
above, enter the
State/Province, followed
by the City and then the
Street.
<INTERSECTION ADDRESS ENTRY SCREENSHOT HERE>
After the street name is
entered, a list of the
intersections for your
chosen street is presented.
You may scroll this list using
the control button on the
right.
<INTERSECTION LIST SCREENSHOT HERE>

18 | P a g e 8 5 0 0 P R O H D U s e r M a n u a l
POI
POI
Tap the [POI] icon on the Main Menu to search by POI (Point of Interest)
When you select POI from the main menu you will first need to select between Normal
POIs (e.g. Hotels, Airports, Restaurants, Banks, etc.) and Truck Specific POIs (e.g. Truck
Repairs, Truck Stops, State Weigh Scales, etc.).
When you have selected either Normal or Truck POIs, you may search for a POI using a
variety of different search methods.
By Category
<POI CATEGORY SCREENSHOT HERE>
Tap the [POI CATEGORY] button
By POI Name
<POI NAME SCREENSHOT HERE>
Tap the [POI NAME] button
By City
<POI IN CITY SCREENSHOT HERE>
Tap the [POI IN CITY] Button
Along Route
<ALONG ROUTE SCREENSHOT HERE>
Tap the [ALONG ROUTE] Button

19 | P a g e 8 5 0 0 P R O H D U s e r M a n u a l
Search by Category:
Tap the [CATEGORY] button.
You can search for POIs near your current location using the POI category search. First,
simply select the category you wish to use; for example ‘Fuel & Auto’, then select a POI
from the result list. The distance and direction to the POI is displayed on the left.
You may sort the results by distance or in alphabetical order.
<POI CATEGORY SCREENSHOT HERE>
<POI LIST SCREENSHOT HERE>
POI categories have sub categories to help focus your search better. Simply tap the
sub category you wish to search, or, alternatively choose the ‘ALL…’ option at the top
of the list to search within all the listed subcategories.

20 | P a g e 8 5 0 0 P R O H D U s e r M a n u a l
Search by POI Name:
Tap the [NAME] button.
The previously searched state/province name and city name are initially selected. If
you want to change state/province or city, tap the State or City button.
Type the POI Name you wish to search for then tap the [NEXT] button. It will list POI
names corresponding to the letters you’ve typed. Select one of the POI names that you
are searching for then you will see a list POIs. Choose one, and then tap [NEXT] button.
<POI NAME SCREENSHOT HERE>
Note: The system will search for the text you entered where it forms any part of the POI
name; for example, if you search for the word ‘Park’, you can find all POIs with the
word ‘Park’ in their name; Park Run Cafe, Mall Parking, CafePark etc.

21 | P a g e 8 5 0 0 P R O H D U s e r M a n u a l
Search for POI by City
Tap the [IN CITY] button.
The previously searched state/province name is initially selected. If you want to change
state/province, tap the State button.
Type the city name then select for the list of categories. The distance and direction to
the POI is displayed on the left. You may sort the results by distance or in alphabetical
order.
<POI IN CITY SCREENSHOT HERE>
<POI IN CITY (CATEGORY) SCREENSHOT HERE>

22 | P a g e 8 5 0 0 P R O H D U s e r M a n u a l
Search for POI Along Route
Tap the [ALONG ROUTE] button.
You can search for POIs of a selected category that are situated on, or close by to,
your current route.
When you select a POI category to search within a list of all POIs from that category
that are on your route will be displayed. The distance and direction to each POI from
your current location is displayed on the left.
<POI ALONG ROUTE SCREENSHOT HERE>
Amenity Filter
When searching for truck stops you may filter your results based on the amenities
available.
Tap the [POI] button on the main menu and select [TRUCK POI], tap [TRUCK STOPS]. You
may now filter the list of truck stops based on 16 different amenity categories. Simply
tap [AMENITIES] and select the categories that you would like, when you have selected
all the desired categories, tap [APPLY]. The list of truck stops will now be filtered to
display only the truck stops that have the amenities you desire.
<AMENITIES FILTER LIST SCREENSHOT HERE>

23 | P a g e 8 5 0 0 P R O H D U s e r M a n u a l
Favorites
Favorites
Tap the [FAVORITES] button to select or add a Favorite as your destination.
The favorites option allows you to save and route to commonly visited destinations,
including home and office locations.
Sort: You can sort existing favorites by distance, alphabetical order or date created
Add: Tap the [ADD] button to add a favorite to the app.
When saving a new favorite, you can give it a name by which to remember it.
<FAVORITES SCREENSHOT HERE>
To set an address for your Home and/or Office from the favorites menu, simply tap the
plus sign on the right of the screen.
When the addresses have been programmed, you can then plan a route to your home
or office simply by tapping the respective icon on the favorites list.

24 | P a g e 8 5 0 0 P R O H D U s e r M a n u a l
Recent List
Recent List
Tap the [RECENT LIST] button to view a list of previously searched
locations.
1. Tap the [RECENT LIST] on the Menu.
2. You will see a list Recent Destinations and Recent Searches.
3. Select one of locations on the list then tap the [GO] button to route directly to the
location.
<RECENT LIST SCREENSHOT HERE>
Sort: You can sort the list by the date created or in alphabetical order.
25 | P a g e 8 5 0 0 P R O H D U s e r M a n u a l
Current Location
Current
Location
Tap this button to find details about your current location.
You will need a valid GPS signal to get accurate and current positioning information.
<CURRENT LOCATION SCREENSHOT HERE>
The following details are listed:
Nearest Address;
Nearest Intersection;
Latitude and Longitude;
Map of your current location.
You may save this location as a favorite.
Tap this button to center the map to your current location.
Tap this button to search for the nearest emergency POIs.
Select the emergency POI category (Hospital, Fuel, Police, Auto, ATMs), a list of the
nearest POIs for that category will then be displayed, simply choose the desired POI
from the list and the route to the POI will be calculated.
Coordinate
Coordinates
Enter coordinates to route to an exact location on the map.

26 | P a g e 8 5 0 0 P R O H D U s e r M a n u a l
There are two steps involved in entering coordinates. You must first enter the Latitude
and then the Longitude. The navigation application supports several coordinate
formats. Choose the format that you prefer.
Step 1
Enter the Latitude in one
of the formats supported.
<COORDINATE (lat) SCREENSHOT HERE>
Step 2
Enter the Longitude in one
of the formats supported.
<COORDINATE (long) SCREENSHOT HERE>
The application shows a
map of the location and
an address, if available, at
the top of the screen.
<COORDINATE (map) SCREENSHOT HERE>
Note: See the on-screen examples to ensure the coordinate you enter is in a valid
format.

27 | P a g e 8 5 0 0 P R O H D U s e r M a n u a l
Multi Route
<ICON
HERE>
Multi Route
Save and restore commonly used routes.
The Multi Route interface allows you to save and restore routes that you commonly use.
When Multi Route is opened you will see a list of any saved routes that you currently
have (the first time you use the device this list will be empty).
<MULTI ROUTE LIST SCREENSHOT HERE>
To load a route simply select it from the list and tap [NEXT] the route will now be
calculated and you will be guided to your destination (or first waypoint in route).
To save a route to the Multi Route list tap [CREATE ROUTE] and then tap [ADD], you can
then add locations to your route as required. Once you have added all the required
locations to your route, tap [NEXT] and you will be prompted to enter a name for your
route, tap [NEXT] when you have entered the name for your route, your route will then
be saved to the Multi Route list, the route preview screen will then be displayed to
provide an overview of your route details.
Note: If you would like to save your current active route to Multi Route you can use the
[SAVE] function in [My Route] > [Edit Route].

28 | P a g e 8 5 0 0 P R O H D U s e r M a n u a l
Map view
Tap a point on the map to choose a location as your destination. The address of the
point you choose is displayed in a grey information box directly above the point you
chose.
<MAP VIEW SCREENSHOT HERE>
Route: Choose to add the location as a Start point, Waypoint, or destination.
More: Tap the [MORE] button to:
Save the location as a Favorite, or
Search for a POI nearby this location.

29 | P a g e 8 5 0 0 P R O H D U s e r M a n u a l
5. Guidance while Driving
After you have set a destination, the system will calculate a route. Once you begin
moving, the system will use the GPS information to update your position on the map
and start to give you guidance.
<MAIN MAP SCREENSHOT HERE>
1
Highlighted route to follow.
3
Indicates the next turn to take.
2
Your current location.
4 The name of the next street to turn
onto.
See the MAP SCREEN FEATURES – DRIVING GUIDANCE MODE section for a more detailed
description of all map objects.

30 | P a g e 8 5 0 0 P R O H D U s e r M a n u a l
Lane Guidance
Lane Guidance helps you safely prepare for your next maneuver by displaying the
correct lane(s) to stay in.
Lane Guidance appears below the Next Street Name box. The highlighted white arrow
indicates the correct lane(s) to be in. In the example below, there is one highlighted
lane turning right; this is the correct lane to stay in for the upcoming maneuver. The
other three grey lanes are going straight.
<LANE GUIDANCE SCREENSHOT HERE>
Signposts
Signposts provide a realistic representation of actual signposts at complex highway
junctions. As you approach a highway junction, the signpost displays route shields, route
directions, locality, exit, and lane information.
<SIGNOST SCREENSHOT HERE>
The Signpost replaces the normal Next street name box at some junctions. The
highlighted shield with white arrows indicates the correct lane(s) to be in. In the
example above, there are three lanes with white arrows indicating that you should
keep left; these are the correct lanes to stay in for the upcoming maneuver. The other
two grey lanes on the greyed-out sign (on right) are exiting the highway. Please be
aware that Signposts are available for some, but not all highway junctions.
Junction View
Junction View, like Signposts, provides a realistic representation of the highway as you
approach the junction. The Junction View displays the highway lanes, shields, directions,
and lane information in a split mode view.
<JUNCTION VIEW SCREENSHOT HERE>
Junction View may be turned on or off in the Display Settings.
[Settings] > [Display Settings] > [View Mode]. See DISPLAY SETTINGS for more information.
31 | P a g e 8 5 0 0 P R O H D U s e r M a n u a l
Please be aware that Lane Guidance, Signposts and Junction View are available for
some, but not all junctions.
Alerts
Your unit will display visual alerts on the main map screen when approaching a location
that requires attention. Alerts can be divided into three groups: Aura alerts (warnings of
upcoming red light cameras, speed cameras, dangerous intersections and mobile
speed traps); general trucker alerts (warnings of locations that are of potential
importance to truck drivers, such as, state borders, time zone changes and weigh
stations); restriction alerts (warnings that you are approaching a location for which your
vehicle is prohibited).
An overview of the alert types is displayed below:
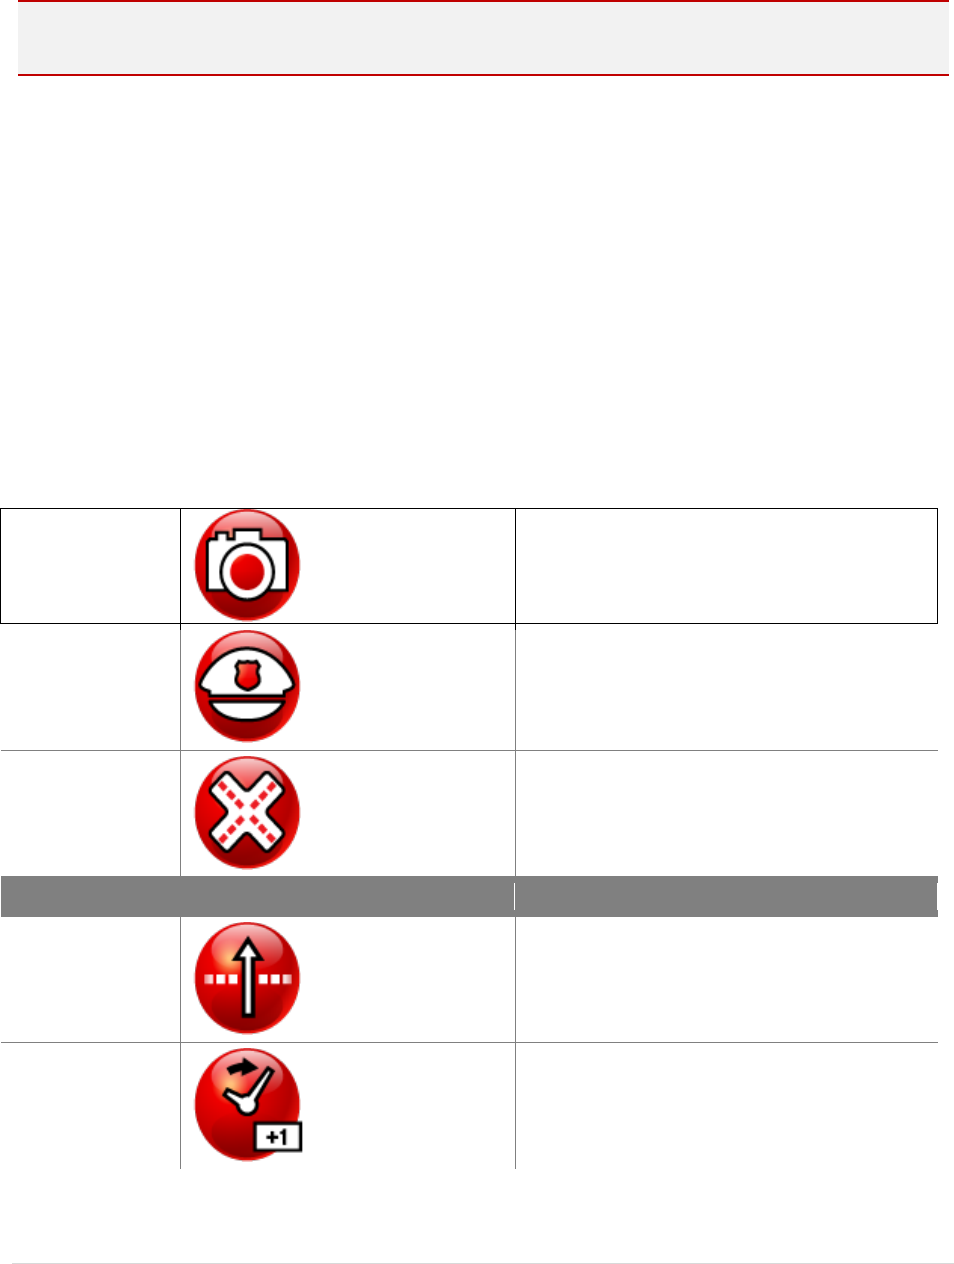
Aura
Camera enforcement: displayed
when you are approaching a
location of a red light camera or
speed camera.
Mobile speed trap: displayed when
you are approaching a location
commonly used as a speed trap.
Dangerous intersection: displayed
when you are approaching a
dangerous intersection.
General
State border: displayed when you are
approaching a state border.
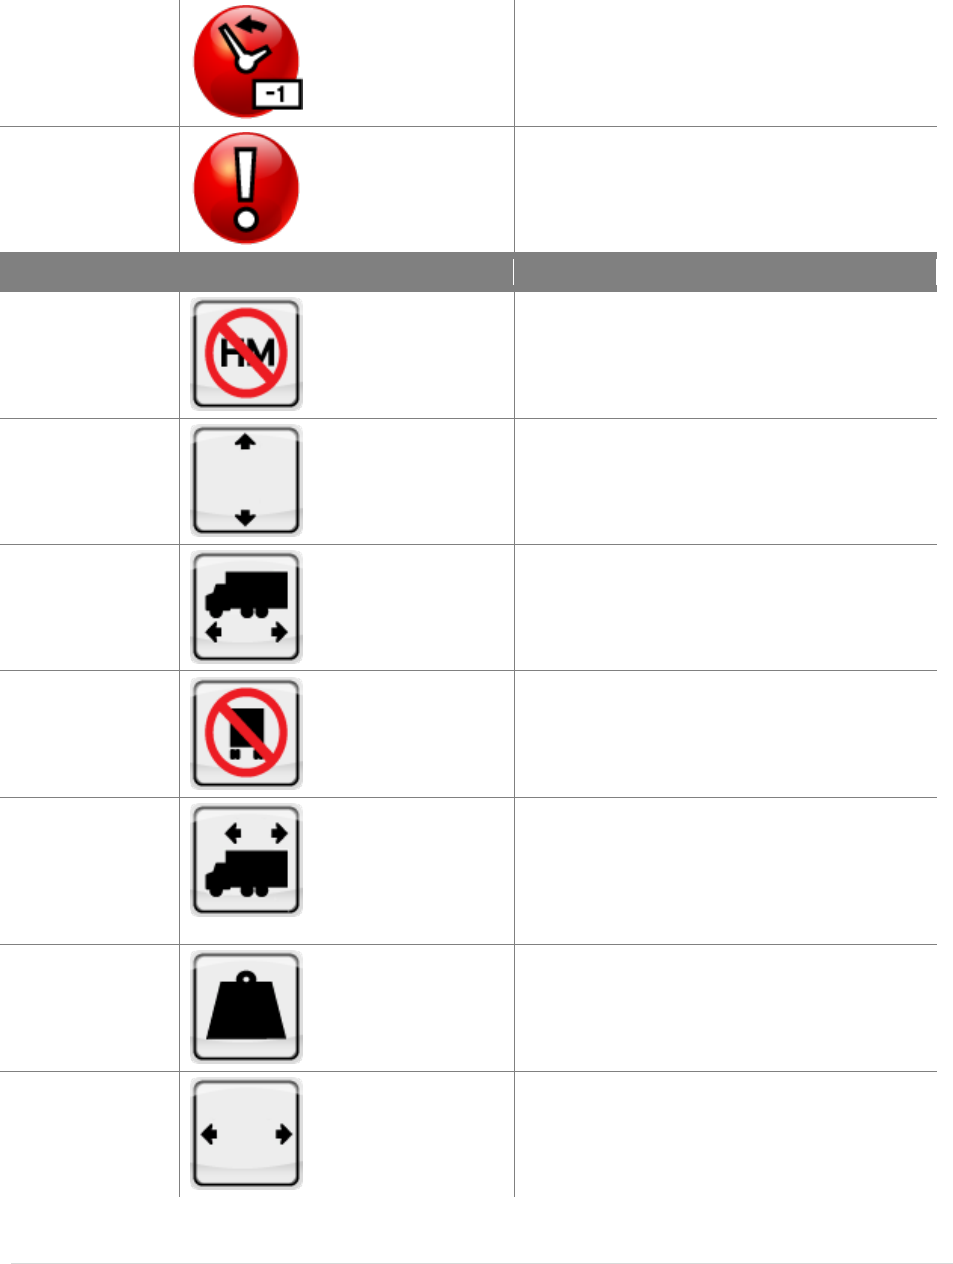
Time zone forward: displayed when
you are approaching a change in
time zone with the time going
forward by an hour.
32 | P a g e 8 5 0 0 P R O H D U s e r M a n u a l
Time zone backward: displayed
when you are approaching a
change in time zone with the time
going backward by an hour.
Weigh station: displayed when you
are approaching a weight station.
Truck
Restrictions
Hazmat restriction: displayed when
you are approaching a location for
which your current vehicle is
prohibited due to its load type.
Height restriction: displayed when
you are approaching a location for
which your current vehicle is
prohibited due to its height.
Length restriction: displayed when
you are approaching a location for
which your current vehicle is
prohibited due to its length.
Truck restriction: displayed when you
are approaching a location that is
prohibited for all trucks.
Trailer length restriction: displayed
when you are approaching a
location for which your current
vehicle is prohibited due to its trailer
length.
Weight restriction: displayed when
you are approaching a location for
which your current vehicle is
prohibited due to its weight.
Width restriction: displayed when you
are approaching a location for
which your current vehicle is
prohibited due to its width.

33 | P a g e 8 5 0 0 P R O H D U s e r M a n u a l
It is the user’s responsibility to account for the vehicle’s height, width, length, HAZMAT,
and other restrictions while driving. Restriction details and locations may change over
time, always follow posted road signs and be aware of road conditions when making
driving decisions.
You can alter the timing of alert display and turn alert displays on or off in Display
Settings.

34 | P a g e 8 5 0 0 P R O H D U s e r M a n u a l
Turn by Turn (TBT)
The Turn by Turn screen offers a more simplified guidance mode. To access this screen,
tap [Menu] > [My Route] > [Turn by Turn].
<TBT SCREENSHOT HERE>
The Turn By Turn screen presents an enlarged maneuver image and text to indicate the
next turn.
The distance remaining to the next maneuver is indicated by the distance bar on the
left.
The second maneuver is displayed at the top of the screen with a smaller image and
text.
List of Turns
The List of Turns presents a full list of all maneuvers for the journey. To access this screen
tap [Menu] > [My Route] > [List of Turns], or from the main map tap [Route Tab] > [List of
Turns].
<LIST OF TURNS SCREENSHOT HERE>
Each graphic shows ‘Distance from position’ and the ‘next street’ name.
Turning off the device before journey is complete.
In the case turning off the device before the journey is complete, the navigation
application will remind you of the last destination when restarted. If you would like to
restore your previous route, select the [YES] button, otherwise select the [NO] button.
<LAST DESTINATION SCREENSHOT HERE>

35 | P a g e 8 5 0 0 P R O H D U s e r M a n u a l
In addition to this, any waypoint that was unreached in the journey will be remembered.
By going to [Menu] > [My Route], you can check waypoints and destination points.

36 | P a g e 8 5 0 0 P R O H D U s e r M a n u a l
6. Manage your Route
Routing Options may be used to create a new route or to edit an existing route. Create
Route / Edit Route buttons will change depending on situation.
[Menu] > [My Route]
<MY ROUTE SCREENSHOT HERE>
Create Route / Edit Route: [Create Route] is available if a route has not been set. [Edit
Route] is available if a route has already been set. Use this option to edit your existing
route.
Detour: Allows you to avoid part of the route or avoid by distance.
Simulation Mode: Starts a driving simulation of the route.
Route Summary: Go to the route summary screen.
View Route Map: Displays an overview map of your complete route.
Turn by Turn: Displays a simplified guidance mode with no map.
List of Turns: Displays a full list of all maneuvers on the route.
Clear Route: Deletes the current route.

37 | P a g e 8 5 0 0 P R O H D U s e r M a n u a l
Create Route
This option is available if no route has been set.
<MY ROUTE (CREATE ROUTE) SCREENSHOT HERE>
• Add a Location to your route
Tap the [ADD] button to add a location to your route. For short routes, you may add up
to 5 waypoints.
• Position the location within the route
The first location you set automatically becomes the destination. You may add another
location to this route by tapping the [ADD] button.
When you add a second location, this becomes the destination and the previous
location moves to the start position.
Any subsequent locations added become the destination, and previously added
locations become waypoints.
<EDIT ROUTE SCREENSHOT HERE>
<EDIT OPTION SCREENSHOT HERE>
• Calculate Route
When finished, tap the [NEXT] button to calculate the route.

38 | P a g e 8 5 0 0 P R O H D U s e r M a n u a l
Edit Route
This option is available only if a route already exists.
<MY ROUTE (EDIT ROUTE) SCREENSHOT HERE>
• Add a Location to your route
Tap the [ADD] button to add another location to your route.
• Position the location within the route
The first location you set automatically becomes the destination. You may add another
location to this route by tapping the [ADD] button.
When you add a second location, this becomes the destination and the previous
location moves to the start position.
Any subsequent locations added become the destination, and previously added
locations become waypoints.
• Find POI nearby any location
Simply select the location and choose [Show on Map] > [More] > [Find Nearby POI].
After selecting the POI, it will be added to your route.
Save Route
Tap [Save] and enter a name for your route, tap [Next], the route information will now
be available for later use in the Multi Route menu.
• Calculate Route
When finished modifying the route, tap the [NEXT] button to calculate.

39 | P a g e 8 5 0 0 P R O H D U s e r M a n u a l
Detour
This function is for editing your route. After editing your route preferences, the
navigation application will recalculate a new route automatically.
<DETOUR SCREENSHOT HERE>
<AVOID PART OF ROUTE SCREENSHOT HERE>
<AVOID BY DISTANCE SCREENSHOT HERE>
You can modify your route by using the following:
• Avoid Part of route
Make a detour to avoid some part of existing route.
• Avoid by Distance
Make a detour to avoid a set distance of your route from your current location. You
can set 100ft, 300ft, 500ft, 1mi, 2mi, or 3mi as the distance to avoid. For example, if you
are stuck in traffic because of a construction site or a car accident ahead of you, you
can apply the relevant distance to this incident, and the navigation application will
make a detour to avoid that incident.
• Recalculate Original
This button allow you to recalculate the original route by removing any detours or others
changes that may have been set.

40 | P a g e 8 5 0 0 P R O H D U s e r M a n u a l
Route Summary
Route Summary is available on the ‘My Route’ screen. In this screen, you can check
route information such as total distance, time, etc.
<ROUTE SUMMARY SCREENSHOT HERE>
Route Preferences: Recalculate your route with different preferences, e.g. avoid toll
roads, user STAA roads, etc.
Fuel cost represents an estimated cost for your trip. Fuel prices may be adjusted by
going to [Menu] > [Settings] > [Guidance Settings] > [Fuel Cost]

41 | P a g e 8 5 0 0 P R O H D U s e r M a n u a l
7. Trucker Tools
The Trucker tools menu provides a range of different functions that are particularly
helpful to truck drivers, to access the trucker tools menu, simply tap [TRUCKER TOOLS] at
the bottom of the main menu.
Mileage Log
<MILEAGE LOG SCREENSHOT HERE>
The mileage log automatically records the number of miles that you drive. These
records can then be organised by state or by year. Additionally, you can save these
records to a SD card for your own records.
Trip Computer
<TRIP COMPUTER SCREENSHOT HERE>
The trip computer provides an overview of totals for your current trip. The display
includes an odometer, average speed for your trip and total trip time. Additionally,
current altitude and cumulative mileage are provided.
Backup/Restore
<BACKUP/RESTORE SCREENSHOT HERE>
The backup/restore function allows you to save your favorites and/or mileage log
entries to a SD card.
For this function to work you must have a SD card inserted into your device. In order to
restore favorites/mileage log you will need to have a SD card inserted that has the
required files saved onto the root directory of the SD card. In order to backup
favorites/mileage log, you will need to have sufficient space on the SD card to allow
the files to be saved.
On Duty Timer
The On Duty Timer is a set of timers that will assist you in filling out your hours of service
log book.
When the On Duty Timer is set to manual, your work time will be calculated depending
on the setting you make in the information tab on the main map (e.g. On Duty, On Duty

42 | P a g e 8 5 0 0 P R O H D U s e r M a n u a l
Driving or Off Duty). When the On Duty Timer is set to Auto, the timer will automatically
change to On Duty Driving after your vehicle has been in motion for 5 minutes, once
the vehicle is stationary for 5 minutes the timer will change to On Duty.
You can view and change the settings for the On Duty Timer, reset totals, change
between auto and manual or manually alter the maximum time allowed and time
remaining in the On Duty Timer menu.
<ON DUTY TIMER SCREENSHOT HERE>
<ON DUTY TIMER SCREENSHOT HERE (Time remaining/Maximum time edit screen)>
The default totals for maximum time are: On Duty Driving Day 11hrs; On Duty Day 14hrs;
On Duty Week 60hrs. To manually alter the maximum time allowed for these totals,
simply tap the total you would like to edit and you will be able to enter both the Time
Remaining and the Maximum Time.
When you have finished making any alterations to On Duty Timer, tap [APPLY] and your
changes will be saved.
My Truck
The My Truck interface allows you to save several vehicle profiles for any different truck
types that you may be driving.
Truck Information
<TRUCK INFORMATION SCREENSHOT HERE>
When opening My Truck, you will see a screen that displays the vehicle information of
your currently selected vehicle, this includes the truck name, truck type and all
important truck parameters (e.g. length, height, load type, etc.). The vehicle
information displayed on this screen relates to the vehicle that is currently being used in
navigation.
To change the currently selected vehicle, tap [CHANGE] in the bottom left corner of
the screen.
My Vehicle
<MY VEHICLE SCREENSHOT HERE>
The My Vehicle screen displays all the vehicles that you have available for use. When
using your device for the first time, you will have two default vehicle profiles, one truck
(Truck 1) and one car (Car).

43 | P a g e 8 5 0 0 P R O H D U s e r M a n u a l
To add a new truck to your list of vehicles, simply tap [ADD] at the bottom of the screen.
<TRUCK TYPE SCREENSHOT HERE>
You will be provided with a list of different truck type axle configurations, to switch
between the different lists for USA and Canada, simply select the appropriate country
name at the top of the list. When you have selected the desired truck type from the list,
tap [APPLY] and the vehicle will automatically be added to the end of your My Vehicle
list.
From the My Vehicle list you can then manually enter the parameters of your truck,
simply select the vehicle you wish to edit the parameters for and tap [EDIT] at the
bottom of the screen.
<ENTER TRUCK INFORMATION SCREENSHOT HERE>
From the Enter Truck Information menu you can give the truck a meaningful name, edit
all truck parameters and set your choice of vehicle icon to be displayed on the map.
To edit any of the truck parameters, simply tap the <ICON HERE> icon to the right of the
parameter field. A sub menu will then be displayed where you can individually enter
each sub category for that truck parameter.
When travelling from the US to Canada or vice versa, routing in the other country will
be based on our closest match to your truck type. For best results, use US truck types in
the US and then switch to a Canada truck type when driving in Canada.
Vehicle Icon
The Vehicle Icon sub menu allows you to set your preferred vehicle icon for your truck.
You can select from five different icon styles with five different colour schemes for each
icon style.
<VEHICLE ICON SCREENSHOT HERE>
Calculator
The Calculator interface provides an easy and convenient means of carrying out basic
calculations using your device.
<CALCULATOR SCREENSHOT HERE>
44 | P a g e 8 5 0 0 P R O H D U s e r M a n u a l
8. Traffic
Live traffic will provide up-to-date, real-time traffic information to BringGo. Live Traffic
includes detailed incident reports and the ability to reroute to avoid any incident.
The traffic service requires an active internet connection to download the traffic
information.
The navigation device receives traffic data from a traffic service provider and displays
this information on the device. Please pay attention to changes in traffic conditions or
incidents which may not be reported by this service.
Traffic
Tap this button at the bottom of the Main Menu to access Traffic
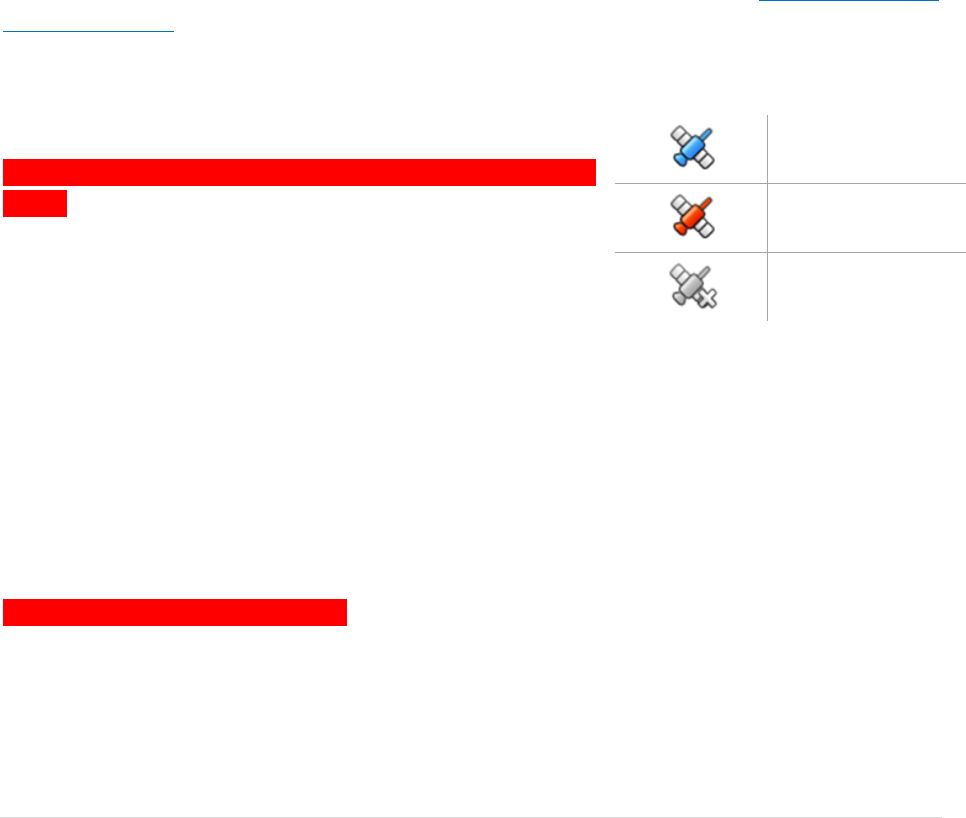
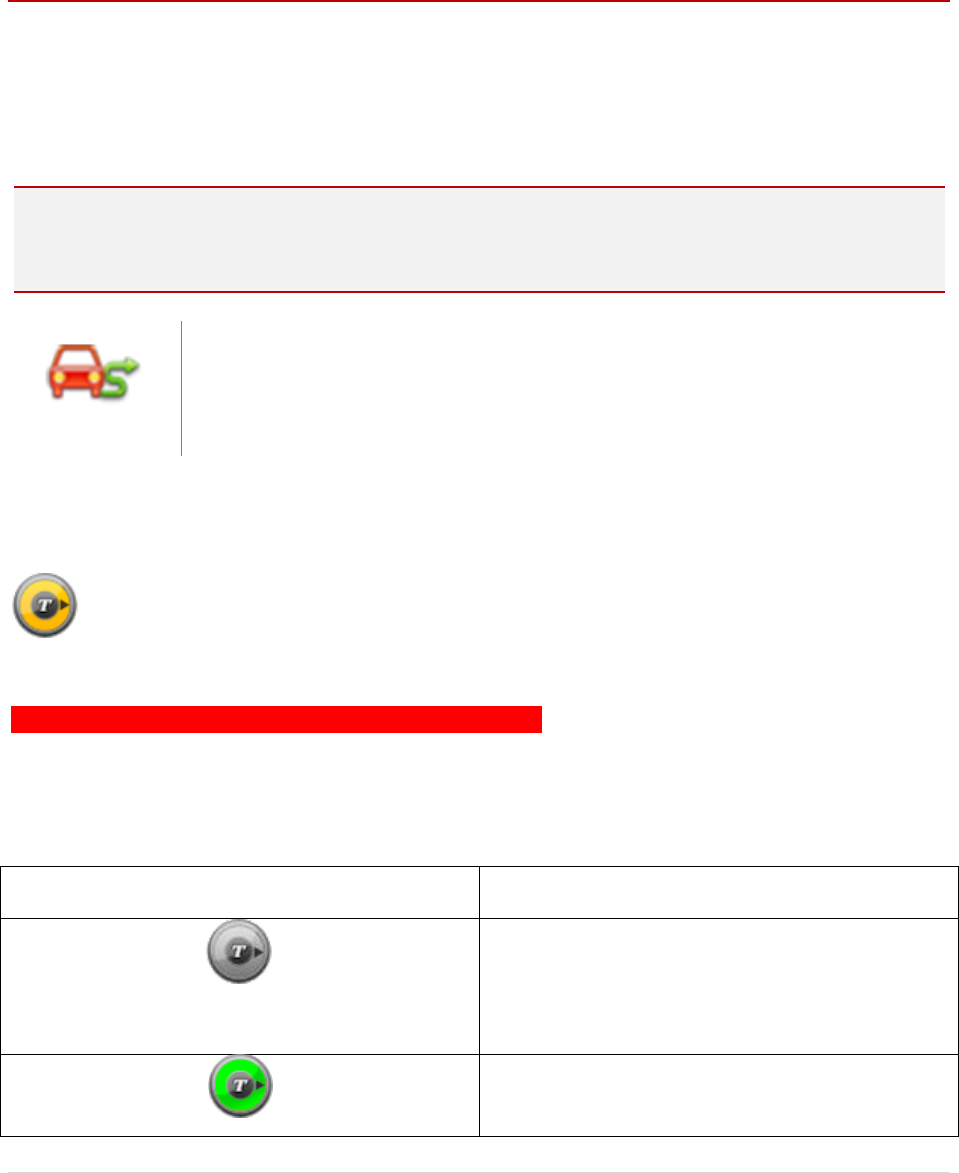
Traffic Connection Status
A color coded Traffic Status Icon on the main map represents the traffic
connection status. Please refer to the table below for the meaning.
<TRAFFIC ICON ON MAIN MAP SCREENSHOT HERE>
Traffic Status Icon
Meaning
The Grey icon means that the traffic
service is not available. Please check that
your smartphone has an internet
connection, and that the Traffic Service is
turned ON in Settings.
The Green icon means that you have an
active traffic service connection, and
there are no traffic incidents on your route.

45 | P a g e 8 5 0 0 P R O H D U s e r M a n u a l
The Yellow icon means that you have an
active traffic service connection, and
there are traffic incidents on your route.
The Red rotating icons means that traffic
information is currently downloading.
46 | P a g e 8 5 0 0 P R O H D U s e r M a n u a l
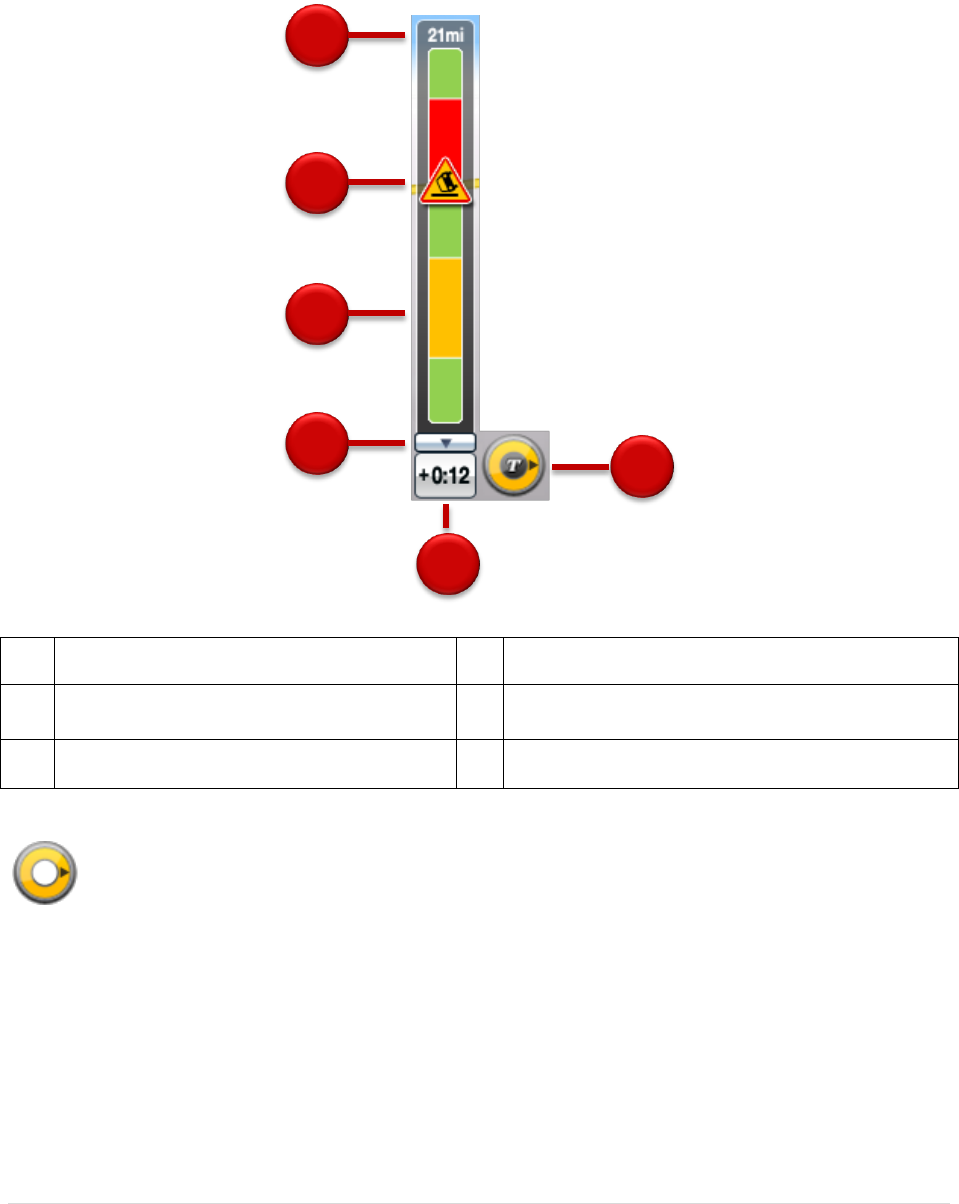
Traffic On Route
1
Expand / Collapse the Traffic bar
4
Distance from current position.
2
Traffic Congestion Extent
5
Traffic Status Icon (Tap to go to Traffic
Details)
3
Traffic Incident
6
Estimated Delay
If a traffic event (an incident such as a roadblock) occurs on your route, the
Traffic Status Icon on the main map will change to yellow and the Traffic bar will
appear. This number in the center of the icon represents the number of traffic
events on your route. In addition to this, a chime will sound for every new event
received that affects your route.
In the example above, two (2) events shave been reported for the route.
If there is a delay associated with this event(s), a box will appear to the left of the Traffic
Status Icon indicating the estimated delay.
4
1
2
3
6
5
2

47 | P a g e 8 5 0 0 P R O H D U s e r M a n u a l
To get more details on these traffic events, or get the option to avoid these events,
simply tap the Traffic Status Icon to see the Traffic Details screen for each event.
The Traffic bar will appear for 30 seconds when an incident occurs or is updated on
your route. To expand or collapse the Traffic Bar, simple tap the arrow next to the time
delay.
Traffic Map
The traffic map presents a map with traffic flow and traffic event(s). The traffic event
icons indicate the type of traffic event.
<TRAFFIC MAP SCREENSHOT HERE>
On the small scale traffic map (zoomed out), traffic flow may be seen. Traffic event
icons are turned off at this scale to see the traffic map clearly.
On the large scale maps (zoomed in), the Traffic event icons appear together with the
traffic flow. You may tap any traffic event icon to receive more details on the event.
Tap the refresh button to update the traffic information.
48 | P a g e 8 5 0 0 P R O H D U s e r M a n u a l
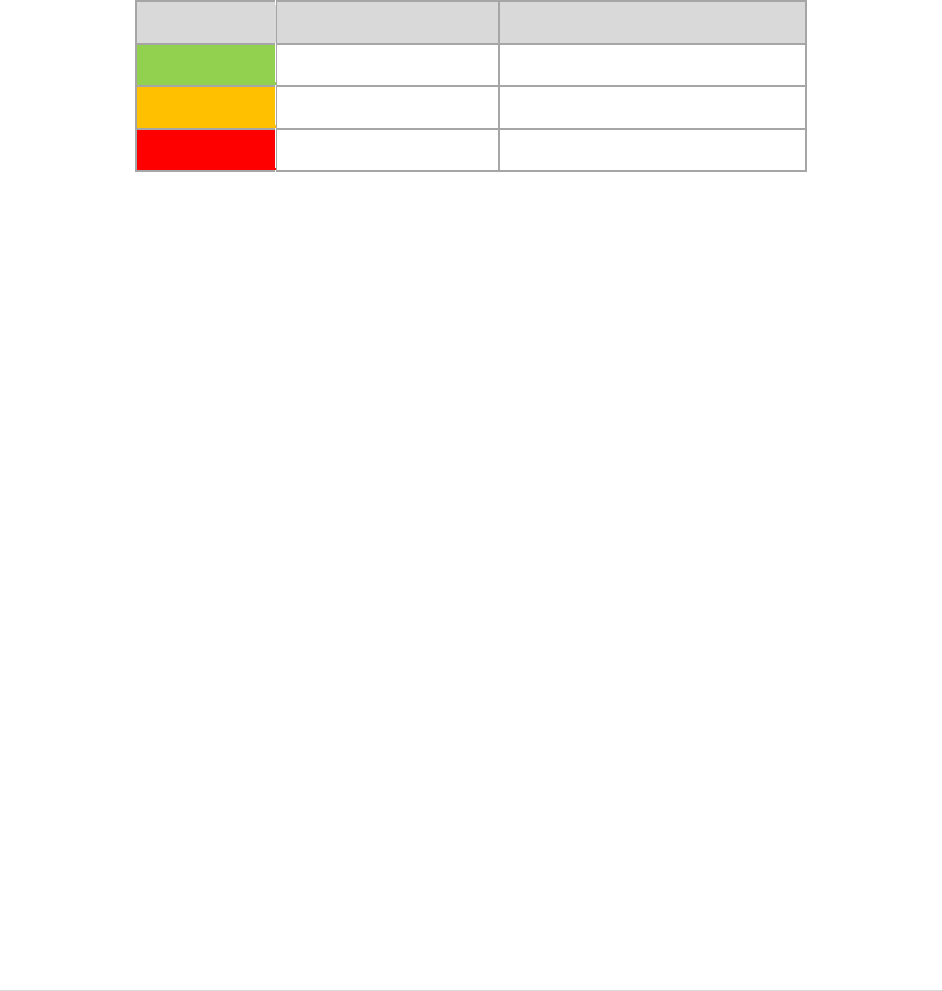
Traffic Flow
The Traffic map contains traffic flow information. The line colors: yellow, red and black
represent the speed at which traffic is moving.
The purple line represents an incident’s extent (i.e. the where it begins and ends) and
means that traffic is flowing normally.
Color
Meaning
Speed Range
Fast
Normal
Slow
23-40 MPH (36-64 km/hr)
Heavy 0-22 MPH (1-35 km/hr)
Congestion events will appear in the Traffic List.
A triangle with these colors is placed to the left of the traffic symbol in the list. Refer to
<Traffic List> section for more details.

49 | P a g e 8 5 0 0 P R O H D U s e r M a n u a l
Traffic Details
At times, you may need to get more information on a specific traffic event. When in the
Traffic map or Traffic List screen, simply tap any event for more details.
<TRAFFIC DETAILS SCREENSHOT HERE>
1
Traffic Event Icon. The icon is
placed at the start of the incident.
6
Traffic Event Icon. In this example, the
icon means ‘Lane Reduction’.
2
Next and Previous. You can scroll
through the list of traffic events.
7
Detailed description of the traffic event.
3
Avoid / Cancel. Tap [AVOID] to
reroute around the traffic event.
You may only avoid ‘On Route’
traffic events. The [CANCEL] button
will only appear for events that you
have asked BringGo to avoid. Tap
[CANCEL] to remove the
avoidance condition for this event.
This means that BringGo will no
longer try to avoid this event.
8 Road, Direction, Start and End Junctions
of the event.
4
Time the traffic message was
received or updated.
9
The magenta line indicates the ‘extent’
of the traffic event. The arrow head is
placed at the end of the incident and
indicates the traffic travel direction.
5
Distance to the traffic event

50 | P a g e 8 5 0 0 P R O H D U s e r M a n u a l
Traffic List
Traffic messages are organized into two groups:
• On My Route: Traffic events on your calculated route. You may only avoid ‘On
Route’ traffic events.
• All Messages: Traffic events that are within 50km of your vehicle’s position in all
directions. This list includes events on your route. The ‘Avoid’ option is not
available for events that are not on your route.
<TRAFFIC LIST SCREENSHOT HERE>
51 | P a g e 8 5 0 0 P R O H D U s e r M a n u a l
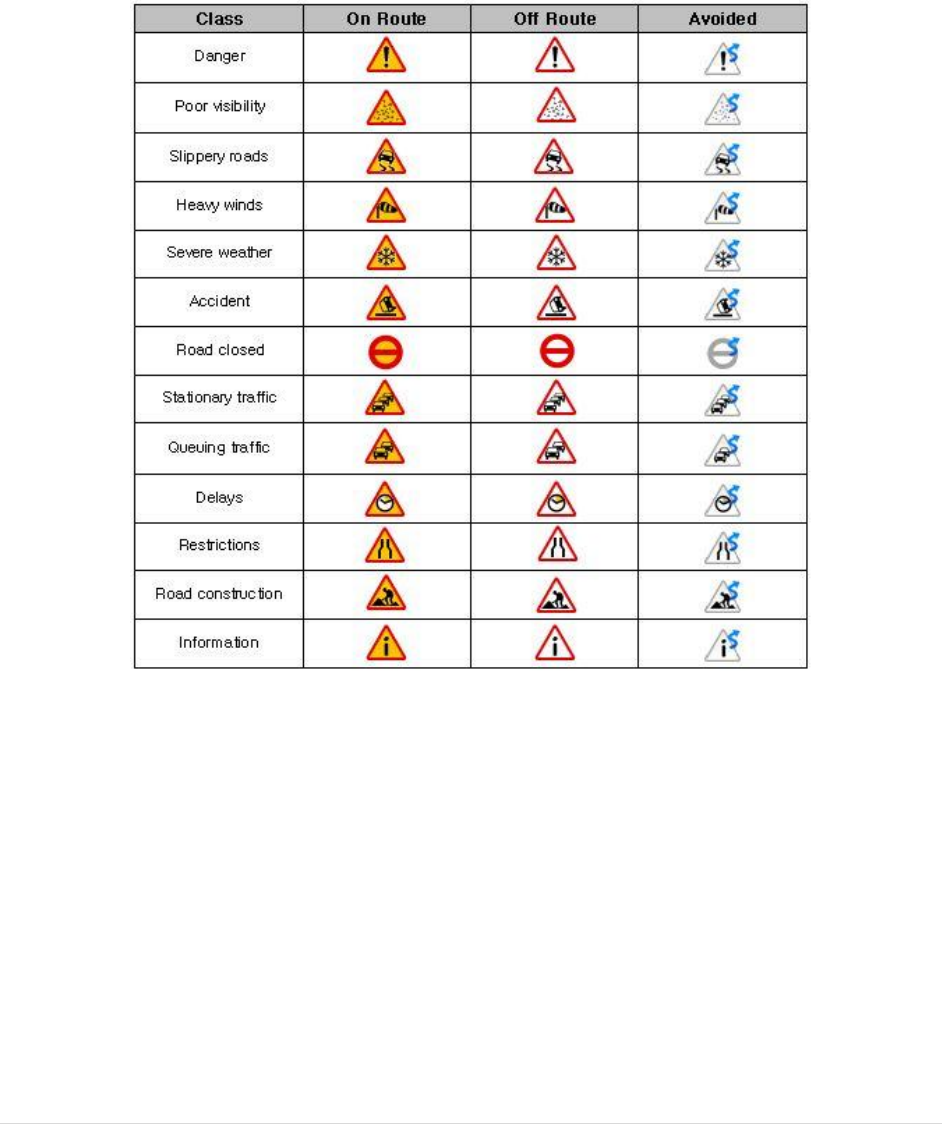
Traffic Event Classes
Traffic messages are organized into classes and each class has a name and symbol.
This symbol will appear next to each event in the list, detail and map.
The traffic event icons are color-coded to indicate their status:
• On Route: These “Red & Yellow” icons appear for “On Route” event only. These
messages are listed in the “On Route” list.
• Off route: These ‘Red & White’ icons indicate events not on your route. These
messages are listed in the “All Messages” list.
• Avoided: This symbol will appear to indicate if the event has been avoided.
When selected, avoided events may be cancelled and will not be excluded
from the route.

52 | P a g e 8 5 0 0 P R O H D U s e r M a n u a l
Traffic Settings
<TRAFFIC SETTINGS SCREENSHOT HERE>
Use Traffic Data
Select to turn the traffic service on or off.
Traffic Event Settings
Traffic information may be turned on/off for certain traffic event classes. The following
options are available:
• Show: Show this traffic event class on the map/list etc.
• Sound: Provide an audible alert when a message from this traffic event class
appears on my route.
<TRAFFIC EVENT SETTINGS SCREENSHOT HERE>
If you uncheck <Show> for a particular class, you will not receive any notification of
events within this class. See Traffic Event Classes section for more details.
Update Interval
Select how often you would like to have traffic information updated.
Predictive Traffic
<PREDICTIVE TRAFFIC SCREENSHOT HERE>
<PREDICTIVE TRAFFIC DESCRIPTION TEXT HERE>
53 | P a g e 8 5 0 0 P R O H D U s e r M a n u a l
9. Weather
Your device allows you to view live weather information in a number of different ways;
different weather overlays may be viewed on map, or a summary of current weather
conditions may be viewed for your current location or for your destination.
On Map
To view weather conditions on a map, tap [SERVICES] and then tap [WEATHER], you
can then select from 9 different weather overlays to display on the map. These overlays
portray different weather conditions.
<LIST OF OVERLAY SCREENSHOT HERE>
When you have selected the desired weather overlay option, tap [APPLY] and the
weather overlay will be displayed on a map. The weather map features a legend to
help you understand the meaning of the different colors and an opacity control to
increase or decrease the transparency of the weather overlay display.
<WEATHER MAP SCREENSHOT HERE – LABELS FOR 6 ELEMENTS>
1
Zoom in
4
Change weather overlay display
2
Zoom out
5
Weather overlay legend
3
Map scale
6
Opacity control
At Your Location
To view a summary of weather conditions at your location, tap [AT YOUR LOCATION] at
the bottom of the weather map screen. The At Your Location screen provides an
overview of the current and upcoming weather conditions.
<WEATHER AT YOUR LOCATION SCREENSHOT HERE – LABELS FOR 8 ELEMENTS>
1
Current weather conditions
5
Sunset/sunrise times for today
2
Current temperature
6
Weather conditions for upcoming days
3
Current wind speed
7
Temperature for upcoming days
4
Location information
8
Temperature for upcoming nights

54 | P a g e 8 5 0 0 P R O H D U s e r M a n u a l
At Destination
If you have an active route in navigation then you can also view a summary of weather
conditions for your destination location. To access this summary, simply tap [AT
DESTINATION] on the bottom of weather map.
<WEATHER AT DESTINATION SCREENSHOT HERE>

55 | P a g e 8 5 0 0 P R O H D U s e r M a n u a l
10. Fuel Prices
The fuel price interface allows you to search for live fuel price information for gas
stations.
At Your Location
<FUEL PRICE AT YOUR LOCATION SCREENSHOT HERE>
To view a list of fuel prices at gas stations near your current location, simply tap
[SERVICES] on the main menu. A list of gas stations and their respective fuel prices is
displayed, this list is sorted by distance from your current location.
Along Route
<FUEL PRICE ALONG ROUTE SCREENSHOT HERE>
If you have an active route entered in navigation, you can search for gas stations that
are on, or situated close to, your route. Simply tap [ALONG ROUTE] at the bottom of the
fuel price screen and a list of gas stations and their respective fuel prices will be
displayed (sorted by distance from your current location).
At Other Location
<FUEL PRICE AT OTHER LOCATION SCREENSHOT HERE>
If you would like to view fuel prices at a different location, tap [AT OTHER LOCATION] at
the bottom of the fuel prices screen, then enter the State/Province and City name of
the location for which you would like to view fuel prices. A list of gas stations and their
respective fuel prices will be displayed (sorted by distance from your current location).

56 | P a g e 8 5 0 0 P R O H D U s e r M a n u a l
11. Settings
In this screen, you can customize the settings of the Navigation application.
Descriptions of each option are as follows:
Display
Settings
Control the display settings of the map view.
Guidance
Settings
Control the settings for guidance announcements.
Language
Settings
Set language used for voice guidance and displayed text.
Routing
Options
Change routing options for the general system.
Home
Set home address.
Office
Set office address.
Traffic Settings
Settings for Traffic information.

57 | P a g e 8 5 0 0 P R O H D U s e r M a n u a l
Display Settings
Display Setting
Control the display settings of the map view.
<DISPLAY SETTINGS SCREENSHOT HERE>
Day/Night: Set the color mode of map as ‘Daytime’, ‘Nighttime’, or ‘Auto mode’. Auto
mode will allow the navigation application to automatically choose day or night mode.
Map Colors: Change the map color.
Map Mode: Change the view mode of map as ‘Track up’, ‘North up’, or ‘3D View’
mode.
View Options: Turn Junction View mode on/off.
Map Overlay: Choose which labels on map you want to display.
Set Clock: Set the time displayed on the main map screen.
Brightness: Set the brightness of the screen.
Alerts: Set which alerts are displayed on the main map.

58 | P a g e 8 5 0 0 P R O H D U s e r M a n u a l
Day/Night
Change the color scheme of the map as ‘Daytime’, ‘Nighttime’, or ‘Auto’ mode.
<DAY/NIGHT SCREENSHOT HERE>
Daytime: Daytime color scheme.
Nighttime: Nighttime color scheme.
Auto: Automatically change the map scheme.
Map Colors
You can change the map color.By touching the map images, change day or night
color of map screen according to your preference. Then tap the [APPLY] button.
<MAP COLORS SCREENSHOT HERE>
Day Color: Select day color of map screen.
Night Color: Select night color of map screen. A darker map color is used to reduce
glare and eye strain while driving.
Map Mode
You can change the view mode of map as ‘Track up’, ‘North up’, or ‘3D View’ mode.
<MAP MODE SCREENSHOT HERE>
Track up: The direction of car is facing upwards.
North up: The map screen is fixed to north direction up.
3D View: 3-dimensional ‘Track up Mode’.

59 | P a g e 8 5 0 0 P R O H D U s e r M a n u a l
View Options
You can turn select which Aura points are displayed on the main map and turn
Junction View on or off.
<VIEW OPTIONS SCREENSHOT HERE>
Map Overlay
You can turn on/off displaying some labels on map.Select options that you wish to be
displayed on the map screen, then tap the [APPLY] button to apply these settings on
the map screen.
<MAP OVERLAY SCREENSHOT HERE>
Street Name: Show or hide the street name on the map.
Favorites Symbol & Name: symbols and names of registered place as your favorite.
POI Symbol & Name: Tapping this button will allow you to hide or display POIs based on
category type. You can choose to only display your favorite POI types, for example
restaurants, fuel stations etc
Guidance Settings
Guidance
Setting
Control the settings for guidance information.
<GUIDANCE SETTINGS SCREENSHOT HERE>
Auto Zoom: You can set the automatic zooming at intersection or on speed.
Fuel Cost: Set fuel pricing, and vehicle fuel consumption.
Guidance Volume: Control the volume of voice guidance instructions.

60 | P a g e 8 5 0 0 P R O H D U s e r M a n u a l
Units: Set the distance units used in guidance.
Auto Zoom
You can turn on/off automatic zooming at the intersection and automatic zooming on
speed options.
<AUTO ZOOM SCREENSHOT HERE>
On Speed: Automatically adjust map scale level according to the speed of car. The
map zooms out to a small scale map when you increase speed; e.g. driving fast on
highway. The map zooms in to a large scale map when you decrease speed; e.g.
when approaching a junction.
At the Intersection: Automatically zoom in/out to a certain map scale level at the next
maneuver intersection.
Levels: Choose the map scale level you would like to map to auto zoom to.
Fuel Cost
<FUEL COST SCREENSHOT HERE>
Fuel Price: Fuel prices fluctuate throughout the year. This setting allows you to adjust the
fuel prices according to current prices. Pricing for fuel volumes can be set as either ‘per
gallon (US)’ or ‘per liter’.
Your journey’s fuel cost estimate will appear on the ‘Route Preview’ screen.
Consumption: The consumption section allows you to set your vehicle’s fuel
consumption. This fuel consumption will then be used in the cost estimate for your trip.
Most modern vehicles include a fuel economy label which describes the vehicle’s fuel
economy ratings. Alternatively, to find out your vehicle’s fuel consumption, please see
the ‘Fuel Economy Guide’ at www.fueleconomy.gov. This guide is published by the U.S.
Environmental Protection Agency (EPA) and U.S. Department of Energy (DOE). It
contains an extensive listing of most vehicle makes and models.
Vehicle consumption is typically expressed as two fuel economy estimates:
• City: represents urban driving and driving in stop and-go rush hour traffic.
City driving typically consumes more fuel than highway driving.

61 | P a g e 8 5 0 0 P R O H D U s e r M a n u a l
• Highway: represents driving on a mixture of rural and interstate highway
driving, typical of longer trips in free-flowing traffic.
Please be aware that the actual fuel cost may vary according to other factors which
affect the fuel consumption; for example, driver behavior, driving conditions, vehicle
maintenance, fuel characteristics, and weather. The cost estimate is an approximation
of fuel costs only. Other costs, such as Toll charges are not included in the calculation.
Guidance Volume
This setting allows you to control the volume level of voice guidance.
<GUIDANCE VOLUME SCREENSHOT HERE>
Increase Volume: press the [+] button to increase the volume of the guidance
announcements.
Decrease Volume: press the [-] button to decrease the volume of the guidance
announcements.

62 | P a g e 8 5 0 0 P R O H D U s e r M a n u a l
Language Settings
<ICON HERE>
Language
Settings
Set the language used for voice guidance and for displayed text.
<LANGUAGE SETTINGS SCREENSHOT HERE>
You may select from three languages for voice guidance and displayed text: English
(USA), French (Canada) and Spanish (USA).
Simply tap [Voice] and/or [Text] and select the language that you want to use. When
you have finished, tap [APPLY] and any changes will be saved.

63 | P a g e 8 5 0 0 P R O H D U s e r M a n u a l
Routing Options
Routing
Options
Change routing options for the system.
<ROUTING OPTIONS SCREENSHOT HERE>
Routing Selection:
To calculate a route for faster time, select ‘Faster Time’ option.
To calculate a route for shorter distance, select ‘Shorter Distance’ option.
Route Preferences: Tap the [Route Preferences] button if you wish to avoid or prefer
certain features or road types (e.g. avoid U-turns, avoid ferries, use STAA roads, etc.).
When you have finished making changes to routing options tap [APPLY] and your
changes will be saved for all future routes.

64 | P a g e 8 5 0 0 P R O H D U s e r M a n u a l
Home and Office
Set an address for your Home and/or Office.
Office
Set your office address
Home
Set your Home address
When the addresses for home and office locations have been entered and saved, you
can then plan a route to your home or office simply by tapping the respective icon on
the main menu.
Traffic Settings
Traffic Setting
Settings for Traffic information.
See

65 | P a g e 8 5 0 0 P R O H D U s e r M a n u a l
12. Trucker Tools
The Trucker tools menu provides a range of different functions that are particularly
helpful to truck drivers, to access the trucker tools menu, simply tap [TRUCKER TOOLS] at
the bottom of the main menu.
Mileage Log
<MILEAGE LOG SCREENSHOT HERE>
The mileage log automatically records the number of miles that you drive. These
records can then be organised by state or by year. Additionally, you can save these
records to a SD card for your own records.
Trip Computer
<TRIP COMPUTER SCREENSHOT HERE>
The trip computer provides an overview of totals for your current trip. The display
includes an odometer, average speed for your trip and total trip time. Additionally,
current altitude and cumulative mileage are provided.
Backup/Restore
<BACKUP/RESTORE SCREENSHOT HERE>
The backup/restore function allows you to save your favorites and/or mileage log
entries to a SD card.
For this function to work you must have a SD card inserted into your device. In order to
restore favorites/mileage log you will need to have a SD card inserted that has the
required files saved onto the root directory of the SD card. In order to backup
favorites/mileage log, you will need to have sufficient space on the SD card to allow
the files to be saved.
On Duty Timer
The On Duty Timer is a set of timers that will assist you in filling out your hours of service
log book.

66 | P a g e 8 5 0 0 P R O H D U s e r M a n u a l
When the On Duty Timer is set to manual, your work time will be calculated depending
on the setting you make in the information tab on the main map (e.g. On Duty, On Duty
Driving or Off Duty). When the On Duty Timer is set to Auto, the timer will automatically
change to On Duty Driving after your vehicle has been in motion for 5 minutes, once
the vehicle is stationary for 5 minutes the timer will change to On Duty.
You can view and change the settings for the On Duty Timer, reset totals, change
between auto and manual or manually alter the maximum time allowed and time
remaining in the On Duty Timer menu.
<ON DUTY TIMER SCREENSHOT HERE>
<ON DUTY TIMER SCREENSHOT HERE (Time remaining/Maximum time edit screen)>
The default totals for maximum time are: On Duty Driving Day 11hrs; On Duty Day 14hrs;
On Duty Week 60hrs. To manually alter the maximum time allowed for these totals,
simply tap the total you would like to edit and you will be able to enter both the Time
Remaining and the Maximum Time.
When you have finished making any alterations to On Duty Timer, tap [APPLY] and your
changes will be saved.
My Truck
The My Truck interface allows you to save several vehicle profiles for any different truck
types that you may be driving.
Truck Information
<TRUCK INFORMATION SCREENSHOT HERE>
When opening My Truck, you will see a screen that displays the vehicle information of
your currently selected vehicle, this includes the truck name, truck type and all
important truck parameters (e.g. length, height, load type, etc.). The vehicle
information displayed on this screen relates to the vehicle that is currently being used in
navigation.
To change the currently selected vehicle, tap [CHANGE] in the bottom left corner of
the screen.
My Vehicle
<MY VEHICLE SCREENSHOT HERE>

67 | P a g e 8 5 0 0 P R O H D U s e r M a n u a l
The My Vehicle screen displays all the vehicles that you have available for use. When
using your device for the first time, you will have two default vehicle profiles, one truck
(Truck 1) and one car (Car).
To add a new truck to your list of vehicles, simply tap [ADD] at the bottom of the screen.
<TRUCK TYPE SCREENSHOT HERE>
You will be provided with a list of different truck type axle configurations, to switch
between the different lists for USA and Canada, simply select the appropriate country
name at the top of the list. When you have selected the desired truck type from the list,
tap [APPLY] and the vehicle will automatically be added to the end of your My Vehicle
list.
From the My Vehicle list you can then manually enter the parameters of your truck,
simply select the vehicle you wish to edit the parameters for and tap [EDIT] at the
bottom of the screen.
<ENTER TRUCK INFORMATION SCREENSHOT HERE>
From the Enter Truck Information menu you can give the truck a meaningful name, edit
all truck parameters and set your choice of vehicle icon to be displayed on the map.
To edit any of the truck parameters, simply tap the <ICON HERE> icon to the right of the
parameter field. A sub menu will then be displayed where you can individually enter
each sub category for that truck parameter.
When travelling from the US to Canada or vice versa, routing in the other country will
be based on our closest match to your truck type. For best results, use US truck types in
the US and then switch to a Canada truck type when driving in Canada.
Vehicle Icon
The Vehicle Icon sub menu allows you to set your preferred vehicle icon for your truck.
You can select from five different icon styles with five different colour schemes for each
icon style.
<VEHICLE ICON SCREENSHOT HERE>
Calculator
The Calculator interface provides an easy and convenient means of carrying out basic
calculations using your device.


3.After paired sucessfully, the bluetooth icon on the display will be on.
1.When the bluetooth icon on the display flashes, means the device is searching the previous paired device.
5.If it still doesn't work, please reset the Bluetooth and follow above step again.
4.Search "HKN" and pair it, input the password "0000" if necessary.
3.Press play/pause button and hold for 10 seconds, after a beep tone, the device is prepaired to be paired again.
1.Power on the unit and press "MODE" button to change to bluetooth mode or press “BT” button on the remote,
2.The previous paired device will connect to the device automatically when each time changing to bluetooth mode.
69 | P a g e 8 5 0 0 P R O H D U s e r M a n u a l
Traffic section for more information.
Exit navigation
Exit
Exit the navigation application.
Tap the [Exit] button to completely close the navigation application.
Bluetooth
WIFI
This device supports “Wi-Fi 802.11 b/g/n”. You can access to the local network through WiFi. About WiFi settings
and operations, please refer to the WiFi section in System Settings.
Notes:
the LED display will display “bt”.
2.Press play/pause button and hold for 10 seconds, the bluetooth icon on the display will flash fast, which means
the device is ready for being paired.

70 | P a g e 8 5 0 0 P R O H D U s e r M a n u a l
13. User information and precautions
1. EnGIS is not responsible for any accident that occurs while operating our software.
2. The suggested route and guidance may be different with actual traffic and road
conditions. Please drive safely and obey traffic rules.
3. Map screen images and user interface information printed on this manual may not
correspond with actual device due to additional features or any modifications. Display
colors printed on this manual may appear different with the actual screen color of
device in result of manufacture process and printing ink. EnGIS does not warrant that
this document is error-free.
4. To prevent GPS signal disturbance, please make sure that you are outside and the
GPS antenna has good visibility of the open sky.
5. If you are in the downtown area where buildings are densely crowded, it may cause
GPS signal reception disturbance. It is not possible to receive GPS signals in a tunnel,
underground parking lot, or enclosed space.
6. Do not place any object near GPS antenna that will cause GPS signal reception
disturbance.
7. Some specially coated windshields, such as heat-reflecting windshields, may block
the GPS signal reception.
8. Do not install electronic equipment with strongly emitting electromagnetic waves
such as a radio wave transmitter near the GPS antenna.
9. The rate of GPS signal reception may be low due to the weather and atmospheric
conditions.
10. Do not operate your device while driving. Please drive safely and pay attention to
the surrounding traffic and pedestrians. Always observe safe driving practices.
11. This product is designed in aid of safer driving. You may receive speed alerts to help
you monitor your speed. EnGIS accepts no liability whatsoever for you receiving any
speeding fines or points on your license through using this software. EnGIS does not
guarantee the accuracy of the data contained within this database either expressed
or implied.
12. Information in this document is subject to change without notice. EnGIS
Technologies, Inc. reserves the right to make changes to the navigation application or

71 | P a g e 8 5 0 0 P R O H D U s e r M a n u a l
make amendments to the content of this document without obligation to inform any
organization or user of such changes.

72 | P a g e 8 5 0 0 P R O H D U s e r M a n u a l
14. Copyright
1. Copyright and intellectual property rights of all documents written by EnGIS
Technologies, Inc. are the property of EnGIS Technologies, Inc.
2. EnGIS Technologies, Inc. has copyright and intellectual property rights of our software
and documents including this manual, and the use of product follows license
agreement. Product warranty and liability limit are included in license, and more
specific subjects can be arranged by a discussion with a staff member in charge.
3. All names are trademarks or registered trademarks of their respective owners. You
cannot infringe ownership without permission.
4. The following contents stated on (A) are EnGIS Technologies, Inc. own technology
and property. You cannot use or let a third party use all or any parts of this technology
or property for any commercial purpose in any way copying, transmitting, publishing,
saving on recovery system, translating into other languages (publishing), distributing, or
broadcasting without the express written permission from EnGIS Technologies, Inc.
(A)
1. Our navigation software
2. Manual contents
3. All symbols and icons related to our Navigation
4. All designs (screen composition, screen arrangement, screen color, screen design)
related to our Navigation.
Navigation Software
© 2013 EnGIS Technologies, Inc.
Visit www.engistech.com for the official web site.
(B)
Data sources
© 2013 TomTom. All rights reserved.
Traffic Information

73 | P a g e 8 5 0 0 P R O H D U s e r M a n u a l
Total Traffic Network Data Distribution Services. Total Traffic Network is a mark (or
registered mark) of Clear Channel in the United States and other countries and hereby
used under license.
Text-To-Speech (TTS)
Copyright © DIOTEK, SVOX TTS
Live Weather Information
<TEXT HERE>
Live Fuel Price Information
<TEXT HERE>
Extended Truck POI Data
<TEXT HERE>
Data Sources and Software Components
Data sources and Software components are listed in the ‘About ‘screen of the
navigation application. Go to Menu > Settings > About.
15. Contact
If you have any issues or any difficulties with our software, please refer to the FAQ
section on our website. We will provide support as soon as possible.
Website: www.engistech.com
Email: support@engistech.com
This device complies with part 15 of the FCC rules. Operation is subject to the following
two conditions:
(1) this device may not cause harmful interference, and
(2) this device must accept any interference received, including interference that
may cause undesired operation.
*RF warning for Portable device: The device has been evaluated to meet general RF
exposure requirement. The device can be used in portable exposure condition
without restriction.
This device is acting as slave device and operating in the 2.4 GHz (2412 – 2462 MHz)
band.
Ad Hoc function is supported but not able to operate on non-US frequencies.
NOTE: This equipment has been tested and found to comply with the limits for a Class B
digital device, pursuant to part 15 of the FCC Rules. These limits are designed to provide
reasonable protection against harmful interference in a residential installation. This
equipment generates uses and can radiate radio frequency energy and, if not installed
and used in accordance with the instructions, may cause harmful interference to radio
communications. However, there is no guarantee that interference will not occur in a
particular installation. If this equipment does cause harmful interference to radio or
television reception, which can be determined by turning the equipment off and on, the
user is encouraged to try to correct the interference by one or more of the following
measures:
- Reorient or relocate the receiving antenna.
- Increase the separation between the equipment and receiver.
-Connect the equipment into an outlet on a circuit different from that to which the
receiver is connected.
-Consult the dealer or an experienced radio/TV technician for help
Do not use the device with the environment which below minimum -10
℃
or over
maximum 50
℃
,the device may not work.
Changes or modifications to this unit not expressly approved by the party responsible
for compliance could void the user’s authority to operate the equipment.
ThisdevicecomplieswithIndustryCanadalicenceexemptRSSstandard(s).
Operationissubjecttothefollowingtwoconditions:
(1)thisdevicemaynotcauseinterference,and
(2)thisdevicemustacceptanyinterference,includinginterferencethatmaycause
undesiredoperationofthedevice.
LeprésentappareilestconformeauxCNRd'IndustrieCanadaapplicablesaux
appareilsradioexemptsdelicence.L'exploitationestautoriséeauxdeuxconditions
suivantes:
(1)l'appareilnedoitpasproduiredebrouillage,et
(2)l'utilisateurdel'appareildoitacceptertoutbrouillageradioélectriquesubi,
mêmesilebrouillageestsusceptibled'encompromettrelefonctionnement.