Cobra Electronics MRF75 MARINE TRANSCEIVER User Manual F75 CvrTOC
Cobra Electronics Corporation MARINE TRANSCEIVER F75 CvrTOC
UserManual.wiki
>
Cobra Electronics
>
MRF75 User Manual
USERS MANUAL
Navigation menu
Upload a User Manual
Namespaces
Wiki Guide
HTML
PDF
Info
Views
User Manual
Discussion / Help
Navigation
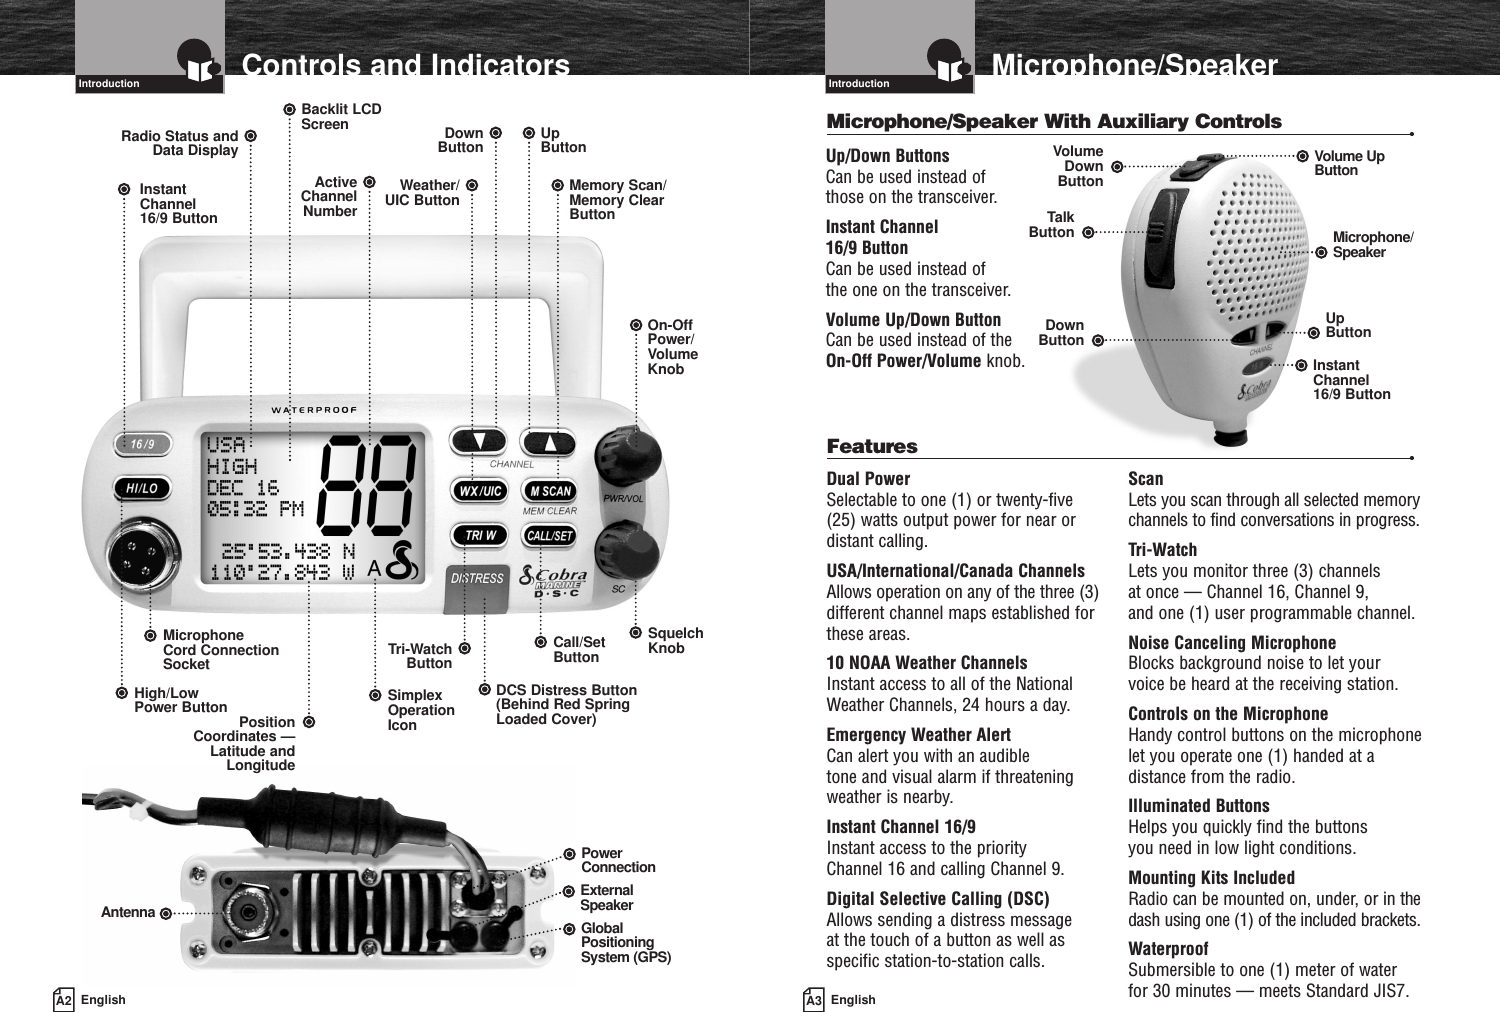

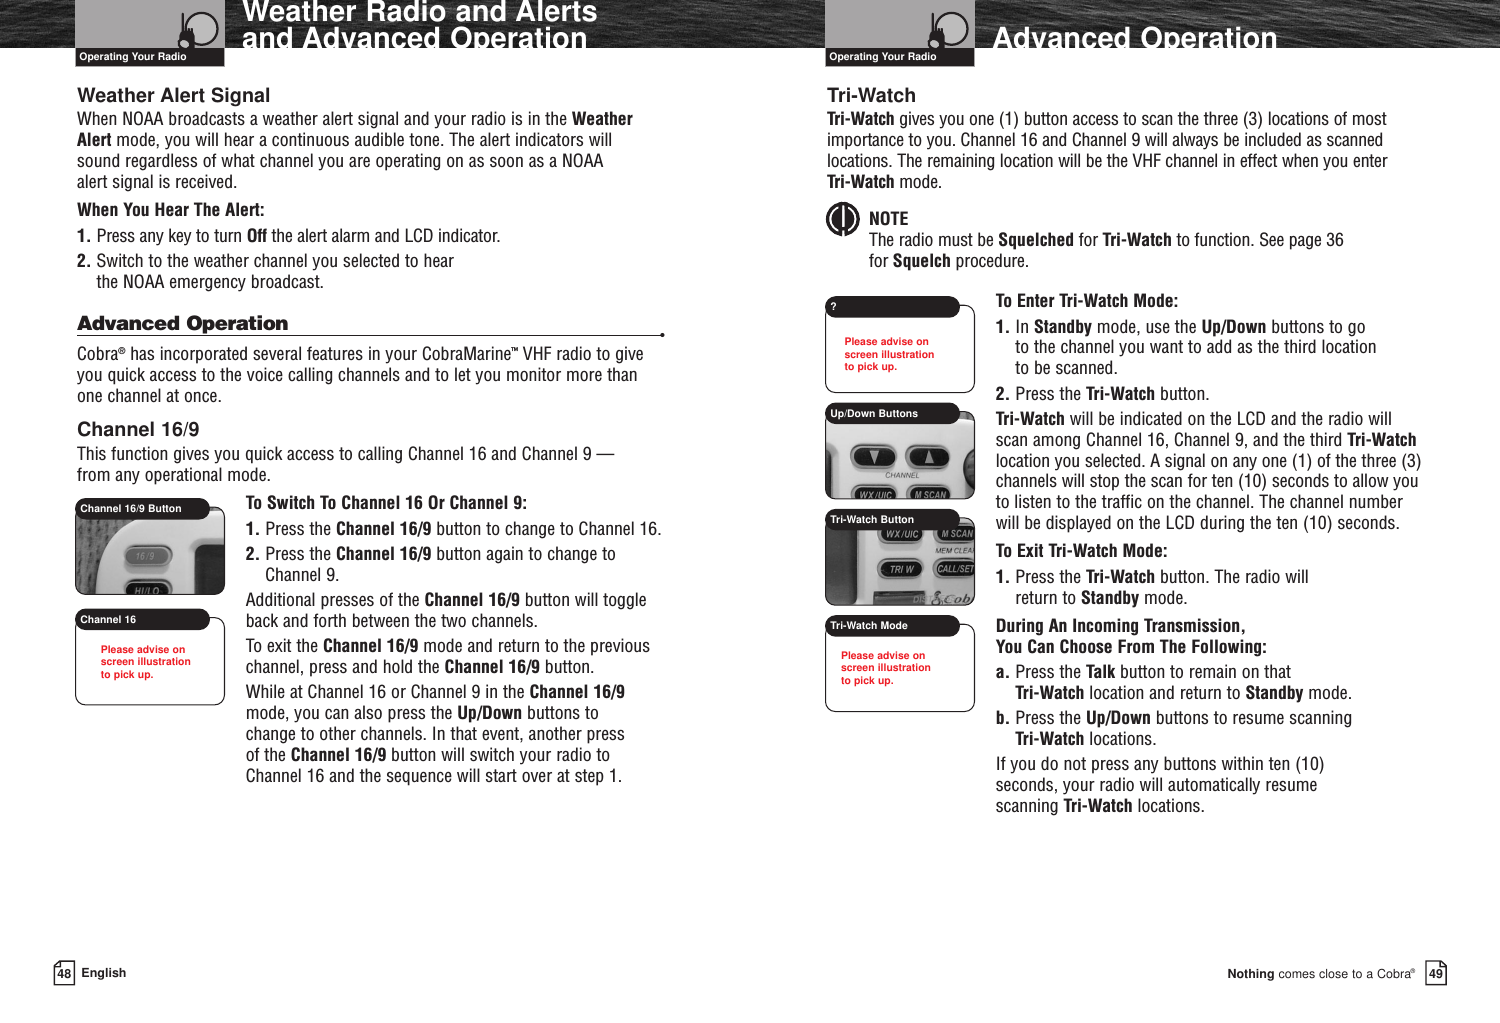
![Nothing comes close to a Cobra®6EnglishVHF Marine RadioProcedures Voice Calling7VHF Marine Radio Procedures •Maintain Your Watch Whenever your boat is underway, the radio must be turned On and be tuned to Channel 16 except when being used for messages.PowerTry one (1) watt first if the station being called is within a few miles. If there is no answer, switch to a higher power. This will conserve your battery and you will sound better since your signal will not overpower the nearby station.Calling Coast Stations Call a coast station on its assigned channel. You may use Channel 16 when you do not know the assigned channel.Calling Other Vessels Call other vessels on Channel 16 or on Channel 9. (Channel 9 is preferred for recreational vessel use.) You may also call on ship-to-ship channels when you know that the vessel is listening on a ship-to-ship channel.Limits On CallingYou must not call the same station for more than 30 seconds at a time. If you do not get a reply, wait at least two (2) minutes before calling again. After three (3) calling periods, wait at least 15 minutes before calling again.Change ChannelsAfter contacting another station on a calling channel, change immediately to a channel which is available for the type of message you want to send.Station IdentificationIdentify, in English, your station by your FCC call sign, ship name, the state registrationnumber, or other official number at both the beginning and end of each message.Prohibited CommunicationsYou MUST NOT transmit:■ False distress or emergency messages.■ Messages containing obscene, indecent, or profane words or meaning.■ General calls, signals, or messages (messages not addressed to a particularstation) on Channel 16, except in an emergency or if you are testing your radio.■ When you are on land.Voice Calling •To Call Another Vessel Or A Shore Installation Such As A Lock Or Bridge Tender:■ Make sure your radio is On.■ Select Channel 16 and listen to make sure it is not being used. NOTEChannel 9 may be used by recreational vessels for general-purpose calling. This frequency should be used whenever possible to relieve congestion on Channel 16.■ When the channel is quiet, press the Talk button and call the ship you wish tocall. (Hold the microphone a few inches from your face and speak directly into it in a normal tone of voice — clearly and distinctly.) Say “[name of station being called] THIS IS [your vessel’s name or call sign].”■ Once contact is made on the calling channel, you must switch to a proper working channel. See the channel listing on page 14.The vessel Corsair calling the vessel Vagabond:Corsair: “Vagabond, this is Corsair.”Vagabond: “Corsair, this is Vagabond. Reply 72 (or any proper working channel).”Corsair: “72” or “Roger”■ After communications are completed, each vessel must sign off with its call sign or vessel name and switch to Channel 16.NOTEFor best sound quality at the station your calling, hold the microphone on thefront of the radio at least two (2) inches (5 cm) from your mouth and slightly off to one side. Speak in a normal tone of voice.VHF Marine Radio Protocols VHF Marine Radio ProtocolsFor Example](https://usermanual.wiki/Cobra-Electronics/MRF75/User-Guide-363976-Page-6.png)
![For ExampleNothing comes close to a Cobra®Emergency Messages and Distress Procedure1312 EnglishEmergency Messages and Distress ProcedureMarine Distress ProcedureSpeak slowly — clearly — calmly.1. Make sure your radio is On.2. Select VHF Channel 16.3. Press Talk button and say: “MAYDAY — MAYDAY — MAYDAY.” (Or “PAN — PAN — PAN,” or “SECURITE — SECURITE — SECURITE.”)4. Say: “THIS IS [your vessel name or call sign].”5. Say: “MAYDAY (or “PAN” or “SECURITE”) [your vessel name or call sign].6. Tell where you are: (what navigational aids or landmarks are near).7. State the nature of your distress.8. State the kind of assistance needed.9. Give number of persons aboard and conditions of any injured.10. Estimate present seaworthiness of your vessel.11. Briefly describe your vessel (length, type, color, hull).12. Say: “I WILL BE LISTENING ON CHANNEL 16.”13. End message by saying: “THIS IS [your vessel name or call sign] OVER.”14. Release Talk button and listen. Someone should answer. If not, repeat the call, beginning at Item 3 above.Keep the radio nearby. Even after your message has been received, the Coast Guardcan find you more quickly if you can transmit a signal for a rescue boat to hone in on.“Mayday — Mayday — Mayday”“This is Corsair — Corsair — Corsair” (or “Illinois 1234 AB” three (3) times)“Mayday Corsair (or Illinois 1234 AB)”“Navy Pier bears 220 degrees magnetic — distance five (5) miles”“Struck submerged object and flooding — need pump and tow”“Four adults, three children aboard — no one injured”“Estimate we will remain afloat one half (1⁄2) hour”“Corsair (or Illinois 1234 AB) is 26 foot sloop with blue hull and tan deck house”“I will be listening on Channel 16”“This is Corsair (or Illinois 1234 AB)”“Over”It is a good idea to write out a script of the message form and post it where you and others on your vessel can see it when an emergency message needs to be sent.Marine Distress Procedure – DSC •Once your radio is connected to a GPS device and is properly set-up with yourMMSI, simply lifting the red door and pressing the red button will automaticallysend a complete distress call on Channel 70. See the DSC Operation section on pages 60 to 73 for further information and page 60 instruction on sending a manual DSC distress call.VHF Marine Radio Protocols VHF Marine Radio Protocols](https://usermanual.wiki/Cobra-Electronics/MRF75/User-Guide-363976-Page-9.png)
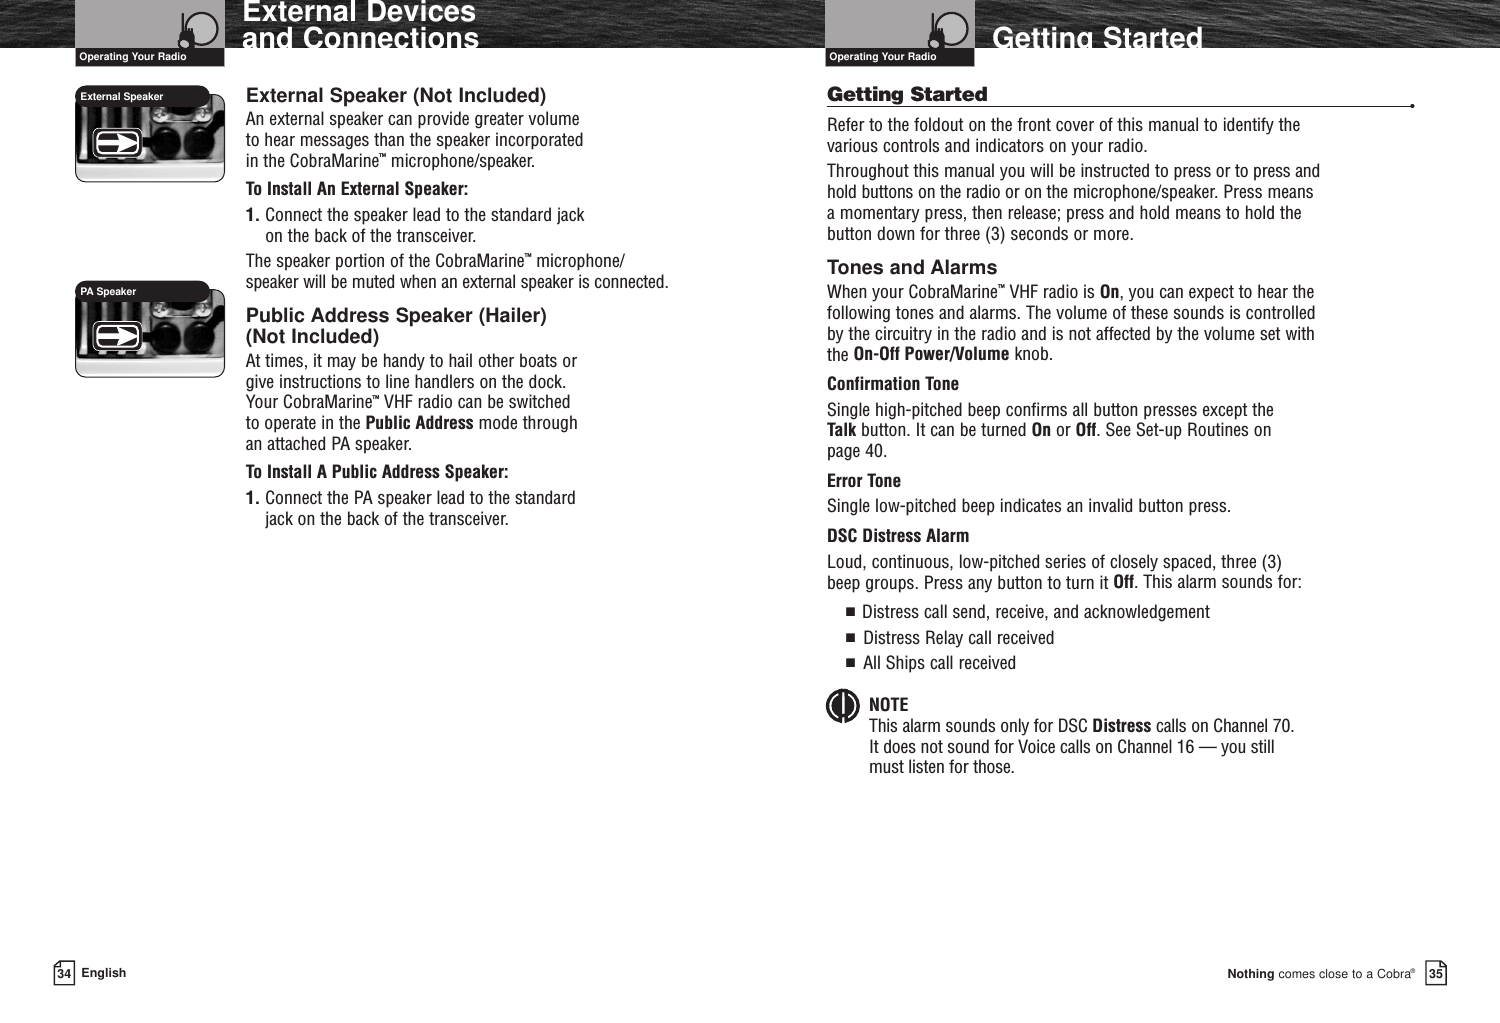
![Nothing comes close to a Cobra®Getting Started3736 EnglishGetting StartedDSC Geographical Alarm Loud, continuous, medium-pitched, high-low tones (warble) — sounds when a Geographical call is received. Press any button to turn it Off.DSC Position Request AlarmMedium-loud, continuous, low-pitched series of closely spaced, four (4) beeps [three (3) short – one (1) long] groups — sounds when a Position Request call is received. Press any button to turn it Off.DSC Individual AlarmMedium-loud, continuous, medium-pitched, two (2) beep groups — sounds when an Individual call is received. Press any button to turn it Off.Weather AlarmMedium-loud, continuous, medium-pitched series of one-half (1⁄2) second beeps spaced one-half (1⁄2) second apart — sounds when Weather Alert is turned On and NOAA sends a 1050 Hz weather alert tone on the selected weather channel. Press any button to turn it Off. Switch to the selected weather channel to hear the NOAA alert message.Power On-OffTransceiver power can be turned On or Off by the On-Off Power/Volume knob on the transceiver or the Volume Up button on the microphone/speaker.To Turn Your Radio On Or Off:1. Press and hold the On-Off Power/Volume knob on the transceiver or the Volume Up button on the microphone/speaker.When the radio is powered On, the Confirmation Tone will sound and the LCD will show all segments for two (2)seconds. All buttons will be inoperative during these two (2) seconds.After two (2) seconds, the radio will return to the settings in effect when it was last powered Off, the LCD will show the corresponding information, and all controls will beoperative. The radio will then be in Standby mode.VolumeThe On-Off Power/Volume knob on the transceiver and the Volume Up/Down buttons on the microphone/speakercontrol the speaker volume. The volume adjustment appliesonly to what you hear from the speaker and does not affectthe volume of your outgoing messages. That is controlled by the circuitry of your radio.To Increase The Volume You Can Choose One Of The Following:a. Turn the On-Off Power/Volume knob clockwise.b. Press and release the Volume Up button on the microphone/speaker.To Decrease The Volume You Can Choose One Of The Following:a. Turn the On-Off Power/Volume knob counter-clockwise.b. Press and release the Volume Down button on themicrophone/speaker.When adjusting the volume while using the microphone/speaker, press and hold the Volume Up or Volume Downbuttons for rapid advance.Operating Your Radio Operating Your RadioOn-Off Power/VolumeVolume Down ButtonOn-Off Power/Volume?Squelch KnobSquelch KnobCompetitorIllustration G](https://usermanual.wiki/Cobra-Electronics/MRF75/User-Guide-363976-Page-21.png)
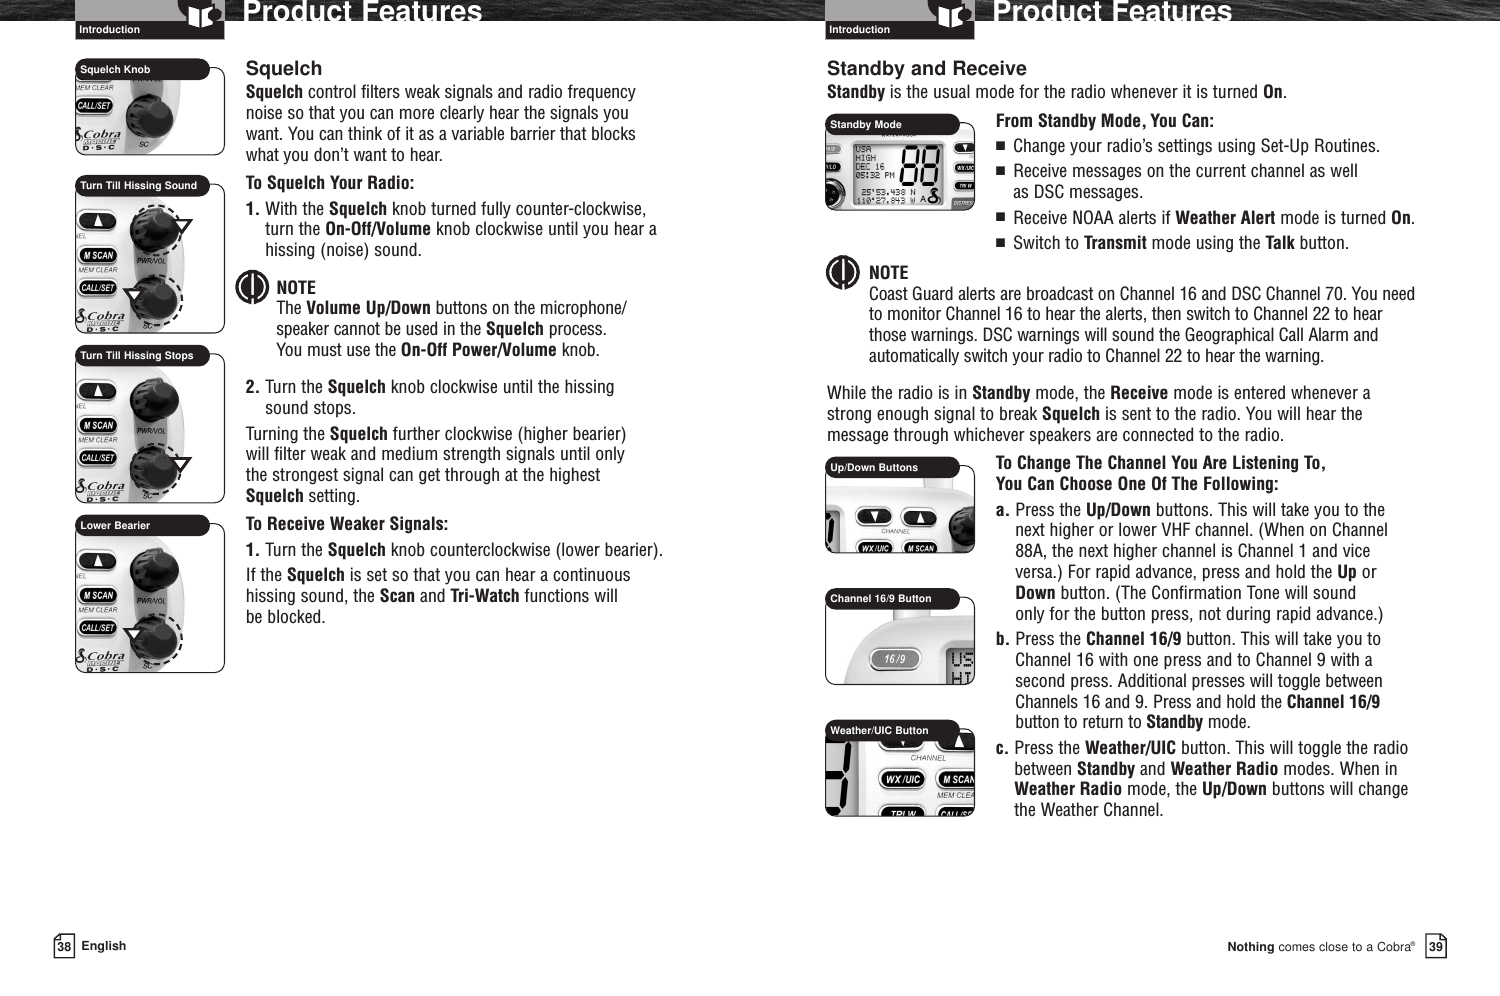
![Nothing comes close to a Cobra®Advanced Operation5150 EnglishAdvanced OperationDuring Scanning (While Not Receiving A Transmission), You Can Choose From The Following:a. Press the Talk button to communicate on the last Tri-Watch location scanned and return to Standby mode.b. Press the Up/Down buttons to change the scan direction.ScanMemory Scan mode is similar to the Tri-Watch mode except that it will scan as many channels as you choose. NOTEThe radio must be Squelched for the Memory Scan mode to function. See page 36 for Squelch procedure.Memory ChannelsYou can program (or tag) any or all channels to be scanned in the Memory Scanmode. These tagged channels can be scanned using Memory Scan mode.To Program Memory Channels:1. Select a channel to be tagged using the Up/Down buttons. 2. Press and hold the Memory Scan/Memory Clear buttonfor three (3) seconds. The channel will be tagged forscanning and MEM (Memory Channel) will appear next to the channel number on the LCD whenever that channelis selected.The radio will return to Standby mode as soon as theMemory Scan/Memory Clear button is released.Repeat steps 1 through 2 to tag as many more channels as you wish.To Clear Memory Channels:1. Select a channel to be cleared from a memory tagging using the Up/Down buttons. 2. Press and hold the Memory Scan/Memory Clearbutton for three (3) seconds. The channel will beuntagged and MEM (Memory Channel) will no longerappear next to the channel number on the LCD whenever that channel is selected.The radio will return to Standby mode as soon as the Memory Scan/Memory Clear button is released.Repeat steps 1 through 2 to clear additional channels from memory locations.Memory ScanDuring Memory Scan, the radio will rapidly switch from tagged channel to taggedchannel. Whenever any activity is detected, the radio will stop the scan for ten (10)seconds to allow you to listen briefly on that channel. It will then continue to scanunless you switch out of the Scan mode.NOTE If there are fewer than two (2) channels tagged, the Memory Scan mode will not be available. [See “To Program Memory Channels” to tag at least two (2) channels.]To Enter Memory Scan:1. From Standby mode, press the Memory Scan/Memory Clear button.The radio will immediately begin to scan the channels youtagged. MEM SCAN (Memory Scan) will show on the LCD. To Exit Memory Scan:1. From Memory Scan mode, press the MemoryScan/Memory Clear button.2. This will return the radio to Standby mode on the last scanned memory location.Operating Your Radio Operating Your RadioUp/Down ButtonsUp/Down ButtonsMemory Scan/ClearMemory ChannelMemory ChannelMemory Scan/ClearMemory Scan/ClearMemory Scan ModeIs Subhead appropriate?Please advise on screen illustration to pick up.Is Subhead appropriate?Please advise on screen illustration to pick up.Please advise on screen illustration to pick up.](https://usermanual.wiki/Cobra-Electronics/MRF75/User-Guide-363976-Page-28.png)