Cobra Electronics MRHH600 VHF Marine Radio Transceiver User Manual
Cobra Electronics Corporation VHF Marine Radio Transceiver
UserManual.wiki
>
Cobra Electronics
>
MRHH600 User Manual
User Manual
Navigation menu
Upload a User Manual
Namespaces
Wiki Guide
HTML
PDF
Info
Views
User Manual
Discussion / Help
Navigation
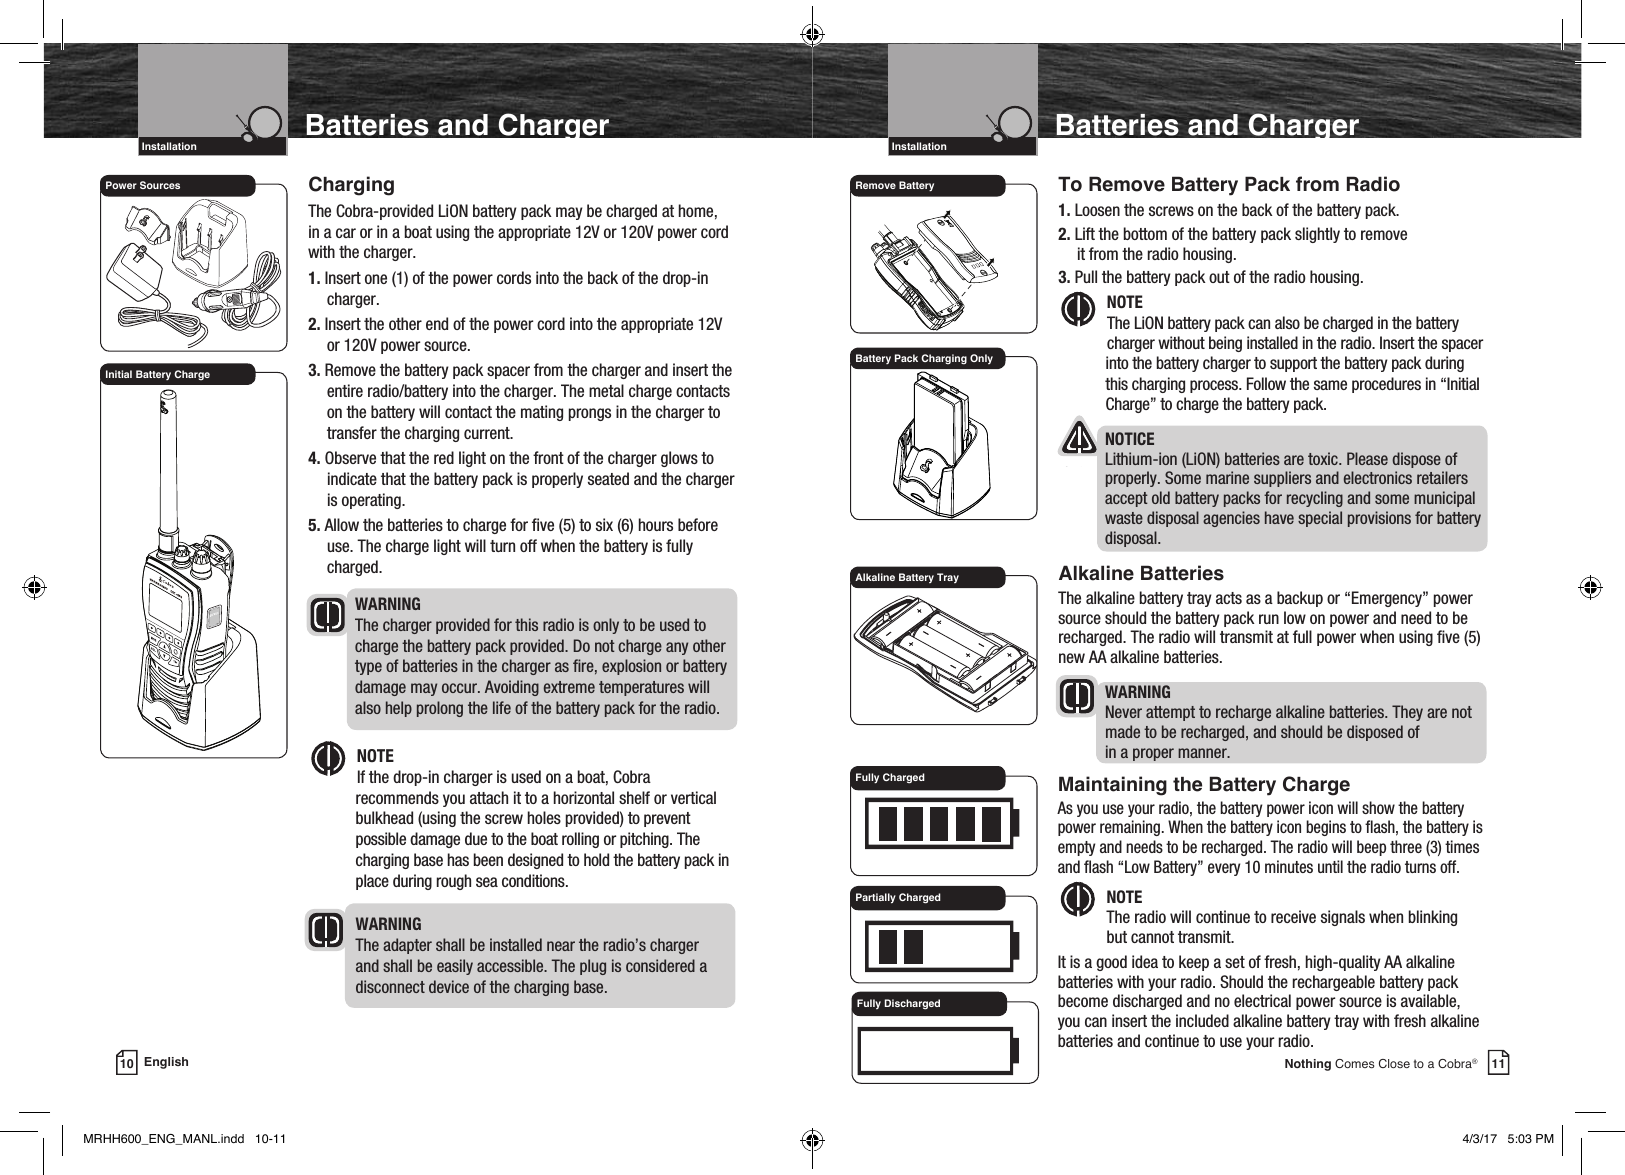
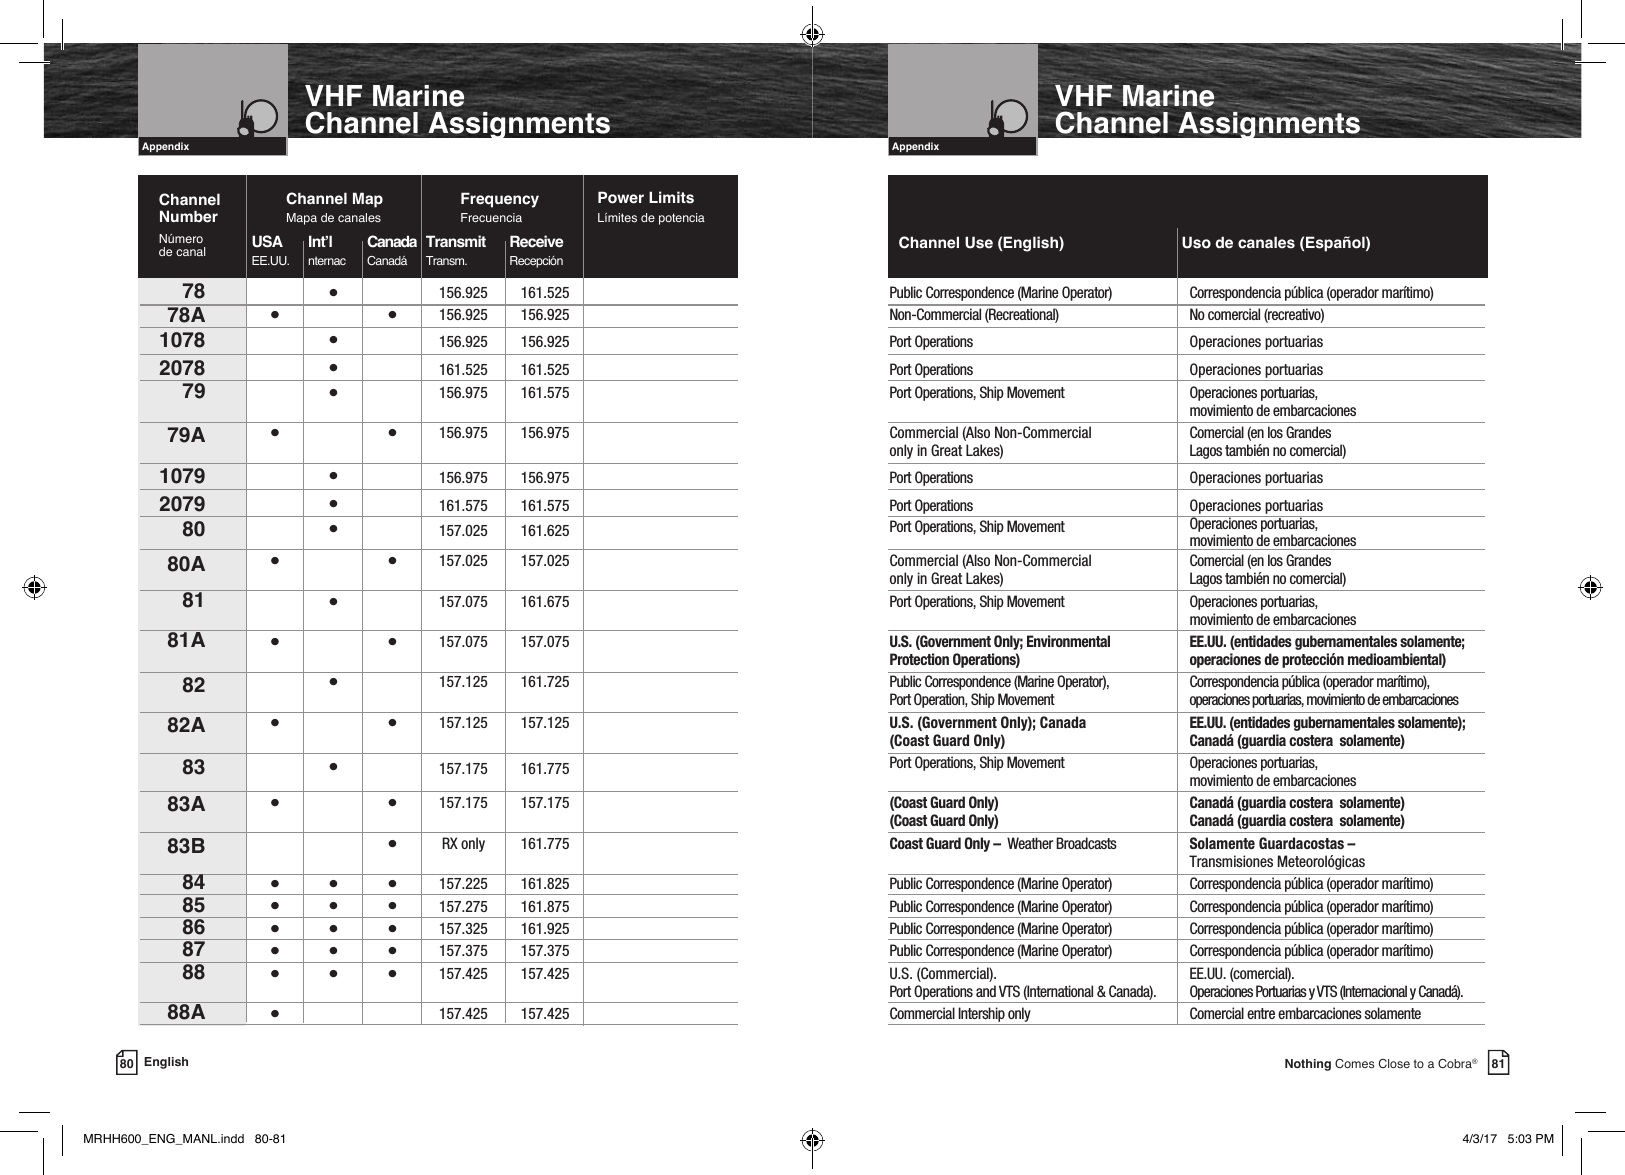
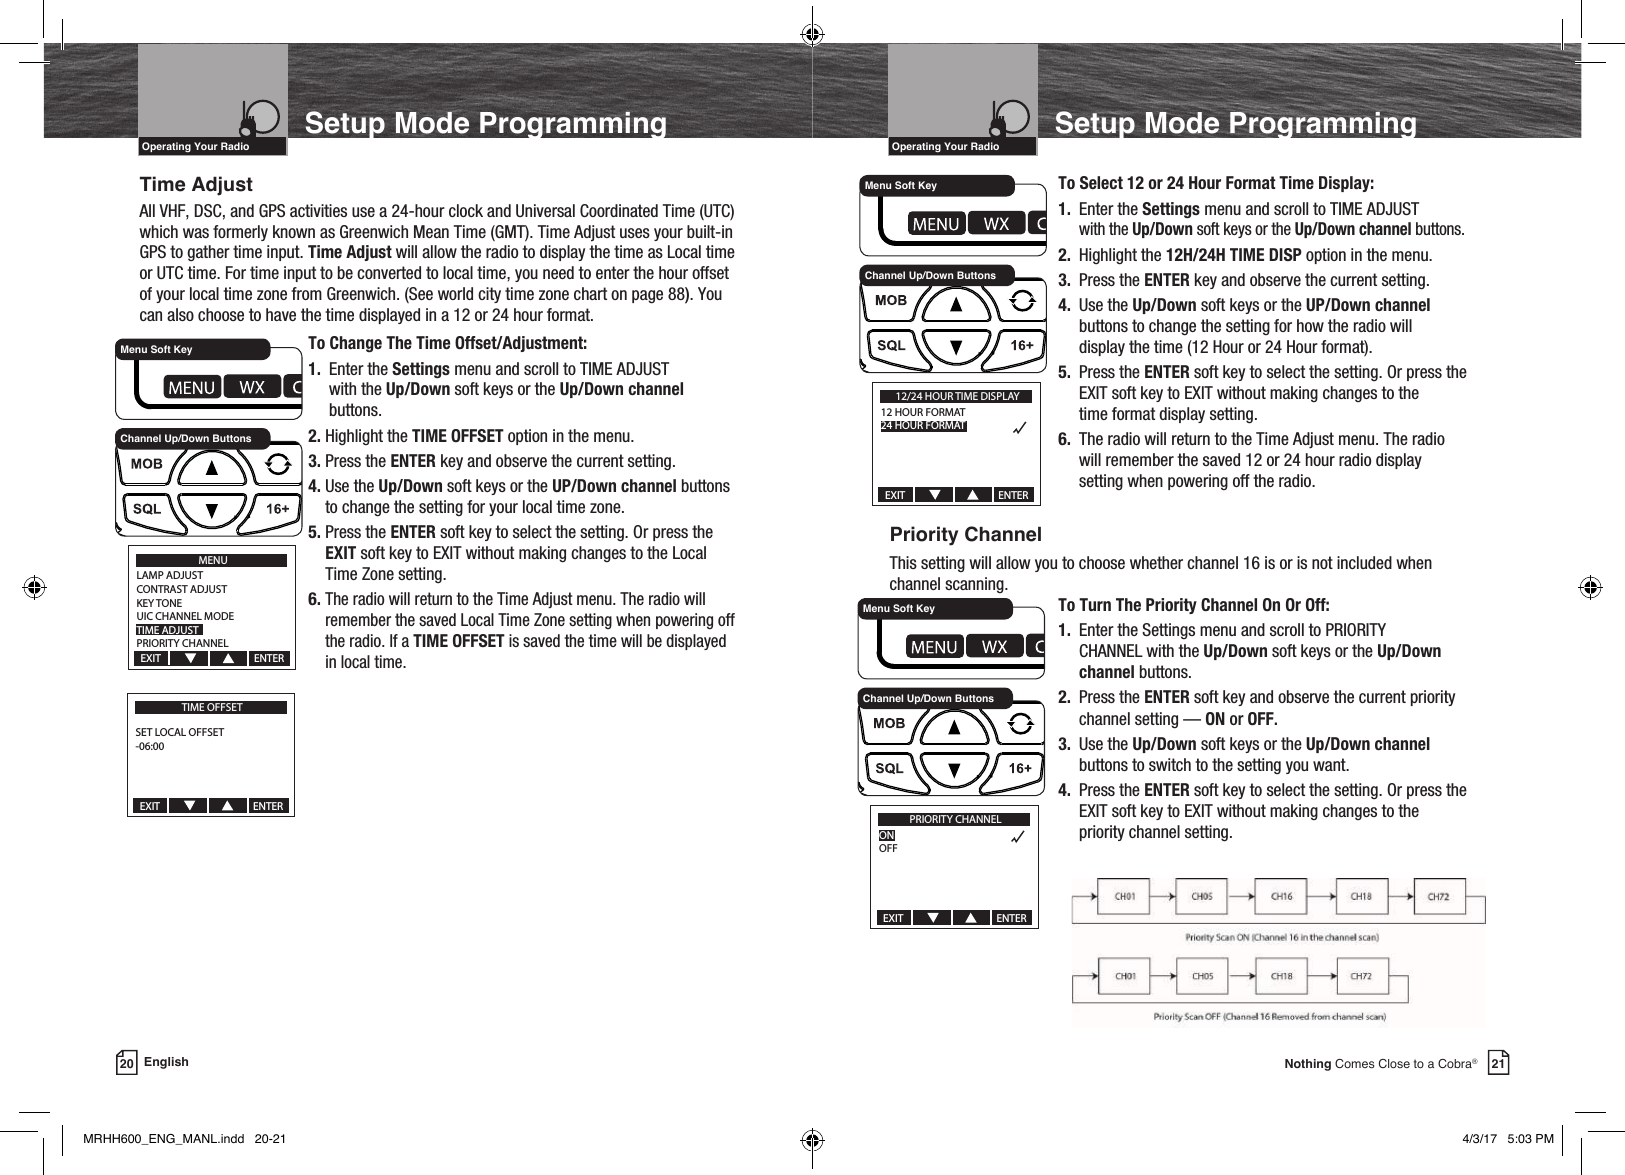
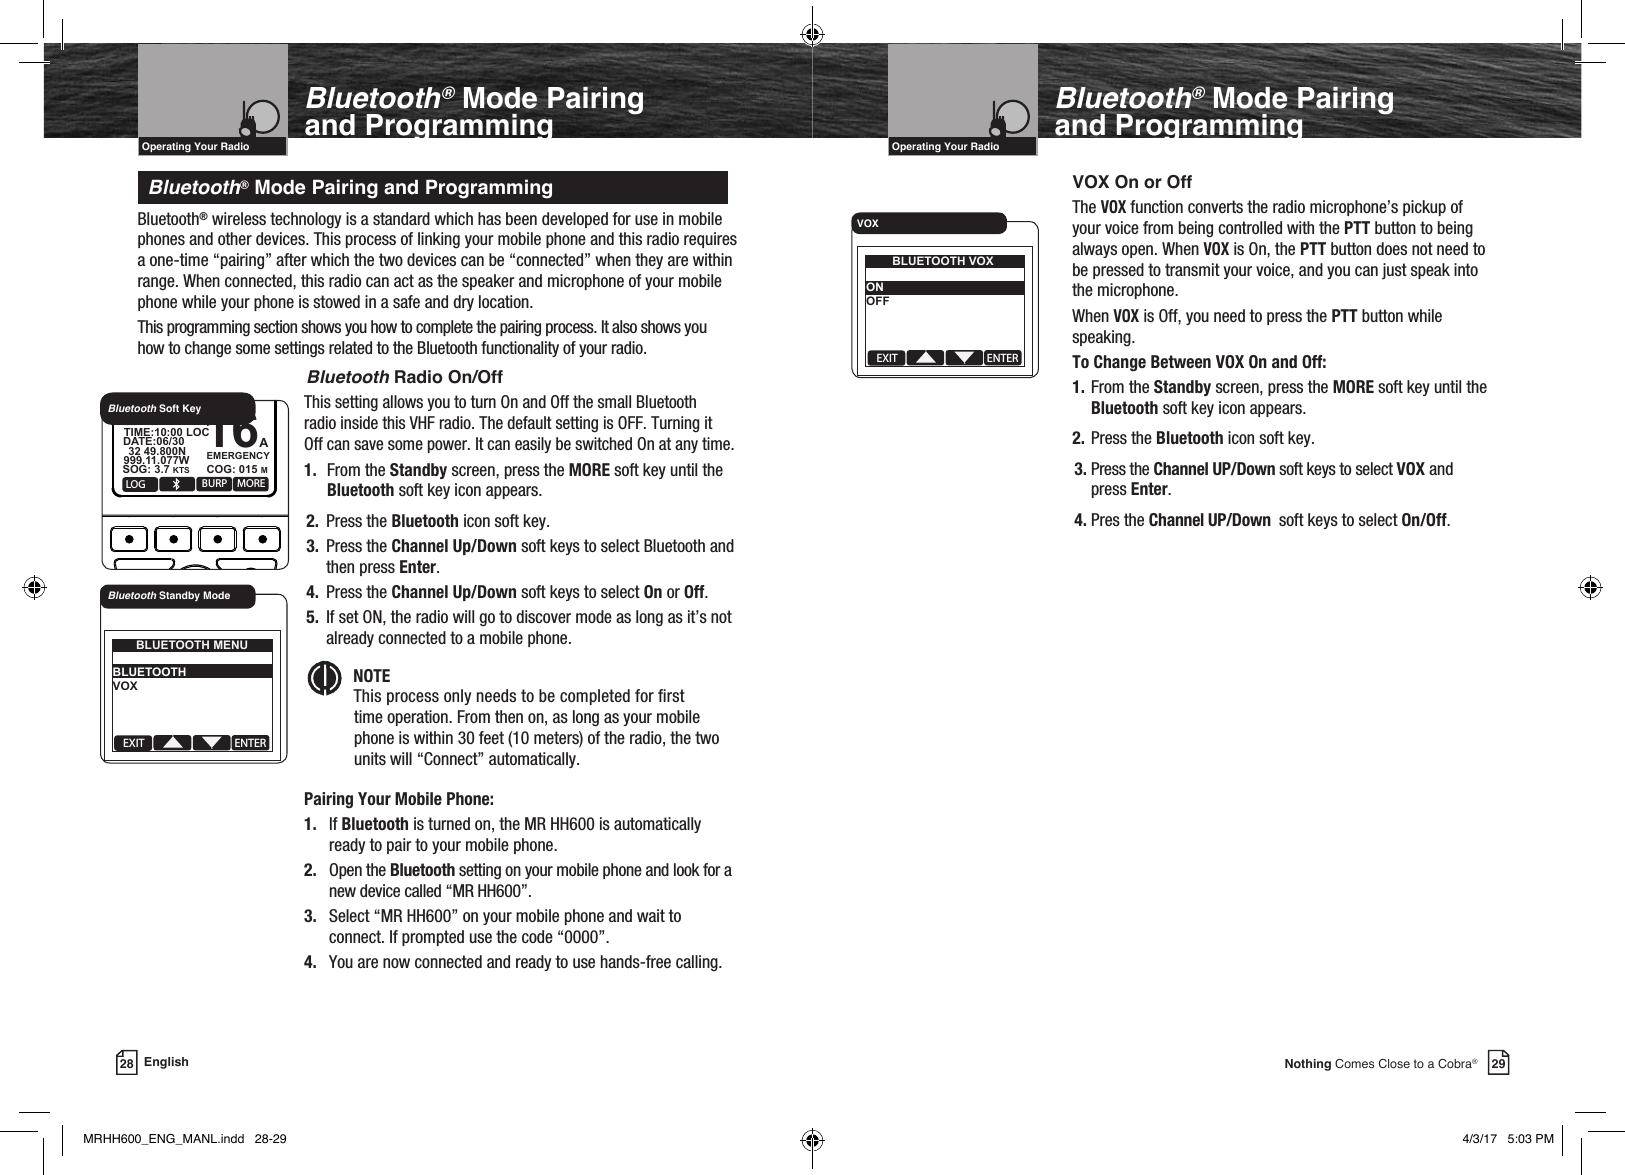
![VHF Marine Radio ProtocolsIntro Operation CustomerAssistanceWarrantyNoticeMain IconsSecondary IconsCaution WarningInstallation CustomerAssistanceOperating Your Radio13Nothing Comes Close to a Cobra®Getting Started Getting Started •Refer to the foldout at the front of this manual to identify the various controls and indicators on your radio. Throughout this manual you will be instructed to “Press” or to “Press and Hold” various buttons (except “Push to Talk”) on the radio. “Press” means a momentary press of approximately one (1) second. “Press and Hold” means to hold the button down for approximately two (2) seconds.Whenever you press any button except the Talk button on your radio, a brief tone (if key tones are selected On) will sound to conrm the button press. With all button presses, the appropriate icon will appear on the LCD and the backlight will turn On. The backlight will stay On for 10 seconds after the button is released.12 EnglishGetting StartedOn/Off/Volume Control (Counterclockwise)On/Off/Volume Control (Clockwise)HH600 RadioVHF Marine Radio ProtocolsIntro Operation CustomerAssistanceWarrantyNoticeMain IconsSecondary IconsCaution WarningInstallation CustomerAssistanceOperating Your Radio Common Radio FunctionsThe following procedures dene common operating functions of the radio when in either Marine Standby or Weather (WX) Standby modes. Power/Volume ControlPower On/Off ControlThe On/Off/Volume control is located at the upper right side of the radio. Turning the On/Off/Volume control past the detent position will turn the radio On or Off.Volume ControlVolume is controlled by turning the On/Off/Volume control.n To increase the volume, turn the On/Off/Volume control clockwise.n To decrease the volume, turn the On/Off/Volume control counterclockwise.Tones And AlarmsWhen your CobraMarine VHF radio is On, you can expect to hear the following tones and alarms. The volume of these sounds is controlled by the circuitry in the radio and is not affected by the volume set with the On-Off Power/Volume knob.Conrmation ToneSingle high-pitched beep conrms all button presses except the Talk button. It can be turned On or Off. See set-up routines on page 30.Error Tone Three low-pitched beep indicates an invalid button press.DSC Distress Alarm High—low—high—low—high. Pause, then repeat. The volume of all alarms will increase after 10 seconds. Press any button to turn it Off. NOTE This alarm sounds only for DSC distress calls on Channel 70. It does not sound for voice calls on Channel 16 — you still must listen for those.Distress Acknowledgement AlarmHigh—low—high—low—high. Pause, then repeat. The volume of all alarms will increase after 10 seconds. Press any button to turn it Off.DSC Routine Call AlarmHigh—pause—high—pause—high. Long pause, then repeat. Press any button to turn it Off.DSC Geographical Alarm Loud, continuous, medium-pitched, high-low tones (warble) — sounds when a geographical call is received. Press any button to turn it Off.DSC Position Request AlarmMedium-loud, continuous, low-pitched series of closely spaced, four (4) beeps [three (3) short – one (1) long] groups — sounds when a position request call is received. Press any button to turn it Off.DSC Individual AlarmHigh—pause—high—pause—high. Long pause, then repeat. Press any button to turn it Off.Weather AlarmMedium-loud, continuous, medium-pitched series of one-half (1⁄2) second beeps spaced one-half (1⁄2) second apart — sounds when weather alert is turned On and NOAA sends a 1050 Hz weather alert tone on the selected weather channel. Press any button to turn it Off.Intro Operation CustomerAssistanceWarrantyNoticeMain IconsSecondary IconsCaution WarningInstallation CustomerAssistanceMRHH600_ENG_MANL.indd 12-13 4/3/17 5:03 PM](https://usermanual.wiki/Cobra-Electronics/MRHH600/User-Guide-3347097-Page-9.png)
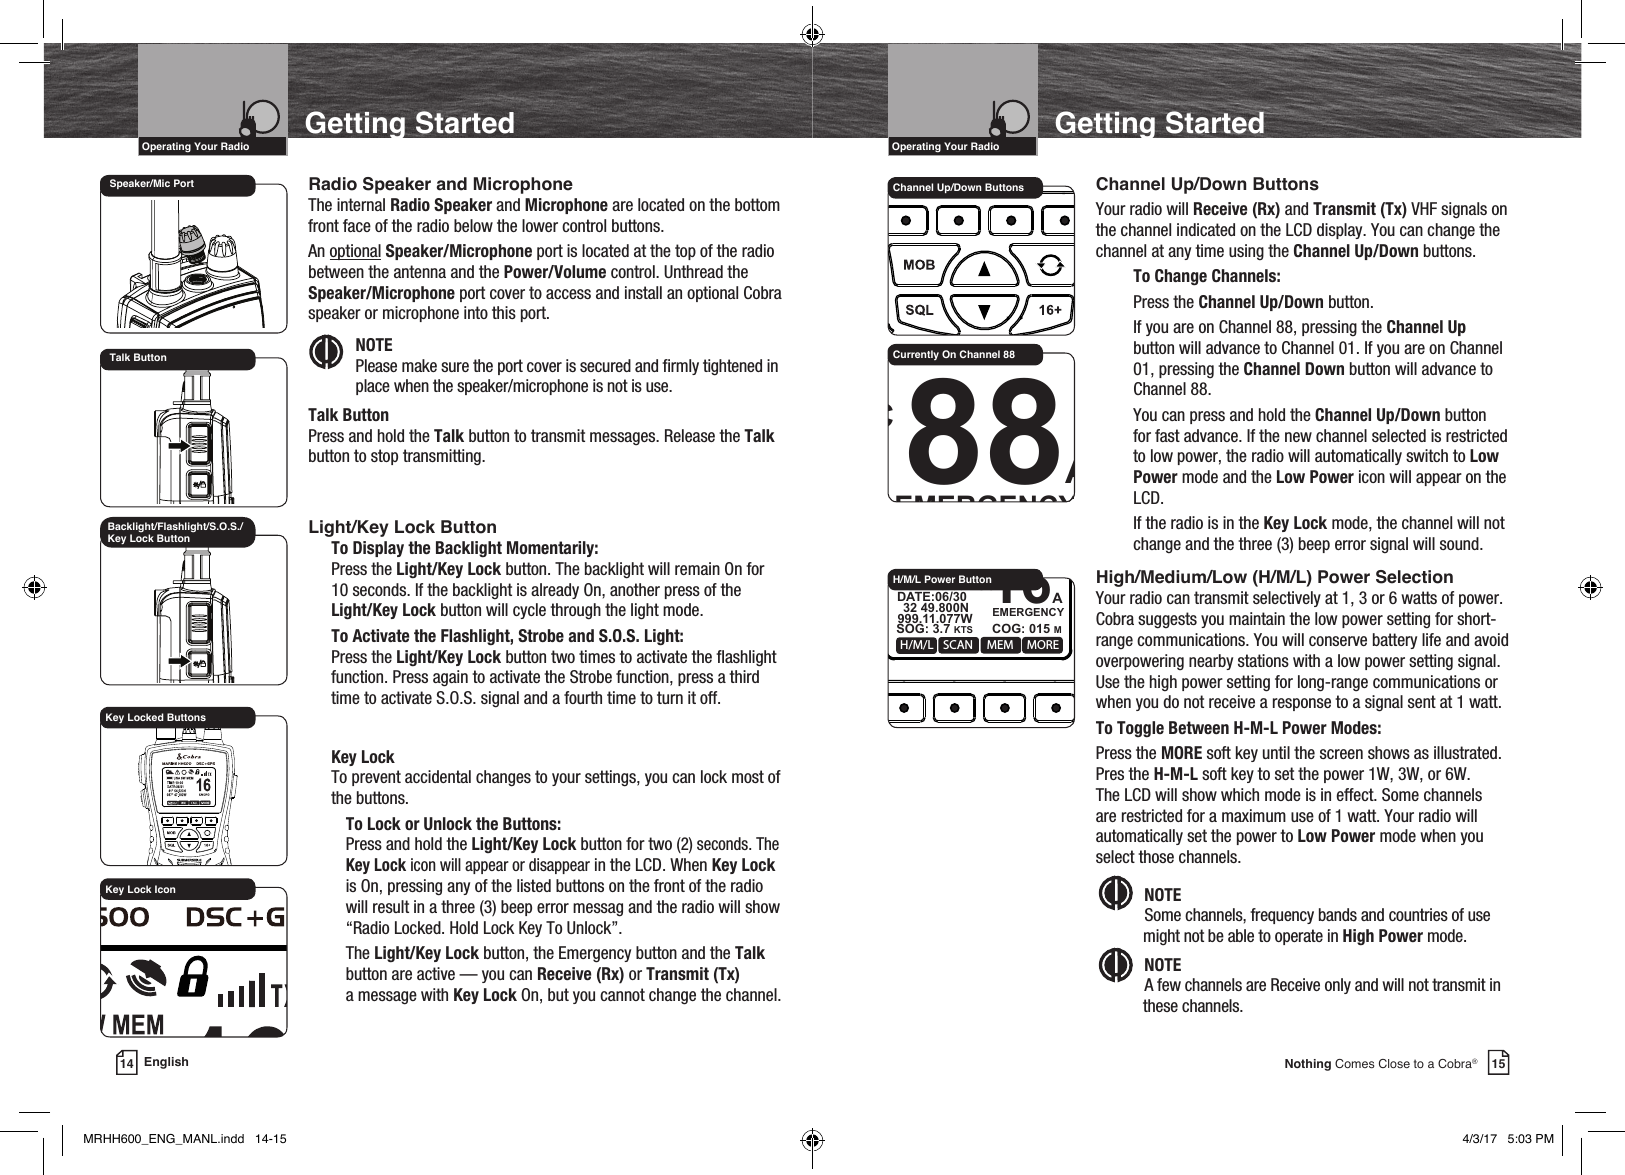
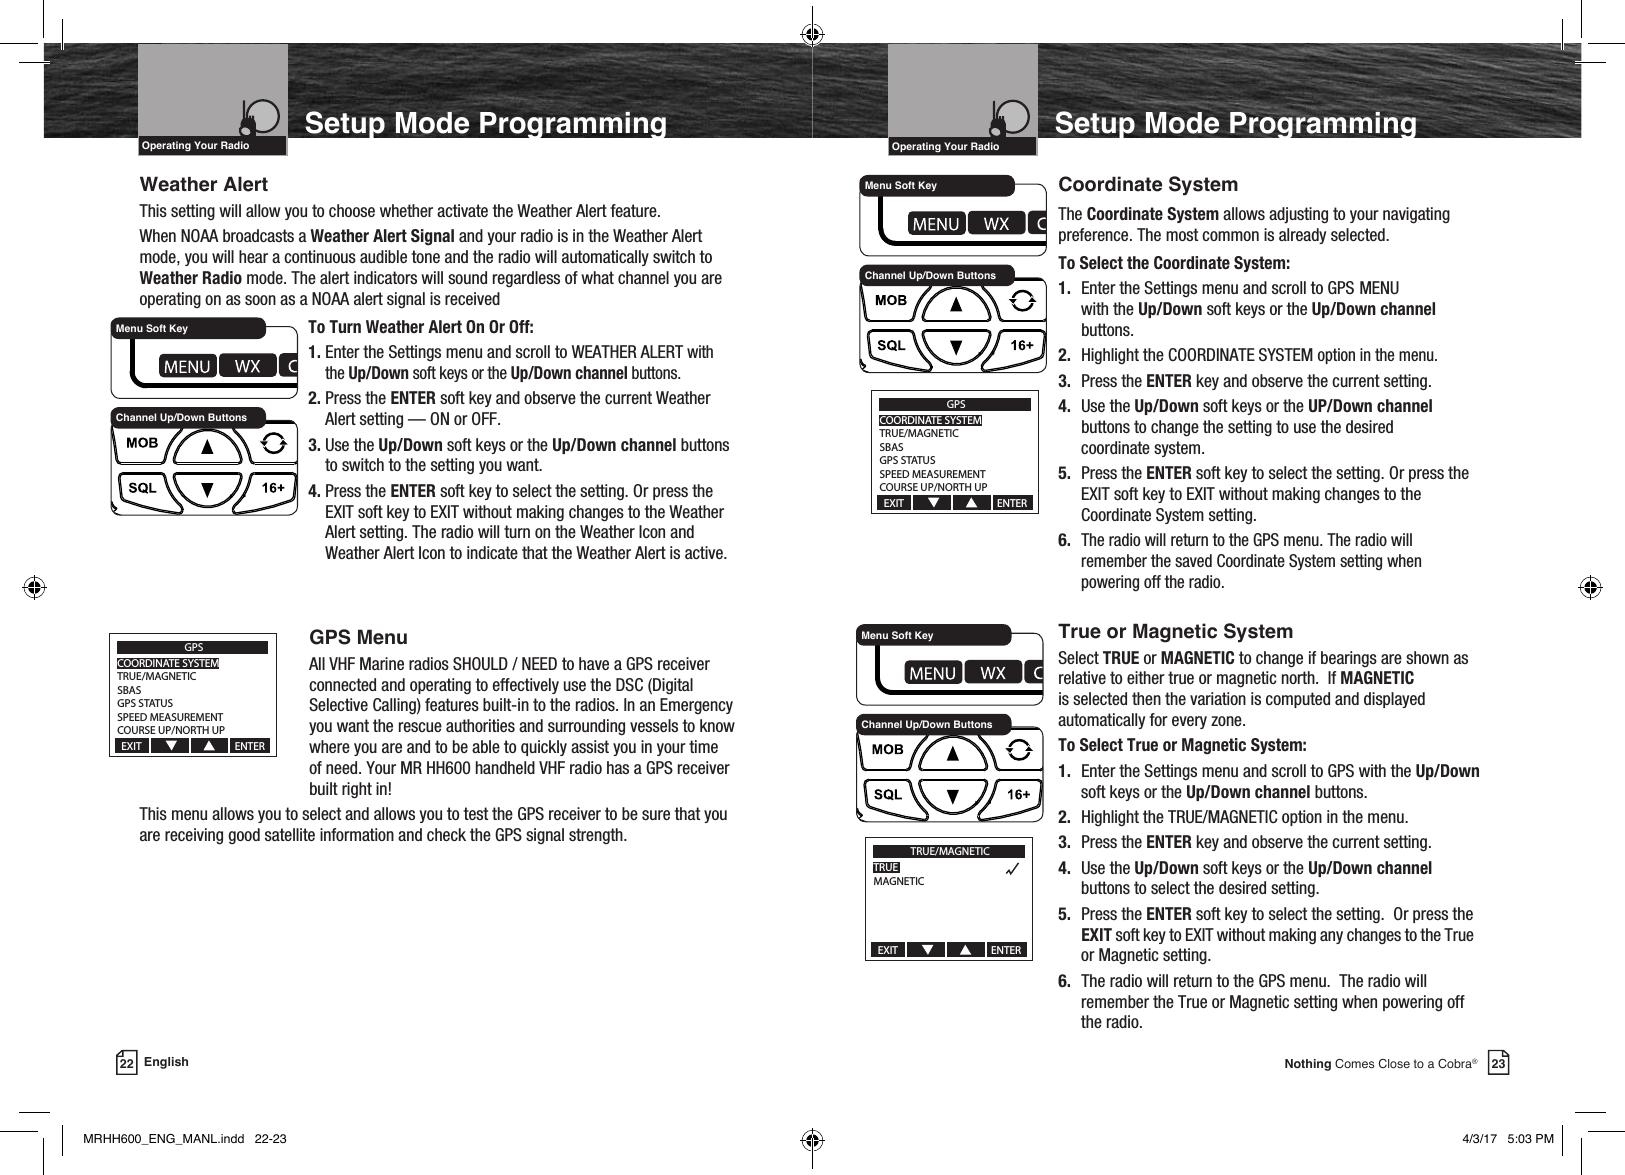
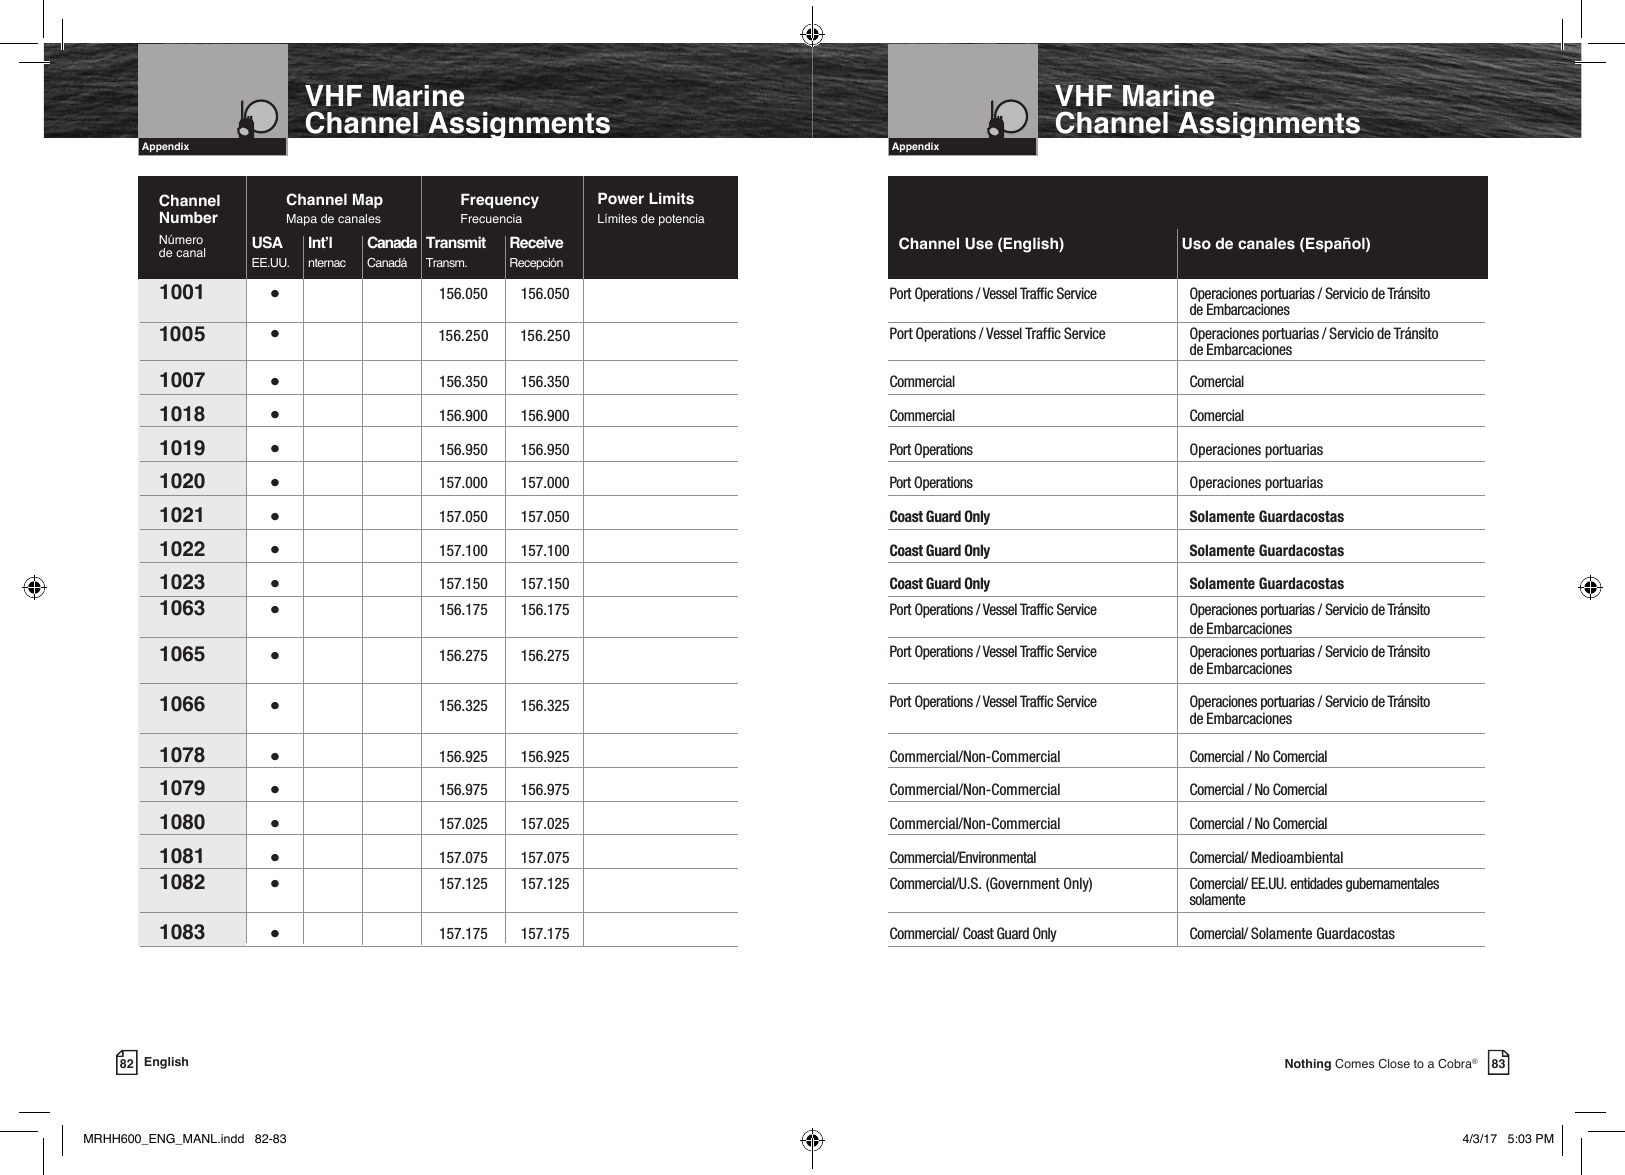
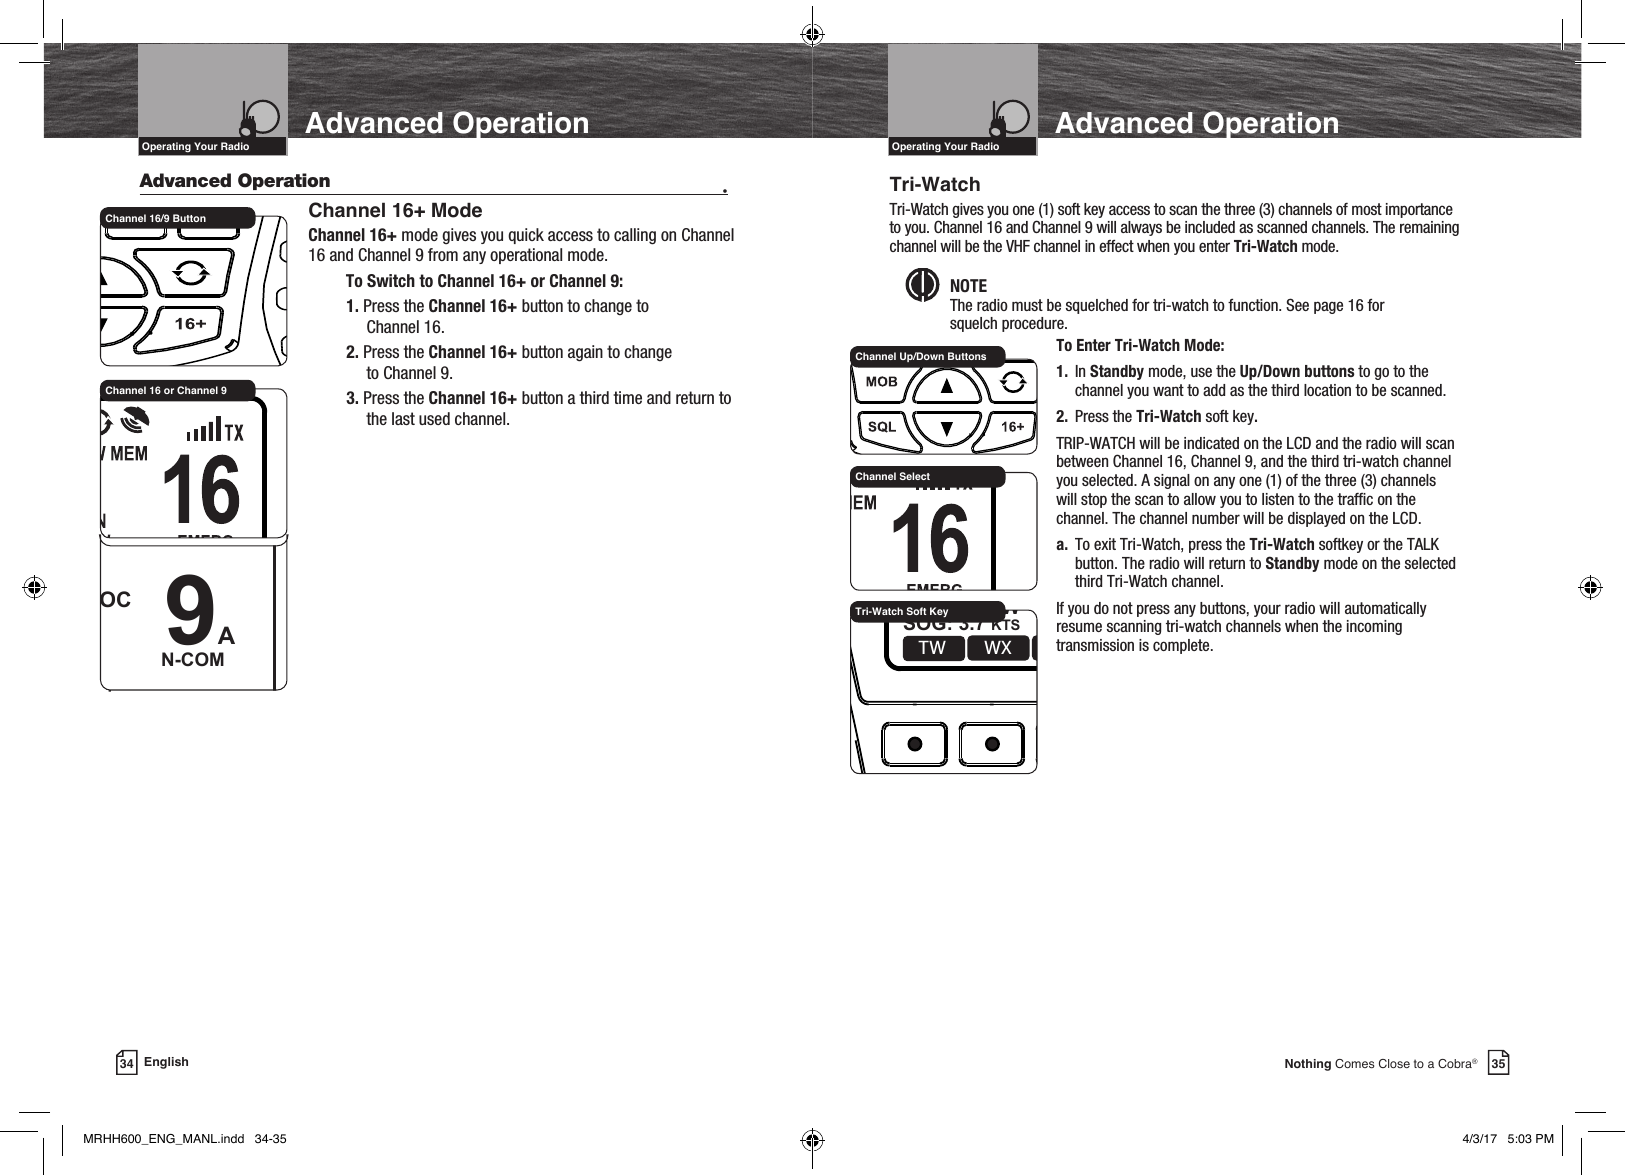
![VHF Marine Radio ProtocolsIntro Operation CustomerAssistanceWarrantyNoticeMain IconsSecondary IconsCaution WarningInstallation CustomerAssistanceOperating Your Radio30 EnglishWeather Mode ProgrammingIntro Operation CustomerAssistanceWarrantyNoticeMain IconsSecondary IconsCaution WarningInstallation CustomerAssistanceIntroductionVHF Marine Radio ProtocolsIntro Operation CustomerAssistanceWarrantyNoticeMain IconsSecondary IconsCaution WarningInstallation CustomerAssistanceOperating Your RadioStandby/Receive and Transmit •Marine Standby and Receive (Rx) ModeMarine Standby mode is the default mode for the radio whenever it is turned on. From this mode, you can change current settings by becoming familiar with the different key functions in Marine Standby mode. While in Marine Standby mode, the user will be able to transmit by pressing the Push to Talk (Talk) button. Signals in Receive (Rx) mode will be received on the selected channel(s), and alerts broadcast by NOAA will activate the corresponding NOAA weather alert channels in your radio. Intro Operation CustomerAssistanceWarrantyNoticeMain IconsSecondary IconsCaution WarningInstallation CustomerAssistanceNOTE Coast Guard alerts are broadcast on Channel 16. You must have the WX Alert enabled to receive NOAA weather alerts. While in Marine Standby mode, you will receive any voice messages sent on the channel to which you are tuned.31Nothing Comes Close to a Cobra® Transmit (Tx) ModeTransmit (Tx) mode gives you the ability to interact with safety services, other vessels and shore stations. When you use this capability, be sure to follow the procedures and to observe the courtesies that govern its use so everyone benets. See the Appendix to help you select the proper channels.To Transmit a Message:1. Check to see that your radio is set to a proper channel for the type of message you plan to send.2. Select the desired Low, Med or High Power setting.3. With the microphone about 2 in. [51 mm] from your mouth, press and hold the Talk button and speak into the microphone. The Transmit icon will appear on the LCD.4. Release the Talk button when you are nished speaking. Your radio can only operate in either Transmit (Tx) or Receive (Rx) mode at any given time. You will not hear the response to your message unless the Talk button is released. Transmit ModeCheck Channel NumberTalk ButtonWeather (WX) Alert ProgrammingStandby/Receive and TransmitReceive Mode NOAA Weather Channels and Alert •Monitoring the weather will probably be a frequent use of your radio. NOAA provides continuous, around-the-clock broadcasts of the latest weather information. Taped weather messages run every four (4) to six (6) minutes and are revised every two (2) or three (3) hours, or as needed. The Coast Guard also announces weather and other safety warnings on Channel 16. Smart boaters keep an eye on safety and an ear to the radio — and never let the weather catch them unaware.NOAA Emergency Weather AlertIn the event of a major storm or other weather condition requiring vessels at sea or on other bodies of water to be notied, NOAA broadcasts a 1050 Hz tone that receivers such as your CobraMarine VHF radio can detect and warn you of a weather alert condition. When the Weather Alert mode on your radio is set toOn, this signal will produce a loud tone from the speaker in the radio and will automatically switch to the alerting weather channel so the alert broadcast can be heard.NOAA Test Alert SystemTo test this system, NOAA broadcasts the 1050 Hz signal every Wednesday sometime between 11 a.m. and 1 p.m. in each local time zone. Any receiver that can detect the weather alert tone may use this service to verify that this system is functioning properly.MRHH600_ENG_MANL.indd 30-31 4/3/17 5:03 PM](https://usermanual.wiki/Cobra-Electronics/MRHH600/User-Guide-3347097-Page-18.png)
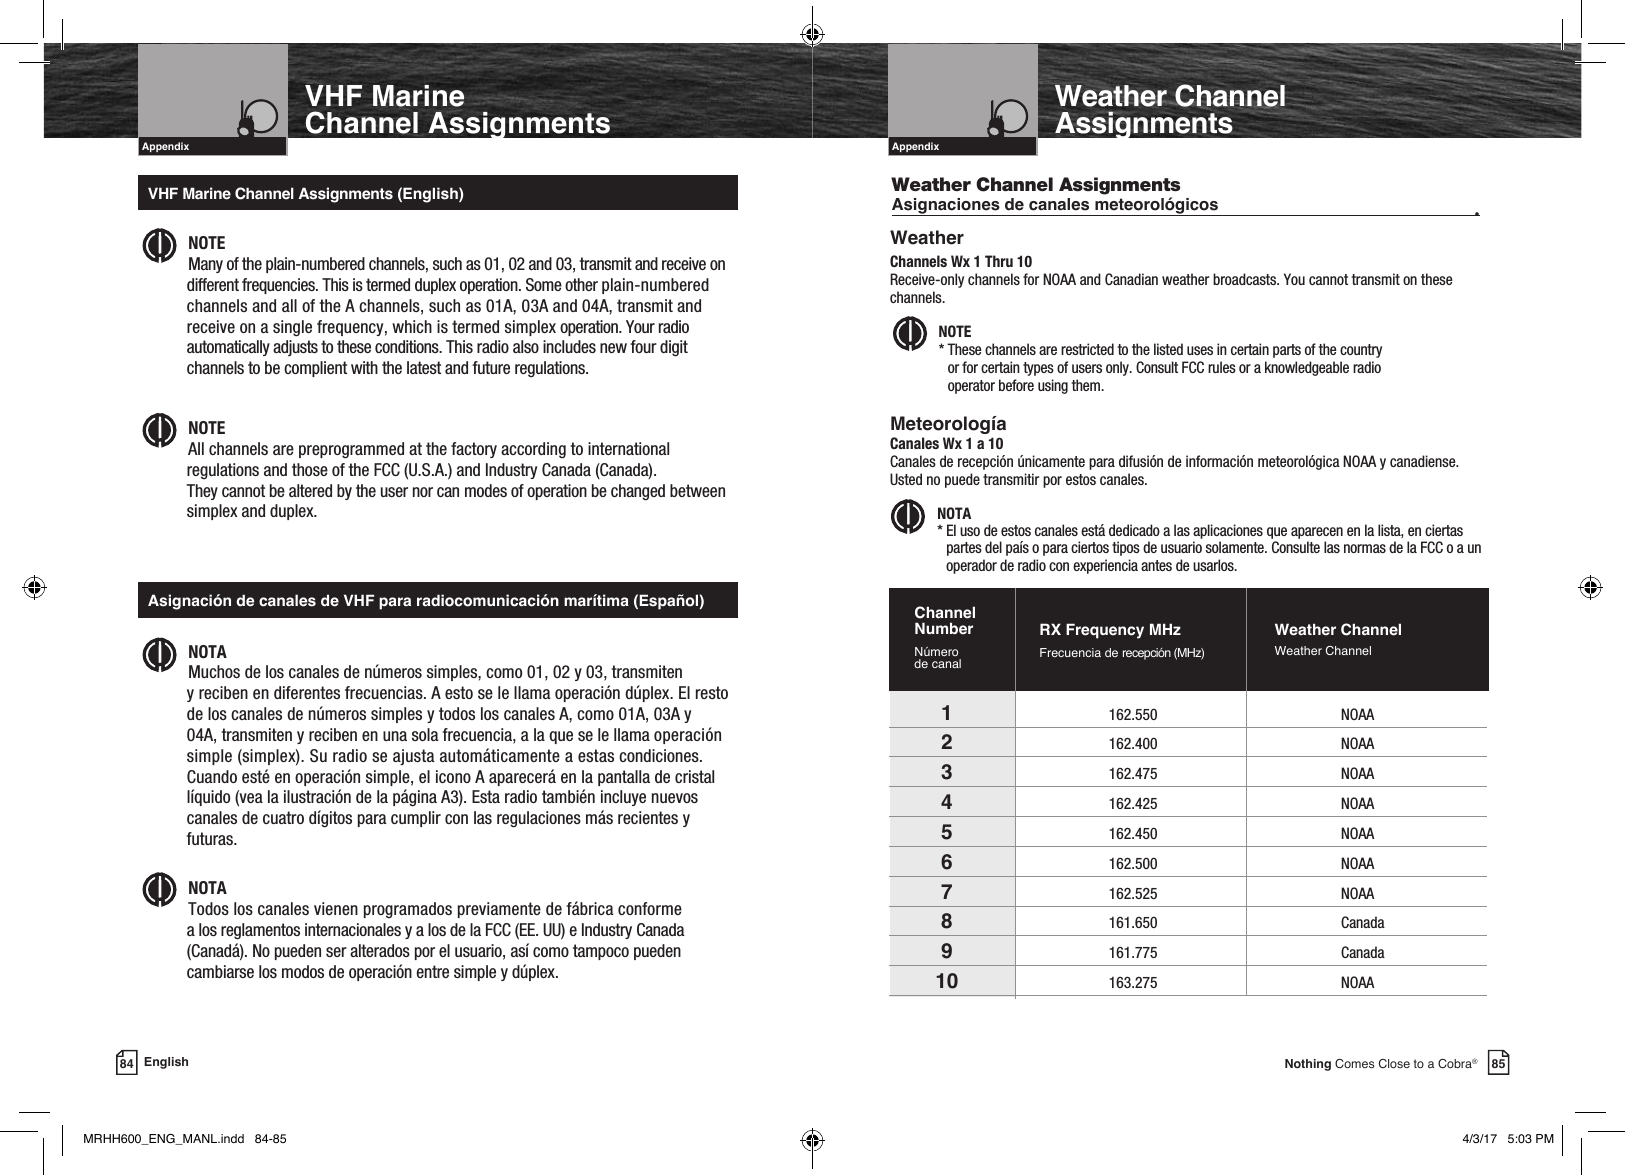
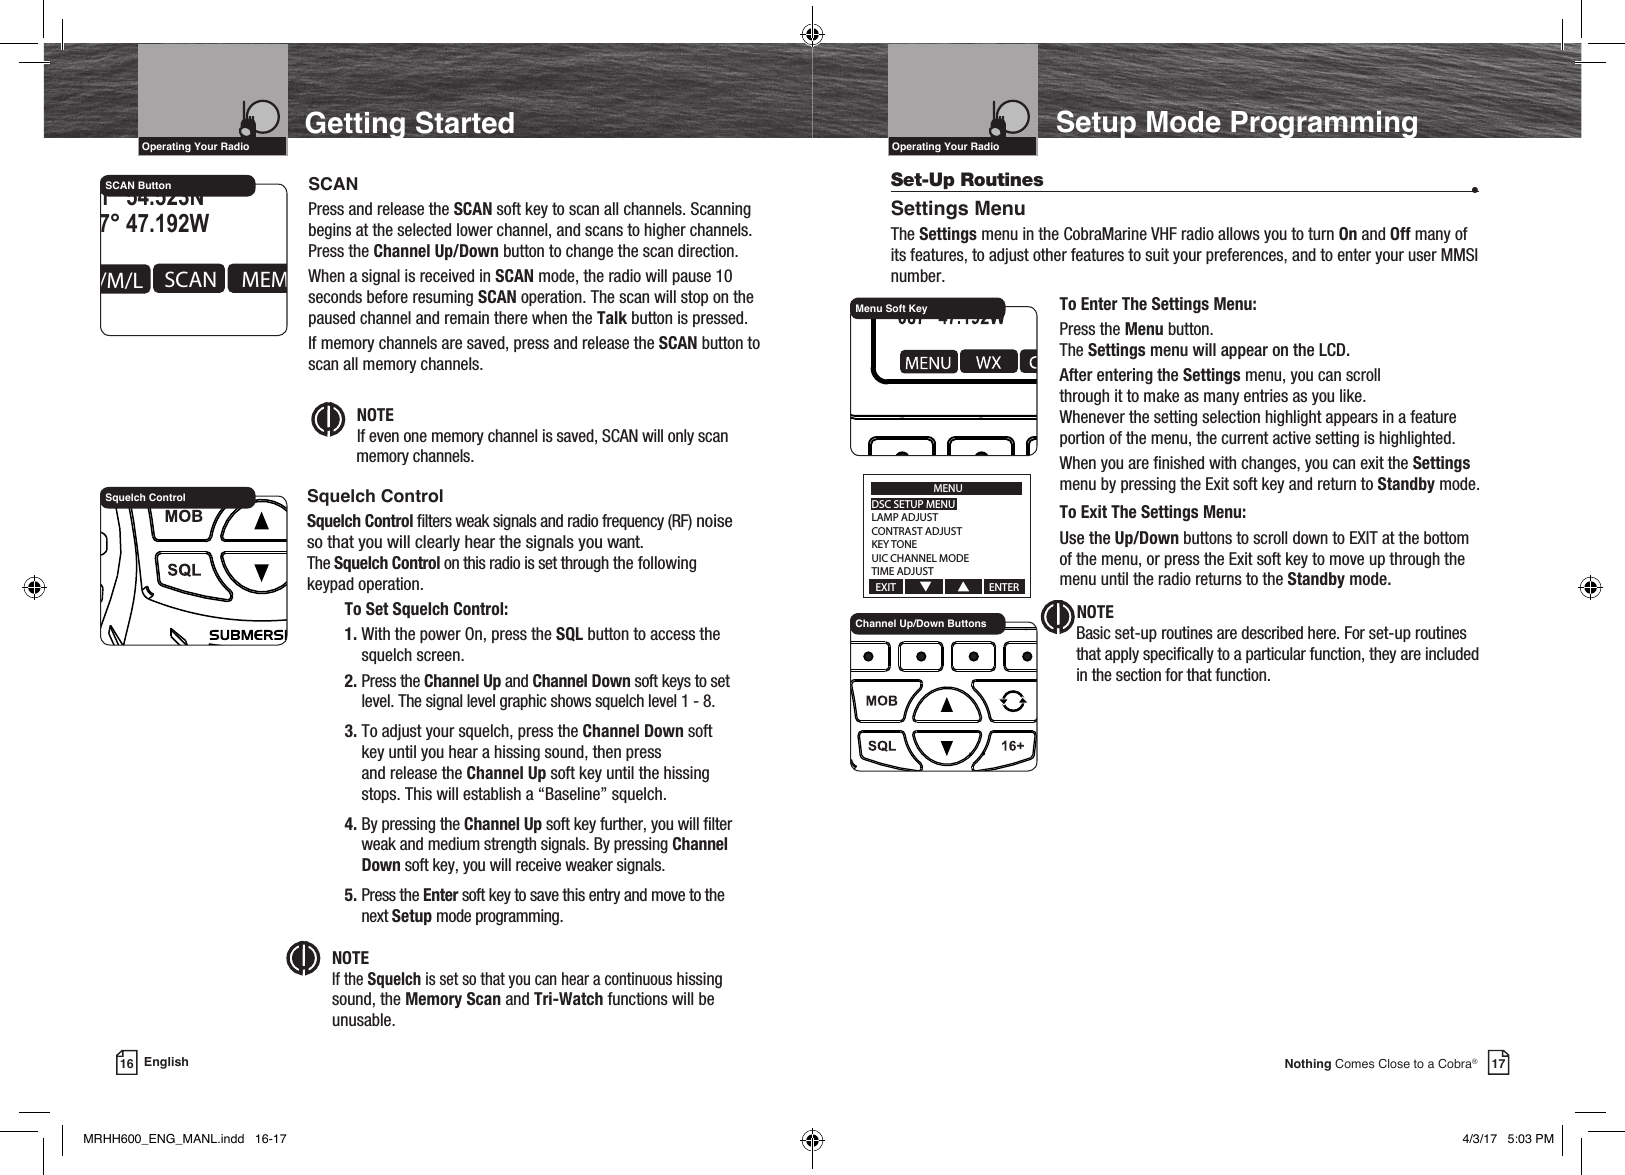
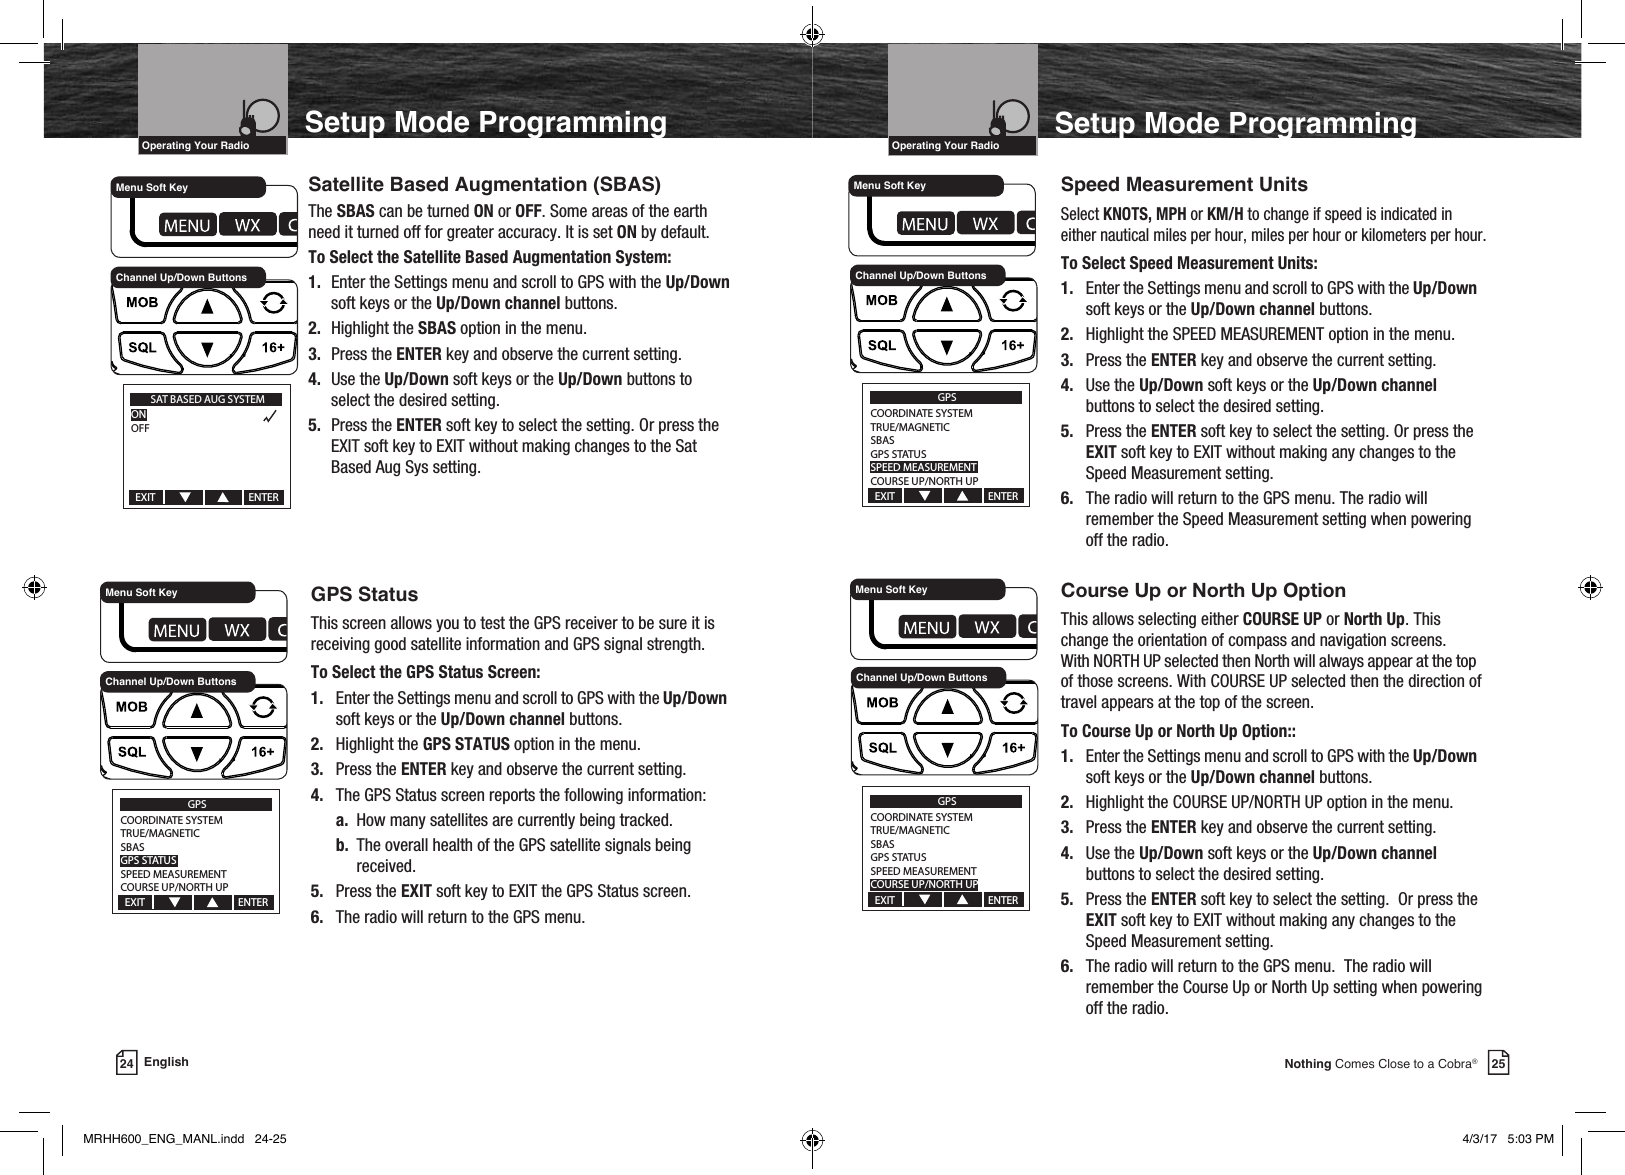
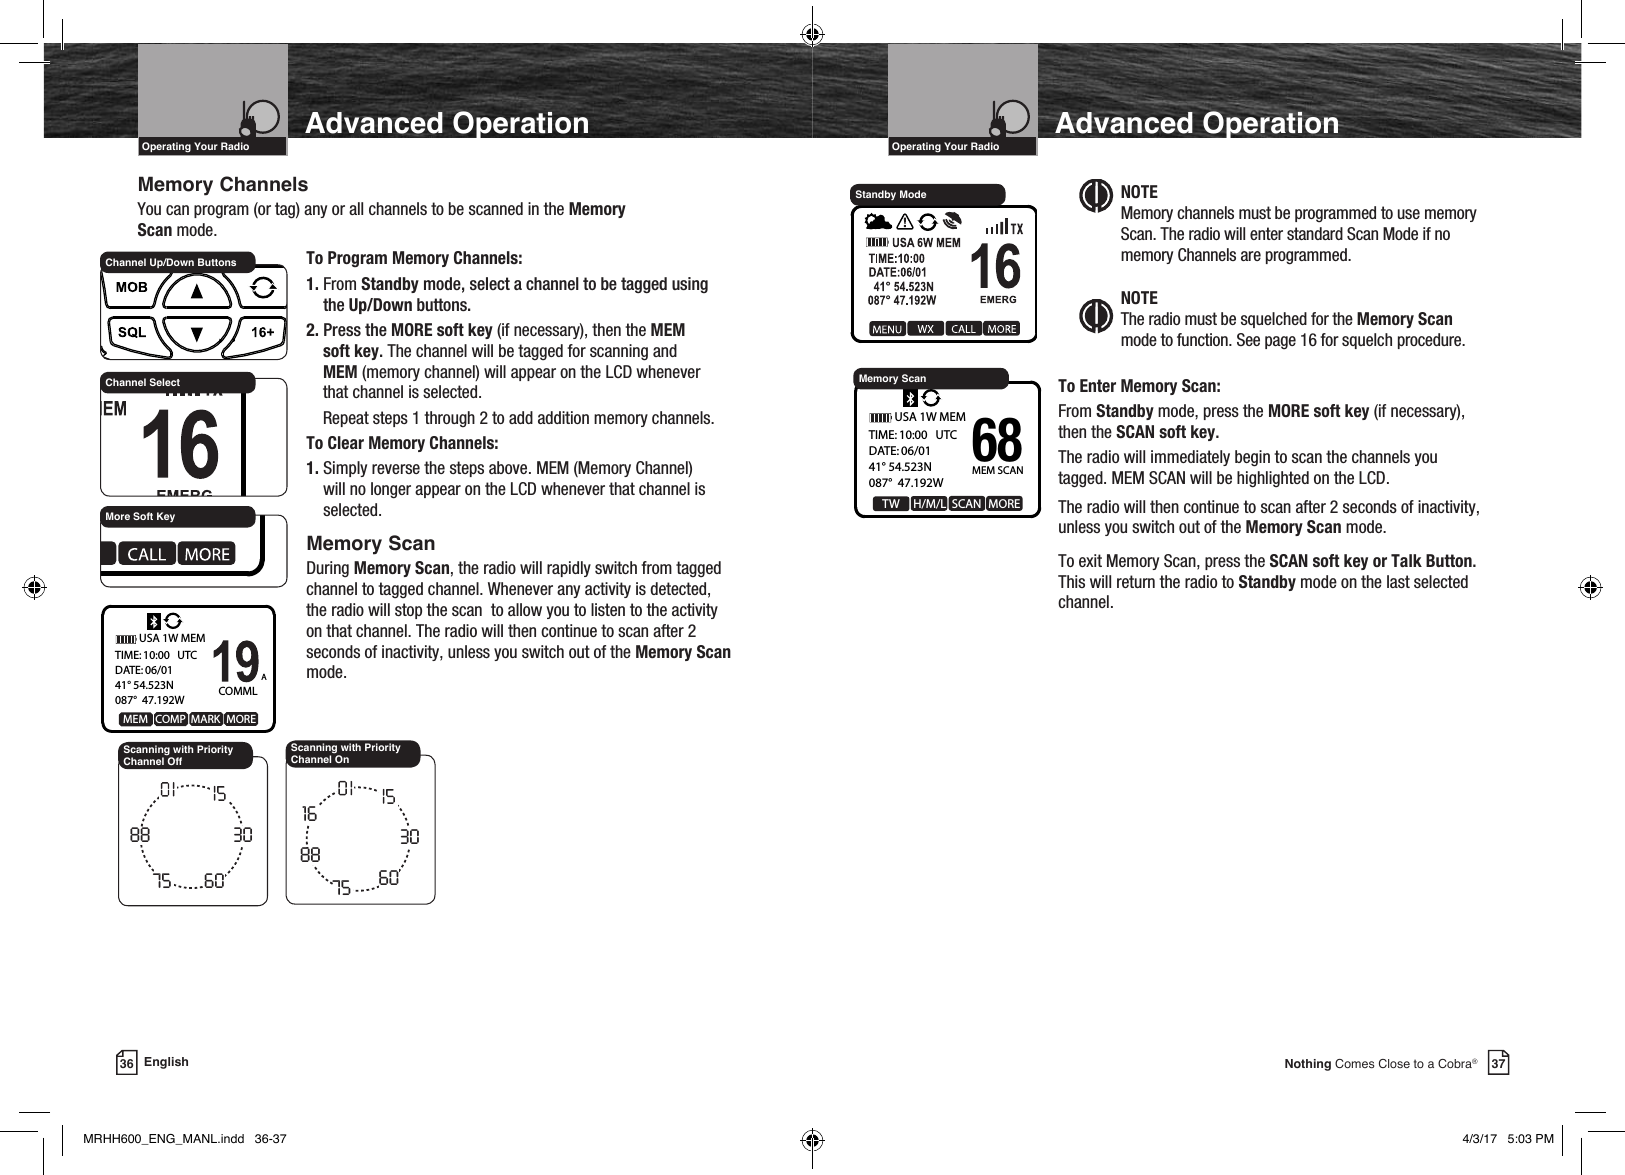
![33Nothing Comes Close to a Cobra®VHF Marine Radio ProtocolsIntro Operation CustomerAssistanceWarrantyNoticeMain IconsSecondary IconsCaution WarningInstallation CustomerAssistanceOperating Your RadioVHF Marine Radio ProtocolsIntro Operation CustomerAssistanceWarrantyNoticeMain IconsSecondary IconsCaution WarningInstallation CustomerAssistanceOperating Your Radio32 EnglishWeather Soft KeyWeather (WX) Standby ModeTo enter the WX Standby mode, press the WX soft key.The Weather Standby Mode will show the currently selected weather channel and the Weather Alert setting status as On or Off.Press the Back soft key to return to VHF Radio Standby. NOAA broadcasts weather information on the channels as described in the NOAA weather channels section on page 85 of this manual.The following items will be displayed on the LCD display:Intro Operation CustomerAssistanceWarrantyNoticeMain IconsSecondary IconsCaution WarningInstallation CustomerAssistanceNOTE Only one (1) or two (2) of the weather channels will be operating in any given location [only in Receive (Rx) mode]. You will need to select the channel with the strongest signal in your location. Intro Operation CustomerAssistanceWarrantyNoticeMain IconsSecondary IconsCaution WarningInstallation CustomerAssistanceNOTE When in the WX Alert mode, and NOAA sends the 1050 Hz alert tone, the radio will sound a series of loud beeps regardless of the volume control setting.Weather StandbyWEATHER RADIOWX ALERT ONBACK ALERT To Set WX Alert On or Off:1. From the Standby mode, press MENU soft key to enter the Weather Alert programming.2. Press Channel Up/Down button to select WX ALERT.3. Press ENTER soft key to select Weather Alert On/Off.4. With the Channel Up/Down soft keys select On/Off.5. Press ENTER soft key to save this entry and EXIT soft key to exit menu.Short Cut to WX Alert On or Off Select:1. From the Standby screen, press the WX soft key.2. Press ALERT soft key to switch WX Alert to On or Off.3. Press BACK soft key to return to radio mode.EXIT ENTERWEATHER ALERTONOFFWX Alert On/OffWeather Radio StandbyWEATHER RADIOWX ALERT ONBACK ALERTThis setting will allow you to choose to activate the Weather Alert feature. When NOAA broadcasts a Weather Alert Signal, and your radio has Weather Alert turned On, you will hear a continuous audible tone and the radio will automatically switch to Weather Radio mode. The alert indicators will sound regardless of what channel you are operating on as soon as a NOAA alert signal is received. Weather Mode Programming Weather Mode ProgrammingMRHH600_ENG_MANL.indd 32-33 4/3/17 5:03 PM](https://usermanual.wiki/Cobra-Electronics/MRHH600/User-Guide-3347097-Page-19.png)

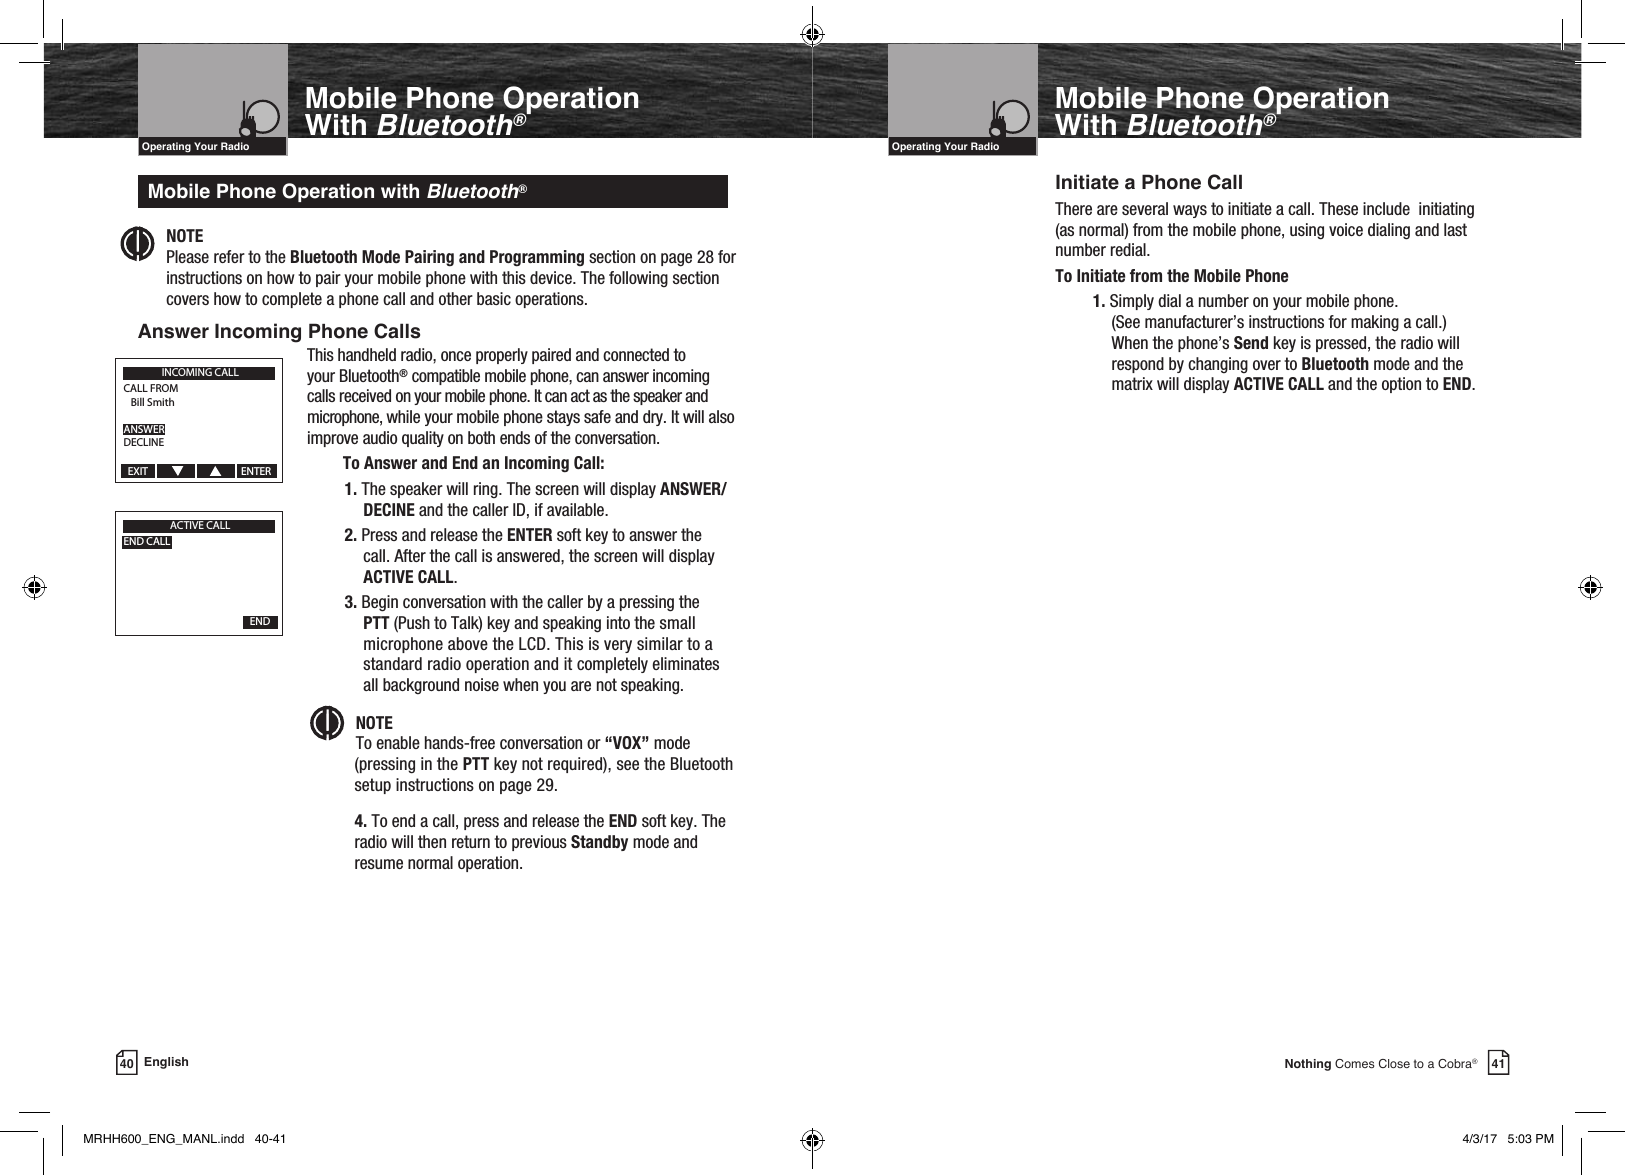
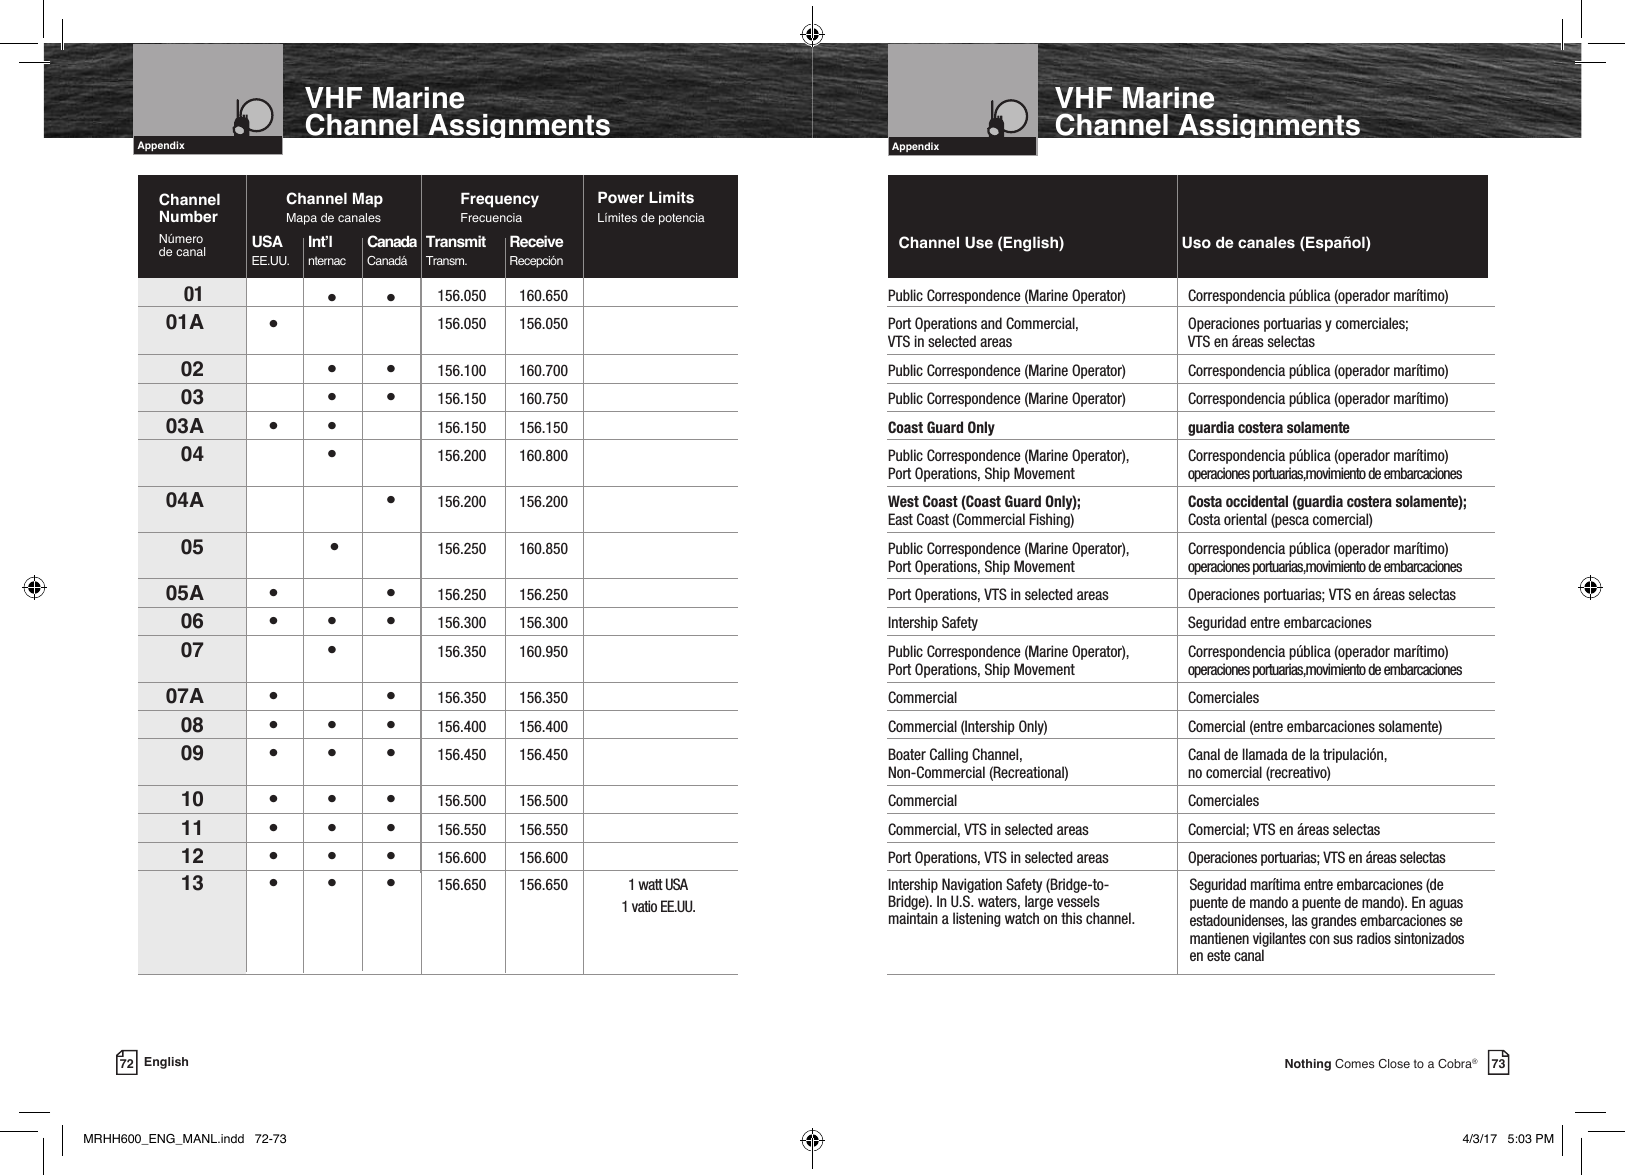
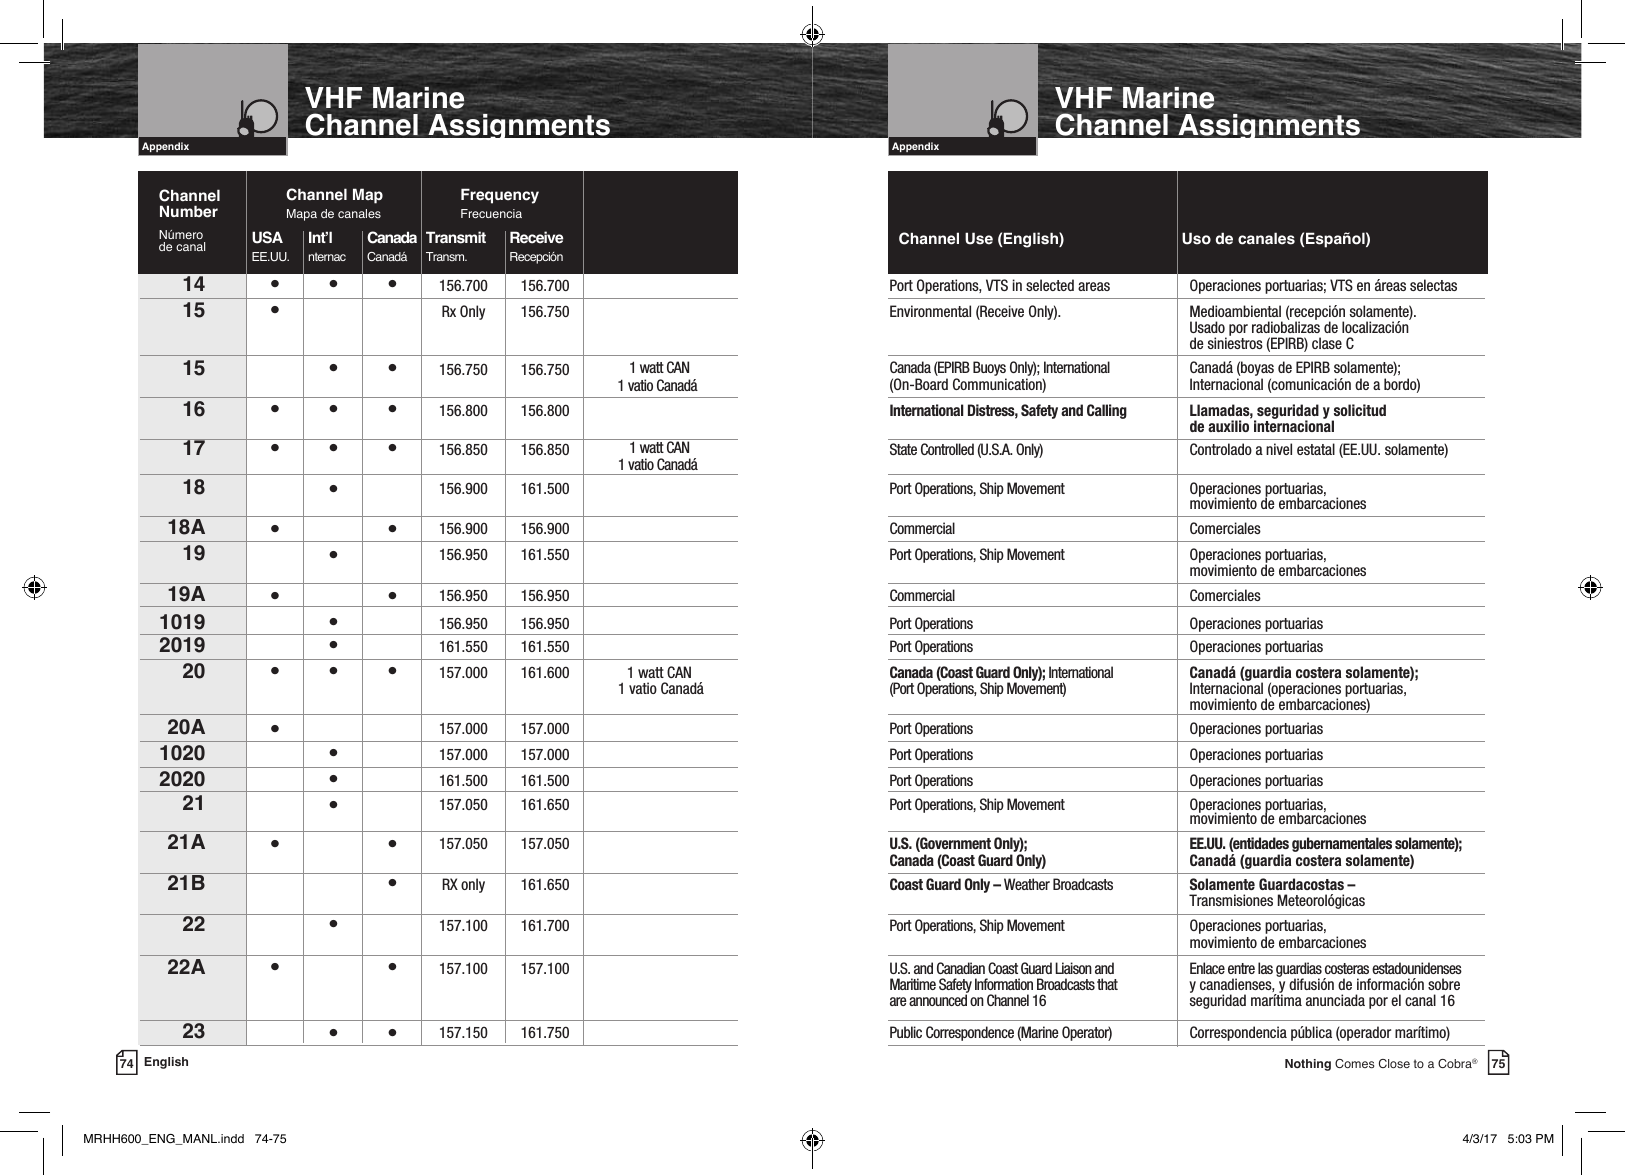
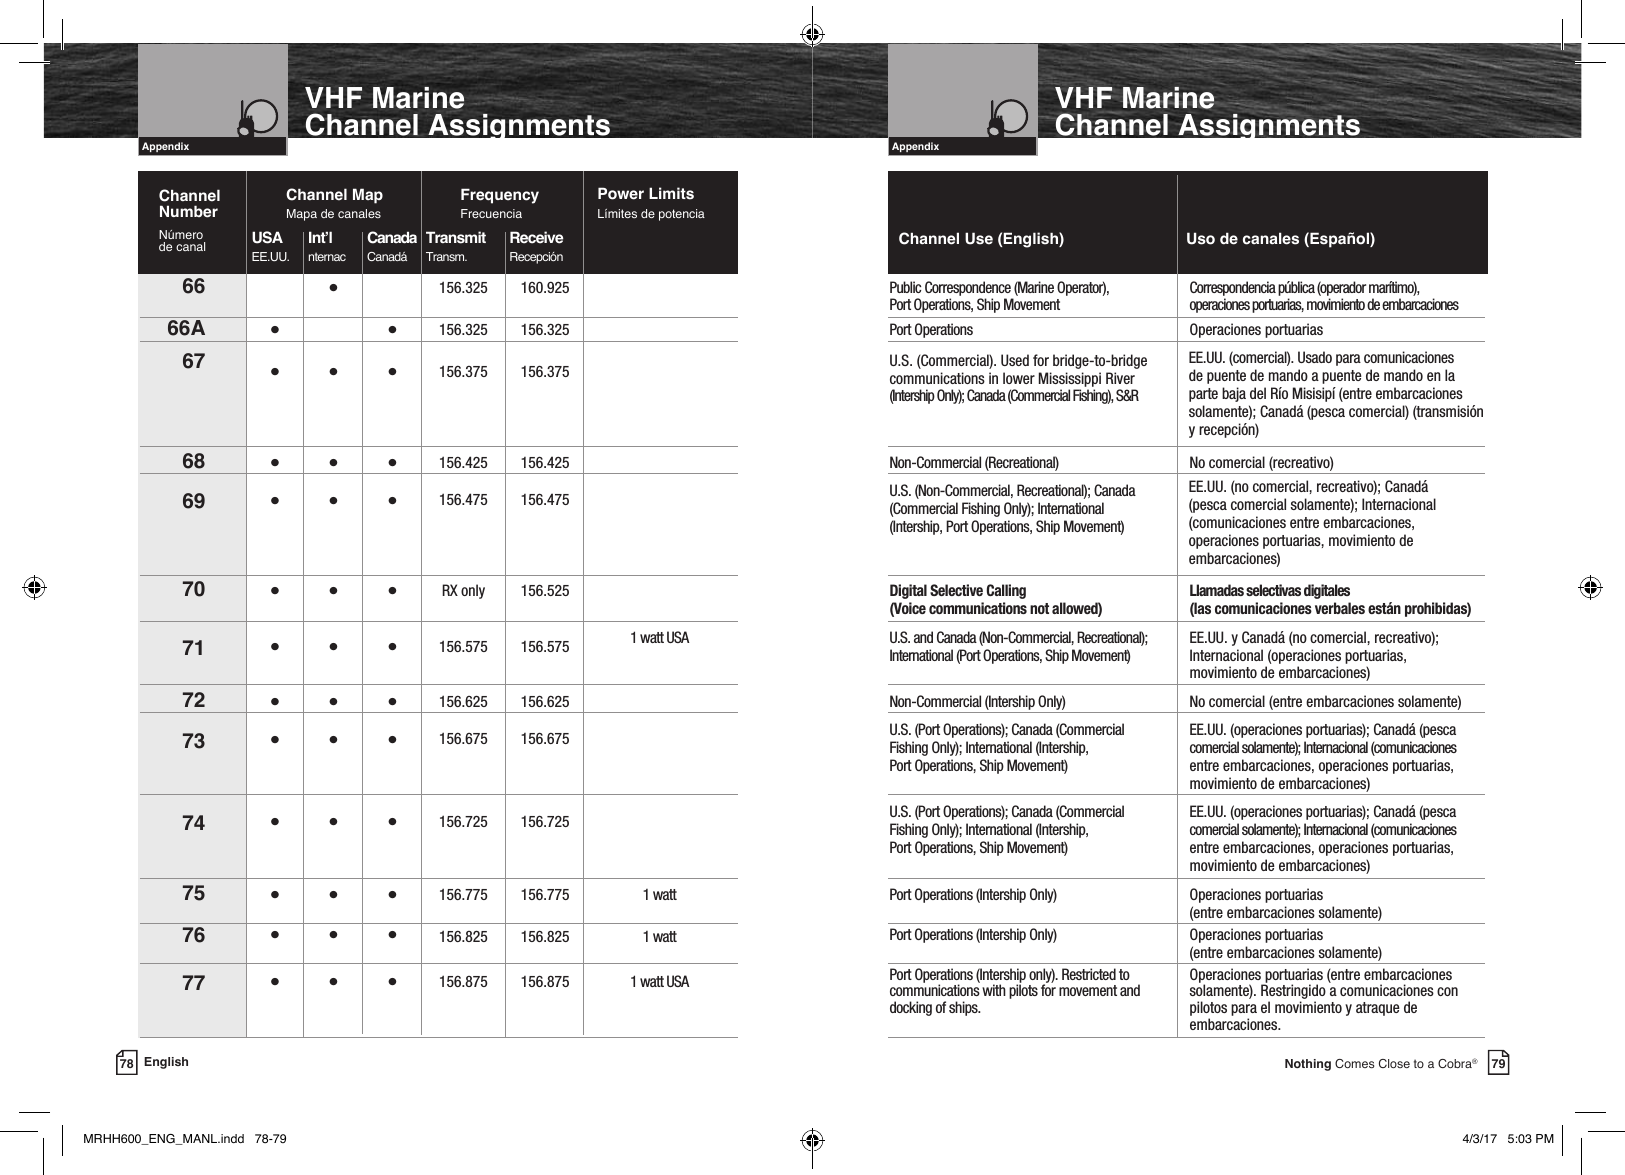
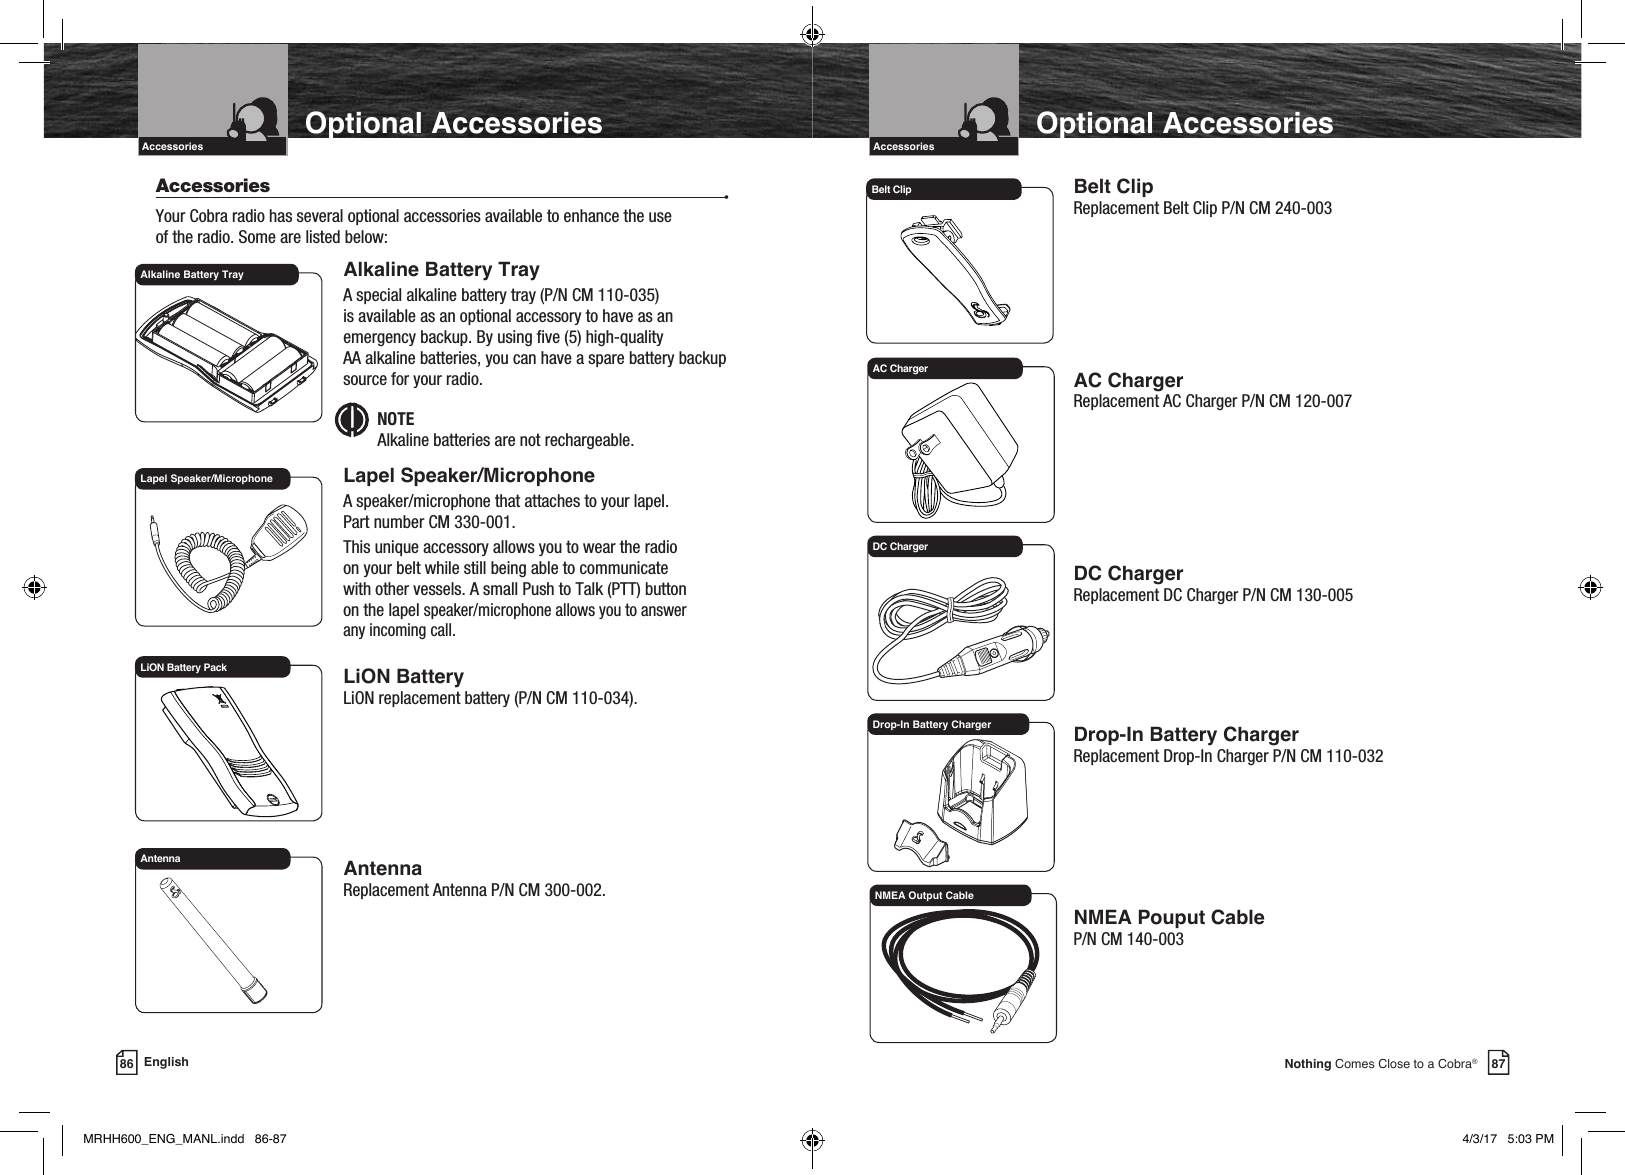
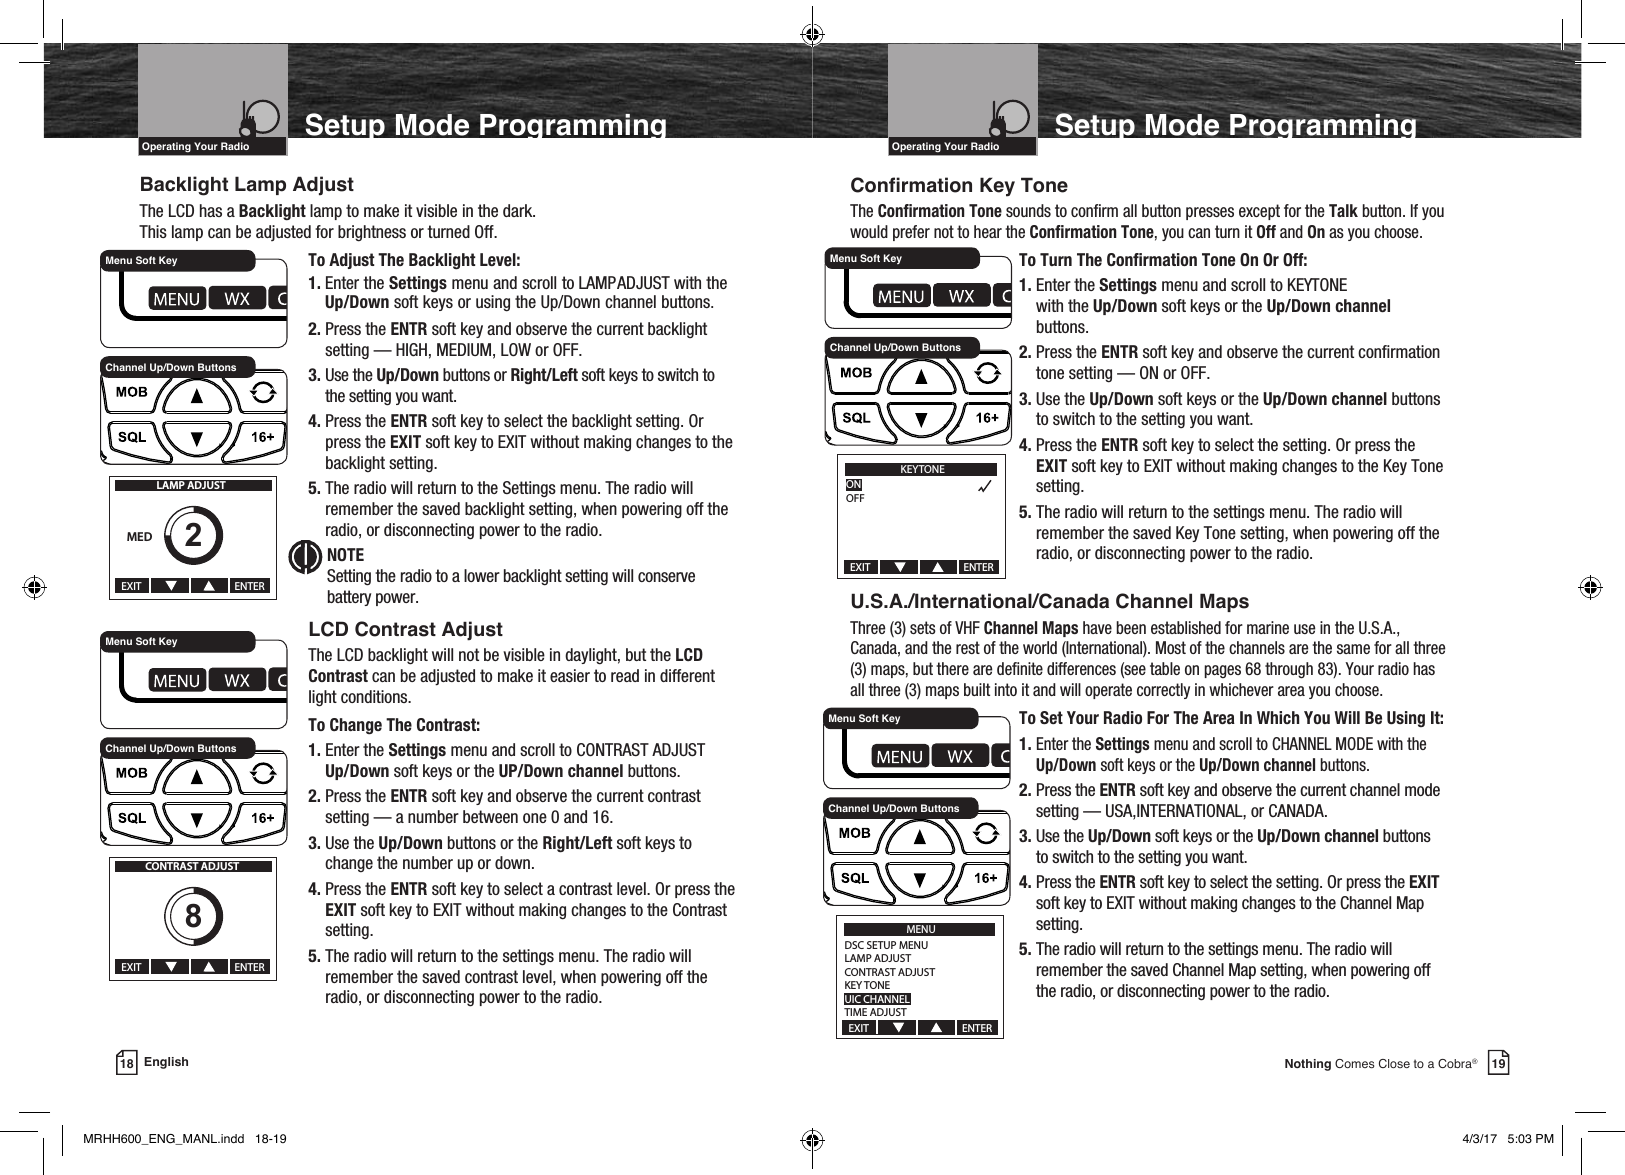
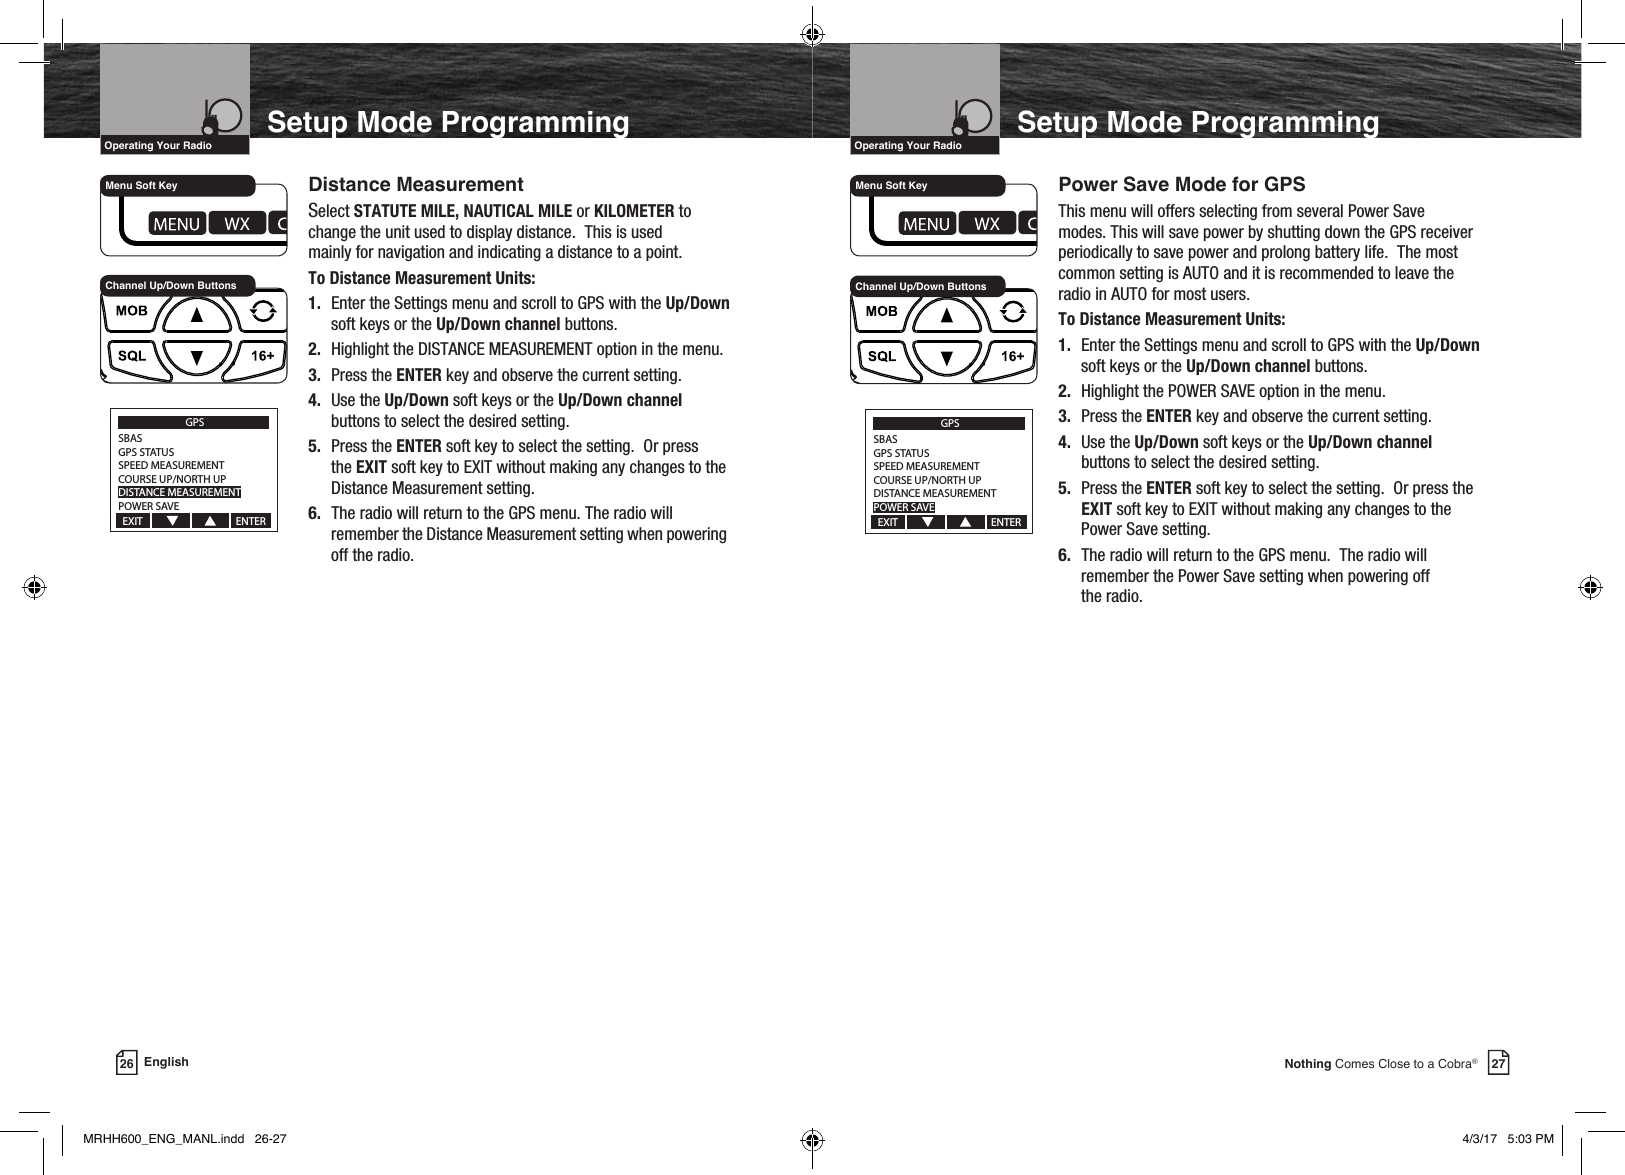
![Intro Operation CustomerAssistanceWarrantyNoticeMain IconsSecondary IconsCaution WarningInstallation CustomerAssistance51Nothing Comes Close to a Cobra®Voice Calling & MOBIntro Operation CustomerAssistanceWarrantyNoticeMain IconsSecondary IconsCaution WarningInstallation CustomerAssistanceVHF Marine Radio ProtocolsVoice Calling •You are required to listen to Channel 16 while standing by. Channel 16 is the distress and safety channel used for establishing initial contact with another station and for emergency communication. The Coast Guard also monitors Channel 16 for safety purposes for everyone on the water.Intro Operation CustomerAssistanceWarrantyNoticeMain IconsSecondary IconsCaution WarningInstallation CustomerAssistanceNOTE Channel 9 may be used by recreational vessels for general-purpose calling. This frequency should be used whenever possible to help relieve congestion on Channel 16. The Coast Guard generally does not make urgent marine information broadcasts or weather warnings on Channel 9. Boaters are still asked to “keep watch” on Channel 16 whenever the radio is turned on and not in use with another station.To call another vessel or shore installation (e.g, lock or bridge tender):n Make sure the radio is On.n Make sure you are in standby listening mode on Channel 16. Make sure Channel 16 is not in use. n When the channel is open (quiet), press the Talk button and call a vessel. Hold the radio or microphone several inches from your face and speak clearly and distinctly in a normal voice tone. Say “name or station being called,” “THIS IS [your vessel name or call sign].”n Once contact is made, you must leave Channel 16 and go to another working channel. See channel listing on page 70.VHF Marine Radio Protocols50 EnglishVoice CallingIntro Operation CustomerAssistanceWarrantyNoticeMain IconsSecondary IconsCaution WarningInstallation CustomerAssistanceIntro Operation CustomerAssistanceWarrantyNoticeMain IconsSecondary IconsCaution WarningInstallation CustomerAssistanceNOTE For best sound quality at the station you are calling, hold the microphone on the front of the radio at least 2 in. (51 mm) from your mouth and slightly off to one (1) side. Speak in a normal tone of voice.Intro Operation CustomerAssistanceWarrantyNoticeMain IconsSecondary IconsCaution WarningInstallation CustomerAssistanceNOTE “Over and Out” The most commonly misused procedure words are “over and out” within the same transmission. “Over” means you expect a reply. “Out” means you are nished and do not expect a reply.WARNING The device complies with RF specications when the device used at 25mm from your front face and 0mm from your body, Maximun SAR Value (10g): 3.54 W/Kg.MOB (Man Over Board) •Your radio features the Man Over Board function that marks and memorizes the postion information if a crew member falls overboard. The radio will help to navigate back to that location. NOTE The radio can’t calculate for the effects of tide, current and wind on your crew member’s location over time. The MOB function can only act as a guide for their possible location. NOTE The radio must have satellite recption for MOB to mark the position. n Press the MOB button. The radio will save that MOB location. Pressing the NAV soft key activates the navigation screen to be able to navigate quickly to the MOB location. n From the MOB screen, press the Enter soft key and radio’s screen will prompt to send a DSC emergency call. See detailed instructions for Digital Selective Calling (DSC) on page 52 for more information.NOTE Activating the MOB function does not send an emergency call.Intro Operation CustomerAssistanceWarrantyNoticeMain IconsSecondary IconsCaution WarningInstallation CustomerAssistanceIntro Operation CustomerAssistanceWarrantyNoticeMain IconsSecondary IconsCaution WarningInstallation CustomerAssistanceThe vessel Corsair calling the vessel Vagabond: Corsair: “Vagabond, this is Corsair (station license number call sign).” Vagabond: “Corsair, this is Vagabond. Over.” Corsair: “Vagabond go to working Channel 68. Over.” Both parties switch over to the agreed upon working channel... Corsair: “Vagabond I need to talk to you about... Over.” Vagabond: “Corsair in answer to your question about... Over.” Corsair: “Vagabond, thanks for the information about... (call sign and out).” After each transmission, say “OVER” and release the microphone Push to Talk (PTT) button. This conrms that the transmission has ended. When all communication with the other vessel is totally completed, end the message by stating your call sign and the word “OUT.” Remember, it is not necessary to state your call sign with each transmission, only at the beginning and end of the message. NOTE For best sound quality at the shore station or other vessel receiving your call, hold the microphone/speaker at least 2 in. (51 mm) from your mouth and slightly off to one (1) side. Speak in a normal tone of voice.For ExampleIntro Operation CustomerAssistanceWarrantyNoticeMain IconsSecondary IconsCaution WarningInstallation CustomerAssistanceMRHH600_ENG_MANL.indd 50-51 4/3/17 5:03 PM](https://usermanual.wiki/Cobra-Electronics/MRHH600/User-Guide-3347097-Page-28.png)
![Intro Operation CustomerAssistanceWarrantyNoticeMain IconsSecondary IconsCaution WarningInstallation CustomerAssistanceIntroduction63Nothing Comes Close to a Cobra®Intro Operation CustomerAssistanceWarrantyNoticeMain IconsSecondary IconsCaution WarningInstallation CustomerAssistanceVHF Marine Radio ProtocolsEmergency Messages and Distress ProcedureMarine Emergency SignalsThe three (3) spoken international emergency signals are:The distress signal MAYDAY is used to indicate that a station is threatened by grave and imminent danger and requests immediate assistance.The urgency signal PAN is used when the safety of the vessel or person is in jeopardy. (This signal is properly pronounced pahn.)The safety signal SECURITE is used for messages about the safety of navigation or important weather warnings. (This signal is properly pronounced see-cure-ee-tay.)When using an international emergency signal, the appropriate signal is to be spoken three (3) times prior to the message.If You Hear a Distress CallYou must give any message beginning with one (1) of these signals priority over any other messages. ALL stations MUST remain silent on Channel 16 for the duration of the emergency unless the message relates directly to the emergency.If you hear a distress message from a vessel, stand by your radio. If it is not answered, YOU should answer. If the distressed vessel is not nearby, wait a short time for others who may be closer to acknowledge. Even if you cannot render direct assistance, you may be in a position to relay the message.MAYDAYPANSECURITE62 EnglishIntro Operation CustomerAssistanceWarrantyNoticeMain IconsSecondary IconsCaution WarningInstallation CustomerAssistanceIntroductionIntro Operation CustomerAssistanceWarrantyNoticeMain IconsSecondary IconsCaution WarningInstallation CustomerAssistanceVHF Marine Radio ProtocolsEmergency Messages and Distress ProcedureMarine Distress ProcedureSpeak slowly — clearly — calmly.1. Make sure your radio is On.2. Select Channel 16.3. Press Talk button and say: “MAYDAY — MAYDAY — MAYDAY.” (Or “PAN — PAN — PAN,” or “SECURITE — SECURITE — SECURITE.”)4. Say: “THIS IS [your vessel name or call sign],” repeated three (3) times.5. Say: “MAYDAY (or “PAN” or “SECURITE”) [your vessel name or call sign].6. Tell where you are: (what navigational aids or landmarks are nearby).7. State the nature of your distress.8. State the kind of assistance needed.9. Give number of persons aboard and conditions of any injured.10. Estimate present seaworthiness of your vessel.11. Briey describe your vessel (length, type, color, hull).12. Say: “I WILL BE LISTENING ON CHANNEL 16.”13. End message by saying: “THIS IS [your vessel name or call sign]. OVER.”14. Release Talk button and listen. Someone should answer. If not, repeat the call, beginning at step 3 above.Keep the radio nearby. Even after your message has been received, the Coast Guard can nd you more quickly if you can transmit a signal for a rescue boat to hone in on.MRHH600_ENG_MANL.indd 62-63 4/3/17 5:03 PM](https://usermanual.wiki/Cobra-Electronics/MRHH600/User-Guide-3347097-Page-34.png)