Cobra Electronics MRHH600 VHF Marine Radio Transceiver User Manual
Cobra Electronics Corporation VHF Marine Radio Transceiver
User Manual
DISTRESS
DISTRESS
VHF MARINE RADIO
MR HH600 FLT GPS BT
Printed in China Part No. 480-1093-P Version B
Owner’s Manual
Nothing Comes Close to a Cobra® English A1 English
Our Thanks to You and
Customer Assistance
Introduction
Our Thanks to You •
Thank you for purchasing a CobraMarine® VHF radio.
Properly used, this Cobra® product will give you
many years of reliable service.
How Your CobraMarine VHF Radio Works
This radio is a battery-powered portable transceiver for use afloat. It gives you
two-way vessel-to-vessel and vessel-to-shore station communications, primarily
for safety and secondarily for navigation and operational purposes. With it, you
can call for help, get information from other boaters, talk to lock or bridge tenders,
and make radiotelephone calls to anywhere in the world through a marine operator.
Besides two-way communications, the radio can provide quick access to receive
all the NOAA (National Oceanographic and Atmospheric Administration) weather channels
and alert you to weather emergencies with a tone on a weather channel
you can select for your area.
Global Positioning Sytem (GPS)
Your Cobra Marine radio includes a built-in GPS receiver. Your position will be continuously
indicated on the LCD and, most importantly, it will be included automatically with any DSC
Distress message you may need to send. That will take the “search” out of “search and
rescue”.
Customer Assistance •
Should you encounter any problems with this product, or not understand
its many features, please refer to this owner’s manual. If you require further
assistance after reading this manual, Cobra Electronics offers the following
customer assistance services:
For Assistance in the U.S.A.
Automated Help Desk English only.
24 hours a day, 7 days a week 773-889-3087 (phone).
Customer Assistance Operators English and Spanish.
8:00 a.m. to 5:30 p.m. Central Time Mon. through Fri. (except holidays)
773-889-3087 (phone).
Questions English and Spanish.
Faxes can be received at 773-622-2269 (fax).
Technical Assistance English only.
www.cobra.com (on-line: Frequently Asked Questions). ©2016 Cobra Electronics Corporation
6500 West Cortland Street
Chicago, Illinois 60707 USA
www.cobra.com
Customer Assistance
A2 English
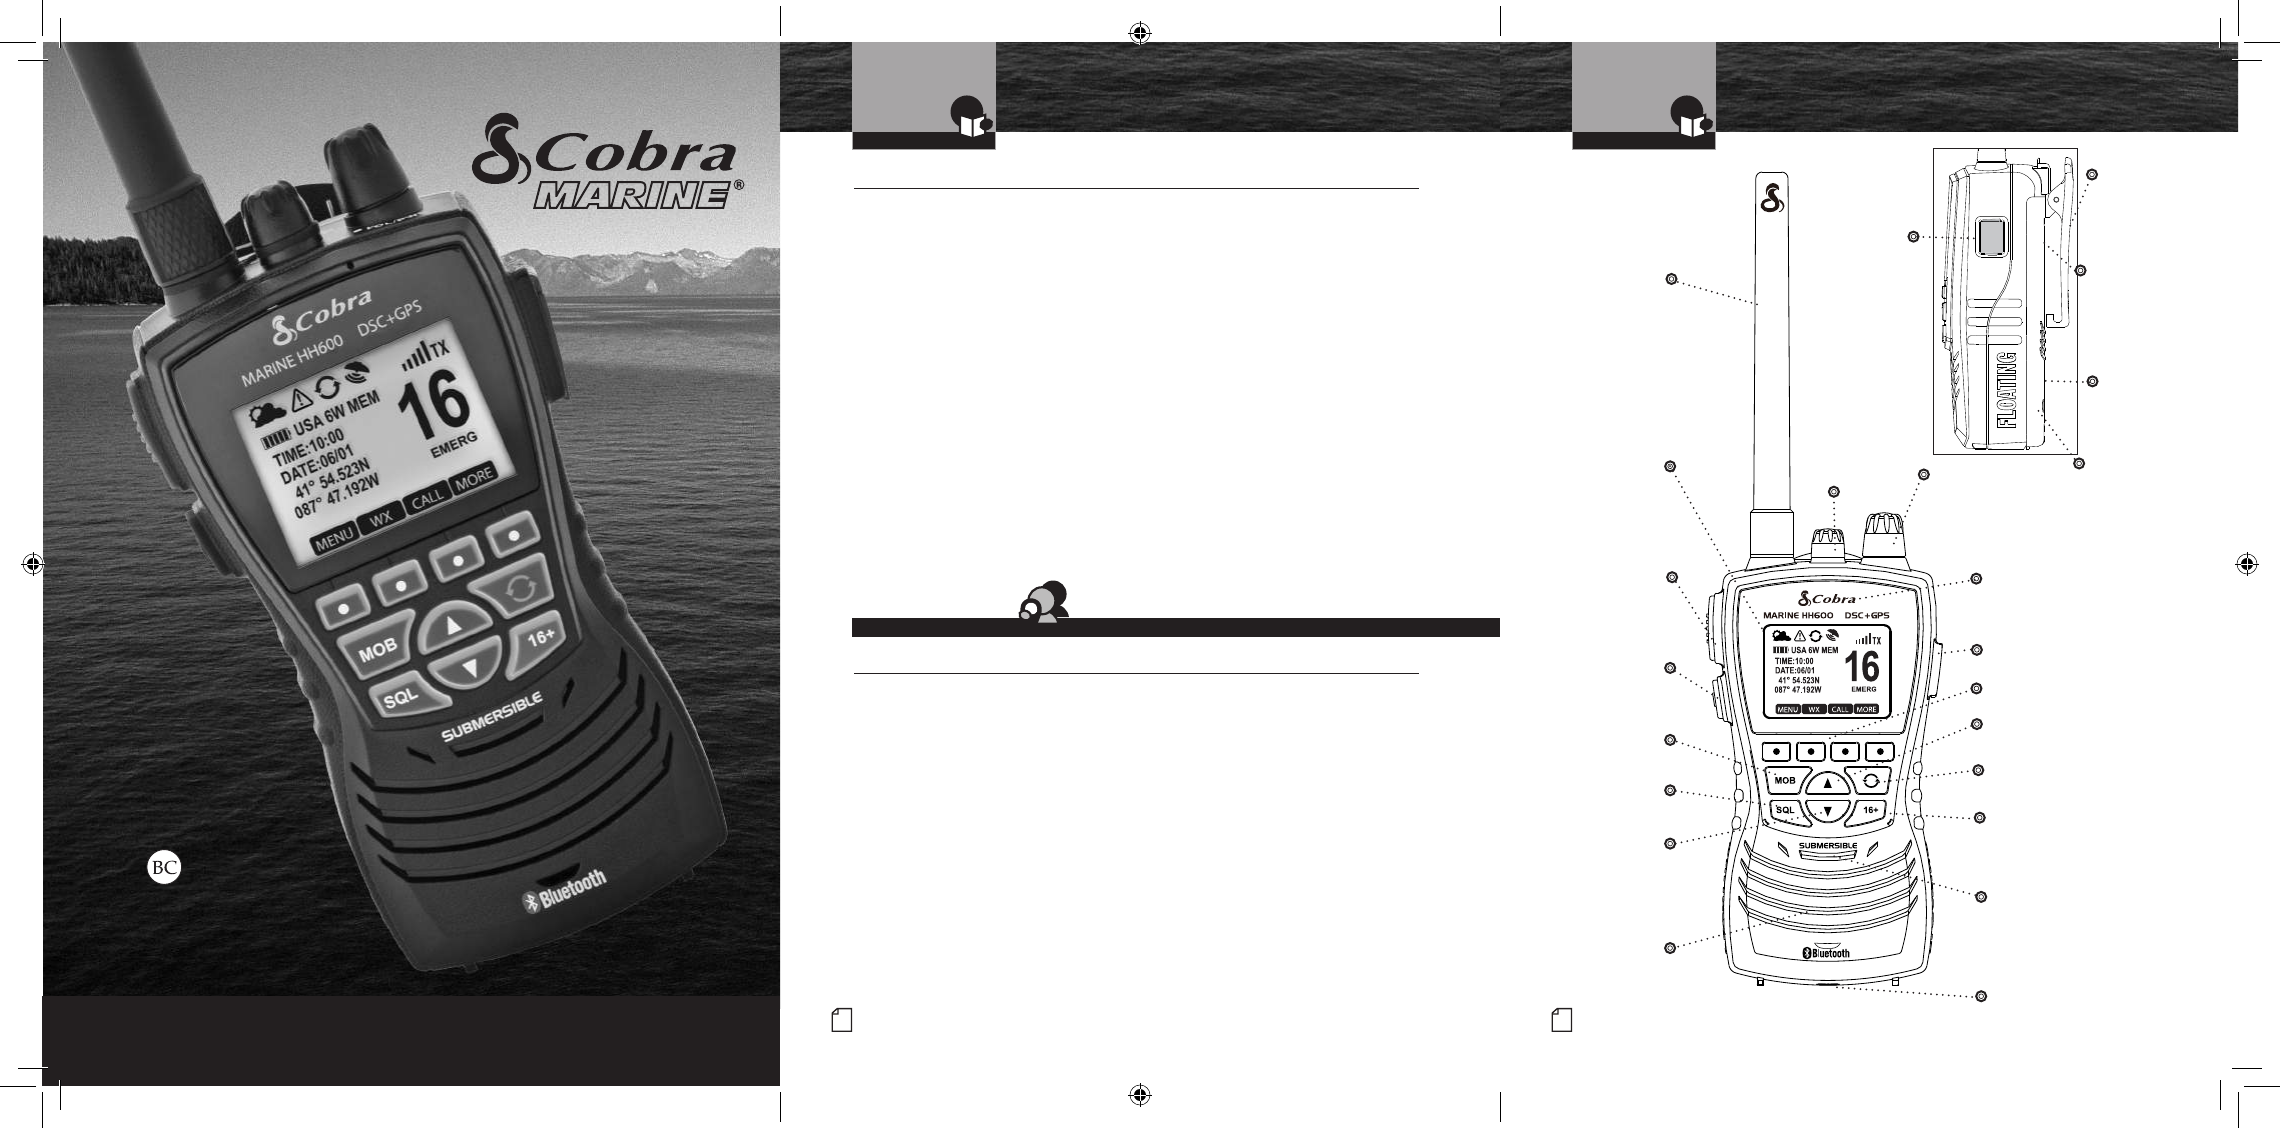
Radio Controls
and Indicators
Introduction
Instant
Channel
16+ Button
Channel
Up Button
ON/OFF/
Volume Control
Speaker/
Microphone
External Cover
Antenna
Backlit
LCD
Screen
Battery
Backlight/
Key Lock
Button
Push
to Talk
Button
Channel
Down
Button
Speaker
Belt Clip
Battery
Door
Screw
VHF Microphone
Rewind-Say-Again®
Button
Man Overboard
(MOB) Button
Distress
Key
LED Flashlight/
S.O.S.
Squelch
Button
Distress
Key
Battery
Door
Screw
Bluetooth® Calling
Microphone
Soft Key Functions
MRHH600_ENG_CVR.indd 1-3 4/3/17 5:04 PM
Product Features (continued) •
EMERG
USA 6W MEM
41° 54.523N
087° 47.192W
DATE:06/01
TIME:10:00
WX
MENU CALL MORE
ROG
16
A3 English
Introduction
Backlit Screen •
Built-In GPS Receiver
Shows GPS coordinates on screen and
automatically sends GPS location with
DSC calls.
Digital Selective Calling (DSC Class-D)
Allows the ability to maintain a listening
watch on VHF Channel 16 while
simultaneously monitoring Channel 70
for DSC calls. Allows sending a distress
message at the touch of a button as well
as specific station-to-station calls. Radio
utilizes two (2) built-in encoders (receivers).
MicroBlueTM
Bluetooth® Wireless Technology in a unique
noise canceling design. Widely compatible
for all mobile phones with Bluetooth®
wireless technology.
Easy Redial Operation
Redial of last phone number dialed.
Voice Dialing
Supports standard mobile phone
voice dialing when paired to a
compatible mobile phone.
Floating
This radio will float if dropped overboard.
It has an orange stripe so it’s easy to
retrieve.
Must use included battery to float.
Rewind-Say-Again®
Replays missed VHF calls.
6 Watt VHF
Select between 1, 3 or 6 watts for short and
long range communication.
Flashlight/S.O.S. Light
The radio can be used as a flashlight, strobe
light or S.O.S. signal.The light flashes when
dropped in the water.
Submersible to IPX8 Standards
Waterproof to 3.3 ft (1 m) of water
for 30 minutes.
All NOAA Weather Channels
Instant access to all National Weather
Channels, 24 hours a day.
Emergency Weather Alert
Receive NOAA alerts when threatening
weather is nearby.
Product Features •
Backlit Screen
and Product Features Product Features
Introduction
MOB (Man Over Board)
The radio dedicated MOB button marks and
memorizes the position information if a crew
member falls overboard.
Noise Canceling Microphone
Reduces effect of environmental
noise when speaking.
Basic Navigation
Basic navigation features include digital
compass, waypoint navigation, course,
speed, etc.
USA/International/Canada Channels
Allows operation on any of the three (3)
different channel maps established for
these areas.
BURP
The Cobra exclusive BURP feature expels
water from the speaker grill if the unit is
dropped in the water or is subjected to
extreme rain and weather.
Speaker/Mic Jack
Allows connecting optional Cobra
Lapel Speaker/Mic and other Cobra
accessories.
Instant Channel 16/9
Provides instant access to priority Channel
16 and calling Channel 9.
NMEA Out
NMEA 0183 output to display other vesels
and their information transmitted by DSC
or your chartplotter.
Unlimited Memory Channels
Allows programming of unlimited
VHF memory channels.
Tri-Watch
Use to monitor three (3) channels
at once — Channel 16, Channel 9 and one
other selected channel.
Channel Names
Friendly VHF channel names under the
channel number.
Channel Scan/Memory Scan
Use to scan through unlimited
channels or memory locations to find
conversations in progress.
Signal Strength Meter
Shows the strength of incoming or outgoing
signals.
Button/Key Lock
Prevents accidental setting changes
when button lock is set.
Illuminated Buttons
Allows high visibility of all function buttons.
AA Battery Compatible
Good for emergency backup.
Includes AA battery tray (P/N CM 110-035).
120V/12V Charger Included
Use to charge battery pack, at home,
in a car or in a boat.
Locking Desktop Charger
Holds the radio or battery in place while
charging. Vertical or horizontal mounting.
A4 English
Introduction
Notes
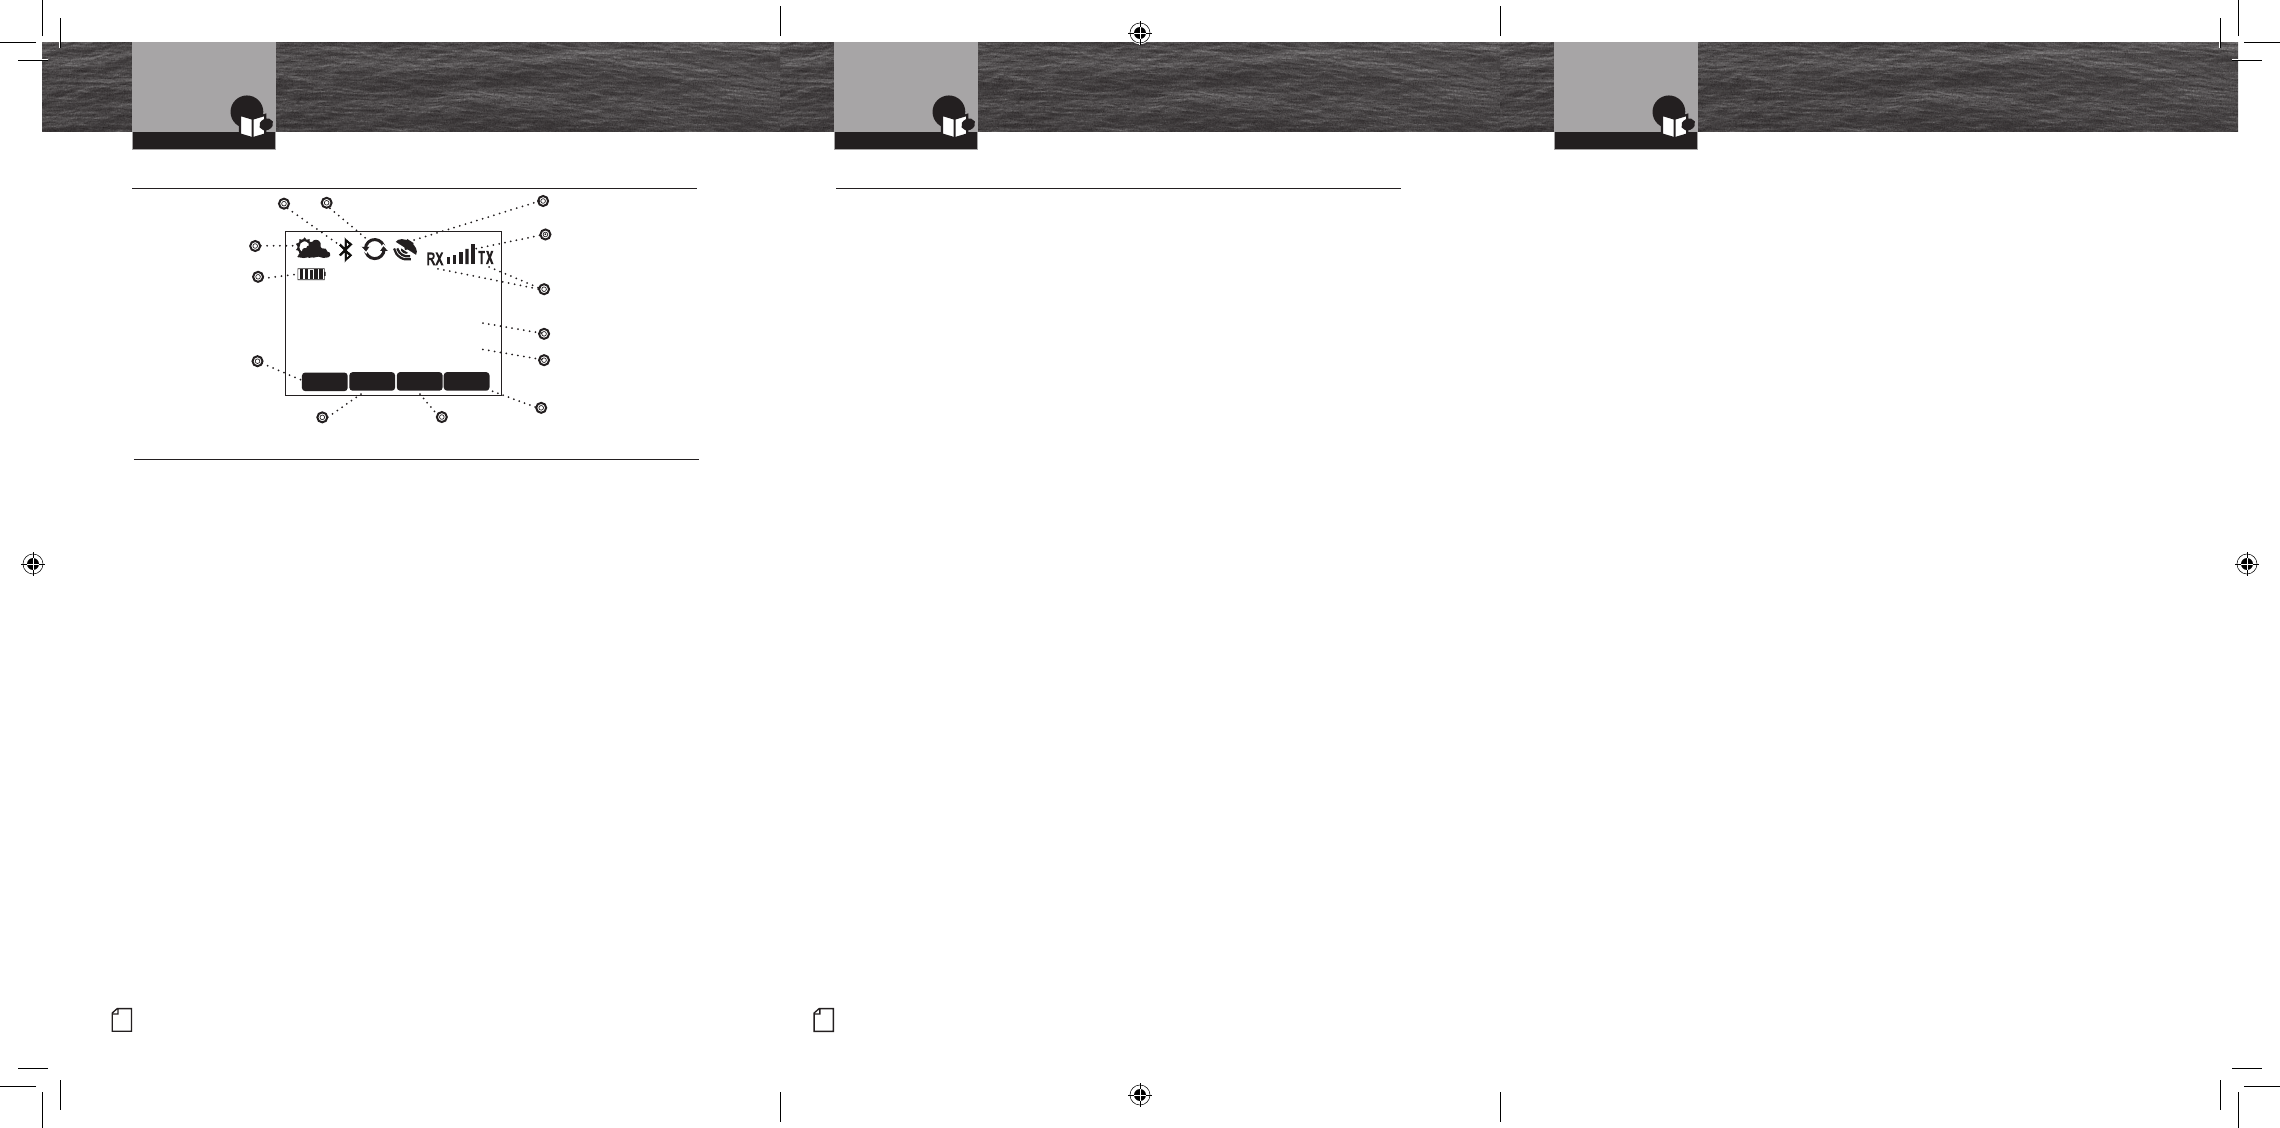
Signal Level Icon
Battery Power Icon
Weather Icon
Active Channel
Transmit and
Receive Icons
Left blank intentionally for your notes
Rewind-Say-Again® Icon
Bluetooth VOX Icon GPS Icon
MENU Soft Key
WEATHER
Soft Key CALL
Soft Key
MORE Soft Key
Channel Description
MRHH600_ENG_CVR.indd 4-6 4/3/17 5:04 PM
Introduction
Intro Operation Customer
Assistance
Warranty
Notice
Main Icons
Secondary Icons
Caution Warning
Installation Customer
Assistance
1
Nothing Comes Close to a Cobra®
Table of Contents
Introduction
Our Thanks to You .............................................. A1
Customer Assistance ............................................ A1
Radio Controls and Indicators ...................................... A2
Backlit Screen ................................................. A3
Product Features ............................................... A3
Important Safety Information ........................................ 2
General Precautions ..............................................3
Recommendations for Marine Communication .......................... 4
FCC Licensing Information ......................................... 5
Installation
Included in this Package ........................................... 7
Install/Remove Antenna ...........................................8
Wrist Strap and Belt Clip ........................................... 9
Batteries and Charger ............................................ 10
Operating Your Radio
Getting Started ................................................. 12
Setup Mode Programming ........................................17
Bluetooth® Mode Pairing and Programming ...........................28
Standby/Receive and Transmit ..................................... 30
NOAA Weather Mode Programming ..................................31
Advanced Operation ............................................. 34
Rewind Operation ...............................................38
Mobile Phone Operation With Bluetooth® .............................40
Floating Feature ................................................46
Troubleshooting and Maintenance .................................. 47
VHF Marine Radio Protocols
VHF Marine Radio Procedures ...................................... 48
Voice Calling ................................................... 50
Routine DSC Calling .............................................52
Radiotelephone Calls ............................................60
Emergency Messages and Distress Procedure ......................... 61
Warranty and Trademark
Limited 3-Year Warranty .......................................... 65
Trademark Acknowledgement .....................................65
Customer Service
Product Service ................................................ 66
Specications (Typical) ........................................... 67
Appendix
VHF Marine Channel Assignments ................................... 68
Weather Channel Assignments ..................................... 85
Accessories ................................................... 86
Intro Operation Customer
Assistance
Warranty
Notice
Main Icons
Secondary Icons
Caution Warning
Installation Customer
Assistance
Intro Operation Customer
Assistance
Warranty
Notice
Main Icons
Secondary Icons
Caution Warning
Installation Customer
Assistance
Intro Operation Customer
Assistance
Warranty
Notice
Main Icons
Secondary Icons
Caution Warning
Installation Customer
Assistance
Intro Operation Customer
Assistance
Warranty
Notice
Main Icons
Secondary Icons
Caution Warning
Installation Customer
Assistance
Intro Operation Customer
Assistance
Warranty
Notice
Main Icons
Secondary Icons
Caution Warning
Installation Customer
Assistance
Intro Operation Customer
Assistance
Warranty
Notice
Main Icons
Secondary Icons
Caution Warning
Installation Customer
Assistance
MRHH600_ENG_MANL.indd 1 4/3/17 5:03 PM
Intro Operation Customer
Assistance
Warranty
Notice
Main Icons
Secondary Icons
Caution Warning
Installation Customer
Assistance
3
Nothing Comes Close to a Cobra®
General Precautions
General Precautions •
The following WARNINGS and NOTICE information will make you aware of RF exposure hazards and
how to assure you operate the radio within the FCC RF exposure limits established for the radio.
WARNINGS
Your radio generates electromagnetic RF (radio frequency) energy when it is transmitting.
To ensure
that you and those around you are not exposed to excessive amounts of that energy, DO NOT
touch the antenna when transmitting. KEEP the radio at least two (2) inches (5 cm) away from
yourself and others when transmitting.
DO NOT operate with more than a duty cycle of 5% transmit, 5% receive and
90% standby. The radio is transmitting when the Talk button is pressed and the transmit
information shows on the LCD screen.
ALWAYS use only Cobra authorized accessories.
DO NOT operate the radio in an explosive atmosphere, near blasting sites,
or in any area where signs are posted prohibiting radio transmissions.
NEVER place the transceiver where it might interfere with operation of your vessel
or cause injury.
DO NOT allow children or anyone unfamiliar with proper procedures to operate
the radio without supervision.
Failure to observe any of these warnings may cause you to exceed FCC RF exposure limits
or create other dangerous conditions.
Introduction
Intro Operation Customer
Assistance
Warranty
Notice
Main Icons
Secondary Icons
Caution Warning
Installation Customer
Assistance
2English
Important Safety Information
Introduction
Important Safety Information •
Before using your CobraMarine VHF radio, please read these general precautions
and warnings.
Warning and Notice Statements
To make the most of this radio, it must be used properly.
Please read the installation and operating instructions carefully before using the radio.
Special attention must be paid to the WARNING and NOTICE statements in this manual.
WARNING
Statements identify conditions that could result in personal injury or loss of life.
NOTICE
Statements identify conditions that could cause damage to the radio
or other equipment.
Safety Training Information
This CobraMarine VHF radio complies with the following guidelines and standards
regarding RF energy and electromagnetic energy levels as well as evaluation of those
levels for human exposure:
n FCC OET Bulletin 65 Edition 97-01 Supplement C, Evaluating Compliance with FCC
Guidelines for Human Exposure to Radio Frequency Electromagnetic Fields.
n American National Standards Institute (C95.1-1992), IEEE Standard for Safety Levels
with Respect to Human Exposure to Radio Frequency Electromagnetic Fields, 3 kHz
to 300 GHz.
n American National Standards Institute (C95.3-1992), IEEE Recommended Practice for
the Measurement of Potentially Hazardous Electromagnetic
Fields — RF and Microwave.
n Industry Canada RSS-102-Radio Frequency (RF) Exposure Compliance of
Radiocommunication Apparatus (All Frequency bands).
Conformité d’exposition de la fréquence du Canada RSS-102-Radio d’industrie (rf) de
l’appareillage de communication par radio (toutes les bandes de fréquence).
Intro Operation Customer
Assistance
Warranty
Notice
Main Icons
Secondary Icons
Caution Warning
Installation Customer
Assistance
Intro Operation Customer
Assistance
Warranty
Notice
Main Icons
Secondary Icons
Caution Warning
Installation Customer
Assistance
Introduction
Intro Operation Customer
Assistance
Warranty
Notice
Main Icons
Secondary Icons
Caution Warning
Installation Customer
Assistance
The device complies with RF specications when the device is used at a distance 25mm from
your front face and 0mm from your body, Maximun SAR Value (1g): 5.76 W/Kg.
Industry Canada Antenna Notice
Under Industry Canada regulations, this radio transmitter may only operate using an antenna of
a type and maximum (or lesser) gain approved for the transmitter by Industry Canada. To reduce
potential radio interference to other users, the antenna type and its gain should be so chosen that
the equivalent isotropically radiated power (e.i.r.p.) is not more than that necessary for successful
communication.
Avis d’antenne du Canada d’industrie
En vertu de la réglementation de l’industrie du Canada, cet émetteur de radio ne peut fonctionner
à l’aide d’une antenne d’un type et un maximum (ou moins) Gain approuvé pour l’émetteur par
Industrie Canada. Pour réduire le risque d’interférence aux autres utilisateurs, le type d’antenne et
son gain doivent être choisis an que la puissance isotrope rayonnée équivalente (PIRE) ne dépasse
pas ce qui est nécessaire pour une communication réussie.
Separation Distance: Body:
Face:
0mm
25mm
Maximum SAR Value (1g):
(Specic Absorption Rate)
Body:
Face:
5.76 W/Kg
3.51 W/Kg
MRHH600_ENG_MANL.indd 2-3 4/3/17 5:03 PM
Introduction
Intro Operation Customer
Assistance
Warranty
Notice
Main Icons
Secondary Icons
Caution Warning
Installation Customer
Assistance
5
Nothing Comes Close to a Cobra®
FCC Licensing Information
Sea Tow Automated Radio Check (ARC) System
Please try the Sea Tow Automated Radio Check service. Areas where the safety check service
is available include the East Coast, Gulf of Mexico, Southern California, and select inland
locations including the Great Lakes. The rst and only boating safety program of its kind, the
Sea Tow Automated Radio Check service is fully automated and allows 24 hour a day automated
responses to radio check calls.
Conducting a radio check through the Sea Tow Automated Radio Check service couldn’t be
simpler. All boaters need to do is tune their VHF radio to Channel 24, 25, 26, 27, 28 or 84
(channel varies by location), then key the mic and ask for a radio check. The system responds
to each radio check with an automated reply including the location, and also replays the boater’s
original radio transmission, allowing them to assess the strength of the signal and conrm the
VHF radio is in good working order.
To nd the Sea Tow Automated Radio Check service channel in an area boaters, radio owners
should visit www.seatow.com/arc. The web page allows you to search for the local channel and
has an instructional video on how to use the service step by step.
FCC Licensing Information •
CobraMarine VHF radios comply with the FCC (Federal Communications Commission)
requirements that regulate the Maritime Radio Service.
This CobraMarine radio incorporates a VHF FM transceiver designed for use in the frequency
range of 156.025 to 163.275 MHz. It has a switchable RF output power of one (1), three (3)
or six (6) watts.
The transceiver is capable of Class-D (Digital Selective Calling) operation in accordance with
CFR Part 47, Section 80,225.
The radio operates on all currently allocated marine channels and is switchable for use
according to U.S.A., International or Canadian regulations. It features instant access to
emergency Channel 16 and calling Channel 9 as well as NOAA (National Oceanic and
Atmospheric Administration) All Hazards Radio with Alert.
Station License
An FCC ship station license is no longer required for any vessel traveling in U.S.A. waters which
uses a VHF marine radio, RADAR, or EPIRB (Emergency Position Indicating Radio Beacon), and
which is not required to carry radio equipment. However, any vessel required to carry a marine
radio on an international voyage, carrying an HF single side band radiotelephone, or carrying a
marine satellite terminal must obtain a station license.
FCC license forms and applications for ship and land stations can be downloaded through the
Internet at www.fcc.gov. Forms can also be obtained by calling the FCC at 888-225-5322.
International Station License
If your vessel will be entering the sovereign waters of a country other than the U.S.A. or Canada,
you should contact that country’s communications regulatory authority for licensing information.
Radio Call Sign
Currently, the FCC does not require recreational boaters to have a license. The United States
Coast Guard recommends that the boat’s registration number and state of registry (e.g., IL 1234
AB) be used as a call sign and be clearly visible on the vessel.
4English
Intro Operation Customer
Assistance
Warranty
Notice
Main Icons
Secondary Icons
Caution Warning
Installation Customer
Assistance
General Precautions
Introduction
NOTICE
Your radio is waterproof only when the batteries are properly installed.
AVOID using or storing the radio at temperatures below -4˚F (-20˚C) or above
140˚F (60˚C).
KEEP your radio at least 3 ft (0.9 m) away from your vessel’s magnetic
navigation compass.
DO NOT attempt to service any internal parts yourself. Have any necessary
service performed by a qualied technician.
This radio is supplied with a lithium-ion (LiON) rechargeable battery pack.
n Use only the Cobra charger to recharge lithium-ion (LiON) batteries in the radio.
n Do not short circuit the battery pack.
n When replacing the batteries, dispose of the old batteries properly. Batteries
may explode if disposed of in a re.
CAUTION Risk of explosion if battery is replaced by an incorrect type. Dispose of used
batteries according to the instructions.
Changes or modications to your radio MAY VOID its compliance with
FCC (Federal Communications Commission) rules and make it illegal to use.
Recommendations for Marine Communication •
The frequencies your radio uses are set aside to enhance safety aoat and for vessel
navigation and operational messages over a range suitable for nearshore voyages.
If the 6 watt maximum output of your radio is not sufcient for the distances you travel from
the coast, consider installing a Cobra Marine xed mount radio with up to 25 watts of
output power. (Visit www.cobra.com or your local dealer for model availability.)
If traveling far offshore, you should consider adding even more powerful radio equipment
such as HF single side band or satellite radio for your vessel.
The U.S. Coast Guard does not endorse cellular telephones as substitutes for marine
radios. They generally cannot communicate with rescue vessels and, if you make
a distress call on a cellular telephone, only the party you call will be able to hear you.
Additionally, cellular telephones may have limited coverage over water and
can be hard to locate. If you do not know where you are, the Coast Guard will have difculty
nding you if you are using a cellular telephone.
However, cellular telephones can have a place on board where cellular coverage
is available — to allow social conversations and keep the marine frequencies
uncluttered and available for their intended uses.
Introduction
Intro Operation Customer
Assistance
Warranty
Notice
Main Icons
Secondary Icons
Caution Warning
Installation Customer
Assistance
MRHH600_ENG_MANL.indd 4-5 4/3/17 5:03 PM
7
Nothing Comes Close to a Cobra®
Included in this Package
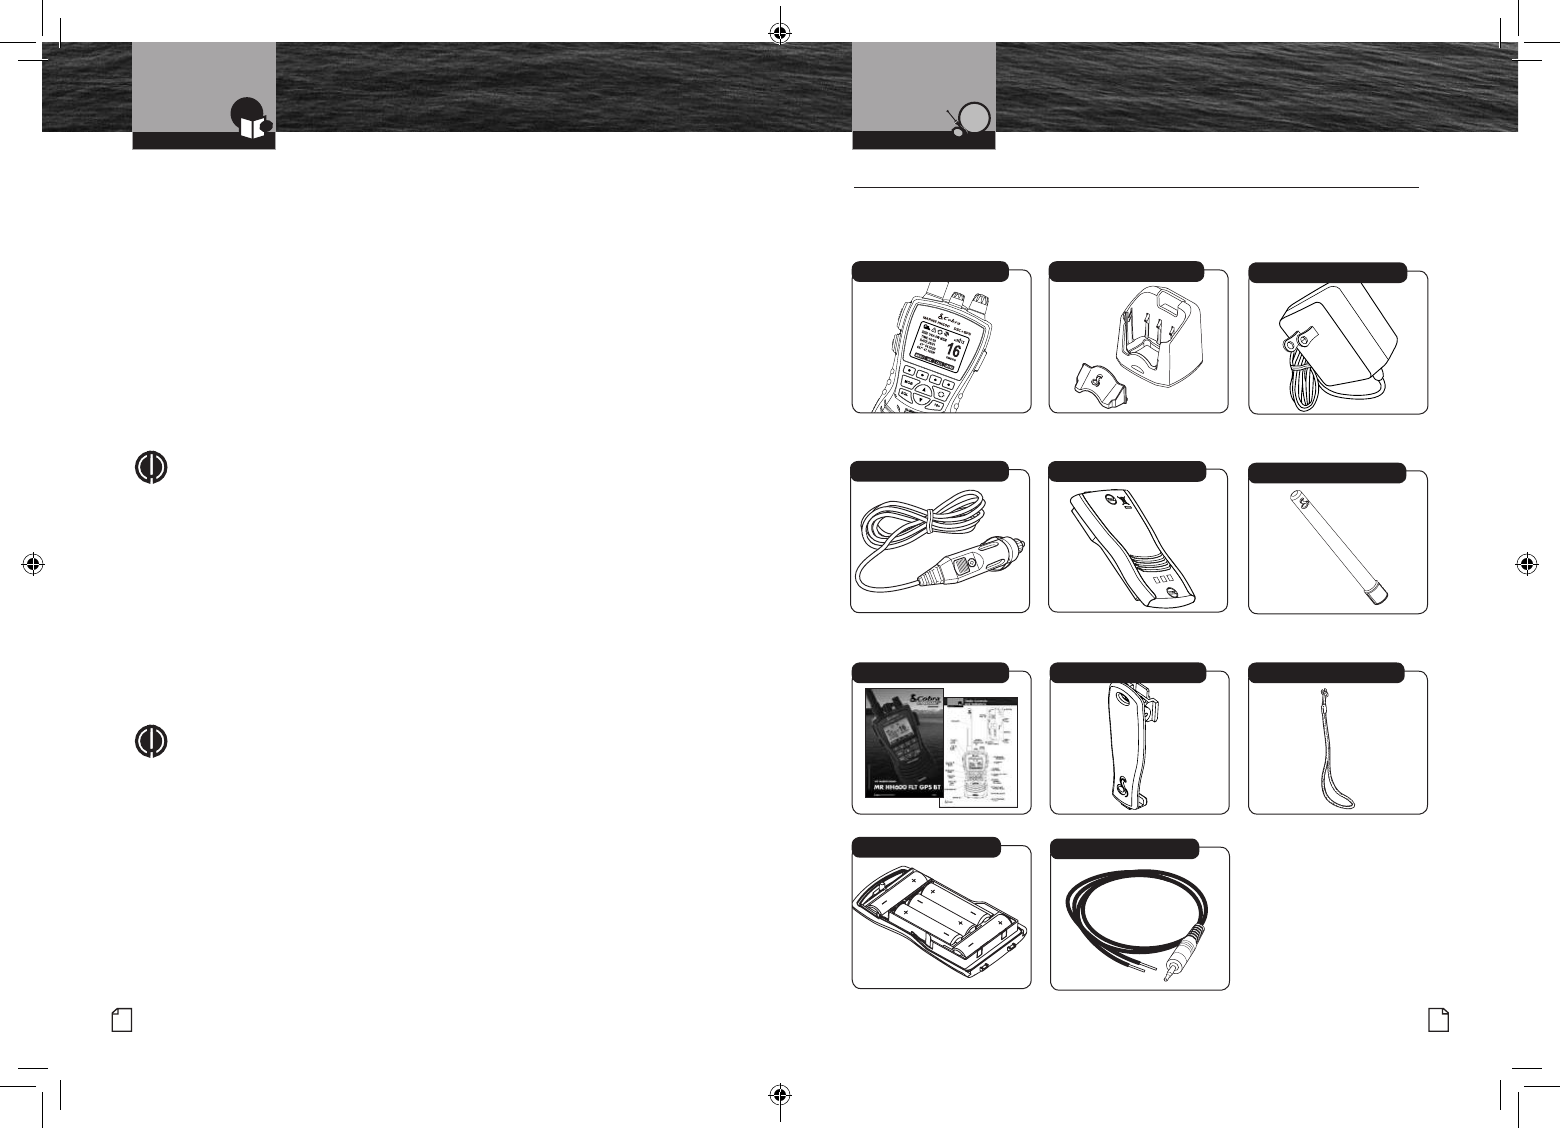
Included in this package •
You should nd all of the following items in the package with
your CobraMarine VHF radio:
6English
FCC & IC Licensing
Information
Canadian Ship Station License
You need a Radio Operator’s Certicate if your vessel is operated in Canadian waters. Radio
Operator training and certication is available from the Canadian Power Squadron. Visit their
website at http://www.cps-ecp.ca/.
User Responsibility and Operating Locations
All users are responsible for observing domestic and foreign government regulations and are subject
to severe penalties for violations. The VHF frequencies on your radio are reserved for marine use and
require a special license to operate from land, including when your boat is on its trailer.
FCC Statement
This device complies with part 15 of the FCC Rules. Operation is subject to the following two
(2) conditions:
1. This device may not cause harmful interference, and
2. This device must accept any interference received, including interference that may cause
undesired operation.
NOTE
This equipment has been tested and found to comply with the limits for a Class B digital
device, pursuant to part 15 of the FCC Rules. These limits are designed to provide
reasonable protection against harmful interference in a residential installation. This
equipment generates, uses and can radiate radio frequency energy and, if not installed
and used in accordance with the instructions, may cause harmful interference to radio
communications. However, there is no guarantee that interference will not occur in a
particular installation. If this equipment does cause harmful interference to radio or
television reception, which can be determined by turning the equipment off and on, the user
is encouraged to try to correct the interference by one or more of the following measures:
- Reorient or relocate the receiving antenna.
- Increase the separation between the equipment and receiver.
- Connect the equipment into an outlet on a circuit different from that to which the
receiver is connected.
- Consult the dealer or an experienced radio/TV technician for help.
NOTE
Any changes or modications to this unit not expressly approved by the party responsible for
compliance could void the user’s authority to operate the equipment.
IC Statement
This device complies with Industry Canada licence-exempt RSS standard(s): Operation is
subject to the following Two conditions:(1) this device may not cause interference, and
(2) this device must accept any interference, including interference that may cause
undesired operation of the device.
Le présent appareil est conforme aux CNR d’Industrie Canada applicables aux appareils
radio exempts de licence. L’exploitation est autorisée aux deux conditions suivantes : (1)
l’appareil ne doit pas produire de brouillage, et (2) l’utilisateur de l’appareil doit accepter
tout brouillage radioélectrique subi, même si le brouillage est susceptible d’en
compromettre le fonctionnement.
Intro Operation Customer
Assistance
Warranty
Notice
Main Icons
Secondary Icons
Caution Warning
Installation Customer
Assistance
Introduction
Intro Operation Customer
Assistance
Warranty
Notice
Main Icons
Secondary Icons
Caution Warning
Installation Customer
Assistance
Radio Drop-In Battery Charger
DC Charger
For connection to 12-volt power
sources.
LiON Battery Pack
Operating Instruction Manual Spring-Loaded Belt Clip
Antenna
VHF Marine Radio Protocols
Intro Operation Customer
Assistance
Warranty
Notice
Main Icons
Secondary Icons
Caution Warning
Installation Customer
Assistance
Installation
AC Charger
For connection to 120-volt power
source.
Wrist Strap
Alkaline Battery Tray NMEA Output Cable
Intro Operation Customer
Assistance
Warranty
Notice
Main Icons
Secondary Icons
Caution Warning
Installation Customer
Assistance
Intro Operation Customer
Assistance
Warranty
Notice
Main Icons
Secondary Icons
Caution Warning
Installation Customer
Assistance
MRHH600_ENG_MANL.indd 6-7 4/3/17 5:03 PM
Intro Operation Customer
Assistance
Warranty
Notice
Main Icons
Secondary Icons
Caution Warning
Installation Customer
Assistance
9
Nothing Comes Close to a Cobra®
Wrist Strap and Belt Clip
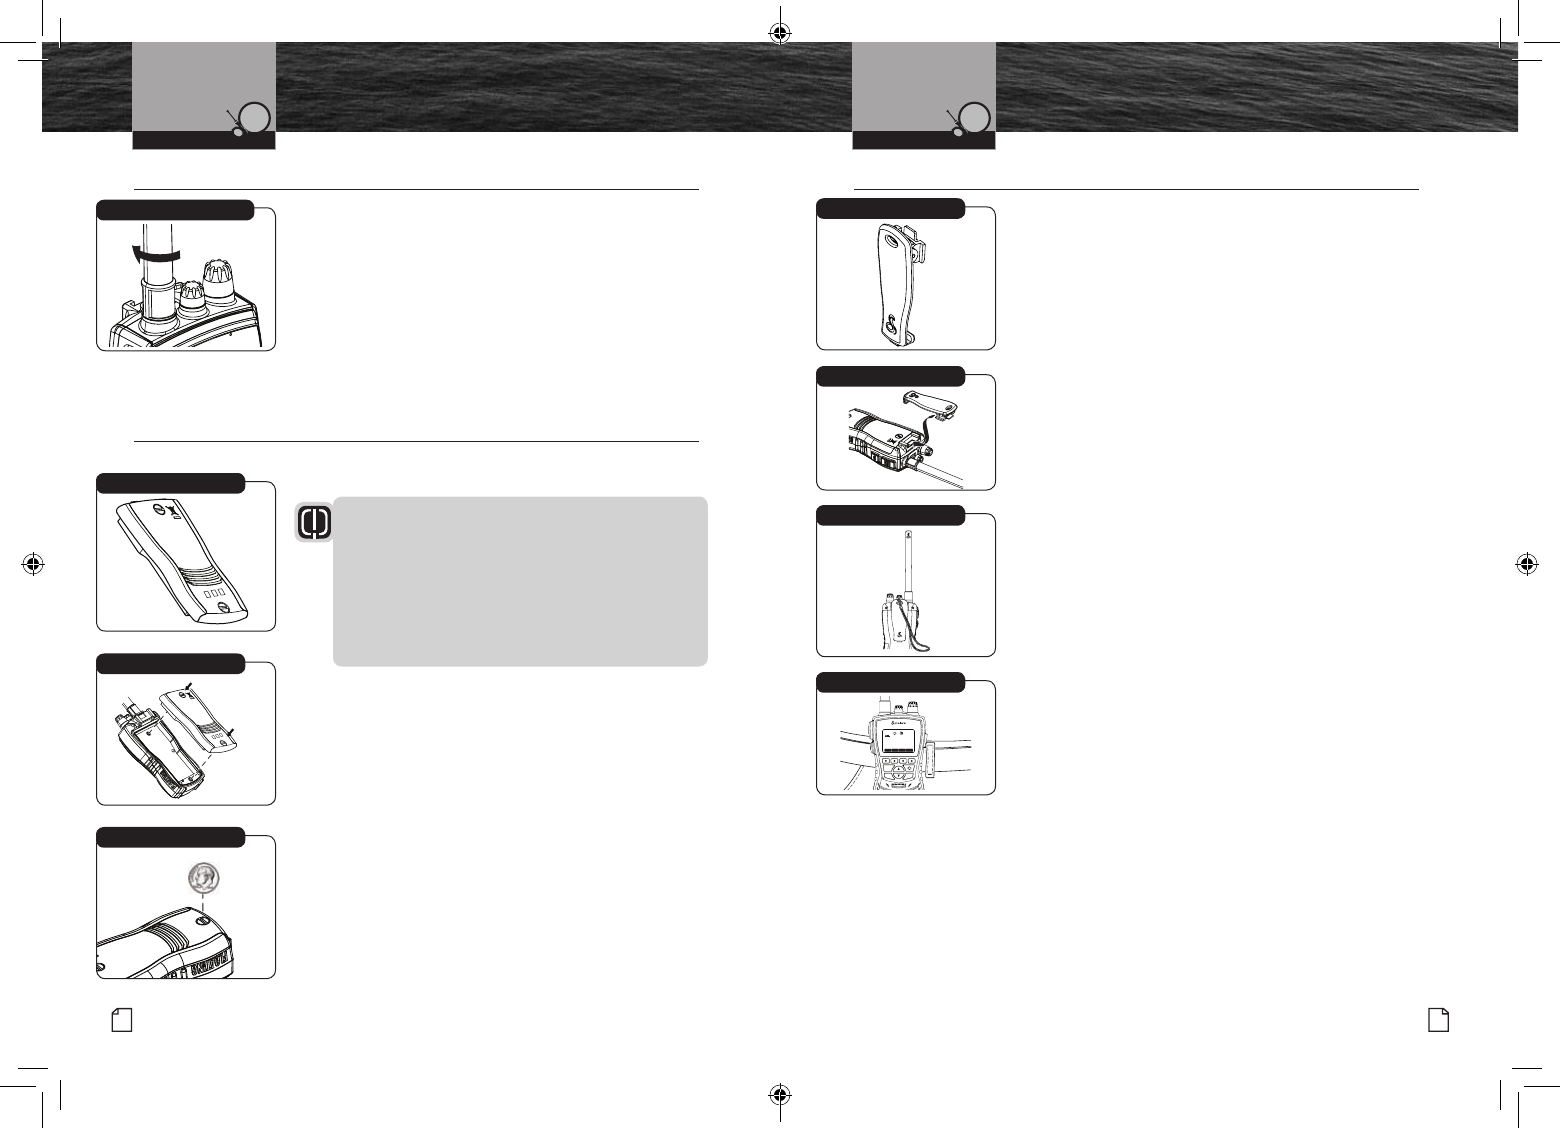
Install/Remove Antenna •
1. To install the antenna turn the antenna into the radio
clockwise to tighten. Do not overtighten.
2. To remove the antenna turn the antenna counterclockwise.
This radio transmitter IC: 906A-MRHH600 has been approved
by Industry Canada to operate with the supplied antenna. Other
antennas are strictly prohibited for use with this device.
Cet émetteur radio IC: 906A-MRHH600 a été approuvé par
Industrie Canada pour fonctionner avec l’antenne fournie.
D’autres antennes sont strictement interdits pour une utilisation
avec cet appareil.
Batteries and Charger •
The radio is shipped with a sealed lithium-ion (LiON) battery pack
(P/N CM 110-034) that is rechargeable.
WARNING
The charger provided for this radio is only to be used
to charge the battery pack provided. Do not charge any
other type of batteries in the charger as re, explosion
or battery damage may occur. Avoiding extreme
temperatures will also help prolong the life of the battery
pack for the radio. The device operating voltage is DC
6.29V - DC 8.40V.
When your rechargeable batteries begin to discharge too quickly,
it is time to install a new battery pack. Your radio
will also operate with ve (5) high-quality AA alkaline batteries,
using the included alkaline battery tray.
Installing the Battery Pack
1. Position the battery pack over the back of the radio.
2. Engage the battery pack into the radio until battery pack is
fully seated into the radio housing.
3. Tighten the screws using a coin or at object to secure the
battery pack to the radio. Do not overtighten.
Belt Clip
Insert Belt Clip onto Radio
HM L
MOB
SQL16+
MARINE HH600 DSC+GPS
WX
MENU CALL MORE
16A
EMERGENCY
USA 6W
32 49.800N
SOG: 3.7 KTS COG: 015 M
999.11.077W
DATE:06/30
TIME:10:00 LOC
Secure Radio
VHF Marine Radio Protocols
Intro Operation Customer
Assistance
Warranty
Notice
Main Icons
Secondary Icons
Caution Warning
Installation Customer
Assistance
Installation
8English
Install/Remove Antenna
VHF Marine Radio Protocols
Intro Operation Customer
Assistance
Warranty
Notice
Main Icons
Secondary Icons
Caution Warning
Installation Customer
Assistance
Installation
Antenna
Wrist Strap and Belt Clip •
Use the spring-loaded belt clip to carry the radio on your person.
1. Slide the belt clip into the guide channel on the back of the
radio until it is locked in place.
2. To attach the wrist strap, insert it through the hole at the top
of the belt clip, feed it through the looped end and pull tight to
secure to the belt clip.
3. Press open the belt clip, slide it over the belt and release the
clip.
4. To remove the belt clip from the radio press the tab on the belt
clip, which unlocks the clip, and slide it out.
Install Battery Pack
LiON Battery Pack
Tighten Screw
Wrist Strap Attachment
MRHH600_ENG_MANL.indd 8-9 4/3/17 5:03 PM
Intro Operation Customer
Assistance
Warranty
Notice
Main Icons
Secondary Icons
Caution Warning
Installation Customer
Assistance
Intro Operation Customer
Assistance
Warranty
Notice
Main Icons
Secondary Icons
Caution Warning
Installation Customer
Assistance
Intro Operation Customer
Assistance
Warranty
Notice
Main Icons
Secondary Icons
Caution Warning
Installation Customer
Assistance
Intro Operation Customer
Assistance
Warranty
Notice
Main Icons
Secondary Icons
Caution Warning
Installation Customer
Assistance
VHF Marine Radio Protocols
Intro Operation Customer
Assistance
Warranty
Notice
Main Icons
Secondary Icons
Caution Warning
Installation Customer
Assistance
Installation
11
Nothing Comes Close to a Cobra®
To Remove Battery Pack from Radio
1. Loosen the screws on the back of the battery pack.
2. Lift the bottom of the battery pack slightly to remove
it from the radio housing.
3. Pull the battery pack out of the radio housing.
Intro Operation Customer
Assistance
Warranty
Notice
Main Icons
Secondary Icons
Caution Warning
Installation Customer
Assistance
NOTE
The LiON battery pack can also be charged in the battery
charger without being installed in the radio. Insert the spacer
into the battery charger to support the battery pack during
this charging process. Follow the same procedures in “Initial
Charge” to charge the battery pack.
NOTICE
Lithium-ion (LiON) batteries are toxic. Please dispose of
properly. Some marine suppliers and electronics retailers
accept old battery packs for recycling and some municipal
waste disposal agencies have special provisions for battery
disposal.
Alkaline Batteries
The alkaline battery tray acts as a backup or “Emergency” power
source should the battery pack run low on power and need to be
recharged. The radio will transmit at full power when using ve (5)
new AA alkaline batteries.
WARNING
Never attempt to recharge alkaline batteries. They are not
made to be recharged, and should be disposed of
in a proper manner.
Batteries and Charger
VHF Marine Radio Protocols
Intro Operation Customer
Assistance
Warranty
Notice
Main Icons
Secondary Icons
Caution Warning
Installation Customer
Assistance
Installation
10 English
Batteries and Charger
Charging
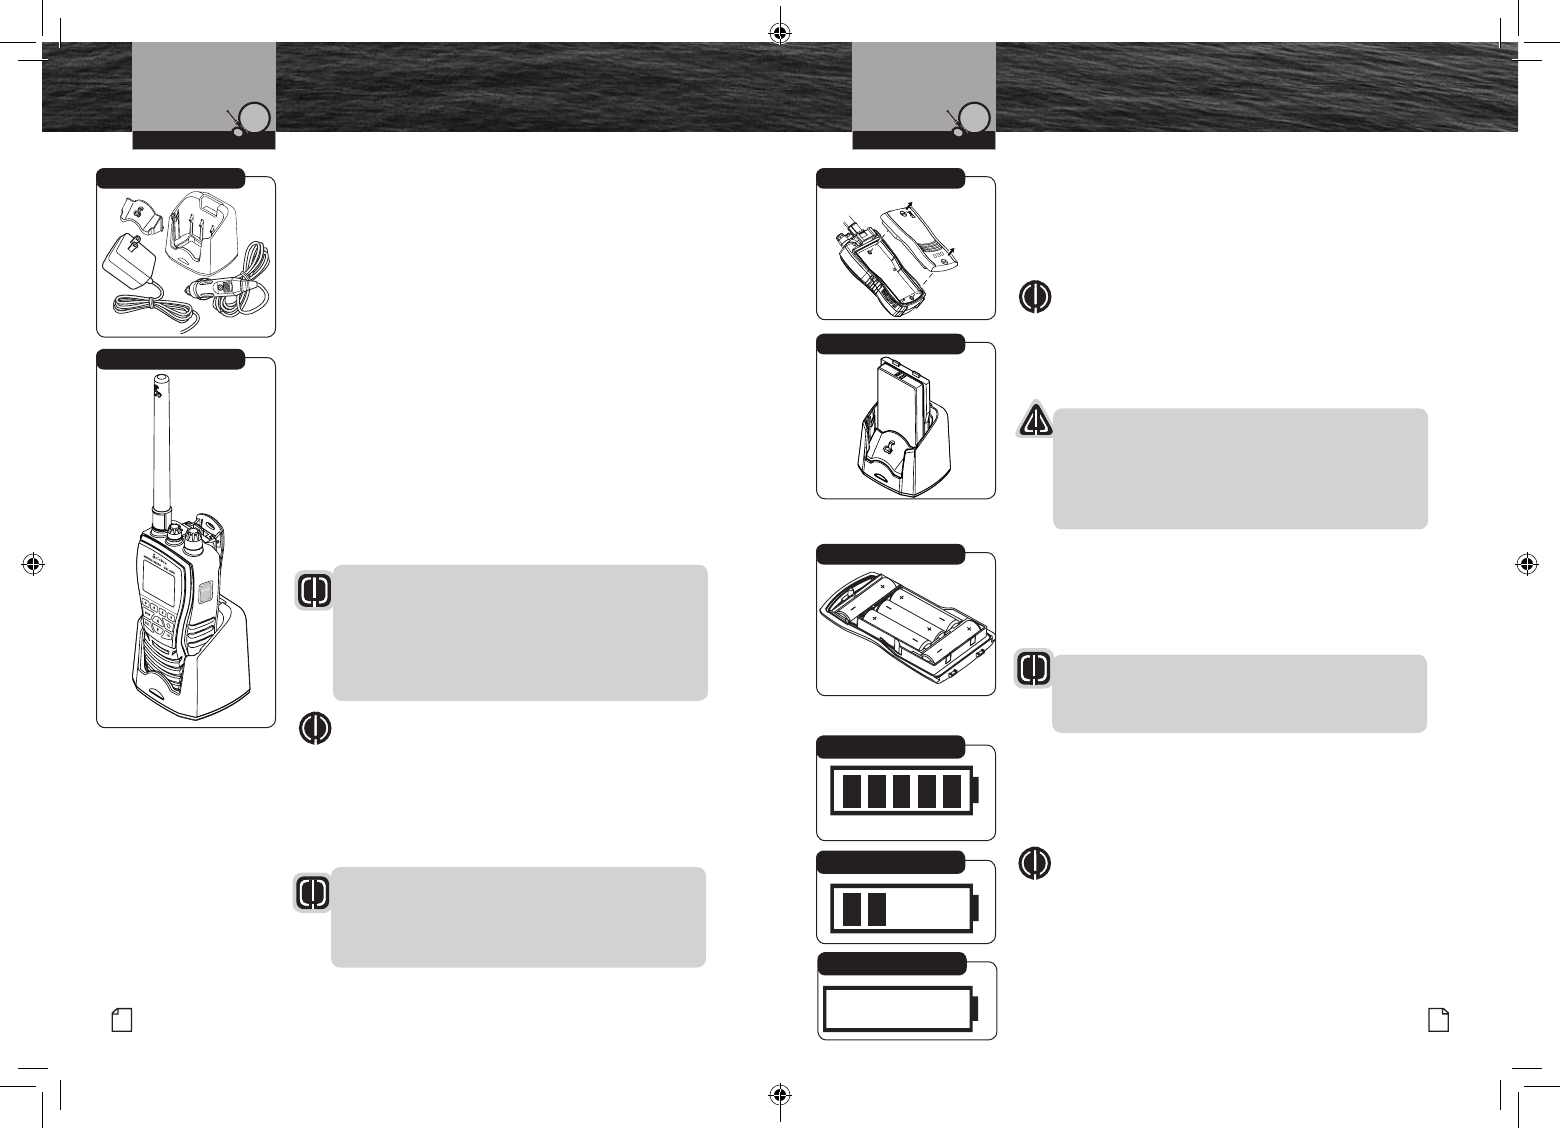
The Cobra-provided LiON battery pack may be charged at home,
in a car or in a boat using the appropriate 12V or 120V power cord
with the charger.
1. Insert one (1) of the power cords into the back of the drop-in
charger.
2. Insert the other end of the power cord into the appropriate 12V
or 120V power source.
3. Remove the battery pack spacer from the charger and insert the
entire radio/battery into the charger. The metal charge contacts
on the battery will contact the mating prongs in the charger to
transfer the charging current.
4. Observe that the red light on the front of the charger glows to
indicate that the battery pack is properly seated and the charger
is operating.
5. Allow the batteries to charge for ve (5) to six (6) hours before
use. The charge light will turn off when the battery is fully
charged.
WARNING
The charger provided for this radio is only to be used to
charge the battery pack provided. Do not charge any other
type of batteries in the charger as re, explosion or battery
damage may occur. Avoiding extreme temperatures will
also help prolong the life of the battery pack for the radio.
Intro Operation Customer
Assistance
Warranty
Notice
Main Icons
Secondary Icons
Caution Warning
Installation Customer
Assistance
NOTE
If the drop-in charger is used on a boat, Cobra
recommends you attach it to a horizontal shelf or vertical
bulkhead (using the screw holes provided) to prevent
possible damage due to the boat rolling or pitching. The
charging base has been designed to hold the battery pack in
place during rough sea conditions.
WARNING
The adapter shall be installed near the radio’s charger
and shall be easily accessible. The plug is considered a
disconnect device of the charging base.
Remove Battery
Alkaline Battery Tray
Battery Pack Charging Only
Power Sources
Initial Battery Charge
Maintaining the Battery Charge
As you use your radio, the battery power icon will show the battery
power remaining. When the battery icon begins to ash, the battery is
empty and needs to be recharged. The radio will beep three (3) times
and ash “Low Battery” every 10 minutes until the radio turns off.
Intro Operation Customer
Assistance
Warranty
Notice
Main Icons
Secondary Icons
Caution Warning
Installation Customer
Assistance
NOTE
The radio will continue to receive signals when blinking
but cannot transmit.
It is a good idea to keep a set of fresh, high-quality AA alkaline
batteries with your radio. Should the rechargeable battery pack
become discharged and no electrical power source is available,
you can insert the included alkaline battery tray with fresh alkaline
batteries and continue to use your radio.
Fully Charged
Partially Charged
Fully Discharged
MRHH600_ENG_MANL.indd 10-11 4/3/17 5:03 PM
VHF Marine Radio Protocols
Intro Operation Customer
Assistance
Warranty
Notice
Main Icons
Secondary Icons
Caution Warning
Installation Customer
Assistance
Operating Your Radio
13
Nothing Comes Close to a Cobra®
Getting Started
Getting Started •
Refer to the foldout at the front of this manual to identify the
various controls and indicators on your radio. Throughout this
manual you will be instructed to “Press” or to “Press and
Hold” various buttons (except “Push to Talk”) on the radio.
“Press” means a momentary press of approximately one (1)
second. “Press and Hold” means to hold the button down for
approximately two (2) seconds.
Whenever you press any button except the Talk button on your
radio, a brief tone (if key tones are selected On) will sound to
conrm the button press. With all button presses, the appropriate
icon will appear on the LCD and the backlight will turn On. The
backlight will stay On for 10 seconds after the button is released.
12 English
Getting Started
On/Off/Volume Control
(Counterclockwise)
On/Off/Volume Control
(Clockwise)
HH600 Radio
VHF Marine Radio Protocols
Intro Operation Customer
Assistance
Warranty
Notice
Main Icons
Secondary Icons
Caution Warning
Installation Customer
Assistance
Operating Your Radio
Common Radio Functions
The following procedures dene common operating functions of the radio when in either
Marine Standby or Weather (WX) Standby modes.
Power/Volume Control
Power On/Off Control
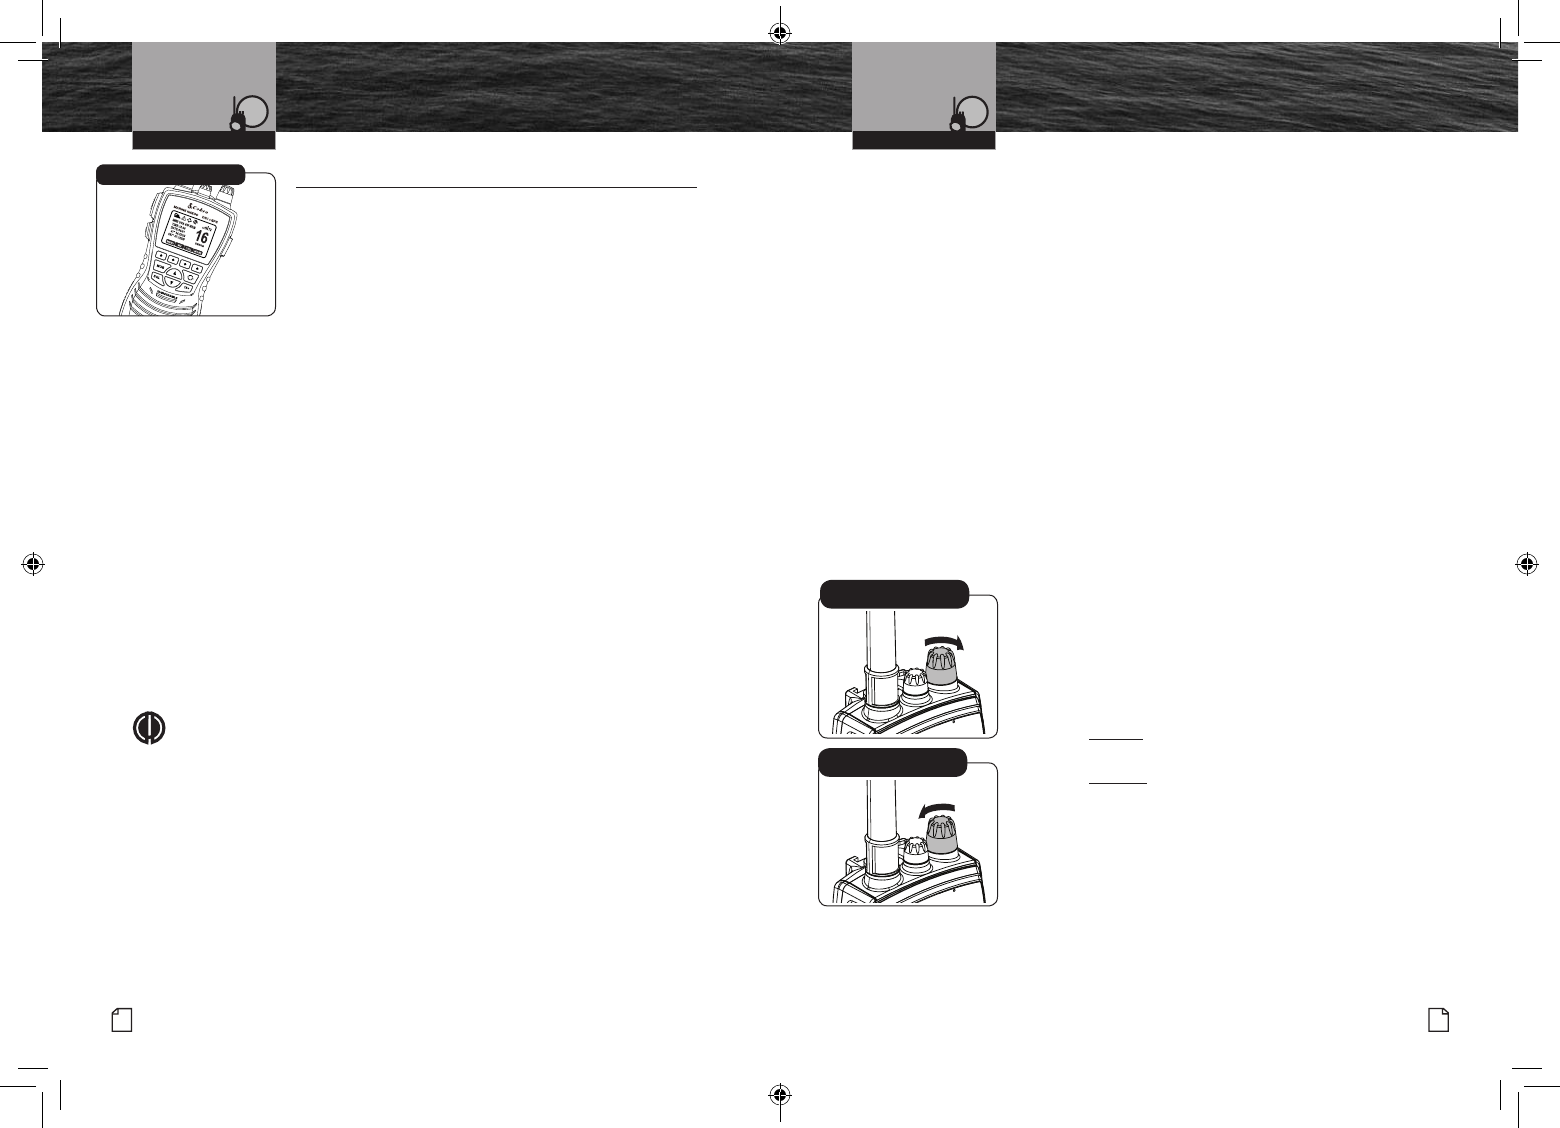
The On/Off/Volume control is located at the upper right
side of the radio. Turning the On/Off/Volume control past
the detent position will turn the radio On or Off.
Volume Control
Volume is controlled by turning the On/Off/Volume control.
n To increase the volume, turn the On/Off/Volume control
clockwise.
n To decrease the volume, turn the On/Off/Volume
control counterclockwise.
Tones And Alarms
When your CobraMarine VHF radio is On, you can expect to hear the following tones and
alarms. The volume of these sounds is controlled by the circuitry in the radio and is not
affected by the volume set with the On-Off Power/Volume knob.
Conrmation Tone
Single high-pitched beep conrms all button presses except the Talk button.
It can be turned On or Off. See set-up routines on page 30.
Error Tone
Three low-pitched beep indicates an invalid button press.
DSC Distress Alarm
High—low—high—low—high. Pause, then repeat. The volume of all alarms will increase
after 10 seconds. Press any button to turn it Off.
NOTE
This alarm sounds only for DSC distress calls on Channel 70.
It does not sound for voice calls on Channel 16 — you still
must listen for those.
Distress Acknowledgement Alarm
High—low—high—low—high. Pause, then repeat. The volume of all alarms will increase
after 10 seconds. Press any button to turn it Off.
DSC Routine Call Alarm
High—pause—high—pause—high. Long pause, then repeat. Press any button to turn it
Off.
DSC Geographical Alarm
Loud, continuous, medium-pitched, high-low tones (warble) — sounds
when a geographical call is received. Press any button to turn it Off.
DSC Position Request Alarm
Medium-loud, continuous, low-pitched series of closely spaced, four (4) beeps [three (3)
short – one (1) long] groups — sounds when a position request call
is received. Press any button to turn it Off.
DSC Individual Alarm
High—pause—high—pause—high. Long pause, then repeat. Press any button to turn it
Off.
Weather Alarm
Medium-loud, continuous, medium-pitched series of one-half (1⁄2) second beeps spaced
one-half (1⁄2) second apart — sounds when weather alert is turned On
and NOAA sends a 1050 Hz weather alert tone on the selected weather channel. Press any
button to turn it Off.
Intro Operation Customer
Assistance
Warranty
Notice
Main Icons
Secondary Icons
Caution Warning
Installation Customer
Assistance
MRHH600_ENG_MANL.indd 12-13 4/3/17 5:03 PM
VHF Marine Radio Protocols
Intro Operation Customer
Assistance
Warranty
Notice
Main Icons
Secondary Icons
Caution Warning
Installation Customer
Assistance
Operating Your Radio
15
Nothing Comes Close to a Cobra®
Getting Started
Channel Up/Down Buttons
Your radio will Receive (Rx) and Transmit (Tx) VHF signals on
the channel indicated on the LCD display. You can change the
channel at any time using the Channel Up/Down buttons.
To Change Channels:
Press the Channel Up/Down button.
If you are on Channel 88, pressing the Channel Up
button will advance to Channel 01. If you are on Channel
01, pressing the Channel Down button will advance to
Channel 88.
You can press and hold the Channel Up/Down button
for fast advance. If the new channel selected is restricted
to low power, the radio will automatically switch to Low
Power mode and the Low Power icon will appear on the
LCD.
If the radio is in the Key Lock mode, the channel will not
change and the three (3) beep error signal will sound.
High/Medium/Low (H/M/L) Power Selection
Your radio can transmit selectively at 1, 3 or 6 watts of power.
Cobra suggests you maintain the low power setting for short-
range communications. You will conserve battery life and avoid
overpowering nearby stations with a low power setting signal.
Use the high power setting for long-range communications or
when you do not receive a response to a signal sent at 1 watt.
To Toggle Between H-M-L Power Modes:
Press the MORE soft key until the screen shows as illustrated.
Pres the H-M-L soft key to set the power 1W, 3W, or 6W.
The LCD will show which mode is in effect. Some channels
are restricted for a maximum use of 1 watt. Your radio will
automatically set the power to Low Power mode when you
select those channels.
Intro Operation Customer
Assistance
Warranty
Notice
Main Icons
Secondary Icons
Caution Warning
Installation Customer
Assistance
NOTE
Some channels, frequency bands and countries of use
might not be able to operate in High Power mode.
Intro Operation Customer
Assistance
Warranty
Notice
Main Icons
Secondary Icons
Caution Warning
Installation Customer
Assistance
NOTE
A few channels are Receive only and will not transmit in
these channels.
Channel Up/Down Buttons
88A
EMERGENCY
USA 6W
32 49.800N
999 11.077W
DATE:06/30
TIME:10:00 LOC
WX
MENU CALL MORE
Currently On Channel 88
VHF Marine Radio Protocols
Intro Operation Customer
Assistance
Warranty
Notice
Main Icons
Secondary Icons
Caution Warning
Installation Customer
Assistance
Operating Your Radio
14 English
Getting Started
Radio Speaker and Microphone
The internal Radio Speaker and Microphone are located on the bottom
front face of the radio below the lower control buttons.
An optional Speaker/Microphone port is located at the top of the radio
between the antenna and the Power/Volume control. Unthread the
Speaker/Microphone port cover to access and install an optional Cobra
speaker or microphone into this port.
NOTE
Please make sure the port cover is secured and rmly tightened in
place when the speaker/microphone is not is use.
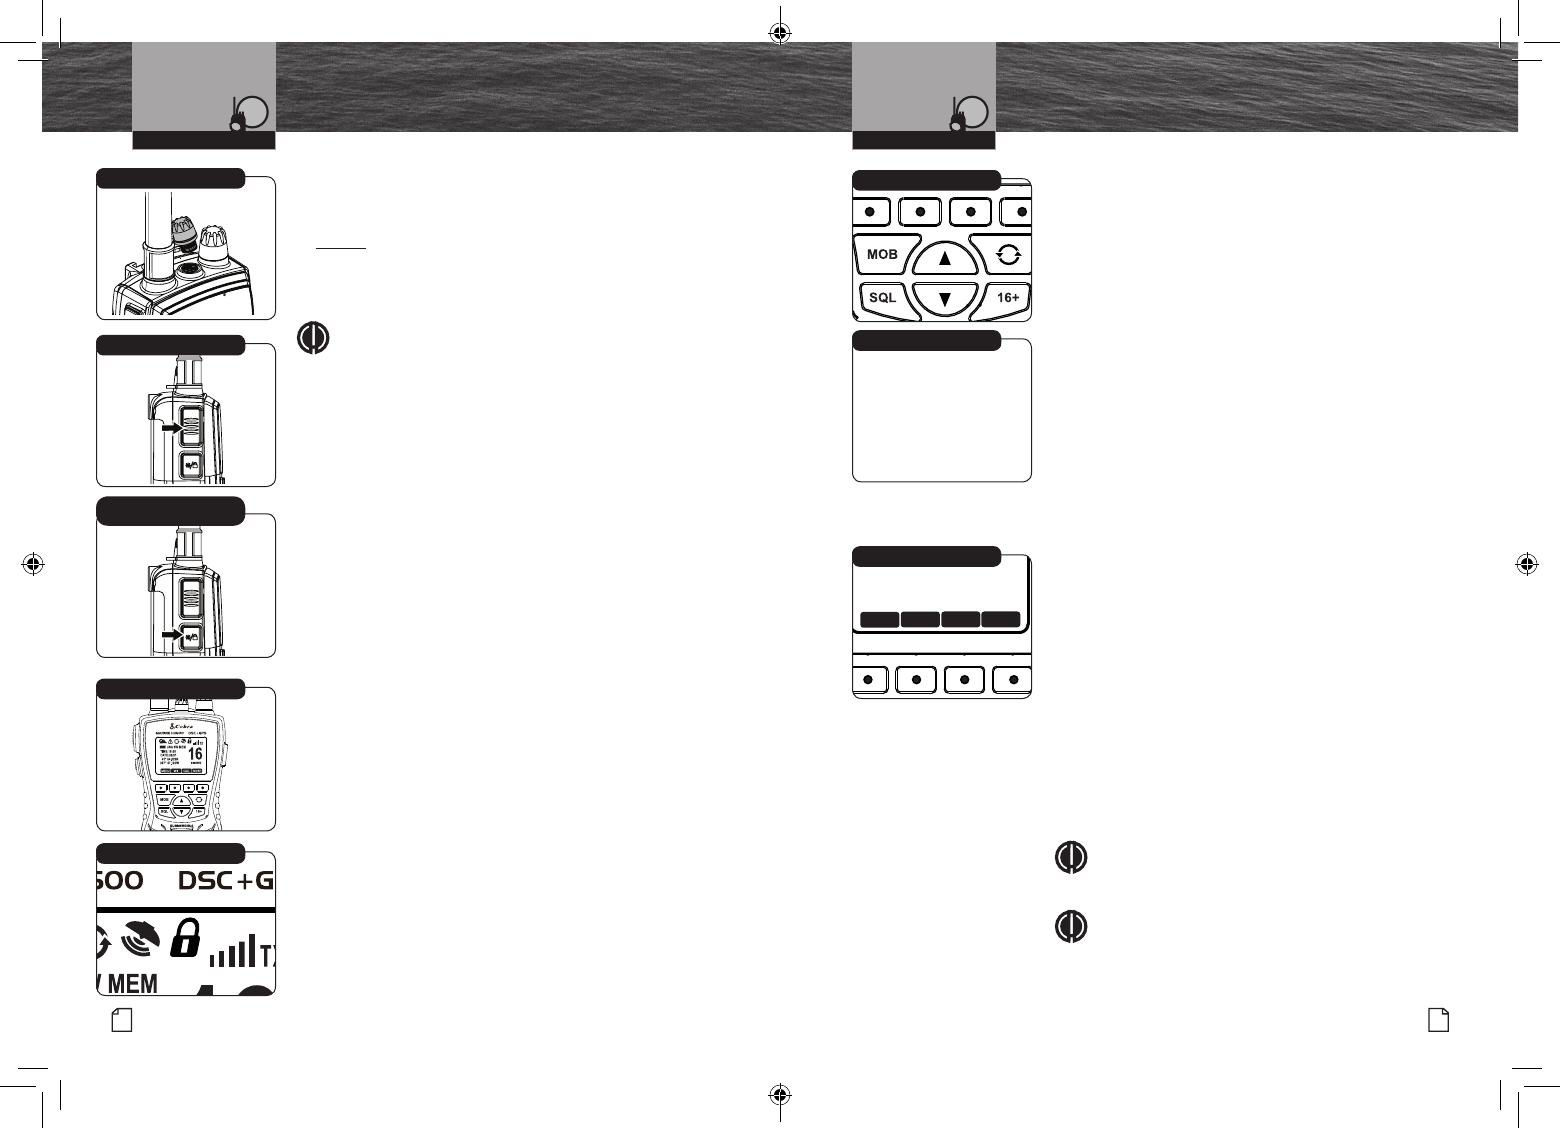
Talk Button
Press and hold the Talk button to transmit messages. Release the Talk
button to stop transmitting.
Light/Key Lock Button
To Display the Backlight Momentarily:
Press the Light/Key Lock button. The backlight will remain On for
10 seconds. If the backlight is already On, another press of the
Light/Key Lock button will cycle through the light mode.
To Activate the Flashlight, Strobe and S.O.S. Light:
Press the Light/Key Lock button two times to activate the ashlight
function. Press again to activate the Strobe function, press a third
time to activate S.O.S. signal and a fourth time to turn it off.
Key Lock
To prevent accidental changes to your settings, you can lock most of
the buttons.
To Lock or Unlock the Buttons:
Press and hold the Light/Key Lock button for two
(2) seconds. The
Key Lock icon will appear or disappear
in the LCD. When Key Lock
is On, pressing any of the listed buttons on the front of the radio
will result in a three (3) beep error messag and the radio will show
“Radio Locked. Hold Lock Key To Unlock”.
The Light/Key Lock button, the Emergency button and the Talk
button are active — you can Receive (Rx) or Transmit (Tx)
a message with Key Lock On, but you cannot change the channel.
Backlight/Flashlight/S.O.S./
Key Lock Button
Key Locked Buttons
Key Lock Icon
Speaker/Mic Port
Talk Button
Intro Operation Customer
Assistance
Warranty
Notice
Main Icons
Secondary Icons
Caution Warning
Installation Customer
Assistance
MOB
SQL 16+
MARINE HH600 DSC+GPS
SCAN
H/M/L MEM MORE
16A
EMERGENCY
USA 6W
32 49.800N
SOG: 3.7 KTS COG: 015 M
999.11.077W
DATE:06/30
TIME:10:00 LOC
H/M/L Power Button
MRHH600_ENG_MANL.indd 14-15 4/3/17 5:03 PM
VHF Marine Radio Protocols
17
Nothing Comes Close to a Cobra®
VHF Marine Radio Protocols
16 English
Getting Started
Intro Operation Customer
Assistance
Warranty
Notice
Main Icons
Secondary Icons
Caution Warning
Installation Customer
Assistance
Operating Your Radio
Intro Operation Customer
Assistance
Warranty
Notice
Main Icons
Secondary Icons
Caution Warning
Installation Customer
Assistance
Operating Your Radio
EMERG
USA 6W MEM
41° 54.523N
087° 47.192W
DATE:06/01
TIME:10:00
SCAN
H/M/L MEM MORE
ROG
16
SCAN Button SCAN
Press and release the SCAN soft key to scan all channels. Scanning
begins at the selected lower channel, and scans to higher channels.
Press the Channel Up/Down button to change the scan direction.
When a signal is received in SCAN mode, the radio will pause 10
seconds before resuming SCAN operation. The scan will stop on the
paused channel and remain there when the Talk button is pressed.
If memory channels are saved, press and release the SCAN button to
scan all memory channels.
Intro Operation Customer
Assistance
Warranty
Notice
Main Icons
Secondary Icons
Caution Warning
Installation Customer
Assistance
NOTE
If even one memory channel is saved, SCAN will only scan
memory channels.
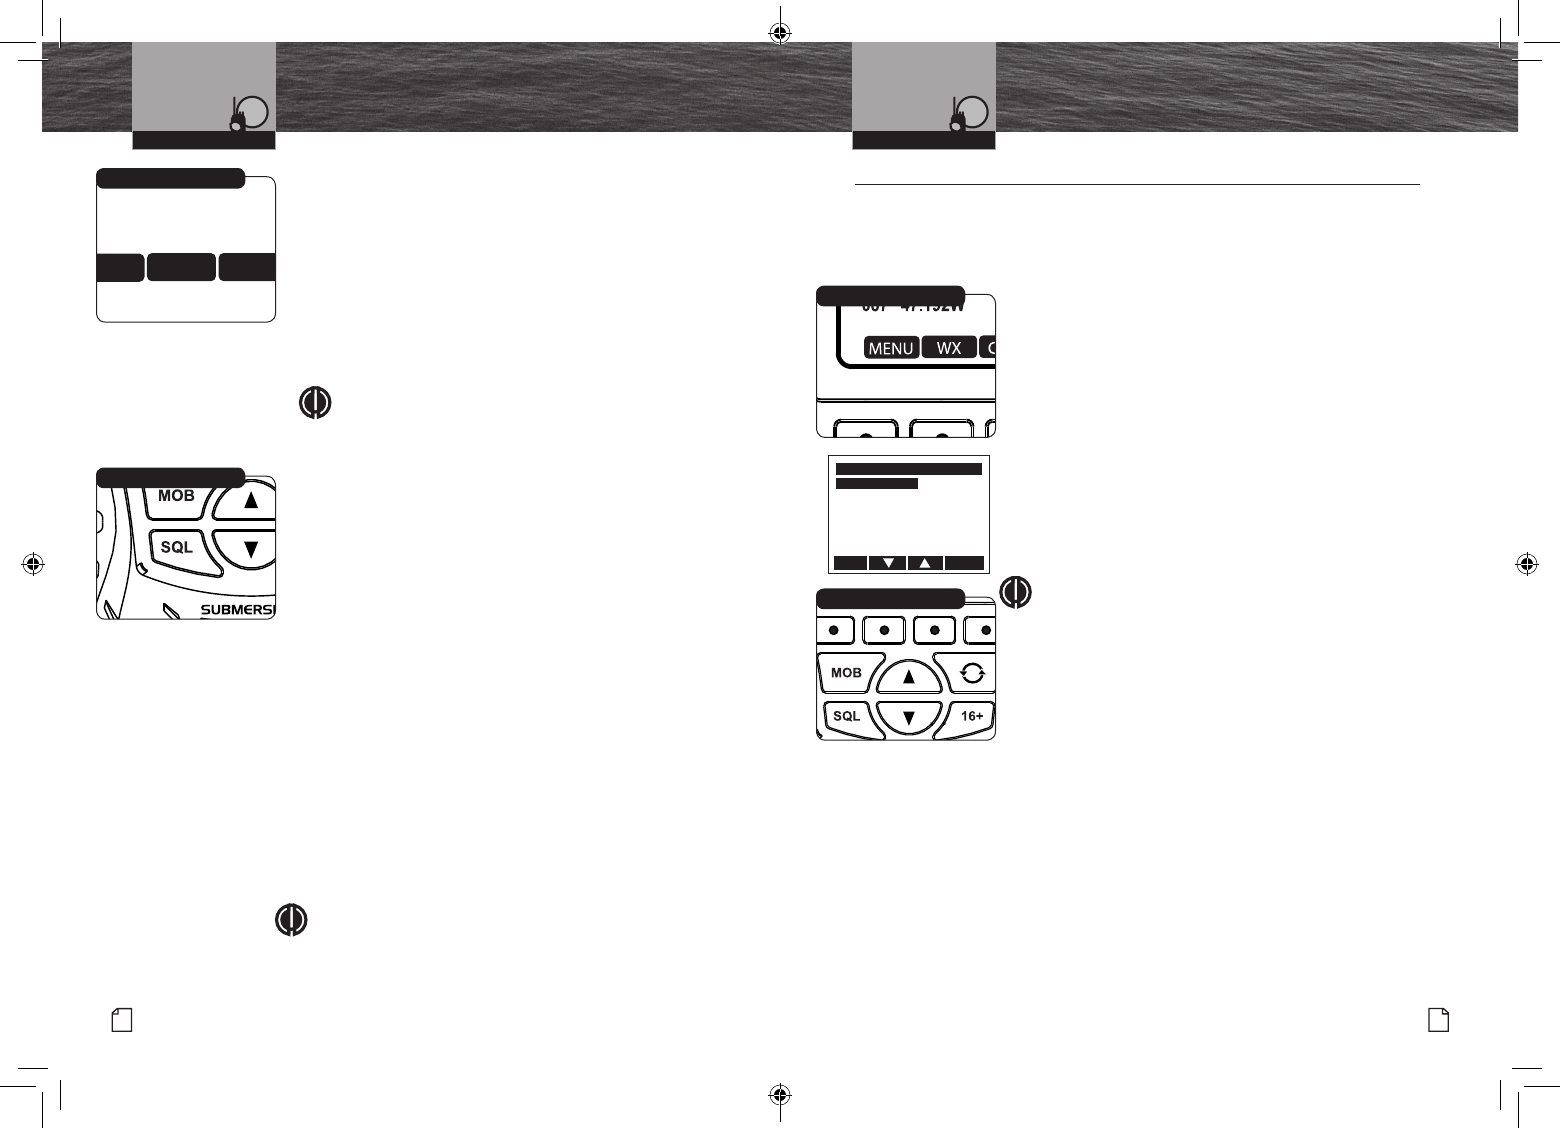
Squelch Control
Squelch Control lters weak signals and radio frequency (RF)
noise
so that you will clearly hear the signals you want.
The Squelch Control on this radio is set through the following
keypad operation.
To Set Squelch Control:
1. With the power On, press the SQL button to access the
squelch screen.
2. Press the Channel Up and Channel Down soft keys to set
level. The signal level graphic shows squelch level 1 - 8.
3. To adjust your squelch, press the Channel Down soft
key until you hear a hissing sound, then press
and release the Channel Up soft key until the hissing
stops. This will establish a “Baseline” squelch.
4. By pressing the Channel Up soft key further, you will lter
weak and medium strength signals. By pressing Channel
Down soft key, you will receive weaker signals.
5. Press the Enter soft key to save this entry and move to the
next Setup mode programming.
Intro Operation Customer
Assistance
Warranty
Notice
Main Icons
Secondary Icons
Caution Warning
Installation Customer
Assistance
NOTE
If the Squelch is set so that you can hear a continuous
hissing
sound, the Memory Scan and Tri-Watch functions will be
unusable.
Squelch Control
Setup Mode Programming
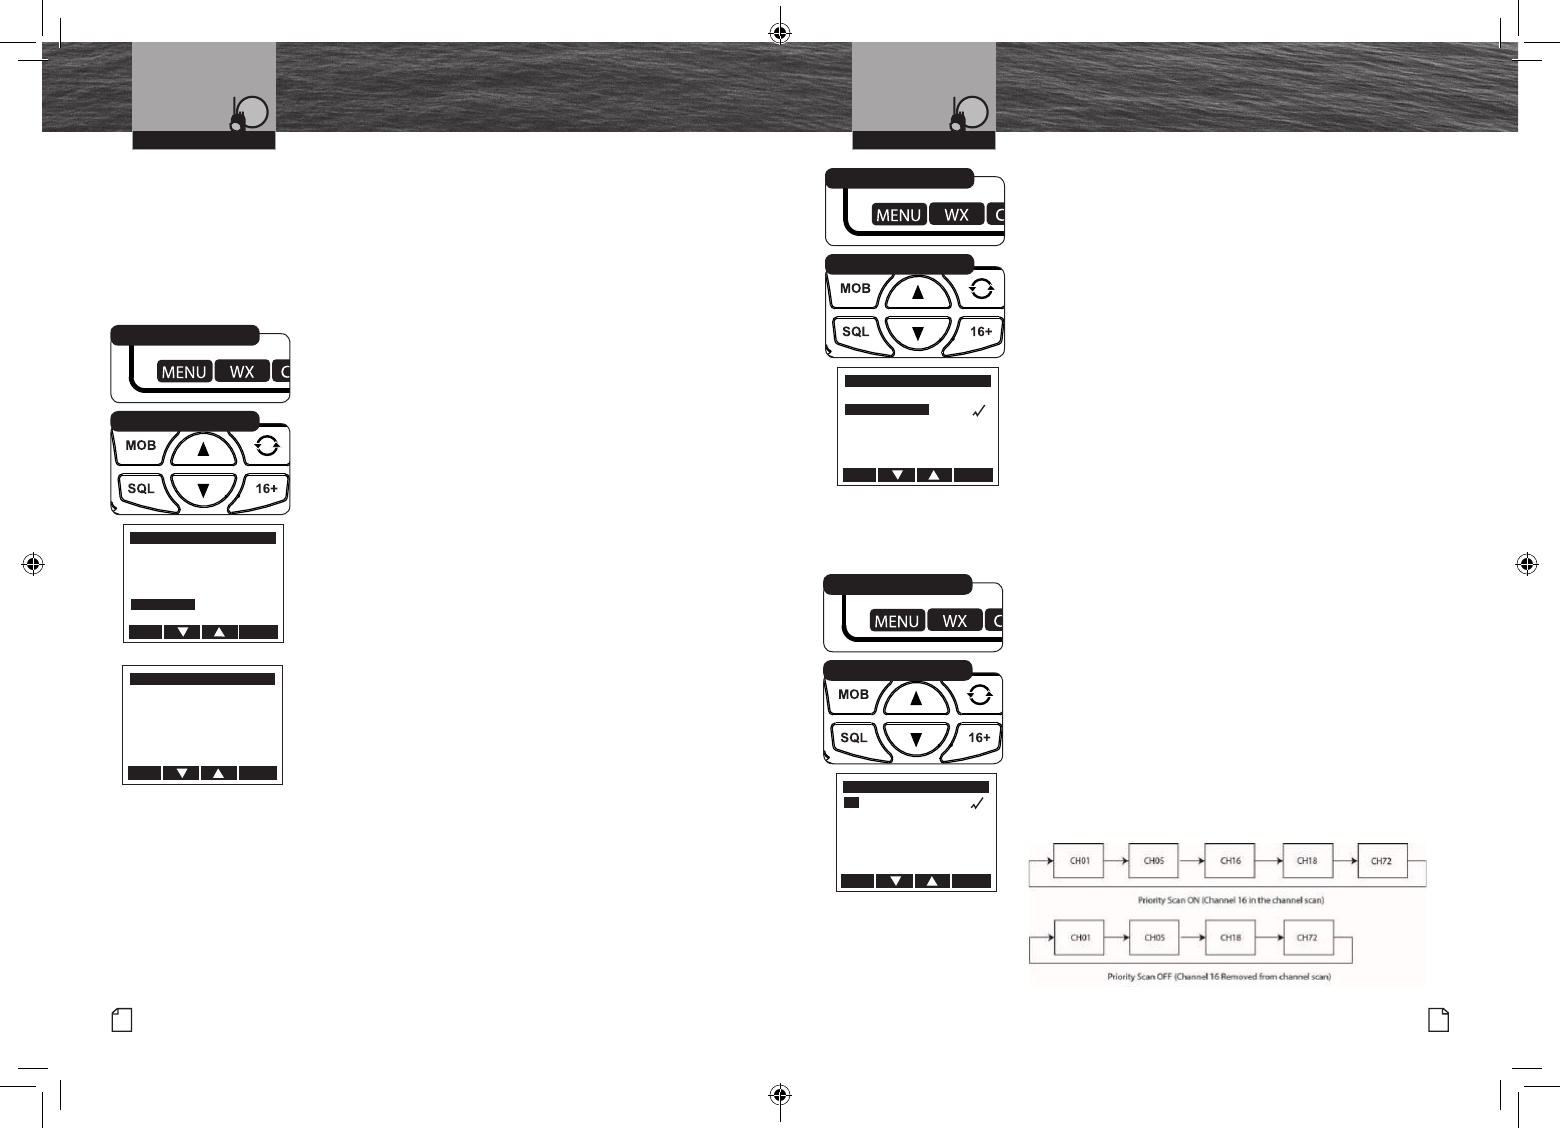
Set-Up Routines •
Settings Menu
The Settings menu in the CobraMarine VHF radio allows you to turn On and Off many of
its features, to adjust other features to suit your preferences, and to enter your user MMSI
number.
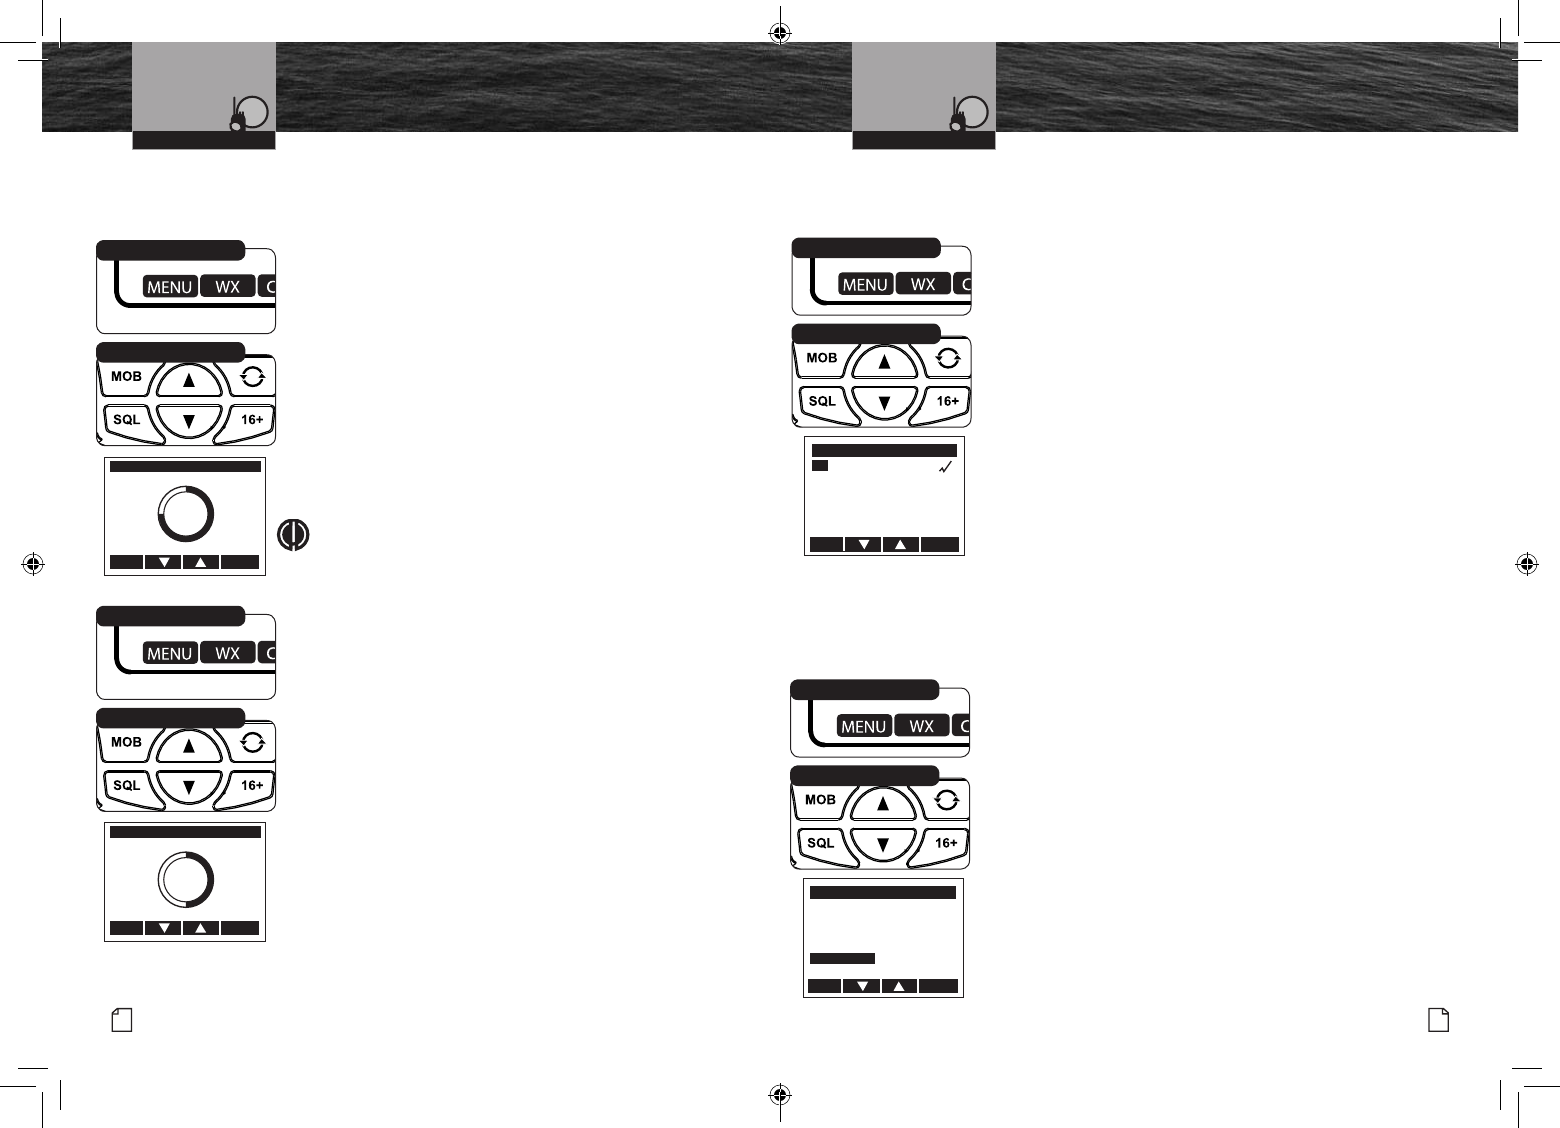
To Enter The Settings Menu:
Press the Menu button.
The Settings menu will appear on the LCD.
After entering the Settings menu, you can scroll
through it to make as many entries as you like.
Whenever the setting selection highlight appears in a feature
portion of the menu, the current active setting is highlighted.
When you are nished with changes, you can exit the Settings
menu by pressing the Exit soft key and return to Standby mode.
To Exit The Settings Menu:
Use the Up/Down buttons to scroll down to EXIT at the bottom
of the menu, or press the Exit soft key to move up through the
menu until the radio returns to the Standby mode.
NOTE
Basic set-up routines are described here. For set-up routines
that apply specically to a particular function, they are included
in the section for that function.
Channel Up/Down Buttons
Menu Soft Key
MENU
DSC SETUP MENU
LAMP ADJUST
CONTRAST ADJUST
KEY TONE
UIC CHANNEL MODE
TIME ADJUST
EXIT ENTER
MRHH600_ENG_MANL.indd 16-17 4/3/17 5:03 PM
VHF Marine Radio Protocols
Intro Operation Customer
Assistance
Warranty
Notice
Main Icons
Secondary Icons
Caution Warning
Installation Customer
Assistance
Operating Your Radio
19
Nothing Comes Close to a Cobra®
Setup Mode Programming
VHF Marine Radio Protocols
Intro Operation Customer
Assistance
Warranty
Notice
Main Icons
Secondary Icons
Caution Warning
Installation Customer
Assistance
Operating Your Radio
18 English
Setup Mode Programming
Backlight Lamp Adjust
The LCD has a Backlight lamp to make it visible in the dark.
This lamp can be adjusted for brightness or turned Off.
To Adjust The Backlight Level:
1. Enter the Settings menu and scroll to LAMP ADJUST with the
Up/Down soft keys or using the Up/Down channel buttons.
2. Press the ENTR soft key and observe the current backlight
setting — HIGH, MEDIUM, LOW or OFF.
3. Use the Up/Down buttons or Right/Left soft keys to switch to
the setting you want.
4. Press the ENTR soft key to select the backlight setting. Or
press the EXIT soft key to EXIT without making changes to the
backlight setting.
5. The radio will return to the Settings menu. The radio will
remember the saved backlight setting, when powering off the
radio, or disconnecting power to the radio.
NOTE
Setting the radio to a lower backlight setting will conserve
battery power.
LCD Contrast Adjust
The LCD backlight will not be visible in daylight, but the LCD
Contrast can be adjusted to make it easier to read in different
light conditions.
To Change The Contrast:
1. Enter the Settings menu and scroll to CONTRAST ADJUST
Up/Down soft keys or the UP/Down channel buttons.
2. Press the ENTR soft key and observe the current contrast
setting — a number between one 0 and 16.
3. Use the Up/Down buttons or the Right/Left soft keys to
change the number up or down.
4. Press the ENTR soft key to select a contrast level. Or press the
EXIT soft key to EXIT without making changes to the Contrast
setting.
5. The radio will return to the settings menu. The radio will
remember the saved contrast level, when powering off the
radio, or disconnecting power to the radio.
Conrmation Key Tone
The Conrmation Tone sounds to conrm all button presses except for the Talk button. If you
would prefer not to hear the Conrmation Tone, you can turn it Off and On as you choose.
To Turn The Conrmation Tone On Or Off:
1. Enter the Settings menu and scroll to KEY TONE
with the Up/Down soft keys or the Up/Down channel
buttons.
2. Press the ENTR soft key and observe the current conrmation
tone setting — ON or OFF.
3. Use the Up/Down soft keys or the Up/Down channel buttons
to switch to the setting you want.
4. Press the ENTR soft key to select the setting. Or press the
EXIT soft key to EXIT without making changes to the Key Tone
setting.
5. The radio will return to the settings menu. The radio will
remember the saved Key Tone setting, when powering off the
radio, or disconnecting power to the radio.
U.S.A./International/Canada Channel Maps
Three (3) sets of VHF Channel Maps have been established for marine use in the U.S.A.,
Canada, and the rest of the world (International). Most of the channels are the same for all three
(3) maps, but there are denite differences (see table on pages 68 through 83). Your radio has
all three (3) maps built into it and will operate correctly in whichever area you choose.
To Set Your Radio For The Area In Which You Will Be Using It:
1.
Enter the Settings menu and scroll to CHANNEL
MODE with the
Up/Down soft keys or the Up/Down channel buttons.
2. Press the ENTR soft key and observe the current channel mode
setting — USA,INTERNATIONAL, or CANADA.
3. Use the Up/Down soft keys or the Up/Down channel buttons
to switch to the setting you want.
4. Press the ENTR soft key to select the setting. Or press the EXIT
soft key to EXIT without making changes to the Channel Map
setting.
5. The radio will return to the settings menu. The radio will
remember the saved Channel Map setting, when powering off
the radio, or disconnecting power to the radio.
EXIT ENTER
MED
LAMP ADJUST
2
Channel Up/Down Buttons
Menu Soft Key
EXIT ENTER
CONTRAST ADJUST
8
Channel Up/Down Buttons
Menu Soft Key
KEYTONE
ON
OFF
EXIT ENTER
Channel Up/Down Buttons
Menu Soft Key
MENU
DSC SETUP MENU
LAMP ADJUST
CONTRAST ADJUST
KEY TONE
UIC CHANNEL MODE
TIME ADJUST
EXIT ENTER
Channel Up/Down Buttons
Menu Soft Key
MRHH600_ENG_MANL.indd 18-19 4/3/17 5:03 PM
21
Nothing Comes Close to a Cobra®
Setup Mode Programming
VHF Marine Radio Protocols
Intro Operation Customer
Assistance
Warranty
Notice
Main Icons
Secondary Icons
Caution Warning
Installation Customer
Assistance
Operating Your Radio
20 English
Setup Mode Programming
VHF Marine Radio Protocols
Intro Operation Customer
Assistance
Warranty
Notice
Main Icons
Secondary Icons
Caution Warning
Installation Customer
Assistance
Operating Your Radio
Time Adjust
All VHF, DSC, and GPS activities use a 24-hour clock and Universal Coordinated Time (UTC)
which was formerly known as Greenwich Mean Time (GMT). Time Adjust uses your built-in
GPS to gather time input. Time Adjust will allow the radio to display the time as Local time
or UTC time. For time input to be converted to local time, you need to enter the hour offset
of your local time zone from Greenwich. (See world city time zone chart on page 88). You
can also choose to have the time displayed in a 12 or 24 hour format.
To Change The Time Offset/Adjustment:
1. Enter the Settings menu and scroll to TIME ADJUST
with the Up/Down soft keys or the Up/Down channel
buttons.
2. Highlight the TIME OFFSET option in the menu.
3. Press the ENTER key and observe the current setting.
4. Use the Up/Down soft keys or the UP/Down channel buttons
to change the setting for your local time zone.
5. Press the ENTER soft key to select the setting. Or press the
EXIT soft key to EXIT without making changes to the Local
Time Zone setting.
6.
The radio will return to the Time Adjust menu. The radio will
remember the saved Local Time Zone setting when powering off
the radio. If a
TIME OFFSET
is saved the time will be displayed
in local time.
To Select 12 or 24 Hour Format Time Display:
1. Enter the Settings menu and scroll to TIME ADJUST
with the Up/Down soft keys or the Up/Down channel buttons.
2. Highlight the 12H/24H TIME DISP option in the menu.
3. Press the ENTER key and observe the current setting.
4. Use the Up/Down soft keys or the UP/Down channel
buttons to change the setting for how the radio will
display the time (12 Hour or 24 Hour format).
5. Press the ENTER soft key to select the setting. Or press the
EXIT soft key to EXIT without making changes to the
time format display setting.
6. The radio will return to the Time Adjust menu. The radio
will remember the saved 12 or 24 hour radio display
setting when powering off the radio.
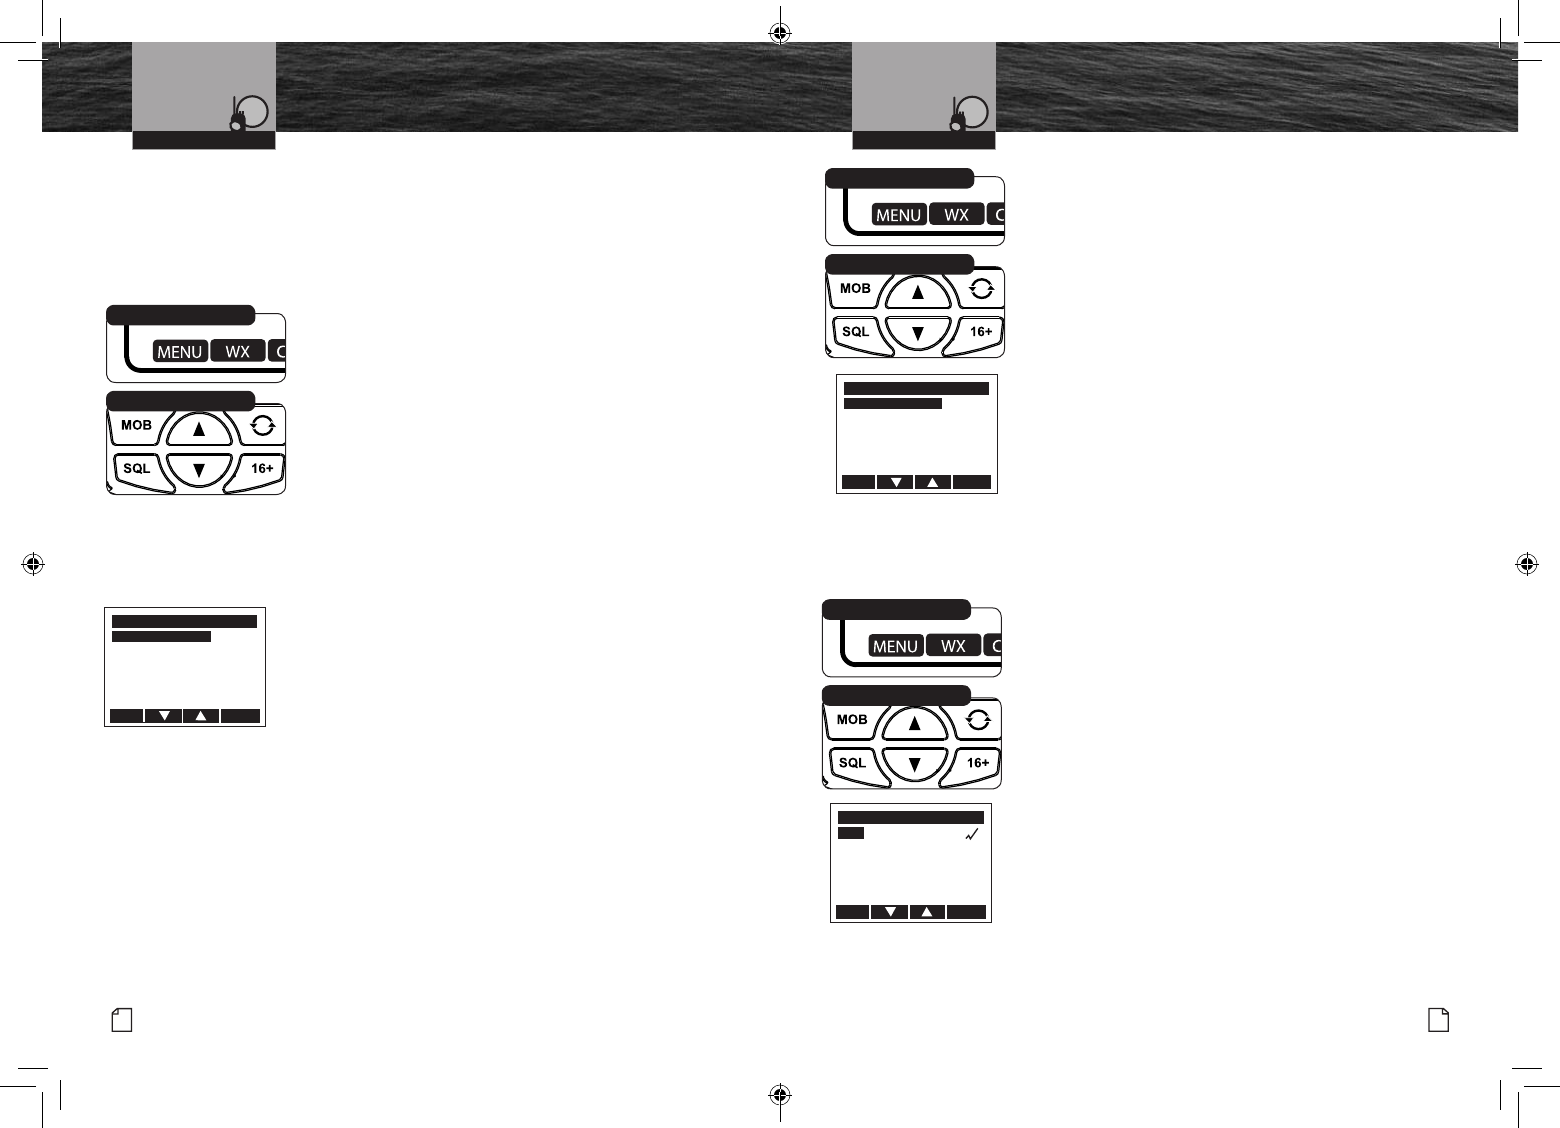
Priority Channel
This setting will allow you to choose whether channel 16 is or is not included when
channel scanning.
To Turn The Priority Channel On Or Off:
1. Enter the Settings menu and scroll to PRIORITY
CHANNEL with the Up/Down soft keys or the Up/Down
channel buttons.
2. Press the ENTER soft key and observe the current priority
channel setting — ON or OFF.
3. Use the Up/Down soft keys or the Up/Down channel
buttons to switch to the setting you want.
4. Press the ENTER soft key to select the setting. Or press the
EXIT soft key to EXIT without making changes to the
priority channel setting.
MENU
LAMP ADJUST
CONTRAST ADJUST
KEY TONE
UIC CHANNEL MODE
TIME ADJUST
PRIORITY CHANNEL
EXIT ENTER
Channel Up/Down Buttons
Menu Soft Key
TIME OFFSET
SET LOCAL OFFSET
-06:00
EXIT ENTER
12/24 HOUR TIME DISPLAY
12 HOUR FORMAT
24 HOUR FORMAT
EXIT ENTER
Channel Up/Down Buttons
Menu Soft Key
PRIORITY CHANNEL
ON
OFF
EXIT ENTER
Channel Up/Down Buttons
Menu Soft Key
MRHH600_ENG_MANL.indd 20-21 4/3/17 5:03 PM
23
Nothing Comes Close to a Cobra®
22 English
VHF Marine Radio Protocols
Intro Operation Customer
Assistance
Warranty
Notice
Main Icons
Secondary Icons
Caution Warning
Installation Customer
Assistance
Operating Your Radio
Setup Mode Programming
VHF Marine Radio Protocols
Intro Operation Customer
Assistance
Warranty
Notice
Main Icons
Secondary Icons
Caution Warning
Installation Customer
Assistance
Operating Your Radio
Setup Mode Programming
Weather Alert
This setting will allow you to choose whether activate the Weather Alert feature.
When NOAA broadcasts a Weather Alert Signal and your radio is in the Weather Alert
mode, you will hear a continuous audible tone and the radio will automatically switch to
Weather Radio mode. The alert indicators will sound regardless of what channel you are
operating on as soon as a NOAA alert signal is received
To Turn Weather Alert On Or Off:
1. Enter the Settings menu and scroll to WEATHER ALERT
with
the Up/Down soft keys or the Up/Down channel buttons.
2. Press the ENTER soft key and observe the current Weather
Alert setting — ON or OFF.
3. Use the Up/Down soft keys or the Up/Down channel buttons
to switch to the setting you want.
4. Press the ENTER soft key to select the setting. Or press the
EXIT soft key to EXIT without making changes to the Weather
Alert setting. The radio will turn on the Weather Icon and
Weather Alert Icon to indicate that the Weather Alert is active.
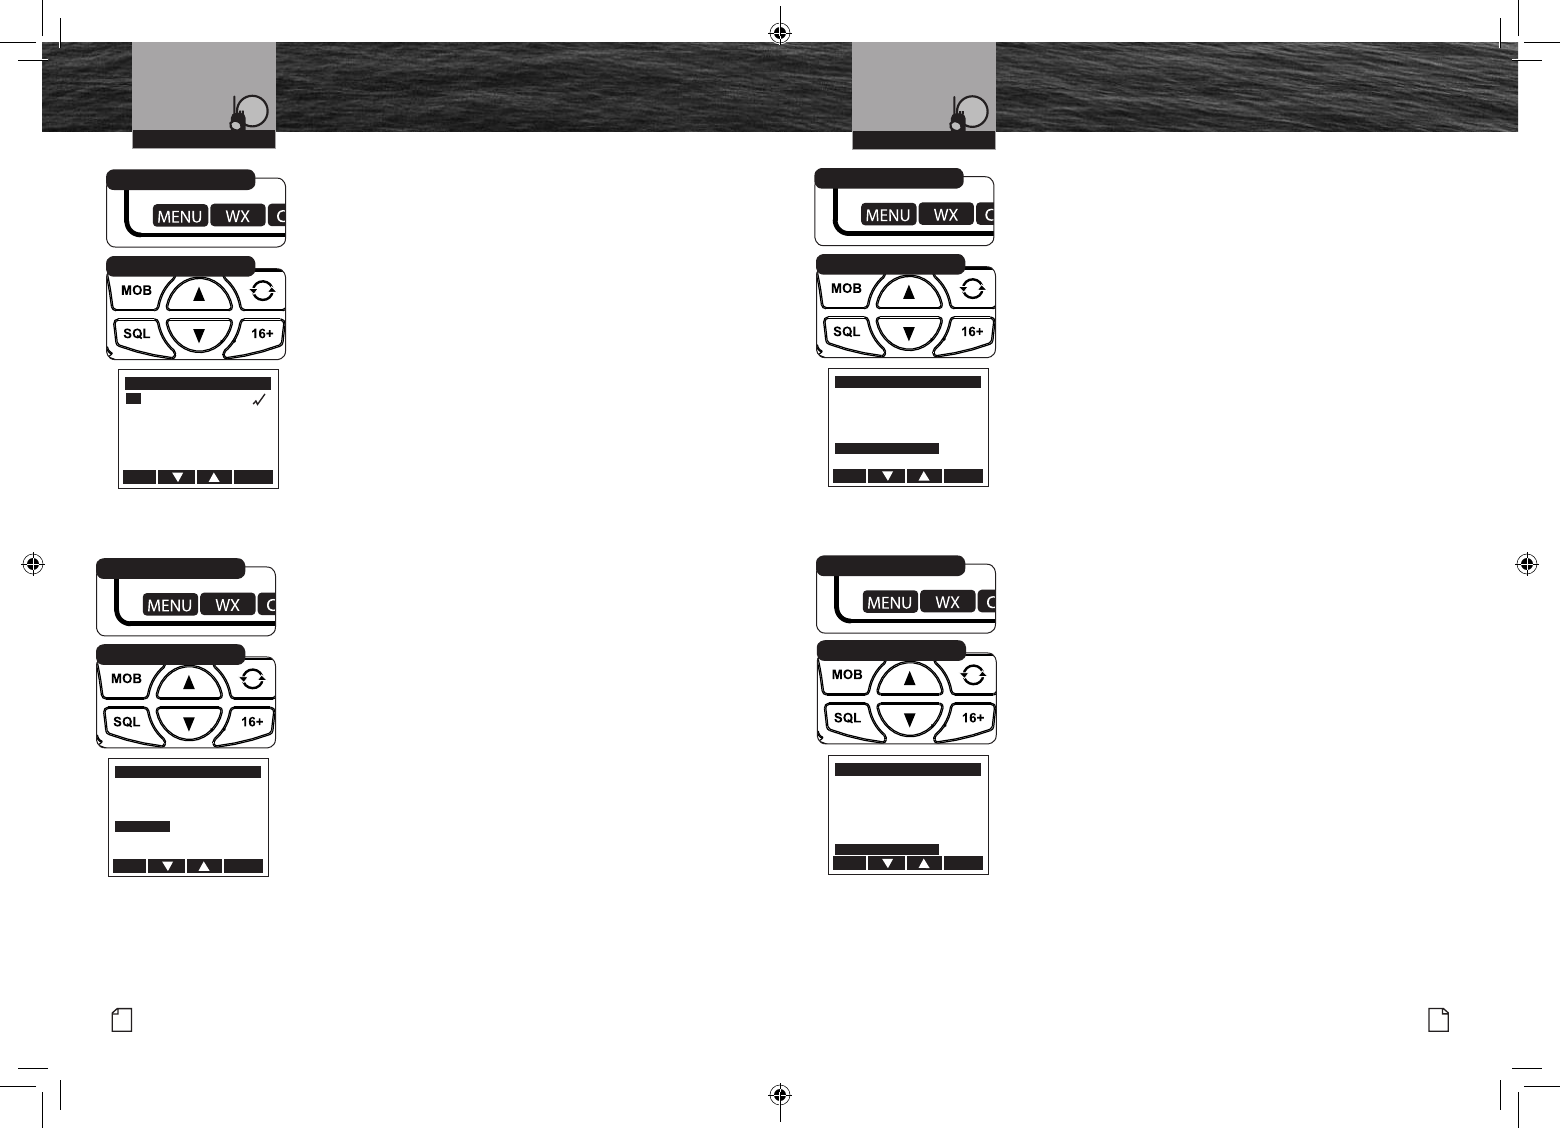
GPS Menu
All VHF Marine radios SHOULD / NEED to have a GPS receiver
connected and operating to effectively use the DSC (Digital
Selective Calling) features built-in to the radios. In an Emergency
you want the rescue authorities and surrounding vessels to know
where you are and to be able to quickly assist you in your time
of need. Your MR HH600 handheld VHF radio has a GPS receiver
built right in!
This menu allows you to select and allows you to test the GPS receiver to be sure that you
are receiving good satellite information and check the GPS signal strength.
Coordinate System
The Coordinate System allows adjusting to your navigating
preference. The most common is already selected.
To Select the Coordinate System:
1. Enter the Settings menu and scroll to GPS MENU
with the Up/Down soft keys or the Up/Down channel
buttons.
2. Highlight the COORDINATE
SYSTEM
option in the menu.
3. Press the ENTER key and observe the current setting.
4. Use the Up/Down soft keys or the UP/Down channel
buttons to change the setting to use the desired
coordinate system.
5. Press the ENTER soft key to select the setting. Or press the
EXIT soft key to EXIT without making changes to the
Coordinate System setting.
6.
The radio will return to the GPS menu. The radio will
remember the saved Coordinate System setting when
powering off the radio.
True or Magnetic System
Select TRUE or MAGNETIC to change if bearings are shown as
relative to either true or magnetic north. If MAGNETIC
is selected then the variation is computed and displayed
automatically for every zone.
To Select True or Magnetic System:
1. Enter the Settings menu and scroll to GPS with the Up/Down
soft keys or the Up/Down channel buttons.
2. Highlight the TRUE/MAGNETIC option in the menu.
3. Press the ENTER key and observe the current setting.
4. Use the Up/Down soft keys or the Up/Down channel
buttons to select the desired setting.
5. Press the ENTER soft key to select the setting. Or press the
EXIT soft key to EXIT without making any changes to the True
or Magnetic setting.
6. The radio will return to the GPS menu. The radio will
remember the True or Magnetic setting when powering off
the radio.
Channel Up/Down Buttons
Menu Soft Key
Channel Up/Down Buttons
Menu Soft Key
GPS
COORDINATE SYSTEM
TRUE/MAGNETIC
SBAS
GPS STATUS
SPEED MEASUREMENT
COURSE UP/NORTH UP
EXIT ENTER
TRUE/MAGNETIC
TRUE
MAGNETIC
EXIT ENTER
Channel Up/Down Buttons
Menu Soft Key
GPS
COORDINATE SYSTEM
TRUE/MAGNETIC
SBAS
GPS STATUS
SPEED MEASUREMENT
COURSE UP/NORTH UP
EXIT ENTER
MRHH600_ENG_MANL.indd 22-23 4/3/17 5:03 PM
25
Nothing Comes Close to a Cobra®
24 English
VHF Marine Radio Protocols
Intro Operation Customer
Assistance
Warranty
Notice
Main Icons
Secondary Icons
Caution Warning
Installation Customer
Assistance
Operating Your Radio
Setup Mode Programming
VHF Marine Radio Protocols
Intro Operation Customer
Assistance
Warranty
Notice
Main Icons
Secondary Icons
Caution Warning
Installation Customer
Assistance
Operating Your Radio
Setup Mode Programming
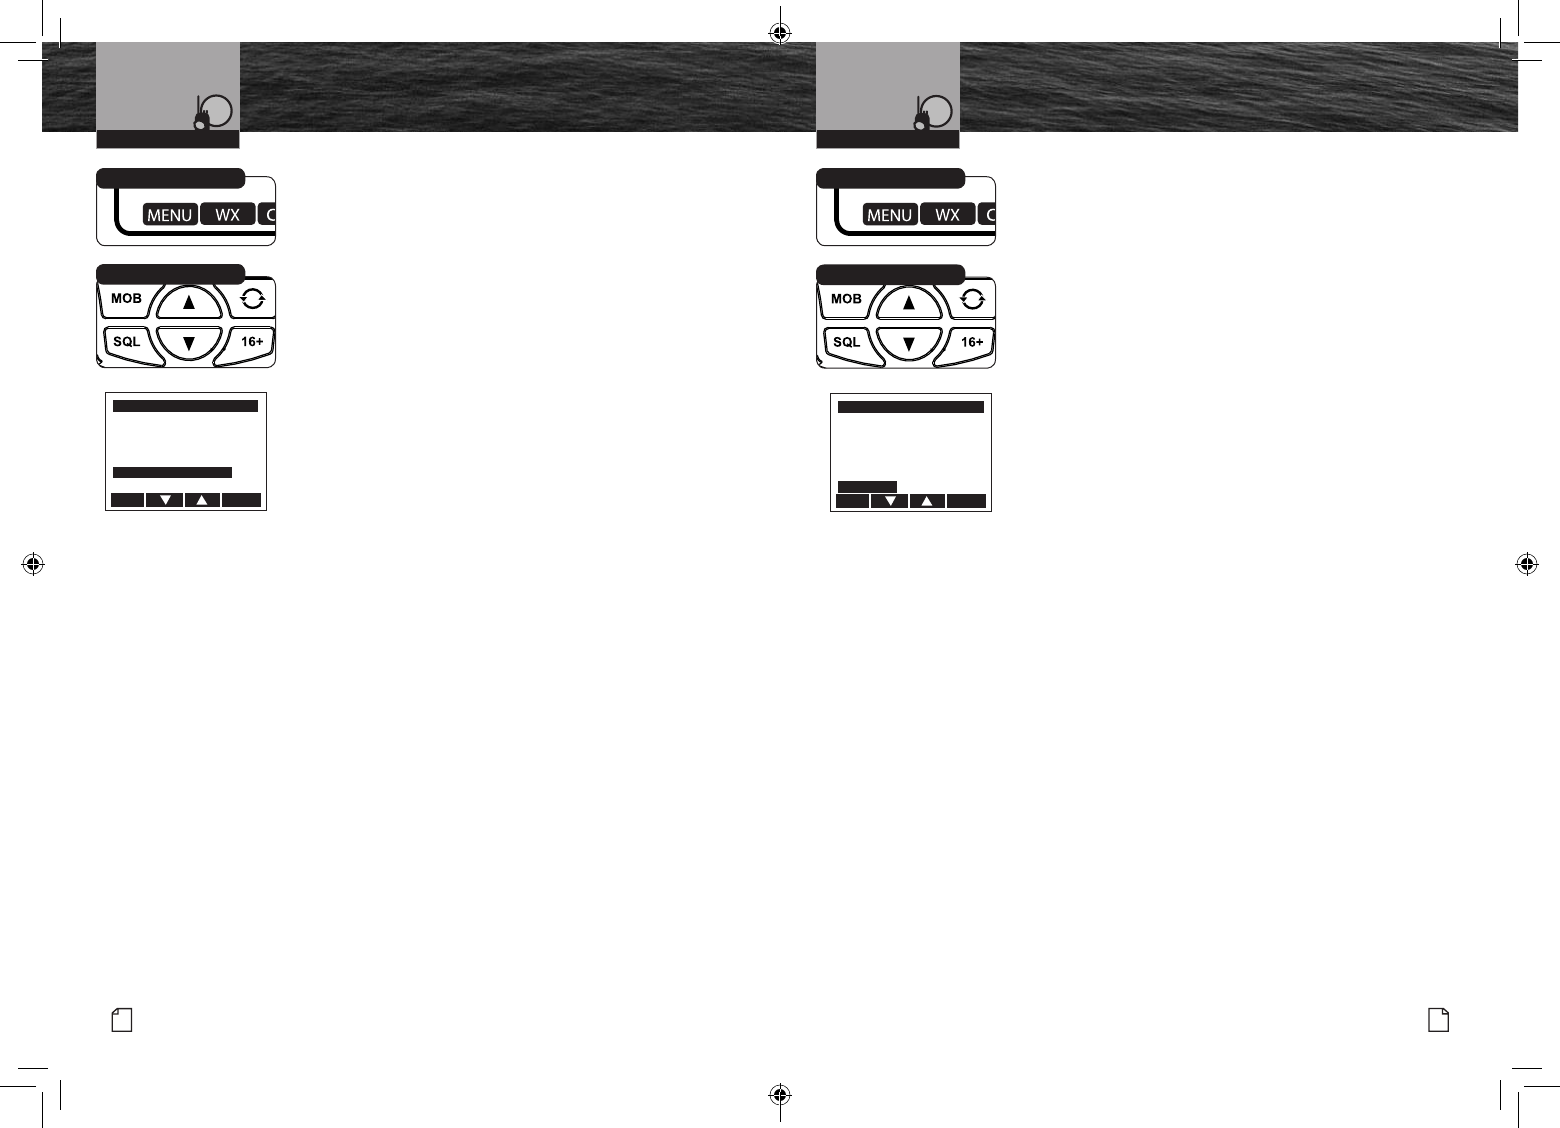
Satellite Based Augmentation (SBAS)
The SBAS can be turned ON or OFF. Some areas of the earth
need it turned off for greater accuracy. It is set ON by default.
To Select the Satellite Based Augmentation System:
1. Enter the Settings menu and scroll to GPS with the Up/Down
soft keys or the Up/Down channel buttons.
2. Highlight the SBAS option in the menu.
3. Press the ENTER key and observe the current setting.
4. Use the Up/Down soft keys or the Up/Down buttons to
select the desired setting.
5. Press the ENTER soft key to select the setting. Or press the
EXIT soft key to EXIT without making changes to the Sat
Based Aug Sys setting.
GPS Status
This screen allows you to test the GPS receiver to be sure it is
receiving good satellite information and GPS signal strength.
To Select the GPS Status Screen:
1. Enter the Settings menu and scroll to GPS with the Up/Down
soft keys or the Up/Down channel buttons.
2. Highlight the GPS STATUS option in the menu.
3. Press the ENTER key and observe the current setting.
4. The GPS Status screen reports the following information:
a. How many satellites are currently being tracked.
b. The overall health of the GPS satellite signals being
received.
5. Press the EXIT soft key to EXIT the GPS Status screen.
6. The radio will return to the GPS menu.
Speed Measurement Units
Select KNOTS, MPH or KM/H to change if speed is indicated in
either nautical miles per hour, miles per hour or kilometers per hour.
To Select Speed Measurement Units:
1. Enter the Settings menu and scroll to GPS with the Up/Down
soft keys or the Up/Down channel buttons.
2. Highlight the SPEED MEASUREMENT option in the menu.
3. Press the ENTER key and observe the current setting.
4. Use the Up/Down soft keys or the Up/Down channel
buttons to select the desired setting.
5. Press the ENTER soft key to select the setting. Or press the
EXIT soft key to EXIT without making any changes to the
Speed Measurement setting.
6. The radio will return to the GPS menu. The radio will
remember the Speed Measurement setting when powering
off the radio.
Course Up or North Up Option
This allows selecting either COURSE UP or North Up. This
change the orientation of compass and navigation screens.
With NORTH UP selected then North will always appear at the top
of those screens. With COURSE UP selected then the direction of
travel appears at the top of the screen.
To Course Up or North Up Option::
1. Enter the Settings menu and scroll to GPS with the Up/Down
soft keys or the Up/Down channel buttons.
2. Highlight the COURSE UP/NORTH UP option in the menu.
3. Press the ENTER key and observe the current setting.
4. Use the Up/Down soft keys or the Up/Down channel
buttons to select the desired setting.
5. Press the ENTER soft key to select the setting. Or press the
EXIT soft key to EXIT without making any changes to the
Speed Measurement setting.
6. The radio will return to the GPS menu. The radio will
remember the Course Up or North Up setting when powering
off the radio.
SAT BASED AUG SYSTEM
ON
OFF
EXIT ENTER
Channel Up/Down Buttons
Menu Soft Key
GPS
COORDINATE SYSTEM
TRUE/MAGNETIC
SBAS
GPS STATUS
SPEED MEASUREMENT
COURSE UP/NORTH UP
EXIT ENTER
Channel Up/Down Buttons
Menu Soft Key
GPS
COORDINATE SYSTEM
TRUE/MAGNETIC
SBAS
GPS STATUS
SPEED MEASUREMENT
COURSE UP/NORTH UP
EXIT ENTER
Channel Up/Down Buttons
Menu Soft Key
GPS
COORDINATE SYSTEM
TRUE/MAGNETIC
SBAS
GPS STATUS
SPEED MEASUREMENT
COURSE UP/NORTH UP
EXIT ENTER
Channel Up/Down Buttons
Menu Soft Key
MRHH600_ENG_MANL.indd 24-25 4/3/17 5:03 PM
27
Nothing Comes Close to a Cobra®
26 English
VHF Marine Radio Protocols
Intro Operation Customer
Assistance
Warranty
Notice
Main Icons
Secondary Icons
Caution Warning
Installation Customer
Assistance
Operating Your Radio
Setup Mode Programming
VHF Marine Radio Protocols
Intro Operation Customer
Assistance
Warranty
Notice
Main Icons
Secondary Icons
Caution Warning
Installation Customer
Assistance
Operating Your Radio
Setup Mode Programming
Distance Measurement
Select STATUTE MILE, NAUTICAL MILE or KILOMETER to
change the unit used to display distance. This is used
mainly for navigation and indicating a distance to a point.
To Distance Measurement Units:
1. Enter the Settings menu and scroll to GPS with the Up/Down
soft keys or the Up/Down channel buttons.
2. Highlight the DISTANCE MEASUREMENT option in the menu.
3. Press the ENTER key and observe the current setting.
4. Use the Up/Down soft keys or the Up/Down channel
buttons to select the desired setting.
5. Press the ENTER soft key to select the setting. Or press
the EXIT soft key to EXIT without making any changes to the
Distance Measurement setting.
6. The radio will return to the GPS menu. The radio will
remember the Distance Measurement setting when powering
off the radio.
Power Save Mode for GPS
This menu will offers selecting from several Power Save
modes. This will save power by shutting down the GPS receiver
periodically to save power and prolong battery life. The most
common setting is AUTO and it is recommended to leave the
radio in AUTO for most users.
To Distance Measurement Units:
1. Enter the Settings menu and scroll to GPS with the Up/Down
soft keys or the Up/Down channel buttons.
2. Highlight the POWER SAVE option in the menu.
3. Press the ENTER key and observe the current setting.
4. Use the Up/Down soft keys or the Up/Down channel
buttons to select the desired setting.
5. Press the ENTER soft key to select the setting. Or press the
EXIT soft key to EXIT without making any changes to the
Power Save setting.
6. The radio will return to the GPS menu. The radio will
remember the Power Save setting when powering off
the radio.
GPS
SBAS
GPS STATUS
SPEED MEASUREMENT
COURSE UP/NORTH UP
DISTANCE MEASUREMENT
POWER SAVE
EXIT ENTER
Channel Up/Down Buttons
Menu Soft Key
GPS
SBAS
GPS STATUS
SPEED MEASUREMENT
COURSE UP/NORTH UP
DISTANCE MEASUREMENT
POWER SAVE
EXIT ENTER
Channel Up/Down Buttons
Menu Soft Key
MRHH600_ENG_MANL.indd 26-27 4/3/17 5:03 PM
29
Nothing Comes Close to a Cobra®
VHF Marine Radio Protocols
Intro Operation Customer
Assistance
Warranty
Notice
Main Icons
Secondary Icons
Caution Warning
Installation Customer
Assistance
Operating Your Radio
Bluetooth® Mode Pairing
and Programming
28 English
Bluetooth® Mode Pairing
and Programming
Bluetooth® wireless technology is a standard which has been developed for use in mobile
phones and other devices. This process of linking your mobile phone and this radio requires
a one-time “pairing” after which the two devices can be “connected” when they are within
range. When connected, this radio can act as the speaker and microphone of your mobile
phone while your phone is stowed in a safe and dry location.
This programming section shows you how to complete the pairing process. It also shows you
how to change some settings related to the Bluetooth functionality of your radio.
Bluetooth Radio On/Off
This setting allows you to turn On and Off the small Bluetooth
radio inside this VHF radio. The default setting is OFF. Turning it
Off can save some power. It can easily be switched On at any time.
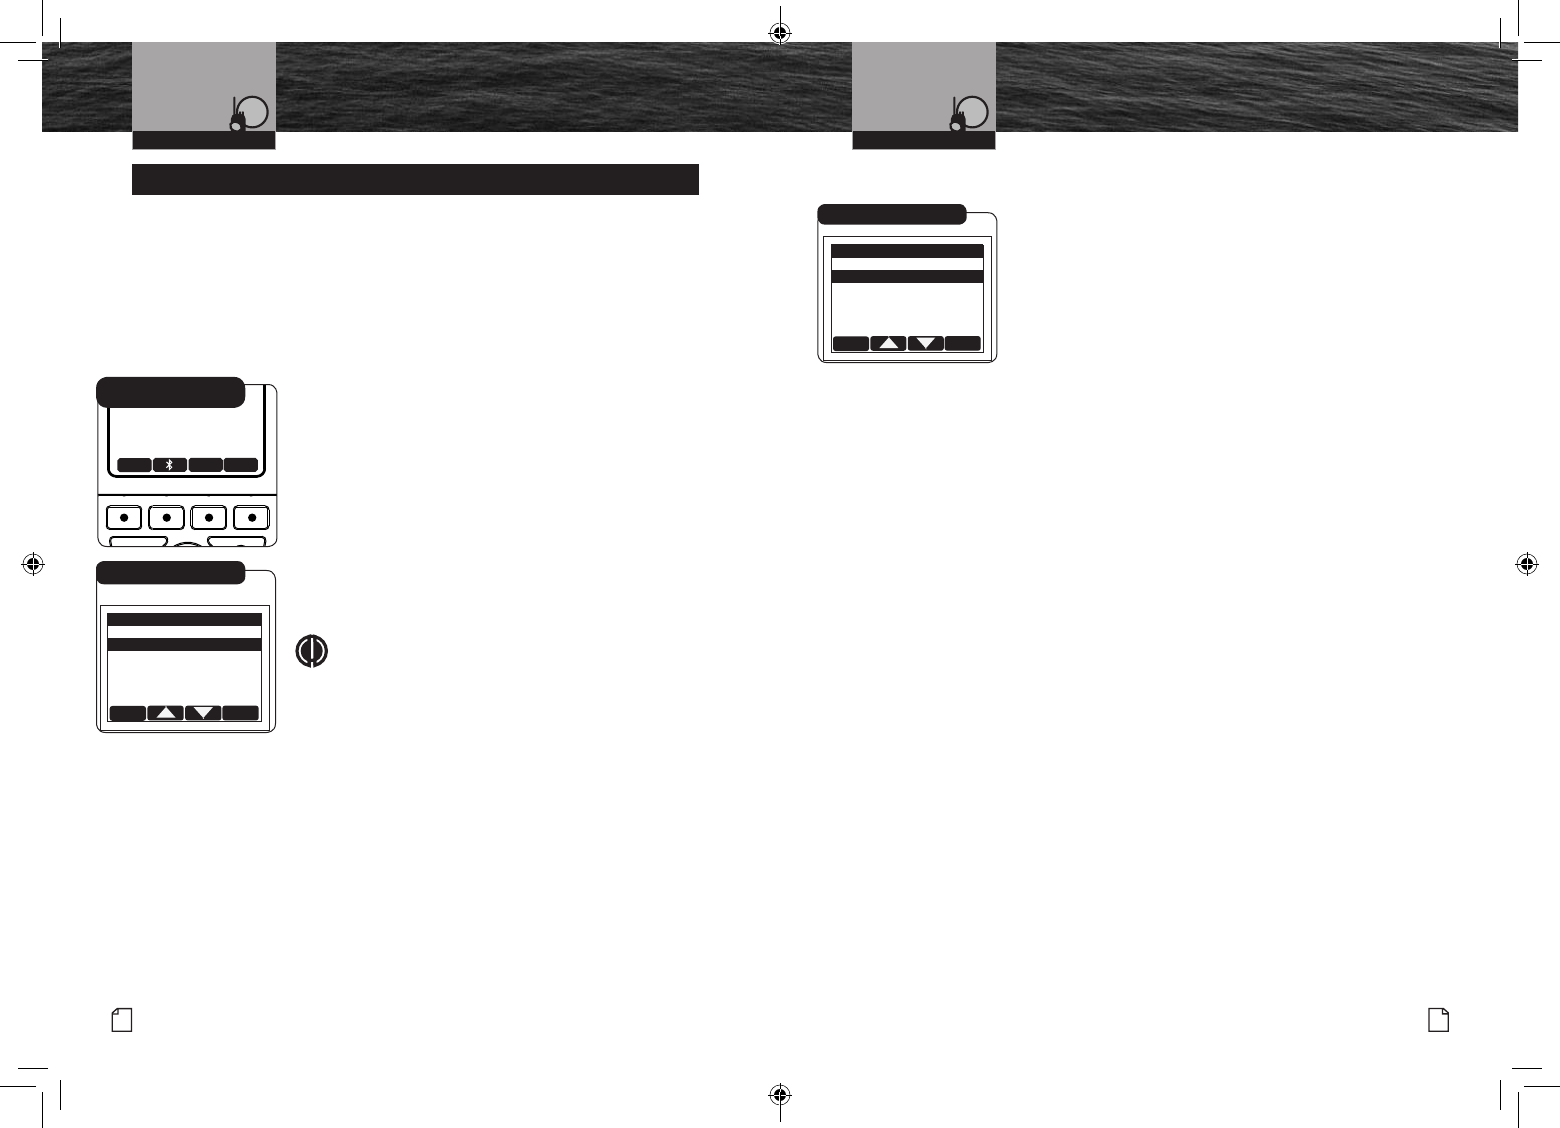
1. From the Standby screen, press the MORE soft key until the
Bluetooth soft key icon appears.
2. Press the Bluetooth icon soft key.
3. Press the Channel Up/Down soft keys to select Bluetooth and
then press Enter.
4. Press the Channel Up/Down soft keys to select On or Off.
5. If set ON, the radio will go to discover mode as long as it’s not
already connected to a mobile phone.
Intro Operation Customer
Assistance
Warranty
Notice
Main Icons
Secondary Icons
Caution Warning
Installation Customer
Assistance
NOTE
This process only needs to be completed for rst
time operation. From then on, as long as your mobile
phone is within 30 feet (10 meters) of the radio, the two
units will “Connect” automatically.
Pairing Your Mobile Phone:
1. If Bluetooth is turned on, the MR HH600 is automatically
ready to pair to your mobile phone.
2. Open the Bluetooth setting on your mobile phone and look for a
new device called “MR HH600”.
3. Select “MR HH600” on your mobile phone and wait to
connect. If prompted use the code “0000”.
4. You are now connected and ready to use hands-free calling.
Bluetooth® Mode Pairing and Programming
VHF Marine Radio Protocols
Intro Operation Customer
Assistance
Warranty
Notice
Main Icons
Secondary Icons
Caution Warning
Installation Customer
Assistance
Operating Your Radio
EXIT ENTER
BLUETOOTH MENU
BLUETOOTH
VOX
Bluetooth Standby Mode
MOB
SQL 16+
MARINE HH600 DSC + GPS
LOG BURP MORE
16A
EMERGENCY
USA 6W
32 49.800N
SOG: 3.7 KTS COG: 015 M
999.11.077W
DATE:06/30
TIME:10:00 LOC
Bluetooth Soft Key
VOX On or Off
The
VOX
function converts the radio microphone’s pickup of
your voice from being controlled with the PTT button to being
always open. When
VOX
is On, the PTT button does not need to
be pressed to transmit your voice, and you can just speak into
the microphone.
When
VOX
is Off, you need to press the PTT button while
speaking.
To Change Between VOX On and Off:
1. From the Standby screen, press the MORE soft key until the
Bluetooth soft key icon appears.
2. Press the Bluetooth icon soft key.
3. Press the Channel UP/Down soft keys to select VOX and
press Enter.
4. Pres the Channel UP/Down soft keys to select On/Off.
EXIT ENTER
BLUETOOTH VOX
ON
OFF
VOX
MRHH600_ENG_MANL.indd 28-29 4/3/17 5:03 PM
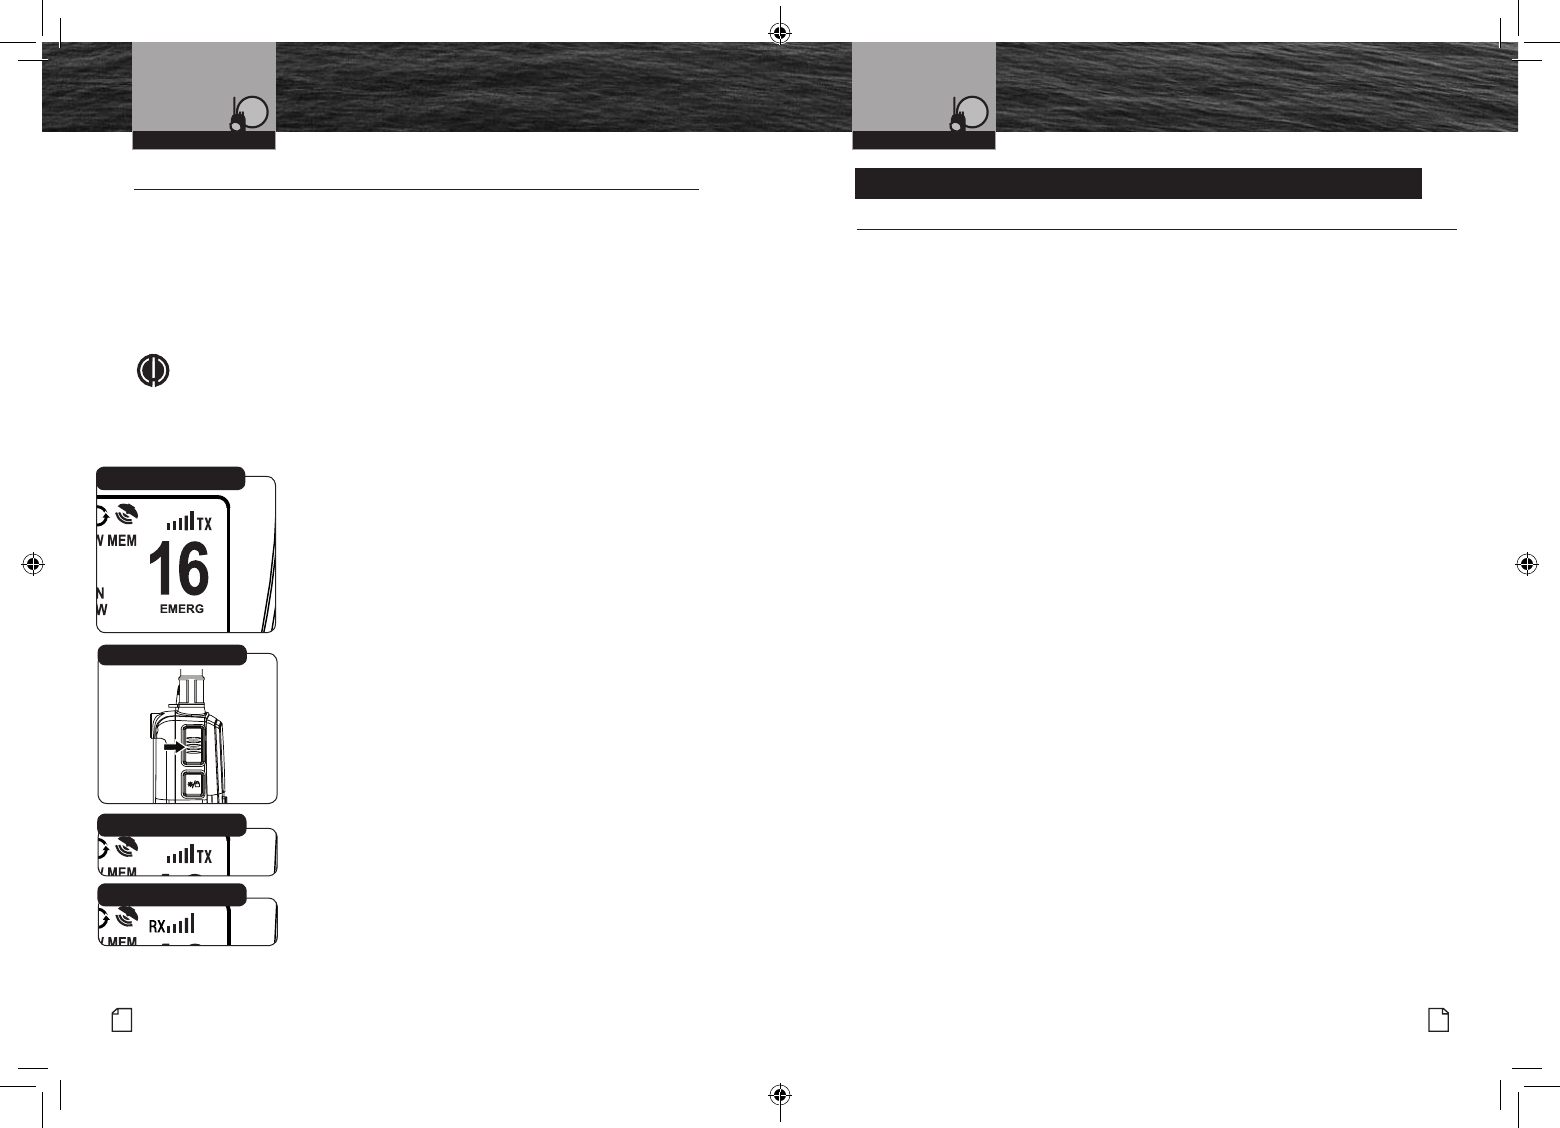
VHF Marine Radio Protocols
Intro Operation Customer
Assistance
Warranty
Notice
Main Icons
Secondary Icons
Caution Warning
Installation Customer
Assistance
Operating Your Radio
30 English
Weather Mode Programming
Intro Operation Customer
Assistance
Warranty
Notice
Main Icons
Secondary Icons
Caution Warning
Installation Customer
Assistance
IntroductionVHF Marine Radio Protocols
Intro Operation Customer
Assistance
Warranty
Notice
Main Icons
Secondary Icons
Caution Warning
Installation Customer
Assistance
Operating Your Radio
Standby/Receive and Transmit •
Marine Standby and Receive (Rx) Mode
Marine Standby mode is the default mode for the radio whenever it is turned on. From
this mode, you can change current settings by becoming familiar with the different key
functions in Marine Standby mode. While in Marine Standby mode, the user will be able
to transmit by pressing the Push to Talk (Talk) button. Signals in Receive (Rx) mode
will be received on the selected channel(s), and alerts broadcast by NOAA will activate the
corresponding NOAA weather alert channels in your radio.
Intro Operation Customer
Assistance
Warranty
Notice
Main Icons
Secondary Icons
Caution Warning
Installation Customer
Assistance
NOTE
Coast Guard alerts are broadcast on Channel 16. You must have the WX Alert
enabled to receive NOAA weather alerts. While in Marine Standby mode, you will
receive any voice messages sent on the channel to which you are tuned.
31
Nothing Comes Close to a Cobra®
Transmit (Tx) Mode
Transmit (Tx) mode gives you the ability to interact with safety
services, other vessels and shore stations. When you use this
capability, be sure to follow the procedures and to observe the
courtesies that govern its use so everyone benets. See the
Appendix to help you select the proper channels.
To Transmit a Message:
1. Check to see that your radio is set to a proper channel for the
type of message you plan to send.
2. Select the desired Low, Med or High Power setting.
3. With the microphone about 2 in. [51 mm] from your
mouth, press and hold the Talk button and speak into the
microphone. The Transmit icon will appear on the LCD.
4. Release the Talk button when you are nished speaking. Your
radio can only operate in either Transmit (Tx) or Receive
(Rx) mode at any given time. You will not hear the response to
your message unless the Talk button is released.
Transmit Mode
Check Channel Number
Talk Button
Weather (WX) Alert Programming
Standby/Receive
and Transmit
Receive Mode
NOAA Weather Channels and Alert •
Monitoring the weather will probably be a frequent use of your radio. NOAA provides continuous,
around-the-clock broadcasts of the latest weather information. Taped weather messages run
every four (4) to six (6) minutes and are revised every two (2) or three (3) hours, or as needed.
The Coast Guard also announces weather and other safety warnings on Channel 16. Smart
boaters keep an eye on safety and an ear to the radio — and never let the weather catch them
unaware.
NOAA Emergency Weather Alert
In the event of a major storm or other weather condition requiring vessels at sea or on other
bodies of water to be notied, NOAA broadcasts a 1050 Hz tone that receivers such
as your
CobraMarine VHF radio can detect and warn you of a weather alert condition. When the
Weather Alert mode on your radio is set toOn, this signal will produce a loud tone
from the
speaker in the radio and will automatically
switch to the alerting weather channel
so the alert broadcast
can be heard.
NOAA Test Alert System
To test this system, NOAA broadcasts the 1050 Hz signal every Wednesday sometime between
11 a.m. and 1 p.m. in each local time zone. Any receiver that can detect the weather alert tone
may use this service to verify that this system is functioning properly.
MRHH600_ENG_MANL.indd 30-31 4/3/17 5:03 PM
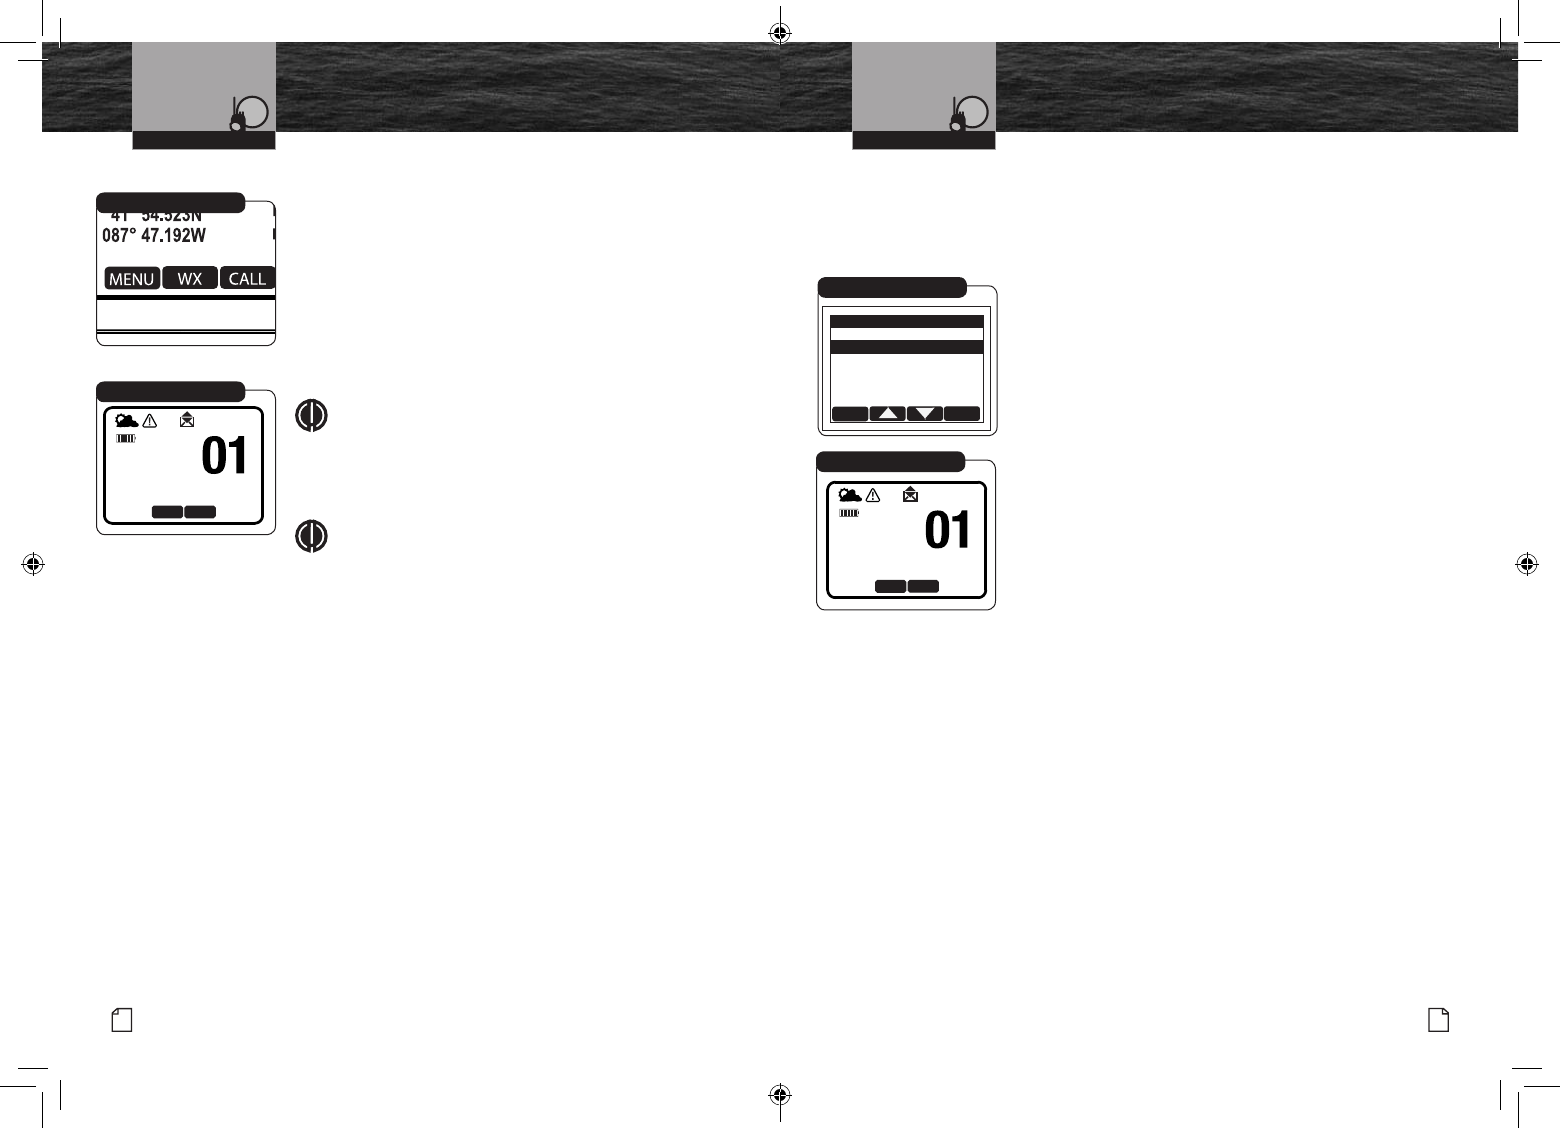
33
Nothing Comes Close to a Cobra®
VHF Marine Radio Protocols
Intro Operation Customer
Assistance
Warranty
Notice
Main Icons
Secondary Icons
Caution Warning
Installation Customer
Assistance
Operating Your RadioVHF Marine Radio Protocols
Intro Operation Customer
Assistance
Warranty
Notice
Main Icons
Secondary Icons
Caution Warning
Installation Customer
Assistance
Operating Your Radio
32 English
Weather Soft Key
Weather (WX) Standby Mode
To enter the WX Standby mode, press the WX soft key.
The Weather Standby Mode will show the currently selected
weather channel and the Weather Alert setting status as On or Off.
Press the Back soft key to return to VHF Radio Standby.
NOAA broadcasts weather information on the channels as
described in the NOAA weather channels section on page 85 of
this manual.
The following items will be displayed on the LCD display:
Intro Operation Customer
Assistance
Warranty
Notice
Main Icons
Secondary Icons
Caution Warning
Installation Customer
Assistance
NOTE
Only one (1) or two (2) of the weather channels will be
operating in any given location [only in Receive (Rx)
mode]. You will need to select the channel with the
strongest signal in your location.
Intro Operation Customer
Assistance
Warranty
Notice
Main Icons
Secondary Icons
Caution Warning
Installation Customer
Assistance
NOTE
When in the WX Alert mode, and NOAA sends the 1050
Hz alert tone, the radio will sound a series of loud beeps
regardless of the volume control setting.
Weather Standby
WEATHER
RADIO
WX ALERT ON
BACK ALERT
To Set WX Alert On or Off:
1. From the Standby mode, press MENU soft key to enter the
Weather Alert programming.
2. Press Channel Up/Down button to select WX ALERT.
3. Press ENTER soft key to select Weather Alert On/Off.
4. With the Channel Up/Down soft keys select On/Off.
5. Press ENTER soft key to save this entry and EXIT soft key to
exit menu.
Short Cut to WX Alert On or Off Select:
1. From the Standby screen, press the WX soft key.
2. Press ALERT soft key to switch WX Alert to On or Off.
3. Press BACK soft key to return to radio mode.
EXIT ENTER
WEATHER ALERT
ON
OFF
WX Alert On/Off
Weather Radio Standby
WEATHER
RADIO
WX ALERT ON
BACK ALERT
This setting will allow you to choose to activate the Weather Alert feature. When NOAA
broadcasts a Weather Alert Signal, and your radio has Weather Alert turned On, you
will hear a continuous audible tone and the radio will automatically switch to Weather
Radio mode. The alert indicators will sound regardless of what channel you are
operating on as soon as a NOAA alert signal is received.
Weather Mode Programming Weather Mode Programming
MRHH600_ENG_MANL.indd 32-33 4/3/17 5:03 PM
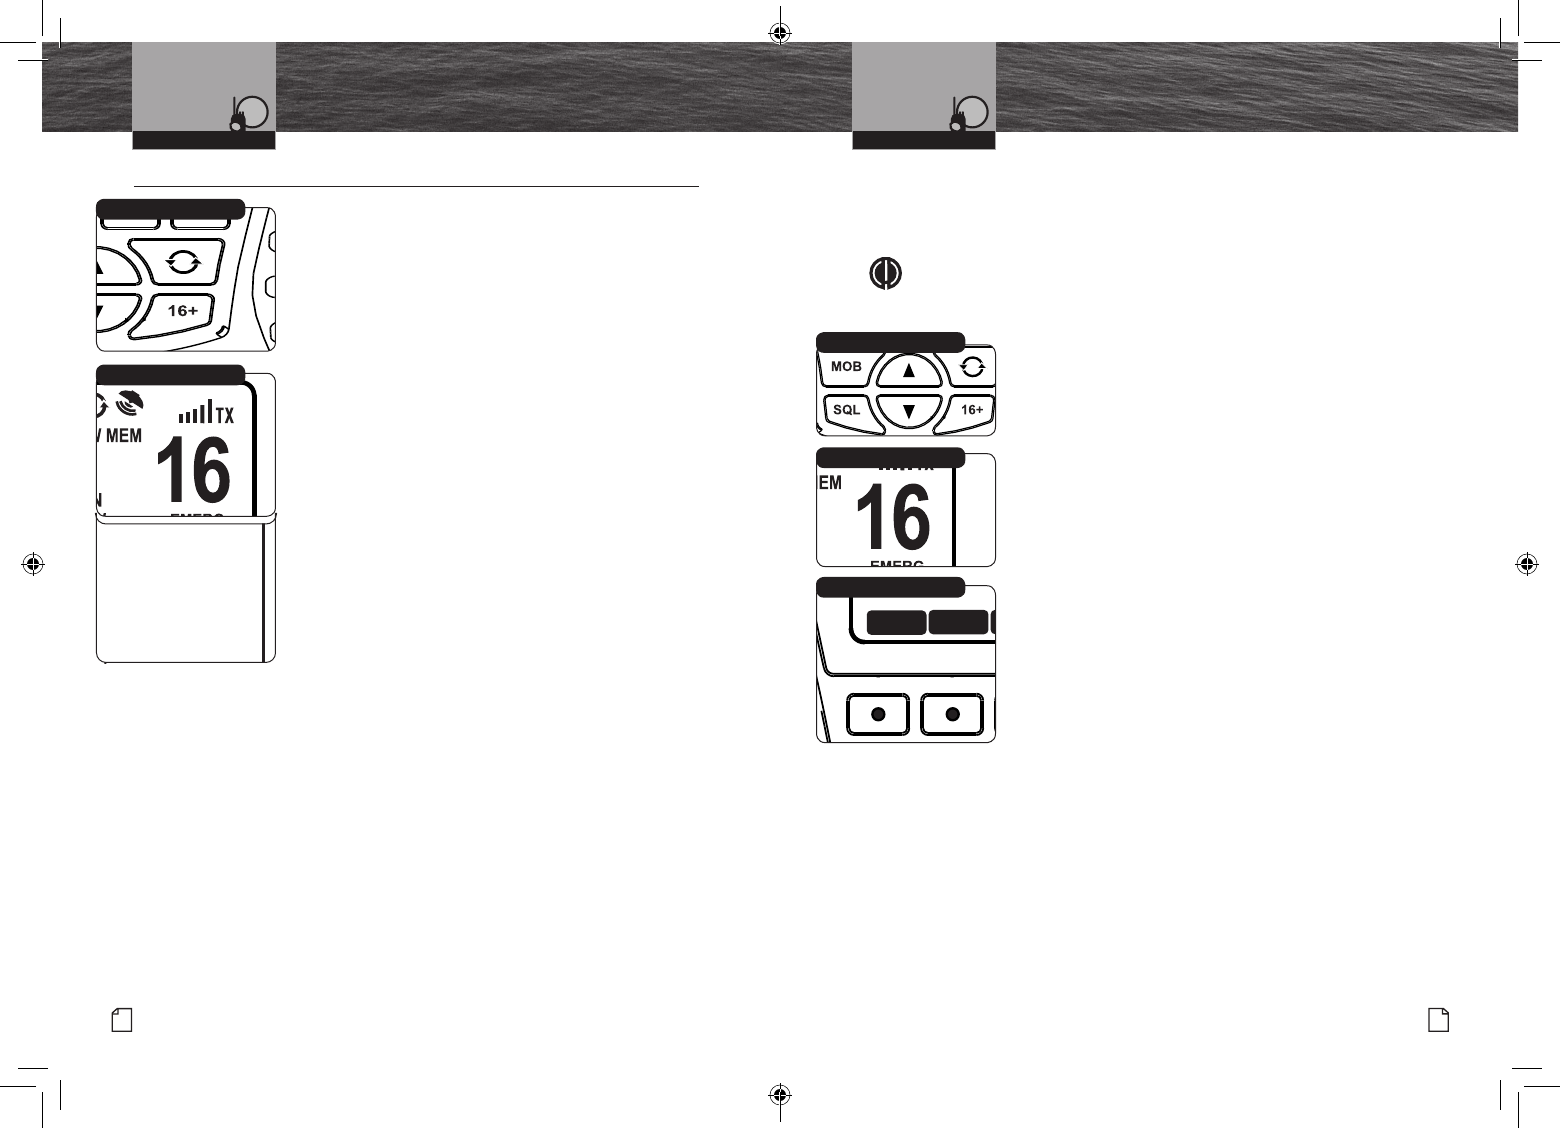
35
Nothing Comes Close to a Cobra®
VHF Marine Radio Protocols
Intro Operation Customer
Assistance
Warranty
Notice
Main Icons
Secondary Icons
Caution Warning
Installation Customer
Assistance
Operating Your Radio
Advanced Operation
VHF Marine Radio Protocols
Intro Operation Customer
Assistance
Warranty
Notice
Main Icons
Secondary Icons
Caution Warning
Installation Customer
Assistance
Operating Your Radio
Advanced Operation
34 English
Advanced Operation •
Channel 16+ Mode
Channel 16+ mode gives you quick access to calling on Channel
16 and Channel 9 from any operational mode.
To Switch to Channel 16+ or Channel 9:
1. Press the Channel 16+ button to change to
Channel 16.
2. Press the Channel 16+ button again to change
to Channel 9.
3. Press the Channel 16+ button a third time and return to
the last used channel.
Channel 16/9 Button
9A
N-COM
USA 6W
32 49.800N
999 11.077W
DATE:06/30
TIME:10:00 LOC
WX
MENU CALL MORE
Channel 16 or Channel 9
Tri-Watch
Tri-Watch gives you one (1) soft key access to scan the three (3) channels of most importance
to you. Channel 16 and Channel 9 will always be included as scanned channels. The remaining
channel will be the VHF channel in effect when you enter Tri-Watch mode.
NOTE
The radio must be squelched for tri-watch to function. See page 16 for
squelch procedure.
To Enter Tri-Watch Mode:
1. In Standby mode, use the Up/Down buttons to go to the
channel you want to add as the third location to be scanned.
2. Press the Tri-Watch soft key.
TRIP-WATCH will be indicated on the LCD and the radio will scan
between Channel 16, Channel 9, and the third tri-watch channel
you selected. A signal on any one (1) of the three (3) channels
will stop the scan to allow you to listen to the trafc on the
channel. The channel number will be displayed on the LCD.
a. To exit Tri-Watch, press the Tri-Watch softkey or the TALK
button. The radio will return to Standby mode on the selected
third Tri-Watch channel.
If you do not press any buttons, your radio will automatically
resume scanning tri-watch channels when the incoming
transmission is complete.
Channel Up/Down Buttons
MOB
SQL 16+
MARINE HH600 DSC+ GPS
WX
TW CALL MORE
16A
EMERGENCY
USA 6W
32 49.800N
SOG: 3.7 KTS COG: 015 M
999.11.077W
DATE:06/30
TIME:10:00 LOC
Tri-Watch Soft Key
Channel Select
MRHH600_ENG_MANL.indd 34-35 4/3/17 5:03 PM
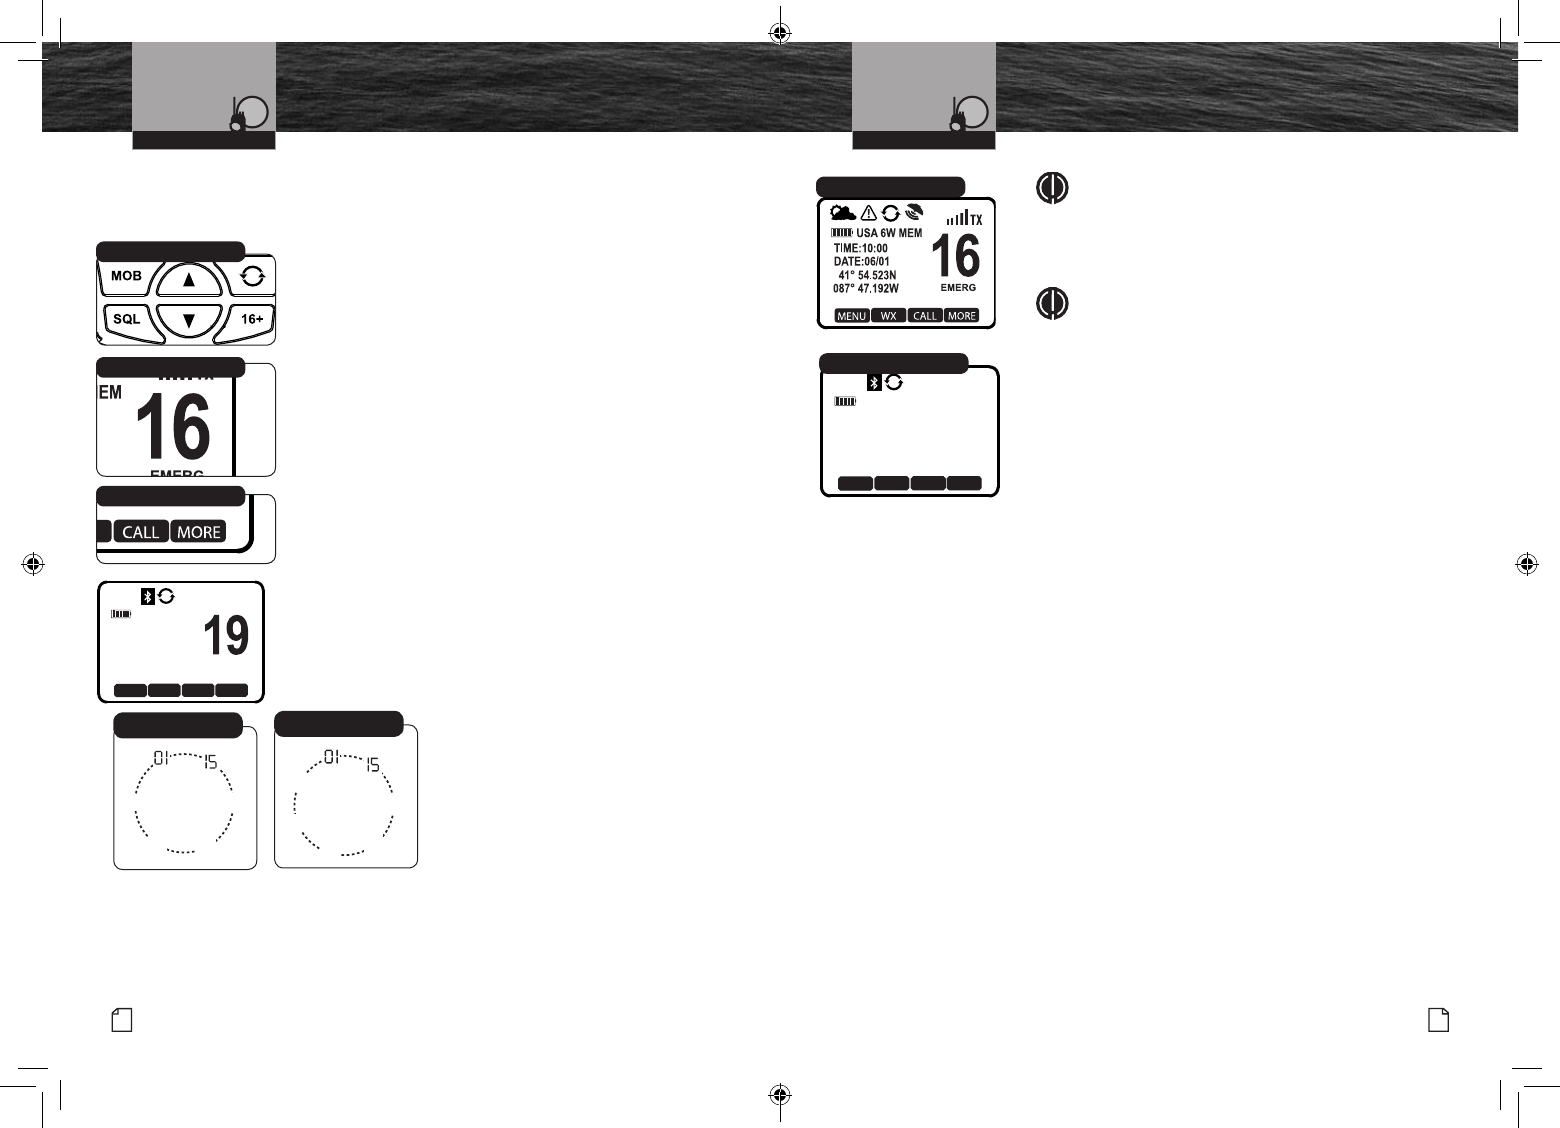
VHF Marine Radio Protocols
Intro Operation Customer
Assistance
Warranty
Notice
Main Icons
Secondary Icons
Caution Warning
Installation Customer
Assistance
Operating Your Radio
37
Nothing Comes Close to a Cobra®
Advanced Operation
VHF Marine Radio Protocols
Intro Operation Customer
Assistance
Warranty
Notice
Main Icons
Secondary Icons
Caution Warning
Installation Customer
Assistance
Operating Your Radio
36 English
Advanced Operation
Memory Channels
You can program (or tag) any or all channels to be scanned in the Memory
Scan mode.
To Program Memory Channels:
1. From Standby mode, select a channel to be tagged using
the Up/Down buttons.
2. Press the MORE soft key (if necessary), then the MEM
soft key. The channel will be tagged for scanning and
MEM (memory channel) will appear on the LCD whenever
that channel is selected.
Repeat steps 1 through 2 to add addition memory channels.
To Clear Memory Channels:
1. Simply reverse the steps above. MEM (Memory Channel)
will no longer appear on the LCD whenever that channel is
selected.
Memory Scan
During Memory Scan, the radio will rapidly switch from tagged
channel to tagged channel. Whenever any activity is detected,
the radio will stop the scan to allow you to listen to the activity
on that channel. The radio will then continue to scan after 2
seconds of inactivity, unless you switch out of the Memory Scan
mode.
88
14
88 30
60
75
79A
68 69
71
72
78A
88
15
30
60
75
Scanning with Priority
Channel Off
NOTE
Memory channels must be programmed to use memory
Scan. The radio will enter standard Scan Mode if no
memory Channels are programmed.
NOTE
The radio must be squelched for the Memory Scan
mode to function. See page 16 for squelch procedure.
To Enter Memory Scan:
From Standby mode, press the MORE soft key (if necessary),
then the SCAN soft key.
The radio will immediately begin to scan the channels you
tagged. MEM SCAN will be highlighted on the LCD.
The radio will then continue to scan after 2 seconds of inactivity,
unless you switch out of the Memory Scan mode.
To exit Memory Scan, press the SCAN soft key or Talk Button.
This will return the radio to Standby mode on the last selected
channel.
COMML
A
MEM COMP MARK MORE
TIME: 10:00 UTC
DATE: 06/01
41° 54.523N
087° 47.192W
USA 1W MEM
Channel Up/Down Buttons
More Soft Key
Channel Select
Standby Mode
MEM SCAN
TW H/M/L SCAN MORE
TIME: 10:00 UTC
DATE: 06/01
41° 54.523N
087° 47.192W
USA 1W MEM
68
Memory Scan
88
14
88
30
60
75
16
Scanning with Priority
Channel On
MRHH600_ENG_MANL.indd 36-37 4/3/17 5:03 PM
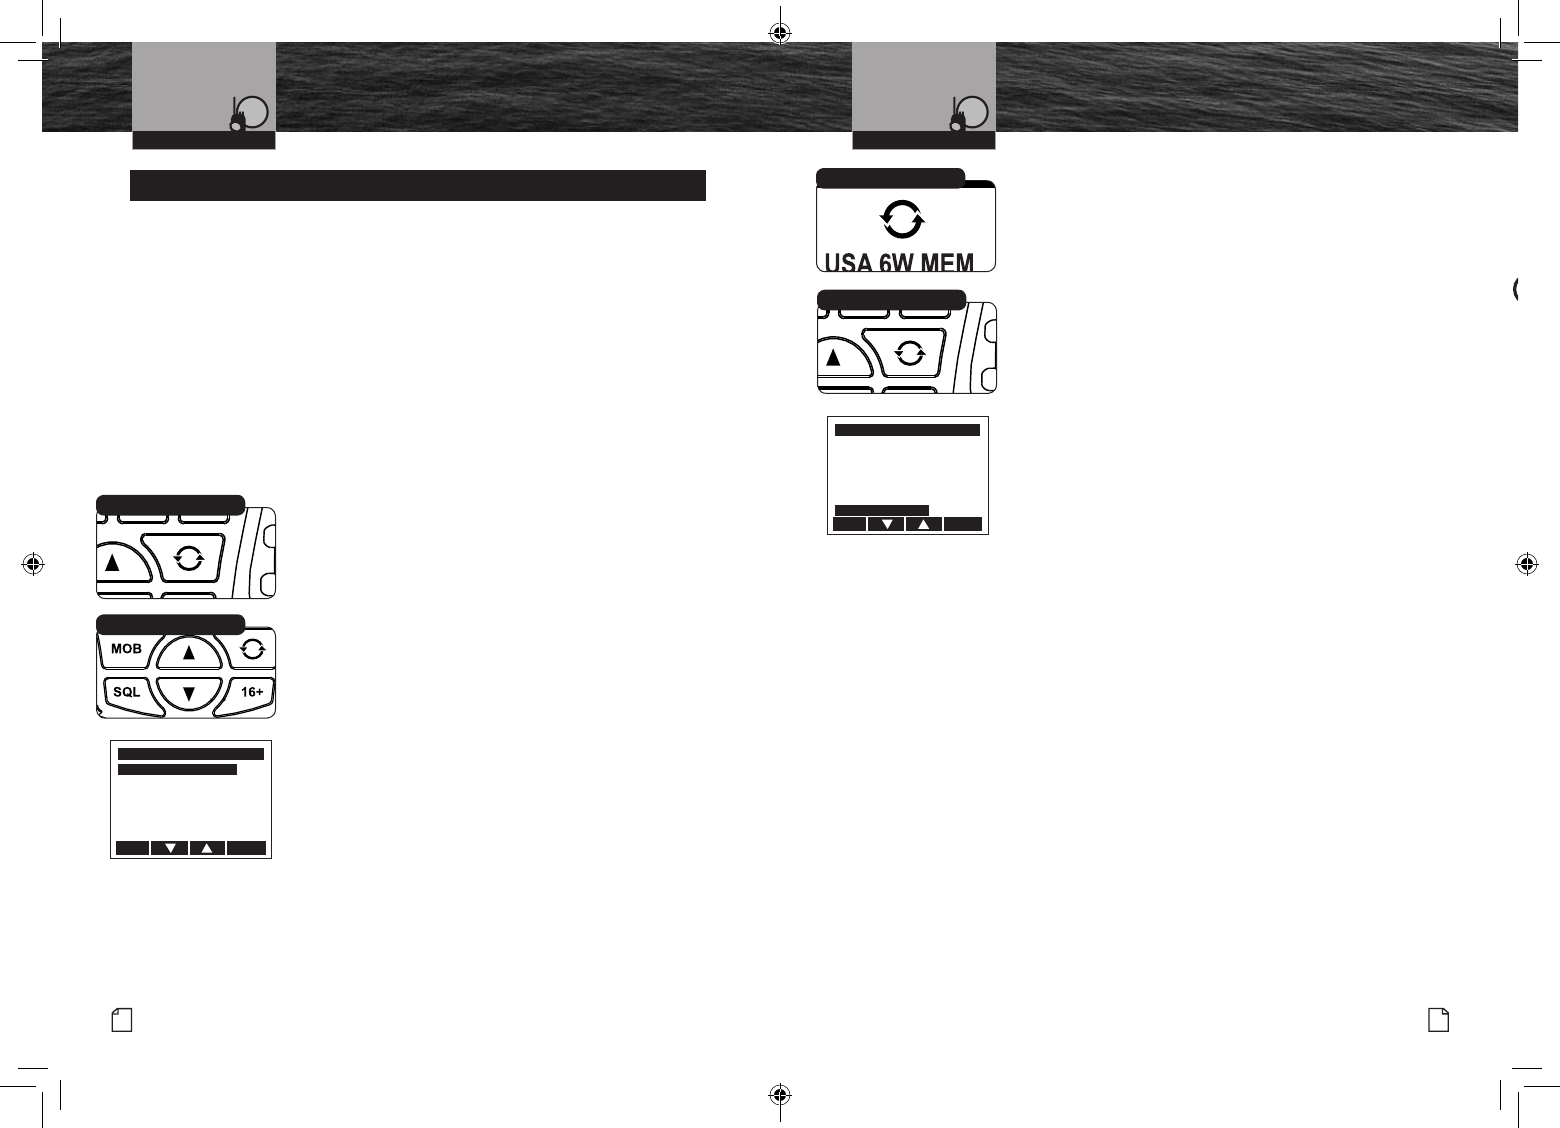
39
Nothing Comes Close to a Cobra®
Rewind Operation
Rewind-Say-Again® Feature
VHF Marine Radio Protocols
Intro Operation Customer
Assistance
Warranty
Notice
Main Icons
Secondary Icons
Caution Warning
Installation Customer
Assistance
Operating Your RadioVHF Marine Radio Protocols
Intro Operation Customer
Assistance
Warranty
Notice
Main Icons
Secondary Icons
Caution Warning
Installation Customer
Assistance
Operating Your Radio
38 English
Rewind Operation
Using Rewind-Say-Again® to Record VOICE Audio
Transmission:
Intro Operation Customer
Assistance
Warranty
Notice
Main Icons
Secondary Icons
Caution Warning
Installation Customer
Assistance
NOTE
If the record memory is locked (rewind icon ashing),
press and hold the REW button to unlock.
1. Press and hold SCAN button for two (2) seconds to enter
Record mode. The matrix will display MIC RECORDER.
2. Press and hold PTT button to begin recording
from radio microphone. The transmitter will turn off. The
matrix will display MIC RECORDER ON and the seconds
remaining will be shown in the lower right corner. If PTT
button is released, recording stops. While recording,
a 20-second countdown begins on display. When
20-second countdown time has ended, recording stops
and two (2) beep tones will be heard.
3. Press and hold SCAN button again for two (2) seconds or
press MEM/ESC button to cancel recording and return to
last operation.
The radio has a Cobra exclusive playback feature, Rewind-Say-Again®. This feature allows
you to replay the last 20 seconds of an incoming audio transmission. It also allows you to
record call details including position coordinates, call signs, registration numbers and store
details that will help authorities locate a distressed vessel.
Example 1:
When engine noise, music or conversation creates too much noise to hear an inbound
message clearly, press the Rewind-Say-Again® button to enter the Rewind-Say-Again®
menu to be able to hear the message a second time. This feature eliminates asking the
sender to repeat the message.
Example 2:
When listening to an urgent distress of an excited caller with confusing background noise,
press the Rewind-Say-Again® button to enter the Rewind-Say-Again® menu to be able to
hear the message a second time and get lifesaving information.
Operation of Rewind-Say-Again®
1. From the Standby mode, press the Rewind soft key after
the last inbound audio transmission. The last recording will
immediately start to play back.
2. Using the Up/Down soft keys or the channel Up/Down
buttons scroll to the PLAY RECORDING menu option.
3. Press the ENTER soft key to hear the recording again.
4. The radio automatically replays the last 20 seconds of the
previous audio transmission.
5.
Press the Rewind key a second time to exit the Rewind menu
and return to Standby mode.
Setup and Advanced Operation of Rewind-Say-Again
®
Operation of Rewind-Say-Again®:
1. Rewind is set to ON by default. The Rewind icon will appear
on the Standby screen when Rewind is on (see illustration).
a. To Turn REWIND Off - press the Rewind key to enter
the Rewind-Say-Again menu. With OFF: Exit REWIND
selected, press the Enter soft key to exit and turn OFF the
Rewind function.
b. To Turn REWIND ON - press the Rewind key to enter the
Rewind-Say-Again menu. With OFF: EXIT REWIND
highlighted, press the Rewind key. This turns on Rewind
and exits to VHF Standby mode.
The Rewind-Say-Again function also has several advanced
options. In addition to the recording of an incoming transmission
the user can also record a personal message for playback
later. This could be useful for navigation, emergency or vessel
operation information if a pen and paper are not available or
practical. The options available are:
2. PAUSE RECORDING - Pause recording of incoming
audio transmissions.
3. PLAYBACK RECORDING - Playback recorded incoming
audio. This can be used to repeat the playback again.
4. SAVE RECORDING - Saves recorded incoming audio.
5. ERASE RECORDING - Erases the saved recording.
6. TRANSMIT RECORDING - Transmit recorded message.
7. RECORD MESSAGE - Record a message (using the
microphone to record the message, using the PTT key
to start and stop the recording).
8. PLAY MESSAGE - Playback the recorded message.
9. SAVE MESSAGE - Save the recorded message.
10. ERASE MESSAGE - Erases the saved message.
11. TRANSMIT MESSAGE - Transmit the recorded message.
Rewind-Say-Again Button
Channel Up/Down Buttons
REWIND-SAY-AGAIN
OFF:EXIT REWIND
PAUSE RECORDING
PLAY RECORDING
SAVE RECORDING
ERASE RECORDING
TRANSMIT RECORDING
EXIT ENTER
Rewind-Say-Again Key
REWIND-SAY-AGAIN
ERASE RECORDING
TRANSMIT RECORDING
RECORD MESSAGE
PLAY MESSAGE
ERASE MESSAGE
TRANSMIT MESSAGE
EXIT ENTER
Rewind-Say-Again Icon
MRHH600_ENG_MANL.indd 38-39 4/3/17 5:03 PM
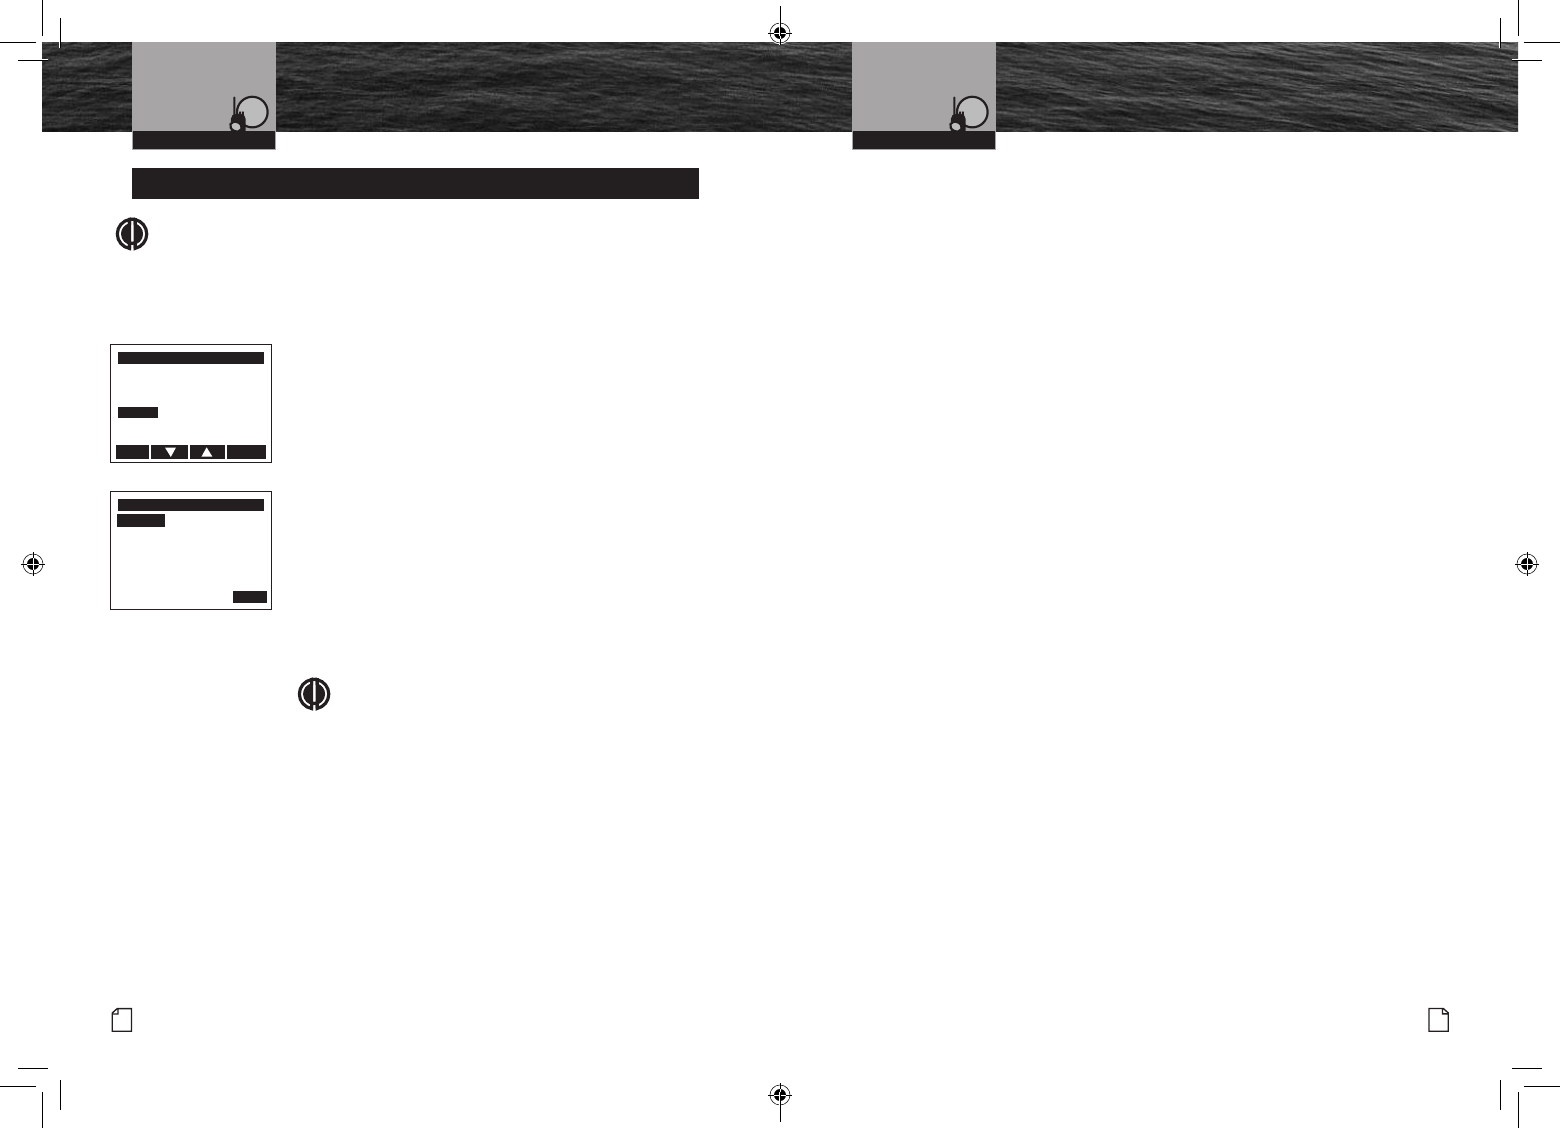
Mobile Phone Operation
With Bluetooth®
NOTE
Please refer to the Bluetooth Mode Pairing and Programming section on page 28 for
instructions on how to pair your mobile phone with this device. The following section
covers how to complete a phone call and other basic operations.
Answer Incoming Phone Calls
Mobile Phone Operation with Bluetooth®
This handheld radio, once properly paired and connected to
your Bluetooth® compatible mobile phone, can answer incoming
calls received on your mobile phone. It can act as the speaker and
microphone, while your mobile phone stays safe and dry. It will also
improve audio quality on both ends of the conversation.
To Answer and End an Incoming Call:
1. The speaker will ring. The screen will display ANSWER/
DECINE and the caller ID, if available.
2. Press and release the ENTER soft key to answer the
call. After the call is answered, the screen will display
ACTIVE CALL.
3. Begin conversation with the caller by a pressing the
PTT (Push to Talk) key and speaking into the small
microphone above the LCD. This is very similar to a
standard radio operation and it completely eliminates
all background noise when you are not speaking.
Intro Operation Customer
Assistance
Warranty
Notice
Main Icons
Secondary Icons
Caution Warning
Installation Customer
Assistance
NOTE
To enable hands-free conversation or “VOX” mode
(pressing in the PTT key not required), see the Bluetooth
setup instructions on page 29.
4. To end a call, press and release the END soft key. The
radio will then return to previous Standby mode and
resume normal operation.
VHF Marine Radio Protocols
Intro Operation Customer
Assistance
Warranty
Notice
Main Icons
Secondary Icons
Caution Warning
Installation Customer
Assistance
Operating Your Radio
40 English
Mobile Phone Operation
With Bluetooth®
VHF Marine Radio Protocols
Intro Operation Customer
Assistance
Warranty
Notice
Main Icons
Secondary Icons
Caution Warning
Installation Customer
Assistance
Operating Your Radio
Initiate a Phone Call
There are several ways to initiate a call. These include initiating
(as normal) from the mobile phone, using voice dialing and last
number redial.
To Initiate from the Mobile Phone
1. Simply dial a number on your mobile phone.
(See manufacturer’s instructions for making a call.)
When the phone’s Send key is pressed, the radio will
respond by changing over to Bluetooth mode and the
matrix will display ACTIVE CALL and the option to END.
41
Nothing Comes Close to a Cobra®
Intro Operation Customer
Assistance
Warranty
Notice
Main Icons
Secondary Icons
Caution Warning
Installation Customer
Assistance
INCOMING CALL
CALL FROM
Bill Smith
ANSWER
DECLINE
EXIT ENTER
ACTIVE CALL
END CALL
END
MRHH600_ENG_MANL.indd 40-41 4/3/17 5:03 PM
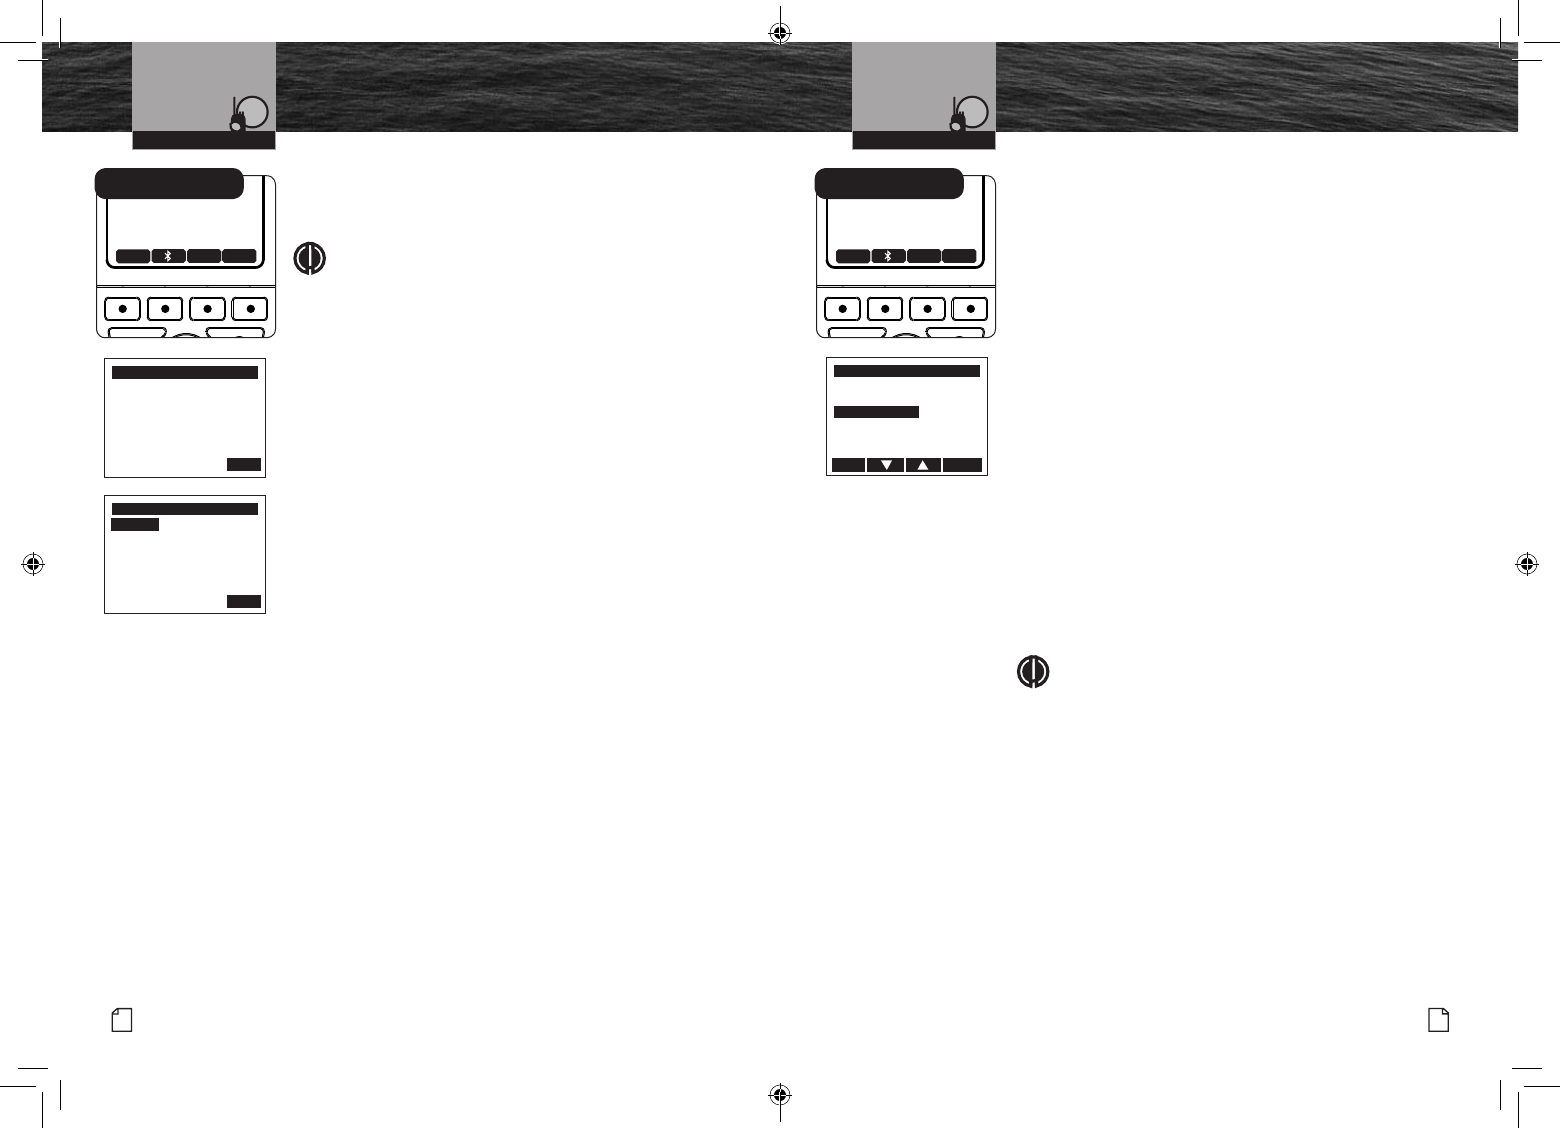
43
Nothing Comes Close to a Cobra®
Mobile Phone Operation
With Bluetooth®
Using Voice Dial
This feature allows you to use your voice to dial a contact from the
contact list on your mobile phone.
Intro Operation Customer
Assistance
Warranty
Notice
Main Icons
Secondary Icons
Caution Warning
Installation Customer
Assistance
NOTE
Voice dialing is an advanced function and may not be
supported by all phones. Cobra suggests you set it up and
become familiar with it on your mobile phone before you
attempt using it in conjunction with the radio or another
Bluetooth device.
To Initiate a Voice Dial Call:
1. Press and hold the Bluetooth soft key from VHF mode.
This will initiate the voice dial feature on the connected
mobile phone.
2. You will hear a beep or audio command from the phone and
the radio will show VOICE DIAL ON. Press and hold the
PTT (Push to Talk) button and speak the command into
the radio.
3. The mobile phone will begin to dial the contact
it “recognizes.” The call will be completed through
the speaker and microphone of the radio.
4. Hang up by pressing the END soft key when
you complete your call.
VHF Marine Radio Protocols
Intro Operation Customer
Assistance
Warranty
Notice
Main Icons
Secondary Icons
Caution Warning
Installation Customer
Assistance
Operating Your Radio
42 English
Mobile Phone Operation
With Bluetooth®
VHF Marine Radio Protocols
Intro Operation Customer
Assistance
Warranty
Notice
Main Icons
Secondary Icons
Caution Warning
Installation Customer
Assistance
Operating Your Radio
Last Number Redial
This feature allows you to redial the last number stored in the
mobile phone’s Call Log. This feature is supported by
most mobile phones.
To Initiate a Last Number Redial:
1. Press and release the Bluetooth soft key to enter the
Bluetooth menu.
2. Press the Channel Up/Down soft key to select REDIAL
LAST CALL.
3. Press ENTER soft key to redial.
3. The connected mobile phone will redial the last number.
The call will be complete through the speaker and
microphone of the radio.
4. Hang up by pressing the END soft key when
you complete your call.
To Disconnect (At the End of the Day)
You might not want to take your calls through this VHF radio once
you are back at the dock or in a dry location. See the instructions
in the Bluetooth Mode Programming section on page 28 for
instructions on how to turn Off the Bluetooth function of the
radio.
Intro Operation Customer
Assistance
Warranty
Notice
Main Icons
Secondary Icons
Caution Warning
Installation Customer
Assistance
NOTE
If switched to Off setting, then the radio will not reconnect
with mobile phone on power up. The two devices will
remain paired, but they will not connect until Bluetooth is
turned back On again from the Bluetooth Programming
mode.
VOICE DIAL
VOICE DIAL ON
END
ACTIVE CALL
END CALL
END
MOB
SQL 16+
MARINE HH600 DSC + GPS
LOG BURP MORE
16A
EMERGENCY
USA 6W
32 49.800N
SOG: 3.7 KTS COG: 015 M
999.11.077W
DATE:06/30
TIME:10:00 LOC
Bluetooth Soft Key
MOB
SQL 16+
MARINE HH600 DSC + GPS
LOG BURP MORE
16A
EMERGENCY
USA 6W
32 49.800N
SOG: 3.7 KTS COG: 015 M
999.11.077W
DATE:06/30
TIME:10:00 LOC
Bluetooth Soft Key
BLUETOOTH MENU
BLUETOOTH
VOX
REDIAL LAST CALL
EXIT ENTER
MRHH600_ENG_MANL.indd 42-43 4/3/17 5:03 PM
45
Nothing Comes Close to a Cobra®
Mobile Phone Operation
With Bluetooth®
General Bluetooth Operation and Frequently Asked Questions
n What is the Industry Standard Range for Bluetooth® Wireless Technology?
The industry standard range for Bluetooth wireless technology is 30 feet
(10 meters). The radio will loose its pairing with the mobile phone if the
mobile phone and the radio are separated farther than this. The radio will automatically
reconnect with the mobile phone when the user comes back into range.
n How many phones can the radio pair with?
The radio can be paired with up to 8 mobile phones. However, it can only connect and
operate with one mobile phone at a time.
n Do I need to have my mobile phone with me?
Yes, the phone call is actually completed through your mobile phone and your mobile
phone operator/carrier. The mobile phone must be with the 30 feet
(10 meters) range of the radio. The radio does not increase the offshore
range of your mobile phone.
n Can I use a standard Bluetooth® headset with this radio?
No, the radio is using the headset prole of the Bluetooth specication to pair with your
mobile phone. It cannot pair to another Bluetooth headset.
n Can I use this unit as a speakerphone or hands-free device?
Turning on VOX allows you to use the radio without pressing the PTT
(Push to Talk) button. The radio will still need to be operated in a face held position with
the microphone close to the mouth. This radio uses a noise canceling microphone, and it
will not operate well from the belt clip or another hands-free position.
VHF Marine Radio Protocols
Intro Operation Customer
Assistance
Warranty
Notice
Main Icons
Secondary Icons
Caution Warning
Installation Customer
Assistance
Operating Your Radio
44 English
Mobile Phone Operation
With Bluetooth®
VHF Marine Radio Protocols
Intro Operation Customer
Assistance
Warranty
Notice
Main Icons
Secondary Icons
Caution Warning
Installation Customer
Assistance
Operating Your Radio
n Please make sure to note your VOX setting.
If VOX is set to On, then the receiving caller might hear conversation and noise in your
background. This setting is retained in memory. If switched On, then it will
be On the next time the radio is switched On and connected.
n Can I use my mobile phone for emergency use?
No, Cobra does not endorse cellular telephones as a substitute for marine radios. They
generally cannot communicate with rescue vessels and, if you make a distress call on your
cellular telephone, only the party you call will be able to hear you.
Additionally, cellular telephones may have limited coverage over water. If you do not
know where you are, the Coast Guard will have difculty nding you if you
are using your cellular telephone. However, cellular telephones can have a place
onboard where cellular coverage is available – to allow social conversations and keep
the marine frequencies uncluttered and available for their intended use.
MRHH600_ENG_MANL.indd 44-45 4/3/17 5:03 PM
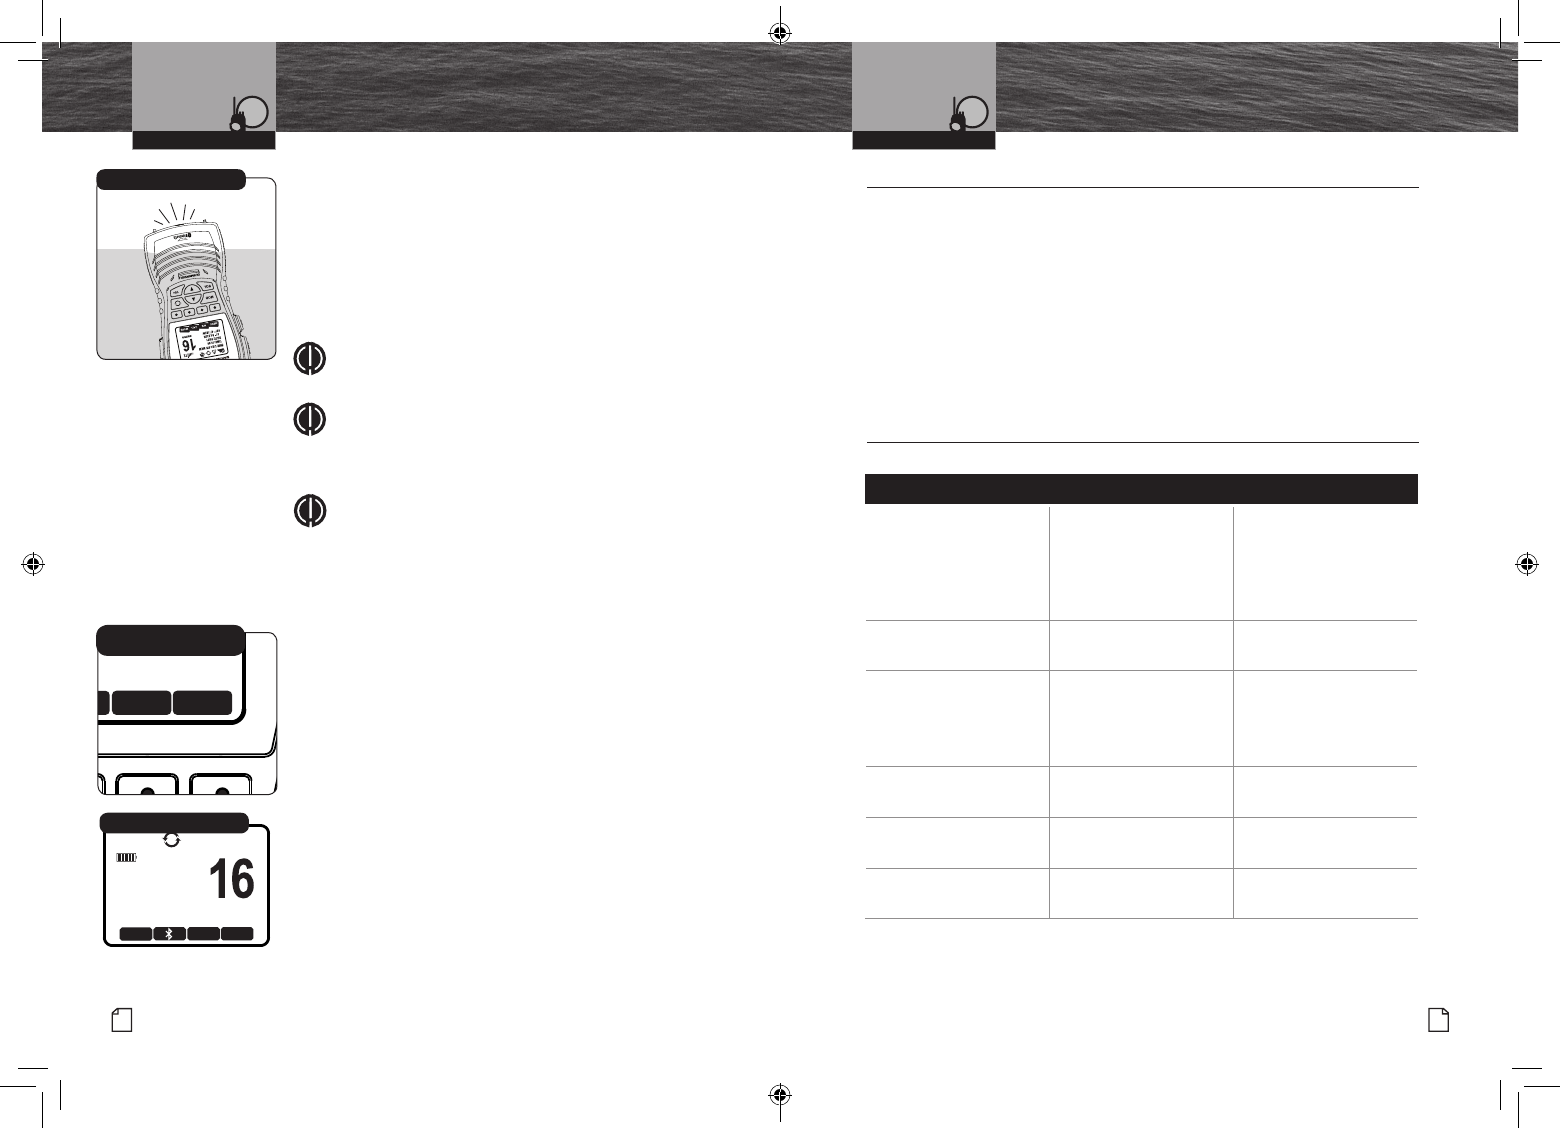
47
Nothing Comes Close to a Cobra®
Maintenance and
Troubleshooting
Floating Radio
VHF Marine Radio Protocols
Intro Operation Customer
Assistance
Warranty
Notice
Main Icons
Secondary Icons
Caution Warning
Installation Customer
Assistance
Operating Your Radio
46 English
Floating Feature
VHF Marine Radio Protocols
Intro Operation Customer
Assistance
Warranty
Notice
Main Icons
Secondary Icons
Caution Warning
Installation Customer
Assistance
Operating Your Radio
No display on LCD when
radio is turned On
Batteries are exhausted
Batteries not installed
properly
Recharge or
replace batteries
Remove batteries and
reinstall according to
polarity markings
Batteries run
down quickly
Batteries are at the
end of their life
Replace with new batteries
Will transmit at
one (1) or three (3) watts,
but not at six (6) watts
Batteries are low
Selected channel is imited
to one (1) watt
Recharge or
replace batteries
Switch to
another channel
Will not transmit Selected channel is limited
to receive only
Switch to
another channel
No sound from speaker Volume level is too low or
squelch level is too deep
Re-adjust volume
and squelch
No response to
button press
Button lock is On Press Backlight/
Key Lock button
Problem Possible Cause(s) Solution(s)
Maintenance •
Very little maintenance is required to keep your CobraMarine VHF radio
in good operating condition:
n Keep the radio and charger clean by wiping with a soft cloth and mild detergent.
Do not use solvents or harsh or abrasive cleaners, which could damage the case or
scratch the LCD screen.
n If the radio is exposed to salt water, wipe with a soft, moist cloth at least once a day
to prevent buildup of salt deposits, which could interfere with button operation.
n
If the radio will be stored for a long period, such as over the winter,
remove the batteries from the battery tray and store them in a separate
package. This is especially important if you are using alkaline batteries.
Troubleshooting •
Intro Operation Customer
Assistance
Warranty
Notice
Main Icons
Secondary Icons
Caution Warning
Installation Customer
Assistance
Intro Operation Customer
Assistance
Warranty
Notice
Main Icons
Secondary Icons
Caution Warning
Installation Customer
Assistance
EMERG
NAV BURP MORE
EXCUSE ME!
USA 6W
MOB
SQL 16+
MARINE HH600 DSC+ GPS
LOG BURP MORE
16A
EMERGENCY
USA 6W
32 49.800N
SOG: 3.7 KTS COG: 015 M
999.11.077W
DATE:06/30
TIME:10:00 LOC
MORE Soft Key
Intro Operation Customer
Assistance
Warranty
Notice
Main Icons
Secondary Icons
Caution Warning
Installation Customer
Assistance
BURP
Floating Radio
This radio is designed to oat if dropped overboard. The ashing
light at the bottom of the radio will activate as soon as it makes
contact with water and the orange center makes it visible and
easy to retrieve. This rugged radio is also designed to meet JIS8
(IPX8) specications. This means it’s designed to operate properly
after being submerged in more than one meter deep water for 30
plus minutes.
NOTE
The radio must be turned on for the strobe light to operate.
NOTE
Do not leave the radio oating in water permanently. This
could cause premature corrosion of the battery contacts and
other damage.
NOTE
The radio is only designed to oat with its included Lithium-
ion battery. Using other approved batteries might cause
the radio to sink. This includes the optional AA battery tray,
depending on the weight of the AA batteries used.
Burp Feature
Cobra’s Burp feature allows the operator to expel water from
inside the speaker grill. This is especially useful if the radio is
dropped overboard or during extreme foul weather conditions. In
these conditions, water can become trapped in the speaker grill
and mufe the audio.
To Activate Burp:
1. Press the MORE soft key until the BURP soft key
appears.
2. The Burp tone(s) at maximum level will sound
from the internal speaker for eight seconds.
3. During this time, the matrix will display EXCUSE ME!.
4. Hold the radio with the speaker grill down to help
the water drain out.
5. After an 8-second interval, the radio will return to
standby.
MRHH600_ENG_MANL.indd 46-47 4/3/17 5:03 PM
49
Nothing Comes Close to a Cobra®
VHF Marine Radio Procedures
VHF Marine Radio Procedures •
Maintain Your Watch
Whenever your boat is underway, the radio must be turned On and be tuned to Channel 16
except when being used for messages.
Power
Try 1 watt rst, if the station being called is within a few miles. If there is no answer,
switch to 3 watts and call again. You have the ability to go up to 6 watts of output power
to increase your calling distance. Remember, the lower wattage outputs will conserve your
battery and minimize interference to other users.
Calling Coast Stations
Call a coast station on its assigned channel. You may use Channel 16 when you
do not know the assigned channel.
Calling Other Vessels
Call other vessels on Channel 16 or on Channel 9. (Channel 9 is preferred for recreational
vessel use.) You may also call on ship-to-ship channels when you know that the vessel is
listening on a ship-to-ship channel.
Initial Calling on Channel 16 or 9
The use of Channel 16 is permitted for making initial contact (hailing) another vessel. The
limits on calling must be followed. Be reminded, Channel 16’s most important function is
for Emergency Messages. If for some reason, Channel 16 is congested, the use of Channel
9, especially in U.S. waters, may be used as the initial contact (hailing) channel for non-
emergency communication.
Limits on Calling
You must not call the same station for more than 30 seconds at a time.
If you do not get a reply, wait at least two (2) minutes before calling again.
After three (3) calling periods, wait at least 15 minutes before calling again.
Change Channels
After contacting another station on a calling channel, change immediately
to a channel which is available for the type of message you want to send.
Station Identication
Identify, in English, your station by your FCC call sign (if available), vessel name and the
state registration number, at both the beginning and at the end of the message.
VHF Marine Radio Protocols
Intro Operation Customer
Assistance
Warranty
Notice
Main Icons
Secondary Icons
Caution Warning
Installation Customer
Assistance
48 English
VHF Marine Radio Procedures
Intro Operation Customer
Assistance
Warranty
Notice
Main Icons
Secondary Icons
Caution Warning
Installation Customer
Assistance
IntroductionVHF Marine Radio Protocols
Intro Operation Customer
Assistance
Warranty
Notice
Main Icons
Secondary Icons
Caution Warning
Installation Customer
Assistance
VHF Marine Radio Protocols
Prohibited Communications
You MUST NOT transmit:
n False distress or emergency messages.
n Messages containing obscene, indecent or profane language.
n General calls, signals or messages (messages not addressed to a particular station) on
Channel 16, except in an emergency or if you are testing your radio.
n When you are on land.
MRHH600_ENG_MANL.indd 48-49 4/3/17 5:03 PM
Intro Operation Customer
Assistance
Warranty
Notice
Main Icons
Secondary Icons
Caution Warning
Installation Customer
Assistance
51
Nothing Comes Close to a Cobra®
Voice Calling & MOB
Intro Operation Customer
Assistance
Warranty
Notice
Main Icons
Secondary Icons
Caution Warning
Installation Customer
Assistance
VHF Marine Radio Protocols
Voice Calling •
You are required to listen to Channel 16 while standing by. Channel 16 is the distress and safety
channel used for establishing initial contact with another station and for emergency communication.
The Coast Guard also monitors Channel 16 for safety purposes for everyone on the water.
Intro Operation Customer
Assistance
Warranty
Notice
Main Icons
Secondary Icons
Caution Warning
Installation Customer
Assistance
NOTE
Channel 9 may be used by recreational vessels for general-purpose calling. This
frequency should be used whenever possible to help relieve congestion on Channel 16.
The Coast Guard generally does not make urgent marine information broadcasts or
weather warnings on Channel 9. Boaters are still asked to “keep watch” on Channel 16
whenever the radio is turned on and not in use with another station.
To call another vessel or shore installation (e.g, lock or bridge tender):
n Make sure the radio is On.
n Make sure you are in standby listening mode on Channel 16. Make sure Channel 16 is
not in use.
n
When the channel is open (quiet), press the Talk button and call a vessel. Hold the radio
or microphone several inches from your face and speak clearly and distinctly in a normal
voice tone. Say “name or station being called,” “THIS IS [your vessel name or call sign].”
n Once contact is made, you must leave Channel 16 and go to another working channel.
See channel listing on page 70.
VHF Marine Radio Protocols
50 English
Voice Calling
Intro Operation Customer
Assistance
Warranty
Notice
Main Icons
Secondary Icons
Caution Warning
Installation Customer
Assistance
Intro Operation Customer
Assistance
Warranty
Notice
Main Icons
Secondary Icons
Caution Warning
Installation Customer
Assistance
NOTE
For best sound quality at the station you are calling, hold the microphone on
the front of the radio at least 2 in. (51 mm) from your mouth and slightly off to one (1)
side. Speak in a normal tone of voice.
Intro Operation Customer
Assistance
Warranty
Notice
Main Icons
Secondary Icons
Caution Warning
Installation Customer
Assistance
NOTE
“Over and Out”
The most commonly misused procedure words are “over and out” within the same
transmission. “Over” means you expect a reply. “Out” means you are nished and do
not expect a reply.
WARNING
The device complies with RF specications when the device used at 25mm from
your front face and 0mm from your body, Maximun SAR Value (10g): 3.54 W/Kg.
MOB (Man Over Board) •
Your radio features the Man Over Board function that marks and memorizes the postion
information if a crew member falls overboard. The radio will help to navigate back to
that location.
NOTE
The radio can’t calculate for the effects of tide, current and wind on your crew
member’s location over time. The MOB function can only act as a guide for their
possible location.
NOTE
The radio must have satellite recption for MOB to mark the position.
n Press the MOB button. The radio will save that MOB location. Pressing the NAV
soft key activates the navigation screen to be able to navigate quickly to the
MOB location.
n From the MOB screen, press the Enter soft key and radio’s screen will prompt to
send a DSC emergency call. See detailed instructions for Digital Selective Calling
(DSC) on page 52 for more information.
NOTE
Activating the MOB function does not send an emergency call.
Intro Operation Customer
Assistance
Warranty
Notice
Main Icons
Secondary Icons
Caution Warning
Installation Customer
Assistance
Intro Operation Customer
Assistance
Warranty
Notice
Main Icons
Secondary Icons
Caution Warning
Installation Customer
Assistance
The vessel Corsair calling the vessel Vagabond:
Corsair: “Vagabond, this is Corsair (station license number call sign).”
Vagabond: “Corsair, this is Vagabond. Over.”
Corsair: “Vagabond go to working Channel 68. Over.”
Both parties switch over to the agreed upon working channel...
Corsair: “Vagabond I need to talk to you about... Over.”
Vagabond: “Corsair in answer to your question about... Over.”
Corsair: “Vagabond, thanks for the information about... (call sign and out).”
After each transmission, say “OVER” and release the microphone Push to Talk (PTT) button.
This conrms that the transmission has ended. When all communication with the other
vessel is totally completed, end the message by stating your call sign and the word “OUT.”
Remember, it is not necessary to state your call sign with each transmission, only at the
beginning and end of the message.
NOTE
For best sound quality at the shore station or other vessel receiving your call, hold the
microphone/speaker at least 2 in. (51 mm) from your mouth and slightly off to one (1)
side. Speak in a normal tone of voice.
For Example
Intro Operation Customer
Assistance
Warranty
Notice
Main Icons
Secondary Icons
Caution Warning
Installation Customer
Assistance
MRHH600_ENG_MANL.indd 50-51 4/3/17 5:03 PM
Intro Operation Customer
Assistance
Warranty
Notice
Main Icons
Secondary Icons
Caution Warning
Installation Customer
Assistance
VHF Marine Radio Protocols
VHF Marine Radio Protocols
Digital Selective Calling (DSC)
Intro Operation Customer
Assistance
Warranty
Notice
Main Icons
Secondary Icons
Caution Warning
Installation Customer
Assistance
53
Nothing Comes Close to a Cobra®
52 English
Maritime Mobile
Service Identity (MMSI)
Digital Selective Calling (DSC) •
Digital selective calling is a semi-automated system for establishing a radio call. It
has been designed by the International Maritime Organization (IMO) as an international
standard for VHF, MF, and HF calls and is part of the Global Maritime Distress and
Safety System (GMDSS).
DSC will eventually replace aural (listening) watches on distress frequencies and will
be used to announce routine and urgent maritime safety information broadcasts. Until
DSC is fully implemented, it is still necessary to maintain a listening watch on Channel
16.
The DSC system allows mariners to instantly send a distress call with GPS position
coordinates to the Coast Guard and other vessels within range of the transmission. DSC
also allows mariners to initiate and receive distress, urgent, safety, routine, position
request, position send, and group calls between vessels equipped with DSC capable
radios.
Maritime Mobile Service Identity (MMSI) •
The MMSI Number Is Available In The U.S.A. From Any Of Two (2) Sources:
n U.S. Power Squadron www.usps.org
n BoatU.S.– www.getmmsi.com
NOTE
The above references are for recreational vessels only. Commercial vessels
should contact the FCC.
An MMSI is a nine (9) digit number used on a marine radio capable of using digital
selective calling (DSC). It is used to selectively call other vessels or shore stations and
is similar to a telephone number.
For your CobraMarine™ radio to operate in the DSC mode, you must enter your maritime
mobile service identity (MMSI) number. See page 55 for instructions
on how to enter it.
In Canada, Contact:
n Industry Canada Spectrum Management Ofce (only available on the Internet):
www.ic.gc.ca and search for “MMSI”.
To Obtain An MMSI Number Outside The U.S.A.:
Users can obtain an MMSI from their country’s telecommunications authority
or ship registry. This may involve amending or obtaining a ship station license.
WARNING
This equipment is designed to generate a digital maritime distress and
safety signal to facilitate search and rescue. To be effective as a safety
device, this equipment must be used only within communication range
of a shore-based VHF marine channel to distress and safety watch system.
The range of the signal may vary.
Intro Operation Customer
Assistance
Warranty
Notice
Main Icons
Secondary Icons
Caution Warning
Installation Customer
Assistance
MRHH600_ENG_MANL.indd 52-53 4/3/17 5:03 PM
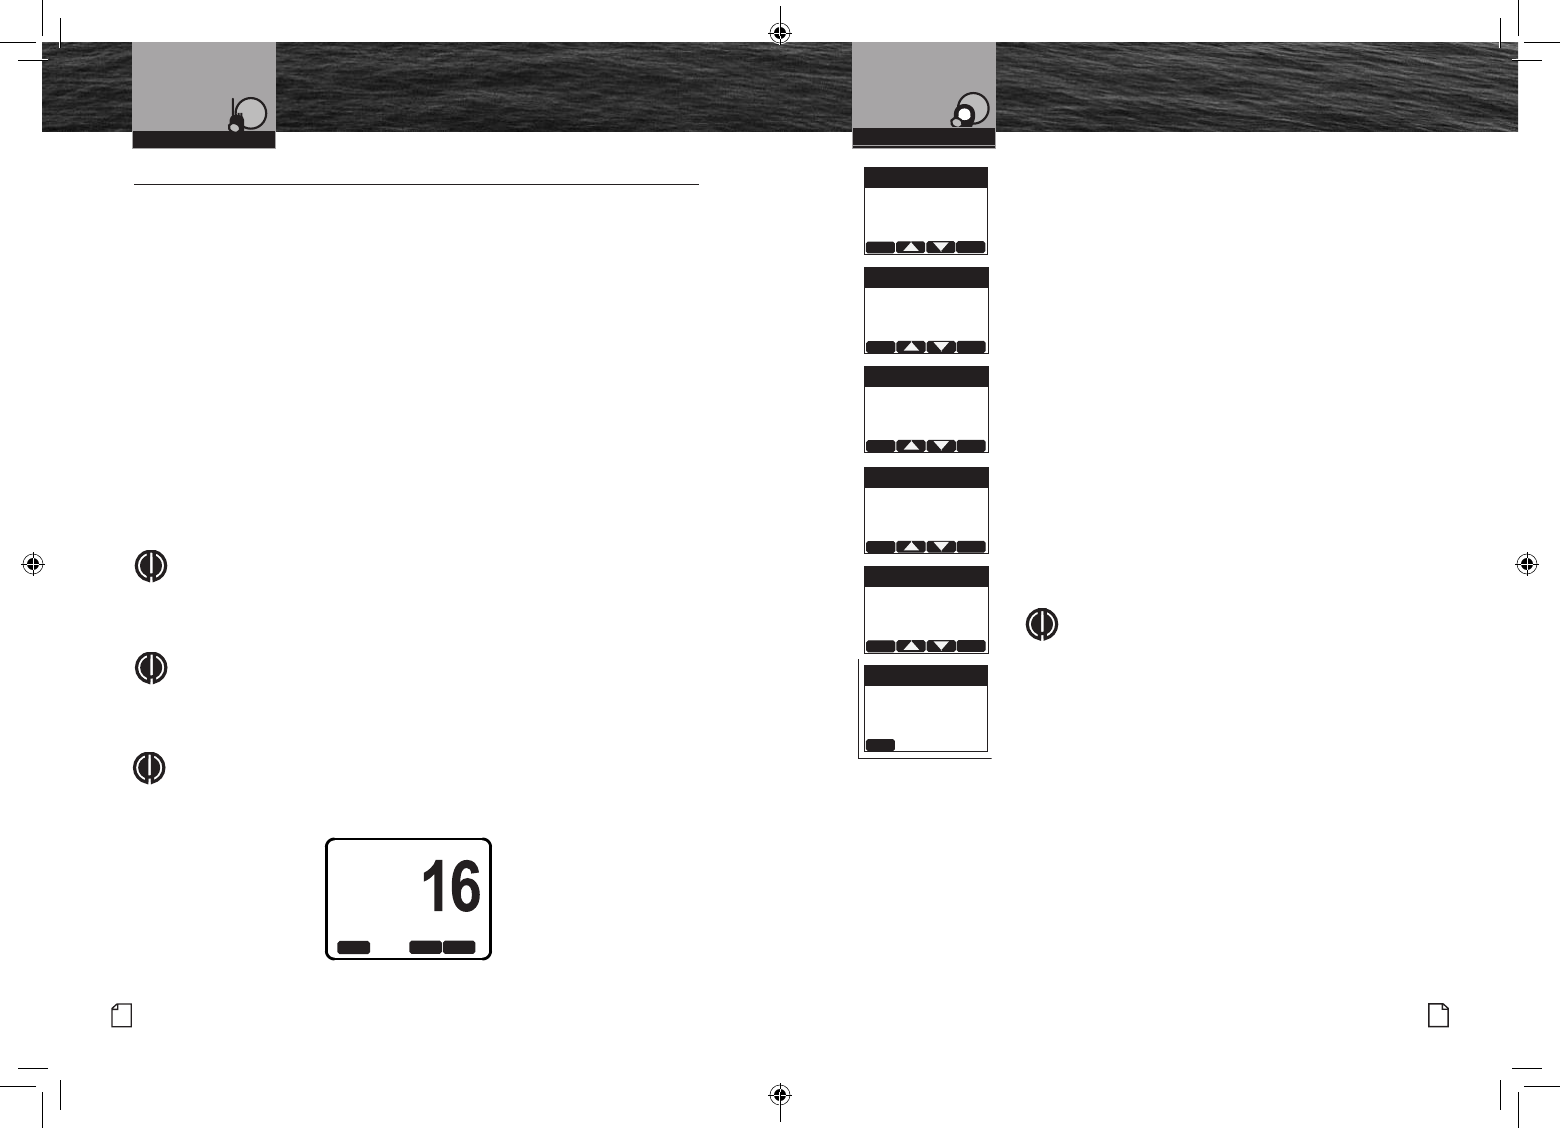
Intro Operation Customer
Assistance
Warranty
Notice
Main Icons
Secondary Icons
Caution Warning
Installation Customer
Assistance
VHF Marine Radio Protocols
VHF Marine Radio Protocols
Intro Operation Customer
Assistance
Warranty
Notice
Main Icons
Secondary Icons
Caution Warning
Installation Customer
Assistance
55
Nothing Comes Close to a Cobra®
54 English
Operating Your Radio
Digital Select Calling (DSC)
Setup
Digital Select Calling (DSC)
Setup
DSC Set-Up •
Digital selective calling — DSC — employs digital RF signals which tend to carry
further and be less susceptible to distortion from noise and atmospheric conditions
than analog ones. The result is greater range and more reliable message delivery
per watt of output power.
But, that is not the only advantage of DSC equipped radios. Those radios are set up to
interface with GPS and to automate many of the operations involved in sending and
receiving messages. That results in more compact and accurate messages and less
congestion of the airwaves.
The price of these benets to the user is the time it takes to do the required set-up
to make the DSC features work. A little time spent when your radio is new will pay
dividends over its life.
User MMSI Number
The nine (9) digit MMSI number, similar to a telephone number, is a unique identier
for a vessel. DSC incorporates this number into every message that is Sent (Tx) or
Received (Rx). Enter the MMSI number as soon as you receive your MMSI number from
the issuing agency.
NOTE
The radio does not operate in the DSC mode until an ofcial MMSI number is
entered. An error tone will sound when attempting to operate in the DSC mode
without an MMSI number.
NOTE
An MMSI number can only be entered one time. To enter a new MMSI number,
please contact Cobra customer service.
NOTE
An alert tone and message will sound each time you try and use the radio until
an MMSI is programmed.
To Enter Your MMSI Number:
1. Enter the Settings menu and scroll to DSC SETUP menu
with the Up/Down soft keys or the Channel Up/Down
buttons.
2. Press the ENTER soft key and scroll to RADIO MMSI
ENTRY with the Up/Down soft keys or the channel Up/
Down buttons.
3. Press the ENTER soft key. The blinking cursor will appear
at the rst digit under RADIO MMSI ENTRY.
4. Use the Up/Down soft keys or the Channel Up/Down
buttons to scroll through the number list to the rst digit
of your number.
5. Press the ENTER soft key to select the digit and the
blinking cursor will move to the next digit of the number.
6. Repeat steps 3 and 4 until all nine (9) digits of your
MMSI number are entered.
7. Check that you have entered the number correctly. The
radio will ask you to re-enter your number to conrm.
8. Press ENTER soft key to save the MMSI number and the
radio will return to the DSC SETUP MENU.
NOTE
After the MMSI number has been entered, the RADIO
MMSI ENTRY menu option will move to the bottom
of the DSC SETUP MENU. This is done because the
MMSI entry is entered only once.
If You Incorrectly Enter Your MMSI Number
YOU CAN DO THIS ONLY ONCE! You will have to contact Cobra® Electronics (see product
service on page 66 for details) for reset before you can enter a new MMSI number into
the radio.
Because the MMSI number is so important to DSC operation, this limitation is imposed
on all DSC capable radios to prevent constant changes and the potential introduction of
errors in the process.
EXIT ENTER
DSC SETUP MENU
RADIO MMSI ENTRY
RADIO ATIS ENTRY
INDIVIDUAL DIRECTORY
GROUP MMSI
POSITION REPLY
AUTO CHANNEL SWITCH
EMERG
DEMO PROG OK
ATTENTION!
DSC IS NOT
AVAILABLE.
PLEASE ENTER
MMSI NUMBER
EXIT ENTER
RADIO MMSI ENTRY
MMSI _ _ _ _ _ _ _ _ _
EXIT ENTER
RADIO MMSI ENTRY
MMSI 123456789
EXIT ENTER
RADIO MMSI ENTRY
RE-ENTER MMSI NUMBER
MMSI _ _ _ _ _ _ _ _ _
EXIT ENTER
RADIO MMSI ENTRY
CONFIRM ENTRY
MMSI 123456789
EXIT
RADIO MMSI
MMSI 123456789
MRHH600_ENG_MANL.indd 54-55 4/3/17 5:03 PM
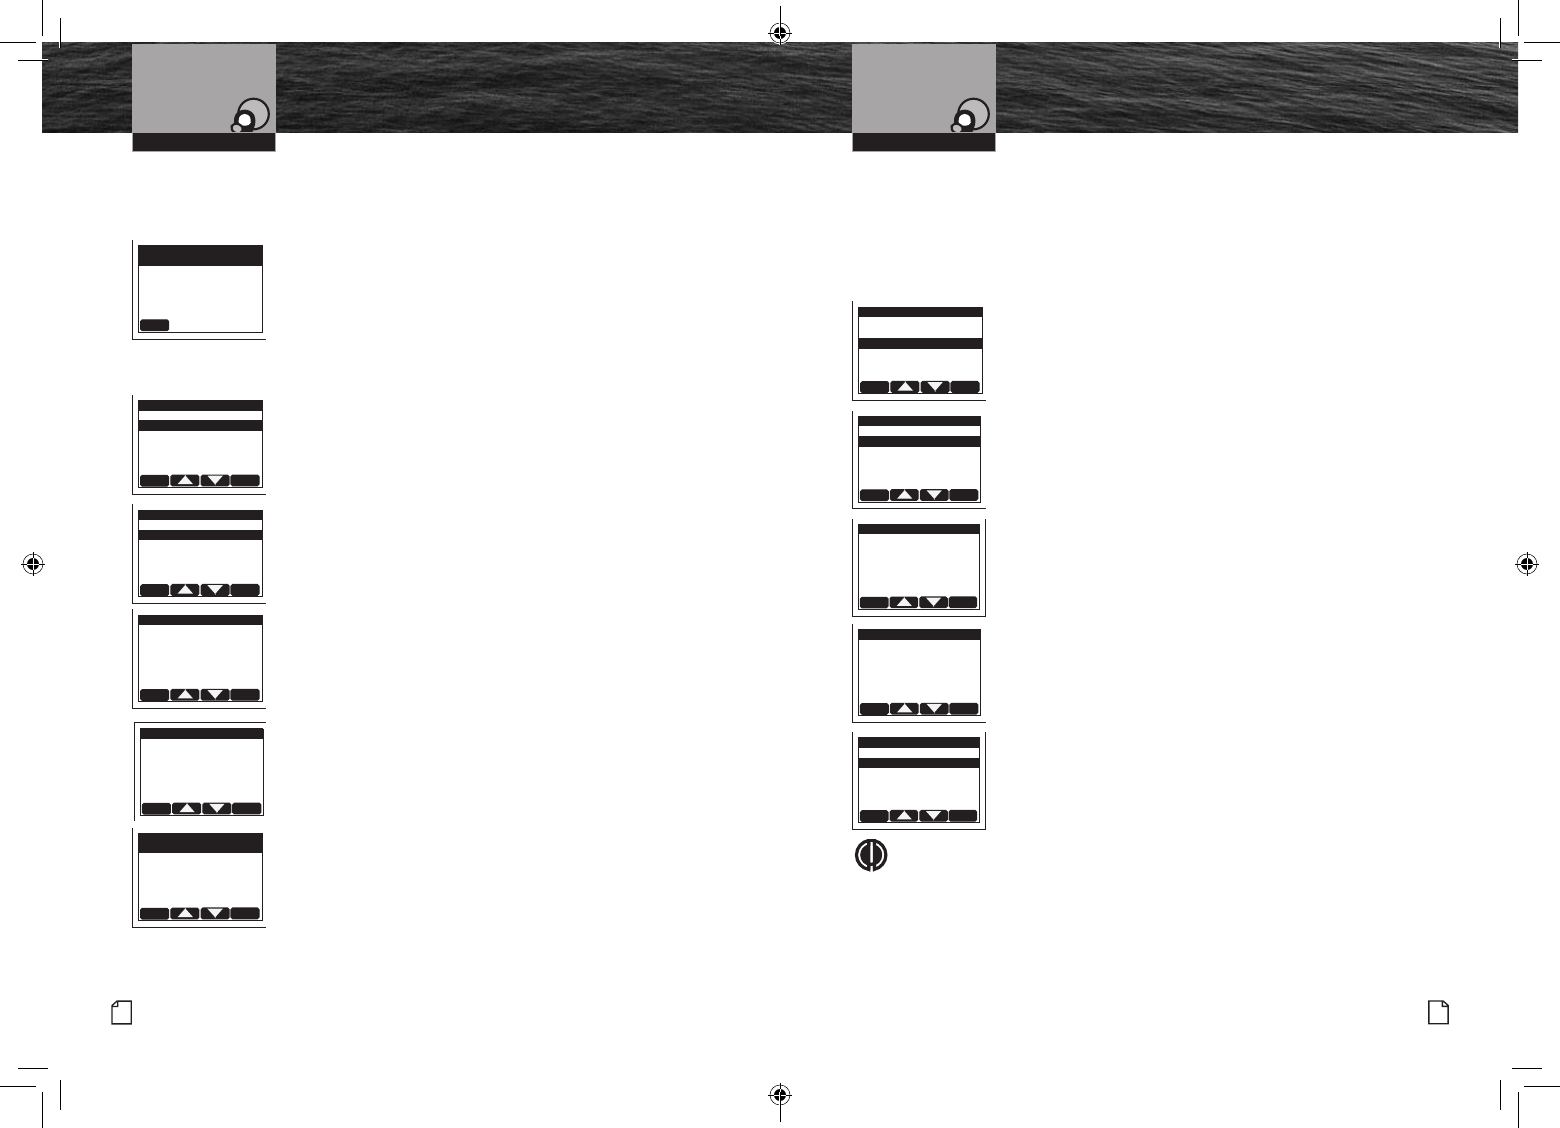
57
Nothing Comes Close to a Cobra®
56 English
Operating Your Radio Operating Your Radio
Digital Select Calling (DSC)
Setup
Digital Select Calling (DSC)
Setup
If You Transfer Your Radio To A Different Vessel
Contact the MMSI issuing agency from which you obtained your number and change the
information associated with your number to correspond to vessel in which it will be mounted.
To View Your MMSI Number At Any Time:
1. Enter the DSC SETUP MENU menu and scroll to
RADIO MMSI ENTRY with the Up/Down soft keys or
the Up/Down channel buttons.
2. Press the ENTER button and the already entered number
will be displayed.
3.
Press the EXIT soft key to return to the DSC SETUP MENU.
Individual Directory
DSC calling allows you to call another vessel or station directly if you
know its MMSI number. Your CobraMarine VHF radio allows you to
store up to twenty (20) names and their associated MMSI numbers
for quick access.
To Enter Or Edit Names And MMSI Numbers In The Directory:
1. Enter the DSC SETUP MENU and scroll to INDIVIDUAL
DIRECTORY with the Up/Down soft keys or the Up/Down
channel buttons.
2. Select the ADD option in the menu. Press the ENTER soft key to
ADD a new Name and MMSI number.
3. The cursor will begin to blink at the rst character under
ADD NAME.
4. Use the Up/Down soft keys or the Up/Down channel
buttons to scroll through the character list.
5. Press the ENTER soft key to select a character. This will
also move the blinking cursor to the next character.
6. Repeat steps 4 and 5 to enter additional characters — up
to a maximum of eleven (11) — for the name.
7. After entering the name, press the ENTER soft key to move
the blinking cursor to the rst character under MMSI.
8. Repeat steps 4 and 5 until the nine (9) digit MMSI is entered.
9. Press the ENTER soft key to save the entry.
10. Press ADD to enter another name/MMSI number entry, or
highlight the entry just entered and press the ENTER soft key
to edit or delete the current entry, or press the EXIT soft key to
return to the DSC SETUP MENU.
Group MMSI Number
Nautical organizations such as yacht clubs and the organizers of events such as regattas can
establish Group MMSIs. These allow a message to be sent automatically to all members of the
group without having to call each one individually.
Each member of the group must enter the group MMSI number in his radio in order to
receive group messages.
To Enter A Group MMSI Number:
1. Enter the DSC SETUP MENU and scroll to GROUP MMSI
with the Up/Down soft keys or the Up/Down channel buttons.
2. Select he ADD option in the menu. Press the ENTER soft key to
ADD a new Name and MMSI number.
3. The cursor will begin to blink at the rst character under
ADD NAME.
4. Use the Up/Down soft keys or the Up/Down channel
buttons to scroll through the character list.
5. Press the ENTER soft key to select a character. This will
also move the blinking cursor to the next character.
6. Repeat steps 4 and 5 to enter additional characters — up
to a maximum of eleven (11) — for the name.
7.
After entering the name, press the
ENTER
soft key to move
the blinking cursor to the second character under MMSI
(the rst digit of a Group MMSI number always starts with a 0).
8. Repeat steps 4 and 5 until the nine (9) digit MMSI is entered.
9. Press the ENTER button to save the entry.
10. Select ADD to enter another name/MMSI number
entry, or highlight the entry just entered and press the ENTER
soft key to edit or delete the current entry, or press the EXIT
soft key to return to the DSC SETUP MENU.
NOTE
The group MMSI is established by modifying the MMSI assigned to one (1) of the
group members. The last digit of that member’s MMSI number is dropped and a zero
(0) is inserted at the beginning. For example, member MMSI number 366123456
becomes group MMSI number 036612345.
Group MMSIs can be entered and changed any number of times without the need to
have your radio reset
EXIT
RADIO MMSI
MMSI 123456789
EXIT ENTER
DSC SETUP MENU
RADIO MMSI ENTRY
INDIVIDUAL DIRECTORY
GROUP MMSI
POSITION REPLY
AUTO CHANNEL SWITCH
INDIVIDUAL CALL REPLY
EXIT ENTER
INDIVIDUAL DIRECTORY
ADD
EXIT ENTER
INDIVIDUAL DIRECTORY
ADD NAME
_ _ _ _ _ _ _ _ _ _ _
MMSI _ _ _ _ _ _ _ _ _
EXIT ENTER
INDIVIDUAL DIRECTORY
ADD NAME
FRIENDS BOAT
MMSI 123456789
EXIT ENTER
INDIVIDUAL DIRECTORY
FRIENDS BOAT
ADD NAME
EXIT ENTER
DSC SETUP MENU
RADIO MMSI ENTRY
INDIVIDUAL DIRECTORY
GROUP MMSI
POSITION REPLY
AUTO CHANNEL SWITCH
INDIVIDUAL CALL REPLY
EXIT ENTER
GROUP MMSI DIRECTORY
ADD
GROUP MMSI
EXIT ENTER
GROUP MMSI DIRECTORY
ADD NAME
_ _ _ _ _ _ _ _ _ _ _
MMSI _ _ _ _ _ _ _ _ _
EXIT ENTER
GROUP MMSI DIRECTORY
ADD NAME
BOAT GROUP
MMSI 036612345
EXIT ENTER
GROUP MMSI DIRECTORY
BOAT GROUP
ADD
MRHH600_ENG_MANL.indd 56-57 4/3/17 5:03 PM
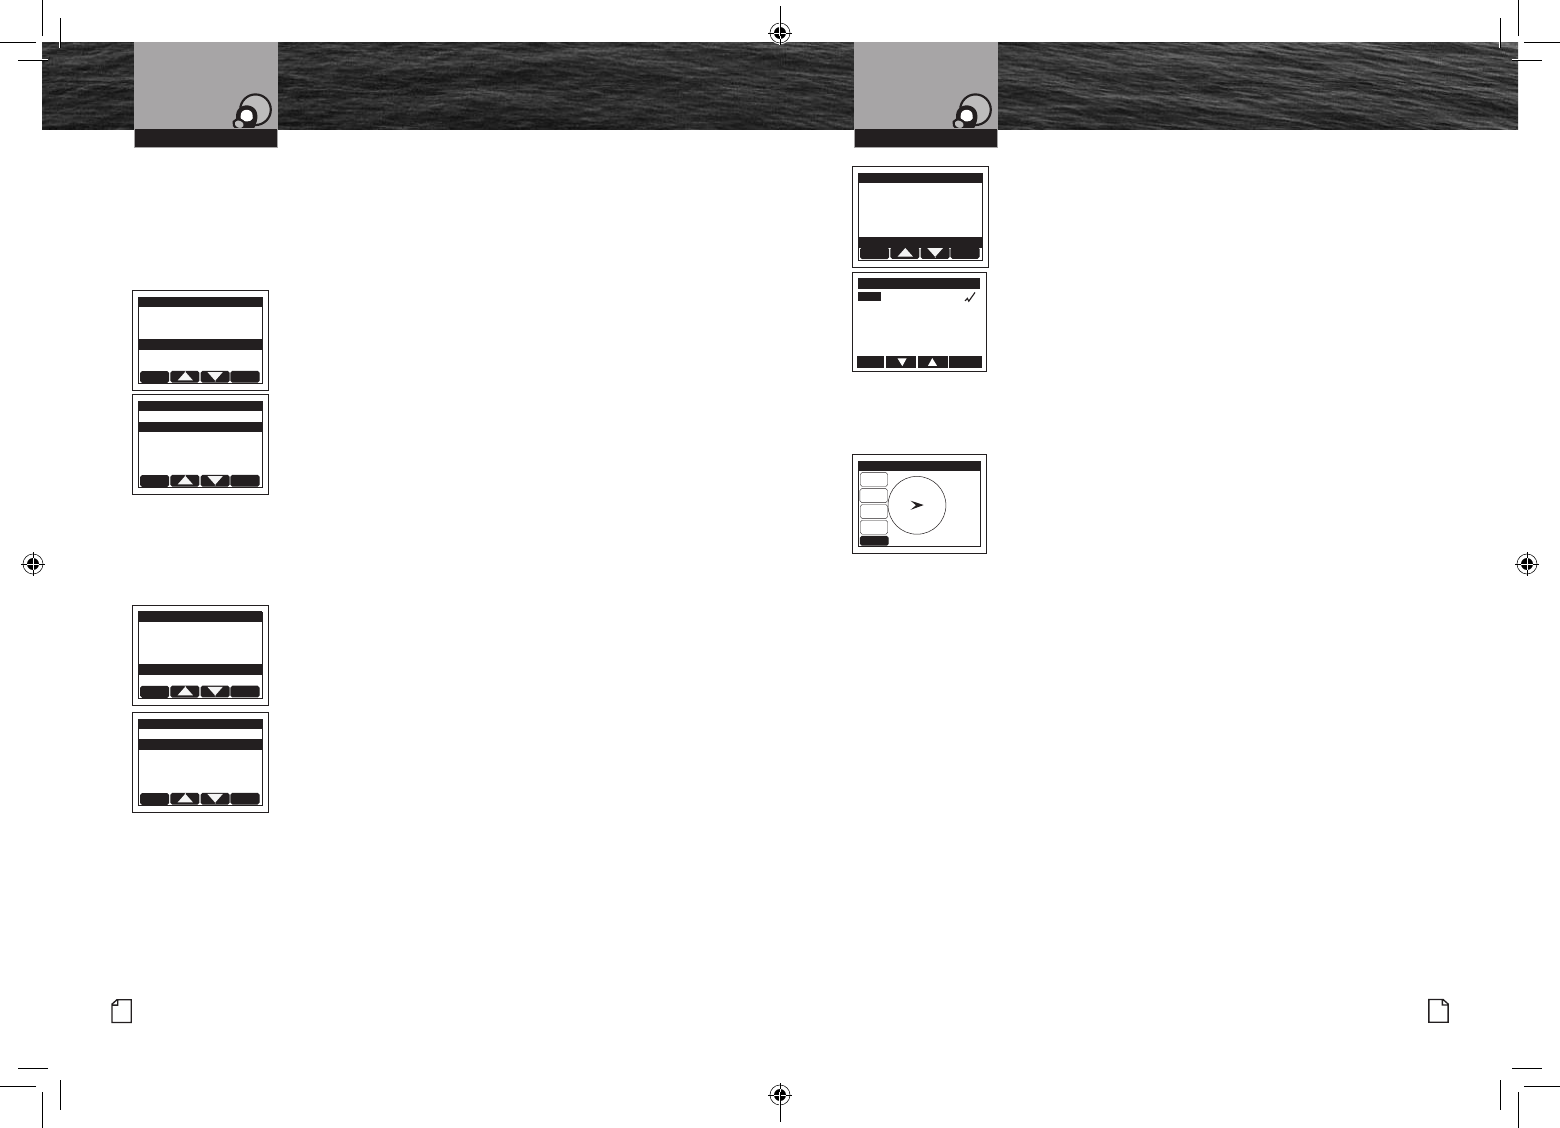
59
Nothing Comes Close to a Cobra®
58 English
Operating Your Radio Operating Your Radio
Position Request Reply Type
The ability to send your position to another station is an added feature of DSC radios that have
GPS. It is handy for rendezvous and rescue situations.
Your CobraMarine VHF radio allows you to choose whether to have the radio automatically
respond to all Position Requests it receives or to alert you to a Position Request and allow you
to choose whether to respond or not — manual reply.
To Set The Position Request Reply Type:
1. Enter the DSC SETUP MENU menu and scroll to
POSITION REPLY with the Up/Down soft keys or the
UP/Down channel buttons.
2. Press the ENTER soft key and observe the current
highlighted setting — AUTO or MANUAL.
3. Use the Up/Down soft keys or the Up/Down channel
buttons to select the desired setting.
4. Press the ENTER soft key to select the setting and return
to the DSC SETUP MENU.
Auto Channel Switch
This setting allows your radio to automatically switch to the requested channel when
receiving an Individual Call. In some cases, automatically switching channels may not be
wanted, especially if the radio is being used for Bridge to Bridge communications in a busy
port or waterway.
To Set The Automatic Channel Switch On or Off:
1. Enter the DSC SETUP MENU menu and scroll to AUTO
CHANNEL SWITCH (Automatic Channel Switch) with the Up/
Down soft keys or the Up/Down channel buttons.
2. Press the ENTER soft key and observe the current highlighted
setting — ON or OFF.
3. Use the Up/Down soft keys or the Up/Down channel buttons
to select the desired setting.
4. Press the ENTER soft key to select the setting and return to
the DSC SETUP MENU.
Individual Call Reply
The Individual Call Reply feature is used when receiving Individual DSC calls. When receiving a
Individual DSC Call, you may not want the radio to reply to the call automatically. This setting
allows you to disable the automatic reply.
Digital Select Calling (DSC)
Setup
Digital Select Calling (DSC)
Setup
To Set The Individual Reply Auto or Manual:
1. Enter the DSC SETUP MENU menu and scroll to
INDIVIDUAL CALL REPLY with the Up/Down soft keys or the
Up/Down channel buttons.
2. Press the ENTER soft key and observe the current
selected setting — AUTO or MANUAL.
3. Use the Up/Down soft keys or the Up/Down channel
buttons to select the desired setting.
4. Press the ENTER soft key to select the setting and return
to the DSC SETUP MENU.
Manual Position Entry
The Manual position entry feature allow you to enter the time (UTC time), Latitude and
Longitude.
To Enter the Time, Latitude, and Longitude:
1. Enter the DSC SETUP MENU menu and scroll to MANUAL ENTRY
with the Up/Down soft keys or the Up/Down channel buttons.
2. The cursor will begin to blink at the rst number of the
UTC time entry.
3. Use the Up/Down soft keys or the Up/Down channel buttons to scroll through the
number list.
4.
Press the
ENTER
soft key to select a number. This will also move the blinking cursor to the
next number under UTC Time.
5. Repeat steps 3 and 4 to enter additional numbers.
6. After entering the UTC time, press the ENTER soft key to move the blinking cursor to the
rst number under LAT (Latitude).
7. Repeat steps 3 and 4 until the seven (7) digit of the LAT is entered.
8.
After entering the LAT (Latitude), press the
ENTER
soft key to move the blinking cursor to the
rst number under LON (Longitude).
9.
Repeat steps 3 and 4 until the eight (8) digit of the LON is entered.
10.
Press the
ENTER
button to save the entry and the radio will return to the DSC SETUP MENU.
MENU EXIT: You can exit the menu at any time by pressing the EXIT soft key on any screen. This
method will exit to the next highest menu. Repeated presses of the EXIT soft key will return the radio
to the radio standby mode.
EXIT ENTER
DSC SETUP MENU
RADIO MMSI ENTRY
INDIVIDUAL DIRECTORY
GROUP MMSI
POSITION REPLY
AUTO CHANNEL SWITCH
INDIVIDUAL CALL REPLY
EXIT ENTER
POSITION REPLY
AUTO
MANUAL
EXIT ENTER
DSC SETUP MENU
RADIO MMSI ENTRY
INDIVIDUAL DIRECTORY
GROUP MMSI
POSITION REPLY
AUTO CHANNEL SWITCH
INDIVIDUAL CALL REPLY
EXIT ENTER
AUTO CHANNEL SWITCH
ON
OFF
EXIT ENTER
DSC SETUP MENU
RADIO MMSI ENTRY
INDIVIDUAL DIRECTORY
GROUP MMSI
POSITION REPLY
AUTO CHANNEL SWITCH
INDIVIDUAL CALL REPLY
INDIVIDUAL CALL REPLY
AUTO
MANUAL
EXIT ENTER
BACK
NAVIGATION
BRG T
131°
SOGKTS
8.8
DISTNM
0.01
MOB
01
01:27 PM
03/07
SCALE:
0.5NM
N
E
S
W
MRHH600_ENG_MANL.indd 58-59 4/3/17 5:03 PM
Intro Operation Customer
Assistance
Warranty
Notice
Main Icons
Secondary Icons
Caution Warning
Installation Customer
Assistance
61
Nothing Comes Close to a Cobra®
Emergency Messages and
Distress Procedure
Radiotelephone Calls •
Boaters may make and receive radiotelephone calls to and from any number on the telephone
network by using the services of public coast stations. Calls can be made — for a fee —
between your radio and telephones on land, sea and in the air. See the Appendix for the
public correspondence (marine operator) channels.
If you plan to use these services, consider registering with the operator of the
public coast station that you plan to work through. These services can provide
you with detailed information and procedures to follow.
NOTICE
You may disclose privileged information during a radiotelephone call.
Keep in mind that your transmission is NOT private, as it is on a regular
telephone. Both sides of the conversation are being broadcast and can be
heard by anyone who has a radio and tunes to the channel you are using.
Intro Operation Customer
Assistance
Warranty
Notice
Main Icons
Secondary Icons
Caution Warning
Installation Customer
Assistance
VHF Marine Radio Protocols
Intro Operation Customer
Assistance
Warranty
Notice
Main Icons
Secondary Icons
Caution Warning
Installation Customer
Assistance
VHF Marine Radio Protocols
60 English
Radiotelephone Calls
Emergency Messages and Distress Procedure •
The ability to summon assistance in an emergency is the primary reason to have a VHF
marine radio. The marine environment can be unforgiving and what may initially be a
minor problem can rapidly develop into a situation beyond your control.
The Coast Guard monitors Channel 16, responds to all distress calls,
and coordinates all search and rescue efforts. Depending on the availability
of other capable vessels or commercial assistance operators in your vicinity,
Coast Guard or Coast Guard Auxiliary craft may be dispatched.
In any event, communicate with the Coast Guard as soon as you experience difculties
and
before your situation becomes an emergency. Use the emergency message procedures
only after your situation has become grave or you are faced with a sudden danger
threatening life or property and requiring immediate help. Use Channel 16 to communicate
your emergency message. Make sure you transmit on high power. If you are merely out of
gas, do not send an emergency message. Drop your anchor and call a friend or marina to
bring the fuel you need or to give you a tow.
MRHH600_ENG_MANL.indd 60-61 4/3/17 5:03 PM
Intro Operation Customer
Assistance
Warranty
Notice
Main Icons
Secondary Icons
Caution Warning
Installation Customer
Assistance
Introduction
63
Nothing Comes Close to a Cobra®
Intro Operation Customer
Assistance
Warranty
Notice
Main Icons
Secondary Icons
Caution Warning
Installation Customer
Assistance
VHF Marine Radio Protocols
Emergency Messages
and Distress Procedure
Marine Emergency Signals
The three (3) spoken international emergency signals are:
The distress signal MAYDAY is used to indicate that a station is threatened by grave and
imminent danger and requests immediate assistance.
The urgency signal PAN is used when the safety of the vessel or person is in
jeopardy. (This signal is properly pronounced pahn.)
The safety signal SECURITE is used for messages about the safety of navigation or
important weather warnings. (This signal is properly pronounced see-cure-ee-tay.)
When using an international emergency signal, the appropriate signal is to be spoken three
(3) times prior to the message.
If You Hear a Distress Call
You must give any message beginning with one (1) of these signals priority over any
other messages. ALL stations MUST remain silent on Channel 16 for the duration of the
emergency unless the message relates directly to the emergency.
If you hear a distress message from a vessel, stand by your radio. If it is not answered,
YOU
should answer. If the distressed vessel is not nearby, wait a short time for
others who
may be closer to acknowledge. Even if you cannot render direct assistance
, you may be in a
position to relay the message.
MAYDAY
PAN
SECURITE
62 English
Intro Operation Customer
Assistance
Warranty
Notice
Main Icons
Secondary Icons
Caution Warning
Installation Customer
Assistance
Introduction
Intro Operation Customer
Assistance
Warranty
Notice
Main Icons
Secondary Icons
Caution Warning
Installation Customer
Assistance
VHF Marine Radio Protocols
Emergency Messages and
Distress Procedure
Marine Distress Procedure
Speak slowly — clearly — calmly.
1. Make sure your radio is On.
2. Select Channel 16.
3. Press Talk button and say:
“MAYDAY — MAYDAY — MAYDAY.”
(Or “PAN — PAN — PAN,”
or “SECURITE — SECURITE — SECURITE.”)
4. Say:
“THIS IS [your vessel name or call sign],” repeated three (3) times.
5. Say:
“MAYDAY (or “PAN” or “SECURITE”)
[your vessel name or call sign].
6. Tell where you are:
(what navigational aids or landmarks are nearby).
7. State the nature of your distress.
8. State the kind of assistance needed.
9. Give number of persons aboard and conditions of any injured.
10. Estimate present seaworthiness of your vessel.
11. Briey describe your vessel (length, type, color, hull).
12. Say:
“I WILL BE LISTENING ON CHANNEL 16.”
13. End message by saying:
“THIS IS [your vessel name or call sign]. OVER.”
14. Release Talk button and listen. Someone should answer.
If not, repeat the call, beginning at step 3 above.
Keep the radio nearby. Even after your message has been received, the Coast Guard
can nd you more quickly if you can transmit a signal for a rescue boat to hone in on.
MRHH600_ENG_MANL.indd 62-63 4/3/17 5:03 PM
65
Nothing Comes Close to a Cobra®
For Example
Warranty and Trademark
Acknowledgement
“Mayday — Mayday — Mayday”
“This is Corsair — Corsair — Corsair” [or “IL 1234 AB”
“Mayday Corsair (or IL 1234 AB)”
“Navy Pier bears 220 degrees magnetic — distance 5 miles”
“Struck submerged object and ooding — need pump and tow”
“Four (4) adults, three (3) children aboard — no one injured”
“Estimate we will remain aoat one-half hour”
“Corsair (or IL 1234 AB) is 26 ft sloop with blue hull and tan deck house”
“I will be listening on Channel 16”
“This is Corsair (or IL 1234 AB)”
“Over”
It is a good idea to write out a script of the message form and post it where you
and others on your vessel can see it when an emergency message needs to be sent.
64 English
Intro Operation Customer
Assistance
Warranty
Notice
Main Icons
Secondary Icons
Caution Warning
Installation Customer
Assistance
Introduction
Intro Operation Customer
Assistance
Warranty
Notice
Main Icons
Secondary Icons
Caution Warning
Installation Customer
Assistance
VHF Marine Radio Protocols
Emergency Messages
and Distress Procedure
Limited 3-Year Warranty •
For Products Purchased In The U.S.A.
Cobra Electronics Corporation warrants that its CobraMarine VHF radio, and the component
parts thereof, will be free of defects in workmanship and materials for a period of three (3)
years from the date of rst consumer purchase. This warranty may be enforced by the rst
consumer purchaser, provided that the product is utilized within the U.S.A.
Cobra will, without charge, repair or replace, at its option, defective radios, products
or
component parts upon delivery to the Cobra Factory Service department, accompanied
by
proof of the date of rst consumer purchase, such as a duplicated copy of a
sales receipt.
You must pay any initial shipping charges required to ship the product for warranty service,
but the return charges will be at Cobra’s expense, if the product is repaired or replaced
under warranty. This warranty gives you specic legal rights, and you may also have other
rights which may vary from state to state.
Exclusions: This limited warranty does not apply:
1. To any product damaged by accident.
2. In the event of misuse or abuse of the product, or as a result
of unauthorized alterations or repairs.
3. If the serial number has been altered, defaced, or removed.
4. If the owner of the product resides outside the U.S.A.
All implied warranties, including warranties of merchantability and tness for a particular
purpose are limited in duration to the length of this warranty. Cobra
shall not be liable for any incidental, consequential or other damages; including, without
limitation, damages resulting from loss of use or cost of installation.
Some states do not allow limitations on how long an implied warranty lasts and/or
do not allow the exclusion or limitation of incidental or consequential damages,
so the above limitations may not apply to you.
For Products Purchased Outside The U.S.A.
Please contact your local dealer for warranty information.
Trademark Acknowledgement •
Cobra®, CobraMarine®, MicroBlue®, Nothing Comes Close to a Cobra®, Rewind-Say-Again®
and the snake design are registered trademarks of Cobra Electronics Corporation, USA.
Cobra Electronics Corporation™ is a trademark of Cobra Electronics Corporation, USA.
The Bluetooth® word mark and logos are registered trademarks owned by the Bluetooth SIG,
Inc. and any use of such marks by Cobra Electronics Corporation is under license.
Other trademarks and trade names are those of their respective owners.
Intro Operation Customer
Assistance
Warranty
Notice
Main Icons
Secondary Icons
Caution Warning
Installation Customer
Assistance
IntroductionWarranty
Intro Operation Customer
Assistance
Warranty
Notice
Main Icons
Secondary Icons
Caution Warning
Installation Customer
Assistance
Marine Distress Procedure – DSC •
Digital Selective Calling (DSC) is a semi-automated system that will allow you to press
the Distress button from any routine to make a distress call. When the distress button
is pressed, all other channels go to Standby mode and allow the digitally encoded “pre-
programmed” message to take precedence. Important information such as your MMSI
number, position and name will be transmitted on Channel 16. The distress alarm will
sound for two (2) minutes or until the alarm is cleared.
The DSC system allows you to choose a “pre-programmed” distress call such as: “Man
Overboard, Sinking, Collision.” There are many pre-programmed choices to choose
from. If a GPS is connected to your radio, your coordinates will also be sent to the
Coast Guard as well as to other vessels that are within range of the transmission. DSC
calling also allows the user to initiate and receive distress, urgent, safety, routine,
position request, position send and group calls between vessels equipped with DSC
capable radios.
WARNING
This radio will generate a digital maritime distress and safety signal to help
facilitate search and rescue. This radio must be used only within communication
range of a shore based VHF station with a distress and safety watch system.
The range of the signal may vary.
Intro Operation Customer
Assistance
Warranty
Notice
Main Icons
Secondary Icons
Caution Warning
Installation Customer
Assistance
MRHH600_ENG_MANL.indd 64-65 4/3/17 5:03 PM
Intro Operation Customer
Assistance
Warranty
Notice
Main Icons
Secondary Icons
Caution Warning
Installation Customer
Assistance
Introduction
67
Nothing Comes Close to a Cobra®
Specications
Cobra rst! DO NOT RETURN THIS PRODUCT TO THE STORE!
See customer assistance on page A1.
If your product should require factory service, please call Cobra rst before sending your
radio. This will ensure the fastest turn-around time on your repair. You may be asked to
send your radio to the Cobra factory. It will be necessary
to furnish the following to have the product serviced and returned:
1. For warranty repair, include some form of proof-of-purchase, such as a photocopy of a
sales receipt. If you send the original receipt, it cannot be returned.
2. Send the entire product.
3. Enclose a description of what is happening with the radio. Include a typed
or clearly printed name and address of where the radio is to be returned.
4. Pack radio securely to prevent damage in transit. If possible, use the
original packing material.
5. Ship prepaid and insured by way of a traceable carrier such as United Parcel Service
(UPS) or Priority Mail to avoid loss in transit to: Cobra Factory Service, Cobra Electronics
Corporation, 6500 West Cortland Street, Chicago, Illinois 60707 U.S.A.
6. If the radio is in warranty, upon receipt of your radio, it will either be repaired
or exchanged depending on the model. Please allow approximately three (3)
to four (4) weeks before contacting Cobra for status. If the radio is out of warranty, a
letter will automatically be sent informing you of the repair
charge or replacement charge.
7. If your radio is returned for factory repair, it will be returned to you with default settings
restored.
If you have any questions, please call 773-889-3087 for assistance.
Specications
Intro Operation Customer
Assistance
Warranty
Notice
Main Icons
Secondary Icons
Caution Warning
Installation Customer
Assistance
66 English
Product Service
Intro Operation Customer
Assistance
Warranty
Notice
Main Icons
Secondary Icons
Caution Warning
Installation Customer
Assistance
Introduction
Customer Service
Intro Operation Customer
Assistance
Warranty
Notice
Main Icons
Secondary Icons
Caution Warning
Installation Customer
Assistance
General
Number of Channels All U.S., Canadian, International and NOAA Weather Channels
Channel Spacing 25 kHz
Modulation 5 kHz Max.
Input Voltage 7.4 VDC
Battery Life: 5% TX, 5% RX, 90% Standby LiON: 10 hours @ 6 watts
Current Drain: Standby
Receive (Rx)
Transmit (Tx)
45 mA
200 mA
1.8 A @ High Power, 700 mA @ Low Power
Temperature Range -20˚C to 40˚C
Radio Dimensions 5.71” H X 2.83” W X 1.87” D
(131mm X 72mm X 47mm) not including antenna
Radio Weight 0 lbs, 11.6 oz. (329 g) with LiON battery
Receiver
Frequency Range 156.050 to 163.275 MHz
Receiver Type Double Conversion Super-Heterodyne
Sensitivity: 12 dB Sinad -120 dBm
Adjacent Channel Selectivity -60 dB
Intermodulation and Rejection -70 dB
AF Output 250 mW @ 8 Ohms
Transmitter
Frequency Range (Tx): 156.025 to 157.425 MHz
RF Output Power 1, 3 or 6 Watts Max (5 Watts rated)
Spurious Emissions -60 dB
Microphone Type Condenser
Frequency Stability ±5 ppm
FM Hum and Noise 40 dB
GPS
Receiver 56 channels
Hot: Nominal: < 1 second, Limit: +/- 5 seconds Warm Nominal: < 33 second, Limit: +/- 5 seconds
Cold:
Nominal: < 35 second, Limit: +/- 10 seconds Update Rate: Up to 5 Hz
Antenna Type Internal patch antenna
GPS receiver rst lock sensitivity Nominal: -148dBm
GPS receiver tracking sensitivity Nominal: -165dBm
Differential System Compatibility WAAS (United States), EGNOS (Europe), MSAS (Japan)
NMEA Info: Output Specication NMEA 0183- ASCII serial output
Electrical Standard EIA-422
NMEA Sentences GGA, GLL, GSA, GSV, RMC, VTG, ZDA
Bluetooth®
Classication Class 2
Version 4.1
Range 10 Meters
MRHH600_ENG_MANL.indd 66-67 4/3/17 5:03 PM
Intro Operation Customer
Assistance
Warranty
Notice
Main Icons
Secondary Icons
Caution Warning
Installation Customer
Assistance
Introduction
69
Nothing Comes Close to a Cobra®
VHF Marine
Channel Assignments
Intro Operation Customer
Assistance
Warranty
Notice
Main Icons
Secondary Icons
Caution Warning
Installation Customer
Assistance
Appendix
68 English
VHF Marine
Channel Assignments
Intro Operation Customer
Assistance
Warranty
Notice
Main Icons
Secondary Icons
Caution Warning
Installation Customer
Assistance
Introduction
VHF Marine Radio Protocols
Intro Operation Customer
Assistance
Warranty
Notice
Main Icons
Secondary Icons
Caution Warning
Installation Customer
Assistance
Appendix
Asignación de canales de VHF para radiocomunicación marítima
•
Existen tres (3) juegos de canales VHF para uso marítimo en los EE.UU., Canadá y el resto
del mundo (internacional). La mayoría de los canales coinciden en los tres (3) mapas,
pero sin duda existen diferencias (consulte las tablas en las páginas siguientes). El radio
incorpora los tres (3) mapas y funcionará correctamente en cualquiera de las tres áreas.
A continuación se ofrece un breve resumen de los tipos de asignación de canal en el canal
EE.UU mapa. Vea las páginas del mapa de canales deatiled para asignaciones de cada canal.
Auxilio, seguridad y llamadas
Canal 16
Para ser oídos por otra estación (llamadas) o en casos de emergencia (auxilio y seguridad).
Llamadas
Canal 9
Llamadas de carácter general (excepto casos de emergencia) para embarcaciones no comerciales.
Se le pide encarecidamente a la tripulación de las embarcaciones recreativas usar este canal para
reducir la congestión del canal 16.
Seguridad entre embarcaciones
Canal 6
Para mensajes de seguridad entre embarcaciones y para mensajes de búsqueda y rescate enviados a
barcos y aviones de la guardia costera.
Enlace con la guardia costera
Para hablar con las guardias costeras estadounidenses y canadienses (excepto casos de emergencia)
tras haber establecido contacto por el canal 16.
No comerciales
Canales activos para pequeñas embarcaciones. Los mensajes deberán estar relacionados con necesidades
de las embarcaciones, como por ejemplo, informes de pesca, atraques y agrupamientos. Use el canal 72
solamente para mensajes entre embarcaciones.
Comerciales
Canales activos para embarcaciones activas solamente. Los mensajes deberán estar
relacionados con la actividad comercial o las necesidades de la embarcación. Use los canales 8,
67, 72 y 88A solamente para mensajes entre embarcaciones.
VHF Marine Channel Assignments•
Three (3) sets of VHF channels have been established for marine use in the U.S.A.,
Canada and the rest of the world (International). Most of the channels are the same for
all three (3) maps, but there are denite differences (see table on the following pages).
Your radio has all three (3) maps built into it and will operate correctly in whichever area
you choose.
The following is a brief outline of the channel assignment types in the U.S.A. Channel
Map. See the deatiled channel map pages for assignments of each channel.
Distress, Safety, and Calling
Channel 16
Getting the attention of another station (calling) or in emergencies (distress and safety).
Calling
Channel 9
General-purpose (non-emergency) calling by non-commercial vessels. Recreational boaters are
urged to use this channel to reduce congestion on Channel 16
Intership Safety
Channel 6
Ship-to-ship safety messages and for search and rescue messages to Coast Guard ships
and aircraft.
Coast Guard Liaison
To talk to the Coast Guard, Canadian Coast Guard (non-emergency) after making contact on Channel
16.
Non-Commercial
Working channels for small vessels. Messages must be about needs of the vessel, such as shing
reports, berthing and rendezvous. Use Channel 72 only for ship-to-ship messages.
Commercial
Working channels for working ships only. Messages must be about business or needs
of the ship. Use Channels 8, 67, 72 and 88A only for ship-to-ship messages.
Channel Assignments (English) Asignaciones de canales (Español)
MRHH600_ENG_MANL.indd 68-69 4/3/17 5:03 PM
Intro Operation Customer
Assistance
Warranty
Notice
Main Icons
Secondary Icons
Caution Warning
Installation Customer
Assistance
Introduction
71
Nothing Comes Close to a Cobra®
Intro Operation Customer
Assistance
Warranty
Notice
Main Icons
Secondary Icons
Caution Warning
Installation Customer
Assistance
Intro Operation Customer
Assistance
Warranty
Notice
Main Icons
Secondary Icons
Caution Warning
Installation Customer
Assistance
Appendix
VHF Marine
Channel Assignments
70 English
VHF Marine
Channel Assignments
Intro Operation Customer
Assistance
Warranty
Notice
Main Icons
Secondary Icons
Caution Warning
Installation Customer
Assistance
Appendix
Sea Tow Automated Radio Check (ARC)
Channels 24, 25, 26, 27, 28, 84
Tune your radio to the proper channel for your area (see seatow.com/arc). Conduct a radio check as you normally would.
Upon releasing the mic the system will replay your transmission letting you hear how you sound.
Public Correspondence (Marine Operator)
For calls to marine operators at public coast stations. You can make and receive telephone calls through
these stations.
Port Operations
Used for directing the movement of ships in or near ports, locks or waterways. Messages
must be about operational handling, movement and safety of ships.
Navigational
Channels are available to all vessels. Messages must be about navigation, including passing
or meeting other vessels. These are also the main working channels for most locks and drawbridges. You
must keep your messages short and power output at no more than 1 watt.
Maritime Control
For talking to vessels and coast stations operated by state or local governments. Messages must be about
regulation and control, boating activities, or assistance.
Digital Selective Calling
Channel 70
This channel is set aside for distress, safety and general calling using only digital selective calling
techniques. Voice communication is prohibited; your radio cannot transmit voice messages on this
channel.
Control de radio automatizado remolque del mar (CAR)
Canales 24, 25, 26, 27, 28, 84
Sintonice su radio en el canal adecuado para su área (ver seatow.com/arc). Llevar a cabo una
comprobación de la radio como lo haría normalmente. Al soltar el micrófono el sistema se volverá a
reproducir la transmisión que le permite escuchar cómo suena.
Correspondencia pública (operador marítimo)
Para llamadas a operadores marítimos en estaciones costeras públicas. Usted puede realizar y recibir
llamadas telefónicas a través de estas estaciones.
Operaciones portuarias
Usados para dirigir el movimiento de las embarcaciones dentro de áreas portuarias, esclusas o
canales. Los mensajes deberán estar relacionados con maniobras operacionales, movimientos
y seguridad de las embarcaciones.
Navegación
Estos canales están disponibles para todas las embarcaciones. Los mensajes deberán estar
relacionados con la navegación, incluidas las maniobras para pasar o alcanzar otras
embarcaciones. Éstos también son los principales canales activos para la mayoría de las
esclusas y puentes levadizos. Usted deberá transmitir mensajes cortos y mantener la potencia de
salida en un vatio como máximo.
Control marítimo
Para comunicarse con embarcaciones y estaciones costeras operadas por entidades gubernamentales
locales o estatales. Los mensajes deberán estar relacionados con regulación y control, asistencia o
actividades de navegación.
Llamadas selectivas digitales
Canal 70
Este canal está reservado para solicitudes de auxilio, seguridad y llamadas de carácter general
que usen solamente técnicas de llamadas selectivas digitales. Las comunicaciones verbales están
prohibidas; el radio no puede transmitir mensajes de voz por este canal.
Channel Assignments (English) Asignaciones de canales (Español)
MRHH600_ENG_MANL.indd 70-71 4/3/17 5:03 PM
73
Nothing Comes Close to a Cobra®
Intro Operation Customer
Assistance
Warranty
Notice
Main Icons
Secondary Icons
Caution Warning
Installation Customer
Assistance
Intro Operation Customer
Assistance
Warranty
Notice
Main Icons
Secondary Icons
Caution Warning
Installation Customer
Assistance
Appendix
VHF Marine
Channel Assignments
72 English
VHF Marine
Channel Assignments
Intro Operation Customer
Assistance
Warranty
Notice
Main Icons
Secondary Icons
Caution Warning
Installation Customer
Assistance
Appendix
01 • • 156.050 160.650 Public Correspondence (Marine Operator) Correspondencia pública (operador marítimo)
01A • 156.050 156.050 Port Operations and Commercial, Operaciones portuarias y comerciales;
VTS in selected areas VTS en áreas selectas
02 • • 156.100 160.700 Public Correspondence (Marine Operator) Correspondencia pública (operador marítimo)
03 • • 156.150 160.750 Public Correspondence (Marine Operator) Correspondencia pública (operador marítimo)
03A • • 156.150 156.150 Coast Guard Only guardia costera solamente
04 • 156.200 160.800 Public Correspondence (Marine Operator), Correspondencia pública (operador marítimo)
Port Operations, Ship Movement operaciones portuarias,movimiento de embarcaciones
04A • 156.200 156.200 West Coast (Coast Guard Only); Costa occidental (guardia costera solamente);
East Coast (Commercial Fishing) Costa oriental (pesca comercial)
05 • 156.250 160.850 Public Correspondence (Marine Operator), Correspondencia pública (operador marítimo)
Port Operations, Ship Movement operaciones portuarias,movimiento de embarcaciones
05A • • 156.250 156.250 Port Operations, VTS in selected areas Operaciones portuarias; VTS en áreas selectas
06 • • • 156.300 156.300 Intership Safety Seguridad entre embarcaciones
07 • 156.350 160.950 Public Correspondence (Marine Operator), Correspondencia pública (operador marítimo)
Port Operations, Ship Movement operaciones portuarias,movimiento de embarcaciones
07A • • 156.350 156.350 Commercial Comerciales
08 • • • 156.400 156.400 Commercial (Intership Only) Comercial (entre embarcaciones solamente)
09 • • • 156.450 156.450 Boater Calling Channel, Canal de llamada de la tripulación,
Non-Commercial (Recreational) no comercial (recreativo)
10 • • • 156.500 156.500 Commercial Comerciales
11 • • • 156.550 156.550 Commercial, VTS in selected areas Comercial; VTS en áreas selectas
12 • • • 156.600 156.600 Port Operations, VTS in selected areas Operaciones portuarias; VTS en áreas selectas
13 • • • 156.650 156.650 1 watt USA Intership Navigation Safety (Bridge-to-
Bridge). In U.S. waters, large vessels
maintain a listening watch on this channel.
Channel Use (English) Uso de canales (Español)
Channel Map
Mapa de canales
Channel
Number
Número
de canal
Power Limits
Límites de potencia
Frequency
Frecuencia
USA Int’l Canada Transmit
Receive
EE.UU. nternac Canadá Transm. Recepción
1 vatio EE.UU.
Seguridad marítima entre embarcaciones (de
puente de mando a puente de mando). En aguas
estadounidenses, las grandes embarcaciones se
mantienen vigilantes con sus radios sintonizados
en este canal
MRHH600_ENG_MANL.indd 72-73 4/3/17 5:03 PM
Intro Operation Customer
Assistance
Warranty
Notice
Main Icons
Secondary Icons
Caution Warning
Installation Customer
Assistance
Introduction
75
Nothing Comes Close to a Cobra®
Intro Operation Customer
Assistance
Warranty
Notice
Main Icons
Secondary Icons
Caution Warning
Installation Customer
Assistance
Appendix
VHF Marine
Channel Assignments
74 English
Intro Operation Customer
Assistance
Warranty
Notice
Main Icons
Secondary Icons
Caution Warning
Installation Customer
Assistance
Introduction
Intro Operation Customer
Assistance
Warranty
Notice
Main Icons
Secondary Icons
Caution Warning
Installation Customer
Assistance
Appendix
VHF Marine
Channel Assignments
14 • • • 156.700 156.700 Port Operations, VTS in selected areas Operaciones portuarias; VTS en áreas selectas
15 • Rx Only 156.750 Environmental (Receive Only). Medioambiental (recepción solamente).
Usado por radiobalizas de localización
de siniestros (EPIRB) clase C
15 • • 156.750 156.750 1 watt CAN Canada (EPIRB Buoys Only); International Canadá (boyas de EPIRB solamente);
(On-Board Communication) Internacional (comunicación de a bordo)
16 • • • 156.800 156.800 International Distress, Safety and Calling Llamadas, seguridad y solicitud
de auxilio internacional
17 • • • 156.850 156.850 1 watt CAN State Controlled (U.S.A. Only) Controlado a nivel estatal (EE.UU. solamente)
18 • 156.900 161.500 Port Operations, Ship Movement Operaciones portuarias,
movimiento de embarcaciones
18A • • 156.900 156.900 Commercial Comerciales
19 • 156.950 161.550 Port Operations, Ship Movement Operaciones portuarias,
movimiento de embarcaciones
19A • • 156.950 156.950 Commercial Comerciales
1019 • 156.950 156.950 Port Operations Operaciones portuarias
2019 • 161.550 161.550 Port Operations Operaciones portuarias
20 • • • 157.000 161.600 1 watt CAN Canada (Coast Guard Only); International Canadá (guardia costera solamente);
(Port Operations, Ship Movement) Internacional (operaciones portuarias,
movimiento de embarcaciones)
20A • 157.000 157.000 Port Operations Operaciones portuarias
1020 • 157.000 157.000 Port Operations Operaciones portuarias
2020 • 161.500 161.500 Port Operations Operaciones portuarias
21 • 157.050 161.650 Port Operations, Ship Movement Operaciones portuarias,
movimiento de embarcaciones
21A • • 157.050 157.050 U.S. (Government Only); EE.UU. (entidades gubernamentales solamente);
Canada (Coast Guard Only) Canadá (guardia costera solamente)
21B • RX only 161.650 Coast Guard Only – Weather Broadcasts Solamente Guardacostas –
Transmisiones Meteorológicas
22 • 157.100 161.700 Port Operations, Ship Movement Operaciones portuarias,
movimiento de embarcaciones
22A • • 157.100 157.100 U.S. and Canadian Coast Guard Liaison and Enlace entre las guardias costeras estadounidenses
Maritime Safety Information Broadcasts that y canadienses, y difusión de información sobre
are announced on Channel 16 seguridad marítima anunciada por el canal 16
23 • • 157.150 161.750 Public Correspondence (Marine Operator) Correspondencia pública (operador marítimo)
Channel Use (English) Uso de canales (Español)
Channel Map
Mapa de canales
Channel
Number
Número
de canal
Frequency
Frecuencia
USA Int’l Canada Transmit
Receive
EE.UU. nternac Canadá Transm. Recepción
1 vatio Canadá
1 vatio Canadá
1 vatio Canadá
MRHH600_ENG_MANL.indd 74-75 4/3/17 5:03 PM
Intro Operation Customer
Assistance
Warranty
Notice
Main Icons
Secondary Icons
Caution Warning
Installation Customer
Assistance
Introduction
77
Nothing Comes Close to a Cobra®
Intro Operation Customer
Assistance
Warranty
Notice
Main Icons
Secondary Icons
Caution Warning
Installation Customer
Assistance
Appendix
VHF Marine
Channel Assignments
76 English
Intro Operation Customer
Assistance
Warranty
Notice
Main Icons
Secondary Icons
Caution Warning
Installation Customer
Assistance
Introduction
Intro Operation Customer
Assistance
Warranty
Notice
Main Icons
Secondary Icons
Caution Warning
Installation Customer
Assistance
Appendix
VHF Marine
Channel Assignments
23A • 157.150 157.150 Coast Guard Only Solamente Guardacostas
23B
• Rx Only 161.750 Coast Guard Only – Weather Broadcasts Solamente Guardacostas –
Transmisiones Meteorológicas
24 • • • 157.200 161.800 Sea Tow ARC (Automated Radio Check) RMCAR (Chequeo Automatizado de la Radio)
25 • • • 157.250 161.850 Sea Tow ARC (Automated Radio Check) RMCAR (Chequeo Automatizado de la Radio)
25B • RX only 161.850 Safety: Continuous Marine Broadcast (CMB) Seguridad: Transmisión Marítima Continua (CMB)
service by MCTS Canada servicio por MCTS Canadá
26 • • • 157.300 161.900 Sea Tow ARC (Automated Radio Check) RMCAR (Chequeo Automatizado de la Radio)
27 • • • 157.350 161.950 Sea Tow ARC (Automated Radio Check) RMCAR (Chequeo Automatizado de la Radio)
28 • • • 157.400 162.000 Sea Tow ARC (Automated Radio Check) RMCAR (Chequeo Automatizado de la Radio)
28B • RX only 162.000 Safety: Continuous Marine Broadcast (CMB) Seguridad: Transmisión Marítima Continua (CMB)
service by MCTS Canada servicio por MCTS Canadá
60 • • 156.025 160.625 Public Correspondence (Marine Operator) Correspondencia pública (operador marítimo)
61 • 156.075 160.675 Public Correspondence (Marine Operator) Correspondencia pública (operador marítimo),
Port Operation, Ship Movement operaciones portuarias, movimiento de embarcaciones
61A
• 156.075 156.075 Canada (Coast Guard Only);
West Coast (Coast Guard
Only); East Coast (Commercial Fishing)
62 • 156.125 160.725 Public Correspondence (Marine Operator), Correspondencia pública (operador marítimo),
Port Operations, Ship Movement operaciones portuarias, movimiento de embarcaciones
62A • 156.125 156.125 West Coast (Coast Guard Only); Costa occidental (guardia costera solamente);
East Coast (Commercial Fishing) Costa oriental (pesca comercial)
63 • 156.175 160.775 Public Correspondence (Marine Operator), Correspondencia pública (operador marítimo),
Port Operations, Ship Movement operaciones portuarias, movimiento de embarcaciones
63A • • 156.175 156.175 Port Operations and Commercial, Operaciones portuarias y comerciales; VTS en
VTS in selected areas, Canada Tow Boats-BCC áreas selectas, Barcos-BCC de la remolque
de Canadá
64 • • 156.225 160.825 Public Correspondence (Marine Operator), Correspondencia pública (operador marítimo),
Port Operations, Ship Movement operaciones portuarias, movimiento de embarcaciones
64A
• 156.225 156.225 U.S. (Government Only); EE.UU. (entidades gubernamentales
Canada (Commercial Fishing) solamente); Canadá (pesca comercial)
65 • 156.275 160.875 Public Correspondence (Marine Operator), Correspondencia pública (operador marítimo),
Port Operations, Ship Movement operaciones portuarias, movimiento de embarcaciones
65A • • 156.275 156.275 Port Operations Operaciones portuarias
Channel Use (English) Uso de canales (Español)
Channel Map
Mapa de canales
Channel
Number
Número
de canal
Power Limits
Límites de potencia
Frequency
Frecuencia
USA Int’l Canada Transmit
Receive
EE.UU. nternac Canadá Transm. Recepción
Canadá (guardia costera solamente); Costa
occidental (guardia costera solamente);
Costa oriental (pesca comercial)
MRHH600_ENG_MANL.indd 76-77 4/3/17 5:03 PM
Intro Operation Customer
Assistance
Warranty
Notice
Main Icons
Secondary Icons
Caution Warning
Installation Customer
Assistance
Introduction
79
Nothing Comes Close to a Cobra®
Intro Operation Customer
Assistance
Warranty
Notice
Main Icons
Secondary Icons
Caution Warning
Installation Customer
Assistance
Appendix
VHF Marine
Channel Assignments
78 English
Intro Operation Customer
Assistance
Warranty
Notice
Main Icons
Secondary Icons
Caution Warning
Installation Customer
Assistance
Introduction
Intro Operation Customer
Assistance
Warranty
Notice
Main Icons
Secondary Icons
Caution Warning
Installation Customer
Assistance
Appendix
VHF Marine
Channel Assignments
66 • 156.325 160.925 Public Correspondence (Marine Operator), Correspondencia pública (operador marítimo),
Port Operations, Ship Movement operaciones portuarias, movimiento de embarcaciones
66A • • 156.325 156.325 Port Operations Operaciones portuarias
67 • • • 156.375 156.375
68 • • • 156.425 156.425 Non-Commercial (Recreational) No comercial (recreativo)
69 • • • 156.475 156.475 U.S. (Non-Commercial, Recreational); Canada
(Commercial Fishing Only); International
(Intership, Port Operations, Ship Movement)
70 • • • RX only 156.525 Digital Selective Calling Llamadas selectivas digitales
(Voice communications not allowed) (las comunicaciones verbales están prohibidas)
71 • • • 156.575 156.575 1 watt USA U.S. and Canada (Non-Commercial, Recreational); EE.UU. y Canadá (no comercial, recreativo);
International (Port Operations, Ship Movement) Internacional (operaciones portuarias,
movimiento de embarcaciones)
72 • • • 156.625 156.625 Non-Commercial (Intership Only) No comercial (entre embarcaciones solamente)
73 • • • 156.675 156.675 U.S. (Port Operations); Canada (Commercial EE.UU. (operaciones portuarias); Canadá (pesca
Fishing Only); International (Intership, comercial solamente); Internacional (comunicaciones
Port Operations, Ship Movement) entre embarcaciones, operaciones portuarias,
movimiento de embarcaciones)
74 • • • 156.725 156.725 U.S. (Port Operations); Canada (Commercial EE.UU. (operaciones portuarias); Canadá (pesca
Fishing Only); International (Intership, comercial solamente); Internacional (comunicaciones
Port Operations, Ship Movement) entre embarcaciones, operaciones portuarias,
movimiento de embarcaciones)
75 • • • 156.775 156.775 1 watt Port Operations (Intership Only) Operaciones portuarias
(entre embarcaciones solamente)
76 • • • 156.825 156.825 1 watt Port Operations (Intership Only) Operaciones portuarias
(entre embarcaciones solamente)
77 • • • 156.875 156.875 1 watt USA Port Operations (Intership only). Restricted to Operaciones portuarias (entre embarcaciones
communications with pilots for movement and solamente). Restringido a comunicaciones con
docking of ships. pilotos para el movimiento y atraque de
embarcaciones.
Channel Use (English) Uso de canales (Español)
Channel Map
Mapa de canales
Channel
Number
Número
de canal
Power Limits
Límites de potencia
Frequency
Frecuencia
USA Int’l Canada Transmit
Receive
EE.UU. nternac Canadá Transm. Recepción
U.S. (Commercial). Used for bridge-to-bridge
communications in lower Mississippi River
(Intership Only); Canada (Commercial Fishing), S&R
EE.UU. (comercial). Usado para comunicaciones
de puente de mando a puente de mando en la
parte baja del Río Misisipí (entre embarcaciones
solamente); Canadá (pesca comercial) (transmisión
y recepción)
EE.UU. (no comercial, recreativo); Canadá
(pesca comercial solamente); Internacional
(comunicaciones entre embarcaciones,
operaciones portuarias, movimiento de
embarcaciones)
MRHH600_ENG_MANL.indd 78-79 4/3/17 5:03 PM
Intro Operation Customer
Assistance
Warranty
Notice
Main Icons
Secondary Icons
Caution Warning
Installation Customer
Assistance
Introduction
81
Nothing Comes Close to a Cobra®
Intro Operation Customer
Assistance
Warranty
Notice
Main Icons
Secondary Icons
Caution Warning
Installation Customer
Assistance
Appendix
VHF Marine
Channel Assignments
80 English
Intro Operation Customer
Assistance
Warranty
Notice
Main Icons
Secondary Icons
Caution Warning
Installation Customer
Assistance
Introduction
Intro Operation Customer
Assistance
Warranty
Notice
Main Icons
Secondary Icons
Caution Warning
Installation Customer
Assistance
Appendix
VHF Marine
Channel Assignments
78 • 156.925 161.525 Public Correspondence (Marine Operator) Correspondencia pública (operador marítimo)
78A • • 156.925 156.925 Non-Commercial (Recreational) No comercial (recreativo)
1078 • 156.925 156.925 Port Operations Operaciones portuarias
2078 • 161.525 161.525 Port Operations Operaciones portuarias
79 • 156.975 161.575 Port Operations, Ship Movement Operaciones portuarias,
movimiento de embarcaciones
79A • • 156.975 156.975 Commercial (Also Non-Commercial Comercial (en los Grandes
only in Great Lakes) Lagos también no comercial)
1079 • 156.975 156.975 Port Operations Operaciones portuarias
2079 • 161.575 161.575 Port Operations Operaciones portuarias
80 • 157.025 161.625 Port Operations, Ship Movement Operaciones portuarias,
movimiento de embarcaciones
80A • • 157.025 157.025 Commercial (Also Non-Commercial Comercial (en los Grandes
only in Great Lakes) Lagos también no comercial)
81 • 157.075 161.675 Port Operations, Ship Movement Operaciones portuarias,
movimiento de embarcaciones
81A • • 157.075 157.075 U.S. (Government Only; Environmental EE.UU. (entidades gubernamentales solamente;
Protection Operations) operaciones de protección medioambiental)
82 • 157.125 161.725 Public Correspondence (Marine Operator), Correspondencia pública (operador marítimo),
Port Operation, Ship Movement operaciones portuarias, movimiento de embarcaciones
82A • • 157.125 157.125 U.S. (Government Only); Canada EE.UU. (entidades gubernamentales solamente);
(Coast Guard Only) Canadá (guardia costera solamente)
83 • 157.175 161.775 Port Operations, Ship Movement Operaciones portuarias,
movimiento de embarcaciones
83A • • 157.175 157.175 (Coast Guard Only) Canadá (guardia costera solamente)
(Coast Guard Only) Canadá (guardia costera solamente)
83B
• RX only 161.775 Coast Guard Only – Weather Broadcasts Solamente Guardacostas –
Transmisiones Meteorológicas
84 • • • 157.225 161.825 Public Correspondence (Marine Operator) Correspondencia pública (operador marítimo)
85 • • • 157.275 161.875 Public Correspondence (Marine Operator) Correspondencia pública (operador marítimo)
86 • • • 157.325 161.925 Public Correspondence (Marine Operator) Correspondencia pública (operador marítimo)
87 • • • 157.375 157.375 Public Correspondence (Marine Operator) Correspondencia pública (operador marítimo)
88 • • • 157.425 157.425 U.S. (Commercial). EE.UU. (comercial).
Port Operations and VTS (International & Canada). Operaciones Portuarias y VTS (Internacional y Canadá).
88A • 157.425 157.425 Commercial Intership only Comercial entre embarcaciones solamente
Channel Use (English) Uso de canales (Español)
Channel Map
Mapa de canales
Channel
Number
Número
de canal
Power Limits
Límites de potencia
Frequency
Frecuencia
USA Int’l Canada Transmit
Receive
EE.UU. nternac Canadá Transm. Recepción
MRHH600_ENG_MANL.indd 80-81 4/3/17 5:03 PM
83
Nothing Comes Close to a Cobra®
82 English
Intro Operation Customer
Assistance
Warranty
Notice
Main Icons
Secondary Icons
Caution Warning
Installation Customer
Assistance
Introduction
Intro Operation Customer
Assistance
Warranty
Notice
Main Icons
Secondary Icons
Caution Warning
Installation Customer
Assistance
Appendix
VHF Marine
Channel Assignments
Intro Operation Customer
Assistance
Warranty
Notice
Main Icons
Secondary Icons
Caution Warning
Installation Customer
Assistance
Introduction
Intro Operation Customer
Assistance
Warranty
Notice
Main Icons
Secondary Icons
Caution Warning
Installation Customer
Assistance
Appendix
VHF Marine
Channel Assignments
1001 • 156.050 156.050 Port Operations / Vessel Trafc Service Operaciones portuarias / Servicio de Tránsito
de Embarcaciones
1005 • 156.250 156.250 Port Operations / Vessel Trafc Service Operaciones portuarias / Servicio de Tránsito
de Embarcaciones
1007 • 156.350 156.350 Commercial Comercial
1018 • 156.900 156.900 Commercial Comercial
1019 • 156.950 156.950 Port Operations Operaciones portuarias
1020 • 157.000 157.000 Port Operations Operaciones portuarias
1021 • 157.050 157.050 Coast Guard Only Solamente Guardacostas
1022 • 157.100 157.100 Coast Guard Only Solamente Guardacostas
1023 • 157.150 157.150 Coast Guard Only Solamente Guardacostas
1063 • 156.175 156.175 Port Operations / Vessel Trafc Service Operaciones portuarias / Servicio de Tránsito
de Embarcaciones
1065 • 156.275 156.275 Port Operations / Vessel Trafc Service Operaciones portuarias / Servicio de Tránsito
de Embarcaciones
1066 • 156.325 156.325 Port Operations / Vessel Trafc Service Operaciones portuarias / Servicio de Tránsito
de Embarcaciones
1078 • 156.925 156.925 Commercial/Non-Commercial Comercial / No Comercial
1079 • 156.975 156.975 Commercial/Non-Commercial Comercial / No Comercial
1080 • 157.025 157.025 Commercial/Non-Commercial Comercial / No Comercial
1081 • 157.075 157.075 Commercial/Environmental Comercial/ Medioambiental
1082 •
157.125 157.125 Commercial/U.S. (Government Only) Comercial/ EE.UU. entidades gubernamentales
solamente
1083 • 157.175 157.175 Commercial/ Coast Guard Only Comercial/ Solamente Guardacostas
Channel Use (English) Uso de canales (Español)
Channel Map
Mapa de canales
Channel
Number
Número
de canal
Power Limits
Límites de potencia
Frequency
Frecuencia
USA Int’l Canada Transmit
Receive
EE.UU. nternac Canadá Transm. Recepción
MRHH600_ENG_MANL.indd 82-83 4/3/17 5:03 PM
Intro Operation Customer
Assistance
Warranty
Notice
Main Icons
Secondary Icons
Caution Warning
Installation Customer
Assistance
Introduction
85
Nothing Comes Close to a Cobra®
Intro Operation Customer
Assistance
Warranty
Notice
Main Icons
Secondary Icons
Caution Warning
Installation Customer
Assistance
Appendix
Intro Operation Customer
Assistance
Warranty
Notice
Main Icons
Secondary Icons
Caution Warning
Installation Customer
Assistance
Weather Channel
Assignments
Weather Channel Assignments
Asignaciones de canales meteorológicos •
RX Frequency MHz
Frecuencia de recepción (MHz)
Channel
Number
Número
de canal
1 162.550 NOAA
2 162.400 NOAA
3 162.475 NOAA
4 162.425 NOAA
5 162.450 NOAA
6 162.500 NOAA
7 162.525 NOAA
8 161.650 Canada
9 161.775 Canada
10 163.275 NOAA
Weather Channel
Weather Channel
84 English
Intro Operation Customer
Assistance
Warranty
Notice
Main Icons
Secondary Icons
Caution Warning
Installation Customer
Assistance
Introduction
NOTE
Many of the plain-numbered channels, such as 01, 02 and 03, transmit and receive on
different frequencies. This is termed duplex operation. Some other plain-numbered
channels and all of the A channels, such as 01A, 03A and 04A, transmit and
receive on a single frequency, which is termed simplex operation. Your radio
automatically adjusts to these conditions. This radio also includes new four digit
channels to be complient with the latest and future regulations.
NOTE
All channels are preprogrammed at the factory according to international
regulations and those of the FCC (U.S.A.) and Industry Canada (Canada).
They cannot be altered by the user nor can modes of operation be changed between
simplex and duplex.
NOTA
Muchos de los canales de números simples, como 01, 02 y 03, transmiten
y reciben en diferentes frecuencias. A esto se le llama operación dúplex. El resto
de los canales de números simples y todos los canales A, como 01A, 03A y
04A, transmiten y reciben en una sola frecuencia, a la que se le llama operación
simple (simplex). Su radio se ajusta automáticamente a estas condiciones.
Cuando esté en operación simple, el icono A aparecerá en la pantalla de cristal
líquido (vea la ilustración de la página A3). Esta radio también incluye nuevos
canales de cuatro dígitos para cumplir con las regulaciones más recientes y
futuras.
NOTA
Todos los canales vienen programados previamente de fábrica conforme
a los reglamentos internacionales y a los de la FCC (EE. UU) e Industry Canada
(Canadá). No pueden ser alterados por el usuario, así como tampoco pueden
cambiarse los modos de operación entre simple y dúplex.
VHF Marine Channel Assignments (English)
Intro Operation Customer
Assistance
Warranty
Notice
Main Icons
Secondary Icons
Caution Warning
Installation Customer
Assistance
Intro Operation Customer
Assistance
Warranty
Notice
Main Icons
Secondary Icons
Caution Warning
Installation Customer
Assistance
Intro Operation Customer
Assistance
Warranty
Notice
Main Icons
Secondary Icons
Caution Warning
Installation Customer
Assistance
Intro Operation Customer
Assistance
Warranty
Notice
Main Icons
Secondary Icons
Caution Warning
Installation Customer
Assistance
Asignación de canales de VHF para radiocomunicación marítima (Español)
Intro Operation Customer
Assistance
Warranty
Notice
Main Icons
Secondary Icons
Caution Warning
Installation Customer
Assistance
Appendix
VHF Marine
Channel Assignments
Weather
Channels Wx 1 Thru 10
Receive-only channels for NOAA and Canadian weather broadcasts. You cannot transmit on these
channels.
Intro Operation Customer
Assistance
Warranty
Notice
Main Icons
Secondary Icons
Caution Warning
Installation Customer
Assistance
NOTE
* These channels are restricted to the listed uses in certain parts of the country
or for certain types of users only. Consult FCC rules or a knowledgeable radio
operator before using them.
Meteorología
Canales Wx 1 a 10
Canales de recepción únicamente para difusión de información meteorológica NOAA y canadiense.
Usted no puede transmitir por estos canales.
NOTA
* El uso de estos canales está dedicado a las aplicaciones que aparecen en la lista, en ciertas
partes del país o para ciertos tipos de usuario solamente. Consulte las normas de la FCC o a un
operador de radio con experiencia antes de usarlos.
Intro Operation Customer
Assistance
Warranty
Notice
Main Icons
Secondary Icons
Caution Warning
Installation Customer
Assistance
MRHH600_ENG_MANL.indd 84-85 4/3/17 5:03 PM
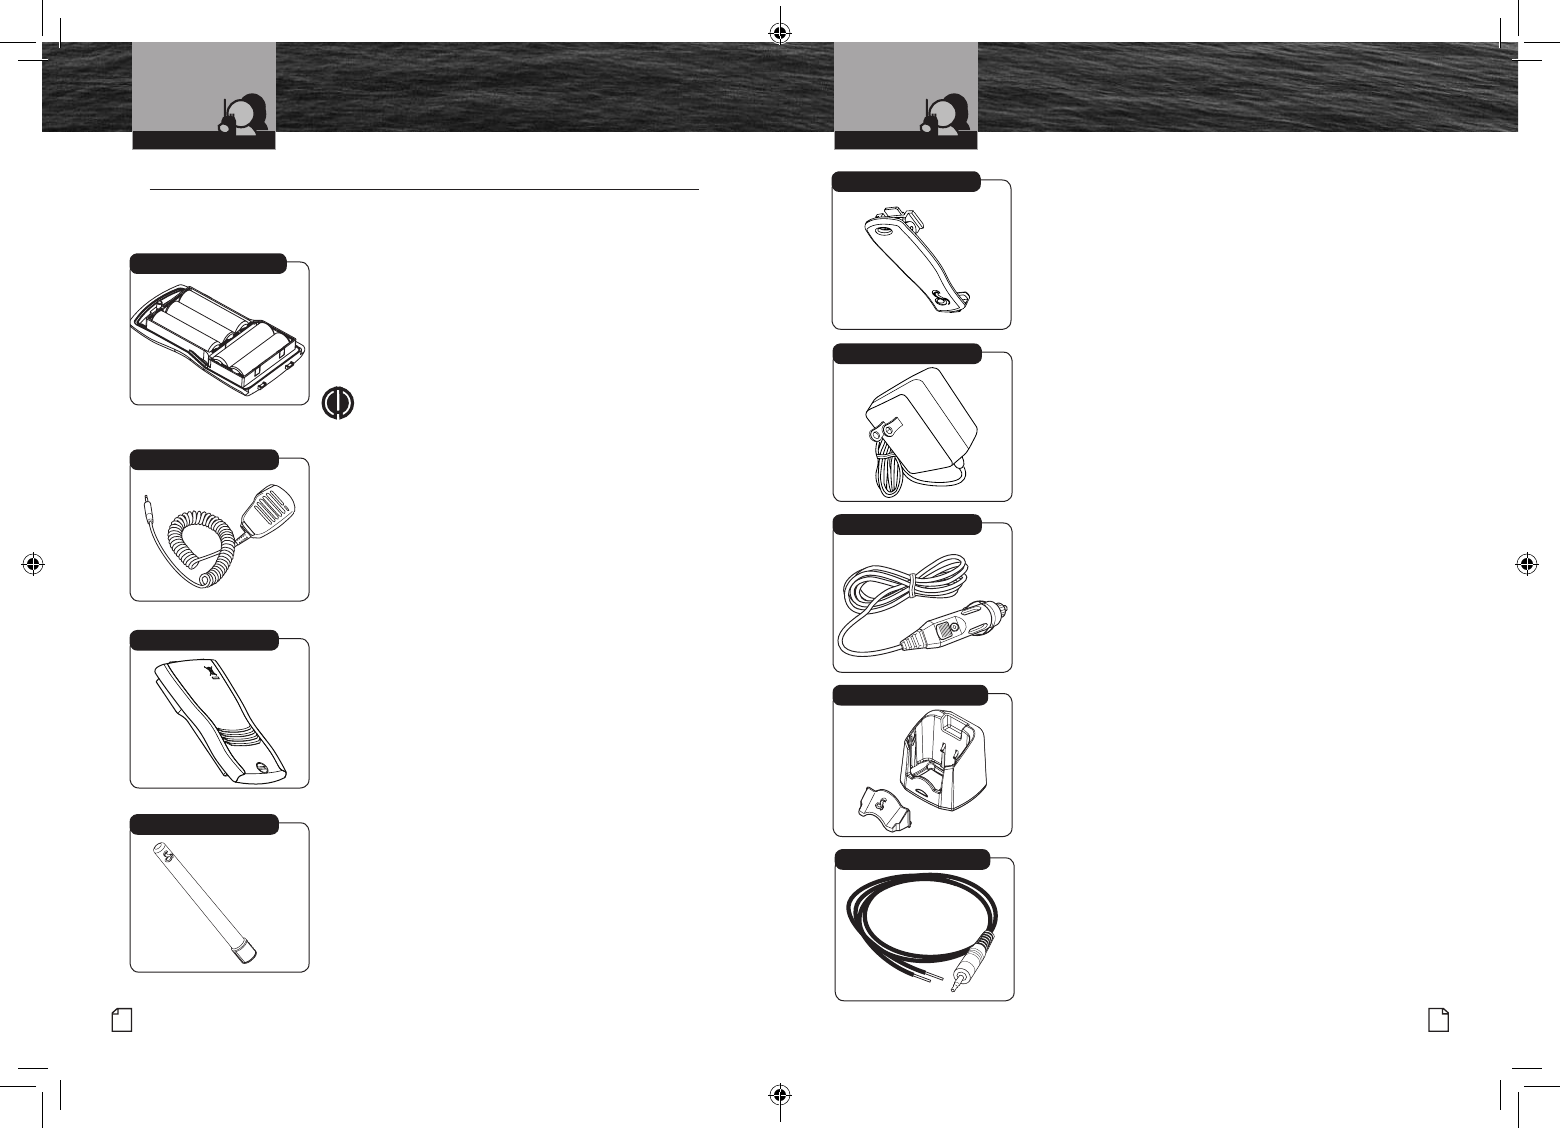
87
Nothing Comes Close to a Cobra®
Introduction
Intro Operation Customer
Assistance
Warranty
Notice
Main Icons
Secondary Icons
Caution Warning
Installation Customer
Assistance
Intro Operation Customer
Assistance
Warranty
Notice
Main Icons
Secondary Icons
Caution Warning
Installation Customer
Assistance
Optional Accessories
Accessories
Belt Clip
Replacement Belt Clip P/N CM 240-003
AC Charger
Replacement AC Charger P/N CM 120-007
DC Charger
Replacement DC Charger P/N CM 130-005
Drop-In Battery Charger
Replacement Drop-In Charger P/N CM 110-032
NMEA Pouput Cable
P/N CM 140-003
Belt Clip
AC Charger
DC Charger
Drop-In Battery Charger
86 English
Intro Operation Customer
Assistance
Warranty
Notice
Main Icons
Secondary Icons
Caution Warning
Installation Customer
Assistance
Introduction
Accessories •
Your Cobra radio has several optional accessories available to enhance the use
of the radio. Some are listed below:
Alkaline Battery Tray
A special alkaline battery tray (P/N CM 110-035)
is available as an optional accessory to have as an
emergency backup. By using ve (5) high-quality
AA alkaline batteries, you can have a spare battery backup
source for your radio.
Intro Operation Customer
Assistance
Warranty
Notice
Main Icons
Secondary Icons
Caution Warning
Installation Customer
Assistance
NOTE
Alkaline batteries are not rechargeable.
Lapel Speaker/Microphone
A speaker/microphone that attaches to your lapel.
Part number CM 330-001.
This unique accessory allows you to wear the radio
on your belt while still being able to communicate
with other vessels. A small Push to Talk (PTT) button
on the lapel
speaker/microphone allows you to answer
any incoming call.
LiON Battery
LiON replacement battery (P/N CM 110-034).
Antenna
Replacement Antenna P/N CM 300-002.
Lapel Speaker/Microphone
Alkaline Battery Tray
LiON Battery Pack
Antenna
Optional Accessories
Introduction
Intro Operation Customer
Assistance
Warranty
Notice
Main Icons
Secondary Icons
Caution Warning
Installation Customer
Assistance
Intro Operation Customer
Assistance
Warranty
Notice
Main Icons
Secondary Icons
Caution Warning
Installation Customer
Assistance
Accessories
NMEA Output Cable
MRHH600_ENG_MANL.indd 86-87 4/3/17 5:03 PM
Introduction
Intro Operation Customer
Assistance
Warranty
Notice
Main Icons
Secondary Icons
Caution Warning
Installation Customer
Assistance
Intro Operation Customer
Assistance
Warranty
Notice
Main Icons
Secondary Icons
Caution Warning
Installation Customer
Assistance
Accessories
World City Time Zones
World City Time Zones •
In order to set correct local time as compared to different World City Time Zones, enter the
hour “offset” as listed below. The correct local time appears on the VHF for Cities all over
the world. See page 43 for setup information.
Longitudinal Zone Offset City
E172.50 to W172.50 -12 IDLW (International Date Line West)
W172.50 to W157.50 -11 Nome
W157.50 to W142.50 -10 Honolulu
W142.50 to W127.50 -9 Yukon STD
W127.50 to W112.50 -8 Los Angeles STD
W112.50 to W097.50 -7 Denver STD
W097.50 to W082.50 -6 Chicago STD
W082.50 to W067.50 -5 New York STD
W067.50 to W052.50 -4 Caracas
W052.50 to W037.50 -3 Rio de Janeiro
W037.50 to W022.50 -2 Fernando de Noronha
W022.50 to W007.50 -1 Azores Islands
W007.50 to E007.50 GMT +0 London
E007.50 to E022.50 +1 Rome
E022.50 to E037.50 +2 Cairo
E037.50 to E052.50 +3 Moscow
E052.50 to E067.50 +4 Abu Dhabi
E067.50 to E082.50 +5 Maldives
E082.50 to E097.50 +6 Dhuburi
E097.50 to E112.50 +7 Bangkok
E112.50 to E127.50 +8 Hong Kong
E127.50 to E142.50 +9 Tokyo
E142.50 to E157.50 +10 Sydney
E157.50 to E172.50 +11 Solomon Islands
E172.50 to W172.50 +12 Auckland
88 English
MRHH600_ENG_MANL.indd 88 4/3/17 5:03 PM