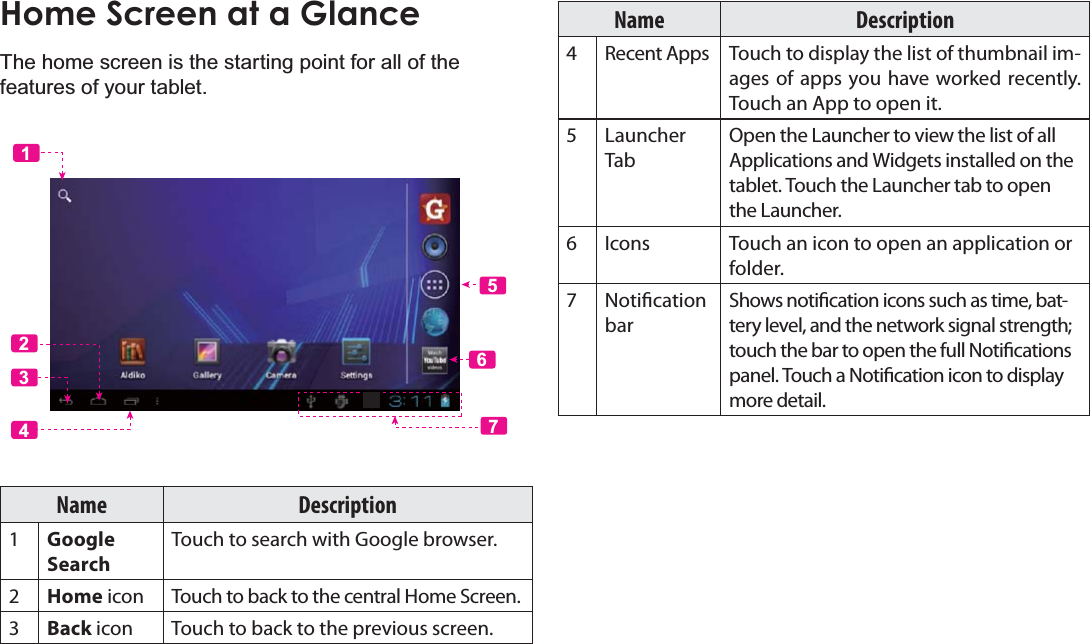
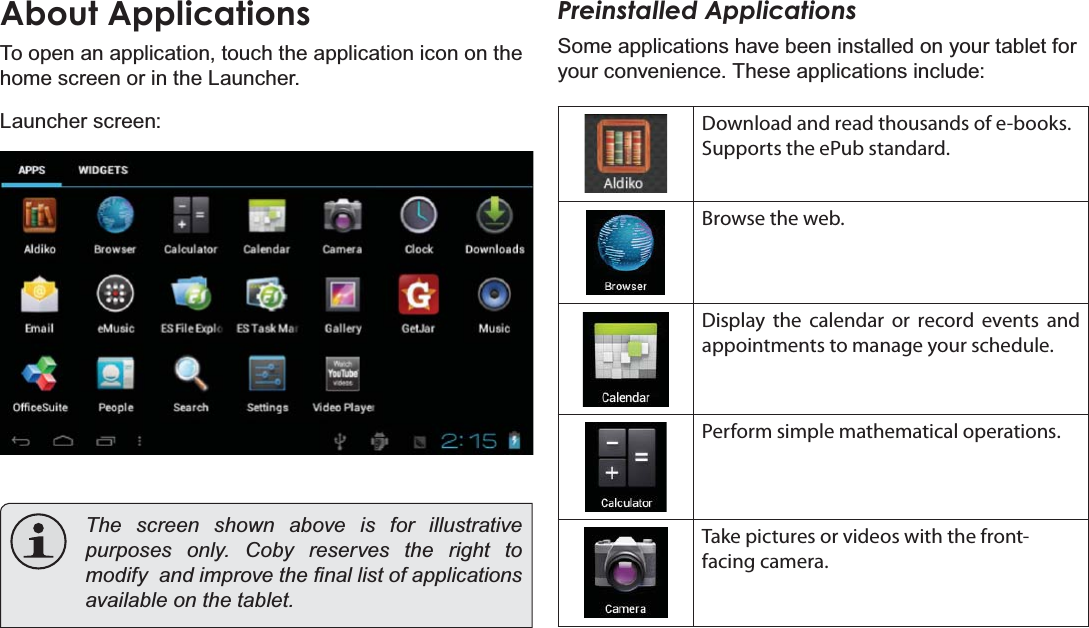
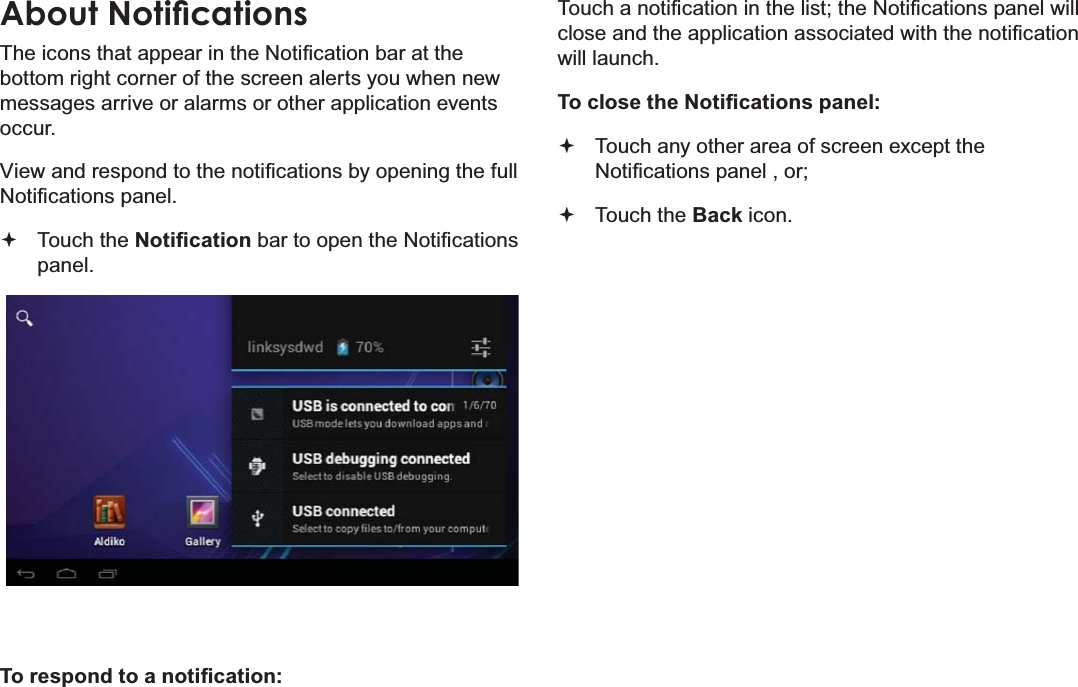
Coby Communications MID4331 Mobile Internet Device User Manual MID4331 IB
Coby Communications Ltd. Mobile Internet Device MID4331 IB
UserManual.wiki
>
Coby Communications
>
MID4331 User Manual
Users Manual
Navigation menu
Upload a User Manual
Namespaces
Wiki Guide
HTML
PDF
Info
Views
User Manual
Discussion / Help
Navigation
![Page 3 Thank YouEnglish ÂThank YouCongratulations on your purchase of a Coby® Kyros® Internet Tablet. This guide is provided to help you get started quickly with your player; please read it carefully and save it for future reference.For detailed instructions, up-to-date information, and helpful tips, please visit the Coby website at www.cobyusa.com. This manual is available for download from the &RE\ZHEVLWHDVD3')¿OH To view PDF documents, download and install the free Adobe Acrobat reader from the Adobe website at ZZZDGREHFRPPackage ContentsPlease make sure that the items shown below are included in the package. Should an item be missing, please contact the local retailer from which you pur-chased this product. Coby® Kyros® Internet Tablet Protective pouch USB cable Power adapter This package may contain plastic bags or other PDWHULDOV WKDW SRVH D KD]DUG WR FKLOGUHQ %Hsure to safely dispose of all packing materials DIWHURSHQLQJ](https://usermanual.wiki/Coby-Communications/MID4331/User-Guide-1903794-Page-3.png)
![Page 8 Getting To Know The Internet TabletEnglishAbout the TouchscreenYour tablet comes equipped with an easy-to-use touch-screen.2XUFDSDFLWLYHPXOWLWRXFKVFUHHQUHTXLUHVJHQWOH¿QJHUWLStouch on the glass screen to activate tablet’s functions. 0XOWLSOH¿QJHUVPD\EHXVHGWRSHUIRUPJHVWXUHVHJ¿QJHUSLFWXUH]RRP3OHDVHQRWH<RXU¿QJHUWLSVPXVWQRWEHFRYHUHG$stylus may be used. Make sure it is for capacitive touch-screens. To avoid damaging the screen, do not touch it with excessive force or with any object other WKDQ\RXU¿QJHU)RUEHVWUHVSRQVHPDNHVXUHyour hands are clean before using the touch-VFUHHQFRQWUROVProtective Film$WKLQ¿OPKDVEHHQDSSOLHGWRWKHWRXFKVFUHHQWRSURWHFWLWGXULQJVKLSSLQJ7KHSURWHFWLYH¿OPVKRXOGEHUHPRYHGEHIRUHXVH7RUHPRYHLWVLPSO\WDNHDFRUQHURIWKH¿OPand peel it away from the screen.Touchscreen ActionsYou can control the functions of the tablet by using the touchscreen in combination with the three touch NH\VORFDWHGRQWKHEH]HO7RFRQWUROWKHWDEOHWZLWKWKHWRXFKVFUHHQXVH\RXU¿QJHUWLSWRPDQLSXODWHLFRQVbuttons, menu items, the on-screen keyboard, and other items displayed on the screen.You can perform the following actions on the touchscreen XVLQJ\RXU¿QJHUWLSRUDSSURSULDWHVW\OXVTouch: To activate an on-screen item (e.g., application icons, buttons, menu items, and the letter/symbols of the on-screen keyboard), simply touch WKHPZLWK\RXU¿QJHUWLSTouch and Hold:Some on-screen items have an alternate action if you touch and hold it (e.g., opening an alternate menu, or to activate the drag function). To touch and hold an item, touch the item and GRQRWOLIW\RXU¿QJHUWLSXQWLOWKHDFWLRQoccurs.](https://usermanual.wiki/Coby-Communications/MID4331/User-Guide-1903794-Page-8.png)
![Page 9 Getting To Know The Internet TabletEnglishDrag: Drag an on-screen item to change its position (e.g., an application icon on the home screen).To drag an item, touch and hold it for a moment, then without lifting your ¿QJHUWLSPRYH\RXU¿QJHUWLSRQWKHscreen until the item reaches its target destination.Swipe: Swipe up/down on the screen to scroll through a list. On some screens, you may be able to swipe left/right to FKDQJHWKHYLHZTo swipe, touch the screen and then TXLFNO\PRYH\RXU¿QJHUWLSDFURVVWKHVFUHHQZLWKRXWOLIWLQJ\RXU¿QJHUWLSDo not pause on the screen with your ¿QJHUWLSDWWKHLQLWLDOSRLQWRIFRQWDFWor you may accidentally drag an item instead.Double-tap: Quickly tap the screen twice on a webpage or other application screen to zoom (the application must support the double-tap/zoom function). Within the browser, double-tapping a web-page section will cause the browser to ]RRPDQG¿WWKDWVHFWLRQWRWKHZLGWKof the screen.About the Orientation SensorThe tablet contains a sensor that will automatically change the orientation of most screens as you rotate the tablet. The sensor works best when the tablet is rotated perpendicular to the ground (i.e., when the tablet is held upright and not fat on its back).The orientation sensor can be turned on and off in the Display settings menu.](https://usermanual.wiki/Coby-Communications/MID4331/User-Guide-1903794-Page-9.png)

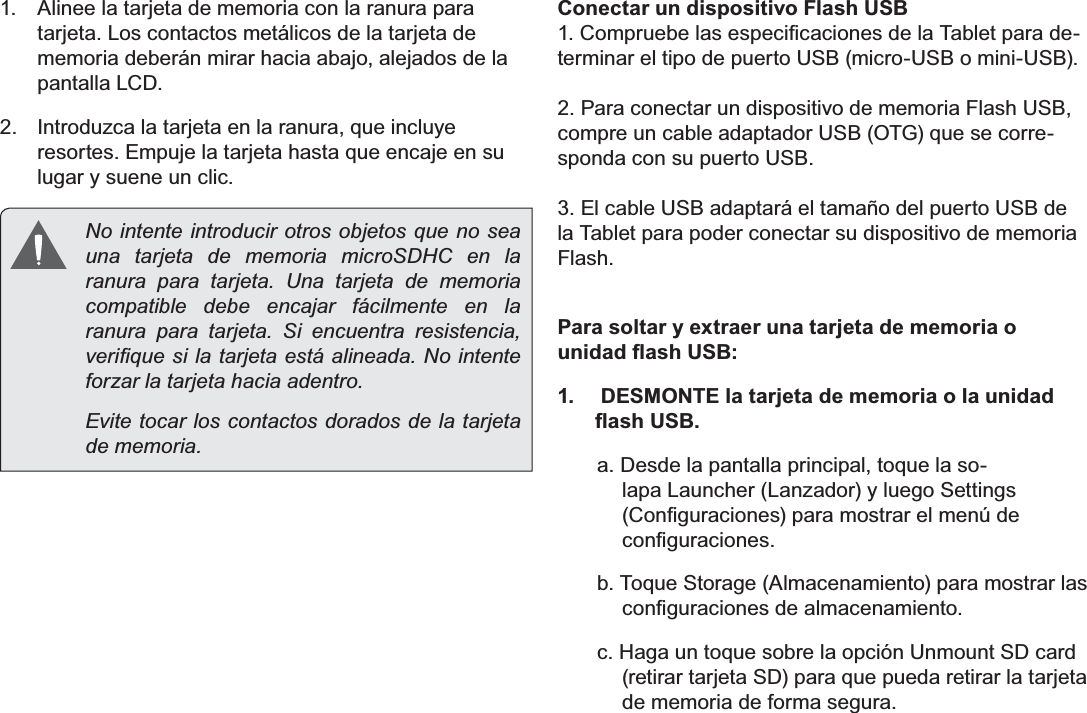
![Page 11 Getting To Know The Internet TabletEnglish3. The USB OTG cable will adapt the Tablet’s USB port WRWKHIXOOVL]HFRQQHFWRURQ\RXUÀDVKGULYHDo not attempt to insert objects other than a PLFUR6'+&PHPRU\FDUGLQWRWKHFDUGVORW$FRPSDWLEOH PHPRU\ FDUG VKRXOG ¿W HDVLO\ LQWRthe card slot; if you encounter resistance, check WKH DOLJQPHQW RI WKH FDUG 'R QRW DWWHPSW WRIRUFHWKHFDUGLQAvoid touching the gold contacts of the memory FDUGTo release and remove a memory card:1. UNMOUNT the memory card.a. From the home screen, tap the Launcher Tab, and then touch Settings to show the settings menu.b. Touch Storage to show the storage settings.c. Touch Unmount SD card to prepare the memory card for safe removal. 2. Push the card further into the slot until you hear a click. The card will spring out of the slot.](https://usermanual.wiki/Coby-Communications/MID4331/User-Guide-1903794-Page-11.png)
![Page 12 Getting To Know The Internet TabletEnglish3. Grasp the card by its edge to remove it.4. 5HPRYHWKH86%ÀDVKGULYH To avoid damage and data corruption, do not remove a memory card while data is being ZULWWHQWRRUUHDGIURPWKHFDUG)RUH[DPSOHGRQRWUHPRYHDFDUGZKLOHSOD\LQJDPXVLF¿OHVWRUHGRQWKHFDUG The available menu items are dependent on the XQLW$OOLOOXVWUDWLRQLVIRUUHIHUHQFHRQO\Resetting the Tablet5HVHWWKHWDEOHWLILWVKRXOGIUHH]HDQGQRWUHVSRQGRUotherwise malfunction.1. Disconnect your tablet if it is connected to a com-puter. 2. Press and hold the POWER key for about 8 seconds to turn off the tablet, and then press and hold the POWER key until you see Coby logo.](https://usermanual.wiki/Coby-Communications/MID4331/User-Guide-1903794-Page-12.png)


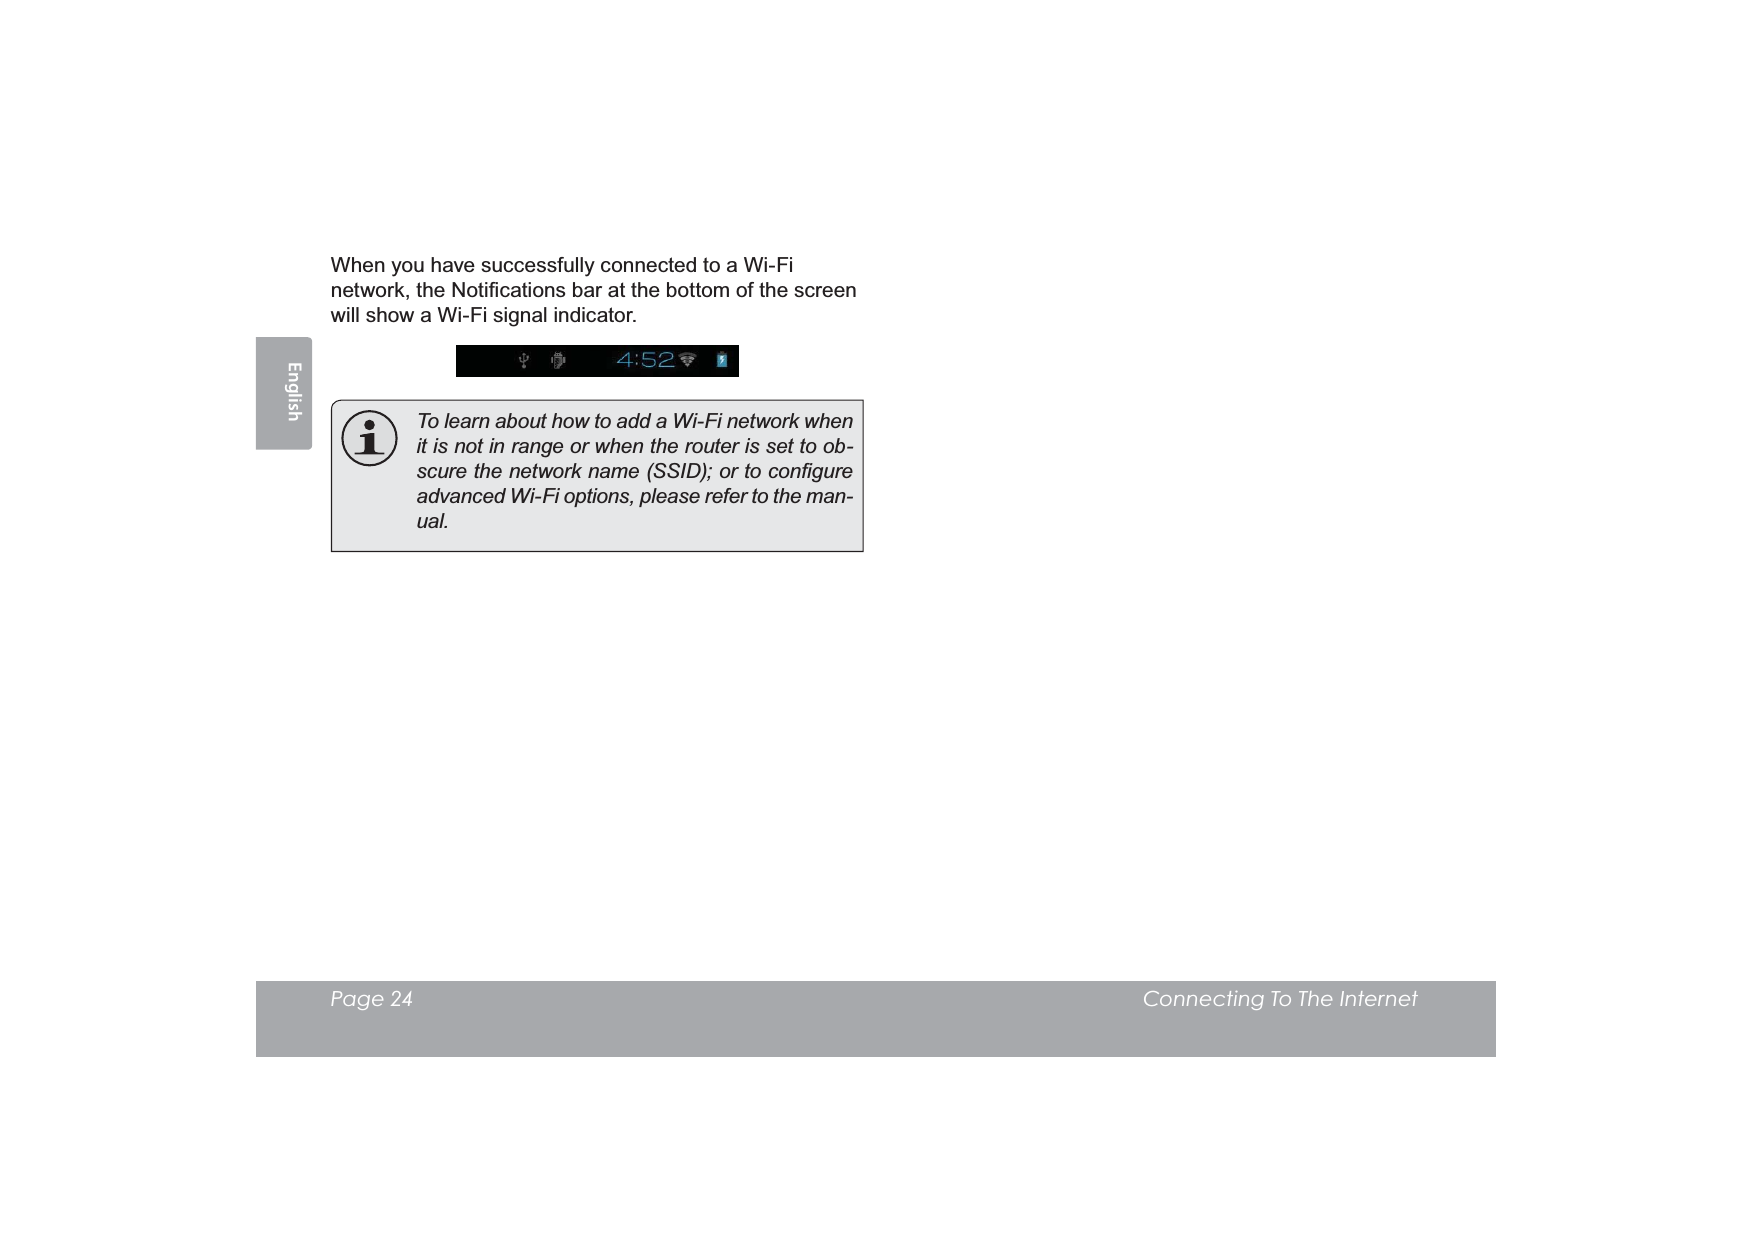
![Page 21 Connecting To The InternetEnglish ÂConnecting to the Internet7KLVWDEOHWFDQXWLOL]H:L)LGDWDQHWZRUNVWRFRQQHFWWRWKH,QWHUQHW Wireless Wi-Fi technology can provide Internet access at distances of over 300 feet; however, this distance can be af-fected by your surrounding environment and Wi-Fi router.In general, being closer to Wi-Fi router improve performance.RequirementsIn order to connect to the Internet, you will need either of the following:A wireless router or access point with a broad-band Internet connectionThe tablet has 802.11 b/g/n Wi-Fi radio. The tablet will also work on wireless routers that only support 802.11 b/g. A minimum connection speed of 64 Kbps is rec-RPPHQGHG )DVWHU VSHHGV ZLOO HQDEOH D EHWWHU,QWHUQHWH[SHULHQFHYou will need to know the name of your network (SSID), as well as the password or other credentials if your network is secured. These settings can usually be found on the administration webpage of your wireless router.Please refer to your wireless router’s documentation for help, or ask your network administrator for details. You may encounter open Wi-Fi networks, or “hot VSRWV´ 7KHVH QHWZRUNV DUH XVXDOO\ FRQ¿JXUHGso that you can simply connect to them without needing to know its settings; the tablet will obtain all the information it needs from the router auto-PDWLFDOO\](https://usermanual.wiki/Coby-Communications/MID4331/User-Guide-1903794-Page-21.png)
![Page 22 Connecting To The InternetEnglishConnect to a Wi-Fi network7KH1RWL¿FDWLRQEDUGLVSOD\VLFRQVWKDWLQGLFDWH\RXUtablet’s Wi-Fi status.Connected to a Wi-Fi network (waves indicate connection strength).[no icon] There are no Wi-Fi networks in range, or the Wi-Fi radio is off.1. Turn on the Wi-Fi radio if it is not already on. To turn on Wi-Fi:a. Go to the Home screen: Touch the Home icon.b. Open the Launcher screen: Touch the Launcher Tab, then touch Settings.c. Open the Wireless & networks menu: Touch WIRELESS & NETWORKS.d. Open the Wi-Fi settings menu: Touch WiFi.e. Make sure that the Wi-Fi option box is setted to ON: Touch and slide the block right to enable the Wi-Fi connection.](https://usermanual.wiki/Coby-Communications/MID4331/User-Guide-1903794-Page-22.png)
![Page 28 Browsing The WebEnglish Request desktop site: 6DYHIRURIÀLQHUHDGLQJ6DYHWKLVSDJHRQWRWKHLQ-ternal memory, then you can read it when the internet connection is disable. Page info: View information about the current page, including the URL. 6HWWLQJV&XVWRPL]HWKH%URZVHU](https://usermanual.wiki/Coby-Communications/MID4331/User-Guide-1903794-Page-28.png)
![Page 33 Optional ConnectionsEnglish2. Mount the storage drive. Touch USB connected to mount the tablet’s built-in storage, then touch “Turn on USB storage” and “OK” ZKHQSURPSWHGWRFRQ¿UP:KHQPRXQWHG\RXFDQFRS\¿OHVWRIURP\RXUFRPSXWHU<RXUWDEOHWZLOOEHUHFRJQL]HGE\WKHFRPSXWHUDVD5HPRYDEOH6WRUDJHGULYH'UDJDQGGURS¿OHVEHWZHHQyour tablet and the computer. To learn more about copy-LQJ¿OHVSOHDVHUHIHUWRWKHGRFXPHQWDWLRQLQFOXGHGZLWKyour computer or operating system.Connecting HeadphonesConnect a pair of headphones (or earphones) to the tablet to enjoy media in private.Lower the volume level of the tablet before connecting headphones, and then slowly raise the volume to a comfortable listening level. The headphones must have a 3.5 mm (1/8 in) plug. When headphones are connected, speaker output will be disabled automatically. Hearing experts advise against the constant XVHRISHUVRQDOVWHUHRVSOD\HGDWKLJKYROXPHConstant exposure to high volumes can lead to KHDULQJORVV,I\RXVKRXOGH[SHULHQFHULQJLQJLQthe ears or hearing loss, discontinue use and VHHNPHGLFDODGYLFH](https://usermanual.wiki/Coby-Communications/MID4331/User-Guide-1903794-Page-33.png)
![Page 37 Safety NoticesEnglish ÂSafety Notices7KHOLJKWQLQJÀDVKZLWKDUURZKHDGV\PEROZLWKLQDQHTXLODWHUDOWULDQJOHLVLQWHQGHGWRDOHUWWKHXVHUWRWKHSUHVHQFHRIXQLQVXODWHG³GDQJHURXVYROWDJH´ZLWKLQWKHSURGXFW¶VHQFORVXUHWKDWPD\EHRIVXI¿FLHQWPDJQLWXGHWRFRQVWLWXWHDULVNRIHOHFWULFVKRFN7KHH[FODPDWLRQSRLQWZLWKLQDQHTXLODWHUDOWULDQJOHLVLQWHQGHGWRDOHUWWKHXVHUWRWKHSUHVHQFHRILPSRUWDQWRSHUDWLRQDQGVHUYLFLQJLQVWUXFWLRQVLQWKHOLWHUDWXUHDFFRPSDQ\LQJWKHDSSOLDQFH For recycling or disposal information about this prod-uct, please contact your local authorities or the Elec-tronics Industries Alliance: ZZZHLDHRUJFor Customer Use:(QWHUEHORZWKHVHULDOQXPEHUWKDWLVORFDWHGRQWKHUHDURIWKHXQLW5HWDLQWKLVLQIRUPDWLRQIRUIXWXUHUHIHUHQFH0RGHO1R6HULDO1RWARNING: 7RSUHYHQW¿UHRUVKRFNKD]DUGGRQRWH[SRVHWKLVGHYLFHWRUDLQRUPRLVWXUH'DQJHURXVKLJKYROWDJHLVSUHVHQWLQVLGHWKHHQFORVXUH'RQRWRSHQWKHFDELQHWProtect your hearing: +HDULQJH[SHUWVDGYLVHDJDLQVWWKHFRQ-VWDQWXVHRISHUVRQDOVWHUHRVSOD\HGDWKLJKYROXPH&RQVWDQWH[SRVXUHWRKLJKYROXPHVFDQOHDGWRKHDULQJORVV,I\RXVKRXOGH[SHULHQFHULQJLQJLQWKHHDUVRUKHDULQJORVVGLVFRQWLQXHXVHDQGVHHNPHGLFDODGYLFHNote: ,IWKHSURGXFWVXGGHQO\KDVQRUHVSRQVHRUSRZHUVRIIDQHOHFWURVWDWLFGLVFKDUJHPD\EHWKHFDXVH,QWKLVFLUFXPVWDQFHSOHDVHIROORZWKHSURFHGXUHVEHORZIRUUHFRYHU\t Turn o the unit by pushing and holding the slide button at the right (Power o position) for 15 seconds.t Turn on the unit again](https://usermanual.wiki/Coby-Communications/MID4331/User-Guide-1903794-Page-37.png)
![Page 39 Safety NoticesEnglishImportant Safety Instructions1. Read Instructions: All the safety and operating instruc-tions should be read before the product is operated.2. Retain Instructions: The safety and operating instruc-tions should be retained for future reference.3. Heed Warnings: All warnings on the product and in the operating instructions should be adhered to.4. Follow Instructions: All operating and usage instruc-tions should be followed.5. Cleaning: Unplug this product from the wall outlet be-fore cleaning. Do not use liquid cleaners or aerosol cleaners. Use a damp cloth for cleaning.6. Attachments: Use only attachments recommended by the manufacturer. Use of other attachments may be KD]DUGRXV7. Water and Moisture: Do not use this product near water (e.g., near a bath tub, washbowl, kitchen sink, laundry tub, in wet basements, or near a swimming pool and the like).8. Ventilation: Slots and openings in the cabinet are provided for ventilation to ensure reliable operation of the product and to protect it from overheating. These openings should never be blocked by placing the product on a bed, sofa, rug, or other similar surface. This product should not be placed in a built-in installa-tion such as a bookcase or rack unless proper ventila-tion is provided or the manufacturer instructions have been adhered to.9. Power Sources: This product should be operated only from the type of power source indicated on the rating label. If you are not sure of the type of power supply to your home, consult your product dealer or local power company. For products intended to operate from bat-tery power or other sources, refer to the operating instructions.10. Overloading: Do not overload wall outlets, extension cords, or integral convenience receptacles as this can UHVXOWLQDULVNRI¿UHRUHOHFWULFVKRFN11. Object and Liquid Entry: Never push objects of any kind into this product through openings as they may touch dangerous voltage points or shout-out parts that FRXOGUHVXOWLQD¿UHRUHOHFWULFVKRFN1HYHUVSLOOOLTXLGof any kind on the product.12. Servicing: Do not attempt to service this product your-self as opening or removing covers may expose you to GDQJHURXVYROWDJHRURWKHUKD]DUGV5HIHUDOOVHUYLF-LQJWRTXDOL¿HGVHUYLFHSHUVRQQHO13. Damage Requiring Service: Unplug this product from WKHZDOORXWOHWDQGUHIHUVHUYLFLQJWRTXDOL¿HGVHUYLFHpersonnel under the following conditions: a) when the power-supply or plug is damaged; b) if liquid has been spilled or if objects have fallen into the product; c) if the product has been exposed to rain or water; d) if](https://usermanual.wiki/Coby-Communications/MID4331/User-Guide-1903794-Page-39.png)
![Page 40 Safety NoticesEnglishthe product does not operate normally by following the operating instructions. Adjust only those controls that are covered by the operating instructions as improper adjustment of other controls may result in damage and ZLOORIWHQUHTXLUHH[WHQVLYHZRUNE\DTXDOL¿HGWHFKQL-cian to restore the product to its normal operation; e) if the product has been dropped or damaged in any way; f) when the product exhibits a distinct change in performance—this indicates a need for service.14. Replacement Parts: When replacement parts are re-quired, be sure that your service technician has used UHSODFHPHQW SDUWV VSHFL¿HG E\ WKH PDQXIDFWXUHU RUhave the same characteristics as the original part. 8QDXWKRUL]HGVXEVWLWXWLRQVPD\UHVXOWLQ¿UHHOHFWULFVKRFNRURWKHUKD]DUGV15. Safety Check: Upon completion of any service or repairs to this product, ask the service technician to perform safety checks to ensure that the product is in proper operating condition.16. Heat: The product should be situated away from heat sources such as radiators, heat registers, stoves, or RWKHU SURGXFWV LQFOXGLQJ DPSOL¿HUV WKDW SURGXFHheat.Legal and Trademark Notices&RE\LVWUDGHPDUNVRI&RE\(OHFWURQLFV&RUSRUDWLRQ$QGURLGLVDWUDGHPDUNRI*RRJOH,QF8VHRIWKLVWUDGHPDUNLVVXEMHFWWR*RRJOH3HUPLVVLRQV3RUWLRQVRIWKHDUWZRUNXVHGIRUWKLVSDFNDJHDUHPRGL¿FDWLRQVEDVHGRQZRUNFUHDWHGDQGVKDUHGE\*RRJOHDQGXVHGDFFRUGLQJWRWHUPVGHVFULEHGLQWKH&UHDWLYH&RPPRQV$WWULEXWLRQ/LFHQVH+'0,WKH+'0,/RJRDQG+LJK'H¿QLWLRQ0XOWLPHGLD,QWHUIDFHDUHWUDGHPDUNVRUUHJLVWHUHGWUDGHPDUNVRI+'0,/LFHQVLQJ//&PLFUR6'+&/RJRLVDWUDGHPDUNRI6'&//&86%LVDUHJLVWHUHGWUDGHPDUNRI86%,PSOHPHQWHUV)RUXP,QF<RX7XEHLVDWUDGHPDUNRI*RRJOH,QF$OORWKHUWUDGHPDUNVDQGORJRVDUHSURSHUW\RIWKHLUUHVSHFWLYHRZQHUVXQOHVVLQGLFDWHGRWKHUZLVH](https://usermanual.wiki/Coby-Communications/MID4331/User-Guide-1903794-Page-40.png)
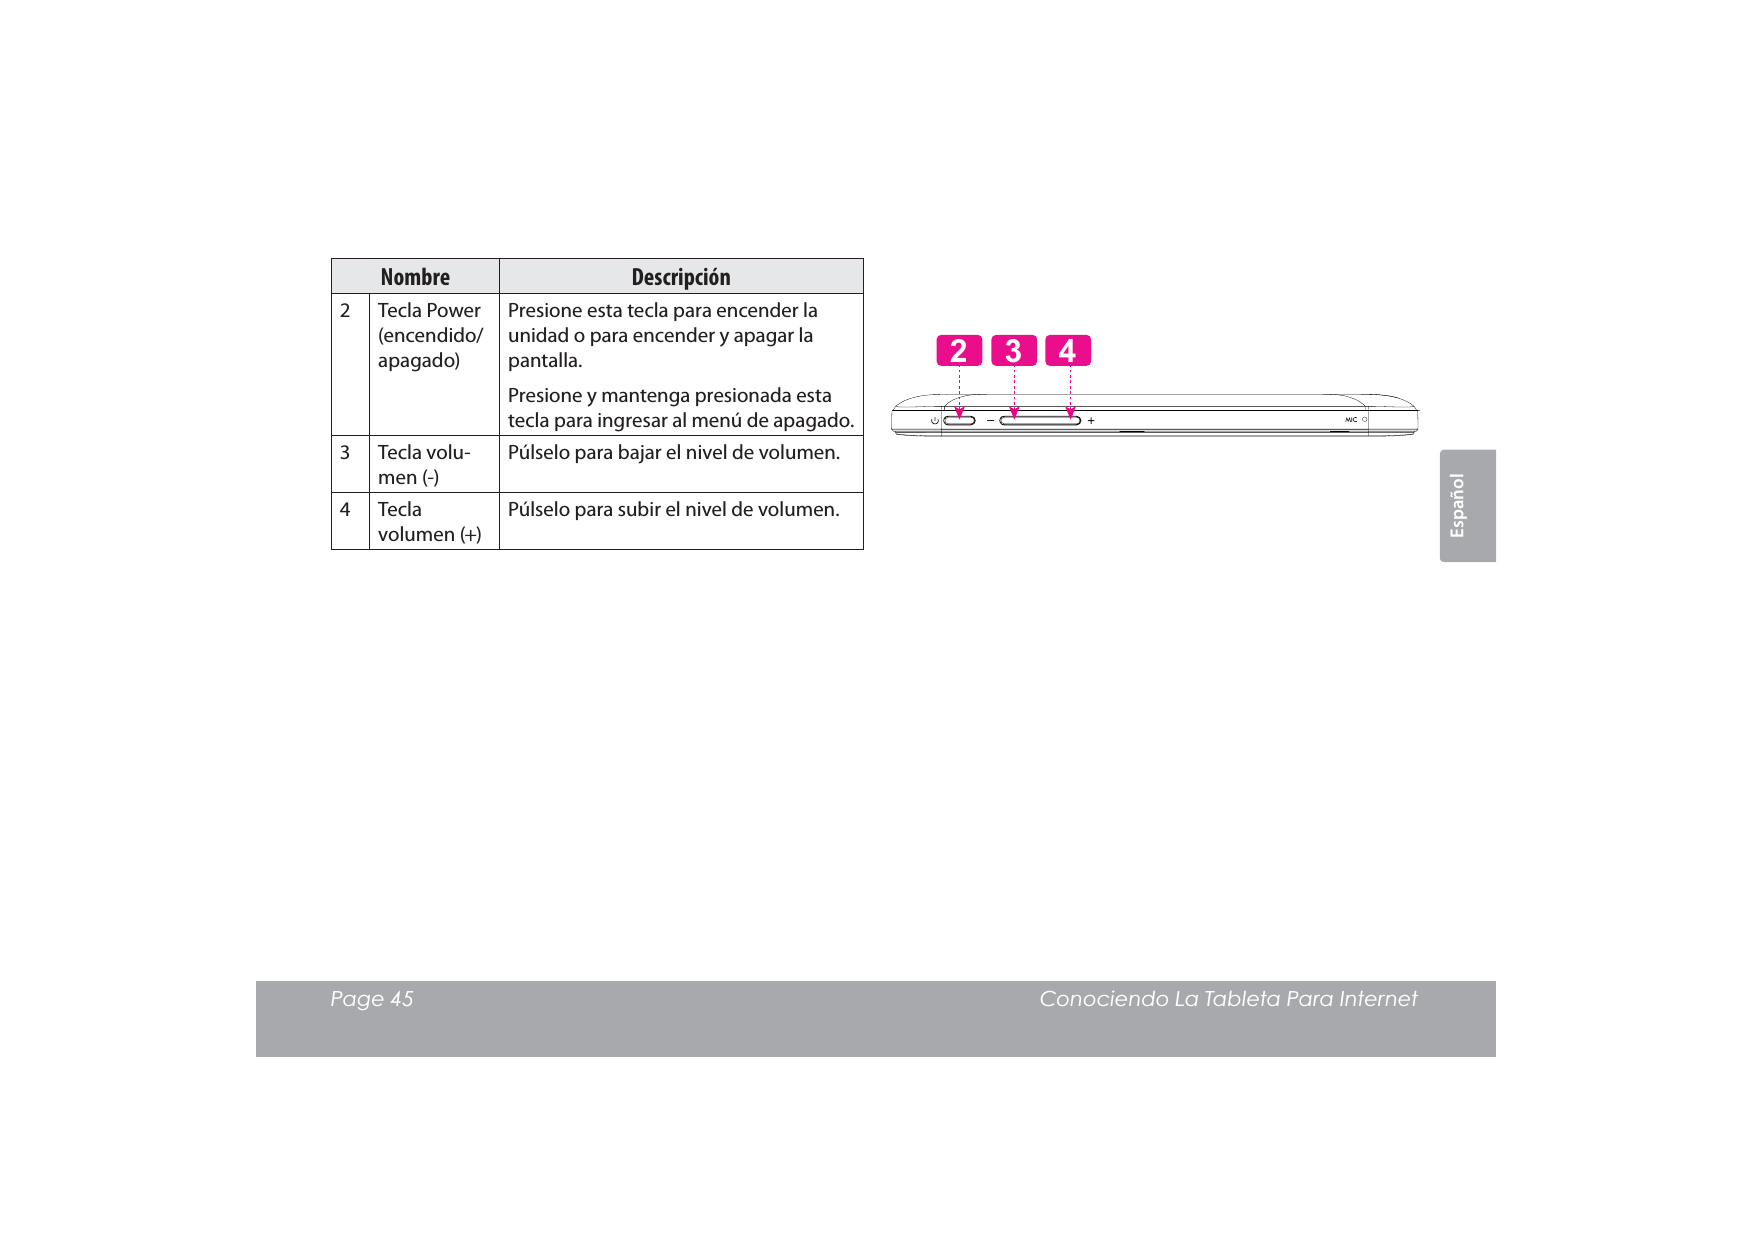
![EspañolPage 52 Primeros Pasos ÂPrimeros pasosCómo encender y apagar la tableta Para encender la tableta haga lo siguiente: Presione y mantenga la tecla ENCENDIDO hasta que la pantalla LCD se encienda y vea el logo de Coby, luego espere hasta que vea la pantalla de desbloqueo.Para apagar la tableta haga lo siguiente:1. Presione la tecla Power y manténgala presionada KDVWDTXHDSDUH]FDHOPHQVDMHGHFRQ¿UPDFLyQ2. Toque OK para apagar la tableta.](https://usermanual.wiki/Coby-Communications/MID4331/User-Guide-1903794-Page-52.png)
![EspañolPage 54 Primeros Pasos6LVHKDFRQ¿JXUDGRXQDFRQWUDVHxDLQJUpVHODSDUD¿QDOL]DUHOGHVEORTXHRGHODSDQWDOOD/DFRQWUDVHxD'HVEORTXHRGH3DQWDOODSXHGHFRQ¿JXUDUVHHQHOPHQ~Security Settings&RQ¿JXUDFLRQHVGH6HJXULGDG ADVERTENCIA: Tenga a bien escribir el patrón de bloqueo con contraseña/PIN/contraseña. Extraviar u olvidar este método bloqueará al usuario. Recuperar la unidad reiniciará el dis-SRVLWLYR QXHYDPHQWH D ODV FRQ¿JXUDFLRQHV GHfábrica. TODOS SUS DATOS Y PROGRAMAS SE PERDERÁN.](https://usermanual.wiki/Coby-Communications/MID4331/User-Guide-1903794-Page-54.png)
![EspañolPage 62 Conectar A InternetConectar a una red Wi-Fi/DEDUUDGHQRWL¿FDFLyQPXHVWUDtFRQRVTXHLQGLFDQHOestado del Wi-Fi de su tableta.Conectado a una red Wi-Fi (las ondas indican la potencia de conexión).[sin ícono]No hay redes Wi-Fi en el rango o la radio Wi-Fi está apagada.1. Encienda la radio Wi-Fi si todavía no está encen-dida. Para encender el Wi-Fi:a. Vaya a la pantalla Home: Toque el ícono Home.b. Abra la pantalla Launcher: Toque la solapa Launcher, luego toque Settings.c. Abra el menú Wireless & networks (Conexiones inalámbricas y redes): Toque WIRELESS & NETWORKS.d. $EUDHOPHQ~:L)LVHWWLQJV&RQ¿JXUDFLRQHVGHWi-Fi): Toque WiFi.e. Asegúrese de que el cuadro de opción Wi-Fi esté en ON (activado): Toque y deslice el bloque a la derecha para activar la conexión Wi-Fi.](https://usermanual.wiki/Coby-Communications/MID4331/User-Guide-1903794-Page-62.png)
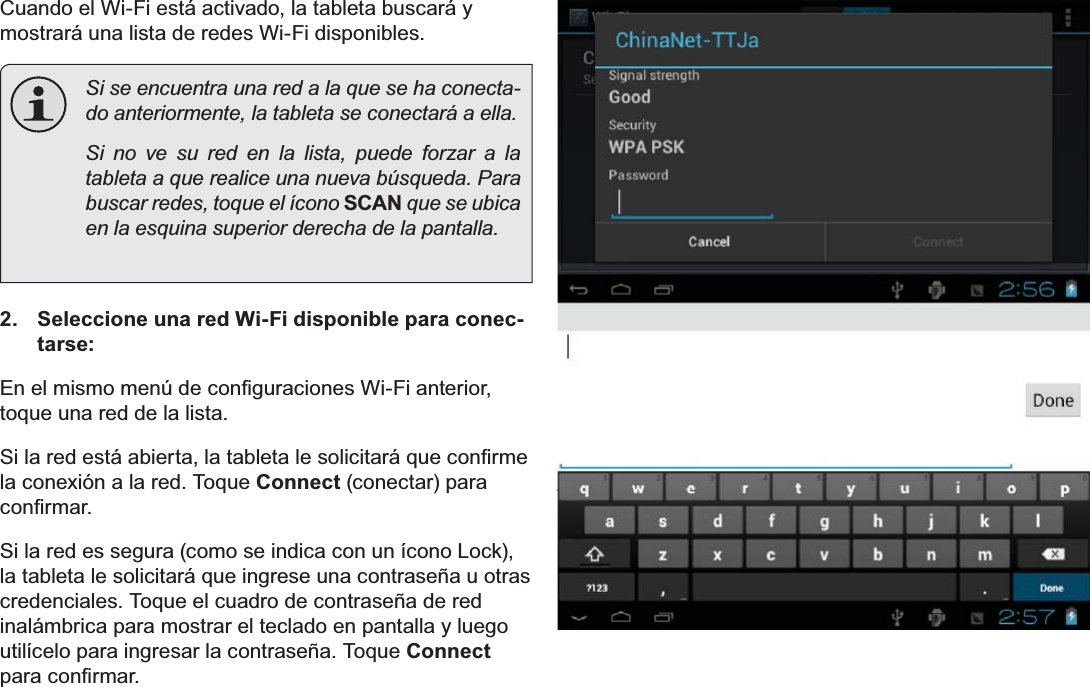
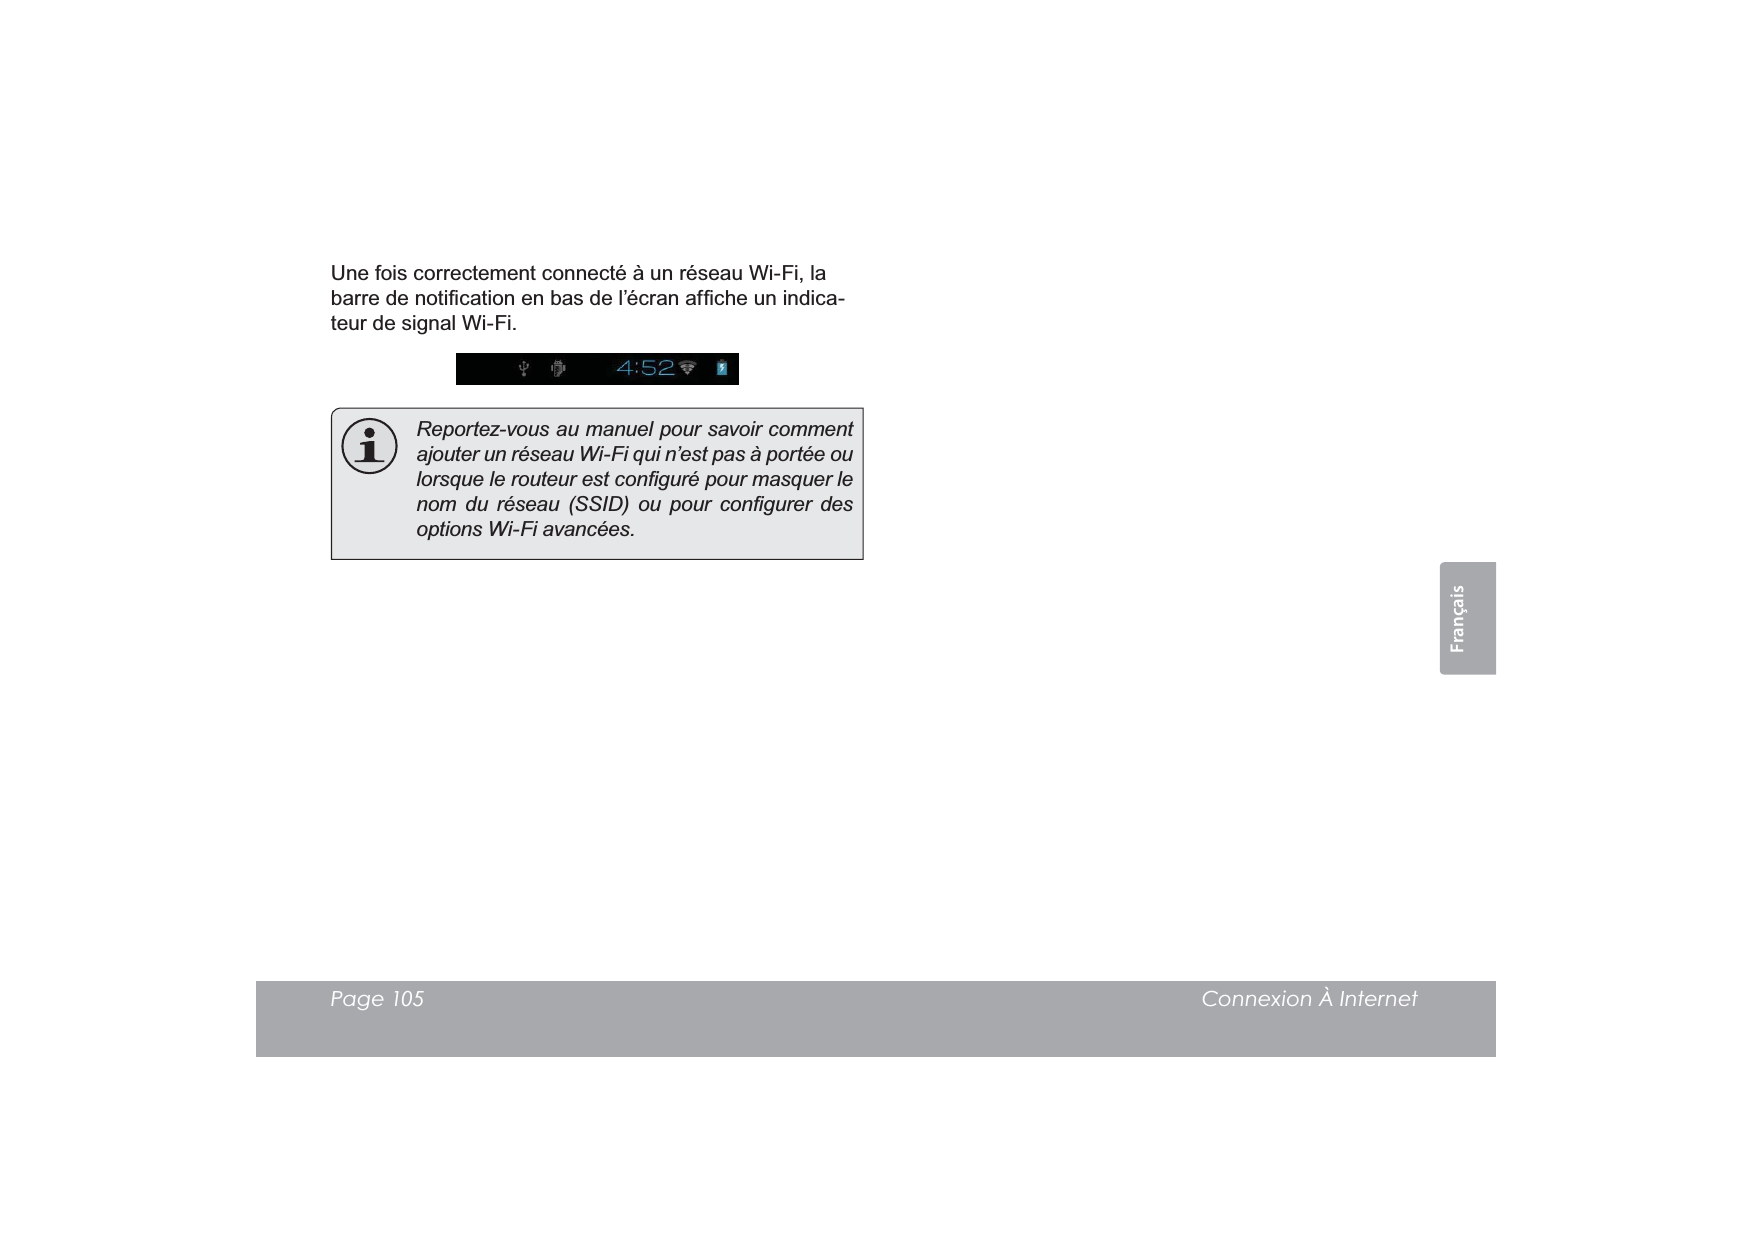
![EspañolPage 64 Conectar A InternetCuando se ha conectado con éxito a una red Wi-Fi, la EDUUDGHQRWL¿FDFLyQHQODSDUWHLQIHULRUGHODSDQWDOODmostrará un indicador de señal Wi-Fi. Para saber cómo agregar una red Wi-Fi cuando no está en el rango o cuando el enrutador está FRQ¿JXUDGR SDUD RFXOWDU HO QRPEUH GH OD UHG66,' R SDUD FRQ¿JXUDU ODV RSFLRQHV DYDQ]D-das de Wi-Fi, tenga a bien remitirse al manual.](https://usermanual.wiki/Coby-Communications/MID4331/User-Guide-1903794-Page-64.png)

![EspañolPage 77$YLVRV'H6HJXULGDG ÂAvisos de Seguridad/D¿JXUDGHUHOiPSDJRTXHWHUPLQDHQSXQWDGHÀHFKDGHQWURGHXQWULiQJXORHTXLOiWHURWLHQHSRU¿QDOLGDGDOHU-WDUDOXVXDULRGHODSUHVHQFLDGH³YROWDMHSHOLJURVR´VLQDLVODPLHQWRGHQWURGHODFDMDGHOSURGXFWRTXHSRGUtDWHQHUSRWHQFLDVX¿FLHQWHSDUDFRQVWLWXLUXQULHVJRGHFKRTXHHOpFWULFR(OVLJQRGHH[FODPDFLyQGHQWURGHXQWULiQJXORHTXLOiWHURWLHQHHOSURSyVLWRGHDGYHUWLUDOXVXDULRGHODSUHVHQFLDGHLQVWUXFFLRQHVGHIXQFLRQDPLHQWR\UHSDUDFLyQLPSRUWDQWHVHQHOPDWHULDOLPSUHVRTXHDFRPSDxDDODUWHIDFWR Para obtener información de reciclaje o eliminación sobre este producto, comuníquese con sus auto-ridades locales o con la Alianza de Industrias Elec-trónicas: www.eiae.org.Para uso de los clientes:,QJUHVHDFRQWLQXDFLyQHOQ~PHURGHVHULHTXHVHHQFXHQWUDHQODSDUWHWUDVHUDGHODXQLGDG&RQVHUYHHVWDLQIRUPDFLyQSDUDUHIHUHQFLDVIXWXUDV1GH0RGHO1GH6HULHADVERTENCIA:3DUDSUHYHQLUHOULHVJRGHGHVFDUJDHOpFWULFDQRH[SRQJDHVWHGLVSRVLWLYRDODOOXYLDQLDODKXPHGDG'HQWURGHOJDEL-QHWHVHHQFXHQWUDSUHVHQWHDOWRYROWDMHSHOLJURVR1RDEUDHOJDELQHWHProteja su capacidad de audición:/RVH[SHUWRVHQDXGLFLyQDGYLHUWHQFRQWUDHOXVRFRQVWDQWHGHUHSURGXFWRUHVSHUVRQDOHVGHDXGLRDYROXPHQDOWR/DH[SRVLFLyQFRQVWDQWHDOYROXPHQDOWRSXHGHOOHYDUDODSpUGLGDGHODDXGLFLyQ6LOH]XPEDQORVRtGRVRVXIUHXQDSpUGLGDGHDXGLFLyQVXVSHQGDHOXVR\EXVTXHDVHVRUDPLHQWRPpGLFRNota: 6LHOSURGXFWRUHSHQWLQDPHQWHQRUHVSRQGHRVHDSDJDHVSRVLEOHTXHODFDXVDVHDXQDGHVFDUJDHOHFWURVWiWLFD(QWDOFDVRVLJDORVSURFHGLPLHQWRVTXHVHGHWDOODQDFRQWLQXDFLyQSDUDODUHFXSHUDFLyQ $SDJXHHOGLVSRVLWLYRSUHVLRQDQGRVXDYHPHQWHHOERWyQ5(6(7UHLQLFLR (QFLHQGDQXHYDPHQWHODXQLGDG](https://usermanual.wiki/Coby-Communications/MID4331/User-Guide-1903794-Page-77.png)
![EspañolPage 78$YLVRV'H6HJXULGDGDeclaración de la FCC(VWHGLVSRVLWLYRFXPSOHFRQOD3DUWHGHODV1RUPDVGHOD)&&(OIXQFLRQDPLHQWRHVWiVXMHWRDODVVLJXLHQWHVGRVFRQGLFLRQHV (VWHGLVSRVLWLYRSXHGHQRFDXVDULQWHUIHUHQFLDVSHUMXGLFLDOHV\ (VWHGLVSRVLWLYRGHEHDFHSWDUFXDOTXLHULQWHUIHUHQFLDUHFLELGDLQFOXVLYHDTXHOODTXHSRGUtDFDXVDUIXQFLRQDPLHQWRQRGHVHDGRNota: (VWHHTXLSRIXHSUREDGR\FXPSOHFRQWRGRVORVOtPLWHVSDUDGLVSRVLWLYRVGLJLWDOHVFODVH%FRQIRUPHDOD3DUWHGHODVQRUPDVGHOD)&&(VWRVOtPLWHVIXHURQGLVHxDGRVSDUDEULQGDUSURWHFFLyQUD]RQDEOHFRQWUDODLQWHUIHUHQFLDSHUMXGLFLDOHQXQDLQVWDODFLyQUHVLGHQFLDO(VWHHTXLSRJHQHUDHPSOHD\SXHGHLUUDGLDUHQHUJtDGHIUHFXHQFLDGHUDGLR\VLQRVHLQVWDOD\HPSOHDVHJ~QODVLQVWUXFFLRQHVSXHGHRFDVLRQDULQWHUIHUHQFLDSHUMXGLFLDOSDUDODVFRPXQLFDFLRQHVGHUDGLR6LQHPEDUJRQRKD\QLQJXQDJDUDQWtDGHTXHQRRFXUULUiHQXQDLQVWDODFLyQHQSDU-WLFXODU6LHVWHHTXLSRFDXVDLQWHUIHUHQFLDSHUMXGLFLDOSDUDODUHFHSFLyQGHUDGLRRWHOHYLVLyQORFXDOSXHGHGHWHUPLQDUVHDODSDJDURHQFHQGHUHOHTXLSRHOXVXDULRSXHGHWUDWDUGHFRUUHJLUODLQWHUIHUHQFLDFRQXQDRPiVGHODVVLJXLHQWHVPHGLGDV 5HRULHQWDURUHXELFDUODDQWHQDUHFHSWRUD $XPHQWDUODGLVWDQFLDHQWUHHOHTXLSR\HOUHFHSWRU &RQHFWDUHOHTXLSRHQXQWRPDFRUULHQWHHQXQFLUFXLWRGLIHUHQWHGHOTXHHVWiFRQHFWDGRHOUHFHSWRU &RQVXOWDUDOGLVWULEXLGRURDXQWpFQLFRFRQH[SHULHQFLDHQUDGLR\79SDUDREWHQHUD\XGD6HUHTXLHUHHOXVRGHFDEOHEOLQGDGRSDUDFXPSOLUFRQORVOtPLWHVGHODFODVH%HQODVXESDUWH%GHOD3DUWHGHODVQRUPDVGHOD)&&1RHIHFW~HFDPELRVQLPRGL¿FDFLRQHVDOHTXLSRH[FHSWRHQFDVRGHTXHDVtORHVSHFL¿TXHHOPDQXDO6LVHGHEHQHIHFWXDUWDOHVFDPELRVRPRGL¿FDFLRQHVVHOHVROLFLWDUiTXHGHWHQJDHOIXQFLRQDPLHQWRGHOHTXLSRRadiación de la FCC Declaración de la exposición: (VWHHTXLSRFXPSOHFRQORVOtPLWHVGHH[SRVLFLyQDODUDGLDFLyQGHOD)&&HVWDEOHFLGRVSDUDXQHQWRUQRQRFRQWURODGR(OXVXDULR¿QDOGHEHVHJXLUODVLQVWUXFFLRQHVGHRSHUDFLyQHVSHFt¿FDVSDUDVDWLVIDFHUHOFXPSOLPLHQWRGHH[SRVLFLyQD5)(VWHWUDQVPLVRUQRGHEHXELFDUVHQLXWLOL]DUVHMXQWRFRQQLQJXQDRWUDDQWHQDRWUDQVPLVRU](https://usermanual.wiki/Coby-Communications/MID4331/User-Guide-1903794-Page-78.png)
![EspañolPage 80$YLVRV'H6HJXULGDG12. Reparaciones: No intente reparar este producto usted mismo, ya que al abrir o quitar las cubiertas se expon-dría a voltaje peligroso u otros peligros. Para cualqui-er reparación, póngase en contacto con el personal WpFQLFRFDOL¿FDGR13. Daños que requieran servicio técnico: Desconecte este producto del enchufe de pared y contáctese con SHUVRQDOWpFQLFRFDOL¿FDGRHQODVVLJXLHQWHVVLWXDFLR-nes: a) cuando la fuente de alimentación o el enchufe estén dañados; b) si se ha derramado líquido, han caído objetos dentro del producto; c) si el producto ha sido expuesto a lluvia o al agua; d) si el producto no funciona normalmente al seguir las instrucciones de funcionamiento. Ajuste sólo aquellos controles incluidos en las instrucciones de funcionamiento, ya que el ajuste inadecuado de otros controles puede ocasionar daños y requerir con frecuencia un trabajo H[WHQVRSRUSDUWHGHXQWpFQLFRFDOL¿FDGRSDUDUHV-taurar el funcionamiento normal del producto; e) si el producto se ha caído o ha sufrido algún daño; f) cu-ando el producto presenta un cambio marcado en su rendimiento; esto indica que necesita mantenimiento.14. Piezas de reemplazo: Cuando se requieren piezas de reemplazo, asegúrese de que el servicio técnico haya XWLOL]DGR ODV SLH]DV GH UHHPSOD]R HVSHFL¿FDGDV SRU HOfabricante o que posean las mismas características que la pieza original. Las sustituciones no autorizadas pueden provocar incendio, descarga eléctrica u otros riesgos.15. Controles de seguridad: Una vez completado el ser-vicio o las reparaciones de este producto, solicite al servicio técnico que realice controles de seguridad para asegurar que se encuentra en condición de fun-cionamiento correcto.16. Calor: El producto debe ubicarse lejos de fuentes de calor tales como radiadores, rejillas de aire caliente, HVWXIDV X RWURV SURGXFWRV LQFOXLGRV DPSOL¿FDGRUHVque produzcan calor.](https://usermanual.wiki/Coby-Communications/MID4331/User-Guide-1903794-Page-80.png)
![EspañolPage 81$YLVRV'H6HJXULGDGAvisos de Legales y Marcas&RE\\.\URVVRQPDUFDVUHJLVWUDGDVGH&RE\(OHFWURQLFV&RUSRUDWLRQ$QGURLGHVXQDPDUFDUHJLVWUDGD*RRJOH,QF(OXVRGHHVWDPDUFDUHJLVWUDGDHVWiVXMHWRDORVSHUPLVRVGH*RRJOH3DUWHVGHODREUDGHDUWHXWLOL]DGRHQHVWHSDTXHWHVRQPRGL¿FDFLRQHVEDVDGDVHQHOWUDEDMRFUHDGR\FRPSDUWLGRSRU*RRJOH\VHXWLOL]DQGHDFXHUGRDORVWpUPLQRVGHVFULWRVHQOD$WULEXFLyQGHOLFHQFLD&UHDWLYH&RPPRQV+'0,HOORJRWLSR+'0,\+LJK'H¿QLWLRQ0XOWLPHGLD,QWHUIDFHVRQPDUFDVRPDUFDVUHJLVWUDGDVGH+'0,/LFHQVLQJ//&PLFUR6'+&ORJRWLSRHVXQDPDUFDUHJLVWUDGDGH6'&//&86%HVXQDPDUFDUHJLVWUDGDGH86%,PSOHPHQWHUV)RUXP,QF<RX7XEHHVPDUFDUHJLVWUDGDGH*RRJOH,QF7RGDVODVGHPiVPDUFDVUHJLVWUDGDV\ORJRWLSRVSHUWHQHFHQDVXVUHVSHFWLYRVSURSLHWDULRVVDOYRTXHVHLQGLTXHORFRQWUDULR](https://usermanual.wiki/Coby-Communications/MID4331/User-Guide-1903794-Page-81.png)
![FrançaisPage 83 Merci ÂMerciFélicitations pour votre achat d’une Tablette Internet de Coby® Kyros®. Ce guide est fourni pour vous aider à utiliser votre lecteur sans tarder ; veuillez le lire attentivement et le conserver pour pouvoir vous y référer ultérieurement.Pour des instructions détaillées, des informations récentes et des conseils utiles, veuillez visiter le site Web de Coby sur www.cobyusa.com. Vous pouvez également télécharger le manuel VXUOHVLWH:HEGH&RE\VRXVIRUPHGH¿FKLHUPDF. Pour visualiser les documents PDF, té-léchargez et installez gratuitement le lecteur Adobe Acrobat à partir du site Web Adobe sur www.adobe.com.Contenu de l’emballage9pUL¿H]TXHOHVDUWLFOHVPHQWLRQQpVFLGHVVRXVVRQWprésents dans l’emballage. Si l’un de ces articles est PDQTXDQWYHXLOOH]FRQWDFWHUYRWUHUHYHQGHXU Tablette Internet de Coby® Kyros® Etui de protection Câble USB Adaptateur d’alimentation Cet emballage peut contenir des sacs en plas-tique ou autres matériaux qui présentent un danger pour les enfants. Veillez à éliminer en toute sécurité tous les matériaux d’emballage après l’ouverture.](https://usermanual.wiki/Coby-Communications/MID4331/User-Guide-1903794-Page-83.png)
![Français Page 84 MerciCaractéristiques Naviguez le Web Visitez vos sites web favoris 9pUL¿H]YRVHPDLOV Gardez contact avec vos amis et votre famille Regardez des vidéos YouTube™ Parcourez la communauté de partage de vidéos la plus populaire du monde Lisez vos livres favoris Téléchargez des milliers de livres avec le comprenait OHFWHXU(ERRN Découvrez de milliers d’applications pour Android™ Jeux, applications, et plus encore avec le marché installé %UDQFKH]YRXVjO¶,QWHUQHWVDQV¿O 5pVHDXWDJH+DXW'pELW:L)LEJQ 3UR¿WH]GHYRWUHELEOLRWKqTXHPXOWLPpGLDQ¶LPSRUWHR 8QHFHQWUDOHSRUWDEOHOLWGHVIRUPDWVPXVLTXHYLGpRet photo populaires Lecteur de carte mémoire microSDHC $XJPHQWH]YRWUHFDSDFLWpGHVWRFNDJHMXVTX¶jGo pris en charge) Caméra intégrée &DPpUDSUDWLTXHDUULqUHIDFH 'pWHFWLRQGHO¶RULHQWDWLRQDXWRPDWLTXH /LVH]FRPPHYRXVOHVRXKDLWH]O¶pFUDQV¶DMXVWHDXWRPDWLTXHPHQW 6LYRXVYRXOH]OLUHGHVOLYUHVGDQVOHIRUPDWH3XEFHODQpFHVVLWHO¶DSSOLFDWLRQGHOHFWHXUpOHFWURQLTXHLQFOXVH](https://usermanual.wiki/Coby-Communications/MID4331/User-Guide-1903794-Page-84.png)

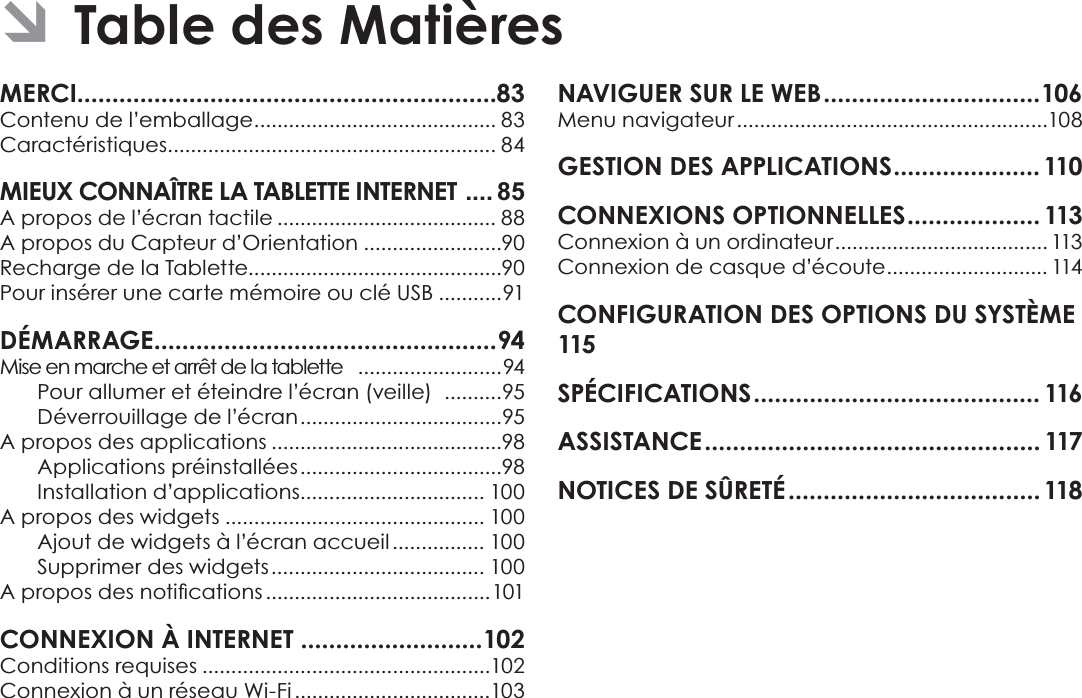
![Français Page 88 Mieux Connaître La Tablette Internet A propos de l’écran tactile9RWUHWDEOHWWHHVWpTXLSpHG¶XQpFUDQWDFWLOHIDFLOHjutiliser. 1RWUHFDSDFLWLIPXOWLWDFWLOHH[LJHWRXFKHUGXERXWGHVdoigts doux sur l’écran de verre pour activer des fonctions de la tablette. Plusieurs doigts peuvent être utilisés pour effectuer des JHVWHV]RRPSDUH[HPSOHG¶LPDJHjGRLJWV6¶LOYRXVplaît noter: vos doigts ne doivent pas être couverts. Un VW\OHWSHXWrWUHXWLOLVp$VVXUH]YRXVTXHF¶HVWSRXUOHVécrans tactiles capacitifs. $¿QG¶pYLWHUG¶HQGRPPDJHUO¶pFUDQQHWRXFKH]pas ce dernier trop fortement, ni en utilisant un REMHWDXWUHTXHYRWUHGRLJW$¿QG¶REWHQLUOHPHLO-leur fonctionnement de l’appareil, assurez-vous que vos mains sont propres avant d’utiliser les touches de l’écran tactile. Pellicule de protection8QHSHOOLFXOH¿QHHVWDSSOLTXpHVXUO¶pFUDQWDFWLOHSRXUOHprotéger durant l’expédition. Il convient d’ôter cette pelliFXOHGHSODVWLTXHDYDQWXWLOLVDWLRQ3RXUFHIDLUHVDLVLVVH]simplement un angle de la pellicule et tirez doucement dessus pour la décoller de l’écran. Actions relatives à l’écran tactileIl est possible de contrôler les fonctions de la tablette à l’aide de l’écran tactile. Pour cela, manipulez du doigt les icônes, les touches, les lignes des menus, le clavier à l’écran, et autres éléments apparaissant sur l’écran. Il vous est possible d’effectuer les actions suivantes par simple placement du bout du doigt sur l’écran.Toucher : Permet d’activer un élément ¿JXUDQWVXUO¶pFUDQWHOVTXHLF{QHVd’applications, touches, options de menu, et lettres ou symboles du clavier apparaissant sur l’écran) ; il VXI¿WGHOHVWRXFKHUGXGRLJWPression continue :&HUWDLQVpOpPHQWV¿JXUDQWVXUO¶pFUDQLQGXLVHQWXQHDXWUHDFWLRQORUVTX¶RQPDLQWLHQWODWRXFKHDSSX\pHSDUH[HPSOHRXYHUWXUHG¶XQVRXVPHQXou activation de la fonction « Déplacer ª3RXUSURYRTXHUOHPDLQWLHQVXUun élément, touchez ce dernier et ne OHYH]SDVOHGRLJWMXVTX¶DXGpFOHQFKHment de l’action.](https://usermanual.wiki/Coby-Communications/MID4331/User-Guide-1903794-Page-88.png)
![FrançaisPage 89 Mieux Connaître La Tablette Internet Déplacer : Permet de faire déplacer un élément DI¿FKpVXUO¶pFUDQSRXUOXLIDLUHFKDQJHUGHSRVLWLRQ3DUH[HPSOHGpSODFHment sur l’écran d’accueil de l’icône de lancement d’une application.) Pour déplacer un élément, maintenez la pression sur ce dernier pendant un instant, puis sans le relâcher, faites bouger votre doigt le long de l’écran MXVTX¶jFHTXHO¶DUWLFOHDWWHLJQHODGHVWLQDWLRQTXHYRXVOXLDYH]FKRLVLHBalayer : Permet de parcourir l’écran verticalePHQWSRXUIDLUHGp¿OHUXQHOLVWH,Oest possible sur certains écrans de procéder à cette manipulation horizontalement pour changer de vue. Pour effectuer la manœuvre, touchez l’écran puis, sans lever le doigt, déplacez rapidement ce dernier le long de l’écran. N’arrêtez pas votre doigt sur l’écran au point de contact initial, car un tel mouvement pourrait entraîner la saisie accidentelle d’un élément.Double-frappe :Pour agrandir une page web ou une autre application, frappez rapidement l’écran deux fois à l’emplacement de FHOOHFLO¶DSSOLFDWLRQFRQFHUQpHGRLWpouvoir supporter la fonction double IUDSSH]RRP/RUVTXHO¶RQVHWURXYHau sein du navigateur, la double frappe sur une portion de page web déclenchera un agrandissement de cette portion par le navigateur puis VRQDMXVWHPHQWjODODUJHXUGHO¶pFUDQ](https://usermanual.wiki/Coby-Communications/MID4331/User-Guide-1903794-Page-89.png)
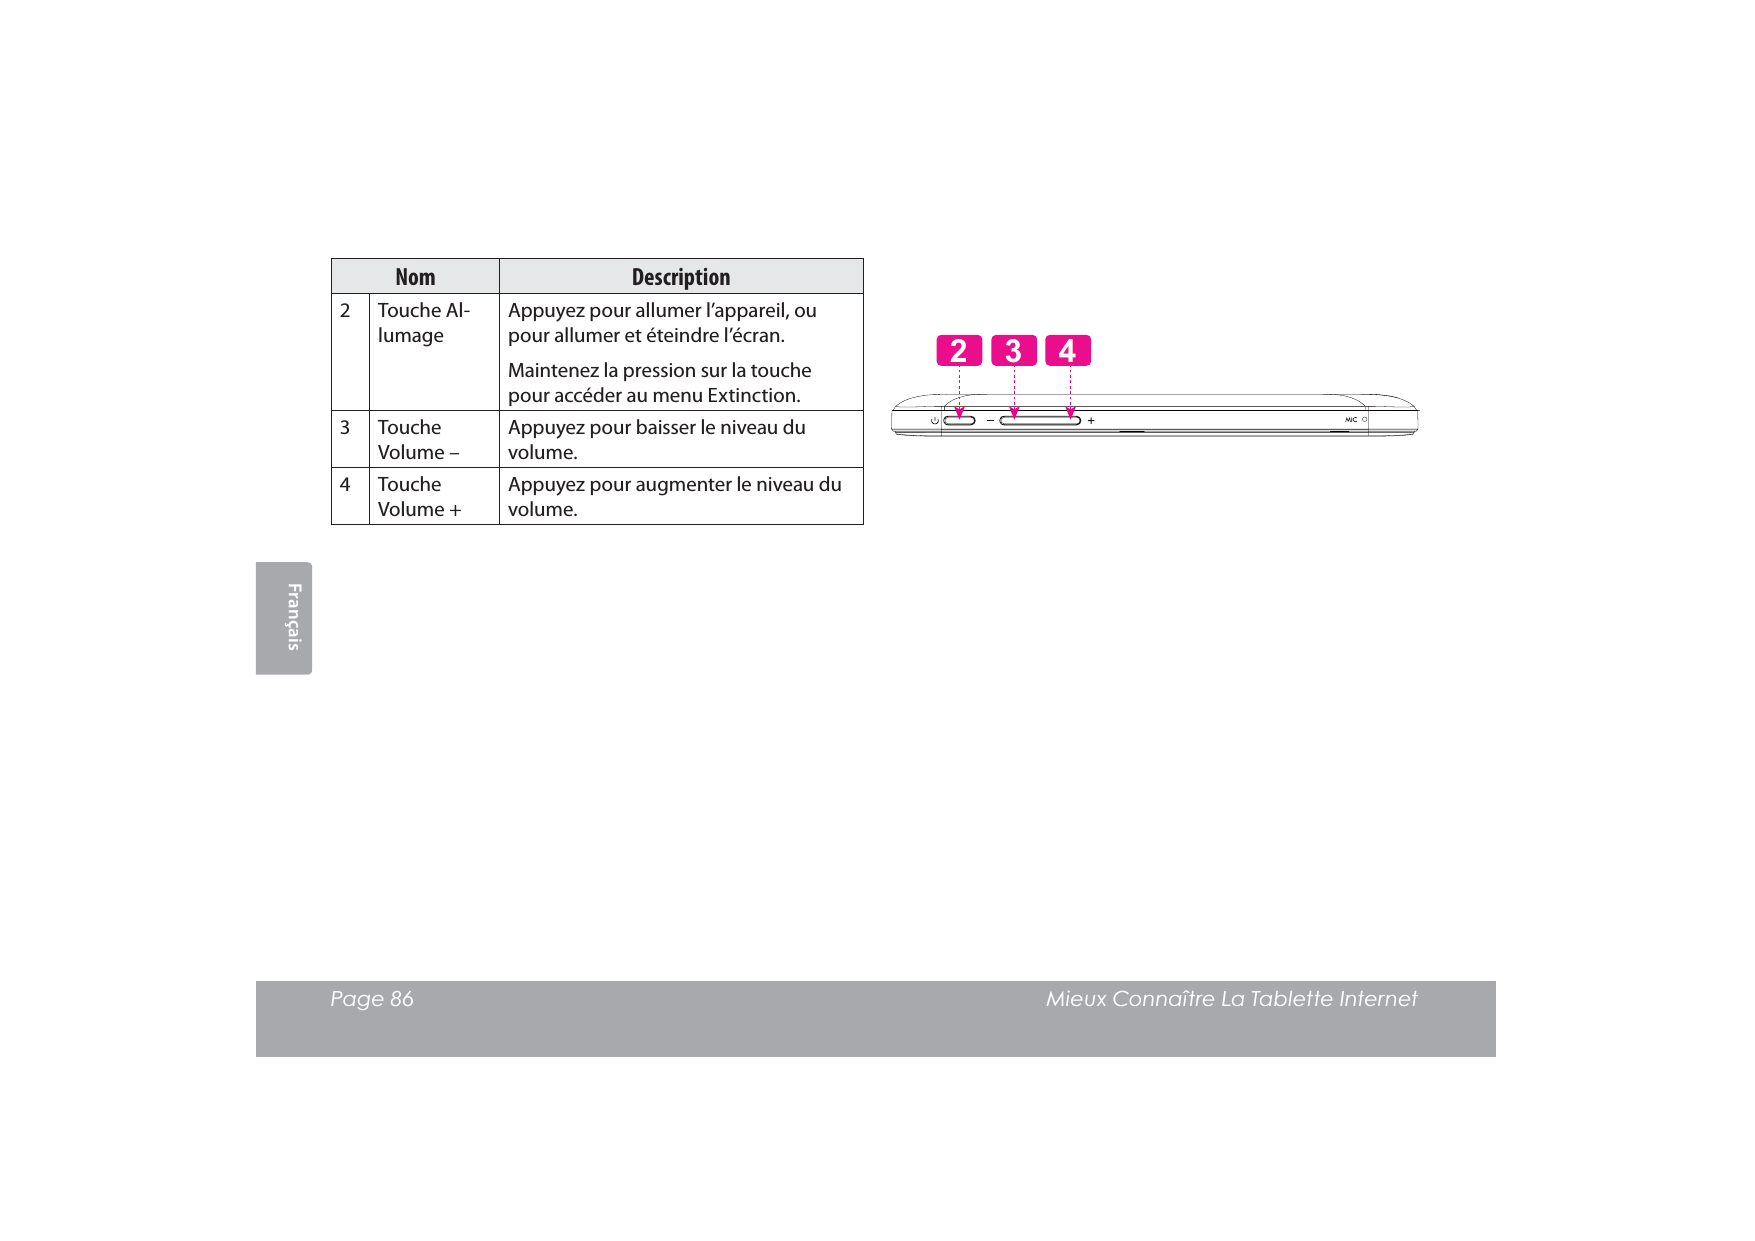
![FrançaisPage 91 Mieux Connaître La Tablette Internet Pour insérer une carte mémoire ou clé USBCette tablette accepte les cartes mémoire microSDHC HWOHVFOpV86%8QFkEOH27*2QWKH*R86%YHQGXséparément, est nécessaire pour connecter une clé USB jPpPRLUHÀDVK Accroître la capacité de mémoire de votre tablette. /LUHGHV¿FKLHUVPpGLDVWRFNpVVXUODFDUWHPpPRLUHSDUH[GHV¿FKLHUVGHPXVLTXHGHYLGpRRXGHphotos).Pour mettre en place une carte mémoire : Alignez la carte mémoire sur l’emplacement prévu. /HVFRQWDFWVPpWDOOLTXHVGHODFDUWHPpPRLUHGRLYHQWse trouver tournés vers le bas, et éloignés de l’écran LCD. )DLWHVJOLVVHUODFDUWHGDQVODIHQWHpTXLSpHG¶XQUHVVRUW3RXVVH]VXUODFDUWHMXVTX¶jFHTXHYRXVHQWHQGLH]XQFOLFLQGLTXDQWTXHODFDUWHHVWELHQinstallée.&RQQH[LRQG¶XQHFOp86%jPpPRLUHÀDVK&RQVXOWH]OHVVSpFL¿FDWLRQVGHODWDEOHWWHSRXUVDYRLUGHTXHOW\SHGHSRUW86%HOOHHVWpTXLSpHPLFUR86%RXPLQL86% 3URFXUH]YRXVXQFkEOHDGDSWDWHXU86%27*2QWKH*RFRUUHVSRQGDQWDXW\SHGHSRUW86%GHYRWUHtablette./HFkEOH27*86%V¶DGDSWHDXSRUW86%GHODWDEOHWWHsur toute la taille du connecteur de la clé USB. Ne cherchez pas à insérer le moindre objet autre qu’une microcarte mémoire SDHC dans la fente prévue. Une carte mémoire compatible pénètre facilement dans la fente prévue à cet HIIHWVLYRXVUHQFRQWUH]XQHUpVLVWDQFHYpUL¿H]l’alignement de la carte. N’essayez pas de faire entrer la carte de force. Evitez de toucher les contacts en or de la carte mémoire.](https://usermanual.wiki/Coby-Communications/MID4331/User-Guide-1903794-Page-91.png)
![Français Page 92 Mieux Connaître La Tablette Internet Pour débloquer et retirer une carte mémoire ou une clé USB:1. DEMONTER la carte mémoire ou la clé USB.D3RXUDI¿FKHUOHPHQXGHVParamètres, toucher l’onglet LanceurSXLVWRXFKH]3DUDPqWUHVGDQVl’écran accueilb. Touchez StockageSRXUDI¿FKHUOHVSDUDPqWUHVGHVWRFNDJHc. Touchez Unmount SD card pour préparer la désinstallation en toute sécurité de la carte mémoire. Enfoncez plus profondément la carte dans son logePHQWMXVTX¶jFHTXHYRXVHQWHQGLH]XQFOLF/DFDUWHVHUDpMHFWpHGHODIHQWHG¶LQVHUWLRQ](https://usermanual.wiki/Coby-Communications/MID4331/User-Guide-1903794-Page-92.png)
![FrançaisPage 93 Mieux Connaître La Tablette Internet Saisissez la carte par les bords pour l’enlever. Pour éviter des dommages et une corruption de données, ne retirez pas la carte mémoire lorsque des données sont en cours d’écriture ou de lecture à partir de la carte. Par exemple, ne retirez pas une carte pendant la lecture d’un ¿FKLHUGHPXVLTXHVWRFNpVXUODFDUWH Les éléments du menu disponibles varient selon l’appareil. Les illustrations servent de référence uniquement.Rajustement du comprimé5HPHWWH]j]pUROHFRPSULPpV¶LOJqOHHWQHUpSRQGSDVou ne fonctionne pas mal autrement. Déconnectez votre comprimé s’il est relié à un ordinateur. Appuyez sur et tenez la touche de Power pendant VHFRQGHVSRXUDUUrWHUOHFRPSULPpHWHQVXLWHDSSX\H]VXU32:(50$5&+($55Ç7HWPDLQWHQH]FHWWHWRXFKHHQIRQFpHMXVTX¶jFHTXHYRXVYR\H]OHlogo Coby.](https://usermanual.wiki/Coby-Communications/MID4331/User-Guide-1903794-Page-93.png)
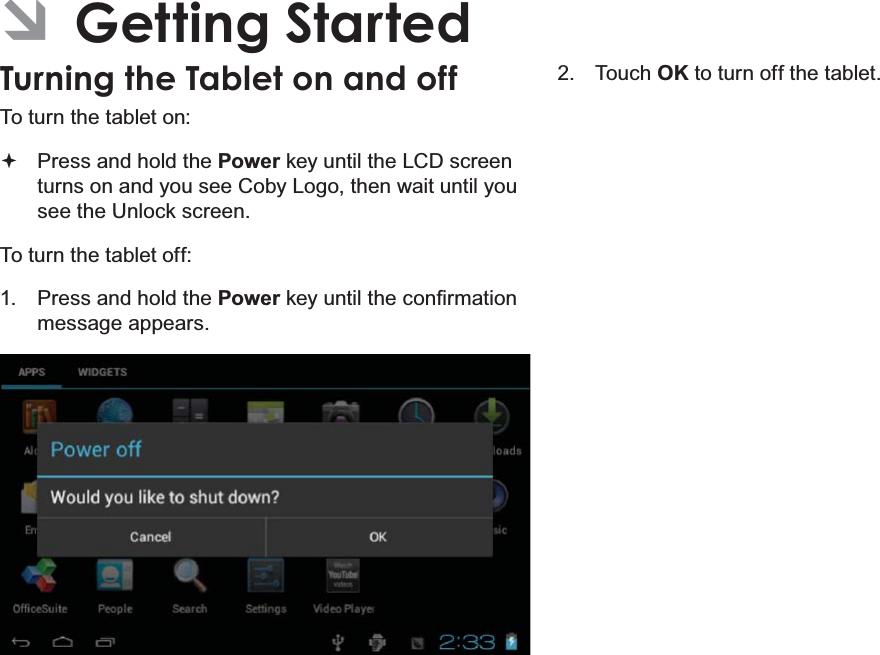
![Français Page 94 Démarrage ÂDémarrageMise en marche et arrêt de la tablette Pour mettre la tablette en marche : $SSX\H]VXUODWRXFKHPDUFKHDUUrWHWPDLQWHQH]FHWWHWRXFKHHQIRQFpHMXVTX¶jFHTXHO¶pFUDQ/&'$&/V¶DOOXPHHWTXHOHORJR&RE\VRLWDI¿FKpHWHQVXLWHDWWHQGH]MXVTX¶jFHTXHYRXVYR\H]O¶pFUDQde Déverrouillage.Pour éteindre la tablette : 0DLQWHQH]DSSX\pHODWRXFKHPowerMXVTX¶jFHTXHOHPHVVDJHGHFRQ¿UPDWLRQDSSDUDLVVH Touchez OK pour éteindre la tablette.](https://usermanual.wiki/Coby-Communications/MID4331/User-Guide-1903794-Page-94.png)
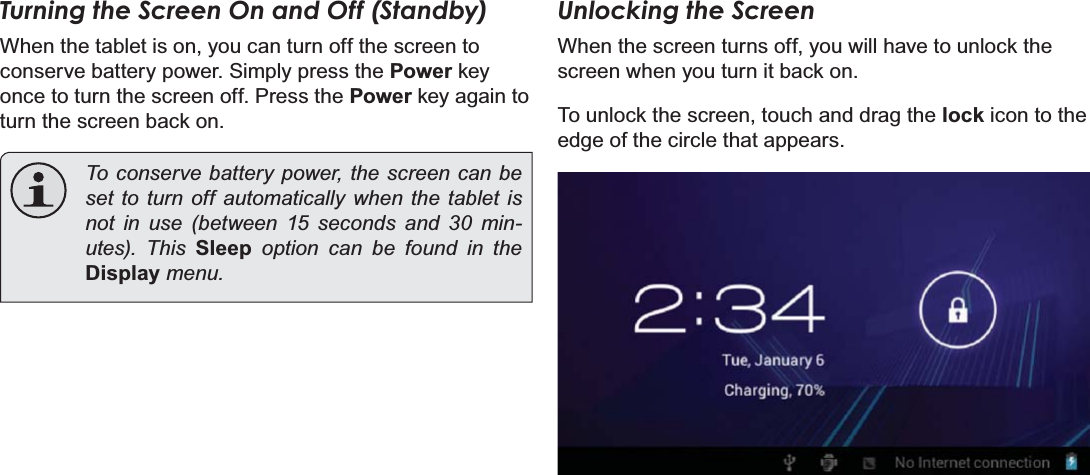
![FrançaisPage 95 DémarragePour allumer et éteindre l’écran (veille) /RUVTXHODWDEOHWWHHVWDOOXPpHRQSHXWpWHLQGUHO¶pFUDQpour sauvegarder la charge de la batterie. Appuyez simplement une nouvelle fois sur la touche Power pour éteindre l’écran. Pour rallumer l’écran, appuyez de nouveau sur la touche Power.Pour préserver la charge de la batterie, on peut régler l’écran de telle sorte qu’il s’éteigne automa-tiquement lorsque la tablette n’est pas utilisée (avec un délai de 15 à 30 minutes). On trouve cette option Sleep sous le menu Display.Déverrouillage de l’écran/RUVTXHO¶pFUDQV¶pWHLQWYRXVGHYH]OHGpYHUURXLOOHUDXPRPHQWRLOVHUDOOXPHPour déverrouiller l’écran, touchez et faites glisser l’icône de verrouillageVXUOHERUGGXFHUFOHTXLDSSDUDvW](https://usermanual.wiki/Coby-Communications/MID4331/User-Guide-1903794-Page-95.png)
![Français Page 96 Démarrage6LXQPRWGHSDVVHDpWpGp¿QLHQWUH]FHGHUQLHUSRXUterminer le déverrouillage de l’écran. Un mot de passe de GpYHUURXLOODJHGHO¶pFUDQSHXWrWUHGp¿QLGDQVOHPHQXParamètres de sécurité. AVERTISSEMENT: Il convient de noter le mot de passe de verrouillage/code PIN/mot de passe. En cas de perte ou d’oubli de ces données interdit l’accès à l’utilisateur. Il sera obligé de réinitialiser l’appareil pour rétablir les paramètres par défaut. TOUTES VOS DON-NÉES ET PROGRAMMES SERONT PER-DUES](https://usermanual.wiki/Coby-Communications/MID4331/User-Guide-1903794-Page-96.png)
![Français Page 100 DémarrageInstallation d’applicationsVous pouvez également télécharger et installer d’autres DSSOLFDWLRQVjSDUWLUGHODERXWLTXHG¶DSSOLFDWLRQVGHl’appareil, via le navigateur web et d’autres sources./DWDEOHWWHGRLWrWUHFRQ¿JXUpHGHIDoRQjSHUPHWWUHO¶LQVWDOODWLRQG¶DSSOLFDWLRQVTXLQHSURYLHQGUDLHQWSDVGX0DUFKp2QSHXWUpJOHUO¶RSWLRQ6RXUFHVLQFRQQXHVGDQVle menu Application settings. Votre appareil Internet portable Coby peut donner accès à, ou offrir des informations sur, des contenus, produits, applications et services tiers. L’utilisation de contenus, produits, applications et services tiers est à la discrétion du tiers et est expressément régie par les conditions d’utilisation GXWLHUV\FRPSULVOHVSROLWLTXHVGHFRQ¿GHQWLDOLWppour de tels contenus, produits, applications et services. Coby Electronics Corporation ne peut pas être tenue pour responsable et décline expressément toute garantie de toute sorte à l’égard de tous les contenus, produits, applications et services de tiers. Coby Electronics Corporation ne sera pas tenu pour responsable de toute perte, coûts ou dommages résultant de votre accès ou utilisation de contenus, produits, applications ou services de tiers.A propos des widgets/HVZLGJHWVVRQWGHVDSSOLFDWLRQVDXWRQRPHVTXHYRXVpouvez placer sur des écrans accueil pour accéder à vos fonctions préférées.Ajout de widgets à l’écran accueil $FFpGH]jO¶pFUDQDFFXHLOVXUOHTXHOYRXVVRXKDLWH]placer un widget. Touchez l’onglet Lanceur. Touchez WIDGETSSRXUDI¿FKHUWRXVOHVZLGJHWVpuis maintenez touché l’icône d’un widget pour O¶DMRXWHUjO¶pFUDQDFFXHLOSupprimer des widgets0DLQWHQH]WRXFKpXQ:LGJHWMXVTX¶jFHTXHO¶LF{QHSupprimer apparaisse en haut de l’écran, puis faites glisser l’icône du Widget vers l’icône Supprimer pour le supprimer.](https://usermanual.wiki/Coby-Communications/MID4331/User-Guide-1903794-Page-100.png)
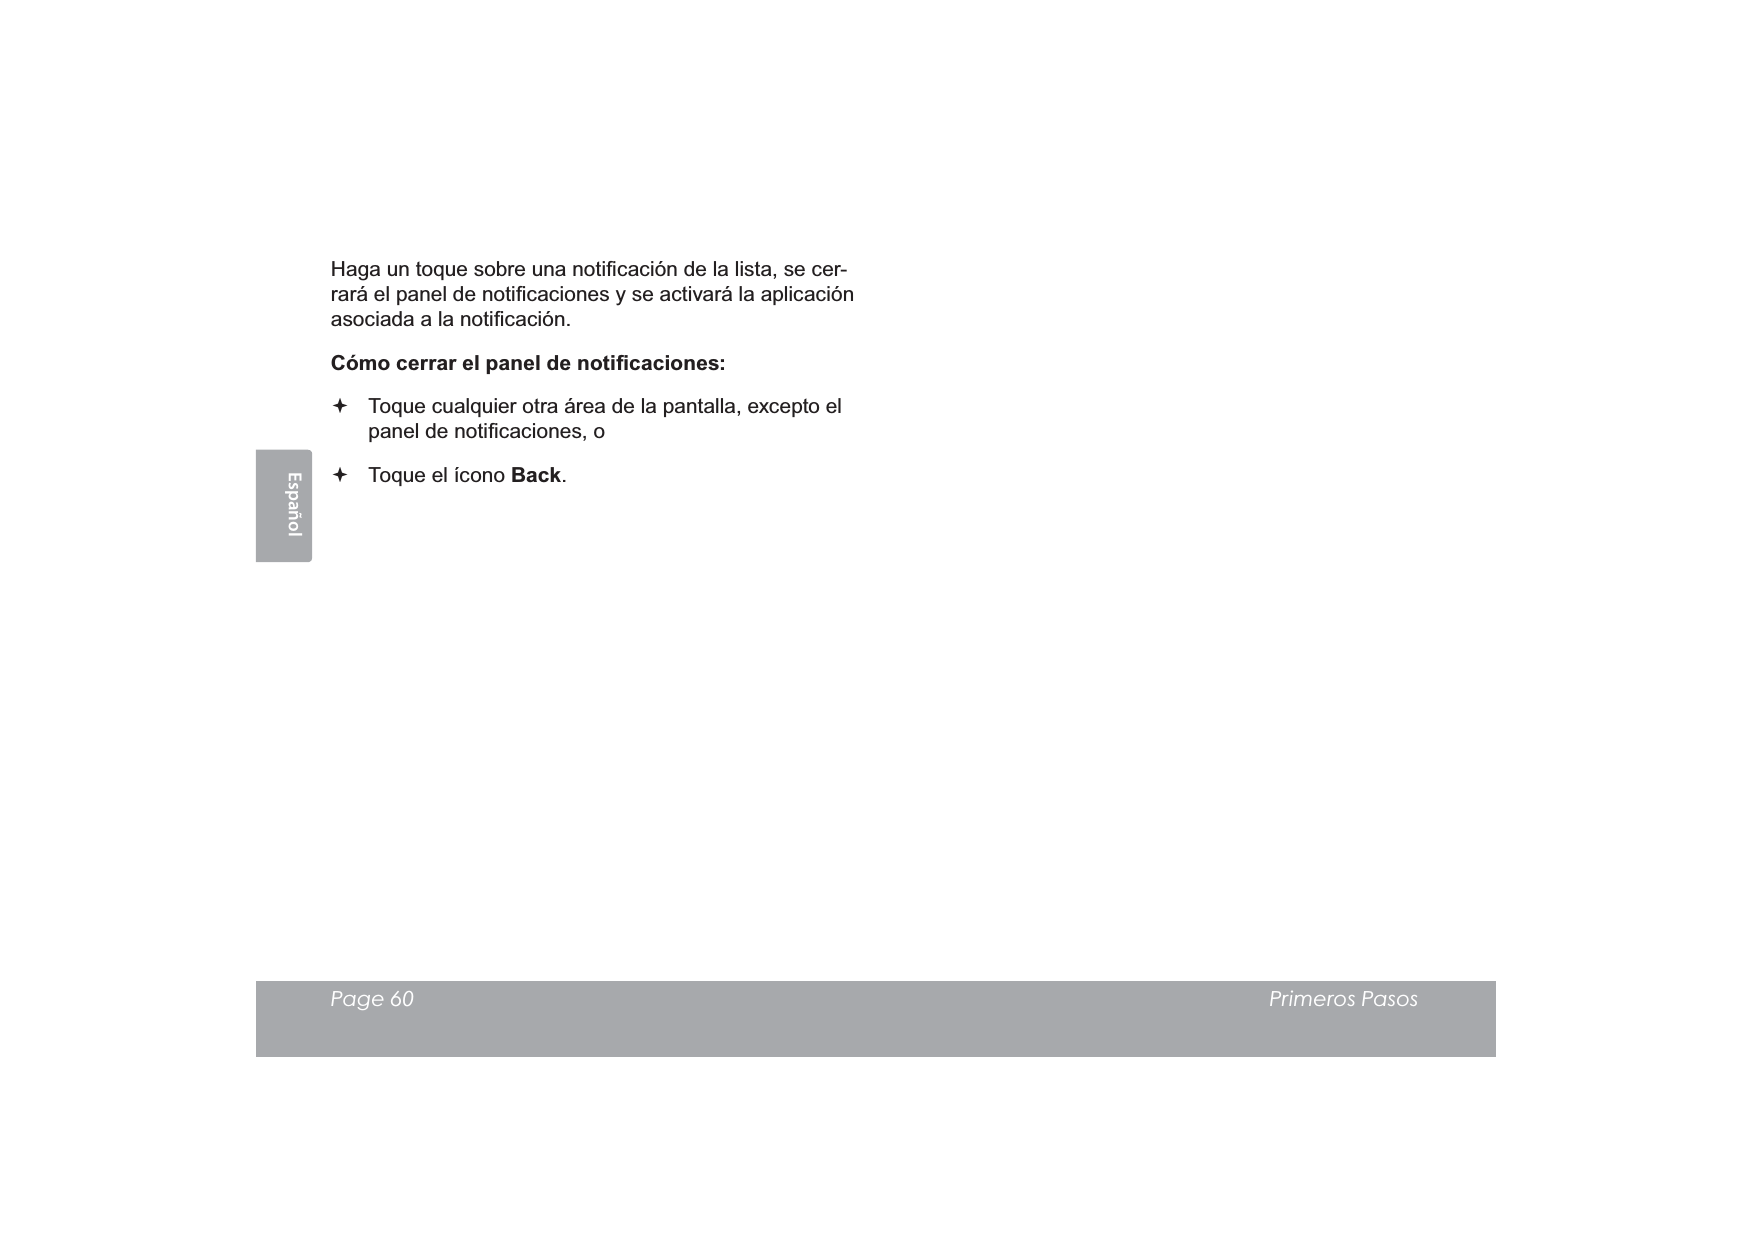
![FrançaisPage 101 Démarrage$SURSRVGHVQRWLÀFDWLRQV/HVLF{QHVTXLDSSDUDLVVHQWGDQVODEDUUHGHQRWL¿FDtion du coin inférieur droit de l’écran vous avertissent de l’arrivée de nouveaux messages, alarmes ou autres événements d’application.'pFRXYUH]OHVHWUpSRQGH]DX[QRWL¿FDWLRQVHQRXYUDQWHQHQWLHUOHSDQQHDXGH1RWL¿FDWLRQV Touchez la barre de 1RWL¿FDWLRQ pour ouvrir le panQHDXGHQRWL¿FDWLRQ3RXUUpSRQGUHjXQHQRWL¿FDWLRQ7RXFKH]XQHQRWL¿FDWLRQVXUODOLVWHOHSDQQHDXGH1RWL¿FDWLRQVVHIHUPHHWO¶DSSOLFDWLRQDVVRFLpHjODQRWL¿FDWLRQGpPDUUH4. 3RXUIHUPHUOHSDQQHDXGH1RWL¿FDWLRQV Touchez toute autre zone de l’écran à l’exception du SDQQHDXGHQRWL¿FDWLRQRX Touchez l’icône Back.](https://usermanual.wiki/Coby-Communications/MID4331/User-Guide-1903794-Page-101.png)
![FrançaisPage 103 Connexion À Internet Connexion à un réseau Wi-Fi/DEDUUHGHQRWL¿FDWLRQDI¿FKHGHVLF{QHVTXLLQGLTXHQWO¶pWDW:L)LGHYRWUHWDEOHWWH&RQQHFWpjXQUpVHDX:L)LOHVRQGHVLQGLTXHQWODIRUFHGXVLJQDOGHFRQQH[LRQ[Pas d’icône],OQ\DSDVGHUpVHDX[:L)LjSRUWpHRXODUDGLR:L)LHVWGpVDFWLYpH1. Activez la radio Wi-Fi si ce n’est pas déjà fait. Pour activer le Wi-Fi :a. Allez à l’écran: Touchez l’icône Accueil.b. Ouvrez l’écran Lanceur : Touchez l’onglet Lanceur, puis Paramètres.c. 2XYUH]OHPHQX6DQV¿OHWUpVHDX[Touchez SANS FIL ET RESEAUX.d. 2XYUH]OHPHQX3DUDPqWUHV:L)LTouchez WiFi.e. $VVXUH]YRXVTXHO¶RSWLRQ:L)LHVWDFWLYpHTouchez et faites glisser la case de droite pour activer la connexion Wi-Fi.](https://usermanual.wiki/Coby-Communications/MID4331/User-Guide-1903794-Page-103.png)
![Français Page 104 Connexion À Internet /RUVTXH:L)LHVWDFWLYpODWDEOHWWHYDUHFKHUFKHUHWDI¿FKHUXQHOLVWHGHVUpVHDX[:L)LGLVSRQLEOHV Si le réseau auquel vous étiez préalablement connecté est trouvé, la tablette s’y connecte automatiquement. Si la liste ne comprend aucun réseau, vous pouvez forcer la tablette à rechercher de nou-veau les réseaux à portée. Pour rechercher des réseaux, touchez l’icône Rechercher si-tué dans le coin supérieur droit de l’écran. 2. Sélection d’un réseau Wi-Fi disponible pour s’y connecter :'DQVOHPrPHPHQXGHVSDUDPqWUHVUpVHDX:L)LFLGHVVXVWRXFKH]XQUpVHDXGHODOLVWH6LOHUpVHDXHVWRXYHUWODWDEOHWWHYRXVLQYLWHjFRQ¿UPHUla connexion au réseau. Touchez Connecter pour FRQ¿UPHU6LOHUpVHDXHVWVpFXULVpLQGLTXpSDUXQLF{QHGHYHUrouillage), la tablette vous invite à entrer un mot de passe RXDXWUHVLQIRUPDWLRQVG¶LGHQWL¿FDWLRQ7RXFKH]ODFDVHPRWGHSDVVHVDQV¿OSRXUDI¿FKHUOHFODYLHUjO¶pFUDQpour entrer le mot de passe. Touchez Connecter pour FRQ¿UPHU](https://usermanual.wiki/Coby-Communications/MID4331/User-Guide-1903794-Page-104.png)
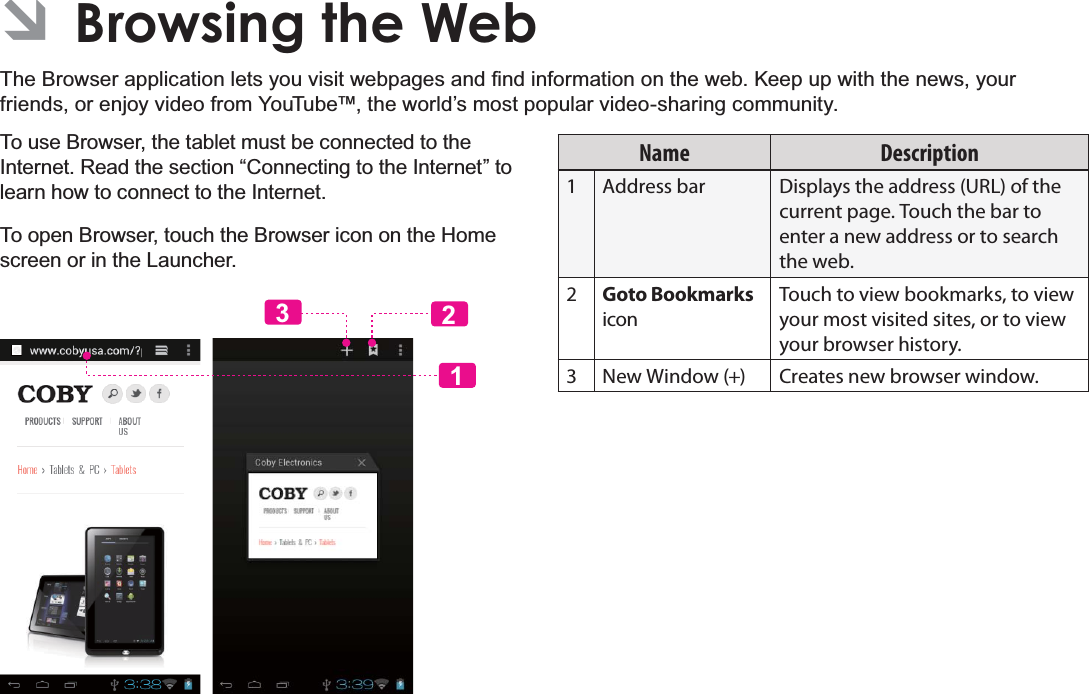
![Français Page 106 Naviguer Sur Le Web ÂNaviguer sur le WebL’application Navigateur vous permet de visiter des pages Web et de rechercher des informations sur le web. Rester au courant des nouvelles, en contact à vos amis, ou regarder des vidéo de YouTube™, la communauté de partage de vidéos la plus populaire au monde.Pour pouvoir utiliser le navigateur, la tablette doit être conQHFWpHj,QWHUQHW5HSRUWH]YRXVjODVHFWLRQ©&RQQH[LRQà Internet » pour savoir comment se connecter à Internet.Pour ouvrir le navigateur, touchez l’icône navigateur sur l’écran accueil ou dans le Lanceur.123Nom Description1 Barre d'adresses Acher l'adresse (URL) de la page courante. Touchez la barre pour entrer une nouvelle adresse ou pour eectuer une recherche sur le Web.2Icône Aller à Favoris Touchez pour acher les marques de pages, acher vos sites les plus visités ou pour acher votre historique de navigation.3 Nouvelle fenêtre (+)Crée une nouvelle fenêtre pour le navigateur.](https://usermanual.wiki/Coby-Communications/MID4331/User-Guide-1903794-Page-106.png)
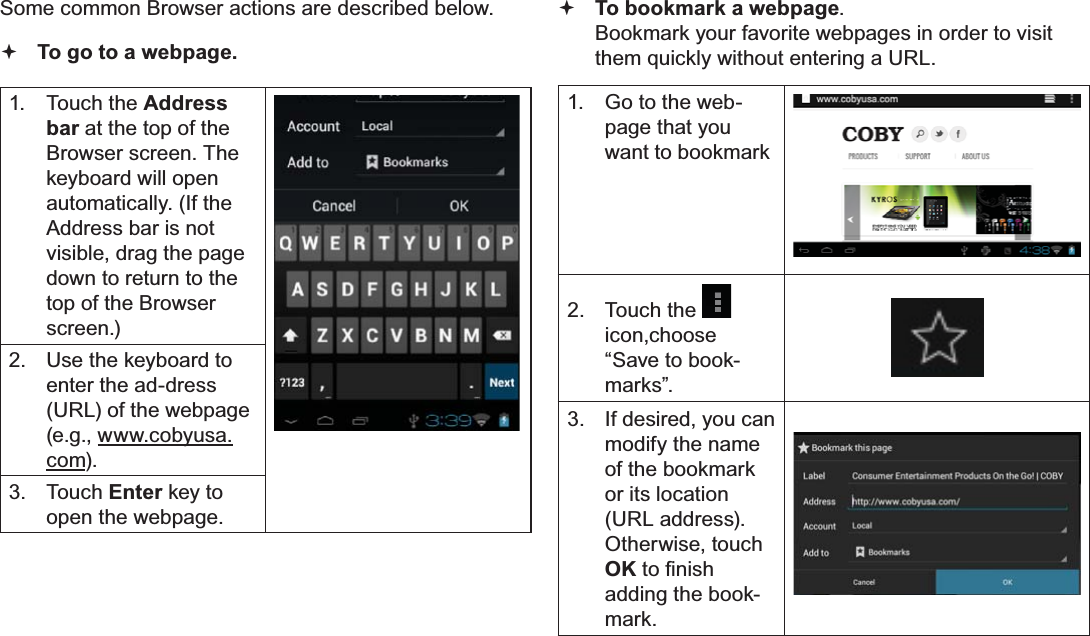
![FrançaisPage 107 Naviguer Sur Le Web9RLFLTXHOTXHVDFWLRQVRUGLQDLUHVGXQDYLJDWHXU Pour aller à une page Web. Touchez la barre d’adresse en haut de l’écran navigateur. /HFODYLHUV¶DI¿FKHDXWRPDWLTXHPHQW6Lla barre d’adresses n’est pas visible, faites glisser la page vers le bas pour retourner en haut de l’écran navigateur.) Utilisez le clavier pour entrer les adresses 85/GHVSDJHV:HEH[www.cobyusa.com). Touchez Entrer pour ouvrir la page Web. Pour marquer une page web. 0DUTXH]YRVSDJHVZHEIDYRULWHVSRXUSRXYRLUOHVconsulter rapidement sans entrer d’URL. Aller à la page :HETXHYRXVsouhaitez marTXHU Touchez l’icône , touchez ©$MRXWHUDX[favoris ». Vous pouvez changer le nom GHODPDUTXHde page ou son emplacement DGUHVVH85/Touchez OK pour WHUPLQHUO¶DMRXWGHPDUTXHGHSDJH](https://usermanual.wiki/Coby-Communications/MID4331/User-Guide-1903794-Page-107.png)
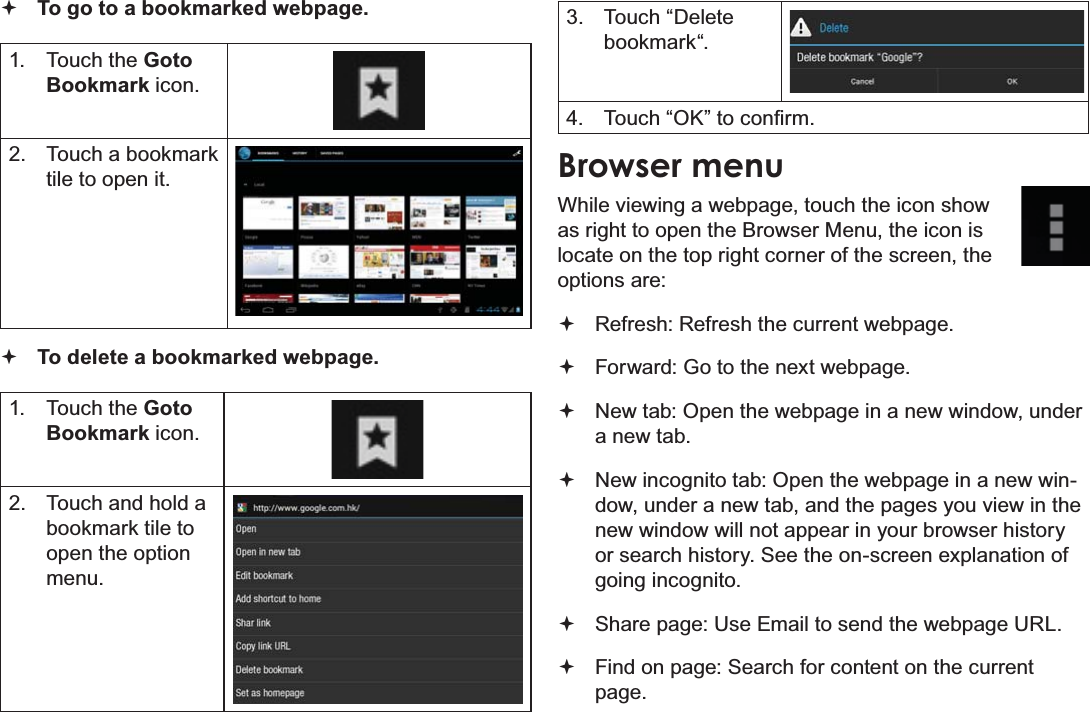
![Français Page 108 Naviguer Sur Le Web Pour aller à une marque de page Web. Touchez l'icône Aller à une marque de page. Touchez l'icône d’une marque de page pour l'ouvrir. Pour supprimer une marque de page Touchez l'icône Aller à une PDUTXHGHSDJH 0DLQWHQH]WRXFKpun icône de PDUTXHGHSDJHpour ouvrir le menu options. Touchez « Supprimer la PDUTXHGHSDJHª 7RXFKH]©2.ªSRXUFRQ¿UPHUMenu navigateur/RUVTX¶XQHSDJH:HEHVWDI¿FKpHWRXFKH]l’icône de droite pour ouvrir le menu navigateur, l’icône se trouve au coin supérieur droit de l’écran, les options sont : Actualiser : Actualise la page web courante. Suivant : Aller à la page web suivante. Nouvel onglet : Ouvrir la page Web dans une nouvelle fenêtre, sous un nouvel onglet. Nouvel onglet incognito : Ouvrir une page Web dans une nouvelle fenêtre, sous un nouvel onglet, et les SDJHVTXHYRXVFRQVXOWH]GDQVODQRXYHOOHIHQrWUHQ¶DSSDUDvWURQWSDVGDQVYRWUHKLVWRULTXHGHQDYLJDWLRQRXO¶KLVWRULTXHGHUHFKHUFKH5HSRUWH]YRXVjl’explication à l’écran d’incognito. Partager la page : Envoyer les URL de page Web par HPDLO](https://usermanual.wiki/Coby-Communications/MID4331/User-Guide-1903794-Page-108.png)
![FrançaisPage 109 Naviguer Sur Le Web Rechercher dans la page : Recherche un contenu dans la page en cours. Demande du site du bureau : Enregistrer pour lecture hors ligne : Enregistrer cette page dans la mémoire interne pour pouvoir la lire ORUVTXHODFRQQH[LRQ,QWHUQHWHVWGpVDFWLYpH ,QIRUPDWLRQVVXUODSDJH$I¿FKHUGHVLQIRUPDWLRQVconcernant la page actuelle, y compris l’URL. 3DUDPqWUHV3HUVRQQDOLVH]OHQDYLJDWHXU](https://usermanual.wiki/Coby-Communications/MID4331/User-Guide-1903794-Page-109.png)
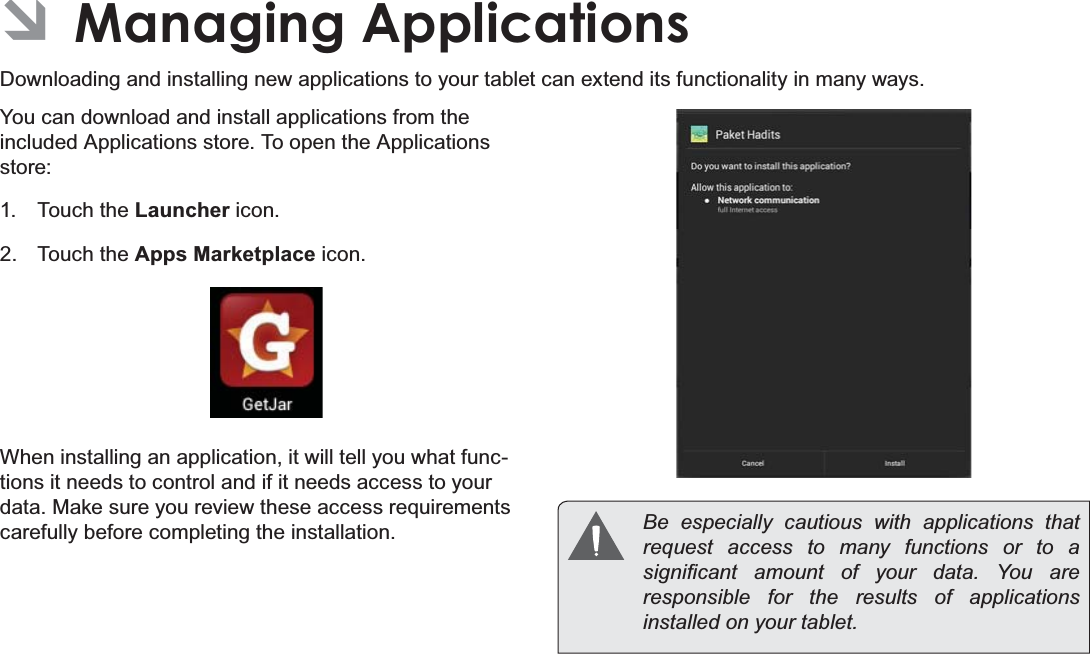
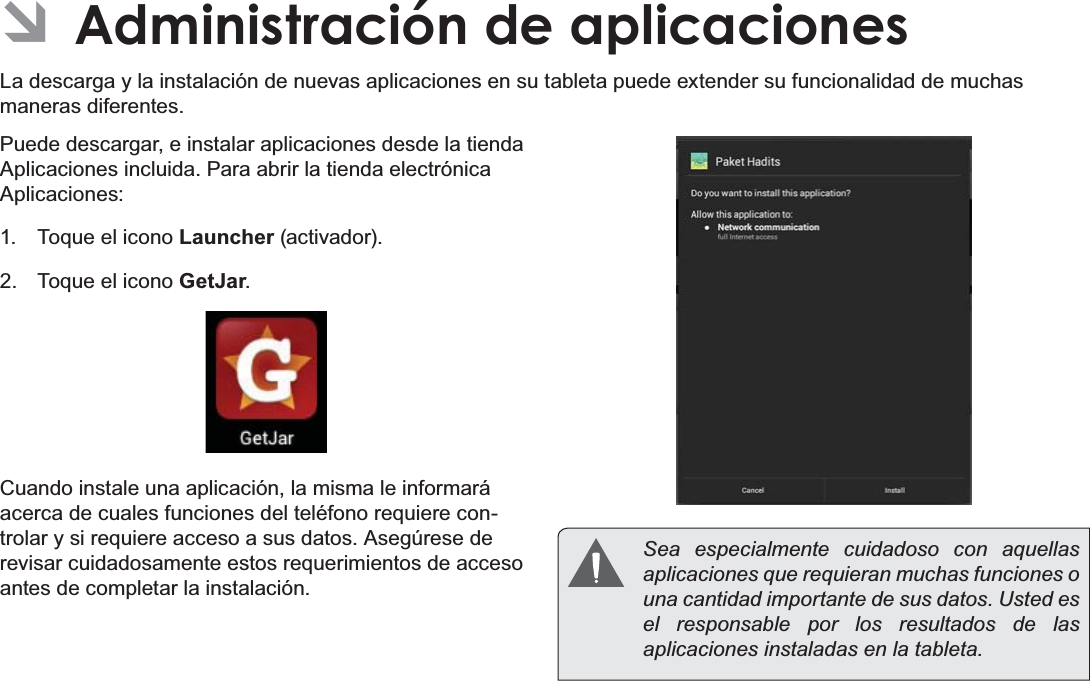
![Français Page 110 Gestion Des Applications ÂGestion des ApplicationsLe téléchargement et l’installation de nouvelles applications sur votre tablette peuvent étendre ses fonctionnalités de SOXVLHXUHVIDoRQVVous pouvez télécharger et installer des applications à partir du magasin Applications inclus. Pour ouvrir le magasin Applications : Touchez l’icône Launcher'LVSRVLWLIGH/DQFHPHQW Touchez l’icône GetJar.Quand vous installez une application, il vous sera montré TXHOOHVIRQFWLRQVGXWpOpSKRQHHOOHDEHVRLQGHFRQWU{OHUHWVLHOOHDEHVRLQG¶XQDFFqVjYRVGRQQpHV$VVXUH]vous de passer soigneusement en revue ces exigences G¶DFFqVDYDQWGHWHUPLQHUO¶LQVWDOODWLRQ Faites très attention avec les applications qui demandent l’accès à beaucoups de fonctions ou à un montant important de vos données. Vous êtes responsable pour les résultats des applications installées sur votre tablette.](https://usermanual.wiki/Coby-Communications/MID4331/User-Guide-1903794-Page-110.png)
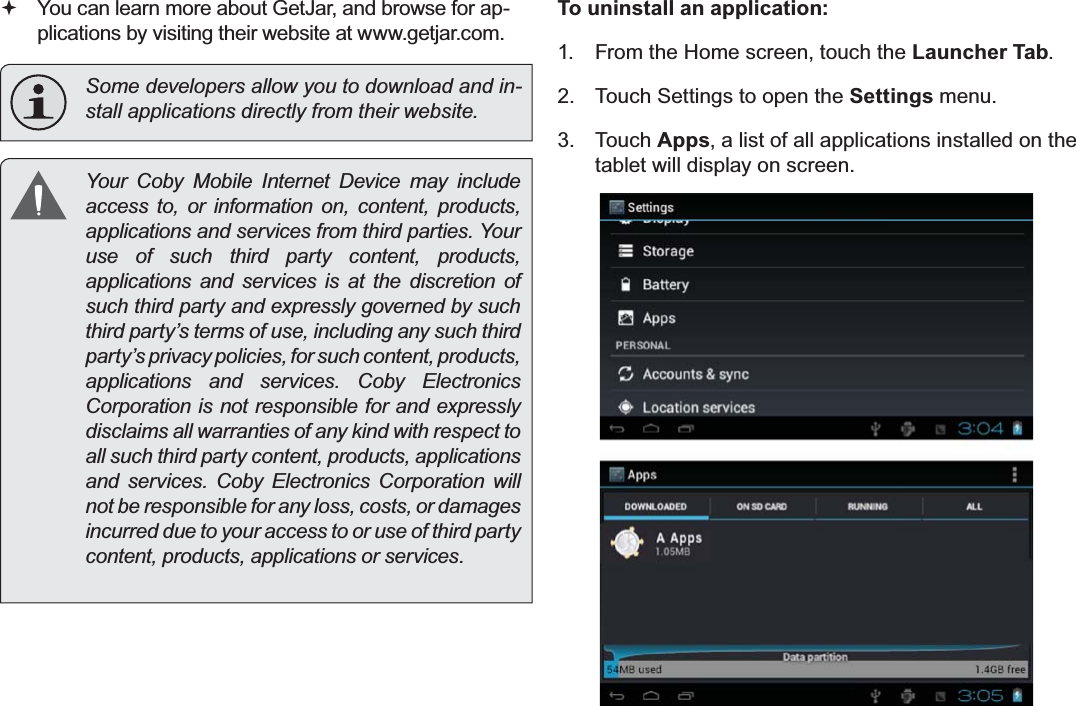
![FrançaisPag e 111 Gestion Des Applications Vous pouvez en apprendre davantage sur GetJar, et naviguer pour des applications en visitant leur site Web à ZZZJHWMDUFRP.Quelques développeurs vous permettent de té-lécharger et d’installer des applications directe-ment à partir de leur site web. Votre appareil Coby Mobile Internet peuvent inclure l’accès à, ou des informations sur, contenus, produits, applications et services de tierces parties. Votre utilisation du contenu de ce tiers, de produits, applications et services est à la discrétion de ce tiers et expressément régie par les termes de ce tiers de la consommation, y FRPSULV OHV SROLWLTXHV GH FRQ¿GHQWLDOLWp WRXWtiers, pour un tel contenu, produits, applications et services. Coby Electronics Corporation n’est pas responsable et décline expressément toute garantie d’aucune sorte à l’égard de tous les contenus de tiers, ces produits, applications et services. Coby Electronics Corporation ne sera pas responsable de toute perte, coût ou dommage résultant de votre accès ou utilisation du contenu de tiers, de produits, applications ou services.Pour désinstaller une application: A partir de l’écran d’Accueil, touchez la touche Launcher Tab. 7RXFKH]6HWWLQJV3DUDPqWUHVSRXURXYULUOHPHQXSettings3DUDPqWUHV Touchez Applications SRXUDI¿FKHUXQHOLVWHGHtoutes les applications installées sur la tablette.](https://usermanual.wiki/Coby-Communications/MID4331/User-Guide-1903794-Page-111.png)
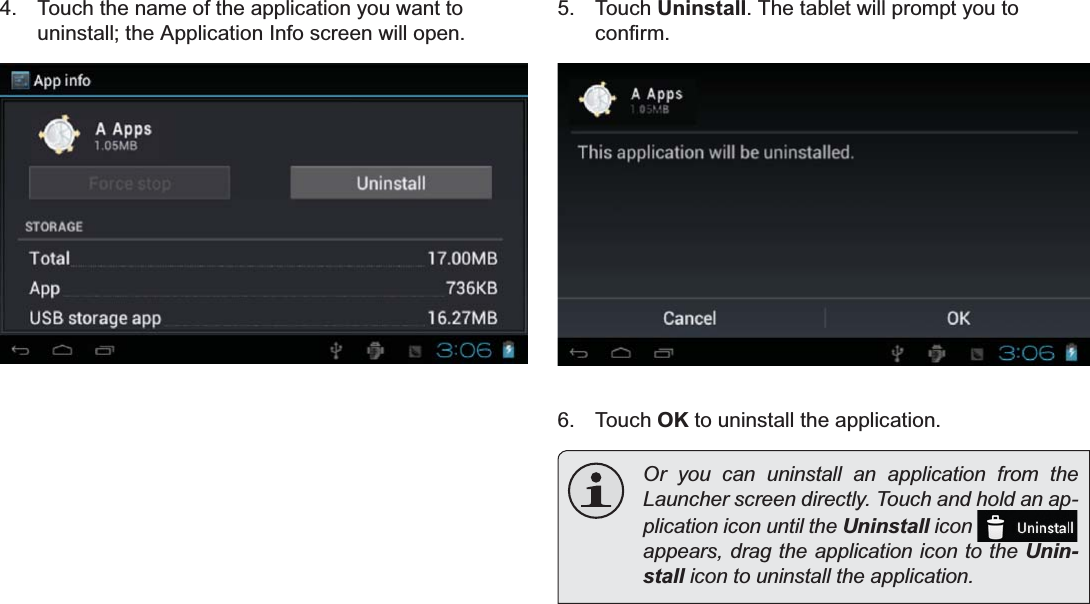
![Français Page 112 Gestion Des Applications 7RXFKH]OHQRPGHO¶DSSOLFDWLRQTXHYRXVVRXKDLWH]désinstaller ; l’écran d’Informations concernant l’Application s’ouvrira.5. Touchez Uninstall'pVLQVWDOOHU/DWDEOHWWHYRXVLQYLWHUDjFRQ¿UPHU6. Touchez OK pour désinstaller l’application. Ou vous pouvez désinstaller une application di-rectement à partir de l’écran Lanceur. Maintenez touché l’icône d’une application jusqu’à ce que l’icône Désinstaller apparaisse , faites glisser l’icône de l’application vers l’icône Désinstaller pour désinstaller l’application.](https://usermanual.wiki/Coby-Communications/MID4331/User-Guide-1903794-Page-112.png)
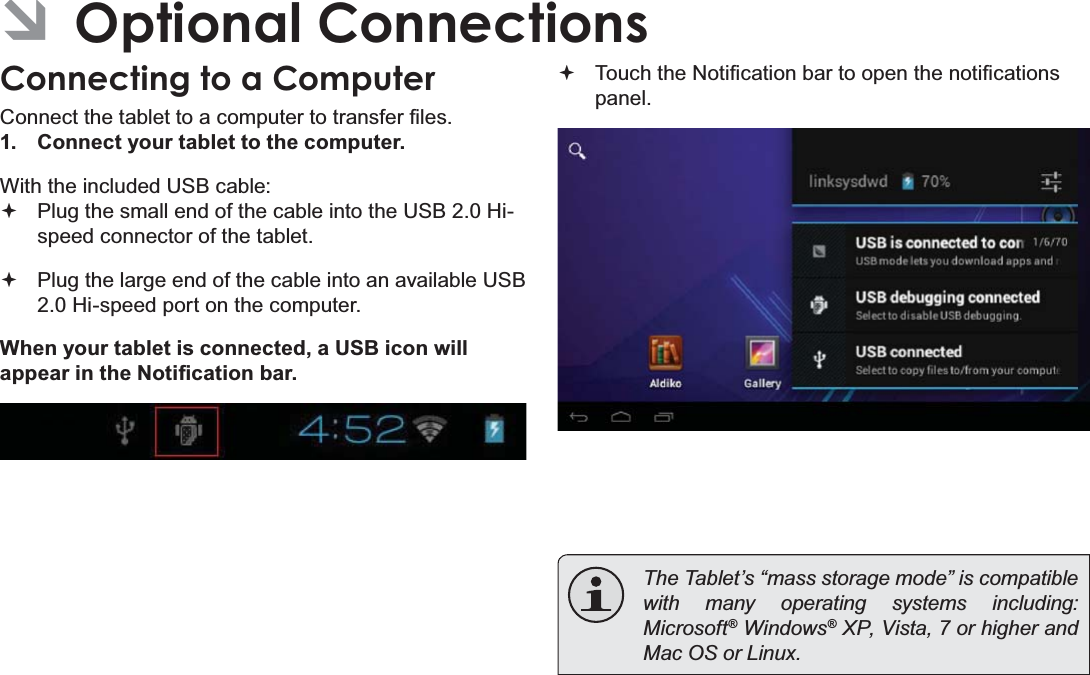
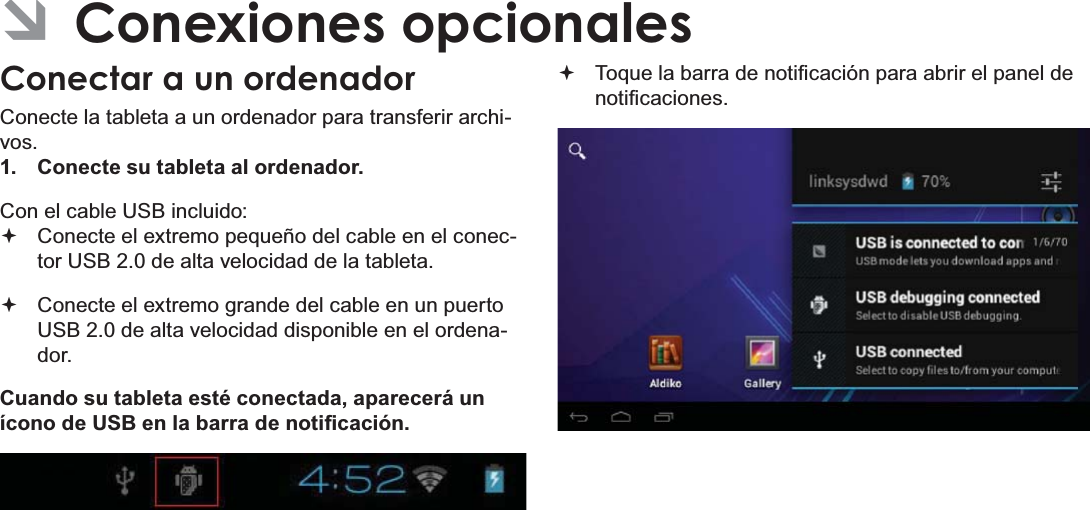
![FrançaisPage 113 Connexions Optionnelles ÂConnexions optionnellesConnexion à un ordinateurConnectez la tablette à un ordinateur pour transférer des ¿FKLHUV1. Connectez votre tablette à l’ordinateurUtilisez le câble USB inclus pour : Brancher le petit connecteur du câble dans le port 86%KDXWHYLWHVVHGHODWDEOHWWH Brancher le grand connecteur du câble dans un port 86%KDXWHYLWHVVHGHO¶RUGLQDWHXUUne fois la tablette est connectée, un icône USB DSSDUDvWUDGDQVODEDUUHGHQRWL¿FDWLRQ 7RXFKH]ODEDUUHGH1RWL¿FDWLRQSRXURXYULUOHSDQQHDXGHQRWL¿FDWLRQ](https://usermanual.wiki/Coby-Communications/MID4331/User-Guide-1903794-Page-113.png)
![Français Page 114 Connexions Optionnelles2. Montez le lecteur de stockage. Touchez USB connecté pour monter la mémoire GHVWRFNDJHLQWpJUpHGDQVODWDEOHWWHSXLVWRXFKH]©$FWLYHUOHVWRFNDJH86%ªHW©2.ªORUVTXHYRXVrWHVLQYLWpjFRQ¿UPHU8QHIRLVPRQWpHYRXVSRXYH]FRSLHUGHV¿FKLHUVYHUVjSDUWLUGHYRWUHRUGLQDWHXULa tablette sera reconnue par l’ordinateur comme un GLVTXHGHVWRFNDJHDPRYLEOH)DLWHVJOLVVHUGpSRVHUGHV¿FKLHUVHQWUHYRWUHWDEOHWWHHWO¶RUGLQDWHXU3RXUHQVDYRLUSOXVVXUODFRSLHGH¿FKLHUVUHSRUWH]YRXVjODGRFXPHQWDWLRQIRXUQLHDYHFYRWUHRUGLQDWHXURXV\VWqPHd’exploitation.Connexion de casque d’écoute&RQQHFWH]XQFDVTXHG¶pFRXWHRXRUHLOOHWWHVjODtablette pour écouter des contenus multimédias en privé.Baissez le niveau de volume de la tablette avant de EUDQFKHUXQFDVTXHSXLVDXJPHQWH]SURJUHVVLYHPHQWOHvolume à un niveau d’écoute confortable. /HFDVTXHGRLWrWUHGRWpG¶XQFRQQHFWHXUPPpo). /HVRQVHUDDXWRPDWLTXHPHQWFRXSpGqVTXHGHVécouteurs sont connectés. Les spécialistes de l’audition déconseillent l’utilisation constante de baladeurs à un volume élevé. Une exposition permanente à des volumes élevés peut entraîner une perte auditive. Si vous ressentez des bourdonnements d’oreille ou des pertes d’audition, veuillez interrompre immédiatement le fonctionnement de votre appareil et consulter un médecin.](https://usermanual.wiki/Coby-Communications/MID4331/User-Guide-1903794-Page-114.png)
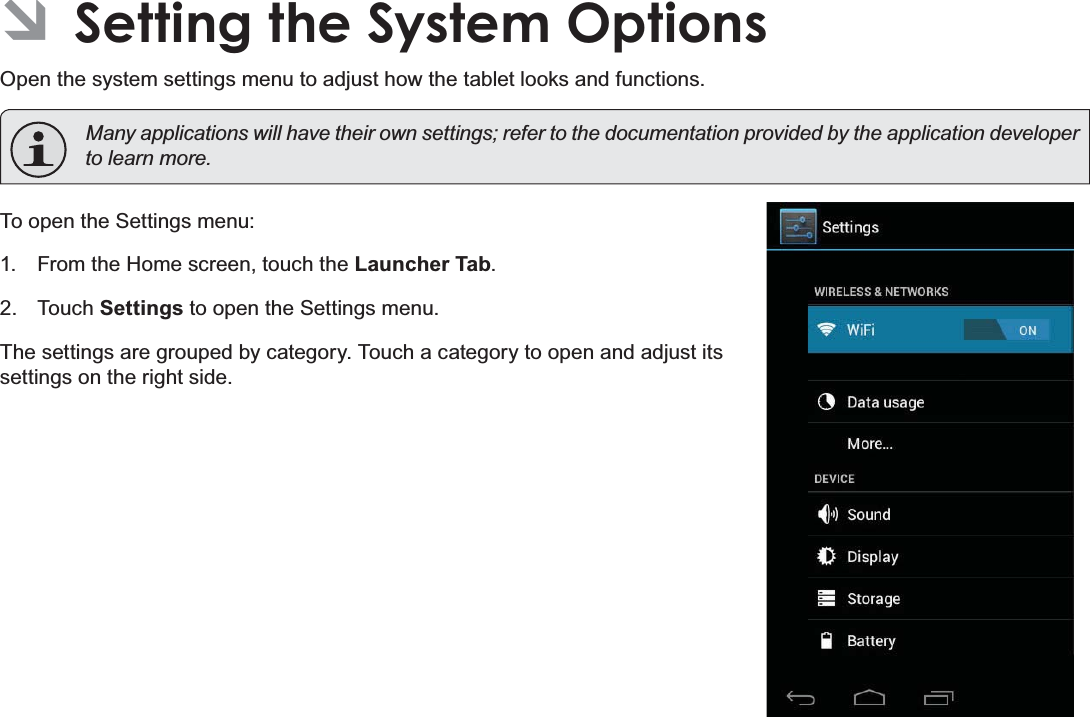
![FrançaisPage 115 &RQÀJXUDWLRQ'HV2SWLRQV'X6\VWqPH Â&RQÀJXUDWLRQGHVRSWLRQVGXV\VWqPH2XYUH]OHPHQXSDUDPqWUHVV\VWqPHSRXUFRQ¿JXUHUODSUpVHQWDWLRQHWOHIRQFWLRQQHPHQWGHODWDEOHWWH De nombreuses applications ont leurs propres paramètres, reportez-vous à la documentation fournie par le développeur de l’application pour en savoir plus.3RXURXYULUOHPHQX3DUDPqWUHV Touchez l’onglet Lanceur dans l’écran accueil. Touchez ParamètresSRXURXYULUOHPHQX3DUDPqWUHV/HVSDUDPqWUHVVRQWUHJURXSpVSDUFDWpJRULH7RXFKH]XQHFDWpJRULHSRXURXYULUHWUpJOHUVHVSDUDPqWUHVVXUOHF{WpGURLW](https://usermanual.wiki/Coby-Communications/MID4331/User-Guide-1903794-Page-115.png)
![FrançaisPage 117 Assistance ÂAssistance6LYRXVUHQFRQWUH]XQSUREOqPHDYHFFHWDSSDUHLOFRQVXOWH]QRWUHVLWH,QWHUQHWwww.cobyusa.comSRXUYpUL¿HUODGLVSRQLELOLWpGHVPLVHVjMRXUGHPLFURORJLFLHOVHWOHV)$44XHVWLRQVOHVSOXVIUpTXHPPHQWSRVpHV6LFHVUHVVRXUFHVQHYRXVDLGHQWSDVjUpVRXGUHOHSUREOqPHYHXLOOH]FRQWDFWHUOHVHUYLFHG¶DVVLVWDQFHWHFKQLTXH&RE\(OHFWURQLFV7HFKQLFDO6XSSRUWCourriel : techsupport@cobyusa.comInternet : www.cobyusa.comNuméro de Téléphone : 3RXUOHVUpVLGHQWVGHV86/XQGL±9HQGUHGL±(67 3RXUOHVUpVLGHQWVFDQDGLHQV/XQGL±9HQGUHGL±(67](https://usermanual.wiki/Coby-Communications/MID4331/User-Guide-1903794-Page-117.png)
![Français Page 118 Notices De Sûreté ÂNotices de Sûreté/HV\PEROHHQIRUPHG¶pFODLUÀpFKpSODFpGDQVXQWULDQJOHpTXLODWpUDOLQIRUPHO¶XWLOLVDWHXUGHODSUpVHQFHGH³WHQVLRQVGDQJHUHXVHV´QRQLVROpHVDXVHLQGXERvWLHUGXSURGXLWGRQWO¶DPSOLWXGHSHXWFRQVWLWXHUXQULVTXHGHGpFKDUJHpOHFWULTXH/HSRLQWG¶H[FODPDWLRQSODFpGDQVXQWULDQJOHpTXLODWp-UDOLQIRUPHO¶XWLOLVDWHXUTXHGHVLQVWUXFWLRQVG¶XWLOLVDWLRQHWGHPDLQWHQDQFHLPSRUWDQWHVVRQWIRXUQLHVGDQVODGRFXPHQWDWLRQTXLDFFRPSDJQHOHSURGXLW Pour de plus amples informations sur le recyclage ou la mise au rebut de ce produit, veuillez contacter les autorités locales ou les représentants de l’EIA (Alliance des industries du secteur de l’électronique) : www.eiae.org.Information client :1RWH]FLDSUqVOHQXPpURGHVpULHVLWXpVXUO¶DSSDUHLO&RQVHUYH]FHVLQIRUPDWLRQVSRXUSRXYRLUYRXV\UpIpUHUXOWpULHXUHPHQW1XPpURGX0RGqOH1XPpURGH6pULHAVERTISSEMENT :$¿QG¶pYLWHUWRXWULVTXHG¶LQFHQGLHRXGHGpFKDUJHpOHFWULTXHQ¶H[SRVH]SDVFHWDSSDUHLOjODSOXLHRXjO¶KXPLGLWp/HERvWLHUUHQIHUPHGHVWHQVLRQVpOHYpHVGDQJHUHXVHV1¶RXYUH]SDVOHERvWLHUGHO¶DSSDUHLOProtégez votre audition : /HVVSpFLDOLVWHVGHO¶DXGLWLRQGpFRQVHLOOHQWO¶XWLOLVDWLRQSURORQJpHG¶pFRXWHXUVVWpUpRjXQQLYHDXGHYROXPHpOHYp/¶pFRXWHjXQQLYHDXGHYROXPHpOHYpFRQVWDQWSHXWSURYRTXHUGHVSHUWHVDXGLWLYHV6LYRXVVRXIIUH]GHERXUGRQQHPHQWVGDQVOHVRUHLOOHVRXGHSHUWHG¶DXGLWLRQDUUrWH]G¶XWLOLVHUOHVpFRXWHXUVHWFRQVXOWH]YRWUHPpGHFLQRemarque :6LFHSURGXLWV¶pWHLQWVRXGDLQHPHQWRXQHIRQFWLRQQHSOXVLOHVWSRVVLEOHTXHFHODVRLWGjXQHGpFKDUJHpOHFWURVWDWLTXH'DQVFHFDVYHXLOOH]SURFpGHUGHFHWWHPDQLqUH (WHLJQH]O¶DSSDUHLOHQDSSX\DQWGRXFHPHQWVXUOHERXWRQ5(6(75(,1,7,$/,6$7,21 5DOOXPH]O¶DSSDUHLO](https://usermanual.wiki/Coby-Communications/MID4331/User-Guide-1903794-Page-118.png)
![FrançaisPage 119 Notices De SûretéDéclaration FCC&HWDSSDUHLOHVWFRQIRUPHDYHFODVHFWLRQGHV5qJOHV)&&/HIRQFWLRQQHPHQWHVWVXMHWDX[GHX[FRQGLWLRQVVXLYDQWHV &HWDSSDUHLOQHSHXWFDXVHUG¶LQWHUIpUHQFHVGDQJHUHXVHVHW &HWDSSDUHLOGRLWDFFHSWHUWRXWHLQWHUIpUHQFH\FRPSULVXQHLQWHUIpUHQFHSRXYDQWFDXVHUXQHDFWLRQQRQVRXKDLWpHNote: &HWpTXLSHPHQWDpWpWHVWpHWGpFODUpFRQIRUPHDX[OLPLWHVGHODFODVVH%GHVpTXLSHPHQWVGLJLWDX[FRQIRUPpPHQWjODVHFWLRQGHV5qJOHV)&&&HVOLPLWHVRQWpWpFUppHVSRXUIRXUQLUXQHSURWHFWLRQUDLVRQQDEOHFRQWUHGHVLQWHUIpUHQFHVQpIDVWHVDXVHLQG¶XQHLQVWDOODWLRQUpVLGHQWLHOOH&HWpTXLSHPHQWJpQqUHXWLOLVHHWSHXWpPHWWUHGHO¶pQHUJLHGHIUpTXHQFHUDGLRTXLVLQRQLQVWDOOpHHWXWLOLVpHFRUUHFWHPHQWSRXU-UDLWFDXVHUGHVLQWHUIpUHQFHVQpIDVWHVDX[FRPPXQLFDWLRQVUDGLR&HSHQGDQWLOQ¶\DDXFXQHJDUDQWLHTX¶LOQ¶\DXUDSDVG¶LQWHUIpUHQFHV6LFHWDSSDUHLOFDXVHGHVLQWHUIpUHQFHVVXUODUpFHSWLRQUDGLRRXWpOpFHTXLSHXWrWUHGpWHUPLQpHQDOOXPDQWHWHQpWHLJQDQWFHWDSSDUHLOQRXVYRXVHQFRXUDJHRQVjHVVD\HUGHFRUULJHUODVLWXDWLRQGHODPDQLqUHVXLYDQWH 5pRULHQWH]RXFKDQJH]ODSRVLWLRQGHO¶DQWHQQH $XJPHQWH]ODVpSDUDWLRQHQWUHO¶DSSDUHLOHWOHUpFHSWHXU %UDQFKH]O¶DSSDUHLOjXQHSULVHGLIIpUHQWHGHFHOOHGXUpFHSWHXU &RQVXOWH]YRWUHUHSUpVHQWDQWHQYHQWHVRXXQWHFKQLFLHQTXDOL¿p/¶XWLOLVDWLRQGHFkEOHVpOHFWULTXHVSURWpJpVHVWUHTXLVHSRXUrWUHFRQIRUPHDX[OLPLWHVGHODFODVVH%HWODVRXVSDUWLH%GHODVHFWLRQGHVUqJOHV)&&1HSDVHIIHFWXHUGHFKDQJHPHQWVRXGHPRGL¿FDWLRQVDFHWDSSDUHLOjPRLQVTXHFHODQHVRLWLQGLTXpGDQVFHPDQXHO6LGHWHOOHVPRGL¿FD-WLRQVGHYDLHQWrWUHIDLWHVLOIDXGUDSHXWrWUHTXHYRXVDUUrWLH]G¶XWLOLVHUFHWDSSDUHLODéclaration FCC sur l’exposition aux radiations: &HWpTXLSHPHQWHVWFRQIRUPHDX[OLPLWHVG¶H[SRVLWLRQDX[UD\RQQHPHQWVGHOD)&&Gp¿QLHVSRXUXQHQYLURQQHPHQWQRQFRQWU{Op/¶XWLOLVDWHXU¿QDOGRLWVXLYUHOHVLQVWUXFWLRQVGHIRQFWLRQQHPHQWVSpFL¿TXHVSRXUVDWLVIDLUHODFRQIRUPLWpDX[H[SRVLWLRQV5)&HWpPHWWHXUQHGRLWSDVrWUHFRORFDOLVpHVRXRSpUDQWHQFRQMRQFWLRQDYHFXQHDXWUHDQWHQQHRXXQDXWUHpPHWWHXU](https://usermanual.wiki/Coby-Communications/MID4331/User-Guide-1903794-Page-119.png)
![Français Page 120 Notices De SûretéConsignes de Sécurité Importantes Lisez les directives : Veuillez lire l’intégralité des consignes de sécurité et d’utilisation avant de mettre l’appareil en service. Conservez ces directives : Vous devriez conserver ces consignes de sécurité et d’utilisation pour référence future. Tenez compte de ces avertissements : Vous devriez respecter tous les avertissements et toutes les instructions pour ce produit. Suivez les instructions : Vous devez suivre toutes les directives d’utilisation.5. Nettoyage : Débranchez ce produit avant de le netWR\HU 1H SDV XWLOLVHU GH QHWWR\DQWV OLTXLGHV RX HQaérosol. Utilisez un chiffon humide pour nettoyer.6. $WWDFKHV1¶XWLOLVH]TXHOHVDWWDFKHVUHFRPPDQGpHVpar le fabricant. L’utilisation d’autres attaches pourrait être dangereuse. Eau et humidité : N’utilisez pas ce produit à proxLPLWpG¶XQHVRXUFHG¶KXPLGLWpQRWDPPHQWSUqVG¶XQHbaignoire, d’un lavabo, d’un évier de cuisine ou d’une EXDQGHULH GDQV XQ VRXVVRO KXPLGH RX SUqV G¶XQHpiscine ou endroits analogues). Ventilation : Les fentes et ouvertures du boîtier sont SUpYXHV SRXU OD YHQWLODWLRQ D¿Q G¶DVVXUHU OH IRQFWLRQQHPHQW ¿DEOH GX SURGXLW HW GH OH SURWpJHU FRQtre une éventuelle surchauffe. Ces ouvertures ne GHYUDLHQWMDPDLVrWUHEORTXpHVSDUXQOLWXQFDQDSpXQWDSLVRXVLPLODLUH&HSURGXLWQHGHYUDLWMDPDLVrWUHSRVpVXUXQHLQVWDOODWLRQPXUDOHFRPPHXQHpWDJqUHjPRLQVTXHODYHQWLODWLRQQHVRLWDGpTXDWHHWTXHOHVinstructions du fabricant n’aient été suivies. 6RXUFHVGHFRXUDQW%UDQFKH]V\VWpPDWLTXHPHQWFHWDSSDUHLOVXUXQHVRXUFHG¶DOLPHQWDWLRQGXW\SHLQGLTXpVXUO¶pWLTXHWWHVLJQDOpWLTXH6LYRXVQ¶rWHVSDVFHUWDLQdu type de courant, demandez à votre représentant commercial ou à votre compagnie d’électricité. Pour les produits fonctionnant avec une pile ou autres sources, veuillez consulter les instructions. Surcharge : Ne pas faire de multiples branchements GDQVOHVSULVHVDYHFOHVUDOORQJHVpOHFWULTXHVRXGHVmultiprises car cela pourrait entraîner un incendie ou une électrocution. ,QVHUWLRQ G¶REMHW RX GH OLTXLGH 1¶LQVpUH] MDPDLVG¶REMHWVGHTXHOTXHVRUWHTXHFHVRLWGDQVFHWDSSDreil par le biais des fentes car ils pourraient entrer en FRQWDFWDYHFGHVSRLQWVGHYROWDJHRXFRXUWFLUFXLWHUGHVpOpPHQWVSURYRTXDQWDLQVLXQULVTXHG¶LQFHQGLHRXGHFKRFpOHFWULTXH1HMDPDLVUHQYHUVHUGHOLTXLGHsur cet appareil. 0DLQWHQDQFH 1H WHQWH] SDV GH UpSDUHU FH SURGXLWYRXVPrPH2XYULURXHQOHYHUO¶HQYHORSSHGXSURGXLWpourrait vous exposer à un voltage dangereux ou à](https://usermanual.wiki/Coby-Communications/MID4331/User-Guide-1903794-Page-120.png)
![FrançaisPage 121 Notices De SûretéG¶DXWUHVULVTXHV1HIDLUHDSSHOTX¶jGHVSURIHVVLRQQHOVTXDOL¿pV 'pJkWV UHTXpUDQW GHV UpSDUDWLRQV 'pEUDQFKH] FHWDSSDUHLOHWFRQ¿H]OHjXQSURIHVVLRQQHOTXDOL¿pGDQVOHVFDVGH¿JXUHVXLYDQWVDOHFRUGRQG¶DOLPHQWDWLRQest endommagé ou la prise est défectueuse ; b) du OLTXLGHV¶HVWGpYHUVpGDQVO¶DSSDUHLORXGHVREMHWVV¶\sont glissés ; c) l’appareil est entré en contact avec de la pluie ou de l’eau ; d) l’appareil ne fonctionne pas corUHFWHPHQWELHQTXHOHVFRQVLJQHVG¶LQVWDOODWLRQDLHQWpWp UHVSHFWpHV (IIHFWXH] XQLTXHPHQW OHV UpJODJHVLQGLTXpVGDQVOHVFRQVLJQHVG¶LQVWDOODWLRQFDUG¶DXWUHVUpJODJHVLQFRUUHFWVULVTXHQWGHSURYRTXHUGHVGRPmages nécessitant la plupart du temps l’intervention SURORQJpH G¶XQ WHFKQLFLHQ TXDOL¿p SRXU UHVWDXUHU OHfonctionnement normal du produit ; e) l’appareil est tombé ou endommagé ; f) l’appareil vous semble netWHPHQW PRLQV SHUIRUPDQW TX¶DXSDUDYDQW LQGLTXDQWainsi la nécessité de recourir à une réparation.3LqFHVGpWDFKpHV6LGHVSLqFHVGpWDFKpHVVRQWUHTXLVHV DVVXUH]YRXV TXH OH WHFKQLFLHQ XWLOLVH OHVPrPHVSLqFHVTXHOHIDEULFDQWRXGHVSLqFHVD\DQWOHV PrPHV FDUDFWpULVWLTXHV TXH OHV RULJLQDOHV 'HVsubstitutions non autorisées pourraient causer un incendie, une électrocution ou autres dangers. Contrôle de routine : Si des réparations ont été effectuées sur ce produit, demandez au technicien de faire les contrôles de sécurité recommandés par le fabriFDQWD¿QGHGpWHUPLQHUTXHO¶DSSDUHLOHVWHQERQQHcondition de fonctionnement. &KDOHXU1¶LQVWDOOH]SDVFHSURGXLWSUqVGHVRXUFHVde chaleur, notamment des radiateurs, des bouches de chauffage, des poëles ou d’autres appareils géQpUDQWGHODFKDOHXU\FRPSULVGHVDPSOL¿FDWHXUVAvis Juridiques et de la Marque&RE\HW.\URVVRQWGHVPDUTXHVGHFRPPHUFHGH&RE\(OHFWURQLFV&RUSRUDWLRQ$QGURLGHVWXQHPDUTXHGHFRPPHUFHGH*RRJOH,QF/¶XWLOLVDWLRQGHFHWWHPDUTXHGHFRPPHUFHIDLWO¶REMHWGH3HUPLVVLRQV*RRJOH'HVSDUWLHVGHODPDTXHWWHXWLOLVpHVSRXUFHWWHRIIUHVRQWGHVPRGL-¿FDWLRQVEDVpHVVXUOHWUDYDLOFUppHWSDUWDJpSDU*RRJOHHWXWLOLVpFRQIRUPpPHQWDX[FRQGLWLRQVGpFULWHVGDQVOD/LFHQFHG¶$WWULEXWLRQ&UHDWLYH&RPPRQV+'0,OHORJR+'0,HW+LJK'H¿QLWLRQ0XOWLPHGLD,QWHUIDFHVRQWGHVQRPVFRPPHUFLDX[RXGHVPDUTXHVGpSRVpHVGH+'0,/LFHQVLQJ//&PLFUR6'+&/RJRHVWXQHPDUTXHGpSRVpHGH6'&//&86%HVWXQHPDUTXHGpSRVpHGH86%,PSOHPHQWHUV)RUXP,QF<RX7XEHHVWXQHPDUTXHGpSRVpHGH*RRJOH,QF7RXWHVOHVDXWUHVPDUTXHVGpSRVpHVHWORJRVDSSDUWLHQQHQWjOHXUVGpWHQWHXUVUHVSHFWLIVVDXILQGLFDWLRQFRQWUDLUH](https://usermanual.wiki/Coby-Communications/MID4331/User-Guide-1903794-Page-121.png)