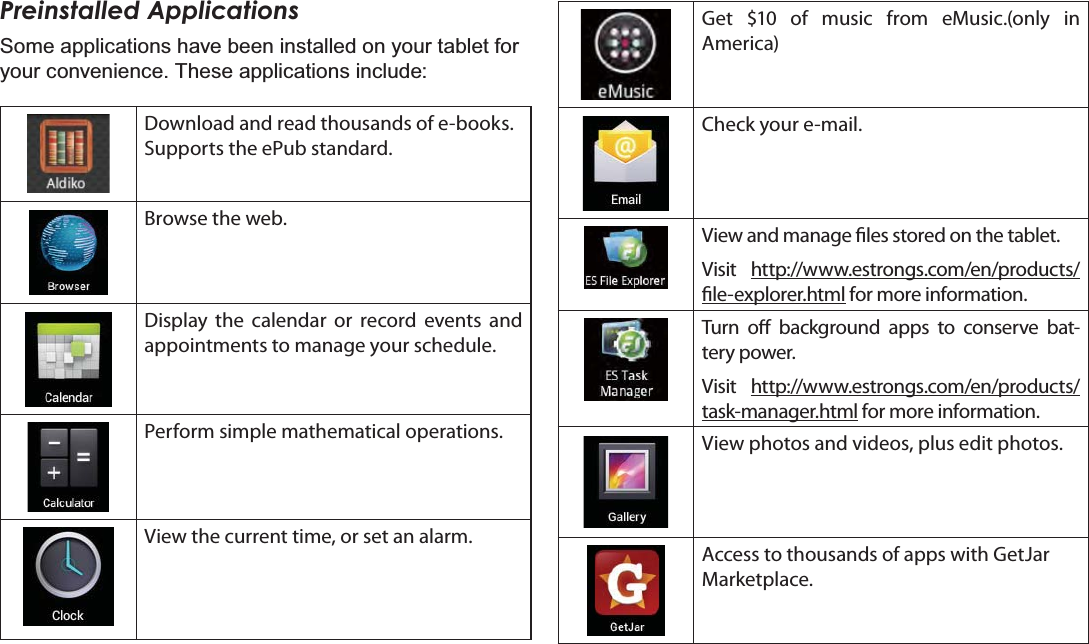
Coby Communications MID7048-7046 Mobile Internet Device User Manual MID7048
Coby Communications Ltd. Mobile Internet Device MID7048
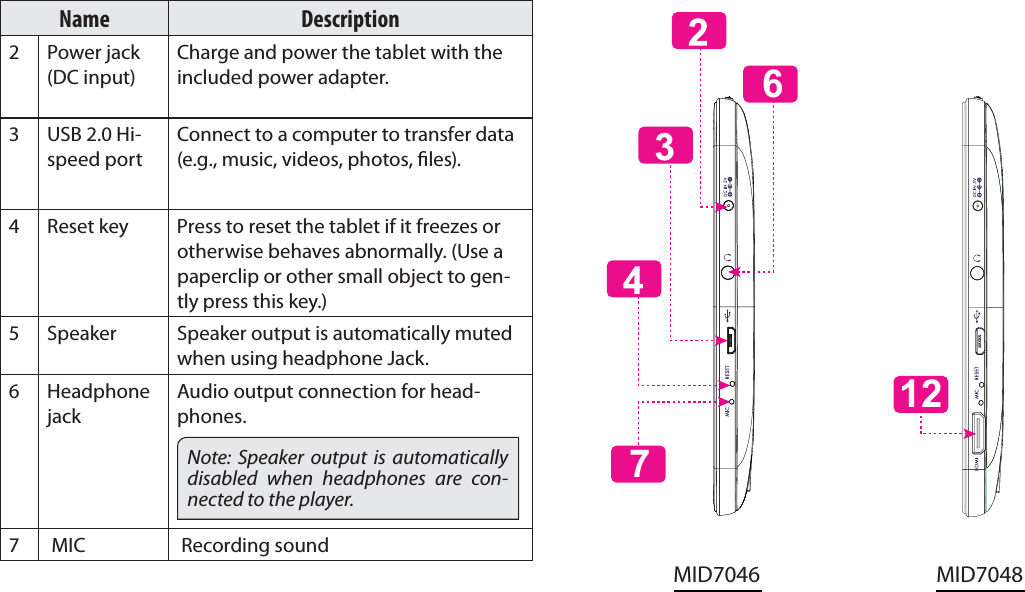
UserManual.wiki
>
Coby Communications
>
MID7048 7046 User Manual
Users Manual
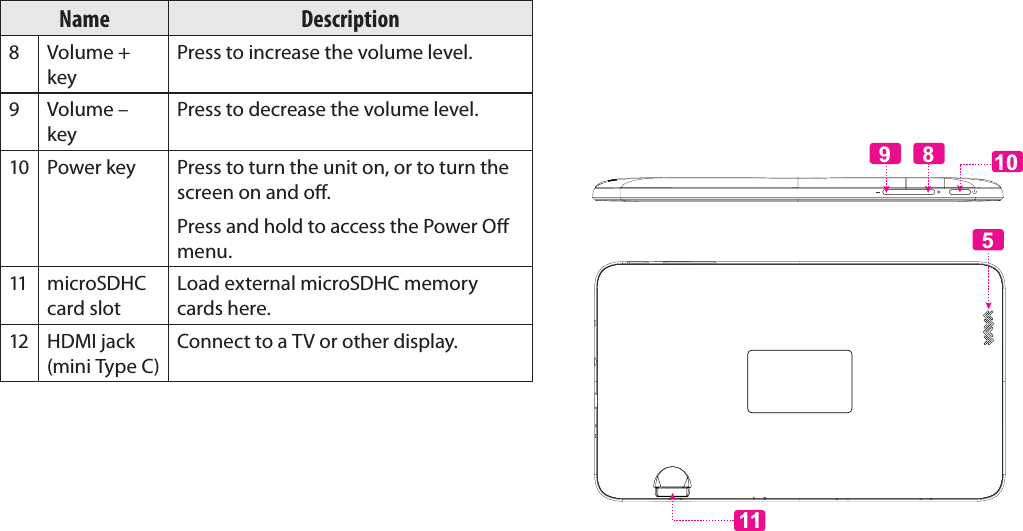
Navigation menu
Upload a User Manual
Namespaces
Wiki Guide
HTML
PDF
Info
Views
User Manual
Discussion / Help
Navigation
![Thank You Page 3EnglishÂThank YouCongratulations on your purchase of a Coby® Kyros®Internet Tablet. This guide is provided to help you get started quickly with your player; please read it carefully and save it for future reference.For detailed instructions, up-to-date information, and helpful tips, please visit the Coby website at www.cobyusa.com.This manual is available for download from the &RE\ZHEVLWHDVD3')¿OHTo view PDF documents, download and install the free Adobe Acrobat reader from the Adobe website at ZZZDGREHFRPPackage ContentsPlease make sure that the items shown below are included in the package. Should an item be missing, please contact the local retailer from which you pur-chased this product.Coby® Kyros® Internet Tablet Protective pouchUSB cablePower adapterThis package may contain plastic bags or other PDWHULDOV WKDW SRVH D KD]DUG WR FKLOGUHQ %Hsure to safely dispose of all packing materials DIWHURSHQLQJ](https://usermanual.wiki/Coby-Communications/MID7048-7046/User-Guide-1821276-Page-3.png)
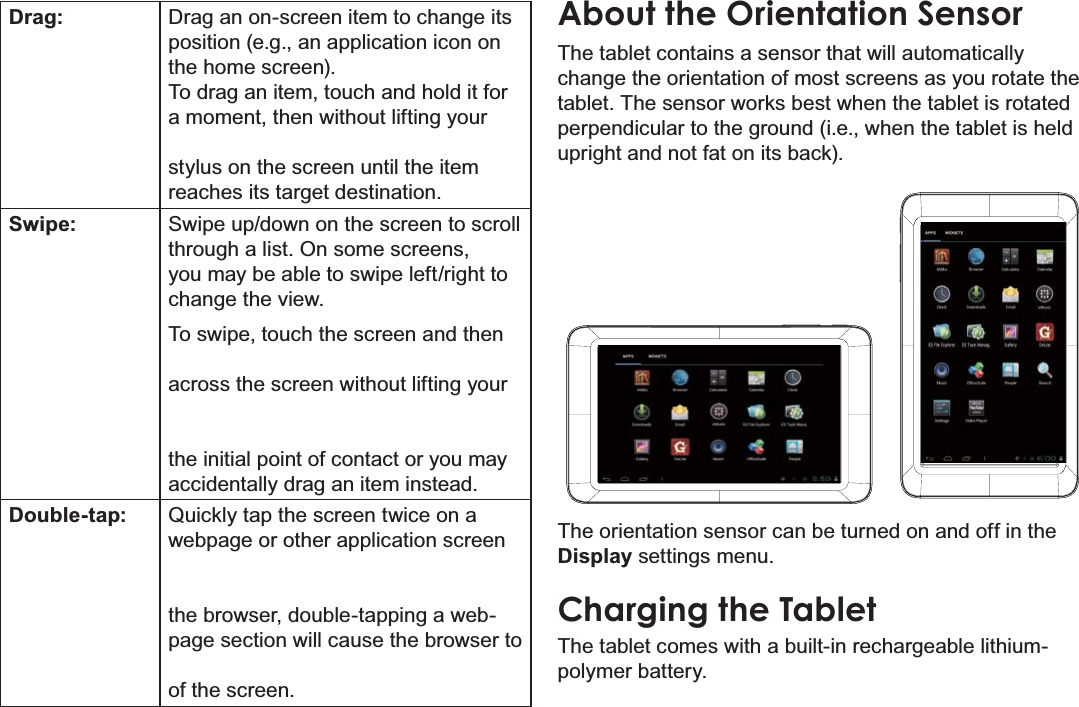
![Page 8 Getting To Know The Internet TabletEnglishAbout the TouchscreenYour tablet comes equipped with an easy-to-use touch-screen.Our MID7046 with resistive touchscreen requires slight pressure on the plastic screen to activate tablet’s func-WLRQV7KLVPD\EHGRQHZLWKDVLQJOH¿QJHURUSODVWLFstylus.Our MID7048 with capacitive multi-touchscreen requires-JHQWOH¿QJHUWLSWRXFKRQWKHJODVVVFUHHQWRDFWLYDWHWDEOHW¶VIXQFWLRQV0XOWLSOH¿QJHUVPD\EHXVHGWRSHU-IRUPJHVWXUHVHJ¿QJHUSLFWXUH]RRP 3OHDVHQRWHRQ0,'<RXU¿QJHUWLSVPXVWQRW EH FRYHUHG $ VW\OXV PD\ EH XVHG 0DNHVXUHLWLVIRUFDSDFLWLYHWRXFKVFUHHQVProtective Film$WKLQ¿OPKDVEHHQDSSOLHGWRWKHWRXFKVFUHHQWRSURWHFWLWGXULQJVKLSSLQJ7KHSURWHFWLYH¿OPVKRXOGEHUHPRYHGEHIRUHXVH7RUHPRYHLWVLPSO\WDNHDFRUQHURIWKH¿OPand peel it away from the screen.Touchscreen ActionsYou can control the functions of the tablet by using the touchscreen. To control the tablet with the touchscreen, XVH\RXU¿QJHUWLSRUVW\OXVWRPDQLSXODWHLFRQVEXWWRQVmenu items, the on-screen keyboard, and other items displayed on the screen.You can perform the following actions on the touchscreen XVLQJ\RXU¿QJHUWLSRUVW\OXVNote: You must use capacitive stylus on multi-WRXFKFDSDFLWLYHVFUHHQVTouch: To activate an on-screen item (e.g., application icons, buttons, menu items, and the letter/symbols of the on-screen keyboard), simply touch WKHPZLWK\RXU¿QJHUWLSRUVW\OXVTouch and Hold:Some on-screen items have an alternate action if you touch and hold it (e.g., opening an alternate menu, or to activate the drag function). To touch and hold an item, touch the item and GRQRWOLIW\RXU¿QJHUWLSVW\OXVXQWLOWKHaction occurs.](https://usermanual.wiki/Coby-Communications/MID7048-7046/User-Guide-1821276-Page-8.png)
![Getting To Know The Internet Tablet Page 11English2. Push the card further into the slot until you hear a click. The card will spring out of the slot.3. Grasp the card by its edge to remove it.To avoid damage and data corruption, do not remove a memory card while data is being written to or read IURPWKHFDUG)RUH[DPSOHGRQRWUHPRYHDFDUGZKLOHSOD\LQJDPXVLF¿OHVWRUHGRQWKHFDUGResetting the Tablet5HVHWWKHWDEOHWLILWVKRXOGIUHH]HDQGQRWUHVSRQGRUotherwise malfunction.1. Disconnect your tablet if it is connected to a com-puter.2. Press the reset button on the bottom of the unit. see “Getting to Know your Internet tablet” section for reference.](https://usermanual.wiki/Coby-Communications/MID7048-7046/User-Guide-1821276-Page-11.png)
![Page 20 Connecting To The InternetEnglishÂConnecting to the Internet7KLVWDEOHWFDQXWLOL]H:L)LGDWDQHWZRUNVWRFRQQHFWWRWKH,QWHUQHWWireless Wi-Fi technology can provide Internet access at distances of over 300 feet; however, this distance can be af-fected by your surrounding environment and Wi-Fi router.In general, being closer to Wi-Fi router improve performance.RequirementsIn order to connect to the Internet, you will need either of the following:A wireless router or access point with a broad-band Internet connectionThe tablet has 802.11 b/g/n Wi-Fi radio. The tablet will also work on wireless routers that only support 802.11 b/g.A minimum connection speed of 64 Kbps is rec-RPPHQGHG)DVWHUVSHHGVZLOOHQDEOHDEHWWHU,QWHUQHWH[SHULHQFHYou will need to know the name of your network (SSID), as well as the password or other credentials if your network is secured. These settings can usually be found on the administration webpage of your wireless router.Please refer to your wireless router’s documentation for help, or ask your network administrator for details.You may encounter open Wi-Fi networks, or “hot VSRWV´ 7KHVH QHWZRUNV DUH XVXDOO\ FRQ¿JXUHGso that you can simply connect to them without needing to know its settings; the tablet will ob-tain all the information it needs from the router DXWRPDWLFDOO\](https://usermanual.wiki/Coby-Communications/MID7048-7046/User-Guide-1821276-Page-20.png)
![Connecting To The Internet Page 21EnglishConnect to a Wi-Fi network7KH1RWL¿FDWLRQEDUGLVSOD\VLFRQVWKDWLQGLFDWH\RXUtablet’s Wi-Fi status.Connected to a Wi-Fi network (waves indicate connection strength).[no icon] There are no Wi-Fi networks in range, or the Wi-Fi radio is off.1. Turn on the Wi-Fi radio if it is not already on. To turn on Wi-Fi:a. Go to the Home screen: Touch the Home icon.b. Open the Launcher screen: Touch the Launcher Tab, then touch Settings.c. Open the Wireless & networks menu: Touch WIRELESS & NETWORKS.d. Open the Wi-Fi settings menu: Touch WiFi.e. Make sure that the Wi-Fi option box is setted to ON: Touch and slide the block right to enable the Wi-Fi connection.When Wi-Fi is on, the tablet will look for and display a list of available Wi-Fi networks.If a network that you have connected to previ-RXVO\LVIRXQGWKHWDEOHWZLOOFRQQHFWWRLWIf you don’t see your network in the list, you FDQIRUFHWKHWDEOHWWRUHVFDQ7RVFDQIRUQHW-works, tap the SCAN icon that located on the WRSULJKWFRUQHURIWKHVFUHHQ2. Select an available Wi-Fi network to connect to:In the same Wi-Fi settings menu above, touch a network in the list.](https://usermanual.wiki/Coby-Communications/MID7048-7046/User-Guide-1821276-Page-21.png)

![Page 26 Browsing The WebEnglishRequest desktop site: 6DYHIRURIÀLQHUHDGLQJ6DYHWKLVSDJHRQWRWKHLQ-ternal memory, then you can read it when the internet connection is disable.Page info: View information about the current page, including the URL.6HWWLQJV&XVWRPL]HWKH%URZVHU](https://usermanual.wiki/Coby-Communications/MID7048-7046/User-Guide-1821276-Page-26.png)
![Optional Connections Page 31English2. Mount the storage drive.Touch USB connected to mount the tablet’s built-in storage, then touch “Turn on USB storage” and “OK” ZKHQSURPSWHGWRFRQ¿UP:KHQPRXQWHG\RXFDQFRS\¿OHVWRIURP\RXUFRPSXWHUWRLW<RXUWDEOHWZLOOEHUHFRJQL]HGE\WKHFRPSXWHUDVD5HPRYDEOH6WRUDJHGULYH'UDJDQGGURS¿OHVEHWZHHQyour tablet and the computer. To learn more about copy-LQJ¿OHVSOHDVHUHIHUWRWKHGRFXPHQWDWLRQLQFOXGHGZLWKyour computer or operating system.Connecting HeadphonesConnect a pair of headphones (or earphones) to the tablet to enjoy media in private.Lower the volume level of the tablet before connecting headphones, and then slowly raise the volume to a comfortable listening level.The headphones must have a 3.5 mm (1/8 in) plug.When headphones are connected, speaker output will be disabled automatically. +HDULQJ H[SHUWV DGYLVH DJDLQVW WKH FRQVWDQWXVHRISHUVRQDOVWHUHRVSOD\HGDWKLJKYROXPH&RQVWDQWH[SRVXUHWRKLJKYROXPHVFDQOHDGWRKHDULQJORVV,I\RXVKRXOGH[SHULHQFHULQJLQJin the ears or hearing loss, discontinue use and VHHNPHGLFDODGYLFH](https://usermanual.wiki/Coby-Communications/MID7048-7046/User-Guide-1821276-Page-31.png)
![Page 36 Safety NoticesEnglishÂSafety Notices7KHOLJKWQLQJÀDVKZLWKDUURZKHDGV\PEROZLWKLQDQHTXLODWHUDOWULDQJOHLVLQWHQGHGWRDOHUWWKHXVHUWRWKHSUHVHQFHRIXQLQVXODWHG³GDQJHURXVYROWDJH´ZLWKLQWKHSURGXFW¶VHQFORVXUHWKDWPD\EHRIVXI¿FLHQWPDJQLWXGHWRFRQVWLWXWHDULVNRIHOHFWULFVKRFN7KHH[FODPDWLRQSRLQWZLWKLQDQHTXLODWHUDOWULDQJOHLVLQWHQGHGWRDOHUWWKHXVHUWRWKHSUHVHQFHRILPSRUWDQWRSHUDWLRQDQGVHUYLFLQJLQVWUXFWLRQVLQWKHOLWHUDWXUHDFFRPSDQ\LQJWKHDSSOLDQFHFor recycling or disposal information about this product, please contact your local authorities or the Electronics Industries Alliance: ZZZHLDHRUJFor Customer Use:(QWHUEHORZWKHVHULDOQXPEHUWKDWLVORFDWHGRQWKHUHDURIWKHXQLW5HWDLQWKLVLQIRUPDWLRQIRUIXWXUHUHIHUHQFH0RGHO1R6HULDO1RWARNING: 7RSUHYHQW¿UHRUVKRFNKD]DUGGRQRWH[SRVHWKLVGHYLFHWRUDLQRUPRLVWXUH'DQJHURXVKLJKYROWDJHLVSUHVHQWLQVLGHWKHHQFORVXUH'RQRWRSHQWKHFDELQHWProtect your hearing: +HDULQJH[SHUWVDGYLVHDJDLQVWWKHFRQ-VWDQWXVHRISHUVRQDOVWHUHRVSOD\HGDWKLJKYROXPH&RQVWDQWH[SRVXUHWRKLJKYROXPHVFDQOHDGWRKHDULQJORVV,I\RXVKRXOGH[SHULHQFHULQJLQJLQWKHHDUVRUKHDULQJORVVGLVFRQWLQXHXVHDQGVHHNPHGLFDODGYLFHNote: ,IWKHSURGXFWVXGGHQO\KDVQRUHVSRQVHRUSRZHUVRIIDQHOHFWURVWDWLFGLVFKDUJHPD\EHWKHFDXVH,QWKLVFLUFXPVWDQFHSOHDVHIROORZWKHSURFHGXUHVEHORZIRUUHFRYHU\t Turn o the unit by pushing and holding the slide button at the right (Power o position) for 15 seconds.t Turn on the unit again](https://usermanual.wiki/Coby-Communications/MID7048-7046/User-Guide-1821276-Page-36.png)
![Page 38 Safety NoticesEnglishImportant Safety Instructions1. Read Instructions: All the safety and operating instruc-tions should be read before the product is operated.2. Retain Instructions: The safety and operating instruc-tions should be retained for future reference.3. Heed Warnings: All warnings on the product and in the operating instructions should be adhered to.4. Follow Instructions: All operating and usage instruc-tions should be followed.5. Cleaning: Unplug this product from the wall outlet be-fore cleaning. Do not use liquid cleaners or aerosol cleaners. Use a damp cloth for cleaning.6. Attachments: Use only attachments recommended by the manufacturer. Use of other attachments may be KD]DUGRXV7. Water and Moisture: Do not use this product near water (e.g., near a bath tub, washbowl, kitchen sink, laundry tub, in wet basements, or near a swimming pool and the like).8. Ventilation: Slots and openings in the cabinet are provided for ventilation to ensure reliable operation of the product and to protect it from overheating. These openings should never be blocked by placing the product on a bed, sofa, rug, or other similar surface. This product should not be placed in a built-in installa-tion such as a bookcase or rack unless proper ventila-tion is provided or the manufacturer instructions have been adhered to.9. Power Sources: This product should be operated only from the type of power source indicated on the rating label. If you are not sure of the type of power supply to your home, consult your product dealer or local power company. For products intended to operate from bat-tery power or other sources, refer to the operating instructions.10. Overloading: Do not overload wall outlets, extension cords, or integral convenience receptacles as this can UHVXOWLQDULVNRI¿UHRUHOHFWULFVKRFN11. Object and Liquid Entry: Never push objects of any kind into this product through openings as they may touch dangerous voltage points or shout-out parts that FRXOGUHVXOWLQD¿UHRUHOHFWULFVKRFN1HYHUVSLOOOLTXLGof any kind on the product.12. Servicing: Do not attempt to service this product your-self as opening or removing covers may expose you to GDQJHURXVYROWDJHRURWKHUKD]DUGV5HIHUDOOVHUYLF-LQJWRTXDOL¿HGVHUYLFHSHUVRQQHO13. Damage Requiring Service: Unplug this product from WKHZDOORXWOHWDQGUHIHUVHUYLFLQJWRTXDOL¿HGVHUYLFHpersonnel under the following conditions: a) when the power-supply or plug is damaged; b) if liquid has been spilled or if objects have fallen into the product; c) if the product has been exposed to rain or water; d) if](https://usermanual.wiki/Coby-Communications/MID7048-7046/User-Guide-1821276-Page-38.png)
![Safety Notices Page 39Englishthe product does not operate normally by following the operating instructions. Adjust only those controls that are covered by the operating instructions as improper adjustment of other controls may result in damage and ZLOORIWHQUHTXLUHH[WHQVLYHZRUNE\DTXDOL¿HGWHFKQL-cian to restore the product to its normal operation; e) if the product has been dropped or damaged in any way; f) when the product exhibits a distinct change in performance—this indicates a need for service.14. Replacement Parts: When replacement parts are re-quired, be sure that your service technician has used UHSODFHPHQW SDUWV VSHFL¿HG E\ WKH PDQXIDFWXUHU RUhave the same characteristics as the original part. 8QDXWKRUL]HGVXEVWLWXWLRQVPD\UHVXOWLQ¿UHHOHFWULFVKRFNRURWKHUKD]DUGV15. Safety Check: Upon completion of any service or repairs to this product, ask the service technician to perform safety checks to ensure that the product is in proper operating condition.16. Heat: The product should be situated away from heat sources such as radiators, heat registers, stoves, or RWKHU SURGXFWV LQFOXGLQJ DPSOL¿HUV WKDW SURGXFHheat.Legal and Trademark Notices&RE\LVWUDGHPDUNVRI&RE\(OHFWURQLFV&RUSRUDWLRQ$QGURLGLVDWUDGHPDUNRI*RRJOH,QF8VHRIWKLVWUDGHPDUNLVVXEMHFWWR*RRJOH3HUPLVVLRQV3RUWLRQVRIWKHDUWZRUNXVHGIRUWKLVSDFNDJHDUHPRGL¿FDWLRQVEDVHGRQZRUNFUHDWHGDQGVKDUHGE\*RRJOHDQGXVHGDFFRUGLQJWRWHUPVGHVFULEHGLQWKH&UHDWLYH&RPPRQV$WWULEXWLRQ/LFHQVHPLFUR6'+&/RJRLVDWUDGHPDUNRI6'&//&86%LVDUHJLVWHUHGWUDGHPDUNRI86%,PSOHPHQWHUV)RUXP,QF<RX7XEHLVDWUDGHPDUNRI*RRJOH,QF$OORWKHUWUDGHPDUNVDQGORJRVDUHSURSHUW\RIWKHLUUHVSHFWLYHRZQHUVXQOHVVLQGLFDWHGRWKHUZLVHThis device complies with Industry Canada licence-exempt RSSstandard(s).Operation is subject to the following two condition:(1)this device may not cause interference,and(2)this device mustaccept any interference,including interference that may cause undesired operation of the device.Under Industry Canada regulations,this radio transmitter may only operate using an antenna of a type and maximum(or lesser)gainapproved for the transmitter by Industry Canada.To reduce potentialradio interference to other users,the antenna type and its gain shouldbe so chosen that,the equivalent isotropically radiated power(e.i.r.p.)is not more than that necessary for successful communication.IC Warning:](https://usermanual.wiki/Coby-Communications/MID7048-7046/User-Guide-1821276-Page-39.png)