Coby Communications MID7048-7046 Mobile Internet Device User Manual MID7048
Coby Communications Ltd. Mobile Internet Device MID7048
Users Manual
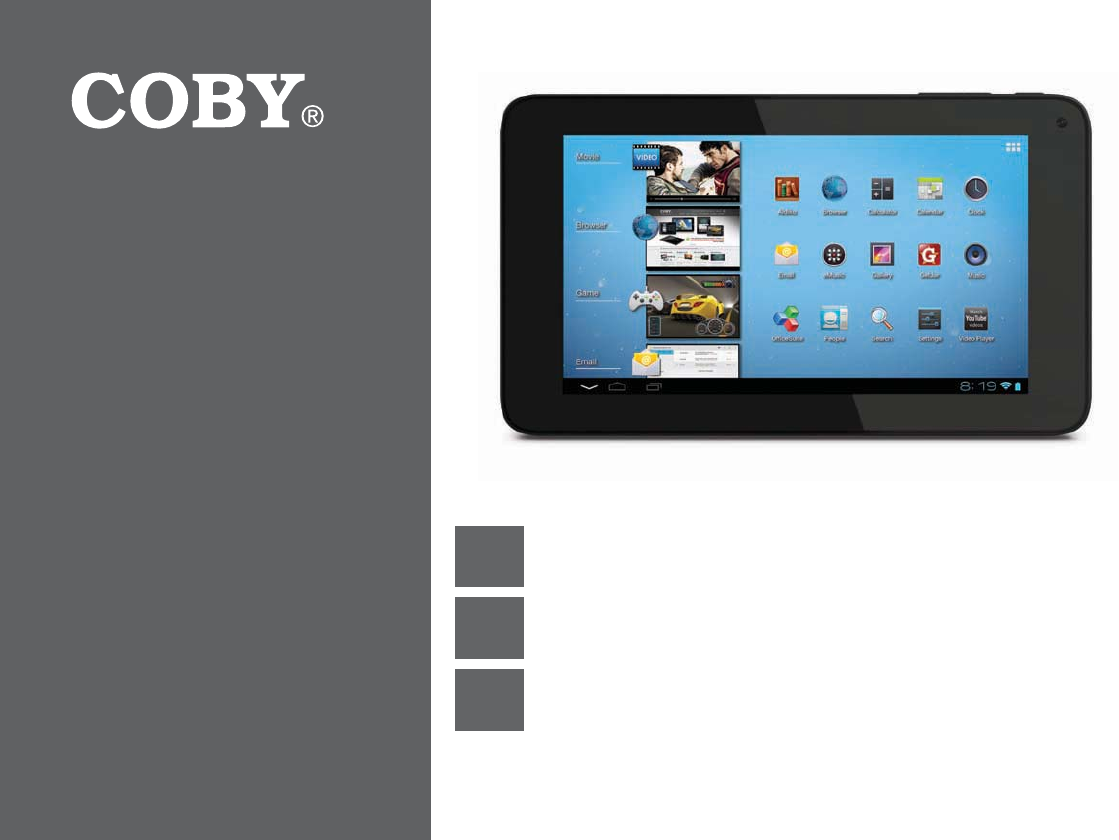
EN Coby® Kyros® Internet Tablet
Quick Start Guide ................................................ Page 2
ES Tableta Internet con Pantalla Táctil
Guía de Inicio Rápido ........................................Pagina 41
FR Tablette Internet à Ecran Tactile
Guide de Démarrage Rapide ................................ Page 81
1MFBTFSFBEDBSFGVMMZCFGPSFVTFt-ÏBFMNBOVBMBOUFTEFVTBSt7FVJMMF[MJSFDFMJWSFUBWBOUVUJMJTBUJPO
For series /
Para la serie /
Pour la série
MID7046
MID7048

Page 2 Table Of Contents
English
THANK YOU.....................................................3
Package Contents........................................................3
Features..........................................................................4
GETTING TO KNOW THE COBY INTERNET
TABLET .............................................................5
About the Touchscreen ...............................................8
Protective Film ........................................................8
Touchscreen Actions..............................................8
About the Orientation Sensor ...................................10
Charging the Tablet ...................................................10
Inserting a Memory Card ..........................................10
Resetting the Tablet.................................................... 11
GETTING STARTED.........................................12
Turning the Tablet on and off ...................................12
Turning the Screen On and Off (Standby) .......13
Unlocking the Screen ..........................................13
Home Screen at a Glance ........................................14
About Applications ....................................................15
Preinstalled Applications.....................................16
Installing Applications .........................................17
About Widgets ............................................................18
$ERXW1RWLÀFDWLRQV.....................................................18
CONNECTING TO THE INTERNET ................. 20
Requirements ............................................................. 20
Connect to a Wi-Fi network ......................................21
BROWSING THE WEB.....................................23
MANAGING APPLICATIONS ........................27
OPTIONAL CONNECTIONS ......................... 30
Connecting to a Computer ..................................... 30
Connecting Headphones .........................................31
SETTING THE SYSTEM OPTIONS ....................32
SPECIFICATIONS...........................................33
SUPPORT........................................................35
SAFETY NOTICES...........................................36
ÂTable of Contents
Thank You Page 3
English
ÂThank You
Congratulations on your purchase of a Coby® Kyros®
Internet Tablet. This guide is provided to help you get
started quickly with your player; please read it carefully
and save it for future reference.
For detailed instructions, up-to-date information, and helpful
tips, please visit the Coby website at www.cobyusa.com.
This manual is available for download from the
&RE\ZHEVLWHDVD3')¿OH
To view PDF documents, download and install
the free Adobe Acrobat reader from the Adobe
website at ZZZDGREHFRP
Package Contents
Please make sure that the items shown below are
included in the package. Should an item be missing,
please contact the local retailer from which you pur-
chased this product.
Coby® Kyros® Internet
Tablet
Protective pouch
USB cable
Power adapter
This package may contain plastic bags or other
PDWHULDOV WKDW SRVH D KD]DUG WR FKLOGUHQ %H
sure to safely dispose of all packing materials
DIWHURSHQLQJ

Page 4 Thank You
English
Features
Browse the Web.
Visit your favorite websites
Check your e-mail
Keep in touch with friends and family
Watch YouTube™ videos
Browse the world’s most popular video-sharing com-
munity
Read your favorite books
Download thousands of books with the included
E-book reader *
Discover thousands of apps for Android™
Games, applications, and more with the installed
marketplace
Connect to the Internet wirelessly
High-speed Wi-Fi 802.11 b/g/n networking
Enjoy your media library anywhere
Portable powerhouse plays popular music, video,
and photo formats
microSDHC memory card reader
Increase your storage capacity (up to 32 GB sup-
ported)
Automatic orientation detection
Read any way you want; the display adjusts auto-
matically!
* Reading books in the ePub format requires the included
E-book reader application.
Getting To Know The Internet Tablet Page 5
English
ÂGetting to Know the Internet Tablet
Unit at a Glance
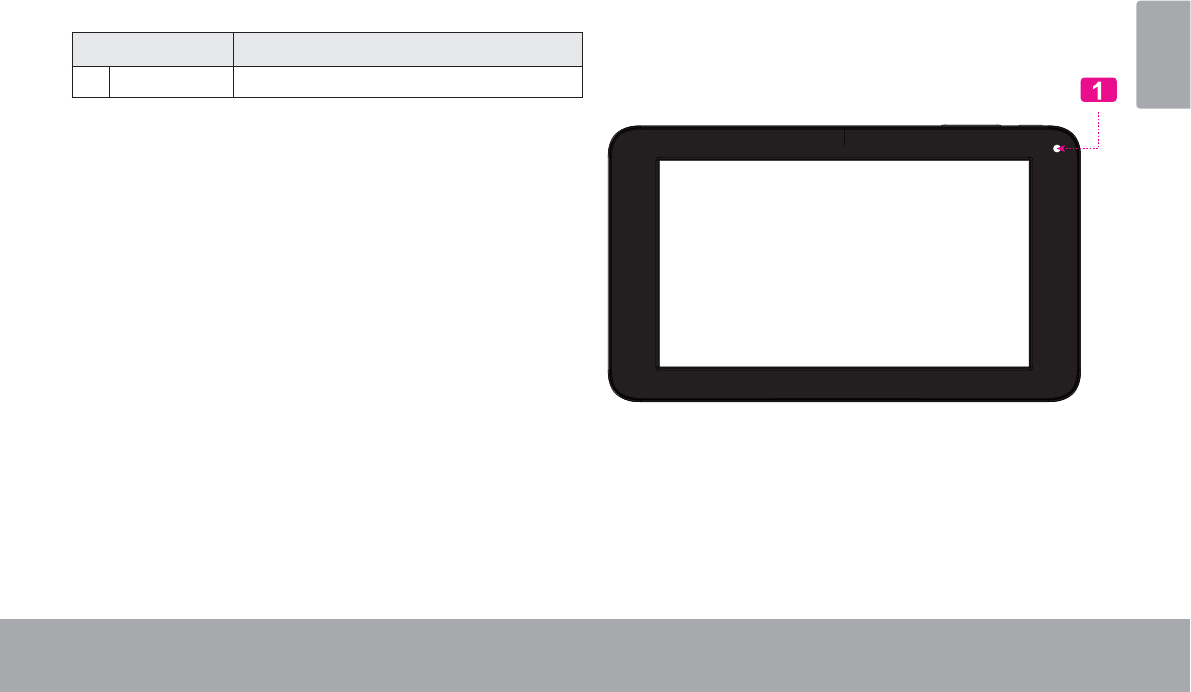
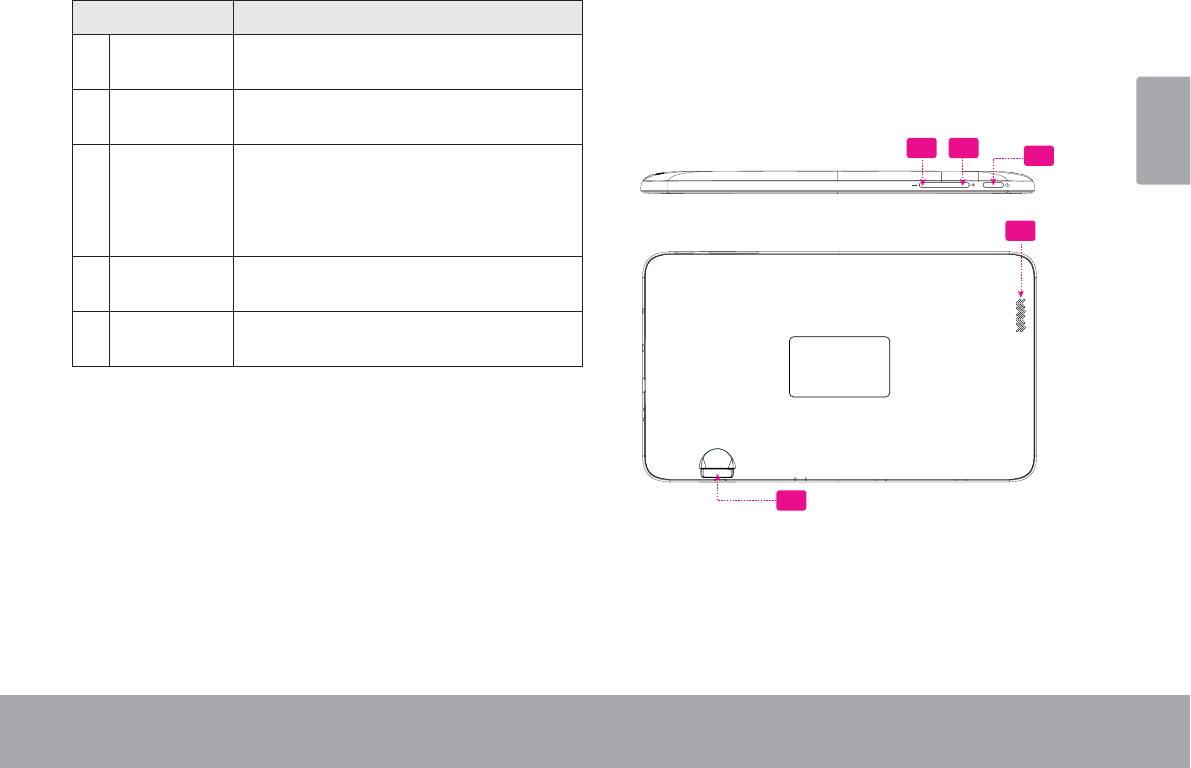
Name Description
1 Camera Front-facing camera (MID7048)
Page 6 Getting To Know The Internet Tablet
English
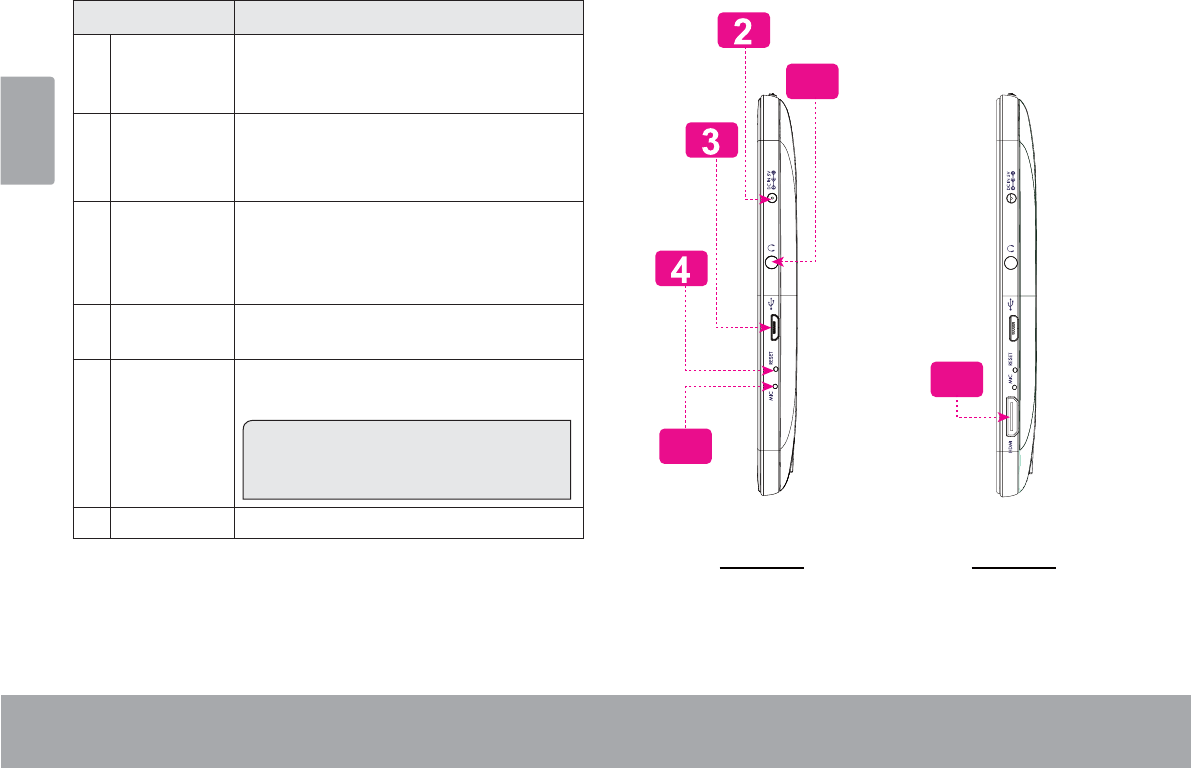
Name Description
2Power jack
(DC input)
Charge and power the tablet with the
included power adapter.
3 USB 2.0 Hi-
speed port
Connect to a computer to transfer data
(e.g., music, videos, photos, les).
4 Reset key Press to reset the tablet if it freezes or
otherwise behaves abnormally. (Use a
paperclip or other small object to gen-
tly press this key.)
5 Speaker Speaker output is automatically muted
when using headphone Jack.
6 Headphone
jack
Audio output connection for head-
phones.
Note: Speaker output is automatically
disabled when headphones are con-
nected to the player.
7 MIC Recording sound
6
7
12
MID7046 MID7048
Getting To Know The Internet Tablet Page 7
English
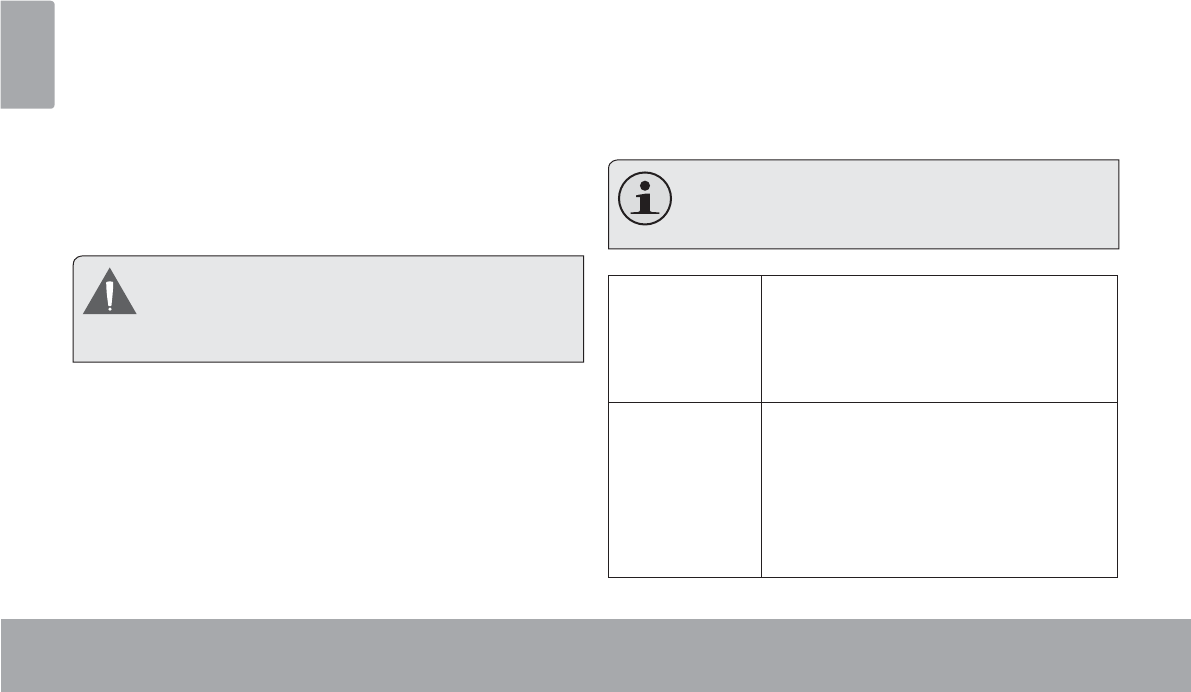
Name Description
8 Volume +
key
Press to increase the volume level.
9 Volume –
key
Press to decrease the volume level.
10 Power key Press to turn the unit on, or to turn the
screen on and o.
Press and hold to access the Power O
menu.
11 microSDHC
card slot
Load external microSDHC memory
cards here.
12 HDMI jack
(mini Type C)
Connect to a TV or other display.
5
11
89 10
Page 8 Getting To Know The Internet Tablet
English
About the Touchscreen
Your tablet comes equipped with an easy-to-use touch-
screen.
Our MID7046 with resistive touchscreen requires slight
pressure on the plastic screen to activate tablet’s func-
WLRQV7KLVPD\EHGRQHZLWKDVLQJOH¿QJHURUSODVWLF
stylus.
Our MID7048 with capacitive multi-touchscreen requires-
JHQWOH¿QJHUWLSWRXFKRQWKHJODVVVFUHHQWRDFWLYDWH
WDEOHW¶VIXQFWLRQV0XOWLSOH¿QJHUVPD\EHXVHGWRSHU-
IRUPJHVWXUHVHJ¿QJHUSLFWXUH]RRP
3OHDVHQRWHRQ0,'<RXU¿QJHUWLSVPXVW
QRW EH FRYHUHG $ VW\OXV PD\ EH XVHG 0DNH
VXUHLWLVIRUFDSDFLWLYHWRXFKVFUHHQV
Protective Film
$WKLQ¿OPKDVEHHQDSSOLHGWRWKHWRXFKVFUHHQWRSURWHFW
LWGXULQJVKLSSLQJ7KHSURWHFWLYH¿OPVKRXOGEHUHPRYHG
EHIRUHXVH7RUHPRYHLWVLPSO\WDNHDFRUQHURIWKH¿OP
and peel it away from the screen.
Touchscreen Actions
You can control the functions of the tablet by using the
touchscreen. To control the tablet with the touchscreen,
XVH\RXU¿QJHUWLSRUVW\OXVWRPDQLSXODWHLFRQVEXWWRQV
menu items, the on-screen keyboard, and other items
displayed on the screen.
You can perform the following actions on the touchscreen
XVLQJ\RXU¿QJHUWLSRUVW\OXV
Note: You must use capacitive stylus on multi-
WRXFKFDSDFLWLYHVFUHHQV
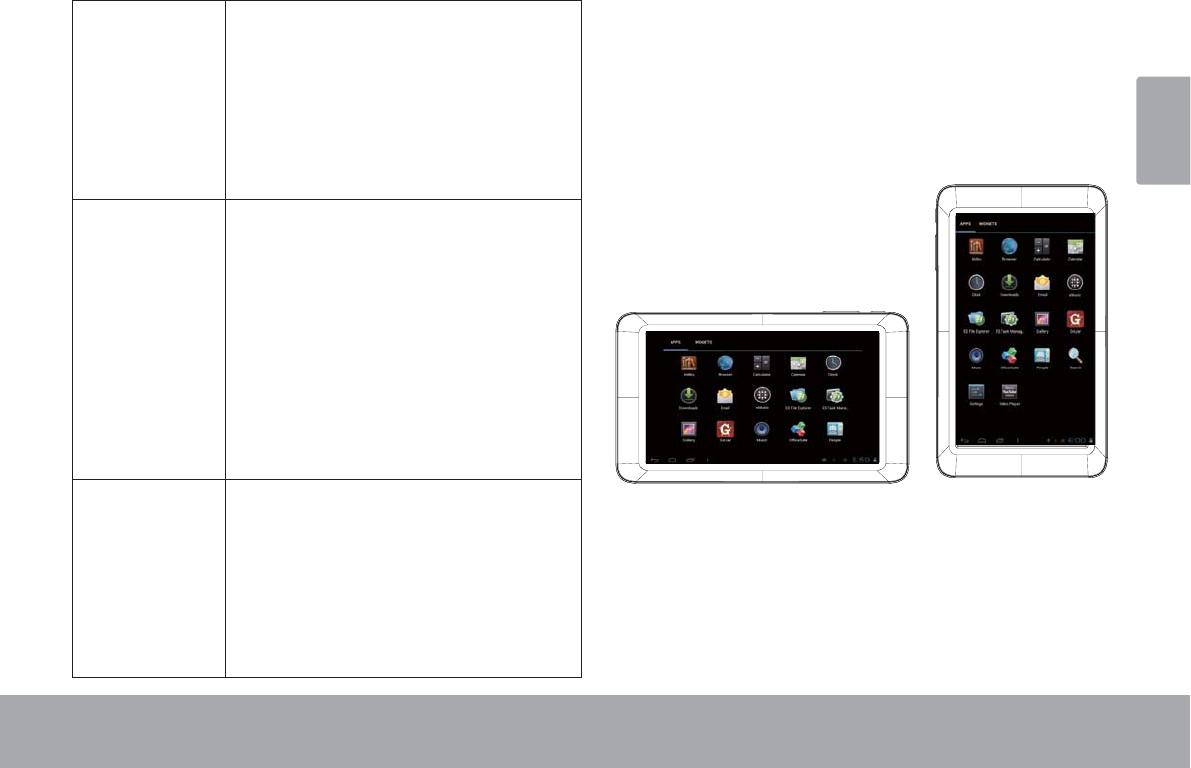
Touch: To activate an on-screen item (e.g.,
application icons, buttons, menu
items, and the letter/symbols of the
on-screen keyboard), simply touch
WKHPZLWK\RXU¿QJHUWLSRUVW\OXV
Touch and
Hold:
Some on-screen items have an
alternate action if you touch and hold
it (e.g., opening an alternate menu, or
to activate the drag function). To touch
and hold an item, touch the item and
GRQRWOLIW\RXU¿QJHUWLSVW\OXVXQWLOWKH
action occurs.
Getting To Know The Internet Tablet Page 9
English
Drag: 'UDJDQRQVFUHHQLWHPWRFKDQJHLWV
SRVLWLRQHJDQDSSOLFDWLRQLFRQRQ
WKHKRPHVFUHHQ
7RGUDJDQLWHPWRXFKDQGKROGLWIRU
DPRPHQWWKHQZLWKRXWOLIWLQJ\RXU
VW\OXVRQWKHVFUHHQXQWLOWKHLWHP
UHDFKHVLWVWDUJHWGHVWLQDWLRQ
Swipe: 6ZLSHXSGRZQRQWKHVFUHHQWRVFUROO
WKURXJKDOLVW2QVRPHVFUHHQV
\RXPD\EHDEOHWRVZLSHOHIWULJKWWR
FKDQJHWKHYLHZ
7RVZLSHWRXFKWKHVFUHHQDQGWKHQ
DFURVVWKHVFUHHQZLWKRXWOLIWLQJ\RXU
WKHLQLWLDOSRLQWRIFRQWDFWRU\RXPD\
DFFLGHQWDOO\GUDJDQLWHPLQVWHDG
'RXEOHWDS 4XLFNO\WDSWKHVFUHHQWZLFHRQD
ZHESDJHRURWKHUDSSOLFDWLRQVFUHHQ
WKHEURZVHUGRXEOHWDSSLQJDZHE
SDJHVHFWLRQZLOOFDXVHWKHEURZVHUWR
RIWKHVFUHHQ
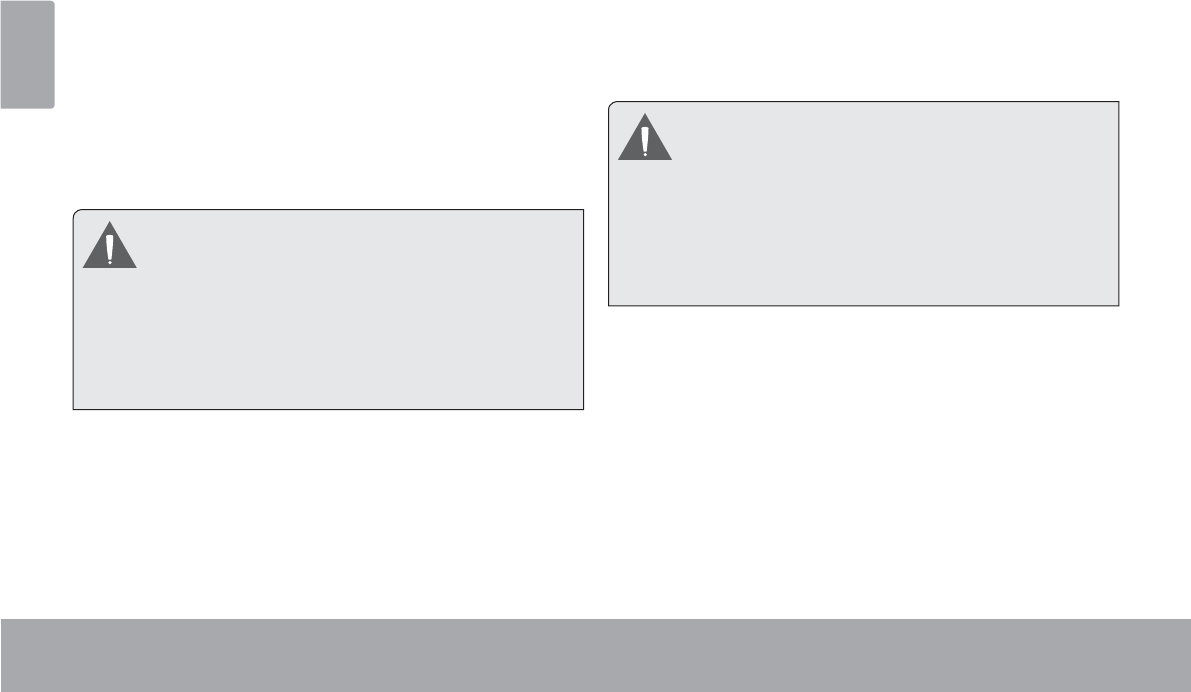
About the Orientation Sensor
7KHWDEOHWFRQWDLQVDVHQVRUWKDWZLOODXWRPDWLFDOO\
FKDQJHWKHRULHQWDWLRQRIPRVWVFUHHQVDV\RXURWDWHWKH
WDEOHW7KHVHQVRUZRUNVEHVWZKHQWKHWDEOHWLVURWDWHG
SHUSHQGLFXODUWRWKHJURXQGLHZKHQWKHWDEOHWLVKHOG
XSULJKWDQGQRWIDWRQLWVEDFN
7KHRULHQWDWLRQVHQVRUFDQEHWXUQHGRQDQGRIILQWKH
DisplayVHWWLQJVPHQX
Charging the Tablet
7KHWDEOHWFRPHVZLWKDEXLOWLQUHFKDUJHDEOHOLWKLXP
SRO\PHUEDWWHU\
Page 10 Getting To Know The Internet Tablet
English
Before using the tablet, the battery should be charged
fully. Press lower right corner settings, next to battery
icon is charging percentage.
To charge the battery:
1. Plug one end of the included power adapter into an
AC 100-240V outlet.
2. Plug the other end of the included power adapter into
the Power jack on the tablet.
3. Disconnect the power adapter when the tablet is fully
charged.
7KHEDWWHU\XVHGLQWKLVGHYLFHPD\SUHVHQWD¿UHRU
FKHPLFDO EXUQ LI PLVWUHDWHG 'R QRW GLVDVVHPEOH
LQFLQHUDWHRUKHDWWKHGHYLFH'RQRWOHDYHWKHGH
vice in a place subject to direct sunlight, or in a car
ZLWKLWVZLQGRZVFORVHG'RQRWFRQQHFWWKHGHYLFH
to a power source other than that which is indicated
here or on the label as this may result in the risk of
¿UHRUHOHFWULFVKRFN
Inserting a Memory Card
The tablet accepts microSDHC memory cards. Insert a
memory card into the microSDHC card slot to:
Increase the memory capacity of your tablet
3OD\PHGLD¿OHVVWRUHGRQWKHPHPRU\FDUGHJ
PXVLFYLGHRRUSKRWR¿OHV
To insert a memory card:
1. Align the memory card with the card slot. The metal
contacts of the memory card should face down away
from the LCD screen.
2. Slide the card into the spring-loaded slot. Push the
card in until it clicks into place.
Do not attempt to insert objects other than a
PLFUR6'+& PHPRU\ FDUG LQWR WKH FDUG VORW $
FRPSDWLEOH PHPRU\ FDUG VKRXOG ¿W HDVLO\ LQWR WKH
card slot; if you encounter resistance, check the
DOLJQPHQW RI WKH FDUG 'R QRW DWWHPSW WR IRUFH WKH
FDUGLQ
Avoid touching the gold contacts of the memory
FDUG
To release and remove a memory card:
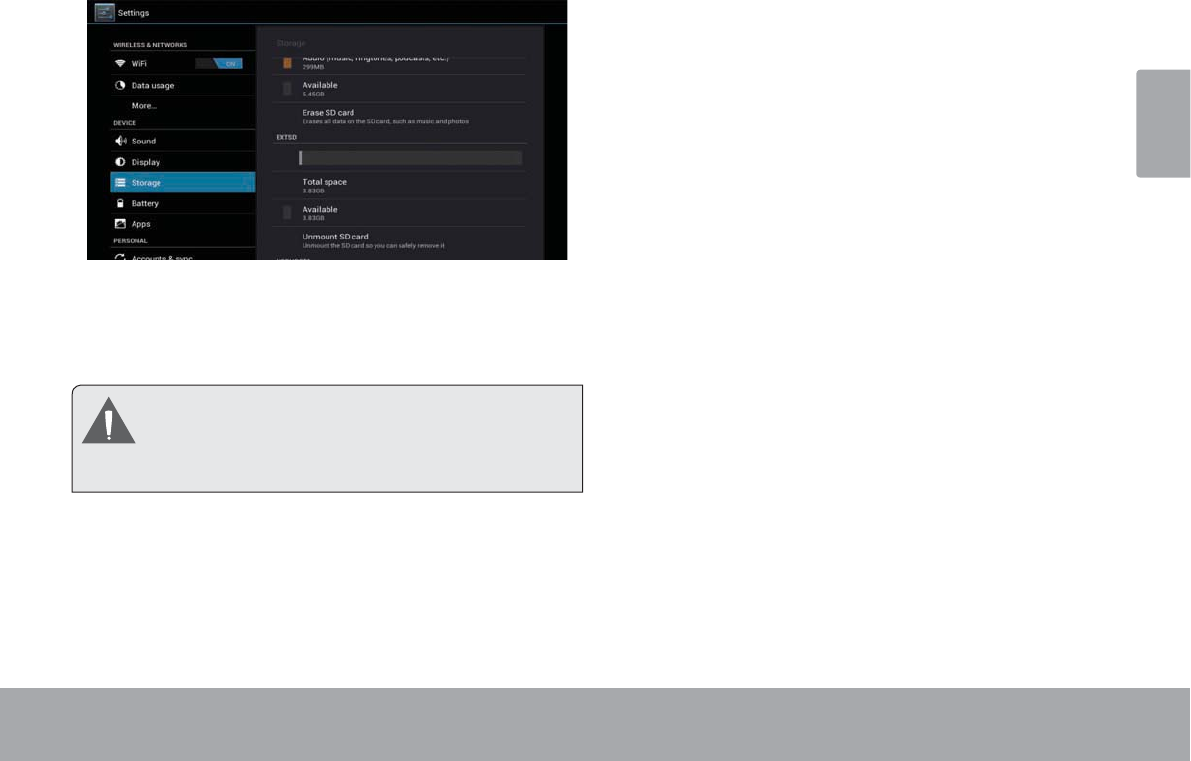
1. UNMOUNT the memory card.
a. From the home screen, tap the Launcher Tab,
and then touch Settings to show the settings
menu.
b. Touch Storage to show the storage settings.
c. Touch Unmount shared storage to prepare the
memory card for safe removal.
Getting To Know The Internet Tablet Page 11
English
2. Push the card further into the slot until you hear a
click. The card will spring out of the slot.
3. Grasp the card by its edge to remove it.
To avoid damage and data corruption, do not remove
a memory card while data is being written to or read
IURPWKHFDUG)RUH[DPSOHGRQRWUHPRYHDFDUG
ZKLOHSOD\LQJDPXVLF¿OHVWRUHGRQWKHFDUG
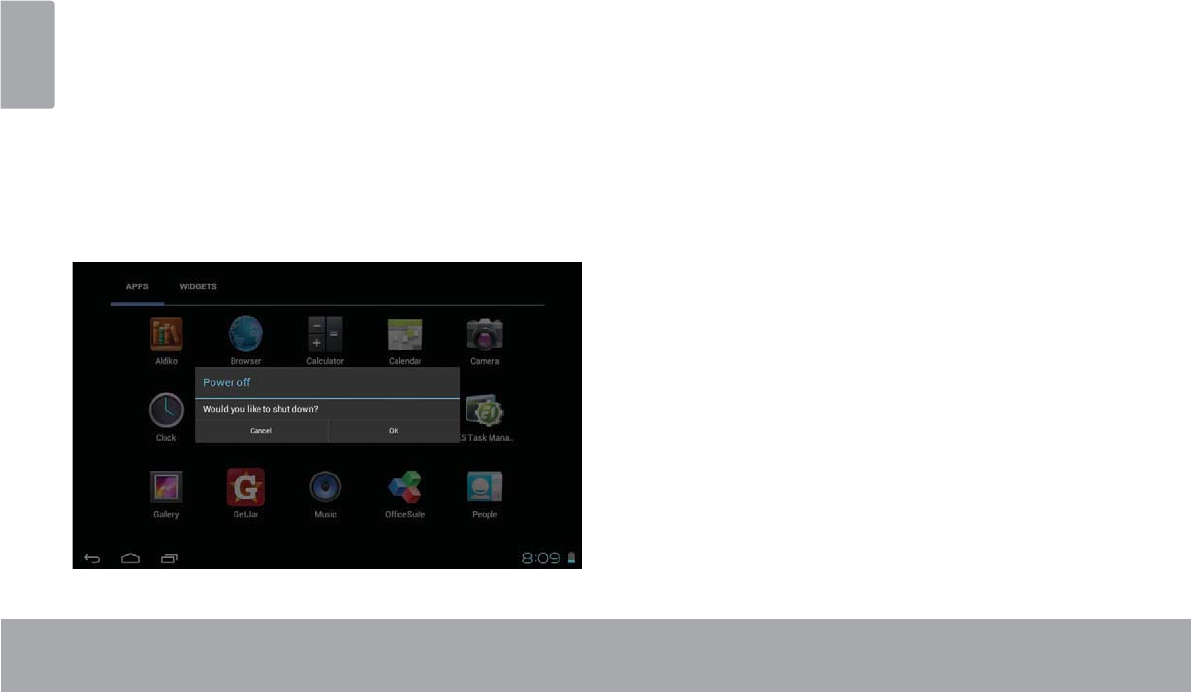
Resetting the Tablet
5HVHWWKHWDEOHWLILWVKRXOGIUHH]HDQGQRWUHVSRQGRU
otherwise malfunction.
1. Disconnect your tablet if it is connected to a com-
puter.
2. Press the reset button on the bottom of the unit. see
“Getting to Know your Internet tablet” section for
reference.
Page 12 Getting Started
English
Getting Started
Turning the Tablet on and off
7RWXUQWKHWDEOHWRQ
3UHVVDQGKROGWKHPowerNH\XQWLOWKH/&'VFUHHQ
WXUQVRQDQG\RXVHH&RE\/RJRWKHQZDLWXQWLO\RX
VHHWKH8QORFNVFUHHQ
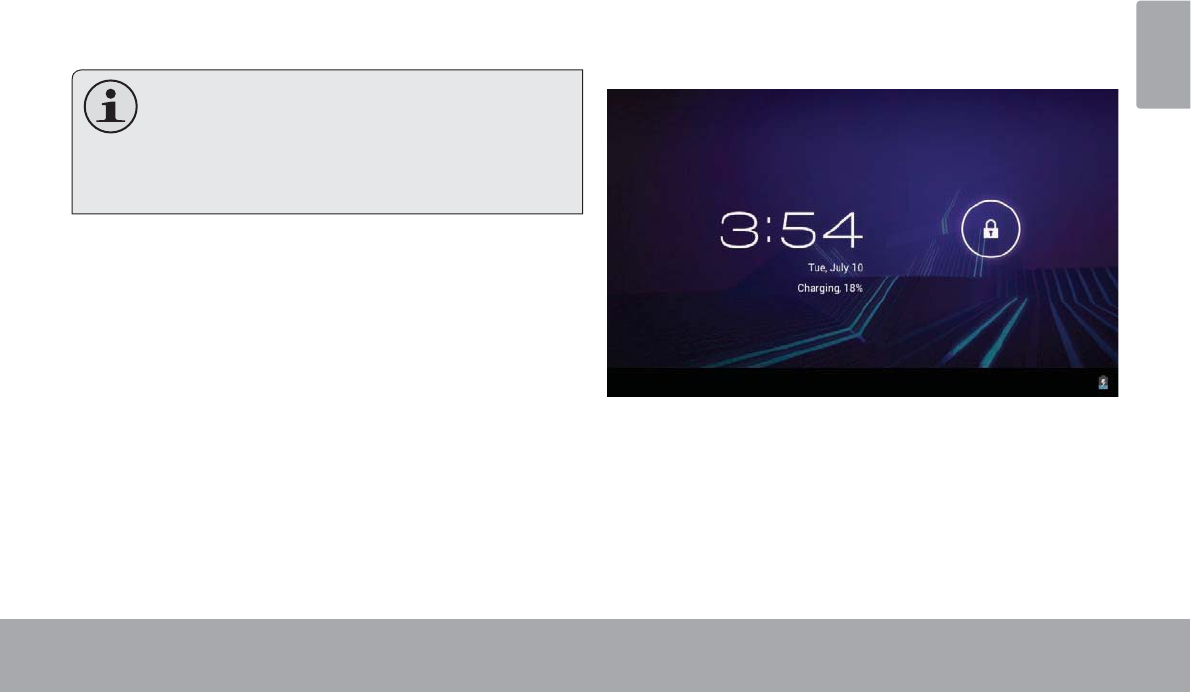
7RWXUQWKHWDEOHWRII
3UHVVDQGKROGWKHPower
PHVVDJHDSSHDUV
7RXFKOKWRWXUQRIIWKHWDEOHW
Getting Started Page 13
English
Turning the Screen On and Off (Standby)
:KHQWKHWDEOHWLVRQ\RXFDQWXUQRIIWKHVFUHHQWR
FRQVHUYHEDWWHU\SRZHU6LPSO\SUHVVWKHPowerNH\
RQFHWRWXUQWKHVFUHHQRII3UHVVWKHPowerNH\DJDLQWR
WXUQWKHVFUHHQEDFNRQ
To conserve battery power, the screen can be
set to turn off automatically when the tablet is
not in use (between 15 seconds and 30 min
Sleep option can be found in the
Display
Unlocking the Screen
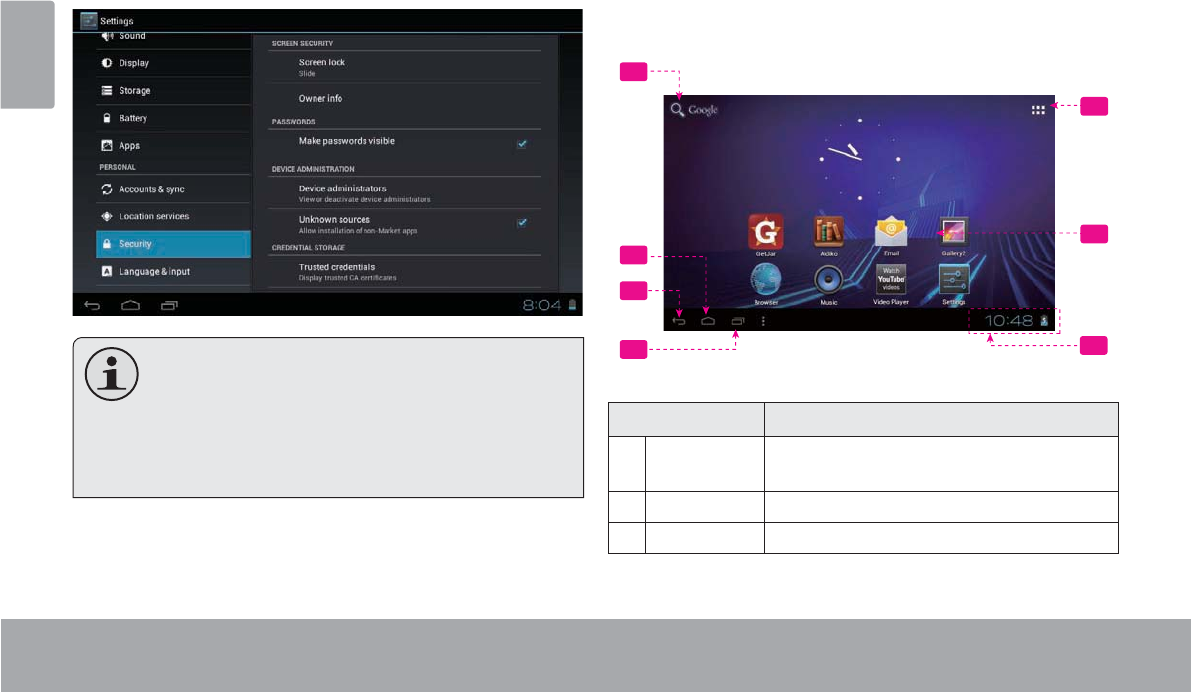
:KHQWKHVFUHHQWXUQVRII\RXZLOOKDYHWRXQORFNWKH
VFUHHQZKHQ\RXWXUQLWEDFNRQ
7RXQORFNWKHVFUHHQWRXFKDQGGUDJWKHlockLFRQWRWKH
HGJHRIWKHFLUFOHWKDWDSSHDUV
Page 14 Getting Started
English
XQORFNLQJWKHVFUHHQ7KH6FUHHQ8QORFNSDVVZRUGFDQ
EHVHWLQWKH6HFXULW\VHWWLQJVPHQX
WARNING: Please write down your password
covering the unit will reset the device back to
ALL YOUR DATA & PRO
GRAMS WILL BE LOST
Home Screen at a Glance
7KHKRPHVFUHHQLVWKHVWDUWLQJSRLQWIRUDOORIWKH
IHDWXUHVRI\RXUWDEOHW
5
6
1
2
3
47
Name Description
1Google
Search
Touch to search with Google browser.
2Home icon Touch to back to the central Home Screen.
3Back icon Touch to back to the previous screen.
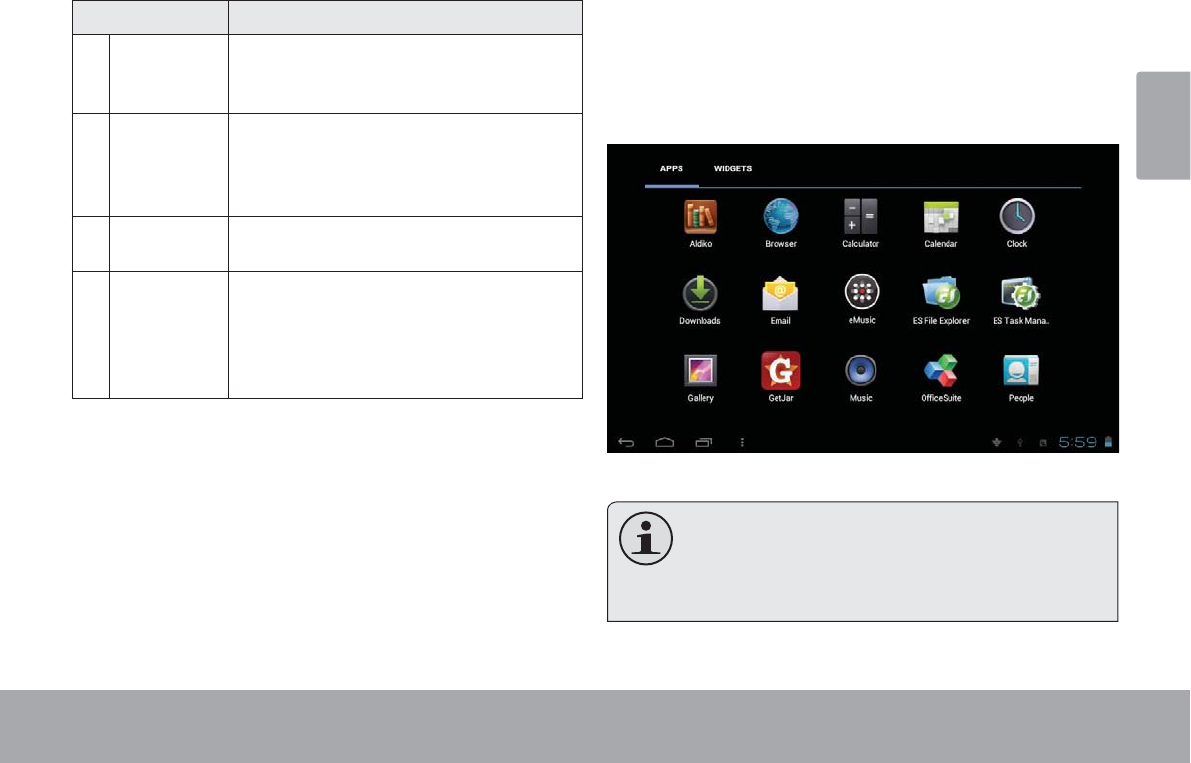
Getting Started Page 15
English
Name Description
4 Recent Apps Touch to display the list of thumbnail im
ages of apps you have worked recently.
Touch an App to open it.
5Launcher
Tab
Open the Launcher to view the list of all
Applications and Widgets installed on the
tablet. Touch the Launcher tab to open
the Launcher.
6 Icons Touch an icon to open an application or
folder.
7 Notication
bar
Shows notication icons such as time, bat
tery level, and the network signal strength;
touch the bar to open the full Notications
panel. Touch a Notication icon to display
more detail.
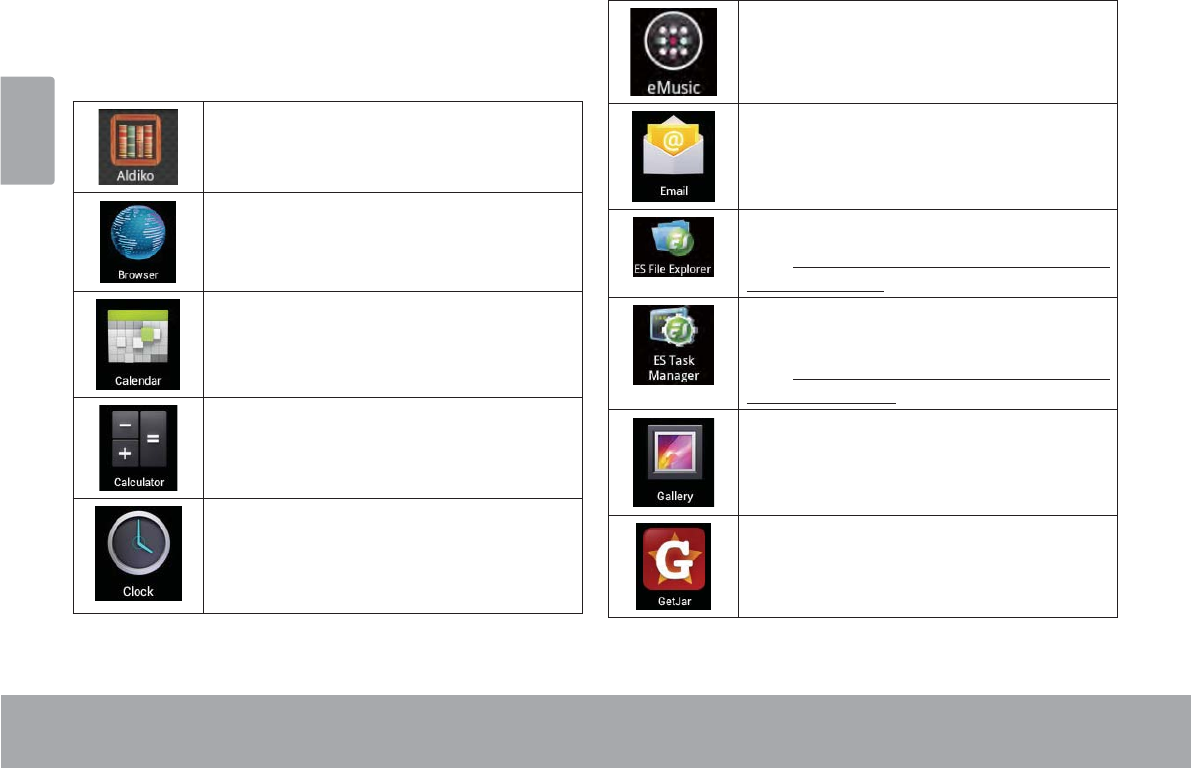
About Applications
7RRSHQDQDSSOLFDWLRQWRXFKWKHDSSOLFDWLRQLFRQRQWKH
KRPHVFUHHQRULQWKH/DXQFKHU
/DXQFKHUVFUHHQ
The screen shown above is for illustrative
Page 16 Getting Started
English
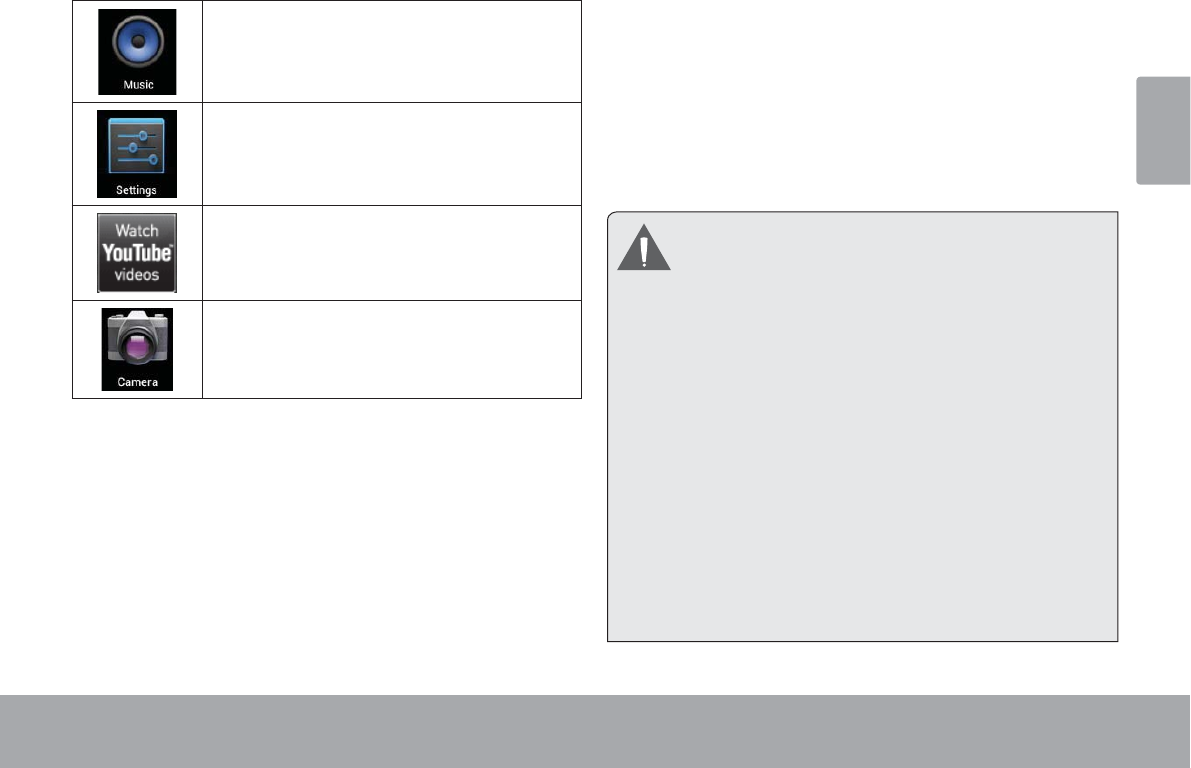
Preinstalled Applications
Some applications have been installed on your tablet for
your convenience. These applications include:
Download and read thousands of e-books.
Supports the ePub standard.
Browse the web.
Display the calendar or record events and
appointments to manage your schedule.
Perform simple mathematical operations.
View the current time, or set an alarm.
Get $10 of music from eMusic.(only in
America)
Check your e-mail.
View and manage les stored on the tablet.
Visit http://www.estrongs.com/en/products/
le-explorer.html for more information.
Turn o background apps to conserve bat-
tery power.
Visit http://www.estrongs.com/en/products/
task-manager.html for more information.
View photos and videos, plus edit photos.
Access to thousands of apps with GetJar
Marketplace.
Getting Started Page 17
English
Play music.
Access the Settings menu to adjust the
tablet’s options.
Launch the mobile YouTube™ browser page
to watch internet videos.
Take pictures or videos with the front-fac-
ing camera.(For MID7048)
Installing Applications
You can also download an install additional applications
from the device’s applications marketplace, the web
browser, or other sources.
The tablet must be set to allow installation of applications
from non-Market sources. The Unknown sources option
can be set in the Application settings menu.
Your Coby Mobile Internet Device may include
access to, or information on, content, products,
DSSOLFDWLRQVDQGVHUYLFHVIURPWKLUGSDUWLHV<RXU
use of such third party content, products,
applications and services is at the discretion of
VXFKWKLUGSDUW\DQGH[SUHVVO\JRYHUQHGE\VXFK
third party’s terms of use, including any such
third party’s privacy policies, for such content,
SURGXFWV DSSOLFDWLRQV DQG VHUYLFHV &RE\
Electronics Corporation is not responsible for
DQG H[SUHVVO\ GLVFODLPV DOO ZDUUDQWLHV RI DQ\
kind with respect to all such third party content,
SURGXFWV DSSOLFDWLRQV DQG VHUYLFHV &RE\
Electronics Corporation will not be responsible
for any loss, costs, or damages incurred due to
your access to or use of third party content,
SURGXFWVDSSOLFDWLRQVRUVHUYLFHV
Page 18 Getting Started
English
About Widgets
:LGJHWVDUHVHOIFRQWDLQHGDSSOLFDWLRQVWKDW\RXFDQ
SODFHRQWKH+RPHVFUHHQVWRDFFHVV\RXUIDYRULWH
IHDWXUHV
Adding Widgets to a Home Screen
1DYLJDWHWRWKH+RPHVFUHHQZKLFK\RXZDQWWR
SODFHWKH:LGJHWRQ
7RXFKWKHLauncher Tab
7RXFKWIDGETSWRVKRZDOOZLGJHWVDQGWKHQKROG
RQDZLGJHWLFRQWRDGGLWWRWKH+RPHVFUHHQ
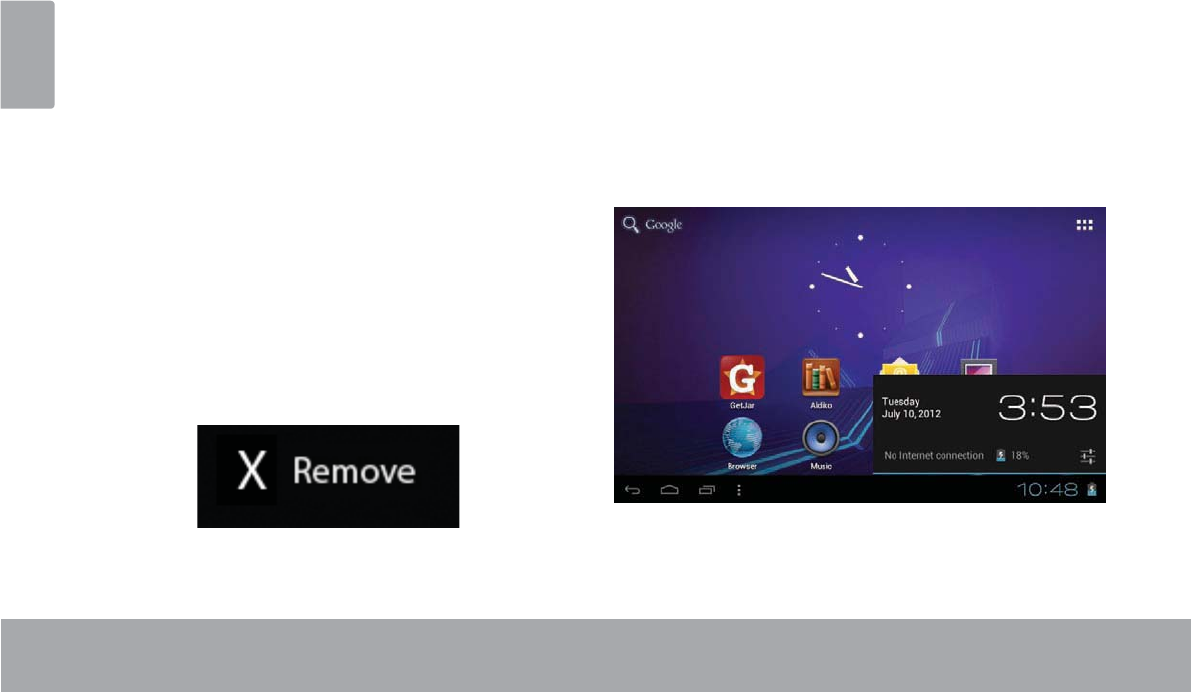
Removing Widgets
7RXFKDQGKROGWKH:LGJHWXQWLO5HPRYHLFRQDSSHDUV
DWWKHWRSVLGHRIWKHVFUHHQWKHQGUDJWKH:LGJHWWRWKH
5HPRYHLFRQWRUHPRYHLW
ERWWRPULJKWFRUQHURIWKHVFUHHQDOHUWV\RXZKHQQHZ
PHVVDJHVDUULYHRUDODUPVRURWKHUDSSOLFDWLRQHYHQWV
RFFXU
7RXFKWKH
SDQHO

Getting Started Page 19
English
7RXFKDQRWL¿FDWLRQLQWKHOLVWWKH1RWL¿FDWLRQVSDQHOZLOO
FORVHDQGWKHDSSOLFDWLRQDVVRFLDWHGZLWKWKHQRWL¿FDWLRQ
will launch.
7RFORVHWKH1RWL¿FDWLRQVSDQHO
Touch any other area of screen except the
1RWL¿FDWLRQVSDQHORU
Touch the Back icon.
Page 20 Connecting To The Internet
English
ÂConnecting to the Internet
7KLVWDEOHWFDQXWLOL]H:L)LGDWDQHWZRUNVWRFRQQHFWWRWKH,QWHUQHW
Wireless Wi-Fi technology can provide Internet access at distances of over 300 feet; however, this distance can be af-
fected by your surrounding environment and Wi-Fi router.In general, being closer to Wi-Fi router improve performance.
Requirements
In order to connect to the Internet, you will need either of
the following:
A wireless router or access point with a broad-
band Internet connection
The tablet has 802.11 b/g/n Wi-Fi radio. The tablet will also
work on wireless routers that only support 802.11 b/g.
A minimum connection speed of 64 Kbps is rec-
RPPHQGHG)DVWHUVSHHGVZLOOHQDEOHDEHWWHU
,QWHUQHWH[SHULHQFH
You will need to know the name of your network (SSID),
as well as the password or other credentials if your
network is secured. These settings can usually be found
on the administration webpage of your wireless router.
Please refer to your wireless router’s documentation for
help, or ask your network administrator for details.
You may encounter open Wi-Fi networks, or “hot
VSRWV´ 7KHVH QHWZRUNV DUH XVXDOO\ FRQ¿JXUHG
so that you can simply connect to them without
needing to know its settings; the tablet will ob-
tain all the information it needs from the router
DXWRPDWLFDOO\
Connecting To The Internet Page 21
English
Connect to a Wi-Fi network
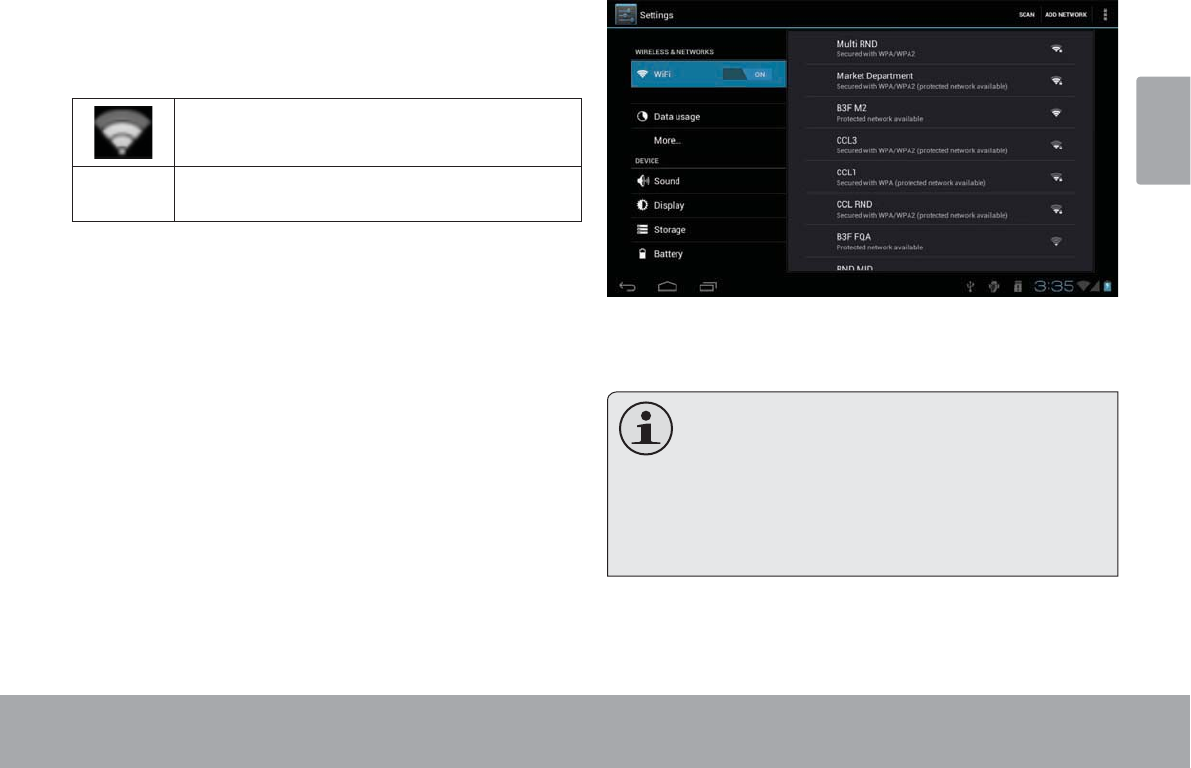
7KH1RWL¿FDWLRQEDUGLVSOD\VLFRQVWKDWLQGLFDWH\RXU
tablet’s Wi-Fi status.
Connected to a Wi-Fi network (waves
indicate connection strength).
[no icon] There are no Wi-Fi networks in range, or
the Wi-Fi radio is off.
1. Turn on the Wi-Fi radio if it is not already on. To
turn on Wi-Fi:
a. Go to the Home screen:
Touch the Home icon.
b. Open the Launcher screen:
Touch the Launcher Tab, then touch Settings.
c. Open the Wireless & networks menu:
Touch WIRELESS & NETWORKS.
d. Open the Wi-Fi settings menu:
Touch WiFi.
e. Make sure that the Wi-Fi option box is setted to
ON: Touch and slide the block right to enable
the Wi-Fi connection.
When Wi-Fi is on, the tablet will look for and display a list
of available Wi-Fi networks.
If a network that you have connected to previ-
RXVO\LVIRXQGWKHWDEOHWZLOOFRQQHFWWRLW
If you don’t see your network in the list, you
FDQIRUFHWKHWDEOHWWRUHVFDQ7RVFDQIRUQHW-
works, tap the SCAN icon that located on the
WRSULJKWFRUQHURIWKHVFUHHQ
2. Select an available Wi-Fi network to connect to:
In the same Wi-Fi settings menu above, touch a network
in the list.
Page 22 Connecting To The Internet
English
If the network is open, the tablet will prompt you to
FRQ¿UPFRQQHFWLRQWRWKHQHWZRUN7RXFKConnect to
FRQ¿UP
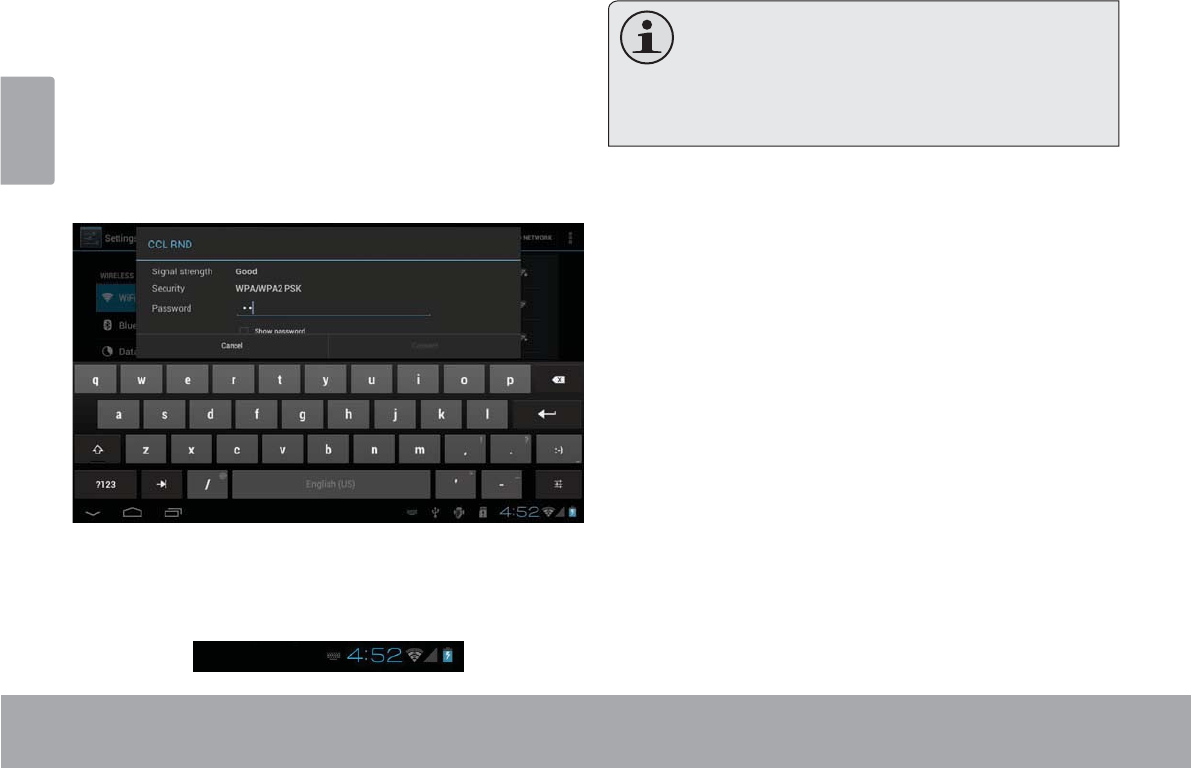
If the network is secured (as indicated by a Lock icon),
the tablet will prompt you to enter a password or other
credentials. Touch the Wireless password box to show
the on-screen keyboard and then use it to enter the
password. Touch ConnectWRFRQ¿UP
When you have successfully connected to a Wi-Fi
QHWZRUNWKH1RWL¿FDWLRQVEDUDWWKHERWWRPRIWKHVFUHHQ
will show a Wi-Fi signal indicator.
To learn about how to add a Wi-Fi network when
it is not in range or when the router is set to ob-
VFXUH WKH QHWZRUN QDPH 66,' RU WR FRQ¿J-
ure advanced Wi-Fi options, please refer to the
PDQXDO
Browsing The Web Page 23
English
Browsing the Web
IULHQGVRUHQMR\YLGHRIURP<RX7XEHWKHZRUOG¶VPRVWSRSXODUYLGHRVKDULQJFRPPXQLW\
7RXVH%URZVHUWKHWDEOHWPXVWEHFRQQHFWHGWRWKH
,QWHUQHW5HDGWKHVHFWLRQ³&RQQHFWLQJWRWKH,QWHUQHW´WR
OHDUQKRZWRFRQQHFWWRWKH,QWHUQHW
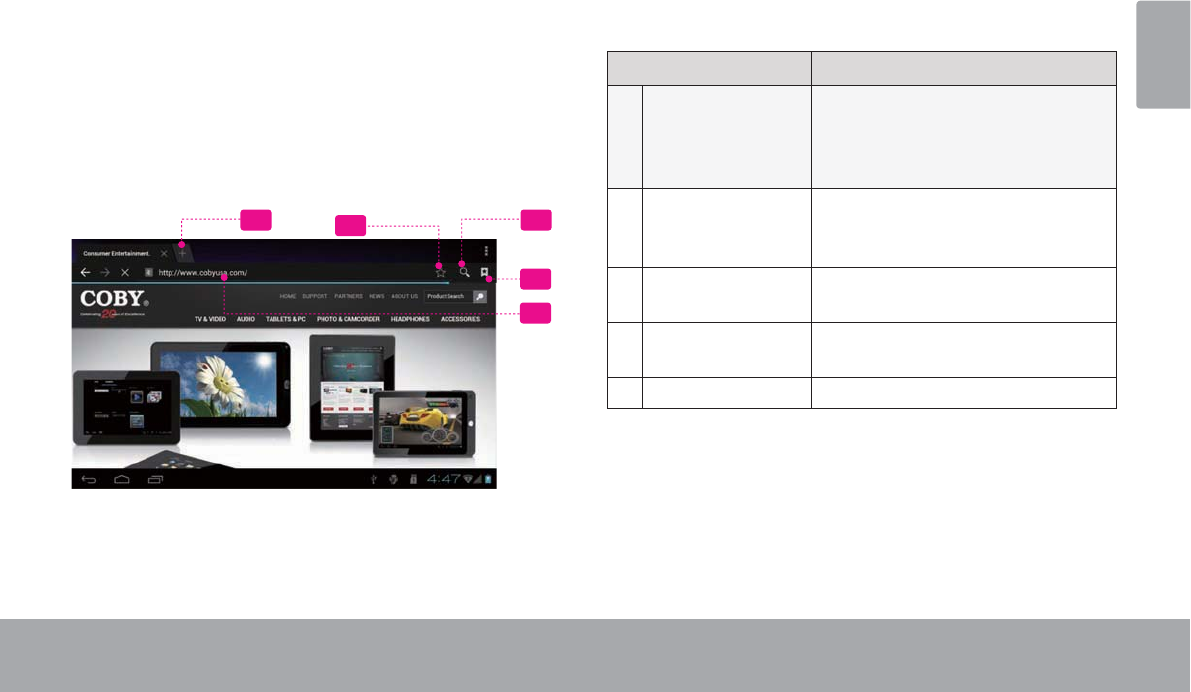
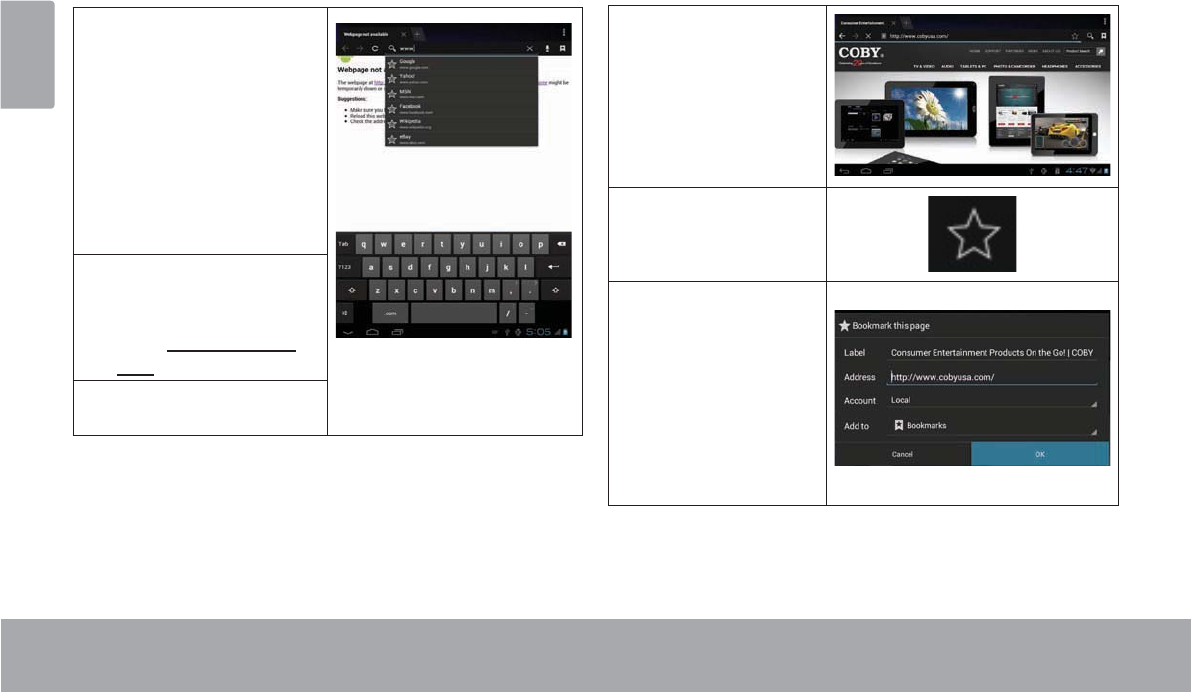
7RRSHQ%URZVHUWRXFKWKH%URZVHULFRQRQWKH+RPH
VFUHHQRULQWKH/DXQFKHU
1
2
435
Name Description
1 Address bar Displays the address (URL) of the
current page. Touch the bar to
enter a new address or to search
the web.
2Goto Bookmarks
icon
Touch to view bookmarks, to view
your most visited sites, or to view
your browser history.
3Search icon Touch to search with Google
browser.
4Add Bookmark
icon
Touch to add bookmarks.
5 New Window (+) Creates new browser window.
Page 24 Browsing The Web
English
Some common Browser actions are described below.
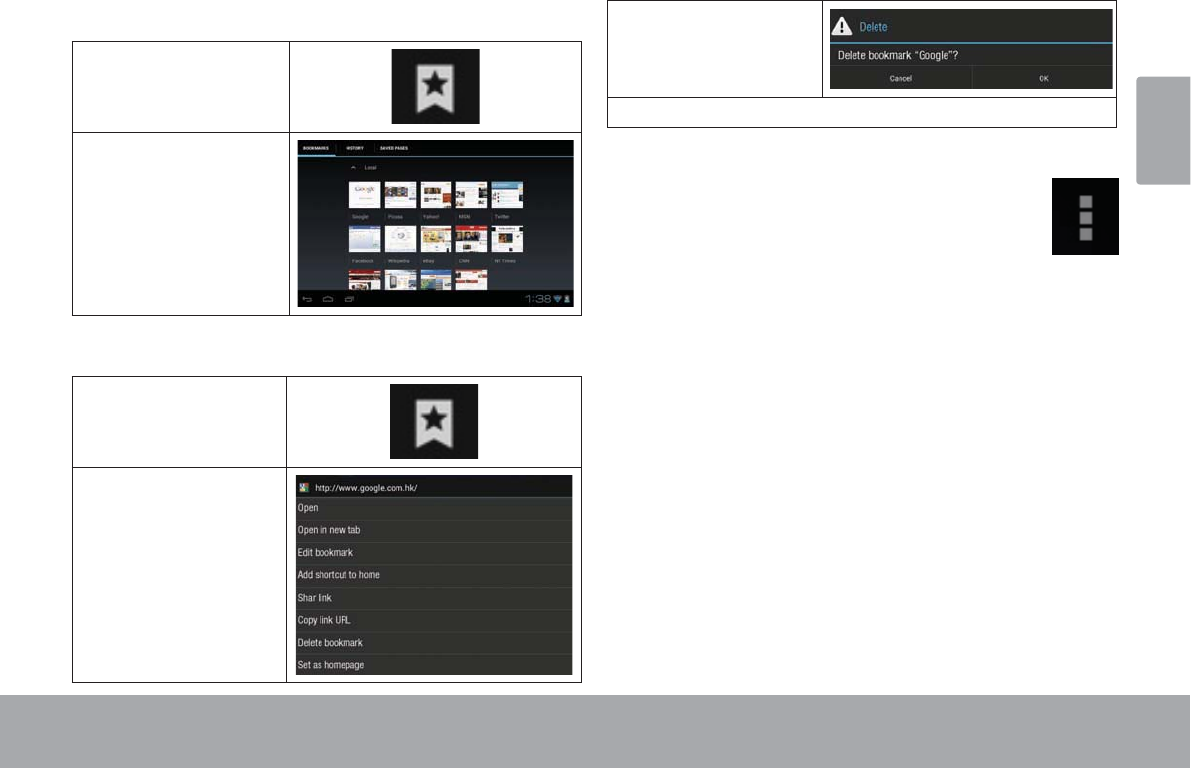
To go to a webpage.
1. Touch the Address
bar at the top of the
Browser screen. The
keyboard will open
automatically. (If the
Address bar is not
visible, drag the page
down to return to the
top of the Browser
screen.)
2. Use the keyboard to
enter the ad-dress
(URL) of the webpage
(e.g., www.cobyusa.
com).
3. Touch Enter key to
open the webpage.
To bookmark a webpage.
Bookmark your favorite webpages in order to visit
them quickly without entering a URL.
1. Go to the web-
page that you
want to bookmark
2. Touch the Add
Bookmark icon.
3. If desired, you can
modify the name
of the bookmark
or its location
(URL address).
Otherwise, touch
OKWR¿QLVK
adding the book-
mark.
Browsing The Web Page 25
English
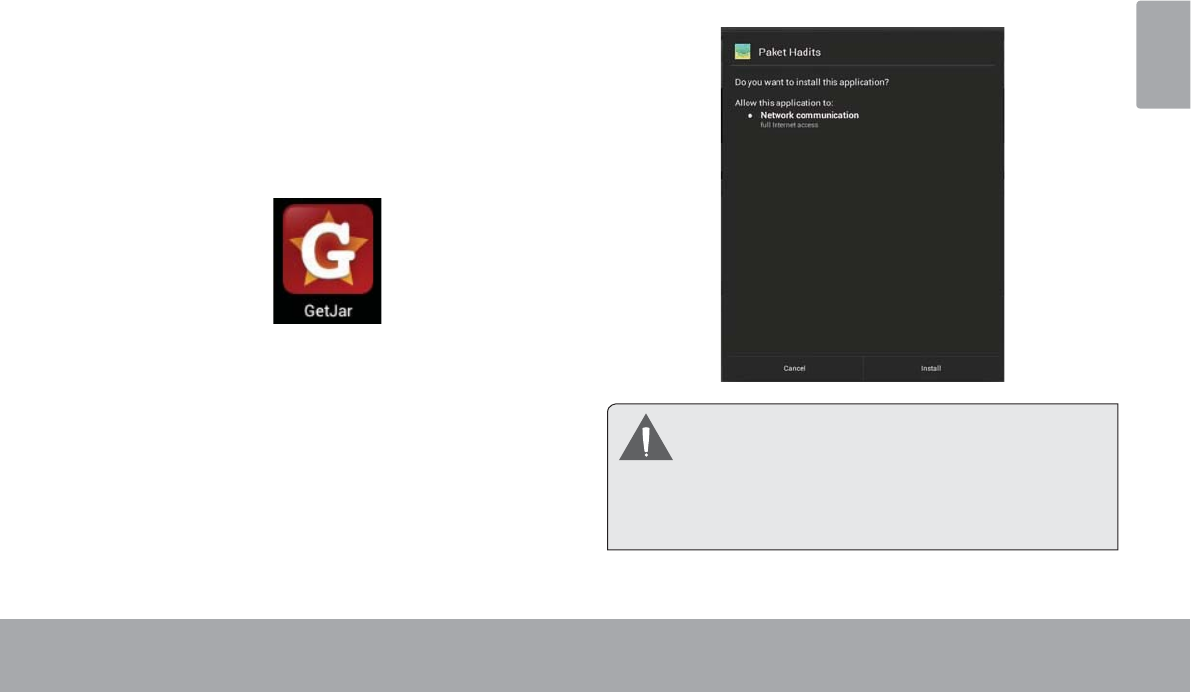
7RJRWRDERRNPDUNHGZHESDJH
7RXFKWKH*RWR
%RRNPDUNLFRQ
7RXFKDERRNPDUN
WLOHWRRSHQLW
7RGHOHWHDERRNPDUNHGZHESDJH
7RXFKWKH*RWR
%RRNPDUNLFRQ
7RXFKDQGKROGD
ERRNPDUNWLOHWR
RSHQWKHRSWLRQ
PHQX
7RXFK³'HOHWH
ERRNPDUN³
Browser menu
:KLOHYLHZLQJDZHESDJHWRXFKWKHLFRQVKRZ
DVULJKWWRRSHQWKH%URZVHU0HQXWKHLFRQLV
ORFDWHRQWKHWRSULJKWFRUQHURIWKHVFUHHQWKH
RSWLRQVDUH
5HIUHVK5HIUHVKWKHFXUUHQWZHESDJH
)RUZDUG*RWRWKHQH[WZHESDJH
1HZWDE2SHQWKHZHESDJHLQDQHZZLQGRZXQGHU
DQHZWDE
1HZLQFRJQLWRWDE2SHQWKHZHESDJHLQDQHZZLQ
GRZXQGHUDQHZWDEDQGWKHSDJHV\RXYLHZLQWKH
QHZZLQGRZZLOOQRWDSSHDULQ\RXUEURZVHUKLVWRU\
RUVHDUFKKLVWRU\6HHWKHRQVFUHHQH[SODQDWLRQRI
JRLQJLQFRJQLWR
6KDUHSDJH8VH(PDLOWRVHQGWKHZHESDJH85/
)LQGRQSDJH6HDUFKIRUFRQWHQWRQWKHFXUUHQW
SDJH

Page 26 Browsing The Web
English
Request desktop site:
6DYHIRURIÀLQHUHDGLQJ6DYHWKLVSDJHRQWRWKHLQ-
ternal memory, then you can read it when the internet
connection is disable.
Page info: View information about the current page,
including the URL.
6HWWLQJV&XVWRPL]HWKH%URZVHU
Managing Applications Page 27
English
ÂManaging Applications
Downloading and installing new applications to your tablet can extend its functionality in many ways.
You can download and install applications from the
included Applications store. To open the Applications
store:
1. Touch the Launcher icon.
2. Touch the Apps Marketplace icon.
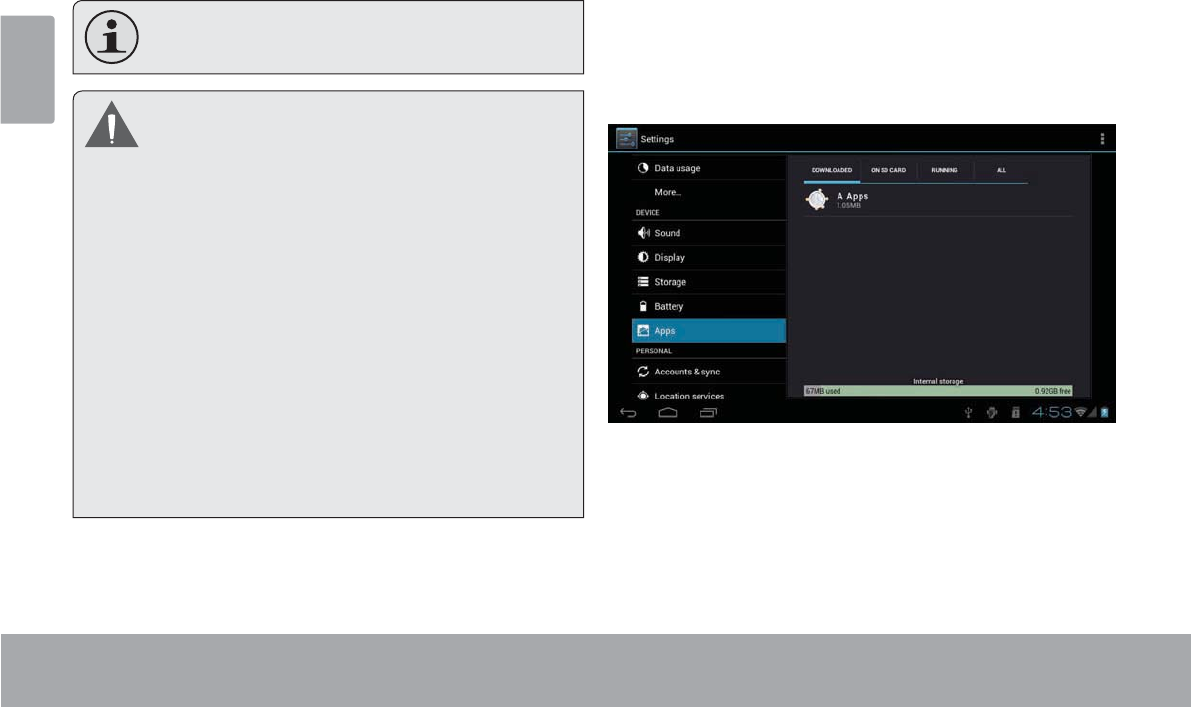
When installing an application, it will tell you what func-
tions it needs to control and if it needs access to your
data. Make sure you review these access requirements
carefully before completing the installation. %H HVSHFLDOO\ FDXWLRXV ZLWK DSSOLFDWLRQV WKDW
request access to many functions or to a
VLJQL¿FDQW DPRXQW RI \RXU GDWD <RX DUH
responsible for the results of applications
LQVWDOOHGRQ\RXUWDEOHW
Page 28 Managing Applications
English
You can learn more about GetJar, and browse for ap-
plications by visiting their website at www.getjar.com.
Some developers allow you to download and in-
VWDOODSSOLFDWLRQVGLUHFWO\IURPWKHLUZHEVLWH
Your Coby Mobile Internet Device may include
access to, or information on, content, products,
DSSOLFDWLRQVDQGVHUYLFHVIURPWKLUGSDUWLHV<RXU
use of such third party content, products,
applications and services is at the discretion of
VXFKWKLUGSDUW\DQGH[SUHVVO\JRYHUQHGE\VXFK
third party’s terms of use, including any such third
party’s privacy policies, for such content,
SURGXFWV DSSOLFDWLRQV DQG VHUYLFHV &RE\
Electronics Corporation is not responsible for and
H[SUHVVO\GLVFODLPVDOOZDUUDQWLHVRIDQ\NLQGZLWK
respect to all such third party content, products,
DSSOLFDWLRQV DQG VHUYLFHV &RE\ (OHFWURQLFV
Corporation will not be responsible for any loss,
costs, or damages incurred due to your access to
or use of third party content, products, applications
RUVHUYLFHV
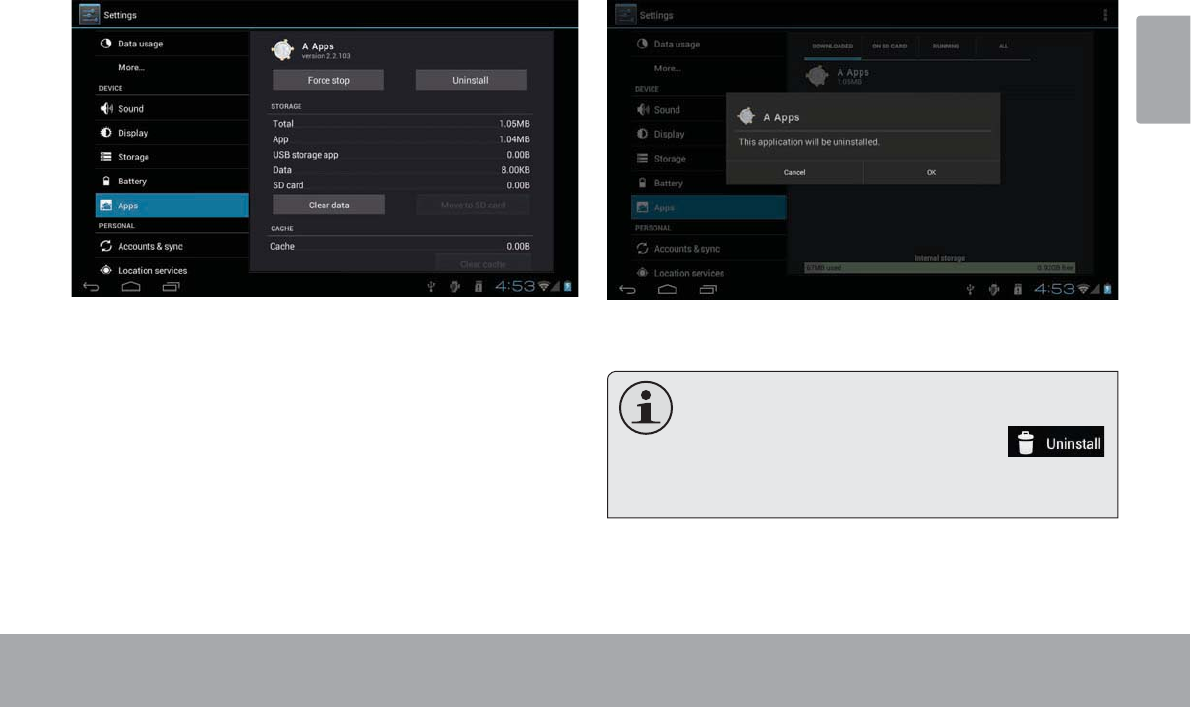
To uninstall an application:
1. From the Home screen, touch the Launcher Tab.
2. Touch Settings to open the Settings menu.
3. Touch Apps, a list of all applications installed on the
tablet will display on screen.
Managing Applications Page 29
English
4. Touch the name of the application you want to
uninstall; the Application Info screen will open.
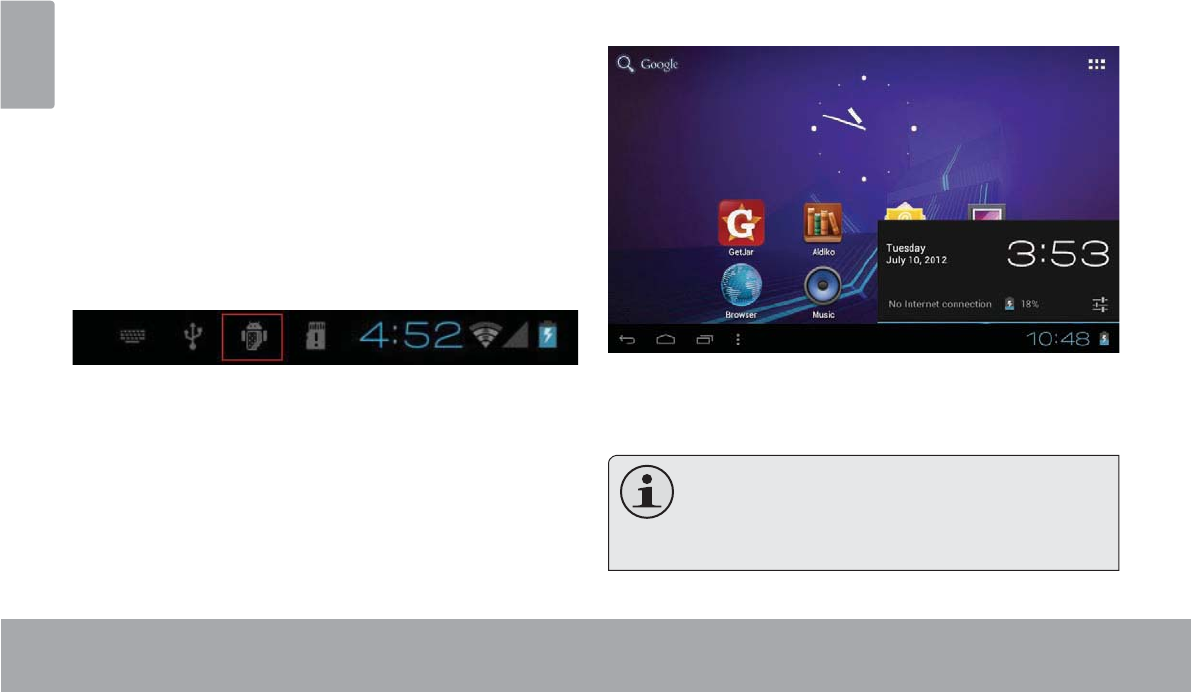
5. Touch Uninstall. The tablet will prompt you to
FRQ¿UP
6. Touch OK to uninstall the application.
Or you can uninstall an application from the
/DXQFKHUVFUHHQGLUHFWO\7RXFKDQGKROGDQDS-
plication icon until the Uninstall icon
appears, drage the application icon to the Unin-
stallLFRQWRXQLQVWDOOWKHDSSOLFDWLRQ
Page 30 Optional Connections
English
Optional Connections
Connecting to a Computer
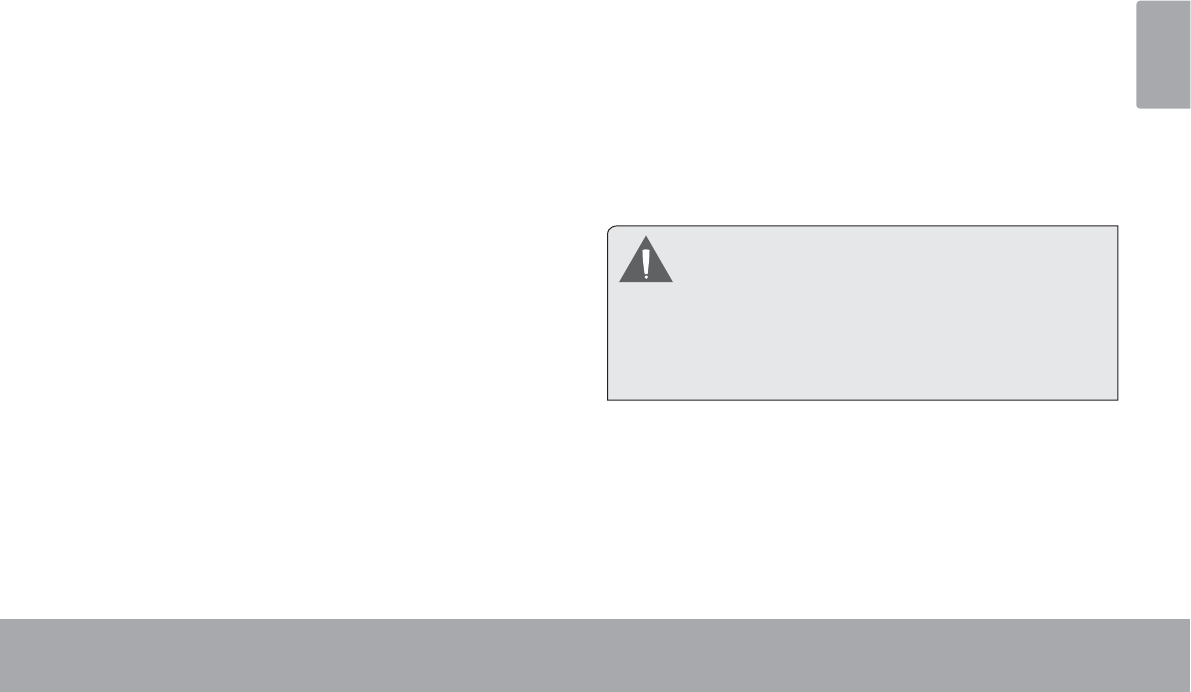
&RQQHFW\RXUWDEOHWWRWKHFRPSXWHU
:LWKWKHLQFOXGHG86%FDEOH
3OXJWKHVPDOOHQGRIWKHFDEOHLQWRWKH86%+L
VSHHGFRQQHFWRURIWKHWDEOHW
3OXJWKHODUJHHQGRIWKHFDEOHLQWRDQDYDLODEOH86%
+LVSHHGSRUWRQWKHFRPSXWHU
:KHQ\RXUWDEOHWLVFRQQHFWHGD86%LFRQZLOO
SDQHO
with many operating systems including:
Microsoft® Windows® XP, Vista, 7 or higher and
Optional Connections Page 31
English
2. Mount the storage drive.
Touch USB connected to mount the tablet’s built-in
storage, then touch “Turn on USB storage” and “OK”
ZKHQSURPSWHGWRFRQ¿UP:KHQPRXQWHG\RXFDQ
FRS\¿OHVWRIURP\RXUFRPSXWHUWRLW
<RXUWDEOHWZLOOEHUHFRJQL]HGE\WKHFRPSXWHUDVD
5HPRYDEOH6WRUDJHGULYH'UDJDQGGURS¿OHVEHWZHHQ
your tablet and the computer. To learn more about copy-
LQJ¿OHVSOHDVHUHIHUWRWKHGRFXPHQWDWLRQLQFOXGHGZLWK
your computer or operating system.
Connecting Headphones
Connect a pair of headphones (or earphones) to the
tablet to enjoy media in private.
Lower the volume level of the tablet before connecting
headphones, and then slowly raise the volume to a
comfortable listening level.
The headphones must have a 3.5 mm (1/8 in) plug.
When headphones are connected, speaker output
will be disabled automatically.
+HDULQJ H[SHUWV DGYLVH DJDLQVW WKH FRQVWDQW
XVHRISHUVRQDOVWHUHRVSOD\HGDWKLJKYROXPH
&RQVWDQWH[SRVXUHWRKLJKYROXPHVFDQOHDGWR
KHDULQJORVV,I\RXVKRXOGH[SHULHQFHULQJLQJ
in the ears or hearing loss, discontinue use and
VHHNPHGLFDODGYLFH
Page 32 Setting The System Options
English
ÂSetting the System Options
Open the system settings menu to adjust how the tablet looks and functions.
Many applications will have their own settings; refer to the documentation provided by the application developer
WROHDUQPRUH
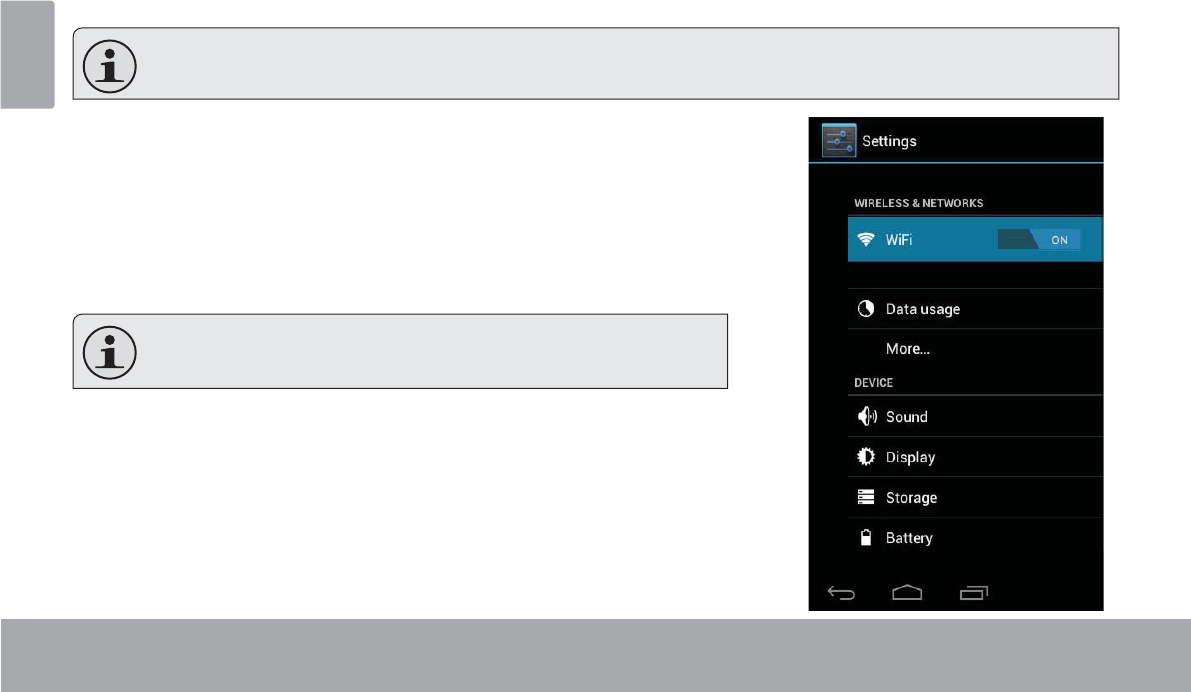
To open the Settings menu:
1. From the Home screen, touch the Launcher Tab.
2. Touch Settings to open the Settings menu.
The settings are grouped by category. Touch a category to open and adjust its
settings on the right side.
Please refer to the manual for a description of the items in the
6HWWLQJVPHQX
6SHFLÀFDWLRQV Page 33
English
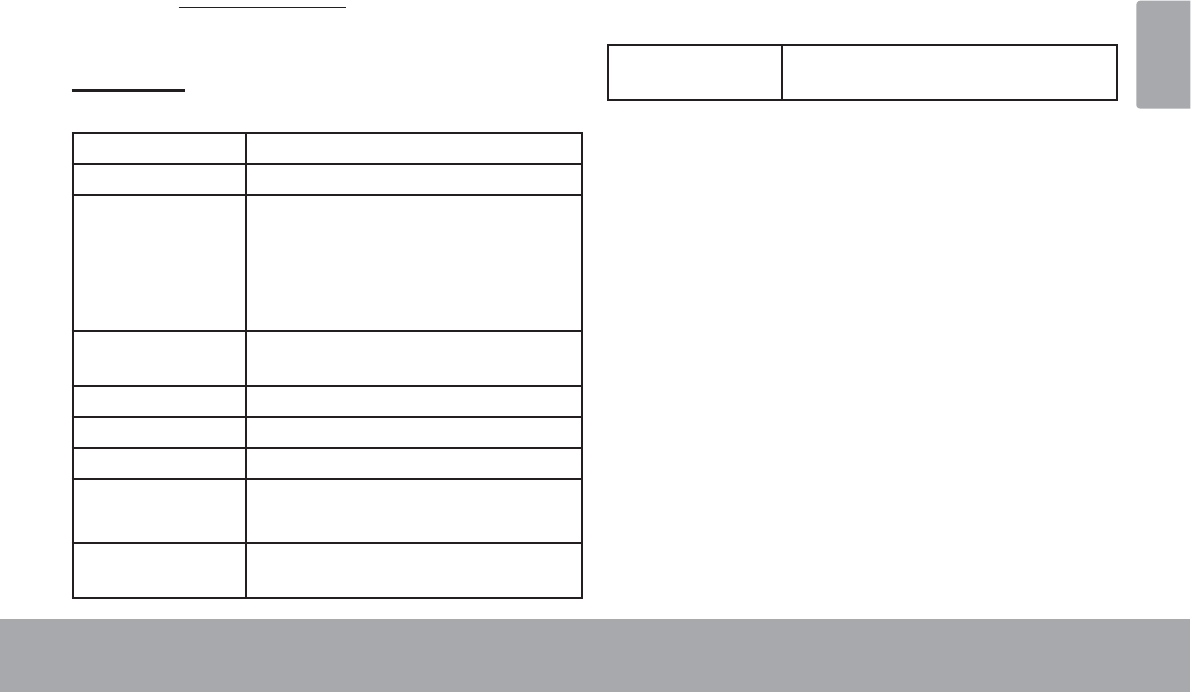
Â6SHFLÀFDWLRQV
Please visit www.cobyusa.comIRUWKHODWHVWSURGXFWLQIRUPDWLRQ'HVLJQVSHFL¿FDWLRQVDQGPDQXDODUHVXEMHFWWR
change without notice.
MID7046
Processor CortexTM -A5 (1 GHz)
RAM 512 MB
Storage Built-in-Storage is model dependant
and indicated on product packaging.
(e.g. -4 = 4GB, -8 = 8GB)1
microSDHC card slot (max. 32GB sup-
ported)
Display 7.0” TFT LCD (800 x 480), resistive
touchscreen
Networking Wi-Fi ( 802.11 b/g/n )
Audio Output 3.5 mm headphone
PC Interface USB 2.0 Hi-speed
Additional
Features
Built-in microphone
speaker
Operating
System
Android™ 4.0
(Ice Cream Sandwich)
Power Rechargeable Li-poly battery Power
Adapter (DC 5V)2
1 *% %LOOLRQE\WHV$YDLODEOHVWRUDJHFDSDFLW\ZLOOEHOHVVGXHWR
RSHUDWLQJV\VWHPDQGSUHLQVWDOOHGVRIWZDUHDSSOLFDWLRQV$FWXDO
IRUPDWWHGFDSDFLW\ZLOOYDU\
2%DWWHU\OLIHZLOOYDU\EDVHGRQVHWWLQJVXVDJHDQGRWKHUIDFWRUV
Page 346SHFLÀFDWLRQV
English
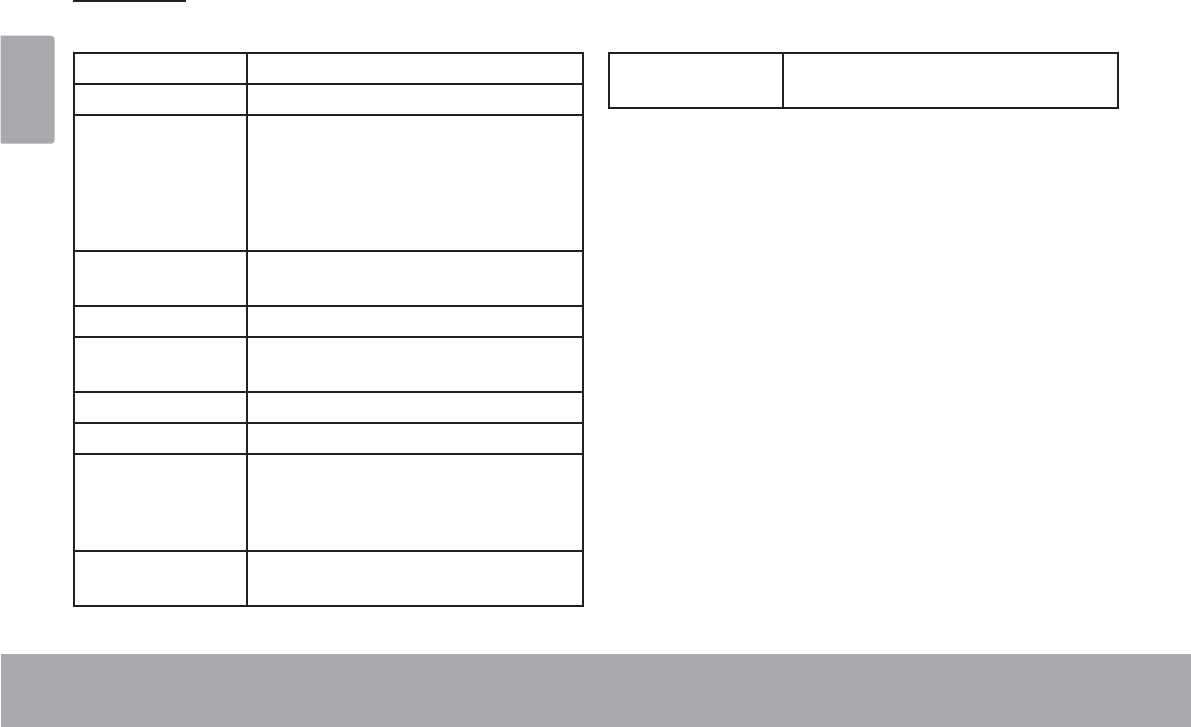
MID7048
Processor CortexTM -A5 (1 GHz)
RAM 1 GB
Storage Built-in-Storage is model dependant
and indicated on product packaging.
(e.g. -4 = 4GB, -8 = 8GB)1
microSDHC card slot (max. 32GB sup-
ported)
Display 7.0” TFT LCD (800 x 480), capacitive
touchscreen
Networking Wi-Fi ( 802.11 b/g/n )
Video Output Mini HDMI, type C (1080p and 720p
supported)
Audio Output 3.5 mm headphone
PC Interface USB 2.0 Hi-speed
Additional
Features
Built-in microphone
speaker
Front-facing camera(0.3 MP)
Operating
System
Android™ 4.0
(Ice Cream Sandwich)
Power Rechargeable Li-poly battery Power
Adapter (DC 5V)2
1 *% %LOOLRQE\WHV$YDLODEOHVWRUDJHFDSDFLW\ZLOOEHOHVVGXHWR
RSHUDWLQJV\VWHPDQGSUHLQVWDOOHGVRIWZDUHDSSOLFDWLRQV$FWXDO
IRUPDWWHGFDSDFLW\ZLOOYDU\
2%DWWHU\OLIHZLOOYDU\EDVHGRQVHWWLQJVXVDJHDQGRWKHUIDFWRUV

Support Page 35
English
ÂSupport
If you have a problem with this device, please check our website at www.cobyusa.com for Frequently Asked
Questions (FAQ) and product updates. If these resources do not resolve the problem, please contact Technical
Support.
Coby Electronics Technical Support
Email: techsupport@cobyusa.com
Web: www.cobyusa.com
Phone: For US Residents: 877-302-2629, Monday-Friday (9:00AM-9:00PM EST)
For Canadian Residents: 855-542-8917, Monday-Friday (8:00AM-8:00PM EST)
Page 36 Safety Notices
English
ÂSafety Notices
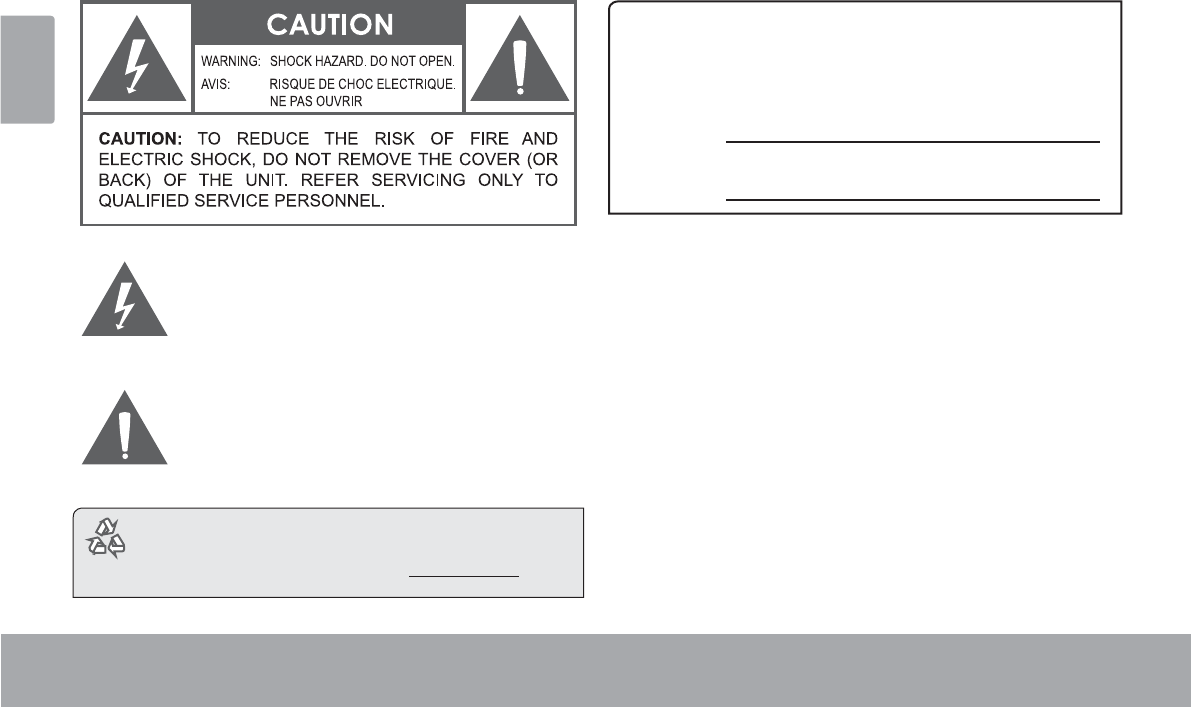
7KHOLJKWQLQJÀDVKZLWKDUURZKHDGV\PEROZLWKLQDQ
HTXLODWHUDOWULDQJOHLVLQWHQGHGWRDOHUWWKHXVHUWRWKH
SUHVHQFHRIXQLQVXODWHG³GDQJHURXVYROWDJH´ZLWKLQ
WKHSURGXFW¶VHQFORVXUHWKDWPD\EHRIVXI¿FLHQW
PDJQLWXGHWRFRQVWLWXWHDULVNRIHOHFWULFVKRFN
7KHH[FODPDWLRQSRLQWZLWKLQDQHTXLODWHUDOWULDQJOH
LVLQWHQGHGWRDOHUWWKHXVHUWRWKHSUHVHQFHRI
LPSRUWDQWRSHUDWLRQDQGVHUYLFLQJLQVWUXFWLRQVLQWKH
OLWHUDWXUHDFFRPSDQ\LQJWKHDSSOLDQFH
For recycling or disposal information about this
product, please contact your local authorities or the
Electronics Industries Alliance: ZZZHLDHRUJ
For Customer Use:
(QWHUEHORZWKHVHULDOQXPEHUWKDWLVORFDWHGRQWKHUHDURIWKH
XQLW5HWDLQWKLVLQIRUPDWLRQIRUIXWXUHUHIHUHQFH
0RGHO1R
6HULDO1R
WARNING: 7RSUHYHQW¿UHRUVKRFNKD]DUGGRQRWH[SRVHWKLV
GHYLFHWRUDLQRUPRLVWXUH'DQJHURXVKLJKYROWDJHLVSUHVHQWLQVLGH
WKHHQFORVXUH'RQRWRSHQWKHFDELQHW
Protect your hearing: +HDULQJH[SHUWVDGYLVHDJDLQVWWKHFRQ-
VWDQWXVHRISHUVRQDOVWHUHRVSOD\HGDWKLJKYROXPH&RQVWDQWH[SRVXUH
WRKLJKYROXPHVFDQOHDGWRKHDULQJORVV,I\RXVKRXOGH[SHULHQFH
ULQJLQJLQWKHHDUVRUKHDULQJORVVGLVFRQWLQXHXVHDQGVHHNPHGLFDO
DGYLFH
Note: ,IWKHSURGXFWVXGGHQO\KDVQRUHVSRQVHRUSRZHUVRIIDQ
HOHFWURVWDWLFGLVFKDUJHPD\EHWKHFDXVH,QWKLVFLUFXPVWDQFH
SOHDVHIROORZWKHSURFHGXUHVEHORZIRUUHFRYHU\
t Turn o the unit by pushing and holding the slide button
at the right (Power o position) for 15 seconds.
t Turn on the unit again

Safety Notices Page 37
English
FCC Statement:
7KLVGHYLFHFRPSOLHVZLWK3DUWRIWKH)&&5XOHV2SHUDWLRQLVVXEMHFWWRWKHIROORZLQJWZRFRQGLWLRQV
7KLVGHYLFHPD\QRWFDXVHKDUPIXOLQWHUIHUHQFHDQG
7KLVGHYLFHPXVWDFFHSWDQ\LQWHUIHUHQFHUHFHLYHGLQFOXGLQJLQWHUIHUHQFHWKDWPD\FDXVHXQGHVLUHGRSHUDWLRQ
Note: 7KLVHTXLSPHQWKDVEHHQWHVWHGDQGIRXQGWRFRPSO\ZLWKWKHOLPLWVIRU&ODVV%GLJLWDOGHYLFHVSXUVXDQWWR3DUWRIWKH)&&UXOHV
7KHVHOLPLWVDUHGHVLJQHGWRSURYLGHUHDVRQDEOHSURWHFWLRQDJDLQVWKDUPIXOLQWHUIHUHQFHLQDUHVLGHQWLDOLQVWDOODWLRQ7KLVHTXLSPHQWJHQHUDWHV
XVHVDQGFDQUDGLDWHUDGLRIUHTXHQF\HQHUJ\DQGLIQRWLQVWDOOHGDQGXVHGLQDFFRUGDQFHZLWKWKHLQVWUXFWLRQVPD\FDXVHKDUPIXOLQWHUIHUHQFH
WRUDGLRFRPPXQLFDWLRQV+RZHYHUWKHUHLVQRJXDUDQWHHWKDWLQWHUIHUHQFHZLOOQRWRFFXULQDSDUWLFXODULQVWDOODWLRQ,IWKLVHTXLSPHQWGRHVFDXVH
KDUPIXOLQWHUIHUHQFHWRUDGLRRUWHOHYLVLRQUHFHSWLRQZKLFKFDQEHGHWHUPLQHGE\WXUQLQJWKHHTXLSPHQWRIIDQGRQWKHXVHULVHQFRXUDJHGWR
WU\WRFRUUHFWWKHLQWHUIHUHQFHE\RQHRUPRUHRIWKHIROORZLQJPHDVXUHV
5HRULHQWRUUHORFDWHWKHUHFHLYLQJDQWHQQD
,QFUHDVHWKHVHSDUDWLRQEHWZHHQWKHHTXLSPHQWDQGUHFHLYHU
&RQQHFWWKHHTXLSPHQWLQWRDQRXWOHWRQDFLUFXLWGLIIHUHQWIURPWKDWWRZKLFKWKHUHFHLYHULVFRQQHFWHG
&RQVXOWWKHGHDOHURUDQH[SHULHQFHGUDGLR79WHFKQLFLDQIRUKHOS
8VHRIVKLHOGHGFDEOHLVUHTXLUHGWRFRPSO\ZLWK&ODVV%OLPLWVLQ6XESDUW%RI3DUWRIWKH)&&UXOHV
'RQRWPDNHDQ\FKDQJHVRUPRGL¿FDWLRQVWRWKHHTXLSPHQWXQOHVVRWKHUZLVHVSHFL¿HGLQWKHPDQXDO,IVXFKFKDQJHVRUPRGL¿FDWLRQVVKRXOG
EHPDGH\RXFRXOGEHUHTXLUHGWRVWRSRSHUDWLRQRIWKHHTXLSPHQW

Page 38 Safety Notices
English
Important Safety Instructions
1. Read Instructions: All the safety and operating instruc-
tions should be read before the product is operated.
2. Retain Instructions: The safety and operating instruc-
tions should be retained for future reference.
3. Heed Warnings: All warnings on the product and in
the operating instructions should be adhered to.
4. Follow Instructions: All operating and usage instruc-
tions should be followed.
5. Cleaning: Unplug this product from the wall outlet be-
fore cleaning. Do not use liquid cleaners or aerosol
cleaners. Use a damp cloth for cleaning.
6. Attachments: Use only attachments recommended by
the manufacturer. Use of other attachments may be
KD]DUGRXV
7. Water and Moisture: Do not use this product near
water (e.g., near a bath tub, washbowl, kitchen sink,
laundry tub, in wet basements, or near a swimming
pool and the like).
8. Ventilation: Slots and openings in the cabinet are
provided for ventilation to ensure reliable operation of
the product and to protect it from overheating. These
openings should never be blocked by placing the
product on a bed, sofa, rug, or other similar surface.
This product should not be placed in a built-in installa-
tion such as a bookcase or rack unless proper ventila-
tion is provided or the manufacturer instructions have
been adhered to.
9. Power Sources: This product should be operated only
from the type of power source indicated on the rating
label. If you are not sure of the type of power supply to
your home, consult your product dealer or local power
company. For products intended to operate from bat-
tery power or other sources, refer to the operating
instructions.
10. Overloading: Do not overload wall outlets, extension
cords, or integral convenience receptacles as this can
UHVXOWLQDULVNRI¿UHRUHOHFWULFVKRFN
11. Object and Liquid Entry: Never push objects of any
kind into this product through openings as they may
touch dangerous voltage points or shout-out parts that
FRXOGUHVXOWLQD¿UHRUHOHFWULFVKRFN1HYHUVSLOOOLTXLG
of any kind on the product.
12. Servicing: Do not attempt to service this product your-
self as opening or removing covers may expose you to
GDQJHURXVYROWDJHRURWKHUKD]DUGV5HIHUDOOVHUYLF-
LQJWRTXDOL¿HGVHUYLFHSHUVRQQHO
13. Damage Requiring Service: Unplug this product from
WKHZDOORXWOHWDQGUHIHUVHUYLFLQJWRTXDOL¿HGVHUYLFH
personnel under the following conditions: a) when the
power-supply or plug is damaged; b) if liquid has been
spilled or if objects have fallen into the product; c) if
the product has been exposed to rain or water; d) if

Safety Notices Page 39
English
the product does not operate normally by following the
operating instructions. Adjust only those controls that
are covered by the operating instructions as improper
adjustment of other controls may result in damage and
ZLOORIWHQUHTXLUHH[WHQVLYHZRUNE\DTXDOL¿HGWHFKQL-
cian to restore the product to its normal operation; e)
if the product has been dropped or damaged in any
way; f) when the product exhibits a distinct change in
performance—this indicates a need for service.
14. Replacement Parts: When replacement parts are re-
quired, be sure that your service technician has used
UHSODFHPHQW SDUWV VSHFL¿HG E\ WKH PDQXIDFWXUHU RU
have the same characteristics as the original part.
8QDXWKRUL]HGVXEVWLWXWLRQVPD\UHVXOWLQ¿UHHOHFWULF
VKRFNRURWKHUKD]DUGV
15. Safety Check: Upon completion of any service or
repairs to this product, ask the service technician to
perform safety checks to ensure that the product is in
proper operating condition.
16. Heat: The product should be situated away from heat
sources such as radiators, heat registers, stoves, or
RWKHU SURGXFWV LQFOXGLQJ DPSOL¿HUV WKDW SURGXFH
heat.
Legal and Trademark Notices
&RE\LVWUDGHPDUNVRI&RE\(OHFWURQLFV&RUSRUDWLRQ
$QGURLGLVDWUDGHPDUNRI*RRJOH,QF8VHRIWKLVWUDGHPDUNLVVXEMHFW
WR*RRJOH3HUPLVVLRQV
3RUWLRQVRIWKHDUWZRUNXVHGIRUWKLVSDFNDJHDUHPRGL¿FDWLRQVEDVHG
RQZRUNFUHDWHGDQGVKDUHGE\*RRJOHDQGXVHGDFFRUGLQJWRWHUPV
GHVFULEHGLQWKH&UHDWLYH&RPPRQV$WWULEXWLRQ/LFHQVH
PLFUR6'+&/RJRLVDWUDGHPDUNRI6'&//&
86%LVDUHJLVWHUHGWUDGHPDUNRI86%,PSOHPHQWHUV)RUXP,QF
<RX7XEHLVDWUDGHPDUNRI*RRJOH,QF
$OORWKHUWUDGHPDUNVDQGORJRVDUHSURSHUW\RIWKHLUUHVSHFWLYHRZQHUV
XQOHVVLQGLFDWHGRWKHUZLVH
This device complies with Industry Canada licence-exempt RSS
standard(s).Operation is subject to the following two condition:
(1)this device may not cause interference,and(2)this device must
accept any interference,including interference that may cause
undesired operation of the device.
Under Industry Canada regulations,this radio transmitter may only
operate using an antenna of a type and maximum(or lesser)gain
approved for the transmitter by Industry Canada.To reduce potential
radio interference to other users,the antenna type and its gain should
be so chosen that,the equivalent isotropically radiated power(e.i.r.p.)
is not more than that necessary for successful communication.
IC Warning:

Coby is a registered trademark of Coby Electronics Corporation.
Printed in China.
COBY es la marca registrada de COBY Electronics Corporation.
Imprimido en China.
Coby est une marque de fabrique de Coby Electronics Corporation.
Imprimé en Chine.
Coby Electronics Corp.
1991 Marcus Ave, Suite 301
Lake Success, NY 11042
www.cobyusa.com
www.ecoby.com