CommScope Technologies S1000R LTE and Dual-Band Wi-Fi Indoor Relay Small Cell User Manual User Guide
CommScope Technologies LLC LTE and Dual-Band Wi-Fi Indoor Relay Small Cell User Guide
User Guide

S1000R
User Guide
[UG template version 16a]
sprint_commscope_S1000R_ug_en_112016_d1

TOC i
Table of Contents
Introduction ............................................................................................................................................. 1
Using this guide ............................................................................................................................... 2
Getting Started ................................................................................................................................ 3
What's in the box...................................................................................................................... 3
Setup at a glance ..................................................................................................................... 4
Setting up your S1000R ........................................................................................................... 5
Begin Self-Installation .............................................................................................................. 8
Configuring the S1000R Router ....................................................................................................... 9
Logging into the router ............................................................................................................. 9
Configuring WiFi service ........................................................................................................ 10
Using the S1000R .......................................................................................................................... 20
How the S1000R works .......................................................................................................... 20
????? ............................................................................................................................. 20
Maintenance .......................................................................................................................... 20
Troubleshooting ............................................................................................................................. 21
Router connection problems ................................................................................................... 21
LED quick reference............................................................................................................... 22
Using LEDs ............................................................................................................................ 22
Resetting the S1000R ............................................................................................................ 24
FAQs ..................................................................................................................................... 25
Why does the S1000R need an external GPS antenna? ................................................. 25
What should I do if the GPS fails to acquire a lock? ........................................................ 25
What happens to the S1000R if there is a power outage or if you lose Internet access? .. 25
Can you move the S1000R to another location? ............................................................. 25
Getting help ........................................................................................................................... 25
Safety information .......................................................................................................................... 26
General precautions ............................................................................................................... 26
FCC information ..................................................................................................................... 26
! FCC radiation exposure statement................................................................................ 26
FCC Part 15 ................................................................................................................... 27

1
Introduction
The S1000R is a variant of CommScope’s S1000 platform that uses LTE relay for backhaul connection to
Sprint’s core network.
The S1000R combines S1000 hardware with Sercomm’s Customer Premise Equipment (CPE) module. The
CPE module provides access to user equipment through the backhaul.
The S1000’s WAN Ethernet port connects to the CPE module’s LAN Ethernet port internally, providing data
communication, management and packet forwarding.

Using this guide 2
Using this guide
This user guide introduces you to the services and features of the S1000R. The guide is divided into the
following chapters:
● Getting Started
● Configuring the S1000R Router
● Using the S1000R
● Troubleshooting
● Safety information
It is important that you read each section and note any special requirements before you use the device.
Please read the Safety information to learn about how to safely use your device.
Failure to read and follow the safety information in this user guide may result in
serious bodily injury, death, or property damage.
Getting Started 3
Getting Started
This chapter describes the contents of the box and setting up your S1000R.
● What's in the box
● Setup at a glance
● Setting up your S1000R
● Begin Self-Installation
NOTE: When you complete this section, configure WiFi and other services in Configuring the S1000R
Router.
What's in the box
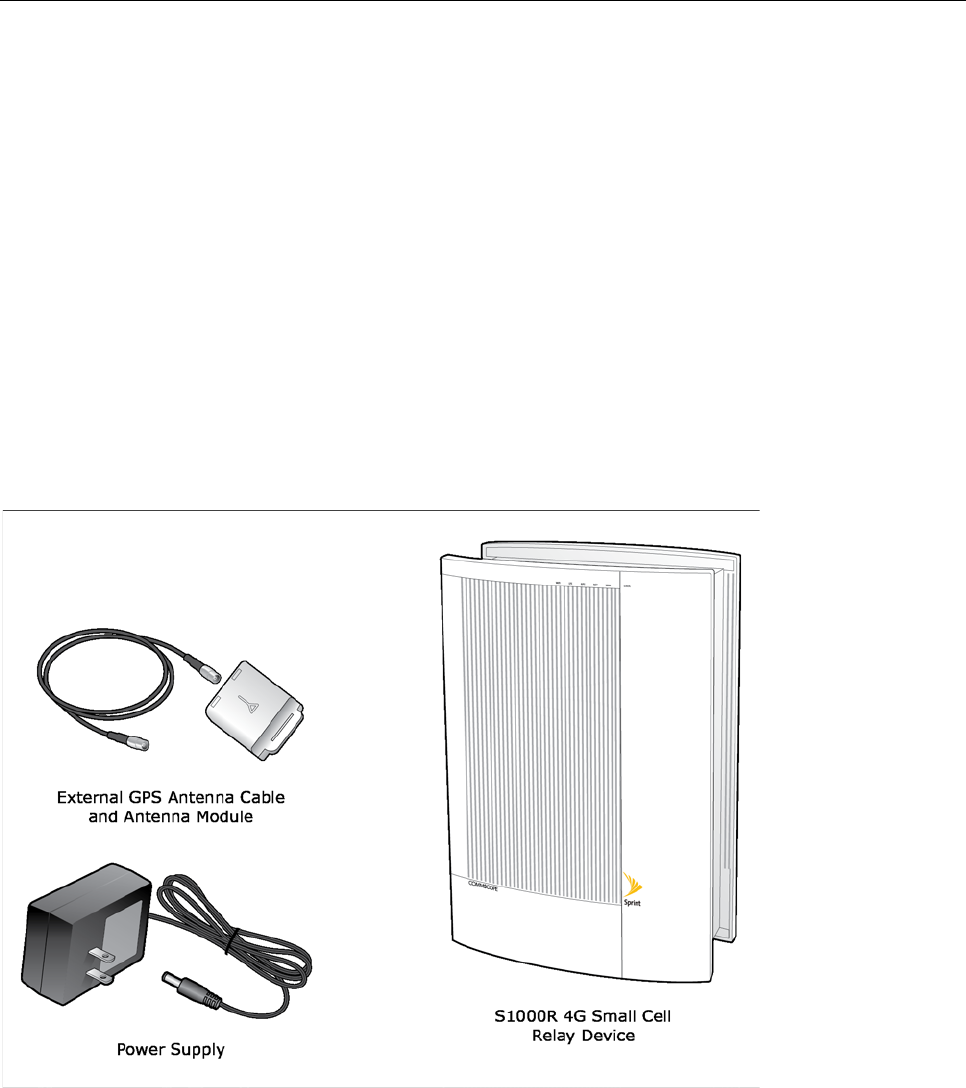
Ensure that the following items are in the box, along with the Quick Start Guide.
Getting Started 4
Setup at a glance
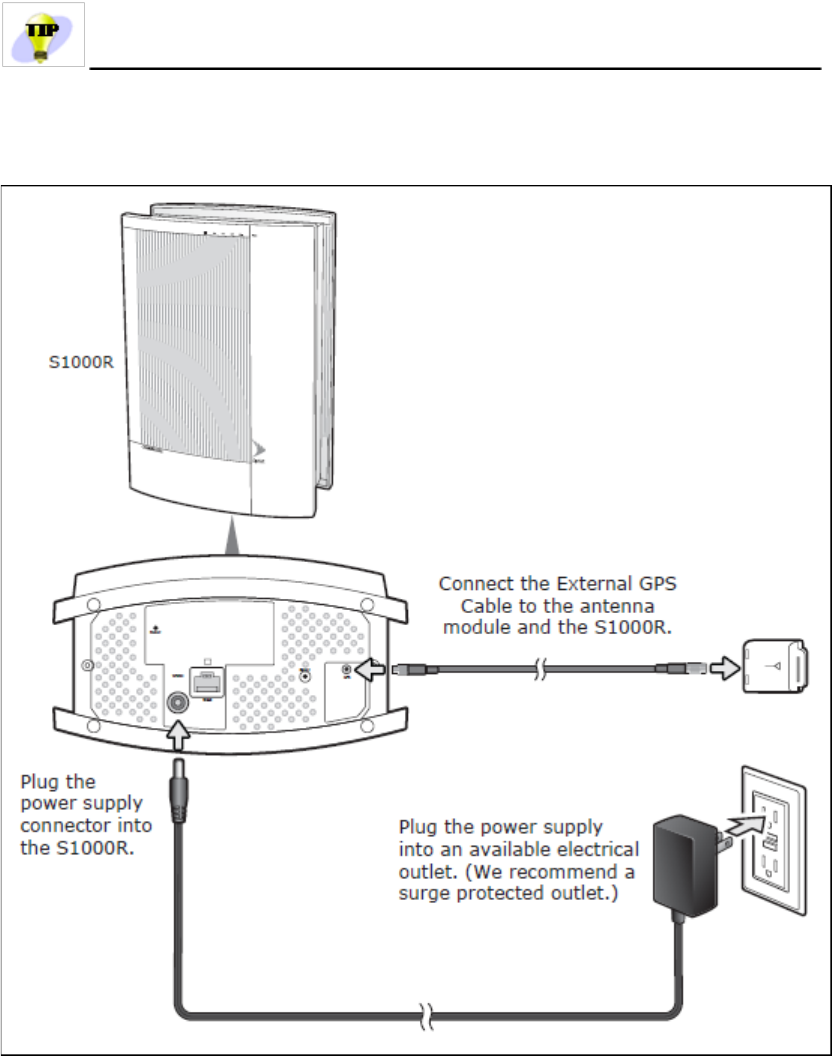
The following diagram shows a typical S1000R setup.
Place the unit on its side on a flat surface to expose the bottom of the unit.
Getting Started 5
Setting up your S1000R
Follow these steps to install your S1000R inside your office or other location.
Place the unit
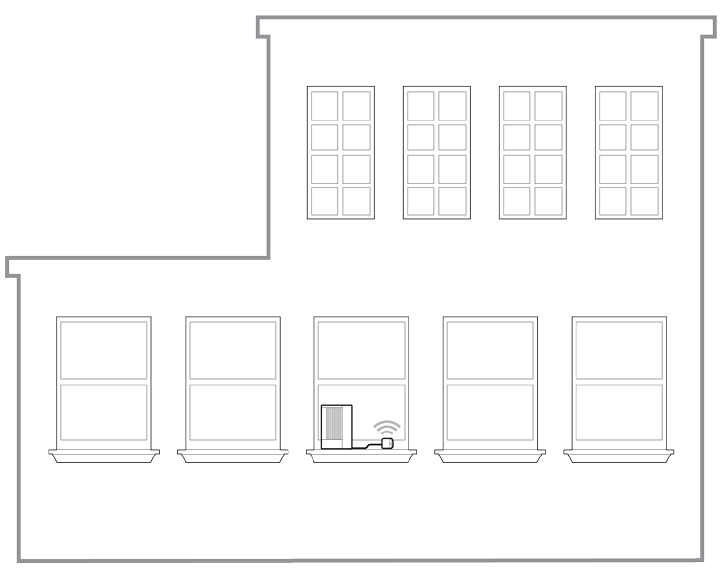
The following diagram shows a typical placement of an S1000R in a building.
Place the device:
● In an elevated location, such as the top of a bookshelf or on a window sill.
● Position the 5 LEDs away from the window to maximize accessibility to Macro signals
● Within reach of an electrical outlet
NOTE: Do not put the device next to any devices that may cause radio interference.
Getting Started 6
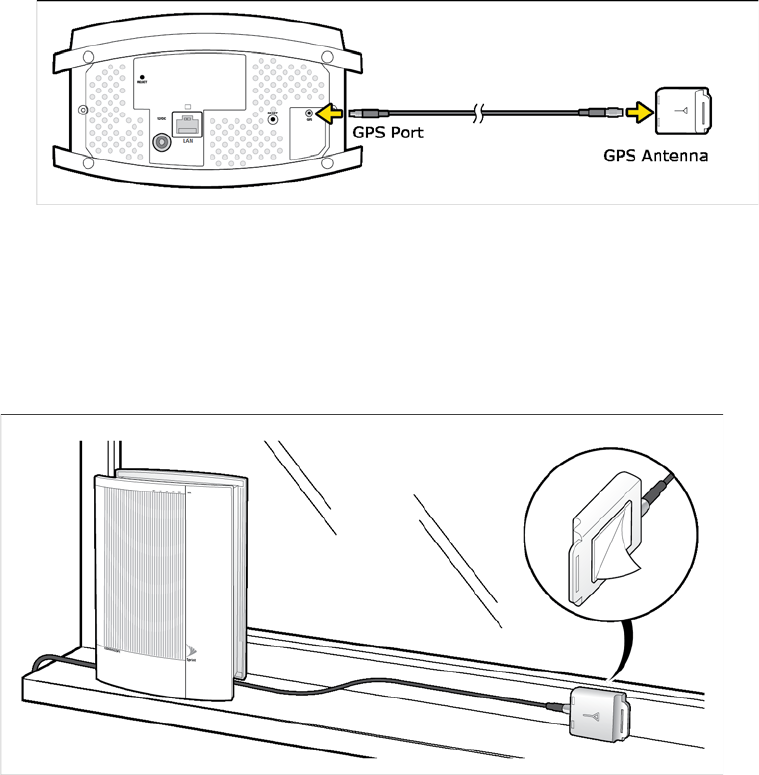
Connect the external GPS antenna
1. Connect the external GPS cable to the GPS port on the bottom of the unit.
2. Position the GPS antenna module on a flat surface near a closed window.
NOTE: You may defer step 2 until after the unit has been placed upright in the next section.
Do not place the GPS antenna:
● Outdoors; it is not weatherproof.
● Behind large, heavy objects such as furniture; doing so could affect the signal.
NOTE: After initial installation, GPS may take 30-40 minutes to get a GPS time fix.
Getting Started 7
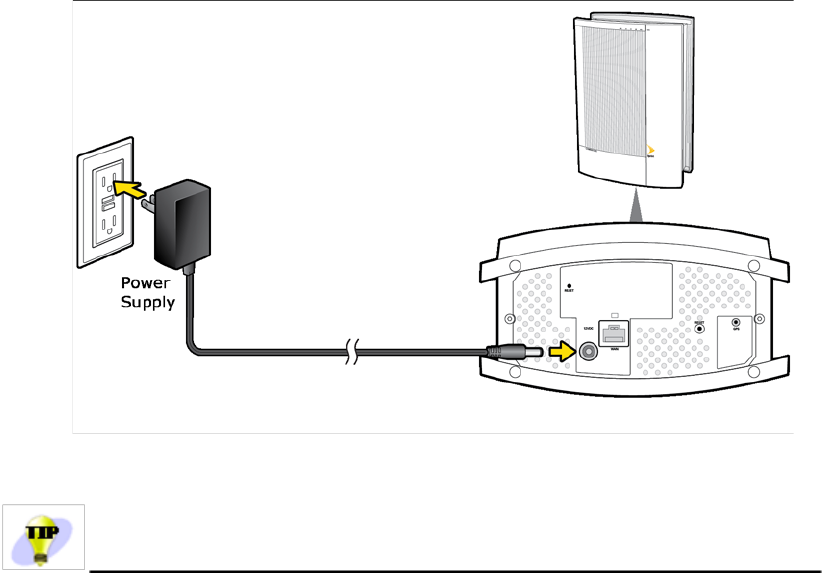
Connect the power supply
1. Plug the power supply connector into the black power port.
Stand the unit upright and carefully move all cables so they come out of one long end of the unit.
There is room for cables to come out from beneath the unit once it is placed upright.
1. Plug the other end of the power cable into an available electrical outlet. (We recommend a surge
protected outlet.)

Getting Started 8
Begin Self-Installation
When you power on your S1000R for the first time, it will go through an automated setup sequence.
1. During boot-up the device LEDs will be solid green for a few seconds during initial hardware tests.
This takes approximately 8 to 10 seconds.
2. The WAN LED will turn solid green; all other LEDs will be OFF. This takes approximately 8 to 10
seconds.
3. The WAN LED will stay solid green; all other LEDs will blink red.
NOTE: Steps 1 through 3 are expected behavior.
4. The NET LED will turn solid green. This will take approximately 15 minutes.
NOTE: If the WAN or NET LEDs are solid red after 15 minutes, talk to your IT administrator to diagnose
problems with your internet connection.
5. This is a good time to take a break.
The device will go continue the self-installation process. During this time the device may download
software images and perform automatic synchronization. The device may also restart a couple of
times.
Return after 60 minutes and check the LEDs. All LEDs should be solid green.
LED Label
Description when solid Green
WAN
Successful connection to the local LAN
NET
Successful connection to Sprint’s Core Network
GPS
GPS lock achieved
LTE
4G Data Services are available
WIFI
WiFi Services are available
NOTE: If all LEDs are not solid green call Customer Care as described in Getting help.
Configuring the S1000R Router 9
Configuring the S1000R Router
This section describes how to configure the S1000R's internal router. Use the router to configure WiFi
settings.
● Logging in to the router
● Configuring WiFi service
NOTE: To access the internal router, connect a computer to the LAN port on the bottom of the unit.
Logging into the router
1. Connect a computer to the LAN port.
2. Start the computer. (If it is already running, restart it.)
3. In a web browser, enter the following URL:
http://192.168.16.1
NOTE: This IP address is the LAN bridge IP address.
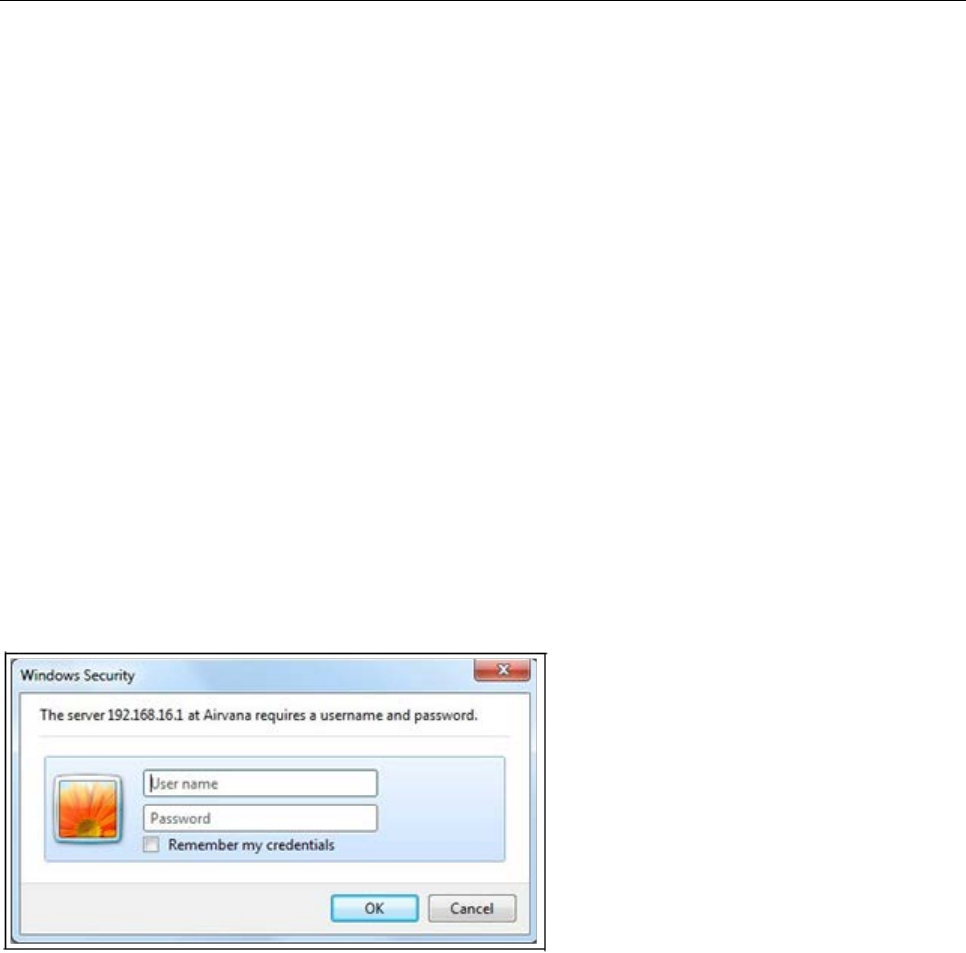
The login dialog box appears.
4. Enter the User name 'admin' and the Password 'admin'.
5. Click OK.
NOTE: If you cannot connect to the router, diagnose the problem using the steps in section Router
connection problems.
Configuring the S1000R Router 10
Home page
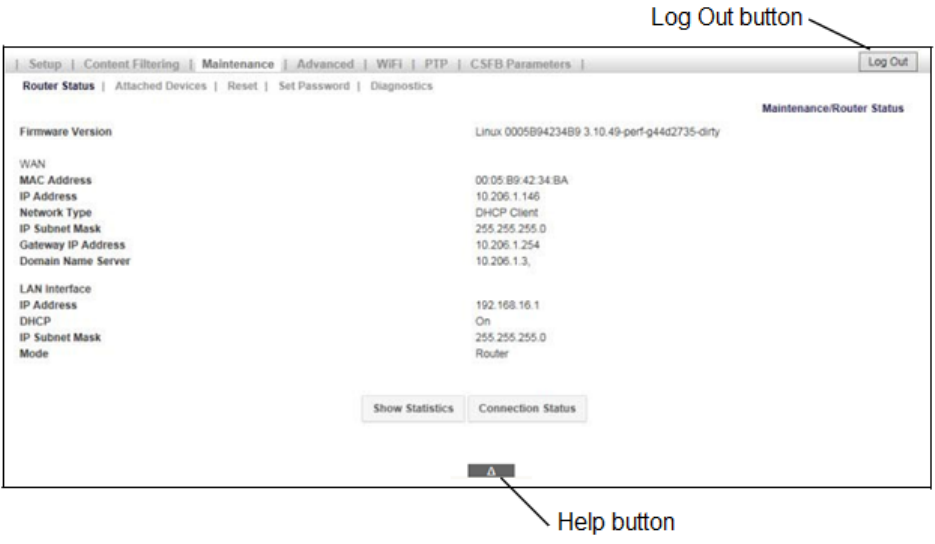
When connected to the router, the Router Status screen appears as shown below.
Main menu
The main menu, on the top of the screen, contains a menu bar to access the major screens.
The main menu also contains the following buttons:
● Log Out - When finished, click this button to log out.
● Help - Located at the bottom of the screen, click to view help for the current screen.
Navigation and data input
Use the menu bar on the top of the screen and the browser’s Back button to navigate.
You must click Save before changing screens or the software does not save changes.
Configuring WiFi service
Follow this section to setup the S1000R’s WiFi service. You will create and configure SSIDs in the router.
1. Log into the S1000R router by following the procedure in Logging into the router.
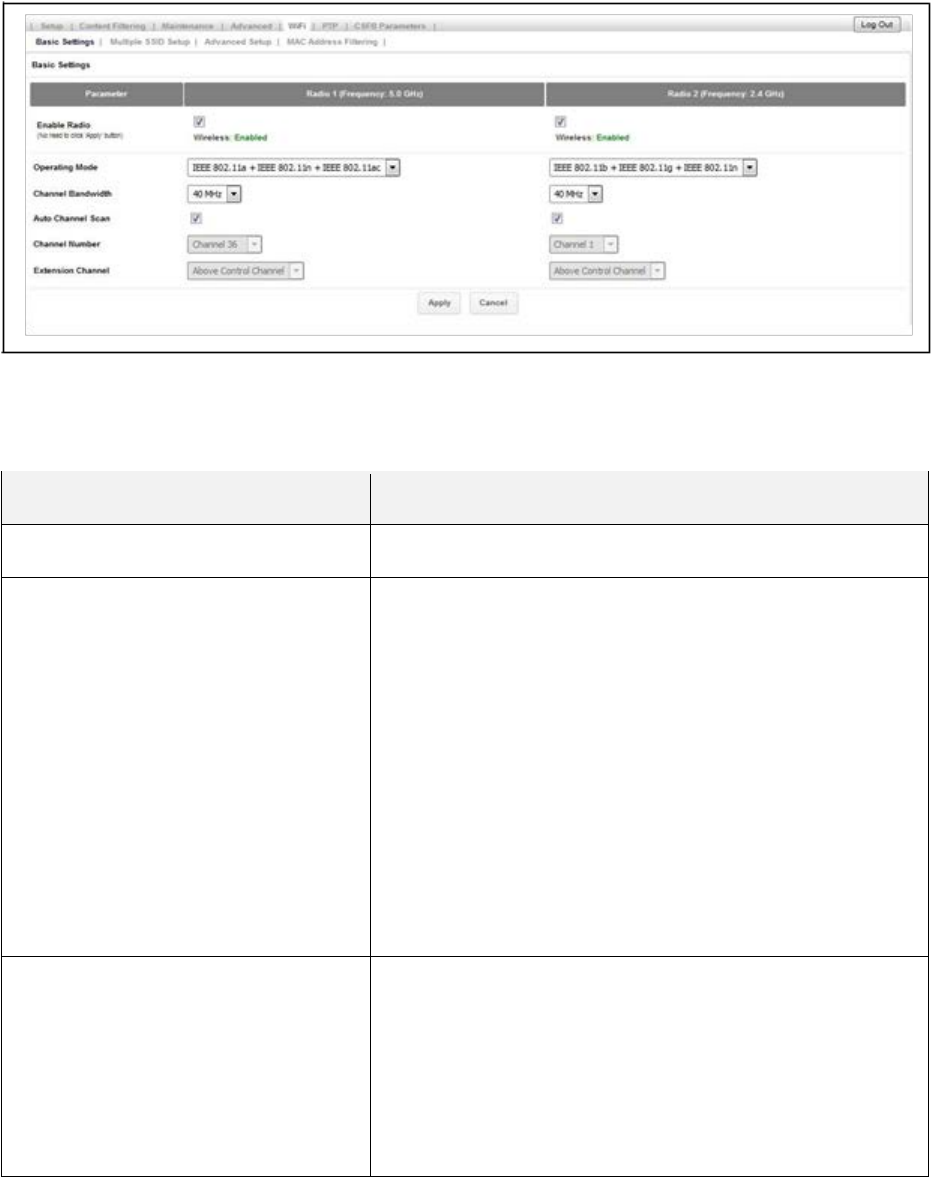
2. From the Home page click WiFi -> Basic Settings.
Configuring the S1000R Router 11
Basic Settings
The Basic Settings tab allows you to enable and configure the two radios available in the S1000R.
Radio 1 has a frequency of 5.0 GHz and Radio 2 has a frequency of 2.4 GHz.
Parameter
Description
Enable Radio
Enable or disable Radio 1 and Radio 2
Operating Mode
The following options are supported on Radio 1:
● IEEE 802.11ac
● IEEE 802.11n
● IEEE 802.11a
The following options are supported on Radio 2:
● IEEE 802.11n
● IEEE 802.11g
● IEEE 802.11b
Channel Bandwidth
The following channel bandwidths are supported on Radio 1
and Radio 2:
● 20MHz
● 40 MHz
● 80 MHz

Configuring the S1000R Router 12
Auto Channel Scan
Check/uncheck the box to enable/disable auto channel
scan.
Channel Number
This field shows the list of available channels under the
respective radio.
NOTE: To select a channel manually, the Auto Channel
Scan option must be disabled.
Extension Channel
Automatically selected based on the selected channel.
NOTE
: For 2.4 GHz radio, this configuration will be enabled
for selected channels, allowing the user to optionally select
"Above Control Channel", or 'Below Control Channel".
Mode
Channel Bandwidth
Data Rates
Radio 1 (5 GHz)
IEEE 802.11ac
20 MHz
Up to 173.3 Mbps
40 MHz
Up to 400 Mbps
80 MHz
Up to 866.7 Mbps
IEEE 802.11n
20 MHz
Up to 72.2 Mbps
40 MHz
Up to 150 Mbps
IEEE 802.11a
20 MHz
Up to 54 Mbps
Radio 2 (2.4 GHz)
IEEE 802.11n
20 MHz
Up to 72.2 Mbps
40 MHz
Up to 150 Mbps
IEEE 802.11g
20 MHz
up to 54 Mbps
IEEE 802.11b
20 MHz
Up to 11 Mbps
NOTE: It is recommended to keep the ACS (Auto Channel Select) feature checked. This feature ensures
that the device will be able to select the most optimal available channel, even in a congested RF
environment.
Configuring the S1000R Router 13
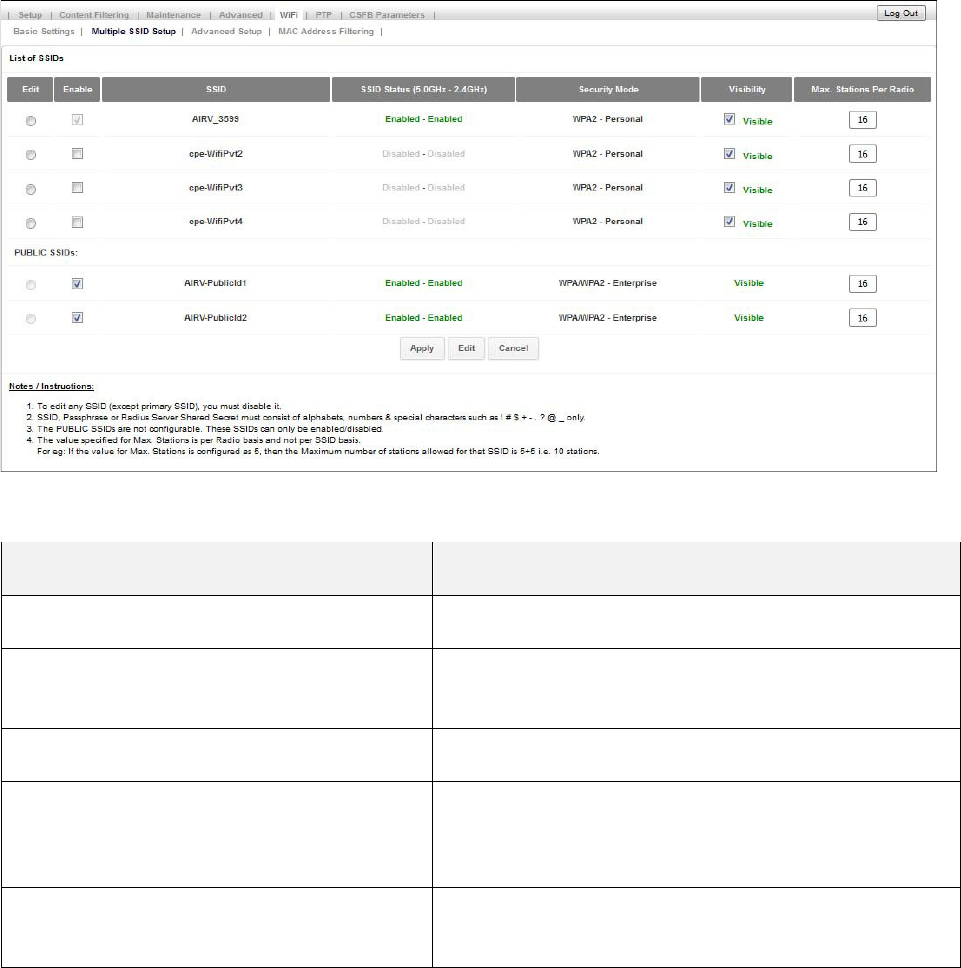
Multiple SSID Setup
The router supports twelve SSIDs. Eight SSIDs are Private and user configurable; four are Public and
configured only by the Operator.
● Click Multiple SSID Setup.
NOTE: Public SSIDs can only be enabled or disabled in the router. Public SSIDs are configured from the
Operator.
Parameter
Description
SSID
The name of the network to which a device associates.
Enable
To enable/disable a SSID, check/uncheck the box for the
SSID. Click Apply.
Status
Shows the status of a SSID per Radio.
Security Mode
Shows the security mode in which the SSID is currently
operating. By default, the security mode is WPA2-
Personal for Private SSIDs.
Visibility
To enable/disable SSID broadcasts, check/uncheck the
box for each of the Private SSIDs and click Apply.
Configuring the S1000R Router 14
Max. Stations Per Radio
This feature can be used to restrict the number of
connections per SSID. A minimum of one station and a
maximum of 128 stations can be specified per SSID.
The maximum stations per radio is for the number of
radios and not for SSIDs. For example, if the value of
Max. Stations Per Radio is configured for 5, the
maximum stations allowed for that SSID is 5 + 5, or 10
stations.
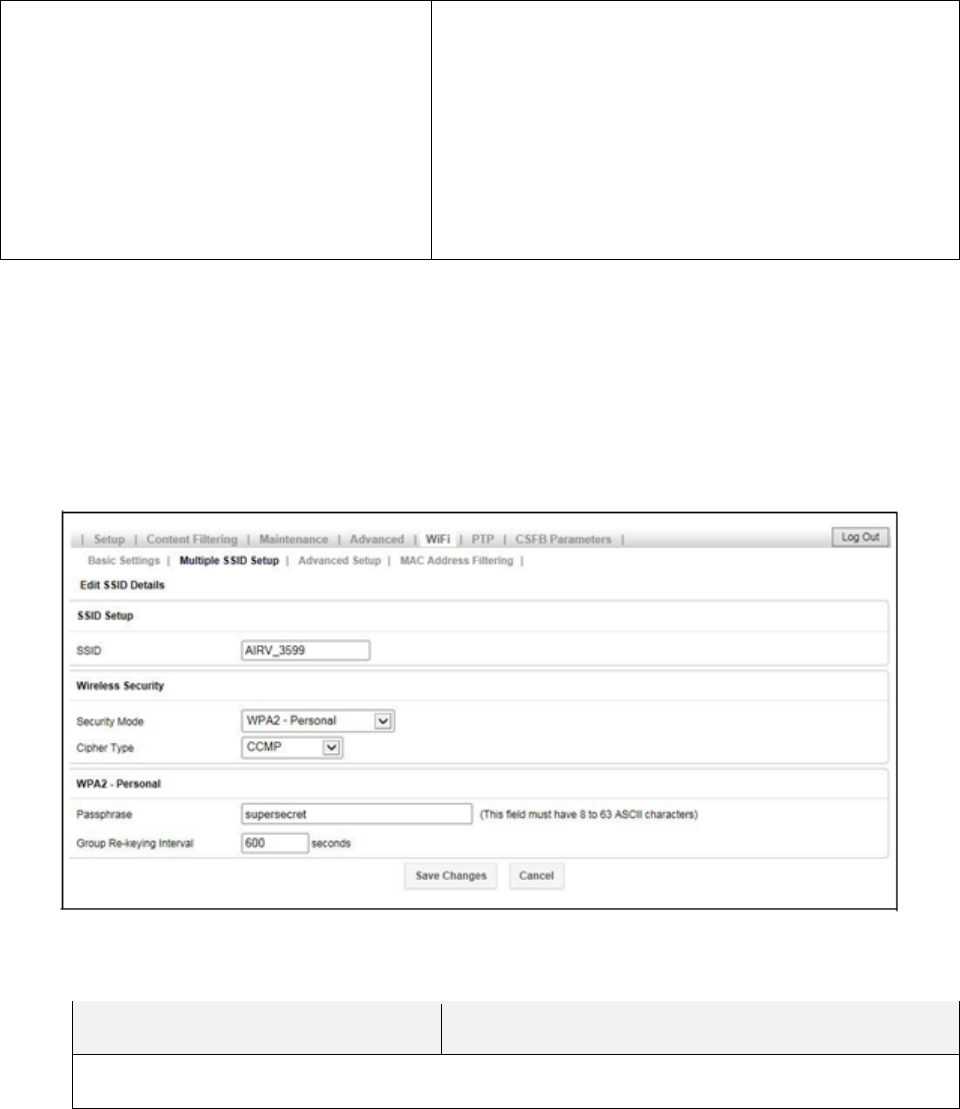
To edit an SSID
1. Find the SSID you want to modify, disable it (uncheck the Enable box), then click Edit.
2. Use the following tables to configure the SSID, then click Save Changes.
Parameter
Description
SSID Setup

Configuring the S1000R Router 15
SSID
The name of the network to which a device can
associate. SSID must be in the range of 1 to 32
characters, and must be unique.
NOTE: If you want to change the name of the SSID,
change the text of the SSID text box, then click Save
Changes. All SSID values will remain the same; only
the name will change.
Wireless Security
Security Mode
The security mode in which the SSID is currently
operating.
Valid values:
● open
● WPA-Personal
● WPA-Enterprise
● WPA2-Personal
● WPA2-Enterprise
● WPA/WPA2-Personal
● WPA/WPA2-Enterprise
NOTE: For Enterprise versions, a RADIUS server
based security check is performed.
You will enter these values for Radius Server:
● Server IP Address (A.B.C.D)
● Server Port (Range: 1 to 65535, Default: 1812)
● Server Shared Secret (WAP to Radius Server)
● Server re-keying interval; this is the time after
which the key must be re-generated. (Range:
600 to 7200 seconds, 0 - disable, Default: 600
seconds)
Cipher Type
This field can be set to one of the following options:
● TKIP - Temporal Key Integrity Protocol
● CCMP - Counter Mode CBC MAC Protocol
● TKIP & CCMP
Configuring the S1000R Router 16
<Security Mode> - Personal
Passphrase
Password required to associate with AP. This can be 8-
63 ASCII characters.
Group Re-keying interval
The period of time between automatic changes of the
group-key with the devices on the network.
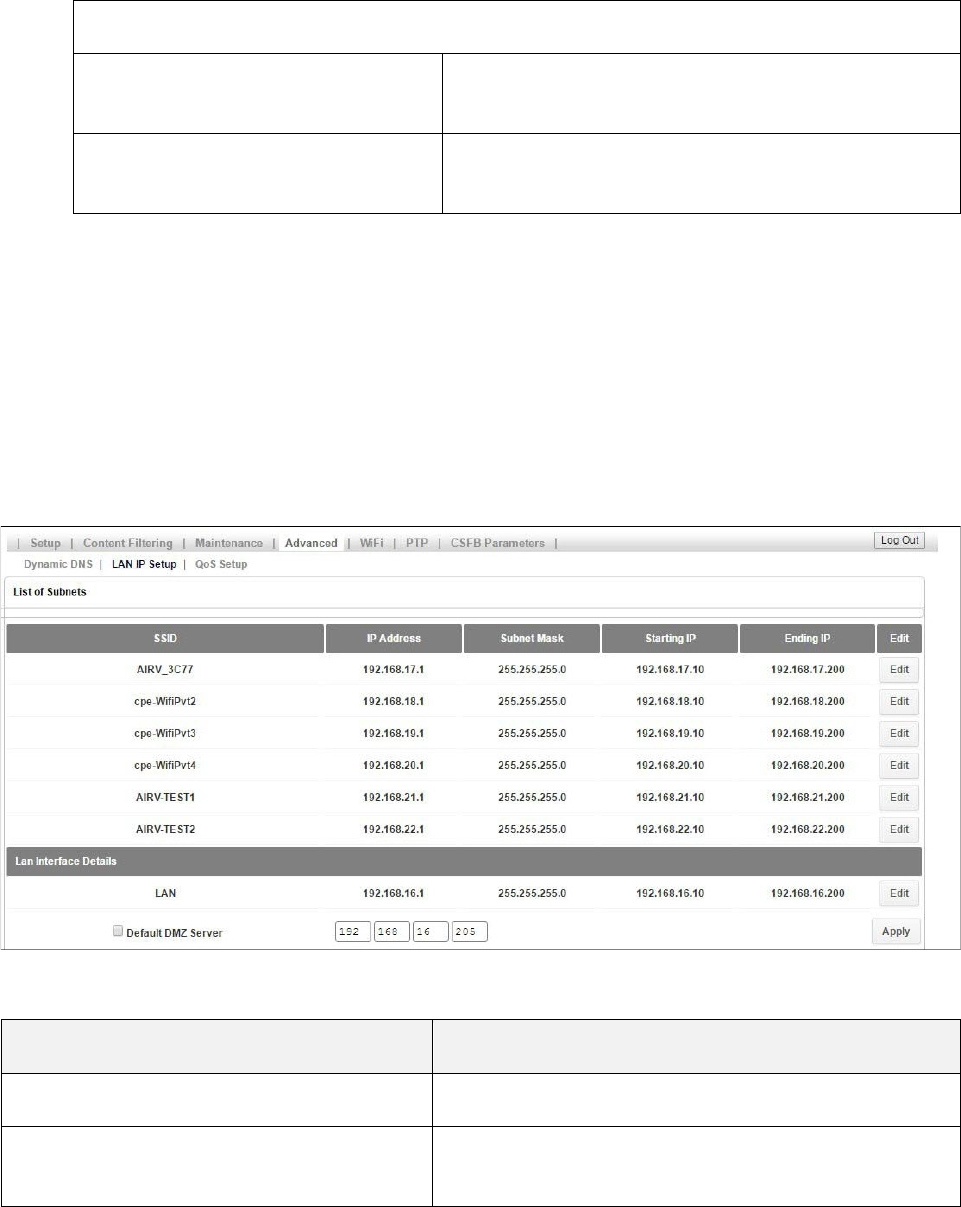
SSID IP configuration
To configure the IP address and subnet for an SSID, navigate to Advanced -> LAN IP Setup. On this page,
you can view the various subnets, including the default IP address range and subnet mask, for every WiFi
SSID. You can edit these fields for each SSID by clicking the Edit button for the SSID and entering new
values.
Parameter
Description
SSID
The name of the SSID
IP Address
The configured IP Address for the router for the SSID.
Format: <A.B.C.D>

Configuring the S1000R Router 17
Subnet Mask
The configured subnet mask for the router in the SSID
This is calculated by the router based on the IP Address.
Format: <A.B.C.D> Default: 255.255.255.0
Starting IP
The starting range of the reserved pool of IP Addresses
for this SSID.
Ending IP
The ending range of the reserved pool of IP Addresses
for this SSID.
Edit
Click this button to edit the configuration for the SSID.
Lan Interface Details
SSID
NOTE: All parameters described above apply to the
SSID for the Local Area Network (LAN).
Default DMZ Server
When checked, the IP Address for this "Demilitarized
zone" is the default server. The IP Address can be
configured.
NOTE: Use this cautiously, as there are security issues
associated with a DMZ server.
Apply
Click this button to commit the configuration.
Advanced Settings
On the WiFi Advanced Setup page you can configure some WiFi advanced parameters such as Beacon
Interval, Transmit Power and Block DFS channel. Generally, no configuration change is required on this
page.
Parameter
Description
Configuring the S1000R Router 18
Beacon Interval
Specifies the time in which a beacon packet must be
broadcast.
By default, all the SSIDs will be beaconing at an interval of
100msec. (Range: 50 msec to 3500 msec)
Transmit Power
This defines the strength of the signal being transmitted
from a radio.
By default, both the radios will be transmitting at the highest
Transmit Power.
Block Dynamic Frequency Selection (DFS)
Channels
This option allows the Auto Channel Selection (ACS)
mechanism to either select/unselect DFS channels.
The following channels are classified as DFS channels:
52,56,60,64,100,104,108,112,116,120,124,128,132,136,140
By default, the 5GHz radio will block all the DFS channels.
One can enable the use of these channels by unchecking
the checkbox and applying the settings.
NOTE: It is NOT recommended to use these channels.
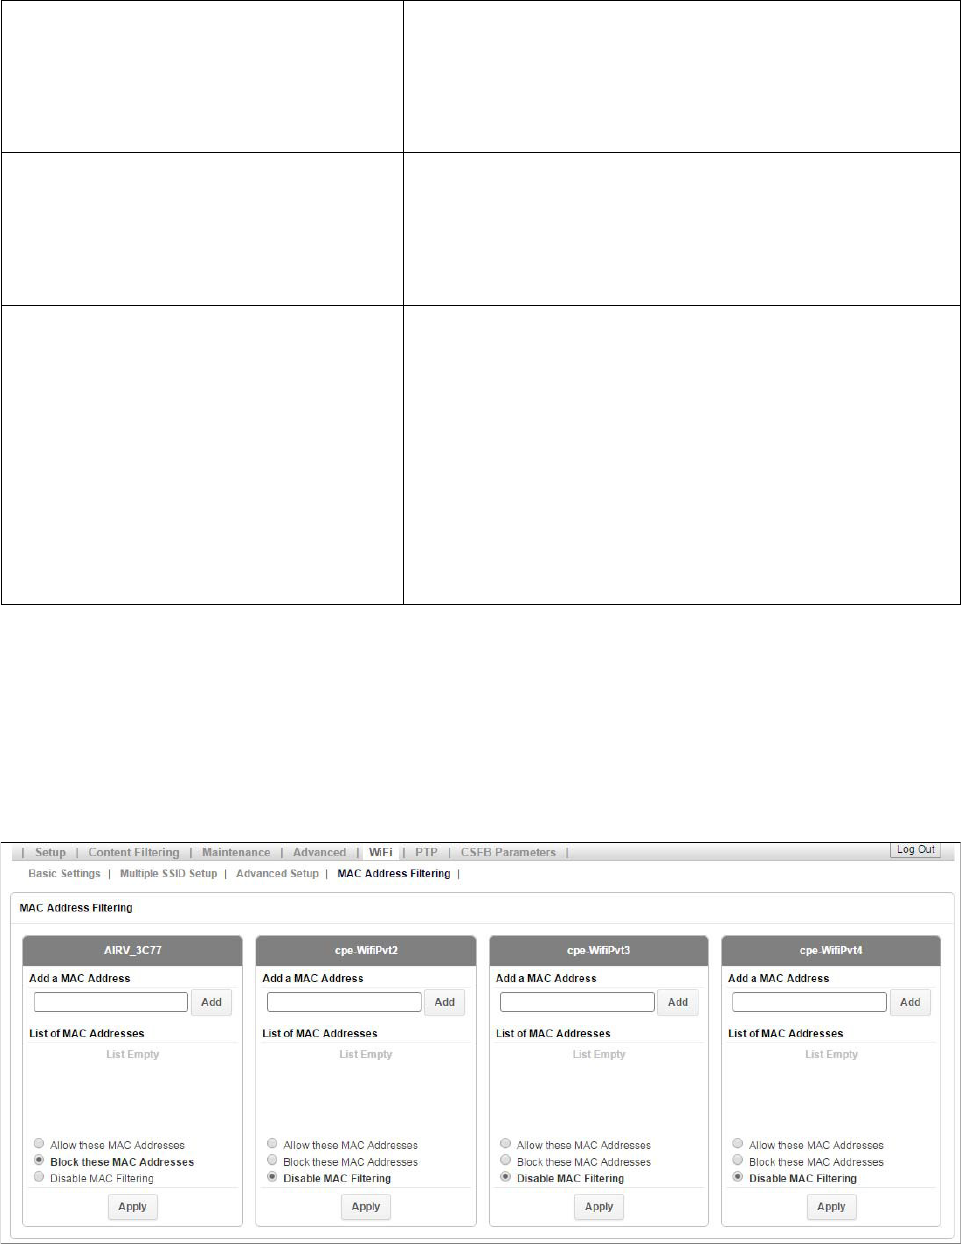
MAC Address Filtering
This feature is used to ALLOW or BLOCK MAC addresses from associating with a Private SSID.
By default, this feature is DISABLED on every Private SSID.

Configuring the S1000R Router 19
Parameter
Description
Add a MAC Address
To add a MAC address in the list, enter a valid MAC
address in the text field provided under a SSID and click
Add.
List of MAC Addresses Displays the list of MAC addresses added.
MAC Command
This option is used to select the operation for the MAC
addresses added in the list.
● Allow these MAC Addresses – used to ALLOW only
the MAC addresses added to the list
● Block these MAC Addresses – used to BLOCK only
the MAC addresses added to the list
● Disable MAC Filtering – used to DISABLE MAC
Address Filtering

Using the S1000R 20
Using the S1000R
This chapter describes how the S1000R works at a high-level, and provides maintenance guidelines.
● How the S1000R works
● Maintenance
How the S1000R works
?????
Maintenance
With normal use, S1000R is maintenance-free. Follow the recommendations below to ensure that it runs
optimally.
Ventilation
The S1000R has ventilation slots that work best if you don’t block the flow of air to them. For desk
mounted devices, keep the device at least 2 inches (5 cm) from walls and other surfaces to ensure proper
air flow.
Cleaning
Dust the S1000R occasionally to keep air vents clear of debris. Do not use liquid cleaners.

Troubleshooting 21
Troubleshooting
This chapter contains tips and procedures to help you troubleshoot your S1000R.
● Router connection problems
● LED quick reference
● Using LEDs
● Resetting the S1000R
● FAQs
● Getting help
Router connection problems
If you cannot connect to the S1000R router, there may be a problem with the router, use the following
procedures to diagnose the problem.
Test for connectivity
If the router is properly installed, the LAN connection is OK, and it is powered ON, test the connection by
using the Ping command:
● Open the command prompt window and enter the command:
ping 192.168.16.1
● If no response is received, either the connection is not working, or your PC's IP address is not
compatible with the router's IP Address.
Verify IP addresses
If the PC is using a fixed IP address, its IP address must be within the range 192.168.16.2 to
192.168.16.254 to be compatible with the S1000 router’s default IP address of 192.168.16.1. Also, the
Network Mask must be set to 255.255.255.0.
● Refer to the CommScope S1000 Web GUI User Guide (913110) for details on checking the PC's
TCP/IP settings.
● Ensure that your PC and the S1000R router are on the same network segment.
● Ensure you are using the wired LAN interface.
Troubleshooting 22
LED quick reference
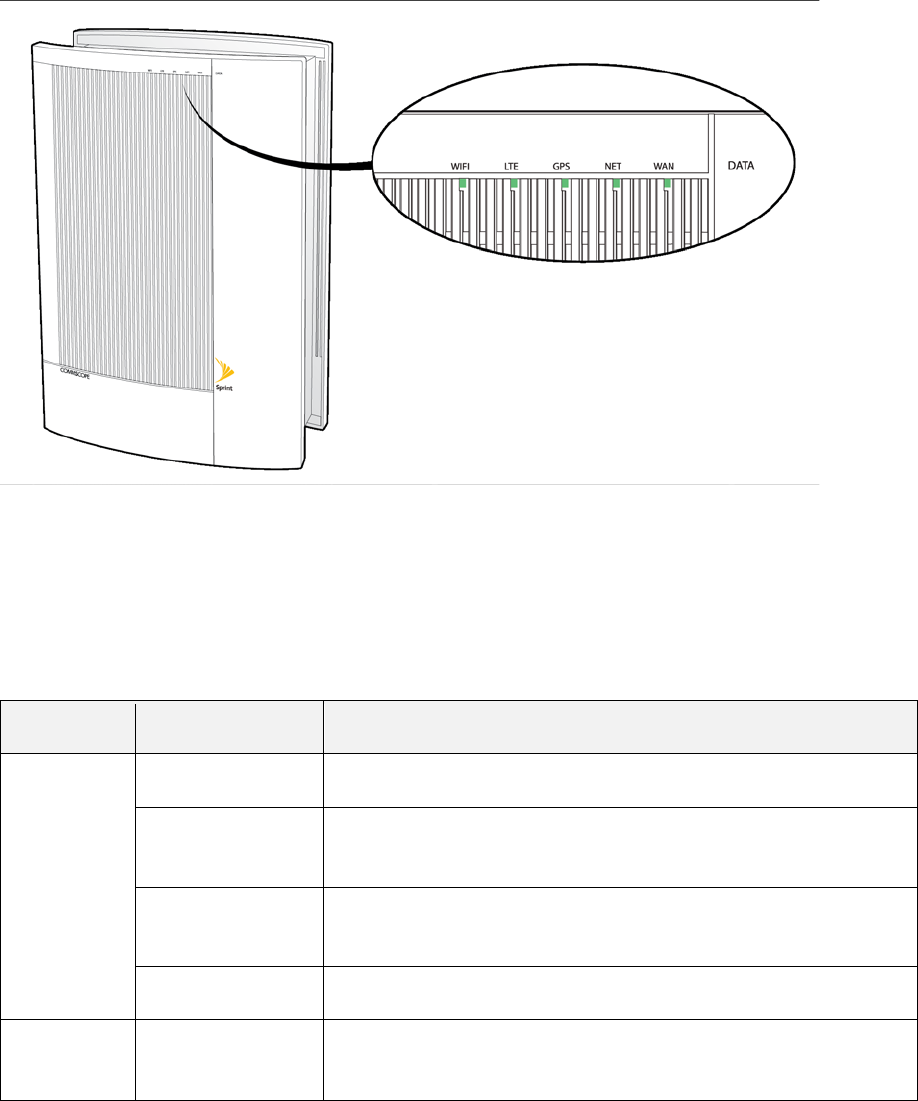
The S1000R has a set of LEDs specific to Data services.
Using LEDs
Use the LEDs to troubleshoot your device.
LED
Display pattern
Action to take
WAN
Solid Green
None. The LTE backhaul is operational with good signal quality.
Solid Red
The LTE backhaul is non-operational. Contact Customer
Support as described in Getting help.
Blinking Red
The LTE backhaul is operational but with low signal quality.
Contact Customer Support as described in Getting help.
Off
Wait. The software is loading.
NET Solid Green
None. The IPSec tunnel is established to the Operator's core
network and is functioning properly.

Troubleshooting 23
Solid Red
The IPSec tunnel to the Operator's core network is down, or has
not established a connection (more than 15 minutes), or a
hardware error occurred during startup. Contact Customer Care
as described in Getting help.
Blinking Red
Wait. The IPSec tunnel to the Operator's core network is
establishing a connection.
Off
Wait. The software is loading.
GPS
Solid Green
None. The GPS has acquired a lock and is ready.
Solid Red
GPS error. GPS Time Fix has not been achieved since boot-up
or DSP reload (30 minutes or more). Contact Customer Care as
described in Getting help.
Blinking Red
Wait. The GPS is acquiring a lock.
Off
Wait. The software is loading.
LTE
Solid Green
None. LTE service is up.
Solid Red
Service error. LTE service has not come up (30 minutes or
more), or a hardware error occurred during startup. Contact
Customer Care as described in Getting help.
Blinking Red
Wait. LTE service is initializing.
Off
The LTE service sector has been turned off by the Operator.
WIFI
Solid Green
None. The 2.4 GHz, 5.0 GHz or both WiFi services are up.
Solid Red
Service error. WiFi service has not come up (30 minutes or
more), or a hardware error occurred during startup. Contact
Customer Care as described in Getting help.
Blinking Red
Wait. WiFi service is initializing.
Off
WiFi service has been turned off either by the Operator or via
local device GUI.
ALL Solid Red
Hardware error. A hardware error or hardware self-test
occurred during startup. Contact Customer Care as described
in Getting help.
Troubleshooting 24
Resetting the S1000R
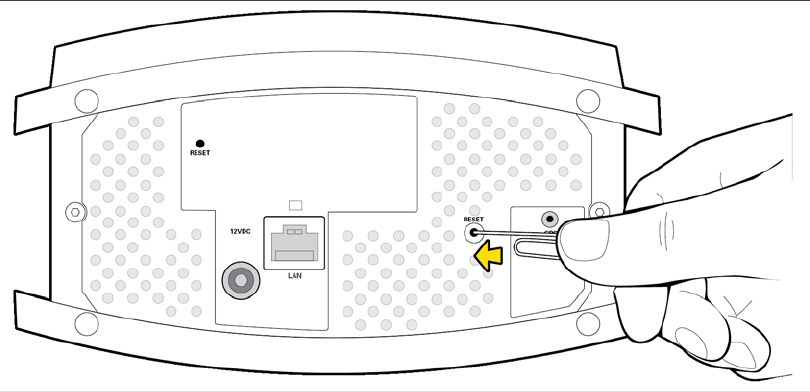
The S1000R has a RESET button on the bottom of the unit, as shown in the following diagram.
If your S1000R operates properly for an extended period and the WAN LED suddenly starts blinking red,
the S1000R may have a problem requiring a reset. To reset, push the RESET button for at least 10
seconds.
After resetting, your S1000R goes through an automated setup sequence. Refer to Begin Self-Installation
for the setup sequence.
If the failure persists after resetting the S1000R, contact Customer Care. Refer to Getting help.
Troubleshooting 25
FAQs
Why does the S1000R need an external GPS antenna?
The S1000R uses an external GPS antenna so that it can:
Synchronize properly with the rest of the Operator's network.
Determine and select the correct radio frequencies available in your area so that the S1000R
uses the correct ones.
What should I do if the GPS fails to acquire a lock?
If the GPS LED does not turn solid green after 2 hours, call Customer Care as described in
section Getting help.
What happens to the S1000R if there is a power outage or if
you lose Internet access?
During a power outage your device will not be operational. When power is restored and your
internet connection comes up, your device will resume data services. If your device does not
resume services, contact Customer Care as described in Getting help.
Can you move the S1000R to another location?
Yes, you can move your device to another location within the Sprint network. Contact Customer
Care for assistance. See Getting help.
Getting help
If you need help with your S1000R, contact Customer Care.
Online at ?????
By Phone: Sprint Customer Care (888-206-3585)
● NOTE: Call your Internet Service Provider for Internet access troubleshooting.

Safety information 26
Safety information
This chapter contains safety information for your S1000R.
General precautions
● Dust the S1000R occasionally to keep air vents clear of debris. Do not wash it.
● The S1000R has ventilation slots that work best if you don’t block them. Keep the S1000R at
least 2 inches (5 cm) from walls and other surfaces to ensure proper air flow.
● Do not operate the S1000R in an extremely dusty or humid environment.
● Avoid placing the S1000R near radiators or other heating sources.
● Avoid locating the S1000R where it could be exposed to direct sunlight for prolonged periods.
● Do not connect the S1000R to a power strip containing an excessive number of other devices.
● Although your S1000R is quite sturdy, it is a complex piece of equipment and can be broken.
Avoid dropping, hitting, bending, or sitting on it.
● Do not immerse the S1000R in water or get it wet. If your device does get wet, unplug it
immediately until it dries.
● Do not allow children to play with the S1000R. They could hurt themselves and others or damage
the device.
For the best care of your S1000R, only Sprint-authorized personnel should
service your device and accessories. Failure to do so may be dangerous and
voids your warranty.
FCC information
FCC ID: QHY-S1000R
! FCC radiation exposure statement
This device complies with FCC's RF radiation exposure limits set forth for an uncontrolled environment
under the following conditions:
● This device should be installed and operated such that a minimum separation distance of 8
inches (20 cm) is maintained between the radiator (antenna) and the user's or nearby person's
body at all times.
● This transmitter must not be co-located or operating in conjunction with any other antenna or
transmitter.
Safety information 27
For more information, see the publication Femtocells and Health at femtoforum.org or visit the FCC
website at fcc.gov.
FCC Part 15
This device complies with part 15 of the FCC Rules. Operation is subject to the following two conditions:
(1) This device may not cause harmful interference, and (2) this device must accept any interference
received, including interference that may cause undesired operation.
This device has been tested and found to comply with the limits for a Class B digital device, pursuant to
Part 15 of the FCC Rules. These limits are designed to provide reasonable protection against harmful
interference in a residential installation. This device generates, uses, and can radiate radio frequency
energy and, if not installed and used in accordance with the instructions, may cause harmful interference
to radio communications. However, there is no guarantee that interference will not occur in a particular
installation. If this device does cause harmful interference to radio or television reception, which can be
determined by turning the device off and on, the user is encouraged to try to correct the interference by
one of the following measures:
● Re-orient or relocate the receiving antennas of other devices.
● Increase the separation between the S1000R and other device receivers.
● Connect the S1000R into an outlet on a circuit different from that to which the other device
receiver is connected.
● Consult the dealer or an experienced radio/TV technician for help.