Compal Communications EB-X500U GPRS User Manual X500 OI English
Compal Communications, Inc. GPRS X500 OI English
Contents
- 1. UserMan1
- 2. UserMan2
- 3. UserMan3
UserMan3
Contacts 49
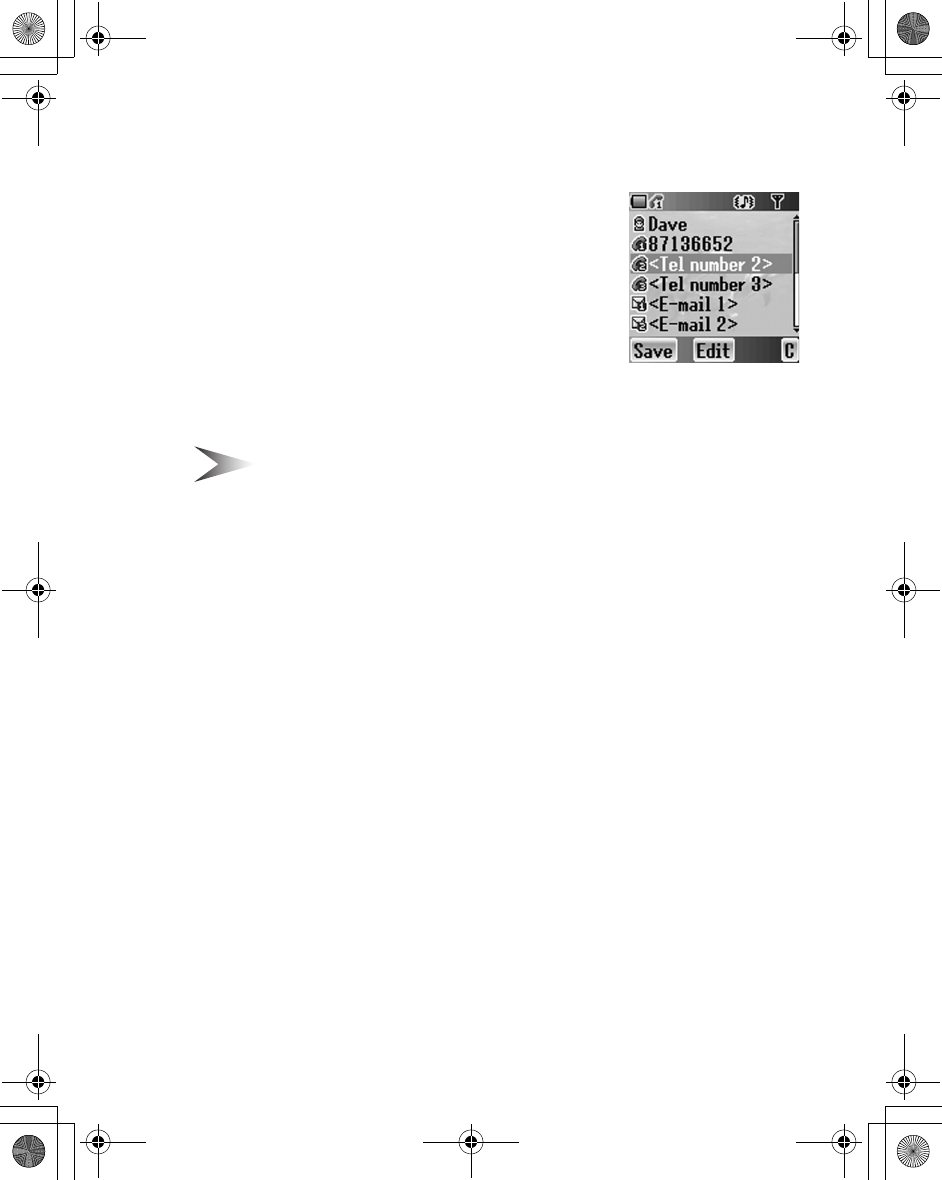
Editing the Contacts list
From Contacts list menu
1. 4(Move) to a required entry
2. <(Menu)
3. 4(Move) to a required entry
OR
enter an alphabet to skip to the first entry which
starts with that letter
4. Press <(Select)
5. 4(Move) to edit
6. Press <(Select)
Note: You can enter Name and Tel number 1 only for SIM Contacts.
Making a call with the Contact list
From Contacts list menu
1. 4(Move) to a required entry
OR
enter an alphabet to skip to the first entry which starts with that letter
2. Press C(Call)
From Contacts list menu
1. 4(Move) to a required entry
OR
enter an alphabet to skip to the first entry which starts with that letter
2. Press <(Menu)
3. 4(Move) to Call
4. Press <(Select)
Sending messages
You can send messages through the Contacts list (see “Messages” on
page 69).
From Contacts list

50 Contacts
1. 4(Move) to a required entry
OR
enter an alphabet to skip to the first entry which starts with that letter
2. Press <(Menu)
3. 4(Move) to Create MMS or Create SMS/EMS
4. Press <(Select)
5. Press <(Select) the phone number
Follow the steps in Messages (see “Messages” on page 69)
Delete the entry from the Contacts list
From the Contacts list
1. 4(Move) to a required entry
OR
enter an alphabet to skip to the first entry which starts with that letter
2. Press <(Menu)
3. 4(Move) to Delete
4. Press <(Select)
5. Press <(Yes)
Copy the entry to the other Contacts list
From the Contacts list
1. 4(Move) to a required entry
OR
enter an alphabet to skip to the first entry which starts with that letter
2. Press <(Menu)
3. 4(Move) to Copy
4. “Copy (entry name) to (SIM or Phone)?” is displayed
5. <(Yes)
Contacts 51
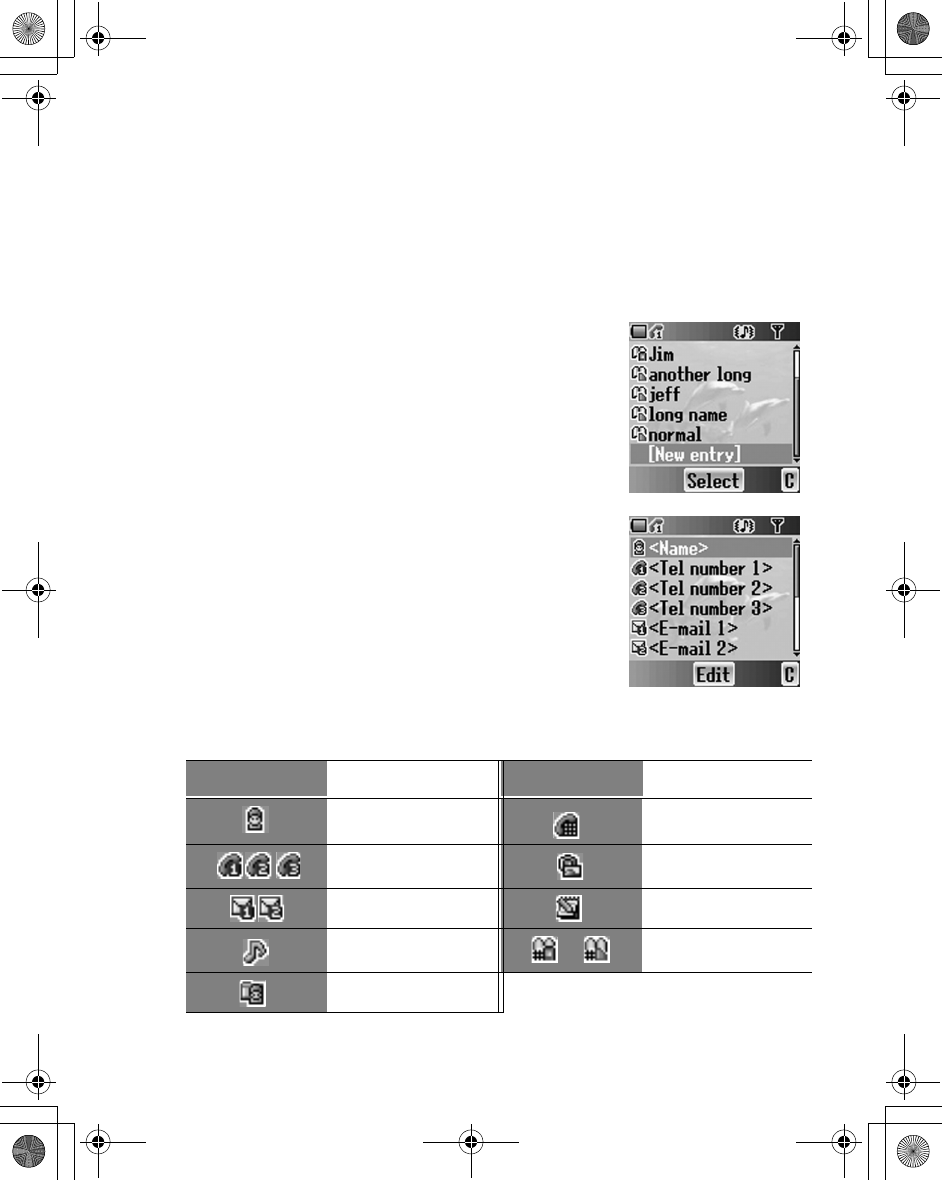
Create
SIM Contacts: You can store Name, Tel number and Location No.
Phone Contacts: You can store Name, 3 Tel numbers, 2 E-mail addresses,
Ringtone type, Group, Hot key dial, Photo, Note and Location No.
From Contacts menu
Creating a new entry
From Contacts menu
1. 4(Move) to Create
2. Press <(Select)
3. 4(Move) to SIM or Phone
4. Press <(Select)
From Contacts list menu
1. Press <(Menu)
2. 4(Move) to Create
3. Press <(Select)
4. 4(Move) to SIM or Phone
5. Press <(Select)
From Contacts list menu
1. 4(Move) to [New entry]
2. Press <(Select)
Icons Items Icons Items
Name Hot key dial
Tel number 1 - 3 Photo
E-mail address1, 2 Note
Ringtone or Location
Group

52 Contacts
Groups
You can categorize Contacts list entries into 10 groups. You can name, select
a particular ringtone and place photo as an icon for each group to identify the
incomint call.
Viewing the Group
If there is no entry, you can add new entry (“Create” on page 51).
From Contacts menu
1. 4(Move) to Groups
2. Press <(Select)
3. 4(Move) to a required group
4. Press <(Select)
5.
Editing the Group
You can change the Name of the Group, Ringtone, Photo and set Default.
From Groups menu
1. 4(Move) to a required Group
2. Press <(Select)
3. 4(Move) to Edit
4. <(Select)
5. 4(Move) to a required item
6. <(Change)

Contacts 53
Memory status
Memory status shows how many locations are available in each Contacts list.
Also you can copy whole data onto the other Contacts list.
From Contacts menu
1. 4(Move) to Memory status
2. Press <(Select)
3. 2 bars indicating Contacts list Memory Status are displayed
(in use location(s) / maximum locations)
4. Press <(Menu)
5. 4(Move) to a required action
6. Press <(Select)
Note: Coppied datas will not be deleted from the Contacts list.
My numbers
You can store and view your information such as names and phone numbers in
your SIM.
From Contacts
1. 4(Move) to My numbers
1. Press <(Select)
2. 4(Move) to a required number
3. Press <(Menu)
4. 4(Move) to View or Edit
5. Press <(Select)
6. 4(Move) to name or number
7. Press <(Edit)
8. Enter name or number
9. Press A(Save)

54 Contacts
Voicemail
You can store the phone number of voicemail and make a call to check the
voicemail.
From Contacts
1. 4(Move) to Voicemail
2. Press <(Select)
3. Press <(Menu)
4. 4(Move) to View or Edit
5. Press <(Select)
6. 4(Move) to name or number
OR
Press C(Call) to make a call
7. To edit, press <(Edit)
8. Enter name or number
9. Press A(Save)
Hot key dial
You can quickly dial the numbers which are assigned at each numeric keys $
- , (see “Hot Key” on page 18).
Viewing Hot key dial list
From Contacts menu
1. 4(Move) to Hot key dial
2. Press <(Select)
3. Hot key dial list is displayed
Assigning Hot keys
While editing the Contacts list entry
1. 4(Move) to <Hot key dial>
2. Press <(Edit)
3. Enter a required number
4. Press <(OK)

Contacts 55
My Contacts
You can select from All, SIM or Phone to display in the Contacts list entries.
From Contacts
1. 4(Move) to My Contacts
2. Press <(Select)
3. 4(Move) to All, SIM or Phone
4. Press <(Select)
56 Games & Apps
Games & Apps
Games & Apps
You can play preinstalled Java games and also downloaded Java games.
Playing a Java games
From Games & Apps menu
1. Press <(Select)
2. 4(Move) to a required Java game
3. Press <(Select)
4. Start to load a Java game application
Note: Most Java games include instructions.
Abort or Exit from the Java game
While in a Java game
1. Press D(End)
2. 4(Move) to a required function
3. Press <(Select)
Viewing Details
From Games & Apps
1. 4(Move) to a required Java game
2. Press A(Menu)
3. Press <(Select)
Changing a Permission setting
From Games & Apps
1. 4(Move) to a required Java game
2. Press A(Menu)
3. 4(Move) to Permission
4. Press <(Select)
5. 4(Move) to a required setting
6. Press<(Select)

Games & Apps 57
Settings
You can change the basic settings while on a Java game.
Volume
From Settings menu
1. Press <(Select)
2. 0(Control) the volume
1 or 7 Volume up
3 or 5 Volume down
3. Press <(OK)
Backlight time
From Settings menu
1. 4(Move) to Backlight time
2. Press <(Select)
3. 4(Move) to On, 30 seconds or Off
4. Press <(Select)
Vibration
From Settings menu
1. 4(Move) to Backlight time
2. Press <(Select)
3. 4(Move) to On or Off
4. Press <(Select)
Accsess point
From Settings menu
1. 4(Move) to Access point
2. Press <(Select)
3. 4(Move) to a required network
4. Press <(Select)
5. 4(Move) to Set as default or Edit

58 Games & Apps
6. Press <(Select)
Editing a network setting
1. 4(Move) to a required network
2. Press <(Select)
3. 4(Move) to Edit
4. Press <(Select)
5. 4(Move) to Rename or Connection
6. Press<(Select)
Editing Connection
1. 4(Move) to GPRS or CSD
2. Press <(Select)
3. Press <(Select) to edit
Edit Logintname, Password, APN, Authentication
View Certification
From Games & Apps
1. 4(Move) to View Certification
2. Press <(Select)
3. 4(Move) to a required Certification
4. Press <(Select)
Browser 59
Browser
You can access Internet services supported by the network, such as news,
weather reports and sport.
Starting the Browser
From Browser menu
1. Press <(Select) Start Browser
2. WAP Browser will start to connect the network
Note: When the server is not responding, press <(Retry) or try again later.
Browser Menu
Navigating contents
Use the 0 to scroll through the contets on the screen. When linked text is
highlighted, press <( ) to load the page.
Using a Browser
While browsing the homepage
1. Press A(Menu)
2. 4(Move) to Menu Browser
OR
Done to disconnect
4Scroll up/down
7Return to previous object
3Return to next object
Menu Description
Back Returns the user to the previous page
Go to URL Enter URL
60 Browser
Bookmarks
Once you set your favourite page or frequently accessed page, you can jump to
the page quickly. Not neccessary to enter the URL every time. Also you can
assign the hot keys to jump to the page.
Adding a Bookmark
You can add a bookmark by entering the URL.
From Browser Menu
1. 4(Move) to Bookmarks
2. Press <( )
3. A(Menu)
4. Press <( )
5. Enter Title and URL with # - ,
6. Select a folder
7. Press <(Save)
Home Displays the Home URL content as defined by the
network operator
Inbox
Bookmarks Use, view, add and delete bookmarks
Save Items To save images or other items from the current page
Snapshots Take a snapshot of the current page
Reload Reload and update the current page
Settings
Select and set
Homepage URL
Download parameters
Restart Browser
Security
About... Information about the type of browser and security
options
Menu Description
Browser 61
Adding a current page as a Bookmark
From Browser Menu
1. 4(Move) to Bookmarks
2. Press <( )
3. Press <( ) to Mark Site
Using Bookmarks
From Browser Menu
1. 4(Move) to Bookmarks
2. Press <( )
3. 4(Move) to a required bookmark
4. Press <(Go)
Managing Bookmarks
While viewing Bookmarks
1. 4(Move) to a required bookmark
2. Press A(Menu)
3. 4(Move) to a required function
4. Press <( )
Details Displays the infomation of the bookmark
Delete Delete the Bookmark
New Bookmark Add a new Bookmark
New Folder Add a new folder to place the Bookmark
Move Move a Bookmark in a folder
Move to Folder Move a Bookmark into another Folder
Delete all Delete all of the Bookmarks
Hot keys Assign the Bookmark to keys
62 Browser
Set Profile
Before Internet services can be accessed, you need to subscribe to your
network operator or Internet Service Provider (ISP) to enable the relevant
configuration information. If you have any trouble with your nework settings,
please contact your network service provider.
Note: Modifying default settings may cause failure of using Browser. See
Personal Settings table on page xx, for your record.
From Browser menu
1. 4(Move) to Set Profile
2. Press <(Select)
3. 4(Move) to a required network
4. Press <(Select)
5. 4(Move) to Activate or Edit
6. Press <(Select)
To Activate the Browser
1. 4(Move) to Activate
2. Press <(Select)
To Edit the Browser settings
1. 4(Move) to Edit
2. Press <(Select)
3. 4(Move) to a required setting
4. Press <(Select)
You can edit following settings
• Server name
• Primary IP
• Primary port
• Secondary IP
• Secondary port
• Linger time
• Homepage
• Connections
To edit connections, see “Editing Connection” on page 58
63 Camera
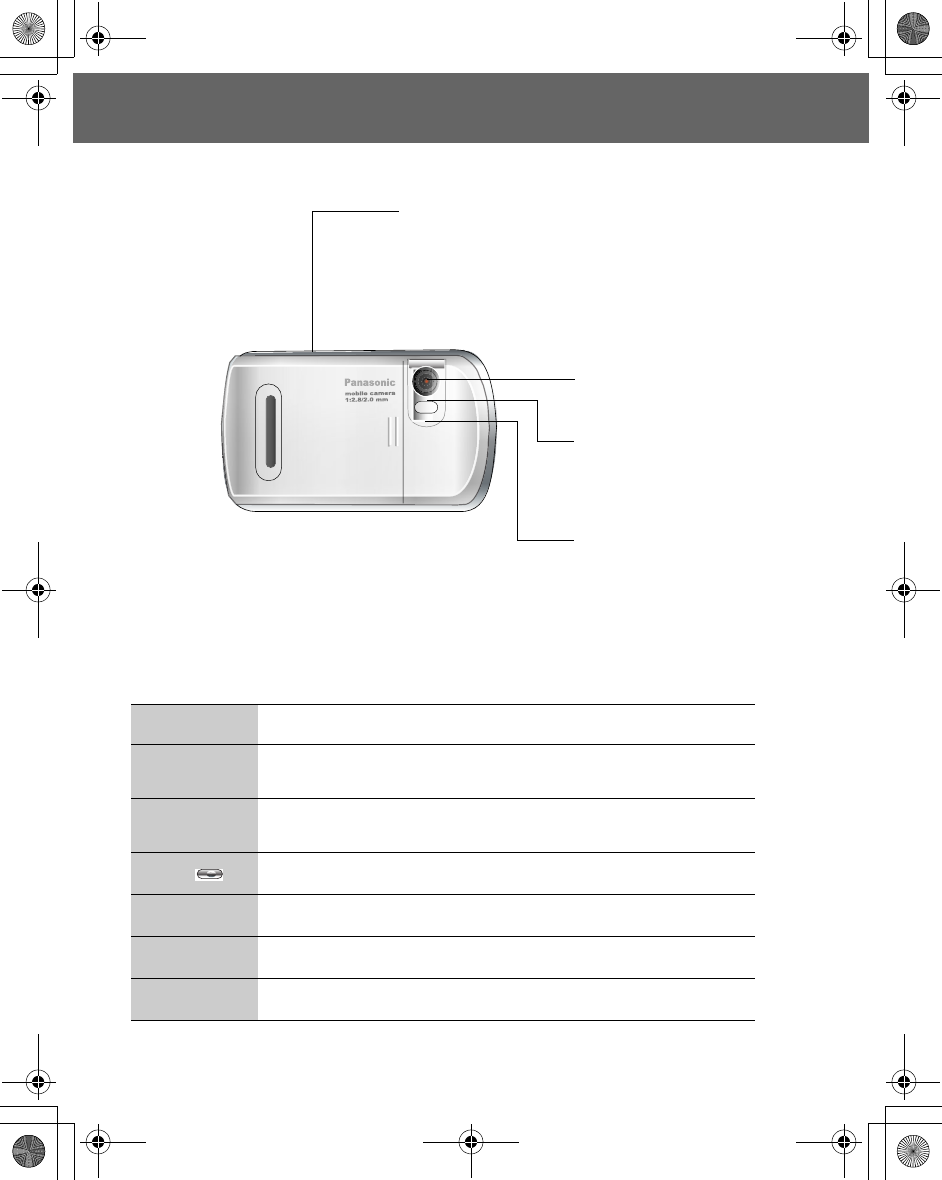
Camera
Key functions
Key Function
1 7Zoom in
Brightness up
5 3Zoom out
Brightness down
< Shutter
AOptions
@Cancel
DExit
Shutter Key:
Turn the Camera/Video Preview mode on.
Press to take a picture or record a video clip.
Camera Lens
Self-portrait Mirror
Photo Light
64 Camera
Preview mode
Launch the Camera/Movie Preview mode
• In Idle screen, Press @( )
• From Main menu, <(Select) Camera (when Camera is selected as shortcut key)
• Press and hold the shutter key (when keylock is Off)
Controlling the Camera
Brightness
In Preview mode
Press 1 7 to Brightness up
Press 5 3 to Bright ness down
Zoom
In Preview mode
Press 1 7 to Zoom in
Press 5 3 to Zoom out
Taking a picture / movie
In preview mode
Press <(Shutter) or the shutter key
Press <(Shutter) or the shutter key again to stop the movie taking
Options
In Preview mode
1. Press A( )
2. 4(Move) to a required function
3. Press <(Select)
Photo light
You can turn the Photo light on when taking a picture in dark condition.
From Options menu
1. Press <(Select)
2. 4(Move) to On or Off
3. Press <(Select)
Close up mode
You can turn the close up mode on when taking a picture at a close range.

Camera 65
From Options menu
1. 4(Move) to Close up mode
2. Press <(Select)
3. 4(Move) to On or Off
4. Press <(Select)
Twilight mode
You can turn the Twilight mode on when taking a picture in low light conditions.
From Options menu
1. 4(Move) to Twilight mode
2. Press <(Select)
3. 4(Move) to On or Off
4. Press <(Select)
Image size
If you select Video size, Movie Preview mode is enabled.
From Options menu
1. 4(Move) to Image size
2. Press <(Select)
3. 4(Move) to a required size
4. Press <(Select)
Following image sizes are available:
• VGA (640 x 480 pixels)
• QVGA (320 x 240 pixels)
• QQVGA (160 x 120 pixels)
• Wallpaper size
• Video size
Quality
You can choose the image quality of your picture.
From Options menu
1. 4(Move) to Quality
2. Press <(Select)
3. 4(Move) to Fine, Nomral or Economy
4. Press <(Select)
Effect
You can enjoy the variable effect on your picture.
From Options menu

66 Camera
1. 4(Move) to Effect
2. Press <(Select)
3. 4(Move) to a required effect
4. Press <(Select)
Following effects are available:
•Normal
• Sunset
• Monochrome
• Inverse
• Emboss
•Cold
Frames
If you set a Frame and take a picture, the picture will be decorated with fancy
preinstalled frames.
From Options menu
1. 4(Move) to Frames
2. Press <(Select)
3. 4(Move) to a required frame
4. Press <(Select)
Following Frames are available:
• Nomal
• Dreamy
• 60s
• Experimental
• Love
•Noise
Self timer
Self timer delays shooting 10 seconds. Press the shutter and click sound will
start. When you hear a Shutter sound which most at loud, picture is taken.
From Options menu
1. 4(Move) to Self timer
2. Press <(Select)
3. 4(Move) to On or Off
4. Press <(Select)
Change style
You can select the preview mode style.
In Preview mode

Camera 67
1. 4(Move) to Change style
2. Press <(Select)
3. 4(Move) to Landscape or Portrait
4. Press <(Select)
Shutter sound
You can change the sound when pressing the shutter.
From Options menu
1. 4(Move) to Shutter sound
2. Press <(Select)
3. 4(Move) to a required sound
4. Press <(Select)
Anti flicker
The anti flicker indicates how many times an image appears on a display per
second. The higher the Anti flicker, the less obvious the screen flicker is.
From Options menu
1. 4(Move) to Anti flicker
2. Press <(Select)
3. 4(Move) to 60Hz or 50Hz
4. Press <(Select)
Exit
You can Exit the Camera mode. You also can exit with pressing D anytime.
68 Camera
Capture mode
When you press the shutter, the image/movie is not saved yet and you can
confirm and control before save.
In Capture mode
1. Press A( )
2. 4(Move) to a required function
3. Press <(Select)
Following functions are avalable for a picture:
• Create MMS
• Set as wallpaper
• Set as caller ID
• Set as group ID
• Rotation
•Effect
•Frames
• Rename
• Properties
• Delete
Following functions are available for a movie:
•Play
• Create MMS
• Set as wallpaper
• Rename
• Properties
• Delete
Messages 69
Messages
Your phone has various messaging features including SMS, MMS and EMS.
SMS/EMS – Enter the recipient’s phone number to send text and images.
MMS – Attach images and music to text messages.
SMS/EMS: Setting up the Phone
It is possible to receive, display, edit and/or send text messages to mobile
phones on your service provider’s network or any network that has a roaming
agreement (dependent on the recipient’s phone parameters).
Before a text message can be sent, you must enter the Message Centre number
into Options (your Service Provider will supply the Message Centre number).
You should also select the protocol via which messages are sent, the storage
time (lifetime) and pick a delivery confirmation setting.
The Message Centre number may have been pre-programmed on the SIM.
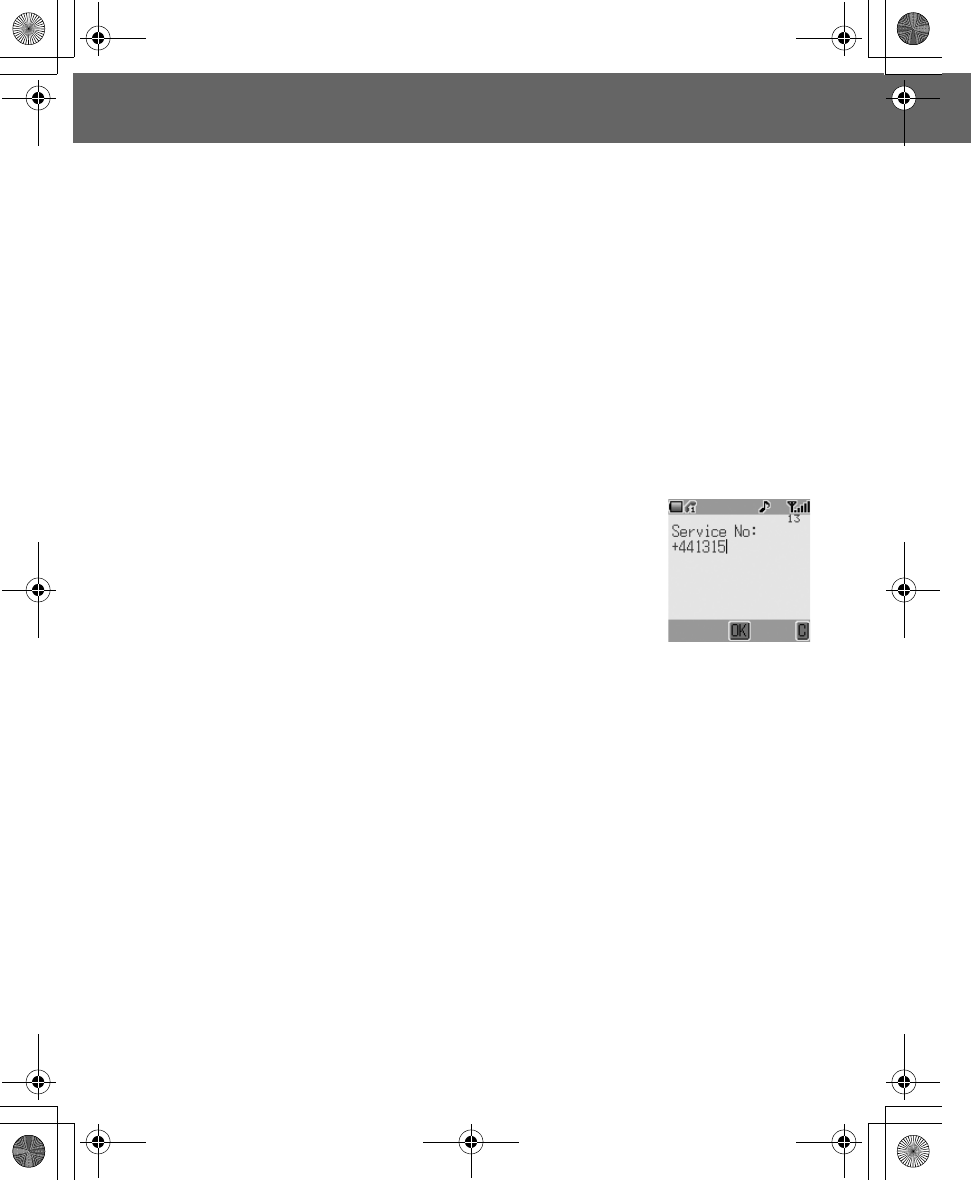
Setting the Message Centre Number
From Idle press <, select Messages > Setting >
SMS/EMS > Message Centre. Press <
Include the international dialling code in the Message
Centre number. Press <
Life Time
The lifetime is the duration that your messages are
stored at the Message Centre.
Delivery attempts will be repeated until the message has been delivered or the
Life Time expires.
From Idle press <, select Messages > Setting > SMS/EMS > Life Time.
Press <
Select from Defaults, 1 hour, 12 hours, 1 day, 1 week or Maximum to set the
time after which messages are automatically deleted. Press <
Messaging Protocol
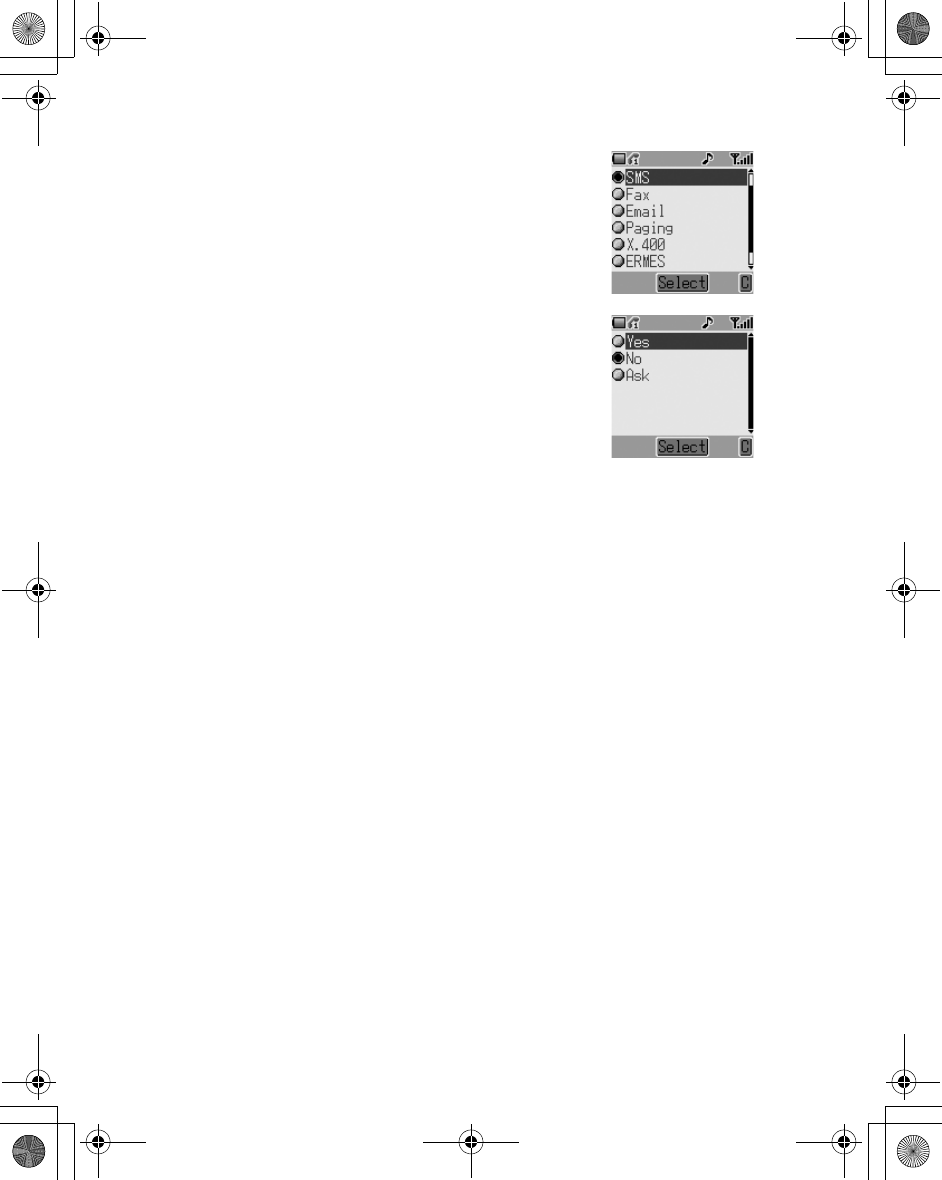
70 Messages
From Idle press <, select Messages > Setting >
SMS/EMS > Protocol. Press <
Select the appropriate protocol for sending
messages. Press <
Delivery Confirmation Setting
From Idle press <, select Messages > Setting >
SMS/EMS > Report. Press <
Select Yes to enable delivery confirmation for your
messages, No to disable the function and Ask to
prompt the message recipient to acknowledge
receipt. Press <
Messages 71
Creating a Text Message
1. From Idle press <, select Messages >
Create > SMS/EMS. Press <
2. Write text message. To change text input
method (displayed in lower left corner of
display), press A. See Text Entry, page 81,
for details.
Use 0 to navigate through the message and
position the cursor to add text
Use @ to delete the character to the left of the
cursor
Press D to cancel the message
3. Press < when you have finished composing
the message
4. The submenu that appears gives the options
of OK. Press <. For information on adding
attachments, see Text Attachments on page
45
5. When [New Entry] is displayed, select an
entry from Phonebook or enter the destination
manually.
- From Phonebook:
Press A and select desired entry. Press <,
then A to save. Press < twice.
- Manual entry:
Press < twice. Enter destination number,
then press < three times.
6. You will be asked Send Message Now? Press <
72 Messages
7. As the message is sent the sending message
animation will display.
If Delivery Confirmation is enabled (see previous
section) and the message is transmitted
successfully, Send message success!
will
appear.
Sending User Messages
Your phone comes with several common message expressions preinstalled.
To send user messages:
1. From Idle press <, select Messages > Create > SMS/EMS. Press <
2. Instead of writing the message content, press < and select User Msgs.
Press <. A list of the saved user messages will be displayed.
3. Select the desired user messages and press <.
4. Send in the same way as for a standard text message. See page 43.
Note: View your user messages at any time by going to Messages >
User Messages. You can also use this menu to compose new user messages.
Text Attachments
When creating a text message, it is possible to include attachments (copyright
permitting).
To include an attachment:
1. Follow the instructions on page 43 to write the text message then press <.
When the OK/Insert Media/User Msgs./Add Sig./Select submenu
appears (see step 4 page 43), select Insert Media. Press <
2. Use 4 to select the file to be inserted into the text body. Press <
Messages 73
Concatenated Messages
SMS messages can be made up text and attached pictures or icons. If you want
to send a larger message, your phone will automatically configure your
message as a string of smaller messages and send these simultaneously.
Concatenated messages such as this appear to a user as a single message.
Receiving Text Messages
When a Short Text Message is sent to your phone, the message New
Message(s)! and the message indicator ( ) will appear in the display with an
alert signal (this signal – an audible tone or vibration – is set in the My Phone >
Sound Settings menu). This indicates that a new message has been received.
Note: If the message indicator shows red the message area is full and you
will need to delete old messages in order to be able to receive new
messages in the future.
Reading immediately
When Read is displayed press < to read the message immediately. Use 4 to
navigate through the message and to identify the sender and the time the
message was sent. With the phone number shown in the Sender field, press C
to dial the phone number.
Reading later
Received messages are stored in the Inbox.
From Idle, press < and select Messages > Inbox
Use 4 to select a message to read (if there is more
than one) and press < to view the message.
You can call the sender, or press < to view your other
options (this submenu can also be viewed by pressing
A when the message is highlighted in the
Inbox).
Responding to Text Messages
74 Messages
Press < when you have read a message to view
response options. Alternatively, highlight the message
in the Inbox (Messages > Inbox) and press A.
Choose to:
Reply to the message
Call Back
Forward the message
Chat
Store Number
Delete the message
Delete All messages or
Extract Media
if any file is attached to the message)
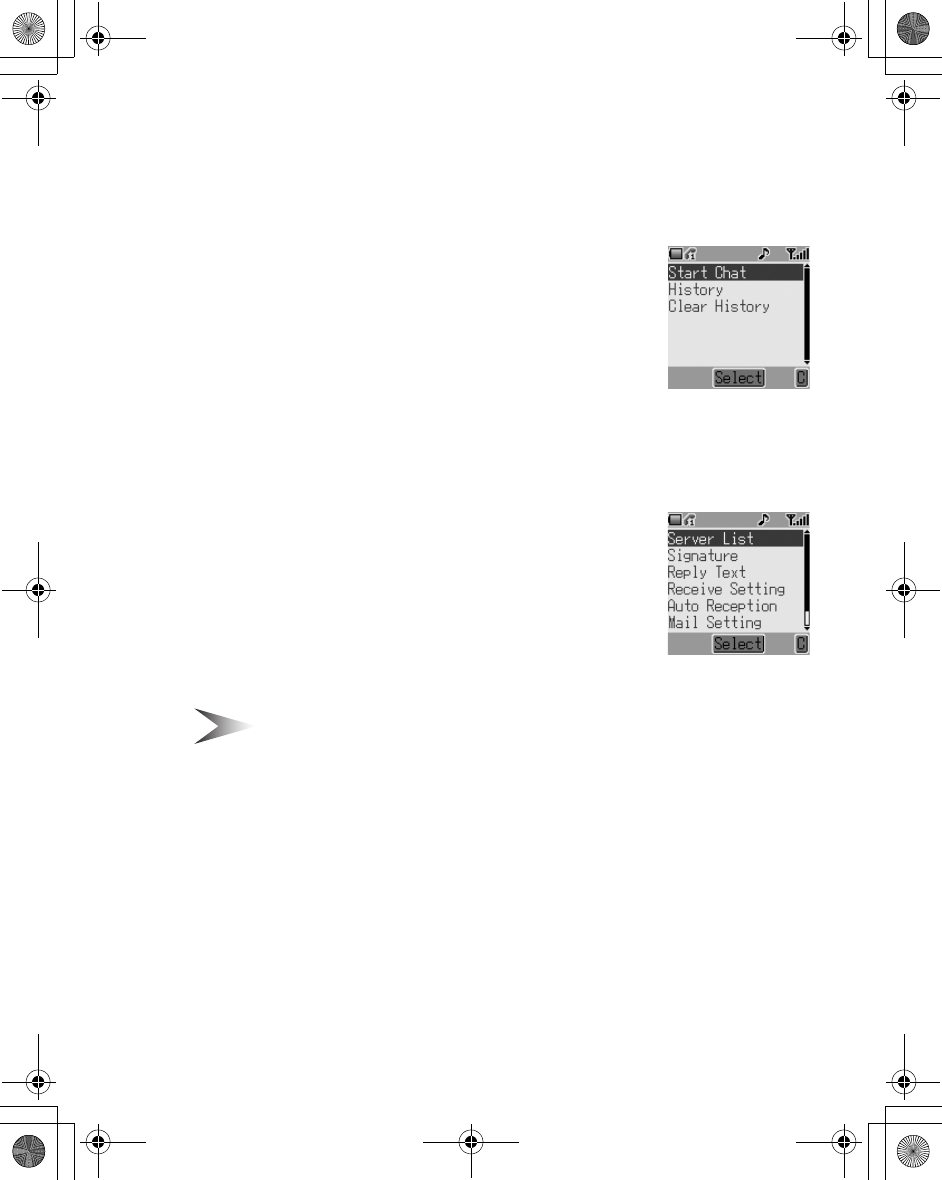
Chat SMS
The Chat feature enables you to read sent and received messages on one
screen when in Chat SMS mode with another party.
1. Either: When reading a previously sent or
received message, press < and select Chat,
press < and/or enter your Nickname (up to 10
characters) – see Text Entry, page 81
Or: Launch Chat SMS mode from Idle by
pressing < and selecting Messages > Chat
SMS > Start Chat. Press <. Enter your
Nickname. Press <
It is now possible to chat with the other party,
providing they have the chat SMS facility on their
phone. Enter your message – see Text Entry, page
81. Press <. Press < again and enter the
destination phone number if necessary (or browse
and select from Phonebook). Press <
When receiving a message in chat mode, the text will
appear automatically above your previous message.
2. Press <, select OK to continue the chat
Messages 75
If the phone is not in chat mode when receiving a reply to a chat message, the
reply will be received as a normal SMS. If a voice call is received when in chat
mode, the phone will allow the user to accept the incoming call. The chat mode
ends at this time.
Chat conversations are stored and can be viewed
in the History folder.
To open the folder from Idle, press < and select
Messages > Chat SMS > History. Regular Chat
users should clear the history regularly to free
memory space.
MMS: Setting Up the Phone
Multimedia Messaging Service (MMS) Configuration must be performed before
you can send or receive an MMS message. You can create up to three server
profiles on the phone.
1. From Idle press <, select Messages > Setting
> MMS > Server List. Press <
2. Select the server and press <
3. Use 4 to select Edit and press <
4. Select Bearer Type or MMS Setting and press
< to start configuring settings
5. If Bearer Type is selected as CSD, set GPRS setting to off, see page 71
Note: Your MMS settings may have been pre-configured by your service
provider. Contact your service provider if you are unclear how to proceed.
Use the Messages > Setting > MMS menu to configure other MMS settings.
Contact your service provider for details of required settings.
Creating an MMS Message
Your phone supports MMS (Multimedia Messaging Service), which means you
can send digital pictures to an MMS-enabled mobile or to an email address.
Wherever you are, attach a photo, audio message or text, and send it
immediately to your friends.
The following basic steps must be followed for all MMS messages. For
information on multimedia additions, read the following section.
1. From Idle press < and select Messages > Create > MMS. Press <
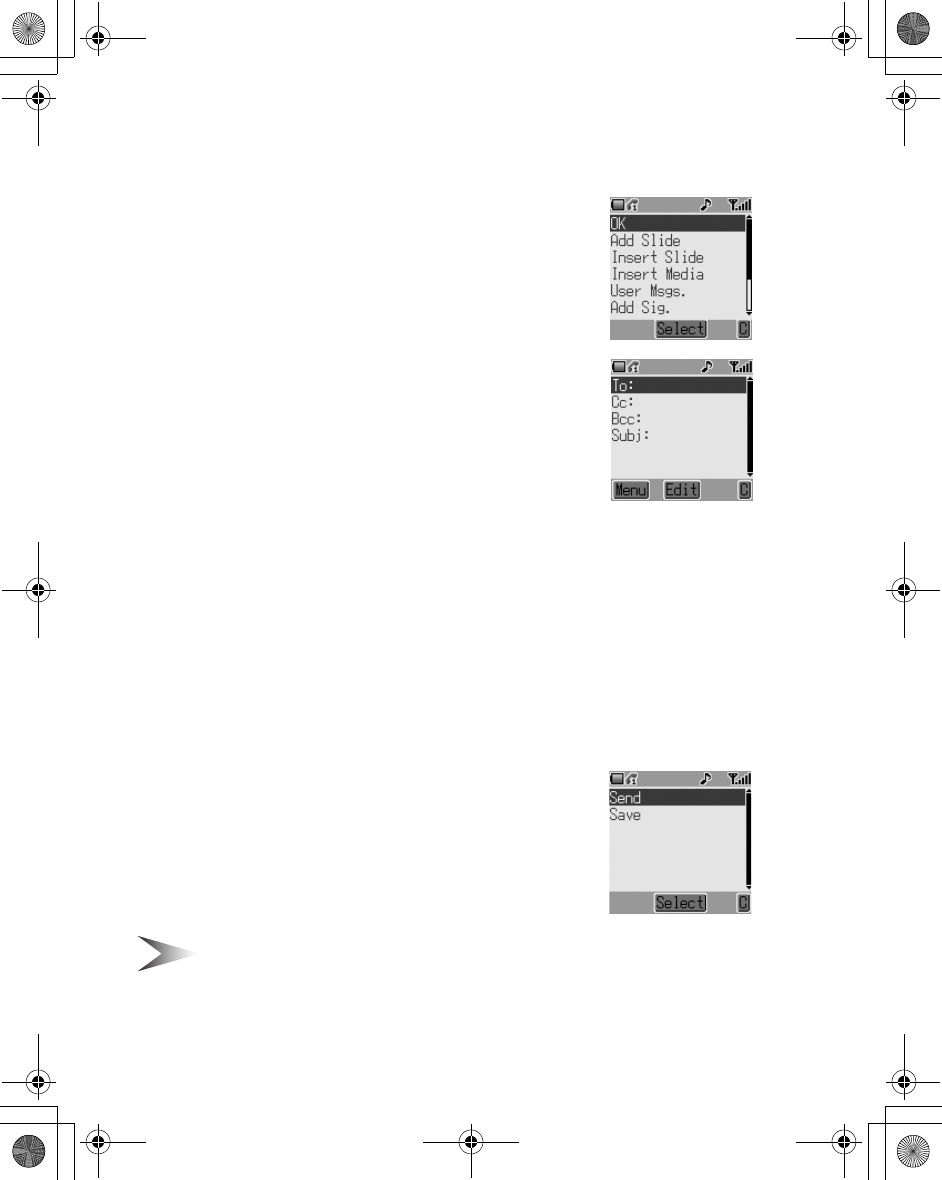
76 Messages
2. Compose the text part of the message (see Text Entry, page 81, for details
of entry methods)
3. When the message is complete press <
4. To attach a media file, follow the instructions
on the following page. To continue without
at-taching a media file, select OK from the
submenu and press <
5. Select To:, press <. When [New Entry] is
displayed,
select an entry from Phonebook or
enter the destination manually.
- From Phonebook:
Press
A
and select desired entry. Press
<
,
then
A
to save. Press
<
twice.
- Manual entry:
Press
<
twice. Enter destination number, then
press
<
three times.
6. If desired, a message can be delivered as a
copy to another recipient. To do this, use 4 to select Cc:. Press < and
follow the operation in step 5.
7. A Bcc: address or phone number is added in the same way. Bcc delivery
differs from Cc delivery in that the original recipient (whose address is in
the To: field) will not be informed of any copies sent to Bcc addresses
8. When the To: field has been filled and any required Cc or Bcc entries have
been added, add the message subject heading. Use 4 to select Subj:,
press < and enter the subject heading. Press < to confirm, then press A
9. Use 4 to select Send or Save as appropriate.
Press < twice
Note: Saved messages are stored in the Outbox and can be edited and sent
in the future.
Attaching Media Files
Media files such as voice files can easily be added to MMS messages.
Messages 77
1. Compose a message following steps 1 to 3 on the previous page. Press <
2. From the submenu select Insert Media. Press <
3. Use 4 to browse and select media files available on your phone. Press <
4. When you have selected files, press <
5. When settings are completed, press < twice
6. Follow the MMS destination entry procedure from step 5 on page 49
Managing Message Lists
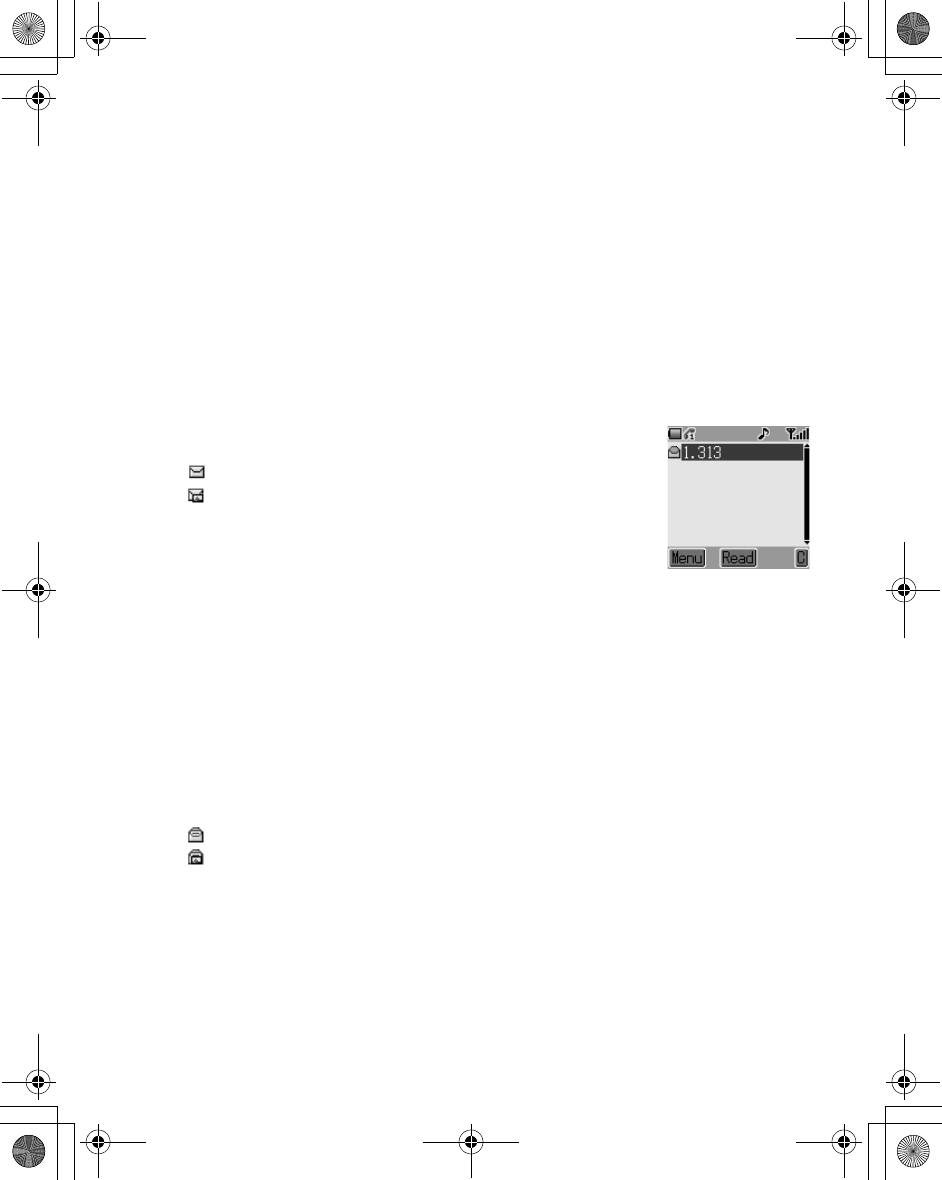
Selecting a stored message allows it to be read, replied to, edited or deleted.
Inbox
Messages received are stored in the Inbox and
tagged with icons:
indicates an unread SMS/EMS message
indicates an unread MMS message
From the Inbox, select a message. Press < to read
the message or A to view other options:
Reply to the message
Call Back the sender
Forward the message
Chat
Store Number
Delete the message
Delete All messages from the Inbox
Extract Media files from the message
If any file is attached to the message)
Edit the message content before forwarding or saving
Outbox
Messages sent or edited are stored in the Outbox and tagged with icons:
indicates an unsent SMS/EMS message
indicates an unsent MMS message
Cell Broadcasts
You need to specify the topic(s) of information you wish to receive as
broadcasts before they can be received.
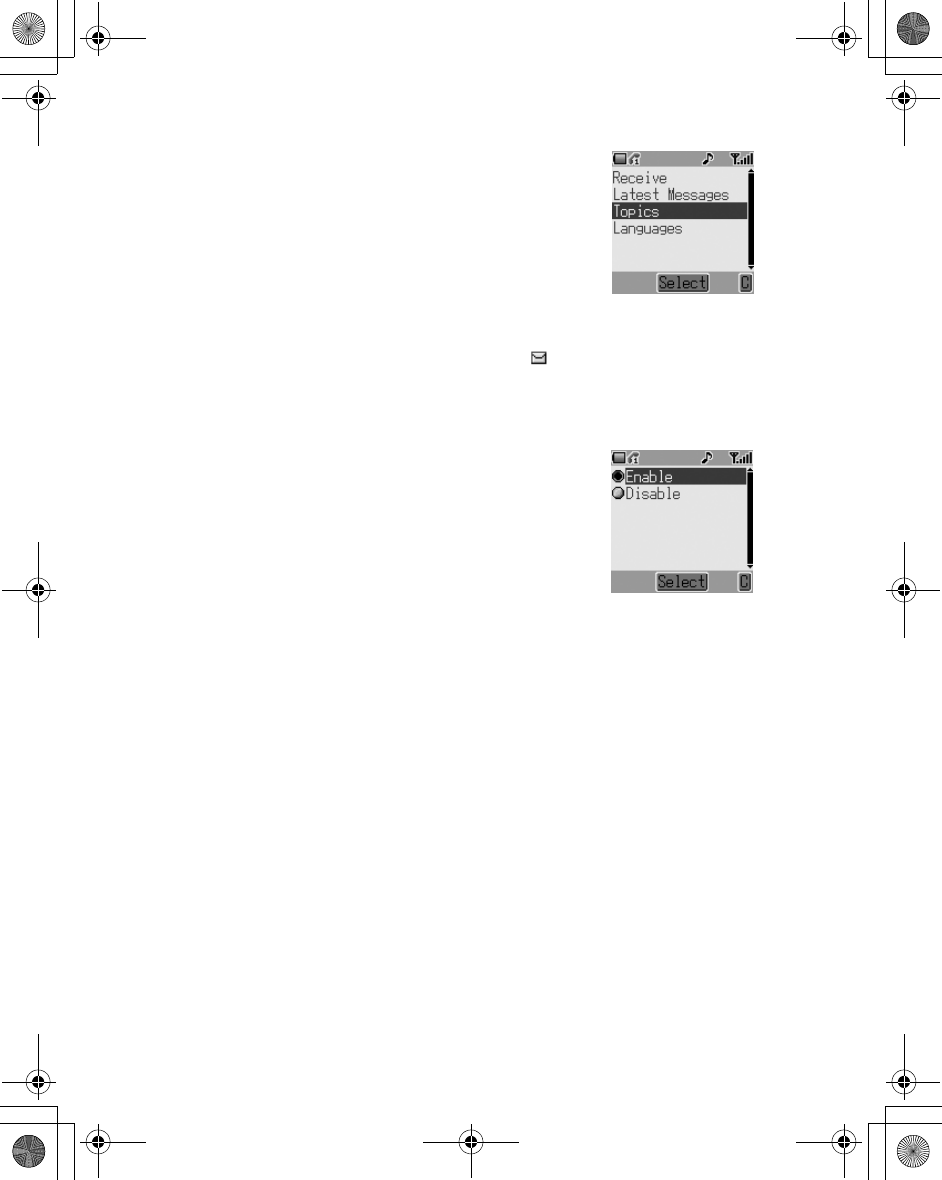
78 Messages
1. From Idle press <, select Messages >
Broadcasts > Topics and press <
2. Select [New Channel] and press < twice to
insert a new topic
3. Enter Channel No. and press <
When a low priority broadcast has been received, will be displayed on the
Idle screen. If a high priority broadcast is received, its text content will be
displayed on the idle screen
Enabling/Disabling Cell Broadcasts
1. From Idle press <, select Messages >
Broadcasts and press <
2. Select Receive and press <
3. Use 4 to select Enable or Disable and press
<
Language
The language in which broadcast messages displayed can be changed (F).
1. From Idle press <, select Messages > Broadcasts > Languages and
press <
2. Select a list and press <
3. Select required language and press <
Scheduler 79
Scheduler
You can organize your calendar to remind you a personal event, such as a
holiday period or birthday. You need to set the clock, day and time before
entering anything in the calendar.
Viewing the Calendar
From Idle screen
1. Press <(Menu)
2. 0(Move) to Calendar
3. Press <(Select)
OR
1. Press 7(Calendar)
Moving the cursor
When the Calendar is displayed, the cursor is on the current day. To display
next/previous month calendar, place the cursor on the Month and press 4. To
display next/previous year calendar, place the cursor on the Year and press 4.
Creating a reminder
On Calendar
1. Press <(On)
2. # - , or 4(Move) and set HOUR
3. 3(Move) to MINUTE
4. # - , or 4(Move) and set MINUTE
5. Press <(OK)
6. Enter a title of the event
7. Press <(OK)
8. Reminder list will be displayed

80 Scheduler
Reminder list
On Calendar
1. Press A(List)
2. Press A(Delete)
OR
press <(View)
3. Press <(Edit)
My Media 81
My Media
You can store your multimedia in each type of folders.
Note: Changing SIM does not affect the contents of stored data.
My Pictures
You can store the picture files and manage them. Picture files are displayed by
icons and move the cursor with 0(Move).
From My Media menu
1. Press <(Select)
2. Press <(View)
OR
press A(Menu)
3. 4(Move) to a required function
4. Press<(Select)
Following functions are available:
•View
• Set as group icon
• Set as Caller ID
• Set as wallpaper
• Send
• Display message info
• Rename
• Delete
My Animations
You can store the movie files and manage them. Movie files are displayed by
icons and move the cursor with 0(Move).
From My Media menu
1. 4(Move) to My Animations
2. Press <(Select)
3. Press <(Play)
OR
press A(Menu)
4. 4(Move) to a required function
5. Press<(Select)
Following functions are available:
•View
• Set as group icon

82 My Media
• Set as Caller ID
• Set as wallpaper
• Display message info
• Rename
• Delete
My Sounds
You can store the sound files and manage them.
From My Media menu
1. 4(Move) to My Sounds
2. Press <(Select)
3. Automatically sound files are played
4. Press <(Play) to play again
OR
press A(Menu)
5. 4(Move) to a required function
6. Press<(Select)
Following functions are available:
•Play
• Set as ringtone
• Send
• Display message info
• Rename
• Delete
Memory Status
You can check the Memory Status occupied by media.
From My Media menu
1. 4(Move) to Memory Status
2. Press <(Select)
3. Press @(Cancel)

Applications 83
Applications
You can use variable preinstalled applications.
Games & Apps
See “Games & Apps” on page 56.
Alarms
You can set 3 sets of the alarm to sound or vibrate when the set time is reached
Note: Even when the phone is switched off at the alarm setted time, the
phone will switch on automatically and start the alarm (see “Aircraft” on
page 1). The phone stayed on after the alarm.
Setting the Alarm
From Applications
1. 4(Move) to Alarms
2. Press <(Select)
3. 4(Move) to an empty alram set
4. Press <(Select)
5. 4(Move) to a required type of alram
6. Press <(Select)
7. # - , or 4(Move) and set the HOUR
8. 3(Move) to the MINUTE
9. # - , or 4(Move) and set the MINUTE
10. Press <(OK)
Following types of the alarm are available:
•Time
•Once
•Daily
• Mon to Fri
• Mon to Sat
• Melody
• Cancel
84 Applications
Muting the Alarm
When an alarm goes on, the chosen melody will sound and the display will flash
with an alarm message. The alarm will sound for 55 seconds.
Ending the alarm
Press any key
To end the alarm
Press any key
Voice memo
You can record a two-way conversation while on a call. The maximum length of
a recording is 16 seconds. Old recordings are overwritten; only one recording
can be stored.
Note: If a different SIM is installed, any voice momos will be lost.
Security of a recording message is your responsibility. You must ask for the
other party’s sonsent before recording.
Recording a Voice memo
While on a call
1. Press <(Select)
2. 4(Move) to Voice memo
3. Press <(Select)
Playing a Voice memo
From Applications
1. 4(Move) to Voice memo
2. Press <(Select)
Deleting a Voice memo
From Applications
1. 4(Move) to Voice memo
2. Press <(Delete)

Applications 85
Sound recorder
You can record and make a sound file to use for ringtone.
From Applications
1. 4(Move) to Sound recorder
2. Press <(Select)
Clock
You can set time and date, and select from various types of clock Format.
Time & Date
From Applications menu
1. 4(Move) to Clock
2. Press <(Select)
3. Press <(Select) Time & Date
4. Current setted Time and Date is displayed
5. 4(Move) to Time or Date
6. Press <(Select)
Setting Time
From Time & Date menu
1. Press <(Select)
2. # - , or 4(Move) and set the HOUR
3. 3(Move) to the MINUTE
4. # - , or 4(Move) and set the MINUTE
5. Press <(OK)
Setting Date
From Time & Date menu
1. 4(Move) to a current setted date
2. Press <(Select)
3. Calender is displayed
4. 4(Move) to a current date
5. Press <(OK)
86 Applications
Format
From Clock menu
1. 4(Move) to Format
2. Press <(Select)
3. 4(Move) to a required format
4. Press <(Select)
Auto power on
You can set Auto power on and the phone switched on at the setted time
automatically.
Note: Even when the phone is switched off at the Auto power on setted time,
the phone will switch on automatically and switched on (see “Aircraft” on
page 1).
From Applications menu
1. 4(Move) to Auto power on
2. Press <(Select)
3. # - , or 4(Move) and set the HOUR
4. 3(Move) to the MINUTE
5. # - , or 4(Move) and set the MINUTE
6. Press <(OK)
7. 4(Move) to a required setting
8. Press <(Select)
Auto power off
You can set Auto power off and the phone switched off at the setted time
automatically.
From Applications menu
1. 4(Move) to Auto power off
2. Press <(Select)
3. # - , or 4(Move) and set the HOUR
4. 3(Move) to the MINUTE
Applications 87
5. # - , or 4(Move) and set the MINUTE
6. Press <(OK)
7. 4(Move) to a required setting
8. Press <(Select)
Calculator
You can use the 4-function calculator (addition,
subtraction, multiplication and division) to make simple
arithmetic operations.
From Application menu
1. 4(Move) to Calculator
2. Press <(Select)
3. Enter a number with # - , (maximum 8 digits)
If a decimal point is required, press ".
Press C to add “-” if needed.
4. Press ! to select arithmetic operation
5. Enter a number (maximum 8 digits)
6. Press <(Select)
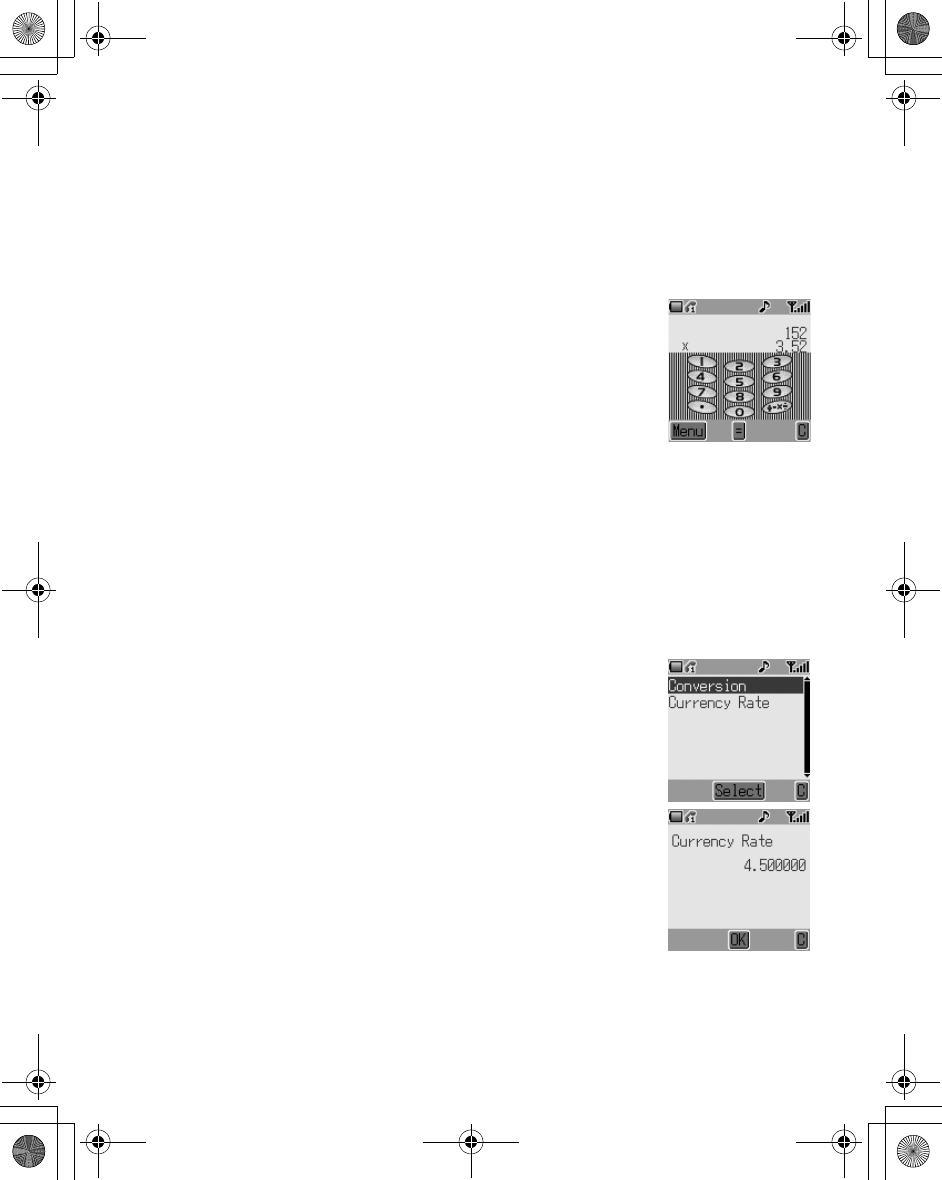
Conversion
You can covert from/ to a home currency using a currency
rate.
From Calculator
1. Enter a number with # - , (maximum 8 digits)
2. A(Menu)
3. Calculated number is displayed
Currency rate
You can set Currency rate to convert to/from a setted
currency.
From Calculator
1. Press A(Menu)
2. 4(Move) to Currency rate
3. Press <(Select)
88 Applications
4. Enter a number with # - , to six decimal places.
5. Press <(OK)
Melody composer
You can compose your original melody and stored as a sound file, and use for
a ringtone.
From Applications menu
1. 4(Move) to Melody composer
2. Press <(Select)
Composing a melody
You can play a melody while on composing.
From Melody composer menu
1. Press <(Change)
2. Enter required notes with # - ,, " and !.
3. Press <(OK)
4. 4(Move) to Name
5. Press <(Change)
6. Name the name of a melody with # - ,
7. Press <(OK)
8. Press A(Save)
Format of the Notes
• The notes appear in the format like 2C4 $ is pressed.
• The first number (“2” in this case) indicates the note octave. The default value is 2.
Press # to change octave range from 1 to 3.
• The fourth number (“4” in this case) indicates the notes length.
The default value is 1/4. Press , to change note length range from 1 to 1/32.
Key $ % & ' ( ) *
Note CDEFGAB
Key + , # " !
Note Rest Note
Length
Set
Octave
Dotted
Note Sharp

Applications 89
• Indicate dotted notes (i.e. notes extended in length) by pressing ".
• Add sharp values to notes by pressing !.
• Enter rests by pressing +.
90 Trouble Shooting
Trouble Shooting
Should any problem persist contact your dealer.
Problem Cause Remedy
Phone will not switch
on
Check that the battery is
fully charged and correctly
connected to the phone
Extremely short battery
life for a new battery
The network you are using
and the condition of the
battery can affect battery
life
Short battery life for an
old battery The battery has worn out Replace with a new fully
charged battery
The battery level
indicator does not
appear and the phone
cannot be switched on
when charging
The battery is not attached
to the phone or when the
battery has been deeply
discharged the phone will
take a short time until the
indicator lights
Leave the phone charging
the battery for a few
minutes before the indicator
is lit and attempting to
switch it on
Battery fails to charge
The battery is not attached
to the phone Ensure the battery is fitted
to the phone prior to
commencing charging
Battery has been connected
to the phone after the fast
travel charger has been
switched on
The battery has been
deeply discharged. The
phone will take a short time
until indicator lights.
Leave the phone charging
the battery for a few
minutes before the indicator
is lit and attempting to
switch it on.
Calls cannot be made
The phone is locked Unlock the phone
Outgoing calls are barred Disable the outgoing call
barring, or barred dial
The phone is not registered
to a network
Move to a coverage area
and operate your phone
after it has registered with a
network
Trouble Shooting 91
Calls cannot be made
from Fixed Dial Store
Check your SIM supports
Fixed Dial
Check if the Fixed Dial is
switched on
Check the phone number is
stored in the Fixed Dial
Calls cannot be
received
The phone is not switched
on Switch the phone on
Incoming calls are barred Disable the incoming call
barring
The phone is not registered
to a network
Move to a coverage area
and operate your phone
after it has registered with a
network
Emergency calls
cannot be made
You are not in a GSM
coverage area
Check that the antenna
symbol is displayed –
move to a coverage area
and operate your phone
when the antenna symbol is
displayed
Phone numbers cannot
be recalled from
Phonebook
The phone is locked Unlock the phone
Phone number has been
restricted Switch off restriction
Problem Cause Remedy
92 Important Error Messages
Important Error Messages
These are some of the most important error messages which may be displayed:
Unregistered SIM
The network has detected an authentication failure
because your SIM is not registered with that network
– contact your Service Provider
Invalid SIM
The SIM is blocked because one of the PIN/PIN2
unblocking keys (PUK/PUK2) has been entered
incorrectly ten times – contact your Service Provider
Insert SIM
The phone has detected a problem with the SIM –
switch the phone off and then back on; if the
message is still displayed contact your Service
Provider
Password
Incorrect: Try Again
The SIM has failed one or more of the SIM
personalisation checks – contact your Service
Provider
Function
Unavailable
The selected feature is either not supported by the
SIM or is not available with the current subscription –
contact your Service Provider
PIN2 Must Be
Unblocked
The PIN2 is blocked permanently because the wrong
PUK2 has been entered ten times, services
controlled by PIN2 cannot be used – contact your
Service Provider
only for MMS:
Capacity Full!
A message has been received but the message store
is full – to receive messages, delete some of the
currently stored messages or set messages to Auto
Delete
Phone Number Too
Long
(Max:20)
The edited or newly created Phonebook number is
too long for the SIM
Capacity Full!
The message area is full. Your messages cannot be
stored until some of the currently stored messages
are deleted
Important Error Messages 93
Unlock Code
Incorrect. Try
Again.
On changing the phone lock code, verification of the
new code is incorrect – retry changing the lock code
with correct verification
Disabling or enabling the lock code has failed due to
incorrect entry of the lock code – re-enter lock code
Incorrect: xx Tries
Left
The entered code is incorrect – re-enter code
correctly
94 Glossary of Terms
Glossary of Terms
APN Access Point Name. Directs the user to the gateway or
the required service
Cut Permanently removes selected text from short text
message
Copy Copies selected text from short text message without
removing it from the original message
CHAP Challenge Handshake Authentication Protocol. A security
feature for the GPRS network
DTMF Tones
Dual Tone Multi-Frequency tones allow you to
communicate with computerised phone systems, voice
mailboxes etc.
EMS Enhanced Message Service. Upgraded feature of Text
Messages
GPRS
General Packet Radio Service. A GSM data transmission
technique that transmits and receives data in packets
rather than setting up a continuous channel. It makes
very efficient use of available radio spectrum and users
pay only for the volume of data sent and received.
GSM Global System for Mobile Communications. The name
given to the advanced digital technology that your phone
uses
MMS Multimedia Messaging Service. Attach images and music
to text message
Network
Operator
The organization responsible for operating a GSM
network
PAP Password Authentication Protocol. A security feature for
the GPRS network
Password Used for the control of the Call Bar. Supplied by your
Service Provider
PIN
Personal Identification Number used for SIM security.
Supplied by your Service Provider. If the PIN is entered
incorrectly 3 times, the PIN will be blocked
Glossary of Terms 95
PIN2
Personal Identification Number used for the control of
Fixed Dial Store and Call Charge metering. Supplied by
your Service Provider. If the PIN2 is entered incorrectly 3
times, the PIN2 will be blocked
PUK/PUK2
PIN/PIN2 Unblocking Key. Used to unblock the PIN/
PIN2. Supplied by your Service Provider. If the PUK/
PUK2 is entered incorrectly 10 times, the PUK/PUK2 will
be blocked
Registration The act of locking on to a GSM/GPRS network. This is
usually performed automatically by your phone
Roaming The ability to use your phone on networks other than your
Home network
Service
Provider
The organization responsible for providing access to the
GSM/GPRS network
SIM
Subscriber Identity Module. A small smart-card which
stores unique subscriber and user-entered information
such as Phonebook and Short Messages. Supplied by
your Service Provider
WAP
Wireless Application Protocol. The communication
standard which enables you to download resources from
the Internet to your phone
96 Specifications
Specifications
Phone (Including Battery)
Note: Charge time will be longer when the phone is turned on. Battery life is
affected by the network being used and the condition of the battery. Talk and
standby time will be dependant upon network conditions, SIM, backlight
usage and battery condition.
Type GSM850
GSM1900
GPRS Class 8
Temperature Range
Charging
Storage
+5ºC – +35ºC
–20ºC – +60ºC
Weight 87g
Dimensions (mm)
Height x Width x Depth 104 x 47 x 19
Supply Voltage 3.7 V DC, 740 mAh
Standby Time (hrs)
Talk Time (hrs)
80 to 250
1.6 to 5
Charge Time (Phone off) Up to 110 min.
Antenna Internal
SIM Type 3 V
Phonebook Memory 200 + SIM
Memory Storage 576 KB
Licencing 97
Licencing
CP8 Patent
© Panasonic Mobile Communications Co., Ltd. 2004
Information in this document is subject to change without notice. No part of
these instructions may be reproduced or transmitted in any form or by any
means without obtaining express permission from Panasonic Mobile
Communications Co., Ltd.
Standards New Zealand
Tegic
T9® is a trademark of Tegic Communications Inc.T9R
Text Input is licenced under one or more of the following: U.S. Pat. Nos.
5,818,437, 5,953,541, 5,187,480, 5,945,928 and 6,011,554; Canadian Pat.
No. 1,331,057; United Kingdom Pat. No. 2238414B; Hong Kong Standard
Pat. No. HK0940329;
Republic of Singapore Pat. No. 51383; Euro. Pat. No. 0 842 463
(96927260.8) DE/DK, FI, FR, IT, NL, PT, ES, SE, GB; and additional patents
are pending worldwide.
OpenWave
OpenWave is a pioneer in the mobile data transfer
industry, supplying voice and data revenue to the mobile
communications sector.
Statement according to FCC part 15.19:
This device complies with Part 15 of the FCC Rules. Operation is subject to the following two
conditions: (1) this device may not cause harmful interference, and (2) this device must
accept any interference received, including interference that may cause undesired operation.
Statement according to FCC part 15.21:
Modifications not expressly approved by this company could void the user's authority to
operate the equipment.
Statement according to FCC part 15.105:
NOTE: This equipment has been tested and found to comply with the limits for a Class B
digital device, pursuant to Part 15 of the FCC Rules. These limits are designed to provide
reasonable protection against harmful interference in a residential installation. This equipment
generates, uses and can radiate radio frequency energy and, if not installed and used in
accordance with the instructions, may cause harmful interference to radio communications.
However, there is no guarantee that interference will not occur in a particular installation. If
this equipment does cause harmful interference to radio or television reception, which can be
determined by turning the equipment off and on, the user is encouraged to try to correct the
interference by one or more of the following measures:
. Reorient or relocate the receiving antenna.
. Increase the separation between the equipment and receiver.
. Connect the equipment into an outlet on a circuit different from that to which the receiver
isconnected.
. Consult the dealer or an experienced radio/TV technician for help.
RFExposure portable:
This device and its antenna must not be co-located or operating in conjunction with any other
antenna or transmitter."
RF exposure FCC:
Tests for SAR are conducted using standard operating positions specified by the FCC with
the phone transmitting at its highest certified power level in all tested frequency bands.
Although the SAR is determined at the highest certified power level, the actual SAR level of
the phone while operation can be well below the maximum value. This is because the phone
is designed to operate at multiple power levels so as to use only the power required to reach
the network. In general, the closer you are to a wireless base station antenna, the lower the
power output.
Before a phone model is available for sale to the public, it must be tested and certified to the
FCC that it does not exceed the limit established by the government-adopted requirement for
safe exposure. The tests are performed in positions and locations (e.g., at the ear and worn
on the body) as required by the FCC for each model. (Body-worn measurements may differ
among phone models, depending upon available accessories and FCC requirements). While
there may be differences between the SAR levels of various phones and at various positions,
they all meet the government requirement for safe exposure.
For body worn operation, to maintain compliance with FCC RF exposure guidelines, use only
accessories that contain no metallic components and provide a separation distance of 15mm
(0.6 inches) to the body. Use of other accessories may violate FCC RF exposure guidelines
and should be avoided.
Health and Safety Information FCC:
Exposure to Radio Frequency (RF) Signals
Your wireless phone is a radio transmitter and receiver. It is designed and manufactured not
to exceed the emission limits for exposure to radio frequency (RF) energy set by the Federal
Communications Commission of the U.S. Government. These limits are part of
comprehensive guidelines and establish permitted levels of RF energy for the general
population. The guidelines are based on the safety standards previously set by both U.S. and
international standards bodies:
This EUT has been shown to be capable of compliance for localized specific absorption rate
(SAR) for uncontrolled environment/general population exposure limits specified in ANSI/IEEE
Std. C95.1-1992 and had been tested in accordance with the measurement procedures
specified in FCC/OET Bulletin 65 Supplement C (2001) and IEEE Std. 1528-2003 Detember
2003).
The standards include a substantial safety margin designed to assure the safety of all persons,
regardless of age and health. The exposure standard for wireless mobile phones employs a
unit of measurement known as the Specific Absorption Rate, or SAR. The SAR limit set by the
FCC is 1.6W/kg *.
* In the U.S. and Canada, the SAR limit for mobile phones used by the public is 1.6 watts/kg
(W/kg) averaged over one gram of tissue. The standard incorporates a substantial margin of
safety to give additional protection for the public and to account for any variations in.