Compal Electronics P5TH6300 Pocket PC User Manual iPAQ Phone
Compal Electronics Inc Pocket PC iPAQ Phone
Contents
- 1. UserMan1
- 2. UserMan2
- 3. UserMan3
UserMan1

hp CONFIDENTIAL DRAFT
Revised: 11/26/03
DRAFT
User’s Guide
HP iPAQ Pocket PC h6300 Series
Document Part Number: 353283-001
February 2004

DRAFT - hp CONFIDENTIAL
hp CONFIDENTIAL
November 26, 2003 11:47 am File: Intro.fm
DRAFT
© 2003 Hewlett-Packard Company
© 2003 Hewlett-Packard Development Company, L.P.
HP, Hewlett Packard, and the Hewlett-Packard logo are trademarks of
Hewlett-Packard Company in the U.S. and other countries.
iPAQ is a trademark of Hewlett-Packard Development Company, L.P. in
the U.S. and other countries.
Microsoft, Windows, the Windows logo, Outlook, and ActiveSync are
trademarks of Microsoft Corporation in the U.S. and other countries.
HP iPAQ Pocket PC is Powered by Microsoft® Windows®.
SD Logo is a trademark of Secure Digital.
BluetoothTM is a trademark owned by the Bluetooth SIG, Inc.
All other product names mentioned herein may be trademarks of their
respective companies.
Hewlett-Packard Company shall not be liable for technical or editorial
errors or omissions contained herein or for incidental or consequential
damages in connection with the furnishing, performance, or use of this
material. The information in this document is provided “as is” without
warranty of any kind, including, but not limited to, the implied warranties
of merchantability and fitness for a particular purpose, and is subject to
change without notice. The warranties for HP products are set forth in the
express limited warranty statements accompanying such products. Nothing
herein should be construed as constituting an additional warranty.
This document contains proprietary information that is protected by
copyright. No part of this document may be photocopied, reproduced, or
translated to another language without the prior written consent of
Hewlett-Packard Company.
ÅWARNING: Text set off in this manner indicates that failure to
follow directions could result in bodily harm or loss of life.
ÄCAUTION: Text set off in this manner indicates that failure to follow
directions could result in damage to equipment or loss of
information.
User’s Guide
HP iPAQ Pocket PC h6300 Series
First Edition (February 2004)
Document Part Number: 353283-001

Revised: 11/24/03
User’s Guide www.hp.com iii
hp CONFIDENTIAL 11/26/03
File: iPAQ_PhoneTOC.fm PN: 353283-001
Contents
1 Getting to Know Your
HP iPAQ Pocket PC
Using the Stylus . . . . . . . . . . . . . . . . . . . . . . . . . . . . . . . . 1–4
Setting the Date and Time . . . . . . . . . . . . . . . . . . . . . . . . 1–5
Setting the Time for Home and Locations
You Are Visiting . . . . . . . . . . . . . . . . . . . . . . . . . . . . 1–6
Setting the Date . . . . . . . . . . . . . . . . . . . . . . . . . . . . . 1–6
Entering Owner Information . . . . . . . . . . . . . . . . . . . . . . 1–7
Setting a Password. . . . . . . . . . . . . . . . . . . . . . . . . . . 1–7
Resetting the Unit. . . . . . . . . . . . . . . . . . . . . . . . . . . . . . . 1–8
Performing a Soft Reset. . . . . . . . . . . . . . . . . . . . . . . 1–8
Performing a Hard Reset . . . . . . . . . . . . . . . . . . . . . . 1–8
Aligning the Screen . . . . . . . . . . . . . . . . . . . . . . . . . . . . . 1–9
Routine Care. . . . . . . . . . . . . . . . . . . . . . . . . . . . . . . . . . 1–10
2 Using the Phone Functions
Your SIM Card. . . . . . . . . . . . . . . . . . . . . . . . . . . . . . . . . 2–1
Activating Your Phone Service . . . . . . . . . . . . . . . . . . . . 2–2
Your PIN . . . . . . . . . . . . . . . . . . . . . . . . . . . . . . . . . . . . . 2–3
Phone Buttons and Icons . . . . . . . . . . . . . . . . . . . . . . . . . 2–5
Checking Your Connection and Signal Strength . . . . . . . 2–6
Turning the Phone Functions On and Off . . . . . . . . . . . . 2–7
HP Profiles . . . . . . . . . . . . . . . . . . . . . . . . . . . . . . . . . . . . 2–8
Making and Receiving Phone
Function Calls . . . . . . . . . . . . . . . . . . . . . . . . . . . . . . . . . 2–8
Making a Call . . . . . . . . . . . . . . . . . . . . . . . . . . . . . . 2–8

Contents
User’s Guide www.hp.com iv
DRAFT - Revised 11/24/03
hp CONFIDENTIAL 11/26/03
File: iPAQ_PhoneTOC.fm PN: 353283-001
Answering a Call . . . . . . . . . . . . . . . . . . . . . . . . . . . . 2–9
Ending a Call . . . . . . . . . . . . . . . . . . . . . . . . . . . . . . . 2–9
Making a Call from Contacts. . . . . . . . . . . . . . . . . . . 2–9
Creating a Speed Dial Entry . . . . . . . . . . . . . . . . . . 2–10
Making a Call Using Speed Dial. . . . . . . . . . . . . . . 2–11
Making a Call from Call History. . . . . . . . . . . . . . . 2–11
Making a Conference Call. . . . . . . . . . . . . . . . . . . . 2–11
Adjusting Phone Function Volume . . . . . . . . . . . . . 2–11
Enabling the Mute Function . . . . . . . . . . . . . . . . . . 2–12
Setting Ring Tones . . . . . . . . . . . . . . . . . . . . . . . . . 2–13
Enabling Speakerphone Mode. . . . . . . . . . . . . . . . . 2–13
Taking Notes During a Call. . . . . . . . . . . . . . . . . . . 2–14
Messaging . . . . . . . . . . . . . . . . . . . . . . . . . . . . . . . . 2–14
Using Voice Mail. . . . . . . . . . . . . . . . . . . . . . . . . . . 2–16
Putting a Call on Hold . . . . . . . . . . . . . . . . . . . . . . . 2–16
Using Call Waiting . . . . . . . . . . . . . . . . . . . . . . . . . 2–16
Displaying Caller ID . . . . . . . . . . . . . . . . . . . . . . . . 2–17
Blocking Calls . . . . . . . . . . . . . . . . . . . . . . . . . . . . . 2–17
Forwarding Calls . . . . . . . . . . . . . . . . . . . . . . . . . . . 2–17
Change the System Volume . . . . . . . . . . . . . . . . . . 2–18
Change the Ringer Volume . . . . . . . . . . . . . . . . . . . 2–19
Changing the Phone Settings . . . . . . . . . . . . . . . . . . . . . 2–19
Securing Your Phone Functions. . . . . . . . . . . . . . . . . . . 2–20
Changing Services Settings . . . . . . . . . . . . . . . . . . . . . . 2–21
Viewing Available GSM/GPRS Networks . . . . . . . . . . 2–21
Changing Network Settings . . . . . . . . . . . . . . . . . . . . . . 2–21
Manually Selecting a Network . . . . . . . . . . . . . . . . 2–22
Manually Selecting a Frequency Band . . . . . . . . . . 2–22
3Using Wireless LAN
Getting Acquainted . . . . . . . . . . . . . . . . . . . . . . . . . . . . . 3–1
Learning the Terms . . . . . . . . . . . . . . . . . . . . . . . . . . . . . 3–2
Getting Started with Wireless LAN. . . . . . . . . . . . . . . . . 3–3
Powering WLAN On or Off . . . . . . . . . . . . . . . . . . . 3–3
Automatically Connecting to a Network. . . . . . . . . . 3–4

Contents
User’s Guide www.hp.com v
DRAFT - Revised 11/24/03
hp CONFIDENTIAL 11/26/03
File: iPAQ_PhoneTOC.fm PN: 353283-001
Manually Entering New Network Settings . . . . . . . . 3–4
Searching for Networks to Access. . . . . . . . . . . . . . . 3–6
Managing Wireless Network Settings . . . . . . . . . . . . . . . 3–7
Viewing or Editing a Wireless Network . . . . . . . . . . 3–7
Deleting a Wireless Network. . . . . . . . . . . . . . . . . . . 3–7
Monitoring Signal Strength and Status . . . . . . . . . . . . . . 3–8
Working with Network Settings. . . . . . . . . . . . . . . . . . . . 3–9
Looking Up an IP Address . . . . . . . . . . . . . . . . . . . . 3–9
Changing TCP/IP Settings. . . . . . . . . . . . . . . . . . . . 3–10
Changing DNS and WINS Settings. . . . . . . . . . . . . 3–11
Setting Up VPN Server Connections. . . . . . . . . . . . 3–12
Changing VPN Server Connections . . . . . . . . . . . . 3–12
Starting VPN Server Connections. . . . . . . . . . . . . . 3–14
Setting Up Proxy Server Settings . . . . . . . . . . . . . . 3–14
Connecting to Hot Spots . . . . . . . . . . . . . . . . . . . . . 3–15
Security . . . . . . . . . . . . . . . . . . . . . . . . . . . . . . . . . . 3–15
4 Using Bluetooth
Getting Acquainted with Bluetooth . . . . . . . . . . . . . . . . . 4–2
Understanding Terms . . . . . . . . . . . . . . . . . . . . . . . . 4–3
Supported Services . . . . . . . . . . . . . . . . . . . . . . . . . . 4–4
Working with Bluetooth Settings. . . . . . . . . . . . . . . . . . . 4–4
Opening Bluetooth Settings. . . . . . . . . . . . . . . . . . . . 4–5
Setting Accessibility Properties. . . . . . . . . . . . . . . . . 4–6
Enabling Bluetooth Services . . . . . . . . . . . . . . . . . . . 4–8
Setting a Shared Folder . . . . . . . . . . . . . . . . . . . . . . 4–10
Understanding Profiles . . . . . . . . . . . . . . . . . . . . . . 4–11
Working with Bluetooth Manager . . . . . . . . . . . . . . . . . 4–13
Opening Bluetooth Manager . . . . . . . . . . . . . . . . . . 4–14
Locating and Selecting a Device . . . . . . . . . . . . . . . 4–14
Connecting to Other Devices . . . . . . . . . . . . . . . . . . . . . 4–15
Identifying the Communications Port . . . . . . . . . . . 4–15
Establishing an ActiveSync Connection . . . . . . . . . 4–16
Establishing a Serial Connection. . . . . . . . . . . . . . . 4–20
Dial-Up Networking . . . . . . . . . . . . . . . . . . . . . . . . 4–21

vi www.hp.com User’s Guide
Contents
DRAFT - Revised 11/24/03
hp CONFIDENTIAL 11/26/03
File: iPAQ_PhoneTOC.fm PN: 353283-001
Joining a Personal Area Network . . . . . . . . . . . . . . 4–22
Establishing a Cell Phone Partnership. . . . . . . . . . . 4–22
Working with Files. . . . . . . . . . . . . . . . . . . . . . . . . . . . . 4–23
Creating a File Transfer Connection . . . . . . . . . . . . 4–23
Sending Files . . . . . . . . . . . . . . . . . . . . . . . . . . . . . . 4–23
Creating a Folder on a Remote Device . . . . . . . . . . 4–23
Receiving a File from a Remote Device . . . . . . . . . 4–24
Deleting a File from a Remote Device . . . . . . . . . . 4–24
Using Business Card Exchange. . . . . . . . . . . . . . . . 4–24
Setting Up Your Business Card Information. . . . . . 4–25
Opening a Connection . . . . . . . . . . . . . . . . . . . . . . . . . . 4–27
Viewing Connection Status . . . . . . . . . . . . . . . . . . . 4–27
Closing a Connection. . . . . . . . . . . . . . . . . . . . . . . . 4–28
Viewing Connection Information . . . . . . . . . . . . . . 4–28
Working with Connections . . . . . . . . . . . . . . . . . . . 4–28
5 Making Your Connections
Using GSM/GPRS Connections . . . . . . . . . . . . . . . . . . . 5–2
Creating a GSM Connection . . . . . . . . . . . . . . . . . . . 5–2
Creating a GPRS Connection . . . . . . . . . . . . . . . . . . 5–4
Setting Up a WAP Browser . . . . . . . . . . . . . . . . . . . . . . . 5–6
Viewing WAP Pages . . . . . . . . . . . . . . . . . . . . . . . . . 5–6
Connecting to a Private Network. . . . . . . . . . . . . . . . . . . 5–7
Connecting with a Default Setting. . . . . . . . . . . . . . . . . . 5–7
Connecting to an E-mail Server. . . . . . . . . . . . . . . . . . . . 5–7
Entering an Internet Address . . . . . . . . . . . . . . . . . . . . . . 5–8
Using a Favorites List . . . . . . . . . . . . . . . . . . . . . . . . . . . 5–8
6 Using the Camera
Taking a Picture . . . . . . . . . . . . . . . . . . . . . . . . . . . . . . . . 6–1
Adjusting your Settings . . . . . . . . . . . . . . . . . . . . . . . 6–2
Saving a Picture. . . . . . . . . . . . . . . . . . . . . . . . . . . . . 6–2
Adjusting Your Settings . . . . . . . . . . . . . . . . . . . . . . 6–2
Editing a Picture . . . . . . . . . . . . . . . . . . . . . . . . . . . . 6–2

Contents
User’s Guide www.hp.com vii
DRAFT - Revised 11/24/03
hp CONFIDENTIAL 11/26/03
File: iPAQ_PhoneTOC.fm PN: 353283-001
Using HP Image Transfer. . . . . . . . . . . . . . . . . . . . . . . . . 6–2
Using HP Image Zone . . . . . . . . . . . . . . . . . . . . . . . . . . . 6–2
Viewing Pictures . . . . . . . . . . . . . . . . . . . . . . . . . . . . 6–3
Viewing a Picture Full-Screen. . . . . . . . . . . . . . . . . . 6–3
Recording Sound With a Picture . . . . . . . . . . . . . . . . 6–3
Viewing a Slideshow. . . . . . . . . . . . . . . . . . . . . . . . . 6–4
E-mailing a Picture. . . . . . . . . . . . . . . . . . . . . . . . . . . . . . 6–5
Using MMS to E-mail a Picture. . . . . . . . . . . . . . . . . . . . 6–5
7Expansion Cards
Installing a Secure Digital (SD) Expansion Card . . . . . . 7–2
Removing a Secure Digital (SD) Expansion Card. . . . . . 7–3
Viewing the Content of Memory Cards. . . . . . . . . . . . . . 7–3
8Using E-mail
Using Inbox . . . . . . . . . . . . . . . . . . . . . . . . . . . . . . . . 8–1
Using Folders. . . . . . . . . . . . . . . . . . . . . . . . . . . . . . . 8–2
Setting Up an Account. . . . . . . . . . . . . . . . . . . . . . . . 8–3
9 Using ActiveSync
Connecting to a Computer . . . . . . . . . . . . . . . . . . . . . . . . 9–2
Installing ActiveSync . . . . . . . . . . . . . . . . . . . . . . . . 9–2
Synchronizing with Your Computer . . . . . . . . . . . . . 9–3
Changing Synchronization Settings. . . . . . . . . . . . . . 9–4
Copying Files . . . . . . . . . . . . . . . . . . . . . . . . . . . . . . . . . . 9–5
Installing Programs . . . . . . . . . . . . . . . . . . . . . . . . . . . . . 9–6
Backing up and Restoring . . . . . . . . . . . . . . . . . . . . . . . . 9–6
Synchronizing Links . . . . . . . . . . . . . . . . . . . . . . . . . . . . 9–7
Using ActiveSync to Send and
Receive E-mail. . . . . . . . . . . . . . . . . . . . . . . . . . . . . . . . . 9–7
Requesting Meetings . . . . . . . . . . . . . . . . . . . . . . . . . . . . 9–7

viii www.hp.com User’s Guide
Contents
DRAFT - Revised 11/24/03
hp CONFIDENTIAL 11/26/03
File: iPAQ_PhoneTOC.fm PN: 353283-001
10Managing the Battery
Installing the Battery . . . . . . . . . . . . . . . . . . . . . . . . . . . 10–1
Installing the Battery . . . . . . . . . . . . . . . . . . . . . . . . 10–2
Removing the Battery . . . . . . . . . . . . . . . . . . . . . . . . . . 10–3
Charging the Battery . . . . . . . . . . . . . . . . . . . . . . . . . . . 10–4
Charging with the AC Adapter . . . . . . . . . . . . . . . . 10–4
Charging with the Desktop Cradle and AC Adapter 10–6
Charging a Spare Battery. . . . . . . . . . . . . . . . . . . . . 10–7
Charging with the Optional USB
Autosync Cable . . . . . . . . . . . . . . . . . . . . . . . . . . . . 10–8
Changing the Backlight Settings . . . . . . . . . . . . . . . 10–9
Changing the Wireless LAN Power
Saving Modes . . . . . . . . . . . . . . . . . . . . . . . . . . . . 10–10
Disabling the Application Buttons . . . . . . . . . . . . 10–10
Manually Monitoring the Battery . . . . . . . . . . . . . 10–11
11Learning the Basics
Using the Today Screen . . . . . . . . . . . . . . . . . . . . . . . . . 11–1
Navigation Bar and Command Bar . . . . . . . . . . . . . 11–2
Status Icons . . . . . . . . . . . . . . . . . . . . . . . . . . . . . . . 11–3
Pop-Up Menus. . . . . . . . . . . . . . . . . . . . . . . . . . . . . 11–4
Creating information . . . . . . . . . . . . . . . . . . . . . . . . 11–5
Customizing the Today Screen . . . . . . . . . . . . . . . . 11–6
Using Applications. . . . . . . . . . . . . . . . . . . . . . . . . . . . . 11–8
Opening Applications . . . . . . . . . . . . . . . . . . . . . . . 11–8
Minimizing Applications. . . . . . . . . . . . . . . . . . . . . 11–8
Closing Applications . . . . . . . . . . . . . . . . . . . . . . . . 11–8
Installing Applications. . . . . . . . . . . . . . . . . . . . . . . 11–9
Backing Up Information . . . . . . . . . . . . . . . . . . . . 11–10
Using iPAQ File Store Folder . . . . . . . . . . . . . . . . 11–11

Contents
User’s Guide www.hp.com ix
DRAFT - Revised 11/24/03
hp CONFIDENTIAL 11/26/03
File: iPAQ_PhoneTOC.fm PN: 353283-001
12Learning Input Methods
Using Input Software . . . . . . . . . . . . . . . . . . . . . . . . . . . 12–1
Changing Word Suggestion Options. . . . . . . . . . . . 12–1
Using the On-Screen Keyboard. . . . . . . . . . . . . . . . 12–3
Writing with the Stylus and the Letter Recognizer . 12–4
Writing with the Stylus and Microsoft Transcriber . . . . 12–5
Writing with the Stylus and Block Recognizer . . . . 12–6
Drawing and Writing on the Screen . . . . . . . . . . . . 12–7
Using the Removeable Micro Keyboard . . . . . . . . . . . . 12–8
Connecting the Keyboard to Your iPAQ Pocket PC 12–9
Checking the Keyboard Connection . . . . . . . . . . . . 12–9
Disconnecting the Keyboard . . . . . . . . . . . . . . . . . 12–10
Configuring the Keyboard. . . . . . . . . . . . . . . . . . . 12–10
Using the Function and Shortcut Keys. . . . . . . . . . . . . 12–11
Accent Characters . . . . . . . . . . . . . . . . . . . . . . . . . . . . 12–12
Disabling the Micro Keyboard. . . . . . . . . . . . . . . . . . . 12–13
13Troubleshooting
Common Problems. . . . . . . . . . . . . . . . . . . . . . . . . . . . . 13–1
ActiveSync. . . . . . . . . . . . . . . . . . . . . . . . . . . . . . . . . . . 13–6
Phone . . . . . . . . . . . . . . . . . . . . . . . . . . . . . . . . . . . . . . . 13–8
Expansion Cards. . . . . . . . . . . . . . . . . . . . . . . . . . . . . . 13–10
Bluetooth . . . . . . . . . . . . . . . . . . . . . . . . . . . . . . . . . . . 13–11
Wireless LAN. . . . . . . . . . . . . . . . . . . . . . . . . . . . . . . . 13–13
Traveling with your Pocket PC . . . . . . . . . . . . . . . . . . 13–15
A Regulatory Notices
Federal Communications Commission Notice. . . . . . . . . A–1
Declaration of Conformity for
products marked with the FCC logo—
United States only . . . . . . . . . . . . . . . . . . . . . . . . . . . A–2
Canadian Notice. . . . . . . . . . . . . . . . . . . . . . . . . . . . . . . . A–3
Avis Canadien . . . . . . . . . . . . . . . . . . . . . . . . . . . . . . A–3
Japanese Notice . . . . . . . . . . . . . . . . . . . . . . . . . . . . . . . . A–3

x www.hp.com User’s Guide
Contents
DRAFT - Revised 11/24/03
hp CONFIDENTIAL 11/26/03
File: iPAQ_PhoneTOC.fm PN: 353283-001
Korean Notice . . . . . . . . . . . . . . . . . . . . . . . . . . . . . . . . . A–3
European Union Notice . . . . . . . . . . . . . . . . . . . . . . . . . . A–4
Battery Warning. . . . . . . . . . . . . . . . . . . . . . . . . . . . . . . . A–5
Equipment Warning . . . . . . . . . . . . . . . . . . . . . . . . . . . . . A–5
Airline Travel Notice . . . . . . . . . . . . . . . . . . . . . . . . . . . . A–6
Wireless Notices. . . . . . . . . . . . . . . . . . . . . . . . . . . . . . . . A–6
U.S. Regulatory Wireless Notice. . . . . . . . . . . . . . . . A–6
Canadian Regulatory Wireless Notice. . . . . . . . . . . . A–6
Australian Wireless Notice . . . . . . . . . . . . . . . . . . . . A–7
Japanese Regulatory Wireless Notice . . . . . . . . . . . . A–7
Brazilian Regulatory Wireless Notice. . . . . . . . . . . . A–8
Singaporean Wireless Notice. . . . . . . . . . . . . . . . . . . A–8
Taiwanese Wireless Notice . . . . . . . . . . . . . . . . . . . . A–9
B Specifications
System Specifications . . . . . . . . . . . . . . . . . . . . . . . . . . . B–1
Physical Specifications. . . . . . . . . . . . . . . . . . . . . . . . . . . B–4
Operating Environment . . . . . . . . . . . . . . . . . . . . . . . . . . B–4

hp CONFIDENTIAL DRAFT
User’s Guide 1–1
Revised: 11/26/03
1
Getting to Know Your
HP iPAQ Pocket PC
Use this chapter to find out about setting up your Pocket PC and
to learn about how it works.
The software programs described below are preinstalled on your
Pocket PC. These preinstalled programs are not deleted if your
Pocket PC loses power.
You can find detailed information for using these programs in the
Help files on your HP iPAQ Pocket PC. To access these Help
files, from the Start menu, tap Help and select a program.
In addition, Microsoft Pocket PC Basics provides instructions on
operating the Pocket PC. To locate Pocket PC Basics, go to the
Today screen and tap Start > Help > Pocket PC Basics.
HP iPAQ Software Functions
Asset Viewer Lists detailed information about your system
and its configuration.
Bluetooth Enables short-range wireless communications
technology capable of exchanging information
up to a distance of about 30 feet (10 meters).
HP Image Capture Take digital photographs with the camera
included on the Pocket PC.
HP Image Zone for Pocket
PC
Use to view and edit photos.

User’s Guide 1–2
Getting to Know Your HP iPAQ Pocket PC
hp CONFIDENTIAL DRAFT
Revised: 11/26/03
(Continued)
HP Image Transfer Transfer digital photographs from the Pocket
PC to your personal computer.
iPAQ Backup Back up your data to protect it from loss due to
a drained battery, accidental deletion, or
hardware failure.
HP iPAQ Image Zone Display individual images and run slide shows
on your Pocket PC. Also display images from
the HP Image Capture camera application or a
digital camera’s SD storage card.
Self-Test Run a basic diagnostic test on the device.
HP iPAQ Software Functions

Getting to Know Your HP iPAQ Pocket PC
User’s Guide 1–3
hp CONFIDENTIAL DRAFT
Revised: 11/26/03
Microsoft Pocket PC
Software Functions
ActiveSync Synchronize the information between your
Pocket PC and personal computer so you have
the latest information in both locations. Be sure
you install ActiveSync on your personal
computer before connecting the cradle and
Pocket PC to your computer.
Calculator Perform calculations and convert currency.
Calendar Schedule appointments, meetings, and other
events, and set an alarm to remind you of the
appointments. Appointments for the day are
displayed on the Today screen.
Connections Connect your Pocket PC to the Internet and
intranet to browse Web sites, send and receive
e-mail, and synchronize information using
ActiveSync.
Contacts Keep an updated list of friends and colleagues
to e-mail, message, and telephone.
Inbox Receive and send Internet e-mail messages
in Inbox on your Pocket PC or your computer if
ActiveSync is installed. You must have an
e-mail address provided by your Internet
Service Provider (ISP) or employer to send and
receive e-mail.
Notes Create handwritten or typed notes, drawings,
and recordings.
Pictures View individual pictures, run a slide show, or
set a picture as the background on the Today
screen.
Pocket Excel Create and edit workbooks or view and edit
Excel workbooks created on your computer.

User’s Guide 1–4
Getting to Know Your HP iPAQ Pocket PC
hp CONFIDENTIAL DRAFT
Revised: 11/26/03
Using the Stylus
Your Pocket PC comes with a stylus that you should use to tap or
write on your screen.
ÄCAUTION: To prevent damage to your Pocket PC screen, never use
any device other than the stylus that comes with the Pocket PC Phone
or an approved replacement to tap or write on the screen. If you
lose or break your stylus, you can order extras at
www.hp.com/products/pocketpc/options.
You can perform three basic actions using the stylus:
(Continued)
Pocket Internet Explorer Browse the Internet and download pages
through synchronization or by connecting to the
Internet.
Pocket Word Create new documents or view and edit Word
documents created on your computer.
Ring Tones Select different sounds to notify you of
incoming calls.
Settings Obtain quick access to settings for the
backlight, clock, memory, power, regional
settings, Today screen, password, sounds and
notifications, etc.
Tasks Keep track of your to-do list.
Terminal Services Client Log onto your computer and use all the
programs available on that computer from your
Pocket PC (Windows 2000 and XP or later).
Windows Media Player
9Series
Play digital audio and video files in Windows
Media or MP3 format on your device.
Microsoft Pocket PC
Software Functions

Getting to Know Your HP iPAQ Pocket PC
User’s Guide 1–5
hp CONFIDENTIAL DRAFT
Revised: 11/26/03
Tap—Lightly touch the screen to select or open an item. Lift the
stylus after you tap an item. Tapping is equivalent to clicking an
item with the mouse on your computer.
Drag—Place the point of the stylus on the screen and drag an
item across the screen without lifting the stylus until you have
completed the selection. Dragging is equivalent to dragging with
the left mouse button pressed on your computer.
Tap and hold—Hold the stylus pointer on an item for a short
time until a menu displays. Tapping and holding is equivalent to
right-clicking your computer mouse button. When you tap and
hold, a circle of red dots appears around the stylus to indicate that
the menu will soon pop up.
Setting the Date and Time
When you turn on your Pocket PC for the first time, you are
requested to select your time zone. After setting the time zone,
you still need to set the time and date on your unit. All three
settings are located in the Clock Settings screen and can be set
at the same time.
NOTE: By default, the time on the Pocket PC is synchronized with
your computer each time the two devices connect using
ActiveSync.

User’s Guide 1–6
Getting to Know Your HP iPAQ Pocket PC
hp CONFIDENTIAL DRAFT
Revised: 11/26/03
Setting the Time for Home and Locations
You Are Visiting
From the Start menu, tap Settings > System tab > Clock icon.
Shortcut: From the Today screen, tap the Clock icon to set
the time.
1. Tap either Home or Visiting.
2. Tap the time-zone down arrow, and select the appropriate
time zone.
3. Tap the hour, minutes, or seconds, and use the up and down
arrows to adjust the time.
Shortcut: You can also adjust the time by moving the hands
of the clock with the stylus.
4. Tap AM or PM.
5. Tap OK.
6. Tap Yes to save the time.
Setting the Date
1. From the Start menu, tap Settings > System tab > Clock
icon.
Shortcut: From the Today screen, tap the Clock icon to set
the date.
2. Tap the down arrow by the date.
3. Tap the left or right arrow to select a month and year.
4. Tap a day.
5. Tap OK.
6. Tap Yes to save the date settings.
You need to reset your time zone, time, and date if:
■The location time (Home or Visiting) needs to be changed.
■All power to the Pocket PC is lost, which removes all saved
settings.

Getting to Know Your HP iPAQ Pocket PC
User’s Guide 1–7
hp CONFIDENTIAL DRAFT
Revised: 11/26/03
■You perform a full reset of your Pocket PC.
Shortcut: From the Today screen, tap the Clock icon to set
the time zone, time, and date.
Entering Owner Information
You can personalize your HP iPAQ Pocket PC by entering owner
information. To enter owner information:
1. From the Today screen, tap Start > Settings > Owner
Information.
Shortcut: From the Today screen, tap Tap here to set owner
information.
2. Tap in the Name field. A keyboard appears at the bottom of
the screen. Tap on the characters to enter your name.
Note: If you prefer, you can use Letter Recognizer, Microsoft
Transcriber, or Block Recognizer to input information. Refer to
Chapter 5, “Learning Input Methods,” for more information.
3. Tap the Tab key on the keyboard to move the cursor to the
next field.
4. Continue entering whatever information you want to include.
5. To display owner information at startup, tap in the Show
information when device is turned on checkbox.
6. Tap on the Notes tab to enter any notes.
7. Tap OK to save the information and return to the Today
screen.
Setting a Password
You can set a password to prevent unauthorized access to or use
of your Pocket PC.
1. From the Start menu, tap Settings > Personal tab >
Password.

User’s Guide 1–8
Getting to Know Your HP iPAQ Pocket PC
hp CONFIDENTIAL DRAFT
Revised: 11/26/03
2. On the Password screen, tap the box next to Prompt if device
unused for, then set the timed prompt.
3. Tap the circle next to Simple 4 digit password or next to
Strong alphanumeric password.
4. Enter your password in the Password box using the screen
keyboard and tap OK.
NOTE: Keep a record of your password in a safe place in case you
forget it. If you are unable to retrieve your password, you must
reset your Pocket PC and will lose your settings and information
that is not saved in ROM.
Resetting the Unit
Performing a Soft Reset
A soft reset stops all running applications, but does not erase any
programs or saved data.
ÄCAUTION: Be sure to save any unsaved data before performing a
soft reset since soft reset erases all unsaved data.
To perform a soft reset:
1. Locate the recessed Reset button on the left side of your
iPAQ Pocket PC.
2. Use the stylus to lightly press the Reset button.
The Pocket PC restarts and displays the Today screen.
Performing a Hard Reset
Perform a hard reset (also known as a full reset) when you want
to clear all settings, programs, and data from RAM.
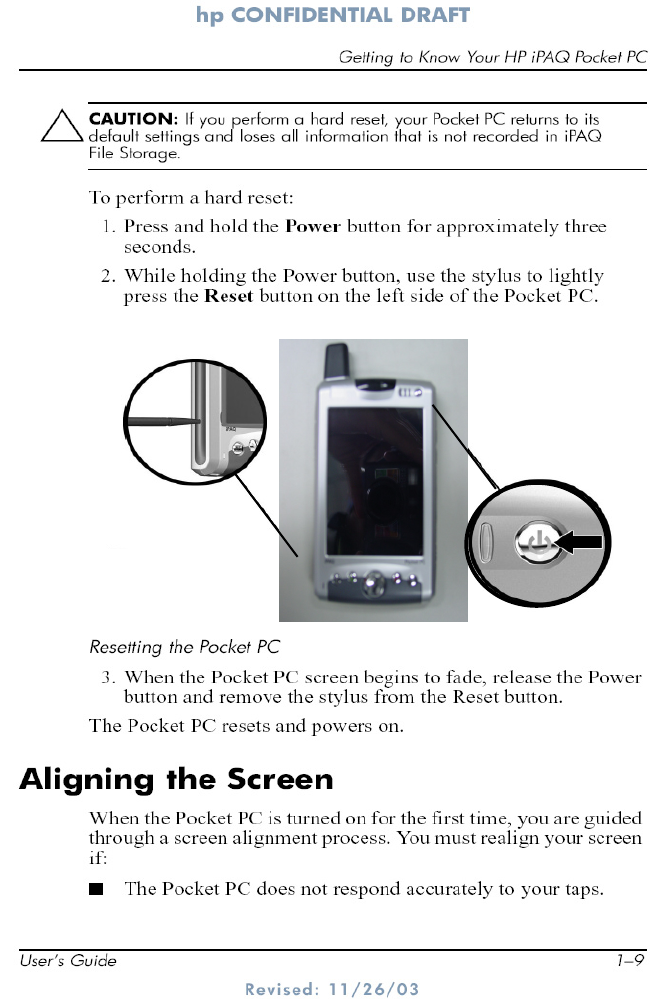

User’s Guide 1–10
Getting to Know Your HP iPAQ Pocket PC
hp CONFIDENTIAL DRAFT
Revised: 11/26/03
■You perform a hard reset of your Pocket PC.
To realign the Pocket PC screen:
1. From the Start menu, tap Settings > System tab > Screen
icon.
2. Tap the Align Screen button.
Shortcut: To access the Align Screen application without
tapping on the screen, push down and hold the 5-Way
Navigation button, then press the Calendar application
button ( ).
3. Tap the cross-hair object at each location. Be precise when
tapping the cross-hair object.
4. Tap OK.
Routine Care
To keep your Pocket PC in good condition and working properly,
follow these guidelines:
■Keep your Pocket PC away from excessive moisture and
temperature extremes.
■Do not expose your Pocket PC to liquids or precipitation.
■Do not place anything on top of your Pocket PC to prevent
damage to the screen.
■Clean your Pocket PC by wiping the screen and the exterior
with a soft, damp cloth lightly moistened only with water.
■Avoid exposing your Pocket PC to direct sunlight or strong
ultraviolet light for extended periods of time.
■Avoid scratching the surface of the screen and banging it
against hard objects.
■Use only the stylus that comes with your Pocket PC or an
approved replacement on the screen to prevent scratching it.

Getting to Know Your HP iPAQ Pocket PC
User’s Guide 1–11
hp CONFIDENTIAL DRAFT
Revised: 11/26/03
ÄCAUTION: To reduce the risk of damage to the internal components,
do not spray liquid directly on the screen, or allow excess liquid to drip
inside your HP iPAQ Pocket PC. Using soap or other cleaning products
on the screen may discolor the finish and damage it.

User’s Guide 1–12
Getting to Know Your HP iPAQ Pocket PC
hp CONFIDENTIAL DRAFT
Revised: 11/26/03

hp CONFIDENTIAL DRAFT
User’s Guide 2–1
Revised: 11/26/03
DRAFT
2
Using the Phone Functions
Use the iPAQ Pocket PC phone functions to make and receive
telephone calls and send and receive SMS (Short Message
Service) and MMS (Multimedia Message Service) messages.
Your mobile phone service provider may also provide other
useful services such as voice mail.
iPAQ Pocket PC phone functions can also be used to connect to
an Internet Service Provider (ISP) or work network so you can
browse the Web and read e-mail. You can connect to the Internet
or work network over GPRS (General Packet Radio Service), or
you can use GSM (Global System for Mobile Communications)
for dial-up access. For information on establishing GSM/GPRS
connections, refer to Chapter 5, “Making Your Connections.”
Your SIM Card
A SIM (Subscriber Identity Module) card (also known as a Smart
card) is required to operate the phone features on your iPAQ
Pocket PC. The SIM card is a plastic card embedded with a
computer chip that stores and transacts data between users. After
the SIM card is activated by your mobile phone service provider,
the computer chip will contain information about your phone
number, service, registration information, and contacts, as well as
memory to store speed dial numbers and text or SMS/MMS
messages that you receive.
With the exception of emergency calls, the SIM card must be
inserted into the SIM slot under the battery on the back of the
Pocket PC in order for voice to work.

User’s Guide 2–2
Using the Phone Functions
hp CONFIDENTIAL DRAFT
hp CONFIDENTIAL
DRAFT
■To dial an emergency number, use the phone function keypad
to enter the emergency number appropriate for your region
and tap Send.
NOTE: For a list of international emergency numbers, go to the
following Web site: http://www.???????
Activating Your Phone Service
Before you are able to use the phone feature on your Pocket PC,
you will need to subscribe with a mobile phone service provider.
NOTE: If you have purchased a prepaid SIM card to use with
your iPAQ Pocket PC, the following information is not
applicable.
After you select a service provider, you must place a phone call to
the service provider to activate your mobile phone service. Your
SIM carrier may require the following information to activate
your card:
❏SIM Card Serial Number (printed on the box label or on
the back of the SIM card)
❏IMEI Number (printed on the system label under the
battery)
Your mobile phone service representative will give you your
wireless phone number and walk you through setting up your
service.
The following features are supported on your iPAQ Pocket PC;
however, these features must be activated by your mobile phone
service provider:
❏Call Forwarding
❏GPRS—General Packet Radio Service
❏International Dialing

Using the Phone Functions
User’s Guide 2–3
hp CONFIDENTIAL DRAFT
Revised: 11/26/03
DRAFT
❏International Roaming
❏Internet access
❏SMS/MMS—Short Messaging Service/Multimedia
Messaging Service
❏Voice Mail
❏VPN—Virtual Private network
❏WAP—Wireless Application Protocol
Additional information on obtaining these services must be
obtained from your mobile phone service provider.
Your PIN
After your SIM card is activated, it may be configured with a PIN
(Personal Identification Number) to prevent unauthorized use of
your mobile phone.
You can disable your PIN; however, for security reasons, it is
recommended that you keep it enabled. While enabled, you must
enter your PIN every time you turn on your phone features.
ÄCAUTION: After three consecutive, incorrect PINs are entered, the
SIM card locks to prevent further use. If the letters PUK (PIN Unblocking
Key) display on your Pocket PC screen, you have locked your SIM card
and must contact your service provider to unlock it.
If your Pocket PC is ever stolen or lost, the PIN will safeguard
your phone functions against fraudulent use.
To enable your PIN:
1. From the Phone keypad, tap Tools > Options > Phone tab.

User’s Guide 2–4
Using the Phone Functions
hp CONFIDENTIAL DRAFT
hp CONFIDENTIAL
DRAFT
2. Select Require PIN when phone is used.
NOTE: To change the PIN at any time, tap CHANGE PIN.
NOTE: To safeguard your Pocket PC device from unauthorized
use, see Chapter 1, “Getting to Know Your HP iPAQ Pocket PC.”
Using the Phone Functions
User’s Guide 2–5
hp CONFIDENTIAL DRAFT
Revised: 11/26/03
DRAFT
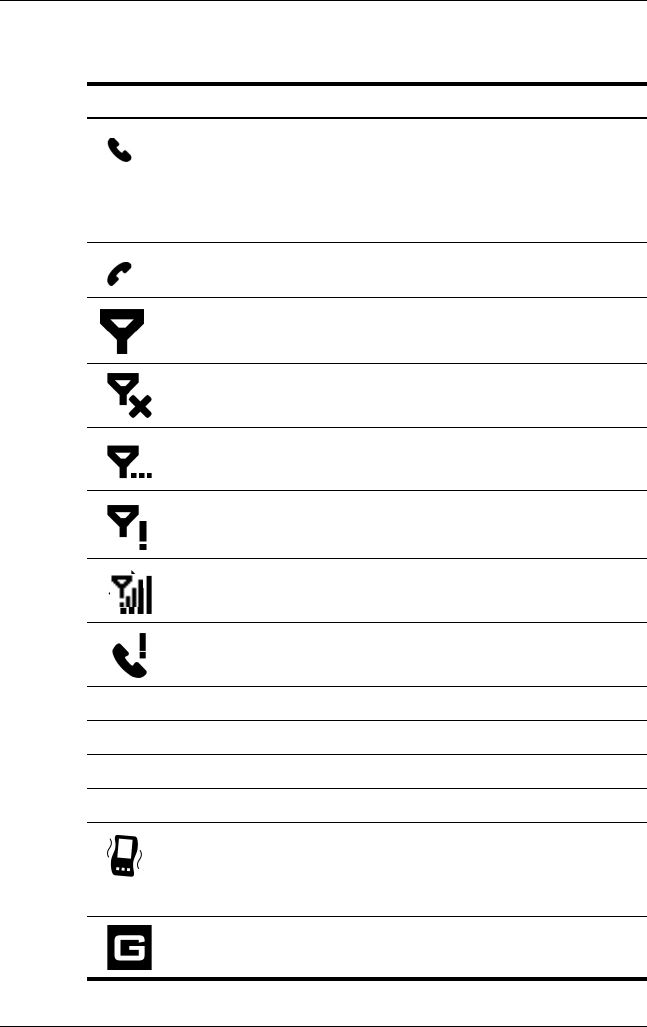
Phone Buttons and Icons
Phone Icons Definition
■Press this Application Button to
answer a call, access the dialer keypad,
and send a call.
■Press and hold this Button to activate
the speakerphone function.
Press and hold this Application Button to
turn on/off the phone or end a call.
Phone is powered on.
Phone is powered off.
Network is searching or unavailable.
Phone connection unavailable or network
error.
Signal strength indicator for phone functions.
Call missed. Tap this icon to view missed
calls.
Call Holding.
Call Forwarding Active.
Voice Mail Received.
Data Connection.
Event notifications set to vibrate instead of
alarm. To set to vibrate: Tap Speaker icon in
the Navigation bar and in the pop-up menu,
tap Vibrate.
GPRS Service is available.

User’s Guide 2–6
Using the Phone Functions
hp CONFIDENTIAL DRAFT
hp CONFIDENTIAL
DRAFT
Checking Your Connection
and Signal Strength
After you insert the activated SIM card into your Pocket PC, your
unit will connect to your service provider’s network.
The icon ( ) indicates that you are connected to your service
providers network. After that, a full strength is indicated by the
icon ( ). The number of vertical bars in the icon diminish as the
signal strength diminishes. The Phone icon ( ) indicates no
signal.
When traveling internationally or between regions, you may need
to change the frequency band on your Pocket PC to be able to
make a connection. To change the frequency band:
1. From the Start menu, tap Settings > Phone icon > Band.
2. Tap the circle next to
❏GSM 850/1900 for North America
❏GSM 900/1800 for regions outside of North America
Select the correct frequency band for the country or region you
are traveling through.
GPRS Connection Active.
One or more instant messages have been
received. Tap this icon to view messages.
One or more e-mail/SMS/MMS messages
have been received. Tap this icon to view
messages.
Microphone is in mute position.
Phone Icons Definition

Using the Phone Functions
User’s Guide 2–7
hp CONFIDENTIAL DRAFT
Revised: 11/26/03
DRAFT
Turning the Phone Functions
On and Off
You can turn your Phone functions on and off while keeping your
actual Pocket PC turned on.
There are several ways to turn on your Phone functions:
■Press and hold the Red application button on the front of
your Pocket PC, or
■From the Start menu, tap Phone. Enter your phone number
on the screen and tap Yes when asked if you want to turn on
the phone.
■From the Start menu, tap iPAQ Wireless and select GSM.
■If the Pocket PC is in Flight Mode, tap the icon in the
Navigation bar and, from the Pop-up menu, tap Turn off
flight mode.
NOTE: Flight mode turns on/off all wireless functions on
your Pocket PC. Turn on Flight mode when you are
traveling by air to prevent a wireless function from
automatically turning on.
There are several ways to turn off your phone functions:
■Press and hold the Red application button on the front of
the unit, or
■From the Start menu, tap iPAQ Wireless and select GSM to
turn off.
■Tap the icon in the Navigation bar and, from the Pop-up
menu, tap Turn on flight mode.
NOTE: Leave the phone function turned on to receive calls when
your Pocket PC is powered off.

User’s Guide 2–8
Using the Phone Functions
hp CONFIDENTIAL DRAFT
hp CONFIDENTIAL
DRAFT
You can use other programs on your device during a call. To
quickly switch back to Phone, tap the Green application
button, or tap Start > Phone.
HP Profiles
INFORMATION TO BE ADDED.
Making and Receiving Phone
Function Calls
You can now make local or long distance domestic calls and, if
you requested setup, you can also make international calls.
Making a Call
When you turn on the Phone functions, the Phone keypad
displays on the Pocket PC screen.
■From the Phone keypad, tap the number you want to call, and
then tap Talk or press the Send button.
■Other ways to make a call:
❏From Contacts (refer to the section on “Making a Call
From Contacts”)
❏Using Speed Dial (refer to the section on “Making a Call
Using Speed Dial”)
❏From Call History (refer to the section on “Making a Call
from Call History”)
❏Making a Conference Call (refer to the section on
“Making a Conference Call”)

Using the Phone Functions
User’s Guide 2–9
hp CONFIDENTIAL DRAFT
Revised: 11/26/03
DRAFT
Answering a Call
When you receive a phone call, the phone function rings or
vibrates and a message will appear on the screen, giving you an
option to either answer or ignore the incoming call.
■Tap Answer or press the Green application button to
receive the call.
NOTE: To silence the phone and reject the call, tap Ignore. This
may send the caller to your voice mail or send out a busy signal,
depending on your service provider.
Ending a Call
When your phone call is finished, tap End on the Phone keypad
or press and hold the Red Application Button to end the call.
Making a Call from Contacts
■From the Contacts list, tap and hold the contact’s phone
number, then tap Call Work, Call Home, or Call Mobile.
■To make a call from an open contact, tap the number you
want to call.
SIM Contacts Help
When switching SIM cards between devices, use SIM Contacts to
copy contacts from a new SIM card to Contacts on your device.
❏To copy a contact from your SIM card onto your device,
in SIM Contacts, select the contact you want to copy to
your device and tap COPY NOW.
❏To verify that your contacts have been copied to your
device, switch to Contacts and search for the added
contacts.

User’s Guide 2–10
Using the Phone Functions
hp CONFIDENTIAL DRAFT
hp CONFIDENTIAL
DRAFT
Creating a Speed Dial Entry
You can create up to 99 speed dial entries to call
frequently-called numbers. Before you can create a speed dial
entry for a phone number, that number must already exist in
Contacts.
1. From the Phone keypad, tap Speed Dial > New.
2. Tap the desired contact name and number.
3. In the Location field, tap the Up/Down arrows to select
an available location to assign as the new speed dial
entry. The first speed dial location is reserved for your
voice mail.
4. Tap OK.
NOTE:
■To create a speed dial entry directly from Contacts, tap and
hold the contact name, tap Add to Speed Dial, and then
tap the Up/Down arrows to select an available location to
assign as the new speed dial entry. Tap OK.
■To edit or delete a speed dial entry, go to the Speed Dial
list, tap and hold the contact name in the box to the right of
the assigned speed dial number, and then tap Edit or
Delete.

Using the Phone Functions
User’s Guide 2–11
hp CONFIDENTIAL DRAFT
Revised: 11/26/03
DRAFT
Making a Call Using Speed Dial
■From the Phone keypad, tap Speed Dial, and then select the
speed dial location number of the desired contact. You can
also press and hold the speed dial location number assigned
to a contact directly from the Phone keypad.
NOTE:
■To dial a one-digit speed dial number from the Phone
keypad, tap and hold a single keypad key.
■To dial a two-digit speed dial number from the Phone
keypad, tap the first digit, then tap and hold the second
digit.
Making a Call from Call History
■From the Phone keypad, tap Call History, and then tap the
icon next to the desired number.
Making a Conference Call
You can create a three-way conference call between yourself and
two other parties.
■From the Phone keypad, dial the first number, tap Talk and
tap Hold, dial the second number, tap Talk and then tap
Conference.
Adjusting Phone Function Volume
During a phone call, press the up (+) or down (-) buttons located
on the right side of the Pocket PC to adjust the Volume Control.
NOTE: The Phone function volume can only be adjusted during a
phone call.

User’s Guide 2–12
Using the Phone Functions
hp CONFIDENTIAL DRAFT
hp CONFIDENTIAL
DRAFT
Enabling the Mute Function
During a call, you can mute your microphone so that the person
with whom you are speaking cannot hear you, but you can still
hear him or her. This is useful if you do not want the other person
to hear a conversation or background noise on your side of the
call.
■From the Phone keypad, tap the microphone icon in the
Command bar to mute or unmute a call.

Using the Phone Functions
User’s Guide 2–13
hp CONFIDENTIAL DRAFT
Revised: 11/26/03
DRAFT
Setting Ring Tones
Tap > Settings > Personal tab > Phone.
❏On the Phone tab, tap the dropdown lists under Ring
type and Ring tone to select the type and tone of ring or
vibration you want to receive for an incoming call. You
may also choose to hear touch tones or beeps when you
press the keypad.
NOTE: To use custom.wav, .mid, or .wma files as ring tones,
use ActiveSync on your personal computer to copy the file
to the /Windows/Rings folder on your device. Then, select
the sound from the Ring tone list.
NOTE: For increased security in public places, set your
Keypad sound to beep or off.
To control tones for the keypad, on the Phone tab under Keypad,
select an option. For example, if set to Long Tone or Short
Tone, the tone will be heard when the keypad is pressed. If set to
Off, a tone is not played.
Changing Ring Tones
Add Information on this.
Changing Keypad Tone
Add information on this.
Enabling Speakerphone Mode
Your iPAQ Pocket PC has a speakerphone mode that allows you
to talk hands-free or allows other people to listen to the caller.
To enable the speakerphone mode:
1. First establish a phone call.
2. Hold down the Green application button until the
speakerphone dialog box comes on and the icon ( ) appears
in the top Navigation bar.

User’s Guide 2–14
Using the Phone Functions
hp CONFIDENTIAL DRAFT
hp CONFIDENTIAL
DRAFT
3. To turn off the speakerphone, hold down the application
button again.
ÅWARNING: Do not leave the phone in speakerphone mode and hold
it to your ear, the sound may temporarily impair your hearing.
Taking Notes During a Call
■To create a note during a call, tap the Note icon in the
Command bar and enter or record your note.
Messaging
Short Message Service (SMS)
SMS is the transmission of short text messages to and from a
mobile phone, fax machine and/or IP address. A single SMS
message must be no longer than 160 alpha-numeric characters
and contain no images or graphics. Messages longer than 160
alpha-numeric characters will be sent as multiple SMS messages.
You can send Short Messages using the Phone keypad:
1. From the Phone keypad, tap Tools > Send SMS.
2. Tap New.
3. In the To field, enter either the e-mail address or SMS
Number of one or more recipients, separating them with a
semicolon, or select a name from the contact list by tapping
the Address Book button in the Navigation bar. All e-mail
addresses entered in the e-mail fields in Contacts appear in
the Address Book.
4. Enter your message. To enter preset messages, tap My Text
and select a message.
5. When the message is finished, tap Send.

Using the Phone Functions
User’s Guide 2–15
hp CONFIDENTIAL DRAFT
Revised: 11/26/03
DRAFT
✎NOTE: If you are working offline, the message is moved to the
Outbox folder and will be sent the next time you connect.
Multimedia Messaging Service (MMS)
The Multimedia Messaging Service (MMS) is a
store-and-forward method of transmitting graphics, video clips,
sound files and short text messages over wireless networks using
Wireless Application Protocol (WAP). MMS also supports e-mail
with the difference being that e-mails are sent directly to an
e-mail address. However, the most common use of MMS is for
communication between mobile phones.
If the recipient MMS phone is not switched on, the Multimedia
Message will be stored and sent to the recipient as soon as they
switch on their phone. If the message is sent to a non-compatible
MMS phone, the user will receive a message that they have been
sent a picture message and may also be given a Web site address
and password with which to view the message.
You can send Multimedia Messages using the Phone keypad:
NOTE TO REVIEWERS: MMS is not included under the
Tools options on the Onyx model that I have. The information
below is duplicated from SMS for the purpose of bookmarking
until the correct information is available.
1. From the Phone keypad, tap Tools > Send MMS.
2. Tap New.
3. In the To field, enter either the e-mail address or MMS
Number of one or more recipients, separating them with a
semicolon, or select a name from the contact list by tapping
the Address Book button in the Navigation bar. All e-mail
addresses entered in the e-mail fields in Contacts appear in
the Address Book.
4. Enter your message or add your graphics or sound files.
5. When the message is finished, tap Send.

User’s Guide 2–16
Using the Phone Functions
hp CONFIDENTIAL DRAFT
hp CONFIDENTIAL
DRAFT
✎NOTE: If you are working offline, the message is moved to the
Outbox folder and will be sent the next time you connect.
Using Voice Mail
The first speed dial location defaults as your voice mailbox.
When you insert your SIM/Smart card into your Pocket PC, it
will automatically detect and set as default the voice mailbox
number of your mobile service provider.
To retrieve your voice mail:
■With the Phone turned on and the Phone keypad visible on
the screen, press and hold down the left side of the 5-way
navigation button for five seconds and release, select 1 Voice
Mail, then press .
NOTE: You may need to configure your phone to the Voice Mail
setting by dialing or setting the Voice Mail dial number.
Putting a Call on Hold
During a phone call, tap Hold on the Phone keypad to put the call
on hold.
Using Call Waiting
Call waiting notifies you of incoming calls when you are already
in a phone session.
To activate Call Waiting:
1. From the Phone keypad, tap Tools > Options > Services
tab.
2. Tap Call Waiting > Get Settings.

Using the Phone Functions
User’s Guide 2–17
hp CONFIDENTIAL DRAFT
Revised: 11/26/03
DRAFT
3. Select Notify me.
NOTE: To stop using call waiting, select Do not notify me.
To use Call Waiting to answer an incoming call during a phone
conversation, tap Answer to move the current phone call to Call
Waiting. The phone call on Call Waiting displays on the screen.
Tap Ignore if you do not want to answer the incoming call.
Displaying Caller ID
You can display your caller ID when placing a phone call.
1. From the Phone keypad, tap Tools > Options > Services
tab.
2. Tap Caller ID > Get Settings.
3. Select Everyone.
NOTE: To prevent your caller ID from being displayed to others,
select No One.
Blocking Calls
Use call barring to block certain types of incoming and/or
outgoing calls.
1. From the Phone keypad, type Tools > Options >
Services tab.
2. Tap Call Barring > Get Settings.
3. Select the type of incoming and/or outgoing calls you
want to block.
Forwarding Calls
Use call forwarding to forward all incoming calls to a different
number.

User’s Guide 2–18
Using the Phone Functions
hp CONFIDENTIAL DRAFT
hp CONFIDENTIAL
DRAFT
1. From the Phone keypad, tap Tools > Options > Services
tab.
2. Tap Call Forwarding > Get Settings.
3. Select Forward all incoming phone calls, and specify
the phone number to receive forwarded calls.
You can also use call forwarding to forward incoming calls to a
different number based on your situation.
❏Select Unavailable to forward calls only when your
phone is turned off or you are unreachable.
❏Select Busy to forward calls only when the line is busy.
❏Select No answer to forward calls only when you can’t
answer your phone.
NOTE: To stop using Call Forwarding, clear the box next to
Forward all incoming phone calls.
Change the System Volume
You can adjust the volume for system sounds, such as the sound
you hear when you tap on program names and menu options.
■Tap the icon in the Navigation bar.
■In the pop-up volume box, move the system volume ( )
slider to the desired volume level.
Select On, Vibrate, or Off to quickly change both the system and
ringer volume settings.
NOTE: You can also press the volume control on your device to
quickly change both the ringer and system volume settings.

Using the Phone Functions
User’s Guide 2–19
hp CONFIDENTIAL DRAFT
Revised: 11/26/03
DRAFT
Change the Ringer Volume
There may be times when you want to change the ringer volume
on your device. For example, you may want to increase the ringer
volume when you're anticipating an important call, or
immediately silence the ringer when you receive a call during a
meeting or when you're in a quiet environment.
■Tap the ( ) icon in the Navigation bar.
■In the pop-up volume box, move the ringer volume ( )
slider to the desired volume level.
Select On, Vibrate, or Off to quickly change both the ringer and
system volume settings.
You can also press the volume control on your device to quickly
change both the ringer and system volume settings.
NOTE: You can also press the volume control on your device to
quickly change both the ringer and system volume settings.
Changing the Phone Settings
Tap Start > Settings > Phone.
You can customize phone settings such as the ring type and ring
tone to be used for incoming calls, and the keypad tone to be used
when entering phone numbers. You can also protect your phone
from unauthorized use with a PIN.
■To change phone settings from the Phone keypad, tap Tools
> Options > Phone tab.
From the Phone tab, you can change the following items:
❏Ring type—Tap the Ring type list and select the desired
option.

User’s Guide 2–20
Using the Phone Functions
hp CONFIDENTIAL DRAFT
hp CONFIDENTIAL
DRAFT
❏Ring tone—Tap the Ring tone list and select the sound
you want.
NOTE: To use custom .wav, .mid, or .wma files as ring
tones, use ActiveSync on your personal computer to copy
the file to the /Windows/Rings folder on your device. Then,
select the sound from the Ring tone list.
❏Keypad tone—Tap the Keypad list, and select the option
you want.
❏Secure your Phone
Securing Your Phone Functions
You can protect your phone functions from unauthorized use by
using a Personal Identification Number (PIN) with your SIM
card. Your PIN will be assigned to your SIM card by your mobile
phone service provider when your SIM card is activated. After
your card is activated, you may change your PIN to one that you
prefer.
To activate your PIN:
1. From the Phone keypad, tap Tools > Options > Phone
tab.
2. Select Require PIN when phone is used.
NOTE: To change the PIN at any time, tap Change PIN.
ÄCAUTION: After three consecutive, incorrect PINs are entered, the
SIM card locks to prevent further use. If the letters PUK (PIN Unblocking
Key) display on your Pocket PC screen, you have locked your SIM card
and must contact your mobile phone service provider to unlock it.
NOTE: Emergency phone calls do not require entering a PIN.

Using the Phone Functions
User’s Guide 2–21
hp CONFIDENTIAL DRAFT
Revised: 11/26/03
DRAFT
Changing Services Settings
You can change service settings from either the Start menu or the
Phone keypad on your iPAQ Pocket PC:
■From the Start menu, tap Settings > Phone > Services tab,
tap a service, and then tap Get Settings.
■From the Phone keypad, tap Tools > Options > Services tab,
tap a service, and then tap Get Settings.
You can configure settings for phone services you subscribe to
through your mobile phone service provider. For example, you
may want to block certain types of incoming and/or outgoing
calls, forward incoming calls to a different phone number based
on your situation, be notified of incoming calls when you’re
already in a phone session, or let others know your identity when
making calls.
Viewing Available GSM/GPRS
Networks
You can view all GSM/GPRS wireless networks available to you.
1. From the Phone keypad, tap Tools > Options > Network
tab.
2. Tap Find Network.
Changing Network Settings
■From the Start menu, tap Settings > Phone > Network tab.
■From the Phone keypad, tap Tools > Options > Network tab.
The GSM/GPRS connection your device is currently using
will be listed at the top of the screen.

User’s Guide 2–22
Using the Phone Functions
hp CONFIDENTIAL DRAFT
hp CONFIDENTIAL
DRAFT
You can view available networks, determine the order in which
your phone accesses another network if the current one is
unavailable, and specify whether you want to change networks
manually or automatically. the current network will remain active
until you change it, lose your signal, or change your SIM card.
Manually Selecting a Network
You may want to manually select a different wireless network to
use, instead of your device automatically doing this for you. For
example, you may want to control costs by knowing when
connectivity for your current, selected network is unavailable,
and deciding whether you want to select a different network to
use.
1. From the Phone keypad, tap Tools > Options > Network
tab.
2. Under Network selection, select Manual and select the
network you want to use.
◆When your current network is unavailable, tap Select
Network, and manually select a different network to
use.
Manually Selecting a Frequency Band
To change the frequency band on your Pocket PC:
1. From the Start menu, tap Settings > Phone icon > Band.
2. Tap the circle next to:
❏GSM 850/1900 for North America
❏GSM 900/1800 for regions outside of North America
Select the correct frequency band for the country or region you
are traveling through.

hp CONFIDENTIAL DRAFT
User’s Guide 3–1
hp CONFIDENTIAL
Revised: 11/26/03
DRAFT
3
Using Wireless LAN
Getting Acquainted
Your Pocket PC can connect to an 802.11b Wireless LAN
(WLAN) or connect directly to other WLAN-enabled devices.
With WLAN, you can:
■Access the Internet
■Send and receive e-mail
■Access corporate network information
■Use virtual private networks (VPN) for secure remote access
■Use hot spots for wireless connectivity
Note: Use of dial-up and wireless Internet, e-mail, corporate
networks, and other wireless communications, such as
Bluetooth-enabled devices, may require separately purchased
additional hardware and other compatible equipment, in addition
to a standard Wireless LAN (WLAN) infrastructure and a
separately purchased service contract. Check with your service
provider for availability and coverage in your area. Not all Web
content may be available. Some Web content may require
installation of additional software.

User’s Guide 3–2
Using Wireless LAN
hp CONFIDENTIAL DRAFT
hp CONFIDENTIAL
November 26, 2003 11:47 am
DRAFT
Learning the Terms
It is recommended that you become familiar with the following
terms as you begin to use WLAN technology.
Term Definition
Wireless Access Point The access point provides a wireless
connection to a network (additional
hardware).
Infrastructure This connection mode uses wireless
access points to connect to networks.
Device-to-computer or
ad-hoc
This mode does not use access points.
It is used in peer-to-peer network
communications. All peers must be
configured on the same channel.
Hot spots Public or private areas where there is a
wireless access point available.
SSID or Network Name SSID is the acronym for the service set
identifier. This identification number uses a
maximum number of 32 characters and is
case sensitive.
Encryption (WEP),
LEAP or IEEE 802.1X
A set of security services used to protect
802.11 networks from unauthorized
access.

Using Wireless LAN
User’s Guide 3–3
hp CONFIDENTIAL DRAFT
Revised: 11/26/03
DRAFT
Getting Started with Wireless LAN
Powering WLAN On or Off
To use WLAN on your Pocket PC, you need to turn on WLAN
and set up your device.
To turn WLAN on or off:
1. From the Start menu, tap iPAQ Wireless > WLAN icon
().
If WLAN is powered on, the WLAN icon on the iPAQ
Wireless screen will turn from grayed out to amber to green
(amber indicates WLAN is on but not connected, and green
indicates WLAN is on) and the Wireless LAN indicator,
located to the left of the power button, will blink green to
indicate WLAN is on.
Shortcut: From the Today screen, tap the Connections icon
( or ), then tap Turn Flight Mode On to turn off
WLAN, or Turn Flight Mode Off to turn on WLAN.
NOTE: Even though the indicator flashes to indicate WLAN is
turned on, it does not necessarily mean a connection has been
established with another device or access point.
Battery Saving Tip: Turn WLAN off when you are not
using it. When WLAN is on, be sure one of the WLAN
power saving modes is selected. Refer to the section on
“Changing the Wireless LAN Power Saving Modes” in
Chapter 10, “Managing the Battery” for more information.
User’s Guide 3–4
Using Wireless LAN
hp CONFIDENTIAL DRAFT
hp CONFIDENTIAL
November 26, 2003 11:47 am
DRAFT
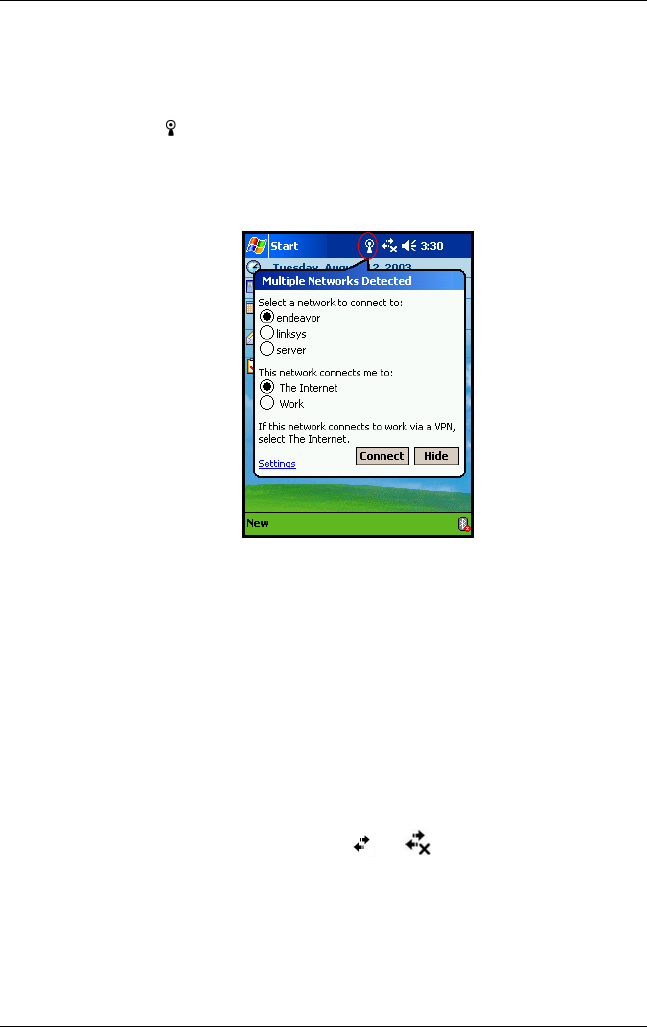
Automatically Connecting to a Network
1. If one or more networks are present, the Network Indicator
icon ( ) will appear in the Navigation bar. Tap the network
you want to connect to, then tap whether the network
connects to the Internet (does not use proxy settings) or Work
(uses proxy settings).
2. If you are prompted for a Network Key (WEP), enter it and
tap Connect. If you are not sure, contact your network
administrator.
Manually Entering New Network Settings
A wireless network can be added either when the network
is detected (the Network Indicator icon is showing in the
Navigation bar) or manually by entering setting information.
To manually add a wireless network:
1. Be sure the WLAN is powered on.
2. Tap the Connections icon ( or ) > Settings >
Advanced tab > Network Card button > Wireless tab >
Add New Settings.

Using Wireless LAN
User’s Guide 3–5
hp CONFIDENTIAL DRAFT
Revised: 11/26/03
DRAFT
3. Tap the General tab and enter a network name (SSID).
Note: If a network was detected in step 2, the SSID is
automatically entered and cannot be changed.
4. In the Connects to: box, select where your network connects
to (The Internet or Work).
5. If you want to connect to an ad-hoc connection, tap the This
is a device-to-computer (ad-hoc) connection checkbox.
6. If authentication information is needed, from the Configure
Wireless Network screen, tap the Authentication tab.
Note: To determine whether authentication information is needed,
see your network administrator.
7. Select the type of network authentication to use:
a. To use data encryption, check the Data encryption
(WEP enabled) checkbox.
b. To use Shared Key authentication, check the Network
Authentication (Shared mode) checkbox. Type the
network key in the Network Key: box.
c. If a network key is provided by your network
automatically, check the The Key is provided for
me automatically checkbox.
d. For increased security, check the Enable network
access using IEEE 802.1X checkbox. You should
only check this option if it is supported by your network
environment. Ask your network administrator if you are
unsure.
User’s Guide 3–6
Using Wireless LAN
hp CONFIDENTIAL DRAFT
hp CONFIDENTIAL
November 26, 2003 11:47 am
DRAFT
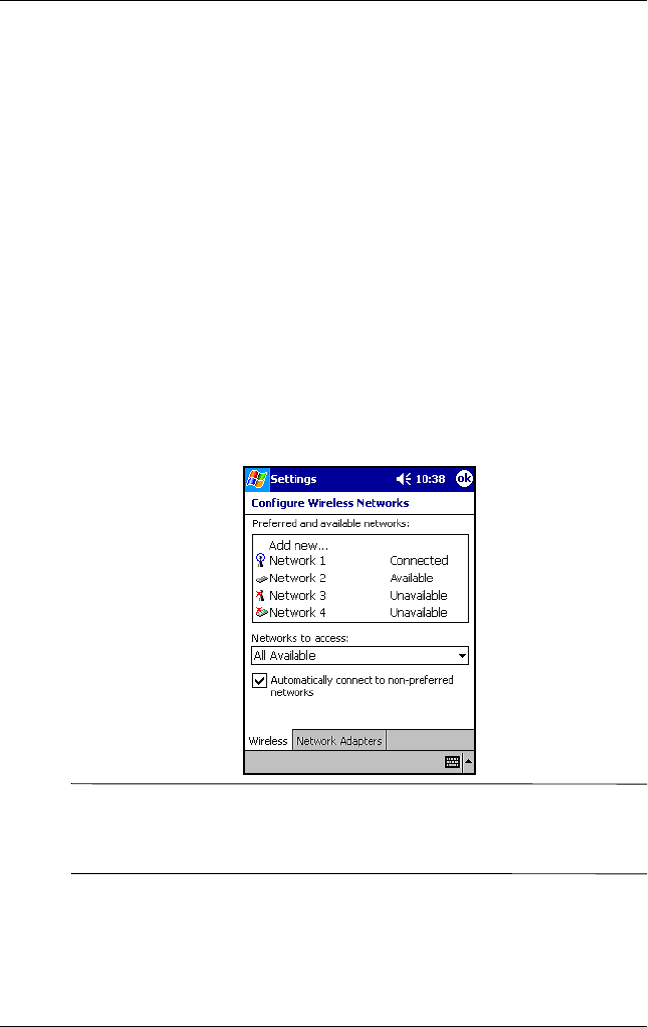
Searching for Networks to Access
Networks that you have already configured are preferred
networks and are listed in Wireless Networks. You can choose
whether to connect only to preferred networks or to have your
Pocket PC search for and connect to any available network
(preferred or not).
1. Tap the Connections icon > Settings > Advanced tab >
Network Card button > Wireless tab.
2. In the Networks to access box, tap the type of network you
want to connect to (All Available, Only access points, or
Only computer-to-computer).
3. To connect only to networks that have already been
configured, clear the Automatically connect to
non-preferred networks checkbox.
Note: If you check the Automatically connect to non-preferred
networks checkbox, your Pocket PC will detect any new
networks and provide you the opportunity to configure them.

Using Wireless LAN
User’s Guide 3–7
hp CONFIDENTIAL DRAFT
Revised: 11/26/03
DRAFT
Managing Wireless Network Settings
Viewing or Editing a Wireless Network
To view or edit an existing or available wireless network:
1. Be sure the WLAN is powered on.
2. Tap the Connections icon > Settings > Advanced tab >
Network Card button > Wireless tab.
3. In the Wireless networks box, tap the desired network name.
4. Edit the existing settings as necessary, then tap OK to save
the changes.
Deleting a Wireless Network
To delete an existing or available wireless network:
1. Be sure the WLAN is powered on.
2. Tap the Connections icon > Settings > Advanced tab >
Network Card button > Wireless tab.
3. In the Wireless networks box, tap and hold the network you
want to delete.
4. Tap Remove Settings.
User’s Guide 3–8
Using Wireless LAN
hp CONFIDENTIAL DRAFT
hp CONFIDENTIAL
November 26, 2003 11:47 am
DRAFT
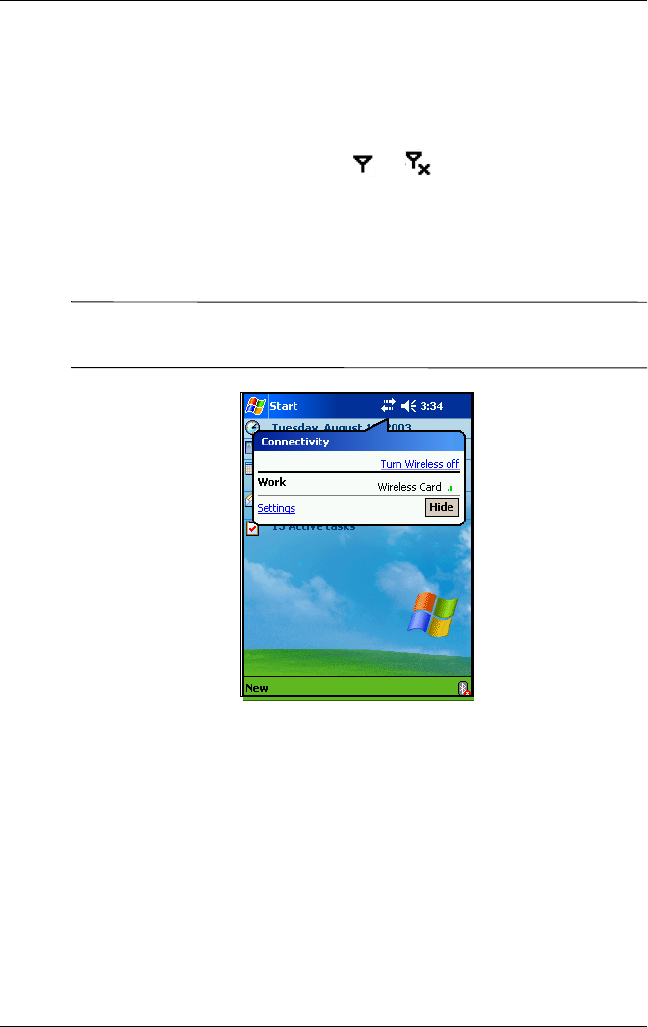
Monitoring Signal Strength and Status
To view the signal strength between your Pocket PC and access
point WLAN connection:
1. Tap the Connections icon ( or ) in the Navigation bar.
2. When the Connectivity box displays, you will be able to
view the type of network the Pocket PC is connected to (for
example, Work or Internet) and an icon displaying the signal
strength.
Note: The Signal Strength icon will not be displayed if a
connection is not present.
3. To make changes to the connection settings, tap Settings.
4. To exit the Connectivity box, tap the Hide button.
Using Wireless LAN
User’s Guide 3–9
hp CONFIDENTIAL DRAFT
Revised: 11/26/03
DRAFT
Working with Network Settings
Looking Up an IP Address
To find the IP address the wireless network is using:
1. Be sure the WLAN is powered on.
2. Connect to the appropriate network.
3. Tap the Connections icon > Settings > Advanced tab >
Network Card button > Network Adapters tab.
4. Tap the appropriate adapter to modify the settings. The IP
address appears in the IP Address box.

User’s Guide 3–10
Using Wireless LAN
hp CONFIDENTIAL DRAFT
hp CONFIDENTIAL
November 26, 2003 11:47 am
DRAFT
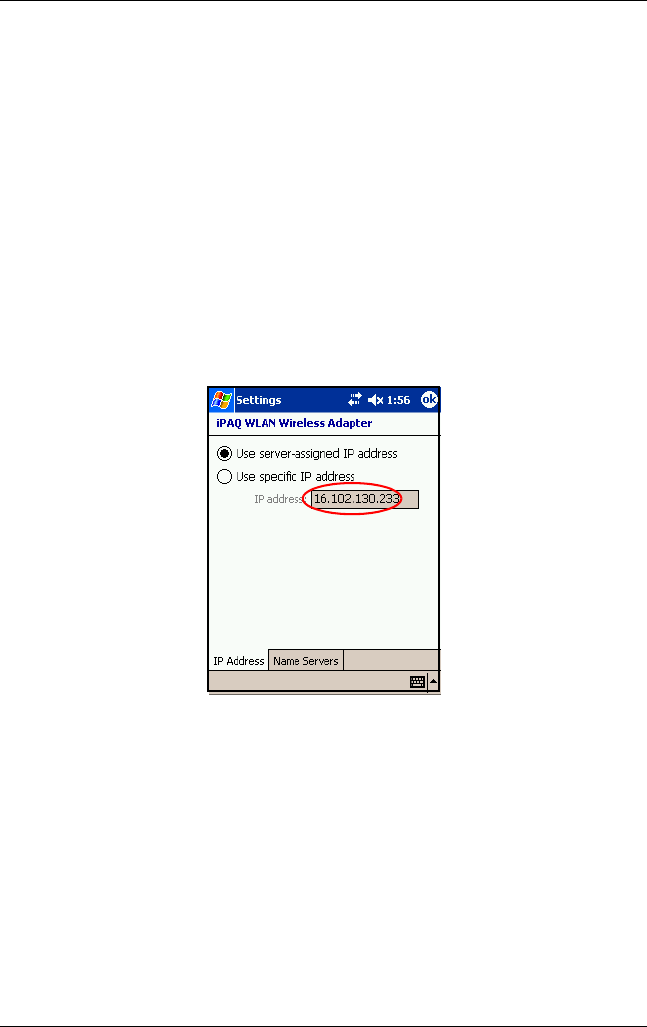
Changing TCP/IP Settings
Note: Most Internet Service Providers (ISPs) and private
networks now use dynamically-assigned IP addresses. You will
not need to change TCP/IP settings unless your ISP or private
network does not use dynamically-assigned IP addresses. If you
are not sure, check with your network administrator.
To change TCP/IP Settings:
1. Contact your ISP or network administrator to determine your
IP address, subnet mask, and/or default gateway (if needed).
2. Be sure the WLAN is powered on.
3. Tap the Connections icon > Settings > Advanced tab >
Network Card button > Network Adapters tab.
4. In the My network card connects to... dropdown box, tap
either The Internet or Work.
Note: If you are connecting to your ISP at home, tap The
Internet. If you are connecting to a private network such as a
corporate network at work, you should tap Work.
5. In the Tap an adapter to modify settings box, tap iPAQ
WLAN Wireless Adapter.
6. Tap the IP Address tab.
7. Tap Use specific IP address and enter the requested
information.
8. Tap OK to save your settings.

Using Wireless LAN
User’s Guide 3–11
hp CONFIDENTIAL DRAFT
Revised: 11/26/03
DRAFT
Changing DNS and WINS Settings
Note: Most Internet Service Providers (ISPs) and private
networks now use dynamically-assigned IP addresses. You will
not need to change DNS and WINS settings unless your ISP or
private network does not use dynamically-assigned IP addresses.
If you are not sure, check with your network administrator.
Servers that require an assigned IP address may also require a
way to map computer names to IP addresses. Your Pocket PC
supports two name resolution options:
■DNS
■WINS
To change server settings:
1. Contact your ISP or network administrator to determine
which name resolution to use, obtain the specific server
address, and determine whether alternate addresses are
available.
Note: An alternate address may enable you to connect when the
primary server is unavailable.
2. Be sure the WLAN is powered on.
3. Tap the Connections icon > Settings > Advanced tab >
Network Card button > Network Adapters tab.
4. In the My network card connects to... dropdown box, tap
either The Internet or Work.
Note: If you are connecting to your ISP at home, tap The
Internet. If you are connecting to a private network such as a
corporate network at work, you should tap Work. If a proxy
server is required, you must select Work. For more information,
refer to the section on “Setting Up Proxy Server Settings” on
page 3-14.

User’s Guide 3–12
Using Wireless LAN
hp CONFIDENTIAL DRAFT
hp CONFIDENTIAL
November 26, 2003 11:47 am
DRAFT
5. In the Tap an adapter to modify settings box, tap iPAQ
WLAN Wireless Adapter.
6. Tap the Name Servers tab and enter the requested
information.
7. Tap OK to save your settings.
Setting Up VPN Server Connections
A VPN connection enables you to securely connect to a private or
a corporate network, via the Internet. To set up a VPN server
connection:
1. Contact your network administrator for your user name,
password, domain name, TCP/IP settings, and host name
or IP address of the VPN server.
2. Be sure the WLAN is powered on.
3. From the Today screen, tap Start > Settings > Connections
tab > Connections > Tasks tab.
4. Under My Work Network, tap Add a new VPN server
connection.
5. Follow the instructions in the New Connection wizard.
Note: For online Help for any screen in the New Connection
wizard or while changing settings, tap the ?.
Changing VPN Server Connections
1. Be sure the WLAN is powered on.
2. From the Today screen, tap Start > Settings > Connections
tab > Connections > Tasks tab.
3. Under My Work Network, tap Manage existing
connections > VPN tab.
4. Tap the VPN connection you want to change, then tap
Settings.

Using Wireless LAN
User’s Guide 3–13
hp CONFIDENTIAL DRAFT
Revised: 11/26/03
DRAFT
5. In the Name box, enter a name for the connection (for
example, your company’s name).
6. In the Host name/IP box, enter the VPN server name or
IP address.
7. Next to VPN type, tap the type of authentication to use with
your device (IPSec/L2TP or PPTP). If you aren’t sure
which option to choose, ask your network administrator.
8. Tap Next.
9. If you selected IPSec/L2TP on the previous screen, tap the
type of authentication. If you select A pre-shared key, enter
the key provided by your network administrator, then tap
Next.
Note: If you selected PPTP in the previous screen, this step is
skipped.
10. Enter the user name, password, and domain name provided
by your network administrator.
Note: If a domain name was not provided, you may be able to
connect without entering one.
11. To change advanced settings, tap the Advanced button.
Note: You will not need to change advanced settings unless:
■The server to which you are connecting does not use
dynamically-assigned IP addresses and you need to enter
your TCP/IP settings,
or
■You need to change server DNS or WINS settings.
12. Tap the Finish button.

User’s Guide 3–14
Using Wireless LAN
hp CONFIDENTIAL DRAFT
hp CONFIDENTIAL
November 26, 2003 11:47 am
DRAFT
Starting VPN Server Connections
To start a connection through a VPN server, be sure the WLAN is
powered on, then select the VPN network. Your Pocket PC will
automatically begin connecting.
Setting Up Proxy Server Settings
If you are connected to your ISP or private network during
synchronization, your Pocket PC should download proper proxy
settings from your computer. If these settings are not on your
computer or need to be changed, you will need to set them up
manually. To set up proxy server settings:
1. Contact your ISP or network administrator for the proxy
server name, server type, port, type of Socks protocol used,
and your user name and password.
2. Be sure the WLAN is powered on.
3. From the Today screen, tap Start > Settings > Connections
tab > Connections > Tasks tab.
4. Under My Work Network, tap Edit my proxy server >
Proxy Settings tab.
5. Tap the This network connects to the Internet and This
network uses a proxy server to connect to the Internet
checkboxes.
6. In the Proxy server box, enter the proxy server name.
7. If you need to change port number or proxy server type
settings, tap the Advanced button and change the desired
settings.
8. Tap OK.

Using Wireless LAN
User’s Guide 3–15
hp CONFIDENTIAL DRAFT
Revised: 11/26/03
DRAFT
Connecting to Hot Spots
Connecting to a hot spot in your local coffee shot or at the airport
or other public places usually requires a prepaid contract with the
hot spot provider for a minimum of 24 hours or a maximum of 6
months to a year. A prepaid contract can be purchased using your
credit card at the hot spot site or by accessing the service
provider’s Web site.
Once you have purchased this time allotment from the service
provider, you will be able to connect to their hot spots using your
HP iPAQ Pocket PC h6300 Series.
To connect at the hot spot location:
1. Turn on your WLAN—From the Start menu, tap iPAQ
Wireless > WLAN icon.
2. Launch Internet Explorer—From the Start menu, tap IE.
3. Internet Explorer will display the network you are connecting
to and, depending on the network, you may need to tap OK.
4. Enter the Internet address to be accessed in the address bar
and tap GO.
NOTE: If you experience problems connecting to the hot spot
location, you will need to contact the service provider’s Help line.
Most hot spot locations provide brochures with Help information.
Security
INFORMATION TO BE ADDED.

User’s Guide 3–16
Using Wireless LAN
hp CONFIDENTIAL DRAFT
hp CONFIDENTIAL
November 26, 2003 11:47 am
DRAFT

hp CONFIDENTIAL
User’s Guide 4–1
Revised: 11/26/03
DRAFT
4
Using Bluetooth
Your HP iPAQ Pocket PC comes with built-in Bluetooth
technology that allows short-range connections and provides fast,
reliable, and secure wireless communication.
With Bluetooth powered on, you can send information or perform
the following tasks wirelessly between two Bluetooth devices,
within a range of approximately 10 meters (30 feet):
■Exchange contacts, calendar items, and tasks
■Send or exchange business cards
■Transfer files
■Synchronize with a computer through an ActiveSync
connection
■Partner with a Bluetooth-enabled cell phone and use the cell
phone as a wireless modem
■Connect to other Bluetooth devices (Virtual COM port)
■Print to a Bluetooth printer
■Use a Bluetooth headset

User’s Guide 4–2
Using Bluetooth
DRAFT - hp CONFIDENTIAL
hp CONFIDENTIAL
Revised: 11/26/03
DRAFT
■Create a personal area network (PAN) to chat, play
games, etc.
Note: Use of dial-up and wireless Internet, e-mail, corporate
networks, and other wireless communications, such as
Bluetooth-enabled devices, may require separately purchased
additional hardware and other compatible equipment, in addition
to a standard Wireless LAN (WLAN) infrastructure and a
separately purchased service contract. Check with your service
provider for availability and coverage in your area. Not all Web
content may be available. Some Web content may require
installation of additional software.
Getting Acquainted with Bluetooth
Before you start using Bluetooth to establish wireless
connections, take a few minutes and familiarize yourself with:
■Terms used in this chapter
■Supported Services
■Bluetooth Settings
■Bluetooth Manager
Note: For more detailed help, refer to the Help files installed on
your Pocket PC. From the Start menu, tap Help > Bluetooth.

Using Bluetooth
User’s Guide 4–3
DRAFT - hp CONFIDENTIAL
hp CONFIDENTIAL
Revised: 11/26/03
DRAFT
Understanding Terms
The following Bluetooth terms are used throughout this chapter.
The Term... Means...
Authentication Verification of a numeric passkey before a
connection or activity can be completed.
Authorization Approval of a connection or activity before
it can be completed.
Bonding (Paired
devices)
Create a trusted connection between your
device and another. After a bond is
created, the two devices become paired.
A paired device does not require
authentication or authorization.
Device address Unique electronic address of a Bluetooth
device.
Device discovery Location and recognition of another
Bluetooth device.
Device name Name that a Bluetooth device provides
when discovered by another device.
Encryption Method of protecting data.
Link key Code used to securely pair devices.
Passkey Code you enter to authenticate
connections or activities requested by other
devices.
Personal Information
Manager (PIM)
Collection of programs used to manage
daily business tasks (for example:
Contacts, Calendar, and Tasks).
Profiles Collection of Bluetooth settings.
Service discovery Determination of which programs you have
in common with other devices.

User’s Guide 4–4
Using Bluetooth
DRAFT - hp CONFIDENTIAL
hp CONFIDENTIAL
Revised: 11/26/03
DRAFT
Supported Services
The functions that Bluetooth supports are called services. You
can communicate only with Bluetooth devices that support at
least one of the following services:
■BPP (Basic Printer profile)
■DUN (Dial-up Networking profile)
■FAX
■FTP (File Transfer profile)
■GAP (Generic Access profile)
■HCRP (Hard Cable Replacement profile)
■LAP (LAN Access profile)
■OBEX (Object Exchange profile)
■OPP (Object Push profile)
■PAN (Personal Area Network profile)
■SPP (Serial Port profile)
■ActiveSync (Uses SPP to connect to ActiveSync on a
computer)
Working with Bluetooth Settings
From the tabs in Bluetooth Settings, you can:
■Turn Bluetooth on and off
■Enter or change your Pocket PC Bluetooth name
■Set your connection preferences
■Enable Bluetooth services
■Specify security settings
■Define settings for sharing and connecting
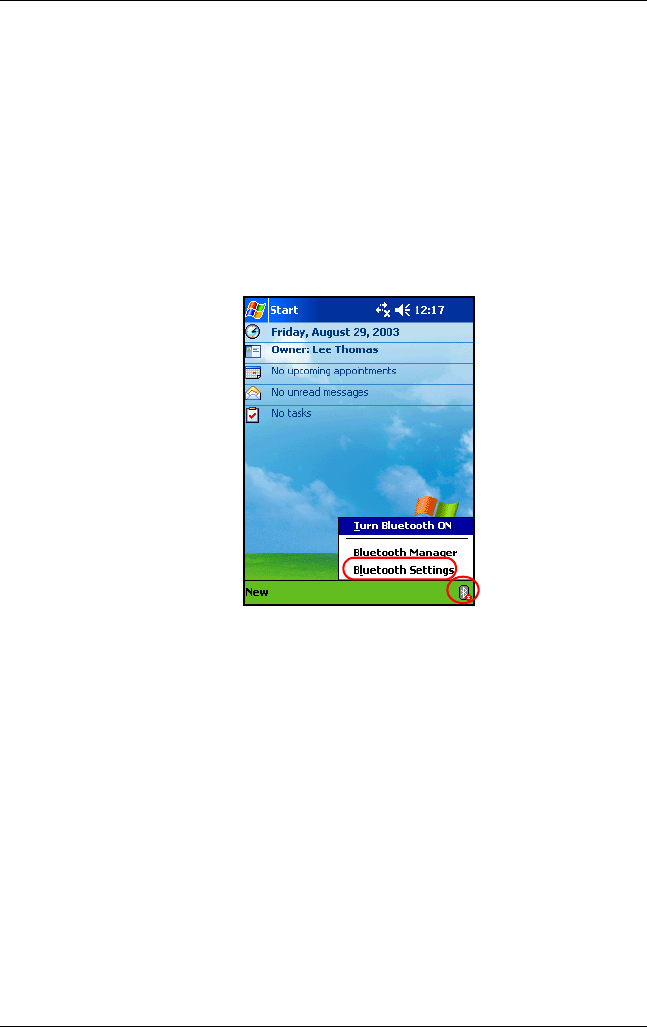
Using Bluetooth
User’s Guide 4–5
DRAFT - hp CONFIDENTIAL
hp CONFIDENTIAL
Revised: 11/26/03
DRAFT
■Select a user profile
■View software and port information
Use the arrows to the right to scroll through the tabs.
Opening Bluetooth Settings
1. From the Today screen, tap the Bluetooth icon.
2. From the pop-up menu, tap Bluetooth Settings.
Turning On Bluetooth
To turn on Bluetooth from Bluetooth Settings:
1. From the Today screen, tap the Bluetooth icon.
2. From the pop-up menu, tap Bluetooth Settings.
3. Tap the Turn on button to enable.
Shortcut: From the Bluetooth pop-up menu, tap Turn
Bluetooth ON.
When Bluetooth is turned on, the Bluetooth LED on the top of
your Pocket PC blinks blue.

User’s Guide 4–6
Using Bluetooth
DRAFT - hp CONFIDENTIAL
hp CONFIDENTIAL
Revised: 11/26/03
DRAFT
Tap the Turn off button to disable. When Bluetooth is turned off,
the Bluetooth icon is grayed with a red X, and no incoming or
outgoing connections are possible.
Battery Saving Tip: Turn Bluetooth off when you are not
using it.
Setting Accessibility Properties
Before your Pocket PC interacts with other Bluetooth devices,
you need to enter or change the accessibility properties to define
how you want your Pocket PC to interact.
Entering a Device Name
The device name is what other devices see on their screen when
they locate your device.
To enter a device name:
1. From the Today screen, tap the Bluetooth icon > Bluetooth
Settings > Accessibility tab.
2. Highlight the name in the Name field and enter your new
name.
3. Tap OK to save your changes.
Allowing Connections
You can determine if all devices or only paired devices can
connect to your Pocket PC.
Allowing All Devices to Connect
1. From the Today screen, tap the Bluetooth icon > Bluetooth
Settings > Accessibility tab.
2. Select Allow other devices to connect, and All devices.
3. Tap OK.

Using Bluetooth
User’s Guide 4–7
DRAFT - hp CONFIDENTIAL
hp CONFIDENTIAL
Revised: 11/26/03
DRAFT
ÄCAUTION: This allows any device, even those unknown to you, to
connect to your Pocket PC. After they are connected, security settings
for specific services apply as specified in the Bluetooth Settings.
Allowing Paired Devices to Connect
Paired devices share and exchange an internally generated Link
Key before connecting. The Link Key is derived from a unique
Bluetooth device address, a random number, and a user-defined
passkey.
This feature allows only devices that you trust to connect to your
Pocket PC.
To allow paired devices to connect:
1. From the Today screen, tap the Bluetooth icon > Bluetooth
Settings > Accessibility tab.
2. Select Allow other devices to connect, and Paired
devices only.
3. Tap OK.
Allowing Others to Locate Your Device
You can allow other devices to search and locate your Pocket PC.
Note: If another remote device has your device’s address, that
device may be able to locate and connect to you even though you
did not select for your device to be discovered.
To allow others to locate your device:
1. From the Today screen, tap the Bluetooth icon > Bluetooth
Settings > Accessibility tab.
2. Select Other devices can discover me.
3. Tap OK to save the changes.

User’s Guide 4–8
Using Bluetooth
DRAFT - hp CONFIDENTIAL
hp CONFIDENTIAL
Revised: 11/26/03
DRAFT
Enabling Bluetooth Services
You can select to enable certain services:
■Automatically when Bluetooth is activated
■When you permit the connection
■When a passkey or link key is correctly entered
You can use any of these security options when transferring files,
creating a serial port connection, exchanging business card
information, configuring dial-up networking, and joining a
personal network.
Automatically Enabling Services
You can allow devices to connect without any authorization so
that any time Bluetooth is on it is ready for connections.
To automatically enable services:
1. From the Today screen, tap the Bluetooth icon > Bluetooth
Settings.
2. Tap the tab for the service you want to enable: File Transfer,
Information Exchange, Serial Port, Dial-up Networking,
or Personal Network Server.
3. Select Enable service.
4. Ensure there are no check marks in the Authorization
required or Authentication (Passkey) required
checkboxes.
5. Tap OK.

Using Bluetooth
User’s Guide 4–9
DRAFT - hp CONFIDENTIAL
hp CONFIDENTIAL
Revised: 11/26/03
DRAFT
Requiring Authorization to Access Services
If you elect to require authorization to access services, you must
authorize each connection. Then, your Pocket PC will always ask
you if the connection should be permitted.
To require authorization to access services:
1. From the Today screen, tap the Bluetooth icon > Bluetooth
Settings.
2. Tap the tab for the service you want to enable: File Transfer,
Information Exchange, Serial Port, Dial-up Networking,
or Personal Network Server.
3. Select Authorization required.
4. Tap OK.
Secure Connections using a Passkey or Bond
To establish a secure connection with another device, you can use
the passkey feature or an established bond. You can also add data
encryption to this type of security.
A passkey is a code you enter to authenticate connections
requested by other devices. The passkey must be known and
used by both parties or the connection will not be allowed.
To require a passkey or bond:
1. From the Today screen, tap the Bluetooth icon > Bluetooth
Settings.
2. Tap the tab for the service you want to enable: File Transfer,
Information Exchange, Serial Port, Dial-up Networking,
or Personal Network Server.
3. Select Authentication (Passkey) required.
4. Select Encryption Required if you want to require all data
exchanged between the devices to be encrypted.
5. Tap OK.
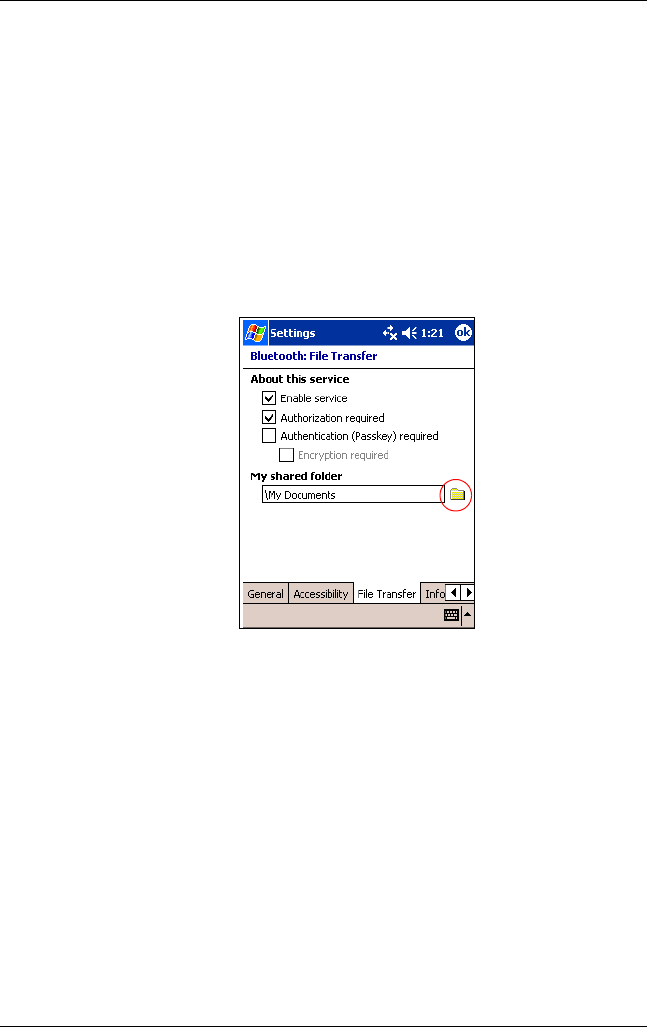
User’s Guide 4–10
Using Bluetooth
DRAFT - hp CONFIDENTIAL
hp CONFIDENTIAL
Revised: 11/26/03
DRAFT
Setting a Shared Folder
You can determine the folder that other devices access when they
connect to your Pocket PC.
To select a shared folder:
1. From the Today screen, tap the Bluetooth icon > Bluetooth
Settings.
2. Tap the File Transfer tab.
3. Tap the Folder icon and locate a desired file folder.
4. Tap OK.
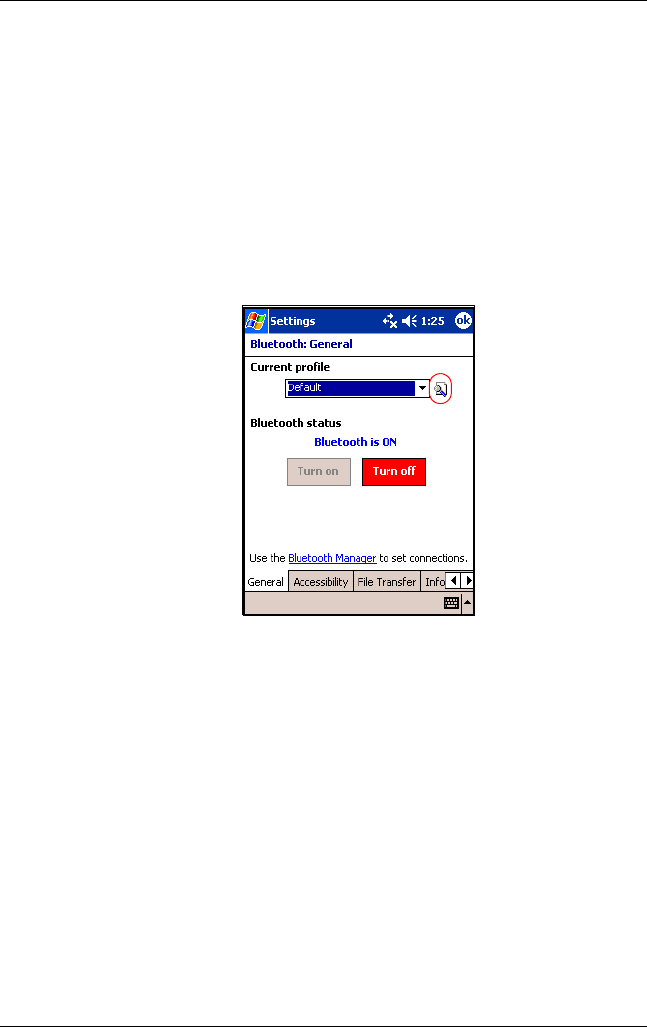
Using Bluetooth
User’s Guide 4–11
DRAFT - hp CONFIDENTIAL
hp CONFIDENTIAL
Revised: 11/26/03
DRAFT
Understanding Profiles
Use profiles to quickly enable selected personal settings in
multiple environments.
Creating a Profile
To create a profile:
1. From the Today screen, tap the Bluetooth icon > Bluetooth
Settings > General tab > Profile icon.
2. Tap the New button.
3. Enter a descriptive name.
4. Select an existing profile to use as a template.
5. Tap OK.

User’s Guide 4–12
Using Bluetooth
DRAFT - hp CONFIDENTIAL
hp CONFIDENTIAL
Revised: 11/26/03
DRAFT
Activating a Profile
When a new profile is created, you will need to activate it.
To activate a profile after creating it:
1. From the Today screen, tap the Bluetooth icon > Bluetooth
Settings.
2. From the General tab, select it from the Current Profile
down arrow list.
3. Tap OK.
Saving Bluetooth Configuration Settings in a Profile
To save the Pocket PC Bluetooth configuration settings to any
profile:
Note: Bluetooth must be turned on for changes to be saved.
1. From the Today screen, tap the Bluetooth icon > Bluetooth
Settings.
2. From the General tab, tap the Profile icon.
3. Select a profile from the Add/Delete Profiles list or create a
new one.
4. Tap OK.
5. Set up your Pocket PC. You should specify the desired
connection, sharing, and security settings in all Bluetooth
Settings tabs.
6. Tap OK to close the Bluetooth Settings. The changes are
automatically saved.

Using Bluetooth
User’s Guide 4–13
DRAFT - hp CONFIDENTIAL
hp CONFIDENTIAL
Revised: 11/26/03
DRAFT
Renaming a Profile
1. From the Today screen, tap the Bluetooth icon > Bluetooth
Settings.
2. From the General tab, tap the Profile icon.
3. Select a profile from the Add/Delete Profiles list.
4. Tap the Rename button.
5. Enter a new descriptive name.
6. Tap Enter.
7. Tap OK.
Deleting a Profile
1. From the Today screen, tap the Bluetooth icon > Bluetooth
Settings.
2. From the General tab, tap the Profile icon.
3. Select a profile from the Add/Delete Profiles list.
4. Tap the Delete button.
5. Tap Yes to confirm you want to delete the profile.
6. Tap OK.
Working with Bluetooth Manager
Use Bluetooth Manager to:
■Establish connections
■Display shortcuts
■Exchange business cards
■Control the on-screen display

User’s Guide 4–14
Using Bluetooth
DRAFT - hp CONFIDENTIAL
hp CONFIDENTIAL
Revised: 11/26/03
DRAFT
Opening Bluetooth Manager
From the Today screen, tap the Bluetooth icon > Bluetooth
Manager.
The first screen that displays is My Shortcuts.
Note: Opening Bluetooth Manager automatically turns on
Bluetooth.
Locating and Selecting a Device
Several tasks require you to locate a device and connect to it.
When you are required to locate a device, the Bluetooth browser
assists by searching for your desired function that supports other
Bluetooth devices.
Pairing Devices
You can pair devices so they must exchange a computer
generated security key prior to each connection. The security key
is also called a “Link Key.” It is generated from a unique
Bluetooth device address, a random number, and a user-defined
password.
After two devices are paired, they have a trusted relationship with
each other that can be verified using a link key. No additional
input is needed from the user. Therefore, connections and
activities can be performed between the paired devices without
constant authorization from the user.
To pair devices:
1. From the Today screen, tap Start > Bluetooth Manager.
2. Tap Tools > Paired devices.
3. Tap Add.
4. Tap the Lookup icon.
5. Tap a device.
6. Enter a password in the Passkey field.

Using Bluetooth
User’s Guide 4–15
DRAFT - hp CONFIDENTIAL
hp CONFIDENTIAL
Revised: 11/26/03
DRAFT
7. Tap OK.
8. Enter the same passkey into the other device.
Note: Some devices, such as mobile phones, need to be placed
in a mode to accept a bond from another device. Refer to that
device’s user instructions for more information.
Unpairing Devices
You can remove a paired relationship between devices.
1. From the Today screen, tap Start > Bluetooth Manager.
2. Tap Tools > Paired devices.
3. Tap a device name.
4. Tap Remove.
5. Tap Yes to remove the pairing.
Connecting to Other Devices
Use ActiveSync, serial and dial-up connections to communicate
with other Bluetooth devices. Establish a partnership with a cell
phone and set up the Bluetooth services it offers.
Identifying the Communications Port
You can identify the virtual COM ports used to create a
serial port connection. You may need to identify these COM
ports for activities such as printing.
Use the inbound COM port when other devices initiate a serial
connection. Use the outbound COM port when you initiate a
serial connection to another device.
To identify the communications port:
1. From the Today screen, tap the Bluetooth icon > Bluetooth
Settings.
2. Tab over to the Serial Port tab and tap it.

User’s Guide 4–16
Using Bluetooth
DRAFT - hp CONFIDENTIAL
hp CONFIDENTIAL
Revised: 11/26/03
DRAFT
3. Note the names of your inbound and outbound COM ports.
4. Tap OK.
Establishing an ActiveSync Connection
You can set up an ActiveSync partnership with a
Bluetooth-enabled computer by first setting up your computer,
then setting up your Pocket PC.
If you own an HP Evo Notebook or Desktop computer, you can
use the Bluetooth Multiport Module presinstalled on that
computer with your Pocket PC.
If you are using other Bluetooth modules or cards on your
computer, refer to the Bluetooth Configuration Manager or
Settings for similar setup procedures, then skip to “Setting Up an
ActiveSync Partnership on Your Pocket PC.”
Using the HP Bluetooth Multiport Module for Evo
Notebooks and Desktops
1. Remove your Pocket PC from the USB Synchronization
Cradle.
2. Turn on Bluetooth on both the Pocket PC and the Evo
computer.
3. Right-click the Bluetooth icon in the system tray on your
computer, then click Advanced Configuration.
4. Select the Client Applications tab, then write down the
COM port number listed next to Bluetooth Serial Port.
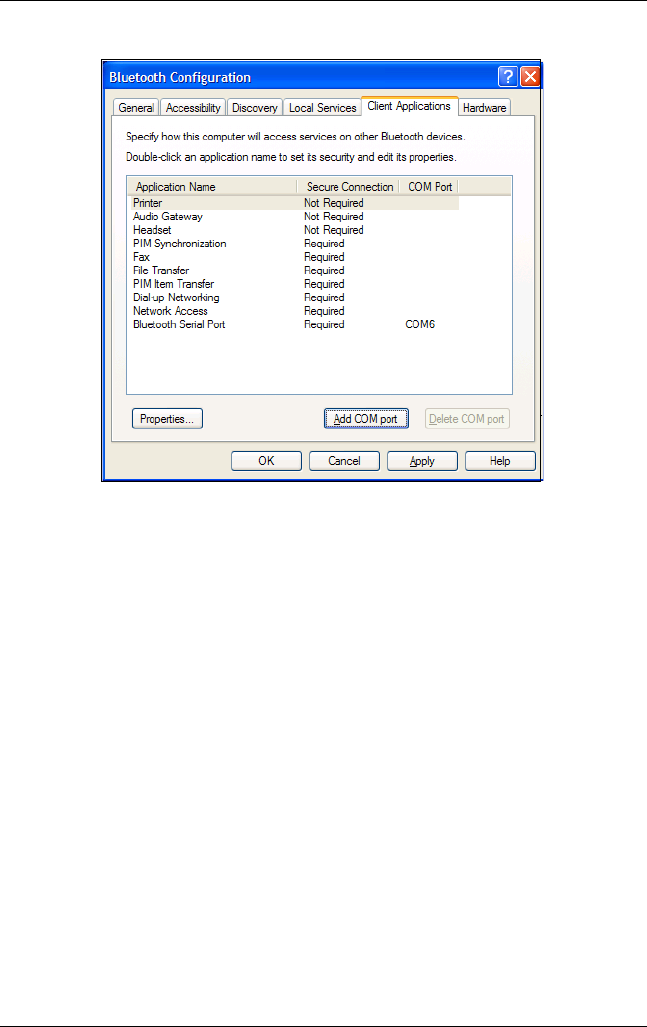
Using Bluetooth
User’s Guide 4–17
DRAFT - hp CONFIDENTIAL
hp CONFIDENTIAL
Revised: 11/26/03
DRAFT
5. Select Bluetooth Serial Port, then click on the Delete COM
Port button.
6. Click on the Local Services tab, then click Add Serial
Service.
7. Type a name for the serial service, then select Startup
Automatically.
8. Remove the checkmark from the Secure Connection box,
then select the COM port that is the same as the one you
wrote down earlier. Click Apply > OK > OK.
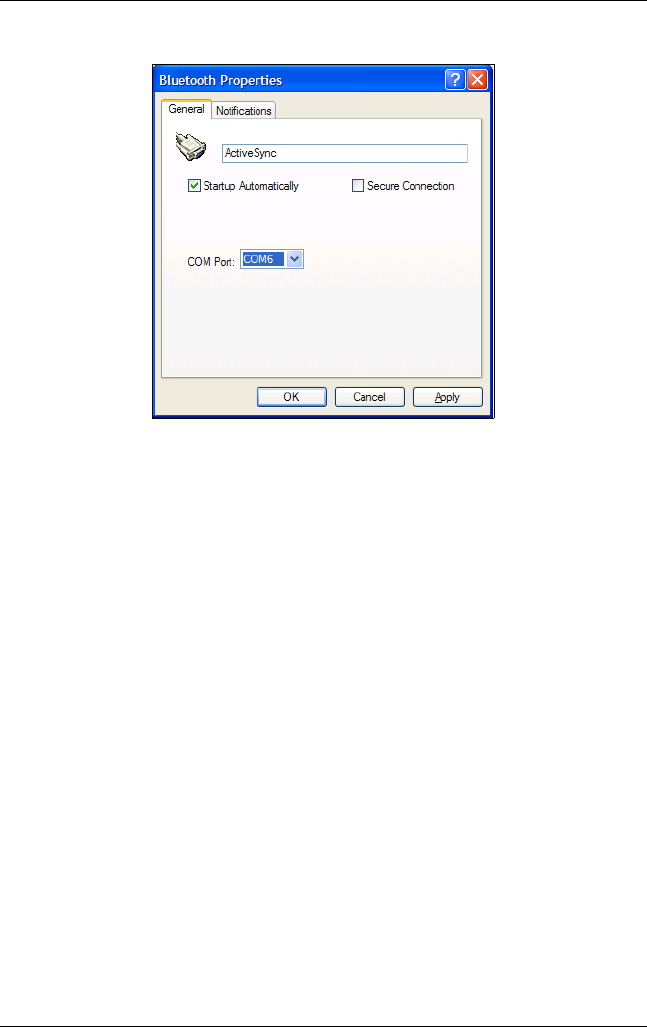
User’s Guide 4–18
Using Bluetooth
DRAFT - hp CONFIDENTIAL
hp CONFIDENTIAL
Revised: 11/26/03
DRAFT
9. Open ActiveSync on your computer, then click File >
Connection Settings.
10. Check the Allow Serial Cable or Infrared Connection to
this COM Port box.
11. Select the COM port that is the same as the one you wrote
down earlier, then click OK.
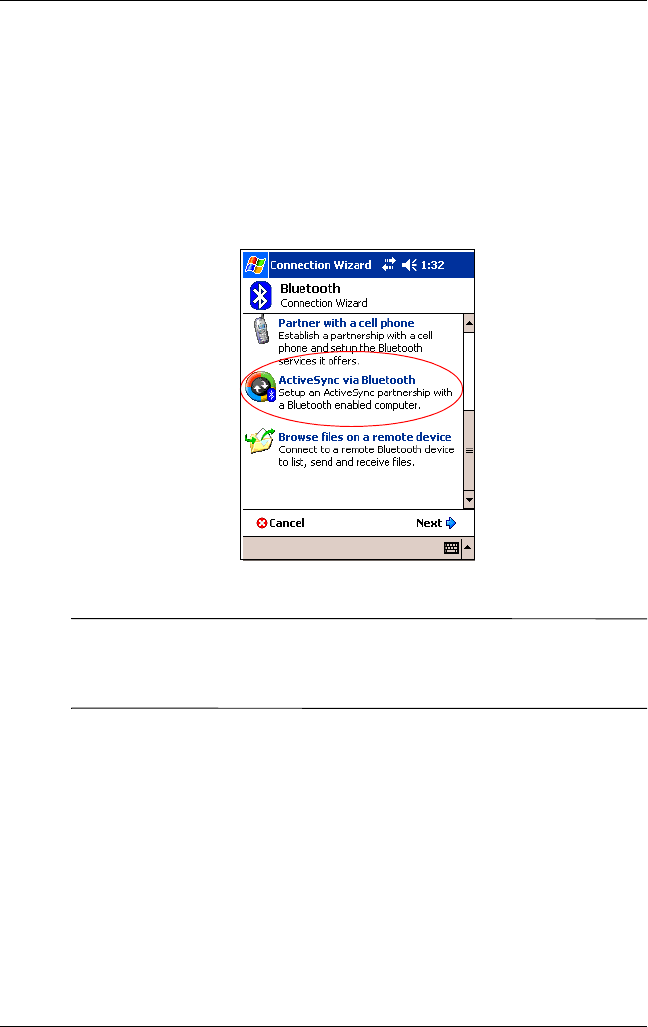
Using Bluetooth
User’s Guide 4–19
DRAFT - hp CONFIDENTIAL
hp CONFIDENTIAL
Revised: 11/26/03
DRAFT
Setting Up an ActiveSync Partnership on Your
Pocket PC
To establish an ActiveSync connection:
1. From the Today screen, tap Bluetooth icon > Bluetooth
Manager.
2. Tap New > ActiveSync via Bluetooth > Next.
3. Follow the connection wizard instructions.
Note: Be sure the ActiveSync COM port setting on your computer
is the same as the COM port setting used for Bluetooth on your
computer.
4. From the Bluetooth Browser screen, select the computer you
want to synchronize with. Tap Next.
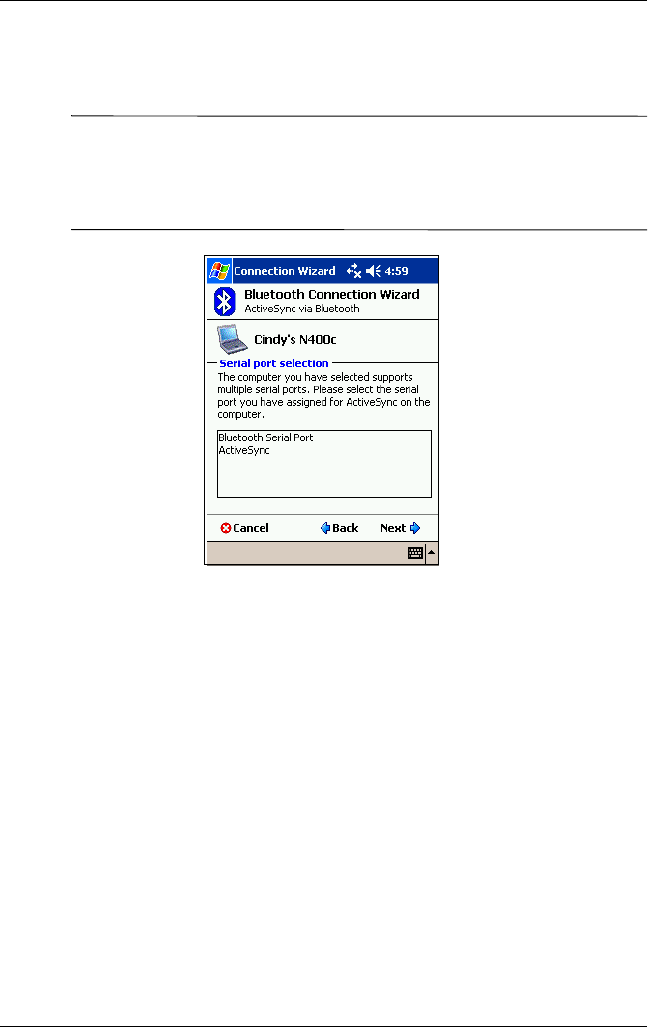
User’s Guide 4–20
Using Bluetooth
DRAFT - hp CONFIDENTIAL
hp CONFIDENTIAL
Revised: 11/26/03
DRAFT
5. Under Serial Port Selection, select the name of the serial
port for the computer selected above, then tap Next > Finish.
Note: If you are setting up the ActiveSync partnership with an
Evo Notebook or Desktop computer, select the name you typed in
Step 7 of “Using the HP Bluetooth Multiport Module for Evo
Notebooks and Desktops.”
.
Establishing a Serial Connection
Use the wireless Bluetooth serial port connection just as you
would a physical serial cable connection. You must configure the
application that will use the connection to the correct serial port.
To establish a serial connection:
1. From the Today screen, tap the Bluetooth icon > Bluetooth
Manager.
2. Tap New > Explore a Bluetooth device > Next.
3. Follow the connection wizard instructions.

Using Bluetooth
User’s Guide 4–21
DRAFT - hp CONFIDENTIAL
hp CONFIDENTIAL
Revised: 11/26/03
DRAFT
Dial-Up Networking
When you use dial-up networking (DUN), the remote device
providing the dial-up networking service and the remote
computer to which you are connecting must both have telephone
access.
Devices that can provide dial-up networking include Bluetooth:
■Mobile phones
■Desktop computers
■Modems
Using Dial-Up Networking
To connect to a device that provides modem access:
1. From the Today screen, tap the Bluetooth icon > Bluetooth
Manager.
2. Tap New > Connect to the Internet > Next.
3. Follow the connection wizard instructions.
Note: After you create the dial-up networking shortcut with a
device, tap and hold the shortcut icon in the My Shortcuts tab of
the Bluetooth Manager, and tap Connect.
4. Tap New Connection.
5. Tap OK.
6. Enter a name in the Connection Name field.
7. Enter a phone number. You must sometimes enter the
country code and area code, depending on where you are
calling.
8. Tap OK to begin dialing.
Note: Some mobile phones require a bond between devices
(see the section “Pairing Devices”).

User’s Guide 4–22
Using Bluetooth
DRAFT - hp CONFIDENTIAL
hp CONFIDENTIAL
Revised: 11/26/03
DRAFT
To connect to the Internet and use Pocket Internet Explorer, you
must first connect to a Bluetooth phone from Bluetooth Manager.
To make this connection the default dial-up connection for
Pocket Internet Explorer:
1. From the Today screen, tap Start > Settings >
Connections tab.
2. Tap the Connections icon > Advanced tab.
3. Tap Select Networks.
4. Enable Bluetooth Settings from the dropdown list.
Note: The Bluetooth modem connection you created can be
viewed only from the Bluetooth Settings on the Connections
Task page.
Joining a Personal Area Network
Connect two or more Bluetooth devices to share files, collaborate
or play multiplayer games.
To establish a Personal Area Network connection:
1. From the Today screen, tap the Bluetooth icon > Bluetooth
Manager.
2. Tap New > Join a personal network > Next.
3. Follow the Connection Wizard instructions.
Establishing a Cell Phone Partnership
You can establish a partnership with a cell phone, then set up the
Bluetooth services it offers.
To establish a cell phone partnership:
1. From the Today screen, tap Start > Bluetooth Manager.
2. Tap New > Connect to Internet via phone.
3. Follow the connection wizard instructions.

Using Bluetooth
User’s Guide 4–23
DRAFT - hp CONFIDENTIAL
hp CONFIDENTIAL
Revised: 11/26/03
DRAFT
Working with Files
You can exchange information with a connected device and use
the Bluetooth File Explorer to:
■Navigate through the directories.
■View files and folders.
■Create new folders.
■Send and receive files from a remote device.
■Delete and rename files on a remote device.
Creating a File Transfer Connection
1. From the Today screen, tap Start > Bluetooth Manager.
2. Tap New > Browse files on a remote device > Next.
3. Follow the connection wizard instructions.
Sending Files
1. Tap and hold a file transfer shortcut icon, and tap Connect.
2. Tap File > Send a File…
3. Locate a file to send.
4. Tap the file to send it.
5. Tap OK.
Creating a Folder on a Remote Device
1. Tap and hold a file transfer shortcut icon, and tap Connect.
2. Navigate to the location you want for the new folder.
3. Tap File > Create a folder.
4. Enter a folder name while New Folder is selected, and tap
Enter.
5. Tap OK.

User’s Guide 4–24
Using Bluetooth
DRAFT - hp CONFIDENTIAL
hp CONFIDENTIAL
Revised: 11/26/03
DRAFT
Receiving a File from a Remote Device
1. Tap and hold a file transfer shortcut icon, and tap Connect.
2. Navigate to the file location on the remote device.
3. Tap the file.
4. Tap File > Get.
5. Tap OK.
Deleting a File from a Remote Device
1. Tap and hold a file transfer shortcut icon, and tap Connect.
2. Navigate to the file location on the remote device.
3. Tap the file.
4. Tap File > Delete.
5. Tap Yes to verify you want to delete the selected file.
6. Tap OK.
Using Business Card Exchange
Using the business card exchange, you can:
■Set up your own business card
■Send a business card to one or more devices
■Request a business card from one or more devices
■Exchange business cards with one or more devices
You must establish a default contact name to send or exchange
business card information.
You must first specify your default business card on the
Information Exchange tab in Bluetooth Settings. This name
becomes the default for business card transfers.

Using Bluetooth
User’s Guide 4–25
DRAFT - hp CONFIDENTIAL
hp CONFIDENTIAL
Revised: 11/26/03
DRAFT
Setting Up Your Business Card Information
To set up your business card information:
1. Create a contact in the Contacts program that includes your
name, title, and other relevant information.
2. From the Today screen, tap the Bluetooth icon > Bluetooth
Settings.
3. Tap the Information Exchange tab.
4. Tap the My business card (vCard) icon.
5. Choose your contact from the list.
6. Tap OK.
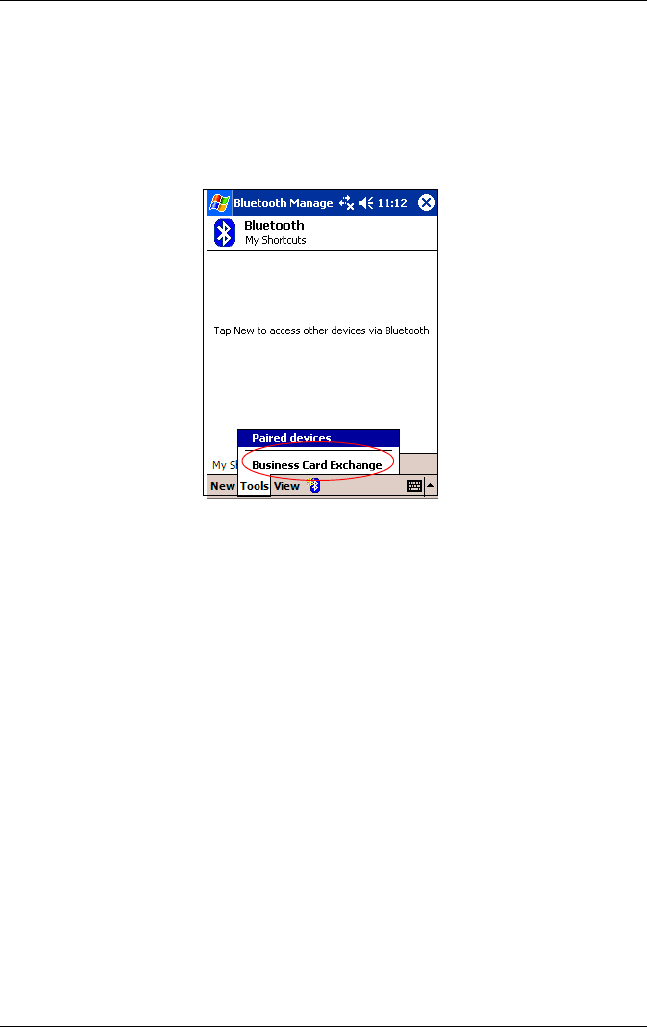
User’s Guide 4–26
Using Bluetooth
DRAFT - hp CONFIDENTIAL
hp CONFIDENTIAL
Revised: 11/26/03
DRAFT
Sending Business Cards
1. From the Today screen, tap the Bluetooth icon > Bluetooth
Manager.
2. Tap Tools > Business Card Exchange.
3. Tap the Send icon.
4. Tap the device where you want to send your business card.
5. Tap OK.
Requesting Business Cards
1. From the Today screen, tap the Bluetooth icon > Bluetooth
Manager.
2. Tap Tools > Business Card Exchange.
3. Tap the Request icon.
4. Tap the device from which you want to request a business
card.
5. Tap OK.

Using Bluetooth
User’s Guide 4–27
DRAFT - hp CONFIDENTIAL
hp CONFIDENTIAL
Revised: 11/26/03
DRAFT
Exchanging Business Cards
You can exchange business card information with another device.
If available, the device’s information will be sent directly into
your Contacts list in Pocket Outlook.
To exchange business cards:
1. From the Today screen, tap the Bluetooth icon > Bluetooth
Manager.
2. Tap Tools > Business Card Exchange.
3. Tap the Exchange icon.
4. Tap the device with which you want to exchange your
business card.
5. Tap OK.
Opening a Connection
1. From the Today screen, tap the Bluetooth icon > Bluetooth
Manager.
2. Tap and hold the icon or list name, and tap Connect.
3. Tap OK.
NOTE: Bluetooth can be set to automatically open a connection
by setting your connection preferences in the Connectivity
Solution application. For more information, refer to Chapter 1,
“Using a Connectivity Solution” for more information.
Viewing Connection Status
You can view:
■Connection’s name
■Device’s name

User’s Guide 4–28
Using Bluetooth
DRAFT - hp CONFIDENTIAL
hp CONFIDENTIAL
Revised: 11/26/03
DRAFT
■Connection status
■Length of connection
■Signal strength
To view the connection status:
1. From the Today screen, tap the Bluetooth icon > Bluetooth
Manager.
2. Tap and hold an active connection icon or list name, and
tap Status.
3. Tap OK.
Closing a Connection
1. From the Today screen, tap the Bluetooth icon > Bluetooth
Manager.
2. Tap and hold the connection icon or list name.
3. Tap Disconnect from the menu.
4. Tap OK.
Viewing Connection Information
1. From the Today screen, tap the Bluetooth icon > Bluetooth
Manager.
2. Tap and hold the connection icon or list name.
3. Tap Properties from the menu.
4. Tap OK.
Working with Connections
You can create shortcuts to open and view status information for
all connections.

Using Bluetooth
User’s Guide 4–29
DRAFT - hp CONFIDENTIAL
hp CONFIDENTIAL
Revised: 11/26/03
DRAFT
Creating a Shortcut
Creating a shortcut to one or more services does not establish
a connection. It only places a shortcut to that service on the
Shortcut tab of the Bluetooth Manager.
To create a shortcut:
1. From the Today screen, tap the Bluetooth icon > Bluetooth
Manager.
2. Tap New, then a type of service, and tap Next.
3. Follow the connection wizard instructions.
Note: Paired devices are designated by a checkmark.
Deleting a Shortcut
1. From the Today screen, tap the Bluetooth icon > Bluetooth
Manager.
2. Tap and hold the connection icon or list name to be deleted.
3. Tap Delete from the menu.
4. Tap Yes to verify the selected shortcut should be deleted.
5. Tap OK.
Viewing Shortcuts
You can view shortcuts as icons or in a list format.
1. From the Today screen, tap the Bluetooth icon > Bluetooth
Manager.
2. Tap View.
3. Tap List or Icon.
4. Tap OK.

User’s Guide 4–30
Using Bluetooth
DRAFT - hp CONFIDENTIAL
hp CONFIDENTIAL
Revised: 11/26/03
DRAFT

hp CONFIDENTIAL
User’s Guide 5–1
hp CONFIDENTIAL
Revised: 11/26/03
DRAFT
5
Making Your Connections
NOTE TO REVIEWERS: This section is incomplete. Waiting for
a working product to work with in order to verify these steps.
(Vincent).
The iPAQ Pocket PC h6300 Series offers you the most
comprehensive set of wireless capabilities to keep you connected
in or out of the office. With GSM/GPRS, WLAN, and Bluetooth
integrated into a single device, you have broad coverage of high
speed access to the Internet, and to business and personal
information.
You can use the following options to get connected:
■Synchronize your Pocket PC with your personal computer to
connect to your company network
■Use the WLAN technology integrated on your Pocket PC to
remotely connect to your company’s Virtual Private Network
(VPN), your mobile Internet Service Provider (ISP), or
connect to hot spot links in public places
■Make a wireless GSM/GPRS connection to place a phone
call or send or receive e-mail and text or SMS/MMS
messages
■Transfer information between Bluetooth enabled devices
■Transfer information between two Infrared (IrDA) enabled
ports

User’s Guide 5–2
Making Your Connections
hp CONFIDENTIAL DRAFT
hp CONFIDENTIAL
November 26, 2003 11:47 am File:
DRAFT
NOTE: Use of dial-up and wireless Internet, e-mail, corporate
networks, and other wireless communications, such as
Bluetooth-enabled devices, may require separately purchased
additional hardware and other compatible equipment, in addition
to a separately purchased service contract. Check with your
service provider for availability and coverage in your area. Not
all Web content may be available. Some Web content may
require installation of additional software.
NOTE: For more information on this subject, refer to the Help file
on your Pocket PC by tapping Start > Help > Connections.
Using GSM/GPRS Connections
Global System for Mobile Communications (GSM) technology is
used to make mobile phone calls and provide data service with
roaming capabilities throughout the world.
General Packet Radio Service (GPRS) technology provides a
high speed data transfer and is typically used for Web browsing
and to send and receive small bursts of data such as e-mail and
MMS messages.
GSM/GPRS technology is integrated into your HP iPAQ Pocket
PC. To send or receive data over a GSM/GPRS network, you
must have an account with a mobile telephone service provider
that supports GSM/GPRS data services and an activated SIM
card. The service provider must enable the GPRS data features on
your account to activate it.
For a list of GSM/GPRS service providers, go to the following
Web site: www.gsmworld.com or to your GSM/GPRS service
provider’s Web site.
Creating a GSM Connection
The three steps required to create a cellular GSM connection are:

Making Your Connections
User’s Guide 5–3
hp CONFIDENTIAL DRAFT
hp CONFIDENTIAL
November 26, 2003 11:47 am
DRAFT
1. Acquiring the following information:
❏Phone number
❏Activated SIM card inserted into your iPAQ Pocket PC
2. Configuring your GSM connection.
3. Dialing the GSM connection.
You can use the cellular GSM connection to:
❏Connect to a mobile telephone network for sending and
receiving mobile telephone calls
❏Send and receive e-mail messages using Inbox. First, you
must set up the Inbox to communicate with the e-mail
server.
❏Send and receive SMS/MMS messages
❏Synchronize data with a computer on the network.
Configuring your GSM connection on
your Pocket PC
1. From the Start menu, tap Settings > Connections tab >
Connections icon.
2. In the drop-down list, select Add a new modem connection
from either ISP or My Work Network.
3. Enter a descriptive name for the connection (for example,
iPAQ dialup).
4. In the Select a modem list, select Cellular Line.
5. Tap Next.
6. You should not need to change any settings in Advanced.
Most ISPs and Networks use a dynamically assigned address.
If the ISP or Network you are using does not use a
dynamically assigned address, enter the connection number
that was give to you by your ISP or Network Administrator
and tap Next.

User’s Guide 5–4
Making Your Connections
hp CONFIDENTIAL DRAFT
hp CONFIDENTIAL
November 26, 2003 11:47 am File:
DRAFT
7. Enter your User name, Password, and Domain if provided by
your ISP or Network Administrator.
8. Tap Finish.
Dialing a GSM Connection
1. From the Start menu, tap Settings > Connections tab >
Connections icon.
2. In the drop-down list, select the service you want to use.
3. Tap Connect.
Closing a GSM Connection
1. First, close Inbox or Pocket Internet Explorer if they are
open.
2. Then tap the Data Connections icon in the Navigation
bar of the Today screen, and tap End.
Creating a GPRS Connection
A GPRS connection is used as a high-speed connection for data
transfer or to access the Internet.
The four steps required to create a GPRS connection are:
1. Subscribing with a GSM service provider that supports
GPRS.
✎The service provider must enable the GPRS features on
your account
2. Configuring your GPRS connection.
3. Connecting to the GPRS network.
4. Authenticating GPRS (if required)

Making Your Connections
User’s Guide 5–5
hp CONFIDENTIAL DRAFT
hp CONFIDENTIAL
November 26, 2003 11:47 am
DRAFT
Configuring your GPRS connection on
your Pocket PC
1. From the Start menu, tap Settings > Connections tab >
Connections icon.
2. Select Add a new modem connection from either the ISP
section or My Work Network section.
3. Enter a descriptive name for the connection (for example,
Phone Dialup or anything you want).
4. In the Select a modem list, tap Cellular Line (GPRS).
5. Tap Next.
6. Under Access Point Name, enter the APN provided by your
GPRS service provider.
7. Tap Next.
8. Enter your User name, Password and, if provided by your ISP
or network administrator, your Domain name.
You should not need to change any settings in Advanced.
Most ISPs now use a dynamically assigned address. If your
GPRS service provider specified the IP addresses for your
DNS servers, tap Advanced, then tap the Name Servers tab.
Select Use specific server addresses, and then enter the
DNS addresses provided by your GPRS service provider. Tap
OK.
9. Tap Finish.
Connecting to the GPRS Network
1. From the Start menu, tap Settings > System tab > GPRS.
2. To automatically connect and/or disconnect from the
network, select the appropriate options under GPRS
Settings.
Your service provider can provide additional information on
connecting to the Internet using GPRS.

User’s Guide 5–6
Making Your Connections
hp CONFIDENTIAL DRAFT
hp CONFIDENTIAL
November 26, 2003 11:47 am File:
DRAFT
Authenticating GPRS
Ask your GPRS service provider to determine the authentication
method used by your network. There are three methods available:
❏None—No authentication required
❏PAP—Password Authentication Protocol
❏CHAP—Challenge Handshake Authentication Protocol
Setting Up a WAP Browser
Wireless application protocol (WAP) is a protocol for the way in
which wireless technology is used for Internet access. A WAP
browser can accommodate the low memory limitations of
handheld devices and the low-bandwidth limitations of a
wireless-handheld connection.
Before you can use the WAP browser, you must set it up.
1. From the Start menu, tap Settings > Connections tab >
Connections.
2. Under My Work Network, select Manage Existing
Connections > Proxy Settings tab.
3. Place a checkmark in the two boxes on the My Work
Network screen and tap Advanced.
4. Next to WAP enter Server and Port information
supplied by your Mobile Service Provider, and tap OK.
Viewing WAP Pages
Once you have set up your WAP browser, you can view WAP
pages by starting a GSM or GPRS connection and using Pocket
Internet Explorer. When you enter a Web site using Pocket
Internet Explorer, remember WAP addresses are prefixed by
“wsp” not “http” (example: wsp:\\www.xxx.com).

Making Your Connections
User’s Guide 5–7
hp CONFIDENTIAL DRAFT
hp CONFIDENTIAL
November 26, 2003 11:47 am
DRAFT
Connecting to a Private Network
1. Before you start, be sure to have your server phone number,
user name, and password. This information can be obtained
from your network administrator.
2. Tap Start > Settings > Connections tab >
Connections icon.
3. In My Work Network, follow the instructions for each type
of connection. For more information on Bluetooth
connections, see Chapter XI, “Using Bluetooth.” For more
information on Wireless LAN connections, see “Setting Up
VPN Server Connections” or “Setting Up Proxy Server
Settings” in Chapter XII, “Using Wireless LAN.”
Connecting with a Default Setting
NEED INFORMATION ON THIS.
Connecting to an E-mail Server
You can send and receive e-mail messages by connecting directly
to an e-mail server using GSM/GPRS or Wireless LAN. If you
have already created a connection to a network or an ISP, you
must still set up an e-mail account in Inbox.
NOTE: The network or ISP connection must use a POP3 or
IMAP4 e-mail server and an SMTP gateway.
To set up an e-mail account on your Pocket PC:
1. From the Start menu, tap Inbox > Accounts > New Account
and enter your e-mail address.
2. Tap Next.
3. Enter your password and tap Next.
4. Check that your Account Type and Name shows a POP3 or
IMAP4 connection and tap Next.

User’s Guide 5–8
Making Your Connections
hp CONFIDENTIAL DRAFT
hp CONFIDENTIAL
November 26, 2003 11:47 am File:
DRAFT
5. Complete the required requests on the screen and, when
finished, tap Finish.
To connect to an e-mail account, from the Start menu, tap Inbox
> Accounts > Connect.
Entering an Internet Address
With Pocket Internet Explorer and a connection to the
Internet, you can view Web sites on your Pocket PC by typing an
Internet address in the Address bar.
NOTE: Web sites that use HTML 4.0, DHTML, animated GIF
images, and Java applets may not work correctly in Pocket
Internet Explorer without additional software.
To enter an Internet address on your Pocket PC:
1. From the Start menu, tap Internet Explorer > Address Bar.
NOTE: If the Address Bar is not visible, tap the View tab >
Address Bar to turn it on.
2. Enter the Internet address in the Address bar.
3. Tap the Go icon.
Using a Favorites List
With Pocket Internet Explorer and a connection to the Internet,
you can view Web sites on your Pocket PC by selecting one from
your Favorites list.
To select a Web site from your Favorites list:
1. From the Start menu, tap Internet Explorer.
2. Tap the Favorites icon and the Web site you want to view.

User’s Guide 6–1
6
Using the Camera
Use the HP Image Capture software to take digital photographs
with the built-in camera on your Pocket PC. You can snap digital
photos, store them on your Pocket PC or transfer the photos to
your personal computer using the HP Image Transfer program,
and you can view, print, add audio to photographs, and create
slideshows using HP Image Zone for Pocket PC.
The camera lens for your camera is located on the top, right
corner on the back of your Pocket PC.
NOTE TO REVIEWERS: The camera section is waiting on
major changes which are scheduled to arrive this week (Denny).
Therefore, this section is incomplete.
Taking a Picture
1. Press the Camera button on the right side of the Pocket
PC to open the HP Image Capture application.
NOTE: Another way to open the camera application is from
the Start menu, tap Programs > HP Image Capture.
2. After the application opens on your screen, tap Select
Mode and select your preferred mode.
3. Focus the camera lens on the subject to be photographed.
4. Tap Preview S to view the image on the Pocket PC
screen before capturing it on your camera.
5. If the image is correct, tap Capture to take the picture.

User’s Guide 6–2
Using the Camera
Adjusting your Settings
Saving a Picture
NONE OF THIS INFORMATION IS AVAILABLE.
Adjusting Your Settings
Editing a Picture
Using HP Image Transfer
Waiting for Working Program.
Using HP Image Zone
HP Image Zone software is included on your Companion CD.
You must download it to your personal computer before it can be
used.
Use HP Image Zone to:
■View pictures stored on your Pocket PC or on a storage card
■Record sounds with pictures
■View a slideshow
■Print pictures

Using the Camera
User’s Guide 6–3
Viewing Pictures
1. From the Start menu, tap Programs > HP Image Zone.
NOTE: The viewer opens in Browse mode by default. Browse
mode displays a thumbnail view of the pictures in the current
folder.
2. Tap a thumbnail to select the picture. A preview of the
picture and information about it will be displayed.
To view images in a different folder:
1. Tap File > Change Folder.
2. Select the desired folder.
3. Tap OK.
Viewing a Picture Full-Screen
To view a picture full-screen, and to be able to zoom in or out:
1. Select the picture by tapping on its thumbnail.
2. Tap View > Image, or tap on the preview window.
3. Zoom in or out using the toolbar buttons. If the picture is too
large to fit on the screen, you can display other parts of the
picture by dragging the stylus on the screen, or by using the
Navigation Buttons.
Recording Sound With a Picture
You can record sound for each picture. When the picture is
displayed, the associated sound is played. Pictures with sound
have a speaker icon in their thumbnails.
To add sound to a picture:
1. Select the picture by tapping on its thumbnail.
2. Tap the Cassette icon on the menu bar.
3. Tap the Record button on the Recording toolbar.

User’s Guide 6–4
Using the Camera
4. Speak into the microphone or record the sound.
5. Tap the Stop button on the Recording toolbar.
To change audio options:
1. Tap File > Options > Audio tab.
2. Select your audio options.
3. Tap OK.
Viewing a Slideshow
You can view a slideshow of the images in the current folder. To
start the slideshow, tap View > Slideshow.
During the slideshow, tap anywhere on the screen to display the
on-screen controls which you can use to move forward or
backward through the slides, or to end the slideshow. You can
also use the Navigation Buttons to move forward or backward
through the slides.
You can control display options such as:
■Sequence
■Delay
■Rotation
■Transition Effect
To change slideshow settings:
1. Tap File > Options > Slideshow tab.
2. Select the settings and effects you want to use in your
slideshow.
3. Tap OK.
Printing Pictures
You can print pictures from HP Image Zone if HP Mobile
Printing has been installed from the Companion CD, or you can
use Bluetooth to print your images if you have access to a
Bluetooth-enabled printer.

Using the Camera
User’s Guide 6–5
To print a picture:
1. Select the picture to be printed by tapping on its thumbnail.
2. Tap File > Print.
NOTE: For more information on using HP Image Zone, tap Start >
Programs > HP Image Zone, then tap > Help.
E-mailing a Picture
THIS INFORMATION WILL BE PROVIDED AT A LATER
DATE.
Using MMS to E-mail a Picture
THIS INFORMATION WILL BE PROVIDED AT A LATER
DATE.
To locate more information about the Camera included on your
Pocket PC, go to the following HP Web site:
www.hp.com/products/pocketpc/options

User’s Guide 6–6
Using the Camera

User’s Guide 7–1
7
Expansion Cards
You can expand the memory and connectivity of your Pocket PC
by using SD (Secure Digital), SDIO (Secure Digital IO), or MMC
(Multimedia Memory) expansion cards. Use these optional
expansion cards for:
■Adding functionality such as the HP PhotoSmart Camera,
Bar Code Scanners, etc.
■Expanding the memory of your Pocket PC for data storage
■Viewing the content of memory cards (SD/MMC)
NOTE: Expansion cards must be purchased separately and are not
included with your Pocket PC.
To locate information about expansion cards, go to the following
HP Web site: www.hp.com/products/pocketpc/options
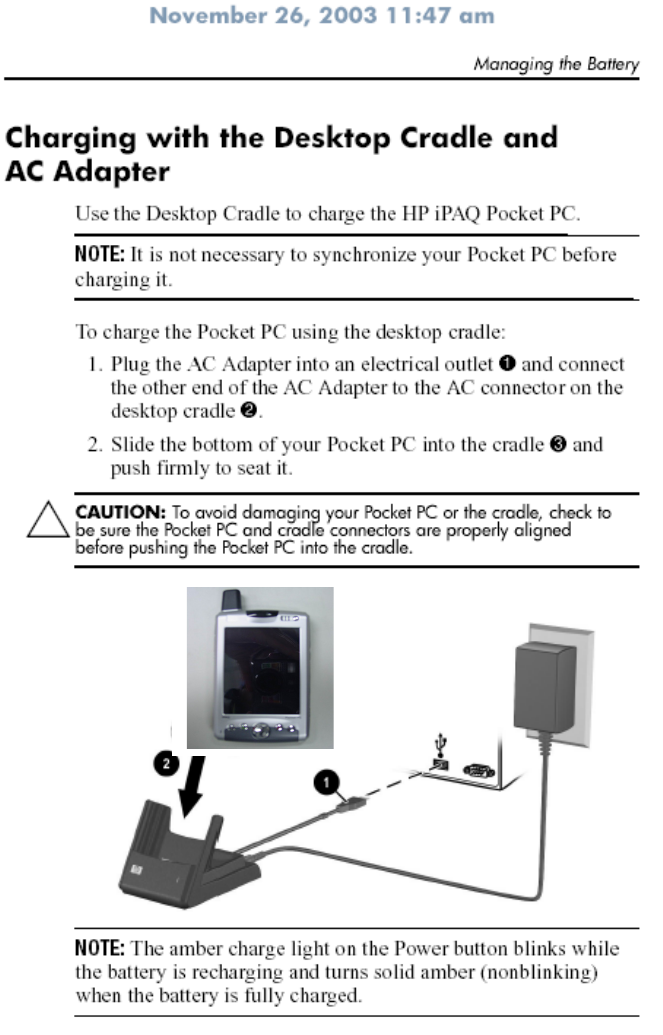
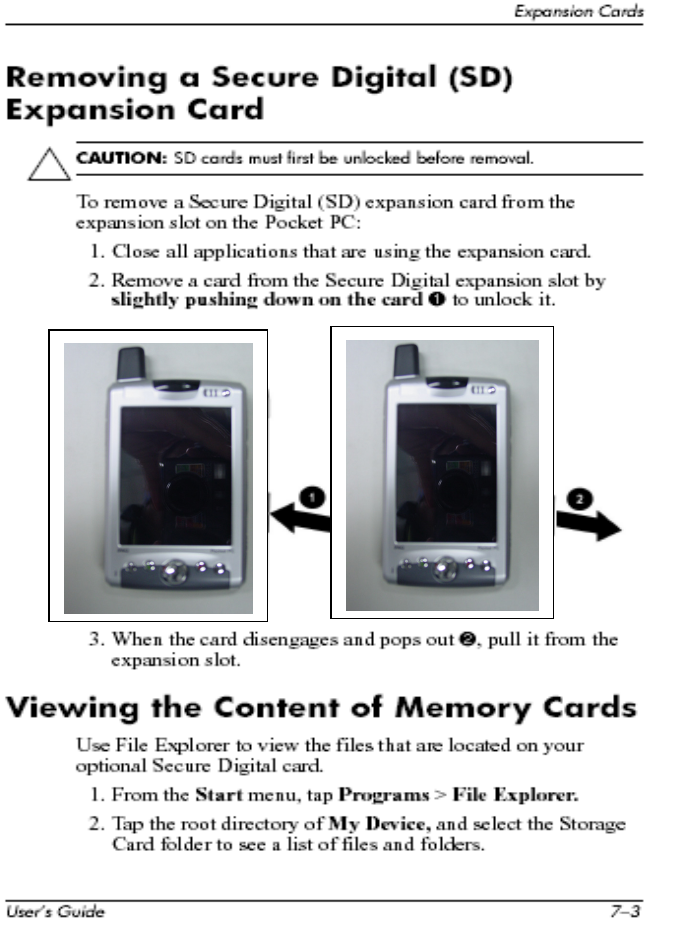

User’s Guide 7–4
Expansion Cards

User’s Guide 8–1
8
Using E-mail
Information on using e-mail including Outlook, Blackberry and
other e-mail services will be included in the next draft.
Using Inbox
You can receive Internet e-mail messages and SMS messages in
Inbox. Internet e-mail messages are sent by using an address you
receive from your Internet service provider (ISP) or your
employer. SMS messages are sent and received through your
wireless phone service provider by using a phone number as the
message address.
You can send and receive e-mail by synchronizing with your PC,
or by connecting to a Post Office Protocol 3 (POP3) or Internet
Message Access Protocol 4 (IMAP4) mail server. You need to set
up an e-mail account for each method that you use except for
Microsoft ActiveSync, which is set up by default. The
ActiveSync folder on your device is used to store messages that
you send and receive through synchronization with a PC.
Account names appear as folders in the folder list (located on the
left, under the navigation bar) in the Inbox message list.
With synchronization, messages are synchronized between the
device Inbox and the PC Inbox by using ActiveSync and
Microsoft Exchange or Microsoft Outlook.
When connecting to a POP3 or IMAP4 server, you use a modem
to connect to your Internet service provider (ISP), or a modem or
Ethernet card to connect to the local area network that your
e-mail server is connected to. You can also use your phone to
connect by using a cellular line connection.

User’s Guide 8–2
Using E-mail
Using Folders
Each e-mail account and SMS account has its own folder
hierarchy with five default folders: Inbox, Outbox, Deleted Items,
Drafts, and Sent Items. The messages you receive and send
through the mail account are stored in these folders. You can also
create additional folders within each hierarchy. The Deleted
Items folder contains messages that have been deleted on the
device. The behavior of the Deleted Items and Sent Items folders
depends on the Inbox options you have chosen.
The behavior of the folders you create depends on whether you
are using ActiveSync, SMS, POP3, or IMAP4.
If you use ActiveSync, e-mail messages in the Inbox folder in
Outlook will automatically be synchronized with your device.
You can select to synchronize additional folders by designating
them for ActiveSync. The folders you create and the messages
you move will then be mirrored on the server. For example, if you
move two messages from the Inbox folder to a folder named
Family, and you have designated Family for synchronization, the
server creates a copy of the Family folder and copies the
messages into that folder. You can then read the messages while
away from your PC.
If you use SMS, messages are stored in the Inbox folder.
If you use POP3 and you move e-mail messages to a folder you
created, the link is broken between the messages on the device
and their copies on the mail server. The next time you connect,
the mail server will see that the messages are missing from the
device Inbox and delete them from the server. This prevents you
from having duplicate copies of a message, but it also means that
you will no longer have access to messages that you move to
folders created from anywhere except the device.
If you use IMAP4, the folders you create and the e-mail messages
you move are mirrored on the server. Therefore, messages are
available to you anytime you connect to your mail server,
whether it is from your device or PC. This synchronization of
folders occurs whenever you connect to your mail server, create
new folders, or rename/delete folders when connected.

Using E-mail
User’s Guide 8–3
For all accounts except ActiveSync, you can access folder options
by tapping Tools > Manage Folders.
Setting Up an Account
To set up an account:
❏To set up a POP3 or IMAP4 e-mail account, tap
Accounts > New Account. Follow the instructions in the
New Account Wizard.
❏To set up an SMS account, tap Accounts > Accounts,
and then tap SMS. Follow the instructions on the screen.
To change options for an account:
1. Tap Accounts > Accounts.
2. Tap the name of the account, and follow the instructions on
the screen.
To delete an account:
1. Tap Accounts > Accounts.
2. Tap and hold the name of the account, and then tap Delete.
NOTE: You can set up several e-mail accounts including your
ActiveSync account, but you can set up only one SMS account.
IMPORTANT: You cannot add a new account while connected. Tap
Accounts > Disconnect to disconnect.
NOTE: You cannot delete your SMS account.

User’s Guide 8–4
Using E-mail

November 26, 2003 11:47 am
User’s Guide 9–1
9
Using ActiveSync
You can use Microsoft ActiveSync to:
■Synchronize information between your HP iPAQ Pocket PC
h6300 Series and up to two computers or one server so that
you have the latest information in all locations.
■Change synchronization settings and the synchronization
schedule.
■Copy files between your unit and computer.
■Install applications on your Pocket PC.
■Back up and restore unit information.
■Synchronize links.
■Send and receive e-mail.
■Request meetings.
ÄCAUTION: For synchronization to work properly, install Microsoft
ActiveSync on your computer before you connect your Pocket PC to
your computer.

User’s Guide 9–2
Using ActiveSync
November 26, 2003 11:47 am
Connecting to a Computer
Connect your Pocket PC to your computer using
Microsoft ActiveSync and the desktop cradle, a wireless
infrared connection, a Wireless LAN connection or Bluetooth.
For more information on using ActiveSync with Bluetooth, refer
to Chapter 4, “Using Bluetooth.”
Note: When using Microsoft ActiveSync to synchronize
e-mail on your computer with your Pocket PC, you must have
Microsoft Outlook 98 or later installed on your personal
computer. If you do not have Outlook, install the Microsoft
Outlook 2002 software from the Companion CD. Microsoft
Outlook Express will not work with the iPAQ Pocket PC and
ActiveSync.
Installing ActiveSync
ÄCAUTION: For synchronization to work properly, install Microsoft
ActiveSync on your computer before you connect your Pocket PC to
your personal computer.
To install Microsoft ActiveSync on your personal computer:
1. Insert the Companion CD into the CD tray or slot on your
computer.
2. When the CD displays on your computer screen, click on the
Start Here tab, then select the link to install Microsoft
ActiveSync.
NOTE: If the Companion CD does not automatically start on
your personal computer, you may need to manually start it by
clicking on the Microsoft Windows Start menu in the lower right
corner of the monitor screen, and then clicking on Run. In the
Run dialog box, navigate to your CD drive and double-click on
SETUP.EXE to start the Companion CD.

Using ActiveSync
User’s Guide 9–3
November 26, 2003 11:47 am
3. Follow the instructions in the installation wizard. For more
help, click the ActiveSync Help button during installation.
4. After installing ActiveSync on your computer, connect the
Pocket PC to the computer using the desktop cradle.
Synchronizing with Your Computer
After you have installed ActiveSync, you can:
■Create partnerships that enable you to synchronize
information with up to two computers.
■Select information to be synchronized with your Pocket PC
(for example, Contacts, Calendar, Inbox, Tasks, Favorites,
Files, Notes, and AvantGo).
Note: When you synchronize files, you can drag and drop the
selected files from your computer to the synchronized folder on
your Pocket PC. If you named your device “PC1” when you
created your partnership, then the synchronized folder is named
“PC1.” When you synchronize, the files move to and from your
Pocket PC.
Using the Serial Infrared (IR) Connection
As an alternative to using the desktop cradle, you can synchronize
your Pocket PC and your computer using an infrared connection
if you have an infrared port or an infrared USB adapter installed
on your computer. The infrared connection option works only on
computers that have Microsoft Windows 98SE, Me, 2000, or XP
operating systems installed.
To set up an infrared connection to a computer:
1. Synchronize your Pocket PC with your computer using the
desktop cradle before the first time you establish an
ActiveSync connection via infrared.
2. Follow your computer manufacturer’s instructions to install
and set up an infrared port.

User’s Guide 9–4
Using ActiveSync
November 26, 2003 11:47 am
3. Remove the Pocket PC from the cradle and line up the
infrared port with the computer infrared port so they are
unobstructed and within 12 inches (30.5 cm) of each other.
4. Initiate a connection by tapping Start > ActiveSync >
Tools > Connect via IR. Synchronization begins on your
device.
5. To disconnect, move the devices away from each other or
tap X in the upper right of the screen to turn off.
Changing Synchronization Settings
You can modify your synchronization settings for Microsoft
ActiveSync to:
■Change when your Pocket PC synchronizes with your
computer or server.
■Change the type of connection from your Pocket PC to your
computer (for example, serial, USB, infrared connections).
■Select the files and information to synchronize with your
computer.
■Select the files and information you do not want to
synchronize with your computer (for example, e-mail
attachments).
■Determine how conflicts between information on your Pocket
PC and information on your computer are handled.
To change synchronization settings:
1. From the Start menu on your computer, click Programs >
Microsoft ActiveSync > Tools > Options.
a. On the Sync Options tab, select the files and information
to synchronize with your computer.
b. On the Schedule tab, select when your Pocket PC
synchronizes with your computer.

Using ActiveSync
User’s Guide 9–5
November 26, 2003 11:47 am
c. On the Rules tab, determine how conflicts between
information on your Pocket PC and information on your
computer are handled.
2. Tap OK when you are finished.
3. From the File menu, click Connection Settings. Select the
type of connection to be allowed between the Pocket PC and
the computer.
Copying Files
You can copy files to and from your computer using Explore in
ActiveSync and Windows Explorer.
To copy files:
1. Insert your Pocket PC into the desktop cradle.
2. From the Start menu on your computer, click Programs >
Microsoft ActiveSync.
3. Click Explore.
4. Double-click the My Pocket PC icon.
5. On your computer, right-click the Start menu, and select
Explore.
6. Locate the file to be moved.
NOTE: You cannot copy preinstalled files or system files.

User’s Guide 9–6
Using ActiveSync
November 26, 2003 11:47 am
7. Drag and drop your files between your Pocket PC and your
computer. ActiveSync converts the files so that they can be
used by the Pocket Office applications, if necessary.
NOTE: Move your files directly into My Documents on your
Pocket PC (or into a folder inside My Documents), so
the applications on your Pocket PC can locate them.
NOTE: Some files may lose some of their format during the
conversion process to an application on the Pocket PC.
Installing Programs
Use ActiveSync to install programs on your Pocket PC from your
computer:
1. Use the desktop cradle to connect your Pocket PC to your
personal computer.
2. Follow the instructions in the Installation Wizard provided
with the program.
3. Check the screen on your Pocket PC to see if any further
steps are necessary to complete the program installation.
Backing up and Restoring
To help reduce the chance of losing information, you should back
up information to your computer on your Pocket PC regularly.
For more information on backing up and restoring information
using Microsoft ActiveSync, refer to “Backing Up Information”
in Chapter 4.

Using ActiveSync
User’s Guide 9–7
November 26, 2003 11:47 am
Synchronizing Links
You can synchronize links to Web sites from your Favorites
list on your computer to view them offline with Pocket Internet
Explorer.
1. From the Start menu on your computer, click Programs
and double-click the Internet Explorer icon.
2. Click Favorites to see the list of links to your favorite
Web sites.
3. To save a Web site link to Mobile Favorites, open the
Web site, and click Create Mobile Favorite.
If you select “Favorites” as an information type to be
synchronized, ActiveSync copies your mobile favorite
to your Pocket PC the next time you synchronize.
4. Follow the instructions in Synchronize information to
manually synchronize your favorite links.
Using ActiveSync to Send and
Receive E-mail
You can send and receive e-mail messages by synchronizing your
Pocket PC with your computer using ActiveSync. If you are using
ActiveSync to send and receive e-mail messages, the name of the
folder you are using is displayed at the bottom of the screen. For
more information on sending and receiving e-mail using
ActiveSync, from the Start menu, tap Help > Inbox.
Requesting Meetings
You can schedule a meeting and send a meeting request through
ActiveSync. For more information, from the Start menu, tap
Help > Calendar.

User’s Guide 9–8
Using ActiveSync
November 26, 2003 11:47 am