Continental Automotive Systems UHI-5100 Bluetooth Handsfree Car Kit with HFP User Manual
Continental Automotive Systems, Inc. Bluetooth Handsfree Car Kit with HFP
User Manual

83
Control systems
COMAND operating safety
COMAND introduction
COMAND FM/AM radio
COMAND satellite radio* (USA only)
COMAND
audio CD/audio DVD/MP3
COMAND video DVD (USA only)
COMAND telephone*
COMAND navigation
COMAND address book
COMAND system settings
COMAND vehicle menu
COMAND automatic climate control
COMAND seats
Instrument cluster control system
Voice Control*

84
Control systems
COMAND operating safety
Warning! G
Any alteration of electronic components or
software can cause malfunctions.
Radio, satellite radio* (USA only), amplifier,
CD/DVD changer, navigation module, tele-
phone and Voice Control Systems* are in-
terconnected. Therefore, if one of the
components is not operational, or has not
been removed/ replaced properly, the func-
tion of other components could be impaired.
Such conditions might seriously impair the
operating safety of your vehicle.
We recommend to have any service work on
electronic components carried out by an au-
thorized Mercedes-Benz Center.
Warning! G
In order to avoid distraction which could
lead to an accident, the driver should enter
system settings while the vehicle is at a
standstill, and operate the system only
when permitted by road, weather and traffic
conditions.
Bear in mind that at a speed of just 30 mph
(approximately 50 km/ h), your car covers a
distance of 44 feet (approximately 14 m) ev-
ery second.
COMAND supplies you with information to
help you select your route more easily and
guide you conveniently and safely to your
destination. For safety reasons, we encour-
age the driver to stop the vehicle in a safe
place before answering or placing a call, or
consulting the COMAND screen to read nav-
igational maps, instructions, or downloaded
information.
Warning! G
While the navigation system provides direc-
tional assistance, the driver must remain fo-
cused on safe driving behavior, especially
attention to traffic and street signs, and
should utilize the system’s audio cues while
driving.
The navigation system does not supply any
information on stop signs, yield signs, traffic
regulations or traffic safety rules. Their ob-
servance always remains in the driver’s per-
sonal responsibility. DVD maps do not cover
all areas nor all routes within an area.

85
Control systems
COMAND introduction
왔COMAND introduction
COMAND (Cockpit Management and Data
System) is an information and operating
center for vehicle sound and communica-
tions systems, including the radio and nav-
igation system, as well as other optional
equipment (satellite radio*, telephone*,
etc.).
Availability of functions while the vehi-
cle is in motion
For safety reasons, certain COMAND func-
tions are not available while the vehicle is
in motion or they are only available to a
limited extent. You will notice this, for ex-
ample, by the fact that certain menu items
cannot be selected or that the COMAND
display shows a corresponding message.
Switching COMAND on or off
왘Press the o shortcut button in the
center console (컄page 86).
COMAND calls up the menu last select-
ed.
COMAND components
In your vehicle, COMAND can be used to
operate:
앫audio functions
앫the navigation system
앫the telephone* and communication
functions (SMS*)
앫Video DVD (USA only)
앫various vehicle settings
COMAND consists of the following:
앫COMAND shortcut buttons
앫COMAND display
앫telephone* keypad
앫COMAND controller
iWhen you switch off COMAND, you also
switch off the currently playing audio source.
During a telephone call, you cannot switch off
COMAND.
86
Control systems
COMAND introduction
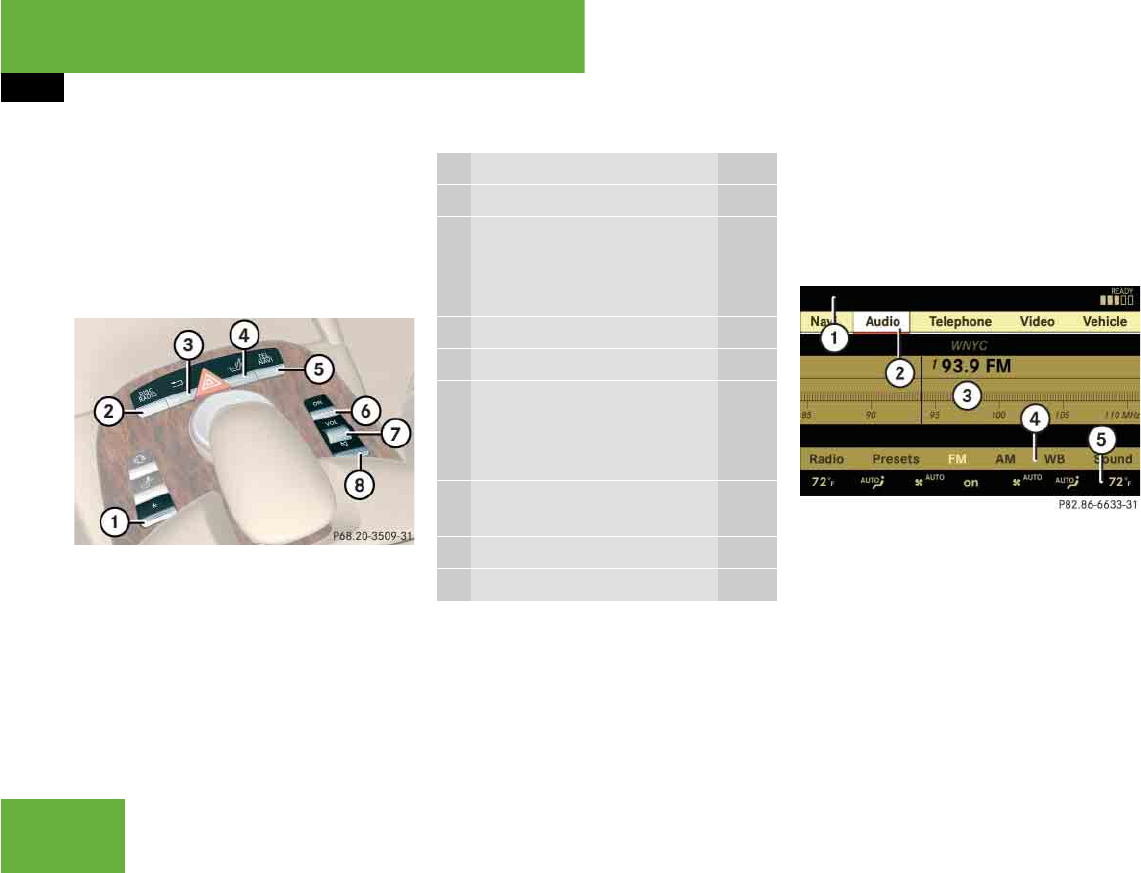
COMAND shortcut buttons
Use the COMAND shortcut buttons to se-
lect main functions directly.
Example:
왘Switching directly to Radio or CD
menu: Press M once or twice.
COMAND display
In the COMAND display, you will find the
function currently selected and the corre-
sponding menus. The COMAND display is
divided into several areas.
1Status line
2Main functions
3Main area
4Submenus
5Climate control settings
A white bar under the main functions 2 in-
dicates the active area.
Once you have selected a main
function 2, the main area 3 is active.
iDuring Dynamic Rear View Monitor* opera-
tion (컄page 453) it is not possible to operate
the COMAND shortcut buttons.
Function Page
1PFavorite button 240
2MShortcut button for:
앫CD/DVD
앫radio
120
101
3LBack button 94
4OSeat menu 261
5NShortcut button for:
앫telephone*
앫navigation
132
167
6oCOMAND on/off
button
85
7,Volume control 96
8FMute button 96
87
Control systems
COMAND introduction
Instrument cluster multifunction
display
This section describes features and con-
trols via the COMAND controller, display
and shortcut buttons only.
Please refer to the “Instrument cluster
control system” section of this manual
(컄page 266) for function descriptions and
operation of the instrument cluster multi-
function display and multifunction steering
wheel buttons as they relate to COMAND
features described in this section.
Adjusting COMAND display
illumination
1Knob
왘Brightening illumination: Turn
knob 1 clockwise.
왘Dimming illumination: Turn knob 1
counterclockwise.
Swiveling COMAND display
1Button for swiveling display to the left
2Button for swiveling display to the right
You can swivel the COMAND display to the
left or right. The buttons are on the
right-hand side of the instrument cluster.
iThe layout of the menus may vary depending
on your vehicle’s equipment. This manual shows
the menus for a fully equipped vehicle.
88
Control systems
COMAND introduction
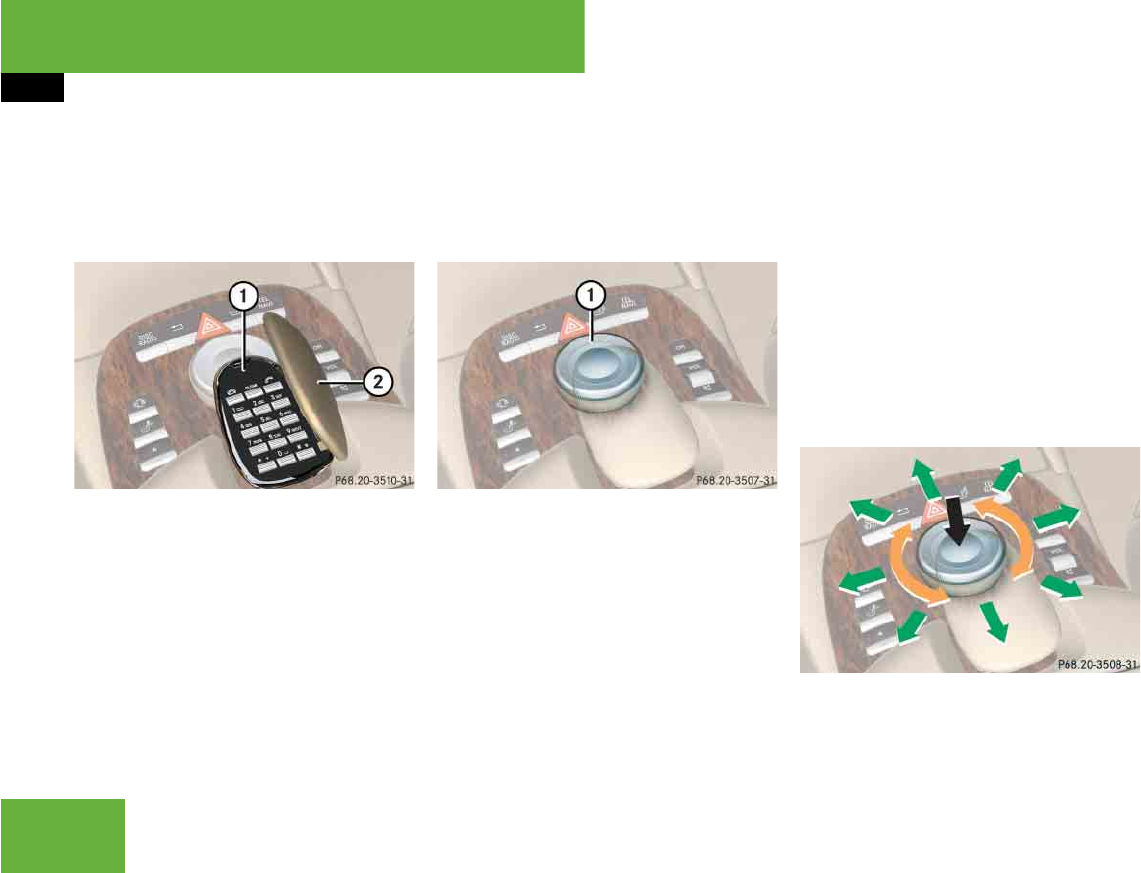
Telephone keypad*
With the help of the telephone keypad, you
can use your mobile phone if it is inserted
in the cradle.
1Telephone keypad
2Folding cover
COMAND controller
Use the COMAND controller to select
menu functions shown on the COMAND
display.
1COMAND controller
You can operate the COMAND controller
as follows:
앫press briefly or press and hold
앫rotate to the left or right
앫slide to the left, right, up, down or
diagonally
In this way, you can move through the
menus, select menu items or exit menus.
You can move through the menus either by
rotating or sliding the controller.
Operating COMAND controller

89
Control systems
COMAND introduction
Symbol How to use the COMAND controller Function
n왘Press briefly. 앫Select menu item.
앫Exit full-screen image with Navi.
왘Press and hold until the selected ac-
tion has been carried out.
앫Save a station.
앫Accept a destination for navigation.
ymz왘Rotate. 앫Move through vertical or horizontal menus.
앫Move through text.
앫Program settings.
qmr왘Slide. 앫Move through vertical menus.
앫Exit horizontal menus.
왘Slide and hold. 앫Move through a navigation map.
omp왘Slide. 앫Move through horizontal menus.
앫Exit vertical menus.
왘Slide and hold. 앫Fast forward or reverse for audio CD or audio DVD playback.
앫Move through a navigation map.
wmx왘Slide and hold. 앫Move through a navigation map.

90
Control systems
COMAND introduction
Operating COMAND
Menu overview
The illustration below shows the structure
of the main functions and their main
menus.
Each main function has a main menu. Each
menu item in the main menu in turn has
several submenu items.
Navi Page Audio Page Telephone* Page
Commands/menus
Map Display 169 FM/AM Radio 100 Telephone* 132
Mode 172 Sat Radio* (USA only) 105 Address Book* 226
CD 112 Telephone OFF* 134
DVD-Audio 112
MP3 112
Audio OFF 99

91
Control systems
COMAND introduction
Video DVD (USA only)1
1Depending on your vehicle’s production date the video DVD function may be not available.
Page Vehicle Page
Commands/menus
Video DVD 124 Exterior Lighting Delayed Switch-off 244
Submenu overview 126 Locator Lighting 245
Switching to video DVD mode 126 Exterior Mirror Convenience Settings 246
Pause playback 128 Automatic Locking 247
DVD menu 129 Easy Entry/Exit Feature 248
Interior Lighting Delayed Switch-off 250
Interior Ambient Light 249
Rear Window Sunshade* 251
Trunk Opening-height Restriction* 251
92
Control systems
COMAND introduction
Calling up the main menu
Illustration: audio main menu
You can call up the main menu of a main
function in the following manner:
왘Moving to the main function line:
Slide qm.
왘Selecting a main function: Slide omp
or rotate ymz.
왘Confirming selection: Press n.
Vertical menus
왘Moving through the menu:
Slide rmq or rotate ymz.
왘Selecting a menu item: Press n.
왘Exiting a menu without making a se-
lection: Slide ompin the opposite di-
rection of the list orientation or press
back button L.
Horizontal menus
왘Moving through the menu:
Slide omp or rotate ymz.
왘Selecting a menu item: Press n.
왘Exiting a menu without making a se-
lection: Slide rmqin the opposite di-
rection of the list orientation or press
back button L.
93
Control systems
COMAND introduction
Entering characters
Illustration: entering a navigation destina-
tion
Selecting characters
왘Slide omp or rotate ymz.
왘Confirming selection: Press n.
COMAND completes your entry as
soon as it can be clearly identified. In
this case, you do not need to switch to
the list.
Deleting individual characters
왘Select and press ) repeatedly in the
bottom line.
Deleting entire words or numbers
왘Press and hold ) in the bottom line
until the word or number is deleted.
Exiting character entry
왘Select and press “Back” in the bottom
line.
or
왘Press back button L in the center
console (컄page 86).
Switching to the list
왘Slide qm.
or
왘Select and press ? in the second line
from the bottom.
왘Exiting list: Slide om to select “Back”.
Accepting first entry
왘Press n until you exit the character
entry window.
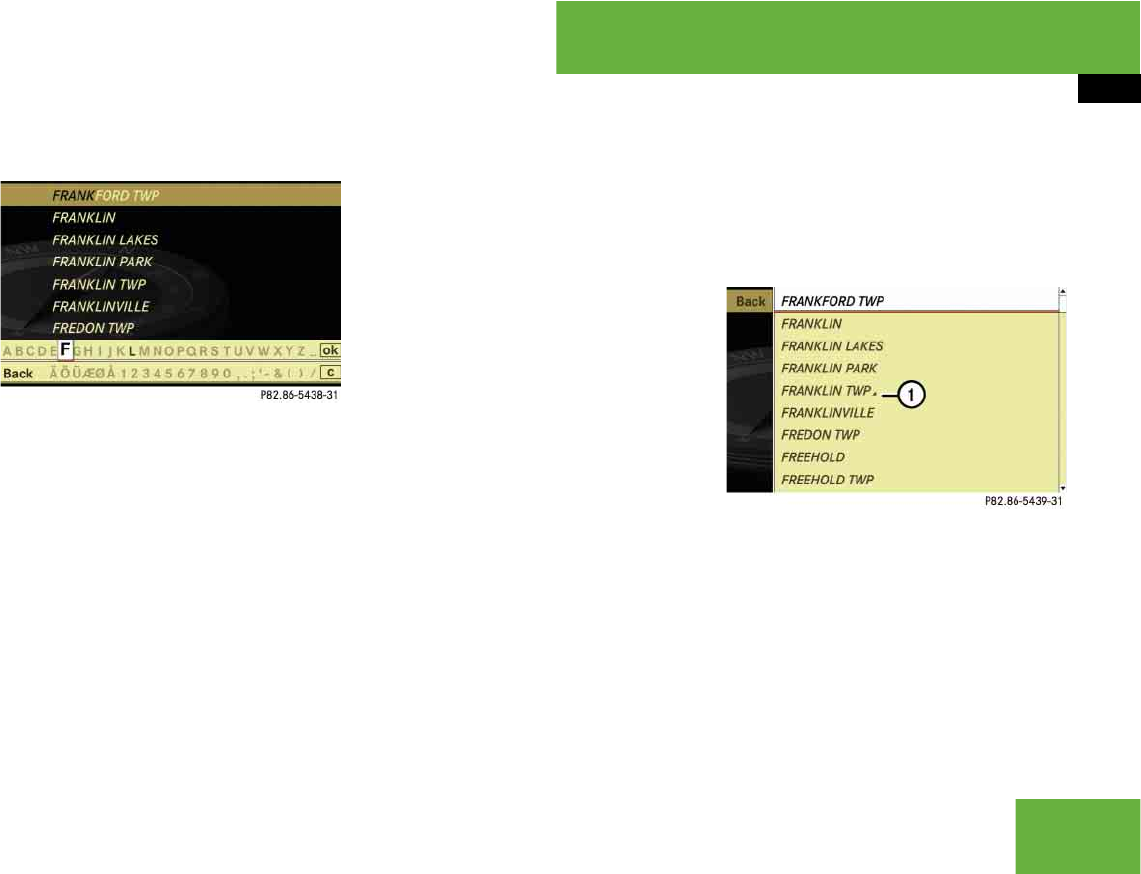
Selecting list item
Illustration: list of towns and cities for navi-
gation
1Symbol for other selection options
(e.g. county)
왘Selecting a line: Slide rmq or
rotate ymz.컄컄
94
Control systems
COMAND introduction
왘Confirming selection: Press n.
Additional selection options are avail-
able for list entries featuring
symbol 1. For example, cities marked
with symbol 1 indicate that the select-
ed country has more than one city fea-
turing that name. Confirming such a list
entry opens up another submenu.
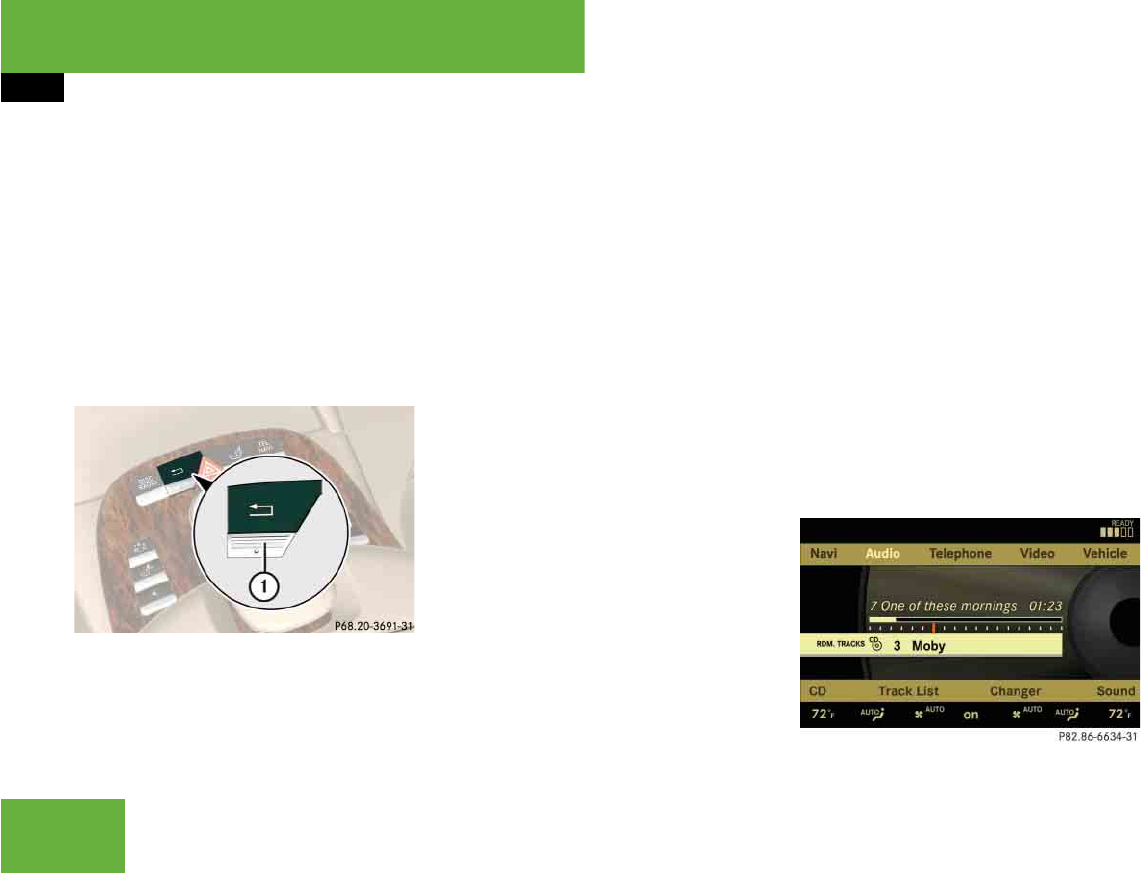
Back button
1Back button
왘Switching to the next highest menu:
Press L briefly.
COMAND switches to the next highest
menu level within the currently active
operating mode.
왘Switching to the main menu: Press
and hold L.
You will hear a signal, and COMAND
switches to the main menu of the cur-
rently active operating mode.
Example of how to use COMAND
In the descriptions below, the main func-
tions always serve as the starting point for
locating the individual menu items.
Example:
“Audio” “Audio” “FM/AM Radio”
“Radio” “Save Station”
If you already see one of the submenus on
the screen (e.g. the “Audio” “Audio”
“Radio” submenu), it is not necessary to
perform the first steps.
The individual steps for the above-men-
tioned example are described below.
왘Switching to the main function line:
Slide qm.
왘Selecting “Audio” main function:
Slide ompor rotate ymz.
왘Confirming selection: Press n.
The audio operating mode last selected
appears.
iIn the COMAND display, you will see the
submenu previously called up for each main
menu.
컄컄
95
Control systems
COMAND introduction
왘Selecting “Audio” in the main menu:
Slide qm.
왘Confirming selection: Press n.
A selection list with the functions of the
“Audio” main menu appears.
왘Selecting “FM/AM Radio”:
Slide qmor rotate ymz.
왘Confirming selection: Press n.
The FM/AM Radio menu appears.
왘Selecting “Radio”: Slide mror
rotate ymz.
왘Confirming selection: Press n.
The Radio submenu appears.
왘Select “Save Station” from selection
list by rotating ymz or sliding rmq.
왘Select desired position.
왘Confirming selection: Press n.
The selected station is saved at the
designated position. The display
switches back to the Radio display.

96
Control systems
COMAND introduction
Main menus of COMAND
Sound
왘Muting: Press the F shortcut but-
ton in the center console (컄page 86).
The sound of the current audio source
is switched on or is muted.
Switching off navigation announce-
ments entirely
왘Canceling navigation message:
Briefly press F shortcut button dur-
ing an announcement.
왘Switching off navigation messages:
Press and hold F during an an-
nouncement until the announcement is
switched off.
You will see the message “The driving
instructions have been muted.” for a
short while.
Adjusting volume
1Thumbwheel
왘Adjusting: Turn , thumbwheel.
The volume of the currently selected
audio source changes.
iThe components and operating principles of
COMAND can be found on (컄page 85).
iWhen the sound is muted, you will see the
symbol F in the status line. When you
change the audio source, the sound is automati-
cally switched on. You will be able to hear an-
nouncements from the navigation system even
when the sound is muted.
iThe announcements remain switched off
even if you start a new route guidance or if
COMAND is switched off/on with the o but-
ton.
If you switch COMAND off by removing the
SmartKey from the starter switch and then
switch the ignition back on after more than
3 minutes, the announcements are automatical-
ly switched back on.
97
Control systems
COMAND introduction
Volume of navigation announcements
You can adjust the volume of the naviga-
tion announcements independently from
the volume of the respective audio source.
During a navigation announcement:
왘turn thumbwheel ,
or
왘press æ or ç on the multifunc-
tion steering wheel.
Adjusting volume for telephone calls
In hands-free mode, you can adjust the vol-
ume of a telephone call while the call is
currently active.
During a telephone call:
왘turn thumbwheel ,
or
왘press æ or ç on the multifunc-
tion steering wheel.
Selecting sound settings
You can select different sound settings for
each individual audio source. The respec-
tive sound menu can be found via the sub-
menu for which you wish to make settings.
Example:
“Audio” “Audio” “FM/AM Radio”
“Sound”
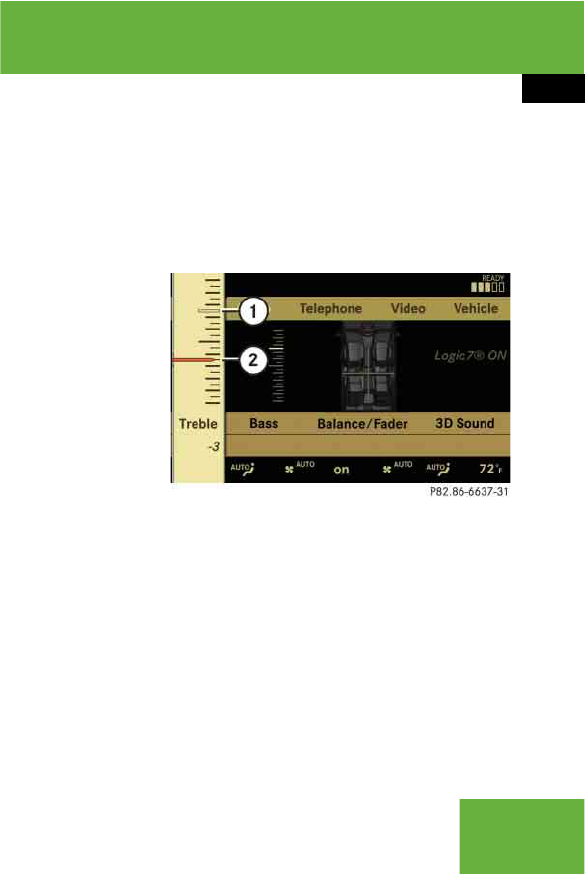
Adjusting treble or bass
왘Select “Sound” “Treble” or “Bass”.
The setting last selected is indicated by
an outlined bar.
Adjusting treble and bass
1Setting last selected
2Current setting
왘Changing setting: Slide rmq or
rotate ymz until desired treble or bass
setting is reached.
왘Exiting menu: Press n, L or
slide omp.
The setting is saved.
98
Control systems
COMAND introduction
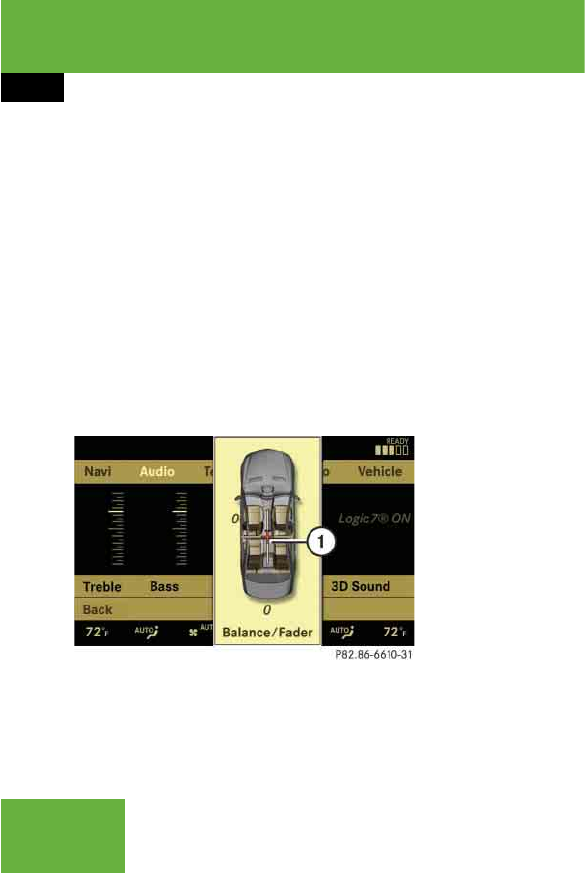
Adjusting balance or fader
Balance is used to determine whether the
sound focus should be shifted toward the
driver’s side or the passenger’s side.
Fader is used to determine whether the
sound focus should be shifted toward the
front or rear of the vehicle
왘Select “Sound” “Balance/Fader”.
The setting last selected is indicated by
an outlined bar.
Adjusting balance and fader
1Current setting indicated by orange
cross-hair symbol
왘Changing setting: Slide rmq or omp
until desired balance/fader setting is
reached.
왘Exiting menu: Press n or L.
The setting is saved.
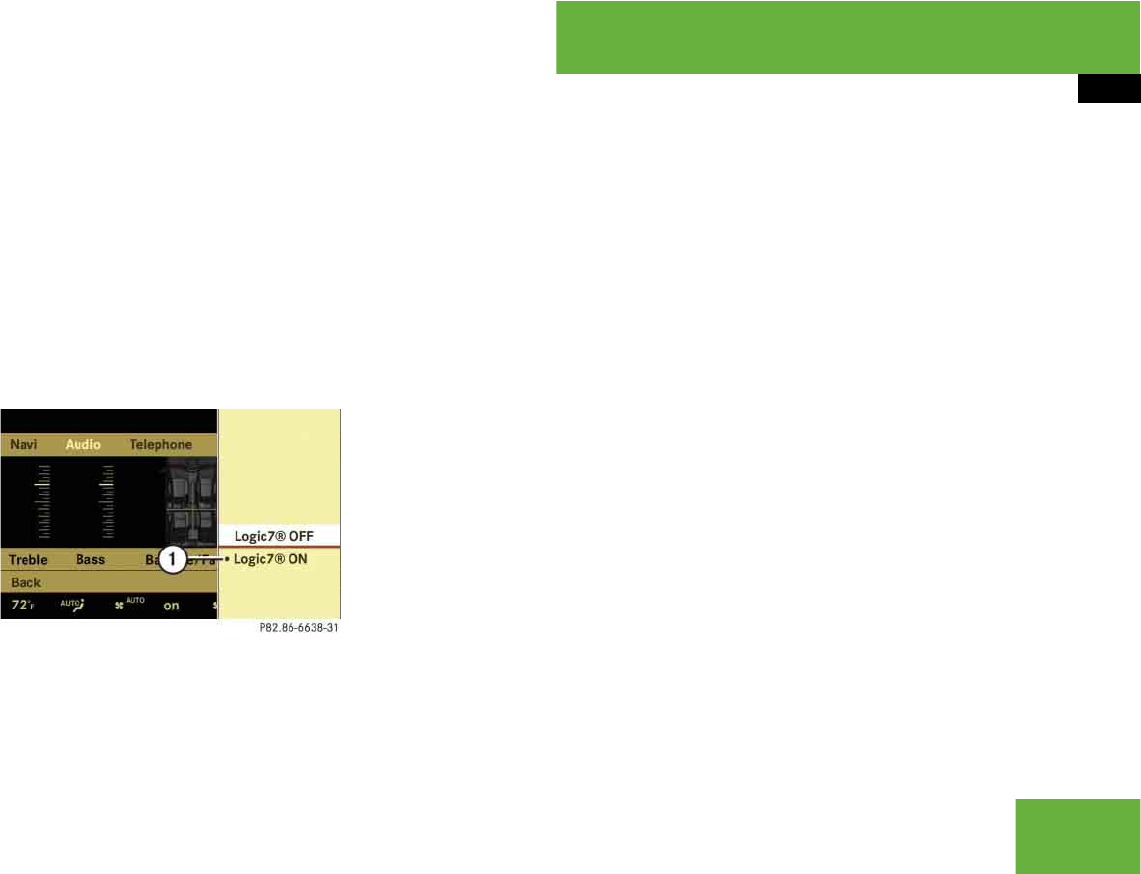
Surround sound
With surround sound, you can choose be-
tween “LOGIC7® ON” and “LOGIC7® OFF”.
Harman/kardon LOGIC7® surround sound
is available for the following operating
modes:
앫Audio DVD (MLP, DTS, PCM, and Dolby
Digital audio formats)
앫Video DVD (DTS, PCM, and Dolby Digi-
tal audio formats) (USA only)
앫Audio CD
앫MP3
앫Radio (FM, AM, WB,
Satellite* (USA only))
앫PCMCIA
iSince some DVDs contain both stereo as
well as multi-channel audio formats, it may be
necessary to adapt the audio format
(컄page 123).
iThe “LOGIC7® ON” function of the har-
man/kardon LOGIC7® surround sound system
makes it possible to play discrete 5.1 and stereo
recordings with optimal surround sound for ev-
ery passenger. Music on CDs or audio DVDs with
high-resolution surround formats such as MLP,
DTS or Dolby Digital is played back optimally.
For an ideal sound experience on all seats,
LOGIC7® distributes 5.1 surround information
via the 13-channel system architecture. The re-
sult is a sound as intended by the sound engi-
neers during the original recording.
harman/kardon LOGIC7® converts all two-chan-
nel stereo sound material into multi-channel sur-
round sound. With the help of LOGIC7®,
surround information stored during the original
recording are read out and distributed through
the 13 channels. No effects are created during
this process; only that which was already there
becomes audible.
In addition, harman/kardon LOGIC7® moves the
perceived sound source away from the individual
loudspeakers, thus generating a natural 360°
sound experience for every passenger.
99
Control systems
COMAND introduction
Adjusting surround sound
With surround sound, you can choose be-
tween “LOGIC7® ON” and “LOGIC7® OFF”.
왘Select “Sound” “3D Sound”.
Adjusting surround sound
1Current setting
왘Selecting a setting: Slide rmq or
rotate ymz.
왘Saving setting: Press n.
The setting is saved and the menu is
closed.
왘Exiting menu without saving
changes: Press L or slide omp.
Switching off/on the audio source
왘Switching off: Select “Audio” “Au-
dio” “Audio OFF”.
The audio source is switched off; “Au-
dio OFF” appears in the display.
왘Switching on: Select “Audio”, then the
desired audio source.
or
왘Load CD/DVD (컄page 115) or a
PCMCIA card (컄page 117).
iBy selecting “LOGIC7® OFF”, all compatible
formats as they are present on the medium are
played back. Due to the vehicle’s spatial charac-
teristics, an optimal sound experience is not en-
sured on all seats.
iPlease note the following:
앫For an ideal sound experience at all seats,
the balance and fader should be adjusted to
the center of the passenger compartment
with LOGIC7® switched on.
앫The best sound results are achieved by play-
ing high-quality audio CDs and audio DVDs.
앫For MP3 tracks, the bit rate should be at
least 128 kbit/s.
앫Surround sound does not function for
mono-signal sources.
앫In the event of poor radio reception quality,
e.g. inside a tunnel, you should switch off
LOGIC7®, as a dynamic switch from Stereo
to Mono could occur, resulting in temporary
sound distortion.
앫With some stereo recordings, the resulting
sound may deviate from conventional stereo
playback.
iWhen you insert an audio CD or audio DVD,
it automatically becomes the active audio
source.

100
Control systems
COMAND FM/AM radio
Submenu overview
Warning! G
Please devote your attention first and fore-
most to the traffic situation you are in.
Before your journey, please familiarize your-
self with the radio functions.
Only use the COMAND when road and traffic
conditions permit you to do so. Otherwise
you could be involved in an accident in
which you or others could be injured.
iThe components and operating principles of
COMAND can be found on (컄page 85).
Radio
(except Weather Band)
Presets
(except Weather Band)
Channel
(only Weather Band)
FM or AM or WB Sound
Station List
(in FM waveband only)
Autostore Channel list Switch to FM waveband Treble
Save Station Preset station list Switch to AM waveband Bass
Frequency Entry Switch to Weather Band Balance/Fader
Show Station Info
(in FM waveband only)
3D Sound
101
Control systems
COMAND FM/AM radio
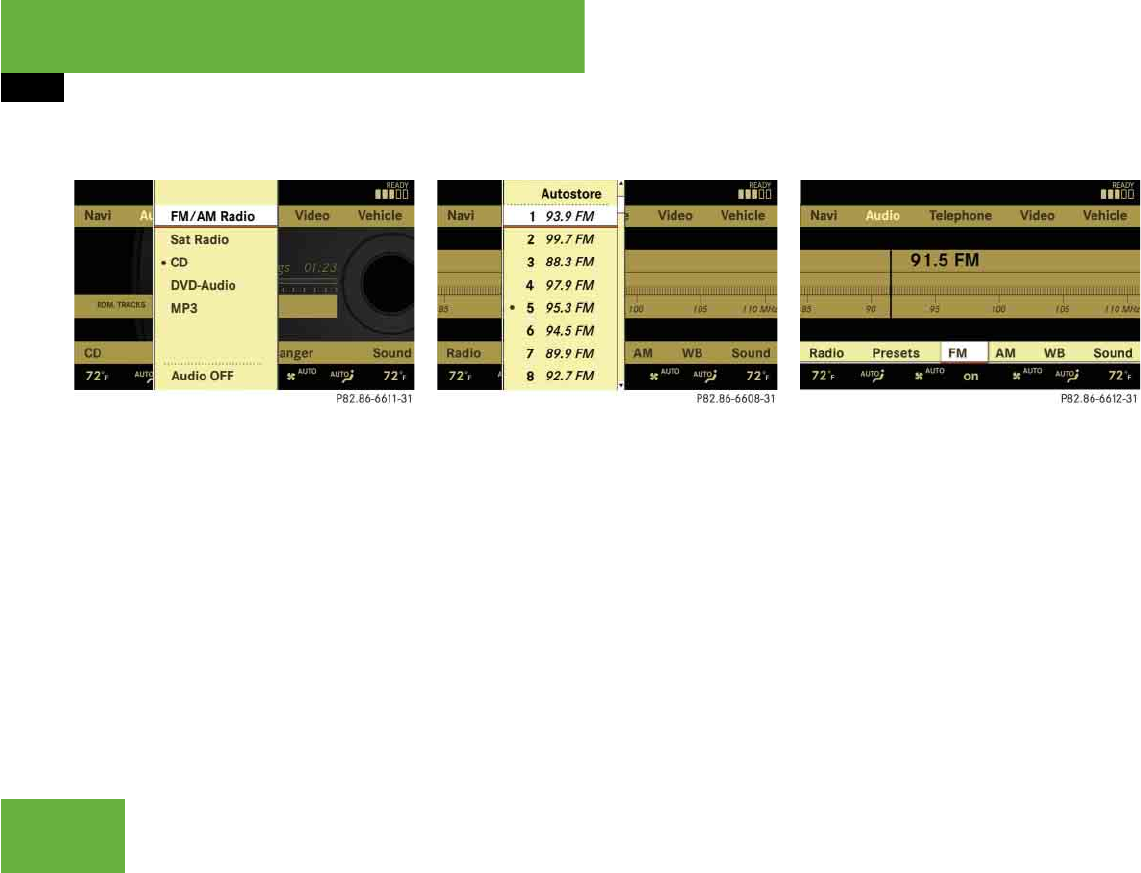
Switching to radio mode
왘Select “Audio” “Audio” “FM/AM
Radio”.
or
왘Press the M shortcut button once or
twice.
The radio display appears once you
have switched to radio mode. You will
hear the station/channel last tuned in
in the previously selected waveband,
provided that the station/channel can
be received.
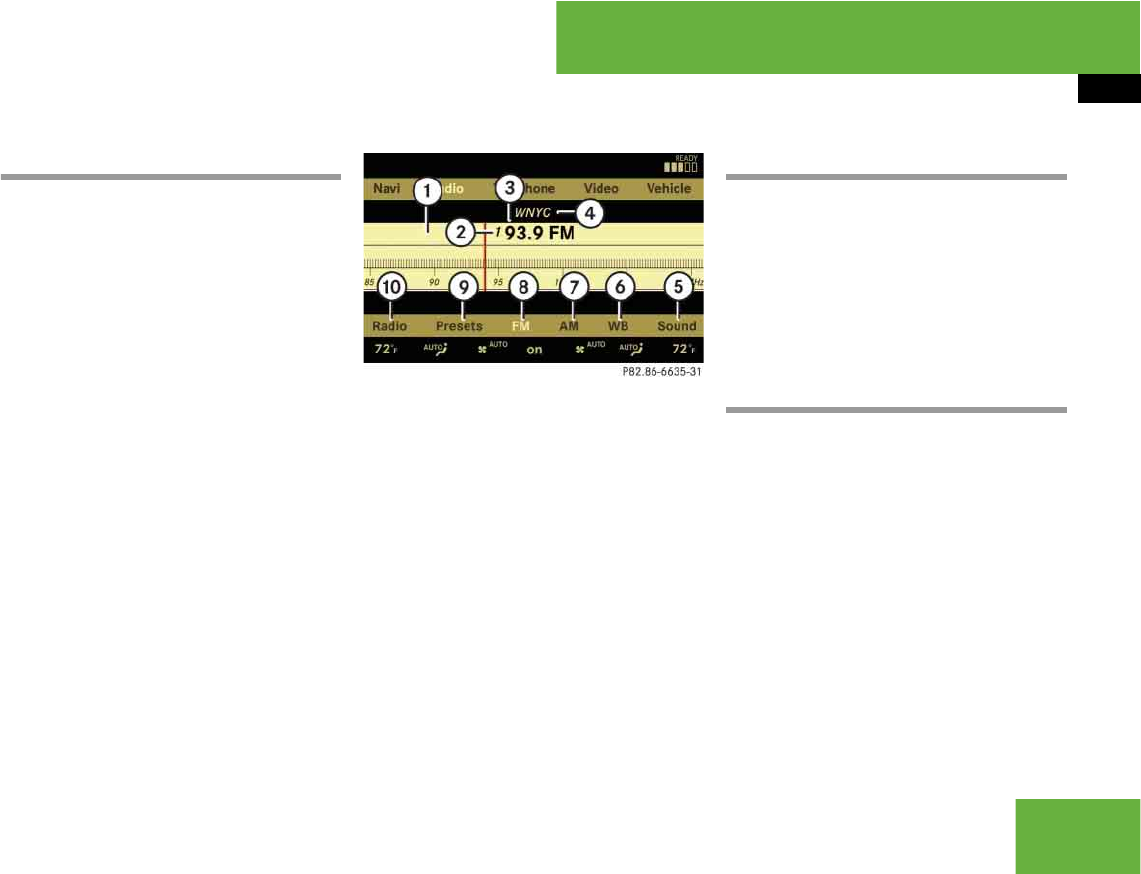
Illustration: radio mode in FM waveband
1Main area with frequency display
2Preset position of selected station
3Frequency of selected station
4Name of selected station
5Sound settings
6To switch to Weather Band
7To switch to AM waveband
8Selected waveband
9Preset options
aRadio options
Switching wavebands
You can switch between the FM, AM and
WB (Weather Band) wavebands.
왘Select “Audio” “Audio” “FM/AM
Radio” “FM” or “AM” or “WB”.
You will hear the station last tuned in
on the selected waveband.
Selecting stations/channels
You have the following selection options:
앫The station list
앫The search function
앫The station presets
앫The manual frequency entry
앫The channel list
iThe number of times you have to press the
M shortcut button depends on the operating
mode currently selected.
iStation name display 4 is available for the
FM waveband and can only be seen when it is
switched on (컄page 104) and if the station
transmits a name.

102
Control systems
COMAND FM/AM radio
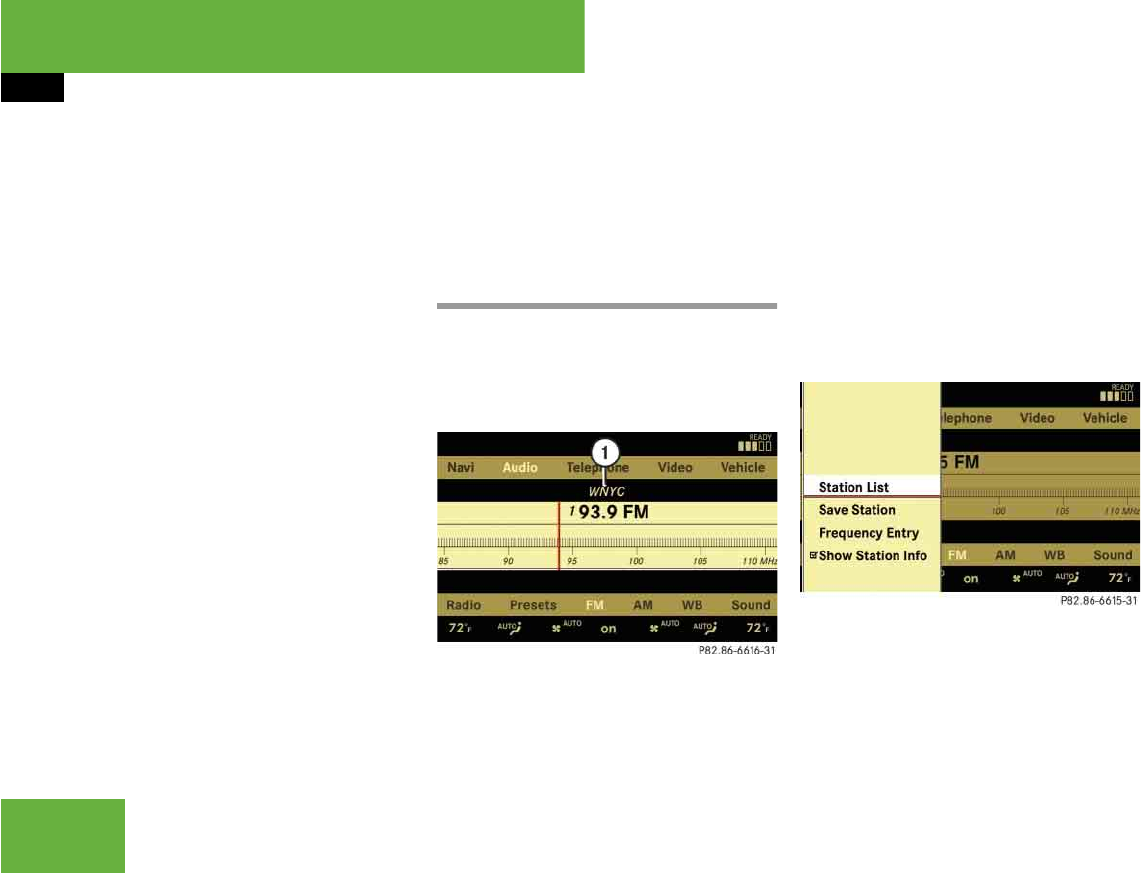
Selecting stations using the station list
왘Select “Audio” “Audio” “FM/AM
Radio” “FM”.
왘Select “Radio” “Station List”.
The station list appears. The dot R in
front of a list entry indicates the cur-
rently selected station. A number in
front of the list entry indicates the pre-
set position in the station preset mem-
ory.
왘Select a station by rotating ymz or
sliding qmr and press n.
Selecting stations/channels using the
search function
왘Slide omp or rotate ymz when the
main area is selected.
Depending on the direction in which
the controller is being slid or rotated,
the system searches upward or down-
ward and stops at the next receivable
station/channel.
Selecting stations using station
presets
왘Select “Audio” “Audio” “FM/AM
Radio” “FM” or “AM”.
왘Select “Presets”.
or
왘Press n when the main area is select-
ed.
The preset menu appears. The dot R
in front of a preset position indicates
that the currently selected station is
saved there.
왘Select station preset by rotating ymz
or sliding qmr and press n.
Selecting stations by entering the fre-
quency manually
왘Select “Audio”“Audio”“FM/AM
Radio”“FM” or “AM”.
왘Select “Radio”“Frequency Entry”.
The menu for manual frequency entry
appears.
왘Exiting menu without making an
entry: Press L back button in the
center console (컄page 86).
왘Increasing or decreasing number:
Slide qmr or rotate ymz.
왘Selecting the next number:
Slide mp.
왘Confirming frequency entry:
Press n.
COMAND tunes in to the frequency
entered.
iThe station list is only available for the FM
waveband. It contains all the stations that can be
currently received and is sorted by station fre-
quencies.
iThis function is not available for Weather
Band.
iThis function is not available for Weather
Band.
iYou can only select currently permitted
numbers.
103
Control systems
COMAND FM/AM radio
Selecting channels using the channel
list
왘Select “Audio” “Audio” “FM/AM
Radio” “WB” “Channel”.
or
왘Press n when the main area is select-
ed.
The channel list appears. The dot R in
front of a list entry indicates the cur-
rently selected channel.
왘Select channel by rotating ymz or
sliding qmr and press n.
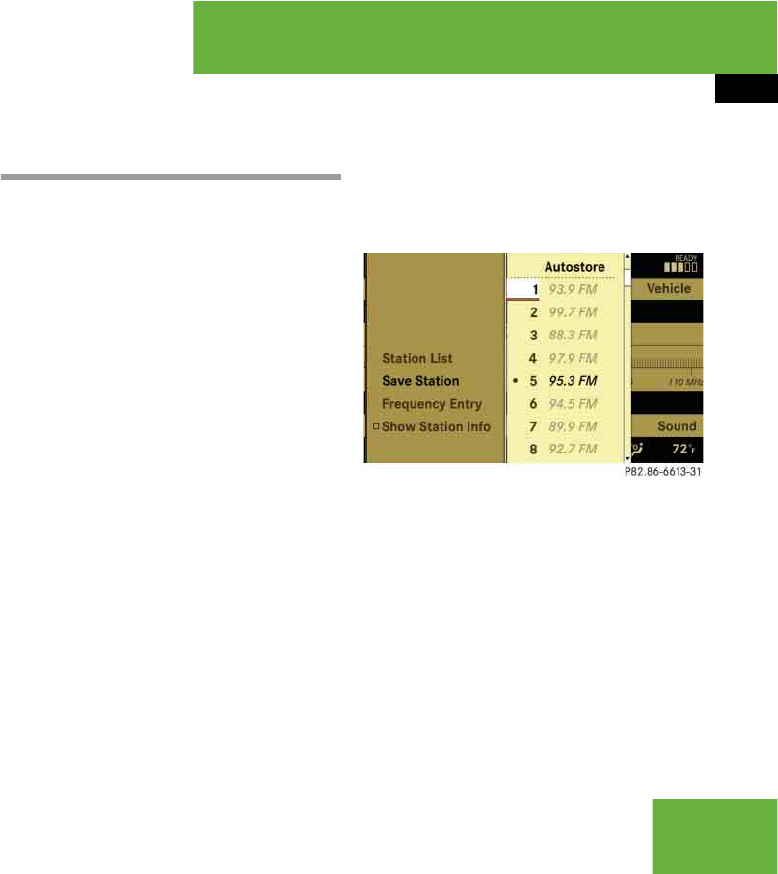
Saving stations
You have the following options:
앫Saving stations manually
앫Saving stations using Autostore
Saving stations manually
Option 1
왘Select “Audio” “Audio” “FM/AM
Radio” “FM” or “AM”.
왘Select “Radio ” “Save Station”.
Option 2
왘Press n when the main area is select-
ed.
Option 3
왘Select “Audio” “Audio” “FM/AM
Radio” “FM” or “AM”.
왘Select “Presets”.
All three of these will call up a station pre-
set screen. The dot R in front of a preset
position indicates that the currently select-
ed station is saved there.
왘Selecting a preset position:
Slide qmr or rotate ymz.
Saving a station to a selected preset po-
sition
If you have called up the station preset
screen using option 1:
왘Press n briefly.
In options 2 and 3:
iIf you enter a frequency in the AM waveband
which is outside the frequency range, COMAND
tunes in to the next lowest frequency.
iThis function is only available for Weather
Band.
iTwenty stations can be saved in each wave-
band except for Weather Band.
104
Control systems
COMAND FM/AM radio
왘Press and hold n until you hear a sig-
nal.
The station is saved.
Saving using autostore
Option 1
왘Press n when the main area is select-
ed.
왘Select “Autostore”.
Option 2
왘Select “Audio” “Audio” “FM/AM
Radio” “FM” or “AM”.
왘Select “Presets” “Autostore”.
Option 3
왘Select “Audio” “Audio” “FM/AM
Radio” “Radio” “Save Station”
“Autostore”.
Station name display
1Station name display
왘Switching the station name display
on/off: Select “Audio” “Audio”
“FM/AM Radio” “FM” “Radio”
“Show Station Info”.
The display is switched on or off, de-
pending on the previous setting. When
the display is switched on, a check-
mark appears in front of the
“Show Station Info” menu item.
iThis function is not available for Weather
Band. The Autostore function saves receivable
stations as presets in order of their reception
quality. All stations saved manually in the preset
memory will be lost if COMAND finds 20 sta-
tions. If COMAND finds less than 20 stations, for
example 9, then the stations saved in preset po-
sitions 1 – 9 will be over written.
iIn the FM waveband, COMAND can show
the name of the station currently tuned in. Sta-
tion name display 1 can only be seen when it is
switched on and if the station transmits a name.

105
Control systems
COMAND satellite radio* (USA only)
왔COMAND satellite radio* (USA only)
Submenu overview
Warning! G
Please devote your attention first and fore-
most to the traffic situation you are in.
Before your journey, please familiarize your-
self with the radio functions.
Only use the COMAND when road and traffic
conditions permit you to do so. Otherwise
you could be involved in an accident in
which you or others could be injured.
iThe components and operating principles of
COMAND can be found on (컄page 85).
Sat Radio Presets Info Category Sound
Channel List Station presets Show program info Select category Treble
Save Channel Bass
Channel Entry Balance/Fader
Service 3D Sound

106
Control systems
COMAND satellite radio* (USA only)
Introduction to Satellite radio
SIRIUS Satellite Radio provides 100 chan-
nels, so called streams, of digital-quality
radio, among others music, sports, news,
and entertainment free of commercials.
SIRIUS Satellite Radio uses a fleet of
high-power satellites to broadcast
24 hours per day, coast-to-coast, in the
contiguous US.
This diverse, satellite-delivered program-
ming is available for a monthly subscrip-
tion fee.
For more information and service availabil-
ity call the SIRIUS Service Center
(컄page 111), or go to
www.siriusradio.com.
Switching to satellite radio
왘Select “Audio” “Audio” “Sat Ra-
dio”.
or
왘Press the M shortcut button once or
twice. The Satellite radio menu appears
if it was the last active radio mode.
The screen which then appears de-
pends on the activation status of the
satellite radio service.
The following options are possible:
앫Satellite radio service is not activat-
ed
앫Only the preview channel is activat-
ed
앫Satellite radio service is fully acti-
vated
iA subscription to SIRIUS satellite radio ser-
vice provider is required for the satellite radio op-
eration described in this chapter. Contact an
authorized Mercedes-Benz Center for details
and availability for your vehicle.
iSatellite radio service may be unavailable or
interrupted from time to time for a variety of rea-
sons, such as environmental or topographic con-
ditions and other things we can’t control. Service
might also not be available in certain places
(e.g., in tunnels, parking garages, or within or
next to buildings) or near other technologies. In
such situations, the satellite radio’s main menu
shows the “Acquiring signal...” screen. At this
point, the radio’s functions are restricted to
manual channel number entry (컄page 109) and
service info display (컄page 111).
107
Control systems
COMAND satellite radio* (USA only)
Satellite radio service is not activated
The telephone number of the SIRIUS Ser-
vice Center and the twelve-digit electronic
serial number (SIRIUS-ID) of the particular
receiver are displayed.
This information is required when calling
the SIRIUS Service Center for an activation
request.
왘Closing screen: Press n.
Only the preview channel is activated
The satellite radio preview channel ap-
pears.
Satellite radio service is fully activated
The main satellite radio menu appears. You
will hear the channel last tuned in, provid-
ed that it can be received.
Main satellite radio menu
1Main area with channel display
2Preset position of selected channel
3Selected channel
4Selected program category
5Sound settings
6To select program category
7Channel number of selected channel
8Other channel information
9Preset options
aSatellite radio options
iCredit card information is also required for
your application. The activation process takes
approximately 5 to 10 minutes after calling the
SIRIUS Service Center.
iIf only the preview channel is activated, you
cannot tune in another channel. If you try to do
this, you will see the screen described in the sec-
tion “Satellite radio service is not activated”
(컄page 107).

108
Control systems
COMAND satellite radio* (USA only)
Selecting program category
왘Select “Audio” “Audio” “Sat Ra-
dio” “Category”.
The category list appears.
왘Select category by rotating ymz or
sliding qmr and press n.
When selecting a channel using the
channel search function or the channel
list, you have access to the channels
you subscribe to and which are includ-
ed in the selected category.
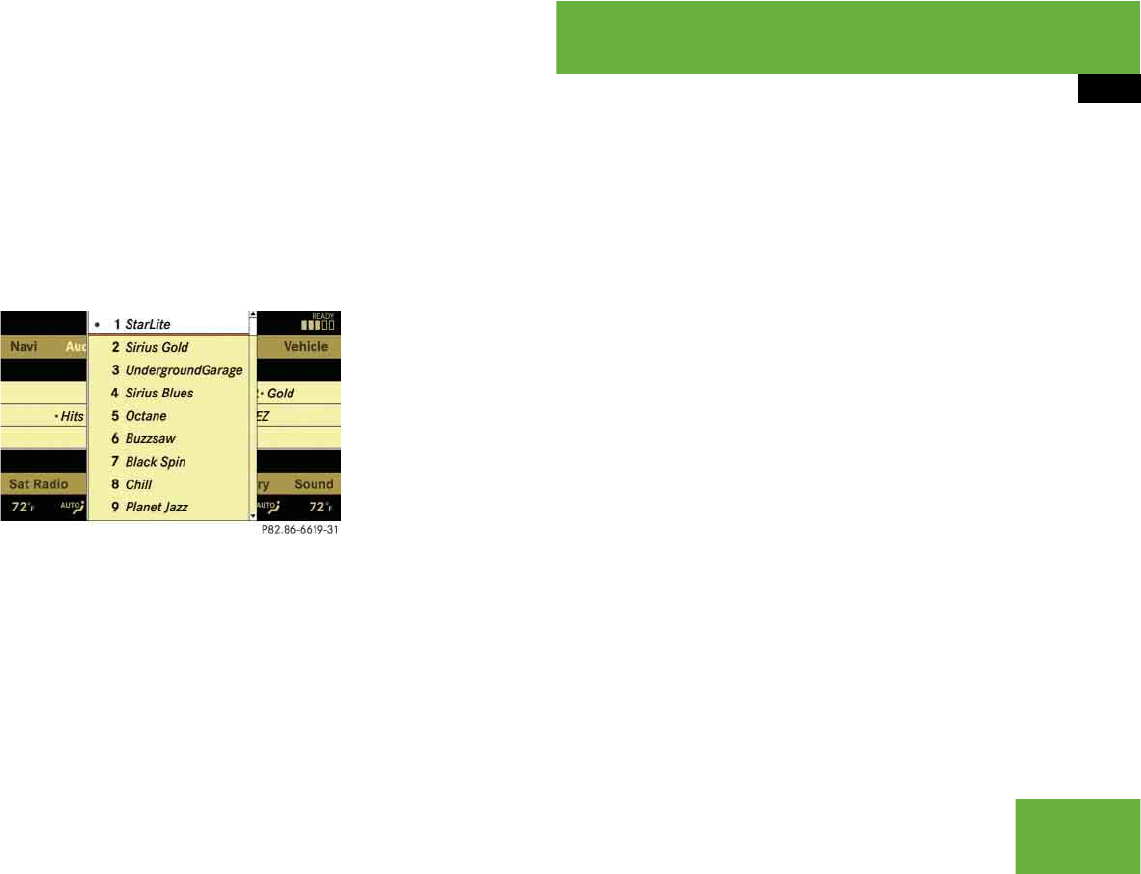
Tuning in channels
You have the following selection options:
앫The channel search function
앫The channel presets
앫The manual channel number entry
앫The channel list
Tuning in channels using channel
search function
왘Slide omp or rotate ymz when the
main area is selected.
Depending on the direction in which
the controller is being pressed or rotat-
ed, the system searches upward or
downward and stops at the next receiv-
able channel.
Tuning in channels using channel
presets
왘Select “Audio” “Audio” “Sat Ra-
dio” “Presets”.
or
iMain area 1 can show all channels includ-
ed in your subscription. Which channels are
shown depends on the selected program catego-
ry 4.
Note that categories and channels shown in illus-
trations are dependent on programming content
delivered by the service provider. Programming
content is subject to change.
Therefore, channel and categories shown in illus-
trations and descriptions contained in this man-
ual may differ from the channels and categories
delivered by the service provider.
iThe channels are categorized. Categories al-
low you to tune to stations broadcasting a cer-
tain type of program.
iIf only the preview channel is activated, only
certain categories are available on the list. Which
categories these are depend on the service pro-
vider.
iWhen you select the category “All Chan-
nels”, you have access to all the channels you
subscribe to, regardless of category, when you
are tuning in a channel using the channel search
function or the channel list.
iThis function is not possible when only the
preview channel is activated. If you try to tune in
a channel in this instance, you will see the
screen described in the section “Satellite radio
service is not activated” (컄page 107).
iWhich channels are found by the channel
search function depends on which channels you
have subscribed to and the program category
you have selected (컄page 108).
109
Control systems
COMAND satellite radio* (USA only)
왘Press n when the main area is select-
ed.
The preset menu appears. The dot R
in front of a preset position indicates
that this is the channel currently select-
ed and being listened to.
왘Select station preset and briefly
press n.
COMAND tunes in the corresponding
channel as long as it is included in your
subscription and is still available.
If the channel is not included in your
subscription, you will see the message
described in the section “Satellite radio
service is not activated” (컄page 107).
If the channel is no longer available or
only the preview channel is activated,
you will see the message “Invalid Chan-
nel”.
왘Closing message: Press n.
Tuning in channels using manual chan-
nel number entry
왘Select “Audio” “Audio” “Sat Ra-
dio” “Sat Radio” “Channel Entry”.
The menu for manual channel number
entry appears.
왘Exiting menu without making an
entry: Press L back button in the
center console (컄page 86).
왘Increase or decreasing number:
Slide qmr or rotate ymz.
왘Selecting next number: Slide omp.
왘Confirming channel entry: Press n.
Further operation depends on whether
the selected channel number is valid or
if the channel is included in your sub-
scription.
Channel number is valid and channel is
included in subscription
COMAND tunes in the channel entered.
Channel number is invalid
You will see the message “Invalid Chan-
nel”.
왘Closing message: Press n.
Channel number is valid but channel is
not included in subscription
You will see the screen described in the
section “Satellite radio service is not acti-
vated” (컄page 107).
왘Closing display: Press n.
iThis function is not possible when only the
preview channel is activated. If you try to tune in
a channel in this instance, you will see the
screen described in the section “Satellite radio
service is not activated” (컄page 107).
110
Control systems
COMAND satellite radio* (USA only)
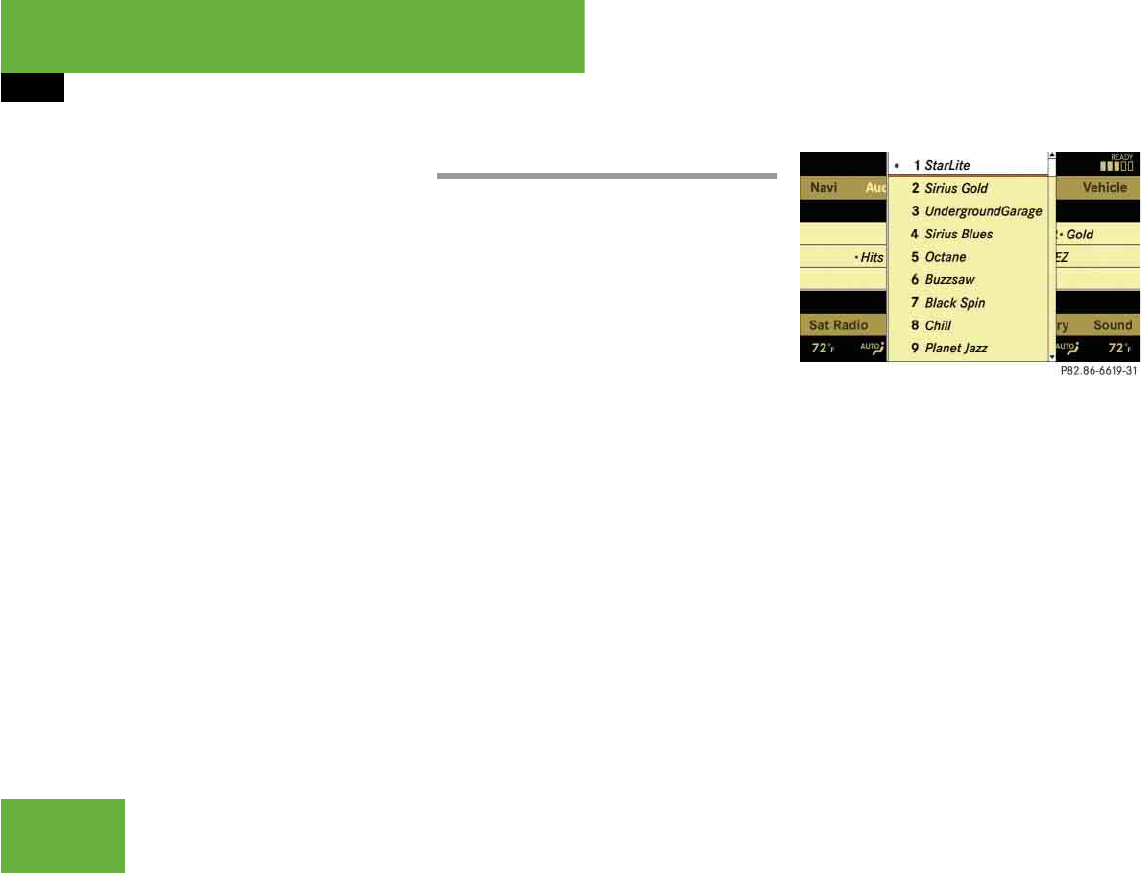
Tuning in channels using the channel
list
왘Select “Audio” “Audio” “Sat Ra-
dio” “Sat Radio” “Channel List”.
The channel list appears. The dot R in
front of a list entry indicates the cur-
rently selected channel.
왘Select channel by rotating ymz or
sliding qmr and press n.
Saving channels
Option 1
왘Select “Audio” “Audio” “Sat Ra-
dio” “Sat Radio” “Save Channel”.
Option 2
왘Press n when the main area is select-
ed.
Option 3
왘Select “Audio” “Audio” “Sat Ra-
dio” “Presets”.
All three of these will call up a preset
menu. The dot R in front of a preset posi-
tion indicates that this is the channel cur-
rently selected and being listened to.
왘Selecting a preset position:
Slide qmr or rotate ymz.
Saving a channel to a selected preset
position
If you have called up the channel preset
screen using option 1:
왘Press n briefly.
In options 2 and 3:
왘Press and hold n until you hear a sig-
nal.
The channel is saved.
iThe contents of the channel list depends on
which channels are included in your subscription
and which program category you have selected
(컄page 108). If only the preview channel is acti-
vated, the channel list contains only the preview
channel.
iThere are twenty preset positions available.

111
Control systems
COMAND satellite radio* (USA only)
Show program info
왘Select “Audio” “Audio” “Sat Ra-
dio” “Info”.
You will see a screen that may contain the
following information:
앫Selected program category
앫Selected channel
앫Artist of the track currently being
played
앫Name of current track
왘Closing screen: Slide omp or
press n.
Channel update
The service provider may conduct a chan-
nel update.
During the update, the message “Updating
channels...” will appear on the display.
No functions can be operated in satellite
radio mode during the update.
Calling SIRIUS Service Center
왘Select “Audio” “Audio” “Sat Ra-
dio” “Sat Radio” “Service”.
The telephone number of the SIRIUS
Service Center and the twelve-digit
electronic serial number (SIRIUS-ID) of
the particular receiver are displayed.
왘Closing screen: Slide omp or
press n.
iIf the program provider does not offer any in-
formation, the “Info” menu item cannot be se-
lected.
iThe program provider determines what in-
formation is displayed on the screen. COMAND
shows no more than two lines per item of infor-
mation. If an item of information is too long,
COMAND shortens it.
iIt may be necessary to call the SIRIUS Ser-
vice Center if, for example:
앫You want to cancel the subscription or
re-subscribe at a later date.
앫You forget to pay the bill.
앫You sell the car to another person.

112
Control systems
COMAND audio CD/audio DVD/MP3
Safety precautions
Notes about MP3 mode
Permissible media for MP3 files
앫CD-R and CD-RW
앫DVD-R and DVD-RW
앫PCMCIA card (컄page 117)
Permissible file systems
앫ISO9660/Joliet for CDs
앫UDF for DVDs
앫FAT16 or FAT32 for PCMCIA cards with
storage medium
Multisession CDs
For multisession CDs, the first session
type of the CD determines how COMAND
will process the CD.
For example, if the first session type is ac-
cording to the audio CD standard and the
second session type is according to the
data CD standard containing MP3 tracks,
COMAND will treat the CD as a conven-
tional audio CD. This means that it is only
possible to access the audio CD tracks.
Access to the MP3 tracks is not possible.
Similarly, if the first session type is accord-
ing to the data CD standard containing
MP3 tracks and the second session type is
according to the audio CD standard,
COMAND will treat the CD as a data CD.
Warning! G
COMAND is classified as a Class 1 laser
product. You must not open the casing.
There is a risk of exposure to invisible laser
radiation if you open the casing, or if the
casing is faulty or damaged.
COMAND does not contain any parts that
you are able to maintain yourself. For safety
reasons, all maintenance work must be car-
ried out by qualified technicians.
Bear in mind that at a speed of just 30 mph
(approximately 50 km/h), your vehicle is
covering a distance of 44 feet (approximate-
ly 14 m) every second.
Warning! G
Only carry out the following when the vehi-
cle is stationary:
앫Inserting a disc
앫Ejecting a disc
There is a risk of accident by being distract-
ed from road and traffic conditions if you
load a CD/DVD while the vehicle is in mo-
tion.

113
Control systems
COMAND audio CD/audio DVD/MP3
This means that it is only possible to ac-
cess the MP3 tracks. Access to the audio
CD tracks is not possible.
File structure on a disc
When you create an MP3 disc, the MP3
tracks can be organized in folders. A folder
can also contain other folders. A disc can
contain a maximum of 255 folders. Each
folder can contain a maximum of
255 tracks and 255 folders. A disc can
contain a maximum of 4000 tracks. Usual-
ly this number will not be reached because
each minute of an MP3 track requires ap-
proximately 1 MB of storage space.
Track and folder names
When you create an MP3 disc, you can as-
sign names to the MP3 tracks and folders.
COMAND uses these names for the corre-
sponding display in MP3 mode. Empty fold-
ers or folders which contain data other
than MP3 tracks are not displayed by
COMAND.
If MP3 files are saved in the root directory
itself (uppermost directory on storage me-
dium), the root directory will also be treat-
ed as a folder. COMAND will then show the
name of the root directory as the folder
name.
You must observe the following when as-
signing track names:
앫Track names must have at least one
character.
앫Track names must have the extension
“mp3”.
앫There must be a period between the
track name and the extension.
Example of a correct track name:
Track1.mp3
COMAND is unable to recognize an MP3
track if:
앫there is no period between the track ti-
tle and the extension
앫there is no extension
Permissible MP3 formats
COMAND supports the MPEG1 Audio Lay-
er 3 format.
Permissible bit and sampling rates
앫Fixed and variable bit rates up to
320 kbit/s
앫Sampling rates of 24 kHz – 48 kHz
Notes on copyright
The music tracks that you create for MP3
mode and can play back in MP3 mode are
generally subject to copyright protection in
accordance with the applicable interna-
tional and national regulations.
iCOMAND does not support ID3 tags.
iThis format is generally known as “MP3”.
iOnly use MP3 tracks with a bit rate of at
least 128 kbit/s and a sampling rate of at least
44.1 kHz. Smaller rates can cause a noticeable
deterioration in sound quality. This is especially
the case if you have activated a surround sound
function.

114
Control systems
COMAND audio CD/audio DVD/MP3
In many countries, reproductions are not
permitted without the prior consent of the
copyright holder, not even for private use.
Make sure that you know the applicable
copyright regulations and that you comply
with these.
If you own these rights yourself, e.g. for
your own compositions and recordings, or
the copyright holder has granted you per-
mission, these restrictions do not apply.
Notes about audio DVD operation
COMAND can playback commercially
available, prerecorded audio DVDs that
bear the following label. You will usually
find the label on the DVD booklet, the inlay,
or the DVD itself.
Data on audio DVDs are stored either in
uncompressed format or in lossless com-
pressed format. The sound quality on au-
dio DVDs is therefore better than on
recordable DVDs that contain MP3 data
because the MP3 format uses a lossy type
of compression.
You cannot delete data from or record
additional data to commercially available,
prerecorded audio DVDs.
Please note the following information
about CDs/DVDs and pay special atten-
tion to the notes on copied and/or
self-written CDs/DVDs.
Notes about CDs/DVDs
iAudio DVDs differ from recordable DVD-R
and DVD-RW discs.
iAudio CDs with copy protection are not
compatible with the CD audio standard and
therefore may not be able to be played by
COMAND.
There may be playback problems when playing
copied discs.
There is a large variety of discs, disc-writing soft-
ware and writers available. This variety means
that there is no guarantee that the system will be
able to play discs that you have written/copied
yourself.
There may be playback problems if you use CD-R
or CD-RW type discs you have copied yourself
with a storage capacity of more than 700 MB.
These CDs are not compatible with currently ap-
plicable standards.

115
Control systems
COMAND audio CD/audio DVD/MP3
Notes about handling CDs/DVDs
앫Only hold discs by the edge.
앫Handle discs carefully to prevent play-
back problems.
앫Avoid getting scratches, fingerprints
and dust on discs.
앫Clean discs from time to time with a
commercially-available cleaning cloth.
Do not wipe them with a circular mo-
tion, but only in straight lines from the
center outwards.
앫Only use a pen designed for such a pur-
pose to label discs.
앫Place discs back in their boxes after
use.
앫Protect discs from heat and direct sun-
light.
Inserting CDs and DVDs
!Do not affix stickers or labels to the discs.
These could peel away and damage COMAND.
COMAND is designed to hold discs which com-
ply with the IEC 60908 standard. You can there-
fore only use discs with a maximum thickness of
1.3 mm.
If you insert thicker discs, e.g. those that contain
data on both sides (DVD on one side and audio
data on the other), they cannot be ejected and
can damage COMAND.
Do not use discs with an 8-cm diameter, even if
they have an adapter.
Only use round discs with a 12-cm diameter.
Warning! G
Only insert a CD or DVD when the vehicle is
stationary. There is a risk of accident by be-
ing distracted from road and traffic condi-
tions if you load a CD/DVD while the vehicle
is in motion.
Bear in mind that at a speed of just 30 mph
(approximately 50 km/h), your vehicle is
covering a distance of 44 feet (approximate-
ly 14 m) every second.
iIf the CD/DVD has a printed side, this must
face upwards when the CD/DVD is inserted. If
neither side is printed, the side to be played
should face downwards.
116
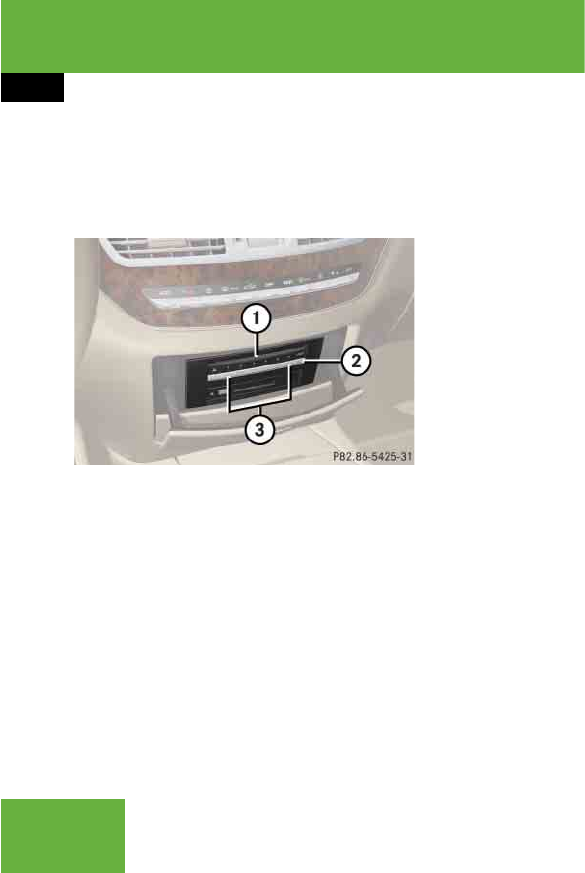
Control systems
COMAND audio CD/audio DVD/MP3
Loading the CD/DVD changer
The CD/DVD changer can hold up to a to-
tal of 6 audio CDs or DVDs.
1Disc slot
2Load button (all magazine trays)
3Magazine tray buttons 1 – 6
Loading an individual magazine tray
왘Press desired magazine tray button 3.
If a disc is loaded, it will be ejected.
왘Take disc out of slot 1.
왘Wait until LED for magazine tray
button 3 which you pressed flashes
quickly.
왘Insert disc into slot 1.
The DVD changer draws the disc in and
begins playback if:
앫it has been loaded correctly
앫it is a permissible type of disc
Loading all six magazine trays
왘Press load button 2.
The DVD changer checks the load sta-
tus of all magazine trays and switches
to the first empty tray.
왘Wait until LED for corresponding maga-
zine tray button 3 flashes quickly.
왘Insert disc into slot 1.
The DVD changer switches to the next
empty magazine tray.
왘Repeat last two steps until all trays are
loaded.
The DVD changer will play the last disc
you loaded if:
앫it has been loaded correctly
앫it is a permissible type of disc
iEach magazine tray button 3 indicates the
status of the corresponding magazine tray by
means of an LED.
앫LED off = magazine tray is empty
앫LED constantly lit = magazine tray is loaded
앫LED flashes = CD/DVD changer requesting
disc to be loaded
iIf a disc is not inserted within approximately
15 seconds COMAND resumes playback of the
last disc.
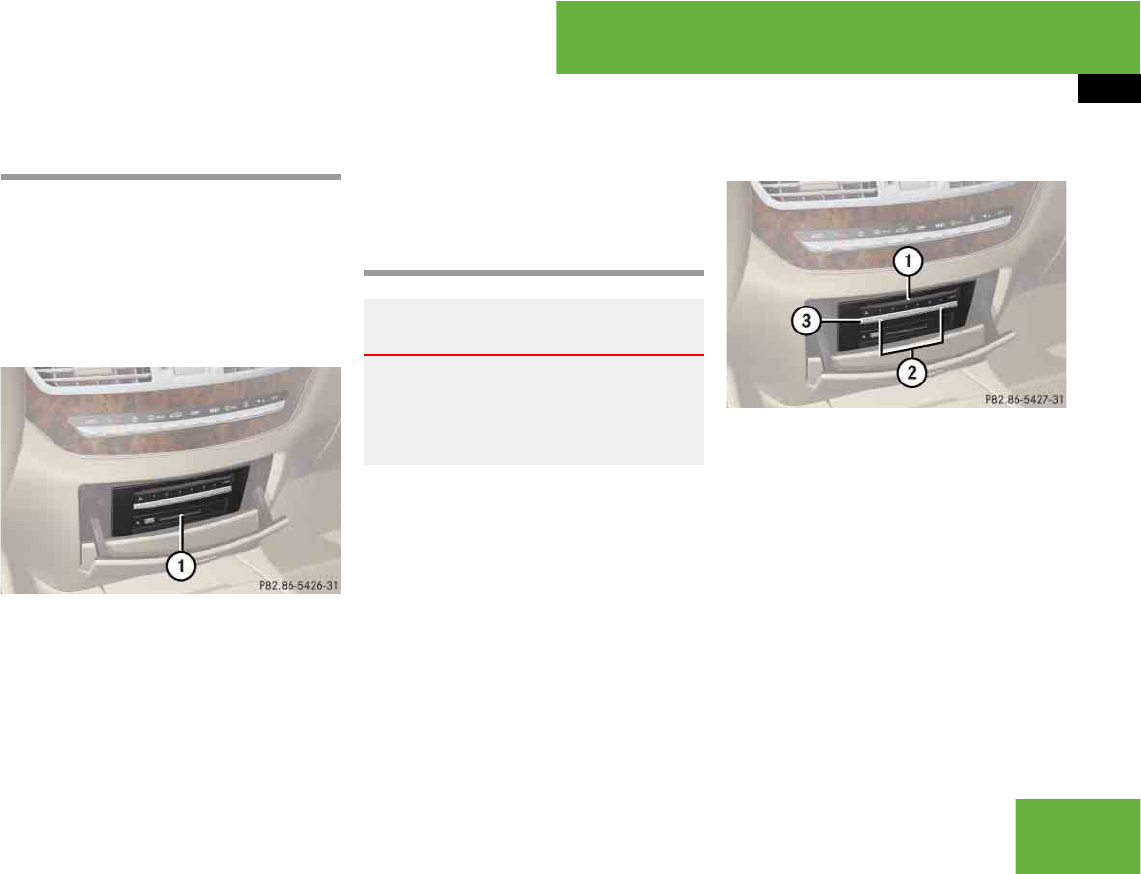
117
Control systems
COMAND audio CD/audio DVD/MP3
Inserting a PCMCIA card
1Slot for PCMCIA card
왘Insert PCMCIA card into slot 1.
The side with the contact must point
towards the slot.
If the PCMCIA card contains a storage
medium with MP3 tracks, COMAND
switches to MP3 mode.
Ejecting CDs and DVDs
Ejecting from the DVD changer
1Disc slot
2Magazine tray buttons 1 – 6
3Eject button (all discs)
왘Ejecting one disc: Press desired mag-
azine tray button 2.
왘Take disc out of slot 1.
If you do not take the disc out of
slot 1, the DVD changer will draw it
back automatically in approximately
15 seconds.
iCOMAND supports commercially available
PCMCIA cards or PCMCIA card adapters with
storage media that may not be designed for the
temperatures which occur in the vehicle. You
should therefore remove the PCMCIA card from
the vehicle when not in use since extreme tem-
peratures could damage these devices. Warning! G
Only eject a disc when the vehicle is station-
ary. You may otherwise be distracted from
the traffic conditions and could cause an ac-
cident.
iIf you eject one disc while playing another
disc, the DVD changer interrupts playback. Play-
back continues once the disc has been ejected.
컄컄
118
Control systems
COMAND audio CD/audio DVD/MP3
왘Ejecting all discs: Press eject
button 3.
The DVD changer switches to the first
loaded tray and ejects the disc.
왘Take disc out of slot 1.
The DVD changer switches to the next
loaded magazine tray and ejects the
disc.
왘Repeat last step until magazine is
empty.
Ejecting a PCMCIA card
1Eject button
2Slot for PCMCIA card
왘Press eject button 1 twice.
The PCMCIA card is ejected.
왘Take PCMCIA card out of slot 2.
컄컄

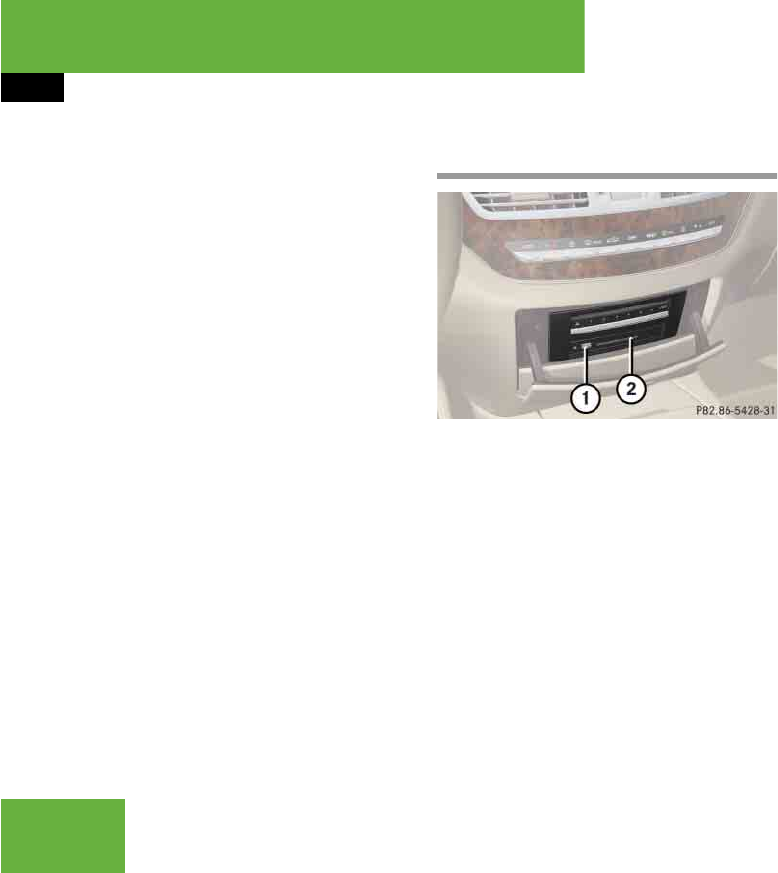
119
Control systems
COMAND audio CD/audio DVD/MP3
Submenu overview
iThe components and operating principles of
COMAND can be found on (컄page 85).
CD or DVD-A or MP3 Pause/Stop/Play
(audio DVD mode only)
Tracks/Track
List/Tracks A-Z
Folders
(MP3 mode only)
Changer Sound
Normal Track Sequence Pause playback Show track list
(audio CD mode and
audio DVD mode)
Select folder Select medium Treble
Random Tracks Stop playback Display alphabetical
track listing
(MP3 mode only)
Bass
Random folder
(MP3 mode only)
Restart playback Balance/Fader
Repeat folder
(MP3 mode only)
3D Sound
Group
(DVD-Audio mode only)
120
Control systems
COMAND audio CD/audio DVD/MP3
Switching to audio CD, audio DVD or
MP3 mode
왘Load CD/DVD (컄page 115) or
PCMCIA card (컄page 117).
or
왘Select “Audio” “Audio”, then “CD”,
“DVD-Audio” or “MP3”.
or
왘Press the M shortcut button once or
twice.
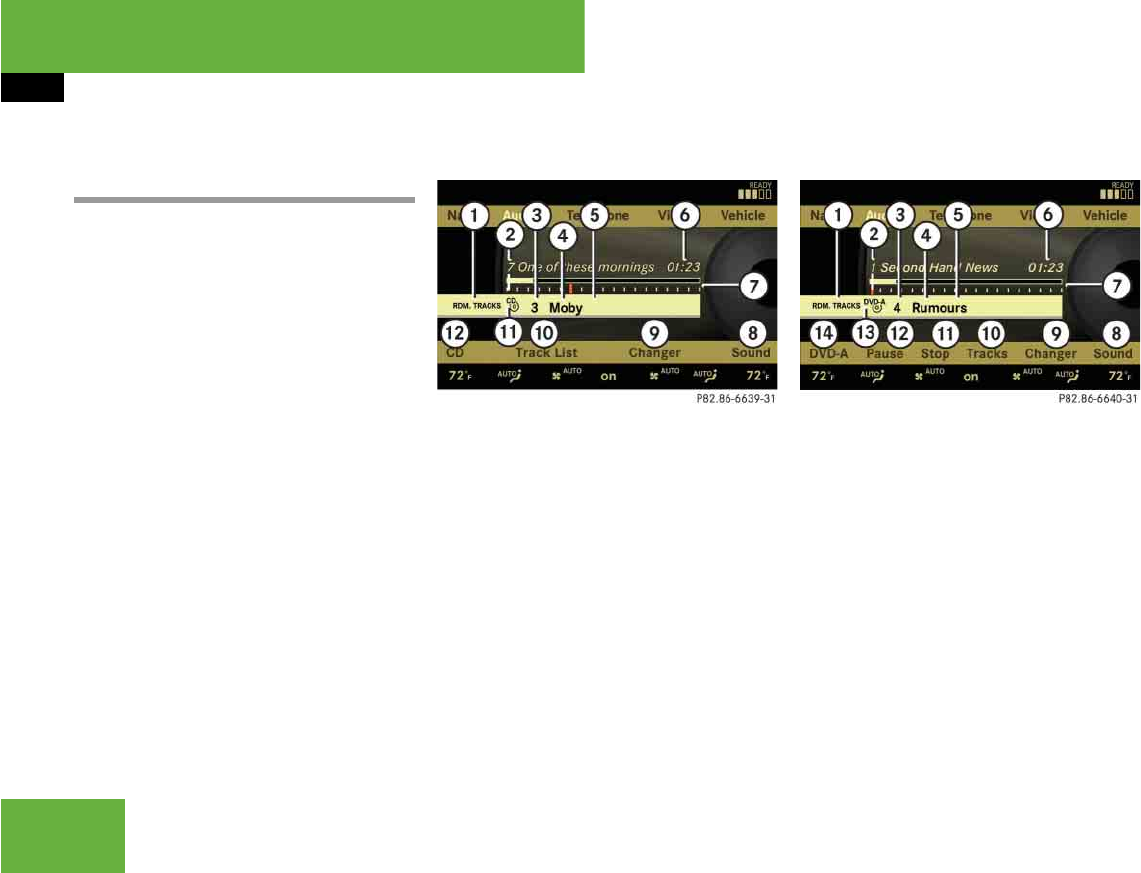
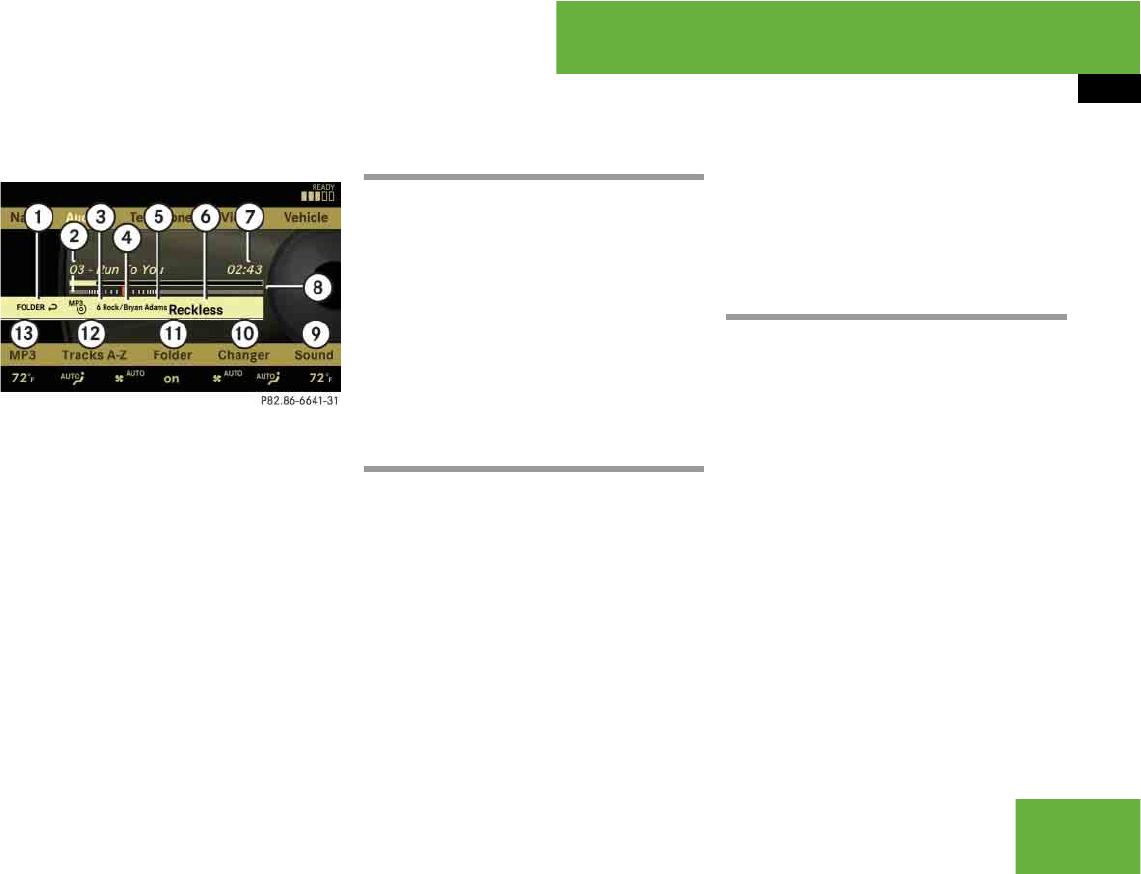
Example display in audio CD mode
1Current playback option
2Track number
3Disc number
4Disc name (only if saved on the disc)
5Track name (only if saved on the disc)
6Track time
7Graphic time and track display
8Sound settings
9Medium selection
aTo call up track listing
bDisc type
cPlayback options
Example display in audio DVD mode
1Current playback option
2Track number
3Disc number
4Disc name (only if saved on the disc)
5Track name (only if saved on the disc)
6Track time
7Graphic time and track display
8Sound settings
9Medium selection
aTo call up track listing
bStop function
cPause (“Play” appears if paused)
dDisc type
ePlayback options
iThe M shortcut button takes you directly
to the previously set disc mode (audio CD,
audio DVD or MP3-CD/DVD). The number of
times you have to press the shortcut button de-
pends on the previously set mode.
121
Control systems
COMAND audio CD/audio DVD/MP3
Example display in MP3 mode
1Current playback option
2Medium type
3Disc number (not on PCMCIA card)
4Track name
5Current folder path
6Current folder
7Track time
8Graphic time and track display
9Sound settings
aMedium selection
bFolder listing
cTrack listing
dPlayback options
Stop function
왘Stopping playback: Select “Audio”
“Audio” “DVD-Audio” “Stop”.
왘Restarting playback: Select “Audio”
“Audio” “DVD-Audio” “Play”.
Playback starts at the beginning of the
DVD.
Pause function
In audio CD, audio DVD and MP3 mode
왘Pausing playback:
Press F briefly.
왘Continuing playback: Press F
again briefly.
Only in audio DVD mode
왘Pausing playback:
Select “Audio” “Audio” “DVD-Au-
dio” “Pause”.
The “Pause” screen changes to “Play”.
왘Continuing playback: Select “Audio”
“Audio” “DVD-Audio” “Play”.
The “Play” screen changes to “Pause”.
Selecting CD/DVD/MP3 media
왘Select “Audio” “Audio”.
왘Select “CD”, “DVD-Audio” or “MP3”.
COMAND begins playback.
왘In audio CD, audio DVD and MP3
mode: Select “Changer”.
or
왘In audio CD and audio DVD mode
only: Press n when the main area is
selected.
The media list appears. The dot R in-
dicates the current medium.
왘Select a medium or folder.
COMAND changes the medium.
iThis function is only available in audio DVD
mode.
122
Control systems
COMAND audio CD/audio DVD/MP3
Selecting a track
Selecting by skipping to tracks
왘Skipping forwards or backwards to
a track (in CD or DVD mode only):
Rotate ymz.
Selecting from the track list
왘Select “Audio” “Audio”.
왘Select “CD”, “DVD-Audio” or “MP3”.
왘Select “Tracks”, “Tracks A-Z” or “Track
list”.
or
왘Only in MP3 mode: Press n when the
main area is selected.
The track list of the current folder ap-
pears. The dotR indicates the current
track.
왘Select a track by rotating ymz or slid-
ing qmr.
Fast forward/rewind
왘Select main area.
왘Slide and hold omp until desired place
is reached.
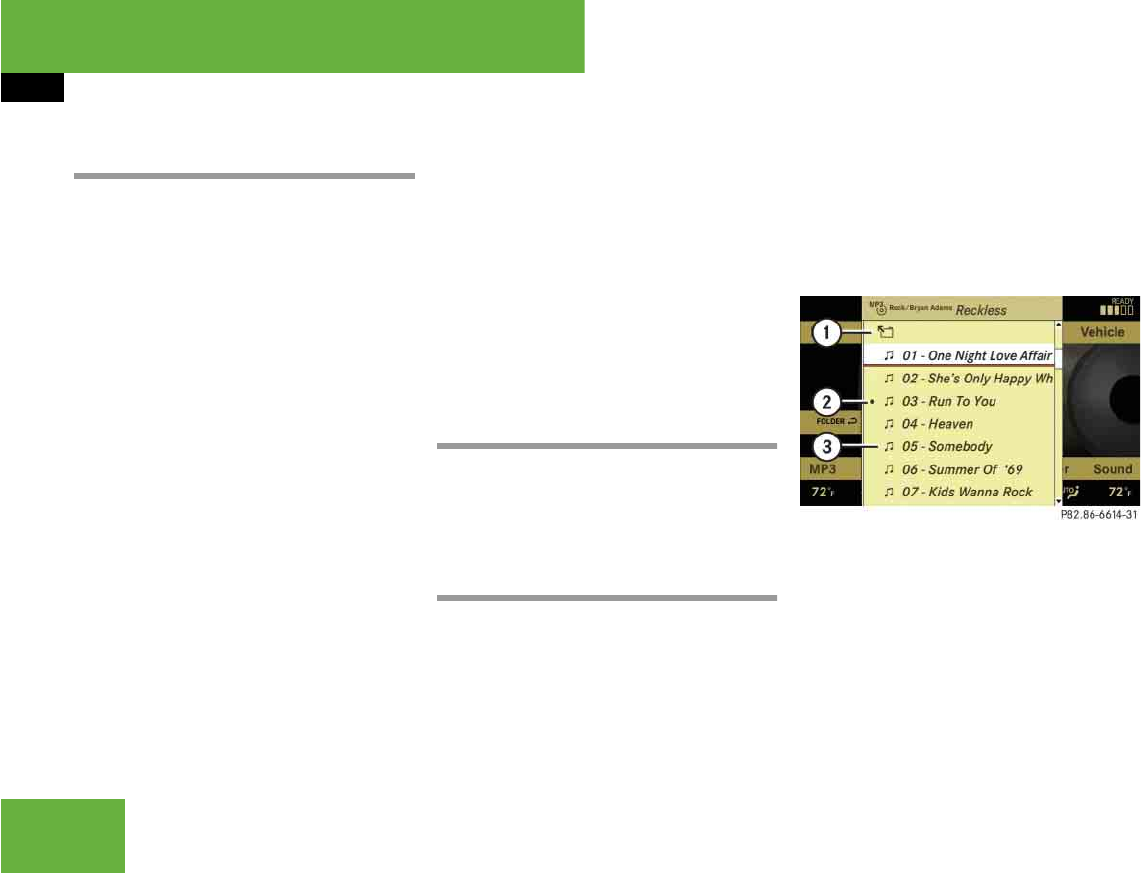
Selecting a folder
왘Select “Audio” “Audio” “MP3”
“Folder”.
or
왘Press n when main area is selected.
The track list of the current folder ap-
pears.
This is what the illustration in the right
column is showing as well.
1Back folder symbol
2Current track symbol
3Track symbol
왘Selecting one folder higher: Select
the Q symbol.
The display changes to the next folder
up in the folder structure on the disc.
iSkipping forwards through the tracks skips
to the next track. Skipping backwards through
the tracks skips to the beginning of the current
track if the track has been playing for more than
8 seconds. If the track has been playing for less
than 8 seconds, it skips to the start of the previ-
ous track.
If you have switched on the “Random Tracks”
playback option, the order of the tracks is ran-
dom.
iIn MP3 mode, the list shows all the tracks in
alphabetical order.
iThis function is only available in audio MP3
mode.
123
Control systems
COMAND audio CD/audio DVD/MP3
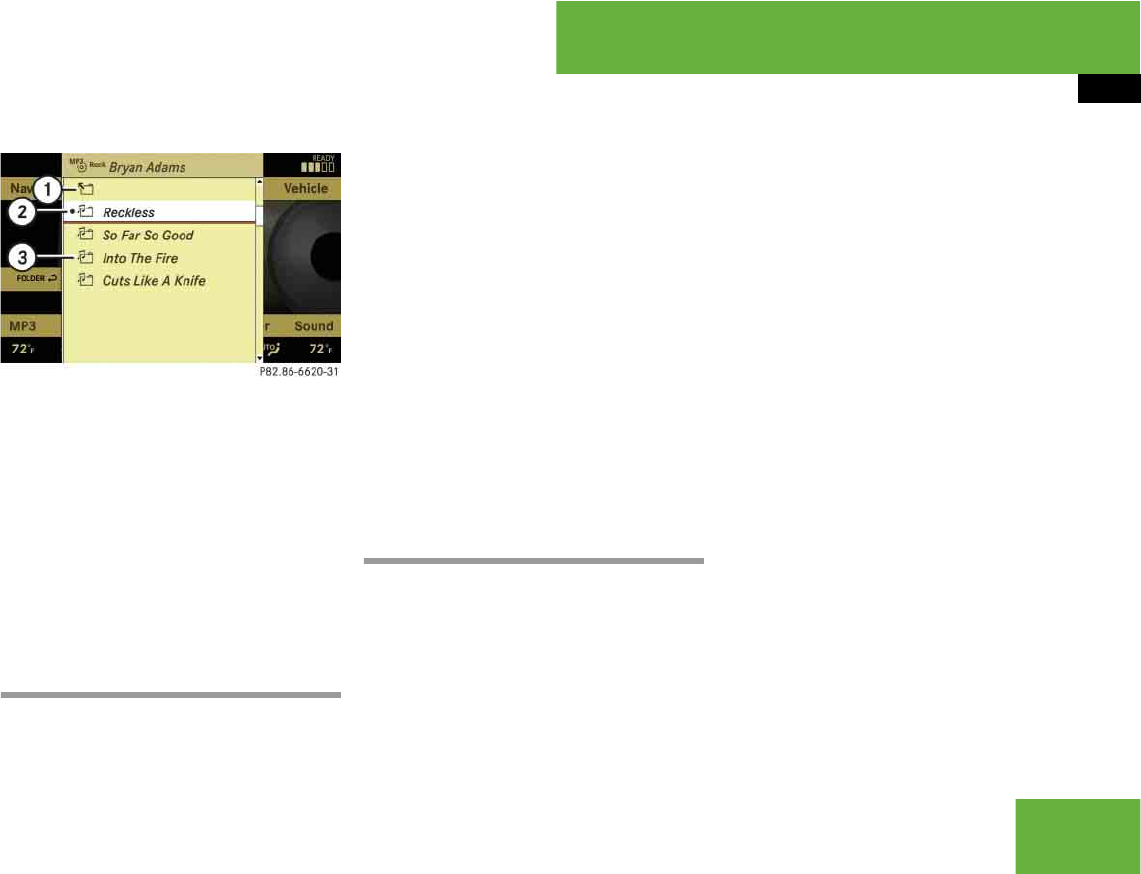
1Back folder symbol
2Current folder symbol
3Folder symbol containing tracks
왘Selecting a folder: Select desired fold-
er.
You will see the tracks in the folder.
왘Select a track.
The track is played and the correspond-
ing folder is now the active folder.
Setting the audio format
This function lets you choose the audio for-
mat that you would like COMAND to play
and is only available in DVD-Audio mode.
왘Select “Audio” “Audio” “DVD-Au-
dio” “Group”.
The list of available audio formats appears.
A dot R indicates the format currently se-
lected.
왘Changing setting: Slide qmr or
rotate ymz.
왘Exiting menu: Slide omp.
Playback options
The following options are available:
앫“Normal Track Sequence”
Tracks playback in the order on the
disc (e.g. track 1, 2, 3, etc.).
앫“Random Tracks”
Tracks playback in a random order
(e.g. track 3, 8, 5, etc.).
앫“Random Folder” (in MP3 mode only)
Tracks in the active folder and any sub-
folders playback in random order.
앫“Repeat Folder” (in MP3 mode only)
Tracks in the active folder will be re-
peated until you switch the function
off.
왘Selecting an option: Select “Audio”
“Audio”.
왘Select “CD”, “DVD-Audio” or “MP3”.
The option list appears. A dot R indi-
cates which option is switched on.
왘Select an option and press n.
The option is switched on. For all op-
tions except “Normal Track Sequence”,
you will see a corresponding indicator
in the main area.
iThe tracks on an audio DVD can be stored in
various audio formats. The number of audio for-
mats depends on the audio DVD.
iThe “Group” menu item cannot be selected
if only one audio format is saved on the DVD.
iThe “Normal Track Sequence” option is au-
tomatically activated when you select a different
medium. If an option is activated, it remains acti-
vated after COMAND is switched on/off.

124
Control systems
COMAND video DVD (USA only)
Depending on your vehicle’s production
date the COMAND video DVD function may
not be available.
Automatic picture fade-out
If a video DVD is playing when the vehicle
is shifted from position P into N, D or R the
picture is faded out automatically and the
following message appears in the display:
“In order not to distract driver, picture is
faded out while the vehicle is in motion”.
When the vehicle is shifted back into P, the
picture comes on again.
Notes about video DVD operation
COMAND can playback commercially
available, prerecorded video DVDs that
bear the following label. You will usually
find the label on the DVD booklet, the inlay,
or the DVD itself.
Some DVDs may not comply with the
NTSC or PAL TV playback standards.
Sound, picture and other playback prob-
lems may occur when you play such DVDs.
COMAND can playback video DVDs meet-
ing the following requirements:
앫Correct regional code
앫NTSC or PAL TV standard
The appropriate information is usually giv-
en either on the DVD or the DVD box. The
factory setting of COMAND is regional
code 1. The setting can be changed at an
authorized Mercedes-Benz Center. This
will allow you to playback video DVDs with
other regional codes, as long as they com-
ply with the NTSC or PAL TV standard.
Warning! G
COMAND is classified as a Class 1 laser
product. You must not open the casing.
There is a risk of exposure to invisible laser
radiation if you open the casing, or if the
casing is faulty or damaged.
COMAND does not contain any parts that
you are able to maintain yourself. For safety
reasons, all maintenance work must be car-
ried out by qualified technicians.
iVideo DVDs differ from recordable DVD-R
and DVD-RW discs.
iThere may be playback problems when play-
ing copied DVDs.
There is a large variety of discs, disc-writing soft-
ware and writers available. This variety means
that there is no guarantee that the system will be
able to play discs that you have written/copied
yourself.

125
Control systems
COMAND video DVD (USA only)
Notes about handling DVDs
앫Only hold discs by the edge.
앫Handle discs carefully to prevent play-
back problems.
앫Avoid getting scratches, fingerprints
and dust on discs.
앫Clean discs from time to time with a
commercially-available cleaning cloth.
Do not wipe them with a circular mo-
tion, but only in straight lines from the
center outwards.
앫Only use a pen designed for such a pur-
pose to label discs.
앫Place discs back in their boxes after
use.
앫Protect discs from heat and direct sun-
light.
Functional limitations
Depending on the DVD, it is possible that
certain functions or actions may be tempo-
rarily or permanently unavailable. If you try
to utilize such functions or carry out such
actions, you will see the 7 symbol in the
display.
Inserting or ejecting DVDs
왘Inserting a DVD (컄page 115).
or
왘Ejecting a DVD (컄page 117).
!Do not affix stickers or labels to the discs.
These could peel away and damage COMAND.
COMAND is designed to hold discs which com-
ply with the IEC 60908 standard. You can there-
fore only use discs with a maximum thickness of
1.3 mm.
If you insert thicker discs, e.g. those that contain
data on both sides (DVD on one side and audio
data on the other), they cannot be ejected and
can damage COMAND.
Do not use discs with an 8 cm diameter, even if
they have an adapter.
Only use round discs with a 12 cm diameter.
Warning! G
Only insert or eject a DVD when the vehicle
is stationary. There is a risk of accident by
being distracted from road and traffic condi-
tions if you load a DVD while the vehicle is in
motion.
Bear in mind that at a speed of just 30 mph
(approximately 50 km/h), your vehicle is
covering a distance of 44 feet (approximate-
ly 14 m) every second.

126
Control systems
COMAND video DVD (USA only)
Submenu overview of video DVD
Switching to video DVD mode
왘Insert a DVD (컄page 115).
or
왘Select “Video” “Video” “Video
DVD”.
or
왘Press the M shortcut button once or
twice.
DVD-V Pause/Play Stop Changer Sound
DVD Functions Pause playback Pause Playback Select medium Treble
Brightness Continue playback Stop playback Bass
Contrast Restart playback Balance/Fader
Color 3D Sound
16:9 Optimized
4:3
Widescreen
iThe M shortcut button takes you directly
to the previously set disc mode (audio CD/DVD,
MP3-CD/DVD or video DVD). The number of
times you have to press the shortcut button de-
pends on the previously set mode.
127
Control systems
COMAND video DVD (USA only)
Hiding/showing the DVD control menu
왘Hiding the menu: Slide qmr.
왘Showing the menu: Slide qmr.
or
왘Wait for approximately 8 seconds.
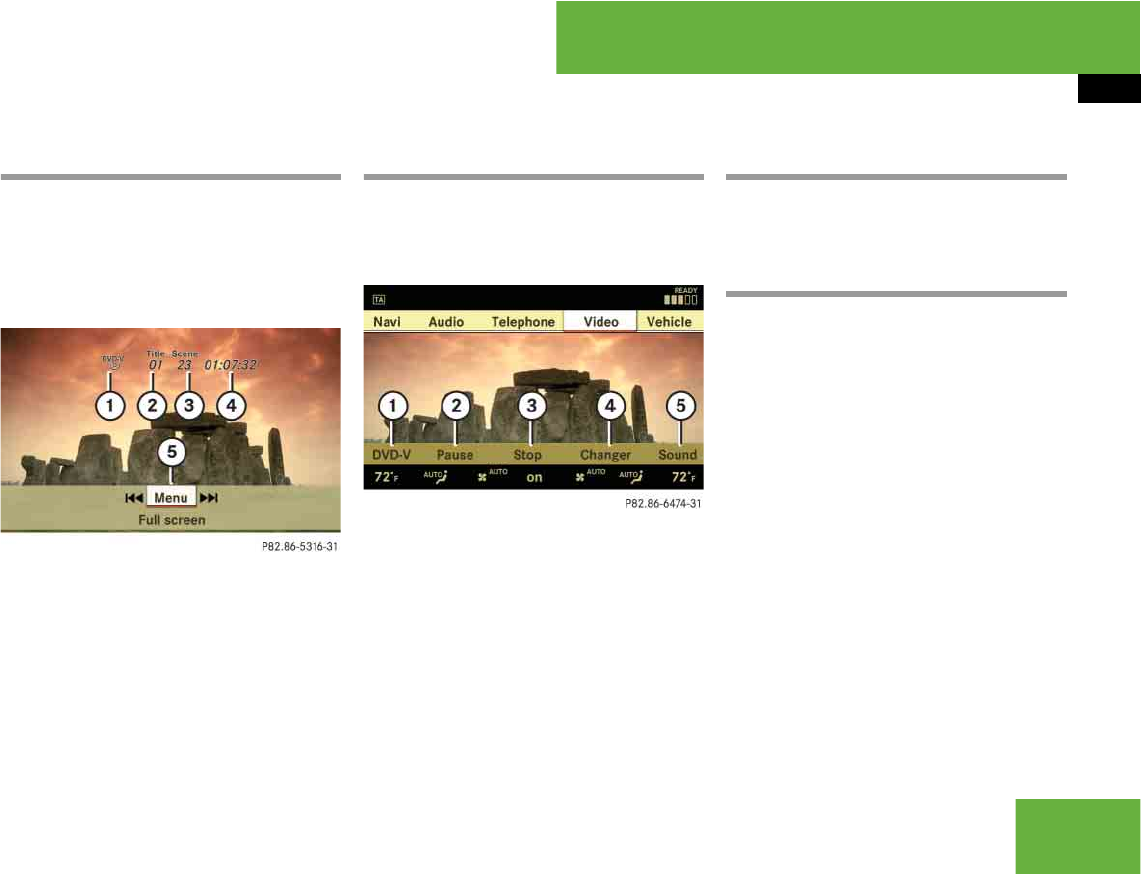
Control menu
1Disc type
2Current track
3Current scene
4Elapsed track time
5Show the menu system
Hiding/showing the menu system
왘Showing the menu: Press n.
왘Hiding the menu: Press n when the
main menu area is selected.
Menu system
1Video DVD options
2Pause
3Stop
4Medium selection
5Sound settings
Fast forward/rewind
왘Slide omp and hold until you get to the
desired scene.
Selecting the DVD medium
왘Select “Video” “Video” “Video
DVD”.
왘Show the menu system, if necessary
(컄page 127).
왘Select “Changer”.
The media list appears. The dotR indi-
cates the current medium.
왘Select a medium.
COMAND changes the medium.

128
Control systems
COMAND video DVD (USA only)
Stop playback
왘Select “Video” “Video” “Video
DVD”.
왘Show the menu system, if necessary
(컄page 127).
왘Stop play: Select “Stop”.
In the display, “Pause” changes to
“Play”.
왘Continue playback: Select “Play”.
Play is continued from the point at
which it was stopped.
왘Stop playback: Select “Stop” again
while playback is stopped.
or
왘Select “Stop” twice in quick succession
during playback.
왘Resume playback: Select “Play”.
Playbacks starts again from the begin-
ning.
Pause playback
왘Select “Video” “Video” “Video
DVD”.
왘Show the menu system, if necessary
(컄page 127).
왘Pause playback: Select “Pause”.
In the display, “Pause” changes to
“Play”.
왘Continue playback: Select “Play”.
Play is continued from the point at
which it was stopped.
Selecting scene/chapter
왘Make sure that the control menu is
shown (컄page 127).
왘Skipping forwards or back: Slide
omp or turn ymz.
Selecting film/track
왘Select “Video” “Video” “Video
DVD”.
왘Show the menu system, if necessary
(컄page 127).
왘Select “DVD-V” “DVD Functions”
“Title selection”.
A selection list appears.
왘Select a film/track.
Screen settings
Setting brightness, contrast and color
왘Select “Video” “Video” “Video
DVD”.
왘Show the menu system, if necessary
(컄page 127).
왘Select “DVD-V” “Brightness”
“Contrast”or “Color”.
iThis function is only available if the DVD is
comprised of several film/tracks.
129
Control systems
COMAND video DVD (USA only)
왘Changing settings: Slide qmr or turn
ymz until you reach the desired set-
ting.
왘Saving settings: Press n.
Changing the picture format
왘Select “Video” “Video” “Video
DVD”.
왘Show the menu system, if necessary
(컄page 127).
왘Select “DVD-V”.
The DVD-V menu appears. The dotRin
front of a menu item -
“16:9 Optimized”, “4:3” or “Wide-
screen” indicates the current format.
왘Changing the format: Slide qmr or
turn ymz, until you reach the desired
setting.
왘Saving the format: Press n.
DVD menu
The DVD menu is the menu stored on the
DVD itself. It is structured in various ways
according to the individual DVD and per-
mits certain actions and settings.
Calling up the DVD menu
왘Select “Video” “Video” “Video
DVD”.
왘Show the menu system, if necessary
(컄page 127).
왘Select “DVD-V” “DVD Func-
tions”“Menu”.
The DVD menu appears.
Selecting menu items in the DVD menu
왘Slide qmr or omp.
왘Confirming the selection: Press n.
The selection menu appears.
왘Reconfirming the selection: Select
“Select”.
COMAND carries out the action de-
fined by the selected DVD menu item.
iDepending on the DVD, it is possible the
menu item “Play” either has no function or has
no function in certain parts of the DVD menu.
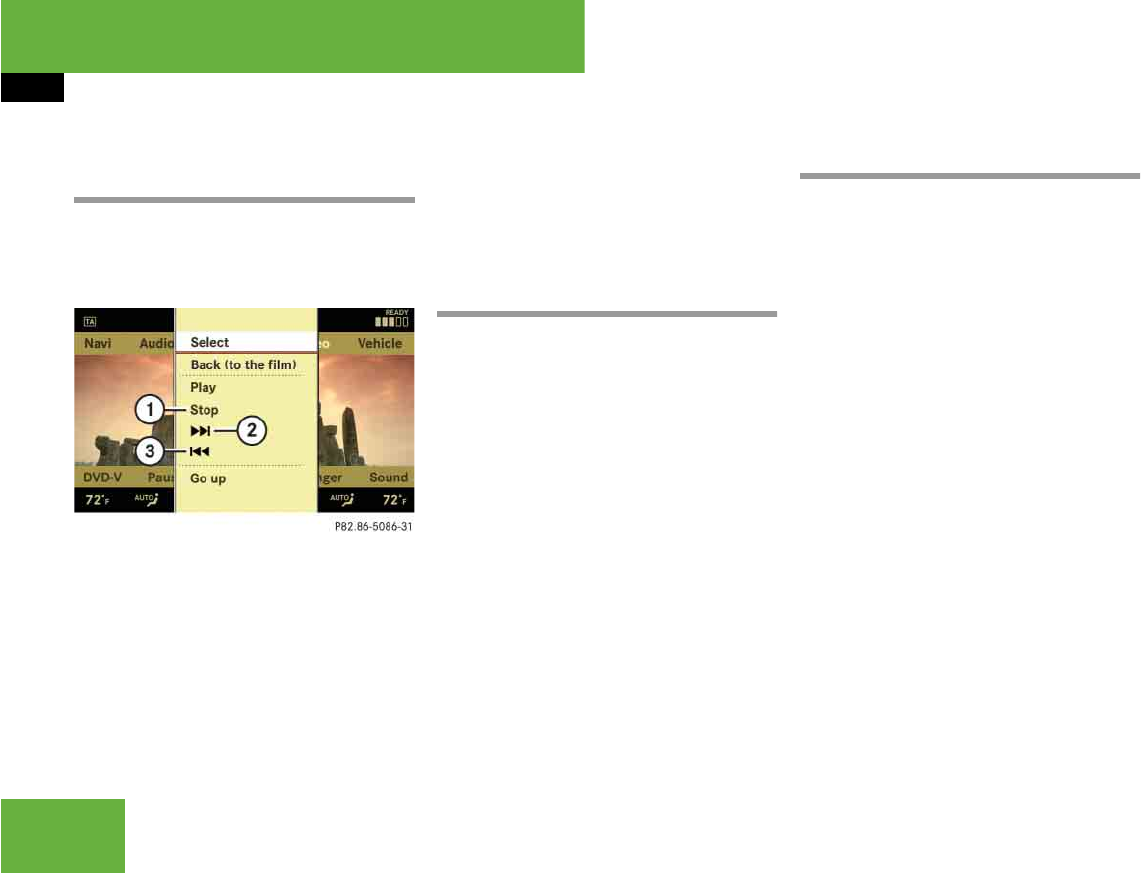
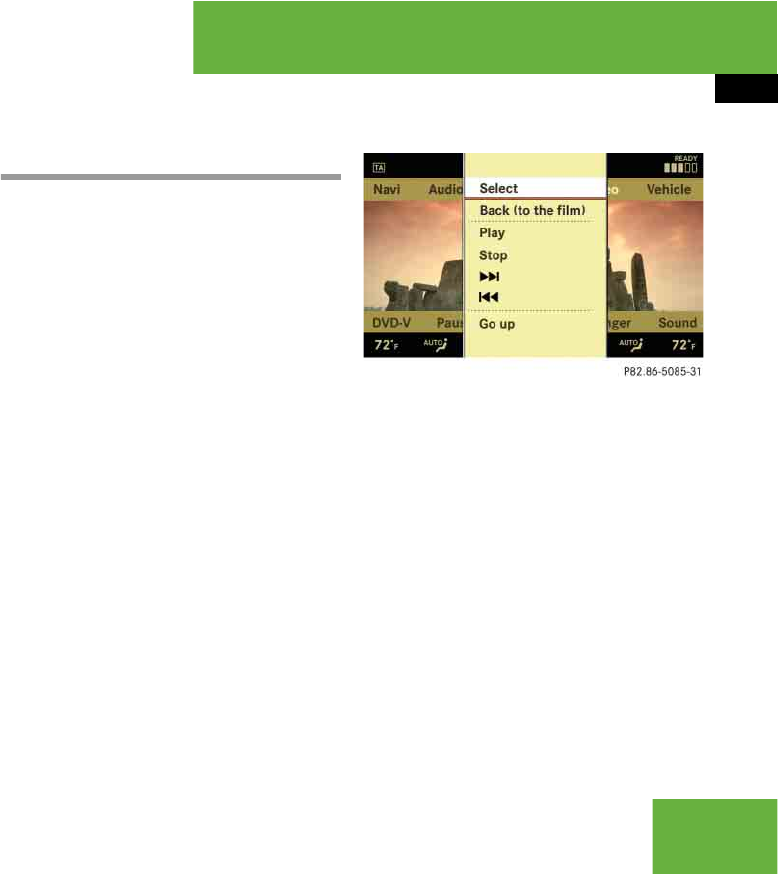
130
Control systems
COMAND video DVD (USA only)
Stopping the film or skipping to the
beginning/end of a scene
왘Select a menu item of your choice from
the DVD menu.
The selection menu appears.
1Stop film
2Skip to the end of a scene
3Skip to the beginning of a scene
왘Stopping the film: Select “Stop”.
왘Skipping to the end of a scene:
Select H.
왘Skipping to the beginning of a
scene: Select G.
Switching to the next highest DVD
menu level
왘Press the L back button in the cen-
ter console.
or
왘Select the corresponding menu item in
the DVD menu.
or
왘Select a menu item of your choice from
the DVD menu.
왘Select the menu item “Go up” in the se-
lection menu.
Back to the film
왘Press the L back button until you
can see the film.
or
왘Select the corresponding menu item in
the DVD menu.
or
왘Select a menu item of your choice from
the DVD menu.
왘Select the menu item “Back (to the
film)” in the selection menu.
iDepending on the DVD, it is possible the
menu items H and G either have no func-
tion or have no function in certain parts of the
DVD menu.
iDepending on the DVD, it is possible the
menu item “Go up” either has no function or has
no function in certain parts of the DVD menu.
iDepending on the DVD, it is possible the
menu item “Back (to the film)” either has no
function or has no function in certain parts of the
DVD menu.

131
Control systems
COMAND video DVD (USA only)
Setting the language and audio format
왘Select “Video” “Video” “Video
DVD”.
왘Show the menu system, if necessary
(컄page 127).
왘Select “DVD-V” “DVD Functions”.
왘Select “Menu Language” or “Audio Lan-
guage”.
In both cases a selection list will ap-
pear. The dotRin front of an entry
indicates the current language.
왘Changing the setting: Slide qmr or
turn ymz, until you reach the desired
setting.
왘Saving a setting: Press n.
왘Exiting the menu: Slide omp.
Subtitles and camera angles
왘Select “Video” “Video” “Video
DVD”.
왘Show the menu system, if necessary
(컄page 127).
왘Select “DVD-V” “DVD Functions”.
왘Select “Subtitles” or “Camera angle”.
In both cases a selection list will ap-
pear. The dotRin front of an entry
indicates the current language.
왘Changing the setting: Slide qmr or
turn ymz, until you reach the desired
setting.
왘Saving a setting: Press n.
왘Exiting the menu: Slide omp.
Interactive content
왘Selecting an action: Slide qmr or
omp, or turn ymz, until you reach the
desired setting.
왘Initiating an action: Press n.
A menu appears, the first entry “Se-
lect” is highlighted.
왘Press n.
iThis function is not available for all DVDs. If
it is available, you can set the language for the
DVD menu and the audio language and/or the
audio format. The number of settings you can
make is determined by the content of the DVD. It
may also be possible to make the settings in the
DVD menu (컄page 129).
iThis function is not available for all DVDs.
The number of settings you can make is deter-
mined by the content of the DVD. It may also be
possible to make the settings in the DVD menu
(컄page 129).
iDVDs may include interactive content (e.g. a
video game). In a video game you can control the
play by selecting and initiating actions. The type
and number of actions depends on the DVD.

132
Control systems
COMAND telephone*
Safety precautions
General notes Calls disconnected while the vehicle is
in motion
A call may be disconnected if:
앫there is insufficient network coverage
앫you move from one transmitter/receiv-
er area (cell) into another and no chan-
nels are free or the cell is full
Warning! G
Some jurisdictions prohibit the driver from
using a cellular telephone while driving.
Whether or not prohibited by law, for safety
reasons, the driver should not use the cellu-
lar telephone while the vehicle is in motion.
Stop the vehicle in a safe location before
placing or answering a call.
If you nonetheless choose to use the mobile
phone1 while driving, please use the hands-
free feature and be sure to pay attention to
the traffic situation at all times. Use the mo-
bile phone only when road, weather and traf-
fic conditions permit. Otherwise, you may
not be able to observe traffic conditions and
could endanger yourself and others.
Bear in mind that at a speed of just 30 mph
(approximately 50 km/h), your vehicle is
covering a distance of 44 feet (approxima-
tely 14 m) every second.
1Observe all legal requirements.
Warning! G
Never operate radio transmitters equipped
with a built-in or attached antenna (i.e. with-
out being connected to an external antenna)
from inside the vehicle while the engine is
running. Doing so could lead to a malfunc-
tion of the vehicle’s electronic system, pos-
sibly resulting in an accident and/or
personal injury.
iUSA only:
This device complies with Part 15 of the FCC
Rules. Operation is subject to the following two
conditions:
(1) This device may not cause harmful interfer-
ence, and
(2) this device must accept any interference re-
ceived, including interference that may
cause undesired operation.
Any unauthorized modification to this device
could void the user’s authority to operate the
equipment.
iCanada only:
This device complies with RSS-210 of Industry
Canada. Operation is subject to the following
two conditions:
(1) This device may not cause interference, and
(2) this device must accept any interference re-
ceived, including interference that may
cause undesired operation of the device.
Any unauthorized modification to this device
could void the user’s authority to operate the
equipment.

133
Control systems
COMAND telephone*
Operating options
When the mobile phone is inserted in the
cradle, you can operate the telephone us-
ing the following devices:
앫mobile phone keypad
앫COMAND telephone keypad
앫buttons s and t on the multi-
function steering wheel (컄page 267)
앫Voice Control* (컄page 291)
앫Bluetooth® headset (컄page 147)
Please note that these functions are only
available with Mercedes-Benz approved
mobile phones. Please contact an autho-
rized Mercedes-Benz Center for informa-
tion on features available for your mobile
phone of choice.
You can control other functions of the mo-
bile phone via the COMAND, instrument
cluster control system (컄page 278) or
Voice Control*.
The descriptions in this section assume
that the mobile phone is inserted in the
cradle. Exceptions to this are clearly stat-
ed.
Unless otherwise indicated, the descrip-
tions and illustrations in this section refer
to COMAND and the telephone keypad.
Operation using the mobile phone and
Bluetooth® headset is described in the re-
spective separate Operating Instructions.
Caller ID
COMAND can display the telephone num-
ber and the name of the caller, e.g. for an
incoming call and also in other menus or
displays.
For the telephone number to be displayed,
the caller must transmit their telephone
number.
This is also the case for name displays. For
this, the telephone number and the name
of the caller must also be saved in the mo-
bile phone book.
iThe components and operating principles of
COMAND can be found on (컄page 85) and
(컄page 94).
iVarious mobile phone cradles can be in-
stalled in the front center armrest, see separate
installation instructions for the mobile phone
cradle. These mobile phone cradles can be ob-
tained from an authorized Mercedes-Benz Cen-
ter. For more information about telephone
(컄page 507). iIn order for the functions described in this
section to work correctly, the Bluetooth® head-
set must be linked to COMAND (컄page 241).
Please make sure any Bluetooth® headset linked
with the mobile phone is switched off or that the
headset is linked with COMAND before you in-
sert the mobile phone in the cradle (컄page 507)
and use the telephone functions with COMAND.

134
Control systems
COMAND telephone*
Functional restrictions
You will not be able to use the telephone,
or you may have to wait a while, in the fol-
lowing situations:
앫If the telephone has not yet logged into
the network.
The telephone automatically tries to
log into a network. If no network is
available, you will also not be able to
make a “911” emergency call.
If you attempt to make an outgoing call,
the “No Service” message will appear
for a short while.
앫If the mobile phone is not inserted in
the cradle.
앫SIM card is not inserted in GSM type
phone.
Notes about COMAND telephone fea-
tures using a Bluetooth® connection
Many of the Mercedes-Benz approved mo-
bile phones, cradles and adaptors avail-
able for use in your vehicle utilize
Bluetooth® technology to communicate
with each other and the vehicle. Depend-
ing on your phone brand and model, the
number of in-vehicle or on-display
COMAND telephone features supported
via Bluetooth® communication, and thus
available for your use, may vary.
The descriptions and illustrations in this
section are based on the use of fully com-
patible Mercedes-Benz approved mobile
phones and cradles that do not utilize Blue-
tooth® technology to communicate with
each other. If your vehicle is equipped with
integrated Bluetooth® functionality than a
Bluetooth® capable mobile phone, head-
set, Laptop, PDA, etc. is required to utilize
those features.
For additional information about
Mercedes-Benz approved Bluetooth® mo-
bile phones and related accessories please
contact the Mercedes-Benz Customer As-
sistance Center at 1-800-FOR-MERCedes
or your nearest authorized Mercedes-Benz
Center.
Switching telephone on or off
왘Switching on: Insert mobile phone
into cradle when COMAND is switched
on.
or
왘Switch on the mobile phone
(see mobile phone operating instruc-
tions).
왘Switching off: Select “Telephone”
“Telephone” “Telephone OFF”.
or
왘Switch off mobile phone (see mobile
phone operating instructions).
iThe roof cargo container* may impair mo-
bile phone reception. In an emergency, remove
the mobile phone from the mobile phone cradle
(컄page 507) to make a call.
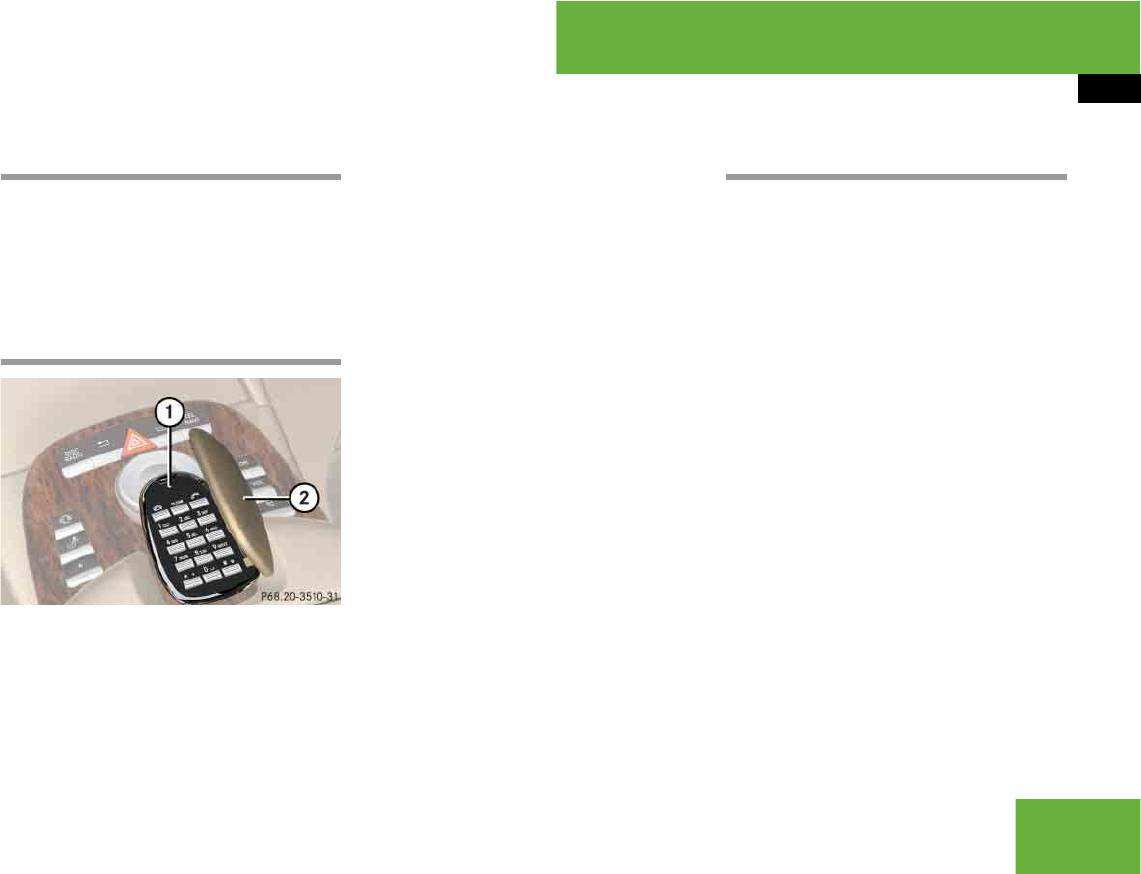
135
Control systems
COMAND telephone*
Activating telephone mode
왘Select “Telephone” “Telephone”
“Telephone”.
or
왘Press s on telephone keypad.
Telephone keypad
1Telephone keypad
2Folding cover
With the telephone keypad you can:
앫Enter and clear numbers and special
characters
앫Reject, accept, connect and end calls
왘Entering characters: Select “Tele-
phone” “Telephone” “Telephone”.
왘Fold up cover 2.
왘Enter characters using A- #.
왘Deleting individual characters:
Press *.
왘Deleting an entire word or number:
Press and hold * until the word or
number is deleted.
“911” emergency call
The following conditions must be fulfilled
in order to make a “911” emergency call:
앫The phone is switched on.
앫A mobile network is available.
앫There is a valid SIM card in the phone
(not necessary in all mobile networks).
If you cannot make an emergency call, you
must initiate rescue measures yourself.
The “911” emergency call is a public ser-
vice. Any misuse is punishable by law.
iYou can enter the * character by
pressing > once. Pressing this button again
within 1.5 seconds enters the + character.
iThe “911” emergency call system is a public
service. Using it without due cause is a criminal
offense.
iThis function places a call to the local 911
provider. It does not initiate a Tele Aid call.
iIf no SIM card is inserted in the mobile
phone, you can only initiate a “911” emergency
call by using COMAND and the mobile phone.

136
Control systems
COMAND telephone*
Placing a “911” emergency call before
entering PIN/PIN2, PUK/PUK2 or un-
lock code
Entering the number using the COMAND
controller
왘Select “Telephone” “Telephone”
“Telephone” “Dial 911”.
Entering the number using the tele-
phone keypad
왘Enter digits 9-1-1 (컄page 135).
왘Press s.
Placing a “911” emergency call after
entering PIN/PIN2, PUK/PUK2 or un-
lock code
Entering the number using the COMAND
controller
왘Select “Telephone” “Telephone”
“Telephone”.
왘Select all the digits in sequence.
왘Select “S”.
Entering the number using the tele-
phone keypad
왘Enter digits 9-1-1 (컄page 135).
왘Press s.
Confirming the emergency call
After the digits have been entered, you will
see the question “Do you want to dial the
911 emergency number?”.
왘Use COMAND controller to select
“Yes”.
The telephone makes the connection.
왘Wait until the emergency call center
answers and describe the emergency
situation.
iThe roof cargo container* may impair mo-
bile phone reception. In an emergency, remove
the mobile phone from the mobile phone cradle
(컄page 507) to make a call.

137
Control systems
COMAND telephone*
Entering the PIN
Entering using the COMAND controller
왘Select “Telephone” “Telephone”
“Telephone”.
왘Entering: Select all the digits in se-
quence.
왘Deleting a digit: Select ) and briefly
press n.
왘Deleting an entire number: Select )
and press and hold n until the number
is deleted.
왘Confirming an entry: Press n.
Entering using the telephone keypad
왘Entering: Enter digits (컄page 135).
왘Confirming an entry: Press n or
press s.
Entering the PIN2
The phone may request the PIN2 in order
to use certain functions. A corresponding
message appears in the display.
왘Enter PIN2 digits into mobile phone.
Entering the PUK/PUK2
If you enter the PIN or PIN2 incorrectly
three times, the SIM card will be locked.
A corresponding message appears in the
display. It is necessary to enter the
PUK/PUK2 to unlock it. The PUK and/or
PUK2 are provided by your telephone ser-
vice provider.
왘Enter PUK/PUK2 digits into mobile
phone.
iYour PIN code (Personal Identification Num-
ber code) prevents unauthorized persons from
using your GSM mobile phone. The PIN code is a
number string, which you have to enter when
switching on the telephone.
The PIN entry applies only to GSM mobile
phones. iThe PIN2 entry applies only to GSM mobile
phones.
iThe PUK/PUK2 entry (Personal Unblocking
Key) applies only to GSM mobile phones.

138
Control systems
COMAND telephone*
Entering the unlock code
Many mobile phones can be protected
from unauthorized use with an unlock code
(see mobile phone operating instructions).
If you wish to use the phone functions
when the unlock code is active, a screen
appears requesting that you enter the un-
lock code. You cannot use the phone func-
tions (except “911” emergency call) until
you have entered the unlock code.
왘Proceed in the same way as entering
the PIN (컄page 137).

139
Control systems
COMAND telephone*
Telephone submenu overview
iThe components and operating principles of
COMAND can be found on (컄page 85).
Name
(only when the mobile
phone is inserted in the
cradle)
Call lists
(not during a call)
DTMF
(only during a call)
Mic OFF/ON
(only during a call)
Text message
(not during a call)
Display COMAND phone
book
Display call list selection:
앫Calls received
앫Calls dialed
Send numerical se-
quence
Switch hands-free mi-
crophone on/off
Call up SMS inbox
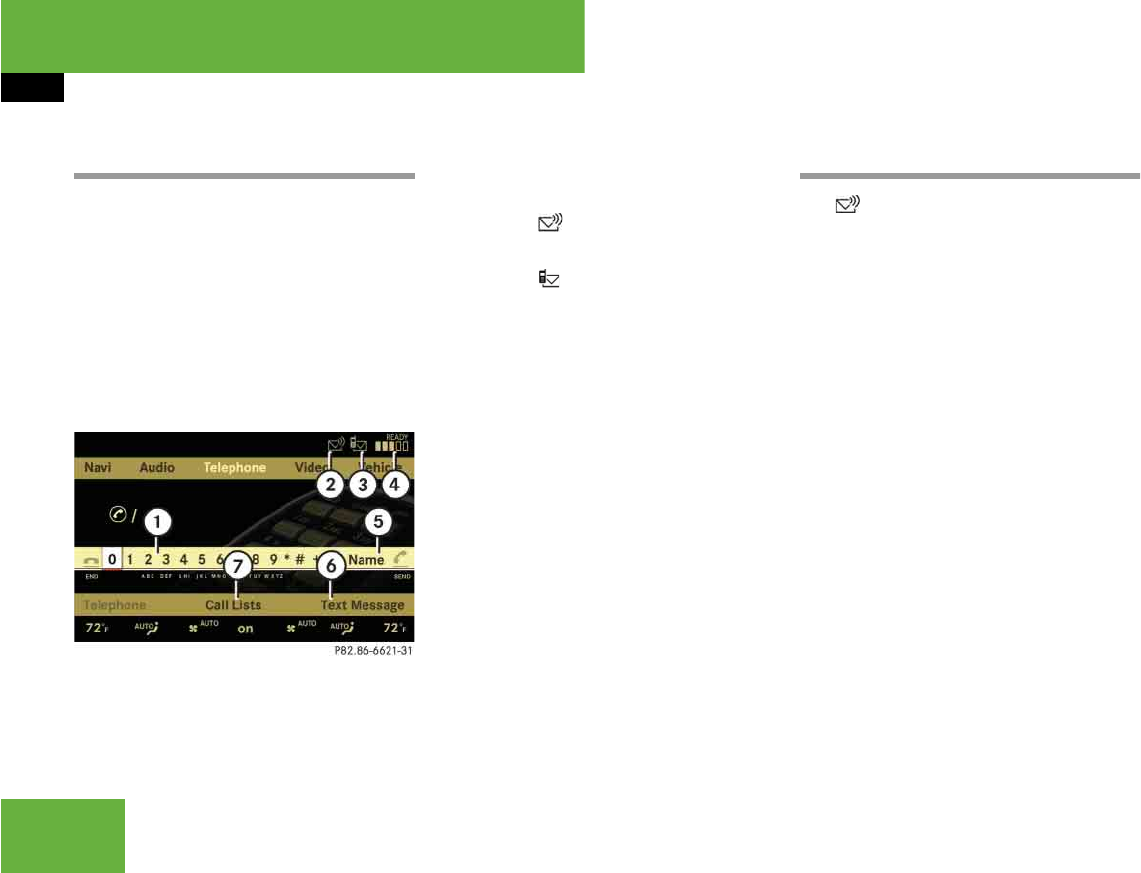
140
Control systems
COMAND telephone*
Main telephone menu
왘Calling up main menu: Select “Tele-
phone” “Telephone” “Telephone”.
or
왘Press s on the telephone keypad
(컄page 135).
Mailbox
The symbol in the example illustration
above indicates that your mailbox contains
new voice messages. You will have to call
the mailbox in order to retrieve the mes-
sages.
You can call your mailbox by:
앫Speed dialing (컄page 145)
앫Entering a telephone number using the
telephone keypad (컄page 144)
앫Entering the telephone number using
the COMAND controller (컄page 144)
iIf you press s when the main telephone
menu has already been called up, the “Calls Di-
aled” list will appear (컄page 141).
1Numbers/characters to enter tele-
phone number
2Symbol for new voice message in
mailbox
3Symbol for unread SMS messag-
es in SMS inbox (컄page 156)
4Signal strength and network status
display
앫Network status “READY” = mobile
phone is logged in with its own
provider’s network
앫Network status “READY ROAM” =
mobile phone is logged in with an-
other provider’s network
앫Network status “No Service” = No
network available
5To show COMAND phone book
(“Name”) (컄page 148)
6To call up text message (SMS)
(컄page 156)
7To display call list selection
(컄page 141)
iOnce connection with your mailbox has
been established, the mailbox system will guide
you through the next steps.
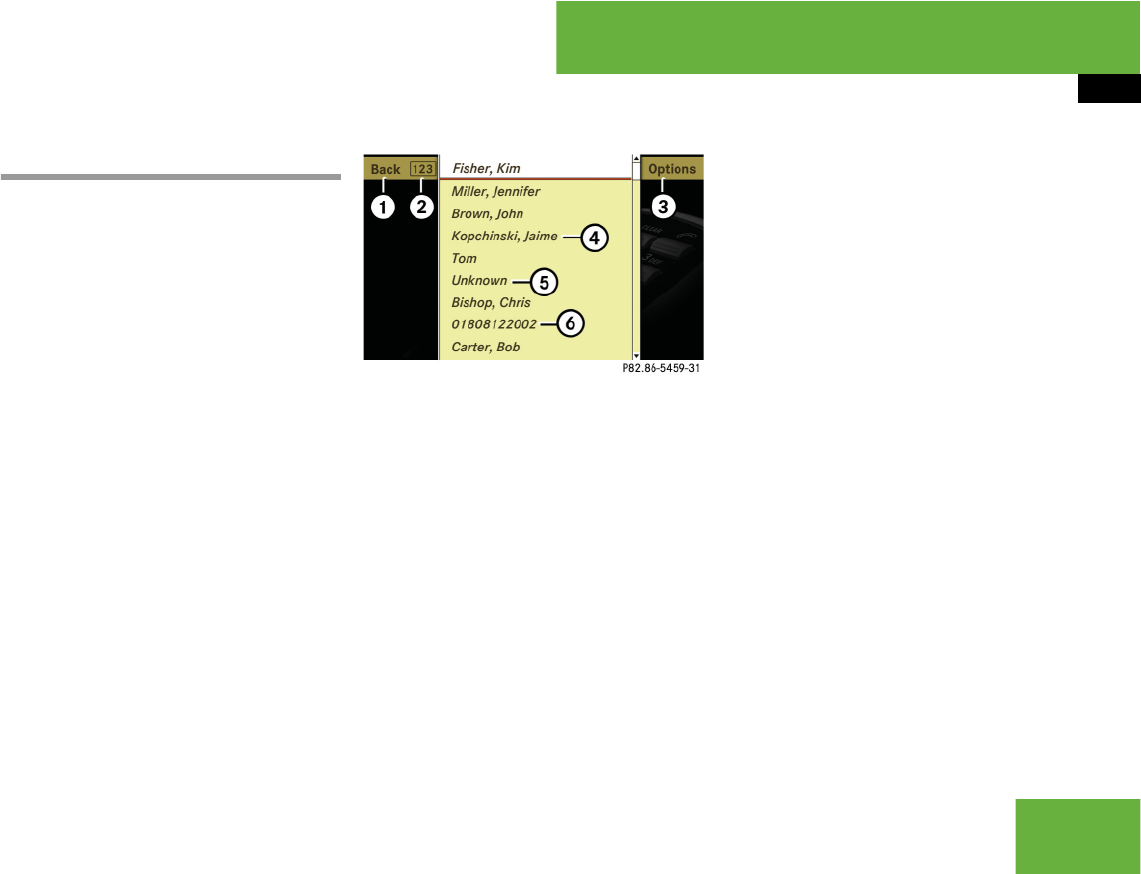
141
Control systems
COMAND telephone*
Call lists
COMAND can display the following calls in
separate lists:
앫Calls received
앫Calls dialed
Calling up a list
왘Select “Call List” from main telephone
menu.
왘Select “Calls Received” or “Calls Di-
aled”.
The corresponding list appears.
Illustration: list of incoming calls
1To close list
2To switch list display (“123” or “ABC”)
3To call up options
4Name or telephone number of a caller
5Unknown caller
6Telephone number of a caller
왘Switching to list display: Select
“123” or “ABC”.
The display changes to telephone num-
ber or name display.
왘Closing list: Slide omp and
select “Back”.
왘Selecting a list entry: Slide qmr or
rotate ymz and select entry.
iThe list of incoming calls contains received
calls as well as missed calls.
iThe “Calls Received” and “Calls Dialed”
menu items do not function if the respective list
has no entries.
The “Call List” menu item does not function if
neither list has any entries.
iIn the list of calls received, you will see the
name of caller 4 if
앫the caller transmitted the telephone number
앫the name and telephone number are saved
in the COMAND address book or in the
phone book on the mobile phone
앫the telephone number is saved in the same
way in which the caller transmits it
You will see the telephone number of caller 6 if
앫the caller transmitted the telephone number
앫no caller data is saved in either the COMAND
address book or the phone book on the mo-
bile phone
An unknown caller 5 has not transmitted his or
her telephone number.
iIn the list of dialed calls, you will see the
name of the person called if you have saved his
or her telephone number and name in the
COMAND address book or in the phone book on
the mobile phone. If no data has been saved, you
will see the telephone number.
컄컄

142
Control systems
COMAND telephone*
Displaying details of a list entry
COMAND can also show a shortened list
entry in its entirety.
왘Select list entry (컄page 141).
왘Slide omp and select “Options”
“Details”.
The detailed view appears.
왘Closing detailed view: Slide qmr or
omp or press n.
Saving a list entry in the address book
Saving as a new entry in the COMAND
address book
왘Slide omp or rotate ymz and select
list entry (컄page 141).
왘Select “Options” “Save” “New En-
try”.
왘Select a number category, e.g. “Home”.
왘Select a telephone category, e.g. “Land
Line”.
왘Select “Save”.
The input menu appears with the data
fields. The data field for the telephone
number is filled in automatically. The
data field for the last name is also filled
in automatically if the entry to be saved
contains a name.
왘If you would like to save the entry
now: Select ?.
1Data field
2Input mark (cursor)
3Input characters
왘If you want to change the available
characters: Proceed as described in
the “Changing data field” paragraph in
the “Assigning a New Entry in the Ad-
dress Book” section (컄page 152).
Adding to an existing entry in the
COMAND address book
왘Slide omp or rotate ymz and select
list entry (컄page 141).
왘Select “Options” “Save” “Add”.
iList entries that show a telephone number
are neither saved in the COMAND address book,
nor in the phone book on the mobile phone. You
can save such entries in the COMAND address
book. You can also save list entries in the
COMAND address book which have already been
saved in the phone book on the mobile phone.
i“Save” does not function if the selected list
entry is already saved in the COMAND address
book.
컄컄

143
Control systems
COMAND telephone*
왘Select a number category to add,
e.g. “Home”.
왘Select a telephone category to add,
e.g. “Land Line”.
왘Select “Save”.
The search menu for COMAND address
book entries appears.
왘Search for desired entry.
왘Press n when you have finished
searching.
COMAND saves the data if there are
fewer than four numbers assigned to
the entry you are searching for in the
selected number category.
If four numbers are saved for the entry
you are searching for, a prompt will ap-
pear asking whether you want to over-
write one of the existing numbers.
왘Select “Yes” or “No”.
If you select “Yes”, a selection list will
appear containing the four existing
numbers.
왘Select the number to be overwritten.
COMAND overwrites the selected num-
ber with the new data.
Incoming call
Rejecting or accepting the call
왘Rejecting: Select “Reject”.
or
왘Press t on the telephone keypad or
on the multifunction steering wheel.
왘Accepting: Select “Accept”.
or
왘Press s on the telephone keypad or
on the multifunction steering wheel.
or
왘Press 0 on the multifunction steer-
ing wheel.
왘Use the mobile phone (see mobile
phone operating instructions).
or
왘Use the Bluetooth® headset
(see headset operating instructions).
If you have accepted the call using
COMAND, the telephone keypad, the mul-
tifunction steering wheel or the mobile
phone, the call will be conducted via the
hands-free system. The volume of the call
can be adjusted (컄page 96).
i“Save” does not function if the selected list
entry is already saved in the COMAND address
book.
iThere is a detailed description of searching
for an COMAND address book entry in the
“Searching for an address book entry” section
(컄page 228).
iIf you have a CDMA/TDMA mobile phone
and reject a call, only the ring tone will stop. The
call itself can only be ended by the caller.
iThe use of a Bluetooth® headset requires
Bluetooth® to be activated and the Bluetooth®
headset to be authorized (컄page 241).

144
Control systems
COMAND telephone*
If you have accepted the call using the
Bluetooth® headset, the call will be con-
ducted via the headset.
Further operating functions can be found
in the “Functions during a single-call con-
nection” section (컄page 146).
You can also accept a call if the
COMAND display is showing a screen oth-
er than the telephone mode screen. After
accepting the call, you will see the caller’s
data in a window.
왘Closing window: Slide qmr or omp
or press n.
Making an outgoing call
Entering the telephone number using
the COMAND controller
왘Switching screen to telephone
mode: Call up main telephone menu
(컄page 140).
왘Entering digits: Select desired digits
by rotating ymz or sliding omp and
press n.
왘Deleting individual digits: Select )
and briefly press n.
왘Deleting an entire telephone num-
ber: Select ) and press and hold n
until the telephone number is deleted.
왘Connecting a call: Select “S”.
Entering a telephone number using the
telephone keypad
왘Switching screen to telephone
mode: Call up main telephone menu
(컄page 140).
왘Use telephone keypad to enter digits.
왘Connecting a call: Press s.
Redial
왘Switching screen to telephone
mode: Call up main telephone menu
(컄page 140).
왘Use COMAND controller to select
“S”.
or
왘Press s on the telephone keypad
(컄page 88).
The list of dialed numbers appears. The
most recently dialed number is at the
top.
왘Select desired entry.
왘Connecting a call: Press n.
iIf you place an outgoing call and receive a
busy signal, the telephone automatically starts
to redial as long as the provider and the mobile
phone support this function (see mobile phone
operating instructions).
While the call is connecting, you can also send
character strings (컄page 146).
iA detailed description of how to enter digits
using the telephone keypad can be found on
(컄page 88).
iIf the list of dialed calls contains no entries,
the “S” menu item cannot be selected and the
s button on the telephone keypad does not
function.

145
Control systems
COMAND telephone*
Placing a call to a call list entry or
COMAND phone book entry
왘Call up a call list and select an entry
(컄page 141).
or
왘Call up COMAND phone book and se-
lect an entry (컄page 148).
왘Connecting a call: Press n.
Speed dialing
You can save telephone numbers in the
speed-dial preset locations on the mobile
phone and call up the speed-dial presets
(see mobile phone operating instructions).
You can also call up speed-dial numbers
using COMAND.
Calling up speed-dial presets using the
COMAND controller
왘Switching screen to telephone
mode: Call up main telephone menu
(컄page 140).
왘Entering number of a speed-dial pre-
set: Select all the digits in sequence.
왘Deleting individual digits:
Select ) and briefly press n.
왘Deleting entire number:
Select ) and press n until the
number is deleted.
왘Connecting a call (speed-dial pre-
sets 1 -99): Select “S”.
or
왘Connecting a call (speed-dial pre-
sets 100 - 999): Select “#” after the
digits “S”.
In both cases, the telephone connects
the call to the saved telephone num-
ber. If the speed-dial memory contains
no telephone numbers, you will see a
corresponding message.
왘Deleting message: Press n.
Calling up speed-dial numbers using the
telephone keypad
왘Switching screen to telephone
mode: Call up main telephone menu
(컄page 140).
왘Single-digit numbers: Press and hold
A- 9 buttons.
or
왘Single- and two-digit numbers: Enter
number using the A- 9 buttons.
왘Press s.
or
왘Three-digit numbers: Enter number
using the A- 9 buttons.
왘Press #, and then s.
In all three cases, COMAND connects
the call to the saved telephone num-
ber. If the speed-dial memory contains
no telephone numbers, you will see a
corresponding message.
iBy default, the mailbox number is preset in
the speed dial memory unless you have modified
it. For more information on the mailbox
(컄page 140).
iOperation during call connection depends
on the speed-dial preset position called up.
컄컄
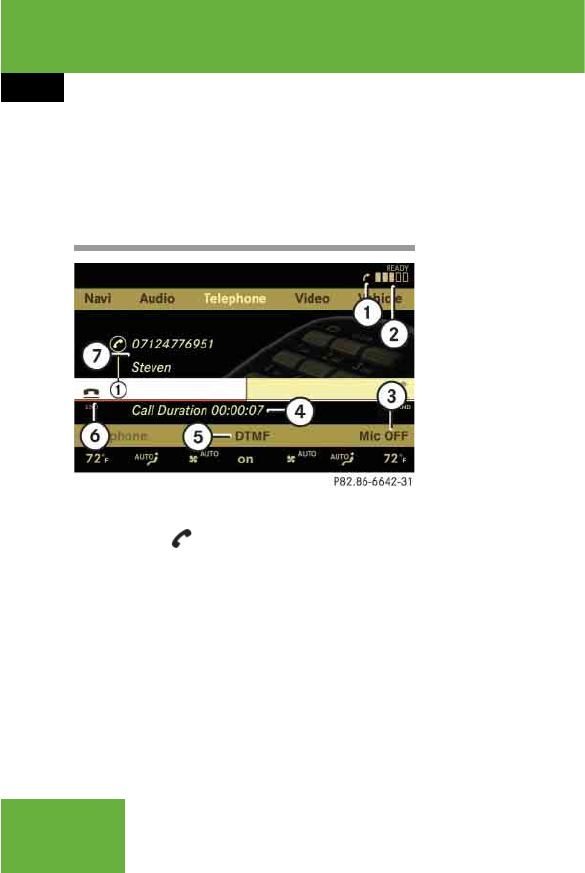
146
Control systems
COMAND telephone*
왘Deleting message: Press n.
Functions during a single-call
connection
Illustration: telephone mode during a call
1Symbol for active telephone con-
nection (also visible in other operating
modes)
2Signal strength display
3To switch hands-free microphone on or
off
4Length of call display
5To send character strings
6To end a call
7Person you are calling
Switching the hands-free microphone
on or off
왘Switching screen to telephone
mode: Call up main telephone menu
(컄page 140).
왘Switching off microphone:
Select “Mic OFF” and press n.
or
왘Press F shortcut button.
If the microphone is switched off,
the > symbol appears in the main ar-
ea.
왘Switching on microphone:
Select “Mic ON”.
or
왘Press F shortcut button.
The > symbol disappears.
Sending a character string via DTMF
Answering machines or other devices can
be controlled by character strings (e.g. for
remote query functions).
Sending character strings via the DTMF
menu
왘During a call, select “DTMF”.
The DTMF dialing display appears.
iThe name of the person you are speaking
with can only be seen in display 7 if his or her
telephone number and name have been saved in
the COMAND address book or phone book on
the mobile phone. The telephone number must
also be saved in the same way in which the per-
son you are talking to transmits it. iThis function is not possible with every mo-
bile phone. If the mobile phone supports the
function, you can use it during the call connec-
tion and also during a call.
컄컄

147
Control systems
COMAND telephone*
1Back to the call display
2Character entry
3To call up the phone book
왘Sending individual characters:
Rotate ymz or slide omp and select
desired character.
Each character you select can be seen
in the main area and is sent immediate-
ly.
왘Sending a phone book entry as a
character string: Select “Name”.
왘Select desired phone book entry.
The entry is immediately sent as a char-
acter string.
왘Switching back to the call display:
Select “Y”.
Sending character strings via the tele-
phone keypad
왘Press corresponding button on tele-
phone keypad.
Each character you select is immedi-
ately sent.
Ending an active call
왘Ending a call: Select “4END” in the
call display.
or
왘Press t on the telephone keypad or
on the multifunction steering wheel.
The COMAND display will change to
the previously selected display, if appli-
cable.
Transferring a call
From the hands-free system to the
Bluetooth® headset
The call transfer is controlled by pressing
the PTT button on the Bluetooth® headset
(see headset operating instructions). Nor-
mally, it is sufficient to press the PTT but-
ton once, but under certain circumstances
you may have to press it a second time.
Once the call has been transferred to the
Bluetooth® headset, all the functions will
be available to you which are described in
the “Functions during a single-call connec-
tion” section (컄page 146).
Exception: “Switching the hands-free mi-
crophone on or off” function (컄page 146).
iTelephone numbers containing the + char-
acter may impair the function.
iThe + character may impair the function.
iThe use of a Bluetooth® headset requires
Bluetooth® to be activated and the Bluetooth®
headset to be authorized (컄page 241).
컄컄

148
Control systems
COMAND telephone*
From the Bluetooth® headset to the
hands-free system
On most Bluetooth® headsets, you press
the PTT button on the headset twice quick-
ly to transfer the call (see headset operat-
ing instructions).
From the hands-free system to the mo-
bile phone
왘If the mobile phone has a folding up-
per section: Flip upper section open.
왘Take mobile phone out of cradle.
The “No telephone inserted” message
appears on the COMAND display. Sub-
sequent operation is only possible us-
ing the mobile phone.
From the mobile phone to the
hands-free system
왘Insert mobile phone into cradle.
Once the call has been transferred to
the hands-free feature, all the functions
will be available to you which are de-
scribed in the “Functions during a sin-
gle-call connection” section
(컄page 146).
COMAND phone book
The COMAND phone book contains both
the COMAND address book entries and
mobile phone entries that have at least
one telephone number.
The COMAND address book entries are
permanently available even when a mobile
phone is not inserted in the cradle.
When the mobile phone is inserted in the
cradle, COMAND will read the phone book
entries in the mobile phone and compares
them with the COMAND address book en-
tries.
If any of the telephone numbers of a phone
book entry in the mobile phone are the
same as an address book entry, COMAND
will only display the address book entry.
If the entries are not the same, the CO-
MAND phone book will show the phone
book entry in the mobile phone.
Calling up the COMAND phone book
왘Select “Telephone” “Telephone”
“Telephone” “Name”.
The COMAND phone book appears.
컄컄
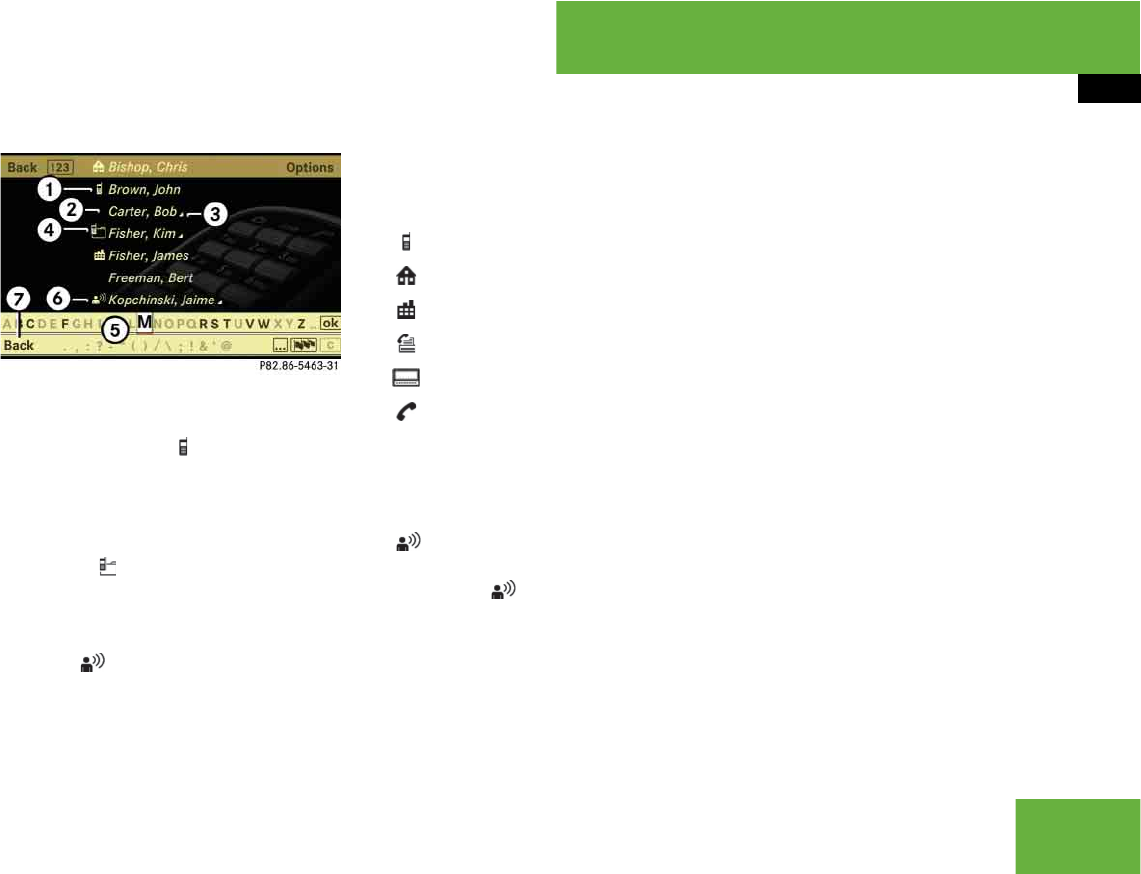
149
Control systems
COMAND telephone*
Illustration: a phone book with name dis-
play and smart speller activated
1Category symbol
2Upper entry from address book (with-
out category symbol)
3Symbol + for several telephone num-
bers (subentries) under the main entry
4Symbol for summarized entries
from the mobile phone with the same
name but different telephone numbers
5Smart speller
6Voice entry symbol
7To close the phone book
Entries with category symbol 1 come
from the mobile phone. The following cate-
gory symbols are possible:
앫 = symbol for “Mobile” category
앫 = symbol for “Home” category
앫 = symbol for “Work” category
앫 = symbol for “Fax” category
앫 = symbol for “Pager” category
앫 = symbol for “Main” category or for
unknown category or for phone entries
that are saved on the SIM card of a
GSM mobile phone
Entries without a category symbol or with
the symbol come from the COMAND
address book.
Entries with the symbol contain a voice
entry. Voice entries can be added to the
address book (컄page 234). This function
is available in vehicles with Voice Control*.
Switching between the smart speller
and the list
왘Switching from the smart speller to
the list: Slide mq repeatedly or press
n until the smart speller is hidden.
or
왘Rotate ymz or slide omp and
select ?.
The smart speller is hidden.
컄컄
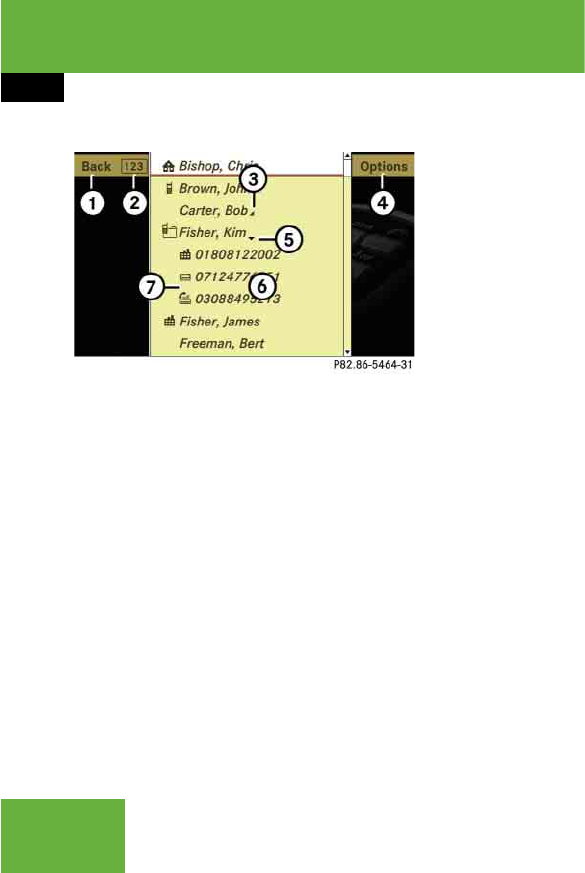
150
Control systems
COMAND telephone*
Illustration: list of phone book entries with
name display and hidden smart speller
1Back to smart speller
2To switch phone book display (“123” or
“ABC”)
3Symbol + for several telephone num-
bers (subentries) under the main entry,
subentry list is closed
4To call up options
5Symbol / for open subentry list
6List of phone book entries
7Subentry list with category symbols
and telephone numbers
왘Switching from the list to the smart
speller: Select “Back” from the list.
or
왘Press back button L in the center
console (컄page 86).
왘Changing phone book display in the
list: Select “123” or “ABC”.
The screen changes to telephone num-
ber or name display.
Closing the COMAND phone book
왘In the smart speller, select “Back”.
or
왘Press back button L in the center
console (컄page 86).
Selecting an entry in the COMAND
phone book
Selecting entries using the smart speller
왘Switch from the list to the smart speller
if necessary.
왘Changing smart speller language:
Select !.
왘Select desired language.
iThe following options are available under
“Options” menu item 4:
앫Displaying details about an entry
(컄page 151)
앫Creating a new entry in the address book
(컄page 152)
앫Deleting an entry (컄page 153)
앫Saving a phone book entry from mobile
phone in the address book (컄page 153)
앫Adding a telephone number to an address
book entry (컄page 155)
컄컄

151
Control systems
COMAND telephone*
왘Changing smart speller character
set: Select #.
Depending on the previous setting, you
will change to letters with special char-
acters or to numbers with special char-
acters.
왘Entering characters: Select the char-
acters of the entry you are searching
for one by one.
왘Deleting individual characters: Se-
lect ) and briefly press n.
Each time you enter or delete a charac-
ter, the closest match will be displayed
at the top of the list.
왘Deleting an entire entry: Select )
and press and hold n until the entry is
deleted.
왘Canceling search: Switch from the
smart speller to the list.
The entry at the top of the list is auto-
matically highlighted.
Selecting using the list
왘If necessary, switch from the smart
speller to the list.
왘Rotate ymz or slide qmr until the de-
sired entry is highlighted.
Selecting subentries
왘Select an entry with the + symbol and
press n.
The + symbol changes to / and the
subentries are displayed.
왘Rotate ymz or slide qmr until the de-
sired subentry is highlighted.
Displaying details of an entry
COMAND can also show a shortened entry
in its entirety. For entries featuring suben-
tries, the detailed view is only available for
the subentries and not for the main entry.
왘Select entry (컄page 150).
왘Select “Options” “Details”.
The detailed view appears.
왘Closing detailed view: Slide qmr or
omp or press n or back button L
in the center console (컄page 86).
Starting to dial the number of an entry
왘Select entry (컄page 150).
왘Press n.
or
왘Press s on the telephone keypad.
A list appears if the entry contains sub-
entries.
왘Select desired subentry.
왘Press n again.
or
왘Press s on the telephone key-
pad.
컄컄
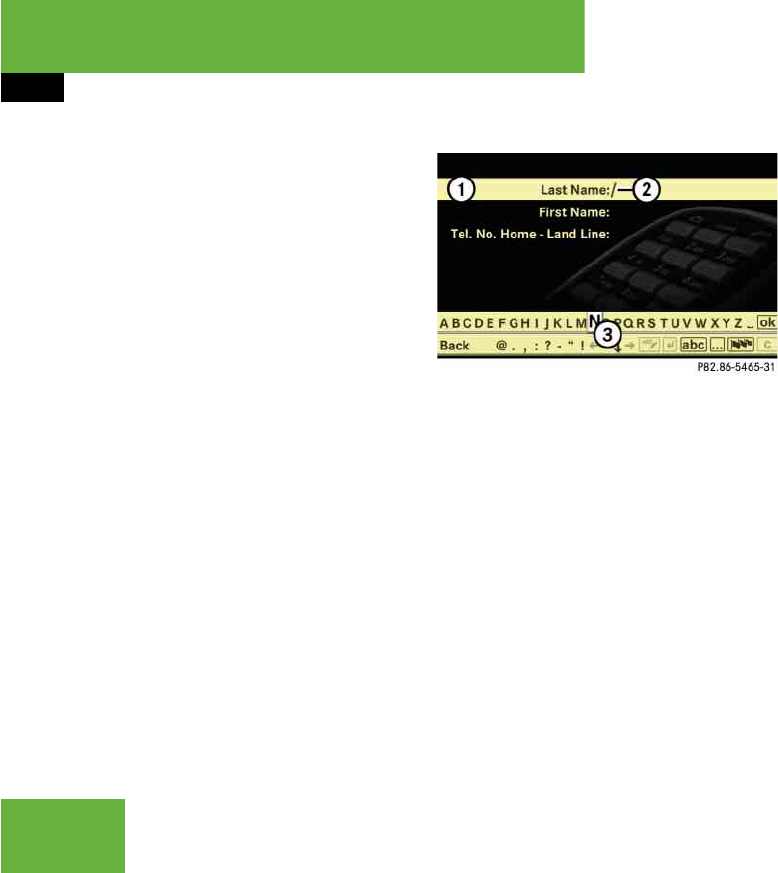
152
Control systems
COMAND telephone*
Assigning a New Entry in the Address
Book
왘Select “Options” “New Entry” in the
COMAND phone book list.
왘Selecting a number category:
Select a category, e.g. “Home”.
왘Selecting a telephone category:
Select a category, e.g. “Land Line”.
왘Confirming selection: Select “Save”.
The input menu appears with the data
fields.
1Data field
2Input mark (cursor)
3Input characters
왘Changing data field: Slide qmr re-
peatedly until desired data field is high-
lighted.
or
왘Select [ or ] repeatedly until de-
sired data field is highlighted.
왘Entering data into a field: Select all
characters one by one from the input
characters line 3.
왘Toggling upper and lower case for
the input characters: Select & or
(.
왘Changing language for the input
characters: Select !.
왘Select desired language.
왘Changing character set for the input
characters: Select #.
Depending on the previous setting, you
will change to letters with special char-
acters or to numbers with special char-
acters.
왘Displaying special characters as in-
put characters: Select ! “Sym-
bols”.
왘Returning input characters to nor-
mal characters: Select ! the
desired language.
왘Moving cursor in the data field:
Select Y or Z.
iThis function is used to create a new entry in
the address book and to enter the data (first
name, last name and telephone number) manu-
ally.
컄컄

153
Control systems
COMAND telephone*
왘Deleting individual characters:
Select ) and briefly press n.
The character to the left of the cursor is
deleted.
왘Deleting an entire entry: Select )
and press and hold n until the entry is
deleted.
왘Saving an entry: Select ?.
왘Canceling an entry: Select “Back”.
If one of the data fields contains data, a
prompt will appear asking whether you
want to save the entry.
왘Select “Yes” or “No”.
The entry will either be saved or
not, depending on your selection.
Deleting an entry
The deletion rules may vary, depending on
the entry selected:
앫Upper entry selected from the address
book:
the entry is deleted from the COMAND
phone book and also from the address
book, if the address book entry only
contains telephone numbers.
앫Subentry of an address book entry se-
lected:
the subentry is deleted from the
COMAND phone book and from the ad-
dress book.
왘Deleting: Select entry (컄page 150).
왘Select “Options” “Delete”.
A prompt appears asking whether the
entry should be deleted.
왘Select “Yes” or “No”.
Once “Yes” has been selected, the en-
try will be deleted according to the
rules mentioned above.
Saving a phone book entry from the
mobile phone in the address book
Saving as a new address book entry
왘Select phone book entry from mobile
phone (컄page 150).
왘Select “Options” “Save” “New En-
try”.
iIt is not possible to delete a phone book en-
try from the mobile phone using the COMAND
phone book.
iThis function is used to save an existing
phone book entry from the mobile phone in the
address book. The following options are avail-
able:
앫Saving as a new address book entry
앫Adding a telephone number to an existing
address book entry
iAll entries with the following category sym-
bols are phone book entries in the mobile phone.
앫 = symbol for “Mobile” category
앫 = symbol for “Home” category
앫 = symbol for “Work” category
앫 = symbol for “Fax” category
앫 = symbol for “Pager” category
앫 = symbol for “Main” category
컄컄
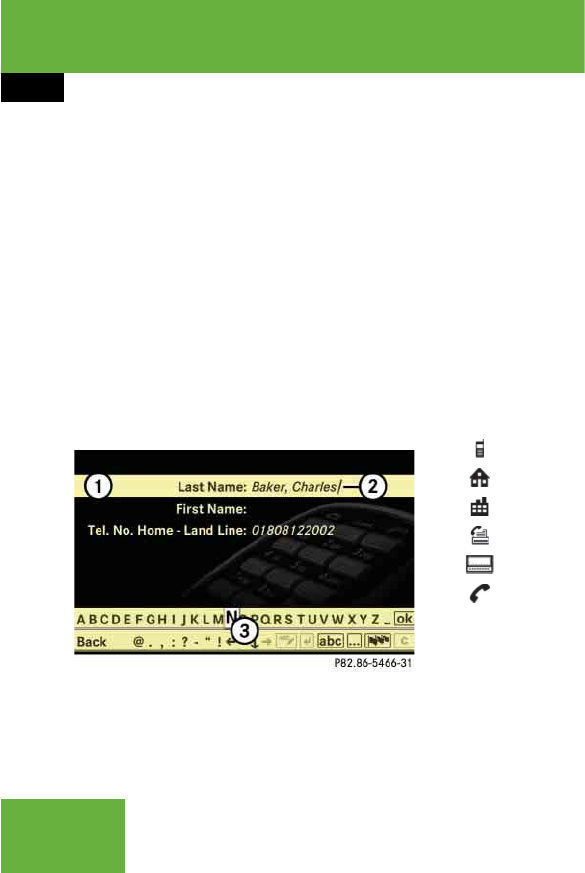
154
Control systems
COMAND telephone*
왘Selecting a number category:
Select a category, e.g. “Home”.
왘Selecting a telephone category:
Select a category, e.g. “Land Line”.
왘Confirming selection: Select “Save”.
The input menu appears with the data
fields. The data field for the telephone
number is filled in automatically. The
data field for the last name is also filled
when the entry to be saved contains a
name.
1Data field
2Input mark (cursor)
3Input characters
왘Proceed as described in the “Changing
data field” paragraph in the “Assigning
a New Entry in the Address Book” sec-
tion (컄page 152).
Adding a telephone number to an exist-
ing address book entry
왘Select phone book entry from mobile
phone (컄page 150).
왘Select “Options” “Save” “Add”.
왘Selecting a number category:
Select a category, e.g. “Home”.
왘Selecting a telephone category:
Select a category, e.g. “Land Line”.
왘Confirming selection: Select “Save”.
The search menu for address book en-
tries appears.
왘Search for desired entry using smart
speller function.
왘After selecting an entry, press n.
If there are fewer than four numbers
assigned to the selected entry in the
selected number category, COMAND
will save the data.
If four numbers are saved for the se-
lected entry, a prompt will appear ask-
ing whether you want to overwrite one
of the existing numbers.
왘Select “Yes” or “No”.
If you select “Yes”, a selection list will
appear containing the four existing
numbers.
iAll entries with the following category sym-
bols are phone book entries in the mobile phone.
앫 = symbol for “Mobile” category
앫 = symbol for “Home” category
앫 = symbol for “Work” category
앫 = symbol for “Fax” category
앫 = symbol for “Pager” category
앫 = symbol for “Main” category
iThere is a detailed description of how to
search for an address book entry in the “Search-
ing for an address book entry” section
(컄page 228).
컄컄

155
Control systems
COMAND telephone*
왘Select number to be overwritten.
COMAND overwrites the selected num-
ber with the new data.
Adding a telephone number to an ad-
dress book entry
왘Select address book entry
(컄page 150).
왘Select “Options” “Add Number”.
왘Selecting a number category:
Select a category, e.g. “Home”.
왘Selecting a telephone category:
Select a category, e.g. “Land Line”.
왘Confirming selection: Select “Save”.
If four numbers are saved for the entry
in the selected number category, a
prompt will appear asking whether one
of the existing numbers should be over-
written.
왘Select “Yes” or “No”.
If you select “Yes”, a selection list
will appear containing the four ex-
isting numbers.
왘Select number to be overwritten.
The input menu appears with the
data field for entering the new tele-
phone number.
왘Entering digits: Select all digits one
by one from the input characters.
왘Moving cursor in the data field:
Select Y or Z.
왘Deleting individual digits: Select )
and briefly press n.
The digit to the left of the cursor is de-
leted.
왘Deleting an entire number:
Select ) and press and hold n until
the number is deleted.
왘Saving entry: Select ?.
왘Canceling an entry: Select “Back”.
If you have already entered data, a
prompt will appear asking whether the
entry should be saved.
왘Select “Yes” or “No”.
The entry will either be saved or
not, depending on your selection.
iThis function is used to add a telephone
number to an existing address book entry. The
telephone number can be entered manually.
iAll entries with the symbol or without a
symbol are address book entries.
i“Add Number” does not function if you have
selected the main entry for an address book en-
try with subentries.

156
Control systems
COMAND telephone*
SMS messages (Short Message
Service)
SMS functions
The following functions are available:
앫Receive
앫Read
The following conditions must be fulfilled
in order to use the functions:
앫The mobile phone is inserted in the cra-
dle and switched on.
앫The PIN has been entered (only GSM
mobile phones).
앫The mobile phone is logged into a mo-
bile network.
앫Mobile phone book must be download-
ed and available in COMAND.
Inbox
Calling up the SMS inbox
왘Select “Telephone” “Telephone”.
The main telephone menu appears.
1Symbol for unread messages in the
SMS inbox
왘Select “Text Message”.
The SMS inbox appears.
1Date and time the highlighted SMS
message was received
2To call up options
3Highlighted SMS message
4Symbol for unread SMS message
5Back to main telephone menu
iThe symbol only appears for those mes-
sages which are received while the mobile phone
is inserted in the cradle.
i“Text Message” does not function if the
SMS inbox contains no SMS messages. The SMS
inbox only shows the messages which are re-
ceived while the mobile phone is inserted in the
cradle.
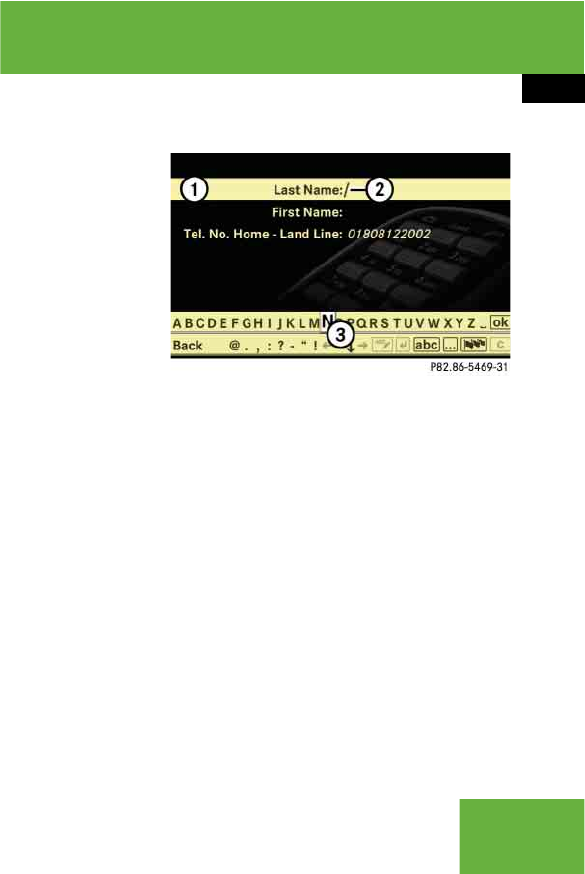
157
Control systems
COMAND telephone*
Selecting an SMS message
왘Rotate ymz or slide qmr and then
press n.
Showing abbreviated sender display in
full
왘Select SMS message “Options”
“Details”.
The detailed view appears.
왘Closing detailed view: Slide qmr or
press n.
Calling an SMS sender
왘Select SMS message “Options”
“Call”.
The telephone connects the call.
Saving SMS sender as new COMAND
address book entry
왘Selecting an SMS message: In the
SMS inbox, select a message “Op-
tions” “Save Number” “New En-
try”.
왘Selecting a number category:
Select a category, e.g. “Home”.
왘Selecting a telephone category:
Select a category, e.g. “Land Line”.
왘Saving: Select “Save”.
The input menu appears with the data
fields. The data field for the telephone
number is filled in automatically.
1Data field
2Input mark (cursor)
3Input characters
왘Proceed as described in the “Changing
data field” paragraph in the “Assigning
a New Entry in the Address Book” sec-
tion (컄page 152).
Adding an SMS sender’s telephone num-
ber to an existing address book entry
왘Selecting an SMS message: In the
SMS inbox, select a message “Op-
tions” “Save Number” “Add”.
iThe SMS messages are sorted by the date
and time they were received. The most recent
message is at the top of the list.
If the name and telephone number of the sender
is saved in the address book or phone book of
the mobile phone, you will see the name of the
sender in the SMS inbox. Otherwise, you will see
the telephone number of the sender.
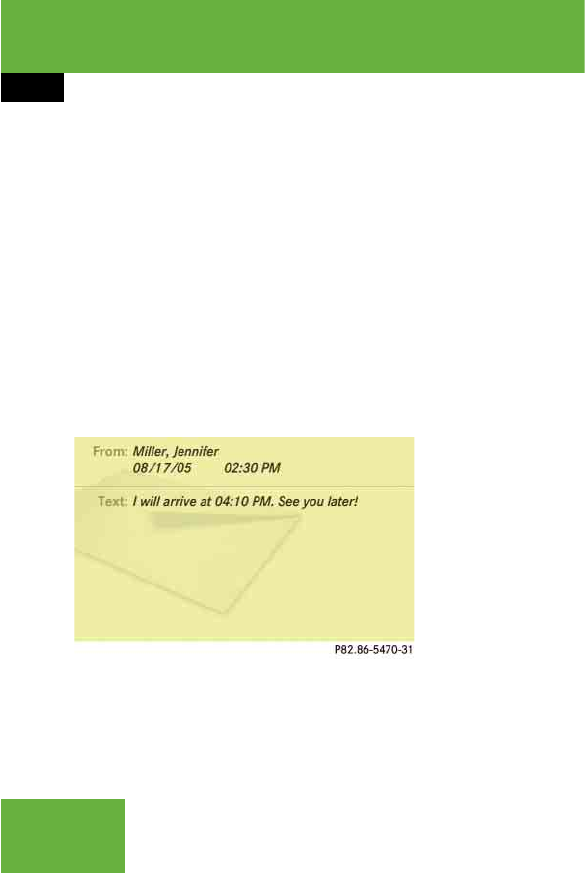
158
Control systems
왘Proceed as described in the “Selecting a number category” paragraph in the “Adding a telephone number to an existing address
book entry” section (컄page 154).
Exiting the SMS inbox
왘Select “Back”.
The main telephone menu appears.
Reading an SMS message
왘In the SMS inbox, select an SMS mes-
sage and press n.
The SMS message appears.
Using data in a text message
왘Selecting data from the text:
Rotate ymz or slide qmr.
왘Using data: Press n “Use”.
If you have selected a telephone num-
ber, the telephone connects the call.
If you have selected a navigable ad-
dress, it is transferred to the navigation
system.
Calling an SMS sender
왘Press n “Call”.
The telephone connects the call.
Saving SMS sender as new address book
entry
왘Press n “Save Number” “New
Entry”.
왘Proceed as described in the “Selecting
a number category” paragraph in the
“Saving SMS sender as new address
book entry” section (컄page 157).
Adding an SMS sender’s telephone num-
ber to an existing address book entry
왘Press n “Save Number” “Add”.
왘Proceed as described in the “Selecting
a number category” paragraph in the
“Adding a telephone number to an ex-
isting address book entry” section
(컄page 154).
Closing an SMS message and returning
to SMS inbox
왘Press n “Back”.
iIf the SMS message contains telephone
numbers or navigable address data, you can se-
lect this data and place a telephone call or trans-
fer the address data to the navigation system.
iThis function is not possible with all SMS
senders.
iThis function is not possible with all SMS
senders.

159
Control systems
COMAND navigation
왔COMAND navigation
Safety precautions
Warning! G
For safety reasons, only enter a destination
when the vehicle is stationary. When the ve-
hicle is in motion, a passenger should enter
the destination. Study manual and select
route before driving.
Bear in mind that at a speed of just 30 mph
(approximately 50 km/h), your vehicle is
covering a distance of 44 feet (approximate-
ly 14 m) every second.
COMAND calculates the route to the desti-
nation without taking account of the follow-
ing, for example:
앫Traffic lights
앫Stop and right-of-way signs
앫Parking or stopping prohibited areas
앫Lane merging
앫Other road and traffic rules and regula-
tions
앫Narrow bridges
COMAND may give incorrect navigation
commands if the data in the digital map
does not correspond with the actual
road/traffic situation. DVD maps do not
cover all areas nor all routes within an area.
For example, if the traffic routing has been
changed or the direction of a one-way road
has been reversed.
For this reason, you must always observe
applicable road and traffic rules and regula-
tions during your journey. Road and traffic
rules and regulations always have priority
over the navigation commands generated by
the system.
Warning! G
Navigation announcements are intended to
direct you while driving without diverting
your attention from the road and driving.
Please always use this feature instead of
consulting the map display for directions.
Consulting the symbols or map display for
directions may cause you to divert your at-
tention from driving and increase your risk
of an accident.

160
Control systems
COMAND navigation (introduction)
COMAND navigation (introduc-
tion)
Map software
The digital maps generated by the map
software become outdated in the same
way as conventional road maps. Optimum
route guidance can only be provided by the
navigation system in conjunction with the
most up-to-date map software.
Information about new map software ver-
sions can be obtained from an authorized
Mercedes-Benz Center.
Updating the map software
You can update the map software yourself
using a DVD.
Notes about handling DVDs
앫Only hold discs by the edge.
앫Handle discs carefully to prevent read
problems.
앫Avoid getting scratches, fingerprints
and dust on discs.
앫Use a commercially-available cleaning
cloth to clean discs. Do not wipe them
with a circular motion, but only in
straight lines from the center out-
wards.
앫Place discs back in their boxes after
use.
앫Protect discs from heat and direct sun-
light.
Updating process
The updating process has the following
phases:
앫Loading a DVD into the DVD changer
(컄page 161)
앫Updating process (컄page 161)
iThe updating process can take between
10 and 60 minutes, depending on the size of the
map software. If the radio was switched on be-
fore you started the updating process, you can
still adjust the volume. You can also use
COMAND to operate the automatic air condition-
ing and to cancel the process. Other functions
are not operational.
If possible, carry out the update when the vehicle
is stationary.
iIf you carry out the update with the engine
switched off and the vehicle battery has insuffi-
cient power, COMAND may automatically switch
off during the process in order to protect the bat-
tery. If this occurs, restart the update with the
engine running period. Similarly, if the SmartKey
position is unintentionally switched to 0, restart
the update.
Warning! G
Never leave the engine running in an en-
closed space. The exhaust gases contain
carbon monoxide. Inhaling exhaust gases
constitutes a health hazard and could lead
to loss of consciousness or even death.
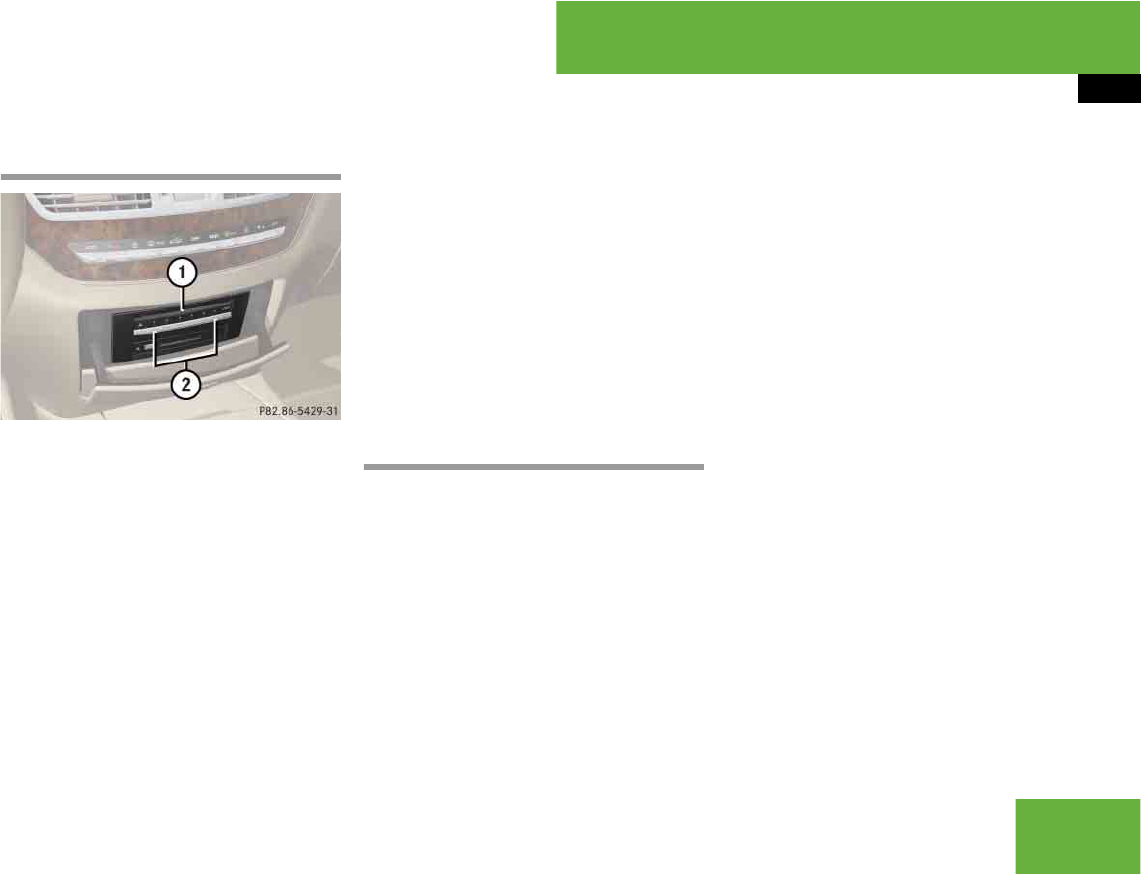
161
Control systems
COMAND navigation (introduction)
Loading a DVD into the DVD changer
1Disc slot
2Magazine tray buttons 1 – 6
왘Switch on COMAND (컄page 85).
왘Press one of the magazine tray
buttons 2.
If a disc is loaded, it will be ejected.
왘Take disc out of slot 1.
왘Wait until LED for magazine button 2
which you pressed flashes quickly.
왘Slide DVD into slot 1 with printed side
facing upwards.
COMAND loads the DVD.
Updating
After you have loaded the DVD, you will
see a message to the effect that the disc
does not contain a recognizable audio for-
mat.
왘Confirming message: Press n.
COMAND checks whether the map
software on the DVD is compatible with
the vehicle’s navigation system and
whether it is compatible with the cur-
rent system software.
Map software is compatible with the
navigation system and the current sys-
tem software
COMAND now checks whether the map
data on the DVD is already installed.
Map data is not yet installed
You will see a comparison of the version
statuses in the display and a prompt will
appear asking whether you want to contin-
ue with the update.
왘Select “Yes” or “No”.
If you select “No”, COMAND automati-
cally ejects the DVD and the map data
is not updated.
왘Take DVD out of the slot.
If you select “Yes”, the map data is up-
dated.
iEach magazine tray button 2 indicates the
status of the corresponding magazine tray by
means of an LED.
앫LED off = magazine tray is empty
앫LED constantly lit = magazine tray is loaded
앫LED flashes = CD/DVD changer requesting
disc to be loaded
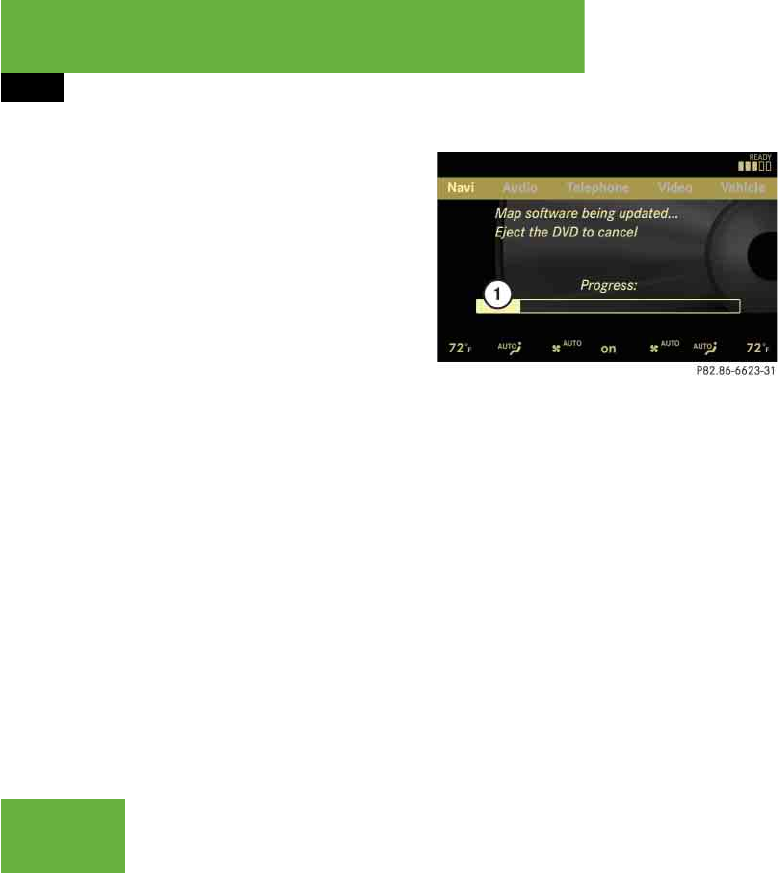
162
Control systems
COMAND navigation (introduction)
Map data is already installed
You will see a message that the map data
is already installed and a prompt will ap-
pear asking you whether you want to con-
tinue with the update.
왘Select “Yes” or “No”.
If you select “No”, COMAND automati-
cally ejects the DVD and the map data
is not updated.
왘Take DVD out of slot.
If you select “Yes”, the existing map
data is saved again.
Updating the map data
While the update is running, you will see a
message to this effect and a progress bar.
The progress bars fills up from left to right
during the update.
1Progress bar
You can either cancel the update or allow
it to run to the end without canceling.
왘Canceling an update on the DVD
changer: Press corresponding maga-
zine tray button 2 (컄page 161).
The DVD will be ejected in both cases.
왘Take DVD out of slot.
왘To allow the update to run to the
end without canceling: Take no fur-
ther action.
If the update is successfully complet-
ed, you will see a message to this ef-
fect.
왘Confirming message: Press n.
COMAND ejects the DVD.
왘Take DVD out of slot.
The update is complete.
If the update is not successfully complet-
ed, you will see a message that the map
update is not possible.
왘Confirming message: Press n.
COMAND ejects the DVD.
왘Take DVD out of slot.
The update may not be successfully com-
pleted for the following reasons:
앫DVD dirty or scratched
iIf the update is canceled, the navigation sys-
tem remains fully operational with the previous
map data. You can restart the update at a later
date. It will then continue from the point where it
was canceled.
iThe navigation system remains fully opera-
tional with the previous map data.

163
Control systems
COMAND navigation (introduction)
왘Clean DVD.
See the “Notes about handling
DVDs” section (컄page 160).
왘Restart update.
앫Overheating due to excessive tempera-
tures in the vehicle interior
왘Wait until vehicle interior has
cooled down.
왘Restart update.
앫The storage medium (hard disk) inte-
grated in COMAND is defective.
왘Consult an authorized
Mercedes-Benz Center.
Map software is not compatible with
the navigation system
You will see a message that the update is
not possible.
왘Confirming message: Press n.
COMAND ejects the DVD.
왘Take DVD out of slot.
왘Load a DVD which is compatible with
the vehicle’s navigation system.
Map software is not compatible with
the current system software
You will see a message that the system
software and the map software are not
compatible.
왘Confirming message: Press n.
COMAND ejects the DVD.
왘Take DVD out of slot.
왘Have the system software updated at
an authorized Mercedes-Benz Center.
iThe map software cannot be updated until
the system software has been updated.

164
Control systems
COMAND navigation (introduction)
General notes
Operational readiness of the navigation
system following a system software
update by an authorized
Mercedes-Benz Center
After a system software update by an au-
thorized Mercedes-Benz Center, the in-
stalled map software may no longer be
compatible. If this is the case, the naviga-
tion system will not be operational.
You will know if this is the case, when the
following message will appear when you
switch to navigation mode: “The system
software has been updated. The map soft-
ware must be updated now. Please insert
the DVD with the map software.”
왘Updating map software: Proceed as
described in the “Updating the map
software” section (컄page 160). Use
map software which is compatible with
the system software.
Initial use or use following a system
software update
In both these cases, the navigation system
must determine the position of the vehicle.
You may have to drive for a while before
precise route guidance is possible.
GPS reception
Correct functioning of the navigation sys-
tem depends on GPS reception, among
other things. In certain situations, GPS re-
ception may be impaired, there may be in-
terference or there may be no reception at
all, e.g. in tunnels, in multistory parking ga-
rage or due to snow on the GPS antenna. If
there is snow on the GPS antenna, you
should remove it. The GPS antenna is at
the back of the vehicle roof.
The roof cargo container* may also impair
mobile phone reception and GPS cover-
age.
Route guidance after vehicle transpor-
tation
COMAND has to redetermine the position
of the vehicle if the vehicle has been trans-
ported (e.g. by ferry, by train or after tow-
ing).
Positioning takes place automatically even
when COMAND is switched off. The dura-
tion varies from one case to another.
Route guidance may be restricted as fol-
lows during vehicle positioning:
앫Navigation announcements, route
guidance displays and displayed street
names are not consistent with the ac-
tual location of the vehicle.
앫COMAND does not generate navigation
announcements.
iPlease note that the update must be allowed
to run to the end in this case. If you interrupt it,
the navigation system will continue to be non-op-
erational.

165
Control systems
COMAND navigation (introduction)
앫Instead of the route guidance displays,
you see the “Off Road” display and a di-
rection arrow. The direction arrow
shows the compass heading to the des-
tination.
When positioning is complete, route guid-
ance is once again possible using naviga-
tion announcements and route guidance
displays.
Interrupting the journey during route
guidance
The following applies if you interrupt the
journey during route guidance and contin-
ue the journey later:
앫COMAND resumes route guidance au-
tomatically if you continue the journey
within 2 hours.
앫Route guidance is canceled if you con-
tinue the journey after more than
2 hours. It will be necessary to resume
the canceled route guidance manually
(컄page 216).
Hard disk errors
COMAND has an integrated hard disk on
which the map software is saved.
If an area of the hard disk has an error,
COMAND can no longer access the map
data in this area, for example, when calcu-
lating a route.
The message “Navigation Unavailable.
Please refer to the operating instructions.”
appears.
왘Deleting message: Switch COMAND
off and back on.
Units of measurement
The units of measurement in navigation
mode are identical to those set in the in-
strument cluster.
Input restrictions
The input restrictions are imposed starting
at a particular vehicle speed. The restric-
tions are canceled as soon as the speed
drops below a certain value.
When the restriction is active, certain oper-
ations or entries are not possible.
You will notice this by the fact that some
menu items cannot be selected or certain
operations will not be possible.
iThe journey is interrupted if you park the ve-
hicle and switch off COMAND.
The journey is continued when you switch
COMAND back on and start driving on.
iIf you switch the navigation system off/on,
it will be operational again until it has to access
the faulty area of the hard disk again. The mes-
sage will then appear again. Consult an autho-
rized Mercedes-Benz Center.

166
Control systems
COMAND navigation (introduction)
Navigation system menu overview
iThe components and operating principles of
COMAND can be found on (컄page 85).
Guide Route
(only with route
guidance active)
Position 6
(only with route
guidance active)
Destination Traffic (USA only)1
1Depending on your vehicle’s production date the traffic menu may not be available.
Select a special des-
tination from the cur-
rent map view
앫Call up route info
앫Call up route
browser
앫Call up the de-
tour function
앫Call up the save
position memory
function
앫Center the map
on the vehicle’s
position
앫Center the map
on the destina-
tion position
Repeat the current
navigation an-
nouncement
Select:
앫a destination
앫stopover
앫save destination
앫cancel route
guidance
Call up real-time traf-
fic messages
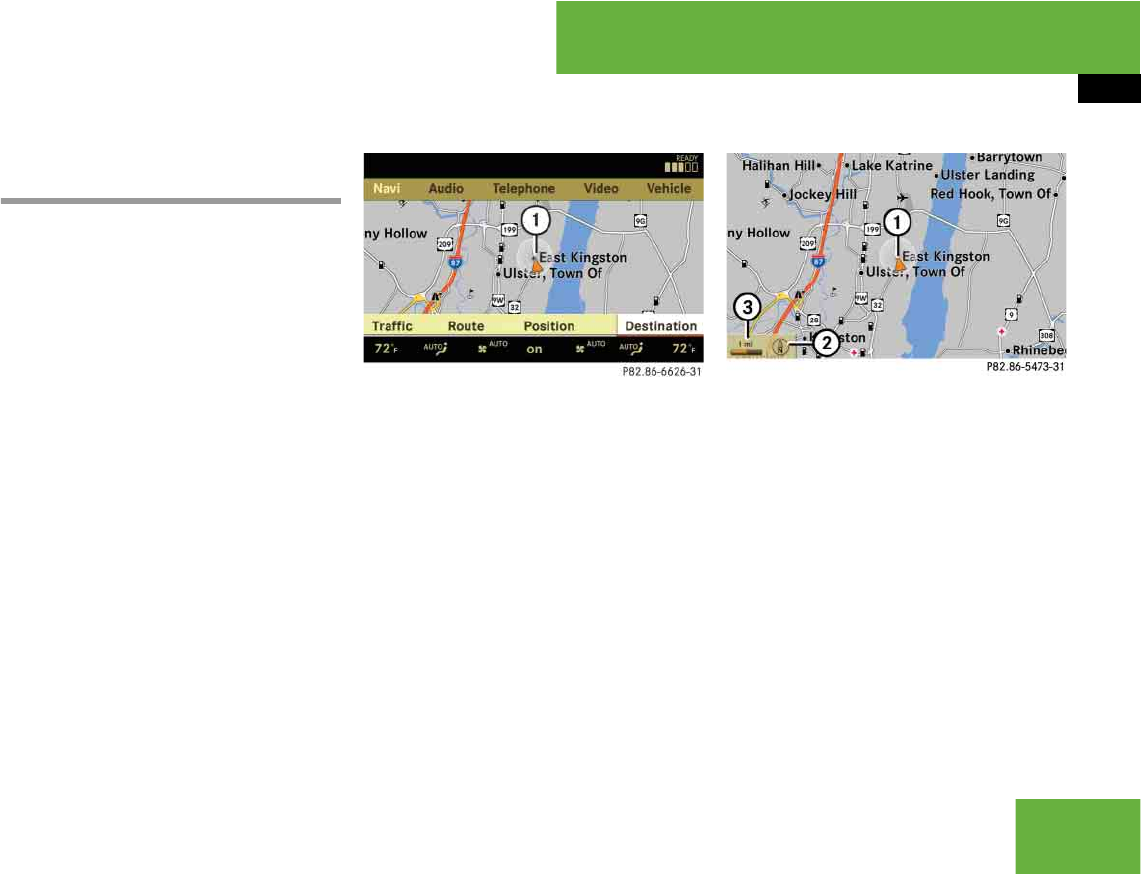
167
Control systems
COMAND navigation (introduction)
Calling up the map display and switch-
ing to navigation mode
왘Press the N shortcut button once or
twice.
or
왘In the main function line, select “Navi”.
Both of these will call up the map display.
You will see the map with the menu system
either shown or hidden.
Illustration: map with route guidance inac-
tive and with the menu system shown
1Current vehicle position
Illustration: map with route guidance inac-
tive and with the menu system hidden
(full screen mode)
1Current vehicle position
2Set map orientation (컄page 170)
3Map scale selected (컄page 168)
Hiding or showing the menu system
왘Hiding: Slide qm.
The “Full Screen” menu item appears in
the main area of the display; it is auto-
matically selected.
왘Press n.
The menu system is hidden. The map
can be seen in the full screen.
iThe number of times you have to press the
N shortcut button depends on the operating
mode currently selected.
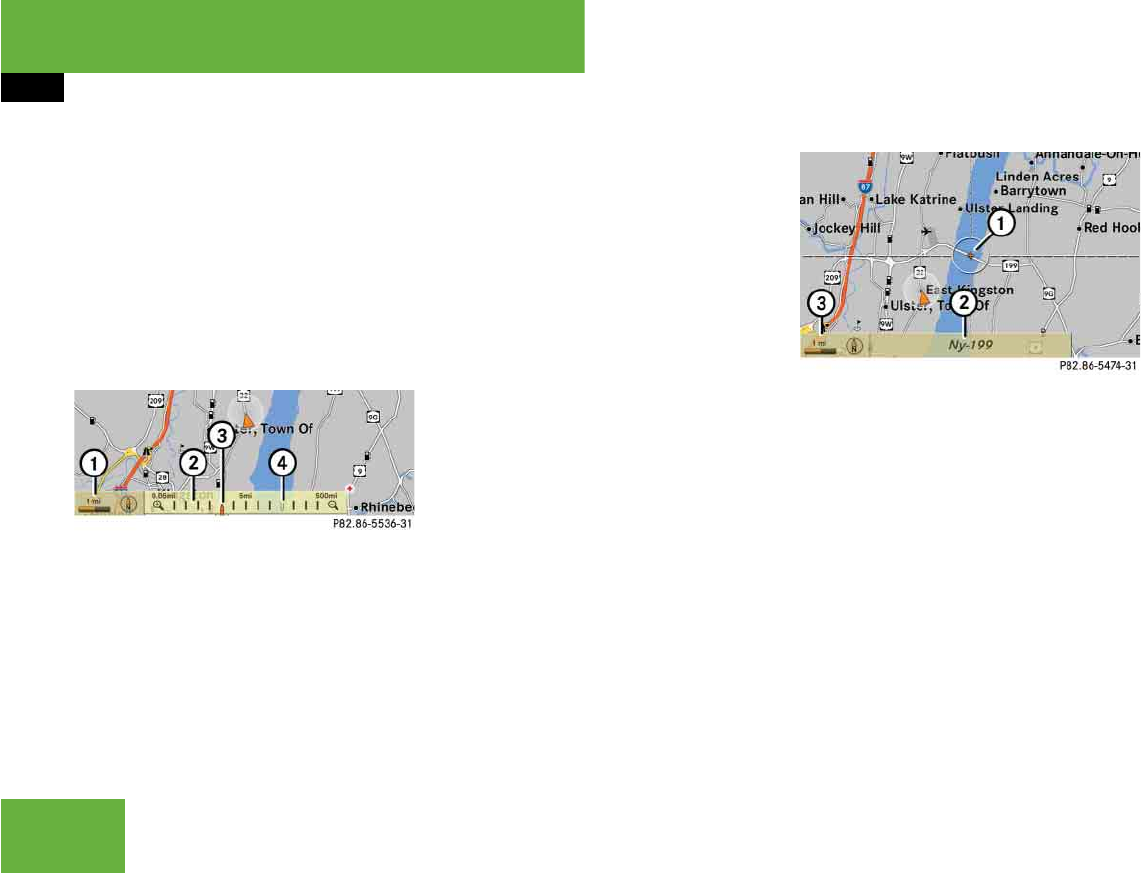
168
Control systems
COMAND navigation (introduction)
왘Showing: Press n in the full-screen
map display.
Adjusting the map scale
왘Rotate ymz until the desired map
scale is set.
1Currently set map scale as number
2Scale
3Currently set map scale as a needle on
the scale
4Previously set value before calling up
the scale
As soon as you rotate ymz, scale 2
appears. Rotating clockwise zooms in,
rotating counterclockwise zooms out.
Saving current vehicle position as des-
tination in last destinations list
왘Showing menu system, if neces-
sary: Press n.
왘Saving: Select “Position” “Save Po-
sition”.
COMAND saves the current vehicle po-
sition as a destination in the last desti-
nations (컄page 225).
Moving the map
왘Slide qmr, omp or wmx.
A crosshair appears on the map.
1Crosshair
2Details of the crosshair position
3Map scale
iIt is only possible to adjust the map scale
with the menu system hidden (full-screen map
display).
iIt is only possible to move the map with the
menu system hidden. iDisplay 2 may be the name of a road, for
example, provided the digital map contains the
necessary data.
If no data is available, display 2 shows:
앫the coordinates of the crosshair if the
geo-coordinate display is switched on
(컄page 171) and the GPS signal is strong
enough
앫no display if the geo-coordinate display is
switched off (컄page 171)

169
Control systems
COMAND navigation (introduction)
Adjusting the map scale
왘Rotate ymz.
Rotating clockwise zooms in, rotating
counterclockwise zooms out.
Saving crosshair position as destination
in last destinations list
왘Showing menu system, if neces-
sary: Press n.
왘Saving: Select “Position” “Save Po-
sition”.
COMAND saves the crosshair position
as a destination in the last destinations
list (컄page 225).
Hiding the crosshair
왘Press back button L in the center
console (컄page 86).
The crosshair disappears and the map
is centered on the vehicle position.
or
왘Set the map to the vehicle or destina-
tion position, see the explanation be-
low.
Centering the map on the vehicle or
destination position
왘Centering on the vehicle’s position:
Select “Navi” “Position” “Vehicle
Position Map”.
or
왘Press back button L when the
crosshair is displayed.
왘Centering on the destination:
Select “Navi” “Position” “Destina-
tion Position Map”.
Basic settings
Map perspective (USA only)
Depending on your vehicle’s production
date the map perspective function may not
be available.
COMAND can display the map from a
bird's eye view or in the normal map view.
왘Select map perspective:
Select “Navi” “Navi” “Map Dis-
play”.
The map display list appears. A dot R
indicates the current setting.
왘Select “Bird’s-eye view”.
The bird's eye view is switched on or
off, depending on the previous status.
iIf you have moved the map, you can use this
function to rapidly return the map to the position
of the vehicle or destination. It is only possible to
center the map on the destination position when
route guidance is active.
iYou can make the following settings regard-
less of whether route guidance is active or inac-
tive.
iIf you scroll the map in the bird's eye view,
COMAND switches back to the normal map view.
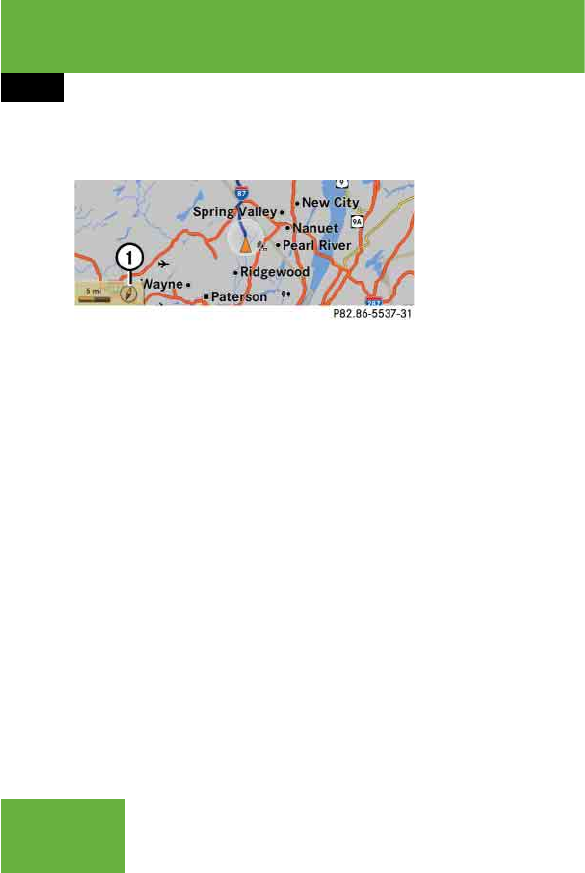
170
Control systems
COMAND navigation (introduction)
Map orientation
1Current map orientation
The following may be displayed:
앫8 = “Heading Up” (the map is dis-
played so that the direction of travel is
always up; the orange point of the icon
points north)
앫9 = “North Up” (the map view is dis-
played so that north is always up)
왘Setting map orientation:
Select “Navi” “Navi” “Map Dis-
play”.
The map display list appears. A dot R
indicates the current setting.
왘Select “North Up” or “Heading Up”.
왘Exiting menu: Slide omp.
The map orientation changes accord-
ingly.
Setting POI symbols
You can set which points of interest (POIs)
should be displayed as symbols in the
map. POIs are garages, hotels, movie the-
aters or restaurants, for example.
The following settings are possible:
앫“Standard symbols” (symbol deter-
mined by the factory settings)
앫“Personal symbols” (you can determine
the symbols yourself)
앫“No symbols”
왘Adjusting: Select “Navi” “Navi”
“Map Display”.
The map display list appears. A dot R
indicates the current setting.
왘Select “Standard symbols”, “Personal
symbols” or “No symbols”.
If you select “Personal symbols”, the
list of POIs appears.
왘Switching POI symbol display on
or off: Select the desired POI.
The corresponding symbol displays
are switched on or off, depending
on the previous status. A check-
mark indicates which status is ac-
tive. You can switch on the symbol
displays for more than one POI.
iDepending on the map scale on the map,
POI symbols may not be visible on the map al-
though their display is activated. In addition, POI
symbols may be covered by the map’s labels.

171
Control systems
COMAND navigation (introduction)
왘Exiting menu: Slide omp or press
back button L in the center console
(컄page 86).
Geo-coordinate display
Illustration: map with geo-coordinate dis-
play switched on
1Current height above sea level
2Number of GPS satellites from which
signals for positioning can be received
3Coordinate display
Display options with geo-coordinate dis-
play switched on
If the crosshair is displayed on the map
view (map was moved manually), only dis-
play 3 is visible.
It shows either the coordinates of the
crosshair or other data on the crosshair
position, e.g. a street name. The digital
map must contain relevant data in order
for this other data to be displayed.
Switching the geo-coordinate display on
or off
왘Select “Navi” “Navi” “Map Dis-
play”.
The map display list appears.
왘Select “Coordinates”.
The geo-coordinate display is switched
on or off, depending on the previous
status. A checkmark indicates which
status is active.
왘Exiting menu: Slide omp or press
back button L in the center console
(컄page 86).
Setting route type (USA only)
Depending on your vehicle’s production
date the route type function may not be
available.
You can set the following route types:
앫“Fast Route”: COMAND calculates a
route with the shortest possible (mini-
mized) driving time.
iThe list shows all symbols that are contained
in the digital map across all states (USA) and/or
provinces (CDN). Not all POIs in all states (USA)
or in all provinces (CDN) are available, however.
Certain POI symbols may not be displayed on the
map, even if the symbol display is switched on.
iThere must be sufficient GPS reception for
displays 1, 2 and 3 to be shown. Height dis-
play 1 is an approximation because the naviga-
tion system uses the GPS signals for the
calculation.
iIf there is no crosshair on the map view, dis-
plays 1, 2 and 3 are visible. Display 3
shows the coordinates of the current vehicle po-
sition.

172
Control systems
앫“Short Route”: COMAND calculates a route with the shortest possible (minimized) distance taking distance and driving time into
account.
왘Select “Navi” “Navi” “Mode”.
The mode list appears. A square 쐍 indi-
cates the current setting.
왘Select route type: “Fast Route” or
“Short Route”.
왘Exit menu: Slide omp or press back
button L in the center console
(컄page 86).
Setting route mode
왘Select “Navi” “Navi” “Mode”.
The mode list appears.
왘Switching mode on or off:
Select desired modes.
Depending on the previous status, the
mode is switched on or off. A check-
mark indicates that the mode is
switched on. It is possible to switch on
more than one mode.
왘Exiting menu: Slide omp or press
back button L in the center console
(컄page 86).
COMAND will verify whether it can in-
corporate the modes if you select them
with route guidance active.
If it can, COMAND calculates a new
route while incorporating the modes
selected.
If it cannot, you will see and hear a cor-
responding message.
왘Select “OK”.
COMAND calculates a new route.
Only those modes which can be in-
corporated are used.
iIf you change the route type setting during
active route guidance, COMAND calculates a
new route. If you change the setting when route
guidance is inactive, COMAND uses the new set-
ting for the next route guidance.
iThis function allows you to set the following
options for route guidance:
앫“Minimize Highways”
앫“Minimize Toll Roads”
앫“Minimize Tunnels”
앫“Minimize Ferries/Motorail”
173
Control systems
COMAND navigation system (entering a destination)
COMAND navigation system
(entering a destination)
The following destination entry options are
available:
앫Entering a destination by address
앫Entering a destination from the desti-
nation memory
앫Entering a destination from the list of
last destinations
앫Entering a destination from the map
앫Entering a stopover
앫Entering a POI
Entering a destination by the address
To enter an address you may proceed as
follows:
앫Enter state (USA) or province (CDN),
street and town/city
앫Enter state (USA) or province (CDN),
town/city and street
앫Enter state (USA) or province (CDN),
town/city and center
앫Enter state (USA) or province (CDN),
zip code and center
앫Enter state (USA) or province (CDN),
zip code and street
Calling up the address input menu
왘Select “Navi” “Destination” “Ad-
dress Entry”.
The address input menu appears. It
shows a state (USA) or a province
(CDN). Which state or province is
shown depends on the vehicle’s loca-
tion.
1State (USA) or province (CDN)
Warning! G
For safety reasons, only enter a new desti-
nation when the vehicle is stationary.
iIt is possible to enter a destination regard-
less of whether route guidance is active or inac-
tive.
iIt is not possible to enter an address when
the vehicle has exceeded a certain speed. As
soon as the vehicle speed drops below a certain
value, the function is available again.
iIf Russian or Chinese is set as the system
language, the address must be entered using
Latin letters. Setting the system language
(컄page 240).
iAs additional information to the street entry,
you can enter either a house number or an inter-
section.
A zip code entry replaces the town/city entry.
컄컄
174
Control systems
COMAND navigation system (entering a destination)
Menu items in the address input menu
Some menu items will not or not yet be
available, depending on the sequence in
which you enter the address and the data
version.
Example: If you have not made any entries,
menu items “House No.”, “Center”, “Inter-
section”, “POI”, “Start” and “Save” will not
yet be available. And the “Zip Code” menu
item will not be available if the digital map
does not contain any zip codes.
Entering a state (USA)
왘In the address input menu, select
“State/Prov” “States (U.S.)”.
A list of states appears with input char-
acters; the input characters are auto-
matically activated.
List of states with input characters
1Top list entry based on the input data
up to that point
2Characters entered by the user
3Characters automatically added by the
system
4Clear last character entry
5Currently selectable characters
6Currently non-selectable characters
7Input characters
8List of states
9Currently selected characters
While the numbers are being selected as
described below, the top list entry 1 al-
ways shows the state which best corre-
sponds to the input data as it has been
entered up to that point.
At the same time, COMAND automatically
supplements characters 2 entered by the
user with other likely input characters 3.
왘Selecting characters: Slide omp or
rotate ymz.
왘Confirming character selection:
Press n.
왘Deleting individual characters:
Select ) in the bottom line and
press n.
왘Deleting an entire entry: Select ) in
the bottom line and press n until the
entire entry is deleted.
iYou can only enter those states which are
saved on the digital map.
iIn the list of input characters 7, you can
only select currently selectable characters.
Which characters are included depends on the
sequence in which you have entered your desti-
nation and the data version of the digital map.
컄컄

175
Control systems
COMAND navigation system (entering a destination)
왘Canceling an entry: Select “Back” in
the bottom line and press n.
or
왘Press back button L in the center
console (컄page 86).
As soon as COMAND can clearly attribute
the characters entered to a state, the input
characters 7 disappear automatically.
You see the list of states without the input
characters. Here you can confirm the cur-
rent entry or make another selection.
During character entry, you can also man-
ually switch to the list of states without in-
put characters at any time.
왘Switching manually to list of states
without input characters: Slide qm.
or
왘Select ? in the second line from the
bottom and press n.
List of states without input characters
왘Selecting a state: Slide qmr or
rotate ymz.
왘Canceling selection: Select “Back” by
sliding om and press n.
or
왘Press back button L in the center
console (컄page 86).
왘Confirming selection: Press n.
The address input menu appears again.
It shows the abbreviation for the se-
lected state.
The following menu items are now avail-
able:
앫“Map”: Entering a destination from the
map (컄page 194)
앫“State/Prov”: Re-enter state (USA) or
province (CDN)
앫“Town”: Entering a town or city
(컄page 179)
앫“Street”: Entering a street
(컄page 181)
앫“Zip Code”: Entering the zip code
(컄page 177)
왘Continuing destination entry:
Select one of the menu items men-
tioned above.
iIt is not possible to enter zip codes if the dig-
ital map does not contain any zip codes for the
selected state.

176
Control systems
COMAND navigation system (entering a destination)
Entering a province (Canada)
왘In the address input menu, select
“State/Prov” “Provinces (Canada)”.
A list of provinces appears.
왘Select desired province.
The address input menu appears again.
It shows the abbreviation for the se-
lected province.
The following menu items are now avail-
able:
앫“Map”: Entering a destination from the
map (컄page 194)
앫“State/Prov”: Re-enter state (USA) or
province (CDN)
앫“Town”: Entering a town or city
(컄page 179)
앫“Street”: Entering a street
(컄page 181)
앫“Zip Code”: Entering the zip code
(컄page 177)
왘Continuing destination entry:
Select one of the menu items men-
tioned above.
Quick access to most recently entered
states (USA) or provinces (CDN)
왘In the address input menu, select
“State/Prov” “Last States/Provinc-
es”.
The list of most recently entered states
(USA) or provinces (CDN) appears. The
last entry is at the top of the list.
왘Select desired state (USA) or desired
province (CDN).
The address input menu appears again.
It shows the abbreviation for the se-
lected state (USA) or province (CDN).
The following menu items are now avail-
able:
앫“Map”: Entering a destination from the
map (컄page 194)
앫“State/Prov”: Re-enter state (USA) or
province (CDN)
앫“Town”: Entering a town or city
(컄page 179)
앫“Street”: Entering a street
(컄page 181)
앫“Zip Code”: Entering the zip code
(컄page 177)
왘Continuing destination entry:
Select one of the menu items men-
tioned above.
iIt is not possible to enter a zip code if the
digital map does not contain any zip codes for
the selected province (CDN).
iIt is not possible to enter a zip code if the
digital map does not contain any zip codes for
the selected state (USA) or province (CDN).
177
Control systems
COMAND navigation system (entering a destination)
Entering the zip code
왘In the address input menu, select “Zip
Code”. A list of zip codes appears with
input characters; the input
characters 4 are automatically acti-
vated.
List of zip codes with input characters
1Top list entry based on the input data
up to that point
2Numbers entered by the user
3Numbers automatically added by the
system
4Input characters
5Currently selectable numbers
6Currently selected numbers
7Currently non-selectable numbers
8List of zip codes
While the numbers are being selected as
described below, the top list entry 1 al-
ways shows the zip code which best corre-
sponds to the input data as it has been
entered up to that point.
At the same time, COMAND automatically
supplements numbers 2 entered by the
user with other likely numbers 3.
왘Selecting numbers: Slide omp or
rotate ymz.
왘Confirming number selection:
Press n.
왘Deleting individual numbers:
Select ) in the bottom line and
press n.
왘Deleting an entire entry: Select ) in
the bottom line and press n until the
entire entry is deleted.
iIt is not possible to enter a zip code if you
have already entered other address data aside
from the state (USA) or province (CDN).
You can only enter those zip codes which are
saved on the digital map.
The available zip codes depend on the state
(USA) or province (CDN) most recently entered.
iIn the list of input characters 4, you can
only select numbers which can be currently en-
tered. Which characters are included depends
on the sequence in which you have entered your
destination and the data version of the digital
map.
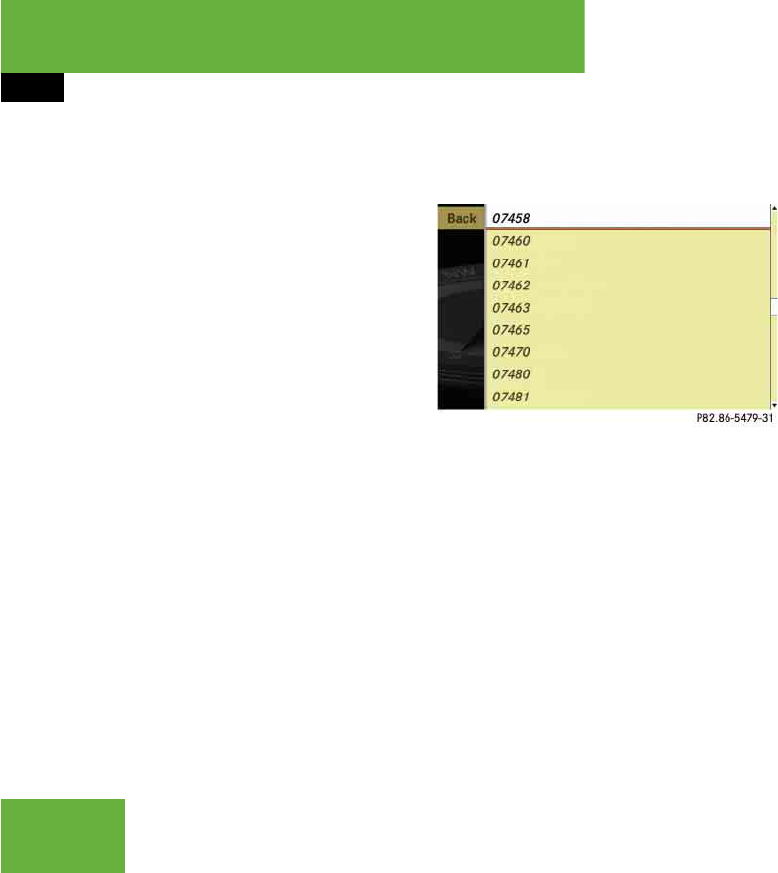
178
Control systems
COMAND navigation system (entering a destination)
왘Canceling an entry: Select “Back” in
the bottom line and press n.
or
왘Press back button L in the center
console (컄page 86).
As soon as COMAND can clearly attribute
the numbers entered to a zip code, input
characters 4 disappear. You see the list
of zip codes without the input characters.
Here you can confirm the current entry or
make another selection.
During character entry, you can also man-
ually switch to the list of zip codes without
input characters at any time.
왘Switching manually to list of zip
codes without input characters:
Slide qm.
or
왘Select ? in the second line from the
bottom and press n.
List of zip codes without input
characters
왘Selecting a zip code: Slide qmr or ro-
tate ymz.
왘Canceling selection: Select “Back”
and press n.
or
왘Press back button L in the center
console (컄page 86).
왘Confirming selection: Press n.
You will see the address input menu
again.
It shows one of the following items of infor-
mation:
앫Street and if necessary, house number,
town/city, state (USA) or province
(CDN)
앫Town/city, state (USA) or province
(CDN) and zip code
앫State (USA) or province (CDN) and zip
code
Which of the following menu items are now
available depends on the situation, or may
depend on the data version of the digital
map. The menu items which are not avail-
able cannot be selected.
앫“Map”: Using the map to enter a desti-
nation (컄page 194)
iThe street and, if necessary, the house num-
ber, will then appear as soon as COMAND can at-
tribute the zip code to an appropriate address.
iIn this case, using the map for destination
entry is based on the town or city seen in the ad-
dress input menu.
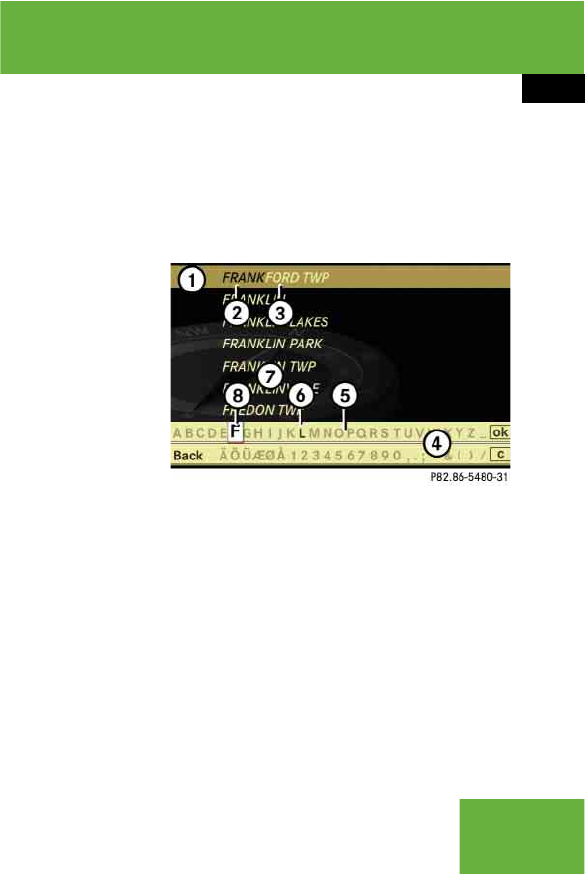
179
Control systems
COMAND navigation system (entering a destination)
앫“Street”: entering a street
(컄page 181)
앫“Center”: entering a center
(컄page 184)
앫“POI”: entering a point of interest
(컄page 197)
앫“Save”: saving a destination in the des-
tination memory (컄page 219)
앫“Start”: starting the route calculation
(컄page 191)
왘Continuing or completing destina-
tion entry: Select one of the menu
items mentioned above.
Entering a town or city
왘In the address input menu, select
“Town”.
The list of towns/cities appears either
with or without the input characters
(컄page 180).
Whether or not the input characters ap-
pear depends on how many towns or
cities are available for the desired state
(USA) or province (CDN).
List of towns or cities with input
characters
When this list appears, the input charac-
ters 4 are automatically activated.
1Top list entry based on the input data
up to that point
2Characters entered by the user
3Characters automatically added by the
system
4Input characters
5Currently non-selectable characters
6Currently selectable character
7List of towns/cities
8Currently selected character
iIn this case, entering a POI is based on the
town or city seen in the address input menu.
iYou can only enter those towns or cities
which are saved on the digital map.
It is not possible to enter a town or city when you
have already entered a street which COMAND
can clearly attribute to a town or city.
If COMAND cannot clearly attribute a previously
entered street to a town/city, only those towns
or cities are available which have a street of that
name.
If you have not yet entered a street before enter-
ing the town or city, towns or cities within the
state (USA) or province (CDN) previously en-
tered are available.

180
Control systems
COMAND navigation system (entering a destination)
The top list entry 1 at first shows either
the town or city in which the vehicle is cur-
rently located or the town or city which
best corresponds to the input data as it
has been entered up to that point.
As soon as you enter a character from in-
put characters 4, the top list entry 1
shows the town or city that best corre-
sponds to the input data as it has been en-
tered up to that point.
At the same time, COMAND automatically
supplements characters 2 entered by the
user with appropriate characters 3.
왘Selecting characters: Slide omp or
rotate ymz.
왘Confirming character selection:
Press n.
왘Deleting individual characters:
Select ) in the bottom line and
press n.
왘Deleting an entire entry: Select ) in
the bottom line and press n until the
entire entry is deleted.
왘Canceling an entry: Select “Back” in
the bottom line and press n.
or
왘Press back button L in the center
console (컄page 86).
As soon as COMAND can clearly attribute
the characters entered to a town or city,
the input characters 4 disappear auto-
matically. You see the list of towns or cities
without the input characters. Here you can
confirm the current entry or make another
selection.
During character entry, you can also man-
ually switch to the list of towns/cities with-
out input characters at any time.
왘Switching manually to the list of
towns/cities without input charac-
ters: Slide qm.
or
왘Select ? in the second line from the
bottom and press n.
List of towns/cities without input
characters
1Symbol for more selection options
iIn the list of input characters 4, you can
only select currently selectable characters.
Which characters are included depends on the
sequence in which you have entered your desti-
nation and the data version of the digital map.
iThe current town or city is shown if:
앫you have accepted the current state (USA) or
province (CDN) when entering the state
(USA) or province (CDN)
앫and if you select town/city entry immediate-
ly afterward

181
Control systems
COMAND navigation system (entering a destination)
왘Selecting a town or city: Slide qmr
or rotate ymz.
왘Canceling selection: Select “Back”
and press n.
or
왘Press back button L in the center
console (컄page 86).
왘Confirming selection: Press n.
Towns/cities with symbol 1 mean
that there is more than one in the se-
lected state (USA) or province (CDN).
Confirming one of these towns/cities
will take you to a further sub-selection.
If there are no other selection options,
the address input menu appears again.
It shows one of the following items of infor-
mation:
앫Town/city and state (USA) or province
(CDN)
앫Street, town/city and state (USA) or
province (CDN)
Which of the following menu items are now
available depends on the situation, or may
depend on the data version of the digital
map. The menu items which are not avail-
able cannot be selected.
앫“Map”: using the map to enter a desti-
nation (컄page 194)
앫“Street”: entering the street
(컄page 181)
앫“House No.”: entering the house num-
ber (컄page 186)
앫“Center”: entering the center
(컄page 184)
앫“Intersection”: entering the intersec-
tion (컄page 189)
앫“POI”: entering a point of interest
(컄page 197)
앫“Save”: saving a destination in the des-
tination memory (컄page 219)
앫“Start”: starting the route calculation
(컄page 191)
왘Continuing or completing destina-
tion entry: Select one of the menu
items mentioned above.
Entering a street
iThe street is visible if you have entered it be-
fore entering the town or city.
iIn this case, using the map for destination
entry is based on the town or city seen in the ad-
dress input menu.
iIn this case, entering a POI is based on the
town or city seen in the address input menu.
iIt is not possible to enter a street if:
앫you have already entered a center
앫you have already entered a zip code that
COMAND can clearly attribute to a street
컄컄
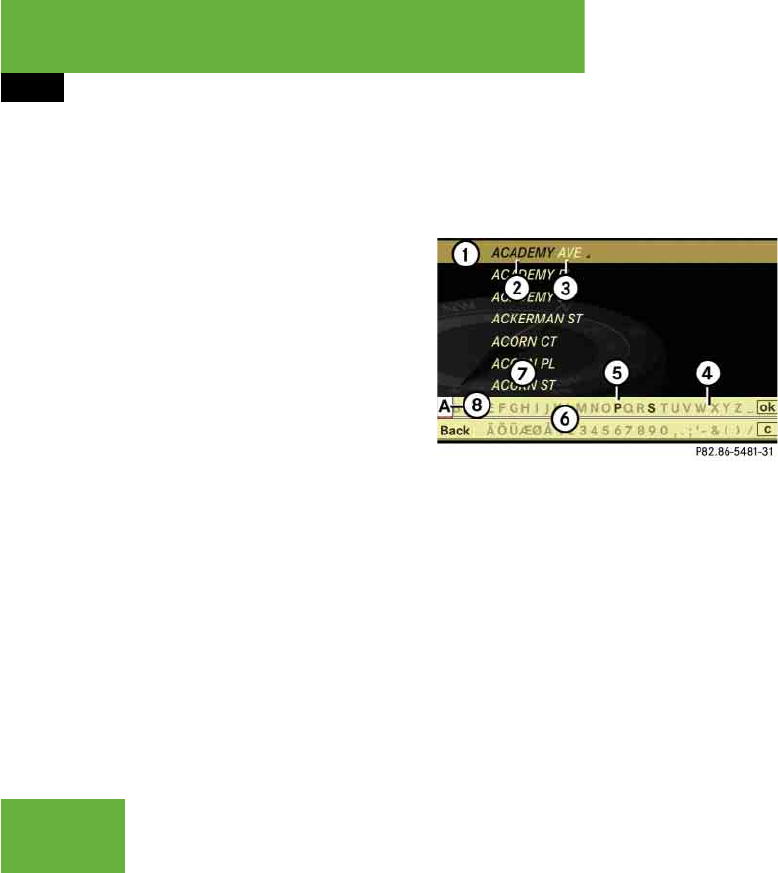
182
Control systems
COMAND navigation system (entering a destination)
왘In the address input menu, select
“Street”.
The list of streets appears either with
or without the input characters
(컄page 183). Whether or not the input
characters appear depends on how
many streets are available for the se-
lected town or city.
Street list with input characters
When this list appears, the input charac-
ters 6 are automatically activated.
1Top list entry based on the input data
up to that point
2Characters entered by the user
3Characters automatically added by the
system
4Currently non-selectable characters
5Currently selectable character
6Input characters
7Street list
8Currently selected character
The top list entry 1 first shows the street
first alphabetically and best corresponds
to the input data as it has been entered up
to that point.
As soon as you enter a character from in-
put characters 6, the top list entry 1
shows the street which best corresponds
to the input data as it has been entered up
to that point.
At the same time, COMAND automatically
supplements characters 2 entered by the
user with appropriate characters 3.
왘Selecting characters: Slide omp or
rotate ymz.
왘Confirming character selection:
Press n.
왘Deleting individual characters:
Select ) in the bottom line and
press n.
iYou can only enter those streets which are
saved on the digital map.
If you have not entered a town or city before en-
tering the street, only those streets within the
state (USA) or province (CDN) previously en-
tered are available. If you have already entered a
town or city, streets within that town or city are
available.
If you have entered a zip code before entering
the street, only those streets within the zip code
area are available.
iIn the list of input characters 6, you can
only select currently selectable characters.
Which characters are included depends on the
sequence in which you have entered your desti-
nation and the data version of the digital map.
컄컄

183
Control systems
COMAND navigation system (entering a destination)
왘Deleting an entire entry: Select ) in
the bottom line and press n until the
entire entry is deleted.
왘Canceling an entry: Select “Back” in
the bottom line and press n.
or
왘Press back button L in the center
console (컄page 86).
As soon as COMAND can clearly attribute
the characters entered to a street, the in-
put characters 6 disappear. You see the
street list without the input characters.
Here you can confirm the current entry or
make another selection.
During character entry, you can also man-
ually switch to the street list without input
characters at any time.
왘Switching manually to the street list
without input characters: Slide qm.
or
왘Select ? in the second line from the
bottom and press n.
Street list without input characters
1Symbol for more selection options
왘Selecting a street: Slide qmr or
rotate ymz.
왘Canceling selection: Select “Back”
and press n.
or
왘Press back button L in the center
console (컄page 86).
왘Confirming selection: Press n.
Streets with symbol 1 run through
several suburbs. Confirming one of
these streets takes you to a further
sub-selection.
If there are no other selection options,
the address input menu appears again
after the confirmation.
It shows one of the following items of infor-
mation:
앫Street and state (USA) or province
(CDN)
앫Street, town/city and state (USA) or
province (CDN)
Which of the following menu items are now
available depends on the situation, or may
depend on the data version of the digital
map. The menu items which are not avail-
able cannot be selected.
앫“Map”: using the map to enter a desti-
nation (컄page 194)
iThe town or city is visible if you have entered
it before entering the street, or if COMAND can
clearly attribute the street entered to a town or
city.
iIn this case, using the map for destination
entry is based on the town or city seen in the ad-
dress input menu.
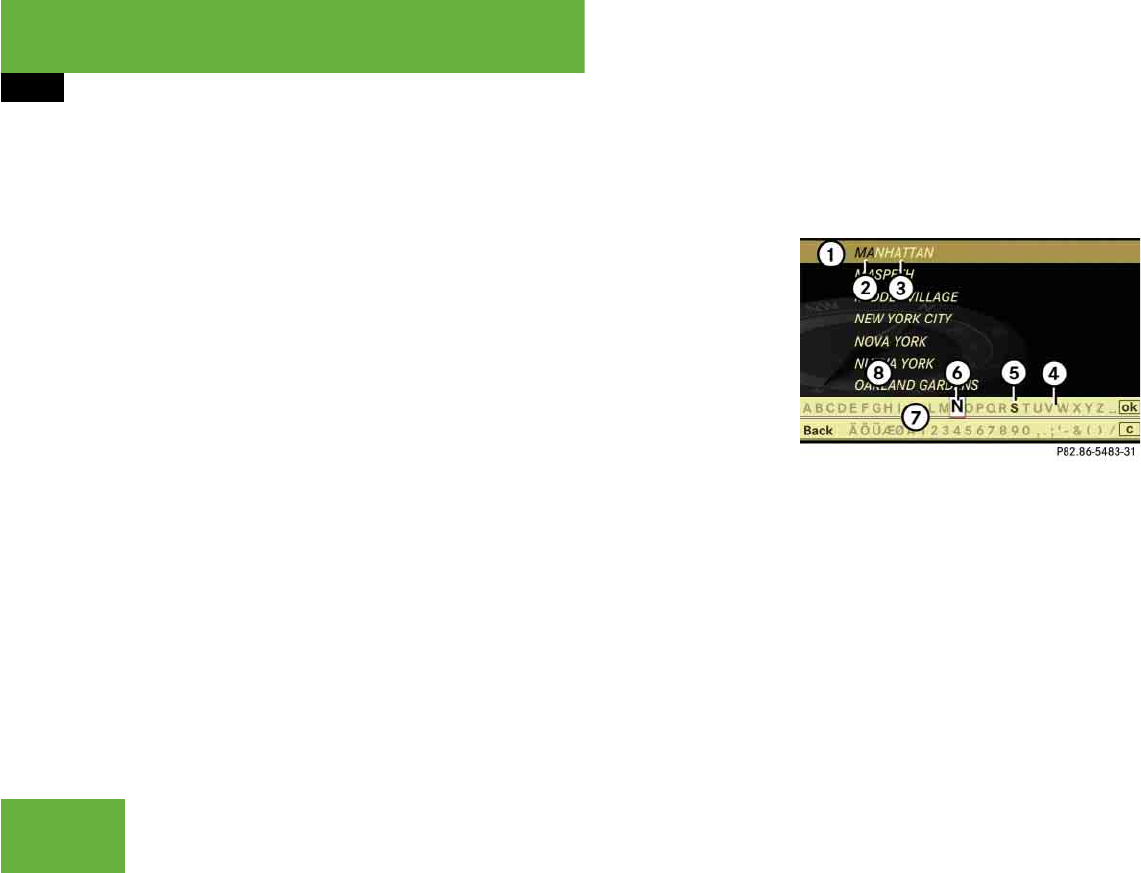
184
Control systems
COMAND navigation system (entering a destination)
앫“House No.”: entering the house num-
ber (컄page 186)
앫“Intersection”: entering the intersec-
tion (컄page 189)
앫“POI”: entering a point of interest
(컄page 197)
앫“Save”: saving a destination in the des-
tination memory (컄page 219)
앫“Start”: starting the route calculation
(컄page 191)
왘Continuing or completing destina-
tion entry: Select one of the menu
items mentioned above.
Entering a center
왘In the address input menu, select “Cen-
ter”.
The list of centers appears either with
or without the input characters
(컄page 185). Whether or not the input
characters appear depends on how
many centers are available in the se-
lected town or city.
List of centers with input characters
When this list appears, the input charac-
ters 7 are automatically activated.
1Top list entry based on the input data
up to that point
2Characters entered by the user
3Characters automatically added by the
system
4Currently non-selectable characters
5Currently selectable character
6Currently selected character
7Input characters
8List of centers
iEntering an intersection is restricted to
streets within the vicinity of the street entered.
iIn this case, entering a POI is based on the
town or city seen in the address input menu.
iIt is not possible to enter a center if:
앫you have not yet entered a town or city
앫you have already entered a street
앫you have already entered a zip code that
COMAND can clearly attribute to an address
You can only enter those centers which are
saved on the digital map.
Depending on the previous entry, centers are
available either for the town/city entered or the
zip code area entered.
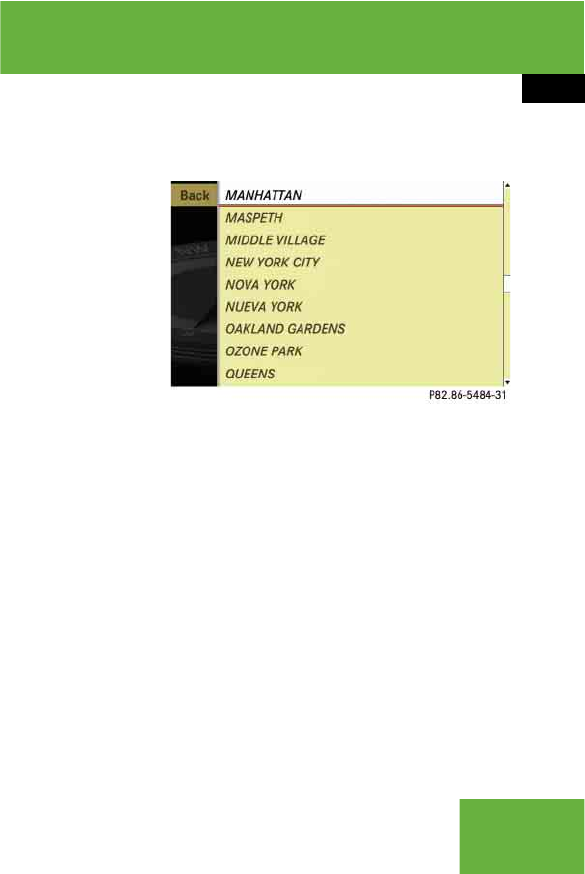
185
Control systems
COMAND navigation system (entering a destination)
While the characters are being selected as
described below, the top list entry 1 al-
ways shows the center which best corre-
sponds to the input data as it has been
entered up to that point.
At the same time, COMAND automatically
supplements characters 2 entered by the
user with appropriate characters 3.
왘Selecting characters: Slide omp or
rotate ymz.
왘Confirming character selection:
Press n.
왘Deleting individual characters:
Select ) in the bottom line and
press n.
왘Deleting an entire entry: Select ) in
the bottom line and press n until the
entire entry is deleted.
왘Canceling an entry: Select “Back” in
the bottom line and press n.
or
왘Press back button L in the center
console (컄page 86).
As soon as COMAND can clearly attribute
the characters entered to a center, the in-
put characters 7 disappear. You see the
list of centers without the input characters.
Here you can confirm the current entry or
make another selection.
During character entry, you can also man-
ually switch to the list of centers without
input characters at any time.
왘Switching manually to the list of
centers without input characters:
Slide qm.
or
왘Select ? in the second line from the
bottom and press n.
List of centers without input characters
왘Selecting a center: Slide qmr or
rotate ymz.
왘Canceling selection: Select “Back”
and press n.
or
왘Press back button L in the center
console (컄page 86).
왘Confirming selection: Press n.
After the confirmation, the address in-
put menu appears again. It shows the
center, town/city and state (USA) or
province (CDN).
iIn the list of input characters 7, you can
only select currently selectable characters.
Which characters are included depends on the
sequence in which you have entered your desti-
nation and the data version of the digital map.
컄컄

186
Control systems
COMAND navigation system (entering a destination)
Which of the following menu items are now
available may depend on the data version
of the digital map. The menu items which
are not available cannot be selected.
앫“Map”: using the map to enter a desti-
nation (컄page 194)
앫“POI”: entering a point of interest
(컄page 197)
앫“Save”: saving a destination in the des-
tination memory (컄page 219)
앫“Start”: starting the route calculation
(컄page 191)
왘Continuing or completing destina-
tion entry: Select one of the menu
items mentioned above.
Entering a house number
How the house number is entered depends
on whether you have already entered just
the street or both the street and the town
or city (컄page 187).
With only the street entered previously
When COMAND can clearly allocate the
street to a town or city, the house number
appears without input characters. Select a
house number from the list (컄page 189).
When COMAND cannot clearly allocate the
street to a town or city, a house number
screen appears. You can now enter a
house number.
1Numbers entered by the user
2Input characters
3Currently selected number
왘Selecting numbers: Slide omp or
rotate ymz.
왘Confirming number selection:
Press n.
왘Deleting individual numbers:
Select ) in the bottom line and
press n.
왘Deleting an entire entry: Select ) in
the bottom line and press n until the
entire entry is deleted.
iIn this case, using the map for destination
entry is based on the center seen in the address
input menu.
iIn this case, entering a point of interest is
based on the center seen in the address input
menu.
iThe house number can only be entered after
the street has been entered.
You can only enter those house numbers which
are saved on the digital map. The digital map
does not contain all house numbers for all
streets.
컄컄

187
Control systems
COMAND navigation system (entering a destination)
왘Canceling an entry: Select “Back” in
the bottom line and press n.
or
왘Press back button L in the center
console (컄page 86).
왘Confirming entry: Select ? in the
second line from the bottom and
press n.
If COMAND cannot clearly attribute the
house number to a town or city, the
town/city input menu appears.
왘Entering town: Proceed as de-
scribed in the “Entering a town or
city” section (컄page 179).
After the town or city has been en-
tered, the address input menu ap-
pears again.
If COMAND can clearly attribute the
house number to a town or city, the ad-
dress input menu also appears.
In both cases, the address input menu
shows the house number, street,
town/city and state (USA) or province
(CDN).
Which of the following menu items are now
available may depend on the data version
of the digital map. The menu items which
are not available cannot be selected.
앫“Map”: using the map to enter a desti-
nation (컄page 194)
앫“POI”: entering a point of interest
(컄page 197)
앫“Save”: saving a destination in the des-
tination memory (컄page 219)
앫“Start”: starting the route calculation
(컄page 191)
왘Continuing or completing destina-
tion entry: Select one of the menu
items mentioned above.
With the street and town/city previously
entered
왘In the address input menu, select
“House No.”.
The list of house numbers appears ei-
ther with or without the input charac-
ters (컄page 189). Whether or not the
input characters appear depends on
how many house numbers are available
in the selected street.
iIn this case, using the map for destination
entry is based on the town or city seen in the ad-
dress input menu.
iIn this case, entering a POI is based on the
town or city seen in the address input menu.
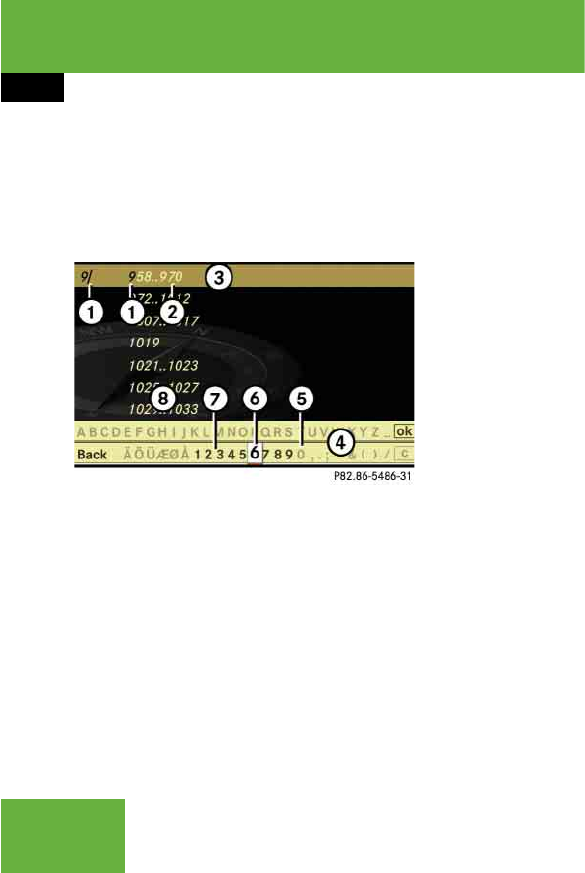
188
Control systems
COMAND navigation system (entering a destination)
List of house numbers with input
characters
When this list appears, the input charac-
ters 4 are automatically activated.
1Numbers entered by the user
2Numbers automatically added by the
system
3Top list entry based on the input data
up to that point
4Input characters
5Currently non-selectable numbers
6Currently selected number
7Currently selectable numbers
8List of house numbers
While the numbers are being selected as
described below, the top list entry 3 al-
ways shows the house number which best
corresponds to the input data as it has
been entered up to that point.
At the same time, COMAND automatically
supplements numbers 1 entered by the
user with appropriate numbers 2.
왘Selecting numbers: Slide omp or
rotate ymz.
왘Confirming number selection:
Press n.
왘Deleting individual numbers:
Select ) in the bottom line and
press n.
왘Deleting an entire entry: Select ) in
the bottom line and press n until the
entire entry is deleted.
왘Canceling an entry: Select “Back” in
the bottom line and press n.
or
왘Press back button L in the center
console (컄page 86).
As soon as COMAND can clearly attribute
the numbers entered to a house number,
the input characters 4 disappear. You see
the list of house numbers without the input
characters. Here you can confirm the cur-
rent entry or make another selection.
During number entry, you can also manual-
ly switch to the list of house numbers with-
out input characters at any time.
왘Switching manually to the list of
house numbers without input char-
acters: Slide qm.
or
왘Select ? in the second line from the
bottom and press n.
iIn the list of input characters 4, you can
only select currently selectable characters.
Which characters are included depends on the
sequence in which you have entered your desti-
nation and the data version of the digital map.

189
Control systems
COMAND navigation system (entering a destination)
List of house numbers without input
characters
왘Selecting house numbers:
Slide qmr or rotate ymz.
왘Canceling selection: Select “Back”
and press n.
or
왘Press back button L in the center
console (컄page 86).
왘Confirming selection: Press n.
After the confirmation, the address in-
put menu appears again. It shows the
house number, street, town/city and
state (USA) or province (CDN).
Which of the following menu items are now
available may depend on the data version
of the digital map. The menu items which
are not available cannot be selected.
앫“Map”: using the map to enter a desti-
nation (컄page 194)
앫“POI”: entering a point of interest
(컄page 197)
앫“Save”: saving a destination in the des-
tination memory (컄page 219)
앫“Start”: starting the route calculation
(컄page 191)
왘Continuing or completing destina-
tion entry: Select one of the menu
items mentioned above.
Entering an intersection
왘In the address input menu, select “In-
tersection”.
The list of intersections appears either
with or without the input characters
(컄page 191). Whether or not the input
characters appear depends on how
many intersections are available for the
selected street.
iIn this case, using the map for destination
entry is based on the town or city seen in the ad-
dress input menu.
iIn this case, entering a POI is based on the
town or city seen in the address input menu.
iThe intersection can only be entered after
the street has been entered.
You can only enter those intersections which are
saved on the digital map.
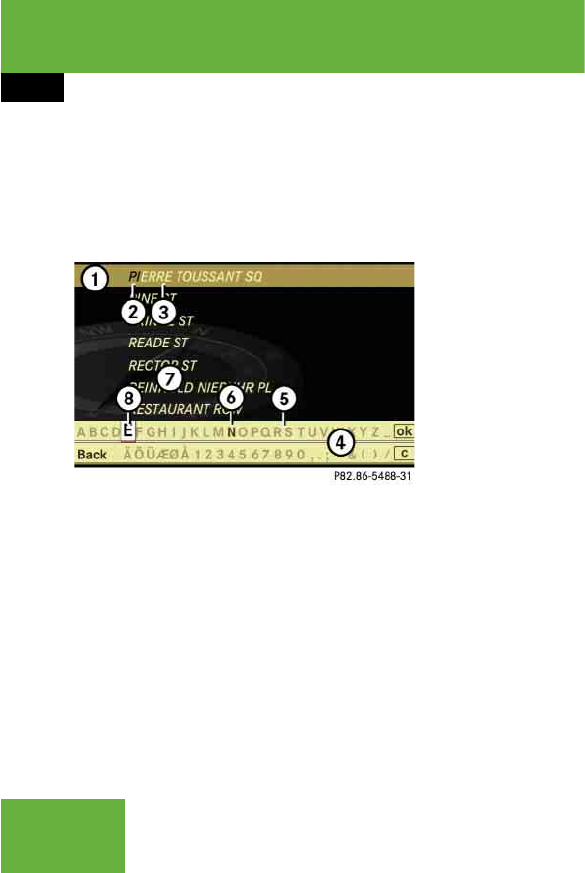
190
Control systems
COMAND navigation system (entering a destination)
List of intersections with input
characters
When this list appears, the input charac-
ters 4 are automatically activated.
1Top list entry based on the input data
up to that point
2Characters entered by the user
3Characters automatically added by the
system
4Input characters
5Currently non-selectable characters
6Currently selectable character
7List of intersections
8Currently selected character
While the characters are being selected as
described below, the top list entry 1 al-
ways shows the intersection which best
corresponds to the input data as it has
been entered up to that point.
At the same time, COMAND automatically
supplements characters 2 entered by the
user with appropriate characters 3.
왘Selecting characters: Slide omp or
rotate ymz.
왘Confirming character selection:
Press n.
왘Deleting individual characters:
Select ) in the bottom line and
press n.
왘Deleting an entire entry: Select ) in
the bottom line and press n until the
entire entry is deleted.
왘Canceling character entry:
Select “Back” in the bottom line and
press n.
or
왘Press back button L in the center
console (컄page 86).
As soon as COMAND can clearly attribute
the characters entered to an intersection,
the input characters 4 disappear. You see
the list of intersections without the input
characters. Here you can confirm the cur-
rent entry or make another selection.
During character entry, you can also man-
ually switch to the list of intersections
without input characters at any time.
왘Switching manually to the list of in-
tersections without input charac-
ters: Slide qm.
or
왘Select ? in the second line from the
bottom and press n.
iIn the list of input characters 4, you can
only select currently selectable characters.
Which characters are included depends on the
sequence in which you have entered your desti-
nation and the data version of the digital map.

191
Control systems
COMAND navigation system (entering a destination)
List of intersections without input
characters
왘Selecting an intersection: Slide qmr
or rotate ymz.
왘Confirming selection: Press n.
Either the address input menu appears
again, or the town/city input menu.
왘Canceling selection: Select “Back”
and press n.
or
왘Press back button L in the center
console (컄page 86).
왘If the town/city input menu ap-
pears: Enter a town or city.
After the town or city has been entered,
the address input menu appears again.
Which of the following menu items are now
available may depend on the data version
of the digital map. The menu items which
are not available cannot be selected.
앫“Map”: using the map to enter a desti-
nation (컄page 194)
앫“POI”: entering a point of interest
(컄page 197)
앫“Save”: saving a destination in the des-
tination memory (컄page 219)
앫“Start”: starting the route calculation
왘Continuing or completing destina-
tion entry: Select one of the menu
items mentioned above.
Starting the route calculation
왘After entering the destination, select
“Start”.
The route calculation will start if route
guidance has not already been activat-
ed.
If route guidance has already been ac-
tivated, a prompt will appear asking
whether you want to end the current
route guidance.
iThe town/city input menu appears if the in-
tersection entered cannot be clearly attributed
to a town or city.
iA detailed description of how to enter a town
or city can be found in the “Entering a town or
city” section (컄page 179).
iIn this case, using the map for destination
entry is based on the town or city seen in the ad-
dress input menu.
iIn this case, entering a POI is based on the
town or city seen in the address input menu.
iYou cannot start the route calculation until
all the necessary address data has been en-
tered.
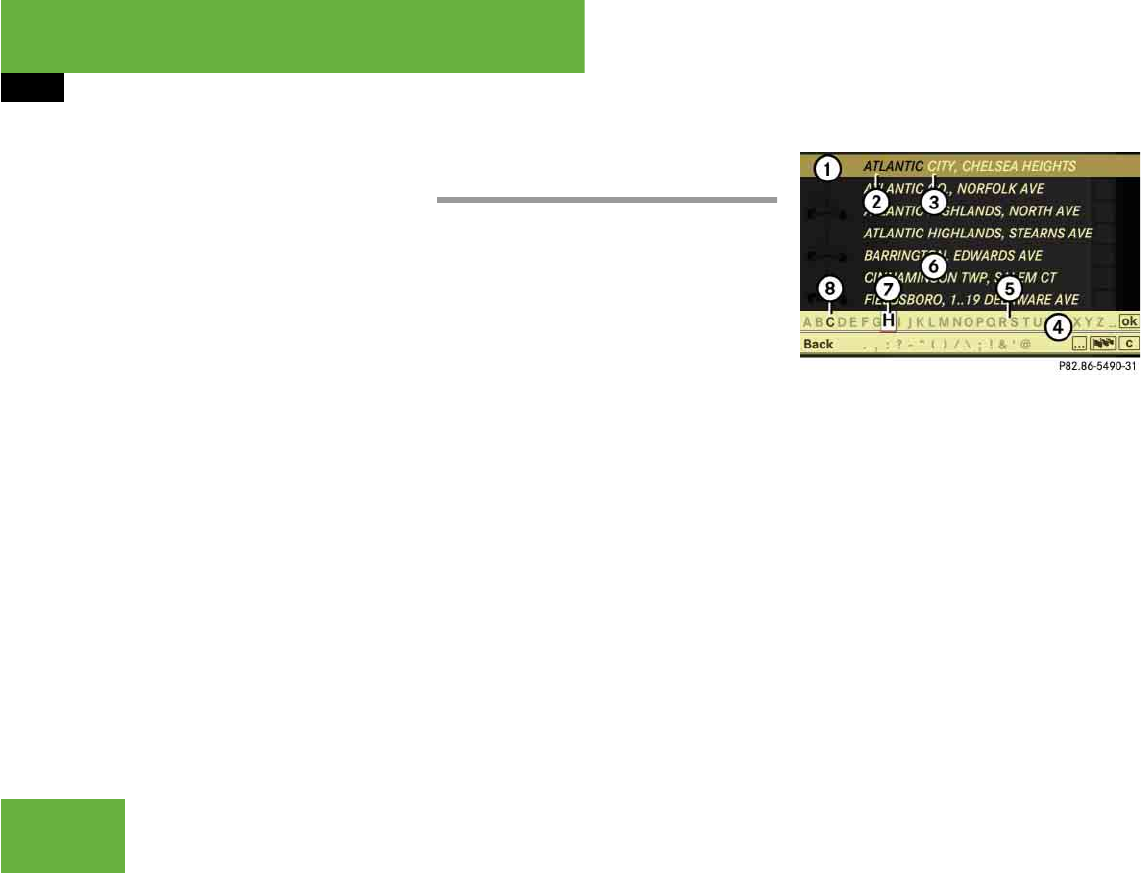
192
Control systems
COMAND navigation system (entering a destination)
왘Select “Yes” or “No”.
If you select “Yes”, COMAND will stop
the route guidance and start the route
calculation for the new destination.
If you select “No”, COMAND will con-
tinue with the active route guidance.
The new destination is discarded.
During the route calculation, an arrow
will indicate the linear direction to the
destination. Below this, you will see the
message “Calculating Route”.
Once the route has been calculated,
route guidance begins (컄page 208).
Entering a destination from the
destination memory
왘Select “Navi” “Destination”
“From Memory”.
The destination memory list appears ei-
ther with or without the input charac-
ters (컄page 193). Whether the input
characters appear depends on the
number of entries in the destination
memory.
Destination memory list with input
characters
When this list appears, the input charac-
ters 4 are automatically activated.
1Top list entry based on the input data
up to that point
2Characters entered by the user
3Characters automatically added by the
system
4Input characters
5Currently non-selectable characters
6Destination memory list
7Currently selected character
8Currently selectable characters
iRoute calculation requires a certain amount
of time. The time depends on the distance from
the destination, for example.
COMAND calculates the route using the digital
map data. The calculated route may differ from
the actual road situation, e.g. due to road con-
struction or incomplete map data. Please make
sure that you observe the notes about the digital
map (컄page 160).
iThe destination memory always contains an
entry called “My Address”. You can save your
home address, for example, under this entry
(컄page 219).
iIn the list of input characters 4, you can
only select currently selectable characters.
Which characters are included depends on the
sequence in which you have entered your desti-
nation and the content of the destination
memory.
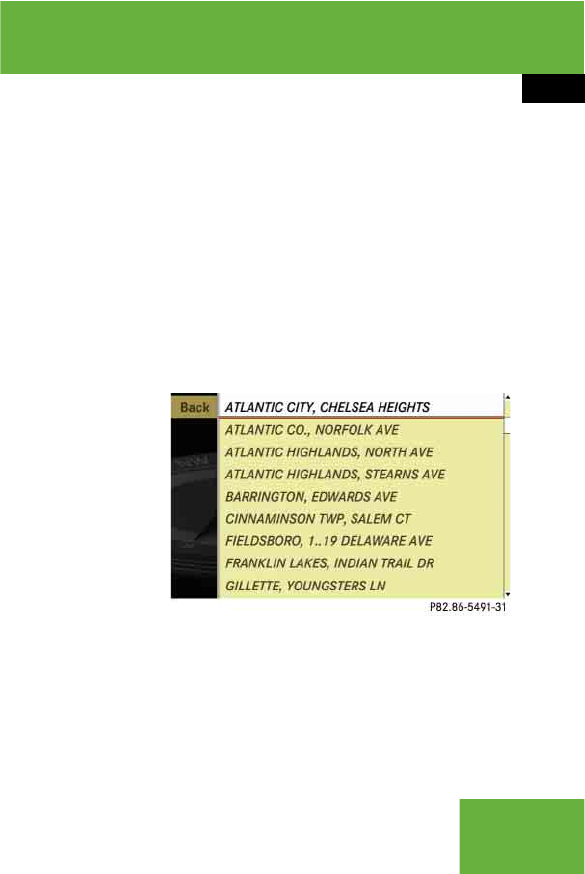
193
Control systems
COMAND navigation system (entering a destination)
While the characters are being selected as
described below, the top list entry 1 al-
ways shows the destination which best
corresponds to the input data as it has
been entered up to that point.
At the same time, COMAND automatically
supplements characters 2 entered by the
user with appropriate characters 3.
왘Changing language for the input
characters: Select !.
왘Select desired language.
왘Changing character set for the input
characters: Select #.
Depending on the previous setting, you
will change to letters with special char-
acters or to numbers with special char-
acters.
왘Selecting characters: Slide omp or
rotate ymz.
왘Confirming character selection:
Press n.
왘Deleting individual characters:
Select ) in the bottom line and
press n.
왘Deleting an entire entry: Select ) in
the bottom line and press n until the
entire entry is deleted.
왘Canceling an entry: Select “Back” in
the bottom line and press n.
or
왘Press back button L in the center
console (컄page 86).
As soon as COMAND can clearly attribute
the characters entered to a destination,
the input characters 4 disappear.
You see the destination memory list with-
out input characters. Here you can confirm
the current entry or make another selec-
tion.
You can also manually switch to the desti-
nation memory list without input charac-
ters at any time.
왘Switching manually to the destina-
tion memory list without input char-
acters: Slide qm.
or
왘Select ? in the second line from the
bottom and press n.
Destination memory list without input
characters
왘Selecting a destination: Slide qmr or
rotate ymz.
왘Canceling selection: Press back but-
ton L in the center console
(컄page 86).
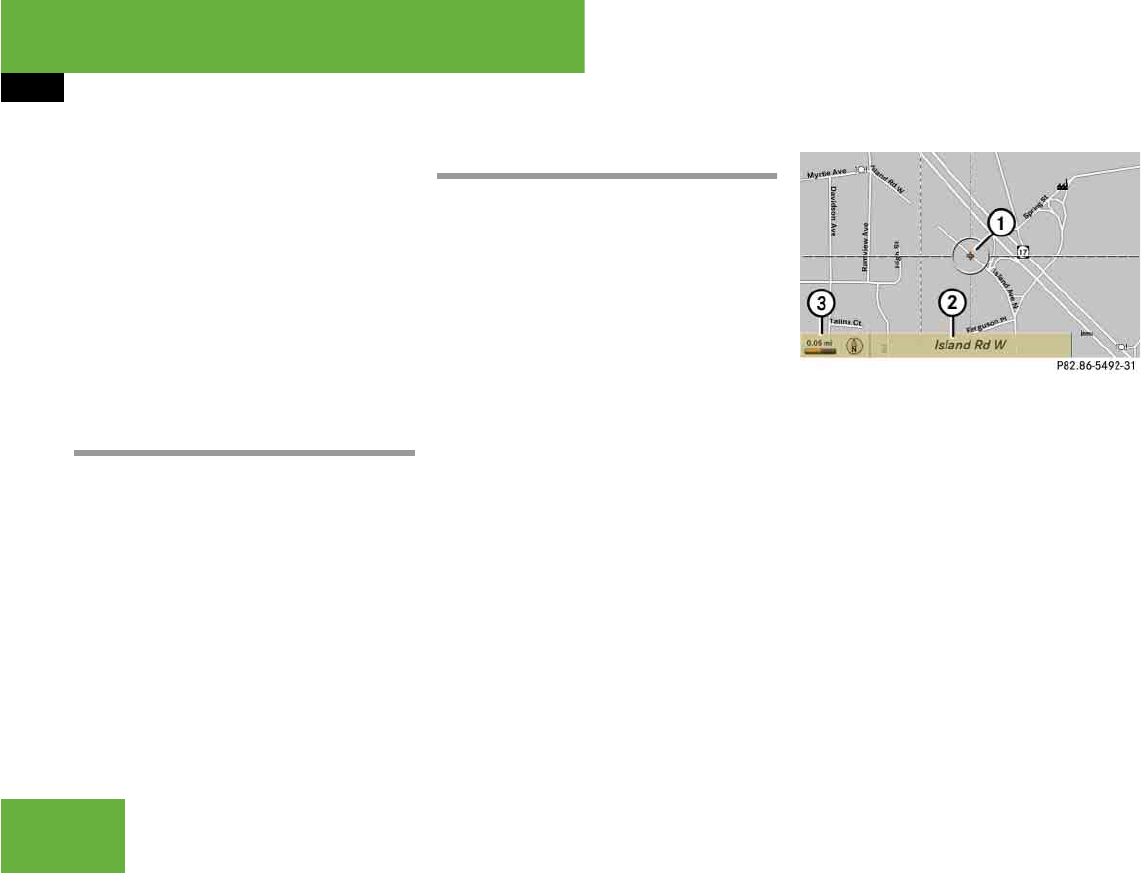
194
Control systems
COMAND navigation system (entering a destination)
or
왘Select “Back” and press n.
왘Confirming selection: Press n.
왘Starting route calculation:
Select “Start”, see also (컄page 191).
Entering a destination from the list of
last destinations
왘Select “Navi” “Destination”
“From Last Destinations”.
The list of last destinations appears.
The most recent destination is at the
top of the list.
왘Select desired destination.
왘Starting route calculation:
Select “Start”, see also (컄page 191).
Entering a destination from the map
Calling up the map
왘In the address input menu, select
“Map” (컄page 173).
You will see the map with a crosshair.
The map is set to the address set in the
address input menu.
or
왘Select “Navi” “Destination”
“Via Map”.
You will see the map with a crosshair.
1Crosshair
2Details of the crosshair position
3Map scale
iThe “Back” menu item is only present if this
list was called up from the list with input charac-
ters.
iDepending on the factory settings of the ve-
hicle, it may not be possible to enter a destina-
tion while the vehicle exceeds a preset speed. As
soon as the vehicles speed drops to below the
preset speed, the function is available again.
You can enter a destination via the map if the dig-
ital map does not contain the address of the des-
tination, but the destination must be within the
area of the digital map.
iDisplay 2 may be the name of a road, for
example, provided the digital map contains the
necessary data.
If no data is available, display 2 shows:
앫the coordinates if the geo-coordinate display
is switched on (컄page 171)
앫no display if the geo-coordinate display is
switched off (컄page 171)

195
Control systems
COMAND navigation system (entering a destination)
Moving the map and selecting the des-
tination
왘Moving map: Slide qmr, omp or
wmx.
왘Adjusting map scale: Rotate ymz.
Rotating clockwise enlarges the map,
rotating counterclockwise reduces it.
왘Selecting a destination: Press n.
If the crosshair is located off the edge
of the digital map, a route cannot be
calculated to this destination and you
will see the message “The destination is
located off the map.”.
왘Select “OK”.
왘Move the map and select a destination
again.
If the destination is within the limits of
the digital map, COMAND attempts to
attribute the destination to the map,
which can take approximately
2 seconds.
If the destination can be attributed, you
will see the address of the destination.
If not, you will see the display “Destina-
tion from map”.
왘Starting route calculation:
Select “Start”, see also (컄page 191).
Entering a stopover
Entering predefined destinations
왘Select “Navi” “Destination”
“Stopover”.
If a stopover has already been entered,
you can change it.
왘Changing: Select “Change Stop-
over”.
You can now select a category.
왘Selecting a category:
Select category, e.g. “Gas station”.
COMAND first looks for destinations
within the immediate vicinity of the ve-
hicle and near the vehicle’s route. If
there are no destinations available
there, COMAND searches for destina-
tions in an area around the vehicle po-
sition.
If COMAND does not find any destina-
tions, you will see a message to this ef-
fect.
왘Select “OK”.
You can now select a different
category.
iWhen route guidance is active, you can en-
ter a stopover. Stopovers can be predefined des-
tinations from the following predefined
categories:
앫“Mercedes-Benz Center”
앫“Hospital”
앫“Gas station”
앫“Parking lot”
앫“Restaurant”
However, you can also enter destinations other
than the predefined ones.
iYou can use the stopover function to influ-
ence the route guidance calculation to the main
destination. When you have reached your stop-
over, COMAND automatically calculates the
route to the main destination.

196
Control systems
If COMAND finds destinations, you will see a list of the destinations and details of how far away they are in the right-hand side of
the display. The information about how
far away the destinations are can take
a few seconds to be displayed.
The left-hand part of the display shows
the destinations on the map. The desti-
nation marked in the list is highlighted
in the map.
왘Selecting a destination: Select the
desired destination from list.
The address of the destination ap-
pears.
왘Starting route calculation:
Select “Start”, see also (컄page 191).
Entering another destination as a stop-
over
왘Select “Navi” “Destination”
“Stopover”.
왘Entering: Select “Other”.
You can select between the following
menu items:
앫“Address Entry”
앫“From Memory”
앫“From Last Destinations”
앫“From POIs”
왘Select a menu item.
Subsequent destination entries may differ,
depending on your selection:
앫“Address Entry” selection:
왘Enter a destination by address
(컄page 173).
앫“From Memory” selection:
왘Enter a destination from the desti-
nation memory (컄page 192).
앫“From Last Destinations” selection:
왘Enter a destination from the list of
last destinations (컄page 194).
앫“From POIs” selection:
왘Enter a special destination
(컄page 197).
왘Starting route calculation: After
entering a destination, select “Start”
(컄page 191).
Changing a stopover
If a stopover has already been entered, you
can change it.
왘Select “Navi” “Destination”
“Stopover” “Change Stopover”.
왘Enter another destination as a stop-
over.
Deleting the stopover
If a stopover has already been entered, you
can delete it.
왘Select “Navi” “Destination”
“Stopover” “Delete Stopover”.
COMAND deletes the stopover and cal-
culates the route to the main destina-
tion.

197
Control systems
COMAND navigation system (Point of interest entry)
COMAND navigation system
(Point of interest entry)
Entering a POI in the surrounding area
왘In the map view while the menu system
is displayed, select “Destination”
“From POIs” “Current Position”
(컄page 167).
왘Continue with designating the POI cat-
egory (컄page 198).
Entering a POI in the surroundings of a
given town
Option 1
왘In the map view while the menu system
is displayed, select “Destination”
“From POIs” “Other Town”
(컄page 167).
왘If necessary, enter state (USA)
(컄page 174) or province (CDN)
(컄page 174).
왘Entering town: Select “Town”.
The town/city input menu appears.
왘Then proceed as described in the “En-
tering a town or city” section
(컄page 179).
왘After entering the town or city, contin-
ue with designating the POI category
(컄page 198).
Option 2
왘Enter an address in the address input
menu (컄page 173).
왘Select “POI”.
왘Continue with designating the POI cat-
egory (컄page 198).
Entering a POI in a different region
왘In the map view while the menu system
is displayed, select “Destination”
“From POIs” “Global POI”
(컄page 167).
The category list appears. The state
(USA) or province (CDN) currently se-
lected is shown in the first list entry.
iThis function gives you quick access to POIs
which are of national interest in the state (USA)
or province (CDN) you have selected. The follow-
ing categories may be available:
앫“AIRPORT”
앫“BORDER CROSSING”
앫“HIGHWAY ACCESS”
Not all categories are available in all states (USA)
or provinces (CDN).

198
Control systems
COMAND navigation system (Point of interest entry)
왘Selecting another state (USA) or
province (CDN): Select the first list
entry.
A list of states/provinces appears.
왘Select desired state (USA) or province
(CDN).
If there are no POIs for the selected
state (USA) or province (CDN), you will
see a corresponding message.
왘Closing message: Select “OK”.
You can again select a state (prov-
ince).
If there are POIs, you will see the cate-
gory list again.
왘Proceed as described in the “Selecting
a category” paragraph in the “Main cat-
egory list without input characters”
section (컄page 200).
Designating a POI category
The categories and POIs available depend
on the distance from the vehicle position
you have set for the POI.
앫POI in the surrounding area:
categories sorted alphabetically and
POIs sorted by distance within a radius
of about 12 mi around the vehicle posi-
tion are available. You can extend the
search radius using the list options
(컄page 203).
앫POI within a given town:
If you have only entered the state (USA)
or province (CDN) and the town or city,
alphabetically sorted categories and al-
phabetically sorted POIs within the
town/city are available.
If you have entered more than the state
(USA) or province (CDN) and the town
or city, alphabetically sorted categories
and POIs sorted by distance within a
radius of about 12 mi around the ad-
dress entered are available.
You can extend the search radius and
the category selection using the list op-
tions (컄page 203).
앫POIs in a different region:
Alphabetically sorted categories and
alphabetically sorted POIs are avail-
able.
Entering a category
Depending on the number of available cat-
egories, the main category list appears for
category entry either with or without input
characters (컄page 200).

199
Control systems
COMAND navigation system (Point of interest entry)
Main category list with input characters
When this list appears, the input charac-
ters 5 are automatically activated.
1Top list entry based on the input data
up to that point
2Characters entered by the user
3Characters automatically added by the
system
4Symbol for available POIs or other
available subcategories
5Input characters
6Currently non-selectable characters
7Currently selectable character
8Currently selected character
9Main category list
While the characters are being selected as
described below, the top list entry 1 al-
ways shows the category which best corre-
sponds to the input data as it has been
entered up to that point.
At the same time, COMAND automatically
supplements characters 2 entered by the
user with appropriate characters 3.
왘Selecting characters: Slide omp or
rotate ymz.
왘Confirming character selection:
Press n.
왘Deleting individual characters:
Select ) in the bottom line and
press n.
왘Deleting an entire entry: Select ) in
the bottom line and press n until the
entire entry is deleted.
왘Canceling an entry: Select “Back” in
the bottom line and press n.
or
왘Press back button L in the center
console (컄page 86).
As soon as COMAND can clearly attribute
the characters entered to a category, the
input characters 5 disappear.
You see the list of main categories without
the input characters. Here you can confirm
the current entry or make another selec-
tion.
You can also manually switch to the main
category list without input characters at
any time.
왘Switching manually to the main cat-
egory list without input characters:
Slide qm.
or
왘Select ? in the second line from the
bottom and press n.
iIn the list of input characters 5, you can
only select currently selectable characters.
Which characters are included depends on the
sequence in which you have entered your desti-
nation and the data version of the digital map.
컄컄
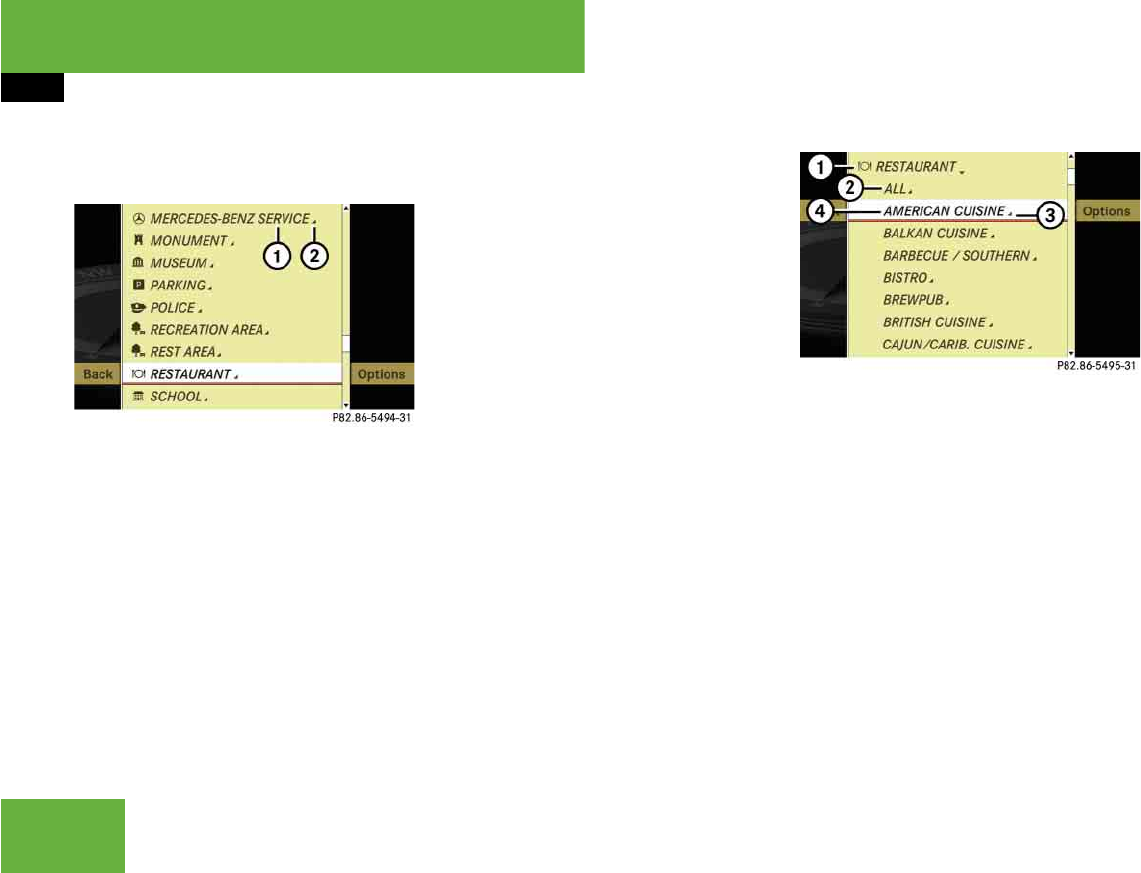
200
Control systems
COMAND navigation system (Point of interest entry)
Main category list without input
characters
Example illustration: main category list for
POIs in the surrounding area
1Category
2Symbol for available POIs or other
available subcategories
왘Selecting a main category: Slide
qmr or rotate ymz.
왘Canceling selection: Select “Back”
and press n.
or
왘Press back button L in the center
console (컄page 86).
왘Confirming selection: Press n.
Main categories with symbol 2 con-
tain either POIs or subcategories. Fur-
ther operation depends on whether the
selected main category contains sub-
categories or only POIs.
Selected main category contains subcate-
gories:
Selecting such a main category opens a list
of subcategories. The illustration below
shows by way of example the “RESTAU-
RANT” main category with available sub-
categories 4.
1Main category
2To show all POIs for all subcategories
under category 1
3Symbol for available POIs
4Subcategory
왘Selecting a subcategory: Slide qmr
or rotate ymz.
왘Canceling selection: Select “Back”
and press n.
or
왘Press back button L in the center
console (컄page 86).
컄컄
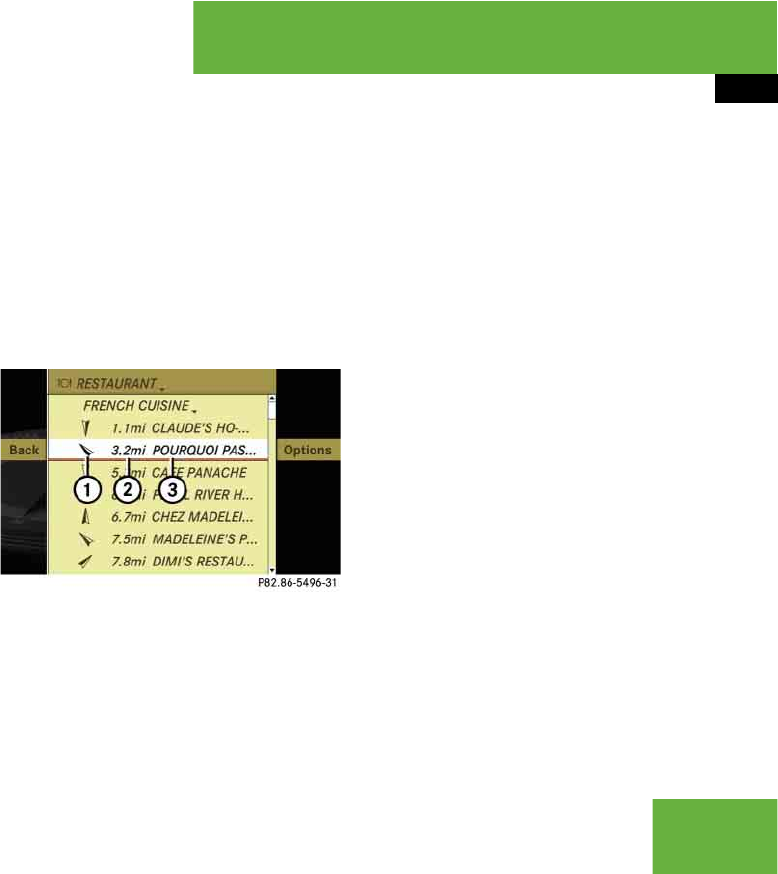
201
Control systems
COMAND navigation system (Point of interest entry)
왘Confirming selection: Press n.
After selecting a subcategory, a list of
POIs appears. It contains the POIs
available within the search radius of
the subcategory.
Selected main category contains no sub-
categories, but only POIs:
Selecting such a main category immedi-
ately opens a list of POIs. The POI list con-
tains the available POIs within the search
radius of the main category.
POI list
Depending on the situation, COMAND first
shows the following list or the POI list with
input characters.
The illustration below shows by way of ex-
ample the POI list for the “RESTAURANT”
main category, “FRENCH CUISINE” subcat-
egory within the surrounding area.
1Compass heading to the destination
2Linear distance to the destination
3Special destination
In the POI list, you can either select a POI
or enter the name of the POI.
Selecting a POI
왘Select desired POI.
The POI list disappears and the address
of the POI appears.
왘Back to POI list: Select “Back” and
press n.
or
왘Press back button L in the center
console (컄page 86).
왘Starting route calculation:
Select “Start”, see also (컄page 191).
iIf you have selected list item 2, the POI list
contains all POIs for all subcategories within the
search radius of main category 1.
iDisplays 1 and 2 are not visible if you
have already entered a POI within a particular
town or city. Displays 1 and 2 are static; they
do not change while you are driving.
컄컄
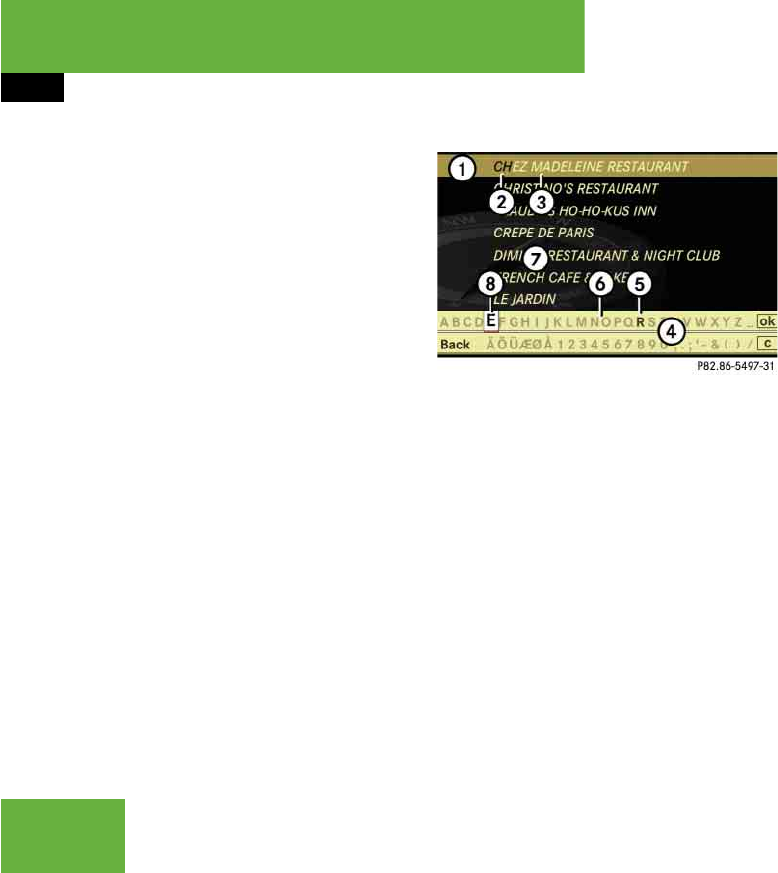
202
Control systems
COMAND navigation system (Point of interest entry)
Entering name of POI
왘Select “Options” “Spell”.
The POI list appears with input charac-
ters; the input characters are automat-
ically activated.
POI list with input characters
1Top list entry based on the input data
up to that point
2Characters entered by the user
3Characters automatically added by the
system
4Input characters
5Currently selectable character
6Currently non-selectable characters
7POI list
8Currently selected character
While the characters are being selected as
described below, the top list entry 1 al-
ways shows the POI that best corresponds
to the input data as it has been entered up
to that point.
At the same time, COMAND automatically
supplements characters 2 entered by the
user with appropriate characters 3.
왘Selecting characters: Slide omp or
rotate ymz.
왘Confirming character selection:
Press n.
왘Deleting individual characters:
Select ) in the bottom line and
press n.
왘Deleting an entire entry: Select ) in
the bottom line and press n until the
entire entry is deleted.
왘Canceling an entry: Select “Back” in
the bottom line and press n.
or
왘Press back button L in the center
console (컄page 86).
iFor POIs in other regions, this list also shows
the compass heading to the destination as well
as the linear distance to the destination, as in the
previous illustration.
iIn the list of input characters 4, you can
only select currently selectable characters.
Which characters are included depends on the
sequence in which you have entered your desti-
nation and the data version of the digital map.
컄컄
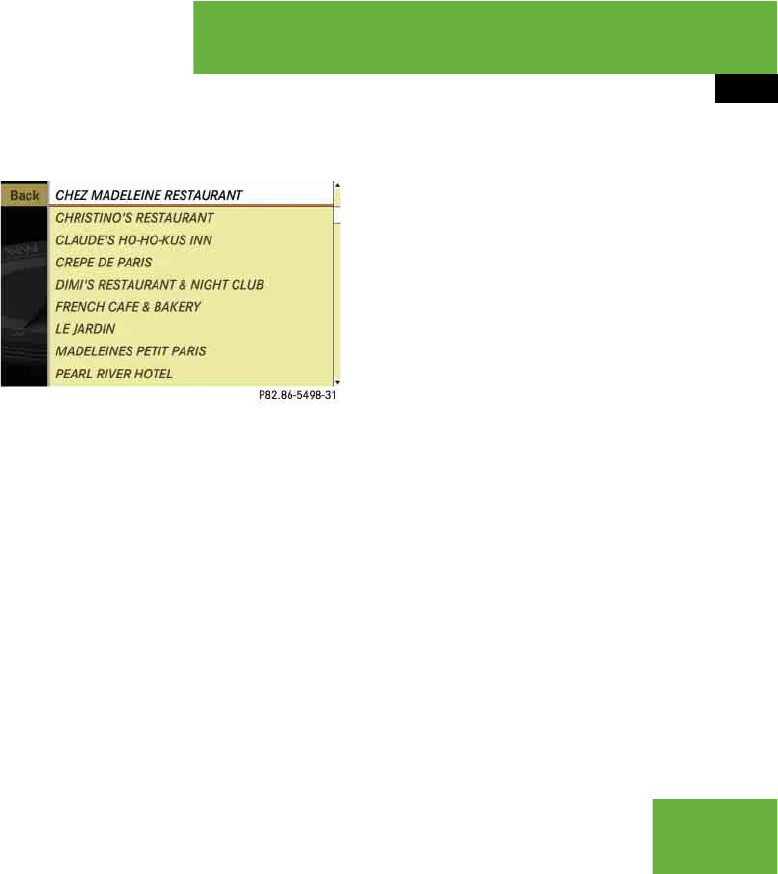
203
Control systems
COMAND navigation system (Point of interest entry)
As soon as COMAND can clearly attribute
the characters entered to a POI, the input
characters 4 disappear.
You see the POI list without input charac-
ters. Here you can confirm the current en-
try or make another selection.
You can also manually switch to the POI
list without input characters at any time.
왘Switching manually to the POI list
without input characters: Slide qm.
or
왘Select ? in the second line from the
bottom and press n.
POI list without input characters
왘Selecting a destination: Slide qmr or
rotate ymz.
왘Canceling selection: Select “Back”
and press n.
or
왘Press back button L in the center
console (컄page 86).
왘Confirming selection: Press n.
왘Starting route calculation:
Select “Start”, see also (컄page 191).
List options
Options in category and POI lists
If you enter a POI in the surrounding area,
initially, only categories and POIs within a
radius of approximately 12 mi around the
vehicle position are available.
The same applies if you enter a POI within
a given town or city and have previously
entered more than the state (USA) or prov-
ince (CDN) and the city or town.
If you expand the list, the search radius in-
creases to around 90 mi. This gives you ac-
cess to all categories and POIs within a
radius of about 90 mi.
왘Expanding list: In one of the lists se-
lect “Options” “Expand Search”.
The list is expanded.
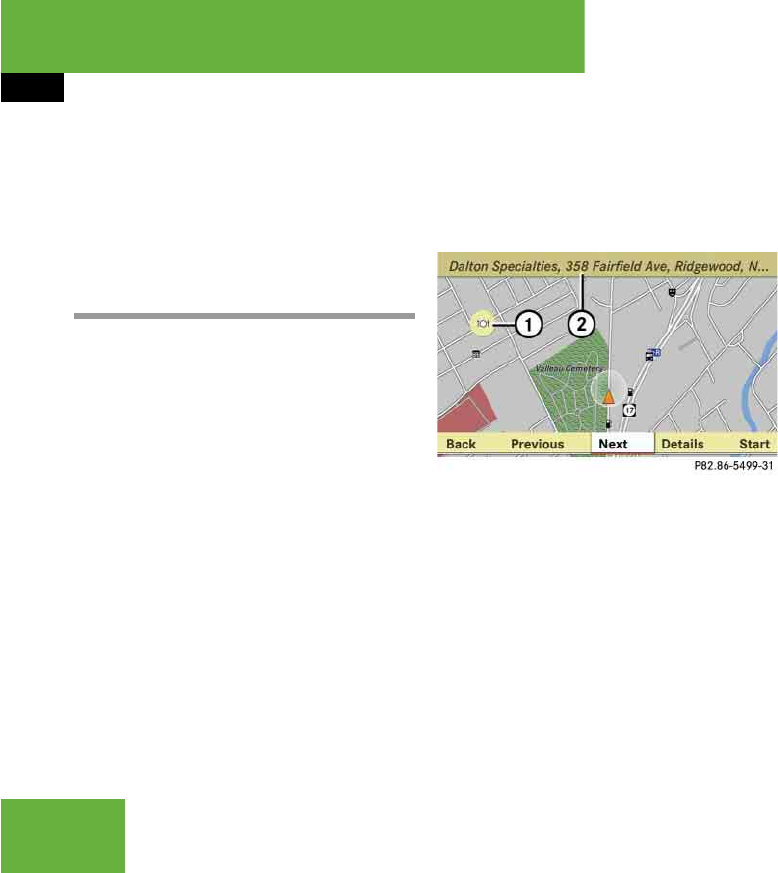
204
Control systems
Options only in POI lists
왘Displaying details of the selected
entry: Select “Options” “Details”.
The detailed view appears.
왘Closing detailed view: Select “OK”.
Entering a POI from the map
왘Select “Guide” in the map view with the
menu system displayed (컄page 167).
You will see POI symbols on the map,
depending on whether POIs are avail-
able and which map scale is set.
The scale at which the symbols are dis-
played on the map varies according to
the symbol.
You can set which symbols COMAND
should display (컄page 170).
The POI closest to the center of the
screen is automatically marked.
If there are no POIs available, the
“Back” menu item is automatically
highlighted and you cannot select oth-
er menu items.
1Highlighted POI
2Information about the highlighted POI
왘Selecting a POI: Select “Next” or “Pre-
vious”.
The next or the previous POI is marked.
왘Displaying details of the selection:
Select “Details”.
왘Starting route calculation:
Select “Start”, see also (컄page 191).
A prompt appears asking whether the
POI should be used as the destination.
왘Select “Yes” or “No”.
If you select “Yes”, the route calcula-
tion begins. If you select “No”, you can
select a new POI.
iIf the crosshair is shown on the map, you
can enter POIs in the vicinity of the crosshair.
If the crosshair is not shown on the map, you can
enter POIs in the vicinity of the vehicle’s current
position.

205
Control systems
COMAND navigation system (real-time traffic) (USA only)
COMAND navigation system (re-
al-time traffic) (USA only)
Depending on your vehicle’s production
date the real-time traffic function may not
be available.
A RDS-TMC (Radio Data System-Traffic
Message Channel) radio transmitter
broadcasts traffic reports COMAND can
receive and incorporate into the navigation
system. Traffic report messages and map
symbols can then be viewed in the
COMAND display. Events displayed are
those within receivable range of the vehi-
cle's location.
Real-time traffic notifications in the
map
COMAND can display certain traffic events
in the map. The notifications are shown at
the map scales from 0.05 mi (50 m) to
500 mi (500 km).
왘Set the map scale: Turn ymz until the
desired map scale is set.
Turning clockwise enlarges the map,
turning counterclockwise reduces it.
Display example for a traffic jam on the
route
1Symbol for event on the route
2Marker symbols for the affected route
section
3Current vehicle position and direction
of travel
4Map scale
iActual road and traffic conditions may be
different from the received messages.
iCOMAND marks the entire route section af-
fected with the appropriate symbols 2, inde-
pendently of its actual length on the route
section. The symbols 2 are shown in the direc-
tion of travel on the left or right of the route.Thus,
they also indicate which side of the roadway is
affected by the event.

206
Control systems
COMAND navigation system (real-time traffic) (USA only)
The following shows the possible symbol
displays.
1Traffic jam on the route (symbol with
red border)
2Traffic jam away from the route (sym-
bol with gray border)
3Stop and go traffic on the route (sym-
bol with red border)
4Stop and go traffic away from the route
(symbol with gray border)
5Blocked section on the route
6Traffic jam
7Stop and go traffic
Displaying real-time traffic reports
Displaying the message list
왘Select “Navi” “Traffic”.
COMAND searches for real-time traffic
transmitters. When no traffic reports
are present, you will see a display to
this effect.
List for inactive route guidance
When route guidance is inactive, the list
displays all streets for which messages are
present.
1Affected street list
왘Read a message: Select a street.
You can find an example message on
(컄page 207).
왘Close the list: Slide omp.
iInstead of a street, an area or a region can
also be affected by a message, for example,
when visibility is limited due to fog.

207
Control systems
COMAND navigation system (real-time traffic) (USA only)
왔List for active route guidance
When route guidance is active, the list dis-
plays only the streets which are part of the
route and for which messages are present.
1Show all messages (including those
which do not affect the route)
2Affected streets (only shown when
messages which affect the route are
present)
왘Display all messages: Select “Display
All Messages”.
All streets are shown for which mes-
sages are present, as well as for those
which are not on the route.
왘Read a message: Select a street.
You can find an example message on
(컄page 207).
왘Close the list: Slide omp once or re-
peatedly.
Example message
1Selection display (“Messages On
Route” or “All messages”)
2Symbol for message event (e.g. traffic
jam)
3Street affected by the message
4Message 1 of 5 for the affected street
5Message text
The symbols for the possible message
events are shown in the following.
1Traffic jam symbol
2Stop and go traffic symbol
3Warning message symbol
4Blocked section symbol
왘Scroll through the contents or to the
next message: Turn ymz or slide
qmr.

208
Control systems
COMAND navigation system (route guidance)
COMAND navigation system
(route guidance)
Route guidance
COMAND guides you to the destination us-
ing navigation commands in the form of
audible navigation announcements and
route guidance displays.
If, for any reason, you do not follow the
navigation commands or if you leave the
calculated route, COMAND automatically
calculates a new route to the destination.
If the map data contains the relevant infor-
mation, COMAND tries to avoid roads that
only have limited access, e.g. roads closed
to through-traffic and non-residents.
Warning! G
COMAND calculates the route to the desti-
nation without taking account of the follow-
ing, for example:
앫Traffic lights
앫Stop and right-of-way signs
앫Parking or stopping prohibited areas
앫Lane merges
앫Other road and traffic rules and regula-
tions
앫Narrow bridges
COMAND may give incorrect navigation
commands if the data in the digital map
does not correspond with the actual
road/traffic situation. For example, if the
traffic routing has been changed or the di-
rection of a one-way road has been re-
versed.
For this reason, you must always observe
applicable road and traffic rules and regula-
tions during your journey. Road and traffic
rules and regulations always have priority
over the navigation commands generated by
the system.
iThe route guidance displays can only be
seen if the display is switched to navigation
mode.
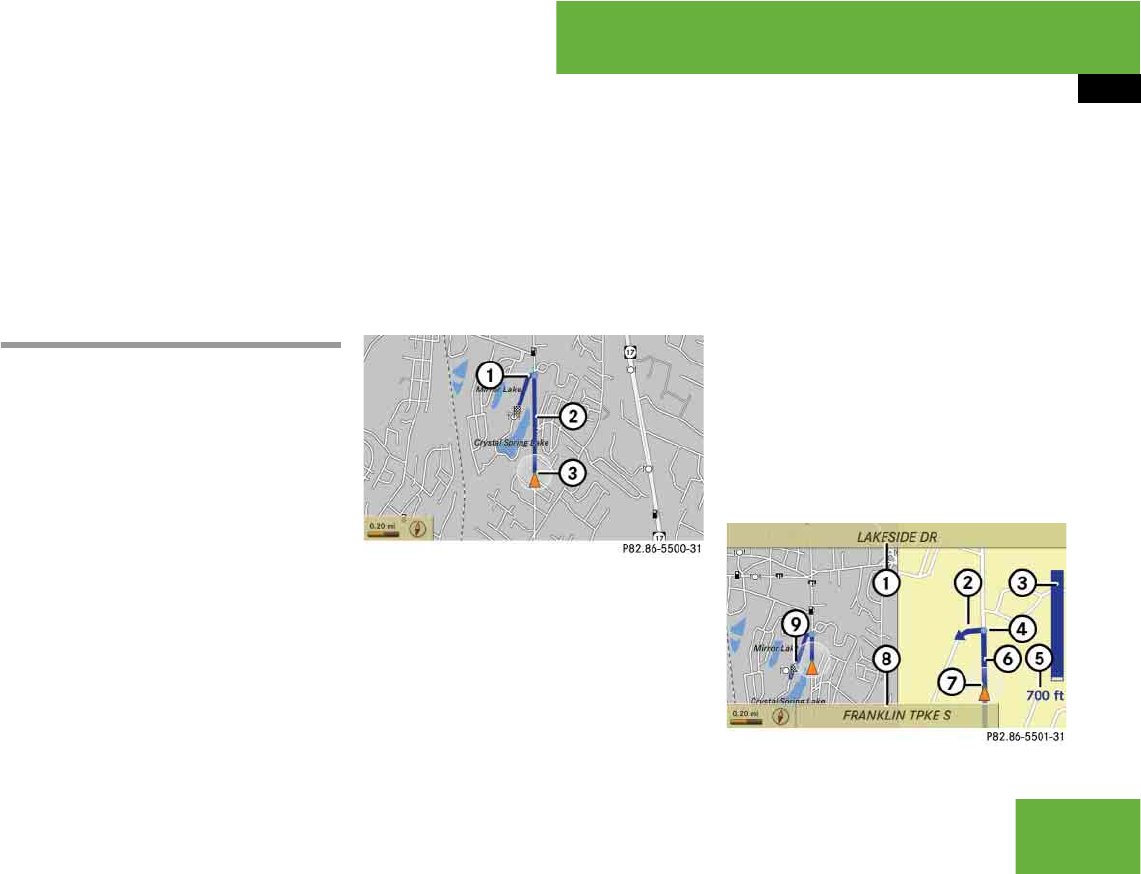
209
Control systems
COMAND navigation system (route guidance)
Roads that have time restrictions (e.g.
closed on Sundays and public holidays) are
not considered for route guidance, if the
digital map contains the relevant informa-
tion.
Examples of displays and announce-
ments for a driving maneuver
Driving maneuvers have three phases:
앫Preparation phase
앫Announcement phase
앫Maneuver phase
Preparation phase
COMAND prepares you for the upcoming
driving maneuver. Based on the example
display below, the driving maneuver is an-
nounced with the “Prepare to turn left”
message. The display is not split and
shows the map over the full screen.
1Point at which the driving maneuver
takes place (light blue dot)
2Route (highlighted blue)
3Current vehicle position; the triangle
points in the vehicle’s direction of trav-
el
Announcement phase
COMAND announces the next driving ma-
neuver. Based on the example display be-
low, the driving maneuver is announced
700 feet in advance with the “Turn left in
700 feet to your destination” message.
The display is divided in two. In the left
half, you see the normal map view. In the
right half, there is either an enlarged view
of the area surrounding the intersection
(intersection zoom) or simply a symbol for
the next driving maneuver.
The following example illustration shows
the intersection zoom in the right half.
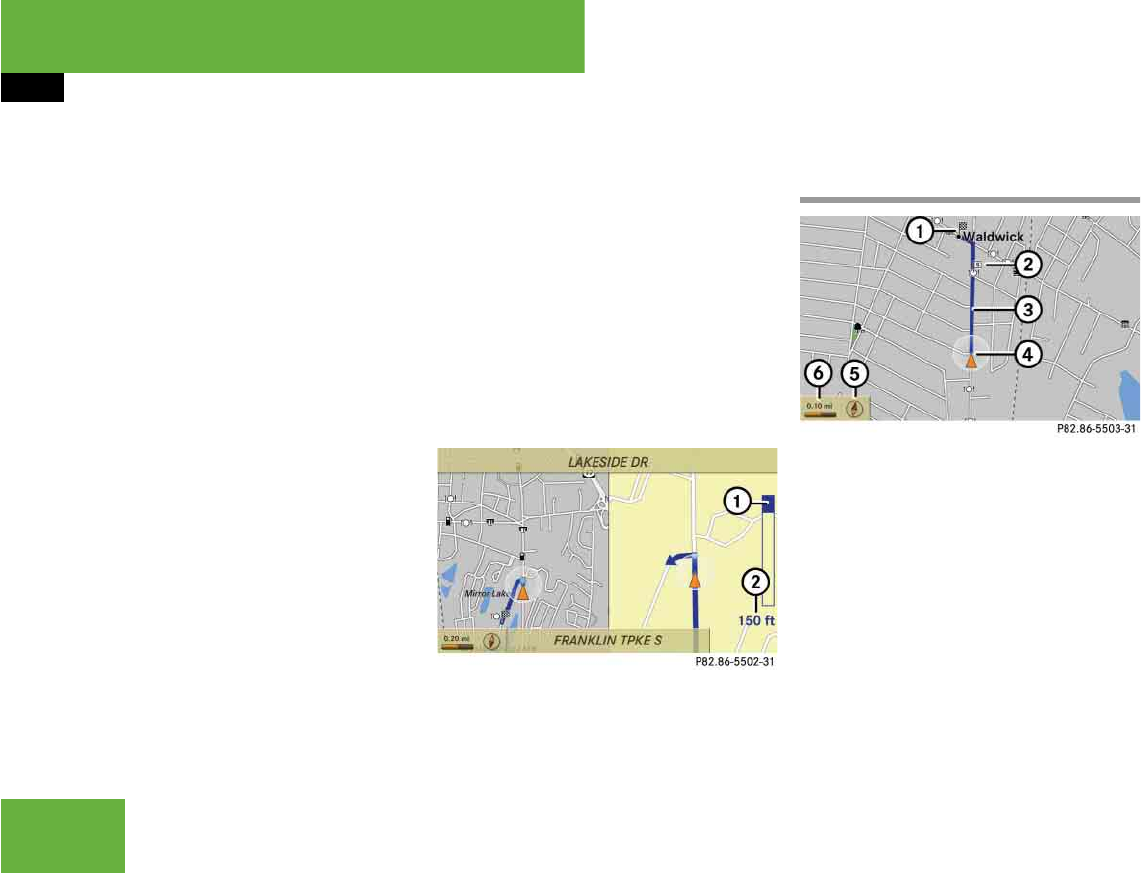
210
Control systems
COMAND navigation system (route guidance)
1Next road
2Driving maneuver (turn left)
3Graphical representation of the dis-
tance to the driving maneuver
4Point at which the driving maneuver
takes place (light blue dot, shown in
both the left and right displays)
5Information about distance to the next
driving maneuver
6Route (highlighted in blue; shown in
both the left and right displays)
7Current vehicle position; the triangle in-
dicates the vehicle’s direction of travel
(shown in both the left and right dis-
plays)
8Street on which you are currently driv-
ing, if included on the digital map
9Destination
Maneuver phase
COMAND announces the next driving ma-
neuver. Based on the example display be-
low, the driving maneuver is announced
150 feet in advance with the “Now turn
left” message. The display is also split into
two halves, as for the announcement
phase.
1Graphical representation of the dis-
tance to the next driving maneuver
2Information about distance to the next
driving maneuver
Example of a display without driving
maneuvers
1Main destination <
2Stopover = (only visible if a stopover
has been entered)
3Route (highlighted blue)
4Current vehicle position; the triangle in-
dicates the vehicle’s direction of travel
5Set map orientation – for an explana-
tion and settings, see (컄page 170)
6Set scale – for an explanation and set-
tings, see (컄page 168)
iThe filled-in section of distance graphic 3
gets shorter the nearer you get to the announced
driving maneuver.
iOnce the maneuver is completed, COMAND
automatically switches back to the non-split
screen.

211
Control systems
COMAND navigation system (route guidance)
Destination or destination area
reached
Once you have reached your destination,
you will hear the announcement “You have
reached the destination”. For certain POIs
(airports or highway junctions), you will
hear the announcement “You have reached
the destination area”. In addition, you will
see a corresponding display and route
guidance is automatically ended.
1Destination on the map
2Destination flag
Partially digitized areas If the destination is within a partially
digitized area
COMAND guides you through fully digitized
areas for as long as possible. Route guid-
ance is conducted in the usual manner, i.e.
with navigation announcements and route
guidance displays.
Before the vehicle reaches a partially digi-
tized area, COMAND notifies you of this
with the following announcements:
앫“Be prepared to enter an area where
turn by turn guidance cannot be provid-
ed.”
앫“In 700 feet you will enter an area
where turn by turn guidance cannot be
provided.”
앫“You are about to enter an area where
turn by turn guidance cannot be provid-
ed.”
iThe digital map may contain areas that are
only partially digitized although they are within a
digitized region.
Warning! G
Due to incomplete digitization, the route
shown on the map may differ from the actual
road/traffic situation.
If you follow the route shown on the map, for
example, it is possible that you could drive
the wrong way down a one-way street or
that a street cannot be driven on.
When using route guidance in a partially dig-
itized area, you must therefore be sure to
observe all relevant traffic regulations and
the course of the road.
All relevant traffic regulations and the
course of the road always take priority over
the route shown on the map.
iThe indicated distance can be seen here by
way of example. In reality, it may be different.

212
Control systems
COMAND navigation system (route guidance)
Route guidance within a partially digi-
tized area
If you start route guidance in this type of
area, you will hear the following announce-
ment: “You are currently in an area where
turn by turn guidance cannot be provided.”
Route guidance is provided by means of a
direction arrow showing the compass
heading to the destination. COMAND will
not generate automatic navigation an-
nouncements.
If you try to call up an announcement man-
ually, (컄page 214) you will hear the an-
nouncement “You are currently in an area
where turn by turn guidance cannot be pro-
vided.”.
During route guidance, the display is divid-
ed. On the right-hand side you will see the
direction arrow showing the compass
heading to the destination.
On the left-hand side of the display you will
see the map with the suggested route. The
suggested route is highlighted blue. How-
ever, it may not be possible to follow the
suggested route because, for example, the
road is closed or not open for car traffic.
If, during route guidance, COMAND leads
you back into a fully digitalized area, route
guidance will simply continue in the usual
manner.
Off-road and off-map
Route guidance to an off-road
destination
COMAND can guide you to destinations
within the area covered by the digital map,
even if a destination is not located at a
road known to the system.
iWhen you call up the route info to this type
of destination, (컄page 217) the following data
shown there may differ from the actual situation:
앫Distance to the destination
앫Estimated driving time to the destination
앫Estimated arrival time Warning! G
The COMAND navigation system may direct
you to off-road routes that your vehicle may
not be capable of traversing through without
damaging your tires, wheels or vehicle. It is
the driver’s sole responsibility to determine
the suitability of the route. Off-road routes
may be of varying conditions and their ap-
propriateness for use may be affected by
various factors such as time of day, time of
year and immediate weather conditions that
cannot be judged or taken into consider-
ation by the COMAND system.
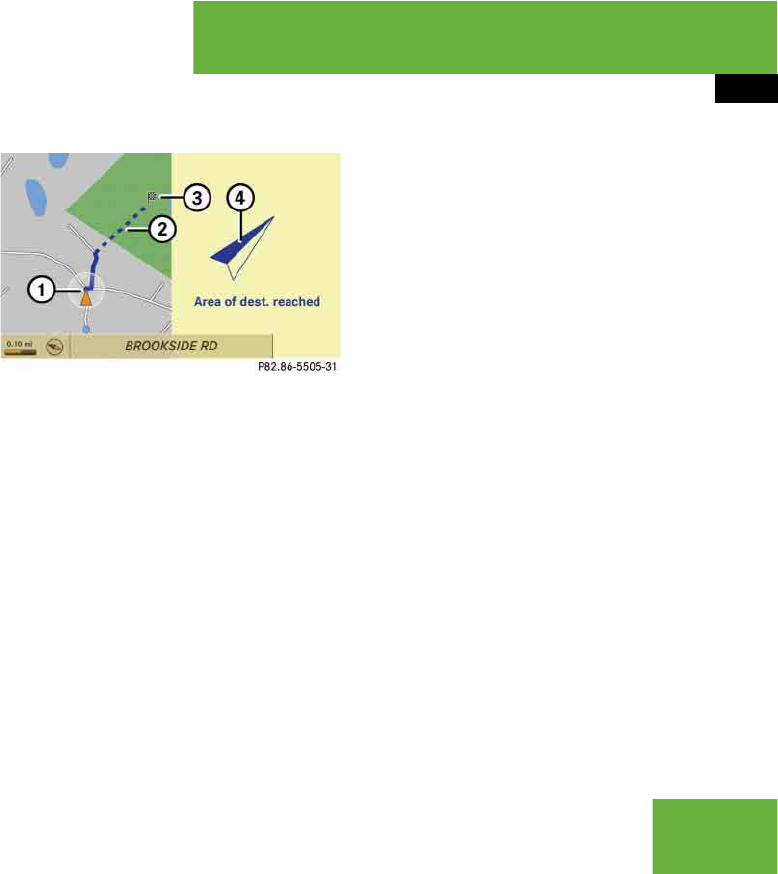
213
Control systems
COMAND navigation system (route guidance)
These destinations are shown as off-road
destinations, which you can enter using
the map, for example.
In these cases, COMAND guides you for as
long as possible with navigation announce-
ments and displays on roads known to the
system.
Shortly before you reach the last known
the point to leave the digitized road net-
work, you will hear the announcement “The
destination is nearby. Follow the arrow on
the display”.
You will then see an arrow that indicates
the direction to the off-road destination.
When the off-road destination is close to
the road, “Area of dest. reached” appears
in addition below the arrow.
The section of the route from the last
known point on the map to the off-road
destination is indicated with a dashed line
after a certain length. It simply shows the
direction to the off-road destination with-
out taking account of any type of obstacles
in the way.
1Current vehicle position; the triangle in-
dicates the vehicle’s direction of travel
2Off-road section of the route
3Off-road destination
4Direction arrow, shows compass head-
ing to destination
On the off-road section of the route, direc-
tion arrows showing the compass heading
to the destination guide you. You will also
see the “Direction to destination” display.
Route guidance from an off-road
location to a destination
If there is no road available on map at cur-
rent position of the car, vehicle is off road.
COMAND is also able to guide you to a des-
tination from such a location.
At the start of the route guidance, you will
see the “Off Road” message and a direc-
tion arrow. The direction arrow shows the
compass heading to the actual destina-
tion.
The route is highlighted blue from the near-
est road known to the system.
As soon as the vehicle is back on a road
known to the system, route guidance con-
tinues in the usual way.
Route guidance from an off-map
location to a destination
If the vehicle position is outside the area
covered by the digital map, then the vehi-
cle is in an off-map location.
COMAND is also able to guide you to a des-
tination from such a location.

214
Control systems
At the start of the route guidance, you will see the “Off Map” message and a direction arrow. The direction arrow shows the compass
heading to the actual destination.
The route is highlighted blue from the near-
est road known to the system.
As soon as the vehicle is back on a road
known to the system, route guidance con-
tinues in the usual way.
Off-road during route guidance
The road layout may differ from the data on
the digital map, due to road construction
measures, for example.
In such cases, the system cannot allocate
the vehicle’s position to the digital map
and the vehicle is therefore in an off-road
position.
The “Off Road” message and an arrow
showing the compass heading to the desti-
nation appear on the display.
As soon as the system can allocate the ve-
hicle position’s to the map again, route
guidance continues in the usual way.
Navigation announcements
Route guidance is already active.
왘Calling up a current announcement:
Select “Navi” 6.
or
왘Press P favorite button if the button
has been programmed with this func-
tion (컄page 240).
왘Canceling navigation message:
Briefly press F shortcut button dur-
ing an announcement.
왘Switching off navigation messages:
Press and hold F during an an-
nouncement until the announcement is
switched off.
You will see the message “The driving
instructions have been muted.” for a
short while.
Warning! G
Navigation announcements are intended to
direct you while driving without diverting
your attention from the road and driving.
Please always use this feature instead of
consulting the map display for directions.
Consulting the symbols or map display for
directions may cause you to divert your at-
tention from driving and increase your risk
of an accident.
iIf Russian or Chinese is set as the system
language, the navigation announcements are in
English. You will find how to set the system lan-
guage on (컄page 240).
Navigation announcements are muted during
telephone calls. You can, however, call up a cur-
rent announcement at any time. You can also
call up a current announcement at any time if
you have missed an announcement.
iYou will find the button programming on
(컄page 240).

215
Control systems
COMAND navigation system (route guidance)
왘Switching navigation announce-
ments back on manually:
Select “Navi” 6.
왘Adjusting volume of the messages:
Adjust the volume during an automatic
announcement (컄page 96).
or
왘Call up an announcement manually us-
ing “Navi” 6 and adjust the vol-
ume (컄page 96).
iThe announcements remain switched off
even if you start a new route guidance or if
COMAND is switched off/on with the o but-
ton.
If you switch COMAND off by removing the
SmartKey from the starter switch and then
switch the ignition back on after more than
3 minutes, the announcements are automatical-
ly switched back on.
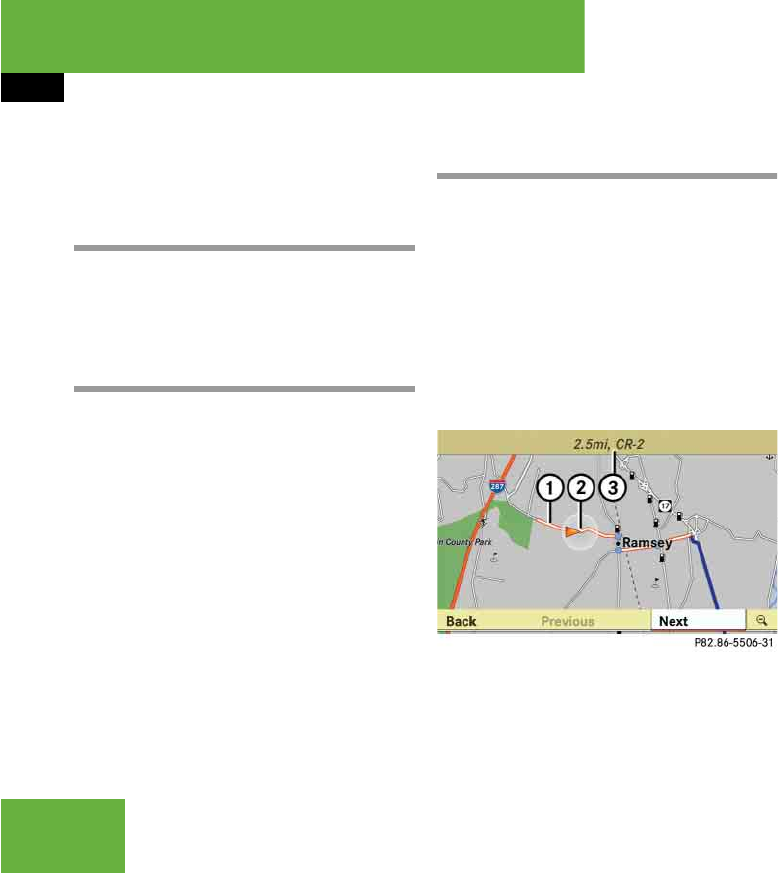
216
Control systems
COMAND navigation system (during route guidance)
COMAND navigation system
(during route guidance)
Cancel route guidance
왘Select “Destination” “Cancel Route
Guidance” in map view with the menu
system displayed (컄page 167).
Continuing cancelled route guidance
왘Select “Destination” “Continue
Route Guidance” in map view with the
menu system displayed (컄page 167).
COMAND calculates the route.
Route browser
왘Select “Route” “Route Browser” in
map view with the menu system dis-
played (컄page 167).
The route browser appears.
1Highlighted route section
2Current vehicle position; the triangle in-
dicates the vehicle’s direction of travel
3Information about the highlighted route
section
왘Displaying next or previous route
section: Select “Next” or “Previous”.
왘Increasing or reducing size of the
map: Select ; or :.
왘Closing route browser:
Select “Back”.
iThe route browser shows an overview of the
route. You can use the route browser to move
along the route section by section and view infor-
mation about and details of each section of the
route.
iThe information 3 about the marked route
section shows the street name and the length of
the route section. Marked route section 1 is al-
ways highlighted in white and outlined in red.
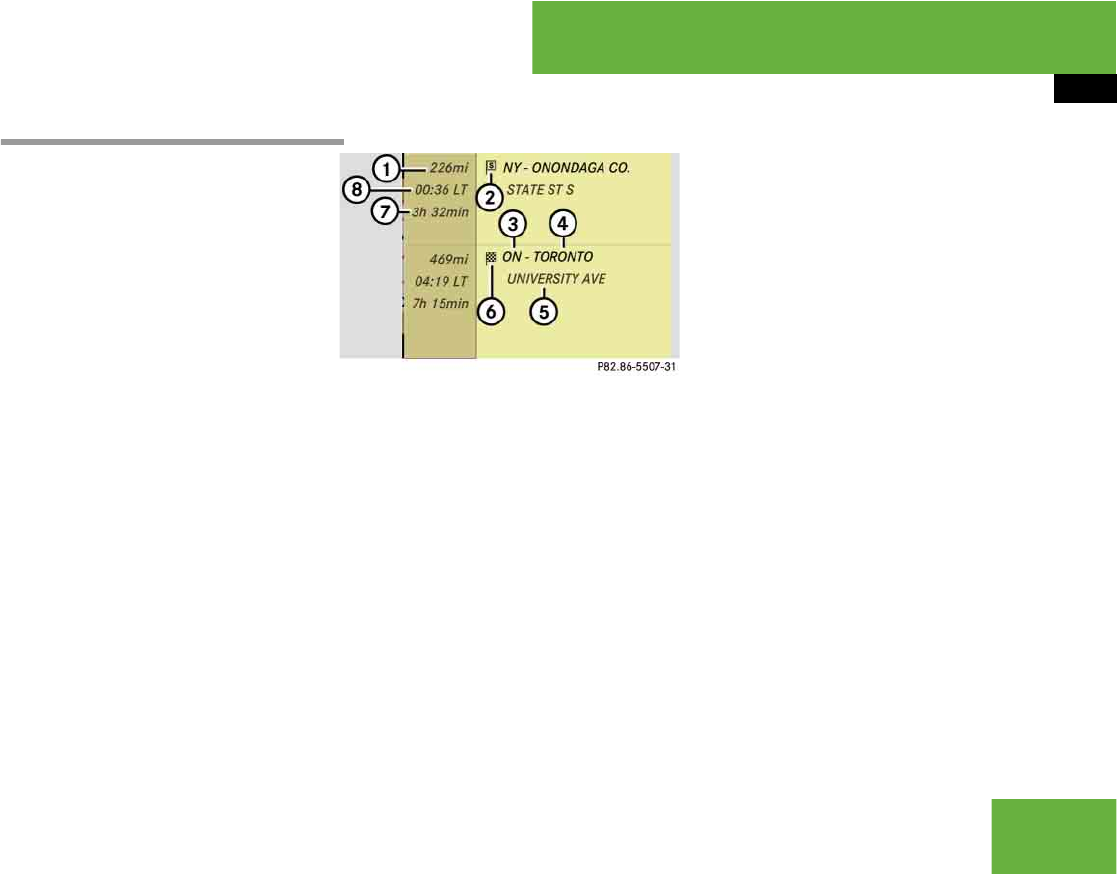
217
Control systems
COMAND navigation system (during route guidance)
왔Displaying route information
왘Select “Route” “Route Info” in map
view with the menu system displayed
(컄page 167).
The route information appears.
Example display with main destination and
stopover
1Distance to the destination
2Symbol = for stopover
3Abbreviation for province (CDN) or
state (USA)
4Town/city
5Street
6Symbol < for main destination
7Estimated driving time to the destina-
tion
8Estimated arrival time
왘Closing route info: Slide omp or
press back button L in the center
console (컄page 86).
iCOMAND uses the time set in COMAND as
the basis for calculating the estimated arrival
time. The clock must be set correctly in
COMAND (컄page 237). The calculation of the
estimated arrival time does not additionally take
into account whether Daylight Saving Time or
standard time is applicable at the destination. If
the destination is in a different time zone, arrival
time display 8 is in local time. This is indicated
by “LT” in the display.
The following data cannot be seen until the route
calculation has been completed:
앫Distance to destination 1
앫Estimated arrival time 8
앫Estimated remaining travel time 7
If the destination is located within a partially dig-
itized area, the following data may differ from the
facts:
앫Distance to destination 1
앫Estimated arrival time 8
앫Estimated remaining travel time 7
컄컄
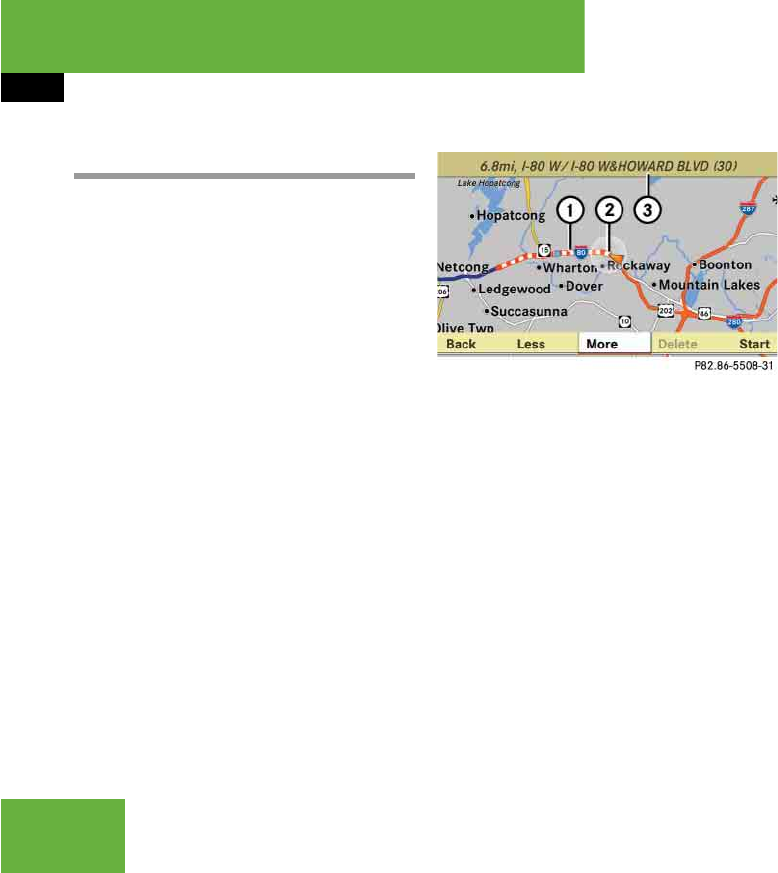
218
Control systems
COMAND navigation system (during route guidance)
Detour function
왘Select “Route” “Detour” in map view
with the menu system displayed
(컄page 167).
The detour function display appears.
왘Setting length of the blockage:
Select “More” or “Less” until the de-
sired length is set.
1Blocked route section
2Current vehicle position; the triangle in-
dicates the vehicle’s direction of travel
3Information about the blocked route
section
왘Starting route calculation:
Select “Start”, see also (컄page 191).
왘Deleting blockage: Select “Navi”
“Route” “Detour” “Delete”.
왘Select “Back”.
iThe detour function blocks a section of the
route ahead of you. You can set the length of the
blockage. If possible, COMAND calculates a de-
tour route.
iThe detour function may direct you to
off-road routes. See Off-road and Off-map for ad-
ditional routes and cautions (컄page 212).
iBlocked route section 1 is always highlight-
ed in red/white. The information about blocked
route section 3 shows which section of the
route is blocked and the length of the blocked
section.
컄컄

219
Control systems
COMAND navigation system (destination memory)
COMAND navigation system
(destination memory)
Saving a destination in the destination
memory
Saving after the address has been en-
tered
왘Select “Save” after entering the ad-
dress (컄page 173).
You can now select save options.
Saving during route guidance
왘Select “Destination” “Save Destina-
tion” during route guidance.
You can now select save options.
Saving a destination from the list of last
destinations
왘Select “Navi” “Destination”
“From Last Destinations”.
The list of last destinations appears.
왘Select desired destination.
The address of the destination is dis-
played.
왘Select “Save”.
You can now select save options.
Selecting save options
Saving a destination without a name
왘Select “Save Without Name”.
COMAND saves the destination in the
destination memory and uses the ad-
dress as the destination name.
or
왘Select “Save as ‘My Address’ ”.
왘Select desired category, e.g. “Home”.
COMAND saves the destination in the
destination memory as your own ad-
dress.
Saving a destination with a name
왘Select “Save new entry”.
왘Select desired category, e.g. “Home”.
The input menu appears with the data
fields and the input characters.
1Selected data field with input mark
(cursor)
2Input characters
iThis function also saves the destination in
the address book. There COMAND creates an
address book entry containing complete, naviga-
ble address data. You can then select this entry
in the address book and start navigation to the
address.
컄컄
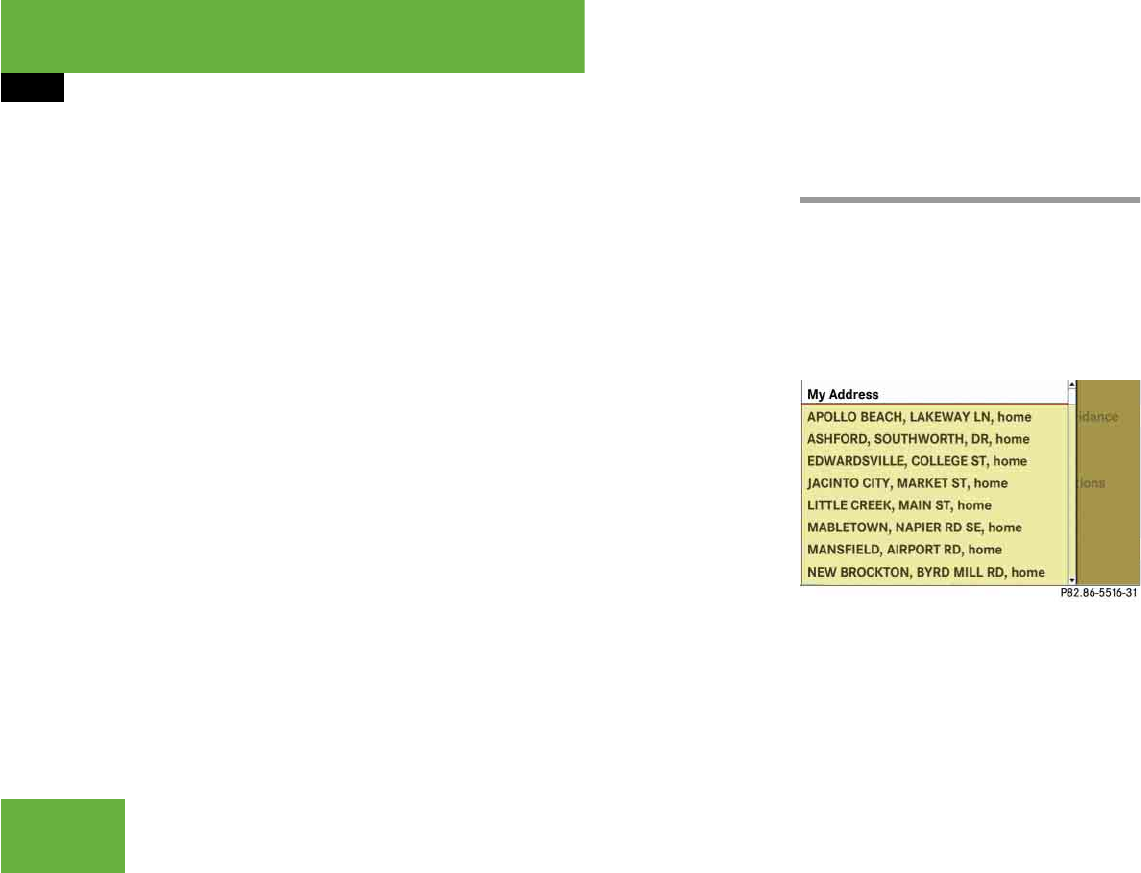
220
Control systems
COMAND navigation system (destination memory)
왘Entering data: Proceed as described
in the “Changing the data field” operat-
ing step in the “Creating a new address
book entry” section (컄page 227).
Assigning a destination to an address
book entry
왘Select “Assign Address Book Entry”.
왘Select desired category, e.g. “Home”.
The menu appears for searching for an
address book entry.
왘Select desired address book entry. Pro-
ceed as described in the “Searching for
an address book entry” section
(컄page 228).
If the selected address book entry does
not yet contain any navigable address
data, COMAND saves the data.
If the selected address book entry al-
ready contains navigable address data,
you will see a question asking you if the
previous data should be overwritten.
왘Select “Yes” or “No”.
If you select “Yes”, COMAND saves the
data.
Deleting a destination from the destina-
tion memory
왘Select “Navi” “Destination”
“From Memory”.
Depending on the number of entries in
the destination memory, you will see
the destination memory list with or
without input characters.
Example illustration: destination memory
list without input characters
iThis function assigns the complete, naviga-
ble address data to an already existing address
book entry. You can then select this entry in the
address book and start navigation to the address
from there.
컄컄
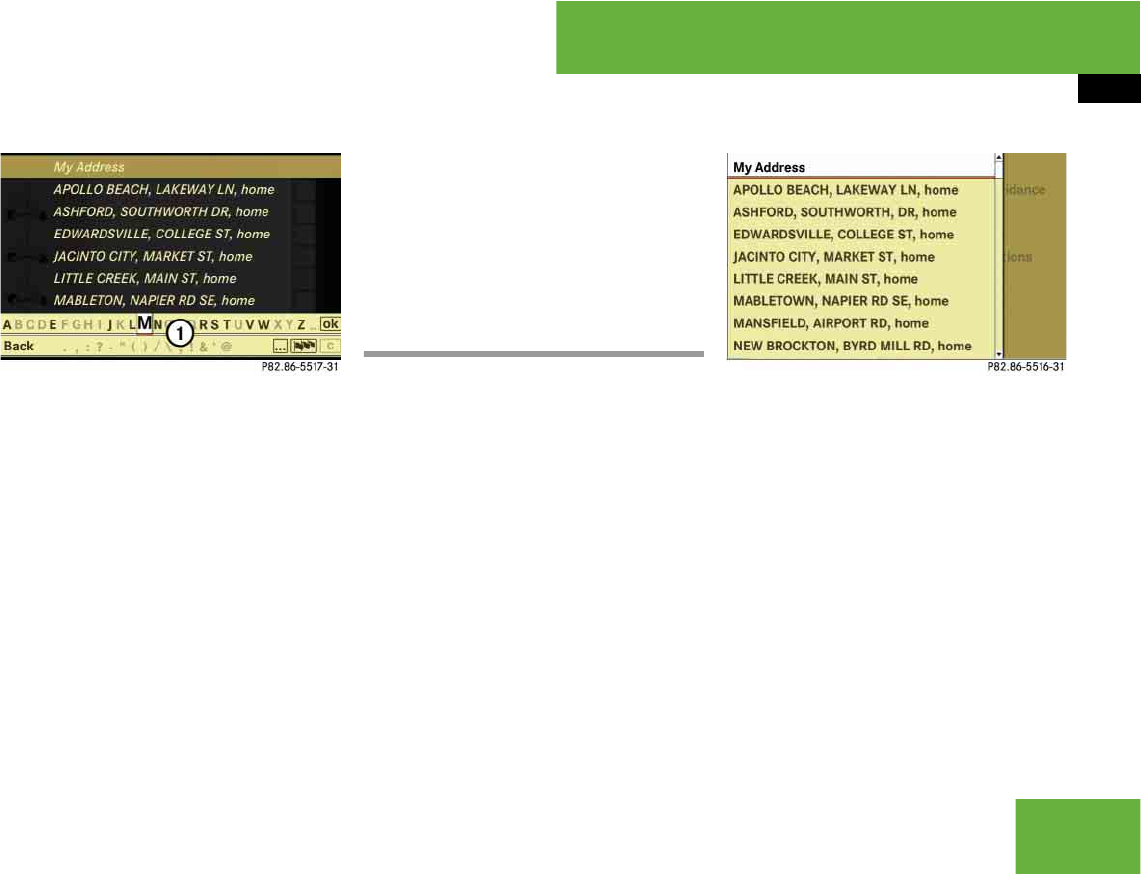
221
Control systems
COMAND navigation system (destination memory)
Example illustration: destination memory
list with input characters
1Input characters
왘Select desired destination. Proceed as
described for destination entry in the
“Entering a destination from the desti-
nation memory” section (컄page 192).
왘Select “Delete” after selecting the des-
tination to be deleted.
A prompt appears asking whether you
want to delete the destination.
왘Select “Yes” or “No”.
If you select “Yes”, COMAND deletes
the destination.
Own address
Assigning your address for the first
time or changing your own address
Assigning and/or changing your own ad-
dress
왘Select “Navi” “Destination”
“From Memory”.
Depending on the number of entries in
the destination memory, you will see
the destination memory list with or
without input characters.
Example illustration: destination memory
list without input characters
In the destination memory list without in-
put characters, the “My Address” entry is
automatically highlighted.
iIf the navigable address data of the destina-
tion to be deleted has also been assigned to an
address book entry, COMAND deletes the data
there as well. If the corresponding address book
entry does not contain any further data, such as
telephone numbers, COMAND deletes the entire
address book entry.
iThe destination memory always contains an
entry called “My Address”. You can save your
home address, for example, under this entry.
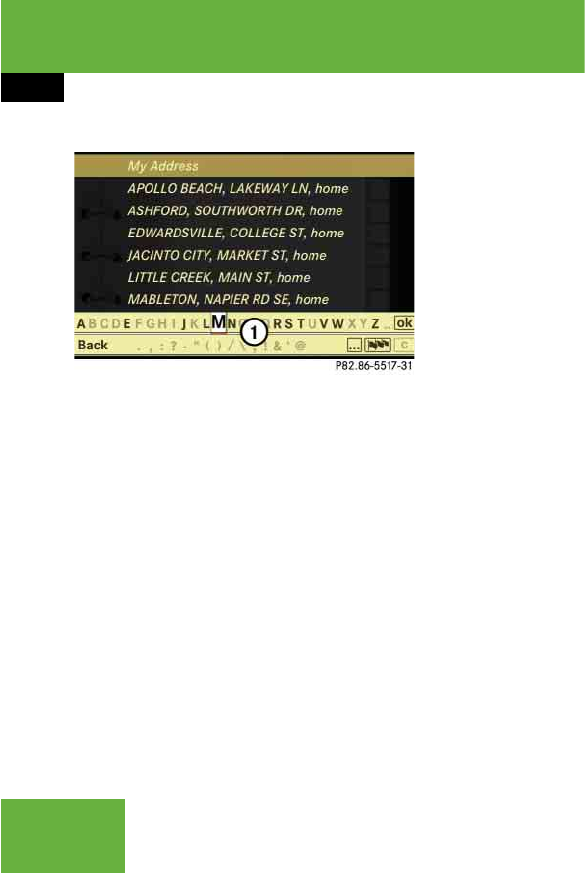
222
Control systems
COMAND navigation system (destination memory)
Example illustration: destination memory
list with input characters
1Input characters
In the destination memory list with input
characters 1, the input characters are au-
tomatically activated.
왘Destination memory list without in-
put characters: Press n immediately.
or
왘Destination memory list with input
characters: Slide qm repeatedly until
the input characters disappear.
The list entry “My Address” is automat-
ically highlighted as long as you have
not entered any characters using the
input characters.
왘If you have entered characters
from the list of input characters:
Rotate ymz or slide qm repeatedly
until the list entry “My Address” is
highlighted.
왘Press n.
Further operation depends on whether you
want to enter the address manually or use
an address book entry as your own ad-
dress.
Entering an address manually
왘If you want to assign your own ad-
dress for the first time: Select “Save
new entry”.
or
왘If you want to change your own ad-
dress: Select “Change” “Save new
entry”.
In both cases, the address input menu ap-
pears.
왘Enter the address. Proceed as de-
scribed for destination entry in the “En-
tering a destination by address”
section (컄page 173).
왘Select “Save” after entering the ad-
dress.
Your address is saved.

223
Control systems
COMAND navigation system (destination memory)
왔Using the address book entry as your own address
왘If you want to assign your own ad-
dress for the first time:
Select “Assign Address Book Entry”.
or
왘If you want to change your own ad-
dress: Select “Change” “Assign Ad-
dress Book Entry”.
In both cases, the menu appears for
searching for an address book entry.
왘Select desired address book entry. Pro-
ceed as described in the “Searching for
an address book entry” section
(컄page 228).
Once the address data is complete and if it
matches the digital map data, COMAND
saves the entry as your own address in the
destination memory.
If address data is still missing or if it cannot
be found on the digital map, a message ap-
pears indicating that the address is incom-
plete.
왘Closing message: Select “OK”.
Depending on which data is missing or
cannot be found on the digital map, you
must now either:
앫select a state (USA) or province (CDN)
앫or enter a town/city
앫or enter a street
앫or enter a house number
왘Selecting a state (USA) or province
(CDN): Select desired state (USA) or
province (CDN) from the list.
왘Entering a town: Proceed as de-
scribed for destination entry in the “En-
tering a town or city” section
(컄page 179).
왘Entering a street: Proceed as de-
scribed for destination entry in the “En-
tering a street” section (컄page 181).
왘Entering a house number: Proceed
as described for destination entry in
the “Entering a house number” section
(컄page 186).
If all data is available and matches the
digital map data, you can save the ad-
dress.
왘Saving: Select “Save”.
iIn the address book entry, the town/city
and street must be spelled in the same way as
the destination entry so that the data matches
the digital map data.
In order for the state (USA) or province (CDN) to
match the map data, you may either enter the
entire name or the abbreviation in the address
book.
Examples:
앫Florida or FL
앫Colorado or CO
앫Alberta or AB
앫Ontario or ON
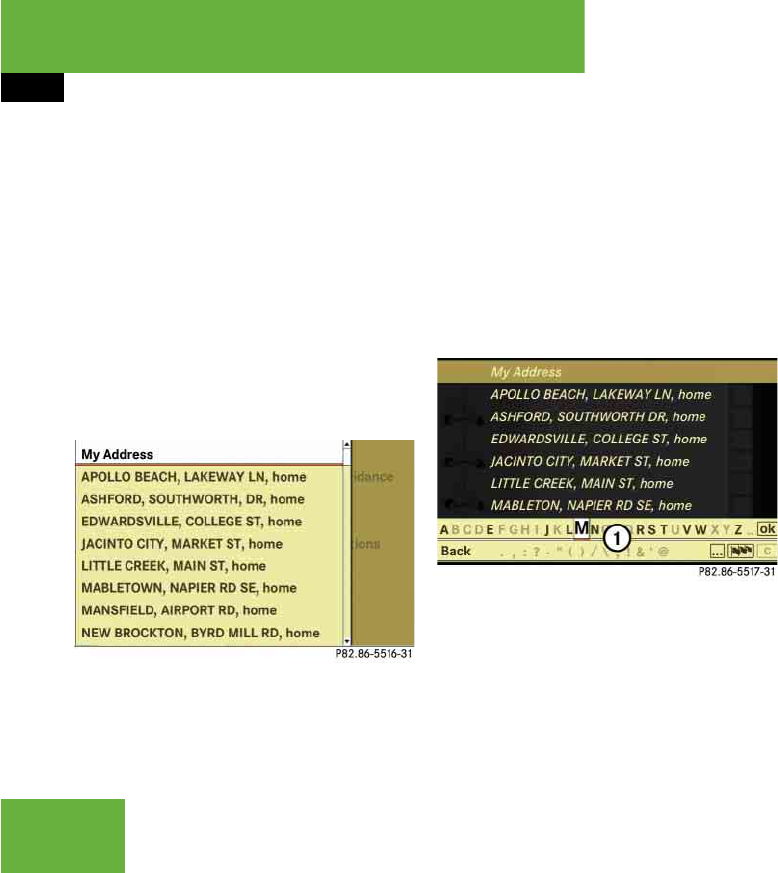
224
Control systems
Displaying your own address
왘Select “Navi” “Destination”
“From Memory”.
The destination memory list appears ei-
ther with or without the input charac-
ters. Whether the input characters
appear depends on the number of en-
tries in the destination memory.
왘Press n.
Destination memory list without input
characters
In the destination memory list without in-
put characters, the “My Address” entry is
automatically highlighted.
왘Press n.
If your own address has already been
assigned, you will see the menu for
starting route guidance with your own
address data.
왘Exiting menu: Select “Back”.
Destination memory list with input
characters
1Input characters
In the destination memory list with input
characters 1, the input characters are au-
tomatically activated.
왘Slide qm repeatedly until the input
characters disappear.
The list entry “My Address” is automat-
ically highlighted as long as you have
not entered any characters using the
input characters.
왘If you have entered characters
from the list of input characters:
Rotate ymz or slide qm repeatedly
until the list entry “My Address” is
highlighted.
왘Press n.
If your own address has already been
assigned, you will see the menu for
starting route guidance with your own
address data.
왘Exiting menu: Select “Back”.

225
Control systems
COMAND navigation system (last destinations)
COMAND navigation system
(last destinations)
Saving a destination permanently in
the destination memory
왘Proceed as described in the “Saving a
destination from the list of last destina-
tions” section (컄page 219).
Saving the vehicle position in the list of
last destinations
왘Centering map on the vehicle’s posi-
tion: Select “Navi” “Position”
“Vehicle Position Map”.
왘Saving: Select “Navi” “Position”
“Save Position”.
COMAND saves the current vehicle po-
sition as a destination in the list of last
destinations.
Saving the crosshair position in the list
of last destinations
왘Showing menu system, if neces-
sary: Press n.
왘Select “Position” “Save Position”.
COMAND saves the crosshair position
as a destination in the list of last desti-
nations.
Deleting one of the last destinations
왘Select “Navi” “Destination”
“From Last Destinations”.
The list of last destinations appears.
왘Select desired destination.
The address of the destination ap-
pears.
왘Select “Delete”.
왘Select “Yes” or “No”.
iCOMAND automatically saves the last desti-
nations for which the route calculation was
launched. It is stored in the “last destinations”
memory. If this memory is full, COMAND deletes
the oldest destination. You can also save one
destination from the list of last destinations in
the destination memory. It will be saved there
permanently.
iIf you have manually moved the map, you
will see a crosshair on the map (컄page 168).
You can save the crosshair position as a destina-
tion in the list of last destinations.
컄컄

226
Control systems
COMAND address book
COMAND address book
General notes
The address book contains the entries that
are saved in the COMAND address book
memory. The entries are permanently
available even if the phone is not inserted
in the cradle*. When you insert the mobile
phone into the cradle*, COMAND reads-in
the phone book entries saved in the mobile
phone and stores the entries as a separate
list from the COMAND address book. This
list is a copy of the phone’s phone book.
This can take several minutes, depending
on how many entries the phone book and
the address book contain. After the read-in
process, the COMAND compares the
phone book entries with the address book
entries. If all of the telephone numbers of a
phone book entry in the mobile phone are
present in an address book entry, the ad-
dress book shows only the address book
entry. If not, the address book also shows
the phone book entry in the mobile phone.
Address book menu overview
Calling up the address book
왘Select “Telephone” “Telephone”
“Address Book”.
The main address book display ap-
pears. If the address book already con-
tains entries, you will see the data of an
entry.
Illustration: address book entry
Warning! G
Please devote your attention first and fore-
most to the traffic situation you are in.
Before your journey, please familiarize your-
self with the address book functions.
Only use the COMAND when road and traffic
conditions permit you to do so. Otherwise
you could be involved in an accident in
which you or others could be injured.
iThe components and operating principles of
COMAND can be found on (컄page 85).
Search New Entry
Search for an ad-
dress book entry
Create new address
book entry
iFor phone book entries in the mobile phone
that contain a name and a telephone number,
you will see the name and the number. If a phone
book entry in the mobile phone contains several
telephone numbers, you will see the message
“Multiple Numbers” instead of a telephone num-
ber.
컄컄
227
Control systems
COMAND address book
Selecting an entry in the main address
book display
왘Slide omp or rotate ymz until the
main area is selected.
Creating a new address book entry
왘Select “Telephone” “Telephone”
“Address Book” “New Entry”.
The input menu appears with the data
fields and the input characters.
Illustration: input menu for private data
1To switch between work and home
data ( or symbol)
2Selected data field with input mark
(cursor)
3Display of set data type – in example
display, home data is set ( symbol
and “Home” display)
4Input characters
왘Switching between private and
business data: Select symbol 1.
The display switches to private or busi-
ness data, depending on the previous
status.
왘Changing data field: Slide rmq re-
peatedly until desired entry is highlight-
ed.
or
왘Select [ or ] repeatedly until de-
sired entry is highlighted.
왘Entering data into a field:
Select desired characters one by one
from the input characters.
왘Toggling upper and lower case for
the input characters: Select & or
(.
왘Changing language for the input
characters: Select !.
왘Select desired language.
iPlease observe the following when creating
a new address book entry:
You can define your own address in the destina-
tion memory in navigation mode. When defining
the address, you can transfer data already en-
tered as an address book entry.
In the address book entry, the town/city and
street must be spelled in the same way as the
destination entry so that the data matches the
digital map data.
In order for the state (province) to match the
map data, its complete name or abbreviation
may be entered.
Examples:
앫Florida or FL
앫Colorado or CO
앫Alberta or AB
앫Ontario or ON
컄컄
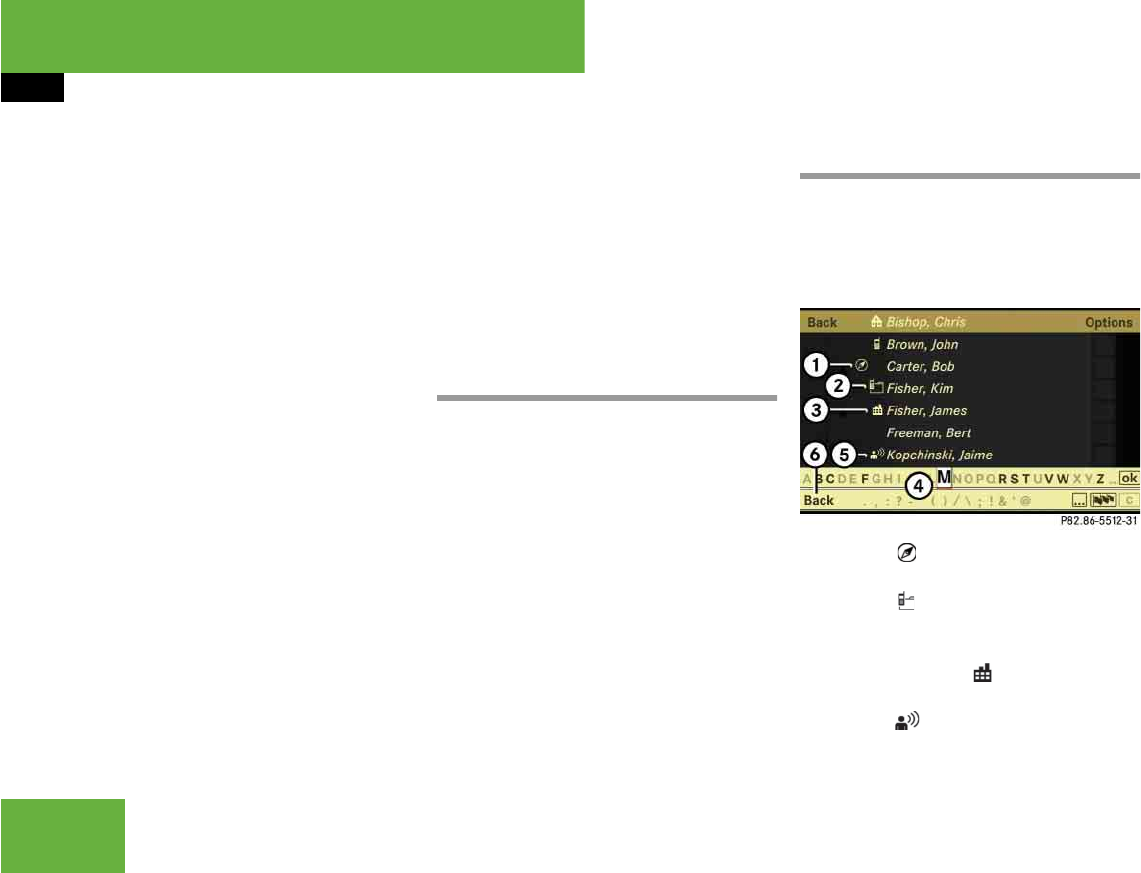
228
Control systems
COMAND address book
왘Changing character set for the input
characters: Select #.
Depending on the previous setting, you
will change to letters with special char-
acters or to numbers with special char-
acters.
왘Moving cursor in the data field:
Select Y or Z.
왘Deleting individual characters:
Select ) and briefly press n.
The character to the left of the cursor is
deleted.
왘Deleting an entire entry: Select )
and press and hold n until the entry is
deleted.
왘Saving an entry: Select ?.
왘Canceling an entry: Select “Back”.
If one of the data fields contains new
data, a prompt will appear asking
whether you want to save the entry.
왘Select “Yes” or “No”.
The entry will either be saved or
not, depending on your selection.
Deleting an entry
왘Search for desired entry (컄page 228).
왘Select “Options” “Delete”.
A deletion prompt appears.
왘Select “Yes” or “No”.
The entry will either be deleted or not,
depending on your selection.
Searching for an address book entry
왘Select “Telephone” “Telephone”
“Address Book” “Search”.
The search menu appears with the
smart speller.
1Symbol for complete address data
from the navigation system
2Symbol for summarized entries
from the mobile phone with the same
name but different telephone numbers
3Category symbol
4Smart speller
5Symbol for voice entry
6Back to the main address book display
iYou cannot delete phone book entries from
the mobile phone.
컄컄

229
Control systems
COMAND address book
Entries with category symbol 3 come
from the mobile phone. The following cate-
gory symbols are possible:
앫 = symbol for “Mobile” category
앫 = symbol for “Home” category
앫 = symbol for “Work” category
앫 = symbol for “Fax” category
앫 = symbol for “Pager” category
앫 = symbol for “Main” category or for
unknown category or for phone entries
that are saved on the SIM card of a
GSM mobile phone
Entries without a category symbol or with
the or symbols come from the
COMAND address book. All other entries
come from the mobile phone and are only
visible when the mobile phone is in the cra-
dle*.
Entries with the symbol contain a voice
entry (컄page 234). It is possible to add
voice entries in vehicles with Voice Con-
trol*.
Entries with the symbol contain com-
plete, navigable address data from the nav-
igation system that correspond to digital
map data. It is possible to quickly start
route guidance to these types of entry
(컄page 233).
Switching from the smart speller to the
list
왘Slide mq repeatedly or press n until
the smart speller is hidden.
or
왘Select ?.
Switching from the list to the smart
speller
왘Select “Back” from the list.
Searching
Searching via the smart speller
왘Switch from the list to the smart speller
if necessary.
왘Changing smart speller language:
Select !.
왘Select desired language.
왘Changing smart speller character
set: Select #.
Depending on the previous setting, you
will change to letters with special char-
acters or to numbers with special char-
acters.
왘Entering characters: Select the char-
acters one by one of the entry you are
searching for.
왘Deleting individual characters:
Select ) and briefly press n.
Each time you enter or delete a charac-
ter, the closest match will be displayed
at the top of the list.
왘Deleting an entire entry: Select )
and press and hold n until the entry is
deleted.
컄컄
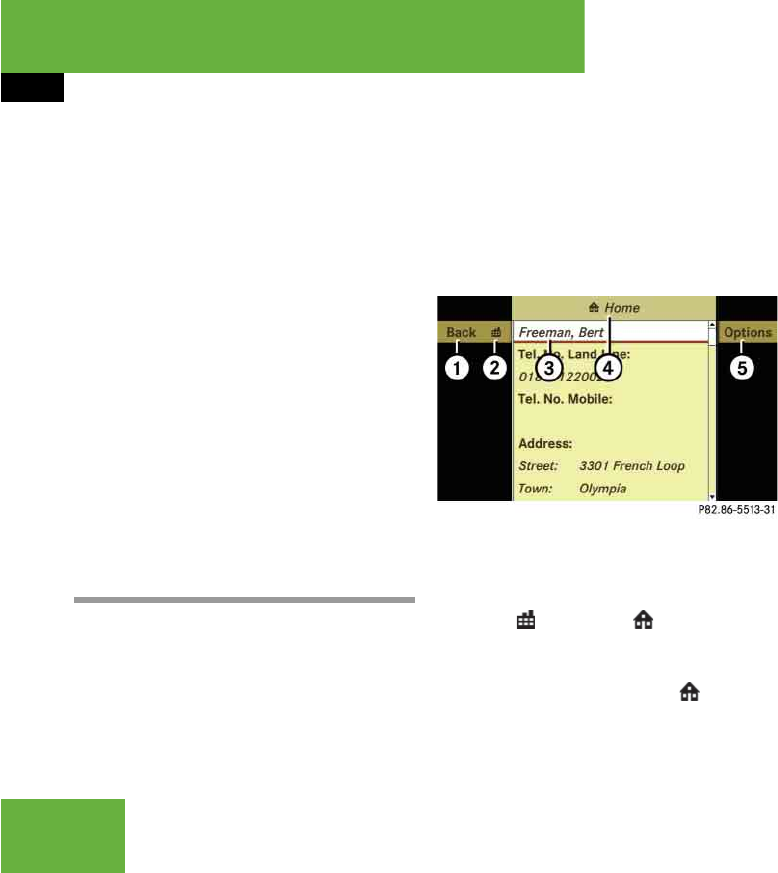
230
Control systems
COMAND address book
왘Canceling search: Switch from the
smart speller to the list (컄page 229).
The entry at the top of the list is auto-
matically highlighted.
왘Going back to main address book
display: If necessary, switch from the
list to the smart speller (컄page 229)
and select “Back” in the smart speller.
Searching via the list
왘If necessary, switch from the smart
speller to the list (컄page 229).
왘Rotate ymz or slide qmr until desired
entry is highlighted on the list.
Displaying a complete address book
entry
Searching for the desired entry
왘Search for an address book entry
(컄page 228).
or
왘Select an address book entry in the
main address book menu
(컄page 227).
왘Press n.
The detailed view appears.
Illustration: detailed view for private data
1To go back to the previous menu
2To switch between work and home
data ( symbol or )
3Selected data field
4Display of set data type – in example
display, home data is set ( symbol
and “Home” display)
5To call up options
Switching between private or business
data
왘Select symbol 2.
The display switches to private or busi-
ness data, depending on the previous
status.
iThe options available under “Options” menu
item 4 depend on which data field 3 is select-
ed. The following options may be available:
앫Displaying abbreviated content in full
(컄page 231)
앫Changing an address book entry
((컄page 231)
앫Changing the description of a telephone
number data field (컄page 232)
앫Adding a telephone number data field
(컄page 232)
앫Calling a number saved in an entry
(컄page 233)
앫Starting route guidance to an entry
(컄page 233)
앫Options for voice entries (컄page 234)
컄컄
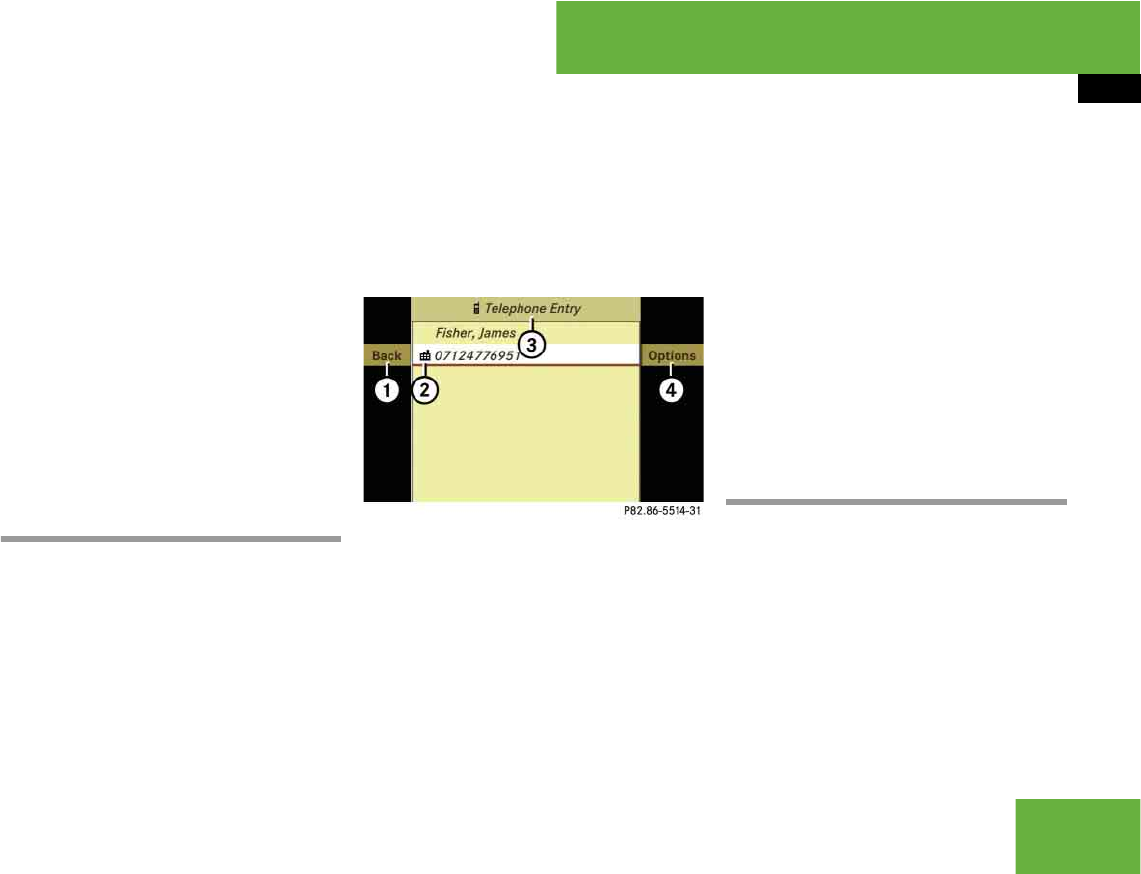
231
Control systems
COMAND address book
Selecting a different data field
왘Rotate ymz or slide qmr.
Displaying abbreviated content in full
왘Select “Options” “Details”.
The display is shown in full.
왘Closing entire display: Slide qmr or
omp or press n.
Closing the detailed view
왘Select “Back”.
Displaying of a complete phone book
entry in the mobile phone
Searching for the desired entry
왘Search for phone book entry in mobile
phone (컄page 228).
or
왘Select a phone book entry from the
mobile phone using the COMAND
address book menu (컄page 227).
왘Press n.
The detailed view appears.
1To go back to the previous menu
2Category symbol
3Display for phone book entry in mobile
phone
4To call up options
Closing the detailed view
왘Select “Back”.
Changing an entry
Changing an address book entry
왘Search for an address book entry
(컄page 228) then, select “Options”
“Change”.
or
iThe mobile phone must be inserted in the
cradle*.
iIf a phone book entry in the mobile phone
has more than one telephone number, you will
see all telephone numbers with the respective
category symbol 2 in the detailed view.
iThe options available under “Options” menu
item 4 depend on which data field 3 is select-
ed. The following options may be available:
앫Changing a phone book entry in the mobile
phone (컄page 231)
앫Calling a number saved in an entry
((컄page 233)
앫Saving a phone book entry from mobile
phone in the address book (컄page 235)
iYou cannot change address book entries
that come from the phone book in the mobile
phone.

232
Control systems
COMAND address book
왘Display the details of an address book
entry (컄page 230) then, select “Op-
tions” “Change Content”.
The input menu appears with the data
fields.
왘Proceed as described in the “Switching
between private and business data”
paragraph in the “Creating a new ad-
dress book entry” section
(컄page 227).
Changing the description of a tele-
phone number data field
왘Display the details of an entry and high-
light the telephone number data field
(컄page 230).
왘Select “Options” “Change Entry
Name”.
왘Select a number category, e.g. “Home”.
왘Select a telephone category, e.g. “Land
Line”.
왘Select “Save”.
COMAND saves the data if there are
fewer than four numbers assigned to
the entry you are searching for in the
selected number category.
Otherwise, you will see a prompt ask-
ing whether one of the existing num-
bers should be overwritten.
왘Select “Yes” or “No”.
If you select “Yes”, a selection list will
appear containing the four existing
numbers.
왘Select number to be overwritten.
COMAND overwrites the selected num-
ber with the new data.
Adding to a telephone number data
field
왘Display the details of an entry and high-
light the telephone number data field
(컄page 230).
왘Select “Options” “Add Number”.
왘Select a number category, e.g. “Home”.
왘Select a telephone category, e.g. “Land
Line”.
왘Select “Save”.
COMAND adds the data field to the entry if
there are fewer than four numbers as-
signed to the entry in the selected number
category. You can now enter a number into
the data field.
왘Proceed as described from the “Enter-
ing data into a field” operating step in
the “Creating a new address book en-
try” section (컄page 227).
If four numbers are already saved for the
entry in the selected number category, a
prompt will appear asking whether one of
the data fields should be overwritten.
iThis function is not possible for phone book
entries in the mobile phone.
iOne address book entry may contain up to
four data fields for private telephone numbers
and four data fields for business telephone num-
bers.
This function is not possible for phone book en-
tries in the mobile phone.

233
Control systems
COMAND address book
왘Select “Yes” or “No”.
If you select “Yes”, a selection list will
appear containing the four data fields.
왘Select field to be overwritten.
COMAND deletes the number of the se-
lected field. You can now enter a new
number into the data field.
왘Proceed as described from the “Enter-
ing data into a field” operating step in
the “Creating a new address book en-
try” section (컄page 227).
Calling a number saved in an entry
왘Display the details of an entry and high-
light the telephone number data field
(컄page 230).
왘Press n.
or
왘Select “Options” “Call”.
In both cases, the telephone* connects
the call. The COMAND display is show-
ing the telephone mode screen.
Starting route guidance to an entry
왘Search for an address book entry
(컄page 228).
왘Display the details of an entry and high-
light the address data field
(컄page 230).
왘Select “Options” “Navigate”.
or
왘Press n.
Further operation depends on whether the
address data is complete and matches the
digital map data of the navigation system.
It does not match, for example, if it is not
spelled in the same way as the destination
entry.
Address data is complete and matches
digital map
If “Navigate” is selected, the navigation
system starts the route calculation.
Address data is incomplete or does not
match digital map
If “Navigate” is selected, a message ap-
pears indicating that the address is incom-
plete.
iTo do this, COMAND must be equipped with
a telephone*. The mobile phone must be insert-
ed in the cradle*. iPressing n only functions if one of the ad-
dress data fields contains data.
iFor the route calculation, the navigation sys-
tem requires the correct spellings of the state
(province), the town/city or zip code, the street
and under some circumstances, the house num-
ber. The town/city and street must be spelled in
the same manner as the destination entry.
The state (province) can be spelled as an entire
name or as an abbreviation.
Examples:
앫Florida or FL
앫Colorado or CO
앫Alberta or AB
앫Ontario or ON

234
Control systems
COMAND address book
왘Closing message: Select “OK”.
Depending on which data is missing or
cannot be found on the digital map, you
must now either:
앫select a state (province)
앫select a county
앫or enter a town/city
앫or enter a street
앫or enter a house number
왘Selecting a state (province):
Select desired state (province) from
the list.
왘Selecting a county: Select desired
county from the list.
왘Entering a town: Proceed as de-
scribed for destination entry in the “En-
tering a town or city” section
(컄page 179).
왘Entering a street: Proceed as de-
scribed for destination entry in the “En-
tering a street” section (컄page 181).
왘Entering a house number: Proceed
as described for destination entry in
the “Entering a house number” section
(컄page 186).
If all data is available and matches the dig-
ital map data, the navigation system starts
the route calculation.
Voice entries
Adding or changing a voice entry
왘Search for the address book entry with
or without a voice entry (컄page 228).
왘Select “Options” “Voice Name”
“Add” or “Change”.
Subsequent operation is controlled by
voice. Voice Control* guides you
through the dialogs.
iIf you have added data, COMAND saves your
additions. This means that you do not need to
re-enter this additional data later on.
The COMAND memory saves the additional data
in a special field, which cannot be displayed. The
data, which you have entered in the address
book initially in the display, remains unchanged.
iFor voice entries, your vehicle must be
equipped with Voice Control*. You can not add
voice entries for address book entry that come
from the phone book in the mobile phone.
iYou can add one voice entry per address
book entry.
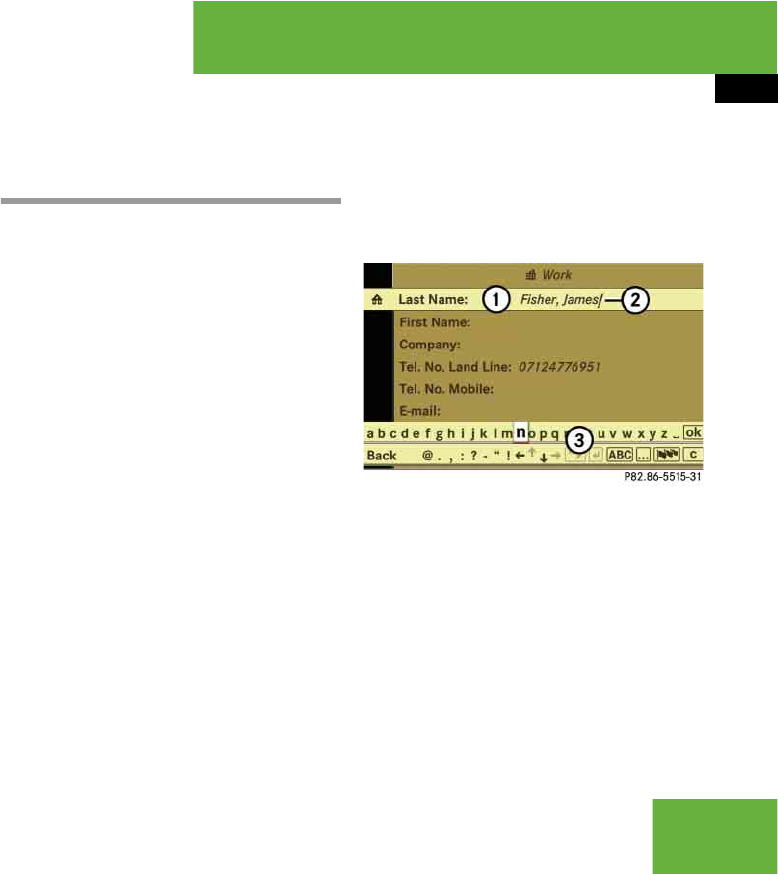
235
Control systems
COMAND address book
왔Deleting a voice entry
왘Search for the address book entry with
a voice entry (컄page 228).
왘Select “Options” “Voice Name”
“Delete”.
A deletion prompt appears.
왘Select “Yes” or “No”.
COMAND deletes the voice entry de-
pending on your selection.
Listening to a voice entry
왘Search for the address book entry with
a voice entry (컄page 228).
왘Select “Options” “Voice Name”
“Read Aloud”.
You will hear the voice entry.
Saving a phone book entry from mobile
phone in the COMAND address book
Saving a phone book entry from mobile
phone as new address book entry
왘Search for phone book entry in mobile
phone (컄page 228).
or
왘Display details of a phone book entry in
the mobile phone (컄page 230).
왘Select “Options” “Save” “New En-
try”.
왘Select a number category, e.g. “Work”.
왘Select a telephone category, e.g. “Mo-
bile”.
왘Select “Save”.
The input menu appears with the data
fields. The name and the telephone
number are entered automatically.
1Data field
2Input mark (cursor)
3Input characters
왘Proceed as described in the “Changing
a data field” paragraph in the “Creating
a new address book entry” section
(컄page 227).
iThe mobile phone must be inserted in the
cradle* and the COMAND have read out the mo-
bile phone book data. This can take several min-
utes, depending on how many entries each
phone book contains.

236
Control systems
COMAND address book
Saving a phone book entry from the
mobile phone in an existing address
book entry
왘Search for a phone book entry in the
mobile phone (컄page 228).
or
왘Display details of a phone book entry in
the mobile phone (컄page 230).
왘Select “Options” “Save” “Add”.
왘Select a number category, e.g. “Home”.
왘Select a telephone category, e.g. “Land
Line”.
왘Select “Save”.
The search menu for address book en-
tries appears.
왘Search for desired entry.
왘After selecting an entry, press n.
COMAND saves the data if there are
fewer than four numbers assigned to
the selected entry in the selected num-
ber category. Otherwise, you will see a
prompt asking whether one of the ex-
isting numbers should be overwritten.
왘Select “Yes” or “No”.
If you select “Yes”, a selection list will
appear containing the four existing
numbers.
왘Select the number to be overwritten.
COMAND overwrites the selected num-
ber with the new data.
Importing data from external
Bluetooth® devices
You can import vCards from external
Bluetooth® devices into the address book.
Please keep the following in mind:
앫Bluetooth® is activated in COMAND
(컄page 241) and in the device con-
cerned.
앫The external device must be able to
send vCards by Bluetooth®.
앫The external device is inside the vehi-
cle, switched on and authorized
(컄page 241).
왘Importing: Start data transfer on the
external device (see operating instruc-
tions of the device concerned).
If there is no address book entry with
the same first name and last name,
COMAND imports the data.
If there is already an address book en-
try with the same first name and last
name, a prompt will appear asking
whether the existing data should be
overwritten.
왘Select “Yes” or “No”.
The existing address book entry will be
overwritten or not, depending on your
selection.
iThe mobile phone must be inserted in the
cradle*.
iThere is a detailed description of how to
search for an address book entry in the “Search-
ing for an address book entry” section
(컄page 228).

237
Control systems
COMAND system settings
COMAND system settings
System settings menu overview
Display settings
Switching the display on or off
왘Switching off: Select “Vehicle”
“Display OFF”.
왘Switching back on: Rotate ymz or
slide qmr.
Setting the display design
왘Select “Vehicle” “System Settings”
“Display”.
왘Select “Day Mode”, “Night Mode” or
“Automatic”.
Time settings
Setting the time
왘Select “Vehicle” “System Settings”
“Time” “Time”.
왘Selecting hour or minute(s):
Slide omp.
왘Setting value: Rotate ymz or
slide qmr.
왘Saving setting: Press n.
iThe components and operating principles of
COMAND can be found on (컄page 85).
Display
(컄page 237)
Time
(컄page 237)
Voice Control*
(컄page 239)
Language
(컄page 240)
Favorite
(컄page 240)
Services
(컄page 241)
Reset
(컄page 237)
Display settings Time settings Voice Control*
settings
Language
settings
Assign favorite
button
Bluetooth®
settings
Reset COMAND to
factory settings
iIn the “Automatic” setting, COMAND ana-
lyzes the automatic vehicle light sensor and
switches between the display design automati-
cally.
iThe correct time must be set for the follow-
ing navigation system functions to operate cor-
rectly:
앫Route guidance on routes with time-depen-
dent traffic guidance
앫Calculation of estimated arrival time
iThe increment value for setting the minutes
depends on the situation. If GPS reception is
available, it is 30 minutes. If GPS reception is not
available, it is one minute.

238
Control systems
COMAND system settings
Setting the time zone and switching be-
tween Daylight Saving Time and stan-
dard time
왘Setting time zone: Select “Vehicle”
“System Settings” “Time” “Time
Zone”.
The country list appears. The dot R in
front of a list entry indicates the cur-
rent setting.
왘Select the country in which you are cur-
rently driving.
A time zone list may also be displayed,
depending on the country selected.
왘Select desired time zone.
Subsequent operation depends on:
앫whether your navigation system has
GPS reception
앫which country you have previously set
You may either:
앫manually switch between “Daylight
Savings Time (Summer)” and “Standard
time (Winter)” in a list
or
앫switch automatic Daylight Saving Time
to standard time changeover (and vice
versa) on or off
왘Switching manually: Select “Daylight
Savings Time (Summer)” or “Standard
time (Winter)”.
The dot R in front of a list entry indi-
cates the current setting.
왘Switching automatic changeover on
or off: Select “Automatic Daylight Sav-
ings Time”.
You have switched the function on or
off. A checkmark appears when the
function is switched on.
왘Saving setting and exit the menu:
Slide omp.
Setting the date
왘Select “Vehicle” “System Settings”
“Time” “Date”.
왘Selecting month, day or year:
Slide omp.
왘Setting value: Rotate ymz or
slide qmr.
왘Saving setting: Press n.
iThe correct time zone and Daylight Saving
Time/standard time must be set for the follow-
ing navigation system functions to operate cor-
rectly:
앫Route guidance on routes with time-depen-
dent traffic guidance
앫Calculation of estimated arrival time iIf you have switched off the automatic
changeover function, you must change Daylight
Saving Time to standard time and vice versa
yourself.

239
Control systems
COMAND system settings
Setting the time/date format
왘Select “Vehicle” “System Settings”
“Time” “Format”.
The format list appears. The dots R in
front of the list entries indicate the cur-
rent setting.
왘Changing format setting:
Select desired format.
왘Saving setting and exit the menu:
Slide omp.
Voice Control* settings
Switching help window on or off
왘Select “Vehicle” “System Settings”
“Voice Control”.
왘Select “Help Window”.
You can switch the help window on or
off. A checkmark appears when the
help window is switched on.
Individualization
Using individualization, you can fine-tune
Voice Control* to your own voice and thus
improve voice recognition. The ability of
the system to recognize the commands of
other users does not deteriorate as a re-
sult.
Individualization consists of two parts. You
train the system to recognize digits in the
first part and specific commands in the
second part.
Starting new individualization
왘Select “Vehicle” “System Settings”
“Voice Control” “Start new indi-
vidualization”.
A prompt appears asking whether you
would like further information.
왘Select “Yes” or “No”.
If you select “No”, the first part of indi-
vidualization begins.
If you select “Yes”, an information dis-
play will be shown with audio instruc-
tion.
왘Closing display: Select “OK”.
The first part of individualization be-
gins.
At the end of the first part, you will see
a prompt asking whether you want to
begin the second part.
왘Select “Yes” or “No”.
If you select “No”, individualization will
be canceled. The data from the first
part is saved automatically.
If you select “Yes”, the second part be-
gins.
Individualization is completed at the end of
the second part. You will see a message to
this effect. The data from the second part
is saved automatically.
iIt is only possible to start individualization
with the vehicle stationary. After starting the
session, the system will guide you through the in-
dividualization by means of acoustic instruc-
tions.
컄컄
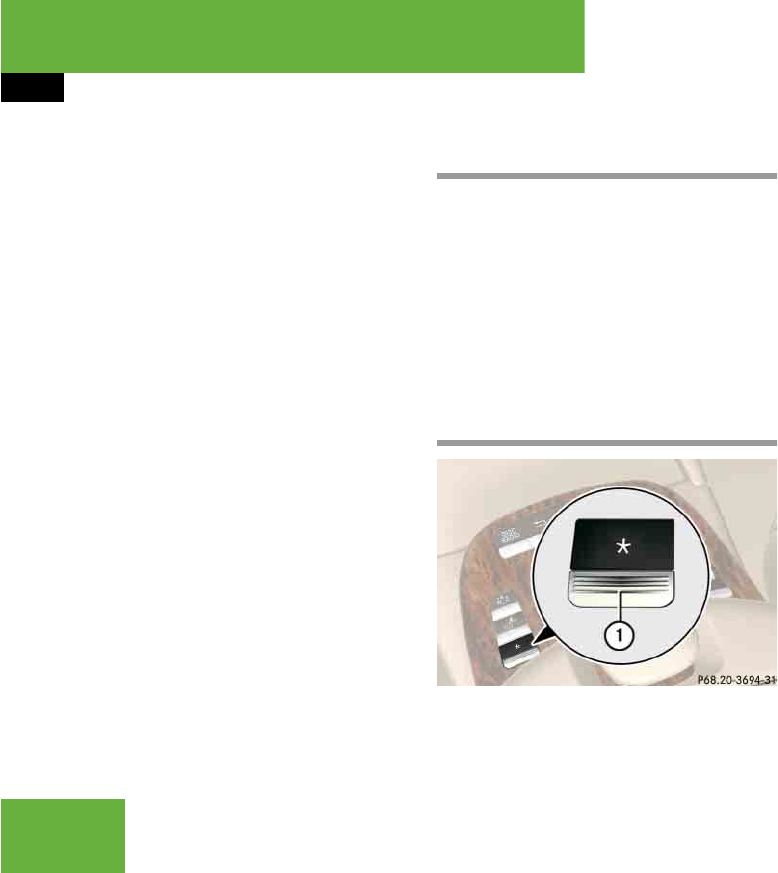
240
Control systems
COMAND system settings
Canceling during the first or second part
of individualization
왘Select “Cancel”.
A prompt appears asking whether you
really do want to cancel.
왘Select “Yes” or “No”.
If you select “Yes”, individualization will
be canceled. The data from the part at
which you exited is not saved.
If you select “No”, the part at which you
stopped begins again.
Deleting existing individualization data
왘Select “Vehicle” “System Settings”
“Voice Control” “Delete individu-
alization”.
A prompt appears asking whether you
really do want to delete.
왘Select “Yes” or “No”.
The individualization data will either be
deleted or not, depending on your se-
lection.
Setting the system language
왘Select “Vehicle” “System Settings”
“Language”.
The language list appears. A dot R in-
dicates the current setting.
왘Changing setting: Select desired lan-
guage.
The language is set.
Assigning the favorite button
1Favorite button
You can assign the following predefined
functions to the favorite button P:
앫“Rear Window Sunshade” (컄page 503)
You can use the favorite button to ex-
tend or retract the rear window sun-
shade. This is the default setting.
앫“Display OFF” (컄page 237)
You can use the favorite button to
switch the COMAND display on or off.
앫“Repeat Navigation Command”
(컄page 214)
You can use the favorite button to re-
call the last announcement issued by
the navigation system.
왘Select “Vehicle” “System Settings”
“Favorite”.
The list of predefined functions appears.
The dot R in front of the list entry indi-
cates the current setting.
왘Changing setting: Rotate ymz and
select desired function.
왘Saving setting and exit the menu:
Press n.
컄컄

241
Control systems
COMAND system settings
Bluetooth® settings
General information about Bluetooth®
Bluetooth® technology is the standard for
short-range wireless technologies, suitable
for transmitting voice and data. It is possi-
ble to connect Bluetooth® devices wire-
lessly. Bluetooth® can be used to
exchange vCards or make calls using a
headset.
Bluetooth® technology uses the freely
available ISM (Industrial Scientific Medi-
cal) wireless network that works at
2.45 GHz. Ranges of up to ten meters are
possible with Bluetooth®.
Activate or deactivate Bluetooth®
왘Select “Vehicle” “System Settings”
“Services” “Deactivate Blue-
tooth”.
You have activated or deactivated
Bluetooth®. A checkmark appears
when Bluetooth® is deactivated.
Connecting Bluetooth® devices
It is possible to establish a Bluetooth® con-
nection between COMAND and the follow-
ing types of device:
앫Mobile phone (only for transferring
business cards)
앫Headset
앫Laptop/PDA
You can connect up to twelve devices to
COMAND but only one device can be ac-
tive at a time.
The connection process includes search-
ing for the device and its subsequent au-
thorization.
Calling up the Bluetooth® device list
and searching for devices
왘Calling up the list: Select “Vehicle”
“System Settings” “Services”
“Search for Bluetooth devices”.
When you call up the list for the first
time after switching on COMAND, the
search for devices in the reception
range starts automatically. You will see
a display to this effect.
The device list appears after a short
while.
왘Canceling search:
Select “Cancel”.
iTo connect a Bluetooth® device, the
Bluetooth® function must be activated in
COMAND and in the device concerned. The
Bluetooth® device must also be set to “visible”
or “findable” in order for COMAND to find and
display it. For the setting procedures, please see
the operating instructions for the Bluetooth®
device.
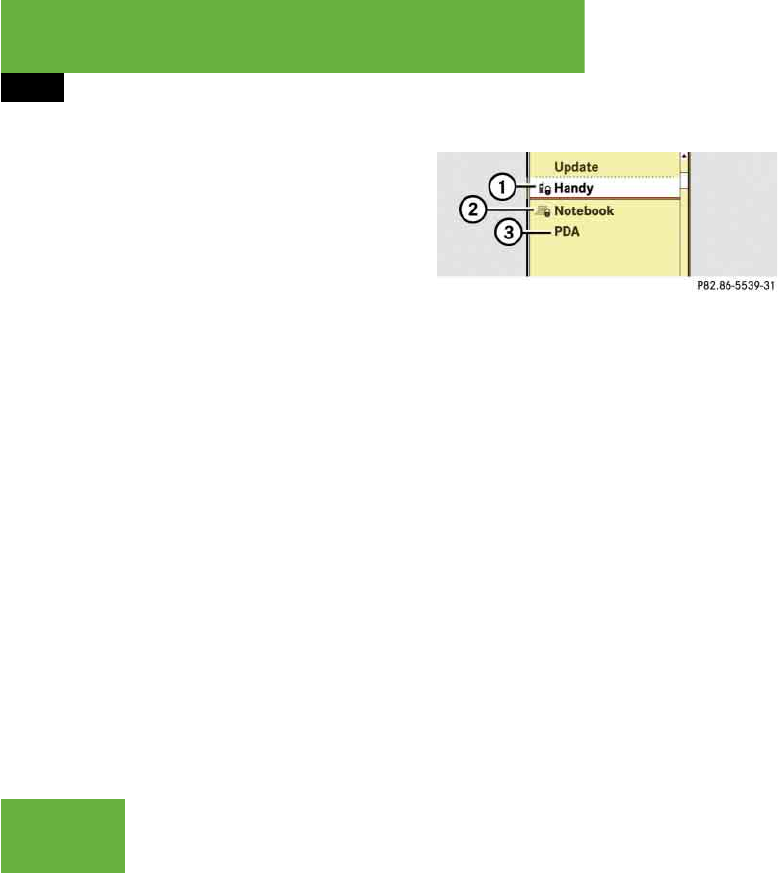
242
Control systems
The second time you call up the list, and each time thereafter, the device list appears immediately if COMAND has not been switched
off and on again in the meantime.
왘Starting search manually:
Select “Update”.
The device list can contain the following
devices:
앫All detected devices, whether autho-
rized or not.
앫All authorized devices, whether detect-
ed or not.
1Authorized and detected device – de-
vice and padlock symbol are the same
color
2Device which was not detected, but
which has been authorized in the past
– device and padlock symbol are differ-
ent colors (the device may be switched
off or not in the vehicle, for example)
3Newly detected device - not yet autho-
rized (no symbol)
Displaying details of a Bluetooth® de-
vice
왘Call up Bluetooth® device list
(컄page 241).
왘Select desired device.
왘Select “Details”.
The detailed display for this device ap-
pears.
왘Closing detailed display: Slide qmr
or press n.
Authorizing a Bluetooth® device
왘Call up Bluetooth® device list
(컄page 241).
왘Select unauthorized device.
왘Select “Authorize”.
The input menu for the passkey ap-
pears.
iIf the device list already contains twelve au-
thorized devices, you must revoke authorization
for one of the authorized devices. Then you must
switch this device off and then restart the
search. Any new devices for which you would like
to search will otherwise not appear in the list.
iThe passkey is any one to sixteen-digit num-
ber which you can set yourself. You must enter
the same number in COMAND and also in the de-
vice to be authorized.

243
Control systems
COMAND system settings
왘Entering passkey into COMAND:
Select the digits one by one.
왘Deleting digits: Select ) and briefly
press n.
왘Canceling entry into COMAND:
Select “Back”.
왘Confirming entry into COMAND:
Select ?.
왘If necessary, enter the same passkey
into the Bluetooth® device (see the op-
erating instructions for the device).
The device is authorized.
De-authorizing a Bluetooth® device
왘Call up Bluetooth® device list
(컄page 241).
왘Select authorized device.
왘Select “De-authorize”.
A prompt appears asking whether you
really want to de-authorize this device.
왘Select “Yes” or “No”.
If you select “Yes”, the device will be
de-authorized.
Reset
왘Select “Vehicle” “System Settings”
“Reset”.
A prompt appears asking whether you
really want to reset.
왘Select “Yes” or “No”.
If you select “Yes” another prompt will
appear asking whether you really want
to reset.
왘Select “Yes” or “No”.
If you select “Yes”, COMAND will be re-
set and restarted.
iOn devices which do not have an input key-
pad (e.g. headsets), the passkey is predeter-
mined. In this case, it is not necessary to enter
the number on the device itself. You will usually
find the passkey in the operating instructions for
the device.
iIf you de-authorize a device which has been
authorized in the past and which is not detected
in the search, this device will no longer be dis-
played in the device list.
Devices which have been authorized in the past
but which are not detected in the search are ei-
ther not switched on or not in the vehicle.
iYou can reset COMAND back to its factory
settings.
In this case, all personal data (e.g. address book
entries, entries in the destination memory and
the list of last destinations of the navigation sys-
tem), among other things, is deleted.
컄컄
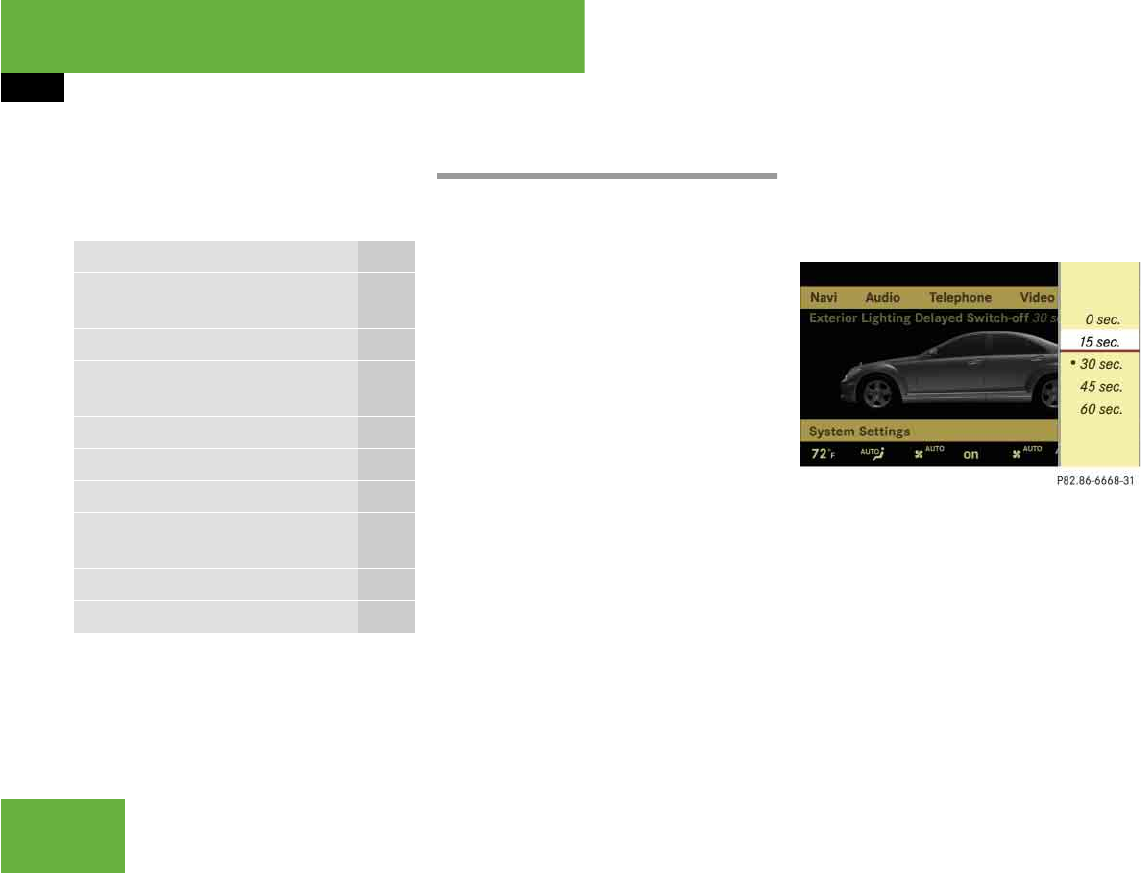
244
Control systems
COMAND vehicle menu
COMAND vehicle menu
In this menu, you can program the follow-
ing vehicle functions:
Setting night security illumination
(Exterior Lighting Delayed Switch-off)
Use this function to set whether and how
long you would like the exterior lighting to
illuminate during darkness after exiting the
vehicle and all doors closed.
The exterior lighting automatically goes
out after the delayed switch-off time has
expired.
You can select:
앫“0 sec.”, the delayed switch-off feature
is deactivated
앫“15 sec.”, “30 sec.”, “45 sec.”, or
“60 sec.”, the delayed switch-off fea-
ture is activated
왘Select “Vehicle”.
The main area is active.
왘Selecting “Exterior Lighting Delayed
Switch-off” menu: Slide omp or
rotate ymz.
왘Confirming selection: Press n.
왘Selecting length of time: Slide qmr
or rotate ymz.
왘Confirming selection: Press n.
or
왘Select “Vehicle” “Vehicle” “Exte-
rior Lighting Delayed Switch-off”.
A selection list appears.
The current setting is indicated by a
dot R.
Function Page
Exterior Lighting Delayed
Switch-off
244
Locator Lighting 245
Exterior Mirror Convenience Set-
tings
246
Automatic Locking 247
Easy Entry/Exit Feature 248
Interior Ambient Light 249
Interior Lighting Delayed
Switch-off
250
Rear-window Sunshade 251
Trunk Opening-height Restriction* 251
iThe components and operating principles of
COMAND can be found on (컄page 85).
iYou can reactivate this function within
10 minutes by opening a door.
컄컄
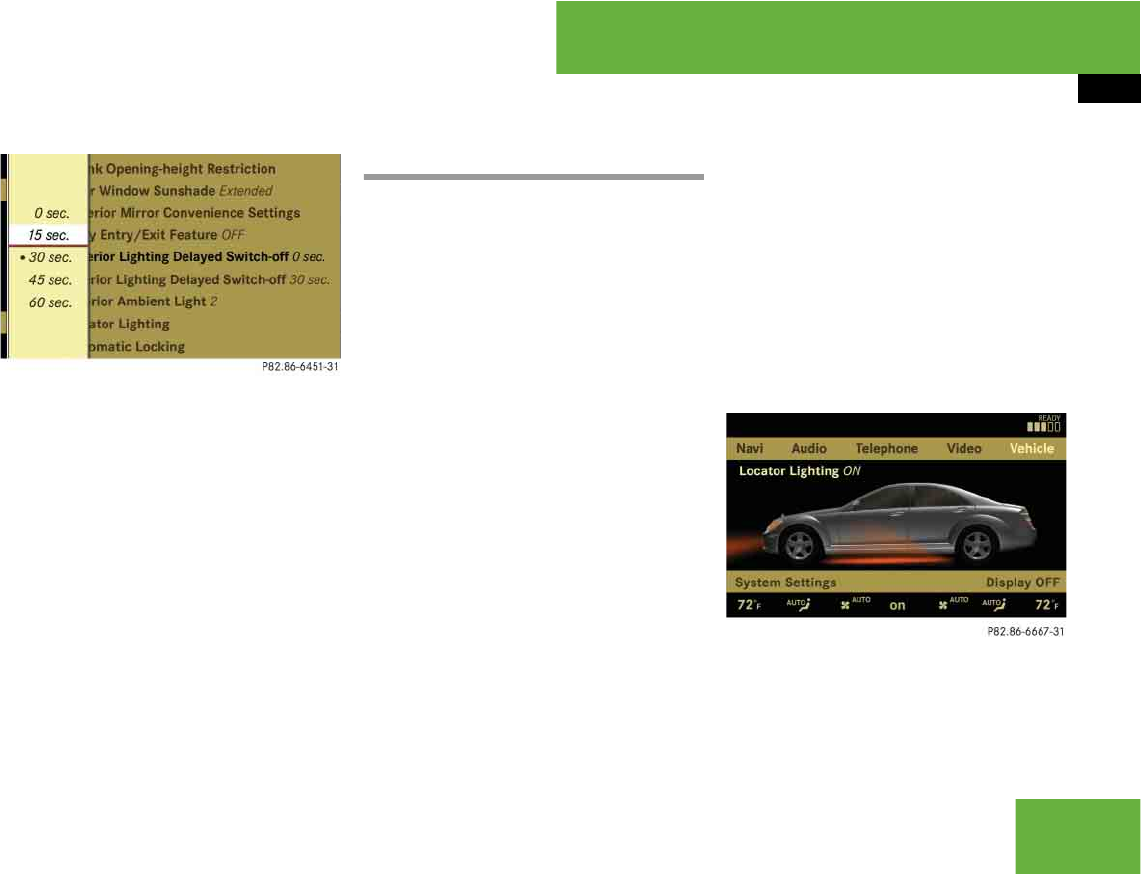
245
Control systems
COMAND vehicle menu
왘Selecting length of time: Slide qmr
or rotate ymz.
왘Confirming selection: Press n.
To activate night security illumination:
왘Select delayed switch-off period (see
above).
왘Turn the exterior lamp switch to
position * before turning off the en-
gine.
Locator lighting on/off
With the locator lighting feature activated
and the exterior lamp switch in position
*(컄page 371), the following lamps will
switch on during darkness when the vehi-
cle is unlocked from the outside:
앫Parking lamps
앫Tail lamps
앫License plate lamps
앫Front fog lamps
앫Door entry lamps in the mirror
앫Side marker lamps
The locator lighting switches off when the
driver’s door is opened.
If you do not open a door after unlocking
the vehicle with the SmartKey, the lamps
will switch off automatically after approxi-
mately 40 seconds.
왘Select “Vehicle”.
The main area is active.
왘Selecting “Locator Lighting” func-
tion: Slide omp or rotate ymz.
왘Confirming selection: Press n.
왘Switching locator lighting on or off:
Press n.
or
iThe components and operating principles of
COMAND can be found on (컄page 85).
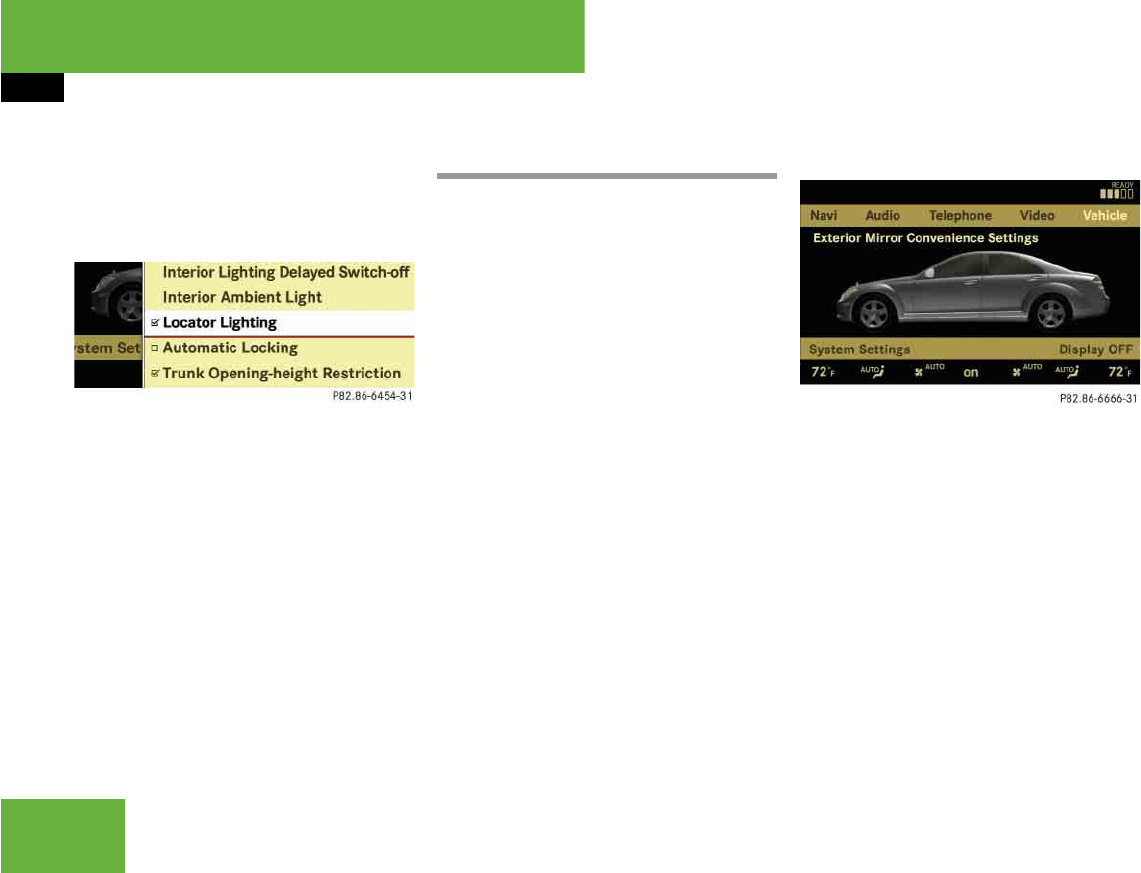
246
Control systems
COMAND vehicle menu
왘Select “Vehicle” “Vehicle” “Loca-
tor Lighting”.
A checkmark appears when the locator
lighting is switched on.
왘Confirming selection: Press n.
To activate locator lighting:
왘Make sure the function “Locator Light-
ing” is set.
왘Turn the exterior lamp switch to
position * when exiting the vehicle.
Exterior mirror convenience settings
In the “Exterior Mirror Convenience Set-
tings” menu, you can switch the following
exterior mirror functions on or off:
앫Exterior mirrors automatically fold in
when the vehicle is locked
앫Exterior mirror on front passenger’s
side automatically tilts downward
when the vehicle is reversing
왘Select “Vehicle”.
The main area is active.
왘Selecting “Exterior Mirror Conve-
nience Settings” menu: Slide omp or
rotate ymz.
왘Confirming selection: Press n.
왘Selecting “Fold in automatically
when locking” or “Lower mirror
when reversing”: Rotate ymz.
왘Confirming selection: Press n.
왘Slide omp to exit.
or
iThe components and operating principles of
COMAND can be found on (컄page 85).
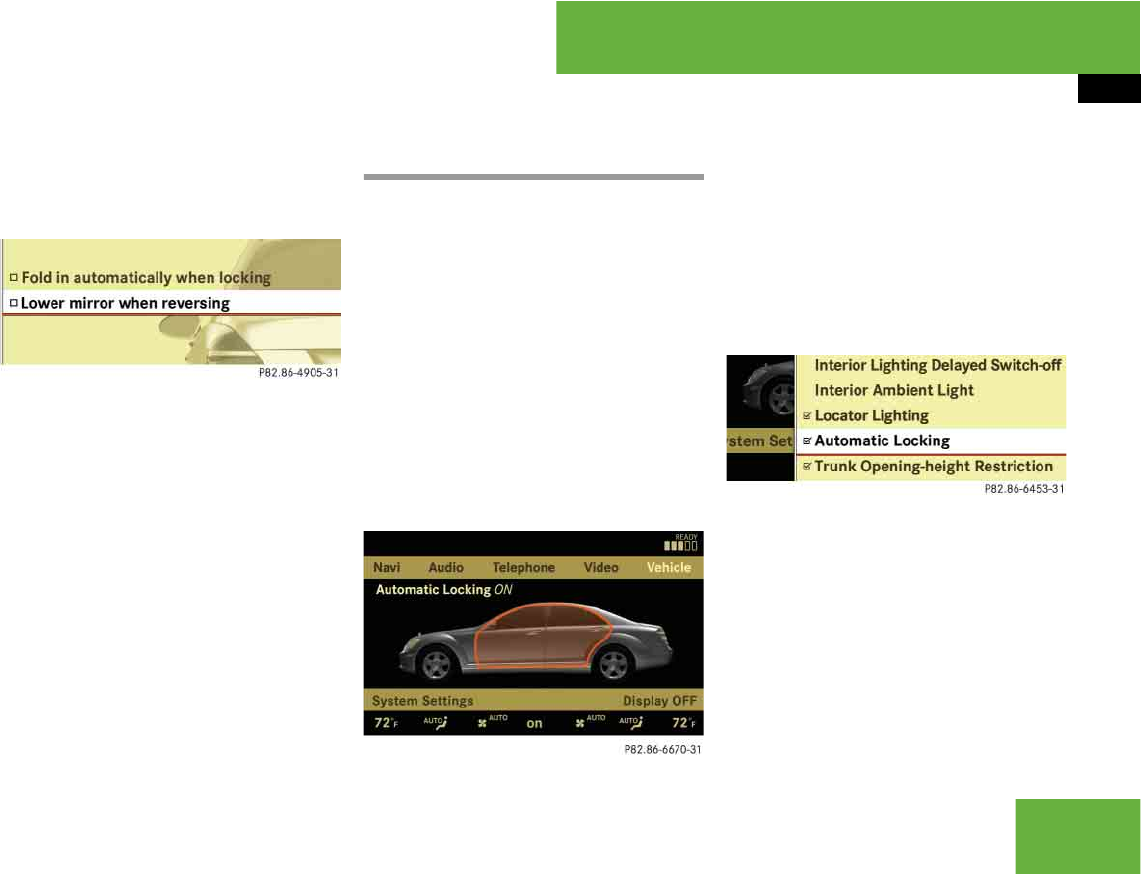
247
Control systems
COMAND vehicle menu
왘Select “Vehicle” “Vehicle” “Exte-
rior mirror Convenience Settings”.
A selection list appears.
왘Selecting a function: Slide qmr or
rotate ymz.
A checkmark appears in the corre-
sponding box when the option has
been selected.
왘Confirming selection: Press n.
왘Slide omp to exit.
Automatic locking on/off
Use this function to activate or deactivate
the automatic central locking
(컄page 342). With the automatic central
locking system activated, the vehicle is
centrally locked at vehicle speeds of ap-
proximately 9 mph (15 km/h).
왘Select “Vehicle”.
The main area is active.
왘Selecting “Automatic Locking” func-
tion: Slide omp or rotate ymz.
왘Switching automatic locking on or
off: Press n.
or
왘Select “Vehicle” “Vehicle” “Auto-
matic Locking”.
A checkmark appears when automatic
locking is switched on.
왘Confirming selection: Press n.
왘Slide omp to exit.
iThe components and operating principles of
COMAND can be found on (컄page 85).

248
Control systems
COMAND vehicle menu
Activating easy-entry/exit feature
Use this function to activate and deacti-
vate the easy-entry/exit feature
(컄page 357).
The following settings are available for the
easy-entry/exit feature:
왘Select “Vehicle”.
The main area is active.
왘Selecting “Easy Entry/Exit Feature”
menu: Slide omp or rotate ymz.
왘Confirming selection: Press n.
or
왘Select “Vehicle” “Vehicle” “Easy
Entry/Exit Feature”.
왘Confirming selection: Press n.
A selection list appears.
The current setting is indicated by a
dot R.
iThe components and operating principles of
COMAND can be found on (컄page 85).
OFF The easy-entry/exit
feature is deactivated.
Steering Column
& Seat
Both the steering col-
umn and the driver’s
seat are moved.
Warning! G
You must make sure no one can become
trapped or injured by the moving steering
wheel and driver’s seat when the easy-en-
try/exit feature is activated.
To stop seat/steering wheel movement, do
one of the following:
앫Press seat adjustment switch
(컄page 348).
앫Move steering wheel adjustment stalk
(컄page 359).
앫Press one of the memory position but-
tons or the memory button M
(컄page 366).
Do not leave children unattended in the ve-
hicle, or with access to an unlocked vehicle.
Children could open the driver’s door and
unintentionally activate the easy-entry/exit
feature, which could result in an accident
and/or serious personal injury.
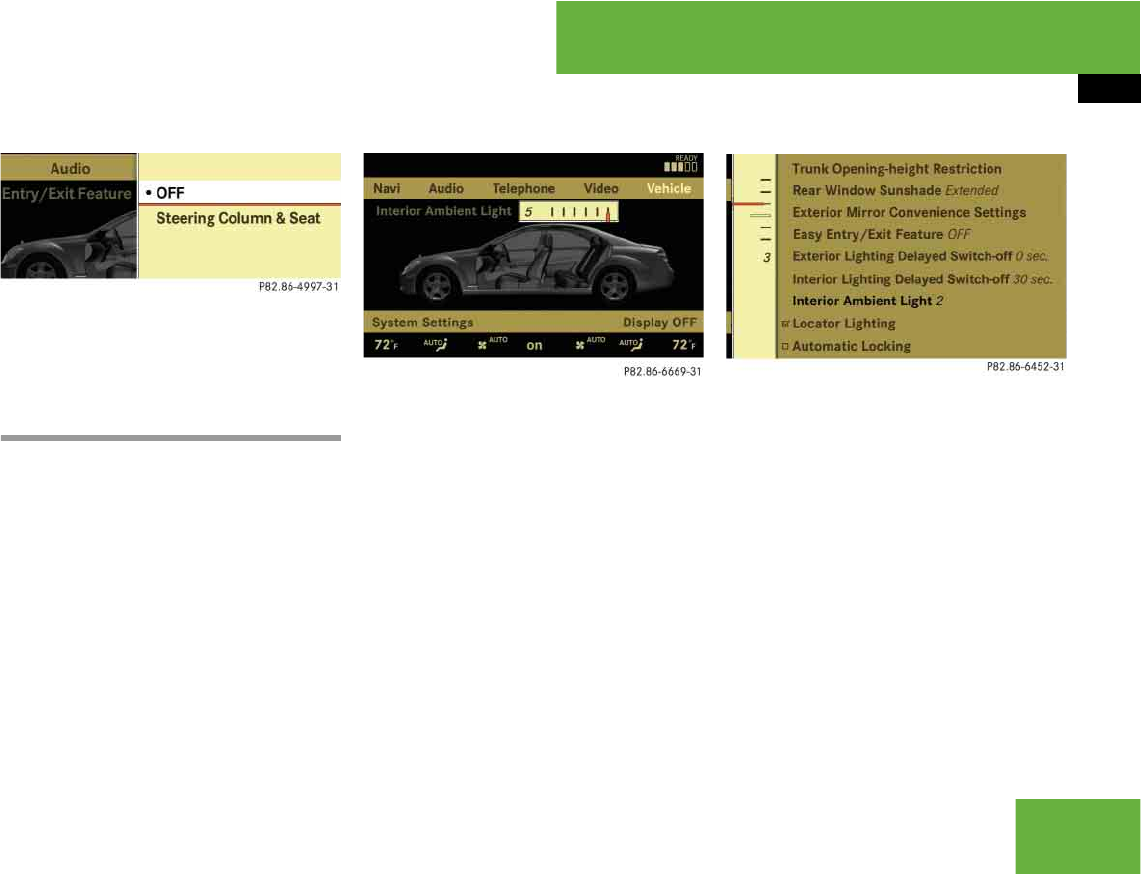
249
Control systems
COMAND vehicle menu
왘Selecting a setting: Slide qmr or
rotate ymz.
왘Confirming selection: Press n.
Setting interior ambient lighting
You can adjust the brightness of the interi-
or lighting on a scale of “0” (off) to “5”
(bright).
왘Select “Vehicle”.
The main area is active.
왘Selecting “Interior Ambient Light”
menu: Slide omp or rotate ymz.
왘Confirming selection: Press n.
왘Adjusting brightness: Slide omp or
rotate ymz.
왘Confirming selection: Press n.
or
왘Select “Vehicle” “Vehicle” “Interi-
or Ambient Light”.
왘Adjusting brightness: Slide qmr or
rotate ymz.
왘Confirming selection: Press n.
iThe components and operating principles of
COMAND can be found on (컄page 85).
컄컄
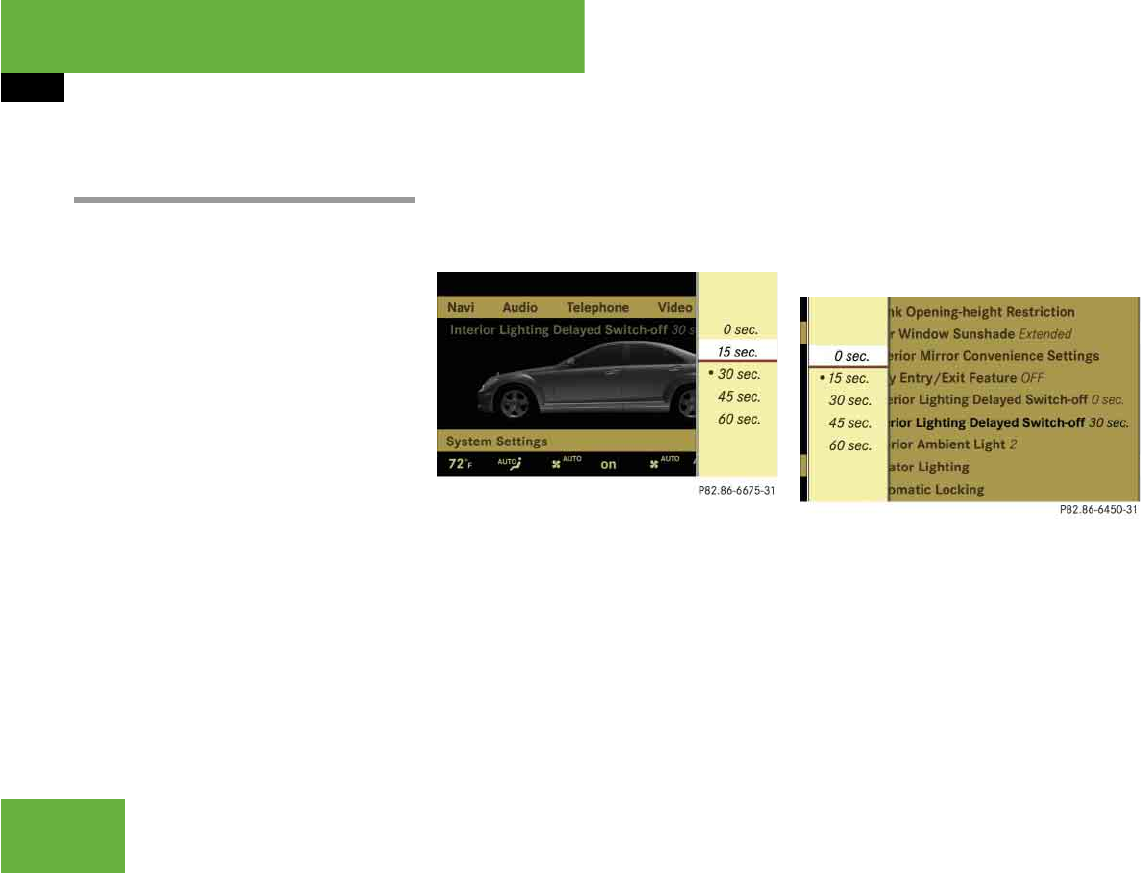
250
Control systems
COMAND vehicle menu
Setting interior lighting delayed
switch-off
Use this function to set whether and how
long you would like the interior lighting to
remain lit during darkness after you have
removed the SmartKey from the starter
switch.
You can select:
앫“0 sec.”, the delayed switch-off feature
is deactivated
앫“15 sec.”, “30 sec.”, “45 sec.”, or
“60 sec.”, the delayed switch-off fea-
ture is activated
왘Select “Vehicle”.
The main area is active.
왘Selecting “Interior Lighting Delayed
Switch-off” menu: Slide omp or
rotate ymz.
왘Confirming selection: Press n.
A selection list appears.
The current setting is indicated by a
dot R.
왘Selecting length of time: Slide qmr
or rotate ymz.
왘Confirming selection: Press n.
or
왘Select “Vehicle” “Vehicle” “Interi-
or Lighting Delayed Switch-off”.
A selection list appears.
The current setting is indicated by a
dot R.
왘Selecting length of time: Slide qmr
or rotate ymz.
왘Confirming selection: Press n.
iThe components and operating principles of
COMAND can be found on (컄page 85).
컄컄
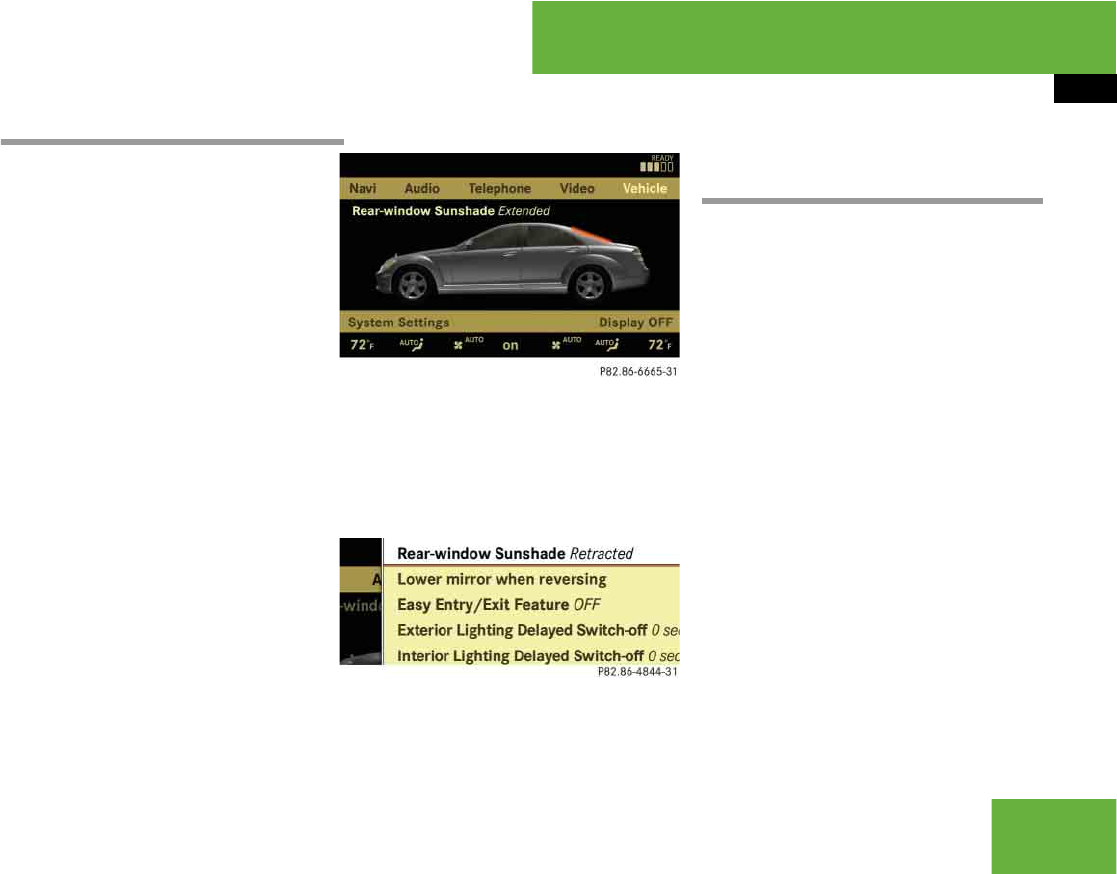
251
Control systems
COMAND vehicle menu
왔Extending or retracting rear window sunshade
This function is used to extend or retract
the rear sunshade.
왘Select “Vehicle”.
The main area is active.
왘Selecting “Rear-window Sunshade”
function: Slide omp or rotate ymz.
왘Extending or retracting rear window
sunshade: Press n.
or
왘Select “Vehicle” “Vehicle”
“Rear-window Sunshade”.
왘Confirming selection: Press n.
Trunk opening-height restriction*
on/off
Vehicles with trunk opening/closing sys-
tem*:
You can select whether the trunk lid should
open fully or only to the height of the roof.
왘Select “Vehicle”.
The main area is active.
왘Selecting “Trunk Opening-height Re-
striction” function: Slide omp or
rotate ymz.
왘Confirming selection: Press n.
iThe components and operating principles of
COMAND can be found on (컄page 85).
iIf you operate the rear-window sunshade via
COMAND or by using the favorite button
(컄page 240), this takes precedence over the
buttons for the rear window sunshade in the rear
doors (컄page 503).
iYou can program this function using the fa-
vorite button (컄page 240).
iAt temperatures below -4°F (-20°C), the
rear window sunshade is switched off.
iThe components and operating principles of
COMAND can be found on (컄page 85).

252
Control systems
COMAND vehicle menu
or
왘Select “Vehicle” “Vehicle” “Trunk
Opening-height Restriction”.
A checkmark appears when the trunk
opening-height restriction is switched
on.
왘Confirming selection: Press n.

253
Control systems
COMAND automatic climate control
COMAND automatic climate
control
You can operate the automatic climate
control via COMAND or via the buttons on
the front and rear* automatic climate con-
trol panel (컄page 469).
Some of the special climate control func-
tions can only be set via COMAND.
The following automatic climate control
functions can be operated via COMAND:
iThe components and operating principles of
COMAND can be found on (컄page 85).
Warning! G
When operating the automatic climate con-
trol, the air that enters the passenger com-
partment through the air vents can be very
hot or very cold (depending on the set tem-
perature). This may cause burns or frostbite
to unprotected skin in the immediate area of
the air vents.
Always keep sufficient distance between un-
protected parts of the body and the air
vents. If necessary, use the air distribution
adjustment (컄page 255) to direct the air to
air vents in the vehicle interior that are not
in the immediate area of unprotected skin.
Warning! G
Follow the recommended settings for heat-
ing and cooling given on the following pages
and pages in the “Controls in detail” part
(컄page 469) Otherwise the windows could
fog up, impairing visibility and endangering
you and others.
Function Page
Temperature 254
Air distribution 255
Air volume 255
Switching off cooling (“ACOFF”) 256
Central climate control (“Mono”) 257
Footwell temperature 257
Air flow from air vents 258
Rear climate control* 259
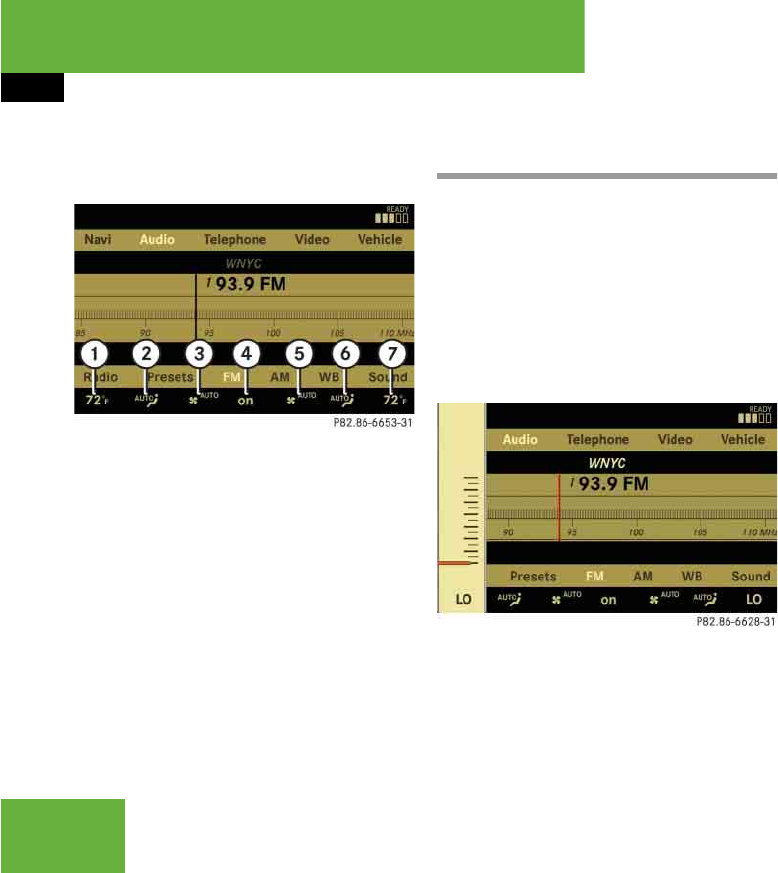
254
Control systems
COMAND automatic climate control
The automatic climate control menu is
called up via the climate control settings.
Climate control settings with functions
(submenus)
1Temperature, left
2Air distribution, left
3Air volume, left
4Central menu, climate control
5Air volume, right
6Air distribution, right
7Temperature, right
Setting temperature
Use the temperature controls %$
(컄page 469) in the center console or
COMAND climate control settings to sepa-
rately adjust the air temperature on each
side of the passenger compartment.
왘Select climate control settings Tem-
perature, left or right and then
press n.
왘Changing temperature: Slide qmr or
rotate ymz.
왘Exiting menu: Press n, back
button L in the center console
(컄page 86) or slide omp.
The setting is saved.
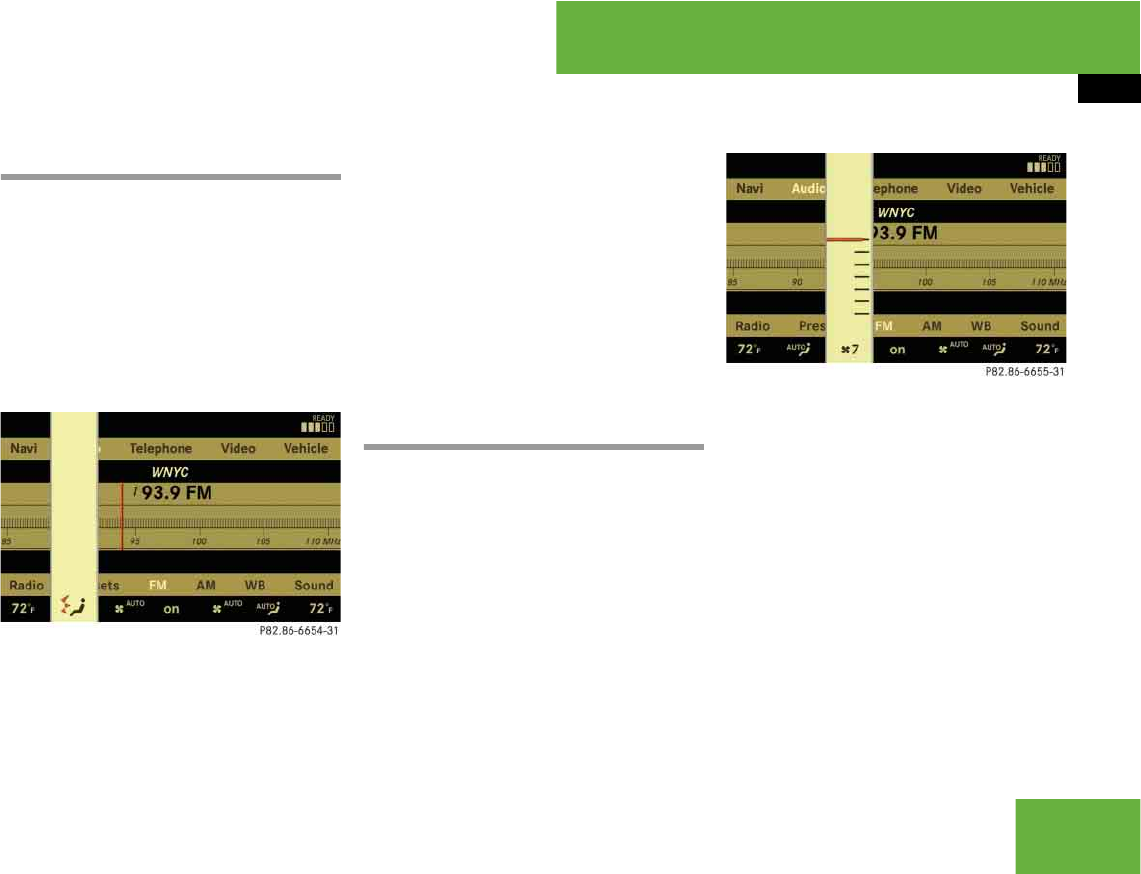
255
Control systems
COMAND automatic climate control
Adjusting air distribution
You can adjust the air distribution sepa-
rately for the driver’s and front passenger’s
side.
왘Select climate control settings Air
distribution, left or right.
왘Changing air distribution:
Rotate ymz.
The symbol for air distribution changes.
The direction and size of the arrows
represent the air distribution.
왘Exiting menu: Press n, back
button L in the center console
(컄page 86) or slide omp.
The setting is saved.
Adjusting air volume
Use buttons Q (컄page 469) in the cen-
ter console or COMAND climate control
settings to separately adjust the air vol-
ume on each side of the passenger com-
partment.
왘Select climate control settings Air
volume, left or right.
왘Changing air volume: Slide qmr or
rotate ymz.
왘Exiting menu: Press n, back
button L in the center console
(컄page 86) or slide omp.
The setting is saved.
iWhen you change the air distribution, the au-
tomatic function of the climate control system is
switched off.
iWhen you change the air volume, the auto-
matic function of the climate control system is
switched off.
컄컄
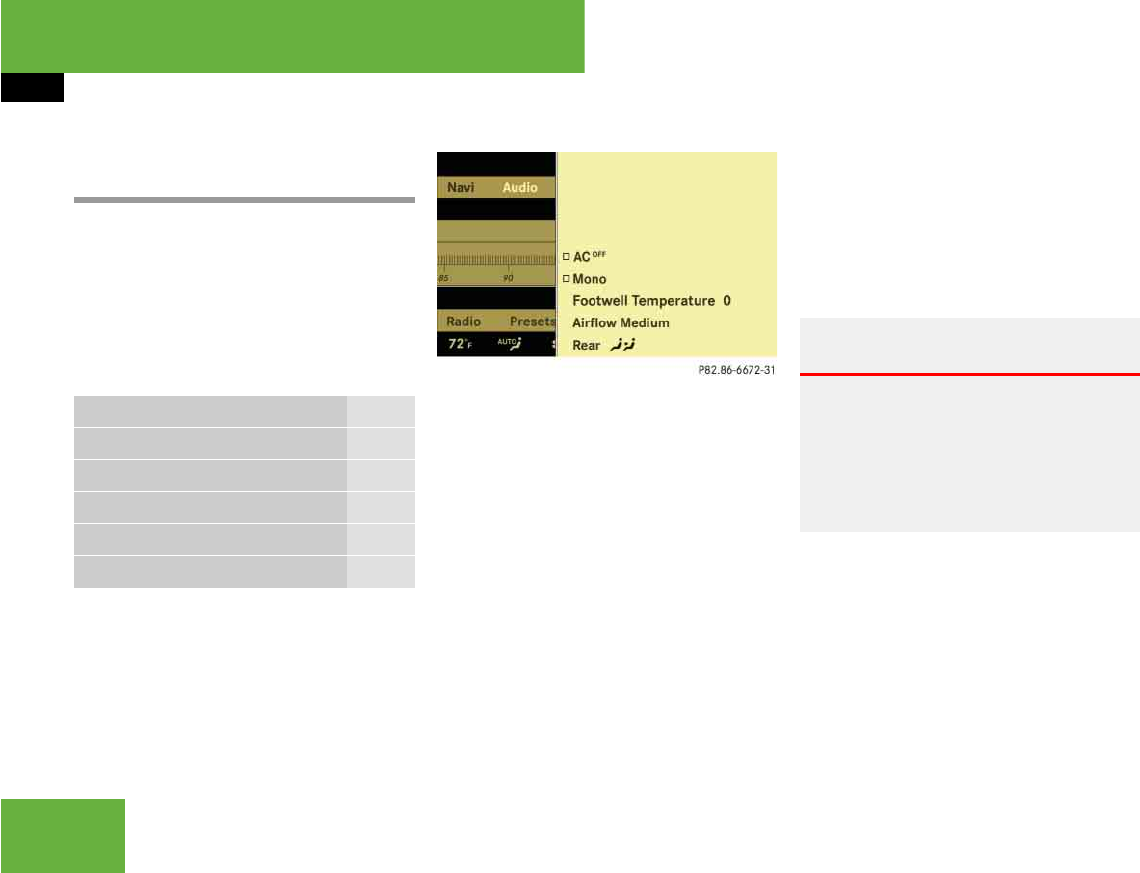
256
Control systems
COMAND automatic climate control
Central climate control menu via
COMAND
The central climate control menu is in the
center of the climate control settings.
When the automatic climate control is
switched on, you will see “on” in the cen-
tral menu. The following functions can only
be operated in the central climate control
menu via COMAND:
왘Select climate control settings Cen-
tral menu.
Switching cooling on or off
The cooling function, only operational
when the engine is running, cools the vehi-
cle interior down to the selected tempera-
ture. The cooling function also
dehumidifies the air in the vehicle interior,
thus preventing the windows from fogging
up.
The “ACOFF” function is used to permanent-
ly switch off the cooling function of the au-
tomatic climate control system.
왘Select climate control settings Cen-
tral climate control menu.
Function Page
Switching off cooling (“ACOFF”) 256
Central climate control (“Mono”) 257
Footwell temperature 257
Air flow from air vents 258
Rear climate control* 259
iCondensation may drip out from underneath
the vehicle. This is normal and not an indication
of a malfunction.
Warning! G
If you turn off the cooling function, the
vehicle will not be cooled when weather
conditions are warm. The windows can fog
up more quickly. Window fogging may
impair visibility and endanger you and
others.
컄컄
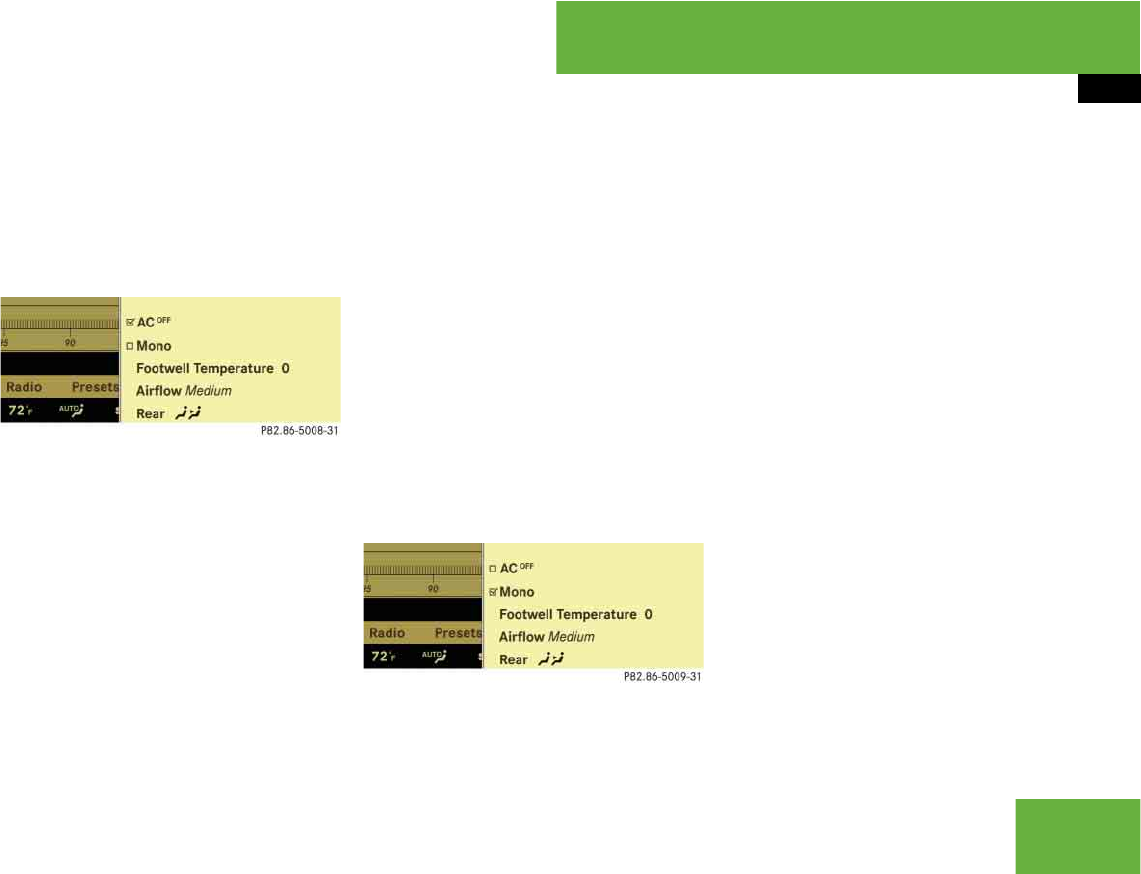
257
Control systems
COMAND automatic climate control
왘Selecting “ACOFF”: Slide qmr or
rotate ymz.
왘Confirming selection: Press n.
A checkmark appears when the cooling
is switched off.
“ACOFF” appears in the central menu of
the climate control settings.
Selecting “Mono” mode
“Mono” is used to adjust the climate zones
for the entire vehicle at the same time.
When the “Mono” function is switched on
and you change the climate on the driver’s
side, these changes will be carried out in
the same manner for all climate zones.
왘Select climate control settings Cen-
tral climate control menu.
왘Selecting “Mono”: Slide qmr or
rotate ymz.
왘Confirming selection: Press n.
A checkmark appears when the func-
tion has been selected.
왘Exiting menu: Press back button L
in the center console (컄page 86) or
slide omp.
The “Mono” function is automatically
switched off when you:
앫change an automatic climate control
setting for the front passenger’s side
using COMAND
앫operate a button from the automatic
climate control for the front passen-
ger’s side
앫operate one of the buttons for the rear
climate control system
Adjusting footwell temperature
The “Footwell Temperature” function is
used to adjust the temperature difference
between the footwell and the rest of the
passenger compartment.
The higher the selected value, the higher
the temperature in the footwell will be.
왘Select climate control settings Cen-
tral climate control menu.
!If the air conditioning cannot be turned on
again, this indicates that the air conditioning is
losing refrigerant. The compressor has turned it-
self off.
Have the air conditioning checked at the nearest
authorized Mercedes-Benz Center.
iIn automatic mode, this setting optimizes
the footwell temperature when outside tempera-
tures are low.
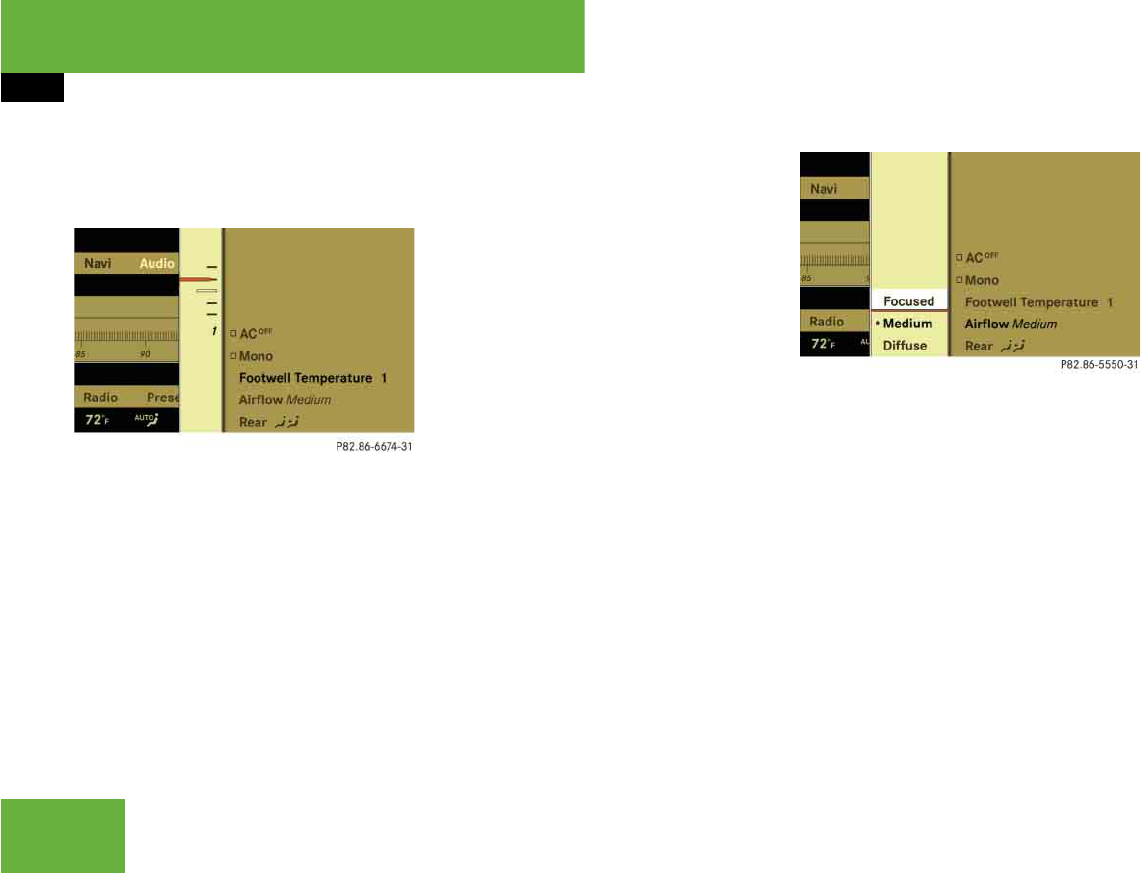
258
Control systems
COMAND automatic climate control
왘Selecting “Footwell Temperature”:
Slide qmr or rotate ymz and then
press n.
왘Changing temperature difference:
Slide qmr or rotate ymz.
왘Exiting menu: Press n, back
button L in the center console
(컄page 86) or slide omp.
The setting is saved.
Adjusting air flow from air vents
The “Airflow” setting defines air distribu-
tion and air volume in automatic mode:
앫“Focused” (default setting, increased
air flow)
앫“Medium” (reduced air flow)
앫“Diffuse” (minimal air flow)
왘Select climate control settings Cen-
tral climate control menu “Airflow”.
A selection list appears.
The current setting is indicated by a
dot R.
왘Changing air flow: Slide qmr or
rotate ymz.
왘Confirming selection: Press n.
iIn automatic mode, this setting optimizes
the air flow when outside temperatures are high.
iWhen the interior ambient temperature of
the vehicle is very hot and the automatic climate
control is cooling the interior, the setting for air
flow is temporarily overridden.

259
Control systems
COMAND automatic climate control
왔Operating rear climate control* from the front
The “Rear)” function is used to oper-
ate the rear climate control via COMAND
and the buttons on the center console con-
trol unit (컄page 477).
Switching on rear climate control oper-
ation from the front
왘Select climate control settings Cen-
tral climate control menu.
왘Selecting “Rear)”: Slide qmr or
rotate ymz.
왘Confirming selection: Press n.
In the climate control settings, “)”
appears in the central menu. The rear
climate control can be operated from
the front.
Climate control settings, rear climate
control
1Rear temperature, left
2Rear air distribution, left
3Rear air volume
4Central menu for rear climate control
5Rear air distribution, right
6Rear temperature, right
The rear climate control is operated in the
same manner as the climate control sys-
tem for the driver’s and front passenger’s
side (컄page 253).
Central menu for rear climate control
In the central menu for the rear climate
control, you can:
앫switch back to operating the front cli-
mate control system
앫switch off the rear climate control
앫switch the automatic function of the
rear climate control from automatic to
manual
왘Select climate control settings Cen-
tral climate control menu.
컄컄
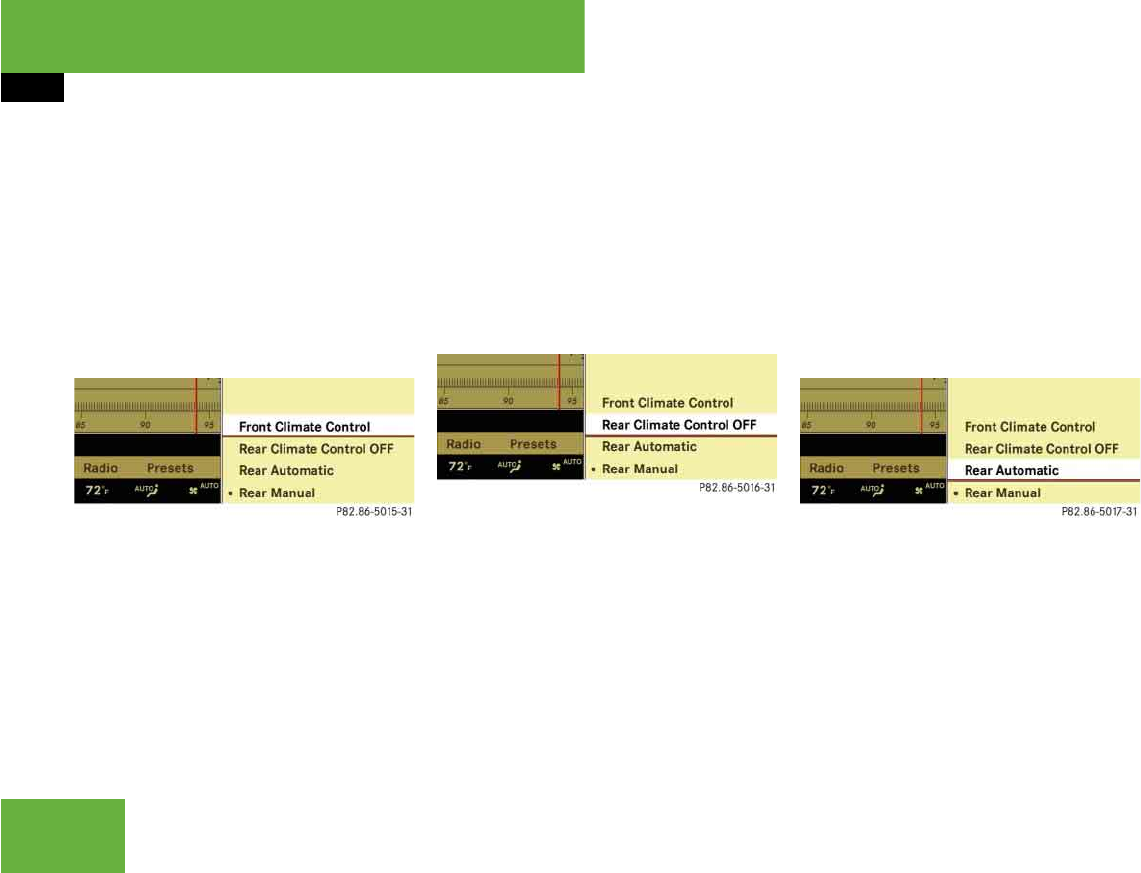
260
Control systems
COMAND automatic climate control
Switching off rear climate control oper-
ation from the front
왘Select climate control settings Cen-
tral climate control menu.
The current setting is indicated by a
dot R.
왘Selecting “Front Climate Control”:
Slide qmr or rotate ymz.
왘Confirming selection: Press n.
The climate control settings shows the
climate control settings for the driver
and front passenger.
Switching off rear climate control
왘Select climate control settings Cen-
tral climate control menu.
The current setting is indicated by a
dot R.
왘Selecting “Rear Climate Control
OFF”: Slide qmr or rotate ymz.
왘Confirming selection: Press n.
The rear climate control is switched off.
Switching on the automatic function of
the rear climate control
왘Select climate control settings Cen-
tral climate control menu.
The current setting is indicated by a
dot R.
왘Selecting “Rear Automatic”:
Slide qmr or rotate ymz.
왘Confirming selection: Press n.
The automatic function of the rear cli-
mate control is switched on.
컄컄
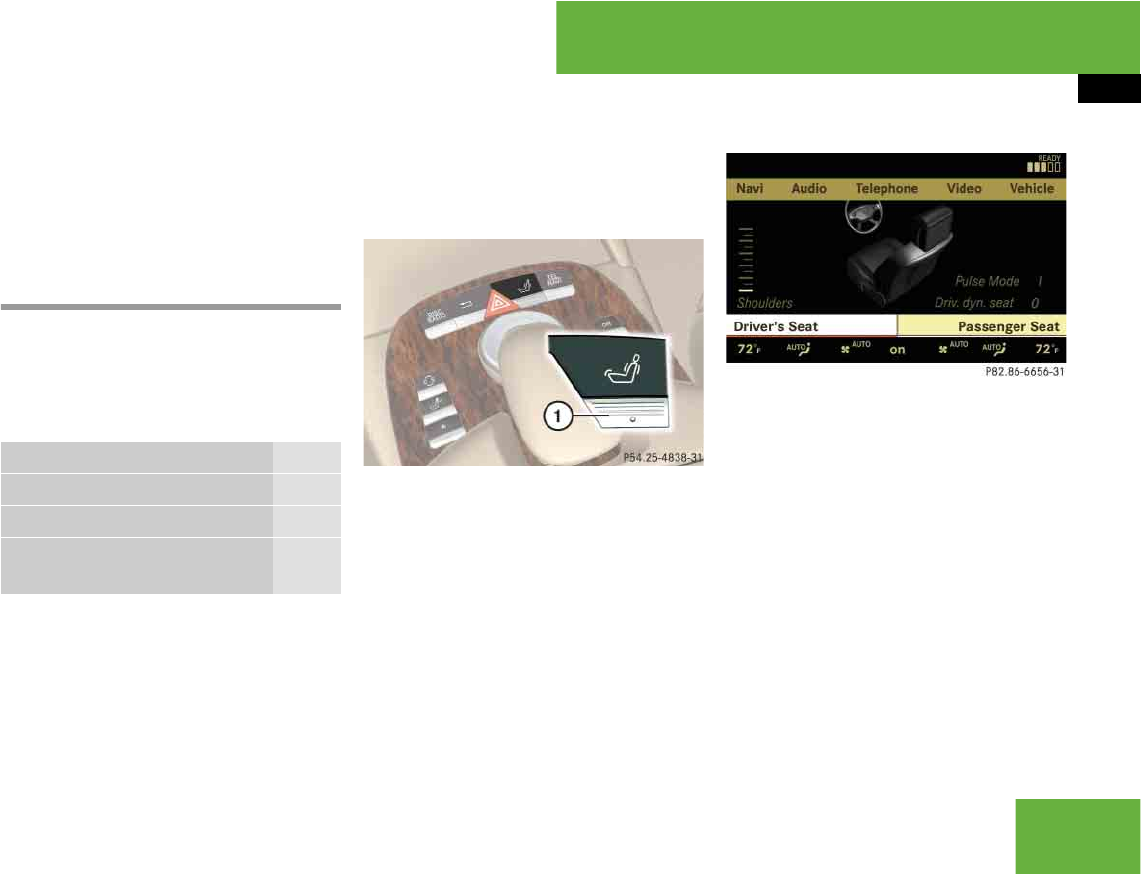
261
Control systems
COMAND seats
COMAND seats
When adjusting the seats, observe the
safety notes in the section “Seats”
(컄page 347).
Operating seats via COMAND
The following seat adjustments can be
made via COMAND:
Selecting a seat
You must first select the seat for which you
would like to make adjustments.
1Seat menu button
왘Press O.
The main area is active.
왘Switching to the bottom menu line:
Slide qmr.
Example illustration (vehicles with Drive-dy-
namic multicontour seat*)
왘Selecting seat: Slide omp or
rotate ymz.
왘Confirming selection: Press n.
Exiting menu
There are several ways to exit the multi-
contour seat menu.
왘Press O again.
or
왘Press any shortcut button.
or
iThe components and operating principles of
COMAND can be found on (컄page 85).
Settings Page
Lumbar support 262
Multicontour seats*, front 262
Drive-dynamic multicontour
seats*, front
264 컄컄
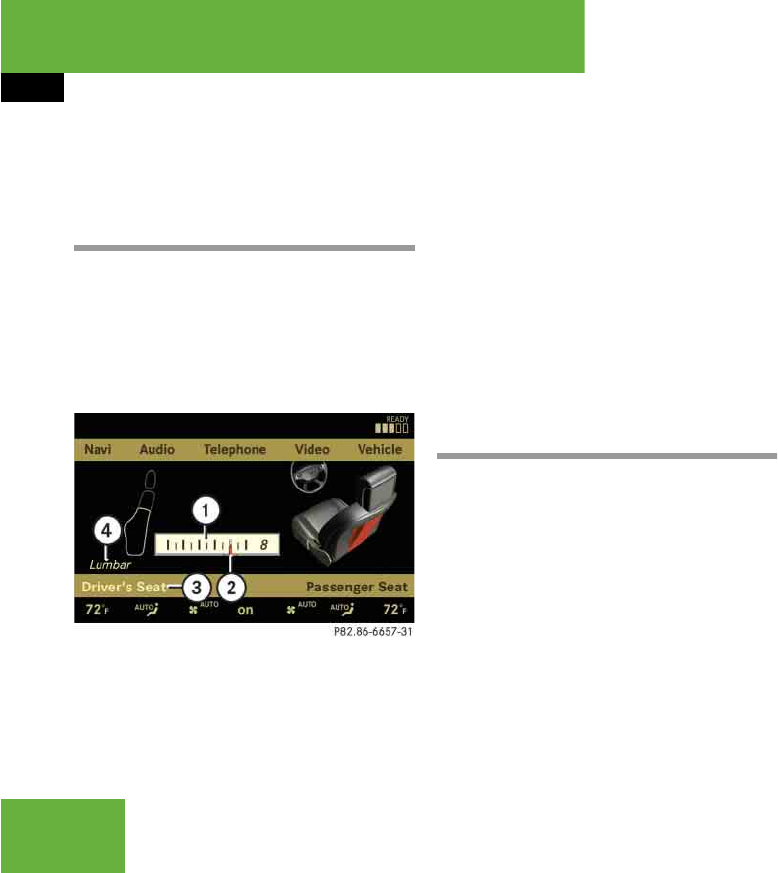
262
Control systems
COMAND seats
왘Select another main function from the
main menu line.
Lumbar support
To support the spine, you can adjust the
curvature of the front seat backrests.
왘Press O.
The main area of the COMAND display
is active. A scale appears.
1Scale
2Cursor
3Current seat
4Current setting
왘Select seat (컄page 261).
왘Adjusting lumbar support:
Slide omp or rotate ymz until desired
setting is reached.
왘Confirming selection: Press n.
왘Switching to the bottom menu line:
Slide omp.
왘Confirming selection: Press n.
Multicontour seats*, front
To support the spine, you can individually
adjust the backrest contour of the front
seats by regulating the air pressure in the
air chambers of the multicontour seat.
The settings are made on the COMAND
display.
You can adjust the following air chambers:
앫sides of seat cushion
앫sides of backrest
앫backrest curvature in lumbar area
앫backrest curvature in shoulder area
iAfter you have pressed O, the seat last
adjusted is active.
iIf PRE-SAFE® has been activated, the air
pressure in the air chambers (on the sides of the
seat cushion and backrest) of the front multicon-
tour seats is increased.
iWhen you adjust the multicontour seat,
noises may result from pumping air into or re-
leasing air out of the air chambers.
컄컄
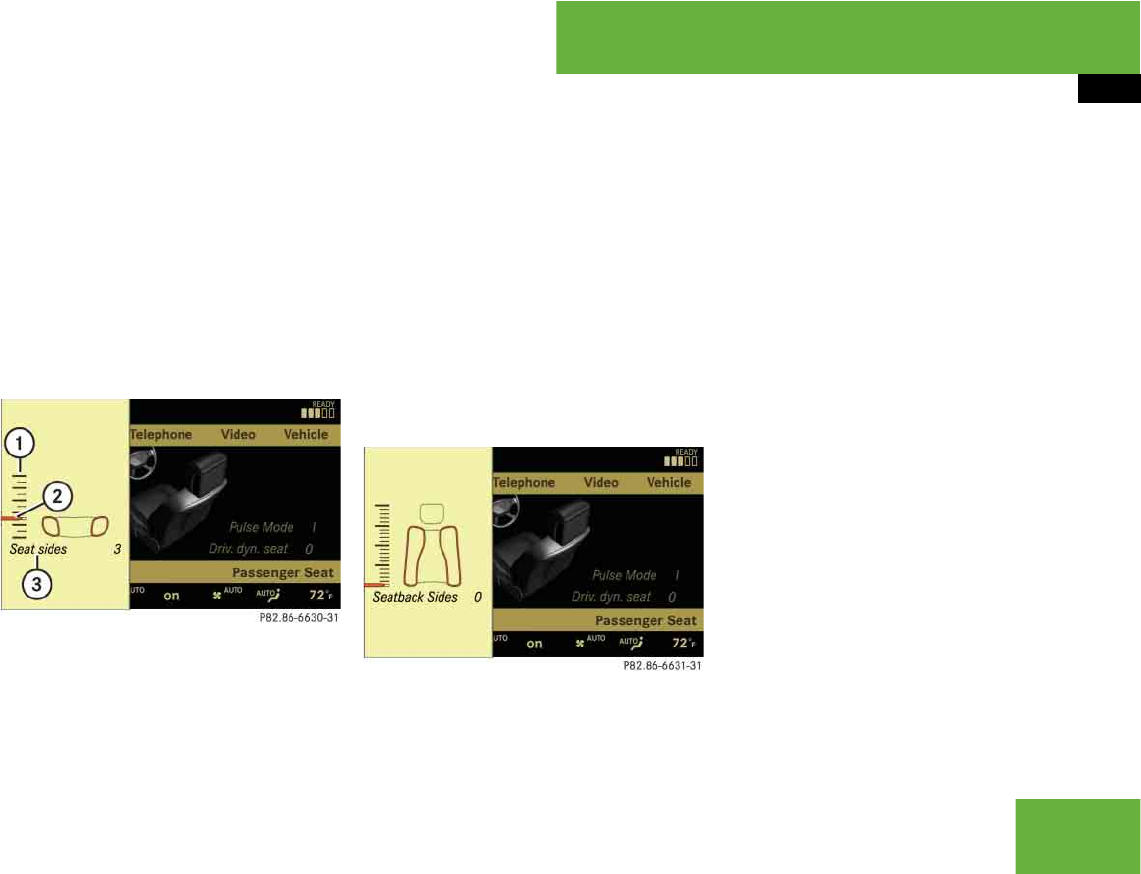
263
Control systems
COMAND seats
Adjusting sides of seat cushion
This function is used to adjust the air
chambers in the sides of the seat cushion.
왘Select seat (컄page 261).
왘Selecting “Seat sides”: Slide omp or
rotate ymz.
왘Confirming selection: Press n.
A scale appears.
1Scale
2Cursor
3Current setting
왘Slide qmr or rotate ymz until desired
setting is reached.
왘Saving setting: Press n.
Adjusting backrest sides
This function is used to adjust the air
chambers in the backrest sides.
왘Select seat (컄page 261).
왘Selecting “Seatback Sides”:
Slide qmr or rotate ymz.
왘Confirming selection: Press n.
A scale appears.
왘Slide qmr or rotate ymz until desired
setting is reached.
왘Saving setting: Press n.
Adjusting backrest curvature in lumbar
area
This function is used to adjust the air
chambers in the lumbar area of the back-
rest.
왘Select seat (컄page 261).
왘Selecting “Lumbar”: Slide omp or
rotate ymz.
왘Confirming selection: Press n.
Cross-hairs appear. You can use them
to make two settings:
앫vertical: shift the point of greatest
curvature upward or downward
앫horizontal: adjust the degree of
curvature
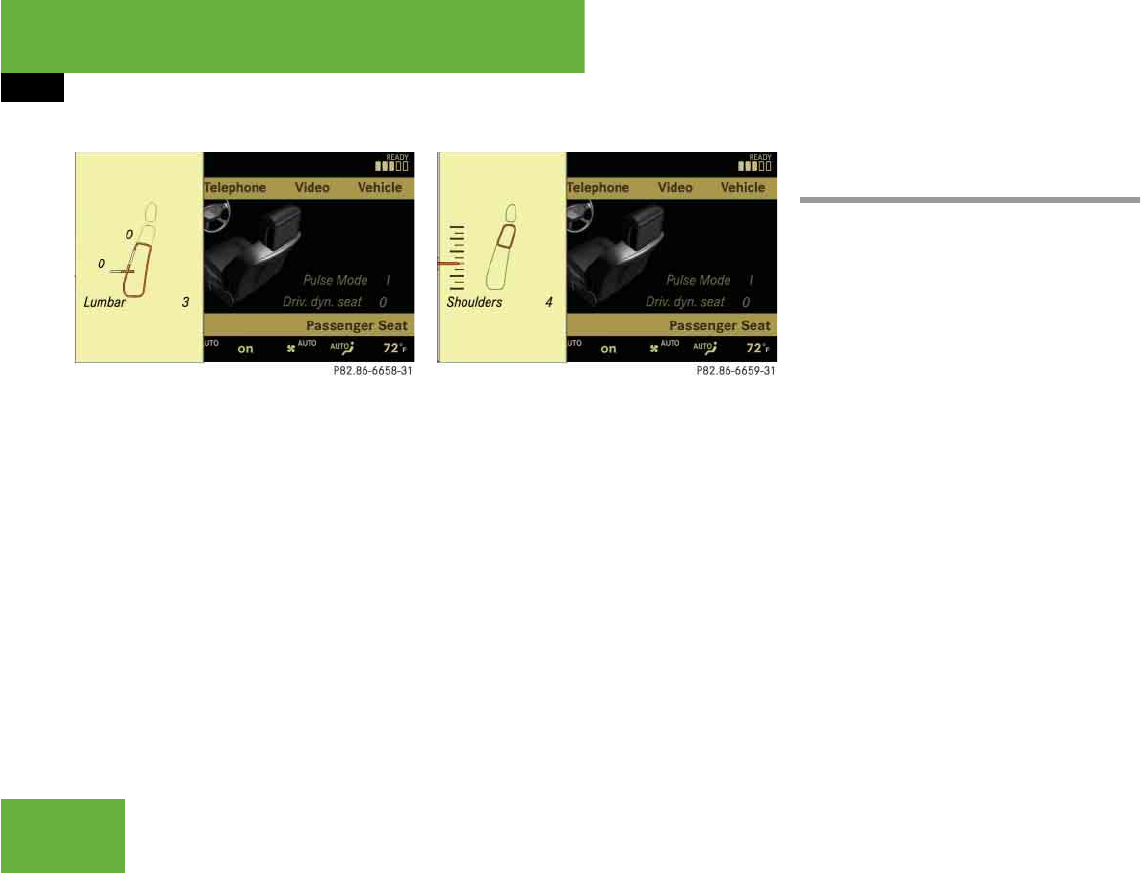
264
Control systems
왘Slide qmr or omp until desired setting
is reached.
왘Saving setting: Press n.
Adjusting backrest curvature in
shoulder area
This function is used to adjust the air
chambers in the shoulder area of the back-
rest.
왘Select seat (컄page 261).
왘Selecting “Shoulders”: Slide omp or
rotate ymz.
왘Confirming selection: Press n.
A scale appears.
왘Slide qmr or rotate ymz until desired
setting is reached.
왘Saving setting: Press n.
Drive-dynamic multicontour seats*,
front
For information on manual multicontour
seat settings, see “Multicontour seats*,
front” (컄page 262).
The Drive-dynamic multicontour seat auto-
matically adjusts the lateral support pro-
vided by the backrest to your driving style.
The Drive-dynamic multicontour seat elec-
tronically controls the air pressure in the
air chambers of the backrest side bolsters.
This function improves driving comfort and
pleasure.
왘Select seat (컄page 261).
왘Selecting “Driv. dyn. seat”:
Slide omp or rotate ymz.
왘Confirming selection: Press n.
iIf PRE-SAFE® has been activated, the air
pressure in the air chambers (sides of seat cush-
ion and backrest) of the drive-dynamic multicon-
tour seats is increased.
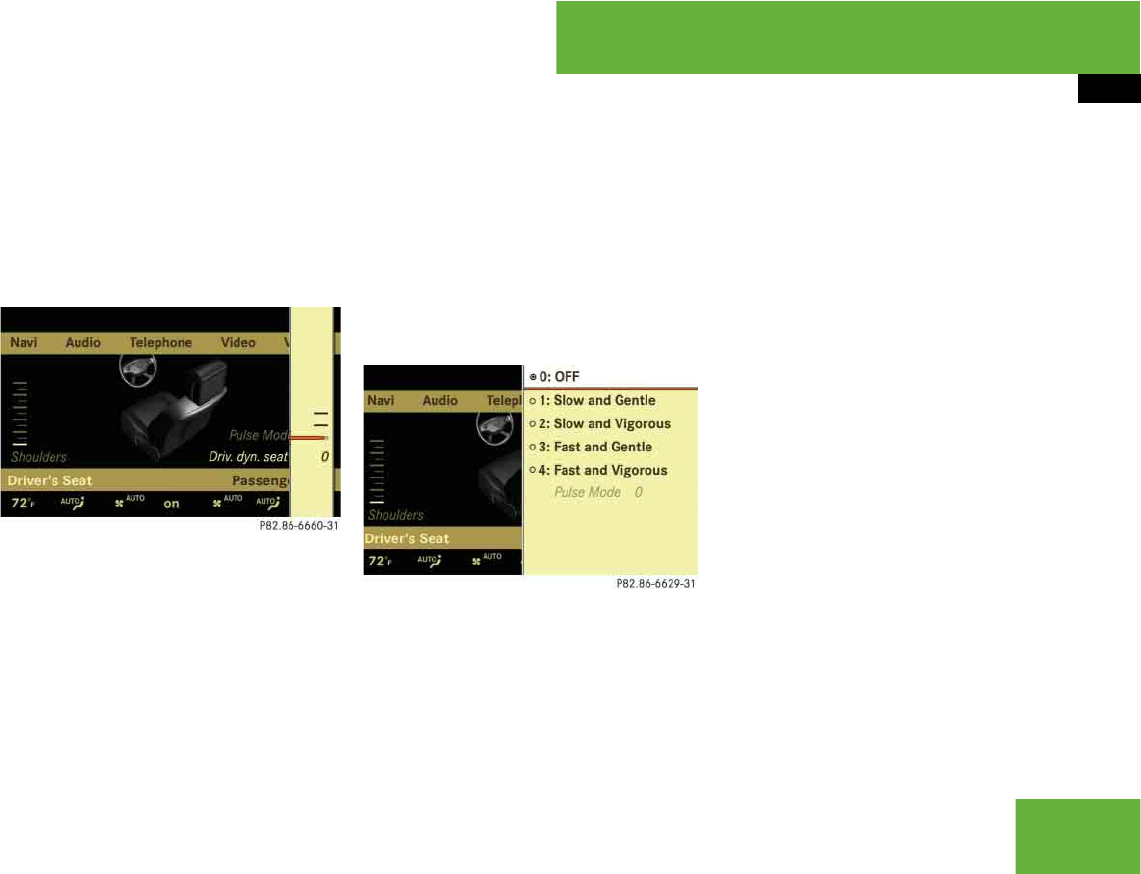
265
Control systems
COMAND seats
A scale appears. You can choose be-
tween:
앫“0”: off
앫“1”: level 1
앫“2”: level 2
왘Slide qmr or rotate ymz until desired
setting is reached.
왘Saving setting: Press n.
Pulse mode
왘Select seat (컄page 261).
왘Selecting “Pulse Mode”: Slide omp
or rotate ymz.
왘Confirming selection: Press n.
A list appears. You can choose be-
tween different types of massage:
The current setting is indicated by a
solid circle.
왘Slide qmr or rotate ymz until desired
setting is reached.
왘Saving setting: Press n.
iDepending on the setting, the massage
function runs for about 7 to 10 minutes.

266
Control systems
Instrument cluster control system
Instrument cluster control
system
The control system is activated as soon as
the SmartKey in the starter switch is
turned to position 2 or as soon as the
KEYLESS-GO* start/stop button
(컄page 346) is in position 2. The control
system enables you to:
앫call up information about your vehicle
앫change vehicle settings
For example, you can use the control sys-
tem to find out when your vehicle is next
due for service, to call up statistical data
on your vehicle, and much more.
The control system relays information to
the multifunction display.
Multifunction display
1Line for main menus
2Text field in multifunction display
Settings, functions, submenus as well as
any malfunctions are shown to you in the
text field.
Warning! G
A driver’s attention to the road and traffic
conditions must always be his/her primary
focus when driving.
For your safety and the safety of others, se-
lecting features through the multifunction
steering wheel should only be done by the
driver when traffic and road conditions per-
mit it to be done safely.
Bear in mind that at a speed of just 30 mph
(approximately 50 km/h), your vehicle is
covering a distance of 44 feet (approximate-
ly 14 m) every second.
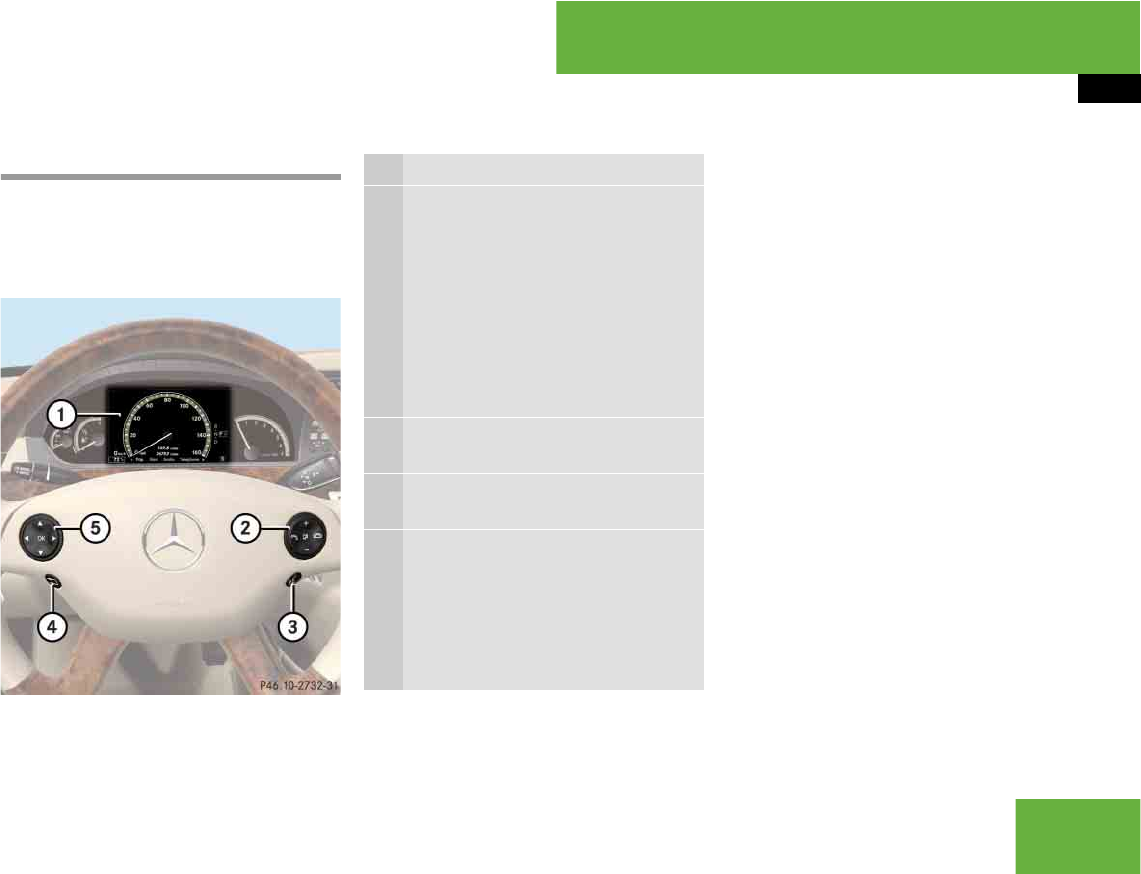
267
Control systems
Instrument cluster control system
Multifunction steering wheel
The displays in the multifunction display
and the settings in the control system are
controlled using the buttons on the multi-
function steering wheel.
The information available in the multifunc-
tion display is arranged in menus, each
containing a number of functions or sub-
menus. For example, in the “Settings”
menu, you will find functions for making
settings to your vehicle. There are func-
tions for calling up information and for
making settings to your vehicle.
It is helpful to think of the menus as being
arranged in a circular pattern:
왘Press & or ( repeatedly to
switch menus.
The number of menus available in the sys-
tem depends on which optional equipment
is installed in your vehicle.
왘Press button L to return to the next
highest menu level.
From a menu’s highest level, you will al-
ways see the screen from the “Trip” menu
that was last active. When you press L
again, you switch to the standard display
(컄page 270).
For information about warning and mal-
function messages appearing in the multi-
function display (컄page 612).
1Multifunction display
2sto take a call
to dial
to redial
tto end a call
to reject an incoming call
æto increase volume
çto decrease volume
Fto mute
3!to accept a call
to activate Voice Control*
4Lback/to cancel Voice
Control*
5$to scroll up
%to scroll down
&to scroll to the right
(to scroll to the left
#to confirm selection
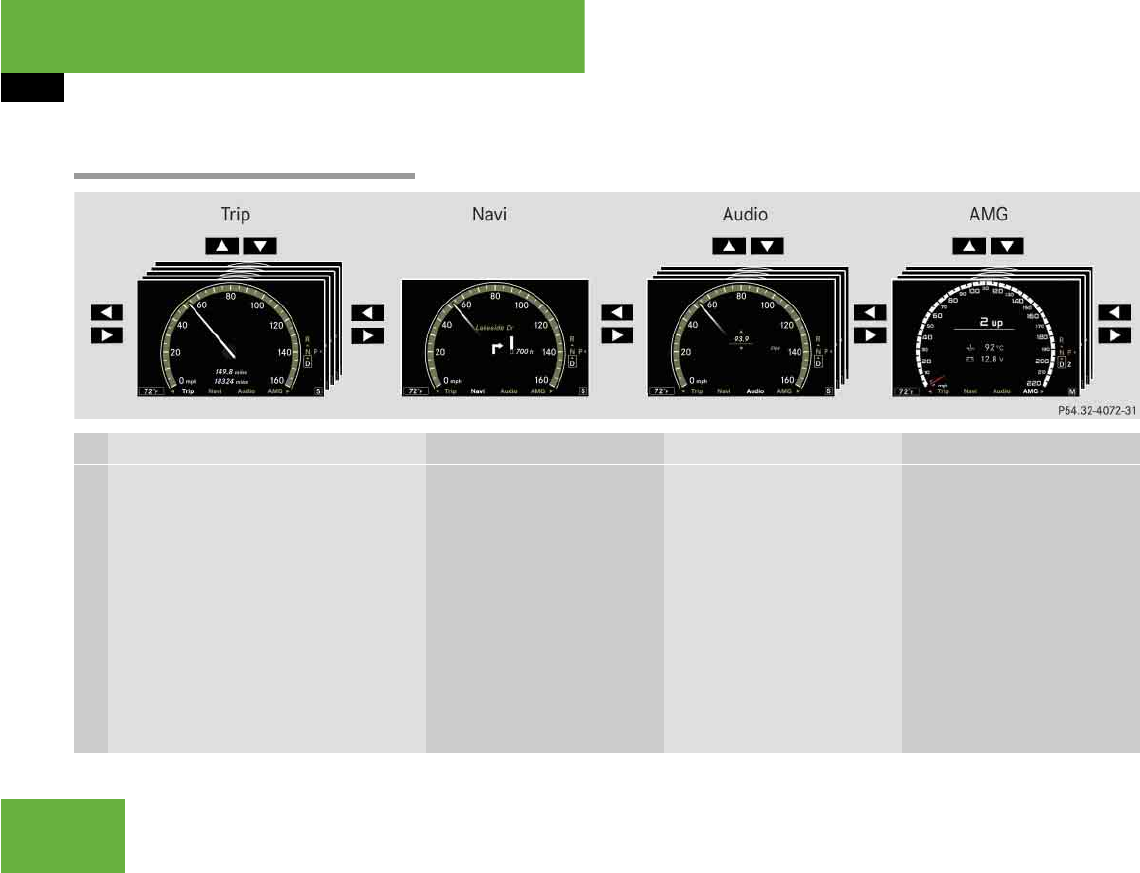
268
Control systems
Instrument cluster control system
Menus
Trip (컄page 270) Navi (컄page 271) Audio (컄page 273) AMG1 (컄page 275)
1S63AMG and S65AMG only.
Commands/submenus
Standard display Showing route guidance in-
structions, current direction
traveled
Selecting radio station Gear currently engaged
Engine oil temperature
Vehicle supply voltage
Fuel consumption statistics since start Selecting satellite radio
channel* (USA only)
RACETIMER
Fuel consumption statistics since last
reset
Operating DVD changer/
audio CD/ audio DVD/MP3
Overall analysis
Resetting fuel consumption statistics Operating Video DVD Lap analysis
Distance to empty
Digital speedometer
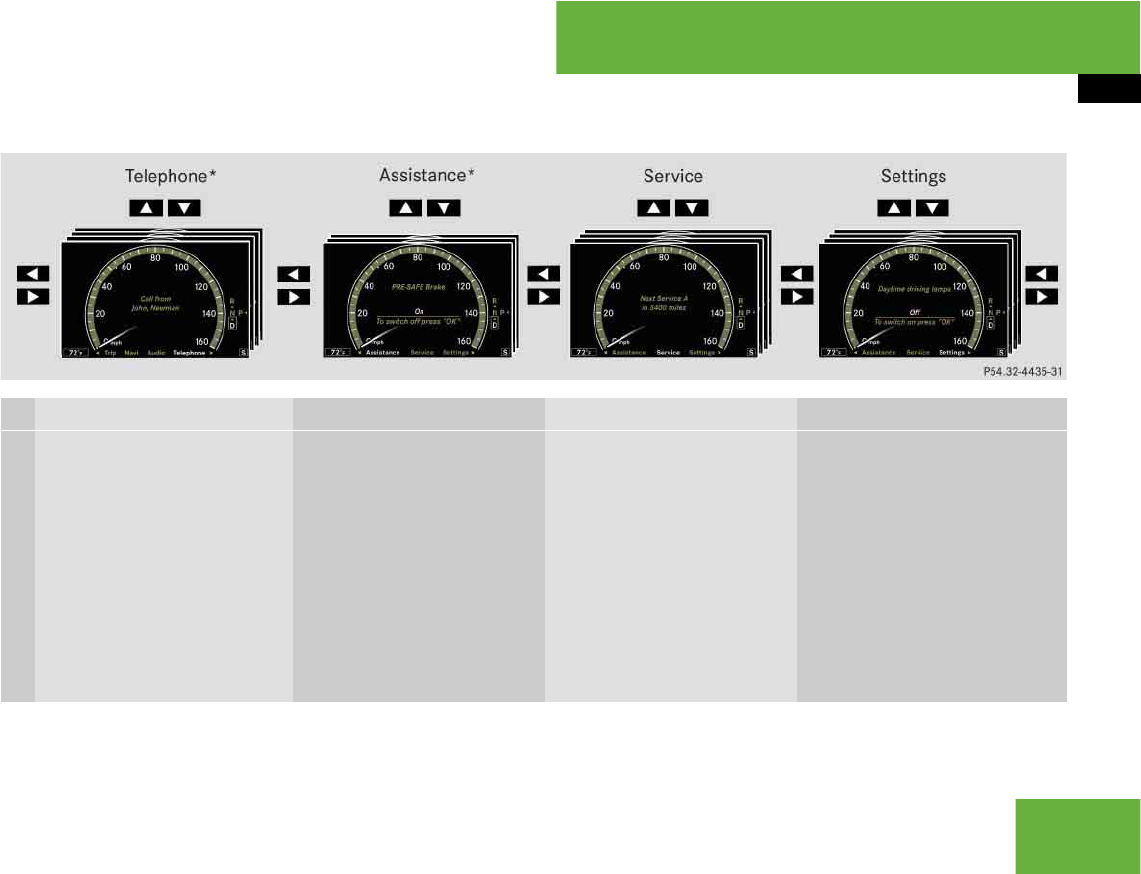
269
Control systems
Instrument cluster control system
Telephone* (컄page 278) Assistance* (컄page 281) Service (컄page 282) Settings (컄page 283)
Commands/submenus
Dialing a number from the
phone book
Displaying the distance graph-
ic*, DISTRONIC Plus*
(USA only)
Calling up vehicle malfunction,
warning and system status
messages stored in memory
Setting daytime running lamp
mode (USA only)
Redialing Activating/deactivating
PRE-SAFE® Brake* (USA only)
Checking tire inflation pres-
sure
Switching additional speedome-
ter on or off
Answering a call Switching on the Dynamic
Rear View Monitor*
automatically
Calling up maintenance ser-
vice display
Switching radar sensors* on or
off (USA only)
Ending a call or rejecting an in-
coming call
Checking engine oil level*
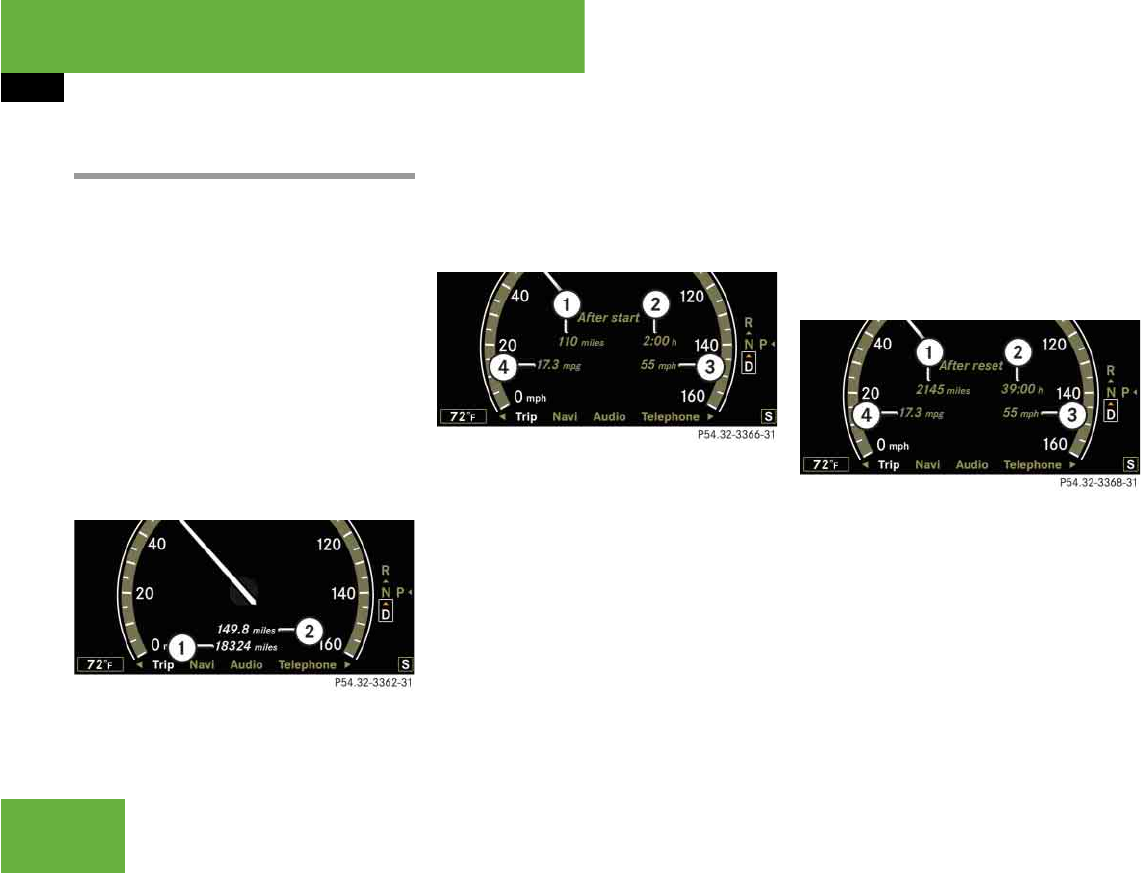
270
Control systems
Instrument cluster control system
Trip menu
In the “Trip” menu, you can show an addi-
tional display for the speedometer and call
up or reset your vehicle’s statistical data.
Standard display
In the standard display, the trip odometer
and main odometer are shown in the mul-
tifunction display.
왘Press ( or & to select the “Trip”
menu.
1Main odometer
2Trip odometer
Fuel consumption statistics since start
왘Press ( or & to select the “Trip”
menu.
왘Press % to select “After start”.
1Distance driven since start
2Time elapsed since start
3Average speed since start
4Average fuel consumption since start
Fuel consumption statistics since last
reset
왘Press ( or & to select the “Trip”
menu.
왘Press % or $ to select “After re-
set”.
1Distance driven since last reset
2Time elapsed since last reset
3Average fuel consumption since last re-
set
4Average speed since last reset
iThe menu overview can be found on
(컄page 268).
iAll values that are based on the last start are
reset when you turn off the vehicle’s engine for
more than four hours (컄page 397).
iIf you turn the SmartKey to position 1 or 2
again during this time, the values will not be re-
set. After 999 hours or 9999 miles (kilometers),
the fuel consumption statistics since start are
automatically reset.
iAfter 9999 hours or 99999 miles (kilome-
ters), the fuel consumption statistics since last
reset are automatically reset.
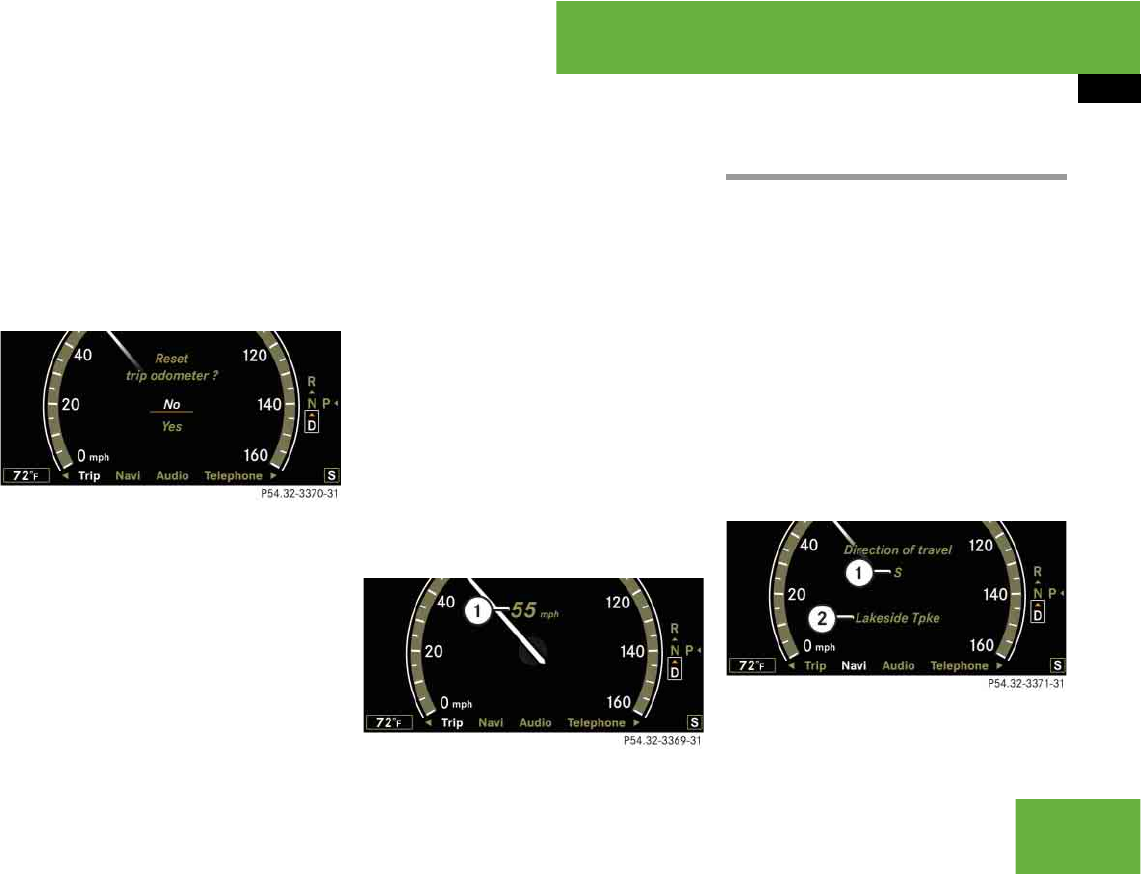
271
Control systems
Instrument cluster control system
Resetting fuel consumption statistics
왘Press ( or & to select the “Trip”
menu.
왘Press % or $ to select the func-
tion you wish to reset.
왘Press #.
Illustration: Reset trip odometer
왘Press % to select “Yes” and confirm
with #.
Distance to empty
왘Press ( or & to select the “Trip”
menu.
왘Press % or $ to select “Range”.
The calculated remaining driving range
based on the current fuel tank level ap-
pears in the multifunction display.
Digital speedometer
왘Press ( or & to select the “Trip”
menu.
왘Press % or $ to select the digital
speedometer.
1Digital speedometer
Navi menu
The display in the “Navi” menu depends on
whether route guidance is active or not.
왘Press ( or & to select the “Navi”
menu.
Route guidance not active
The multifunction display shows the direc-
tion of travel and the name of the street
you are currently driving on, if known by
the navigation system.
1Direction of travel
2Street you are currently driving on
iYou can reset the trip odometer by pressing
and holding the L button. The trip odometer
is then reset without confirmation.
iIf only very little fuel is left in the tank, a fuel
pump is shown instead of the range.
iThe menu overview can be found on
(컄page 268).
컄컄

272
Control systems
Instrument cluster control system
Route guidance active
The image on the multifunction display de-
pends on whether you are being notified of
a driving maneuver.
No notification of driving maneuver
Example illustration
1Distance to destination
2Symbol for “follow the course of the
road”
3Distance to next driving maneuver
4Street you are currently driving on
Notification of driving maneuver with-
out lane recommendation
Example illustration
1Street into which the driving maneuver
leads
2Symbol for “driving maneuver”
3Distance to driving maneuver and visu-
al distance display
When you are being notified of a driving
maneuver, you will see a visual distance
display 3 next to the driving maneuver
symbol. The visual distance display is re-
duced from bottom to top the closer you
come to the announced driving maneuver.
Navigation status displays in the instru-
ment cluster
While route guidance is active, the follow-
ing messages may be shown on the multi-
function display:
앫<
You have reached your destination.
앫“Area of dest. reached”
You have arrived in the area of your
destination. The message appears, for
example, for relatively large POIs.
앫“New Route…”
COMAND calculates a new route, e.g.
because you have deviated from the
calculated route or due to a detour re-
port. Afterward, COMAND continues
route guidance.
컄컄
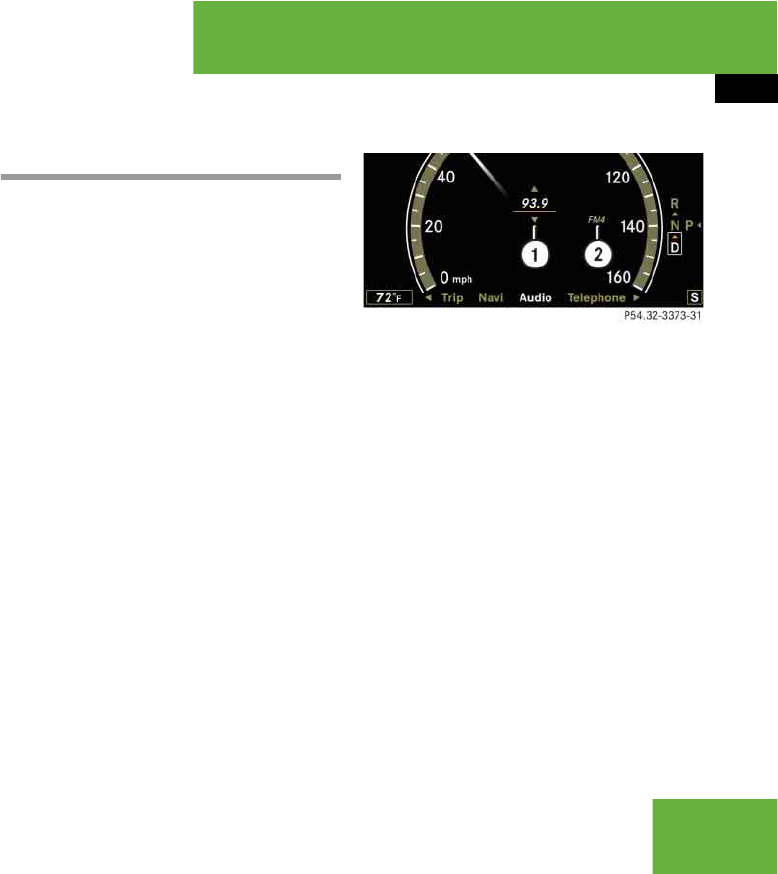
273
Control systems
Instrument cluster control system
앫“Calculating Route”
COMAND is calculating a route. After-
ward, COMAND starts route guidance.
앫“Off Map”
The vehicle’s location is outside of the
digital map’s range. The vehicle is in an
off-map position (컄page 213).
앫“Off Road”
The vehicle is either on a road that has
not been digitized (컄page 214) or on
the side of a road, e.g. in a parking
space.
앫“No Route”
COMAND cannot calculate a route to
the selected destination.
앫“Direction of Dest.”
The vehicle has gone off the map dur-
ing route guidance (컄page 213).
Audio menu
The functions in the “Audio” menu operate
the audio equipment which you currently
have turned on.
If no audio equipment is currently turned
on, the message: “Audio off” is shown in
the multifunction display.
Selecting radio station
왘Turn on COMAND and select “Radio”
(컄page 100).
왘Press ( or & to select the “Au-
dio” menu.
왘Press % or $ to select a station.
1Station frequency
2Waveband
왘Press æ or ç to adjust the vol-
ume.
Selecting satellite radio* channel
(USA only)
The satellite radio is treated as a radio ap-
plication.
왘Turn on COMAND and select “Sat Ra-
dio” (컄page 105).
iThe menu overview can be found on
(컄page 268).
iYou can only change the frequency band
and save new stations using COMAND
(컄page 100).
컄컄
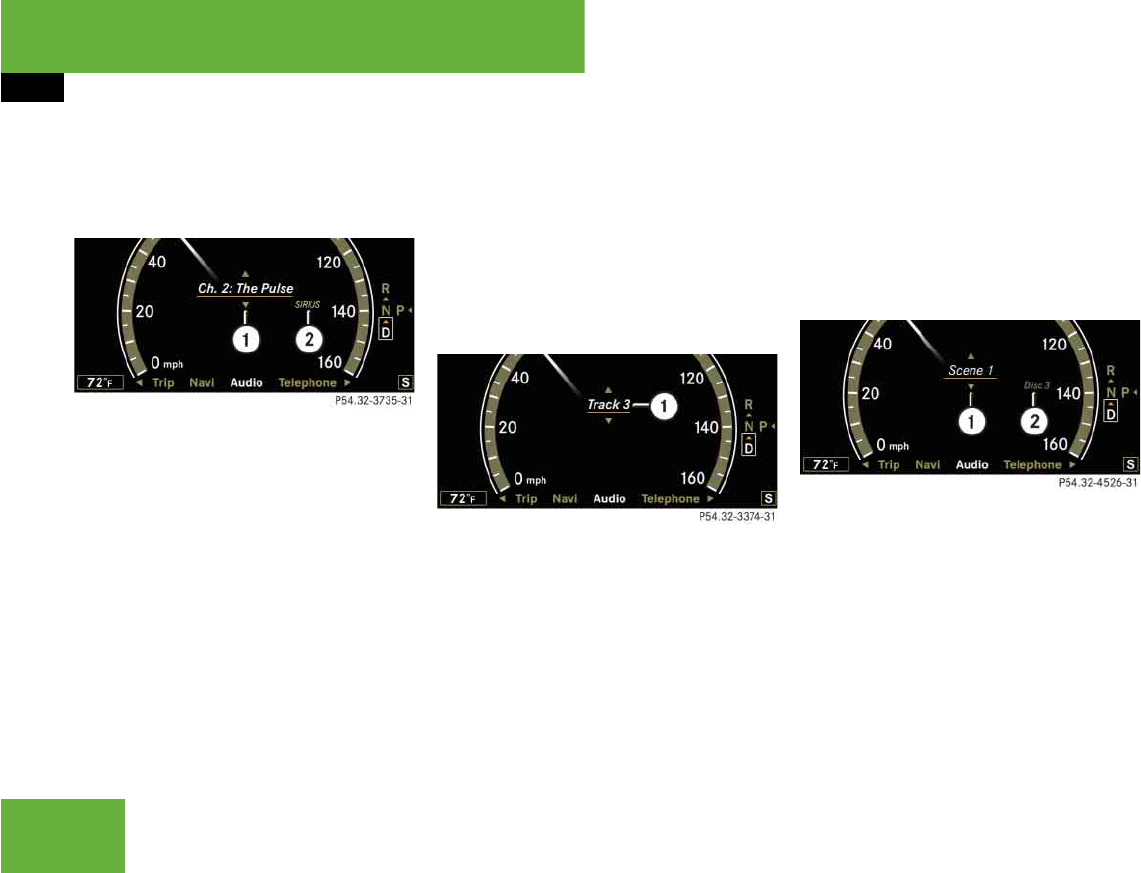
274
Control systems
Instrument cluster control system
왘Press ( or & to select the “Au-
dio” menu.
왘Press % or $ to select a station.
1Channel number and/or name
2SAT mode
왘Press æ or ç to adjust the vol-
ume.
Operating DVD changer/audio CD/
audio DVD/MP3
왘Turn on COMAND and select “CD”,
“DVD-Audio” or “MP3” (컄page 112).
왘Press ( or & to select the “Au-
dio” menu.
왘Press % or $ to select a track.
Example: audio CD
1Current track
왘Press æ or ç to adjust the vol-
ume.
Operating video DVD (USA only)
왘Turn on COMAND and select “Video”
“Video” “Video DVD”
(컄page 126).
왘Press ( or & to select the “Au-
dio” menu.
1Current scene
2Disc number
왘Press % or $ to select a scene.
i A subscription to SIRIUS satellite radio ser-
vice provider is required for the satellite radio op-
eration. Contact an authorized Mercedes-Benz
Center for details and availability for your
vehicle.
For more information on satellite radio
(컄page 105). iWhen you play a CD or DVD with text, the
multifunction display shows the name and num-
ber of the track. For MP3s, only the track is
shown.
컄컄
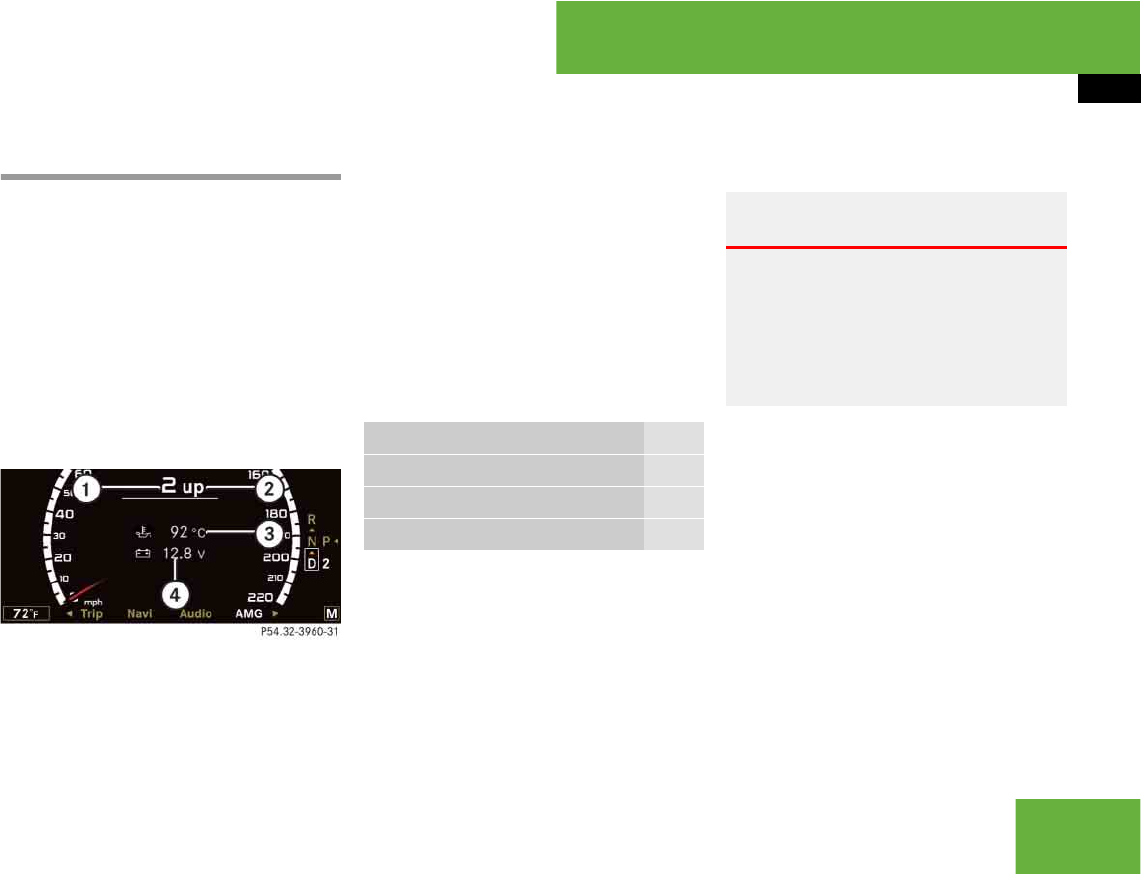
275
Control systems
Instrument cluster control system
AMG menu
The main screen of the AMG menu shows
you
앫the gear currently engaged
앫the engine oil temperature
앫the vehicle supply voltage
왘Press ( or & to select the
“AMG” menu.
1Gear indicator
2Upshift indicator
3Engine oil temperature
4Vehicle supply voltage
If the engine reaches the overspeed range
in the manual shift program, you will see
“up” 2 next to gear indicator 1 as a re-
minder to upshift.
Use buttons % or $ to select the fol-
lowing functions in the AMG menu:
RACETIMER
The RACETIMER allows you to time and
save driving stretches in hours, minutes
and seconds.
왘Press ( or & to select the
“AMG” menu.
왘Press % to select the RACETIMER.
iThis function is only available in S 63 AMG
and S 65 AMG.
iThe engine oil temperature symbol will be
shown in blue if the engine oil temperature has
not yet reached 176°F (80°C). During this time,
avoid driving at full engine speed.
Function Page
RACETIMER 275
Overall analysis 277
Lap analysis 277
Warning! G
The RACETIMER feature is for use only on
roads and in conditions where high speed
driving is permitted. Racing on public roads
is prohibited under all circumstances and
the driver is and must always remain re-
sponsible for following posted speed limits.
컄컄
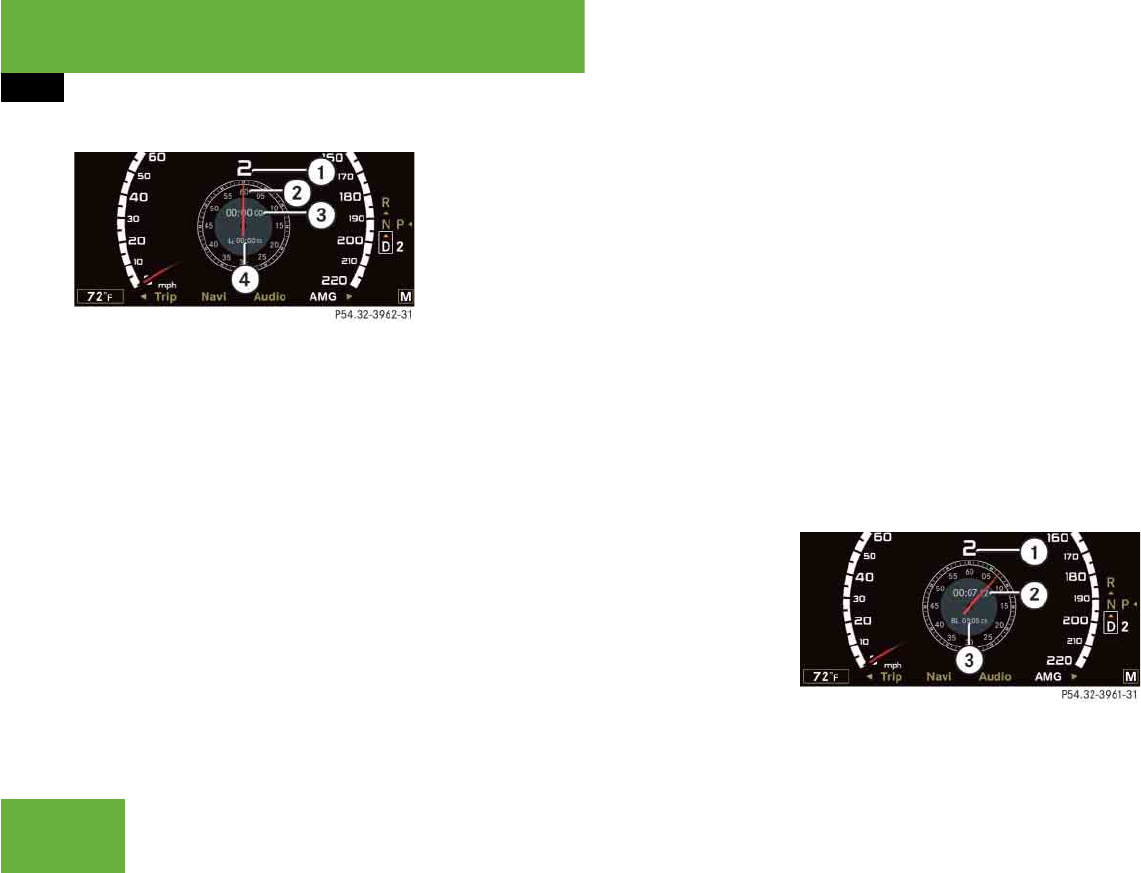
276
Control systems
Instrument cluster control system
1Gear indicator
2RACETIMER
3Seconds display
4Lap
왘Starting RACETIMER: Press æ.
왘Displaying intermediate time:
Press ç.
The intermediate time is shown for
5 seconds.
왘Stopping RACETIMER: Press æ.
왘To select a different display, press
$, ( or &.
Saving lap time and starting a new lap
왘Press button ç while the timer is
running.
The intermediate time will be shown for
5 seconds.
왘Press button ç within 5 seconds.
The intermediate time shown will be
saved as a lap time.
The RACETIMER begins timing the new
lap. The new lap begins to be timed as
soon as the intermediate time is called
up.
1Gear indicator
2RACETIMER
3Best lap time
iYou can start the RACETIMER when the en-
gine is running or the starter switch is in
position 2 (컄page 344).
iWhile the RACETIMER is being displayed,
you cannot adjust the audio volume using but-
tons æ or ç.
iWhen you stop the vehicle and turn the
Smartkey to position 1 (컄page 344) or, in vehi-
cles with KEYLESS-GO*, turn off the engine and
do not open the driver’s door, the RACETIMER
stops timing. Timing is resumed when you switch
the ignition back on or restart the engine and
then press æ button.
iWhen you switch on the Night View Assist*
(컄page 461) while the RACETIMER is operating,
the RACETIMER will continue to run in the back-
ground but cannot be operated with the multi-
function steering wheel buttons.
To stop the RACETIMER, switch off the Night
View Assist* first.
iYou can save up to 16 laps.
컄컄
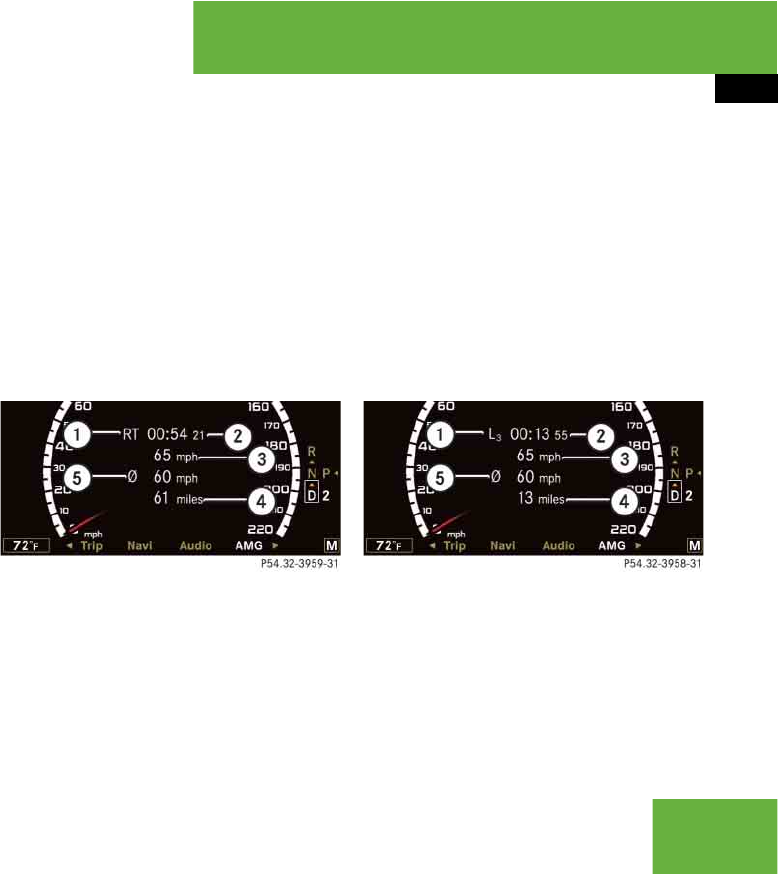
277
Control systems
Instrument cluster control system
Resetting current lap
왘Press button æ while the timer is
running.
The timer stops.
왘Press button ç.
The lap time is reset to “0”.
Deleting all laps
왘Press button æ while the timer is
running.
The timer stops.
왘Press ç for at least 3 seconds.
왘Press button æ.
The timer starts. The saved laps are de-
leted.
Overall analysis
왘Press ( or & to select the
“AMG” menu.
왘Press $ repeatedly until the overall
analysis appears in the multifunction
display.
1Overall analysis of RACETIMER
2Overall driving time
3Maximum speed
4Overall distance driven
5Average speed
왘To select a different display, press
$, ( or &.
Lap analysis
왘Press ( or & to select the
“AMG” menu.
왘Press $ repeatedly until the lap
analysis appears in the multifunction
display.
1Lap number
2Lap time
3Maximum speed
4Lap length
5Average speed during lap
왘Press $ or % to see other lap
analyses.
iIt is not possible to delete a single saved lap.
iThese functions are only available if you
have saved at least one lap and have stopped the
RACETIMER.
iThese functions are only available if you
have saved at least two laps and have stopped
RACETIMER.
컄컄

278
Control systems
Instrument cluster control system
왘To select a different display, press
( or &.
Telephone* menu
You can use the functions in the “Tele-
phone” menu to operate your telephone,
provided it is inserted in the cradle and
switched on.
iEach lap is shown in its own submenu. The
fastest lap is indicated by flashing symbol 1.
iThe menu overview can be found on
(컄page 268).
Warning! G
Some jurisdictions prohibit the driver from
using a cellular telephone while driving.
Whether or not prohibited by law, for safety
reasons, the driver should not use the cellu-
lar telephone while the vehicle is in motion.
Stop the vehicle in a safe location before
placing or answering a call.
If you nonetheless choose to use the mobile
phone while driving, please use the hands-
free feature and be sure to pay attention to
the traffic situation at all times. Use the mo-
bile phone only when road, weather and traf-
fic conditions permit.
Otherwise, you may not be able to observe
traffic conditions and could endanger your-
self and others.
Bear in mind that at a speed of just 30 mph
(approximately 50 km/h), your vehicle is
covering a distance of 44 feet (approxima-
tely 14 m) every second.
Warning! G
Never operate radio transmitters equipped
with a built-in or attached antenna (i.e. with-
out being connected to an external antenna)
from inside the vehicle while the engine is
running. Doing so could lead to a malfunc-
tion of the vehicle’s electronic system, pos-
sibly resulting in an accident and/or
personal injury.
컄컄

279
Control systems
Instrument cluster control system
Logging-on to a network
왘Switch on the telephone and COMAND
(컄page 85).
왘Press ( or & to select the “Tele-
phone” menu.
Which messages appear in the multifunc-
tion display depends on whether your tele-
phone is switched on or off.
앫If the telephone is off, the message in
the multifunction display is: “Telephone
OFF”.
앫If the telephone is not inserted in the
cradle, the message in the multifunc-
tion display is: “No telephone inserted”.
앫If the PIN or unlock code is not yet en-
tered, the message in the multifunction
display is “Please enter PIN” or “Enter
unlock code”.
앫If the telephone is switched on, the
telephone will then search for a net-
work. During this time, the multifunc-
tion display is blank. If no network
available, the multifunction display
reads “No Service”.
앫If the telephone is on, as soon as the
telephone has found a network,
“Ready” or “Ready (Roaming)” appears
in the multifunction display.
Entering the PIN or unlock code
왘Enter the PIN or unlock code using the
telephone keypad*, Voice Control* or
telephone*.
The telephone will then search for a
network.
You may carry out the following functions:
Dialing a number from the mobile
phone book
If your telephone is ready to receive calls,
you may select and dial a number from the
phone book at any time.
왘Log on to the network (컄page 279).
iVarious mobile phone cradles can be in-
stalled in the front center armrest, see separate
installation instructions for the mobile phone
cradle. These mobile phone cradles can be ob-
tained from an authorized Mercedes-Benz Cen-
ter. For more information about telephone
(컄page 507).
iThe roof cargo container* may impair mo-
bile phone reception. In an emergency, remove
the mobile phone from the mobile phone cradle
(컄page 507) to make a call. Function Page
Dialing a number from the phone
book
279
Redialing 280
Answering a call 281
Ending a call or rejecting an in-
coming call
281
컄컄

280
Control systems
Instrument cluster control system
왘Press % or $ or # to switch
to the phone book.
왘Press % or $ to select the de-
sired name.
The stored names are displayed in as-
cending alphabetical order.
왘Press s or # to start dialing.
If several entries are present for the
same name, they are all shown.
왘Select the desired entry.
왘Press s or # to start dialing.
The message “Connecting call…” ap-
pears on the multifunction display, as
well as the dialed telephone number or
name as long as it is stored in the
phone book.
The dialed number is saved in the “Di-
aled numbers” list.
Once a connection has been estab-
lished, the name appears on the multi-
function display, provided that it has
been stored in the phone book, other-
wise the dialed telephone number ap-
pears.
Redialing
The control system stores the most recent-
ly dialed phone numbers. This eliminates
the need to search through your entire
phone book.
왘Log on to the network (컄page 279).
왘Press s to switch to the number
and/or name last dialed in the redial
memory.
왘Press % or $ to select the de-
sired number and/or name.
왘Press s or # to start dialing.
Once a connection has been estab-
lished, the name appears in the multi-
function display, provided that it has
been stored in the phone book, other-
wise the dialed telephone number ap-
pears.
iWhen you insert a Mercedes-Benz approved
mobile phone into the cradle*, the control sys-
tem reads in the phone book that is saved on the
SIM card or in the phone book of the mobile
phone. This can take several minutes, depending
on how many entries each phone book contains.
When you press %, $, (, & or
# during the download of the phone book the
message “Reading telephone data, please
wait...” appears in the multifunction display.
When the message: “Reading telephone data,
please wait...” disappears, the phone book has
been loaded.
iIf you do not want to dial from the phone
book, press t or L. In the multifunction
display appears again “Ready” or “Ready (Roam-
ing)”.
iIf you press and hold % or $ for
more than 1 second, the system scrolls
rapidly through the list of names.
If you press and hold % or $ for more than
4 seconds, the control system shows the first
four entries of the letter next used. Release the
button to stop the quick search. The search
stops automatically at the end of the list.
컄컄
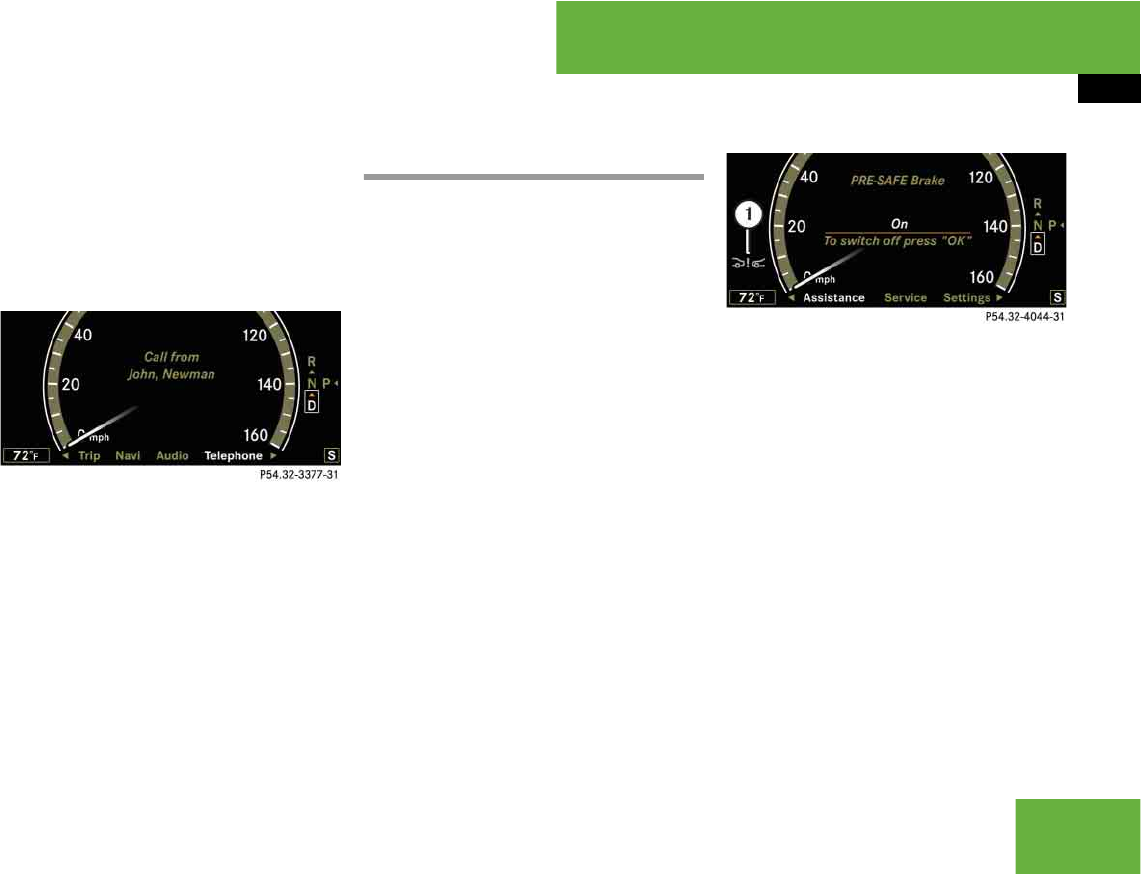
281
Control systems
Instrument cluster control system
Answering a call
When your telephone is ready to receive
calls, you can answer a call at any time
with the ignition on. When you are in the
“Telephone” menu, you will see the follow-
ing message on the multifunction display:
왘Press s.
Ending a call or rejecting an incoming
call
왘Press t.
Assistance* menu
In the “Assistance” menu, you can change
the settings of your driving systems.
Displaying distance graphic*,
DISTRONIC Plus* (USA only)
For information about displaying distance
graphic (컄page 428).
Activating/deactivating PRE-SAFE®
Brake* (USA only)
왘Press ( or & to select the
“Assistance” menu.
왘Press % or $ to select the
“PRE-SAFE Brake” function.
왘Press #.
1PRE-SAFE® Brake* indicator :
왘Press # again if you would like to
change the current status.
After the function has been activated,
indicator : appears on the
left-hand side of the multifunction dis-
play.
For more information (컄page 76).
Switching on the Dynamic Rear View
Monitor* automatically
왘Press ( or & to select the
“Assistance” menu.
iThe caller’s number appears only if it is
transmitted.
The caller’s name appears only if the number and
the name are stored in the phone book.
iThe menu overview can be found on
(컄page 268).
iThe image from the Dynamic Rear View
Monitor is shown on the COMAND display.
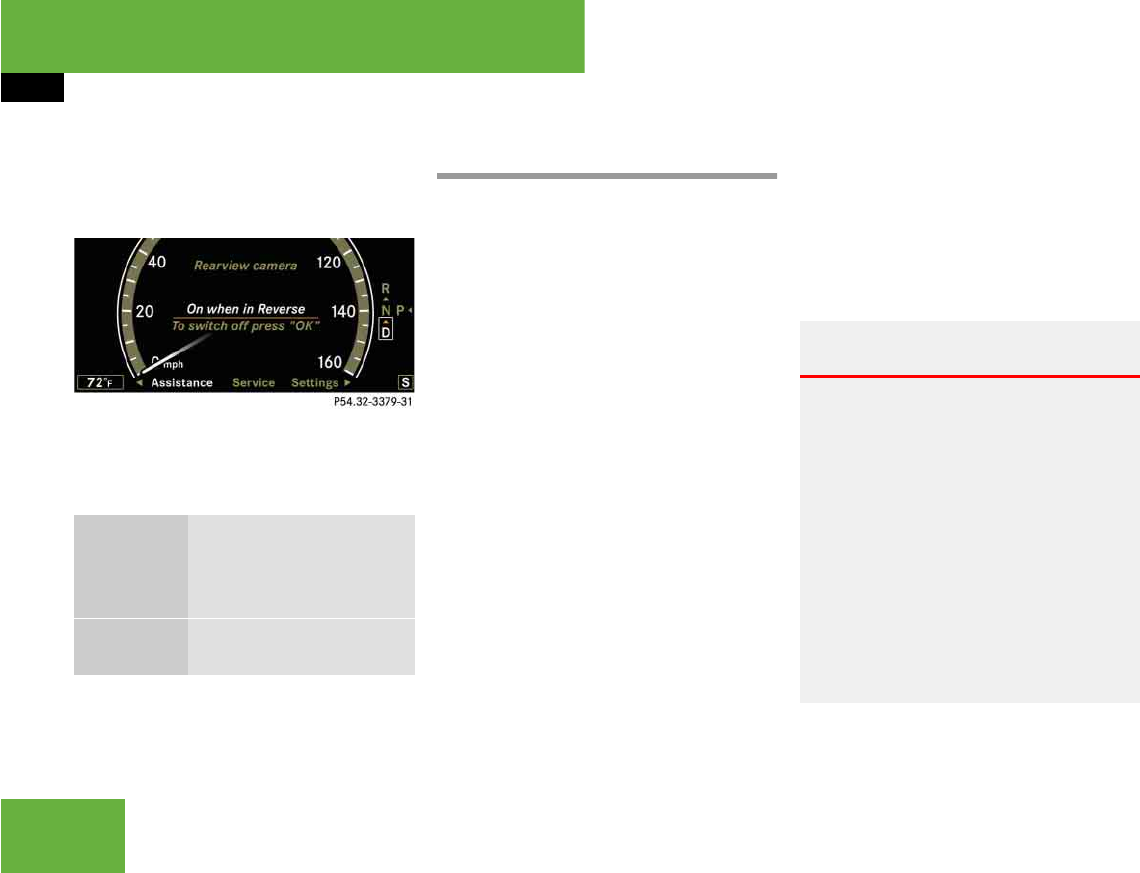
282
Control systems
Instrument cluster control system
왘Press % or $ to select the
“Rearview camera” function.
왘Press #.
왘Press # again if you would like to
change the current status.
The following settings are available:
Service menu
The “Service” menu is used for
앫calling up messages
앫checking tire inflation pressure elec-
tronically with the Advanced TPMS*
(standard on U.S. vehicles)
앫activating Run Flat Indicator
(Canada only)
앫calling up the maintenance service in-
dicator display
앫check engine oil level*
Calling up vehicle malfunction, warning
and system status messages stored in
memory
Use the vehicle status message memory
menu to scan malfunction and warning
messages that may be stored in the sys-
tem. Such messages appear in the multi-
function display and are based on
conditions or system status the vehicle’s
system has recorded.
The vehicle status message memory menu
only appears if there are any messages
stored.
왘Press ( or & to select the
“Service” menu.
“On when in
Reverse”
The Dynamic Rear View
Monitor automatically
switches on when reverse
gear is engaged.
“OFF”The Dynamic Rear View
Monitor is not switched on.
iThe menu overview can be found on
(컄page 268).
Warning! G
Malfunction and warning messages are only
indicated for certain systems and are inten-
tionally not very detailed. The malfunction
and warning messages are simply a remind-
er with respect to the operation of certain
systems and do not replace the owner’s
and/or driver’s responsibility to maintain
the vehicle’s operating safety by having all
required maintenance and safety checks
performed on the vehicle and by bringing
the vehicle to an authorized Mercedes-Benz
Center to address the malfunction and
warning messages (컄page 612).

283
Control systems
Instrument cluster control system
If conditions have occurred causing
status messages to be recorded, the
number of messages appears in the
multifunction display: “2 Messages”.
왘Press % or $ to select the mes-
sage.
왘Press # to confirm.
Checking tire inflation pressure
For information about checking tire infla-
tion pressure (컄page 561).
Activating Run Flat Indicator
(Canada only)
For information about activating Run Flat
Indicator (컄page 565).
Calling up the maintenance service in-
dicator display
For information about calling up the main-
tenance service indicator display
(컄page 582).
Checking engine oil level (S 600 and
S65AMG)
For information about checking engine oil
level (컄page 543).
Settings menu
In the “Settings” menu, you can:
앫switch the daytime running lamps on or
off (USA only)
앫switch the additional speedometer on
or off
앫switch the radar sensors* on or off
(USA only)
Setting daytime running lamp mode
(USA only)
왘Press ( or & to select the “Set-
tings” menu.
왘Press % or $ to select the “Day-
time driving lamps” function.
왘Press #.
왘Press # again if you would like to
change the current status.
Depending on the previous status, the
daytime running lamps will be switched
on or off.
iSee the “Practical hints” section for mal-
function and warning messages (컄page 612).
iIf you turn the SmartKey in the starter
switch to position 0 and then back to position 2,
all messages will be deleted from the message
memory. iThe menu overview can be found on
(컄page 268).
iThis function is not available in countries
where the daytime running lamp mode is manda-
tory and therefore in a constant mode.

284
Control systems
With “Daytime driving lamps” mode selected and the exterior lamp switch at position M or *, the low beam headlamps are
switched on when the engine is running.
In low ambient light conditions the follow-
ing lamps will switch on additionally:
앫Parking lamps
앫Tail lamps
앫License plate lamps
앫Side marker lamps
For more information on the daytime run-
ning lamp mode (컄page 373).
Showing or hiding additional
speedometer
You can have an additional digital speed-
ometer shown on the multifunction dis-
play. The speed is shown in the unit of
kilometers/hour (USA) or miles/hour
(Canada).
왘Press ( or & to select the “Set-
tings” menu.
왘Press % or $ to select the “Add.
speedometer” function.
왘Press #.
왘Press # again if you would like to
change the current status.
Depending on the previous status, the
additional speedometer will be
switched on or off.
Switching radar sensors* on/off
If your vehicle is equipped with DISTRONIC
Plus*, BAS Plus*, or Park Assist* it is
equipped with a radar sensor system
which you can switch on and off.
When travelling in Canada in a vehicle not
registered in Canada, you must switch off
the radar sensor system. Canadian law
does not permit the use of the radar sensor
system for vehicles from outside of Cana-
da. When you switch off the radar sensor
system, the following functions are deacti-
vated:
앫BAS Plus* (컄page 69)
앫DISTRONIC Plus* (컄page 424)
앫Park Assist* (컄page 448)
앫PRE-SAFE® Brake* (컄page 76)
iIf you turn the exterior lamp switch to anoth-
er position, the corresponding lamp(s) will
switch on.
iMake sure that the light switch is set
to B or * when you switch off the day-
time running lamps while driving at night.

285
Control systems
Instrument cluster control system
왔
왘Press ( or & to select the “Set-
tings” menu.
왘Press % or $ to select the “Ra-
dar sensor” function.
왘Press #.
왘Press # again if you would like to
change the current status.
Depending on the previous status, the
radar sensors will be switched on or
off.
iUSA only:
This device has been approved by the FCC as a
“Vehicular Radar System”. The radar sensor is
intended for use in an automotive radar system
only. Removal, tampering, or altering of the de-
vice will void any warranties, and is not permitted
by the FCC. Do not tamper with, alter, or use in
any non-approved way.
Any unauthorized modification to this device
could void the user’s authority to operate the
equipment.
iCanada only:
This device complies with RSS-210 of Industry
Canada. Operation is subject to the following
two conditions:
(1) This device may not cause interference, and
(2) this device must accept any interference re-
ceived, including interference that may
cause undesired operation of the device.
Removal, tampering, or altering of the device will
void any warranties, and is not permitted. Do not
tamper with, alter, or use in any non-approved
way.
Any unauthorized modification to this device
could void the user’s authority to operate the
equipment.
iThe selected status of the radar sensors re-
mains stored in memory even if the engine is
turned off and restarted.
iThe following message appears in the multi-
function display if the radar sensors are
switched off and you attempt to activate DIS-
TRONIC Plus*, Park Assist* or PRE-SAFE®
Brake*:
“Radar sensor
deactivated
See Oper. Manual”

286
Control systems
Voice Control*
Voice Control*
Operating safety
Warning! G
Please devote your attention first and fore-
most to the traffic situation you are in. While
the system permits hands-free phone oper-
ation, attention to traffic may be diverted
not only by physical operation of a phone,
but also by the distraction of a phone con-
versation while driving. As such, for safety
reasons, we encourage the driver to stop the
vehicle in a safe place before answering or
placing a phone call.
For safety reasons, you should only select a
destination when the vehicle is stationary.
While the navigation system provides direc-
tional assistance, the driver must remain fo-
cused on safe driving behavior, especially
attention to traffic and street signs, and
should utilize the system’s audio cues while
driving.
The navigation system does not supply any
information on stop signs, yield signs, traffic
regulations or traffic safety rules. Their ob-
servance always remains in the driver’s per-
sonal responsibility. DVD maps do not cover
all areas nor all routes within an area.
Traffic regulations always have priority over
any route recommendations given.
Bear in mind that at a speed of just 30 mph
(approximately 50 km/h), your vehicle is
covering a distance of 44 feet
(approximately 13.5 m) every second.
Warning! G
Navigation announcements are intended to
direct you while driving without diverting
your attention from the road and driving.
Please always use this feature instead of
consulting the map display for directions.
Consulting the symbols or map display for
directions may cause you to divert your at-
tention from driving and increase your risk
of an accident.
Warning! G
Please do not use the Voice Control System
in an emergency, as the tone of your voice
may change in a stressful situation. This
could cause a delay in completing your
phone call in a timely manner. This could
distract you in an emergency situation and
cause you to be involved in an accident.

287
Control systems
Voice Control* introduction
Voice Control* introduction
The Voice Control System gives you the ca-
pability to control the following systems on
your vehicle using spoken commands:
앫Telephone* (컄page 291)
앫Navigation (컄page 298)
앫Address book (컄page 308)
앫Audio (컄page 312) (AM/FM radio,
CD/DVD changer, MP3 player)
You control these systems using spoken
commands. Moreover, controls such as
the buttons on the multifunction steering
wheel (컄page 289) allow you to keep your
hands on the steering wheel.
The command vocabulary consists of
approximately 300 ready to use phrases.
The Voice Control System recognizes com-
mands and number sequences, irrespec-
tive of the speaker. To optimize speech
recognition for your voice follow the indi-
vidualization process (컄page 333).
You can use the Voice Control System to
call up all of COMAND’s main menu items,
with the exception of the main menus for
“Vehicle” and “Navi”.
The commands and digit sequences can be
spoken without pausing between the indi-
vidual words. If an unavailable or incorrect
command is used, the Voice Control Sys-
tem will prompt you for a new command by
asking “Please repeat” or “Please repeat
your entry”.
In order to provide for a safe and comfort-
able dialog, the Voice Control System ac-
knowledges important commands.

288
Control systems
Voice Control* introduction
Spelling
You may not need to spell the entire name
(street, intersection, city or point of inter-
est) especially if the name is lengthy. Spell-
ing the first three to five characters of the
name should be sufficient for the system
to recognize the name provided it is avail-
able on the navigation DVD.
The selection appearing on the COMAND
display is sorted based on your recognized
voice input and a matching algorithm.
You can use the commands “Next page” or
“Previous page” to scroll up or down in the
list.
Use the command “Correction” to start
over by again spelling the name.
Speak each character as clearly as you
can, especially when they sound very simi-
lar (d or e).
Command types
The Voice Control System commands can
be categorized as:
앫General Commands
These are commands always available
to you as soon as the Voice Control
System is activated (for example
“Help” commands).
앫Local Commands
These are commands specific to the
currently active system shown in the
COMAND display (for example com-
mands to control the CD/DVD chang-
er).
For a complete list of commands
(컄page 318).
Active System
The active system is the system currently
shown in the COMAND display.
If, for example, you listen to the radio while
the telephone system is active on the
COMAND display, you have to switch to
the radio using the command “Radio” be-
fore you can operate the radio.
iDuring Voice Control System operation visu-
al help windows also appear in the COMAND dis-
play (컄page 290).

289
Control systems
Voice Control* introduction
왔Controls
Operation via the multifunction
steering wheel
Activating Voice Control
왘Switch on COMAND (컄page 85).
왘Press !.
An audible tone (beep) confirms the ac-
tivation of the system.
왘Speak a command.
Canceling Voice Control
왘Press L.
or
왘Speak the command “Cancel”
(except for speaking voice entries, en-
tering a town or city or carrying out in-
dividualization).
or
왘Press any COMAND button.
Item
1!to activate Voice Control
to accept a call
2Lto cancel Voice Control
3æto increase volume
çto decrease volume
sto take a call
to dial
to redial
tto end a call
to reject an incoming call
iVoice Control can be cancelled at any time,
even during a dialog. Please note that if the Voice
Control System is cancelled during a dialog, then
the complete procedure is stopped and Voice
Control is cancelled.
290
Control systems
Voice Control* introduction
Setting volume level
왘Activate Voice Control.
왘Speak a command, for example “Help”.
왘Press æ or ç. The volume is in-
creased or decreased during voice out-
put.
or
왘Set volume for voice output using the
COMAND volume thumbwheel on the
lower part of the front center console
(컄page 96).
Displays
COMAND Display
In addition to the acoustic help function,
a visual help function (컄page 239) is avail-
able on the COMAND display.
Upon activating the Voice Control, the
most important available commands for
the currently active system appear on the
COMAND display.
When the Voice Control System requires
additional information from the user, a se-
lection list is shown on the COMAND dis-
play in the address book and navigation
system.
1COMAND display
Multifunction display
For example: telephone numbers are
shown on the multifunction display while
dialing when the main “Telephone” menu
is selected in the instrument cluster con-
trol system.
1Multifunction display
Symbols
The following symbols are found in follow-
ing Voice Control System pages:
sThis symbol stands for commands
and voice entries you are speaking.
tThis symbol stands for voice output
by the system.
uThis symbol indicates that informa-
tion is available on the COMAND
display.

291
Control systems
Voice Control* telephone
Voice Control* telephone Telephone operation
The Voice Control System gives you the
following capabilities:
앫Enter a telephone unlock code
앫Dial a phone number by speaking the
telephone number
앫Store names and numbers in the
COMAND address book
앫Dial a phone number by speaking the
name of an COMAND address book en-
try
앫Delete an address book entry from the
address book
앫Have the system read out the phone
book of the address book entry by en-
try
앫Manage and access an automated an-
swering system/voice mail box
앫Redial names and numbers
Warning! G
Some jurisdictions prohibit the driver from
using a cellular telephone while driving.
Whether or not prohibited by law, for safety
reasons, the driver should not use the cellu-
lar telephone while the vehicle is in motion.
Stop the vehicle in a safe location before
placing or answering a call.
If you nonetheless choose to use the mobile
phone while driving, please use the hands-
free feature and be sure to pay attention to
the traffic situation at all times. Use the mo-
bile phone only when road, weather and traf-
fic conditions permit. Otherwise, you may
not be able to observe traffic conditions and
could endanger yourself and others.
Bear in mind that at a speed of just 30 mph
(approximately 50 km/h), your vehicle is
covering a distance of 44 feet (approxima-
tely 14 m) every second.
Warning! G
Never operate radio transmitters equipped
with a built-in or attached antenna (i.e. with-
out being connected to an external antenna)
from inside the vehicle while the engine is
running. Doing so could lead to a malfunc-
tion of the vehicle’s electronic system, pos-
sibly resulting in an accident and/or
personal injury.
iVarious mobile phone cradles can be in-
stalled in the front center armrest, see separate
installation instructions for the mobile phone
cradle. These mobile phone cradles can be ob-
tained from an authorized Mercedes-Benz Cen-
ter. For more information about telephone
(컄page 507).
iThe roof cargo container* may impair mo-
bile phone reception. In an emergency, remove
the mobile phone from the mobile phone cradle
(컄page 507) to make a call.

292
Control systems
Voice Control* telephone
The Voice Control System detects whether
앫your telephone is switched on
앫the corresponding mobile network is
logged in
앫it is possible to dial
If dialing is not possible, the Voice Control
System will advise you accordingly.
Before you can operate the telephone us-
ing the Voice Control System, you have to
activate the Voice Control (컄page 289).
Telephone commands
For a complete list of commands
(컄page 318).
“Telephone”
Use the command “Telephone” to activate
the telephone main menu. Use this com-
mand if you want the digits you are enter-
ing to appear on the COMAND display.
“Help telephone”
The Voice Control System features a com-
prehensive help function.
Use the command “Help telephone” and
the Voice Control System will read out an
option list of available functions and com-
mands that can be used in conjunction
with the telephone (컄page 239).
“Enter PIN”
Use the command “Enter PIN” to input the
code to unlock your telephone. After
speaking the command, you are prompted
to enter the code.
Speak the code
앫as a continuously spoken string of dig-
its, or
앫in digit blocks of three to five digits.
Digits from “Zero” to “Nine” may be used.
After each digit block (separate the digit
blocks by using an approximately
0.5 second pause), the Voice Control Sys-
tem repeats the recognized digits and
waits until you continue speaking.
Sample dialog:
sEnter PIN
tPlease say the PIN
sZero zero one one
tZero zero one one
sOK
iYou can continue operating your mobile
phone using the telephone keypad or keypad on
your phone.
iThe PIN (only GSM mobile phones) prompt
starts automatically whenever the phone is
locked and you wish to use it.

293
Control systems
Voice Control* telephone
“Dial number”
You can dial a phone number using the
command “Dial number”.
Digits from “Zero” to “Nine” may be used.
The phone number must be spoken
앫as a continuously spoken string of
digits, or
앫in digit blocks (three to five digits in
each block).
After each digit block (separate the digit
blocks by using an approximately 0.5 sec-
ond pause), the Voice Control System re-
peats the recognized digits and waits until
you continue speaking.
When dialing 1800 numbers, you may pro-
nounce the first four digits as “One eight
hundred” and the system will recognize the
spoken entries as “One eight zero zero”.
All other numeric entries must be spoken
as individual numbers.
Sample dialog:
sDial number
tPlease say the number
sOne two three
tOne two three
sFour five six seven
tFour five six seven
sOK
tDialing
“Confirm”
Using the command “Confirm” will repeat
all digits spoken up to that point. Upon re-
peating the digits, the system will prompt
you to continue your input.
Sample dialog:
sDial number
tPlease say the number
sOne two three
tOne two three
sConfirm
tOne two three, please continue
sFour five six seven
tFour five six seven
sOK
tDialing
iYou can also dial the telephone number spo-
ken by pressing button s on the multifunc-
tion steering wheel (instead of using the
command “OK”):
You can dial the telephone number before all
numbers are recited in full.

294
Control systems
Voice Control* telephone
“Correction”
Using the command “Correction” will cor-
rect the last entered digit block. After
speaking the command, the last digit block
is deleted and all previously entered digits
are repeated. The system then prompts
you to continue your input.
Sample dialog:
sDial number
tPlease say the number
sOne two three
tOne two three
sFour five six seven
tFive five six seven
sCorrection
tOne two three, please continue
sFour five six seven
tFour five six seven
sOK
tDialing
“Delete”
Using the command “Delete” will erase all
digits entered. The system then prompts
you to start your input again.
Sample dialog:
sDial number
tPlease say the number
sOne two three
tOne two three
sFour five six seven
tFour five six seven
sDelete
tNumber deleted. Please enter the
number again
sFour two seven three
tFour two seven three
sThree nine one
tThree nine one
sOK
tDialing
“Redial”
Use the command “Redial” to dial the last
dialed number.
“Save name” (COMAND address book)
Use the command “Save name” to create a
new entry in your COMAND address book.
After using the command, the system will
prompt you to enter a phone number.
Digits from “Zero” to “Nine” can be en-
tered (컄page 293).
Speak the telephone number
앫as a continuous string
or, with longer phone numbers,
앫in form of digit blocks (three to five dig-
its).
After each digit block (separate the digit
blocks by using an approximately
0.5 second pause), the Voice Control Sys-
tem repeats the recognized digits and
waits until you continue speaking.

295
Control systems
Voice Control* telephone
After the command “OK”, you will be
prompted up to two times to input the
name. When repeating the name, make
sure that you pronounce it in the same
manner as during the first input. Otherwise
the name cannot be saved and the Voice
Control System cancels the save proce-
dure.
Sample dialog:
sSave name
tPlease say the number first
sOne two three
tOne two three
sFour five six seven
tFour five six seven
sOK
tPlease say the name
sJohn Smith
tPlease repeat the name
sJohn Smith
tDo you want to save the number in
a category?
sNo
tName and number saved
“Dial name” (COMAND address book)
Use the command “Dial name” to place a
phone call by selecting a name previously
saved in your personal address book.
Sample dialog:
sDial name
tPlease say the name
sJohn Smith
If several telephone numbers exist
for the same entry, the Voice Con-
trol System will ask for clarification.
tDo you want to place a work call or
a home call?
sWork
tJohn Smith work
Dialing
iThe Voice Control System may recognize
names even if not saved in your voice. For opti-
mum call-up performance, however, you should
speak and save the names you intend to use
yourself.
iYou can also add a name to an entry by call-
ing up the corresponding menu on COMAND and
saying the name twice (컄page 226).

296
Control systems
“Call <voice entry>” (address book)
Use the command “Call <voice entry>” to
place a phone call by directly selecting a
name previously stored in your address
book.
One address book entry can have up to
three different telephone numbers (mobile
phone/car/land line) for both the home
and work fields.
If only one telephone number is stored for
a given name, you can recall the entry us-
ing the command “Call John Smith”.
If several telephone numbers are associat-
ed with one entry, you can recall the de-
sired telephone number by using the
following commands:
앫“Call John Smith home”
앫“Call John Smith work”
앫“Call John Smith home cell phone”
앫“Call John Smith home car”
앫“Call John Smith home land line”
앫“Call John Smith work cell phone”
앫“Call John Smith work car”
앫“Call John Smith work land line”
The system confirms your input and the
number is dialed.
Sample dialog:
sCall John Smith
If several telephone numbers exist
for the same entry, the Voice Con-
trol System will ask for clarification.
tDo you want to place a work call or
a home call?
sWork
tJohn Smith work
Dialing
“Delete name” (COMAND address book)
Use the command “Delete name” to delete
a name from the COMAND address book.
Sample dialog:
sDelete name
tThe name, please
sSmith office
tSmith office: Would you like to de-
lete the voice name?
sYes
tThe voice name is deleted

297
Control systems
Voice Control* telephone
“List phone book” and dialing a phone
number
Use the command “List phone book” to lis-
ten to all voice entries in the phone book
with a phone number stored, and select an
entry and dial that number.
Sample dialog:
sList phone book
The system reads out the complete
phone book entry by entry.
Selecting an entry and dialing that
number
왘For the desired entry, press ! dur-
ing or immediately after voice output.
If more than one phone number exists
for a given entry, the Voice Control Sys-
tem prompts:
tDo you want to place a work call or
a home call?
sHome
The system reads out the name of
the selected entry and dials the cor-
responding number.
Canceling the dialog
왘Press L.
The system confirms “Cancel”.
The dialog is concluded.
Managing automated answering sys-
tem/voice mail box
Activate the Voice Control System to ac-
cess and manage your answering ma-
chine/voice mail box.
왘Activate the Voice Control System dur-
ing a phone call (컄page 289).
An audible tone (beep) confirms the ac-
tivation of the system.
왘Speak the required digits (“Zero” to
“Nine”).
or
왘Speak the required words “Star” and
“Pound”.
왘Speak the final command “OK”.
The system dials the number entered.

298
Control systems
Voice Control* navigation
Voice Control* navigation
Important notes
Warning! G
For safety reasons, you should only select a
destination when the vehicle is stationary.
While the navigation system provides direc-
tional assistance, the driver must remain fo-
cused on safe driving behavior, especially
attention to traffic and street signs, and
should utilize the system’s audio cues while
driving.
The navigation system does not supply any
information on stop signs, yield signs, traffic
regulations or traffic safety rules. Their ob-
servance always remains in the driver’ per-
sonal responsibility. DVD maps do not cover
all areas nor all routes within an area.
Traffic regulations always have priority over
any route recommendations given.
Bear in mind that at a speed of just 30 mph
(approximately 50 km/h), your vehicle is
covering a distance of 44 feet
(approximately 13.5 m) every second.
During route guidance, you will not receive
information on:
앫traffic lights
앫stop and yield signs
앫parking or stopping zones
앫one-way streets
앫narrow bridges, or
앫other traffic regulation data.
You should therefore always strictly observe
traffic regulations while driving. Drive care-
fully and always obey traffic laws and road
signs, even if they contradict navigation sys-
tem instructions.
Warning! G
Please do not use the Voice Control System
in an emergency, as the tone of your voice
may change in a stressful situation. This
could cause a delay in completing your
phone call in a timely manner. This could
distract you in an emergency situation and
cause you to be involved in an accident.

299
Control systems
Voice Control* navigation
Navigation operation
The Voice Control System allows you to
앫enter a state or province
앫enter a city
앫spell the name of a city
앫spell the name of district or center
앫spell the name of a street
앫spell the name of an intersection
앫enter a house number
앫enter a complete address
앫select one of your last destinations
앫enter a POI (point of interest)
앫select one of your last destinations
앫save a destination
앫navigate to a destination stored in the
destination memory of the address
book
앫start route guidance
앫display the map
앫zoom in or zoom out of the map
앫listen to the destination memory
앫cancel route guidance
앫turn guide instructions on or off
Before you can operate navigation using
the Voice Control System, you have to ac-
tivate the Voice Control System
(컄page 289).
Selecting navigation mode
왘Press !.
왘Speak the command “Navigation”.
왘Press !.
왘Speak one of the navigation com-
mands.
Warning! G
Navigation announcements are intended to
direct you while driving without diverting
your attention from the road and driving.
Please always use this feature instead of
consulting the map display for directions.
Consulting the symbols or map display for
directions may cause you to divert your at-
tention from driving and increase your risk
of an accident.

300
Control systems
Voice Control* navigation
Navigation commands
For a complete list of commands
(컄page 318).
“Help navigation”/“Help”
Use the command “Help navigation” or
“Help” to read out an option list of avail-
able functions and commands that can be
used in conjunction with the navigation
system.
“Enter state”,“Enter province”
Use the command “Enter state” or “Enter
province” to select a different state or
province on the navigation DVD.
Sample dialog:
sEnter state
tPlease say the name of the state
sNew York
uThe system shows a numbered list
of states recognized by the system
tPlease select a line number
sNumber two
or to accept, say
sYes
tState accepted
The selected entry is adopted from the list.
“Last states”
Use the command “Last states” to select a
state or province from among a number of
last selected states or provinces.
Dialog for entering a complete address
“Enter destination”
Use the command “Enter destination” to
enter a complete destination address.
The system guides you through the dialog.
As soon as a valid address has been en-
tered, you can start route guidance or save
the destination. For information on spelling
(컄page 305).
Sample dialog:
sEnter destination
tPlease spell a New York street
name
sB-R-O-A-D-W
iYou cannot start the route guidance until all
necessary address data has been entered.

301
Control systems
Voice Control* navigation
uThe system displays a numbered
list of matching street names on
the COMAND display
tPlease select a line number
sNumber two
tNumber two accepted
tDo you want to enter a house num-
ber?
sNo
tDo you want to enter an intersec-
tion?
sNo
tDo you want to spell the town’s
name?
sYes
tPlease spell the town name
sN-E-W-Y-O-R-K
uThe system displays a numbered
list of matching city names on the
COMAND display
tPlease select a line number
sNumber one
tNumber one accepted
tDo you want to start route guid-
ance?
sYes
tStarting route guidance
The system calculates the route and, upon
completing route calculation, starts route
guidance.
“Points of interest”
Use the command “Points of interest” to
select a point of interest (POI) such as air-
ports, railroad stations, gas stations etc.
Sample dialog:
sPoints of interest
uThe system shows the following list
on the COMAND display:
앫current position
앫other town/city
앫Global POI
tPlease select a line number
sNumber one
uThe system displays a numbered
list of available POI categories:
Select POI category menu
tPlease select a line number
sNumber one
iYou may not need to spell the entire name
(street, intersection, city or point of interest) es-
pecially if the name is lengthy. Spelling the first
three to five characters of the name should be
sufficient for the system to recognize the name
provided it is available on the navigation DVD.
iThe selection appearing on the COMAND
display is sorted based on your recognized voice
input and a matching algorithm.
You can use the commands “Continue” or
“Back” to scroll up or down in the list.
Use the command “Correction” to start over by
again spelling the name.
Speak each character as clearly as you can, es-
pecially when they sound very similar (d or e).

302
Control systems
Voice Control* navigation
uThe system displays a numbered
list search categories: Find menu
tPlease select a line number
sNumber one
uThe system displays a numbered
list of airports sorted by distance
tPlease select a line number
sNumber one
tPoint of interest accepted
tDo you want to start route guid-
ance?
sYes
tStarting route guidance
“Next POI”
With the commands
앫“Next gas station”
앫“Next parking lot”
앫“Next Mercedes-Benz service”
앫“Next restaurant”
앫“Next hospital”
you can select POIs in your vicinity.
Sample dialog:
sNext gas station
uThe system shows a numbered list
of gas stations on the COMAND dis-
play
tPlease select a line number
sNumber one
tNumber one accepted
tDo you want to start route guid-
ance?
sYes
The system calculates the route and, upon
completing route calculation, starts route
guidance.
“Last destinations”
Use the command “Last destinations” to
select a destination from among a number
of destinations last navigated to.
“Save destination”
Use the command “Save destination” to
save the current destination in the address
book.
iDepending on the number of categories and
POI’s available for a given area, the system may
display several lists on each of which you may
have to make a selection by speaking the desired
line number or you have to spell the name of a
POI.
iThe Voice Control System may recognize
names even if not saved in your voice. For best
possible call-up performance, however, you
should speak and save the names you intend to
use yourself.
If an entry is already available in the address
book, the system will ask you if you would like to
add the address to the available entry.

303
Control systems
Voice Control* navigation
Sample dialog:
sSave destination
tPlease say the name
sJohn Smith
tPlease repeat the name
sJohn Smith
tWhere do you want to save: home
or work?
sWork
tThe destination has been saved
“Navigate to <voice entry>” (address
book)
Use the command “Navigate to <voice en-
try>” to start route guidance by selecting
voice entry with a saved destination ad-
dress from the COMAND address book.
A voice entry may have two different desti-
nation addresses associated with it (home
or work).
The system confirms your command, cal-
culates the route, and begins route guid-
ance.
If only one address is stored, you can use
the command “Navigate <voice name>” to
select the stored destination address for
that name.
If two addresses are stored, you can use
the commands
앫“Navigate <voice name> home”
or
앫“Navigate <voice name> work”
to directly select between home or work
address for that name. The system con-
firms your selection, calculates the route,
and begins route guidance.
Sample dialog:
sNavigate to John Smith
If more than one address exists for
this voice entry, the Voice Control
System will prompt you:
tNavigate to home or work?
sWork
tJohn Smith work
Starting route guidance

304
Control systems
Voice Control* navigation
“Start route guidance”
Use the command “Start route guidance”
to start route guidance after entering a val-
id destination.
Sample dialog:
sStart route guidance
tStarting route guidance
Route guidance begins.
“Guidance instructions on”
Use the command “Guidance instructions
on” to have the Voice Control System re-
peat the last guidance instruction. If guid-
ance voice output was previously muted,
using this command will deactivate the
muting of the voice output.
“Guidance instructions off”
Use the command “Guidance instructions
off” to mute the systems’ guidance voice
output.
“Cancel route guidance”
Use the command “Cancel route guid-
ance” to cancel route guidance.
Sample dialog:
sCancel route guidance
tAre you sure you want to cancel
route guidance?
sYes
Route guidance is canceled.
or
sNo
tCancel
The dialog with the Voice Control System
is canceled. Route guidance remains ac-
tive.
“Map”
Use the command “Map” to activate or
switch to map display.
“Zoom in”, “Zoom out”
Use these commands to zoom in on map or
to zoom out of map to the desired level of
map detail.
“Zoom in completely”, “Zoom out com-
pletely”
These commands are used to adapt the
map display directly to the smallest or larg-
est map scale.
“List destination memory”
Use the command “List destination memo-
ry” to have the system read out all destina-
tion memory entries and select and entry
for route guidance.

305
Control systems
Voice Control* navigation
Sample dialog:
sList destination memory
The system reads out the address
book destination memory.
To select a voice entry and adopt address
for route guidance:
왘When the system reads the desired en-
try, press !.
If more than one address is available,
the system will prompt you:
tNavigate to home or work?
sHome
The system reads the selected
voice entry and starts route guid-
ance.
To cancel the dialog:
왘Press L.
You have canceled the dialog. The sys-
tem confirms cancellation by saying
“Cancel”.
Commands for entering parts of an
address
“Enter town”
The “Enter town” command is used to en-
ter any larger town or city in the USA or
Canada.
Sample dialog:
sEnter town
tPlease spell the name of the town
sE-A-S-T-O-N
uThe system displays a numbered
list of available city names
tPlease select a line number
sNumber one
tNumber one, town accepted
The city selected is adopted for route guid-
ance.
“Spell town”
Use the command “Spell town” to enter a
city name by spelling mode and see if it
matches an entry available on the naviga-
tion DVD.
Speak the characters as a continuous
string (five to seven characters). The sys-
tem then displays a list of cities on the
COMAND display from which you can se-
lect the desired city.
Sample dialog:
sSpell town
tPlease spell the town name
iIf the desired town/city does not appear on
the list of towns/cities, the town or city can be
entered by using the “Spell town” command.
iYou can scroll through the list by using the
“Continue” or “Back” command. Say “Correc-
tion” to enter the town or city again.

306
Control systems
sN-E-W-Y-O-R
uThe system displays a numbered
list of available city names
tPlease select a line number
sNumber one
tNumber one, town accepted
The city selected is adopted for route guid-
ance.
“District” or “Center”
Use the command “District” or “Center” to
to spell a city location in the city previously
selected.
Speak the characters as a continuous
string (five to seven characters). The sys-
tem then displays a list of available city dis-
tricts or centers on the COMAND display.
Select the desired city center from that
list.
Sample dialog:
sDistrict
tPlease spell the center
sS-T-A-T-E-N-I-S
uThe system displays a list of avail-
able districts if more than one name
matches the name of a district for
the given city
tPlease select a line number
sNumber one
tNumber one, center accepted
The district selected is adopted for route
guidance.
iYou can use the commands “Continue” or
“Back” to scroll up or down in the list. Use the
command “Correction” to start over again by
spelling the name of the town.
iYou must also spell foreign towns or cities in
English. Please note that the list on the COMAND
display is sorted according to the probability of
the voice recognition.
Speak each character as clearly as you can, es-
pecially when they sound very similar (d or e).

307
Control systems
Voice Control* navigation
“Street”
Use the command “Street” to spell and se-
lect a street for the adopted city. Only
street names available on the navigation
DVD can be selected.
Speak the characters as a continuous
string (five to seven characters). The sys-
tem then displays a list of available street
names on the COMAND display. Select the
desired street name from that list.
Sample dialog:
sStreet
tPlease spell the name of the street
sF-O-R-E-S-T
uThe system displays a numbered
list of available street names
tPlease select a line number
sNumber one
tNumber one, street accepted
The street name selected is adopted for
route guidance.
“Intersection”, “Cross street”
Use the command “Intersection” or “Cross
street” to spell and select an intersection.
Speak the characters as a continuous
string (five to seven characters). The sys-
tem then displays a list of available inter-
sections on the COMAND display. Select
the desired intersection from that list.
Sample dialog:
sIntersection
tPlease spell the first street name
sF-O-R-E-S-T
tPlease spell the name of the cross-
ing street
sD-U-D-L-E-Y
uThe system displays a numbered
list of available intersections on the
COMAND display
tPlease select a line number
sNumber one
tIntersection accepted
The intersection is adopted for route guid-
ance. If an address at the intersection is
recognized, the system asks if it is correct.
Say “Yes” or “No”.
“House number”
Use the command “House number” to se-
lect a house number for the street previ-
ously selected. Speak the house number in
single digits.
Sample dialog:
sHouse number
tPlease say the house number in sin-
gle digits
sThree two
tIs three two correct?
sOK
tHouse number accepted
The house number is adopted for route
guidance.

308
Control systems
Voice Control* address book
Voice Control* address book
COMAND address book overview
The Voice Control System address book
function gives you the capability to store
names and associated phone numbers and
address information.
You can store up to 80 speaker-dependent
voice entries in the Voice Control System
address book.
Using these voice entries, you can dial a
phone number stored in address book or
start route guidance to an address stored
in the address book. Available commands
are dependent on the status of the address
book. The address book can be in one of
the following status:
앫Address book not open
앫Address book open
Operation with address book not open
(global)
The Voice Control System gives you the
following capabilities:
앫Store a name (컄page 294)
앫Dial a name (컄page 295)
앫Delete a name (컄page 296)
앫Navigate to an entry (컄page 303)
앫List address book (컄page 309)
앫List phone book of the address
(컄page 297)
앫List address book destination memory
(컄page 304)
앫Delete the address book (컄page 310)
앫Open the address book
Opening address book
왘Press !.
왘Speak the command “Address book”.
왘Press !.
왘Speak one of the address book com-
mands described below.
Operation with address book open
(local)
In addition to the capabilities listed when
the address book is not open, the address
book opened allows you to:
앫open an entry using the corresponding
voice entry
앫open any entry by spelling the name
Warning! G
Please devote your attention first and fore-
most to the traffic situation you are in.
Before your journey, please familiarize your-
self with the address book functions.
Only use the Voice Control System when
road and traffic conditions permit you to do
so. Otherwise you could be involved in an
accident in which you or others could be in-
jured.

309
Control systems
Voice Control* address book
왔왘Opening entry: Speak the command “Open entry”.
Operating and using address book
왘Press !.
왘Speak one of the following commands
depending on the address book status
(open or not open).
Available commands with the address
book not open
For a complete list of commands
(컄page 318).
“Help address book”
Use the command “Help address book” to
have the Voice Control System read out an
option list of all available commands for
the address book.
“Save name” (컄page 294)
“Dial name” (컄page 295)
“Call <voice name>” (컄page 296)
“Delete name” (address book)
Use the command “Delete name” to delete
a voice name from your address book.
Sample dialog:
sDelete name
tPlease say the name
sJohn Smith
tDo you want to delete John Smith?
sYes
tThe voice name is deleted
“Navigate to <voice entry>” (address
book) (컄page 303)
“List address book”
Use the command “List address book” to
have the system read out all available ad-
dress book entries and, if desired, select
an entry when it is being read.

310
Control systems
Voice Control* address book
Sample dialog:
sList address book
The system reads out all available address
book entries.
왘Selecting address book entry: When
the system reads the desired entry,
press !.
The entry is selected and shown on the
COMAND display.
왘Canceling the dialog: Press L.
You have canceled the dialog. The sys-
tem reads out “Cancel”.
“List phone book” and dialing a phone
number (컄page 297)
“List destination memory” (컄page 304)
“Delete address book”
Use the command “Delete address book”
to delete all or individual voice names of
the address book entries. Only the voice
name is deleted; the remaining data in the
entry are retained.
“Address book”
Use this command to open the address
book.
Available commands with the address
book open
“Help address book”
Use the command “Help address book” to
have the Voice Control System read out an
option list of all available commands for
the address book.
“Open <voice name>”
Use the command “Open <voice name>”
to open an entry in your address book that
has a voice name already assigned to it.
Sample dialog:
sOpen John Smith
uThe entry “John Smith” appears on
the COMAND display
“Select entry”
Use the command “Select entry” to open
an entry in your address book.
Sample dialog:
sSelect entry
tPlease say the name
sJohn Smith
uThe entry “John Smith” appears on
the COMAND display.
“Spell entry”
Use the command “Spell entry” to open an
address book entry by spelling the name.
Speak the name as a continuous string
(five to seven characters).

311
Control systems
Voice Control* address book
The system will display a list of possible
matches on the COMAND display from
which you can select the desired entry.
Sample dialog:
sSpell entry
tPlease spell the name
sS-M-I-T-H
uThe system displays a numbered
list of matching entries on the
COMAND display
tPlease select a line number
sNumber two
uThe system opens the entry associ-
ated with line number two on the
list
iYou can use the commands “Continue” or
“Back” to scroll up or down the next page. Use
the command “Correction” to exit the current
selection list and spell the name again.

312
Control systems
Voice Control* radio
Voice Control* radio Radio operation
The Voice Control System gives you the ca-
pability to:
앫Select a station
앫Seek a station
앫Select a specific frequency
앫Save up to 20 stations in your station
list
앫Select frequency band (FM or AM)
앫Select weatherband
앫Switch to satellite radio* (USA only)
앫Delete station (from station list)
앫List the station list
앫Delete the station list
To operate the radio using the Voice Con-
trol System, the Voice Control System
must be activated (컄page 289).
Selecting radio mode
왘Press !.
왘Speak the command “Radio”.
왘Press !.
왘Speak one of the radio commands.
The system switches to the last tuned
station in the selected band.
Radio commands
For a complete list of commands
(컄page 318).
“Help Radio”
Use the commands
앫“FM”
앫“AM”
앫“Weatherband”
to select the desired frequency band or
switch the radio to the weatherband.
Warning! G
Please devote your attention first and fore-
most to the traffic situation you are in.
Before your journey, please familiarize your-
self with the radio functions.
Only use the Voice Control System when
road and traffic conditions permit you to do
so. Otherwise you could be involved in an
accident in which you or others could be in-
jured.

313
Control systems
Voice Control* radio
왔“Sat Radio*” (USA only)
Use this command for switching on the
satellite radio*.
“Next station” or “Previous station”
The following commands are used to start
the station search and to tune in the next
station:
앫“Next station”
앫“Previous station”
Selecting frequency (FM, AM only)
You may, for example, select a frequency
in the FM band (87.9 to 107.9 Megahertz)
directly using a verbal command such as
“Ninety-five five”. The Voice Control Sys-
tem also recognizes the words “frequen-
cy”, “point” and “megahertz”. You may for
example use the command “Frequency
ninety-five point five”.
Sample dialog:
sNinety-five point five
The Voice Control System tunes the radio
to frequency FM 95.5.
“Save station” (List saved stations)
Use this command to save the set station
(AM and FM only) by name in your personal
station list. After using this command, the
Voice Control System will prompt you to
repeat the name two to four times before it
is saved in the station list. When repeating
the station name, make sure that you pro-
nounce it in the same manner as during the
first input. Otherwise the name cannot be
saved and the Voice Control System can-
cels the save procedure.
Sample dialog:
sSave station
tPlease say the station name
sSmooth Jazz
tPlease say the station name again
sSmooth Jazz
tThe station Smooth Jazz has been
saved
“Select station” (List saved stations)
Use the command “Select station” (AM
and FM only) to select a saved station
name from your station list.
Sample dialog:
sSelect station
tPlease say the station name
sSmooth Jazz
The Voice Control System tunes to the cor-
responding frequency.
iThe Voice Control System may recognize
names even if not saved in your voice. For opti-
mum performance, however, call up only names
you have saved yourself.
iYou can freely select the station name, for
example “Favorite station”.

314
Control systems
Voice Control* radio
“Station Smooth Jazz” (List saved sta-
tions)
Use this command (AM and FM only) to di-
rectly select a saved station name from
your station list.
Sample dialog:
sStation Smooth Jazz
The Voice Control System tunes to the cor-
responding station.
“List station list” and select station
from list
Use this command to list the entire station
list, or to select an entry from the station
list.
Sample dialog:
sList station list
The Voice Control System reads out the
entire list.
To select a station:
When the system reads the desired sta-
tion:
왘Press !.
왘Canceling the dialog: Press L.
The dialog is concluded. The system
confirms “Cancel”.
“Delete station” (List saved stations)
Use the command “Delete station” (AM
and FM only) to delete a station from your
personal station list.
Sample dialog:
sDelete station
tWhich station do you want to de-
lete?
sSmooth Jazz
tDo you want to delete Smooth Jazz?
sYes
tStation deleted
iIf the Voice Control System does not recog-
nize the station name you requested, please re-
fer to the section “List station list” (컄page 314).
By following the dialog, you can check and deter-
mine if the name is saved in the station list.

315
Control systems
Voice Control* radio
왔“Delete station list”
Use this command to delete the complete
station list or one or more stations from
the station list.
Sample dialog:
sDelete station list
tDo you want to delete all voice
names from the station list?
sYes
tAre you sure?
sYes
tAll voice names have been deleted
from the station list
The system deletes the complete station
list. The deletion of the station list cannot
be undone.
or
tNo
The system starts reading the station list.
When the system reads the station to be
deleted:
왘Press !.
The station to be deleted is selected.
The name of the selected station is
read out once more.
tDo you want to delete Smooth Jazz?
sYes
tStation deleted
The station is erased and the remaining
station entries are read out.
or
tNo
The system continues reading the station
list entry by entry.

316
Control systems
Voice Control* CD/DVD changer/MP3
Voice Control*
CD/DVD changer/MP3
Operation
The Voice Control System gives you the
ability to:
앫Select a CD/DVD/medium
앫Select a track
앫Select a folder in MP3 mode
앫Select a group in audio-DVD mode
To operate the DVD changer using the
Voice Control System, the Voice Control
System must be activated (컄page 289).
Selecting CD mode
왘Press !.
왘Speak one of the following commands:
앫“CD”
앫“DVD”
앫“MP3”
왘Press !.
왘Speak one of the following commands.
Commands
For a complete list of commands
(컄page 318).
“Help CD” or “Help DVD” “Help MP3”
Use the commands
앫“Help CD”
앫“Help DVD”
앫“Help MP3”
and the Voice Control System will read out
a complete list of available commands for
the CD, DVD or MP3.
“CD/DVD/Medium 1” to
“CD/DVD/Medium 6”
Use commands “CD/DVD/Medium 1” to
“CD/DVD/Medium 6” to select one of up
to 6 mediums in your DVD changer.
Warning! G
Please devote your attention first and fore-
most to the traffic situation you are in.
Before your journey, please familiarize your-
self with the audio functions.
Only use the Voice Control System when
road and traffic conditions permit you to do
so. Otherwise you could be involved in an
accident in which you or others could be in-
jured.
iThe following commands “Next/Previous
CD/DVD” and “CD/DVD 1” to “CD/DVD 6”,
cause the DVD changer to switch from one slot
to another, regardless of the type of medium
found in the selected slot. In your command, you
can therefore replace the term “CD/DVD” with
“Medium”.

317
Control systems
Voice Control* CD/DVD changer/MP3
“Next CD/DVD/Medium”
Use the command “Next CD/DVD/Medi-
um” to select the next available medium in
the DVD changer.
“Track 1” to “Track 39”
Use the commands “Track 1” to
“Track 39” to select one of up to 39 title
numbers of a loaded medium.
“Next track”
Use the command “Next track” to select
the next track.
“Previous track” or “Repeat track”
Use the command “Previous track” or “Re-
peat track” to play again the track you are
listening to.
“Group 1” to “Group 9”
The “Group 1” to “Group 9” commands are
used to select a group on the inserted au-
dio-DVD.
“Next group”/“Previous group”
The “Next group”/“Previous group” com-
mands are used to select a group on the in-
serted audio-DVD.
“Memory card”
The “Memory card” command is used to
switch from the DVD drive to the PCMCIA
card.
“Drive”
The “Drive” command is used to switch
from the PCMCIA card to the DVD drive.

318
Control systems
Voice Control* command list
Voice Control* command list
Command list
Chapter “Command list” gives you on over-
view of all commands available for use to
control the Voice Control System.
Which commands are available for use is
dependent on the equipment level in your
vehicle.
General commands
iSome functions can be operated using sev-
eral different commands. In the following list,
these commands are grouped in one cell.
Choose your preferred command from those
available.
앫yes
앫right
앫ok
앫cancel
앫stop
앫quit
앫abort
앫terminate
앫no
앫no thank you
앫address book
앫MP3
앫CD
앫navigation
앫route guidance
앫audio DVD
앫radio
앫sat radio*
앫satellite radio*
앫telephone
앫messages
앫SMS
앫vehicle
앫correction
앫wrong
앫incorrect
앫help
앫help please
앫please help
앫help functions
앫help devices
앫help voice control
앫linguatronic help
앫general help
앫help permanent commands

319
Control systems
Voice Control* command list
Telephone* commands
앫help global commands
앫letters of the English alphabet
앫digits 0 - 9
앫continue
앫go forward
앫next page
앫back
앫go back
앫previous page
앫help radio
앫help tuner
앫radio help
앫tuner help
앫help telephone
앫help phone
앫help address book
앫help CD
앫help disc
앫help CD player
앫help CD changer
앫help audio DVD
앫help DVDA
앫help DVD audio
앫help DVD audio player
앫help DVD audio changer
앫help navigation
앫help nav
앫help navi
앫help route guidance
앫help routing
앫help destination guidance
앫telephone (on)
앫phone (on)
앫telephone off
앫save
앫save PIN
앫save PIN code
앫save number
앫save PIN number
앫save telephone number
앫save name
앫save password
앫store PIN
앫store PIN code
앫store number
앫store PIN number

320
Control systems
Voice Control* command list
앫store telephone number
앫store name
앫store password
앫dial
앫dial PIN
앫dial number
앫dial PIN number
앫dial PIN code
앫dial phone number
앫dial telephone number
앫dial password
앫dial unlock code
앫confirm
앫confirm PIN
앫confirm number
앫confirm PIN number
앫confirm PIN code
앫confirm phone number
앫confirm telephone number
앫confirm password
앫confirm unlock code
앫repeat PIN
앫repeat number
앫repeat PIN number
앫repeat PIN code
앫repeat phone number
앫repeat telephone number
앫repeat password
앫repeat unlock code
앫enter PIN
앫enter PIN code
앫enter PIN number
앫enter code
앫enter unlock code
앫list phone book
앫read out phone book
앫play phone book
앫get phone book
앫recall phone book
앫redial
앫redial last number
앫redial last phone number
앫correction
앫wrong PIN
앫wrong number
앫wrong PIN number
앫wrong PIN code
앫wrong phone number
앫wrong telephone number
앫wrong unlock code
앫incorrect PIN
앫incorrect number
앫incorrect PIN number
앫incorrect PIN code

321
Control systems
Voice Control* command list
Navigation commands
앫incorrect phone number
앫incorrect telephone number
앫incorrect unlock code
앫delete
앫delete PIN
앫delete number
앫delete PIN number
앫delete PIN code
앫delete phone number
앫delete telephone number
앫delete unlock code
앫navigation
앫nav
앫navi
앫route guidance
앫routing
앫destination guidance
앫guidance instructions on
앫switch guidance instruction on
앫switch guidance instructions on
앫switch route guidance instruction on
앫switch route guidance instructions on
앫switch on guidance instruction
앫switch on guidance instructions
앫switch on route guidance instruction
앫switch on route guidance instructions
앫guidance instructions off
앫switch guidance instructions off
앫switch route guidance instructions off
앫switch off guidance instructions
앫switch off route guidance instructions
앫mute guidance instructions
앫mute route guidance instructions
앫house number
앫enter house number
앫map (on)
앫show map
앫switch on map
앫zoom in
앫zoom in on map
앫zoom out
앫zoom out on map
앫zoom in completely
앫zoom out completely
앫enter country
앫enter another country
앫spell country
앫spell another country
앫change country
앫change another country
앫intersection
앫spell intersection

322
Control systems
Voice Control* command list
앫spell cross street
앫enter intersection
앫enter cross street
앫last destinations
앫last states
앫last provinces
앫spell town
앫spell city
앫spell name of town
앫spell name of city
앫enter town
앫enter city
앫enter name of town
앫enter name of city
앫district
앫center
앫spell district
앫spell center
앫enter district
앫enter center
앫points of interest
앫enter points of interest
앫enter point of interest
앫enter POI
앫enter POIs
앫street
앫spell street
앫spell name of street
앫enter street
앫enter name of street
앫enter destination
앫destination entry
앫destination input
앫address entry
앫address input
앫save destination
앫save address
앫store destination
앫store address
앫start route guidance
앫start navigation
앫start nav
앫start routing
앫begin route guidance
앫begin navigation
앫begin route guidance
앫begin routing
앫continue route guidance
앫continue navigation
앫continue nav
앫continue routing
앫destination guidance on
앫cancel route guidance
앫cancel navigation

323
Control systems
Voice Control* command list
Address book commands
앫cancel nav
앫cancel routing
앫cancel destination guidance
앫exit route guidance
앫exit navigation
앫exit nav
앫exit routing
앫exit destination guidance
앫terminate route guidance
앫terminate navigation
앫terminate nav
앫terminate routing
앫terminate destination guidance
앫next gas station
앫next Mercedes-Benz service
앫next workshop
앫next MB service
앫next MB service point
앫next MB service center
앫next Mercedes service
앫next Mercedes service point
앫next Mercedes service center
앫next Mercedes-Benz service point
앫next Mercedes-Benz service center
앫next service point
앫next service center
앫next hospital
앫next parking lot
앫next restaurant
앫address book (on)
앫address list (on)
앫addresses (on)
앫list address book
앫read out address book
앫get address book
앫recall address book
앫delete address book
앫spell entry
앫spell name
앫spell heading
앫search entry
앫search name
앫search heading
앫open entry
앫show entry
앫list entry
앫select entry
앫get entry
앫open entry
앫open page
앫open item
앫open name

324
Control systems
Voice Control* command list
앫open <voice name>
앫delete name
앫delete <voice name>
앫list destination memory
앫read out destination memory
앫play destination memory
앫get destination memory
앫recall destination memory
앫<voice name>
앫<voice name> car
앫<voice name> car phone
앫<voice name> land line
앫<voice name> phone
앫<voice name> telephone
앫<voice name> cell phone
앫<voice name> mobile phone
앫<voice name> cellular phone
앫call <voice name>
앫call <voice name> work
앫call <voice name> office
앫call <voice name> business
앫call <voice name> company
앫<voice name> home
앫call <voice name> home
앫work
앫office
앫business
앫company
앫car
앫car phone
앫land line
앫land line phone
앫land line telephone
앫cell phone
앫mobile phone
앫cellular phone
앫work car (phone)
앫office car (phone)
앫business car (phone)
앫company car (phone)
앫car (phone) work
앫car (phone) office
앫car (phone) business
앫car (phone) company
앫work land line
앫office phone
앫land line phone business
앫land line telephone company
앫work cell phone
앫office mobile phone
앫business cellular phone
앫cell phone company
앫home
앫home car

325
Control systems
Voice Control* command list
Audio commands
앫home car phone
앫car home
앫car phone home
앫home land line
앫home land line phone
앫land line home
앫land line phone home
앫home cell phone
앫home mobile
앫cell home
앫cell phone home
앫mobile home
앫mobile phone home
앫cellular home
앫cellular phone home
앫call <voice name> work car
앫call <voice name> work land line
앫call <voice name> work cell phone
앫call <voice name> home car
앫call <voice name> land line phone
앫call <voice name> cell phone home
앫navigate to <voice name>
앫drive to <voice name>
앫navigate to <voice name> work
앫navigate to <voice name> home
앫dial name
앫dial voice name
앫save name
앫save voice name
앫save number
앫save telephone number
앫store voice name
앫store number
앫store telephone number
앫accept
앫accept PIN
앫accept PIN code
앫accept lock code
앫accept PIN number
앫accept number
앫accept telephone number
앫accept name
앫accept password
앫OK
앫finished
앫<1> - <8>
앫use <1> - <8>
앫number <1> - <8>
앫line <1> - <8>
앫audio
앫audio off

326
Control systems
Voice Control* command list
Radio
Example: 95.5 FM
Example: 540 AM
Satellite radio* (USA only)
앫radio (on)
앫AM
앫MW
앫FM
앫weatherband
앫next station
앫station search
앫going up
앫other station
앫radio seek
앫station <voice entry>
앫go to <voice entry>
앫<voice entry>
앫delete station
앫save station
앫store station
앫select station
앫select channel
앫list station list
앫list saved stations
앫read out station list
앫play station list
앫get station list
앫recall station list
앫delete station list
앫previous station
앫last station
앫coming down
앫station search coming down
앫ninety-five five
앫ninety-five five megahertz
앫ninety-five point five
앫ninety-five point five megahertz
앫frequency ninety-five five
앫frequency ninety-five point five
앫frequency ninety-five five megahertz
앫frequency ninety-five point five mega-
hertz
앫five-hundred-forty
앫five-hundred-forty kilohertz
앫frequency five-hundred-forty
앫frequency five-hundred-forty kilohertz
앫sat radio*
앫satellite radio*

327
Control systems
Voice Control* command list
왔CD
MP3
앫CD (on)
앫CD player (on)
앫CD changer (on)
앫next CD
앫other CD
앫next medium
앫other medium
앫previous CD
앫last CD
앫preceding CD
앫replay CD
앫replay medium
앫repeat medium
앫last medium
앫previous medium
앫next track
앫other track
앫previous track
앫last track
앫repeat track
앫replay track
앫track 1-39
앫load track 1-39
앫load track number 1-39
앫select track 1-39
앫select track number 1-39
앫CD 1-6
앫CD number 1-6
앫medium 1-6
앫medium number 1-6
앫MP3 (on)
앫MP3 player (on)
앫MP3 changer (on)
앫next MP3
앫other MP3
앫next medium
앫other medium
앫previous MP3
앫last MP3
앫preceding MP3
앫replay MP3
앫replay medium
앫repeat medium
앫last medium
앫previous medium
앫next directory
앫other directory

328
Control systems
Voice Control* command list
DVD
앫next folder
앫other folder
앫previous directory
앫previous folder
앫last directory
앫last folder
앫repeat directory
앫repeat folder
앫next track
앫other track
앫previous track
앫last track
앫repeat track
앫replay track
앫track 1-39
앫load track 1-39
앫load track number 1-39
앫select track 1-39
앫select track number 1-39
앫MP3 1-6
앫MP3 number 1-6
앫medium 1-6
앫medium number 1-6
앫drive
앫memory card
앫audio DVD
앫DVDA player (on)
앫audio DVD player (on)
앫DVD audio player (on)
앫DVDA changer (on)
앫audio DVD changer (on)
앫DVD audio changer (on)
앫next DVDA
앫other DVDA
앫next DVD audio
앫other DVD audio
앫next audio DVD
앫other audio DVD
앫next medium
앫other medium
앫previous DVDA
앫last DVDA
앫preceding DVDA
앫replay DVDA
앫previous DVD audio
앫last DVD audio
앫preceding DVD audio
앫replay DVD audio
앫previous audio DVD
앫last audio DVD
앫preceding audio DVD
앫replay audio DVD

329
Control systems
Voice Control* command list
앫replay medium
앫repeat medium
앫last medium
앫previous medium
앫next directory
앫other directory
앫next folder
앫other folder
앫previous directory
앫previous folder
앫last directory
앫last folder
앫repeat directory
앫repeat folder
앫next group
앫other group
앫previous group
앫previous repeat group
앫previous replay group
앫last group
앫last repeat group
앫last replay group
앫group 1-9
앫select group 1-9
앫group number 1-9
앫select group number 1-9
앫next track
앫other track
앫previous track
앫last track
앫repeat track
앫replay track
앫track 1-39
앫load track 1-39
앫load track number 1-39
앫select track 1-39
앫select track number 1-39
앫DVDA 1-6
앫DVDA number 1-6
앫DVD audio 1-6
앫DVD audio number 1-6
앫audio DVD 1-6
앫audio DVD number 1-6
앫medium 1-6
앫medium number 1-6

330
Control systems
Voice Control* troubleshooting
Help function
To support the user, the Voice Control Sys-
tem contains an extensive help function.
The help function gives you:
앫General hints on how to best use the
Voice Control System
앫A listing of all available commands
Help commands
“Help voice control”
Using the command “Help voice control”
will give you information on how to best
use the Voice Control System.
“Help”
In a main menu, help can be accessed at
any time by saying the command “Help”.
The Voice Control System will then read
out the available functions and commands
of all systems.
In a submenu, help can also be accessed at
any time by saying the command “Help”.
The Voice Control System will then read
out an option list of all available functions
and commands available in the particular
submenu.
You can also use the help function to ac-
cess help for a specific system. To access
help for the phone operation, you would
speak the command “Help Telephone”.
If you wish to execute the last command
read out:
왘Press !.
Help window
You can use the help window to view a se-
lection of valid commands on the
COMAND display.
The help functions can be switched on or
off via COMAND in the “System settings”
menu (컄page 239).
Entering digits and spelling
Entering digits
앫Digits from “Zero” to “Nine” may be
used.
앫Speaking phone numbers in digit
blocks of 3 to 5 digits has proven a
very reliable method for the input of
phone numbers.
Spelling
앫The letters of the English alphabet and
the digits 0 - 9 may be used.
앫Speak the letters in blocks of 5 - 7 let-
ters at a time.
앫Speak each individual letter clearly.

331
Control systems
What to do if ...
Problem Possible cause/consequence Suggested solution
Voice Control System does not recognize a
station list entry.
The voice entries for the station names
sound too similar.
왘When you create your address book en-
tries, select names with the greatest
possible acoustic differences.
왘Speak the command “List station list”.
The system reads out the station list en-
try by entry.
왘Press ! when the desired station
name is being read out.
The station is selected (컄page 314).
Should interference occur during the pro-
cess of storing a name, the Voice Control
System prompts you to repeat your voice
entry a third and fourth time. If the interfer-
ence continues, the dialog is stopped.
Both voice entries differ. 왘Pronounce the voice entries both times
in the same manner.

332
Control systems
Problem Possible cause/consequence Suggested solution
Voice Control System does not recognize
commands.
You have not operated the system from the
driver’s seat.
왘Operate the Voice Control System only
by the driver as the microphone is
geared to the driver side.
You have spoken unclearly, too loudly or
too quietly.
왘Speak the commands in a continuous
manner using a normal tone.
A blower is set to the highest setting, vents
are pointed at microphones or wind noise is
being created through open windows.
왘Avoid loud disturbances.
Voice Control System does not recognize a
address book entry.
The voice entries in the address book sound
too similar.
왘When you create your address book en-
tries, select names with the greatest
possible acoustic differences: If for ex-
ample you have the names Smith and
Schmidt, choose for example “Smith
work” or “Schmidt John”.
왘Speak the command “List phone book”.
The system reads out the address book
entry by entry.
왘Press ! when the desired entry is
being read out.
The entry is selected and the corre-
sponding number is dialed
(컄page 297).

333
Control systems
Voice Control* individualization
The individualization is used to adapt the
Voice Control System to your own voice
and to therefore improve speech recogni-
tion. This does not affect the speech rec-
ognition of other users.
Individualization consists of two stages:
앫Digits
앫Commands
You can activate individualization in the
COMAND system settings (컄page 239).
A dialog and screen displays will guide you
through the individualization process.
The system can be reset to the factory set-
tings at any time.
iThe individualization can only be performed
when the vehicle is stationary.
If you drive off, the individualization will be can-
celed.
After starting the session, the system will guide
you through the individualization by means of
acoustic instructions.
iYou may wish to complete only a portion of
the individualization process.
Completing the digits portion alone may result in
an improved recognition rate.
Individualization can be exited at any time. The
data trained, however, will only be retained if a
given individualization portion is completed and
the data is stored when prompted to do so by the
system.

Error: This Masterpage should never be used!