Controlled Electronic Management Systems ETHERPROX Proximity Card Reader User Manual EtherProx Entry
Controlled Electronic Management Systems Ltd Proximity Card Reader EtherProx Entry
Users Manual

EtherProxTM Entry
Installation and Operation Manual
tyco
Fire &
Security
Software
House

Copyright Acknowledgements EtherProx Entry
InfoProx™ is a trademark of Software House.
EtherProx™ is a trademark of Software House.
MicrosoftÒ and WindowsÒ are registered trademarks of Microsoft Corporation.
This product is manufactured under license from HID Corporation, Irvine, California and
embodies one or more of the inventions disclosed and claimed in U.S. Patents, Number
4,546,241, 4,730,188, 5,041,826 and/or 5,166,676.
ProxKey™ and ProxCard™are trademarks, and ISOProx® and ProxCard ll ® are registered
trademarks of HID Corporation
Document Number: #8000-1410-00
Revision: B0
Release Date: March 2002
This manual is proprietary information of Software House.
Unauthorized reproduction of any portion of this manual is prohibited. The material in this
manual is for informational purposes only. It is subject to change without notice.
Software House assumes no responsibility for incorrect information this manual may contain.
© 2002
Software House
70 Westview Street
Lexington, MA 02421-3108
All rights reserved
Software House Page i

Table of Contents EtherProx Entry
Table of Contents
1. IMPORTANT SAFETY INFORMATION ................................................................................ 1
POWER SOURCES ................................................................................................................................. 1
ANSI/UL LISTING (USA) AND CSA 22.2 LISTING (CANADA) ............................................................ 1
UL 294-COMPLIANT INSTALLATION.................................................................................................... 1
FCC CLASS A DIGITAL DEVICE .......................................................................................................... 2
CANADIAN RADIO EMISSIONS REQUIREMENTS................................................................................... 2
2. INTRODUCTION ......................................................................................................................... 2
DESCRIPTION ....................................................................................................................................... 3
READER TYPES .................................................................................................................................... 4
PREPARING TO INSTALL ETHERPROX .................................................................................................. 5
3. ETHERPROX ENTRY INSTALLATION ............................................................................... 11
POWER CONNECTIONS....................................................................................................................... 12
EXIT READER CONNECTIONS ............................................................................................................ 13
ETHERPROX ENTRY ETHERNET CONNECTION .................................................................................. 13
DOOR CONNECTIONS......................................................................................................................... 14
CONNECTING AN EXIT READER TO THE ETHERPROX........................................................................ 16
INSTALLING THE ETHERPROX ENTRY UNIT ...................................................................................... 17
To install the EtherProx Entry unit............................................................................................... 17
4. CONFIGURING THE ETHERPROX ENTRY ....................................................................... 19
SETTING UP AN IP ADDRESS.............................................................................................................. 19
To set up an IP Address ................................................................................................................ 20
TESTING THE CONNECTION ............................................................................................................... 21
SETTING THE TIME AND DATE........................................................................................................... 22
To set the time and date ................................................................................................................ 22
ENTERING A LOCATION NAME; CHANGING THE USER NAME AND PASSWORD ................................ 23
To enter a location name and change the user name and password ............................................ 23
SETTING UP THE INITIAL DOOR CONFIGURATION ............................................................................. 24
To configure a door....................................................................................................................... 24
5. ADMINISTERING THE ETHERPROX ENTRY................................................................... 25
ESTABLISHING A CONNECTION WITH ETHERPROX ENTRY ............................................................... 25
To establish a connection with EtherProx Entry .......................................................................... 25
ETHERPROX ENTRY MAIN MENU ..................................................................................................... 26
ADMINISTER CARDHOLDERS ............................................................................................................. 27
To search for cardholders............................................................................................................. 27
To add a cardholder...................................................................................................................... 28
To set the card status..................................................................................................................... 29
To set time clearances................................................................................................................... 30
To set time clearances and configure timed events, based on the example.................................. 32
VIEW TRANSACTIONS........................................................................................................................ 32
To select report options and view the report ................................................................................ 32
ADMINISTER ETHERPROX ................................................................................................................. 33
To change an EtherProx configuration setting............................................................................. 35
To back up configuration and data files ....................................................................................... 39
To restore configuration and data files.........................................................................................40
ETHERPROX ENTRY MESSAGES AND RESPONSES ............................................................................. 40
6. DIAGNOSTICS ........................................................................................................................... 43
Software House Page iii

Table of Contents Software House
RUNNING DIAGNOSTICS .....................................................................................................................43
To run diagnostics..........................................................................................................................43
UNDERSTANDING THE DIAGNOSTIC MENU SYSTEM ..........................................................................44
TECHNICAL SUPPORT .........................................................................................................................46
7. GLOSSARY..................................................................................................................................47
Page iv Software House

EtherProx Entry Introduction
1. Important Safety Information
The safety guidelines for EtherProx Entry include:
· Power sources
· ANSI/UL listing (USA) and CSA 22.2 listing (Canada)
· UL 294-compliant installations
· FCC Class A digital device
· Canadian Radio Emissions Requirements
Power Sources
To power the door latch, you should use a power limited UL 294 or UL 603 door
strike power supply. You can obtain the door strike power supply from AlarmSAF,
Altronix, Securitron, and Software House. You can also use the door strike power
supply to provide power to the reader units. The typical load on the power supply is
250 milliamps per reader. You can also power the readers by using the DIU
supplied by Software House, or a Desktop Power Supply rated 12 VDC, 1.2 Amp
minimum, with Class 2 and UL Markings. If you do not have a battery backup for
the power supply, you cannot connect the power supply to a receptacle that is
controlled by a switch.
ANSI/UL listing (USA) and CSA 22.2 listing (Canada)
A National Recognized Test Laboratory (NRTL) has examined and tested
EtherProx Entry, InfoProx Entry, and InfoProx Exit readers according to the
requirements of ANSI/UL 294 - Access Control System Units and CSA 22.2 – No.
205-M1983. The readers are low-voltage 12-volt assemblies that operate from
power limited sources. When you install a reader according to the instructions in
this manual and wire it according to the National Electrical Code (NEC), you can
expect the reader to meet all safety requirements.
UL 294-compliant Installation
To ensure a secure installation that is in full compliance with UL 294 requirements
for security and performance, follow these guidelines:
· You must install the wiring for the door controls on the secured side of
the premises.
· If you provide backup power with the installation, the batteries in the 12-
volt UL 294 or UL 603 power supply should provide power for the door
strike and the readers for a minimum of four hours. If you do not
provide backup power with the installation, make a permanent marking
on the power supply label of the expected duration of the fully charged
battery. The Software House DIU also provides battery power.
· According to UL 294 requirements, if you attempt to force open a door
at an entrance that is controlled by an InfoProx reader, or tamper with
the reader, an audible alarm will activate. A sound alarm device must
Software House Page 1

Introduction EtherProx Entry
have a sound level of at least 85 decibels. An alarm must activate for
15 minutes. You can purchase a Battery Back Up Supervisory Siren
sounder, Model 0821 from Street Smart Security. There are three ways
to meet the UL 294 alarm requirements:
o Use a Software House DIU. The DIU closes a set of
relay contacts when an intrusion or tamper is detected
by the InfoProx Reader. The relay contacts activate the
alarm.
o Reverse the Entry and Exit readers so that the door
controls are on the secure side of the door. Use the relay
output of the Exit reader to activate a supervised sound
device.
o Use a standard UL burglar alarm system to monitor the
door and the tamper activity at the InfoProx reader.
FCC Class A Digital Device
InfoProx readers have been tested and found to comply with the limits for a Class
A digital device, pursuant to Part 15 of the FCC Rules. These limits are designed
to provide reasonable protection against harmful interference when the device is
operated in a commercial environment. This equipment generates, uses, and can
radiate radio frequency energy and, if not installed and used in accordance with
the instruction manual, may cause harmful interference to radio communications.
Operation of this equipment in a residential area is likely to cause harmful
interference in which case the user will be required to correct the interference at
his own expense. The FCC ID is ACD/SPASSSERIES.
Canadian Radio Emissions Requirements
This digital apparatus does not exceed the Class A limits for radio noise emissions
from digital apparatus set out in the Radio Interference Regulations of the
Canadian Department of Communications.
Le present appareil numerique n’emet pas de bruits radioelectriques depassant les
limites applicables aux appareils numeriques de la class A prescrites dans le
Reglement sur le brouillage radiolelectrique edicte par le ministere des
Communications du Canada.
2. Introduction
The Software House EtherProx™ Entry Reader is a compact door control unit that
provides a sophisticated, cost-effective solution for single-door access monitoring and
control. The unit’s electronics are housed in a polycarbonate enclosure with an LCD
display screen and three LED indicators. Despite being small enough to mount onto an
electrical containment box, EtherProx Entry communicates to network-connected
computers through a built-in web server, which establishes connections to computers
anywhere in the world. In addition, for cardholders and administrators, the unit displays
three LED status indicators and two lines of status information on its LCD screen. A built-
in multi-tone sound device provides audible prompts and status indications for the user.
Page 2 Software House
EtherProx Entry Introduction
The EtherProx Entry door access system is ideal for controlling a single door, usually in a
remote area. You can use EtherProx Entry for businesses, leisure facilities, members-only
clubs, and secure areas in public buildings.
EtherProx Entry is also ideal for an establishment that initially requires a few readers and
envisions future expansion. For example, you can link EtherProx Entry to a multi-door
Access 2000 system, integrating alarm processing and card production facilities by
changing the firmware.
EtherProx Entry maintains a database of valid cards that are added by using a web
browser interface. The Web administration pages also allow you to configure EtherProx
Entry for door event times, location names, login names, and passwords.
To connect to the EtherProx Entry for configuration of the unit and for access
management, a personal computer with Microsoft Internet Explorer 5.5 and an Ethernet
network adapter is required. Once the EtherProx Entry has been configured and the
necessary card data has been entered, for backup purposes, you can upload data to the
computer by means of its web server. In the event of data loss on EtherProx Entry,
backup data can be downloaded to the reader’s database. Additionally, EtherProx Entry
may be connected to a local area or wide area network so that it can be controlled and
queried remotely to generate activity, status, and alarm reports.
Description
The EtherProx Entry reader is housed in a polycarbonate, fully encapsulated
enclosure that is both weather and vandal resistant. The keypad is required for
PIN validation and for access to the Administration menu. EtherProx Entry
supports HID 26 bit, HID 32 bit, and HID (Software House) 37 bit Wiegand
proximity technology, under license from HID Corporation. The following cards and
read ranges are supported.
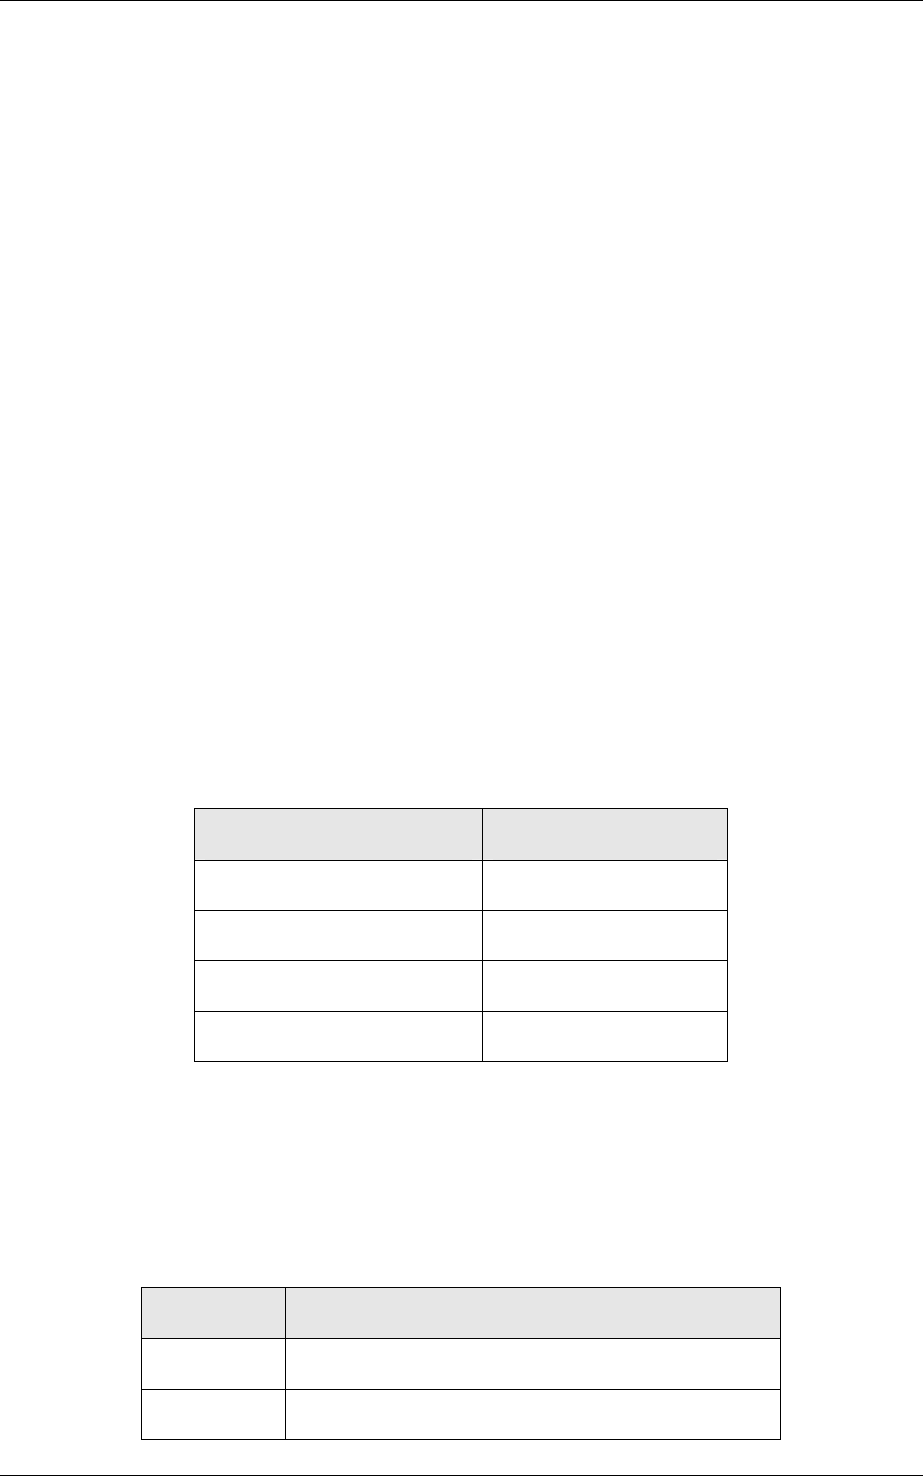
CARDS READ RANGES
ISOProx® ll Card 9cm (3.6")
ProxCard™ Plus Card 6cm (2.4")
ProxCard® ll Card 10cm (4")
ProxKey™ ll Fob 4cm (1.6")
Each reader can service one InfoProx™ Exit reader configuration supported for
IN/OUT control. Alternatively, a pushbutton can be connected as an input to the
reader to provide egress from a controlled area where no exit reader is mounted.
In normal door mode, the EtherProx Entry reader has three analog inputs, as listed
in the following table.
INPUT DOOR MODE
Input 0 Monitors door position (Normally Closed)
Input 1 Monitors lock status (Normally Closed)
Software House Page 3

Introduction EtherProx Entry
Input 2 Monitors request-to-exit button (Normally Open)
For normal door mode access, the reader has one relay reserved for a door strike.
You can configure the relay to Powered to Secure or Powered to Unlock; the relay
automatically fires when a valid card is presented to the reader.
Initially, enter all card ID numbers into the reader's database. When a valid card is
read, access is granted. You can assign PINs to some or all of the cards to
increase security. You can configure the reader to require a valid PIN after
presenting a card. The PIN can be required on either the entry or the exit sides of
the door, or on both sides, depending on your security needs.
You can set up time zones to limit access during specific hours. You can configure
the reader to allow access to cardholders entering a specific Global Pin Code,
without the need to present a card. This is especially useful for time-specific group
functions or for situations where tight security is not required.
Reader Types
Software House manufactures four readers: EtherProx Entry; InfoProx Entry;
InfoProx Exit, and InfoProx Online. The EtherProx Entry is a door control unit that
is controlled through web-based software The InfoProx is a standalone door
control unit that contains memory and data; the InfoProx Exit works with the
InfoProx Entry or the EtherProx Entry. The InfoProx Online will be used with iStar
90X0 series controllers and AC 2000.
Since all the Prox readers look alike, a Sensor Pass (SPASS) identification code
distinguishes one reader from another. The SPASS code appears on the back of a
reader unit so that you can verify that you have the correct type of reader for your
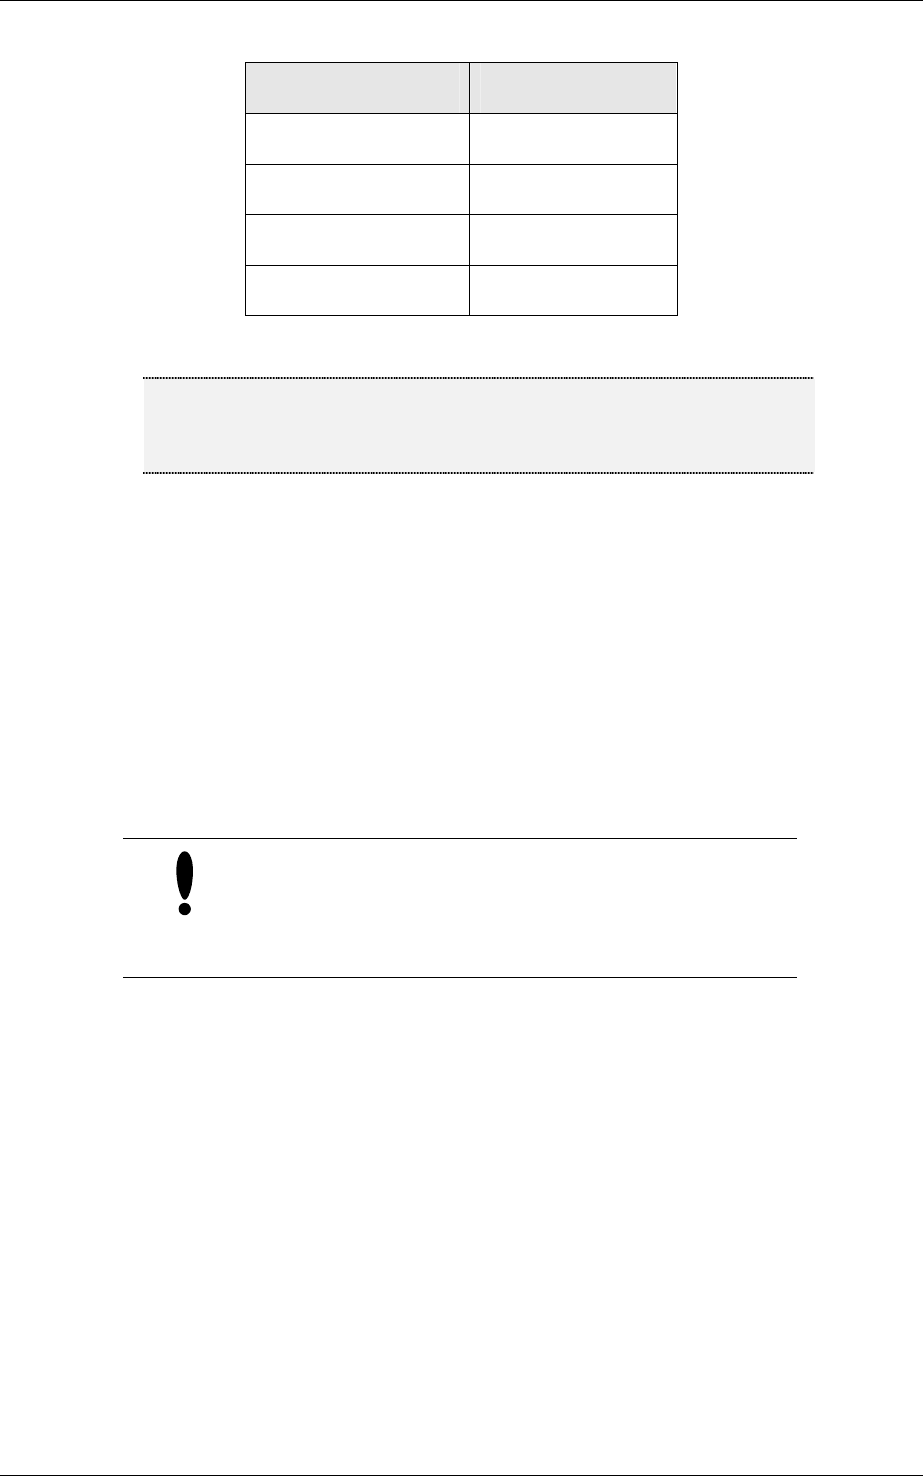
installation. The following table lists the reader units with their SPASS code.
Page 4 Software House
EtherProx Entry Introduction
PROX READER UNIT SPASS CODE
InfoProx Entry IPE
InfoProx Exit IPX
InfoProx Online IPO
EtherProx Entry EPE
Note You can use the InfoProx Entry and EtherProx Entry only as entry
readers; you cannot use an entry reader as an exit reader for another
entry reader.
Preparing to Install EtherProx
There are several ways to install an EtherProx reader. You can use an optional Door
Interface Unit (DIU) or reverse the Entry and Exit readers in order to comply with UL 294.
A DIU is an option that provides power for the readers and additional inputs, outputs, and
alarms. You can wire the door controls to the DIU, making the installation UL 294-
compliant.
If you install readers for only inside access control and not for outside access control, your
installation does not have to comply UL 294 requirements.
When you install the Entry reader on the secure side of the
door, the wiring is not accessible during an attempted
break-in. With this type of installation, the Transaction report
will show an entrance as Access granted - Exit and an exit
as Access granted – Entry.
Software House Page 5
Introduction EtherProx Entry
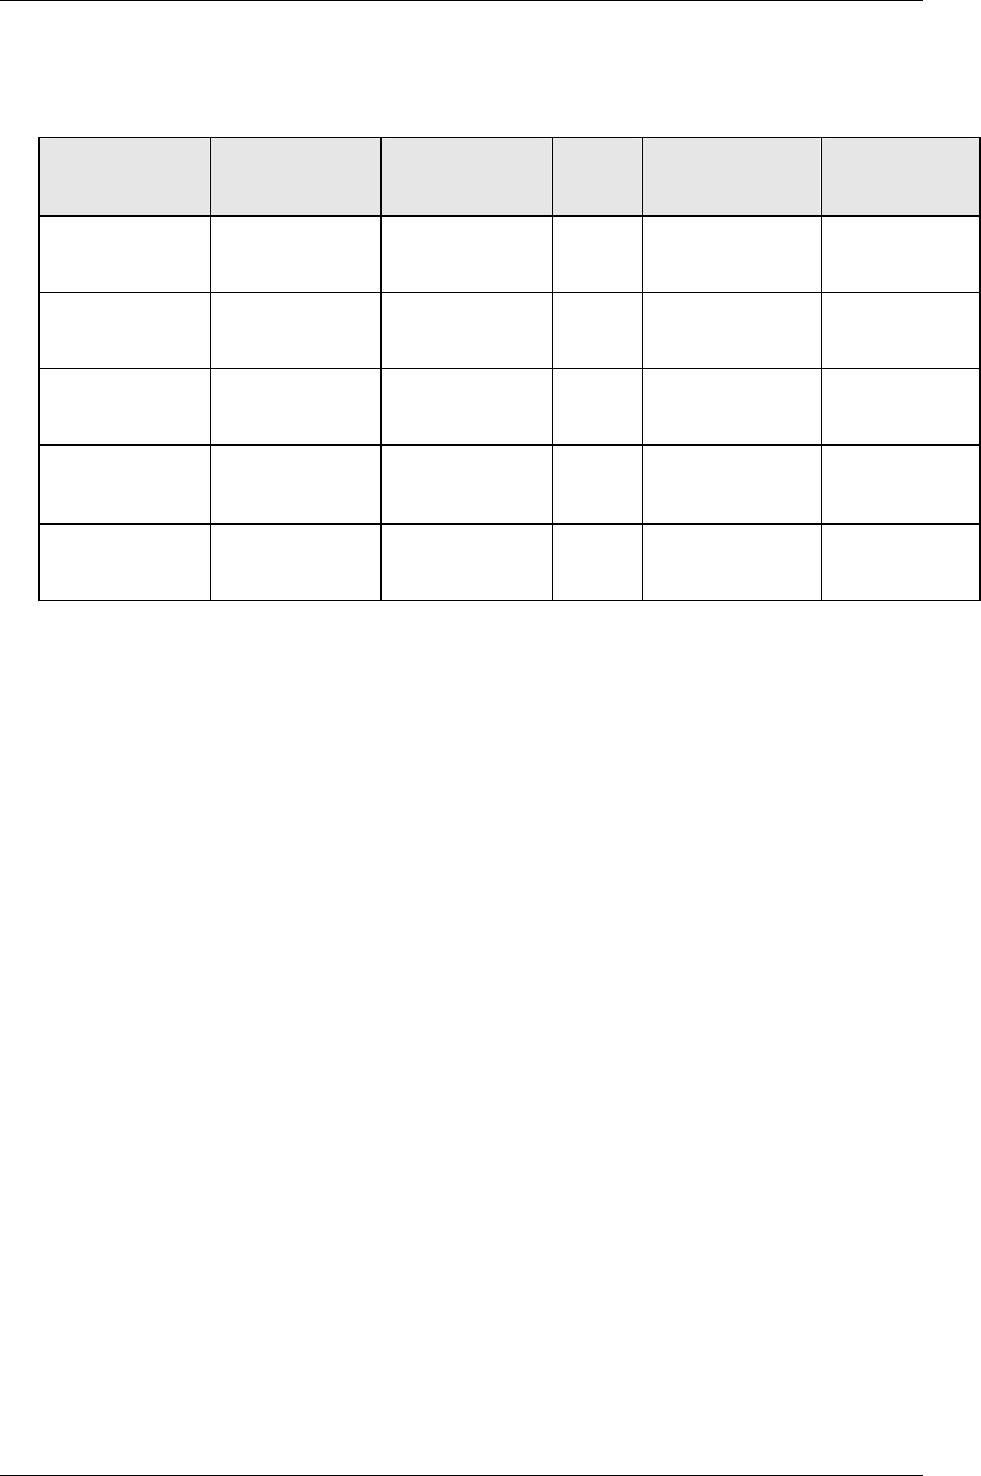
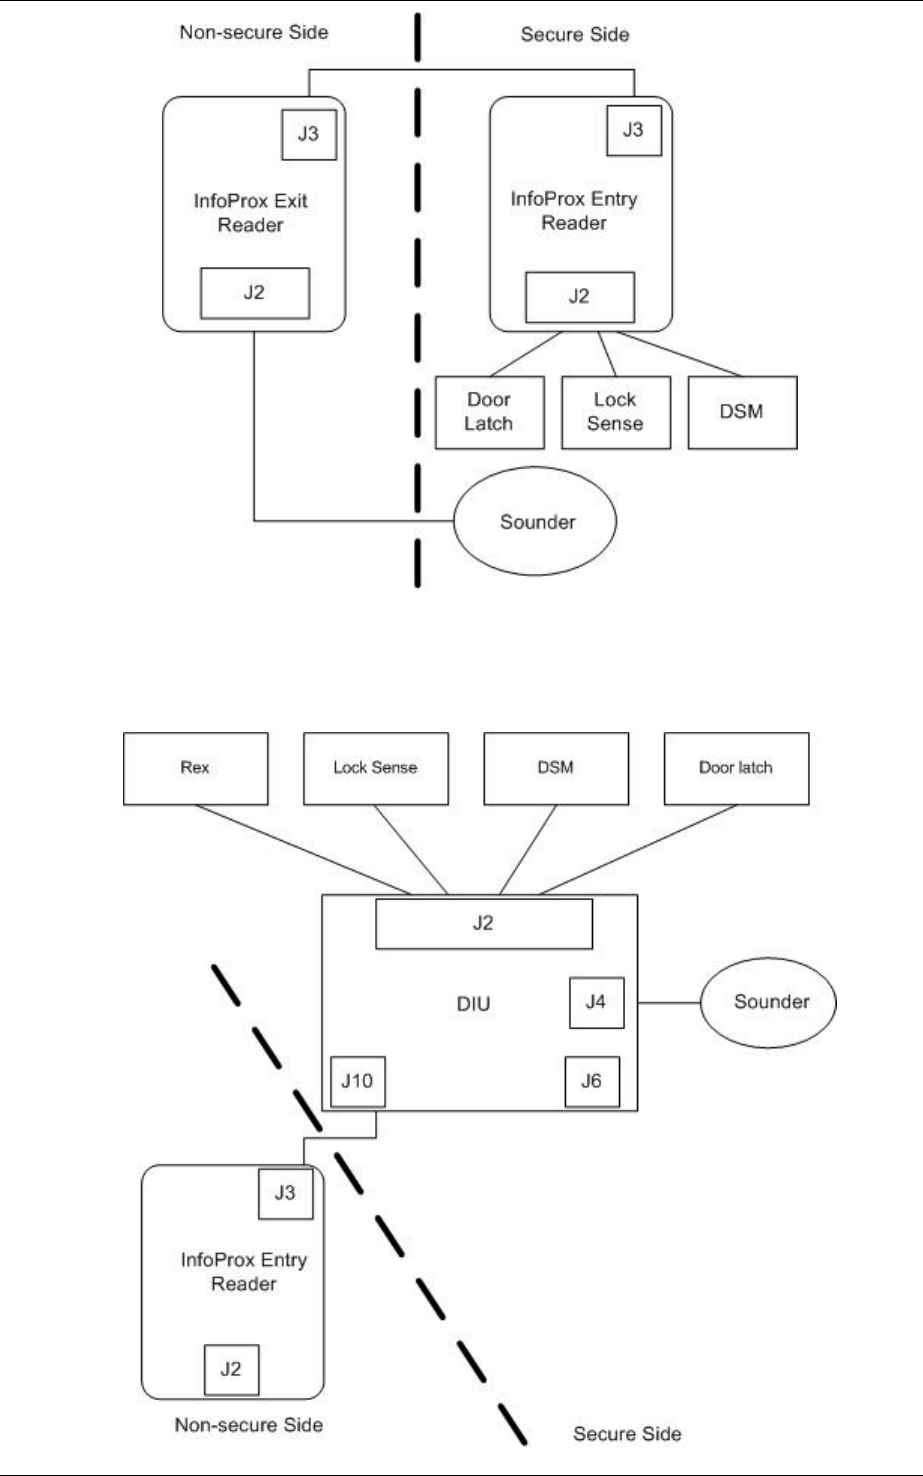
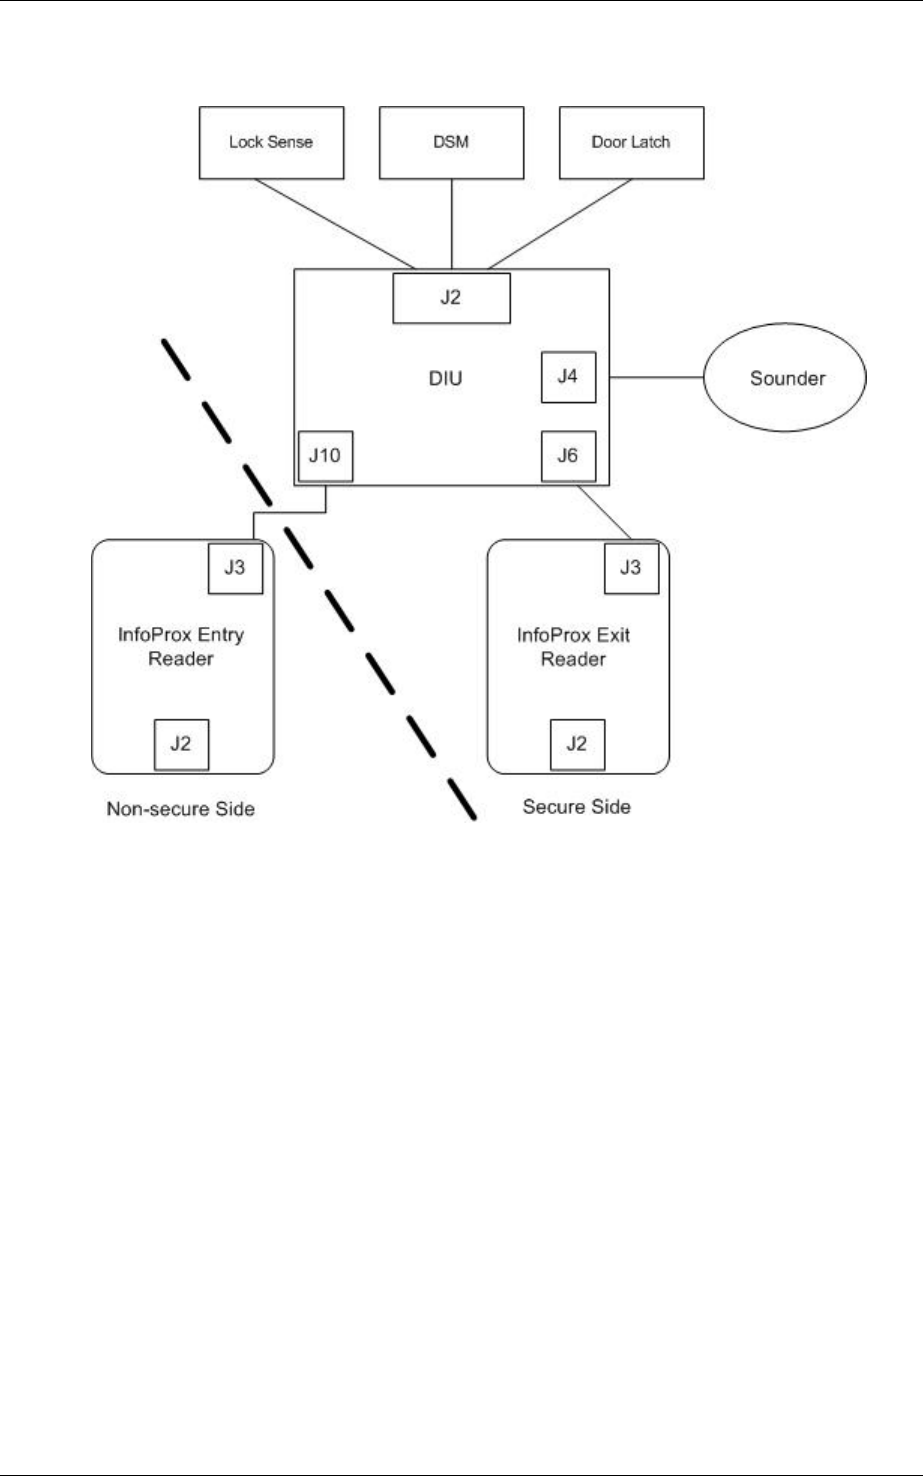
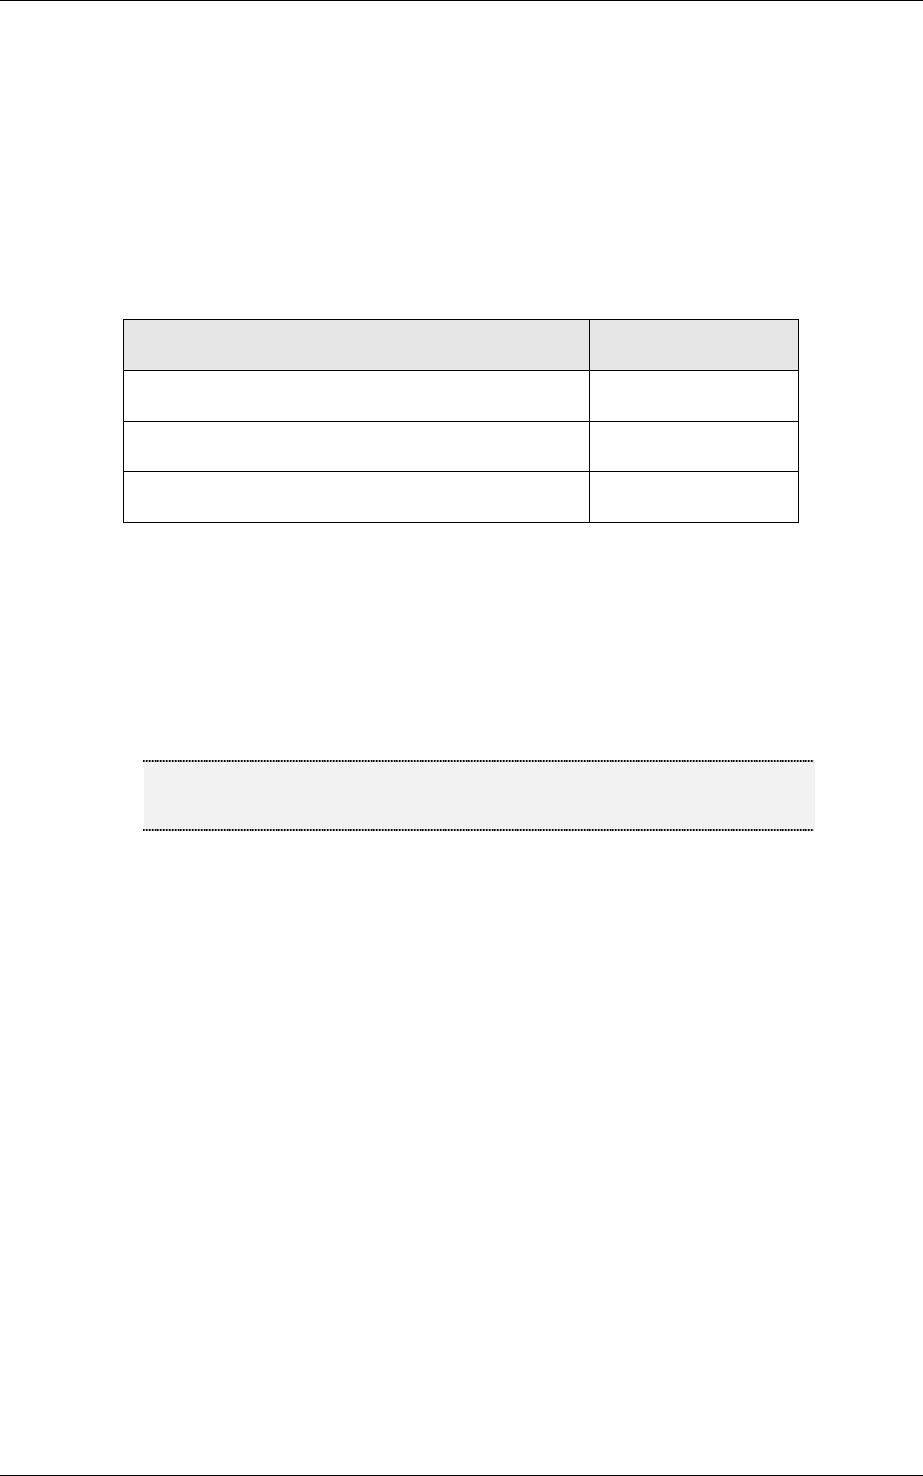
The following table contains the secure and traffic control installation configurations for
entry hardware, exit hardware, DIU, door control wiring, and sounder wiring.
INSTALLATION ENTRY
HARDWARE
EXIT
HARDWARE
DIU DOOR CONTROL
WIRING
SOUNDER
WIRING
Traffic control
(see Figure 2)
Entry reader REX switch No Entry reader Not
applicable
Traffic control
(see Figure 3)
Entry reader Exit reader No Entry reader Not
applicable
Secure (see
Figure 4)
Exit reader Entry reader No Entry reader Exit reader
Secure (see
Figure 5)
Entry reader REX switch Yes DIU DIU
Secure (see
Figure 6)
Entry reader Exit reader Yes DIU DIU
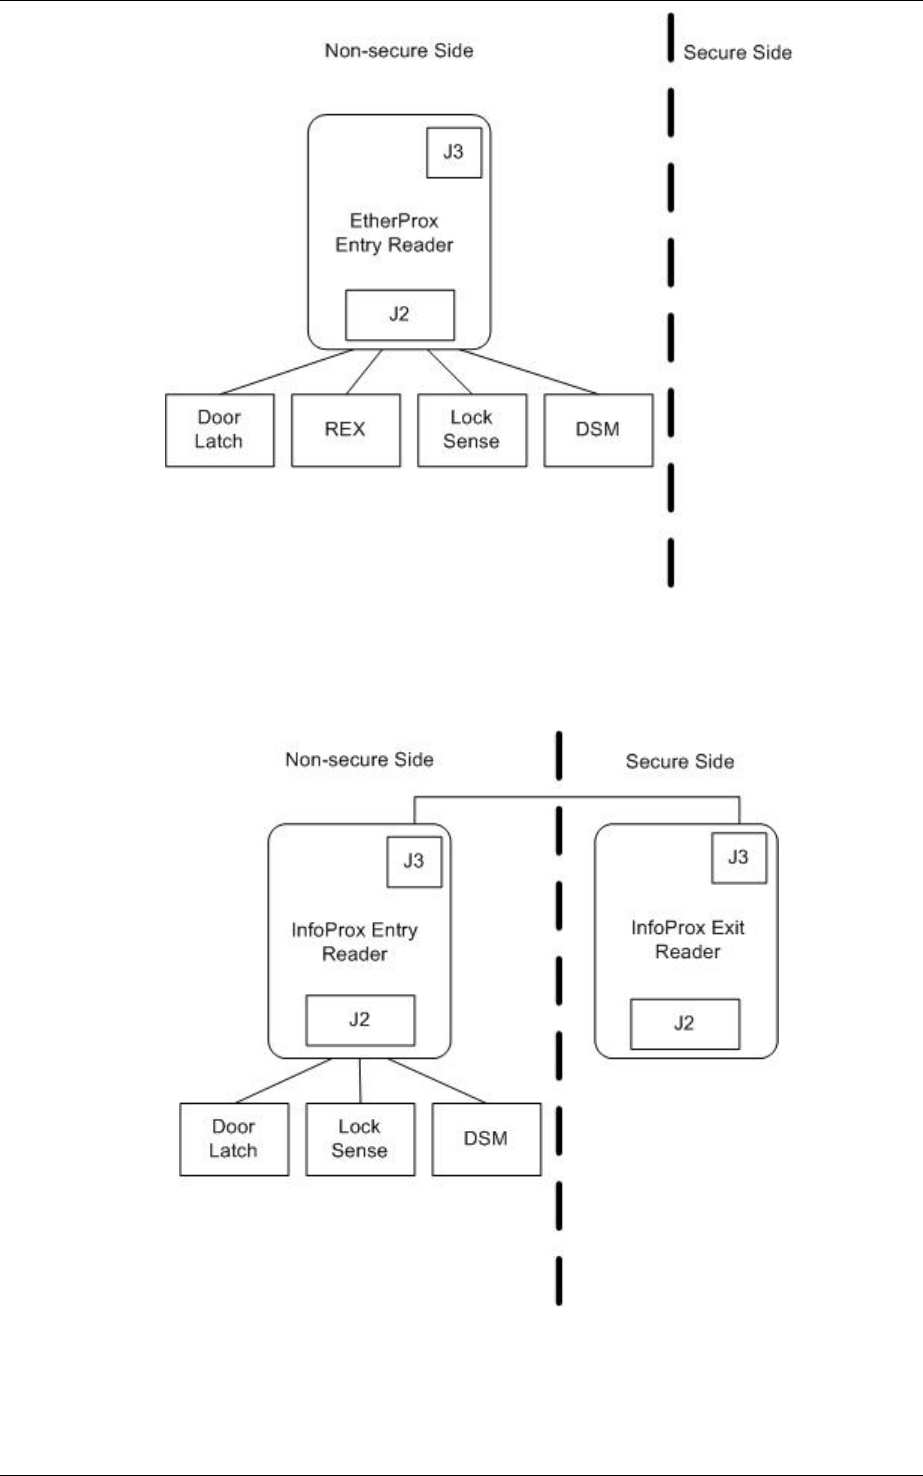
The following diagrams contain the secure and traffic control installation configurations
for entry hardware, exit hardware, DIU, and door control wiring. The diagrams
illustrate how to configure the hardware. For details on connector pins and power
wiring, see section 4, “InfoProx Hardware Installation.” For details on the DIU, see the
DIU Installation and Operation Manual.
Page 6 Software House
EtherProx Entry Introduction
Figure 2: Traffic control with Entry reader and REX switch
Figure 3: Traffic control with Entry reader and Exit reader
Software House Page 7
Introduction EtherProx Entry
Figure 4: Secure with Exit reader and Entry reader
Page 8 Software House
EtherProx Entry Introduction
Figure 5: Secure with Entry reader, DIU, and REX switch
Figure 6: Secure with Entry reader, DIU, and Exit reader
Software House Page 9
EtherProx Entry EtherProx Entry Installation
3. EtherProx Entry Installation
EtherProx Entry mounts directly onto a standard UK or European (French) electrical
containment box. North American installations require an adapter plate so you can use
standard conduit and fittings. A clear polycarbonate screen covers the LCD for protection.
You pull the cables through the conduit, which terminate in the containment box. The
following cables are required:
CABLE CONNECTOR
Category 5 data network cable 4-pin socket (J5)
4-pair (max) cable for inputs and output 10-pin socket (J2)
2-pair (Belden 8723) cable to exit reader 4-pin socket (J3)
The EtherProx Entry unit uses Phoenix Contact connectors for inputs and outputs. You
secure the cables into the screw terminals. Belden 8723 or equivalent cable is
recommended for the 2-pair cable.
EtherProx Entry provides two stainless steel tamper-resistant mounting screws. These
screws are concealed behind specially molded covers when the installation is complete.
Note The connectors on the EtherProx Entry reader are keyed to ensure
correct orientation.
Software House Page 11
Configuring EtherProx Entry EtherProx Entry
Power Connections
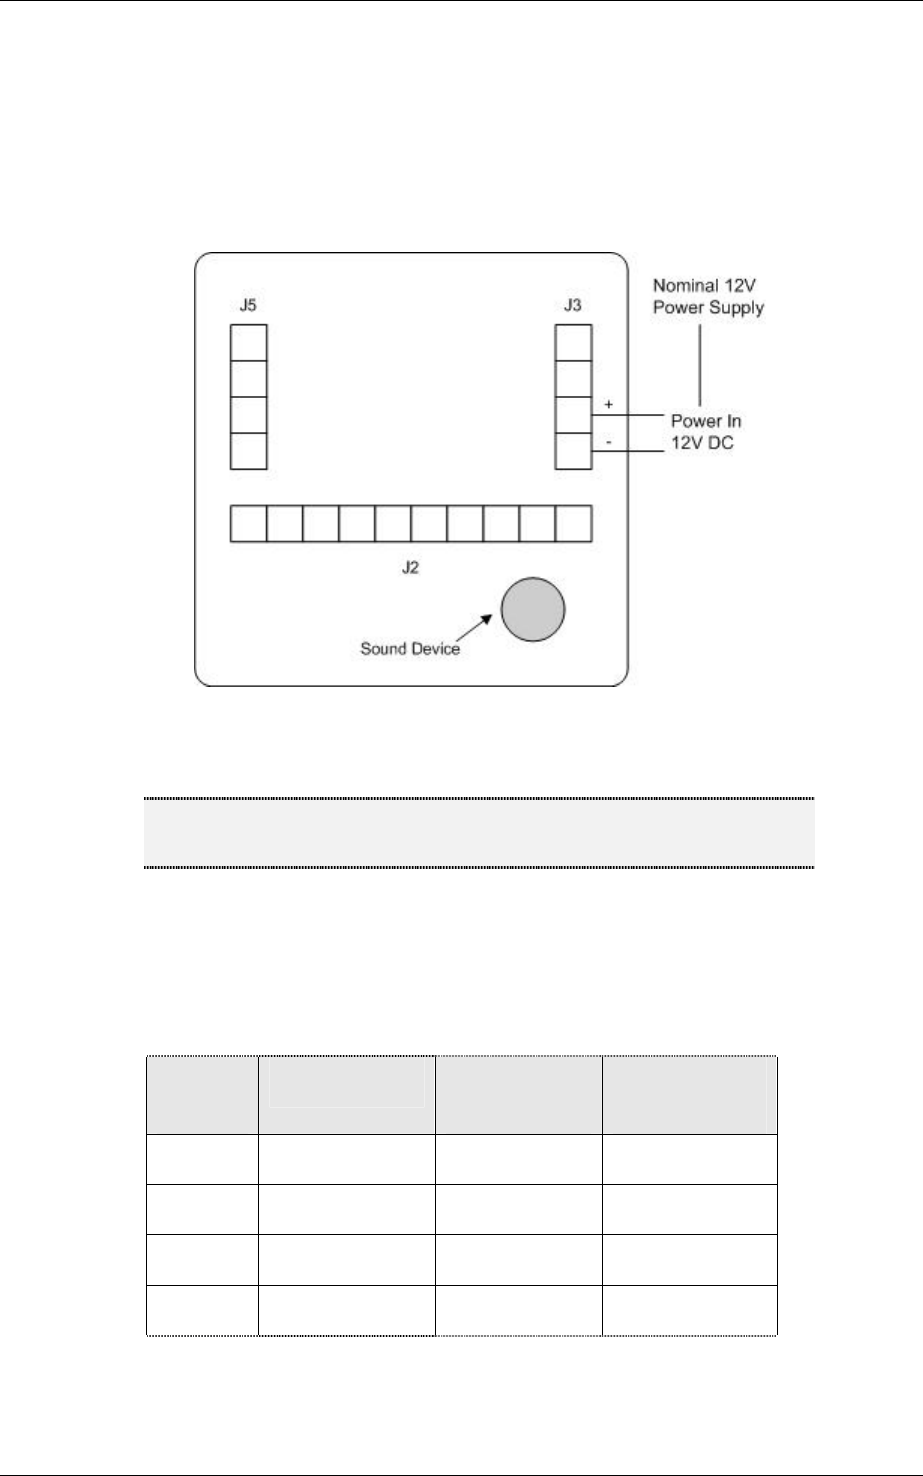
The EtherProx Entry reader contains an internal voltage regulator that requires an
external power supply with nominal 12-volt output. The internal voltage regulator is
capable of supplying at least 250 mA of current. The Power input is filtered, as well
as Transzorb and reverse-voltage protected. Power is supplied to the reader by
means of a J3 connector, as shown in Figure 1.
Figure 1: Terminal and Power Connections
Note The Phoenix Contact terminals for the power and data connections can
accommodate two leads fitted into one terminal.
The total cable length between the power supply and the reader depends on the
type of cable you use and whether you connect an exit reader. Here are guidelines
for determining the voltage:
1. For long cable runs, use Table 1 to calculate the voltage drop of the cable
between the power supply and the reader.
EXIT
READER
WIRE SIZE VOLTAGE
DROP/100 FT
VOLTAGE
DROP/100 M
Y 18 AWG 0.64V 1.95V
Y 22 AWG 1.6V 4.9V
N 18 AWG .38V 1.17V
N 22 AWG 0.96V 2.9V
Table 1: Voltage Table
2. Subtract the result from the power supply’s output voltage.
Page 12 Software House
EtherProx Entry EtherProx Entry Installation
3. If the result is greater than 7.0 volts, the wiring is adequate. If not, use heavier
(lower gauge) wire or a power supply with a higher voltage output.
Example: If you use a 22AWG wire with a 12-volt power supply 300 feet
away from the readers, the voltage drops to 7.2 volts at the
reader. Using the Table 1: Voltage Table to calculate the
voltage, multiply 3 (300 ft) times the 1.6V drop equals a -4.8
drop for the 300 ft. span. Subtract 4.8 from the 12V supply,
which equals 7.2. A voltage of 7.2 at the readers is sufficient
power to operate the readers above the 7V minimum required.
In this example, the total distance from the power source and
the exit cannot be more than 300 ft.
Exit Reader Connections
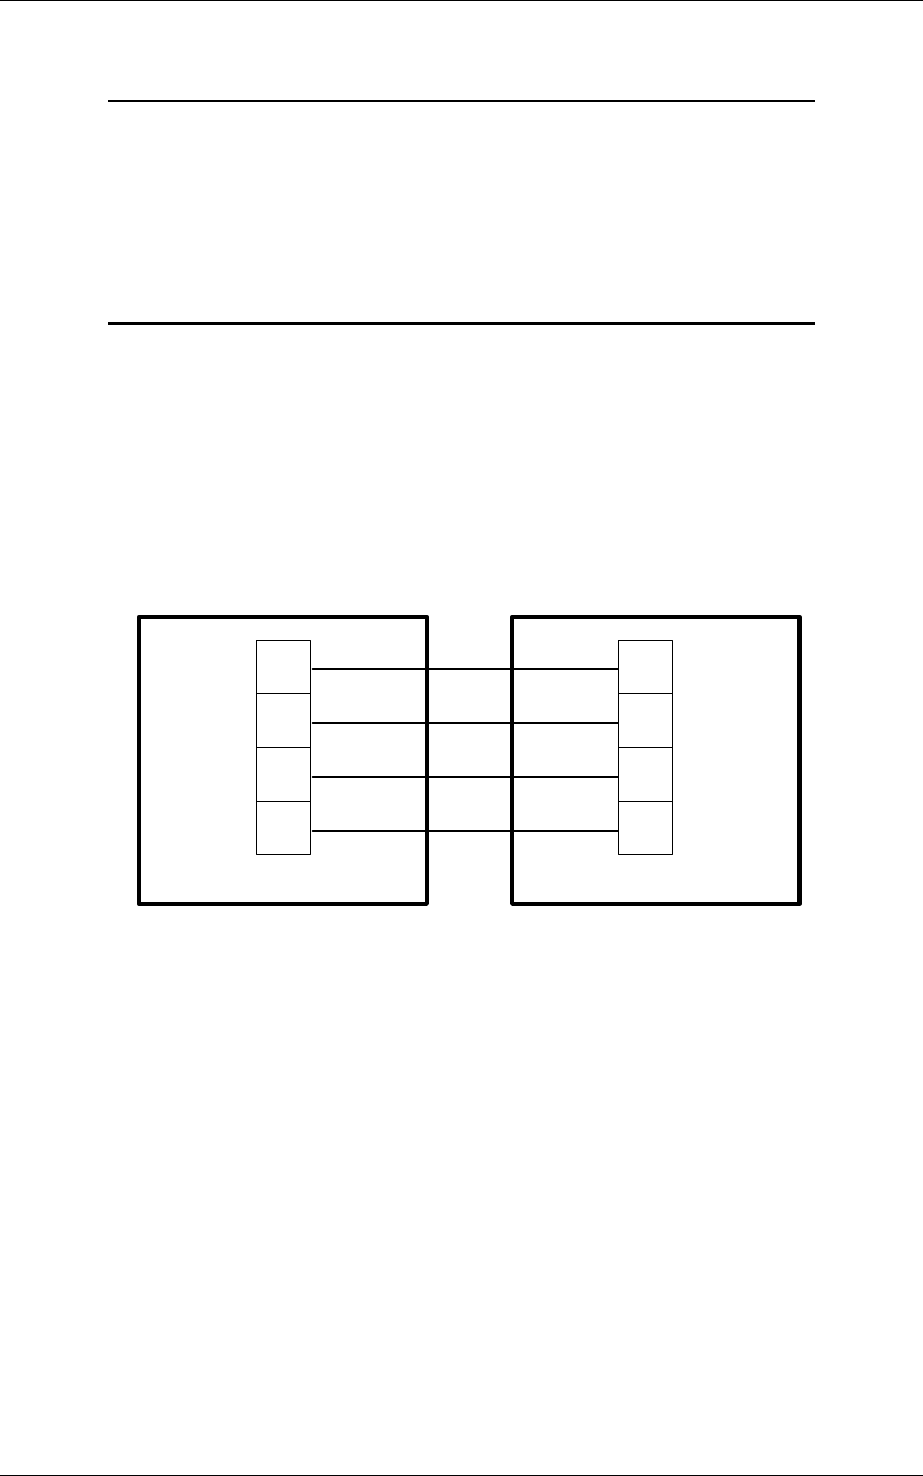
The InfoProx exit reader is connected to the entry reader through a two-pair cable,
providing power and communications. The connection is from connector J3 on the
entry reader to connector J3 on the exit reader, and is connected at both ends with
a four-pin Phoenix Contact socket (see Figure 2).
J3
InfoProx Exit EtherProx Entry
J3
A
B
+
-
A
B
+
-
Figure 2: Exit Reader Connections
The recommended interconnecting cable is Belden 8723 or equivalent. It is not
necessary to connect the drain wires in the cable. You can cut the drain wires off
flush with the jacket.
EtherProx Entry Ethernet Connection
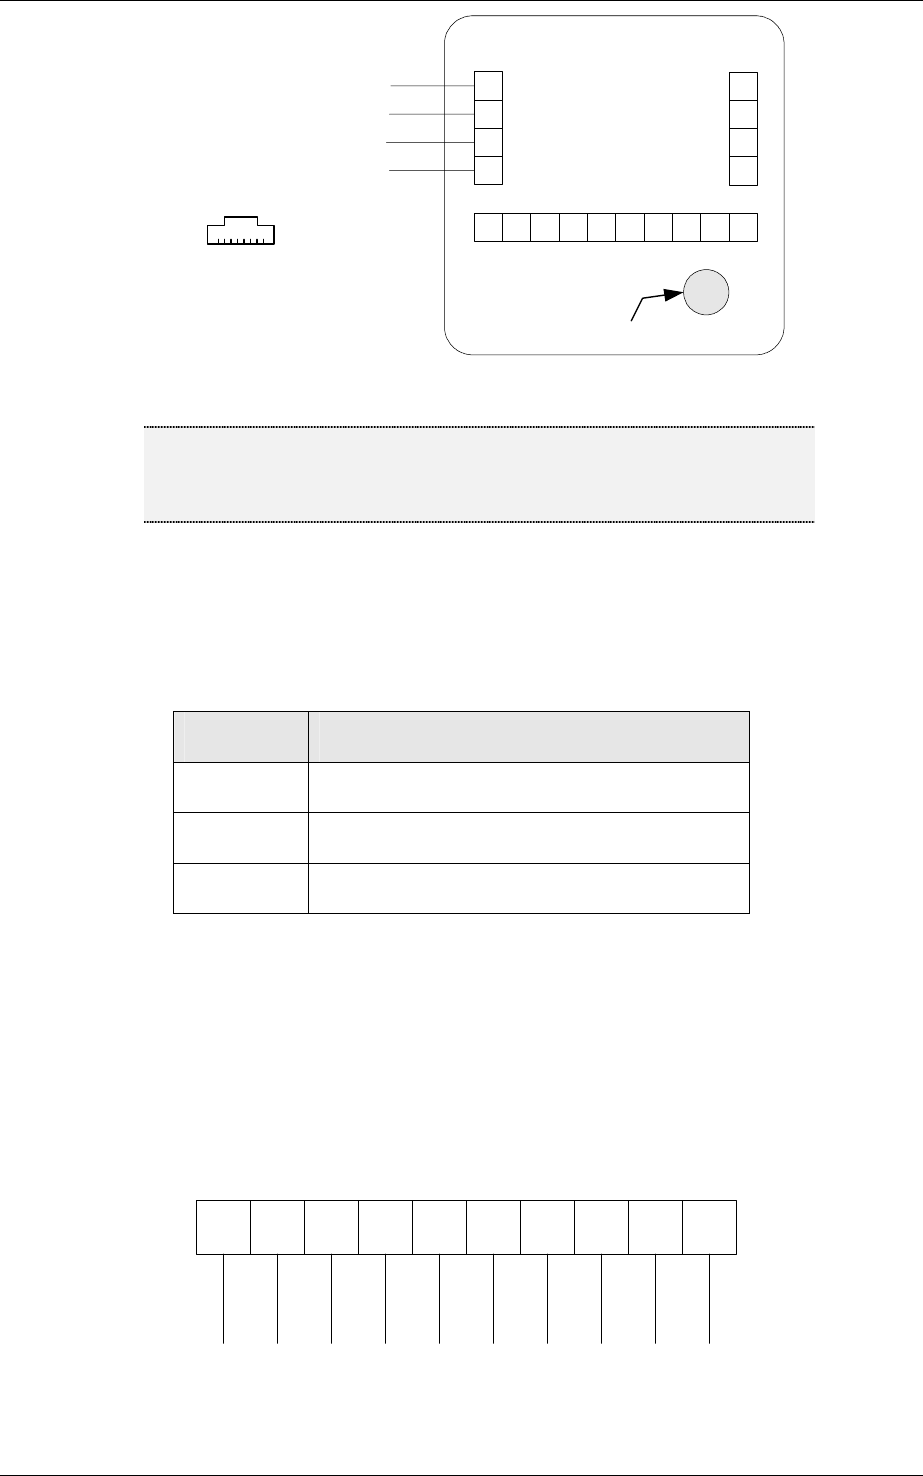
Connect the Ethernet cable to J5 using a Category 5 or better cable. Terminate
the keypad end with a 4-pin Phoenix connector. Connect the other end of the
Ethernet cable to an RJ-45 female connector (see Figure 4).
Software House Page 13
Configuring EtherProx Entry EtherProx Entry
6 RX- green
2 TX- orange
3 RX+ white/green
1 TX+ white/orange
J5
J2
Sound Device
J3
1
RJ-45
pin number
1
Front view
of RJ45
plug
Figure 3:EtherProx Entry Connection
Note The wire colors in Figure 3 may not always correspond with the
particular cable you are using. For example, the orange conductor may
be orange/white.
Door Connections
The door connections for normal door mode:
INPUT DOOR CONNECTION
Input 0 Monitors door position (normally closed)
Input 1 Monitors lock status (normally closed)
Input 2 Exit push button (normally open)
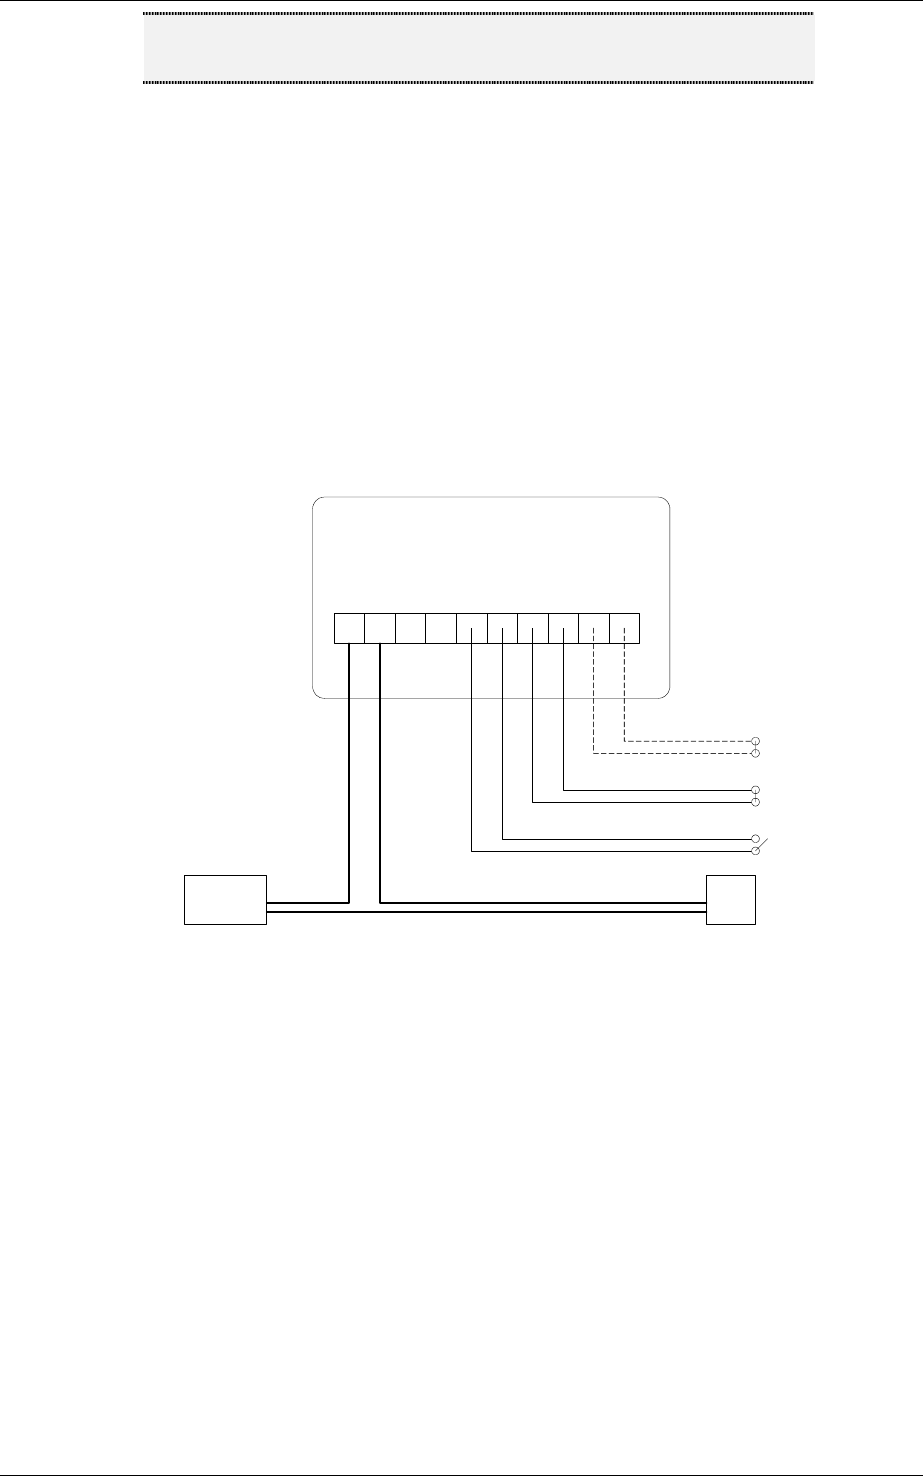
The four inputs and the relay output for the reader are located in a 10-pin Phoenix
Contact connector J2, as shown in Figure 4. The door control unit has a single-
pole relay with a set of dry contacts rated at five amps at 30 VDC maximum. The
common connection is available on pin 10; the normally opened connection is
available on pin 9 of J2. For normal door mode, the relay is reserved for door
strike control. The relay operates when a valid card is presented. You can
configure the relay as Powered to Unlock or Powered to Secure.
10 9 8 7J26 5 4 3 2 1
Relay
Contacts
Input 3
(unused)
Input 2 Input 1 Input 0
Figure 4: Inputs and Outputs on J2
Page 14 Software House
EtherProx Entry EtherProx Entry Installation
Note On the back of the unit, pin 1 is at the right end of the connector, as
shown in Figure 4. Pin 10 is Common; Pin 9 is N/O.
The diagram in Figure 5 illustrates typical connections to a door. The power supply
must have sufficient capacity to operate the door strike. You can connect three
optional switches, which include:
· Door state monitor switch – a normally closed switch whose contacts
are closed when the door is closed; EtherProx Entry uses the door
state monitor switch to generate the door held and door open alarms
· Lock status switch - if present, a normally closed switch that is usually
part of the door strike assembly. If lock status monitoring is enabled,
the lock status switch must be connected
· Exit pushbutton switch – a normally opened switch that is used if the
door lock must be released to leave the secured area
CNO J2
12345678910
InfoProx Entry
Door State
Monitor (NC)
(Optional)
Lock Status
Switch (NC)
(Optional)
Exit Pushbutton (NO)
Optional
Door
Strike
Door Strike
Power Supply
Figure 5: Typical Connections to a Door
Software House Page 15
Configuring EtherProx Entry EtherProx Entry
Connecting an Exit Reader to the EtherProx
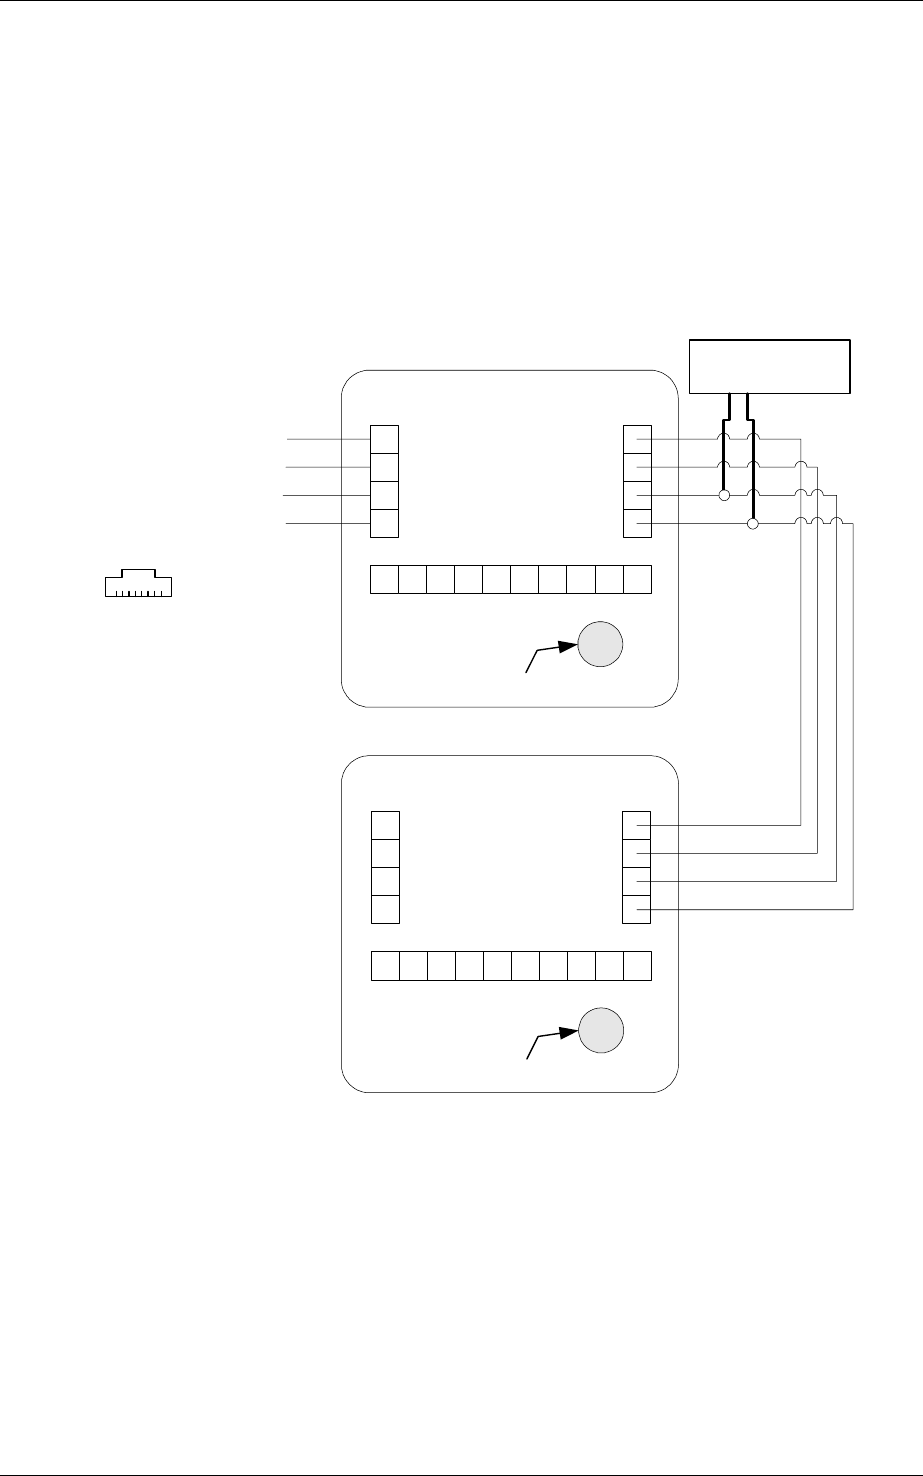
Both readers require a power supply of nominally 12V DC this can be taken from
one power supply by tapping off the Phoenix connector J3 on the Entry reader as
shown or by using two separate supplies. Communications from the EtherProx
Entry Reader to the InfoProx Exit reader is taken from J3 on the Entry reader to J3
on the Exit reader. To connect an InfoProx Exit reader to the EtherProx Entry
reader, refer to the diagram in Figure 6.
B
+
-
A
6 RX- green
2 TX- orange
3 RX+ white/green
1 TX+ white/orange
J5
J2
Sound Device
J3
1
RJ-45
pin number
1
Front view
of RJ45
plug
J5
J2
Sound Device
J3
1
EtherProx Exit
TM
InfoProx Exit
TM
A
B
+
-
Nominal 12V
Power Supply
Figure 6: Exit Reader Connections
Page 16 Software House

EtherProx Entry EtherProx Entry Installation
Installing the EtherProx Entry Unit
Follow these instructions to install the EtherProx Entry unit.
To install the EtherProx Entry unit
1. Make sure that you remove the shipping sticker (Remove before
washing) from the sound device opening (see Figure 6).
2. Connect the power source. Verify that EtherProx Entry is working
properly.
3. Recheck the wiring connections; make sure that all terminal screws are
securely tightened.
4. Secure the adapter plate to the containment box, if required for a U.S.
installation.
5. Position the reader over the containment box and tighten the two security
screws, ensuring that the screws are not over tightened.
6. Make sure there are no gaps around the unit. With no gaps, you will
prevent light from triggering the tamper sensor.
7. Fit the cover buttons firmly in place over the screws. To remove the
cover buttons, use a screwdriver on the outer edges to lift the covers.
Software House Page 17

EtherProx Entry Configuring EtherProx Entry
4. Configuring the EtherProx Entry
When you connect power to the EtherProx Entry reader for the first time, EtherProx uses
the default configuration settings. However, you can configure the reader for your site
requirements. You must complete the following tasks before you can use the reader:
· Set up an IP address
· Test the connection
· Set the time and date
· Enter a location name; change the user name and password
· Set up the initial door configuration
· Add Cardholders
Setting up an IP Address
To access EtherProx Entry through a network connection, assign a unique IP
address to the device. Check with your local network administrator to coordinate
the IP address and prevent network-addressing conflicts.
After you determine the IP address, you will need to set up the IP address for
EtherProx Entry.
Software House Page 19

Configuring EtherProx Entry EtherProx Entry
To set up an IP Address
1. At the EtherProx keypad, type Ù Ù Ù 0 0 0 0.
The EtherProx Diags menu appears with the following prompt:
<* 0^ 0>
If you do not press a key to select an option on the
Administration menu within 10 seconds, the
Administration menu will disappear.
2. Type # # #.
The following prompt appears on the EtherProx Entry LCD.
Configure
3. Press 0 to select Configure.
The following prompt appears.
IP address
4. Press 0 to select IP address.
The following prompt appears.
Manually
5. Press 0 to select Manually.
The following prompt appears.
Manual IP set
You are now ready to enter the IP address.
6. On the keypad, type the IP address with an asterisk (Ù) to represent a period
(.). Be sure to include a period after the last number in the IP address. For
example, for the IP address 172.31.10.10, type 172Ù31Ù10Ù10Ù
To correct an entry, type a pound sign (#) to cancel
the number. Then retype the IP address number with
the asterisks.
7. When prompted, press # to confirm the new address.
Page 20 Software House

EtherProx Entry Configuring EtherProx Entry
Testing the Connection
After you set up the IP address, connect EtherProx Entry to your laptop or Local
Area Network (LAN). When you use a laptop, you will need a a CAT 5 crossover
cable. If you connect EtherProx Entry to a LAN or HUB, use a standard CAT 5
patch cable.
To verify the IP address and communications path, ping the EtherProx from a PC.
To do so, open a DOS Command Prompt window, and type ping, followed by the
IP address you had set up in the previous task. For example,
C:\>ping 172.31.10.10
If the IP address and communication path are correct, you should see a reply in
the Command Prompt window that is similar to the following example:
Pinging 172.31.10.10 with 32 bytes of data:
Reply from 172.31.10.10: bytes=32 time=2ms TTL=32
Reply from 172.31.10.10: bytes=32 time=2ms TTL=32
Reply from 172.31.10.10: bytes=32 time=4ms TTL=32
Reply from 172.31.10.10: bytes=32 time=3ms TTL=32
If the IP address or communication path is incorrect, you should see a reply in the
Command Prompt window that is similar to the following example:
Pinging 172.31.10.10 with 32 bytes of data:
Request timed out.
Request timed out.
Request timed out.
Request timed out.
Once you connect EtherProx Entry, you can set the time and date, as explained in
the next section.
Software House Page 21

Configuring EtherProx Entry EtherProx Entry
Setting the Time and Date
To continue configuring EtherProx Entry, you must run Microsoft Internet Explorer
version 5.5 or higher. Other browsers, such as Netscape, will not work with EtherProx
Entry software.
You can either enter the configuration settings manually or upload the configuration tables
to EtherProx Entry. In this section, you will establish a network connection between
EtherProx Entry and the PC by using Internet Explorer 5.5. Then you will set the time and
date.
To set the time and date
1. Run Internet Explorer 5.5.
2. Type the EtherProx Entry IP address in the Address box and press
Enter.
The network should establish a connection to EtherProx Entry. A prompt
appears asking you to enter a user name and password.
3. Enter the user name web and the password spider.
After your login is validated, the Main Menu appears.
4. Click Administer EtherProx.
The Administer EtherProx page appears.
5. Click Update Clock.
The Update Clock page appears.
6. Verify that the time and date are correct.
7. Click Update EtherProx clock.
The time and date appear on the Update Clock page.
8. Verify that the time and date are correct.
9. Click the Back button to return to the Administer EtherProx page.
Page 22 Software House

EtherProx Entry Configuring EtherProx Entry
Entering a Location Name; Changing the User Name and Password
A location name is useful when you configure more than one EtherProx. You can
specify any location name, change the user name, and password, or continue to
use the default user name and password.
If you want to change the user name and password, be sure
to jot down the new user name and password for future
reference. If you do not know the user name and password,
you must return the EtherProx Entry reader unit to the
manufacturer.
To enter a location name and change the user name and password
1. On the Main Menu, click Administer EtherProx>EtherProx
Configuration>Configure EtherProx.
The Configure EtherProx page appears.
2. Enter a location name and click Update.
3. Change the default user name and password by entering a new user
name in the New Login box.
4. Enter the new password twice: once in the New Password box and
again in the Re-enter new password box.
5. Click Update.
Software House Page 23

Configuring EtherProx Entry EtherProx Entry
Setting up the Initial Door Configuration
To configure a door
1. On the Main Menu, click Administer EtherProx>EtherProx
Configuration>Configure Door.
The Door Configuration page appears.
2. In the Door Times section, specify the seconds for the Unlock time
option.
3. Change the settings for any other Door options.
4. Click Update.
Page 24 Software House

Software House Administering the EtherProx Entry
5. Administering the EtherProx Entry
EtherProx Entry runs as a web server, enabling you to administer EtherProx Entry through
Internet Explorer. You will need a valid user name and password for the login procedure.
Establishing a Connection with EtherProx Entry
You must establish a connection with EtherProx Entry through Internet Explorer.
To establish a connection with EtherProx Entry
1. Open Internet Explorer.
2. Type the EtherProx Entry IP address in the Address box.
The EtherProx Entry welcome page appears.
3. Click Proceed.
The Enter Network Password dialog box appears.
4. Enter your user name and password.
5. Click OK.
You may be prompted to enter your user name and password twice,
which is a random validation check.
Note For security purposes, you will be logged out after four
minutes of inactivity. If this occurs, you must enter your
password again to continue.
The Main Menu appears. You can return to the Main Menu from any
page by clicking Main Menu.
Software House Page 25

Administering EtherProx Entry EtherProx Entry
EtherProx Entry Main Menu
After you log in to EtherProx Entry, the EtherProx Entry Main Menu appears, as
shown in Figure 8. The Main Menu allows you to perform the following functions:
· Administer cardholders
· View transactions
· Administer EtherProx
Main menu
Administer Cardholders View transactions Administer EtherProx
Search for card holder
Add new card holder
Time clearances
View Transactions EtherProx status
EtherProx configuration
Remote door control
Update clock
Backup and restore
Generate Card
and Alarm Reports
Network Details
Card Database Size
Version
Configure Door
Timed Events
Configure EtherProx
Unlock Times
Inputs
Door Latch Relay
Accessories
Location
Login Password
Figure 7: EtherProx Entry Main Menu
The Main Menu contains links to the following pages:
· Administer Cardholders (see Section 4.3) - search, add, edit, delete,
and view cardholder records; set time clearances
· View Transactions (see Section 4.4) – view transactions, generate
reports on card events, alarm events, or both
· Administer EtherProx (see Section 4.5) - view and change EtherProx
Entry configuration settings
Page 26 Software House

EtherProx Entry Administering EtherProx Entry
Administer Cardholders
Click Administer Cardholders to access the following cardholder administration
options:
· Search for cardholder
· Add new cardholder
· Time clearances
You can search for cardholders in the database to view the cardholder information
for a specific group of cardholders. You can search for a card by last name, first
name, or card number.
To search for cardholders
1. On the Main Menu, click Administer Cardholders>Search for
Cardholder.
2. Enter the search criteria.
Note If you leave the search criteria boxes blank, EtherProx
Entry will display all cardholder records.
3. Click Go Search.
You should see a report page that contains cardholders records, based
on your search criteria.
4. To view account information for a specific cardholder, in the view column
on the report page, click the // symbol.
Software House Page 27
Administering EtherProx Entry EtherProx Entry
The Add New Cardholder feature lets you enter and edit cardholder information,
and set the card status.
To add a cardholder
1. On the Main Menu, click Administer Cardholder>Add New
Cardholder.
2. Enter a cardholder’s last name, first name, and middle initial.
3. Enter the card numbers in the Card number box.
Note If you do not know the card number for a particular
cardholder, you can find the card number on the
Transaction report page in the Not in System message.
Copy the card number from the Transaction report
page. Then paste the number into the Card number
box.
4. Enter a 4-digit number in the PIN box if required.
Note If you do not enter a PIN, EtherProx assigns a default
value of 0000.
5. Click Add.
Page 28 Software House

EtherProx Entry Administering EtherProx Entry
You can the set card status in the Cardholder data section of the Update
Cardholder details page.
To set the card status
1. On the Main Menu, click Administer Card Holders>Search for
Cardholder
The Search for Cardholders page appears.
2. Enter the search criteria in the Search fields.
3. Click Go Search.
The Cardholder Search Results page appears. You should see the
cardholders records, based on your search criteria.
4. To view account information for a specific cardholder, in the View column
on the report page, click the // symbol.
The Update Cardholder Details page appears.
5. In the Cardholder Data section, select a card status.
There are three card status options:
Extended - sets the extended door opening time when a card is
presented. Use the Extended status when a cardholder has a
mobility problem and needs more than the standard amount of
time to get through the doors.
Lost/Stolen - prevents unauthorized use of a lost or stolen card.
Operational - makes the card operational on the system. You
can issue cards that you entered previously and then make them
operational later by selecting the Operation status. You can also
disable a card by deselecting the Operational status option. For
example, disable the Operational status when an employee no
longer works for the company.
Software House Page 29
Administering EtherProx Entry EtherProx Entry
You can specify a time period for clearance during which access is granted to
a cardholder. You can set up time clearances for an individual cardholder or
groups of cardholders.
To set time clearances
1. On the Main Menu, click Administer Cardholders>Time Clearances.
The Time Clearance page appears. You should see a table with columns
representing the days of the weeks, start time, and end time. In rows1
through 4, you can specify up to four time periods for a group.
2. Select a group from the Clearance Name drop-down list. For example,
select Clearance A.
Note You cannot adjust the Always and Never groups, as
these are system defaults, but you can define up to six
of your own groups from A – F.
3. Click a cell to select a day of the week.
The cell you selected changes to green, indicating that access will be
granted for that day.
Note If you want to turn off access for a particular day, click
that cell. The cell you selected changes to white,
indicating that access will not be granted for that day.
4. Repeat step 3 to select additional days for which you will allow access.
5. Click a Start cell that corresponds to a day you selected.
The Start cell appears in blue. The Enter new time boxes appear.
Note Time is based on a 24-hour clock format. For example,
for 5:00 PM set the time as 17:00. For midnight, se the
time as 00:00.
To specify a 24-hour time period, set the Start time as
00:00 and the End time as 23:59.
6. Click in the hour time box and type the hour with two digits. For example,
for 5:00 PM, type 17.
7. Press Tab. In the minute time box, type the minutes. Then click Update.
A message appears asking if you want to change the setting.
8. Click OK.
Page 30 Software House
EtherProx Entry Administering EtherProx Entry
9. Click the End cell.
The End cell appears in blue. The Enter new time boxes appear.
10. Repeat steps 6 through 8 to enter the end time.
11. Click Submit Update to save the time clearance settings.
EtherProx will grant access for the days and time periods you specified.
Note To restore the default time clearance settings, click
Restore Table.
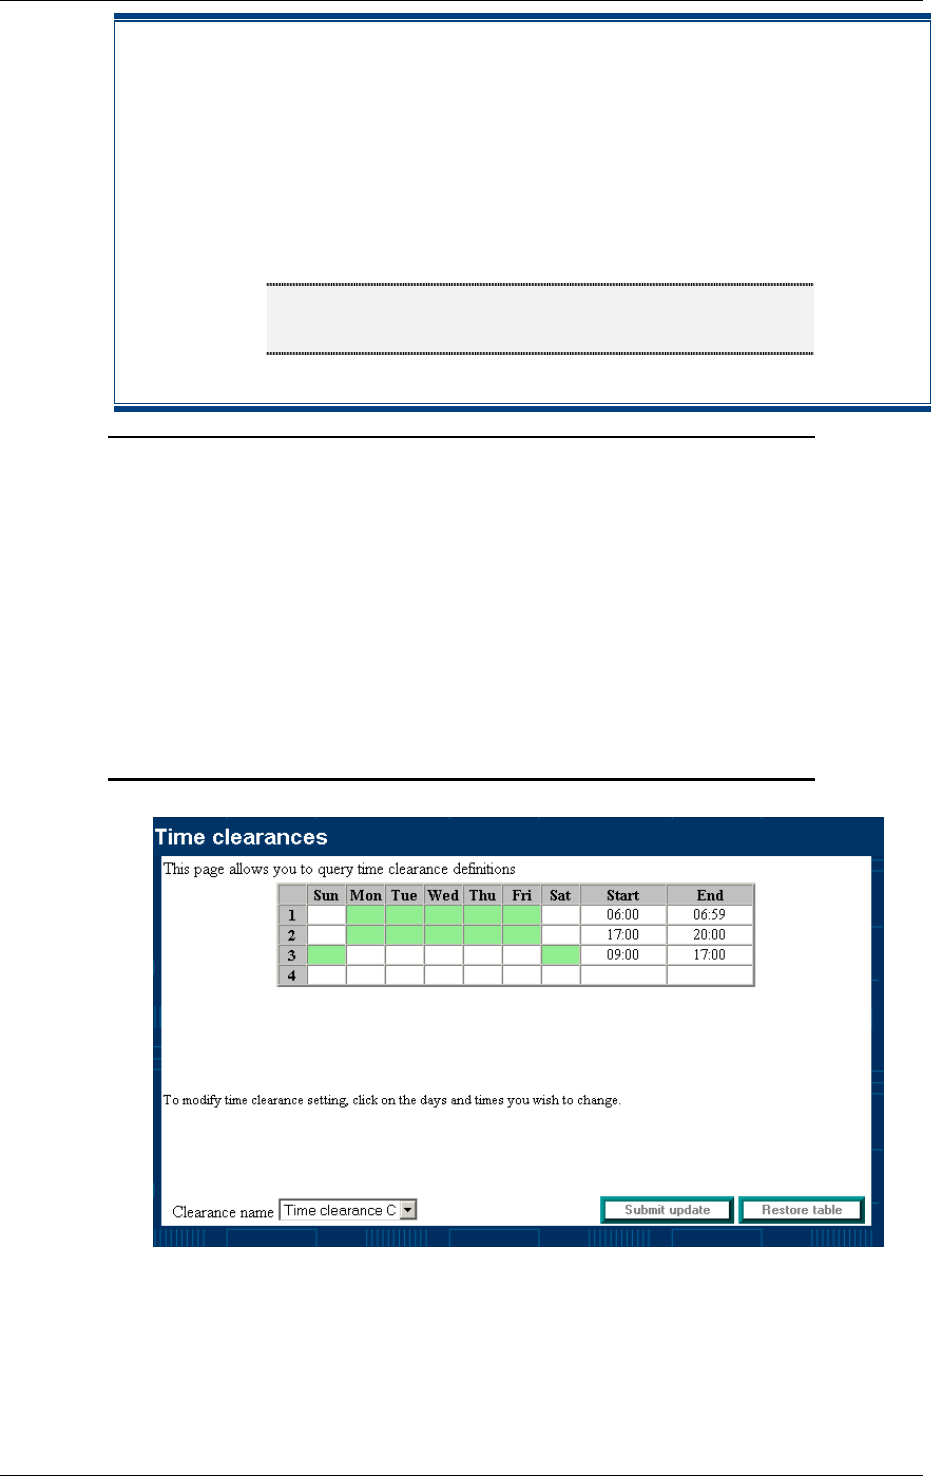
Example: Here is an example of time clearances for timed events. You
use the EtherProx reader to control access to the cafeteria.
The kitchen is open (Door Override) to everyone during
breakfast (7:00 a.m. to 8:00 a.m.) and lunch (12:00 p.m. to
1:30 p.m.) on Monday through Friday. For the remainder of
the day, 8:01 a.m. to 11:59 a.m. and 1:31 p.m. to 5:00 p.m.,
the cafeteria is accessible with use of a Global PIN. From 6:00
a.m. to 6:59 a.m. and 5:01 p.m. to 7:59 p.m., Monday through
Friday, plus Saturdays and Sundays from 9:00 a.m. to 5:00
p.m., access to the kitchen is available using a Card-Only
without a PIN. Access at any other time from Sunday through
Saturday requires a Card and PIN (normal mode). Based on
the example, Figure 8 shows how you would set the time
clearances for the timed events.
Figure 8: Time Clearances Page for Example
Software House Page 31

Administering EtherProx Entry EtherProx Entry
To set up time clearances for the timed events and configure the timed events
that were used in the example, follow these steps:
To set time clearances and configure timed events, based on the example
1. On the Main Menu, click Administer Card Holders>Time Clearances.
2. Set the following time clearances:
Clearance A = M-F (7:00 – 7:59); M-F (12:00 – 13:29)
Clearance B = M-F (8:00 – 11:59); M-F (13:30 – 17:00)
Clearance C = M-F (6:00 – 6:59); M-F (17:00 – 20:00); Sat, Sun
(9:00 – 17:00)
3. On the Main Menu, click Administer EtherProx>EtherProx
Configuration>Configure Timed Events.
The Configure Timed Events page appears.
4. Set Door Override to Time Clearance A.
5. Set Card-Only no PIN to Time Clearance C.
6. Set Global Pin Only to Time Clearance B.
7. Click Update.
View Transactions
To view transactions, you generate a report for card-events, alarm-events, or both.
Than you need to select report options to view the report.
To select report options and view the report
1. On the Main Menu, click View Transactions.
The Transaction and Event Reporting page appears.
2. In the Type of Report Required section, select a report option.
3. Select time intervals in the Starting from and Ending at drop-down lists
to specify a time range for the report.
Page 32 Software House

EtherProx Entry Administering EtherProx Entry
4. Click Generate report.
You should see a report page that lists all the selected transactions.
5. Scroll down to see the rest of the report transactions on the page.
6. Click More Transactions if the report continues on more than one page.
7. Display the report page you want to print.
8. Click Print Report at the top of the report page.
9. Click OK to print the report
Note When EtherProx Entry memory is filled with
transactions, the oldest transactions are overwritten by
the new transactions.
Administer EtherProx
To access the Administer EtherProx page, on the Main Menu, click Administer
EtherProx. The Administer EtherProx page contains the following configuration
features:
· EtherProx status
· EtherProx configuration
· Remote door control
· Update clock
· Backup and restore
Software House Page 33
Administering EtherProx Entry EtherProx Entry
EtherProx Status
On the Administer EtherProx page, click EtherProx Status. The EtherProx
Status page appears with the following status details:
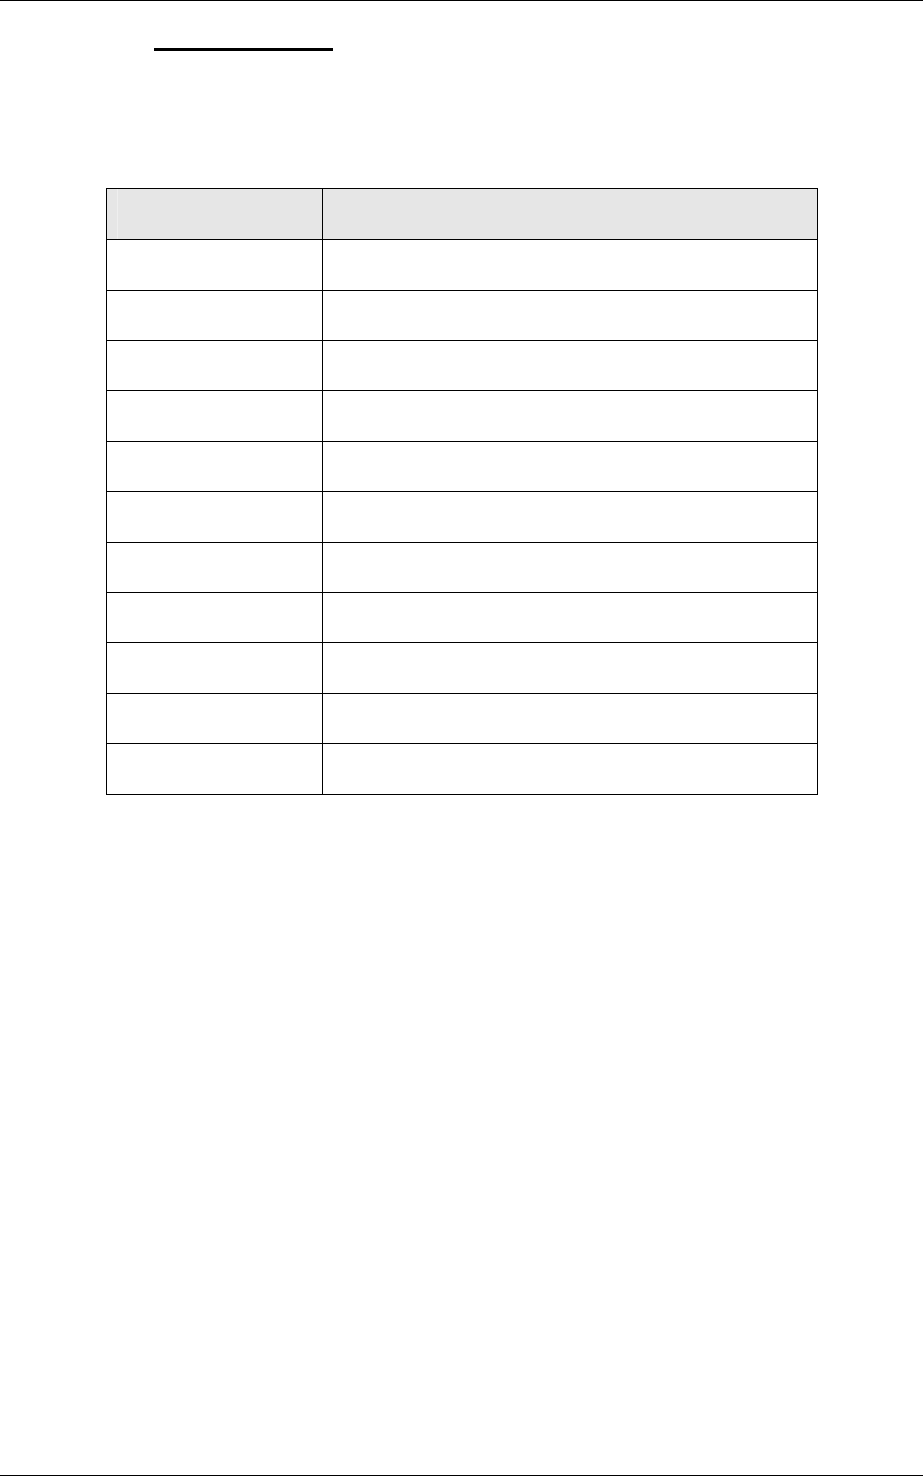
STATUS TYPE STATUS DETAIL
Network Details IP Address
Hardware Address
Card Database Maximum # Cards
# Cards
Maximum # Transactions
# Transactions
Version S/W Version
Build
S/W Date
H/W Version
Board S/N
The EtherProx configuration options include:
· Configure Door
· Configure Timed Events
· Configure EtherProx
Page 34 Software House

EtherProx Entry Administering EtherProx Entry
To change an EtherProx configuration setting
1. On the Main Menu, click Administer EtherProx>EtherProx
Configuration.
The EtherProx Entry Configuration menu appears.
2. Select a configuration option.
3. Make changes to the settings.
4. Click Update.
Note Click Default configuration to return to the default
settings.
Software House Page 35

Administering EtherProx Entry EtherProx Entry
Configure Door
The following table lists the Configure Door settings with their descriptions.
CONFIGURE DOOR SETTING DESCRIPTION
Unlock Time Length of time that the lock is released
Relock Delay Time Number of seconds to delay the relock
after a door is detected as open. You must
enable Door Sensing for this setting to
work.
Standard Door Open Time Length of time a door can be open before
an alarm is generated. You must enable
the Door Sensing for this setting to work.
Extended Door Open Time Length of time a special status card can
hold a door open before an alarm is
generated. You must enable the Door
Sensing for this setting to work.
Door Held Warning Length of time a door held warning sound
is generated on the reader before the
alarm goes off. You must enable the Door
Sensing for this setting to work.
Alarm Sounder Duration Length of time a door held open alarm or
door forced open alarm warning is
generated. You must enable the Door
Sensing for this setting to work.
Powered to Secure Specifies whether power to the lock
secures the door (default).
Powered to Unlock Specifies whether power to the lock
unlocks the door.
Door Sensing Enabled Specifies whether a door state switch is
connected. If you disable this setting, the
Standard Door Open Time, Re-lock Delay
Time, Extended Door Open Time, Door
Held Warning, and Alarm Sounder
Duration settings will be disabled.
Lock Sensing Enabled Specifies whether a lock status switch is
connected.
Request to Exit Enabled Specifies whether an exit pushbutton
switch is connected.
Page 36 Software House
EtherProx Entry Administering EtherProx Entry
Configure Timed Events
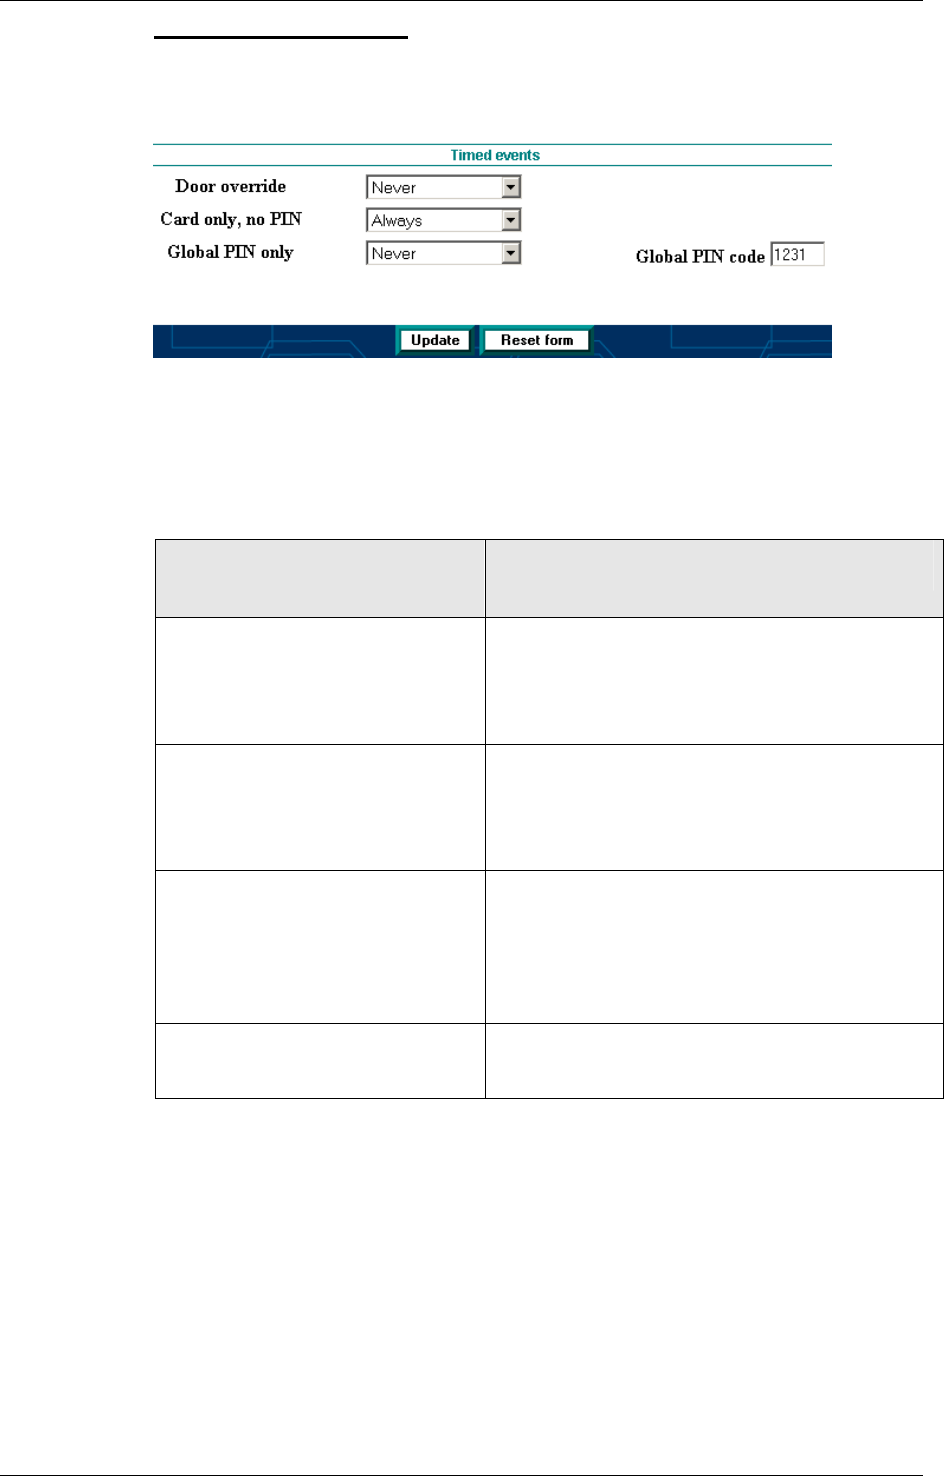
The Timed Events page lets you select events that you want to occur during
specified time intervals, as shown in Figure 9.
Figure 9: Timed Events Page
The following table lists the Configure Timed Events settings with their
descriptions.
CONFIGURE TIMED EVENTS
SETTING
DESCRIPTION
Door Override Unlocks the door and allows unrestricted
access. The parameters are the same as
the groups in time clearances (See section
4.3, "Time Clearances").
Card Only, No PIN If you use PINs with your cards, you can
specify a time clearance group during which
cardholders do not need to enter the PIN.
For example, at a busy time of day.
Global PIN Only Permits access with a global PIN that you
specify in the Global PIN code box. When
you enable this setting, cards are not
required because anyone who knows the
global PIN code can gain access.
Global PIN Code Lets you specify or change the global PIN.
The global PIN must contain four digits.
Software House Page 37
Administering EtherProx Entry EtherProx Entry
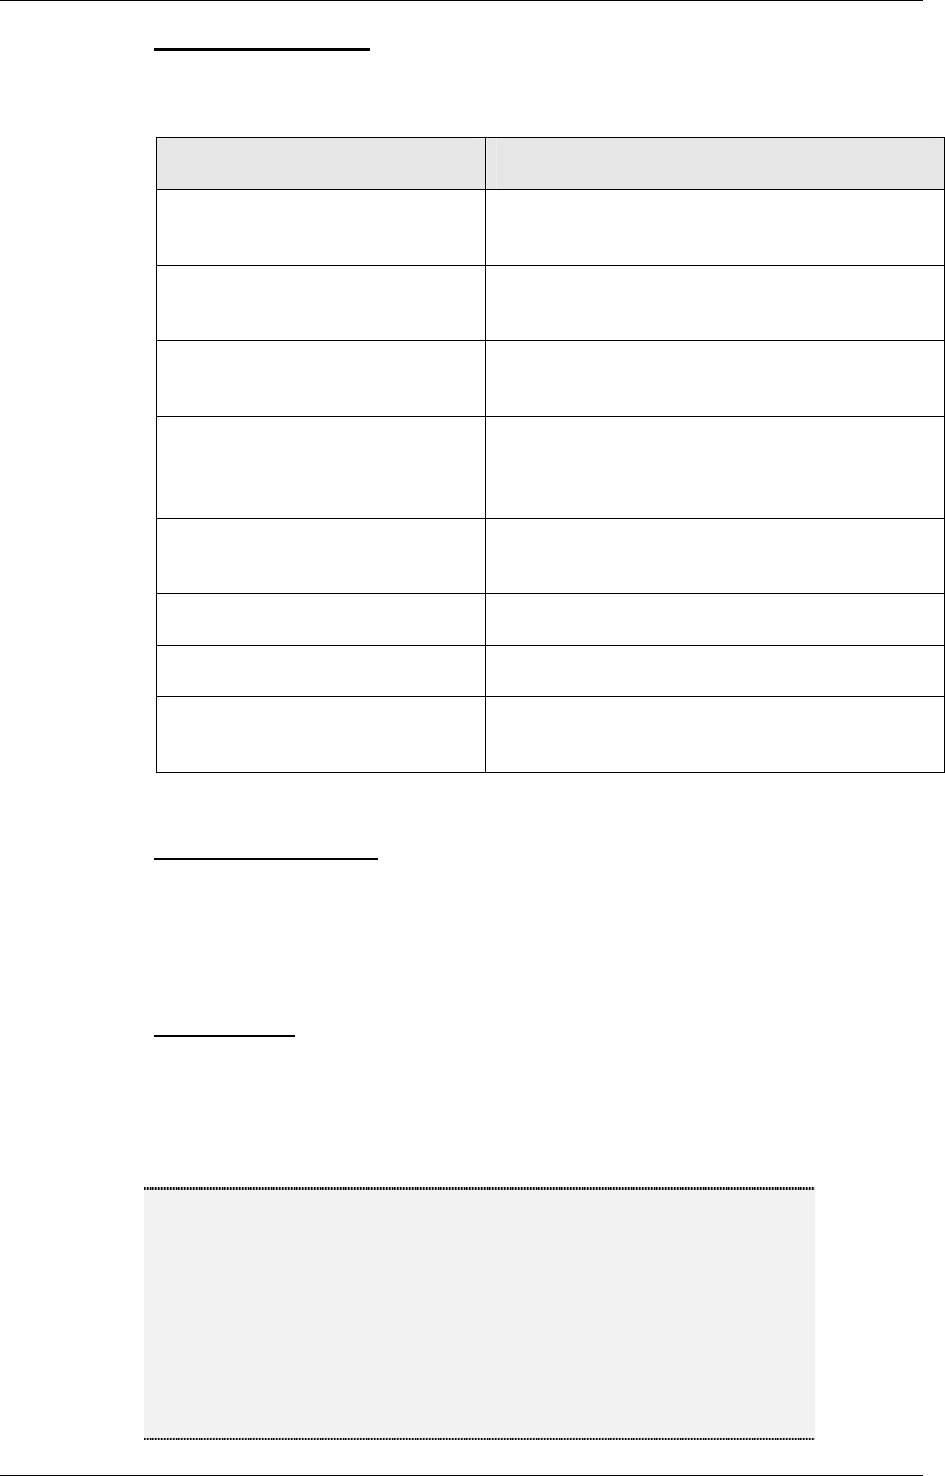
Configure EtherProx
On the Configure EtherProx page, you can select EtherProx device
configuration parameters.
CONFIGURE ETHERPROX SETTING DESCRIPTION
Door Interface Unit Specifies whether a Door Interface Unit
(DIU) is connected.
Entry PIN Specifies whether a PIN is required for
entry.
Exit Reader Specifies whether an exit reader is
connected.
Exit PIN Specifies whether a PIN is required with an
exit reader. If Exit Reader is disabled, the
Exit Reader checkbox is unavailable.
Location Name Specifies the EtherProx Entry location
name.
New Login Specifies a login name.
New Password Specifies a new password.
Re-enter new password Specifies whether to re-enter the new
password for validation.
Remote Door Control
You can use the Open Door option to remotely open a door, which is similar to
swiping an access card. On the Remote Door Control page, click Open Door
to trigger the open door button and open a door immediately. The message
Unlocking Door appears.
Update Clock
On the Update Clock page, you can set the time of the reader to the local time
where you installed the reader. See section 3.3, "Set the Time and Date," for
details. Click Update EtherProx Clock to update the time. Click OK to
confirm updating the time.
Note If the EtherProx Entry is located in a time zone different from the one in
which the computer is located, you must temporarily reset the computer
time to coincide with the local time at the EtherProx Entry.
For example, to update an EtherProx Entry located in a time zone that
is two hours behind the time zone set on the computer, use the
Windows Control Panel to subtract two hours from the computer’s
current time setting before updating the EtherProx clock. Then reset the
computer to the correct local time.
Page 38 Software House

EtherProx Entry Administering EtherProx Entry
Backup and Restore
The Backup and Restore feature allows you to back up and restore EtherProx
configuration and data files.
To back up configuration and data files
1. On the Main Menu, click Administer EtherProx>Backup and Restore.
The Backup and Restore EtherProx data page appears.
2. Click Start FTP Server.
When a connection is established, the FTP window appears with the
following files:
· Cards.dat - card table file
· Config.dat - door configuration settings file
· Times.dat - time zones file
· Trans.dat - transactions file that contains all transactions
made since the last backup
· System.dat - system data file (password)
Note When you copy the transactions from the EtherProx
Entry Trans.dat file, the transaction records are deleted
on the reader. You cannot copy the transaction records
back to the reader. If you want to archive the transaction
records, keep your Trans.dat files in a folder on your
local computer.
3. Open Windows Explorer. Create a folder that will contain the backup
files.
4. In the FTP window, select the files you want to back up.
5. In the FTP window, select File>Copy to Folder.
6. Open the folder that will contain the backup files.
7. Click OK.
EtherProx copies the files to the folder you selected.
8. Close the Windows Explorer.
9. Click Close Windows FTP program.
Software House Page 39

Administering EtherProx Entry EtherProx Entry
To restore configuration and data files
1. On the Main Menu, click Administer EtherProx>Backup and Restore.
The Backup and Restore EtherProx data page appears.
2. Click Start FTP Server.
3. Open Windows Explorer.
4. Open the folder that contains the files you want to restore.
5. Select and drag the files into the FTP window.
6. Close the windows.
7. Click Close Windows FTP program.
EtherProx Entry Messages and Responses
The EtherProx Entry reader has three LED indicators and an LCD display, which
display the status and error messages during normal operation.
When communication has been established, the EtherProx Entry reader displays a
blinking message. For example, if the screen blinks from E to S, which indicates a
normal connection, the following status message appears:
EtherProx Rdr 16:30 E
Show card
EtherProx Rdr 16:30 S
Show card
EtherProx Rdr 16:30 E
Show card
The E-S sequence shown in the example indicates that the Ethernet connection is
valid. EtherProx is detecting a 10BaseT Ethernet connection. If no Ethernet
connection is established and Comm is not valid, instead of E-S, the LCD will
display a blinking -S sequence, as follows:
EtherProx Rdr 16:30 -
Show card
EtherProx Rdr 16:30 S
Show card
EtherProx Rdr 16:30 -
Show card
When a card is presented to the reader, the name and status of the reader are
displayed on the top line. Other status information and the current time are
Page 40 Software House
EtherProx Entry Administering EtherProx Entry
displayed, too. Hours and minutes are shown in the 24-hour format. The colon
flashes on the seconds digit.
Note If the –S sequence appears, check your RJ45 connection and make
sure that all connections are tight.
After a valid card swipe, the LCD displays a message, as shown in the following
example:
Access granted
Show card 16:31
When a door override or similar operation is active, the following LCD display
appears:
EtherProx Rdr E
Door open 16:35
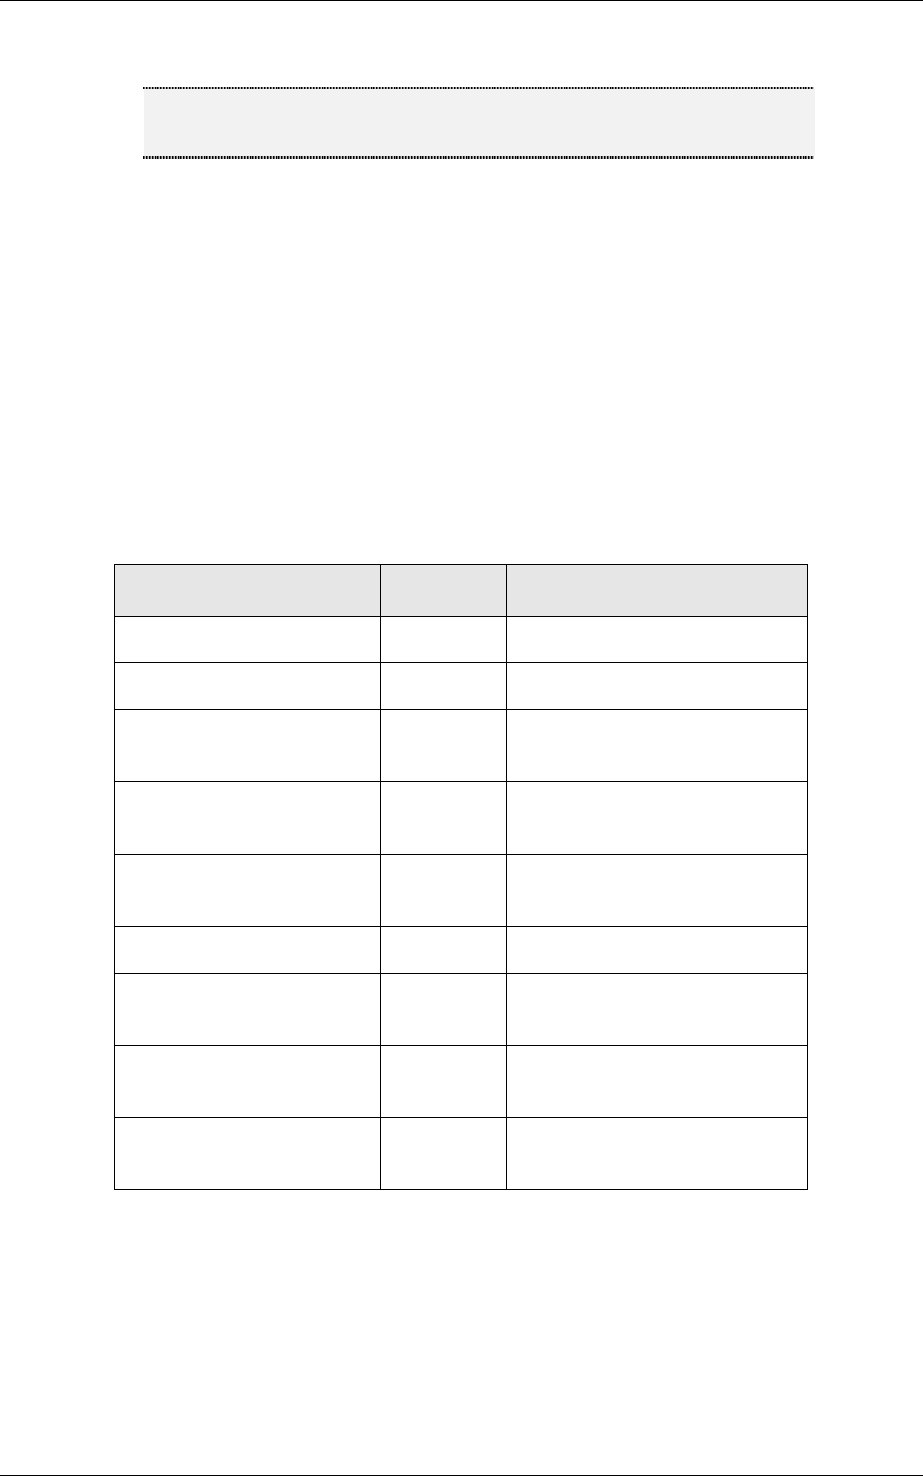
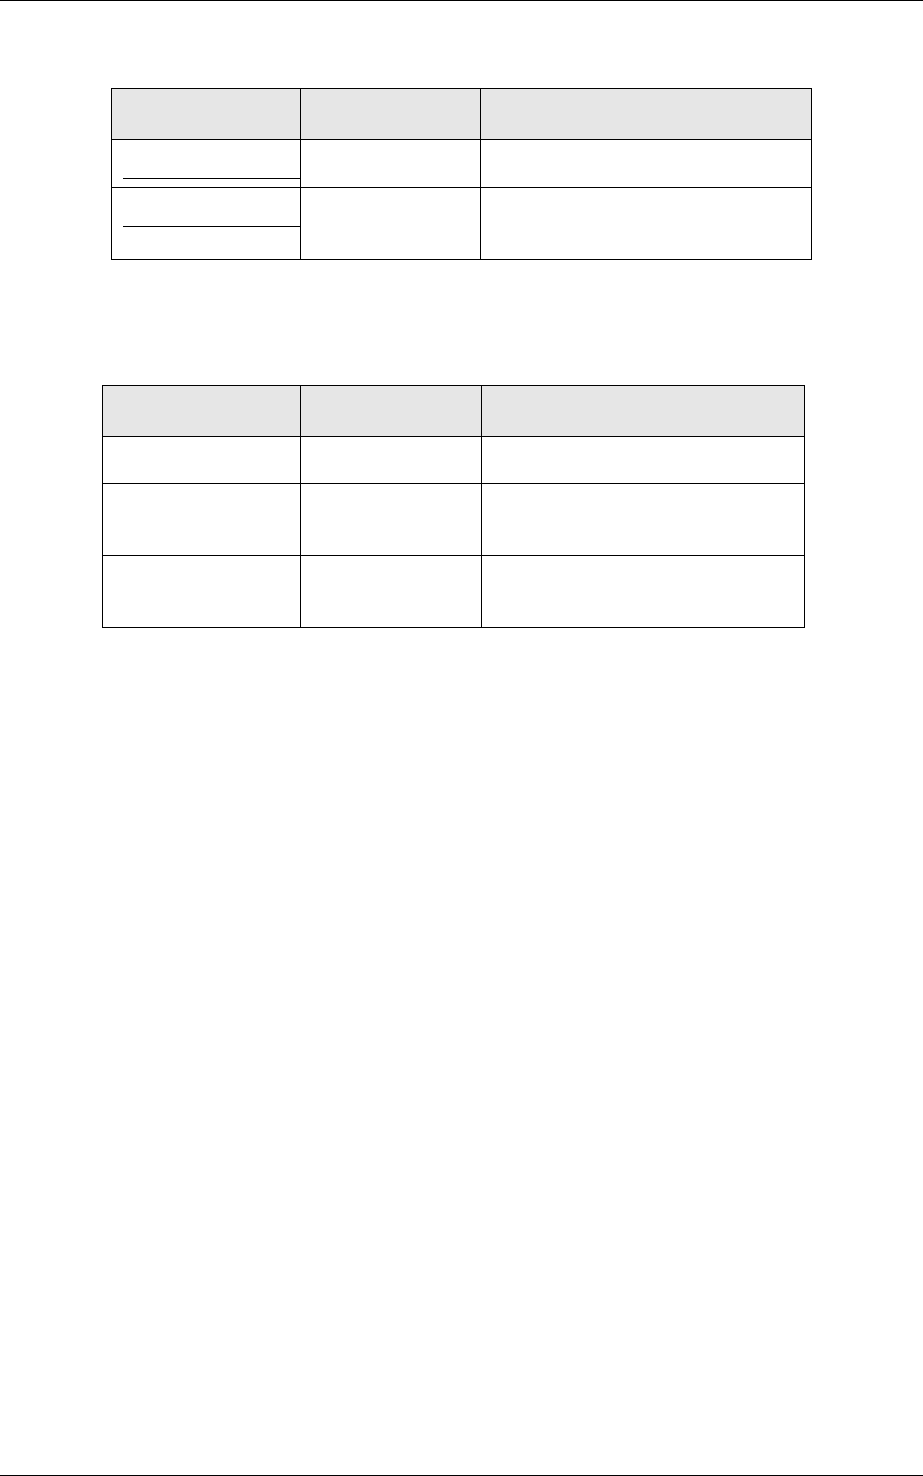
The status and error messages and their meanings are listed in the three tables
that follow: When a card is presented, one of the following responses is
generated:
LCD message LED Comment
Access Granted Green Card valid for access
Card Error RETRY Red Problem reading card
Card Expired Red Card not operational but is in
system.
Lost/Stolen Card Flashing
Red No access allowed
No Database! Red No access; no cards in
system.
Not In System Red Card number not known
PIN Timed Out Amber Requested PIN entered too
late
Wrong PIN,Retry Amber Invalid card and PIN
combination entered
Wrong Timezone Amber Card cannot be used at this
time
Software House Page 41
Administering EtherProx Entry EtherProx Entry
Other LCD messages, shown on the top line of the LCD panel, include the
following:
LCD message LED Comment
CLOSE DOOR Flashing red Door open illegally
Enter PIN None Enter PIN code for presented
card
Idle state messages, shown on the bottom line of the LCD panel, include the
following:
LCD message LED Comment
Door open Flashing amber Door unlocked, free access.
Enter PIN Flashing amber Card not required, only global
PIN code
Show card None EtherProx Entry ready to read
card.
Page 42 Software House

EtherProx Entry Diagnostics
6. Diagnostics
The EtherProx Entry reader provides a set of diagnostic tools for testing the EtherProx
software and hardware. The EtherProx Diagnostic Menu System provides menus on how
to work with diagnostics.
Note Only installation and maintenance personnel should run diagnostics on
EtherProx Entry.
Running Diagnostics
You can run the EtherProx diagnostic tools using the reader keypad. As you run the
diagnostics, you will see messages appear on the LCD display.
To run diagnostics
1. To enter Diagnostic mode, at the reader keypad, press ÙÙÙ0000.
The following message appears on the LCD display:
<* 0^ 0>
2. Press # to continue.
The following message appears on the LCD display:
EtherProx Diags
Information
For details on the diagnostic menus, see section 5.2, “Understanding the
Diagnostic Menu System.”
Note If you do not press a key for 10 seconds, EtherProx exits
Diagnostic Mode.
3. To navigate through the diagnostic menus:
n Press # to move to the next menu item.
n Press 0 to select a menu item.
n Press Ù to move to the previous menus and options.
Note When you enter an IP address, type Ù to represent
each period in the IP address. You should end the IP
address with Ù. You clear typing errors by pressing # to
erase each character you want to delete.
Software House Page 43

Diagnostics EtherProx Entry
When you reach the end of a submenu, the following message appears:
Back
Note If you do not press a key for 10 seconds, EtherProx will
move back through the menu tree and return to the Main
Menu. Although there is one exception. The Input Test
menu will hold for 60 seconds, and then EtherProx will
move back through the menu tree and return to the Main
Menu.
4. To exit Diagnostic mode, press # until you see the following menu item
on the LCD display:
<* 0^ 0>
5. Press 0.
Understanding the Diagnostic Menu System
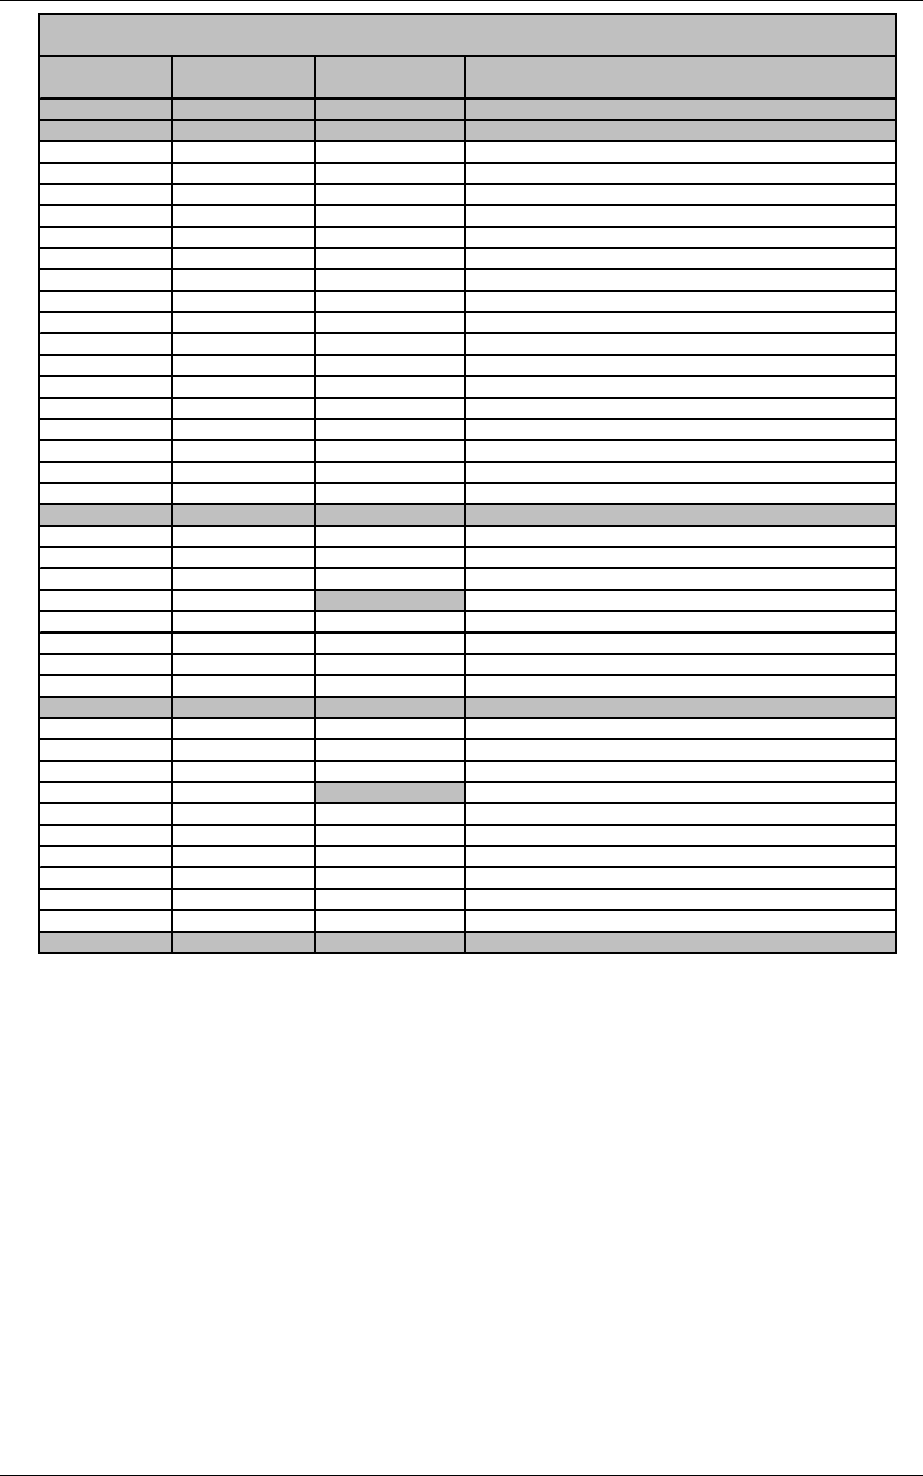
The following table contains the menu items in the EtherProx Diagnostic Menu System.
The Main Menu contains four menu items: Information, Test, Configure, and Exit. These
menu items contain submenu items and options, which appear in the Submenu and
Option columns. You can run diagnostics on any of the options. In the Description column,
there are descriptions of the options.
Page 44 Software House
EtherProx Entry Diagnostics
Main Menu Submenu Option Description
EtherProx Diags
Information Info Menu
Network IP Address Display current IP address and setting method
MAC Address Display ethernet address (in Hex w/o dashes)
Web Server Display server status
V
ersions S/W Type EtherProx Entry or EtherProx
S/W Version Software version number
S/W Date Software version date
H/W Version Hardware version number
H/W Ser/No. Hardware serial number
Database DB Format Type of database in use
Free DB Space Maximum number of records that can be stored
# Cards Number of records currently stored
# Transactions Number of events currently stored
System DIU Shows if DIU is connected and operational
Edit Reader Shows if second reader is connected and operational
Test Test Menu Local Test
Local Device Inputs Test input operation
Keypad Test full keypad operation
Leds Test led sequence
Aux Device Test
Aux Device(s) Read Head Verify exit reader read head operation
Keypad Test keypad operation
Leds Test LED sequence
Configure Configuration Set IP Address
IP Address Manually Set IP address manually
Auto Instruct to obtain IP automatically from an address serve
r
Aux Device(s) Set Aux Devices
Auto detect Not available
DIU Manually define Door Interface Unit as connected
2nd Reader Manually define second reader/keypad as connected
Diagnostic code Enter new code Change code to access these diagnostics
Special option Enter UPD code Code to request software update from server.
Exit <* 0^ #>
EtherProx Diagnostic Menu System
Software House Page 45

Diagnostics EtherProx Entry
Technical Support
If you are experiencing technical problems operating the EtherProx Entry Reader,
contact your dealer. The Software House Customer Support Center is available to
answer technical support questions on Monday through Friday from 8:00 am to
8:00 pm, Eastern Standard Time. The Customer Support Center phone numbers
are 1-781-890-2287 and 1-800-392-2873.
Before calling, please check your manual and make sure that the EtherProx Entry
unit is set up and powered properly. If you still need to call, have the following
information available:
· Product name and number
· Version
· SPASS number
· Clear description of the problem
Page 46 Software House

EtherProx Entry Glossary
7. Glossary
Adapter Plate: A metal plate used to convert the reader from a European to a U.S.
electrical containment box standard.
Alarm event: Activities such as door held or door forced. A transaction report contains
alarm events.
Alarm sound device duration: The length of time the sounder will be active if a door held
or forced occurs.
Browser: A computer application, such as Internet Explorer or Netscape, which allows
Internet access and viewing of web pages.
Card event: Cardholder door access and rejects. A transaction report contains card
events.
Cardholder: A person to which a card number has been assigned.
Cat 5:An Ethernet cable supporting 100mbps, using either Unshielded Twisted Pair (UTP)
or Shielded Twisted Pair (STP).
Containment Box: A metal box used to contain wires and connectors for light switches,
sockets, or various other devices.
Crossover Cable: A cable with Transmit pin(s) on one end wired to Receive pin(s) on the
other. It is sometimes referred to as a “null modem cable.”
Decimal Format: The representation of a numerical quantity using digits 0-9 (base 10).
Door Control Unit (DCU): A door control unit that provides access control.
Door Control Unit System: The DCU system encompasses the entry door control unit,
the exit reader, and any peripheral devices, such as the DIU.
Door forced: A forced entry through a door. The door control unit detects a door-forced
condition when the Door Sense Monitor (DSM) activates without a valid card access or
REX.
Door held: A door held alarm sounds after a valid card access if the cardholder holds the
door open after the door open time expires.
Door Interface Unit (DIU): A device designed to connect to a door control unit, providing
additional inputs, outputs, and alarms.
Door open time: The length of time that the door can be open after a valid card access.
The door open time is sometimes referred to as the shunt time.
Door Override: A mode where the door is unlocked.
Door sensing input: An input that monitors the Door State Monitor (DSM) switch.
Door strike time: The length of time that the lock will be open after a valid card read.
Door State Monitor (DSM): A switch that indicates whether a door is open or closed.
Software House Page 47

Glossary EtherProx Entry
Download: The InfoProx door control unit is the central or controlling device from which
users download data to a backup program on a computer.
Entry Reader: The InfoProx Entry Reader is a door control unit with memory, enabling it
to work as a standalone access control device.
EtherProx System: A system defined by all the components that make EtherProx
function as an integrated door control unit.
Ethernet: The most widely used Local Area Network (LAN), sending its communications
through radio frequency signals carried by coaxial cable to computers in the network.
TCP/IP is the most common software protocol for communication using Ethernet.
Exit Reader: An InfoProx Exit reader connects to an Entry Reader (either InfoProx or
EtherProx) and serves as a remote access device or as a device on the secure side of a
door used to exit that door.
Extended door open time: Additional time that a door will be shunted. For example, you
can use extended door open time for disabled cardholders or for doors that are meant to
be held open longer such as airport loading gates.
File Transfer Protocol (FTP): A TCP/IP software protocol used to transfer files between
computers.
Gin: Global Identification number.
Global PIN: Global Personal Identification number.
Hardware address: See MAC address.
Hexadecimal Format: Illustrates binary code values with a numerical quantity using 0-15
digits and combining 0-9 + ABCDEF as values. Example: 0025BA.
Hotstamp Number: A number stamped by the manufacturer on the outside of a card. It is
not always equivalent to the card number, which is the encoded system number.
IP Address: Internet Protocol address is the unique 32-bit number that serves as an
address for a node in a TCP/IP network. Example: 172.31.10.20.
Liquid Crystal Display (LCD): A display technology used by the InfoProx and EtherProx
readers.
Light Emitting Diode (LED): A display technology that emits light when conducting
current.
Local Area Network (LAN): A communications network that serves users within a
confined geographical area. LAN is comprised of servers, client workstations, and network
operating systems, such as Windows NT or Unix that allow various nodes to communicate
and share data within the LAN. Data transfer is managed by a transport protocol such as
TCP.
Lock sensing input: An input that monitors a lock sensor that is available on some locks.
Lock sensor: Indicates whether a lock is engaged.
Page 48 Software House

EtherProx Entry Diagnostics
MAC Address: The unique 48-bit address burned into Ethernet and Token Ring adapters,
identifying a specific network card from all others. The address is normally shown as 12
hexadecimal nibbles, for example, 00-50-F9-3A-64-BC.
NO/NC: Normally Open or Normally Closed contacts.
PIN: Personal Identification Number used with cards to allow access.
PIR: Passive infrared switch. Typically used for a REX.
Power to secure: Indicates that a door is locked (secured) when the door strike relay is
powered (engaged).
Power to unlock: Indicates that the door is unlocked when the door strike relay is
powered.
Proximity: A type of reader (read head) that operates without a card actually touching the
reader. The proximity reader uses wireless Radio Frequency (RF) technology.
Reader: A door control unit that reads cards to allow access, which is one function of the
unit.
Relock delay time: The amount of time, in seconds, to delay relocking the door after a
valid card access. Sometimes referred to as relock time.
Relock time: see Relock delay time.
Request to exit input: The input that monitors the Request to exit (REX or RTE) switch.
The REX switch might be a pushbutton or PIR. This input is frequently placed on the
secure side of a door to allow egress without a card read.
REX: See request to exit.
Site Code: An encoded three-digit number that differentiates one set of cards from
another. The site code is embedded by the manufacturer of the cards, usually at the
request of the user.
Sounder: The piezoelectric device at the back of the reader from which sounds, such as
alarms or confirmation beeps, emit: The Sounder is also referred to as the Sound Device.
Standard door open time: See Door open time.
Supervised input: An input that detects four states: normal, alarm, open circuit, and
short circuit.
Swipe: Present a card to the reader within the read range.
System Number: The system number is an embedded card number; it appears in
hexadecimal format on the door control unit LCD display.
Tamper Sensor: A light-sensing device on the back of the reader unit that sounds an
alarm when the unit has been tampered with.
Time clearance: Configures access at specified days and times.
Time zone: Configures access levels based on the time clearance.
Software House Page 49

Glossary EtherProx Entry
Transaction: Record of an event logged into a report file. Examples of events are alarms
or actions, such as door access, door forced, or door held.
Unlock time: See Door strike time.
Unsupervised input: An input that detects two states: normal and alarm.
Upload: Moves data from the software backup utility on a computer to a reader. The
reader is the primary and controlling device from which you can download data to a
computer.
Page 50 Software House