Controlled Entry Distributors FM420U 433.9 MHz REMOTE TRANSMITTER User Manual FM420U v 11 2013
Controlled Entry Distributors, Inc. 433.9 MHz REMOTE TRANSMITTER FM420U v 11 2013
User Manual
FM420U
ISTFM420U
V.06.2013
EN
MULTI-CHANNEL 433.92 MHz RADIO CONTROL.
Operation and programming instructions.
EN
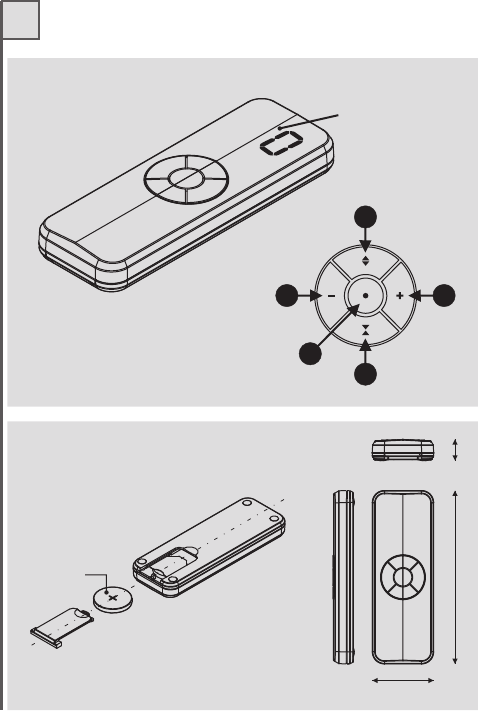
Fig. 1
Fig. 2
2
2
CR2430
2
14.2
116.0
40.8
dimensions in mm
20
13
5
4
DISPLAY
EN
3
SPECIFICATIONS
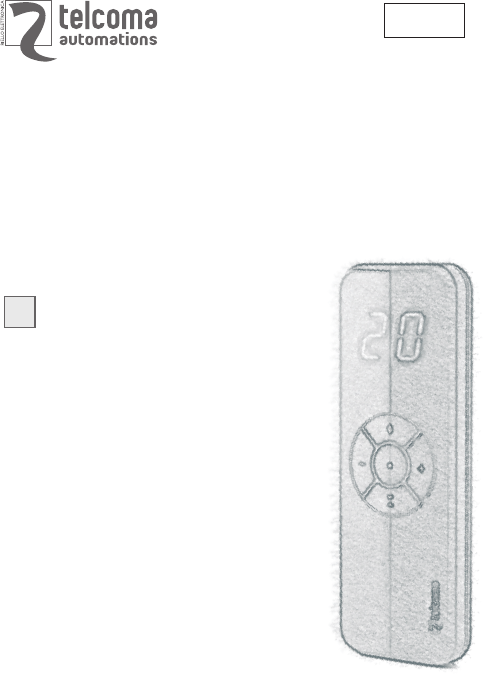
Multi-channel radio control for quick and intuitive control of 20 users with
receivers in the series FM400U
Innovative and stylish container with white led display which, located
under semi-transparent plastic, shows the selected channel. At the centre
of a rubber faced keypad with three function keys and two up-down
channel selection keys. Fitted with practical non-slip rubber buttons.
TECHNICAL SPECIFICATIONS u.m. FM420
Power supply with battery type Vdc 3 (CR2430)
Transmission consumption mA 50
Frequency MHz 433,92
Modulation FSK
Operating temperature °C -20 +55
Any changes or modifications not expressly approved by the party
responsible for compliance could void the user's authority to
operate this equipment.
Tested to Comply with FCC Standards FOR HOME OR OFFICE USE.
Operation is subject to the following two conditions: (1) This device
may not cause harmful interference, and (2) this device must accept
any interference received, including interference that may cause
undesired operation.
EN
Fig. 1
Fig. 2
2
2
CR2430
2
14.2
116.0
40.8
dimensions in mm
20
13
5
4
DISPLAY
EN
3
SPECIFICATIONS
Multi-channel radio control for quick and intuitive control of 20 users with
receivers in the series FM400U
Innovative and stylish container with white led display which, located
under semi-transparent plastic, shows the selected channel. At the centre
of a rubber faced keypad with three function keys and two up-down
channel selection keys. Fitted with practical non-slip rubber buttons.
TECHNICAL SPECIFICATIONS u.m. FM420
Power supply with battery type Vdc 3 (CR2430)
Transmission consumption mA 50
Frequency MHz 433,92
Modulation FSK
Operating temperature °C -20 +55
Any changes or modifications not expressly approved by the party
responsible for compliance could void the user's authority to
operate this equipment.
Tested to Comply with FCC Standards FOR HOME OR OFFICE USE.
Operation is subject to the following two conditions: (1) This device
may not cause harmful interference, and (2) this device must accept
any interference received, including interference that may cause
undesired operation.
EN
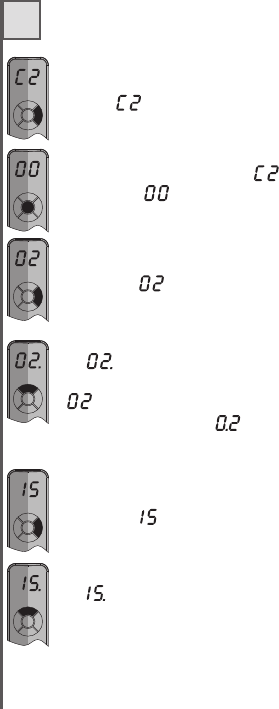
Use key 1 or 3 (indicated in the drawing) to scroll through to the
flashing
Use the central key to confirm
The channel will start flashing.
Use key 3 (indicated in the drawing) or 1 to scroll through the
channels to
Press key 2 to add the channel 02 to C2. The dot next to 2 will light
up ( ).
To remove it from C2 press key 4, and the dot next to 2 will turn off
( ).
If a dot is lit next to 0 ( ), this means that channel 02 also
belongs to group C1.
Use key 3 (indicated in the drawing) or 1 to scroll through the
channels to
Press key 2 to add the channel 15 to C2. The dot next to 5 will light
up ( ).
To remove it from C2 press key 4, and the dot next to 5 will turn off.
5
EN
4
DESCRIPTION OF COMPONENTS
Fig. 1
1 channel decrease key
2. CH1 transmission key
3. channel increase key
4. CH2 transmission key
5. CH3 transmission key
MAIN FUNCTIONS
Fig. 2
Battery panel opening and
external dimensions in mm
This transmitter can control up to 20 automations, each of which can be
sent 3 different functions (for example OPEN, CLOSE and STOP).
To scroll through the 20 channels, press key 1 (to decrease the number) or
3 (to increase the number).
After selecting the channel, press keys 2, 4 or 5 to transmit the code.
To memorise the code in the user, read the receiver instructions.
Press and hold the the keys indicated in the drawing (1 and 3)
until starts to flash.
-Channels groups (C1, C2).
Use this menu to group channels as required. Once configured, press a
command for C1 or C2 to transmit all selected channels in sequence.
Example: how to group channels 02 and 15 in C2
SPECIAL FUNCTIONS
EN
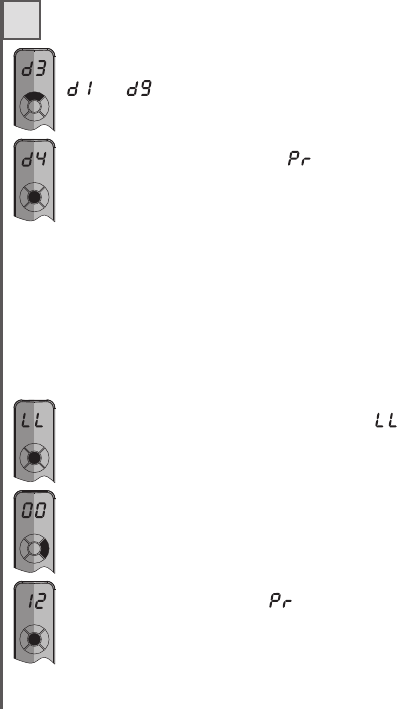
Press key 5 to confirm. The text appears briefly and the
radio control returns to normal operating status.
- Maximum number of channelsDisplay of channels can be set to the
minimum indispensable, to optimise search times.
Procedure:
To increase battery lifetime, set a short delay interval.
Groups C1 and C2 are only displayed if programmed.
From the secondary menu, press key 5 to select
Use key 3 (indicated in the drawing) or 1 to scroll through values
00 to 20.
Example: on selection of 12, all channels from 00 to 15 will be
displayed.
Press key 5 to confirm. The text appears briefly and the radio
control returns to normal operating status.
Use key 2 (indicated in the drawing) or 4 to scroll through values
to corresponding to a display shutdown delay from
approx. 2 to 10 seconds.
7
EN
6
Use the central key to complete programming of C2. The text
is displayed briefly, followed by after which the display
turns off.
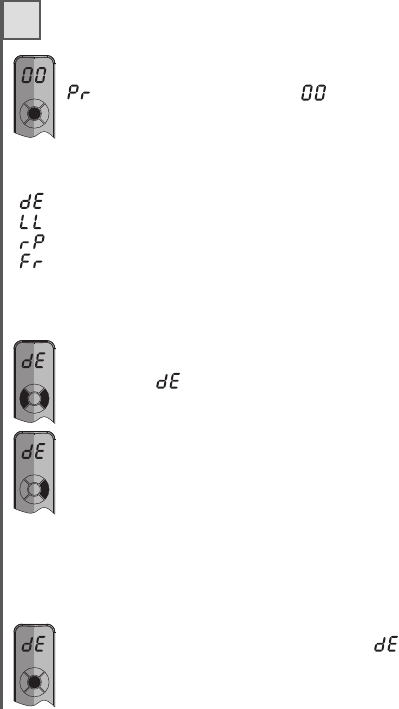
Access to secondary menu
This menu contains the following functions:
- Display shutdown delay setting
- Maximum channel number setting
- Channel 00 repetition function
- Firmware Version
Procedure to enable secondary menu:
Press and hold the keys indicated in the drawing for approx. 10
seconds until appears.
key 3 (indicated in the drawing) or 1 to scroll through the menu
until the required function is displayed
- Display shutdown delay
The channel remains on display after release one of the keys for a time
interval that can be modified as follows:
From the secondary menu, press key 5 to select
EN
Press key 5 to confirm. The text appears briefly and the
radio control returns to normal operating status.
- Maximum number of channelsDisplay of channels can be set to the
minimum indispensable, to optimise search times.
Procedure:
To increase battery lifetime, set a short delay interval.
Groups C1 and C2 are only displayed if programmed.
From the secondary menu, press key 5 to select
Use key 3 (indicated in the drawing) or 1 to scroll through values
00 to 20.
Example: on selection of 12, all channels from 00 to 15 will be
displayed.
Press key 5 to confirm. The text appears briefly and the radio
control returns to normal operating status.
Use key 2 (indicated in the drawing) or 4 to scroll through values
to corresponding to a display shutdown delay from
approx. 2 to 10 seconds.
7
EN
6
Use the central key to complete programming of C2. The text
is displayed briefly, followed by after which the display
turns off.
Access to secondary menu
This menu contains the following functions:
- Display shutdown delay setting
- Maximum channel number setting
- Channel 00 repetition function
- Firmware Version
Procedure to enable secondary menu:
Press and hold the keys indicated in the drawing for approx. 10
seconds until appears.
key 3 (indicated in the drawing) or 1 to scroll through the menu
until the required function is displayed
- Display shutdown delay
The channel remains on display after release one of the keys for a time
interval that can be modified as follows:
From the secondary menu, press key 5 to select
EN
9
EN
8
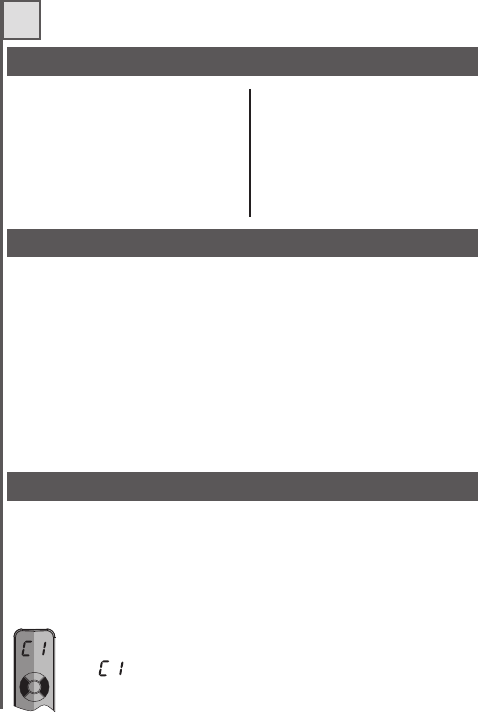
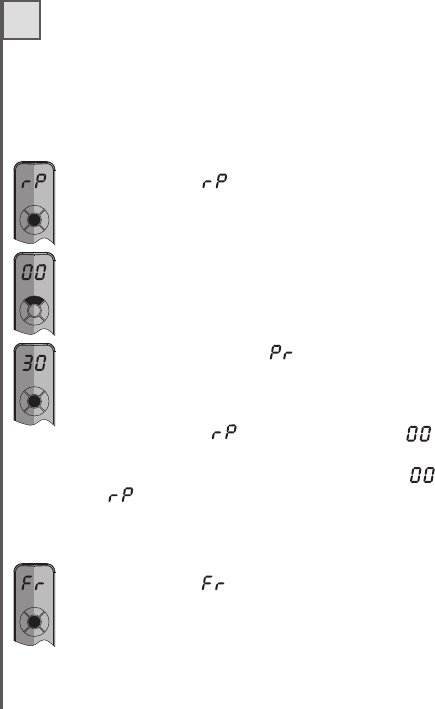
- Channel 00 repetition This new multi-channel control enables
programming of channel 00 so that it repeats transmission sequentially for
a set time interval.
This function is useful when channel 00 is optimised for centralised
commands, and repetition optimises reception of the radio signal.
Press key 5 to select
Press key 5 to confirm. The text appears briefly and the radio
control returns to normal operating status.
In this case (30) channel 00, after pressing a transmission key, is
transmitted at regular intervals for 30 seconds. On each
transmission, the text is displayed, followed by . Press
key 1 or 3 to interrupt transmission repetition.
To disable repeated transmission of channel 00, set in the
menu .
Use key 2 (indicated in the drawing) or 4 to scroll through values
00 to 40.
Select 00 to disable transmission repetition.
Select 10, 20, 30 or 40 to set the repetition interval in seconds.
- Firmware Version
Press key 5 to select . This displays a number corresponding
to the radio control firmware version.
BATTERY REPLACEMENT
To replace the battery, open the battery compartment and remove the
battery with the aid of a tool (for example the tip of a pen). Fit the new
battery taking care to observe polarity. See fig. 2 on page 2.
GUARANTEE
The present guarantee covers possible faults and/or irregularities due to
manufacturing defects and/or faults.
The guarantee will automatically decay in the event of tampering or mi-
suse of the product.
During the guarantee period TELCOMA srl pledge to repair and/or re-
place defective and non-tampered parts. The call charges, as well as
the collection, packaging and transportation costs of the product for re-
pair or replacement are at the clients full and exclusive expense.

EN
9
EN
8
- Channel 00 repetition This new multi-channel control enables
programming of channel 00 so that it repeats transmission sequentially for
a set time interval.
This function is useful when channel 00 is optimised for centralised
commands, and repetition optimises reception of the radio signal.
Press key 5 to select
Press key 5 to confirm. The text appears briefly and the radio
control returns to normal operating status.
In this case (30) channel 00, after pressing a transmission key, is
transmitted at regular intervals for 30 seconds. On each
transmission, the text is displayed, followed by . Press
key 1 or 3 to interrupt transmission repetition.
To disable repeated transmission of channel 00, set in the
menu .
Use key 2 (indicated in the drawing) or 4 to scroll through values
00 to 40.
Select 00 to disable transmission repetition.
Select 10, 20, 30 or 40 to set the repetition interval in seconds.
- Firmware Version
Press key 5 to select . This displays a number corresponding
to the radio control firmware version.
BATTERY REPLACEMENT
To replace the battery, open the battery compartment and remove the
battery with the aid of a tool (for example the tip of a pen). Fit the new
battery taking care to observe polarity. See fig. 2 on page 2.
GUARANTEE
The present guarantee covers possible faults and/or irregularities due to
manufacturing defects and/or faults.
The guarantee will automatically decay in the event of tampering or mi-
suse of the product.
During the guarantee period TELCOMA srl pledge to repair and/or re-
place defective and non-tampered parts. The call charges, as well as
the collection, packaging and transportation costs of the product for re-
pair or replacement are at the clients full and exclusive expense.

11
10
NOTE
NOTE

11
10
NOTE
NOTE

Telcoma s.r.l.
via L. Manzoni, 11 z.i. Campidui
31015 Conegliano (TV) Italy
Tel. +39 0438-451099 - Fax +39 0438-451102
http://www.telcoma.it E-mail:info@telcoma.it