Controlled Entry Distributors TRADCS433 Community Controls Handicap Plate Transmitter User Manual TS small receiver pg1
Controlled Entry Distributors, Inc. Community Controls Handicap Plate Transmitter TS small receiver pg1
user manual

Extra-Small Receiver Installation
Read this manual carefully before installing any transmitter or receiver. Complete the programming
procedure before installing the receiver in its final location. The installer will need to have access to the
receiver's programming button and must be able to view the receiver's LED light during the program-
ming process.
System
The Extra-Small Transmitters and Receivers operate at 433.92 MHz and use code-hopping technology.
The receiver will only operate with learned transmitters’ signal (see programming transmitter instruc-
tions).
Installation
NOTE: Complete the programming instructions
before installing the receiver in its final location.
Install the receiver in a location so that the antenna is
not surrounded by metal. Metal may cause a reduc-
tion in range and inconsistency of signal reception.
Door operator motors and power supplies may also
cause radio frequency interference. If the receiver is
installed in a metal enclosure, drill a hole in the
enclosure and thread as much of the antenna as
possible through the hole. This will reduce the effects
the metal has on the receiver's reception. The
receiver comes equipped with a wiring harness for
easy installation.
Receiver Wiring Harness:
Orange Wire: Normally Open Relay Output
Brown wire with White Stripe: Normally Open Relay Output Common Connection
Red Wire: 24VACl24VDC Power
Black Wire: Ground
Purple Wire: 12 VACl12VDC Power
Brown Wire: Normally Closed Relay Output Common Connection
Yellow Wire: Normally Closed Relay Output
Programming Instructions:
NOTE: Prior to programming, ensure the receiver's LED light blinks red when power is applied. If the
LED is not blinking red, disconnect and then reconnect the power.
Programming transmitter(s) into the receiver's memory:
The receiver can learn up to 12 transmitters. Follow the steps below to program your receiver(s).
1. Press the receiver's programming button for less than 2 seconds and release. The LED should
change from blinking red to solid green. The receiver has entered programming mode.
2. Press and release the transmitter once and ensure that the receiver's LED changes to solid red. The
receiver is learning the transmitter's code.
3. Wait a few seconds and then press the transmitter button again. The receiver's LED should now blink
green several times. It has ended its learning procedure. The LED should now be blinking red.
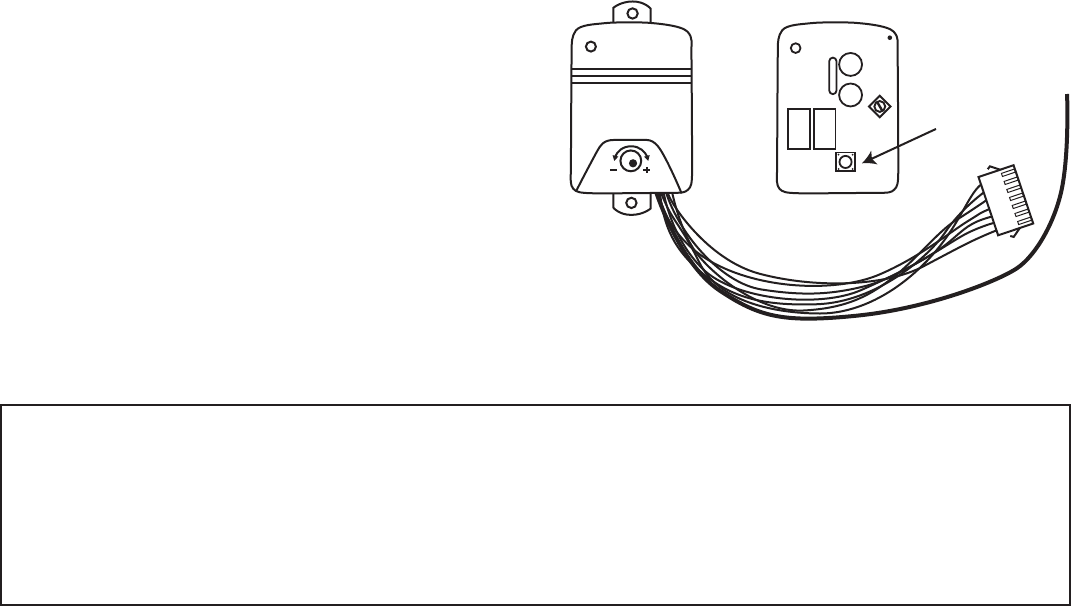
Exterior: Interior:
Programming
Button

Specifications:
Transmitter
Frequency: 433.92 MHz
Dimensions: 1.25 x .875 x .25”
Security Code Method: Code Hopping
Battery Life: 60,000 cycles
Operating Temperatures: -4°F to 122°F
Receiver
Frequency: 433.92 MHz
Dimensions: 2.25 x 1.25 x .75”
Security Code Method: Code Hopping, up to 12 transmitters
Operating Temperatures: -4°F to 122°F
Electrical Rating: 100,000 cycles at 2 Amps. 24 VDC/120 VAC
Input Power: 24 VAC, 24 VDC or 12 VAC, 12VDC
Output: 2 relay outputs: 1 NO 1 NC
Programming the receivers output activation time:
When the receiver is activated, its outputs will stay in the minimum activation state for approximately 1.5
seconds (default). This time can be adjusted to stay in the activation state for up to 4 hours. See below
to adjust the receiver's output activation time.
1. Press the receiver's programming button for 4 seconds and release. The LED should be solid red. The
receiver is in the activation time programming mode.
2. Press and release the transmitter button.
3. When the desired time has elapsed (up to 4 hours) press the transmitter button again. The receiver's
LED should blink green several times. When the procedure has ended, the LED should be blinking red.
Deleting transmitters from the receiver's memory:
See below to erase the receiver's memory of all previously learned transmitters. NOTE: Deleting
previously learned transmitters does not change the receiver's output activation time.
1. Press the receiver's programming button for at least 8 seconds until the receiver's LED starts blinking
green, then release the programming button. The LED should now be blinking red.
2. The receiver's memory is now cleared.
FCC ID: SU7TRADCS433
Changes or modifications not expressly approved by
the party responsible for compliance could void the
user’s authority to operate the equipment.