Coppernic HFAM2G2 RFID MODULE HF-AM2-G2 User Manual MorphoCheck Terminal Developers Guide A04
Coppernic RFID MODULE HF-AM2-G2 MorphoCheck Terminal Developers Guide A04
Users Manual

PSION TEKLOGIX
Coppernic
SAGEM
MORPHOCHECK TERMINAL
USERS Guide
FEBRUARY 10, 2010 Rev 3

Morphocheck Terminal - Developer’s Guide
DPD A00358-A03
Page 2 / 15
Title
MorphoCheck Terminal
Doc Type
User’s guide
Doc Id
DPD A00358
Revision
Date
Name
Status/Comment
A00
21/12/07
M.ARNAUD
Initial Version
A01
16/01/08
M.ARNAUD
Add reference and correction
A02
25/01/08
M.ARNAUD
Add correction
A03
10/02/10
M. PIEPERS
Add WiFi and Bluetooth details
A04
12/02/10
M. PIEPERS
Add FCC warning
THIS DEVICE COMPLIES WITH PART 15 OF THE FCC RULES. OPERATION
IS SUBJECT TO THE FOLLOWING TWO CONDITIONS: (1) THIS DEVICE MAY
NOT CAUSE HARMFUL INTERFERENCE, AND (2) THIS DEVICE MUST
ACCEPT ANY INTERFERENCE RECEIVED, INCLUDING INTERFERENCE THAT
MAY CAUSE UNDESIRED OPERATION.
NOTE: THE MANUFACTURER IS NOT RESPONSIBLE FOR ANY RADIO OR
TV INTERFERENCE CAUSED BY UNAUTHORIZED MODIFICATIONS TO
THIS EQUIPMENT. SUCH MODIFICATIONS COULD VOID THE USER'S
AUTHORITY TO OPERATE THE EQUIPMENT.

Morphocheck Terminal - Developer’s Guide
DPD A00358-A03
Page 3 / 15
TABLE OF CONTENT
1.!INTRODUCTION.......................................................................... 4!
1.1.!About this Manual....................................................................................4!
2.!DEVELOPMENT TOOLS ............................................................ 5!
2.1.!WorkAboutPRO HDK .Net Wrapper.......................................................5!
3.!INTERFACE BOARD................................................................... 6!
3.1.!Overview ..................................................................................................6!
3.2.!Serial Communication Settings................................................................7!
3.3.!General Power Supply..............................................................................8!
3.4.!Dual Reader............................................................................................10!
3.5.!Fingerprint Reader..................................................................................12!
4.!SCANNER CONNECTOR.......................................................... 13!
4.1.!Overview ................................................................................................13!
4.2.!MRZ Reader...........................................................................................14!
4.3.!Imager Reader ........................................................................................15!
5.!Bluetooth radio............................................................................. 15!
6.!WiFi 802.11b/g radio ................................................................... 15!

Morphocheck Terminal - Developer’s Guide
DPD A00358-A03
Page 4 / 15
1. INTRODUCTION
1.1.
About this Manual
This manual provides guidance on how to access and control the peripherals of the Sagem
MorphoCheck terminal base on the WorkAboutPRO G2 device.
Chapter 1: Introduction
Provides an overview of this manual.
Chapter 3: Development tools
Describes the libraries available for .Net and C++ developers
Chapter 3: Interface board
Describes how the dual (contact-less and contact) reader and the fingerprint reader are
connected to the WorkAboutPRO G2 device through the interface board.
Chapter 4: Scanner port
Describes how to use the MRZ reader and the Imager module on the WorkAboutPRO.
Chapter 5: Bluetooth radio and Psion Teklogix Mobile Device SDK
Management of Bluetooth radio
Chapter 6: WiFi radio and Psion Teklogix Mobile Device SDK
Management of WiFi radio

Morphocheck Terminal - Developer’s Guide
DPD A00358-A03
Page 5 / 15
2. DEVELOPMENT TOOLS
2.1.
WorkAboutPRO HDK .Net Wrapper
The WorkAboutPRO HDK is intended to support developers of third-party hardware for
Psion Teklogix WorkAboutPRO Hand-Held Computer. On top of that, a library has been
designed to wrap these low level functions for .Net developer.
In this chapter all the code sample are extracted from the .Net wrapper, but can be easily
translated to C++, see the WorkAboutPRO HDK .Net Wrapper documentation for more
information.
Everything you need to install and use the WorkaboutPro HDK .Net Wrapper can be
downloaded on the Partner Database page of the Psion Teklogix website.
Morphocheck Terminal - Developer’s Guide
DPD A00358-A03
Page 6 / 15
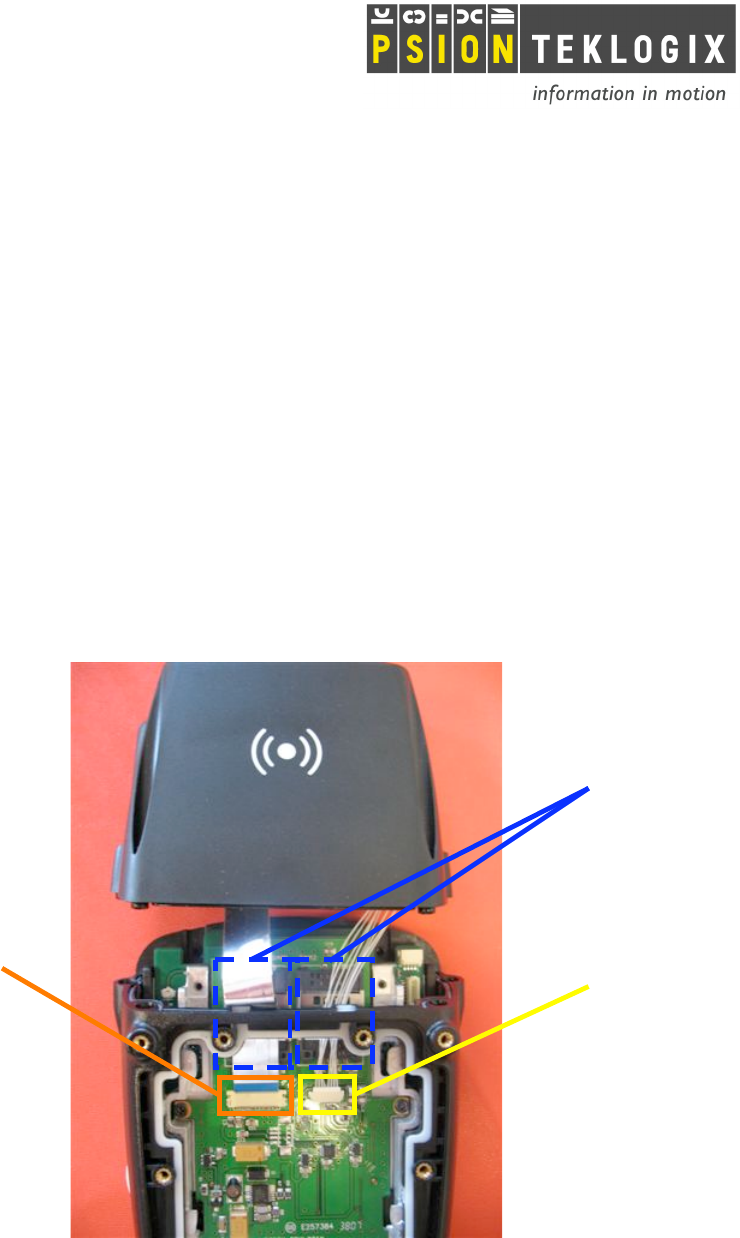
3. INTERFACE BOARD
3.1.
Overview
The interface board is used to multiplex the serial communication towards the dual reader or
the fingerprint reader. This board is connected on the WorkAboutPRO through the XMod
connector.
Besides the 2 SAM sockets easily accessible on the top of the board, the interface board
provides 2 connectors:
1. Dual Reader connector linked with the RFID and SmartCard reader (also called Dual
Reader).
2. MSO-CBM connector linked with the Sagem MSO-CBM finger print reader.
2 SAM card slots
2. MSO-CBM
Fingerprint connector
1. Dual reader
connector (RFID and
SmartCard reader)
Morphocheck Terminal - Developer’s Guide
DPD A00358-A03
Page 7 / 15
3.2.
Serial Communication Settings
To enable the serial interface on the WorkAboutPRO expansion slot, you need to set the
registry key as follows:
HKLM\Drivers\PsionTeklogix\Expansion Slot\FFUART = dword:1
A warm reset of the terminal is mandatory after completion.
The communication to both readers is multiplexed through the port number COM1.
WorkAboutPRO .Net Wrapper sample code:
using PsionTeklogix.WorkAboutPro;
public class DeviceInterface
{
public static void Init()
{
WorkAboutPro WAP = new WorkAboutPro();
// Enable the serial port COM1 by setting the registry key
// HKLM\Drivers\PsionTeklogix\Expansion Slot\FFUART = dword:1
if( !WAP.COM1Active )
{
WAP.COM1Active = true;
WAP.Reboot();
}
}
}
Morphocheck Terminal - Developer’s Guide
DPD A00358-A03
Page 8 / 15
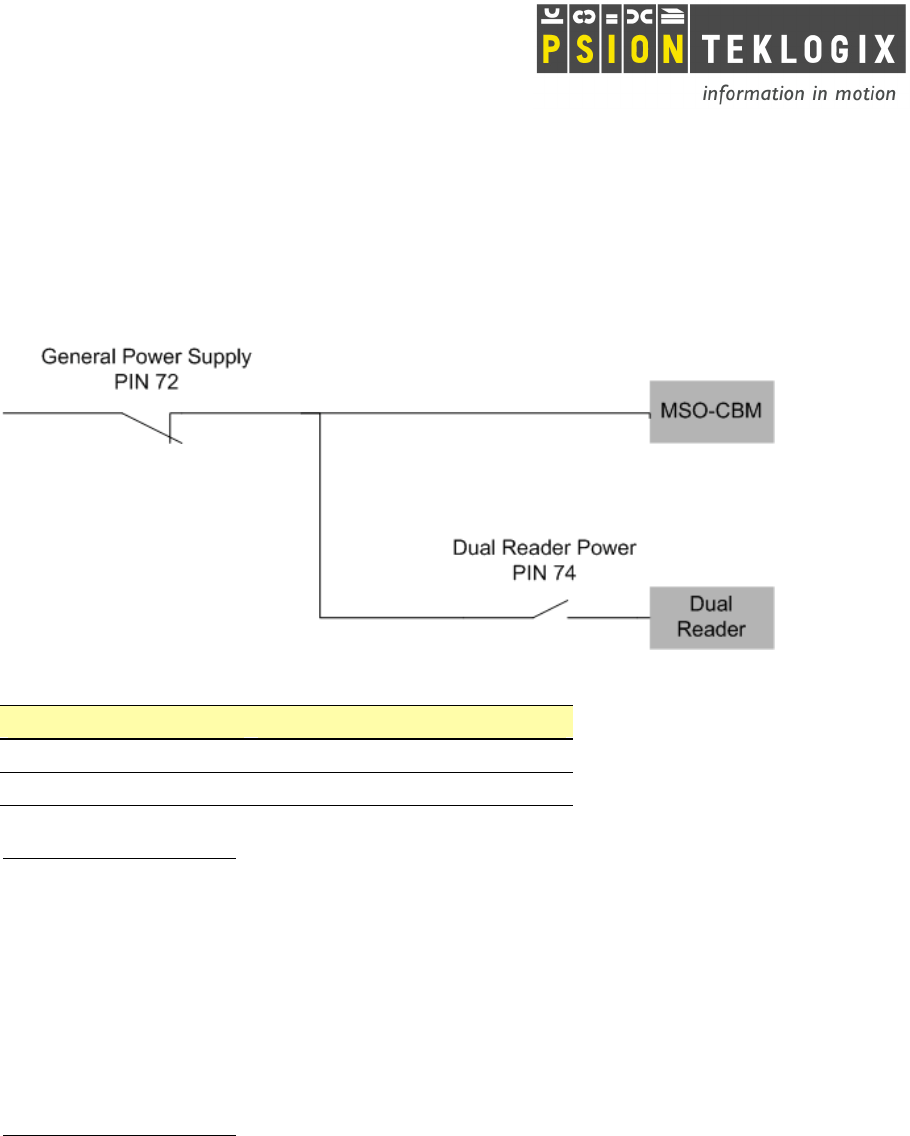
3.3.
General Power Supply
General power supply is driven though the GPIO on pin 72.
PIN 72 State
General Power Supply
FALSE
ON
TRUE
OFF
IMPORTANT NOTICE : Pin 70 must be set to false before switching the interface board
power. Power overconsumption and a pin 70 damage may occur if not applied.
Power ON
Set the output pin 72 to false switches ON the interface board power.
The fingerprint reader is automatically power ON.
The dual reader is NOT automatically power ON: you need to set the pin 74 to true to do that.
IMPORTANT NOTICE : Pin 70 must be set to false before switching ON the interface board
power. MSO-CBM dysfonction may occur if not applied.

Morphocheck Terminal - Developer’s Guide
DPD A00358-A03
Page 9 / 15
WorkAboutPRO .Net Wrapper sample code:
using PsionTeklogix.WorkAboutPro;
public class DeviceInterface
{
public static void PowerOn()
{
WorkAboutPro WAP = new WorkAboutPro();
// Set pin 70 to false for proper use
WAP.GPIO_SetPIN70State(false);
// Set pin 72 to false to enable power
WAP.GPIO_SetPIN72State(false);
}
}
Power OFF
Set the output pin 72 to true, switches OFF the interface board power.
IMPORTANT NOTICE : Pin 70 must be set to false before switching off the interface board
power. Power overconsumption and a pin 70 damage may occur if not applied.
WorkAboutPRO .Net Wrapper sample code:
using PsionTeklogix.WorkAboutPro;
public class DeviceInterface
{
public static void PowerOff()
{
WorkAboutPro WAP = new WorkAboutPro();
// Set pin 70 to false for proper use
WAP.GPIO_SetPIN70State(false);
// Set pin 72 to false to disable power
WAP.GPIO_SetPIN72State(true);
}
}
Morphocheck Terminal - Developer’s Guide
DPD A00358-A03
Page 10 / 15
3.4.
Dual Reader
PIN 74 State
Dual Reader Power
TRUE
ON
FALSE
OFF
Power ON the Dual Reader
Power on the interface board and set the output pin 74 to true switches on the dual reader.
WorkAboutPRO .Net Wrapper sample code:
using PsionTeklogix.WorkAboutPro;
public class DeviceInterface
{
public static void SwitchOnDualReader()
{
WorkAboutPro WAP = new WorkAboutPro();
// Enable general power supply
// if it hasn’t been done before
// Set pin 70 to false for proper use
WAP.GPIO_SetPIN70State(false);
// Set pin 72 to false to enable power
WAP.GPIO_SetPIN72State(false);
// Set pin 74 to true to enable dual reader power
WAP.GPIO_SetPIN74State(true);
}
}
Power OFF the Dual Reader
Set the output pin 74 to false switches off the dual reader.
Obviously if the interface board is powered off the dual reader is too switched off.

Morphocheck Terminal - Developer’s Guide
DPD A00358-A03
Page 11 / 15
Using the WorkAboutPRO .Net Wrapper:
using PsionTeklogix.WorkAboutPro;
public class DeviceInterface
{
public static void SwitchOffDualReader()
{
WorkAboutPro WAP = new WorkAboutPro();
// Set pin 74 to false to disable dual reader power
WAP.GPIO_SetPIN74State(false);
// Disable general power supply
// Set pin 70 to false for proper use
WAP.GPIO_SetPIN70State(false);
// Set pin 72 to false to disable power
WAP.GPIO_SetPIN72State(true);
}
}
Switch the Serial Communication to the Dual Reader
PIN 70 State
Communication switch to
TRUE
MSO-CBM
FALSE
DUAL READER
Set the output pin 70 to false switches the serial communication to the dual reader.
The default state of the pin 70 is false, which means that by default the serial communication
is link to the dual reader.
Using the WorkAboutPRO .Net Wrapper:
using PsionTeklogix.WorkAboutPro;
public class DeviceInterface
{
public static void SwitchSerialCommToDualReader()
{
WorkAboutPro WAP = new WorkAboutPro();
// Switch the serial communication to the Dual Reader
WAP.GPIO_SetPIN70State(false);
}
}

Morphocheck Terminal - Developer’s Guide
DPD A00358-A03
Page 12 / 15
3.5.
Fingerprint Reader
Power ON the Fingerprint reader
This operation is done through the interface board power on. See the 2.4 General Power
Supply section.
Power OFF the Fingerprint reader
This operation is done through the interface board power off. See the 2.4 General Power
Supply section.
Switch the serial communication to the Fingerprint reader
PIN 70 State
Communication switch to
TRUE
MSO-CBM
FALSE
DUAL READER
Set the output pin 70 to true switches the serial communication to the MSO-CBM fingerprint
reader.
WorkAboutPRO .Net Wrapper sample code:
using PsionTeklogix.WorkAboutPro;
public class DeviceInterface
{
public static void SwitchSerialCommToFingerprintReader()
{
WorkAboutPro WAP = new WorkAboutPro();
// Switch the serial communication to the MSO-CBM
WAP.GPIO_SetPIN70State(true);
}
}
Morphocheck Terminal - Developer’s Guide
DPD A00358-A03
Page 13 / 15
4. SCANNER CONNECTOR
4.1.
Overview
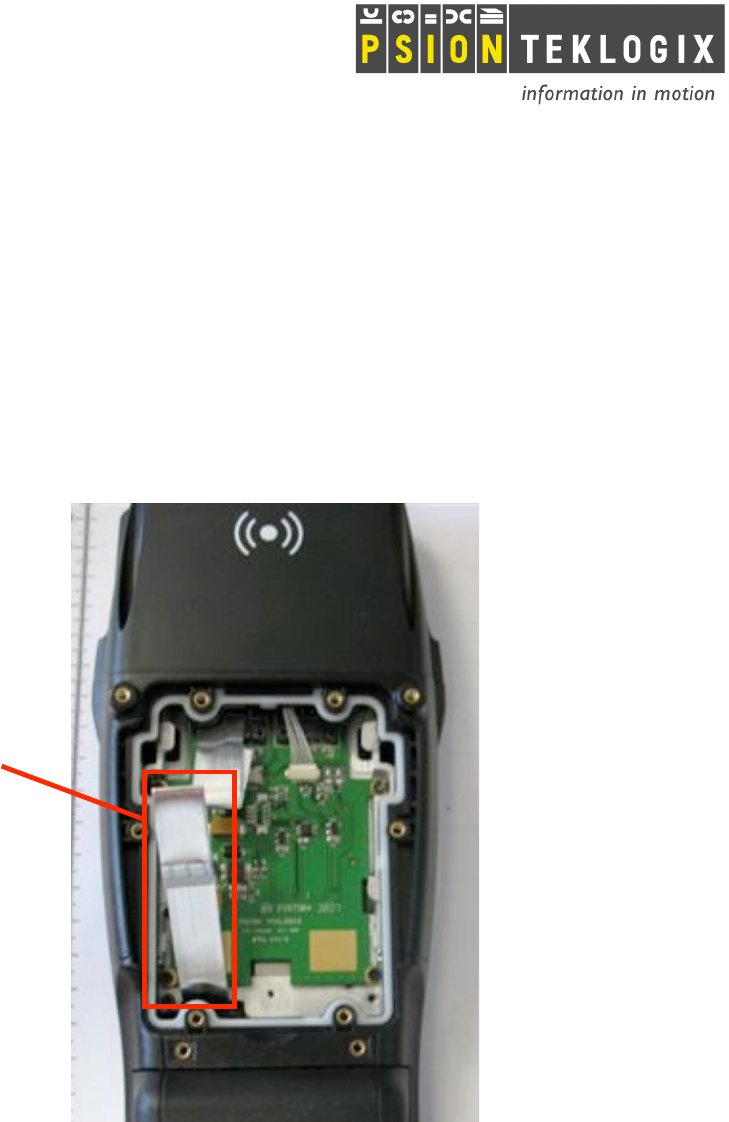
The flex cable is used to connect the MRZ reader or the Imager module.
Scanner
flex cable
Morphocheck Terminal - Developer’s Guide
DPD A00358-A03
Page 14 / 15
4.2.
MRZ Reader
Serial Communication settings
The MRZ reader is accessible through the scanner connector on the serial port COM3. The
default communication settings are:
19200 bps
No parity
8 data bits
1 stop bit
Power ON the MRZ Reader
Scanner EnablePower State
MRZ power
TRUE
ON
FALSE
OFF
The MRZ reader consums a lot of power, it is strongly recommended to manage its power
supply manually. The function WorkAboutPro.ScannerPort_EnablePower(bool state) allows
you to enable power by changing the parameter state to true.
IMPORTANT : It is IMPERATIVE to check your device configuration before using the MRZ
reader, please proceed to the following recommandation to avoid any conflict:
• Check in the Start menuSettingsSystemAbout Device that the scanner is set to None.
Otherwize go to the Boost menu by holding the red key, the blue key and the scanner key
during 6 seconds. Then set the internal scanner to None.
WorkAboutPRO .Net Wrapper sample code:
using PsionTeklogix.WorkAboutPro;
public class DeviceInterface
{
public static void PowerOnMRZReader()
{
WorkAboutPro WAP = new WorkAboutPro();
// Enable power on scanner port
WAP.ScannerPort_EnablePower(true);
}
}
Power OFF the MRZ Reader
Scanner EnablePower State
MRZ power
TRUE
ON
FALSE
OFF

Morphocheck Terminal - Developer’s Guide
DPD A00358-A03
Page 15 / 15
The function WorkAboutPro.ScannerPort_EnablePower(bool state) with the parameter state
set to false switches off he reader.
WorkAboutPRO .Net Wrapper sample code:
using PsionTeklogix.WorkAboutPro;
public class DeviceInterface
{
public static void PowerOffMRZReader()
{
WorkAboutPro WAP = new WorkAboutPro();
// Disable power on scanner port
WAP.ScannerPort_EnablePower(false);
}
}
4.3.
Imager Reader
Before using your imager you need to configure your device internal scanner.
• Check in the Start menuSettingsSystemAbout Device that the scanner is set to HHP
IT 4080. Otherwize go to the Boost menu by holding the red key, the blue key and the scanner
key during several seconds. Then choose option 57in the scanner list.
5. Bluetooth radio
The Psion Teklogix Mobile Device Software Development Kit (PTX Mobile SDK) gives all
required information to control the Bluetooth radio available on the Morphochek device.
The PTX SDK is available on Psion Teklogix’ website: www.psionteklogix.com
6. WiFi 802.11b/g radio
The Psion Teklogix Mobile Device Software Development Kit (PTX Mobile SDK) gives all
required information to control the WiFi 802.11b/g radio available on the Morphochek
device.
The PTX SDK is available on Psion Teklogix’ website: www.psionteklogix.com