Coretronic S718QL DELL ADVANCED PROJECTOR User Manual Coretronic Dell S718QL UM
Coretronic Corp. DELL ADVANCED PROJECTOR Coretronic Dell S718QL UM
User Manual

Dell Advanced Projector S718QL
User’s Guide

Notes, Cautions, and Warnings
NOTE: A NOTE indicates important information that helps you make
better use of your projector
CAUTION: A CAUTION indicates potential damage to hardware or
loss of data if instructions are not followed.
WARNING: A WARNING indicates a potential for property
damage, personal injury, or death.
Provide an earthing connection.
Provide an earthing connection before the main plug is connected to the mains.
____________________
Information in this document is subject to change without notice.
© 2017 Dell Inc. All rights reserved.
Reproduction of these materials in any manner whatsoever without the written permission
of Dell Inc. is strictly forbidden.
Trademarks used in this text: Dell and the DELL logo are trademarks of Dell Inc.; DLP
and DLP logo are trademarks of TEXAS INSTRUMENTS INCORPORATED; Microsoft and
Windows are either trademarks or registered trademarks of Microsoft Corporation in the
United States and/or other countries.
Other trademarks and trade names may be used in this document to refer to either the
entities claiming the marks and names or their products. Dell Inc. disclaims any
proprietary interest in trademarks and trade names other than its own.
Model: Dell Advanced Projector S718QL
July 2017 Rev. A00
Contents | 3
Contents
1 About Your Dell Projector. . . . . . . . . . . . . . . . . 5
Projector Box Contents . . . . . . . . . . . . . . . . . . . . . 5
Projector Top and Bottom View . . . . . . . . . . . . . . . 6
Projector Connections . . . . . . . . . . . . . . . . . . . . . . 7
Remote Control . . . . . . . . . . . . . . . . . . . . . . . . . 12
2 Adjusting Projector Image . . . . . . . . . . . . . . . 15
Adjusting Projected Zoom . . . . . . . . . . . . . . . . . . 15
Projector Image Focus Adjustment . . . . . . . . . . . . 16
Adjusting Projector Position . . . . . . . . . . . . . . . . . 17
Adjusting Image Corners . . . . . . . . . . . . . . . . . . . 19
Adjusting Image Size . . . . . . . . . . . . . . . . . . . . . 20
3 Using Your Projector. . . . . . . . . . . . . . . . . . . . 22
Using Network Display . . . . . . . . . . . . . . . . . . . . 22
Using PC-Free Presentation . . . . . . . . . . . . . . . . . 35
Set-up Bluetooth Speaker . . . . . . . . . . . . . . . . . . 43
Using High Dynamic Range (HDR) . . . . . . . . . . . . 55
4 Troubleshooting. . . . . . . . . . . . . . . . . . . . . . . . 57
Troubleshooting Tips. . . . . . . . . . . . . . . . . . . . . . 57
Guiding Signals . . . . . . . . . . . . . . . . . . . . . . . . . 60
5 Maintenance . . . . . . . . . . . . . . . . . . . . . . . . . . . 61
Replacing the Remote Control Battery . . . . . . . . . . 61
6 Specifications . . . . . . . . . . . . . . . . . . . . . . . . . 62
Compatibility Mode (Digital) . . . . . . . . . . . . . . . . . 65
7 Additional Information . . . . . . . . . . . . . . . . . . 67
8 Contacting Dell . . . . . . . . . . . . . . . . . . . . . . . . 68
About Your Dell Projector 5
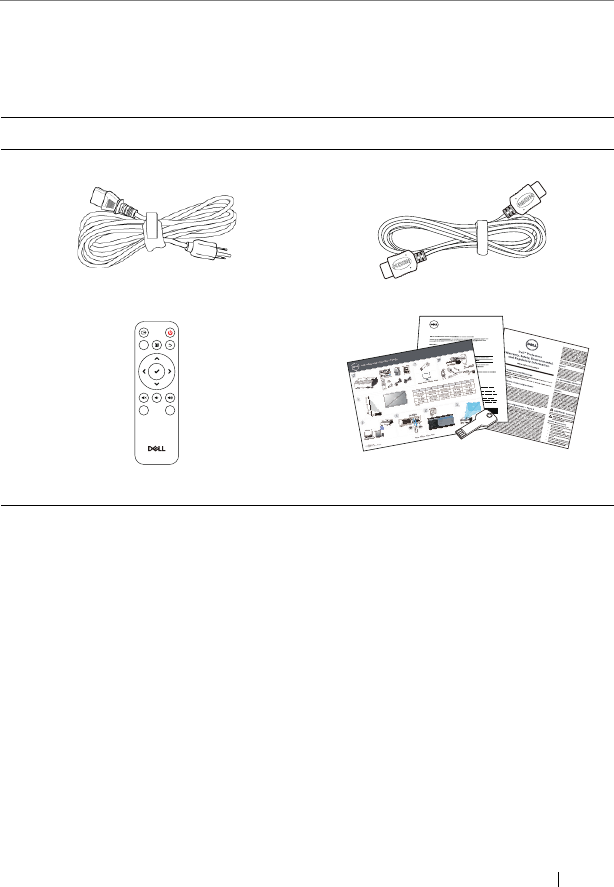
Your projector comes with all the items shown below. Ensure that you have all
the items, and contact Dell if anything is missing.
Projector Box Contents
1About Your Dell Projector
Package Contents
Power cable 1.8 m HDMI cable (2.0 spec)
Remote control (CR2032 x 2pcs)
User's Guide and Documentation
Video
Mode
Freeze
Blank
Informacion Importante
Dell
S718QL
6About Your Dell Projector
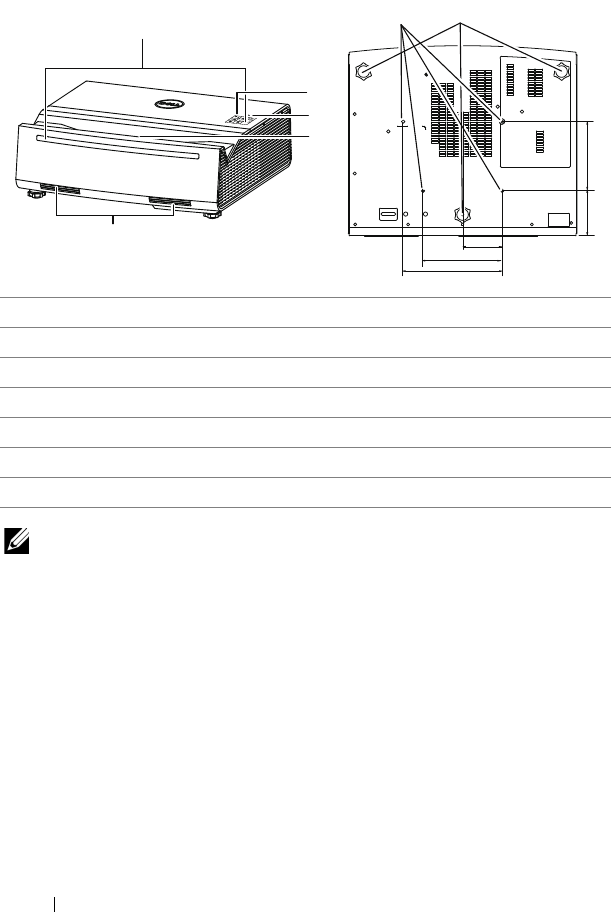
Projector Top and Bottom View
NOTE: Wall mount screw hole M4 x 9 mm depth.
1 IR receivers
2 Status indicators
3 Power button
4 Lens
5 6W (x 2) speakers
6 Mounting holes for wall mount
7 Tilt adjustment wheel
4
3
1
5
2
67
140.0090.99
160.00
200.00
80.00
Top View Bottom View
About Your Dell Projector 7
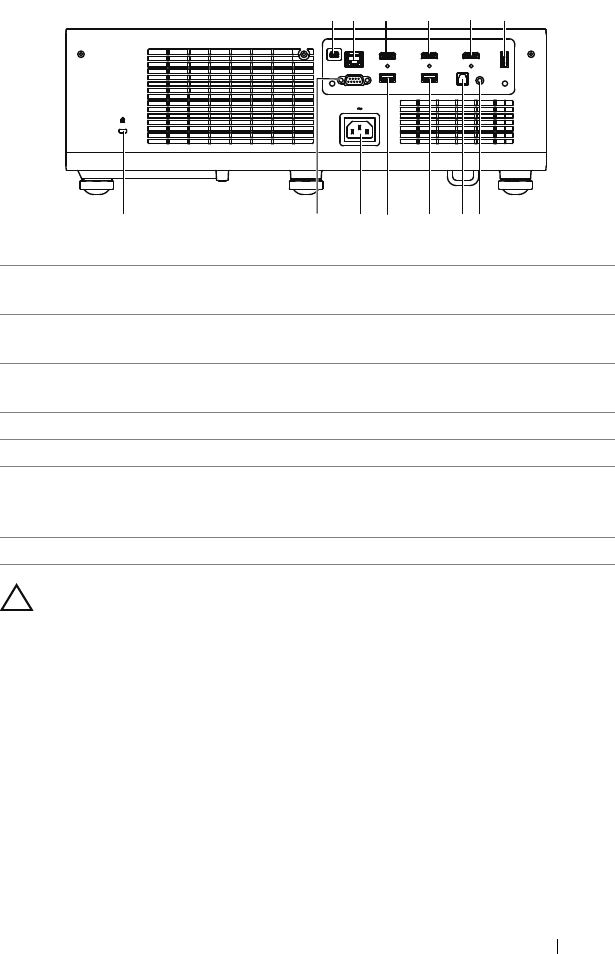
Projector Connections
CAUTION: Before you begin any of the procedures in this
section, follow the Safety Instructions as described on page 8.
1 Mini USB (mini type B) connector
for firmware upgrade
8 SPDIF connector
2 RJ45 connector 9 USB Type A Power (5V/1.8A)
connector
3 HDMI 1 (2.0) connector 10 USB Type A Power (5V/1.8A)
connector
4 HDMI 2 (1.4) connector 11 Power cord connector
5 HDMI 3 (1.4) connector 12 RS232 connector
6 USB (Type A) 3.0 connector for
USB media playback and
optional wireless dongle
13 Kensington cable slot
7 Audio output connector
1 2 3 4 56
13 1112 78910

8About Your Dell Projector
CAUTION: Safety Instructions
1
Do not use the projector near appliances that generate a lot of heat.
2
Do not use the projector in areas where there is an excessive amount of
dust. The dust may cause the system to fail and the projector will
automatically shutdown.
3
Ensure that the projector is mounted in a well-ventilated area.
4
Do not block the ventilation slots and openings on the projector.
5
Ensure the projector operates between ambient temperatures 5°C to 40°C
(41°F to 104°F).
6
Do not try to touch the ventilation outlet as it can become very hot after the
projector has been turned on or immediately after it is turned off.
7
Do not look into the lens while the projector is on as it may cause injury to
your eyes.
8
Do not place any objects near or in front of the projector or cover its lens
while the projector is on as the heat may cause the object to melt or burn.
9
Do not use alcohol to wipe the lens.
NOTE:
•
Do not attempt to ceiling mount the projector by yourself. It should be
installed by a qualified technician.
•
Recommended Projector Wall Mount Kit. For more information, see the
Dell Support website at
dell.com/support
.
•
For more information, see the Safety Information that shipped with your
projector.
•
The S718QL projector can only be used indoors.
About Your Dell Projector 9
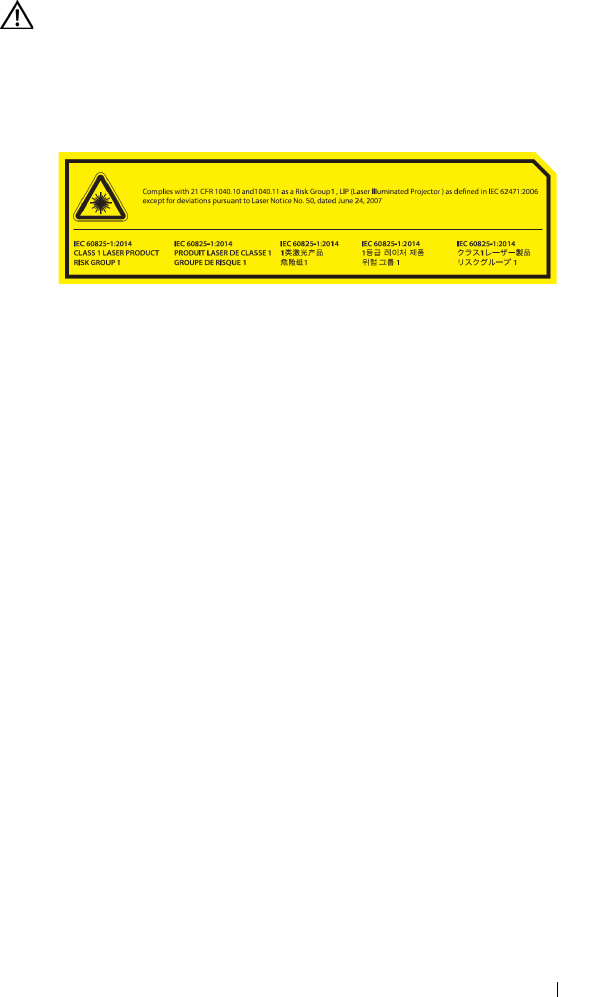
WARNING: Laser Safety Notice
This product is classified as CLASS 1 LASER PRODUCT - RISK
GROUP 1 according to IEC 60825-1 : 2014. Complies with FDA
regulations 21 CFR 1040.10 and 1040.11 as a Risk Group 1 , LIP (
Laser Illuminated Projector) as defined in IEC 62471:2006 except for
deviations pursuant to Laser Notice No. 50, dated June 24, 2007.
•
Failure to comply with the following could result in death or serious
injury.
•
This projector has a built-in Class 4 laser module. Never attempt to
disassemble or modify the projector.
•
Any operation or adjustment not specifically instructed in the User
manual creates the risk of hazardous laser radiation exposure.
•
Do not open or disassemble the projector as this may cause damage or
exposure to laser radiation.
•
Do not stare into beam when the projector is on. The bright light may
result in permanent eye damage.
•
When turning on the projector, make sure no one within projection range
is looking into the lens.
•
Follow the control, adjustment, or operation procedures to avoid damage
or injury from exposure of laser radiation.
•
The instructions for the assembly, operation, and maintenance include
clear warnings concerning precautions to avoid possible exposure to
hazardous laser radiation.

10 About Your Dell Projector
Federal Communication Commission Interference
Statement
This device complies with Part 15 of the FCC Rules. Operation is subject to
the following two conditions: (1) This device may not cause harmful
interference, and (2) this device must accept any interference received,
including interference that may cause undesired operation.
This equipment has been tested and found to comply with the limits for a
Class B digital device, pursuant to Part 15 of the FCC Rules. These limits are
designed to provide reasonable protection against harmful interference in a
residential installation. This equipment generates, uses and can radiate radio
frequency energy and, if not installed and used in accordance with the
instructions, may cause harmful interference to radio communications.
However, there is no guarantee that interference will not occur in a particular
installation. If this equipment does cause harmful interference to radio or
television reception, which can be determined by turning the equipment off
and on, the user is encouraged to try to correct the interference by one of the
following measures:
•
Reorient or relocate the receiving antenna.
•
Increase the separation between the equipment and receiver.
•
Connect the equipment into an outlet on a circuit different from that to
which the receiver is connected.
•
Consult the dealer or an experienced radio/TV technician for help.
FCC Caution: Any changes or modifications not expressly approved by the
party responsible for compliance could void the user's authority to operate
this equipment.
This transmitter must not be co-located or operating in conjunction with any
other antenna or transmitter.
Radiation Exposure Statement:
This equipment complies with FCC radiation exposure limits set forth for an
uncontrolled environment. This equipment should be installed and operated
with minimum distance 20cm between the radiator & your body.
FOR COUNTRY CODE SELECTION USAGE (WLAN DEVICES)
Note: The country code selection is for non-US model only and is not available
to all US model. Per FCC regulation, all WiFi product marketed in US must fixed
to US operation channels only .

About Your Dell Projector 11
Industry Canada statement:
This device complies with ISED’s licence-exempt RSSs. Operation is subject
to the following two conditions: (1) This device may not cause harmful
interference, and (2) this device must accept any interference received,
including interference that may cause undesired operation.
Le présent appareil est conforme aux CNR d’ ISED applicables aux appareils
radio exempts de licence. L’exploitation est autorisée aux deux conditions
suivantes : (1) le dispositif ne doit pas produire de brouillage préjudiciable, et
(2) ce dispositif doit accepter tout brouillage reçu, y compris un brouillage
susceptible de provoquer un fonctionnement indésirable.
Radiation Exposure Statement:
This equipment complies with ISED radiation exposure limits set forth for an
uncontrolled environment. This equipment should be installed and operated
with minimum distance 20cm between the radiator & your body.
Déclaration d'exposition aux radiations:
Cet équipement est conforme aux limites d'exposition aux rayonnements
ISED établies pour un environnement non contrôlé. Cet équipement doit être
installé et utilisé avec un minimum de 20 cm de distance entre la source de
rayonnement et votre corps.
12 About Your Dell Projector
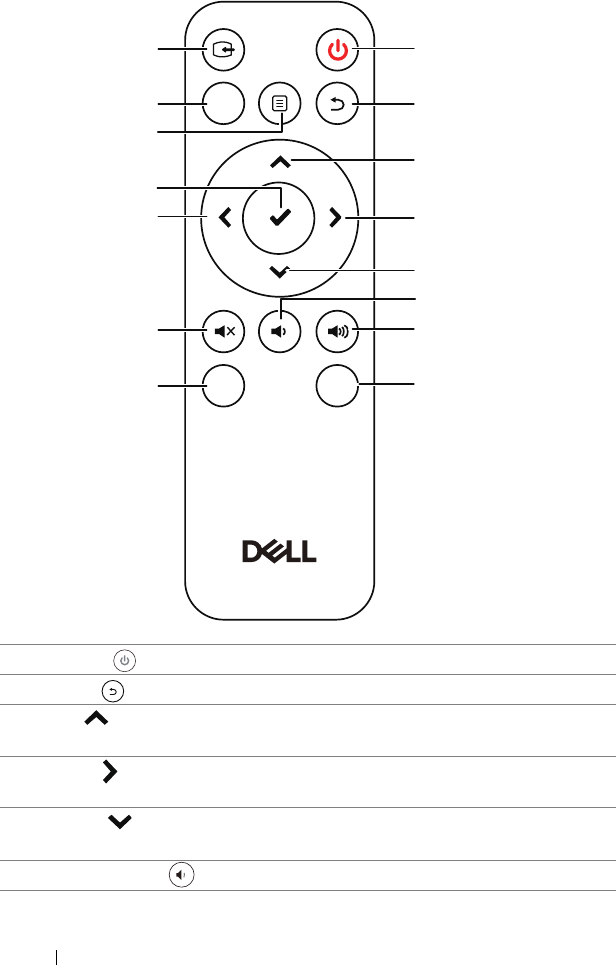
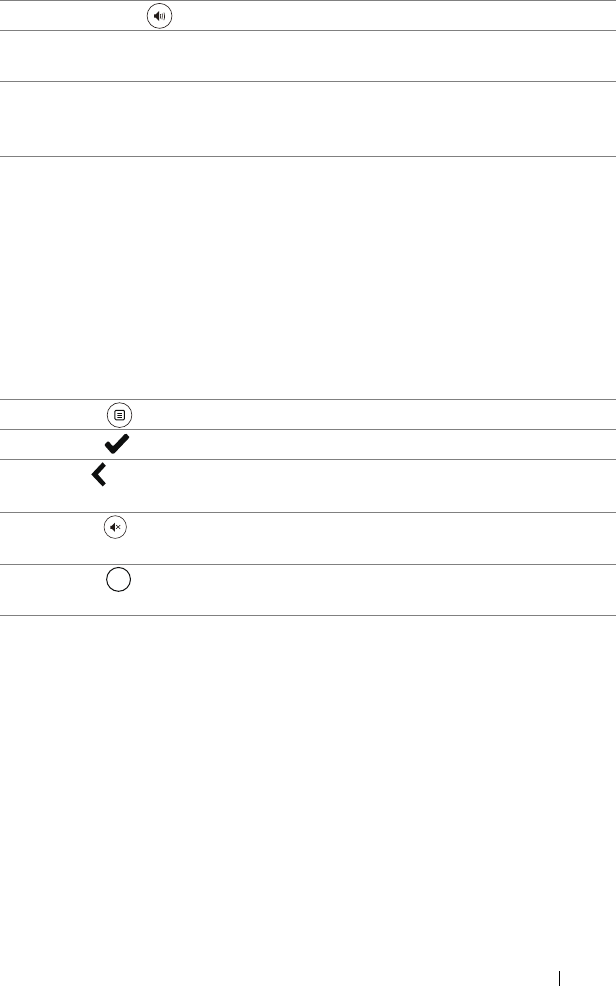
Remote Control
1 Power Turns the projector on or off.
2 Back Returns to the previous screen.
3 Up Press to navigate through the On-Screen
Display (OSD) Menu items.
4 Right Press to navigate through the On-Screen
Display (OSD) Menu items.
5 Down Press to navigate through the On-Screen
Display (OSD) Menu items.
6 Volume down Press to decrease the volume.
Video
Mode
Freeze
Blank
1
2
3
4
5
6
7
8
11
12
15
14
13
10
9
About Your Dell Projector 13
7 Volume up Press to increase the volume.
8 Freeze Press to pause the screen image, then press
"Freeze" again to resume normal projection.
9 Video in Press to switch between sources: HDMI 1,
HDMI 2, HDMI 3, Wireless/LAN Display, and
USB Viewer.
10 Video mode The projector has preset configurations that
are optimized for displaying data (presentation
slides) or video (movies, games, etc.).
Press the Video Mode button to toggle
between Presentation mode, Bright mode,
Movie mode, sRGB, or Custom mode.
Pressing the Video Mode button once will
show the current display mode. Pressing the
Video Mode button again will switch between
modes.
11 Menu Press to activate the OSD.
12 Enter Press to confirm the selection.
13 Left Press to navigate through the On-Screen
Display (OSD) Menu items.
14 Mute Press to mute or un-mute the projector
speaker.
15 Blank Press to toggle between white/blank/resume
the image.
Blank
14 About Your Dell Projector
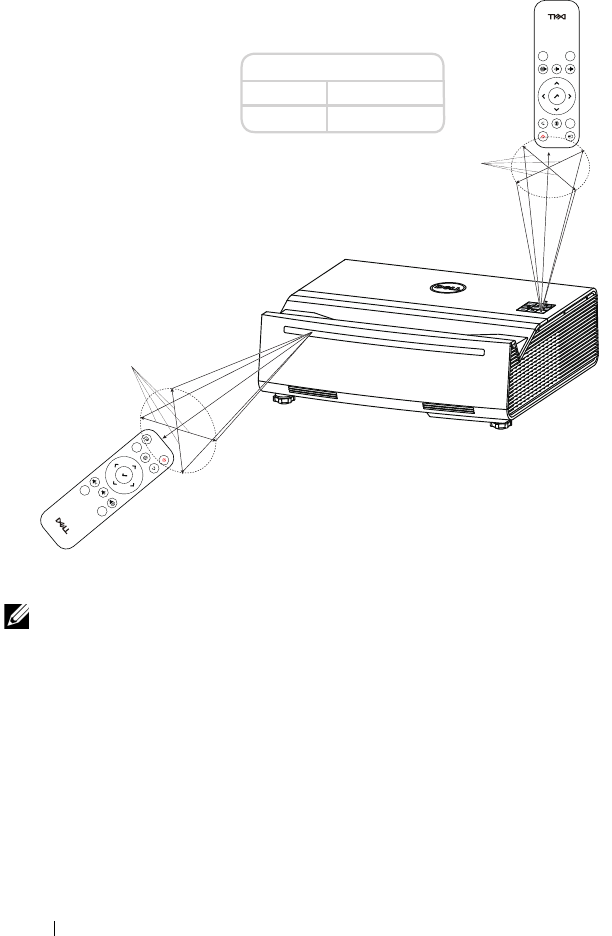
Remote Control Operating Range
NOTE: Actual operating range may slightly differ from the diagram.
Weak batteries will also prevent the remote control from properly
operating the projector.
Video
Mode
Freeze
Blank
Video
Mode
Freeze
Blank
Operating range
Angle ±30°
Distance 7 m/22.97 feet
$QJOH
'LVWDQFH
$QJOH
'LVWDQFH
Adjusting Projector Image 15
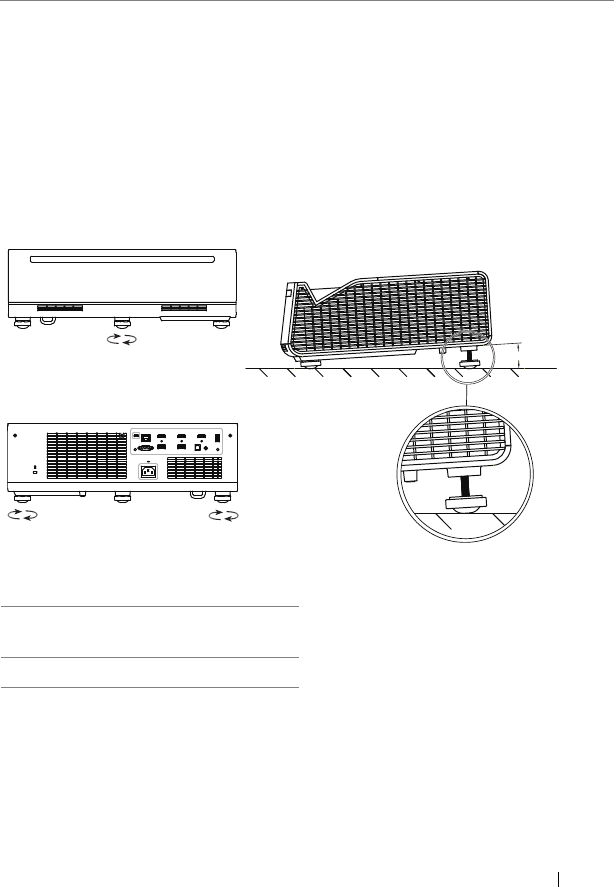
Adjusting Projected Zoom
Raising the Projector Height
1
Raise the projector to the desired display angle, and use the rear tilt
adjustment wheel to fine-tune the display angle.
Lowering the Projector Height
1
Lower the projector, and use the front tilt adjustment wheel to fine-tune the
display angle.
2Adjusting Projector Image
1 Rear tilt adjustment wheel
(Angle of tilt: 0 to 3.6 degrees)
2 Front tilt adjustment wheel
3.6°
1
1
22
16 Adjusting Projector Image
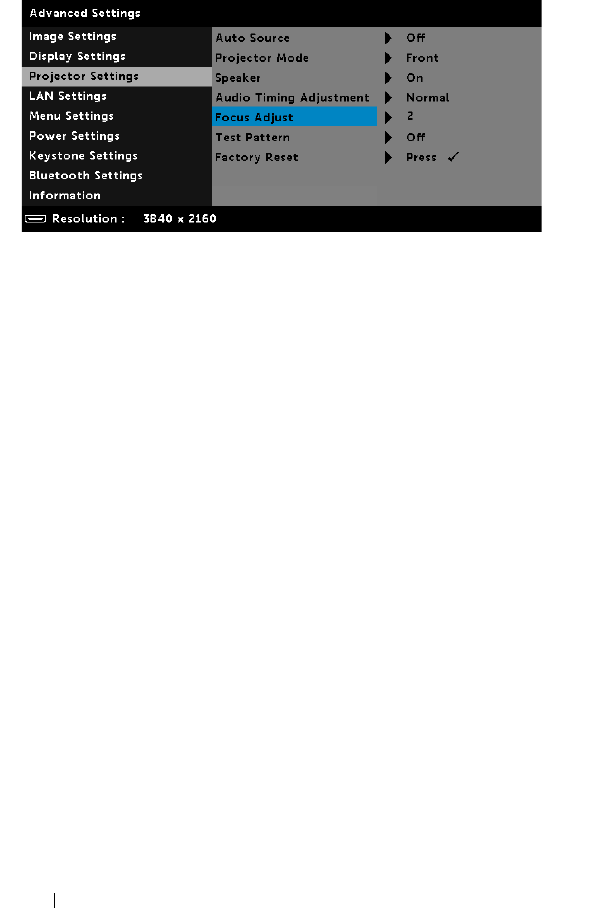
Projector Image Focus Adjustment
1
The Dell S718QL supports power focus.
Steps: Advanced Settings > Projector Settings > Focus Adjust
2
Adjust the focus until the image is clear. The projector focuses at distances
ranging between 0.32 ft to 0.74 ft (10 cm to 22.5 cm).
Adjusting Projector Image 17
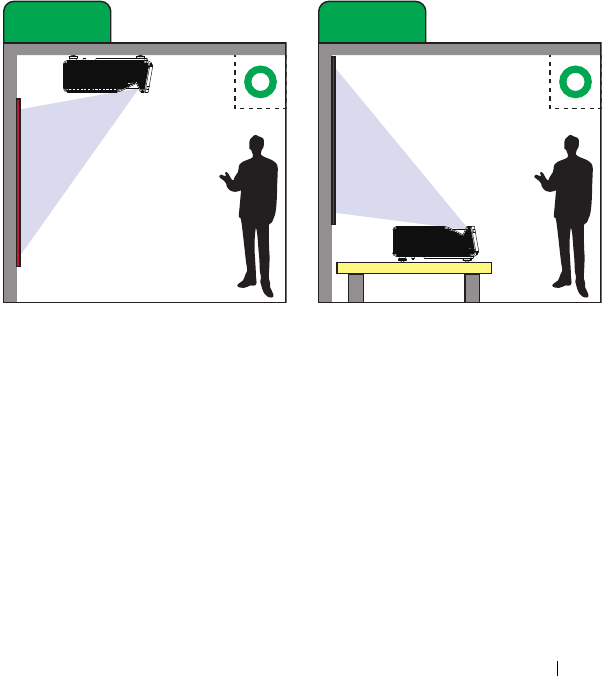
Adjusting Projector Position
When you select a position for the projector, consider the size and shape of
your screen, the location of your power outlets, and the distance between the
projector and the rest of your equipment. Follow these general guidelines:
•
When positioning the projector to the screen, it must be at least 3.9 inches
(10 cm) from the projection screen.
•
Position the projector to the required distance from the screen. The distance
from the lens of the projector to the screen, the zoom setting, and the video
format determine the size of the projected image.
•
Lens throw ratio: 0.189
You can set up or install the S718QL in the following ways:
Case A Case B
Wall Mount Projection
Table Top Projection
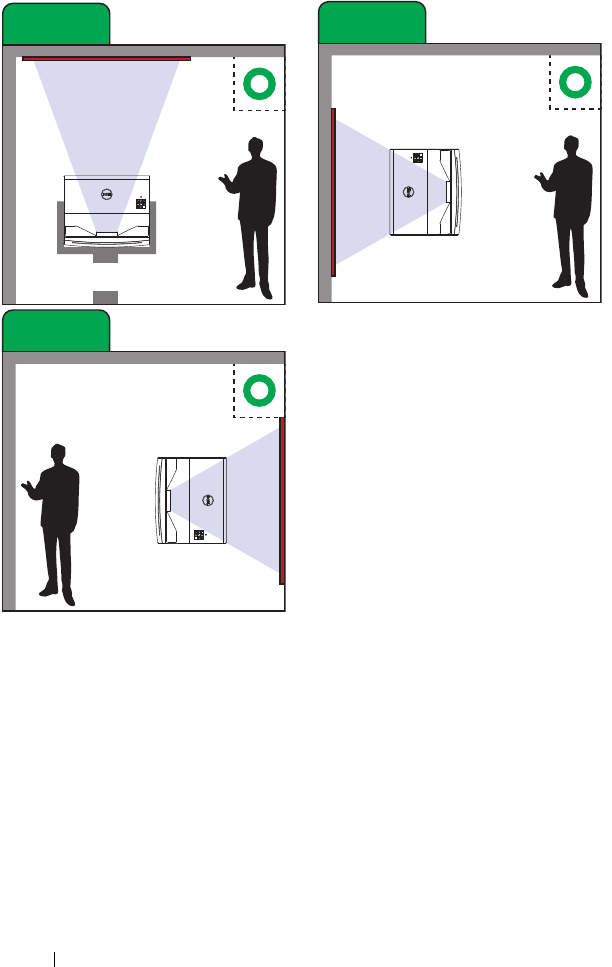
18 Adjusting Projector Image
Case C
Upward Projection
Case D
Portrait Right Projection
Case E
Portrait Left Projection
Adjusting Projector Image 19
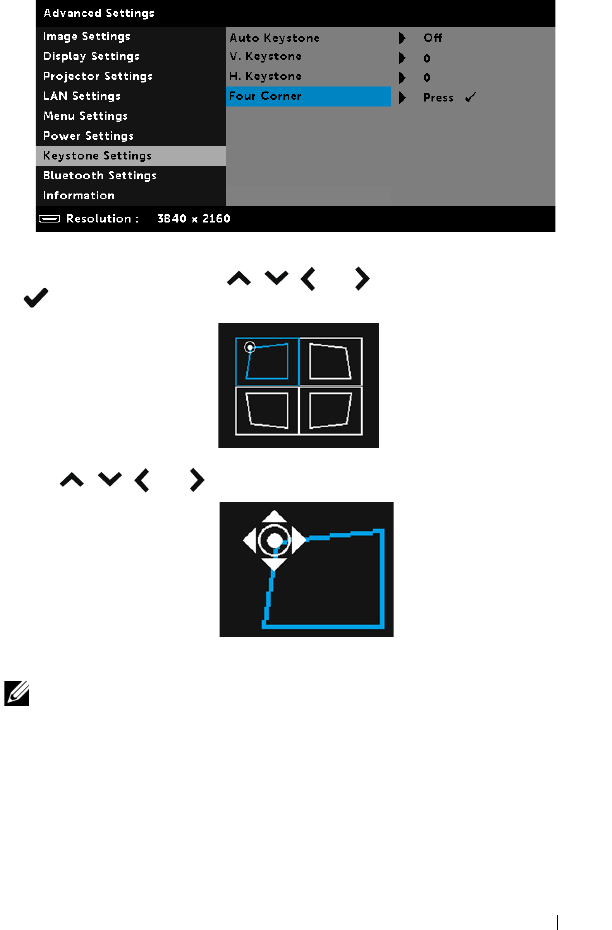
Adjusting Image Corners
Use 4 corner adjustment feature to get perfect, rectangular images.
1
Advanced Settings > Keystone Settings > Four Corner
2
At four corner screen, use
, ,
and to select one corner and press
to confirm.
3
Use
, ,
and to adjust the image shape as necessary.
4
When you are finished, press "Menu" button to exit.
NOTE: The function is unavailable when H./V. Keystone is adjusted.
20 Adjusting Projector Image
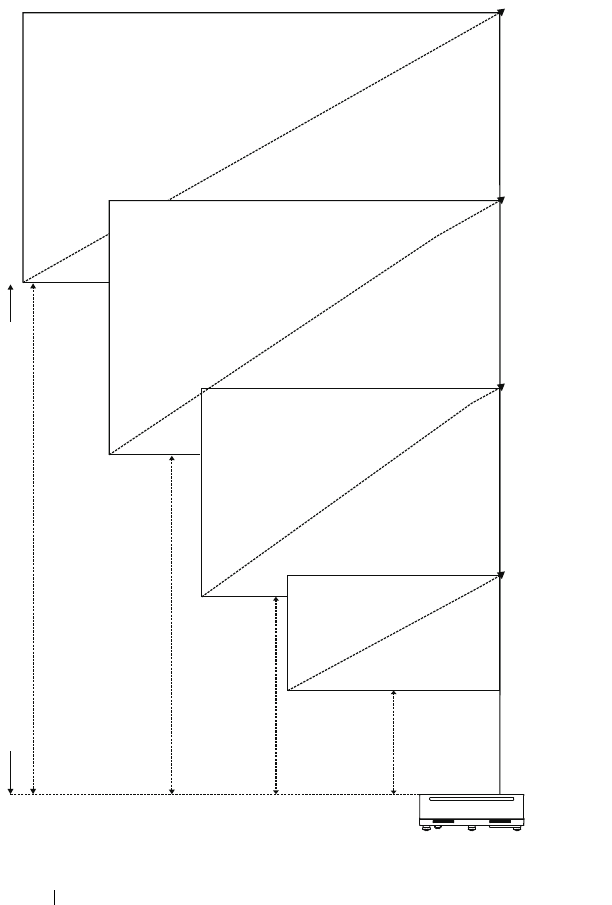
Adjusting Image Size
130" (330.2 cm)
120" (304.8 cm)
110" (279.4 cm)
100" (254.0 cm)
0.74' (22.5 cm)
0.60' (18.4 cm)
0.47' (14.2 cm)
0.32' (10.0 cm)
Projector to screen distance (Horizontal)
Adjusting Projector Image 21
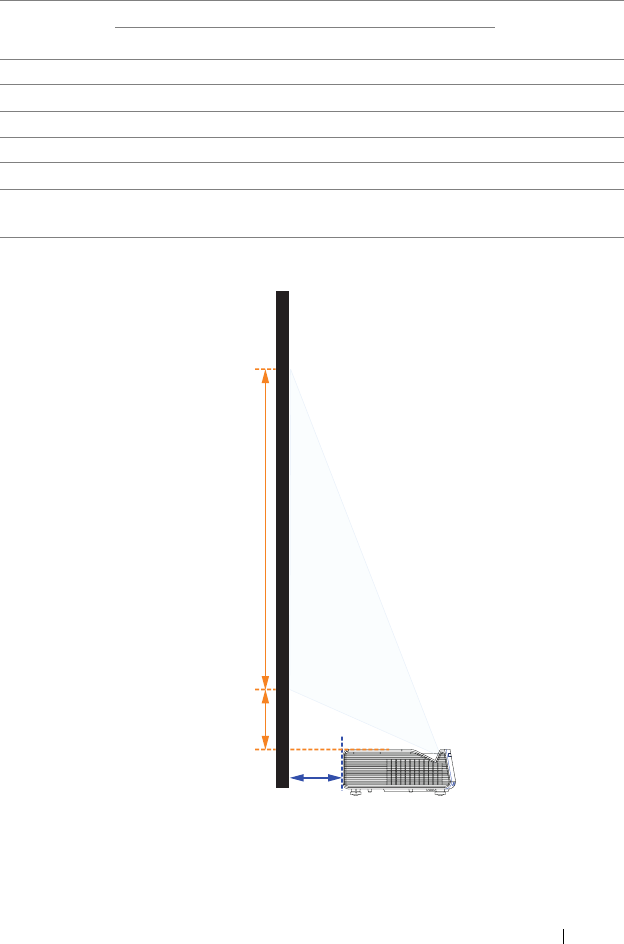
Adjusting Image Shape
Projection
Distance (L1)
Image size Distance from top
of image to top of
projector (L2)
Diagonal (S1) Width (S2) Height (S3)
inch cm inch cm inch cm inch cm inch cm
3.9 10.0 100 254.0 87.1 221.2 49.0 124.5 7.3 18.6
5.6 14.2 110 279.4 95.8 243.3 53.9 137.0 8.2 20.9
7.2 18.4 120 304.8 104.5 265.4 58.8 149.4 9.1 23.1
8.9 22.5 130 330.2 113.2 287.5 63.7 161.9 10.0 25.4
* This graph is for user reference only.
* Offset Ratio: 118%
S3
L2
(Offset)
L1
22 Using Your Projector
Using Network Display
Configure Your Projector for Network Display
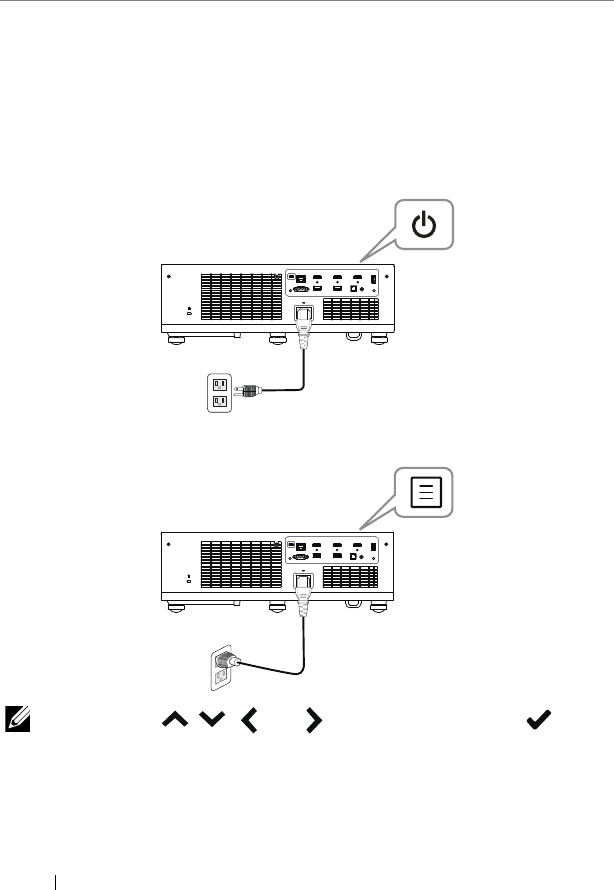
Connect Projector to the Network
1
Connect the power cable and turn on the projector by pressing the power
button.
2
Press the
Menu
button on your projector control panel or remote control.
NOTE: Use
, ,
and
buttons to navigate and to
select.
3Using Your Projector
Using Your Projector 23
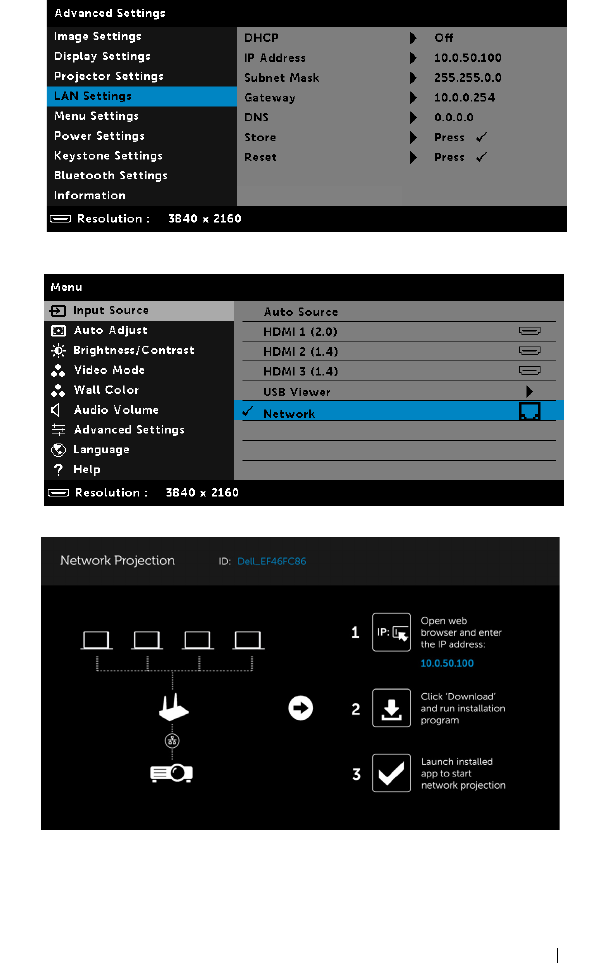
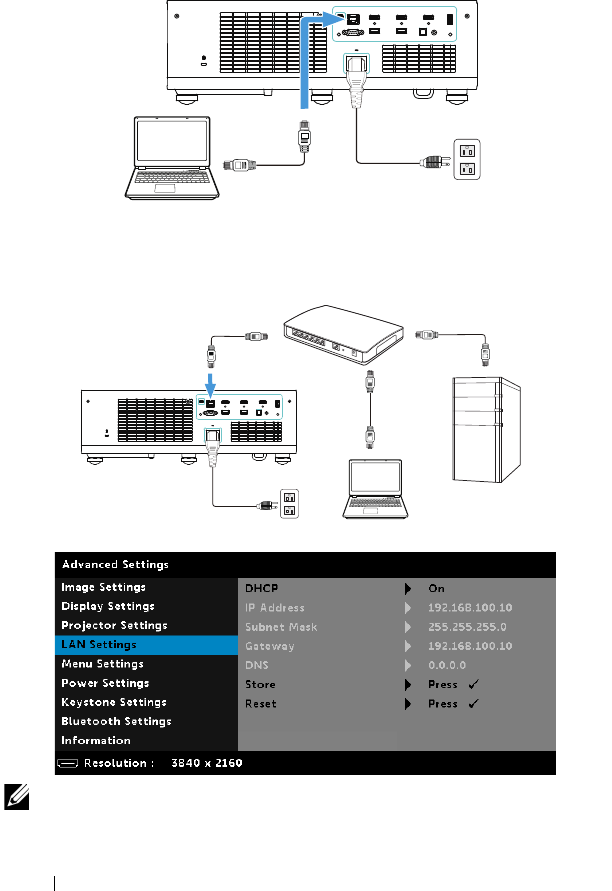
3
Ensure DHCP option is
Off
from LAN settings of Advanced Settings menu.
4
Access the
Input Source
menu, select
Network
source.
The
Network Guide Screen
shown below appears:
24 Using Your Projector
Connect Projector Directly to the Computer
A.Cable Connections
5
Connect the LAN cable to the projector and the computer.
B.Switch Source
6
Connect the LAN cable to the projector and the computer via the switch
source.
7
DHCP of LAN Settings switches to
On
.
NOTE: If the DHCP setting is set to On, the IP sharing device will
automatically assign a set of IP Address, Subnet Mask, and Gateway.
Using Your Projector 25
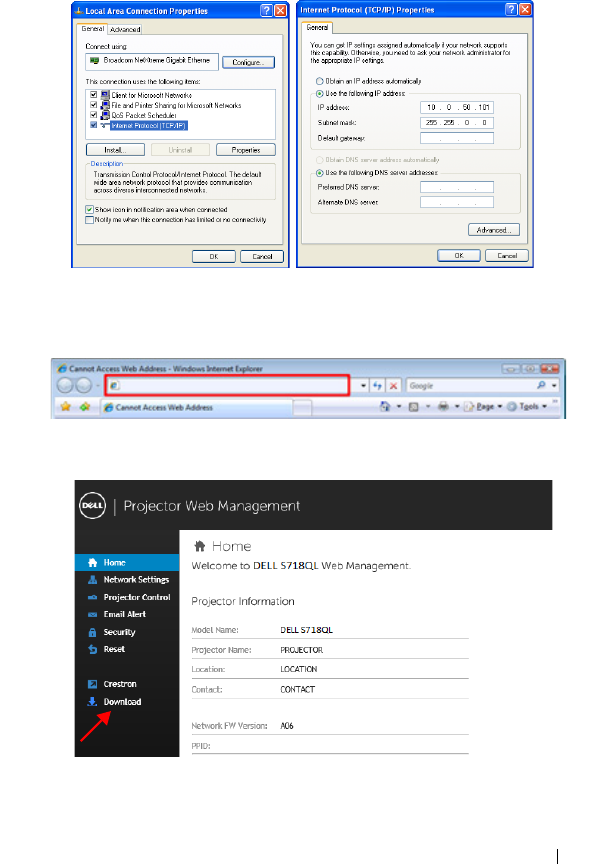
Install Dell Network Projection Software on the Windows
1
Open Local Area Connection Properties, and then enter the IP Address and
Subnet Mask, click OK.
Steps: Start > Control Panel > Network and Internet > Network and
Sharing Center > Change Adapter Setting > Local Area Connection
2
Open the Internet browser on your computer, and enter
10.0.50.100
(default)
in the browser's address bar. You will be directed to the
Dell S718QL Web
Management
page.
3
The S718QL Web Management page opens. For first-time use, click
Download
.

26 Using Your Projector
4
At the
Download
page, click
Download Network Projection App For
Windows 10/8/7/Vista/XP
and install to your computer.
NOTE: If you are unable to install the application because of
inadequate rights on the computer, please contact your network
administrator.
5
Click
Run
to proceed with the one-time installation of the software.
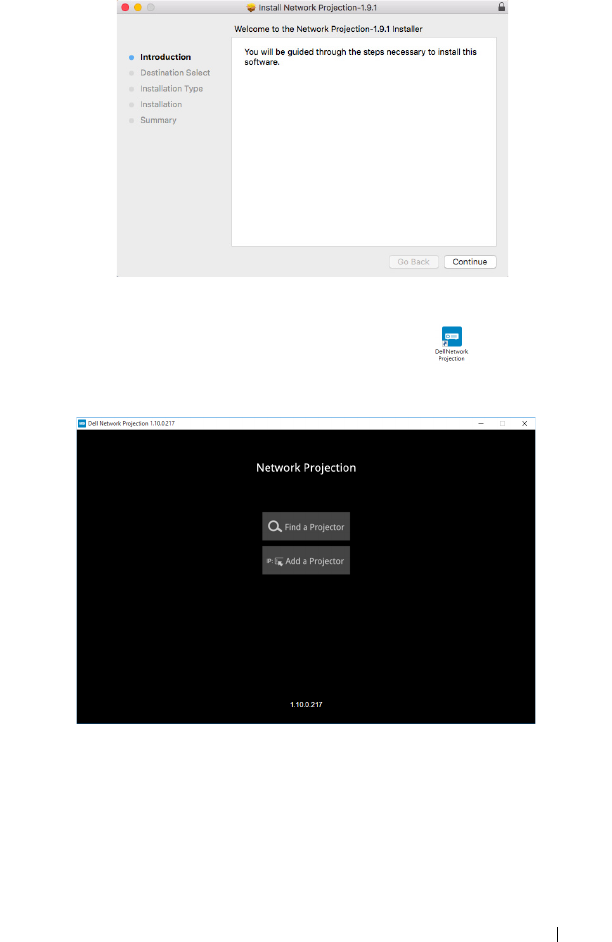
6
The installation software will launch. Follow the on-screen instructions to
complete setup.
NOTE: Alternatively you can download the latest version of the Dell
Network Projection application from dell.com/support
Using Your Projector 27
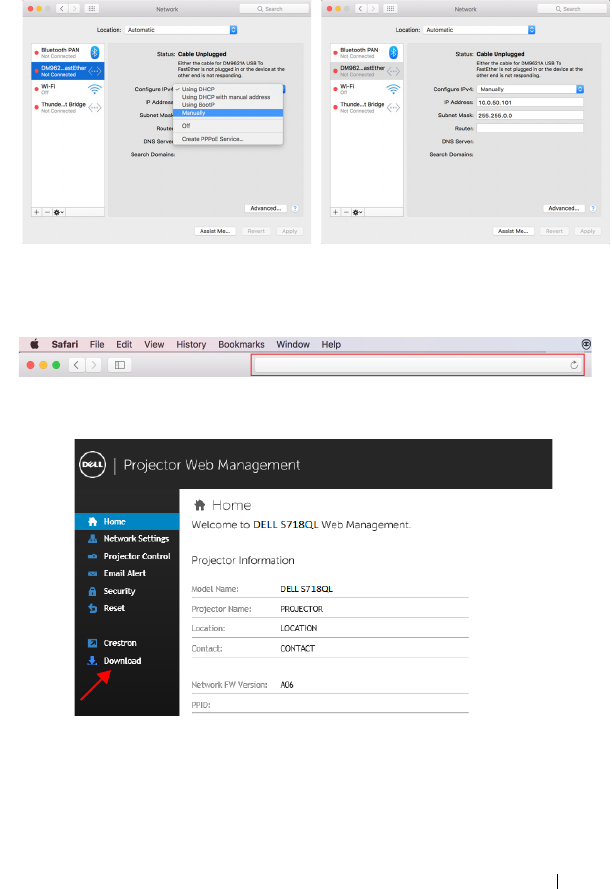
Install Dell Network Projection Software on the Mac
1
Open Local Area Connection Properties, and then enter the IP Address and
Subnet Mask, click OK.
Steps: Go > Applications > System Preferences > Network
2
Open the Safari browser on your Mac computer, and enter
10.0.50.100
(default) in the browser's address bar. You will be directed to the
Dell
S718QL Web Management
page.
3
The S718QL web management page opens. For first-time use, click
Download
.
28 Using Your Projector
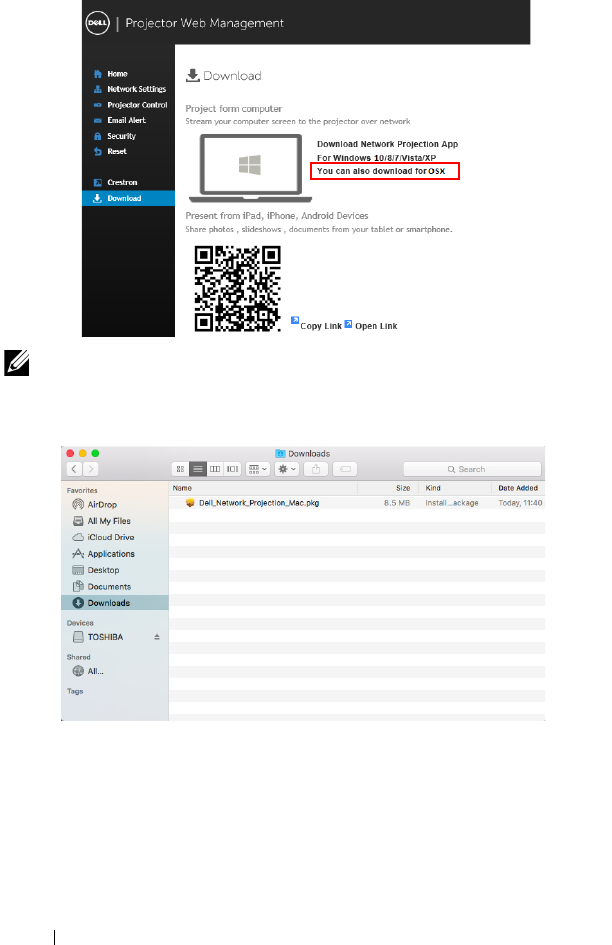
4
At the
Download
page, click
You can also download for OSX
and install to
your computer.
NOTE:
If you are unable to install the application because of
inadequate rights on the computer, please contact your network
administrator.
5
Running
Dell_Network_Projection_Mac.pkg
from
Downloads
folder.
Using Your Projector 29
6
The installation software will launch. Follow the on-screen instructions to
complete setup.
Using the Dell Network Projection App (Windows)
Once the installation is completed, you can double-click icon on the
desktop to start the application.
The
Dell Network Projection Screen
shown below appears:
30 Using Your Projector
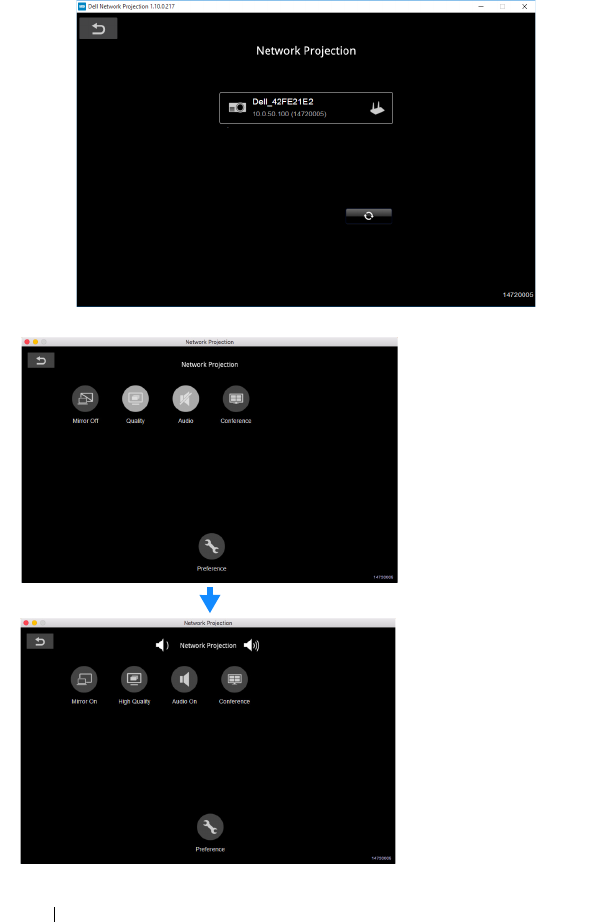
1
At
Dell Network Projection
screen, click
Find a Projector
, and then select
Dell_42FE21E1 (random code)
. This is the name & code that will be
projected, when your projector is set to the 'Network' source.
2
Click
Mirror Off
option to start presenting.
Using Your Projector 31
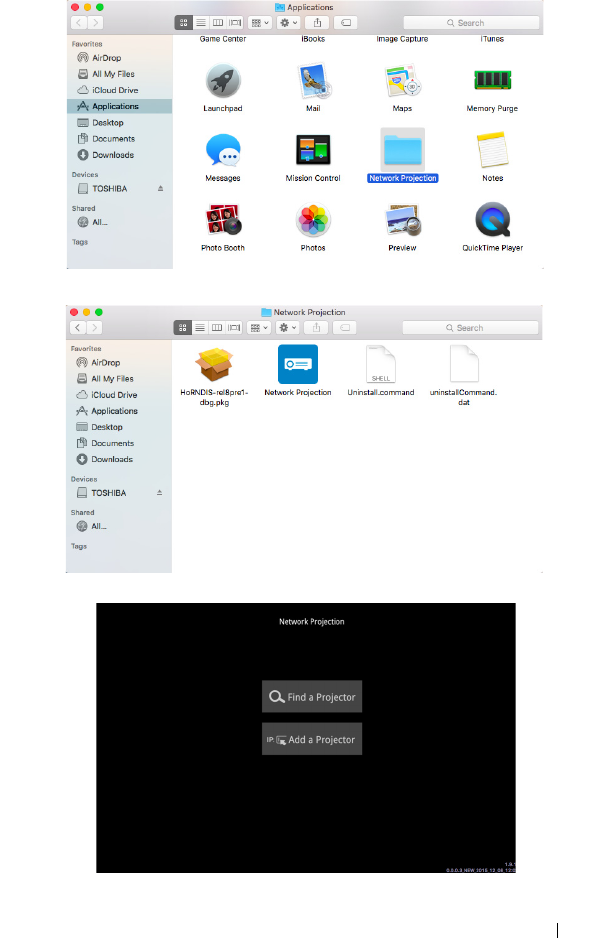
Using the Dell Network Projection App (Mac)
1
1.Go to
Applications
folder, and then open the
Network Projection
folder.
2
Running
Network Projection
application from Network Projection folder.
The
Dell Network Projection Screen
shown below appears:
32 Using Your Projector
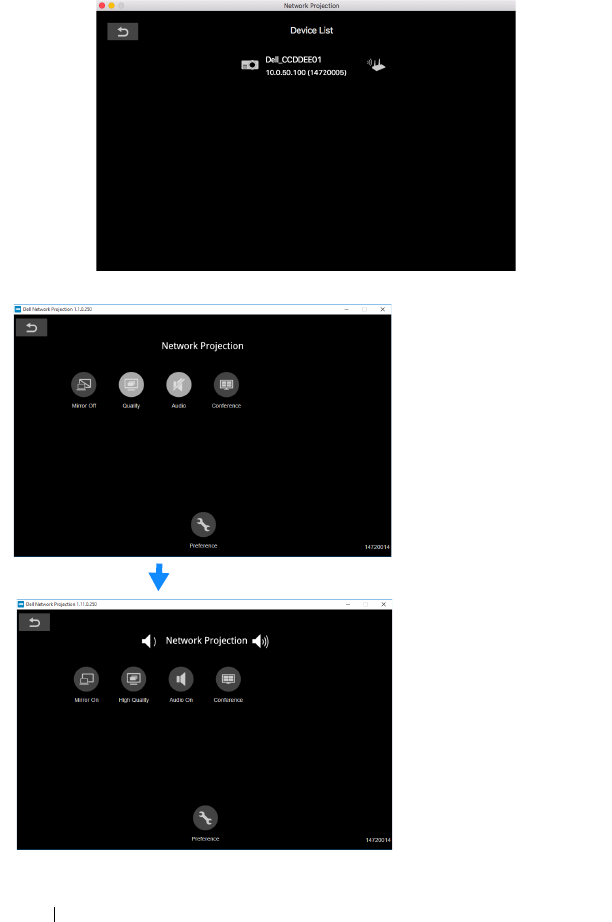
3
At the
Dell Network Projection
screen, click
Find a Projector
, and then
select Dell_CCDDEE01 (random code). This is the name & code that will be
projected, when your projector is set to the 'Network' source.
4
Click
Mirror Off
option to start presenting.

Using Your Projector 33
Split Screen
After the network projection connects, click
Conference
button to activate the
split screen feature.
34 Using Your Projector
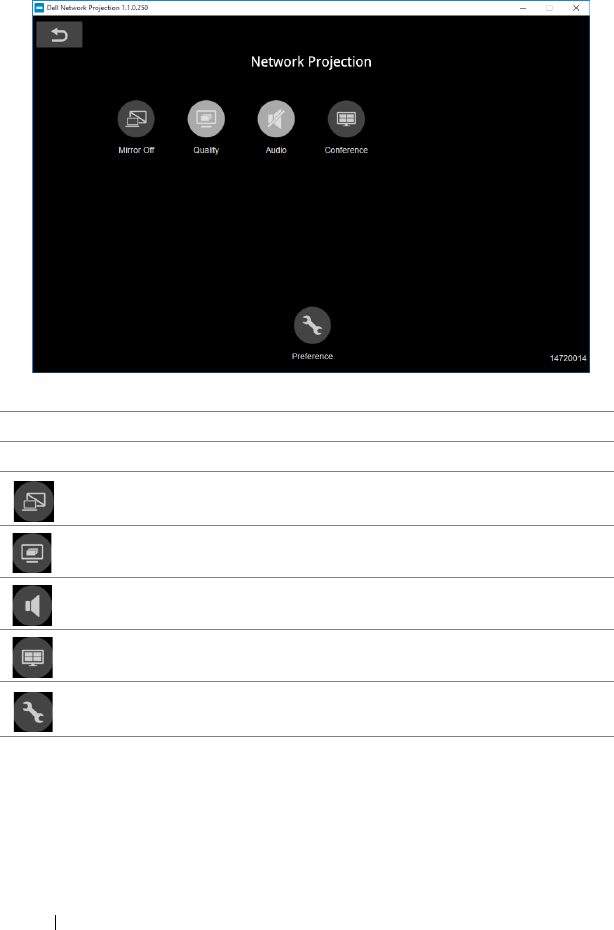
Understanding the Buttons
Item Description
Control Toolbar
Mirror Off/On Click to toggle network projection On/Off and
screen extension.
Quality Click to toggle High/Low quality.
Audio Click to toggle audio On/Off.
Conference Click to activate the conference control.
Preference Click to activate the fast connection settings.

Using Your Projector 35
Using PC-Free Presentation
Multimedia File Type Support
Photos
Media
Type
Ext Name Version
Support
Detailed Specification Notes
JPEG jpg/jpeg Baseline mode: size <=65536
x 65536
Progressive baseline:
•
color mode=444, size <=
2080 x 2080
•
color mode=(422, 440),
size <=2544 x 2544
•
color mode=(420, 400,
411, others), size <=2944
x 2944
JPEG (CMYK) is not support
Support
baseline
mode &
progressive
baseline
BMP bmp Size<=65536 x 65536 Support all
modes
PNG/GIF png/gif PNG<=65536 x 65536
GIF<=65536 x 65536
Animation mode is not
supported
Support
interlace
Animation
mode is not
supported
TIFF tiff TIFF<=3264 x 2176 Support all
modes

36 Using Your Projector
Audio
File Type File
Extension
Version
Support
Detailed Specification Notes
Mpeg-1
Layer 3
mp3 VBR: bit rate: 8~320 Kbps
WMA wma/asf WMA 7~9.1 Bit rate: CBR up to 320
kbps, VBR up to 256 kbps
1. Microsoft
Licensee
only
2. WMA
7~9.1 is
WMA2
WMV wav Sampling rate: 8KHz; Bit
rate: 32Kbps
Microsoft
ADPCM only
LPCM n/a
(included
in the
video
only)
LPCM LPCM:
Sampling rate:
8KHZ~192KHz; Bit rate:
64~4608 Kbps
ADPCM n/a
(included
in the
video
only)
1. Microsoft
ADPCM
2. IMA ADPCM
(DVI_ADPCM)
3. SWF
ADPCM
4. QT IMA
ADPCM
Microsoft ADPCM:
Sampling rate: 8KHz; Bit
rate: 32 Kbps
OGG
Vorbis
ogg CBR: Sampling rate:
32K~192KHz
VBR: Up to 500 Kbps
(spec)
AMR amr/3ga

Using Your Projector 37
Video
File Type Video
Type
Audio Type Detailed Specification Notes
MP4
(.mov,
.mp4)
MPEG-4
AVC
(H.264)
LPCM
ADPCM
MPEG-Audio
H.264:
1. Main and High Profile @
level 4.2
2. Baseline @ level 3
3. 4K@24P
ADPCM:
1. Microsoft
ADPCM
2. IMA ADPCM
(DVI_ADPCM)
3. SWF ADPCM
4. QT IMA
ADPCM
MP4
(.mp4)
H.265/HE
VC
MPEG-Audio
HE-AAC, LC-
AAC
H.265:
1. MP@L5.1 Main Tier
2. 4K@60P 10bit
AVI (.avi) MPEG-4
AVC
(H.264)
LPCM
ADPCM
MPEG-Audio
MPEG-1: support up to
1080@60p
H.264:
1. Main and High Profile @
level 4.2
2. Baseline @ level 3
3. 4K@24P
ADPCM:
1. Microsoft
ADPCM
2. IMA ADPCM
(DVI_ADPCM)
3. SWF ADPCM
4. QT IMA
ADPCM
FLV (.flv) MPEG-4
AVC
(H.264)
LPCM
MPEG-Audio
H.264: 4K@24P
F4V (.f4v) H.264 HE-AAC
MP3
H.264:
1. Main and High Profile @
level 4.2
2. Baseline @ level 3
3. 4K@24P
MKV
(.mkv)
MPEG-4
AVC
(H.264)
LPCM
ADPCM
MPEG-Audio
H.264:
1. Main and High Profile @
level 4.2
2. Baseline @ level 3
3. 4K@24P
ADPCM:
1. Microsoft
ADPCM
2. IMA ADPCM
(DVI_ADPCM)
3. SWF ADPCM
4. QT IMA
ADPCM
MKV
(.mkv)
H.265/HE
VC
VP9
MPEG-Audio
HE-AAC, LC-
AAC
H.265:
1. MP@L5.1 Main Tier
2. 4K@60P 10bit
38 Using Your Projector
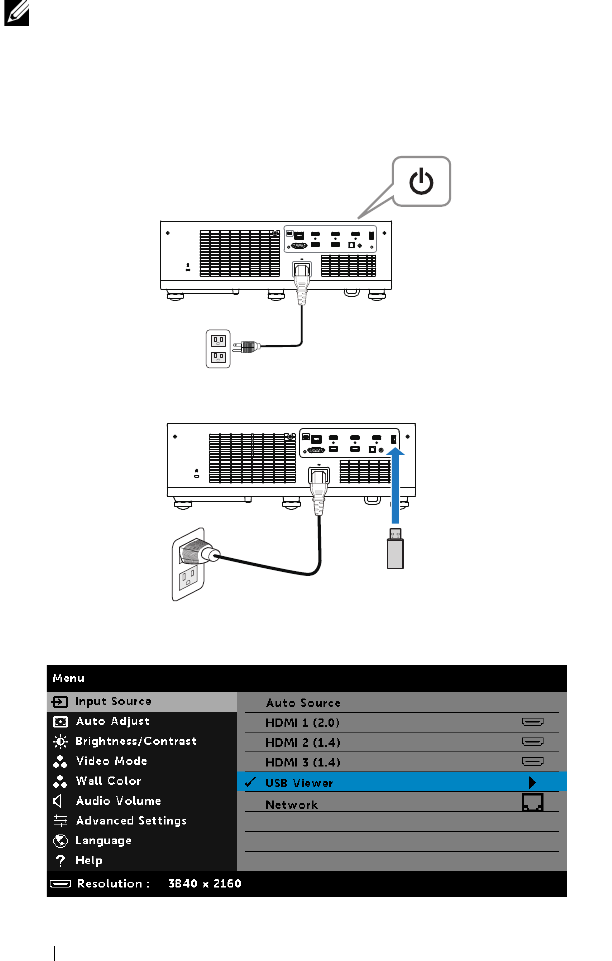
Setting up to present using External USB Storage
NOTE: A USB flash disk must be plugged into the projector if you
want to use the USB media playback feature.
Follow these steps to play the Video, Audio, Photo, or PDF files on your
projector:
1
Connect the power cable and turn on the projector by pressing the power
button.
2
Plug in a
USB flash disk
to your projector.
3
Press the
Menu
button on the control panel or remote control.
4
Access the
Input Source
menu, select
USB Viewer
source.
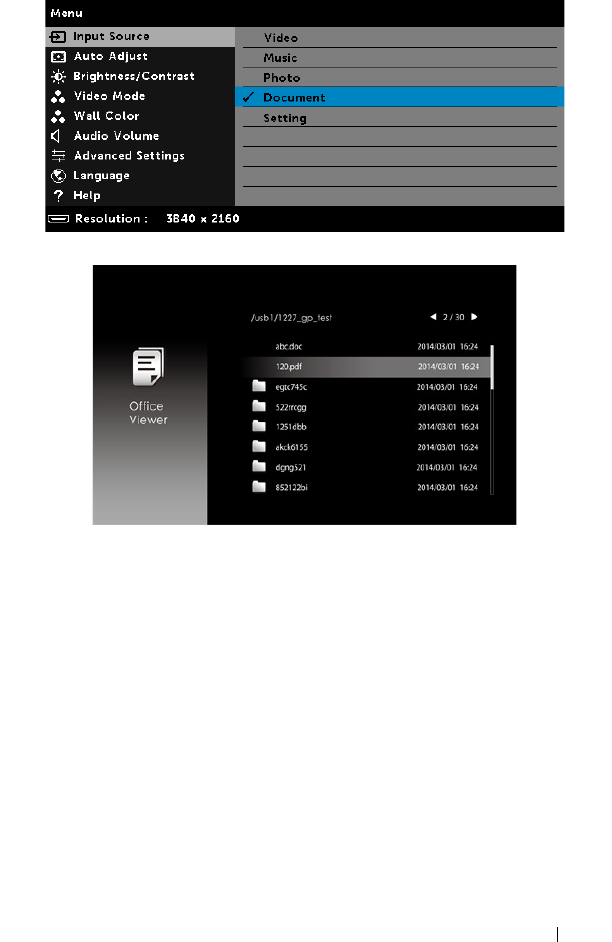
Using Your Projector 39
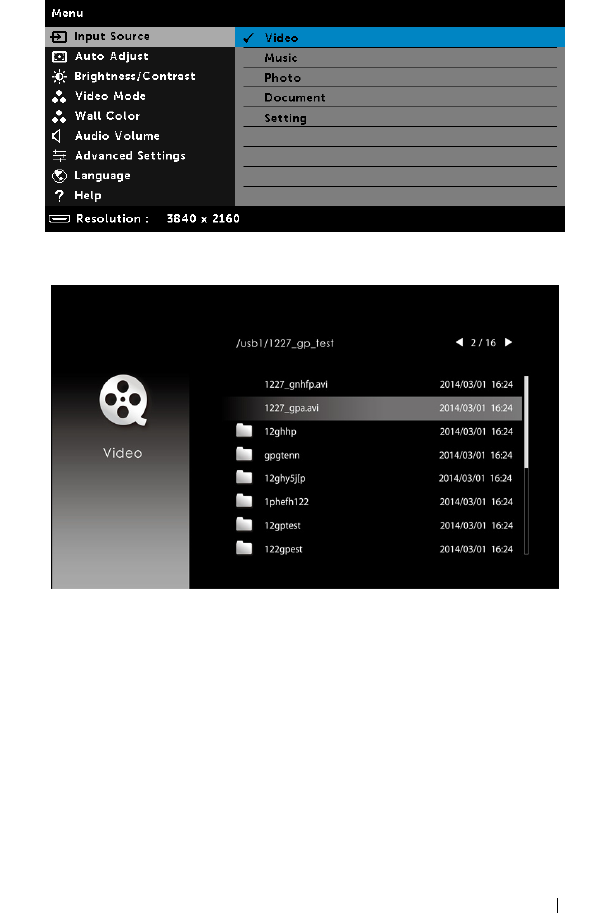
5
Go to USB Viewer menu:
a
You can play
Video
,
Music
, or
Photo
files, or select
Setting
option to
change multimedia settings.
The
Video Source Screen
shown below appears:
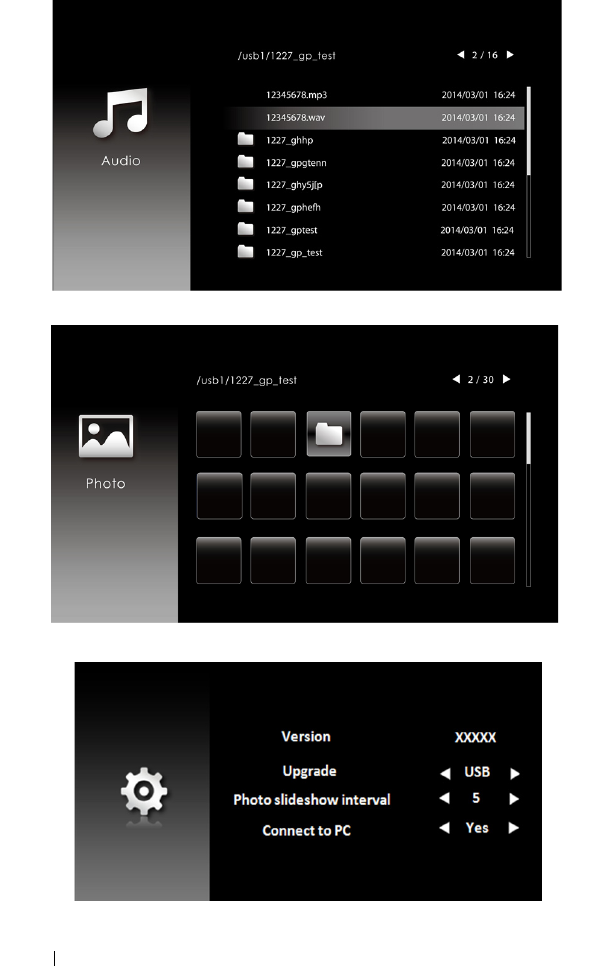
40 Using Your Projector
The
Music Source Screen
shown below appears:
The
Photo Source Screen
shown below appears:
The
Setting Source Screen
shown below appears:
Using Your Projector 41
b
You can also play
MS Excel
,
MS Word
,
MS PowerPoint
, or
PDF
files
via
Document
option.
The
Document Screen
shown below appears:

42 Using Your Projector
Office Viewer File Type Support
The office viewer feature allows you to play the MS Excel, MS Word, MS
PowerPoint, and PDF files.
File Type Support Version Pages/Lines Limitation Size
Limitation
Notes
Adobe PDF Up to 1000 pages (One
file)
Up to
75 MB
MS Word Word 97, 2000,
2002, 2003
Because office viewer
does not load all pages
of MS Word file at the
same time, there are no
obvious limitations of
page and line.
Up to
100 MB
Does not
support
Bold Text in
Simple
Chinese
front
Word 2007,
2010 (.docx)
MS Excel Excel 97,
2000,2002, 2003
Row Limit: up to 595 /
Column Limit: up to 256
Up to
15 MB
Does not
support
password-
protected
sheets
Excel 2007,
2010 (.xlsx)
Sheet: up to 100
Office XP Excel Note: Any one of three
limitations above cannot
appear on one Excel file
simultaneously
MS
PowerPoint
PowerPoint 97 Up to 1000 pages (One
file)
Up to
19 MB
Does not
support
Slide Show
order
PowerPoint
2000, 2002,
2003
PowerPoint
2007, 2010
(.pptx)
Office XP
PowerPoint
PowerPoint
presentation-
2003 and
earlier*.pps)
PowerPoint
presentation-
2007 and
2010(.ppsx)
Using Your Projector 43
Set-up Bluetooth Speaker
NOTE:
a
Bluetooth transmitter range is 10 m.
b
Bluetooth sound profile supports Stereo (2 channel).
c
The S718QL projector Bluetooth transmitter can only communicate
with one Bluetooth speaker at a time same time.
d
Bluetooth will not operate when 3.5 mm audio out or SPDIF is
connected.
e
Up to five Bluetooth speakers can be paired & saved.
f
Once a Bluetooth speaker is paired, the projector will automatically
connect to it when the projector is turned on.
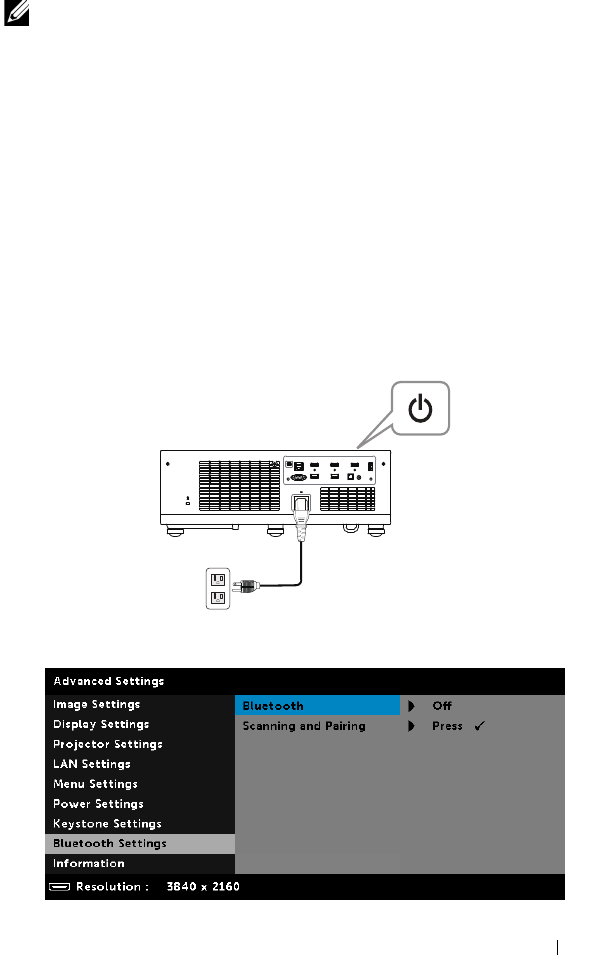
Adding a New Bluetooth Speaker
Follow these steps to pair your projector with a compatible Bluetooth speaker:
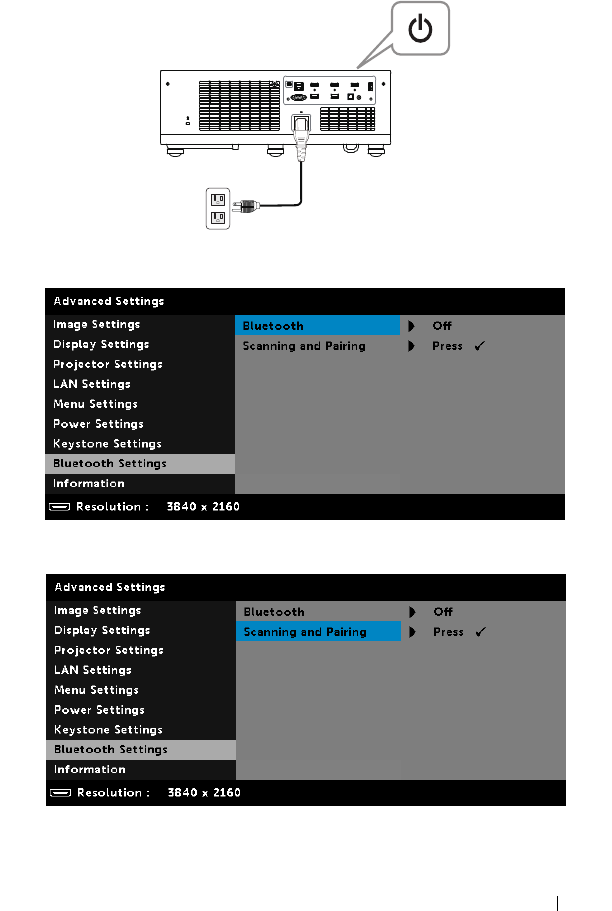
1
Connect the power cable and turn on the projector by pressing the power
button.
2
Access the
Advanced Settings
menu. Select the
Bluetooth Settings
and
then turn-on
Bluetooth
feature on the sub-menu.
44 Using Your Projector
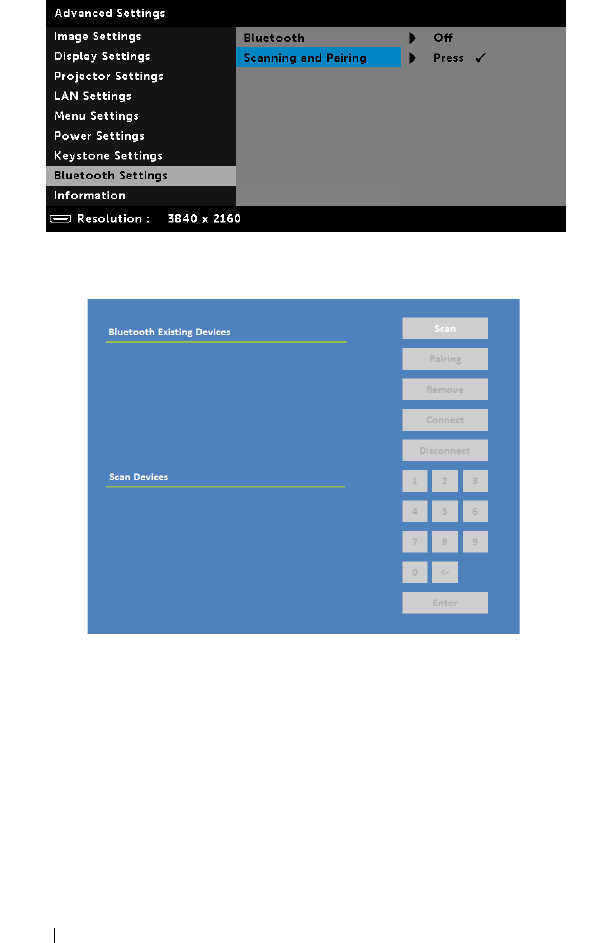
3
When the Bluetooth function is enabled, select Scanning and Pairing, and
then press the
Enter
button to enter the
Scanning and Pairing
screen.
Pairing instruction shown below appears:
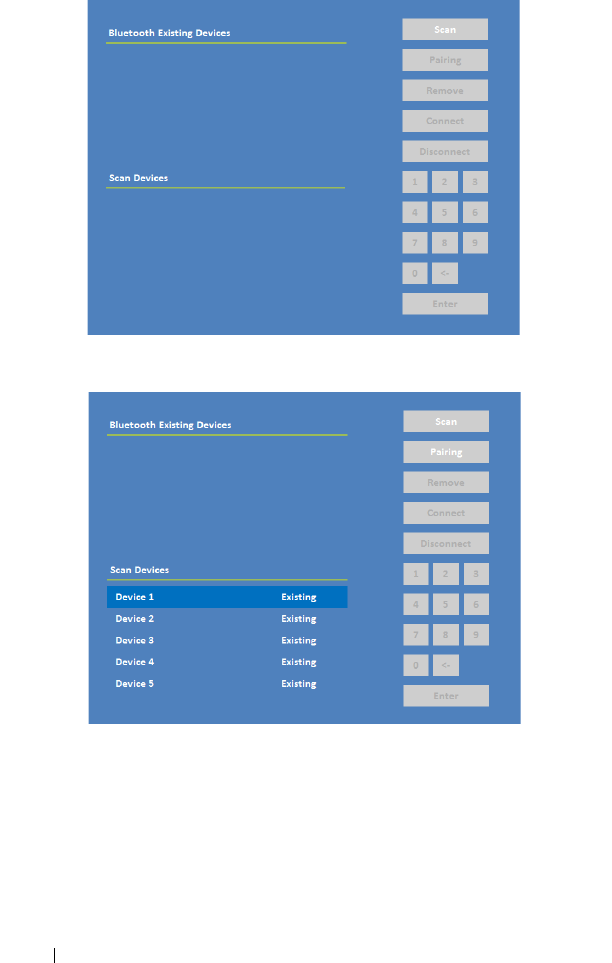
a
Click
Scan
button.
Using Your Projector 45
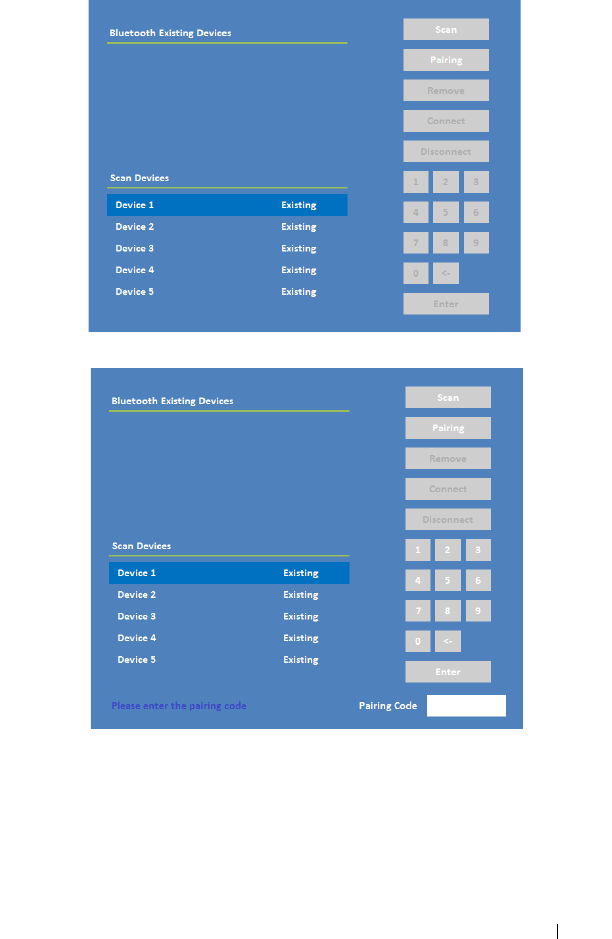
b
When the Scan Devices list appears, select
Device 1
and click the
Pairing
button.
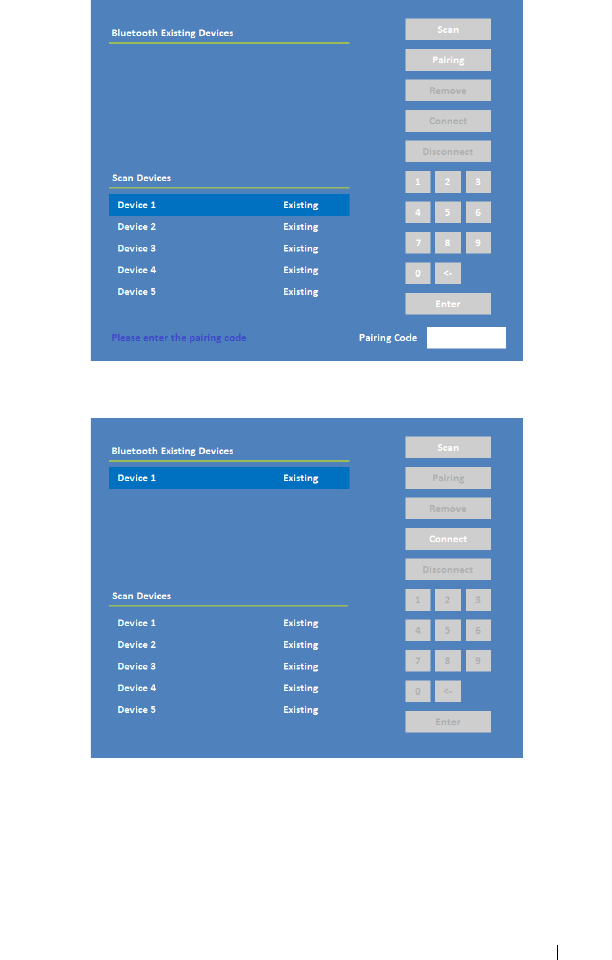
c
Please enter the pairing code.
46 Using Your Projector
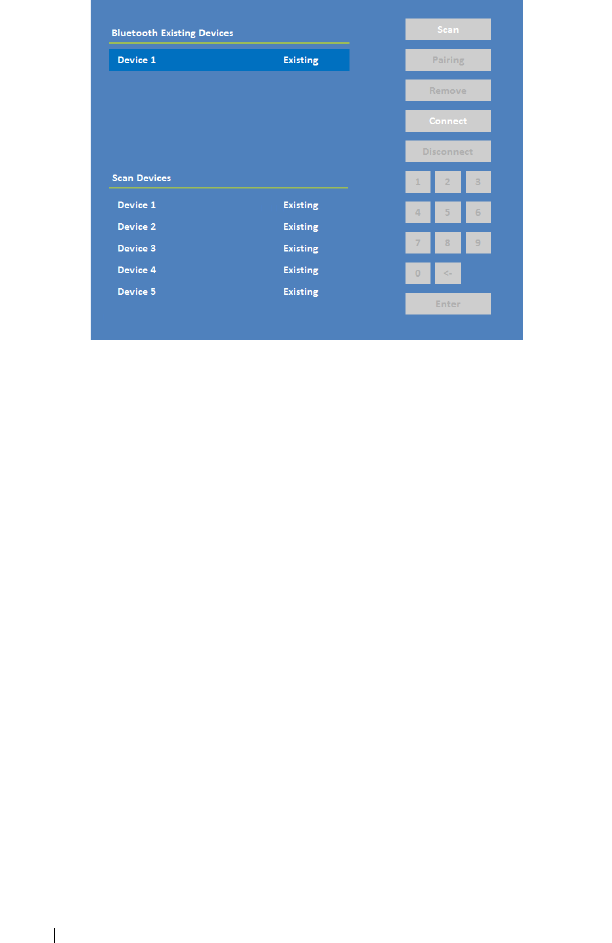
d
When the pairing process is complete, select
Device 1
from the Bluetooth
Existing Devices list. Then click the
Connect
button.
Using Your Projector 47
Remove a Bluetooth Speaker
1
Connect the power cable and turn on the projector by pressing the power
button.
2
Access the
Advanced Settings
menu. Select the
Bluetooth Settings
and
then turn-on
Bluetooth
feature on the sub-menu.
3
When the Bluetooth function is enabled, select Scanning and Pairing, and
then press the
Enter
button to enter the
Scanning and Pairing
screen.
Pairing instruction shown below appears:
48 Using Your Projector
a
Click
Scan
button.
b
When the Scan Devices list appears, select
Device 1
and click the
Pairing
button.
Using Your Projector 49
c
Please enter the pairing code.
d
When the pairing process is complete, select
Device 1
from the Bluetooth
Existing Devices list. Then click the
Connect
button.

50 Using Your Projector
4
When you into
Bluetooth Scanning and Pairing
sub-menu, select the
device you would like to remove, and then click
Remove
button.

Using Your Projector 51
Disconnect a Bluetooth Speaker
1
Connect the power cable and turn on the projector by pressing the power
button.
2
Access the
Advanced Settings
menu. Select the
Bluetooth Settings
and
then turn-on
Bluetooth
feature on the sub-menu.
3
When the Bluetooth function is enabled, select Scanning and Pairing, and
then press the
Enter
button to enter the
Scanning and Pairing
screen.
Pairing instruction shown below appears:

52 Using Your Projector
a
Click
Scan
button.
b
When the Scan Devices list appears, select
Device 1
and click the
Pairing
button.

Using Your Projector 53
c
Please enter the pairing code.
d
When the pairing process is complete, select
Device 1
from the Bluetooth
Existing Devices list. Then click the
Connect
button.
54 Using Your Projector
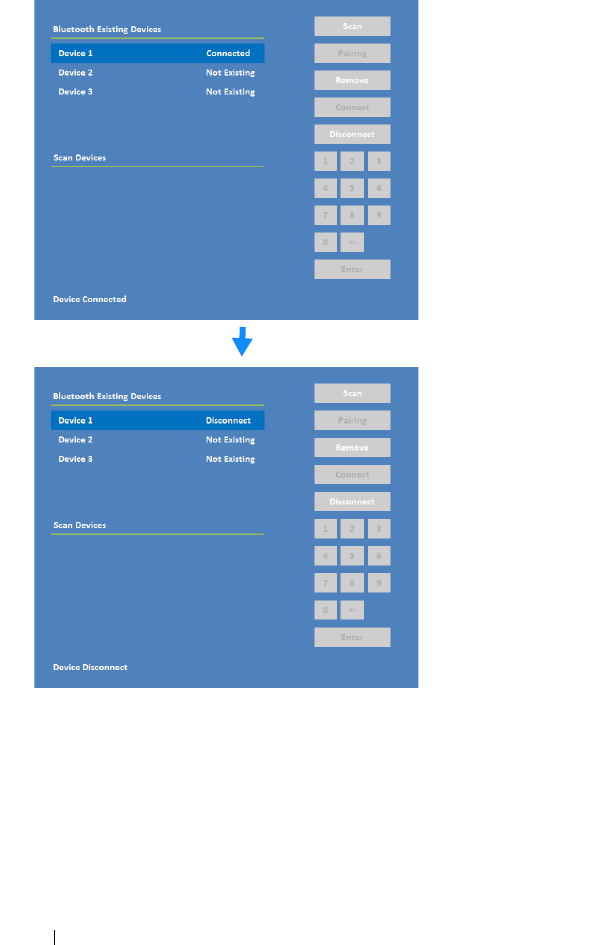
4
When you into
Bluetooth Scanning and Pairing
sub-menu, select Device
1, and then click
Disconnect
button.
Using Your Projector 55
Using High Dynamic Range (HDR)
NOTE:
a
Only HDMI-1 port can support HDR feature.
b
PQ functions cannot be adjusted in HDR mode.
Follow these steps to activate HDR feature:
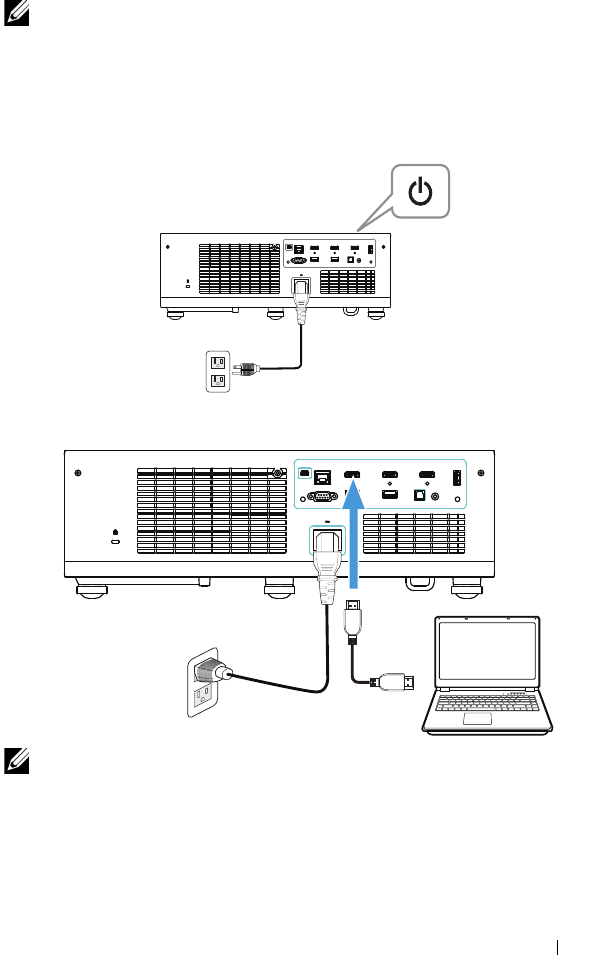
1
Connect the power cable and turn on the projector by pressing the power
button.
2
Connect the
HDMI 2.0 cable
to the projector HDMI-1 port and the computer
or DVD player.
NOTE: Your computer or DVD player must support the HDR function.

56 Using Your Projector
3
Access the
Display Settings
menu, select
HDR
and then follow the
functionality difference to select
Auto
,
Off
,
HDR1
,
HD2
, or
HD3
on the sub-
menu.
Troubleshooting 57
Troubleshooting Tips
If you experience problems with your projector, see the following
troubleshooting tips. If your problem persists, please contact Dell.
4
Troubleshooting
Problem Possible Solution
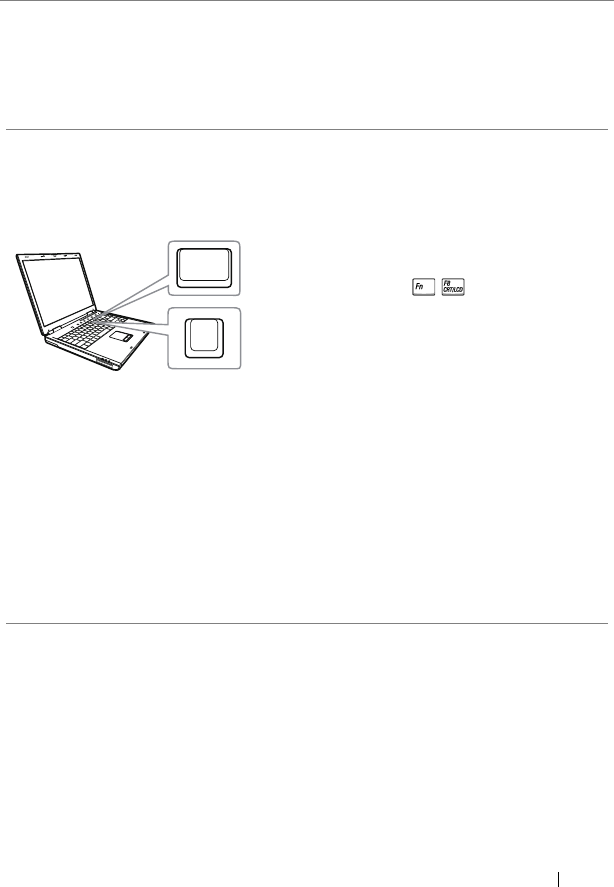
No image appears on the
screen
•
Ensure that you have chosen the correct
input source on the INPUT SOURCE
menu.
•
Ensure the external graphics port is
enabled. If you are using a Dell laptop
computer, press (Fn+F8). For
other computers, see your respective
documentation. If images are not
displayed properly, please upgrade the
video driver of your computer. For Dell
computers, see www.dell.com/support.
•
Ensure that all the cables are securely
connected. See "Adjusting Projector
Image" on page 15.
•
Ensure that the pins of the connectors are
not bent or broken.
•
Use the Test Pattern in the Projector
Settings of the Advanced Settings menu.
Ensure that the colors of the test pattern
are correct.
Fn
F8
CRT/LCD
58 Troubleshooting
Partial, scrolling, or
incorrectly displayed image
If you are using a Dell laptop computer, set
the resolution of the computer to 4K (3840
x 2160):
a
Right-click the unused portion of your
Microsoft
®
Windows
®
desktop, click
Properties
, and then select
Settings
tab.
b
Verify that the setting is 3840 x 2160
pixels for the external monitor port.
c
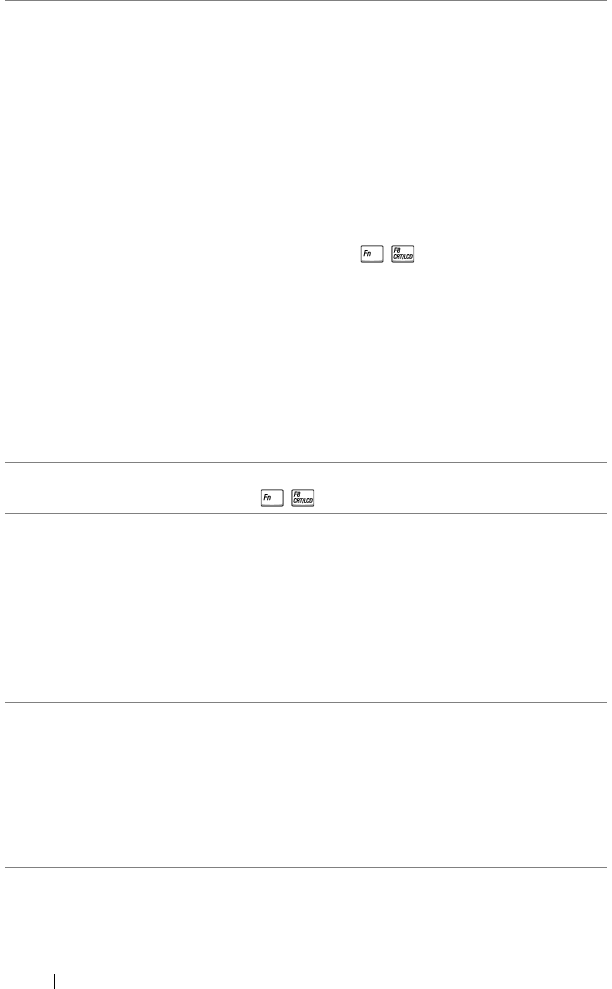
Press (Fn+F8).
If you experience difficulty in changing
resolutions, or if your monitor freezes,
restart all the equipment and the projector.
If you are not using a Dell laptop computer,
see your documentation. If images are not
displayed properly, please upgrade the
video driver of your computer. For a Dell
computer, see www.dell.com/support.
The screen does not display
your presentation
If you are using a portable computer, press
(Fn+F8).
Image color is incorrect
•
If the display receives the wrong signal
output from the graphics card, please set
the signal type to
RGB
in the OSD
Image
Settings
of the
Advanced Settings
tab.
•
Use
Test Pattern
in the
Projector
Settings
of the
Advanced Settings
menu. Ensure that the colors of the test
pattern are correct.
Image is out of focus 1
Adjust the focus until the image is clear.
Use
Focus Adjust
in the
Projector
Settings
of the
Advanced Settings
menu.
2
Ensure that the projection screen is within
the required distance from the projector
(0.32 ft [10 cm] ~ 0.74 ft [22.5 cm]).
Problem (continued) Possible Solution (continued)

Troubleshooting 59
The image is stretched
when displaying a 16:9 DVD
The projector automatically detects the
input signal format. It will maintain the
aspect ratio of the projected image
according to the input signal format with an
Original setting.
If the image is still stretched, adjust the
aspect ratio in the Display Settings of the
Advanced Settings menu in the OSD.
Image is reversed Select
Projector Settings
of the
Advanced
Settings
from the OSD and adjust the
projector mode.
TEMP light is solid amber The projector has overheated. The display
automatically shuts down. Turn the display
on again after the projector cools down. If
the problem persists, please contact Dell.
TEMP light is blinking
amber
If the projector fan fails, the projector will
automatically shut down. Try to clear the
projector mode by pressing and holding the
Power
button for 10 seconds. Please wait
for about 5 minutes and try to power up
again. If the problem persists, please
contact Dell.
The remote control is not
operating smoothly or works
only within a limited range
The battery may be low. If so, replace with
new CR2032 battery.
LAN control support
•
Web Control functions were verified on
IE9, IE10, and IE11. The other version
may have compatibility problem.
•
The Compatibility View setting should be
disabled. Otherwise the web control page
may have icon or content display
abnormal issue.
Problem (continued) Possible Solution (continued)

60 Troubleshooting
Guiding Signals
Projector
Status Description
Control Buttons Indicator
Power TEMP
(Amber)
LAMP
(Amber)
Standby mode Projector in Standby mode. Ready to
power on. White Flashing OFF OFF
Warming up
mode
Projector takes some time to warm up
and power on. White OFF OFF
Laser Diode
on
Projector in Normal mode, ready to
display an image.
Note: The OSD menu is not
accessed.
White OFF OFF
Cooling mode Projector is cooling to shutdown. White OFF OFF
Projector
overheated
Air vents might be blocked or ambient
temperature may be above 40°C. The
projector automatically shuts down.
Ensure that the air vents are not
blocked and that the ambient
temperature is within operational
range. If the problem persists, please
contact Dell.
OFF AMBER OFF
Fan
breakdown
One of the fans has failed. The
projector automatically shuts down. If
the problem persists, please contact
Dell.
OFF AMBER
Flashing OFF
Laser Diode
driver
overheated
Air vents might be blocked or the
Laser Diode driver has overheated.
The projector will automatically shut
down. Turn the display on again after
the projector cools down. If the
problem persists, please contact Dell.
AMBER AMBER OFF
Color Wheel
breakdown
Color wheel cannot start. The
projector has failed and the projector
automatically shuts down. Unplug the
power cord after three minutes and
then turn on the projector. If this
problem persists, please contact Dell.
White AMBER
Flashing
AMBER
Flashing
Laser Diode
failure
Laser Diode is defective. OFF OFF AMBER
Fault - DC
supply (+12V)
Power supply has been interrupted.
The projector automatically shuts
down. Unplug the power cord after
three minutes and then turn on the
projector. If this problem persists,
please contact Dell.
AMBER Flashing AMBER AMBER
Maintenance 61
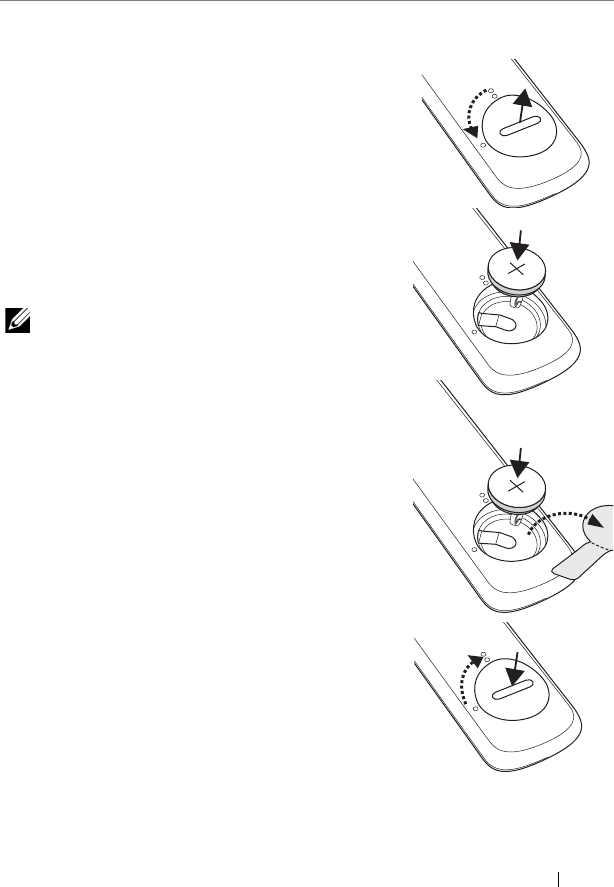
Replacing the Remote Control Battery
1Rotate the battery lid counterclockwise to
remove the battery cover.
2Insert a CR2032 coin cell battery and align
the polarity correctly according to the
marking in the battery holder.
NOTE: When you use the remote control
for the first time, there is a plastic sheet
between the battery and its contact.
Remove the sheet before use.
3Rotate the battery lid clockwise to mount
the battery cover.
5
Maintenance
3
V
O
L
T
S
CR2032
3
V
O
L
T
S
CR2032

62 Specifications
6Specifications
Light Valve 0.66" UHD TRP S610 DMD, DarkChip3™
Brightness 5000 ANSI Lumens (Max.)
Contrast Ratio 1300:1 Typical (Full On/Full Off)
100000:1 High Contrast Ratio
Uniformity 80% Typical (Japan Standard - JBMA)
Number of Pixels 3840 x 2160 (4K)
Aspect Ratio 16:9
Displayable Color 1.07 billion colors
Color Wheel Speed 2 X for Normal
Projection Lens F-Stop: F/2.74
Focal length, f=2.84 mm
No Manual Zoom Lens, Fixed
Throw ratio =Fixed UST 0.18 wide and tele
Offset ratio: 118%
Projection Screen Size 100 ~ 130 inches (diagonal)
Projection Distance 0.32 ~ 0.74 ft (10 ~ 22.5 cm)
Video Compatibility Component Video input via HDMI: 2160p
(24/25/60 Hz), 1080i (24/25/60 Hz), 720p (50/60
Hz), 576i/p, 480i/p
Power Supply Universal AC 100-240 V 50-60 Hz with PFC
input
Power Consumption Normal mode: 500 W ± 15% @ 110 Vac
Eco mode: 280 W ± 15% @ 110 Vac
Standby mode: < 0.5 W
Network standby: < 2 W
NOTE: By default, the projector is set to
enter power saving mode after 20 minutes
of no activity.
Audio 2 speakers x 6 watt RMS
Specifications 63
Noise Level Normal mode: 33 dB(A)
Eco mode: 29 dB(A)
Projector Weight < 29.76 lb (13.5 Kg)
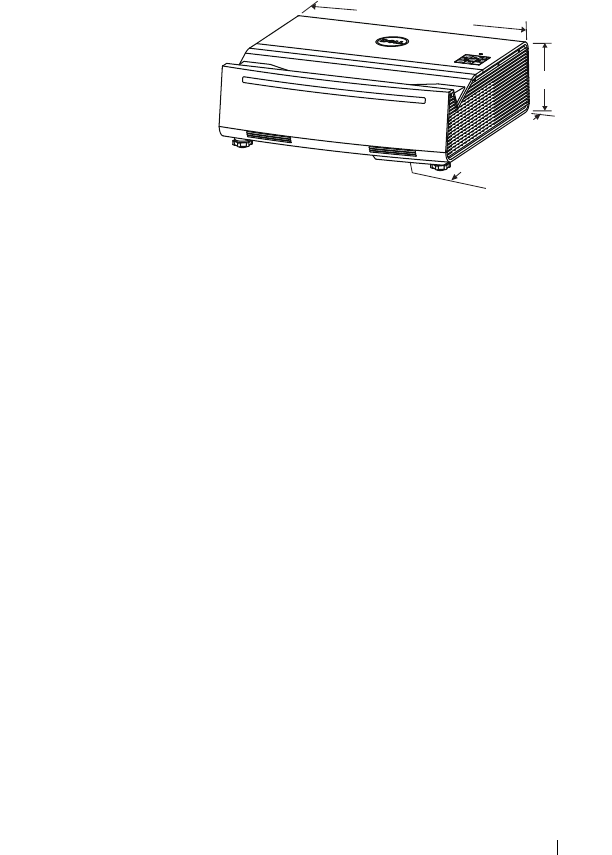
Dimensions (W x D x H) 18.07 x 15.16 x 5.31 inches (459 x 385 x 135
mm)
Environmental Operating temperature: 5 °C - 40 °C (41 °F-
104 °F)
Humidity: 80% maximum
St
orage temperature: 0 °C to 60 °C (32 °F to
140 °F)
Humidity: 90% maximum
Shipping temperature: -20 °C to 60 °C
(-4 °F to 140 °F)
Humidity: 90% maximum
I/O Connectors Power: One AC power socket (3-pin - C14 inlet)
HDMI 2.0 input: One HDMI 2.0 connector for
HDMI 2.0 specification HDCP 2.2 compliant and
HDR capable.
HDMI 1.4 input: Two HDMI 1.4 connectors for
HDMI 1.4 specification HDCP 2.2 compliant.
Variable audio output: One 3.5 mm stereo mini
phone jack (Green).
USB (mini type B) port: One mini type B
connector for firmware upgrade.
USB 3.0 (type A) port: One USB 3.0 type A
connector for USB playback.
USB Power (5V/1.8A): Two USB Power
(5V/1.8A) for power only
RS232 port: One 9-pin D-sub for RS232
communication.
5.31"(135 mm)
18.07"(459 mm)
15.16"(385 mm)

64 Specifications
RJ-45 port: One RJ-45 connector for build-in for
network control and LAN display.
SPDIF port: One SPDIF connector for digital
audio output.
Light Source Up to 20,000 hours in Normal mode

Specifications 65
Compatibility Mode (Digital)
Resolution Refresh Rate
(Hz)
H Sync
Frequency
(KHz)
Pixel Clock
(MHz)
Support HDMI
1.4 or 2.0
640 x 480 59.940 31.469 25.175 HDMI 1.4 & 2.0
640 x 480 75.000 37.500 31.500 HDMI 1.4 & 2.0
640 x 480 85.008 43.269 36.000 HDMI 1.4 & 2.0
720 x 480 p60 59.940 31.469 27.000 HDMI 1.4 & 2.0
720 x 576 p50 50.000 31.250 27.000 HDMI 1.4 & 2.0
800 x 600 60.317 37.879 40.000 HDMI 1.4 & 2.0
800 x 600 75.000 46.875 49.500 HDMI 1.4 & 2.0
800 x 600 85.061 53.674 56.250 HDMI 1.4 & 2.0
1024 x 768 60.004 48.363 65.000 HDMI 1.4 & 2.0
1024 x 768 74.930 60.241 80.000 HDMI 1.4 & 2.0
1024 x 768 84.997 68.677 94.500 HDMI 1.4 & 2.0
1280 x 720 59.855 44.772 74.250 HDMI 1.4 & 2.0
1280 x 720 p50 50.000 37.500 74.250 HDMI 1.4 & 2.0
1280 x 720 p60 60.000 45.000 74.250 HDMI 1.4 & 2.0
1280 x 800 59.810 49.702 83.500 HDMI 1.4 & 2.0
1280 x 1024 60.020 63.981 108.000 HDMI 1.4 & 2.0
1366 x 768 59.790 47.712 85.500 HDMI 1.4 & 2.0
1400 x 1050 59.978 65.317 121.750 HDMI 1.4 & 2.0
1600 x 1200 60.000 75.000 162.000 HDMI 1.4 & 2.0
1920 x 1080 60.000 67.500 148.500 HDMI 1.4 & 2.0
1920 x 1080 i50 50.000 28.125 74.250 HDMI 1.4 & 2.0
1920 x 1080 i60 60.000 33.750 74.250 HDMI 1.4 & 2.0
1920 x 1080
p120 120.00 33.750 297.000 HDMI 1.4 & 2.0
3840 x 2160 24.000 54.000 297.000 HDMI 1.4 & 2.0
3840 x 2160 25.000 56.250 297.000 HDMI 1.4 & 2.0
3840 x 2160 30.000 67.500 297.000 HDMI 1.4 & 2.0

66 Specifications
3840 x 2160 50.000 112.500 594.000 HDMI 2.0
3840 x 2160 60.000 135.000 594.000 HDMI 2.0
4096 x 2160 24.000 54.000 297.000 HDMI 1.4 & 2.0
4096 x 2160 25.000 56.250 297.000 HDMI 1.4 & 2.0
4096 x 2160 30.000 67.500 297.000 HDMI 1.4 & 2.0
4096 x 2160 50.000 112.500 594.000 HDMI 2.0
4096 x 2160 60.000 135.000 594.000 HDMI 2.0

Additional Information 67
For additional information on how to use your projector, please see the
Dell
Projectors User Guide
at www.dell.com/support/manuals.
7Additional Information

68 Contacting Dell
For customers in the United States, call 800-WWW-DELL (800-456-3355).
NOTE: If you do not have an active Internet connection, you can find
contact information on your purchase invoice, packing slip, bill, or Dell
product catalog.
Dell provides several online and telephone-based support and service
options. Availability varies by country and product, and some services may
not be available in your area. To contact Dell for sales, technical support, or
customer service issues:
1
Visit go to www.dell.com/contactDell.
2
Select your country from the displayed list.
3
Select a Segment for Contact.
4
Select the appropriate service or support link based on your need.
8Contacting Dell

Index 69
Index
A
Adjusting Projector Focus 16
Adjusting the Projected Image
Adjusting the Projector Height
15
lower the projector
Front tilt adjustment
wheel 15
Rear tilt adjustment
wheel 15
C
Connection Ports
Audio output connector 7
HDMI 1 (2.0) connector 7
HDMI 2 (1.4) connector 7
HDMI 3 (1.4) connector 7
Kensington cable slot 7
Mini USB (mini type B)
connector for firmware
upgrade 7
Power cord connector 7
RJ45 connector 7
RS232 connector 7
SPDIF connector 7
USB (Type A) 3.0 connector
for USB media playback and
optional wireless dongle 7
USB Type A Power (5V/1.8A)
connector 7
Contact Dell 5
D
Dell
contacting 67, 68
M
Main Unit 6
6W (x 2) speakers 6
IR receivers 6
Lens 6
Mounting holes for wall mount
6
Power button 6
Status indicators 6
Tilt adjustment wheel 6
P
phone numbers 68
R
Remote Control 12
Replacing 61
S
Specifications
Aspect Ratio 62

70 Index
Audio 62
Brightness 62
Color Wheel Speed 62
Contrast Ratio 62
Dimensions 63
Displayable Color 62
Environmental 63
I/O Connectors 63
Light Valve 62
Noise Level 63
Number of Pixels 62
Power Consumption 62
Power Supply 62
Projection Distance 62
Projection Lens 62
Projection Screen Size 62
Projector Weight 63
Uniformity 62
Video Compatibility 62
support
contacting Dell 67, 68
T
telephone numbers 68