Craftsman 247282820 User Manual STEEL BLADE DETHATCHER Manuals And Guides L0905248
CRAFTSMAN Walk Behind Lawnmower, Gas Manual L0905248 CRAFTSMAN Walk Behind Lawnmower, Gas Owner's Manual, CRAFTSMAN Walk Behind Lawnmower, Gas installation guides
User Manual: Craftsman 247282820 247282820 CRAFTSMAN STEEL BLADE DETHATCHER - Manuals and Guides View the owners manual for your CRAFTSMAN STEEL BLADE DETHATCHER #247282820. Home:Lawn & Garden Parts:Craftsman Parts:Craftsman STEEL BLADE DETHATCHER Manual
Open the PDF directly: View PDF ![]() .
.
Page Count: 52

Operator's nual
CRAFTSMAN°
21 SteeJ Blade Dethatcher
Model No. 247.282820
For answers to your questions about this product,
call 1-800-4MY-HOME.
CAUTION: Before using this
product, read this manual and
follow aJl safety ruJes and operating
instructions.
,, SAFETY
,, ASSEMBLY
,, OPERATION
,, MAINTENANCE
,, PARTS LIST
,, ESPAI_OL R 30
Sears, Roebuck and Co., Hoffman Estates, IL 60179, U.S.A.
Visit our website: www.sears.com/craftsman
FormNo.769-04612
(May4, 2009)
Warranty Statement ....................................................... 2
Safety instructions ......................................................... 3
Slope Guide .................................................................... 6
Safety Labels ................................................................. 7
Assembly ........................................................................ 8
Operation ..................................................................... 10
Service and Maintenance ........................................... 13
Off-Season Storage ..................................................... 18
Troubleshooting ........................................................... 19
Parts List ...................................................................... 20
Espa_ol ......................................................................... 30
Service Numbers ..................................................... Back
Cover
CRAFTSMAN FULL WARRANTY
Ifthis Craftsmanproductfailsdueto a defectin materialor workmanshipwithintwo yearsfromthedateof purchase,returnit to any Sears
store,Parts& RepairServiceCenter,or otherCraftsmanoutletin the UnitedStatesfor free repair(or replacementif repairprovesimpos-
sible),
Thiswarrantyappliesfor only 90daysif thisproductis everusedforcommercialor rentalpurposes.
ThiswarrantycoversONLYdefectsin materialandworkmanship.Searswill NOTpayfor:
• Expendableitemsthatcanwear outfromnormalusewithinthewarrantyperiod,suchas belts,filters,sparkplugsordethatching
blades,
• Repairsnecessarybecauseof accident,suchas abentcrankshaft,or failureto operateor maintainthe productaccordingto all
suppliedinstructions,
• Preventivemaintenance,or repairsnecessarydueto improperfuel mixture,contaminatedorstalefuel,
Thiswarrantygivesyouspecificlegal rights,andyou mayalso haveotherrightswhichvaryfromstateto state.
Sears, Roebuckand Co., HoffmanEstates, IL 60179
EngineOil: 10W-30
Fuel: UnleadedGasoline
SparkPlug: TorchF6RTC
SparkPlugGap: .020"-.030"
Model Number
Serial Number
Dateof Purchase
Recordthe modelnumber,serialnumber,
anddate of purchaseabove.
©SearsBrands,LLC 2
__IL Thissymbolpointsoutimportantsafetyinstruc-
tionswhich, if not followed,couldendangerthe
personalsafetyand/or propertyof yourselfand
others.Readandfollowallinstructionsinthis
manualbeforeattemptingto operatethismachine.Failureto
complywiththeseinstructionsmayresultin personalinjury.When
yousee thissymbol,HEEDITSWARNING!
Your Responsibility: Restrictthe useof this powermachineto
personswhoread,understand,andfollowthe warningsand instruc-
tionsinthis manualandonthe machine.
Thismachinewasbuilt to beoperatedaccordingto the rulesfor
safeoperationinthismanual.As withanytypeof powerequip-
ment,carelessnessor erroronthe part of the operatorcan result
in seriousinjury.Thismachineis capableof amputatinghandsand
feetandthrowingobjects.Failuretoobservethe followingsafety
instructionscould resultin seriousinjuryordeath.
EngineExhaust,someof itsconstituents,andcertainvehicle
[ componentscontainor emitchemicalsknownto Stateof California
[to causecancerand birthdefectsor otherreproductiveharm.
CHILDREN
,, Tragicaccidentscanoccur ifoperator isnotalert to presenceof
children.Childrenare often attractedto outdoorpowerequipment.
Theydo notunderstandthedangers.Neverassumethat childrenwill
remainwhereyoulast sawthem.
,, Keepchildrenoutof the work areaand underwatchfulcareof a
responsibleadult otherthanthe operator.
,, Bealert andturndethatcheroff if a child entersthe area.
,, Beforeandwhile movingbackwards,look behindanddownfor small
children.
,, Useextremecare whenapproachingblind corners,doorways,shrubs,
trees,orotherobjectsthat mayobscureyourvisionof a childwho may
run intothedethatcher.
,, Keepchildrenawayfrom hotor runningengines.Theycan suffer
burnsfrom a hotmuffler.
,, Neverallow childrenunder 14yearsold to operatethedethatcher.
Children14years oldand overshouldreadand understandoperation
instructionsand safetyrulesin this manualand shouldbetrainedand
supervisedbyanadult.
GENERAL OPERATION
• Readthis operator'smanualcarefullyin itsentirety beforeattempt-
ing to assemblethis machine.Read,understand,andfollow all
instructionsonthe machineand inthe manual(s)beforeoperation.
Becompletelyfamiliarwiththe controlsand the properuseof this
machinebeforeoperatingit. Keepthis manualin a safe placefor
futureand regularreferenceand for orderingreplacementparts.
,, Be familiarwithall controlsandtheir properoperation.Knowhowto
stopthe machineanddisengagethem quickly.
,, Do notstart enginewith bladesengaged.
,, Thismachineis a precisionpieceof powerequipment,not a plaything.
Therefore,exerciseextremecautionat all times.Your unithas been
designedto performonejob: to dethatchgrass. Do notuseit forany
otherpurpose.
,, Neverallow childrenunder 14yearsold to operatethis machine.
Children14years oldand overshouldreadand understandthe
instructionsin this manualand shouldbetrainedand supervisedbya
parent.
,, Onlyresponsibleindividualswho arefamiliarwiththese rulesof safe
operationshouldbe allowedto usethis machine.
,, Thoroughlyinspectthe areawherethe equipmentis to be used.
Removeall stones,sticks,wire, bones,toys andotherforeign objects
whichcouldbe tripped overor pickedup andthrownbythe det-
hatcher'sblades.Thrownobjectscancauseserious personalinjury.
,, Tohelpavoidbladecontact injury,stay in operatorzonebehind bail
and keepchildren,bystanders,helpers,andpetsat least75 feet from
dethatcherwhile it is inoperation.Stop machineifanyoneentersarea.
3
,, Alwayswear safetyglassesor safetygogglesduringoperationand
whileperforminganadjustmentor repairto protectyour eyes.Thrown
objectswhichricochet cancauseseriousinjuryto the eyes.
,, Wearsturdy,rough-soledworkshoesand close-fittingslacksand
shirts.Shirts andpantsthat coverthe armsand legs andsteel-toed
shoesare recommended.Neveroperatethis machinein shorts,bare
feet,sandals,slippery or lightweight(e.g.canvas)shoes.
,, Do notput handsorfeet nearor underbladehousingas blades
protrudebelow bottomof housing. Contactwith bladecan amputate
handsand feet. Keephandsand feetwayfromall rotatingparts.
,, Injury canoccur if thedethatcherispulledoverthe foot duringa fall
causedby slippingortripping.Do notholdon to thedethatcherif you
arefalling; releasethe bail immediately.
,, Neverpullthe dethatcherbacktowardyou whileyou arewalking.If
youmustbackthe dethatcherawayfroma wall or obstructionfirst look
downandbehindto avoidtrippingandthen followthesesteps:
,, Step backfromdethatcherto fullyextendyourarms.
,, Be sure youarewell balancedwithsure footing.
,, Pull backslowly,nomorethan halfwaytowardsyou.
,, Repeatthesestepsas needed.
,, Do notoperatedethatcherwhileunderthe influenceof alcoholor
drugs.
,, Raisedethatcherto highestcut positionbeforestartingengine.
,, Do notengagethe bladeswhilestartingengine.
,, Thebladecontrolbail is a safetydevice.Neverattemptto bypassits
operation.Doingso makesthesafetydeviceinoperativeandmay
result inpersonalinjurythroughcontactwiththe rotatingblade.The
bladecontrolbail mustoperateeasily in bothdirectionsand automati-
callyreturnto the disengagedpositionwhenreleased.
,, Neveroperatethe dethatcherin wetgrass. Alwaysbe sureof your
footing. A slipandfall cancauseserious personalinjury.Ifyou feel
youare losingyourfooting, releasethe bladecontrolbail immediately
andthe bladeswill stoprotating.
,, Dethatchonly in daylightor good artificiallight. Walk,neverrun.
,, Stopthe bladeswhencrossinggraveldrives,walksor roads.
,, If the equipmentshouldstartto vibrateabnormally,stopthe engine
andcheck immediatelyfor thecause.Vibrationis generallya warning
of trouble.
,, Shutthe engineoff andwait untilthe bladescomesto a completestop
beforeremovingor uncloggingdebrisfrom underthe bladehousing.
Thecutting bladesmaycontinueto rotatefor a few secondsafterthe
engineis shutoff. Neverplaceany partof the body inthe bladearea
until you aresure the bladeshas stoppedrotating.
,, Neveroperatedethatcherwithoutthe properbladecontrolbail,guards
andother safetyprotectivedevicesin placeandworking.Never
operatedethatcherwithdamagedsafety devices.Failureto do so can
result inpersonalinjury.
• Mufflerandenginebecomehotandcancauseaburn.Donottouch.
• Onlyusepartsandaccessoriesmadeforthismachinebythe
manufacturer.Failuretodosocanresultinpersonalinjury.
• Whenstartingengine,pullcordslowlyuntilresistanceisfelt,thenpull
rapidly.Rapidretractionofstartercord(kickback)willpullhandand
armtowardenginefasterthanyoucanletgo.Brokenbones,fractures,
bruisesorsprainscouldresult.
• Ifsituationsoccurwhicharenotcoveredinthismanual,usecare
andgoodjudgment.ContactyourAuthorizedServiceCenterfor
assistance.
SLOPE OPERATION
Slopesare a majorfactorrelatedto slipandfall accidentswhichcanresultin
severeinjury.Operationon slopesrequiresextracaution.Ifyoufeel uneasy
ona slope,donotdethatchit.Foryoursafety,usethe slopegaugeincluded
as partof this manualto measureslopesbeforeoperatingthis uniton a
slopedorhilly area.Ifthe slopeis greaterthan 15degrees,do notdethatch
it.
Do:
• Dethatchacrossthefaceof slopes;neverupanddown. Exercise
extremecautionwhenchangingdirectionon slopes.
• Watchfor holes,ruts,rocks, hiddenobjects,or bumpswhich can
causeyou to slipor trip.Tall grasscan hideobstacles.
• Alwaysbe sureof your footing.A slip andfall can causeserious
personalinjury.If youfeel youare losingyour balance,releasethe
bladecontrolbail immediately,andthe blade willstop rotatingwithin
severalseconds
Do Not:
• Do notdethatchneardrop-offs,ditchesorembankments,whereyou
couldlose yourfootingorbalance.
• Do notdethatchslopesgreaterthan 15 degreesas shownonthe
slopegauge.
• Do notdethatchwet grass.Unstablefootingcouldcauseslipping.
SERVICE
Safe Handling Of Gasoline:
• Toavoidpersonalinjuryor propertydamage useextremecare in
handlinggasoline.Gasolineis extremelyflammableandthevapors
areexplosive.Seriouspersonalinjurycan occur whengasolineis
spilledon yourselfor yourclotheswhichcan ignite.Washyour skin
andchangeclothesimmediately.
• Useonly an approvedgasolinecontainer.
• Neverfill containersinsidea vehicle oron a truckor trailerbedwith a
plastic liner.Alwaysplacecontainersonthe ground awayfrom your
vehiclebeforefilling.
• Removegas-poweredequipmentfromthetruck ortrailer and refuel it
onthe ground.Ifthis is notpossible,then refuelsuchequipmentona
trailerwitha portablecontainer,ratherthanfrom a gasolinedispenser
nozzle.
• Keepthe nozzlein contactwiththe rimof thefueltank or container
openingat alltimesuntil fueling is complete.Donot usea nozzle
lock-opendevice.
• Extinguishallcigarettes,cigars, pipesand othersourcesof ignition.
• Neverfuel machineindoorsbecauseflammablevaporswillaccumu-
lateinthe area.
• Neverremovegascap oradd fuel whileengineis hotor running.
Allowengineto coolat leasttwo minutesbeforerefueling.
• Neveroverfill fueltank. Filltankto red indicatorbar insidetank.
• Replacegasoline capandtightensecurely.
• If gasolineis spilled, wipe itoffthe engineandequipment.Moveunit
to anotherarea.Wait 5 minutesbeforestartingengine.
• Neverstorethe machineorfuel containernearanopen flame,spark
or pilot lightas on a waterheater,spaceheater,furnace,clothesdryer,
orother gas appliances.
• Toreducefire hazard,keepdethatcherfreeof grass, leaves,or other
debrisbuild-up.Cleanup oil orfuel spillageand removeanyfuel
soakeddebris.
• Allowdethatcherto coolat least5 minutesbeforestoring.
General Service:
•Neverrun an engineindoorsor in a poorlyventilatedarea. Engine
exhaustcontainscarbonmonoxide,anodorlessanddeadlygas.
• Beforecleaning,repairing,or inspecting,makecertainthe bladesand
all movingparts havestopped.Disconnectthespark plugwire and
groundagainstthe engineto preventunintendedstarting.
• Checkthe bladeand enginemountingfastenersat frequentintervals
for propertightness.Also,visuallyinspectbladesfor damage(e.g.,
bent,cracked,worn)Replacebladeswiththeoriginalequipment
manufacture's(O.E.M.)bladeonly. Useof partswhich donot meetthe
originalequipmentspecificationsmayleadto improperperformance
andcompromisesafety!
• Dethatcherbladesmaybesharpandcan cut. Wrapthe bladeor wear
gloves,and use extracautionwhenservicingthem.
• Keepall nuts,bolts,and screwstightto besurethe equipmentis in
safeworkingcondition.
• Nevertamperwithsafety devices.Checktheir properoperation
regularly.
• Afterstrikinga foreignobject,stopthe engine,disconnectthespark
plugwire andground againsttheengine.Thoroughlyinspectthe
dethatcherfor any damage.Repairthe damagebeforestartingand
operatingthe dethatcher.
• Forsafetyprotection,frequentlycheckcomponentsand replaceim-
mediatelywithoriginal equipmentmanufacturer's(O.E.M.)partsonly.
Useof partswhich donot meettheoriginal equipmentspecifications
mayleadto improperperformanceand compromisesafety!
• Do notchangethe enginegovernorsettingor overspeedtheengine.
The governorcontrolsthe maximumsafeoperatingspeed of the
engine.Donotcrank enginewithspark plugremoved.
• Checkfuel line, tank, cap, andfittingsfrequentlyfor cracksor leaks.
Replaceif necessary.
• Maintainor replacesafetyand instructionlabels,as necessary.
• Observeproperdisposallawsandregulations.Improperdisposalof
fluidsand materialscanharmthe environment.
YourResponsibility:Restrictthe use of this powermachineto personswho read,understand,andfollowthe warningsand instructionsin this manualandon the
machine.
4
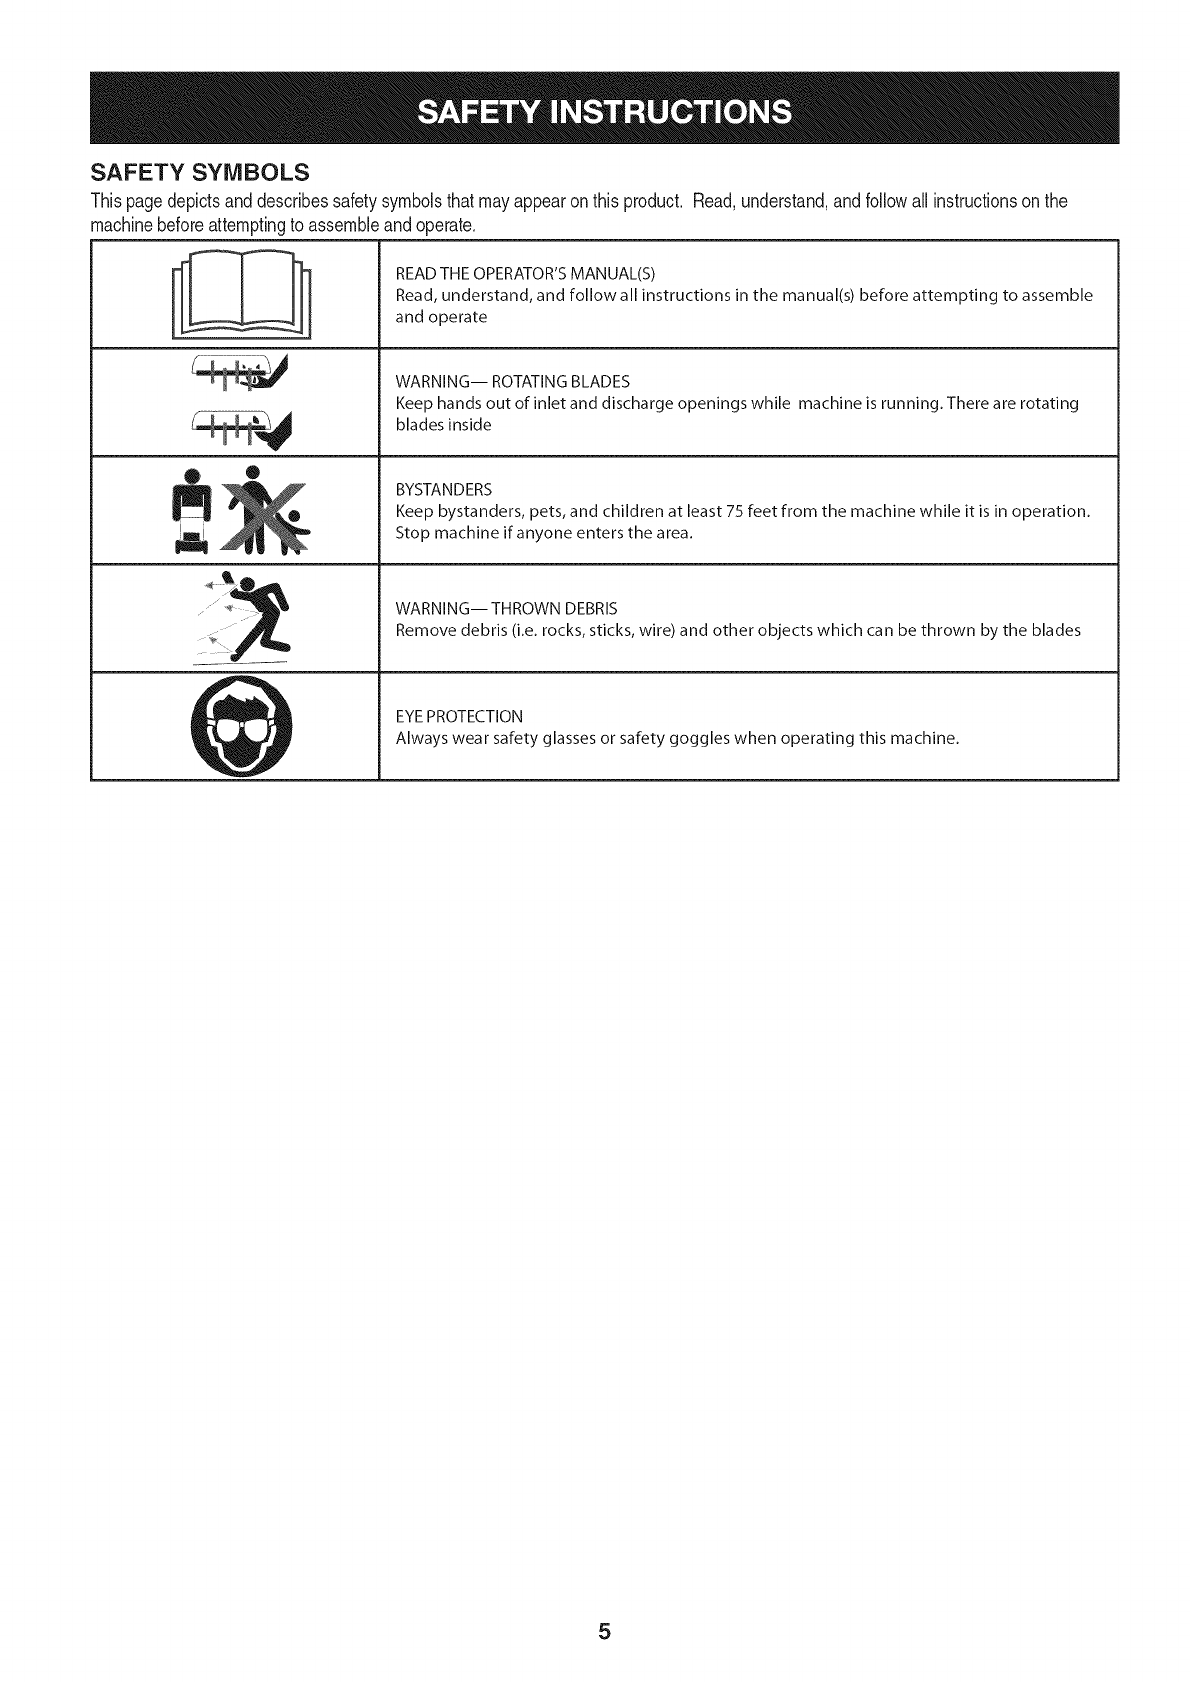
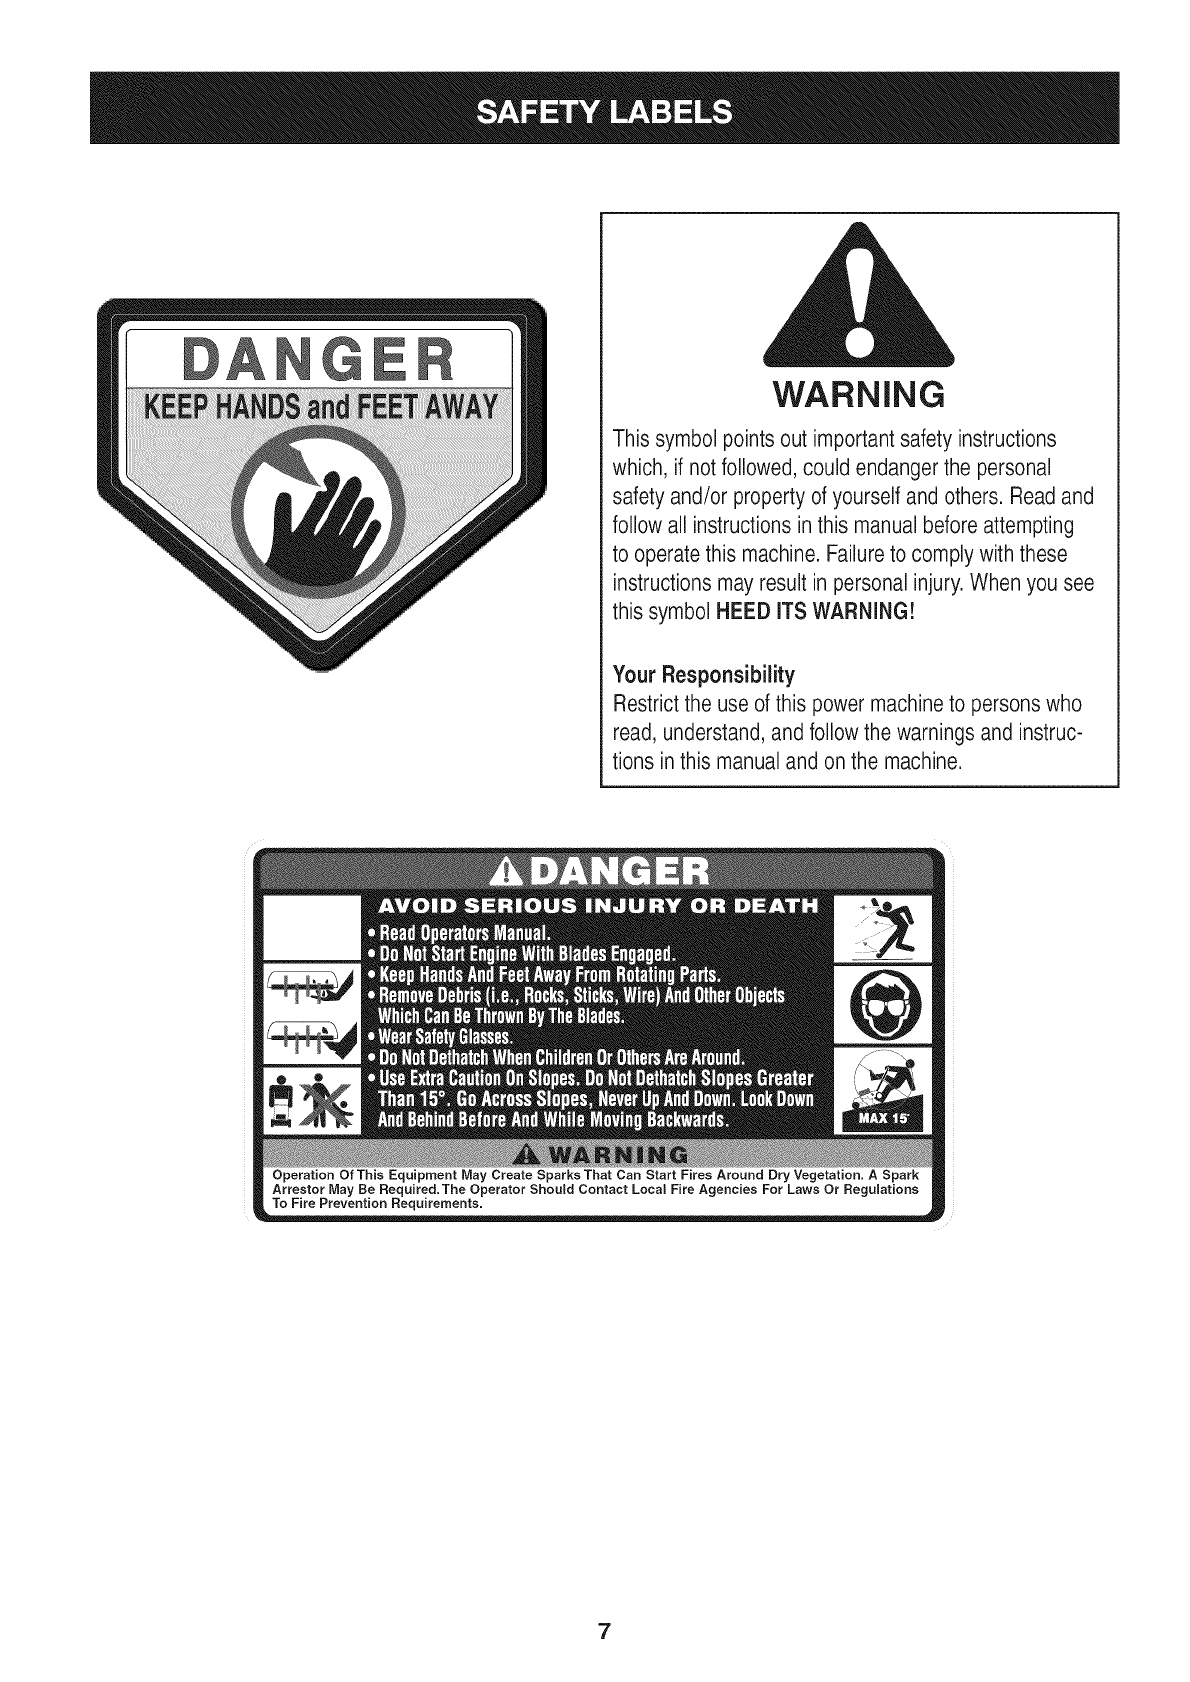
SAFETY SYMBOLS
Thispagedepictsanddescribessafetysymbolsthatmayappearonthis product. Read,understand,andfollowallinstructionson the
machinebeforeattemptingto assembleandoperate.
® =
®
READ THE OPERATOR'S MANUAL(S)
Read, understand, and follow all instructions in the manual(s) before attempting to assemble
and operate
WARNING-- ROTATING BLADES
Keep hands out of inlet and discharge openings while machine is running. There are rotating
blades inside
BYSTANDERS
Keep bystanders, pets, and children at least 75 feet from the machine while it is in operation.
Stop machine if anyone enters the area.
WARNING-- THROWN DEBRIS
Remove debris (i.e. rocks, sticks, wire) and other objects which can be thrown by the blades
EYEPROTECTION
Always wear safety glasses or safety goggles when operating this machine.
5
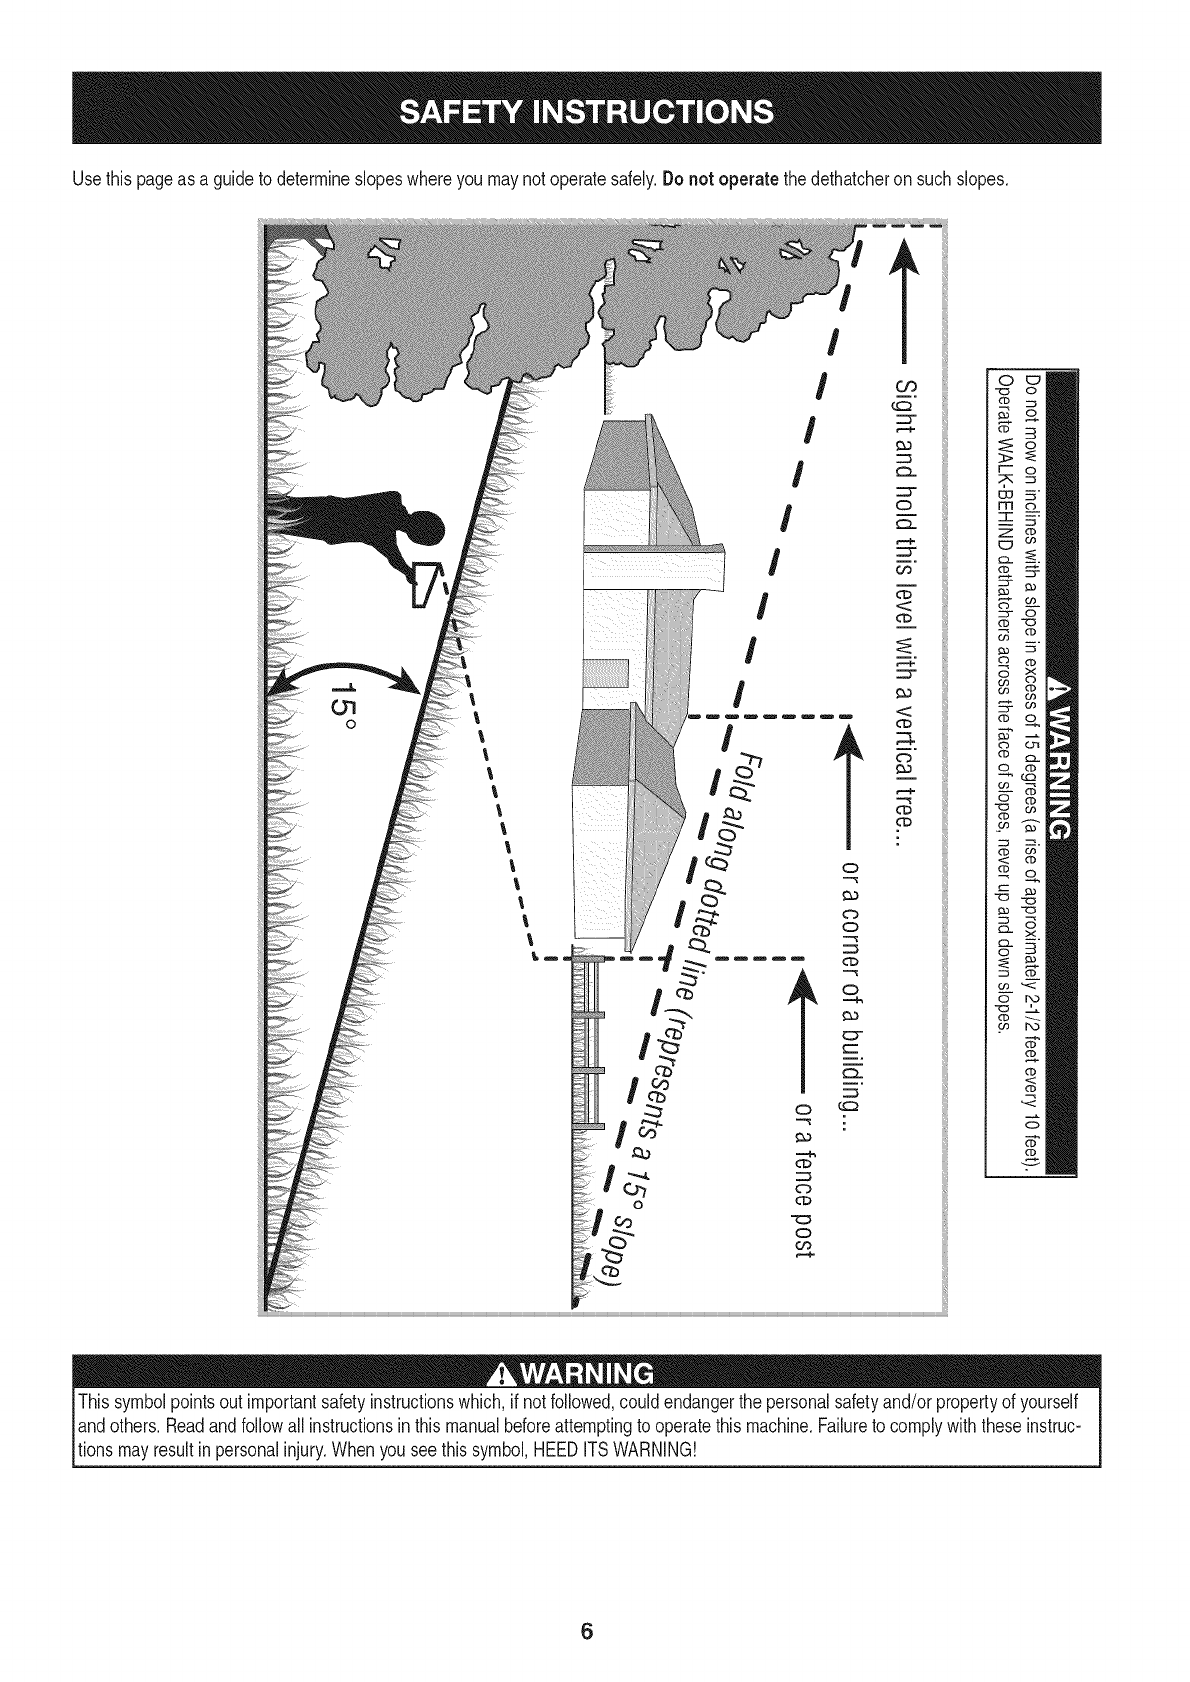
Usethispageas a guideto determineslopeswhereyou maynot operatesafely.Donot operate the dethatcheron suchslopes.
!
!
!
!
!
!
tC
CD
r-
6c
IT
-1-
z2r
C3
O3
O3
C_
o_,
co
O
d)
t-
o
co
o
(D
Thissymbolpointsout importantsafetyinstructionswhich,if not followed,couldendangerthe personalsafetyand/or propertyof yourself
andothers.Readandfollowallinstructionsin thismanualbeforeattemptingto operatethis machine.Failureto complywiththeseinstruc-
tionsmay resultin personalinjury.Whenyou seethis symbol,HEEDITSWARNING!
6
WARNING
This symbol points out important safety instructions
which, if not followed, could endanger the personal
safety and/or property of yourself and others. Readand
follow all instructions in this manualbefore attempting
to operatethis machine.Failureto comply with these
instructions mayresult in personal injury.When you see
this symbol HEED ITS WARNING!
Your Responsibility
Restrict the use of this power machineto persons who
read, understand,and follow the warnings and instruc-
tions in this manualand on the machine.
7
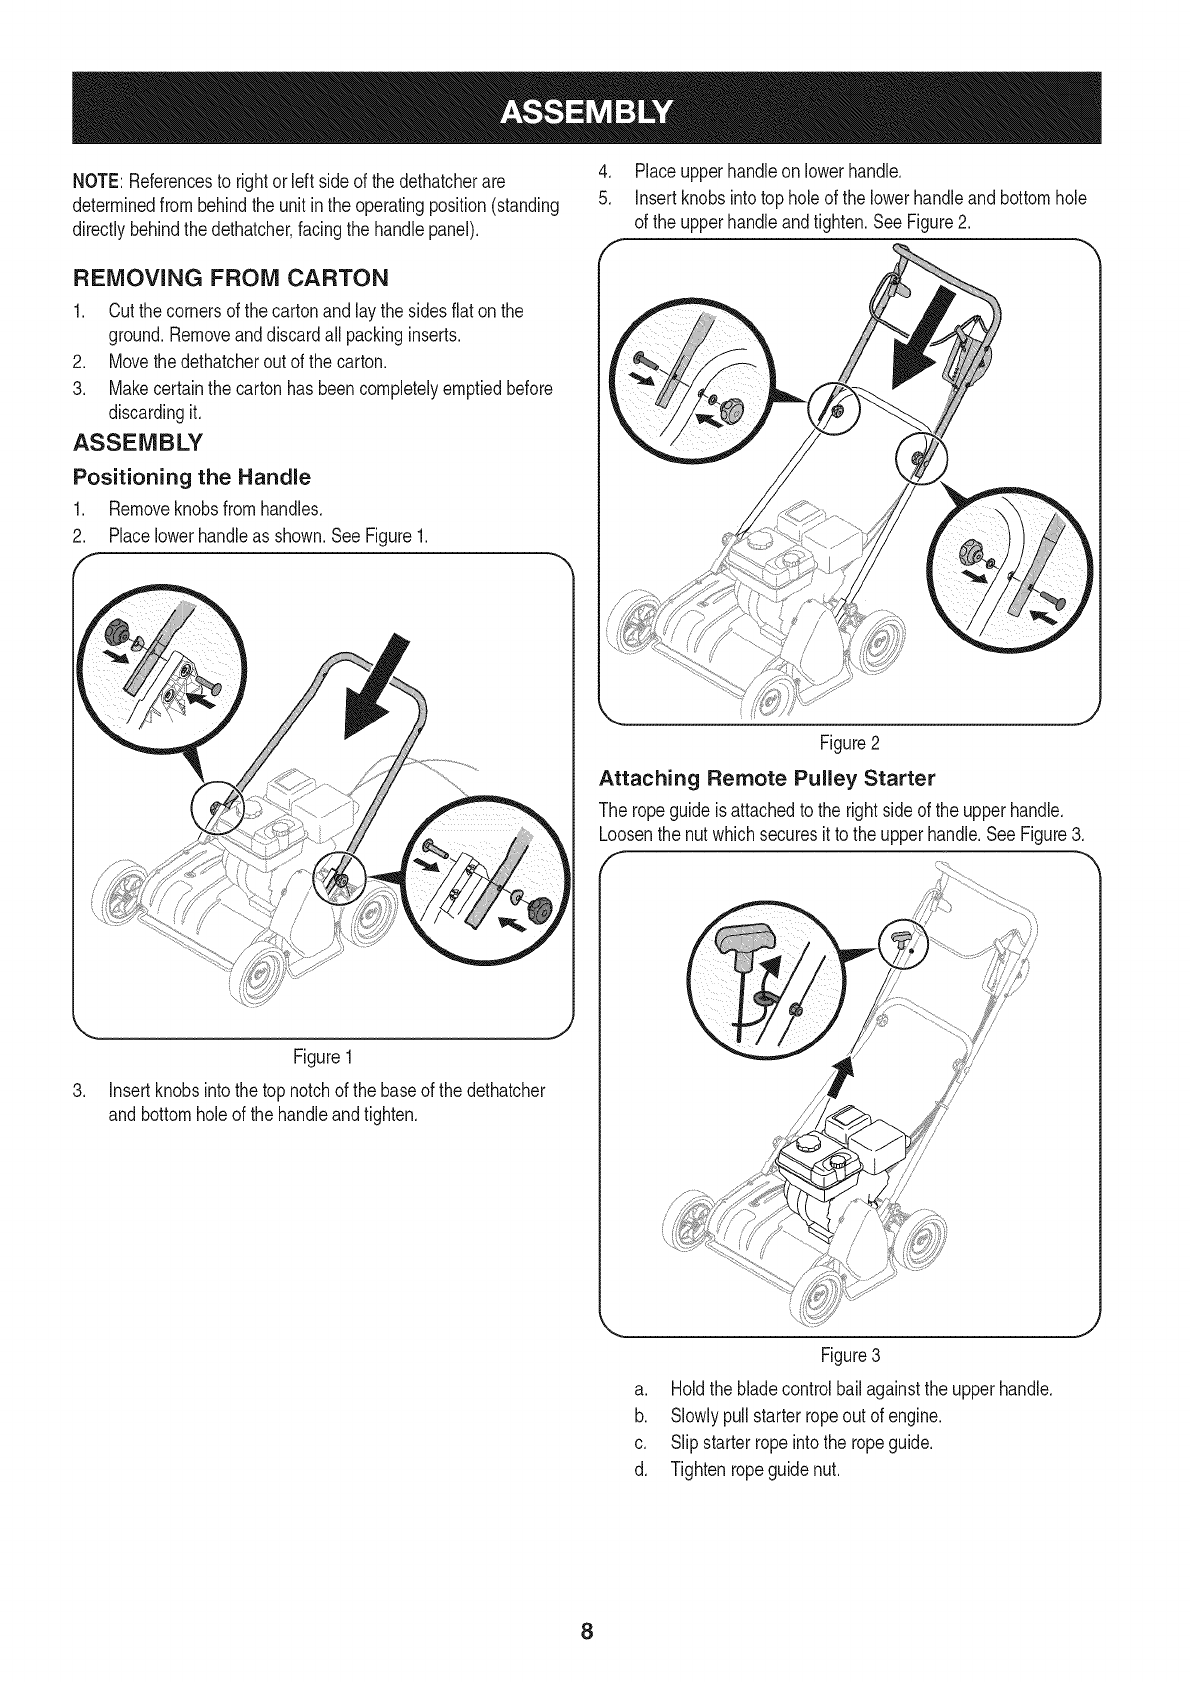
NOTE:Referencesto rightorleft sideof thedethatcherare
determinedfrom behindtheunit inthe operatingposition(standing
directlybehindthedethatcher,facingthe handlepanel).
REMOVING FROM CARTON
1. Cutthe cornersof the cartonandlay the sidesflat onthe
ground.Removeanddiscardall packinginserts.
2. Movethe dethatcherout of the carton.
3. Makecertainthe cartonhas beencompletelyemptiedbefore
discardingit.
ASSEMBLY
Positioning the Handle
1. Removeknobsfromhandles.
2. Placelowerhandleas shown.See Figure1.
4. Placeupperhandleon lowerhandle.
5. Insertknobsintotop holeof the lowerhandleand bottomhole
of the upperhandleandtighten.SeeFigure2.
Figure2
Attaching Remote Pulley Starter
The ropeguideisattachedto the rightsideof the upperhandle.
Loosenthe nut whichsecuresitto the upperhandle.SeeFigure3.
f
Figure1
Insertknobsintothe top notchof the baseof the dethatcher
andbottomholeof the handleandtighten.
Figure3
a. Holdthe bladecontrolbailagainstthe upperhandle.
b. Slowlypullstarterropeout of engine.
c. Slipstarterropeintothe ropeguide.
d. Tightenropeguidenut.
J
8
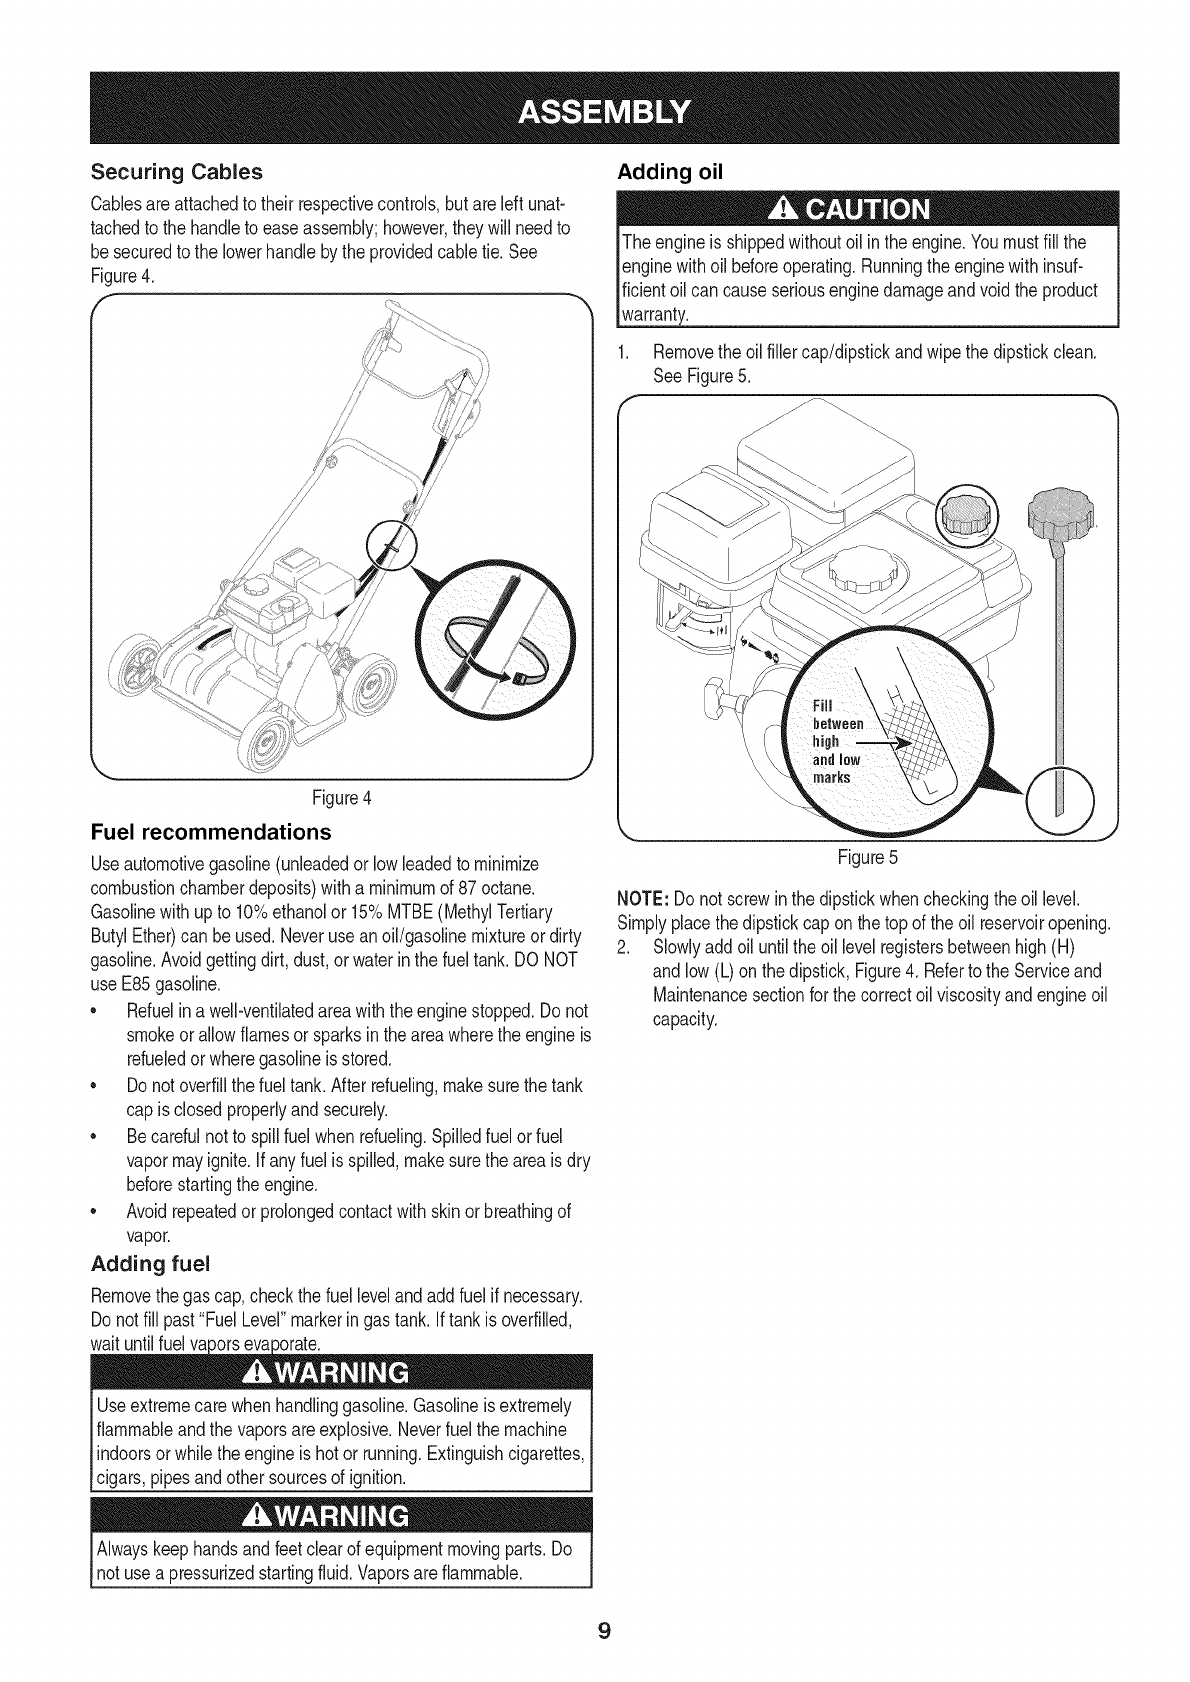
Securing Cables
Cablesareattachedto their respectivecontrols,but areleft unat-
tachedto the handleto easeassembly;however,theywill needto
besecuredto the lowerhandleby the providedcabletie. See
Figure4.
f
Figure4
Fuel recommendations
Useautomotivegasoline(unleadedor low leadedto minimize
combustionchamberdeposits)witha minimumof 87octane.
Gasolinewithupto 10%ethanolor 15%MTBE(MethylTertiary
ButylEther)can beused.Neverusean oil/gasolinemixtureordirty
gasoline.Avoidgettingdirt,dust, orwaterin the fueltank. DO NOT
use E85gasoline.
• Refuelina well-ventilatedareawiththe enginestopped.Donot
smokeor allowflamesor sparksinthe areawherethe engineis
refueledorwheregasolineis stored.
• Do notoverfillthe fuel tank.Afterrefueling,makesurethetank
cap is closedproperlyand securely.
• Becarefulnot to spill fuelwhen refueling.Spilledfuel or fuel
vapormayignite.Ifany fuel is spilled,makesurethe areais dry
beforestartingthe engine.
• Avoidrepeatedor prolongedcontactwithskinor breathingof
vapor.
Adding fuel
Removethegas cap,checkthefuel levelandaddfuel if necessary.
Do notfill past"Fuel Level"markeringas tank. Iftankis overfilled,
waituntilfuel va
Adding oil
Theengineis shippedwithoutoil in the engine.Youmustfill the
enginewithoil beforeoperating.Runningthe enginewithinsuf-
ficientoilcan causeseriousenginedamageandvoid the product
warranty.
1. Removetheoil fillercap/dipstickandwipethe dipstickclean.
SeeFigure5.
f
Figure5
NOTE: Donot screwinthe dipstickwhencheckingthe oil level.
Simplyplacethe dipstickcap onthe top of the oil reservoiropening.
2. Slowlyaddoil untilthe oil levelregistersbetweenhigh(H)
andlow (L)onthe dipstick,Figure4. Referto the Serviceand
Maintenancesectionfor the correctoil viscosityandengineoil
capacity.
Useextremecarewhen handlinggasoline.Gasolineis extremely
flammableandthe vaporsareexplosive.Neverfuel the machine
indoorsorwhilethe engineis hotor running.Extinguishcigarettes,
cigars,pipesandothersourcesof ignition.
Alwayskeephandsandfeetclearof equipmentmovingparts. Do
not usea pressurizedstartingfluid.Vaporsare flammable.
9

BailInterlock
ThrottleControl
/
Choke
Control
BladeControl
Oil Fill Bail
l RecoilStarter
Gasoline
Cap
HeightAdjustment
Lever
Figure6
CHOKE CONTROL
Activatingthe choke control closes the choke plate on carburetor
and aids instarting engine.
THROTTLE CONTROL
The throttle control is located on the engine, it regulates the speed
of the engine (Rabbit being the fastest, Turtlebeing the slowest) and
willshut off the engine when pushed to the STOP position.
RECOIL STARTER
The starterhandleis usedto start theengine,
GASOLINE CAP
Removethegas cap to addfuel.
OIL FILL
Engineoil levelcan be checkedandoiladdedthroughthe oilfill.
BLADE CONTROL BAIL
Locatedon the upperhandle,the bladecontrolhandleis usedto
engageanddisengagedriveto the cutting blades.Squeezethe
controlhandleagainstthe upperhandleto engagetheblades;
releaseit to disengage.
HEIGHT ADJUSTMENT LEVER
The heightadjustmentleverraisesand lowersthe cuttingblades.
Usethe 1-settingfor transportation,settings2through5 for
dethatching.Settings3, 4, and5 arenot neededuntilthe bladesare
too wornto beeffectiveon setting2. Optimumcuttingdepthis 1/8of
an inch.
BAIL INTERLOCK
The bailinterlocklocksthe bladecontrolhandleinplaceto prevent
unwantedengagingof the cuttingblades.
10
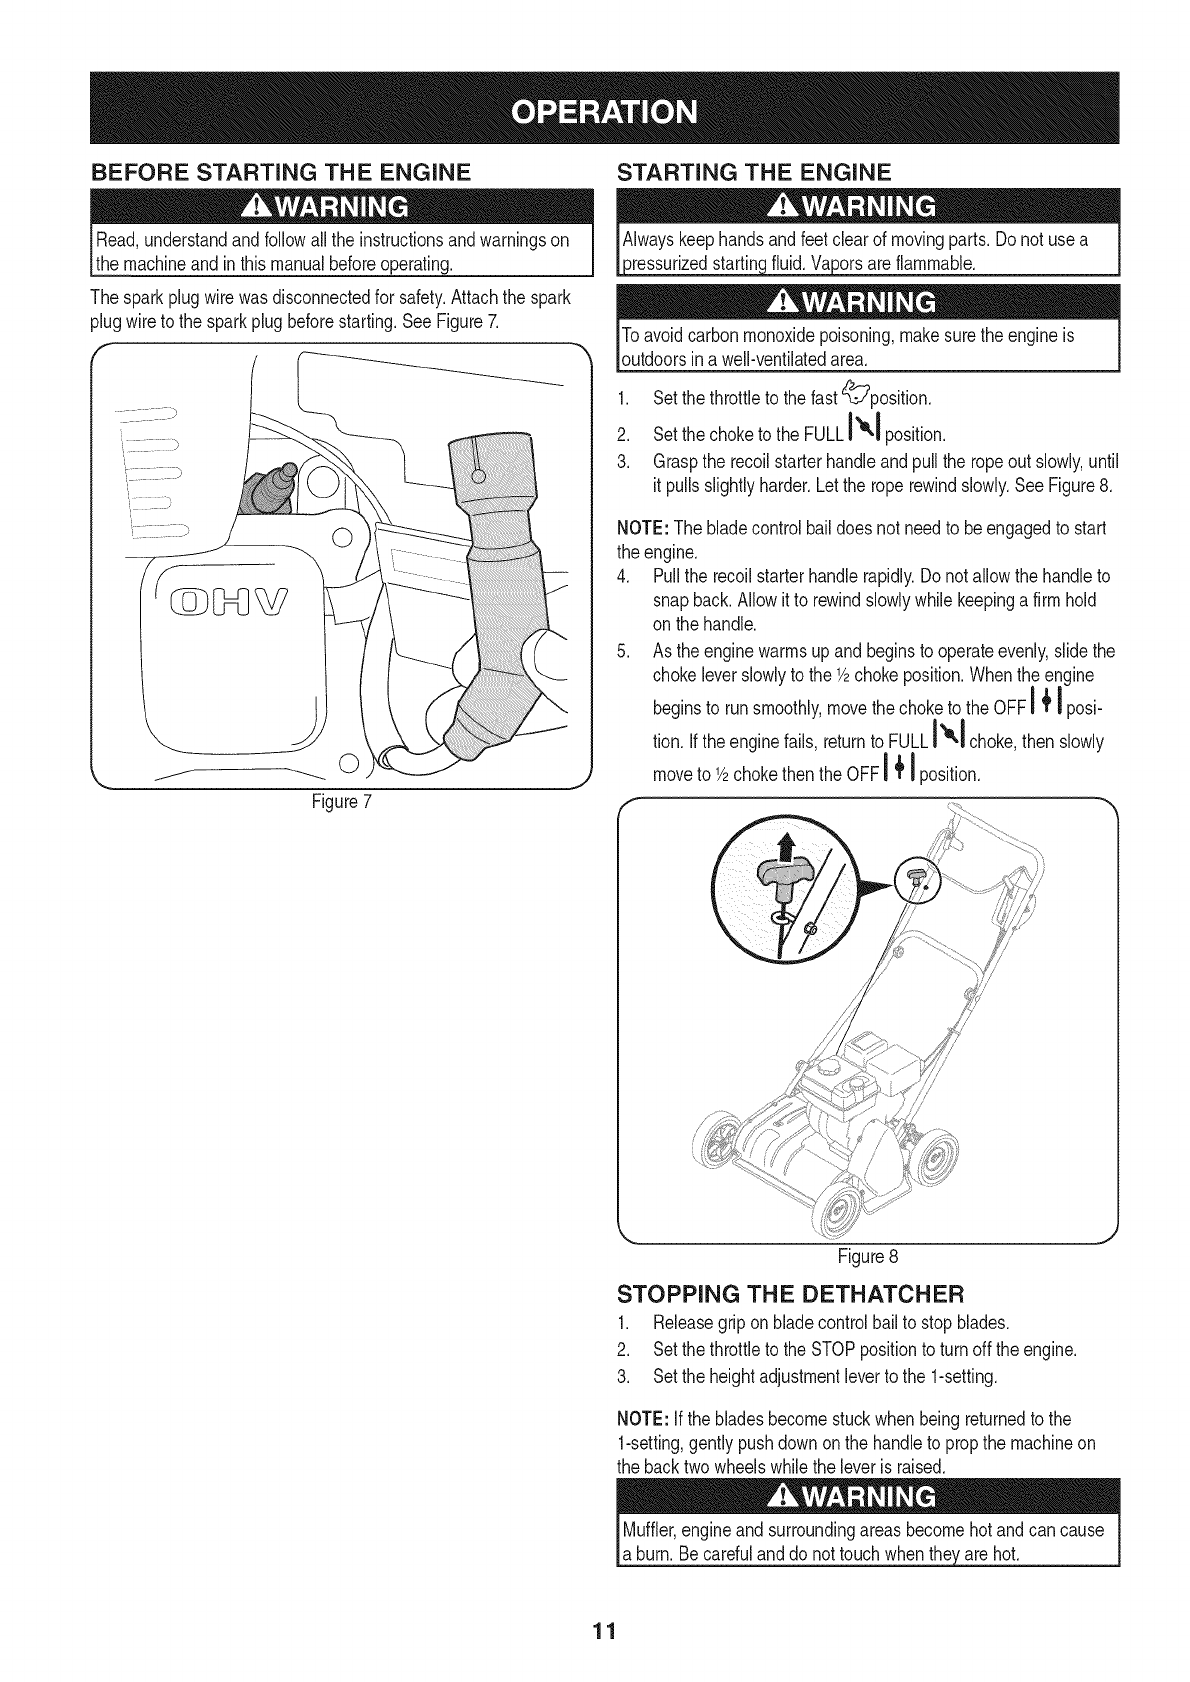
BEFORE STARTING THE ENGINE STARTING THE ENGINE
Read,understandandfollowallthe instructionsandwarningson
the machineandin thismanualbeforeoperating.
Thesparkplugwirewasdisconnectedfor safety.Attachthe spark
plugwireto the sparkplugbeforestarting.SeeFigure7.
O
Figure7
_ressurizedstartinc flammable.
Toavoidcarbonmonoxidepoisoning,makesurethe engineis
outdoorsin awell-ventilatedarea.
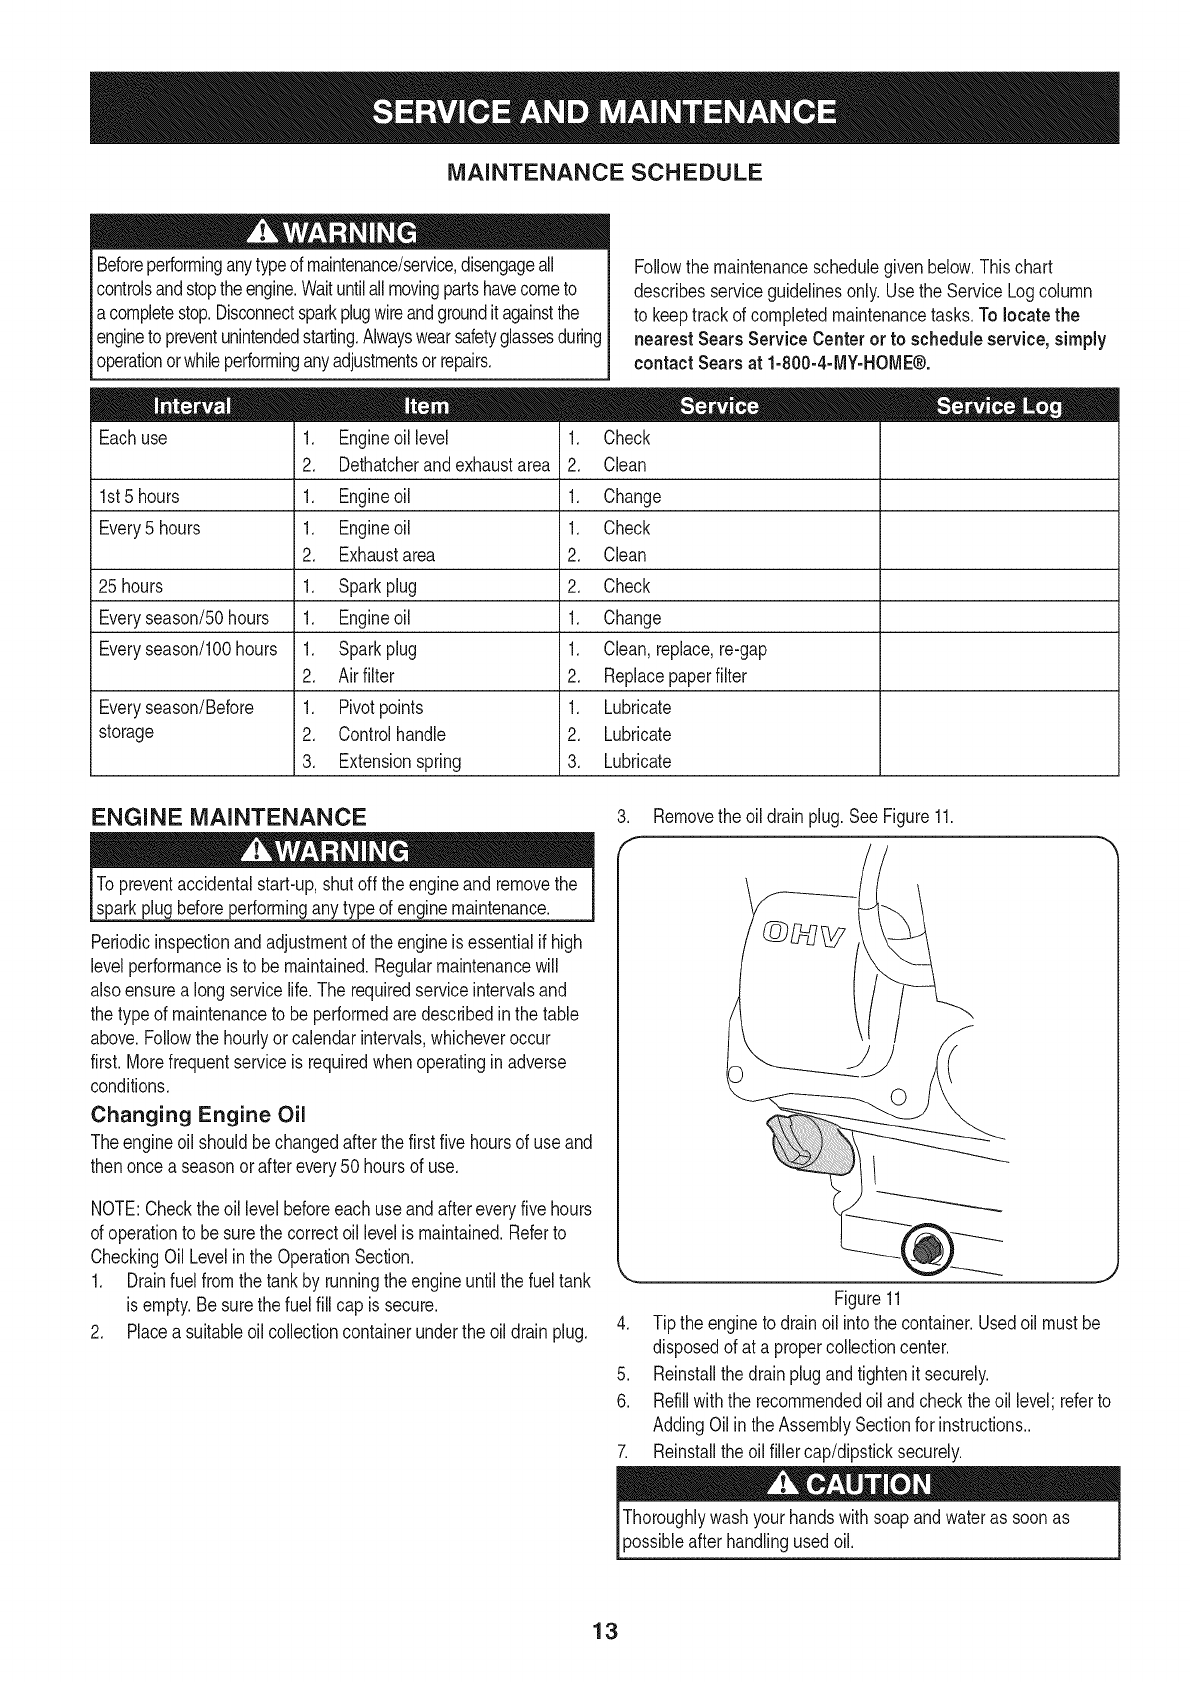
1. Set thethrottleto the fast_position.
2. Set thechoketo the FULLi'_"1 position.
3. Graspthe recoilstarterhandleandpullthe ropeoutslowly,until
it pullsslightlyharder.Letthe roperewindslowly.SeeFigure8.
NOTE:The bladecontrolbaildoesnot needto beengagedto start
the engine.
4. Pullthe recoilstarterhandlerapidly.Donot allowthe handleto
snapback.Allowit to rewindslowlywhilekeepinga firmhold
onthe handle.
5. As the enginewarmsup andbeginsto operateevenly,slidethe
chokeleverslowlyto the 1/2chokeposition.Whentheengine
I÷II
beginsto runsmoothly,movethe choketo the OFF_ _posi-
tion.If theenginefails, returnto FULLI_1 choke then slowly
m a
moveto 1/2chokethen the OFF_ _position.
/
j,
Figure8
STOPPING THE DETHATCHER
1. Releasegriponbladecontrolbailto stopblades.
2. Set thethrottleto the STOPpositionto turn off theengine.
3. Set theheightadjustmentleverto the 1-setting.
NOTE: Ifthe bladesbecomestuckwhenbeingreturnedto the
1-setting,gentlypushdownon the handleto propthe machineon
the backtwo wheelswhilethe leveris raised.
Muffler,engineand surroundingareas becomehot andcancause
a burn.Becarefulanddo nottouchwhenthey_arehot.
11

USING THE DETHATCHER
Dethatchthe lawnonce inthe springandonceinthe fall to clear
deadand/or dyinggrassfromthe lawn,and to allowmoreairto
flowthroughthe ground.Grassshouldbe 21/2incheshighwhen
dethatched.Afterdethatching,fertilizeandwaterthe lawnto encour-
agequickergrowth.
Besure lawnisclearof stones,sticks,wire,orother objectswhich
coulddamagedethatcheror engine.Suchobjectscouldbe ac-
cidentlythrownby the dethatcherin anydirectionandcauseserious
personalinjuryto the operatorandothers.
1. Releasebailinterlockandengagebladecontrolbailto start
blades.SeeFigure9.
.
Figure9
Setthe heightadjustmentleverto theappropriateslot;2 being
the highestsetting,5 beingthe lowest.Settings3, 4, and5
arenot neededuntilthe bladesare toowornto beeffectiveon
setting2. Optimumcuttingdepth is 1/8of aninch.SeeFigure10.
\
(
Figure10
• If dethatcherbecomesstuckduringuse,gentlypushdownon
handleto raisefrontwheels
•Do notdrive overdiscardedthatchas thiscreatesan uneven
cuttingheight
•Whendethatching,leaveapproximatelyeight inchesof soil be-
tweenthe first andseconddethatchingpaths;rakedethatched
grassfromfirst andsecondpaththen dethatchbetweenthe two
paths.
•Whenturning,pivotdethatcheronbacktwowheelswithblades
disengaged.
Do not makesharpturnswithcuttingbladesengaged.Thiswill
bendblades.
TRANSPORTING THE DETHATCHER
1. Setthe heightadjustmentleverto the 1-setting.
2. Pushto new location.
Do not setthe cuttingbladestoodeep; doingso will shortenthe life
of the bladedrivebelt.
12
MAINTENANCE SCHEDULE
Beforeperforminganytypeof maintenance/service,disengageall
controlsandstoptheengine.Waituntilallmovingpartshavecometo
acompletestop.Disconnectsparkplugwireandgrounditagainstthe
engineto preventunintendedstarting.Alwayswearsafetyglassesduring
operationorwhileperforminganyadjustmentsor repairs.
Eachuse 1. Engineoillevel
2. Dethatcherandexhaustarea
1st5 hours 1. Engineoil
Every5 hours 1. Engineoil
2. Exhaustarea
25 hours 1. Sparkplug
Everyseason/5Ohours 1. Engineoil
Everyseason/lOOhours 1. Sparkplug
2. Airfilter
Everyseason/Before 1. Pivotpoints
storage 2. Controlhandle
3. Extensionspring
Followthe maintenanceschedulegivenbelow.Thischart
describesserviceguidelinesonly.Usethe ServiceLogcolumn
to keeptrackof completedmaintenancetasks.To locate the
nearest Sears Service Centeror to scheduleservice,simply
contactSearsat 1-800-4-MY-HOME®,
1. Check
2. Clean
1. Change
1. Check
2. Clean
2. Check
1. Change
1. Clean,replace,re-gap
2. Replacepaperfilter
1. Lubricate
2. Lubricate
3. Lubricate
ENGINE MAINTENANCE
Topreventaccidentalstart-up,shutoffthe engineand removethe
sparkplugbeforeperforminganytypeof enginemaintenance.
Periodicinspectionandadjustmentof theengineisessentialifhigh
levelperformanceis to be maintained.Regularmaintenancewill
alsoensurea longservicelife.The requiredserviceintervalsand
the typeof maintenanceto beperformedaredescribedinthe table
above.Followthe hourlyor calendarintervals,whicheveroccur
first.Morefrequentserviceis requiredwhenoperatinginadverse
conditions.
Changing Engine Oil
Theengineoil shouldbechangedafterthe firstfive hoursof useand
thenonce aseasonor afterevery50 hoursof use.
NOTE:Checkthe oillevel beforeeachuse andaftereveryfivehours
of operationto besurethe correctoil levelismaintained.Referto
CheckingOil Levelinthe OperationSection.
1. Drainfuelfromthe tankby runningtheengineuntilthe fueltank
isempty.Besurethe fuel fill cap is secure.
2. Placea suitableoil collectioncontainerunderthe oildrainplug.
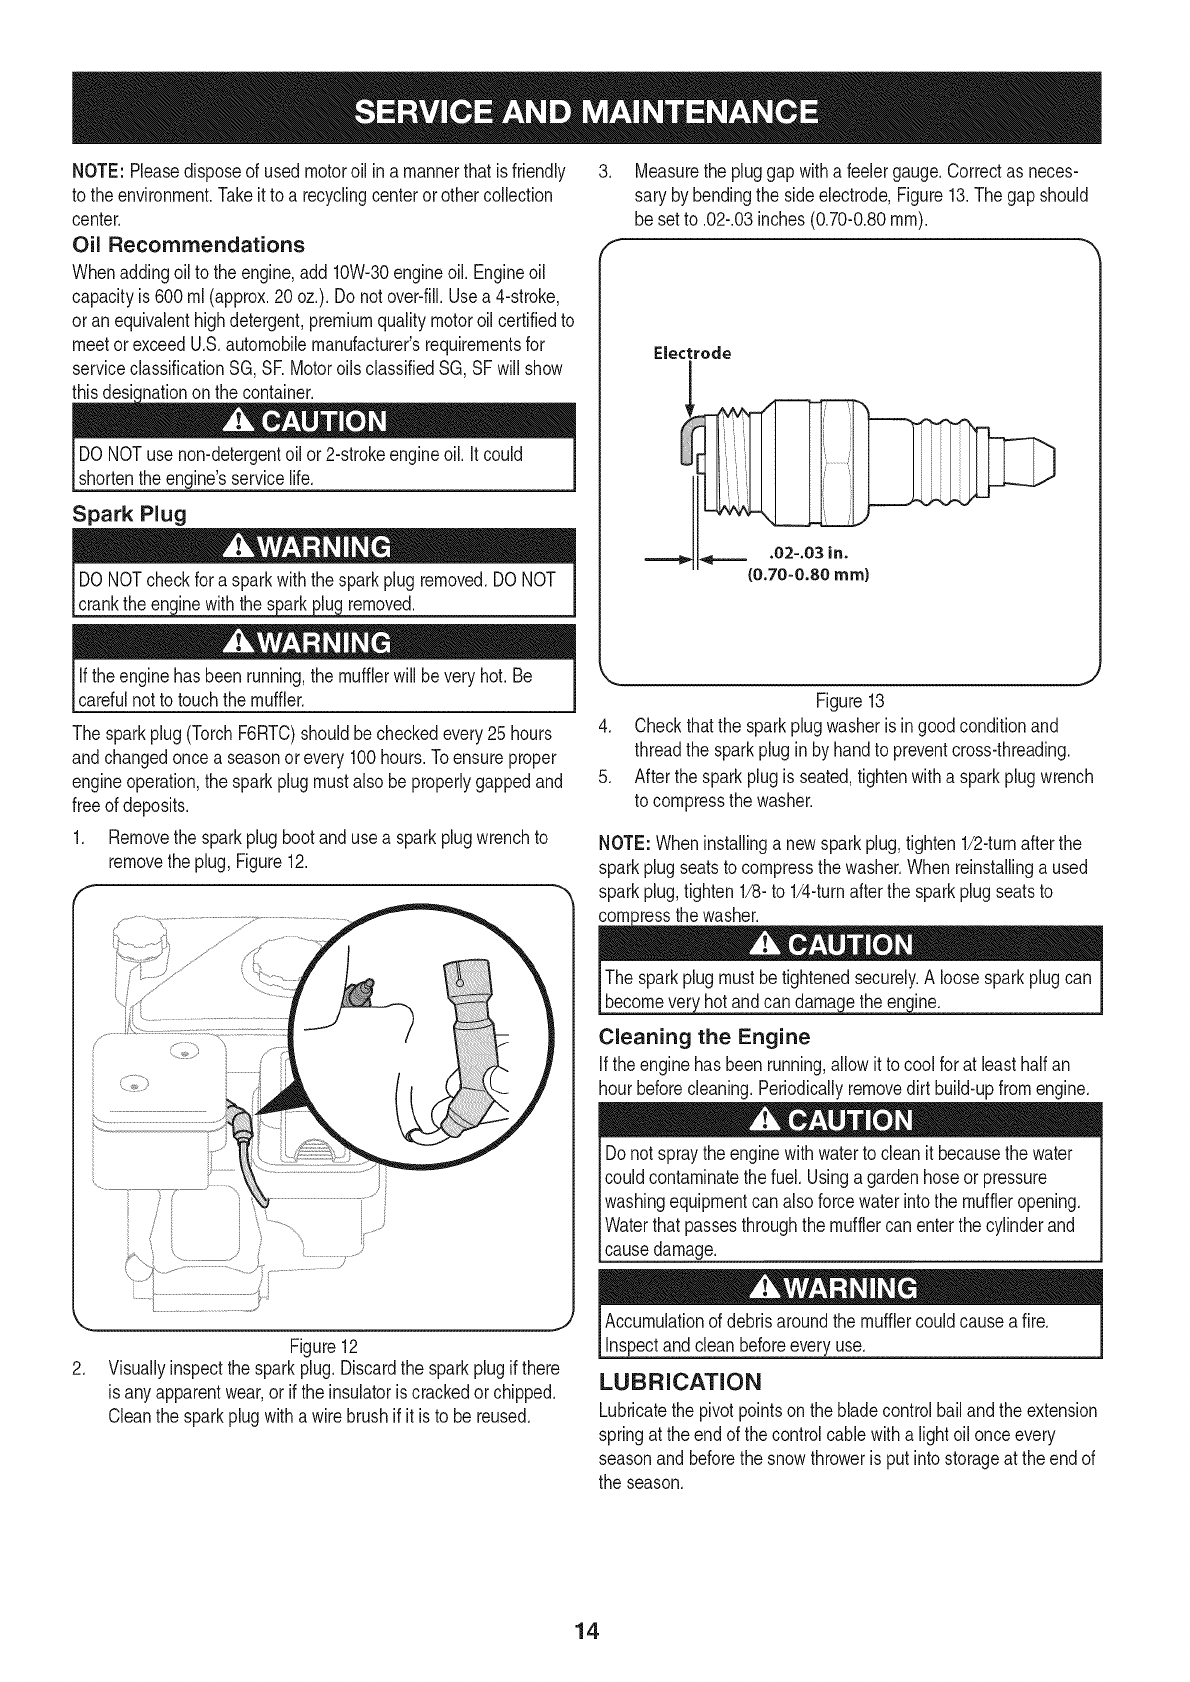
.Removetheoil drainplug.SeeFigure11.
J
Figure11
4. Tip the engineto drainoil intothe container.Usedoil mustbe
disposedof at a propercollectioncenter.
5. Reinstallthe drainplugandtightenit securely.
6. Refillwiththe recommendedoil andcheckthe oil level;referto
AddingOilinthe AssemblySectionfor instructions..
7. Reinstallthe oilfiller cap/dipsticksecurely.
)ossibleafterhandlingusedoil.
13
NOTE: Pleasedisposeof usedmotoroil ina mannerthat is friendly
to the environment.Takeit to a recyclingcenterorothercollection
center,
Oil Recommendations
Whenaddingoilto the engine,add10%30 engineoil. Engineoil
capacityis 600rnl(approx.20oz.). Do notover-fill.Usea 4-stroke,
oran equivalenthighdetergent,premiumqualitymotoroil certifiedto
meetor exceedU.S.automobilemanufacturer'srequirementsfor
serviceclassificationSG, SE MotoroilsclassifiedSG, SFwill show
thisdesknationon the container.
DO NOTuse non-detergentoil or2-strokeengineoil. Itcould
shortenthe engine'sservicelife.
Spark Plug
crankthe en(!mewiththe removed.
If theenginehasbeenrunning,the mufflerwill be veryhot.Be
carefulnotto touchthe muffler.
The sparkplug(TorchF6RTC)shouldbecheckedevery25 hours
andchangedoncea seasonorevery 100hours.Toensureproper
engineoperation,the sparkplugmustalso beproperlygappedand
freeof deposits.
1. Removethe sparkplugbootanduse a sparkplugwrenchto
removethe plug, Figure12.
,
Figure12
Visuallyinspectthe sparkplug.Discardthe sparkplugif there
is any apparentwear,or if the insulatoriscrackedorchipped.
Cleanthe sparkplugwith a wirebrushif it is to be reused.
3. Measurethe pluggapwitha feelergauge.Correctas neces-
saryby bendingthe sideelectrode,Figure13.The gapshould
be setto .02-.03inches(0.70-0.80turn).
Electrode
_==== .02-.03 in.
(0.70-0.80 ram)
Figure13
4. Checkthatthe sparkplugwasheris ingoodconditionand
threadthe sparkplugin byhandto preventcross-threading.
5. Afterthe sparkplugis seated,tightenwitha sparkplugwrench
to compressthe washer.
NOTE:Wheninstallinga newsparkplug,tighten1/2-turnafterthe
sparkplugseatsto compressthe washer.Whenreinstallinga used
sparkplug,tighten1/8-to 1/4-turnafterthe sparkplugseatsto
)tess the washer.
The sparkplugmustbetightenedsecurely.A loosesparkplugcan
becomever hotandcan darna e the en ine.
Cleaning the Engine
If theenginehasbeenrunning,allowit tocool for at leasthalfan
hourbeforecleaning.Periodicallyremovedirt build-upfromengine.
Do not spraythe enginewithwaterto cleanit becausethe water
couldcontaminatethe fuel.Usinga gardenhoseor pressure
washingequipmentcan alsoforcewaterinto the muffleropening.
Waterthatpassesthroughthemufflercan enterthecylinderand
causedamage.
Accumulationof debrisaroundthe mufflercouldcauseafire.
Inspectandcleanbeforeeveryuse.
LUBRICATION
Lubricatethe pivotpointsonthe bladecontrolbailandthe extension
springat the endof thecontrolcablewitha lightoil onceevery
seasonandbeforethe snowthroweris putinto storageat the endof
the season.
14
ADJUSTMENTS
Blade Cutting Height
Thedethatcherisdesignedto cut1/8of an inchintothe ground.At
the beginningof the productlife usethe 2-setting.As the blades
wearit will be necessaryto increasethe depthof the cuttingblades
by usingthe3, 4, and5 settings.
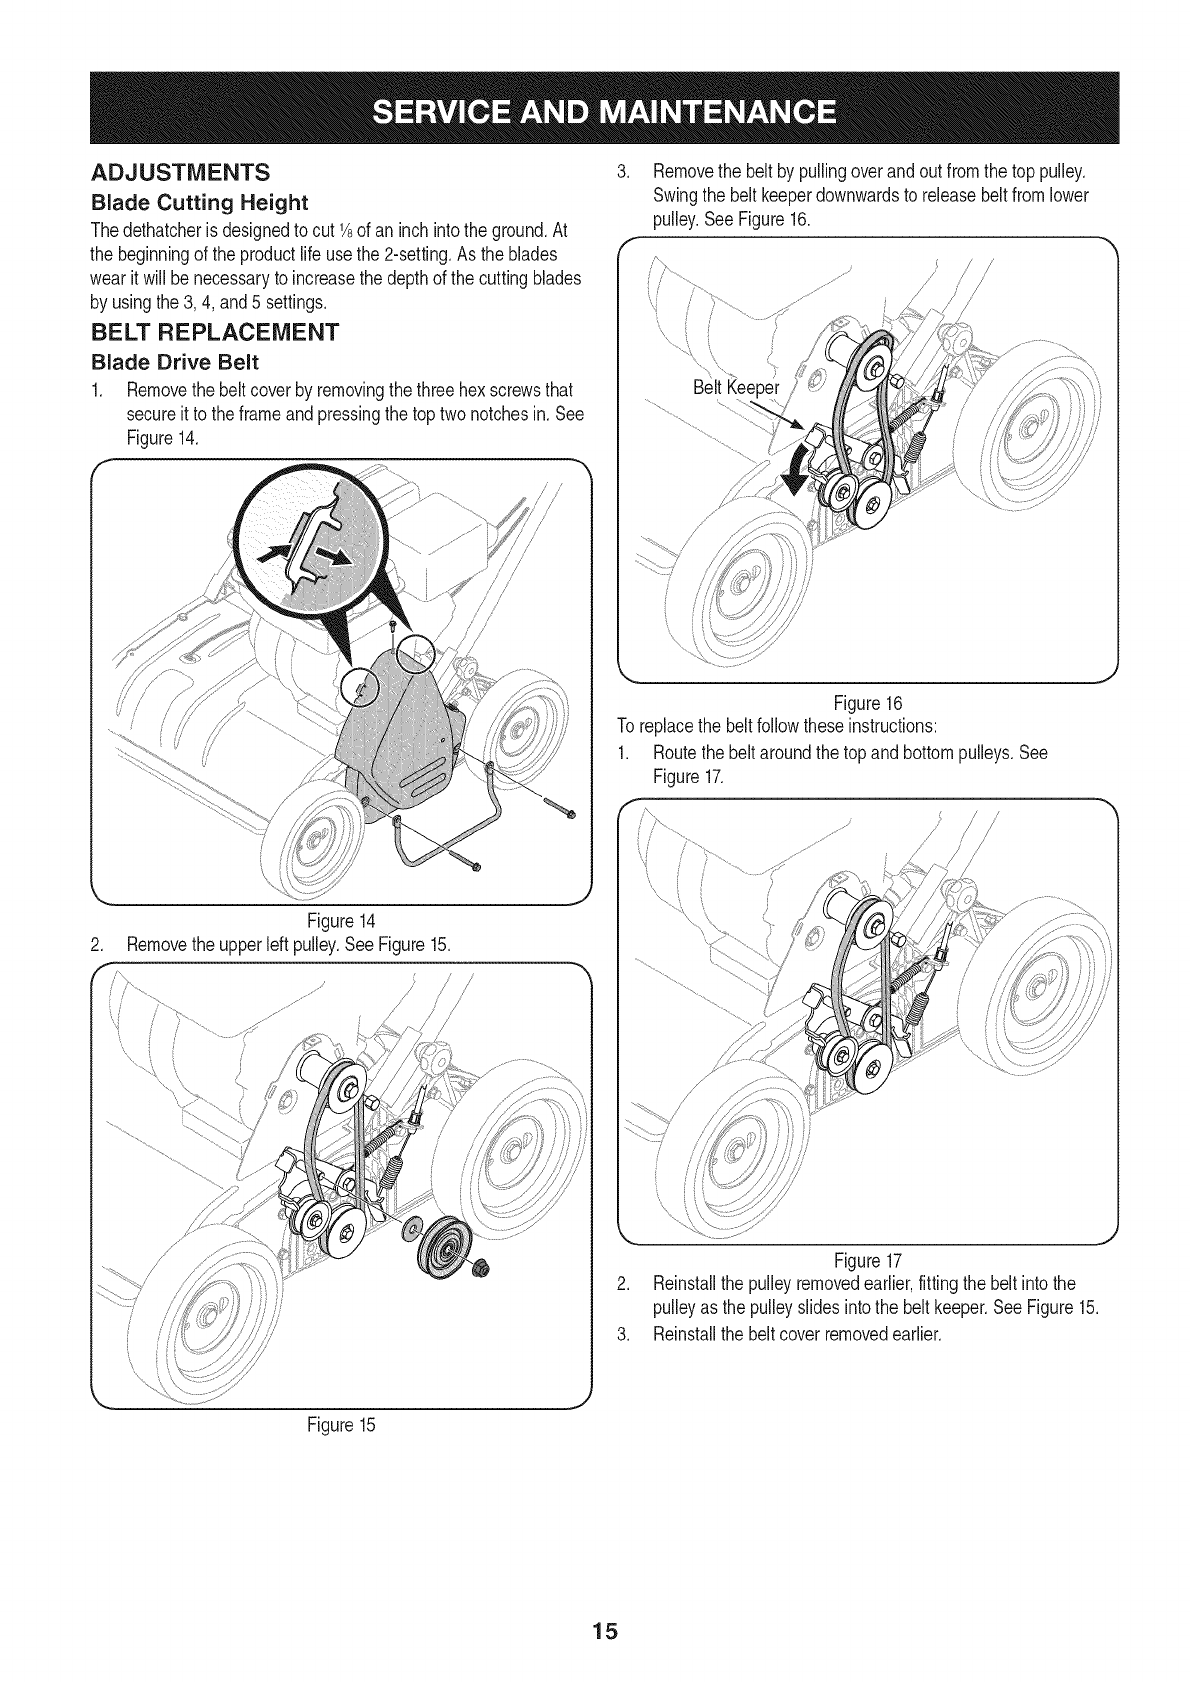
BELT REPLACEMENT
Blade Drive Belt
1. Removethebelt coverby removingthe threehex screwsthat
secureit to the frameandpressingthe top twonotchesin. See
Figure14.
.Removethe beltby pullingoverandout fromthetop pulley.
Swingthe beltkeeperdownwardsto releasebeltfromlower
pulley.SeeFigure16.
/
/
i
\/
BeltKeeper
.
Figure14
Removetheupperleftpulley.SeeFigure15.
Figure15
Figure16
Toreplacethe beltfollowtheseinstructions:
1. Routethe beltaroundthetop andbottompulleys.See
Figure17.
Figure17
2. Reinstallthe pulleyremovedearlier,fittingthe beltinto the
pulleyas the pulleyslidesintothe belt keeper.SeeFigure15.
3. Reinstallthe beltcoverremovedearlier.
15
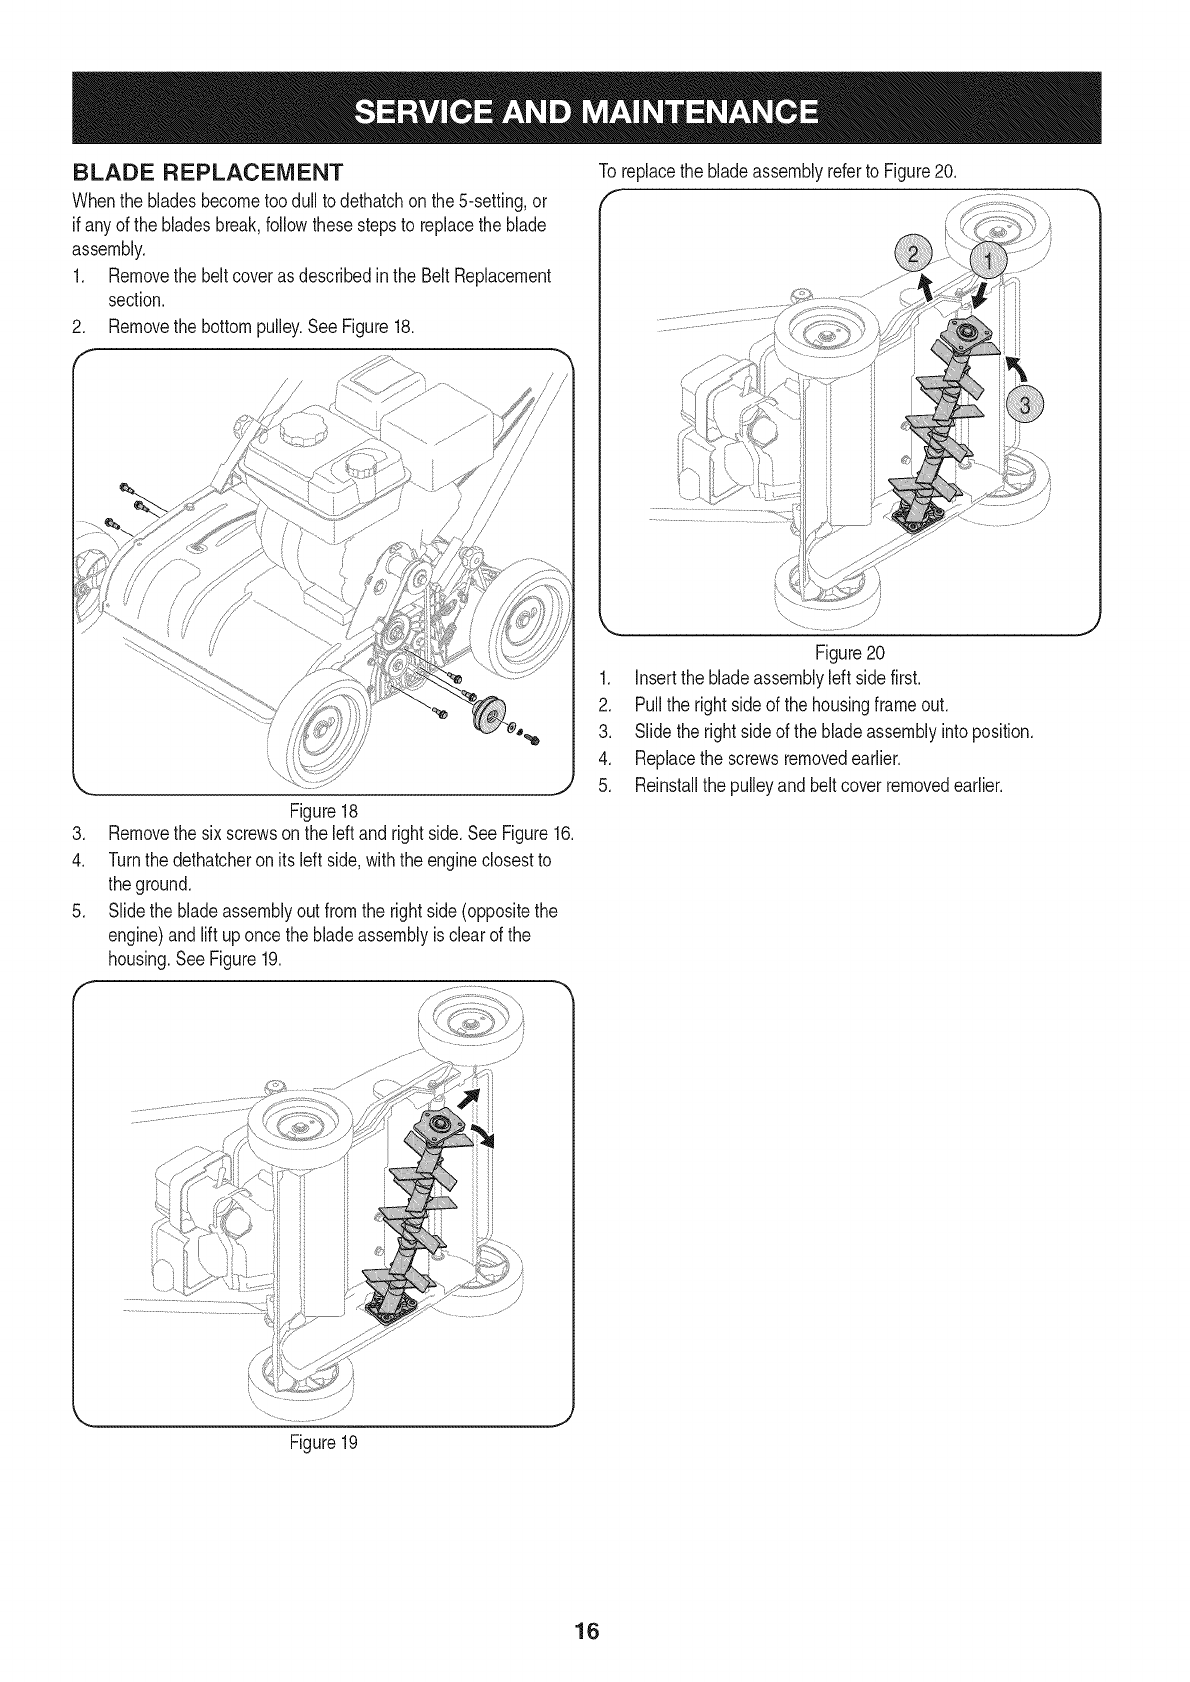
BLADE REPLACEMENT
Whenthe bladesbecometoodull to dethatchonthe 5-setting,or
if any of the bladesbreak,followthesestepsto replacethe blade
assembly.
1. Removethe beltcoveras describedinthe Belt Replacement
section.
2. Removethe bottompulley.SeeFigure18.
To replacethe bladeassemblyreferto Figure20.
.
4.
.
Figure18
Removethe sixscrewson the leftand rightside.SeeFigure16.
Turnthe dethatcheron its leftside,withthe engineclosestto
theground.
Slidethe bladeassemblyout fromthe rightside (oppositethe
engine)andlift uponcethe bladeassemblyis clearof the
housing.SeeFigure19.
Figure20
1. Insertthe bladeassemblyleftside first.
2. Pullthe rightside of the housingframeout.
3. Slidethe rightsideof the bladeassemblyinto position.
4. Replacethe screwsremovedearlier.
5. Reinstallthe pulleyand beltcoverremovedearlier.
Figure19
J
16
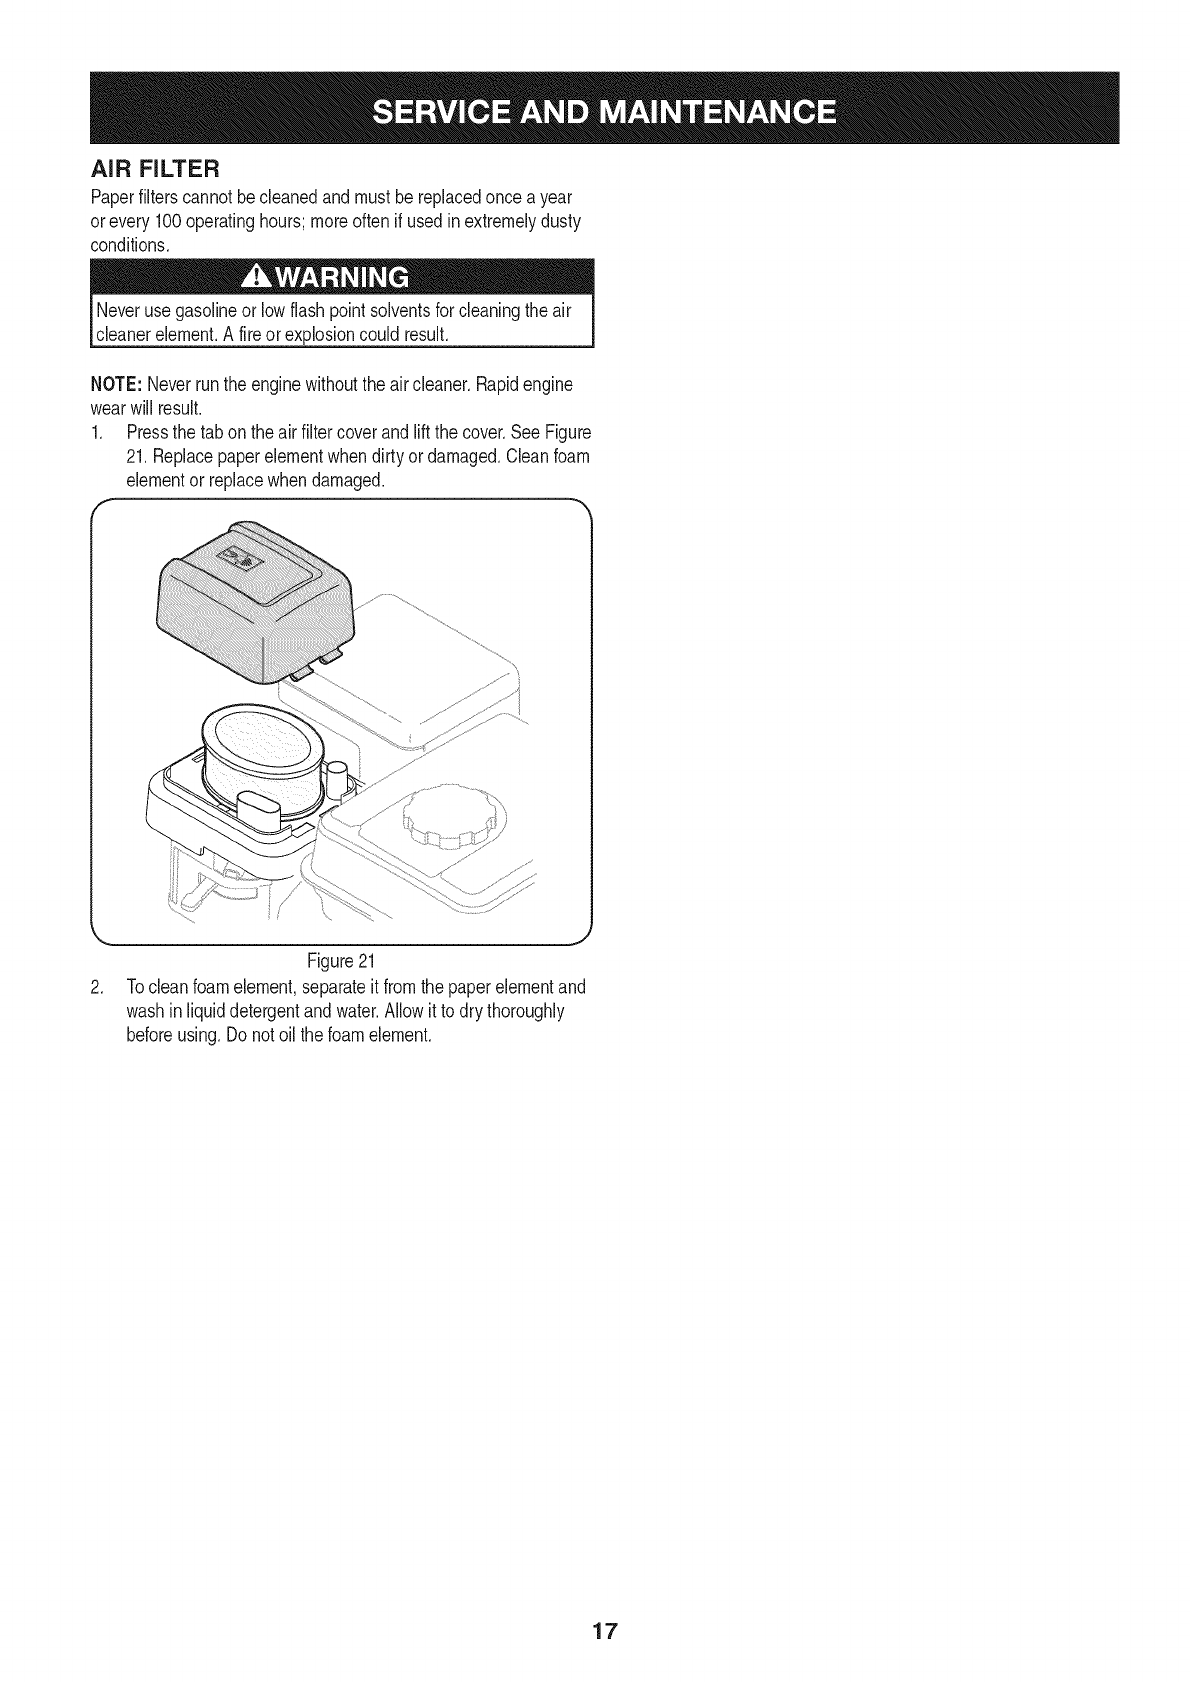
AiR FILTER
Paperfilterscannotbecleanedandmustbe replacedonce a year
orevery 100operatinghours;moreoftenif usedin extremelydusty
conditions.
Neverusegasolineor low flashpointsolventsfor cleaningthe air
cleanerelement.A fireor explosioncould result.
NOTE: Neverrunthe enginewithoutthe aircleaner.Rapidengine
wearwill result.
1. Pressthe tab onthe airfiltercoverand liftthe cover.SeeFigure
21.Replacepaperelementwhen dirtyordamaged.Cleanfoam
elementor replacewhen damaged.
f
Figure21
2. Tocleanfoamelement,separateit fromthe paperelementand
washin liquiddetergentandwater.Allowit to dry thoroughly
beforeusing.Do notoil thefoamelement.
17
Ifthe dethatcherwill notbe usedfor30 daysorlonger,the equipmentneedsto be storedproperly.Followstorageinstructionsbelowto
ensuretop performancefromthe dethatcherfor manymoreyears.
PREPARING THE ENGINE
Enginesstoredover30daysneedto bedrainedof fuel to prevent
deteriorationandgumfrom forminginthe fuel systemor onessential
carburetorparts.If thegasolineinyourenginedeterioratesduring
storage,youmayneedto havethe carburetor,andotherfuel system
components,servicedor replaced.
1. Removeall fuel fromthe tankby runningtheengineuntilit
stops.
2. Changethe engineoil.
3. Removethe sparkplugandpourapproximately1oz.(30 ml)of
cleanengineoil intothe cylinder.Pullthe recoilstarterseveral
timesto distributethe oil,and reinstallthe sparkplug.
4. Cleandebrisfromaroundthe engine,and under,around,and
behindthe muffler.Applya light filmof oilon anyareasthatare
susceptibleto rust.
5. Storeina clean,dry andwellventilatedareaawayfromany
appliancethatoperateswitha flameor pilot light,suchas a
furnace,waterheateror clothesdryer.Avoidany areawith
a sparkproducingelectricmotor,orwherepowertoolsare
operated.
6. if possible,avoidstorageareaswithhighhumidity.
7. Keepthe enginelevelin storage.Tiltingthe engine can cause
fuelor oil leakage.
PREPARING DETHATCHER
Ifthe dethatcherwill not beusedfor 30 daysor longer,followthe
instructionsbelow.
1. Storethe equipmentin aclean,dry area.
2. Ifstoringthe dethatcherin an unventilatedarea,rustproofthe
metalpartsof the machinewitha lightoil or siliconecoating.
3. Cleanthe exteriorof the engineandthedethatcher.
18
Beforeperforminganytypeofmaintenance/service,disengageallcontrolsandstoptheengine.Waituntilall
movingpartshavecometoacompletestop.Disconnectsparkplugwireandgroundit againsttheengineto prevent
unintendedstarting.Alwayswearsafetyglassesduringoperationorwhileperforminganyadjustmentsorrepairs.
This sectionaddresses minorserviceissues.Tolocate the nearestSears Service Centeror to scheduleservice,simplycontact
Searsat 1-800-4-MY-HOME®.
Enginefailsto start
Enginerunserratically
1. Fueltankempty,or stalefuel.
2. Blockedfuel line.
3. Sparkplugwire disconnected.
4. Faultysparkplug.
1. Enginerunningon choke.
2. Fuellineblocked,or stalefuel.
3. Wateror dirt in fuel system.
4. Carburetorout of adjustment.
Engineoverheats 1. Carburetorout of adjustment.
Lossof power 1. Sparkplugwire loose.
2. Ventingas cap plugged.
Excessivevibration 1. Loosepartsor damagedblades
1. Filltankwithcleanfreshgasoline.
2. Cleanfuel line.
3. Connectwireto sparkplug.
4. Cleansparkplug, readjustgap,or replace.
1. Movechokeleverto OFFposition.
2. Cleanfuel lineandfill tankwithfresh,clean
gasoline.
3. Drainfueltank. Refillwithfreshfuel.
4. ContactaSearsServiceCenter.
1. ContactaSearsServiceCenter.
1. Firmlyconnectsparkplugwire.
2. Clearvent.
1. Stopengineimmediatelyanddisconnectspark
plugwire.Checkfor possibledamage.Tighten
allboltsandnuts. Repairas needed.If problem
persists,takedethatcherto a SearsService
Dealer.
NEED MORE HELP?
Find this and all your other product manuals online.
Get answers from our team of home experts.
Get a personalized maintenance plan for your home.
Find information and tools to help with home projects.
b_emg}_t te _;em by Sea_s
19
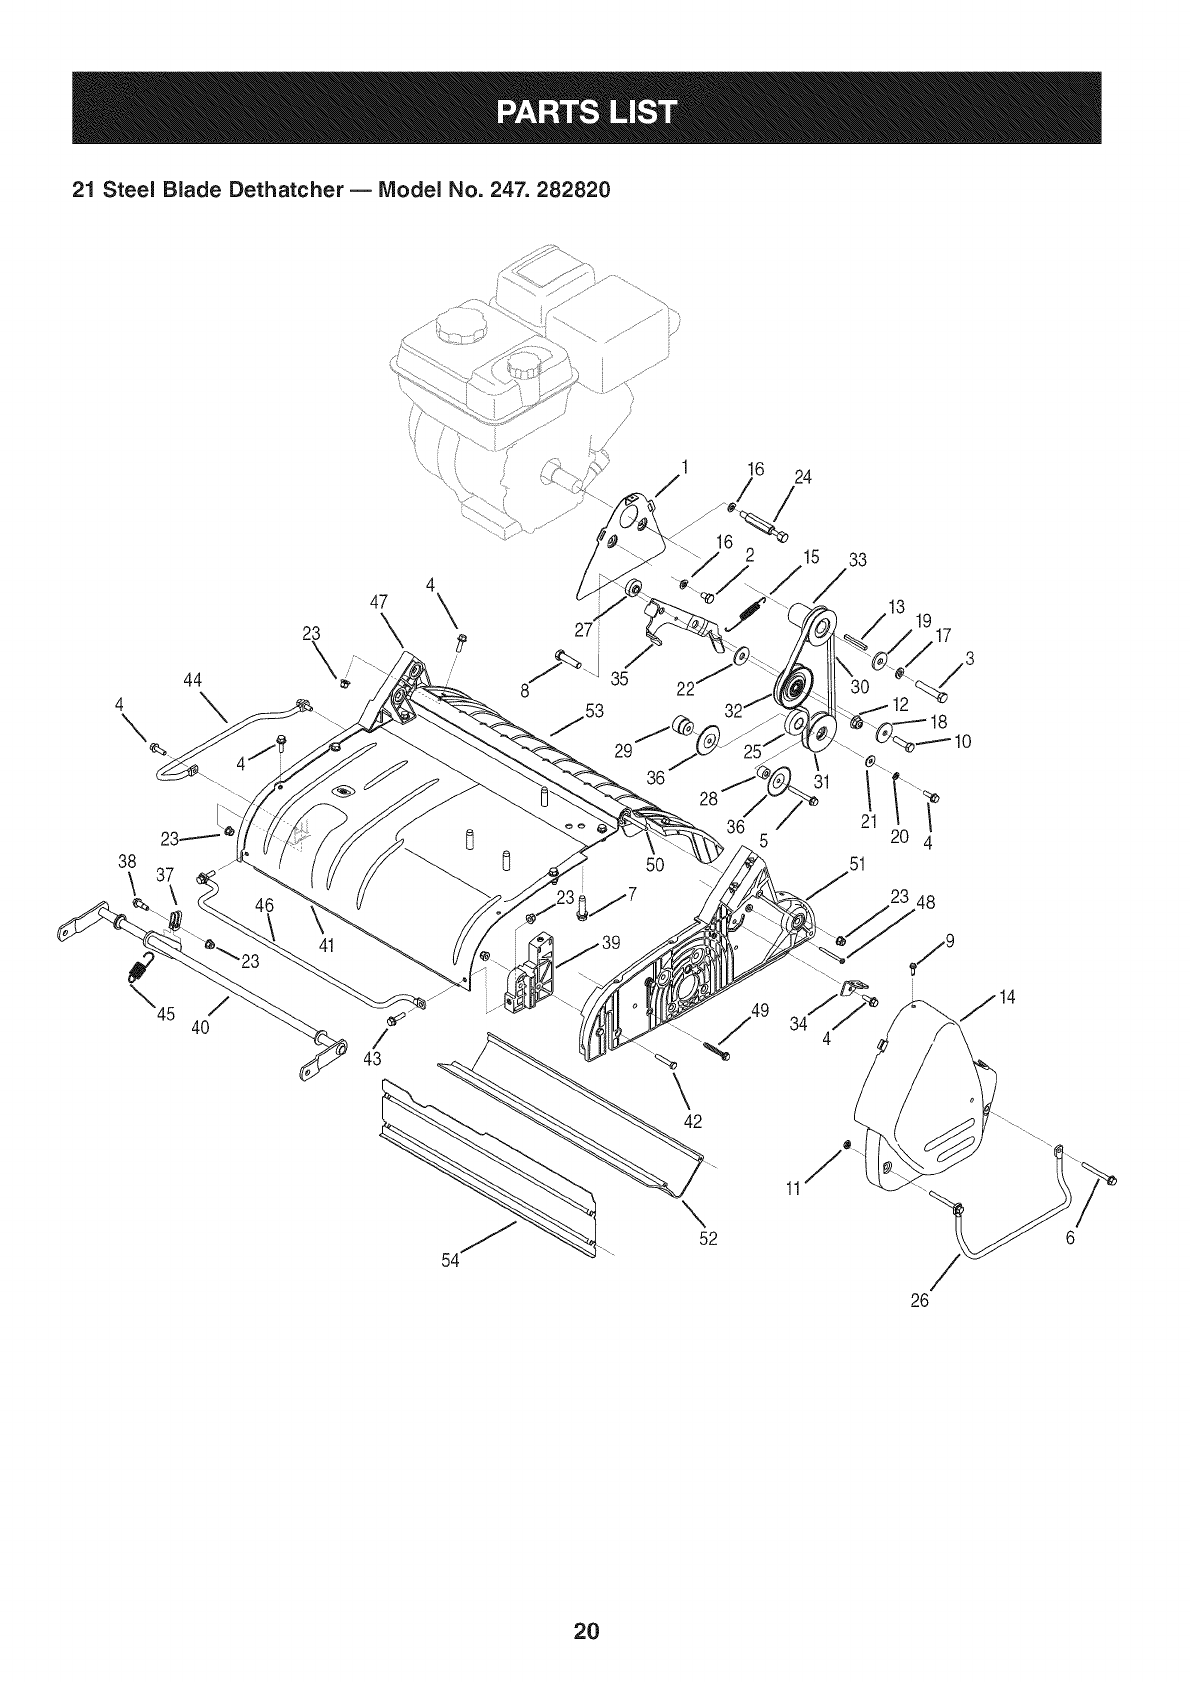
21 Steel Blade Dethatcher _ Model No. 247. 282820
44
4 \
\
23
41
4
47
\ \
/
43
/
35
29
1 16 24
//
22
36
50
2 15 33
/
21
51
19
20 4
23 48
17
/3
54
42
\52
/
11
26
2O

21 Steel Blade Dethatcher _ IViodel No. 247. 282820
D = O O
681-04035-0637 PulleyGuardAssembly
2 710-0107 HexScrew,5/16- 24
3 710-0151 HexScrew,3/8- 24
4 710-04189 Screw,M6- 1x 20.0
5 710-04192 Screw,M6- 1
6 710-04866 Screw,M6- 1
7 710-0502A SeresScrew,3/8- 16
8 710-0520 HexScrew,3/8- 16
9 710-1237 Screw,.625
10 710-1683 HexScrew,M8- 1.25
11 912-0298 JamNut, 1/4- 20
12 712-04065 FlangeLockNut,3/8- 16
13 914-04029 SquareKey,3/16 x 1.75
14 731-05123 PulleyCover
15 732-04224 ExternalSpring
16 936-0119 LockWasher,5/16
17 936-0169 LockWasher,3/8
18 736-0343 FiatWasher,.330x 1.25x .120
19 736-04005 FiatWasher,.395x 1.12x .14
20 736-0648 LockWasher
21 736-0685 FiatWasher,6.4 ID
22 736-0702 FiatWasher,10.5ID
23 712-0713 FlangeLockNut
24 738-04114A Belt RetainerScrew
25 941-0124 BallBearing
26 747-05100 BumperSide
27 750-04233A idlerSpacer
D = O Q
750-04391 BearingSpacer,6.6x 16.7x 11.6
29 750-04394 idlerSpacer,6.5 x 22.3 x 23
30 954-04028 V Belt
31 756-04112A Pulley
32 756-04133 Pulley,2 x 2.75x .625
33 756-04275 Pulley,.75 IDx 2.14
34 781-04053 CableBracketMount
35 781-04089 idlerArm
36 781-04096 WasherBearing
37 781-04064
38 738-04079
39 681-04014A
40 981-04105
41 781-04263-0721
42 710-04197
43 710-04865
44 747-05098-0637
CableRetainerBracket
ShoulderSpacer,7.13x 11.50
WheelCradleBracketAssembly
HeightadjustmentBracketAssembly
Frame
Screw,M6-1x 35.0
Screw,M6- 1x 25.0
RightHandBumperSide
45 732-04518 ExternalSpring,17.6mmx 54.0ram
46 747-05097-0637FrontBumper
47 681-04162 RightHandFrameAssembly
48 710-04384 TapScrew
49 710-1026 Screw,1/4 -20
50 711-04204A DeflectorMountedRod
51 681-04161 LeftHandFrameAssembly
52 731-05049 RearBaffle
53 731-06907 Deflector
54 781-04051A-0637Baffle
21
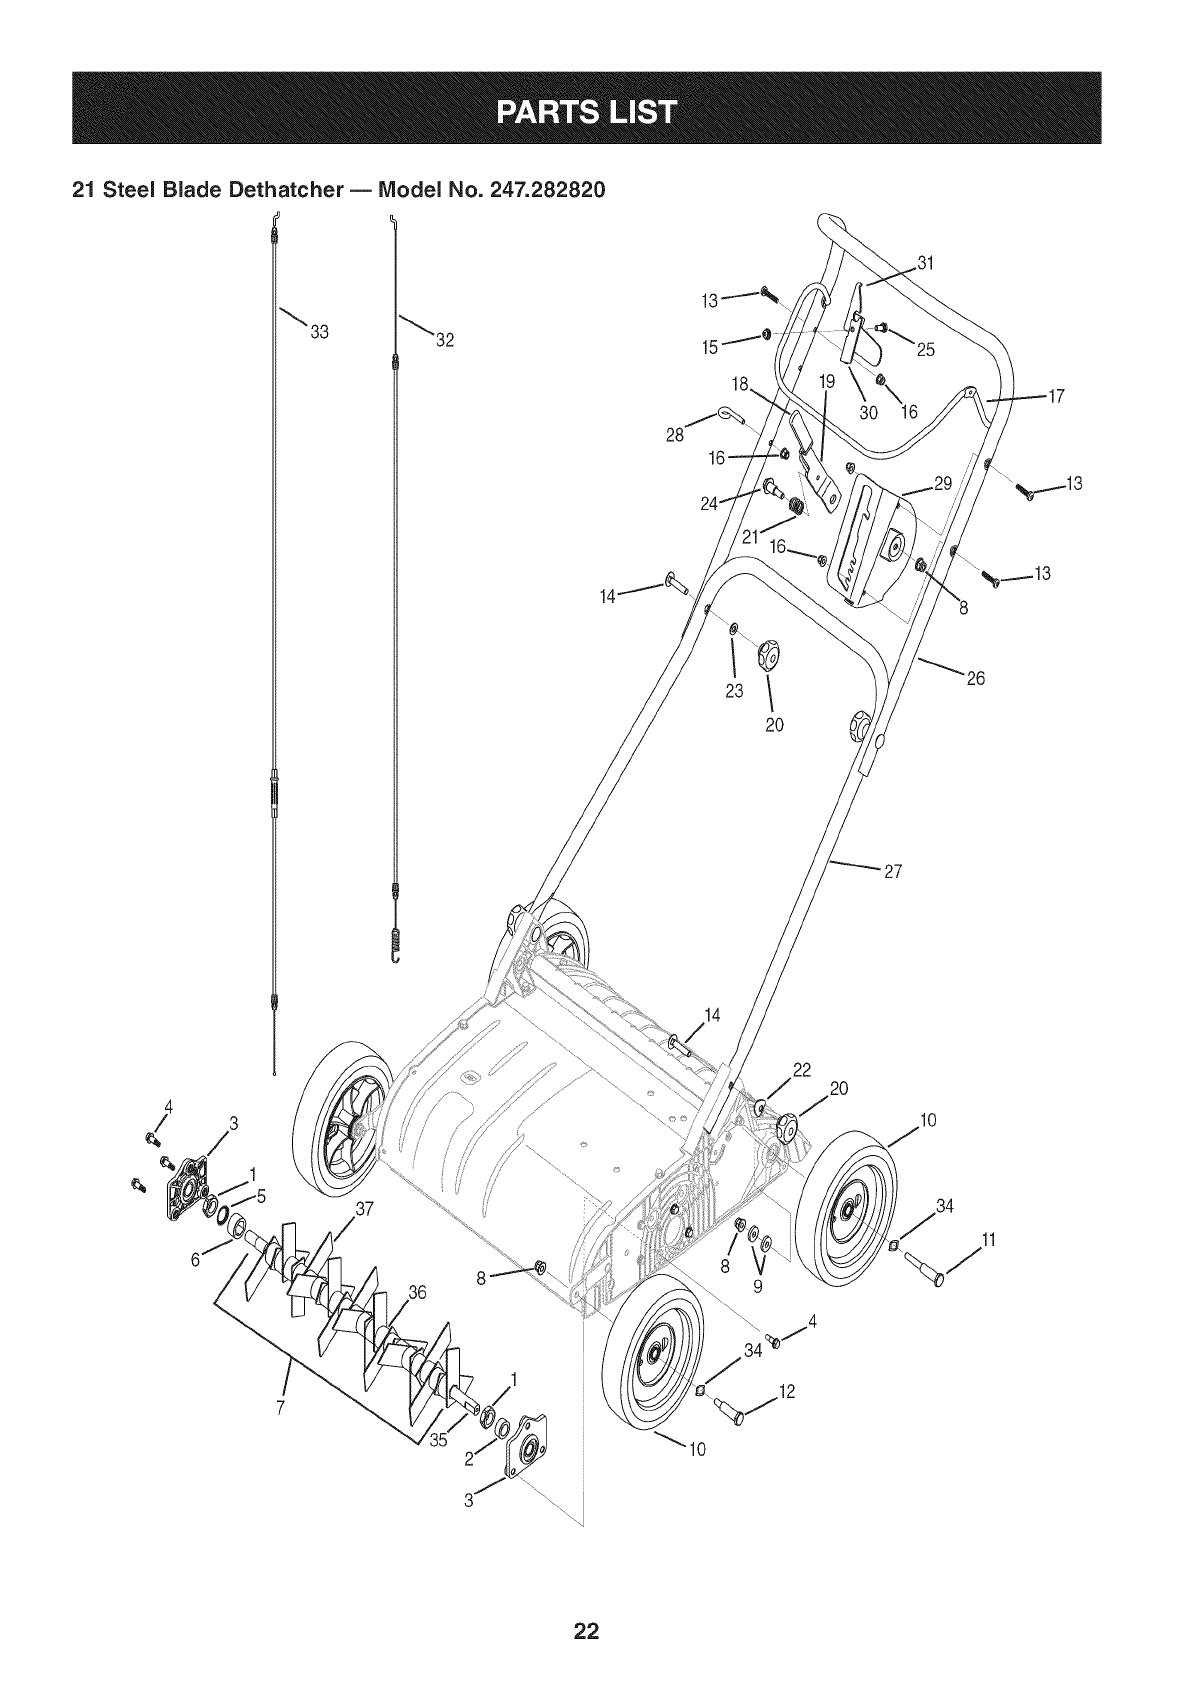
21 Steel Blade Dethatcher _ IViodel No. 247.282820
14
30 16
14
37
36
22
20
10
11
_10
22
21 Steel Blade Dethatcher _ IViodel No. 247. 282820
m = 0 0
712-04053A Nut,M18x 1.5
2 750-04201 BearingSpacer
3 681-04018A BearingAssembly
4 738-04079 ShouldScrew,7.13x 11.5
5 736-04114 SafetyWasher
6 750-04196 HexSpacerShaft
7 681-04164 BladeAssembly
8 712-0714 FlangeLockNut, M8- 1.25
9 736-04176 FiatWasher,8.20x 20.93x 4.00
10 734-2004A Wheel,8 x 2.125
11 738-04384 ShoulderScrew,12.63x 37.98
12 738-04385 ShoulderScrew,12.63x 37.98
13 710-04283 Spacer,M6- 1.30
14 710-1700 CarrierSpacer,M8- 1.25
15 712-04064 FlangeLockNut, 1/4-20
16 712-0713 FlangeLockNut, M6- 1
17 747-04861-0637 Bail
18 720-0270A HandleGrip
19 781-04258-0637 HeightAdjustmentLiftHandle
D = " O
720-04041 TurningKnob,M8 x 1.25
21 732-04190A CompressionSpacer,.087x.715x.688
22 936-0451 SaddleWasher,.320x.93x.060
23 736-0700 FiatWasher,8.4x 16x 1.60
24 738-04092 ShoulderSpacer,11.87x 15.5
25 938-0952A ShoulderBolt,.375x.125
26 749-04464-0637 UpperHandle
27 749-04117B-0637LowerHandle
28 782-7627A EyeBolt
29 781-04261-0637 HeightAdjustmentBracketMount
30 781-04267-0637 BailInterlockBracketMount
31 781-04268-0637 BailInterlockPivotBracket
32 946-04444 ClutchCable
33 946-04443 HeightCableAdjustment
34 736-0504 WaveWasher
35 911-04146 40 CMShaft
36 750-04190 FixedBladeSpacer
37 781-04016B FixedBlade
23
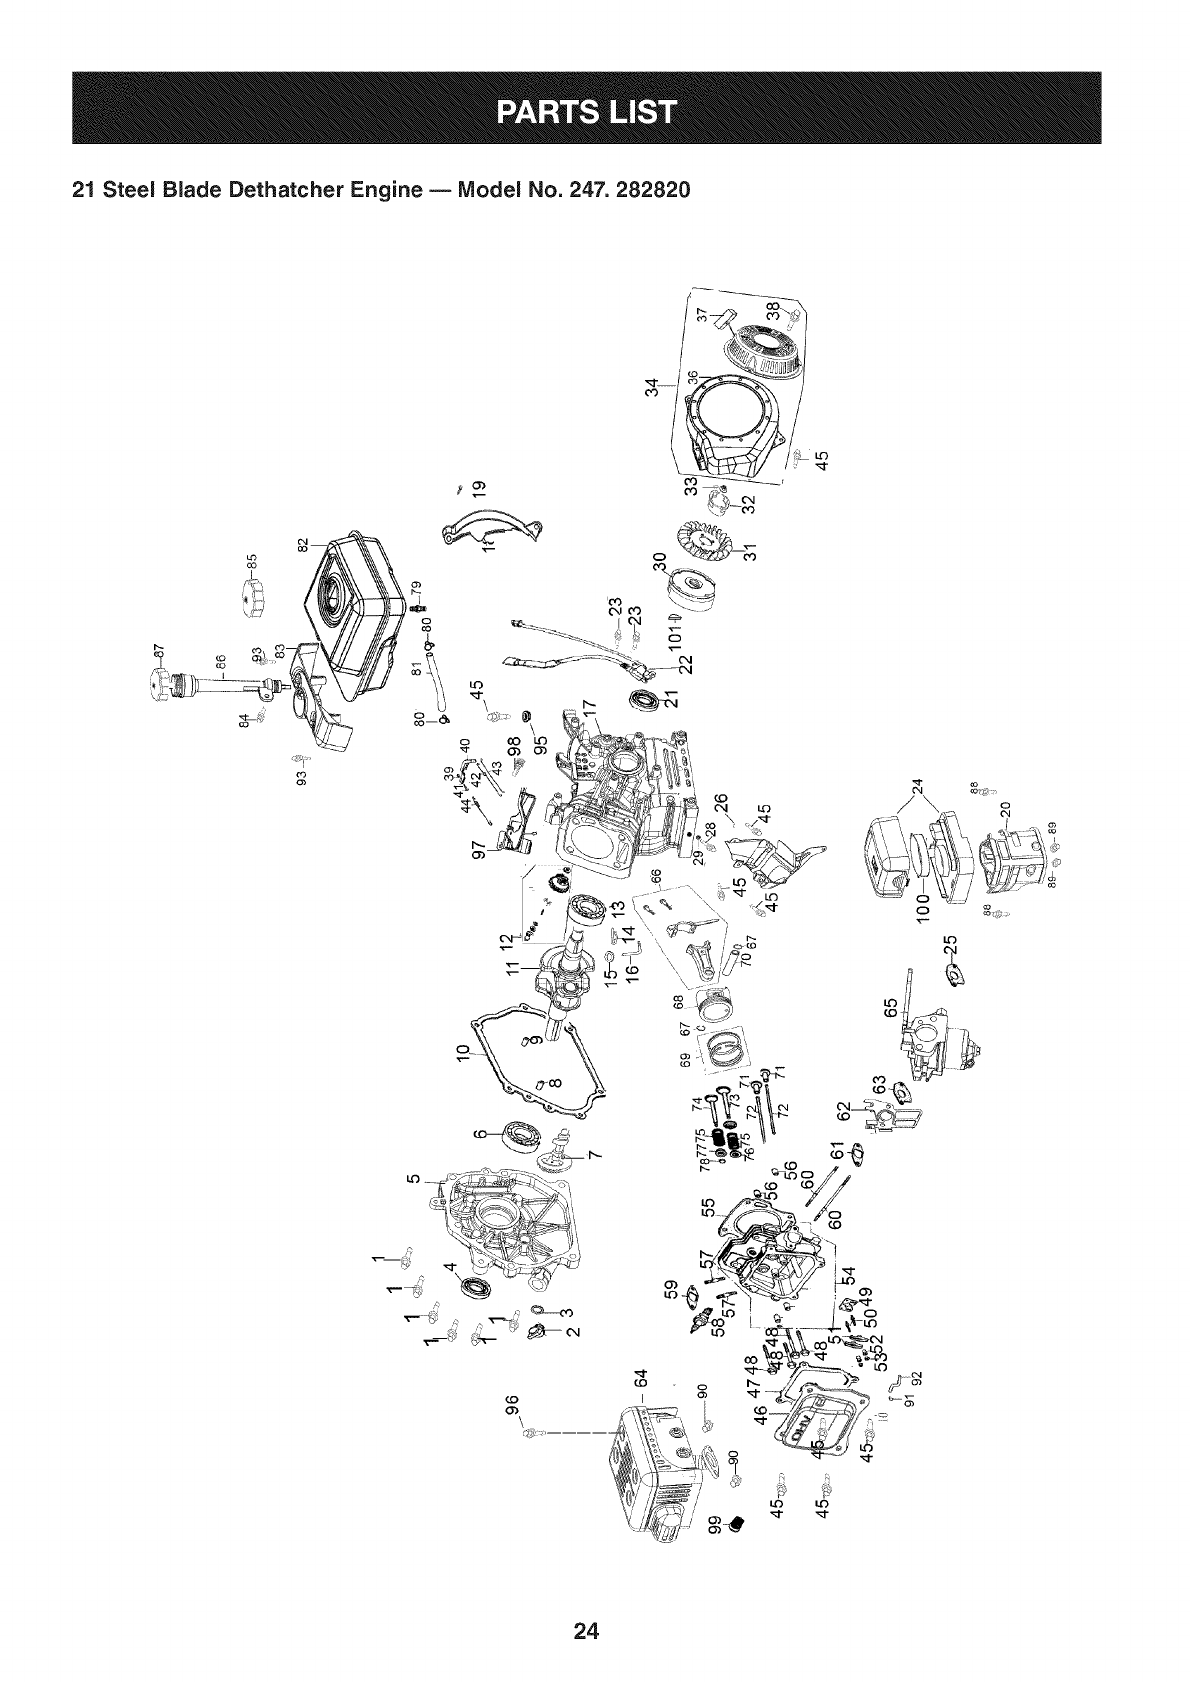
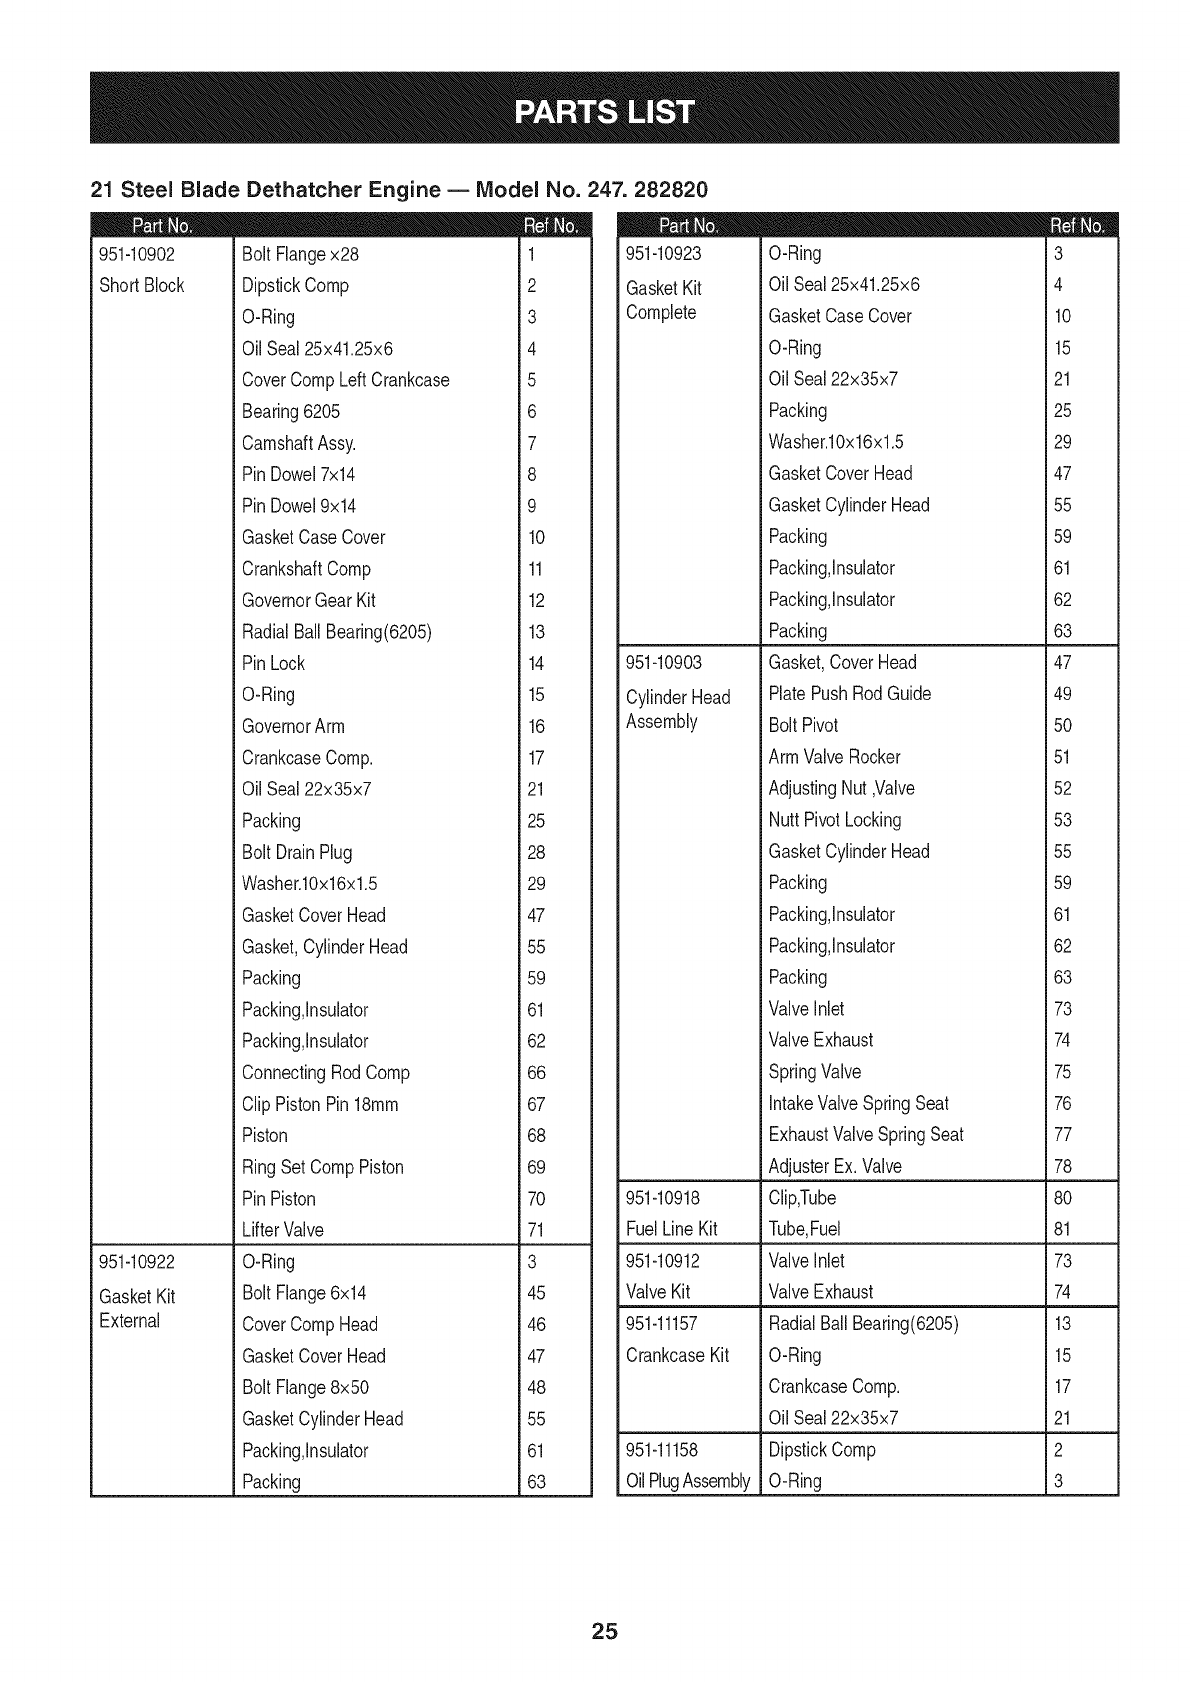
21 Steel Blade Dethatcher Engine -- Model No. 247. 282820
03
_U'3
24
21 Steel Blade Dethatcher Engine B IViodel No. 247. 282820
951-10902
Short Block
951-10922
GasketKit
Bolt Flangex28 1
DipstickComp 2
O-Ring 3
OilSeal25x41.25x6 4
CoverCompLeftCrankcase 5
Bearing6205 6
CamshaftAssy. 7
PinDowel7x14 8
PinDowel9x14 9
GasketCaseCover 10
CrankshaftComp 11
GovernorGearKit 12
RadialBallBearing(6205) 13
PinLock 14
O-Ring 15
GovernorArm 16
CrankcaseComp. 17
OilSeal22x35x7 21
Packing 25
Bolt DrainPlug 28
Washer.10x16x1.5 29
GasketCoverHead 47
Gasket,CylinderHead 55
Packing 59
Packing,Insulator 61
Packing,Insulator 62
ConnectingRod Comp 66
Clip PistonPin18ram 67
Piston 68
RingSet CompPiston 69
PinPiston 70
LifterValve 71
O-Ring 3
Bolt Flange6x14 45
951-10923 O-Ring
GasketKit OilSeal25x41.25x6
Complete GasketCaseCover
951-10903
CylinderHead
Assembly
951-10918
FuelLineKit
951-10912
ValveKit
3
4
10
O-Ring 15
OilSeal22x35x7 21
Packing 25
Washer.10x16x1.5 29
GasketCoverHead 47
GasketCylinderHead 55
Packing 59
Packing,Insulator 61
Packing,Insulator 62
Packing 63
Gasket,CoverHead 47
PlatePushRodGuide 49
Bolt Pivot 50
ArmValveRocker 51
AdjustingNut ,Valve 52
Nutt PivotLocking 53
GasketCylinderHead 55
Packing 59
Packing,Insulator 61
Packing,Insulator 62
Packing 63
ValveInlet 73
ValveExhaust 74
SpringValve 75
IntakeValveSpringSeat 76
ExhaustValveSpringSeat 77
AdjusterEx.Valve 78
Clip,Tube 80
Tube,Fuel 81
ValveInlet 73
ValveExhaust 74
External CoverCompHead 46
GasketCoverHead 47
Bolt Flange8x50 48
GasketCylinderHead 55
Packing,Insulator 61
Packing 63
951-11157
CrankcaseKit
951-11158
OilPlugAssembly
RadialBallBearing(6205) 13
O-Ring 15
CrankcaseComp. 17
OilSeal22x35x7 21
DipstickComp 2
O-Ring 3
25

21 Steel Blade
951-11155 Bolt Flangex28 1
CrankcaseCover DipstickComp 2
Kit O-Ring 3
OilSeal25x41.25x6 4
CoverCompLeftCrankcase 5
Bearing6205 6
GasketCaseCover 10
RadialBallBearing(6205) 13
OilSeal22x35x7 21
951-11156 OilSeal25x41.25x6 4
CrankshaftKit Bearing6205 6
CrankshaftComp 11
RadialBallBearing(6205) 13
OilSeal22x35x7 21
951-10925 Gasket,CoverHead 47
CylinderHeadKit Bolt 48
Gasket,CylinderHead 55
710-04920 Bolt 1
710-04092 DowelPin 8
715-04089 DowelPin 9
714-04074 LockingPin 14
951-11102 FlywheelBaffle 18
710-04918 FlangeBolt 19
951-10806 intakeHeateningPipeSeat 20
951-10916 ignitionCoil 22
710-04919 FlangeBolt 23
951-10818 AirCleanerHousingAssembly 24
951-11151 Air Baffle 26
710-04906 DrainPlug 28
736-04440 Washer 29
951-10908 Flywheel 30
951-10910 CoolingFan 31
951-10911 StarterCup 32
712-04209 FlywheelNut 33
951-11107 Fan HousingCover 36
951-10914 RecoilStarterAssembly 37
710-04914 Bolt 38
712-04211 Nut 39
951-11106 GovernorArm 40
Dethatcher Engine B Model No. 247.282820
710-04908 Bolt
951-10954 ThrottleReturnSpring 42
951-11152 GovernorRod 43
951-10915 GovernorReturnSpring 44
710-04916 Bolt 45
710-04922 Bolt 48
710-04902 PivotBolt 50
751-11123 ValveAdjustingNut 52
751-11124 PivotLockingNut 53
715-04090 DowelPin 56
951-10657 MufflerStudAssembly 57
951-10292 SparkPlug 58
710-04909 Stud Bolt 60
951-10901 MufflerComplete 64
951-10921 CarburetorAssembly 65
951-10913 PushRod Kit 72
951-10651 FuelTankFilter 79
951-10920 FuelTank 82
951-11128 EngineCover 83
710-04928 Bolt 84
951-10917 Cap Comp,Fuel 85
951-10656 DipstickTube 86
951-10655 DipstickAssembly 87
710-04948 Bolt 88
710-04949 Bolt 89
712-04214 FlangeNut 90
726-04101 HoseClamp 91
731-07059 BreatherHose 92
710-04950 PanelBolt 93
712-04212 Nut 95
710-04927 Bolt 96
951-11071 ThrottleControlAssembly 97
951-11067 ThrottleControlKnob 98
951-10829 SparkArrestor 99
951-10794 Air Cleaner 100
951-10307 FlywheelKey 101
951-11048 CarburetorKit
951-10826 RecoilSpringandPulley
26

Congratulationson makinga smartpurchase.YournewCraftsman®
productis designedandmanufacturedfor yearsof dependable
operation.But likeall products,it mayrequirerepairfromtimeto
time.That'swhenhavinga RepairProtectionAgreementcan save
youmoneyandaggravation.
Here'swhatthe RepairProtectionAgreement*includes:
• Expert service byour 10,000professionalrepairspecialists
Unlimitedserviceand no chargefor partsand laboron all
coveredrepairs
• Product replacementupto $1500if yourcoveredproductcan't
befixed
•Discountof 10%from regularprice of serviceand related
installedpartsnotcoveredbythe agreement;also, 10%off
regularpriceof preventivemaintenancecheck
• Fast help by phone- we call it RapidResolution- phone
supportfroma Searsrepresentative.Thinkof us asa "talking
owner'smanual."
Onceyou purchasethe Agreement,a simplephonecall is all that it
takesfor youto scheduleservice.Youcancall anytimeday or night,
or schedulea serviceappointmentonline.
The RepairProtectionAgreementis a risk-freepurchase.Ifyou
cancelfor any reasonduringthe productwarrantyperiod,wewill
providea full refund.Or,a proratedrefundanytimeafterthe product
warrantyperiodexpires.Purchaseyour RepairProtectionAgree-
menttoday!
Some limitations and exclusionsapply. For prices and ad-
ditional informationinthe U.S.A.call 1-800-827-6655.
*Coveragein Canadavaries on some items.For full details call
Sears Canadaat 1-800-361-6665.
Sears Installation Service
For Searsprofessionalinstallationof homeappliances,garagedoor
openers,waterheaters,and othermajorhomeitems,inthe U.S.A.
or Canadacall 1-800-4-MY-HOME®.
27

MTD CONSUMER GROUP (MTD) and the United States Environment Protection Agency (U. S. EPA)
Emission Control System Warranty Statement
(Owner's Defect Warranty Rights and Obligations)
The U.S. EPAand MTDarepleasedto explaintheemissionscontrolsystemwarrantyonyour modelyear 2005and latersmalloff-roadengine.
Newsmalloff-roadenginesmustbe designed,builtandequippedto meetthe stringentanti-smogstandards.MTDmustwarrantythe emission
controlsystemonyour enginefor the periodof timelistedbelow,providedtherehas beennoabuse,neglector impropermaintenanceof your
smalloff-roadengine.
Youremissioncontrolsystemmayincludepartssuchas the carburetor,aircleaner,ignitionsystem,exhaustsystem,andotherassociated
emission-relatedcomponents.
Wherea warrantableconditionexists,MTDwill repairyoursmalloff-roadengineat nocost to yourincludingdiagnosis,partsand labor.
MANUFACTURER'S WARRANTY COVERAGE:
Thisemissionscontrolsystemis warrantedfor twoyears.If anyemission-relatedpart onyourengineis defective,the part will berepairedor
replacedby MTD.
OWNER'S WARRANTY RESPONSIBILITIES:
As the smalloff-roadengineowner,youare responsibleforthe performanceof the requiredmaintenancelistedinyourOwner'sManual.MTD
recommendsthatyou retainall yourreceiptscoveringmaintenanceson yoursmalloff-roadengine,but MTDcan not denywarrantysolelyfor
the lackof receiptsor foryour failureto ensurethe performanceto allscheduledmaintenance.
As the smalloff-roadengineowner,youshouldhoweverbeawarethat MTDmaydenyyour warrantycoverageif yoursmalloff-roadengineor
part hasfaileddueto abuse,neglect,impropermaintenanceor unapprovedmodifications.
Youare responsiblefor presentingyour smalloff-roadengineto an AuthorizedMTDServiceDealeras soonas a problemexists.Thewar-
rantedrepairsshouldbecompletedina reasonableamountof time, notto exceed30days.
Ifyou haveanyquestionsregardingyourwarrantyrightsand responsibilities,you shouldcontacta MTDServiceRepresentativeat
1-800-800-7310and addressis MTDLLC,RO.Box361131,ClevelandOH,44136-0019.
DEFECTS WARRANTY REQUIREMENTS FOR 1995 AND LATER SMALL OFF-ROAD ENGINES:
Thissectionappliesto 1995andlater smalloff-roadengines.The warrantyperiodbeginsonthe datethe engineor equipmentis deliveredto
an ultimatepurchaser.
(a) GeneralEmissionsWarrantyCoverag_e_
MTDmustwarrantto the ultimatepurchaserandeachsubsequentpurchaserthatthe engineis:
(1)Designed,built,andequippedsoas to conformwithallapplicableregulationsadoptedby the AirResourcesBoardpursuantto its
authorityin Chapters1and2,Part5, Division26of the Healthand SafetyCode;and
(2) Freefromdefectsin materialsandworkmanshipthatcausethe failureof a warrantedpart to beidenticalin all materialrespectsto the
part asdescribedinthe enginemanufacturer'sapplicationfor certificationfor a periodof twoyears.
.(b)The warrantyonemissions-relatedpartswill be interpretedas follows:
(1)Anywarrantedpart thatis not scheduledfor replacementas requiredmaintenanceinthe writteninstructionsrequiredby Subsection
(c) mustbe warrantedfor the warrantyperioddefinedin Subsection(a)(2). Ifany suchpartfailsduringthe periodof warrantycoverage,it
mustbe repairedor replacedby MTDaccordingto Subsection(4) below.Anysuchpart repairedor replacedunderthe warrantymustbe
warrantedforthe remainingwarrantyperiod.
(2)Any warrantedpartthat is scheduledonlyfor regularinspectioninthe writteninstructionsrequiredby Subsection(c) must bewarranted
for thewarrantyperioddefinedin Subsection(a)(2). A statementin suchwritteninstructionsto theeffectof "repairor replaceas necessary"
will not reducethe periodof warrantycoverage.Any suchpart repairedor replacedunderwarrantymustbewarrantedfor the remaining
warrantyperiod.
(3) Anywarrantedpartthat whichis scheduledfor replacementas requiredmaintenancein the writteninstructionsrequiredby Subsec-
tion (c) mustbewarrantedfor the periodof timepriorto the first scheduledreplacementpointforthat part.Ifthe part failspriorto the
first scheduledreplacement,the partmustbe repairedor replacedby MTDaccordingto Subsection(4)below.Anysuchpart repairedor
replacedunderwarrantymust bewarrantedfor the remainderof the periodpriorto the firstscheduledreplacementpointfor the part.
(4) Repairor replacementof any warrantedpartunderthewarrantyprovisionsof thisarticle mustbe performedat nochargeto the ownerat
awarrantystation.
(5) Notwithstandingthe provisionsof Subsection(4)above,warrantyservicesor repairsmustbe providedat all MTDdistributioncenters
thatare franchisedto servicethe subjectengines.
(6) Theownermustnot bechargedfor diagnosticlaborthatleadsto thedeterminationthata warrantedpart is in fact defective,provided
thatsuchdiagnosticworkis performedat a warrantystation.
(7)The enginemanufactureris liablefordamagesto otherenginecomponentsproximatelycausedbya failureunderwarrantyof any
warrantedpart.
(8) Throughoutthe engine'swarrantyperioddefinedin Subsection(a)(2), MTDwill maintaina supplyof warrantedpartssufficientto meet
theexpecteddemandfor suchparts.

(9)Anyreplacementpartmaybeusedintheperformanceofanywarrantymaintenanceorrepairsandmustbeprovidedwithoutchargeto
theowner.SuchusewillnotreducethewarrantyobligationsofMTD.
(10)Add-onormodifiedpartsthatarenotexemptedbytheAirResourcesBoardmaynotbeused.Theuseofanynon-exemptedadd-onor
modifiedpartsshallbegroundsfordisallowingawarrantyclaimmadeinaccordancewiththisarticle.Theenginemanufacturershallnotbe
liableunderthisarticletowarrantfailuresofwarrantedpartscausedbytheuseofnon-exemptedadd-onormodifiedpart.
(c) MTDwill includea copyof the followingemissionwarrantypartslistwitheach newengine,usingthoseportionsof the listapplicable
to the engine.
(1)FuelMeteringSystem
• Coldstart enrichmentsystem(soft choke)
• Carburetorand internalparts
• Fuel Pump
(2)Air InductionSystem
• Aircleaner
• Intakemanifold
(3) IgnitionSystem
• Sparkplug(s)
MagnetoIgnitionSystem
(4)ExhaustSystem
(5) MiscellaneousItemsUsedin AboveSystem
Vacuum,temperature,position,timesensitivevalvesand switches
Connectorsandassemblies
GDOC-100173Rev.A

Declaraci6n de garantia ............................................... 30
Instrucciones sobre seguridad .................................... 31
Guia para pendientes ................................................... 34
Armado ......................................................................... 36
Funcionamiento ............................................................ 38
Servicio y Mantenimiento ............................................ 41
Almacenamiento fuera de temporada ......................... 46
Soluci6n de Problemas ................................................ 47
NOmero de servicio ............................................ Cubierta
posterior
GARANTiA COMPLETA CRAFTSMAN
SiesteproductoCraftsmanfalla debidoa undefectoen los materialeso la manodeobradentrodelos dosaSosde lafechade compra,
sirvasedevolverloa cualquiertiendaSears,Centrode servicioSears,uotro puntode ventaCraftsmanen losEstadosUnidosparasu
reparaci6n(o reemplazosi la reparaci6nresultaimposible)sincargo.
Estagaranfias61otendr&validezdurante90 diassi esteproductose utilizaen cualquiermomentoparafinescomercialeso dealquiler.
Estagaranfiacubre0NICAMENTElosdefectosenlos materialesyen la manodeobra. SearsNOpagar&por:
• Arficulosde duraci6nlimitadaquepuedendesgastarseen condicionesnormalesde usoduranteel periodode garanfia,talescomo
correas,filtros,bujiaso cuchillasescarificadoras.
• Reparadonesrequeridasdebidoa accidentes,tal comouncig(JeSalabollado,o nooperaro mantenerel productode acuerdocon las
instruccionessuministradas.
• Mantenimientopreventivo,o reparacionesnecesariasdebidoal usode unamezclade combustibleincorrect&combustiblecontami-
nadoo viejo.
Estagarantiale otorgaderechoslegalesespecificos,peroustedpodriagozardeotrosderechosenraz6nde su lugarde residencia.
Sears, Roebuckand Co., Hoffman Estates, IL 60179
Aceitedel motor:
Combustible:
Bujiadeencendido
Separaci6nde las bujias:
10W-30
Gasolinasin plomo
TorchF6RTC
.020"-.030"
N_rnerode rnodelo
N_rnerode serie
Fechade cornpra
Registreel nOmerode modelo,nOmerode serie
y fechadecompram_sarriba
©SearsBrands,LLC 30

Lapresenciadeestesimbolo indicaque setrata de
instruccionesdeseguridadimportantesquedebe
respetarparaevitar poneren riesgosu seguridad
personaly/o materialy lade los demos.Lea y cumpla
todaslas instruccionesdeeste manualantesde
intentaroperaresta m_quina.Sino respetaestasinstruccionespuede
provocarlesionespersonales.Cuandovea este simbolo,ipresteatenci6n
a la advertencia!
Su responsabilidad:Restrinjael usode estarn_.quinarnotorizada
a las personasquelean,cornprendany respetenlas advertenciase
instruccionesquefiguranen esternanualy en larn_.quina.
Estam_quinafueconstruidaparaset opera@ de acuerdocon las reglas
deseguridadcontenidasenestemanual.AI igual queconcualquiertipo
de equipomotorizado,un descuidoo error por partedel operadorpuede
producirlesionesgraves.Estam_quinaes capazdeamputarmanosy
pies y de arrojarobjetoscongranfuerza.De no respetarlasinstrucciones
de seguridadsiguientesse pueden producirlesionesgraveso la muerte.
El escapedel motordeeste producto,algunosde suscomponentes
y algunoscomponentesdel vehiculocontieneno liberansustancias
quimicasqueel estadode Californiaconsideraque puedenproducir
c_ncer,defectosdenacimientou otrosproblemasreproductivos.
N QOS
•Pueden ocurrir accidentes tragicos si el operador no est,. atento a la
presencia de niRos.A los niRosles suele atraer los equipos me@.nicosde
exteriores. No entienden los riesgos ni los peligros. Nunca suponga que
los niRos permanecer_.n en el lugar donde los vio per Oltimavez.
• Mantenga a los niRos fuera del _.reade trabajo y bajo estricta vigilancia
de un adulto responsable adem_.s del operador.
• Este alerta y apague el escarificador si un niRoingresa al _.rea.
• Antes de moverse hacia atr_.sy mientras Io este haciendo, mire hacia
atr_.sy cuide que no haya niRos.
• Tenga mucho cuidado cuando se aproxime alas esquinas ciegas,
puertas, arbustos, _.rbolesy otros objetos que puedan obstaculizarle la
vista de un niRoque pudiese correr hacia el escarificador.
• Mantenga a los niRos alejados de los motores en marcha o calientes.
Pueden sufrir quemaduras con un silenciador caliente.
• Nunca permita que los niRos menores de 14 ares operen esta m_.quina.
Los niRos mayores de 14 ares deben leer y entender las instrucciones de
funcionamiento y reglas de seguridad contenidas en este manualy deben
ser entrenados y supervisados per un adulto.
FUNCIONANIIENTO GENERAL:
• Lea con atenci6n todas las instrucciones contenidas en este manual
antes de intentar ensamblar esta m_.quina.Lea, comprenda y respete
todas las instrucciones que figuran en la m_.quinayen el o los manuales
antes de hacerla funcionar. Antes de hacer funcionar este equipo,
familiarfcese totalmente con los controles y el use correcto del mismo.
Guarde este manual en un lugar seguro para consultas futuras y
peri6dicas, asf come para solicitar repuestos.
• Familiarfcese con todos loscontroles y con el uso adecuado de los
mismos. Sepa c6mo detener la m_.quinay desenganchar los controles
rapidamente.
• No arranque el motor con las cuchillas engranadas.
• Esta m_.quinaes una unidad de equipo motorizado de precisi6n, no un
juguete. Per Io tanto, tenga mucho cuidado en todo memento. Esta unidad
fue diseRadapara realizar una tarea: escarificar el paste. No la utilice
para ningOnotro fin.
• No permita nunca que los niRosmenores de 14 ares utilicen esta
m_.quina.Los niRosmayores de 14 ares deben leer y entender las
instrucciones de operaci6n contenidas en este manual, y deben set
entrenados y supervisados per sus padres.
• $61ose debe permitir usar esta m_.quinaa individuos responsables y
familiarizados con sus reglas de seguridad.
• Inspeccione minuciosamente el _.readonde utilizar_,el equipo. Retire
todas las piedras, palos, alambre, huesos, juguetes y otros objetos
extraRos que podrfan hacer tropezar o set recogidos y arrojados per la
acci6n de lascuchillas del escarificador. Los objetos arrojados per la
m_.quinapueden causar lesiones graves.
• Para ayudar a evitar una lesi6n per contacto con las cuchillas,
mant@gase en la zona del operador detr_.sdel asa y mantenga a los
niRos, observadores, ayudantes y mascotas apartados al menos 25
metros del escarificador mientras est,. funcionando. Detenga la m_.quina
si alguien entra en el _.rea.
• Para protegerse los ojos utilice siempre anteojos o antiparras de
seguridad mientras opera la m_.quinao mientras la ajusta o repara. Los
objetos arrojados que rebotan pueden causar lesiones oculares graves.
• Utilice zapatos de trabajo resistentes, de suela fuerte, asi como
pantalones y camisas ajustados. Se recomienda vestir camisa y pantal6n
para cubrir brazos y piernas y usar zapatos con puntera de acero. Nunca
opere esta m_.quinacon pantalones cortos, descalzo, con sandalias,
zapatos resbalosos o livianos (per ej. de lena).
• No ponga las manes y los pies cerca o debajo del alojamiento de
las cuchillas ya que las cuchillas sobresalen per la parte inferior del
alojamiento. El contacto con las cuchillas puede amputarle maneso pies.
Mantenga las manesy los pies alejados de laspiezas giratorias.
• Se pueden causar lesiones graves si el escarificador es arrastrado sobre
el pie durante una caida per haber resbalado otropezado. No se sostenga
del escarificador si se est,. cayendo, suelte el asa inmediatamente.
.Nunca tire del escarificador hacia usted mientras camina. Si debe
retroceder con el escarificador para evitar una pared u obst_.culo,mire
primero abajo y atr_.spara notropezar y luego siga estos pasos:
• Retroceda del escarificador hasta estirar completamente los brazes.
• AsegOrese que tiene buen equilibrio y est,. bien parade.
• Tire lentamente hacia atr_.s,no m_.sde la mitad de la distancia.
• Repita estos pasos si hace falta.
• No utilice el escarificador bajo la influencia del alcohol o las drogas.
• Eleve el escarificador a la posici6n de corte m_.salta antes de arrancar el
motor.
• No engrane las cuchillas mientras arranca el motor.
• El asa de control de la cuchilla es un dispositivo de seguridad. Nunca
intente evitar su funcionamiento. De hacerlo, dejarian de operar los
dispositivos de seguridad y podrian producirse lesiones personales per
el contacto con la cuchilla giratoria. El asa de control de la cuchilla debe
funcionar f@ilmente en ambas direcciones y regresar autom_.ticamentea
la posici6n desengranada cuando se la suelta.
• Nunca haga funcionar el escarificador sobre cesped hOmedo. Siempre
este seguro de estar bien parado. Si resbala y cae puede lesionarse
seriamente. Si siente que pierde el equilibrio, suelte inmediatamente el
asa de control de lascuchillas y las cuchillas dejar_.nde rotar.
• Escarifique solamente con luznatural o con una buena luz artificial.
Camine, nunca corra.
• Detenga las cuchillas cuando cruza sendas de grava, senderos o
caminos.
• Si la m_.quinacomienza a vibrar deforma extraRa,detenga el motory
busque inmediatamente la causa. La vibraci6n generalmente advierte que
hay alg@ problema.
• Apague el motor y espere hasta que las cuchillas se detengan totalmente
antes de retirar los residues o la obstrucci6n debajo del alojamiento
de las cuchillas. Las cuchillas pueden continuar rotando unos cuantos
segundos m_.sdesp@s de apagar el motor. Nunca coloque ninguna parte
del cuerpo en el _.reade las cuchillas hasta estar seguro de que han
dejado de girar.
• Nunca haga funcionar el escarificador sin tenet colocados y funcionando
la correspondiente asa de control de las cuchillas, los protectores y
otros dispositivos de seguridad. Nunca haga funcionar el escarificador
si los dispositivos de seguridad est_.ndaRados. De Io contrario podrian
producirse lesiones personales.
31
•El silenciador y el motor se calientan y pueden causar quemaduras. No
los toque.
• Utilice solamente piezas y accesorios manufacturados para esta m_.quina
por el fabricante. De Iocontrario podrfan producirse lesiones personales.
• Para encender el motor, jale de la cuerda lentamente hasta que sienta
resistencia, luego jale r_.pidamente.El repliegue r_.pidode la cuerda de
arranque (tensi6n de retroceso) le jalar_,la mano y el brazo hacia el motor
m_.sr_.pidode Io que usted puede soltar. Puede Ilegar a causar huesos
robs, fracturas, hematomas y esguinces.
• Si se presentan situaciones que no est_.nprevistas en este manual,
sea cuidadoso y use el sentido comOn.Comunfquese con su centro de
servicio autorizado para obtener ayuda.
FUNCIONAMIENTO EN PENDIENTES
Las pendientes son un factor importante en los accidentes ocasionados por
derrapes y cafdas y pueden producir lesiones graves. La operaci6n en pendiente
requiere mucha precauci6n. Si no se siente seguro en una pendiente, no la
escarifique. Para su seguridad, use el indicador de pendientes que se incluye
como parte de este manualpara medir la pendiente antes de operar la unidaden
una zona inclinada. Si la pendiente supera los 15 grados, no la escarifique.
Haga Io siguiente:
• Escarifique la pendiente en sentido transversal, nunca hacia arriba y
abajo. Tenga mucho cuidado al cambiar de direcci6n en una pendiente.
• Este atento a los agujeros, surcos, rocas, objetos ocultos o bultos que
puedan provocar que se resbale o se tropiece. El cesped alto puede
ocultar obst_.culos.
• Siempre este seguro de estar bien parado. Si resbala y cae puede
lesionarse seriamente. Si siente que pierde el equilibrio, suelte
inmediatamente el asa de control de las cuchillas, las que dejar_.nde
rotar en unos segundos.
No haga Io siguiente:
• No escarifique cerca de hundimientos, zanjas o terraplenes, pod@
perder el equilibrio.
• No escarifique pendientes que superen los 15 grados como Io indica el
medidor de pendientes.
• No escarifique el pasto hOmedo. Si no est,. firmemente parado, puede
resbalarse.
MANTENIlVlIENTO
Manejosegurode la gasolina:
•Para evitar lesiones personales o dafios materiales tenga mucho cuidado
cuando trabaje con gasolina. La gasolina es sumamente inflamable y sus
vapores pueden causar explosiones. Si se derrama gasolina encima o
sobre la ropa se puede lesionar gravemente ya que se puede incendiar.
L_.vesela piel y @.mbiese de ropa de inmediato.
• Utilice s61olos recipientes para gasolina autorizados.
• Nunca Ilene los recipientes en el interior de un vehfculo o cami6n o caja
de remolque con recubrimiento pl_.stico.Coloque siempre los recipientes
en el piso y lejos del vehfculo antes de Ilenarlo.
• Retire el equipo a gasolina del cami6n o remolque y II@elo en el piso.
Si esto no es posible, Ilene el equipo en un remolque con un recipiente
port_.til,en vez de hacerlo desde una boquilla dispensadora de gasolina.
• Mantenga la boquilla dispensadora en contacto con el borde del dep6sito
de combustible o con la abertura del recipiente en todo momento,
hasta terminar la carga. No utilice un dispositivo de apertura y cierre de
boquilla.
• Apague todos los cigarrillos, cigarros, pipas y otras fuentes de
combusti6n.
• Nunca cargue combustible en la m_.quinaen interiores porque los
vapores inflamables podrfan acumularse en el _.rea.
• Nunca saque la tapa de la gasolina ni agregue combustible mientras
el motor est,. caliente o en marcha. Deje que el motor se enffie por Io
menos dos minutos antes de volver a cargar combustible.
• Nunca Ileneen exceso el dep6sito de combustible. Llene el tanque hasta
la barra indicadora roja dentro del tanque.
• Vuelva a colocar la tapa del combustible y ajOstela bien.
• Limpie el combustible que se hayaderramado sobre el motor y el equipo.
Traslade la m_.quina a otra zona. Espere 5 minutos antes de encender el
motor.
•Nunca almacene la m_.quinao el recipiente de combustible cerca
de llama expuesta, chispas o aparatos con piloto como por ejemplo,
calentadores de agua, calefactores, hornos, secadores de ropa u otros
aparatos a gas.
• Para reducir el riesgo de incendio mantenga el escarificador libre de
pasto, hojas y de otros residuos acumulados. Limpie los derrames
de aceite o combustible y saque todos los residuos embebidos en
combustible.
• Deje que el escarificador se enffie 5 minutos por Io menos antes de
almacenarlo.
Servicio general:
• Nunca encienda el motor en espacios cerrados o en una zona con poca
ventilaci6n. El escape del motor contiene mon6xido de carbono, un gas
inodoro y letal.
• Antes de limpiar, reparar o inspeccionar la maquina, compruebe que la
cuchilla y todas las partes m6viles se hayan detenido. Desconecte el
cable de la bujfa y p6ngalo haciendo masa contra el motor para evitar que
se encienda accidentalmente.
• Revise lossujetadores de montaje de las cuchillas y del motor a
intervalos frecuentes para verificar que est@ bien apretados. Adem_.s,
inspeccione visualmente las cuchillas en busca de daRos (abolladuras,
rajaduras, desgaste, etc.). Reemplace las cuchillas @icamente por
cuchillas del fabricante del equipo original (OEM). Eluso de piezas que
no cumplen con las especificaciones del equipo original puede resultar en
rendimiento inadecuado y puede poner en peligro la seguridad.
• Las cuchillas del escarificador son muy afiladas y pueden lastimar.
Envuelva la cuchilla o use guantes y extreme las precauciones cuando
efect0e mantenimiento.
• Mantenga todos los pernos, tuercas y tornillos bien ajustados para
asegurarse de que la m_tquinase encuentra en condiciones seguras de
operaci6n.
• Nunca altere los dispositivos de seguridad. Controle peri6dicamente que
funcionen correctamente.
• Despues de golpear con algOnobjeto extraRo, detenga el motor,
desconecte el cable de la bujfa y conecte el motor a masa. Inspeccione
minuciosamente la m_.quinapara ver si est,. daRada. Repare el daRo
antes de encenderla y hacerla funcionar.
• Para proteger su seguridad, verifique frecuentemente los componentes
y reempl@elos inmediatamente por piezas del fabricante del equipo
original (O.E.M.) Onicamente.El uso de piezas que no cumplen con
las especificaciones del equipo original puede resultar en rendimiento
inadecuado y puede poner en peligro la seguridad.
• No cambie la configuraci6n del regulador del motor ni acelere demasiado
el mismo. El regulador del motor controla la velocidad m_.ximade
funcionamiento seguro del motor. No de arranque al motor si no esterla
bujfa de encendido.
• Verifique frecuentemente la Ifnea de combustible, el tanque, el tap6n,
y losaccesorios buscando rajaduras o perdidas. Reemplace de ser
necesario.
• Mantenga o reemplace las etiquetas de seguridad y de instrucciones
segtJnsea necesario.
• Observe las leyes y normas aplicables para disponer adecuadamente de
los desechos. La eliminaci6n inapropiada de Ifquidos o materiales puede
daRarel medio ambiente.
Su responsabilidad: Restrinjael uso deestam_quinamotorizadaalas personasque lean,comprendany respetenlasadvertenciase instruccionesque figuran
enestemanualyen la m_quina.
32
S{IVIBOLOS DE SEGURIDAD
Enestap&ginase presentany describenlos simbolosde seguridadquepuedenaparecerenesteproducto. Lea,entienday cumplatodas
las instruccionesincluidasen lam&quinaantesdeintentarrealizarel montajede la unidady utilizarla.
_ LEA EL(LOS) MANUAL(ES) DEL OPERADOR
i
I
!
i
I
li
Lea, entienda y cumpla todas las instrucciones incluidas en el(los) manuales antes de intentar
realizar el montaje de la unidad y utilizarla.
ADVERTENCIA- CUCHILLAS GIRATORIAS
Mientras la m_iquina est.1 en funcionamiento mantenga las manos fuera de las aberturas de
entrada y de descarga. En el interior hay cuchillas giratorias
OBSERVADORES
Mantenga a los observadores, mascotas y ni_os al menos a 25 metros de la m_iquina mientras
est,1 en funcionamiento. Detenga la m_iquina si alguien entra en la zona.
ADVERTENCIA - DESECHOS ARROJADOS
Retire los desechos (piedras, palos, alambre, etc.) y dem_is objetos que puedan ser arrojados
por las cuchillas
PROTECCION OCULAR
Siempre use anteojos o antiparras de seguridad cuando hace funcionar esta m_iquina.
33
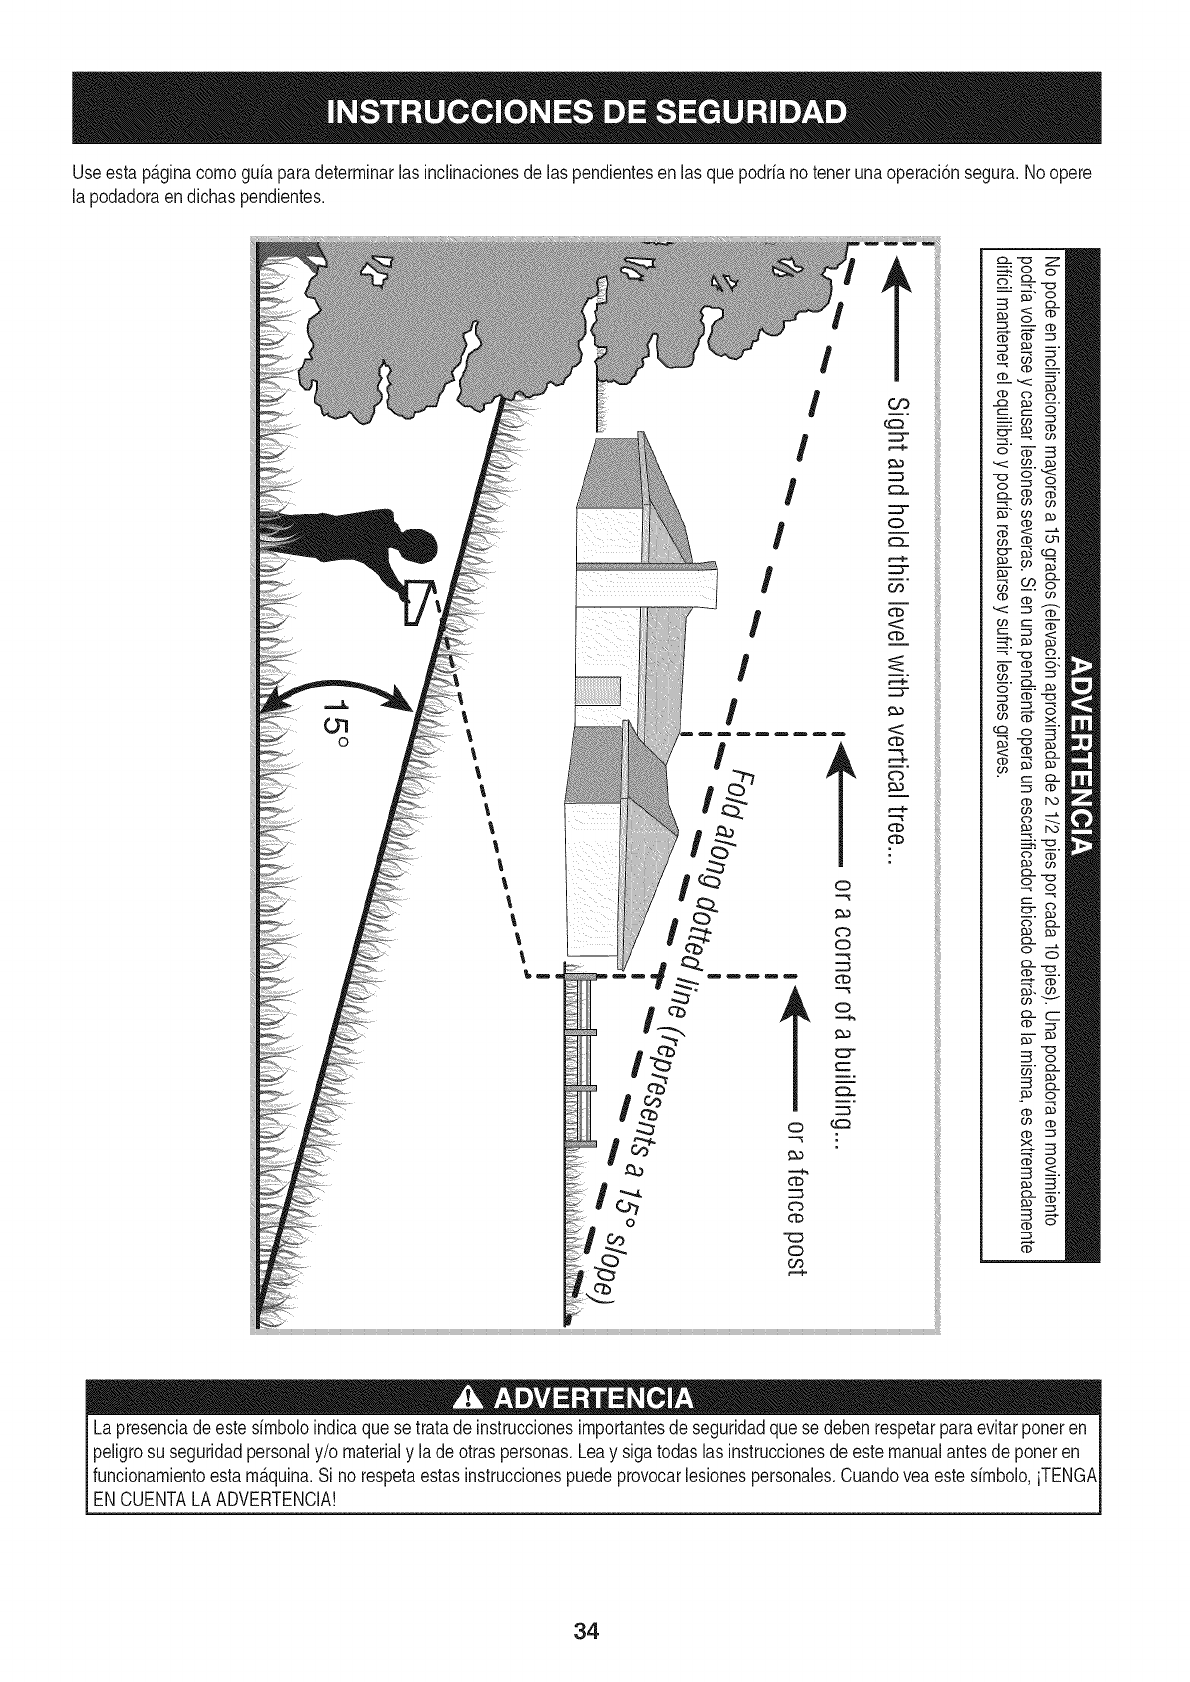
Useestap_.ginacomoguiaparadeterminarlas inclinacionesde las pendientesen las quepodrianotenerunaoperaci6nsegura.Noopere
la podadoraendichaspendientes.
/
/
I
I
I
/
/
c__ -rJ z
__,_o o
__q._
_-_-
o _- 3
--. 03 03
t3) _
-_" "r.J __.
__×
No_
_." -__.
_.
_-X
_ t3)
x
_-N
Lapresenciadeeste simboloindicaque setratade instruccionesimportantesde seguridadque sedebenrespetarparaevitarponeren
peligrosu seguridadpersonaly/o materialy lade otraspersonas.Leay sigatodaslas instruccionesde estemanualantesde poneren
funcionamientoestam_.quina.Si norespetaestasinstruccionespuedeprovocarlesionespersonales.Cuandovea estesimbolo,iTENGA
ENCUENTALAADVERTENCIA!
34

Estapdtginasemarch6intencionadamenteenblanco.
35
NOTA:Las referenciasa ladoderechoo izquierdodelescarificador
se deterrninansitu_.ndosedetr_.sde la unidaden posicidnde
operacidn(perrnaneciendodirectarnentedetr_.sdel escarificador,
rnirandohaciael panelde la rnanija).
RETIRO DE LA CAJA
1. Cortelas esquinasde lacajade cart6ny extiendalos lados
de rnaneraquequedenpianossobreel piso Quitey descarte
todoslos insertosdeernpaque.
2. Saqueel escarificadorde lacaja.
3. AsegQresedevaciarcornpletarnentela cajaantesde
descartarla.
ARMADO
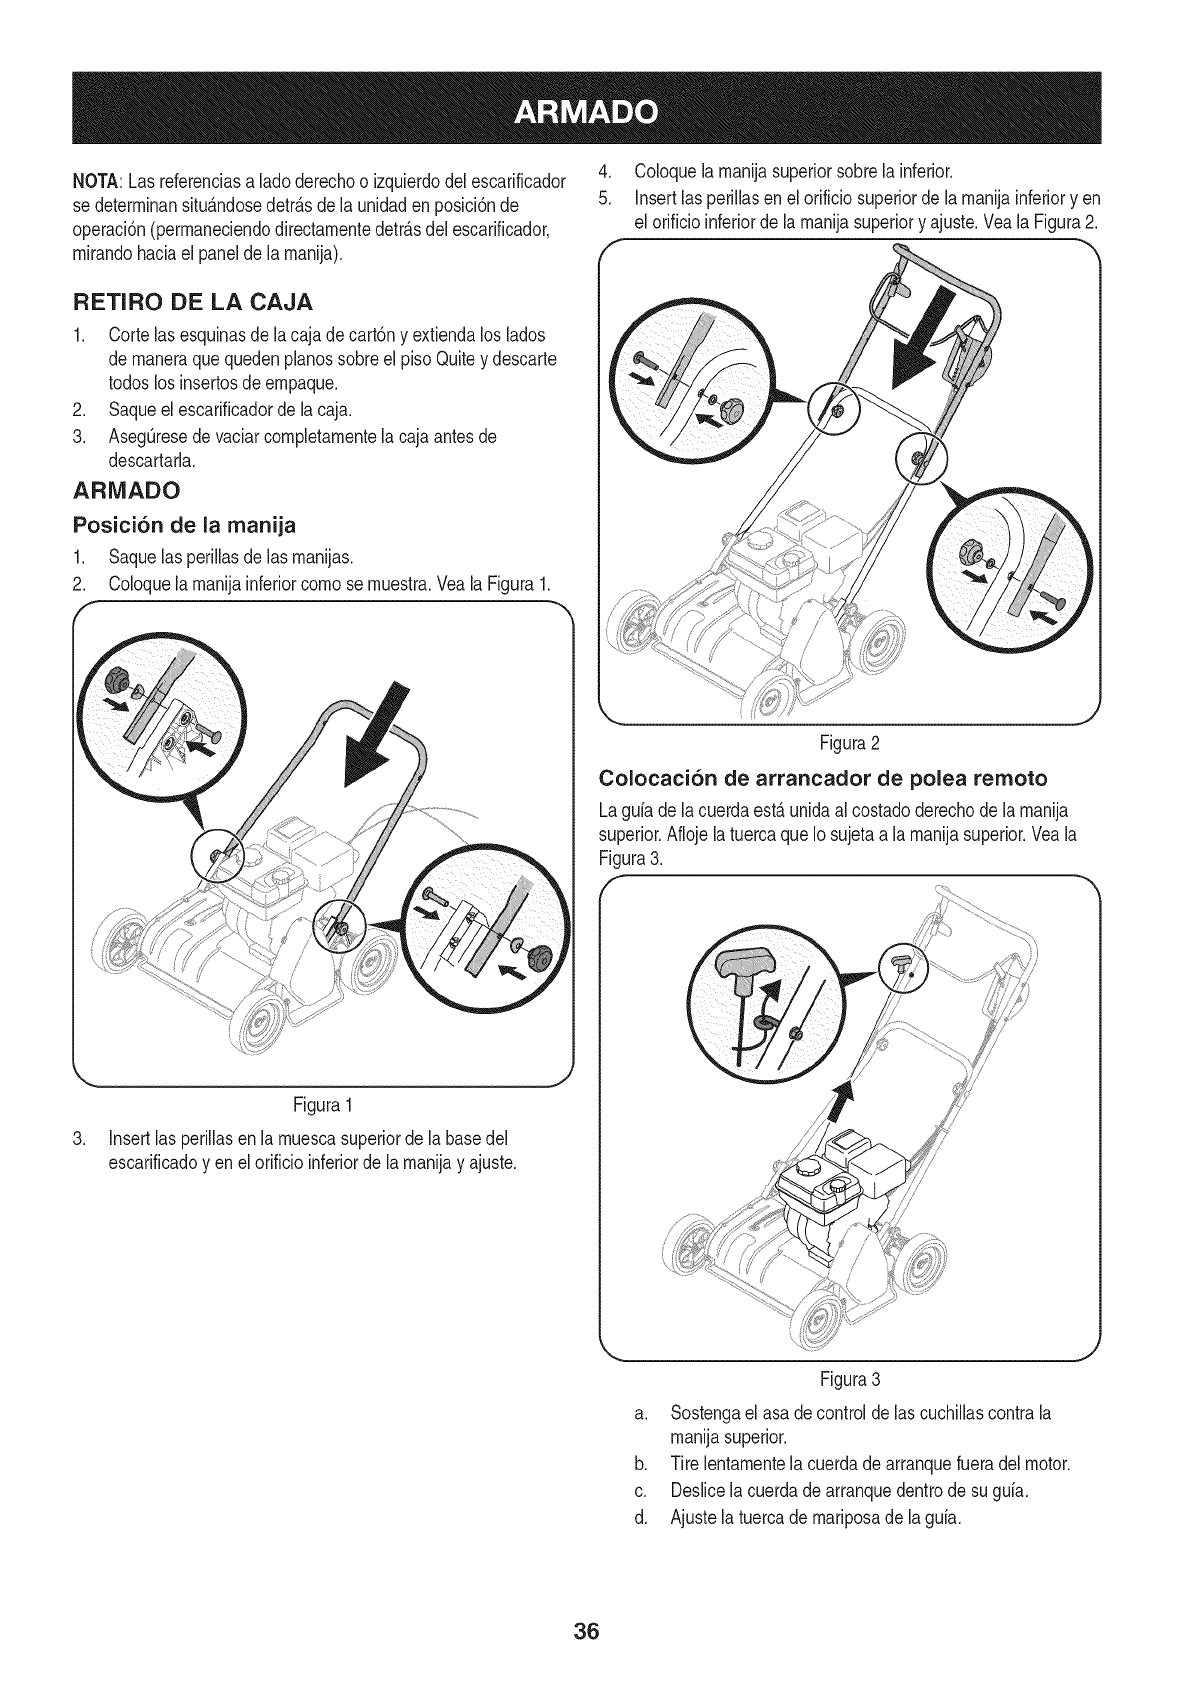
Posici6n de la manija
1. Saquelas perillasde las rnanijas.
2. Coloquela rnanijainferiorcornose rnuestra.Veala Figura1.
4. Coloquela rnanijasuperiorsobrela inferior.
5. Insertlas perillasen el orificiosuperiorde larnanijainferioryen
el orificioinferiorde la rnanijasuperiory ajuste.Veala Figura2.
Figura2
Colocaci6n de arrancador de polea remoto
Laguia dela cuerdaest,. unidaal costadoderechode la rnanija
superior.Aflojela tuercaqueIo sujetaa la rnanijasuperior.Veala
Figura3.
Figura1
Insertlas perillasenla rnuescasuperiorde labasedel
escarificadoyen elorificioinferiorde larnanijay ajuste.
/
Figura3
a. Sostengael asade controlde lascuchillascontrala
rnanijasuperior.
b. Tire lentarnentelacuerdadearranquefueradelmotor.
c. Deslicelacuerdadearranquedentrode su guia.
d. Ajustela tuercade rnariposade laguia.
J
36
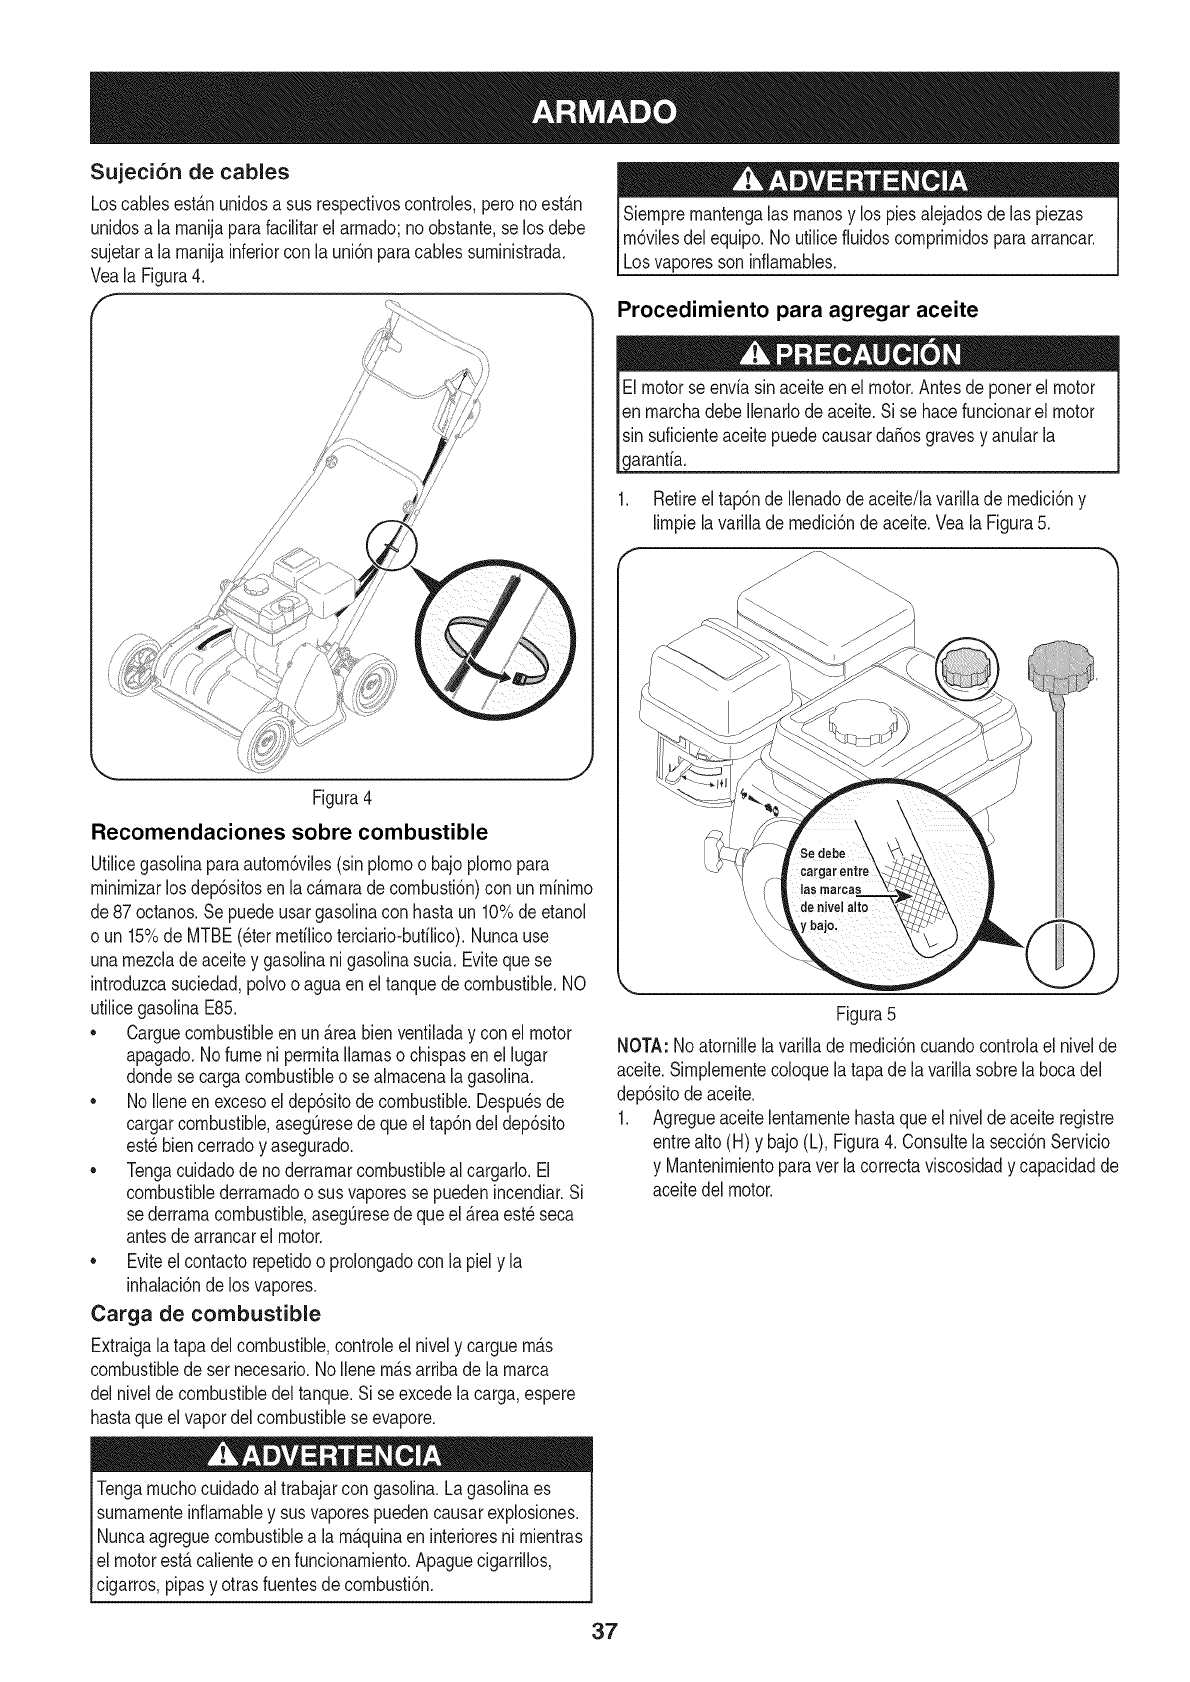
Sujeci6n de cables
Loscablesest_nunidosa susrespectivoscontroles,peronoest&n
unidosala rnanijaparafacilitarel arrnado;noobstante,se los debe
sujetara la rnanijainferiorcon la uni6nparacablessurninistrada.
Veala Figura4.
f
Figura4
Recomendaciones sobre combustible
Utilicegasolinaparaautorn6viles(sin plornoo bajoplornopara
rninirnizarlosdep6sitosenla c_rnaradecornbusti6n)con unrninirno
de87 octanos.Sepuedeusargasolinacon hastaun 10%deetanol
o un 15%de MTBE(eter rnefilicoterciario-bufilico).Nuncause
unarnezclade aceitey gasolinanigasolinasucia. Evitequese
introduzcasuciedad,polvoo aguaen eltanquede combustible.NO
utilicegasolinaE85.
•Carguecombustibleenun _reabienventiladay conel motor
apagado.Nofumeni perrnitallamasochispasenel lugar
dondese cargacombustibleo sealrnacenalagasolina.
•No Ileneen excesoel dep6sitode combustible.Despu_sde
cargarcombustible,asegQresede queeltap6ndel dep6sito
est_biencerradoy asegurado.
•Tengacuidadode noderrarnarcombustibleal cargarlo.El
combustiblederrarnadoo susvaporesse puedenincendiar.Si
se derrarnacombustible,asegQresede queel _reaest_seca
antesde arrancarel motor.
•Eviteel contactorepetidoo prolongadocon la piely la
inhalaci6nde los vapores.
Carga de combustible
Extraigalatapa del combustible,controleel nively carguern_.s
combustiblede ser necesario.No Ilenern_sarribade larnarca
delnivelde combustibledel tanque.Sise excedela carga,espere
hastaqueel vapordelcombustiblese evapore.
Tenga rnuchocuidadoaltrabajarcon gasolina.Lagasolinaes
surnarnenteinfiarnabley susvaporespuedencausarexplosiones.
Nuncaagreguecombustiblea larnaquinaen interioresnirnientras
el motorest,.calienteoen funcionarniento.Apaguecigarrillos,
cigarros,pipasy otrasfuentesde cornbusti6n.
rn6vilesdel equipo.No utilicefluidoscornprirnidosparaarrancar.
vaporessoninflarnables.
Procedimiento para agregar aceite
EImotorseenvia sinaceiteenel motor.Antesde ponerel motor
enrnarchadebeIlenarlodeaceite.Si se hacefuncionarel motor
sin suficienteaceitepuedecausarda_osgravesy anularla
arantia.
1. Retireel tap6nde Ilenadode aceite/lavarillade rnedici6ny
lirnpiela varillade rnedici6nde aceite.Veala Figura5.
Figura5
NOTA:No atornillela varilladernedici6ncuandocontrolael nivelde
aceite.Sirnplernentecoloquela tapade lavarillasobrela bocadel
dep6sitodeaceite.
1. Agregueaceitelentarnentehastaqueel niveldeaceiteregistre
entrealto (H) y bajo(L), Figura4. Consultelasecci6nServicio
y Mantenirnientoparavet la correctaviscosidady capacidadde
aceitedel motor.
37
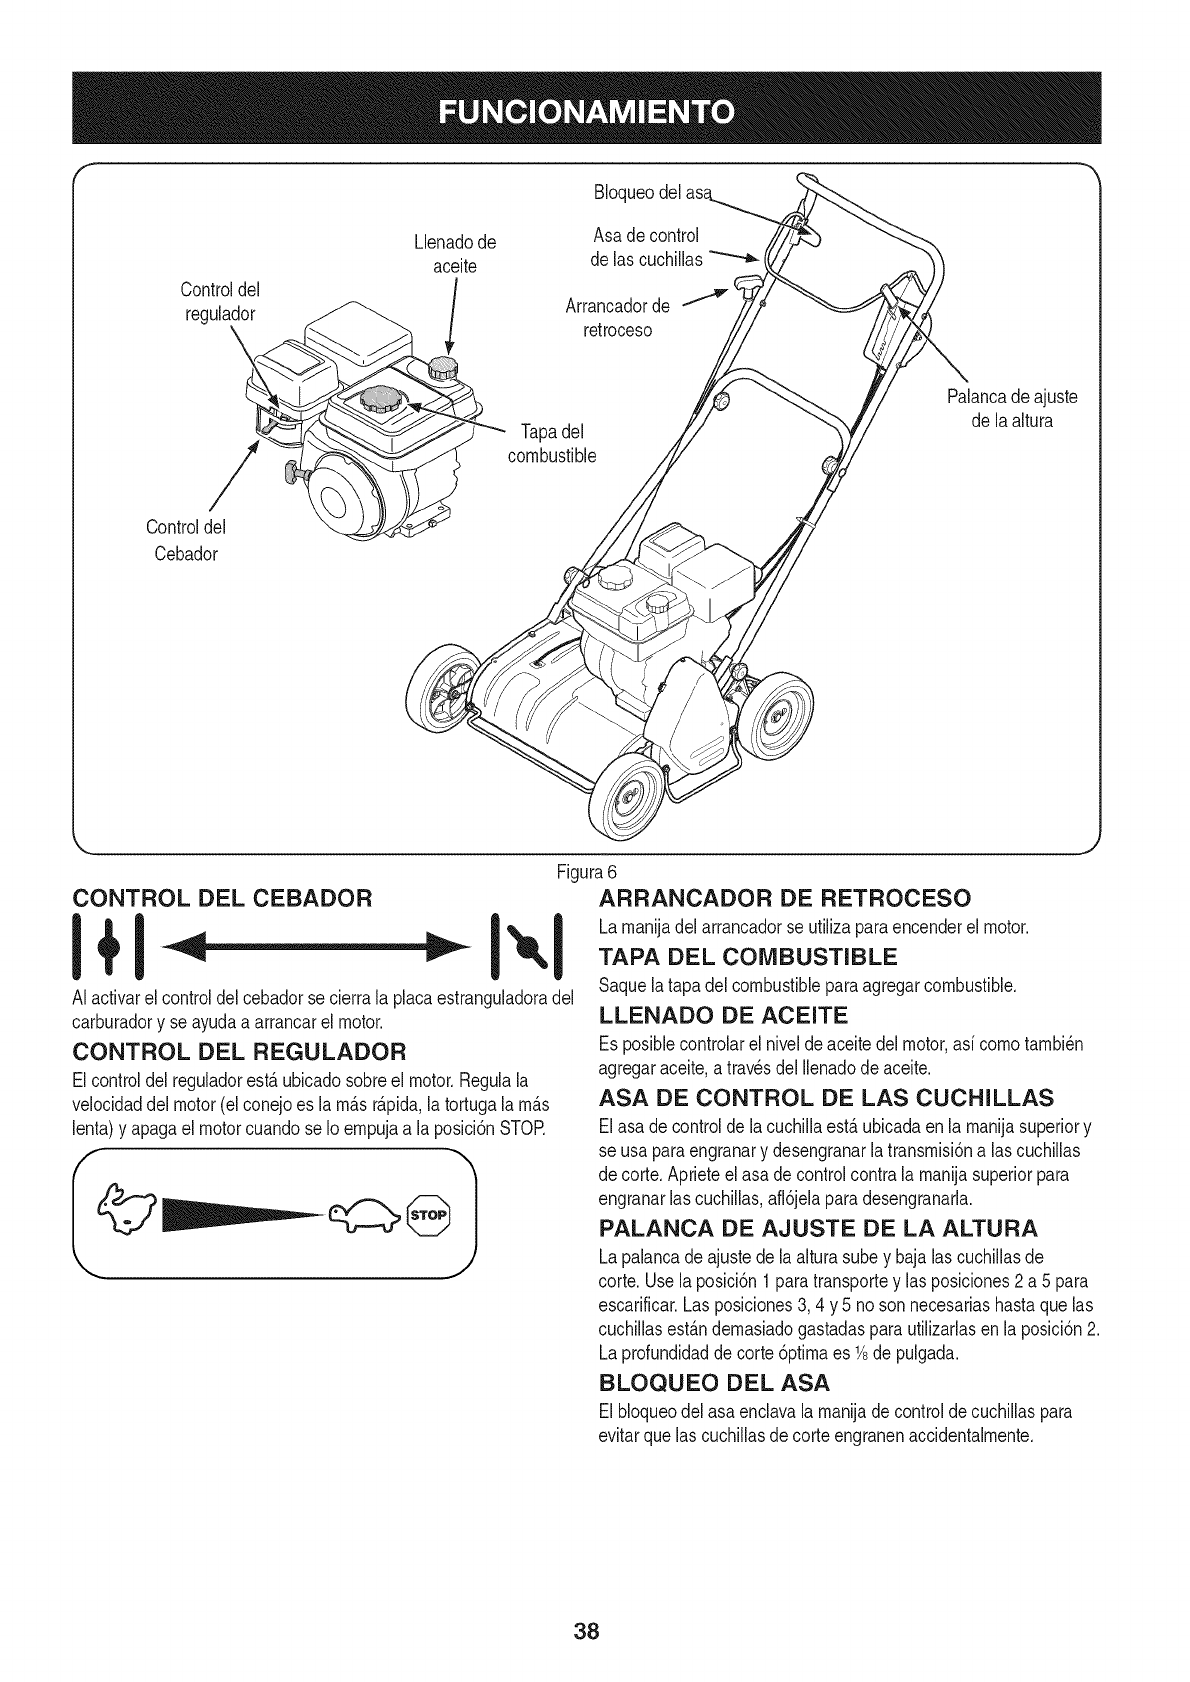
BIoqueodel
Llenadode Asa decontrol
aceite delas cuchillas'"""_ _
Controldel l
regulador Arrancadorde
retroceso
/
Controldel
Cebador
Tapadel
combustible
Palancadeajuste
de laaltura
Figura6
CONTROL DEL CEBADOR
AIactivarel controldelcebadorsecierrala placaestranguladoradel
carburadory se ayudaa arrancarel motor.
CONTROL DEL REGULADOR
Elcontroldel reguladorest,.ubicadosobreel motor.Regulala
velocidaddel motor(elconejoes la m_.sr_.pida,la tortugala m_.s
lenta)y apagael motorcuandose Io empujaa la posici6nSTOR
ARRANCADOR DE RETROCESO
La manijadelarrancadorse utilizaparaencenderel motor.
TAPA DEL COMBUSTIBLE
Saquela tapadel combustibleparaagregarcombustible.
LLENABO BE ACEITE
Es posiblecontrolarel niveldeaceitedelmotor,asi comotambi_n
agregaraceite,a travesdel Ilenadodeaceite.
ASA DE CONTROL DE LAS CUCHILLAS
Elasa de controldela cuchillaest,.ubicadaen la manijasuperiory
se usa paraengranary desengranarlatransmisi6na las cuchillas
decorte.Aprieteel asade controlcontrala manijasuperiorpara
engranarlascuchillas,afl6jelaparadesengranarla.
PALANCA DE AJUSTE DE LA ALTURA
La palancadeajustedela alturasubey bajalas cuchillasde
corte.Usela posici6n1paratransportey lasposiciones2a 5 para
escarificar.Las posiciones3, 4 y 5 noson necesariashastaque las
cuchillasest_.ndemasiadogastadasparautilizarlasenla posici6n2.
La profundidadde corte6ptimaes 1/8de pulgada.
BLOQUEO DEL ASA
El bloqueodel asaenclavala manijade controldecuchillaspara
evitarquelas cuchillasde corteengranenaccidentalmente.
38
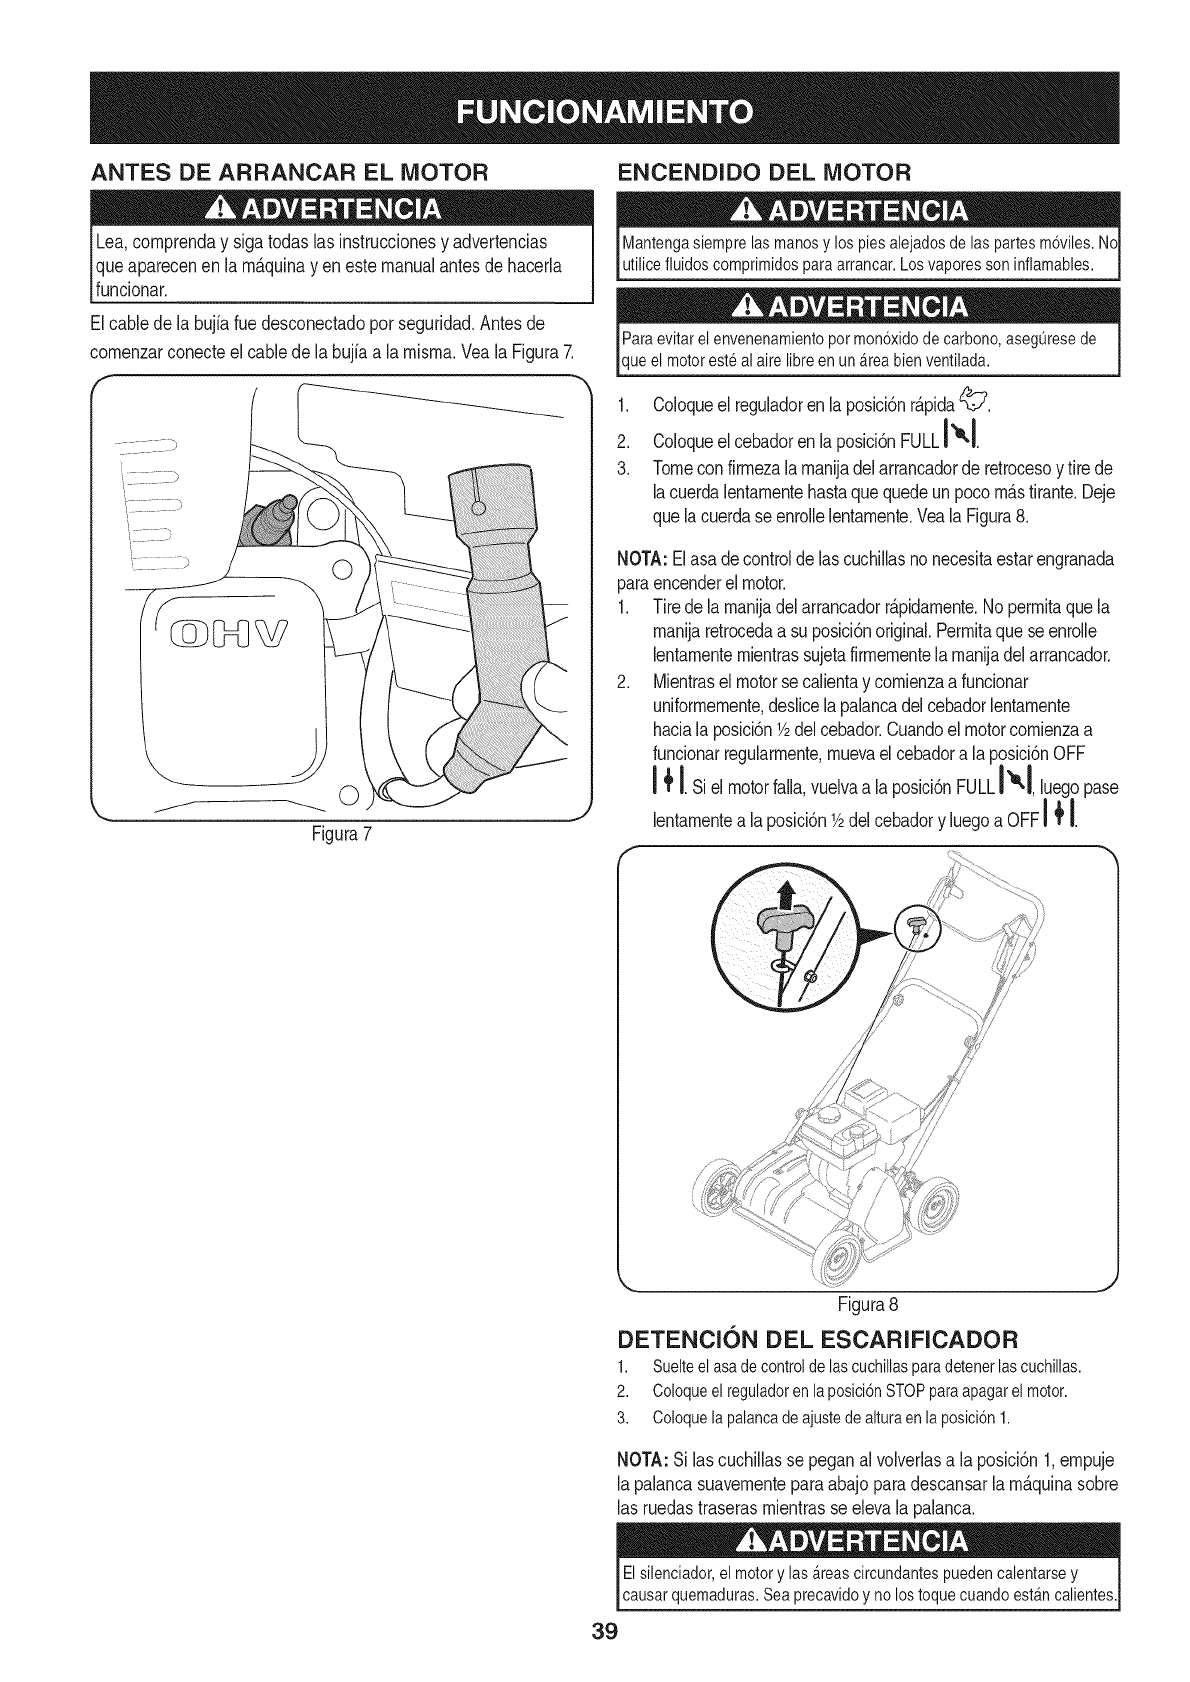
ANTES DE ARRANCAR EL MOTOR ENCENDIDO DEL MOTOR
Lea,cornprenday siga todaslas instruccionesy advertencias
queaparecenen la rn_.quinayen estemanualantesdehacerla
funcionar.
Elcablede la bujiaruedesconectadoporseguridad.Antesde
cornenzarconecteelcablede la bujiaa larnisrna.Veala Figura7.
f
__ 0
Figura7
Mantengasiemprelas manosy los piesalejadosde las partesm6viles.No
utilicefluidoscomprimidosparaarrancar.Losvaporessoninflamables.
ueel motoresteal aire libreen un _reabienventilada.
1. Coloqueel reguladorenla posici6nr_.pidaZ_.
A__a
2. Coloqueel cebadorenla posici6nFULLI'_'1.
3. Tomeconfirrnezalarnanijadelarrancadorde retrocesoy tire de
lacuerdalentarnentehastaquequedeunpocorn_.stirante.Deje
quelacuerdase enrollelentarnente.Veala Figura8.
NOTA:Elasadecontrolde lascuchillasnonecesitaestarengranada
paraencenderel motor.
1. Tiredela rnanijadelarrancadorr_.pidarnente.No perrnitaquela
rnanijaretrocedaa su posici6noriginal.Perrnitaquese enrolle
lentarnenternientrassujetafirrnernentelarnanijadelarrancador.
2. Mientrasel motorse calientay cornienzaafuncionar
uniforrnernente,deslicela palancadelcebadorlentarnente
hacialaposici6n1/2delcebador.Cuandoel motorcornienzaa
funcionarregularrnente,rnuevael cebadora laposici6nOFF
!÷Isielmotorfa,a,vuelvaalaposici nFULLI'1,luegopase
lentarnentea laposici6ntV2delcebadory luegoa OFFI _ !.
f
/
/
Figura8
DETENCION DEL ESCARIFICADOR
1. Suelteelasadecontroldelascuchillasparadetenerlascuchillas.
2. Coloqueelreguladorenlaposici6nSTOPparaapagarelmotor.
3. Coloquelapalancadeajustedealturaenlaposici6n1.
NOTA:Si las cuchillasse peganal volverlasa laposici6n1,ernpuje
la palancasuavernenteparaabajoparadescansarlarn_.quinasobre
las ruedastraserasrnientrasse elevala palanca.
Elsilenciador,el motory las _reascircundantespuedencalentarsey
causarquemaduras.Seaprecavidoy no lostoquecuandoest_n calientes.
39
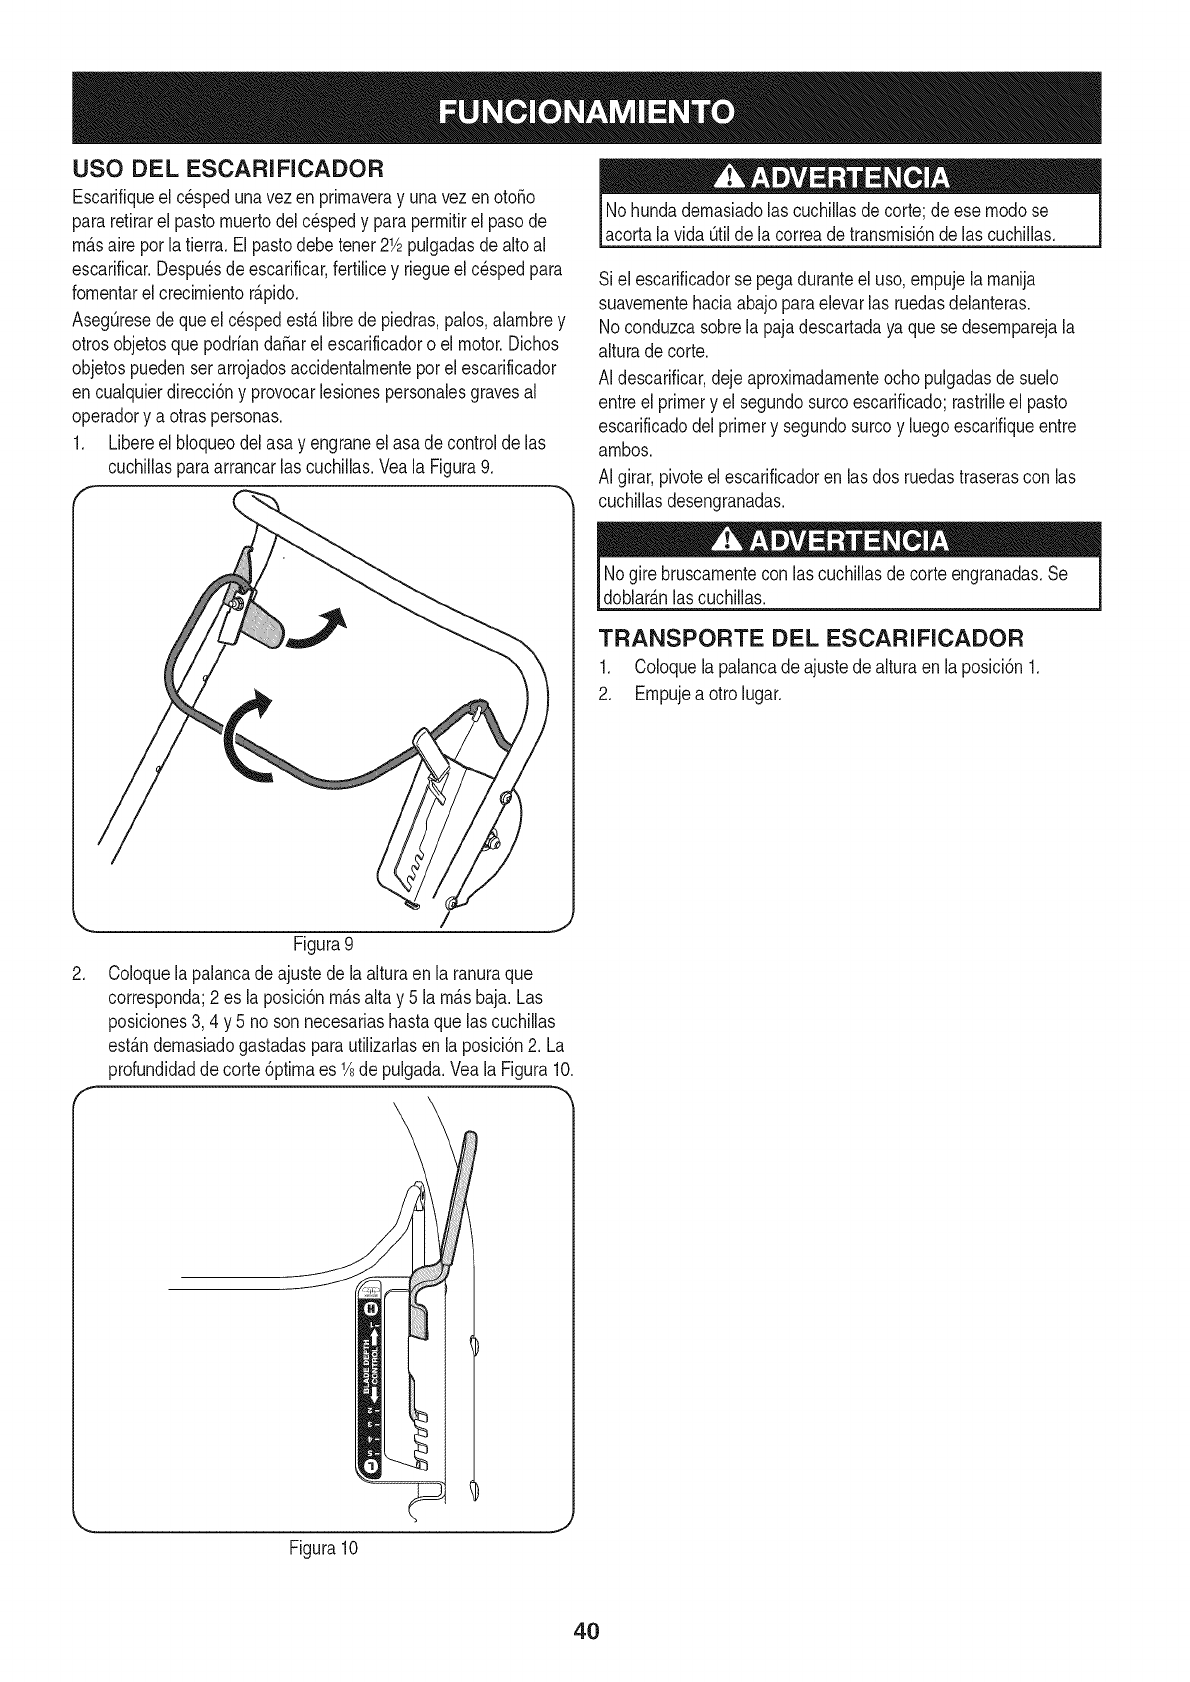
USO DEL ESCARIFICADOR
Escarifiqueel c_spedunavezenprirnaveray unavezenotofio
pararetirarel pastornuertodelc_spedy paraperrnitirel pasode
rn_.saireporlatierra.El pastodebetenet21/2pulgadasde altoal
escarificar.Despu_sdeescarificar,fertilicey riegueelc_spedpara
fornentarelcrecirnientor_.pido.
AsegOresedequeel c_spedest,.libredepiedras,palos,alarnbrey
otrosobjetosque podriandafiarelescarificadoro el motor.Dichos
objetospuedenserarrojadosaccidentalrnenteporelescarificador
encualquierdirecci6ny provocarlesionespersonalesgravesal
operadory aotraspersonas.
1. Libereel bloqueodelasay engraneel asa decontrolde las
cuchillasparaarrancarlas cuchillas.Veala Figura9.
,
Figura9
Coloquela palancadeajustedela alturaenla ranuraque
corresponda;2 es la posici6nrn_.saltay 5 la rn_.sbaja.Las
posiciones3, 4 y 5 noson necesariashastaque lascuchillas
est_.ndernasiadogastadasparautilizarlasen la posici6n2. La
profundidaddecorte6ptirnaes 1/8de pulgada.Yeala Figura10.
\
(
Figura10
Nohundadernasiadolas cuchillasde corte;deese rnodose
acortalavida Otildela correadetransrnisi6ndelas cuchillas.
Siel escarificadorse pegaduranteel uso,ernpujelarnanija
suavernentehaciaabajoparaelevarlas ruedasdelanteras.
No conduzcasobrela pajadescartadayaque sedesernparejala
alturadecorte.
AIdescarificar,dejeaproxirnadarnenteocho pulgadasdesuelo
entreel primery el segundosurcoescarificado;rastrilleel pasto
escarificadodelprimery segundosurcoy luegoescarifiqueentre
arnbos.
AIgirar,pivoteel escarificadoren las dos ruedastraserascon las
cuchillasdesengranadas.
Nogirebruscarnentecon lascuchillasdecorteengranadas.Se
doblar_.nlascuchillas.
TRANSPORTE DEL ESCARIFICADOR
1. Coloquela palancade ajustedealturaen laposici6n1.
2. Ernpujea otro lugar.
4O
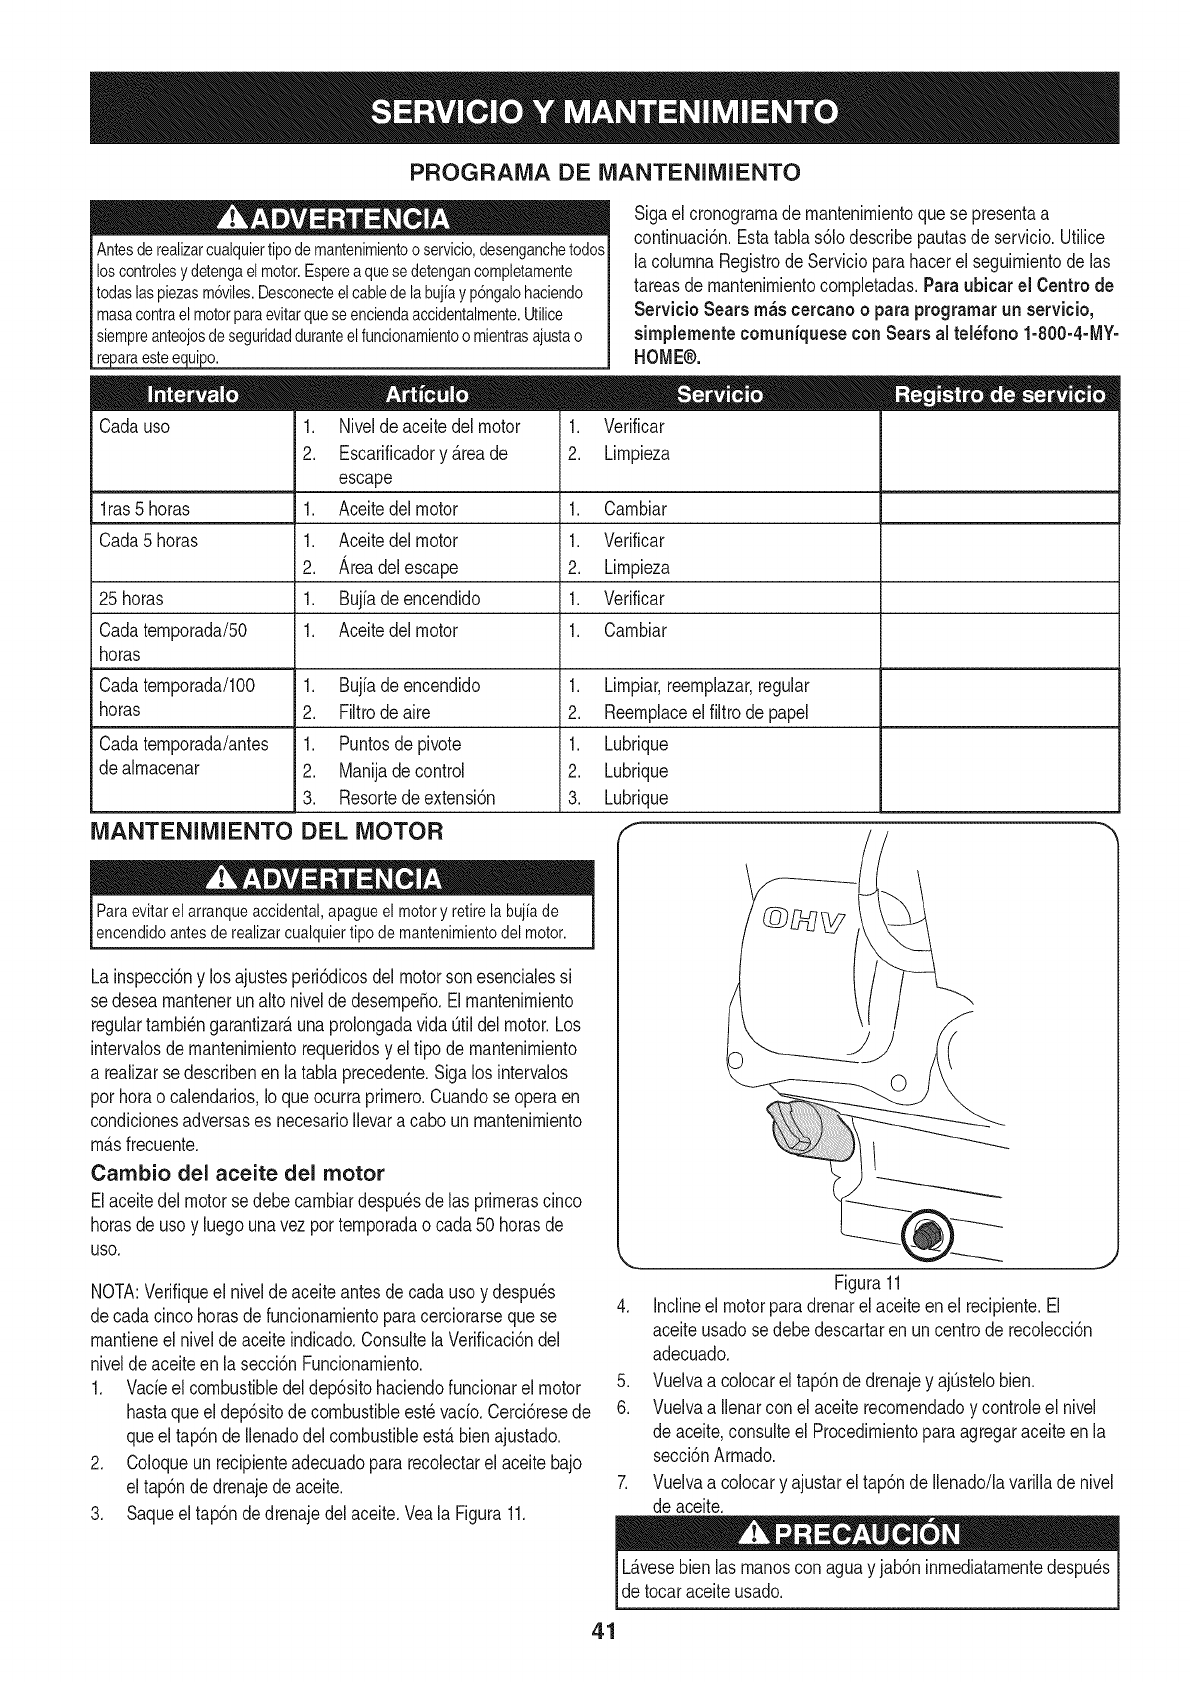
PROGRAIVlA DE iVlANTENIIVllENTO
Antesderealizarcualquiertipodemantenimientooservicio,desenganchetodos
loscontrolesydetengaelmotor.Espereaquesedetengancompletamente
todaslaspiezasm6viles.Desconecteelcabledelabujiayp6ngalohaciendo
masacontraelmotorparaevitarqueseenciendaaccidentalmente.Utilice
siempreanteojosdeseguridadduranteelfuncionamientoomientrasajustao
re araestee ui o.
Cada uso 1. Nivelde aceitedel motor 1.
2. Escarificadory&reade 2.
escape
l ras5 horas 1. Aceitedel motor 1.
Cada5 horas 1. Aceitedel motor 1.
2. Areadelescape 2.
25 horas 1. Bujfadeencendido 1.
Cadaternporada/50 1. Aceitedel motor 1.
horas
Cadaternporada/lO0 1. Bujiadeencendido 1.
horas 2. Filtrodeaire 2.
Cadaternporada/antes 1. Puntosde pivote 1.
dealrnacenar 2. Manijadecontrol 2.
3. Resortedeextensi6n 3.
iVlANTENIIVlIENTO DEL MOTOR
Paraevitarel arranqueaccidental,apagueel motory retirela bujiade
encendidoantesde realizarcualquiertipo demantenimientodel motor.
La inspecci6ny losajustesperi6dicosdelmotorson esencialessi
se desearnantenerunalto niveldedesernpeSo.El rnantenirniento
regulartarnbi_ngarantizar_unaprolongadavida Otildel motor.Los
intervalosdernantenirnientorequeridosy el tipode rnantenirniento
a realizarse describenen latabla precedente.Sigalos intervalos
porhorao calendarios,Ioqueocurraprirnero.Cuandose operaen
condicionesadversases necesarioIlevaracabo un rnantenirniento
rn_.sfrecuente.
Cambio del aceite del motor
Elaceitedel motorse debecarnbiardespu_sde las prirnerascinco
horasdeuso y luegounavezporternporadao cada 50horasde
USO,
Sigael cronograrnade rnantenirnientoquese presentaa
continuaci6n.Estatabla s61odescribepautasde servicio.Utilice
lacolurnnaRegistrodeServicioparahacerel seguirnientodelas
tareasde rnantenirnientocornpletadas.Paraubicar el Centro de
Servicio Sears rn_scercano o paraprogramarun servicio,
sirnplernentecomuniquese con Searsal tel_fono 1-800-4-MY-
HOME®.
Verificar
Urnpieza
Carnbiar
Verificar
Lirnpieza
Verificar
Carnbiar
Lirnpiar,reernplazar,regular
Reernplaceelfiltrode papel
Lubrique
Lubrique
Lubrique
NOTA:Verifiqueel niveldeaceiteantesde cadauso y despu_s
decada cincohorasde funcionarnientoparacerciorarseque se
rnantieneel niveldeaceiteindicado.Consultela Verificaci6ndel
niveldeaceiteenla secci6nFuncionarniento.
1. Vadeel combustibledeldep6sitohaciendofuncionarel motor
hastaqueel dep6sitodecombustibleest_vado. Cerci6resede
queel tap6ndeIlenadodelcombustibleest_bienajustado.
2. Coloqueun recipienteadecuadopara recolectarel aceitebajo
Figura11
4. Inclineel motorparadrenarel aceiteenel recipiente.El
aceiteusadose debedescartaren uncentrode recolecci6n
adecuado.
5. Vuelvaa colocarel tap6ndedrenajey ajOstelobien.
6. Vuelvaa Ilenarcon el aceiterecornendadoy controleel nivel
deaceite,consulteel Procedirnientoparaagregaraceiteen la
secci6nArrnado.
,
el tap6ndedrenajedeaceite.
Saqueeltap6n dedrenajedelaceite.Veala Figura11.
7. Vuelvaa colocary ajustarel tap6nde llenado/lavarillade nivel
deaceite.
L_.vesebienlas rnanoscon aguay jab6ninrnediatarnentedespu_s
de tocaraceiteusado.
41

NOTA: Elirnineel aceiteusadodel motordeunarnaneraque no
perjudiqueel medicarnbiente.Ll_veloa uncentrode recicladou
otrocentroderecolecci6n.
Recomendaciones sobre el aceite
Cuandoagregueaceiteal rnotor,agregeaceiteparamotor10W-30.
Lacapacidadde aceitedel motores 600rnl(aprox.20onzas). No
Ileneexcesivarnente.Useunaceiteparamotorde cuatrotiernpos,
o unaceitedetergentede calidadpremiumequivalentecon
certificadoquecubrao excedalas exigenciasde losfabricantesde
autorn6vilesarnericanosrespectode laclasificaci6nde servicioSG
y SR Losaceitesparamotorcon la clasificaci6nSG,SF tienenest,.
designaci6nen elenvase.
NO utiliceaceitessindetergenteniaceiteparamotordedos
tiernpos.Podriareducirsela vida _tildel motor.
Bujia de encendido
Electrodo
4_=====0,02-0,03 pulgadas
(0.70-0,80 ram)
ueal motorsi no est,.la bujiade encendido.
Siel motorhaestadofuncionando,el silenciadorestar_,rnuy
caliente.Tengacuidadode notocarelsilenciador.
Sedebecontrolarla bujia(TorchF6RTC)cada25 horasy se la
debecarnbiarunavezporternporadao cada 100horas.Para
asegurarsede queel motorfuncionebien,la bujiadebeteneruna
separaci6ncorrectay tarnbi_ndebeestarlibrede dep6sitos.
1. Retirela fundadela bujfay utiliceunaIlaveparabujiaspara
extraerla,Figura12.
.
.
,,J
Figura12
Inspeccionevisualrnentela bujfa.Elirninela bujiasi presenta
desgastevisible,o si el aislanteest,.agrietadoo astillado.
Lirnpielabujiacon uncepillode alarnbresi se va a reutilizar.
Midala separaci6ndebujfacon uncalibrador.Realicelos
ajustesnecesariostorciendoel electrodolateral,Figura13.La
separaci6ndebeajustarseen 0,02-0,03pulgadas(0.70-0,80
rnrn).
Figura13
4. Verifiqueque laarandeladela bujfaest_enbuenas
condicionesy enrosquelabujiahaciaadentrornanualrnente
paraevitarquese enrosquecruzada.
5. Unavezque labujfaest,.colocadaen su lugar,aprietecon una
Ilaveparabujiaparacornprirnirla arandela.
NOTA:Cuandoinstaleunabujianueva,apriete 1/2vuelta,despu_s
quela bujiaseencuentracolocadaen su lugar,paracornprirnirla
arandela.Cuandoreinstaleunabujiausada,ajuste1/8-a 1/4degiro,
despu_sque la bujiaseencuentracolocadaensu lugar,a fin de
cornprirnirlaarandela.
Labujfadebeestarbienajustada.Si labujiaestAfioja puede
recalentarsey daSarel motor.
Limpieza del motor
Siel motorhaestadofuncionando,d_jeloenfriarduranteporIo
rnenosmediahoraantesde lirnpiarlo.Retireperi6dicarnentela
suciedadacurnuladaen elmotor.
No rode el motorcon aguaparalirnpiarloporqueel aguapodria
contarninarel combustible.Sise utilizaunarnangueradejardino
equipode lavadoa presi6ntarnbi_npuedeentraraguadentrode la
aberturadel silenciador.Elaguaque pasaporel silenciadorpuede
ingresarenel cilindro,causandodaSos.
No rode el motorcon aguaparalirnpiarloporqueel aguapodria
contarninarel combustible.Sise utilizaunarnangueradejardino
equipode lavadoa presi6ntarnbi_npuedeentraraguadentrode la
aberturadel silenciador.Elaguaque pasaporel silenciadorpuede
ingresarenel cilindro,causandodaSos.
LUBRICACION
Lubriquelos puntosde girodelasa decontrolde las cuchillasy del
resortede extensi6ndel extrernodelcablede controlcon unaceite
livianounavezporternporaday antesde alrnacenarel escarificador
al finalde laternporada.
42
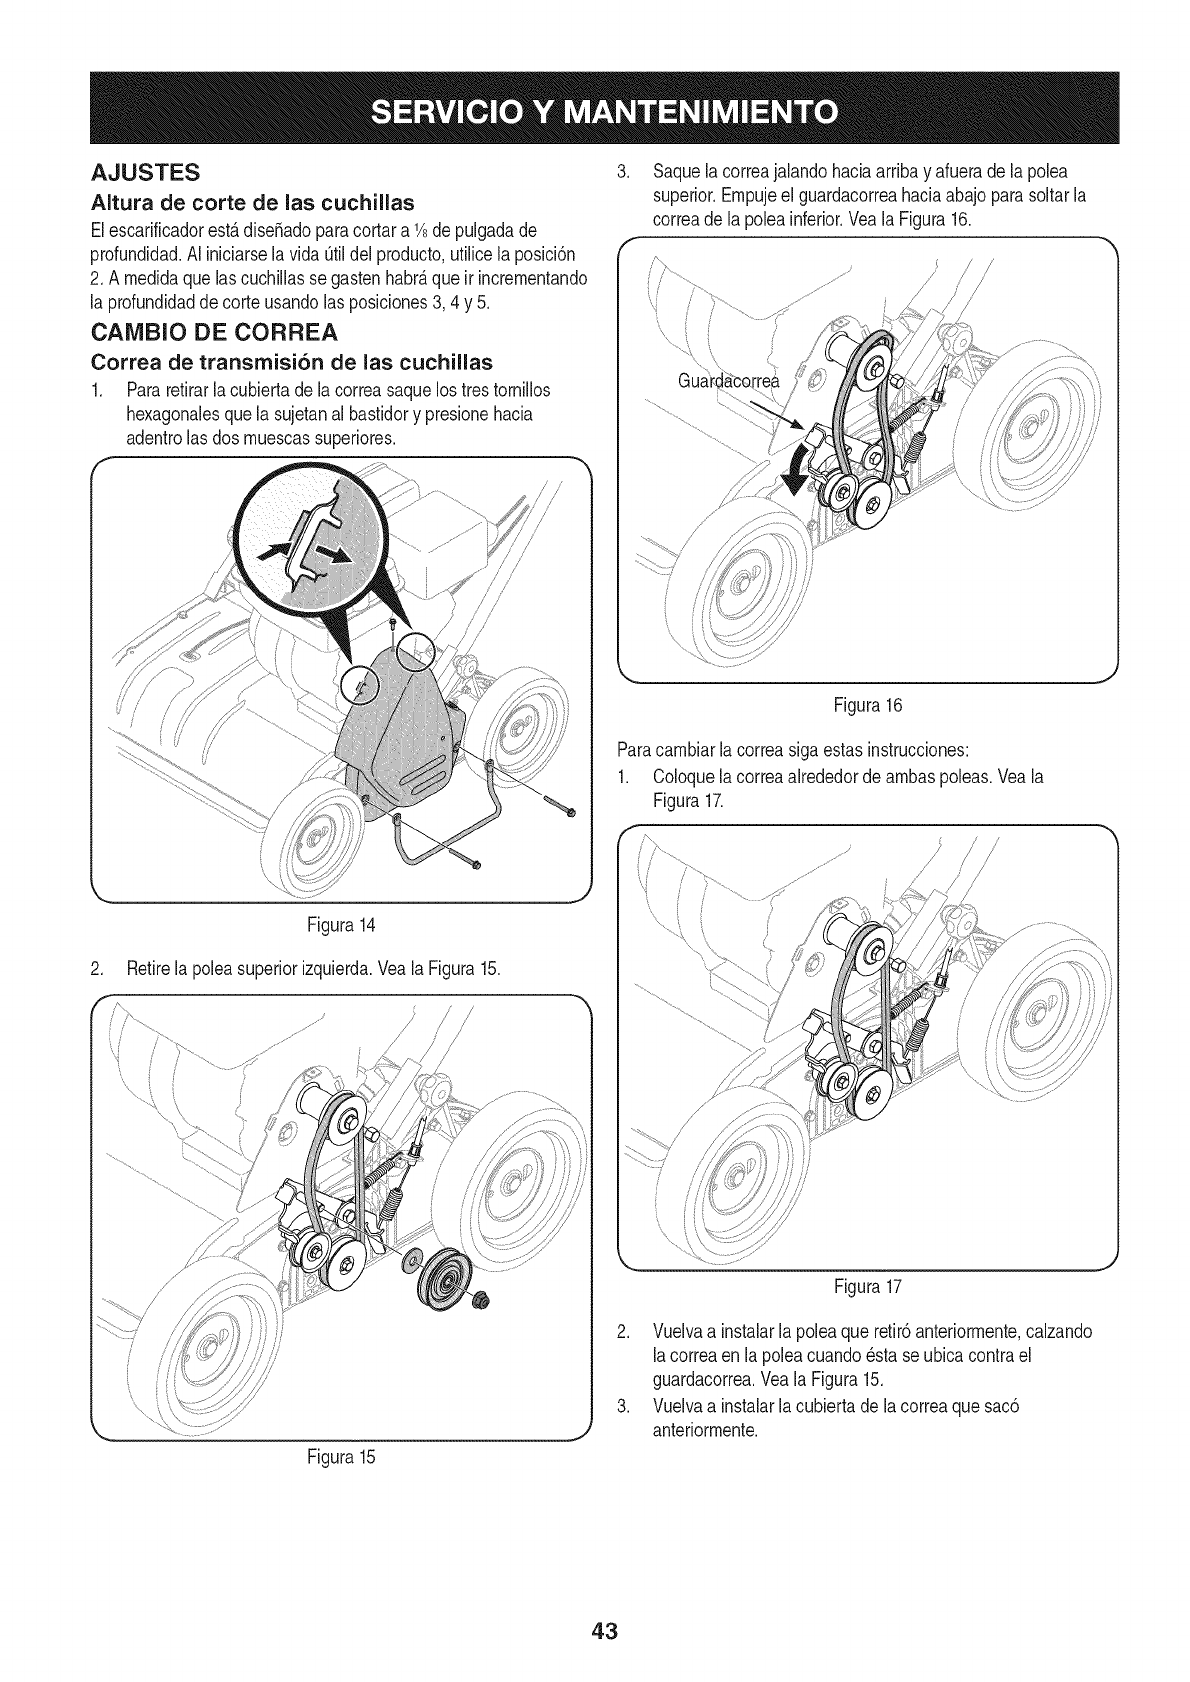
AJUSTES
AItura de corte de las cuchiJlas
Elescarificadorest&dise_adoparacortara 1/8depulgadade
profundidad.AI iniciarselavida Qtildel producto,utilicela posici6n
2. A medidaque lascuchillasse gastenhabr_,queir incrementando
la profundidadde corteusandolasposiciones3, 4 y 5.
CAiVIBIO DE CORREA
Correa de transmisi6n de las cuchillas
1. Pararetirarla cubiertade lacorreasaquelostrestornillos
hexagonalesquela sujetanal bastidory presionehacia
adentrolas dos muescassuperiores.
Figura14
2. Retirela poleasuperiorizquierda.Veala Figura15.
t'",
i
.Saquela correa alandohaciaarribay afuerade lapolea
superior.Ernpujeel guardacorreahaciaabajoparasoltarla
correadela poleainferior.Veala Figura16.
Figura16
Paracambiarlacorreasigaestasinstrucciones:
1. Coloquela correaalrededordearnbaspoleas.Veala
Figura17.
ii
\
Figura15
Figura17
2. Vuelvaa instalarla poleaque retir6anteriormente,calzando
la correaen la poleacuando_sta se ubicacontrael
guardacorrea.Veala Figura15.
3. Vuelvaa instalarlacubiertadela correaque sac6
anteriormente.
43

CAIViBIODE CUCHILLAS
Cuandolas cuchillasest&ntandesafiladasque noescarificanen
la posici6n5, o si algunadeelias se rornpe,siga estospasospara
reernplazarel conjuntodecuchillas.
1. Retirela cubiertadela correacornose describeen lasecci6n
Carnbiode correas.
2. Saquela poleainferior.Veala Figura18.
.
4.
5.
Figura18
Extraigalos seistornillosdel ladoderechoe izquierdo.Veala
Figura16.
Vuelqueel escarificadorsobreel ladoizquierdo,conel motor
rn_.scercadel suelo.
Desplaceel conjuntodecuchillashaciaafueraporel lado
derecho(opuestoal motor)y levanteunavezquelas cuchillas
se encuentrenfueradel alojarniento.Veala Figura19.
Paracarnbiarel conjuntode cuchillasconsultela Figura20.
Figura20
1. Inserteelconjuntodecuchillascornenzandocon el lado
izquierdo.
2. Jaleel ladoderechodel marcodelalojarnientohaciaafuera.
3. Desplaceel ladoderechodelconjuntode cuchillasa su lugar.
4. Vuelvaa colocarlos tornillosquesac6anteriorrnente.
5. Vuelvaa instalarla poleay lacubiertade lacorreaquesac6
anteriorrnente.
Figura19
44

FILTRO DE AIRE
Losfiitrosde papelnose puedenlirnpiar.Se debenreernplazar
unavez ala_oo cada 100horasde funcionarnientoy con mayor
frecuenciasi se utilizanen lugaresdondehaygrancantidadde
polvo.
Nuncause gasolinao solventesde puntode encendidobajoparalimpiar
el elementodel depuradordeaire. Podriaproducirseun incendioo
explosi6n.
NOTA:Nuncaopereel motorsin eldepuradorde aireinstalado.
Resultar_.en desgaster_.pidodel motor.
1. Optimala pestaSadela tapadel filtrodeairey levantela
tapa.Reernplaceelelernentodepapelsi est,.sucioo daSado.
Lirnpieelelernentode espurnao reernpl_.celosi est,.daSado.
f
\
.
Figura21
Paralirnpiarel elernentodeespurna,sep_.relodel elernento
depapely I_.velocondetergenteliquidoy agua.Perrnitaque
se sequebienantesdeusarlo.Nolubriqueel elernentode
espurna.
45

Si nose va a usarel escarificadordurante30 alaso rn_.s,es necesarioalrnacenarel equipoadecuadarnente.Sigalas instruccionesde
alrnacenarnientoquese indicana continuaci6nparagarantizarel rendirnientorn_.xirnodelescarificadorduranternuchosaSosrn_.s.
PREPARACION DEL MOTOR
Los rnotoresalrnacenadosrn_.sde30 diasnecesitanser drenados
decombustibleparaevitarquese deterioreny se forrnegornaenel
sisternade combustibleyen las piezasprincipalesdel carburador.
Si lagasolinaen su motorse deterioraduranteel alrnacenarniento,
es posiblequedeba repararo reernplazarelcarburadory otros
cornponentesdelsisternadecombustible.
1. Elirninetodoel combustibledeltanquehaciendofuncionarel
motorhastaquesedetenga.
2. Carnbieel aceitedelmotor.
3. Extraigala bujiade encendidoy viertaenel cilindro
aproxirnadarnente1onza(30 rnl)de aceiteparamotorlirnpio.
Tirevariasvecesdel arrancadorde retrocesoparadistribuirel
aceitey reinstalela bujfa.
4. Lirnpielos residuosacurnuladosalrededordel motor,y debajo,
alrededor,y detr_.sdelsilenciador.Apliqueunacapadelgada
deaceiteentodaslas_.reasquepuedenIlegaraoxidarse.
5. Guardeel motoren un sectorlirnpio,secoy bienventilado,
lejosdecualquierartefactoquefuncionecon unallamao luz
pilotocornohornos,calentadoresdeaguay secadoresderopa.
Evitecualquiersectorcon unmotorel_ctricoqueproduzca
chispaso dondese utilicenherrarnientasel_ctricas.
6. Sies posible,evitesectoresde alrnacenarnientoconrnucha
hurnedad.
7. Mantengael motorniveladocuandoIo alrnacene.Elmotor
inclinadopuededar lugara perdidasdecombustibleo aceite.
PREPARACION DEL ESCARIFICADOR
Sino seva a usarel escarificadordurante30dias o rn_.s,sigalas
instruccionesincluidasacontinuaci6n.
1. Alrnaceneel equipoen un_.readespejaday seca.
2. Sialrnacenael escarificadoren unlugarrnalventilado,cubra
laspiezasrnet_.licasde la rn_.quinaconunacapadelgadade
aceiteo siliconacornoantioxidante.
3. Lirnpieel exteriordelmotory delescarificador.
46
Antesde realizarcualquiertipodernantenirnientooservicio,desenganchetodosloscontrolesy detengael motor.
Esperea quesedetengancornpletarnentetodaslaspiezasrn6viles.Desconecteelcabledelabujfay p6ngalo
haciendornasacontraelmotorparaevitarqueseenciendaaccidentalrnente.Utilicesiernpreanteojosdeseguridad
_durantea operac6nornentrasreazaajusteso reparacones.
Estasecci6nanaliza problemasmenores de servicio.Paraubicar el Centrode ServicioSears m_s cercanooparaprogramarun
servicio,simplementecomuniqueseconSears al tel_fono 1-800-4-MY-HOME®.
El motornoarranca
El motorfuncionade rnanera
err_.tica
El motorrecalienta
Perdidadepotencia
Vibraci6nexcesiva 1.
1. Eldep6sitodecombustibleest,.vado oel
combustiblese ha echadoa perder.
2. Lalineadel combustibleest,.bloqueada.
3. Sehadesconectadoel cablede la bujia.
4. Labujiano funcionacorrectarnente.
1. Elmotorest,.funcionandoen laposici6n
"choke"(cebador).
2. Lalineadel combustibleest,.tapadaoel
combustiblees viejo.
3. Hayaguao suciedaden el sisternade
combustible.
4. Es necesarioregularelcarburador.
1. Es necesarioregularelcarburador.
1. Elcablede la bujfaest,.flojo.
2. Laventilaci6nde la tapadelcombustible
est,.obstruida.
1. Haypiezasflojaso las cuchillasest_.n
da_adas
1. Lleneel dep6sitocon gasolinalirnpiay nueva.
2. Lirnpiela lineadelcombustible.
3. Conecteelcable a labujia.
4. Lirnpiela bujia,ajusteladistanciadisruptivao
carnbielabujfa.
1. Muevalapalancadelcebadora la posici6nOFF
(apagado).
2. Lirnpiela Ifneadelcombustibley Ileneel
dep6sitocon gasolinalirnpiay nueva.
3. Vadee[ tanquedecombustible.Cargue
combustiblenuevoenel tanque.
4. Cornuniquesecon elcentrodeservicioSears.
1. Cornuniquesecon elcentrodeservicioSears.
1. Conectefirmernenteel cablede labujia.
2. Destapeiaventiiaci6n.
Detengael motorde inrnediatoy desconecte
elcable dela bujia.Controlesi la rn_.quina
est,.daffada.Ajustetodoslospernosy las
tuercas.Realicelas reparacionesnecesarias.
Siel problernapersiste.Ileveel escarificadora[
distribuidordeservicioSears.
LNECESITA MASAYU DA?
Encontrar_ la respuesta y m_s en managemyhome.com - isin cargo!
• En linea podr_ encontrar este manual y los manuales de todos sus otros productos.
• Sus preguntas ser_n respondidas por nuestro equipo de especialistas.
• Obtenga un plan de mantenimiento personalizado para su hogar.
• Encuentre informaci6n y herramientas que Io ayudar_n con los proyectos dom6sticos
47
Felicitacionesporhaberrealizadounaadquisici6ninteligente.El
productoCraftsman@quehaadquiridoest&diseSadoy fabricado
parabrindarmuchosaSosdefuncionamientoconfiable.Perocomo
todoslosproductosa vecespuederequerirde reparaciones.Esen
ese momentocuandoel disponerde unAcuerdode protecci6npara
reparacionesle puedeahorrardineroy problemas.
Acontinuaci6nsedetallanlos puntosincluidosen elAcuerdo:
* Servicio experto prestadopornuestros10,000especialistasen
reparacionesprofesionales
* Servicio ilimitadosincargoparalaspiezasy la manodeobraen
todaslas reparacionescubiertas
* Reemplazodel productohasta1500d61aressi no es posible
repararelproductocubierto
*Descuentode 10%del precionormaldel servicioy delas piezas
relacionadascon el mismoquenoest_ncubiertasporel acuerdo;
adem&s,10%del precionormalde laverificaci6nde manten-
imientopreventivo
*Ayudar_pidapot tel_fono -Io IlamarnosResoluci6nR_pida-el
apoyotelef6nicode unChamuscaal representante.Pienseen
nosotroscomoel manual"de undue_ohablador."
Unavezadquiridoel Acuerdo,puedeprogramarelservicio
con tan s61orealizarunaIlamadatelef6nica.PuedeIlamaren
cualquiermomentodeldia o dela nocheo programarunservicio
en linea.
ElAcuerdode Protecci6nde Reparaci6nes unacomprasin
riesgo.Siustedanulaporalgunaraz6nduranteel periodode
garanfiadeproducto,proporcionaremosun reembolsoIleno.O,
un reembolsoprorrateadoen cualquiermomentodespu_sdel
periodode garanfiade productoexpira,iAdquieraboysu acuerdo
de protecci6nparareparaciones!
Se aplican determinadaslimitaciones y e×clusiones.Para
obtener informaci6nadicionaly preciosen los Estados
UnidosIlarneal 1-800-827-6655.
El*Coverageen Canad;_variaen algunos articulos.
Paradetalles Ilenos la Ilamada ChamuscaCanad;_en
1-800-361-6665.
Servicio de instalaci6nde Sears
Si deseasolicitarla instalaci6nprofesionalde Searsde aparatos
dom_sticos,dispositivosparaabrirportones,calentadoresde
aguay otrosarficulosdom_sticosimportantes,enlos Estados
Unidoso Canad_Ilameal 1-800-4-MY-HOME@.
48

49

50

51

Your Home
For expert troubleshooting and home solutions advice:
www.managemyhome.com
For repair - in your home - of all major brand appliances,
lawn and garden equipment, or heating and cooling systems,
no matter who made it, no matter who sold it!
For the replacement parts, accessories and
owner's manuals that you need to do-it-yourself.
For Sears professional installation of home appliances
and items like garage door openers and water heaters.
1-800-4-MY-HOME ®(1-800-469-4663)
Call anytime, day or night (U.S.A. and Canada)
www.sears.com www.sears.ca
Our Home
For repair of carry-in items like vacuums, lawn equipment,
and electronics, call anytime for the location of your nearest
Sears Parts & Repair Service Center
1-800-488-1222 (U.S.A.) 1-800-469-4663 (Canada)
www.sears.com www.sears.ca
To purchase a protection agreement on a product serviced by Sears:
1-800-827-6655 (U.S.A.) 1-800-361-6665 (Canada)
Para pedir servicio de reparaci6n
a domicilio, y para ordenar piezas:
1-888-SU-HOGAR ®
(1-888-784-6427)
Au Canada pour service en fran£ais:
1-800-LE-FOYER M°
(1-800-533-6937)
www.sears.ca
TM SM
® Registered Trademark /Trademark /Service Mark of Sears Brands, LLC
TM
® Marca Registrada /Marca de F&brica /sM Marca de Servicio de Sears Brands, LLC
MCMarque de commerce /UD Marque depos6e de Sears Brands, LLC © Sears Brands, LLC
