Craftsman 247776611 User Manual LOG SPLITTER Manuals And Guides 1310042L
User Manual: Craftsman 247776611 247776611 CRAFTSMAN LOG SPLITTER - Manuals and Guides View the owners manual for your CRAFTSMAN LOG SPLITTER #247776611. Home:Lawn & Garden Parts:Craftsman Parts:Craftsman LOG SPLITTER Manual
Open the PDF directly: View PDF ![]() .
.
Page Count: 60
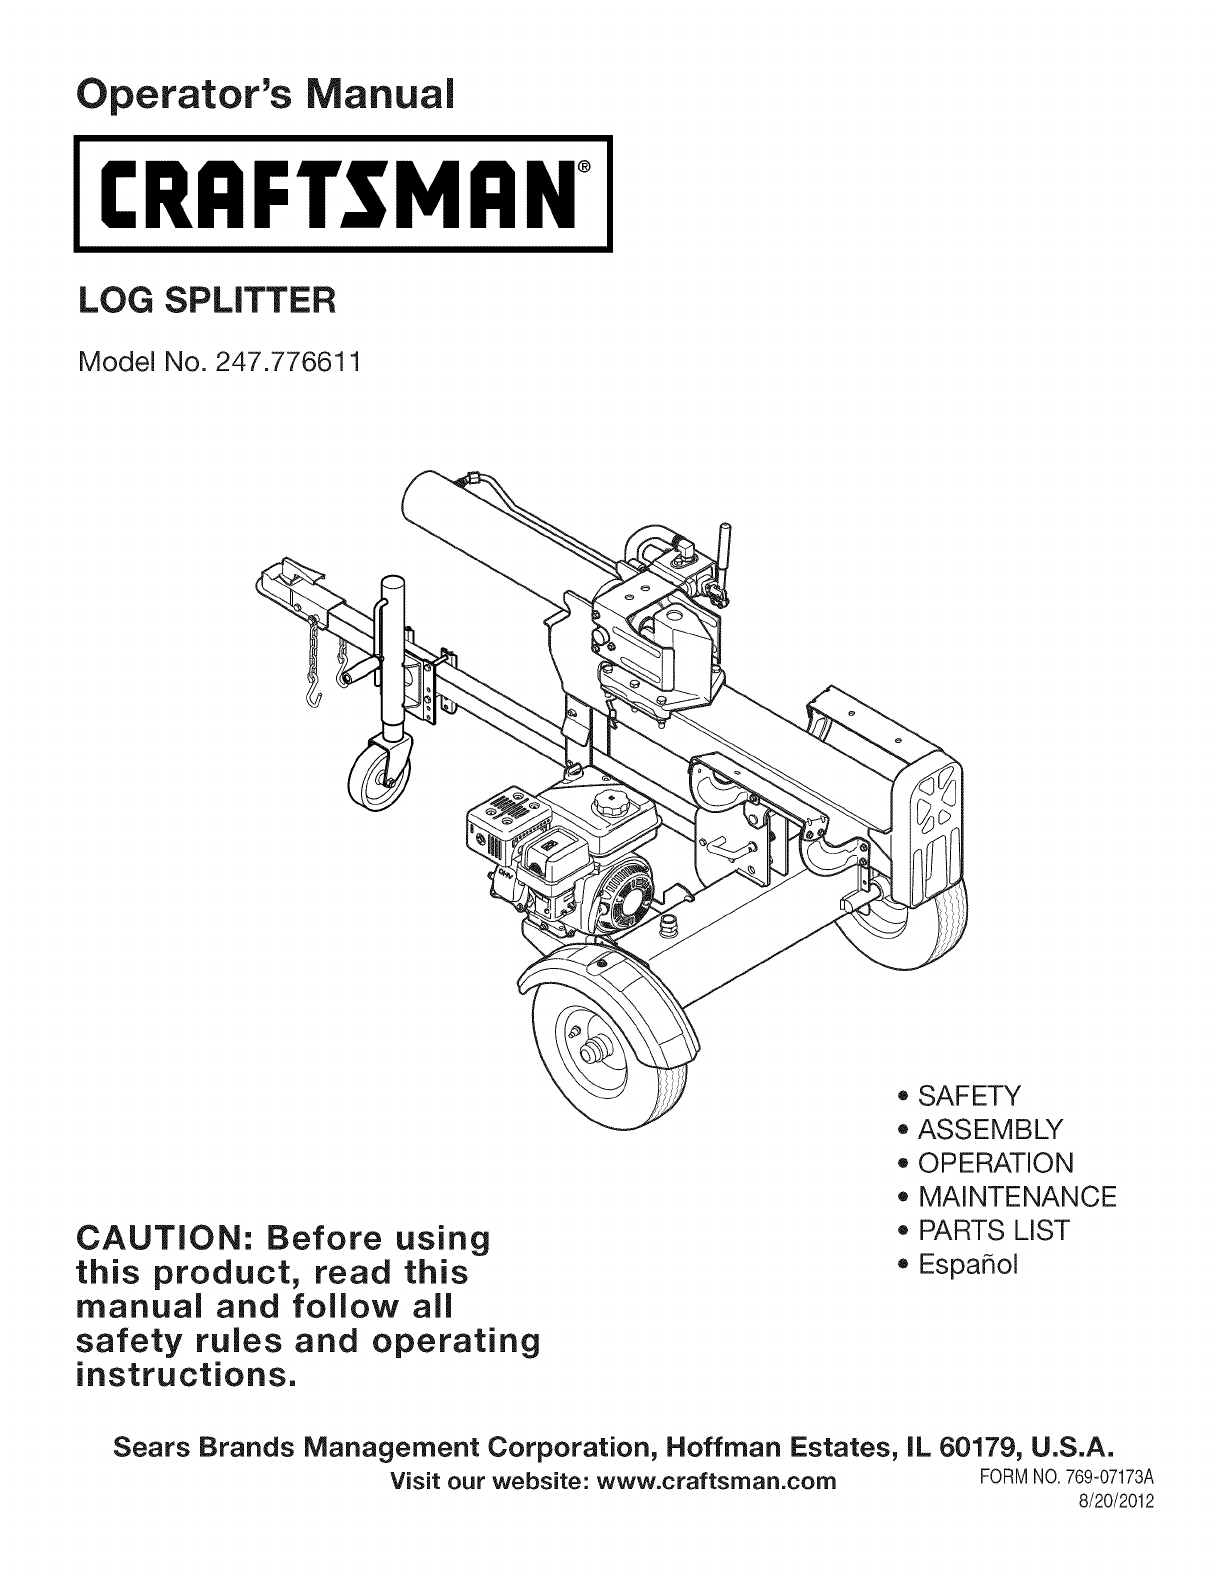
Operator's Manual
CRRF[SM ®
LOG SPLITTER
Model No. 247.776611
CAUTION: Before using
this product, read this
manual and follow all
safety rules and operating
instructions.
o SAFETY
ASSEMBLY
OPERATION
MAINTENANCE
PARTS LIST
Espa_ol
Sears Brands Management Corporation, Hoffman Estates, iL 60179, U.S.A.
Visit our website: www.craftsman.corn FORMNO.769-07173A
8/20/2012
Warranty Statement .................................. Page 2
Safe Operation Practices .......................... Pages 3-6
Assembly .................................................. Pages 7-10
Operation .................................................. Pages 11-15
Service & Maintenance ............................... Pages 16-20
Off Season Storage .................................. Page 21
Troubleshooting ........................................ Page 22-23
Parts List ..................................................... Pages 24-34
Labels ....................................................... Page 35
Repair Protection Agreement ................... Page 36
Espafiol ..................................................... Page 37
Service Numbers ...................................... Back Cover
CRAFTSMAN ONE YEAR FULL WARRANTY
FORONEYEARfromthe dateof purchase,this productis warrantedagainstanydefectsin materialor workmanship.A defectiveproductwill
receivefree repairor replacementif repairis unavailable,
Forwarrantycoveragedetailsto obtainfree repairor replacement,visitthe web site:www.craftsman.com
Thiswarranty coversONLYdefects in material andworkmanship. Warranty coverage does NOTinclude:
• Expendableitemsthatcan wearoutfromnormalusewithinthewarrantyperiod,suchas the spark plug, air cleaner, belts, and oil
filter.
• Productdamageresultingfromuserattemptsat productmodificationor repairorcausedby productaccessories.
• Repairsnecessarybecauseof accidentorfailureto operateor maintainthe productaccordingto all suppliedinstructions.
• Preventivemaintenance,or repairsnecessarydueto improperfuel mixture,contaminatedor stalefuel.
Thiswarrantyis void if thisproductis everusedwhile providingcommercialservicesor if rentedto anotherperson,
Thiswarrantygivesyou specificlegalrights,andyou mayalso haveotherrightswhichvaryfromstateto state,
Sears Brands Management Corporation, Hoffman Estates, IL 60179
Engine Series: 752Z170-LU
Engine Oil: SAE 30
Engine Oil Capacity: 20 Ounces
Fuel Capacity: 1.5 Quarts
Spark Plug (.030" Gap): Champion® RJ19LM
Hydraulic Fluid/Capacity: Dexron® Ill/3.0 gal.
Model Number .............................................................
Serial Number ..............................................................
Date of Purchase ..........................................................
Record the model number, serial number
and date of purchase above
©SearsBrands,LLC
2
4_ Thissymbolpointsout importantsafetyinstructions
which,if not followed,could endangerthe personal
safetyand/or propertyof yourselfandothers.Read
andfollowall instructionsin thismanualbefore
attemptingto operatethismachine.Failureto comply
withtheseinstructionsmayresultin personalinjury.
Whenyousee thissymbol,HEEDITSWARNING!
Thismachinewasbuilt to beoperatedaccordingto the safeopera-
tion practicesin thismanual.As withany typeof powerequipment,
carelessnessorerroronthe part of the operatorcan resultin
seriousinjury.Thismachineis capableof amputatingfingers,hands,
toesandfeetandthrowingdebris.Failureto observethe following
safetyinstructionscouldresultin seriousinjuryordeath.
CALIFORNIA PROPOSITION 65
EngineExhaust,someof itsconstituents,andcertainvehicle
componentscontainoremitchemicalsknownto Stateof California
to causecancerandbirthdefectsorother reproductiveharm.
Your Responsibility -- Restrictthe use of thispowermachine
to personswho read,understandandfollowthewarningsand
instructionsinthis manualandonthe machine.
SAVE THESE INSTRUCTIONS!
TRAINING
1. Read,understand,andfollowall instructionson the machineand
in themanual(s)beforeattemptingto assembleandoperate.
Keepthis manualina safeplacefor futureand regularreference
andfor orderingreplacementparts.
2. Befamiliarwithall controlsandtheir properoperation.Knowhow
to stopthe machineanddisengagethemquickly.
3. Neverallowchildrenunder16yearsof ageto operatethis
machine.Children16andovershouldreadandunderstandthe
instructionsandsafeoperationpracticesin thismanualandon
the machineandbe trainedandsupervisedby anadult.
4. Neverallowadultsto operatethis machinewithoutproper
instruction.
5. Manyaccidentsoccurwhen morethan onepersonoperatesthe
machine.Ifa helperis assistingin stackinglogs,neveractivate
the controluntilthe helperis a minimumof 10feetfromthe
machine.
6. Keepbystanders,pets,andchildrenat least10feetfromthe
machinewhile it is in operation.
7. Neverallowanyoneto rideon thismachine.
8. Nevertransportcargoonthis machine.
9. Hydrauliclogsplittersdevelophighfluidpressuresduringopera-
tion.Fluidescapingthrougha pinholeopeningcan penetrate
yourskinandcausebloodpoisoning,gangrene,or death.Give
attentionto the followinginstructionsat all times:
a. Do notcheckfor leakswithyourhand.
b. Do notoperatemachinewithfrayed,kinked,cracked,or
damagedhoses,fittings,ortubing.
c. Stopthe engineandrelievehydraulicsystempressureby
cyclingthe valvecontrolleverfromforwardto reverseseveral
timeswhileengineis not running;returningto neutralbefore
repairingor adjustingfittings,hoses,tubing,orother system
components.
d. Do notadjustthe pressuresettingsof the pumporvalve.
10. Leakscanbe detectedby passingcardboardorwood,while
wearingprotectiveglovesand safetyglasses,overthe suspected
area. Lookfor discolorationof cardboardorwood.
11. Ifinjuredby escapingfluid,see a doctorimmediately.Serious
infectionor reactioncandevelopif propermedicaltreatmentis not
administeredimmediately.
12. Keeptheoperatorzoneandadjacentareaclearfor safe,secure
footing.
13. Ifyour machineis equippedwithaninternalcombustionengine
and is intendedfor usenearanyunimprovedforest,brush,or
grasscoveredland,the engineexhaustshouldbeequippedwith
a sparkarrestor.Makesureyoucomplywithapplicablelocal,
state,andfederalcodes.Takeappropriatefirefightingequipment
withyou.
14. Thismachineshouldbeusedfor splittingwoodonly,do notuse it
for anyother purpose.
15. Followthe instructionsinthe manual(s)providedwithany
attachment(s)for thismachine.
PREPARATION
1. Alwayswear safetyshoesor heavyboots.
2. Alwayswear safetyglassesor safetygoggleswhenoperatingthis
machine.
3. Neverwearjewelryor looseclothingthatmightbecomeentangled
inmovingor rotatingpartsof the machine.
4. Makesuremachineis ona flat,dry,solid groundbeforeoperating.
5. Alwaysblockwheelsto preventunintendedmovement,andlock
beamineitherthe horizontalorverticalposition.
3
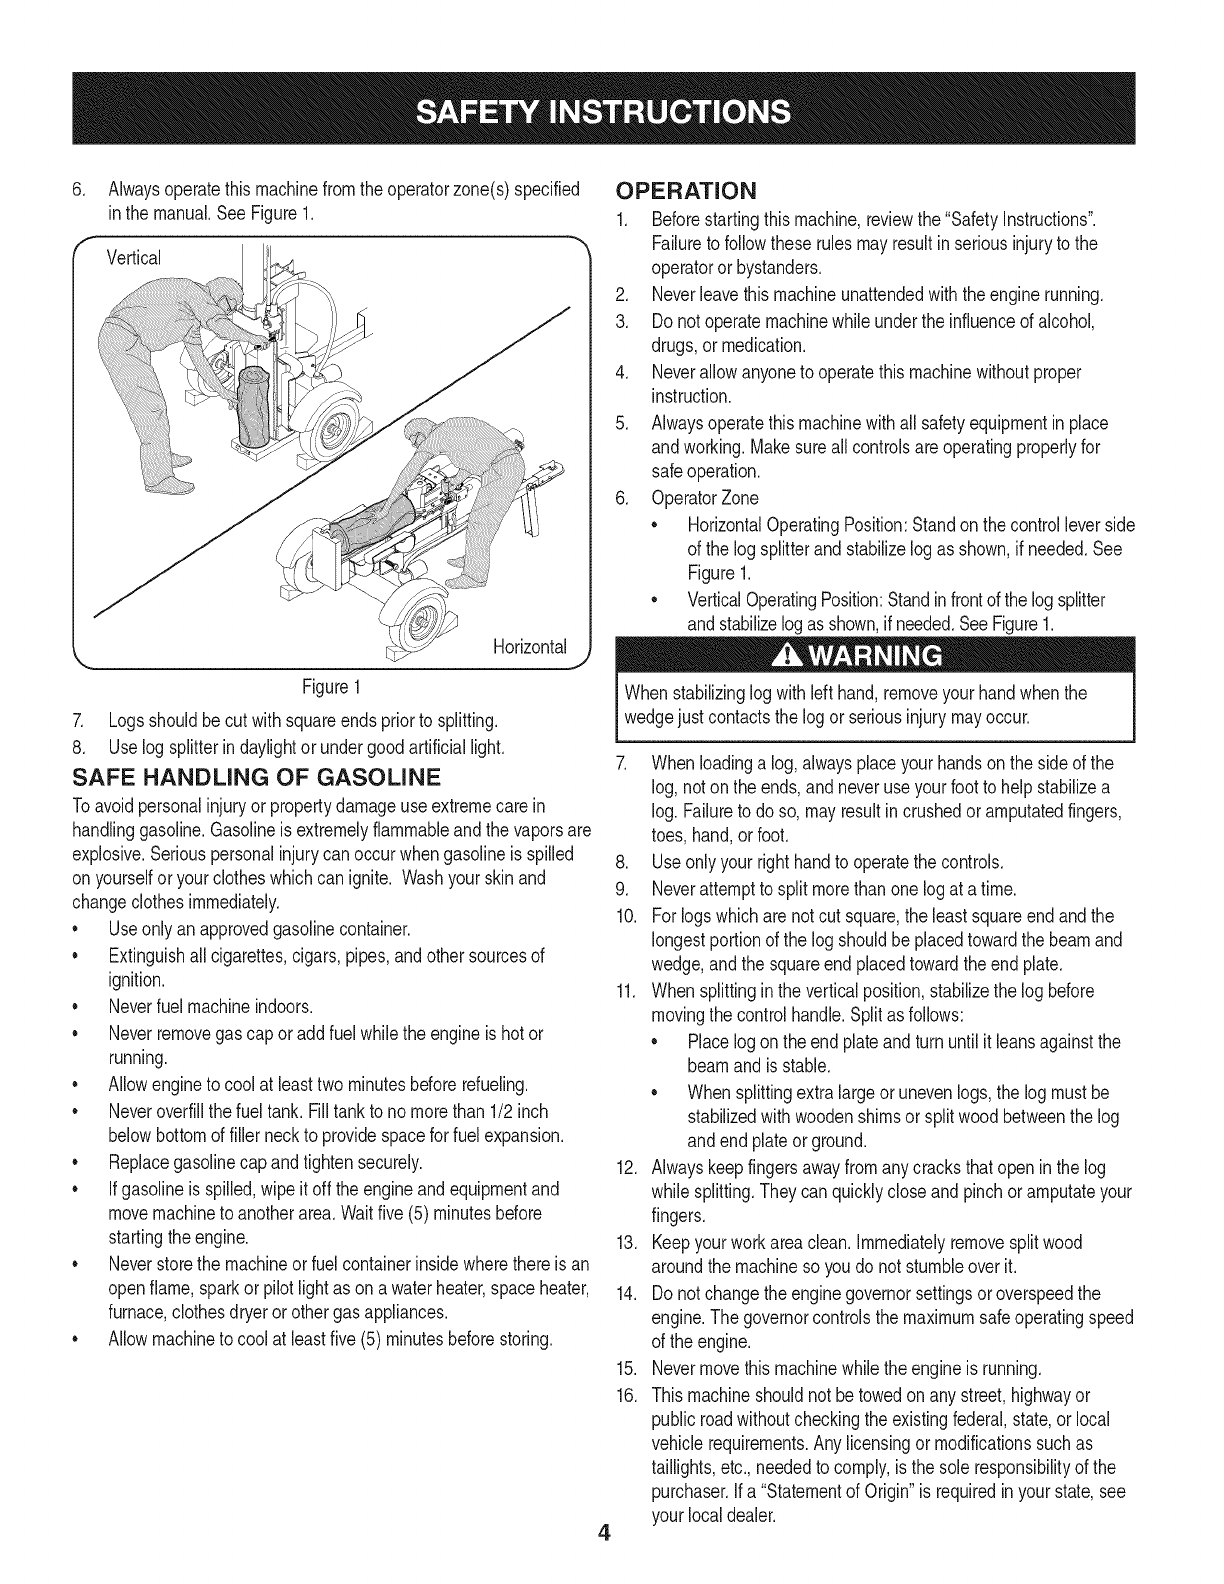
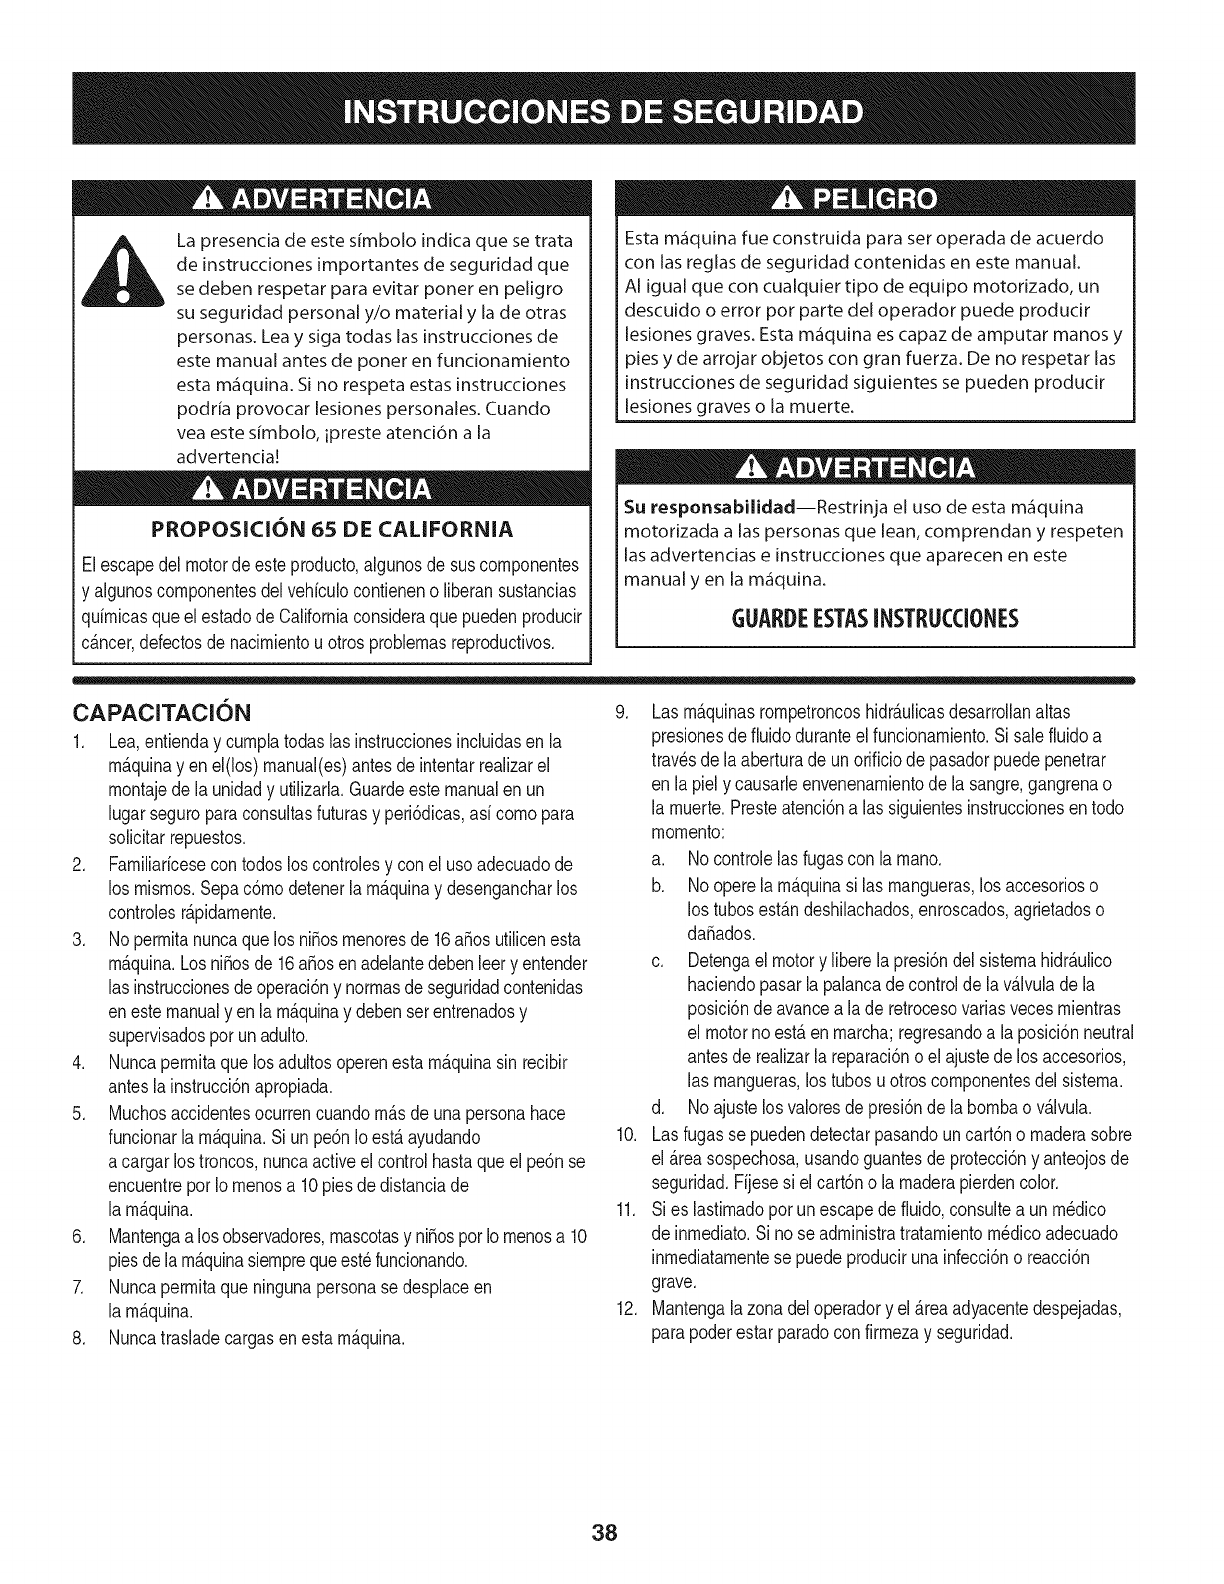
.Alwaysoperatethismachinefromtheoperatorzone(s)specified
inthe manual.SeeFigure1.
Vertical
Figure1
7. Logsshouldbecut withsquareendspriorto splitting.
8. Uselogsplitterin daylightor undergoodartificiallight.
SAFE HANDLING OF GASOLINE
Toavoidpersonalinjuryor propertydamageuseextremecare in
handlinggasoline.Gasolineis extremelyflammableandthe vaporsare
explosive.Seriouspersonalinjurycan occurwhengasolineis spilled
onyourselfor yourclotheswhichcan ignite. Washyour skinand
changeclothesimmediately.
• Useonlyan approvedgasolinecontainer.
• Extinguishallcigarettes,cigars,pipes,andothersourcesof
ignition.
• Neverfuel machineindoors.
• Neverremovegas capor addfuel whilethe engineis hot or
running.
• Allowengineto coolat leasttwo minutesbeforerefueling.
• Neveroverfillthe fueltank. Filltankto no morethan 1/2inch
belowbottomof filler neckto providespacefor fuel expansion.
• Replacegasolinecapandtightensecurely.
• Ifgasolineis spilled,wipe it off theengineandequipmentand
movemachineto anotherarea.Waitfive (5)minutesbefore
startingtheengine.
• Neverstorethe machineorfuel containerinsidewherethereis an
openflame,sparkor pilotlightas on awaterheater,spaceheater,
furnace,clothesdryer orothergas appliances.
• Allowmachineto cool at leastfive(5) minutesbeforestoring.
OPERATION
1. Beforestartingthis machine,reviewthe "SafetyInstructions".
Failureto followtheserulesmayresultin seriousinjuryto the
operatoror bystanders.
2. Neverleavethismachineunattendedwiththe enginerunning.
3. Donot operatemachinewhile underthe influenceof alcohol,
drugs,ormedication.
4. Neverallowanyoneto operatethismachinewithoutproper
instruction.
5. Alwaysoperatethismachinewithall safetyequipmentin place
andworking.Makesureall controlsareoperatingproperlyfor
safeoperation.
6. OperatorZone
• HorizontalOperatingPosition:Standon thecontrolleverside
of the log splitterand stabilizelogas shown,if needed.See
Figure1.
• VerticalOperatingPosition:Standinfrontof thelogsplitter
andstabilizelogas shown,if needed.SeeFigure1.
Whenstabilizinglog withlefthand,removeyour handwhenthe
wedgejust contactsthe logor seriousinjurymayoccur.
4
7. Whenloadinga log, alwaysplaceyourhandsonthe sideof the
log, noton the ends,and neveruseyour footto helpstabilizea
log. Failureto do so,mayresultin crushedor amputatedfingers,
toes, hand,or foot.
8. Useonly yourrighthandto operatethe controls.
9. Neverattemptto split morethan onelogat a time.
10. Forlogswhicharenot cutsquare,the leastsquareendandthe
longestportionof the log shouldbe placedtowardthe beamand
wedge,andthe squareend placedtowardthe endplate.
11. Whensplittinginthe verticalposition,stabilizethe logbefore
movingthe controlhandle.Splitas follows:
• Placelogon the endplateandturn untilit leansagainstthe
beamand is stable.
• Whensplittingextralargeor unevenlogs,the logmustbe
stabilizedwithwoodenshimsor splitwoodbetweenthe log
andend plateorground.
12. Alwayskeepfingersawayfromany cracksthatopenin thelog
while splitting.Theycanquicklycloseandpinchor amputateyour
fingers.
13. Keepyourworkareaclean.Immediatelyremovesplitwood
aroundthe machineso youdo notstumbleover it.
14. Donot changethe enginegovernorsettingsoroverspeedthe
engine.The governorcontrolsthe maximumsafeoperatingspeed
of the engine.
15. Nevermovethismachinewhilethe engineis running.
16. Thismachineshouldnotbe towedonany street,highwayor
public roadwithoutcheckingtheexistingfederal,state,orlocal
vehiclerequirements.Any licensingor modificationssuchas
taillights,etc.,neededto comply,is the sole responsibilityof the
purchaser.Ifa "Statementof Origin"is requiredinyour state,see
your localdealer.
17.Donottowmachineover45mph.
18.SeeTransportingtheLogSplittersectioninthismanualforproper
towinginstructionsonceallfederal,local,orstaterequirements
aremet.
MAINTENANCE AND STORAGE
1. Stopthe engine,disconnectthe sparkplugandgroundit against
the enginebeforecleaning,orinspectingthe machine.
2. Stopthe engineandrelievehydraulicsystempressureby cycling
the valvecontrolleverfromforwardto reverseseveraltimeswhile
engineis not running;returningto neutralbeforerepairingor
adjustingfittings,hoses,tubing,or othersystemcomponents.
3. Topreventfires, cleandebrisandchaff fromthe engineand
mufflerareas.Ifthe engineis equippedwitha sparkarrestor
muffler,cleanand inspectit regularlyaccordingto manufacturers
instructions.Replaceif damaged.
4. Periodicallycheckthatall nutsandbolts,hoseclamps,and
hydraulicfittingsaretightto besureequipmentis insafeworking
condition.
5. Checkallsafetyguardsandshieldsto be suretheyarein the
properposition.Neveroperatewithsafetyguards,shields,or
otherprotectivefeaturesremoved.
6. Thepressurereliefvalveis presetat thefactory.Donot adjustthe
valve.
7. Neverattemptto movethismachineoverhillyor uneventerrain
withouta towvehicleor adequatehelp.
8. Foryour safety,replaceall damagedor wornpartsimmediately
withoriginalequipmentmanufacturer's(O.E.M) partsonly.Useof
partswhichdo notmeetthe originalequipmentspecificationsmay
leadto improperperformanceandcompromisesafety!
9. Do notalter thismachinein any manner,alterationssuchas
attachinga ropeorextensionto the controlhandle,or addingto
the widthor heightof the wedgemayresultin personalinjury.
10. Accordingto the ConsumerProductsSafetyCommission(CPSC)
andthe U.S.EnvironmentalProtectionAgency(EPA),thisproduct
hasan Average UsefulLifeof seven(7)years,or 130hoursof
operation.At the endof theAverageUsefulLifehavethe machine
inspectedannuallybyan authorizedservicedealerto ensurethat
allmechanicalandsafetysystemsareworkingproperlyand not
wornexcessively.Failureto do so can resultinaccidents,injuries
ordeath.
SPARK ARRESTOR
Thismachineis equippedwithan internalcombustionengineand
shouldnotbe usedonor nearanyunimprovedforest-covered,brush
coveredor grass-coveredlandunlesstheengine'sexhaustsystem
is equippedwitha sparkarrestormeetingapplicablelocalor state
laws(if any).
Ifa sparkarrestoris used,it shouldbe maintainedin effectiveworking
orderby theoperator.Inthe Stateof Californiathe aboveis required
bylaw (Section4442of the CaliforniaPublicResourcesCode).Other
statesmayhavesimilarlaws. Federallawsapplyonfederallands.
A sparkarrestorfor the muffleris availablethroughyournearest
engineauthorizedservicedealeror contactthe servicedepartment,
RO.Box361131Cleveland,Ohio44136-0019.
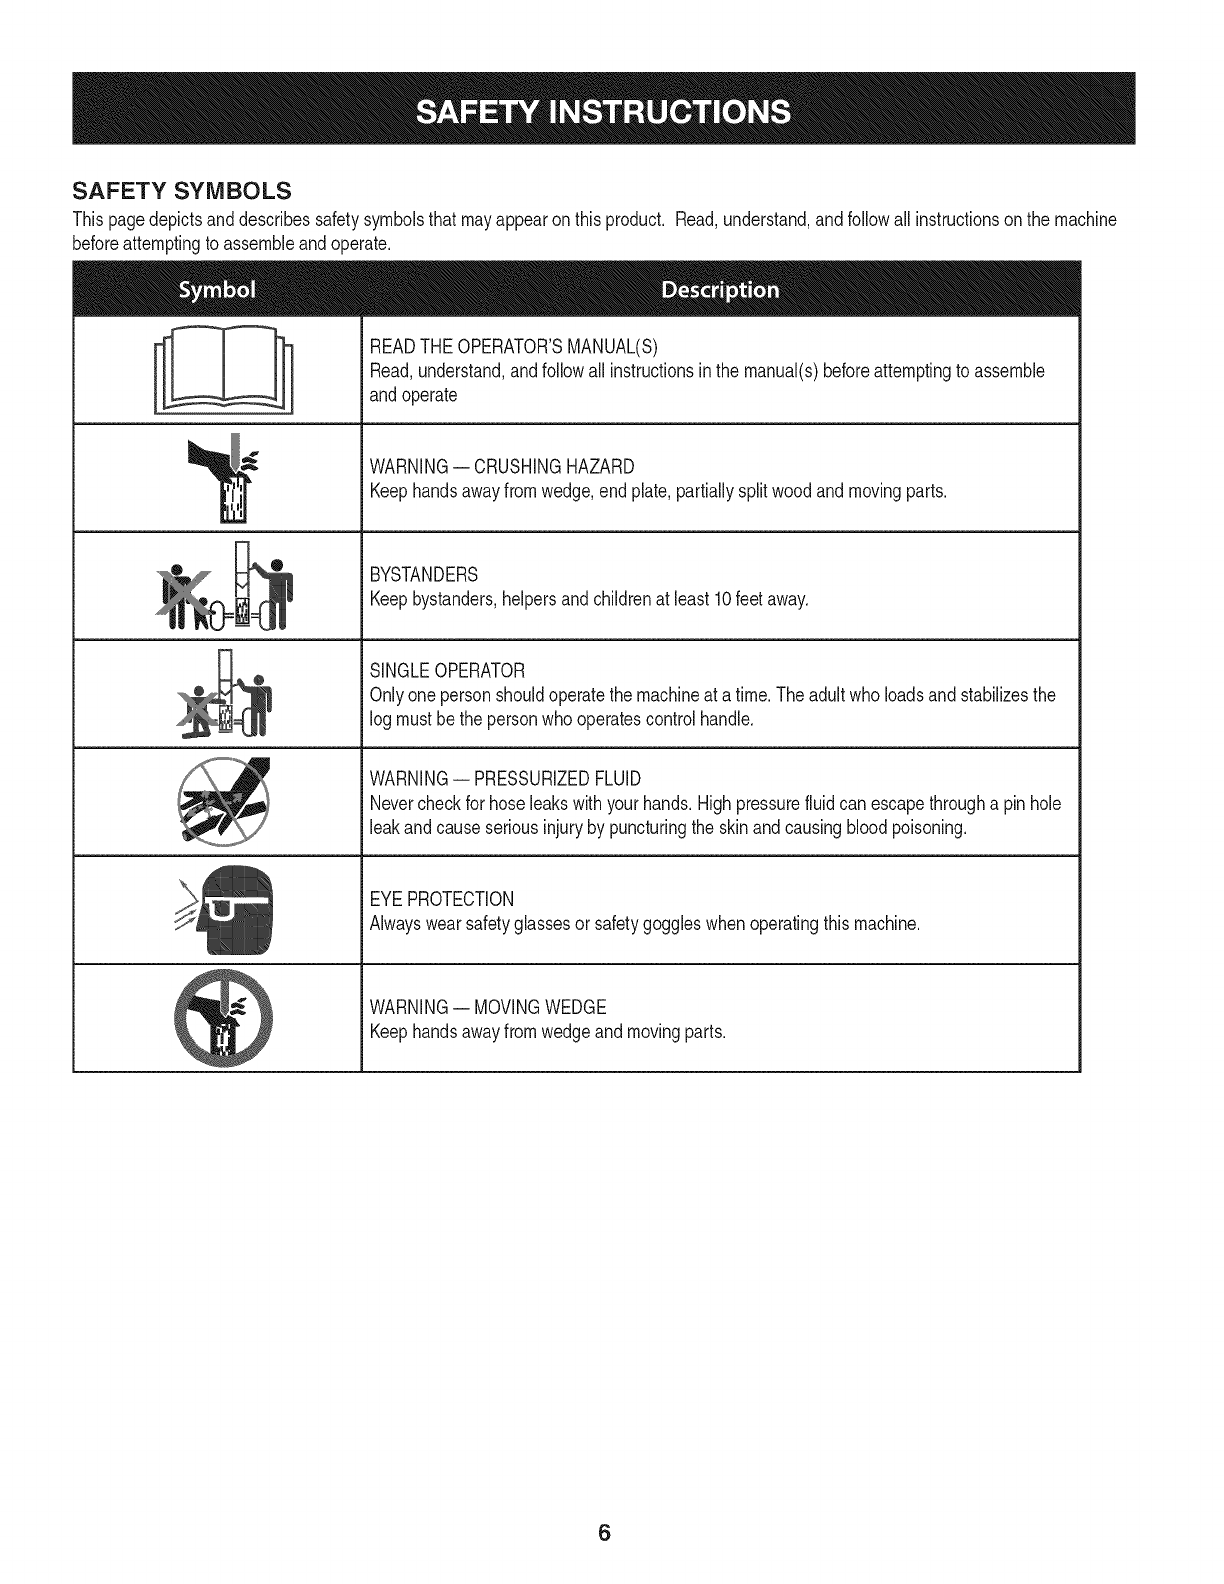
SAFETY SYMBOLS
Thispagedepictsanddescribessafetysymbolsthatmayappearonthisproduct. Read,understand,andfollowall instructionson the machine
beforeattemptingto assembleandoperate.
ii
'lI
READTHEOPERATOR'SMANUAL(S)
Read,understand,andfollowall instructionsinthe manual(s)beforeattemptingto assemble
andoperate
WARNING-- CRUSHINGHAZARD
Keephandsawayfromwedge,endplate,partiallysplitwood andmovingparts.
BYSTANDERS
Keepbystanders,helpersandchildrenat least10feetaway.
SINGLEOPERATOR
Onlyonepersonshouldoperatethe machineat a time.The adultwho loadsand stabilizesthe
logmustbethe personwho operatescontrolhandle.
WARNING-- PRESSURIZEDFLUID
Nevercheckfor hoseleakswithyourhands.High pressurefluidcan escapethrougha pin hole
leakandcauseseriousinjuryby puncturingthe skinandcausingbloodpoisoning.
EYEPROTECTION
Alwayswear safetyglassesor safetygoggleswhenoperatingthismachine.
WARNING-- MOVINGWEDGE
Keephandsawayfromwedgeandmovingparts.
6
Useextremecautionunpackingthismachine.Somecomponentsare
veryheavyandwill requireadditionalpeopleor mechanicalhandling
equipment.
NOTE:Yourlogsplitteris shippedwithmotoroilinthe engine.However,
youMUSTcheckthe oillevelbeforeoperating.Becarefulnot tooverfill.
SeeGasandOilFill-Upinthissection.
NOTE:All referencesin thismanualto the leftor right sideof the log
splitterarefromtheoperatingpositiononly.SeeOperatorZonein the
Operationsectionof the Safetyinstructions.
UNPACKING & ASSEMBLING THE LOG
SPLITTER
TOOLS NEEDED: Safetyglasses,leathergloves,wirecutters,prybar
and/orclawhammer.
1. Usea pry barorclawhammerto loosenand removethe topof
thecrate.
2. Usea pry barorclawhammerto removethe sidesof thecrate,
beginningwiththe shortsides(orleftand rightsideof the log
splitter).Setthe sidesof the crateasideto avoid injury.
3. Onthefrontsideofthecratethetongueassemblyis attachedonthe
insideof thecratewitha cabletie.Cutthecabletieto removetongue.
4. Removethe largeplasticcoveranddiscard.
Do NOTremoveanywoodor cutany strapssecuringthe logsplitter
I orits componentsto the log splitteror thecrateat thistime. Only
removestrapsand/orwoodwhen instructedto doso.
5. inspectthe bottomof the cratefor anyprotrudingstaplesor wood
splintersandremove.
6. Removeany loosepartsincludedwiththe logsplitter(i.e.opera-
tot's manual,etc.).
7. Removethe four hexboltsandlocknutsfor securingadjustable
jack standfromhardwarepack.
8. Placetheadjustablejack standhalfwaybetweenthe beam
support/latchbracketandendof thetongue.SeeFigure1.
9. Insertthe hex boltsthroughtop holesinthe jackstandmounting
bracketsandholesinthe adjustablejackstand.Securewith lock
nuts.
10. Insertthe hex boltsthroughthe upperholesin the bottomof the
mountingbracketsandadjustablejack stand.Securewith lock
nuts.
11. The adjustablejack standis raisedbyturningthe crankclockwise
and loweredby turningcounter-clockwise.
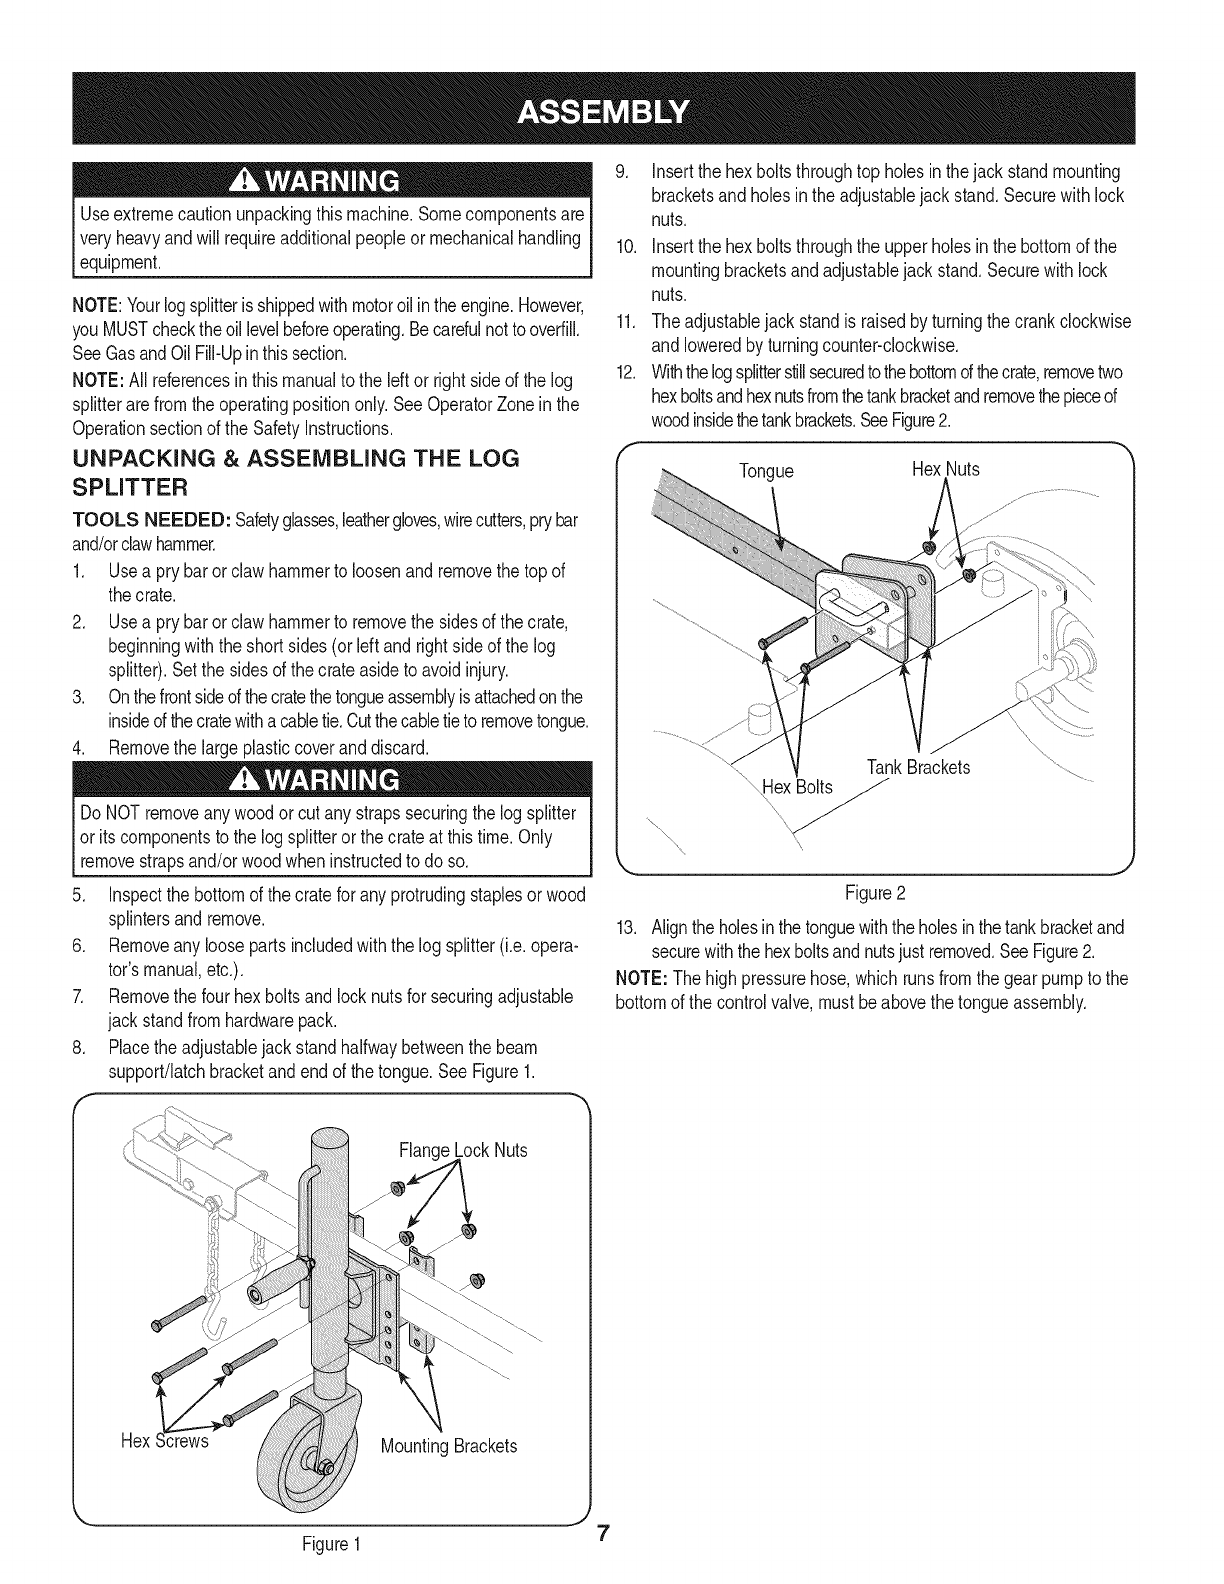
12. Withthelogsplitterstillsecuredtothebottomofthecrate,removetwo
hexboltsandhexnutsfromthetankbracketandremovethepieceof
woodinsidethetankbrackets.SeeFigure2.
Tongue HexNuts
TankBrackets ...............................
\Hex_
_ J
Figure2
13. Alignthe holesin thetonguewiththe holesin thetankbracketand
securewiththe hexboltsandnutsjust removed.SeeFigure2.
NOTE: Thehighpressurehose,whichrunsfromthe gearpumpto the
bottomof the controlvalve,mustbeabovethetongueassembly.
FlangeLockNuts
mex MountingBrackets
Figure1 7
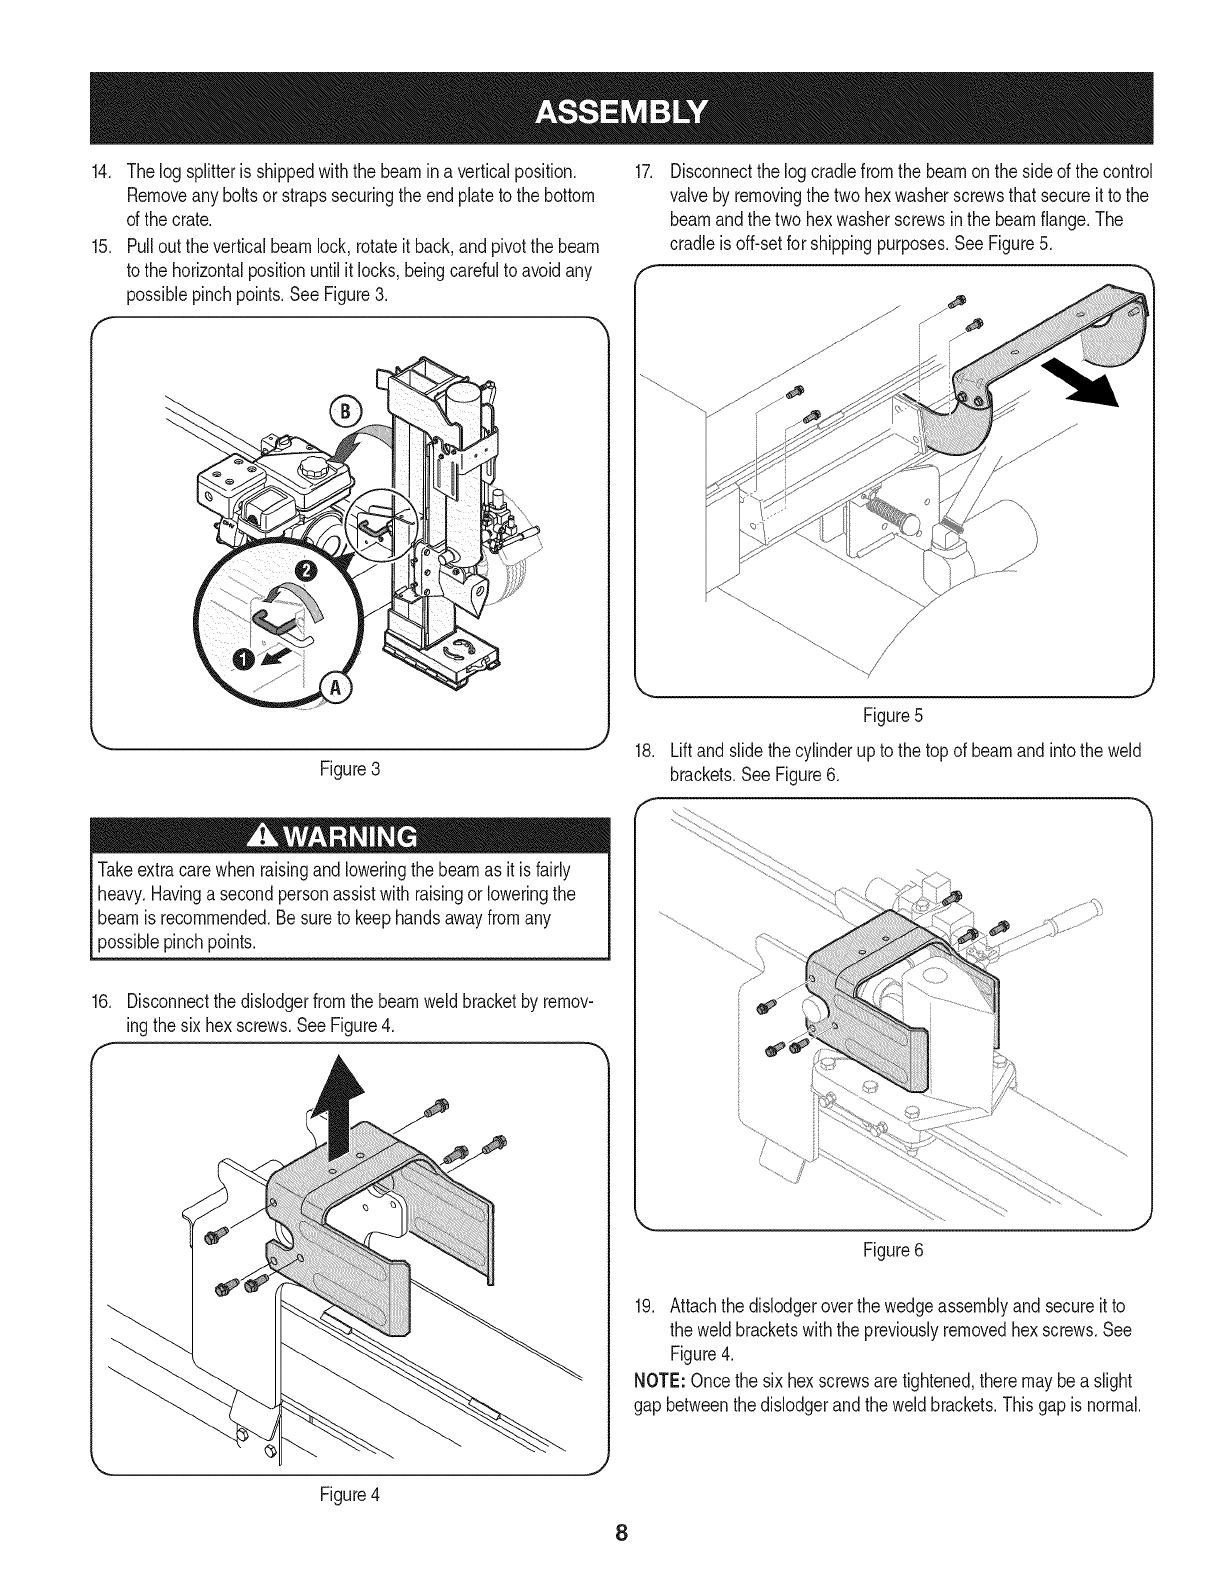
14, Thelog splitteris shippedwiththe beamina verticalposition,
Removeanyboltsor strapssecuringthe endplateto the bottom
of the crate.
15. Pulloutthe verticalbeamlock, rotateit back,andpivotthe beam
to the horizontalpositionuntilit locks,beingcarefulto avoidany
possiblepinchpoints.See Figure3.
j
Figure3
17. Disconnectthe logcradlefromthe beamon theside of the control
valveby removingthe two hexwasherscrewsthatsecureit to the
beamandthe twohex washerscrewsin the beamflange.The
cradleis off-setfor shippingpurposes.SeeFigure5.
18.
Figure5
Liftandslidethe cylinderupto the top of beamandintothe weld
brackets.SeeFigure6.
Takeextracarewhen raisingandloweringthe beamas it is fairly
heavy.Havinga secondpersonassistwithraisingor loweringthe
beamis recommended.Besureto keephandsawayfromany
possiblepinchpoints.
16. Disconnectthe dislodgerfromthe beamweld bracketby remov-
ingthe sixhex screws.SeeFigure4.
f-,
\
Figure4
Figure6
19. Attachthe dislodgeroverthe wedgeassemblyandsecureit to
the weldbracketswiththe previouslyremovedhex screws.See
Figure4.
NOTE:Oncethe sixhex screwsaretightened,theremaybea slight
gap betweenthe dislodgerandtheweld brackets.Thisgap is normal.
8
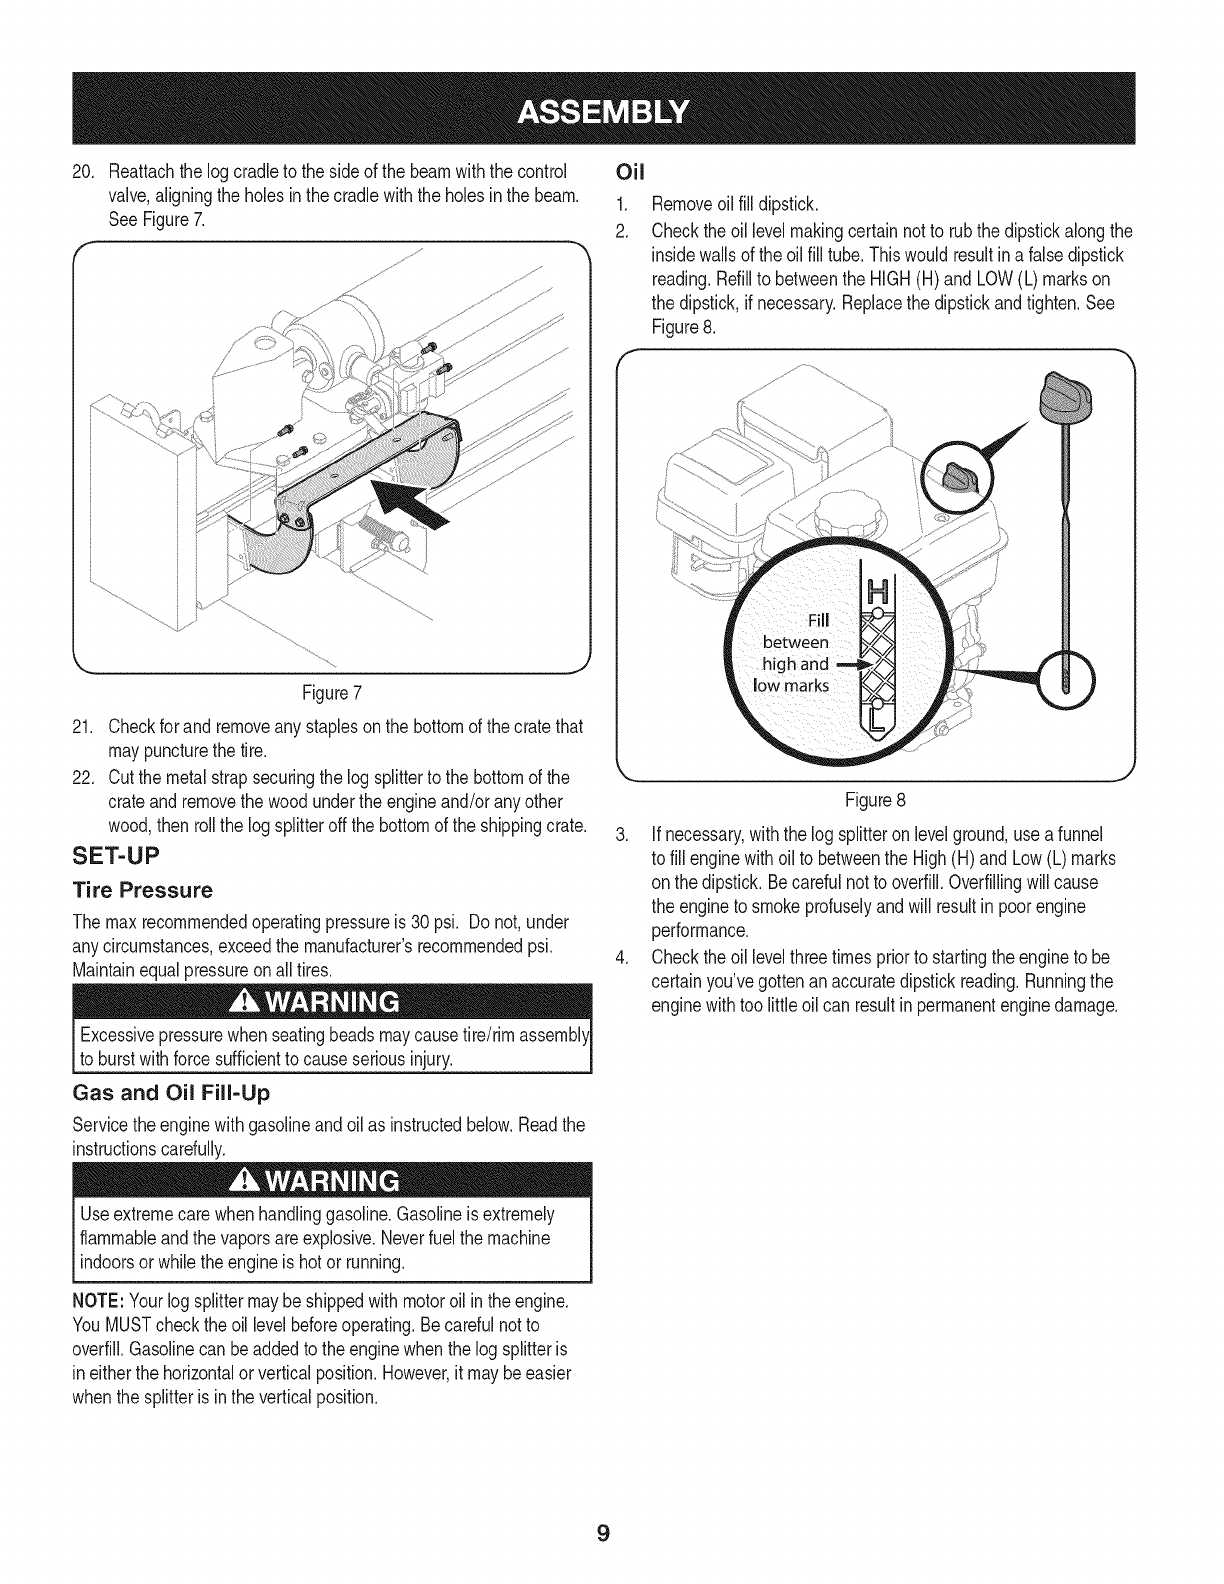
20. Reattachthe logcradleto the sideof the beamwiththe control Oil
valve,aligningthe holesin thecradlewiththe holesin the beam. 1.
SeeFigure7. 2.
J
Figure7
21. Checkfor and removeany staplesonthe bottomof the cratethat
maypuncturethe tire.
22. Cutthe metalstrapsecuringthe log splitterto the bottomof the
crateand removethe woodunderthe engineand/orany other
wood,then rollthe logsplitteroffthe bottomof the shippingcrate.
SET-UP
Tire Pressure
The maxrecommendedoperatingpressureis 30 psi. Do not,under
anycircumstances,exceedthe manufacturer'srecommendedpsi.
Maintainequalpressureon alltires.
Excessivepressurewhen seatingbeadsmaycausetire/rim
to burstwithforcesufficientto causeseriousinjury.
Gas and Oil Fill-Up
Servicethe enginewithgasolineandoil as instructedbelow.Readthe
instructionscardully.
Useextremecarewhenhandlinggasoline.Gasolineis extremely
flammableandthe vaporsareexplosive.Neverfuelthe machine
indoorsor whilethe engineis hot or running.
NOTE:Yourlogsplittermaybe shippedwithmotoroil inthe engine.
YouMUSTchecktheoil levelbeforeoperating.Becarefulnot to
overfill.Gasolinecan beaddedto theenginewhenthe log splitteris
ineitherthe horizontalor verticalposition.However,it maybeeasier
whenthe splitteris inthe verticalposition.
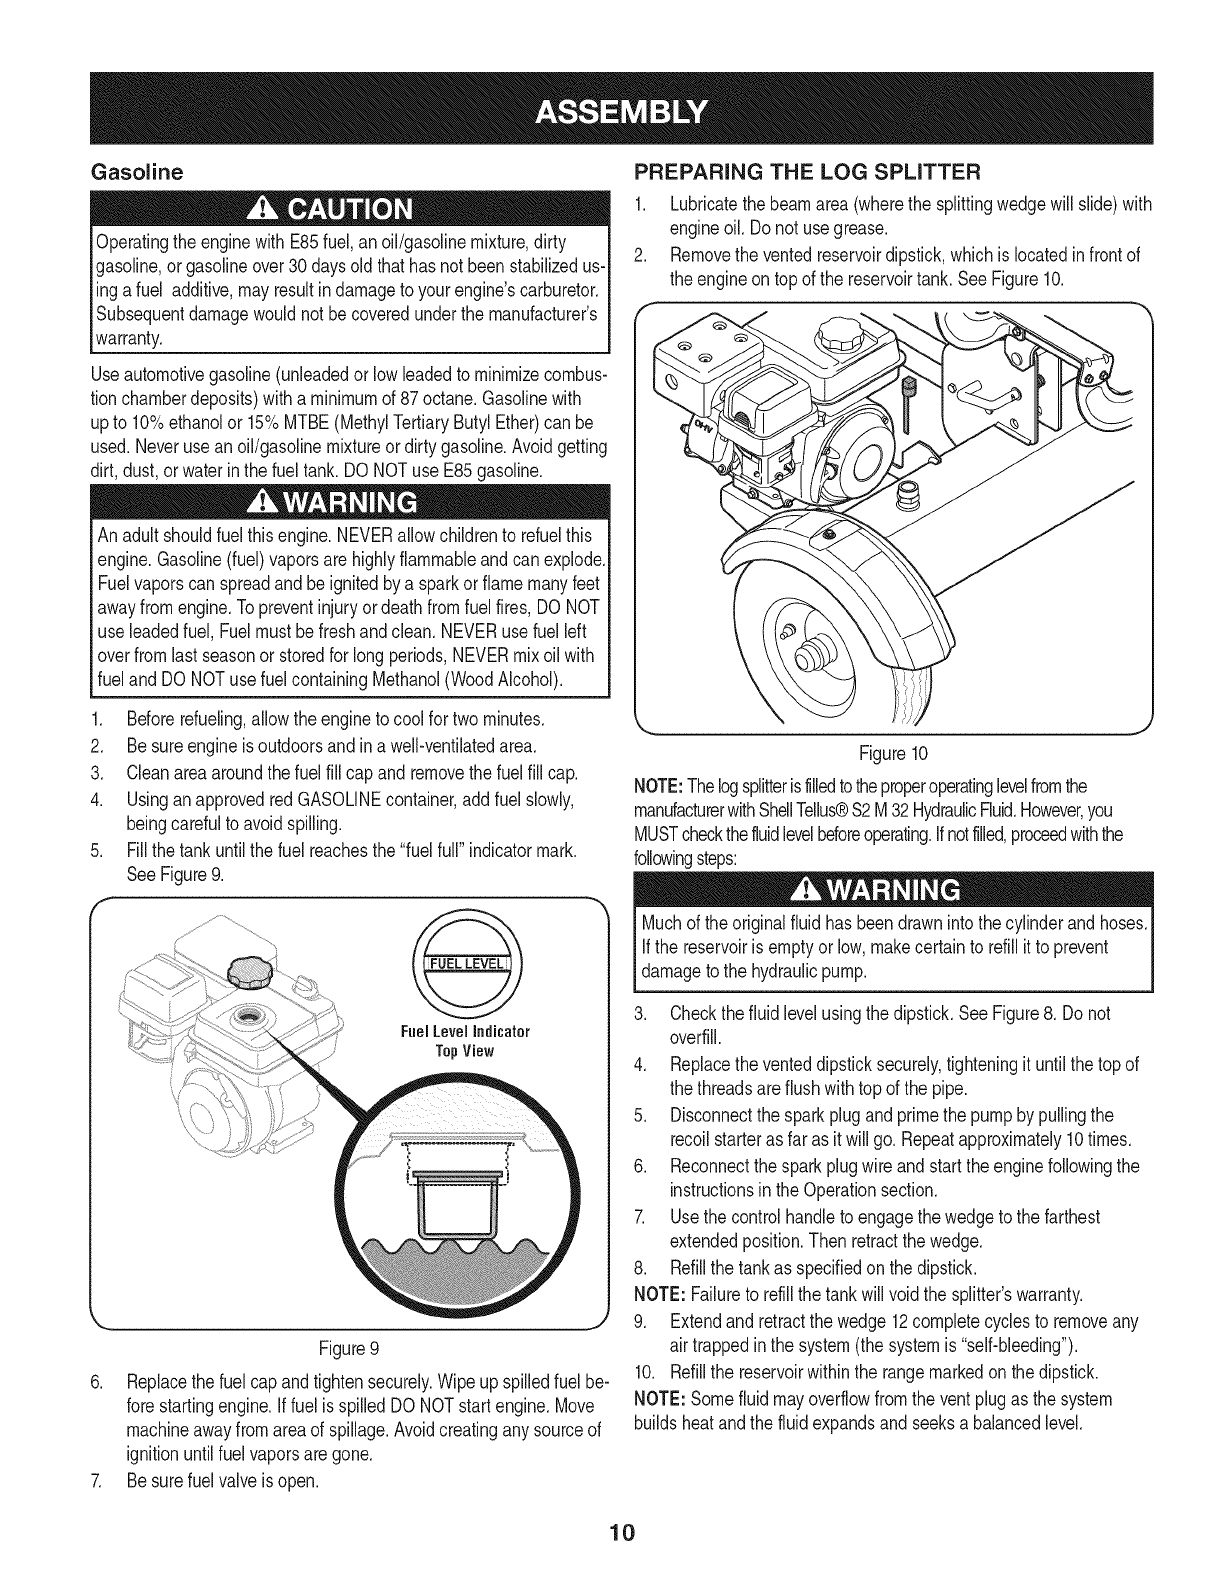
Removeoil fill dipstick.
Checkthe oil levelmakingcertainnotto rubthe dipstickalongthe
insidewallsof the oilfill tube.Thiswouldresultin a falsedipstick
reading.Refillto betweenthe HIGH(H) and LOW(L) markson
the dipstick,if necessary.Replacethe dipstickandtighten.See
Figure8.
Figure8
3. Ifnecessary,withthe log splitteron levelground,use afunnel
to fill enginewithoilto betweenthe High(H) and Low(L)marks
on thedipstick. Becarefulnotto overfill.Overfillingwillcause
the engineto smokeprofuselyandwill resultin poorengine
performance.
4. Checkthe oil levelthreetimes priorto startingthe engineto be
certainyou'vegottenanaccuratedipstickreading.Runningthe
enginewithtoo littleoil can resultin permanentenginedamage.
9
Gasoline
Operatingthe enginewith E85fuel,anoil/gasolinemixture,dirty
gasoline,or gasolineover30daysoldthathas not beenstabilizedus-
inga fuel additive,mayresultindamageto yourengine'scarburetor.
Subsequentdamagewouldnot becoveredunderthe manufacturer's
warranty.
Useautomotivegasoline(unleadedor low leadedto minimizecombus-
tionchamberdeposits)witha minimumof 87octane.Gasolinewith
upto 10%ethanolor 15%MTBE(MethylTertiaryButylEther)can be
used.Neveruse anoil/gasolinemixtureor dirtygasoline.Avoidgetting
dirt,dust,or waterinthe fueltank. DONOTuse E85gasoline.
An adultshouldfuelthisengine.NEVERallowchildrento refuelthis
engine.Gasoline(fuel)vaporsare highlyflammableandcanexplode.
Fuelvaporscan spreadandbe ignitedby a sparkor flamemanyfeet
awayfromengine.Topreventinjuryordeathfromfuelfires, DO NOT
useleadedfuel, Fuelmust befreshandclean.NEVERusefuel left
over fromlastseasonor storedfor longperiods,NEVERmixoil with
fuel and DONOTuse fuelcontainingMethanol(WoodAlcohol).
Beforerefueling,allowthe engineto cool for twominutes.
2. Besureengineis outdoorsand ina well-ventilatedarea.
3. Cleanareaaroundthe fuelfill capand removethe fuelfill cap.
4. UsinganapprovedredGASOLINEcontainer,addfuel slowly,
beingcarefulto avoidspilling.
5. Fill thetank untilthefuel reachesthe"fuel full"indicatormark.
SeeFigure9.
Figure9
6. Replacethe fuel capandtightensecurely.Wipe upspilledfuel be-
forestartingengine.If fuel isspilledDO NOTstartengine.Move
machineawayfromareaof spillage.Avoidcreatinganysourceof
ignitionuntilfuelvaporsare gone.
7. Besurefuel valveisopen.
PREPARING THE LOG SPLITTER
1. Lubricatethebeamarea(wherethe splittingwedgewill slide)with
engineoil. Donot usegrease.
2. Removethe ventedreservoirdipstick,whichis locatedin frontof
the engineon topof the reservoirtank.SeeFigure10.
Figure10
NOTE:Thelogsplitterisfilledtotheproperoperatinglevelfromthe
manufacturerwithShellTellus®$2 M32HydraulicFluid.However,you
MUSTcheckthefluidlevelbeforeoperating.Ifnotfilled,proceedwiththe
followingsteps:
Muchof the originalfluidhas beendrawnintothe cylinderandhoses.
Ifthe reservoiris emptyor low,makecertainto refillitto prevent
damageto the hydraulicpump.
3. Checkthe fluidlevelusingthe dipstick.SeeFigure8. Donot
overfill.
4. Replacethe venteddipsticksecurely,tighteningituntilthe top of
the threadsareflushwithtopof the pipe.
5. Disconnectthe sparkplugandprimethe pumpby pullingthe
recoilstarteras far as itwill go. Repeatapproximately10times.
6. Reconnectthe sparkplugwire andstartthe enginefollowingthe
instructionsinthe Operationsection.
7. Usethe controlhandleto engagethe wedgeto the farthest
extendedposition.Thenretractthe wedge.
8. Refillthe tankas specifiedon the dipstick.
NOTE:Failureto refillthe tankwill voidthe splitter'swarranty.
9. Extendand retractthe wedge12completecyclesto removeany
air trappedin the system(the systemis "self-bleeding").
10. Refillthe reservoirwithinthe rangemarkedon the dipstick.
NOTE:Somefluidmayoverflowfromthe ventplugas the system
buildsheatandthe fluid expandsand seeksa balancedlevel.
10
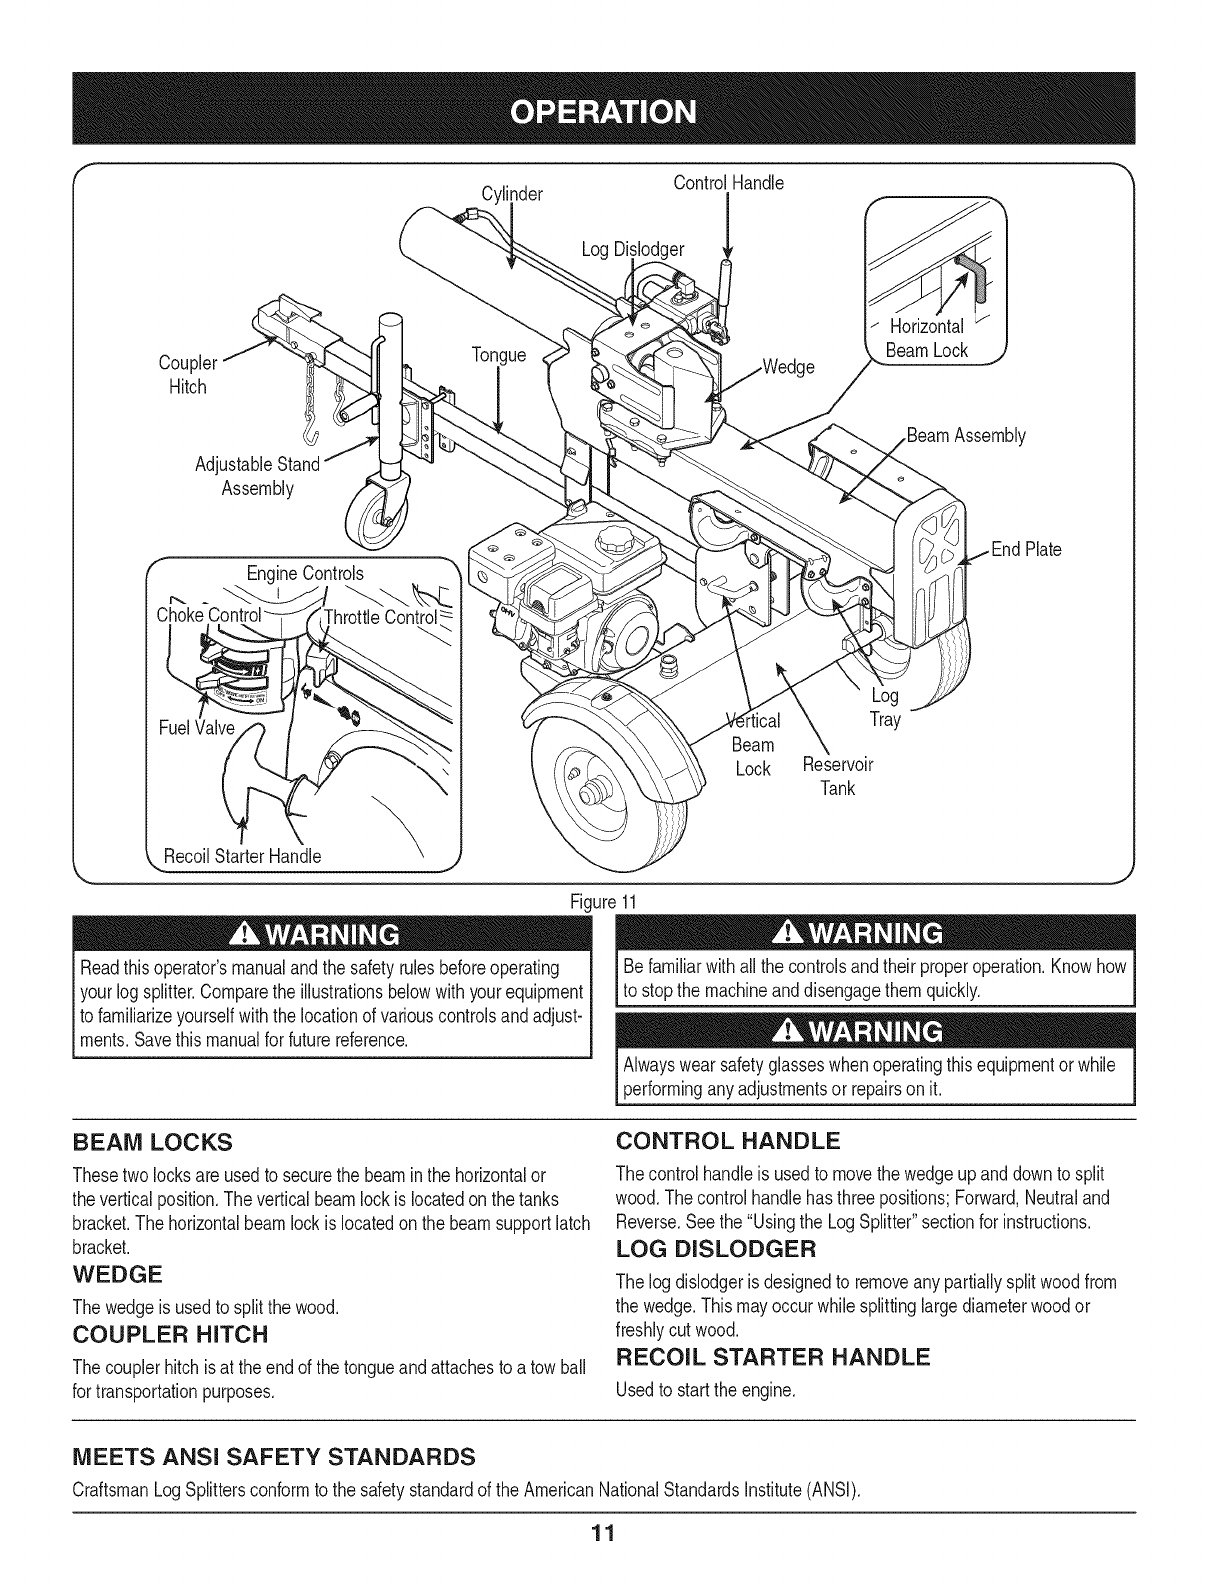
ControlHandle
Cylinder
LogDi:;lodger
Coupler
Hitch
AdjustableStand
Assembly
Tongue
Horizontal
BeamLock
Assembly
Choke
EngineControls
Cont_
FuelValve
, RecoilStarterHandle \
Fi.
Readthis operator'smanualandthe safetyrulesbeforeoperating
yourlogsplitter.Comparethe illustrationsbelowwith yourequipment
to familiarizeyourselfwiththe locationof variouscontrolsandadjust-
ments.Savethis manualfor futurereference.
ure 11
Tray
Beam
Lock Reservoir
Tank
Plate
Befamiliarwithall the controlsandtheir properoperation.Knowhow
to stopthe machineanddisengagethemquickly.
Alwayswear safetyglasseswhenoperatingthisequipmentorwhile
performinganyadjustmentsor repairson it.
BEAM LOCKS
Thesetwolocksare usedto securethe beaminthe horizontalor
theverticalposition.The verticalbeamlockis locatedonthe tanks
bracket.The horizontalbeamlockis locatedonthe beamsupportlatch
bracket.
WEDGE
Thewedgeis usedto splitthe wood.
COUPLER HITCH
Thecouplerhitchis at theend of the tongueandattachesto a towball
for transportationpurposes.
CONTROL HANDLE
The controlhandleis usedto movethewedgeup anddownto split
wood.Thecontrolhandlehas threepositions;Forward,Neutraland
Reverse.Seethe "Usingthe LogSplitter"sectionfor instructions.
LOG DISLODGER
The logdislodgeris designedto removeany partiallysplitwoodfrom
the wedge.Thismayoccurwhilesplittinglargediameterwoodor
freshlycutwood.
RECOIL STARTER HANDLE
Usedto startthe engine.
MEETS ANSI SAFETY STANDARDS
CraftsmanLogSplittersconformto the safetystandardof the AmericanNationalStandardsInstitute(ANSI).
11
LOG TRAY
Thelogtrayisdesignedto catchthe logafteritis split,
END PLATE
Theend plateholdsthelog in placewhilethe wedgesplitsthe log.
TONGUE
Thetongueis usedto attachto a towingvehiclefor transportation.
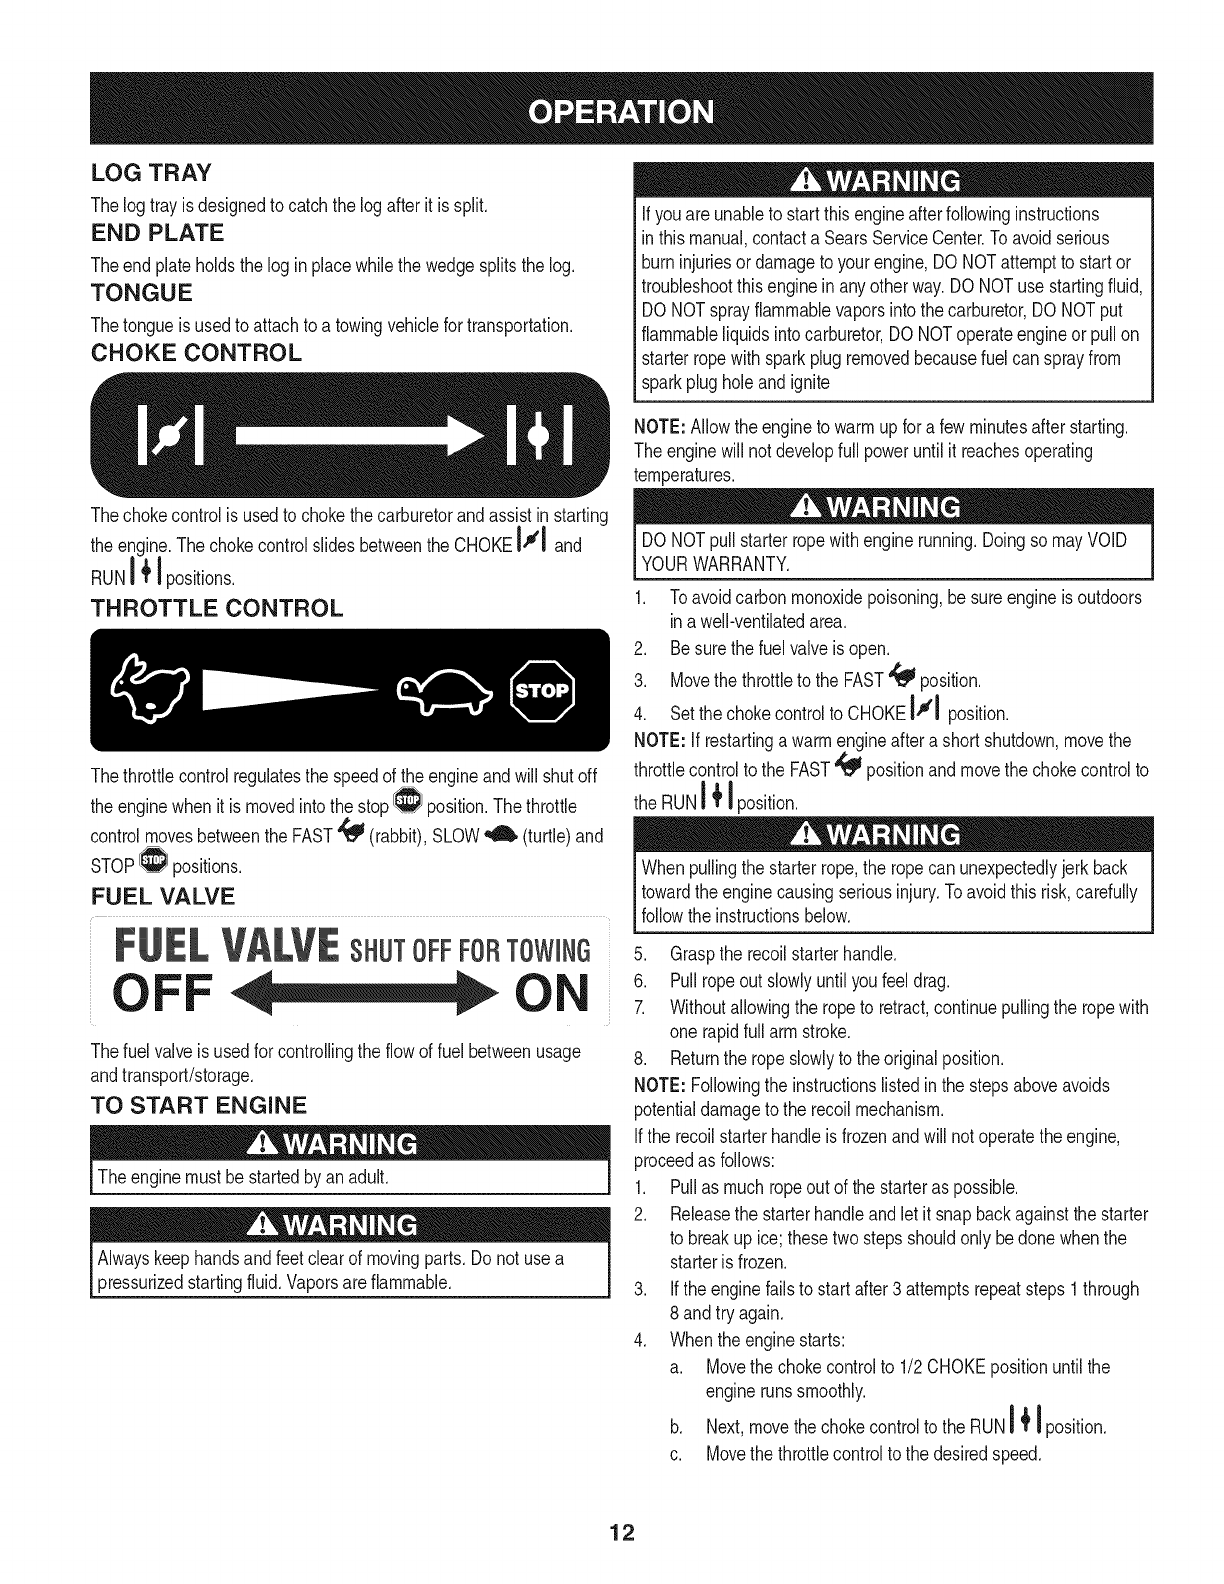
CHOKE CONTROL
Thechokecontrolis usedto chokethe carburetorandassistinstarting
the enqine.Thechokecontrolslidesbetweenthe CHOKEIJl and
RUNI_'}! positions.
THROTTLE CONTROL
Thethrottlecontrolregulatesthe speedof the engineandwill shutoff
the enginewhenit is movedinto the stop_ position.The throttle
controlmovesbetweenthe FAST'_ (rabbit),SLOW_ (turtle)and
STOP_ positions.
FUEL VALVE
FUELVALVESHUTOFFFORTOWmNG
OFF
Thefuel valveis usedfor controllingthe flowof fuel betweenusage
andtransport/storage.
TO START ENGINE
The enginemust bestartedbyan adult.
Alwayskeephandsand feetclearof movingparts.Do not usea
pressurizedstartingfluid.Vaporsareflammable.
Ifyouare unableto startthisengineafterfollowinginstructions
in thismanual,contacta SearsServiceCenter.Toavoid serious
burninjuriesor damageto yourengine,DO NOTattemptto startor
troubleshootthisenginein anyother way.DO NOTuse startingfluid,
DONOTsprayflammablevaporsinto thecarburetor,DONOTput
flammableliquidsintocarburetor,DO NOToperateengineor pullon
starterropewithsparkplugremovedbecausefuelcan sprayfrom
sparkplugholeand ignite
NOTE:Allowtheengineto warmupfor a fewminutesafterstarting.
The enginewill notdevelopfull poweruntil it reachesoperating
temperatures.
.
2.
3.
4.
DONOTpull starterropewithenginerunning.DoingsomayVOID
YOURWARRANTY.
Toavoidcarbonmonoxidepoisoning,be sureengineis outdoors
ina well-ventilatedarea.
Besurethe fuelvalveis open.
Movethe throttleto the FAST'_ position.
Setthe chokecontrolto CHOKEIJl position.
NOTE:If restartingawarmengineaftera shortshutdown,movethe
throttlecontrolto the FAST'_ positionand movethe chokecontrolto
the RUN! _' Jposition.
Whenpullingthe starterrope,the ropecan unexpectedlyjerk back
towardthe enginecausingseriousinjury.Toavoidthis risk,carefully
followthe instructionsbelow.
5. Graspthe recoilstarterhandle.
6. Pullropeout slowlyuntilyoufeel drag.
7. Withoutallowingthe ropeto retract,continuepullingthe ropewith
one rapidfull arm stroke.
8. Returnthe ropeslowlyto theoriginalposition.
NOTE:Followingthe instructionslistedinthe stepsaboveavoids
potentialdamageto the recoilmechanism.
Ifthe recoilstarterhandleis frozenandwill not operatethe engine,
proceedas follows:
1. Pullas muchropeout of thestarteras possible.
2. Releasethe starterhandleandlet it snapbackagainstthe starter
to breakup ice;thesetwostepsshouldonlybedonewhenthe
starteris frozen.
3. Ifthe enginefailsto start after3 attemptsrepeatsteps 1through
8 andtry again.
4. Whenthe enginestarts:
a. Movethe chokecontrolto 1/2CHOKEpositionuntilthe
enginerunssmoothly.
m i
b. Next,movethe chokecontrolto the RUN! I position.
c. Movethe throttlecontrolto the desiredspeed.
12
Ifthe enqinestartsbutfalterswhenthechokecontrolis movedto the
RUN! _1 position:
1. Momentarilymovechokecontrolbackto theCHOKEIJl
position.
2. Next,movethechokecontrolto 1/2CHOKEpositionuntilengine
runssmoothly.
II ÷It
3. Finally,movethe chokecontrolto the RUNI I position.
II t,i
4. Ifthe enginediesafterchokecontrolis movedto RUN! I
position,repeatstepsfor startingthe engineon page12.
It ÷II
5. if the enginefailsto startafter3 attemptsin the RUN! I
position,movethe chokecontrolto CHOKEIJl positionand
startengine.
6. Ifenginedoesnot startafterfollowingtheseinstructions,contact
a SearsServiceCenter.DONOTattemptto troubleshootthis
enginein anyotherway.
TO STOP ENGINE
1. Ifoperatingthe enginein the snowor rain,runthe enginefor a
fewminutesto helpdry offany moisture.
2. Movethe throttlecontrolleverto the STOP_ position.
3. Movethe enginechokebackandforthseveraltimesand leavein
the CHOKEIJl position.
4. Besurethe FuelShut-OffValveis off.
5. Disconnectsparkplugwireandgroundit to preventaccidental
startingwhiletheequipmentis unattended.
USING THE LOG SPLITTER
NOTE: Readthe Operationsectioninthe SafePracticessectionat the
beginningof thismanualbeforeoperating.
1. Placethe logsplitteronflat,dry, solidground.
2. Blockthe frontandbackof bothwheels.SeeFigure12.
Vertical
.
4.
Horizontal
Figure12
Placethe beamineitherthe horizontalor verticalpositionand
lockit intoplace.
Blockthe frontandbackof bothwheels.
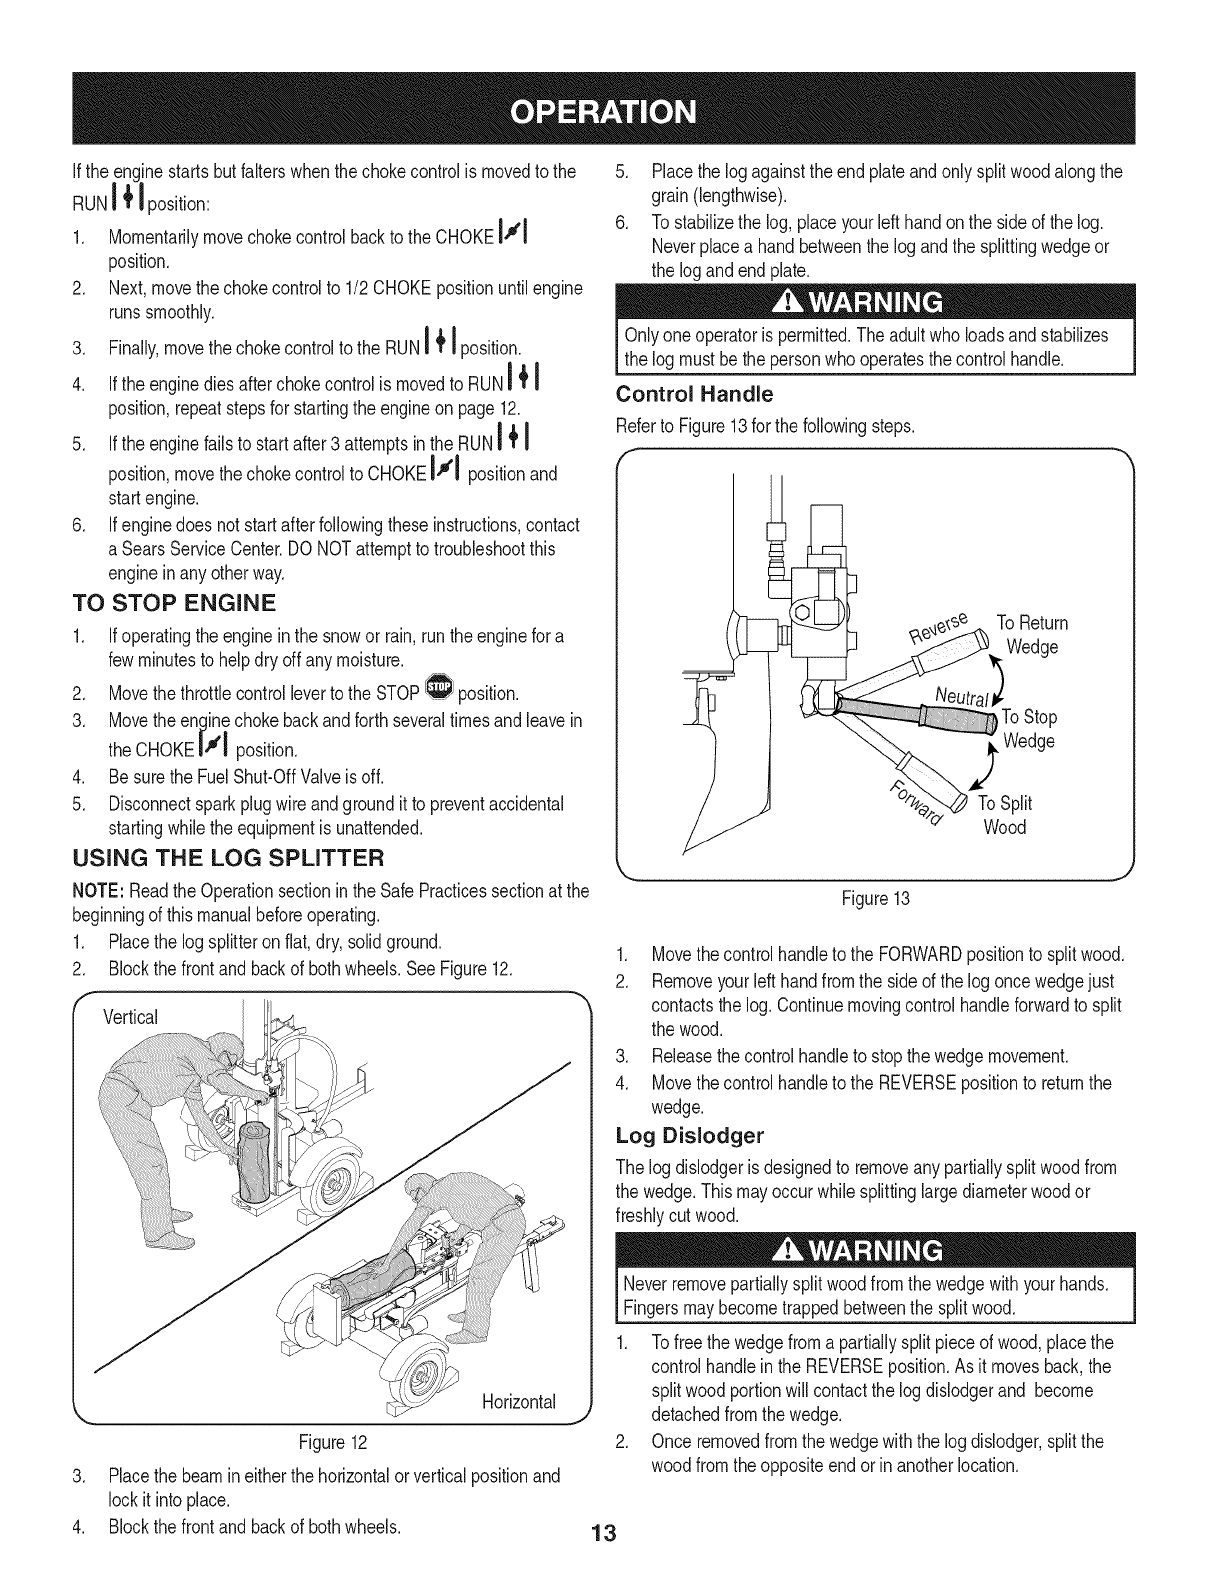
5. Placethe logagainstthe endplateandonly splitwood alongthe
grain(lengthwise).
6. To stabilizethe log,placeyourleft handon the sideof the log.
Neverplacea handbetweenthe log andthe splittingwedgeor
the logandend plate.
Onlyoneoperatoris permitted.The adultwho loadsandstabilizes
the logmustbe thepersonwhooperatesthecontrolhandle.
Control Handle
Referto Figure13for the followingsteps.
o,e.,le_s_._ToReturn
_'e-e_"_-'-/7ToSplit
o" Wood
Figure13
1. Movethecontrolhandleto the FORWARDpositionto splitwood.
2. Removeyourleft handfromthe sideof the log oncewedgejust
contactsthelog. Continuemovingcontrolhandleforwardto split
the wood.
3. Releasethe controlhandleto stopthe wedgemovement.
4. Movethecontrolhandleto the REVERSEpositionto returnthe
wedge.
Log Dislodger
The logdislodgeris designedto removeany partiallysplitwoodfrom
the wedge.Thismayoccurwhilesplittinglargediameterwoodor
freshlycutwood.
Neverremovepartiallysplitwoodfromthe wedgewithyourhands.
Fingersmaybecometrappedbetweenthe splitwood.
1. Tofree the wedgefroma partiallysplitpieceof wood,placethe
controlhandleinthe REVERSEposition.As it movesback,the
splitwood portionwill contactthe logdislodgerand become
detachedfromthe wedge.
2. Once removedfromthe wedgewiththe logdislodger,splitthe
woodfromthe oppositeendorin anotherlocation.
13
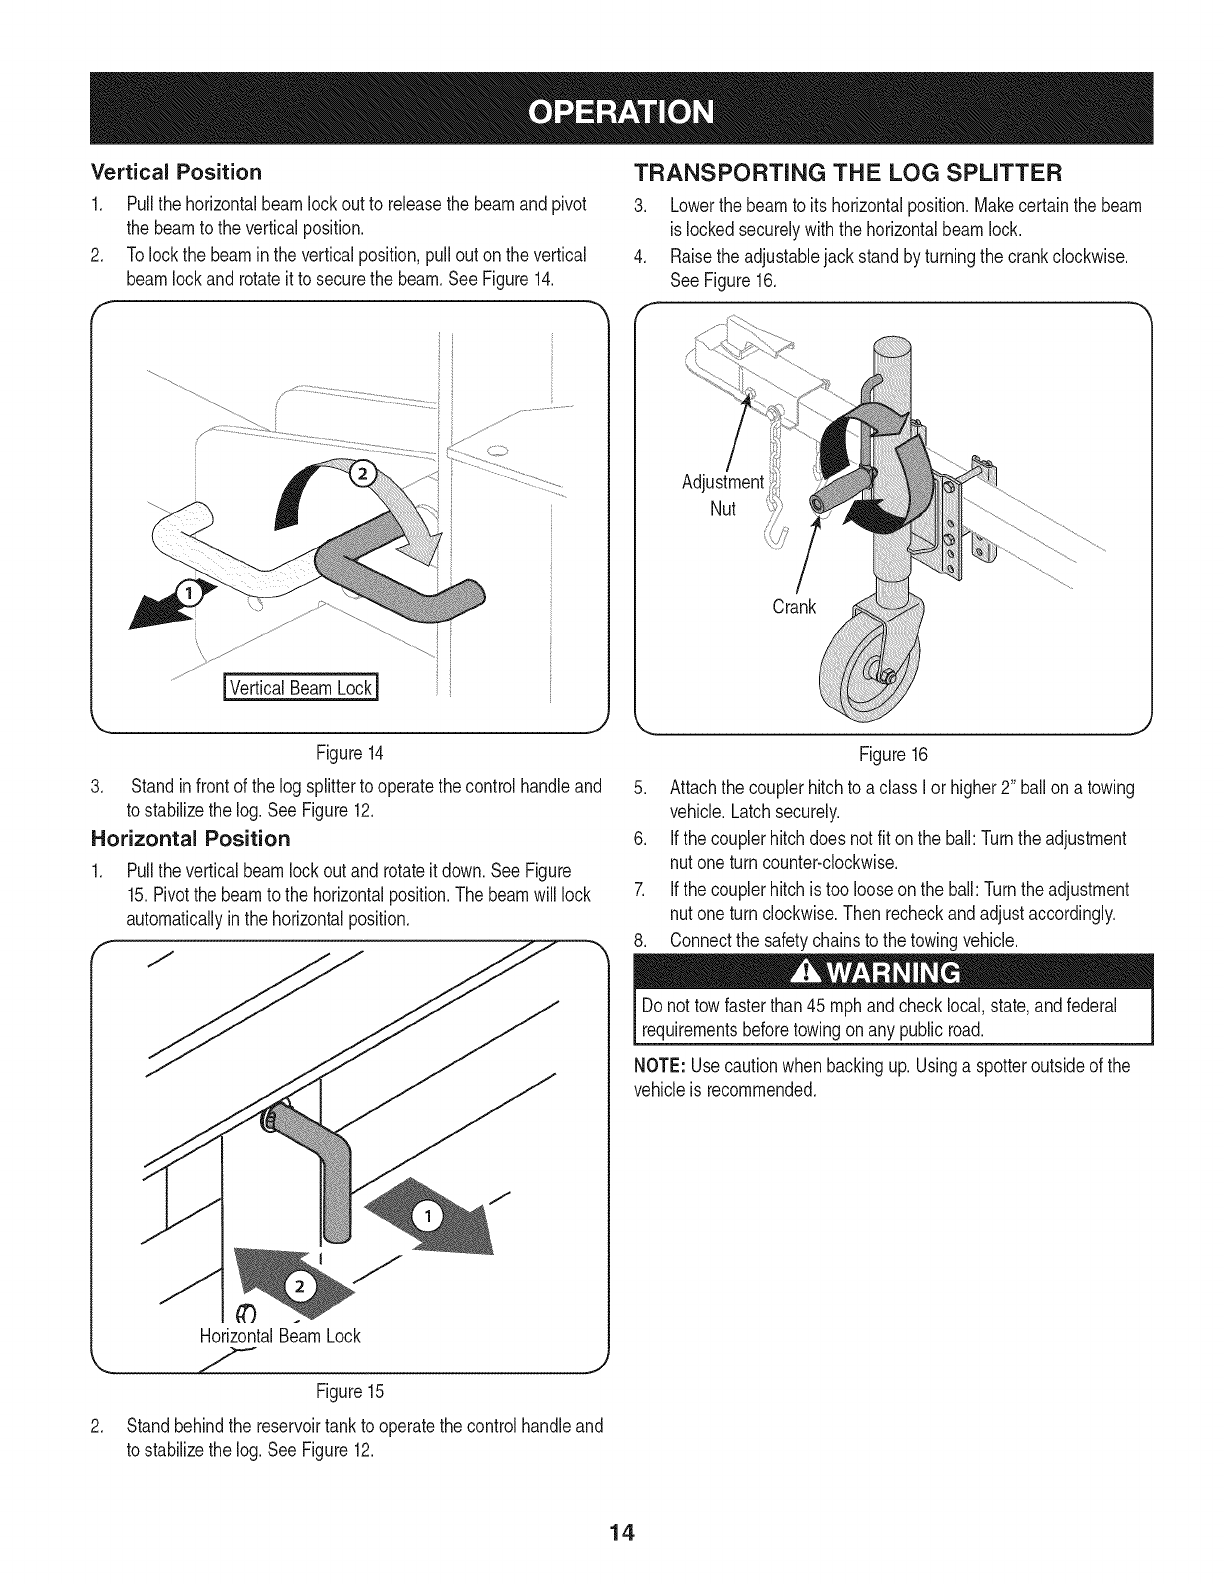
Vertical Position
1. Pullthe horizontalbeamlockout to releasethe beamand pivot
the beamto the verticalposition.
2. Tolockthe beaminthe verticalposition,pullout onthe vertical
beamlockandrotateit to securethe beam.SeeFigure14.
f
TRANSPORTING THE LOG SPLITTER
3. Lowerthe beamto itshorizontalposition.Makecertainthe beam
is lockedsecurelywith the horizontalbeamlock.
4. Raisethe adjustablejack standby turningthe crankclockwise.
SeeFigure16.
Adjustment
Nut
.
iVertical BeamLock]
J
Figure14
Standin frontof thelog splitterto operatethecontrolhandleand
to stabilizethe log.See Figure12.
Horizontal Position
1. Pulltheverticalbeamlockout and rotateit down.SeeFigure
15.Pivotthe beamto the horizontalposition.The beamwill lock
automaticallyinthe horizontalposition.
HorizontalBeamLock
Crank
Figure16
5. Attachthe couplerhitchto a class I or higher2" ballona towing
vehicle.Latchsecurely.
6. Ifthe couplerhitchdoes notfit onthe ball: Turnthe adjustment
nutoneturn counter-clockwise.
7. Ifthe couplerhitchis too looseon the ball:Turntheadjustment
nutoneturn clockwise.Thenrecheckandadjustaccordingly.
8. Connectthe safetychainsto the towingvehicle.
Donot towfasterthan 45 mph andchecklocal, state,and federal
requirementsbeforetowingonany public road.
NOTE:Usecautionwhen backingup.Usinga spotteroutsideof the
vehicleis recommended.
.
Figure15
Standbehindthe reservoirtankto operatethe controlhandleand
to stabilizethe log.See Figure12.
14
OPERATING TIPS
Always:
1. Usecleanfluidandcheckthe fluid levelregularly.
2. Useanapprovedhydraulicfluid.ApprovedfluidsincludeShell
Tellus®$2 M 32 HydraulicFluid,Dexron®III/Mercon®automatic
transmissionfluid, Pro-SelectTM AW-32HydraulicOilor 10WAW-
ISOviscositygrade32 hydraulicoil.
NOTE: Itis not recommendedthathydraulicfluidsbe mixed.
3. Alwaysensurethatthe filteris in place.Cleanor replacethe filter
regularly.
4. Thisunitcomeswitha breathercapon the fluidreservoir.Donot
useany othertypeof reservoircap.
5. Makesurethe pumpis mountedandalignedproperly.
6. Thisunitcomeswitha flexible"spider"typecouplingbetween
theengineandpumpdriveshafts.Do notuse anyothertypeof
coupling.
7. Keepthe hosesclearand unblocked.
8. Bleedthe airout of the hosesbyfullyextendingand retracting
thewedge 12completecyclesto removeanyair trappedin the
systembeforeoperating.
9. Flushandcleanthehydraulicsystembeforerestartingafterservicing.
SeeServiceandMaintenancesection.
10. Use"pipedope"onall hydraulicfittings.
11. Allowtimeforthe engineto warm-upbeforesplittingwood.
12. Primethepumpbeforethe initialstart-upby turningoverthe
enginewithsparkplugdisconnected.
13. Splitthe woodalongthegrain(lengthwise)only.
Never:
1. Usewhenfluidis below200F or above1500R
2. Usea solidengine/pumpcoupling.
3. Operatethroughreliefvalvefor morethan 5 seconds.Ifthe
wedgestopsmovingor reachestheendof itsstroke,releasethe
controlhandleor REVERSEitwithin5 secondsto avoidputting
stresson thehydraulicsystemandengine.
4. Attemptto adjustunloadingor reliefvalvesettings.
5. Operatewithairinthe hydraulicsystem.
6. Useteflontapeon the hydraulicfittings.
7. Attemptto cutwoodacrossthegrain.
8. Attemptto removepartiallysplitwoodfromthe wedgewithyour
hands.Fullyretractthe wedgeto dislodgethewood withthe log
dislodger.
15
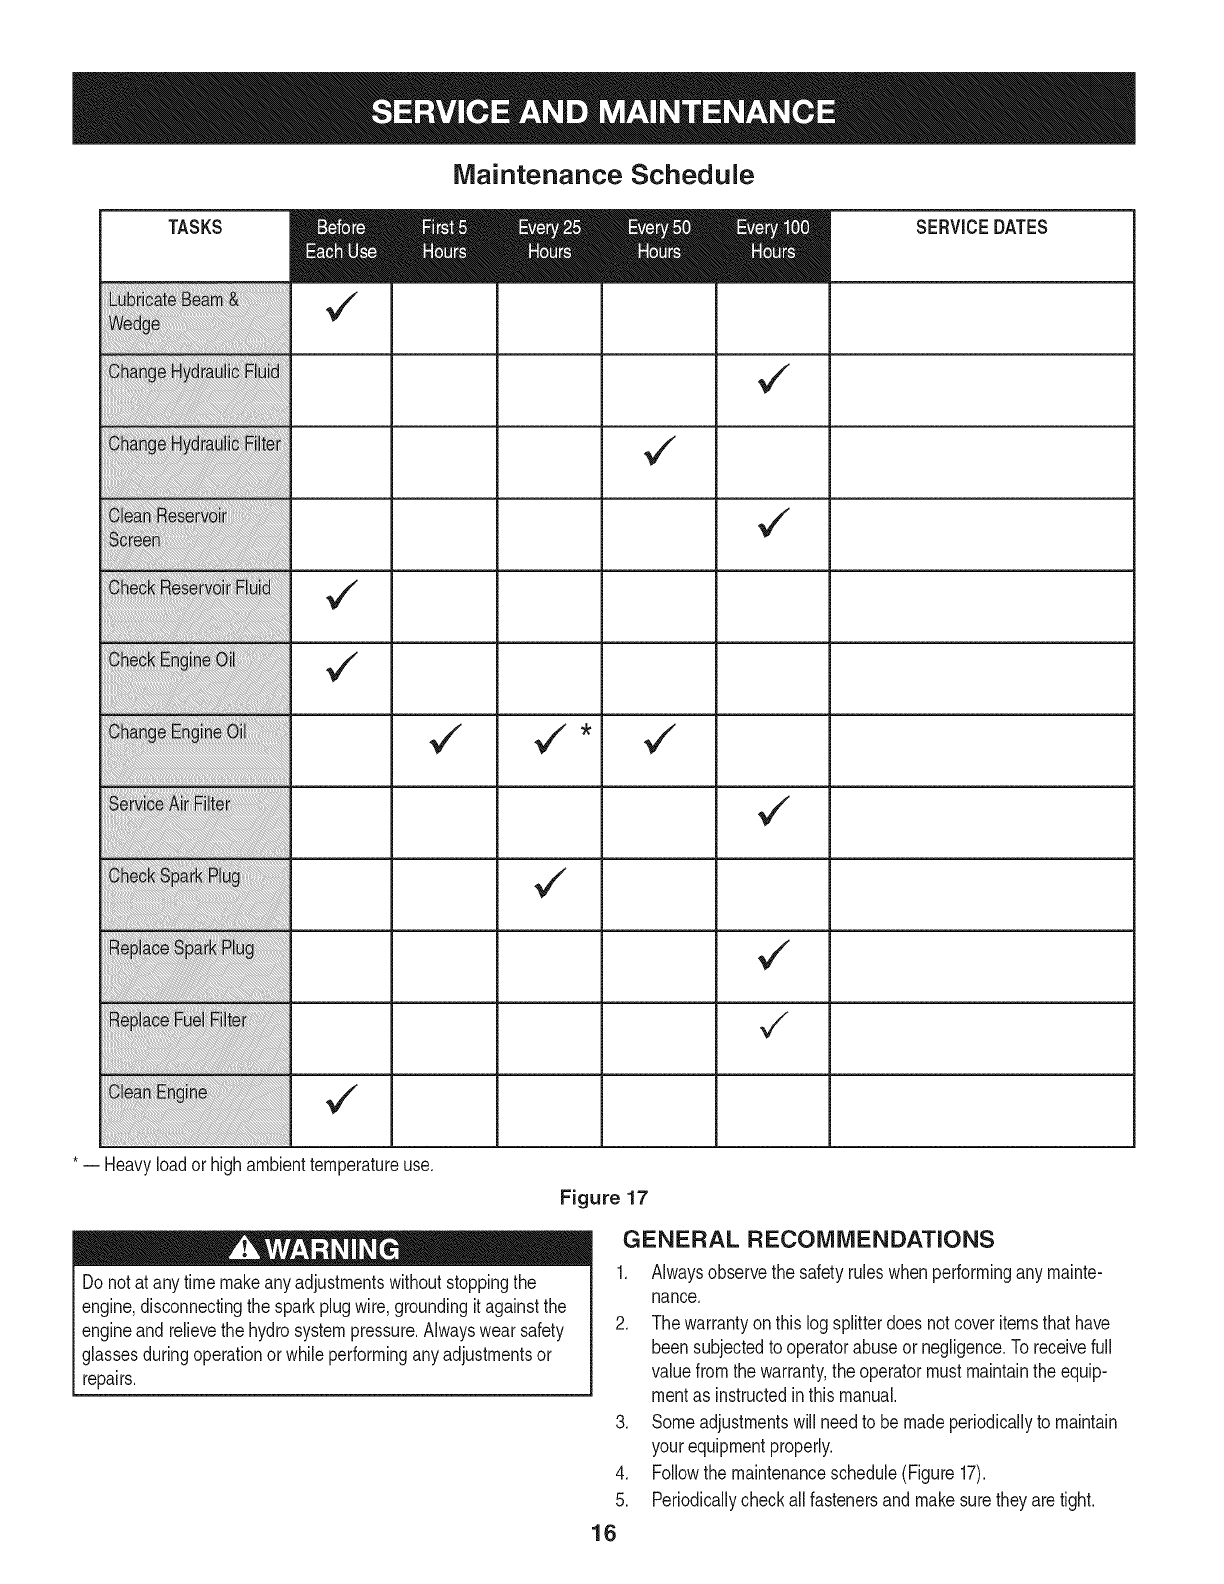
Maintenance Schedule
TASKS
,/
* -- Heavyloador highambienttemperatureuse.
v"
SERVICEDATES
,/
Figure 17
GENERAL RECOMMENDATIONS
Do notat any timemakeanyadjustmentswithoutstoppingthe
engine,disconnectingthe sparkplugwire,groundingit againstthe
engineandrelievethe hydrosystempressure.Alwayswear safety
glassesduringoperationor whileperforminganyadjustmentsor
repairs.
.
5.
16
1. Alwaysobservethe safetyruleswhenperformingany mainte-
nance.
2. The warrantyonthis logsplitterdoesnotcoveritemsthathave
beensubjectedto operatorabuseor negligence.Toreceivefull
valuefromthe warranty,the operatormust maintainthe equip-
mentas instructedin thismanual.
3. Someadjustmentswill needto bemadeperiodicallyto maintain
yourequipmentproperly.
Followthe maintenanceschedule(Figure 17).
Periodicallycheckallfastenersandmakesuretheyaretight.
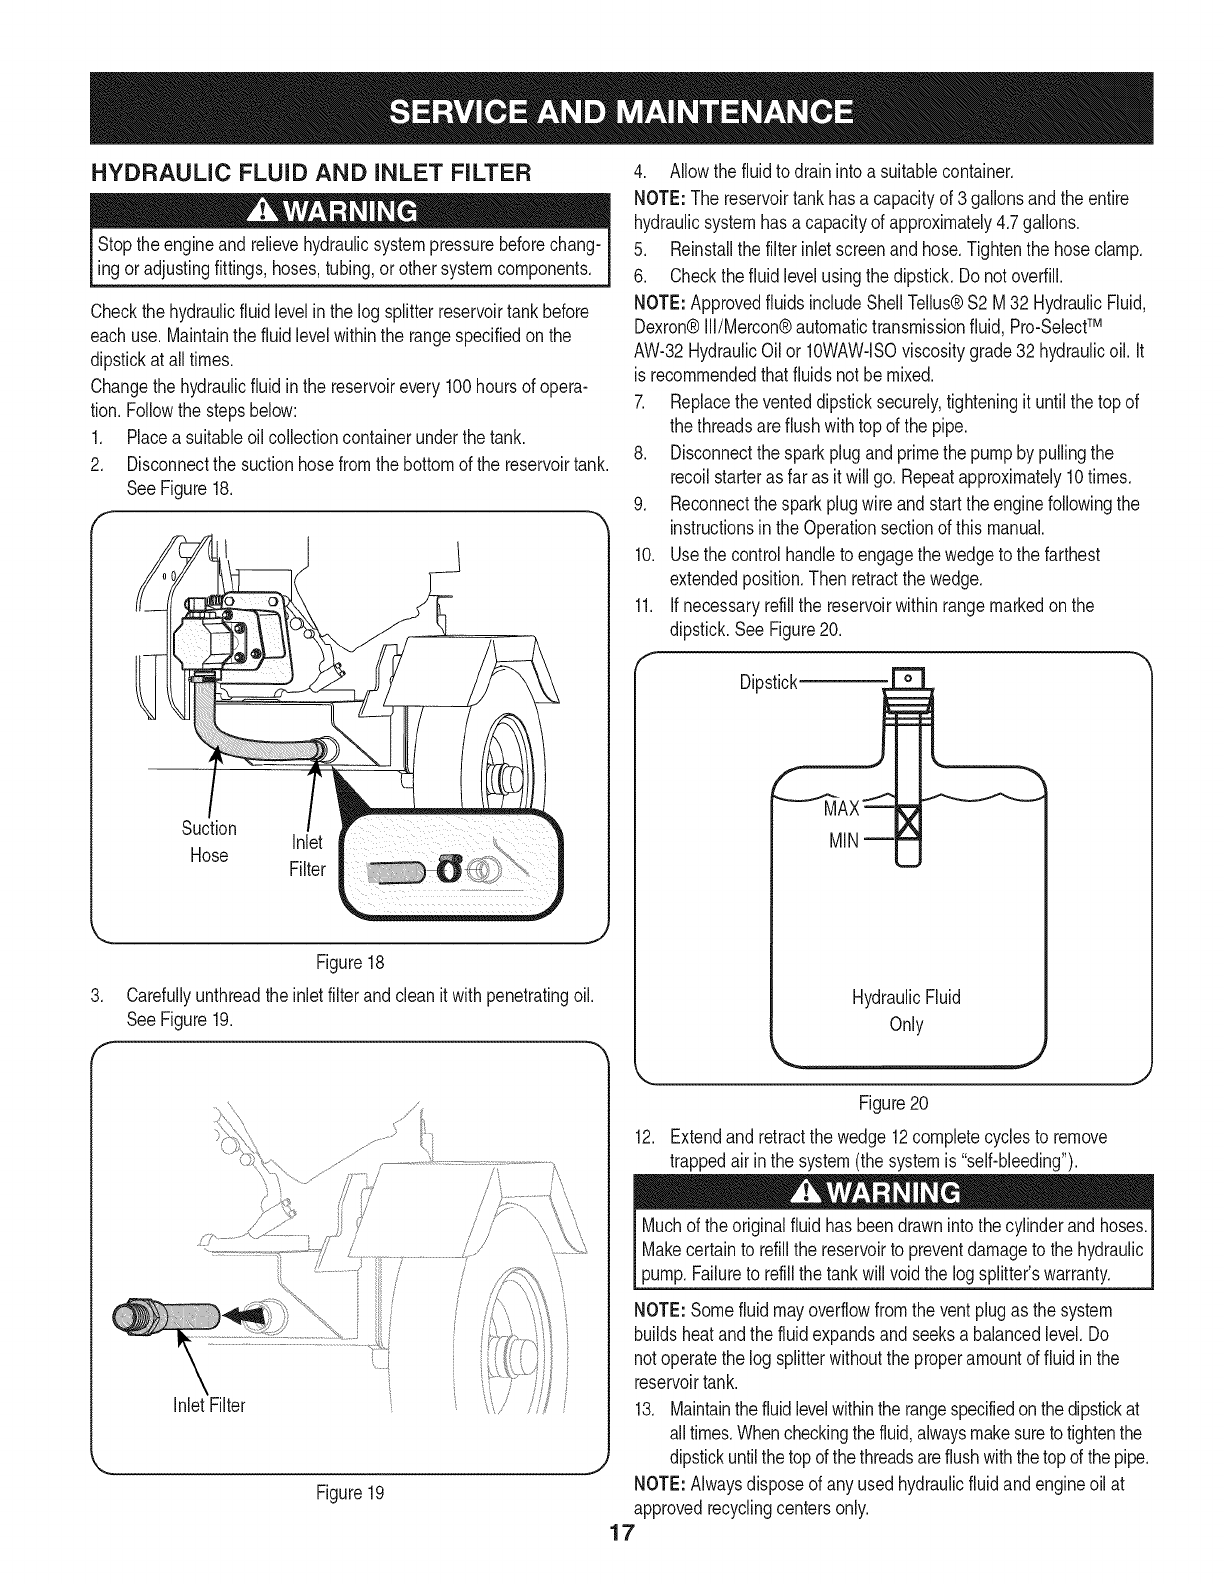
HYDRAULIC FLUID AND iNLET FILTER
Stopthe engineandrelievehydraulicsystempressurebeforechang-
ingor adjustingfittings,hoses,tubing,or othersystemcomponents.
Checkthehydraulicfluid levelin the logsplitterreservoirtankbefore
eachuse.Maintainthe fluid levelwithinthe rangespecifiedon the
dipstickat alltimes.
Changethe hydraulicfluid in the reservoirevery100hoursof opera-
tion.Followthe stepsbelow:
1. Placea suitableoil collectioncontainerunderthe tank.
2. Disconnectthe suctionhosefromthe bottomof the reservoirtank.
SeeFigure18.
f*-
Suction Inlet
Hose Filter
Figure18
3. Carefullyunthreadthe inletfilterandclean it withpenetratingoil.
SeeFigure19.
InletFilter
Figure19
4. Allowthe fluidto draininto a suitablecontainer.
NOTE:The reservoirtankhasa capacityof 3 gallonsandthe entire
hydraulicsystemhasa capacityof approximately4.7gallons.
5. Reinstallthe filterinletscreenand hose.Tightenthe hoseclamp.
6. Checkthe fluidlevelusingthe dipstick.Do notoverfill.
NOTE:ApprovedfluidsincludeShellTellus®S2 M32 HydraulicFluid,
Dexron®III/Mercon®automatictransmissionfluid,Pro-SelectTM
AW-32HydraulicOilor IOWAW-lSOviscositygrade32 hydraulicoil. It
is recommendedthatfluidsnotbe mixed.
7. Replacethe venteddipsticksecurely,tighteningit untilthe top of
the threadsareflushwithtopof the pipe.
8. Disconnectthe sparkplugandprimethe pumpby pullingthe
recoilstarteras far as it will go. Repeatapproximately10times.
9. Reconnectthe sparkplugwire andstartthe enginefollowingthe
instructionsinthe Operationsectionof this manual.
10. Usethe controlhandleto engagethe wedgeto the farthest
extendedposition.Thenretractthe wedge.
11. Ifnecessaryrefillthe reservoirwithinrangemarkedonthe
dipstick.SeeFigure20.
Dipstick
HydraulicFluid
Only
Figure20
12. Extendand retractthe wedge12completecyclesto remove
trappedairin the system(the systemis "self-bleeding").
Muchof the originalfluidhas beendrawnintothe cylinderandhoses.
Makecertainto refillthe reservoirto preventdamageto the hydraulic
pump.Failureto refillthe tankwillvoid the logsplitter'swarranty.
NOTE:Somefluidmayoverflowfromthe ventplugas the system
buildsheatandthe fluid expandsand seeksa balancedlevel.Do
notoperatethe log splitterwithouttheproperamountof fluid inthe
reservoir tank.
13. Maintainthefluidlevelwithinthe rangespecifiedonthedipstickat
alltimes.Whencheckingthefluid,alwaysmakesureto tightenthe
dipstickuntilthe topof thethreadsareflushwiththetopof the pipe.
NOTE:Alwaysdisposeof anyused hydraulicfluidandengineoil at
approvedrecyclingcentersonly.
17
14. Contaminantsinthefluidmaydamagethe hydrauliccomponents.
Flushingthe reservoirtankandhoseswithkerosenewhenever
serviceis performedonthetank,hydraulicpumporvalveis recom-
mended.ContactaSearsor otherauthorizedservicedealer.
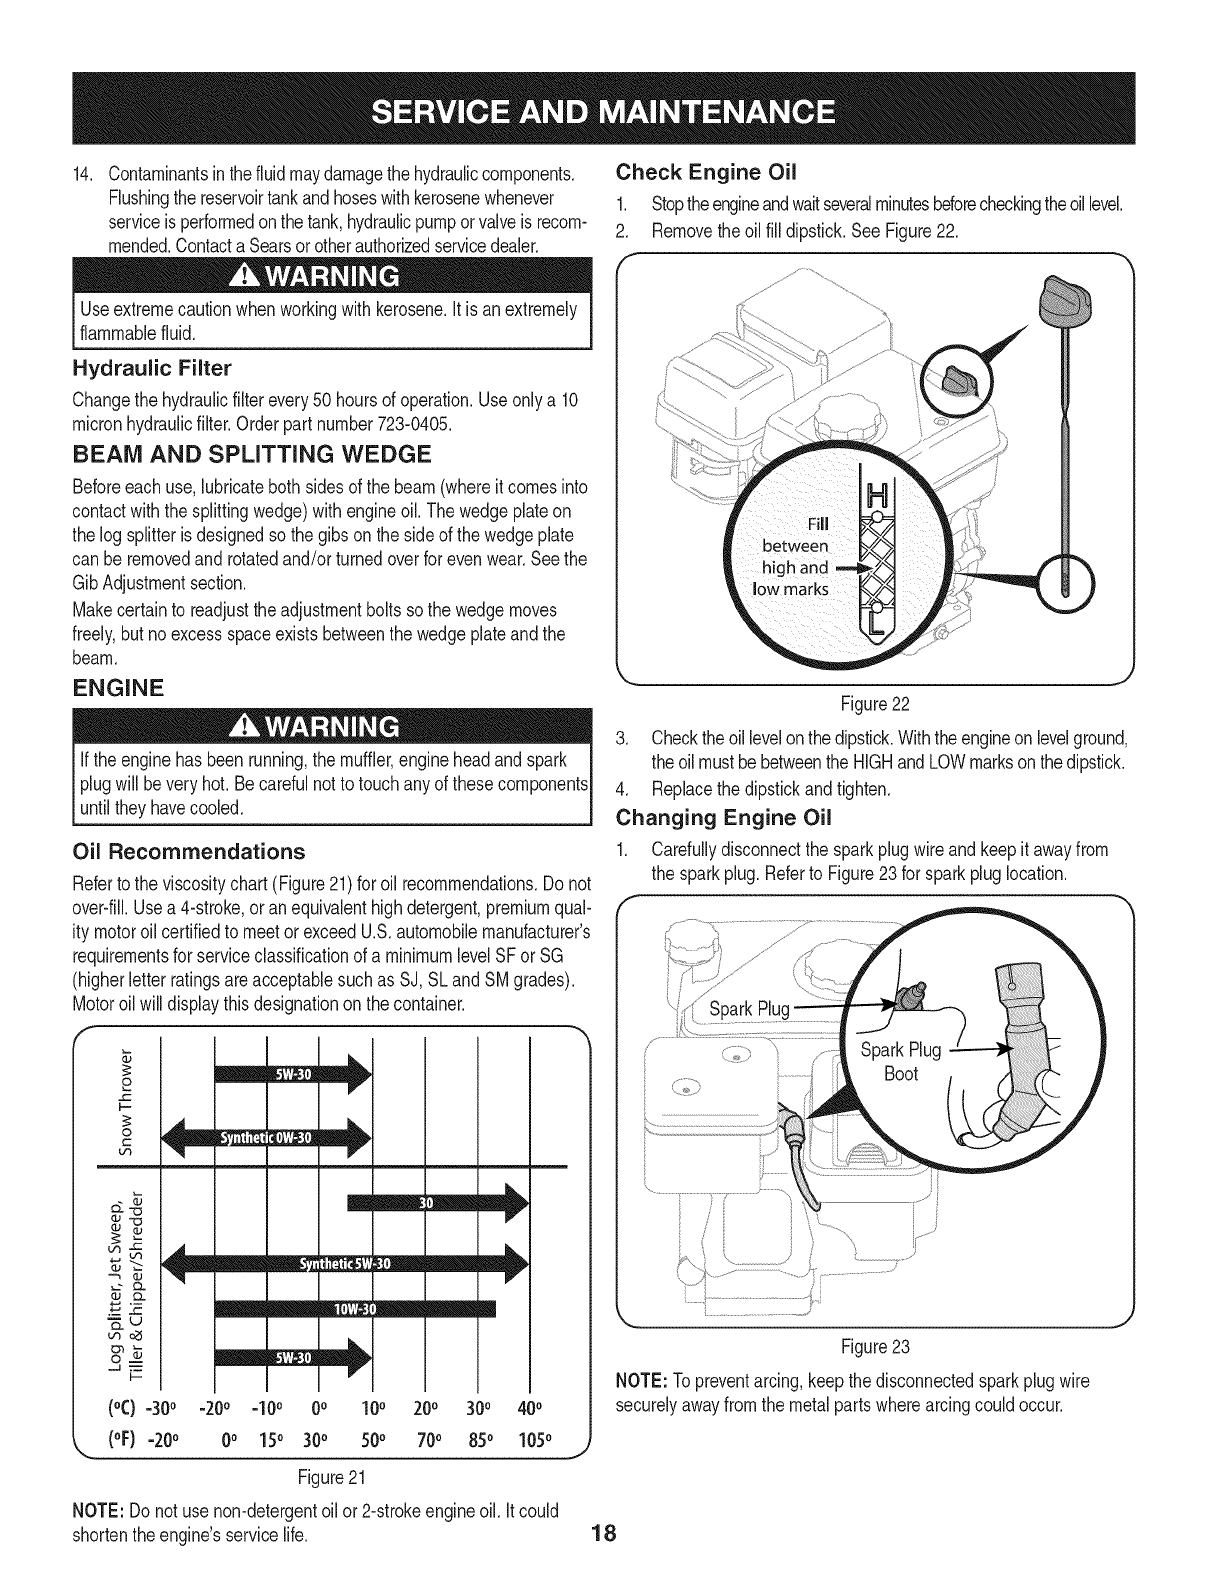
Check Engine Oil
1. Stoptheengineandwaitseveralminutesbeforecheckingtheoillevel.
2. Removethe oilfill dipstick.SeeFigure22.
Useextremecautionwhenworkingwith kerosene.It is anextremely
flammablefluid.
Hydraulic Filter
Changethe hydraulicfilterevery50 hoursof operation.Useonlya 10
micronhydraulicfilter.Orderpart number723-0405.
BEAM AND SPLITTING WEDGE
Beforeeach use,lubricatebothsidesof the beam(whereit comesinto
contactwiththe splittingwedge)withengineoil. Thewedgeplateon
the logsplitteris designedso the gibson the sideof the wedgeplate
can beremovedand rotatedand/or turnedoverfor evenwear.Seethe
GibAdjustmentsection.
Makecertainto readjustthe adjustmentboltssothe wedgemoves
freely,but noexcessspaceexistsbetweenthe wedgeplateandthe
beam.
ENGINE
Ifthe enginehasbeenrunning,the muffler,engineheadandspark
plugwill beveryhot.Becarefulnot to touchany of thesecomponents
untiltheyhavecooled.
Oil Recommendations
Referto the viscositychart(Figure21)for oil recommendations.Do not
over-fill.Usea 4-stroke,or anequivalenthighdetergent,premiumqual-
ity motoroilcertifiedto meetorexceedU.S.automobilemanufacturer's
requirementsfor serviceclassificationof a minimumlevelSF or SG
(higherletterratingsareacceptablesuchas SJ, SLandSMgrades).
Motoroil willdisplaythisdesignationon thecontainer.
o
©
I
mm/mlb,
®"o V
cu
4,,.., _
.__z __ _:__lm
_u
cqo_
b-
(°C) =30°"20° =10°0°10°200 300 400
(oF)-20 °0o150 300 500 700 850 105o
Figure21
NOTE: Donot use non-detergentoil or2-strokeengineoil. Itcould
shortentheengine'sservicelife.
J
Figure22
3. Checkthe oillevelonthe dipstick.Withtheengineon levelground,
the oilmustbebetweenthe HIGHandLOWmarksonthe dipstick.
4. Replacethe dipstickandtighten.
Changing Engine Oil
1. Carefullydisconnectthe sparkplugwire andkeepit awayfrom
the sparkplug.Referto Figure23for sparkpluglocation.
Figure23
NOTE: Topreventarcing,keepthedisconnectedsparkplugwire
securelyawayfromthe metalpartswherearcingcouldoccur.
18
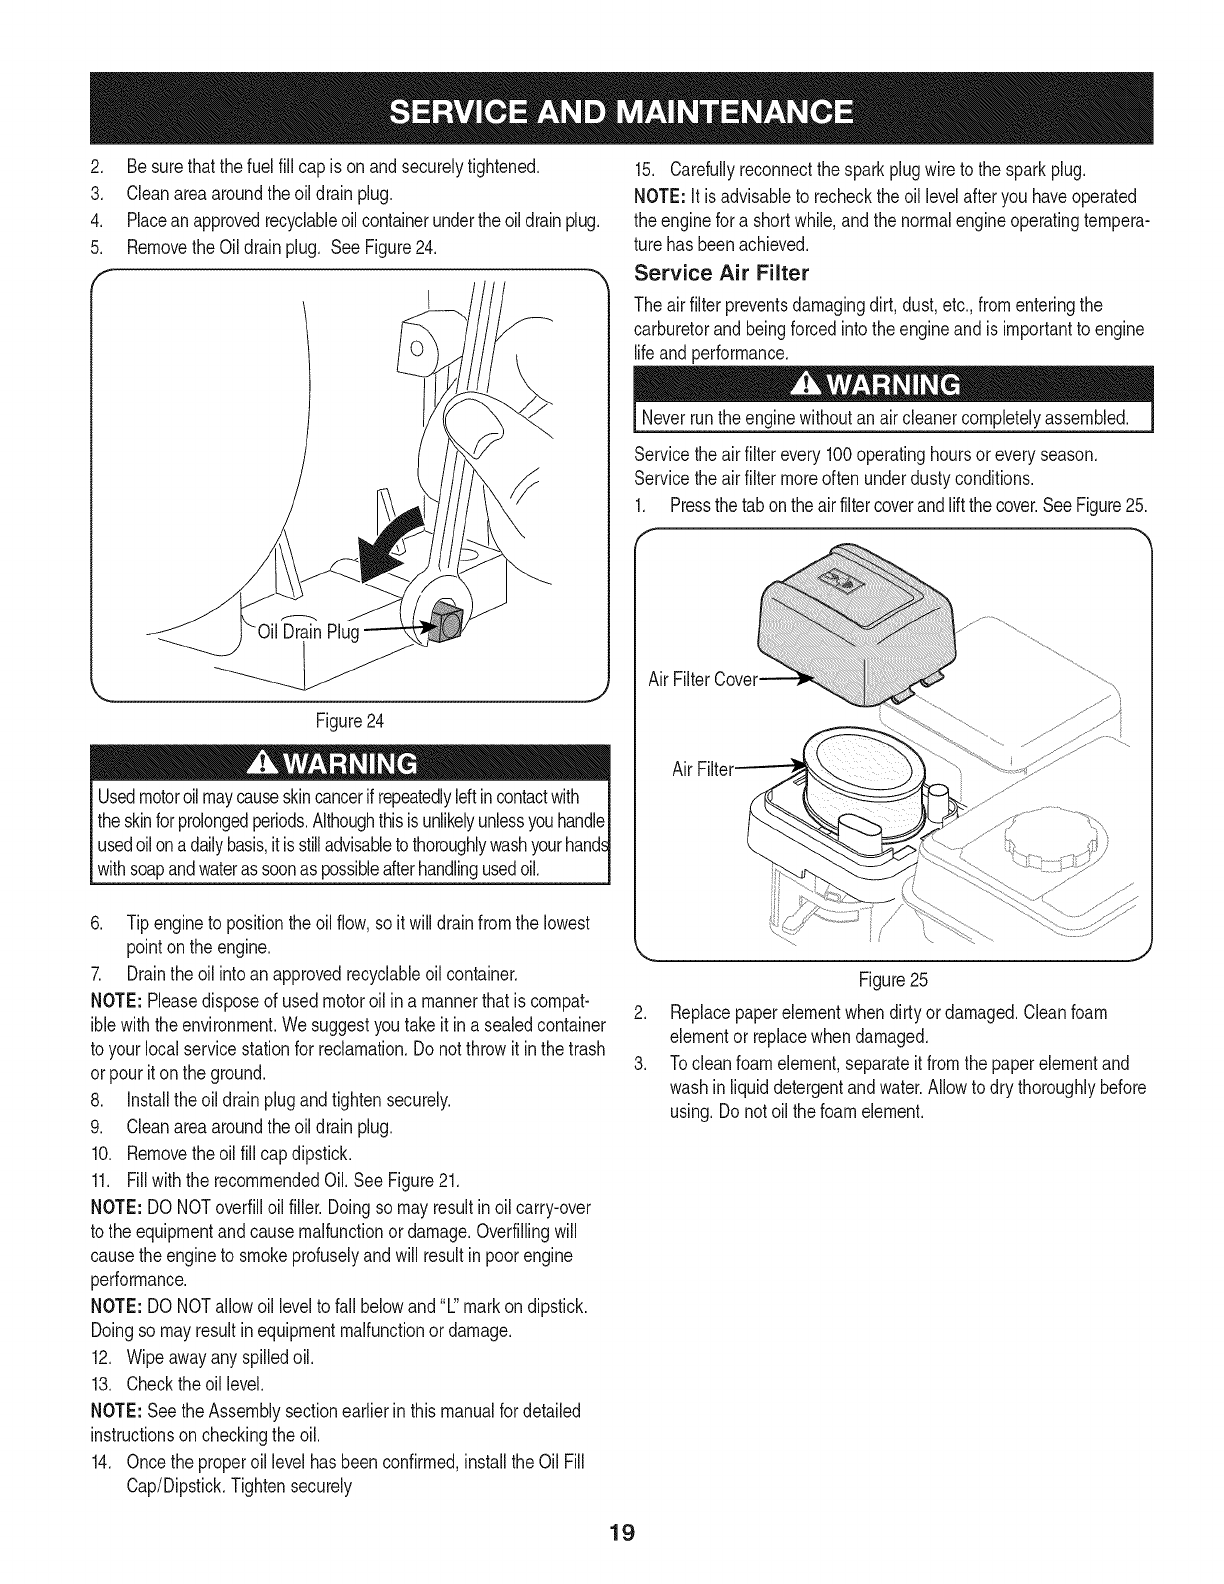
2. Besurethatthe fuel fill cap is onandsecurelytightened.
3. Cleanareaaroundthe oildrain plug.
4. Placeanapprovedrecyclableoilcontainerundertheoildrainplug.
5. RemovetheOil drainplug. SeeFigure24.
f, ,,_
1
Figure24
Usedmotoroilmaycauseskincancerif repeatedlyleftincontactwith
the skinforprolongedperiods.Althoughthisis unlikelyunlessyouhandle
usedoilona dailybasis,itis stilladvisableto thoroughlywashyourhands
withsoapandwateras soonaspossibleafterhandlingusedoil.
6. Tip engineto positiontheoil flow,so it will drainfromthe lowest
pointonthe engine.
7. Drainthe oilinto anapprovedrecyclableoil container.
NOTE: Pleasedisposeof usedmotoroil ina mannerthat is compat-
iblewiththe environment.Wesuggestyou takeit in a sealedcontainer
to yourlocal servicestationfor reclamation.Do not throwit inthe trash
orpourit on the ground.
8. Installtheoil drainplugandtightensecurely.
9. Cleanareaaroundthe oildrain plug.
10. Removetheoil fill capdipstick.
11. Fill withthe recommendedOil.See Figure21.
NOTE: DONOToverfilloil filler.Doingso mayresultinoil carry-over
to the equipmentand causemalfunctionordamage.Overfillingwill
causethe engineto smokeprofuselyandwill resultinpoorengine
performance.
NOTE: DONOTallowoil levelto fall belowand"L"markondipstick.
Doingso mayresultinequipmentmalfunctionor damage.
12. Wipeawayany spilledoil.
13. Checktheoil level.
NOTE:Seethe Assemblysectionearlierin thismanualfor detailed
instructionson checkingthe oil.
14. Oncethe properoil levelhasbeenconfirmed,installthe Oil Fill
Cap/Dipstick.Tightensecurely
15. Carefullyreconnectthe sparkplugwireto the sparkplug.
NOTE:It is advisableto rechecktheoil levelafteryou haveoperated
the enginefor a shortwhile,andthe normalengineoperatingtempera-
ture hasbeenachieved.
Service Air Filter
The airfilterpreventsdamagingdirt,dust, etc.,fromenteringthe
carburetorandbeingforcedintothe engineandis importantto engine
lifeandperformance.
Neverrunthe enginewithoutanaircleanercompletelyassembled.
Servicetheair filterevery100operatinghoursor everyseason.
Servicetheair filtermoreoften underdustyconditions.
1. Pressthetab ontheairfiltercoverandliftthecover.SeeFigure25.
AirFilter
...... i J
Figure25
2. Replacepaperelementwhendirtyor damaged.Cleanfoam
elementor replacewhendamaged.
3. Tocleanfoamelement,separateit fromthe paperelementand
washin liquiddetergentandwater.Allowto dry thoroughlybefore
using.Do notoil thefoamelement.
19
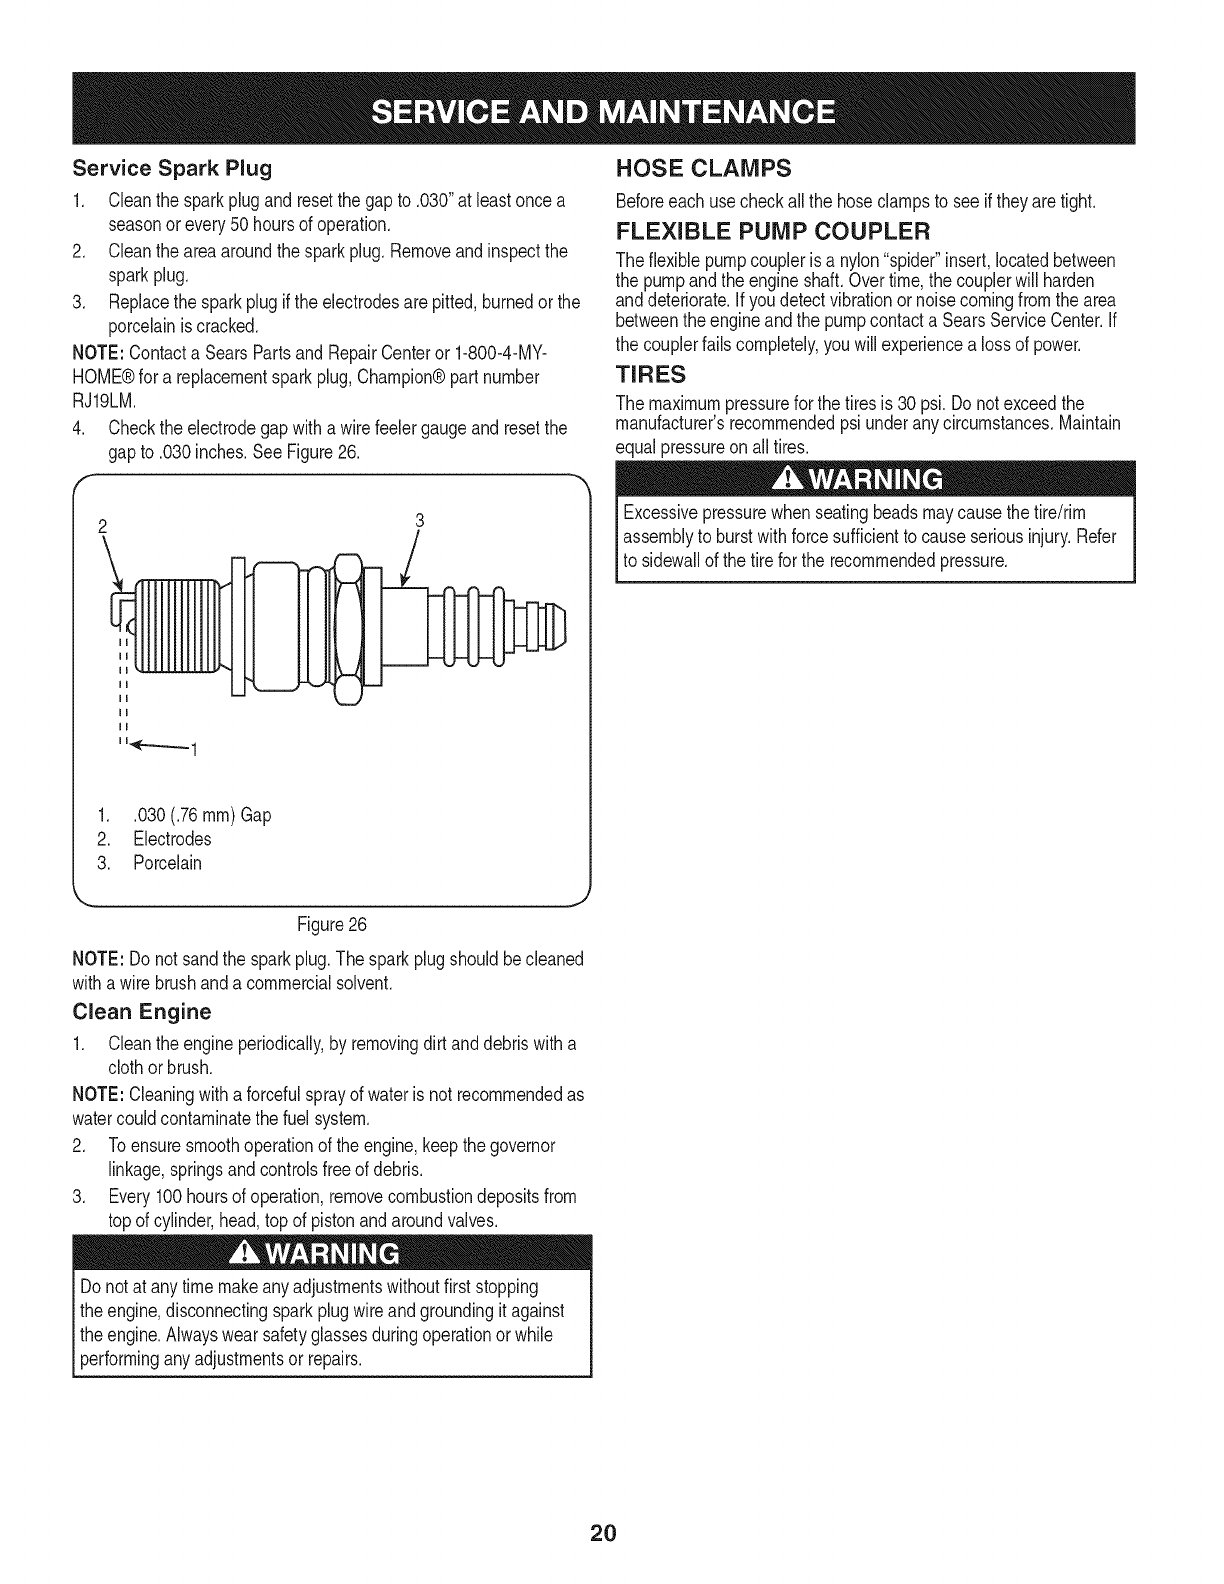
Service Spark Plug
1. Cleanthe sparkplugandresetthe gapto .030"at leastonce a
seasonorevery50hoursof operation.
2. Cleantheareaaroundthe sparkplug. Removeandinspectthe
sparkplug.
3. Replacethe sparkplugif the electrodesare pitted,burnedorthe
porcelainis cracked.
NOTE:Contacta SearsPartsand RepairCenteror 1-800-4-MY-
HOME®for a replacementsparkplug,Champion®partnumber
RJ19LM.
4. Checkthe electrodegapwitha wirefeelergaugeand resetthe
gapto .030inches.SeeFigure26.
2
\3
1. .030(.76 ram) Gap
2. Electrodes
3. Porcelain
HOSE CLAMPS
Beforeeachusecheckall the hoseclampsto see if theyaretight.
FLEXIBLE PUMP COUPLER
The flexiblepumpcoupleris a nylon"spider"insert,locatedbetween
the pumpandthe engineshaft.Overtime,the couplerwill harden
anddeteriorate.If youdetectvibrationornoisecomingfromthe area
betweentheengineandthe pumpcontacta SearsServiceCenter.If
the couplerfailscompletely,youwill experiencea lossof power.
TIRES
The maximumpressurefor the tiresis 30 psi.Do notexceedthe
manufacturer'srecommendedpsiunderanycircumstances.Maintain
equalpressureon alltires.
Excessivepressurewhenseatingbeadsmaycausethetire/rim
assemblyto burstwithforcesufficientto causeseriousinjury.Refer
to sidewallof the tirefor the recommendedpressure.
Figure26
NOTE: Donot sandthe sparkplug.The sparkplugshouldbecleaned
witha wirebrushanda commercialsolvent.
Clean Engine
1. Cleantheengineperiodically,by removingdirt anddebriswitha
clothorbrush.
NOTE:Cleaningwitha forcefulsprayof wateris not recommendedas
watercouldcontaminatethe fuel system.
2. Toensuresmoothoperationof theengine,keepthe governor
linkage,springsandcontrolsfreeof debris.
3. Every100hoursof operation,removecombustiondepositsfrom
topof cylinder,head,top of pistonandaroundvalves.
Do notat any timemakeanyadjustmentswithoutfirststopping
theengine,disconnectingsparkplugwireand groundingit against
theengine.Alwayswearsafetyglassesduringoperationor while
[ performng anyadjustmentsor repars.
2O
Prepareyour logsplitterfor storageat the endof the seasonor if the
logsplitterwill not beusedfor 30daysor more.
Neverstorethe machinewithfuelin thefuel tankinsideof building
wherefumesmayreachanopenflameor sparkor whereignition
sourcesarepresentsuchas hotwaterand spaceheaters,furnaces,
clothesdyers,stoves,electricmotors,etc.
NOTE:A yearlycheck-upby yourlocalSearsservicecenteris a good
wayto ensureyourlog splitterwill providethe maximumperformance
nextseason.
LOG SPLITTER
1. Cleanthe logsplitterthoroughly.
2. Wipethe logsplitterwithanoiledragto preventrust,especially
onthe wedgeandthe beam.
ENGINE
NOTE: Itis importantto preventgumdepositsfromformingin the
essentialfuel systempartssuchas the carburetor,fuelfilter,fuel hose
ortankduringstorage.Also,alcoholblendedfuels (calledgasoholor
usingethanolor methanol)can attractmoisturewhichleadsto separa-
tionandformationof acidsduringstorage.Acidicgascan damagethe
fuel systemof anenginewhile instorage.
1. Drainthe fueltankby runningthe engineuntilthe fuel linesand
carburetorareempty.Besurethe engineis cool.Do not smoke
whilehandlingthe fuel.
NOTE: Neveruse engineorcarburetorcleanerproductsinthe fuel
tankor permanentdamagemayoccur.Usefreshfuel nextseason.
2. Removethe sparkplug,pourapproximately1/2oz.of engineoil
intocylinderandcrankit slowlyto distributetheoil.
3. Replacethe sparkplug.
FUEL STABILIZER
NOTE: Fuelstabilizeris anacceptablealternativein minimizingthe
formationof fuel gumdepositsduringstorage.
Pleasefollowthe instructionsbelowfor storingyourlogsplitterwith
fuel andstabilizerinthe engine:
1. Addstabilizerto the gasolinein the fueltankor storagecontainer.
Alwaysfollow the mixratiofoundonthe stabilizercontainer.
2. Runtheengineat least10minutesafteraddingstabilizerto allow
the stabilizerto reachthe carburetor.
NOTE: Do notdrainthe gastankandcarburetorif usingfuelstabilizer.
Drainall the oilfromthe crankcase(thisshouldbedoneafterthe
enginehasbeenoperatedand is stillwarm)and refillthecrankcase
withfreshoil.
OTHER
• Donot storethe gasolinefromoneseasonto another.
• Replaceyourgasolinecan if it startsto rust.
Storethe logsplitterin a clean,dry area.Do not storeit nextto
any corrosivematerials,suchas fertilizer.
• Wipethe equipmentwithan oiledragto preventrust.
21
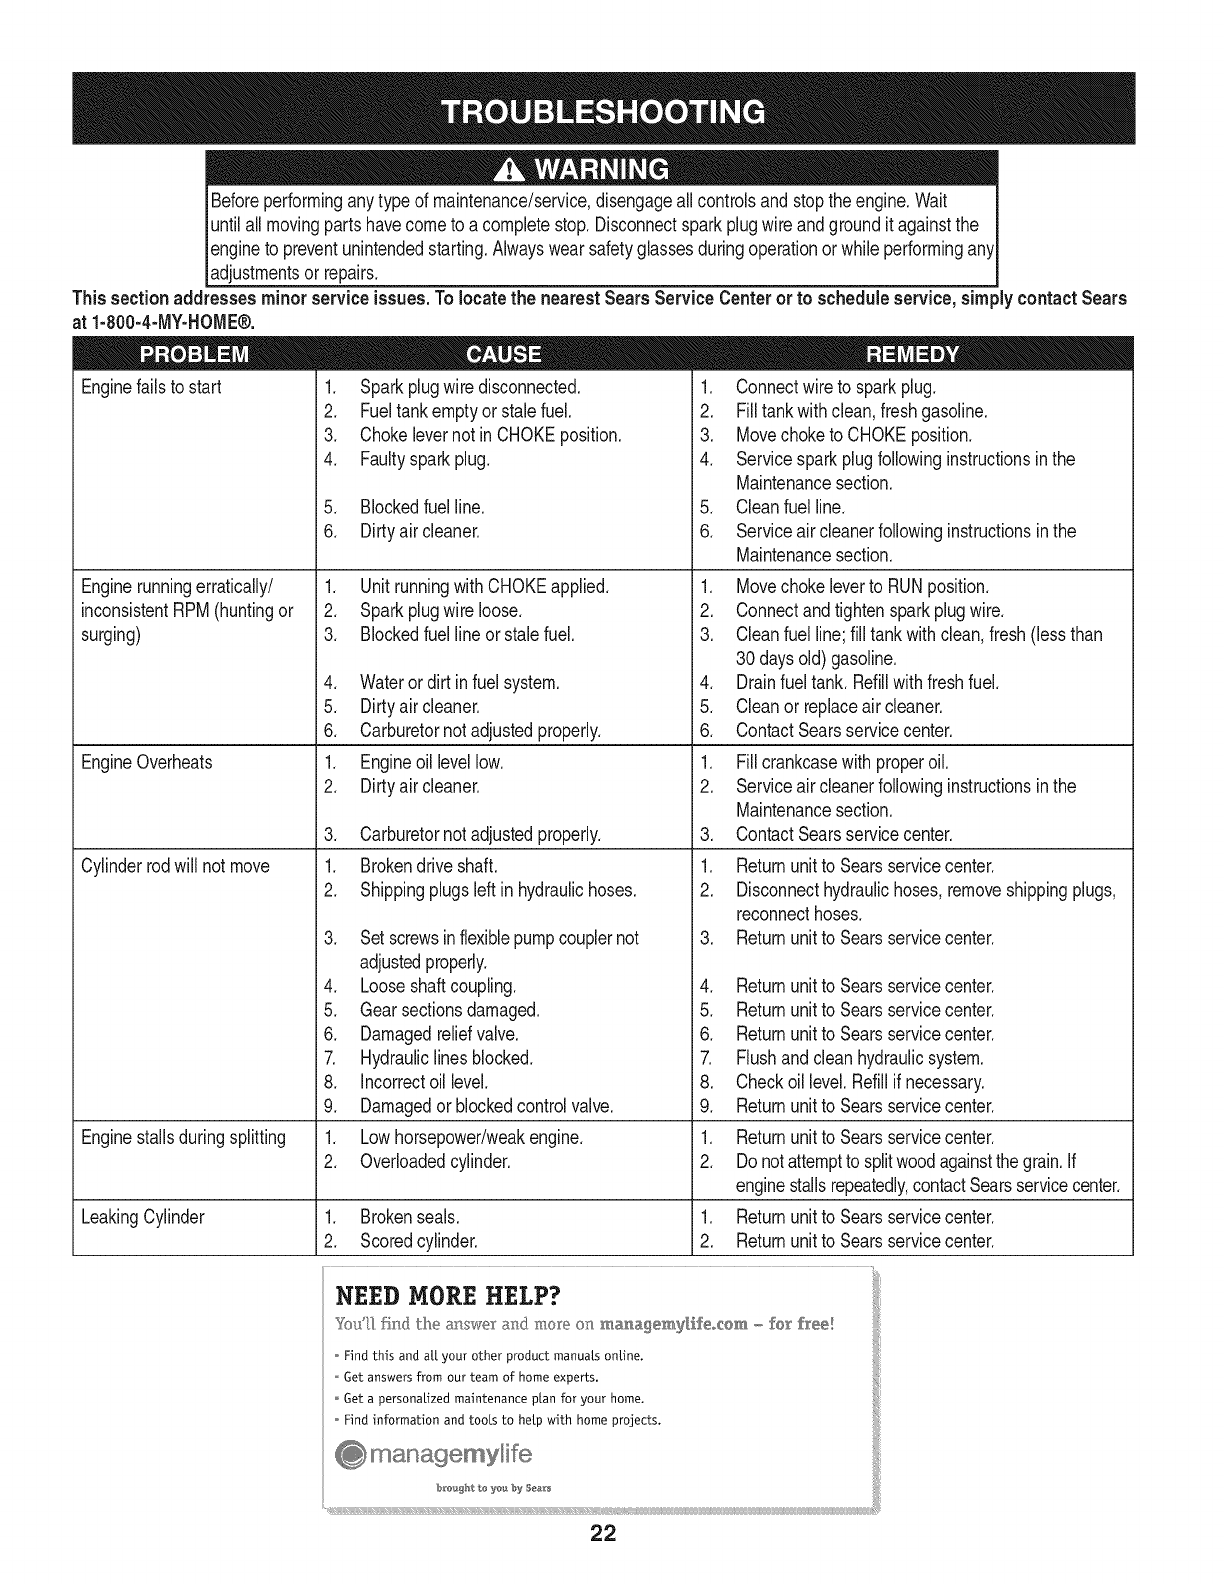
Beforeperforminganytype of maintenance/service,disengageall controlsandstopthe engine.Wait
untilall movingpartshavecometo a completestop.Disconnectsparkplugwire andgroundit againstthe
engineto preventunintendedstarting.Alwayswearsafetyglassesduringoperationor whileperformingany
adjustmentsor repars.
This section addresses minor service issues. To locate the nearest Sears Service Centeror to schedule service, simply contact Sears
at 1-800-4-MY-HOME®.
1. Sparkplugwire disconnected.
2. Fueltankemptyor stalefuel.
3. Chokelevernot inCHOKEposition.
4. Faultysparkplug.
Enginefailsto start
Enginerunningerratically/
inconsistentRPM(huntingor
surging)
EngineOverheats
Cylinderrodwill not move
5. Blockedfuel line.
6. Dirtyair cleaner.
1. UnitrunningwithCHOKEapplied.
2. Sparkplugwire loose.
3. Blockedfuel lineor stalefuel.
4. Waterordirt infuel system.
5. Dirtyair cleaner.
6. Carburetornot adjustedproperly.
1. Engineoillevellow.
2. Dirtyair cleaner.
3. Carburetornot adjustedproperly.
1. Brokendriveshaft.
2. Shippingplugsleft in hydraulichoses.
3. Setscrewsinflexiblepumpcouplernot
1. Connectwireto sparkplug.
2. Filltankwithclean,freshgasoline.
3. Movechoketo CHOKEposition.
4. Servicesparkplugfollowinginstructionsinthe
Maintenancesection.
5. Cleanfuel line.
6. Serviceaircleanerfollowinginstructionsin the
Maintenancesection.
1. Movechokeleverto RUNposition.
2. Connectandtightensparkplugwire.
3. Cleanfuel line;fill tankwith clean,fresh(lessthan
30 daysold)gasoline.
4. Drainfuel tank. Refillwithfreshfuel.
5. Cleanor replaceair cleaner.
6. ContactSearsservicecenter.
1. Fillcrankcasewith properoil.
2. Serviceaircleanerfollowinginstructionsin the
Maintenancesection.
3. ContactSearsservicecenter.
1. Returnunitto Searsservicecenter.
2. Disconnecthydraulichoses,removeshippingplugs,
reconnecthoses.
3. Returnunitto Searsservicecenter.
adjustedproperly.
4. Looseshaftcoupling.
5. Gearsectionsdamaged.
6. Damagedreliefvalve.
7. Hydrauliclines blocked.
8. Incorrectoil level.
4. Returnunitto Searsservicecenter.
5. Returnunitto Searsservicecenter.
6. Returnunitto Searsservicecenter.
7. Flushandcleanhydraulicsystem.
8. Checkoil level.Refillif necessary.
9. Damagedor blockedcontrolvalve. 9. Returnunitto Searsservicecenter.
Enginestallsduringsplitting 1. Lowhorsepower/weakengine. 1. Returnunitto Searsservicecenter.
2. Overloadedcylinder. 2. Donotattemptto splitwoodagainstthe grain.If
enginestallsrepeatedly,contactSearsservicecenter.
LeakingCylinder 1. Brokenseals. 1. Returnunitto Searsservicecenter.
2. Scoredcylinder. 2. Returnunitto Searsservicecenter.
NEED MORE H£LP?
Yb_!l[ fh_# the answ(>r a_sd more oxs _anagem,F&&fe_cem, _ £e£° free!
Find this and at[ your other product manuals onEne.
* Get answers from our team of home experts.
Get a personalized maintenance plan for your home.
* Find information and tool.s to help with home projects.
b[e'ugb_, to _t'et_by $ea_rs
@ @H
22
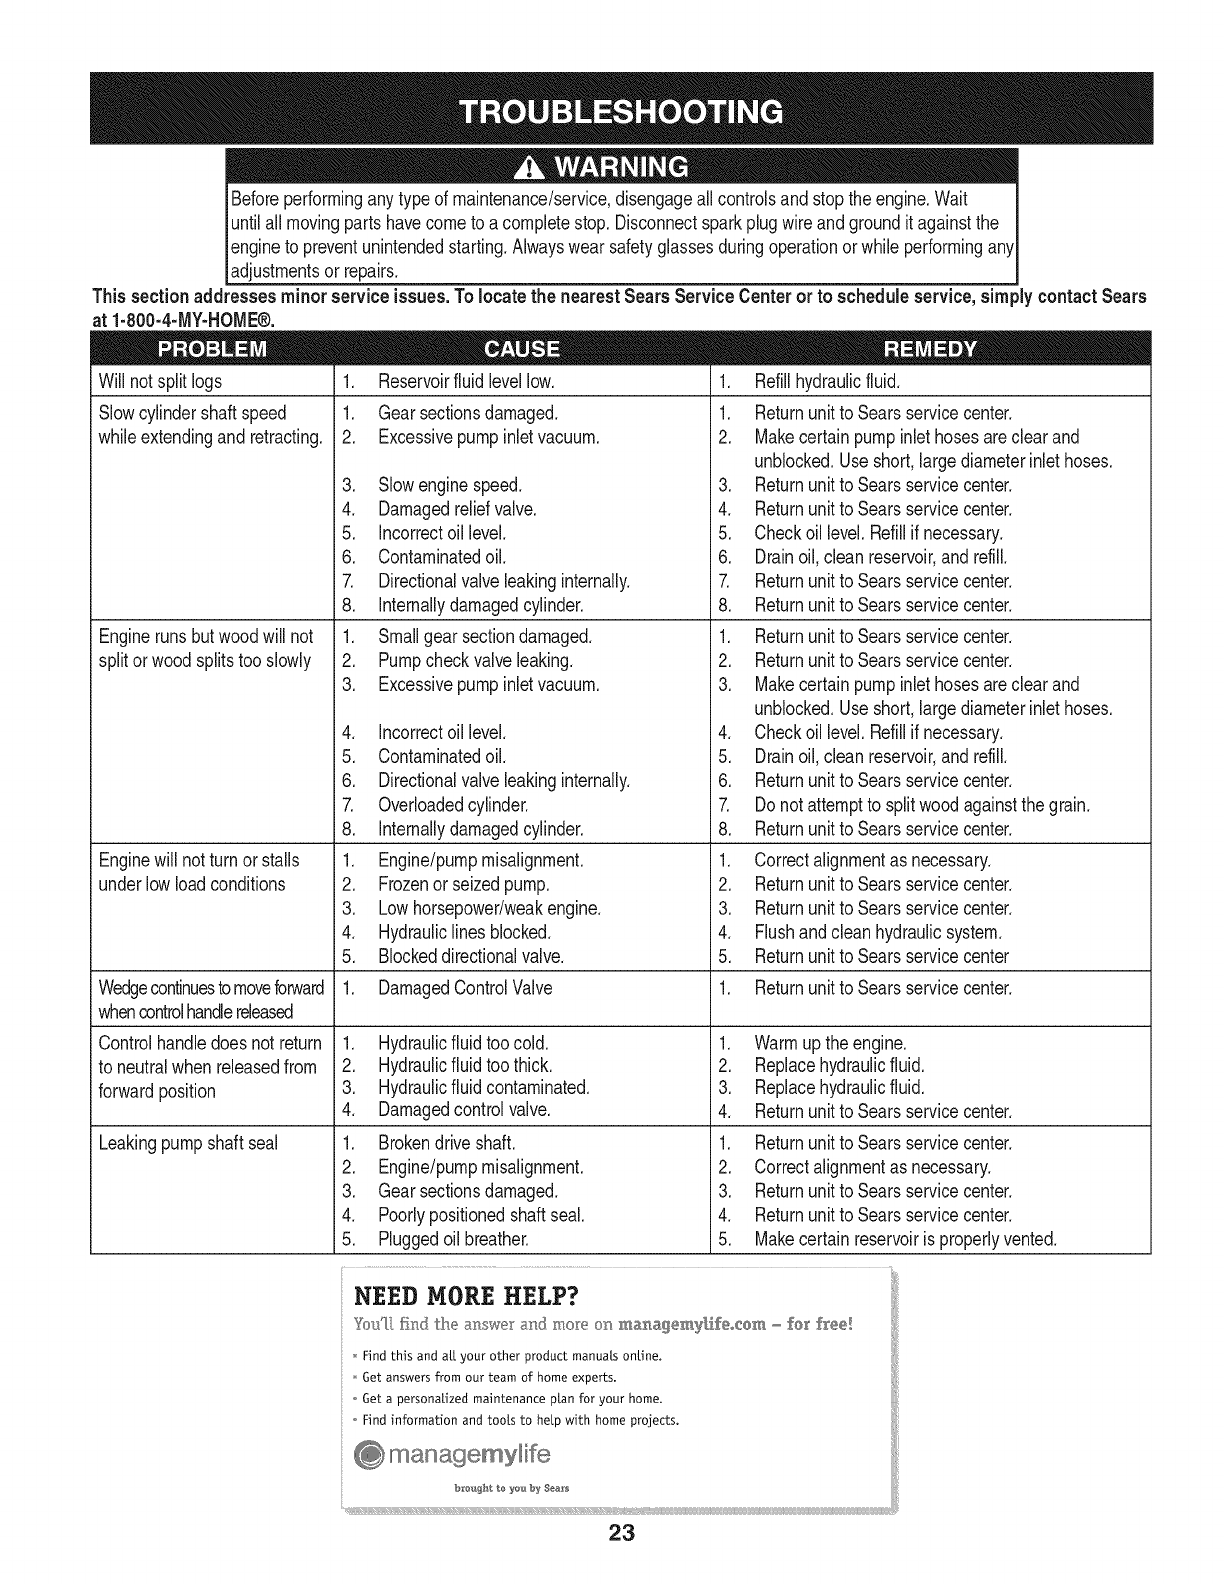
Beforeperforminganytype of maintenance/service,disengageall controlsandstopthe engine.Wait I
untilall movingpartshavecometo a completestop.Disconnectsparkplugwire andgroundit againstthe I
engineto preventunintendedstarting.Alwayswear safetyglassesduringoperationor whileperforminganyI
[adjustmentsor repars.
This section addresses minor service issues. To locate the nearest Sears Service Centeror to schedule service, simply contact Sears
at 1-800-4-MY-HOME®.
Will notsplit logs
Slowcylindershaftspeed
whileextendingand retracting.
Engineruns butwoodwill not
splitorwood splitstoo slowly
Enginewill notturn or stalls
underlowloadconditions
Wedgecontinuesto moveforward
whencontrolhandlereleased
Controlhandledoes notreturn
to neutralwhen releasedfrom
forwardposition
Leakingpumpshaft seal
1. Reservoirfluid levellow.
1. Gearsectionsdamaged.
2. Excessivepumpinletvacuum.
3. Slowenginespeed.
4. Damagedreliefvalve.
5. Incorrectoil level.
6. Contaminatedoil.
7. Directionalvalveleakinginternally.
8. Internallydamagedcylinder.
1. Smallgear sectiondamaged.
2. Pumpcheckvalveleaking.
3. Excessivepumpinletvacuum.
4. Incorrectoil level.
5. Contaminatedoil.
6. Directionalvalveleakinginternally.
7. Overloadedcylinder.
8. Internallydamagedcylinder.
1. Engine/pumpmisalignment.
2. Frozenor seizedpump.
3. Lowhorsepower/weakengine.
4. Hydrauliclines blocked.
5. Blockeddirectionalvalve.
1. DamagedControlValve
1. Hydraulicfluidtoo cold.
2. Hydraulicfluidtoo thick.
3. Hydraulicfluid contaminated.
4. Damagedcontrolvalve.
1. Brokendriveshaft.
2. Engine/pumpmisalignment.
3. Gearsectionsdamaged.
4. Poorlypositionedshaftseal.
5. Pluggedoil breather.
1. Refillhydraulicfluid.
1. Returnunitto Searsservicecenter.
2. Makecertainpump inlethosesareclearand
unblocked.Useshort,largediameterinlet hoses.
3. Returnunitto Searsservicecenter.
4. Returnunitto Searsservicecenter.
5. Checkoil level.Refillif necessary.
6. Drainoil,clean reservoir,andrefill.
7. Returnunitto Searsservicecenter.
8. Returnunitto Searsservicecenter.
1. Returnunitto Searsservicecenter.
2. Returnunitto Searsservicecenter.
3. Makecertainpump inlethosesareclearand
unblocked.Useshort,largediameterinlet hoses.
4. Checkoil level.Refillif necessary.
5. Drainoil,clean reservoir,andrefill.
6. Returnunitto Searsservicecenter.
7. Do notattemptto splitwoodagainstthe grain.
8. Returnunitto Searsservicecenter.
1. Correctalignmentas necessary.
2. Returnunitto Searsservicecenter.
3. Returnunitto Searsservicecenter.
4. Flushandcleanhydraulicsystem.
5. Returnunitto Searsservicecenter
1. Returnunitto Searsservicecenter.
1. Warmupthe engine.
2. Replacehydraulicfluid.
3. Replacehydraulicfluid.
4. Returnunitto Searsservicecenter.
1. Returnunitto Searsservicecenter.
2. Correctalignmentas necessary.
3. Returnunitto Searsservicecenter.
4. Returnunitto Searsservicecenter.
5. Makecertainreservoiris properlyvented.
NEED HORE HELP?
YOu[[ S:nd Lhe answex and more on maA_xge_'_y_ifeocem - rex _h'ee!
Find this and a[[ your other product manuats online.
; = Get answers from our team of home experts.
Get a personalized maintenance p[an for your home.
Find information and too[s to help with home projects.
brou#ht to you by Sea_s
23
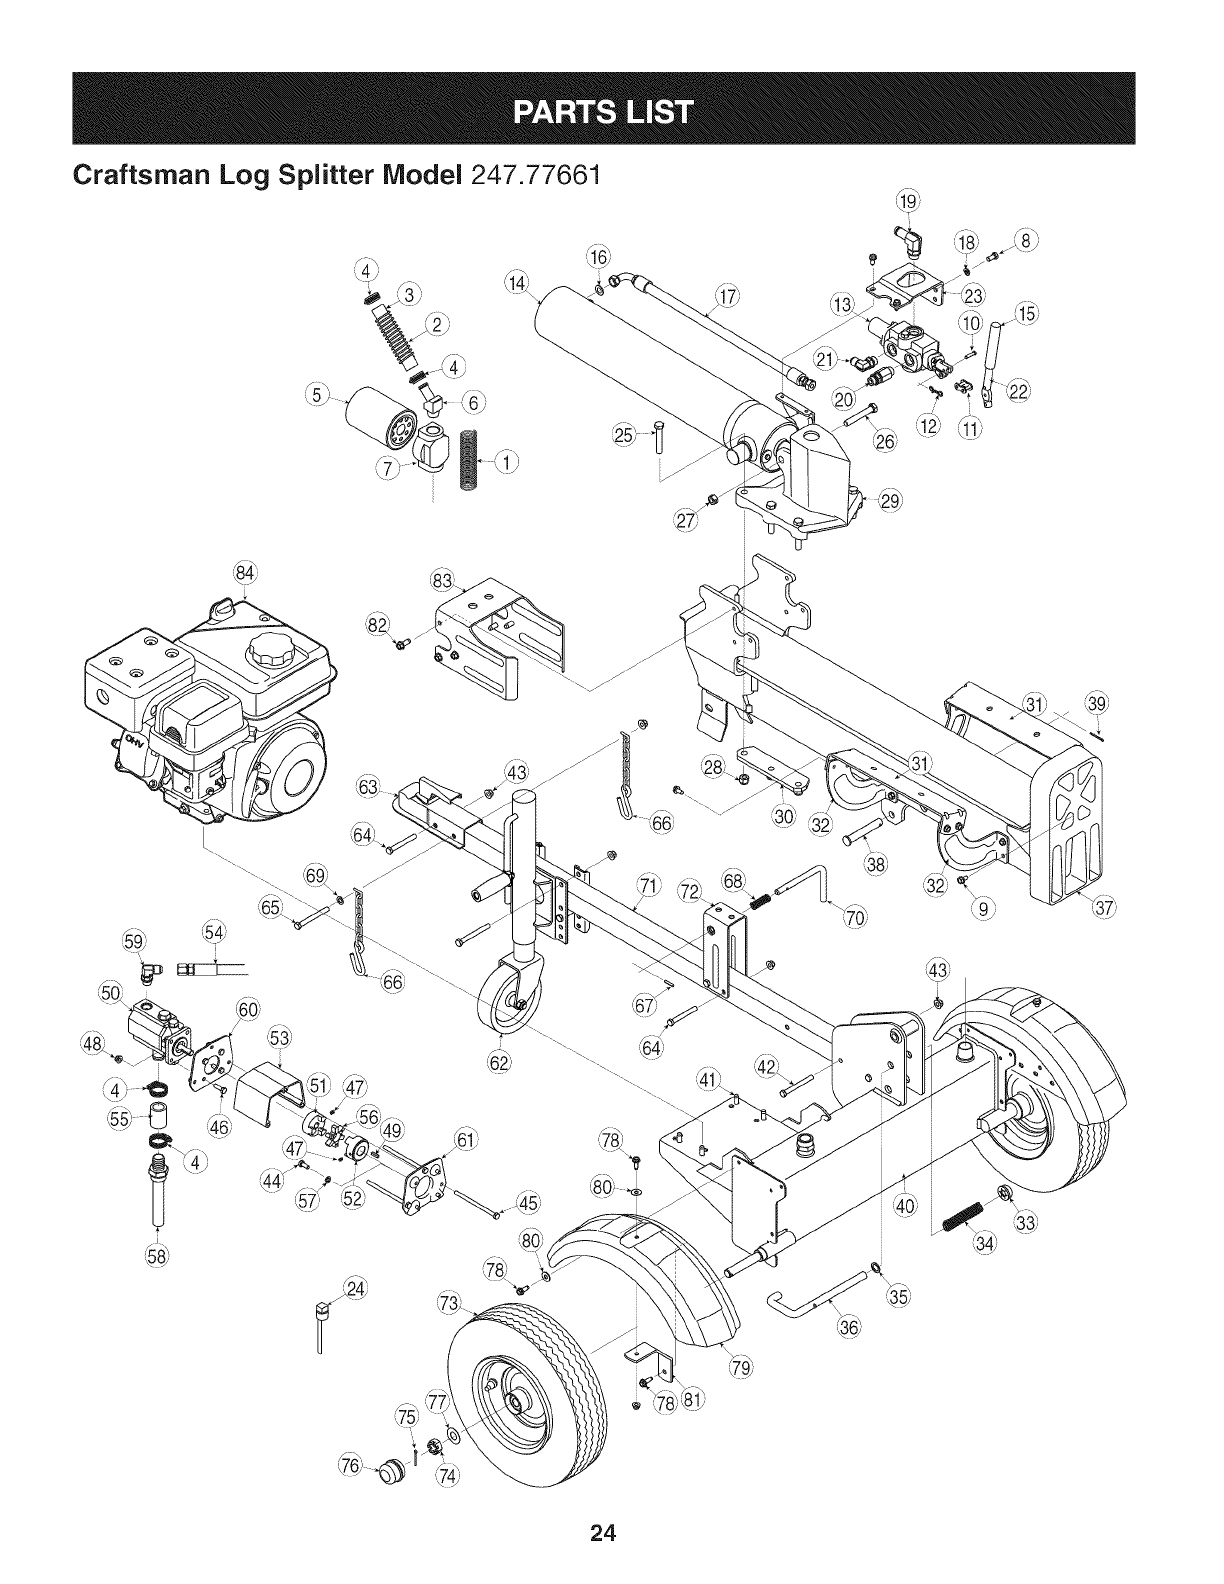
Craftsman Log Splitter Model 247.77661
;_ _,_,.
Y_
/
i
24
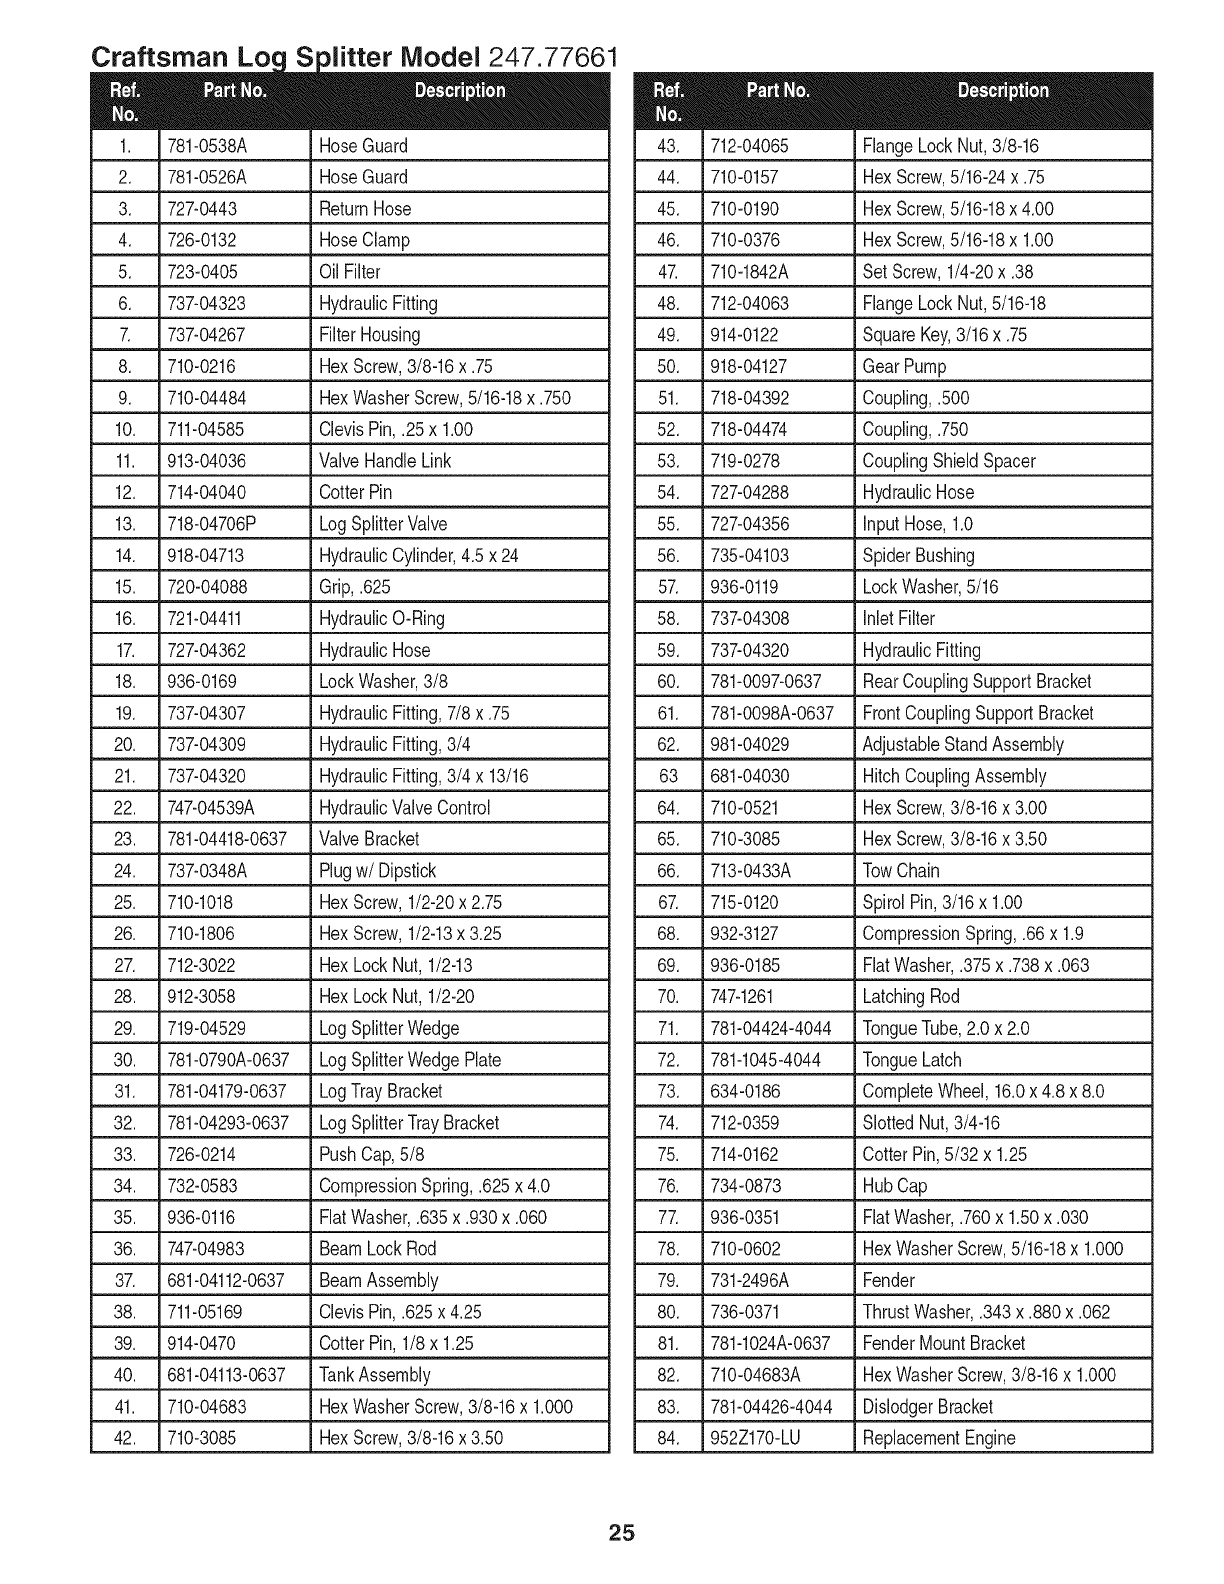
Loc Model 247
781-0538A
781-0526A
727-0443
726-0132
723-0405
737-04323
737-04267
710-0216
710-04484
711-04585
913-04036
714-04040
718-04706P
918-04713
720-04088
721-04411
727-04362
936-0169
737-04307
737-04309
737-04320
747-04539A
781-04418-0637
737-0348A
710-1018
710-1806
712-3022
912-3058
719-04529
781-0790A-0637
781-04179-0637
781-04293-0637
726-0214
732-0583
936-0116
747-04983
681-04112-0637
711-05169
914-0470
681-04113-0637
710-04683
710-3085
HoseGuard
HoseGuard
ReturnHose
HoseClamp
Oil Filter
HydraulicFitting
FilterHousing
HexScrew,3/8-16x .75
HexWasherScrew,5/16-18x .750
ClevisPin,.25 x 1.00
ValveHandleLink
CotterPin
LogSplitterValve
HydraulicCylinder,4.5 x 24
Grip, .625
HydraulicO-Ring
HydraulicHose
LockWasher,3/8
HydraulicFitting,7/8 x .75
HydraulicFitting,3/4
HydraulicFitting,3/4 x 13/16
HydraulicValveControl
ValveBracket
Plugw/Dipstick
HexScrew,1/2-20x 2.75
HexScrew,1/2-13x 3.25
HexLockNut, 1/2-13
HexLockNut, 1/2-20
LogSplitterWedge
LogSplitterWedgePlate
LogTrayBracket
LogSplitterTrayBracket
PushCap,5/8
CompressionSpring,.625x 4.0
FiatWasher,.635x.930x.060
BeamLockRod
BeamAssembly
ClevisPin,.625x 4.25
CotterPin, 1/8x 1.25
TankAssembly
HexWasherScrew,3/8-16x 1.000
HexScrew,3/8-16x 3.50
25
712-04065
710-0157
710-0190
710-0376
710-1842A
712-04063
914-0122
918-04127
718-04392
718-04474
719-0278
727-04288
727-04356
735-04103
936-0119
737-04308
737-04320
781-0097-0637
781-0098A-0637
981-04029
681-04030
710-0521
710-3085
713-0433A
715-0120
932-3127
936-0185
747-1261
781-04424-4044
781-1045-4044
634-0186
712-0359
714-0162
734-0873
936-0351
710-0602
731-2496A
736-0371
781-1024A-0637
710-04683A
781-04426-4044
952Z170-LU
FlangeLockNut,3/8-16
HexScrew,5/16-24x .75
HexScrew,5/16-18x 4.00
HexScrew,5/16-18x 1.00
SetScrew,1/4-20x .38
FlangeLockNut,5/16-18
SquareKey,3/16 x .75
GearPump
Coupling,.500
Coupling,.750
CouplingShieldSpacer
HydraulicHose
input Hose,1.0
SpiderBushing
LockWasher,5/16
inlet Filter
HydraulicFitting
RearCouplingSupportBracket
FrontCouplingSupportBracket
AdjustableStandAssembly
HitchCouplingAssembly
HexScrew,3/8-16x 3.00
HexScrew,3/8-16x 3.50
TowChain
SpirolPin,3/16 x 1.00
CompressionSpring,.66 x 1.9
FiatWasher,.375x.738x.063
LatchingRod
TongueTube,2.0x 2.0
TongueLatch
CompleteWheel,16.0x 4.8 x 8.0
SlottedNut,3/4-16
CotterPin,5/32 x 1.25
HubCap
FiatWasher,.760x 1.50x .030
HexWasherScrew,5/16-18x 1.000
Fender
ThrustWasher,.343x.880x.062
FenderMountBracket
HexWasherScrew,3/8-16x 1.000
DislodgerBracket
ReplacementEngine

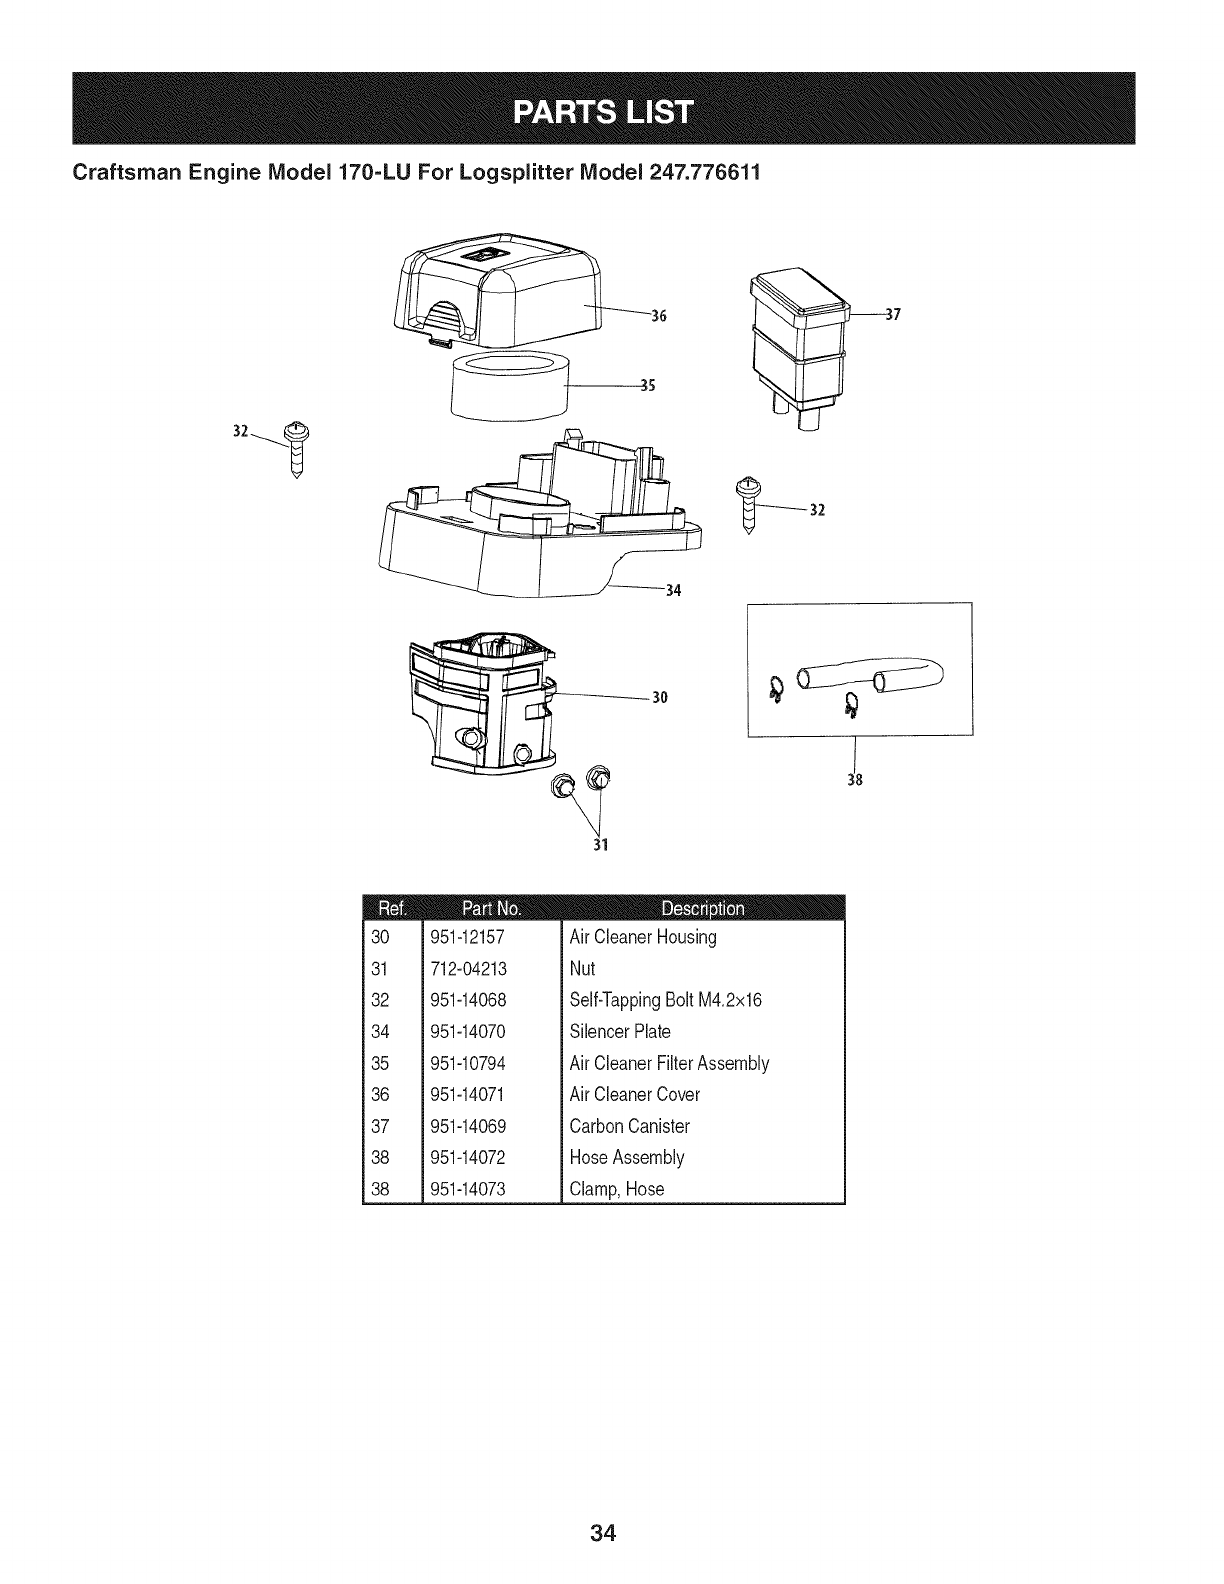
Craftsman Engine IViodel 170=LU For Logsplitter IViodel 247.776611
23 23
©
2O
951-14063
951-14141
951-11289
712-04214
951-14067
710-05002
m = W O
MufflerStud
MufflerStudAssembly
MufflerGasket
Nut,M8
MufflerAssembly
BoltM5xl0
26
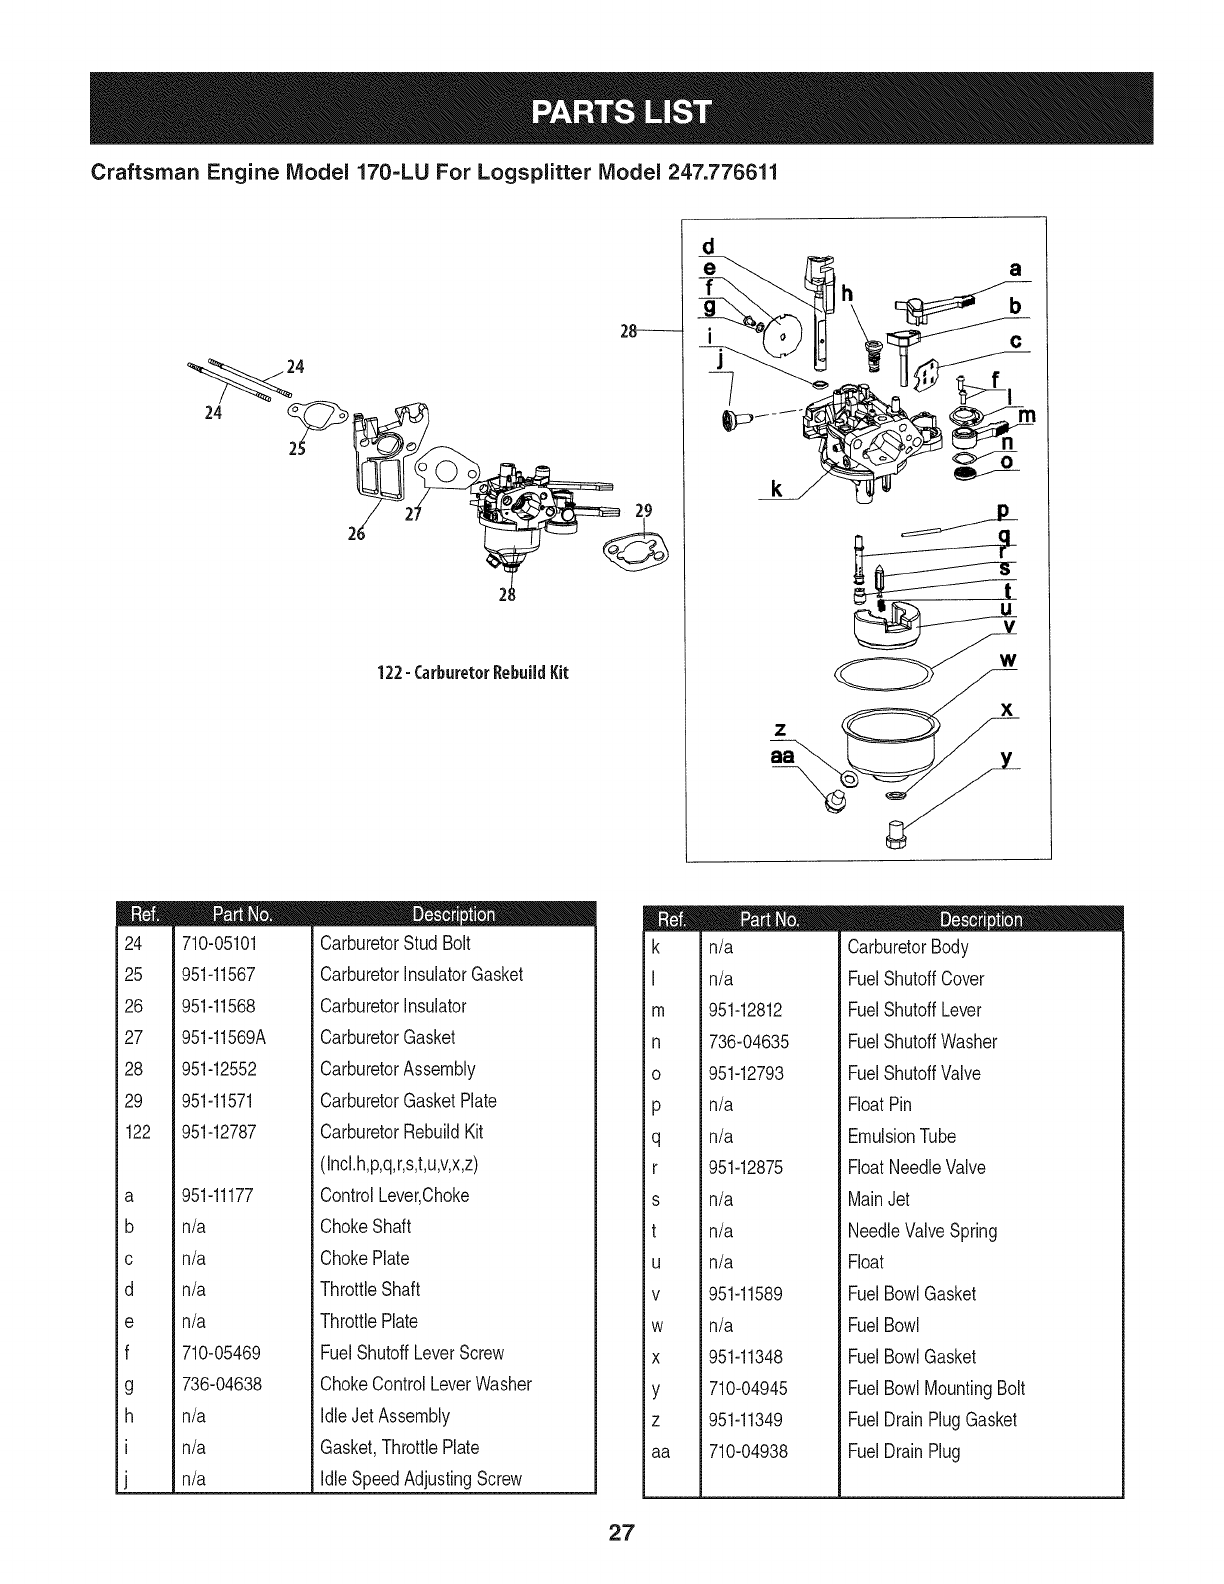
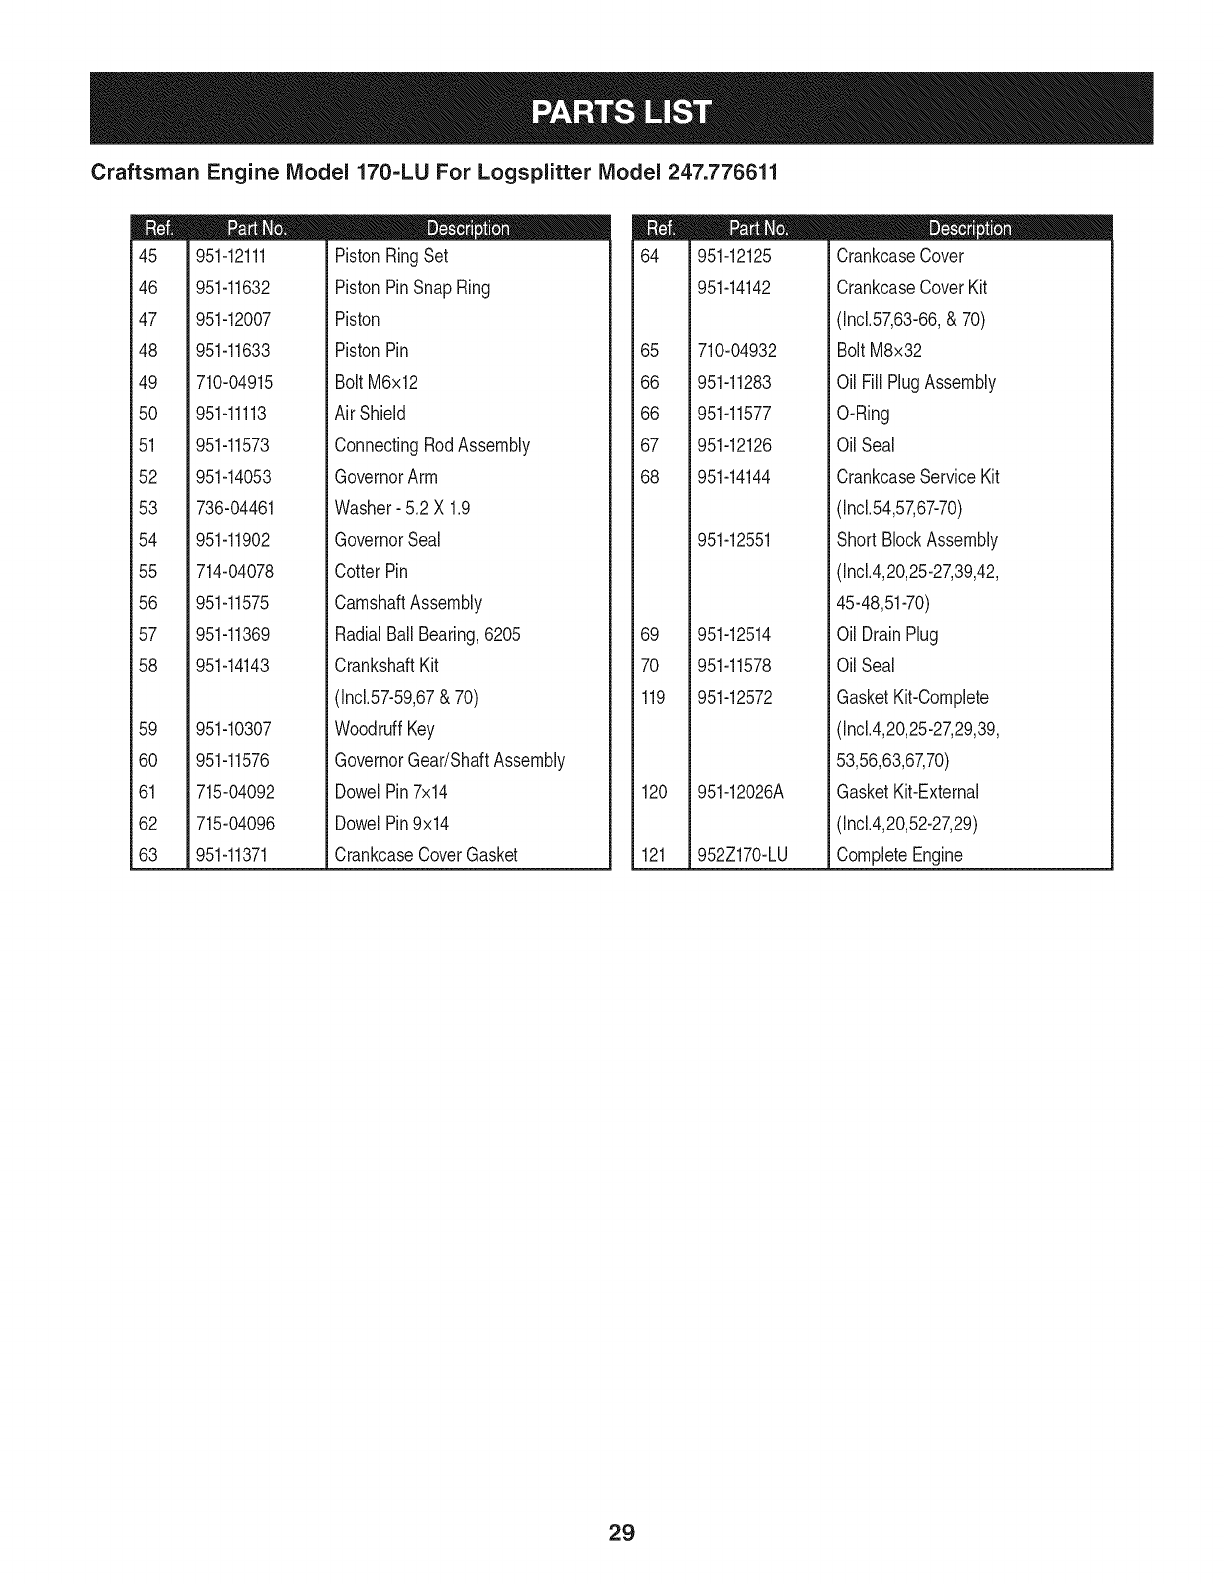
Craftsman Engine Model 170-LU For Logsplitter Model 247.776611
28-----
4
24
122- CarburetorRebuildKit
d
k
m
24
25
26
27
28
29
122
a
b
C
d
e
f
g
h
I
J
710-05101
951-11567
951-11568
951-11569A
m = O O
CarburetorStud Bolt
CarburetorInsulatorGasket
CarburetorInsulator
CarburetorGasket
951-12552
951-11571
951-12787
951-11177
n/a
n/a
n/a
n/a
710-05469
736-04638
n/a
n/a
n/a
CarburetorAssembly
CarburetorGasketPlate
CarburetorRebuildKit
(Incl.h,p,q,r,s,t,u,v,x,z)
ControlLever,Choke
ChokeShaft
ChokePlate
ThrottleShaft
ThrottlePlate
FuelShutoffLeverScrew
ChokeControlLeverWasher
IdleJet Assembly
Gasket,ThrottlePlate
IdleSpeedAdjustingScrew
m
k
I
m
n
o
P
q
r
s
t
U
V
W
X
Y
Z
aa
n/a
n/a
951-12812
736-04635
D = O O
CarburetorBody
FuelShutoffCover
FuelShutoffLever
FuelShutoffWasher
951-12793
n/a
n/a
951-12875
n/a
n/a
n/a
951-11589
n/a
951-11348
710-04945
951-11349
710-04938
FuelShutoffValve
FloatPin
EmulsionTube
FloatNeedleValve
MainJet
NeedleValveSpring
Float
FuelBowlGasket
FuelBowl
FuelBowlGasket
FuelBowlMountingBolt
FuelDrainPlugGasket
FuelDrainPlug
27
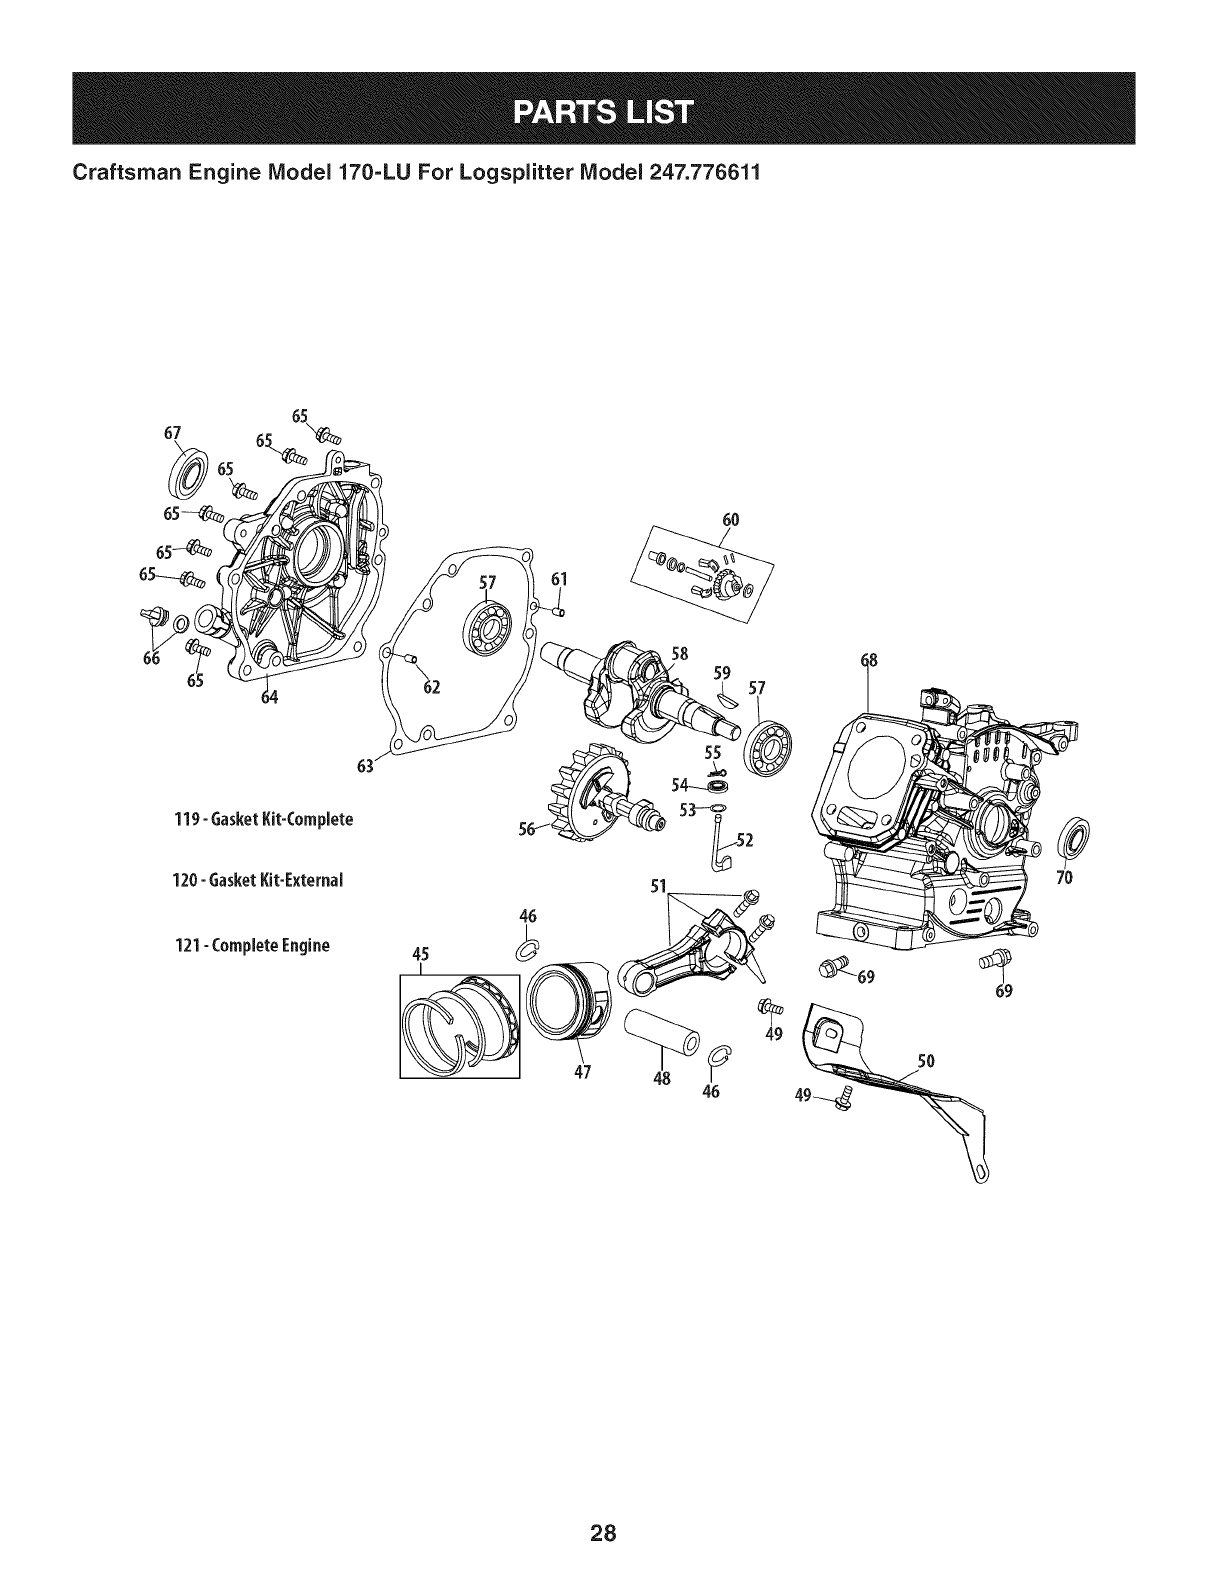
Craftsman Engine IViodel 170-LU For Logsplitter IViodel 247.776611
65
65
120-GasketKit-External
121- CompleteEngine 45
47 48
49
28
Craftsman Engine IViodel 170=LU For Logsplitter IViodel 247.776611
m
45
46
47
48
49
5O
51
52
53
54
55
56
57
58
59
6O
61
62
63
951-12111
951-11632
951-12007
951-11633
710-04915
951-11113
951-11573
951-14053
736-04461
951-11902
714-04078
951-11575
951-11369
951-14143
951-10307
951-11576
715-04092
715-04096
951-11371
D = O O
PistonRingSet
PistonPinSnapRing
Piston
PistonPin
Bolt M6x12
Air Shield
ConnectingRodAssembly
GovernorArm
Washer-5.2 X 1.9
GovernorSeal
CotterPin
CamshaftAssembly
RadialBallBearing,6205
CrankshaftKit
(Incl.57-59,67& 70)
WoodruffKey
GovernorGear/ShaftAssembly
DowelPin7x14
DowelPin9x14
CrankcaseCoverGasket
65
66
66
67
68
69
7O
119
120
121
951-12125
951-14142
710-04932
951-11283
951-11577
951-12126
951-14144
951-12551
951-12514
951-11578
951-12572
951-12026A
952Z170-LU
D = O O
CrankcaseCover
CrankcaseCoverKit
(Incl.57,63-66,&70)
Bolt M8x32
Oil FillPlugAssembly
O-Ring
OilSeal
CrankcaseServiceKit
(In01.54,57,67-70)
ShortBlockAssembly
(Incl.4,20,25-27,39,42,
45-48,51-70)
Oil DrainPlug
OilSeal
GasketKit-Complete
(Incl.4,20,25-27,29,39,
53,56,63,67,70)
GasketKit-External
(Incl.4,20,52-27,29)
CompleteEngine
29
Craftsman Engine IViodel 170=LU For Logsplitter IViodel 247.776611
118
2
120-6asketKit-External
121- CompleteEngine
3O
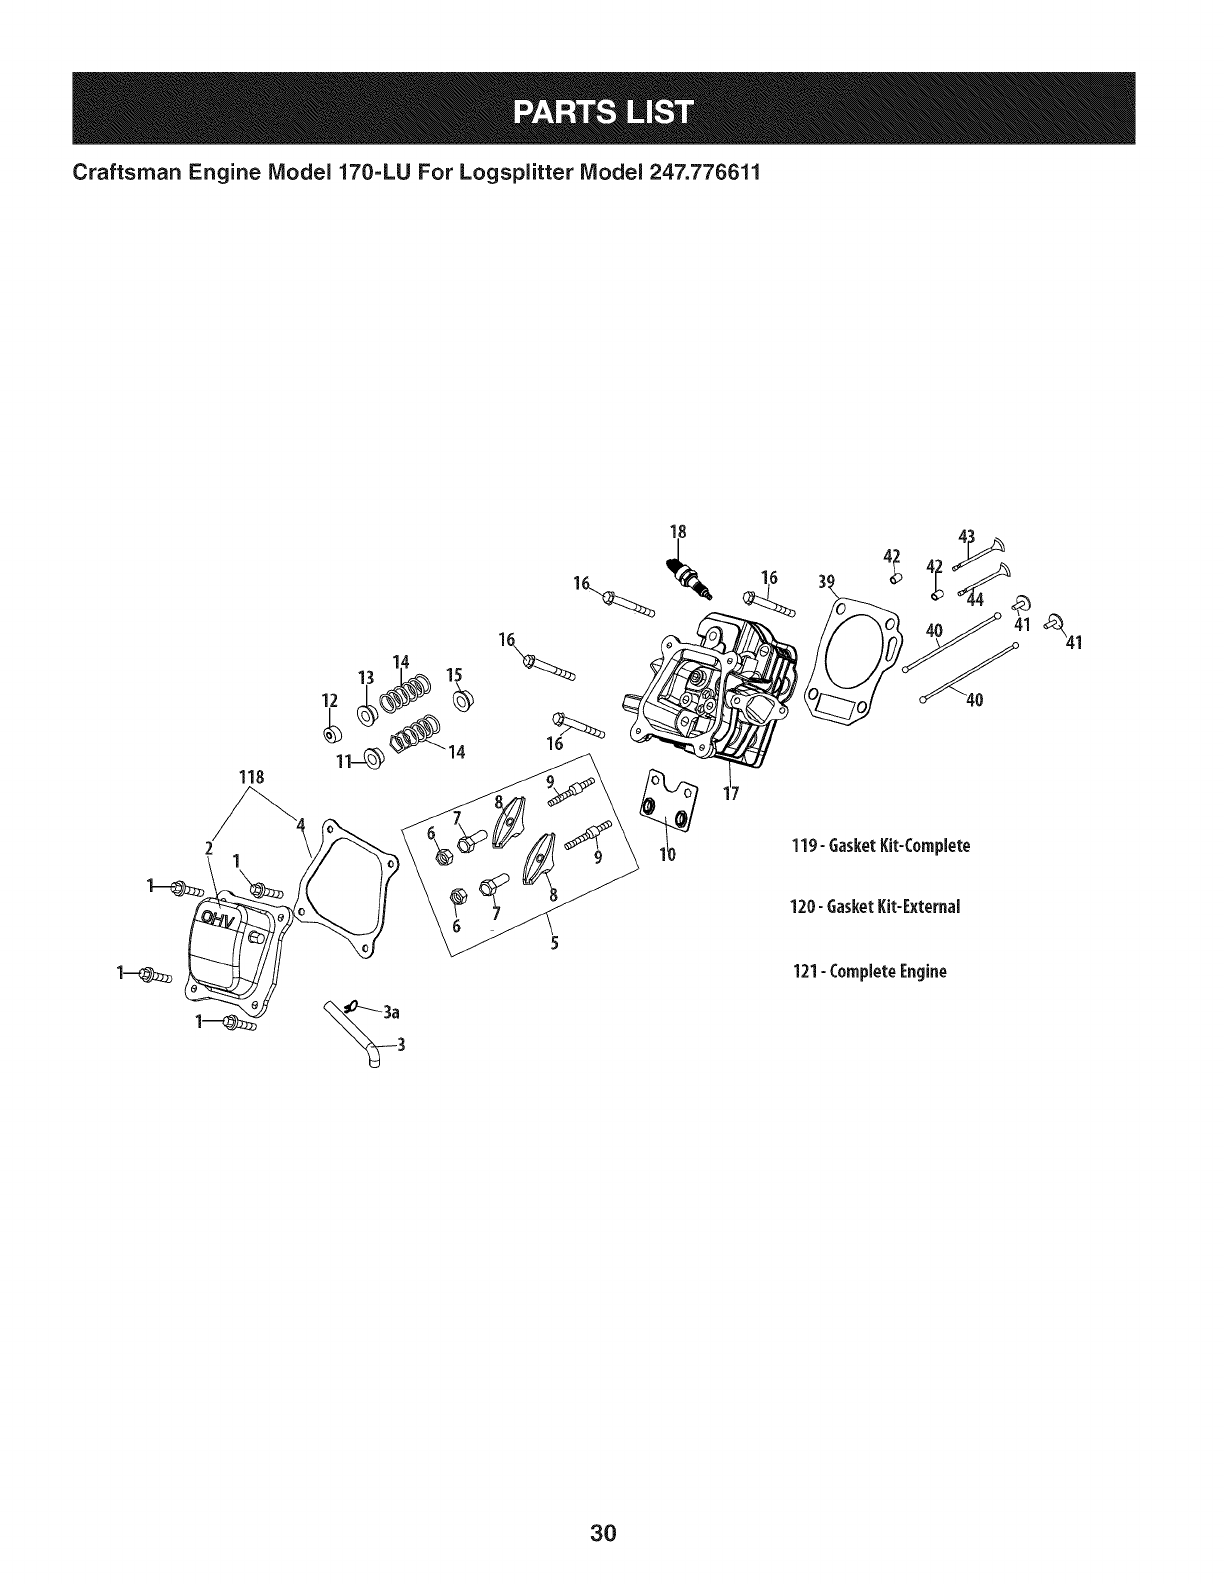
Craftsman Engine IViodel 170=LU For Logsplitter IViodel 247.776611
m
1
2
3
3a
4
5
6
7
8
9
10
11
12
13
14
15
16
17
710-04968
951-11054A
731-07059
726-04101
951-11565
951-11892
751-11124
751-11123
951-11893
710-04902
951-11895
951-12000
951-12002
951-12003
951-12004
951-11894
710-04933
951-10722B
D = B 0
BoltM6x16
ValveCover
BreatherHose
BreatherHoseClamp
ValveCoverGasket
RockerArmAssembly
Nut,PivotLocking
AdjustingNut,Valve
RockerArm
Bolt,Pivot
PushRodGuide
ValveSpringRetainer(intake)
ExhaustValveAdjuster
ValveSpringRetainer(Exhaust)
ValveSpring
ValveSeal(intake)
BoltM8x55
CylinderHead Kit
(Incl.4-15,17,20,25,27,39,43,44)
m
18
39
4O
41
42
43
44
118
119
120
121
951-10292
951-11572
951-10648
951-11899
715-04108
951-10647A
951-10647A
951-12626
951-12572
951-12026A
952Z170-LU
751-12550
m= i _ 0
SparkPlug/F6Rtc
CylinderHeadGasket
PushRodKit
Tappet
DowelPin10X16
ValveKit
ValveKit
ValveCoverKit
GasketKit-Complete
(Incl.4,20,25-27,29,39,
53,56,63,67,70)
GasketKit-External
(Incl.4,20,52-27,29)
CompleteEngine
(Incl.4,20,25,26,27,29)
GasketKit- Complete
(Incl.4,20,25-27,29,38,
52,53,62,66,69)
31
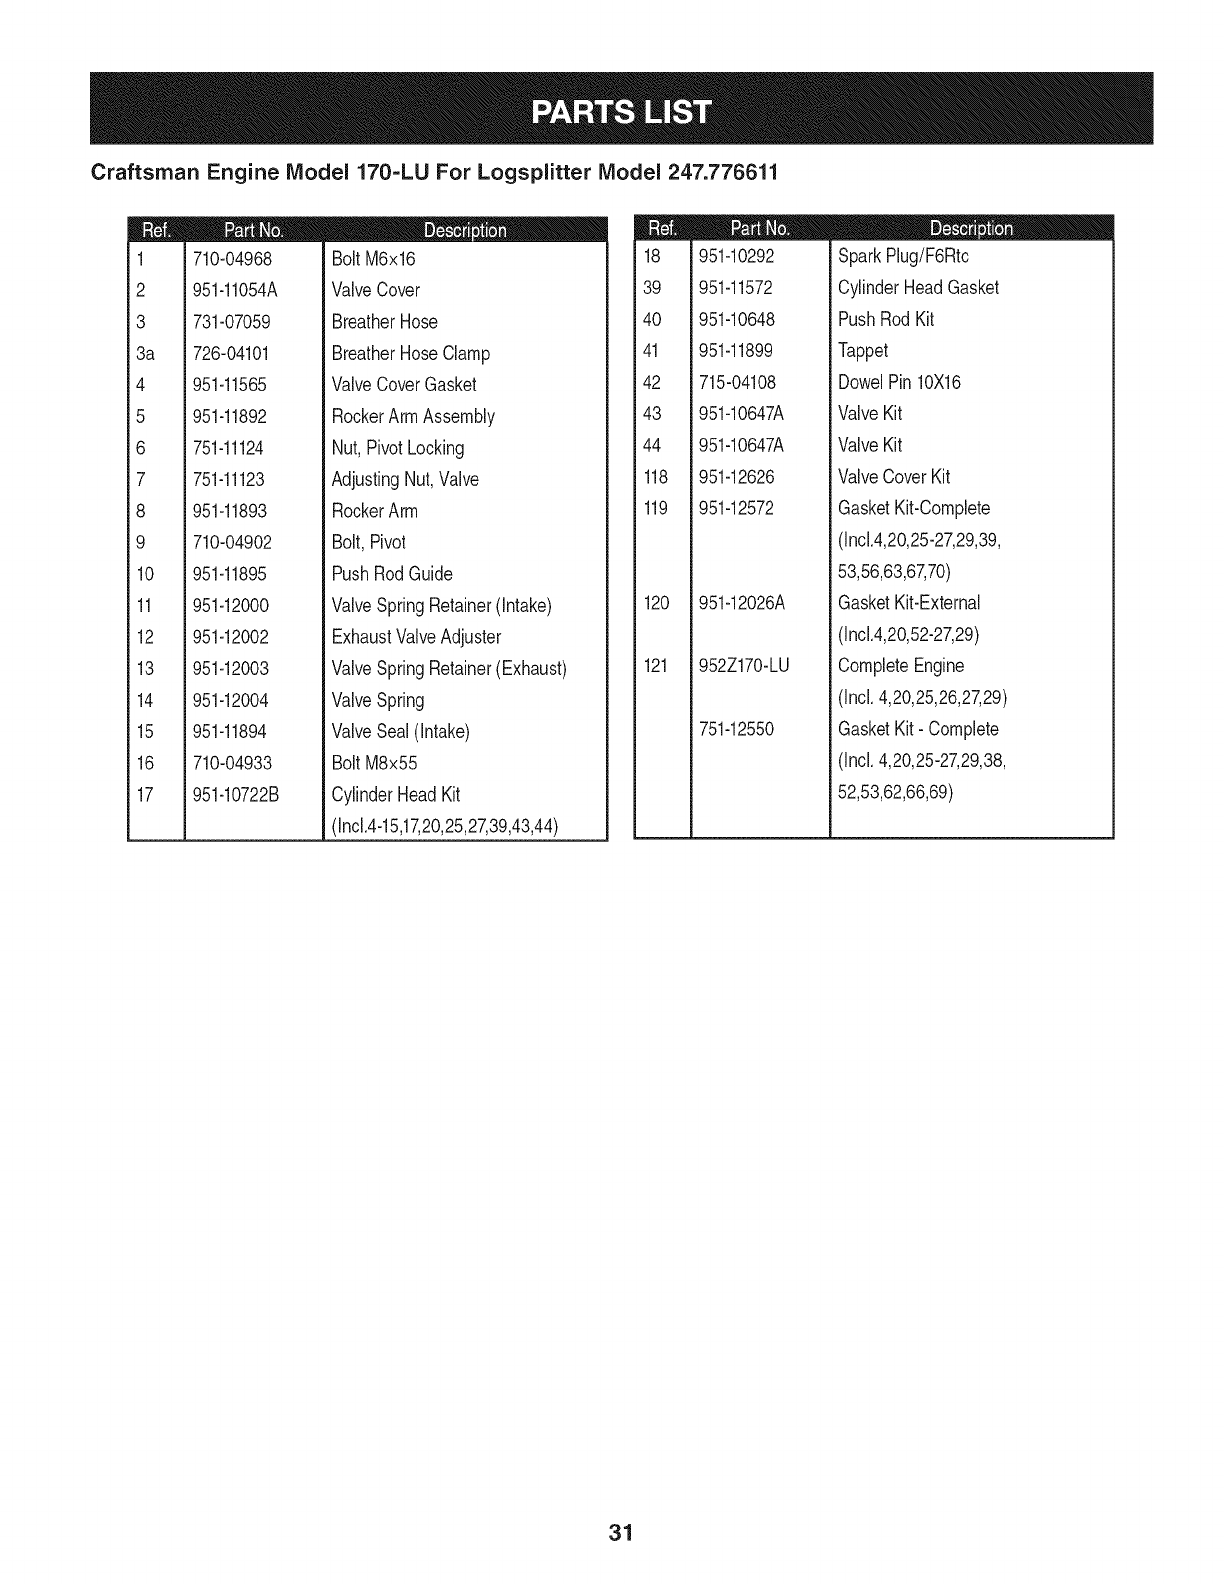
Craftsman Engine IViodel 170=LU For Logsplitter IViodel 247.776611
72
74
75
m
71
72
73
74
75
76
77
79
80
81
82
113
114
115
951-10792
710-04919
951-10805
951-10934
951-10911
712-04209
710-04915
951-11583
736-04455
710-04974
951-12418
712-05015
710-04918
951-14138
D = O O
ignitionCoil
FlangeBolt M6X25
Flywheel
CoolingFan
StarterCup
NutM14
Bolt:M6X12Zinc
BlowerHousing
FiatWasher
FlangeBolt
RecoilStarterAssembly
Nut,M6
BoltM6x20
BlowerHousingShield
32
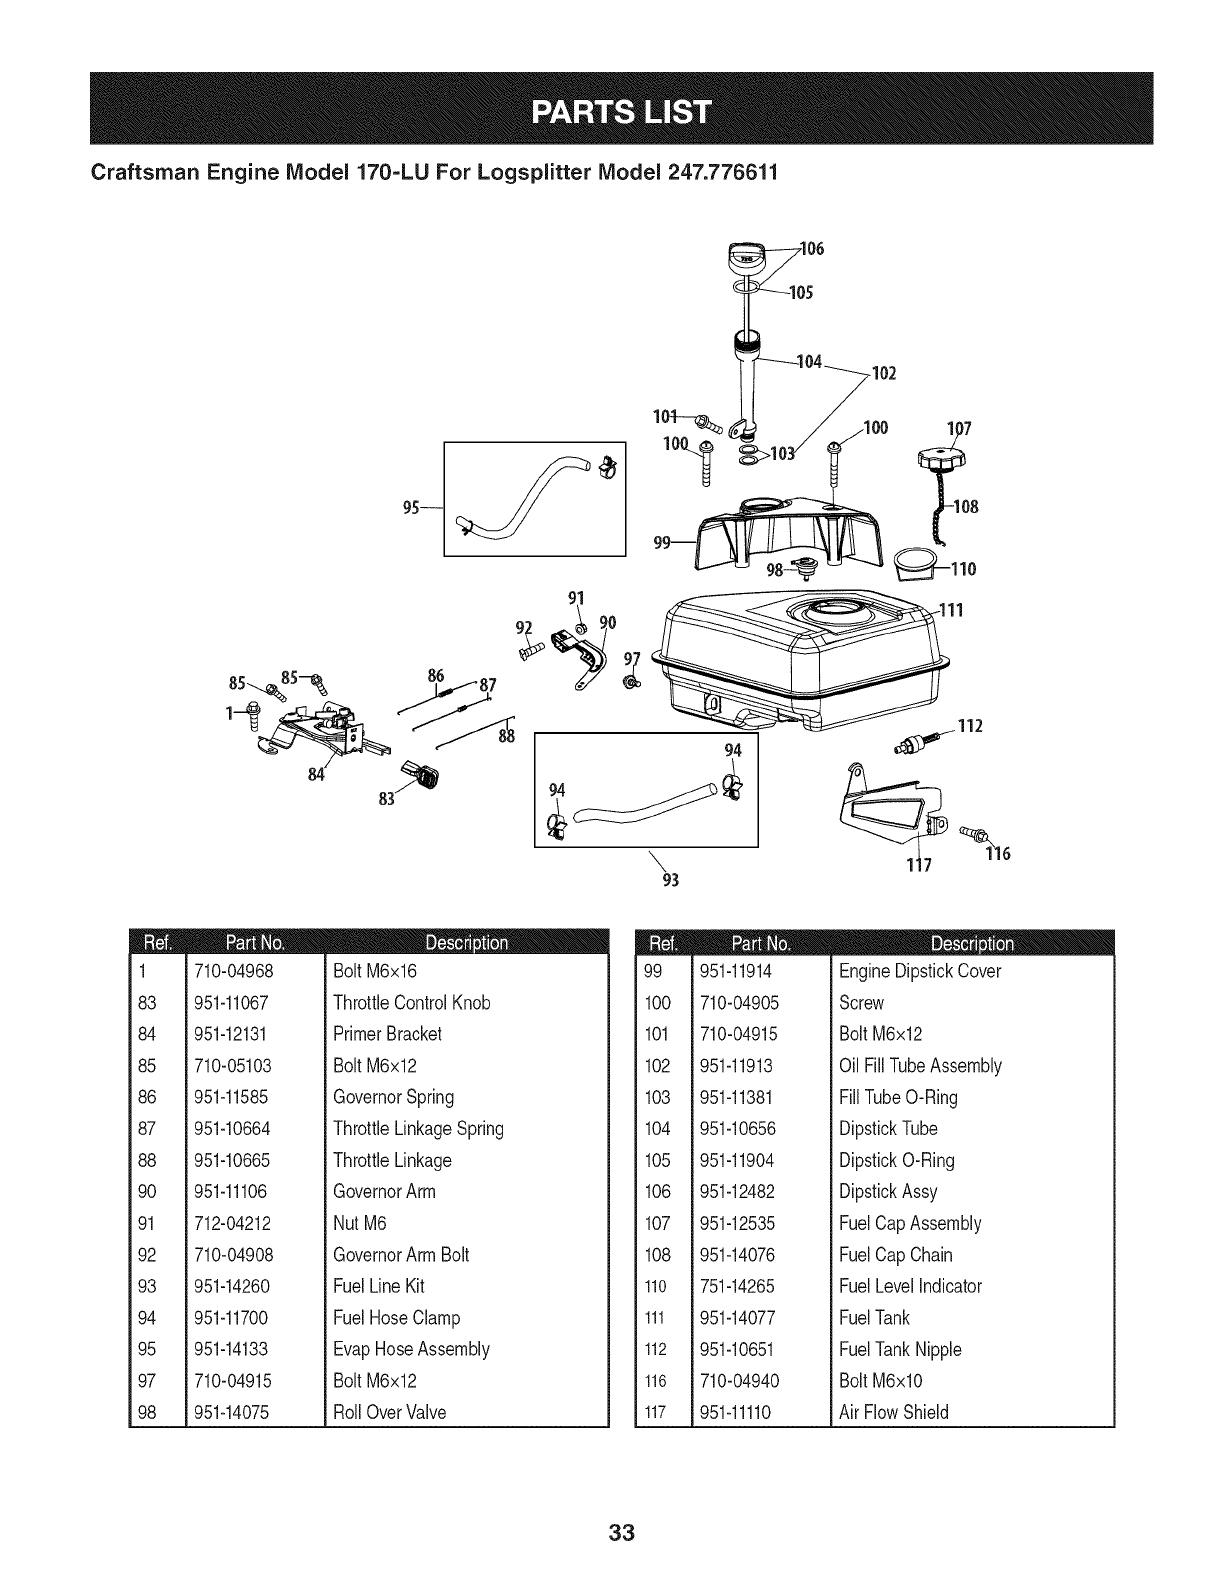
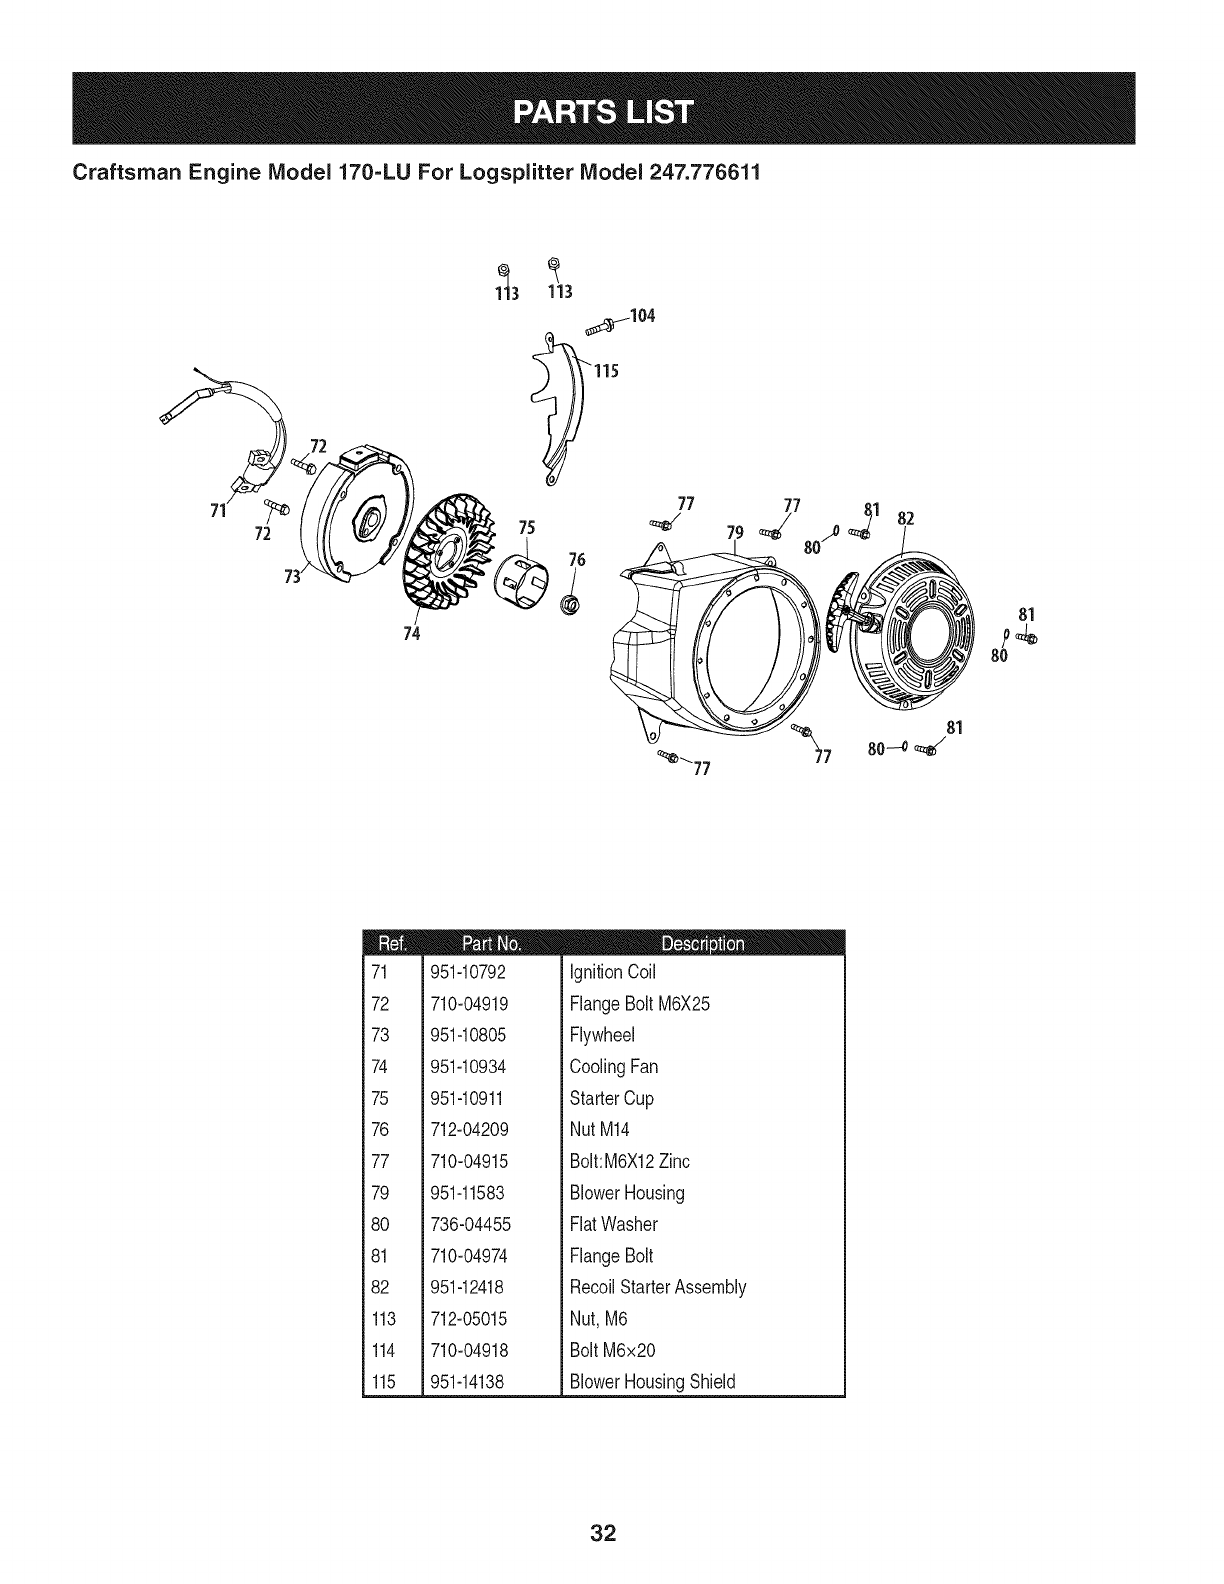
Craftsman Engine Model 170-LU For Logsplitter Model 247.776611
84
94
\93
8
_110
_112
m
1
83
84
85
86
87
88
90
91
92
93
94
95
97
98
710104968
951-11067
951-12131
710105103
951-11585
951-10664
951-10665
951-11106
712-04212
710-04908
951-14260
951-11700
951-14133
710-04915
951-14075
D = O 0
BoltM6x16
ThrottleControlKnob
PrimerBracket
BoltM6x12
GovernorSpring
ThrottleLinkageSpring
ThrottleLinkage
GovernorArm
NutM6
GovernorArmBolt
FuelLineKit
FuelHoseClamp
EvapHoseAssembly
BoltM6x12
RollOverValve
m
99
1CO
101
102
103
104
105
106
107
108
110
111
112
116
117
951-11914
710-04905
710-04915
951-11913
951-11381
951-10656
951-11904
951-12482
951-12535
951-14076
751-14265
951-14077
951-10651
710-04940
951-11110
D = 0 0
EngineDipstickCover
Screw
Bolt M6x12
Oil FillTubeAssembly
Fill TubeO-Ring
DipstickTube
DipstickO-Ring
DipstickAssy
FuelCapAssembly
FuelCap Chain
FuelLevelIndicator
FuelTank
FuelTankNipple
Bolt M6xlO
Air FlowShield
33
Craftsman Engine IViodel 170=LU For Logsplitter IViodel 247.776611
3O
m
30
31
32
34
35
36
37
38
38
951-12157
712-04213
951-14068
951-14070
951-10794
951-14071
951-14069
951-14072
951-14073
D = O
Air CleanerHousing
Nut
Self-TappingBolt M4.2x16
SilencerPlate
Air CleanerFilterAssembly
Air CleanerCover
CarbonCanister
HoseAssembly
Clamp,Hose
34
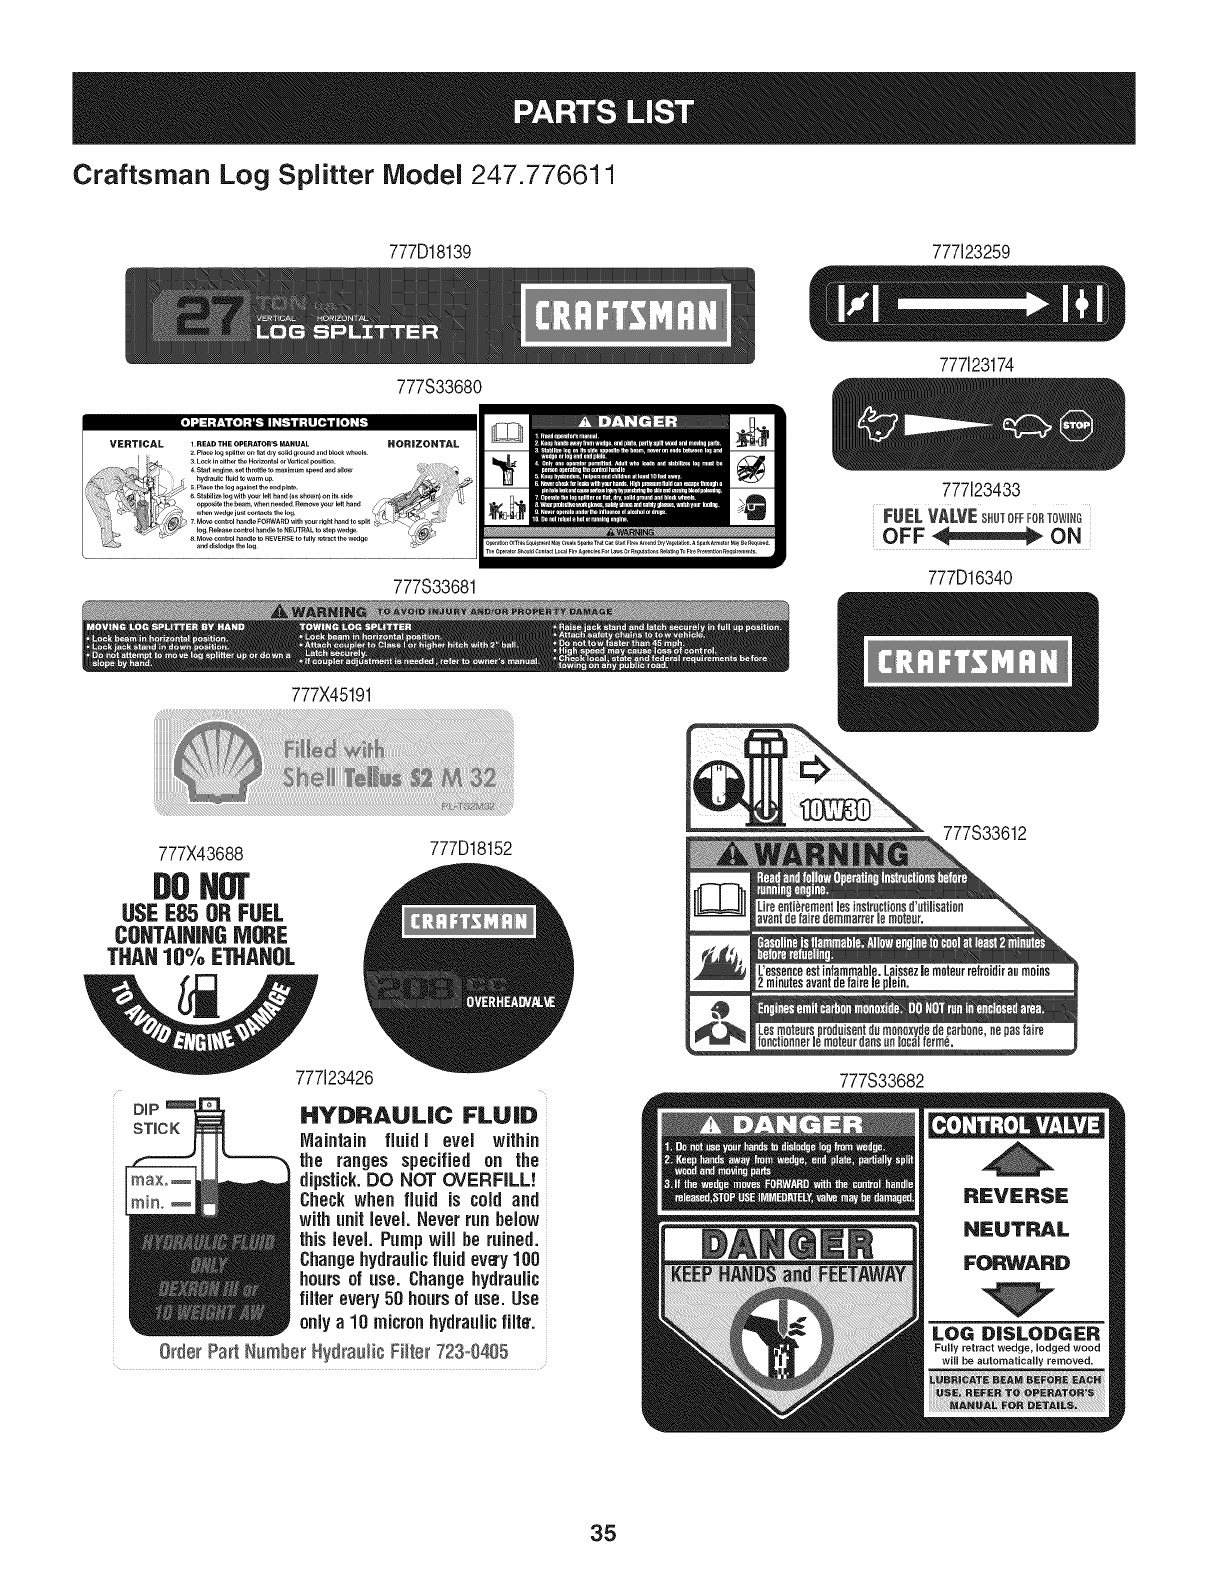
Craftsman Log Splitter Model 247.776611
777D18139 777123259
777S33680 777i23174
777S33681
777123433
FUELVALVEs,uTOFFFORT0WUNG
OFF _ ON
777D16340
777X45191
777X43688
DONOT
USEE85 OR FUEL
CONTAiNiNGMORE
THAN10% ETHAHOL
777D18152
777123426
DiP
STICK HYDRAULIC FLUID
Maintain fluidJ eveJ within
the ranges specified on the
dipstick.DO NOT OVERFILL!
Checkwhen fluid is cold and
withunitlevel. Neverrunbelow
thislevel. Pumpwiil be ruined.
Changehydraulicfluidevery100
hoursof use. Changehydraulic
filterevery50 hoursof use.Use
onlya10 micronhydrauliclilt#.
Order Part Number Hydraulic FHter723°0405
777S33612
777S33682
35
Congratulations on making a smart purchase. Your new Craftsman® product is designed and
manufactured for years of dependable operation. But like all products, it may require repair
from time to time. That's when having a Repair Protection Agreement can save you money and
aggravation.
Here's what the Repair Protection Agreement* includes:
[] Expert service by our 10,000 professional repair specialists
[] Unlimited service and no charge for parts and labor on all covered repairs
[] Product replacement up to $1500 if your covered product can't be fixed
[] Discount of 25% from regular price of service and related installed parts not covered by the
agreement; also, 25% off regular price of preventive maintenance check
[] Fast help by phone - we call it Rapid Resolution - phone support from a Sears representative.
Think of us as a "talking owner's manual."
Once you purchase the Repair Protection Agreement, a simple phone call is all that it takes for you
to schedule service. You can call anytime day or night, or schedule a service appointment online.
The Repair Protection Agreement is a risk-free purchase. If you cancel for any reason during the
product warranty period, we will provide a full refund. Or, a prorated refund anytime after the
product warranty period expires. Purchase your Repair Protection Agreement today!
Some limitations and exclusions apply. For prices and additional information in the U.S.A.
call 1=800=827=6655.
*Coverage in Canada varies on some items. For full details call Sears Canada at 1=800=361=
6665.
Sears Installation Service
For Sears professional installation of home appliances, garage door openers, water heaters, and
other major home items, in the U.S.A. or Canada call 1=800=4=MY=HOME®.
36
Declaraci6n de garant_a .......................... Pagina 37
Medidas de seguridad ............................ Paginas 38-41
Montaje ................................................... Paginas 42-45
Funcionamiento ...................................... Paginas 46-50
Servicio y mantenimiento ......................... Paginas 51-55
AImacenamiento fuera detemporada ....Pagina 56
Soluci6n de Problemas ........................... Paginas 57-58
Acuerdo de protecci6n
para reparaciones ................................ Pagina 59
NOmeros de servicio ............................... Contratapa
GARANTiA COMPLETA CRAFTSMAN POR UN ANO
PORUNANOa partirde lafechade lacompra,este productoest,.garantizadopordefectosen losmaterialeso lamanodeobra. Losproductos
defectuososser_.nreparadossin costoo reemplazadossin costosi la reparaci6nnoest,.disponiNe.
Paraobtenerinforrnaci6nsobreelalcancede lagarantiay solicitarla reparaci6noel reernplazogratuitos,visiteel sitioWeb:www.craftsrnan.corn
Esta garantiacubre0NICAMENTElos defectos en los materiales y en la mano de obra. EstagarantiaNOcubre:
• Arficulosde duraci6nlimitadaquepuedendesgastarseen condicionesnormalesde usoduranteel periodode garanfia,talescomobujias,
depuradoresde air& correasy filtrosde aceite.
• LosdaSosquesufrael productocomoconsecuenciadelos intentosporparte delusuariode modificarloo repararloo aquelloscausados
porlos accesoriosdelproducto.
• Reparacionesrequeridasdebidoa accidentesuocasionadaspornooperaro mantenerel productode acuerdocon las instrucciones
surninistradas.
• Mantenirnientopreventivo,o reparacionesnecesariasdebidoal usode unarnezcladecombustibleincorrect&combustiblecontaminadoo viejo.
La presentegarantiase anulasi se utilizaesteproductoalgunavezparaprestarservicioscornercialeso si se Ioalquilaa otra persona.
Estagarantialeotorgaderechoslegalesespecificos,peroustedpodriagozarde otrosderechosen raz6nde su lugarde residencia.
Sears Brands Management Corporation, Hoffman Estates, IL 60179
Serie del motor:
Aceite del motor:
Capacidad de aceite del motor:
Capacidad de combustible:
Bujia (separaci6n de 0,030"):
Fluido hidr_.ulico/Capacidad:
752Z170-LU
SAE 30
20 Onzas
1.5 Cuartos de gal6n
Champion® RJ19LM
Dexron® ill/3,0 gaNones
NOmero de modelo ..........................................................
NOmero de serie ...............................................................
Fecha de compra .............................................................
Registre arriba el nurnero dei modelo, el nurnero
de serie y la fecha de compra
©SearsBrands,LLC
37
La presencia de este sfmbolo indica que se trata
de instrucciones importantes de seguridad que
se deben respetar para evitar poner en peligro
su seguridad personal y/o material y la de otras
personas. Leay siga todas las instrucciones de
este manual antes de poner en funcionamiento
esta m_quina. Sino respeta estas instrucciones
podrfa provocar lesiones personales. Cuando
vea este sfmbolo, ipreste atenci6n a la
advertencia!
PROPOSICION 65 DE CALIFORNIA
Elescapedel motorde esteproducto,algunosde suscomponentes
y algunoscomponentesdelvehiculocontieneno liberansustancias
quimicasqueelestadode Californiaconsideraque puedenproducir
c_ncer,defectosde nacimientouotrosproblemasreproductivos.
Esta m_quina fue construida para ser operada de acuerdo
con las reglas de seguridad contenidas en este manual.
AI igual que con cualquier tipo de equipo motorizado, un
descuido o error por parte del operador puede producir
lesiones graves. Esta m_iquina es capaz de amputar manos y
pies y de arrojar objetos con gran fuerza. De no respetar las
instrucciones de seguridad siguientes se pueden producir
lesiones graves o la muerte.
Su responsabilidad--Restrinja el uso de esta m_quina
motorizada a las personas que lean, comprendan y respeten
las advertencias e instrucciones que aparecen en este
manual yen la m_iquina.
GUARDEESTASINSTRUCCIONES
CAPACITACION
1. Lea,entienday cumplatodaslas instruccionesincluidasen la
m_quinay en el(los)manual(es)antesde intentarrealizarel
montajede la unidady utilizarla.Guardeestemanualen un
lugarseguroparaconsultasfuturasy peri6dicas,asi comopara
solicitarrepuestos.
2. Familiaricesecontodoslos controlesy con el usoadecuadode
los mismos.Sepac6modetenerla m_quinay desengancharlos
controlesr_pidamente.
3. No permitanuncaque losni_osmenoresde 16a_osutilicenesta
m_quina.Losni_osde 16a_osenadelantedebenleery entender
las instruccionesdeoperaci6ny normasdeseguridadcontenidas
enestemanualyen la m_quinay debenserentrenadosy
supervisadosporunadulto.
4. Nuncapermitaquelos adultosoperenestam_quinasin recibir
antesla instrucci6napropiada.
5. Muchosaccidentesocurrencuandom_sdeuna personahace
funcionarla m_quina.Si unpe6nIo est_ayudando
acargar lostroncos,nuncaactiveelcontrolhastaqueel pe6nse
encuentreporIo menosa 10piesde distanciade
la m_quina.
6. Mantengaa losobservadores,mascotasy ni_osporIomenosa 10
piesdelam_quinasiemprequeest_funcionando.
7. Nuncapermitaqueningunapersonase desplaceen
la m_quina.
8. Nuncatrasladecargasenestam&quina.
9. Lasm&quinasrompetroncoshidr&ulicasdesarrollanaltas
presionesde fluidoduranteel funcionamiento.Sisalefluido a
trav_sdela aberturade unorificiode pasadorpuedepenetrar
en la piely causarleenvenenamientode la sangre,gangrenao
la muerte.Presteatenci6na las siguientesinstruccionesentodo
momento:
a. Nocontrolelas fugascon la mano.
b. Nooperelam&quinasi las mangueras,los accesorioso
los tubosest&ndeshilachados,enroscados,agrietadoso
daSados.
c. Detengael motory liberelapresi6ndelsistemahidr&ulico
haciendopasarla palancade controldela valvulade la
posici6nde avancea la de retrocesovariasvecesmientras
el motorno est&enmarcha;regresandoa laposici6nneutral
antesde realizarlareparaci6no el ajustede los accesorios,
las mangueras,los tubosuotroscomponentesdelsistema.
d. Noajustelosvaloresde presi6ndela bombao v&lvula.
10. Lasfugasse puedendetectarpasandouncart6no maderasobre
el &reasospechosa,usandoguantesdeprotecci6ny anteojosde
seguridad.Fijesesi el cart6no la maderapierdencolor.
11. Si es lastimadoporunescapede fluido,consultea un m_dico
de inmediato.Si nose administratratamientom_dicoadecuado
inmediatamentese puedeproducirunainfecci6no reacci6n
grave.
12. Mantengalazonadeloperadory el &reaadyacentedespejadas,
parapoderestarparadocon firmezay seguridad.
38
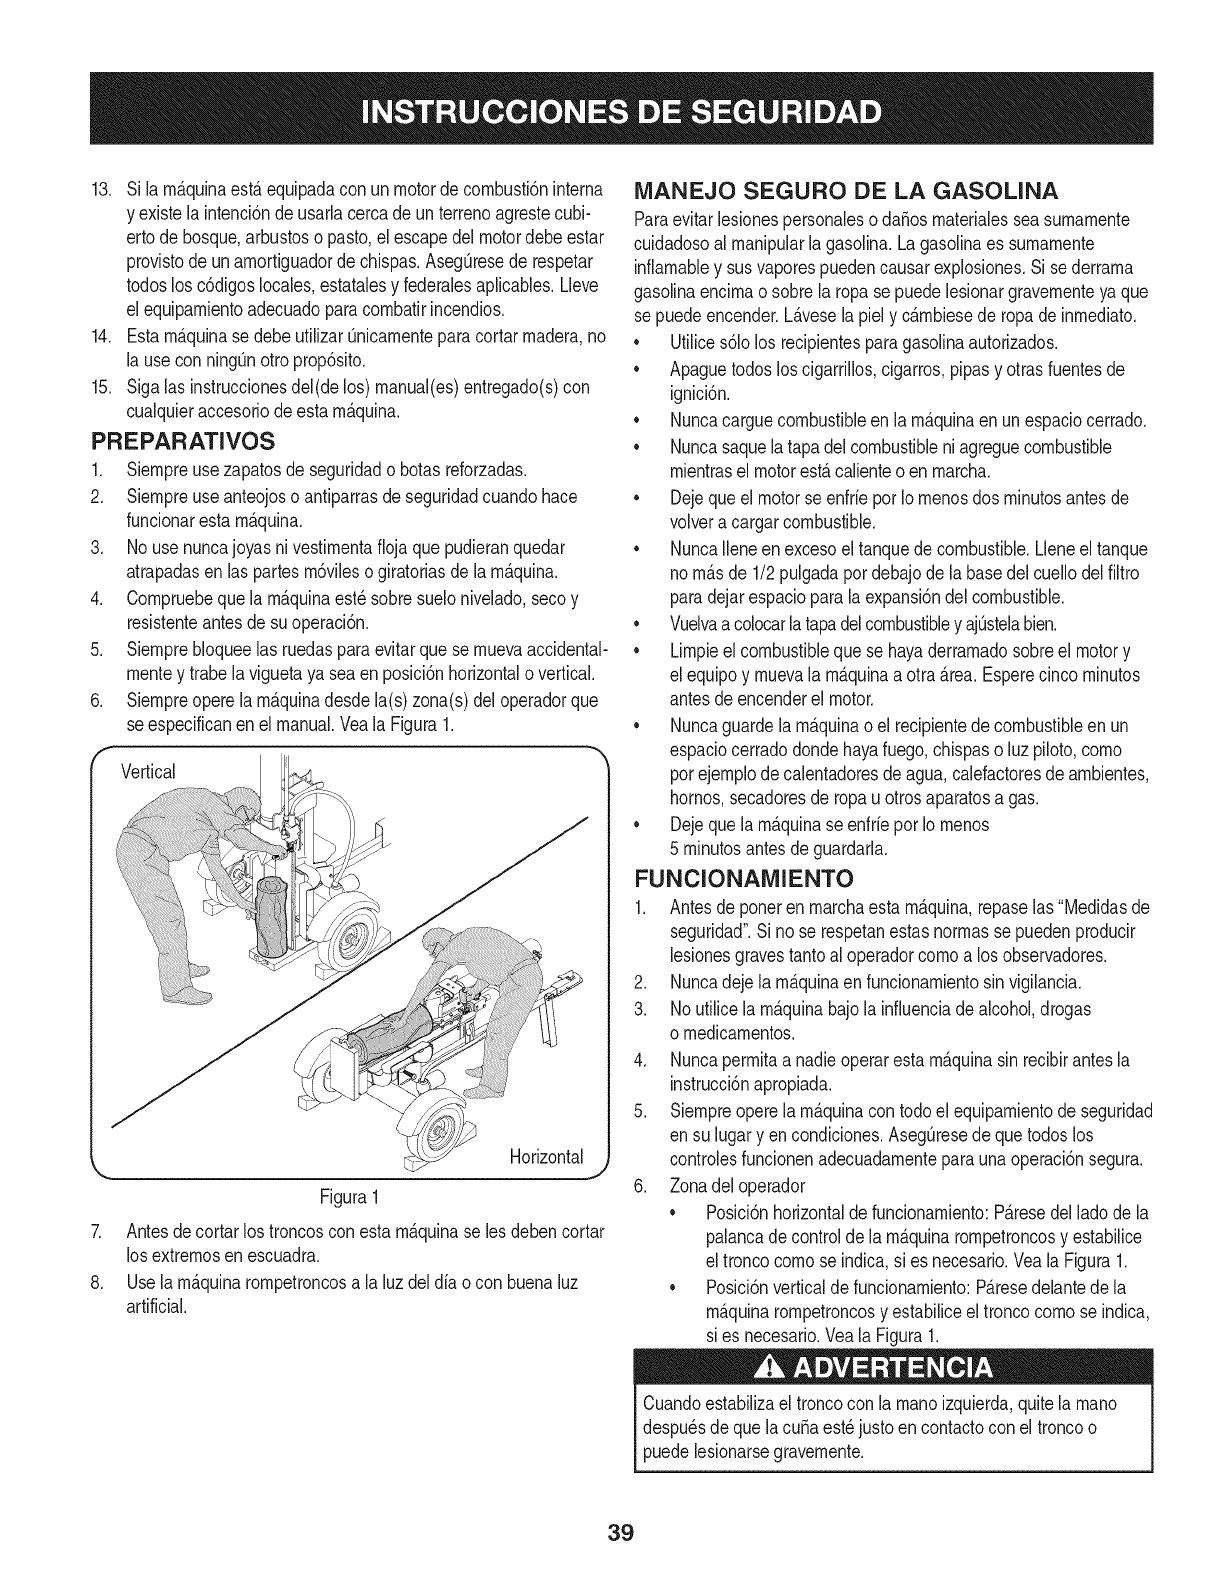
13. Si larn_.quinaest,.equipadacon un motordecornbusti6ninterna
y existela intenci6nde usarlacercade unterrenoagrestecubi-
ertode bosque,arbustoso pasto,el escapedelmotordebeestar
provistode unarnortiguadorde chispas.AsegQresede respetar
todoslos c6digoslocales,estatalesy federalesaplicables.Lleve
el equiparnientoadecuadoparacornbatirincendios.
14. Estarn_.quinasedebeutilizarQnicarnenteparacortarrnadera,no
la usecon ningQnotroprop6sito.
15. Sigalas instruccionesdel(delos) rnanual(es)entregado(s)con
cualquieraccesoriodeestarn_.quina.
PREPARATIVOS
1. Siernpreusezapatosdeseguridado botasreforzadas.
2. Siernpreuseanteojoso antiparrasdeseguridadcuandohace
funcionarestarn_.quina.
3. No usenuncajoyas nivestirnentafioja quepudieranquedar
atrapadasen laspartesrn6vilesogiratoriasdela rn_.quina.
4. Cornpruebeque larn_.quinaest_sobresuelonivelado,secoy
resistenteantesde suoperaci6n.
5. Siernprebloqueelas ruedasparaevitarque sernuevaaccidental-
rnentey trabe la viguetaya sea enposici6nhorizontalo vertical.
6. Siernpreoperelarn_.quinadesdela(s) zona(s)del operadorque
se especificanenel manual.Veala Figura1.
_Vertical "]
Horizontal
Figura1
7. Antesdecortarlos troncosconesta rn_.quinase les debencortar
los extrernosenescuadra.
8. Usela rn_.quinarornpetroncosa la luz deldiao con buenaluz
artificial.
iVIANEJO SEGURO DE LA GASOLINA
Paraevitarlesionespersonalesoda_os rnaterialesseasurnarnente
cuidadosoal rnanipularlagasolina.Lagasolinaes surnarnente
inflarnabley susvaporespuedencausarexplosiones.Sise derrarna
gasolinaencirnao sobrela ropase puedelesionargravernenteya que
sepuedeencender.L_.vesela piely c_.rnbiesede ropade inrnediato.
• Utilices61olos recipientesparagasolinaautorizados.
• Apaguetodosloscigarrillos,cigarros,pipasy otrasfuentesde
ignlclon.
• Nuncacarguecombustibleenla rn_.quinaenun espaciocerrado.
• Nuncasaquelatapadel combustibleniagreguecombustible
rnientrasel motorest,.calienteo en rnarcha.
• Dejequeelmotorse enfrieporIo rnenosdosrninutosantesde
volvera cargarcombustible.
• NuncaIleneen excesoel tanquede combustible.Lleneel tanque
norn_.sde 1/2pulgadapordebajode la basedelcuellodelfiltro
paradejarespacioparalaexpansi6ndelcombustible.
• Vuelvaacolocarlatapadelcombustibley ajQstelabien.
• Lirnpieel combustiblequese hayaderrarnadosobreel motory
el equipoy rnuevala rn_.quinaa otra_.rea.Esperecincorninutos
antesdeencenderel motor.
• Nuncaguardelarn_.quinao el recipientedecombustibleen un
espaciocerradodondehayafuego,chispaso luz piloto,corno
porejernplodecalentadoresdeagua,calefactoresde arnbientes,
hornos,secadoresde ropau otrosaparatosa gas.
• Dejequelarn_.quinase enfriepor Iornenos
5 rninutosantesdeguardarla.
FUNCIONAMIENTO
1. Antesdeponeren rnarchaestarn&quina,repaselas"Medidasde
seguridad".Sino se respetanestasnorrnasse puedenproducir
lesionesgravestantoal operadorcornoa los observadores.
2. Nuncadeje larn_.quinaenfuncionarnientosin vigilancia.
3. Noutilicela rn_.quinabajola infiuenciade alcohol,drogas
o rnedicarnentos.
4. Nuncaperrnitaa nadieoperarestarn_.quinasin recibirantesla
instrucci6napropiada.
5. Siernpreoperela rn_.quinacon todoel equiparnientode seguridad
en su lugaryen condiciones.AsegQresede quetodoslos
controlesfuncionenadecuadarnenteparaunaoperaci6nsegura.
6. Zonadeloperador
• Posici6nhorizontaldefuncionarniento:P_.resedel ladodela
palancadecontrolde la rn_.quinarornpetroncosy estabilice
el troncocornose indica,si es necesario.Veala Figura1.
• Posici6nverticalde funcionarniento:P_.resedelantede la
rn_.quinarornpetroncosy estabiliceel troncocornose indica,
sies necesario.Veala Figura1.
Cuandoestabilizael troncocon la rnanoizquierda,quitela rnano
despu_sde quela cubaest_justoen contactocon el troncoo
puedelesionarsegravernente.
39
7. Cuandocargueuntronco,siernprecoloquelas rnanosa los
ladosdel misrno,noen los extrernos,y nouse nuncaelpie para
estabilizaruntronco.Si no respetaestasinstrucciones,se puede
producirel aplastarnientoo laarnputaci6nde dedos,dedosdelos
pies,rnanoso pies.
8. UseQnicarnentela rnanoderechaparaoperarloscontroles.
9. Nuncaintentecortarrn_.sde untroncoa lavez.
10. Paralos registrosqueno est_.ncortadosen _.ngulorecto,el
extrernornenoscuadradode lasesi6nse debecolocarhaciael
rayoy la curia,y el extrernocuadradocolocadohaciala placa
terminal.
11. Cuandocorteen posici6nvertical,estabiliceel troncoantesde
moverla rnanijade control.CortesegQnse indicaa continuaci6n:
• Coloqueel troncoen laplacadel extrernoy girelohastaque
se inclinecontrala viguetay quedeestable.
AIdividirextragrandeo desigualregistros,el registrodebe
setestabilizadoconcutlasde rnaderao de rnaderadividida
colocaentreel registroy la placaterminalotierra.
12. Siernprernantengalos dedosalejadosdecualquierhendidura
quese abraenel troncornientrasrealizael cortado.Estas
separacionessepuedencerrarcon rapidezy atrapar
oarnputardedos.
13. Mantengalirnpiael_.reade trabajo.Retireinrnediatarnentela
rnaderacortadaquequedealrededordela rn_.quinaparano
tropezarsecon la rnisrna.
14. Nocarnbielaconfiguraci6ndel reguladordel motorni acelere
dernasiadoel motor.Elreguladordel motorcontrolalavelocidad
rn_.xirnadefuncionarnientosegurodel motor.
15. Nuncarnuevala rn_.quinarnientrasel motorest,.en funciona-
rniento.
16. Estarn_.quinanose deberernolcaren ningunacalle,rutao
carninopOblicosinverificarlos requisitosaplicablesa los vehicu-
los segQnlas reglarnentacionesfederales,estataleso localesque
se encuentrenen vigencia.Cualquierautorizaci6no rnodificaci6n
quese debarealizar,porejernplo,en relaci6ncon lucestraseras,
etc.,es responsabilidadexclusivadelcornprador.Si ensu estado
se exigeuna"Declaraci6n
de Origen",consultecon su distribuidorlocal.
17. No rernolquelarn_.quinaporencirnade las 45rnph.
18. Vealasecci6n'Transportede la rn_.quinarornpetroncos'
deestemanualparaconsultarlas instruccionesde rernolque
adecuadasdespu_sde habercurnplirnentadotodoslos requisitos
federales,localeso estatales.
MANTENIMIENTO Y ALIVlACENANIIENTO
1. Detengael motor,desconectela bujiay hagarnasacontrael
motorantesde lirnpiaroinspeccionarla rn_.quina.
2. Detengael motory liberela presi6ndel sisternahidr_.ulico
haciendopasarla palancadecontrolde lav_.lvuladela posici6n
deavancea lade retrocesovariasvecesrnientras
el motornoest,.en rnarcha;regresandoa la posici6nneutral
antesde realizarla reparaci6no elajustedelos accesorios,las
rnangueras,los tubosu otroscornponentesdelsisterna.
3. Paraevitarincendios,lirnpiela suciedady grasade las _.reas
del motory del silenciador.Siel motorest,.equipadocon un
silenciadorcon arnortiguadorde chispas,lirnpieloe inspec-
ci6neloregularrnentesegQnlas instruccionesde losfabricantes.
Reernpl_.celosi est,.dafiado.
4. Peri6dicarnentecontrolequetodaslastuercasy pernos,abrazad-
eras dernanguerasy accesorioshidr_.ulicosest_najustados,
paraverificarqueel equipose encuentraen condicionesde
trabajoseguras.
5. Controletodoslosprotectoresy escudosde seguridadpara
verificarque se encuentrenen posici6nadecuada.Nuncaopere
la rn_.quinasi se han retiradolosprotectoreso escudosde
seguridadu otrosdispositivosdeprotecci6n.
6. Lav_.lvuladedescargadepresi6nvienepreconfigurada
de f_.brica.Nola ajuste.
7. Nointentenuncamoverla rn_.quinaen terrenoen pendienteo
desparejosin unvehiculode rernolqueo sin ayudaadecuada.
8. Potsu seguridad,carnbietodaslas piezasdafiadasodesgasta-
das inrnediatarnenteutilizandoQnicarnenteequipodel fabricante
original('OEM'). Eluso de piezasque nocurnplencon las especi-
ficacionesdelequipooriginalpuederesultaren rendirniento
inadecuadoy puedeponerenpeligrola seguridad.
9. Nornodifiqueesta rn_.quinade ning_nrnodo;si se realizan
rnodificacionestalescornoagregadode unacuerdao alargador
a la rnanijade control,o el aurnentodelanchoo la alturadela
curia,se puedenproducirlesionespersonalesgraves.
10. SegOnlaCornisi6nde Seguridadde Productosparael Consu-
rnidorde los EstadosUnidos(CPSC)y la Agenciade Protecci6n
Arnbientalde los EstadosUnidos(EPA),esteproductotieneuna
vida dtilmedia de siete(7) afioso 130horasde funcionarniento.
Ai finaiizarlavida dtil mediahagainspeccionaranualrnenteesta
unidadporundistribuidorde servicioautorizadoparacerciorarse
de quetodoslossisternasrnec_.nicosy de seguridadfuncionan
correctarnentey notienenexcesivodesgaste.SinoIo hace,
puedenproducirseaccidentes,lesioneso la rnuerte.
AMORTIGUADOR DE CHISPAS
Estarn_.quinaest,.equipadacon unmotorde cornbusti6ninternoy
nodebeser utilizadaeno cercade unterrenoagrestecubiertopor
bosque,rnalezaso hierbaexceptoqueelsisternadeescapedel
motorest_equipadocon unarnortiguadordechispasquecurnpla
con lasleyeslocaleso estatalescorrespondientes(encasode
existir).
Si se utilizaunarnortiguadorde chispasel operadorIo debernantener
en condicionesde usoadecuadas.Enel Estadode Californialas
rnedidasanteriorrnenternencionadassonexigidasporIcy (Arficulo
4442del C6digode RecursosPOblicosde California).Esposible
queexistanleyessirnilaresenotrosestados.Lasleyesfederalesse
aplicanenterritoriosfederales.
Puedeconseguirelarnortiguadordechispasparael silenciadoratraves
de sudistribuidordernantenirnientodernotoresautorizadorn_.scercano
o poni_ndoseencontactoconel departarnentodeservicios,RO.Box
361131Cleveland,Ohio44136-0019.
40
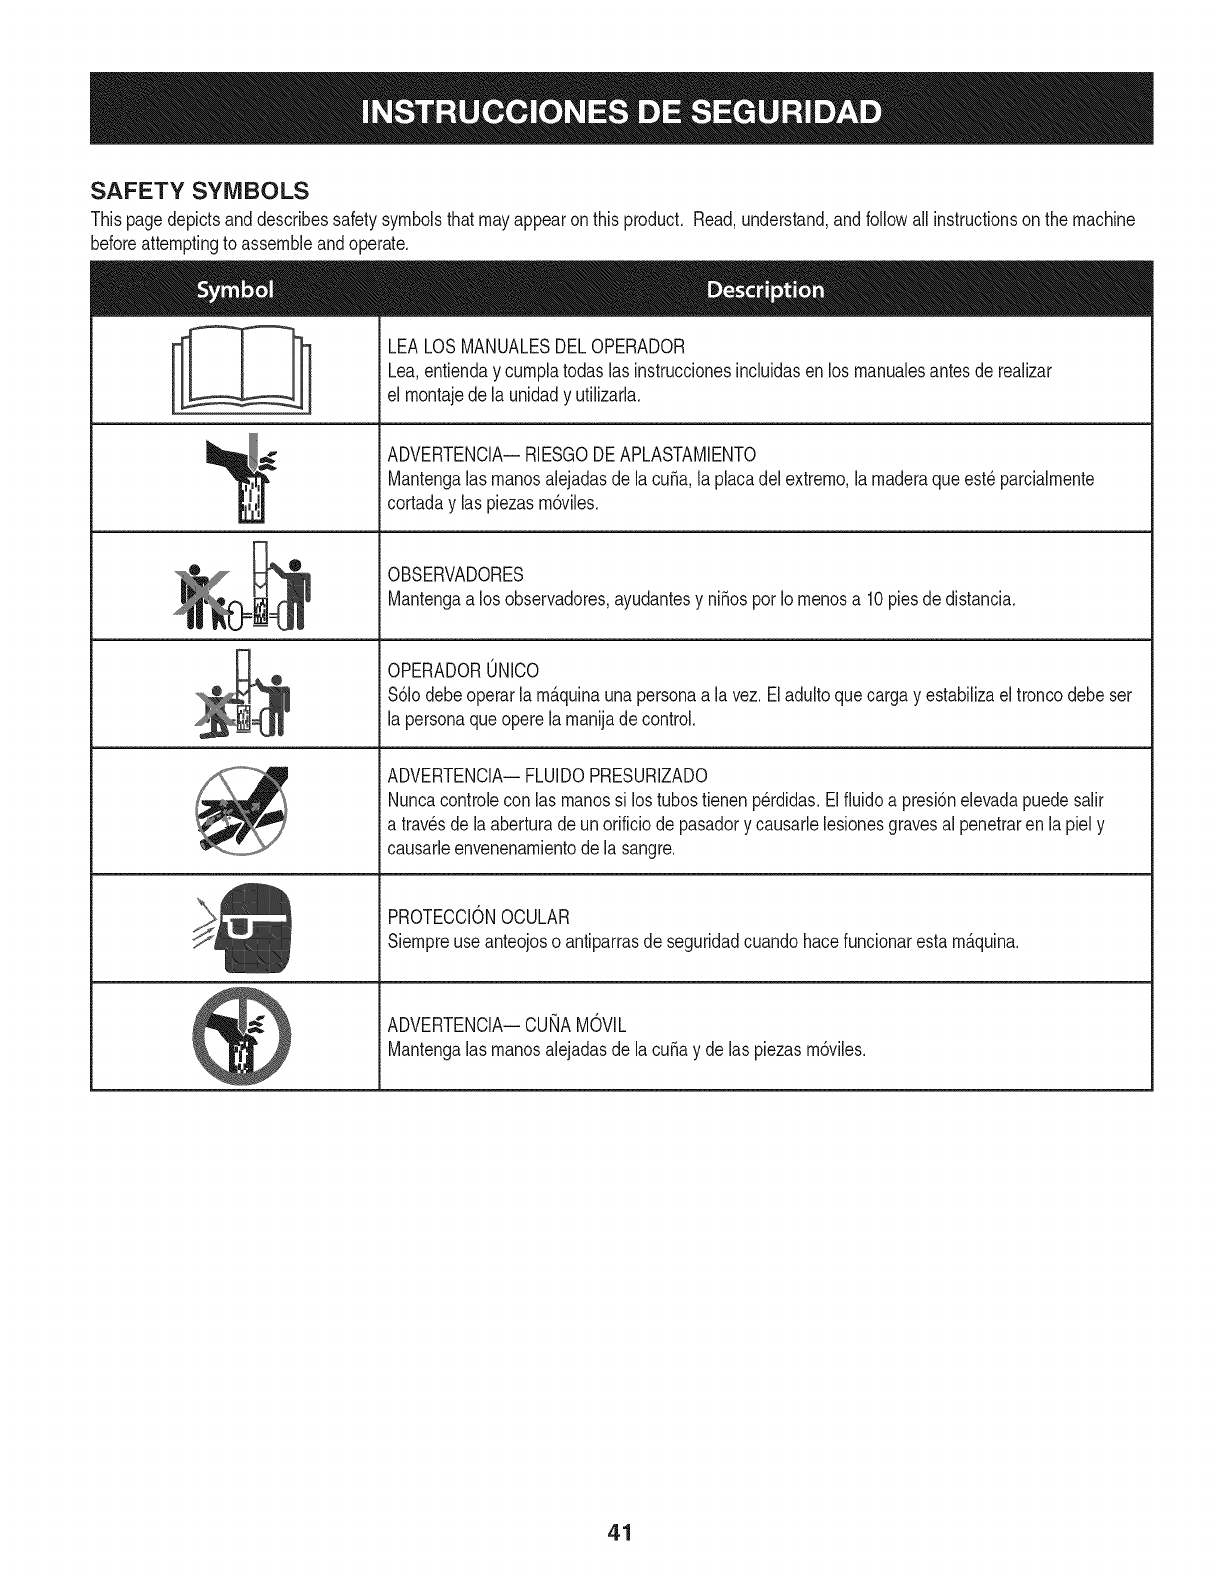
SAFETY SYMBOLS
Thispagedepictsanddescribessafetysymbolsthatmayappearonthis product. Read,understand,andfollowallinstructionson the machine
beforeattemptingto assembleandoperate.
LEALOSMANUALESDELOPERADOR
Lea,entienday curnplatodaslas instruccionesincluidasen losrnanualesantesderealizar
el rnontajedela unidady utilizarla.
ADVERTENCIA--RIESGODEAPLASTAMIENTO
Mantengalasrnanosalejadasde lacuSa,la placadelextrerno,larnaderaqueest_parcialrnente
cortaday las piezasrn6viles.
OBSERVADORES
Mantengaa los observadores,ayudantesy niSosporIornenosa 10piesdedistancia.
OPERADORONICO
%1odebeoperarla rn_.quinaunapersonaa la vez.Eladultoquecargay estabilizael troncodebeser
la personaqueoperelarnanijadecontrol.
ADVERTENCIA--FLUlDOPRESURIZADO
Nuncacontrolecon las rnanossi los tubostienen perdidas.Elfiuidoa presi6nelevadapuedesalir
a travesdela aberturade unorificiode pasadory causarlelesionesgravesal penetraren lapiely
causarleenvenenarnientodela sangre.
PROTECCIONOCULAR
Siernpreuseanteojoso antiparrasde seguridadcuandohacefuncionarestarn_.quina.
ADVERTENCIA--CUNAMOVIL
Mantengalasrnanosalejadasde lacuba y de las piezasrn6viles.
41
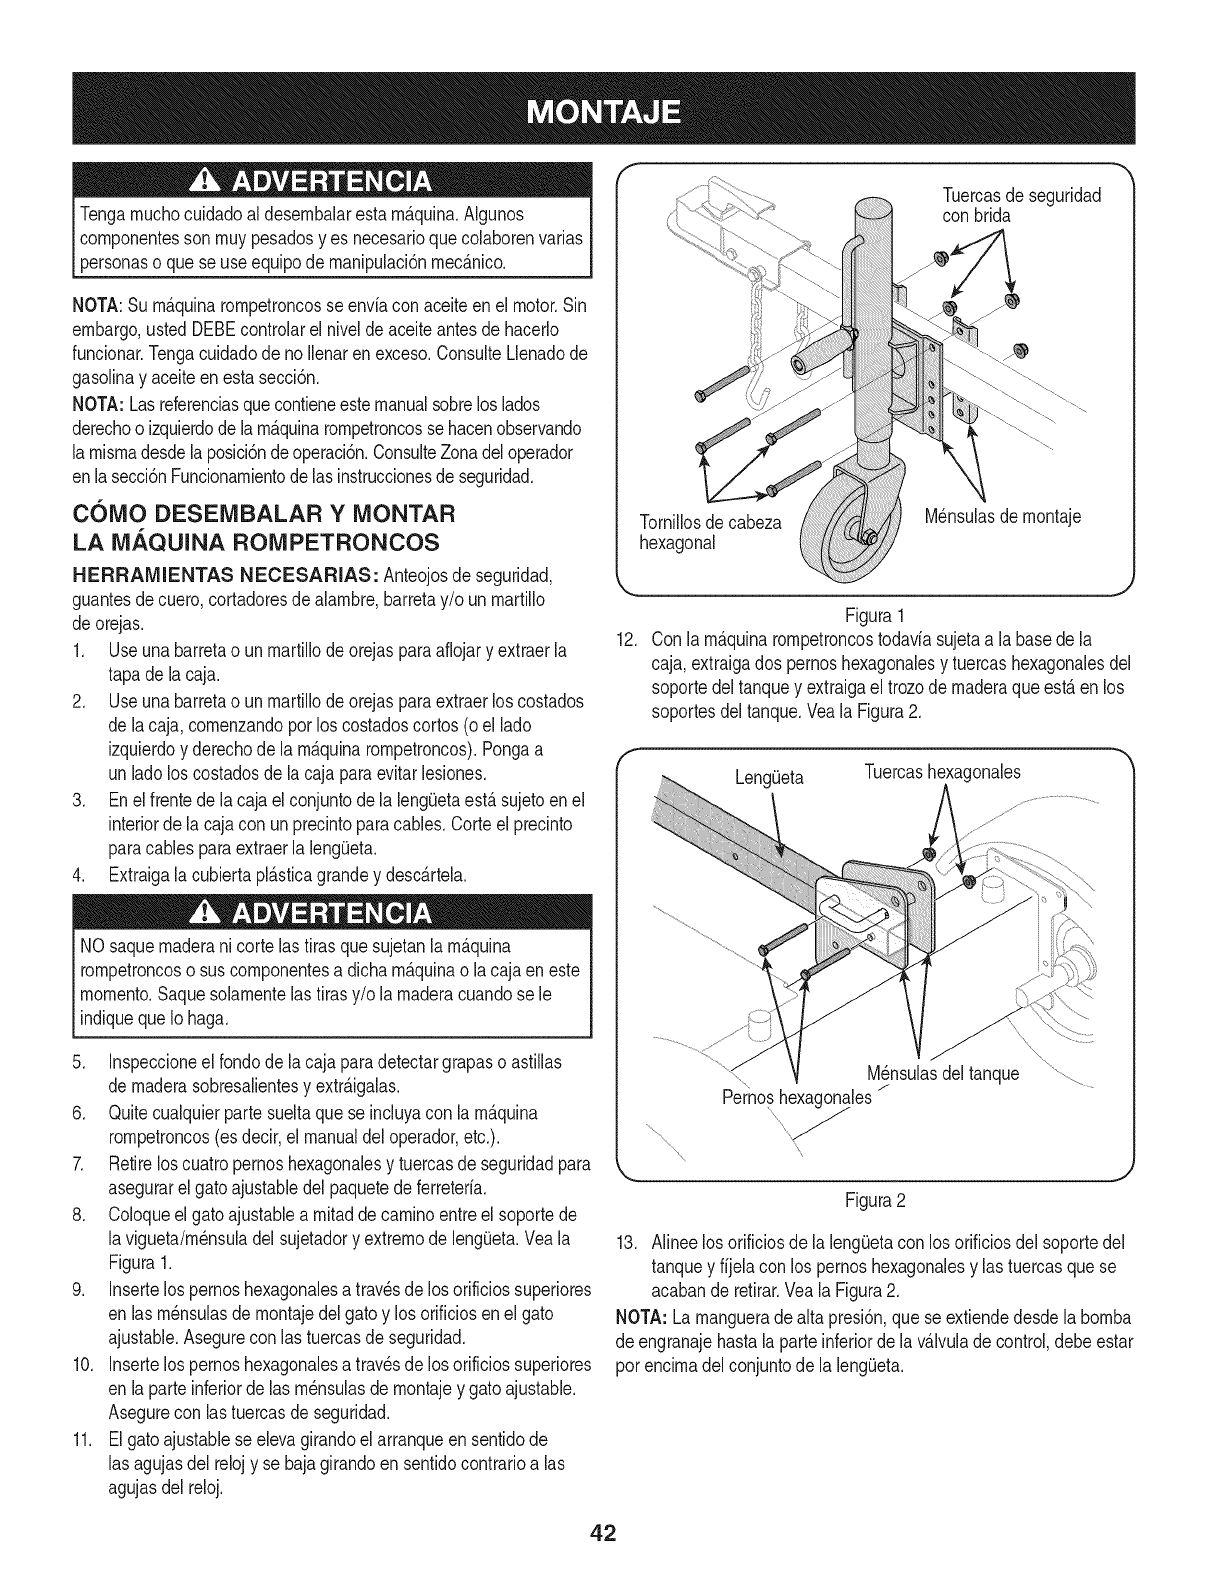
Tengarnuchocuidadoal desernbalarestarn_.quina.Algunos
cornponentessonrnuypesadosyes necesarioquecolaborenvarias
_personaso quese useequpode manpuac 6nrnec_.nco.
NOTA:Surn_.quinarornpetroncosse enviaconaceiteenel motor.Sin
embargo,ustedDEBEcontrolarel nivelde aceiteantesde hacerlo
funcionar.Tengacuidadode no Ilenarenexceso.ConsulteLlenadode
gasolinay aceiteenestasecci6n.
NOTA: Lasreferenciasquecontieneestemanualsobrelos lados
derechoo izquierdode larn_.quinarornpetroncosse hacenobservando
larnisrnadesdelaposici6ndeoperaci6n.ConsulteZonadeloperador
enlasecci6nFuncionarnientode lasinstruccionesde seguridad.
COMO DESENIBALAR YMONTAR
LA MAQUINA ROMPETRONCOS
H ERRAMIENTAS NECESARIAS: Anteojosdeseguridad,
guantesde cuero,cortadoresde alarnbre,barretay/o unrnartillo
deorejas.
1. Useunabarretao unrnartillode orejasparaaflojary extraerla
tapade lacaja.
2. Useunabarretao unrnartillode orejasparaextraerloscostados
de lacaja,cornenzandoporlos costadoscortos(o el lado
izquierdoy derechode la rn_.quinarornpetroncos).Pongaa
un ladolos costadosdela cajaparaevitarlesiones.
3. Enel frentede lacaja elconjuntodela leng(Jetaest,.sujetoenel
interiorde la cajacon unprecintoparacables.Corteel precinto
paracablesparaextraerla leng_Jeta.
4. Extraigala cubiertapl_.sticagrandey desc_.rtela.
NOsaquernaderani cortelas tirasquesujetanlarn_.quina
rornpetroncoso suscornponentesa dicha rn_.quinao la cajaen este
rnornento.Saquesolarnentelas tirasy/o larnaderacuandose le
indiquequeIo haga.
5. Inspeccioneel fondode lacaja paradetectargrapaso astillas
de rnaderasobresalientesy extr_.igalas.
6. Quitecualquierpartesueltaque se incluyacon la rn_.quina
rornpetroncos(esdecir,el manualdeloperador,etc.).
7. Retirelos cuatropernoshexagonalesy tuercasde seguridadpara
asegurarelgatoajustabledel paquetede ferreteria.
8. Coloqueel gatoajustablea rnitaddecarninoentreel soportede
lavigueta/rn_nsuladelsujetadory extrernode leng(Jeta.Veala
Figura1.
9. Insertelospernoshexagonalesatrav_sde losorificiossuperiores
en lasrn_nsulasdernontajedelgatoy los orificiosen elgato
ajustable.Asegurecon las tuercasde seguridad.
10. Insertelospernoshexagonalesatravesde losorificiossuperiores
en laparteinferiordelas rn_nsulasdernontajey gatoajustable.
Asegurecon lastuercasdeseguridad.
11. Elgatoajustablese elevagirandoelarranqueensentidode
las agujasdel relojy se bajagirandoensentidocontrarioalas
agujasdel reloj.
Tuercasde seguridad
conbrida
Tornillosde cabeza
hexagonal
M_nsulasde rnontaje
J
Figura1
12. Con la rn_.quinarornpetroncostodaviasujetaa labasede la
caja,extraigados pernoshexagonalesy tuercashexagonalesdel
soportedel tanquey extraigael trozode rnaderaqueest,.en los
soportesdeltanque.Veala Figura2.
Leng(Jeta Tuercashexagonales
M_nsulasdel tanque
Pemosh_les/-
Figura2
13. Alineelosorificiosde laleng_Jetacon los orificiosdel soportedel
tanquey fijela con los pernoshexagonalesy lastuercasquese
acabande retirar.Veala Figura2.
NOTA: Larnanguerade alta presi6n,que seextiendedesdela bornba
de engranajehastalaparteinferiordela v_.lvuladecontrol,debeestar
por encirnadel conjuntode la leng(Jeta.
42

14. La rn_.quinarornpetroncosse envfacon la viguetaenposici6n 17.
vertical.Extraigalos pernoso las tirasquesujetanlaplacadel
extrernoa la basedela caja.
Tirehaciaafueradelbloqueode viguetavertical,r6telohacia
atr_.sy girelaviguetaa la posici6nhorizontalhastaquequede
trabada,tornandola precauci6nde evitarlosposiblespuntosde
apriete.Veala Figura3.
15.
f
(
Figure3
18.
Desconecteel bastidordetroncosde laviguetaqueest,.al
costadodela v_Jvuladecontrolextrayendolosdos tornillosde
lasarandelashexagonalesqueIo sujetana la viguetay losdos
tornillosde lasarandelashexagonalesde bridade lavigueta.El
bastidorest,.desplazadoa los finesdelenvio.Veala Figura5.
Figura5
Levantey desliceel cilindrohaciaarribahastael topede la
viguetay dentrode los soportessoldados.Veala Figura6.
Tengaespecialcuidadocuandoeleveo bajelaviguetadadoquees
bastantepesada.Se recorniendacontarconunasegundapersona
que ayudea elevary bajarlavigueta.AsegQresede rnantenerlas
rnanostan lejoscornoseaposiblede los puntosdeapriete.
16. Desconecteel liberadordel soportesoldadodeviguetaretirando
los seistornilloshexagonales.Veala Figura4.
Figura6
19. Coloqueel liberadorencirnadelrnontajedela cuSay fijelo en
lossoportessoldadoscon lostornilloshexagonalesqueextrajo
previarnente.Veala Figura4.
NOTA:Unavezapretadoslos seistornilloshexagonales,puedehaber
unapequeSaseparaci6nentreelliberadory los soportessoldados.
Estaseparaci6nes normal.
Figura4
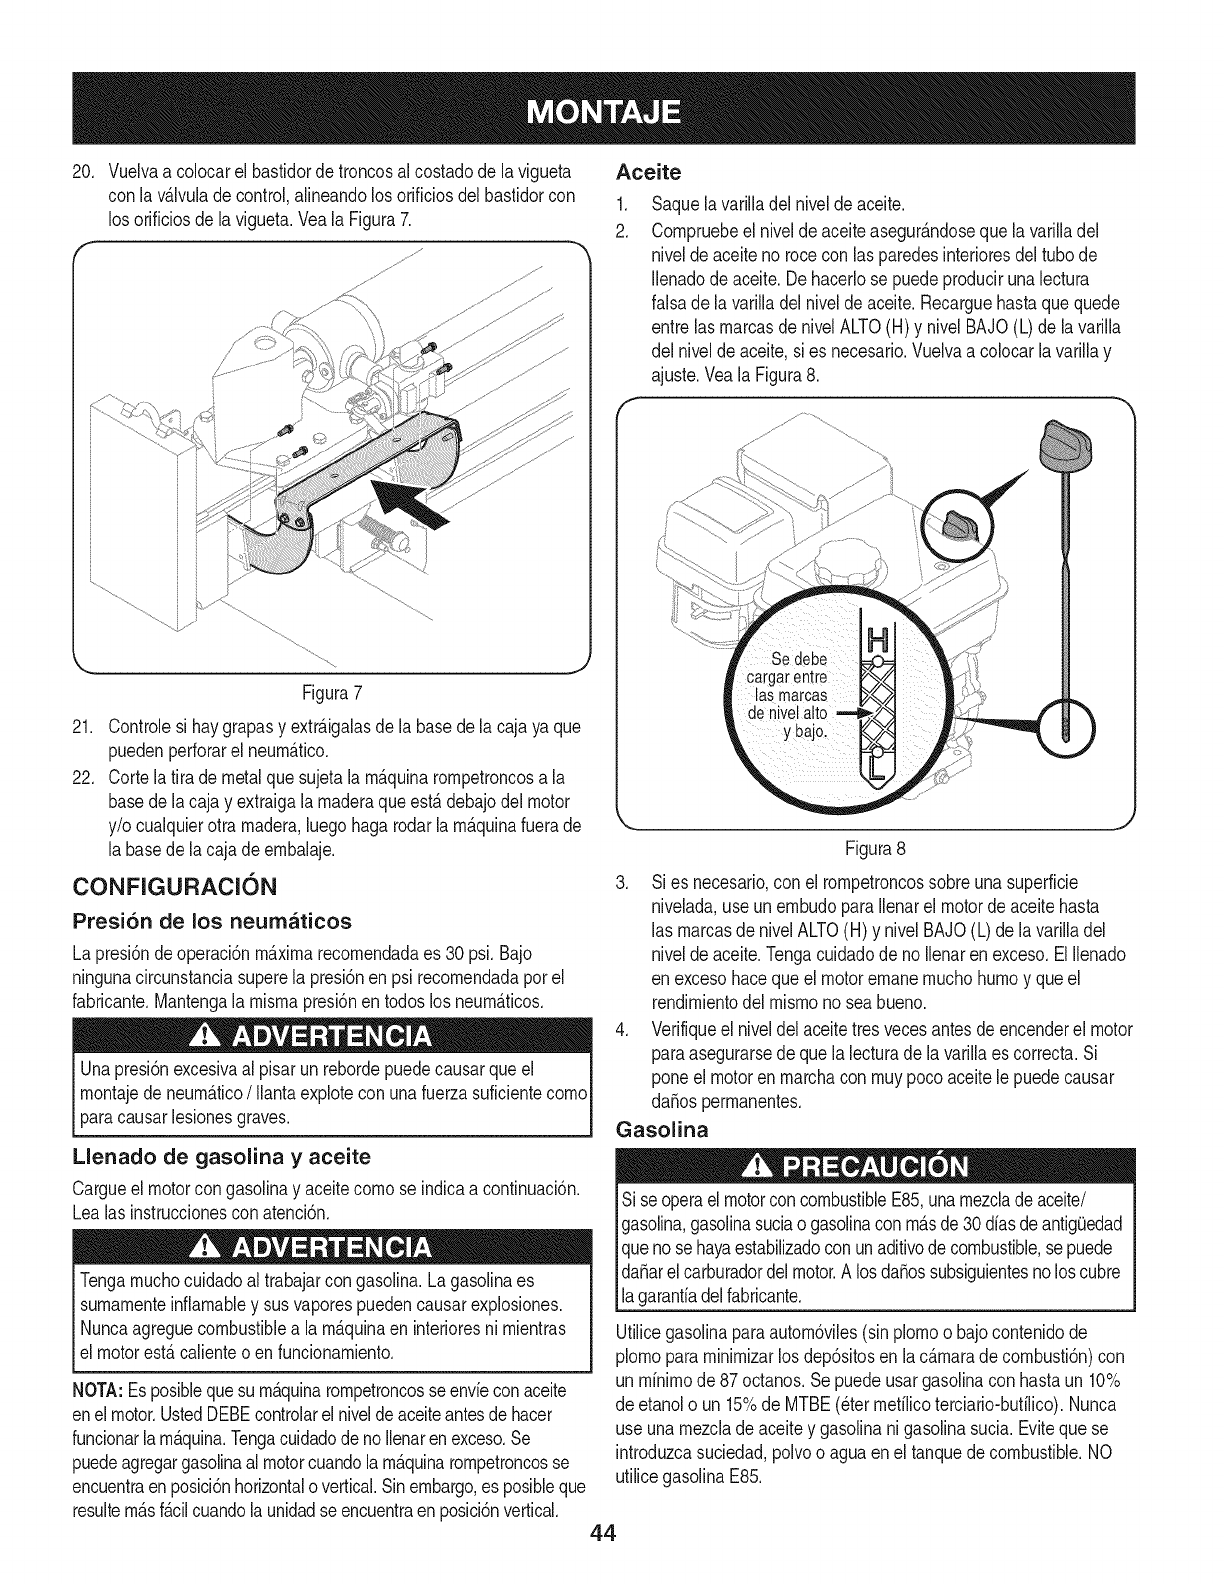
20.Vuelvaacolocarelbastidordetroncosalcostadodelavigueta Aceite
con lav&lvulade control,alineandolos orificiosdel basfidorcon
los orificiosde lavigueta.Veala Figura7. .
2.
Saquelavarilladelnivelde aceite.
Cornpruebeel niveldeaceiteasegur_.ndosequela varilladel
nivelde aceiteno rocecon las paredesinterioresdeltubo de
Ilenadode aceite.Dehacerlose puedeproducirunalectura
falsade lavarilladelnivelde aceite.Recarguehastaquequede
entre lasrnarcasdenivelALTO(H) y nivelBAJO(L)de lavarilla
del niveldeaceite,si es necesario.Vuelvaa colocarlavarillay
ajuste.Veala Figura8.
J
Figura7
21. Controlesi haygrapasy extr_.igalasde la basedela cajaya que
puedenperforarel neurn_.tico.
22. Cortelatira de metalquesujetalarn_.quinarornpetroncosa la
basede lacaja y extraigala rnaderaqueest,.debajodel motor
y/o cualquierotra rnadera,luegohagarodarlarn_.quinafuerade
la basedela cajade ernbalaje.
CONFIGURACION
Presi6n de los neumaticos
La presi6ndeoperaci6nrn_.xirnarecornendadaes 30 psi.Bajo
ningunacircunstanciasuperela presi6nen psi recornendadaporel
fabricante.Mantengala rnisrnapresi6nen todoslosneurn_.ticos.
Unapresi6nexcesivaal pisar unrebordepuedecausarqueel I
rnontajede neurn_.tico/Ilantaexploteconunafuerzasuficientecorno
1
paracausarlesionesgraves.
Llenado de gasolina y aceite
Cargueel motorcon gasolinay aceitecornose indicaa continuaci6n.
Lealas instruccionescon atenci6n.
Tengarnuchocuidadoal trabajarcon gasolina.Lagasolinaes
surnarnenteinfiarnabley susvaporespuedencausarexplosiones.
Nuncaagreguecombustiblea la rn_.quinaen interioresni rnientras
elmotorest,.calienteo enfuncionarniento.
NOTA:Esposiblequesurn_.quinarornpetroncosseenvfeconaceite
enelmotor.UstedDEBEcontrolarel niveldeaceiteantesdehacer
funcionarla rn_.quina.TengacuidadodenoIlenarenexceso.Se
puedeagregargasolinaalmotorcuandolarn_.quinarornpetroncosse
encuentraenposici6nhorizontalovertical.Sinembargo,es posibleque
resultern_.sf_.cilcuandolaunidadseencuentraen posici6nvertical.
Figura8
3. Si es necesario,con el rornpetroncossobreunasuperficie
nivelada,useun ernbudoparaIlenarel motordeaceitehasta
las rnarcasde nivelALTO(H) y nivelBAJO(L)de lavarilladel
nivelde aceite.Tengacuidadodeno Ilenaren exceso.ElIlenado
en excesohacequeel motorernanernuchohurnoy queel
rendirnientodelrnisrnonosea bueno.
4. Verifiqueel niveldelaceitetresvecesantesde encenderel motor
paraasegurarsedequela lecturade lavarillaes correcta.Si
poneel motoren rnarchacon rnuypocoaceitelepuedecausar
daSosperrnanentes.
Gasolina
Si seoperael motorconcombustibleE85,unarnezcladeaceite/
gasolina,gasolinasuciao gasolinaconrn_.sde 30diasdeantig_Jedad
quenose hayaestabilizadoconunaditivodecombustible,se puede
daSarelcarburadordelmotor.A losdaSossubsiguientesnoloscubre
lagarantiadelfabricante.
Utilicegasolinaparaautorn6viles(sinplornoo bajocontenidode
plornopararninirnizarlosdep6sitosen lac_.rnaradecornbusti6n)con
un rninirnode87 octanos.Sepuedeusargasolinacon hastaun 10%
de etanolo un 15%de MTBE(eterrnefilicoterciario-bufilico).Nunca
use unarnezclade aceitey gasolinanigasolinasucia.Evitequese
introduzcasuciedad,polvoo aguaenel tanquedecombustible.NO
utilicegasolinaE85.
44
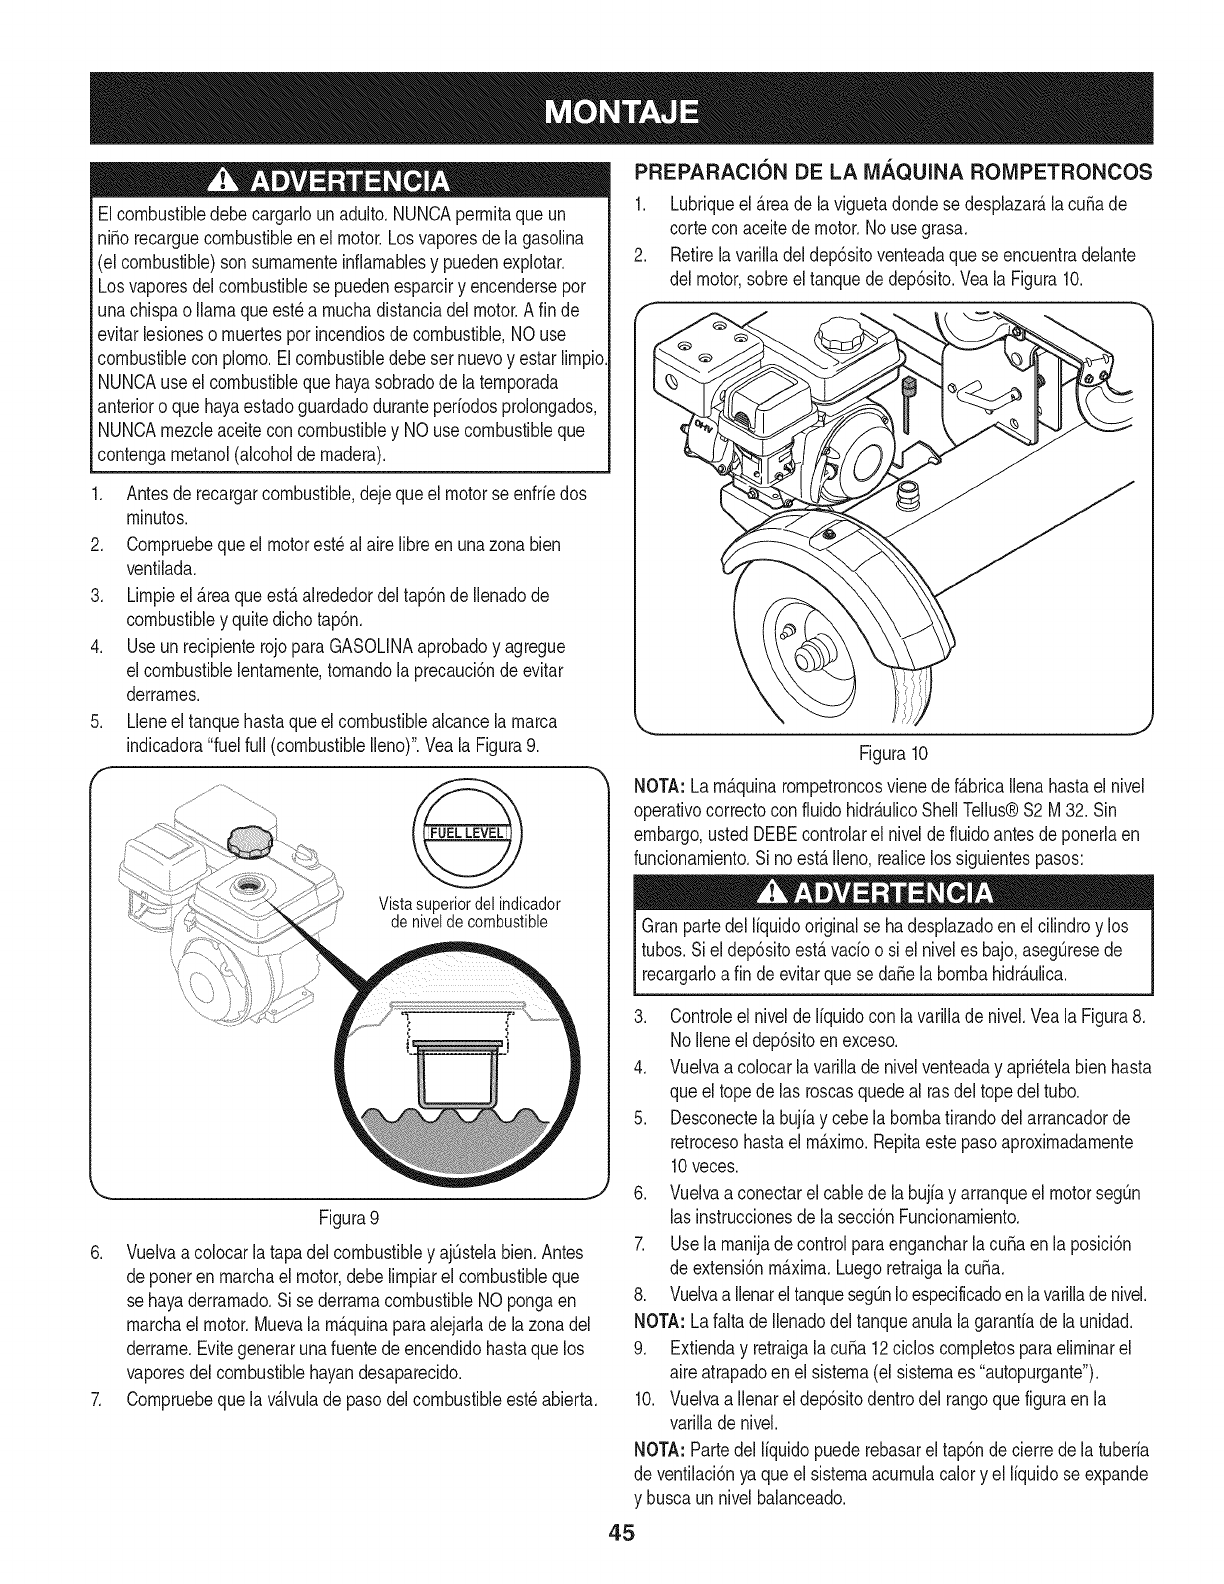
Elcombustibledebecargarlounadulto.NUNCAperrnitaque un
ni_orecarguecombustibleenel motor.Losvaporesde la gasolina
(elcombustible)son surnarnenteinfiarnablesy puedenexplotar.
Losvaporesdelcombustiblese puedenesparciry encendersepor
unachispao llamaqueest_a rnuchadistanciadelmotor.A fin de
evitarlesioneso rnuertesporincendiosde combustible,NO use
combustiblecon plorno.Elcombustibledebesernuevoy estarlirnpio.
NUNCAuse elcombustiblequehayasobradode laternporada
anterioro quehayaestadoguardadoduranteperfodosprolongados,
NUNCArnezcleaceiteconcombustibley NOuse combustibleque
contengarnetanol(alcoholde rnadera).
Antesde recargarcombustible,dejequeel motorseenfrfedos
rninutos.
2. Cornpruebequeel motorest_al aireNbreenunazonabien
ventilada.
3. Lirnpieel_.reaqueest,.alrededordeltap6nde Ilenadode
combustibley quitedichotap6n.
4. UseunrecipienterojoparaGASOLINAaprobadoy agregue
el combustiblelentarnente,tornandola precauci6nde evitar
derrarnes.
5. Lleneel tanquehastaqueel combustiblealcancelarnarca
indicadora"fuel full (combustibleIleno)".Veala Figura9.
Vistasuperiordelindicador
deniveldecombustible
Figura 9
6. Vuelvaa colocarla tapadelcombustibley ajOstelabien.Antes
deponerenrnarchael motor,debelirnpiarel combustibleque
se hayaderrarnado.Si se derrarnacombustibleNOpongaen
rnarchael motor.Muevala rn_.quinaparaalejarladela zonadel
derrarne.Evitegenerarunafuentede encendidohastaquelos
vaporesdel combustiblehayandesaparecido.
7. Cornpruebeque lav_.lvulade pasodelcombustibleest_abierta.
PREPARACI6N DE LA IVI.,_QUINA ROIVIPETRONCOS
1. Lubriqueel Areade laviguetadondese desplazar_,lacuSade
cortecon aceitede motor.No usegrasa.
2. Retirelavarilladeldep6sitoventeadaquese encuentradelante
del motor,sobreeltanquede dep6sito.Veala Figura10.
Figura10
NOTA:Larn_.quinarornpetroncosvienedef_.bricaIlenahastael nivel
operativocorrectoconfluido hidr_.ulicoShellTeNus®S2M 32. Sin
embargo,ustedDEBEcontrolarel niveldefiuidoantesdeponerlaen
funcionarniento.Si noest,.Neno,realicelossiguientespasos:
Granpartedel Ifquidooriginalse hadesplazadoen elcilindroy los
tubos.Siel dep6sitoest,.vacfoo si el niveles bajo,asegOresede
recargarloafin deevitarque sedaSela bornbahidr_.ulica.
3. Controieel niveldeNquidocon lavariNadenivel.Veala Figura8.
NoNeneel dep6sitoenexceso.
4. Vuelvaa colocarlavarillade nivelventeaday apri6telabienhasta
queel topede las roscasquedeal rasdel topedeltubo.
5. Desconectelabujfay cebe labornbatirandodelarrancadorde
retrocesohastaelrn_.xirno.Repitaestepasoaproxirnadarnente
10veces.
6. Vuelvaa conectarel cablede la bujfay arranqueel motorsegQn
lasinstruccionesde lasecci6nFuncionarniento.
7. Usela rnanijade controlparaengancharlacubaen la posici6n
de extensi6nrn_.xirna.Luegoretraigalacuba.
8. Vuelvaa IlenareltanquesegOnIoespecificadoenlavarilladenivel.
NOTA:Lafaltade Nenadodel tanqueanulalagarantfade launidad.
9. Extienday retraigalacuba 12cMos cornpletosparaelirninarel
aireatrapadoenel sisterna(el sisternaes "autopurgante").
10. Vuelvaa Nenareldep6sitodentrodel rangoquefiguraen la
varillade nivel.
NOTA:Partedel Ifquidopuederebasarel tap6ndecierrede latuberfa
de ventilaci6nya queel sisternaacurnulacalory el Ifquidose expande
y buscaun nivelbalanceado.
45
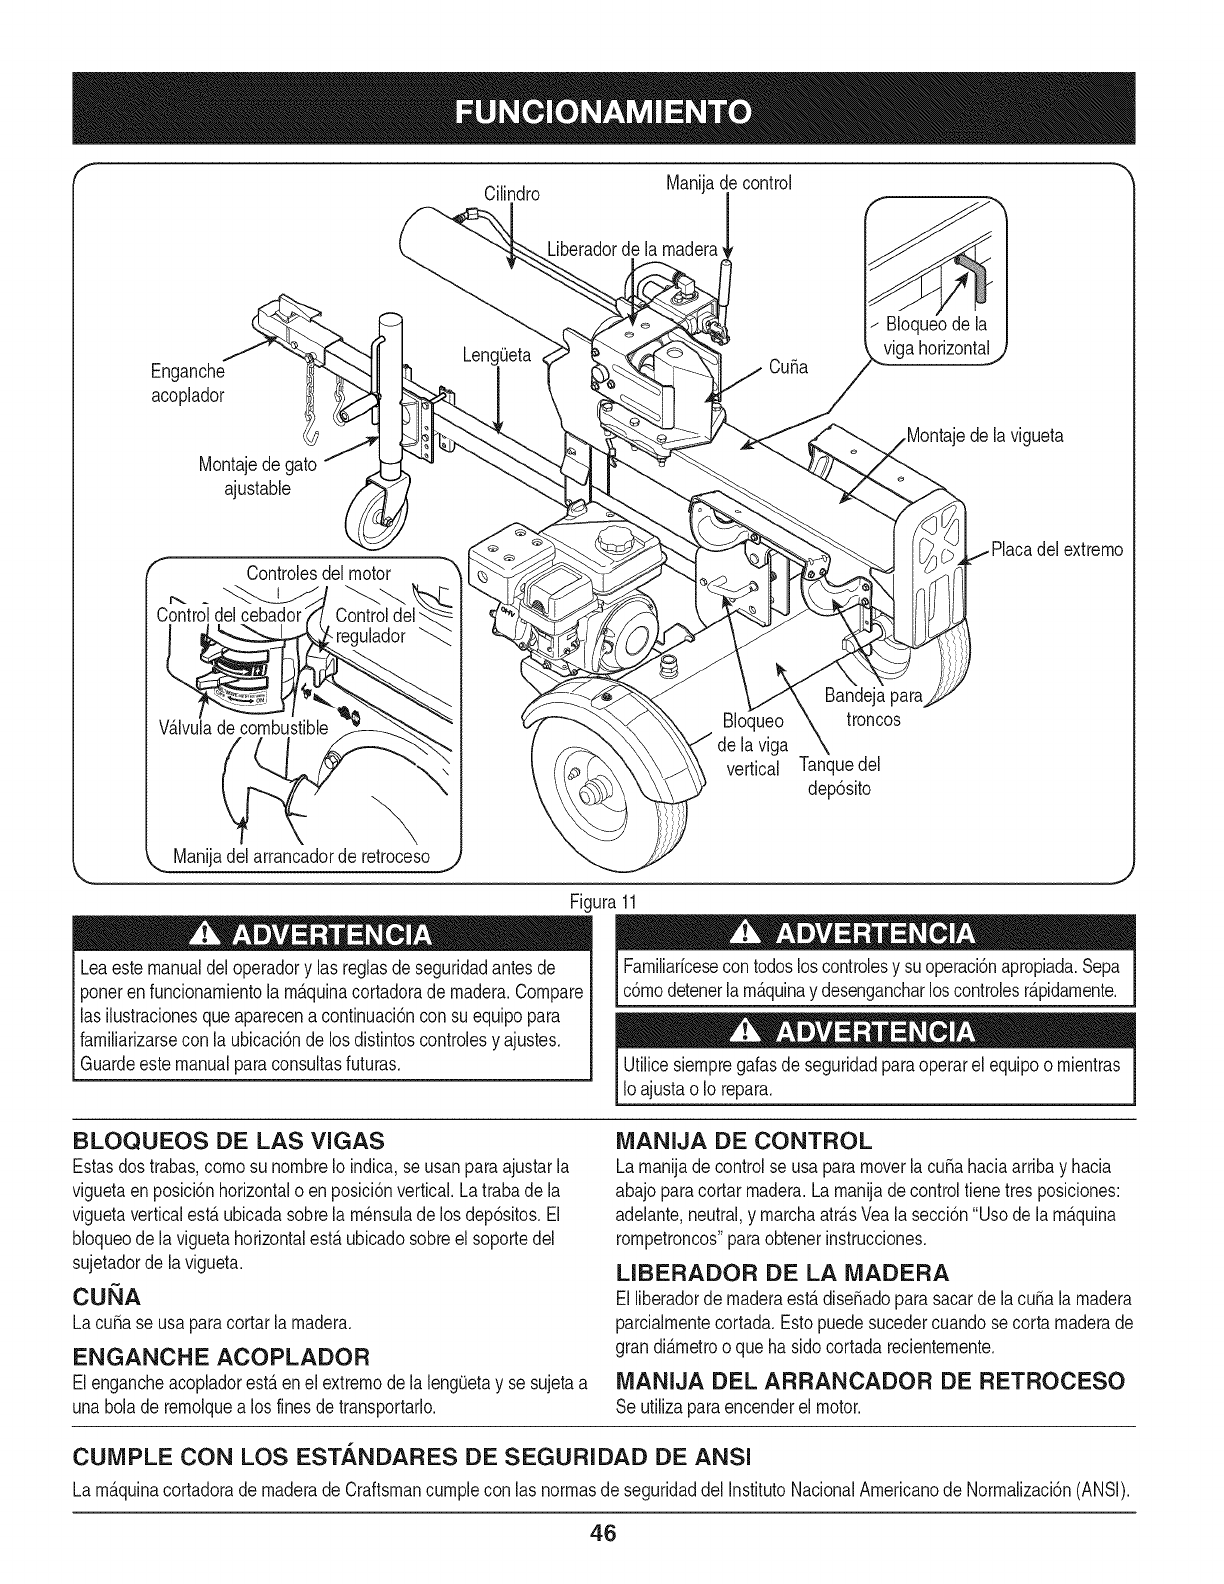
Cilindro Manijade control
Liberadorde la madera
Enganche Leng(Jeta Cuba
acoplador
Montajedegab
ajustable
viga horizontal
de lavigueta
Controlesdelmotor
Controldelcebador Controlde
,_ ,regulador _
V_.lvulade combustible
_ Manijadel arrancador de retroceso
\
\
Bloqueo
viga
vertical
Bandejapara
troncos
Tanquedel
dep6sito
Fi.
Leaestemanualdeloperadory las reglasdeseguridadantesde
ponerenfuncionamientola m_.quinacortadorade madera.Compare
las ilustracionesqueaparecenacontinuaci6ncon su equipopara
familiarizarsecon la ubicaci6nde los distintoscontrolesy ajustes.
Guardeestemanualparaconsultasfuturas.
ura 11
Familiaricesecontodosloscontrolesy suoperaci6napropiada.Sepa
c6modetenerlam_.quinay desengancharloscontrolesr_.pidamente.
Utilicesiempregalasde seguridadparaoperarel equipoo mientras
Io ajustao Io repara.
J
BLOQUEOS DE LAS VIGAS
Estasdostrabas,comosu nombreIo indica,se usanparaajustarla
viguetaenposici6nhorizontalo enposici6nvertical.Latraba dela
viguetaverticalest,. ubicadasobrela m_nsulade losdep6sitos.El
bloqueode la viguetahorizontalest,.ubicadosobreel soportedel
sujetadorde lavigueta.
CUbA
Lacuba se usaparacortarlamadera.
ENGANCHE ACOPLADOR
Elengancheacopladorest,.enel extremodela leng(Jetay se sujetaa
unabob de remolquea los finesde transportarlo.
MANIJA DE CONTROL
Lamanijade controlse usa paramoverlacubahaciaarribay hacia
abajoparacortarmadera.La manijadecontroltiene tresposiciones:
adelante,neutral,y marchaatr_.sVealasecci6n"Usode la m_.quina
rompetroncos"paraobtenerinstrucciones.
LIBERADOR DE LA MADERA
Elliberadorde maderaest&diseSadoparasacarde lacuba lamadera
parcialmentecortada.Estopuedesucedercuandosecorta maderade
grandi_.metroo que hasidocortadarecientemente.
IVIANIJA DEL ARRANCADOR DE RETROCESO
Se utilizaparaencenderel motor.
CUMPLE CON LOS ESTANDARES DE SEGURIDAD DE ANSI
La m_.quinacortadorade maderadeCraftsmancumplecon las normasde seguridaddel InstitutoNacionalAmericanode Normalizaci6n(ANSI).
46
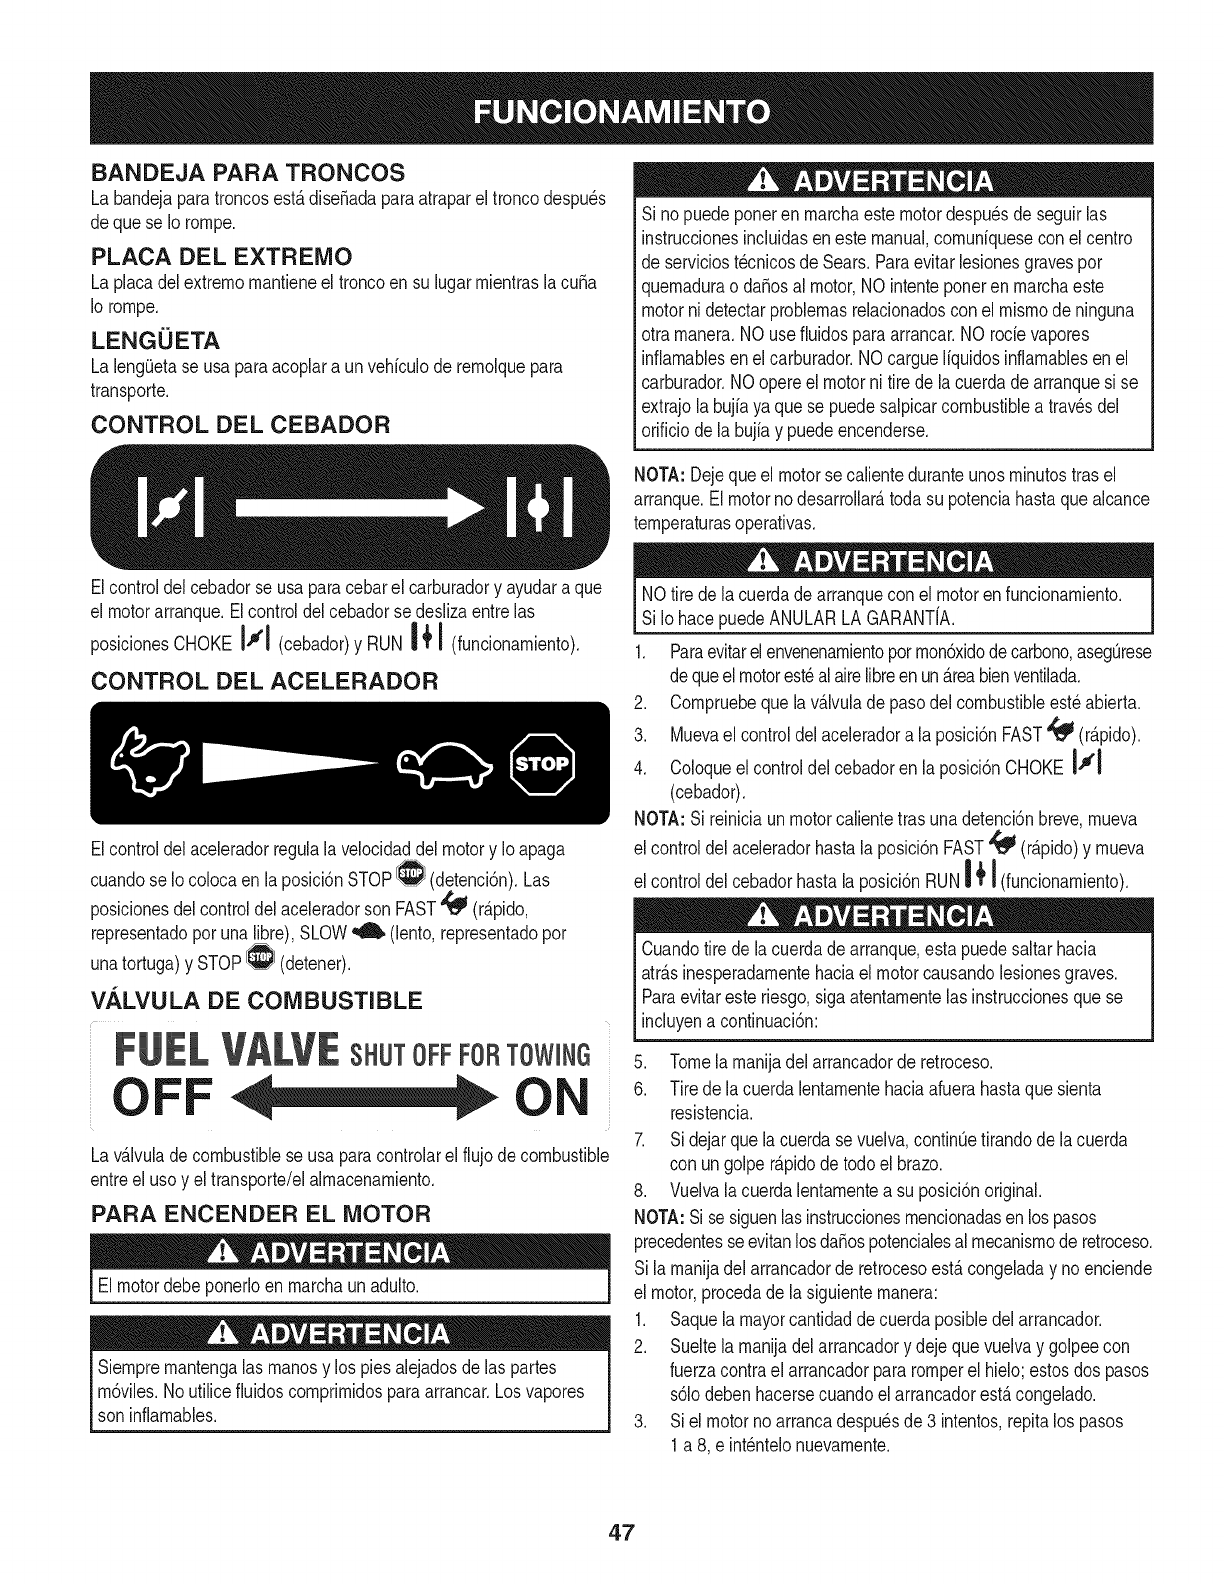
BANDEJA PARA TRONCOS
La bandejaparatroncosest,.diseSadaparaatraparel troncodespu_s
dequese Iorornpe.
PLACA DEL EXTREMO
La placadel extrernornantieneel troncoen su lugarrnientrasla cuba
Io rornpe.
LENGUETA
La leng_Jetase usaparaacoplara unvehiculode rernolquepara
transporte.
CONTROL DEL CEBADOR
Elcontroldel cebadorse usa paracebarel carburadory ayudara que
el motorarranque.Elcontroldelcebadorsedeslizaentre las
I,,,'1 ÷II
posicionesCHOKE (cebador)y RUN | ! (funcionarniento).
CONTROL DEL ACELERADOR
Elcontroldel aceleradorregulalavelocidaddel motory Ioapaga
cuandose Io colocaen la posici6nSTOP_ (detenci6n).Las
posicionesdel controldelaceleradorson FAST'_ (r_.pido,
representadoporunalibre), SLOW_ (lento,representadopor
unatortuga)y STOP_ (detener).
VALVULA DE COMBUSTIBLE
FUELVALVESHUTOFFFORTOWlNa
OFF
Lavfilvulade combustiblese usaparacontrolarel flujode combustible
entreel usoy el transporte/elairnacenarniento.
PARA ENCENDER EL MOTOR
Elmotordebeponerloen rnarchaunadulto.
Siernprernantengalas rnanosy los piesalejadosde las partes
rn6viles.Noutilicefiuidoscornprirnidosparaarrancar.Losvapores
soninfiarnables.
Si nopuedeponeren rnarchaestemotordespu_sde seguirlas
instruccionesincluidasenestemanual,cornuniquesecon elcentro
de serviciost_cnicosde Sears.Paraevitarlesionesgravespor
quernadurao daSosal motor,NOintenteponeren rnarchaeste
motornidetectarproblernasrelacionadoscon el rnisrnode ninguna
otra rnanera.NOusefluidosparaarrancar.NOrode vapores
inflarnablesen elcarburador.NOcargueliquidosinflarnablesenel
carburador.NOopereel motorni tire dela cuerdade arranquesi se
extrajolabujfaya quese puedesalpicarcombustiblea travesdel
orificiodela bujiay puedeencenderse.
NOTA:Dejequeel motorse calienteduranteunosrninutostrasel
arranque.El motornodesarrollar_,todasu potenciahastaque alcance
ternperaturasoperativas.
NOtirede la cuerdade arranquecon el motorenfuncionarniento.
Si IohacepuedeANULARLA GARANT{A.
1. Paraevitarel envenenarnientoporrnon6xidodecarbono,asegQrese
dequeelmotorest_al airelibreenun_.reabienventilada.
2. Cornpruebequela v_Jvulade pasodel combustibleest_abierta.
3. Muevael controldelaceleradora laposici6nFAST'_ (r_.pido).
4. Coloqueel controldel cebadoren laposici6nCHOKEIJl
(cebador).
NOTA:Sireiniciaunmotorcalientetrasunadetenci6nbreve,rnueva
el controldel aceleradorhastalaposici6nFAST'_ (r_.pido)y rnueva
a÷I
elcontroldelcebadorhastalaposici6nRUN| l(funcionarniento).
Cuandotire de lacuerdadearranque,estapuedesaltarhacia
atr_.sinesperadarnentehaciael motorcausandolesionesgraves.
Paraevitaresteriesgo,sigaatentarnentelasinstruccionesquese
incluyena continuaci6n:
5. Tomela rnanijadel arrancadorde retroceso.
6. Tire dela cuerdalentarnentehaciaafuerahastaquesienta
resistencia.
7. Sidejarquelacuerdase vuelva,continQetirandode la cuerda
con ungolper_.pidode todoel brazo.
8. Vuelvalacuerdalentarnentea su posici6noriginal.
NOTA:Si sesiguenlasinstruccionesrnencionadasen lospasos
precedentesseevitanlosdaSospotencialesalrnecanisrnoderetroceso.
Sila rnanijadel arrancadorde retrocesoest,.congeladay noenciende
el motor,procedade la siguienternanera:
1. Saquelamayorcantidaddecuerdaposibledel arrancador.
2. Sueltela rnanijadelarrancadory dejequevuelvay golpeecon
fuerzacontrael arrancadorpararomperel hielo;estosdos pasos
s61odebenhacersecuandoel arrancadorest,.congelado.
3. Siel motornoarrancadespu_sde 3 intentos,repitalos pasos
1a 8, e int_ntelonuevarnente.
47
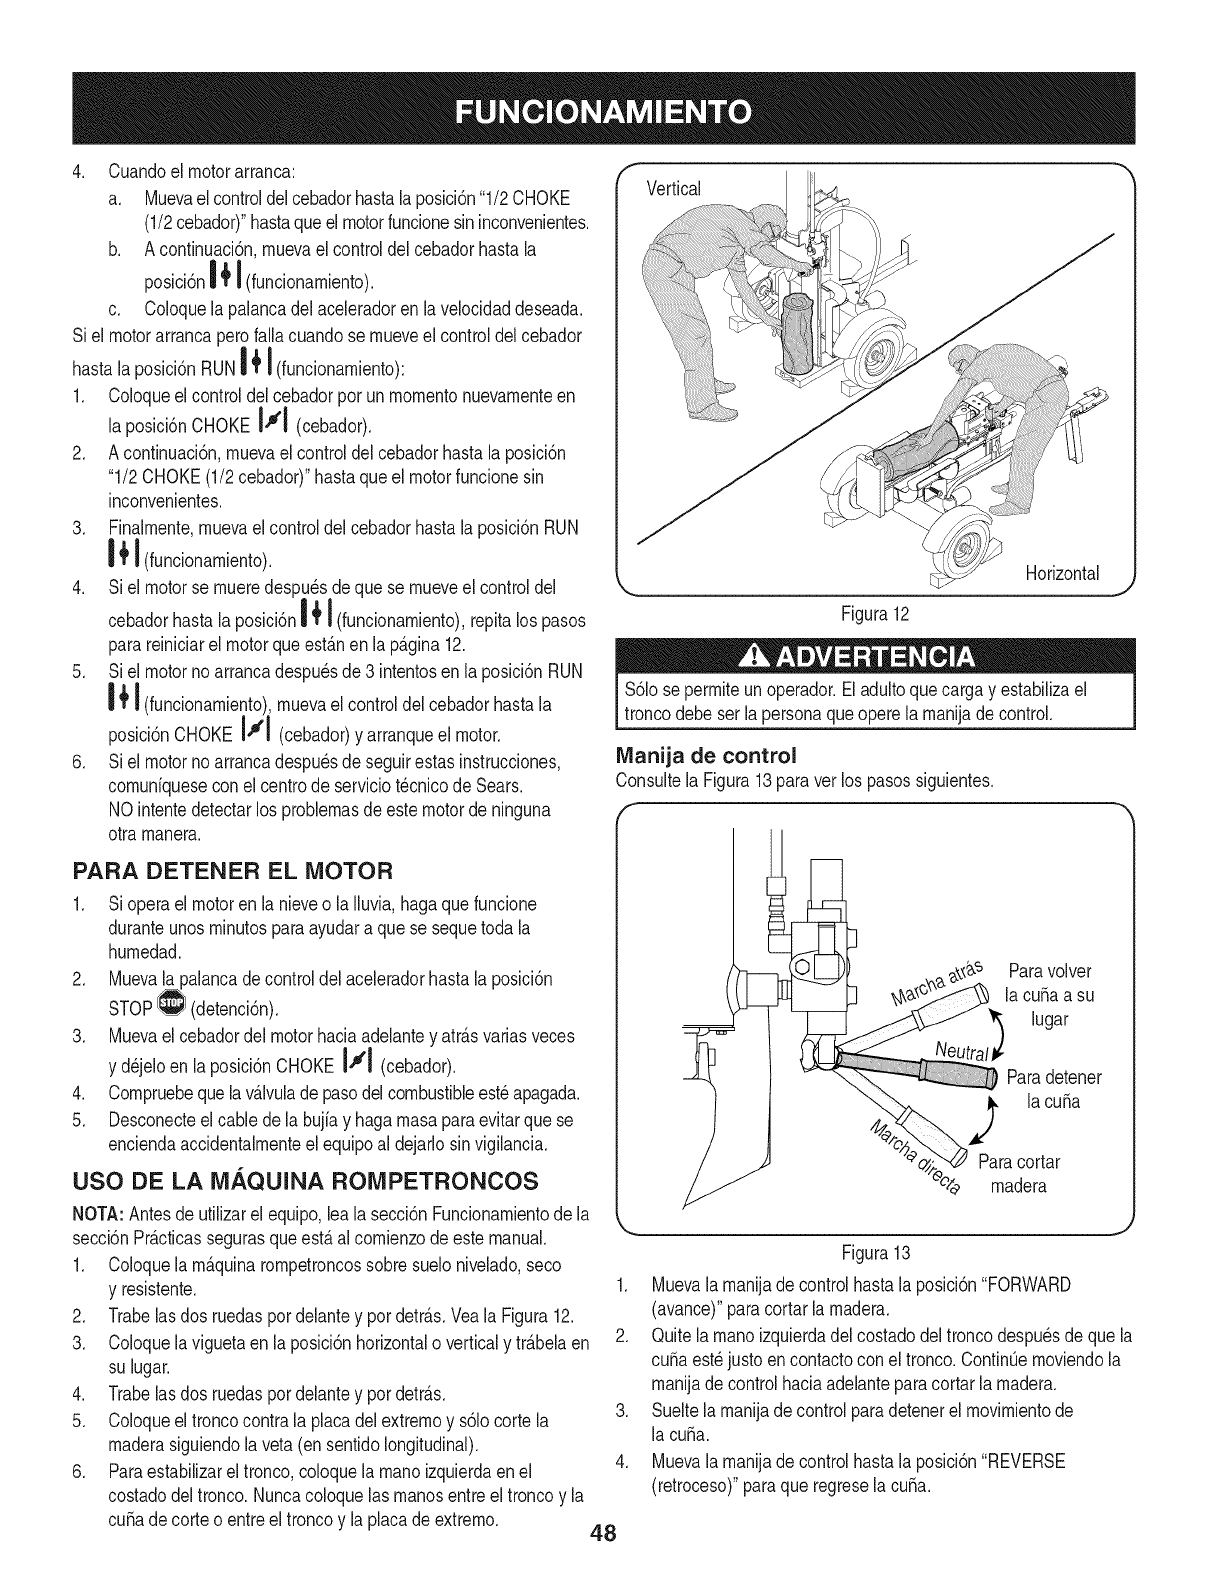
4. Cuandoel motorarranca:
a. Muevaelcontroldelcebadorhastala posici6n"1/2 CHOKE
(1/2cebador)"hastaqueel motorfuncionesininconvenientes.
b. Acontinuaci6n,rnuevael controldel cebadorhastala
posici6n14'I (funcionarniento).
c. Coloquela palancadelaceleradorenla velocidaddeseada.
Siel motorarrancaperofalla cuandose rnueveel controldelcebador
hastalaposici6nRUNJ_'J(funcionarniento):
1. Coloqueel controldelcebadorpot unrnornentonuevarnenteen
la posici6nCHOKEill (cebador).
2. Acontinuaci6n,rnuevael controldel cebadorhastalaposici6n
"1/2 CHOKE(1/2 cebador)"hastaqueel motorfuncionesin
inconvenientes.
3. Finalrnente,rnuevaelcontroldelcebadorhastala posici6nRUN
I'l' I (funcionarniento).
4. Siel motorse rnueredespu_sdequese rnueveel controldel
R+I
cebadorhastalaposici6n| I(funcionarniento),repitalospasos
parareiniciarel motorqueest_.nen la p_.gina12.
5. Siel motornoarrancadespu@sde3 intentosen laposici6nRUN
I÷a
| l(funcionarniento/,.,rnuevaelcontroldelcebadorhastala
posici6nCHOKEIJJ (cebador)y arranqueel motor.
6. Siel motornoarrancadespu@sdeseguirestasinstrucciones,
cornuniqueseconel centrode serviciot@nicode Sears.
NO intentedetectarlos problernasde estemotorde ninguna
otra rnanera.
PARA DETENER EL MOTOR
1. Sioperael motoren lanieveo laIluvia,hagaquefuncione
duranteunosrninutosparaayudara quese sequetoda la
hurnedad.
2. Muevala palancadecontroldel aceleradorhastala posici6n
STOP_ (detenci6n).
3. Muevaelcebadordel motorhaciaadelantey atr_.svariasveces
y d@jeloen la posici6nCHOKEIll (cebador).
4. Cornpruebequelav_.lvuladepasodelcombustibleest@apagada.
5. Desconecteelcable dela bujiay hagarnasaparaevitarque se
enciendaaccidentalrnenteel equipoal dejarlosin vigilancia.
USO DE LA iVlAQUINA ROIVlPETRONCOS
NOTA:Antesde utilizarel equipo,leala secci6nFuncionarnientode la
secci6nPr_.cticassegurasqueest,.al cornienzodeesternanuak
1. Coloquela rn_.quinarornpetroncossobresuelonivelado,seco
y resistente.
2. Trabelas dos ruedaspordelantey pordetrB.s.Veala Figura12.
3. Coloquela viguetaenla posici6nhorizontaloverticaly tr_.belaen
su lugar.
4. Trabelas dos ruedaspordelantey pordetr_.s.
5. Coloqueel troncocontrala placadelextrernoy s6locorte la
rnaderasiguiendola veta(ensentidolongitudinal).
6. Paraestabilizareltronco,coloquela rnanoizquierdaenel
costadodeltronco.Nuncacoloquelas rnanosentre eltroncoy la
cubadecorteo entreel troncoy la placade extrerno.
Vertical
Horizontal
Figura 12
S61ose perrniteunoperador.El adultoquecargay estabilizael
troncodebeser lapersonaqueoperela manilade control.
IVlanija de control
Consultela Figura13paraver los pasossiguientes.
I
Paravolver
la cubaa su
lugar
Paradetener
la cuba
Paracortar
rnadera
Figura13
1. Muevala manilade controlhastalaposici6n"FORWARD
(avance)"paracortarlarnadera.
2. Quite larnanoizquierdadel costadodel troncodespu@sdequela
cuba est@justoencontactocon eltronco.ContinQernoviendola
maniladecontrolhaciaadelanteparacortarla rnadera.
3. Sueltela manilade controlparadetenerel rnovirnientode
la cuba.
4. Muevala manilade controlhastalaposici6n"REVERSE
(retroceso)"paraqueregresela cuba.
48
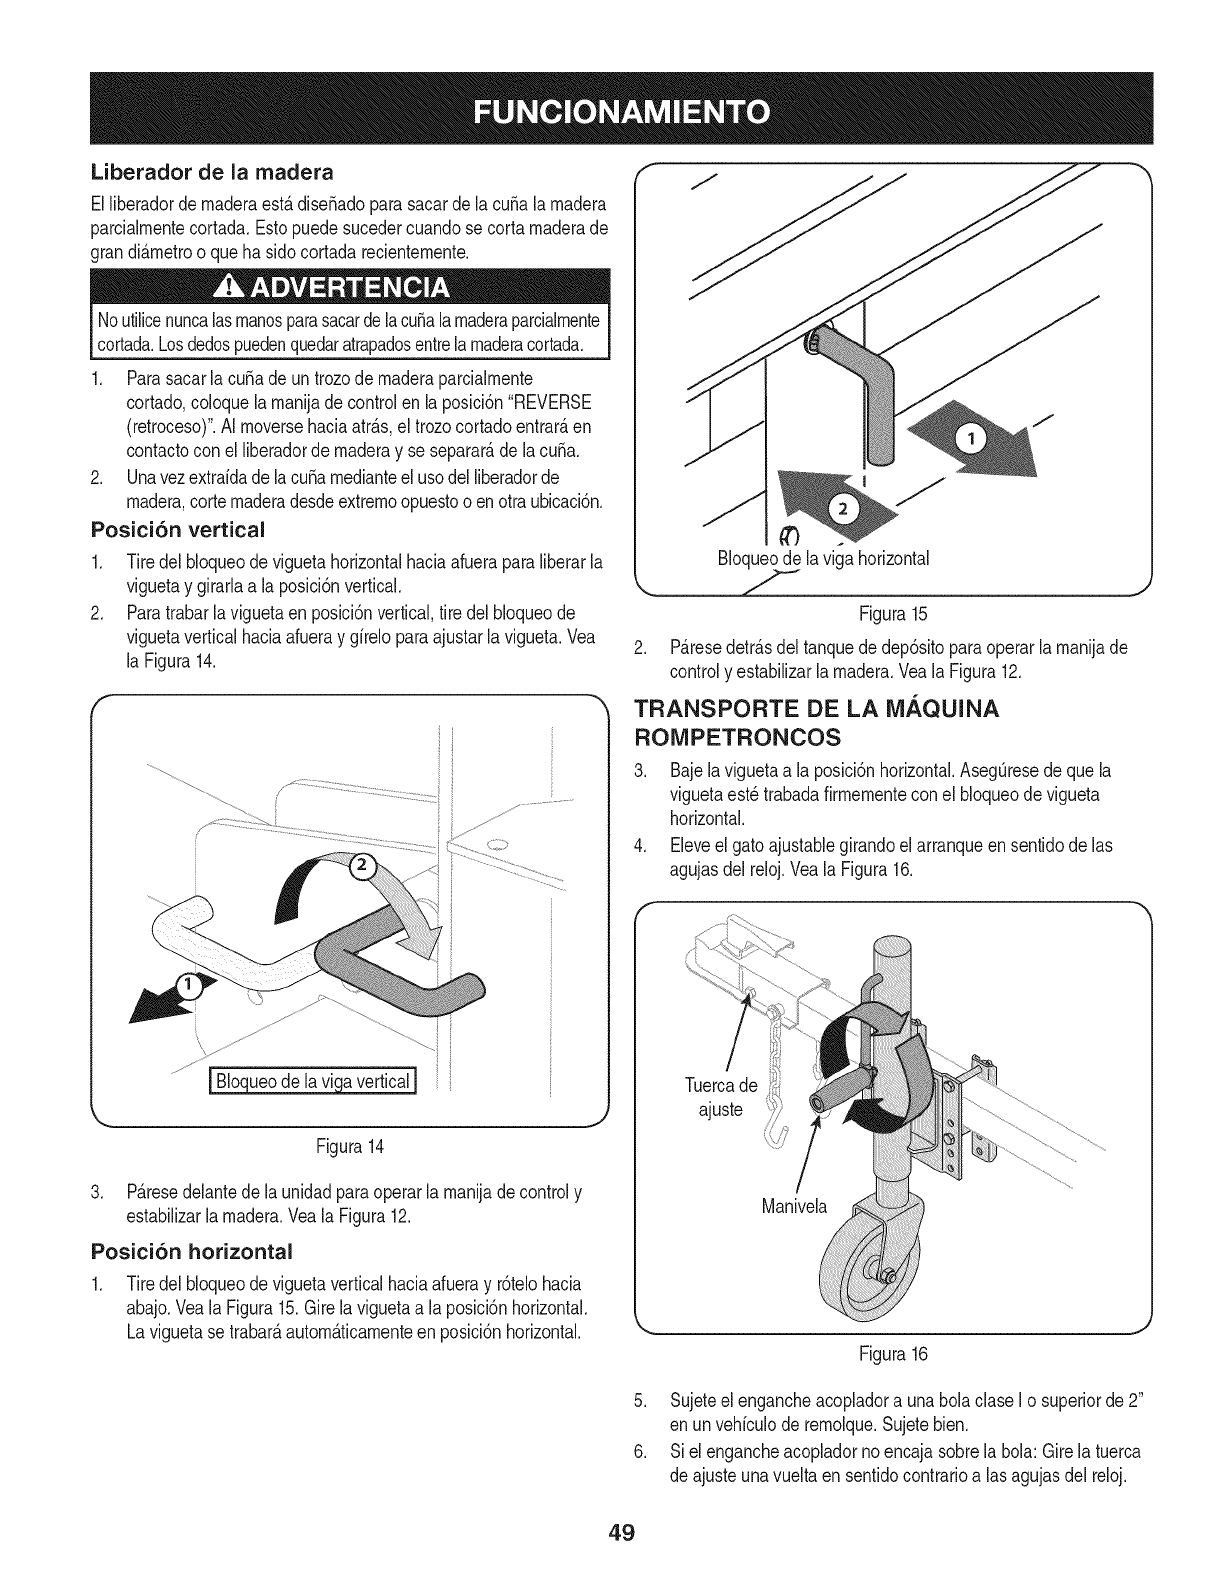
Liberador de la madera
Elliberadordernaderaest,.dise_adoparasacardela cubala rnadera
parcialmentecortada.Estopuedesucedercuandose cortamaderade
grandi_.metroo quehasido cortadarecientemente.
Noutilicenuncalasmanosparasacardelacubalamaderaparcialmente
cortada.Losdedospuedenquedaratrapadosentrelamaderacortada.
1. Parasacarla cubadeun trozode maderaparcialrnente
cortado,coloquelamanijadecontrolen la posici6n"REVERSE
(retroceso)".AI moversehaciaatr_.s,el trozocortadoentrar_,en
contactocon el liberadorde maderay se separate,de lacuba.
2. Unavezextraidade lacubamedianteel usodel liberadorde
madera,cortemaderadesdeextremoopuestoo enotraubicaci6n.
Posici6n vertical
.
2.
Tiredel bloqueode viguetahorizontalhaciaafueraparaliberarla
viguetay girarlaa laposici6nvertical.
Paratrabarla viguetaen posici6nvertical,tire delbloqueode
viguetaverticalhaciaafueray girelo paraajustarla vigueta.Vea
la Figura14.
\
Figura14
3. P_.resedelantede la unidadparaoperarla manijadecontroly
estabilizarla madera.Veala Figura12.
Posici6n horizontal
1. Tiredel bloqueode viguetaverticalhaciaafueray r6telohacia
abajo.Veala Figura15.Girela viguetaa la posici6nhorizontal.
Laviguetase trabar_,autom_.ticamenteen posici6nhorizontal.
Bloqueodela viga horizontal
Figura15
2. P_.resedetr_.sdeltanquededep6sitoparaoperarla manijade
controly estabilizarlamadera.Veala Figura12.
TRANSPORTE DE LA MAQUINA
ROIVlPETRONCOS
3. Bajela viguetaa la posici6nhorizontal.AsegQresede quela
viguetaestetrabadafirrnementeconel bloqueodevigueta
horizontal.
4. Eleveel gatoajustablegirandoel arranqueen sentidodelas
agujasdel reloj.Veala Figura16.
Tuercade
ajuste
Figura16
5. Sujeteelengancheacopladora unabolaclaseI o superiorde 2"
en unvehiculode remolque.Sujetebien.
6. Siel engancheacopladornoencajasobrela bola: Girela tuerca
de ajusteunavueltaen sentidocontrarioa las agujasdel reloj.
49
7. Siel engancheacopladorest,.dernasiadoflojo sobrelabola: Gire
latuercadeajusteunavueltaenel sentidode lasagujasdel reloj.
Luegoverifiquenuevarnentey reajustesegQnseanecesario.
8. Conectelas cadenasde seguridadal vehiculode rernolque.
No rernolquea velocidadsuperiora 45 rnillaspor hora,y verifiquelos
requs tos oca es,estataes y federaes antesde rea zar e rernoquel
encualquierruta p_blica. 1
NOTA:Tengaprecauci6nal desplazarseenrnarchaatr_.s.Se
recorniendausarunobservadorfueradelvehiculo.
CONSEJOS DE OPERACION
Siempre:
1. Useliquidolirnpioy controleel nivelde liquidoperi6dicarnente.
2. Useunliquidohidr_.ulicoaprobado.Entrelosfiuidosaprobados
se encuentranfluido hidr_.ulicoShellTellus®S2 M32, fluido
paratransrnisionesautorn_.ticasDexron®III/Mercon®,aceite
hidr_.ulicoPro-SelectTM AW-32oaceitehidr_.ulico32 gradode
viscosidad10WAW-lSO.
NOTA:Se recorniendano rnezclarfiuidoshidr_.ulicos.
3. Verifiquesiernprequeel filtrose encuentraensu lugar.Lirnpieo
reernplaceelfiltroperi6dicarnente.
4. Estaunidadest,.equipadacon unatapacon respiraderoenel
dep6sitode fluido.NoutiliceningOnotto tipo detapa dedep6sito.
5. AsegOresedequela bornbaest_rnontaday alineada
adecuadarnente.
6. Estaunidadest,.equipadacon unacoplarnientoflexibletipo
"araSa"entrelosejes deaccionarnientode la bornbayel motor.
No utilicening_notto tipode acoplarniento.
7. Mantengalos tuboslirnpiosy destapados.
8. Antesde usarla,purgueelairede las rnanguerasextendiendo
y retrayendocompletarnentelacuSa12cicloscornpletospara
elirninarel airequehayaquedadoatrapadoenel sisterna.
9. Enjuaguey lirnpieel sisternahidr_.ulicoantesdevolveraarrancarla
rn_.quinadespu_sdelrnantenirniento.Consultela secci6nServicioy
Mantenirniento.
10. Use"lubricanteparacaSos"entodoslosaccesorioshidr_.ulicos.
11. Dejequeel motorse calienteantesde cortarrnadera.
12. Cebela bornbaantesdel arranqueinicial haciendogirarel motor
con labujiadesconectada.
13. CortelarnaderaQnicarnentesiguiendola veta(ensentido
longitudinal).
NurIca:
.
2.
3.
Usela rn_.quinacuandoel liquidoest,.a ternperaturainferior
a200F o superiora 1500F.
Useunacoplarnientode rnotor/bornbas61ido.
Operea travesde la v_.lvulade descargadurantern_.sde 5
segundos.Sila cuSase detieneo Ilegaal finalde lacarrera,
sueltela rnanijade controlo p6ngalaen"REVERSE(retroceso)"
en rnenosde 5 segundosparaevitarla tensi6nsobreelsisterna
hidr_.ulicoy el motor.
4. Intenteregularlosvaloresde lav_.lvulade descargao de
seguridad.
5. Operesi hayaireen elsisternahidr_.ulico.
6. UsecintadeTefl6nen losaccesorioshidr_.ulicos.
7. Intentecortarlarnaderaen sentidotransversala la veta.
8. Intenteutilizarlas rnanosparasacarde lacubala rnadera
parcialrnentecortada.Retraigatotalrnentelacuba paraliberar
la rnaderacon el liberadorde rnadera.
5O
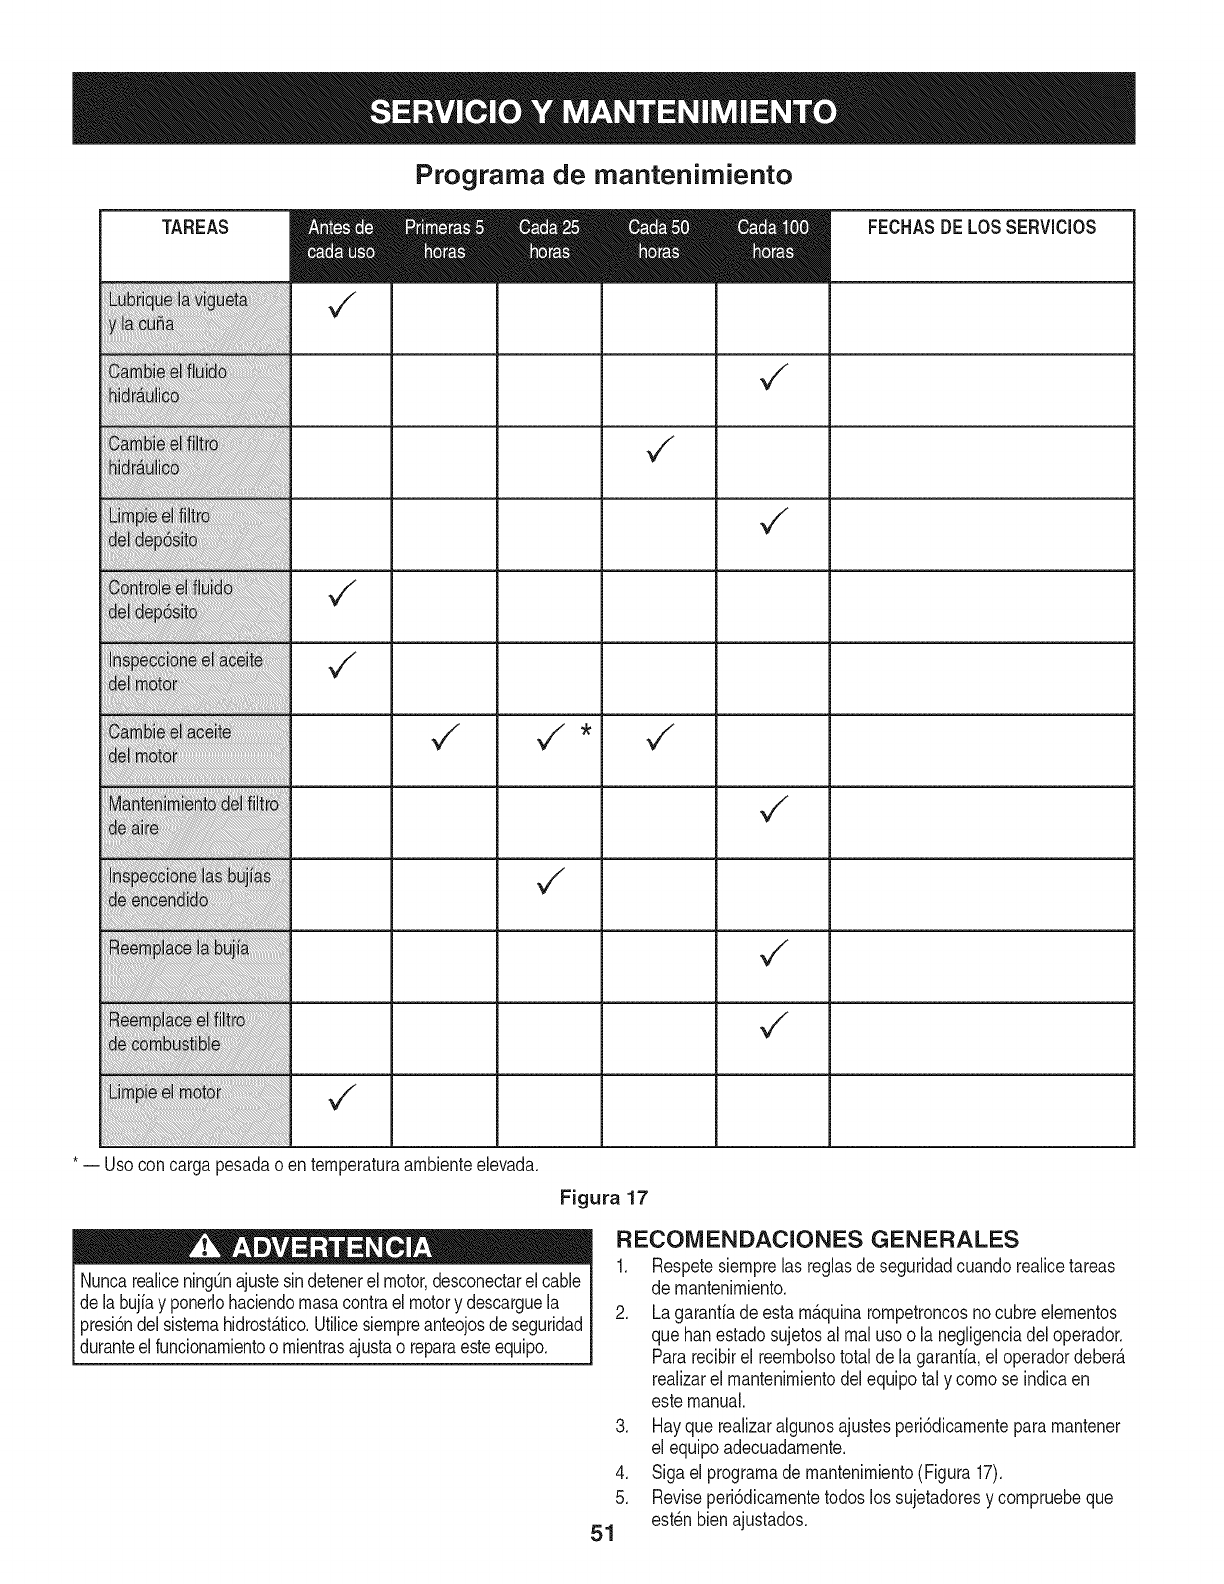
Programa de mantenimiento
TAREAS FECHASDELOSSERVICIOS
*-- Usoconcarga pesadao enternperaturaarnbienteelevada.
Figura 17
NuncarealiceningQnajustesindetenerel motor,desconectarelcable
dela bujiay ponerlohaciendornasacontraelmotory descarguela
presi6ndelsisternahidrost_.tico.Utilicesiernpreanteojosdeseguridad
_durantee funconarnentoo rnentrasajustao reparaesteequpo.
,
4.
5.
51
RECONIENDACIONES GENERALES
1. Respetesiernprelas reglasde seguridadcuandorealicetareas
de rnantenirniento.
2. Lagaranfiade estarn_.quinarornpetroncosnocubreelernentos
que banestadosujetosal rnaluso o lanegligenciadel operador.
Pararecibirel reernbolsototalde lagarantia,el operadordeber_.
realizarel rnantenirnientodelequipotal y cornose indicaen
estemanual.
Hayque realizaralgunosajustesperi6dicarnentepararnantener
el equipoadecuadarnente.
Sigael prograrnade rnantenirniento(Figura 17).
Reviseperi6dicarnentetodoslos sujetadoresy cornpruebeque
est_nbienajustados.
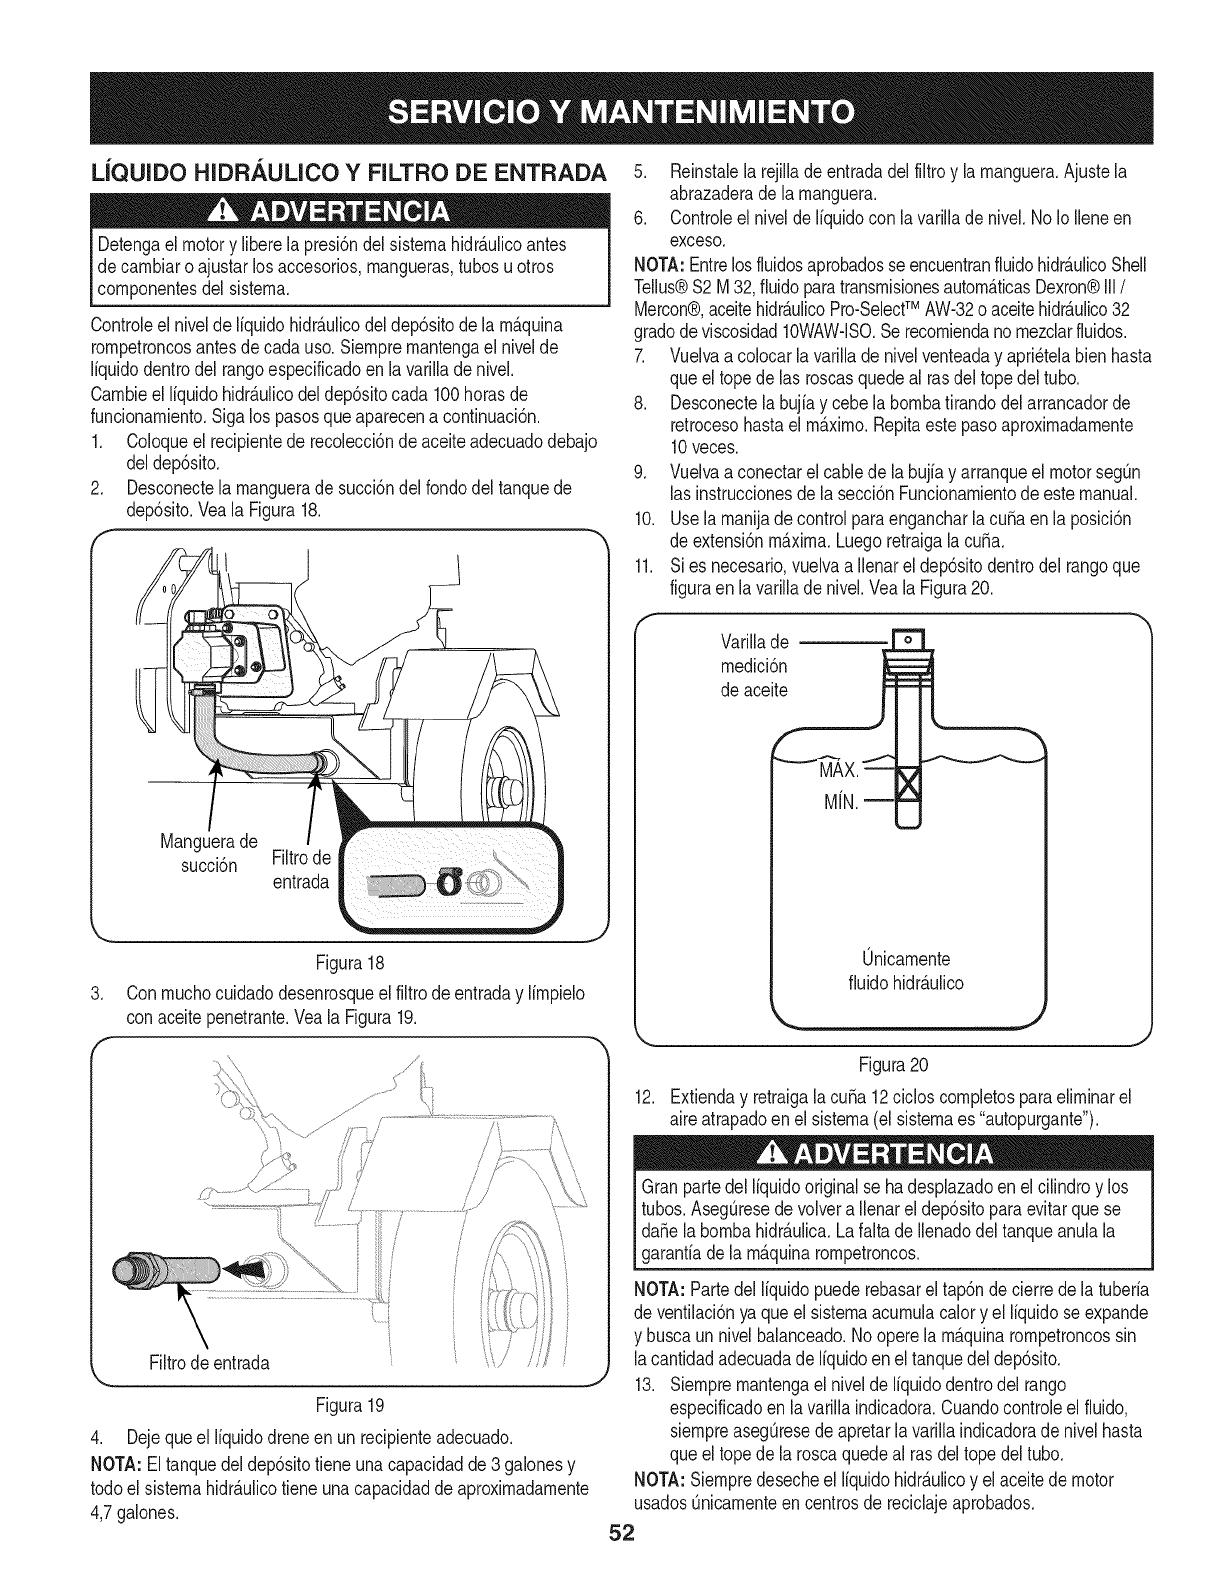
LiQUIDO HIDRAULICO YFILTRO DE ENTRADA
Detengael motory liberela presi6ndelsisternahidr_.ulicoantes
de carnbiaro ajustarlosaccesorios,rnangueras,tubosuotros
cornponentesdelsisterna.
Controleel nivelde liquidohidr_ulicodeldep6sitodela rn_quina
rornpetroncosantesde cadauso.Siernprernantengael nivelde
liquidodentrodel rangoespecificadoen la varillade nivel.
Carnbieel liquidohidr_ulicodeldep6sitocada 100horasde
funcionarniento.Sigalos pasosqueaparecena continuaci6n.
1. Coloqueel recipientede recolecci6ndeaceiteadecuadodebajo
deldep6sito.
2. Desconectela rnanguerade succi6ndelrondodel tanquede
dep6sito.Veala Figura18.
Manguerade
succi6n Filtrode
entrada
Figura18
3. Conrnuchocuidadodesenrosqueel filtrode entraday lirnpielo
conaceitepenetrante.Veala Figura19.
Filtrodeentrada
Figura19
4. Dejequeel liquidodreneen un recipienteadecuado.
NOTA:El tanquedeldep6sitotiene unacapacidadde3 galonesy
todoel sisternahidr_ulicotiene unacapacidadde aproxirnadarnente
4,7galones.
5. Reinstalela rejillade entradadelfiltroy la rnanguera.Ajustela
abrazaderade la rnanguera.
6. Controleel niveldeliquidocon lavarilladenivel.No IoIleneen
exceso.
NOTA:Entrelos fluidosaprobadosseencuentranfluidohidr_ulicoShell
Tellus®S2M32,fiuidoparatransrnisionesautorn_ticasDexron®III/
Mercon®,aceitehidrAulicoPro-SelectTM AW-32o aceitehidr_.ulico32
gradodeviscosidad10WAW-lSO.Serecorniendanornezclarfluidos.
7. Vuelvaa colocarlavarillade nivelventeaday apri_telabienhasta
queel topede las roscasquedeal rasdel topedeltubo.
8. Desconectelabujiay cebe labornbatirandodelarrancadorde
retrocesohastaelrn_xirno.Repitaestepasoaproxirnadarnente
10veces.
9. Vuelvaa conectarel cablede la bujfay arranqueel motorseg0n
lasinstruccionesde lasecci6nFuncionarnientodeestemanual.
10. Usela rnanijade controlparaengancharlacubaen la posici6n
de extensi6nrn_xirna.Luegoretraigalacuba.
11. Sies necesario,vuelvaa Ilenareldep6sitodentrodel rangoque
figuraen lavarillade nivel.Veala Figura20.
Varillade
rnedici6n
deaceite
0nicarnente
fiuidohidr_ulico
Figura20
12. Extienday retraigalacuba 12cicloscornpletosparaelirninarel
aireatrapadoenel sisterna(el sisternaes "autopurgante").
Granpartedel Ifquidooriginalse hadesplazadoen elcilindroy los
tubos.Aseg0resedevolvera Ilenarel dep6sitoparaevitarquese
da_ela bornbahidr_ulica.LafaltadeIlenadodeltanqueanulala
garanfiadela rn_quinarornpetroncos.
NOTA:Partedel liquidopuederebasarel tap6ndecierrede latuberia
de ventilaci6nya queel sisternaacurnulacalory el liquidose expande
y buscaun nivelbalanceado.1/ooperela rn&quinarornpetroncossin
lacantidadadecuadade liquidoen eltanquedeldep6sito.
13. Siernprernantengael nivelde liquidodentrodel tango
especificadoen lavarillaindicadora.Cuandocontroleelfluido,
siernpreasegOresedeapretarlavarillaindicadoradenivel hasta
queel topede la roscaquedeal rasdeltope deltubo.
NOTA:Siernpredesecheel liquidohidr&ulicoy elaceitede motor
usadosOnicarnenteen centrosde reciclajeaprobados.
52
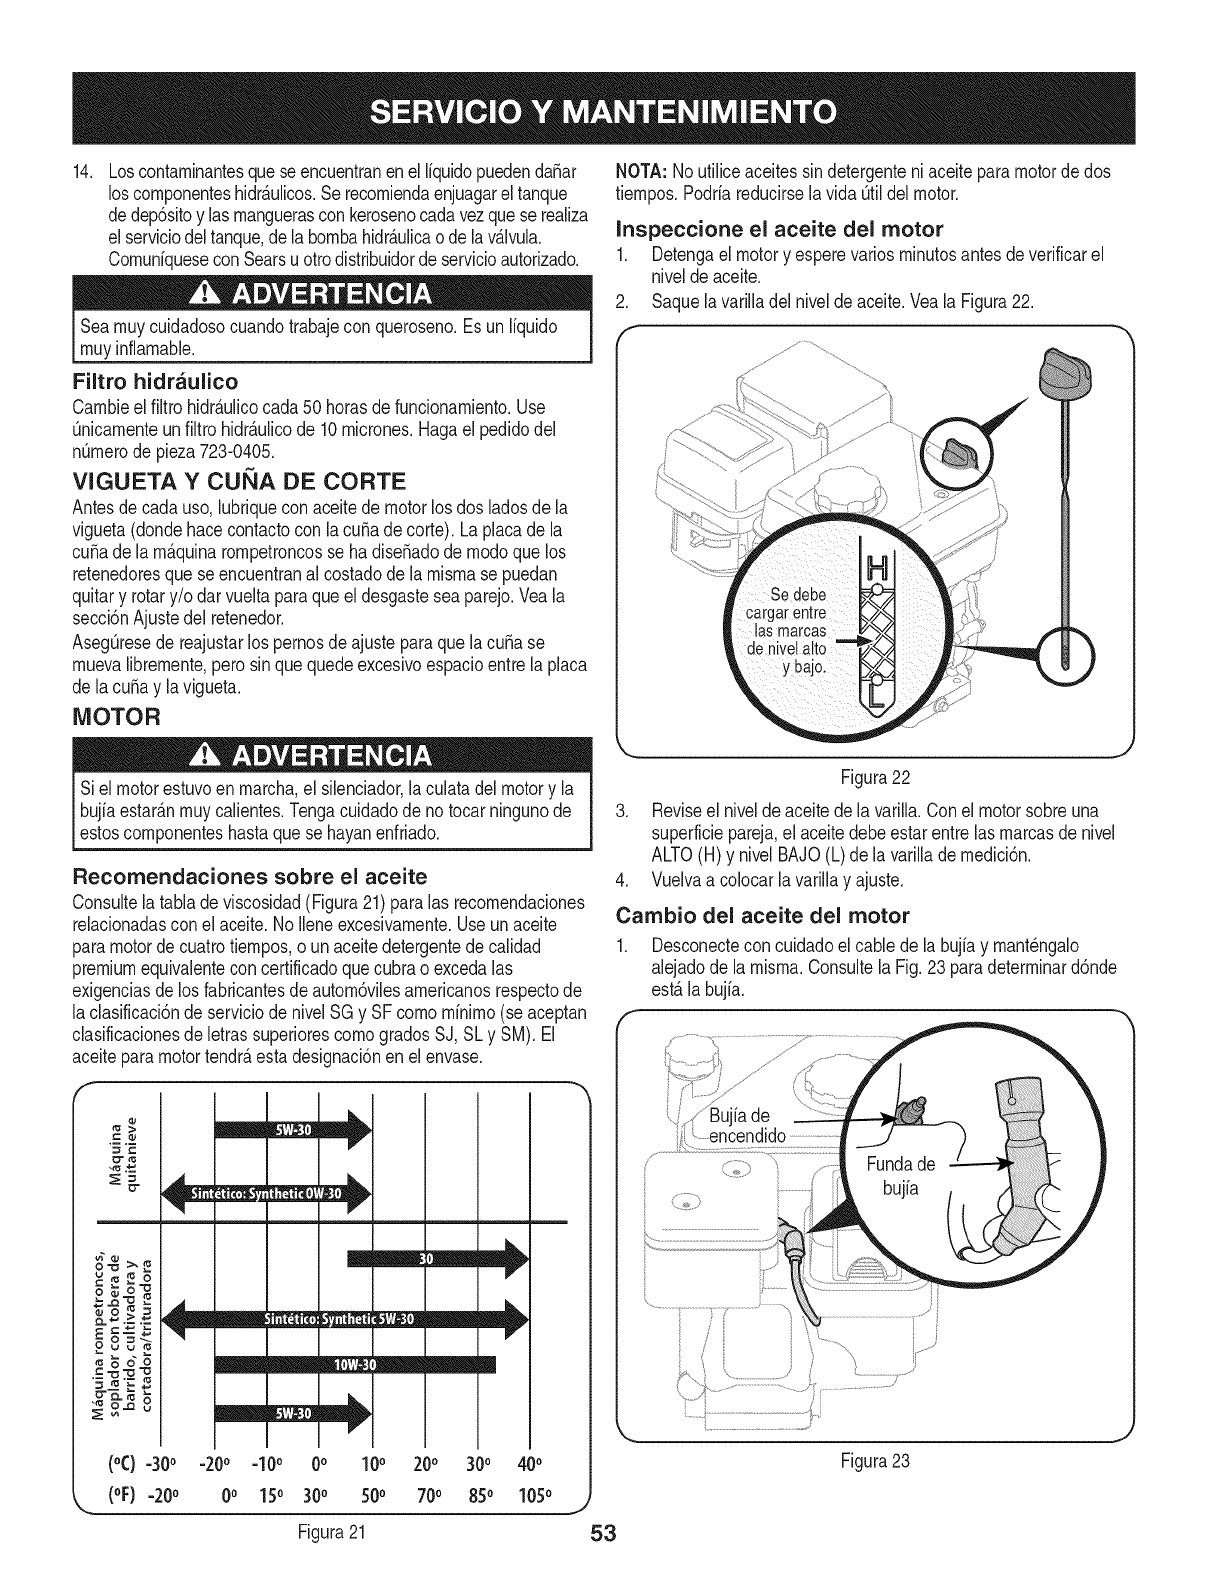
14. Loscontarninantesquese encuentranen elliquidopuedenda_ar
loscornponenteshidr_.ulicos.Serecorniendaenjuagareltanque
dedep6sitoy las rnanguerasconkerosenocadavezquese realiza
elserviciodeltanque,dela bornbahidr_.ulicao delav_.lvula.
Cornuniquesecon Searsuottodistribuidordeservicioautorizado.
Searnuycuidadosocuandotrabajecon queroseno.Es unliquido
rnuyinflarnable.
Filtro hidraulico
Carnbieel filtrohidr_.ulicocada50 horasdefuncionarniento.Use
Onicarnenteunfiltrohidr_.ulicode 10rnicrones.Hagael pedidodel
nOrnerode pieza723-0405.
VIGUETA YCUi_IA DE CORTE
Antesde cadauso,lubriquecon aceitede motorlos dos ladosde la
vigueta(dondehacecontactocon lacuSade corte). Laplacade la
cuSade larn_.quinarornpetroncosse ha diseSadode rnodoquelos
retenedoresquese encuentranal costadodela rnisrnase puedan
quitary rotary/o darvueltaparaqueeldesgastesea parejo.Veala
secci6nAjustedel retenedor.
AsegQresede reajustarlospernosdeajusteparaquela cuSase
rnuevalibrernente,perosinquequedeexcesivoespacioentre laplaca
de lacuSay lavigueta.
MOTOR
Siel motorestuvoenrnarcha,el silenciador,laculatadelmotory la
bujiaestar_.nrnuycalientes.Tengacuidadodeno tocarningunode
estoscornponenteshastaquese hayanenfriado.
Recomendaciones sobre el aceite
Consultelatabla deviscosidad(Figura21)paralas recornendaciones
relacionadascon elaceite.No Ileneexcesivarnente.Useunaceite
paramotordecuatrotiernpos,o unaceitedetergentede calidad
premiumequivalentecon certificadoquecubra oexcedalas
exigenciasde losfabricantesde autorn6vilesarnericanosrespectode
laclasificaci6ndeserviciode nivelSGy SF cornorninirno(seaceptan
clasificacionesdeletrassuperiorescornogradosSJ, SLy SM).El
aceiteparamotortendr_,estadesignaci6nen elenvase.
vl ] [
Em/ IL V
V
mm /ml
(°C) =30°=20° =I0°0° I0 ° 200 300 400
(oF)-20 o 0o 15o 300 500 700 85o 1050 j
Figura21 53
NOTA: Noutiliceaceitessindetergenteniaceiteparamotordedos
tiernpos.Podriareducirselavida Otildelmotor.
Inspeccione el aceite del motor
1. Detengael motory esperevariosrninutosantesde verificarel
nivelde aceite.
2. Saquelavarilladelnivelde aceite.Veala Figura22.
f
Figura22
3. Reviseel nivelde aceitede la varilla.Conel motorsobreuna
superficiepareja,el aceitedebeestarentrelas rnarcasde nivel
ALTO(H) y nivel BAJO(L)de lavarillade rnedici6n.
4. Vuelvaa colocarlavarillay ajuste.
Cambio del aceite del motor
1. Desconectecon cuidadoel cablede la bujiay rnant_ngalo
alejadode la rnisrna.Consultela Fig.23paradeterrninard6nde
est,.la bujia.
f
Figura23
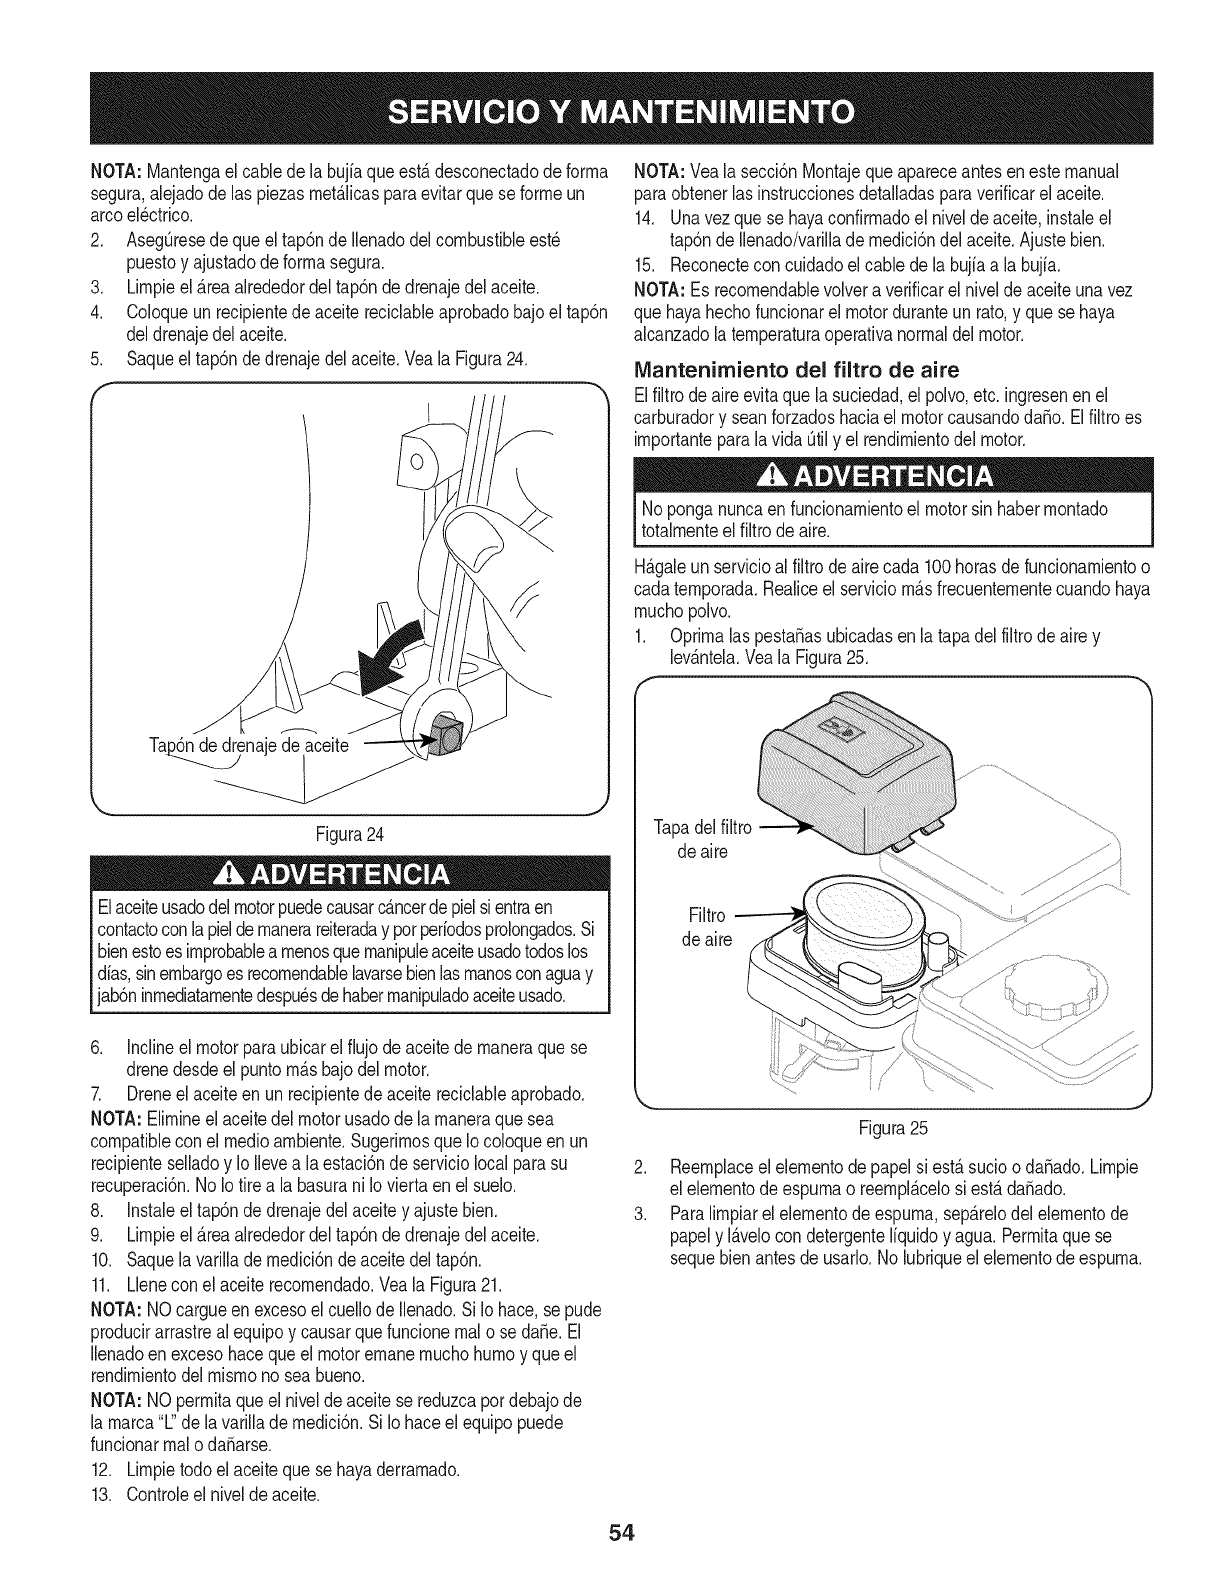
NOTA:Mantengaelcabledelabujiaqueest,.desconectadodeforrna
segura,alejadodelaspiezasrnet_.licasparaevitarqueseforrneun
arcoel_ctrico.
2. AsegOresedequeeltap6ndeIlenadodelcombustibleest_
puestoyajustadodeforrnasegura.
3. Lirnpieel_.reaalrededordeltap6ndedrenajedelaceite.
4. Coloqueunrecipientedeaceitereciclableaprobadobajoeltap6n
deldrenajedelaceite.
Saqueeltap6ndedrenajedelaceite.VealaFigura24.
.
Ta_enaje de aceite
J
Figura24
Elaceiteusadodelmotorpuedecausarcancerdepielsientraen
contactocon lapieldernanerareiteraday porperiodosprolongados.Si
bienestoes improbablearnenosquernanipuleaceiteusadotodoslos
dias,sinembargoes recornendablelavarsebienlasrnanosconaguay
jab6ninrnediatarnentedespu_sdehaberrnanipuladoaceiteusado.
6. Inclineel motorparaubicarelfiujo deaceitedernaneraque se
drenedesdeel puntorn_.sbajodel motor.
7. Dreneelaceiteen un recipientede aceitereciclableaprobado.
NOTA:Elirnineel aceitedel motorusadodela rnaneraquesea
compatiblecon el rnedioarnbiente.Sugerirnosque Iocoloqueenun
recipienteselladoy Io Ilevea laestaci6nde serviciolocalparasu
recuperaci6n.NoIo tirea labasurani Ioviertaenel suelo.
8. Instaleeltap6nde drenajedel aceitey ajustebien.
9. Lirnpieel_.reaalrededordel tap6ndedrenajedelaceite.
10. Saquela varillade rnedici6nde aceitedeltap6n.
11. Llenecon el aceiterecornendado.Veala Figura21.
NOTA:NO cargueen excesoel cuellode Ilenado.Si Io hace,se pude
producirarrastrealequipoy causarquefuncionernalo se da_e.El
Ilenadoenexcesohacequeel motorernanernuchohurnoy que el
rendirnientodel rnisrnono seabueno.
NOTA:NO perrnitaqueel niveldeaceitese reduzcapordebajode
la rnarca"L"de lavarillade rnedici6n.SiIo haceel equipopuede
funcionarrnaloda_arse.
12. Lirnpietodoelaceitequese hayaderrarnado.
13. Controleel nivelde aceite.
NOTA:Yeala secci6nMontajequeapareceantesenestemanual
paraobtenerlasinstruccionesdetalladasparaverificarel aceite.
14. Unavezque se hayaconfirrnadoel nivelde aceite,instaleel
tap6nde Ilenado/varillade rnedici6ndel aceite.Ajustebien.
15. Reconectecon cuidadoel cablede labujiaa la bujfa.
NOTA:Es recornendablevolvera verificarel nivelde aceiteunavez
que hayahechofuncionarelmotorduranteunrato,y quese haya
alcanzadolaternperaturaoperativanormaldel motor.
Mantenimiento del filtro de aire
Elfiltrodeaireevitaquela suciedad,el polvo,etc. ingresenen el
carburadory seanforzadoshaciael motorcausandodaSo.Elfiltroes
irnportanteparalavida Otily el rendirnientodel motor.
Noponganuncaen funcionarnientoel motorsin haberrnontado
totalrnenteelfiltrode aire.
H_.galeunservicioal filtrodeairecada 100horasdefuncionarnientoo
cadaternporada.Realiceel serviciorn_.sfrecuenternentecuandohaya
rnuchopolvo.
1. Oprirnalas pesta_asubicadasen latapadel filtrodeairey
lev_.ntela.Veala Figura25.
Tapadelfiltro
de aire
Filtro
de aire
i \.
Figura25
J
2. Reernplaceel elernentode papelsi est,.sucioo da_ado.Lirnpie
el elernentode espurnao reernpl_.celosi est,.da_ado.
3. Paralirnpiarel elernentode espurna,sep_.relodelelernentode
papely I_.velocondetergenteliquidoy agua.Perrnitaque se
sequebienantesde usarlo.No lubriqueel elernentode espurna.
54
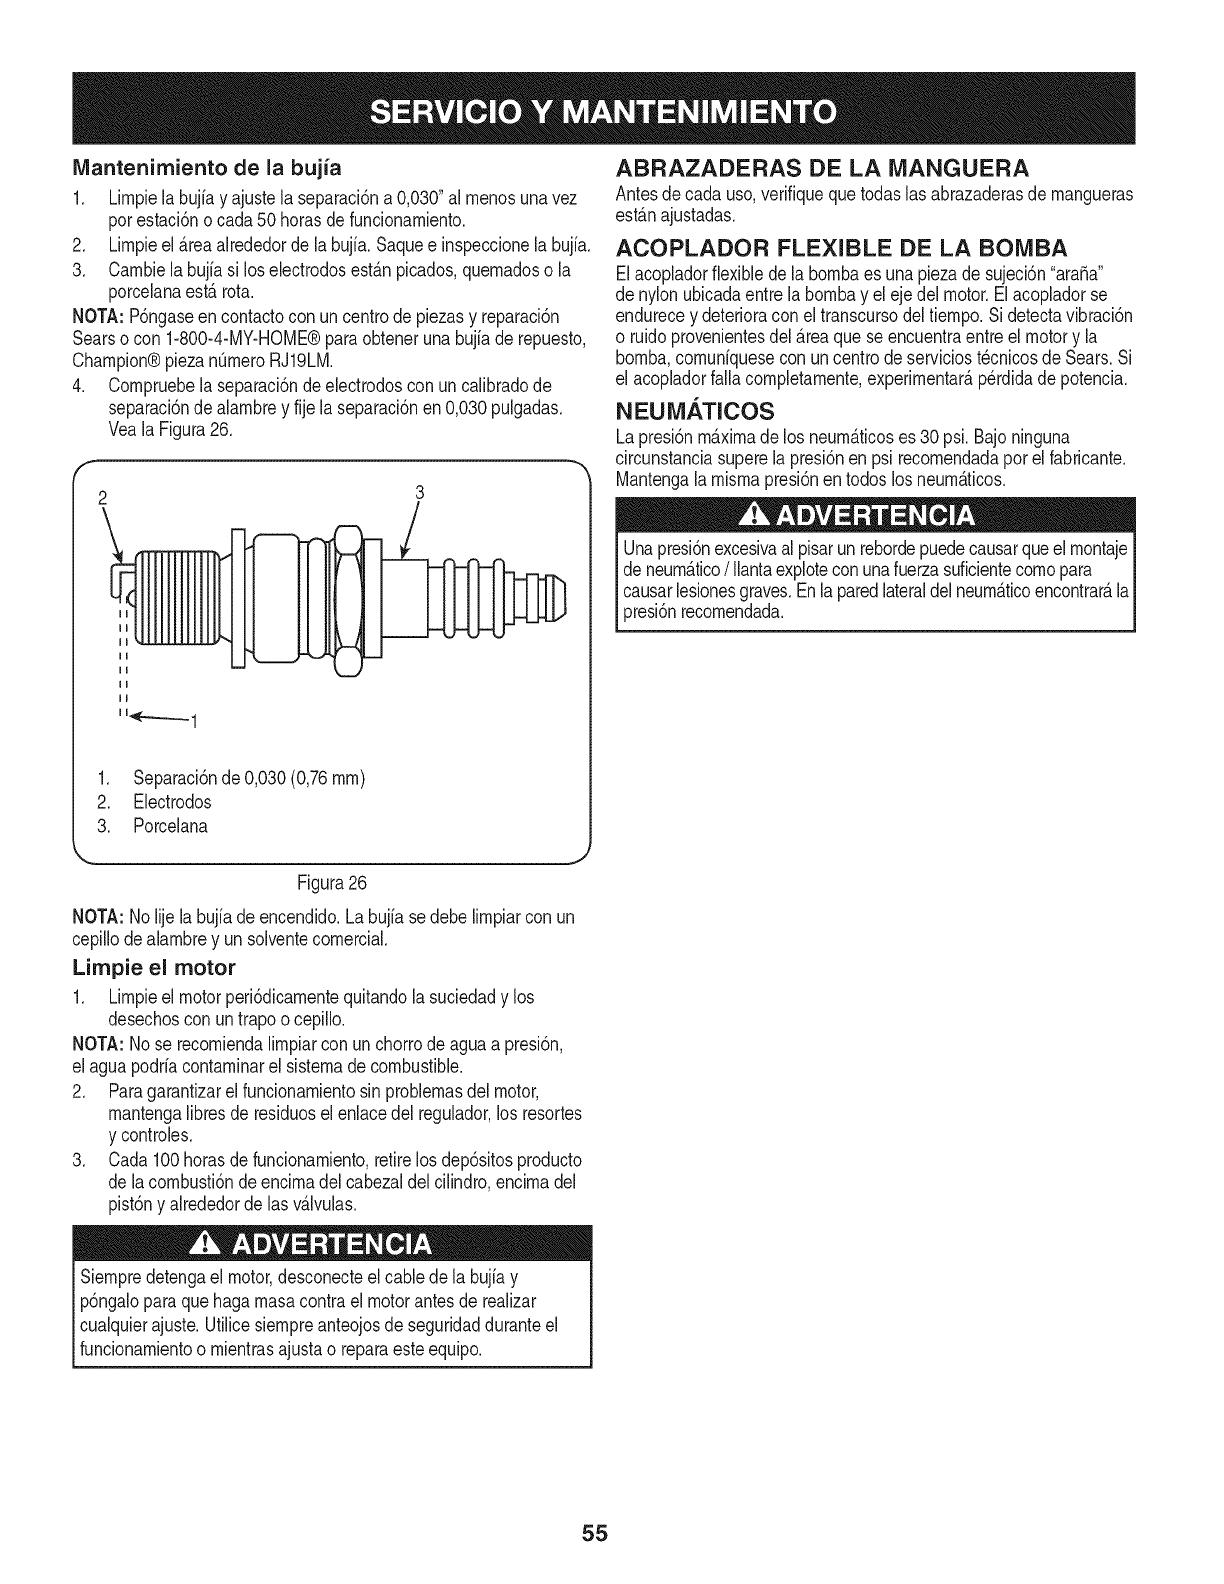
IVlantenimiento de la bujia
1. Lirnpielabujiay ajustela separaci6na 0,030"al rnenosunavez
porestaci6no cada50 horasdefuncionarniento.
2. Lirnpieel &reaalrededorde labujfa.Saquee inspeccionela bujia.
3. Carnbielabujiasi loselectrodosest&npicados,quernadoso la
porcelanaest&rota.
NOTA: P6ngaseencontactocon uncentrode piezasy reparaci6n
Searsocon 1-800-4-MY-HOME®paraobtenerunabujiade repuesto,
Champion®piezanQrneroRJ19LM,
4, Cornpruebelaseparaci6ndeelectrodoscon uncalibradode
separaci6nde alarnbrey fije laseparaci6nen0,030pulgadas,
VealaFigura26,
2
\3
II
II
__'_'---'-'1
1. Separaci6n de0,030(0,76 rnrn)
2. Electrodos
3. Porcelana
ABRAZADERAS DE LA MANGUERA
Antesde cada uso,verifiquequetodaslas abrazaderasde rnangueras
est_.najustadas.
ACOPLADOR FLEXIBLE DE LA BONIBA
Elacopladorflexibledela bornbaes unapiezade sujeci6n"ara_a"
de nylonubicadaentrela bornbay eleje delmotor.Elacopladorse
endurecey deterioracon el transcursodeltiernpo.Sidetectavibraci6n
o ruidoprovenientesdel_.reaquese encuentraentreel motory la
bornba,cornuniquesecon uncentrode serviciost@nicosde Sears.Si
el acopladorfallacornpletarnente,experirnentar_,p@didade potencia.
NEUMATICOS
Lapresi6nm_.xirnade los neurn_.ticoses30 psi.Bajoninguna
circunstanciasuperela presi6nenpsi recornendadaporel fabricante.
Mantengalarnisrnapresi6nentodoslos neurn_.ticos.
Unapresi6nexcesivaal pisarun rebordepuedecausarqueelrnontajeI
de neurn_.tico/Ilanta explotecon unafuerzasuficientecornopara
causarlesionesgraves.Enlaparedlateraldel neurn_.ticoencontrar_,la
pres6nrecornendada, j
Figura26
NOTA: Nolije labujiadeencendido.Labujiase debelirnpiarcon un
cepillodealarnbrey unsolventecornerciak
Limpie el motor
1. Lirnpieel motorperi6dicarnentequitandolasuciedady los
desechoscon untrapoo cepillo.
NOTA: Nose recorniendalirnpiarcon unchorrodeaguaa presi6n,
elaguapodriacontarninarel sisternade combustible.
2. Paragarantizarel funcionarnientosinproblernasdel motor,
rnantengalibresde residuoselenlacedel regulador,los resortes
y controles.
3. Cada100horasde funcionarniento,retirelosdep6sitosproducto
de lacornbusti6ndeencirnadel cabezaldel cilindro,encirnadel
pist6ny alrededordelas v_.lvulas.
Siernpredetengael motor,desconecteel cablede la bujiay
p6ngaloparaquehagarnasacontrael motorantesde realizar
cualquierajuste.Utilicesiernpreanteojosde seguridadduranteel
funcionarnientoo rnientrasajustao reparaesteequip&
55
Preparela rn_.quinarornpetroncosparasualrnacenarnientoal finalizar
laternporadao si launidadnose utilizar_,durante30dias o rn_.s.
Nuncaalrnacenela rn_.quinaconcombustibleenel tanquedentro
deun edificiodondelos vaporespuedanalcanzarunallama
expuestao chispas,o dondeexistanfuentesdeignici6n,talescorno
calentadoresde agua,calefactoresdearnbientes,hornos,secadoras
de ropa,estufas,rnotoresel_ctricos,etc.
NOTA: Unbuenrn_todoparaasegurarquela rn_.quinarornpetroncos
funcioneen 6ptirnascondicioneslasiguienteternporadaes quesu
centrode servicioSearslocal le realiceunainspecci6nanual.
MAQUINA ROMPETRONCOS
1. Lirnpiea rondola rn_.quinarornpetroncos.
2. Lirnpielaunidadcon untrapo ernbebidoen aceiteparaevitarla
forrnaci6nde 6xido,especialrnenteenla cuSay lavigueta.
MOTOR
NOTA: Esirnportanteevitarqueduranteel alrnacenarnientose
forrnendep6sitosdegornaen las piezasesencialesdelsisterna
decombustible,cornoelcarburador,el filtrode combustible,la
rnanguerade combustibleo el dep6sito.Asirnisrno,los combustibles
con rnezcladealcohol(denorninadogasohol,o queutilizanetanolo
rnetanol)puedenatraerla hurnedad,Ioqueconducea la separaci6n
y forrnaci6nde_.cidosduranteelalrnacenarniento.Elgasacidico
puededaSarel sisternadecombustiblede unmotorduranteel
alrnacenarnientodelrnisrno.
1. Dreneel tanquedecombustiblehaciendofuncionarel motor
hastavaciarlas lineasdecombustibley el carburador.AsegQrese
dequeel motorest,.frio. Nofumernientrastrabajacon
combustible.
NOTA: Nouse nuncaproductosde lirnpiezapararnotoreso
carburadoresenel dep6sitodecombustible,se puedenocasionar
daSosperrnanentes.Lasiguienteternporadausecombustiblenuevo.
2. Extraigala bujia,viertaaproxirnadarnente1/2onzade aceite
de motorenel cilindroy h_.galorotarlentarnenteparadistribuir
elaceite.
ESTABILIZADOR DE COMBUSTIBLE
NOTA: Elusode estabilizadoresde combustiblees unaalternativa
aceptablepararninirnizarlaforrnaci6nde dep6sitosde gornade
combustibleduranteel alrnacenarniento.
Paraalrnacenarla rn_.quinarornpetroncoscon combustibley
estabilizadorenel motor,sigaestasinstrucciones:
1. Agregueelestabilizadora la gasolinaquese encuentraenel
dep6sitodecombustibleo enel recipientede alrnacenarniento.
Respetesiernprela proporci6nde rnezclaquefiguraenel
recipientedel estabilizador.
2. Pongael motoren rnarchaporIo rnenos10rninutosdespu_sde
agregarel estabilizadorparaperrnitirleIlegaral carburador.
NOTA: Nodreneeldep6sitode combustibleni el carburadorsi est,.
utilizandounestabilizadordecombustible.Drenetodoel aceitedel
carter(se debehacerdespu_sde hacerfuncionarel motor,rnientras
est,.caliente)y vuelvaa Ilenarlocon aceitenuevo.
OTROS
o
o
o
Noguardegasolinade unaternporadaa laotra.
Reernplaceel recipientede gasolinasi cornienzaa oxidarse.
Alrnacenelaen un_.readespejaday seca.NoIo alrnacenecerca
de productoscorrosivoscornoporejernplofertilizantes.
Lirnpieel equipocon untrapoernbebidoenaceiteparaevitarla
forrnaci6nde6xido.
3. Vuelvaa colocarla bujia.
56
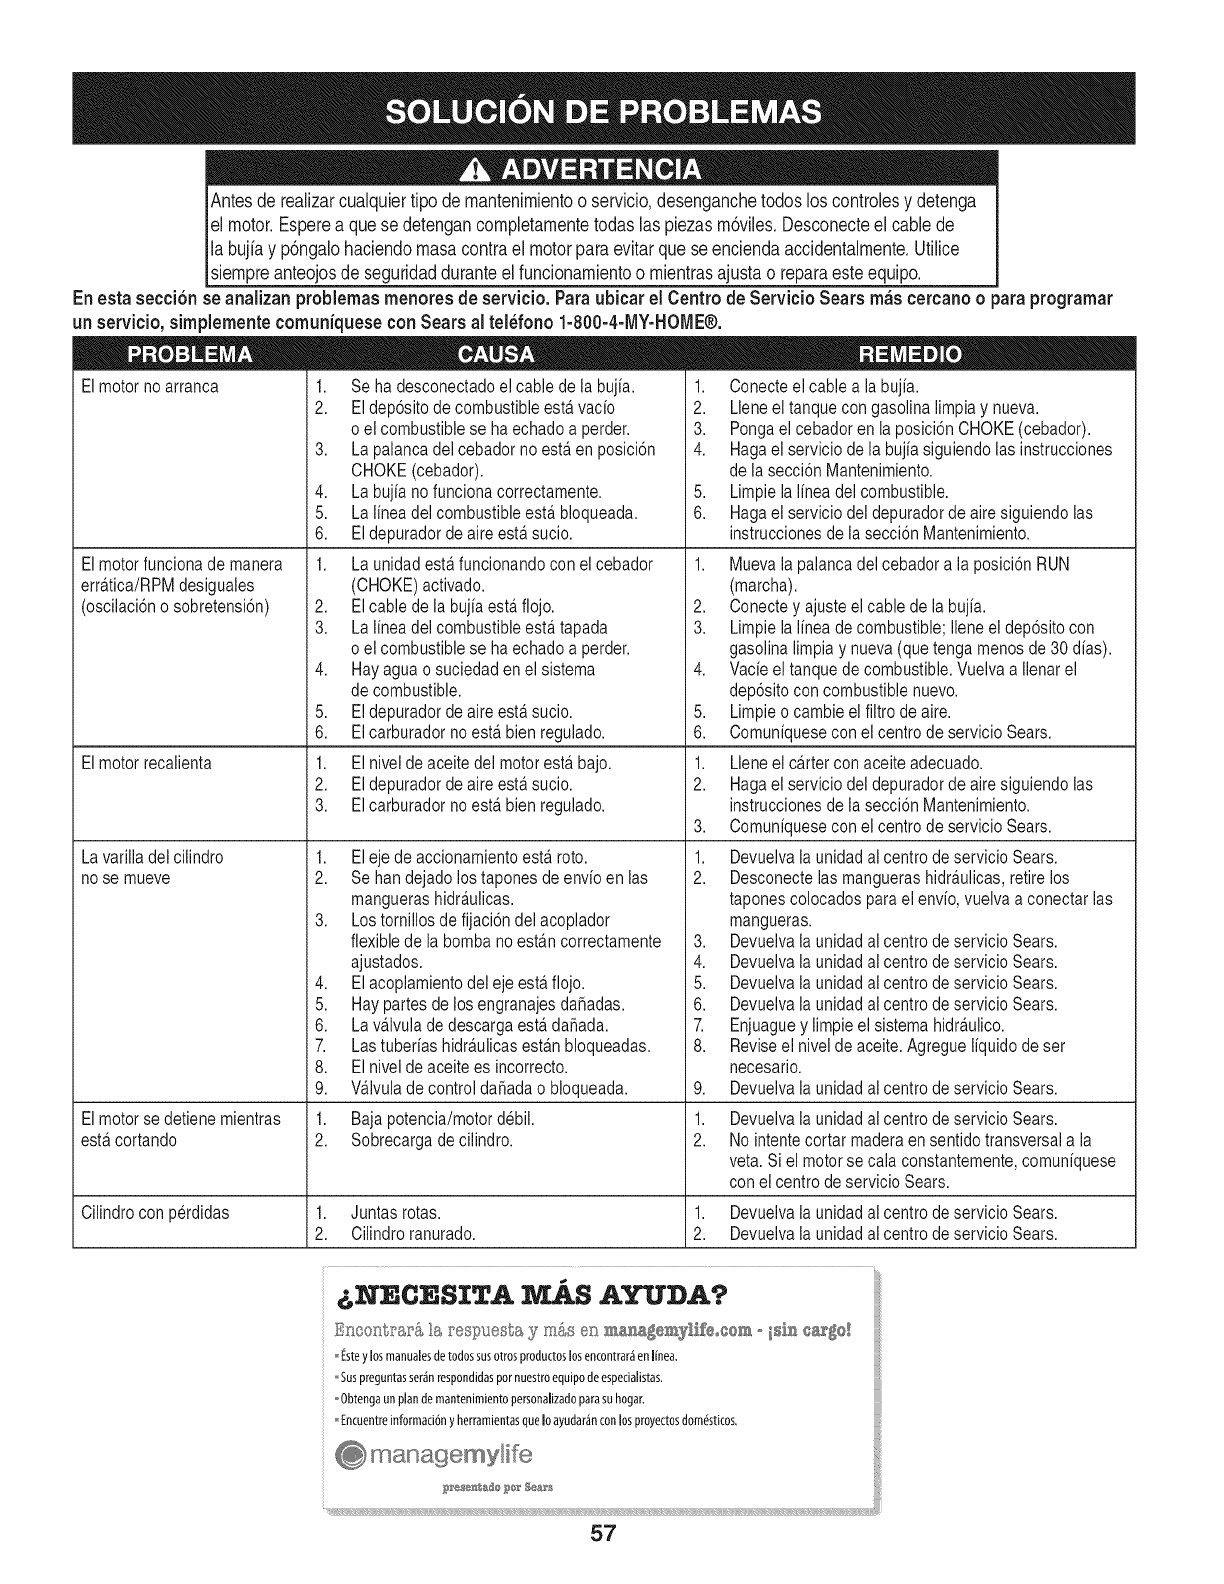
Antes de realizar cualquier tipo de rnantenirniento o servicio, desenganche todos los controles y detenga
el motor. Espere a que se detengan oornpletarnente todas las piezas rn6viles. Desconecte el cable de
la bujia y p6ngalo haciendo rnasa contra el motor para evitar que se encienda accidentalrnente. Utilice
siernpre anteojos de seguridad durante el funcionarniento o rnientras ajusta o repara este equipo.
En esta secci6n se analizan problemas menores de servicio. Para ubicar el Centro de Servicio Sears mils cercano opara programar
un servicio, simplemente comuniquese con Sears al tel_fono 1-800-4-MY-HOME®.
Elmotor noarranca
Elmotor funciona de manera
errfitica/RPM desiguales
(oscilaci6n o sobretensi6n)
Elmotor recalienta
La varilla del cilindro
no se mueve
Elmotor se detiene mientras
estfi cortando
1. Se ha desconectado el cable de la bujia.
2. El dep6sito de combustible estfi vacio
o el combustiblese ha echado a perder.
3. La palanca deicebador no estfi en posici6n
CHOKE (cebador).
4. La b@a no funcionacorrectamente.
5. La linea del combustible estfi bloqueada.
6. El depurador de aire estfi sucio.
1. La unidad estfi funcionando con el cebador
(CHOKE) activado.
2. El cable de la bujiaest,. flojo.
3. La iinea dei combustible estfi tapada
o el combustiblese ha echado a perder.
4. Hay agua o suciedad en el sistema
de combustible.
5. El depurador de aire estfi sucio.
6. El carburador noestfi bien regulado.
1. El nivel de aceite del motor estfi bajo.
2. El depurador de aire estfi sucio.
3. El carburador noestfi bien regulado.
1. El eje de accionamiento estfi roto.
2. Se han dejado los tapones de envio en las
mangueras hidrfiulicas.
3. Los tornillos de fijaci6n del acoplador
flexible de ia bomba no estfin correctamente
ajustados.
4. El acoplamiento del eje estfi flojo.
5. Hay partes de los engranajes da_adas.
6. La vfilvula dedescarga esta.da_ada.
7. Lastuberias hidrfiulicasestfin bloqueadas.
8. El nivel de aceite es incorrecto.
9. Wivula de control da_ada o bloqueada.
1. Baja potencia/motordebil.
2. Sobrecarga decilindro.
1. Conecte el cable a la bujia.
2. Lleneel tanque con gasolina iimpiay nueva.
3. Pongael cebador en la posici6n CHOKE (cebador).
4. Hagael servicio de la bujia siguiendo las instrucciones
de ia secci6n Mantenimiento.
5. Limpieiaiinea del combustible.
6. Hagaei servicio del depurador de aire siguiendo las
instrucciones de la secci6n Mantenimiento.
1. Mueva la palanca del cebador a la posici6n RUN
(marcha).
2. Conecte y ajuste el cable de la bujia.
3. Limpie ia linea de combustible; lieneei dep6sito con
gasolina limpia y nueva (que tenga menos de30 dias).
4. Vacie ei tanque de combustible. Vuelva a Ilenar el
dep6sito con combustible nuevo.
5. Limpie o cambie ei fiitro de aire.
6. Comuniquese con el centro de servicio Sears.
1. Lleneel critter con aceite adecuado.
2. Hagael servicio del depurador de aire siguiendo las
instrucciones de ia secci6n Mantenimiento.
3. Comuniquese con ei centro de servicio Sears.
1. Devuelvaia unidad al centro de servicio Sears.
2. Desconectelas mangueras hidrfiulicas, retire los
tapones colocados para el envio, vuelva a conectar las
mangueras.
3. Devueivala unidad ai centro de servicio Sears.
4. Devueivala unidad ai centro de servicio Sears.
5. Devueivala unidad ai centro de servicio Sears.
6. Devuelvaia unidad ai centro de servicio Sears.
7. Enjuaguey limpieel sistema hidrfiulico.
8. Reviseel nivel de aceite. Agregue liquido de ser
necesario.
9. Devueivaia unidad ai centro de servicio Sears.
1,
2.
Devueivaia unidad ai centro de servicio Sears.
No intentecortar maderaen sentido transversala ia
veta. Si el motor se caia constantemente,comuniquese
con ei centro de servicio Sears.
Cilindro con perdidas 1. Juntas rotas. 1. Devueivala unidad ai centro de servicio Sears.
2. Cilindro ranurado. 2. Devueivaia unidad ai centro de servicio Sears.
6N C SITA MAS AYUDA?
En_o_trar_ la r'espuesta _?m&s en ma_agemylifeoGe_R o _si_ cadge!
l_stey losmanualesdetodossusotrosproductoslosencontrar_enlinea.
Susp1_guntasser_nrespondidaspornuestroequipodeespecialistas.
Obtengaunplandemantenimientopersonalizadoparasuhogar,
[ncuentreinformaci6ny herramientasquelo ayudar,inconlosproyectosdom_sticos,
57
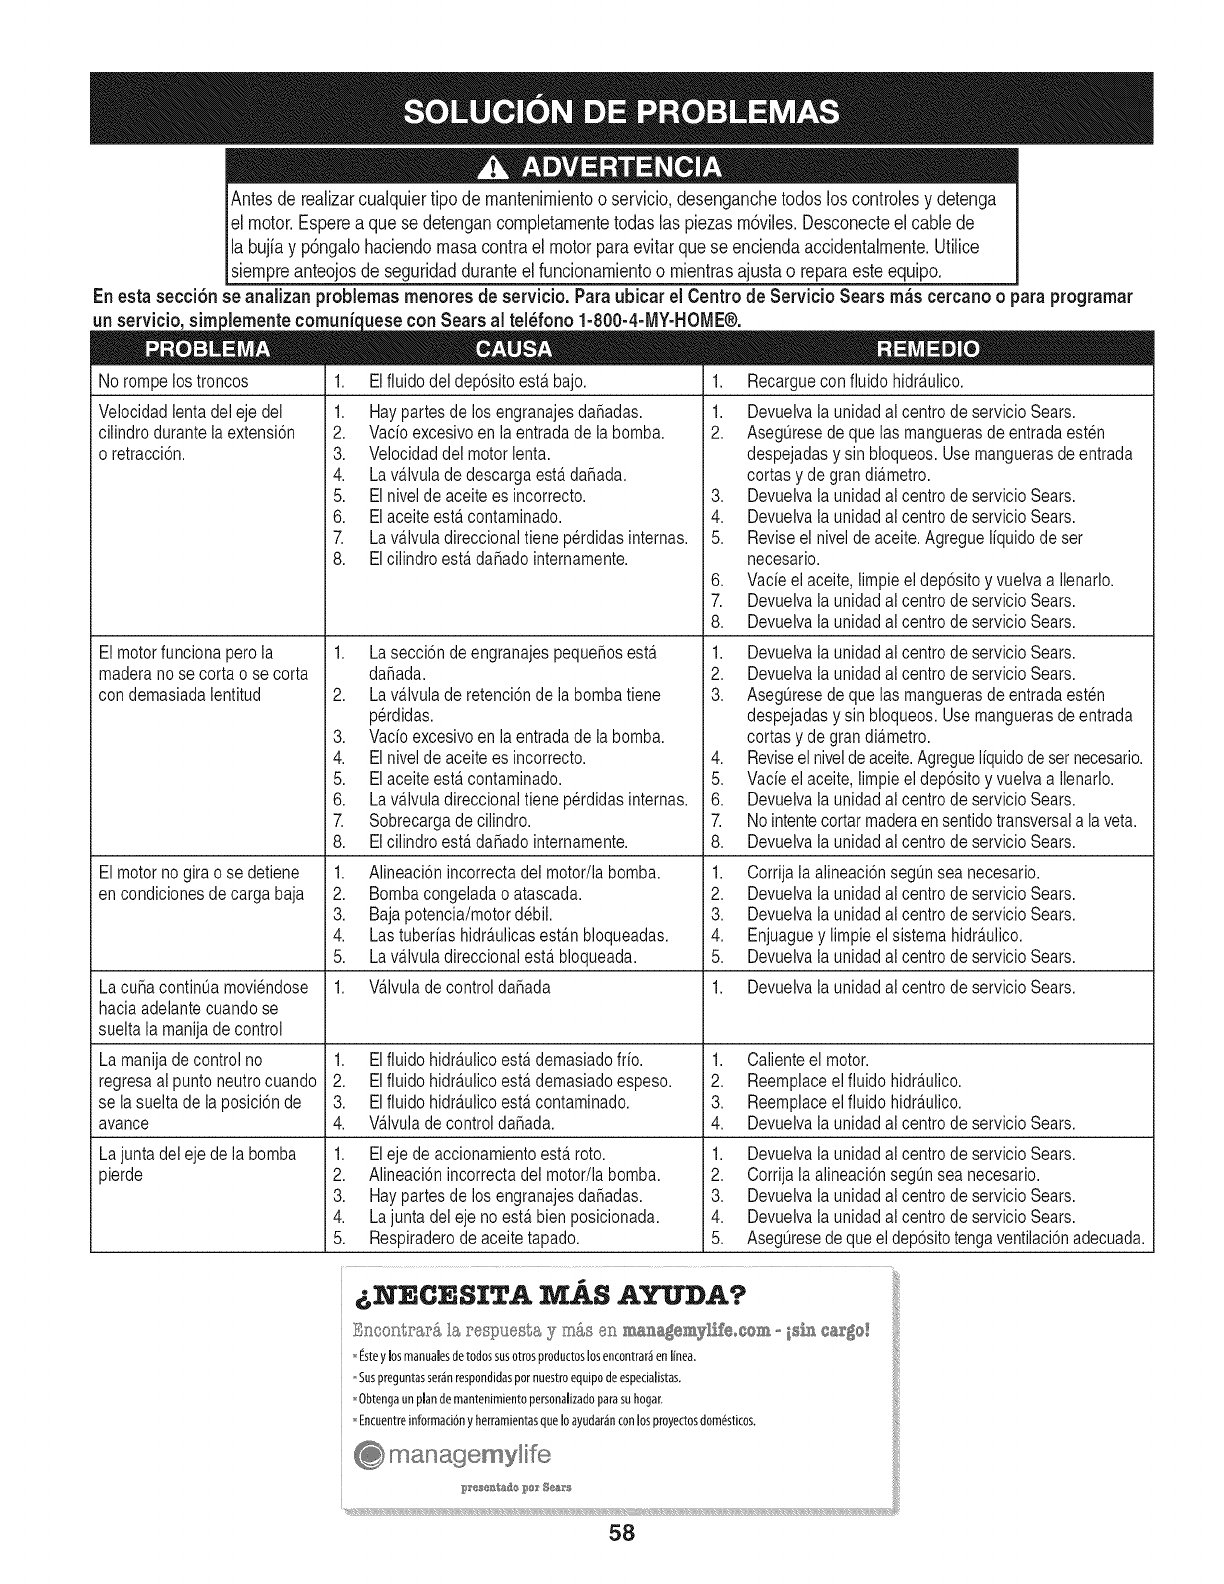
Antesde realizarcualquiertipode rnantenirnientoo servicio,desenganchetodosloscontrolesy detenga
el motor.Esperea quese detenganoornpbtarnentetodaslas piezasrn6vibs. Desconecteel cablede
Ila bujiay p6ngalohaciendornasacontrael motorparaevitarquese enciendaaccidentalrnente.Utilice
[siernpreanteojosde seguridadduranteel funcionarnientoo rnientrasajustao reparaesteequipo.
En estasecci6nseanalizan problernasmenores de servicio.Paraubicar el Centrode Servicio Sears rn_scercanooparaprograrnar
un servicio sire_lernentecomunicuese conSears al tel_fono 1-800-4-MY-HOME®.
No rompe los troncos
Velocidad lenta del eje del
cilindro durante la extensi6n
o retracci6n.
El motor funciona perola
madera no se corta o se corta
con demasiada lentitud
Elmotornogirao sedetiene
encondicionesdecargabaja
La cu5a continua moviendose
hacia adelante cuando se
suelta la manija de control
La manija de control no
regresa ai punto neutro cuando
se la sueita de ia posici6n de
avance
La junta del eje de la bomba
pierde
1. Elfluido del dep6sito esta.bajo.
1. Haypartes de los engranajes daRadas.
2. Vacio excesivoen la entradade la bomba.
3. Velocidad del motorlenta.
4. Lava.ivulade descargaesta.da_ada.
5. Elnivel de aceite es incorrecto.
6. Elaceiteesta. contaminado.
7. Lava.lvuladireccional tiene perdidas internas.
8. Elcilindro esta.da_ado internamente.
2,
3,
4.
5.
6.
7.
8.
1.
2.
3.
4.
5.
1.
Lasecci6n de engranajes peque_os esta.
da_ada.
Lav#,lvulade retenci6nde la bomba tiene
perdidas.
Vacio excesivoen ia entradade la bomba.
Elnivel de aceite es incorrecto.
Elaceite esta.contaminado.
Lava.lvuladireccional tiene p6rdidas internas.
Sobrecarga de cilindro.
Eicilindro esta.da_ado internamente.
Alineaci6n incorrecta dei motor/la bomba.
Bomba congelada o atascada.
Baja potencia/motor debil.
Lastuberias hidra.ulicasestan bloqueadas.
Lava.ivuladireccionai esta.bloqueada.
Wivula decontrol da_ada
1. Elfluido hidraulico esta demasiado ffio.
2. Elfluido hidra.ulicoesta.demasiado espeso.
3. Elfluido hidra.ulicoesta.contaminado.
4. WivuladecontroidaSada.
1. Eleje de accionamiento esta.roto.
2. Alineaci6n incorrecta del motor/la bomba.
3. Haypartes de los engranajes daSadas.
4. Lajunta del eje no esta.bien posicionada.
5. Respiraderodeaceitetapado.
1. Recargueconfhidohidra.ulico.
1. Devueiva la unidad al centro de servicio Sears.
2. Asegurese de que ias mangueras de entrada esten
despejadas y sin bloqueos. Use manguerasde entrada
cortas y de gran dia.metro.
3. Devueiva la unidad al centro de servicio Sears.
4. Devueiva la unidad ai centro de servicio Sears.
5. Revise el nivel de aceite. Agregue liquido de set
necesario.
Vacie el aceite, limpie el dep6sito y vuelvaa ilenarlo.
Devueiva la unidad al centro de servicio Sears.
Devuelva ia unidad ai centro de servicio Sears.
6,
7.
8.
1.
2.
3.
4,
5.
6.
7.
8.
1.
2.
3.
4.
5.
1.
1,
2.
3.
4.
1.
2.
3.
4.
5.
Devuelva la unidad al centro de servicio Sears.
Devueiva la unidad al centro de servicio Sears.
Asegurese de que ias mangueras de entrada esten
despejadas y sin bloqueos. Use manguerasde entrada
cortas y de gran alia.metro.
Reviseel nivelde aceite.Agregueliquidodeset necesario.
Vacie el aceite, limpie el dep6sito y vuelvaa Ilenarlo.
Devueiva ia unidad al centro de servicio Sears.
No intentecortar maderaensentido transversala ia veta.
Devuelva ia unidad ai centro de servicio Sears.
Corrija la alineaci6nsegun sea necesario.
Devueiva la unidad ai centro de servicio Sears.
Devuelva la unidad al centro de servicio Sears.
Enjuaguey limpie el sistema hidra.ulico.
Devuelva ia unidad ai centro de servicio Sears.
Devuelva ia unidad ai centro de servicio Sears.
Caiiente el motor.
Reemplace el fluido hidra.ulico.
Reemplace el fluido hidra.ulico.
Devuelva ia unidad ai centro de servicio Sears.
Devuelva la unidad ai centro de servicio Sears.
Corrija la alineaci6nsegun sea necesario.
Devuelva la unidad al centro de servicio Sears.
Devueiva la unidad al centro de servicio Sears.
Aseg_resedeque ei dep6sitotenga ventiiaci6nadecuada.
NECESITA MAS AYUDA?
:_kloo@_rarS_i_arespuesta y m&s en mana_emy_i,/_oCOmo _sin _ar_
@teylosmanualesdetodossusotrosproductoslosencontrar_en linea.
Suspreguntasset,inrespondidaspornuestroequipodeespecialistas.
Obtengaun plandemantenimientopersonalizadoparasuhogar.
Encuentreinformaci6ny herramientasqueIoayudar,inconlosproyectosdom_sticos.
managemylife
58
Felicitaciones por haber realizado una adquisici6n inteligente. El producto Craftsman® que ha
adquirido esta diseSado y fabricado para brindar muchos aSos de funcionamiento confiable. Pero
como todos los productos a veces puede requerir de reparaciones. Es en ese momento cuando el
disponer de un Acuerdo de protecci6n para reparaciones le puede ahorrar dinero y problemas.
A continuaci6n se detallan los puntos incluidos en el Acuerdo:
[] Servicio experto prestadopor nuestros 10,000 especialistas en reparacionesprofesionales
[] Servicio ilirnitado sin cargo para las piezasy la mano de obra en todas las reparacionescubiertas
[] Reernplazo del producto hasta 1500 d61aressi no es posible reparar el producto cubierto
[] Descuento de 25% del precio normal del servicio y de las piezas relacionadascon el mismo que no esten cubiertas
por el acuerdo; ademas, 25% del precio normal de laverificaci6n de mantenimientopreventivo
[] Ayuda r_pida pot tel_fono - Io IlamamosResoluci6n RApida- el apoyo telef6nico de un Chamusca al representante.
Piense en nosotros como el manual "de un dueSohablador."
Una vez adquirido el Acuerdo, puede programar el servicio con tan s61orealizar una Ilamadatelef6nica. Puede Ilamaren
cualquier momentodel dia o de la noche o programar un servicio en linea.
ElAcuerdo de Protecci6nde Reparaci6nes unacompra sin riesgo. Si usted anulapor alguna raz6n duranteel periodo de
garantia de producto,proporcionaremos un reembolso Ileno.O, un reembolsoprorrateadoen cualquier momentodespues
del periodode garantia de producto expira, iAdquiera hoy su acuerdode protecci6n para reparaciones!
Se aplican determinadas limitaciones y exclusiones. Para obtener informaciTn adicional y precios en los Estados
Unidos Ilame al 1-800-827-6655.
El *Coverage en Canad_ivaria en algunos articulos. Para detalles Ilenos la Ilamada Chamusca Canad_ien 1-800-
361-8885.
Servicio de instalaci6nde Sears
Si desea solicitar la instalaci6n profesionalde Sears de aparatosdomesticos, dispositivos paraabrir portones,calentado-
res de agua y otrosarticulos domesticosimportantes, en los Estados Unidos o Canada flameal 1-800-4-MY-HOME®.
59

Your Home
For troubleshooting, product manuals and expert advice:
managernylife
www.managemylife.com
For repair - in your home - of all major brand appliances,
lawn and garden equipment, or heating and cooling systems,
no matter who made it, no matter who sold it!
For the replacement parts, accessories and
owner's manuals that you need to do-it-yourself.
For Sears professional installation of home appliances
and items like garage door openers and water heaters.
1-800-4-MY-HOME ®(1-800-469-4663)
Call anytime, day or night (U.S.A. and Canada)
www.sears.com www.sears.ca
Our Home
For repair of carry-in items like vacuums, lawn equipment,
and electronics, call anytime for the location of your nearest
Sears Parts & Repair Service Center
1-800-488-1222 (U.S.A.) 1-800-469-4663 (Canada)
www.sears.com www.sears.ca
To purchase a protection agreement on a product serviced by Sears:
1-800-827-6655 (U.S.A.) 1-800-361-6665 (Canada)
Para pedir servicio de reparaci6n
a domicilio, y para ordenar piezas:
1-888-SU-HOGAR ®
(1-888-784-6427)
www.sears.com
Au Canada pour service en frangais:
1-800-LE-FOYER Mc
(1-800-533-6937)
www.sears.ca
® Registered Trademark /TMTrademark of KCD IP, LLC in the United States, or Sears Brands, LLC in other countries
® Marca Registrada !TMMarca de Fabrica de KCD IP, LLC en Estados Unidos, o Sears Brands, LLC in otros paises
MCMarque de commerce !MDMarque deposee de Sears Brands, LLC
