Craftsman 247794510 User Manual LOG SPLITTER Manuals And Guides 98110157
CRAFTSMAN Log Splitter Manual 98110157 CRAFTSMAN Log Splitter Owner's Manual, CRAFTSMAN Log Splitter installation guides
User Manual: Craftsman 247794510 247794510 CRAFTSMAN LOG SPLITTER - Manuals and Guides View the owners manual for your CRAFTSMAN LOG SPLITTER #247794510. Home:Lawn & Garden Parts:Craftsman Parts:Craftsman LOG SPLITTER Manual
Open the PDF directly: View PDF ![]() .
.
Page Count: 28
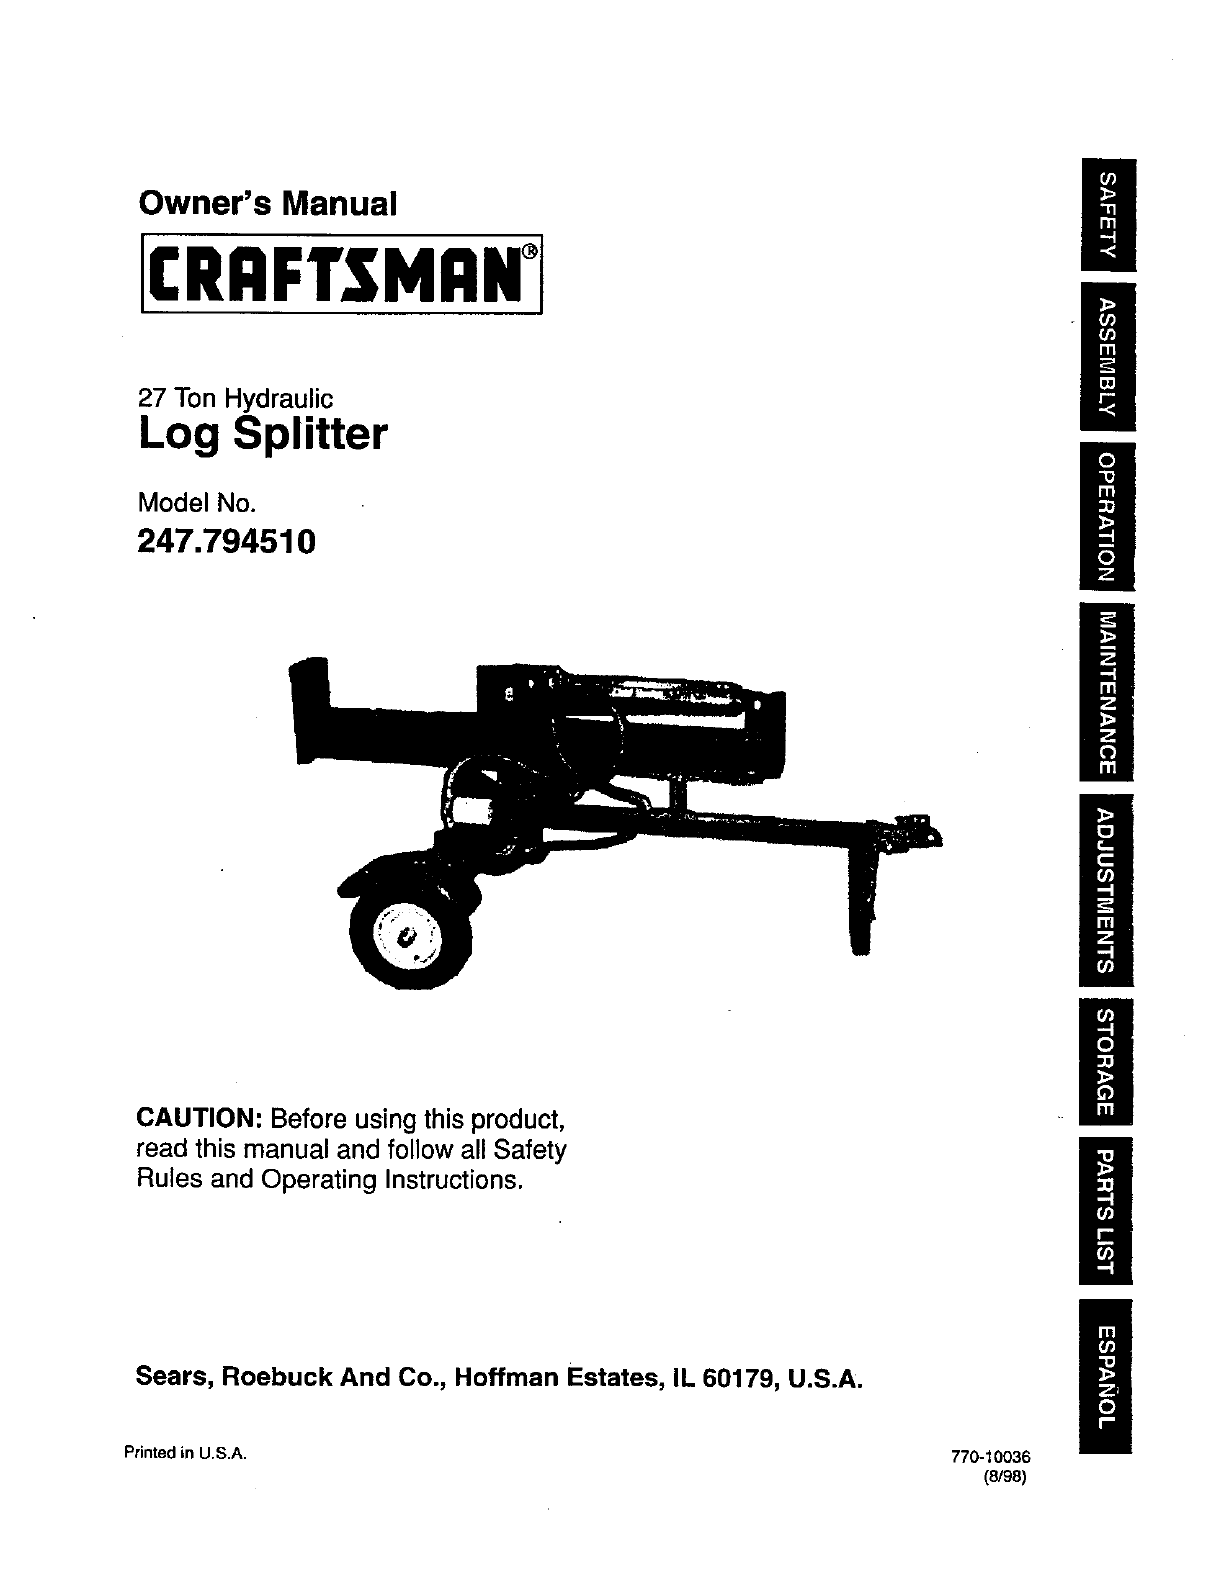
Owner's Manual
II:RnFUMnN°I
27 Ton Hydraulic
Log Splitter
Model No.
247.794510
U
ill
/
l
CAUTION: Before using this product,
read this manual and follow all Safety
Rules and Operating Instructions.
Sears, Roebuck And Co., Hoffman Estates, IL 60179, U.S.A.
Printed in U.S.A. 770-10036
(8/98)
m
m
B

Content Page
Warranty Information......................................... 2
Safe OperationPractices................................... 3
Accessories....................................................... 6
Assembly ........................................................... 7
Operation..:........................................................ 9
Content Page
Maintenance...................................................... 13
Service& Adjustment........................................ 16
Oft-SeasonStorage........................................... 18
Troubleshooting................................................. 19
Parts List............................................................ 21
ONE-YEAR WARRANTY ON CRAFTSMAN LOG SPLITTER
For one year from the date of purchase, when this Craftsman log splitter is maintained, lubricated, and tuned up
according to the operating and maintenance instructions in the operator's manual, Sears will repair, free of
charge, any defect in material or workmanship.
This warranty excludes the tires, spark plug, oil filter and air cleaner, which are expendable parts and become
worn during normal use.
If this log splitter is used for commercial or rental purposes, this warranty applies for only 30 days from the date
of purchase.
WARRANTY SERVICE IS AVAILABLE BY CONTACTING THE NEAREST SEARS SERVICE CENTER IN THE
UNITED STATES. THIS WARRANTY APPLIES ONLY WHILE THIS PRODUCT iS IN USE IN THE UNITED
STATES.
This warranty gives you specific legal rights, and you may also have other rights which vary from state to state.
Sears, Roebuck and Co., Dept. 817WA, Hoffman Estates, IL 60179
Horsepower: ......................... 6.5
Engine OiI.....LII...JL.L..;..:h.... SAE 30/1.25 pints
Fuel CalS'acity: ........................ unleaded/t .5 quarts
Hydraulic Fluid ...................... Dexron III/4 gallons
Tire Pressure....;..]_.L_L.._;,..::30 p.s.i, maximum
Spark Plug (Gap .030") .......... Champion RJ19LM
Magnetron Ignition Air Gap.....0125"
.. 247.794510
Model a_umoer........................................................
Serial Number...........................................................
Date of Purchase......................................................
Recordmodelnumber,serial numberand dateof
purchaseof the log splitterand keep ina safeplace
for future reference.

This symbol points out Important safety Instructions which, if not followed, could endanger the per-
sonat safety and/or property of yourself and others. Read and follow all instructionsin this manual before
attempting to operate your log splitter.Failure to complywith these instructionsmay result in personal injury.
When you see this symbol_heed Its warning. |
,_WARNING:
A
Your log splitterwas builtto be operated according to the rules for safe operation In this
manual. As with any type of power equipment, carelessness or error on the part of the oper-
ator can result in serious injury.If you violate any of these rules, you may cause serious
njury to yourse f or others.
The engineexhaust fromthis productcontainschemicalsknownto the stateof Californiato cause
cancer,birthdefectsorother reproductiveharm.
Towing
This unitshouldnotbe towed onany street,
highwayor publicroadwithoutcheckingthe
existingfederal, local or state requirements.
Suchinformationmay be obtainedbycallingyour
stateor localbureauof motorvehicles.Any
licensingor modificationsneededto complywith
federal, local or state vehicle requirements is the
sole responsibility of the purchaser.
Make sure you follow the wiring diagram color
codes when installing the light kit on the log
splitter. (e.g. ground to ground, left turn to ]eft
turn, etc.). Failure to wire unit correctly may
cause the tow vehicle wiring to overheat and/or
the log splitter lights to operate incorrectly.Itmay
be necessary to replace the turn signal flasher
unit in your tow vehicle if it is not capable of
operating the additional lights on the logsplitter.
Before towing the log splitter on a street, highway
or public road, verify that all lightsare functioning
properly and the yellow side reflectors are in
position. Replace bulbs if they are burnt out.
Before towing, always check to be certain the log
splitter is correctly and securely attached to the
tow vehicle, and safety chains are in place.
Leave slack in chains for turning allowance.
Use a class I or higher hitch with a 1-7/8" bail.
Keep ball socket and clamp face lubricated with
chassis grease.
Be sure the coupler is secured to the hitch ball
and the lock lever is down tight and locked.
Check vehicle hitch,ball and couplerforsignsof
wear or damage. Replace any parts that are worn
or dam-agedbefore towing.
The coupler must be secured to the log splitter
tongue tube with the original equipment bolts and
nuts. See your authorized service dealer for
replacement parts. Coupler nuts should be
tightened securely (20 foot pounds).
Make sure beam assembly is securely latched in
the horizontal positionandjackstand(ifprovided)
ispivoted andsecuredin the uppositionbefore
towinglogsplitter.Nevertowwiththe beam in
verticalposition.
Do nottowthe logsplitterfasterthan45 MPH.
Higherspeedsmaydamagelogsplitter.
Excessive highspeedsmaycausethe logsplitter
to =fishtail"or otherwisabecomeunstable.
Checkthetirepressureonthe logsplittertires.It
must be 30 p.s.i, maximumforhighwaytravel.
When parking,storingor usingyourlog splitter,
keepthe coupleroffthe groundsodirtwillnot
buildupinthe ball socket.
Do notallowanyone to sitor rideonyourlog
splitter. Theycan easilyfalloff andbe seriously
injured.
Training
Beforeoperatingthislog splitter,readand
understandthisoperator'smanualcompletely.
Becomefamiliar withit for yourownsafety.To fail
to do so maycauseseriousinjury.Donotallow
anyonetooperateyourlogsplitterwhohas not
read thismanual.Keepthismanualin a safe
placefor future andregular referenceandfor
orderingreplacementparts.
Neveruseyoursplitterfor any otherpurposethan
splittingwood.Itis designedfor thisuse and any
otherusemay causean injury.Your logsplitteris
a precisionpieceof powerequipment,nota toy.
Therefore,exerciseextremecautionat alltimes.
Neverallow childrento operateyour logsplitter.
Do notallowadults tooperateit withoutproper
instruction.Only personswellacquaintedwith.
theserulesofsafeoperationshouldbe allowedto
use yourlogsplitter.
Onlythe operatoristo be near yourlog splitter
duringuse.Keepallothers,includingpetsand
children,a minimumof20 feet awayfrom your
workzone. Flyingwoodcan be hazardous.Ifa
3

helperis assistinginloadinglogs,neveractivate
the controluntilthe helperis clearof the area.
More accidentsoccurwhenmorethanone
personoperatesthe logsplitterthanat anyother
time.
Noone shouldoperatethisunitwhileintoxicated
orwhiletakingmedicationthat impairsthe
sensesorreactions.A clearmindisessentialfor
safety.Neverallowa parsonwho istiredor
otherwisenotalertto useyourlogsplitter.
Preparation
Neverwear looseclothingorjewelrythat can be
caughtby movingpartsof yourlogsplitterand
pullyouintoit. Keepclothingaway fromall
movingpartsofyourlog splitter.
•Wear properheadgearto keep hair awayfrom
movingpads. Alwayswear protectivehearing
devicesas needed.
•Alwayswear safetyshoes.A droppedlogcan
seriouslyinjureyourfoot.
•Alwayswear safetyglassesorgoggleswhile
operatingyoursplitter.A pieceof splittinglog
couldfly offand hityoureyes.
•Wear leatherworkgloves.Besuretheyare tight
fitting withoutloosecuffsordrawstrings.
Use your log splitterin daylight, or under good
artificial light.
Never operateyour splitteronslippery,wet,
muddyor icysurfaces.Safe footing is essential
in preventingaccidents.
Never operateyoursplitterwhileattached to a
towingvehicle.
Onlyoperateyoursplitteron levelgroundand
notonthe sideof a hill.It couldtip,or rollinglogs
or poorfooting couldcause an accident.
Operatingthe splitteron levelgroundalso
preventsthe spillageof gasolinefrom the fuel
tank.
•Never attemptto movethe logsplitteroverhilly
oruneventerrainwithout a towvehicleor
adequate help.
Alwaysblockthe wheelsto preventmovement
of logsplitterwhile inoperation.
•Checkthe fuel beforestartingthe engine.
Gasolineis an extremelyflammablefuel. Do not
fill the gasolinetank indoors,whenthe engineis
running,orwhilethe engineis stillhot. Replace
gasolinecapsecurelyand wipeoffany spilled
gasolinebeforestartingthe engineas it may
cause a fire orexplosion.
Bothendsof each logmustbe cutas squareas
possibletohelppreventthe logfrom ridingoutof
the splitterduringoperation.
Operation
Vertical Operating Position: Stand infront of
the logsplitter.
Horizontal Operating Position: Stand behind
the reservoir tank. See illustrations.
4
Knowhow to stop the unit anddisengagethe
controls.
• Never place hands orfeet between log and
splittingwedge orbetween log andend plate
duringforward or reversestroke.To doso may
resultincrushedoramputatedfingers or toes,or
worse,you maylosean arm orfoot.
Donotstraddlethe splitterwhen usingit.Aslip
inany positioncouldresultin aseriousinjury.
Donotstep overyour logsplitterwhenthe
engineis running.You maytripor accidentally
activatethe splittingwedge ifyoustep over. If
you needto get to the otherside, walk around.
•Nevertry to splittwo logson topof each other.
One mayfly outand injureyou.
•When loadingthe log splitter,placeyourhands
on the sideof the log,notat the ends.Never
attemptto load yoursplitterwhilethe splitting
wedge is inmotion.You may get caughtby the
wedge and injured.
Onlyuse yourhand to operatethe splitting
wedge orcontrollever.Never use yourfoot or a
ropeorany otherextensiondevice.This could
resultinyour inability to stopyour splitterquickly
enoughto avoid injury.
• Always keep fingers awayfrom any cracksthat
openinthe logduringsplittingoperation.They
can quickly closeand pinchor amputateyour
fingers.

Neverattempttosplitwoodsacrossthe grain.
Sometypesof woodmay burstorfly outof your
splitterandresultin injuryto youora bystander.
For logsthat are notcut square,the longest
portionofthe logshouldbe rotateddownand
the mostsquareend placedagainstthe splitting
wedge.
Keep yourworkarea clean. Immediately
removesplitwoodaround your splitterso that
youdonotstumbleover it. Clean chipsand dirt
offend plate(woodplatform)aftereach logis
split,or whenevernecessaryto maintainflat
contactbetweenwood andend plate(platform).
Never movethe log splitterwhilethe engineis
running.
Neverleave yourlogsplitterunattendedwiththe
enginerunning.Shutoff the engineifyouare
leavingyoursplitter,even for a shortperiodof
time. Someonecouldaccidentally activatethe
splittingwedgeand be injured.
Do notrunengineinan enclosedarea. Exhaust
gases containcarbonmonoxide.This odorless
gas can be deadlywheninhaled.
Be carefulnotto touchthe mufflerafterthe
enginehas been running.It willbe HOT!
if the equipmentshouldstarttovibrate
abnormally, stopthe engineandcheck
immediatelyfor the cause.Vibrationis generally
a warningoftrouble.
When cleaning,repairingorinspecting,make
certainallmovingpartshave stopped.
Disconnectthe sparkplugwireand keepthe
wireawayfrom the plugto preventaccidental
starting.
Customer Responsibilities
Donotoperateyoursplitterinpoormechanical
conditionorwhenin needof repair.
•Periodicallycheckthat allnuts,bolts,screws,
hoseclampsandhydraulicfittings are tightto be
sure equipmentis insafe workingcondition.
Where appropriate, check allsafetyguardsand
shieldstobe suretheyare inthe properposition.
Neveroperateyoursplitterwithsafetyguards,
shieldsor otherprotectivefeatures removed.
Thesesafetydevicesare for yourprotection.
Replace alldamaged orworn partssuchas
hydraulichosesand fittingsimmediatelywith
manufacturerapprovedreplacementparts.
•Do notchangethe enginegovernorsettingsor
overspeedthe engine.This increasesthe
hazard ofpersonalinjury.The maximumengine
speed ispresetbythe manufacturerandis
withinsafetylimits.
•Do not alteryour log splitter in any mannersuch
as attaching a ropeor extensionto the control
lever or adding to the widthorheight of the
wedge. Such alterationsmaycause your splitter
to be unsafe.
• Perform all recommendedmaintenance
proceduresbefore youuse your splitter.
•Do notserviceorrepairyour logsplitterwithout
disconnectingthe spark plugwireand movingit
away from the sparkplug.
•Never storethe equipmentwithgasolineinthe
tank insideof a buildingwhere ignitionsources
are present,suchas hotwaterand space
heaters, clothesdryers and the like. Allowthe
engine to cool beforestodnginany enclosure.
• Always storegasolinein an approved,tightly
sealed container.Storethe containerinacool,
dry place. Do notstorein a buildingwhere
ignitionsourcesare present.
• To reducefire hazard, keep engine free ofgrass,
leaves, wood chips,and excessivegreaseand
oil.
•The hydraulicsystemofyourlogsplitterrequires
careful inspection,along withthe mechanical
parts. Be sure to replace frayed, kinked,or
otherwisedamaged hydrauliccomponents.
Fluid escapingfrom a very smallholecan be
almost invisible. Do not check for leakswith your
hand. Escaping fluid under pressure can have
sufficient force to penetrate skin, causing
• serious personal injury. Leaks can be located by
passing a piece of cardboard or wood over the
suspected leak and looking for discoloration.
Should it become necessary to loosen or
remove any hydraulic fitting or line, be sure to
relieve all pressureby shutting off the engine
and moving the control handle back and forth
several times.
Do not remove the cap from the hydraulic tank or
reservoir while your log splitteris running. Hot oil
under pressure couldcause injury.
The pressure relief valve on your splitter is
preset at the factory. Do not adjust the valve.
Only a qualified service technician should
perform this adjustment.
• Completely drain fuel tank prior to storage. This
guards against accumulation of fuel fumes
whichcouldresultin a fire hazard.
Never store log splitter outside without a
waterproof cover. Rain will cause rust on the
inside of the cylinder.
Important Information
Always:
Use clean fluid and check fluid level regularly.
Use Dexron III Automatic Transmission Fluid or
10W non-foaming hydraulic fluid.
Use a filter (clean or replace regulady).
Use a breather cap on fluid reservoir.
5

•Make certain pumpis mountedand aligned
propedy.
•Use a flexible "spider" type couplingbetween
engine and pumpdriveshafts.
•Keep hosesclear and unblocked.
Bleed airoutof hoses beforeoperating.
•Flushandclean hydraulicsystembeforestart-
up after any malfunctionorservicing.
•Use "pipe dope"on all hydraulicfittings.
•Allowtime forwarm-upbefore splittingwood.
•Primethe pump beforeinitialstart-upby turning
overthe enginewithsparkplugdisconnected.
Splitwoodwiththe grain(lengthwise)only.
Never:
Use whenfluidis below20°F,orabove 150° F.
•Use asolidengine/pumpcoupling.
•Forcepumpwhenmounting.
•Operatethrough reliefvalve.
•Attemptto adjustunloadingorreliefvalve
settingswithoutpressuregauges.
Operatewithairin hydraulicsystem.
UseTeflontape onhydraulicfittings.
•Attemptto cutwoodacross the grain.
These accessodeswere availablewhenthe log splitterwas purchased. These are alsoavailableat mostSears
retailoutlets,catalog andservicecenters. MostSears storescanorderrepairpartsfor youwhenyouprovidethe
modelnumberof yourlog splitter.
Stabilizer
Gasoline Can
Tailight Kit

IMPORTANT: This unitisshippedwithout gasoline
inthe engine. Afterassembly,see OPERATION
sectionofthismanual forproperfuel fill-up.
TOOLS and Other Items Required
1. Crowbaror Large Screwdriver
2. A pair of 9/16" orAdjustableWrenches*
3. Screwdriver
4. Cutters
5. EngineOil (the equipmentis shippedwithoilin
the enginefor starting)
6. Unleaded Gasoline
7. Dexmn III AutomaticTransmissionFluidor 10W
Non-FoamingHydraulicFluid(Approximately7
gallons)
Unpacking from Crate
AWARNING: Exerciseextreme cautionas
parts are very heavy. Mechanical handling
equipmentorsufficientmanpowershould
be usedto preventinjury.
Pry the top, sides and endsoff crate usinga
crowbar or large screwdriver.
Set panels aside to avoid tire punctures or
personal injury.
Remove and discard plastic bag that covers
unit.Note: Do not remove the banding from
around the tank until the log splitter is
assembled.
Disconnecting Spark Plug
Beforeyouproceedwiththe assembly
procedure, disconnectthe sparkplugwirefrom
the sparkplugon the log splitterengineand
movethe wire away fromthe sparkplug.This
will preventaccidentalstarting.Sea Figure1.
Remove the twobolts, lock washersandhex
nutsthat securethe tongueassemblyto the
beam assembly.See Figure2.
Unlockthe twobeam locksby pullingoutonthe
beam locksandpivotingthemdown.Remove
the tongueassembly.
Tongue
Assembly
,Beam
Lock Washers
and Hex Nuts
Figure 2
Place the end of the tongue assemblyin
between the brackets onthe wheelandreservoir
tank assembly. Secure with hardware removed
earlier. See Figure 3.
Bracket
Tongue
Disconnectspark Engine
plugwire here
Figure I
Setting Up Log Splitter
NOTE: All hardwareneeded for assemblingyour
Craftsmanlog splitterhas beenplaced inpositionon
the equipment.
Nuts
Lock
Washers
Bolts
Figure 3
Removethe springclipandthe clevispinfrom
thejack stand.Pivotthejack standto the
operatingposition(90°), andsecurewiththe
springclipandclevispin.See Figure4.
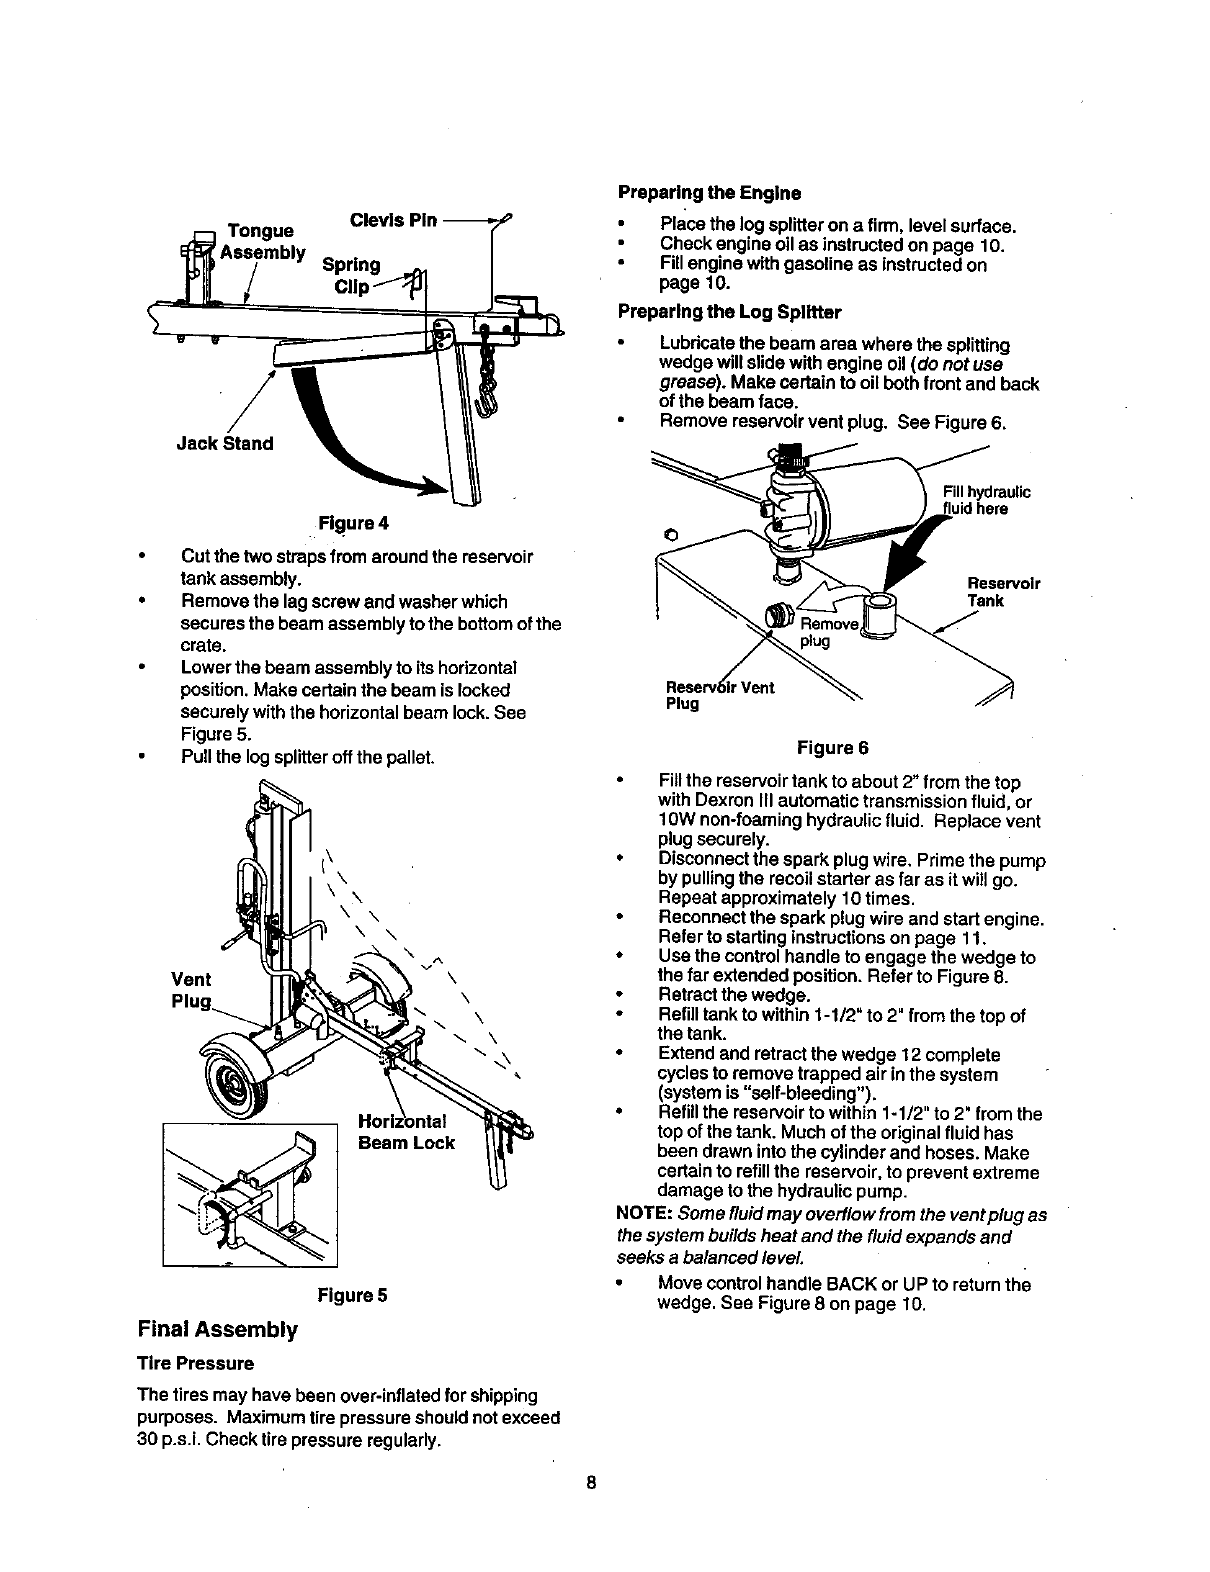
ClevisPin
._ Tongue
i_ Assembty Spring
J_ 1_.
.,D
•Figure 4
• Cutthetwo strapsfromaroundthe reservoir
tank assembly.
•Removethe lagscrewand washerwhich
securesthe beam assemblytothe bottomofthe
crate.
Lowerthe beam assemblyto its horizontal
position.Make certainthe beam islocked
securelywiththe horizontalbeam lock.See
Figure5.
Pullthe logsplitteroffthe pallet.
Vent
\\
\\
\x\
\\
'\ \
\ \
\4
_Beam Lock
Figure 5
Final Assembly
Tire Pressure
The tires may have bean over-inflated forshipping
purposes.Maximumtirepressureshouldnotexceed
30 p.s.i. Checktire pressureregularly.
Preparing the Engine
• Place the logsplitteron a firm, levelsurface.
•Checkengineoilas instructedon page 10.
Fillenginewithgasolineas instructedon
page 10.
Preparing the Log Splitter
Lubricatethe beam area wherethe splitting
wedgewillslidewithengine oil(do notuse
grease). Make certainto oil bothfront and back
of the beam face.
Remove reservoirvent plug. See Figure 6.
Fill hydraulic
Reservo|r
Tank
ReservO_lrVent 9
Plug
Figure8
Fill the reservoirtankto about 2" from the top
withDexron In automatictransmission fluid, or
lOW non-foaminghydraulicfluid. Replacevent
plugsecurely.
•Disconnectthe sparkplugwire, Primethe pump
by pullingthe recoilstarteras far as it willgo.
Repeatapproximately10 times.
Reconnectthe spark plugwire and startengine.
Refertostartinginstructions on page 11.
•Use the controlhandleto engage the wedgeto
the far extendedposition.Refer to Figure8.
Retract the wedge.
Refill tank to within 1-1/2" to 2" from the top of
the tank.
Extend and retract the wedge 12 complete
cyclesto removetrapped airinthe system
(system is "self-bleeding").
• Refillthe reservoir to within 1-1/2" to 2" from the
top of the tank. Much of the original fluid has
been drawn into the cylinder and hoses.Make
certain to refill the reservoir, to prevent extreme
damage to the hydraulic pump.
NOTE: Some fluid may overflow from the ventplug as
the system buildsheat and the fluidexpands and
seeks a balancedlevel.
Move control handle BACK or UP to return the
wedge. See Figure 8 on page 10.
8

Know Your Log Splitter
Read thisowner'smanual andsafetyrulesbeforeoperatingyour log splitter.Compare the
illustrationson thispagewithyourequipmentto familiarize yourselfwiththe locationof
variouscontrolsandadjustments.Save thismanualfor future reference.
The operationof any logsplittercan resultinforeign objectsbeingthrownintothe eyes,
whichcan resultinsevere eyedamage.Always wear safety glasses, for operatingyour
logsplitter,orwhileperformingany adjustmentsor repairson it.
Control Hose
Handle Guard Beam
Lock
End
Plate
Reservoir Tank T_ong e
Assembly
Seam
Lock
j_Oil Fill
Spark
Plug
Figure7
MEETS ANSI SAFETY REQUIREMENTS
Sears log splittersconformto the safetystandardsB71.7-1985 of the AmericanNationalStandards Institute.
9
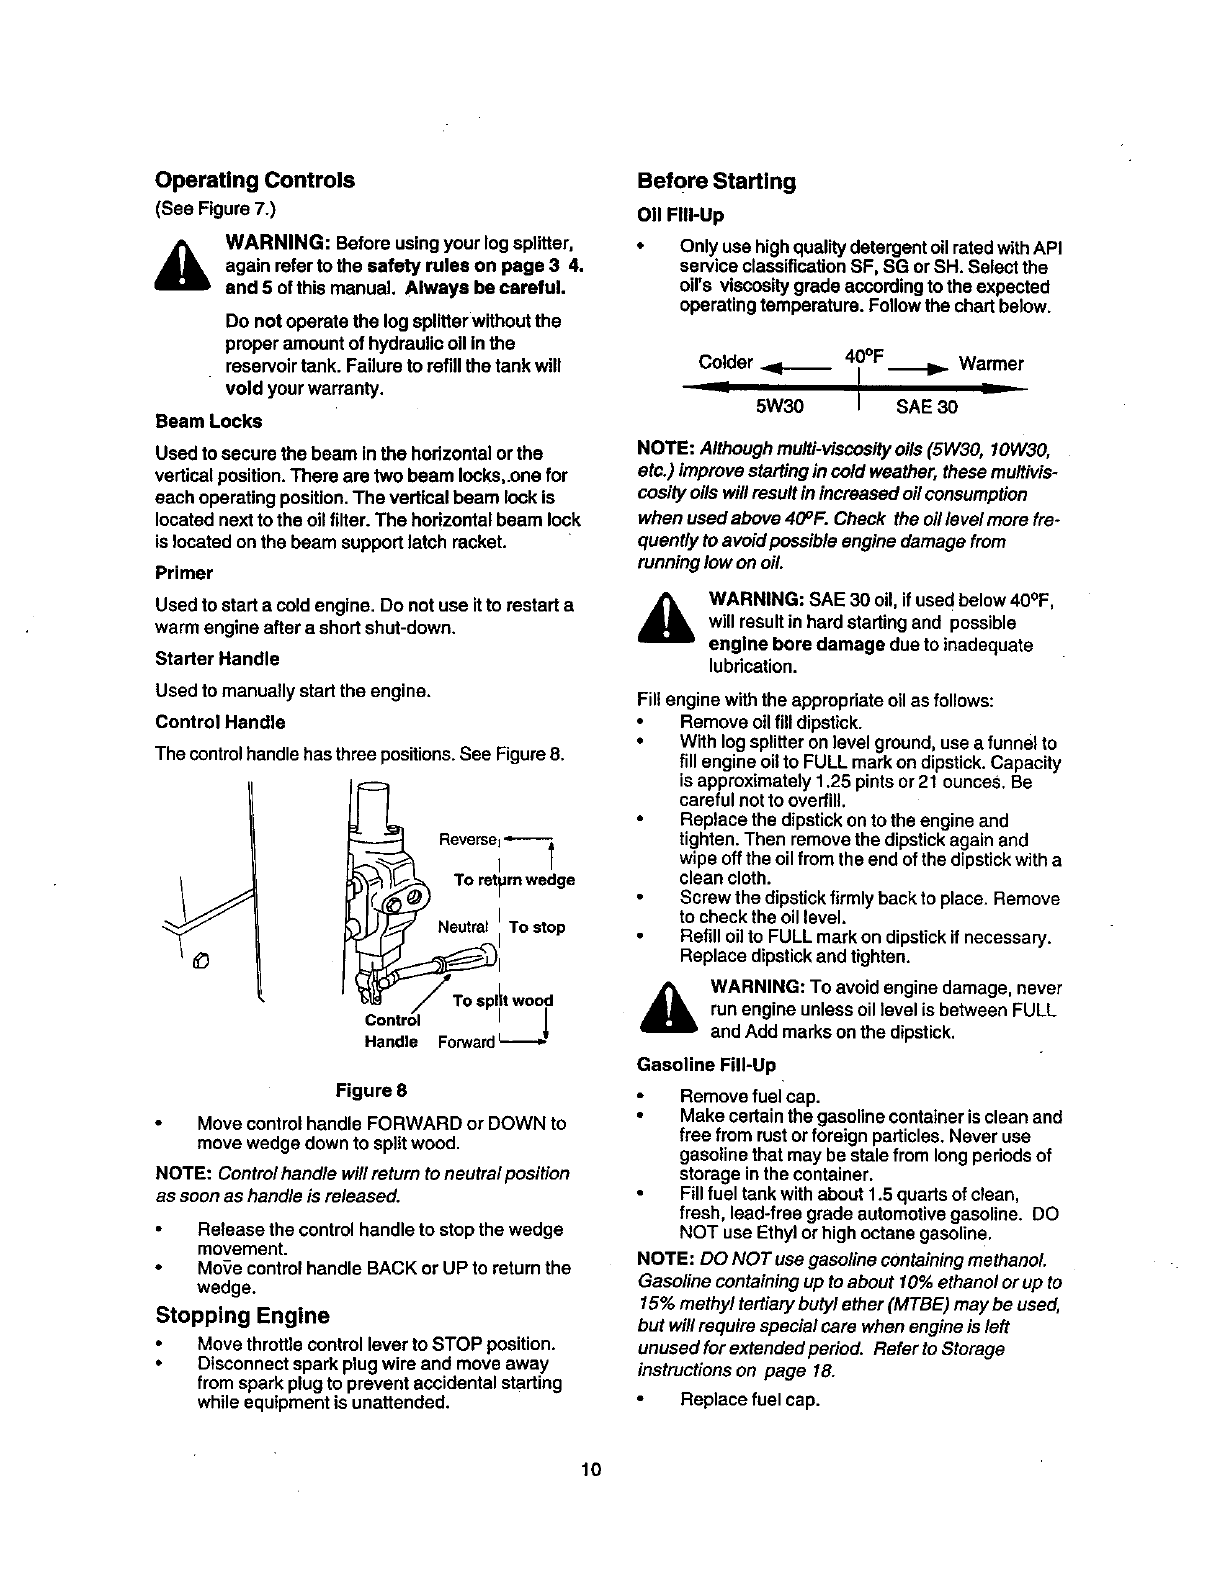
Operating Controls
(See Figure7.)
WARNING: Beforeusingyour logsplitter,
again referto the safety rules on page 3 4.
and 5 ofthis manual. Always be careful.
Do notoperate the log splitterwithoutthe
properamountof hydraulicoil inthe
reservoirtank. Failureto refillthe tank will
void yourwarranty.
Beam Locks
Usedto securethe beam inthe hodzontalorthe
verticalposition.There are two beam Iocks,.onefor
each operatingposition.The verticalbeam lockis
locatednextto the oilfilter. The horizontalbeam lock
is located onthe beam supportlatch racket.
Primer
Usedto start acoldengine. Do notuse itto restart a
warmengineafter a shortshut-down.
Starter Handle
Usedto manuallystartthe engine.
Control Handle
The control handle has three positions. See Figure 8.
Reve'e;----t
To ret_Jrnwedge
) Neutral I To stop
.o,ttwood
Figure 8
MovecontrolhandleFORWARD or DOWN to
move wedgedownto splitwood.
NOTE: Control handlewill return toneutral position
as soonas handleis released.
Release the controlhandleto stop the wedge
movement.
•MoTecontrolhandleBACKor UP to returnthe
wedge.
Stopping Engine
Movethrottlecontrolleverto STOP position.
•Disconnectsparkplugwire and moveaway
from sparkplugto preventaccidentalstarting
while equipmentis unattended.
Before Starting
011FIN-Up
Only usehighqualitydetergentoilratedwithAPI
serviceclassificationSF, SG orSH. Selectthe
oil's viscositygradeaccordingto the expected
operating temperature. Follow the chartbelow.
Colder _40°F _Warmer
5W30 SAE 30
NOTE: Although multi-viscosity oils (5W30o 10W30,
etc.) improve starting in cold weather, these multivis-
cosity oils willresult in increased oil consumption
when used above 40°F. Check the oil level more fre-
quently to avoid possible engine damage from
running low on oil.
AWARNING: SAE 30 oil,ifusedbelow 40°F,
willresult in hardstartingand possible
engine bore damage dueto inadequate
lubrication.
Fill engine with the appropdate oil as follows:
Remove oil fill dipstick.
• With log splitter on level ground, use a funnel to
fill engine oil to FULL mark on dipstick. Capacity
is approximately 1.25 pints or 21 ounces. Be
careful not to overfill.
Replace the dipstick on to the engine and
tighten. Then remove the dipstick again and
wipe off the oil from the end of the dipstick with a
clean cloth.
Screw the dipstick firmly back to place. Remove
to check the oil level,
Refill oil to FULL mark on dipstick if necessary.
Replace dipstick and tighten.
WARNING: To avoidenginedamage, never
runengineunlessoillevelis betweenFULL
and Add marksonthe dipstick,
Gasoline Fill-Up
Remove fuelcap.
Make certainthe gasolinecontaineris cleanand
free from rustorforeign particles.Neveruse
gasolinethat maybe stalefrom longperiodsof
storageinthe container.
Fillfuel tankwithabout 1.5 quarts of clean,
fresh, lead-freegradeautomotivegasoline. DO
NOT use Ethylorhighoctanegasoline.
NOTE: DO NOT usegasolinecontainingmethanol.
Gasolinecontainingup toabout 10%ethane/or up to
15%methyl tertiarybutylether(MTBE) may he used,
but will requirespecial care when engineis left
unusedforextendedperiod. Referto Storage
instructionson page 18.
Replacefuel cap.
10

&WARNING: Do not fillcloser than1/2 inchof
topof fueltank to preventspillsand to allow
forfuelexpansion.Ifgasolineis accidentiy
spilled,movelog splitteraway fromarea of
spill.Avoidcreatingany sourceof ignition
untilgasolinevapors havedisappeared.
Starting Engine
Attachsparkplugwireand rubberbootto the
sparkplug.
Placethe throttlecontrollever inSTART
position.
Pushthe primerthree times,wait about two
secondsbetweeneach push. Incold weather
withtemperaturesbelow55° F, primeengine
five times.
Graspthe starterhandleandpullropeoutslowly
untilenginereachesstartof the compression
cycle(rope willpullslightlyharderat thispoint).
Let the rope rewindslowly.
Pull ropewitharapid,continuous,fullarm
stroke.Keep a firmgripon the starterhandle.
Let rope rewindslowly.Donotlet starterhandle
snapback againststarter.
NOTE:/f enginedoesnotfireafter threeattempts,
repeat aboveinstructions.
Stopping Engine
Movethrottlecontrolleverto STOP position.
Disconnectsparkplugwireand moveaway
from spark plug to prevent accidental starting
while equipment is unattended.
Raising and Lowering Beam
Use control handleto run wedgeupanddown
beam 6 to 8 timesto circulatethe hydraulicfluid,
whichwillwarm andthinthe fluid.
Place log splitterona firm, levelsurface.
To raise the beam: Pulloutthe beamlock on
the tongueand pivotitdownto releasethe
beam.
Move the beamto theverticalposition.Secureit
withthe beam lock onthe reservoirtank
assembly.See Figure9.
To lower the beam: Pulloutthe beam lockon
the reservoirtank.
Pivotbeam lockdownto releasethe beam.
Carefullypullbackonbeam and loweritto the
horizontalposition. See Figure9.
Pulloutthe beam lock onthe tongue,pivotit
upwardsand releaseitto holdthe beam.Make
certainit is latched securely.
,_ WARNING: Alwaysusethe logsplitterinthe
verticalpositiononlywhen splitting heavy
logs.
Operating Position
Vertical
Pullthe horizontalbeam lockoutandpivotit
downto releasethe beam.Pivotthebeam to the
verticalposition.
Lockthe beam inthe verticalposition,by pulling
outonthe verticalbeam lockandpivotingitto
the left. See Figure10.
Stand infront of the log splitter.Operatethe
controlhandlewithyour righthandand stabilize
the log,if necessary,withyourlefthand. See
Figure10.
Vertical
Beam
>
<
\
b\ \
\ \
\ \
\
'\1
Tongue
Horizontal Beam Lock
Figure 9
Figure 10
Horizontal
Pullthe verticalbeam lockoutand pivotitdown.
Pivotthe beam to the horizontalposition.
Lockthe beam inthe hodzontalposition, by
pullingoutonthe horizontalbeam lockand
pivotingit upwards.
11
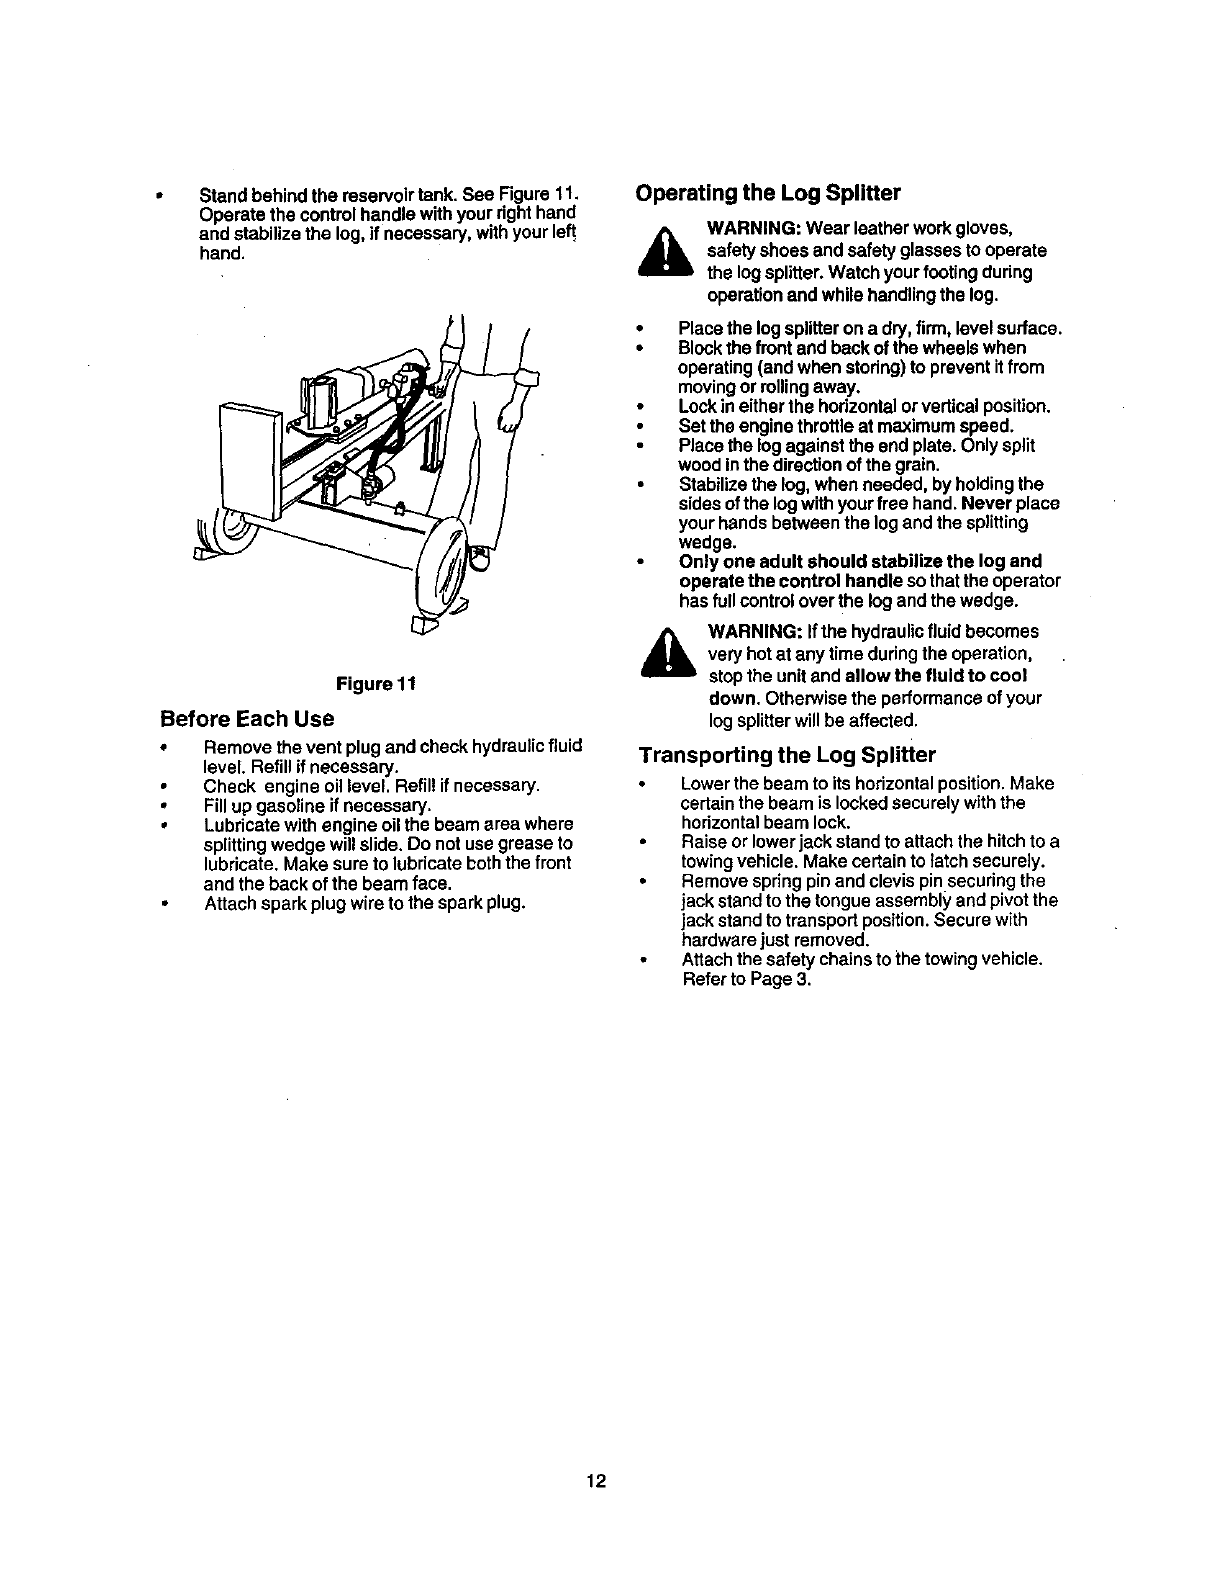
Stand behindthe reservoirtank.See Figure11.
Operate the controlhandlewithyourdght hand
and stab ze the og, fnecessary,withyourlef_
hand.
Figure 11
Before Each Use
e
e
Removethe vent plugand checkhydraulicfluid
level. Refillif necessary.
Check engineoillevel. Refillif necessary.
Fillup gasolineif necessary.
Lubricatewithengineoil the beam area where
splittingwedgewill slide.Donotuse greaseto
lubricate.Make sureto lubricateboththe front
and the back ofthe beam face.
Attachsparkplugwireto the sparkplug.
Operating the Log Splitter
&WARNING: Wear leatherworkgloves,
safetyshoesand safetyglassestooperate
the logsplitter.Watchyourfooting during
operationand whilehandlingthe log.
•Placethe logsplitteron a dry,firm,levelsurface.
•Blockthe frontandback ofthe wheelswhen
operating(andwhen stodng)to preventit from
movingorrollingaway.
•Lockineitherthe hodzontalorverticalposition.
Setthe enginethrottleat maximumspeed.
Placethe logagainstthe endplate.Onlysplit
woodinthe directionof thegrain.
•Stabilizethe log,whenneeded,by holdingthe
sidesofthe logwithyourfree hand.Never place
yourhandsbetweenthe logandthe splitting
wedge.
Only one adult should stabilize the log and
operate the control handleso thattheoperator
hasfull controloverthe logandthe wedge.
&WARNING: Ifthe hydraulicfluid becomes
veryhotatany time duringthe operation,
stopthe unitandallow the fluid to cool
down. Otherwisethe performanceof your
log splitterwillbe affected.
Transporting the Log Splitter
Lower the beam to its horizontal position. Make
certain the beam is locked securely with the
hodzontal beam lock.
Raise or lower jack stand to attach the hitch to a
towing vehicle. Make certain to {atch securely.
Remove spring pin and clevis pin securing the
jack stand to the tongue assembly and pivot the
jack stand to transport position. Secure with
hardware just removed.
Attach the safety chains to the towing vehicle,
Refer to Page 3.
12
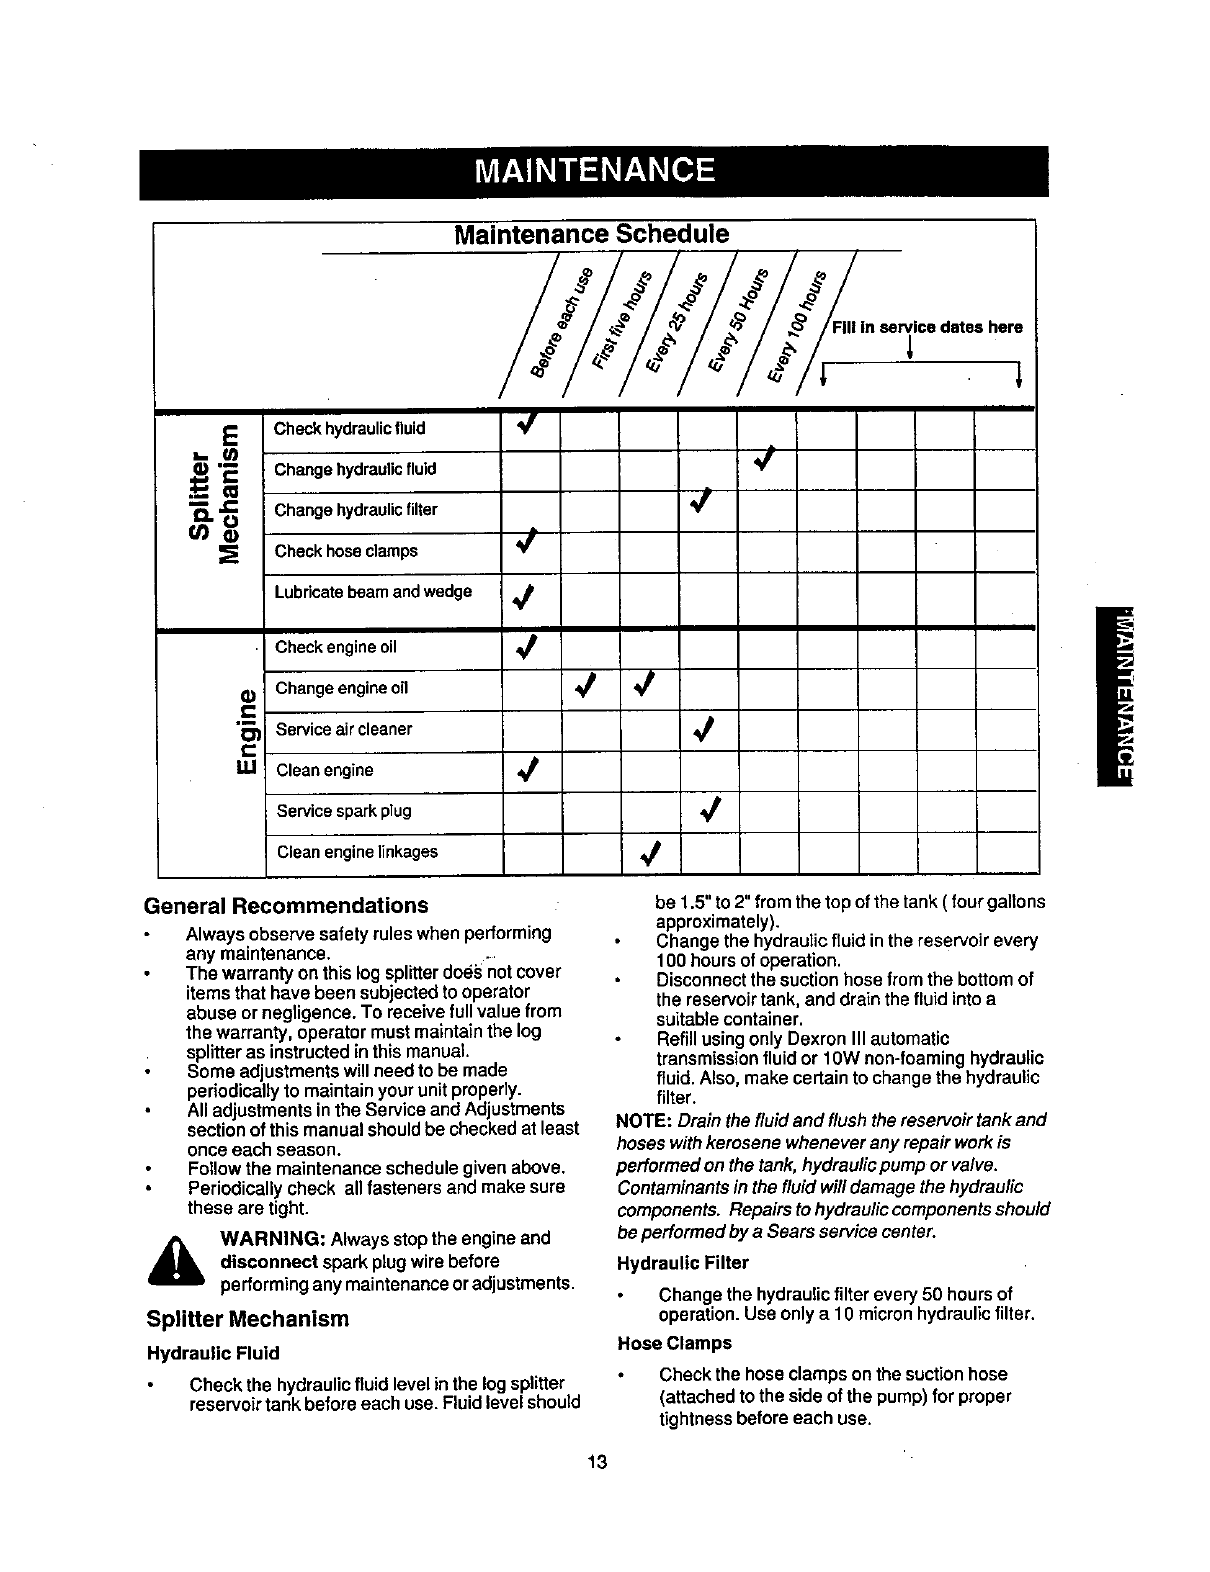
Maintenance Schedule
ECheckhydraulicfluid
"_ Changehydraulicfluid ¢
Changeh,drau,c,,tar
,= ,/
Checkhoseclamps
Lubricatebeam andwedge
€
im
O1
UJ
Check engineoil
Change engineoil _
i Service air cleaner
Clean engine
Service spark plug
Clean enginelinkages ,_
General Recommendations
Always observe safety ruleswhenperforming
any maintenance.
The warranty on this log splitter does not cover
items that have been subjected to operator
abuse or negligence. To receive full value from
the warranty, operator must maintain the log
splitter as instructed in this manual.
Some adjustments will need to be made
periodically to maintain your unit properly.
All adjustments in the Service and Adjustments
sectionof this manual should be checked at least
once each season.
Follow the maintenance schedule given above.
Periodically check all fasteners and make sure
these are tight.
WARNING: Always stopthe engine and
disconnect sparkplug wirebefore
performinganymaintenanceoradjustments.
Splitter Mechanism
Hydraulic Fluid
Check the hydraulic fluidlevel in the logsplitter
reservoirtank beforeeach use.Fluidlevelshould
be 1.5" to 2" from the top of the tank ( four gallons
approximately).
Change the hydraulic fluid in the reservoir every
100 hours of operation.
Disconnect the suction hose from the bottom of
the reservoir tank, and drain the fluid into a
suitable container.
Refill using only Dexron III automatic
transmission fluid or 10W non-foaming hydraulic
fluid. Also, make certain to change the hydraulic
filter.
NOTE: Drain the fluid and flush the reservoir tank and
hoses with kerosene whenever any repair work is
performed on the tank, hydraulic pump or valve.
Contaminants in the fluid willdamage the hydraulic
components. Repairs to hydraulic components should
be performedby aSears service center.
Hydraulic Filter
Change the hydraulicfilter every 50 hours of
operation.Use onlya 10 micron hydraulic filter.
Hose Clamps
Check the hose clamps on the suction hose
(attached to the sideof the pump) for proper
tightness before each use.
13

• Checkthe hoseclampsonthe returnhoseat
least onceaseason.
Beam And Splitting Wedge
Lubricatebothsidesof the beamwhereit
contactsthe splittingwedgewithengineoil
beforeeach use toobtainyears of service.
However,normalwear willoccur.
Periodicallycheck the boltson the sideof the
wedgeplateto eliminateexcessspacebetween
the wedgeplateandthe beam.
The wedgeplateonthe logsplitter[sdesigned
so the gib blocksonthe sideofthe wedgeplate
can be easilyremovedand rotatedor turned
overfor evenwear.You canlocatethesetwo gib
blocks behind the gibplateshownin thefigure
below. Make certain to.readjustthe adjustment
bolts so wedge moves freely, but no excess
space exists between the wedge plate and
beam. See Figure 12.
Hex Bolt
•When engineisdrained of alloil, replacedrain
plugsecurely.
•Refillwithfresh oil.Refer to GAS AND OIL FILL-
UP sectionof thismanual.
•Replace dipstick.
Service air cleaner
The air cleaner prevents damagingdirt,dust,etc.,
from enteringthe carburetorand beingforced Into the
engineand isimportantto enginelifeand
performance.The aircleaner consistspfa paper pre-
cleaner and a foam filter cartridge.
_lb ARNING: Never runyour enginewithout
air cleanercompletelyinstalledon engine.
•Replace paper pre-cleaneroncea year or every
100 operatinghours.Replace morefrequently if
operatingunderdustyconditions.Replacement
filters are availableat any Sears servicecenter.
Do not attempt to clean or oil the paper pre-
cleaner element.
•Servicecartridgeevery three monthsorevery
25 operatinghours. Servicecartridgemore often
underdustyconditions.
•To service foam cartridge: Loosenair cleaner
coverscrews.Donot removescrewfrom cover.
Swingcoverdown to removefromhinge. See
Figure 13.
Cover Screw
Adjustment Bolt
Gib Plate Back Plate
Figure 12
Engine
Changing engine oil
Plate
Only use high quality detergent oil rated with
API service classification SF, SG or SH. Select
the oil's viscosity grade according to the
expected operating temperature. Refer to
page 10 of this manual for viscosity chart.
• Stop engine and wait several minutes before
checking oil level. With engine on level ground,
the.oil must be to FULL mark on dipstick.
Change engine oil after the first five hours of
operation, and every 25 hours thereafter.
Change oil more frequently if the engine is
operated under heavy load, or in high ambient
temperatures.
Drain oil while engine is warm. Follow the instructions
given below.
Remove oil drain plug and dipstick. Catch oil in a
suitable container.
14
Covet -Foam Filter Cover
Body Filter
Figure 13
Inspect filter for discolorationordirt
accumulation.If eitheris present,proceedas
follows.
Clean insideof bodyand coverthoroughly.
Removefoam cartddge.Wash inliquid
detergentandwater. Squeeze dryina clean
cloth.Saturateinengineoil. Squeeze (don't
twist) in a clean, absorbentclothto removeall
excessoil.
Reassemblefoam cartridgeand paper pre-
cleanerin the body.Swingcoverdown and
tightenthe two screwsloosened earlier.
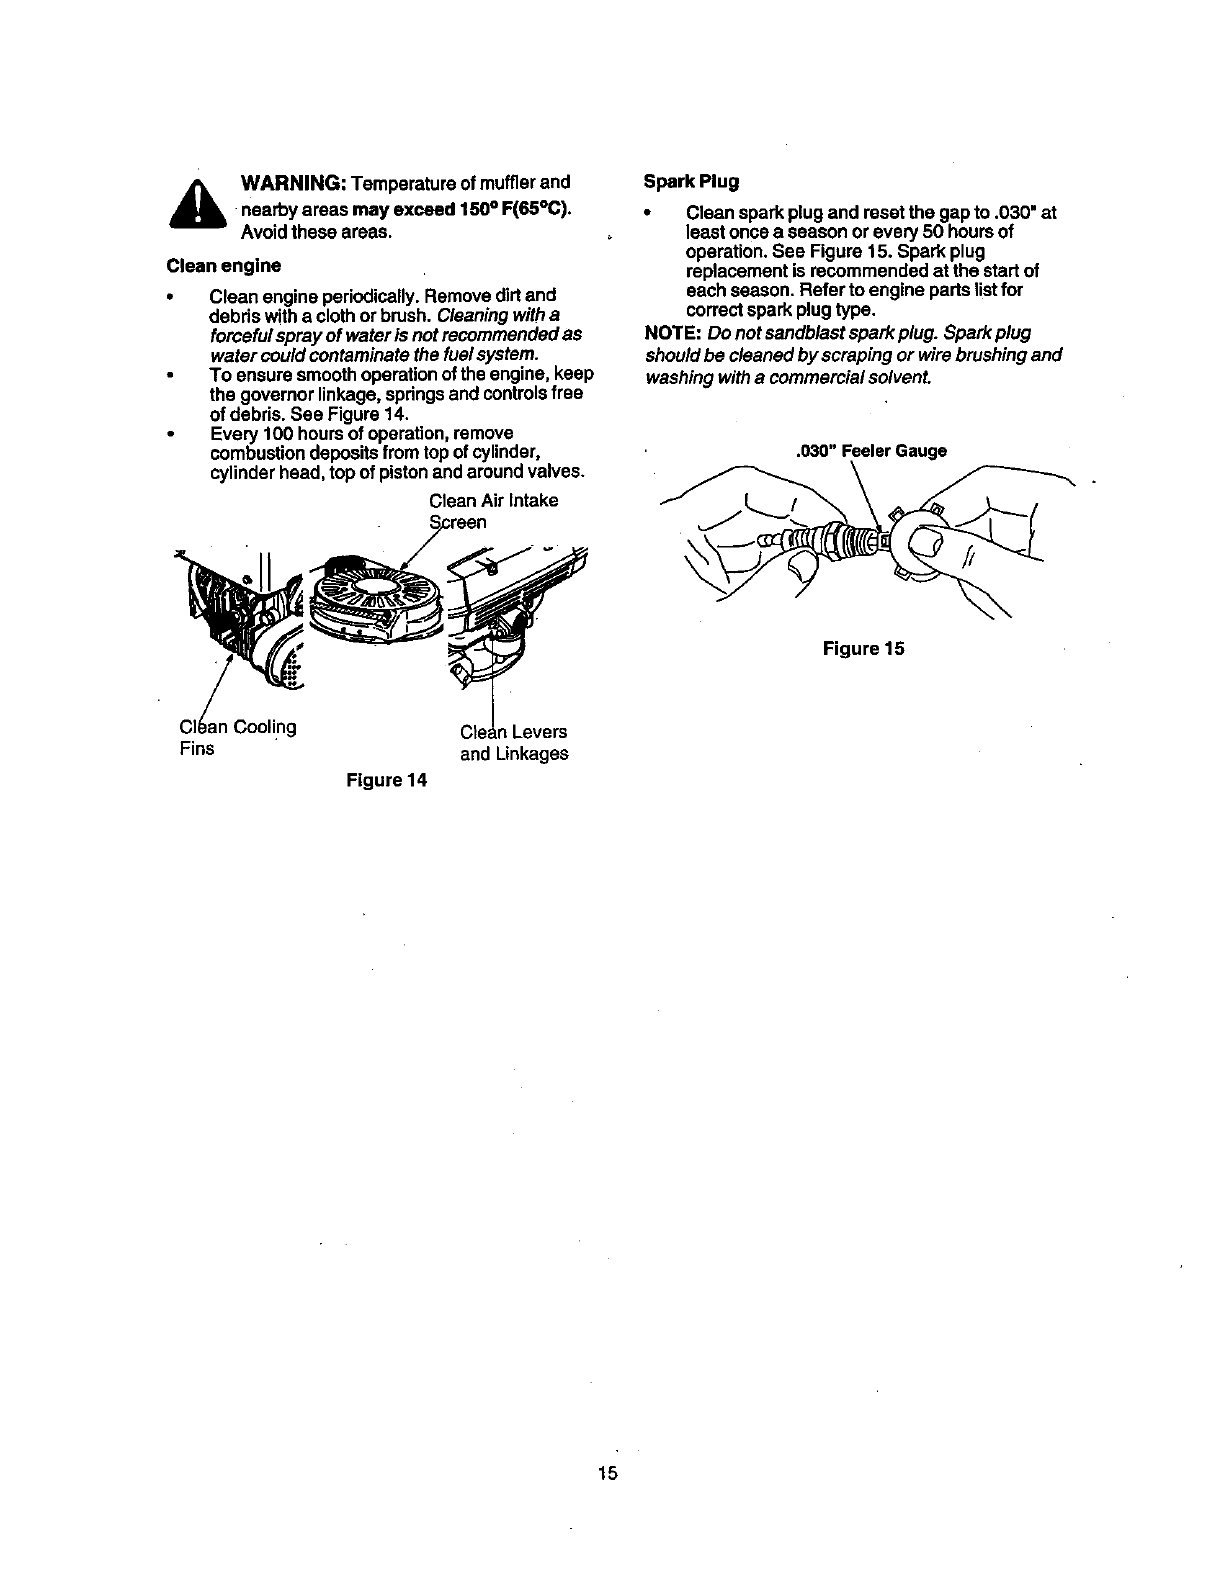
_lb ARNING: Temperatureofmufflerand
nearbyareas may exceed 150aF(65°C).
Avoidthese areas.
Clean engine
Clean engineperiodically.Removedirtand
debds withaclothor brush.Cleaningwitha
forcefulsprayof wateris notrecommendedas
water couldcontaminatethefuelsystem.
To ensuresmoothoperationof theengine, keep
the govsmorlinkage,spdngsandcontrolsfree
of debris. See Figure 14.
Every 100 hoursof operation,remove
combustiondepositsfromtopof cylinder,
cylinderhead, topof pistonandaroundvalves.
Clean Air Intake
Spark Plug
•Clean sparkplugand resetthe gapto .030" at
least oncea seasonor every 50 hoursof
operation,See Figure15. Sparkplug
replacementis recommendedat the startof
each season.Refer to enginepartslistfor
correctsparkplugtype.
NOTE: Do notsandblastsparkplug. Sparkplug
shouldbe cleanedby scrapingor wire brushingand
washing with a commercialsolvent.
.030" Feeler Gauge
Cla_n Cooling
Fins
Figure 14
Levers
and Linkages
Figure 15
15

AWARNING: Alwaysstop engine,
disconnect spark plug wire, and moveit
awayfromsparkplugbeforeperformingany
adjustmentsor repaim.
Tires
See sidewalloftireforrecommendedpressure.
Maximumtirepressureunderany
circumstancesis30 p.s.i. Equal tirepressure
shouldbe maintainedonalltires.
AWARNING: Excessivepressure(over30
p.s.i.)whenseatingbeadsmaycause tire/
dmassembly to burstwithforce sufficientto
cause seriousinjury.
Flexible Pump Coupler
The flexible pumpcouplerisanylon"spider" insert,
locatedbetweenthe pumpand engineshaft.Over a
periodof time,the couplerwillhardenand
deteriorate.Replacethe couplerifyoudetect
vibrationor noiseinthe area betweenthe engineand
the pump.If the couplerfails completely,youwill
experiencea lossofpower.
_1 WARNING: Never hitthe engineshaftin
any manner,as a blowwillcause permanent
damageto the engine.
IMPORTANT: If you do not have the right tools or are
otherwise uncomfortable with the procedure, contact
Sears service center.
When replacing the flexible pump coupler, proceed
as follows. Follow the instructions carefully as the
alignment is critical.
Disconnect the spark plug wire, and secure it
away from the spark plug.
Drain gasoline from fuel tank or place a piece of
plastic film underneath the gas cap to prevent
gasoline from leaking.
Using a 1/2 inch socket with an extension,
remove the three bolts securing the engine to
the engine mounting bracket. The three bolts
can be found under the engine mounting
bracket.
Caretul}y lift engine off mounting bracket and set
aside on a sturdy, level surface.
Remove the nylon spider insert from the pump
shaft. You may need apair of needle nose
pliers to grasp the insert.
•Place a new "spider"insert into the pump coupling
half. See Figure 16,1. Make sure the key is on the
pump shaft. The key way inthe lower coupling
half has to fit over the key on the pump shaft.
Re-seat the engine making sure to align the
pump and engine coupling halves. There must 16
be space between endof the engine and the
coupling half. See Figure16,2.
Upper
"_ Coupling
(_ Half
Engine
Mountln
Bracket
Lookunderthis
for enginebolts
• Figure 16
NOTE: Thepump couplinghaftcan be rotated by
hand toaid inalignment, ff the twoparts are not
alignedthe unitwill notoperateproperly anddamage
couldoccur.
Set .035-.060 inchclearancebetween the
couplinghalves by slidinga matchboxcover "
betweenthejaws ofthe upperandthe lower
couplinghalves.
NOTE: Before securing the set screw, apply some
Loctite TM on the threads of the screw,
Tightenthe setscrewto78 inch-poundstorque.
Secureenginewiththreeboltsremoved earlier.
Torque boltsto 200 to 450 inch-pounds.
Reattachsparkplugwireto sparkplug.Be sure
to removeplasticfilm from undergas cap if
necessary.
Beam & Splitting Wedge
The wedgeplateis subjectto normalwear.
Periodicallyadjustthe bolts onthe wedgeplate
makingsurethatthe wedgemovesfreely. Also make
surethat noexcessspace exists betweenthe wedge
plateand the beam.

TOadjust:
Loosenthreehexboltsontopofthewedgeplate
(beneaththe splittingwedge). See Rgure 17.
Loosenthe locknutson the two adjustment
boltsonthe sideof the gib plate, located
beneaththe splittingwedge. See Figure17.
Turnthe adjustmentboltsin untilsnug,then
back them offslowly untilthe wedgeassembly
willslideon the beam.
Tightenthe locknutssecurelyagainstthe gib
plateto holdadjustmentbolts inthisposition.
Retightenthe three hex bolts ontop ofthe
wedge plate.
Hex Bolt
• Adju_
Gib Plate BackPlate
Figure 17
To replace:
Periodicallyremove and replacethe "gibe" (spacers)
between the wedge plate and the back plate as
follows.
NOTE: If desired,thegibsmay be rotatedand/or
turnedoverforeven wear.
Removethe centerbelt ontopof the wedge
plate.Slidethe gib plate out. See Figure17.
Removeand replacethe gibs.Reassemblethe
gibplate, makingcertainfiat washeris inplace
underthe gibplate.
Readjustthe boltson the sideof the wedgeplateas
instructedpreviously.
Adjusting Carburetor
&WARNING: Ifyou make anyadjustmentsto
theenginewhileitis running,keep clearof all
movingpartsto avoidinjury.Be carefulof
heatedsurfacesandmuffler.
Ifthe enginecarburetorneedsadjustment,contact
your nearest Sears service center.
Engineperformancemay be affected in altitudes
above4,000 feet. To improve engineperformance,
install a high altitude adjustment kit. This kit is
available at Sears service centers.
Engine Speed
The enginespeedon yourlogsplitterhas beensetby
the enginemanufacturer.Do notattempt to increase
enginespeedorit may resultin personalinjury. If you
believethe engine is running toofastortooslow,
contactSears service centerforrepairand
adjustment.
IMPORTANT: Changing of enginegoverned
speedby the customerwillvoid engine
warranty.
17

Prepareyourlogsplitterfor storageat the endof the
seasonor ifthelog splitterwillnotbe usedfor30days
ormore.
&WARNING: Never store machine with fuel
in the fuel tank inside of building where
fumes may reach an open flame or spark, or
where ignition sources are present such as
hot water and space heaters, furnaces,
clothes dryers, stoves, electric motors, etc.
NOTE: A yearlycheck-upbyyour locaISears Service
Centeris a goodwayto makecertainyour logsplitter
willprovidemaximumperformanceforthenext
season.
LOG SPLITTER
Clean the logsplitterthoroughly.
Wipe unitwithan oiledragto prevent rust,
especiallywedgeand beam.
ENGINE
IMPORTANT: It isimportantto preventgumdeposits
from forming inessentialfuel systempartssuchas
carburetor,fuel filter, fuelhose, ortankduring
storage.Also,expedenceindicatesthat alcohol
blendedfuels (calledgasohotor usingethanolor
methanol)can attractmoisturewhichleadsto
separationandformationof acids duringstorage.
Acidic gas can damage the fuel systemof an engine
while in storage.
Drain the fuel tank.
Start the engine and let it run untilthe fuel lines
and carburetor are empty.
Drain carburetor by pressing upward on bowl
drain which is located below the carburetor.
Neveruseengineorcarburetorcleanerproducts
inthe fuel tankor permanentdamage may
Occur.
•Use freshfuel next season.
NOTE: Fuel stabilizeris an acceptable alternativein
minimizingthe formationof fuelgum depositsduring
storage.
•Add stabilizerto gasolineinfuel tankor storage
container.
Alwaysfollow the mix ratiofound on stabilizer
container.
Run engineat least 10 minutesafteradding
stabilizerto allowthe stabilizerto reachthe
carburetor.
•Do notdrainthe gas tank andcarburetorif using
fuel stabilizer.Drainall the oil from the
crankcase(thisshouldbe done afterthe engine
has been operatedand is stillwarm) and refill
the crankcasewithfresh oil.
If youhave drainedthe fueltank, protectthe
insideof the engineas follows.
•Remove sparkplug,pourapproximately1/2
ounce(approximatelyonetabtespoon)of engine
oil intocylinderandcrank slowlyto distributeoil.
Replacesparkplug.
OTHER
Do not store gasoline from one season to
another.
Replace your gasoline can if it starts to rust.
Rust and/or dirt in the gasoline will cause
problems. Store unit in a clean, dry area. Do not
store next to corrosive materials, such as
fertilizer.
NOTE: If storing in an unventila ted or metal storage
shed, be certain to rustproof the equipmentby coating
with a light oil or silicone.
18
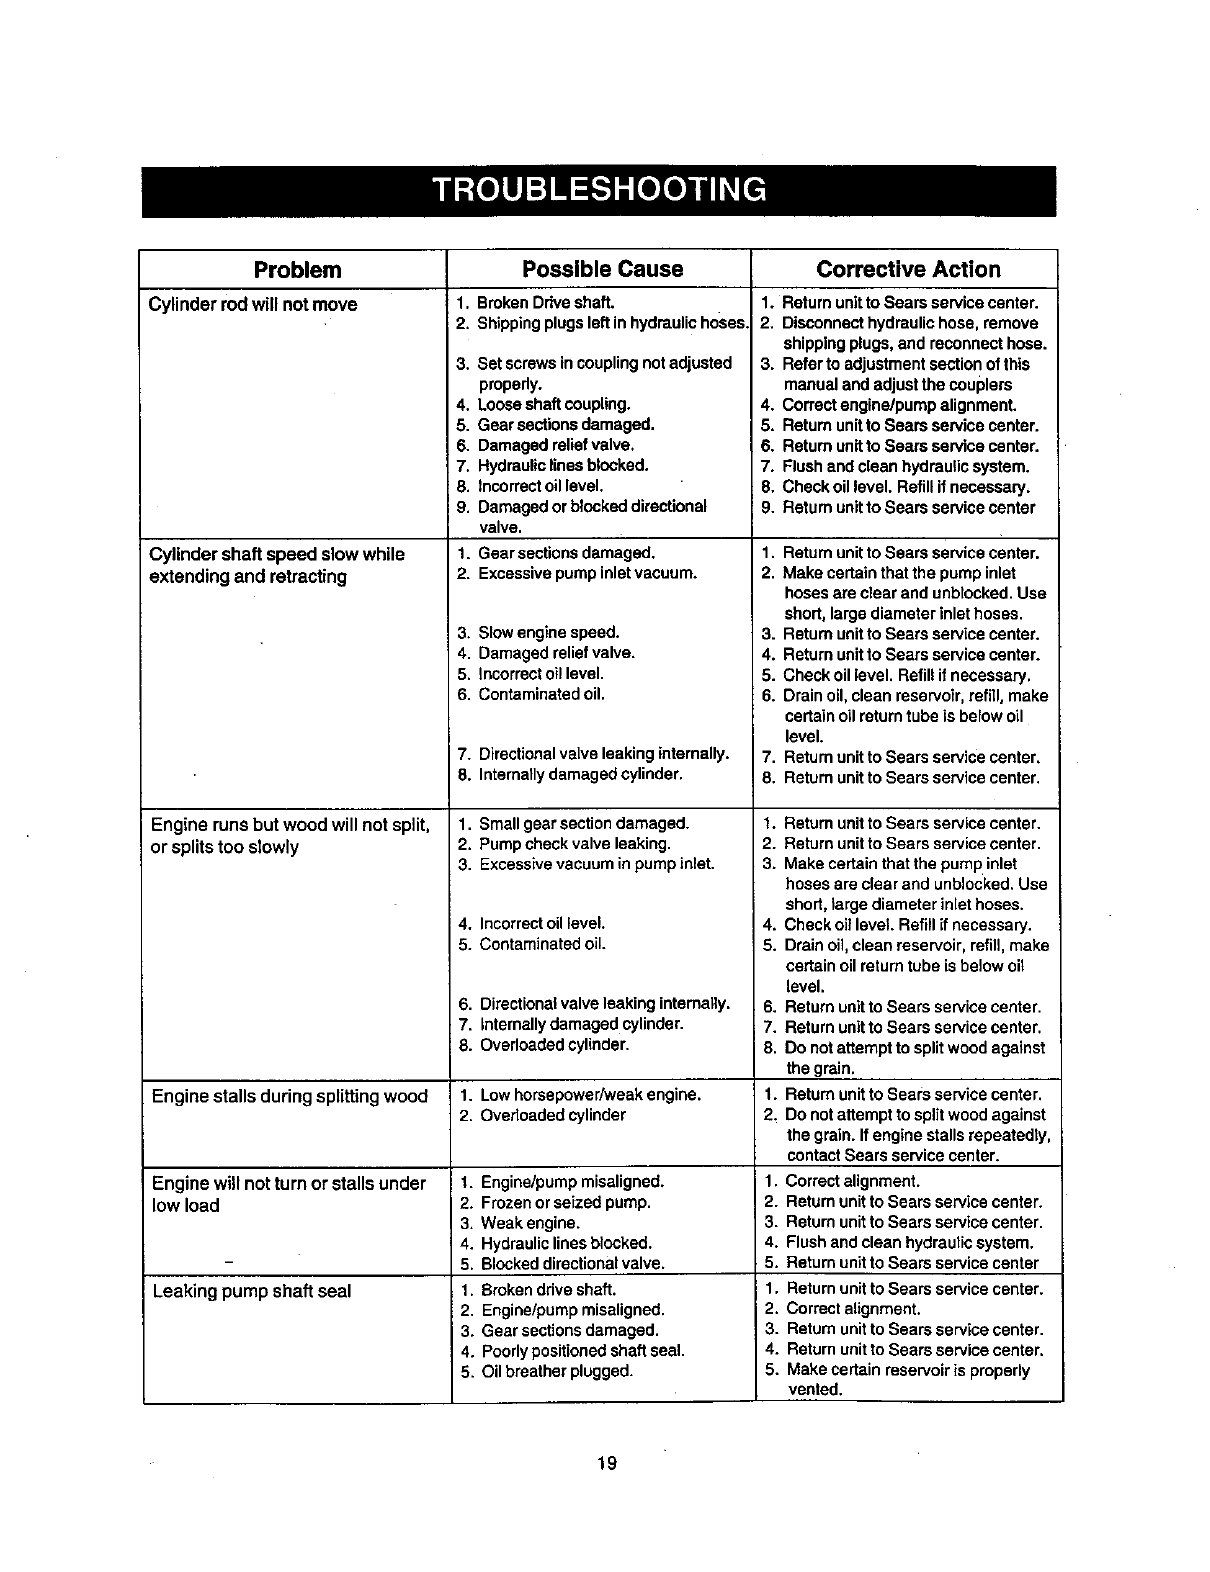
Problem Corrective Action
Cylinderrodwill notmove
Possible Cause
1. BrokenDriveshaft.
2. Shippingplugsleftin hydraulichoses.
Cylinder shaft speed slow while
extending and retracting
Enginerunsbutwoodwill notsplit,
orsplitstoo slowly
Engine stalls during splitting wood 1.
2.
Engine will notturnor stallsunder
low load
Leaking pump shaftseal
3. Set screwsincouplingnotadjusted
pmpedy.
4. Looseshaftcoupling.
_. Gear sectionsdamaged.
6. Damagedreliefvalve,
7. Hydrauliclines blocked.
8, Incorrectoillevel.
9, Damagedor blocked directional
valve.
1. Gear sections damaged,
2. Excessive pump inlet vacuum.
3. Slow enginespeed.
4. Damaged reliefvalve.
5, Incorrect oillevel.
6. Contaminatedoil,
7. Directionalvalveleaking internally.
8. Internallydamagedcylinder,
1. Small gear section damaged.
2. Pump check valve leaking.
3. Excessive vacuum in pump inlet.
I 4. IncorrectoilFevel.
5. Contaminated oil.
6. Directionalvalveleakingintemally.
7. internally damaged cylinder.
8. Overloaded cylinder.
1.
2.
3,
4.
5.
1. Broken driveshaft.
2, Engine/pumpmisaligned.
3. Gear sections damaged.
4. Poorly positioned shaft seal.
5. Oil breather plugged.
1. Return unitto Sears servicecenter.
2. Disconnecthydraulic hose,remove
shippingplugs,and reconnecthose.
3. Referto adjustment sectionof this
manualand adjust the couplers
4. Correctengine/pumpalignment.
5. Returnunitto Searsservicecenter.
6. Returnunitto Searsservicecenter.
7. Rush and clean hydraulicsystem.
8. Check oillevel. Refillifnecessary,
9. Returnunit to Sears servicecenter
1, Returnunit to Sears servicecenter.
2. Make certainthat the pump inlet
hosesareclear and unblocked.Use
short,largediameterinlethoses.
3. Returnunitto Sears service center.
4. Returnunitto Sears service center.
5. Checkoillevel, Refill if necessary,
6. Drainoil, clean reservoir,refill,make
certainoilreturntube is belowoil
level.
7. Returnunitto Sears servicecenter.
8, Returnunitto Sears servicecenter,
1.
2.
3.
4.
5.
6.
7.
8.
LowhorsepowerAveakengine. 1.
Overloadedcylinder 2.
Engine/pumpmisaligned, i 1,
Frozenorseized pump. 2.
Weak engine. 3.
Hydrauliclinesblocked. 4.
Blocked directional valve. 5.
1,
2,
3.
4.
5.
Returnunit to Sears servicecenter.
Return unitto Sears servicecenter.
Make certainthat the pump inlet
hosesare clear and unblocked,Use
short,large diameter inlet hoses.
Checkoillevel. Refillif necessary.
Drainoil,clean reservoir,refill,make
certainoil returntube is below oil
level,
Return unitto Sears service center.
Return unitto Sears service center,
Do notattempt to splitwoodagainst
thegrain,
Return unitto Sears service center,
Do notattempt to splitwood against
thegrain.Ifengine stalls repeatedly,
contactSears service center.
Correctalignment.
Returnunitto Sears servicecenter.
Returnunitto Sears servicecenter.
Flushandclean hydraulicsystem,
Returnunitto Sears service center
Returnunitto Sears service center.
Correctalignment.
Return unitto Sears service center.
Return unitto Sears service center,
Make certainreservoiris properly
vented,
19

Troubleshooting Guide continued
Problem Corrective Action
Engine fails to start
Engine runs erratic.
Possible Causes
1. Dirtyaircleaner.
2. Fueltank empty,orstale fuel.
3. Blockedfuel line.
4. Spark plugwire disconnected.
5. Faultysparkplug.
1. Spark plugwire loose.
2. Blockedfuelline orstale fuel.
3. Dirtyaircleaner.
4. Carburetorout of adjustment
1. Engineoillevellow.
2. Dirtyaircleaner.
3. Carburetorout of adjustment.
4. Airflow restricted.
1. Serviceaircleanerfonowinginstructions
onpage 14 ofthismanual.
2, Filltank withfreshfuel.
3. Cleanfuelline.
4. Connectsparkplugwireto spark
plug.
5. Servicesparkplugfollowing
instmc6onson page 15.
1. Connectandtightensparkplugwire.
2. Cleanfuel line,Filltankwithfresh
fuel.
3. Serviceaircleanerfollowing
instructionson page 14.
4. ContactSears servicecenter.
Engineoverheats 1. Fillcrankcase with properoil.
2. Service air cleaner following
instructions on page 14.
3. Contact Seers service center.
4. Stop engine, disconnect spark plug
wire, move blower housing, and
clean.
Willnotsplitlogs 1, Reservoir fluid level low. 1. Refill withDexron III automatic
transmission fluid.
Leaking cylinder 1, Broken seals. 1. Return unit to Sears service center.
2, Scored cylinder 2. Return unit to Sears service canter.
For repairs beyondthe minoradjustmentslisted above,
" please contact your nearest SEARS service center.
2O
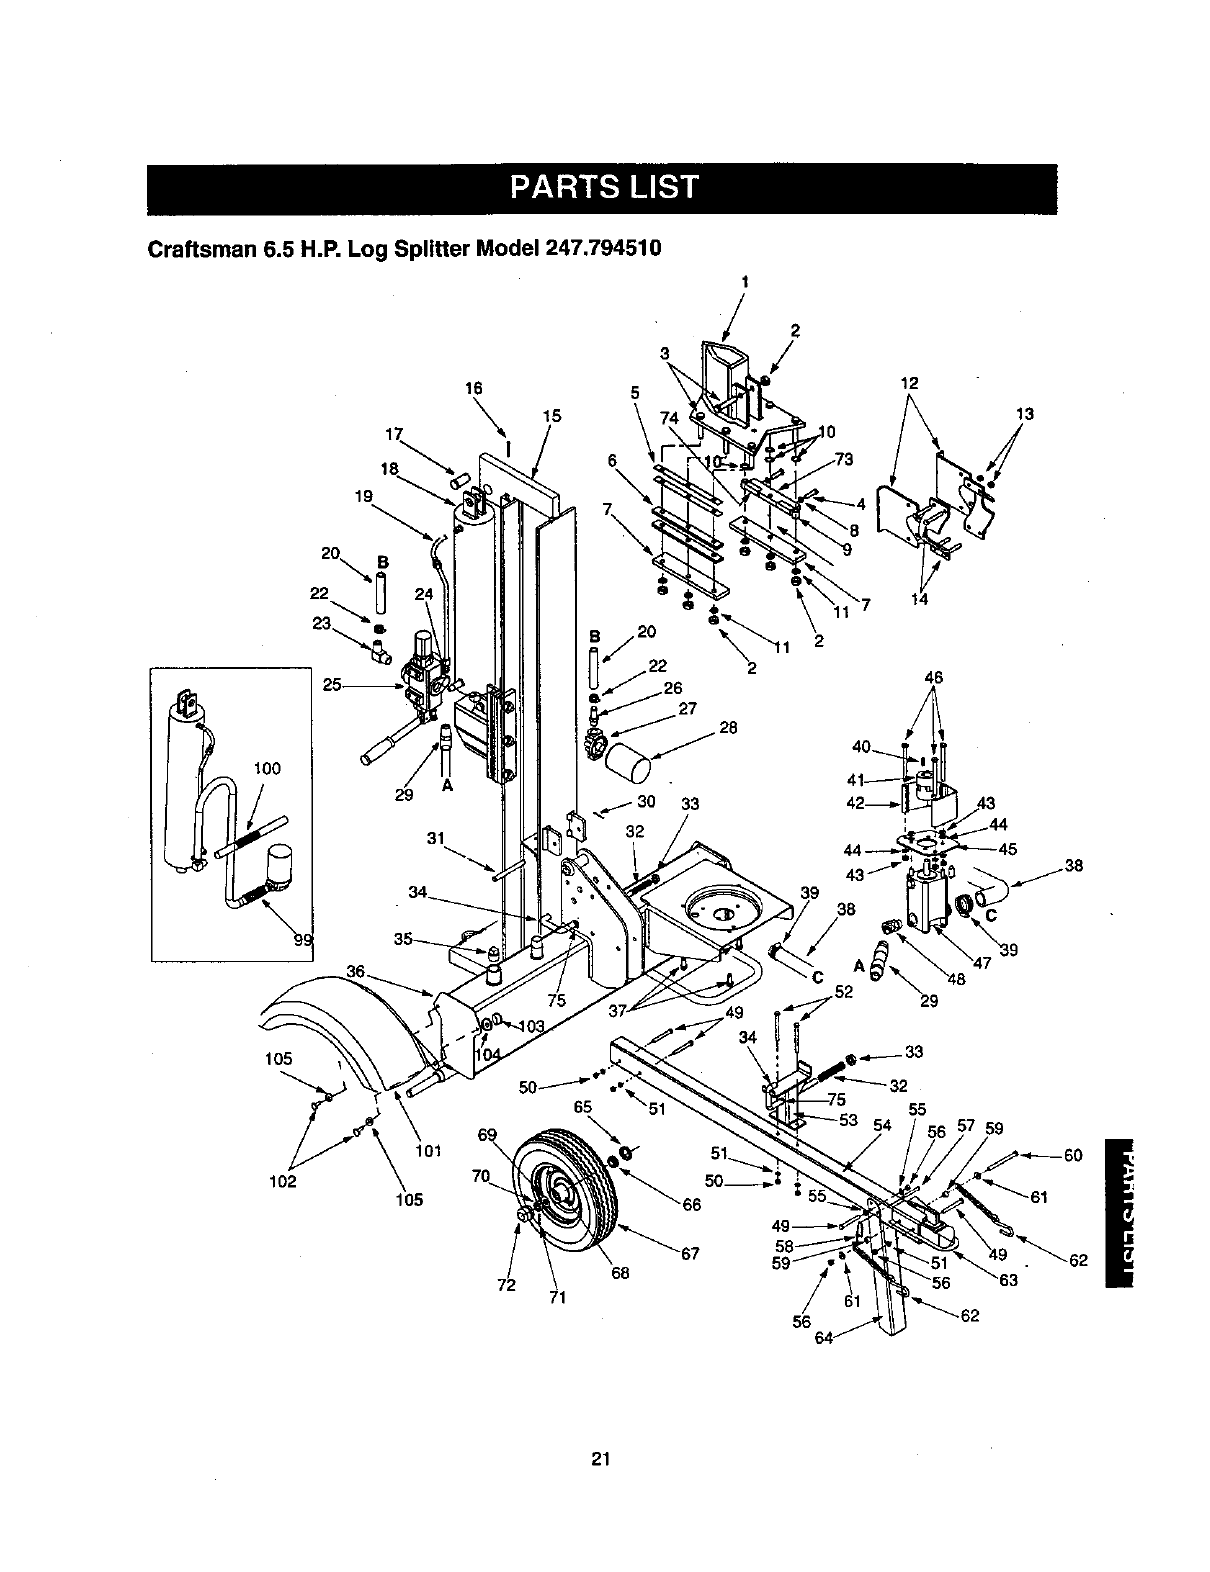
Craftsman 6.5 H.P. Log Splitter Model 247.794510
IO0
29
31
105
101
102 70
105
75
65
68
71
2
27
33
2
/12
13
46
56
32
55
54 59
21

Craftsman 6.5 H.P. Log Splitter Model 247.794510
KEY PART
NO. NO.
1 781-0323B
2 712-0239
3 710-1018
4 710-0459A
5 781-0352A
6 781-0350A
7 781-0537
8 712-3001
9 750-0750
10 736-0192
11 736-0921
12 781-0168A
13 712-0130
14 710-0859
15 681-0126
16 714-0211
17 711-1135
18 718-0306
19 727-0471
20 727-0443
22 726-0132
23 737-0153
24 737-0192
25 718-0481
26 737-0235
27 737-0306
28 723-0405
29 727-0502
30 714-0470
31 738-0805
32 732-0583
33 726-0214
34 781-0690
35 737-0236
36 681-0092A
37 710-0654A
38 735-0256
39 726-0174
40 714-0122
41 716-0250A
42 719-0353
43 712-0123
44 736-0119
45 781-0097
46 716-1338
DESCRIPTION KEY PART
NO. NO.
Wedge Asm 47 718-0476
Lock Nut 1/2-20 48 737-0329
Hex Cap Screw 1/2-20 x 2.75 49 710-0521
Hex Cap Screw 3/8-24 x 1,5 50 712-0798
AdjustableGib Shim 51 736-O169
Fixed Gib 52 710-0411
Back Bracket 53 781-0398
Hex Jam Nut3/8-24 54 781-0680A
Spacer 55 736-0185
Flat Washer .531 x.93 x ,090 56 712-0375
Lock Washer 1/2 57 711-0813
StripperSide 58 732-0194
Lock Nut 3/8-16 59 750-0497
Hex Cap Screw 3/8-16 x 2,5 60 710-0944
Beam Asm 61 736-0262
Cotter Pin 62 713-0433
Clevis Pin 63 727-0311
HydraulicCylinder 64 781-0162
HydraulicTube 65 721-0168
Return Hose 3/4" I.D. x 44" Lg. 66 741-0987
Hose Clamp 5/8" 67 634-0186
ReturnElbow 734-0872
90°SolidMale Adapter 634-0188
ControlValve 734-0255
3/4" Hose Adapter 68 741-0988
Filter Housing 69 736-0351
Oil Filter 70 712-0359
High PressureHydraulicHose 71 714-0162
Cotter Pin 1/8"Dia. 72 734-0873
Hinge Pin 1/2 x 4.8" Lg. 73 781-0356
Comp. Spdng 4" Lg. 74 781-0351
Push Cap 75 736-0116
Locking Rod
Pipe Plug 97 --
Frame Asm
Hex Washer Screw 3/8-16 x 1.0 98 770-10035
Suction Hose
Hose Clamp 99 781-0526
Sq.-Key 3/16" x .75" 100 781-0538
Flexible Coupling 101 681-0138
Coupling Shield 102 710-0157
Hax Nut 5/16-24 103 712-0123
L-Wash, 5/16" I.D.* 104 736-0119
Rear Coupling SuppodBracket 105 736-0159
Hex Screw 5/16-24 x 3,25
DESCRIPTION
Gear Pump (11 GPM)
45 Degree Elbow
Has Bolt 3/8-16 x 3" Lg.
Hex Nut 3/6-16 Thd.*
L-Wash. 3/8" I.D."
Hex Bolt 3/8-16 x 4" Lg.
Support Beam Asm
Tube
Flat Washer 3/8
Hex L-Nut 3/8-16 Thd.
Clevis Pin 5/16 x 2.5" Lg.
SpringPin
Spacer 3/8" I.D. x .625" O.D,
Hex Bolt 3/8-16 x 4" Lg. (Grd 5)
FI-Wash. 3/8=I.D. x .87" O.D,
Chain--Tow Hitch
HitchCoupler
JackStand
BearingSeal Only
BearingCone
Wheel Asm Comp. -Gray
Tire 16 x 4.8
Rim Asm -Gray
Air Valve
BearingCup
FI-Wash..76" I.D. x 1.5" O.D.
SlottedNut 3/4-16 Thd.
Cotter Pin 5/32" Dia. x 1-114"Lg.
Hub Cap
FloatingGib Plate
Adjustable Gib
Flat Washer .635 ID x .93 OD
Tecumseh Vertical Shaft Engine
Model 143.995000(not shown)
Owner's Manual
(not shown)
Hose Guard
Hose Guard
Fender Assembly
Hex Bolt: 5/16-24 x 0.75" Gr.5
Hex Nut 5/16-24
Lock Washer 5/16
Flat Washer 5/16
22
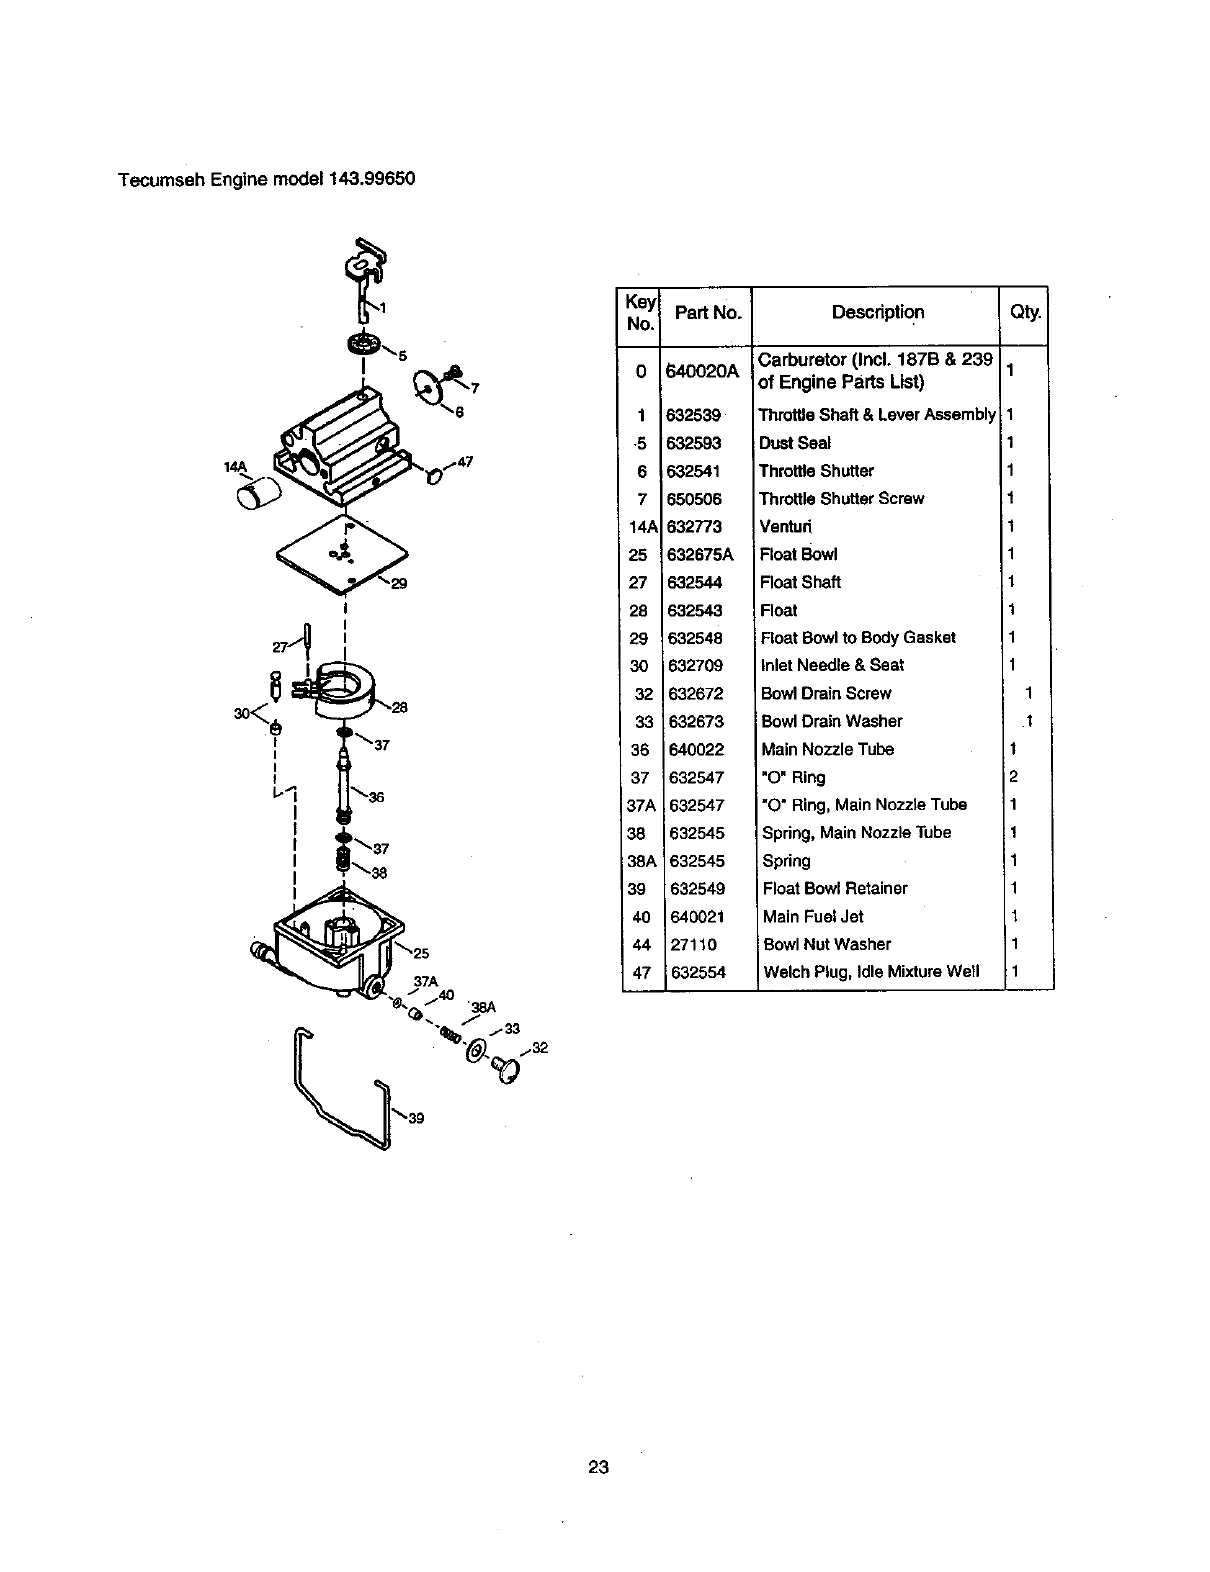
Tecumseh Engine model 143.99650
14A
I
I
I
37A
Kay
No.
0
1
.5
6
7
14A
25
27
28
29
3O
32
33
36
37
37A
38
38A
39
40
44
47
Pa_ No.
640020A
632539
632593
632541
650506
632773
632675A
632544
632543
632548
i632709
632672
632673
640022
632547
632547
632545
632545
632549
640021
27110
632554
Description
Carburetor (Incl. 187B & 239
of Engine Parts List)
ThrottleShaft & LeverAssembly
DustSeal
Throt6e Shutter
Throttle ShutterScrew
Ventud
Float Bowl
FloatShaft
Float
Float Bowl to BodyGasket
Inlet Needle & Seat
BowlDrain Screw
BowlDrain Washer
Main Nozzle Tube
"O" Ring
=O°Ring,Main Nozzle Tube
Spring, Main Nozzle Tube
Spring
Float Bowl Retainer
Main Fuel Jet
BowlNut Washer
Welch Plug, Idle Mixture Wetl
aty.
1
1
1
1
1
1
1
1
1
I
2
1
1
1
1
1
1
1
23
Tecumseh Engine model 143.99650
_370K 39O
292_'I
/
292 261
3O0
_g_
310
307
,12C 416
t
277
240,
35O
\245/"
251
12
45
187A
\239 38O
177 83_,_
41
42
4O
75
24
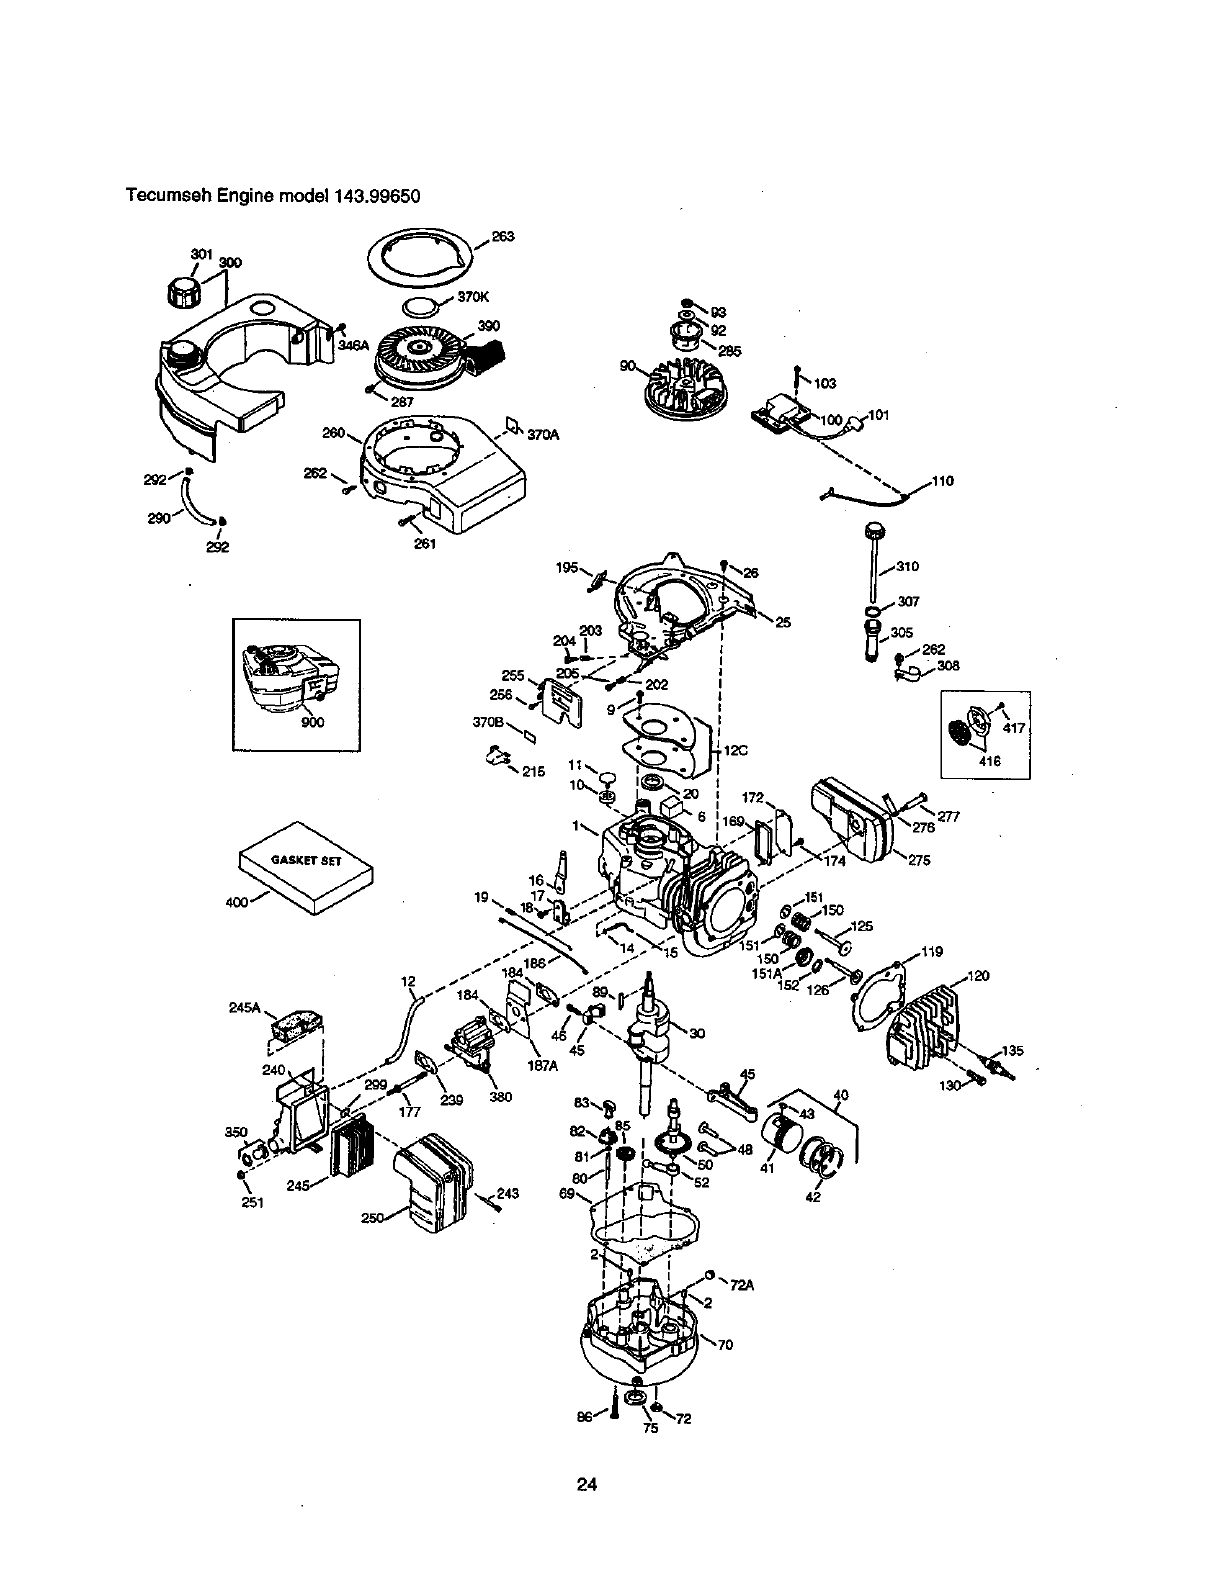
TecumsehEnginemodel143.99650
Key
No.
0
0
2
6
9
10
11
12
12
14
116
16
17
i2°
25
26
30
40
40
41
41
42
42
43
45
46
48
50
52
89
70
72
72A
75
80
81
82
83
85
Part No. Description
RPM High 3100 to 3400
RPM Low2000 to 2300
36177
27652
36059
590566
36002
36003A
32447
36005A
28277
36O06
36008
31335
651018
36103
36010
36145
650802
36180
40004
40005
36070
36071
40006
40007
20381
36023A
32610A
36030
36031A
29914
36032A
37271
36083
28483
36010
30574A
30590A
30591
36057
36O34
Cylinder(Incl. 2,10,12,20 & 125)
Dowel Pin
BreatherElement
Screw, 10-24 x3/4"
BreatherValve Body
Check Valve
BreatherTube
Breather Cover & Gasket
Washer
GovernorRod (Machined)
GovernorLever
GovemorLever Clamp
Screw, Torx3"-15,8-32 x 19/64"
GovernorSpdng
Oil Seal
BlowerHousingBaffle(Jnc1.195)
Screw,114-20 x 5/8"
Crankshaft
Piston,F_n,RingSet (Std.)
Piston,Pin,RingSet (.010 OS)
Piston& PinAss'y.(Std.)(Incl. 43)
Piston&Pin Ass'y.(.010 OS)(Incf.43):
Ring Set (Std.)
Ring Set (.010 OS)
P_stonPin RetainingRing
ConnectingRod Ass'y.(Incl. 46)
ConnectingRod Bolt
Valve Lifter
Camshaft (MCR)
Oit Pump Ass'y.
MountingFlangeGasket
MountingFlange (Incl.72 thin 86)
Oil Drain Plug
Oil Drain Plug
Oil Seal
GovernorShaft
Washer
Governor Gear Ass'y.(IncL81)
GovernorSpool
idlerGear
Qty.
1
2
1
3
1
1
1
1
1
1
1
1
1
1
1
1
3
1
1
1
1
1
1
1
2
1
2
2
1
1
1
1
1
1
1
1
1
1
1
1
Key
No. Part No.
86 650924
89 611154
90 611170
92 650815
93 650816
100 34443S
101 610118
103 651007
110 36230
119 36061
120 36187
125 36471
125 36472
126 29314C
130 6021A
135 35395
160 31672
151 31673
161A 40016A
152 37075
169 27234A
172 32755
174 30200
177 650925A
184 36183
166 36009
187A 37136
195 610973
202 36482
203 31342
204 651029
205 651030
215 36051
239 36048
240 36044B
243 650899
245 36046
245A 36102
250 36047
251 650928
285 36110
256 650983
Description
Screw, 1/4-20 x 1-9/16"
FlywheelKey
Flywheel
BstlevilleWasher
FlywheelNut
Solid State Ignition
Spark Plug Cover
Screw,TorxT-15, 10-24 x 15/16"
GroundWire
CylinderHead Gasket
CylinderHead
ExhaustValve (Std.) (IncL 161)
ExhaustValve (1/32"OS)
intakeValve (Std.) (Incl. 161)
Screw,5/16-18 x 1-1/2"
ResistorSpark Plug (RJ19LM)
Valve Spdng
LowerValve SpdngCap
IntakeValveSeal
"O'-Ring
ValveSpringBoxGasket
Valve SpringBoxCover
Screw,10-24 x 9/16"
CarburetorMountingStud
CarburetorGasket
GovernorLink
AirBaffle
TerminalAss'y.
CompressionSpdng
CompressionSpdng
Screw,To_xT-10, 5-40 x 7/16"
Screw,TorxT-10, 6-32 x 17132"
ControlKnob
Carburetorto AirCleaner Gasket
AirCleaner Body(IncL239,299&
350)
Screw,10-32 x 2-3/32"
AirCleaner Filter
Air Cleaner Filter
Air CleanerCover
LockNut 1/4-20
Control Plate
Screw,8-32 x 17/32"
7
1
1
1
1
1
1
2
1
1
1
1
1
1
7
1
2
2
1
1
1
1
2
2
2
1
1
1
1
1
1
1
1
1
1
1
-1
1
12
Tablecontinuedinnextpage
25

Tecumseh Engine model 143.99650
Table continued
Key Part No.
No.
260 36038
261 650929
262 650737
263 36108
275 36107
276 36043
277 650927
285 34449A
287 650926
290 34357
292 26460
299 650900
300 36066
301 36246
305 36063
307 35499
308 36040
310 36147
346A 28763
350 36045A
370A 36261
370B 36530
370K 36695
380 640020A
390 590737
400
416
417
900
900
Description Qty.
BlowerHousing 1
Screw,1/4-20 x 11/16" 1
Screw, 114-20x 1_" 3
TrimRing 1
Muffler 1
LockingPlate 1
Screw, 5/16-18 x 2-11/32" 2
StarterCup 1
Screw, 8-32 x 21/64" 2
Fuel Line 1
Fuel Line Clamp 2
"U"Type Nut Clip 1
Fuel Tank(Incl. 301) 1
Fuel Cap 1
Oil FillTube 1
0 Ring 1
FillTube Clip 1
Dipstick 1
Screw,10-32 x 35/64' 2
Primer 1
LubricationDecal 1
ControlDecal 1
StarterDecal 1
Carburetor 1
RewindStarter 1
Note:This enginecouldhavebeen builtwith
590694 starter.
36062D Gasket Set
Note: Includes items 27234A, 28833, 36005A,
36032A, 36061, 37136, 696088.
36085 Spark Arrestor Kit (Optional)
650760 Screw, 8-32 x 3/8" (Optional)
0 Replacement Engine none,order
from 71-999
0 Replacement S/B 750850, order
from 71-999
1
1
0
26
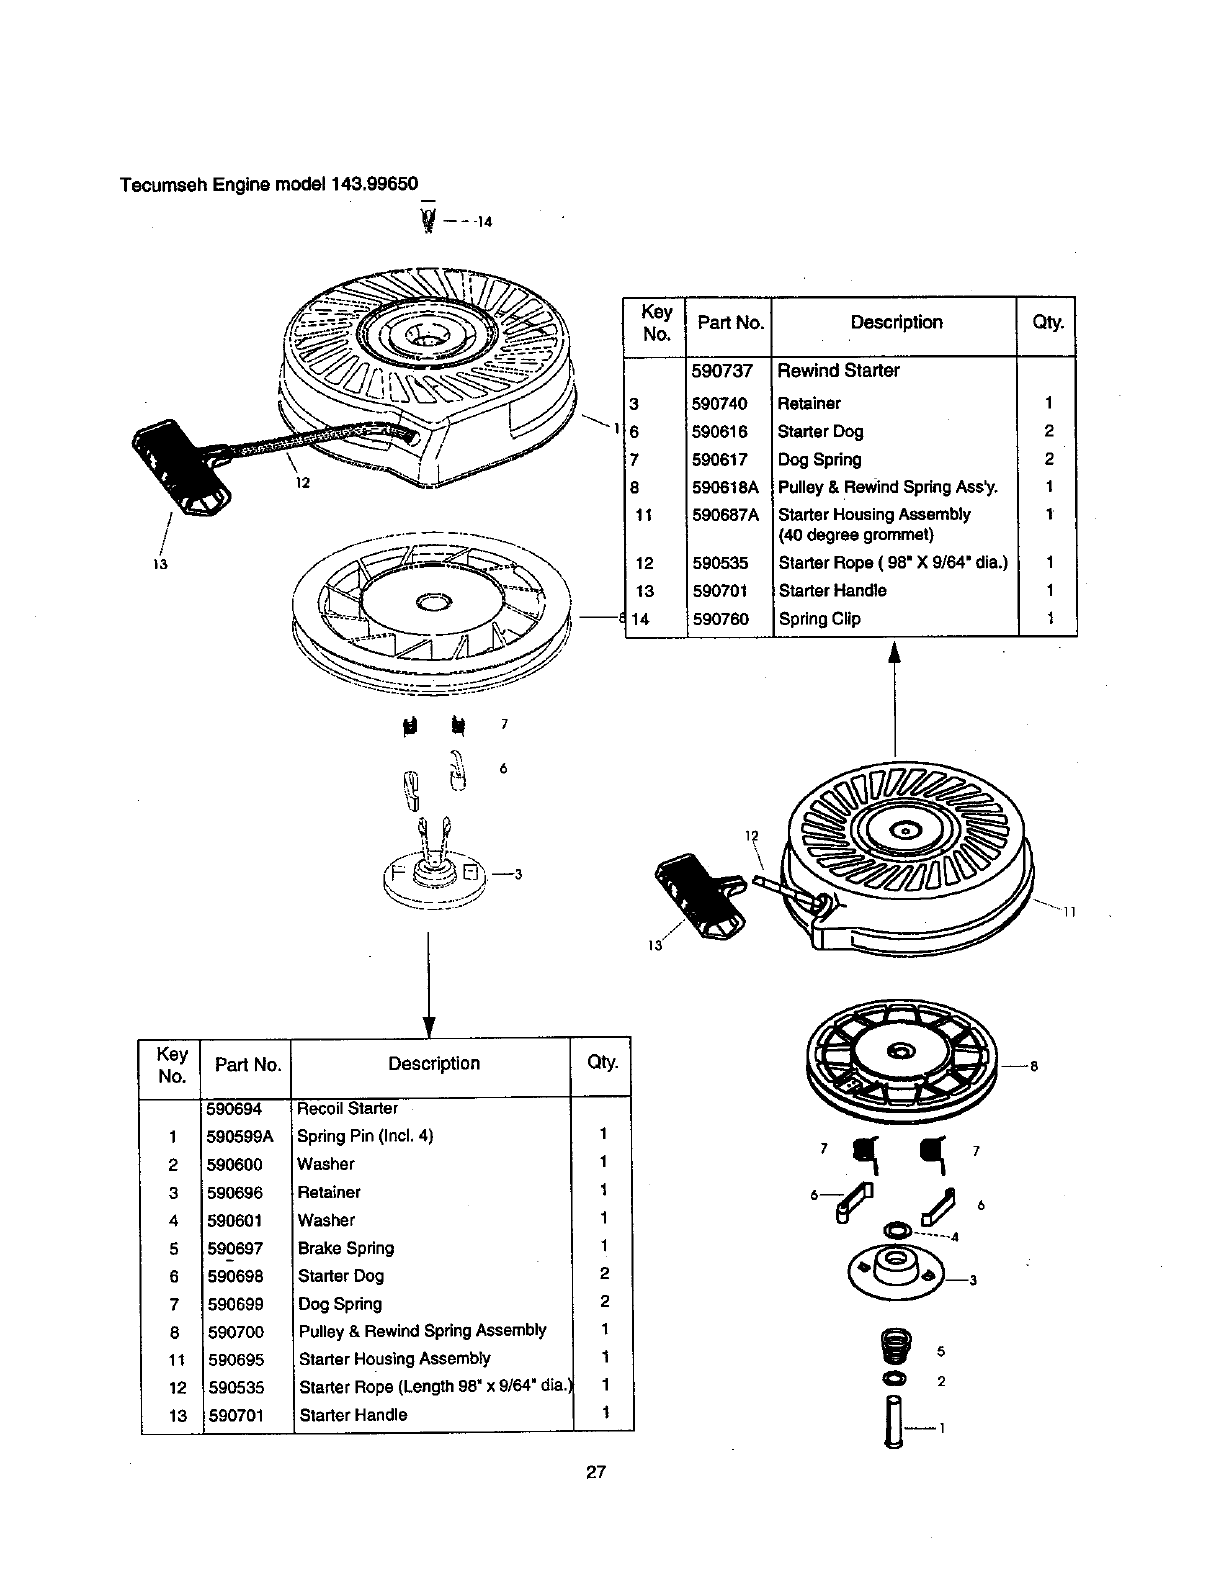
Tecumseh Engine model 143.99650
'!_-- - -14
Key Part No. Description Qty.
No.
590737 Rewind Starter
3 590740 IRetainer
6 590616 Starter Dog
7 590617 Dog Spring
8 590618A Pulley & Rewind SpringAss_'.
11 590687A StarterHousingAssembly
(40 degree grommet)
12 590535 StarterRope ( 98" X 9/64" dia.)
13 590701 StarterHandle
14 590760 SpringClip
1
2
2
1
1
1
1
1
13J'
Key Part No.
No.
1
2
3
4
5
6
7
8
11
12
13
590694
590599A
590600
i590696
590601
i90697
590698
590699
590700
590695
590535
590701
Description Qty.
RecoilStarter
Spring Pin (Incl. 4) 1
Washer 1
Retainer 1
Washer 1
Brake Spring 1
StarterDog 2
Dog Spring 2
Pulley & Rewind SpringAssembly 1
Starter HousingAssembly 1
Starter Rope (Length98Nx 9/64" dia 1
Starter Handle 1
27
5
For in-home major brand repair service:
Call 24 hours a day, 7 days a week
1-800-4-MY-HOME (1-800-469-4663)
Para pedlr servicio de reparaci6n a domlcilio m1-600-676-5811
In Canada for all your service and parts needs call 1-800-665-4455
Au Canada pour tout le service ou les pi_ces 1-800-665-4455
For the repair or replacement parts you need:
Call 7 am -7 pm, 7 days a week
1-800-366-PART (1-800-366-7278)
Para ordenar piezae con entrega a domlcilio m1-800-659-7084
For the location of a Sears Parts and Repair Center in your area:
Call 24 hours a day, 7 days a week
1-800-488-1222
For Information on purchasing a Sears Maintenance Agreement
or to Inquire about an existing Agreement:
Call 9 am - 5 pro, Monday -Saturday
1-800-827-6655
omeCentral
TheServiceSideof Sears"
