Craftsman 247887821 User Manual SNOW THROWER Manuals And Guides 1306521L
User Manual: Craftsman 247887821 247887821 CRAFTSMAN SNOW THROWER - Manuals and Guides View the owners manual for your CRAFTSMAN SNOW THROWER #247887821. Home:Lawn & Garden Parts:Craftsman Parts:Craftsman SNOW THROWER Manual
Open the PDF directly: View PDF ![]() .
.
Page Count: 64
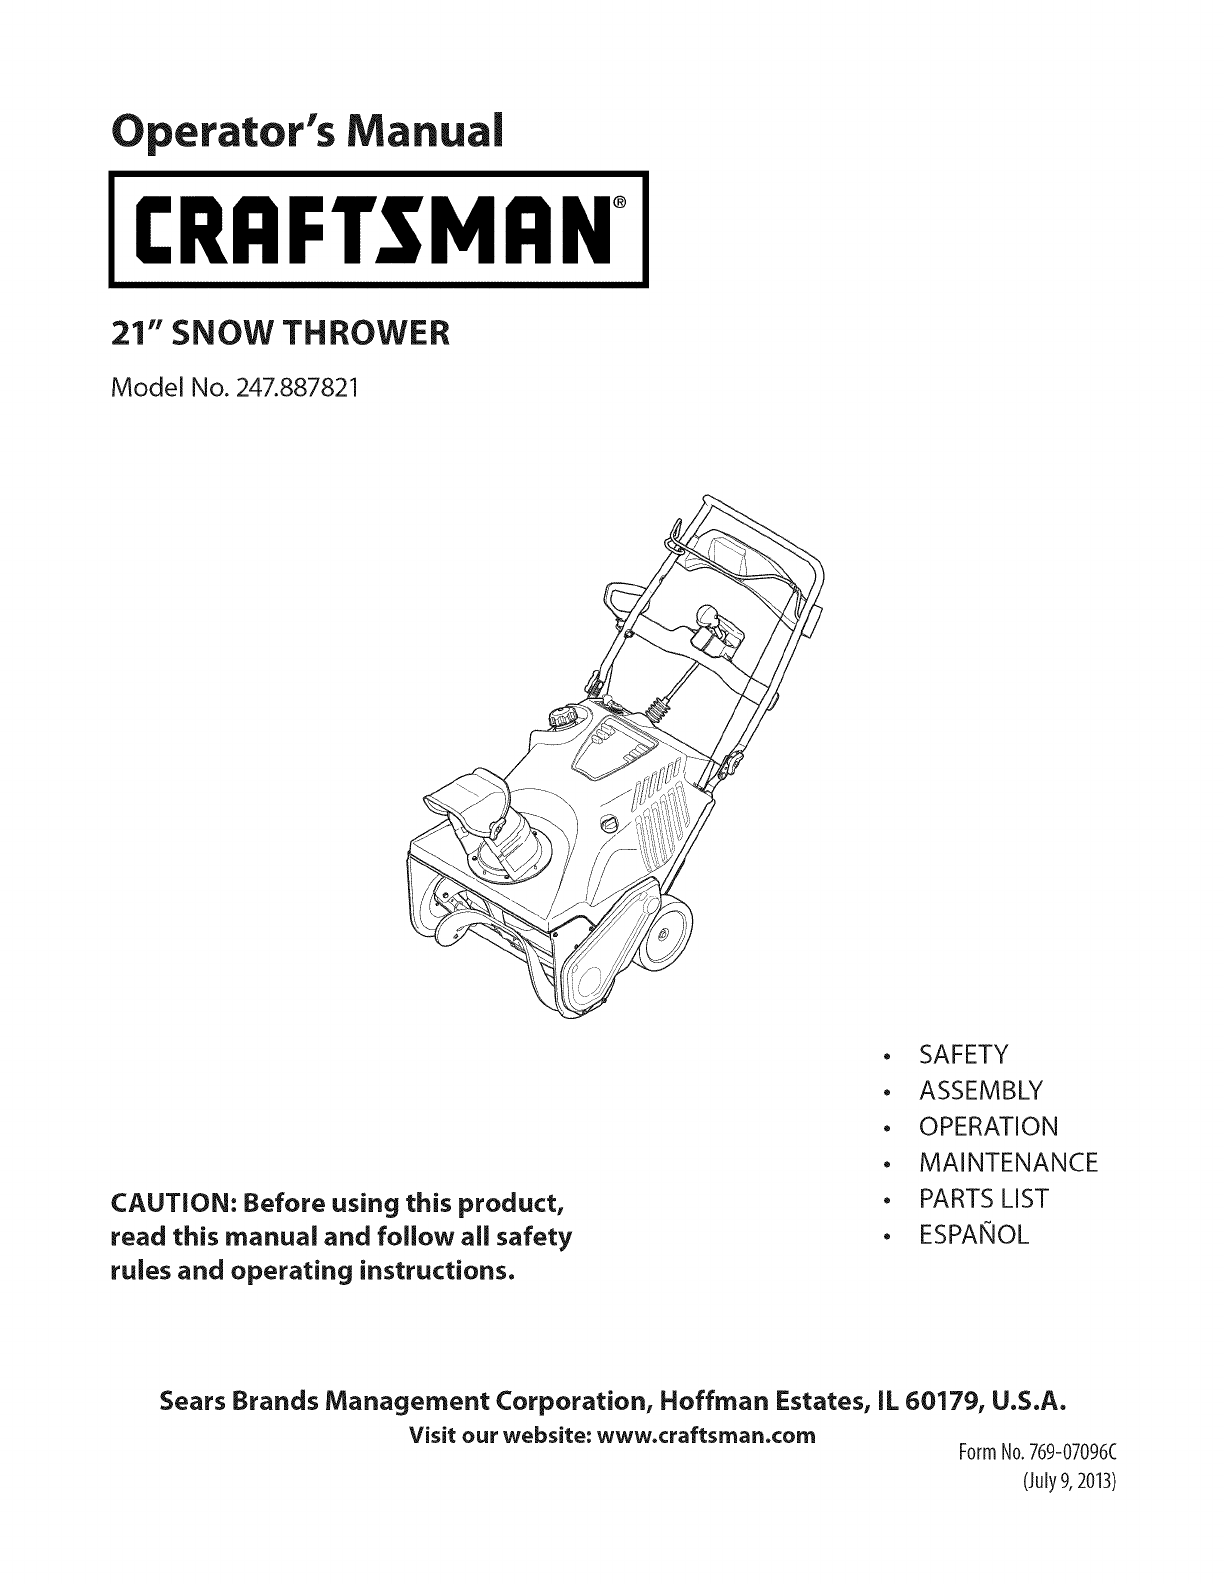
Operator's Manual
I:RRFrSMRN°
21" SNOW THROWER
Model No. 247.887821
CAUTION: Before using this product,
read this manual and follow all safety
rules and operating instructions.
•SAFETY
•ASSEMBLY
•OPERATION
•MAINTENANCE
•PARTS LIST
•ESPANOL
Sears Brands Management Corporation, Hoffman Estates, IL 60179, U.S.A.
Visit our website: www.craftsman.com FormNo.769-07096C
(JuLy9, 2013)
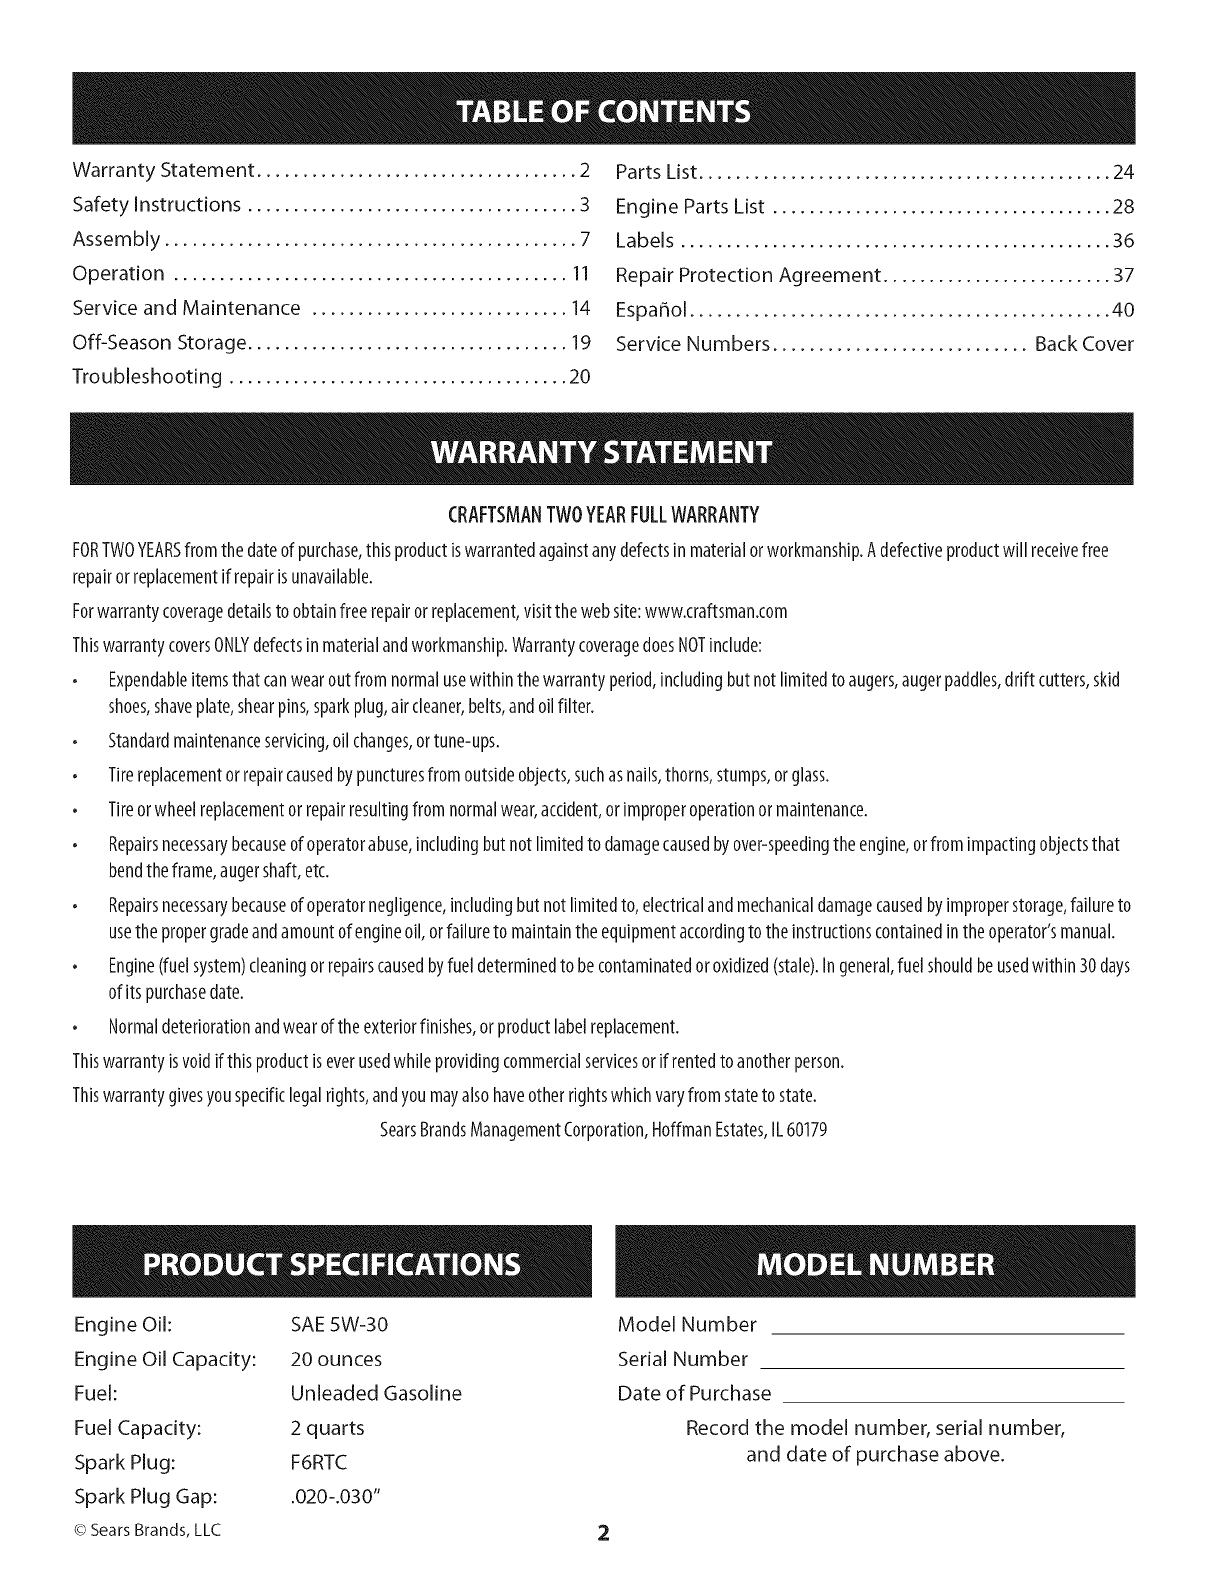
Warranty Statement ................................... 2
Safety Instructions .................................... 3
Assembly ............................................. 7
Operation ........................................... 11
Service and Maintenance ............................ 14
Off-Season Storage ................................... 19
Troubleshooting ..................................... 20
Parts List ............................................. 24
Engine Parts List ..................................... 28
Labels ............................................... 36
Repair Protection Agreement ......................... 37
Espa_ol .............................................. 40
Service Numbers ............................ Back Cover
CRAFTSMANTWOYEARFULLWARRANTY
FORTWOYEARSfromthedateof purchase,thisproductiswarrantedagainstanydefectsinmaterialorworkmanship.Adefectiveproductwill receivefree
repairorreplacementif repairisunavailable.
Forwarrantycoveragedetailsto obtainfreerepairorreplacement,visitthewebsite:www.craftsman.com
ThiswarrantycoversONLYdefectsinmaterialandworkmanship.WarrantycoveragedoesNOTinclude:
• Expendableitemsthatcanwearoutfromnormalusewithinthewarrantyperiod,includingbutnot limitedto augers,augerpaddles,drift cutters,skid
shoes,shaveplate,shearpins,sparkplug,aircleaner,belts,andoilfilter.
• Standardmaintenanceservicing,oilchanges,ortune-ups.
• Tirereplacementorrepaircausedbypuncturesfromoutsideobjects,suchasnails,thorns,stumps,orglass.
• Tireorwheelreplacementorrepairresultingfromnormalwear,accident,orimproperoperationormaintenance.
• Repairsnecessarybecauseofoperatorabuse,includingbutnot limitedto damagecausedbyover-speedingtheengine,orfromimpactingobjectsthat
bendtheframe,augershaft,etc.
• Repairsnecessarybecauseofoperatornegligence,includingbutnot limitedto,electricalandmechanicaldamagecausedbyimproperstorage,failureto
usethepropergradeandamountofengineoil,orfailureto maintaintheequipmentaccordingto theinstructionscontainedinthe operator'smanual.
• Engine(fuelsystem)cleaningorrepairscausedbyfueldeterminedto becontaminatedoroxidized(stale).ingeneral,fuelshouldbeusedwithin30days
ofitspurchasedate.
• Normaldeteriorationandwearoftheexteriorfinishes,orproductlabelreplacement.
Thiswarrantyisvoidif thisproductiseverusedwhileprovidingcommercialservicesorif rentedto anotherperson.
Thiswarrantygivesyouspecificlegalrights,andyoumayalsohaveotherrightswhichvaryfromstateto state.
SearsBrandsManagementCorporation,NoffmanEstates,IL60179
Engine Oil: SAE 5W-30
Engine Oil Capacity: 20 ounces
Fuel: Unleaded Gasoline
Fuel Capacity: 2 quarts
Spark Plug: F6RTC
Spark Plug Gap: .020-.030"
© Sears Brands, LLC
Model Number
Serial Number
Date of Purchase
Record the model number, serial number,
and date of purchase above.
2
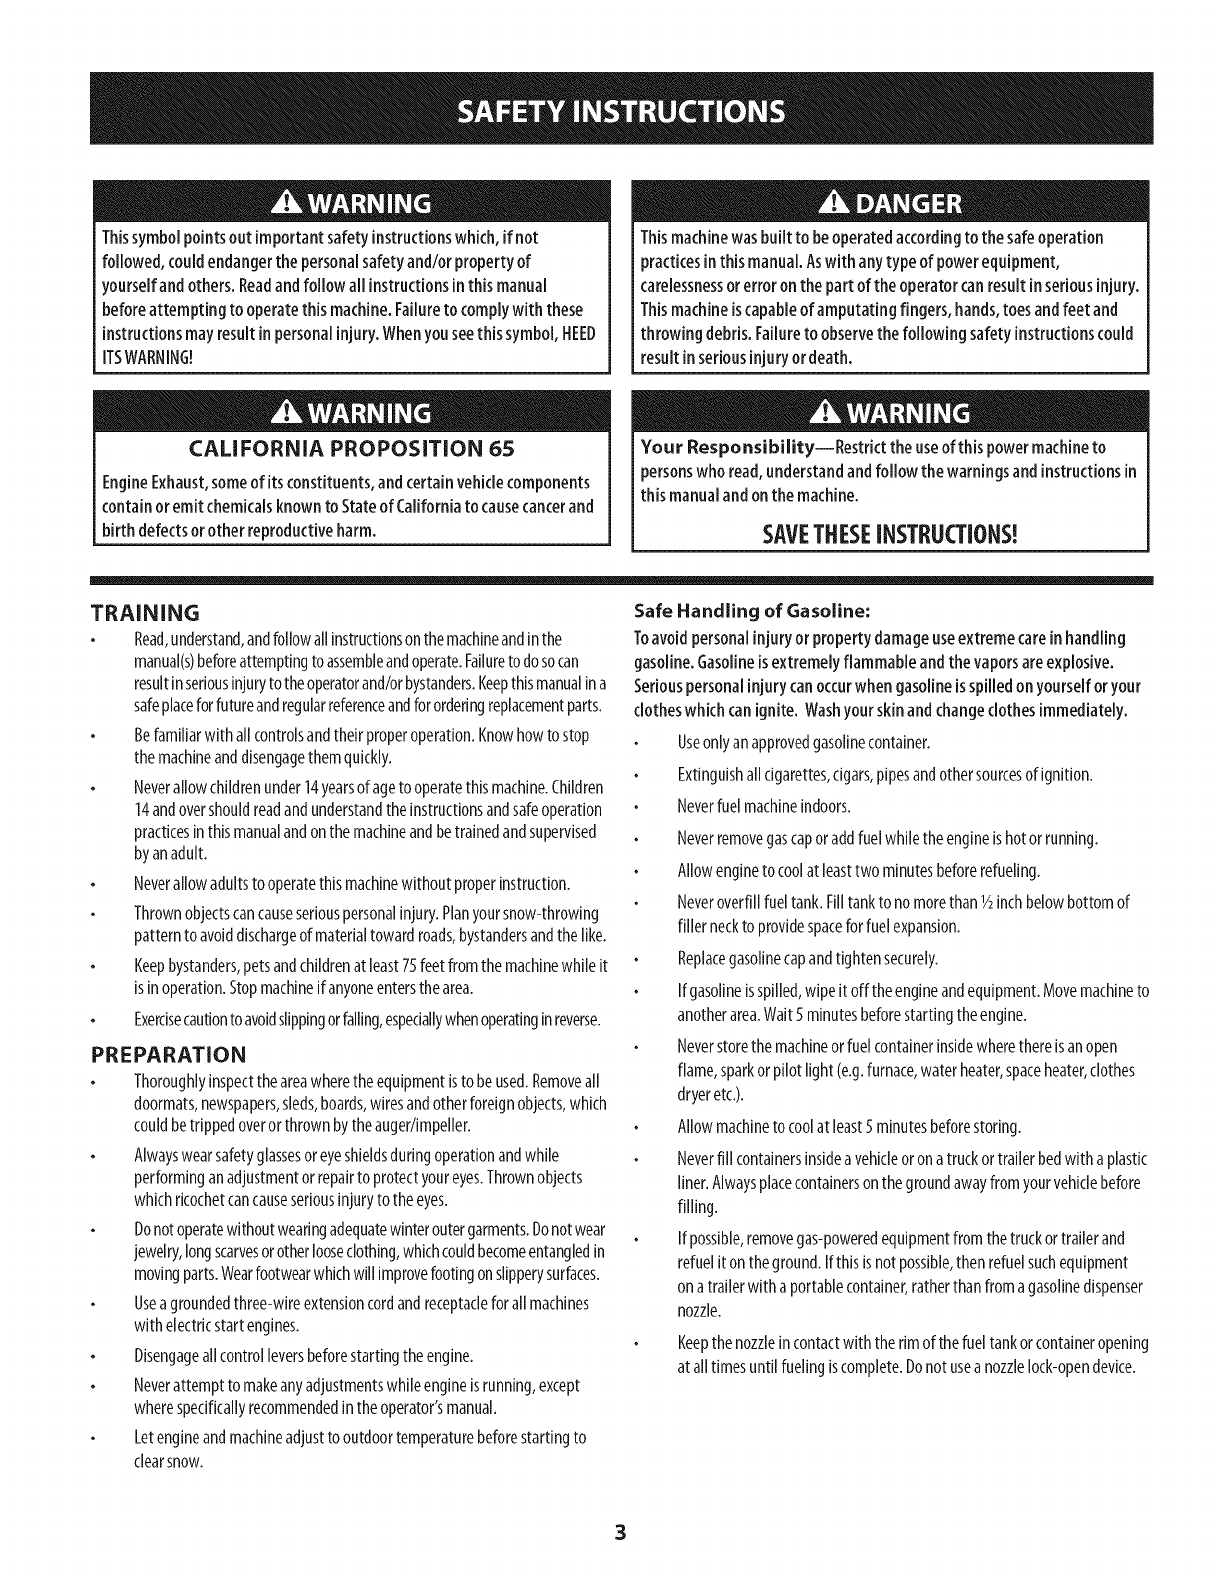
Thissymbolpointsout importantsafety instructionswhich, if not
followed, couldendangerthe personalsafetyand/or property of
yourselfand others.Readandfollow all instructions inthis manual
beforeattempting to operatethis machine.Failureto complywith these
instructionsmayresultinpersonalinjury.Whenyou seethis symbol, HEED
ITSWARNING!
CALIFORNIA PROPOSITION 65
EngineExhaust,someof its constituents,and certainvehiclecomponents
containor emit chemicalsknownto Stateof Californiato causecancerand
birth defectsorother reproductiveharm.
Thismachinewasbuilt to beoperatedaccordingto the safeoperation
practicesinthis manual.Aswith anytype of powerequipment,
carelessnessorerroron the part of the operatorcanresultinseriousinjury.
Thismachineiscapableof amputating fingers, hands,toesandfeet and
throwingdebris.Failureto observethefollowing safety instructionscould
resultinseriousinjuryor death.
Your Responsibility--Restrict theuseof this powermachineto
personswhoread,understandandfollow thewarningsand instructionsin
this manualandonthe machine.
SAVETHESEINSTRUCTIONS!
TRAINING
Read,understand,andfollowallinstructionsonthemachineandinthe
manual(s)beforeattemptingto assembleandoperate.Failureto dosocan
resultinseriousinjuryto theoperatorand/orbystanders.Keepthismanualina
safeplaceforfutureandregularreferenceandfororderingreplacementparts.
Befamiliarwith allcontrolsandtheir properoperation.Knowhowto stop
themachineanddisengagethemquickly.
Neverallowchildrenunder14yearsof ageto operatethis machine.Children
14andovershouldreadandunderstandtheinstructionsandsafeoperation
practicesinthis manualandonthemachineandbetrainedandsupervised
byanadult.
Neverallowadultsto operatethismachinewithout properinstruction.
Thrownobjectscancauseseriouspersonalinjury.Planyoursnow-throwing
patternto avoiddischargeof materialtowardroads,bystandersandthelike.
Keepbystanders,petsandchildrenat least75feetfromthemachinewhileit
isin operation.Stopmachineif anyoneentersthearea.
Exercisecautionto avoidslippingorfalling,especiallywhenoperatinginreverse.
PREPARATION
Thoroughlyinspecttheareawherethe equipmentisto beused.Removeall
doormats,newspapers,sleds,boards,wiresandotherforeignobjects,which
couldbetrippedoverorthrownbytheauger/impeller.
Alwayswearsafetyglassesoreyeshieldsduringoperationandwhile
performinganadjustmentor repairto protectyoureyes.Thrownobjects
whichricochetcancauseseriousinjuryto theeyes.
Donotoperatewithoutwearingadequatewinteroutergarments.Donotwear
jewelry,longscarvesorotherlooseclothing,whichcouldbecomeentangledin
movingparts.Wearfootwearwhichwill improvefootingonslipperysurfaces.
Usea groundedthree-wkeextensioncordandreceptacleforallmachines
with electricstartengines.
Disengageallcontrolleversbeforestartingtheengine.
Neverattemptto makeanyadjustmentswhileengineisrunning,except
wherespecificallyrecommendedintheoperator'smanual.
Letengineandmachineadjustto outdoortemperaturebeforestartingto
clearsnow.
Safe Handling of Gasoline:
Toavoidpersonalinjuryor property damageuseextreme careinhandling
gasoline.Gasolineisextremely flammable andthe vaporsareexplosive.
Seriouspersonalinjurycanoccurwhen gasolineis spilledon yourselforyour
clotheswhich canignite. Washyourskinandchangeclothesimmediately.
Useonlyanapprovedgasolinecontainer.
Extinguishall cigarettes,cigars,pipesandothersourcesofignition.
Neverfuel machineindoors.
Neverremovegascaporaddfuelwhiletheengineishotorrunning.
Allowengineto coolat leasttwo minutesbeforerefueling.
Neveroverfillfueltank.Filltankto nomorethan1/2inchbelowbottomof
filler neckto providespaceforfuelexpansion.
Replacegasolinecapandtightensecurely.
Ifgasolineisspilled,wipeit offtheengineandequipment.Movemachineto
anotherarea.Wait5 minutesbeforestartingtheengine.
Neverstorethemachineorfuel containerinsidewherethereisanopen
flame,sparkorpilot light (e.g.furnace,waterheater,spaceheater,clothes
dryeretc.).
Allowmachineto coolat least5 minutesbeforestoring.
Neverfill containersinsidea vehicleorona truckortrailerbedwitha plastic
liner.Alwaysplacecontainersonthegroundawayfromyourvehiclebefore
filling.
Ifpossible,removegas-poweredequipmentfromthetruckortrailerand
refuelit ontheground.Ifthis isnotpossible,then refuelsuchequipment
onatrailerwith a portablecontainer,ratherthanfromagasolinedispenser
nozzle.
Keepthenozzleincontactwith therimofthefueltankorcontaineropening
at alltimesuntil fuelingiscomplete.Donotusea nozzlelock-opendevice.
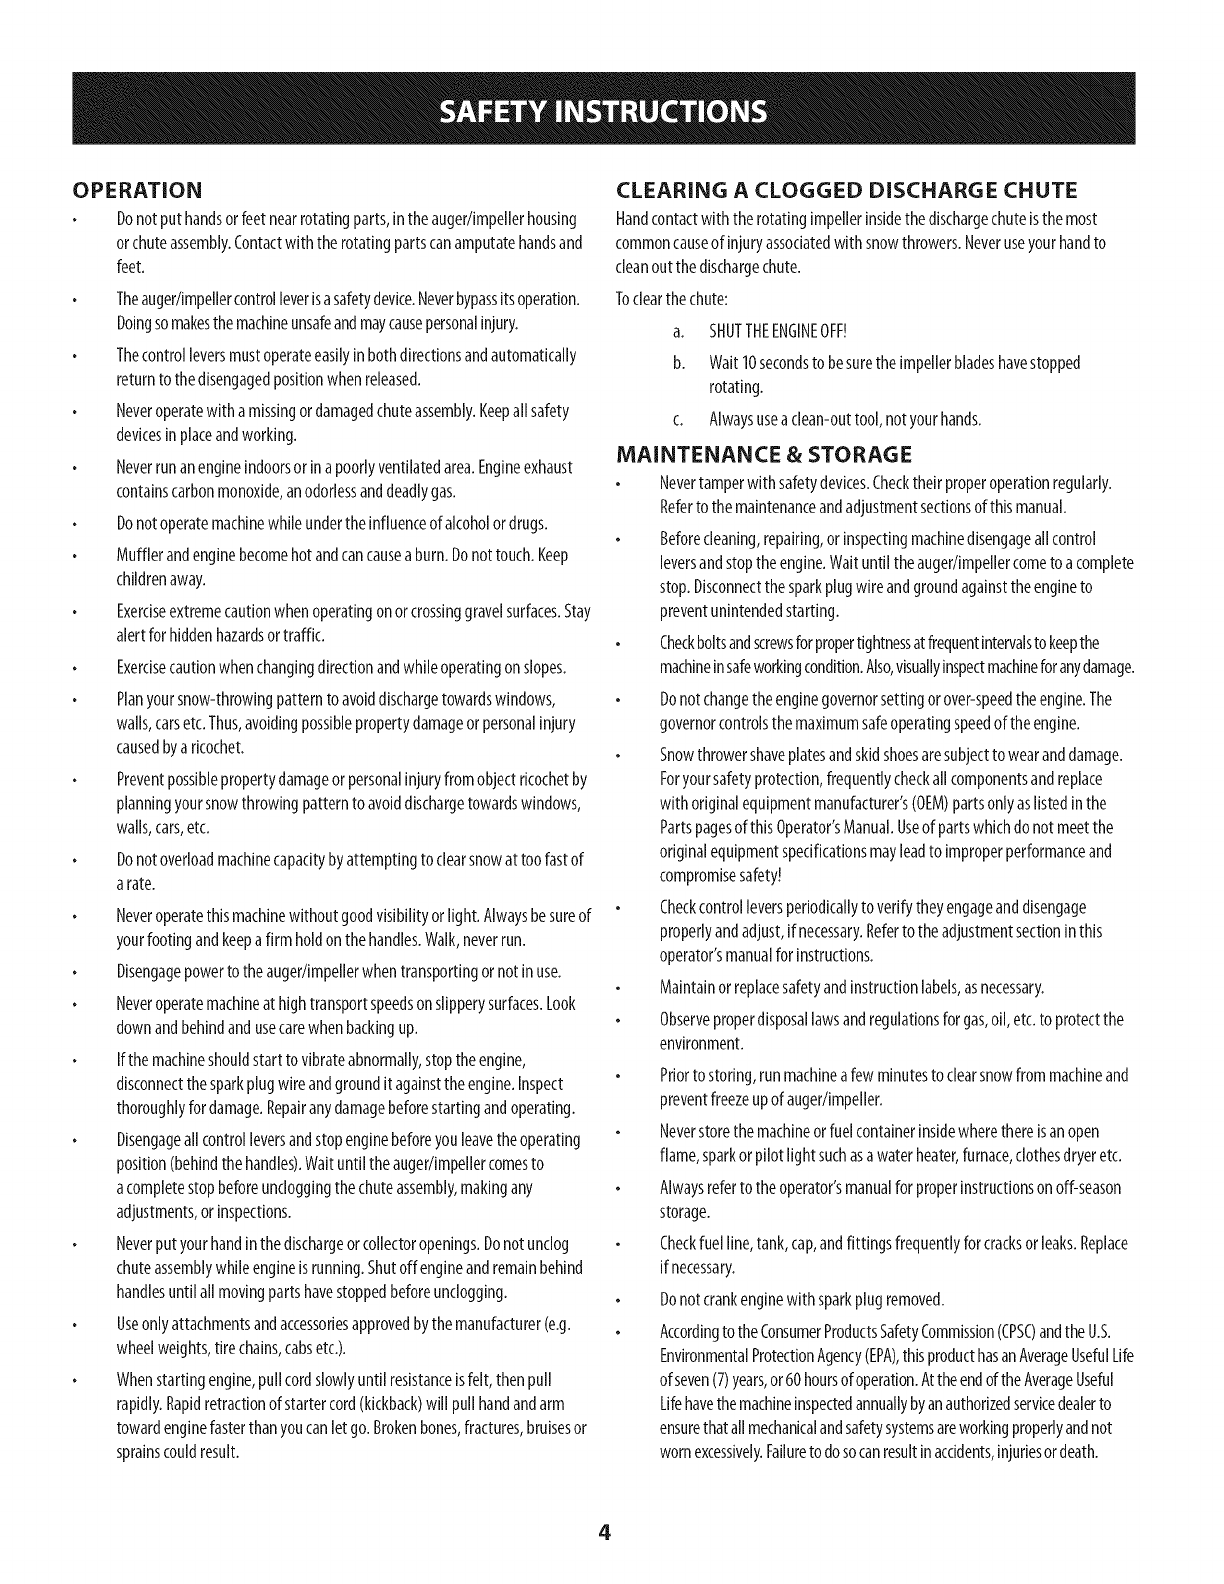
OPERATION
Donotputhandsorfeetnearrotatingparts,intheauger/impellerhousing
orchuteassembly.Contactwith therotatingpartscanamputatehandsand
feet.
Theauger/impellercontrolleverisasafetydevice.Neverbypassitsoperation.
Doingsomakesthemachineunsafeandmaycausepersonalinjury.
Thecontrolleversmustoperateeasilyin bothdirectionsandautomatically
returnto thedisengagedpositionwhenreleased.
Neveroperatewith amissingordamagedchuteassembly.Keepallsafety
devicesinplaceandworking.
Neverrunanengineindoorsor inapoorlyventilatedarea.Engineexhaust
containscarbonmonoxide,anodorlessanddeadlygas.
Donotoperatemachinewhileundertheinfluenceof alcoholor drugs.
Mufflerandenginebecomehotandcancauseaburn.Donottouch.Keep
childrenaway.
Exerciseextremecautionwhenoperatingonorcrossinggravelsurfaces.Stay
alertforhiddenhazardsortraffic.
Exercisecautionwhenchangingdirectionandwhileoperatingonslopes.
Planyoursnow-throwingpatternto avoiddischargetowardswindows,
walls,carsetc.Thus,avoidingpossiblepropertydamageorpersonalinjury
causedbyaricochet.
Preventpossiblepropertydamageorpersonalinjuryfromobjectricochetby
planningyoursnowthrowingpatternto avoiddischargetowardswindows,
walls,cars,etc.
Donotoverloadmachinecapacitybyattemptingto clearsnowat too fastof
arate.
Neveroperatethismachinewithoutgoodvisibilityorlight. Alwaysbesureof
yourfootingandkeepafirm holdonthehandles.Walk,neverrun.
Disengagepowerto the auger/impellerwhentransportingor notinuse.
Neveroperatemachineat hightransportspeedsonslipperysurfaces.Look
downandbehindandusecarewhenbackingup.
If the machineshouldstartto vibrateabnormally,stoptheengine,
disconnectthesparkplugwire andgrounditagainsttheengine.Inspect
thoroughlyfordamage.Repairanydamagebeforestartingandoperating.
Disengageallcontrolleversandstopenginebeforeyouleavetheoperating
position(behindthehandles).Waituntil theauger/impellercomesto
acompletestopbeforeuncloggingthechuteassembly,makingany
adjustments,orinspections.
Neverputyourhandinthedischargeorcollectoropenings.Donotunclog
chuteassemblywhileengineisrunning.Shutoff engineandremainbehind
handlesuntil allmovingpartshavestoppedbeforeunclogging.
Useonlyattachmentsandaccessoriesapprovedbythemanufacturer(e.g.
wheelweights,tirechains,cabsetc.).
Whenstartingengine,pullcordslowlyuntil resistanceisfelt, then pull
rapidly.Rapidretractionof startercord(kickback)will pullhandandarm
towardenginefasterthanyoucanlet go.Brokenbones,fractures,bruisesor
sprainscouldresult.
CLEARING A CLOGGED DISCHARGE CHUTE
Handcontactwith therotatingimpellerinsidethedischargechuteisthemost
commoncauseof injuryassociatedwith snowthrowers.Neveruseyourhandto
cleanoutthedischargechute.
Toclearthechute:
a. SHUTTHEENGINEOFF!
b. Wait10secondsto besuretheimpellerbladeshavestopped
rotating.
c. Alwaysuseaclean-outtool,notyourhands.
MAINTENANCE &STORAGE
Nevertamperwith safetydevices.Checktheirproperoperationregularly.
Referto themaintenanceandadjustmentsectionsof thismanual.
Beforecleaning,repairing,orinspectingmachinedisengageallcontrol
leversandstoptheengine.Waituntil theauger/impellercometo acomplete
stop.Disconnectthesparkplugwire andgroundagainstthe engineto
preventunintendedstarting.
Checkboltsandscrewsforpropertightnessatfrequentintervalsto keepthe
machineinsafeworkingcondition.Also,visuallyinspectmachineforanydamage.
Donotchangetheenginegovernorsettingorover-speedtheengine.The
governorcontrolsthemaximumsafeoperatingspeedof the engine.
Snowthrowershaveplatesandskidshoesaresubjectto wearanddamage.
Foryoursafetyprotection,frequentlycheckallcomponentsandreplace
with originalequipmentmanufacturer's(OEM)partsonlyaslistedinthe
Partspagesofthis Operator'sManual.Useof partswhichdo notmeetthe
originalequipmentspecificationsmayleadto improperperformanceand
compromisesafety!
Checkcontrolleversperiodicallyto verifytheyengageanddisengage
properlyandadjust,if necessary.Referto the adjustmentsectioninthis
operator'smanualfor instructions.
Maintainorreplacesafetyandinstructionlabels,asnecessary.
Observeproperdisposallawsandregulationsforgas,oil,etc.to protectthe
environment.
Priorto storing,runmachineafewminutesto clearsnowfrommachineand
preventfreezeupof auger/impeller.
Neverstorethemachineorfuelcontainerinsidewherethereisanopen
flame,sparkorpilot light suchasa waterheater,furnace,clothesdryeretc.
Alwaysreferto theoperator'smanualforproperinstructionsonoff-season
storage.
Checkfuelline,tank,cap,andfittingsfrequentlyforcracksorleaks.Replace
ifnecessary.
Donotcrankenginewithsparkplugremoved.
Accordingto theConsumerProductsSafetyCommission(CPSC)andthe U.S.
EnvironmentalProtectionAgency(EPA),thisproducthasanAverageUsefulLife
of seven(7)years,or60 hoursofoperation.Attheendof theAverageUseful
Lifehavethemachineinspectedannuallybyanauthorizedservicedealerto
ensurethatallmechanicalandsafetysystemsareworkingproperlyandnot
wornexcessively.Failureto dosocanresultinaccidents,injuriesordeath.
4
DO NOT MODIFY ENGINE
Toavoidseriousinjuryordeath,donot modify engineinanyway.Tampering
with thegovernorsettingcanleadto arunawayengineandcauseit to operate
at unsafespeeds.Nevertamperwith factorysetting of enginegovernor.
NOTICE REGARDING EMiSSiONS
Engineswhich are certifiedto complywith Californiaandfederal EPA
emissionregulationsfor SORE(SmallOff RoadEquipment)arecertified
tooperateonregularunleadedgasoline,and mayincludethefollowing
emissioncontrolsystems:EngineModification (EM),OxidizingCatalyst(0C),
SecondaryAir injection(SAI)andThreeWayCatalyst(TWC)ifsoequipped.
SPARK ARRESTOR
Thismachineisequippedwith aninternalcombustionengineandshould
not beusedon ornearanyunimprovedforest-covered,brushcoveredor
grass-coveredland unlesstheengine'sexhaustsystemisequippedwith a
sparkarrestormeetingapplicable localorstate laws (if any).
Ira sparkarrestorisused,it shouldbemaintainedineffective working order
bytheoperator,intheState of Californiathe aboveisrequiredbylaw (Section
4442of theCaliforniaPublicResourcesCode).Otherstates mayhavesimilar
laws.Federallawsapplyonfederal lands.
Asparkarrestorfor the muffler isavailablethroughyour nearestSearsParts
andRepairServiceCenter.
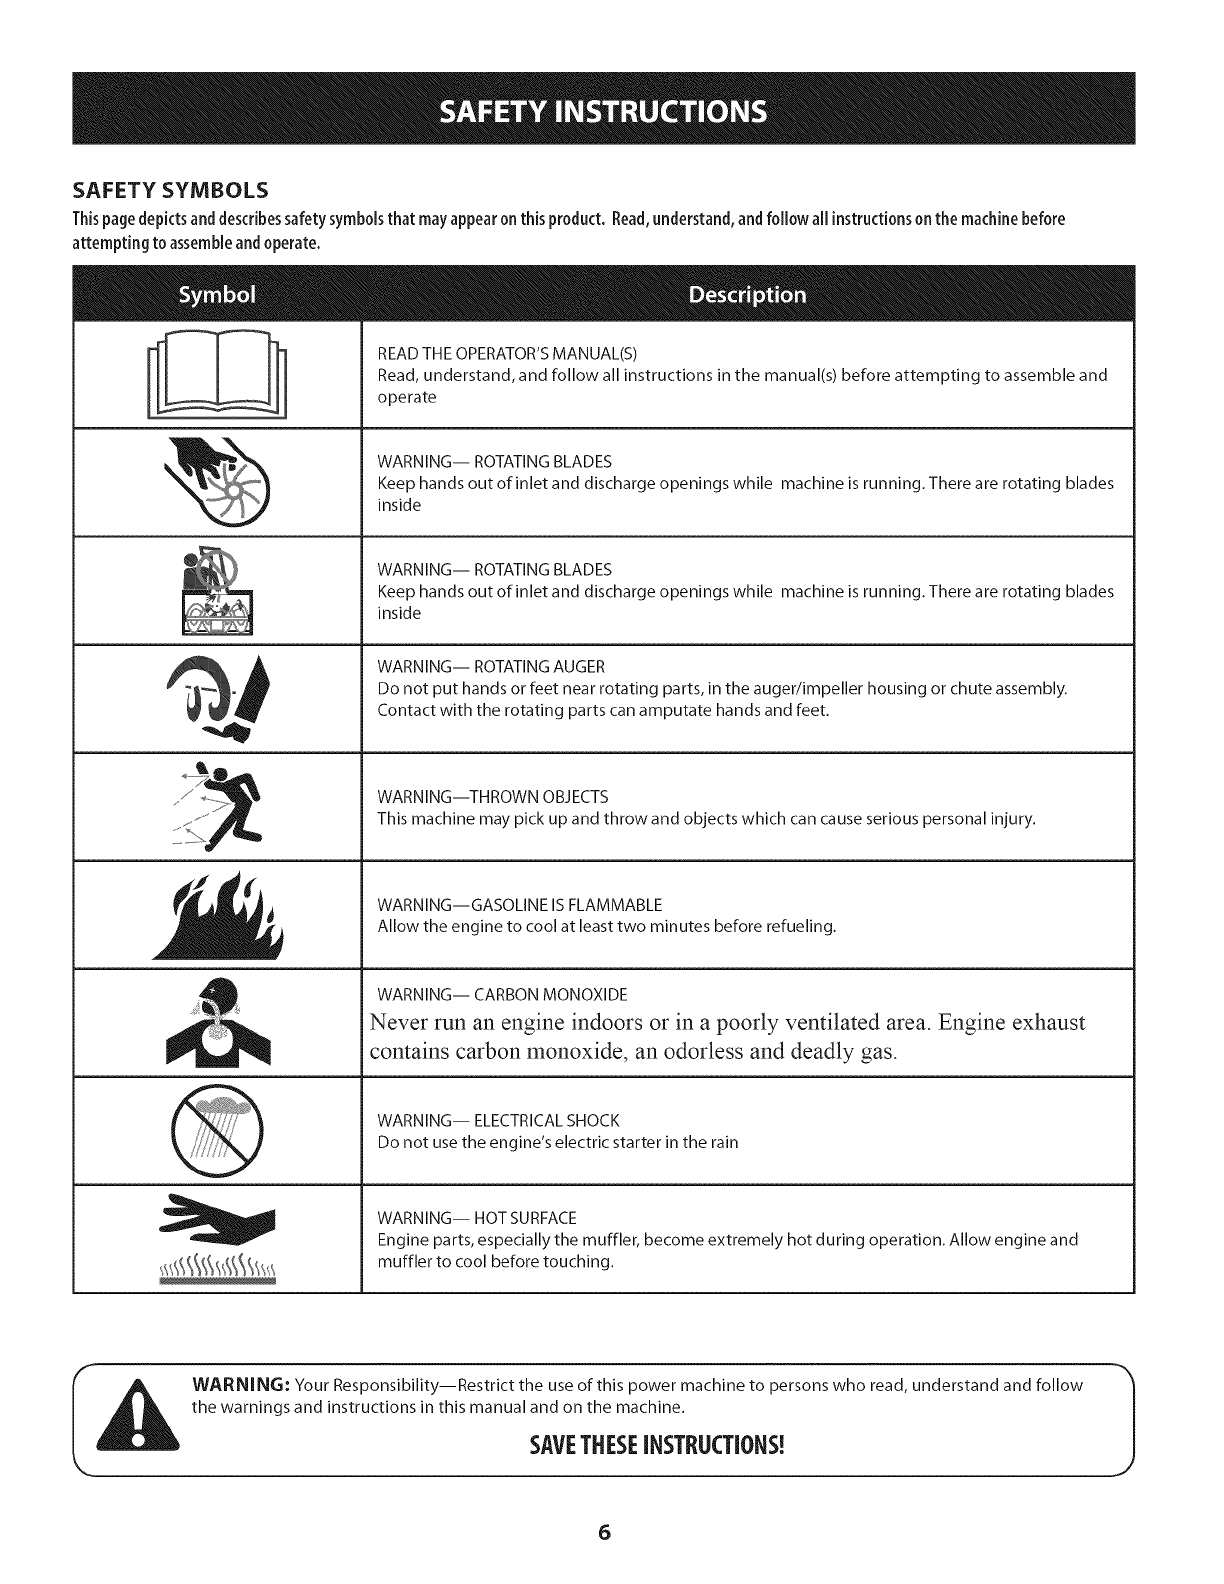
SAFETY SYMBOLS
Thispage depicts and describes safety symbols that may appear on this product. Read, understand, and follow all instructions on the machine before
attempting to assemble and operate.
READ THE OPERATOR'S MANUAL(S)
Read, understand, and follow all instructions in the manual(s) before attempting to assemble and
operate
WARNING-- ROTATING BLADES
Keep hands out of inlet and discharge openings while machine is running. There are rotating blades
inside
WARNING-- ROTATING BLADES
Keep hands out of inlet and discharge openings while machine is running. There are rotating blades
inside
WARNING-- ROTATING AUGER
Do not put hands or feet near rotating parts, in the auger/impeller housing or chute assembly.
Contact with the rotating parts can amputate hands and feet.
WARNING--THROWN OBJECTS
This machine may pick up and throw and objects which can causeserious personal injury.
WARNING--GASOLINE IS FLAMMABLE
Allow the engine to cool at least two minutes before refueling.
WARNING-- CARBON MONOXIDE
Never run an engine indoors or in a poorly ventilated area. Engine exhaust
contains carbon monoxide, an odorless and deadly gas.
WARNING-- ELECTRICAL SHOCK
Do not use the engine's electric starter in the rain
WARNING-- HOT SURFACE
Engine parts, especially the muffler, become extremely hot during operation. Allow engine and
muffler to cool before touching.
WARNING: Your Responsibility--Restrict the use of this power machine to persons who read, understand and follow
the warnings and instructions in this manual and on the machine.
SAVETHESEiNSTRUCTIONS!
6
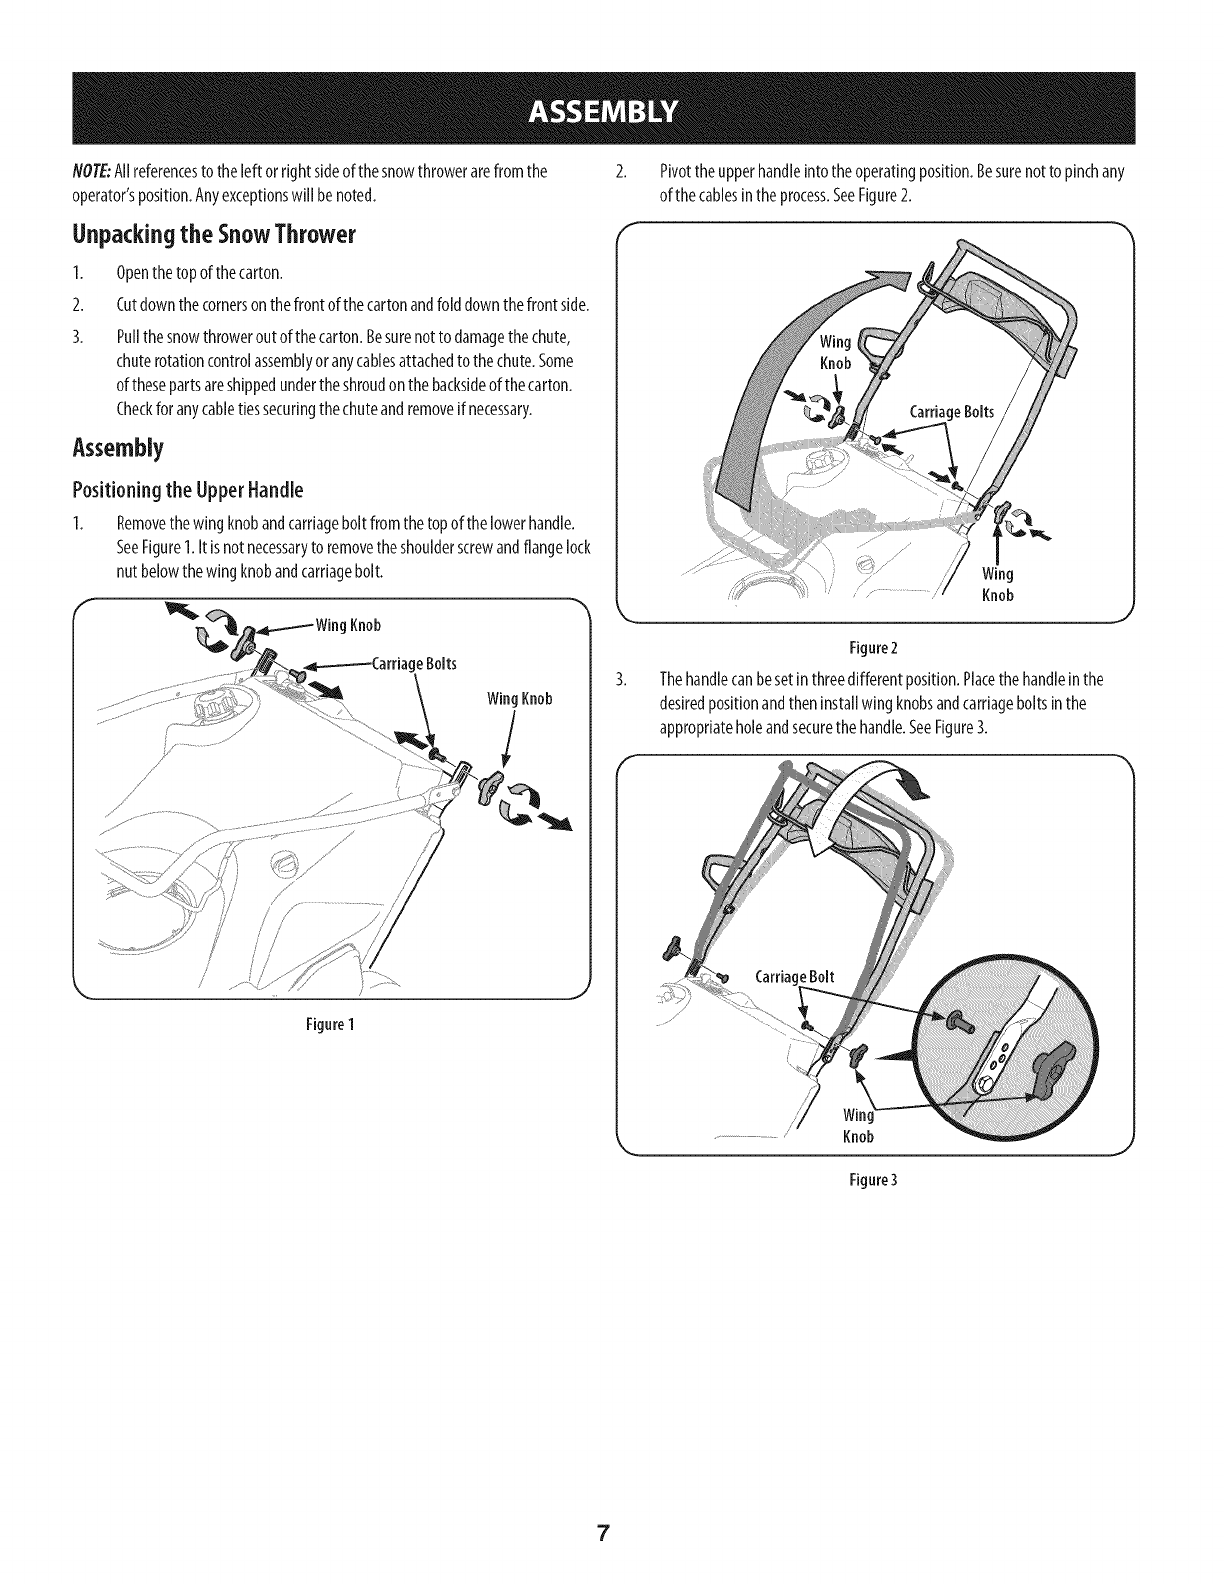
NOTE"Allreferencesto the[eftorright sideof thesnowthrowerarefromthe
operator'sposition.Anyexceptionswi[[benoted.
Unpacking the SnowThrower
1.
2.
3.
Openthetopofthecarton.
Cutdownthecornerson thefrontof thecartonandfold downthefrontside.
Pullthesnowthroweroutof thecarton.Besurenot to damagethechute,
chuterotationcontrolassemblyoranycablesattachedto thechute.Some
of thesepartsareshippedundertheshroudon thebacksideof thecarton.
Checkfor anycabletiessecuringthechuteandremoveifnecessary.
Assembly
Positioningthe UpperHandle
I. Removethe wing knobandcarriageboltfrom thetopof the lowerhandle.
SeeFigureI. It isnotnecessaryto removetheshoulderscrewandflangelock
nutbelowthewing knobandcarriagebolt.
Knob
ge Bolts
/
Figure1
Pivottheupperhandleintotheoperatingposition.Besurenotto pinchany
of thecablesinthe process.SeeFigure2.
Wing
"................. Knob
J
Figure2
Thehandlecanbesetinthreedifferentposition.Placethe handleinthe
desiredpositionandtheninstallwing knobsandcarriageboltsinthe
appropriateholeandsecurethehandle.SeeFigure3.
Knob
Figure3
7
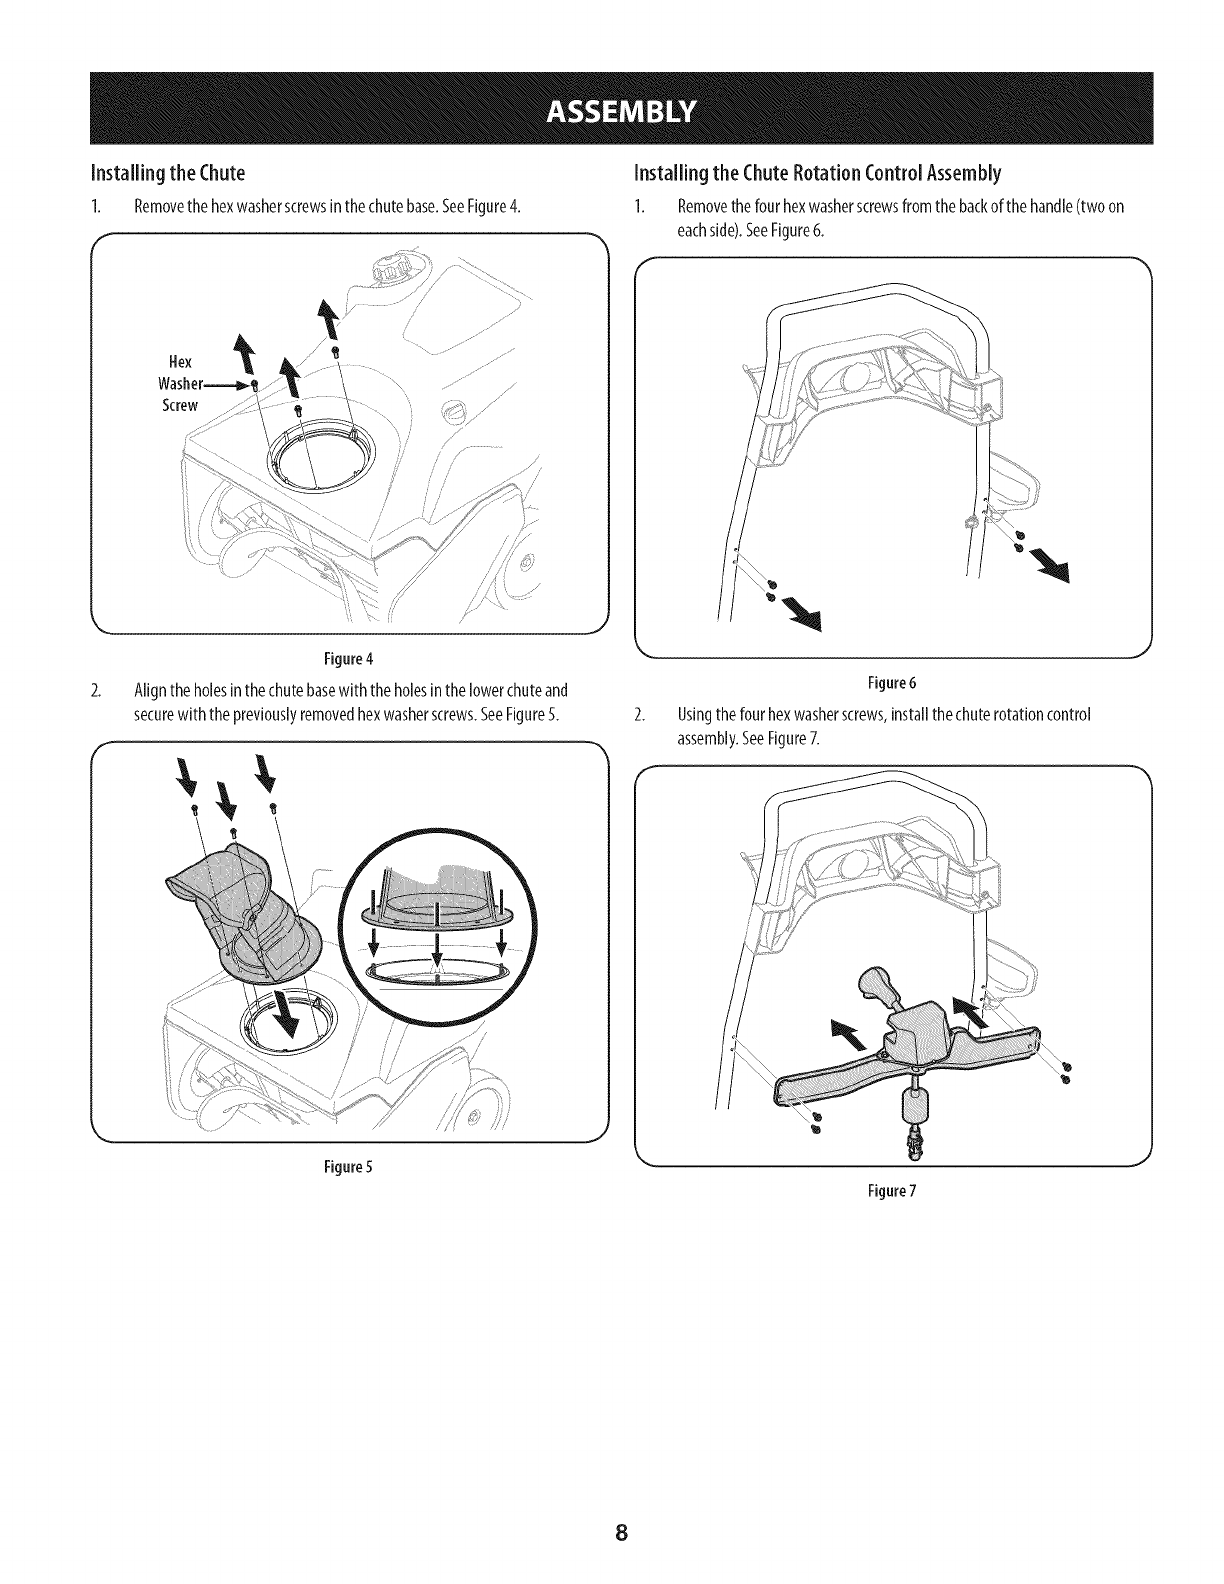
Installing the Chute
1. Removethehexwasherscrewsinthechutebase.SeeFigure4.
f
Hex
Screw
/ /
2.
Figure4
Alignthe holesinthechutebasewith theholesinthelowerchuteand
securewith thepreviouslyremovedhexwasherscrews.SeeFigure5.
f
Figure5
Installing the ChuteRotation ControlAssembly
1. Removethefourhexwasherscrewsfromthebackofthe handle(twoon
eachside).SeeFigure6.
Figure6
Usingthefour hexwasherscrews,installthechuterotationcontrol
assembly.SeeFigure7.
Figure7
8
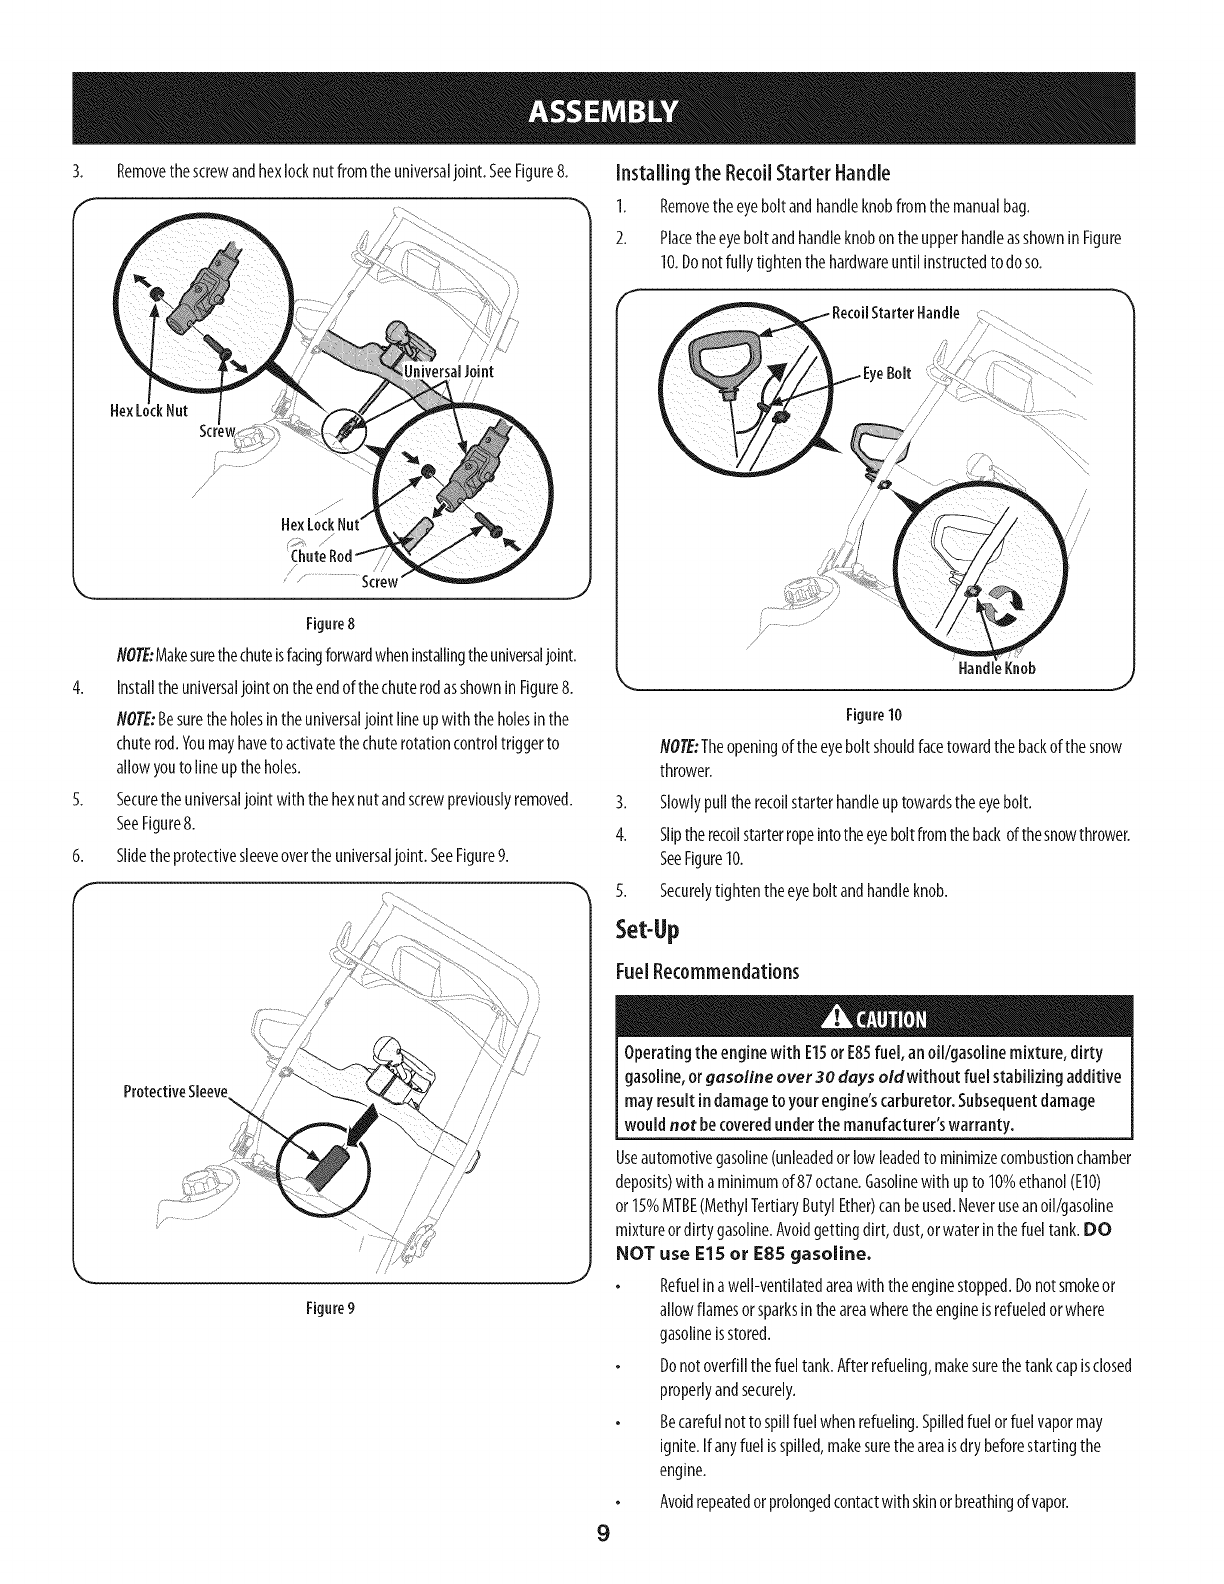
3. Removethescrewandhexlocknutfromtheuniversaljoint. SeeFigure8.
OniversaIJoini
/
/...................Screw
Figure8
NOTE:Makesurethechuteisfacingforwardwheninstallingtheuniversaljoint.
4. Installthe universaljoint on theendof thechuterodasshownin Figure8.
NOTE:Besuretheholesintheuniversaljoint lineupwith theholesin the
chuterod.Youmayhaveto activatethechuterotationcontroltriggerto
allowyouto lineup theholes.
5. Securetheuniversaljoint with thehexnutandscrewpreviouslyremoved.
SeeFigure8.
6. Slidetheprotectivesleeveovertheuniversaljoint. SeeFigure9.
ProtectiveSleeve
Figure9
Installing the RecoilStarter Handle
I. Removetheeyeboltandhandleknobfromthemanualbag.
2. Placetheeyeboltandhandleknobontheupperhandleasshownin Figure
10.Donotfully tightenthe hardwareuntil instructedto do so.
f
RecoilStarter Handle, i
EyeBolt
/
/.........
//J
HandleKnob
Figure10
NOTE:Theopeningof theeyeboltshouldfacetowardthe backof the snow
thrower.
3. Slowlypulltherecoilstarterhandleuptowardstheeyebolt.
4. Sliptherecoilstarterropeintotheeyeboltfromthebackofthesnowthrower.
SeeFigure10.
5. Securelytightentheeyebolt andhandleknob.
Set-Up
FuelRecommendations
Operatingthe enginewith E15or E85fuel,an oil/gasolinemixture, dirty
gasoline,orgasoline over30 days oldwithout fuel stabilizing additive
mayresult indamageto your engine'scarburetor.Subsequentdamage
wouldnot be coveredunderthe manufacturer'swarranty.
Useautomotivegasoline(unleadedorlowleadedto minimizecombustionchamber
deposits)with aminimumof 87octane.Gasolinewith upto 10%ethanol(EIO)
or 15%MTBE(MethylTertiaryButylEther)canbeused.Neverusean oil/gasoline
mixtureordirty gasoline.Avoidgettingdirt, dust,orwaterinthefueltank.DO
NOT use E15 or E85 gasoline.
Refuelinawell-ventilatedareawith theenginestopped.Donotsmokeor
allowflamesorsparksintheareawheretheengineis refueledorwhere
gasolineisstored.
Donotoverfillthefueltank.Afterrefueling,makesurethetankcapisclosed
properlyandsecurely.
Becarefulnot to spillfuelwhenrefueling.Spilledfuel orfuelvapormay
ignite.If anyfuelisspilled,makesuretheareaisdry beforestartingthe
engine.
Avoidrepeatedorprolongedcontactwith skinorbreathingofvapor.
9
Adding Fuel
Useextremecarewhen handlinggasoline.Gasolineisextremelyflammable
andthevaporsareexplosive.Neverfuelthe machineindoorsorwhile the
engineishotor running.Extinguishcigarettes,cigars,pipesandother
sourcesof ignition.
Alwayskeephandsandfeet dear of equipment moving parts.Donot usea
pressurizedstarting fluid. Vaporsareflammable.
Removethegascap,checkthefuellevelandaddfuel ifnecessary.Fillthe
tankuntilthe fuelreaches1/2"belowthebottomof thefiller neckto allow
forfuel expansion.Becarefulnotto overfill.
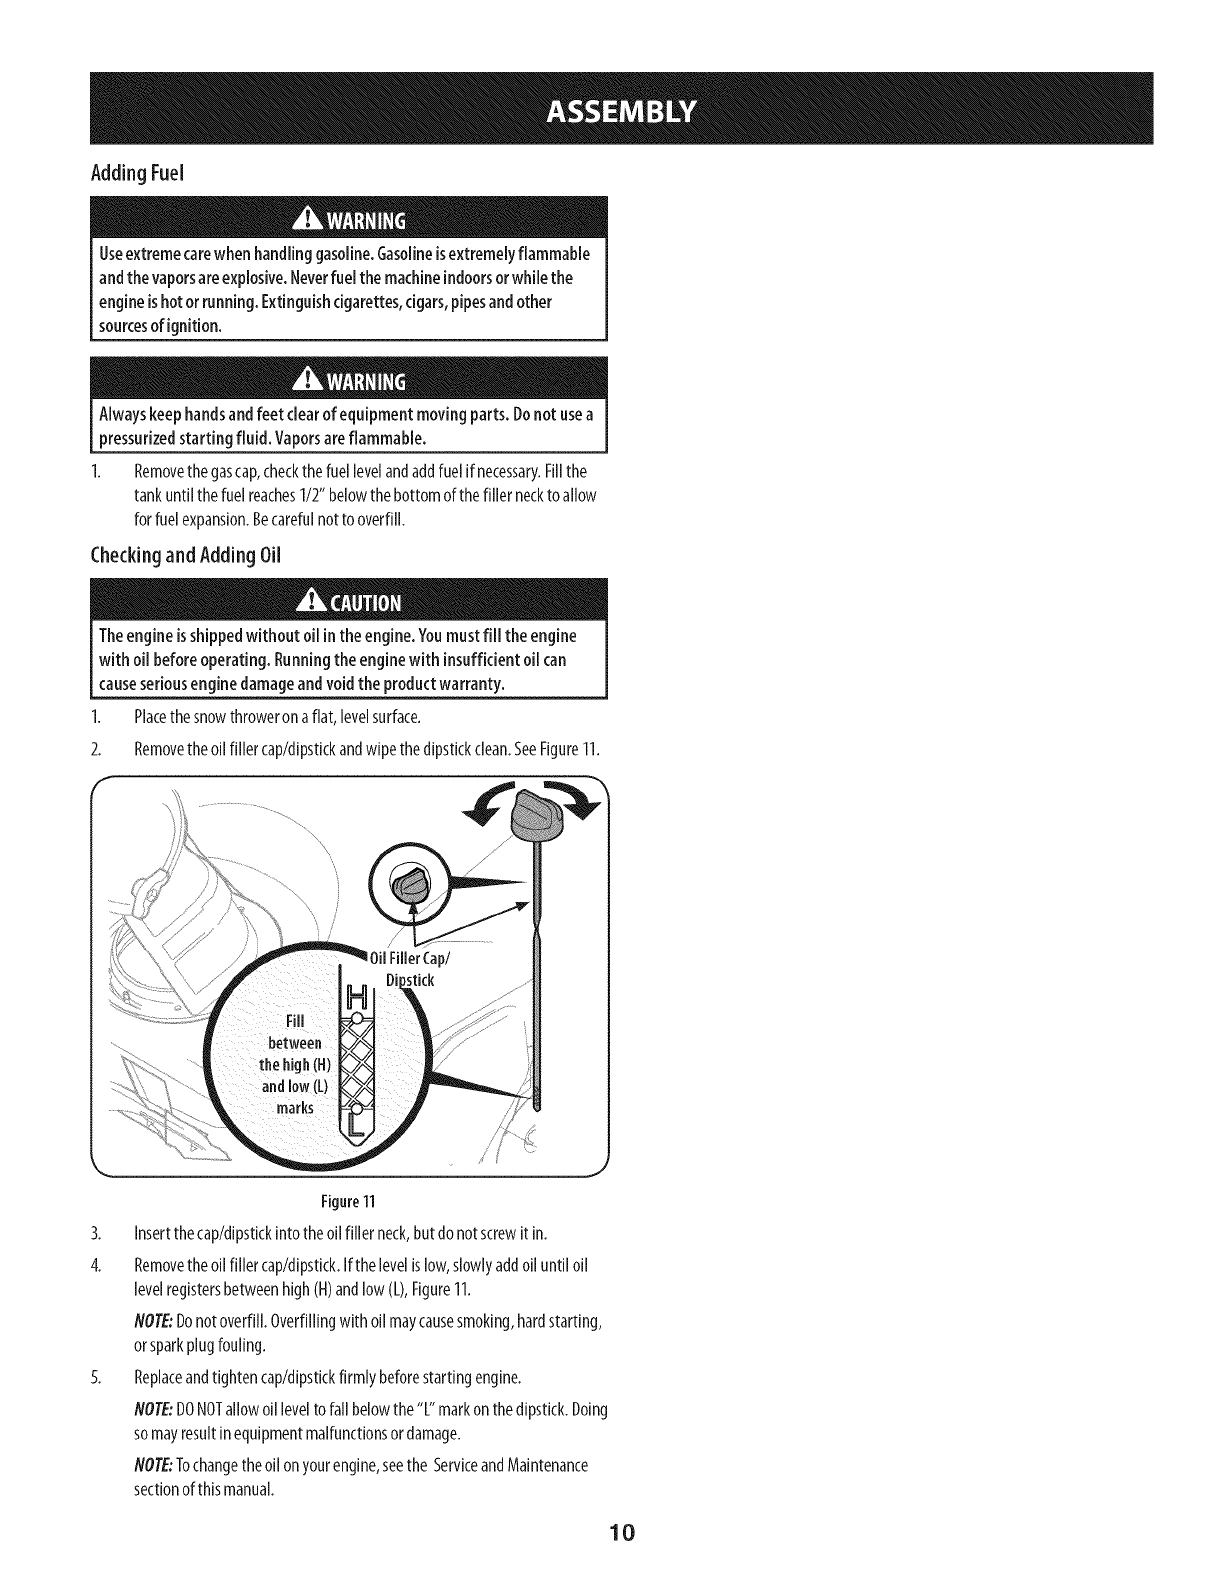
Checkingand Adding Oil
Theengineisshippedwithout oil inthe engine.Youmustfill the engine
with oil beforeoperating. Runningtheenginewith insufficientoil can
causeseriousengine damageandvoid the productwarranty.
1. Placethesnowthrowerona flat,levelsurface.
2. Removetheoilfiller cap/dipstickandwipethedipstickclean.SeeFigure11.
f
)il FillerCap/
bstick
J
Figure11
3. Insertthecap/dipstickinto theoilfiller neck,butdo notscrewit in.
4. Removetheoilfiller cap/dipstick.Ifthelevelislow,slowlyaddoiluntil oil
levelregistersbetweenhigh(H)andlow(L),Figure11.
NOTE:Donotoverfill.Overfillingwith oilmaycausesmoking,hardstarting,
orsparkplugfouling.
5. Replaceandtightencap/dipstickfirmlybeforestartingengine.
NOTE:DONOTallowoil levelto fall belowthe "L"markon thedipstick.Doing
somayresultin equipmentmalfunctionsordamage.
NOTE:Tochangetheoilonyourengine,seethe ServiceandMaintenance
sectionofthis manual.
10
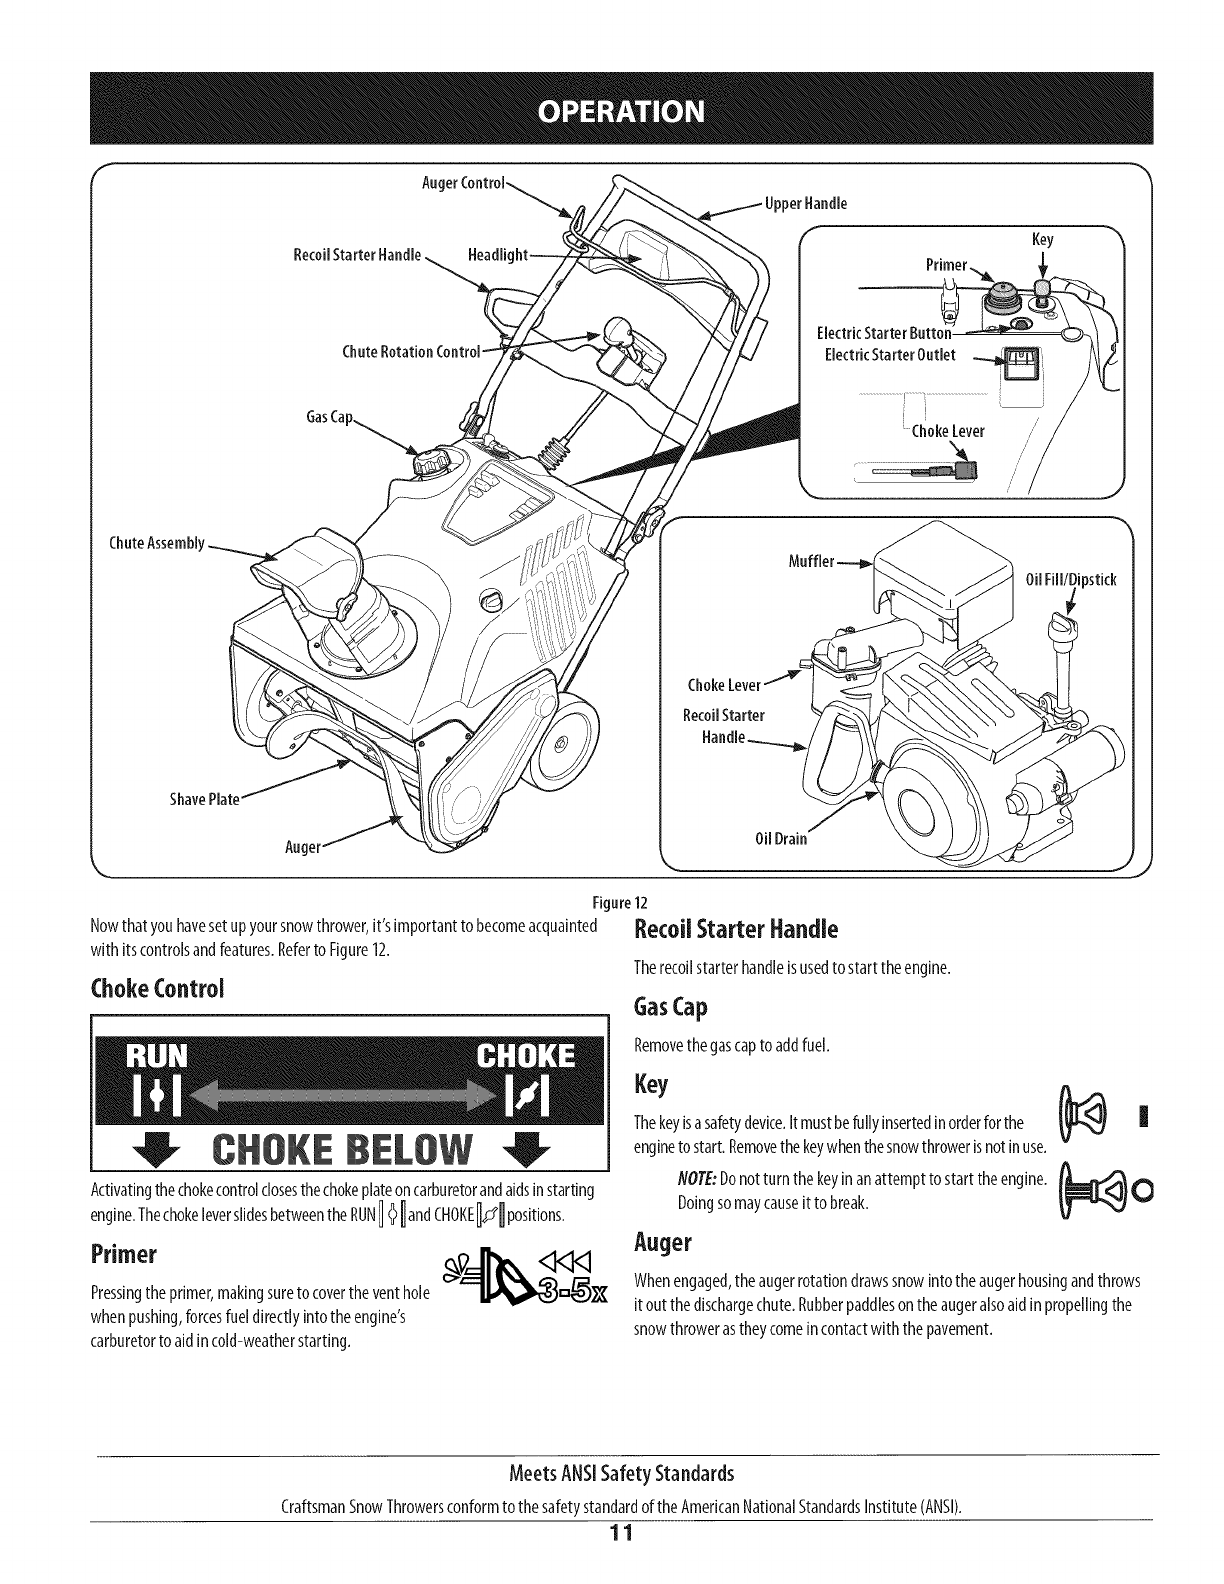
f
Primer,
GasCa
ShavePlate'
Oil Drain
Figure12
Nowthat youhavesetupyoursnowthrower,it's importantto becomeacquainted Re€OnStarter Handle
with itscontrolsandfeatures.Referto Figure12. Therecoilstarterhandleisusedto start theengine.
Choke Control GasCap
CHOKEBELOW
ActivatingthechokecontroJdosesthechokepJateoncarburetorandaidsJnstarting
engine.Thechokeleverslidesbetweenthe"UNI_andC,OKEMpositions.
Primer
Pressingtheprimer,makingsureto covertheventhole
whenpushing,forcesfuel directlyintotheengine's
carburetorto aidincold-weatherstarting.
Removethegascapto addfuel.
"°YThekeyisasafetydevice.It mustbefullyinsertedinorderforthe II
engineto start.Removethekeywhenthesnowthrowerisnotinuse.
NOTE:Donot turnthekeyinan attemptto starttheengine.
Doingsomaycauseitto break. _!_ 0
Auger
Whenengaged,theaugerrotationdrawssnowinto theaugerhousingandthrows
itoutthedischargechute.Rubberpaddlesontheaugeralsoaidin propellingthe
snowthrowerastheycomeincontactwiththe pavement.
Meets ANSISafety Standards
CraftsmanSnowThrowersconformtothesafetystandardof theAmericanNationalStandardsInstitute(ANSI).
11
AugerControl
Locatedontheupperhandle,theaugercontrolhandleisusedtoengageanddisengage
drivetotheauger.Squeezethecontrolhandleagainsttheupperhandleto engagethe
auger;releaseittodisengage.
Muffler
Engineexhaustexitstheengineviathemuffler.
ChuteRotation Control
Thechuterotatecontrolislocatedinthecenterofthecontrolpanelandcontrolsthe
directionsnowisthrown.Depressthebuttonandrotatethechuterotationcontroltothe
rightto turnthechutetotherightandrotatetotheleft toturnthechuteto theleft.
ChuteAssembly
Thepitchofthedischargechutecontrolstheangleatwhichthesnowisthrown.Loosen
thewingknobonthesideofthedischargechutebeforepivotingthedischargechute
upwardordownward.Retightentheknoboncethedesiredpositionhasbeenachieved.
ShavePlate
Theshaveplatemaintainscontactwith thepavementasthesnowthroweris
propelled,allowingsnowcloseto the pavement'ssurfaceto bedischarged.
Oil Fill/Dipstick
Engineoillevelcanbecheckedandoiladdedthroughtheoilfill.
Oil Drain
Engineoilcanbedrainedthroughtheoildrain.
ffeadlight
Theheadlightislocatedontheuppercenterof thecontrolpanelandisonwhenthe
snowthrowerisrunning.
Electric Starter Outlet
Requirestheuseof athree-prongoutdoorextensioncordanda120Vpowersource/
walloutlet.
Electric Starter Button
Pressingtheelectricstarterbuttonengagestheengine'selectricstarterwhenplugged
intoa 120Vpowersource.
BeforeStarting the Engine
Read,understandandfollow all the instructionsandwarningsonthe
machineandin this manualbeforeoperating.
Starting TheEngine
Alwayskeephandsandfeet clearof moving parts. Donot usea pressurized
starting fluid. Vaporsareflammable.
Toavoidcarbonmonoxidepoisoning,makesurethe engineis outdoorsin a
well-ventilated area.
1. Makecertaintheaugercontrolisinthedisengaged(released)position.
Insertignitionkeyinto slot.Makesureit snapsinto place.Donotattemptto
turnthekey.SeeFigure13.
Figure13
NOTE:Theenginecannotstart unlessthekeyisfully insertedinto the
ignitionswitch.
ElectricStarter
Determinethatyourhome'swiringisathree-wiregroundedsystem.Aska licensed
electricianif youarenotcertain.
Ifyouhavea groundedthree-prongreceptacle,proceedasfollows:
Theextensioncordcanbeanylength, but must be ratedfor 15ampsat
125volts, groundedand ratedfor outdoor use.
Plugtheextensioncordintotheoutletlocatedontheengine'ssurface.Plugthe
otherendofextensioncordintoathree-prong120-volt,grounded,ACoutletina
well-ventilatedareaSeeFigure14.
Figure14
12
2. Pushthechokeleverto theCHOKE_ position.
3. If theengineiswarm,placethechokeinthe RUN1_ I positioninsteadof
CHOKE_J0
4. Pushtheprimerthree(3)times,makingsuretocovertheventholewhenpushing.
S. If theengineiswarm,pushtheprimerbuttononlyonce.
6. Pushstarterbuttonto startengine.
7. Oncetheenginestarts,releasestarterbutton.
8. Allowtheengineto warmupseveralminutes,adjustingchoketowardRUN
1_ _position.Waituntilenginerunssmoothlybeforeeachchokeadjustment.
9. Whendisconnectingtheextensioncord,alwaysunplugtheend
at thethree-prongwall outletbeforeunpluggingtheoppositeend
fromthesnowthrower.
RecoilStarter
1. Pushthechokeleverto theCHOKE_J_ position.
2. If theengineiswarm,placethechokeinthe RUN1_ I positioninsteadof
CHOKE_B
3. Pushtheprimerthree(3)times,makingsuretocovertheventholewhenpushing.
4. If theengineiswarm,pushtheprimerbuttononlyonce.
S. Grasptherecoilstarterhandleandslowlypulltheropeout.Atthepointwhere
it becomesslightlyharderto pulltherope,slowlyallowtheropeto recoil.
6. Pullthestarterhandlewith afirm, rapidstroke.Donotreleasethehandle
andallowit to snapback.Keepa firm holdon thestarterhandleandallowit
to slowlyrecoil.
7. Allowtheengineto warmupseveralminutes,adjustingchoketowardRUN1_ _
position.Waituntilenginerunssmoothlybeforeeachchokeadjustment.
Stoppingthe Engine
1. Runtheengineforafew minuteswithoutloadbeforestoppingto helpdry
offanymoistureontheengine.
2. Tostoptheengineremovethe keyandstoreit in asafeplace.
3. Wipeallthesnowandmoistureawayfromtheenginecontrolsarea.
Muffler, engineand surroundingareasbecomehotandcancausea burn.
Becarefulanddonottouchwhen theyare hot.
Engagingthe Auger
Engagetheaugerbysqueezingtheaugercontrolagainsttheupperhandle.Release
thecontrolto stoptheauger.
Engagingthe Drive
Lift upslightlyontheupperhandleto allowtherubberpaddleson theaugerto
contactthepavementandpropelthesnowthrowerforward.Pushingdownwardon
thehandlewill raisetheaugeroffthe groundandstoptheforwardmotion.
NOTE:Excessiveupwardpressureonthehandlewill resultin premature
wearto therubberaugerpaddles,whichwill notbecoveredbythe warranty.
Clearinga CloggedDischargeChute
Handcontactwiththerotatingimpellerinsidethedischargechuteisthemostcommon
causeofinjuryassociatedwithsnowthrowers.Neveruseyourhandtocleanoutthe
dischargechute.
Toclearthechute:
1. SHUTTHEENGINEOFF!
2. Wait10secondsto besuretheimpellerbladeshavestoppedrotating.
3. Alwaysuseaclean-outtoolorstkk, notyourhands.
13

MAINTENANCESCHEDULE
Followthemaintenanceschedulegivenbelow.Thischartdescribesserviceguidelines
only.UsetheServiceLogcolumntokeeptrackofcompletedmaintenancetasks.To
Beforeperforming any type of maintenance/service,disengageall controls scheduleservicefrom SearsParts & Repair,call 1-800-659-5917.
andstop theengine.Wait untilall movingpartshavecometo acomplete
stop. Disconnectspark plugwire and ground itagainst theengineto
preventunintendedstarting. Alwayswearsafety glassesduring operation
orwhile performing anyadjustmentsor repairs.
Eachuse
1st5hours
Every5hours
25hours
Everyseason/50hours
Everyseason/lO0hours
Everyseason/Beforestorage
1. Engineoil level.
2. Snowthrowerandexhaustarea.
1. Engineoil.
1. Engineoil.
2. Exhaustarea.
1. Sparkplug.
1. Engineoil
1. Sparkplug
1. Pivotpoints
2. Controlhandle
3. Extensionspring
1. Check
2. Clean
1. Change.
1. Check.
2. Clean.
1. Check.
1. Change
1. Clean,replace,re-gap
1. Lubricate
2. Lubricate
3. Lubricate
EngineMaintenance
Thoroughlywashyour handswith soapandwater assoonaspossibleafter
handlingusedoil.
Oil Recommendations
Whenaddingoil to theengine,referto theviscositychartbelow(Figure15).
o
_c:
L/3
OJ (u
F-
m mlb
iv
V"
mm_mll
m ==lib
(°C) -30° -20°-I0 ° 0° 100 20o 300 400
(°F)-20 o 0o 150 300 500 700 850 105o j
Figure 15
Engineoil capacityis600ml(approx.20oz.).Donotover-fill.Usea 4-stroke,oran
equivalenthighdetergent,premiumqualitymotoroil certifiedto meetorexceed
U.S.automobilemanufacturer'srequirementsfor serviceclassificationSG,SEMotor
oilsclassifiedSG,SFwill showthisdesignationonthecontainer.
NOTE:Pleasedisposeof usedmotoroilina mannerthat isfriendlyto the
environment.Takeitto a recyclingcenterorothercollectioncenter.
DONOTusenon-detergent oil or2-strokeengine oil. It couldshorten the
engine'sservicelife.
ChangingEngineOil
Shutoff the engineandremovethe ignitionkeybeforeperformingany
maintenance.Topreventaccidentalstart-up,disconnectthe sparkplugboot.
Periodicinspectionandadjustmentof theengineisessentialifhighlevelperformance
isto bemaintained.Regularmaintenancewill alsoensurealongservicelife.The
requiredserviceintervalsandthetypeof maintenanceto beperformedaredescribed
inthetableabove.Followthehourlyorcalendarintervals,whicheveroccurfirst.More
frequentserviceisrequiredwhenoperatinginadverseconditions.
Checkoillevelbeforeeachuseandevery5 operatinghourswhentheengineis
warm. Referto CheckingandAddingOilintheAssemblySection.
Changetheoilafterthefirst 5operatinghoursandevery50operatinghours
thereafter.Engineshouldstill bewarmbutNOThotfromrecentuse.
14
2.
3.
4.
Drainfuelfromthetankbyrunningtheengineuntil thefueltankisempty.
Besurethefuelfill capissecure.
Removethethreescrewsthatsecurethelowerpanel.Removethelowerpanel
bylifting upon thepaneltofreethetabsat thebottomofthepanelfromthe
tabslotsandthenpullback.SeeFigure16.
/,
/!/
Figure16
NOTE:Thebottomof thepanelhastabsthathelpholditinplace.
NOTE:Anoil drainextensionkit isavailableseparately.Contacta SearsParts
andRepairCenterfor kit#753-06684.
Placea suitableoilcollectioncontainerundertheoildrainplug.
Removetheoildrainplug,SeeFigure17.
OilDrainnPlug J
Figure17
5. Tipthesnowthrowerbackto drainoil intothe container.Usedoil mustbe
disposedofat a propercollectioncenter.
6. Reinstallthedrainplugandtightenit securely.
7. Refillwith therecommendedoil andchecktheoil level;referto Checking
andAddingOilintheAssemblySecUon.
8. Reinstalltheoil filler cap/dipsticksecurely.
9. Re-installthe lowerpanelbyplacingthetabsinthetab slots,lifting the
panelintoplaceandsecurewith thethreescrewsremovedinstep2.
SparkPlug
DONOTcheckfor a sparkwith the sparkplug removed.DONOTcrankthe
enginewith the sparkplug removed.
If the enginehasbeenrunning, the muffler willbeveryhot.Becarefulnot
to touch the muffler.
Thesparkplugshouldbecheckedevery25hoursandchangedonceaseasonor
every100hours.Toensureproperengineoperation,thesparkplugmustalsobe
properlygappedandfreeof deposits.
I. Removethe sparkplug bootanduseasparkplugwrenchto removethe
plug,SeeFigure18.
SparkPlug
©
SparkPlug
Figure18
Visuallyinspectthesparkplug.Discardthesparkplugifthereisany
apparentwear,oriftheinsulatoriscrackedorchipped.Cleanthesparkplug
with awire brushif it isto bereused.
NOTE:Aresistorsparkplugmustbeusedfor replacement.Contacta Sears
PartsandRepairCenterfora replacementsparkplug(Part#951-10292).
15
Measurethepluggapwith afeelergauge.Correctasnecessarybybending
thesideelectrode,seeFigure19.Thegapshouldbesetto .02-.03inches
(0.60-0.80mm).
Electrode
.02-.03in.
(0.60-0.80ram)
Figure 19
4. Checkthatthesparkplugwasherisin goodconditionandthreadthespark
plugin byhandto preventcross-threading.
5. Afterthe sparkplugisseated,tightenwith asparkplugwrenchto compress
thewasher.
NOTE:Wheninstallinganewsparkplug,tighten1/2-turnafterthespark
plugseatsto compressthewasher.Whenreinstallingausedsparkplug,
tighten1/8-to 1/4-turnafterthesparkplugseatsto compressthewasher.
Thesparkplug mustbetightened securely.Aloosesparkplugcanbecome
veryhot and candamagetheengine.
Cleaningthe Engine
Iftheenginehasbeenrunning,allowittocoolforat leasthalfanhourbeforecleaning.
Periodicallyremovedirtbuild-upfromengine.Beforeservicingtheengine,removethe
carburetorcoverand/orblowerhousing.Cleandirtanddebrisfromthefollowingareas:
Donot spraythe enginewith water tocleanit becausethewater could
contaminatethe fuel. Usinga gardenhoseorpressurewashingequipment
canalsoforce water intothe muffler opening. Waterthat passesthrough
the muffler canenterthe cylinder andcausedamage.
CoolingFins
AirIntakeScreenor RecoilStarter/FlywheelGuardAreas
SparkPlugConnection
Levers
LinkageArea
Guards
Carburetor
EngineHead
Removingdebriswillinsureadequatecooling,correctenginespeedandreducethe
riskoffire.
Donotspraytheenginewith water to cleanit becausethe water could
contaminatethe fuel. Usinga gardenhoseor pressurewashingequipment
canalsoforcewater into the muffler opening.Waterthat passesthrough
the muffler canenter theenginecylinder andcausedamage.
Accumulationof debris aroundthe muffler couldcauseafire. Inspectand
cleanbefore everyuse.
Lubrication
Lubricatethe pivotpointsonthecontrolhandleandtheextensionspringat theend
of thecontrolcablewith a lightoil onceeveryseasonandbeforethesnowthrower
is putinto storageatthe endof theseason.
Adjustments
ShavePlate
Tochecktheadjustmentof theshaveplate,placethemachineon alevelsurface.
Thewheels,shaveplateandaugerpaddlesshouldallcontactthelevelsurface.
Notethatif theshaveplateisadjustedtoohigh,snowmayblowundertheauger
housing.If theshaveplatewearsoutexcessively,orthesnowthrowerdoesnot
self-propel,theshaveplatemaybetoolow thegroundandneedsto beadjusted.
NOTE:Onnewsnowthrowersormachineswith anewshaveplateinstalled,
theaugerpaddlesmaybeslightlyofftheground.
Toadjusttheshaveplateproceedasfollows:
1. Runthesnowthroweruntilthefueltankisempty.
2. Pullthestartercorduntilresistanceisfelt.Thentipthesnowthrowerbackuntilit
restson thehandles.Toensurethatthesnowthrowerdoesnottip forward,it may
benecessarytosecurethehandletothegroundwithablockorotherobject.
3. Loosenthefourflangelocknutsandcarriagescrewswhichsecuretheshaveplate
tothehousing.SeeFigure20.Movetheshaveplatetotheappropriatepositionand
retightenthenutsandscrewssecurely.
16
ReversibleShavePlate
Figure20
......./ /
/
4. Tipthesnowthrowerbackto theoperatingpositionandpullthestarter
handleafewtimesto seeif it isdifficult to pull.
5. If thestarterisdifficult to pull,removethesparkplugandpullthehandle
severaltimesto ensurethat anyoil trappedintheengineheadis removed.
Oilmaycomeout of the sparkplug holewhen it isremovedand the starter
handleis pulled.
6. Inspectthesparkplug.If it iswet,cleanoff anyo11beforere-installing.
ControlCable
Asaresultofboththecontrolcableandtheaugerdrivebeltstretchingdueto wear,
periodicadjustmentsmaybenecessary.Iftheaugerseemsto hesitatewhenrotating,
proceedasfollows:
Theupperholeinthecontrolhandleprovidesforan adjustmentin cabletension.
Toadjust,disconnecttheendof controlcablefromthebottomholeinthecontrol
handleandreinsertit intheupperhole.Insertthecablefromtheoutsideasshown
in Figure21.
F
/
/
ControlCable
Figure21
Testthesnowthrowerto seeif thereisanoticeabledifference.Ifafterthe
adjustmentto thecontrolcabletheaugerstill hesitateswhenrotating,seeBelt
Replacementforinstructionsonreplacingthebelt.
ChuteAssembly
Referto theAssemblysectionforinstructionson adjustingthechuteassembly.
AugerDriveBelt Replacement
1. Runthesnowthroweruntil thefuel tankisempty.
2. Pulltherecoilstarterhandleuntil resistanceisfelt.Thentip thesnow
throwerbackuntil it restsonthehandles.
3. Slideaboardupthroughtheaugerandthroughthechuteto securethe
augerinplace.
4. Removethebeltcoverby removingthetwohexwasherscrewsandonehex
lockscrewthatsecureit to theframe.SeeFigure22.
HexLockScrew
HexWasherScre_
Figure22
Removethe flangenutthat securestheaugerpulleyto theaugershaft.See
Figure23.
/
\\
Ang_
An
Figure23
FlangeNut
J
6. Removetheaugerpulleyandthebelt.
17
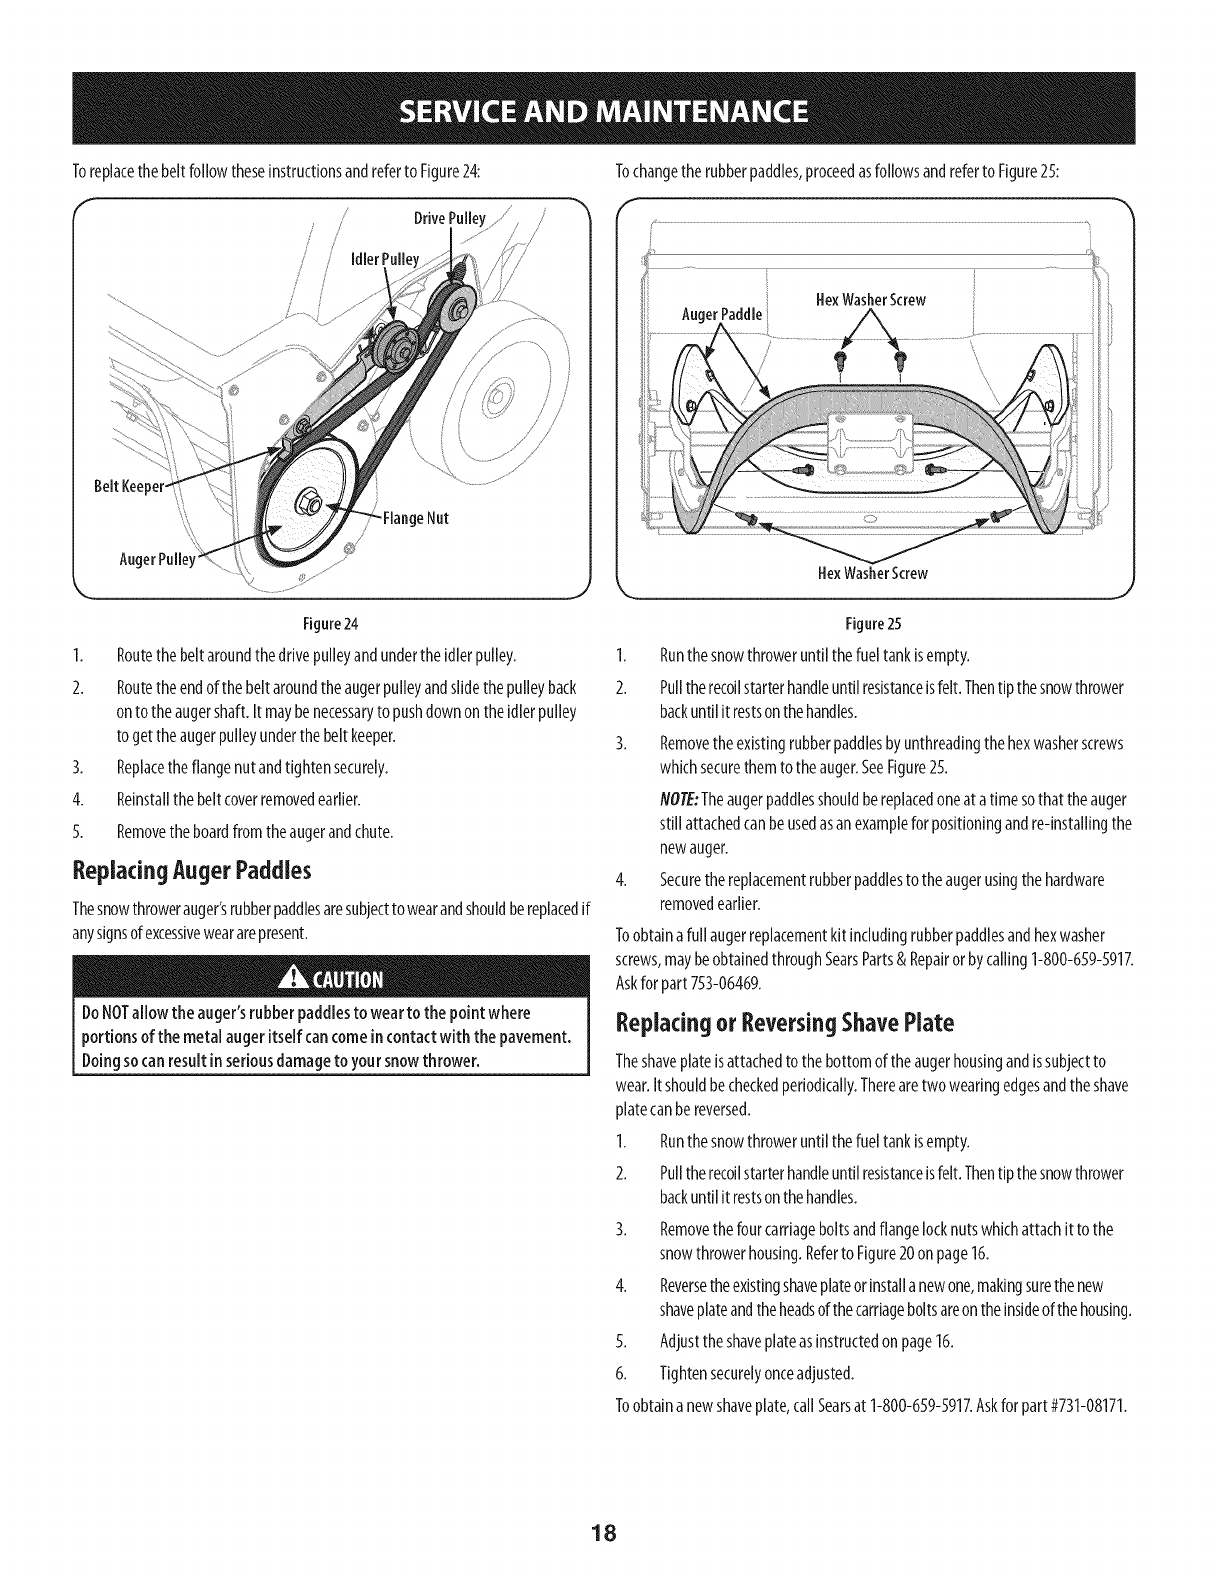
Toreplacethe beltfollowtheseinstructionsandreferto Figure24:
/
s/
/i/
/IdlerPulle /
/
Figure24
1. Routethebeltaroundthedrivepulleyandundertheidlerpulley.
2. Routetheendofthe beltaroundtheaugerpulleyandslidethepulleyback
onto theaugershaft.It maybenecessaryto pushdownonthe idlerpulley
to getthe augerpulleyunderthe beltkeeper.
3. Replacetheflangenutandtightensecurely.
4. Reinstallthebeltcoverremovedearlier.
5. Removetheboardfromtheaugerandchute.
ReplacingAugerPaddies
Thesnowthrowerauger'srubberpaddlesaresubjectto wearandshouldbereplacedif
anysignsofexcessiveweararepresent.
DoNOTallowthe auger'srubber paddlesto wearto the point where
portionsof the metal augeritselfcancomeincontactwith the pavement.
Doingsocanresultinseriousdamageto yoursnowthrower.
Tochangetherubberpaddles,proceedasfollowsandreferto Figure25:
erPaddle HexWasherScrew
HexWasherScrew
Figure 25
1. Runthesnowthroweruntilthefueltankisempty.
2. Pulltherecoilstarterhandleuntil resistanceisfelt.Thentip thesnowthrower
backuntilitrestsonthehandles.
3. Removetheexistingrubberpaddlesbyunthreadingthehexwasherscrews
whichsecurethemto the auger.SeeFigure25.
NOTE:Theaugerpaddlesshouldbereplacedoneat atimesothat the auger
still attachedcanbeusedasanexampleforpositioningandre-installingthe
newauger.
4. Securethereplacementrubberpaddlesto theaugerusingthehardware
removedearlier.
Toobtaina fullaugerreplacementkitincludingrubberpaddlesandhexwasher
screws,maybeobtainedthroughSearsParts& Repairor bycalling1-800-659-5917.
Askfor part 753-06469.
Replacing or Reversing Shave Plate
Theshaveplateisattachedto thebottomoftheaugerhousingandissubjectto
wear.It shouldbecheckedperiodically.Therearetwo wearingedgesandtheshave
platecanbereversed.
1. Runthesnowthroweruntilthefueltankisempty.
2. Pulltherecoilstarterhandleuntil resistanceisfelt.Thentip thesnowthrower
backuntilitrestsonthehandles.
3. Removethefourcarriageboltsandflangelocknutswhichattachit to the
snowthrowerhousing.Referto Figure20on page16.
4. Reversetheexistingshaveplateorinstallanewone,makingsurethenew
shaveplateandtheheadsof thecarriageboltsareon theinsideof thehousing.
5. Adjusttheshaveplateasinstructedonpage16.
6. Tightensecurelyonceadjusted.
Toobtaina newshaveplate,callSearsat 1-800-659-5917.Askfor part#731-08171.
18
If the snowthrowerwill notbeusedfor30daysorlonger,orifit is theendof thesnowseasonwhenthelastpossibilityof snowisgone,theequipmentneedsto bestored
properly.Followstorageinstructionsbelowto ensuretop performancefrom thesnowthrowerformanymoreyears.
Preparingthe engine
Enginesstoredover30daysneedto bedrainedof fuelto preventdeteriorationand
gumfromforminginthefuel systemoron essentialcarburetorparts.Ifthegasoline
inyourenginedeterioratesduringstorage,you mayneedto havethecarburetor,
andotherfuelsystemcomponents,servicedorreplaced.
1. Removeallfuel fromthetankbyrunningtheengineuntil it stops.
2. Changetheengineoil.
3. Removethesparkplugandpourapproximately1oz.(30ml)of deanengine
oilinto thecylinder.Pulltherecoilstarterseveraltimesto distributetheoil,
andreinstallthesparkplug.
4. Cleantheexteriorof the enginebydiscardingdirt anddebrisfrom the
followingareas:
Donot spraythe enginewith water to cleanit becausethewater could
contaminatethe fuel. Usinga gardenhoseorpressurewashingequipment
canalsoforce water intothe muffler opening. Waterthat passesthrough
the muffler canenterthe cylinder andcausedamage.
CoolingFins
AirIntakeScreenor RecoilStarter/FlywheelGuardAreas
SparkPlugConnection
Levers
LinkageArea
Guards
Carburetor
EngineHead
5. Storeinaclean,dryandwellventilatedareaawayfromanyappliance
thatoperateswith aflameor pilotlight,suchasafurnace,waterheateror
clothesdryer.Avoidanyareawitha sparkproducingelectricmotor,orwhere
powertoolsareoperated.
Preparingsnow thrower
Ifthesnowthrowerwill notbeusedfor 30daysorlonger,followtheinstructions
below.
1. Storetheequipmentinaclean,dryarea.
2. Wipedownthesnowthrowerwith a ragandremoveanydirt ordebris.
3. Ifstoringthe snowthrowerinanunventilatedarea,rustproofthemetal
partsof the machinewith alight oilorsiliconecoating.
Neverstore snowthrower with fuel in tank indoorsor in poorlyventilated
areas,wherefuelfumes mayreachan openflame,sparkor pilotlight ason
a furnace,water heater,clothesdryeror gasappliance.
6. If possible,avoidstorageareaswith highhumidity.
7. Keeptheenginelevelinstorage.Tiltingtheenginecancausefueloroil
leakage.
19
Disconnectthe sparkplugwireandgrounditagainsttheengineto prevent
unintendedstarting.Beforeperforminganytypeofmaintenance/service,
disengageallcontrolsandstoptheengine.Waituntilall movingparts
havecometoacompletestop.Alwayswearsafetyglassesduringoperation
orwhileperforminganyadjustmentsorrepairs.
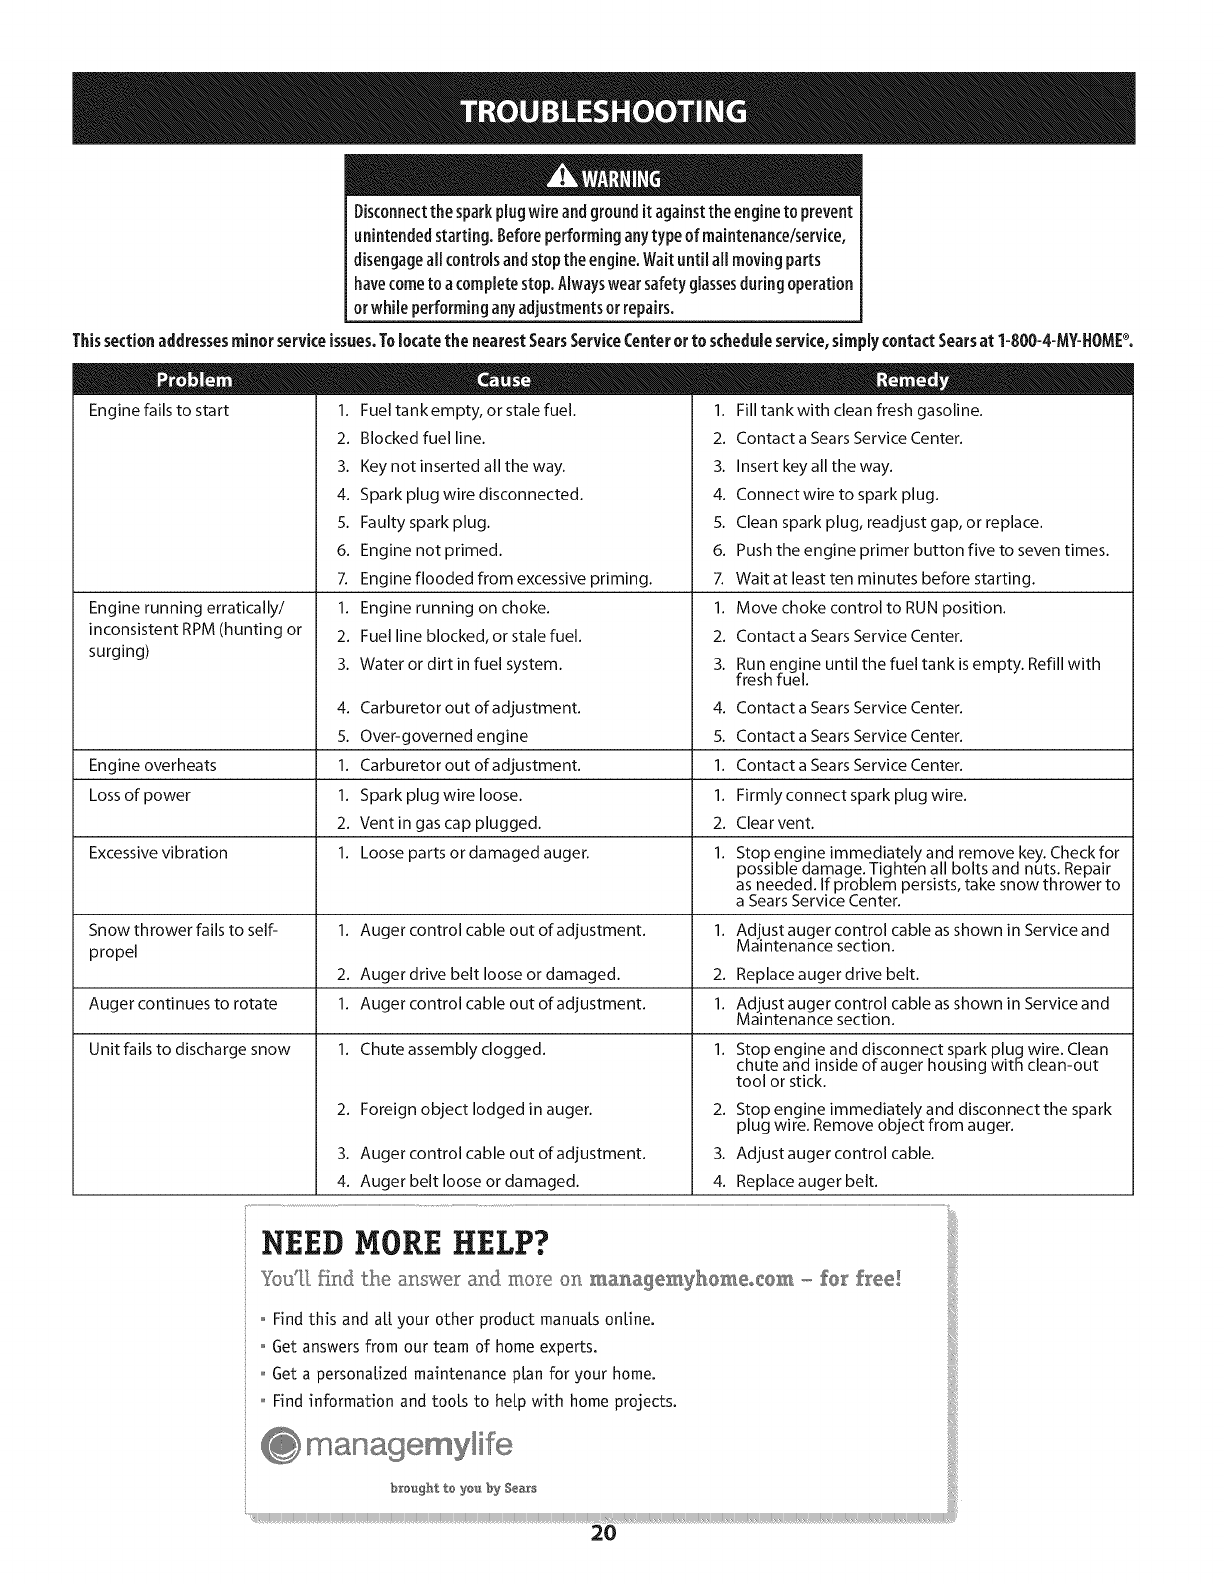
Thissectionaddressesminorserviceissues.Tolocatethe nearestSearsServiceCenterorto scheduleservice,simplycontactSearsat 1-800-4-MY-HOM[_.
Engine fails to start 1. Fuel tank empty, or stale fuel 1. Fill tank with dean fresh gasoline.
2. Blocked fuel line.
3. Keynot inserted all the way.
4. Spark plug wire disconnected.
5. Faulty spark plug.
Engine running erratically/
inconsistent RPM (hunting or
surging)
2. Contact a Sears Service Center.
3. Insert key all the way.
4. Connectwire to spark plug.
5. Clean spark plug, readjust gap, or replace.
6. Engine not primed. 6.
7. Engine flooded from excessive priming. 7.
1. Engine running on choke. 1.
2. Fuel line blocked, or stale fuel. 2.
3. Water or dirt in fuel system. 3.
4. Carburetor out of adjustment. 4.
5. Over-governed engine 5.
Engine overheats 1. Carburetor out of adjustment. 1.
Loss of power 1. Spark plug wire loose. 1.
2. Ventin gas cap plugged. 2.
Excessive vibration 1. Loose parts or damaged auger. 1.
Snow thrower fails to self- 1. Auger control cable out of adjustment. 1.
propel
2. Auger drive belt loose or damaged. 2.
Auger continues to rotate 1. Auger control cable out of adjustment. 1.
Unit fails to discharge snow 1. Chute assembly clogged. 1.
Push the engine primer button five to seven times.
Wait at least ten minutes before starting.
Move choke control to RUN position.
Contact a Sears Service Center.
Run engine until the fuel tank is empty. Refill with
fresh fuel.
Contact a Sears Service Center.
Contact a Sears Service Center.
Contact a Sears Service Center.
Firmly connect spark plug wire.
Clear vent.
Stop engine immediately and remove key. Check for
possible damage. Tighten all bolts and nuts. Repair
as needed. If problem persists, take snow thrower to
a Sears Service Center.
Adjust auger control cable as shown in Service and
Maintenance section.
Replace auger drive belt.
Adjust auger control cable as shown in Service and
Maintenance section.
Stop engine and disconnect spark plug wire. Clean
chute and inside of auger housing with clean-out
tool or stick.
2. Foreign object lodged in auger. 2. Stop engine immediately and disconnect the spark
plug wire. Remove object from auger.
3. Auger control cable out of adjustment. 3. Adjust auger control cable.
4. Auger belt loose or damaged. 4. Replace auger belt.
NEED MORE HELP? !
You'll. f:ind the a_swe:_" ar_d_more on mas_agemy_OmeoCem - £er £ree!
o Find this and a[[ your other product manuals online.
: ° Get answers from our team of home experts.
i
20

21

22

23
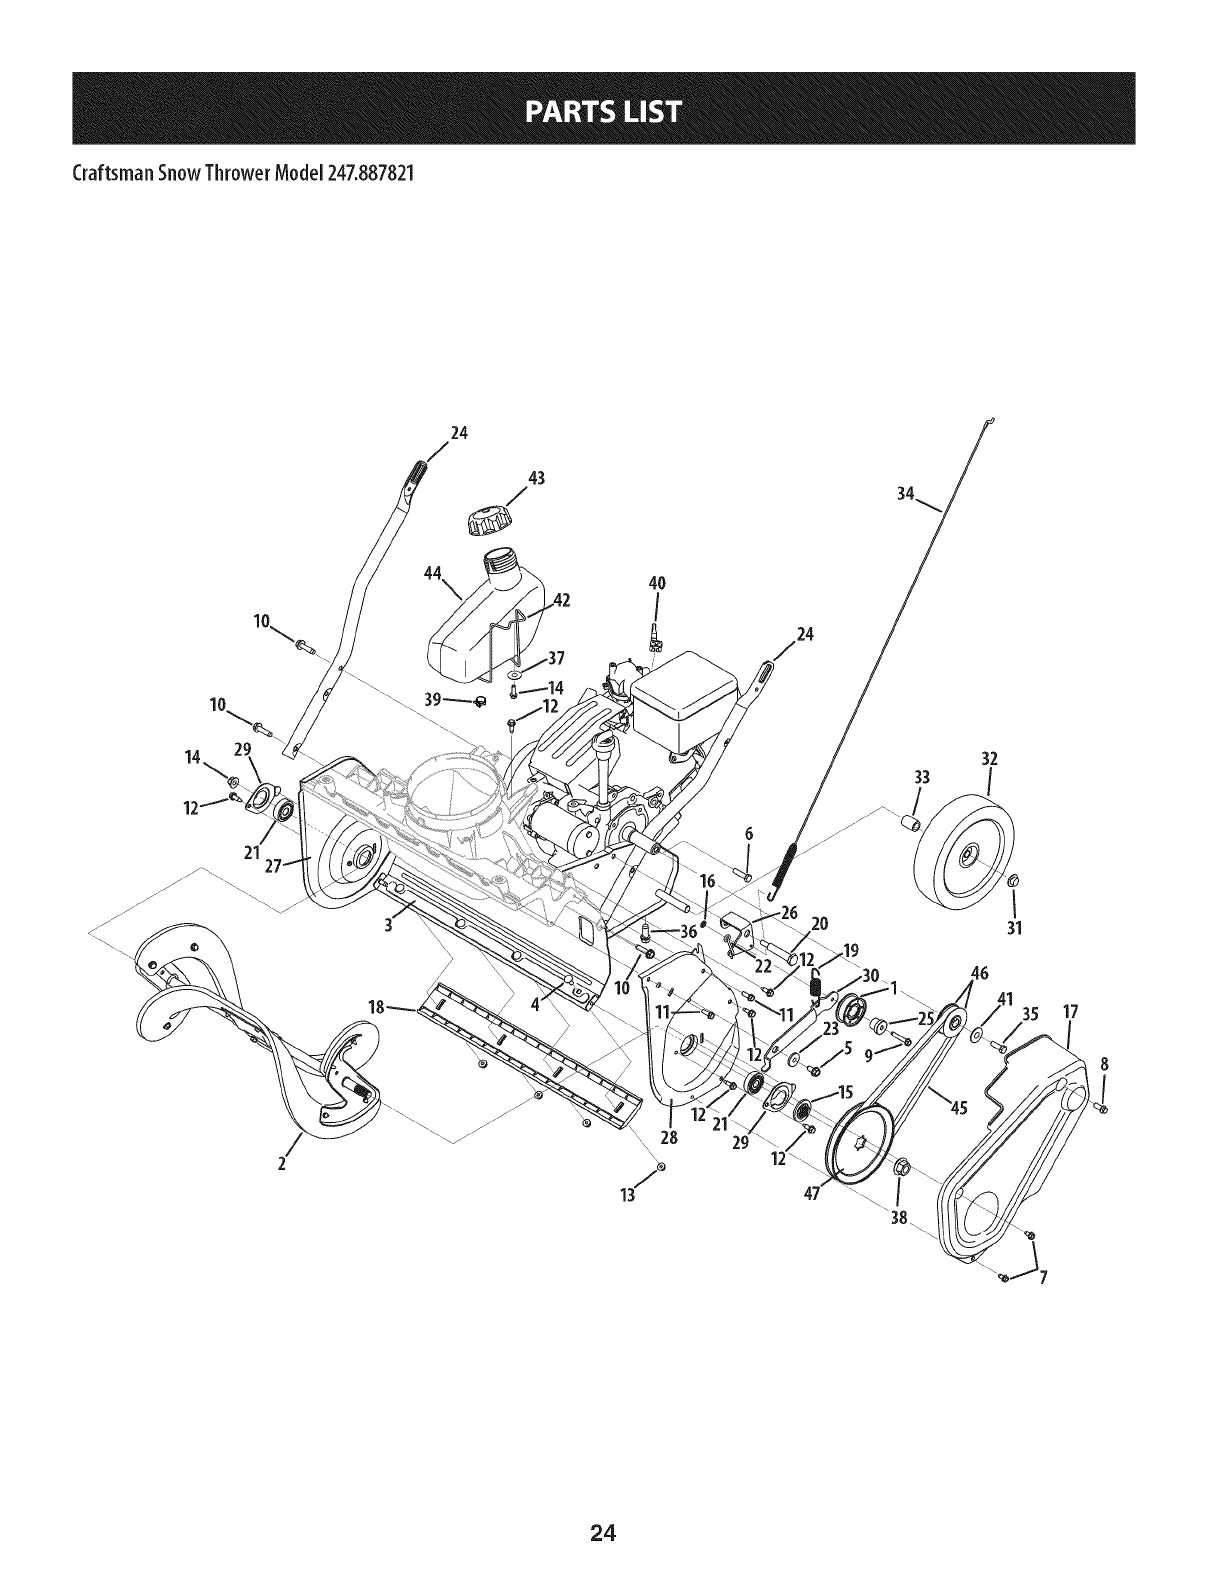
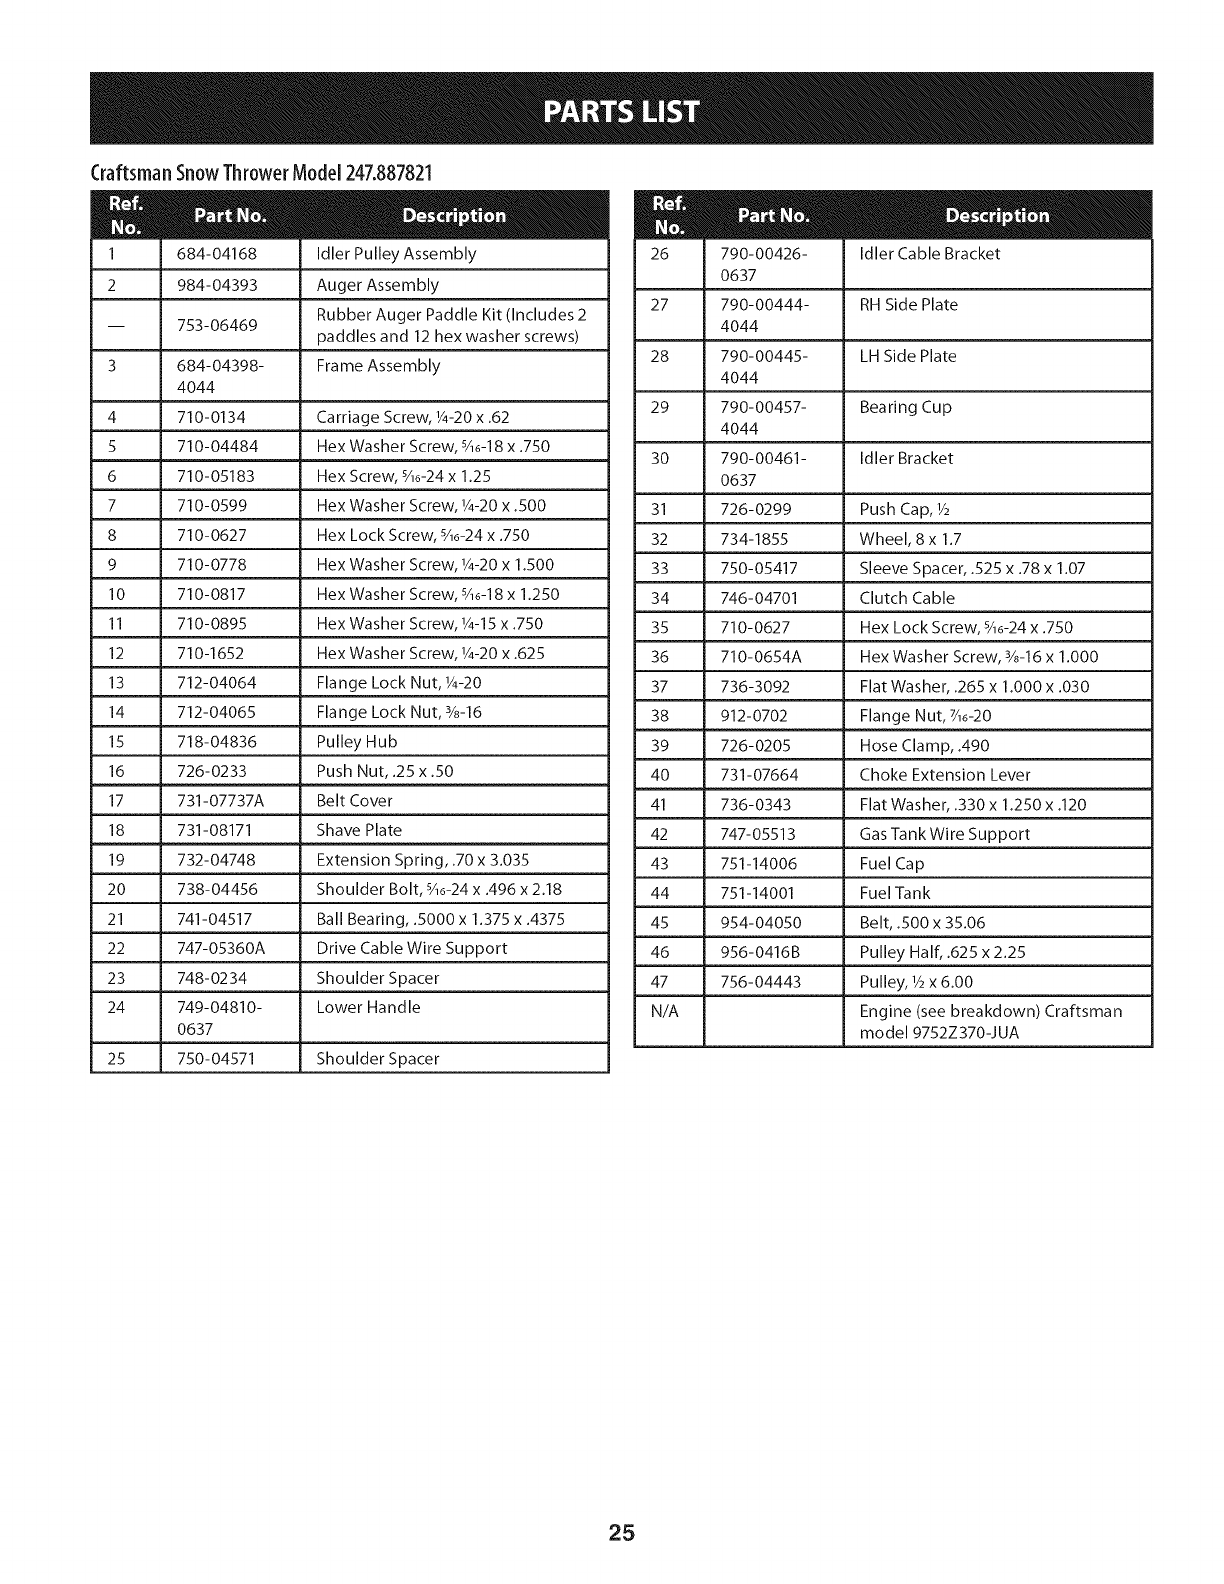
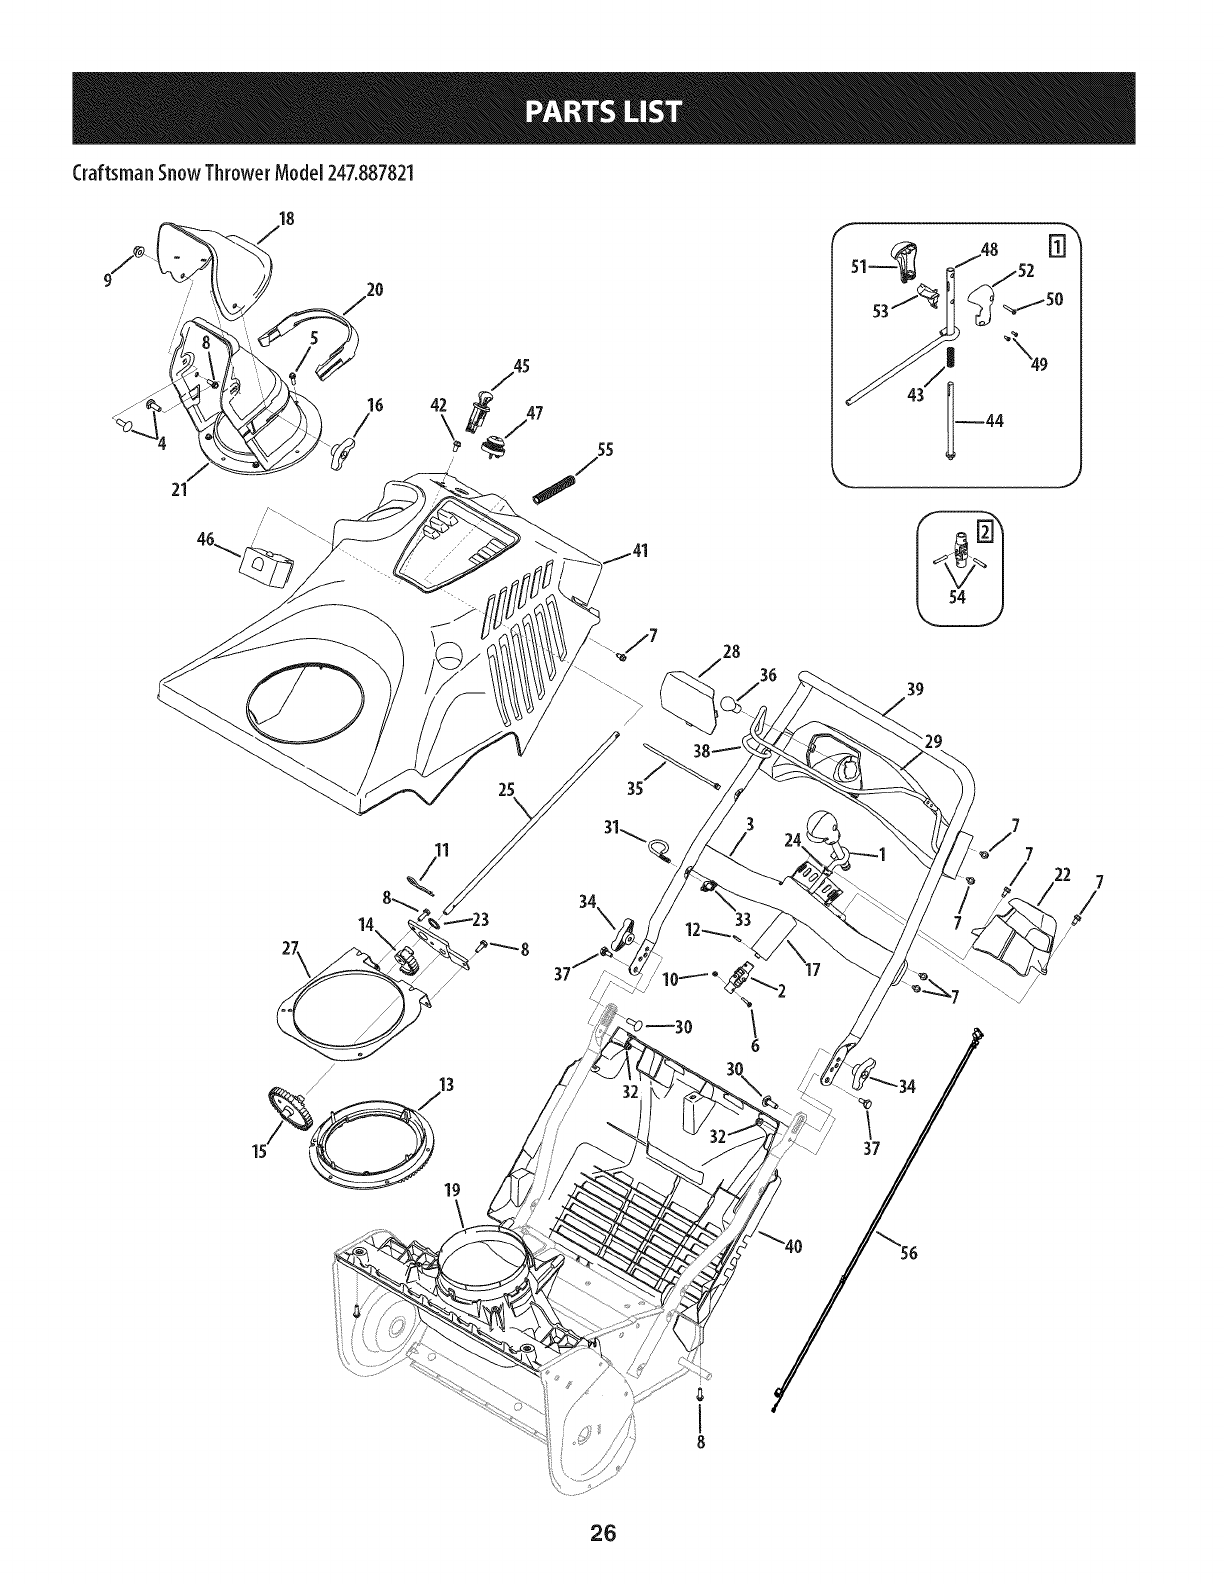
Craftsman SnowThrowerModel247.887821
24
J
43
33 32
21
24
Craftsman SnowThrowerModel247.887821
2
3
684-04168
984-04393
753-06469
684-04398-
4044
Idler Pulley Assembly
Auger Assembly
Rubber Auger Paddle Kit (Includes 2
paddles and 12 hex washer screws)
Frame Assembly
J
4 710-0134 Carriage Screw, 1/4-20x .62
5 710-04484 Hex Washer Screw, s/_o-18x .750
6 710-05183 Hex Screw, s/_o-24x 1.25
7 710-0599 Hex Washer Screw, 1/4-20x .500
8 710-0627 Hex Lock Screw, s/_o-24x .750
9 710-0778 Hex Washer Screw, 1/4-20x 1.500
10 710-0817 Hex Washer Screw, s/_o-18x 1.250
11 710-0895 Hex Washer Screw, 1/4-15x .750
12 710-1652 Hex Washer Screw, 1/4-20x .625
13 712-04064 Flange Lock Nut, 1/4-20
14 712-04065 Flange Lock Nut, 3/8-16
15 718-04836 Pulley Hub
16 726-0233 Push Nut, .25 x .50
17 731-07737A Belt Cover
18 731-08171 Shave Plate
19 732-04748
20 738-04456
21 741-04517
22 747-05360A
23 748-0234
24 749-04810-
0637
25 750-04571
Extension Spring, .70 x 3.035
Shoulder Bolt, s/_o-24x .496 x 2.18
Ball Bearing, .5000 x 1.375 x .4375
Drive Cable Wire Support
Shoulder Spacer
Lower Handle
Shoulder Spacer
790-00426- Idler Cable Bracket
0637
27 790-00444- RH Side Plate
4044
28 790-00445- LH Side Plate
4044
29 790-00457- Bearing Cup
4044
30 790-00461- Idler Bracket
0637
31 726-0299 Push Cap, 1/2
32 734-1855 Wheel, 8 x 1.7
33 750-05417 Sleeve Spacer, .525 x .78 x 1.07
34 746-04701 Clutch Cable
35 710-0627 Hex Lock Screw, sAo-24x .750
36 710-0654A Hex Washer Screw, 3/8-16x 1.000
37 736-3092 Flat Washer, .265 x 1.000 x .030
38 912-0702 Flange Nut, 7_o-20
39 726-0205 Hose Clamp, .490
40 731-07664 Choke Extension Lever
41 736-0343 Flat Washer, .330 x 1.250 x .120
42 747-05513 Gas Tank Wire Support
43 751-14006 Fuel Cap
44 751-14001 Fuel Tank
45 954-04050 Belt, .500 x 35.06
46 956-0416B Pulley Half, .625 x 2.25
47 756-04443 Pulley, 1/2x 6.00
N/A Engine (see breakdown) Craftsman
model 9752Z370-JUA
25
Craftsman SnowThrowerModel247.887821
21
28
36
|
39
32
6
37
22 7
/
/
26
Craftsman SnowThrowerModel247.887821
631-04526P Chute Rotation Control Assembly
2 684-04400 Joint Block Assembly
3 684-04383- Indicator Bracket Assembly
0637
4 _ 710-0451 _ Carriage Bolt, SA0-18x.750
5 710-05108 Hex Washer Screw, 1/4x .750
6 710-05179A Machine Screw, #8-32 x .88
7 710-0599 Hex Washer Screw, 1/4-20x 0.500
8 710-0895 Hex Washer Screw, 1/4-15x 0.750
9 712-04063 Flange Lock Nut, sA0-18
10 712-04035 Hex Lock Nut, #8-32
11 714-04003 Cotter Pin, .125 x 2.5
12 715-04095 Spring Pin, .156 x .85
13 917-04844B Bevel Gear, 95T
14 717-04940 Spur Gear, 35T
15 717-04941 Spur Gear, 40T/11T
16 720-04122 Wing Knob, sA0-18
17 720-04174 Grip, 1.18 x 3.33
L
18 731-04426A Upper Chute
19 , 731-07626B i Chute Adapter
20 731-07708 Chute Plug
21 931-07753A Lower Chute
22 731-07957 Chute Rotation Cover
23 736-04161 Flat Washer, .75 x 1.00 x .06
24 941-0475 Plastic Bushing, .380
25 747-05299A Chute Rotation Rod, 3/8
26 790-00416 Gear Mounting Plate
27 790-00471 Gear Retainer Bracket
28 731-07784 Handle Panel Lens
29 731-07760A Handle Panel
-- 777X44559 Light Label
710-04998 Carriage Screw, sA6-18x 1.00
31 710-05348 Eye Bolt, 1/4-20
32 712-04064 Flange Lock Nut, 1/4-20
33 720-0279 Wing Knob, 1/4-20
34 720-04122 Wing Knob, sA6-18
35 725-0157 Cable Tie, 3A6x .05 x 7.4
36 725-1629 Lamp, #1141
37 738-04419A Shoulder Screw, 1/4-20x .375 x .148
38 747-05327C- Auger Control
0637
39 749-04693B- Upper Handle
0637
40 731-07725 Bottom Cover Assembly
41 631-04607 Cover Assembly
42 710-04187 Hex Washer Screw, Y4-15x .50
43 732-04789 Compression Spring, .460 x 1.469
44 731-08018 Chute Rotation Rod
45 925-04031A Ignition Switch Assembly
46 951-10645A Electric Starter
47 951-10639A Primer
48 684-04381- Chute Rotation Rod Assembly
0637
49 710-04352 Screw, #6 x .375
50 710-04353 Screw, #8 x 1.00
51 731-04904 RH Control Knob
52 731-04905 LH Control Knob
53 731-06525 Joystick Trigger
54 715-0150 Roll Pin, 3A6x 1.1
55 731-08631 Conduit
56 925-04139 Wiring Harness w/Light Socket
-- 925-1649 Light Socket
27
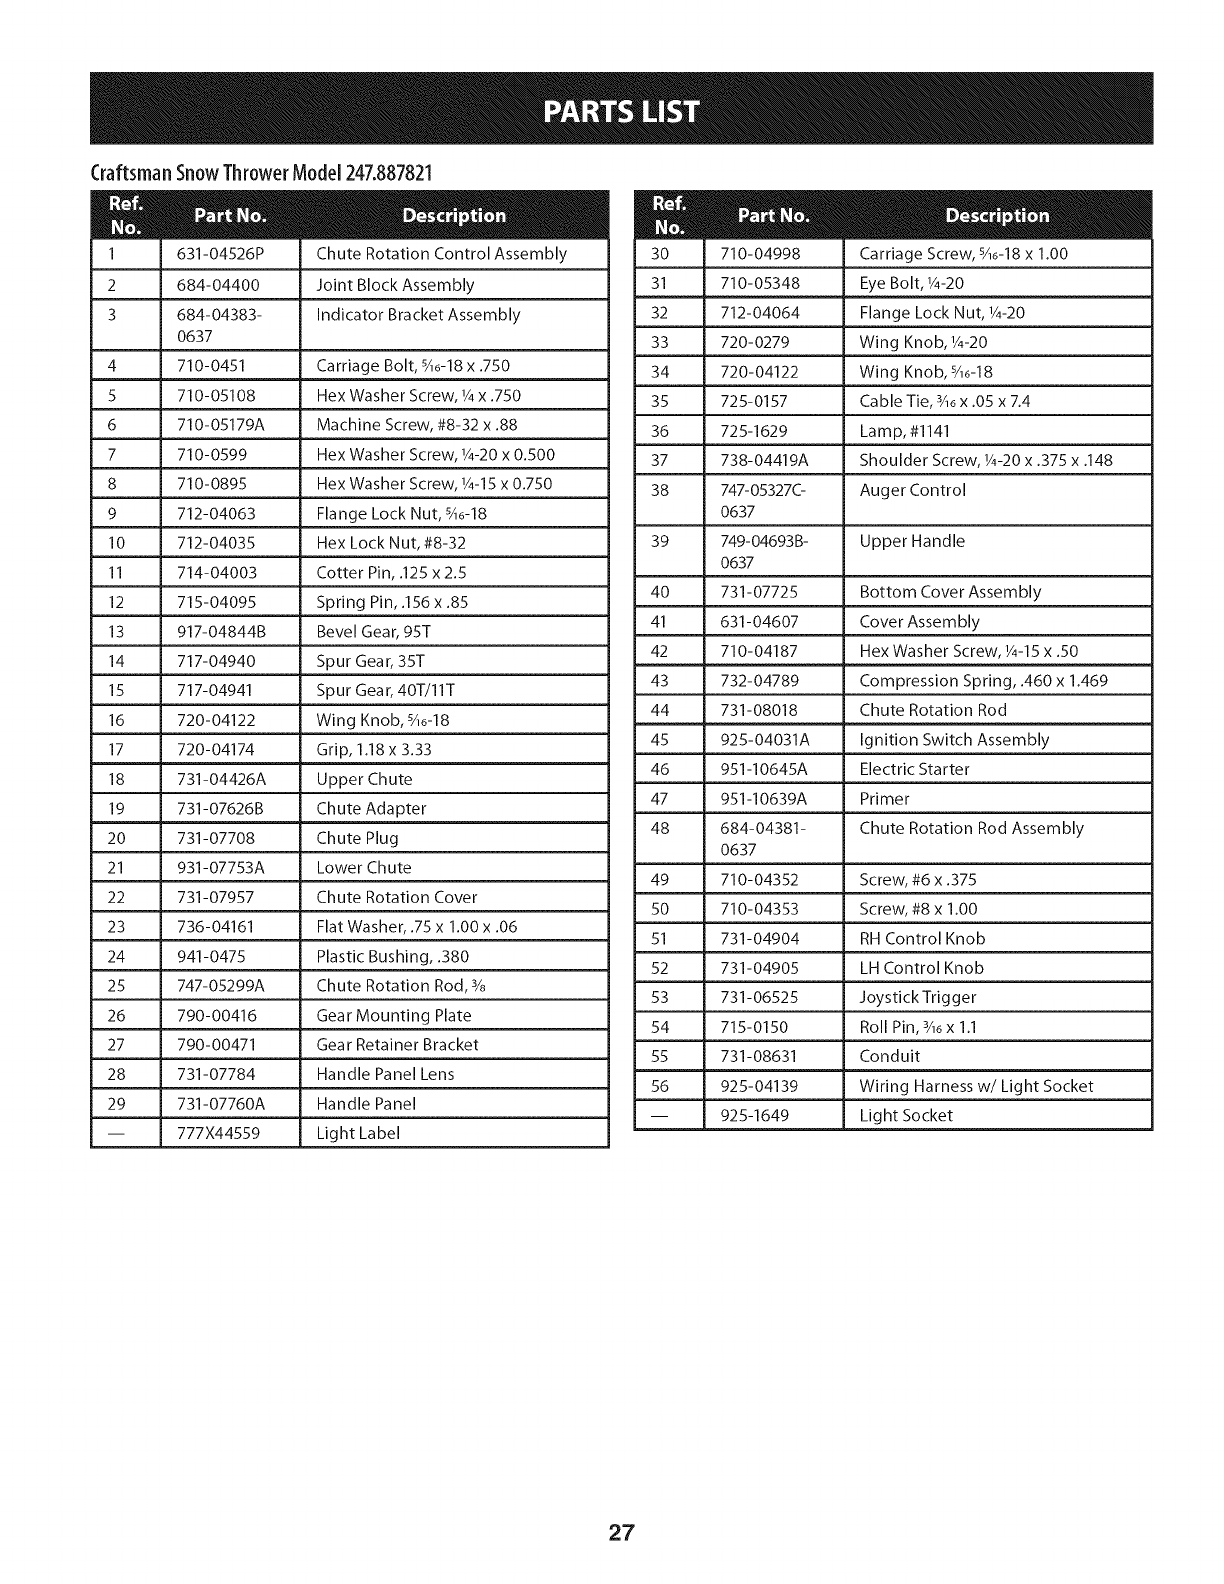
CraftsmanEngineModel370JUA ForSnow Model247.887821
--24 _3
50
22 21
21
21
22
23
24
25
5O
91
92
710-04911
951-10657
951-11289
712-04214
951-12010
710-05002
710-04915
951-11104
951-12016
D-® o
Stud M8x34
Muffler Stud Assembly
Exhaust Pipe Gasket
Nut, M8
Muffler Assembly
Bolt M5x10
Bolt M6x12
Governor Spring Bracket
Governor Shield
m
93
94
95
96
97
99
100
101
710-04943
712-05015
951-12100
951-10664
951-10665
712-04212
951-11106
710-04908
D-® 0
Bolt M6x28
NutM6
Governor Spring
Throttle Linkage Spring
Throttle Linkage
NutM6
Governor Arm
Governor Arm Bolt
28

Craftsman EngineModel370JUAForSnowModel247.887821
89
5O
78
79
8O
81
82
83
84
85
87
710-04915
951-11370
951-12013
710-04919
751-12050A
D _ o o
Bolt M6x12
Oil Seal 25x41.25x6
Ignition Coil Assembly
Bolt M6x25
Alternator Assembly
951-12051
951-10934
951-10911
712-04209
951-12644
Flywheel
Cooling Fan
Starter Cup
Nut, Special, M14x1.5
Blower Housing
88
89
9O
1O2
103
104
105
106
107
108
951-12644
710-04974
751-14152
951-10645A
715-04088
D _ ® o
Gasket 06
Bolt M6xl0
Recoil Starter
Electric Starter
Dowel Pin 8x8
710-05182
710-04915
951-11109
731-05632
951-10637
Bolt M6x32
Bolt M6x12
Blower Housing Shield
Key
Key Switch Base
29
CraftsmanEngineModel370JUA ForSnow Model247.887821
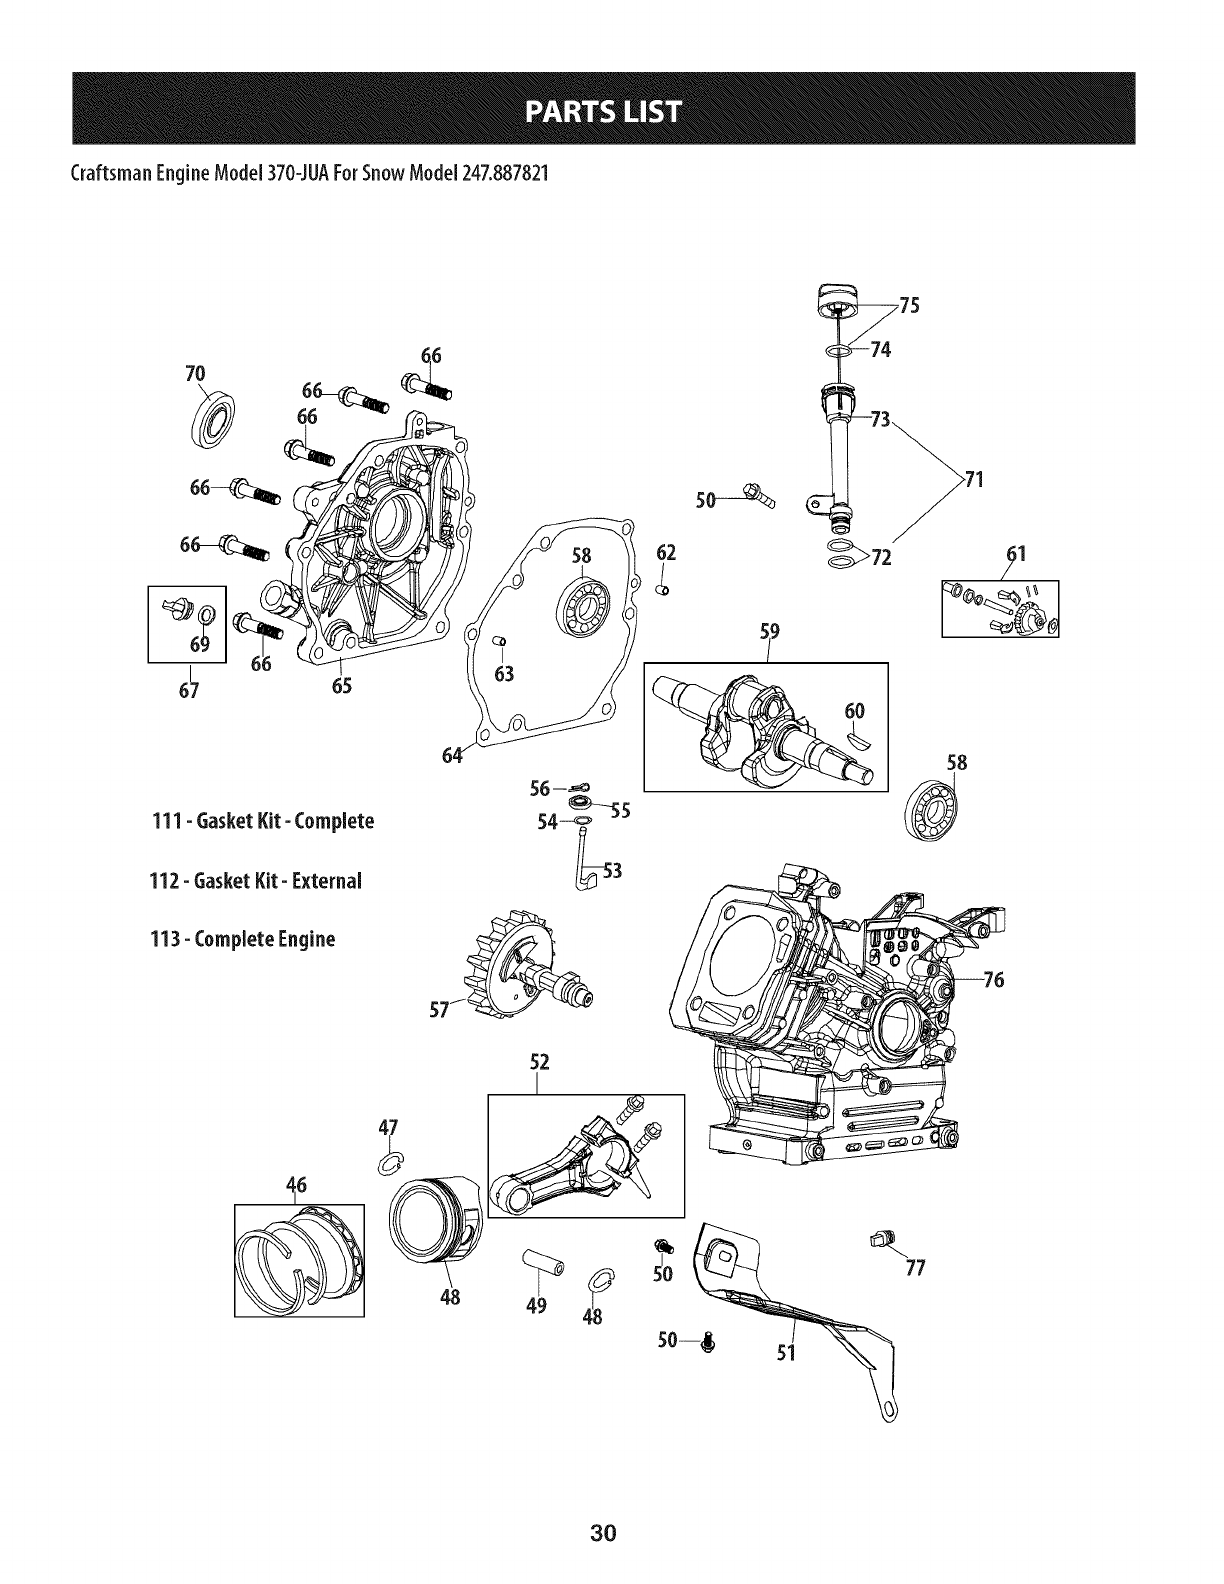
7O
I
67
111- GasketKit- Complete
112- Gasket Kit- External
113- Complete Engine
56 --_
S4_
62
9
48 49
30
Craftsman EngineModel370JUAForSnowModel247.887821
46
47
48
49
50
51
52
53
54
55
56
57
58
59
60
61
62
63
64
65
951-12111
951-11632
951-12007
951-11633
710-04915
951-11113
951-11573
751-14053
736-04461
951-11902
714-04078
951-11575
951-11369
951-12102
951-10307
951-11576
715-04092
715-04096
951-11371
951-12125
951-11246
D _ o 0
Piston Ring Set
Piston Pin Snap Ring
Piston
Piston Pin
Bolt M6x12
Air Shield
Connecting Rod Assembly
Governor Arm Shaft
Washer 5.2x1.9
Governor Seal
Cotter Pin
Camshaft Assembly
Radial Ball Bearing, 6205
Crankshaft Kit
(Incl.58,70 & 78)
Woodruff Key
Governor Gear/Shaft Assembly
Dowel Pin 7x14
Dowel Pin 9x14
Crankcase Cover Gasket
Crankcase Cover
Crankcase Cover Kit
(Incl.58,64-70)
66
67
69
70
71
72
73
74
75
76
77
111
112
113
710-04932
751-10493
951-11577
951-11368
951-11913
951-11381
951-10656
951-11904
951-12482
751-14097
951-12103
751-12513A
951-12514
751-12121A
751-12026A
952Z370-JUA
D _ o 0
Bolt M8x32
Oil Fill Plug Assembly
O-Ring 15.8x2.5
Oil Seal 25x41.25x6
Oil Fill Tube Assembly
Oil Fill Tube O-Ring
Oil Fill Tube
Oil Fill Tube O-Ring
Dipstick Assembly
Crankcase
Crankcase Kit
(Incl.55,58,70,76 & 78)
Short Block Assembly
(Incl. 6,22,27-29,40,42,43,
46-49,52-70,76-78)
Oil Drain Plug
Gasket Kit - Complete
(In cl.6,22,27-29,35,40,54,
55,64,70 & 78)
Gasket Kit- External
(Incl.6,22,27-29 & 35)
Complete Engine
31
CraftsmanEngineModel370JUA ForSnow Model247.887821
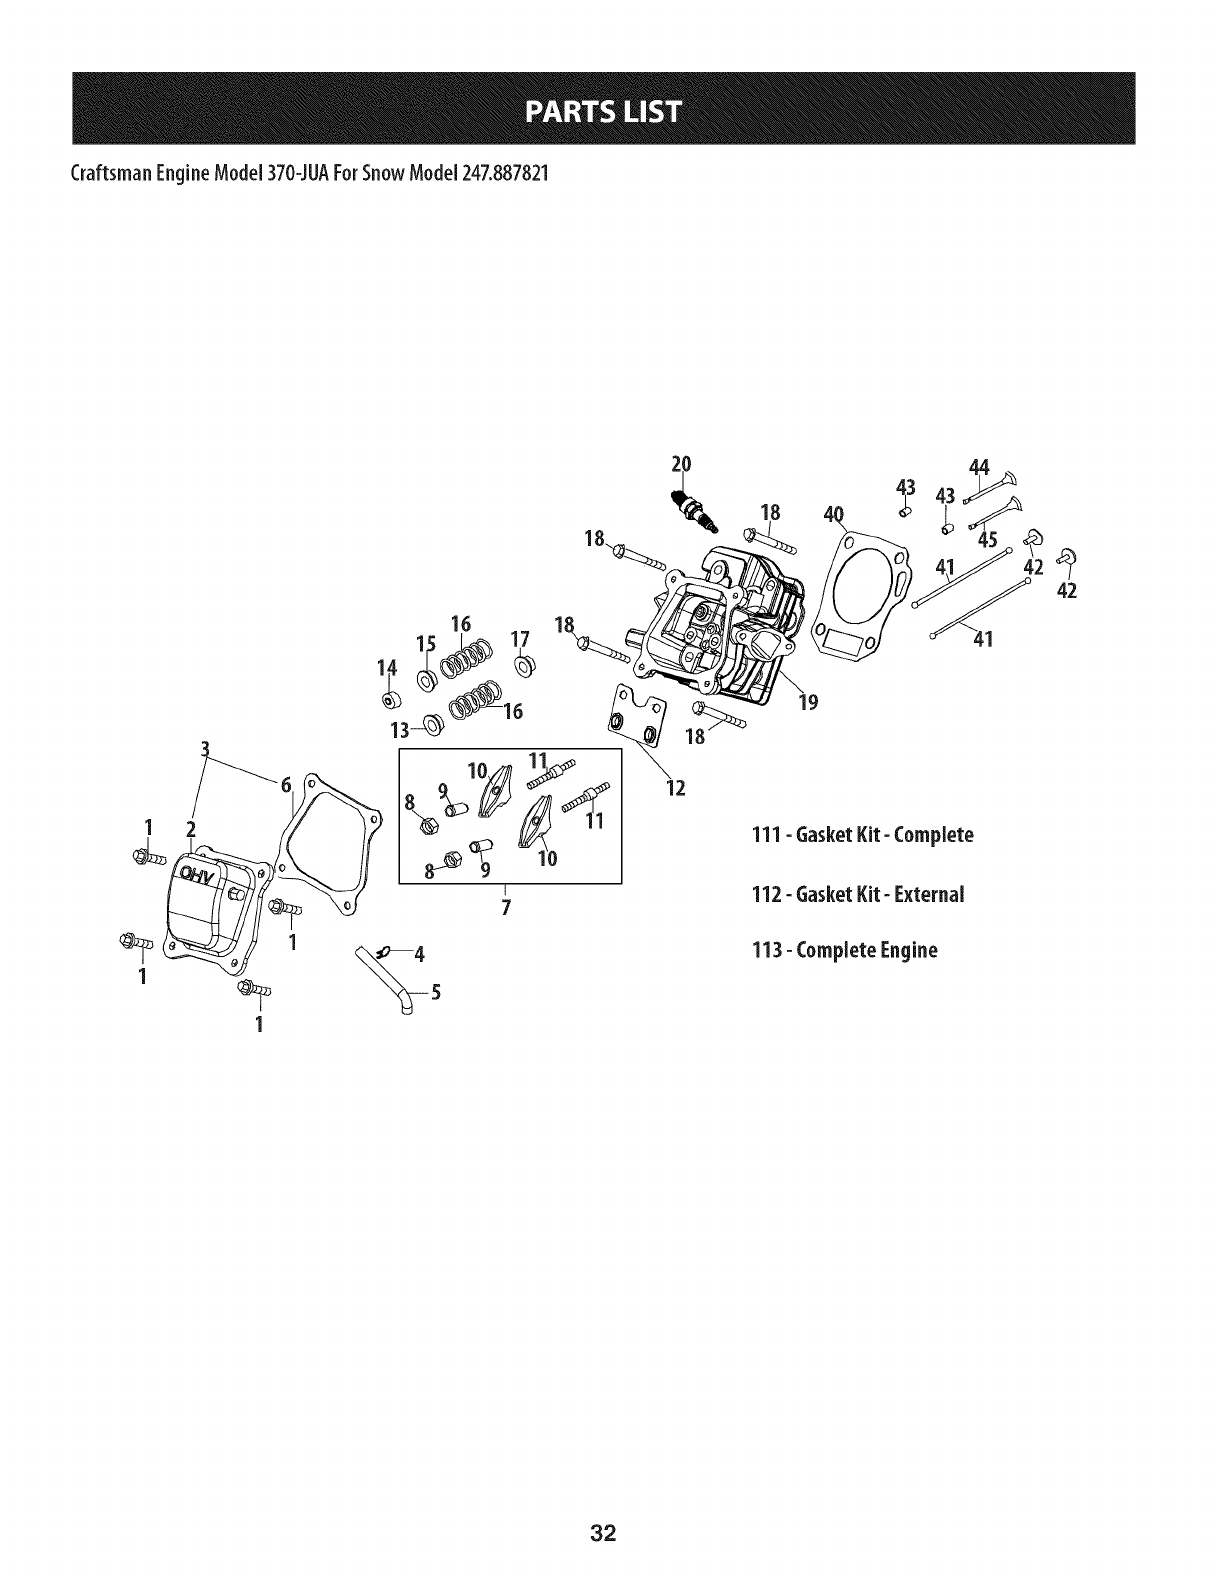
1 2 _ 111- Gasket Kit- Complete
1
1
7112- GasketKit- External
113- Complete Engine
32
CraftsmanEngineModel370JUAForSnowModel247.887821
1
2
3
4
5
6
7
8
9
10
11
12
13
14
15
16
17
18
19
710-04968
951-12608
951-12626
726-04101
731-07059
951-11565
951-11892
751-11124
751-11123
951-11893
710-04902
951-11895
951-12000
951-12002
951-12003
951-12004
951-11894
710-04933
751-10722 B
II _ o o
Bolt M6x16
Valve Cover
Valve Cover Kit
Breather Hose Clamp
Breather Hose
Valve Cover Gasket
Rocker Arm Assembly
Nut, Pivot Locking
Adjusting Nut ,Valve
Rocker Arm
Bolt, Pivot
Push Rod Guide
Valve Spring Retainer (Intake)
Exhaust Lash Cap
Valve Spring Retainer (Exhaust)
Valve Spring
Valve Seal (Intake)
Bolt M8x55
Cylinder Head Assembly
(Incl.6-17,19,22,27-29,40,44 & 45)
2O
4O
41
42
43
44
45
111
112
113
951-10292
951-11572
951-10648
951-11899
715-04108
951-10647A
951-10647A
751-12121A
751-12026A
952Z370-JUA
951-12648
II - o
Spark Plug/F6Rtc
Gasket, Cylinder Head
Push Rod Kit
Tappet
Dowel Pin 10x16
Valve Kit
Valve Kit
Gasket Kit - Complete
(In cl.6,22,27-29,35,40,54,
55,64,70 & 78)
Gasket Kit- External
(Incl.6,22,27-29 & 35)
Complete Engine
54,55,64,70,79)
Short Block
(In cl.6,22,27,28,40,42,43,
46-49,52-67,70,76-79)
33
CraftsmanEngineModel370JUA ForSnow Model247.887821
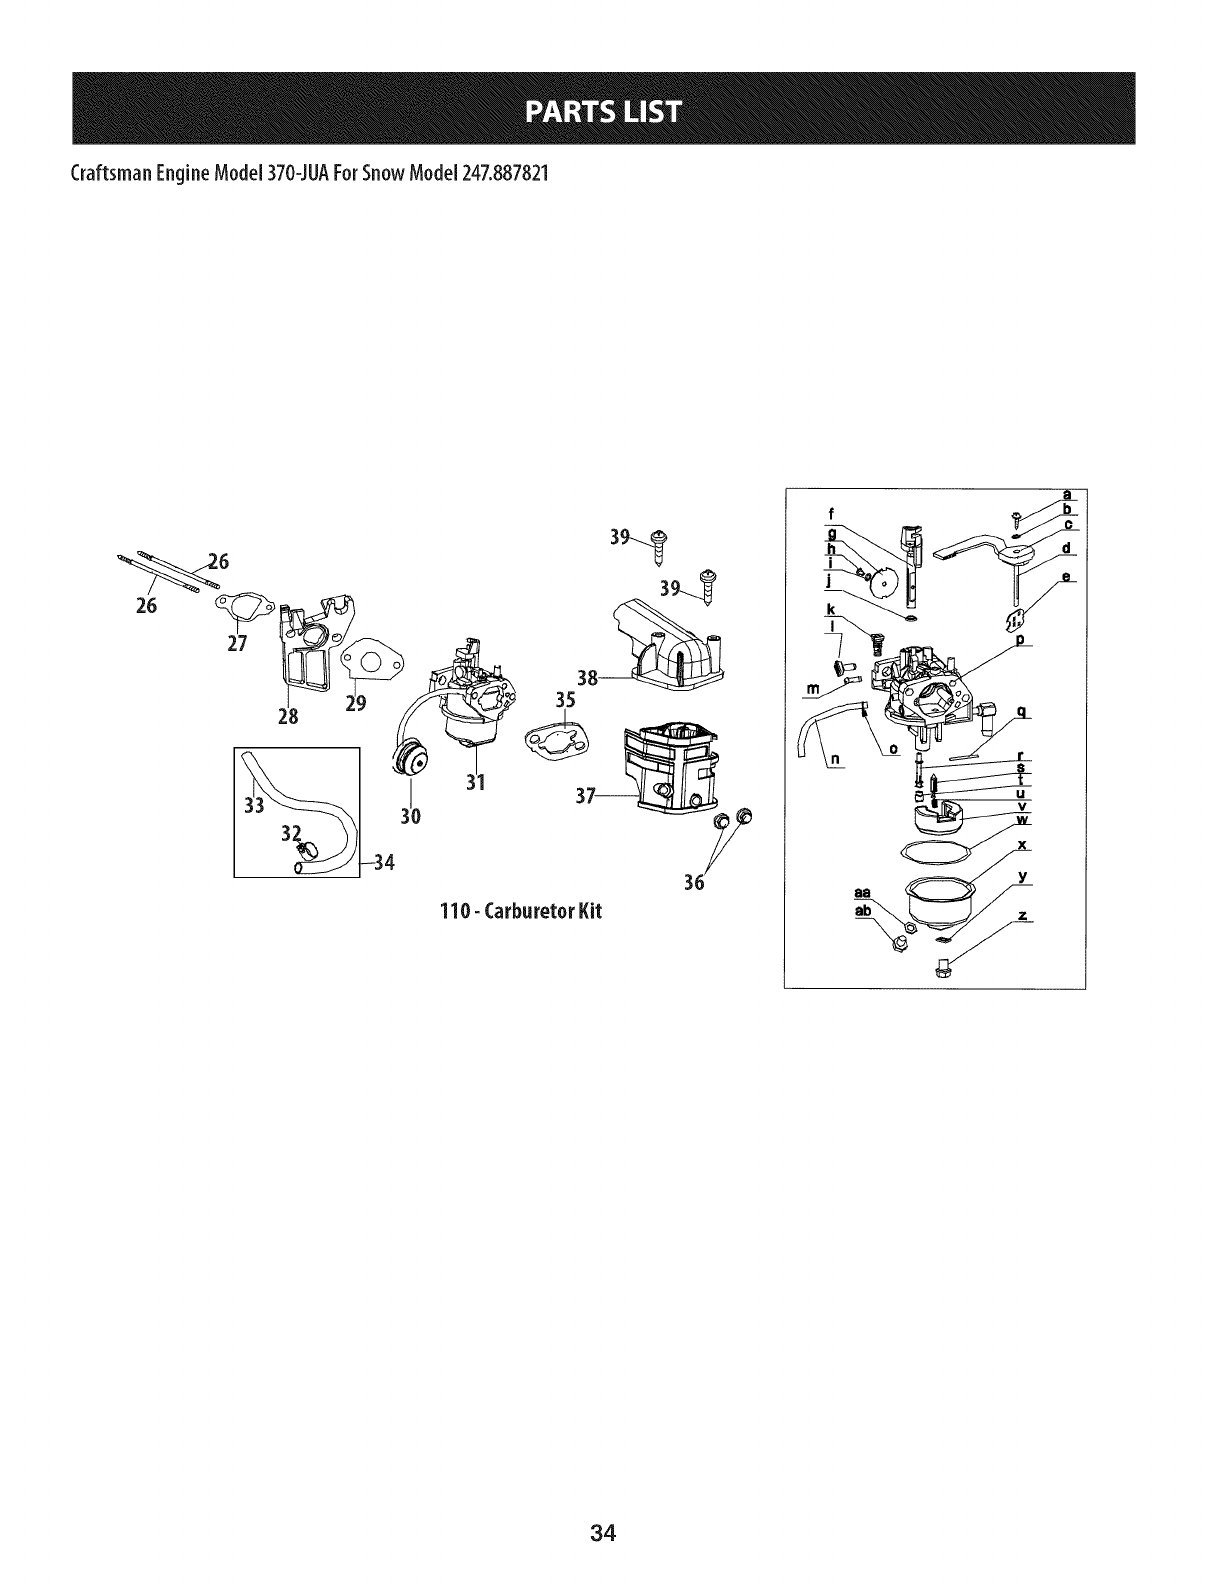
39_
3_
110- CarburetorKit
Y
Z
34
CraftsmanEngineModel370JUAForSnowModel247.887821
13m
26
27
28
29
30
31
32
33
34
35
36
37
38
39
II0
a
b
c
d
e
f
710-05101
951-11567
951-11568
951-11569A
951-10639A
751-14028A
951-11700
951-12613
951-12012
951-11571
712-04213
951-10962
951-10961
710-05275
951-12788A
D _ o 0
Stud M6xll0
Carburetor Insulator Gasket
Carburetor Insulator
Carburetor Gasket
Primer Assembly
Carburetor Assembly
Fuel Hose Clamp
Fuel Hose
Fuel Line Kit
Carburetor Gasket Plate
Nut
Air Cleaner Housing
Air Cleaner Assembly
Self-Tapping Bolt M4.2x45
Carburetor Kit
(Incl. k,q,r,s,t,u,v,w,y & aa)
710-05468
736-04638
951-12515
n/a
n/a
n/a
Mixture Screw
Washer 3
Control Lever, Choke
Choke Shaft
Choke Plate
Throttle Shaft
g
h
I
J
k
I
m
n
O
P
q
r
s
t
U
V
W
X
Y
Z
aa
ab
n/a
710-05469
736-04638
n/a
n/a
n/a
n/a
951-12019
951-11906
n/a
n/a
n/a
951-12875
n/a
n/a
n/a
951-11589
n/a
951-11348
710-04945
951-11349
710-04938
D _ o e
Throttle Plate
Screw M3x6
Washer 3
Gasket, Throttle Plate
Idle Jet Assembly
Idle Speed Adjusting Screw
Primer Pipe
Primer Hose
Hose Clamp
Carburetor Body
Float Pin
Emulsion Tube
Needle Valve
Main Jet
Needle Valve Spring
Float
Fuel Bowl Gasket
Fuel Bowl
Fuel Bowl Gasket
Fuel Bowl Mounting Bolt
Fuel Drain Plug Gasket
Fuel Drain Plug
35
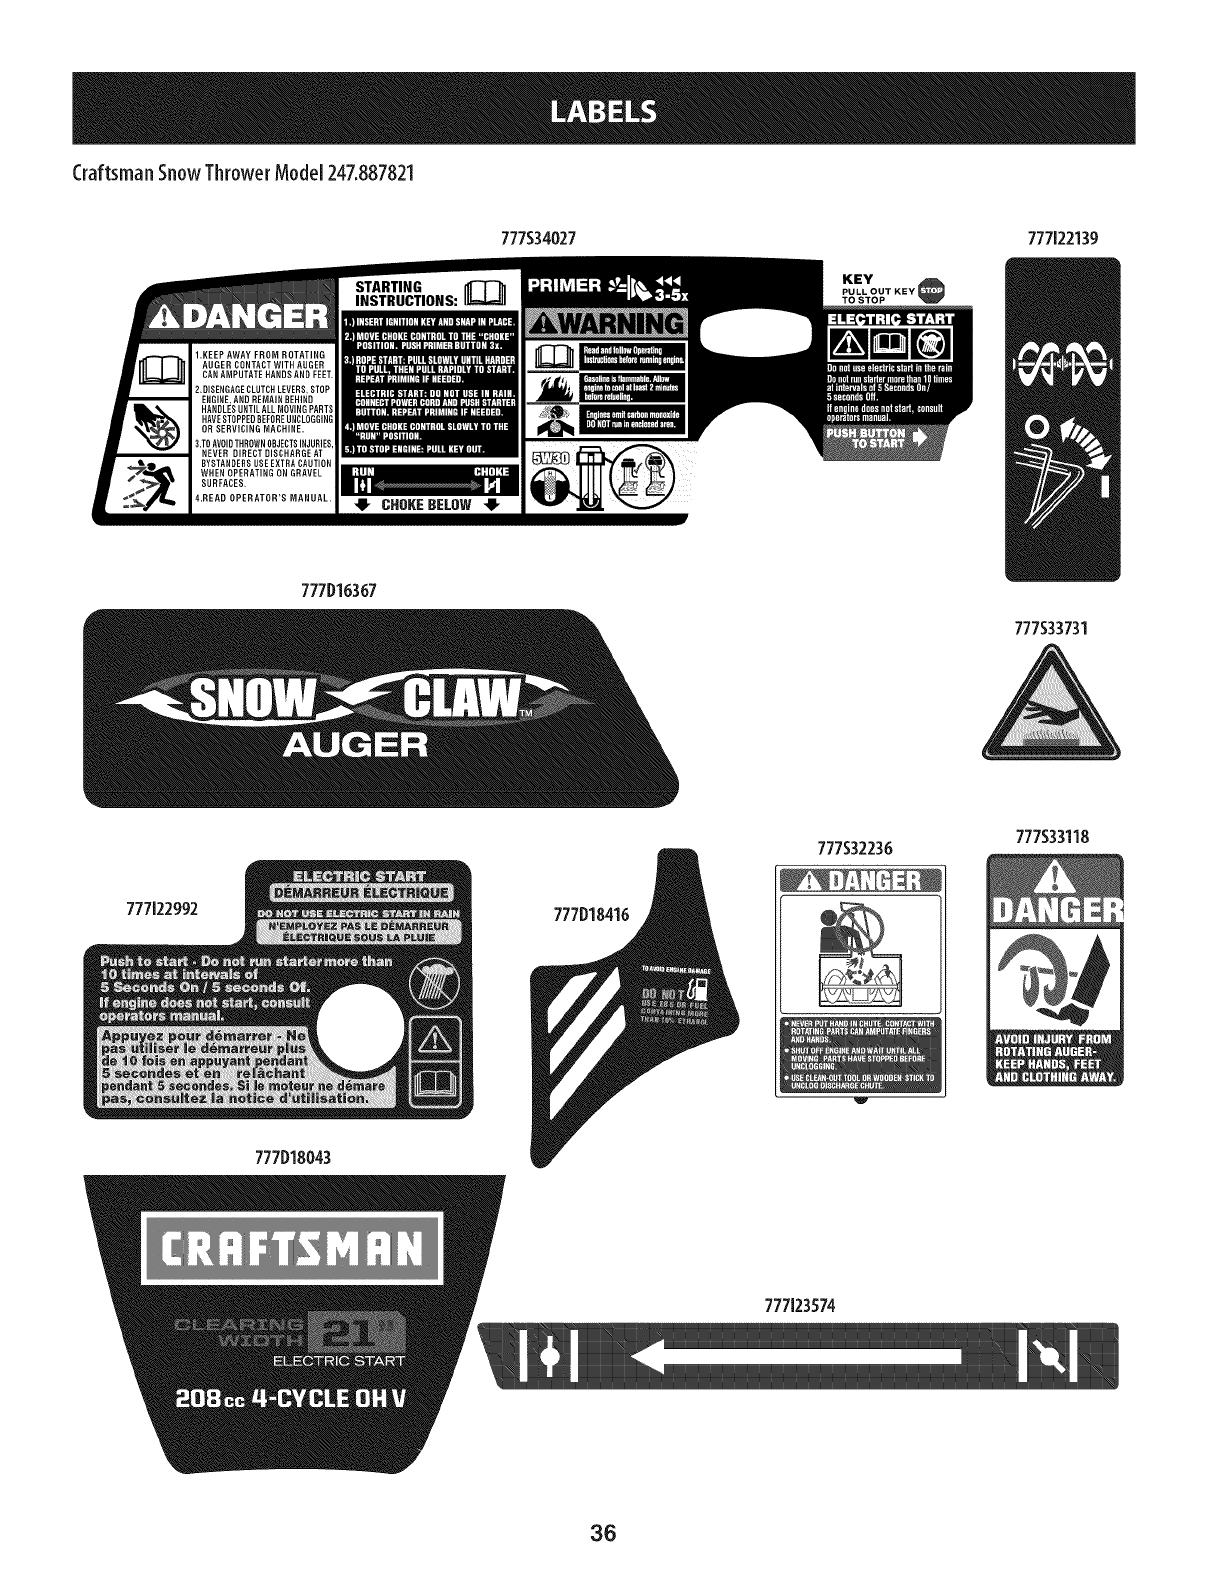
Craftsman SnowThrowerModel247.887821
777S34027 777122139
777D16367
777533731
777122992
777D18043
777D18416
777S32236 777S33118
777123574
36
Congratulations on making a smart purchase. Your new Craftsman® product is designed and
manufactured for years of dependable operation. But like all products, it may require repair
from time to time. That's when having a Repair Protection Agreement can save you money and
aggravation.
Here's what the Repair Protection Agreement* includes:
[] Expert service by our 10,000 professional repair specialists
[] Unlimited service and no charge for parts and labor on all covered repairs
[] Product replacement up to $1500 if your covered product can't be fixed
[] Discount of 25% from regular price of service and related installed parts not covered by the
agreement; also, 25% off regular price of preventive maintenance check
[] Fast help by phone - we call it Rapid Resolution - phone support from a Sears representative.
Think of us as a "talking owner's manual."
Once you purchase the Repair Protection Agreement, a simple phone call is all that it takes for you
to schedule service. You can call anytime day or night, or schedule a service appointment online.
The Repair Protection Agreement is a risk-free purchase. If you cancel for any reason during the
product warranty period, we will provide a full refund. Or, a prorated refund anytime after the
product warranty period expires. Purchase your Repair Protection Agreement today!
Some limitations and exclusions apply. For prices and additional information in the U.S.A.
call 1=800=827=6655.
*Coverage in Canada varies on some items. For full details call Sears Canada at 1=800=361=
6665.
Sears Installation Service
For Sears professional installation of home appliances, garage door openers, water heaters, and
other major home items, in the U.S.A. or Canada call 1=800=4=MY=HOME®.
37
FEDERALand/or CALIFORNIAEMISSIONCONTROLWARRANTYSTATEMENT
YOURWARRANTYRIGHTSANDOBLIGATIONS
MTD Consumer Group Inc, the United States Environmental Protection Agency (EPA), and for those products certified for sale in the state of
California, the California Air Resources Board (CARB) are pleased to explain the emission (evaporative and/or exhaust) control system (ECS)
warranty on your 2013 and later small off-road spark-ignited engine and equipment (outdoor equipment engine). In California, new outdoor
equipment engines must be designed, built and equipped to meet the State's stringent anti-smog standards (in other states, outdoor
equipment engines must be designed, built, and equipped to meet the U.S. EPA small off-road spark ignition engine regulations). MTD
Consumer Group Inc must warrant the ECSon your outdoor equipment engine for the period of time listed below, provided there has been no
abuse, neglect, or improper maintenance of the outdoor equipment engine.
Your ECS may include parts such as the carburetor, fuel-injection system, ignition system, catalytic converter, fuel tanks, fuel lines, fuel caps,
valves, canisters, filters, vapor hoses, clamps, connectors, and other associated emission-related components.
Where a warrantable condition exists, MTD Consumer Group Inc will repair your outdoor equipment engine at no cost to you including
diagnosis, parts, and labor.
MANUFACTURER'SWARRANTYCOVERAGE:
This emission control system is warranted for two years. If any emission-related part on your outdoor equipment engine is defective, the
part will be repaired or replaced by MTD Consumer Group Inc. In the event that a component is covered for longer than two years by the
Manufacturer's equipment warranty, the longer coverage period will apply.
/
OWNERSWARRANTYRESPONSIBILITIES:
As the outdoor equipment engine owner, you are responsible for performance of the required maintenance listed in your owner's manual. MTD
Consumer Group Inc recommends that you retain all receipts covering maintenance on your outdoor equipment engine, but MTD Consumer
Group Inc cannot deny warranty solely for the lack of receipts.
As the outdoor equipment engine owner, you should however be aware that MTD Consumer Group Inc may deny you warranty coverage if
your outdoor equipment engine or a part has failed due to abuse, neglect, improper maintenance, or unapproved modifications.
You are responsible for presenting your outdoor equipment engine to MTD Consumer Group Inc's distribution center or service center as soon
as the problem exists. The warranty repairs should be completed in a reasonable amount of time, not to exceed 30 days. If you have a question
regarding your warranty coverage, you should contact the MTD Consumer Group Inc Service Department at 1-800-800-7310 or at
http://su pport.mtd prod ucts.com.
GENERALEMISSIONSWARRANTYCOVERAGE:
MTD Consumer Group Inc warrants to the ultimate purchaser and each subsequent purchaser that the outdoor equipment engine is: (1)
designed, built, and equipped so as to conform with all applicable regulations; and (2) free from defects in materials and workmanship that
cause the failure of a warranted part for a period of two years.
The warranty period begins on the date the outdoor equipment engine is delivered to an ultimate purchaser or first placed into service.
Subject to certain conditions and exclusions as stated below, the warranty on emission-related parts is as follows:
1. Any warranted part that is not scheduled for replacement as required maintenance in the written instructions supplied is warranted for
the warranty period stated above. If the part fails during the period of warranty coverage, the part will be repaired or replaced by MTD
Consumer Group Inc according to subsection (4) below. Any such part repaired or replaced under warranty will be warranted for the
remainder of the period.
2. Any warranted part that is scheduled only for regular inspection in the written instructions supplied is warranted for the warranty period
stated above. Any such part repaired or replaced under warranty will be warranted for the remaining warranty period.
3. Any warranted part that is scheduled for replacement as required maintenance in the written instructions supplied is warranted for the
period of time before the first scheduled replacement date for that part. If the part fails before the first scheduled replacement, the part
will be repaired or replaced by MTD Consumer Group Inc according to subsection (4) below. Any such part repaired or replaced under
warranty will be warranted for the remainder of the period prior to the first scheduled replacement point for the part.
Repair or replacement of any warranted part under the warranty provisions herein must be performed at a warranty station at no charge
to the owner.
4.
5. Notwithstanding the provisions herein, warranty services or repairs will be provided at all of our distribution centers that are franchised to
service the subject engines or equipment.
6. The outdoor equipment engine owner will not be charged for diagnostic labor that is directly associated with diagnosis of a defective,
emission-related warranted part, provided that such diagnostic work is performed at a warranty station.
7. MTD Consumer Group Inc is liable for damages to other engine or equipment components proximately caused by a failure under
warranty of any warranted part.
8. Throughout the off-road engine and equipment warranty period stated above, MTD Consumer Group Inc will maintain a supply of
warranted parts sufficient to meet the expected demand for such parts.
9. Any replacement part may be used in the performance of any warranty maintenance or repairs and must be provided without charge to
the owner. Such use will not reduce the warranty obligations of MTD Consumer Group Inc.
10. Add-onormodifiedpartsthatarenotexemptedbytheAirResourcesBoardmaynotbeused.Theuseofanynon-exemptedadd-onor
modifiedpartsbytheultimatepurchaserwillbegroundsfordisallowingawarrantyclaims.MTDConsumerGroupIncwillnotbeliableto
warrantfailuresofwarrantedpartscausedbytheuseofanon-exemptedadd-onormodifiedpart.
WARRANTEDPARTS:
The repair or replacement of any warranted part otherwise eligible for warranty coverage may be excluded from such warranty coverage if
MTD Consumer Group Inc demonstrates that the outdoor equipment engine has been abused, neglected, or improperly maintained, and that
such abuse, neglect, or improper maintenance was the direct cause of the need for repair or replacement of the part. That notwithstanding,
any adjustment of a component that has a factory installed, and properly operating, adjustment limiting device is still eligible for warranty
coverage. Further, the coverage under this warranty extends only to parts that were present on the off-road engine and equipment purchased.
The following emission warranty parts are covered (if applicable):
1. Fuel Metering System
Cold start enrichment system (soft choke)
Carburetor and internal parts (or fuel injection system)
Fuel pump
Fuel tank
2. Air Induction System
Air cleaner
Intake manifold
3. Ignition System
Spark plug(s)
Magneto ignition system
4. Exhaust System
Catalytic converter
SAI (Reed valve)
5. Miscellaneous Items Used in Above System
Vacuum, temperature, position, time sensitive valves and switches
Connectors and assemblies
6. Evaporative Control
Fuel hose
Fuel hose clamps
Tethered fuel cap
Carbon canister
Vapor lines
050790Rev.A
Declarad6n de garantia .............................. 40
Medidas de seguridad ................................ 41
Montaje ............................................. 45
Fundonamiento ..................................... 49
Servido y Mantenimiento ............................ 52
Almacenamiento fuera de temporada ................ 58
Solud6n de problemas ............................... 59
Acuerdo de protecd6n para reparadones ............. 61
Numeros de servido ........................ Contratapa
CRAFTSMANDOSANOSDE6ARANTIATOTAL
Durantedosahosdesdelafechadecompra,esteproductoest_garantizadocontracualquierdefectodematerialesomanodeobra.Unproductodefectuoso
recibir_lareparaci6nosustituci6ngratuitasilareparaci6nnoest_disponible.
Paraobtenerinformaci6ndetalladacoberturadelagarantiaparaobtenerlareparaci6nosustituci6ngratuita,visiteelsitioweb:www.craftsman.com
Estagarantiacubredefectosenmaterialesy manodeobra.Lagarantianoincluye:
• Losarticulosnoreutilizablesquepuedengastarseporelusonormaldentrodelperiododegarantia,incluyendoperonolimitadoalasbarrenas,palas
delsinfin,cortadoresdederiva,zapatasantideslizantes,placaderaspado,pasadoresdeseguridad,bujias,filtro deaire,cinturones,y elfiltro deaceite.
• Losserviciosdemantenimientoestandar,cambiosdeaceitey ajustes-ups.
• Tireelreemplazooreparaci6ncausadaporpinchazosconobjetosexternos,talescomoclavos,espinas,toconesovidrios.
• Tiredelaruedaoelreemplazoolareparaci6nresultantesdeldesgastenormal,accidenteuoperaci6nomantenimientoinadecuados.
• Reparacionesnecesariasdebidoalabusodeloperador,incluyendoperonolimitadoalosdahoscausadosporelexcesodevelocidaddelmotor,odel
impactodeobjetosquetuerzanelmarco,elejesinfin,etc
• Reparacionesnecesariasdebidoanegligenciadeloperador,incluyendoperonolimitadoa,el_ctricosy dahosmec_nicoscausadosporalmacenamiento
inadecuado,noutilizaci6ndelacalidadocantidaddeaceitedelmotor,opotnomantenerelequipodeacuerdoalasinstruccionescontenidasenel
manualdeloperador.
• Motor(sistemadecombustible)limpiezaoreparacionescausadasporelcombustibledecididoasercontaminadouoxidado(viejo).Engeneral,el
combustibledebeusarsedentrodelos30diassiguientesalafechadecompra.
• Deterioroy desgastenormaldelosacabadosexterioresoreemplazoetiquetadelproducto.
Estagarantiaesinv_lidasiesteproductoseutilizamientrasquelaprestaci6ndeservicioscomercialesosisealquilaaotrapersona.
Estagarantialeotorgaderechoslegalesespecificos,y ustedtambi_npuedetenerotrosderechosquevariandeestadoaestado.
SearsBrandsManagementCorporation,HoffmanEstates,IL60179
Tipo de aceite del motor: SAE 5W-30
Capaddad de aceite del motor: 20 onzas
Gasolina:
Capaddad de combustible:
Bujias:
Separad6n de las bujias:
© Sears Brands, LLC
Gasolina sin plomo
2 Cuartos de gal6n
F6RTC
0.020"-0.030"
Numero de modelo
Numero de serie
Fecha de compra
Registre arriba el numero del modelo, el numero
de serie y la fecha de compra
40
Lapresenciadeestesimboloindicaquesetrata deinstruccionesde
seguridadimportantes quedeberespetarparaevitar poneren riesgosu
seguridadpersonaly/o materialy la de losdem_is.Leay cumpJatodasJas
instruccionesdeestemanualantesdeintentar operarestam_iguina.Sino
respetaestasinstruccionespuedeprovocarJesionespersonales.Cuando
yeaestesimbolo, iTENGAENCUENTALAADVERTENCIA!
PROPOSICION 65 DE CALIFORNIA
Elescapedel motor de esteproducto,algunosdesuscomponentesy
algunoscomponentesdel vehiculocontieneno liberan sustanciasquimicas
queel estadodeCaliforniaconsideraquepuedenprodudr c_ncer,defectos
denadmiento uotros problemasreproductivos.
Estam_quinaest_disefada parasetutilizada respetandolasnormasde
seguridadcontenidasen estemanual.AIigualqueconcualquiertipo de
equipomotorizado, undescuidooerror por partedel operadorpuede
producirlesionesgraves.Estam_quinaescapazdeamputar dedos,manos
y piesy dearrojarresiduos.Denorespetarlasinstruccionesdeseguridad
siguientessepuedenprodudr lesionesgraveso lamuerte.
Su Responsabilidad -- Estam_quinamotorizadas61opueden
usarlalaspersonasquelean,comprendany respetenlasadvertenciase
instruccionesqueaparecenenestemanualyen la m_quina.
iGUARDEESTASINSTRUCCIONES!
CAPACITACION
Lea,entienday cumplatodaslasinstrucdonesincluidasenlam_quinay
enel(los)manual(es)antesdeintentarrealizarel montajede launidady
utilizarla.SinoIo hace,sepuedenprovocarlesionespersonalesaloperador
oa lostranseuntes.Guardeestemanualenunlugarseguroparaconsultas
futurasy peri6dicas,asicomoparasolidtarrepuestos.Antecualquierduda,
flameal1-800-4MY-HOME.
FamJlJaricesecontodosloscontrolesyconelusoadecuadode
losmismos.Sepac6modetenerlam_quinaydesengancharloscontroles
r_pidamente.
Nopermitanuncaquelosnifiosmenoresde14afrosutilicenestam_quina.
Losnifiosde14afrosenadelantedebenleeryentenderlasinstruccionesde
operad6nynormasdeseguridadcontenidasenestemanualyenlam_quina
ydebenserentrenadosysupervisadosporun adulto.
Nuncapermitaquelosadultosoperenestam_quinasinredbirantesla
instrucci6napropiada.
Losobjetosarrojadosporlam_quinapuedencausarlesionesgraves.
Planifiqueelpatr6nenelquevaair arrojandonieveparaevitarque
ladescargade materialserealicehadaloscaminos,
losobservadores,etc.
PREPARATIVOS
Inspeccioneminudosamenteel _readondeutilizar_elequipo.Saquetodos
losfelpudos,peri6dicos,trineos,tablas,cablesyotrosobjetosextralos con
losquepodriatropezaro quepodrianserarrojadosporlabarrena/impulsor.
Paraprotegerselosojosutilicesiempreanteojosoantiparrasdeseguridad
mientrasoperalam_quinaomientraslaajustao repara.Losobjetos
arrojadosquerebotanpuedencausarlesionesocularesgraves.
Nooperelam_quinasinlavestimentaadecuadaparaestaralairelibreen
inviemo.Noutilicealhajas,bufandaslargasuotrasprendassueltasque
podrianenredarseen laspartesm6viles.Utiliceuncalzadoespecialpara
superficiesresbaladizas.
Useun prolongadoryuntomacorrientedetrescablesconconexi6na tierra
paratodaslasm_quinasconmotoresdeencendidoel(_ctrico.
Desengranetodaslaspalancasdecontrolantesdearrancarelmotor.
Nuncaintenterealizarajustesmientrasel motorest_enmarchaexceptoen
loscasosespecificamenterecomendadosenel manualdeloperador.
Dejequeelmotorylam_quinaseadaptenalatemperaturaexteriorantes
decomenzarasacarlanieve.
Mantengaalosobservadores,mascotasynifos porIomenosa75piesdela
m_quinasiemprequeest#funcionando.Detengalam_quinasialguiense
acerca.
Seaprecavidoparaevitarpatinarseocaerseespedalmentecuandooperala
m_quinaenmarchaatr_s.
41
Manejo seguro de la gasolina:
Paraevitarlesionespersona[es0daffosmateria[esseasumamentecuidadosoai
manipu[ar[agaso[ina.Lagaso[inaessumamenteinfiamab[eysusvaporespuedencausar
explosiones.Sisederramagaso[inaencimaosobre[aropasepuede[esionargravemente
yaquesepuedeencender.Bveseiapie[yc_imbiesederopadeinmediato.
Utilices6iolosrecipientesparagaso[inaautorizados.
Apaguetodosloscigarri[[os,cigarros,pipasyotrasfuentesdecombusti6n.
Nuncacarguecombustibleen lam_iquinaenun espaciocerrado.
Nuncasaque[atapade[combustibleniagreguecombustiblemientrase[
motorest_icaiienteoenmarcha.
Dejequeel motorseenfrieporIo menosdosminutosantesdevolvera
cargarcombustible.
Nunca[[eneenexcesoe[dep6sitode combustible.Llenee[tanqueanom_is
de1/2pu[gadapordebajode[abasede[cue[[ode[[enadodejandoespacio
para[adiiataci6nde[combustible.
Vue[vaaco[ocar[atapade[combustibleyajfiste[abien.
Limpiee[combustiblequesehayaderramadosobree[motorye[equipo.
Trasladelam_iqulnaaotrazona.Espere5minutosantesdeencenderelmotor.
Nuncaa[macene[a m_iquinao e[recipientedecombustibleenunespacio
cerradodondehayafuego,chispasoluzpiloto(porejemplo,hornos,
calentadoresdeagua,calefactores,secadoresderopa,etc.).
Dejeque[a m_iquinaseenfriepor[o menos5 minutosantesdeguardar[a.
Nunca[[enelosrecipientesen e[interiordeunvehku[oocami6no cajade
remo[queconrecubrimientop[_istico.Co[oquesiemprelosrecipientesene[
pisoy[ejosde[vehku[oantesde[[enar[os.
Siesposib[e,retiree[equipoagaso[inade[cami6noremo[quey [Bne[oene[
sue[o.Siestono esposib[e,[[enee[ equipoenun remo[queconunrecipiente
port_iti[,envezdehacer[oconunaboquii[adispensadoradegaso[ina.
Mantenga[aboqui[[ade[[enadoencontactocone[bordede[dep6sito
decombustibleocon[aaberturade[recipienteentodomomento,hasta
terminar[acarga.Noutiliceundispositivodeboqui[[adeapertura/cierre.
FUNCIONAMIENTO
Nopongalasmanoso lospiescercadelaspiezasglratorias,enlacajadela
barrena/impulsoroenelmontajedelcanaldedescarga.Elcontactoconlas
piezasgiratoriaspuederesultarenlaamputad6ndemanosopies.
Lapalancade controldela barrena/impulsoresundispositivodeseguridad.
Nuncaevitesufuncionamiento.Dehacerlolaoperaci6ndelam_quinaes
riesgosaypuedeocasionarlesiones.
Laspalancasdecontroldebenfuncionarbienenambasdirecdonesy
regresarautom_ticamentealaposid6nde desengranecuandoselassuelta.
Nuncaoperelam_quinasifaltaunmontajedelcanalosielmismoest_daffado.
Mantengatodoslosdispositivosdeseguridadensulugaryenfuncionamiento.
Nuncaendendael motorenespacioscerradosoenunazonaconpoca
ventilaci6n.Elescapedel motorcontienemon6xidodecarbono,ungas
inodoroyletal.
Noutilicelam_quinabajolainfluendadelalcoholo lasdrogas.
Elsilenciadoryelmotorsecalientanypuedencausarquemaduras.
Nolostoque.Mantengaalosniffosalejados.
Seasumamenteprecavidocuandooperelam_iquinasobreunasuperficie
congravaocuandolatruce.Mant#ngasealertaporsisepresentanpeligros
ocultosotr_nsito.
Tengacuidadocuandocambiededirecci6nocuandooperelam_quinaen
pendientes.
Planifiqueel patr6nenelquevaa irarrojandonieveparaevitarquela
descargadematerialseproduzcahacialasventanas,lasparedes,los
autom6viles,etc.yevitaras[posiblesdaffosmaterialeso lesionesproduddas
porlosrebotes.
Nuncadirija[adescargahadalosnifios,losobservadoresolasmascotasni
dejequenadieseparedelantedelam_quina.
Nosobrecarguelacapacidaddelam_quinatratandodesacarlanievemuy
r_pidamente.
Nuncaopereestam_quinasinbuenavisibilidadoiluminaci6n.Siempredebe
estarsegurodequeest_bienafirmadoysujetandofirmementelasmanijas.
Camine,nuncacorra.
Cortelacorrientealabarrena/impulsorcuandotransportelam_quina
o cuandolamismanoest_enuso.
Nuncaoperelam_quinaaalta veloddaddedesplazamientosobre
superficiesresbaladizas.Mirehaciaabajoyhaciaarrasytengacuidado
cuandovayamarchaarras.
Sila m_quinacomenzaraavibrardemaneraanormal,detengaelmotor,
desconecteelcabledelabujiayp6ngalademaneraquehagamasacontra
el motor.Inspeccionelam_quinaminudosamenteparavet siest_daffada.
Reparetodoslosdaffosantesdeencenderyoperarla m_quina.
Desengranetodaslaspalancasdecontrolydetengaelmotorantesdedejar
laposid6ndeoperaci6n(detr_sdelasmanijas).Espereaquelabarrena/
impulsorsedetengaporcompletoantesdedestaparelmontajedelcanalo
realizarajustese inspecciones.
Nuncapongalasmanosenlasaberturasdedescargaoderecolecd6n.No
destapeelmontajedel canalmientraselmotorest_enfundonamiento.
Antesdedestaparlo,apagueelmotory permanezcadetr_sdelasbarrasde
controlhastaquetodaslaspartesm6vilessehayandetenido.
Uses61ounionesyaccesoriosaprobadospotel fabricante(porejemplo,
pesasparalasruedas,cadenasparalosneum_ticos,cabinas,etc.).
Paraencenderelmotor,jaledelacuerdalentamentehastaquesienta
resistenda,luegojaler_pidamente.Elreplieguer_pidode lacuerdade
arranque(tensi6nderetroceso)lejalar_lamanoyelbrazohadaelmotor
m_sr_pidode Ioqueustedpuedesoltar.PuedeIlegaracausarhuesosrotos,
fracturas,hematomasyesguinces.
Llameal1-800-4MY-HOMEparalaubicaci6nm_scercanadeSearsParts&
ServiceCenterdereparaci6n.
DESPEJE DE UN CANAL DE DESCARGA OBSTRUIDO
Elcontactodelasmanosconelimpulsorrotatorioqueest_dentrodelcanalde
descargaeslacausam_scomtindelesionesasociadasconlasm_quinasquitanieve.
Nuncausesumanoparalimpiarelcanaldedescarga.
Paradespejarelcanal:
1. iAPAGUEELMOTOR!
2. Espere10segundosparaestarsegurodequelascuchillasdel motorhan
dejadoderotar.
3. Utilicesiempreunaherramientade limpieza,nouselasmanos.
42
MANTENIMIENTOY ALMACENAMIENTO
Nuncaalterelosdispositivosdeseguridad.Controleperi6dicamenteque
fundonencorrectamente.Rem[tasealassecdonesdemantenimientoy
ajustedeestemanual.
Antesderealizarlalimpieza,repararorevisarlam_quina,desengranetodas
laspalancasdecontrolydetengael motor.Espereaquelabarrena/impulsor
sedetengaporcompleto.Desconecteelcabledelabuj[ayp6ngalohadendo
masacontrael motorparaevitarqueseendendaacddentalmente.
Controlefrecuentementequetodoslospernosytornillosest#nbien
ajustadosparacomprobarquelam_quinaseencuentraen condkiones
segurasdefundonamiento.Adem_s,hagaunainspecd6nvisualdela
m_quinaparaverificarsiest_daffada.
Nocambielaconfigurad6ndel reguladordel motorniaceleredemasiado
elmismo.Elreguladordel motorcontrolalaveloddadm_ximade
fundonamientosegurodel motor.
Quitanievesafeitarplacasy patinesest_nsujetosadesgasteydaffos.Parasu
protecd6ndeseguridad,verifiquefrecuentementetodosloscomponentesy
con(OEM)delfabfcantedelequipooriginals61oapareceenlasp_ginasde
piezasdeestemanualdeloperador.Elusodepiezasquenocumplenconlas
espedficadonesdelequipooriginalpuedecondudra lamalaejecud6ny la
segufdaddecompromiso!
Reviselaspalancasdecontrolperi6dkamenteparaverificarqueengraneny
desengranenadecuadamenteyajtistelossiesnecesar[o.Consultelasecd6n
deajustesenestemanualdeloperadorparaobtenerinstrucdones.
Mantengao reemplacelasetiquetasdeseguridadydeinstrucdonessegtin
seanecesafo.
Observelareglamentaci6nylasnormasrespectoa laeliminaci6ncorrectade
gasolina,aceite,etc.paraprotegerelmedioambiente.
Antesdealmacenarlam_quinaenci(_ndalaunosminutosparasacarlanieve
quehayaquedadoenlamismayparaevitaras[quesecongelelabarrena/
impulsor.
Nuncaalmacenelam_quinao elredpientedecombustibleenunespacio
cerradodondehayafuego,chispasoluzpilotocomoporejemplo,
calentadoresdeagua,hornos,secadoresde ropa,etc.
Consultesiempreel manualdeloperadorparaobtenerinstrucciones
adecuadasparaelalmacenamientofueradetemporada.
VerifiquefrecuentementelaI[neadecombustible,eldep6sito,eltap6n,ylos
accesoriosbuscandorajadurasop_rdidas.Reemplacedesernecesario.
Nod_arranquealmotorsinoest_labuj[adeencendido.
Segt_nlaComisi6ndeSeguridaddeProductosparael Consumidordelos
EstadosUnidos(CPSC)ylaAgenciadeProtecd6nAmbientaldelosEstados
Unidos(EPA),esteproductotieneunavidautil mediadesiete(7)afroso60
horasdefundonamiento.AIfinalizarlavidat_tilmediahagainspeccionar
anualmenteestaunidadporundistribuidordeservicioautorizadopara
cerciorarsedequetodoslossistemasmec_nicosydeseguridadfuncionan
correctamenteynotienenexcesivodesgaste.SinoIohace,pueden
producirseaccidentes,lesionesolamuerte.
NO MODIFIQUE EL MOTOR
Paraevitarlesionesgraveso lamuerte,nomodifiqueel motordeningunamanera.
Sialteralaconfiguraci6ndelregulador,el motorsepuededesbocaryfundonar
avelocidadesquenosonseguras.Nuncacambielaconfiguraci6ndef_bricadel
reguladordel motor.
AVISO REFERIDO A EMISIONES
Losmotoresqueest_ncertificadosycumplenconlasregulacionesdeemisiones
federalesEPAydeCaliforniaparaSORE(Equipospequefostodoterreno)est_n
certlficadosparafuncionarcongasolinasinplomocomunypuedenincluir
lossiguientessistemasdecontroldeemisiones:Modificaci6ndemotor(EM),
catalizadoroxidante(OC),inyecci6ndeairesecundaria(SAI)ycatalizadorde tres
vias(TWC)siest_ninstalados.
AMORTIGUADOR DE CHISPAS
Estam_quinaest_equipadaconun motor decombusti6n internoy nodebe
set utilizadaenocercade unterreno agrestecubiertoporbosque,maiezas
o hierbaexceptoqueel sistemadeescapedel motorest_equipadocon
unamortiguador de chispasquecumplaconlasleyeslocalesoestatales
correspondientes(encasode existir)
SiseutilizaunamortiguadordechispaseloperadorIodebemanteneren
condicionesdeusoadecuadas.Enel EstadodeCalifornialasmedidasanteriormente
mencionadassonexigidasporley(Artkulo 4442delC6digodeRecursosPt_blicos
deCalifornia).Esposiblequeexistanleyessimllaresenotrosestados.Lasleyes
federalesseaplicanenterritoriosfederales.Podr_obtenerunamortiguadorde
chispasparaelsilendadorenelcentrodeservidodepiezasy reparadonesSears
m_scercano.
43
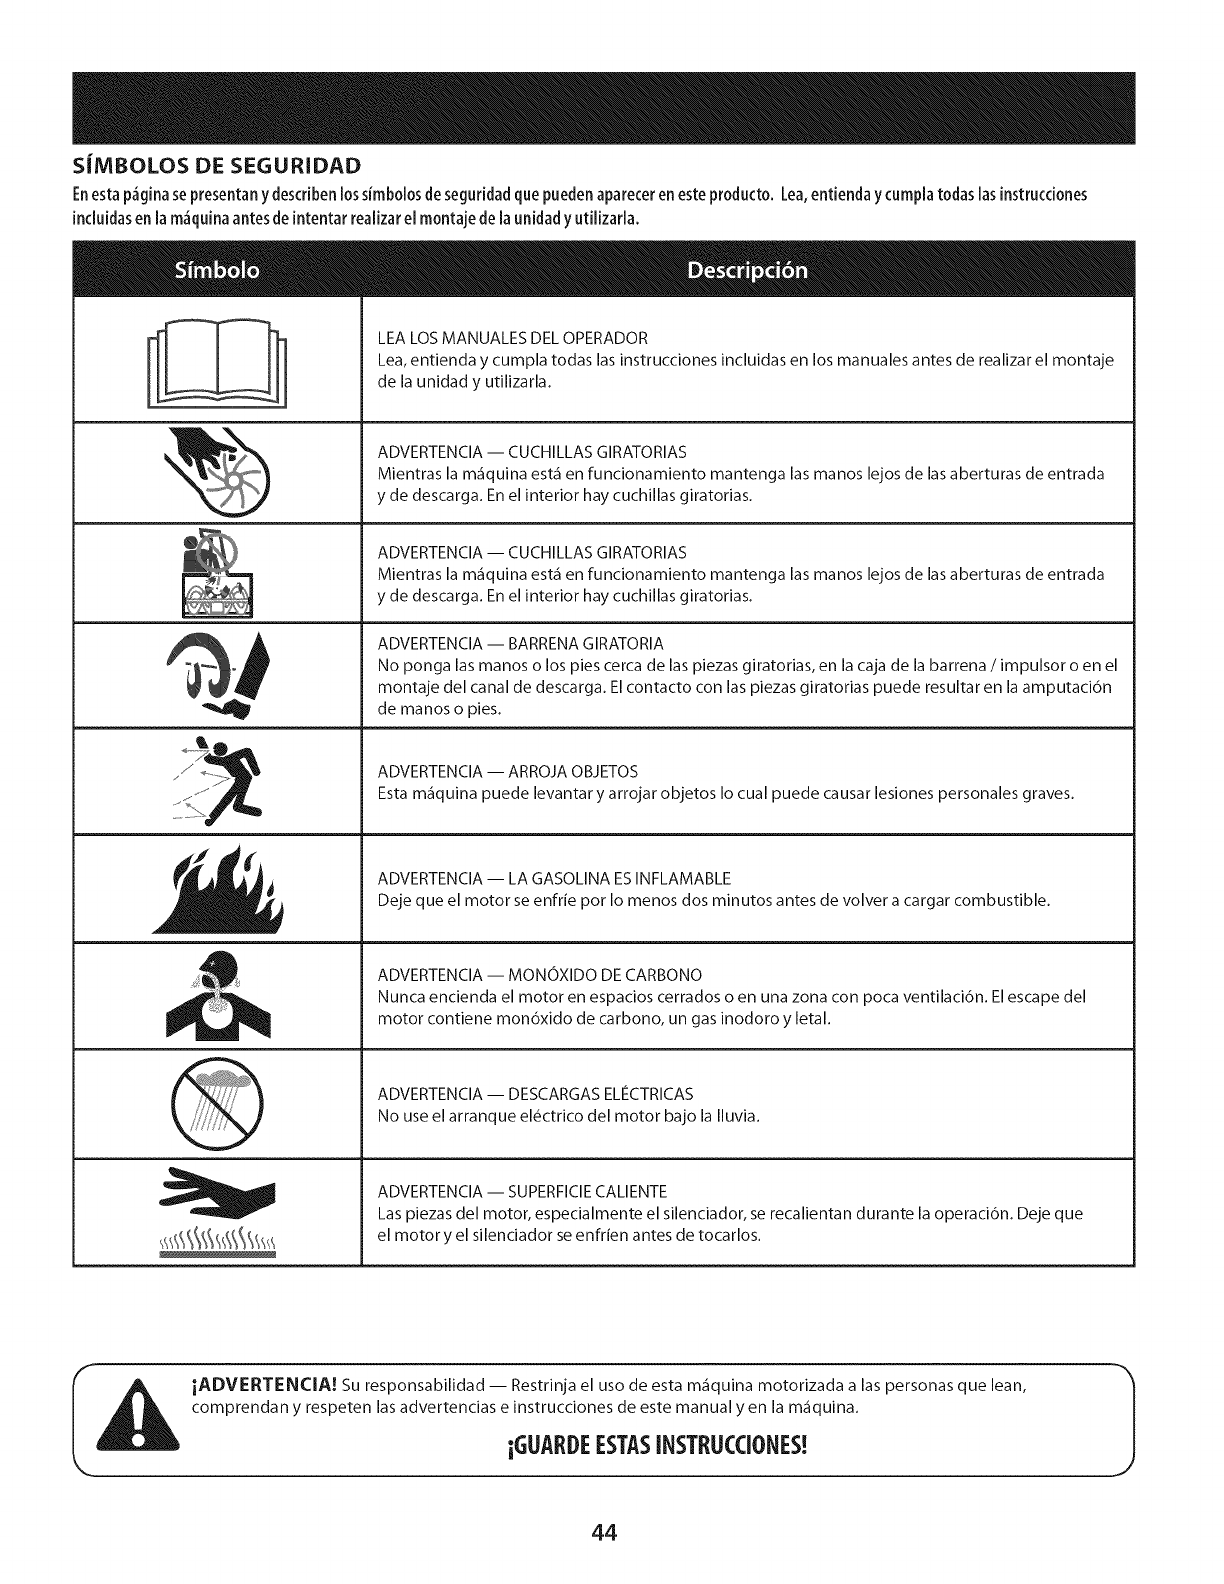
S|MBOLOS DE SEGURIDAD
Enesta p_gina se presentan y describen lossirnboios de seguridad que pueden aparecer en este producto. Lea, entienda y curnpia todas [as [nstrucdones
[nduidas en la rn_quina antes de [ntentar realizar el montaje de la unidad y utilizarla.
LEA LOS MANUALES DEL OPERADOR
Lea, entienda y cumpla todas las instrucciones incluidas en los manuales antes de realizar el montaje
de la unidad y utilizarla.
ADVERTENCIA -- CUCHILLAS GIRATORIAS
Mientras la m_quina est_ en funcionamiento mantenga las manos lejos de las aberturas de entrada
y de descarga. En el interior hay cuchillas giratorias.
ADVERTENClA -- CUCHILLAS GIRATORIAS
Mientras la m_quina est_ en funcionamiento mantenga las manos lejos de las aberturas de entrada
y de descarga. En el interior hay cuchillas giratorias.
No ponga las manos o los pies cerca de las piezas giratorias, en la caja de la barrena /impulsor o en el
montaje del canal de descarga. El contacto con las piezas giratorias puede resultar en la amputaci6n
4_111_ de manos o pies.
,_i.!_1_i ADVERTENCIA -- ARROJA OBJETOS"z _ Esta m_quina puede levantary arrojar objetos Io cual puede causar lesiones personales graves.
f
_l_i _ ADVERTENCIA-- LA GASOLiNA ESINFLAMABLE
Deje que el motor se enfrie pot Io menos dos minutos antes de volver a cargar combustible.
_:_ ADVERTENCIA -- MONOXIDO DE CARBONO
Nunca encienda el motor en espacios cerrados o en una zona con poca ventilaci6n. El escape del
motor contiene mondxido de carbono, un gas inodoro y letal.
ADVERTENClA -- DESCARGAS ELIeCTRICAS
No use el arranque el_ctrico del motor bajo la Iluvia.
ADVERTENCIA -- SUPERFIClE CALIENTE
Las piezas del motor, especialmente el silenciador, se recalientan durante la operaci6n. Deje que
el motor y el silenciador se enfrien antes de tocarlos.
Ii_ll |ADVERTENClA! Su responsabilidad -- Restrinja el uso de esta m_quina motorizada a las personas que lean,
%
comprendan y respeten las advertencias e instrucciones de este manual yen la m_quina.
iGUARDEESTASINSTRUCCIONES!
44
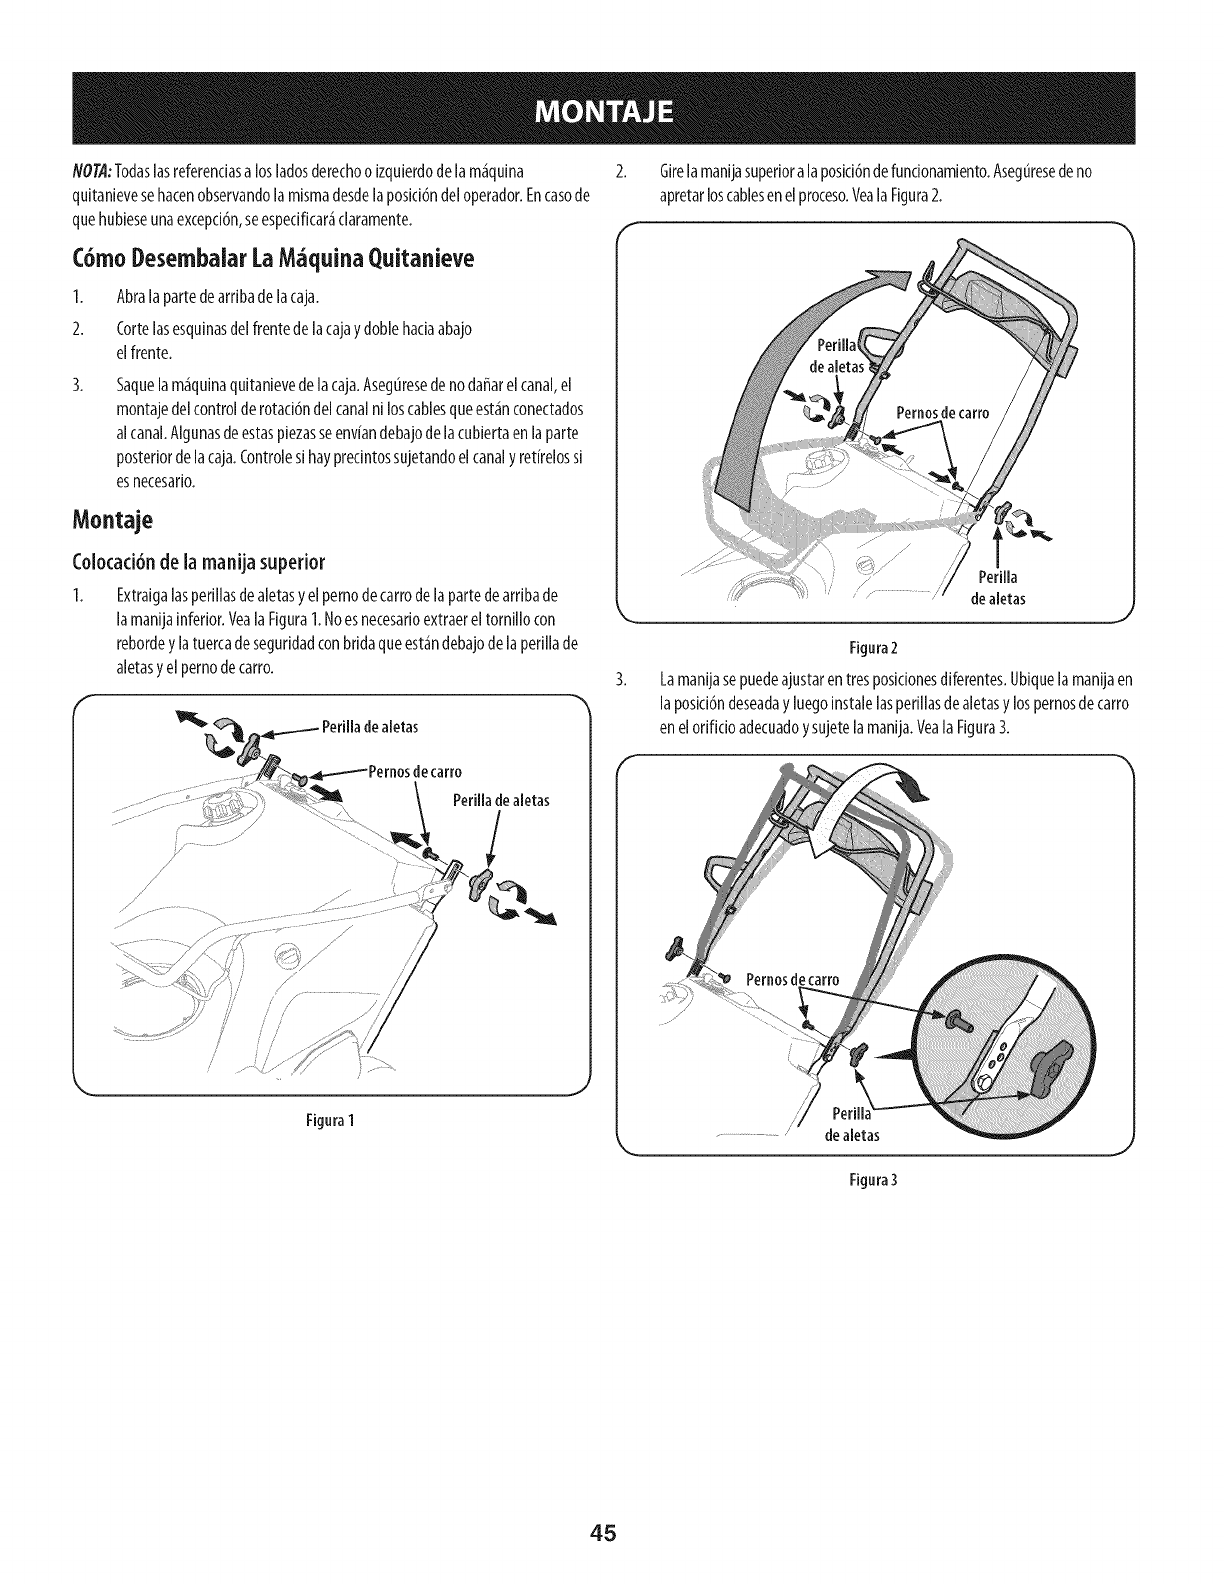
NOTA:Todaslasreferenciasalosladosderechooizquierdodelam_quina
quitanievesehacenobservandolamismadesdelaposici6ndeloperador.Encasode
quehubieseunaexcepci6n,seespecificar_claramente.
C6mol)esembaiar LaM quina Quitanieve
1. Abralapartedearribadelacaja.
2. Cortelasesquinasdelfrentedelacajaydoblehaciaabajo
elfrente.
Saquelam_quinaquitanievedelacaja.Aseguresedenodaffarelcanal,el
montajedelcontrolderotad6ndel canalniloscablesqueest_nconectados
alcanal.Algunasdeestaspiezasseenviandebajodelacubiertaenlaparte
posteriordelacaja.Controlesi hayprecintossujetandoelcanalyretirelossi
esnecesario.
Montaje
Colocaci6nde la manija superior
1. Extraigalasperillasdealetasyelpernodecarrodelapartedearribade
lamanijainferior.VealaFigura1.Noesnecesarioextraereltornillocon
rebordeylatuercadeseguridadconbridaqueest_ndebajodelaperillade
aletasyelpernodecarro.
Perillade aletas
/
/ /
/
/
//
Perilladealetas
/
////
/
/
/
/
/
Figura 1
Girelamanijasuperioralaposici6ndefuncionamiento.Aseguresedeno
apretarloscablesenelproceso.YealaFigura2.
Perilla
dealetas
Figura 2
Lamanijasepuedeajustarentresposidonesdiferentes.Ubiquelamanijaen
laposid6ndeseadayluegoinstalelasperillasdealetasylospernosdecarro
enelorifido adecuadoysujetelamanija.YealaFigura3.
Per
dealetas
Figura 3
45
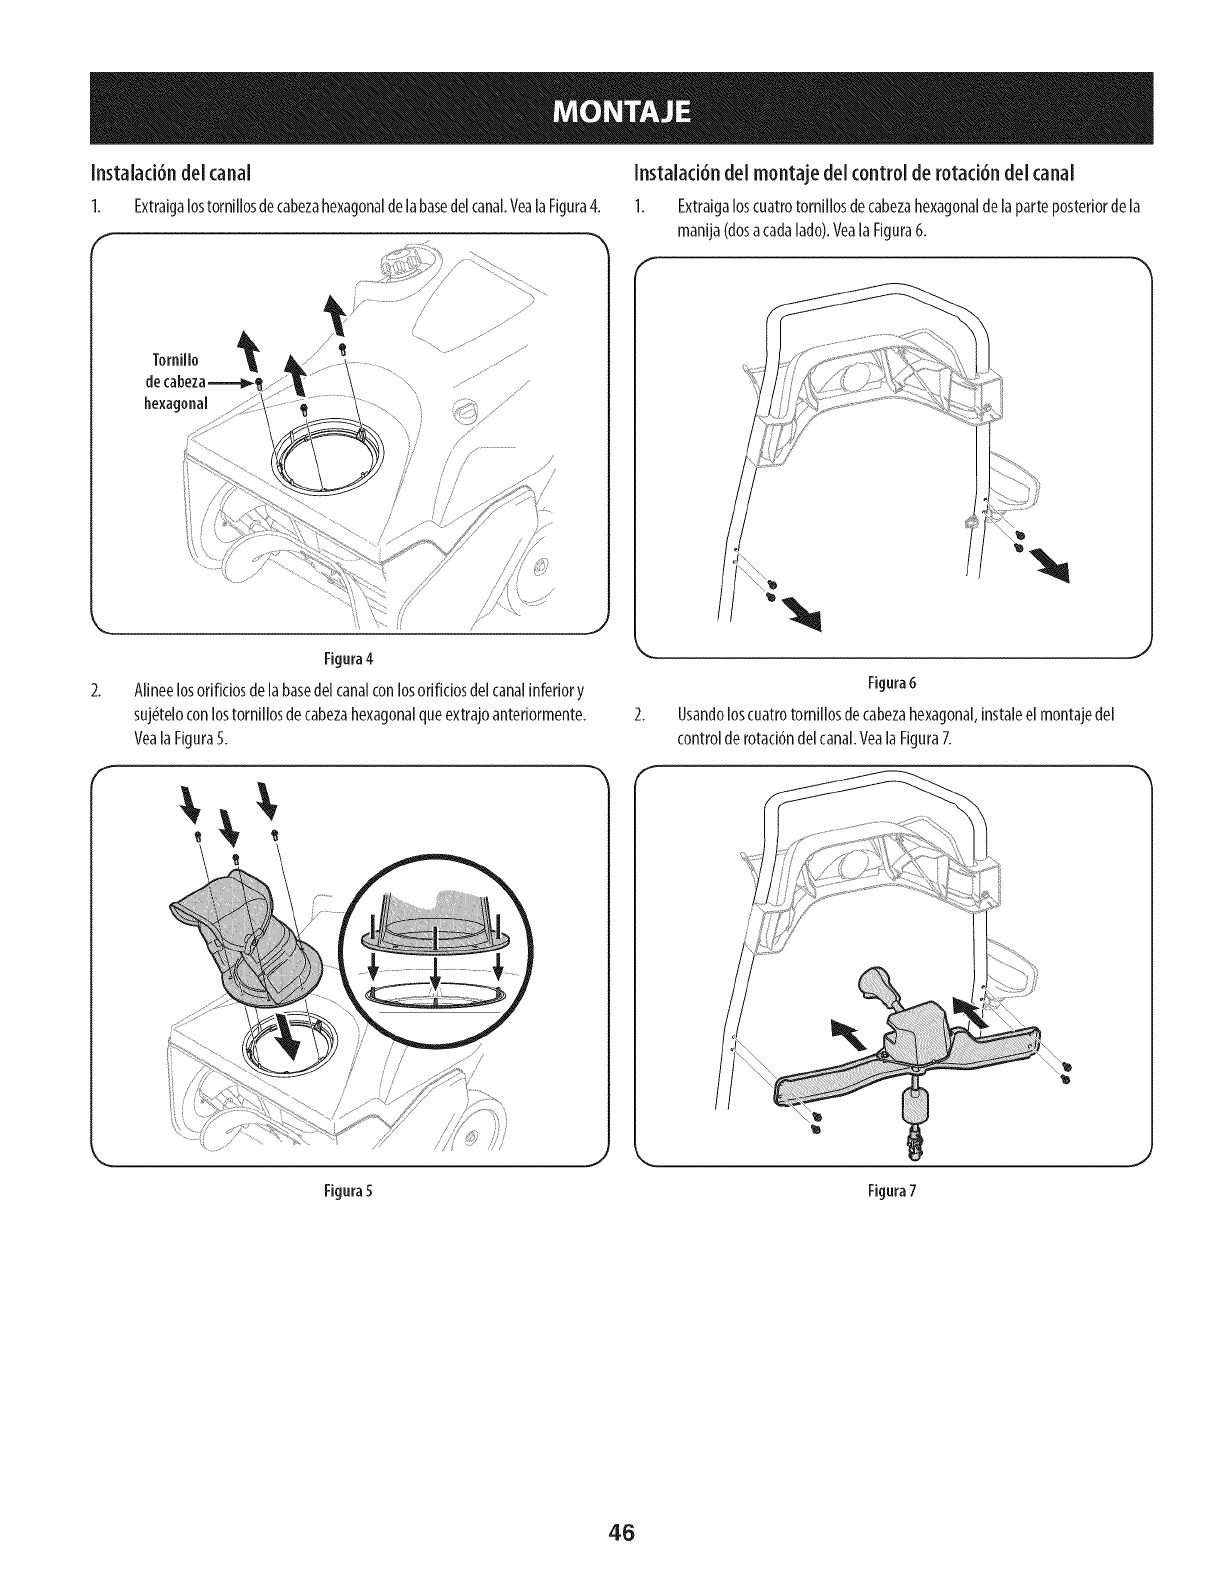
Instalad6n del canal
I. Extraigalostornillosdecabezahexagonalde labasedelcanal.VealaFigura4.
/
Fignra4
2. AlineelosorificJosde labasedel canalconlosodficJosdel canalinferiory
suj_teloconlostornillosdecabezahexagonalqueextrajoanteriormente.
VealaFigura5.
f --
/ /
L _.
FignraS
Instalad6n del montaje del control de rotaci6n del canal
I. Extraigaloscuatrotomillosdecabezahexagonaldelaparteposteriordela
manija(dosacadalado).VealaFigura6.
Fignra6
Usandoloscuatrotomillosdecabezahexagonal,instaleel montajedel
controlderotaci6ndelcanal.Veala Figura7.
Fignra7
46
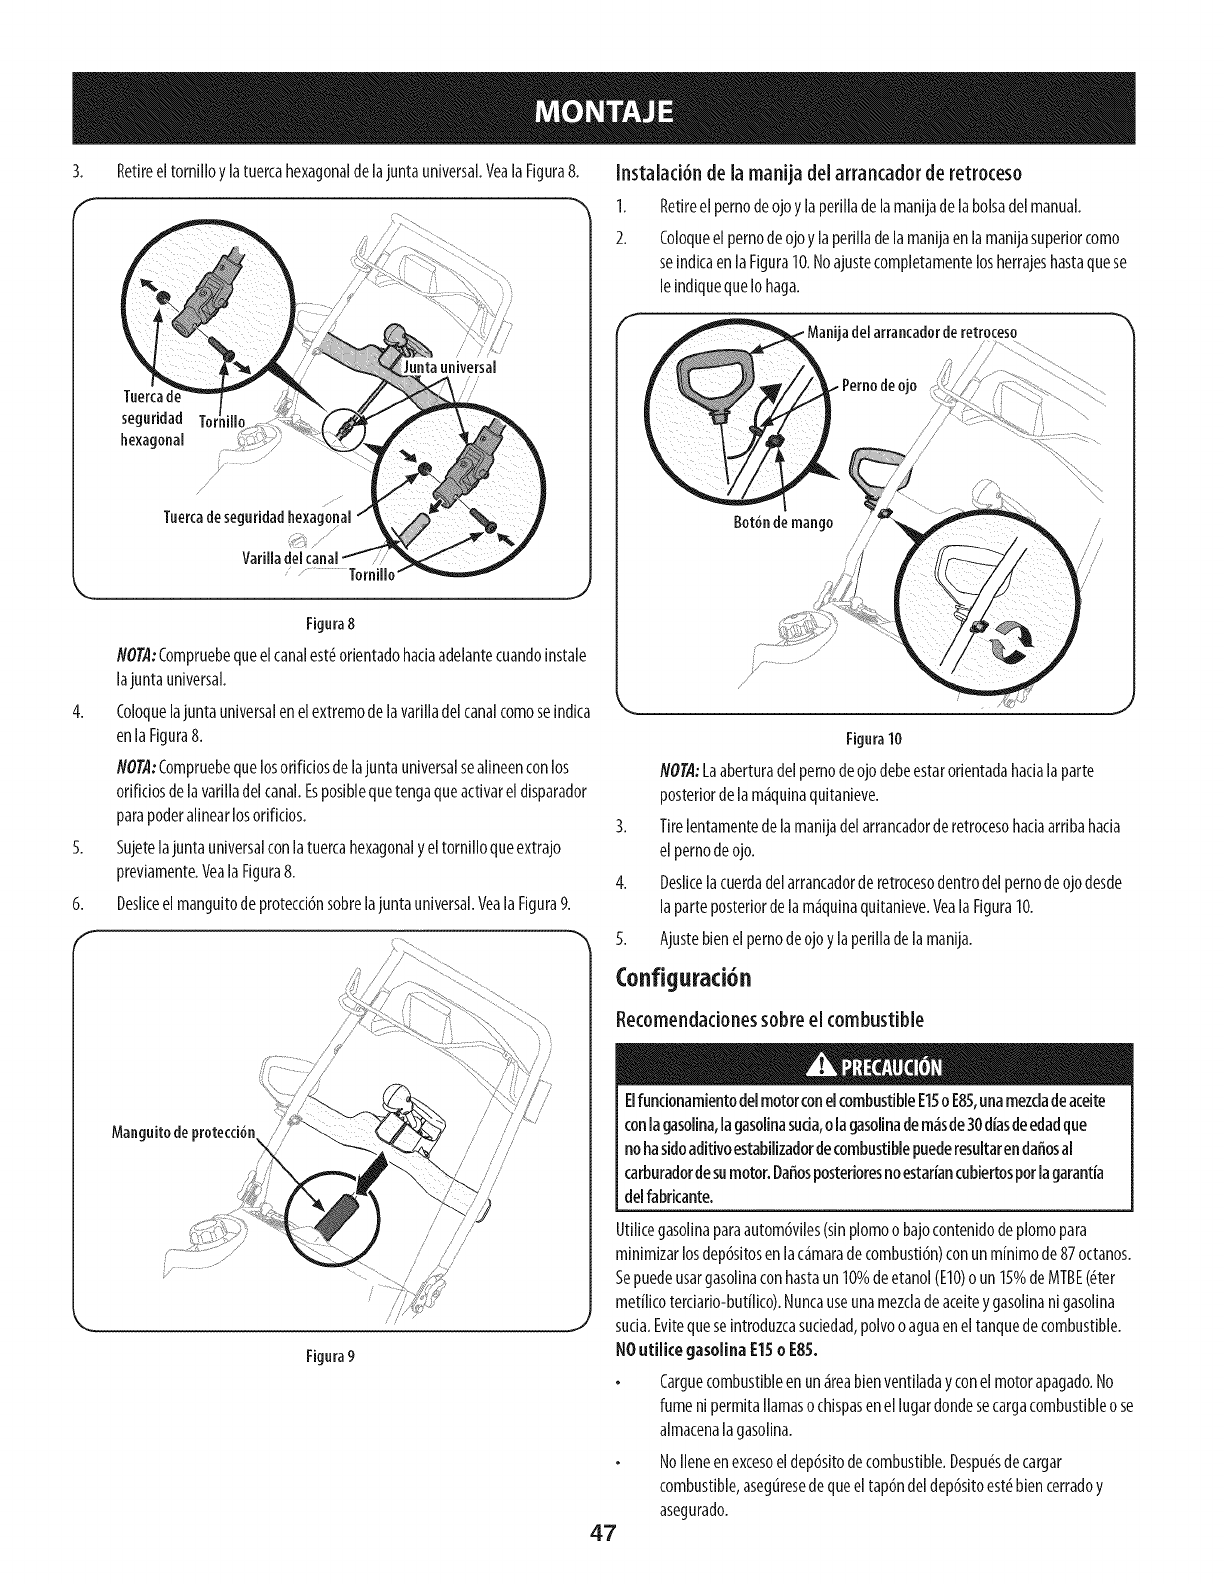
3. Retireeltornilloylatuercahexagonaldelajunta universal.Veala Figura8.
Juntauniversal
j,J
Tuercadeseguridadhexago[
Variiia
"........ Tornillo
Figura8
NOTA:Compruebequeelcanalest_orientadohaciaadelantecuandoinstale
lajunta universal.
4. Coloquelajunta universalen elextremode lavafilladel canalcomoseindica
enla Figura8.
NOTA:Compruebequelosorificiosdelajuntauniversalsealineenconlos
orificiosdelavafilladelcanal.Esposiblequetengaqueactivarel disparador
parapoderalinearlosofificios.
5. Sujetelajunta universalconlatuercahexagonaly eltornillo queextrajo
previamente.VealaFigura8.
6. Desliceelmanguitodeprotecd6nsobrelajunta universal.VealaFigura9.
Manguito de /
//
//
/
/ ;
//
//
/f/f
Figura9
Instalad6n de la manija del arrancador de retroceso
I. Retireel pernodeojoy lapefilladelamanijade labolsadelmanual.
2. Coloqueelpernodeojoyla perilladelamanijaenlamanijasuperiorcomo
seindicaenlaFigura10.Noajustecompletamentelosherrajeshastaquese
leindiquequeIohaga.
/_nija delarrancadorde
gotdndemango
retroceso
/
Utilicegasolinaparaautom6viles(sinplomoo bajocontenidodeplomopara
minimizarlosdep6sitosenlac_maradecombusti6n)conunm[nimode87octanos.
Sepuedeusargasolinaconhastaun10%deetanol(EIO)oun15%deMTBE(_ter
metilicoterciafio-butflico).Nuncauseunamezcladeaceiteygasolinani gasolina
suda.Evitequeseintroduzcasudedad,polvoo aguaeneltanquedecombustible.
NOutilicegasolinaE15oE85.
Carguecombustibleen un_reabienventiladayconel motorapagado.No
fumenipermitallamasochispasenel lugardondesecargacombustibleose
almacenalagasolina.
NoIleneenexcesoeldep6sitodecombustible.Despu(_sdecargar
combustible,aseguresedequeeltap6ndeldep6sitoest_biencerradoy
asegurado.
Figura10
NOTA:Laaberturadelpernodeojodebeestarorientadahacialaparte
posteriordelam_quinaquitanieve.
3. Tirelentamentedelamanijadel arrancadorderetrocesohaciaarribahacia
el pernodeojo.
4. Deslicelacuerdadelarrancadorde retrocesodentrodel pernodeojodesde
laparteposteriorde lam_quinaquitanieve.VealaFigura10.
5. Ajustebienelpernodeojoylaperilladelamanija.
Configuraci6n
Recomendadonessobre el combustible
ElfuncionamientodelmotorconelcombustibleE15oE85,unamezdadeaceite
conlagasolina,lagasolinasucia,olagasolinadem_sde30diasdeedadque
nohasidoaditivoestabilizadordecombustiblepuederesultarendaffosal
carburadordesumotor.Daffosposterioresnoestariancubiertospotlagarantia
delfabrkante.
47
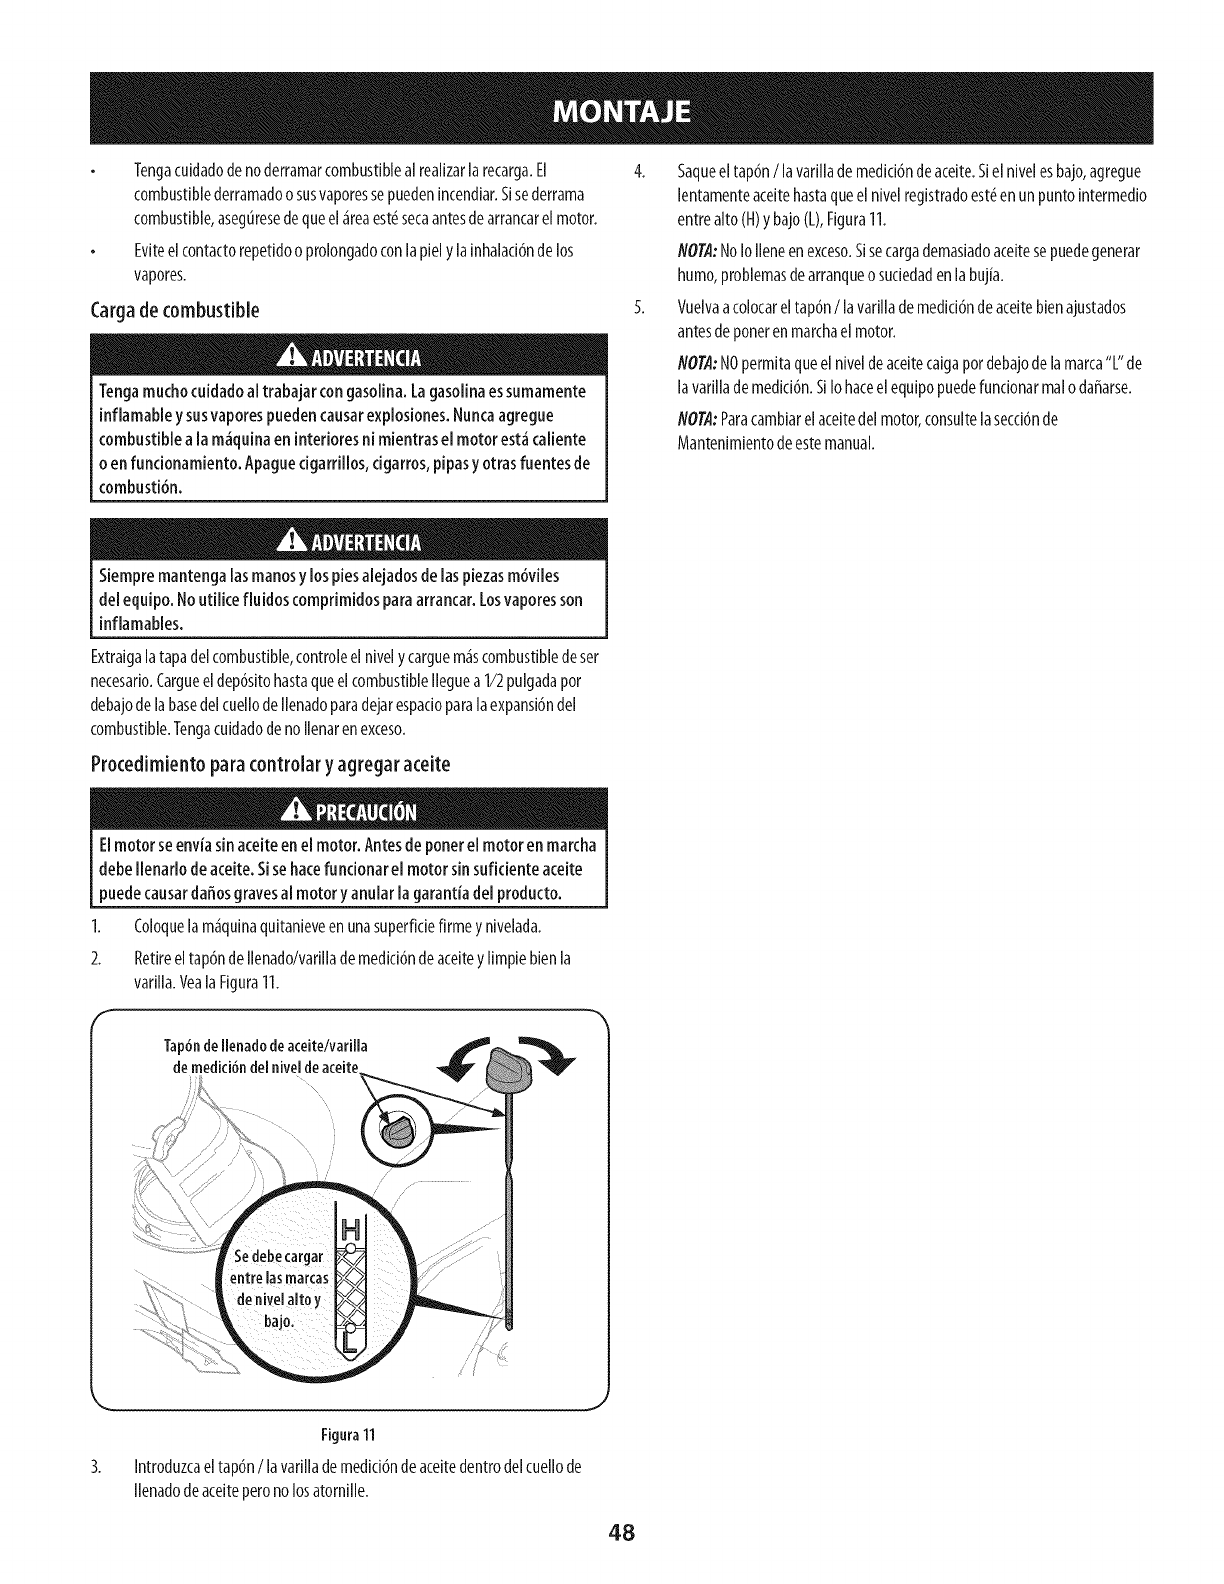
Tengacuidadodeno derramarcombustiblealrealizarlarecarga.El
combustiblederramadoo susvaporessepuedenincendiar.Sisederrama
combustible,asegtiresedequeel_reaest_secaantesdearrancarel motor.
Eviteelcontactorepetidoo prolongadoconlapiely lainhalad6ndelos
vapores.
Cargade combustible
Tengamucbocuidadoal trabajarcon gasolina.Lagasolinaessumamente
inflamable y susvaporespuedencausarexplosiones.Nuncaagregue
combustiblea la m_quinaeninterioresni mientrasel motor est_caliente
o enfuncionamiento.Apaguedgarrillos, cigarros,pipasy otrasfuentesde
combusti6n.
4. Saqueeltap6n/la varillademedici6nde aceite.Siel nivelesbajo,agregue
lentamenteaceitehastaqueelnivelregistradoest_enunpuntointermedio
entrealto(H)ybajo(L),Figura11.
NOTA:NoIolleneenexceso.Sisecargademasiadoaceitesepuedegenerar
humo,problemasdearranqueo sudedadenlabujia.
5. Vuelvaacolocareltap6n/la varillademedici6ndeaceitebienajustados
antesdeporterenmarchaelmotor.
NOTA:NOpermitaqueelnivelde aceitecaigapordebajodelamarca"L"de
lavarillademedici6n.SiIohaceelequipopuedefuncionarmalo dafiarse.
NOTA:Paracambiarelaceitedel motor,consultelasecci6nde
Mantenimientodeestemanual.
Siempremantengalasmanosy lospiesalejadosdelaspiezasm6viles
del equipo.Noutilke fluidos comprimidosparaarrancar.Losvaporesson
inflamables.
Extraigalatapadelcombustible,controleelnively carguem_scombustibledeser
necesario.Cargueeldep6sitohastaqueelcombustiblelleguea I/2 pulgadapor
debajodelabasedelcuellodellenadoparadejarespacioparalaexpansi6ndel
combustible.Tengacuidadodenollenarenexceso.
Procedimiento paracontrolar yagregar aceite
Elmotor seenviasinaceiteenel motor. Antesde porterel motor enmarcba
debellenarlodeaceite.Sisebacefundonarel motor sinsuficiente aceite
puedecausardaffosgravesal motory anularla garantiadel producto.
I. Coloquelam_quinaquitanieveenunasuperficiefirmeynivelada.
2. Retireeltap6ndellenado/varillademedici6ndeaceiteylimpiebienla
varilla.Veala FiguraII.
Tap6nde llenado de aceite/varilla
de medid6n
3.
Figura11
Introduzcaeltap6n/la varillademedici6ndeaceitedentrodelcuellode
Ilenadode aceiteperono losatornille.
48
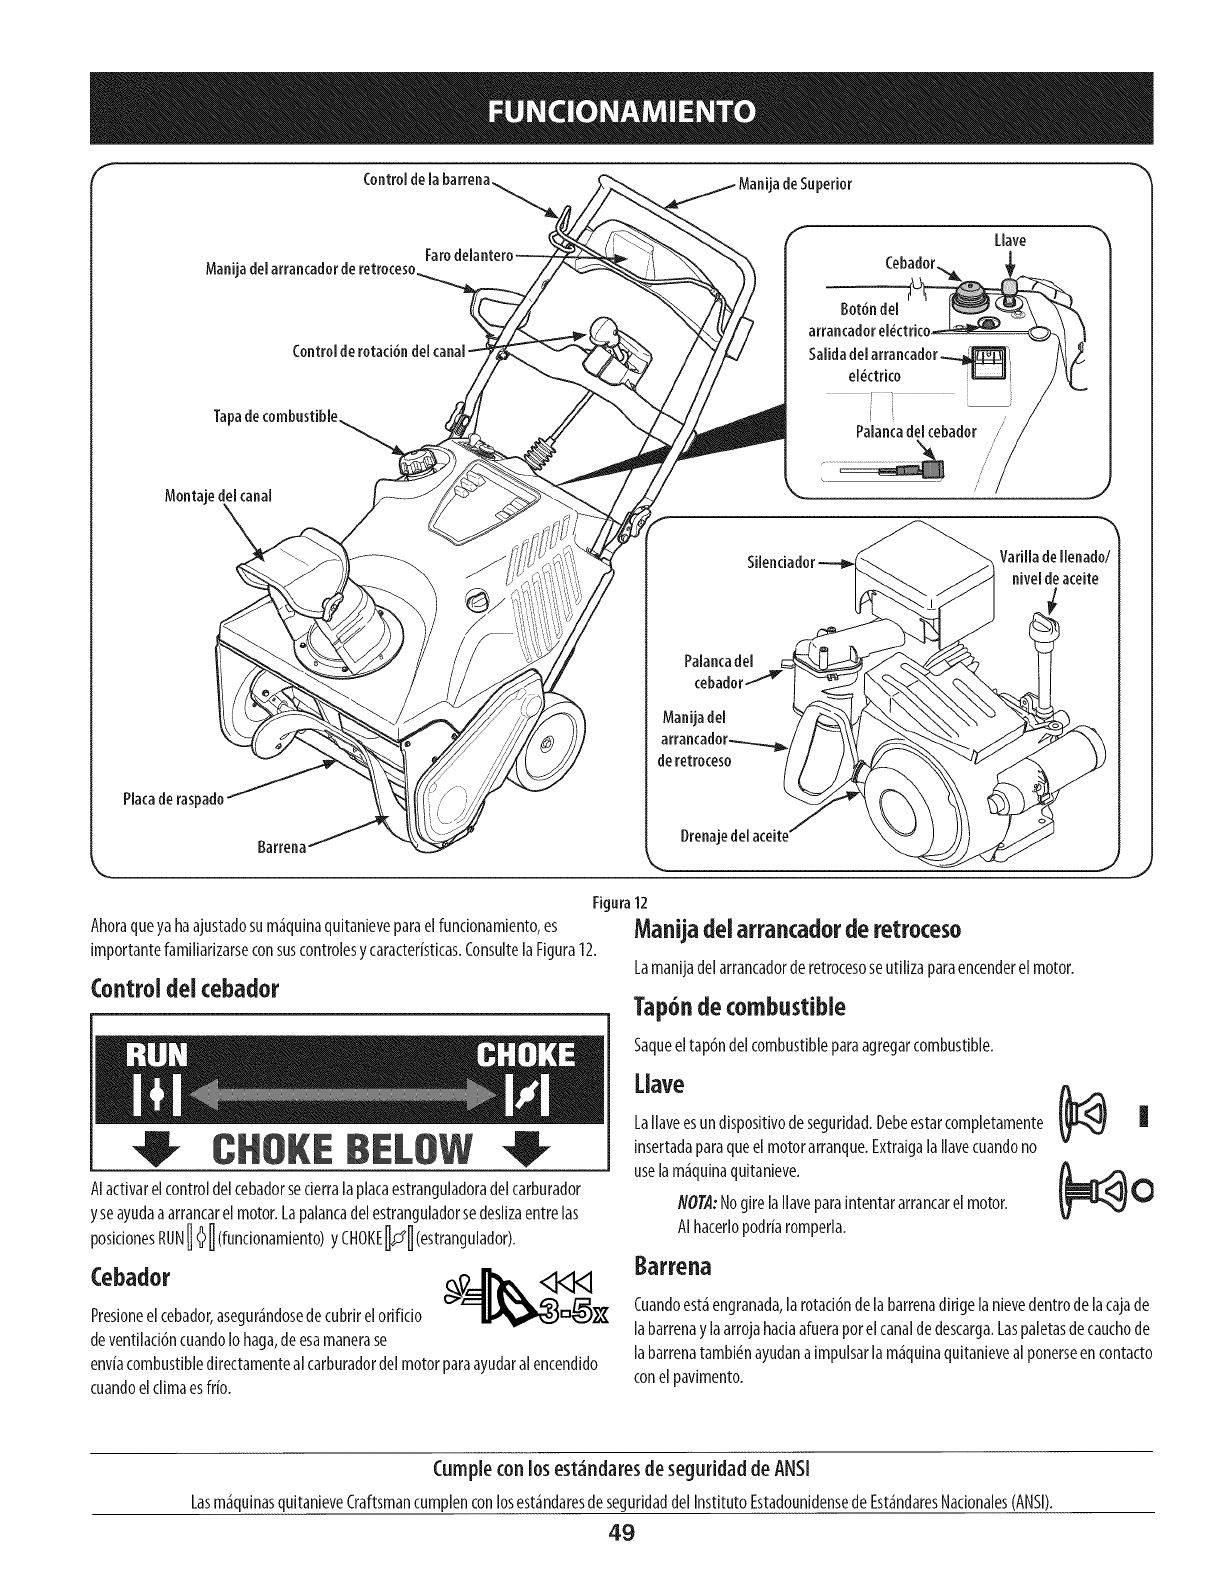
Control de la barrena
Manila delarrancador de retroceso
Controlderotad6n
Tapade combustible
Llave
Cebador.
Bot6ndel
Salidadelarrancador_',
el_ctrico L==Ji
Palancadelcebador
Montaje del canal
Placade raspado
Palancadel
Manila del
de retroceso
Drenaj_
Varilla de llenado/
nivel deaceite
Figura12
Ahoraqueyahaajustadosum_quinaquitanieveparaelfuncionamiento,es Manila del arrancador de retroceso
importantefamiliarizarseconsuscontrolesycaracteristicas.ConsultelaFigura12. Lamaniladelarrancadorderetrocesoseutilizaparaencenderelmotor.
Controldeicebador Tap6ndecombustible
CHOKEBELOW
AIactivarelcontroldelcebadorsecierralaplataestranguladoradelcarburador
yseayudaa arrancarelmotor.Lapalancadelestranguladorsedeslizaentrelas
posicionesRUN1_ _(funcionamiento)yCHOKE_J_ (estrangulador).
Cebador __%;_
Presioneelcebador,asegur_ndosedecubrirelorificio
deventilaci6ncuandoIohaga,deesamanerase
enviacombustibledirectamentealcarburadordelmotorparaayudaralencendido
cuandoelclimaesfrio.
Saqueeltapbndelcombustibleparaagregarcombustible.
Llave
LaIlaveesundispositivodeseguridad.Debeestarcompletamente
insertadaparaqueelmotorarranque.ExtraigalaIlavecuandono
uselam_quinaquitanieve.
NOTA:NogirelaIlaveparaintentararrancarelmotor.
AIhacerlopodr[aromperla.
Barrena
Cuandoest_engranada,larotaci6ndelabarrenadirigelanievedentrodelacajade
labarrenaylaarrojahadaafueraporelcanaldedescarga.Laspaletasdecauchode
labarrenatambi6nayudana impulsarla m_quinaquitanievealponerseen contacto
conelpavimento.
Cumplecon los est_ndaresdeseguridad deANSI
Lasm_quinasquitanieveCraftsmancumplenconlosest_ndaresde seguridaddel InstitutoEstadounidensede Est_ndaresNacionales(ANSI).
49
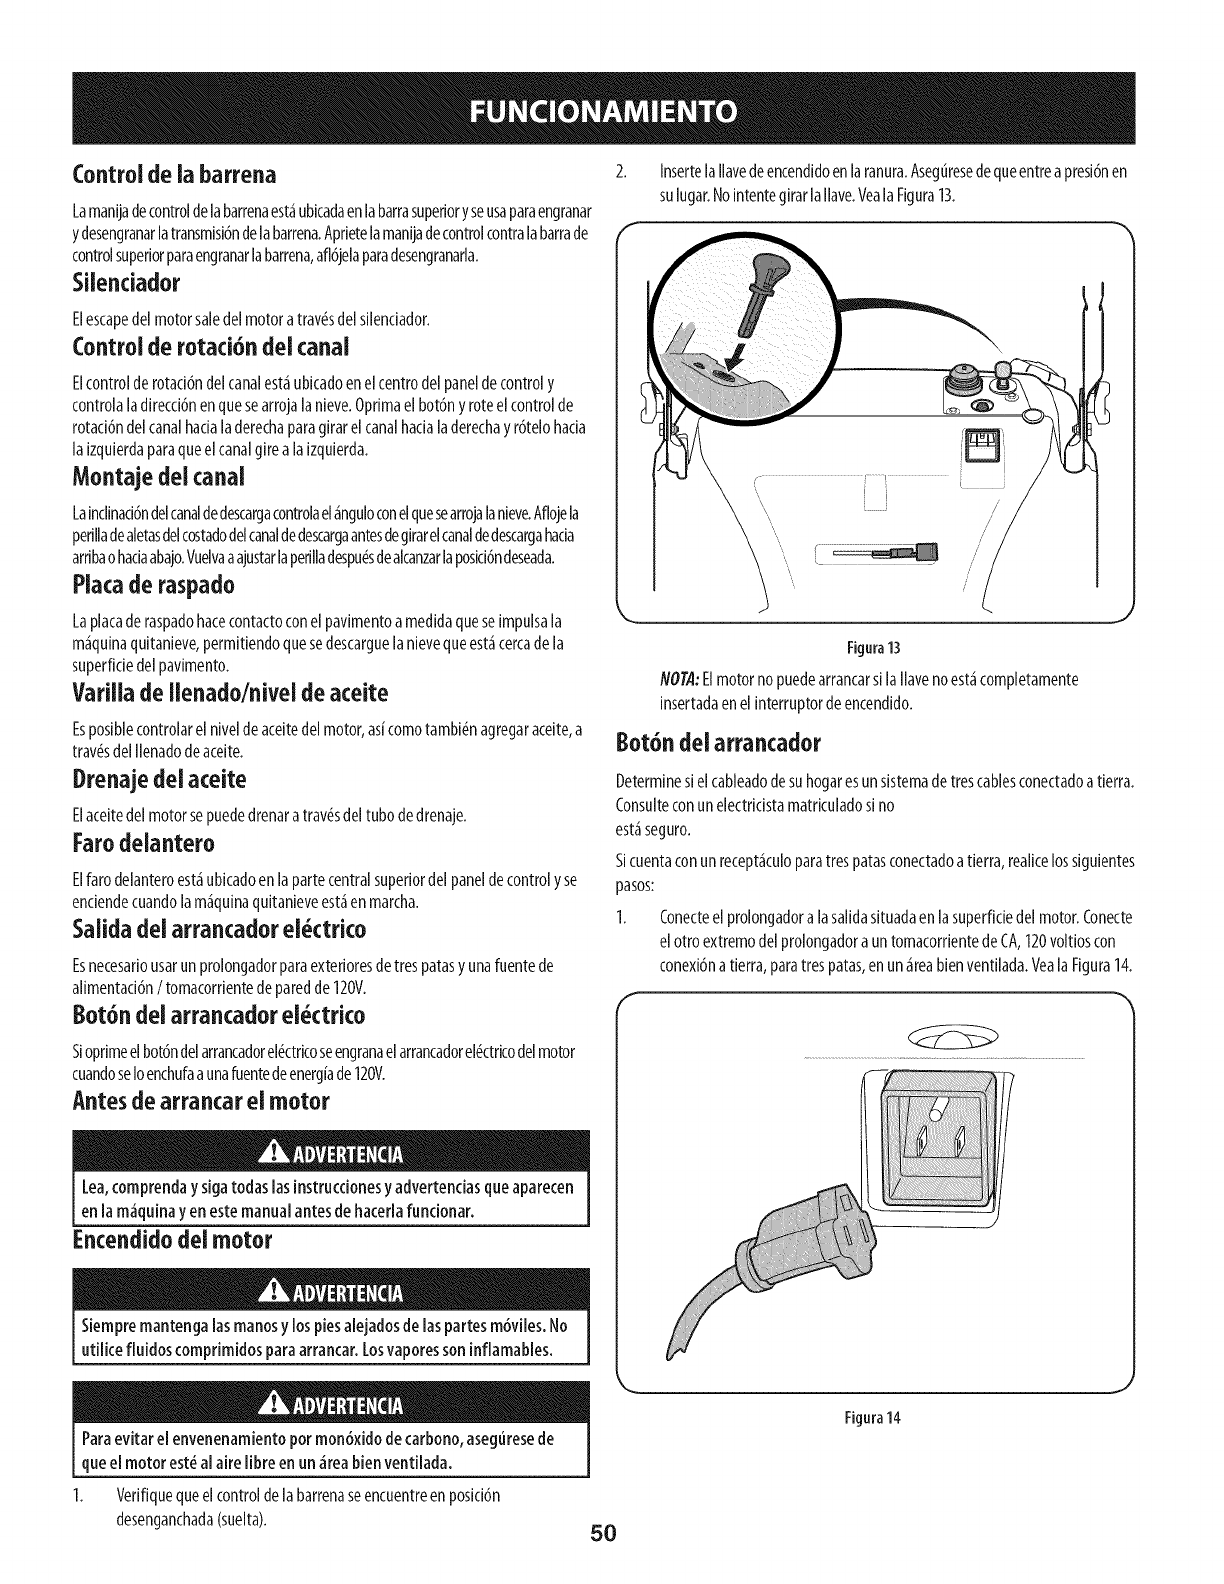
Controlde ia barrena
Lamanijadecontroldelabarrenaest_ubicadaenlabarrasuperioryseusaparaengranar
ydesengranarlatransmisi6ndelabarrena.Aprietelamanijadecontrolcontralabarrade
controlsuperiorparaengranarlabarrena,afl6jelaparadesengranarla.
Silenciador
Elescapedelmotorsaledelmotoratrav(_sdel silendador.
Controlde rotaci6ndeicanal
Elcontrolderotad6ndelcanalest_ubicadoenelcentrodel paneldecontroly
controlaladirecd6nenquesearrojalanieve.Oprimaelbot6nyroteelcontrolde
rotad6ndelcanalhadaladerechaparagirarelcanalhadaladerechay r6telohada
laizquierdaparaqueelcanalgirealaizquierda.
Montajedel canal
Lainclinaci6ndelcanaldedescargacontrolael_nguloconelquesearrojalanieve.Aflojela
perilladealetasdelcostadodelcanaldedescargaantesdegirarelcanaldedescargahada
arribaohadaabajo.Vuelvaaajustarlaperilladespu(_sdealcanzarlaposid6ndeseada.
Platade raspado
Laplacaderaspadohacecontactoconelpavimentoamedidaqueseimpulsala
m_quinaquitanieve,permitiendoquesedescarguelanievequeest_cercadela
superficiedelpavimento.
VarUlade ilenado/nivel de aceite
Esposiblecontrolarel niveldeaceitedel motor,asicomotambi_nagregaraceite,a
tray,sdelIlenadodeaceite.
Drenajedel aceite
Elaceitedelmotorsepuededrenaratrav_sdeltubode drenaje.
Farodelantero
Elfarodelanteroest_ubicadoenla partecentralsuperiordelpaneldecontroly se
endendecuandolam_quinaquitanieveest_enmarcha.
Salidadeiarrancador ei4ctrico
Esnecesariousarunprolongadorparaexterioresde trespatasy unafuentede
alimentad6n/tomacomentedeparedde120V.
8ot6n del arrancador ei4ctrico
Sioprimeelbot6ndelarrancadorel(ktricoseengranaelarrancadorel(ktricodelmotor
cuandoseIoenchufaaunafuentedeenergiade120V.
Antesde arrancar el motor
Lea,comprendaysigatodas lasinstruccionesyadvertenciasqueaparecen
enla m_quinayenestemanualantesdehacerlafuncionaro
Encendidodei motor
Siempremantengalasmanosy lospiesalejadosdelaspartesm6viles.No
utilke fluidoscomprimidosparaarrancar.Losvaporessoninflamables.
InsertelaIlavedeencendidoenlaranura.Aseguresedequeentrea presi6nen
sulugar.NointentegirarlaIlave.YealaFigura13.
Figura13
NOTA:Elmotornopuedearrancarsila Ilavenoest_completamente
insertadaenel interruptordeencendido.
8ot6n dei arrancador
Determinesielcableadodesuhogaresunsistemadetrescablesconectadoa tierra.
Consulteconunelectricistamatriculadosi no
est_seguro.
SIcuentaconunrecept_culoparatresparasconectadoatierra,realicelossiguientes
pasos:
1. Conecteelprolongadoralasalidasituadaenlasuperficiedel motor.Conecte
elotro extremodelprolongadorauntomacorrientede CA,120voltioscon
conexibnatierra,paratrespatas,enun_reabienventilada.VealaFigura14.
Paraevitar el envenenamientopor mon6×idodecarbono,aseguresede
queel motor est4al airefibre enun_reabienventilada.
Verifiquequeelcontroldelabarrenaseencuentreenposid6n
desenganchada(suelta). 5O
Figura 14
2. Empujelapalancadelestranguladoralaposid6nCHOKE(estrangulador)_J_.
3. Sielmotoryaest_caliente,ubiqueelreguladorenlaposid6nRUNI _ I
fundonamiento)enlugardeCHOKE(estrangulador)_.
4. Predonetres(3)veceselbot6ndecebado,asegur_ndosedecubrirelorifido
deventilaci6nalpresionar.
5. Sielmotorest_caliente,presioneel bot6ndelcebadorunasolavez.
6. Predoneelbot6ndelarrancadorparaarrancarel motor.
7. Unavezencendidoel motor,suelteelbot6ndelarrancador.
8. Dejequeel motorsecalientevariosminutos,ajustandoelestrangulador
,acialaposicibnRUN(fundonamiento)I _ I. Espere,asiaqueelmotor
funcionesuavementeantesdecadaajustedelaobturad6n.
9. Cuandodesconecteelprolongador,desenchufesiempreelextremo
queest_eneltomacorrientesdeirespatasdelaparedantesdedesenchufar
elextremoopuestoqueest_enlam_quinaquitanieve.
Arrancador deretroceso
I. Empujelapalancadelestranguladoralaposid6nCHOKE(estrangulador)_.
2. Sielmotoryaest_caliente,ubiqueelreguladorenlapodd6n RUN
IfuncJonamJentolI¢Hen ugardeCHOKElestrangu adorlM'
3. Predonetres(3)veceselbot6ndecebado,asegur_ndosedecubrirelorifido
deventilaci6nalpresionar.
4. Sielmotorest_caliente,predoneel bot6ndelcebadorunasolavez.
5. Tomela manijadelarrancadorderetrocesoytirede lacuerdahaciaafuera
lentamente.Enel puntoquesehacelevementem_sdificiltirar delacuerda,
permitaquelamismaretrocedalentamente.
6. Tirede lamanijadelarrancadorconunmovimientofirme yr_pido.Nosuelte
Lamanijanide)equeretrocedaasupodci6noriginal.Mantengalamanija
delarrancadorfirmementesujetayde)equelacuerdaretrocedalentamente.
Dejequeel motorsecalientevariosminutos,ajustandoel estranguladorhada
laposicJbnRUN(funcJonamJento)1_ 1'EsperehastaqueelmotorfuncJone
suavementeantesdecadaajustedelaobturad6n.
Detend6ndel motor
1. Hagafuncionarelmotorduranteunosminutossincargaantesdepararpara
ayudarasecarlahumedadenelmotor.
2. Paradetenerel motorsaquelaIlaveygu_rdelaenunlugarseguro.
3. Limpietodalanieveylahumedaddel_reade loscontrolesdel motor.
Elsilenciador,el motory las_reascircundantesserecalientany pueden
causarquemaduras.Seaprecavidoy no lostoquecuandoest_ncalientes.
Enganchede la barrena
Paraengranarlabarrenaaprietelamanijadecontrolcontralabarradecontrol
superior.Suelteelcontrolparadetenerlabarrena.
Enganchede la transmisi6n
Levanteligeramenteelasasuperiorparapermitirquelaspaletasde gomaenel
dnfin deponerseencontactoconelpavimentoeimpulsarelquitanieveshada
delante.Empujandohaciaabajosobrela manijalevantarlabarrenadelatierray
detenerelmovimientohadaadelante.
NOTA:Silapresi6nascendentesobrelamanijaesexcesivatendr_como
resultadoundesgasteprematurodelaspaletasdecauchodelabarrenay
estonoestar_cubiertoporlagarantia.
Despejede uncanalde descargaobstruido
Elcontactodelasmanosconelimpulsorrotatorioqueest_dentrodelcanalde
descargaeslacausam_scomt_ndelesionesasodadasconlasm_quinasquitanieve.
Nuncauselasmanosparalimpiarelcanaldedescarga.
Paradespejarelcanal:
1. iAPAGUEELMOTOR!
2. Espere10segundosparaestarsegurodequelascuchillasdel motorhan
dejadoderotar.
3. Utilicesiempreunaherramientadelimpiezao varilla,nouselasmanos.
51
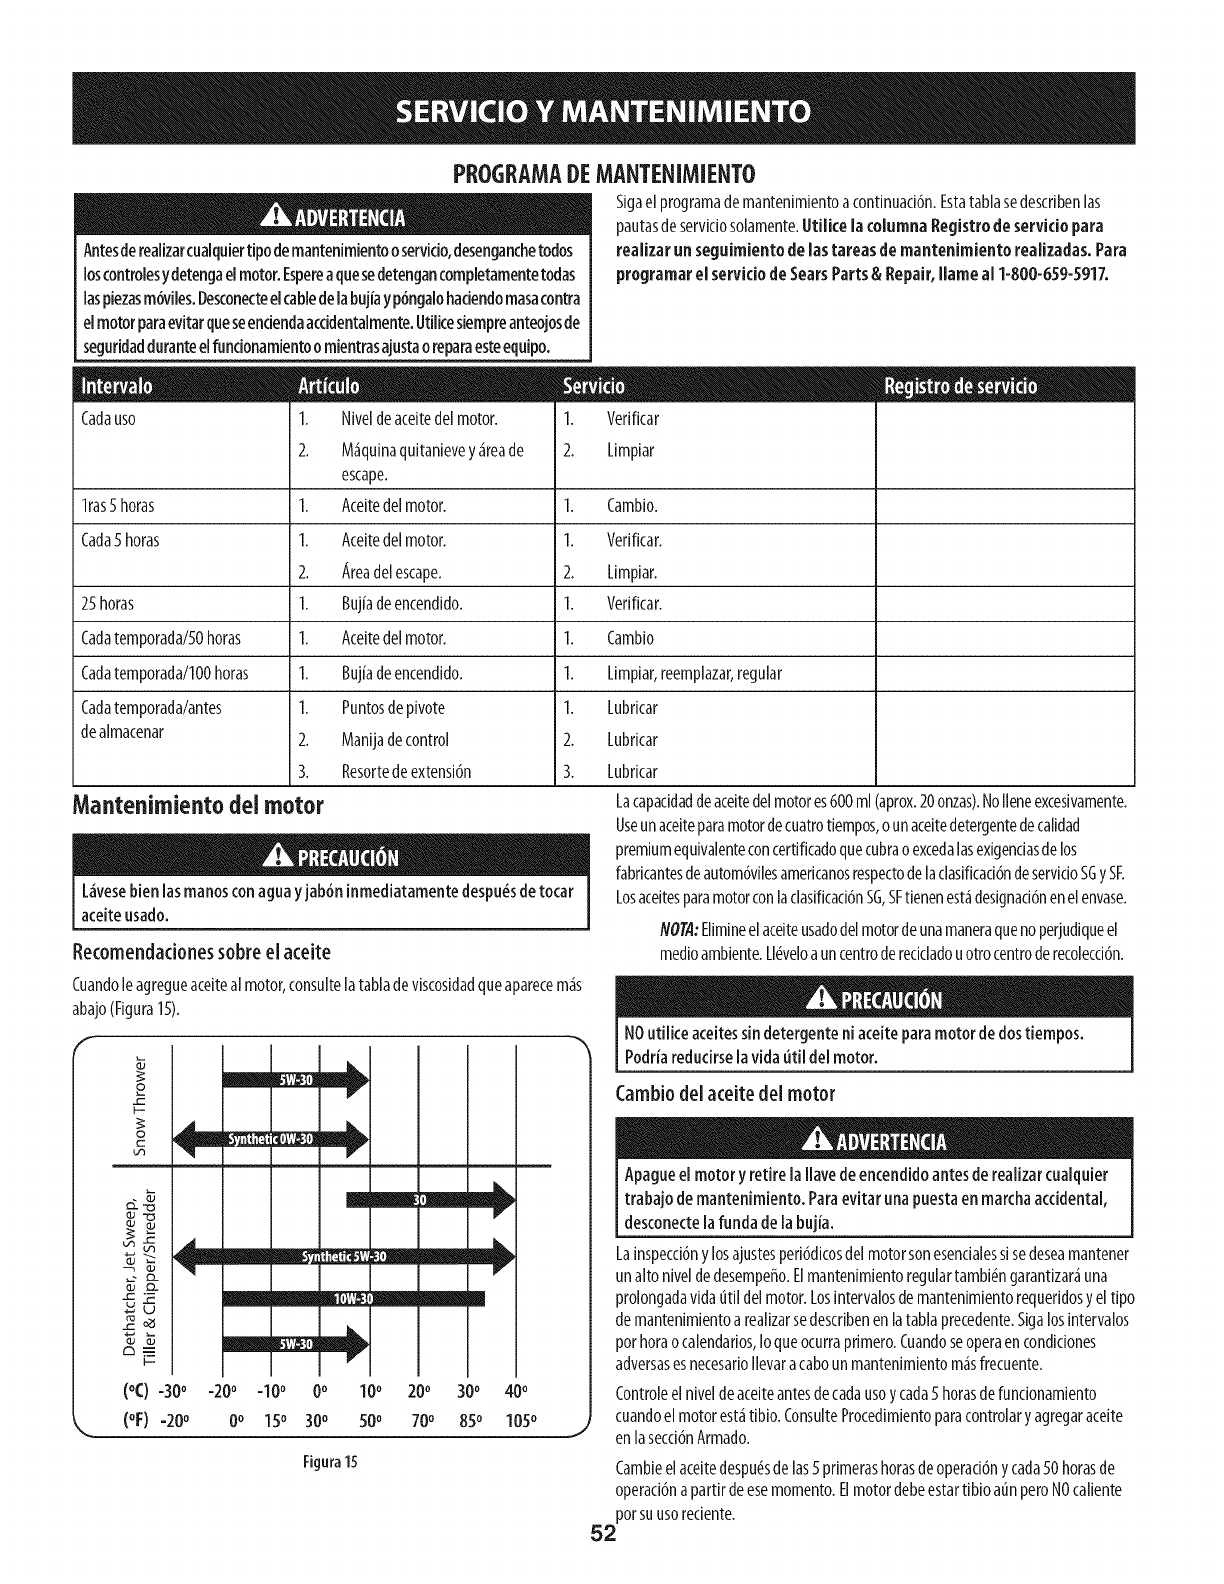
PEOGEAMADEMANTENIMIENTO
Antesderealizarcualquiertipodemantenimientooservicio,desengancbetodos
loscontrolesydetengaelmotor.Espereaquesedetengancompletamentetodas
laspiezasm6viles.Desconecteelcabledelabujiayp6ngalobaciendomasacontra
elmotorparaevitarqueseendendaaccidentalmente.Utilkesiempreanteojosde
seguridadduranteelfundonamientoo mientrasajustao reparaesteequipo.
Cadauso 1.
2.
Sigael programademantenimientoa continuaci6n.Estatablasedescfibenlas
pautasdeservidosolamente.Utilice la columna Registro deservicio para
reaffzarun seguimiento de lastareas de mantenimJento realizadas.Para
programarel servkio deSearsParts&Repair,flame al 1-800-659-5917.
Niveldeaceitedelmotor.
M_quinaquitanievey_reade
escape.
Aceitedelmotor.
Aceitedelmotor.
Areadelescape.
Bujiadeencendido.
Aceitedelmotor.
Bujiadeencendido.
Puntosde pivote
Manijadecontrol
Resortedeextensi6n
1. Vefificar
2. Limpiar
lras5 horas 1. 1. Cambio.
Cada5horas 1. 1. Vefificar.
2. 2. Limpiar.
25horas 1. 1. Vefificar.
Cadatemporada/50horas 1. 1. Cambio
Cadatemporada/lO0horas 1. 1. Limpiar,reemplazar,regular
Cadatemporada/antes 1. 1. Lubficar
dealmacenar 2. 2. Lubficar
3. 3. Lubrkar
Mantenimientodel motor
L_vesebienlasmanosconaguayjab6n inmediatamentedespu_sde tocar
aceiteusado.
Recomendacionessobre el aceite
Cuandoleagregueaceitealmotor,consultelatabladeviscosidadqueaparecem_s
abajo(Figura15).
o
_c
o
c
v_
2_
c3m_
I--
Z__J J
V
v
(oC) -30° -20o -I0 o 0o100 200 300 400
(oF) -20°Oo 150 300 500 700 850 1050
Figura 15
Lacapaddaddeaceitedelmotores600ml (aprox.20onzas).NoIleneexcesivamente.
Useunaceiteparamotordecuatrotiempos,o unaceitedetergentedecalidad
premiumequivalenteconcertificadoquecubrao excedalasexigendasdelos
fabficantesdeautom6vilesameficanosrespectodelaclasiflcad6ndeservidoSGySE
Losaceitesparamotorconlaclasificad6nSG,SFtienenest_designad6nenelenvase.
NOTA:Elimineelaceiteusadodelmotordeunamaneraquenoperjudiqueel
medioambiente.Ll_veloauncentrodereddadouotrocentroderecolecd6n.
NOutilice aceitessindetergenteniaceiteparamotor dedostiempos.
Podriaredudrse lavida util del motor.
Cambiodel aceite del motor
Apagueel motory retirela flare deencendidoantesde realizarcualguier
trabajo de mantenimiento. Paraevitar unapuestaen marchaaccidental,
desconectelafunda dela bujia.
Lainspecd6nylosajustesperi6dicosdelmotorsonesendalesslsedeseamantener
unalto niveldedesempeffo.Elmantenimientoregulartambi_ngarantizar_una
prolongadavidautil delmotor.Los[ntervalosdemantenimientorequefidosyeltipo
demantenimientoa realizarsedescfibenenlatablaprecedente.Sigalosintervalos
porhoraocalendarios,loqueocurraprimero.Cuandoseoperaencondidones
adversasesnecesafiollevaracabounmantenimientom_sfrecuente.
Controleelniveldeaceiteantesdecadausoycada5 horasdefundonamiento
cuandoel motorest_tibio.ConsulteProcedimientoparacontrolaryagregaraceite
enlasecd6nArmado.
Cambieelaceitedespu_sdelas5 pfimerashorasde operad6nycada50horasde
operad6napartirdeesemomento.Elmotordebeestartibio alanperoNOcaliente
porsuusoredente.
52
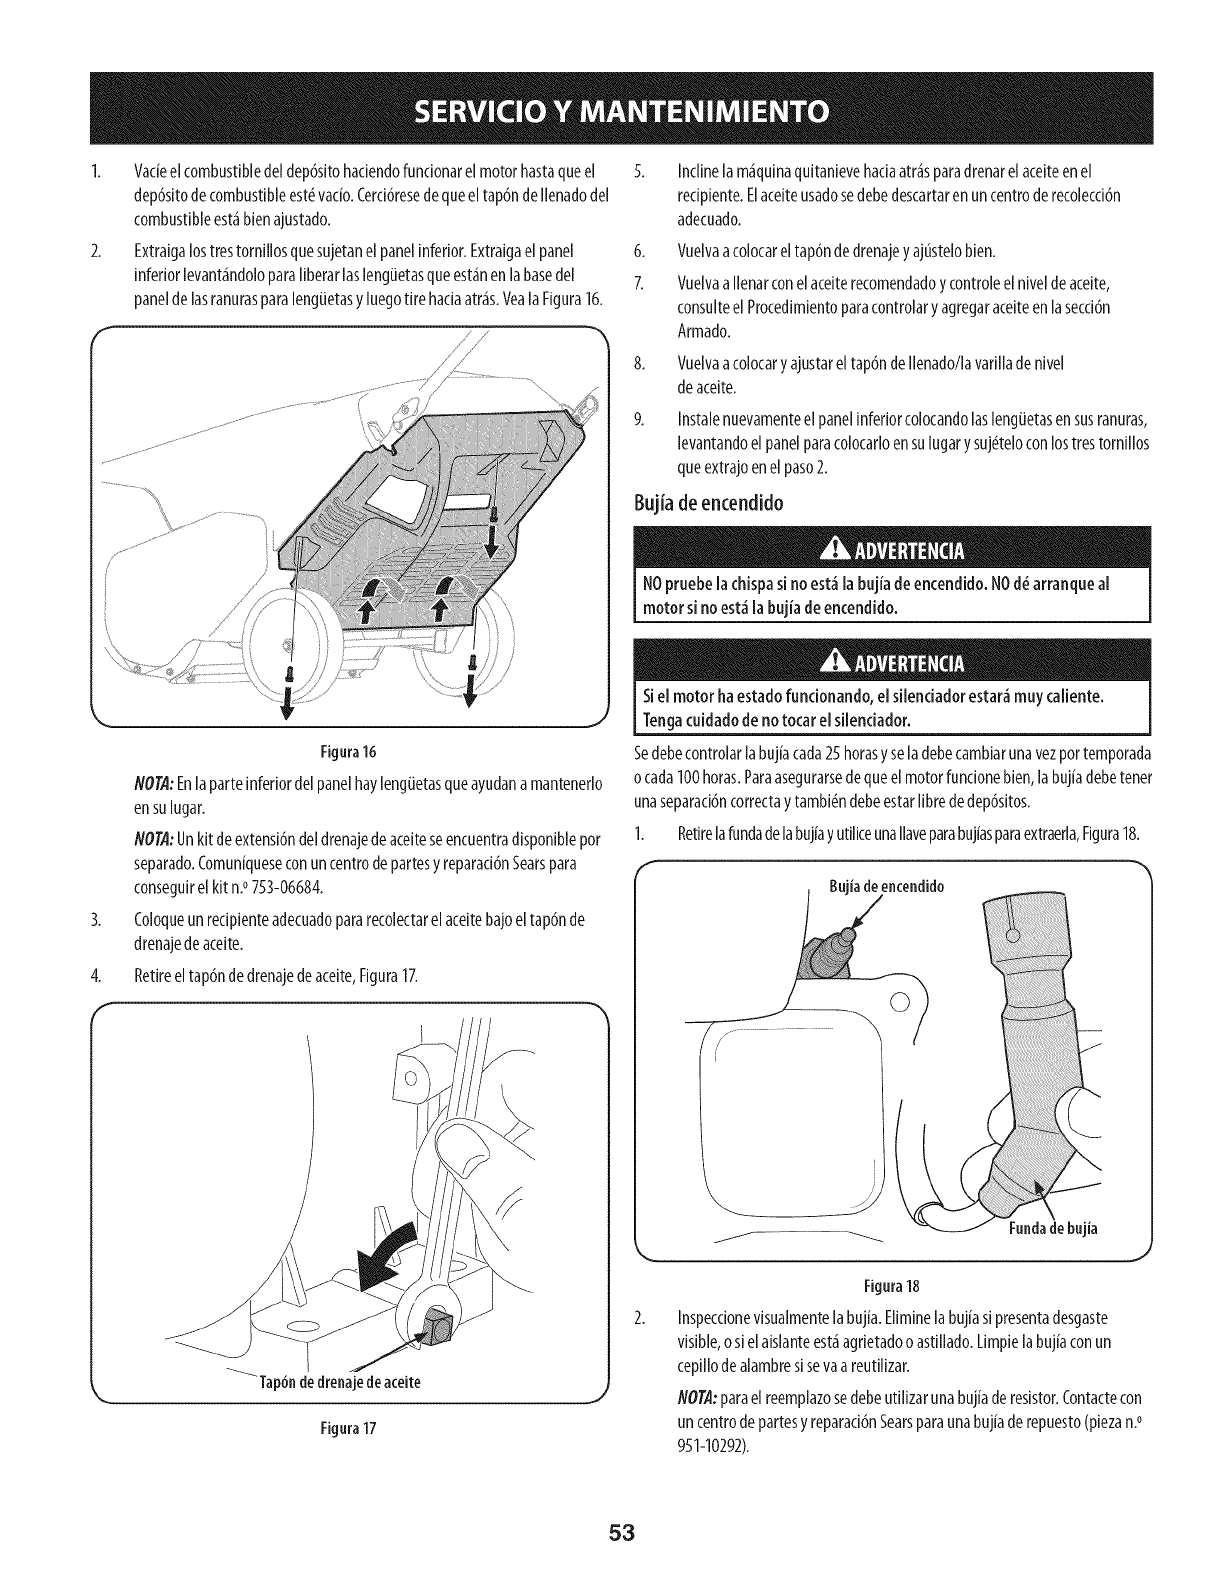
2_
3,
Vadeel combustibledeldep6sitohadendofundonarel motorhastaqueel 5.
dep6sitodecombustibleest_vado.Cerci6resedequeeltap6ndeIlenadodel
combustibleest,ibienajustado.
Extraigalostrestornillosquesujetanel panelinferior.Extraigaelpanel 6.
inferiorlevant_indoloparaliberarlaslengiJetasqueest_inenlabasedel 7.
paneldelasranurasparalengiJetasyluegotirehaciaatr_is.VealaFigura16.
/,/
/ /
/// //
//
Figura16
NOTA:EnlaparteinferiordelpanelhaylengiJetasqueayudana mantenerlo
ensulugar.
NOTA:Unkit deextensi6ndeldrenajedeaceiteseencuentradisponiblepor
separado.Comuniqueseconuncentrodepartesyreparaci6nSearspara
conseguirel kitn.° 753-06684.
Coloqueunrecipienteadecuadopararecolectarelaceitebajoeltapbnde
drenajedeaceite.
Retireeltapbndedrenajedeaceite,Figura17.
Tap6ndedrenajedeaceite
Figura17
4,
Inclinelam_iquinaquitanievehadaatr_isparadrenarelaceiteen el
redpiente.Elaceiteusadosedebedescartarenuncentroderecolecci6n
adecuado.
Vuelvaacolocareltap6ndedrenajeyajustelobien.
VuelvaaIlenarconelaceiterecomendadoycontroleelniveldeaceite,
consulteelProcedimientoparacontrolaryagregaraceiteenlasecci6n
Armado.
Vuelvaacolocaryajustarel tap6nde Ilenado/lavarilladenivel
deaceite.
Instalenuevamenteel panelinferiorcolocandolaslengiJetasensusranuras,
levantandoelpanelparacolocarloensulugary suj_teloconlostrestornillos
queextrajoenel paso2.
BujJadeencendido
NOpruebelachispasino est_labujia deencendido.NOd_arranqueal
motor sinoest_labujia deencendido.
Siel motor ha estadofuncionando,el silendadorestar_muycaliente.
Tengacuidadodeno tocar el silendador.
Sedebecontrolarlabujiacada25horasyseladebecambiarunavezpottemporada
o cada100horas.Paraasegurarsedequeelmotorfuncionebien,labujiadebetenet
unaseparaci6ncorrectaytambi_ndebeestarlibrededep6sitos.
1. Retirelafun@delabujiayutiliceunaIlaveparabujiasparaextraerla,Figura18.
ia de encendido
Fundade bujia
Figura18
Inspeccionevisualmentelabujia.Eliminelabujiasipresentadesgaste
visible,o sielaislanteest,1agrietadoo astillado.Limpielabujiaconun
cepillodealambresi sevaareutilizar.
NOTtI:paraelreemplazosedebeutilizarunabujiaderesistor.Contactecon
uncentrodepartesyreparaci6nSearsparaunabujiaderepuesto(piezan.°
951-10292).
53
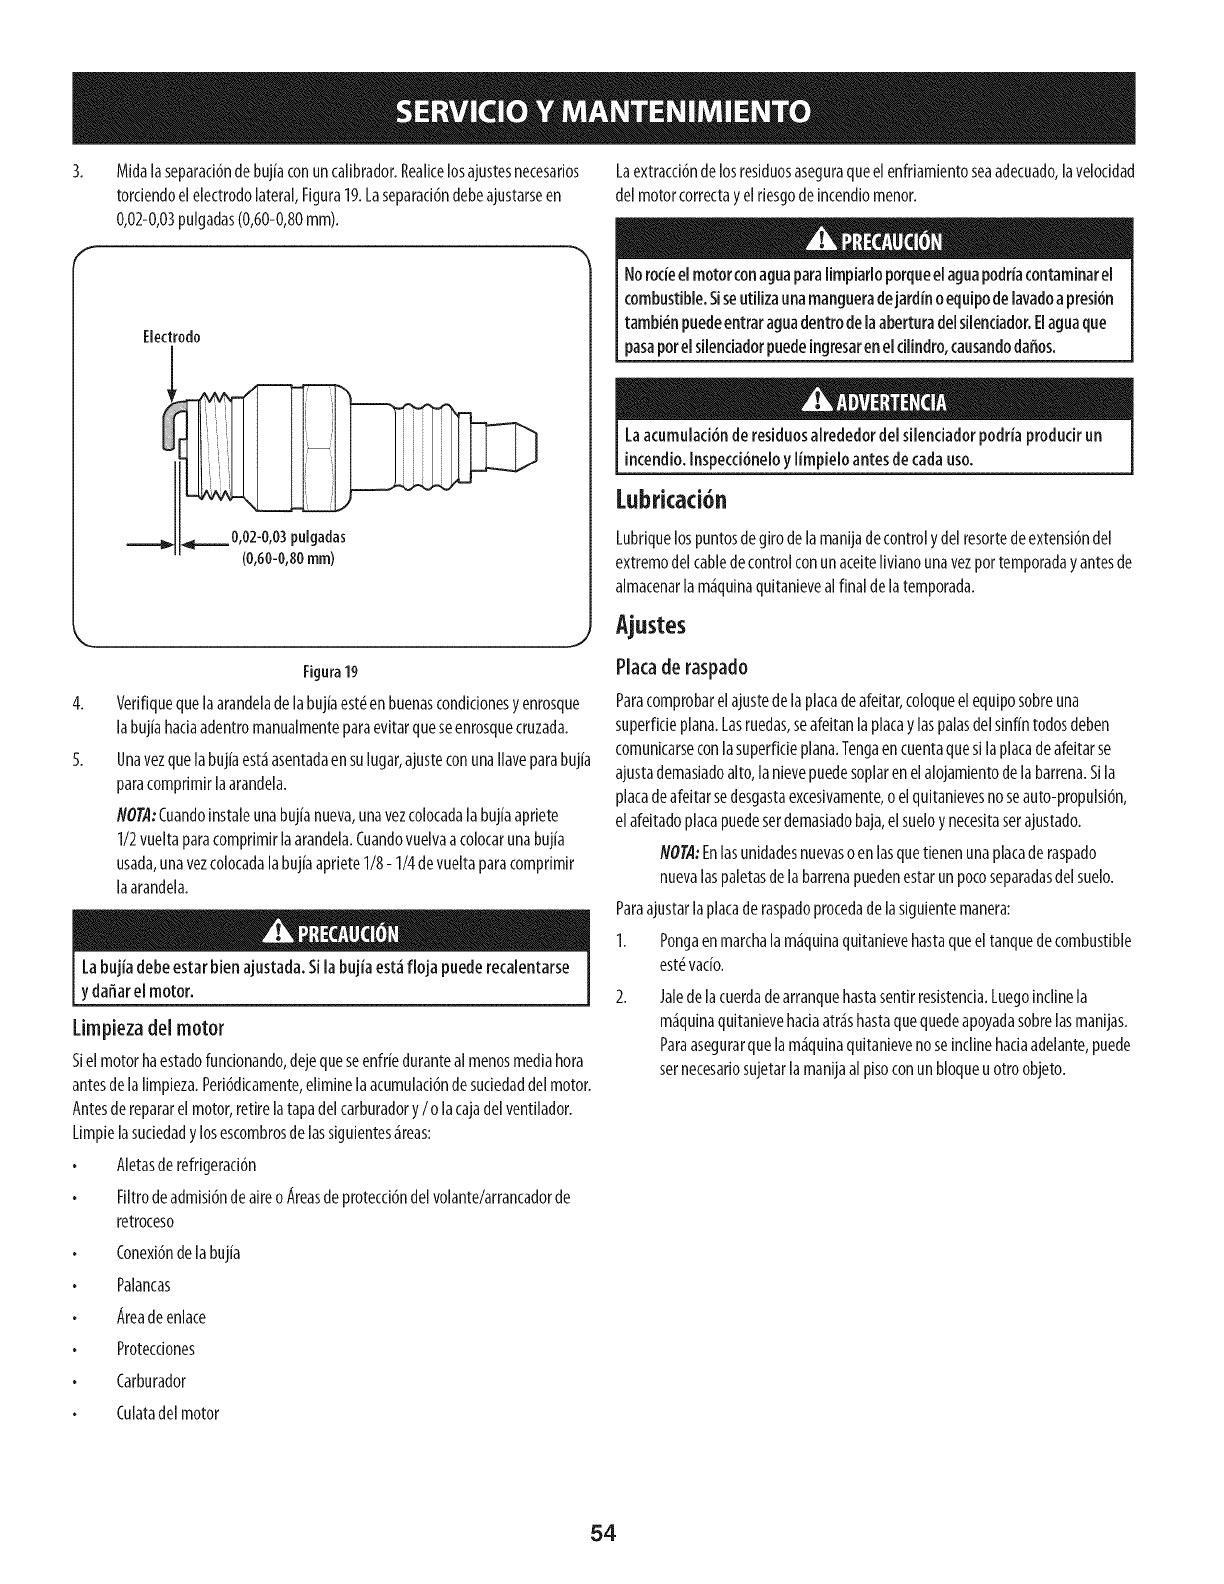
Midalaseparad6ndebujiaconuncalibrador.Reallcelosajustesnecesarios
tordendoelelectrodolateral,Figura19.Laseparaddndebeajustarseen
0,02-0,03pulgadas(0,60-0,80mm).
Electrodo
0,02-0,03pulgadas
(0,60-0,80ram)
4.
5.
Figura 19
Verifiquequelaarandeladelabujiaest_enbuenascondicionesyenrosque
labujiahadaadentromanualmenteparaevltarqueseenrosquecruzada.
Unavezque[abujiaest_iasentadaensulugar,ajusteconunallaveparabujia
paracomprlmlrlaarandela.
NOT,4:Cuando[nstaleunabujianueva,unavezcolocadalabujiaapriete
I/2 vueltaparacomprlmirlaarandela.Cuandovuelvaacolocarunabujia
usada,unavezcolocadalabujiaaprieteI/8- I/4 devueltaparacomprimir
laarandela.
Labujiadebeestar bienajustada.Silabujiaest_floja puederecalentarse
y daffarel motor.
Limpieza del motor
S[elmotorhaestadofuncionando,dejequeseenfriedurantealmenosmediahora
antesdelallmpleza.Perlddlcamente,eliminelaacumuladdndesudedaddelmotor.
Antesderepararel motor,retirelatapadelcarburadory/o lacajadelventilador.
Limpielasudedady losescombrosde lassigulentes_ireas:
Aletasde refrlgeracldn
Flltrodeadmlsidndealreo Areasdeprotecddndelvolante/arrancadorde
retroceso
Conexidndela bujia
Palancas
Areadeenlace
Protecciones
Carburador
Laextracd6ndelosresiduosaseguraqueelenfriamientoseaadecuado,laveloddad
del motorcorrectayelrlesgodelncendlomenor.
Norodeel motorconaguaparalimpiarloporqueelaguapodria(ontaminarel
combustible.Siseutilizaunamangueradejardinoequipodelavadoa presi6n
tambi_npuedeentraraguadentrodelaaberturadelsilenciador.Elaguaque
pasapotelsilenciadorpuedeingmsarenelcilindro,causandodaffos.
Laacumulaci6nderesiduosalrededordel silenciadorpodriaprodudr un
incendio.Inspecci6neloy limpielo antesdecadauso.
Lubricad6n
Lubriquelospuntosdegirodelamanijadecontrolydelresortedeextensi6ndel
extremodelcabledecontrolconunaceltelivianounavezportemporadayantesde
almacenarlam_iquinaqultaNevealfinalde latemporada.
Placa de raspado
Paracomprobarelajustedelaplacadeafeltar,coloqueel equiposobreuna
superfideplana.Lasruedas,seafeitanlaplacaylaspalasdelsinfintodosdeben
comunlcarseconlasuperfideplana.Tengaen cuentaquesilaplacadeafeltarse
ajustademasiadoalto,laNevepuedesoplarenelalojamlentodelabarrena.S[la
placadeafeltarsedesgastaexcesivamente,o elqultaNevesnoseauto-propulsidn,
elafeltadoplacapuedeserdemasladobaja,elsueloy necesltaserajustado.
NOT,4:EnlasuNdadesnuevasoenlasquetienenunaplacade raspado
nuevalaspaletasdela barrenapuedenestarunpocoseparadasdelsuelo.
Paraajustarlaplacaderaspadoprocedadelaslguientemanera:
I. Pongaenmarchala m_iquinaquitaNevehastaqueeltanquede combustible
est#vado.
Jaledelacuerdadearranquehastasentirresistenda.Luegoinclinela
m_quinaquitaNevehadaatr_shastaquequedeapoyadasobrelasmanias.
Paraasegurarquelam_quinaquitanievenoseinclinehadaadelante,puede
sernecesariosujetarlamanijaalpisoconunbloqueuotroobjeto.
Culatadelmotor
54
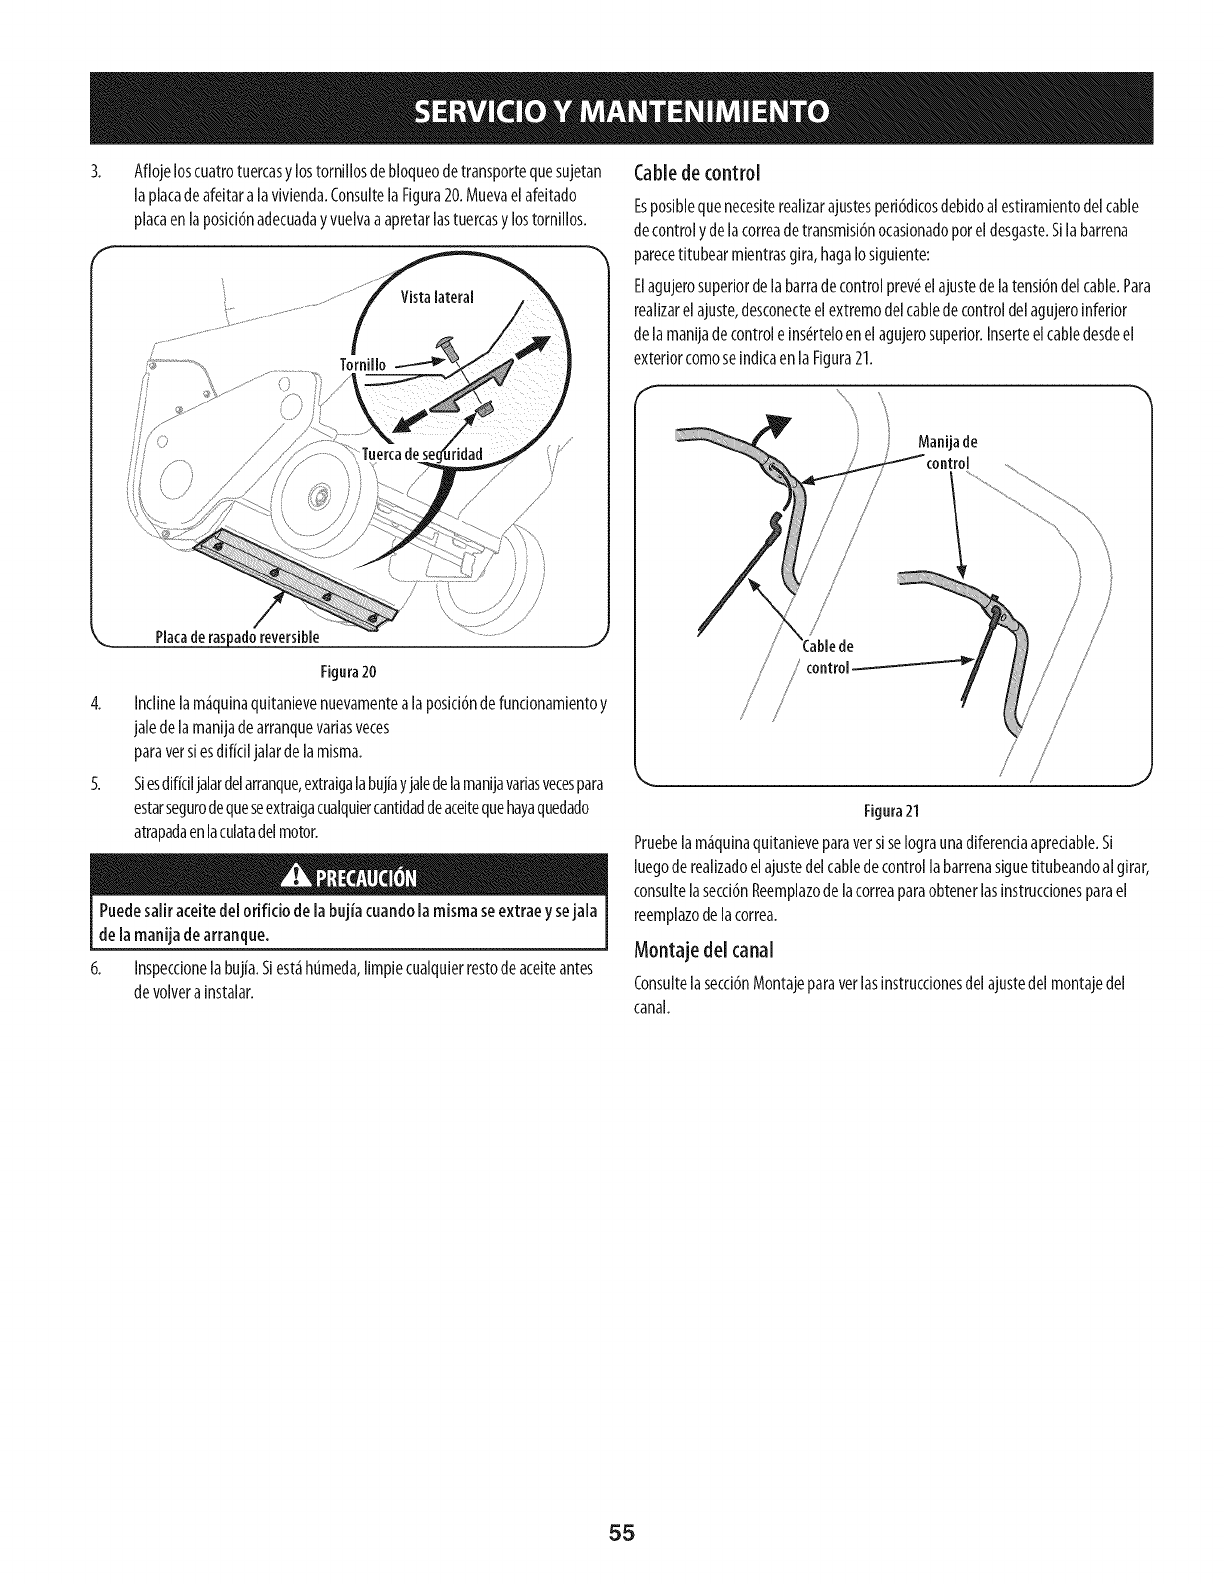
3. Aflojeloscuatrotuercasylostornillosdebloqueodetransportequesujetan Cable de control
laplacadeafeitaralavivienda.Consultela Figura20.Muevaelafeitado
plataenlaposicidnadecuaday vuelvaa apretarlastuercasylostornillos.
Placade ras_adoreversible
Figura20
4. Inclinelam_quinaquitanievenuevamenteala posici6ndefuncionamientoy
jaledelamanijadearranquevariasveces
paraversiesdificiljalardelamisma.
5. Siesdificiljalardelarranque,extraigalabujiayjaledelamanijavariasvecespara
estarsegurodequeseextraigacualquiercantidaddeaceitequehayaquedado
atrapadaenlaculatadelmotor.
Puedesalir aceitedel orifido de la bujia cuandolamismaseextraey sejaia
dela manijadearranque.
6. Inspecdonelabujia.Siest_iht_meda,limpiecualquierrestodeaceiteantes
devolverainstalar.
Esposiblequenecesiterealizarajustesperi6dicosdebidoalestiramientodelcable
decontrolyde[acorreadetransmisi6nocasionadoporeldesgaste.Sila barrena
parecetitubearmientrasgira,hagaIosiguiente:
Elagujerosuperiordelabarradecontrolprev(_elajustedelatensi6ndelcable.Para
realizarelajuste,desconecteelextremodelcabledecontroldelagujeroinferior
delamanijadecontrole ins_rteloenelagujerosuperior.Inserteelcabledesdeel
exteriorcomoseindicaenlaFigura21.
Manijade
Figura21
Pruebelam_iquinaquitanieveparaversiseIograunadiferenciaapreciable.Si
luegoderealizadoelajustedelcabledecontrollabarrenasiguetitubeandoalgirar,
consultelaseccidnReemplazodelacorreaparaobtenerlasinstruccionesparael
reemplazodelacorrea.
Montaje del canal
Consultelasecci6nMontajeparaverlasinstruccionesdelajustedel montajedel
canal.
55
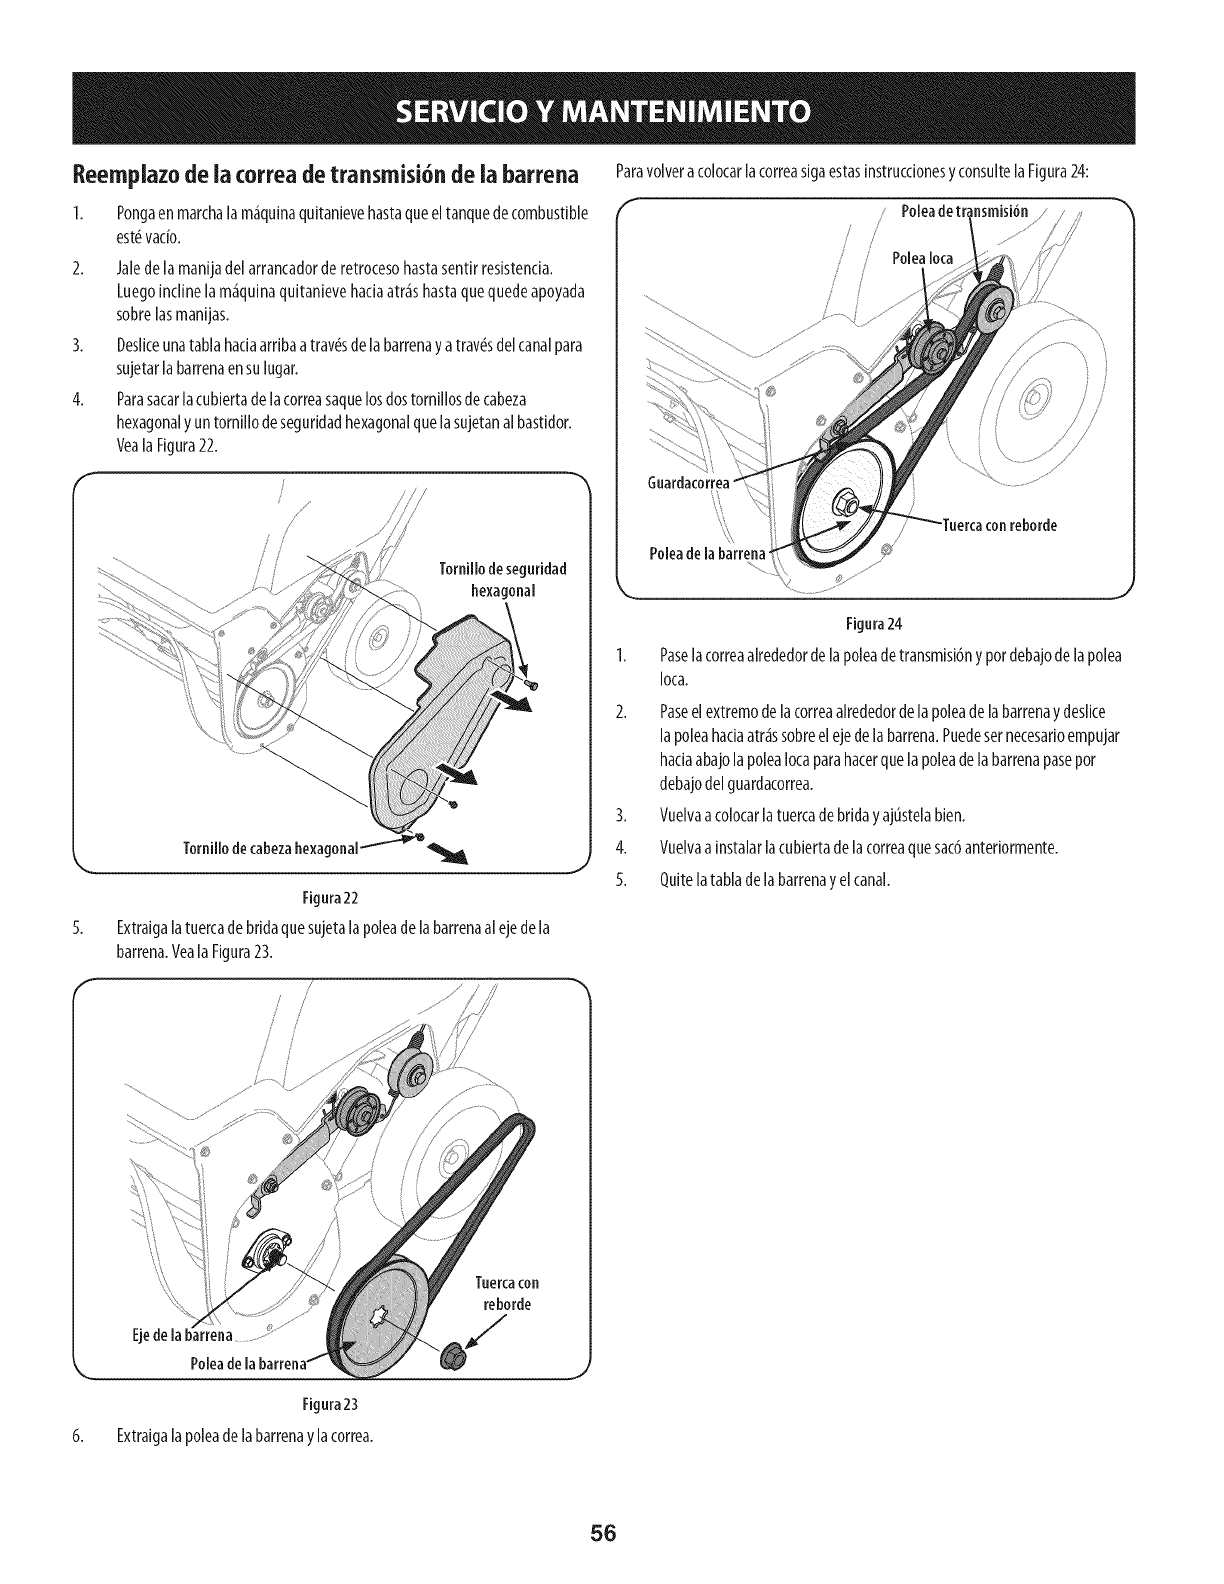
Reemplazo de ia ¢orrea de transmisi6n de ia barrena
Pongaenmarchalam_quinaquitanievehastaqueeltanquedecombustible
est_ratio.
2. Jaledela manijadel arrancadorderetrocesohastasentirresistenda.
Luegoinclinelam_quinaquitanievehadaatr_shastaquequedeapoyada
sobrelasmanijas.
3. Deslkeunatablahadaarribaa tray,sdela barrenayatray,s delcanalpara
sujetarlabarrenaensulugar.
4. Parasacarlacubiertade lacorreasaquelosdostornillosdecabeza
hexagonaly untornillo deseguridadhexagonalquelasujetanalbastidor.
VealaFigura22.
Tomillodeseguridad
hexagonal
5.
Tomillodecabezahexagonal-'_'__
Figura22
Extraigalatuercadebridaquesujetalapoleadelabarrenaalejedela
barrena.Veala Figura23.
ParavolveracolocarlacorreasigaestasinstrucdonesyconsultelaFigura24:
jPoleadetr;
/J
PoleaIoca
Figura24
Paselacorreaalrededordelapoleadetransmisi6nypordebajodelapolea
Iota.
2. Paseelextremodelacorreaalrededordelapoleadelabarrenaydeslice
lapoleahadaatr_ssobreel ejedelabarrena.Puedesernecesarioempujar
hadaabajolapoleaIocaparahacerquelapoleadelabarrenapasepor
debajodelguardacorrea.
3. Vuelvaacolocarlatuercadebridayajustelabien.
4. Vuelvaainstalarlacubiertadelacorreaquesac6anteriormente.
5. Quitelatabladela barrenayelcanal.
6.
Ejedelabarrena..................
Polea
Figura23
Extraigalapoleadelabarrenaylacorrea.
Tuercacon
reborde
5G
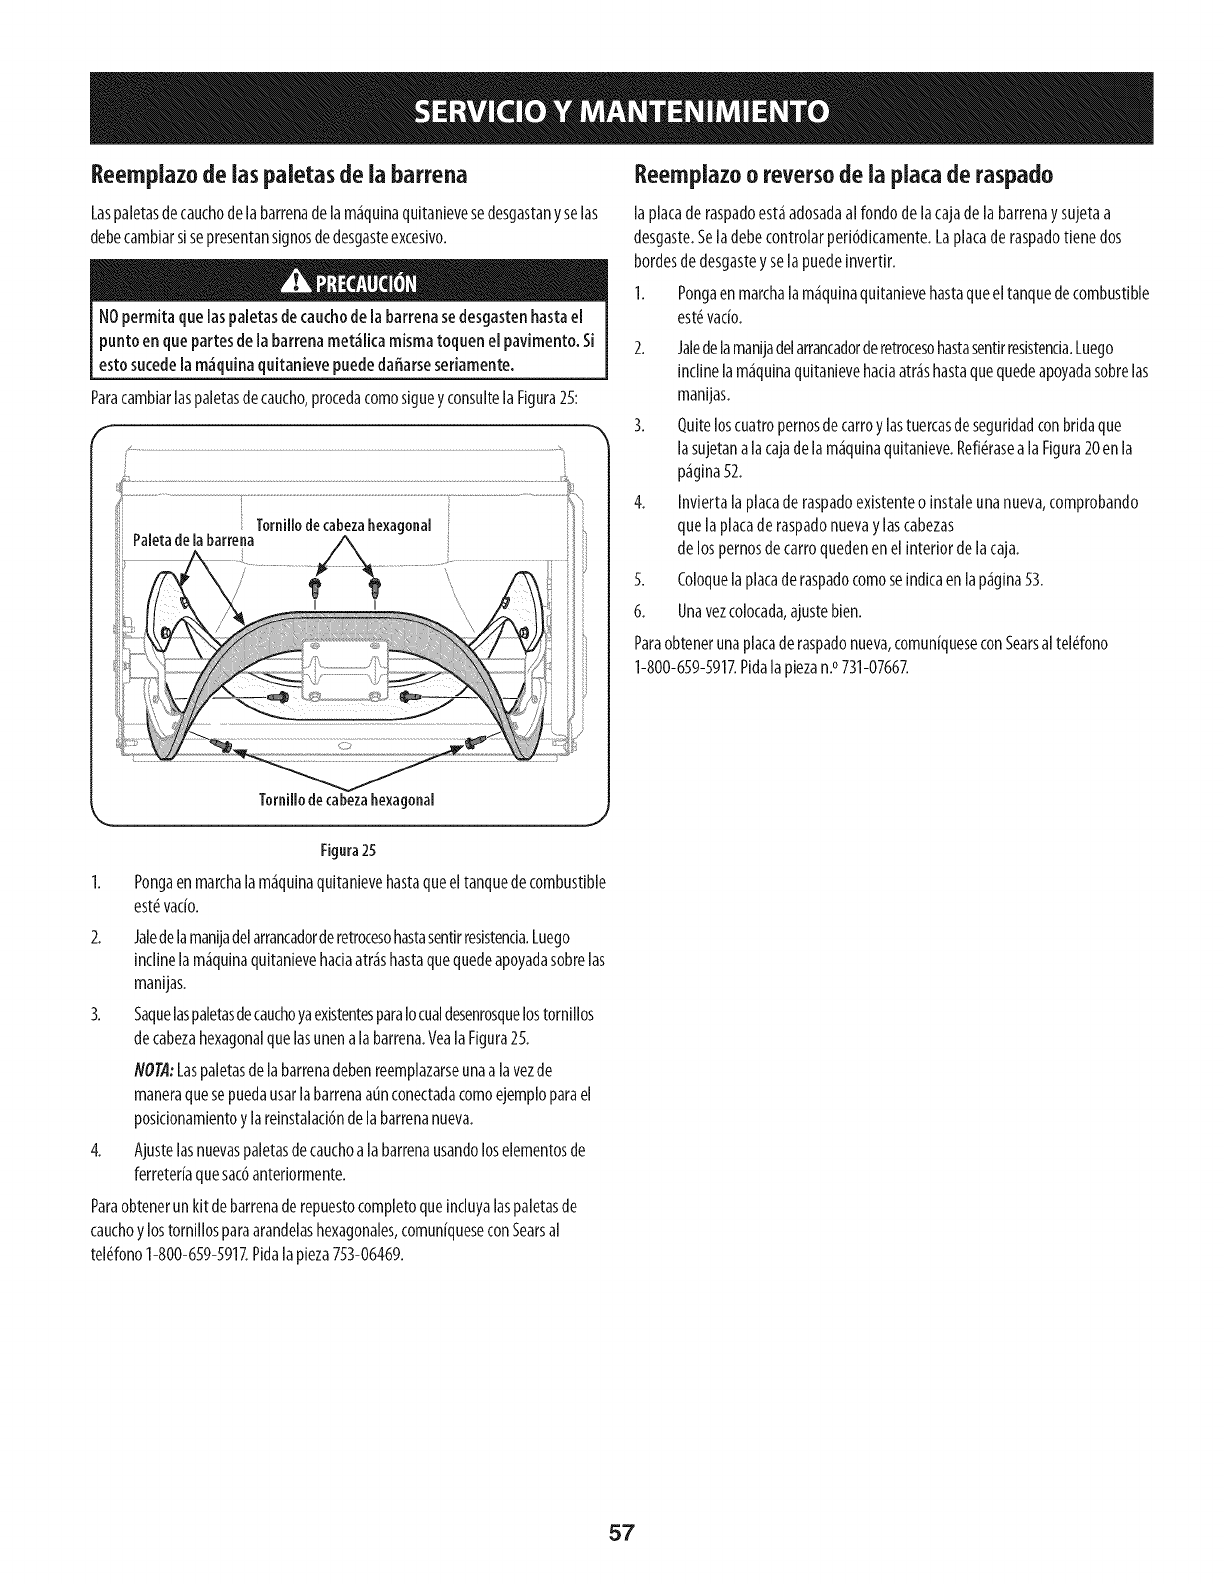
Reernplazode iaspaletasde ia barrena
Laspaletasdecauchodelabarrenade lam_quinaquitanievesedescjastany selas
debecambiarsl sepresentansignosdedesgasteexcesivo.
NOpermffaque[aspaietasde cauchode[abarrenasedesgastenhastael
punto enquepartesde [a barrenamet_lica mismatoquen el pavimento.Si
estosucede[am_quina quitanievepuededaffarseseriamente.
Paracambiarlaspaletasdecaucho,procedacomosicjueyconsultelaFicjura25:
Tomillodecabezahexagonal
Figura25
Pongaenmarchalam_quinaquitanievehastaqueeltanquedecombustible
est_vac[o.
2. Jaledelamanijadelarrancadorderetrocesohastasentirresistenda.Luecjo
inclinelam_qu[naquitanievehadaatr_shastaquequedeapoyadasobrelas
manijas.
3. SaquelaspaletasdecauchoyaexistentesparaIocualdesenrosquelostorniIIos
decabezahexagonalquelasunenalabarrena.VealaFigura25.
NOTA:Laspaletasdelabarrenadebenreemplazarseunaalavezde
maneraquesepuedausarlabarrenaaunconectadacomoejemploparael
pos[donam[entoylare[nstalad6nde labarrenanueva.
4. Ajustelasnuevaspaletasde cauchoala barrenausandoloselementosde
ferreteriaquesac6anteriormente.
Paraobtenerunkitde barrenaderepuestocompletoqueincluyalaspaletasde
cauchoylostornillosparaarandelashexacjonales,comuniqueseconSearsal
tel(_fono1-800-659-591ZPidalapieza753-06469.
Reemplazoo reversode la plata de raspado
laplacaderaspadoest_adosadaal rondodelacajade labarrenaysujetaa
descjaste.Seladebecontrolarperi6dicamente.Laplacaderaspadotienedos
bordesdedescjasteysela puedeinvertir.
I. Poncjaenmarchalam_quinaquitanievehastaqueeltanquedecombustible
est_vado.
2. Jalede[amanijadelarrancadorderetrocesohastasentirresistenda.Luecjo
inclinelam_qu[naqu[tan[evehadaatr_shastaquequedeapoyadasobrelas
man[jas.
3. Quiteloscuatropemosdecarroy lastuercasde secjuridadconbridaque
lasujetanalacajadela m_qu[naqu[tan[eve.Refi(_raseala F[cjura20enla
p_cjina52.
4. Inviertalaplata de raspadoexistenteo instaleunanueva,comprobando
quela plataderaspadonuevay[ascabezas
delospernosdecarroquedenenelinterior delacaja.
5. Coloquelaplataderaspadocomose[nd[caen lap_cj[na53.
6. Unavezcolocada,ajustebien.
Paraobtenerunaplataderaspadonueva,comuniqueseconSearsaltel_fono
1-800-659-5917.Pidalapiezan.°731-0766Z
57

Sinosevaa utilizarlam_quinaquitanievedurante30diaso m_s,o sieselfinal delatemporadadenieveyyanoexisteposibilldaddequenieve,esnecesarioalmacenar
elequipodemaneraadecuada.Sigalasinstruccionesdealmacenamientoqueseindicanacontinuaci6nparacjarantizarelrendimientom_ximodelam_quinaquitanieve
durantemuchosafiosm_s.a
Preparaci6ndei motor
Losmotoresquesealmacenandurantem_sde30diasdebenserdrenadosde
combustibleparaevitarquesedeteriorenyseformecjomaenelsistemade
combustibleoenlaspiezasprindpalesdelcarburador.Silacjasolinaensumotor
sedeterioraduranteelalmacenamiento,puederesultarnecesariorepararo
reemplazarel carburadoryotroscomponentesdelslstemadecombustible.
1. ElJmJnetodoelcombustibledeltanquehadendofundonarelmotorhasta
quesedetenga.
Cambieelaceitedelmotor.2.
3. Extra[cjalabujiadeencend[doyv[ertaeneldiindroaproximadamente1
onza(30ml)deaceiteparamotorIlmpio.Tirevariasvecesdelarrancadorde
retrocesoparadlstrlbulrelacelteyrelnstalela bujia.
4. Limpieel exteriordelmotoreliminandolasudedadylosresiduosdelas
sicjuienteszonas:
Norode el motor conacjuaparalimpiado porqueel acjuapodria
contaminarel combustible.Siseutiliza unamancjueradejard[n o equipo
delavadoa presi6ntambi_n puedeentrar acjuadentro dela abertura
del siienciador.Elacjuaquepasapor elsiienciadorpuedeincjresarenel
cilindro, causandodaffos.
Aletasde refrigerad6n
Filtrode admisi6ndeaireo Areasde protecd6ndel volante/
arrancadorderetroceso
Conexi6ndelabujia
Palancas
Areadeenlace
Protecdones
Carburador
Culatadelmotor
5. Almaceneelmotorenunsectorlimplo,secoybienventilado,lejosde
cualquierartefactoquefundoneconunallamao luzpilotocomohornos,
calentadoresdeaguao secadoresderopa.Evitecualquiersectorconun
motorel_ctricoqueproduzcachispasodondeseutilkenherramientas
el_ctrlcas.
Nuncaalmacenela m_quinaquitanieveconcombustibleen eltanque en
unespadocerradoo en_reasconpocaventilaci6n,donde losgasesdel
combustible puedanalcanzarelfuecjo,chispasouna luzpiloto comola que
tienen alcjunosbornos,calentadoresdeacjua,secadoresderopaoalcjun
otto dispositivoagas.
6. Siesposible,evitesectoresdealmacenamientoconmuchahumedad.
7. MantengaelmotorniveladocuandoIoalmacene.Lainclinad6ndel motor
puederesultarenfugasdecombustibleoaceite.
Preparad6nde ia m quina quitanieve
Sinosevaausarlam_quinaquitanievedurante30d[aso m_s,sigalassiguientes
instruccionesincluidasa continuaci6n
1. Almaceneelequipoenun_readespejadayseca.
2. Limpielam_quinaquitanieveconuntrapoyquitelasudedadolosresiduos.
3. Sialmacenalam_quinaquitanieveenunlugarmalventilado,cubralas
piezasmet_lkasdelam_quinaconunacapadelgadadeaceiteo silkona
comoantioxidante.
58
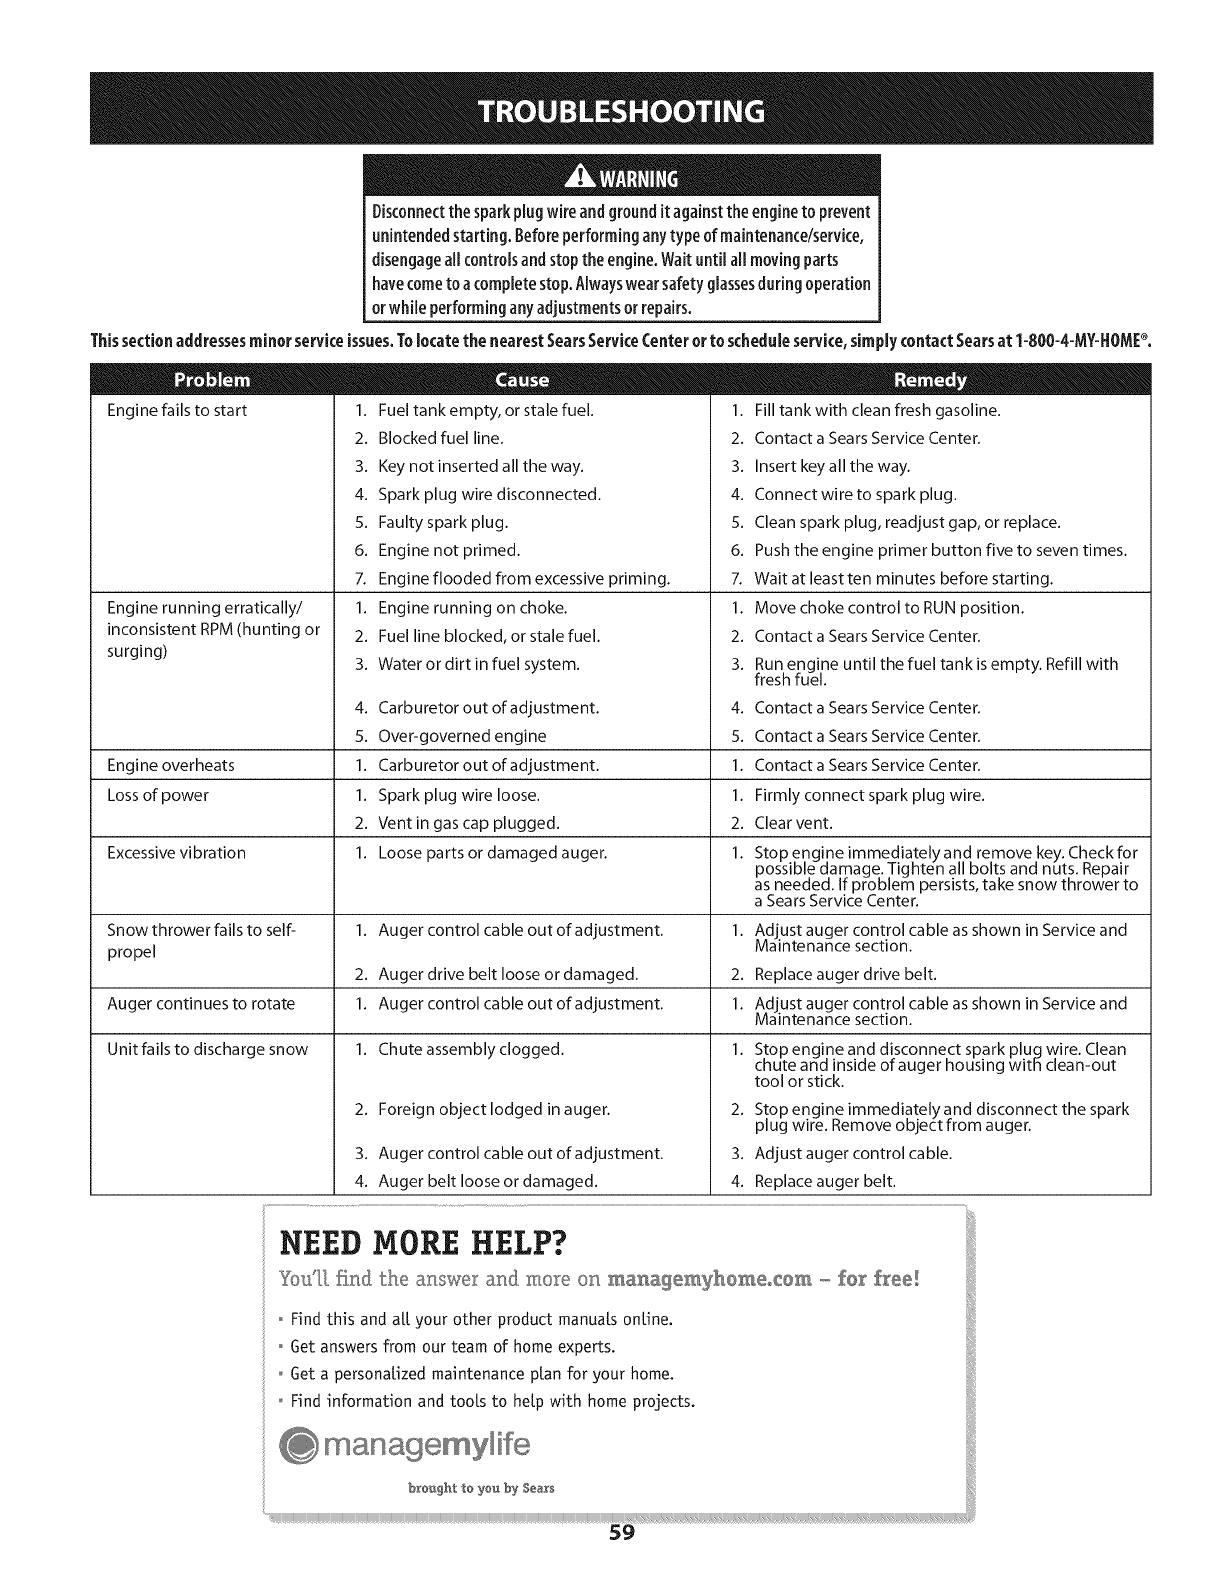
Disconnectthe sparkplug wireand grounditagainstthe engineto prevent
unintendedstarting. Beforeperforminganytypeof maintenance/service,
disengageall controlsandstopthe engine.Waituntil all movingparts
havecometo acompletestop.Alwayswearsafetyglassesduringoperation
orwhile performingany adjustmentsorrepairs.
Thissectionaddressesminorserviceissues.Tolocatethe nearestSearsServiceCenterorto scheduleservice,simplycontactSearsat 1-800-4-MY-HOME_.
Enginefails to start 1. Fuel tank empty, or stale fuel. 1. Fill tank with clean fresh gasoline.
2. Blocked fuel line.
3. Key not inserted all the way.
4. Spark plug wire disconnected.
5. Faulty spark plug.
2. Contact a Sears Service Center.
3. Insert key all the way.
4. Connect wire to spark plug.
5. Clean spark plug, readjust gap, or replace.
6. Engine not primed. 6.
7. Engine flooded from excessive priming. 7.
Engine running erratically/ 1. Engine running on choke. 1.
inconsistent RPM (hunting or
surging) 2. Fuel line blocked, or stale fuel. 2.
3. Water or dirt in fuel system. 3.
4. Carburetor out of adjustment. 4.
5. Over-governed engine 5.
Engine overheats 1. Carburetor out of adjustment. 1.
Lossof power 1. Spark plug wire loose. 1.
2. Vent in gas cap plugged. 2.
Excessivevibration 1. Loose parts or damaged auger. 1.
Snow thrower fails to self- 1. Auger control cable out of adjustment. 1.
propel
2. Auger drive belt loose or damaged. 2.
Auger continues to rotate 1. Auger control cable out of adjustment. 1.
Unit fails to discharge snow 1. Chute assembly clogged. 1.
Pushthe engine primer button five to seven times.
Wait at least ten minutes before starting.
Move choke control to RUN position.
Contact a SearsService Center.
Run engine until the fuel tank is empty. Refill with
fresh fuel.
Contact a SearsService Center.
Contact a SearsService Center.
Contact a SearsService Center.
Firmly connect spark plug wire.
Clearvent.
Stop engine immediately and remove key. Check for
possible damage. Tighten all bolts and nuts. Repair
as needed. If problem persists, take snow thrower to
a SearsService Center.
Adjust auger control cable as shown in Service and
Maintenance section.
Replace auger drive belt.
Adjust auger control cable as shown in Service and
Maintenance section.
Stop engine and disconnect spark plug wire. Clean
chute and inside of auger housing with clean-out
tool or stick.
2. Foreign object lodged in auger. 2. Stop engine immediately and disconnect the spark
plug wire. Remove object from auger.
3. Auger control cable out of adjustment. 3. Adjust auger control cable.
4. Auger belt loose or damaged. 4. Replace auger belt.
NEED MORE HELP?
Yoc/]_ fisd t:he asswer a:r_d :mo_e o_ _anage_yhomeoCO_ o_for free!
o Find this and a[[ your other product manuals online.
o 6et answers from our team of home experts.
o Get a personalized maintenance plan for your home.
o Find information and tools to help with home projects.
mana,gemylife
brought to you by Sea_s
_i@!i!i!i!i!i!i!i!i!i!i!i!i!i!i!i!i!i!i!i!i!i!i!i!i!i!i!i!i!i!i!i!i!i!i!i!i!i!i!i!i!i!i!i!i!i!i!i!i!i!i!i!i!i!i!i!i!i!i!i!i!i!i!i!i!i!i!i!i!i!i!i!i!i!i!i!i!i!i!i!i!i!i!i!i!iiiii
59

60
Felicitaciones por haber realizado una adquisici6n inteligente. El producto Craftsman® que ha
adquirido esta diseSado y fabricado para brindar muchos aSos de funcionamiento confiable. Pero
como todos los productos a veces puede requerir de reparaciones. Es en ese momento cuando el
disponer de un Acuerdo de protecci6n para reparaciones le puede ahorrar dinero y problemas.
A continuaci6n se detallan los puntos incluidos en el Acuerdo:
[] Servicio experto prestadopor nuestros 10,000 especialistas en reparacionesprofesionales
[] Servicio ilirnitado sin cargo para las piezasy la mano de obra en todas las reparacionescubiertas
[] Reernplazo del producto hasta 1500 d61aressi no es posible reparar el producto cubierto
[] Descuento de 25% del precionormal del servicio y de las piezas relacionadascon el mismo que no esten cubiertas
por el acuerdo; ademas, 25% del precio normal de laverificaci6n de mantenimientopreventivo
[] Ayuda r_pida pot tel_fono - Io IlamamosResoluci6n RApida- el apoyo telef6nico de un Chamusca al representante.
Piense en nosotros como el manual "de un dueSohablador."
Una vez adquirido el Acuerdo, puede programar el servicio con tan s61orealizar una Ilamadatelef6nica. Puede Ilamaren
cualquier momentodeldia o de la noche o programar un servicio en linea.
ElAcuerdo de Protecci6nde Reparaci6nes unacompra sin riesgo. Si usted anulapor alguna raz6n duranteel periodo de
garantia de producto,proporcionaremosun reembolso Ileno.O, un reembolsoprorrateado en cualquier momentodespues
del periodode garantia de producto expira, iAdquiera hoy su acuerdode protecci6n para reparaciones!
Se aplican determinadas limitaciones y exclusiones. Para obtener informaciTn adicional y precios en los Estados
Unidos Ilame al 1-800-827-6655.
El *Coverage en Canad_ivaria en algunos articulos. Para detalles Ilenos la Ilamada Chamusca Canad_ien 1-800-
361-8885.
Servicio de instalaci6nde Sears
Si desea solicitar la instalaci6n profesionalde Sears de aparatosdomesticos, dispositivos paraabrir portones,calentado-
res de agua y otros articulos domesticosimportantes, en los Estados Unidos o Canada flameal 1-800-4-MY-HOME®.
61
DECLARACI6NFEDERALy/o DECALiFORNiASOBREGARANTiASENELCONTROLDEEMISIONES
SUSDERECHOSY OBLIGACIONESENCUANTOA LAGARANTiA
MTD Consumer Group Inc, la Agencia de Proteccidn Medioambiental de los Estados Unidos (EPA), y para aquellos productos certificados para su
venta en el estado de California, el Departamento de los Recursos del Aire de California (CARB) se complacen en explicar la garantia que cubre
al sistema de control (ECS) de emisiones (evaporativas y/o de escape) de su equipo y motor (motor de equipos de exteriores) de encendido por
chispa para todo terreno, peque_o, de exteriores del a_o 2013 y ahos posteriores En California, los nuevos motores de equipos de exteriores
deben estar dise_ados, construidos y equipados para cumplir con las estrictas normas antipolucidn del Estado (en otros estados, los equipos
del aho 1997 y modelos posteriores deben ser estar dise_ados, construidos y equipados para cumplir con las regulaciones de motores de
encendido por chispa para todo terreno peque_os de la Agencia de Proteccidn Medioambiental de los Estados Unidos, (EPA). MTD Consumer
Group Inc. debe garantizar el sistema de control de emisiones (ECS) de su motor de equipos de exteriores por el periodo de tiempo indicado
m_is abajo, siempre y cuando no exista uso incorrecto, negligencia o mantenimiento inadecuado de dicho motor.
Su ECS puede incluir piezas tales como el carburador, el sistema de inyeccidn de combustible, el sistema de encendido, el convertidor catalitico,
los depdsitos de combustible, las lineas de combustible, los tapones de combustible, las wilvulas, contenedores, filtros, mangueras de vapor,
abrazaderas, conectores y otros componentes afines relacionados con las emisiones.
Donde exista una condicidn cubierta por la garantia, MTD Consumer Group Inc. reparar_i su motor de equipos de exteriores sin costo alguno
incluyendo el diagn6stico, las piezas y la mano de obra.
COBERTURADELAGARANTiADELFABRICANTE:
Este sistema de control de emisiones se garantiza por el t_rmino de dos a_os. Si alguna pieza relacionada con las emisiones de su motor de
equipos de exteriores es defectuosa, MTD CONSUMER GROUP INC. reparar_i o sustituir_i dicha pieza. En caso de que un componente est,1
cubierto pot m_is de dos ahos pot la garantia del equipo del fabricante, el periodo de cobertura ya no se aplicar_i.
RESPONSABILIDADESDELPROPIETARiOSEGUNLAGARANTiA:
En su car_icter de propietario del motor de equipos de exteriores, usted es responsable del mantenimiento requerido que se especifica en el
manual del propietario. MTD Consumer Group Inc le recomienda que conserve todos los recibos que cubren el mantenimiento de su motor, no
obstante Io cual MTD Consumer Group Inc no podr_i denegar el cumplimiento de la garantia 0nicamente pot la falta de los recibos.
Como propietario del motor de equipos de exteriores, usted debe saber que MTD Consumer Group Inc. puede denegar la cobertura de
la garantia si su motor o una pieza del mismo fallan debido a uso incorrecto, negligencia, mantenimiento indebido o a modificaciones no
aprobadas.
Usted es responsable de presentar su motor al centro de distribuci6n o servicio t_cnico de MTD Consumer Group Inc. tan pronto como
aparezca el problema. Las reparaciones cubiertas por la garantia se deben Ilevar a cabo en un lapso razonable que no exceda de 30 dias.
Si tiene alguna pregunta respecto de la cobertura de la garantia, p6ngase en contacto con el Departamento del Servicio T_cnico de MTD
Consumer Group Inc. al tel_fono 1-800-800-7310 o pot correo electr6nico en http://support.mtdproducts.com
COBERTURADELAGARANTiADEEMISIONESGENERALES:
MTD Consumer Group Inc garantiza al comprador final y a cada comprador subsiguiente que el motor de equipos de exteriores: est,1 dise_ado,
construido y equipado de modo de cumplir con todas las regulaciones aplicables y que se encuentra libre de defectos de materiales y de
fabricaci6n que pudieren causar la falla de una pieza garantizada id_ntica, en todos los aspectos materiales a la pieza descripta en la solicitud
de certificaci6n de MTD Consumer Group Inc.
El periodo de garantia comienza en la fecha de entrega del motor al comprador final o en la fecha en que la m_iquina se pone en
funcionamiento pot primera vez. El periodo de garantia es de dos ahos.
Sujeto a ciertas condiciones y exclusiones que se indican a continuaci6n, la garantia de las piezas relacionadas con las emisiones es la siguiente:
1. Cualquier pieza garantizada que no est_ programada para set reemplazada como parte del mantenimiento requerido en las instrucciones
escritas suministradas se garantiza pot el periodo de garantia arriba mencionado. Si la pieza falla durante el periodo de cobertura de la
garantia, la misma ser_i reparada o reemplazada pot MTD Consumer Group Inc. de acuerdo con el p_irrafo (4) a continuaci6n. Cualquier
pieza reparada o reemplazada seg0n la garantia se garantizar_i por el resto del periodo de garantia.
2. Cualquier pieza garantizada que est_ programada solamente para inspecci6n regular en las instrucciones escritas suministradas se
garantiza pot el periodo de garantia arriba mencionado. Cualquier pieza reparada o reemplazada seg0n la garantia se garantizar_i pot el
resto del periodo.
3. Cualquier pieza garantizada que est_ programada para reemplazo seg0n el mantenimiento requerido de conformidad con las
instrucciones escritas suministradas, se garantiza pot el periodo de tiempo anterior a la primera fecha de reemplazo programada para esa
pieza. Si la pieza falla antes del primer reemplazo programado, la misma ser_i reparada o reemplazada pot MTD Consumer Group Inc. de
acuerdo con el p_irrafo (4) a continuaci6n. Cualquier pieza reparada o reemplazada bajo garantia se garantizar_i pot el resto del periodo
anterior al primer reemplazo programado puntual para esa pieza.
4. La reparaci6n o el reemplazo de cualquier pieza garantizada de conformidad con las disposiciones de la garantia que aqui se estipula se
deben realizar en un centro de garantia sin costo alguno para el propietario.
5. No obstante las disposiciones que aqui se estipulan, los servicios o reparaciones bajo garantia se suministrar_in en todos nuestros centros
de distribuci6n bajo franquicia de mantenimiento para los motores o equipos en cuesti6n.

6. Elpropietariodelmotordeequiposdeexterioresnodeber_pagareltrabajodediagndsticodirectamenteasociadoconunapieza
garantizadadefectuosaenrelaci6nconlasemisiones,siempreycuandodichotrabajodediagn6sticoserealiceenuncentrocubiertopot
lagarantia.
7. MTDConsumerGroupIncesresponsablepotdahoscausadosaotroscomponentesdemotoresoequiposderivadosdelafallabajo
garantiadecualquierpiezagarantizada.
8. Durantelatotalidaddelperiododegarantiadelmotoryequipoparatodoterrenoarribamencionado,MTDConsumerGroupInc
mantendr_unsuministro
depiezasbajogarantiasuficienteparasatisfacerlademandaesperadadetalespiezas.
9. Cualquierpiezadereemplazosepodr_usarparaelcumplimientodelmantenimientoolasreparacionesbajogarantiaysesuministrar_in
sincargopara
elpropietario.Dichousonoreducir_lasobligacionesdegarantiadeMTDConsumerGroupInc.
]0. Nosepodr_nusarpiezasadicionalesnimodificadasquenoest_nexentasdeacuerdoconelDepartamentodelosRecursosdelAire
(AirResourcesBoard).Elusodecualquierpiezaadicionalomodificadanoexentapotelcompradorfinalser_causaldeinvalidezdelos
reclamosbajogarantia.MTDConsumerGroupIncnotendr_responsabilidadpotlagarantiadefallasdepiezasgarantizadasquefueren
causadaspotelusodeunapiezaadicionalnoexenta
omodificada.
PI EZAS GARANTIZAi)AS:
La reparaci6n o el reemplazo de cualquier pieza garantizada que de otro modo pudiese estar cubierta por la garantia podr_ ser excluida de
tal cobertura de garantia si MTD Consumer Group Inc demuestra que el motor es objeto de uso incorrecto, negligencia o mantenimiento
inadecuado, y que tal uso incorrecto, negligencia o mantenimiento inadecuado rue causa directa de la necesidad de reparaci6n o reemplazo de
dicha pieza. No obstante Io antedicho, cualquier ajuste de un componente con un dispositivo de limitaci6n de ajuste instalado en f_brica y que
funcione adecuadamente, podr_ set cubierto pot la garantia. Adem_s,
la cobertura bajo esta garantia se extiende solo a piezas que estuvieron presentes en el motor y equipo todo terreno adquiridos.
Est_n cubiertas las siguientes piezas con garantia para emisiones (de corresponder):
1. Sistema de medici6n de combustible
Sistema de mejora para inicio en frfo (cebado suave)
Carburador y piezas internas (o sistema de inyecci6n pot combustible)
Bomba de combustible
Dep6sito de combustible
2. Sistema de inducci6n de aire
Purificador de aire
Colector de admisi6n
3. Sistema de encendido
Bujia(s) de encendido
Sistema de encendido pot magneto
4. Sistema de encendido
Convertidor catalitico
SAI (v_lvula Reed)
5. Componentes varios utilizados en el sistema anterior
Wlvulas e interruptores de vacio, temperatura, posici6n sensibles al tiempo
Conectores y montajes
6. Control evaporativo
Manguera de combustible
Abrazaderas de la manguera de combustible
Tap6n del combustible atado pot correa
Caja de carbono
Lineas de vapor
050790 Rev.A

Your Home
For troubleshooting, product manuals and expert advice:
managernylife
www.managemylife.com
For repair - in your home - of all major brand appliances,
lawn and garden equipment, or heating and cooling systems,
no matter who made it, no matter who sold it!
For the replacement parts, accessories and
owner's manuals that you need to do-it-yourself.
For Sears professional installation of home appliances
and items like garage door openers and water heaters.
1-800-4-MY-HOME ®(1-800-469-4663)
Call anytime, day or night (U.S.A. and Canada)
www.sears.com www.sears.ca
Our Home
For repair of carry-in items like vacuums, lawn equipment,
and electronics, call anytime for the location of your nearest
Sears Parts & Repair Service Center
1-800-488-1222 (U.S.A.) 1-800-469-4663 (Canada)
www.sears.com www.sears.ca
To purchase a protection agreement on a product serviced by Sears:
1-800-827-6655 (U.S.A.) 1-800-361-6665 (Canada)
Para pedir servicio de reparaci6n
a domicilio, y para ordenar piezas:
1-888-SU-HOGAR ®
(1-888-784-6427)
www.sears.com
Au Canada pour service en frangais:
1-800-LE-FOYER Mc
(1-800-533-6937)
www.sears.ca
® Registered Trademark /TMTrademark of KCD IP, LLC in the United States, or Sears Brands, LLC in other countries
® Marca Registrada !TMMarca de Fabrica de KCD IP, LLC en Estados Unidos, o Sears Brands, LLC in otros paises
MCMarque de commerce !MDMarque deposee de Sears Brands, LLC
