Craftsman 315115070 User Manual 6 ELECTRIC SANDER/POLISHER Manuals And Guides L0408276
CRAFTSMAN Sander Manual L0408276 CRAFTSMAN Sander Owner's Manual, CRAFTSMAN Sander installation guides
User Manual: Craftsman 315115070 315115070 CRAFTSMAN 6 ELECTRIC SANDER/POLISHER - Manuals and Guides View the owners manual for your CRAFTSMAN 6 ELECTRIC SANDER/POLISHER #315115070. Home:Tool Parts:Craftsman Parts:Craftsman 6 ELECTRIC SANDER/POLISHER Manual
Open the PDF directly: View PDF ![]() .
.
Page Count: 14
RishtFax 8/12/2004 4:56 PAGE 002/015 Fax Server
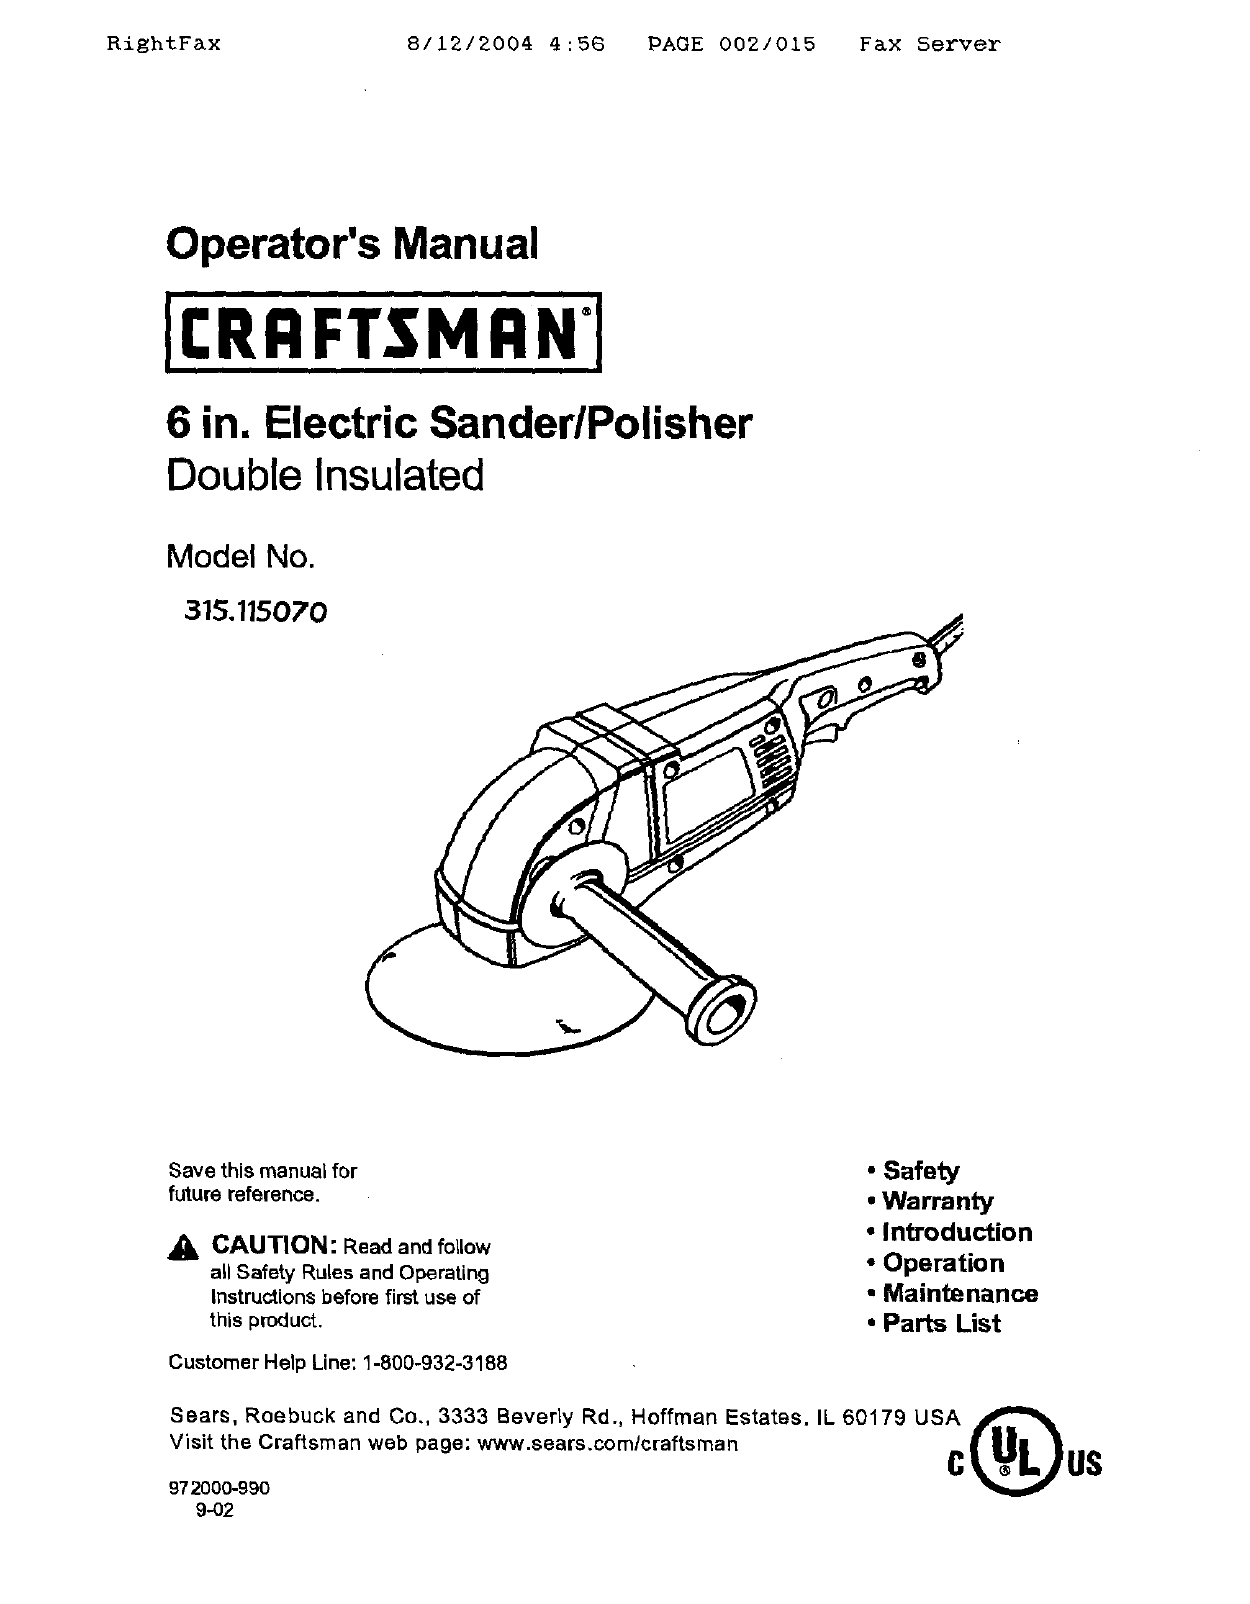
Operator's Manual
II:RRFTSMRN1
6 in. Electric Sander/Polisher
Double Insulated
Model No.
315.115o7o
Save this manual for
future reference.
CAUTION: Read and follow
all Safety Rules and Operatin 9
Instructions before first use of
this product.
Customer Help Line: 1-800-932-3188
• Safety
•Warranty
• Introduction
•Operation
•Maintenance
•Parts List
Sears, Roebuck and Co., 3333 Beverly Rd., Hoffman Estates. IL 60179 USA
Visit the Craftsman web page: www.sears.com/craftsman II1,_
C_,_L_ US
972OO0-990
9-02

Ri_htFax 8/1212004 4:58 PAGE 003/015 Fax Server
•Table of Contents/Warranty/Introduction .......................................................................................... 2
•General Safety Rules ........................................................................................................................ 3-4
• SpecificSafety Rules ......................................................................................................................................... 4
•Symbols............................................................................................................................................................. 5
•ProductSpecifications ....................................................................................................................................... 6
•Operation................................................................................................................................................... 6-10
•Maintenance.......................................................................................................................................... 11
• Accessories ....................................................................................................................................... 11
•ExplodedV}ewand Repair Parts List ............................................................................................... 12-13
•Parts Ordering/Servlce ............................................................................................................... 14
FULL ONE YEAR WARRANTY ON CRAFTSMAN SANDER/POLISHER
If this rRRFTSMRN Sender/Polisher fells to give complete satisfaction within one year from the date of pur-
chase, RETURN iTTO THE NEAREST SEARS STORE OR SEARS SERVICE CENTER IN THE UNITED
STATES, and Sears will replace it, free of charge,
If this rRIIFTSMRN Sander/Polisher is used for commercial or rental purposes, this warranty applies for only 90
days from the date of purchase.
This warranty gives you specific legal rights, and you may also have other rights which vePJ from state to state.
Sears, Roebuck and Co., Dept. 84TWA, Hoffman Estates, IL 60179
Congratulations and thank you for buying this
Craftsman 6 inch Electric Sander/Polisher, Your too]
has been designed, engineered and manufactured to
provide you with Sears high standard of dependability,
ease of operation, and operator safety. Properly cared
for it wlil give you years of rugged, trouble-free
performance.
Your sander/polisher has many features for making
your sanding/polishing operations more pleasant and
enjoyable. Safety, performance and dependability
have been given top pdodty in the design of this tco_
making it easy to maintain and operate.
polisher,Pay closeattentionto the Rules for Safe
Operation, Warningsand Cautions. ff you use
this tool propedyand ontyfor what it is intended,
you will enjoyyears of safe, reliable service,
,_ Look for thissymbOlmsans attentionll! Yourt° p°intsafety°Utisinvolved,imp°rtant safety precautions. It
& WARNING:
The operationof any sander/polishercan result in forelgn objects being throwninto your
eyes, which can result in severe eye damage. Before beginning power tool operation,
always wear safetygoggles or safetyglasseswith side shieldsand a full face shieldwhen
needed, We recommend Wide Vision Safety Mask for use over eyeglasses or standard
safety glasses with sideshields, available at Sears Retail Stores. Always wear eye protec-
tion which is marked to comp_ with ANSI Z87,1.

RightFmx 811212004 4:58 PAGE 0041015 Fax Server
below may result in electric shock fire and/or
serious personal injury.
SAVE THESE INSTRUCTIONS
Work Area
• Keep your work area clean and well lit. Cluttered
benches and dark areas invite accidents,
•Do not operate power tools in explosive atmo-
spheres, such as in the presence of flammable
liquids, gases, or dust, Power too(s may create
sparks which may ignite the dust or fumes.
• Keep bystanders, children, end visitors away
while operating a power tool. Distractions can
cause you to lose control.
Electrical Safety
•Double insulated tools are equipped with a
polarized plug (one blade is wider than the
other). This plug will fit in a polarized outlet only
one way. If the plug does not fit fully in the
outlet, reverse the plug. If it still does not fit,
contact a qualified electrician to install apolar-
ized outlet, Do not change the plug in any way,
Double insulation [] eliminates the need for the
three-wire grounded power cord and grounded
power supply system.
• Avoid body contact with grounded surfaces_
such as pipes, radiators, ranges, and _d'rigere-
tore. There is an increased risk oi"electric shock if
your body is grounded.
•Don't expose power tools to rain orwet condi-
tions. Water entering a power tool will increase the
risk of electric shock
•Do not abuse the cord, Never use the cord to
carry the tools or pull the plug from an outlet.
Keep cord away from heat, oil, sharp edges, or
moving parts. Replace damaged cords immedi-
ately, Damaged cords increase the risk of electric
shook
•When operating a power tool outside, use an
outdoor extension cord marked "W-A" or "W".
These cords are rated for outdoor use and reduce
the risk of electdc shock.
Personal Safety
•Stay ale=t, watch what you are doing and use
common sense when operating e power tool.
Do not use tool while tired or under the influ-
ence of drugs, alcohol, or medication. A moment
of inattention while operating power tools may
result in serious personal iniury.
•Dress properly, Do not wear loose clothing or
jewelw. Contain long hair, Keep your hair,
€lothing, and gloves away from moving parts,
Loose clothes, jewelry, or long hair can be caught
in moving parts.
• Avoid accidental starting. Be sure switch is off
before plugging in. Carrying tools with your finger
on the switch or plugging in tools that have the
switch on invites accidents,
•Remove adjusting keys orwrenches before
turning the tool on, Awreneh or akey that is left
attached to a rotating part of the tool may result in
personal injury,
•Do not overreach. Keep proper footing end
balance at all times. Proper footing and balance
enables better control of the tool in unexpected
situations.
•Use safety equipment. Always wear eye protec-
tion. Dust mask, non-skid safety shoes, hard hat,
or hearing protection must be used for appropriate
conditions.
Tool Use and Care
•Use clamps or other practical way to secure
and suppo=t the workpiece to a stable platform.
Holding the work by hand or against your body is
unstable and may lead to loss of control
•Do not force tool Use the corrsct tool for your
application. The correct tool will do the job better
and safer at the rate for which it is designed,
• Do not use tool if switch does not turn it on or
off. Any tool that cannot be controlled with the
switch is dangerous and must be repaired.
• Disconnect the plug from power source before
making any adjustments, changing accesso-
ries, or storing the tool, Such preventive safety
measures reduce the risk of starting the tool
accidentally.
•Store idle tools out of the reach of children and
other untrained persons. Tools are dangerous in
the hands of untrained users,
•Maintain tools with care. Keep cutting tools
sharp and clean, Properly maintained tools with
sharp outing edges are less likely to bind and are
easier to control
•Checkfor misalignment or binding of moving
parts, breakage of parts, end any other condi-
tion that may affect the tool's operation. If
damaged, have the tool serviced before using.
Many acciderts are caused by poorly maintained
tools.
•Use only accessories that ere recommended by
the manufacturer for your model. Accessories
that may be suitable for one tool, may become
hazardous when used on another tool.

RightFax 811212004 4:5G PAGE 0051015 Fax Ssrver
Service
• Tool saP/ice must be performed only by quali-
fied repair personnel, Service or maintenance
performedby unqualifiedpersonnelcouldresultin
ariskofinjury.
• When servicing a too[, use only identical re-
placement parts, Follow instructions in the
Maintenance section of this manual. Use of
unauthorizedpartsorfailure to follow Maintenance
Instructions may create arisk of electric shockor
injury.
• Hold tool by insulated gripping surfaces when performing an operation where the tool may contact
hidden wiring or its cord. Contact with a "live" wire will make exposed metal parts of the tool "live"and
shock the operator.
•Accessories must be rated for at least the speed recommended on the tool warning label. Wheels and
other accessories running over rated speed can fly apart and cause injury.
Additional Rules For Safe Operation
•Know your power tooL Read operator's manual
carefully. Learn its applications and limitations,
as well as the specific potential hazards
related to this tool. Following this rule will reduce
the risk of electdc shock, fire, or serious injury.
• Always wear safety glasses. Everyday aye-
glasses have only impact-resistant lenses;
they are NOT safety glasses. Following this rule
will reduce the risk of serious personal injury.
•Protect your lungs. Wear a face or dust mask if
the operation is dusty. Following this rule will
reduce the risk of serious personal injury.
•Protect your hearing. Wear hearing protection
during extended periods of operation. Following
this rule will reduce the risk of serious personal
injury.
•Inspect tool cords periodically and. if dam-
aged, have repaired at your nearest authorized
service center, Constantly stay aware of cord
location. Following this rule will reduce the dsk of
electric shock or fire,
•Check damaged parts. Before furtber use of
the tool, a guard or other parf that is damaged
should he carefully checked to determine that
it will operate properly and perform its in-
tended function. Check for alignment of mov.
ing parts, binding of moving pad:e, breakage of
parts, mounting, and any other conditions that
may effect its operation. A guard or other part
that is damaged should be properly repaired or
replaced by an authorized service center,
Following this rule will reduce the risk of shock,
fire, or serious injury.
•Do not abuse cord. Never carry the tool by the
cord or yank it to disconnect it from the recep-
tacle. Keep cord away from heat, oil, and sharp
edges. Following this rule will reduce the risk of
electdc shock or tim.
• Make sure your extension cord is in good
condition, When using an extension cord, be
sure to use one heavy enough to camj the
current your product will draw. A wire gage
size (A.W.G.) of at least 16 is recommended for
an extension cord 100 feet or less in length. A
cord exceeding 100 feet is not recommended,
If in doubt, use the next heavier gage. The
smaller the gage number, the heavier the cord,
An undersizedcordwillcause a dropin line
voltage resultingin lossof power end overheating.
•Inspect forand remove all nails from lumber
before sanding. Folbwing this rule will reduce the
riskof seriouspersona{ injury.
•Drugs, alcohol, medication. Do not operate too]
while underthe influence of drugs, alcohol, or
any medication. Followingthisrule willreducethe
riskof electricshock,fire. or seriouspersonalinjup!.
•Save theae instructions. Refer to them fre-
quently and use them to instruct others who
may use this tooL If you loan someone this
tool, loan them these instructions also.
_&WARNING: Some dust created by power
sandfng, sawing, grinding, drilling, and other
construction activities contains chemicals
known to cause cancer, birth defects or other
reproductive harm. Some examples of these
chemicals are:
• lead from lead-based paints,
•crystalline silica from bricks and cement
and other masonry products, and
• arsenic and chromium from chemically-
treated lumber.
Your risk from these exposures varies,
depending on how oftenyou do this type of
work. To reduce your exposure to these
chemicals: work in a well ventilated area, and
work with approved safety equipment, such as
those dust masks that are specially designed
to filter out microscopic particles.

RightFax 811212004 4 : 56 PAGE 0061015 Fax Server
i
SYMBOL NAME OESlGNATIONIEXPLANATION
V Volts
A Amperes
Hz Hertz
rain Minutes
Alternating Current
W Watts
noNo Load Speed
] Class II Construction
..,/rain Revolutions or Reciprocation Per Minute
ASafety Alert Symbol
Voffage
Current
Frequency (cycles per second)
Time
Type or a characteristicof current
Power
Rotationalspeed, at no load
Designates Double Insulated
ConstructionTools
Revolutions,strokes, surface
speed, orbits etc. per minute
Indicates danger, warning or caution.
It means attention!!! Your safety is
involved,
The purpose of safety symbols is to attract your attention to possible dangers. The safety symbols, and
the explanations with them, desan/e your careful attention and understanding. The safety warnings do
not by themselves eliminate any danger. The Instructions or warnings they give are not substitutes for
proper accident prevention measures.
SYMBOL MEANING
ASAFETY ALERT SYMBOL:
Indicates danger, warning, or caution. May be used in conjunctionwith other symbols or
pictographs.
DANGER: Failure to obey a safetywarningwill result in seriousinjury to yourselforto others.
Always followthe safetyprecautionstoreducethe riskoffire, electricshock,and persona[injury.
WARNING: Failureto obey asafetywarningcan result in seriousinjuryto yourselforto others,
Always followthe safety precautionsto reducethe riskof fire,electricshock,and personalinjury.
CAUTION: Failureto obeya safetywarning mayresult inproperty damageor personal inju_/to
yourselfortoothers.Always follow the safetyprecautionsto reduce therisk offire,electricshock,
and personalinjury,
NOTE: Advises you af information or instructions vital to the operation or maintenance oft he equipment.
SAVE THESE INSTRUCTIONS
5

RightFax 8/12/2004 4:56 PAGE 007/015 Fax Server
Size of Sanding Disc 6 inches
Size of Polishing Bonnet 6 inches
Horsepower 112
Rating 120 volts, 60 Hz, AC only, 4.5 amps,
Spindle Size 1/2 inch 20 TPI
No Load Speed 1,400lmin, & 1650/rain,
your sander/polisher.Failure to doso couldresult
in dust, shavings,loose particlesor foreign
objects beingthrown into your eyes, causing
possibleseriousinjury.
KNOW YOUR SANDER/POLISHER
Your sander/polisheris suitablefor sandingwith
coarse, medium, and fine grit sandingdiscs.When
used withthe polishing bonnet supplied, itcan also be
used as a bufferor polisher.
Before attempting to use any tool, familiarize yourself
with all operating features and safety requirements.
_it iW_eAnRdNe_NoG_d_ub_?;rolamtedshOcsy_terem_ing
from abreak inthe tool'sinternalwiring,Observe
all normalsafetyprecautionsrelated to avoiding
electricalshock,
TWO SPEED SWITCH
See Figure 1,
Your sander/polisheris equipped with atwo speed
switchtdgger located inthe rear handle, To turn ON,
depress switchtrigger, to turn OFF, release switch
trigger.For low speed sandingor polishing,depress
switchtdgger halfway. For highspeed sandingor
polishing depress switchtrigger all the way. Be sure
switch trigger is in OFF poeition before
connecting to power supply source.
_& WARNING :toolto make youD° not allow familiaritywithcareless' Remember that ay°ur
careless fraction of a second is sufficientto inflict
severe injury.
POUSI'gNG
BONNET SWITCHTRIGGER
SANDINGDISC
(NOTIHCLUDI:D)
AUXIUARYHANDLE
Fig. 1
6

RightFax 8/12/2004 4:56 PAGE 008/015 Fax Server
_& WARNING: Your sander/polishershouldnever
be connectedto power supplywhen you are
assemblingparts, making adjustments,
assemblingor replacingsandingdiscsor
bonnets, cleaning,or when notin use.
Disconnecting sander/polisherwill prevent
accidental startingthat couldcause serious
personal injury.
LOCK-ON BUTTON
See Figure2.
Your sander/polisheris equippedwitha "lock-on"
feature, which is convenientwhen continuousopera-
tionfor extended periods of time is required.This
feature can be usedfor both highand low speeds.
To lock on, depressthe switchtrigger,push inand
holdthe "lock-on" buttonbcated on the sideof the
handle,then release the switchtrigger. Release"lock-
on"button and your sander/poilsherwitlcontinue
running.To release the lock-on feature, depress
switchtrigger and release it.
AUXILIARY HANDLE
See Figure 2.
An auxiliary handle is pecked with your sander/polisher
for ease of operation and to help prevent loss of
control, Any loss of control could result in an
accident, causing possible serious personal injuw.
The motor housings are designed so that the auxiliary
handle can be instatled on either side of the unit.
TO INSTALL:
•Fit baitthrough hole in motorhousingandthread
intohex nut providedinternally.
I "Fit:jhtenboltand handle securely.
INSTALLING OR REMOVING RUBBER DISC
See Figure 3,
•Unplug your sender/polishen
,_ WARNING: Feilure to unplug your sender/
polisher could result in accidental starting
causing possible sedous personal injury.
•Positionthe teal as showninfigure3 and alignthe
spindlelock holewiththe two haEE-circlenotchesin
motorhousing.Lockspindleby insertingthe pin
providedthrough spindlelockhole and trappingit in
halfcircle notches. This will preventspindlefrom
rotating.
• Thread nJbber disc,fiat face up, onto spindleina
clockwisedirection.Turn untilrubber discshoulders
on the spindle.
•The unit is now ready for installationof the sanding
discor polishingbonnet.
SPINDLELOCK
HOLE Fig. 3
ELECTRICAL CONNECTION
Your sandedpelisherhas a precisionbuiltelectrlomotor.
It shouldbe connectedto a power supply that is 120
volts, 60 Hz, AC only (nom'mlhousehold curlrent).
Do notoperatethis tool on directcurrent(IX;). A
substantialvoltagedropwUlcausee tossof powerand
the motorwitloverheat.Ifyourtool doesnotoperate
when pluggedintoan outlet,double-checkthe power
supply.

RightF&x 8/12/2004 4:56 PAGE 009/015 Fax Server
SANDING DISC SELECTION
Selectingthe correct sizegrit andtype sandingdiscis
an extremely importantstep in achievinga highquality
sandedfinish. Aluminum oxide,siliconcarbide, and
other syntheticabrasivesare bestfor power sanding.
Naturalabrasives, suchas flintand game_are too soft
foreconomicaluse in power sanding.
In general, coarse gritwill remove the most material
and finergrit wigproducethe best finishin all sanding
operations.The condition ofthe surface to be sanded
will determinewhich gritwill dothe job. If the surfaceis
rough,startwith e coarsegdt and sand untilthe surface
is uniform.Mediumgrit may then be usedto remove
scratchesleft by the coarser gritand finer gdt usedfor
finishingof the surface.
Always use the proper grit sandingdisc,and notextra
pressurewhen sanding.Continuesanding with each
grit untilsurfaceis uniform,
INSTALLING OPTIONAL SANDING DISC
See Figure 4.
•Unplug your sendedpolisher.
_i, W uARNrelfuGi: _ic_Uil_t°t u_lsPtlugy°gUr_unfn_r/po_isih_r
seriouspersonelinjury.
•Positionthe tool as shownin figure4 and alignthe
spindlelockhole with the two half-circlenotches in
motorhousing.Lockspindleby inserting the pin
providedthrough spindlelockhole and trapping it in
halfcircle notches.This will prevent spindlefrom
rotating.
•Center the sandingdiscoverthe rubberdiscand
startspanner nutonto threaded spindlein a clock-
wise direction.
•Securelytightenspanner nutwith the spanner
wrench provided.
_, WARNING: Remove pin before attemptingto
operate sander/po{{sher. Failure to do so could
cause pinto be thrown from the tool resultingin
possibleseriousinjury.
SPANNERWRENCH
SPANNERNUT SANDINGDISC
{NOr INCLUOED)
RUBBERDISC
Fig.4
APPLICATIONS
(Use only for the purposes listed below)
•Sandingon wood surfaces.
•Removingrust fram and sanding steelsudaces.
•Polishingand buffing.
_i polisher toWARNING: Beforepewersupplyc°nnecting y°Ursource,always checksanded
to be sure switch is not in "lock-on" position,
Failure to do so could result in accidental
starting of your sandedpolisher resulting in
possible serious injuPJ,

RightFKx 8112/2004 4:56 PAGE 010/015 F&X Server
PREPARING FOR OPERATION
For ease of opemtbn,this toolhas a frontartillery
handle and mar handle. See Figure tThis provides
for two-hand operation,which is necessaryin orderto
maintainproper controlend keep both hands clearof
the sandingdisc and sending area. When operating
your sandorlpolisber,always use bothhands. Check
the auxiliary handle beforeeach use and make sure
the handle bolt is tight againstthe housing,
SANDING
Clamp or otherwise secure the workto preventitfrom
moving underyour sandedpollsher.Secure small
workpiecesin a vise or use clampsto securethem to
a workbench.
towards theoperatorwARNING: Unsecured work couldbethroWncausinginjury.
Holdthe tool in frontand away from you, keeping it
clear of the workplace,Start the tool by depressingthe
switchtriggerand letting the motorbuildto its maxi-
mum speed. Gradually lower sender/polisher to the
workpieceat aslight5°to 8°angle. See Figure 5.
DO NOTA'rrEMPT TO HOLD THE SANDING DISC
FLAT ON THE WORKPIECE.
Always keep the tool in motionmovingover the work,
allowingRto operate freely withoutunnecessary
pressure.The weight of the unit suppliesadequate
pressure, so let the sandingdiscand sander do the
work, Applying additionalpressureonly sbws the
motor,rapidly wears sandingdiscsand greatly re-
duces sender speed, Excessive pressurewillovedoed
the motorcausingpossibledamage from motor
overheating and can resultin inferiorwork. Any finish
or resin onwood maysoRenfrom the frictional heat
Do not allow sanding on one spot too long. Sand-
ing in one spot tee longwill cause uneven sandingand
gougingof the work.
result in lossof controlleading to possible
seriousinjury.
Upon completion of a sanding operation, lift tool
away from work surface before turning off.
,_1 WARNING: Sanding disc must come to a
complete stop before settingtool down on
workbench.Failure to do so can cause the too[ to
be thrown from workbench becauseof sanding
discrotation.This couldresult in damage to the
toolor possible seriousinjuryto theoperator,

Righ%Fax 811212004 4:5G PAGE 0111015 Fax Server
caught inmovingparts causingseriousinjury.
Keep head away from sander/polisherand
sandingor polishingarea. Hair coutd be drawn
intosender/polishercausing sedous injury.
INSTALLING POLISHING BONNETS
See Figure 6.
•Unplug your sendedpolisher,
_IL polishercouldWARNING:Failure to unplugyour sander/result
in accidentalstarting
causing possibleseriouspersonal injury.
• If you have been using thistool as a sander,
removespanner nutand sandingdisc.
•Slip polishingbonnetover rubberdisc, pullstdng
endstight, and tie ina bowto securebonnet.
•Tuck string ends and bow undemseth bonnet
'_1_ WARNING:bowunderneath bonnet couldFailure to tuck etdng ends andresultin string
ends coming loose and hitting or grabbing
foreign objects.
POLISHING
See Figure 7,
FOR BEST RESULTS, ALWAYS OPERATE AT LOW
SPEED WHEN POLISHING,
Hold the tool firmly, allowingit to operate freelywitho,.t
unnecessarypressure.This toolwas designed sothat
the weight ofthe tool alone will provideadequate
pressurefor polishingat top efficiency.
BONNETS MUST BE KEPT CLEAN AND FREE
FRO• GRIT, DIRT, AND OTHER ABRASIVE PAR-
TICLES,
When bonnetsbecome dirty and clogged with polish-
ingfilm, wash in lukewarmwater with a mild detergent.
Allow bonnetsto dry throughly before reuse. Polish
withalongsweepingmotion,back and forth,advanc-
ing alongthe surfaceto be polished. Do notholdthe
tool inone spotor usa a circularor spiralpattern. This
will cause swirlsinthe finish. Spread a lightcoat of
polishorwax overa smallarea. Polishwiththe tool
accordingto the manufacturer's instructionsprintedon
the label of the polishorwax container.
Note: Some polishesshouldbe buffedwhile damp
where others must be allowedto dry;thereforealways
check the manufacturer's label.
Tilt the tool so that the polishing bonnet is at a slight
angle to the work surface. Always start polishing at the
top or highest point and work down. This will prevent
light dust or polish film from being thrown upon com-
pleted section. It also eliminates pulling the tool's
powercordover sectionsalready polished, particularly
on automobiles.
Surfaces that have an old film of wax or polish,or that
have notbeen polishedorwaxedfor an extended period
of time, may requirea secondapplication. This is espe-
ciallytrue on oxidized surfaces. Heavily oxidized sur-
faces should be cleaned with a commercial paste or
liquidcleaner before polishingor waxing.
WacAShNLN,GM:aCeh::krePt_l:yhianrgec[_12nnet:nb_._em
from any loose particles orforeign objectsthat
may be embedded in the bonnet. Failure to do so
could cause these particles or objectsto be
thrown from the tool resulting in possible serious
injury.
10

Ri_htF&x 8/12/2004 4:56 PAGE 012/015 Fax Server
DOUBLE INSULATION is a safetyconceptinelectric
power tools,whicheliminates the need forthe usual
three wire groundedpower cordand groundedsupply
system. Wherever there is electdccurrentin the tool
there are two complete setsof insulation to pmteotthe
user. All exposed metal partsare isolatedfrom internal
metal motor componentswith pretectin9insulation
IMPORTANT -- Servicingof atoolwithdouble
insulationrequiresextreme care and knowledgeof the
system and shouldbe performed onlybyaqualified
service tecnhician. For service we suggestyou return
the tool to your nearest Sears Store for repair, Always
use originalfactory replacementpartswhen servicing.
partsmay create a hazard or cause product
damage.
GENERAL
Only the partsshownon parts list, page 13, are
(ntendedto be repairedor replacedby the customer.
All otherinsulatlenpartsrepresentsystemanandimportantshouldbepartservicedof thedoubleonly --'_
by a qualified Sears earvice technician.
Avoid usingsolventswhen cleaningplasticp_rta.Most
plasticsare susceptibleto varioustypos of commercial
solventsandmaYclothsto removedirt, carbondust,be damaged by theiruse.etc.Use clean ,_
WARNING: Do not at any time let brake fluids,
contain chemicalsthat can damage, weaken, or
destroy plastic.
When alsctdctools are used on fiberglass boats,
sports cars,wallboard, spackling compounds,or
plaster,if has been found that they are subjectto
acceleratedwear and passible prematurefailure, as
the fiberglasschipsand gdndingsare highlyabrasive
to bearings,brushes, commutators, arc.
Consequently it is not recommendedthat:this tool be
used for extended work on any fiberglassmaterial,
wallpoard,spacklingcompounds,or plaster.During
any use on these matedals, it is extremelyimported:
that the tool iscleaned frequentlyby blowing with an
airjet.
'=_ safe_ glasses:AIwaySwithsidewARN|NG wear safetygoggles,Orshields duringpower
tool operationor whenblowingdust. If operation
is dusty, alsowear a dust mask.
EXTENSION CORDS
The use of any extension cord will cause some loss of
power. To keep the lossto a minimumandto preveht
tool overheating,use an extensioncordthat is heavy
enoughto cam/the currentthe toolwill draw.
A wire gauge size (A.W.G.) of at least 16 is
recommendedforan extensioncord 100 feet or less in
length.When workJngoutdoors,use an extensioncord
that is suitablefor outdooruse.The cord's jacket will
be markedWA.
the sandingCAUTION :area andextensionpositionC°rdsthe cordawaysofromthat itKeep
will not get caughton lumber, tools, etc., during
sandingor polishingoperation.
each use. If damagedCheckextensionreptaceWARNING:cordsbeforeimmediately'
Never use tool withadamaged cord since
touching the damaged area couldcause
electricalshockresultingin seriousinjury.
LUBRICATION
All of the beadngs inthistool are lubdceted with a
sufficientamount of high grade lubricantfor the life of
the unit under normal opemtir,_j conditions.Therefore,
no furtherlubrication is required.
THE FOLLOWING RECOMMENDED ACCESSORIES ARE CURRENTLY AVAILABLE AT SEARS RETAIL STORES
Polishing Bonnet
A
Assorted Sanding Discs
150 Grit -- Fine
100 Grit -- Medium
60 Grit -- Coarse
40 Grit -- VeW Coarse
WARNING: The use of attachments or accessories not listed above might be hazardous.
11

RightF&x 8/12/2004 4:5B PAGE 018/015 Fax Server
CRAFTSMAN SANDER/POLISHER -MODEL NUMBER 315,115070
SEE NOTE "A", Page 13
4
m
12

RightFax 8/12/2004 4:56 PAGE 014/015 Fax Server
-- CRAFTSMAN SANDERIPOLISHER-MODEL NUMBER 315,115070--
[!
The modelnumberwill befound ona plataattachedto the motorhousing.Always mentionthe model |
numberinallcorrespondenceregardingyourCRAFTSMAN SANDER/POLISHER orwhenordering Jrepairparts.
SEE BACK PAGE FOR PARTS ORDERING INSTRUCTIONS
Key PaN
No. Number
1 974892-001
2 612186-003
3_*
4 622322-001
5 983001-001
6 976491-001
7 972895-005
8 621984-000
9 621230-000
972000-990
PARTS LIST
Descdption Quan,
Polishing Bonnet ........................................ 1
Spanner Nut ............................................... 1
Sanding Disc
Rubber Disc ............................................... 1
Data Plate .................................................. 1
Logo Plate .................................................. 1
Auxiliary Handle ......................................... 1
Spanner Wrench ........................................ 1
Pin .............................................................. 1
Operator's Manual
NOTE: "A" --The assembly shown represents an important part of the Double Insulated System. To
avoid the possibility of alteration or damage to the System, service should be performed by your
nearest Sears Repair Center, Contact your nearest Sears Catalog Order or Retail Store for service
center information.
*** Sanding discs in assorted grits for sanding both wood and metal may be obtained from your
nearest Sears Retail Store.
tl i
13

RightF&x 8/12/2004 4:56 PAGE 015/015 Fax Server
Your Home
For repair-in your home-of all major brand appliances,
lawn and garden equipment, or heating and cooling systems,
no matter who made it, no matter who sold it?
For the replacement parts, accessories and
owner's manuals that you need to do-it-yourself.
For Sears professional installation of home appliances
and items like garage door openers and water heaters.
1-800-4-MY-HOME ®(1-800-469-4663)
Call anylirne, day or night(U.S.A, and Canada)
www._ars,com Www.sears,Ga
Our Home
For repair of carry-in items like vacuums, lawn equipment,
and electronics, cell or go on-line for the location of your nearest
Sears Parts & Repair Center,
1-800-488-1222
Call anytime,day or night(U.S.A. only)
www.sears.com
To purchase a protection agreement on a product serviced by Sears:
1-800-827-6655 (U.S.A.) 1-800-361-6665 (Canada)
Para pedir servicio de reparacibn
a domicilio,y para ordenarpiezas:
1-888-SU-HOGAR _
(1-888-784-6427)
Au Canada pour service en fran_ais:
1-800-LE-FOYEI_ c
(1-800-533-6937)
www,sears.ca
6E 6 m.m====f
®Re_=eredTrademarklTMTtademarklSMS_vl_Marko_Seal, Roebuck and Co,
®M arca Relgi_trada /TMMarca de F&bdca /SMMarca de SerAcio de Sears. Roebuck and Co,
McMarque de cornrnerce/ MOMarque depos6e de Seas, Roebuck and Co. © Sears, Roebuck and Co.
