Craftsman 358341190 User Manual ELECTRIC CHAIN SAW Manuals And Guides L1004090
CRAFTSMAN Chainsaw, Electric Manual L1004090 CRAFTSMAN Chainsaw, Electric Owner's Manual, CRAFTSMAN Chainsaw, Electric installation guides
User Manual: Craftsman 358341190 358341190 CRAFTSMAN ELECTRIC CHAIN SAW - Manuals and Guides View the owners manual for your CRAFTSMAN ELECTRIC CHAIN SAW #358341190. Home:Lawn & Garden Parts:Craftsman Parts:Craftsman ELECTRIC CHAIN SAW Manual
Open the PDF directly: View PDF ![]() .
.
Page Count: 34

Operator's Manual
CRAFTSMAN°
12 Amp/3.5 Peak HP Motor
ELECTRIC CHAIN SAW
Model No.
358.341190 - 16 in. Bar
•Safety
•Assembly
•Operation
•Maintenance
•Espahol, p. 17
245157
&WARNING: c us
Read and follow all Safety Rules and Operating
Instructions before first use of this product.
For answers to your questions about this product:
Call 7 am-7 pm, Mon-Sat; 10 am-7 pm, Sun
1-800-235-5878 (Hours listed are Central Time)
Sears, Roebuck and Co., Hoffman Estates, IL 60179 U.S.A.
115367526 Rev. 1 2/11/10 JBW

Warranty 2 Service and Adjustments 14
Safety Rules 2 Storage 16
Assembly 7 Troubleshooting Table 16
Operation 7 Spanish 17
Maintenance 12 Parts Ordering Back Cover
CRAFTSMAN FULL WARRANTY
When used and maintained according to the operator's manual, if this product fails
due to a defect in material or workmanship within two years from the date of
purchase, return it to any Sears store or other Craftsman outlet in the United States
for free replacement.
This warranty applies for only 90 days from purchase date if this product is used for
commercial or rental purposes.
This warranty covers ONLY defects in material and workmanship, Sears will
NOT pay for:
• Expendable items that can wear out from normal use within the warranty period,
such as the bar and chain.
This warranty gives you specific legal rights, and you may also have other rights
which vary from state to state.
Sears, Roebuck and Co,, Hoffman Estates, IL 60179
,flWARNING: When using electric
gardening appliances, basic safety
precautions must always be followed
to reduce the risk of fire, electric shock,
and serious injury. Read and follow all
instructions.
WARNING: Always disconnect
unit from power source when making
repairs, adjustments, and when chang-
ing accessories and attachments such
as saw bar, chain or guards.
Because a chain saw is a high-speed
woodcutting tool, special precautions
must be observed to reduce risk of acci-
dents. Careless or improper use of this
tool can cause serious injury.
PLAN AHEAD
• Restrict the use of your saw to adult
users who understand and can fol-
low the safety rules, precautions,
and operating instructions found in
this manual.
• Dress properly. Wear protective gear.
Always use steel-toed safety foot-
wear with non-slip soles; snug-fitting
clothing; heavy-duty, non-slip gloves;
eye protection such as non-fogging,
vented goggles or face screen; an
approved safety hard hat; and sound
barriers (ear plugs or mufflers) to pro-
tect your hearing. Regular users
should have hearing checked regu-
larly as chain saw noise can damage
hearing.
• Secure hair above shoulder length. Do
not wear loose clothing or jewelry; they
can get caught in moving parts.
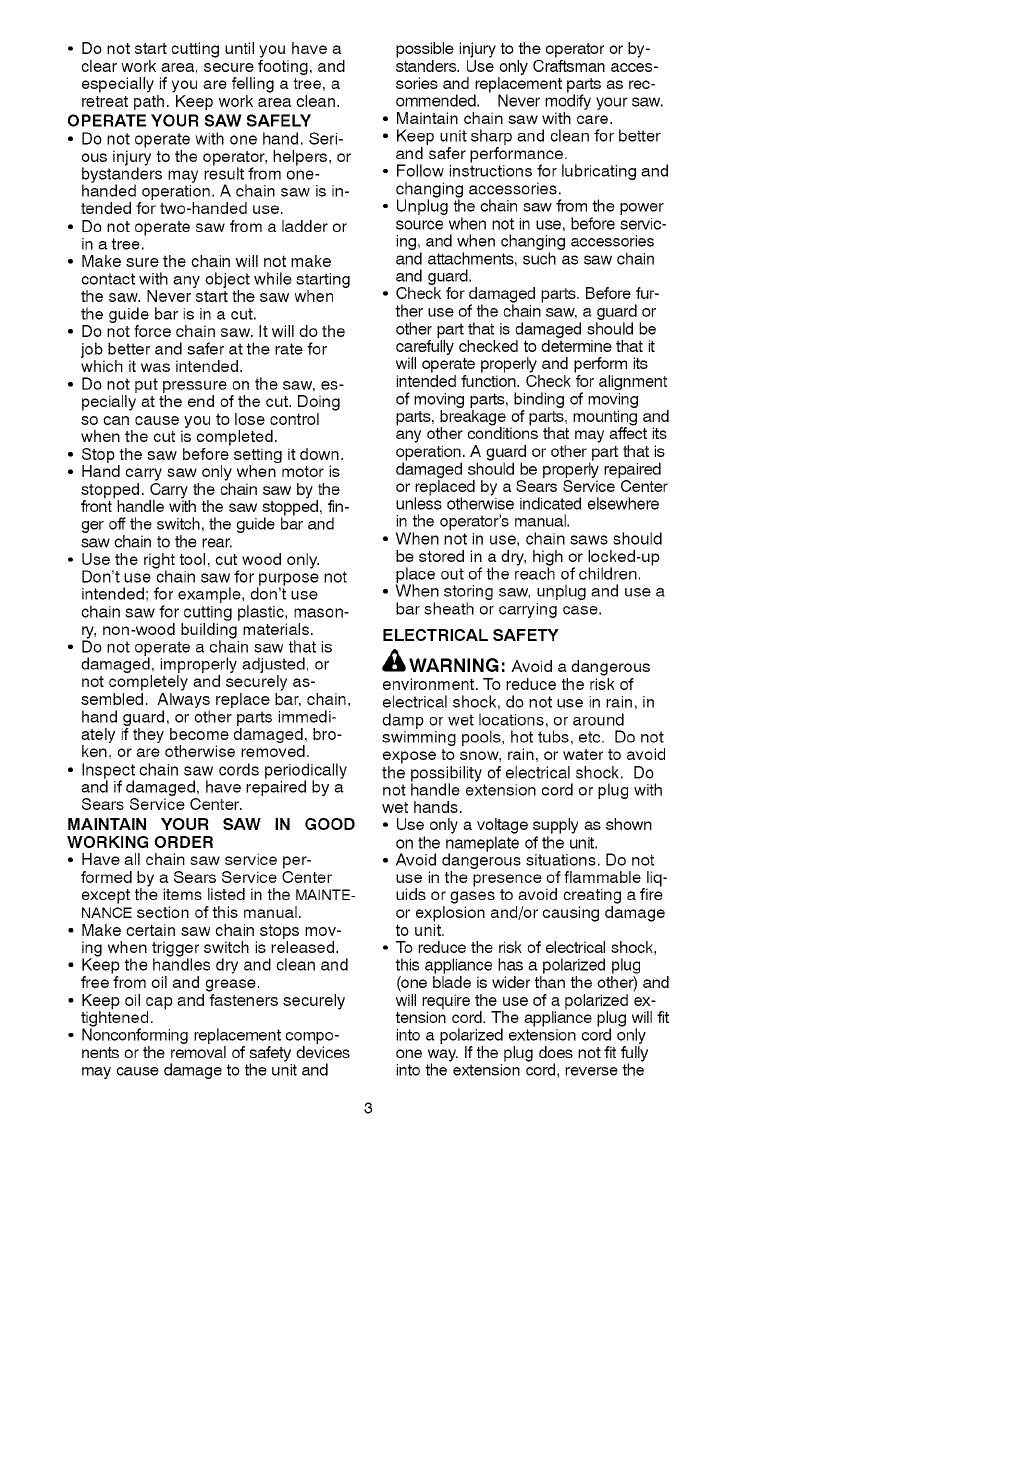
Hearing _ Safety Hat
Protection ''_ I _p_="_-- Eye
Snug Protection
Fitting
Clothing Heavy Duty
Gloves
Safety Safety Chaps
Shoes "_ mt_
Keep all parts of your body away
from the chain when saw is running.
Keep children away. Do not let visitors
contact chain saw or extension cord.
All visitors should be kept at least 30
feet (10 meters) away from work area.
Do not handle or operate a chain saw
when you are fatigued, ill, upset, or if
you have taken alcohol, drugs, or me-
dication. You must be in good physical
condition and mentally alert. If you
have any condition that might be ag-
gravated by strenuous work, check
with doctor before operating. Watch
what you are doing. Use common
sense.
• Donotstartcuttinguntilyouhavea
clearworkarea,securefooting,and
especiallyifyouarefellingatree,a
retreatpath.Keepworkareaclean.
OPERATEYOURSAWSAFELY
• Donotoperatewithonehand.Seri-
ousinjurytotheoperator,helpers,or
bystandersmayresultfromone-
handedoperation.Achainsawisin-
tendedfortwo-handeduse.
• Donotoperatesawfromaladderor
inatree.
• Makesurethechainwillnotmake
contactwithanyobjectwhilestarting
thesaw.Neverstartthesawwhen
theguidebarisinacut.
• Donotforcechainsaw.Itwilldothe
jobbetterandsaferattheratefor
whichitwasintended.
• Donotputpressureonthesaw,es-
peciallyattheendofthecut.Doing
socancauseyoutolosecontrol
whenthecutiscompleted.
• Stopthesawbeforesettingitdown.
• Handcarrysawonlywhenmotoris
stopped.Carrythechainsawbythe
fronthandlewiththesawstopped,fin-
gerofftheswitch,theguidebarand
sawchaintotherear.
• Usetherighttool,cutwoodonly.
Don'tusechainsawforpurposenot
intended;forexample,don'tuse
chainsawforcuttingplastic,mason-
ry,non-woodbuildingmaterials.
• Donotoperateachainsawthatis
damaged,improperlyadjusted,or
notcompletelyandsecurelyas-
sembled.Alwaysreplacebar,chain,
handguard,orotherpartsimmedi-
atelyiftheybecomedamaged,bro-
ken,orareotherwiseremoved.
• Inspectchainsawcordsperiodically
andifdamaged,haverepairedbya
SearsServiceCenter.
MAINTAINYOURSAWIN GOOD
WORKINGORDER
• Haveallchainsawserviceper-
formedbyaSearsServiceCenter
excepttheitemslistedintheMAINTE-
NANCEsectionofthismanual.
• Makecertainsawchainstopsmov-
ingwhentriggerswitchisreleased.
• Keepthehandlesdryandcleanand
freefromoilandgrease.
• Keepoilcapandfastenerssecurely
tightened.
• Nonconformingreplacementcompo-
nentsortheremovalofsafetydevices
maycausedamagetotheunitand
possibleinjurytotheoperatororby-
standers.UseonlyCraftsmanacces-
soriesandreplacementpartsasrec-
ommended.Nevermodifyyoursaw.
• Maintainchainsawwithcare.
• Keepunitsharpandcleanforbetter
andsaferperformance.
• Followinstructionsforlubricatingand
changingaccessories.
• Unplugthechainsawfromthepower
sourcewhennotinuse,beforeservic-
ing,andwhenchangingaccessories
andattachments,suchassawchain
andguard.
• Checkfordamagedparts.Beforefur-
theruseofthechainsaw,aguardor
otherpartthatisdamagedshouldbe
carefullycheckedtodeterminethatit
willoperateproperlyandperformits
intendedfunction.Checkforalignment
ofmovingparts,bindingofmoving
parts,breakageofparts,mountingand
anyotherconditionsthatmayaffectits
operation.Aguardorotherpartthatis
damagedshouldbeproperlyrepaired
orreplacedbyaSearsServiceCenter
unlessotherwiseindicatedelsewhere
intheoperator'smanual.
•Whennotinuse,chainsawsshould
bestoredinadry,highorlocked-up
placeoutofthereachofchildren.
•Whenstoringsaw,unplugandusea
barsheathorcarryingcase.
ELECTRICALSAFETY
_IkWARNING: Avoid a dangerous
environment. To reduce the risk of
electrical shock, do not use in rain, in
damp or wet locations, or around
swimming pools, hot tubs, etc. Do not
expose to snow, rain, or water to avoid
the possibility of electrical shock. Do
not handle extension cord or plug with
wet hands.
• Use only a voltage supply as shown
on the nameplate of the unit.
• Avoid dangerous situations. Do not
use in the presence of flammable liq-
uids or gases to avoid creating a fire
or explosion and/or causing damage
to unit.
• To reduce the risk of electrical shock,
this appliance has a polarized plug
(one blade is wider than the other) and
will require the use of a polarized ex-
tension cord. The appliance plug will fit
into a polarized extension cord only
one way. If the plug does not fit fully
into the extension cord, reverse the
plug.Iftheplugstilldoesnotfit,obtain
acorrectpolarizedextensioncord.A
polarizedextensioncordwillrequire
theuseofapolarizedwalloutlet.This
plugwillfitintothepolarizedwalloutlet
onlyoneway.Ifplugdoesnotfitfully
intothewalloutlet,reversetheplug.If
theplugstilldoesnotfit,contacta
qualifiedelectriciantoinstalltheproper
walloutlet.Donotchangetheequip-
mentplug,extensioncordreceptacle,
orextensioncordpluginanyway.
• Toreduceriskofelectricalshock,use
extensioncordsspecificallymarkedas
suitableforoutdoorappliances.The
electricalratingofthecordmustnotbe
lessthantheratingoftheunit.The
cordmustbemarkedwithsuffix"W-A"
(inCanada,'M,t').Useapolarized
cord.Makesureyourextensioncord
isingoodcondition.Inspectextension
cordbeforeuseandreplaceifdam-
aged.Donotuseadamagedcord.
Cordinsulationmustbeintactwithno
cracksordeterioration.Plugconnec-
torsmustbeundamaged.Anunder-
sizedextensioncordwillcauseadrop
inlinevoltageresultinginlossofpow-
erandoverheating.Ifindoubt,usethe
nextheaviergauge.Thelowerthe
gaugenumber,theheavierthecord
(seeSELECTANEXTENSIONCORDin
theOPERATIONsection).Donotuse
multiplecords.
• Donotabusecord.Nevercarrythe
unitbytheextensioncordoryank
extensioncordtodisconnectunit.
• Secureextensioncordtopowercord
topreventdisconnectionfromunit.
• Donotusetheunitiftheswitchdoes
notturntheunitonandoffproperly,
orifthelock-outdoesnotwork.Re-
pairstotheswitchmustbemadeby
aSearsServiceCenter.
• Keepextensioncordclearofopera-
torandobstaclesatalltimes.Posi-
tioncordsothatitwillnotbecaught
onbranches.Donotexposecordsto
heat,oil,water,orsharpedges.
• Toavoidthepossibilityofelectric
shock,avoidbodycontactwithany
groundedconductor,suchasmetal
fencesorpipes.
• GroundFaultCircuitInterrupter
(GFCI)protectionshouldbeprovided
oncircuitoroutlettobeused.Re-
ceptaclesareavailablehavingbuilt-
inGFClprotectionandmaybeused
forthismeasureofsafety.Inspect
chainsawcordsperiodicallyandif
damaged,haverepairedbyaSears
ServiceCenter.
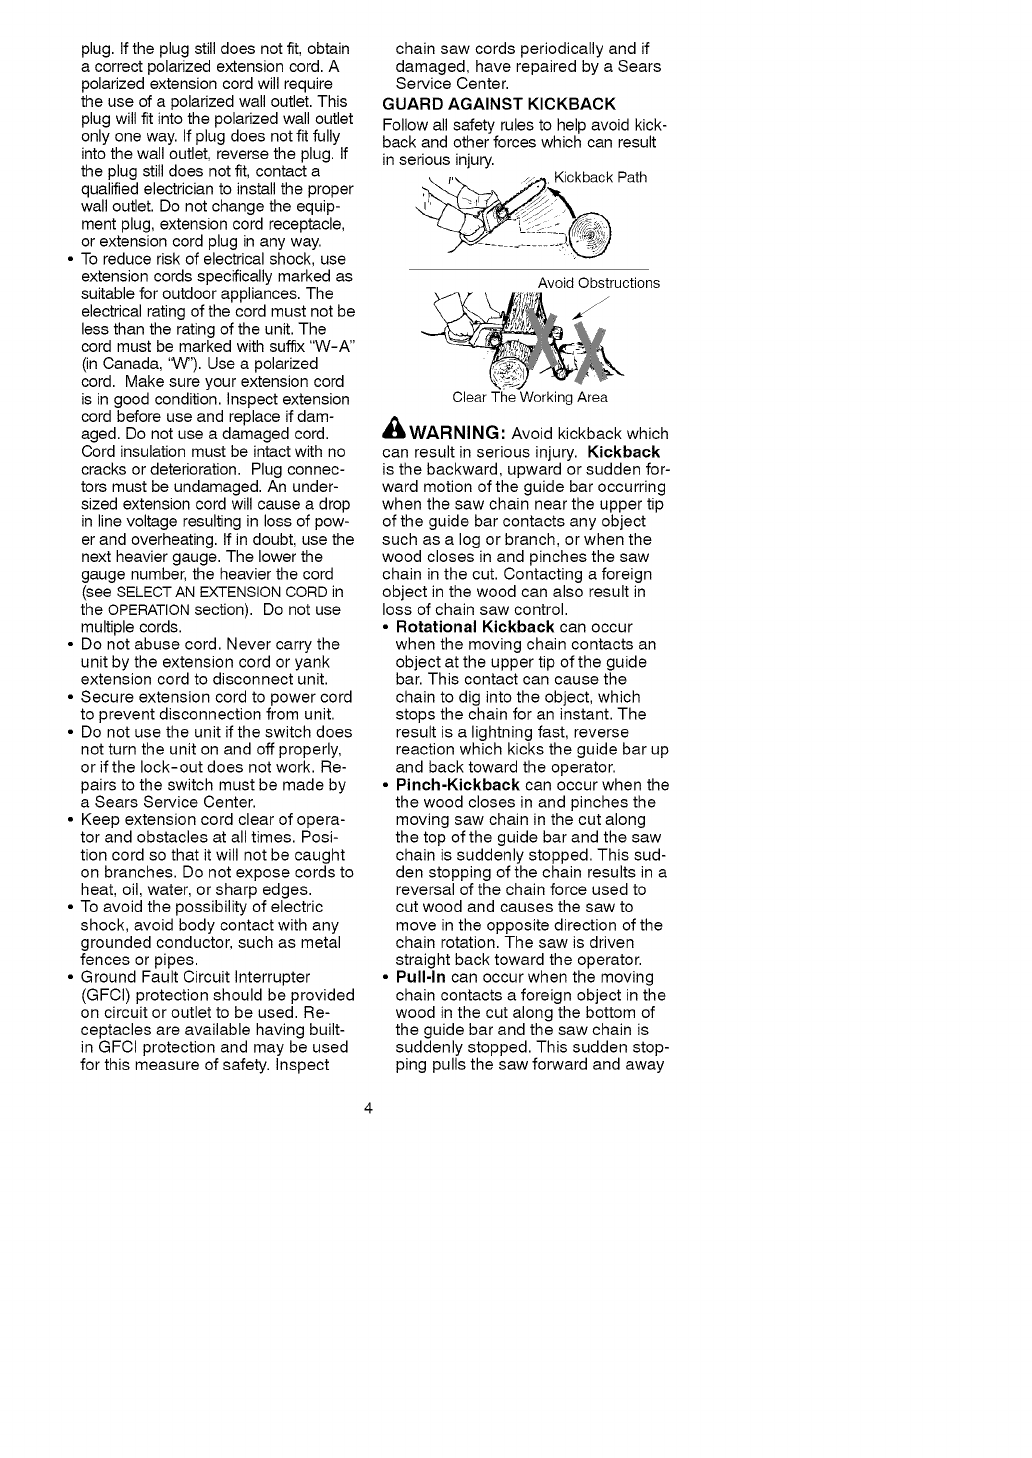
GUARDAGAINST KICKBACK
Follow all safety rules to help avoid kick-
back and other forces which can result
in serious injury. Kickback Path
Avoid Obstructions
Clear The Working Area
_WARNING: Avoid kickback which
can result in serious injury. Kickback
is the backward, upward or sudden for-
ward motion of the guide bar occurring
when the saw chain near the upper tip
of the guide bar contacts any object
such as a log or branch, or when the
wood closes in and pinches the saw
chain in the cut. Contacting a foreign
object in the wood can also result in
loss of chain saw control.
• Rotational Kickback can occur
when the moving chain contacts an
object at the upper tip of the guide
bar. This contact can cause the
chain to dig into the object, which
stops the chain for an instant. The
result is a lightning fast, reverse
reaction which kicks the guide bar up
and back toward the operator.
• Pinch-Kickback can occur when the
the wood closes in and pinches the
moving saw chain in the cut along
the top of the guide bar and the saw
chain is suddenly stopped. This sud-
den stopping of the chain results in a
reversal of the chain force used to
cut wood and causes the saw to
move in the opposite direction of the
chain rotation. The saw is driven
straight back toward the operator.
• Pull-In can occur when the moving
chain contacts a foreign object in the
wood in the cut along the bottom of
the guide bar and the saw chain is
suddenly stopped. This sudden stop-
ping pulls the saw forward and away
fromtheoperatorandcouldeasily
causetheoperatortolosecontrolof
thesaw.
REDUCETHECHANCEOF
KICKBACK
• Recognizethatkickbackcanhappen
Withabasicunderstandingofkick-
back,youcanreducetheelementof
surprisewhichcontributestoacci-
dents
•Never let the moving chain contact
any object at the tip of the guide bar
•Keep working area free from obstruc-
tions such as other trees, branches,
rocks, fences, stumps, etc Eliminate
or avoid any obstruction that your
saw chain could hit while cutting
•When cutting a branch, do not let the
guide bar contact another branch or
other objects around it.
•Keep saw chain sharp and properly
tensioned. A loose or dull chain can
increase the chance of kickback.
Follow manufacturer's chain sharp-
ening and maintenance instructions.
Check tension at regular intervals,
but never with engine running. Make
sure bar clamp nuts are securely
tightened.
•Begin and continue cutting at full
speed. If the chain is moving at a
slower speed, there is greater
chance of kickback occurring.
•Use extreme caution when re-enter-
ing a cut.
•Do not attempt cuts starting with the
tip of the bar (plunge cuts).
•Watch for shifting logs or other ob-
jects that could close a cut and pinch
or fall onto chain.
•Use the specified Reduced-Kickback
Guide Bar and Low Kickback Chain.
Avoid Pinch-Kickback:
•Be extremely aware of situations or
obstructions that can cause material
to pinch the top of or otherwise stop
the chain.
•Do not cut more than one log at a
time.
•Do not twist the saw as the bar is
withdrawn from an undercut when
bucking.
Avoid Pull-In:
•Always begin cutting with the saw at
full speed and the saw housing
against wood.
•Use wedges made of plastic or
wood. Never use metal to hold the
cut open.
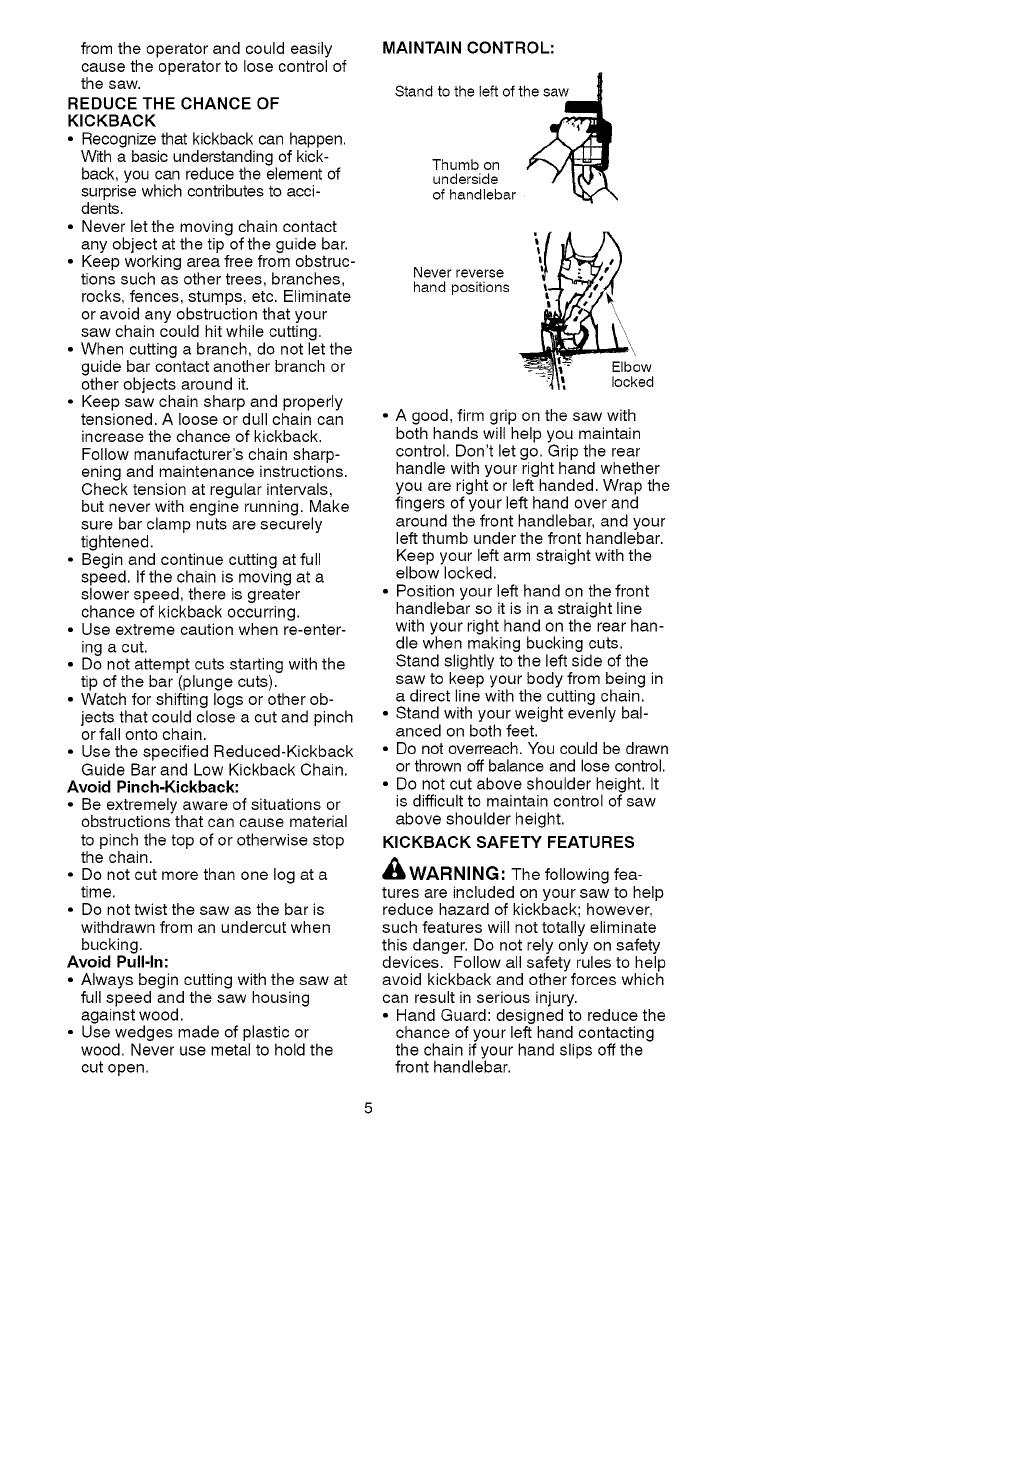
MAINTAIN CONTROL:
Stand to the left of the sa_
Thumb on Y_-,_/_;_W
underside /_kt '_
of handlebar _ \
Never reverse
hand positions
\\\
\\OW
---__ locked
•A good, firm grip on the saw with
both hands will help you maintain
control. Don't let go. Grip the rear
handle with your right hand whether
you are right or left handed. Wrap the
fingers of your left hand over and
around the front handlebar, and your
left thumb under the front handlebar.
Keep your left arm straight with the
elbow locked.
•Position your left hand on the front
handlebar so it is in a straight line
with your right hand on the rear han-
dle when making bucking cuts.
Stand slightly to the left side of the
saw to keep your body from being in
a direct line with the cutting chain.
•Stand with your weight evenly bal-
anced on both feet.
•Do not overreach. You could be drawn
or thrown off balance and lose control.
•Do not cut above shoulder height. It
is difficult to maintain control of saw
above shoulder height.
KICKBACK SAFETY FEATURES
WARNING: The following fea-
tures are included on your saw to help
reduce hazard of kickback; however,
such features will not totally eliminate
this danger. Do not rely only on safety
devices. Follow all safety rules to help
avoid kickback and other forces which
can result in serious injury.
•Hand Guard: designed to reduce the
chance of your left hand contacting
the chain if your hand slips off the
front handlebar.
• Positionoffrontandrearhandlebars:
designedwithdistancebetween
handlesand"in-line"witheachother.
Thespreadand"in-line"positionof
thehandsprovidedbythisdesign
worktogethertogivebalanceand
resistanceincontrollingthepivotof
thesawbacktowardtheoperatorif
kickbackoccurs.
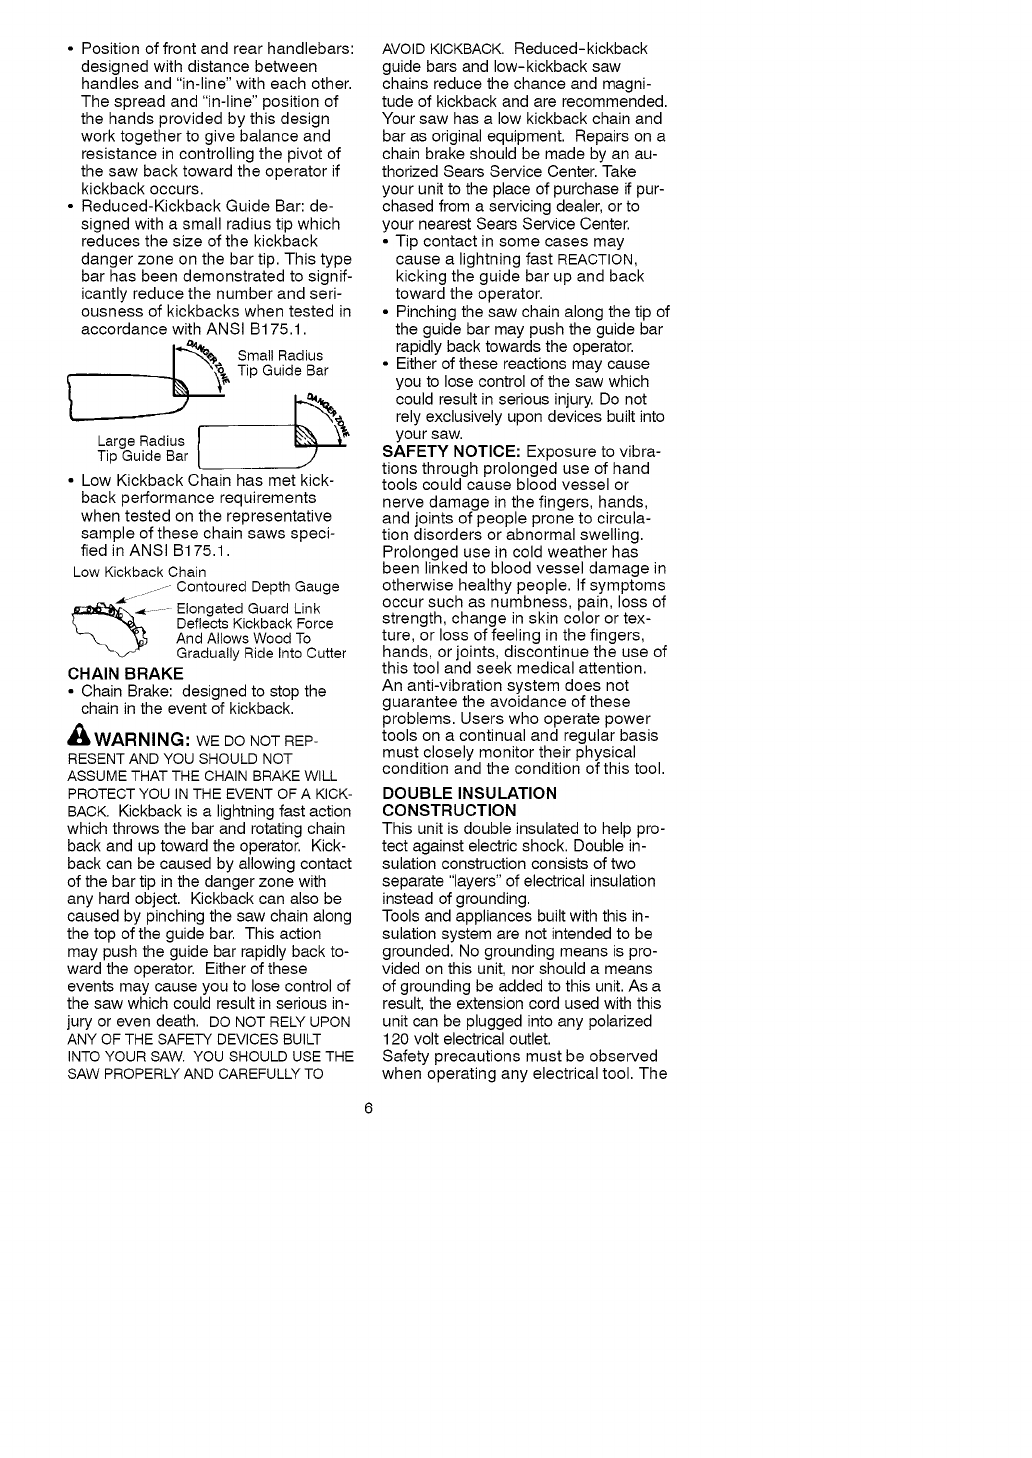
• Reduced-KickbackGuideBar:de-
signedwithasmallradiustipwhich
reducesthesizeofthekickback
dangerzoneonthebartip.Thistype
barhasbeendemonstratedtosignif-
icantlyreducethenumberandseri-
ousnessofkickbackswhentestedin
accordancewithANSIB175.1.
._._ Small Radius
Tip GuideBa,_,
Large Radius [Tip Guide Bar
• Low Kickback Chain has met kick-
back performance requirements
when tested on the representative
sample of these chain saws speci-
fied in ANSI B175.1.
Low Kickback Chain
......... Contoured Depth Gauge
-,_i_-_ Elongated Guard Link
Deflects Kickback Force
And Allows Wood To
Gradually Ride Into Cutter
CHAIN BRAKE
• Chain Brake: designed to stop the
chain in the event of kickback.
_ik WARNING: WE DO NOT REP-
RESENT AND YOU SHOULD NOT
ASSUME THAT THE CHAIN BRAKE WILL
PROTECT YOU IN THE EVENT OF A KICK-
BACK. Kickback is a lightning fast action
which throws the bar and rotating chain
back and up toward the operator. Kick-
back can be caused by allowing contact
of the bar tip in the danger zone with
any hard object. Kickback can also be
caused by pinching the saw chain along
the top of the guide bar. This action
may push the guide bar rapidly back to-
ward the operator. Either of these
events may cause you to lose control of
the saw which could result in serious in-
jury or even death. DO NOT RELY UPON
ANY OF THE SAFETY DEVICES BUILT
INTO YOUR SAW. YOU SHOULD USE THE
SAW PROPERLYAND CAREFULLYTO
AVOID KICKBACK. Reduced-kickback
guide bars and low-kickback saw
chains reduce the chance and magni-
tude of kickback and are recommended.
Your saw has a low kickback chain and
bar as original equipment. Repairs on a
chain brake should be made by an au-
thorized Sears Service Center. Take
your unit to the place of purchase if pur-
chased from a servicing dealer, or to
your nearest Sears Service Center.
• Tip contact in some cases may
cause a lightning fast REACTION,
kicking the guide bar up and back
toward the operator.
• Pinching the saw chain along the tip of
the guide bar may push the guide bar
rapidly back towards the operator.
• Either of these reactions may cause
you to lose control of the saw which
could result in serious injury. Do not
rely exclusively upon devices built into
your saw.
SAFETY NOTICE: Exposure to vibra-
tions through prolonged use of hand
tools could cause blood vessel or
nerve damage in the fingers, hands,
and joints of people prone to circula-
tion disorders or abnormal swelling.
Prolonged use in cold weather has
been linked to blood vessel damage in
otherwise healthy people. If symptoms
occur such as numbness, pain, loss of
strength, change in skin color or tex-
ture, or loss of feeling in the fingers,
hands, or joints, discontinue the use of
this tool and seek medical attention.
An anti-vibration system does not
guarantee the avoidance of these
problems. Users who operate power
tools on a continual and regular basis
must closely monitor their physical
condition and the condition of this tool.
DOUBLE INSULATION
CONSTRUCTION
This unit is double insulated to help pro-
tect against electric shock. Double in-
sulation construction consists of two
separate "layers" of electrical insulation
instead of grounding.
Tools and appliances built with this in-
sulation system are not intended to be
grounded. No grounding means is pro-
vided on this unit, nor should a means
of grounding be added to this unit. As a
result, the extension cord used with this
unit can be plugged into any polarized
120 volt electrical outlet.
Safety precautions must be observed
when operating any electrical tool. The
doubleinsulationsystemonlyprovides
addedprotectionagainstinjuryresult-
ingfromaninternalelectricalinsulation
failure.
WARNING:Allelectricalrepairs
tothisunit,includinghousing,switch,
motor,etc.,mustbediagnosedandre-
pairedbyqualifiedservicepersonnel.
Replacementpartsforadoubleinsu-
latedappliancemustbeidenticaltothe
partstheyreplace.Adoubleinsulated
applianceismarkedwiththewords
"doubleinsulation"or"doubleinsu-
lated".Thesymbol[] (squarewithina
square)mayalsobemarkedonthe
appliance.Failuretohavetheunitre-
pairedbySearsservicepersonnelcan
causethedoubleinsulationconstruc-
tiontobecomeineffectiveandresultin
seriousinjury.
STANDARDS:Thisproductislistedby
UnderwritersLaboratories,Inc.inac-
cordancewithULStandard1662and
ANSIB175.1.
ANSIB175.1-2000"AmericanNation-
alStandardforPoweredTools- Safe-
tyRequirements".
SAVE THESEINSTRUCTIONS
CARTON CONTENTS
Check carton contents against the fol-
lowing list.
Model 358.341190
• Chain Saw (fully assembled)
• Bar Sheath
Examine parts for damage. Do not use
damaged parts.
NOTE: If you need assistance or find
that parts are missing or damaged,
please call 1-800-235-5878.
ASSEMBLY
Your unit is fully assembled; no assem-
bly is required.
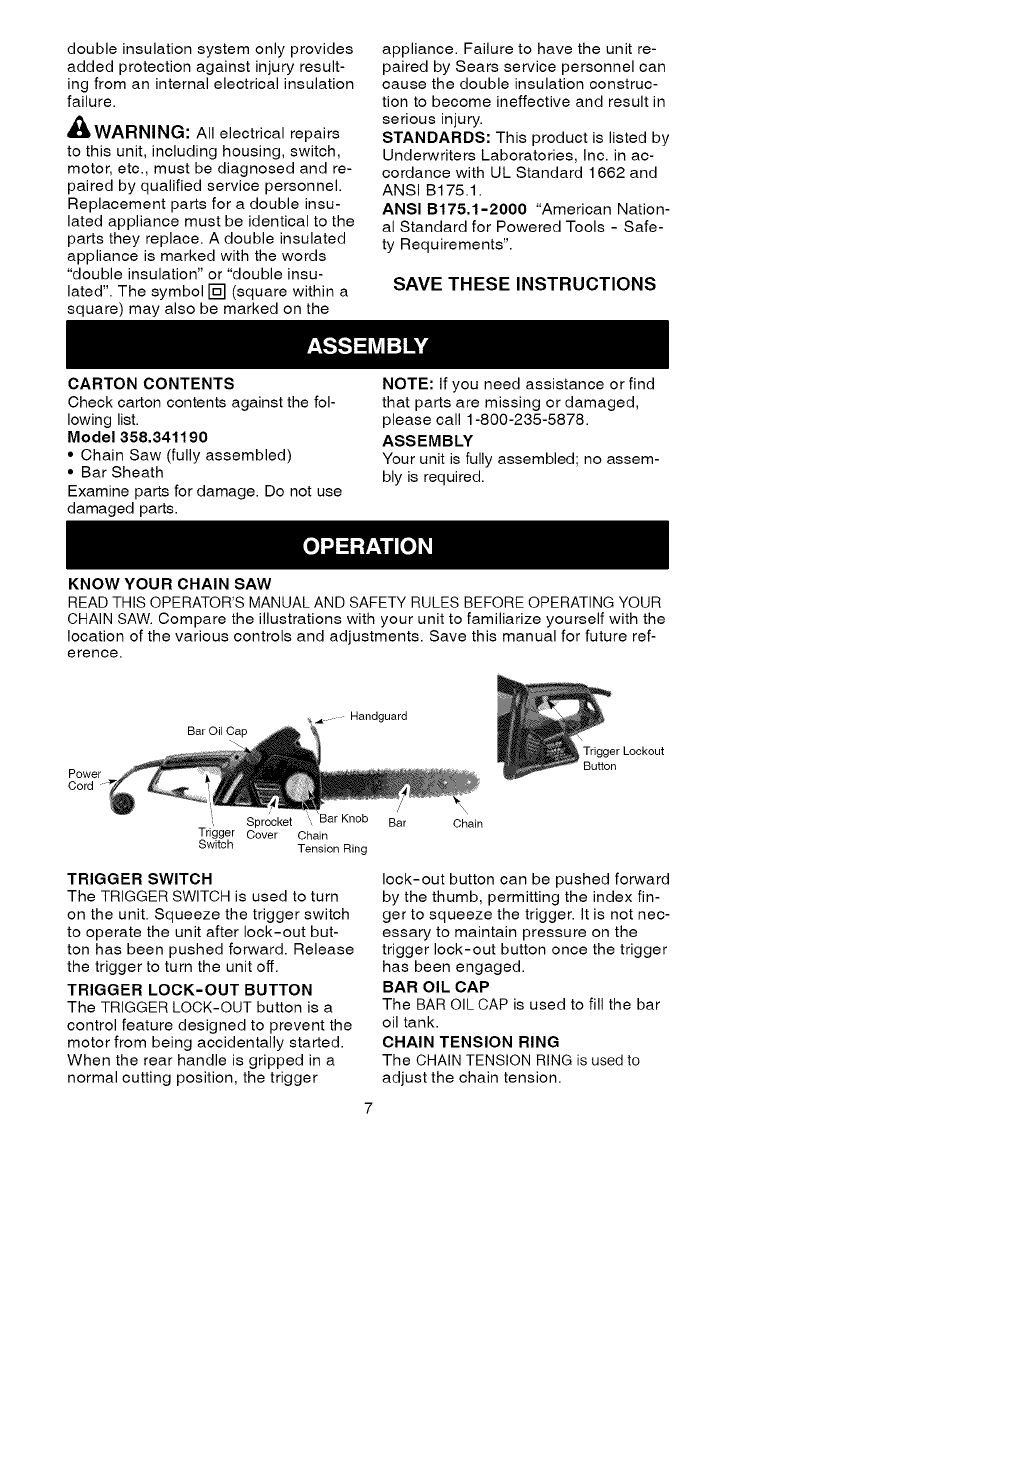
KNOW YOUR CHAIN SAW
READ THIS OPERATOR'S MANUAL AND SAFETY RULES BEFORE OPERATING YOUR
CHAIN SAW. Compare the illustrations with your unit to familiarize yourself with the
location of the various controls and adjustments. Save this manual for future ref-
erence.
_. - - Handguard
Bar Oil Cap
Trigger Lockout
Power
Cord
Sprocket Bar Knob
Trigger Cover Chain
Switch Tension Ring
TRIGGER SWITCH
The TRIGGER SWITCH is used to turn
on the unit. Squeeze the trigger switch
to operate the unit after lock-out but-
ton has been pushed forward. Release
the trigger to turn the unit off.
TRIGGER LOCK-OUT BUTTON
The TRIGGER LOCK-OUT button is a
control feature designed to prevent the
motor from being accidentally started.
When the rear handle is gripped in a
normal cutting position, the trigger
Bar Chain
lock-out button can be pushed forward
by the thumb, permitting the index fin-
ger to squeeze the trigger. It is not nec-
essary to maintain pressure on the
trigger lock-out button once the trigger
has been engaged.
BAR OIL CAP
The BAR OIL CAP is used to fill the bar
oil tank.
CHAIN TENSION RING
The CHAIN TENSION RING is used to
adjust the chain tension.
POWERCORD
ThePOWERCORDisusedtoconnect
thechainsawtoanapprovedexten-
sioncord.
CHAINTENSION
Itisnormalforanewchaintostretch
duringfirst15minutesofoperation.
Youshouldcheckyourchaintension
frequently.Readjustchainafterevery
15minutesofoperation.SeeCHECK
CHAINTENSIONundertheSERVICE
ANDADJUSTMENTSsection.
OPERATINGINSTRUCTIONS
Useonlyavoltagesupplyasspecified
onyourunit.
SELECTANEXTENSIONCORD
Extensioncordsareavailableforthis
unitatSears.
MINIMUM WIRE GAUGE
RECOMMENDATIONS
25 ft. 50 ft. 100 ft.
Volts (7.67 m) (15.24 m) (30.48 m)
14 12 NOT
120 A.W.G.* A.W.G.* RECOMMENDEC
*American Wire Gauge
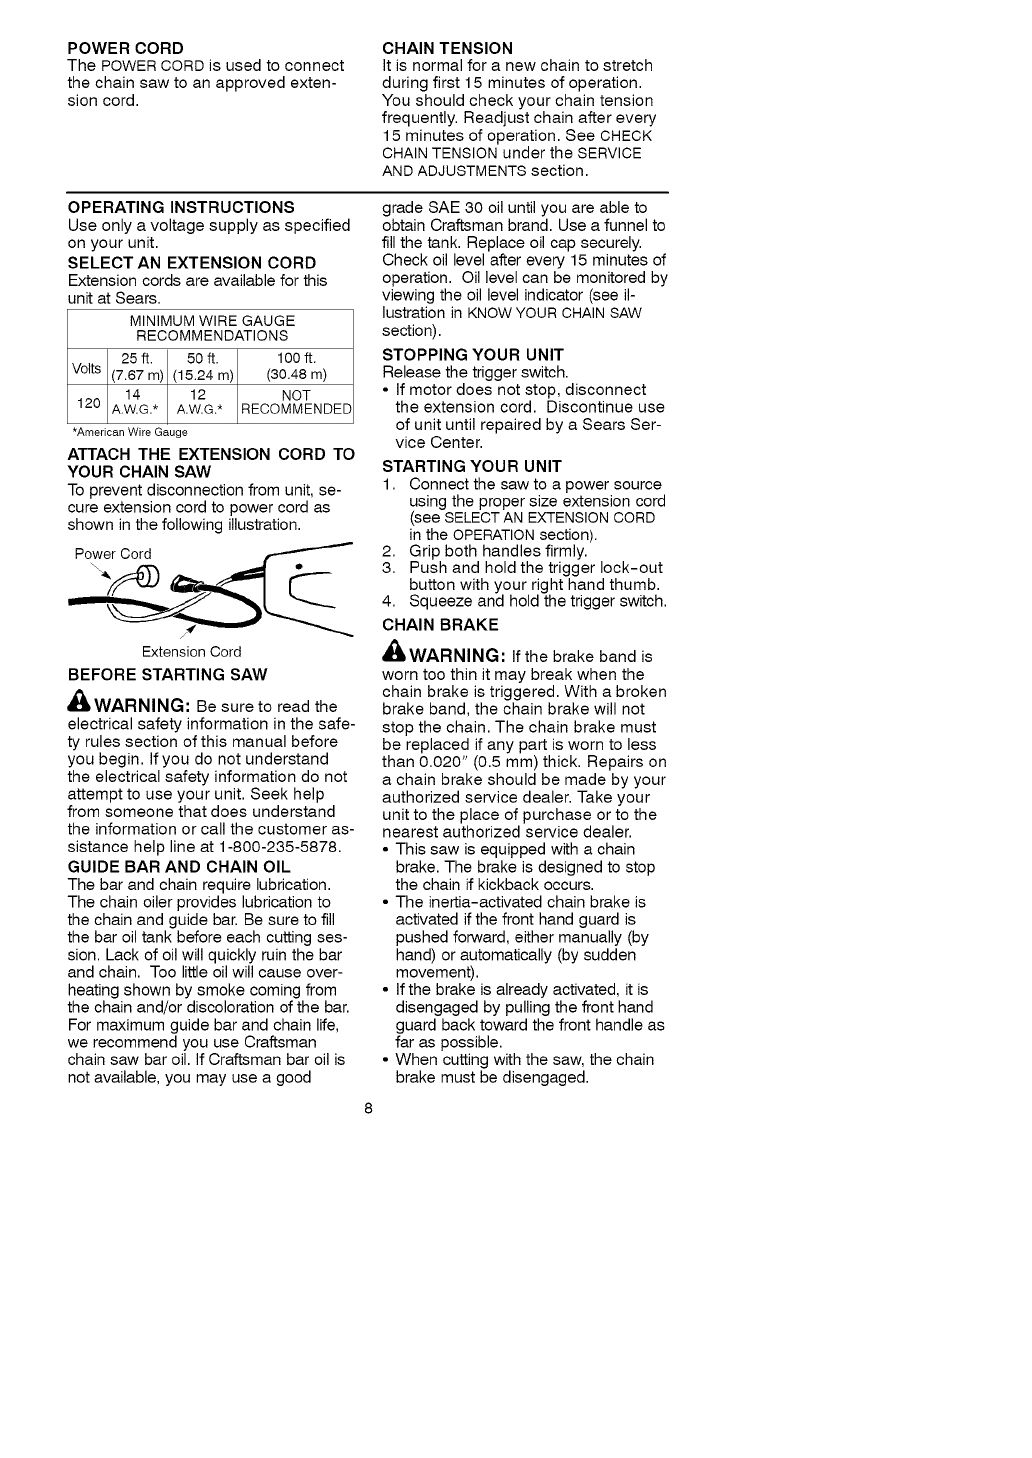
ATTACH THE EXTENSION CORD TO
YOUR CHAIN SAW
To prevent disconnection from unit, se-
cure extension cord to power cord as
shown in the following illustration.
Power Cord
Extension Cord
BEFORE STARTING SAW
'_WARNING: Be sure to read the
electrical safety information in the safe-
ty rules section of this manual before
you begin. If you do not understand
the electrical safety information do not
attempt to use your unit. Seek help
from someone that does understand
the information or call the customer as-
sistance help line at 1-800-235-5878.
GUIDE BAR AND CHAIN OIL
The bar and chain require lubrication.
The chain oiler provides lubrication to
the chain and guide bar. Be sure to fill
the bar oil tank before each cutting ses-
sion. Lack of oil will quickly ruin the bar
and chain. Too little oil will cause over-
heating shown by smoke coming from
the chain and/or discoloration of the bar.
For maximum guide bar and chain life,
we recommend you use Craftsman
chain saw bar oil. If Craftsman bar oil is
not available, you may use a good
grade SAE 30 oil until you are able to
obtain Craftsman brand. Use a funnel to
fill the tank. Replace oil cap securely.
Check oil level after every 15 minutes of
operation. Oil level can be monitored by
viewing the oil level indicator (see il-
lustration in KNOW YOUR CHAIN SAW
section).
STOPPING YOUR UNIT
Release the trigger switch.
•If motor does not stop, disconnect
the extension cord. Discontinue use
of unit until repaired by a Sears Ser-
vice Center.
STARTING YOUR UNIT
1. Connect the saw to a power source
using the proper size extension cord
(see SELECT AN EXTENSION CORD
in the OPERATION section).
2. Grip both handles firmly.
3. Push and hold the trigger lock-out
button with your right hand thumb.
4. Squeeze and hold the trigger switch.
CHAIN BRAKE
_/L WARNING: If the brake band is
worn too thin it may break when the
chain brake is triggered. With a broken
brake band, the chain brake will not
stop the chain. The chain brake must
be replaced if any part is worn to less
than 0.020" (0.5 mm) thick. Repairs on
a chain brake should be made by your
authorized service dealer. Take your
unit to the place of purchase or to the
nearest authorized service dealer.
• This saw is equipped with a chain
brake. The brake is designed to stop
the chain if kickback occurs.
• The inertia-activated chain brake is
activated if the front hand guard is
pushed forward, either manually (by
hand) or automatically (by sudden
movement).
• If the brake is already activated, it is
disengaged by pulling the front hand
guard back toward the front handle as
far as possible.
• When cutting with the saw, the chain
brake must be disengaged.
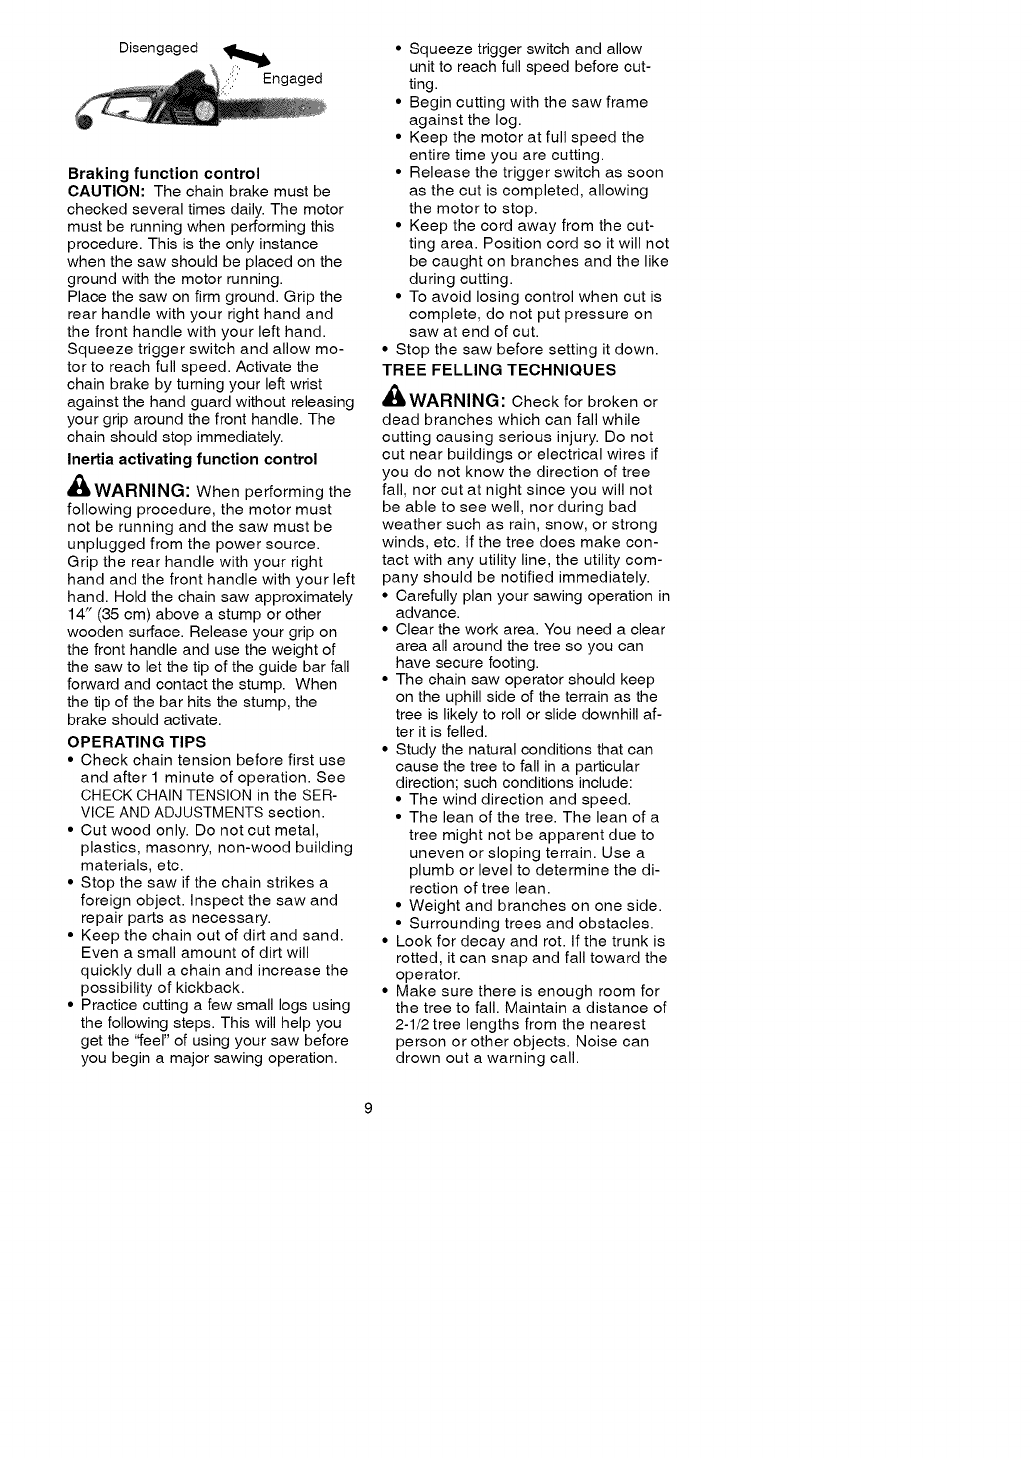
Disengaged
Engaged
Braking function control
CAUTION: The chain brake must be
checked several times daily. The motor
must be running when performing this
procedure. This is the only instance
when the saw should be placed on the
ground with the motor running.
Place the saw on firm ground. Grip the
rear handle with your right hand and
the front handle with your left hand.
Squeeze trigger switch and allow mo-
tor to reach full speed. Activate the
chain brake by turning your left wrist
against the hand guard without releasing
your grip around the front handle. The
chain should stop immediately.
Inertia activating function control
,_WARNING: When performing the
following procedure, the motor must
not be running and the saw must be
unplugged from the power source.
Grip the rear handle with your right
hand and the front handle with your left
hand. Hold the chain saw approximately
14" (35 cm) above a stump or other
wooden surface. Release your grip on
the front handle and use the weight of
the saw to let the tip of the guide bar fall
forward and contact the stump. When
the tip of the bar hits the stump, the
brake should activate.
OPERATING TIPS
•Check chain tension before first use
and after 1 minute of operation. See
CHECK CHAIN TENSION in the SER-
VICE AND ADJUSTMENTS section.
• Cut wood only. Do not cut metal,
plastics, masonry, non-wood building
materials, etc.
• Stop the saw if the chain strikes a
foreign object. Inspect the saw and
repair parts as necessary.
• Keep the chain out of dirt and sand.
Even a small amount of dirt will
quickly dull a chain and increase the
possibility of kickback.
• Practice cutting a few small logs using
the following steps. This will help you
get the ffeel" of using your saw before
you begin a major sawing operation.
• Squeeze trigger switch and allow
unit to reach full speed before cut-
ting.
• Begin cutting with the saw frame
against the log.
• Keep the motor at full speed the
entire time you are cutting.
• Release the trigger switch as soon
as the cut is completed, allowing
the motor to stop.
• Keep the cord away from the cut-
ting area. Position cord so it will not
be caught on branches and the like
during cutting.
• To avoid losing control when cut is
complete, do not put pressure on
saw at end of cut.
• Stop the saw before setting it down.
TREE FELLING TECHNIQUES
_ILWARNING: Check for broken or
dead branches which can fall while
cutting causing serious injury. Do not
cut near buildings or electrical wires if
you do not know the direction of tree
fall, nor cut at night since you will not
be able to see well, nor during bad
weather such as rain, snow, or strong
winds, etc. If the tree does make con-
tact with any utility line, the utility com-
pany should be notified immediately.
• Carefully plan your sawing operation in
advance.
• Clear the work area. You need a clear
area all around the tree so you can
have secure footing.
• The chain saw operator should keep
on the uphill side of the terrain as the
tree is likely to roll or slide downhill af-
ter it is felled.
• Study the natural conditions that can
cause the tree to fall in a particular
direction; such conditions include:
• The wind direction and speed.
• The lean of the tree. The lean of a
tree might not be apparent due to
uneven or sloping terrain. Use a
plumb or level to determine the di-
rection of tree lean.
• Weight and branches on one side.
• Surrounding trees and obstacles.
• Look for decay and rot. If the trunk is
rotted, it can snap and fall toward the
operator.
• Make sure there is enough room for
the tree to fall. Maintain a distance of
2-1/2 tree lengths from the nearest
person or other objects. Noise can
drown out a warning call.
• Removedirt,stones,loosebark,
nails,staples,andwirefromthetree
wherecutsaretobemade.
z' Planaclearretreatpath
_" _.._ _Directionoffall
-t
FELLING LARGE TREES
(6 inches in diameter or larger)
The notch method is used to fell large
trees. A notch is cut on the side of the
tree in the desired direction of fall. After
a felling cut is made on the opposite
side of tree, the tree will tend to fall in
the direction of the notch.
NOTE: If tree has large buttress roots,
remove them before making the notch.
If using saw to remove buttress roots,
keep saw chain from contacting
ground to prevent dulling of the chain.
NOTCH CUT AND FELLING TREE
• Make notch cut by cutting the top of
the notch first. Cut through 1/3 of the
diameter of the tree. Next complete
the notch by cutting the bottom. See
illustration. Once the notch is cut re-
move the wedge of wood from the
tree.
First cut _ z' t Felling cut here
Notch ,_ ___-.- _-_: z.
Second cuV j \ _ Hinge
• After removing the wood from the
notch, make the felling cut on the op-
posite side of the notch. This is done
by making a cut about two inches
higher than the center of the notch.
This will leave enough uncut wood
between the felling cut and the notch
to form a hinge. This hinge will help
prevent the tree from falling in the
wrong direction.
Hinge holds tree on stump and helps
control fall
Opening
of felling
cut
Closing of
notch
NOTE: Before felling cut is complete,
use wedges to open the cut if neces-
sary to control the direction of fall. To
avoid kickback and chain damage, use
wood or plastic wedges, but never
steel or iron wedges.
• Be alert to signs that the tree is
ready to fall: cracking sounds, widen-
ing of the felling cut, or movement in
the upper branches.
• As tree starts to fall, stop saw, put it
down, and get away quickly on your
planned retreat path.
• DO NOT use your saw to cut down a
partially fallen tree. Be extremely cau-
tious with partially fallen trees that may
be poorly supported. When a tree
doesn't fall completely, set saw aside
and pull down tree with a cable winch,
block and tackle, or tractor.
CUTTING A FALLEN TREE
(BUCKING)
Bucking is the term used for cutting a
fallen tree to the desired log size.
_,WARNING: Do not stand on the
log being cut. Any portion can roll
causing loss of footing and control. Do
not stand downhill of the log being cut.
IMPORTANT POINTS
• Cut only one log at a time.
• Cut shattered wood very carefully;
sharp pieces of wood could be flung
toward operator.
• Use a sawhorse to cut small logs.
Never allow another person to hold
the log while cutting and never hold
the log with your leg or foot.
• Do not cut in an area where logs,
limbs, and roots are tangled. Drag
logs into a clear area before cutting
them by pulling out exposed and
cleared logs first.
BUCKING TECHNIQUES
_LWARNING: If saw becomes
pinched or hung in a log, don't try to
force it out. You can lose control of the
saw resulting in injury and/or damage to
the saw. Stop the saw, drive a wedge
10
ofplasticorwoodintothecutuntilthe
sawcanberemovedeasily.Restartthe
sawandcarefullyreenterthecut.Donot
useametalwedge.Donotattemptto
restartyoursawwhenitispinchedor
hunginalog.
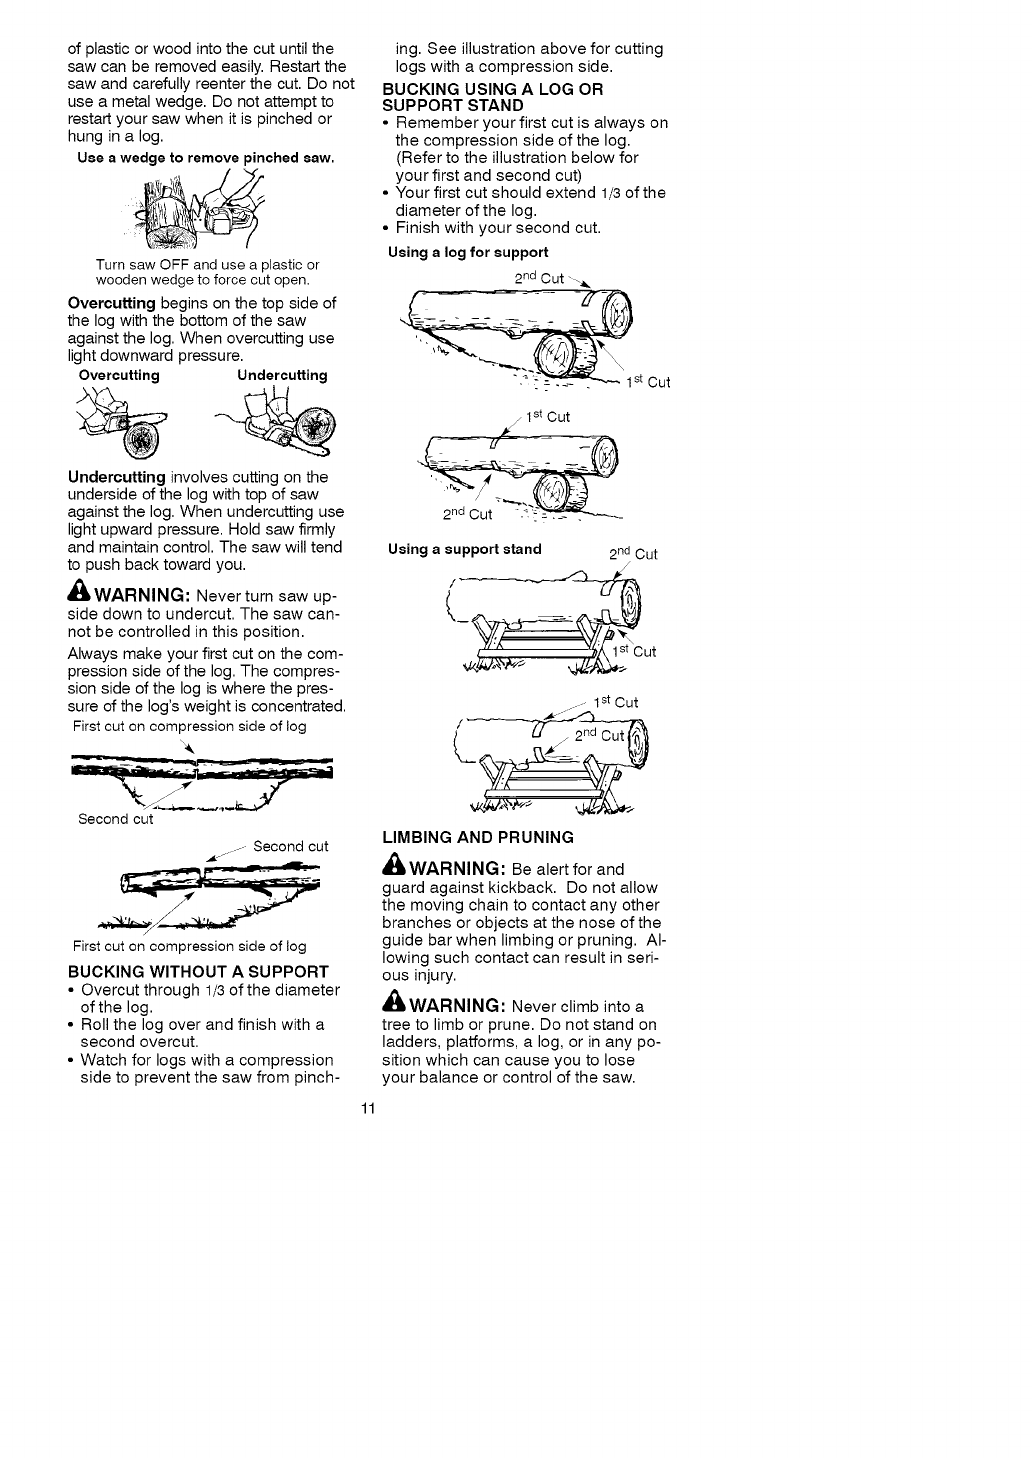
Use a wedge to remove pinched saw.
Turn saw OFF and use a plastic or
wooden wedge to force cut open.
Overcutting begins on the top side of
the log with the bottom of the saw
against the log. When overcutting use
light downward pressure.
Overcutting Undercutting
Undercutting involves cutting on the
underside of the log with top of saw
against the log. When undercutting use
light upward pressure. Hold saw firmly
and maintain control. The saw will tend
to push back toward you.
_i, WARNING: Never turn saw up-
side down to undercut. The saw can-
not be controlled in this position.
Always make your first cut on the com-
pression side of the log. The compres-
sion side of the log is where the pres-
sure of the log's weight is concentrated.
First cut on compression side of !og
Second cut
.,-- ..... Second cut
First cut on compression side of log
BUCKING WITHOUT ASUPPORT
•Overcut through 1/3 of the diameter
of the log.
• Roll the log over and finish with a
second overcut.
• Watch for logs with a compression
side to prevent the saw from pinch-
11
ing. See illustration above for cutting
logs with a compression side.
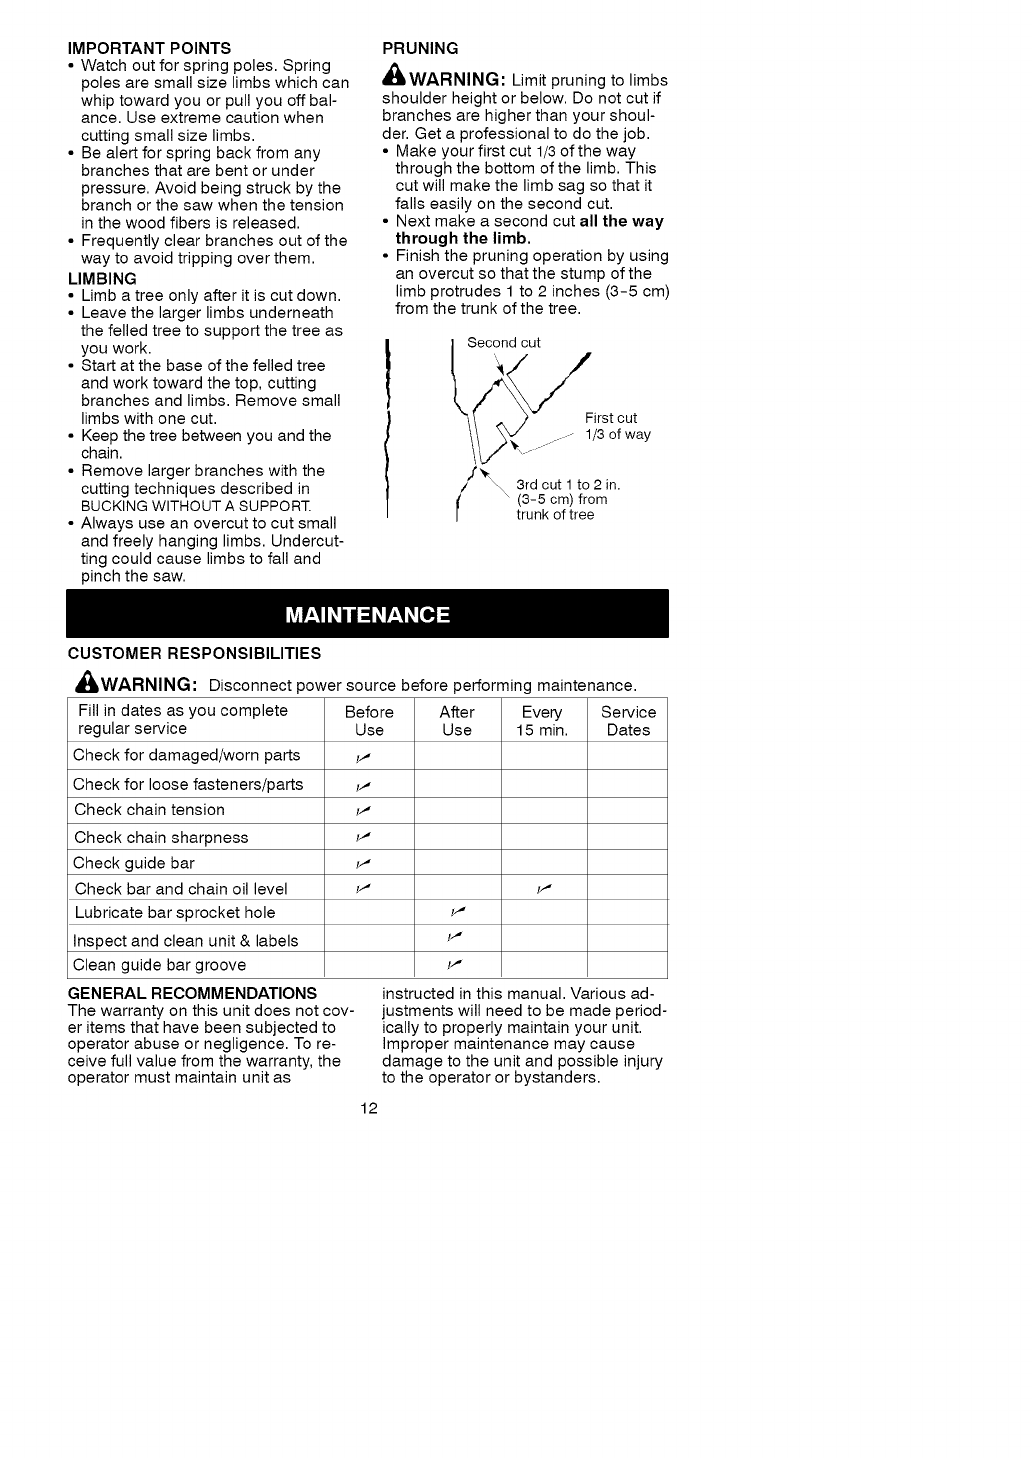
BUCKING USING A LOG OR
SUPPORT STAND
• Remember your first cut is always on
the compression side of the log.
(Refer to the illustration below for
your first and second cut)
• Your first cut should extend 1/3 of the
diameter of the log.
• Finish with your second cut.
Using a log for support
2 nd Cut "_
"-_- _ 1st Cut
j 1st Cut
Using a support stand 2 nd Cut
l_
ut
..... 1 st Cut
/ "_ .....
LIMBING AND PRUNING
_/L WARNING: Be alert for and
guard against kickback. Do not allow
the moving chain to contact any other
branches or objects at the nose of the
guide bar when limbing or pruning. Al-
lowing such contact can result in seri-
ous injury.
_k, WARNING: Never climb into a
tree to limb or prune. Do not stand on
ladders, platforms, a log, or in any po-
sition which can cause you to lose
your balance or control of the saw.
IMPORTANTPOINTS
•Watchoutforspringpoles.Spring
polesaresmallsizelimbswhichcan
whiptowardyouorpullyouoffbal-
ance.Useextremecautionwhen
cuttingsmallsizelimbs.
• Bealertforspringbackfromany
branchesthatarebentorunder
pressure.Avoidbeingstruckbythe
branchorthesawwhenthetension
inthewoodfibersisreleased.
• Frequentlyclearbranchesoutofthe
waytoavoidtrippingoverthem.
LIMBING
• Limbatreeonlyafteritiscutdown.
• Leavethelargerlimbsunderneath
thefelledtreetosupportthetreeas
youwork.
•Startatthebaseofthefelledtree
andworktowardthetop,cutting
branchesandlimbs.Removesmall
limbswithonecut.
• Keepthetreebetweenyouandthe
chain.
• Removelargerbrancheswiththe
cuttingtechniquesdescribedin
BUCKINGWITHOUTASUPPORT.
•Alwaysuseanovercuttocutsmall
andfreelyhanginglimbs.Undercut-
tingcouldcauselimbstofalland
pinchthesaw.
PRUNING
,_IkWARNING: Limit pruning to limbs
shoulder height or below. Do not cut if
branches are higher than your shoul-
der. Get a professional to do the job.
• Make your first cut 1/3 of the way
through the bottom of the limb. This
cut will make the limb sag so that it
falls easily on the second cut.
• Next make a second cut all the way
through the limb,
• Finish the pruning operation by using
an overcut so that the stump of the
limb protrudes 1 to 2 inches (3-5 cm)
from the trunk of the tree.
Seco_d cut
3Sto_&y
/__ 3rd cut 1 to 2 in.
I \ (3-5 cm) from
trunk of tree
CUSTOMER RESPONSIBILITIES
,_WARNING: Disconnect power source before performing maintenance.
Fill in dates as you complete Before After Every Service
regular service Use Use 15 min. Dates
Check for damaged/worn parts
Check for loose fasteners/parts
Check chain tension
Check chain sharpness
Check guide bar
Check bar and chain oil level
Lubricate bar sprocket hole
Inspect and clean unit & labels
Clean guide bar groove
GENERAL RECOMMENDATIONS
The warranty on this unit does not cov-
er items that have been subjected to
operator abuse or negligence. To re-
ceive full value from the warranty, the
operator must maintain unit as
12
instructed in this manual. Various ad-
justments will need to be made period-
ically to properly maintain your unit.
Improper maintenance may cause
damage to the unit and possible injury
to the operator or bystanders.
CHECKFOR DAMAGED OR
WORN PARTS
Contact Sears Service Center for re-
placement of worn or damaged parts.
NOTE: It is normal for a small amount
of oil to appear under the saw after
motor stops. Do not confuse this with a
leaking oil tank.
•Trigger Switch - Ensure the trigger
switch functions properly by squeez-
ing and holding the trigger switch.
Make sure motor starts and stops.
• Oil Tank - Discontinue use of chain
saw if oil tank shows signs of dam-
age or leaks.
• Power Cord - Discontinue use if
chain saw power cord shows signs
of damage or wear.
CHECK FOR LOOSE
FASTENERS AND PARTS
• Bar Knob
• Chain
• Housing Screws
CHECK CHAIN TENSION
WARNING: Wear protective
gloves when handling chain. The
chain is sharp and can cut you even
when it is not moving.
Chain tension is very important. Chain
stretches during use. This is especially
true during the first few times you use
your saw. Always check chain tension
each time you use your saw.
NOTE: Make sure the CHAIN
BRAKE is disengaged. Disengage
the CHAIN BRAKE (A) by pulling it
backward.
Disengaged
Engaged
3. Tensioning the chain is easy.
Turn bar bolt knob (A) counter
clock wise. Then turn ring (B)
counter clock wise to loosen
chain or clock wise to tighten
chain.
4. After adjustment and while
wearing heavy duty work gloves,
with your one hand, depress the
lock out/off button on the top of
the rear handle, and at the same
time, squeeze the trigger, then
with your the other hand, move
the saw chain back and forth on
the guide bar to be sure the
chain moves freely and is in
proper mesh with sprocket.
NOTE: If the chain is difficult to
rotate or if it binds on the guide bar,
too much tension has been applied
and must be adjusted as described
in step 1.
5. While tensioning the chain. Hold
tip of the bar up and then tighten
the bar bolt knob.
_WARNING: If the saw is operated
with a loose chain, the chain could
jump off the guide bar and result in se-
rious injury.
1.
2. Unplug unit from the power source.
Use a screwdriver to move chain
around guide bar to ensure kinks
do not exist. The chain should ro-
tate freely.
13
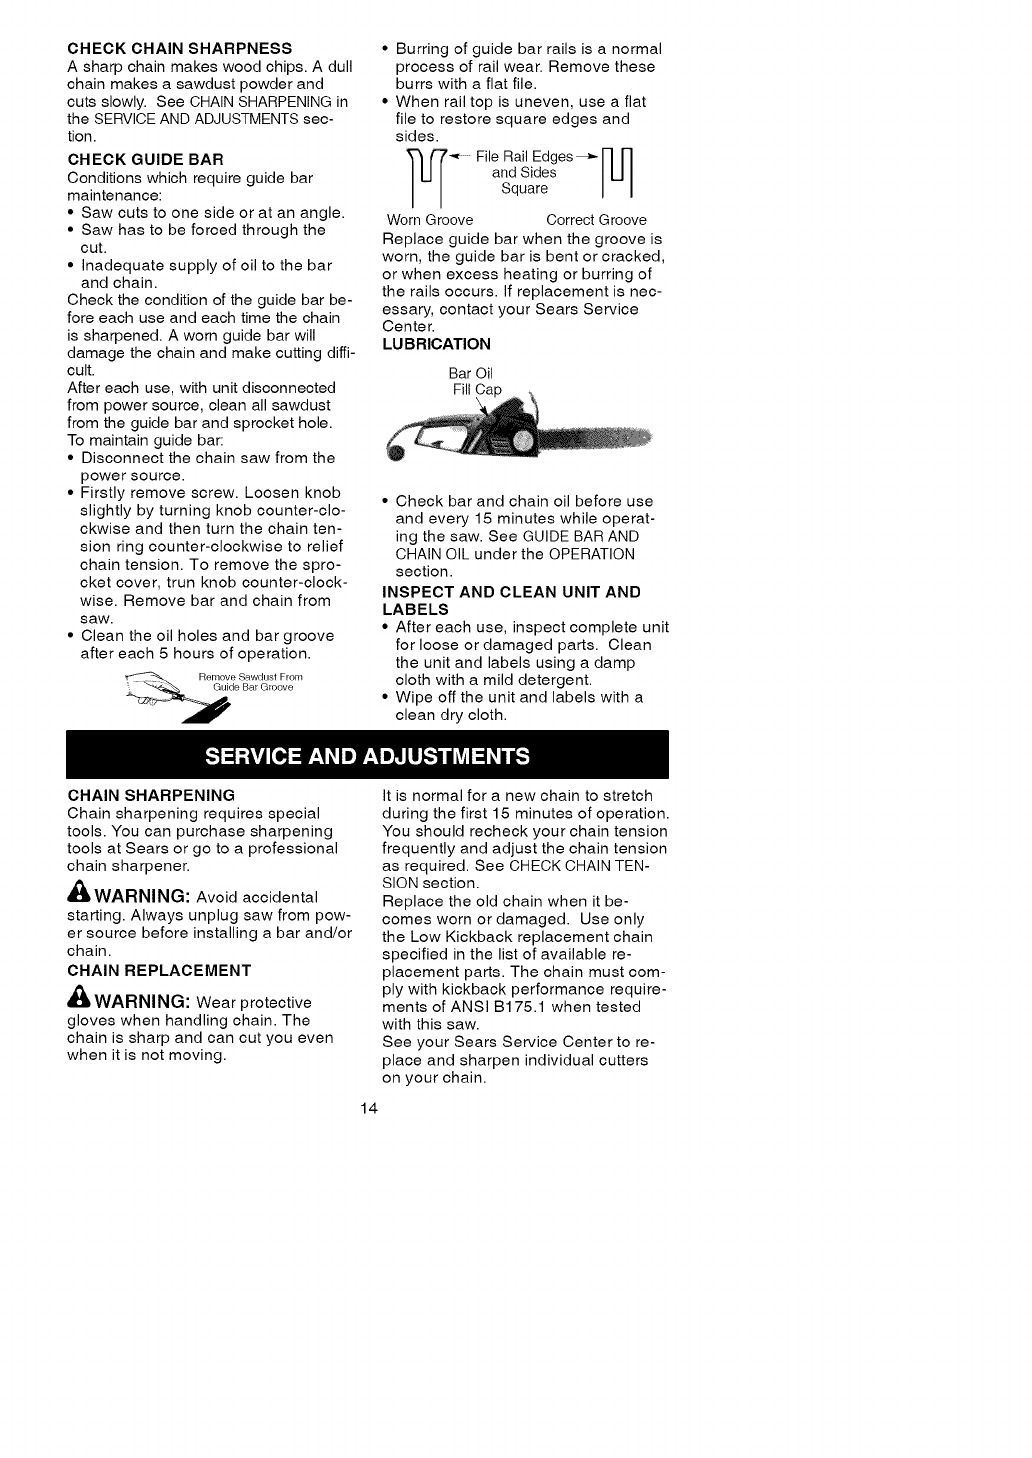
CHECKCHAINSHARPNESS
A sharp chain makes wood chips. A dull
chain makes a sawdust powder and
cuts slowly. See CHAIN SHARPENING in
the SERVICE AND ADJUSTMENTS sec-
tion.
CHECK GUIDE BAR
Conditions which require guide bar
maintenance:
• Saw outs to one side or at an angle.
• Saw has to be forced through the
cut.
• Inadequate supply of oil to the bar
and chain.
Check the condition of the guide bar be-
fore each use and each time the chain
is sharpened. A worn guide bar will
damage the chain and make cutting diffi-
cult.
After each use, with unit disconnected
from power source, clean all sawdust
from the guide bar and sprocket hole.
To maintain guide bar:
• Disconnect the chain saw from the
power source.
• Firstly remove screw. Loosen knob
slightly by turning knob counter-clo-
ckwise and then turn the chain ten-
sion ring counter-clockwise to relief
chain tension. To remove the spro-
cket cover, trun knob counter-clock-
wise. Remove bar and chain from
saw.
• Clean the oil holes and bar groove
after each 5 hours of operation.
• Burring of guide bar rails is a normal
process of rail wear. Remove these
burrs with a flat file.
• When rail top is uneven, use a flat
file to restore square edges and
sides.
_-_ File Rail Edges_r] r]
I"1 and Sides ]U I
Square I I
Worn Groove Correct Groove
Replace guide bar when the groove is
worn, the guide bar is bent or cracked,
or when excess heating or burring of
the rails occurs. If replacement is nec-
essary, contact your Sears Service
Center.
LU BRICATION
Bar Oil
Fill Ca
• Check bar and chain oil before use
and every 15 minutes while operat-
ing the saw. See GUIDE BAR AND
CHAIN OIL under the OPERATION
section.
INSPECT AND CLEAN UNIT AND
LABELS
• After each use, inspect complete unit
for loose or damaged parts. Clean
the unit and labels using a damp
cloth with a mild detergent.
• Wipe off the unit and labels with a
clean dry cloth.
CHAIN SHARPENING
Chain sharpening requires special
tools. You can purchase sharpening
tools at Sears or go to a professional
chain sharpener.
_L WARNING: Avoid accidental
starting. Always unplug saw from pow-
er source before installing a bar and/or
chain.
CHAIN REPLACEMENT
WARNING: Wear protective
gloves when handling chain. The
chain is sharp and can cut you even
when it is not moving.
It is normal for a new chain to stretch
during the first 15 minutes of operation.
You should recheck your chain tension
frequently and adjust the chain tension
as required. See CHECK CHAIN TEN-
SION section.
Replace the old chain when it be-
comes worn or damaged. Use only
the Low Kickback replacement chain
specified in the list of available re-
placement parts. The chain must com-
ply with kickback performance require-
ments of ANSI B175.1 when tested
with this saw.
See your Sears Service Center to re-
place and sharpen individual cutters
on your chain.
14
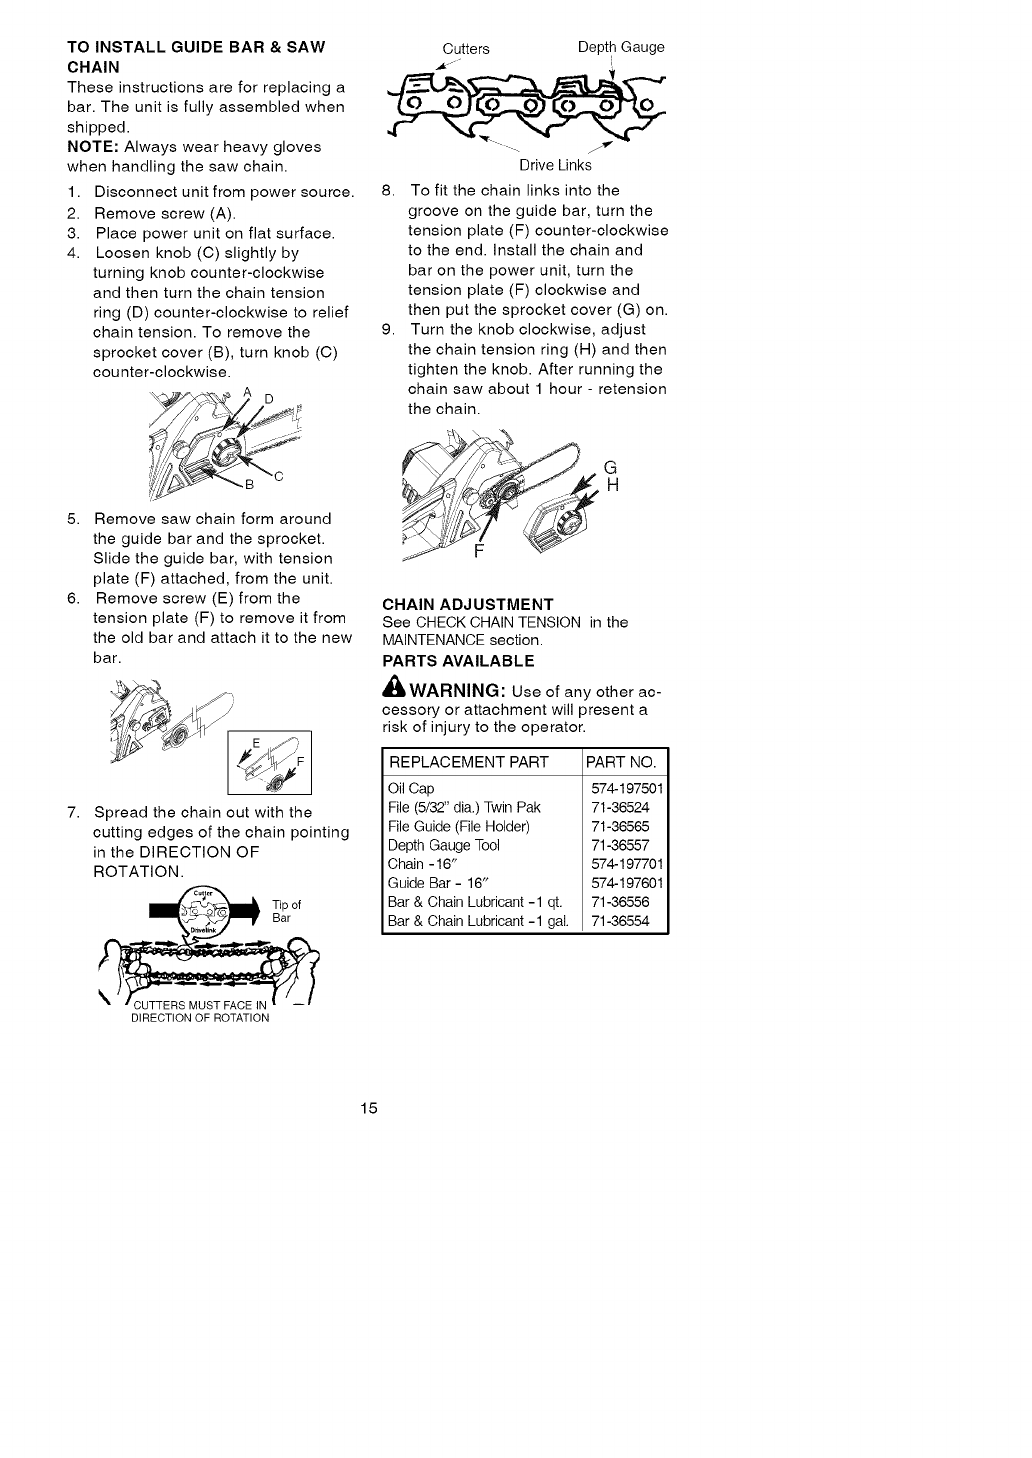
TOINSTALL GUIDE BAR & SAW
CHAIN
These instructions are for replacing a
bar. The unit is fully assembled when
shipped.
NOTE: Always wear heavy gloves
when handling the saw chain.
1. Disconnect unit from power source.
2. Remove screw (A).
3. Place power unit on flat surface.
4. Loosen knob (C) slightly by
turning knob counter-clockwise
and then turn the chain tension
ring (D) counter-clockwise to relief
chain tension. To remove the
sprocket cover (B), turn knob (C)
counter-clockwise.
Cutters Depth Gauge
Drive Links
8. To fit the chain links into the
groove on the guide bar, turn the
tension plate (F) counter-clockwise
to the end. Install the chain and
bar on the power unit, turn the
tension plate (F) clockwise and
then put the sprocket cover (G) on.
9. Turn the knob clockwise, adjust
the chain tension ring (H) and then
tighten the knob. After running the
chain saw about 1 hour - retension
the chain.
5. Remove saw chain form around
the guide bar and the sprocket.
Slide the guide bar, with tension
plate (F) attached, from the unit.
6. Remove screw (E) from the
tension plate (F) to remove it from
the old bar and attach it to the new
bar.
7. Spread the chain out with the
cutting edges of the chain pointing
in the DIRECTION OF
ROTATION.
Tip of
Bar
DiRECTiON OF ROTATION
G
H
CHAIN ADJUSTMENT
See CHECK CHAIN TENSION in the
MAINTENANCE section.
PARTS AVAILABLE
,_WARNING: Use of any other ac-
cessory or attachment will present a
risk of injury to the operator.
REPLACEMENT PART
Oil Cap
File (5/32" dia.) Twin Pak
File Guide (File Holder)
Depth Gauge Tool
Chain - 16"
Guide Bar - 16"
Bar & Chain Lubricant -1 qt.
Bar & Chain Lubricant -1 gal.
PART NO.
574-197501
71-36524
71-36565
71-36557
574-197701
574-197601
71-36556
71-36554
15
,_ WARNING: Perform the following
steps after each use:
• Allow motor to cool before storing or
transporting.
• Store chain saw and extension cord
in a well ventilated area
• Store chain saw with all guards in
place and position chain saw so that
any sharp object cannot accidentally
cause injury.
• Store chain saw unplugged, well out
of the reach of children.
SEASONAL STORAGE
Prepare your unit for storage at the end
of the season or if it will not be used for
30 days or more.
If your chain saw is to be stored for a
period of time:
• Clean it thoroughly before lengthy
storage.
• Store in a clean dry area.
• Lightly oil external metal surfaces
and guide bar.
• Oil the chain and use the bar sheath
(included) to cover bar and chain.
TROUBLESHOOTING TABLE
WARNING: Always stop unit and disconnect from the power source be-
fore performing all of the recommended remedies below except remedies
that require unit to be operating.
TROUBLE CAUSE REMEDY
1. Chain tension incorrect.Chain does
not move
when trigger
switch is
engaged.
Chain clat-
ters or cuts
roughly.
Chain stops
during cut.
Oil inade-
quate for bar
and chain
lubrication.
Chain cuts
at an angle.
2. Guide bar rails pinched.
3. Trigger switch failure.
4. Circuit breaker tripped/
fuse failure.
1. Chain tension incorrect.
2. Cutters damaged.
3. Chain worn.
4. Cutters dull, improperly
sharpened, or depth
gauges too high.
5. Sprocket worn.
1. Chain cutter tops not
filed flat.
2. Guide bar burred or
bent; rails uneven.
1. Oil tank empty.
2. Oil outlet clogged.
3. Guide bar oil hole
blocked.
1. Cutters damaged on
one side.
2. Chain dull on one side.
3. Guide bar bent or worn.
1. See "Check Chain Tension" in
Maintenance section.
2. Repair or replace.
3. Contact Sears Service.
4. Reset circuit breaker or replace
fuse.
1. See "Check Chain Tension" in
Maintenance Section.
2. Contact Sears Service.
3. Resharpen or replace chain.
4. See "Chain Sharpening" in
Service and Adjustments section.
5. Contact Sears Service.
1. See "Chain Sharpening" in
Service and Adjustments section.
2. Repair or replace guide bar.
1. Fill oil tank.
2. Contact Sears Service.
3. Remove bar and clean.
1. See "Chain Sharpening" in
Service and Adjustments section.
2. See "Chain Sharpening" in
Service and Adjustments section.
3. Replace guide bar.
If situations occur which are not covered in this manual, use care and good
judgement. If you need assistance, contact Sears Service or the CUSTOMER
ASSISTANCE HELPLINE at 1-800-235-5878.
16
Garantfa 17 ServicioyAjustes 31
ReglasdeSeguridad 17 Almacenamiento 33
Montaje 23 TablaDiagn6stica 34
Uso 23 RepuestosyEncargosContratapa
Mantenimiento 29
GARANTiA COMPLETA DE CRAFTSMAN
Si este producto falla per un defecto en el material o de mano de obra dentro de dos
ahos a partir de la fecha de compra y este se ha utilizado y mantenido de acuerdo al
manual del usuario, envfelo a cualquier tienda Sears o otra tienda Craftsman en los
Estados Unidos para su reemplazo gratuita.
Esta garantfa es aplicable per s61o 90 dfas desde la fecha de compra si este
producto se usa con fines comerciales o se usa para arriendo.
Esta garantia cubre SOLAMENTE defectos en material y de mano de obra,
Sears NO pagara:
• Partes desechables que pueden desgastarse al usarlas normalmente dentro del
perfodo de la garantfa, tal come la barra y la cadena.
Esta garantfa le otorga derechos legales especfficos, y usted tambi6n puede tener
otros derechos que varfan de estado a estado.
Sears, Roebuck and Co., Hoffman Estates, IL 60179
ADVERTENCIA: Siempre que se
use cualquier cortador electrico, deben
observarse precauciones bAsicas de
seguridad para reducir el riesgo de in-
cendio, choque electrico, y accidentes
personales. Lea todas las instruc-
ciones.
ADVERTENOIA: Siempre desco-
necte la sierra de cadena del recurso de
energfa cuando no se encuentre en
uso, antes de efectuar servicio, y al
cambiar accesorios, como Io es la cade-
na de la sierra y el protector.
dustrial anti-desluzantes; protecci6n de
ojos talescomo gafas de seguridad
que no se la cara; casco duro aproba-
do; y barrera de sonido (tapones de
ofdo u orejeras anti-sonido) para pro-
teger la audici6n. Los que usan sier-
ras de fuerza habitualmente deberAn
hacerse revisar la audici6n freuente-
mente ya que el ruido de las sierras
de cadena puede da5ar los ofdos.
Mantenga el cabello por encima del
nivel de los hombros. No desgaste
la ropa suelta o joyerfa; pueden en-
redarse en las piezas m6viles.
Debido a que las sierra de cadena son
instrumentos para cortar madera a alta
velocidad, deben observarse precau-
ciones de seguridad especiales para re-
ducir el riesgo de accidentes. El uso
descuidado o indebido de esta herra-
mienta puede causar graves heridas.
PIENSE ANTES DE PROOEDER
• Limite el uso de la sierra a aquellos
usuarios adultos que comprendan y
puedan implementar todas las pre-
cauciones, reglas de seguridad e
instrucciones de uso que se encuen-
tran en este manual.
• Vfstase de forma apropiada. Use equi-
po protector. Siempre use calzado de
seguridad con puntas de acero y sue-
las anti-deslizantes; ropa ajustada al
cuerpo; guarantes gruesos de uso in-
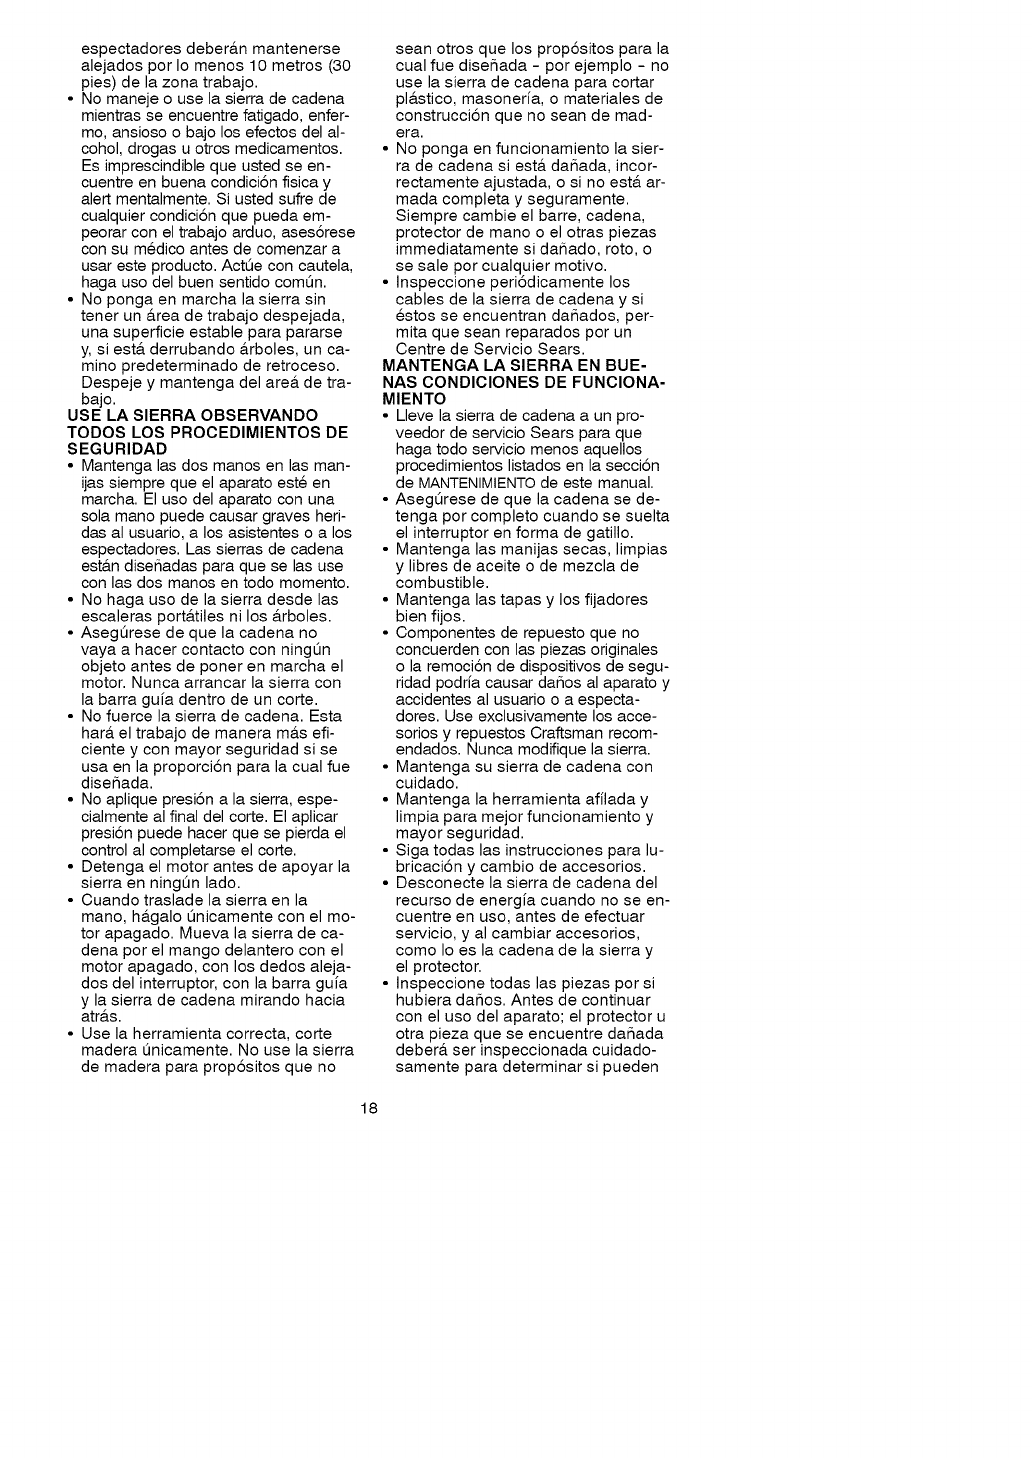
Protecidn. ,_ ...... Casco Duro
de Oidos "_ le, g, ur_ Proteccion de
Ropa Ojos
Ajustada Guantes de
al Cuerpo /Uso
Industrial
Zapatos Pantorrilleras
de Seguridad., _ de Seguridad
_lllm
• Mantenga todas las partes del cuer-
po alejadas de la cadena siempre
que el motor de la sierra se en-
cuentre en funcionamiento.
• Mantenga a los ni_os alejados. No
permita que ninguna persona haga
contacto con la sierra de cadena ni
con el cable de extensi6n. Todos los
17
espectadoresdeber&nmantenerse
alejadosporIomenos10metros(30
pies)delazonatrabajo.
• Nomanejeouselasierradecadena
mientrasseencuentrefatigado,enfer-
mo,ansiosoobajolosefectosdelal-
cohol,drogasuotrosmedicamentos.
Esimprescindiblequeustedseen-
cuentreenbuenacondici6nfisicay
alertmentalmente.Siustedsufrede
cualquiercondici6nquepuedaem-
peorarconeltrabajoarduo,ases6rese
consumedicoantesdecomenzara
usaresteproducto.Actt3econcautela,
hagausodelbuensentidocom0n.
• Nopongaenmarchalasierrasin
tenerun&readetrabajodespejada,
unasuperficieestableparapararse
y,siest&derrubando&rboles,unca-
minopredeterminadoderetroceso.
Despejeymantengadelare&detra-
bajo.
USELASIERRAOBSERVANDO
TODOSLOSPROCEDIMIENTOSDE
SEGURIDAD
• Mantengalasdosmanosenlasman-
ijassiemprequeelaparatoesteen
marcha.Elusodelaparatoconuna
solamanopuedecausargravesheri-
dasalusuario,alosasistentesoalos
espectadores.Lassierrasdecadena
est&ndise_adasparaqueselasuse
conlasdosmanosentodomomento.
• Nohagausodelasierradesdelas
escalerasport&tilesnilos&rboles.
• Asegt3resedequelacadenano
vayaahacercontactoconningt3n
objetoantesdeponerenmarchael
motor.Nuncaarrancarlasierracon
labarraguiadentrodeuncorte.
• Nofuercelasierradecadena.Esta
har&eltrabajodemaneram&seft-
cienteyconmayorseguridadsise
usaenlaproporci6nparalacualfue
diseSada.
• Noapliquepresi6nalasierra,espe-
cialmentealfinaldelcorte.Elaplicar
presi6npuedehacerquesepierdael
controlalcompletarseelcorte.
• Detengaelmotorantesdeapoyarla
sierraenningt3nlado.
• Cuandotrasladelasierraenla
mano,h&galoQnicamenteconelmo-
torapagado.Muevalasierradeca-
denaporelmangodelanteroconel
motorapagado,conlosdedosaleja-
dosdelinterruptor,conlabarraguia
ylasierradecadenamirandohacia
atr&s.
• Uselaherramientacorrecta,corte
madera5nicamente.Nouselasierra
demaderaparaprop6sitosqueno
seanotrosquelosprop6sitosparala
cualfuediseSada- porejemplo- no
uselasierradecadenaparacortar
pl&stico,masoneria,omaterialesde
construcci6nquenoseandemad-
era.
• Nopongaenfuncionamientolasier-
radecadenasiest&daSada,incor-
rectamenteajustada,osinoest&ar-
madacompletayseguramente.
Siemprecambieelbarre,cadena,
protectordemanooelotraspiezas
immediatamentesidaSado,roto,o
sesaleporcualquiermotivo.
• Inspeccioneperi6dicamentelos
cablesdelasierradecadenaysi
estosseencuentrandaSados,per-
mitaqueseanreparadosporun
CentredeServicioSears.
MANTENGALASIERRAENBUE-
NASCONDIClONESDEFUNClONA-
MIENTO
• Llevelasierradecadenaaunpro-
veedordeservicioSearsparaque
hagatodoserviciomenosaquellos
procedimientoslistadosenlasecci6n
deMANTENIMIENTOdeestemanual.
•Aseg0resedequelacadenasede-
tengaporcompletocuandosesuelta
elinterruptorenformadegatillo.
• Mantengalasmanijassecas,limpias
ylibresdeaceiteodemezclade
combustible.
• Mantengalastapasylosfijadores
bienfijos.
• Componentesderepuestoqueno
concuerdenconlaspiezasoriginales
olaremoci6ndedispositivosdesegu-
ridadpodriacausarda_osalaparatoy
accidentesalusuariooaespecta-
dores.Useexclusivamentelosacce-
soriosyrepuestosCraftsmanrecom-
endados.Nuncamodifiquelasierra.
• Mantengasusierradecadenacon
cuidado.
• Mantengalaherramientaafiladay
limpiaparamejorfuncionamientoy
mayorseguridad.
• Sigatodaslasinstruccionesparalu-
bricaci6nycambiodeaccesorios.
• Desconectelasierradecadenadel
recursodeenergiacuandonoseen-
cuentreenuso,antesdeefectuar
servicio,yalcambiaraccesorios,
comoIoeslacadenadelasierray
elprotector.
• Inspeccionetodaslaspiezasporsi
hubieradaSos.Antesdecontinuar
conelusodelaparato;elprotectoru
otrapiezaqueseencuentredaSada
deber&serinspeccionadacuidado-
samenteparadeterminarsipueden
18
usarsedeformaapropiadaypara
vierificarsipuedeefectuarelfuncio-
namientoparaelcuealfuedisefiada.
Inspeccioneelalineamientodelas
piezasmovibles,piezasmovibles
queseencuentrenatascadas,la
rupturadepiezas,monturaycualqu-
ierotracondici6nquepuedaafectar
elusodelaparato.Elprotectorocu-
alquierotrapiezaqueseencuentre
dafiadadeber&serreparadaapro-
piadamenteodeber&serreemplaza-
daporunCentrodeServicioSears,
anoserqueseindiquedeotrafor-
maenestemanualdelusuario.
• AInoencontrarseenuso,lassierras
decadenadeber&nalmacenarseen
unlugarseco,enunlugaraltoobajo
Ilave,fueradelalcancedelosnifios.
• AIalmacenarlasierra,useunafun-
daounestuchedecarga.
SEGURIDADELECTRICA
_/L ADVERTENClA: Evite ambientes
peligrosos. Para reducir el riesgo de
choque electrico, no use su aparato en
lugares ht3medos o mojados ni cerca de
piscinas, de los hidromasajes, etc. No
exponga el aparato a la nieve, a la Iluvia
ni al agua para evitar la posibilidad de
choque electrico. No toque el enchufe
del cable de extensi6n ni el del aparato
con las manos mojadas.
• Use el tipo de voltaje que se muestra
en su aparato.
• Evite situaciones peligrosas. No use
en presencia de liquidos o gases in-
flamables para evitar crear incendio o
explosi6n y/o causar dafio al aparato.
• Para reducir el riesgo de choque elec-
trico, este equipo cuenta con un en-
chufe polarizado (una aleta es m&s
ancha que la otra). Este enchufe en-
trar& solamente en una sola posici6n
en un enchufe polarizado del cable de
extensi6n. Asegt3rese de tener un
cable de extensi6n polarizado. A su
vez, el enchufe polarizado del cable
de extensi6n polarizado. A su vez, el
enchufe polarizado del cable de ex-
tensi6n entrar_, en el tomacorriente de
una sola forma. Si el enchufe no entra
completamente en el tomacorriente,
invierta el enchufe. Si todavia no en-
tra, contacte un electricista autorizado
para que instale el tomacorriente apro-
piado. No cambie el enchufe, re-
cept_.culo del cable de extensi6n o
cable de extensi6n en ninguna forma.
• Para reducir el riesgo de choque elec-
trico, use cables de extensi6n es-
pecificamente marcados como com-
patibles para el uso de aparatos de
exterior, y que tengan una clasificaci6n
electrica no menor que la clasificaci6n
del aparato. El cable deber_, venir
marcado con el sufijo 'MT-A" ('MT"en
Canada). Asegt3rese de que su cable
de extensi6n este en buenas condi-
ciones de uso. Inspeccione el cable
de extensi6n de m_.s baja clasifica-
ci6n, se podria crear una baja en el
voltaje resultando en la p@dida de
electricidad y calentamiento. Si se en-
cuentra en duda, use un cable con la
clasificaci6n siguiente de m_.s alta es-
cala. Mientras m_.s bajo sea el calibre
del cable, m_.s grueso ser_. el cable.
(Yea SELECCION DEL CABLE DE EX-
TENSION en la secci6n USO). No uti-
lice las cables de extensi6n mt31tiples.
• No abuse del cord6n. Nunca maneje
el aparato por el cable de extensi6n o
tire del mismo para desconectar el
aparato.
• Amarre el cable de extensi6n a cable
del aparato para asi evitar que se
desconecten el uno del otro.
• No use el aparato si el interruptor no
enciende o apaga el aparato de for-
ma apropiada, o si el cierre de salida
no funciona. Reparaciones al inter-
ruptor deber_.n ser hechas por un
Centro de Servicio Sears.
• Mantenga el cable de extensi6n libre
de todo obst_.culo y alejado del usua-
rio en todo momento. Mantenga el
cable de manera que no pueda enre-
darsecon las ramas. No exponga el
cable al calor, aceite, agua o bordes
con filo.
• Para evitar la posibilidad de choque
electrico, evite el contacto del cuerpo
con el conductor a tierra, como Io
son el metal, las cercas o tuberias.
• La proteccci6n del Interruptor de Fal-
la de Circuito a Tierra (GFCI) deber_.
ser provista en el enchufe o circuito
a ser usados. Vienen disponibles re-
cept_.culos con el GFCl incluido y
estos deber_.n ser usados como me-
dida de seguridad. Inspeccione los
cables de la sierra de cadena per-
i6dicamente y si estos se encuen-
tran dafiados, permit que sean repa-
rados por una Centro de Servicio
Sears.
PROTEJASE CONTRA LAS
RECULADAS
Ud. debe seguir todas las precauciones
e instrucciones de seguridad para ayu-
dar a evitar las reculadas y las dem&s
fuerzas que pueden causar graves heri-
das.
19
Trayectoria
de la Reculada
Evite las Obstrucciones
Z_ ADVERTENClA: Evite reculada
le pueden causar graves heridas. Re-
culada es el movimiento hacia el
frente, hacia atr&s o r&pidamente ha-
cia adelante, esto puede ocurrir cuan-
do la punta de la barra guia de la sier-
ra de cadena entra en contacto con
cualquier objeto como puede ser otra
rama o tronco, o cuando la madera se
cierra y atasca mientras se hace el
corte. El entrar en contacto con alg0n
objeto extrafio a la madera le puede
causar al usuario la p@dida del control
de la sierra de cadena.
• La Reculada Rotacional puede
acontecer cuando la cadena en mo-
vimiento entra en contacto con alg0n
objeto en la parte superior de la pun-
ta de la barra guia puede causar que
la cadena entre al material y se de-
tenga por un instante. El resultado
es una reacci6n inversa, a velocidad
de rel&mpago, que hace recular la
barra guia hacia arriba y hacia atr&s
hacia el usuario.
• La Reculada pot Atasco acontecen
cuando la madera se cierra y atasca
la cadena en movimiento en el corte
a Io largo de la parte superior de la
barra guia y la cadena se detiene re-
pentinamente. Esta detenci6n re-
pentina de la cadena tiene como re-
sultado una inversi6n de la fuerza de
la cadena usada para cortar madera
y causa que la sierra se mueva en
sentido opuesto al de la rotaci6n de
la cadena. La sierra directamente
hacia atr&s en direcci6n al usuario.
• La Reculada por Impulsion puede
acontecer cuando la cadena en mo-
vimiento entra en contacto con algL_n
objeto extrafio a la madera en el
corte a Io largo de la parte inferior de
la barra guia y la cadena se detiene
repentinamente. Esta detenci6n re-
pentina de la cadena tira de la sierra
adelante y lejos del usuario y podria
hacer f&cilmente al usuario perder el
control de la sierra.
REDUZCA LAS PROBABILIDADES
DE RECU LADA
• Este consciente de la posibilidad de
reculada. Teniendo una buena com-
prensi6n b&sica de la reculada, ud.
podr& reducir el elemento de sorpre-
sa que contribuye a los accidentes.
• Nunca permita que la cadena en mo-
vimiento toque ningOn objeto en la
punta de la barra guia.
• Mantenga el &rea de trabajo libre de
obstrucciones como por ejemplo
otros &rboles, ramas, piedras, cer-
cas, tocones, etc. Elimine o evite
toda obstrucci6nes comp por ejem-
plo otros &rboles, ramas, piedras,
cercas, tocones, etc. Elimine o evite
toda obstrucci6n que la cadena pue-
da tocar mientras est& cortando.
• AI cortar una rama, no deje la barra
guia entrar en contacto con otra
rama o otros objetos alrededor.
• Mantenga la sierra afilada y con la
tensi6n correcta. Las cadenas con
poco file o flojasincrementan la pro-
babilidad de reculada. Siga las in-
strucciones del fabricante para afilar
y efectuar mantenimiento de la cade-
na. Verifique la tensi6n a intervalos
regulares con el motor parado, nun-
ca en marcha. Asegt3rese de que las
tuercas de la barra esten ejustadas
firmemente.
• Empiece y efectt3e la totalidad de
cada corte con el acelerador a fon-
do. Si la cadena se est& moviendo a
una velocidad menor que la m&xima,
hay m&s probabilidad de que la sier-
ra recule.
• Use cuidado extremo al entrar de
nuevo en un corte ya empezado.
• No intente hacer cortes empezando
con la punta de la barra (cortes de
taladro).
• Tenga cuidado con troncos que se
desplazan y con las dem&s fuerzas
que podrian cerrar un corte y apretar
la cadena o bien caer sobre ella.
• Use la Barra Guia Reducidora de
Reculadas y la Cadena Minimizado-
ra de Reculadas recomendadas
para su sierra.
Evite la Reculada por Presion:
• Mantengase siempre al tanto de
toda situaci6n u obstrucci6n que
pueda apretar la cadena en la parte
superior de la barra o detener la ca-
dena de cualquier forma.
• No corte m&s de un tronco a la vez.
2O
•AIseccionartroncosconcorteas-
cendiente,notuerzalasierraalsa-
carlavarradelcorte.
Evite la Impulsion:
• Siempre empiece a cortar con el mo-
tor acelerado a fondo y la caja de la
sierra apoyada en el madera.
• Use cutlas de pl&stico o de madera,
no de metal para mantener abierto el
corte.
MANTENGA EL CONTROL
P_tresehacia la izquierda de
la sierra ._
El pulgar ,P'_',,i'_;/ffl;;_
per debajo 7lt'_
de la manija
Nunca invierta
la posici6n de
las manes
\\\
Code rigido
• Sostenga firmemente con las dos
manos le ayudar_, a mantener el
control de la sierra. No afloje. Man-
tenga la mano derecha envolviendo
totalmente la manija trasera, sea ud.
derecho o zurdo. Sostenga la manija
delantera con la mano izquierda,
colocando el pulgar debajo de la
manija con los fijo. Mantenga su bra-
zo izquierda recta con el codo rigido.
• Coloque la mano izquierda en la
manija delantera, de modo que
puede en linea recta con la mano
derecha en la manija trasera, cuan-
do este haciendo cortes de seccio-
namiento. P_.rese levemente hacia la
izquierda de la sierra para evitar que
el cuerpo este e linea directa con la
cadena.
• P_.rese con el peso distribuido igual-
mente entre los dos pies.
• No se extienda excesivamente, la
sierra puede impulsarlo o empujarlo
y ud. puede perder el quililibrio y el
control de la sierra.
• No corte arriba del nivel de los hom-
bros, puedsto que torna dificil man-
tener el control de la sierra.
DISPOSITIVIOS DE SEGURIDAD
CONTRA LAS RECULADAS
ADVERTENCIA: Los siguientes
dispositivos han sido incluidos en la
sierra para ayudar a reducir el riesgo de
reculadas; sin embargo, tales implemen-
tos no pueden eliminar totalmente esta
reacci6n peligrosa. Como usuario de
sierra de cadena, ud. no debe confiarse
solamente en los dispositivos de seguri-
dad. Ud. debe seguir todas las precau-
clones de seguridad, instrucciones y
mantenimiento que se encuentran en
este manual para ayudar a evitar las re-
culadas y otras fuerzas que pueden
causar graves heridas.
• Protector de Mano Delantera, dis-
efiado para reducir la probabilidad
que su mano izquierda entre en con-
tacto con la cadena, si la mano se
desprende de la manija delantera.
• La posici6n de las manijas delantera
y trasera, disefiadas con distancia
entre las manijas y "en linea" la una
con la otra. La separaci6n y la cola-
caci6n en linea que este disefio pro-
vee se combinan para dar equilibrio
y resistencia para controlar la propul-
si6n de la sierra hacia el usuario si
acontece una reculada.
• Barra Guia Reducidora de Reculadas,
disefiada con punta de radio pequefio
que reduce el tamafio de la zona de
peligro en la punta de la barra. Las
barras guias reducidoras de reculadas
son aquellas que han demostrado que
reducen significativamente la cantidad
y la seriedad de las reculadas cuando
han sido examinadas de acuerdo con
los requisitos de seguridad para las
sierras de cadena a gasolina estable-
cidos por el Patr6n ANSI (American
National Standards Institute, Inc.)
B175.1.
bZona Punta de Radio
de Pequefio Barra
Guia bona de
Punta de Radio _,_ellg_o
Gaande Barra
Guia
Las Cadenas Minimizadoras de Re-
culadas han satisfecho los requisitos
de rendimiento del ANSI B175.1 (Re-
quisitos de Seguridad para las Sier-
ras de Cadena a Gasolina) en prue-
bas con una muestra representativa
de Sierras de cadena con desplaza-
miento de menos de 3,8 pulgadas,
como se especifica en ANSI B175.1.
21
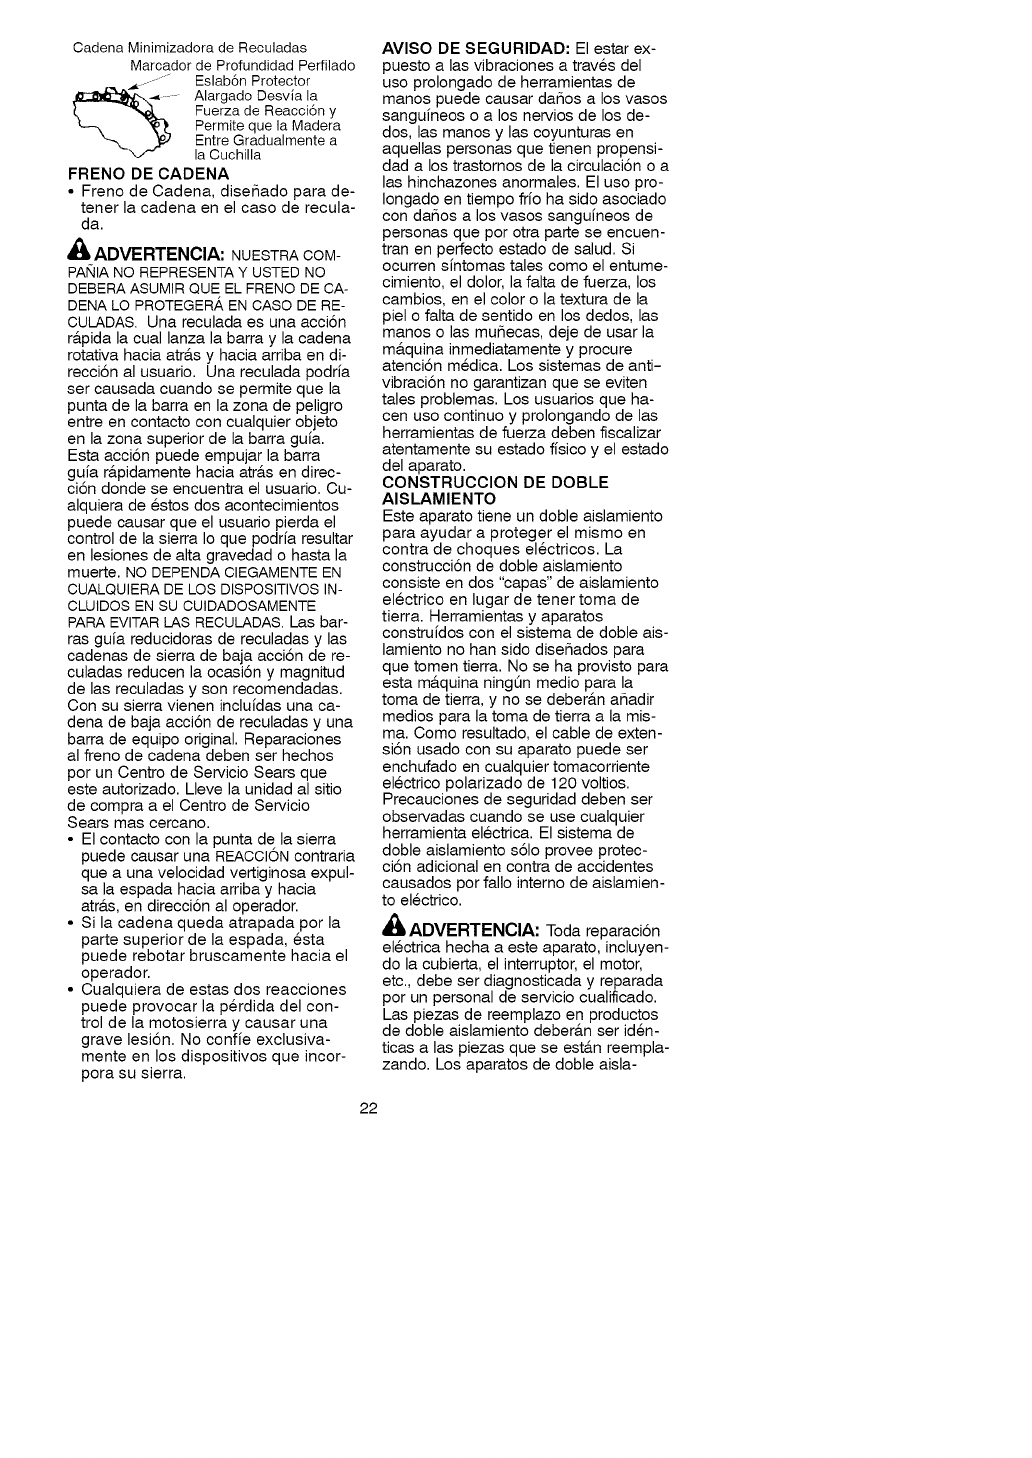
CadenaMinimizadoradeReculadas
MarcadordeProfundidadPerfilado
.........Eslab6nProtector
AlargadoDesviala
FuerzadeReacci6ny
PermitequelaMadera
EntreGradualmentea
laCuchilla
FRENODECADENA
• FrenodeCadena,disefiadoparade-
tenerlacadenaenelcasoderecula-
da.
,_/k ADVERTENOIA: NUESTRA COM-
PAI_IIANO REPRESENTA Y USTED NO
DEBERA ASUMIR QUE EL FRENO DE CA-
DENA LO PROTEGER/_ EN CASO DE RE-
CULADAS. Una reculada es una acci6n
r&pida la cual lanza la barra y la cadena
rotativa hacia atr&s y hacia arriba en di-
recci6n al usuario. Una reculada podria
ser causada cuando se permite que la
punta de la barra en la zona de peligro
entre en contacto con cualquier objeto
en la zona superior de la barra guia.
Esta acci6n puede empujar la barra
guia r_.pidamente hacia atr&s en direc-
ci6n donde se encuentra el usuario. Cu-
alquiera de estos dos acontecimientos
puede causar que el usuario pierda el
control de la sierra Io que podria resultar
en lesiones de alta gravedad o hasta la
muerte. NO DEPENDA CIEGAMENTE EN
CUALQUIERA DE LOS DISPOSMVOS IN-
CLUIDOS EN SU CUIDADOSAMENTE
PAPA EVlTAR LAS RECULADAS. Las bar-
ras guia reducidoras de reculadas y las
cadenas de sierra de baja acci6n de re-
culadas reducen la ocasi6n y magnitud
de las reculadas y son recomendadas.
Con su sierra vienen incluidas una ca-
dena de baja acci6n de reculadas y una
barra de equipo original. Reparaciones
al freno de cadena deben ser hechos
por un Centro de Servicio Sears que
este autorizado. Lleve la unidad al sitio
de compra a el Centro de Servicio
Sears mas cercano.
• El contacto con la punta de la sierra
puede causar una REACCION contraria
que a una velocidad vertiginosa expul-
sa la espada hacia arriba y hacia
atr&s, en direcci6n al operador.
• Si la cadena queda atrapada por la
parte superior de la espada, esta
puede rebotar bruscamente hacia el
operador.
• Cualquiera de estas dos reacciones
puede provocar la p@dida del con-
trol de la motosierra y causar una
grave lesi6n. No confie exclusiva-
mente en los dispositivos que incor-
pora su sierra.
22
AVISO DE SEGURIDAD: El estar ex-
puesto alas vibraciones a traves del
uso prolongado de herramientas de
manos puede causar dafios a los vasos
sanguineos o a los nervios de los de-
dos, las manos y las coyunturas en
aquellas personas que tienen propensi-
dad a los trastornos de la circulaci6n o a
las hinchazones anormales. El uso pro-
Iongado en tiempo frio ha sido asociado
con dafios a los vasos sanguineos de
personas que por otra parte se encuen-
tran en perfecto estado de salud. Si
ocurren sintomas tales como el entume-
cimiento, el dolor, la falta de fuerza, los
cambios, en el color o la textura de la
piel o falta de sentido en los dedos, las
manos o las mufiecas, deje de usar la
m&quina inmediatamente y procure
atenci6n medica. Los sistemas de anti-
vibraci6n no garantizan que se eviten
tales problemas. Los usuarios que ha-
cen uso continuo y prolongando de las
herramientas de fuerza deben fiscalizar
atentamente su estado fisico y el estado
del aparato.
CONSTRUCCION DE DOBLE
AISLAMIENTO
Este aparato tiene un doble aislamiento
para ayudar a proteger el mismo en
contra de choques electricos. La
construcci6n de doble aislamiento
consiste en dos "capas" de aislamiento
electrico en lugar de tener toma de
tierra. Herramientas y aparatos
construidos con el sistema de doble ais-
lamiento no han sido disefiados para
que tomen tierra. No se ha provisto para
esta m&quina ningOn medio para la
toma de tierra, y no se deber&n afiadir
medios para la toma de tierra a la mis-
ma. Como resultado, el cable de exten-
si6n usado con su aparato puede ser
enchufado en cualquier tomacorriente
electrico polarizado de 120 voltios.
Precauciones de seguridad deben ser
observadas cuando se use cualquier
herramienta electrica. El sistema de
doble aislamiento s61o provee protec-
ci6n adicional en contra de accidentes
causados por fallo interno de aislamien-
to electrico.
,_ADVERTENClA: Toda reparacidn
electrica hecha a este aparato, incluyen-
do la cubierta, el interruptor, el motor,
etc., debe ser diagnosticada y reparada
por un personal de servicio cualificado.
Las piezas de reemplazo en productos
de doble aislamiento deber_.n ser iden-
ticas alas piezas que se est_.n reempla-
zando. Los aparatos de doble aisla-
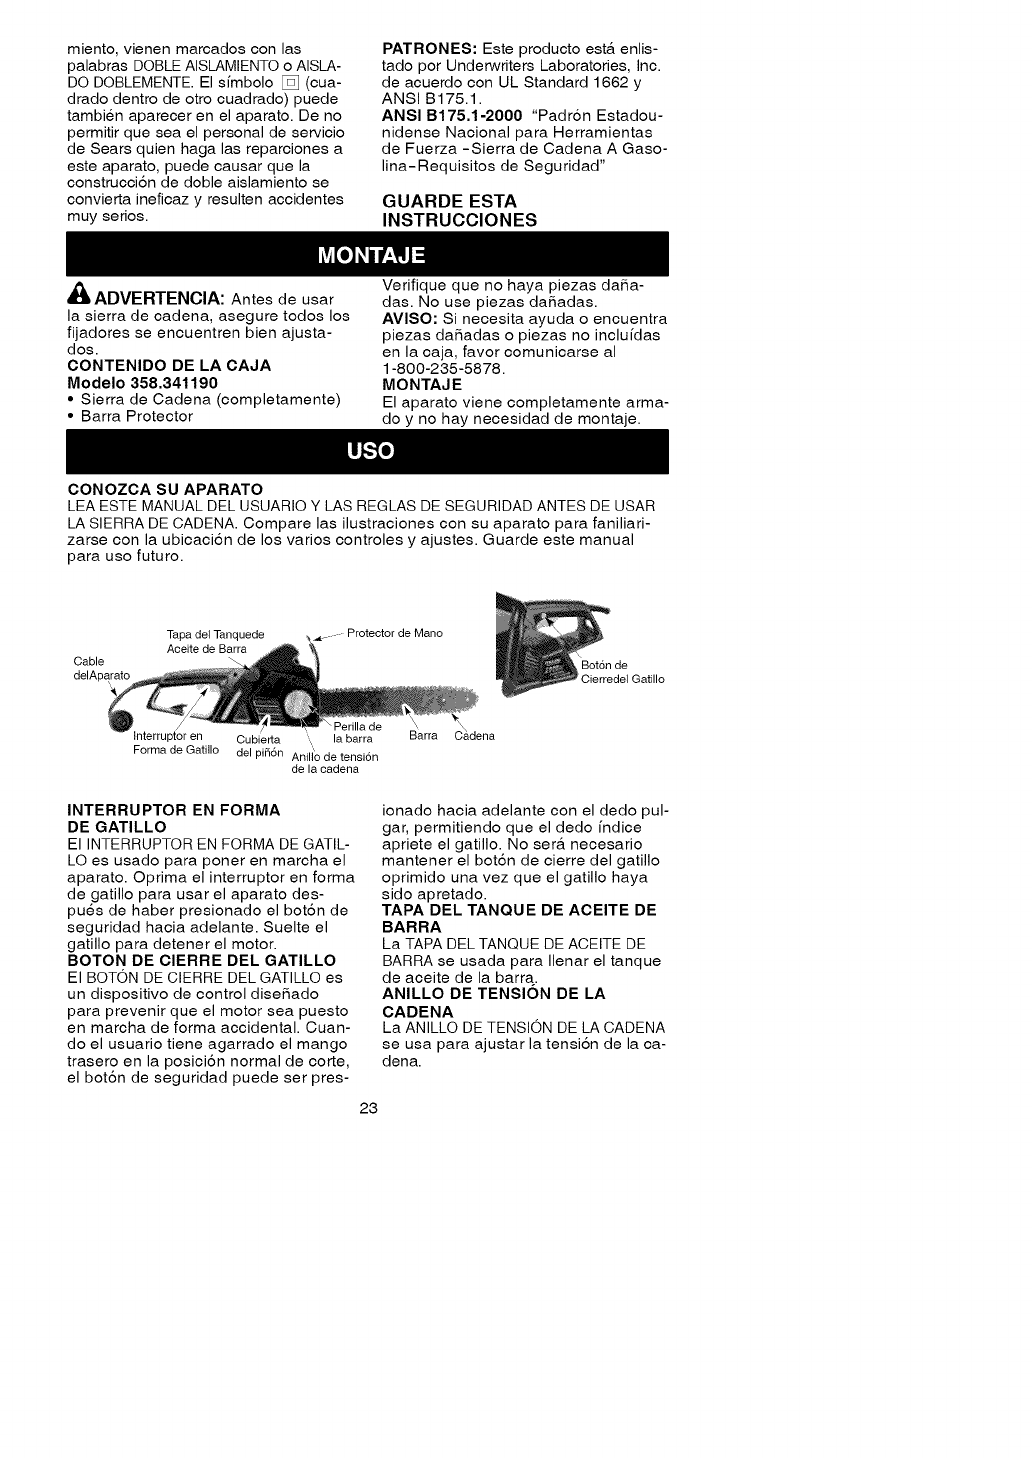
miento,vienenmarcadosconlas
palabrasDOBLEAISLAMIENTOoAISLA-
DODOBLEMENTE.Elsfmbolo[] (cua-
dradodentrodeotrocuadrado)puede
tambienaparecerenelaparato.Deno
permitirqueseaelpersonaldeservicio
deSearsquienhagalasreparcionesa
esteaparato,puedecausarquela
construcci6ndedobleaislamientose
conviertaineficazyresultenaccidentes
muyserios.
PATRONES:EsteproductoestAenlis-
tadoporUnderwritersLaboratories,Inc.
deacuerdoconULStandard1662y
ANSIB175.1.
ANSIB175.1-2000"Padr6nEstadou-
nidenseNacionalparaHerramientas
deFuerza-SierradeCadenaAGaso-
lina-RequisitosdeSeguridad"
GUARDE ESTA
INSTRUCClONES
A
rot, ADVERTENClA: Antes de usar
la sierra de cadena, asegure todos los
fijadores se encuentren bien ajusta-
dos.
OONTENIDO DE LA OAJA
Modelo 358,341190
• Sierra de Cadena (completamente)
• Barra Protector
Verifique que no haya piezas daSa-
das. No use piezas daSadas.
AVlSO: Si necesita ayuda o encuentra
piezas da5adas o piezas no incluidas
en la caja, favor comunicarse al
1-800-235-5878.
MONTAJE
El aparato viene completamente arma-
do y no hay necesidad de montaje.
OONOZOA SU APARATO
LEA ESTE MANUAL DEL USUARIO Y LAS REGLAS DE SEGURIDAD ANTES DE USAR
LA SIERRA DE CADENA. Compare las ilustraciones con su aparato para faniliari-
zarse con la ubicaci6n de los varios controles y ajustes. Guarde este manual
para uso futuro.
Cable
Tapa del Tanquede
Aceite de Barra
., .,_...... Protector de Mano
_ Bot6n de
Cierredel Gatillo
de
Interruptor en Cubierta ",,, la barra
Forma de Gatillo del pi_6n Anili'o de tensi6n
de la cadena
Barra C&dena
INTERRUPTOR EN FORMA
DE OATILLO
El INTERRUPTOR EN FORMA DE GATIL-
LO es usado para poner en marcha el
aparato. Oprima el interruptor en forma
de gatillo para usar el aparato des-
pues de haber presionado el bot6n de
seguridad hacia adelante. Suelte el
gatillo para detener el motor.
BOTON DE OlERRE DEL GATILLO
El BOTON DE CIERRE DEL GATILLO es
un dispositivo de control dise5ado
para prevenir que el motor sea puesto
en marcha de forma accidental. Cuan-
do el usuario tiene agarrado el mango
trasero en la posioi6n normal de corte,
el bot6n de seguridad puede ser pres-
ionado hacia adelante con el dedo pul-
gar, permitiendo que el dedo indice
apriete el gatillo. No serA necesario
mantener el bot6n de cierre del gatillo
oprimido una vez que el gatillo haya
sido apretado.
TAPA DEL TANQUE DE ACEITE DE
BARRA
La TAPA DEL TANQUE DE ACEITE DE
BARRA se usada para Ilenar el tanque
de aceite de la barra..
ANILLO DE TENSION DE LA
OADENA
La ANILLO DE TENSION DE LA CADENA
se usa para ajustar la tensi6n de la ca-
dena.
23
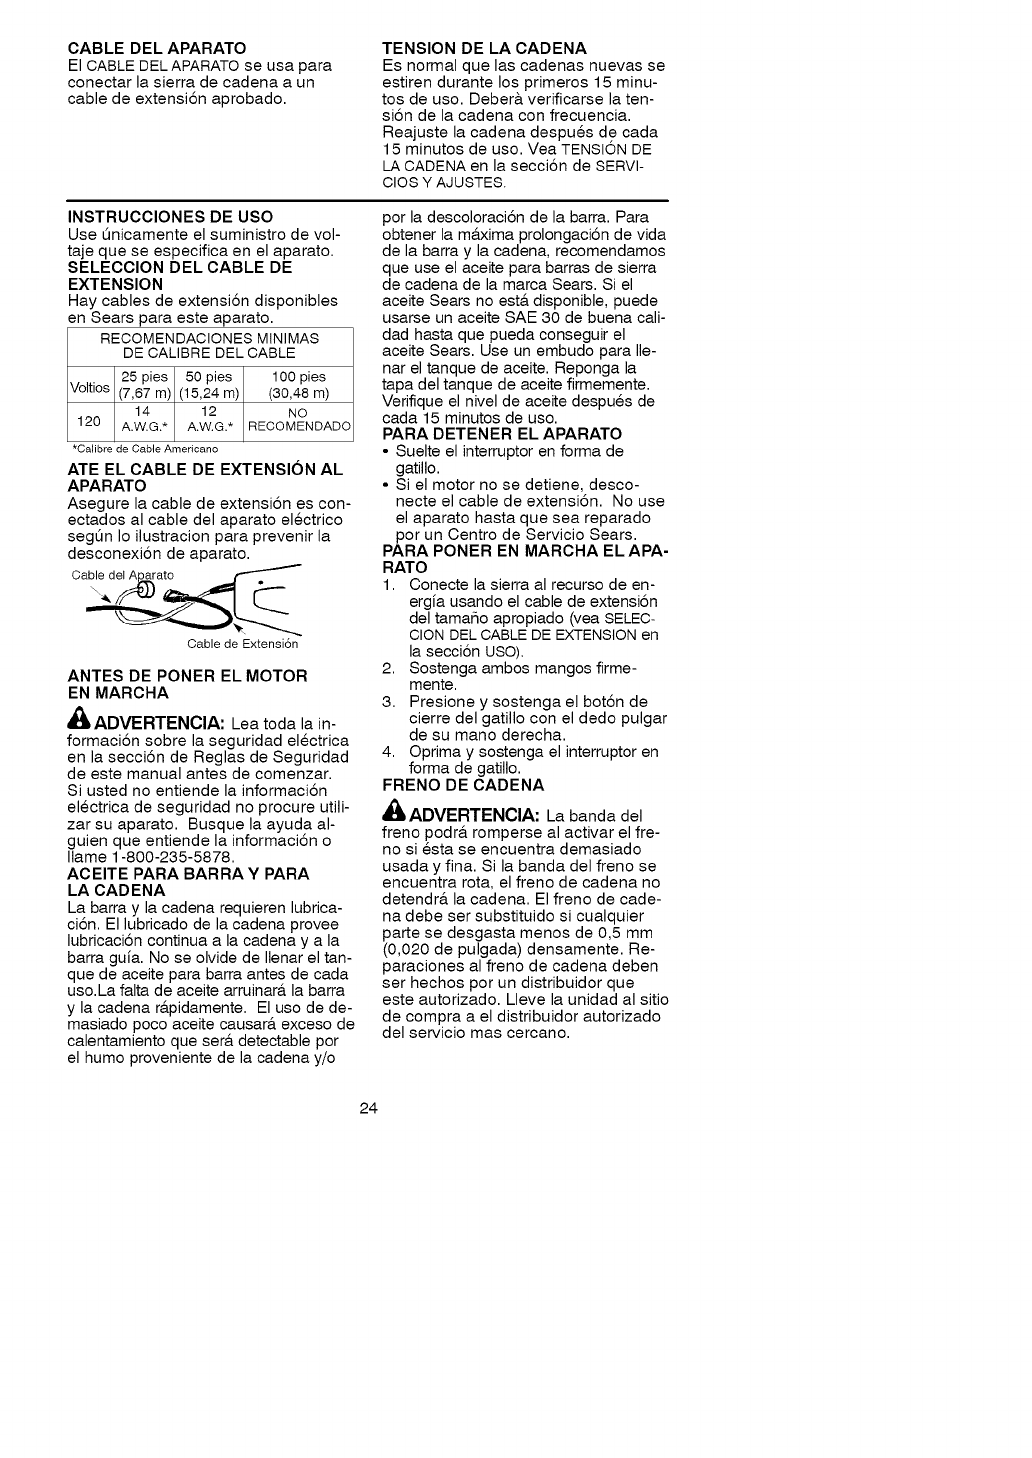
CABLEDELAPARATO
ElCABLEDELAPARATOseusapara
conectarlasierradecadenaaun
cabledeextensi6naprobado
TENSIONDELACADENA
Esnormalquelascadenasnuevasse
estiren durante los primeros 15 minu-
tos de uso Deber& verificarse la ten-
si6n de la cadena con frecuencia
Reajuste la cadena despues de cada
15 minutos de uso Vea TENSION DE
LA CADENA en la secci6n de SERVI-
CIOS Y AJUSTES
INSTRUCClONES DE USO
Use 5nicamente el suministro de vol-
taje que se especifica en el aparato
SELECClON DEL CABLE DE
EXTENSION
Hay cables de extensi6n disponibles
en Sears para este aparato
RECOMENDACIONES MINIMAS
DE CALIBRE DEL CABLE
25 pies 50 pies 100 pies
Voltios (7,67 m) (15,24 m) (30,48 m)
14 12 NO
120 A.W.G.* A.W.G.* RECOMENDADO
*Calibre de Cable Americano
ATE EL CABLE DE EXTENSION AL
APARATO
Asegure la cable de extensi6n es con-
ectados al cable del aparato electrico
segSn Io ilustracion para prevenir la
desconexi6n de aparato
Cable deI Aj_ato
Cable de Extensidn
ANTES DE PONER EL MOTOR
EN MARCHA
_ILADVERTENClA: Lea toda la in-
formaci6n sobre la seguridad electrica
en la secci6n de Reglas de Seguridad
de este manual antes de comenzar
Si usted no entiende la informaci6n
electrica de seguridad no procure utili-
zar su aparato Busque la ayuda al-
guien que entiende la informaci6n o
Ilame 1-800-235-5878
ACEITE PARA BARRA Y PARA
LA CADENA
La barra y la cadena requieren lubrica-
ci6n El lubricado de la cadena provee
lubricaci6n continua a la cadena y a la
barra guia No se olvide de Ilenar el tan-
que de aceite para barra antes de cada
usoLa falta de aceite arruinar& la barra
y la cadena r&pidamente El uso de de-
masiado poco aceite causar_, exceso de
calentamiento que ser& detectable por
el humo proveniente de la cadena y/o
por la descoloraci6n de la barra. Para
obtener la m_.xima prolongaci6n de vida
de la barra y la cadena, recomendamos
que use el aceite para barras de sierra
de cadena de la marca Sears. Si el
aceite Sears no est,. disponible, puede
usarse un aceite SAE 30 de buena cali-
dad hasta que pueda conseguir el
aceite Sears. Use un embudo para Ile-
nar el tanque de aceite. Reponga la
tapa del tanque de aceite firmemente.
Verifique el nivel de aceite despues de
cada 15 minutos de uso.
PARA DETENER EL APARATO
• Suelte el interruptor en forma de
gatillo
• Si el motor no se detiene, desco-
necte el cable de extensi6n No use
el aparato hasta que sea reparado
por un Centro de Servicio Sears
PARA PONER EN MARCHA EL APA-
RATO
1 Conecte la sierra al recurso de en-
ergia usando el cable de extensi6n
del tamaSo apropiado (vea SELEC-
CION DEL CABLE DE EXTENSION en
la secci6n USO).
2. Sostenga ambos mangos firme-
mente.
3. Presione y sostenga el bot6n de
cierre del gatillo con el dedo pulgar
de su mano derecha.
4. Oprima y sostenga el interruptor en
forma de gatillo.
FRENO DE CADENA
_ILADVERTENClA: La banda del
freno podr& romperse al activar el fre-
no si esta se encuentra demasiado
usada y fina Si la banda del freno se
encuentra rota, el freno de cadena no
detendr& la cadena El freno de cade-
na debe ser substituido si cualquier
parte se desgasta menos de 0,5 mm
(0,020 de pulgada) densamente Re-
paraciones al freno de cadena deben
ser hechos por un distribuidor que
este autorizado Lleve la unidad al sitio
de compra a el distribuidor autorizado
del servicio mas cercano
24
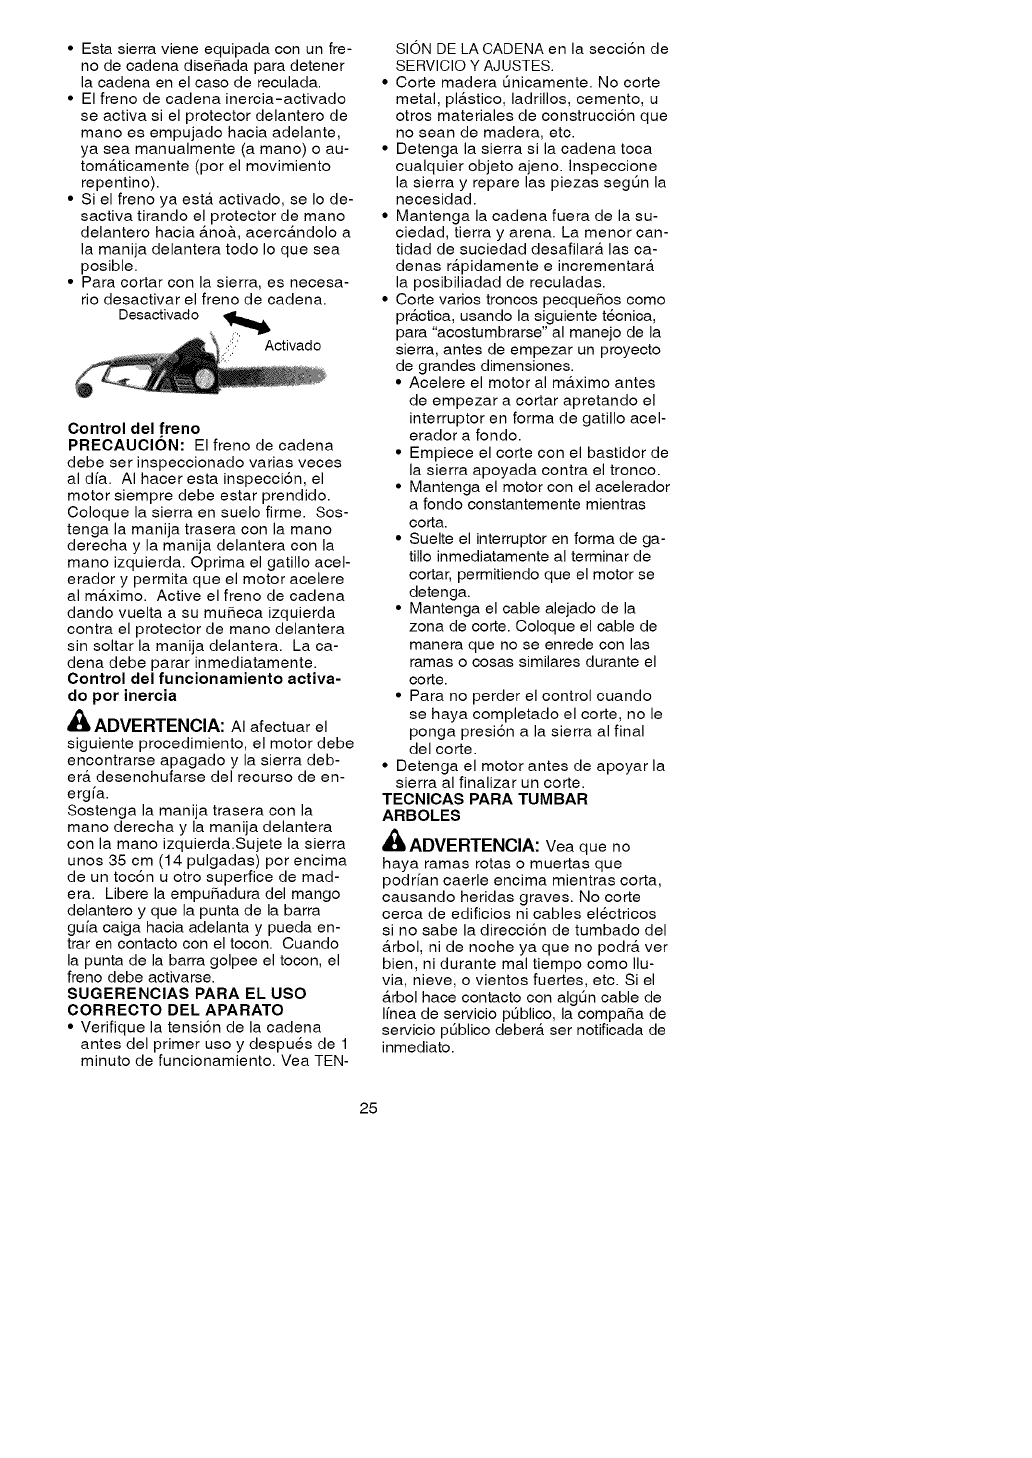
• Estasierravieneequipadaconunfre-
nodecadenadiseRadaparadetener
lacadenaenelcasodereculada.
• Elfrenodecadenainercia-activado
seactivasielprotectordelanterode
manoesempujadohaciaadelante,
yaseamanualmente(amano)oau-
tomAticamente(porelmovimiento
repentino).
• Sielfrenoyaesteractivado,seIode-
sactivatirandoelprotectordemano
delanterohacia_no&,acerc_ndoloa
lamanijadelanteratodoIoquesea
posible.
• Paracortarconlasierra,esnecesa-
riodesactivarelfrenodecadena.
Desactivado,_
:_:i.' Activado
Control del .freno
PRECAUCION: El freno de cadena
debe ser inspeccionado varias veces
al dfa. AI hacer esta inspecci6n, el
motor siempre debe estar prendido.
Coloque la sierra en suelo firme. Sos-
tenga la manija trasera con la mano
derecha y la manija delantera con la
mano izquierda. Oprima el gatillo acel-
erador y permita que el motor acelere
al mAximo. Active el freno de cadena
dando vuelta a su muReca izquierda
contra el protector de mano delantera
sin soltar la manija delantera. La ca-
dena debe parar inmediatamente.
Control del funcionamiento activa-
do por inercia
ADVERTENOIA: AI afectuar el
siguiente procedimiento, el motor debe
encontrarse apagado y la sierra deb-
era desenchufarse del recurso de en-
ergfa.
Sostenga la manija trasera con la
mano derecha y la manija delantera
con la mano izquierda.Sujete la sierra
unos 35 cm (14 pulgadas) por encima
de un toc6n u otro superfice de mad-
era. Libere la empuRadura del mango
delantero y que la punta de la barra
gufa caiga hacia adelanta y pueda en-
trar en contacto con el tocon. Cuando
la punta de la barra golpee el tocon, el
freno debe activarse.
SUGERENCIAS PARA EL USO
OORREOTO DEL APARATO
• Verifique la tensi6n de la cadena
antes del primer uso y despues de 1
minuto de funcionamiento. Vea TEN-
SION DE LA CADENA en la secci6n de
SERVICIO Y AJUSTES.
• Corte madera Onicamente. No corte
metal, plAstico, ladrillos, cemento, u
otros materiales de construcci6n que
no sean de madera, etc.
• Detenga la sierra si la cadena toca
cualquier objeto ajeno. Inspeccione
la sierra y repare las piezas segOn la
necesidad.
• Mantenga la cadena fuera de la su-
ciedad, tierra y arena. La menor can-
tidad de suciedad desafilarA las ca-
denas rApidamente e incrementarA
la posibiliadad de reculadas.
• Corte varios troncos pecque5os como
prActica, usando la siguiente tecnica,
para "acostumbrarse" al manejo de la
sierra, antes de empezar un proyecto
de grandes dimensiones.
• Acelere el motor al mAximo antes
de empezar a cortar apretando el
interruptor en forma de gatillo acel-
erador a fondo.
• Empiece el corte con el bastidor de
la sierra apoyada contra el tronco.
• Mantenga el motor con el acelerador
a fondo constantemente mientras
corta.
• Suelte el interruptor en forma de ga-
tillo inmediatamente al terminar de
cortar, permitiendo que el motor se
detenga.
• Mantenga el cable alejado de la
zona de corte. Coloque el cable de
manera que no se enrede con las
ramas o cosas similares durante el
torte.
• Para no perder el control cuando
se haya completado el corte, no le
ponga presi6n a la sierra al final
del corte.
• Detenga el motor antes de apoyar la
sierra al finalizar un corte.
TEONIOAS PARA TUMBAR
ARBOLES
_IL ADVERTENOIA: Yea que no
haya ramas rotas o muertas que
podrfan caerle encima mientras corta,
causando heridas graves. No corte
cerca de edificios ni cables electricos
si no sabe la direcci6n de tumbado del
Arbol, ni de noche ya que no podrA ver
bien, ni durante mal tiempo como Ilu-
via, nieve, o vientos fuertes, etc. Si el
Arbol hace contacto con algOn cable de
Ifnea de servicio pOblico, la compa5a de
servicio pt3blico deberA ser notificada de
inmediato.
25
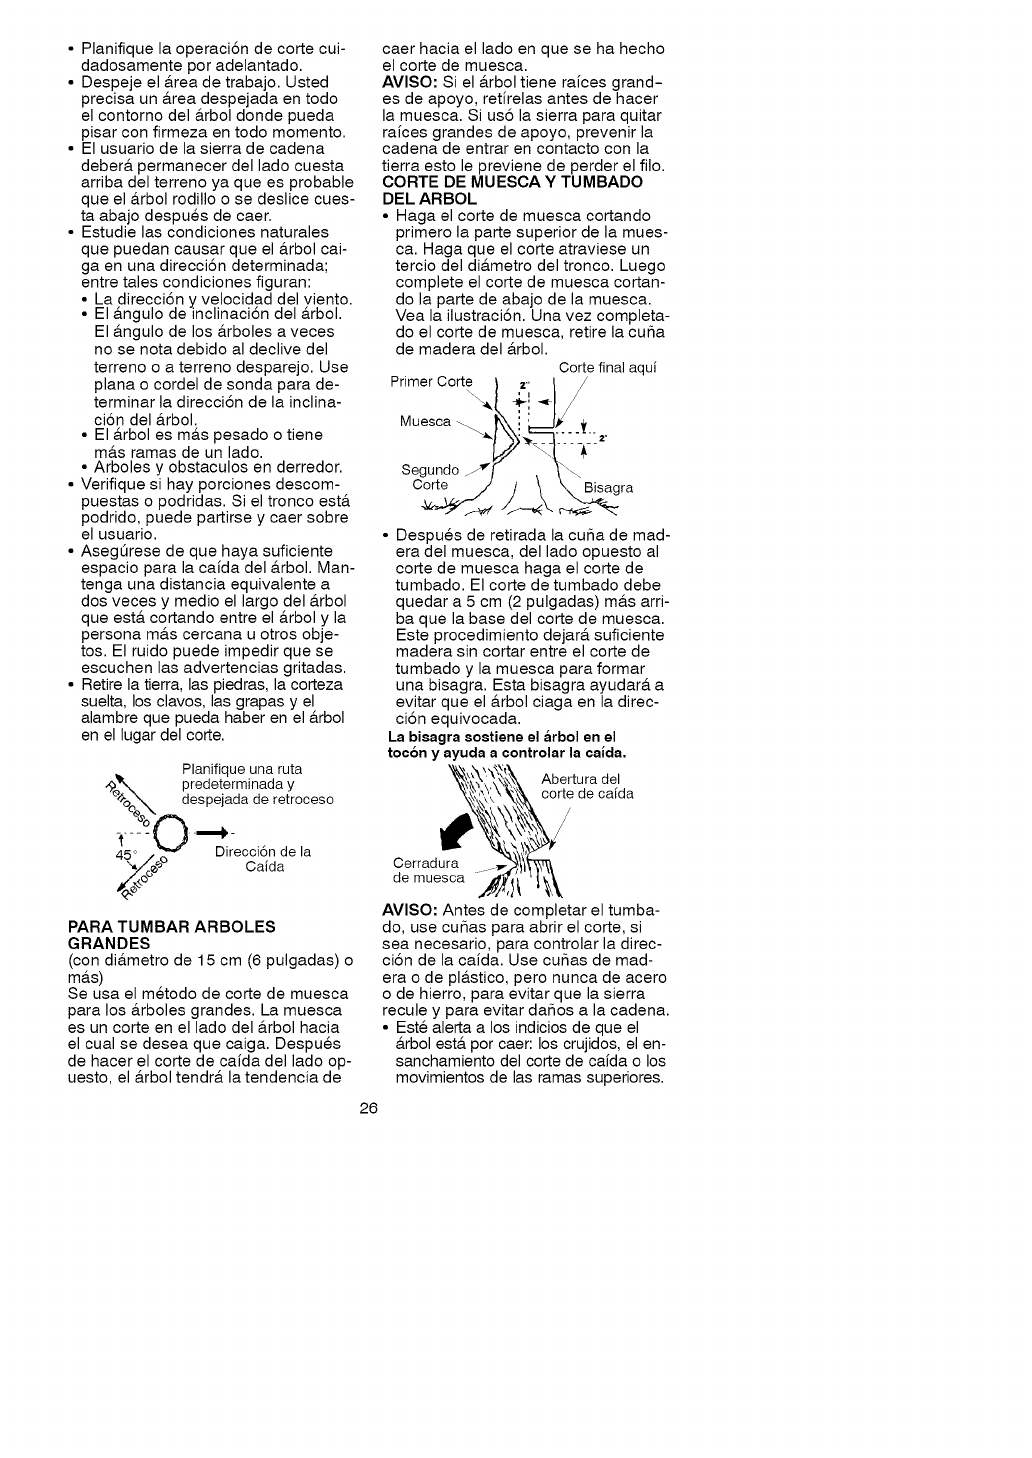
• Planifiquelaoperaci6ndecortecui-
dadosamenteporadelantado.
• Despejeel&readetrabajo.Usted
precisaun&readespejadaentodo
elcontornodel&rboldondepueda
pisarconfirmezaentodomomento.
• Elusuariodelasierradecadena
deber&permanecerdelladocuesta
arribadelterrenoyaqueesprobable
queel_.rbolrodilloosedeslicecues-
taabajodespuesdecaer.
• Estudielascondicionesnaturales
quepuedancausarqueel&rbolcai-
gaenunadirecci6ndeterminada;
entretalescondicionesfiguran:
• Ladirecci6nyvelocidaddelviento.
El&ngulodeinclinaci6ndel&rbol.
El&ngulodelos&rbolesaveces
nosenotadebidoaldeclivedel
terrenooaterrenodesparejo.Use
planaocordeldesondaparade-
terminarladirecci6ndelainclina-
ci6ndel&rbol.
• El&rbolesm&spesadootiene
m&sramasdeunlado.
•Arbolesyobstaculosenderredor.
•Verifiquesihayporcionesdescom-
puestasopodridas.Sieltroncoest&
podrido,puedepartirseycaersobre
elusuario.
•Aseg0resedequehayasuficiente
espacioparalacaidadel&rbol.Man-
tengaunadistanciaequivalentea
dosvecesymedioellargodel&rbol
queest&cortandoentreel&rbolyla
personam&scercanauotrosobje-
tos.Elruidopuedeimpedirquese
escuchenlasadvertenciasgritadas.
• Retirelatierra,laspiedras,lacorteza
suelta,losclavos,lasgrapasyel
alambrequepuedahaberenel&rbol
enellugardelcore.
Planifiqueunaruta
x_o_x, predeterminaday
_"o_ despejadaderetroceso
Direccidndela
4_/,____° Caida
PARATUMBARARBOLES
GRANDES
(condi&metrode15cm(6pulgadas)o
m&s)
Seusaelmetododecortedemuesca
paralos&rbolesgrandes.Lamuesca
esuncorteenelladodel&rbolhacia
elcualsedeseaquecaiga.Despues
dehacerelcortedecaidadelladoop-
uesto,el&rboltendr&latendenciade
caerhaciaelladoenquesehahecho
elcortedemuesca.
AVlSO:Siel&rboltieneraicesgrand-
esdeapoyo,retirelasantesdehacer
lamuesca.Sius6lasierraparaquitar
raicesgrandesdeapoyo,prevenirla
cadenadeentrarencontactoconla
tierraestoleprevienedeperderelfilo.
CORTEDEMUESOA Y TUMBADO
DEL ARBOL
• Haga el corte de muesca cortando
primero la parte superior de la mues-
ca. Haga que el corte atraviese un
tercio del di&metro del tronco. Luego
complete el corte de muesca cortan-
do la parte de abajo de la muesca.
Vea la ilustraci6n. Una vez completa-
do el corte de muesca, retire la cuSa
de madera del &rbol.
Corte final aqui
Primer Corte } z,' I J
+!*1/
Mues°a N\i
Segundo zz_"f- _-_
Corte. ") / \ y'Bisagra
• Despues de retirada la cuSa de mad-
era del muesca, del lado opuesto al
corte de muesca haga el corte de
tumbado. El corte de tumbado debe
quedar a 5 cm (2 pulgadas) m&s arri-
ba que la base del corte de muesca.
Este procedimiento dejar& suficiente
madera sin cortar entre el corte de
tumbado y la muesca para formar
una bisagra. Esta bisagra ayudar& a
evitar que el &rbol ciaga en la direc-
ci6n equivocada.
La bisagra sostiene el arbol en el
tocon y ayuda a controlar la calda.
Abertura del
corte de caida
//
Cerradura
de muesca
AVISO: Antes de completar el tumba-
do, use cuSas para abrir el corte, si
sea necesario, para controlar la direc-
ci6n de la caida. Use cuSas de mad-
era o de pl&stico, pero nunca de acero
o de hierro, para evitar que la sierra
recule y para evitar daSos a la cadena.
• Este alerta a los indicios de que el
&rbol est& por caer: los crujidos, el en-
sanchamiento del corte de caida o los
movimientos de las ramas superiores.
26
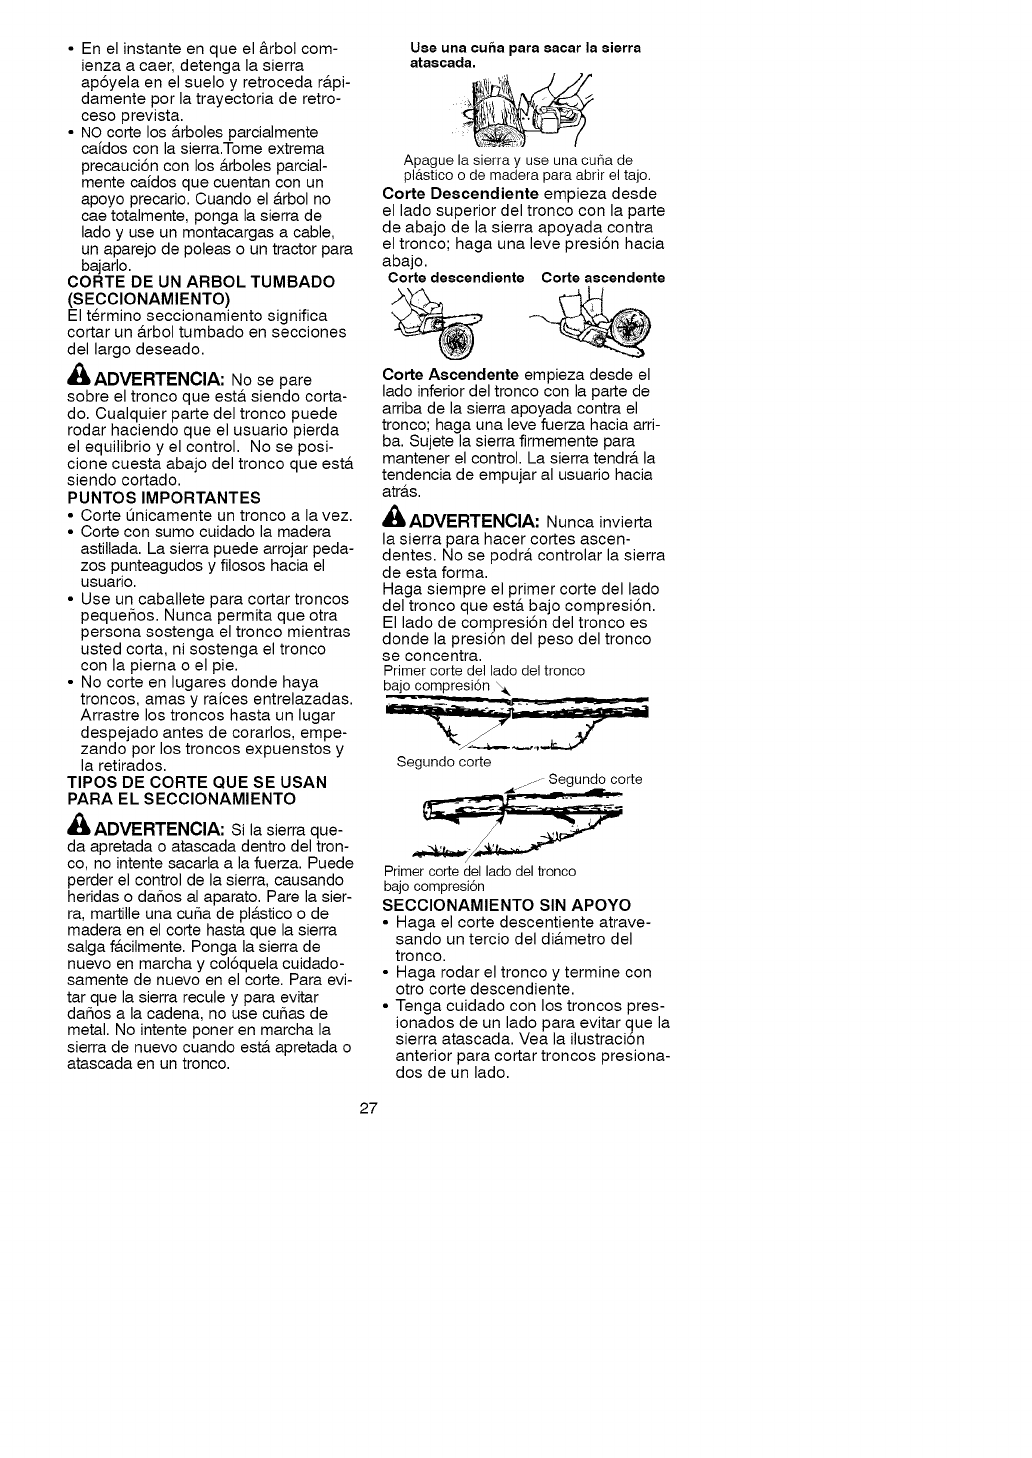
• Enelinstanteenqueel&rbolcom-
ienzaacaer,detengalasierra
ap6yelaenelsueloyretrocedar&pi-
damenteporlatrayectoriaderetro-
cesoprevista.
•NOcortelos&rbolesparcialmente
caidosconlasierra.Tomeextrema
precauci6nconlos_.rbolesparcial-
mentecaidosquecuentanconun
apoyoprecario.Cuandoel&rbolno
caetotalmente,pongalasierrade
ladoyuseunmontacargasacable,
unaparejodepoleasountractorpara
bajarlo.
CORTEDEUNARBOLTUMBADO
(SECClONAMIENTO)
Elterminoseccionamientosignifica
cortarun&rboltumbadoensecciones
dellargodeseado.
_ADVERTENClA:Nosepare
sobreeltroncoqueest,.siendocorta-
do.Cualquierpartedeltroncopuede
rodarhaciendoqueelusuariopierda
elequilibrioyelcontrol.Noseposi-
clonecuestaabajodeltroncoqueest&
siendocortado.
PUNTOSIMPORTANTES
• Cortet3nicamenteuntroncoalavez.
• Corteconsumocuidadolamadera
astillada.Lasierrapuedearrojarpeda-
zospunteagudosyfilososhaciael
usuario.
• Useuncaballeteparacortartroncos
pequeSos.Nuncapermitaqueotra
personasostengaeltroncomientras
ustedcorta,nisostengaeltronco
conlapiemaoelpie.
• Nocorteenlugaresdondehaya
troncos,amasyraicesentrelazadas.
Arrastrelostroncoshastaunlugar
despejadoantesdecorarlos,empe-
zandoporlostroncosexpuenstosy
laretirados.
TIPOSDECORTEQUESEUSAN
PARAELSECClONAMIENTO
_ILADVERTENClA: Si la sierra que-
da apretada o atascada dentro del tron-
co, no intente sacarla a la fuerza. Puede
perder el control de la sierra, causando
heridas o daSos al aparato. Pare la sier-
ra, martille una cuSa de pl&stico o de
madera en el corte hasta que la sierra
salga f&cilmente. Ponga la sierra de
nuevo en marcha y col6quela cuidado-
samente de nuevo en el corte. Para evi-
tar que la sierra recule y para evitar
daSos a la cadena, no use cuSas de
metal. No intente poner en marcha la
sierra de nuevo cuando est& apretada o
atascada en un tronco.
Use una cuba para sacar la sierra
atascada.
Apague la sierra y use una cuSa de
pl&stico o de madera para abrir el tajo.
Corte Descendiente empieza desde
el lado superior del tronco con la parte
de abajo de la sierra apoyada contra
el tronco; haga una leve presi6n hacia
abajo.
Corte descendiente Corte aseendente
Corte Ascendente empieza desde el
lado inferior del tronco con la parte de
arriba de la sierra apoyada contra el
tronco; haga una leve fuerza hacia arri-
ba. Sujete la sierra firmemente para
mantener el control. La sierra tendr& la
tendencia de empujar al usuario hacia
atr&s.
_/L ADVERTENClA: Nunca invierta
la sierra para hacer cortes ascen-
dentes. No se podr& controlar la sierra
de esta forma.
Haga siempre el primer corte del lado
del tronco que est& bajo compresi6n.
El lado de compresi6n del tronco es
donde la presi6n del peso del tronco
se concentra.
Primer corte del lade del tronco
bajo compresi6n _,
Segundo corte
j-_ Segundo corte
Primer corte del lado del tronco
bajocompresi6n
SECClONAMIENTO SIN APOYO
• Haga el corte descentiente atrave-
sando un tercio del di&metro del
tronco.
• Haga rodar el tronco y termine con
otro corte descendiente.
• Tenga cuidado con los troncos pres-
ionados de un lado para evitar que la
sierra atascada. Yea la ilustraci6n
anterior para cortar troncos presiona-
dos de un lado.
27
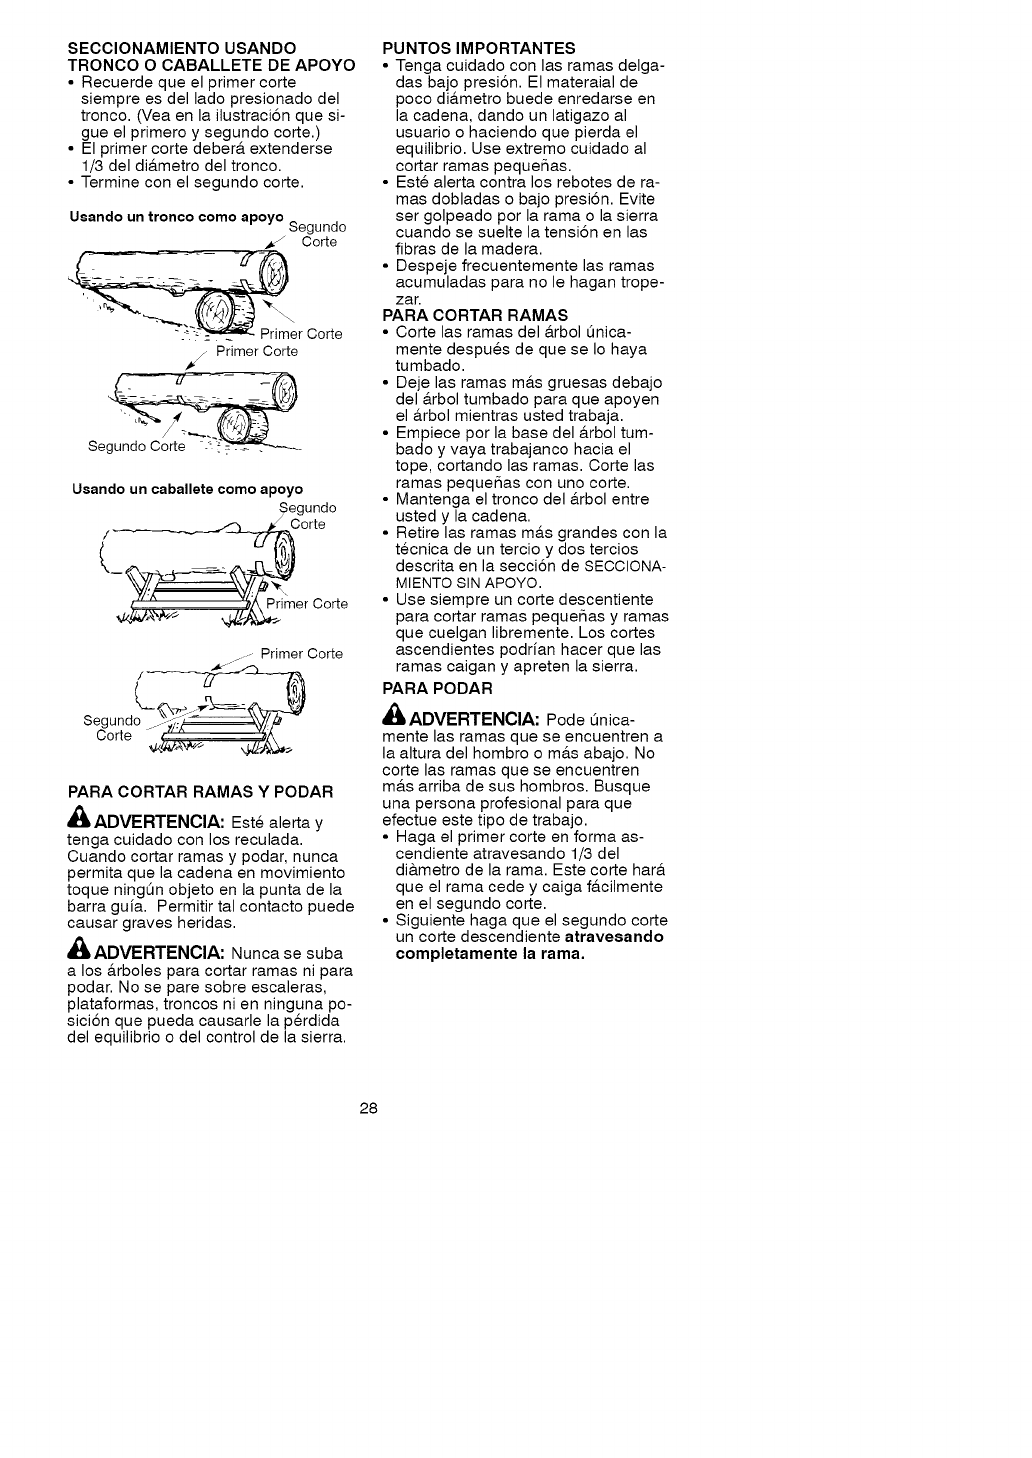
SECCIONAMIENTOUSANDO
TRONCOOCABALLETEDE APOYO
• Recuerde que el primer corte
siempre es del lado presionado del
tronco. (Vea en la ilustraci6n que si-
gue el primero y segundo corte.)
• El primer corte deber& extenderse
1/3 del di&metro del tronco.
• Termine con el segundo corte.
Usando un tronco como apoyo Segundo
Corte
• ":__--'_"_ Primer Corte
Primer Corte
Usando un caballete como apoyo
Segundo
/_Corte
{, ___ Co ,e
./---- Primer Corte
/ ,,t,_
Se,
PARA CORTAR RAMAS YPODAR
_ILADVERTENClA: Este alerta y
tenga cuidado con los reculada.
Cuando cortar ramas y podar, nunca
permita que la cadena en movimiento
toque ningOn objeto en la punta de la
barra guia. Permitir tal contacto puede
causar graves heridas.
_L, ADVERTENClA: Nunca se suba
a los &rboles para cortar ramas ni para
podar. No se pare sobre escaleras,
plataformas, troncos ni en ninguna po-
sici6n que pueda causarle la p@dida
del equilibrio o del control de la sierra.
PUNTOS IMPORTANTES
• Tenga cuidado con las ramas delga-
das bajo presi6n. El materaial de
poco di&metro buede enredarse en
la cadena, dando un latigazo al
usuario o haciendo que pierda el
equilibrio. Use extremo cuidado al
cortar ramas pequeSas.
• Este alerta contra los rebotes de ra-
mas dobladas o bajo presi6n. Evite
ser golpeado por la rama o la sierra
cuando se suelte la tensi6n en las
fibras de la madera.
• Despeje frecuentemente las ramas
acumuladas para no le hagan trope-
zar.
PARA CORTAR RAMAS
• Corte las ramas del &rbol t3nica-
mente despues de que se Io haya
tumbado.
• Deje las ramas m&s gruesas debajo
del &rbol tumbado para que apoyen
el &rbol mientras usted trabaja.
• Empiece por la base del &rbol tum-
bado y vaya trabajanco hacia el
tope, cortando las ramas. Corte las
ramas pequeSas con uno corte.
• Mantenga el tronco del &rbol entre
usted y la cadena.
• Retire las ramas m&s grandes con la
tecnica de un tercio y dos tercios
descrita en la secci6n de SECCIONA-
MIENTO SIN APOYO.
• Use siempre un corte descentiente
para cortar ramas peque_as y ramas
que cuelgan libremente. Los cortes
ascendientes podrian hacer que las
ramas caigan y apreten la sierra.
PARA PODAR
ADVERTENCIA: Pode 5nica-
mente las ramas que se encuentren a
la altura del hombro o m&s abajo. No
corte las ramas que se encuentren
m&s arriba de sus hombros. Busque
una persona profesional para que
efectue este tipo de trabajo.
• Haga el primer corte en forma as-
cendiente atravesando 1/3 del
di&metro de la rama. Este corte har&
que el rama cede y caiga f&cilmente
en el segundo corte.
• Siguiente haga que el segundo corte
un corte descendiente atravesando
completamente la rama.
28
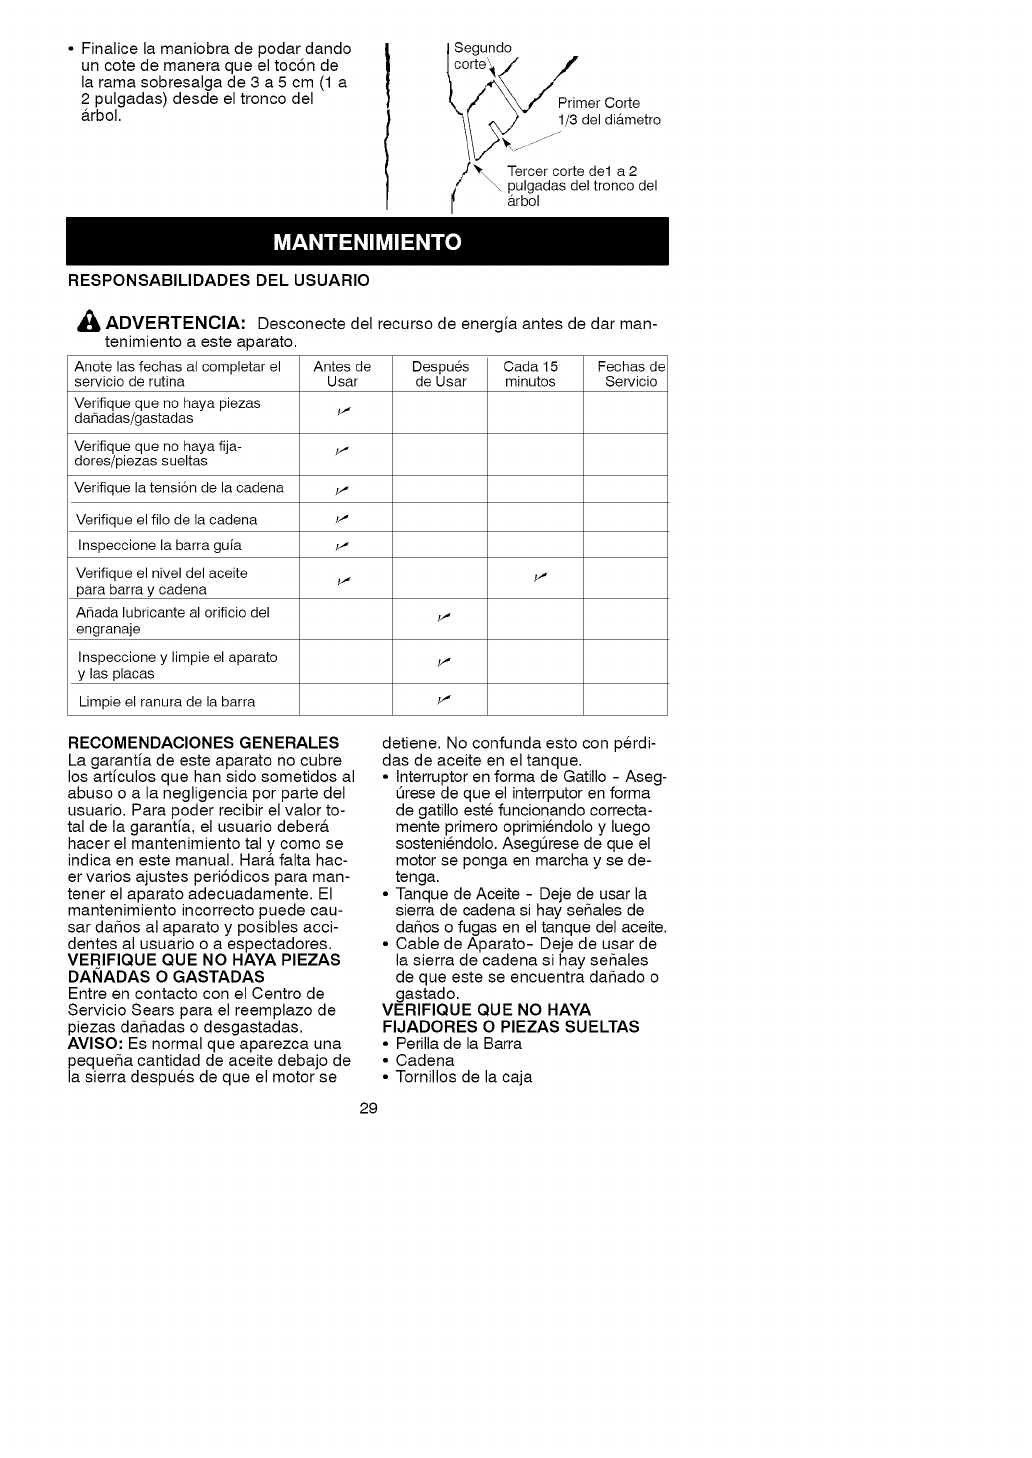
• Finalicelamaniobradepodardando
uncotedemaneraqueeltoc6nde
laramasobresalgade3a5cm(1a
2pulgadas)desdeeltroncodel
&rbol.
RESPONSABILIDADESDELUSUARIO
/
1IS....... ,3 e, ,ametro
/'_ Tercer corte de1 a 2
pulgadas del tronco del
I arbol
,_ ADVERTENCIA:
tenimiento a este aparato.
Anote las fechas al completar el Antes de
servicio de rutina Usar
Verifique que no haya piezas i_"
dahadas/gastadas
Verifique que no haya fija- _,
dores/piezas sueltas
Verifique la tensi6n de la cadena _,
Verifique el filo de la cadena _'
Inspeccione la barra guia _'
Verifique el nivel del aceite i_" _'
para barra y cadena
Anada lubricante al orificio del _,
engranaje
Inspeccione y limpie el aparato _,
y las placas
Limpie el ranura de la barra _'
Desconecte del recurso de energia antes de dar man-
Despues Cada 15 Fechas de
de Usar minutos Servicio
RECOMENDACIONES GENERALES
La garantia de este aparato no cubre
los articulos que han sido sometidos al
abuso o a la negligencia por parte del
usuario. Para poder recibir el valor to-
tal de la garantia, el usuario deber&
hacer el mantenimiento tal y como se
indica en este manual. Har& falta hac-
er varios ajustes peri6dicos para man-
tener el aparato adecuadamente. El
mantenimiento incorrecto puede cau-
sar daSos al aparato y posibles acci-
dentes al usuario o a espectadores.
VERIFICIUE ClUE NO HAYA PIEZAS
DAI_ADAS O GASTADAS
Entre en contacto con el Centro de
Servicio Sears para el reemplazo de
piezas daSadas o desgastadas.
AVISO: Es normal que aparezca una
pequeSa cantidad de aceite debajo de
la sierra despues de que el motor se
detiene. No confunda esto con perdi-
das de aceite en el tanque.
• Interruptor en forma de Gatillo - Aseg-
6rese de que el interrputor en forma
de gatillo este funcionando correcta-
mente primero oprimiendolo y luego
sosteniendolo. Aseg0rese de que el
motor se ponga en marcha y se de-
tenga.
• Tanque de Aceite - Deje de usar la
sierra de cadena si hay se_ales de
da_os o fugas en el tanque del aceite.
• Cable de Aparato- Deje de usar de
la sierra de cadena si hay se_ales
de que este se encuentra da_ado o
gastado.
VERIFIQUE QUE NO HAYA
FIJADORES O PIEZAS SUELTAS
• Perilla de la Barra
• Cadena
• Tornillos de la caja
29
VERIFIQUE LA TENSION DE LA
CADENA
ADVERTENCIA: Use guantes
protectores al manejar la cadena. La
cadena tiene file y podrfa causarle
graves cortaduras, aun cuando esta
no se enouentre en movimiento.
La tensi6n de la cadena es muy impor-
tante. Estiramientos de la cadena du-
rante use. Esto es especialmente ver-
dad durante los tiempos primeros que
usted utiliza la sierra. Controle
siempre la tensi6n de la cadena cada
vez que usted utiliza su sierra.
NOTA: AsegQrese de que el FRENO
DE CADENA se encuentre liberado.
Libere el FRENO DE CADENA (A)
tirando de 61 haeia atrAs.
Desactivado
Activado
1.
2.
Desconecte el aparato del recurso
de energfa.
Usando el destomillador, para mover
la eadena alrededor de la barra gufa
para asegurarse de que la eadena
no se haya enroscado. La eadena
deberA moverse libremente.
4. Despues del ajuste y utilizando
guantes protectores de alta
resistenoia, presione con una
mane el bot6n de aislamiento /
apagado situado en la parte
superior del mango trasero y, al
mismo tiempo, apriete el gatillo.
A continuaci6n, mueva la
oadena de la sierra con la otra
mane haoia atras y haoia
delante sobre la espada para
asegurarse de que se mueve
libremente y se ha engranado
correctamente en el piR6n.
NOTA: Si es diffcil girar la cadena o
si se atasoa en la espada, ello
indica que se ha aplicado
demasiada tensi6n y debe ajustarse
segQn Io descrito en el paso 1.
5. AI aplicar tensi6n a la cadena.
Sostenga la punta de la espada
orientada haeia arriba y apriete
el mando de ajuste de la
espada.
AADVERTENClA: Si la sierra se
funciona con un cadena flojo, la cade-
na podrfa saltar de la barra y resultado
en accidentes muy graves.
VERIFIQUE Sl LA CADENA SE
ENOUENTRA AFILADA
Las cadenas afiladas producen troci-
tos de madera al cortar. Las cadenas
desafiladas, per otra parte, producen
polvo de aserrfn y cortan lentamente.
Vea AFILACION DE LA CADENA en la
secci6n SERVICIO Y AJUSTES.
3. El ajuste de la tensi6n de la
cadena es sencillo. Gire el mando
de ajuste de la espada (A) haeia la
izquierda. A continuaci6n, gire el
anillo (B) haeia la izquierda para
aflojar la cadena o hacia la
dereeha para apretarla.
A
3O
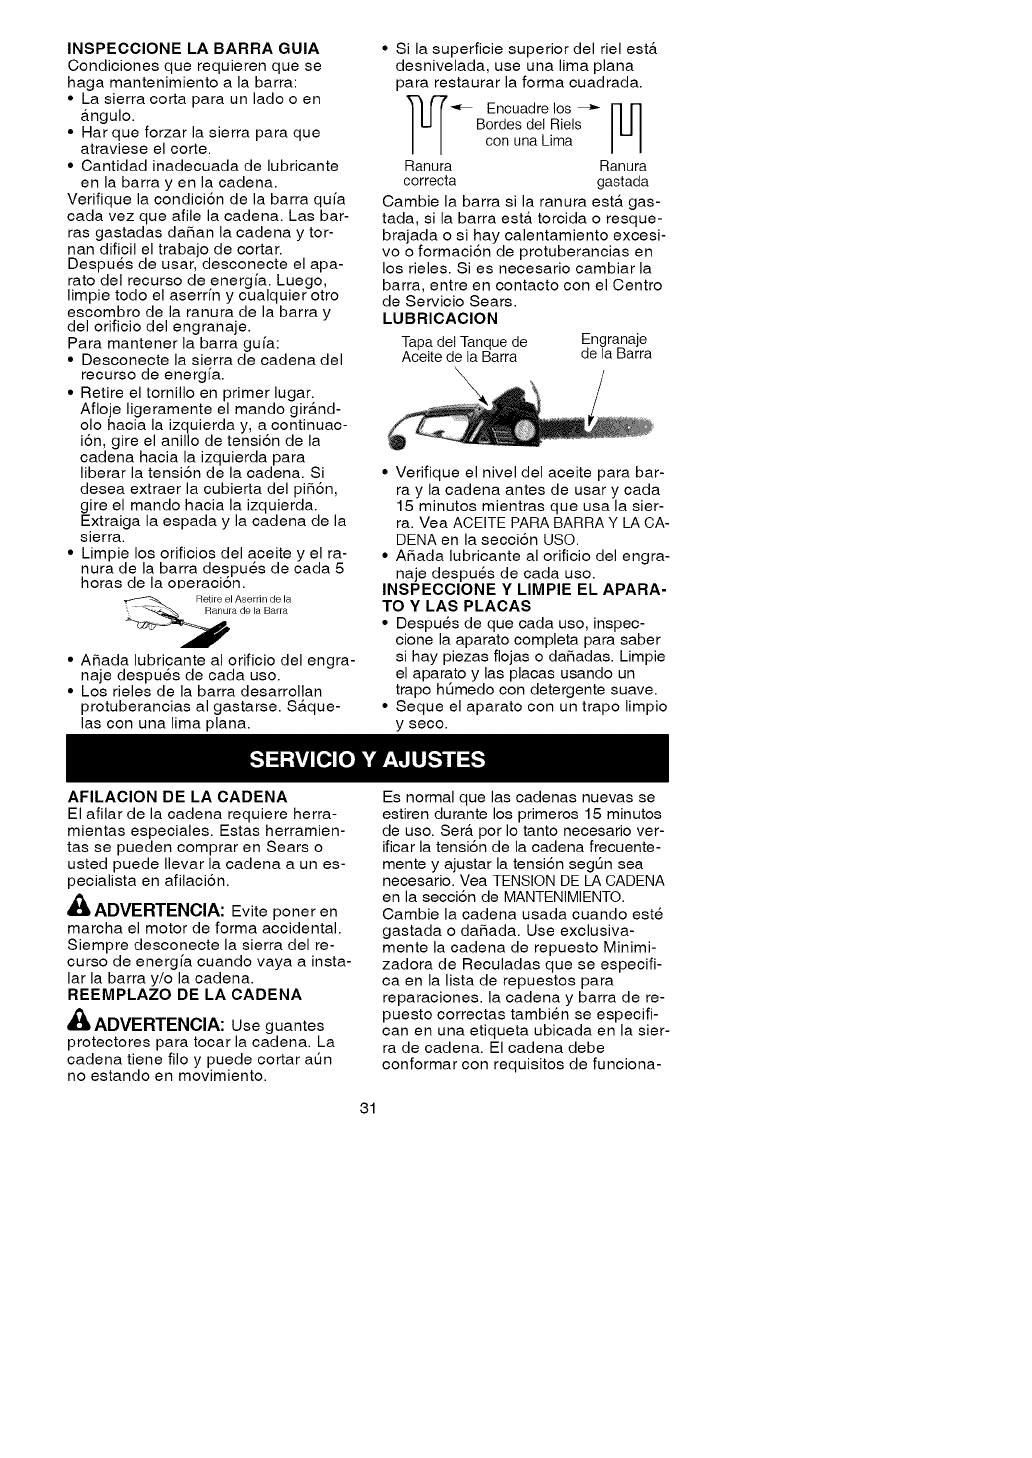
INSPECClONELABARRAGUlA
Condicionesquerequierenquese
hagamantenimientoalabarra:
• Lasierracortaparaunladooen
_ngulo.
• Hat que forzar la sierra para que
atraviese el corte.
• Cantidad inadecuada de lubricante
en la barra y en la cadena.
Verifique la condici6n de la barra qufa
cada vez que afile la cadena. Las bar-
ras gastadas dafian la cadena y tor-
nan dificil el trabajo de cortar.
Despues de usar, desconecte el apa-
rato del recurso de energfa. Luego,
limpie todo el aserrfn y cualquier otro
escombro de la ranura de la barra y
del orificio del engranaje.
Para mantener la barra gufa:
• Desconecte la sierra de cadena del
recurso de energfa.
• Retire el tornillo en primer lugar.
Afloje ligeramente el mando gir_nd-
olo hacia la izquierda y, a continuac-
i6n, gire el anillo de tensi6n de la
cadena hacia la izquierda para
liberar la tensi6n de la cadena. Si
desea extraer la cubierta del pifi6n,
gire el mando hacia la izquierda.
Extraiga la espada y la cadena de la
sierra.
• Limpie los orificios del aceite y el ra-
nura de la barra despues de cada 5
horas de la oDeraci6n.
• Afiada lubricante al orificio del engra-
naje despues de cada use.
• Los rieles de la barra desarrollan
protuberancias al gastarse. S_que-
las con una lima plana.
• Si la superficie superior del riel estA
desnivelada, use una lima plana
para restaurar la forma cuadrada.
_"_ Encuadre los _'- [_]
Bordes del Riels
con una Lima
Ranura Ranura
correcta gastada
Cambie la barra si la ranura est_ gas-
tada, si la barra estA torcida o resque-
brajada o si hay calentamiento excesi-
vo o formaci6n de protuberancias en
los rieles. Si es necesario cambiar la
barra, entre en contacto con el Centro
de Servicio Sears.
LUBRIOAClON
Tapa del Tanque de Engranaje
Aceite de la Barra de la Barra
• Verifique el nivel del aceite para bar-
ray la cadena antes de usar y cada
15 minutos mientras que usa la sier-
ra. Vea ACEITE PARA BARRA Y LA CA-
DENA en la secci6n USO.
• Afiada lubricante al orificio del engra-
naje despues de cada uso.
INSPEOOIONE Y LIMPIE EL APARA-
TO Y LAS PLAOAS
• Despues de que cada uso, inspec-
cione la aparato completa para saber
si hay piezas flojas o dafiadas. Limpie
el aparato y las placas usando un
trapo hOmedo con detergente suave.
• Seque el aparato con un trapo limpio
y seco.
AFILACION DE LA CADENA
El afilar de la cadena requiere herra-
mientas especiales. Estas herramien-
tas se pueden comprar en Sears o
usted puede Ilevar la cadena a un es-
pecialista en afilaci6n.
ADVERTENClA: Evite poner en
marcha el motor de forma accidental.
Siempre desconecte la sierra del re-
curso de energfa cuando vaya a insta-
lar la barra y/o la cadena.
REEMPLAZO DE LA CADENA
ADVERTENClA: Use guantes
protectores para tocar la cadena. La
cadena tiene filo y puede cortar aQn
no estando en movimiento.
Es normal que las cadenas nuevas se
estiren durante los primeros 15 minutes
de use. SerA per Io tanto necesario ver-
ificar la tensi6n de la cadena frecuente-
mente y ajustar la tensi6n segQn sea
necesario. Vea TENSION DE LA CADENA
en la secci6n de MANTENIMIENTO.
Cambie la cadena usada cuando este
gastada o dafiada. Use exclusiva-
mente la cadena de repuesto Minimi-
zadora de Reculadas que se especifi-
ca en la lista de repuestos para
reparaciones, la cadena y barra de re-
puesto correctas tambien se especifi-
can en una etiqueta ubicada en la sier-
ra de cadena. El cadena debe
conformar con requisites de funciona-
31

mientodereculadadeANSIB175.1
euandoestAprobadoconestasierra.
EntreeneontaetoconelCentrede
ServiciodeSearsparacambiaryafilar
laseuehillasindividualesdelaeadena.
INSTALARLAESPADAYLA
OADENADELASIERRA
Lassiguientesinstrueeionespermiten
sustituirunaespada.Elequipoaban-
donalafabricaeompletamente
ensamblado.
NOTA:Utilicesiempreguantesde
altaresistenciaparamanipularla
eadenadelasierra.
1. Desconectelasierradeeadena
delrecursodeenergfa.
2. Extraigaeltornillo(A).
3. Coloquelaunidadel6etricasobre
unasuperficieplana.
4. Aflojeligeramenteelmando(C)
girAndolohaeialaizquierday,a
eontinuaei6n,gireelanillode
tensi6ndelacadena(D)haeiala
izquierdaparaliberarlatensi6nde
lacadena.Sideseaextraerla
eubiertadelpiR6n(B),gireel
mando(C)haeialaizquierda.
?_'_,4b%_,_ _ A D
5. Extraiga la eadena de la sierra de
la espada y el piR6n. Deslice la
espada, unida a la plaea de
tensi6n (F), para extraerla de la
unidad.
6. Extraiga el tornillo (E) de la plaea
de tensi6n (F) para extraerlo de la
espada antigua e instalarlo en la
espada nueva.
7. Extienda la eadena con los bordes
eortantes de la misma orientados
en la DIRECCION DE
ROTACION.
Punta de
la Barra
\
LAS CUCHILLAS DEBERAN
APUNTAR EN DIRECCION
A LA ROTACION
Cuchillas Marcador de Profundidad
Eslabones de Funcionamiento
8. Para instalar los eslabones de la
eadena en el sureo de la espada,
gire la plaea de tensi6n (F) haeia
la izquierda hasta el final. Instale
la cadena y la espada en la unidad
el6etrica, gire la plaea de tensi6n
(F) haeia la derecha y vuelva a
eolocar la eubierta del piR6n (G).
9. Gire el mando haeia la dereeha,
ajuste el anillo de tensi6n de la
eadena (H) y apriete el mando.
Despu6s de utilizar la sierra
durante 1 hera, vuelva a ajustar la
eadena.
AJUSTE DE LA CADENA
Vea TENSION DE LA CADENA en al sec-
ei6n de MANTENIMIENTO.
32
PIEZAS DE SERVICIO AL CLIENTE
ADVERTENCIA: El use de eual-
quier otro accesorio puede presentar
riesgo de accidente al usuario.
PIEZA DE REPUESTO
Tapa del Aceite
Lima (5/32" diametro)
Paquete de Dos
Lima asidero
Herramienta de medidor de la
profundidad
Cadena de 16"
Barra Gufa de 16"
Lubricante de Barra y Cadena
1 cuarto gl.
Lubricante de Barra y Cadena
1 galon
N-_DE PIEZA
574-197501
71-36524
71-36565
71-36557
574-197701
574-197601
71-36556
71-36554
AADVERTENCIA: Realice los si-
guientes pasos despues de eada uso:
• Deje que el motor se enfrie antes de
guardarlo o transportarlo.
• Guarde la sierra y el cable de exten-
si6n en un lugar bien ventilado.
• Guarde el aparato con todos los pro-
teetores en su lugar y eoloque el apa-
rato de modo que las piezas con filo
no puedan eausat heridas por aeei-
dente.
• Guarde el aparato en un lugar segu-
roy eompletamente fuera del al-
eanee de los niSos.
ESTACIONAL ALMACENAJE
Prepare el aparato al final de la tempo-
rada o si no Io va a usar por 30 dias o
m_s.
Siva a guardar el aparato durante un
periodo large:
• Limpie la sierra a conciencia antes
del almacenaje.
• Almacene en un lugar limpio y seco.
• Aplique una pequeSa cantidad de
aceite alas superficies extemas
metAlicas y a la barra guia.
• Lubrique la cadena y envuelvala en
papel grueso o en tela.
33
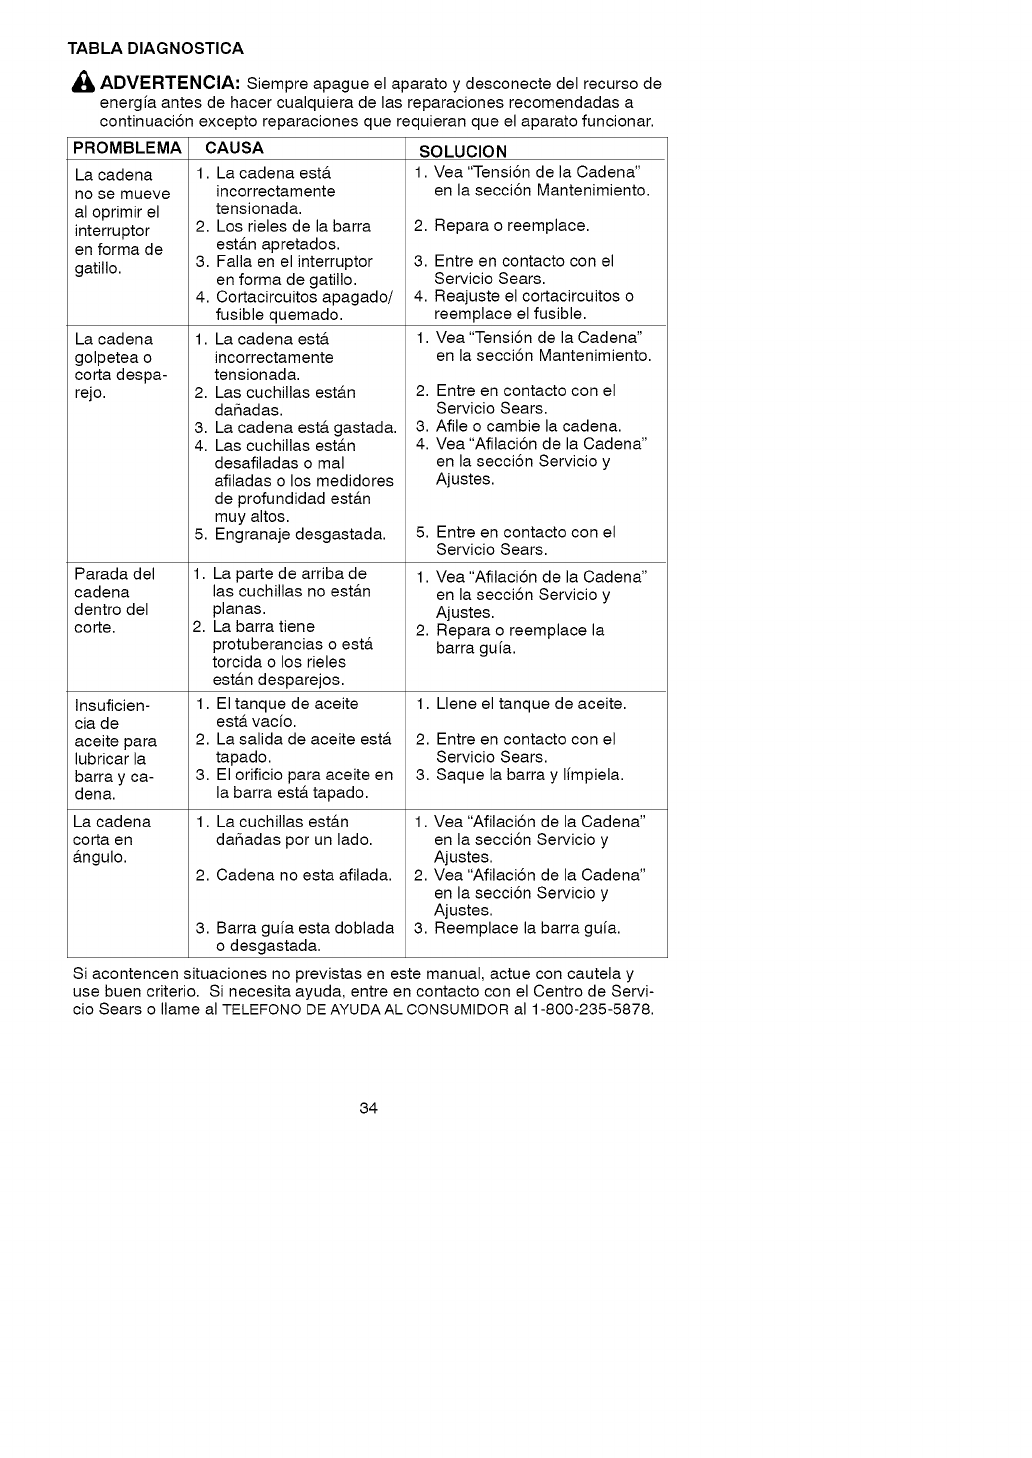
TABLADIAGNOSTICA
ADVERTENCIA: Siempre apague el aparato y desconecte del recurso de
energia antes de hacer cualquiera de las reparaciones recomendadas a
continuaci6n excepto reparaciones que requieran que el aparato funcionar.
PROMBLEMA
La cadena
no se mueve
al oprimir el
interruptor
en forma de
gatillo.
La cadena
golpetea o
co_a despa-
rejo.
Parada del
cadena
dentro del
co_e.
Insuficien-
cia de
aceite para
lubricar la
barra y ca-
dena.
La cadena
co_a en
angulo.
CAUSA
1. La cadena est&
incorrectamente
tensionada.
2. Los deles de la barra
est_.n apretados.
3. Falla en el interruptor
en forma de gatillo.
4. Cortacircuitos apagado/
fusible quemado.
1. La cadena est&
incorrectamente
tensionada.
2. Las cuchillas est&n
dafiadas.
3. La cadena est& gastada.
4. Las cuchillas est&n
desafiladas o mal
afiladas o los medidores
de profundidad est&n
muy altos.
5. Engranaje desgastada.
1. La parte de arriba de
las cuchillas no est_.n
planas.
2. La barra tiene
protuberancias o est,.
torcida o los rieles
est_.n desparejos.
1. El tanque de aceite
est,. vacio.
2. La salida de aceite est,.
tapado.
3. El orificio para aceite en
la barra est,. tapado.
1, La cuchillas est_.n
dafiadas por un lado.
2. Cadena no estaafilada.
3. Barra guia esta doblada
o desgastada.
SOLUCION
1. Yea "Tensi6n de la Cadena"
en la secci6n Mantenimiento.
2. Repara o reemplace.
3. Entre en contacto con el
Servicio Sears.
4. Reajuste el cortacircuitos o
reemplace el fusible.
1. Yea "Tensi6n de la Cadena"
en la secci6n Mantenimiento.
2. Entre en contacto con el
Servicio Sears.
3. Afile o cambie la cadena.
4. Vea "Afilaci6n de la Cadena"
en la secci6n Servicio y
Ajustes.
5. Entre en contacto con el
Servicio Sears.
1. Yea "Afilaci6n de la Cadena"
en la secci6n Servicio y
Ajustes.
2. Repara o reemplace la
barra guia.
1. Llene el tanque de aceite.
2. Entre en contacto con el
Servicio Sears.
3. Saque la barra y limpiela.
1. Vea "Afilaci6n de la Cadena"
en la secci6n Servicio y
Ajustes.
2. Vea "Afilaci6n de la Cadena"
en la secci6n Servicio y
Ajustes.
3. Reemplace la barra guia.
Si acontencen situaciones no previstas en este manual, actue con cautela y
use buen criterio. Si necesita ayuda, entre en contacto con el Centro de Servi-
cio Sears o Ilame al TELEFONO DE AYUDA AL CONSUMIDOR al 1-800-235-5878.
34
