Craftsman 358795631 User Manual HEDGE TRIMMER Manuals And Guides L0706456
CRAFTSMAN Hedge Trimmer, Gas Manual L0706456 CRAFTSMAN Hedge Trimmer, Gas Owner's Manual, CRAFTSMAN Hedge Trimmer, Gas installation guides
User Manual: Craftsman 358795631 358795631 CRAFTSMAN HEDGE TRIMMER - Manuals and Guides View the owners manual for your CRAFTSMAN HEDGE TRIMMER #358795631. Home:Lawn & Garden Parts:Craftsman Parts:Craftsman HEDGE TRIMMER Manual
Open the PDF directly: View PDF ![]() .
.
Page Count: 40

IMPORTANT MANUAL Do Not Throw Away
S _AUR8
Operator's
Manual
Model No.
358.795631
DANGER:
READ THE OPERATOR'S
MANUAL AND FOLLOW
ALL WARNINGS AND
SAFETY INSTRUCTIONS.
FAILURE TO DO SO CAN
RESULT IN SERIOUS
INJURY.
i
Always Wear Eye Protection
CRRFTSMRNo
21 cc (1.3 cu. in.) 2-CYCLE
22 Inch Blade
GAS HEDGE TRIMMER
•Assembly
•Operation
•Customer Responsibilities
•Service Adjustments
•Repair Parts
Sears, Roebuck and Co., Hoffman Estates, IL 60179 U.S.A.
530-084237 03/12/96

iiii ,,i,= ii iiiiii ii i ,i.,11,1,11ii iiiiiiiiiiiii iiii
SAFETY RULES
===================,,,,,H,= ,.i ii HII i i i i ,i = ,,,,,,,,,,,,,,,,,, ,,,=
i ^ CAU.iON,ALWAYSO,SCONNEOTSPA.KPLUGW,.=ANOP .OEW,.EW.ERECANNOTCONI
• • TACT SPARK PLUG TO PREVENT ACCIDENTAL STARTING WHEN SETTING UP, TRANSPORTING,
O' ADJ USTING OR MAKING RE,PAIRS.
OPERATOR SAFETY
•Always wear safety eye protection.
• Alwayswear heavy long pants, long sleeves,boots and
gloves. Do not go barefoot or wear sandals, short
pants, short sleeves. Being fully covered helps to pro-
tect you from pieces of toxic pfants thrown by the
blade.
•Secure hair so it above shoulder length. Secure loose
clothing or jewelry. Clothing with loosely hanging ties,
straps, tassels, etc. can be caught in moving pans.
Do not operate this unit when you are tired, il! or under
the influence of alcohol, drugs, or medication.
•Wear hearing protection ff you use this unit for more
than 1-1/2 hours per day.
•Never start or run the engine inside aclosed room or
building. Breathing exhaust fumes can kill.
•Keep handles free of oiland fuel.
•if situations occur which are not covered in this manu-
al, use care and good judgement.
UNIT MAINTENANCE/SAFETY
• Look for and replace damaged or loose parts before
each use. Look for and repair fuel leaks before use.
Keep the unit in good working condition.
•Make sure the unit is maintained and assembled cor-
rectly as listed in this manual.
•Make carburetor adjustments with the blade supported
to prevent it from contacting any object. Hold the unit
by hand.
•Keep others away when making carburetor adjust-
ments.
•Use only quality SEARS accessories and replacement
parts as recommended for this unit.
• Have all maintenance and service not explained in tills
manual performed by your SEARS Ser_ce Center.
FUEL SAFETY
•Mix and pour fuet outdoors.
•Keep away from sparks or flames.
• Use a container approved for fuel.
• Do not smoke or allow smoking near fuel or the unit or
while using the unit.
•Wipe up all fuel spills before starting engine.
• Move at least 10 feet (3 meters) away from fueling site
before starting engine.
• Stop engine and allow unit to cool before removing_fue!
cap.
CUTTING SAFETY
•Inspect the area to be cut before each use. Remove
objects (rocks, broken glass, nails, wire, string, etc.)
whichcan become entangled in the blade.
•Keep others including children, animals, bystanders
and helpers a minimum of 15 feet (5 meters) away.
Stopthe engine immediatelyif you are approached.
•Always keep the engine on the right-hand side of your
body.
•Hold the unit firmly with both hands.
•Keep firm footing and balance. Do not over-reach.
• Keep the blade below waist level.
•Do not raise the engine above your shoulder.
• Keep all parts of your body away from the blade and
muffler when engine is running.
• Use only for jobs explained in this manual.
TRANSPORTING AND STORAGE
• Stopthe unit before transporting.
• Allow the engine to cool, and secure the unit before
storing or transporting in a vehicle.
•Empty the fuel tank before stodng or transporting the
unit. Use up any fue! left in the carburetor by starting
the engine and letting theengine run until it stops.
•Store unit and fuel in an area where fuel vapors cannot
reach sparks or open flames from water heaters, elec-
tric motor or switches,furnaces, etc.
• Store unit so the blade cannot accidentally cause
injury.
•Store the unit out of the reach of children.
SAFETY NOTICE .... I
jExposure to vibrations through prolonged useof gasoline powered hand units could cause blood vessel or nerve damage in the tin-]
Jgers, hands, and joints of people prone to circulationdisorders or abnormal swellings. Prolonged use in cold weather has been|
Ilinked to blood vessel damage in otherwise healthypeople. If symptoms occur such as numbness, pain, loss of strength, change int
|skin color or texture, or lossof feeling in the fingers, hands or joints, discontinuethe use of thrs unit and seek medical a_ent=on. An|
]anti-vibration system does not guarantee the avoidance of these problems.Users who operate power too=son a continuatano regu-]
[lar basis must monitor closely their physicalconditionand the conditionofthis unit.
LOOK FOR THIS SYMBOL TO POINT OUT IMPORTANT SAFETY PRECAUTIONS.
IT MEANS - ATTENTION!!! BECOME ALERT!!! YOUR SAFETY IS INVOLVED.
-2-
i i HIIIIIII, I II I II I II Illll III
SAFETY RULES
j ii I II i ii ii
DANGER:
THIS POWER UNIT CAN BE DANGEROUS! THIS UNIT CAN CAUSE SERIOUS INJURY INCLUDING
AMPUTATION OR BLINDNESS TO THE OPERATOR AND OTHERS. THE WARNINGS AND SAFETY
INSTRUCTIONS IN THIS MANUAL MUST BE FOLLOWED TO PROVIDE REASONABLE SAFETY AND
EFFICIENCY IN USING THIS UNI'I;.THE OPERATOR IS RESPONSIBLE FOR FOLLOWING THE WARN-
INGS AND INSTRUCTIONS IN THIS MANUAL AND ON THE UNI7;.READ THE ENTIRE OPERATOR'S
MANUAL BEFORE ASSEMBLING AND USING THE UNITT RESTRICT THE USE OF THIS POWER TOOL
TO PERSONS WHO READ, UNDERSTAND, AND FOLLOW THE WARNINGS AND INSTRUCTIONS IN
THIS MANUAL AND ON THE UNIT. NEVER ALLOW CHILDREN TO USE THIS TOOL.
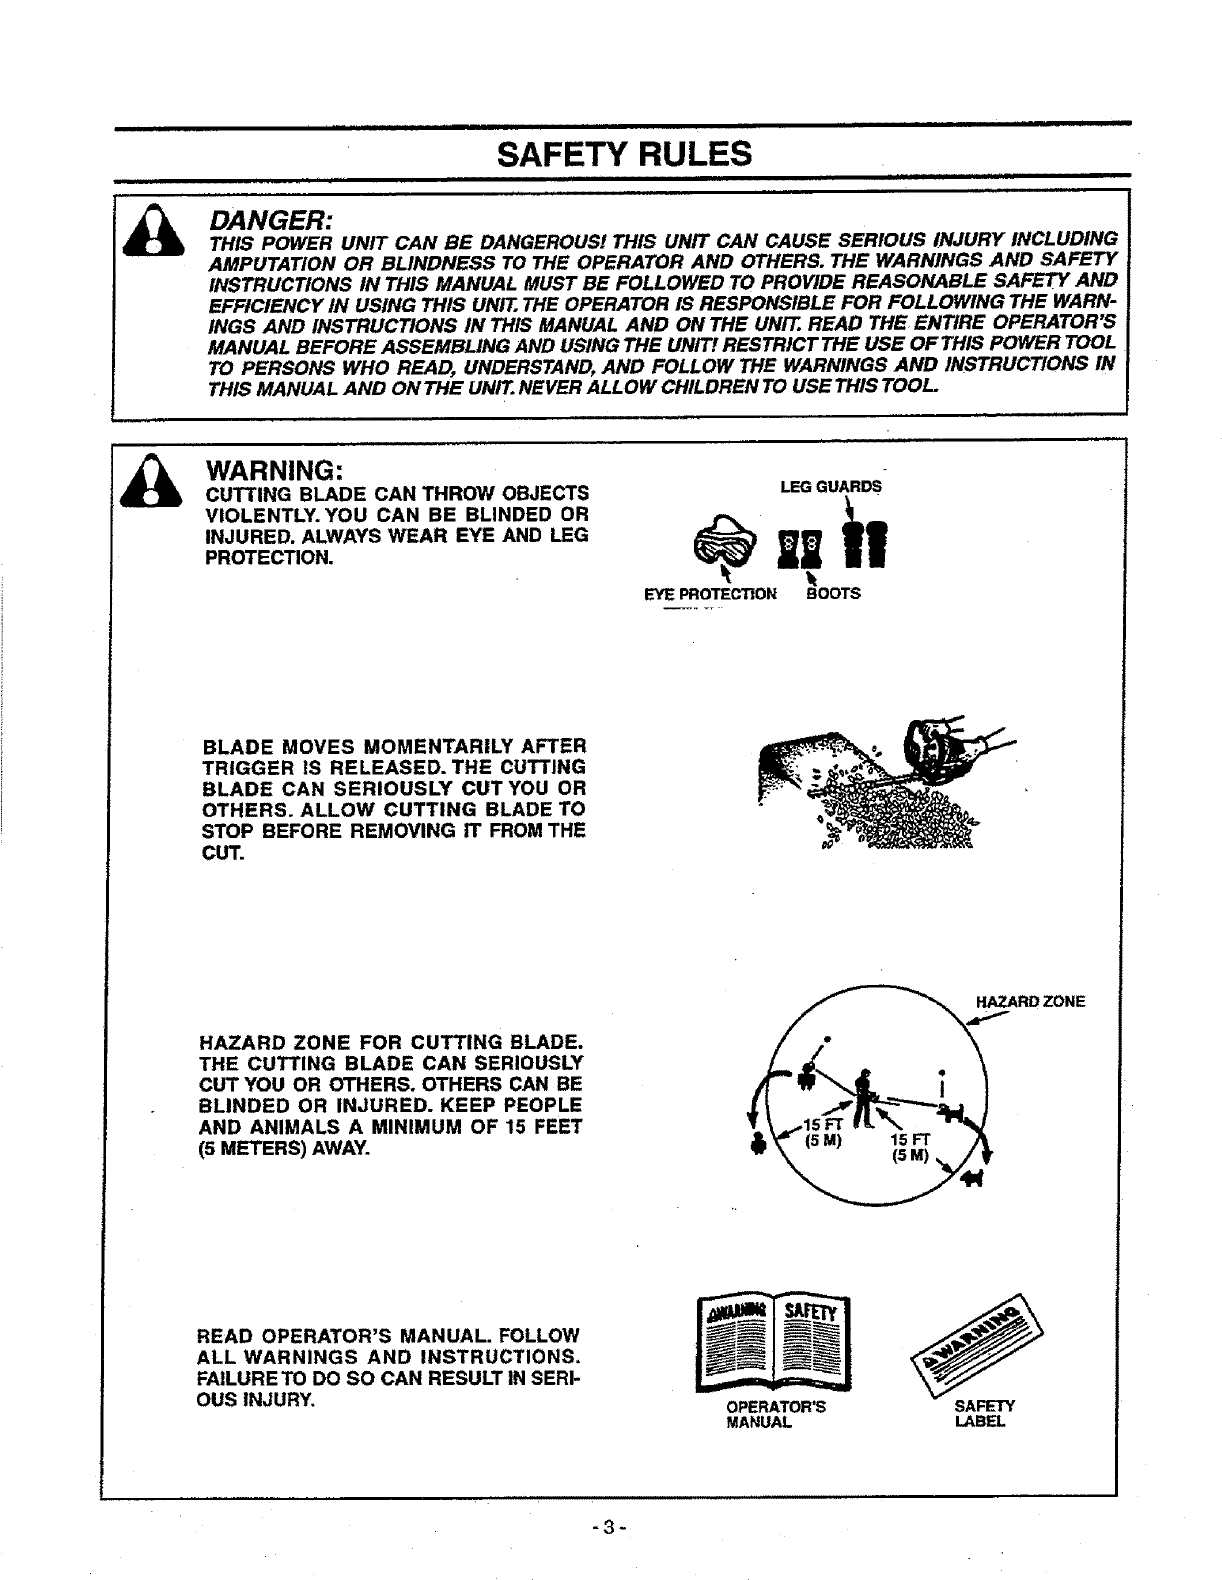
WARNING:
CUTTING BLADE CAN THROW OBJECTS
VIOLENTLY. YOU CAN BE BLINDED OR
INJURED. ALWAYS WEAR EYE AND LEG
PROTECTION.
LEG GUARDS
Ii
EYE PROTECTION BOOTS
BLADE MOVES MOMENTARILY AFTER
TRIGGER IS RELEASED. THE CUTTING
BLADE CAN SERIOUSLY CUT YOU OR
OTHERS. ALLOW CUTTING BLADE TO
STOP BEFORE REMOVING IT FROM THE
CUT.
HAZARD ZONE FOR CUTTING BLADE.
THE CUTTING BLADE CAN SERIOUSLY
CUT YOU OR OTHERS. OTHERS CAN BE
BLINDED OR INJURED. KEEP PEOPLE
AND ANIMALS A MINIMUM OF 15 FEET
(5 METERS) AWAY.
HAZARDZONE
READ OPERATOR'S MANUAL. FOLLOW
ALL WARNINGS AND INSTRUCTIONS.
FAILURE TO DO SO CAN RESULT IN SERI-
OUS INJURY. OPERATOR'S
MANUAL SAFETY
LABEL
-3-
CONGRATULATIONS on your purchase of aSears
Craftsman Gas Hedge Trimmer. It has been designed,
engineered and manufactured to give you the best possi-
ble dependability and performance.
Should you experience any problems you cannot easily
remedy, please contact your nearest Sears Service Cen-
ter/Department. Sears has competent, well trained tech*
niciansand the proper tools to serviceor repair this unit.
Please read and retain this manual. The instructionswill
enable you to assemble and maintain your unit properly.
Always observe the "SAFETY RULES."
MODEL NUMBER: 358.795631
DATE CODF__JSERIALNO.:
DATE OF PURCHASE:
THE MODEL AND SERIAL NUMBER WILL BE
FOUND ON THE PRODUCT.
YOU SHOULD RECORD BOTH SERIAL NUMBER
AND DATE OR PURCHASE AND KEEP IN A SAFE
PLACE FOR FUTURE REFERENCE. i
i i ,
MAINTENANCE AGREEMENT
ASears Maintenance Agreement is available on this
product.Contact your nearest Sears store for details.
CUSTOMER RESPONSIBILITIES
•Read and observe the safety ruJes.
• Follow a regular schedule in maintaining, caring for,
and using your unit.
•Follow the instructions under'Customer Responsibili-
ties" and "Storage" sections of this Operator's Manual.
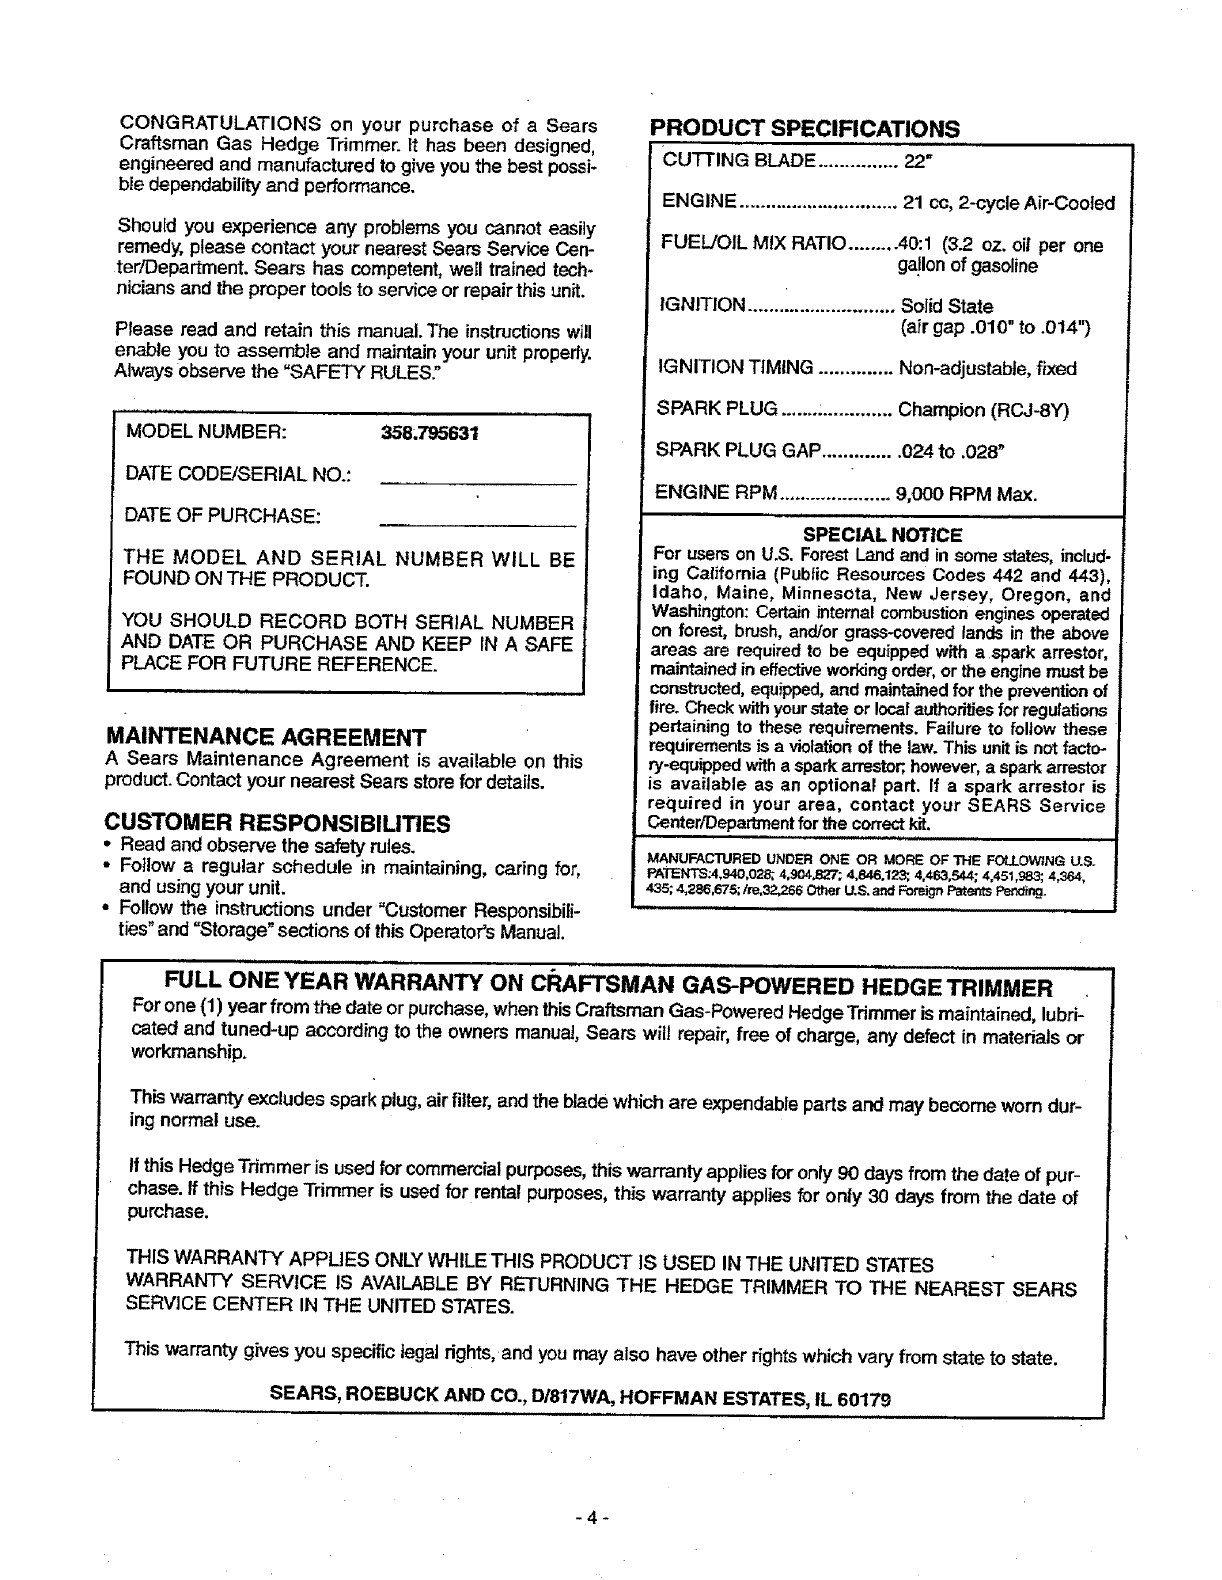
PRODUCT SPECIFICATIONS
CUTTING BLADE ............... 22"
ENGINE .............................. 21 cc, 2-cycle Air-Cooled
FUEL/OIL MIX RATIO......... 40:1 (3.2 oz. oil per one
gallon of gasoline
IGNITION ............................ Solid State
(air gap .010" to .014")
IGNITION TIMING .............. Non-adjustable, fixed
SPARK PLUG .......:............. Champion (RCJ-SY)
SPARK PLUG GAP.............. 024 to .028"
ENGINE RPM ..................... 9,000 RPM Max.
SPECIAL NOTICE
For users on U.S. Forest Land and in some states, includ-
ing California (Public Resources Codes 442 and 443),
Idaho, Maine, Minnesota, New Jersey, Oregon, and
Washington: Cert_n internal combustion engines operated
on forest, brush, and/or grass-covered lands in the above
areas are required to be equipped with a spark arrestor,
maintained in effective working order, or the enginemust be
constructed, equipped, and maintained for the prevention of
fire. Check with your state or local authoritiesfor regulations
pertaining to these requirements. Failure to follow these
requirements is a violation of the law. This unit is not facto-
ry.equipped with aspark arreston however, aspark arrestor
is available as an optional part. If a spark arrestor is
required in your area, contact your SEARS Service
Center/Department for the correctk_t.
MANUFACTURED UNDER ONE OR MORE OF THE FOU_OWtNG U.S.
PATENTS:4,940,028; 4,904,827; 4,846,123, 4,463,544; 4,45,1,983; 4,364,
435; 4,286,675;/re,32,266 Other U.S. and Foreign Pat_ts Psr'_ng.
,ii
FULL ONE YEAR WARRANTY ON CI_AFTSMAN GAS-POWERED HEDGE TRIMMER
Forone (1) year from the date or purchase,whenthisCraftsman Gas-Powered Hedge Trimmeris maintained, lubri-
cated and tuned-up according to the owners manual,Sears will repair, free of charge, any defect in materials or
workmanship.
This warranty excludes spark plug,air filter, and the blade which are expendable parts and may become worn dur-
ing normal use.
If this Hedge Trimmer is usedfor commercialpurposes,this warranty applies for only 90 days from the date of pur-
chase, ff this Hedge Trimmer is used for rental purposes, this warranty applies for only 30 days from the date of
purchase.
THIS WARRANTY APPLIES ONLY WHILE THIS PRODUCT IS USED IN THE UNITED STATES
WARRANTY SERVICE IS AVAILABLE BY RETURNING THE HEDGE TRIMMER TO THE NEAREST SEARS
SERVICE CENTER IN THE UNITED STATES.
This warranty gives you specific legal rights, and you may also have other rights which vary from state to state.
SEARS, ROEBUCK AND CO., D/817WA, HOFFMAN ESTATES, IL 60179
-4-
i iii iii i ii iii IHIII | I II
TABLE OF CONTENTS
i , ii i1|11 i i iii iiiiii i
Safety Rules .................................................................... 2 Service and Adjustments............................................... 16
Product Specifications ..................................................... 4 Storage .......................................................................... 17
Warranty.......................................................................... 4TroubleShooting..........:.................................................18
Operation.........................................................................7 RepairParts...................................................................19
Customer Responsibilities ............................................. 13 Ordering Repair Parts/Service ........................ Back Cover
i i1| ii ii i i i i iiiii i iii
INDEX
I IIIIIHI II I I I II
A
Accessories.................................................... ................. 5
Air Fitter ......................................................................... 14
C
Carburetor Adjustments ................................................. 16
Customer Responsibilities ............................................. 13
Cutting Blade Lubrication .............................................. 13
E
Engine
FueVOil ....................................................................... t 1
Spark Plug .................................................................. 14
Starting ....................................................................... 12
Storage ....................................................................... 17
F
Fuel Filter....................................................................... 15
Fueling........................................................................... 11
H
Hardware Contents .......................................................... 6
K
Know Your Hedge Trimmer ............................................... 7
i IHI IIIIH,III IIII III
M
Maintenance Schedule ................. ................................. 13
Model Number ................................................................ .4
O
Operation ......................................................................... 7
Ordering Repair Parts ..................................... Back Cover
S
Service and Adjustments ............................................... 16
Spark Plug ..................................................................... 14
Specifications ................................................................... 4
Starting .......................................................................... 12
Storage .......................................................................... 17
T
Trimming Methods ......................................................... 10
Trouble Shooting ............................................................ 18
W
Warranty ....................................................................... ..4
iiiilll iiiii ii i iii iiii IIIIIIHII I
ACCESSORIES
i i iiiii
i ,i illll ii i iiii iiiii ii i
These accessories and attachments were available when the unit was originally purchased.They are also available at
most Sears retail outlets and service centers. Most Sears stores can order these items for you when you provide the
model number of your unit.
SAFETY
GOGGLES
Accessories
SPARK AIR
PLUG RLTER 2-CYCLE
ENGINE OIL
m!
I
-5-
ii ,=ll|=ll I,,,,H,I ,,I II II I ,ll I I Ill
HARDWARE CONTENTS
i i i iiiiiiiiii i iiiiiiiii ii i / .i i i iiiiiiil,lml ii i i iiiiiii i ii i i
ENGINE OIL OPERATOR'S MANUAL
THIS MODEL COMES FULLY ASSEMBLED
NOTE: It is normalto hear the fue! filter rattlein an empty
fuel tank.
TO REMOVE HEDGETRIMMER FROM
CARTON
• Remove loose parts includedwith Hedge Trimmer.
• Remove all packing material.
•Check carton thoroughlyfor additionalloose parts.
. Use cardboard lineras work surface during inspection
of unit.
,..6 _
i illlliiillii i |lllll i i iiiiml ii iiiiiiiii
OPERATION
iiiiiiiiiiii ii i i i i iiiiiiiii i iiiii iii i ii iiiiiii i ii ii iiiiiiiii
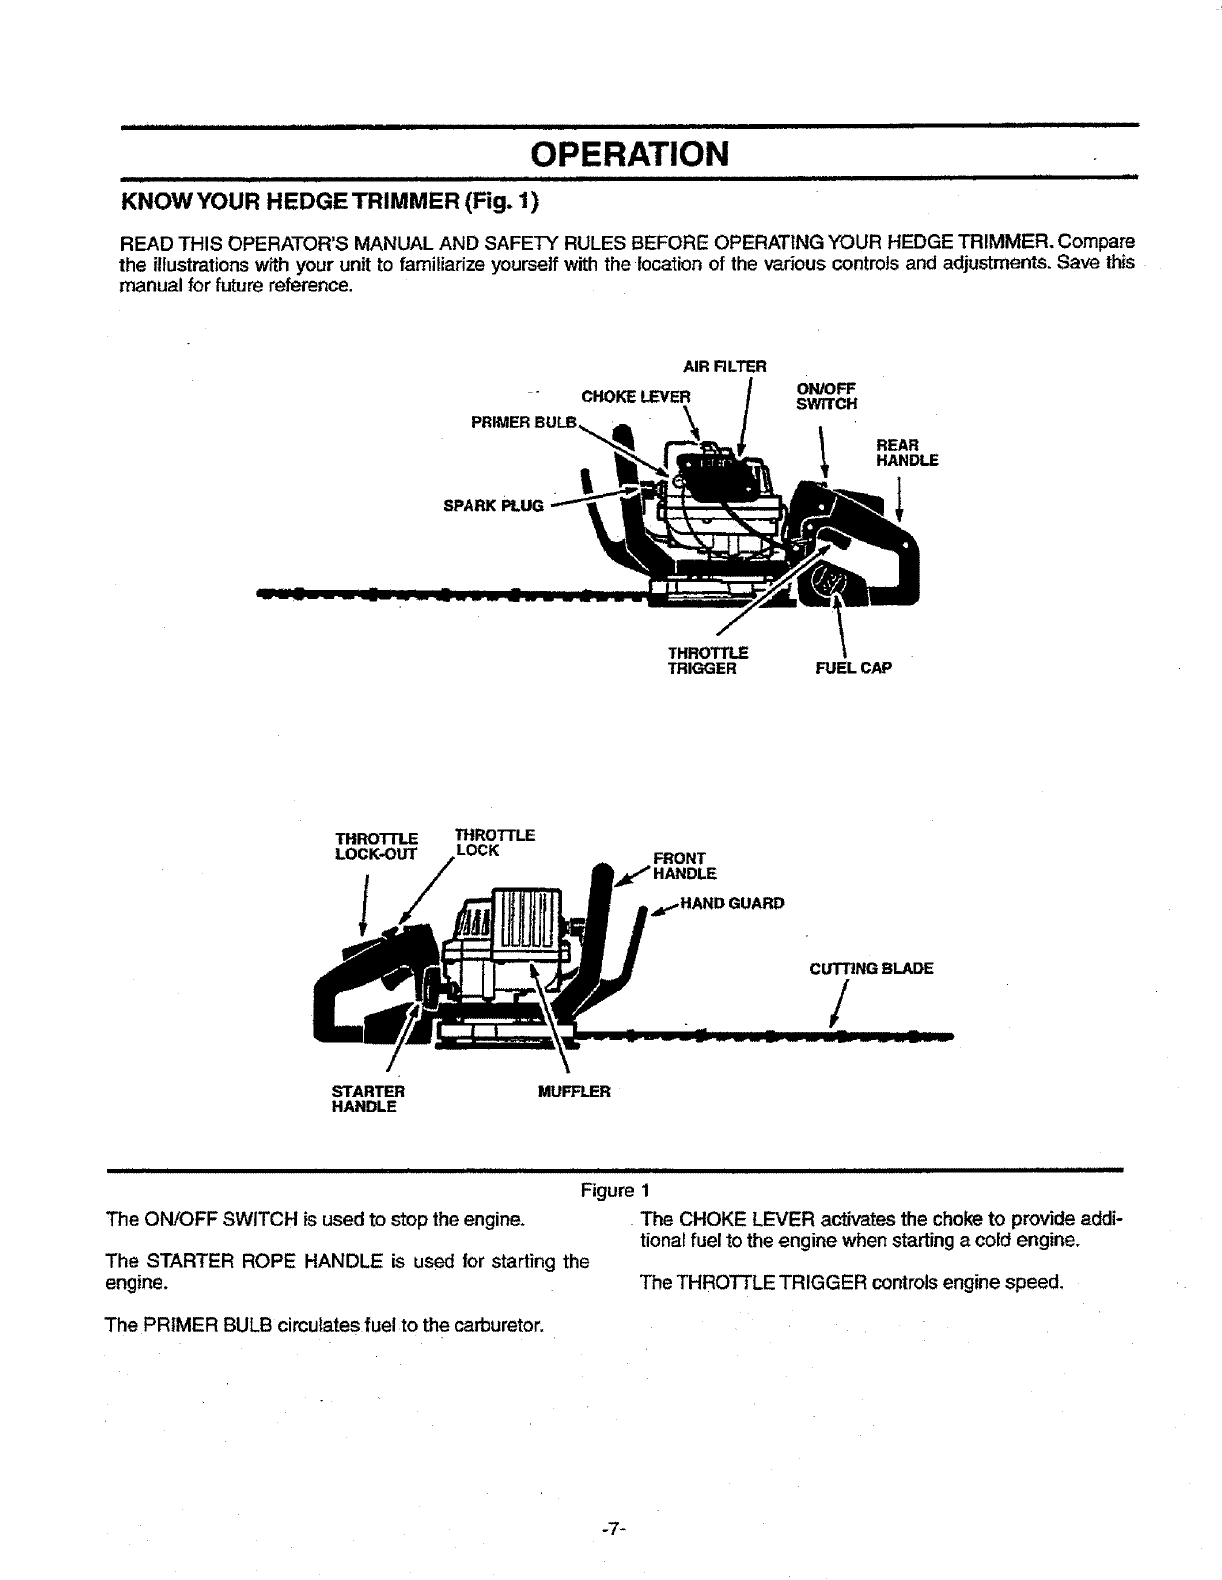
KNOWYOUR HEDGETRIMMER (Fig. 1)
READ THIS OPERATOR'S MANUAL AND SAFETY RULES BEFORE OPERATING YOUR HEDGE TRIMMER. Compare
the ittustratienswith your unit to familiarize yourselfwith the location of the various controlsand adjustments. Save this
manual for future reference.
SPARK PLUG
AIR R LTER
ON/OFF
CHOKE LEVER SWITCH
|
REAR
HANDLE
u w
THROTTLE
TRIGGER \
FUEL CAP
THROTrLE THROTTLE
LOCK-OUT LOCK FRONT
._r.,,HAND GUARD
CUTTING BLADE
/_
STARTER MUFFLER
HANDLE
ii i =i1,1 iiii iii i i i iiiiiiiii1=111 i iii iiiiii
Figure 1
The ON/OFF SWITCH is used to stop the engine. The CHOKE LEVER activates the choketo provide addi-
tional fuel to the engine when starting a cold engine.
The STARTER ROPE HANDLE is used for starting the
engine. The THROTTLE TRIGGER controls engine speed.
The PRIMER BULB cimulates fuelto the carburetor.
-7-
|....................
OPERATION - SAFETY
ill = 111
i
LEG GUARDS
................................ , ,,,, ,, ,
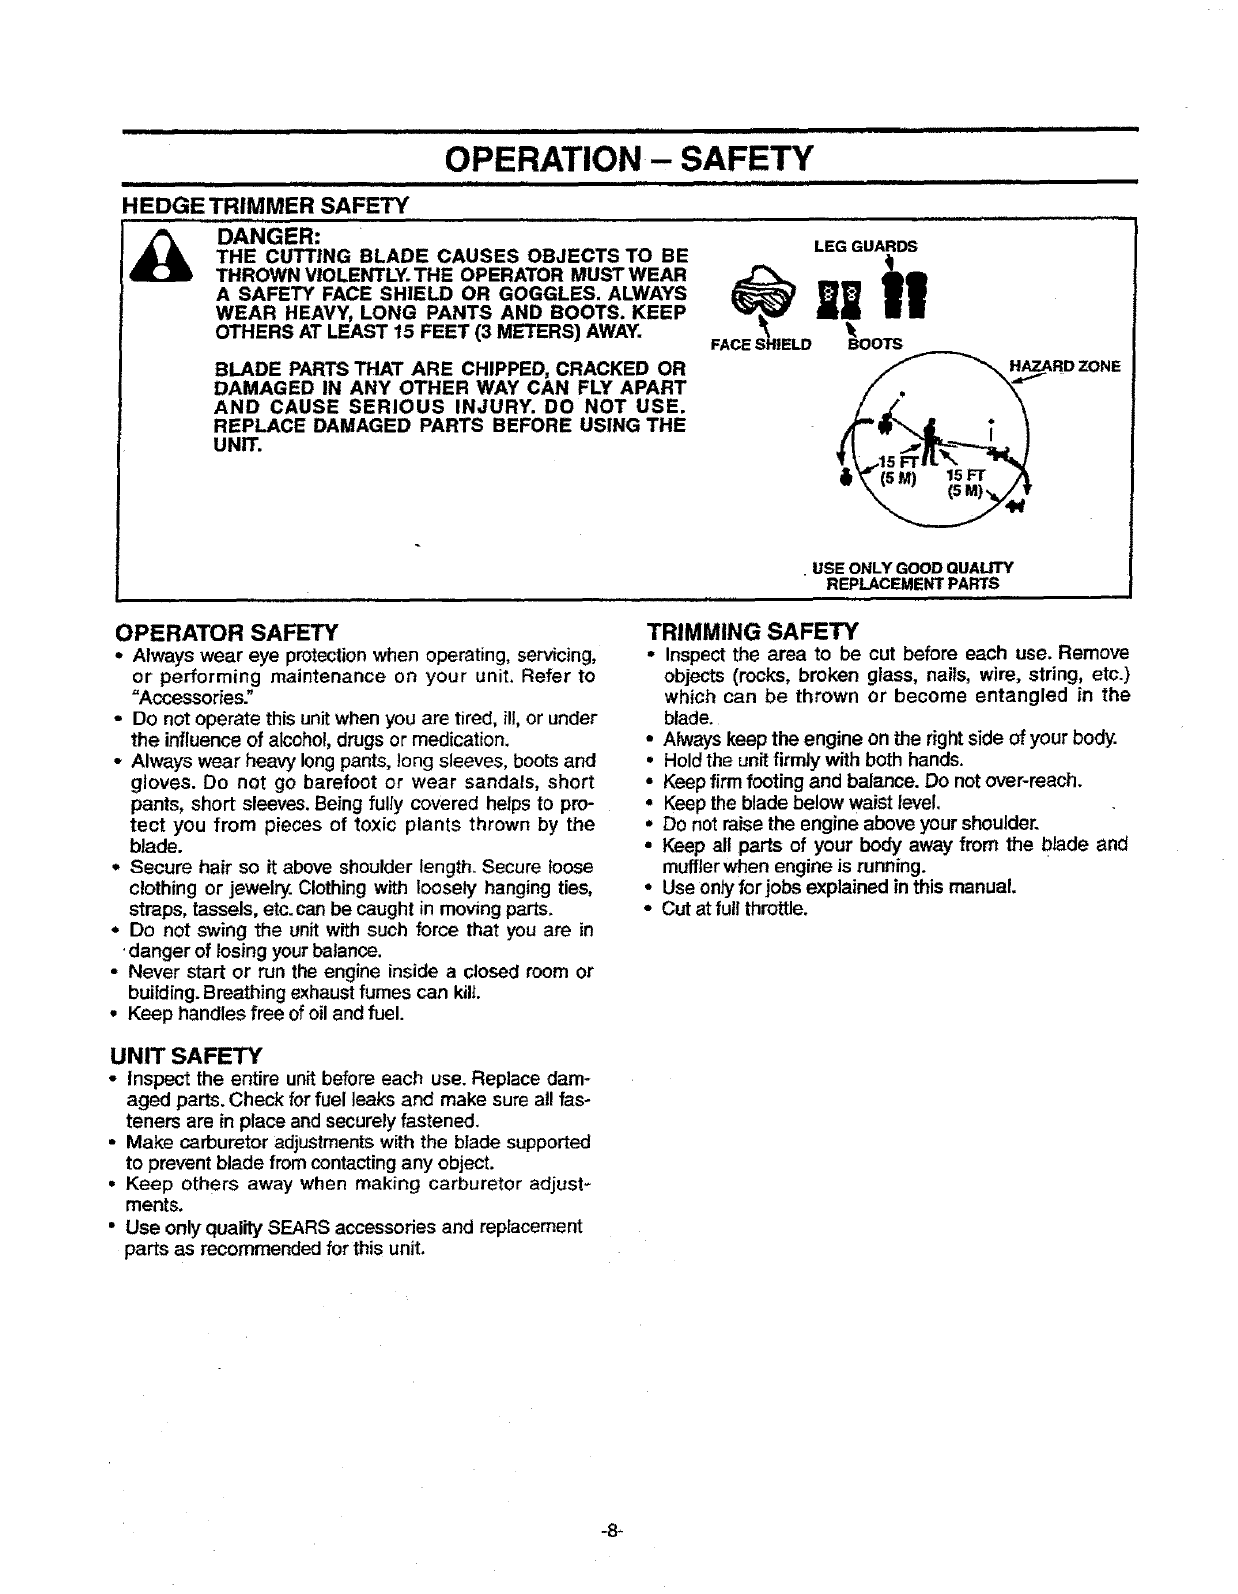
HEDGE TRIMMER SAFETY
i_ DANGER:
THE CUTTING BLADE CAUSES OBJECTS TO BE
THROWN VIOLENTLY.THE OPERATOR MUST WEAR
A SAFETY FACE SHIELD OR GOGGLES. ALWAYS
WEAR HEAVY, LONG PANTS AND BOOTS. KEEP
OTHERS AT LEAST 15 FEET (3 METERS) AWAY.
BLADE PARTS THAT ARE CHIPPED, CRACKED OR
DAMAGED IN ANY OTHER WAY CAN FLY APART
AND CAUSE SERIOUS INJURY. DO NOT USE.
REPLACE DAMAGED PARTS BEFORE USING THE
UNIT.
÷
FACE SHIELD
|1
BOOTS
USE ONLY GOOD QUALITY
REPLACEMENT PARTS
OPERATOR SAFETY
• Always wear eye protectionwhen operating, servicing,
or performing maintenance on your unit. Refer to
=Accessories."
•Do not operate this unit when you are tired, ill,or under
the influence of alcohol drugs or medication.
oAlways wear heavy long pants, long sleeves, boots and
gloves. Do not go barefoot or wear sandals, short
pants, short sleeves. Being fulJy covered helps to pro-
tect you from pieces of toxic plants thrown by the
blade.
oSecure hair so it above shoulder length. Secure loose
clothing or jewelry. Clothing with loosely hanging ties,
straps, tassels, etc.can be caught in moving parts.
• Do not swing the unit with such force that you are in
•danger of losing your balance.
• Never start or run the engine inside a closed room or
building. Breathing exhaust fumes can kilt.
•Keep handles free of oil and fuel.
UNIT SAFETY
•Inspect the entire unitbefore each use. Replace dam-
aged parts. Check for fuel leaks and make sure al! fas-
teners are in place andsecurely fastened,
• Make carburetor adjustments with the blade supported
to prevent blade from contactingany object.
•Keep others away when making carburetor adjust-
ments.
•Use only quality SEARS accessories and replacement
parts as recommended for this unit.
TRIMMING SAFETY
•Inspect the area to be cut before each use. Remove
objects (rocks, broken glass, nails, wire, string, etc.)
which can be thrown or become entangled in the
blade.
•Always keep the engine on the right side of your body.
•Hold the unit firmly with both hands.
•Keep firm footing and balance. Do not over-reach.
,Keep the blade below waist level.
•Do not raise the engine above your shoulder.
• Keep all parts of your body away from the blade and
muffler when engine is running.
•Use onty forjobs explained !n this manual.
•Cut at full throttle.
i i i
OPERATION
HOWTO USE YOUR HEDGE TRIMMER NOTE' Verity the throttle trigger stays in the advanced
STOPPING YOUR ENGINE
•Move start/stop switch to the "STOP" position.
•If engine does not stop, pull choke knob out fully.
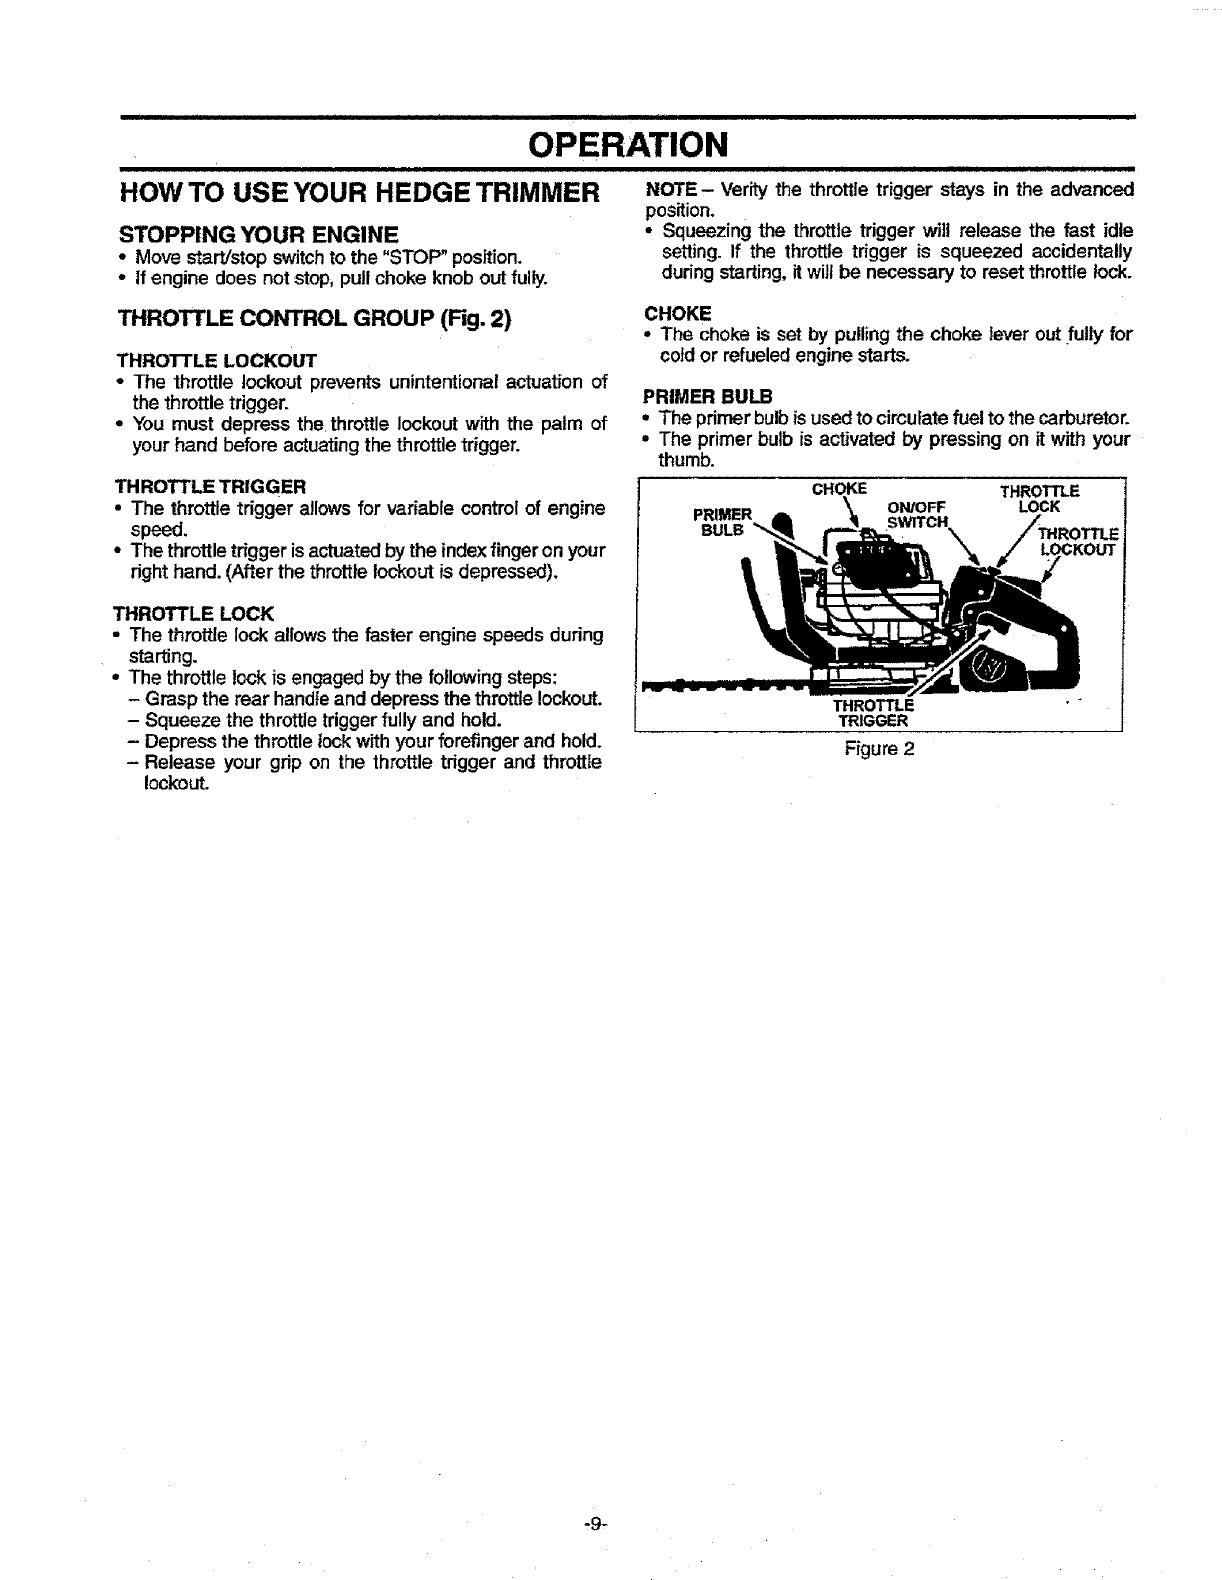
THROTTLE CONTROL GROUP (Fig. 2)
THROTTLE LOCKOUT
• The throttle lockout prevents unintentional actuation of
the throttletrigger.
•You must depress the throttle lockout with the palm of
your hand before actuatingthe throttletrigger.
THROTTLE TRIGGER
•The throttle trigger allows for variable control of engine
speed.
•The throttle trigger is actuated by the index fingeron your
righthand. (After the throttlelockout is depressed).
THROTTLE LOCK
•The throttle lock allows the faster engine speeds during
starting.
•The throttle lockis engaged by the following steps:
- Grasp the rear handle and depress the throttle lockout.
- Squeeze the throttle trigger fully and hold.
- Depress the throttle lockw_thyour forefinger and hold.
- Release your grip on the throttle trigger and throttle
lockout.
position.
•Squeezing the throttle trigger will release the fast idle
setting. If the throttle trigger is squeezed accidentally
during starting, it will be necessary to reset throttle lock.
CHOKE
• The choke is set by pulling the choke lever out .fully for
coldor refueledengine starts.
PRIMER BULB
• The primer bulb is usedto circulate fuel to the carburetor.
•The primer bulb is activated by pressing on it with your
thumb.
PRIMER
BULB
CHOKE THROTTLE
ON/OFF LOCK
THROTTLE
TRIGGER
Figure 2
,9,
i ,,,, ,,,,i,u,iiiiii m. ,,,,,i,,,,, i ilUl ui,iiiii i
OPERATION
=11 ,,,,,= i =, ,=,= i
STOPPING "fOUR ENGINE
• Move the ONIOFF switchto the OFF position.
•If engine does not stop, move the choke leverto the full
choke position.
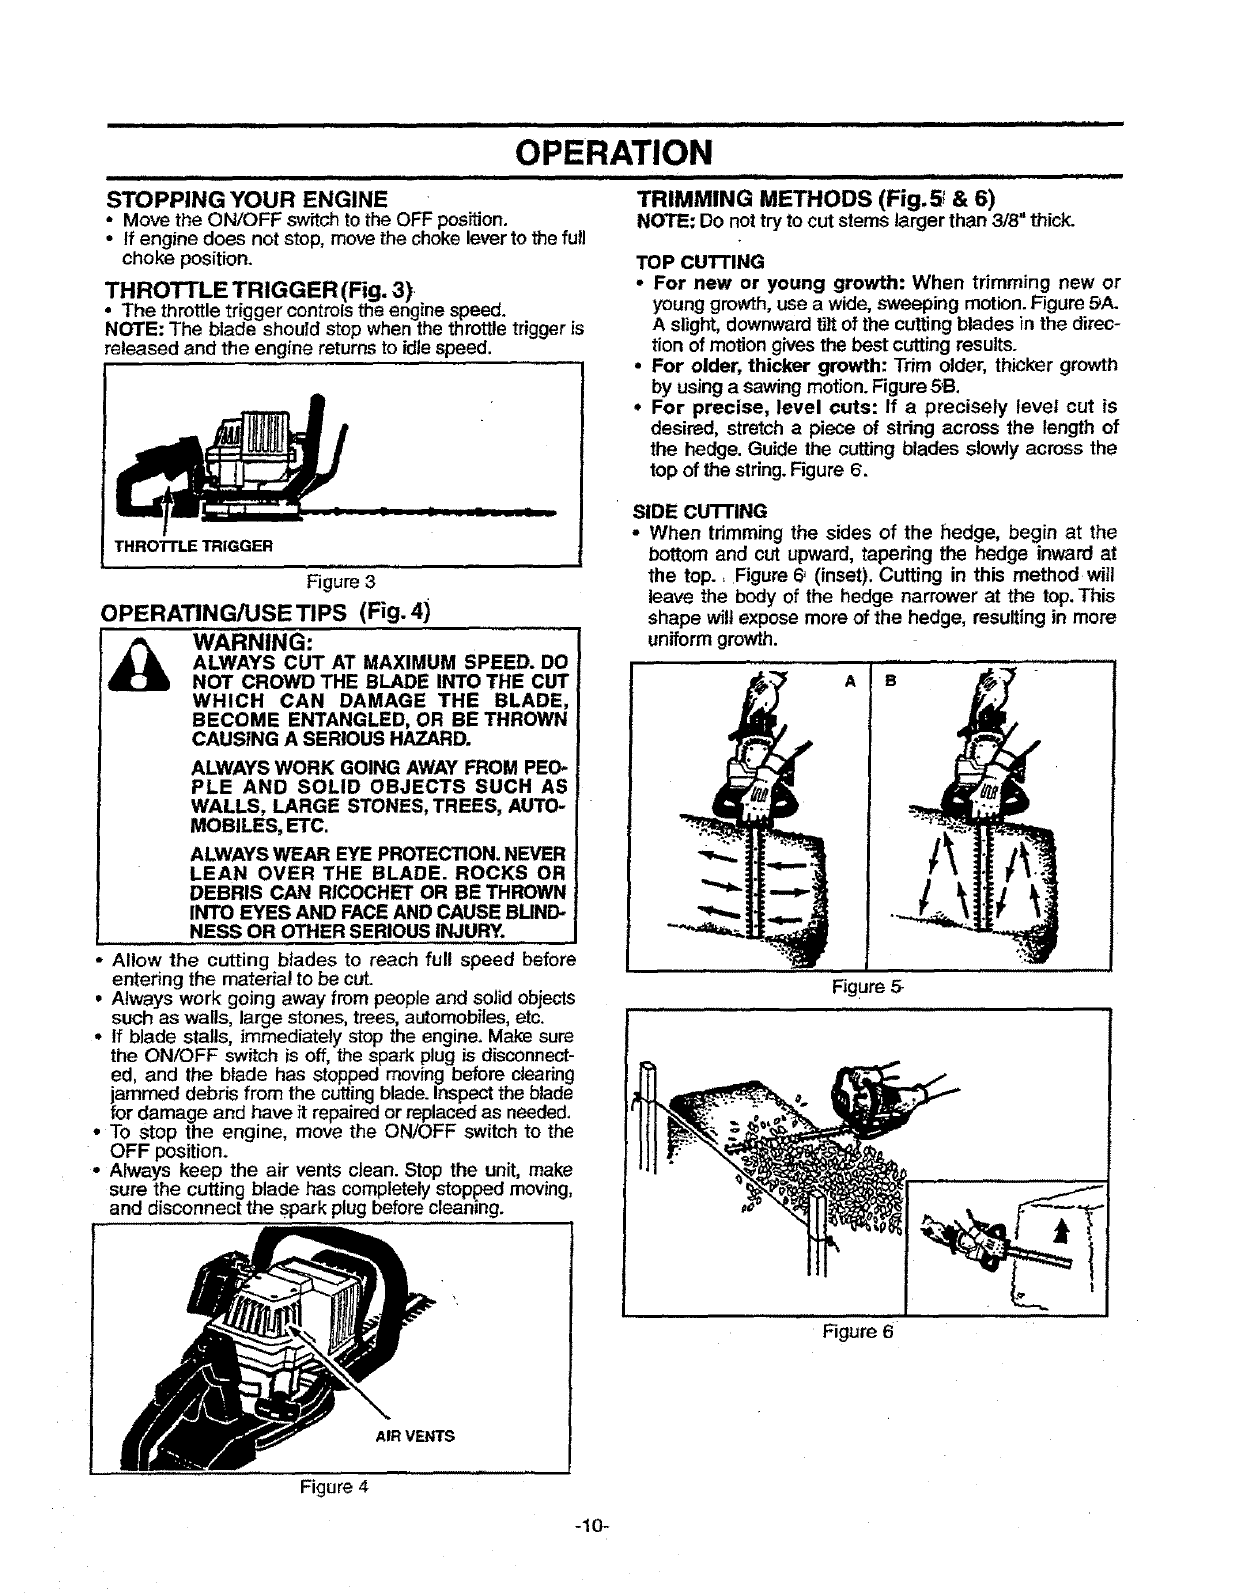
THROTTLE TRIGGER (Fig. 3)
The throttle trigger controlsthe enginespeed.
NOTE: The blade should stop when the throttle trigger is
released and the engine returns to idlespeed.
THROTrLE TRIGGER
Figure 3
OPERATIN G/USE TIPS (Fig. 4)
w...,.o
ALWAYS CUT AT MAXIMUM SPEED. DO
NOT CROWD THE BLADE INTO THE CUT
WHICH CAN DAMAGE THE BLADE,
BECOME ENTANGLED, OR BE THROWN
CAUSING A SERIOUS HAZARD.
ALWAYS WORK GOING AWAY FROM PEO-
PLE AND SOLID OBJECTS SUCH AS
WALLS, LARGE STONES, TREES, AUTO-
MOBILES, ETC.
ALWAYS WEAR EYE PROTECTION. NEVER
LEAN OVER THE BLADE. ROCKS OR
DEBRIS CAN RICOCHET OR BE THROWN
INTO EYES AND FACE AND CAUSE BLIND-
NESS OR OTHER SERIOUS INJURY.
• Allow the cutting blades to reach full speed before
entering the material to be cut.
• Always work going away from people and solid objects
such as walls, large stones, trees, automobiles,etc.
• If blade stalls, immediately stop the engine. Make sure
the ON/OFF switch is off, the spark plug is disconnect-
ed, and the blade has stopped moving before clearing
ioammeddebris from the cutting blade. Inspect the blade
rdamage and have _trepaired or replaced as needed.
° To stop the engine, move the ON/OFF switch to the
OFF position.
o Always keep the air vents clean. Stop the unit, make
sure the cutting blade has completely stopped moving,
and disconnect the spark plug before cleaning.
AIR VENTS
TRIMMING METHODS (Fig.5_ & 6)
NOTE: Do nottry to cut stems larger than 3/8" thick.
TOP cu'n'ING
•For new or young growth: When trimming new or
younggrowth, use a wide, sweeping motion. Figure 5A.
Aslight,downward tiltof the cuttingblades in the direc-
tion of motion gives the best cuttingresults.
•For older, thicker growth: Trim older, thicker growth
by usinga sawing motion. Figure5!3.
• For precise, level cuts: If a precisely level cut is
desired, stretch a piece of string across the length of
the hedge. Guide the cutting blades slowly across the
top of the string.Figure 6.
SIDE cu'n'ING
• When tdmming the sides of the hedge, begin at the
bottom and cut upward, tapering the hedge inward at
the top., Figure 6' (inset). Cutting in this method will
leave the body of the hedge narrower at the top. This
shape will expose more of the hedge, resulting in more
uniform growth.
A B
Figure 5
Figure 6
Figure 4
-10-
HI iii i I i ii i i= ii
OPERATION
i H= H
BEFORE STARTING ENGINE
WARNING:
BE SURE TO READ THE FUEL SAFETY
INFORMATION IN THE SAFETY RULES
SECTION ON PAGE 2 OF THIS MANUAL
BEFORE YOU BEGIN.
IFYOU DO NOT UNDERSTAND THE FUEL
SAFETY SECTION DO NOT ATTEMPT TO
FUEL YOUR UNIT; SEEK HELP FROM
SOMEONE WHO DOES UNDERSTAND
THE FUEL SAFETY SECTION'OR CALL
THE CUSTOMER ASSISTANCE HOTLINE
AT 1-800235-5878.
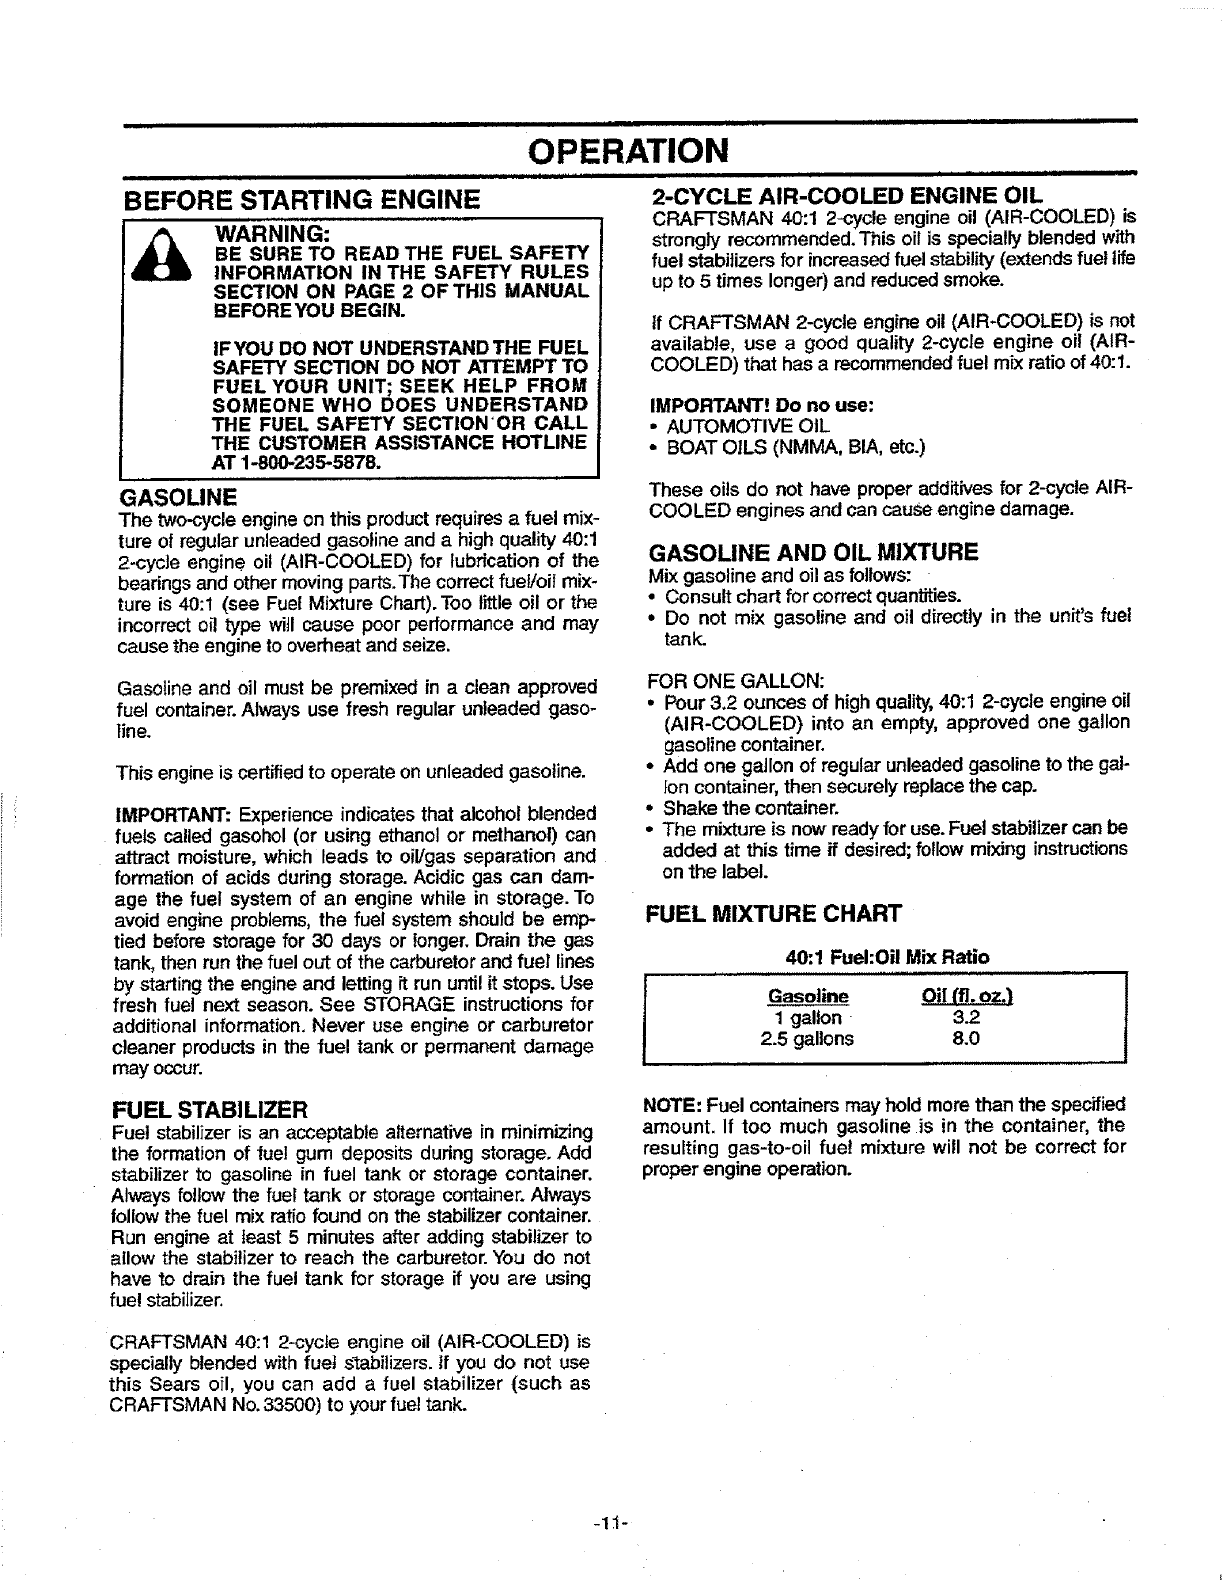
GASOLINE
The two-cycle engine on this product requires a fuel mix-
ture of regular unleaded gasoline and ahigh quality 40:1
2-cycle engine oil (AIR-COOLED) for lubrication of the
bearings and other moving parts.The correct fuel/oil mix-
ture is 40:1 (see Fuel Mixture Chart). Too little oil or the
incorrect oil type will cause poor performance and may
cause the engine to overheat and seize.
i= = ,,= ,= i ill
2-CYCLE AIR-COOLED ENGINE OIL
CRAFTSMAN 40:1 2-cycle engine oil (AIR-COOLED) is
strongly recommended.This oil is specially blended with
fuel stabilizersfor increasedfuel stability(extends fuel life
upto 5 times longer) and reducedsmoke.
If CRAFTSMAN 2-cycte engine oil (AIR-COOLED) is not
available, use a good quality 2-cycle engine oil (AIR-
COOLED) that has a recommended fuel mix ratio of 40:1.
IMPORTANT! Do no use:
•AUTOMOTIVE OIL
•BOAT OILS (NMMA, BIA, etc.)
These oils do not have proper additivesfor 2-cycle AIR-
COOLED engines and can cause engine damage.
GASOLINE AND OIL MIXTURE
Mix gasoline and oil as follows:
•Consult chart for correct quantities.
•Do not mix gasoline and oil directly in the unit's fuel
tank.
Gasoline and oil must be premixed in a clean approved
fuel container. Always use fresh regular unleaded gaso-
line.
This engine is certifiedto operate on unleaded gasoline.
IMPORTANT: Experience indicates that alcohol blended
fuels called gasohol (or using ethanol or methanol) can
attract moisture, which leads to oil/gas separation and
formation of acids during storage. Acidic gas can dam-
age the fuel system of an engine while in storage. To
avoid engine problems,the fuel system should be emp-
tied before storage for 30 days or longer. Drain the gas
tank, then run the fuel out of the carburetorand fuel lines
by startingthe engine and lettingit run untilit stops. Use
fresh fuel next season. See STORAGE instructions for
additional information. Never use engine or carburetor
cleaner products in the fuel tank or permanent damage
may occur.
FOR ONE GALLON:
•Pour 3,2 ounces of high quality,40:1 2-cycle engine oil
(AIR-COOLED) into an empty, approved one gallon
gasoline container.
•Add one gallon of regular unleaded gasoline to the gal-
lon container, then securely replace the cap.
-Shake the container.
• The mixture is now readyfor use.Fuel stabilizercan be
added at this time if desired;follow mixing instructions
on the label.
FUEL MIXTURE CHART
I40:1 Fuel:Oil Mix Ratio
Gasoline Oil (fl. oz.)
1gallon 3.2
2.5 gallons 8.0
FUEL STABILIZER
Fuel stabilizer is an acceptable alternative in minimizing
the formation of fue! gum deposits dudng storage. Add
stabilizer to gasoline in fuel tank or storage container.
Always follow the fuel tank or storage container. Always
follow the fuel mix ratio found on the stabilizer container.
Run engine at [east 5 minutes after adding stabilizer to
allow the stabilizer to reach the carburetor. You do not
have to drain the fuel tank for storage ff you are using
fue! stabilizer.
NOTE: Fuel containers may hold more than the specified
amount. If too much gasoline is in the container, the
resulting gas-to-oil fue! mixture will not be correct for
proper engine operation.
CRAFTSMAN 40:1 2-cycle engine oil (AIR-COOLED) is
specially blended with fuel s_abilizers, if you do not use
this Sears oil, you can add a fuel stabilizer (such as
CRAFTSMAN No.33500) to your fuel tank.
-1"1-
i ii i I,IHI IIIIIII I =11 IIIIIIIII I IIIII ,I,,,11,11111II IIII ]
OPERATION
,,,,,,=r= ,= =,,,= I I
STOPPING YOUR ENGINE
-Move the ON/OFF switch to the OFF position.
•If engine does not stop, move the choke lever to full
choke.
DANGER:
THE CUTTING BLADE WILL TURN WHEN
THE ENGINE STARTS.
FOR SAFE STARTING AND OPERATION,
FOLLOW AtL SAFETY PRECAt_rlONS IN
THIS OPERATOR'S MANUAL AND
LABELS ON THE UNIT. DRESS PROP-
ERLY BEFORE STARTING ENGINE.
AVOID ANY CONTACT WITH THE MUF-
FLER, A HOT MUFFLER CAN CAUSE
SERIOUS BURNS.
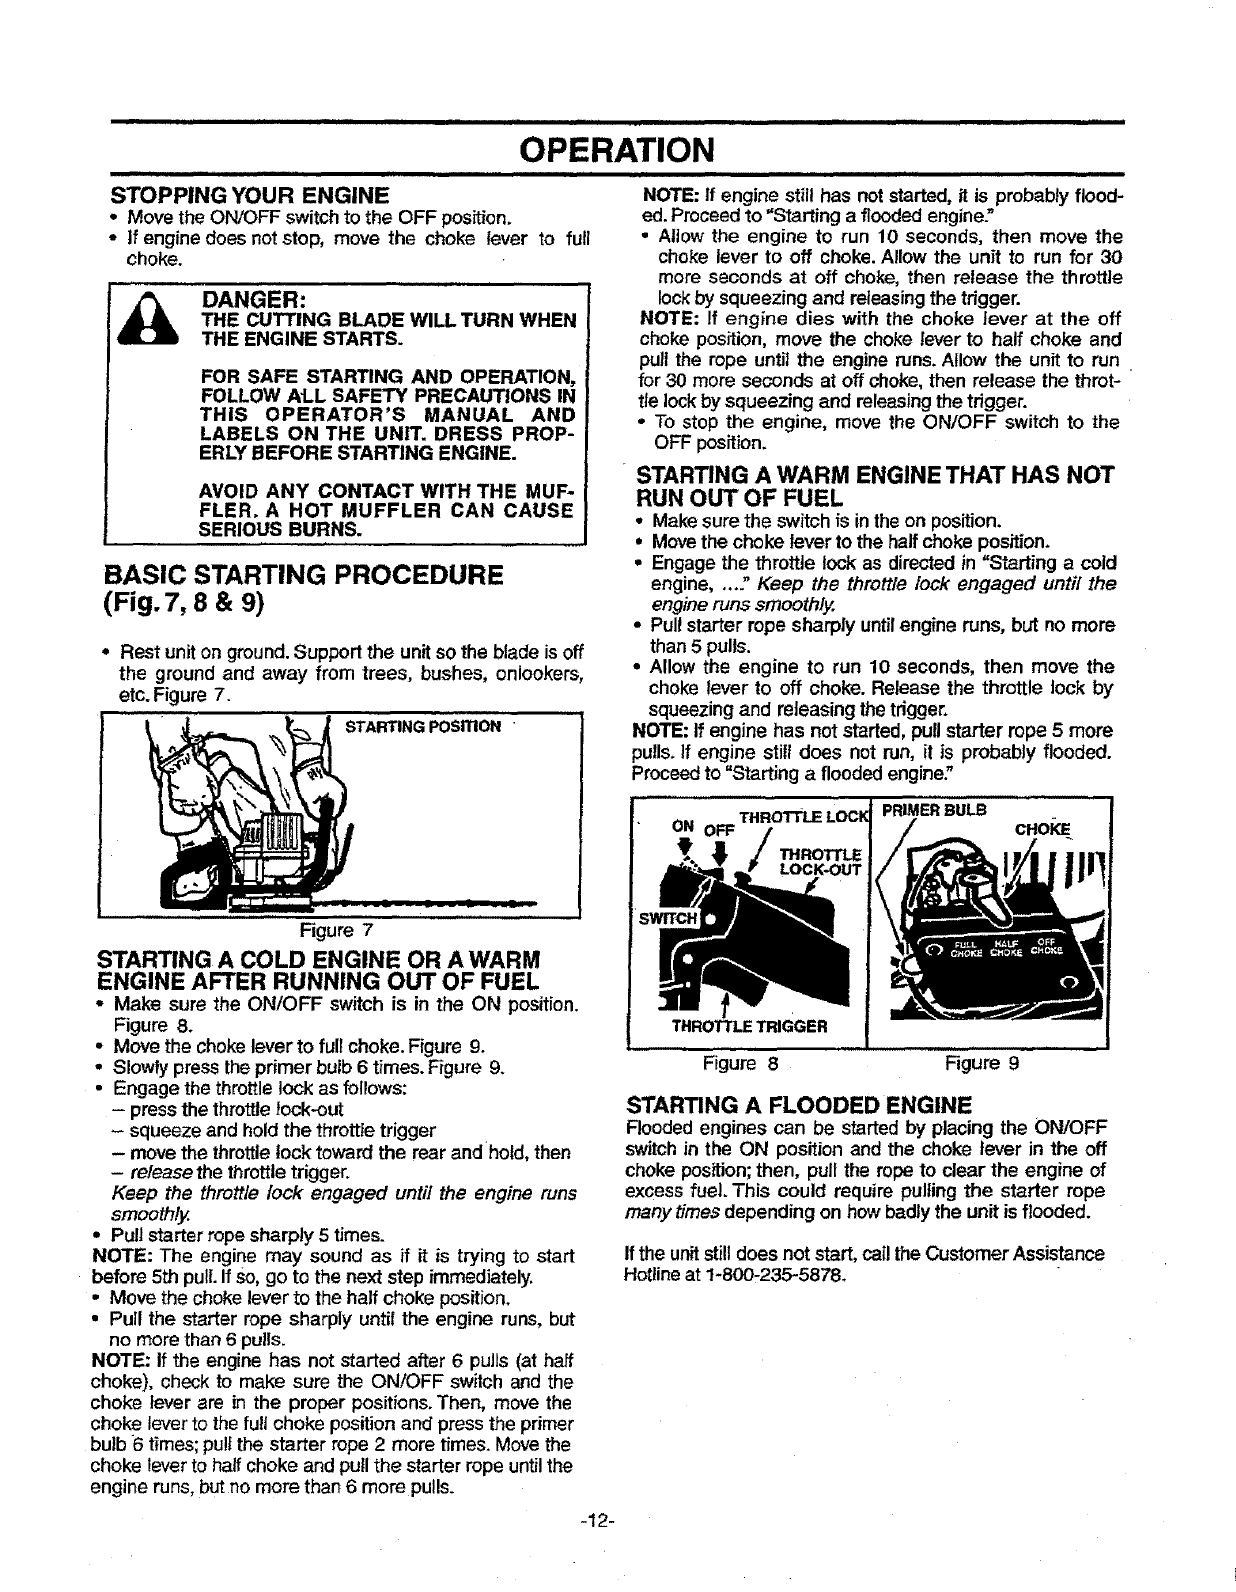
BASIC STARTING PROCEDURE
(Fig. 7, 8 & 9)
•Rest unit on ground. Support the unitso the blade is off
the ground and away from trees, bushes, onlookers,
etc. Figure 7.
qSTARTING Posmo_
L ----It.
Figure 7
STARTING A COLD ENGINE OR A WARM
ENGINE AFTER RUNNING OUT OF FUEL
° Make sure the ON/OFF switch is in the ON position.
Figure 8.
-Move the chokelever to full choke. Figure 9.
•Slowly press the primer bulb6 times.Figure 9.
•Engage the throttlelock as follows:
- pressthe throttlelock-out
- squeeze and holdthe throttletrigger
- move the throttlelock toward the rear andhold, then
-releasethe throttletrigger.
Keep the throttle lock engaged until the engine runs
smoothly.
• Pull starter rope sharply 5 times.
NOTE: The engine may sound as if it is trying to start
before 5th pull. If so, go to the next step immediately.
• Move the choke lever to the half choke position.
• Pull the starter rope sharply until the engine runs, but
no more than 6 pulls.
NOTE: If the engine has not started after 6 pulls (at half
choke), check to make sure the ON/OFF switch and the
choke lever are in the proper positions. Then, move the
choke lever to the full choke position and press the primer
bulb 6 times; pullthe starter rope 2 more times. Move the
choke lever to half choke and pull the starter rope until the
engine runs, but no more than 6 more pulls.
=,,= i,==
NOTE: ff engine still has not started, it is probably flood-
ed. Proceed to "Starting a flooded engine."
• Altow the engine to run 10 seconds, then move the
choke lever to off choke. Allow the unit to run for 30
more seconds at off choke, then release the throttle
lock by squeezing and re!easing the trigger.
NOTE: If engine dies with the choke lever at the off
choke position, move the choke lever to half choke and
pull the rope unt_ the engine runs. Allow the unit to run
for 30 more seconds at off choke, then release the throt-
tie lock by squeezing and releasing the trigger.
• To stop the engine, move the ON/OFF switch to the
OFF position.
STARTING A WARM ENGINE THAT HAS NOT
RUN OUT OF FUEL
• Make sure the switchis inthe on position.
•Movethe choke lever to the halfchoke position.
•Engage the throttle lock as directedin =Starting a cold
engine.... / Keep the throttle lock engaged until the
engine runs smoothly.
•Pull starter rope sharply until engine runs, but no more
than 5 pulls.
•Allow the engine to run 10 seconds, then move the
choke lever to off choke. Release the throttle lock by
squeezing and releasing the trigger.
NOTE: If engine has not started, pullstarter rope 5 more
pulis. If engine still does not run, it is probably flooded.
Proceedto "Starting a flooded engine."
ON OFF
THROTTLE
LOCK*OUT
THROTrLE TRIGGER
Figure 8 Figure 9
STARTING A FLOODED ENGINE
Floodedengines can be started by placing the ON/OFF
switchin the ON position and the choke lever in the off
choke position;then, pull the rope to clear the engine of
excess fuel, This could require pulling the starter rope
many times depending on howbadly the unit is flooded.
If the unit still does not start, cat! the Customer Assistance
Hctline at 1-800-235-5878.
-12-
.........CUSTOM'ER RESP'() ISIBILITIES
I I I IIII I IIIIIIIIIIIIII I II I II I IIIIIII IIIIIII IIIIII II I I I I I
MAINTENANCE SCHEDULE
Fillin datesas you completeregularservice Before After Every Every !Yeady ServiceDates
Use Use 5 Hrs. 25 Hrs. ,,, ,,,
Check fordamagedor wornparts ,¢
Check for loosefastenersandparts ,,I
Clean unit 4"
Cuttingbladelubrication "(
Clean air filter "(
Clean/inspectsparkarrestorscreen(if installed)
andmuffler 4
Replacesparkplug v"
Replacefuel filter "/
GENERAL RECOMMENDATIONS
The warranty on this hedge trimmer does not cover items
that have been subjected to operator abuse or negli-
gence. To receive full value from the warranty,the opera-
tor must maintain hedge trimmer as instructed in this
manual.
Some adjustments will need to be made periodically to
propedy maintain your unit.
All adjustments in the Service and Adjustments section
of this manual should be checked at least once each
season.
• Once a year, replace the spark plug, reptace air filter. A
new spark plug and a cleantnew air filter element
assures proper air-fuel mixture and helps your engine
turn better and last longer.
- Follow the maintenance schedule in this manual.
WARNING:
DISCONNECT THE SPARK PLUG
BEFORE PERFORMING MAINTENANCE
EXCEPT FOR CARBURETOR ADJUST-
MENTS.
REPLACE CUTTING BLADE PARTS THAT
ARE CRACKED, CHIPPED, OR DAMAGED
IN ANY OTHER WAY BEFORE USING THE
UNIT.
INSPECT THE ENTIRE UNIT. REPLACE
DAMAGED PARTS. CHECK FOR FUEL
LEAKS AND MAKE SURE ALL FASTEN-
ERS ARE IN PLACE AND SECURELY
FASTENED.
i i
LUBRICATION CHART
TOP STRAP
BEFORE USE
CHECK FOR DAMAGED/WORN PARTS
*Cutting blade -replace cutting blade parts that are
bent, warped,cracked, or damaged inany way
* Fuel cap - replace broken or leakingfuelcap.
. Debris shield - replace debris shield that is bent,
warped, cracked, or damaged in any way
CHECK FOR LOOSE FASTENERS/PARTS
*Cutting blade
*Assist handle
oThrottle handle
,Cylinder cover/Muffler guard
• Air filter cover
oMuffler
• Debris shield
AFTER USE
CLEAN UNIT AND LABELS
,Clean the unit using adamp cloth with a mild deter-
gent.
° Wipe off the unit with a clean dry cloth.
CUTI'ING BLADE LUBRICATION (Fig. 10)
•Make sure the ON/OFF switch is in the OFF position
and the blade has stopped moving. Disconnect the
spark plug.
°Remove any debris from the cuttingblade.
•Clean all parts and check for damage. Have damaged
parts repaired or replaced by qualifiedservice person-
nel.
° Apply alight machine oil along the edge of the top
strap. ¢'
OUGHT MACHINE OIL -13- Figure 10

......... ii i iiiiiiiiiiiiii i i i iii i roll IH I IIIIIIIIII I]
CUSTOMER RESPONSIBILITIES
EVERY 5 HOURS
CLEAN AIR FILTER (Fig. 11)
A dirty air filter decreases the life and performance of the
engine and increases fuel consumption an'd harmful
emissions•
Always clean after 5 tanks of fuel or 5 hoursof operation.
Clean more frequentlyin dustyconditions,
•Loosen the two screwson the air filter cover enough to
remove the cover from the engine.
•Remove air filter.
•Wash air filter in soapand water.
•Squeeze air filter dry and replace in cover.
•Re-install the air filter cover.
AIR RLTER SCREWS
i...........................
CLEANINGTHE SPARK ARRESTOR SCREEN
•Removethe sparkplugboot from the spark plug.
•Remove the spark plug•
•Loosen and removethe four (4) engine coverscrews
•Remove the two (2) muffler guard springs
•Remove muffler diffuser and spark arrestor screen
assembly. Notice the orientation of these parts for
reassembty
•Clean the spark arrestor screen with a wire brush or
replace if breaksare found in the screen
• Replace any broken or cracked parts
•Reinstalldiffuser and spark arrestor screen asembly.
•Reinstall mufflercoverand the two mufflercover retaining
springs
• Reinsta[lengine cover and the four engine cover screws
(15-20 in Ibs.).
Figure 11
EVERY 25 HOURS
CLEAN AND INSPECT SPARK ARRESTOR
SCREEN (Fig. 12)
As the unit is used, carbon deposits build up on the muf-
fler and spark arrestor creen (if installed), and must be
removed to avoid creating a "fire hazard or affecting
engine performance
Required cleaning is every 25 hours of operation or
annually, whichever is fess
Reptace the spark arrestor screen if breaks occur.
Figure 12
YEARLY
REPLACE SPARK PLUG (Fig. 13)
The spark plug should be replaced each year to ensure
the engine starts easier and runs better Spark plug gap
should be .025"°
•Pull off the spark plug boot.
°Remove and discardthe spark ptug.
•Replace with correct spark plug and re-tightenwith spark
plug wrench (10-12Ib-ft).
• Reconnect spark plug with spark plug boot•
BOOT
Figure 13
- 14_
i1|1 i i i i iiii i iiii i 11111
CUSTOMER RESPONSIBILITIES
iiiiii ii iii iii iii i i i ii i 1111111
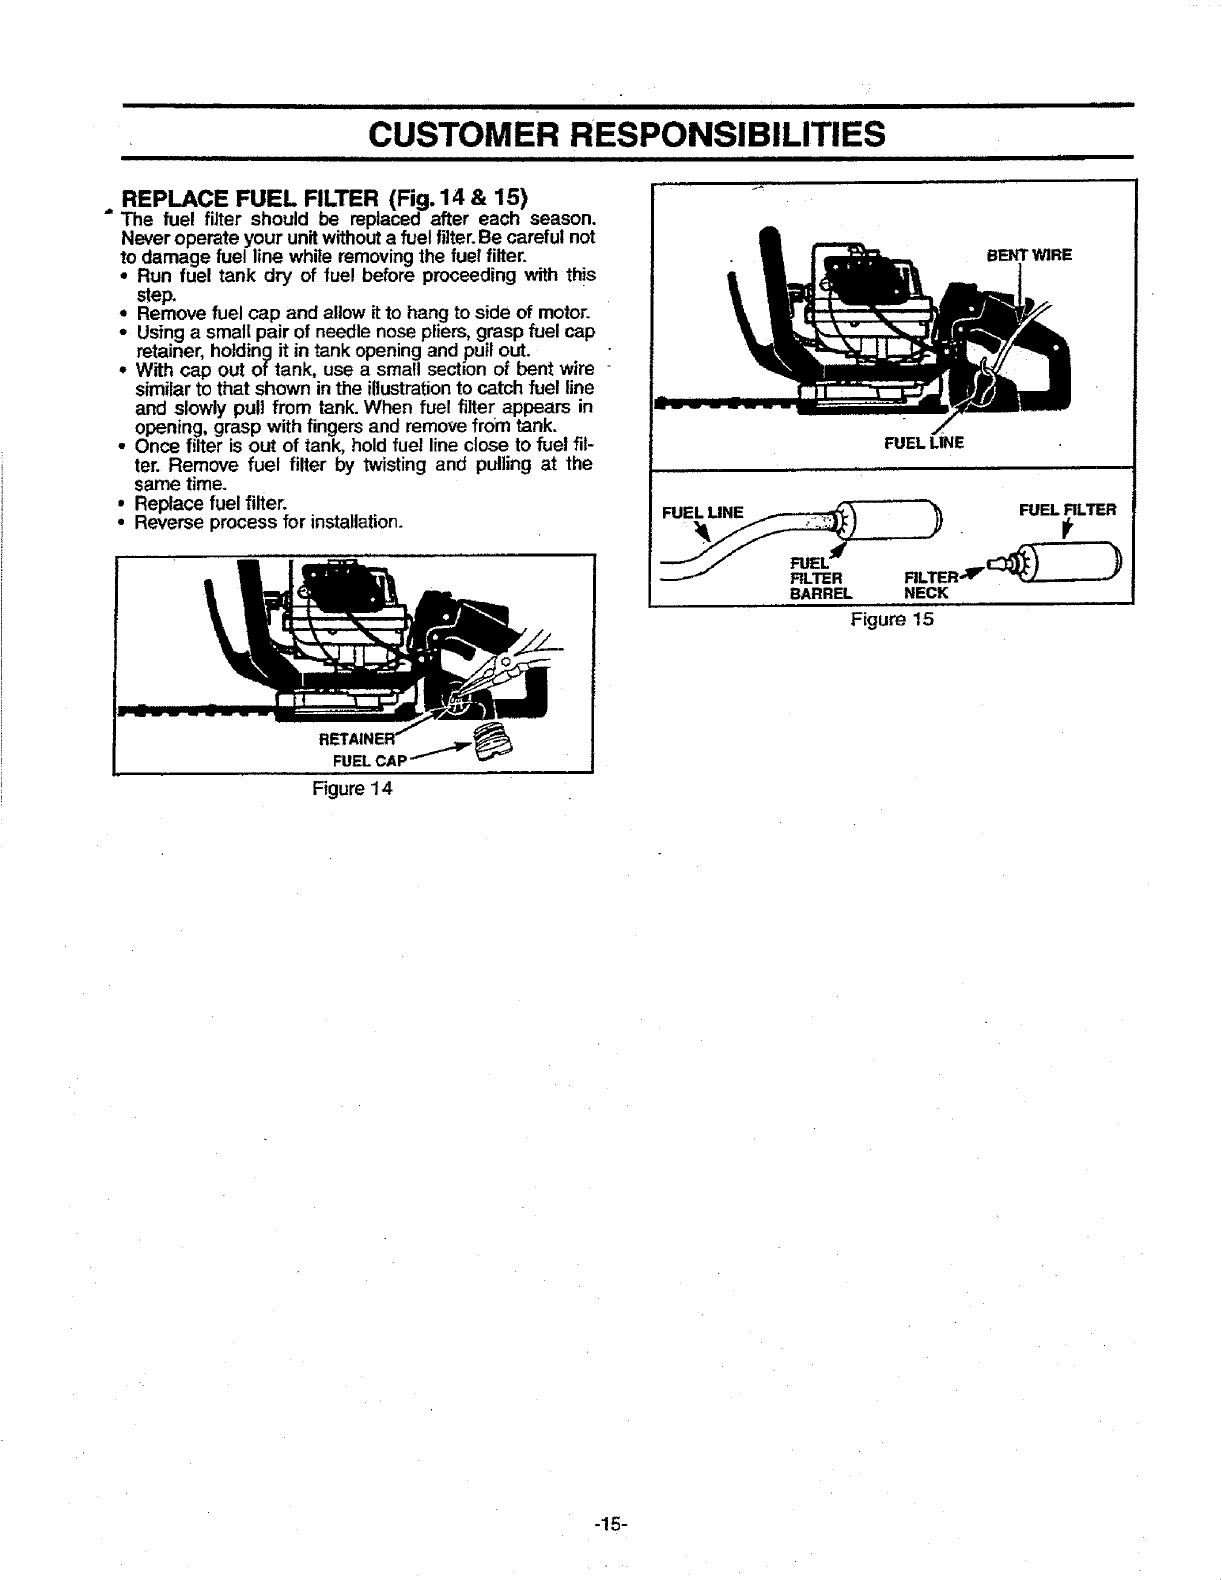
REPLACE FUEL FILTER (Fig. 14 & 15)
"The fuel filter should be replaced after each season.
Neveroperate your unitwithouta fuel filter. Be careful not
to damage fuel line while removingthe fuel filter.
• Run fuel tank dry of fue! before proceeding with this
step,
• Remove fuel cap and allow it to hang to side of motor.
•Using asmatl pair of needle nosepliers, grasp fuel cap
retainer, holding it intank openingand pullout.
•With cap out of tank, use a small section of bent wire
similarto that shown inthe illustrationto catch fuel line
and slowly pull from tank.When fuel filter appears in
opening, grasp with fingers and removefrom tank.
•Once filter is out of tank, hold fuel line close to fuel fil-
ter. Remove fuel filter by twisting and pulling at the
same time.
•Replace fuel filter.
•Reverse process for installation.
FUEL CAP
BENT WIRE
FUEL LINE
FUELLINE _ .... i _ )
BARREL NECK
Figure 15
Figure 14
FUEL RLTER
,,,,_
-15-
iiilUll i1| i iiii Ull i iii i
SERVICE AND ADJUSTMENTS
|1111 ii i i i ill |iii i I iiiiiiiiiii I
Carburetor adjustment is critical and if done improperly adjustment should be no morethan the width of the slot in the
can permanently damage the engine as well as the car- adjusting screw.
buretor. Please read all instructions and consult the • Turn both of the mixture screws counterclockwiseuntflthey
Troubleshooting section of this manual before begin- stop.Do notattemptto adjustthe screw beyondthe stopsas
ning this process, if the engine does not operate accord- damagecan occur.
ing to these instructions after repeating the adjusting • Turnthe idle speedscrewclockwise1/2 turn.
steps, do not use the unit, For further assistance, please •Startthe engineandoperateforthree )3) minutesto warm up.
call our customer assistance hotline at 1-800-235-5878. Go to"Adjusting procedure?
WARNING:
MAKE CARBURETOR ADJUSTMENTS
WITH THE LOWER END SUPPORTED TO
PREVENT BLADE FROM CONTACTING
ANY OBJECT. HOLD UNIT WITH YOUR
HAND.
THE BLADE WILL BE MOVING DURING
MOST OF THIS PROCEDURE, WEAR
YOUR PROTECTIVE EQUIPMENT AND
OBSERVE ALL SAFETY PRECAUTIONS.
IN "LOW SPEED MIXTURE ADJUST-
MENT," RECHECK IDLE SPEED AFTER
EACH ADJUSTMENT. THE CUTTING
BLADE MUST NOT MOVE AT IDLE SPEED.
If enginedoes not start, it may be flooded,tf in doubt, read the
sectiononflooded engine inthe starting section of this manual
priorto beginning any adjustments.
If you are unsure about adjusting the carburetor or experience
any problem while attemptingthis process, please cal!the 1-800
number listed on the front cover of this manualfor further assis-
tance.
The carburetor has been adjusted at the factory for sea level
conditions. Adjustments may become necessary if the unit is
used at significantly higher altitudesor if you notice any of the
following conditions:
•Engine willnot continue to run at idle position.See =Idlespeed
adjustment."
•Blade continues to move when the engine idles.See "Idle
speed adjustment."
•Engine dies or hesitates when it should accelerate. See
"Acceleration check?"
°Loss of cuttingpow,er which cannot be corrected by cleaning
the air filter. See High speed adjustment."
NOTE.-Do not attempt to turn the adjustments beyond the stops
as damage can occur.
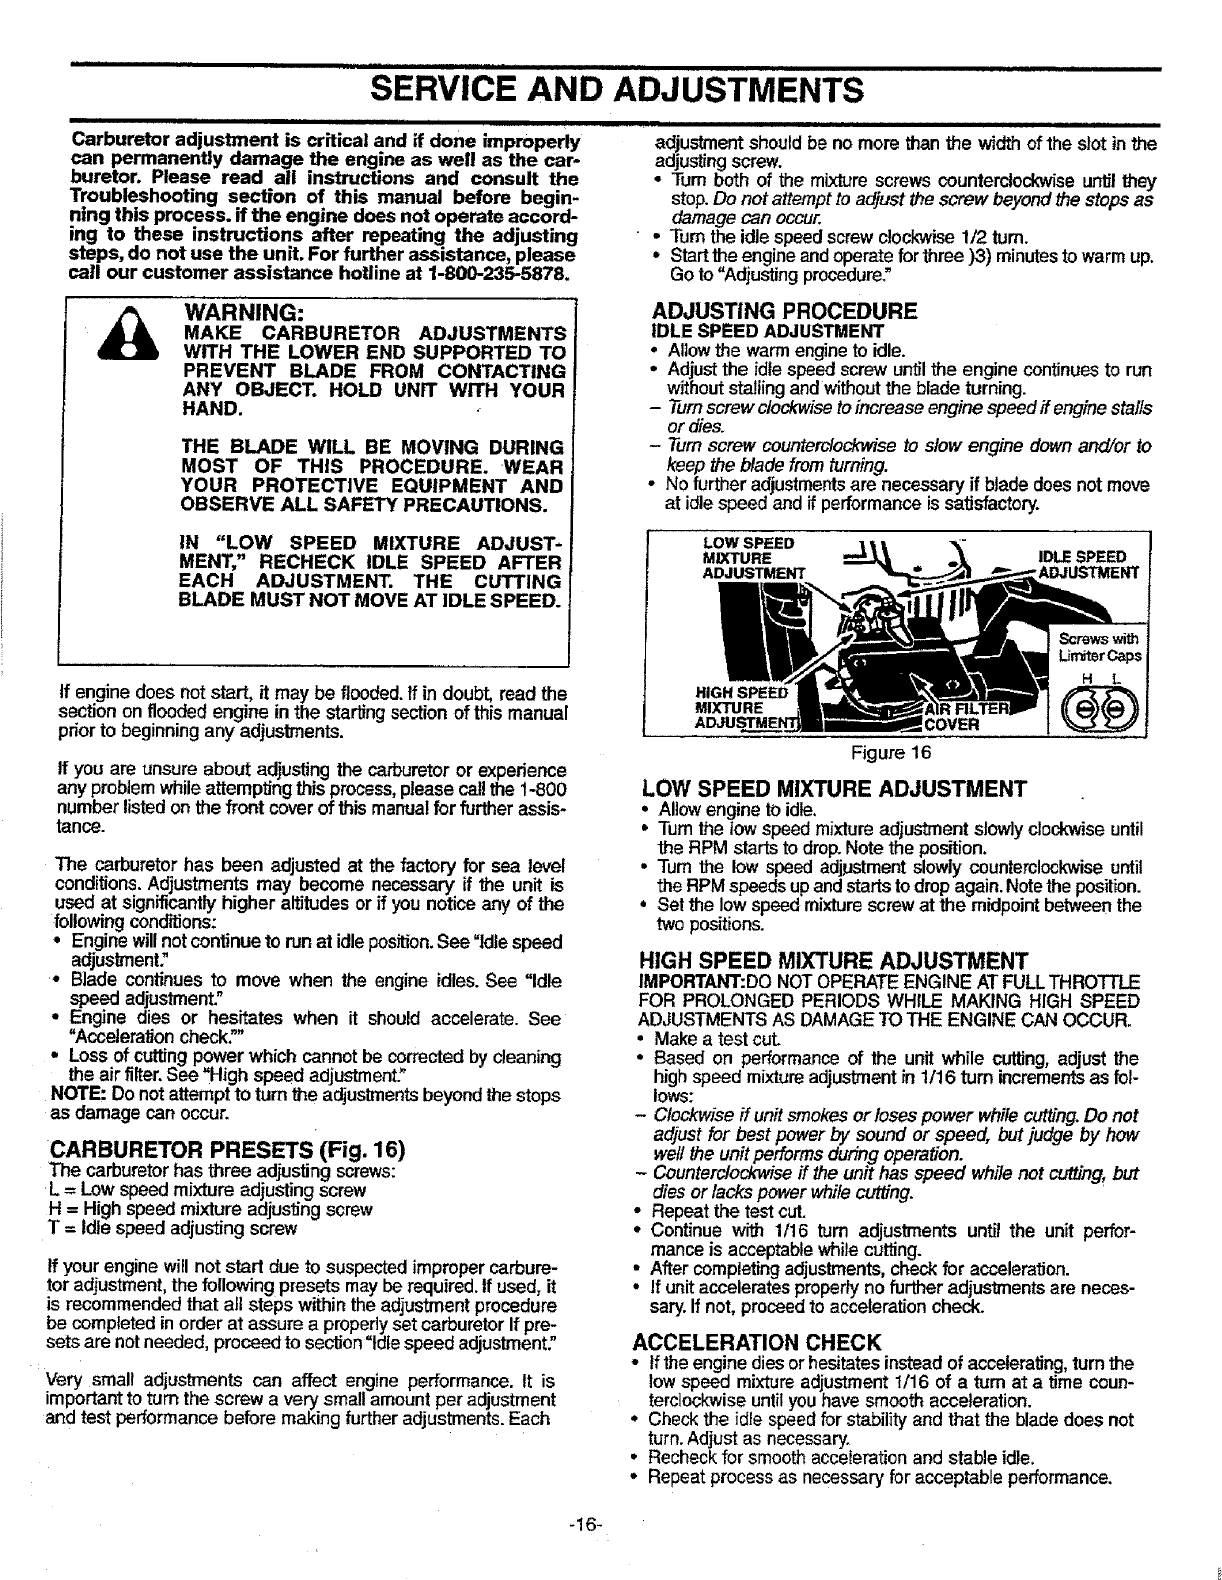
CARBURETOR PRESETS (Fig. 16)
The carburetorhas three adjustingscrews:
L = Low speed mixture adjusting screw
H=Highspeedmixture adjustingscrew
T = Idle speed adjusl_ngscrew
If your engine will notstart due to suspectedimpropercarbure-
toradjustment, the following presets may be required. If used, it
is recommended that all steps w;thin the adjustment procedure
be completed inorder at assure aproperly set carburetor If pre-
sets are not needed, proceed to section =Idlespeed adjustment."
Very small adjustments can affect engineperformance. It is
important to tum the screw a very small amount per adjustment
and test performance before making further adjustments. Each
ADJUSTING PROCEDURE
IDLE SPEED ADJUSTMENT
Allowthe warm engineto idle.
Adjustthe idlespeedscrewuntilthe enginecontinuesto run
withoutstallingandwithoutthe bladeturning.
-Turnscrewclockwisetoincreaseengine speedif enginestalls
or dies.
-Turnscrew counterclockwise to stow engine down and/or to
keep the blade from turning.
•No further adjustments are necessary if blade does not move
at idlespeed and if performance is satisfactory.
LOW SPEED ..._,
MIXTURE
ADJUSTMENT IDLE SPEED
HIGH SPEED
MIXTURE
COVER
Figure 16
LOW SPEED MIXTURE ADJUSTMENT
• Allowengine to idle.
• Turnthe lowspeedmixtureadjustment slowlyclockwiseuntil
the RPM startsto drop.Note the position.
• Turnthe low speedadjustmentslowlycounterclockwiseuntil
the RPMspeedsupand startsto dropagain.Notetheposition.
• Set the lowspeedmixturescrewat the midpoint betweenthe
twopositions.
HIGH SPEED MIXTURE ADJUSTMENT
IMPORTANT:DONOTOPERATEENGINE ATFULLTHROTTLE
FOR PROLONGEDPERIODS WHILE MAKING HIGH SPEED
ADJUSTMENTSAS DAMAGETOTHE ENGINE CAN OCCUR.
•Make a test cuL
•Based on performanceof the unit while cutting,adjust the
highspeed mixture adjustmentin 1/16 turn incrementsas fol-
lows:
-Clockwiseif unitsmokes orlosespower while cutting.Do not
adjustfor best power by sound or speed, but judge by how
well the unitperforms duringoperation.
-Counterclockwise if the unit has speed while not cutting,but
diesor lackspower while curing.
• Repeatthe test cut.
•Continue w_ 1/16 turn adjustments until the unit perfor-
mance is acceptablewhilecutting.
•After completing adjustments, check for aoceleralJon.
•If unit accelerates properly no further adjustments are neces-
sary. If not, proceed to acceleration check.
ACCELERATION CHECK
•ffthe enginedies or hesitatesinsteadof accelerating,turn the
lowspeed mixture adjustment1/16 of aturn at a time coun-
terclockwiseuntilyou have smooth acceleration.
•Check the idle speedforstability and that the bladedoes not
turn.Adjustas necessary.
• Recheckfor smooth acceleration and stable idle,
•Repeat process as necessary for acceptable performance.
-16-
iiiiii iiiiii iiiiiiiiiiii iiii iii i i ii i IIIIIIIHIIIIIIIIIII
Immediately prepare your unit for storage at the end of
the season or if it will not be used for 30 days or more.
WARNING:
ALLOW THE ENGINE TO COOL, AND
SECURE THE UNIT BEFORE STORING
OR TRANSPORTING IN A VEHICLE.
STORE UNIT AND FUEL IN AN AREA
WHERE FUEL VAPORS CANNOT REACH
SPARKS OR OPEN FLAMES FROM
WATER HEATERS, ELECTRIC MOTORS
OR SWITCHES, FURNACES, ETC.
STORAGE
ii iiii i [[i i iiiiii i iiiii iiiii iiiiiiiiiiiiiiiiiiiii i i
FUEL SYSTEM
Never use engine or carburetor cleaner products in the
fueltank or permanent damage may occur to fuei system
components. Follow these instructions:
•Drain the fuel from the unit into an approved fuel con-
tainer.
•Drain the fuel lines and carburetor by starting the
engine and letting It run until it stops.
• Allow the engine to coot before storage.
STORE UNIT WITH ALL GUARDS IN
PLACE. POSITION SO THAT ANY SHARP
OBJECT CANNOT ACCIDENTALLY
CAUSE INJURYTO PASSERS BY.
STORE THE UNIT OUT OF TIlE REACH
OF CHILDREN.
IMPORTANT: It is important to prevent gum deposits
from forming in essential fuel system parts such as the
carburetor, fuel _ter, fuel hose or tank during storage.
Also, experience indicates that alcohol blended fuels,
those that use ethanoi or methanol (called gasohol or
oxygenated fuel), can attract moisture and form acidic
gas which will damage your engine. To avoid engine
problems,the fuel system shouldbe emptied before stor-
age of 30 days or longer.
GAS TRIMMER STORAGE INSTRUCTIONS
If your trimmer is to be stored for a period of time, clean it
thoroughly prior to storage. Remove any dirt, leaves, oil,
grease, etc. Store in a clean dry area.
• Clean the entire unit.
•Clean air filter. Refer to "Customer Responsibilities."
• Lightly oi! external metal surfaces to prevent rust from
forming.
•Re-assemble' all loose parts, being sure that all han-
dles and guards are in place and are securely fas-
tened. Replace any damaged parts.
°The recommended storage position is either vertically
with the fuel cap on top, or hodzontaily with the fuel
cap up. Do not store unit with the cutting attach-
ment up, above the engine.
I_lb CAUTION: Wear protective gloves when
handling. The blade is sharp and can cut
you.
Fuel stabilizer is an acceptable alternative in minimizing
the formation of fuel gum deposits during storage. Add
stabilizerto the gasoline in the fuel tank or fuel storage
container. Always follow the mix instructions found on
stabilizer containers. Run engine at least 5 minutes after
adding stabilizer to allow the stabilizer to reach the car-
buretor.
CRAFTSMAN 40:1 2-cycle engine oil (AIR-COOLED) is
specially blended with fuel stabilizer. If you do not use
this Sears oil, you can add a fuel stabilizer (such as
CRAFTSMAN No. 33500) to your fuel tank.
INTERNAL ENGINE
•Remove spark plug and pour 1 teaspoon of 40:1
2-cycle engine oil (AIR-COOLED) through the spark
plugopening. Slowly pull the starter rope 8 to 10 times
to distributeoil to inner enginesurfaces.
• Replace spark plug witha new one of the recommended
type and heat range. Refer to "Product Specifications."
• Clean air filter. Refer to =Customer Responsibilities."
•Re-install all covers and hardware removed for access;
tighten all screws and fasteners.
•Check entire unit for loose screws, nuts, and bolts.
Replace any damaged, broken, or worn parts.
-Lightly oil external metal surface to prevent rust from
forming.
oUse fresh fuel having the proper gasoline to oil ratio at
the beginning of the next season.
OTHER
•Do not store gasoline from one season to another.
•Replace your gasoline can if your can starts to rust.
Rust and/or dirt in your fuel system will cause problems.
• Store your unit in a well ventilated area and covered, if
possible, to prevent dust and dirt accumulation. Do not
cover with plastic. Plastic cannot breathe and will
induce condensation and eventual rust or corrosion.
IMPORTANT: Never cover unit while engine and exhaust
areas are still warm.

"iii i i iii •i IIIHI I I
TROUBLE SHOOTING POINTS
iiiiii =i iii i1= i =HUH
TROUBLE SHOOTING CHART
i
i ii =
SYMPTOM
Engine will notstart or
will run only for a few
seconds after starting,
CAUSE
,,,,,,, ,,,,,,,,,,, L
1. Fuel tank empty.
2. Engine flooded,
3. Spark plug notfiring.
4. Fuel not reaching carburetor.
5. Carburetor requires adjustment,
6. Air filter dirty.
7. Fuel filter dirty.
8. None of the above.
Engine will not idle
properly. 2.
3.
i, , ,
Engine will not
accelerate, lacks
power,or dies
under a load.
Engine smokes
excessively.
1. Idle speed set too fast ortoo stow.
Carburetor requires adjustment,
None of the above.
1. Air filter dirty.
2. Spark plugfouled.
3. Carburetor requiresadjustment.
4. Muffleroutletsplugged.
5. None of the above.
,,,,,,,,,,,,,,,,,,,,,i,,
1. Air filter dirty.
2. Fuel incorrect.
3. Carburetor requires adjustment.
...........,,,,i ,,,i ,, ii
Engine runs hot. 1.
2.
3.
4.
iJ-,
Cutting attachment
moves at idle speed,
Fuel incorrect.
Carburetor settoo low (lean).
Spark plugincorrect.
None of the above.
, ,,,,,,,,,,,,,,,,,,: ,, i
1, Carburetor requiresadjustment.
2, Throttle cable binding.
3. Clutchrequires repair,
,,,,, ,, ,
Cutting blade stops 1. Forcing blade into material being cut,
under a load or does 2. Blade clogged withdebris,
not turn when the 3. None of the above.
engine is accelerated,
CORRECTION
,L•
1. Filltank with correct fuel mixture.
2. See "Starting Instructions:
3. Installnew plug!checkignitionswitch.
4. Replace fuelfilter;, inspectfuel line.
5. See "Carburetor Adjustments;
6. Clean or replace air filter.
!7. Contact your SEARS Service Center/Dept.
8. Contact your SEARS Service Center/Dept.
J
1, See "CarburetorAdjustments."
2. See "Carburetor Adjustments."
3. Contact your SEARS Service Center/Dept.
1. Clean or replace air filter.
2. Claan and re-gap or replacespark plug.
3, See "Carburetor Adjustments;
4. Contact your SEARS Service Center/Dept,
5. Contact your SEARS Service Center/Dept,
,,,,, =
1, Clean or replace air filter.
2. Refuel with correct fuel mixture,
3, See =Carburetor Adjustments:
1. See "Fueling Your Unit."
2. See "Carburetor Adjustments."
3. Replace withcorrect plug.
4, Contact your SEARS Service Center/Dept.
1. See "Carburetor Adjustments."
2. Contact your SEARS Service Center/Dept,
3. Contact your SEARS Service Center/Dept.
, ,,,,,
1. Cut at a slower pace.
! 2. Clean debris from blade.
3. Contact your SEARS Service Center/Dept.
ff situationsoccur which are notcovered in this manual use care and good judgemenL
ff you need assistance, contact your SEARS Service Center/Department or the
CUSTOMER ASSISTANCE HOTLINE at 1-800-235-5878.
-18-
ill, i i,iii i .11111 ill ii i i ii
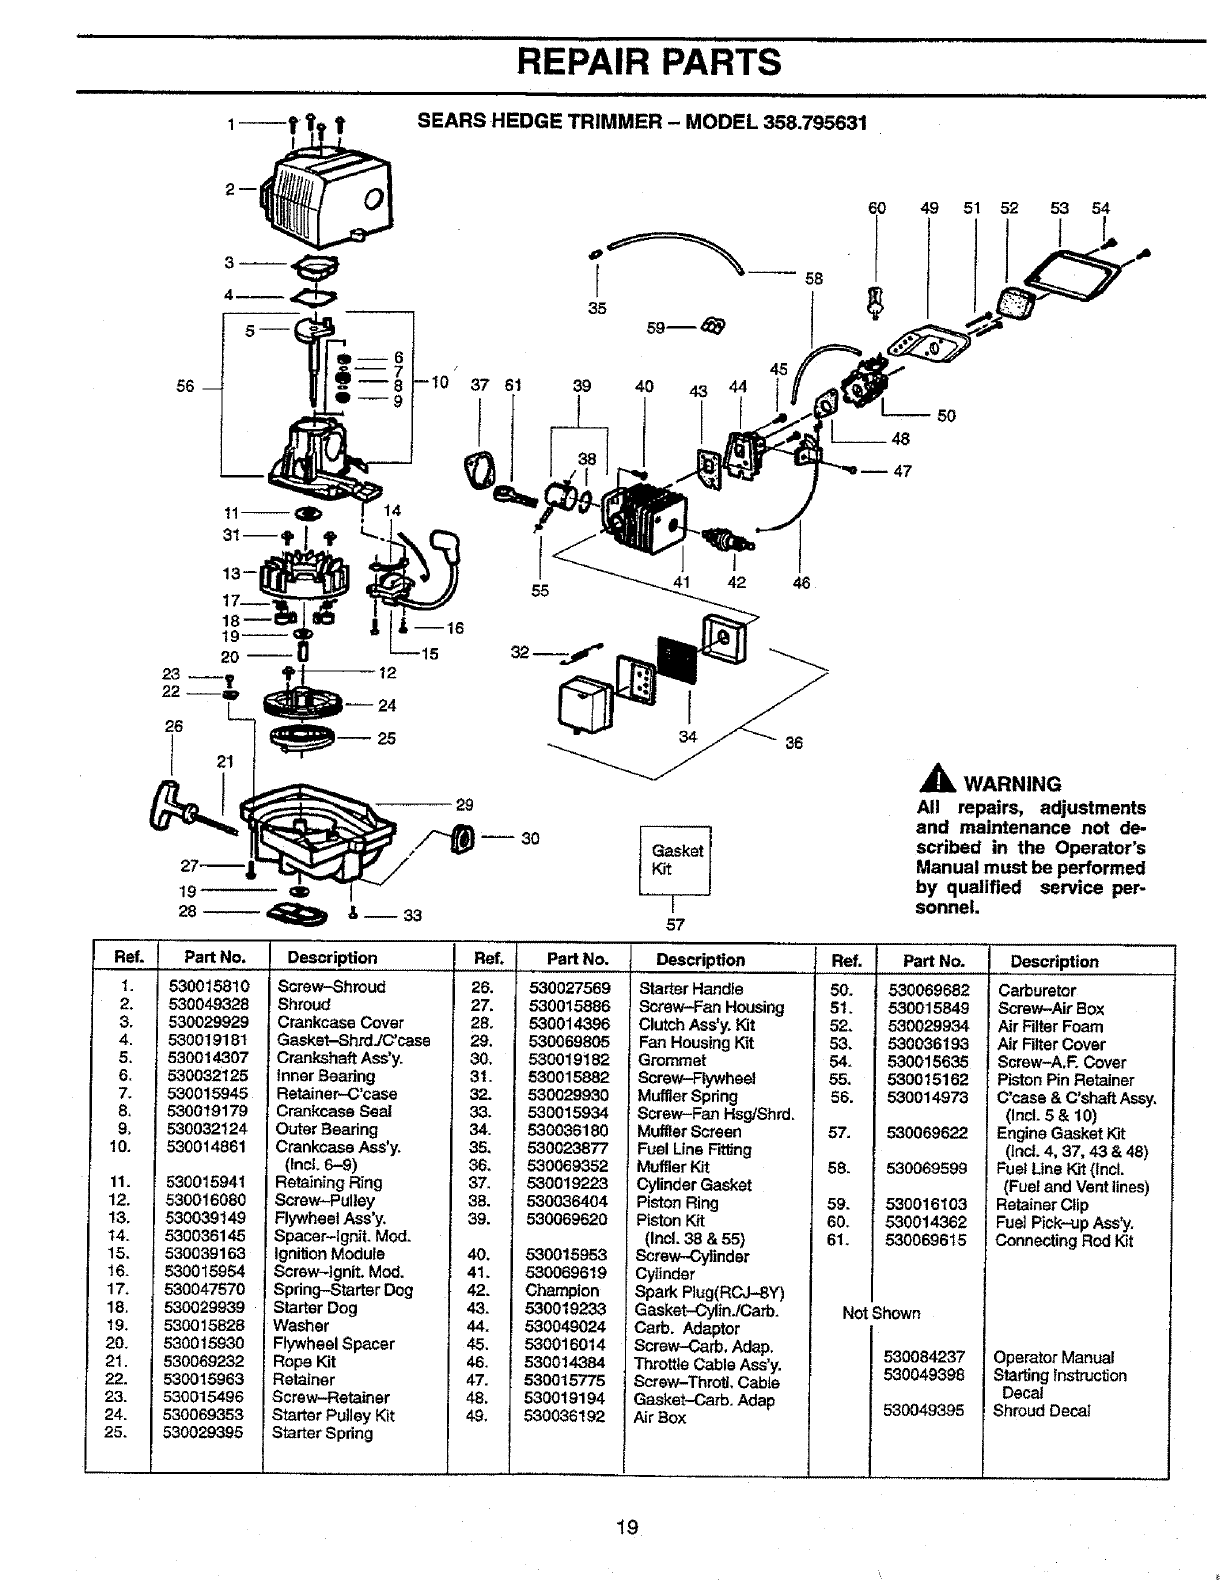
REPAIR PARTS
Ref.
1.
3.
4.
5.
6.
7.
8.
9,
10.
11.
12.
!3.
14.
15,
16.
17.
18.
19,
20,
21.
22.
23.
24.
25.
SEARS HEDGE TRIMMER - MODEL 358.795631
6O
45
41 42 46
34 36
57
49 51 52 53 54
t
&WARNING
All repairs, adjustments
and maintenance not de-
scribed in the Operator's
Manual must be performed
by qualified service per-
sonnel.
Part No,
530015810
530049328
530029929
530019181
530014307
530032125
530015945
530019179
530032124
530014861
530015941
530016080
530039149
530036145
530039163
530015954
530047570
530029939
530015828
530015930
530069232
530015963
530015496
530069353
530029395
Desoription
Screw-Shroud
Shroud
Crankcase Cover
Gasket-Shrd JC'case
Crankshaft Ass'y.
Inner Bearing
Retainer-C'case
Crankcase Seal
Outer Bearing
Crankcase Ass'y.
(IncL 6-9)
Reta_ning Ring
Screw-Pultay
Flywheel Ass'y.
Spacer-lgnit. Mod.
Ignition Module
Screw-lgnit. Mud.
Spring-Starter Dog
Starter Dog
Washer
Flywheel Spacer
Rope Kit
Retainer
Screw-Retainer
Starter Pulley Kit
Starter Spring
Ref.
26.
27.
25.
29.
30.
31.
32.
33.
34.
35.
36.
37.
38.
39.
40,
41.
42.
43.
44.
45.
46.
47.
48.
49.
Part No.
530027569
530015886
530014396
530069805
530019182
530015882
530O29930
530015934
530036180
530023877
530069352
530019223
530036404
530069620
530015953
530069619
Champion
530019233
530049024
530016014
530014384
530015775
530019194
530036192
Description
Starter Handle
Screw-Fan Housing
Clutch Ass'y. Kit
Fan Housing Kit
Grommet
Screw-Flywheel
Muffler Spring
Screw-Fan Hsg/Shrd,
Muffler Screen
Fuel Line Fi_ng
Muffler Kit
Cylinder Gasket
Piston Ring
Piston Kit
(Incl. 38 & 55)
Screw-Cylinder
Cylinder
Spark Rug(RCJ-SY)
Gasket-CyfinJCarb.
Carb. Adaptor
Screw-Carb. Adap.
Throttle Cable Ass'y.
Screw-ThrotL Cabte
Gasket-Carb. Adap
Air Box
Ref. Pa_No.
50. 530069682
51. 530015849
52. 530029934
53. 530036193
54. 530015635
55. 530015162
56. 530014973
57. 530069622
58. 530069599
59. 530016103
60, 530014362
61. 530069615
NotShown
530084237
530049399
530049395
Description
Carburetor
Screw-Air Box
Air FilterFoam
Air FilterCover
Screw-A,F. Cover
PistonPin Retainer
C'case &C'shaftAssy,
(Incl. 5 & 10)
EngineGasket Kit
(lnc[ 4, 37, 43 & 48)
FuelLine Kit (lncL
(Fueland Vent lines)
RetainerClip
Fuel Pick-up Ass'y.
ConnectingRod Kit
OperatorManual
Starting lnstrustJon
Decal
Shroud Decal
19
iiiii iii i lull ii
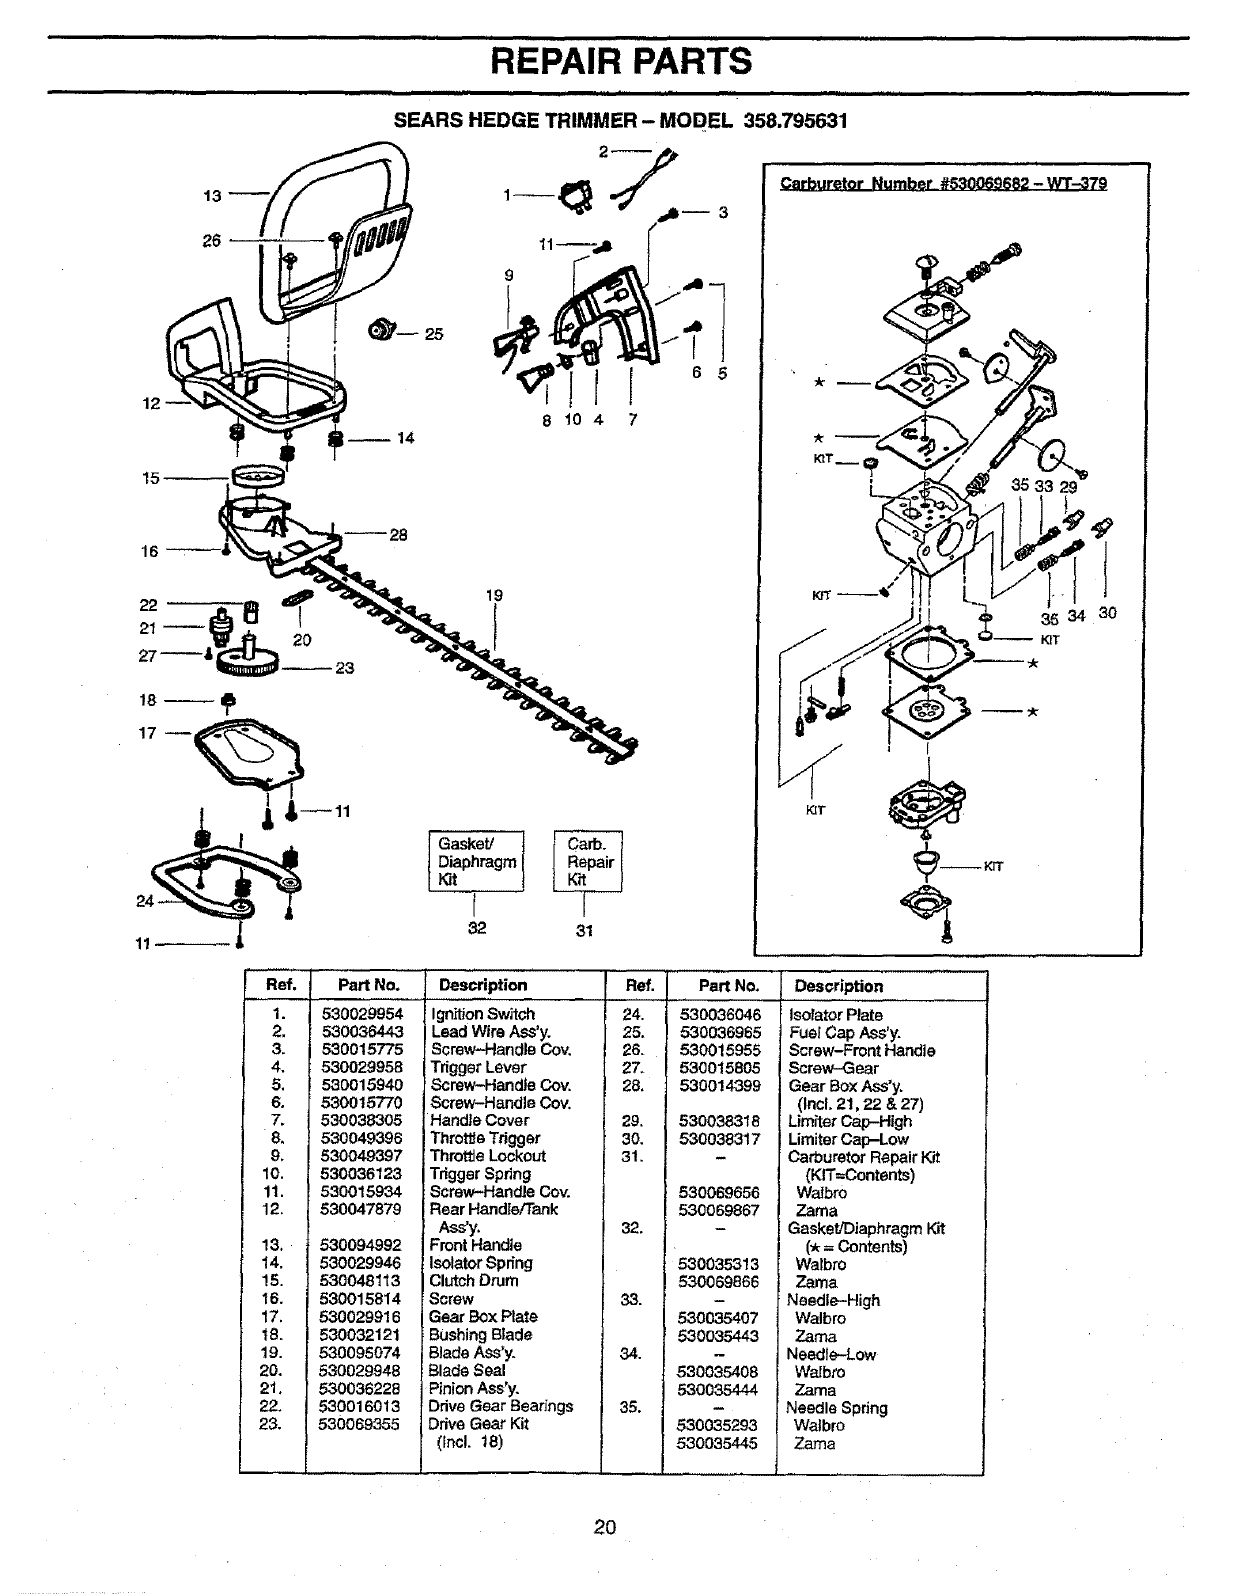
REPAIR PARTS
t3
26
iii .,111 i iii ,
SEARS HEDGE TRIMMER - MODEL 358.795631
1_ 2_
3
19
11m_
9
8104 7
._rburetor Number #530069682- WT-379
Gasket/
Diaphragm
_t f
82 3t
3534 30
KIT
R_.
1.
2.
5,
6.
7.
10.
11.
12.
13,
14.
15.
16.
17,
t8.
19.
20.
21,
22,
23.
Part No.
530029954
530036443
530015775
530029958
53OO15940
530015770
530038305
530049396
530049397
530036123
530015934
530047879
530094992
530029946
530048113
530015814
530029916
530032121
530095074
530029946
530036226
530016013
53O069355
Description Ref.
24.
25.
26.
27.
28.
29.
30.
31.
32.
34.
Ign_on Switch
Lead Wire ASs'y.
Screw-Handle Coy,
Trigger Lever
Screw-Handle Coy.
Screw-Handle Coy.
Handle Cover
!Throttle Trigger
' Thro_e Lockout
Trigger Spdng
Screw-Handle Coy.
Rear Handle/Tank
Ass'y.
Front Handle
Isolator Spdng
Clutch Drum
Screw
Gear Box Plate
Bushing Blade
Blade Ass'y.
Blade Seal
Pinion Ass'y.
Drive Gear Bearings
Drive Gear Kit
(Incl, 18)
35.
Pa_No,
53O036046
530036965
530015955
530015805
530014399
530038318
530038317
530069656
530069867
m
530035313
530069866
530035407
530035443
m
530035408
530035444
530035293
530035445
Description
usolatorPiate
Fuel Cap Ass'y.
Screw-Front Handle
Screw-Gear
Gear Box Ass'y.
(IncL 21,22 & 27)
Limiter Cap-High
Limiter Cap-Low
Carburetor Repair Kit
(KIT=Contents)
Walbro
Zama
Gasket/Diaphragm I_t
(* =Contents)
Walbro
Zama
Needle-High
Walbro
Zama
Needle-Low
Walbro
Zama
Needle Spring
Walbro
Zama
20

Operator's
Manual
Model No.
358.795631
IFYOU NEED REPAIR
SERVICE OR PARTS:
REPAIR SERVICE
1..800-4-REPAIR
(1-800-473-7247)
ORDERING PARTS
1-800-FON-PART
(1-800-366-7278)
CUSTOMER
ASSISTANCE
1-800-235-5878
CRRFTSMRN°
21 cc (1.3 cu. in.) 2-CYCLE
22 Inch Blade
GAS HEDGE TRIMMER
Each Gas Hedge Trimmer _ has its own model number. The
model number for your unit will be found on adecal attached to
the unit.
All parts listed herein may be ordered from any Sears,
Roebuck and Co.Service Center and most Retail Stores.
WHEN ORDERING REPAIR PARTS, ALWAYS GIVE THE
FOLLOWING INFORMATION AS SHOWN IN THIS LIST:
.PRODUCT-"GAS HEDGE TRIMMER"
.MODEL NUMBER-358.795631
•PARTNUMBER
•PARTDESCRIPTION
Your Sears Merchandise has added value when you consider
that Sears has service units nationwide staffed with Sears
trained technicians.., professional technicians specifically
trained on Sears products, having the parts, tools and equip
ment to insure that we meet our pledge to you, we service what
we sell.
Sears, Roebuck and Co., Hoffman Estates, IL 60179 U.S.A.

MANUAL IMPORTANTE No Io deseche
Manual del
Operario
Modelo No.
358.795631
1-800-235-5878
ADVERTENCIA:
LEA EL MANUAL DEL
OPERADOR Y SIGA
TODAS LAS 1NSTRUC-
CINES Y ADVERTEN-
CIAS DE SEGURIDAD.
SI NO LO HACE CORRE
EL RIESGO DE SUFRIR
LESIONES.
,,i i
Use siempre una protecci6n para los ojos
CRRFTSMRNo
MOTOR DE 2 TIEMPOS 21cc
22PulgadaCuchilla
GAS PROTEGE GUARNECEDOR
•Armado
•Operaci6n
•Responsabilidades del cliente
• Ajustes de servicio
• Piezas de repuesto
Sears, Roebuck and Co., Hoffman Estates, IL 60179 EE.UU.
530-084237 03112/96
,11=i,=iii H =11= m,I I I =I I II II II
REGLAS DE SEGURIDAD
iiiii iiiiiiii iiiii i i iii iii i
ATENCION: PARA IMPEDIR EL ARRANQUE ACCIDENTAL DURANTE LA PREPARACION, TRANS- I
PORTE, AJUSTE O REPARACION, SIEMPRE DESCONECTAR EL CABLE DE 1-_ BUJIA Y COLOCAR-
LO EN UN LUGAR DONDE NO PUEDATOCAR LA BIJJIA.
SEGURIDAD DEL OPERADOR
* Usa siempm protecci6n ocularde seguddad.
• Usan siempre cu largos sudaderas pesados, ou largas man-
gas, botas yguantes. No van con los pies descalzos o usan
sandal!as, sudaderas cortos, mangas cortas. Que se cubdr
compietamente ayuda protegerfe de piezas de plantas t6xicas
arrojades por la cuchilla.
, El peio seguro de modo que longitud de hombro anterior. Los
vestidos de soPturaseguros o joyas. Los vestJdoscon colgan*
do ddbilmente v[nculos, |alas, bodes, etc. Puedan estsr cog!-
do en moviendo partes.
• No manejar esta mdquina estando cansado, enfermo o
despuds de haber ingerido bebides alcoh61icas, drogas o
medicinas.
• Protegerse los ofdos cuando se vaya a usar esta mdquina por
mds 1-1/2 horas at d[a.
•Nunca arrancar o hacer funcionar el motor en un lugar uncut-
redo oedificio. La asp|raci6n de los gases de escape puede
causar la muerte.
* Mantener los mangos libresde aceJtey combustible.
•Si I|egan a coumr situaciones no explicadas en este manual
tenet culdado yactuar juiciosamente.
SEGURIDAD/MANTENIMIENTO DE LA
MAQUINA
• Inspeccionar en busca de piezas dafiadas o sueltas y carm
biarlas antes de usar la mdquina. Ver si hay fuga de com-
bustible y reparar antes de usar. Mantener la mdquina en
buenas condiciones.
•Asegurar de mantener y armar correctamente la m&quina
como se !rid!caen este manual.
. Hagan ajustes de carburador con la cuchilla sostenida para
evitado de contactar cualquiera objeto. Sestenga la unidad a
mano.
•No dejar que nadie se acerque mientras se ajusta el c_rbu_
radon
• Utilice solamente calidad SEARS accesorios yremplazo
parte como recomendados por esta unidad.
• Haga que todo el mantenimient y servicio no explicado en
este manual sea Itevado acabo pot su Centro de Servicio
Sears.
SEGURIDAD CON EL COMBUSTIBLE
• Mezclar y reabaslecer de combustibleal airo fibre.
• No acercar a chsipas o llamas expuestas.
•Usarun contenedorapmbado paracombustible.
• No fumar ni dejar que nadie fume cerca de! combustible o de
la mdquina omientras se est_ usando la m&quina.
*Limpiar el combustibledenamado antes de arrancar el motor.
° Alejarse al menos 10 pies (3 metros) de lugar de abastec*
ira!untode combustibleantes de arrancar el motor.
•Apagar el motor y dejar que la m_quina se enfde antes de
quitar la tapa de| combustible.
SEGURIDAD DURANTE EL CORTE
•tnspeccione el _rea para set cortar antes de cada uso.
Rut!runobjetos (rocas, viddo quebrado, u_es, alambre, cuer-
da, etc.) cualpuede se enreda en la cuchilla.
•Mantengan otrosnifies inc|uyentes, animaJes,espectadores y
ayudantes un m_nimo de 50 pies (15 metros) lejos. Detenga la
mdquina inmediatamentesi usted estuvieraenfocado.
•$iempre mantener el motor a! lade derechodel cuerpo.
o Sujetar la mdquina firmemente con ambes manos.
•Mantener un paso firme y buen equilibrio.No tratar de alcan-
zar rods aIl&de Ioseguro.
• Mantenga la cuchilladebajo nivel de la cintura.
•No tevanta la mdquina antedormente su hombro.
•Mantengan partes todas de su mJerpo lejos de !a cuchilla y
silendador cuando md.quinaest_ corriendc.
- Usar ]a m&quina sotamente para los trabajos expl[cados en
este manual.
TRANSPORTING AND STORAGE
• Apajar la m_quina antes de transportada.
•Dejar que el motor se engde y sujetar bien la mdquina antes
de guardaria otransportadaen un vehfculo.
• Vaciar el t_nque de gasolina antes de guardar o transportar la
m_quina. Gastar todo el combustible restante en et carbu-
radon Para elio, arrancar el motor y dejarlo funcionar hasta
que se pare.
•Guardar ta mdquina y el combustibleen un lugar donde los
vapores del combustible no aicaneen las chispas o llamas
expuestas de calentadores de agua, motores electricos o
interruptores, calefac/ores, etc.
•Guardar la mdquina de tat manera que el cuchiila no pueda
causar acoidentalmentealguna lasi6n.
•Guarar la mdquina lejos del alcance de los ni_os.
AVISO DE SEGURIDAD
La exposiciSnavibracionesa t_av_sdel usoprolongadode herramientasmanualesirnpulsadaspotgasolfnapuedecauSarda,fosa los vasossam
guineos oa los nervios de los dedos,manosy munecas de laspersonassusceptibless trastomoscircula_os oa hinchazonesanormales.[] uso
proJongadoenchrnasfrioshas_dorelacionadoconlesiones a losvasossanguineossufr_dospotpersonasporlo derndssanas.Si se presentansin-
tomes en _asmanostales comoadownecirr_ento,dolor,p_rdidade rue=a, cambioen efcolorotexturade ts pie!,o pdrdidade sensibilidaden los
dedos,las manoso fa muneca,discontin,_eel usode astaherramientaysoliciteatenci6nm_dica.Un sistemaanti_bratodonogarantizala anulaci6n
de estosproblemas.Lbsusuadosqueoperen herramientasde p_deren unabasecontlnusy regulatestienen quemonitorearestrechamentesu
condici6nfisica y ]acondici6n deestaunldad.
BUSQUE ESTE SIMBOLO PARA PUNTUALIZAR PRECAUCIONES IMPORTANTES DE SEGURIDAD.
SIGNIFICA - iiiATENCION!!! i_|ESTE ALERTA!!! ESTA EN JUEGO SU SEGURIDAD.
-2-

iii ii iiii ii iiii HII IIIII I J L III I IIIII
SAFETY RULES
H,,,,, H ,,,,H ,H H
PELIGRO:
iESTA MAQ_UINA MOTORIZADA PUEDE SER PELIGROSA! ESTA MAQUINA PUEDE PROVOCAR
AMPUTACiON DE INCLUIR DE LESION SERIA 0 CEGUERA AL OPERADOR Y DEMAS PERSONAS,
SE RECOMIENDA RESPETAR LAS INSTRUCCiONES DE SEGURIDAD Y ADVERTENCIAS QUE
APARECEN EN ESTE MANUAL PARA PROPORCIONAR UNA SEGURIDAD Y RENDIMIENTO RAZON-
ABLES DURANTE EL USO DE ESTA MAQUINA. EL OPERADOR ES RESPONSABLE DE RESPETAR
LAS ADVERTENCIAS Y SEGUIR LAS INSTRUCCIONES DADAS EN ESTE MANUAL Y EN LA
MAQUINA, LEER TODO EL MANUAL DEL OPERADOR ANTES DE ARMAR Y USAR ESTA MAQUINA.
PERMITIR EL USO DE LA MAQUINA MOTORIZADA SOLAMENTE A I.AS PERSONAS QUE HAYAN
LEIDO. ENTENDIDO Y SEGUIDO LAS INSTRUCCIONES Y ADVERTENCIAS EN ESTE MANUAL YEN
LA MAQUlNA. NUNCA PERMITEN NINOS UTILIZAR ESTA HERRAMIENTA,
ADVERTENCIA:
EL CORTE DE CUCHILLA PUEDE LANZAR
OBJETOS VIOLENTAMENTE. USTED
PUEDE ESTAR CEGADO O ESTADO
DAI_ADO. USA SIEMPRE PROTECClON
DE PIERNAY OJOo
PfERNERAS
@=nww
CARETA BOTAS
LA CUCHILLA SE MUEVE MOMENT,ANEA-
MENTE DESPUES DE QUE GATILLO EST.&,
LIBERADO. LA CUCHILLA CORTADORA
PUEDE CORTARLE SERIAMENTE U
OTROS. PERMITA CUCHILLA CORTADO-
RA DETENER ANTES DE RETIRANDOLA
DEL CORTF_
ZONE DE PEUGRO
ZONA DE PELIGRO PARA CUCHILLA
CORTADORA. LA CUCHILLA CORTADO-
RA PUEDE CORTARLE SERIAMENTE U
OTROS. OTROS PUEDEN ESTAR CEGADO
O ESTADO DAI_iADO.MANTENGA GENTE
Y ANIMALES UN MfNIMO DE 15 PiES (5
METROS) LEJOS.
LEER EL MANUAL DEL OPERADOR,
RESPETAR TODAS I.AS ADVERTENCIAS Y
SEGUIR LAS INSTRUCClONES. EL NO
HACERLO PUEDE DAR POR RESULTADO
GRAVES LESIONES,
MANUALDEIL
OPERADOR E'rJQUETA DE
SEGURIDAD
FELIClTACIONES por su compra de un cortamalezas
Proteja Guarnecedor a gasotina Craftsman de Sears. Ha
sido diseSado, concebido y fabric,ado para proporcionar la
mejor confiabilidad y rendimiento posibles.
En caso de experimentar alg_n problema que no pueda
resorter f_cilmente, comunfquese con et centro/departa-
mento de servicio Sears m_s cercano. Sears cuenta con
tOcnicos competentes y capacitados y las herramientas
adecuadas para reparar esta m_quina.
Le rogamos que lea y conserve este manual. Estas instz'uc-
clones le permitir_n armar y mentener su maquina correc-
tamente. Siempre respete las "REGLAS DE SEGURtDAD."
NUMERO DE MODELO:
CODIGO DE FECHA/
NOMERO DE ORDEN:
358.795631
FECHA DE COMPRA:
EL NUMERO DE MODELO Y DE SERIE SE ENCUENTRA
EN LA CALCOMANIA PEGADA EN LA MAQUINA.
ANOTE EL NUMERO DE SERE Y LA FECHA DE
COMPRA Y GUARDE LA tNFORMACiON EN UN LUGAR
SEGURO PAPA REFERENClA FUTURA.
CONTRATO DE MANTENtMIENTO
Se ofrece un contrato de mantenimiento Sears para este
producto. Para detalles, comunicarse con la _enda Seam m_s
ce_a.
RESPONSABILIDADES DEL USUARIO
•Lea y respete las reglas de seguridad.
•Siga un programa regular de mantenimiento, cuidado y uso
de la mdquina.
•Siga [as instrucciones dadas en las secciones de
"ResponsabiZidades del usuado" y "Almacenarniento" en
este manual de_ operador.
ESPECIFICACIONES DEL PRODUCTO
CORTE DE CUCHILLA ...... 22"
MOTOR ............................... 2 tiempos, 21 cc enfriado
per aire
PROPORCION DE MF_.ZCLA
GASOL1NNACEITE ........... 40:1 (3.2 oz de aceite por
gatdn de gasotina)
ENCENDIDO ...................... Estado sOlido
(entrehierro .010" a .014")
REGULACION DEL
ENCENDIDO ...................... No ajustab]e, fijo
BUJtA .................................. Champion (RCJ°8Y)
DISTANCIA ENTRE
ELECTRODOS... ................. 024 to .028"
RPM DEL MOTOR .............. 9,000 RPM Mdx.
AVISO ESPECIAL
Para los usuados en tierras forestaies de EEUU. yen algunos
estados, induyendo California (Recursos P_blicoscdcr_os 4442 y
4443), Idaho, Maine, Minnesota, New Jersey, Oregon y
Washington: Se requiere que ciertos motores de combustion
intema operados en bosques, arbustos y/o tierras 0Jbiertas de
_asto en las zonas antes mencionadas estdn equipados con
chispero,mantenidoen buenascondiPJones,o el motordebe estar
constzuido,equipadey mantenidopara taprevenc_n de incendios.
Aver_guarcon ]asautoddadesestataies o localeslas reguiaciones
rela_Nasa estos requisito& El incumpllmientode estosrequisites
infringela Iey. Esta mdquina no esta equipada de fdbrica con un
chispero, no obs_te se ofreseano como equipo opcionaLSi en
su zona se requiere el uso de chispero, comun_quese con el
centroldepartarnento de servicio de Sears para el conjunto
correcto.
FABRICADO BAJO UNA O MAS DE LAS SIGUIENTES PATENTES DE EEUU.:
4,940,028; 4,904.82"Z; 4.846,123; 4,463,544: 4.451.983; 4 364.435: 4;_2.86,675Jr e
32,,366..'OTRAS PATENTES t3E_EUU,-Y.EXTRANJERAS PENDIENTES.
GARANTIA COMPLETO DE UN Al_lO PARA EL CRAFTSMAN
PROTEJA GUARNECEDOR A GASOLINA
Por un (1} afio desde la fecha de ¢ompra cuando esta unidad a gasolina Craftsman Proteja Guamecedor agasolina sea mantenida,
lubricade y puestaapunto de acuerdo con las instruccionesde operaciOnymantenirnientoen el manualdel operado, Sears reparard
fibre de costo cualquier defecto de material o de mano de obra.
Esta garantia excJuye la cuchilla, bujia y filtro de aire, las cuales son partes desechables que se desgastan durante el uso normal.
Esta garant_a se aplica durante 90 d[as solamente desde la fecha de compra si este Proteja Guamecedor alinee 9uamecedor se usa
para fines comerciales. Esta 9arantia se ap!icadurante 30 dias solamente desde la fecha de compra si este Proteja Guamecedor ali-
nee guameceoor se usa para nnes ae alquiJer.Esta garant[a se aplica s01omientras eSteproducto se use en los Estados Unidos.
EL SERVfClO DE GARANTIA ESTA DfSPONIBLE DEVOLVIENDO EL PROTEJA GUARNECEDOR AL CENTRO O DEPARTAMEN-
TO DE SERVIClO DE SEARS MAS CERCANO EN LOS ESTADOS UNIDOS.
Esta garantfa le otorga derechos ]ega]es especificos y usted puede tambi_n tener otros derechos que varian de estado aestado.
SEARS, ROEBUCK AND CO., D/817WA, HOFFMAN ESTATES, IL 60179
-4-
ii i
TABLA DE MATERIAS
Regtas de seguridad ................................................................2
Especificaciones del producto.................................................4
Garantfa...................................................................................4
Operaci6n .................................................................................7
Responsabitidades del usuario............................................13
Mantenimientoy ajustes ........................................................16
Almacenamiento....................................................................17
Localizaci6nde aven'as........................................................18
Pedidode piezasde repuesto/Servicio.......Cardtulaposterior
INDEX
A
Accesodos ....................................................................... 5
Ajustes de carburador .................................................... 16
Atmacenamiento ...... :..................................................... 17
Arreglarsg de M_todos .................................................. 10
B
Bujfa.............................................................................. t4
C
Comenzando ................................................................. ! 2
Conozca su proteja guarnecedor .................................... 7
Contenido de tomiileffa ................................................... 6
Corte de cuchitlalubricaci6n.......................................... 13
E
Especificaciones .............................................................. 4
F
Fittrode aire................................................................... 14
Filtro de combustible.._ ................................................... 15
G
Gamntla ........................................................................... 4
Gasolina ......................................................................... 11
L
Localizaci6n de averfas ................................................. 18
M
Mantenimiento y ajustes ........,....................................... 16
Motor
CombustibleJaceite ..................................................... 1t
Bujia............................................................................ 14
Arranque ..................................................................... 12
Almacenamiento .................................. :...................... 17
N
N_3merode mode!o .......................................................... 4
0
Operaci6n ........................................................................ 7
Ordenando panes de repamci6n .......... Car_tula posterior
P
Programa de mantenimiento ......................................... 13
R
Responsabilidades del usuario...................................... 13
illl,ll =ll|lllllll ii== i i ill iii
ACCESORIOS
iiiiiiiiiii ii i i
Estos accesodos estan disponibles cuando se compra odginalmentela m&quina. Tambi_n se encuentran disponibles en
la mayoria de |as tiendas y centros de sedvicio Sears. La mayofia de las tiendas Sears puede pedir estos componentes
a hombre del usuario cuando se proporciona el n_mero de modelo de la mdquina.
Accesorios
GAFAS
PROTECTORAS BUJIA RLTRO
DEAtRE
iN
ACEITE PAR
MOTOR DE
2-TIEMPOS
SEARS
_?,_
i ii i i i1,, ,H,,,,,,,HI ,,Ill I,I H I
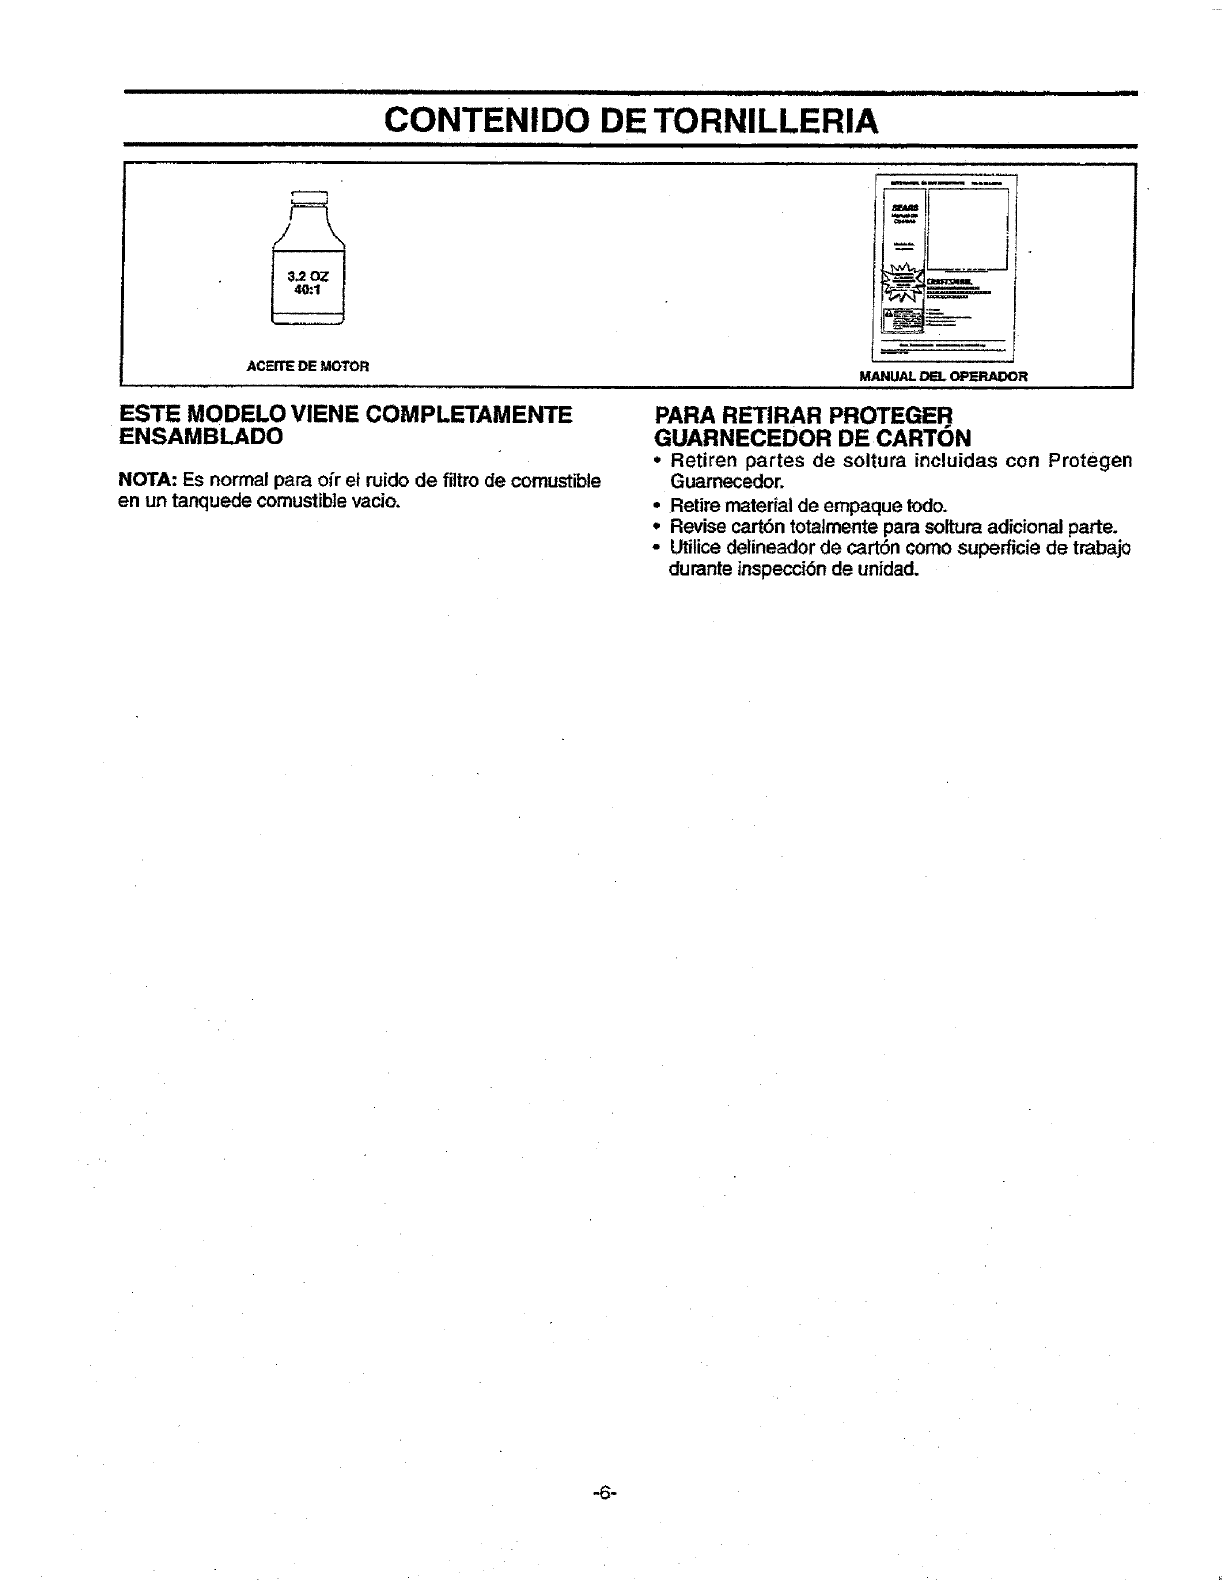
CONTENIDO DE TORNILLERIA
m
ACEITEDE MOTOR MANUAL _OPERADOR
ESTE MODELO VIENE COMPLETAMENTE
ENSAMBLADO
NOTA: Es normal para o/r el ruido de filtro de comustible
en un tanquede comustiblevacio.
PARA RETIRAR PROTEGER
GUARNECEDOR DE CARTON
• Retiren partes de soltura incluidas con Protegen
Guarnecedor.
• Retire material de empaque todo.
• Revisecart6n totaimente para solturaadicional parte.
• Utilicedelineadorde cart6n como superficie de trabajo
durante inspecci6nde unidad.
-6-
illl, ii i i , ,, i,i ,i ,ill ,, i,,,,,,i, ,,,111,ii ii
OPERACION
H ii, .i,i ii i i i
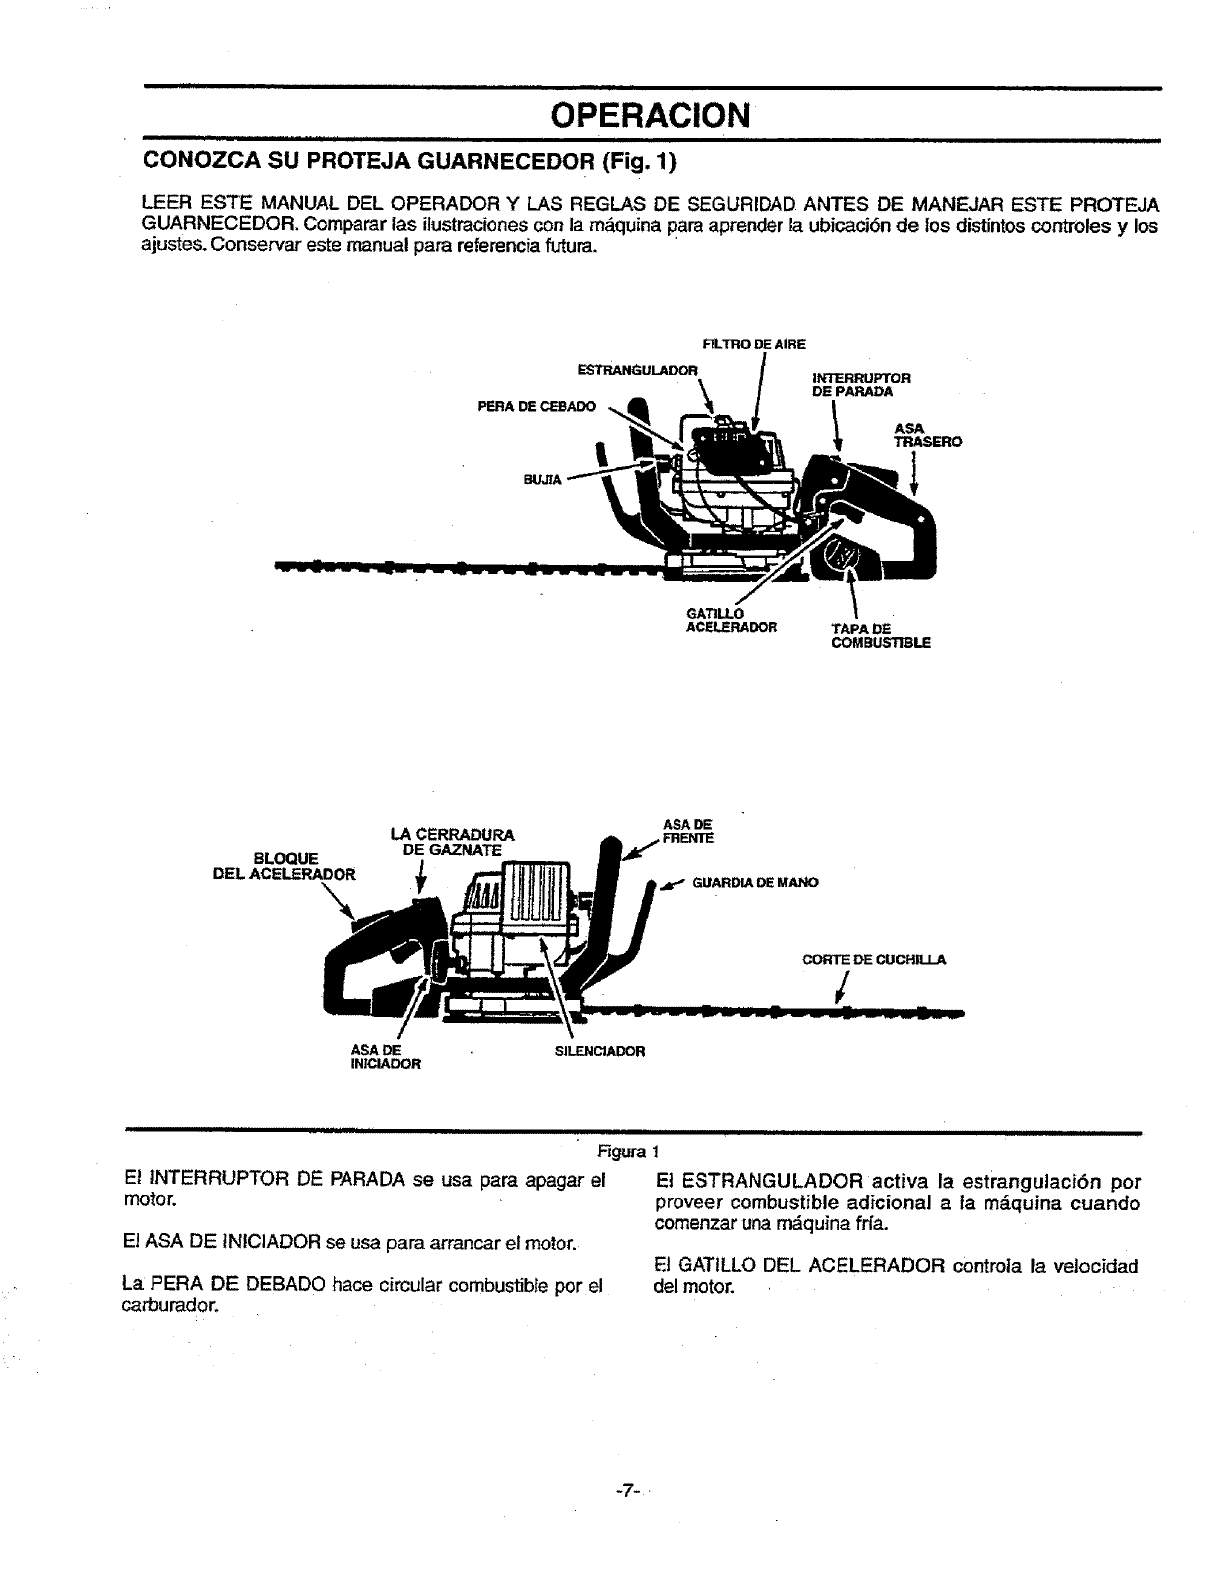
CONOZCA SU PROTEJA GUARNECEDOR (Fig. 1)
LEER ESTI= MANUAL DEL OPERADOR Y LAS REGLAS DE SEGURIDAD ANTES DE MANEJAR ESTE PROTEJA
GUARNECEDOR. Comparar las ilustracienes con la mdquina para aprender la ubicaci6n de los distintos controles y los
ajustes. Conservar este manual para referencia futura.
FILTRO DE AIRE
ESTRANGULADOR
PERA D_EC_BADO
INTERRUPTOR
DE PARADA
ASA
TRASERO
GAT]LLO
ACELERADOR TAPA DE
COMBUSTIBLE
BLOQUE
DEL ACELERADOR
\
LA CERRADURA
DE GAZNATE
ASA DE
FRENTE
CORTE DE CUCHlU.A
/
ASA DE SILENCJADOR
INIClADOR
El INTERRUPTOR DE PARADA se usa para apagar el
motor.
El ASA DE tNICIADOR se usa para armncar el motor.
La PERA DE DEBADO hace circular combustibfe por el
carburador,
ii ill,i INIII iii i i i iiiii
Figura !
El ESTRANGULADOR activa la estrangulaci6n pot
proveer combustible adicional ata mdquina cuando
comenzar una mdquina fn'a.
Et GATILLO DEL ACELERADOR controla la velocidad
del motor.
"7- "
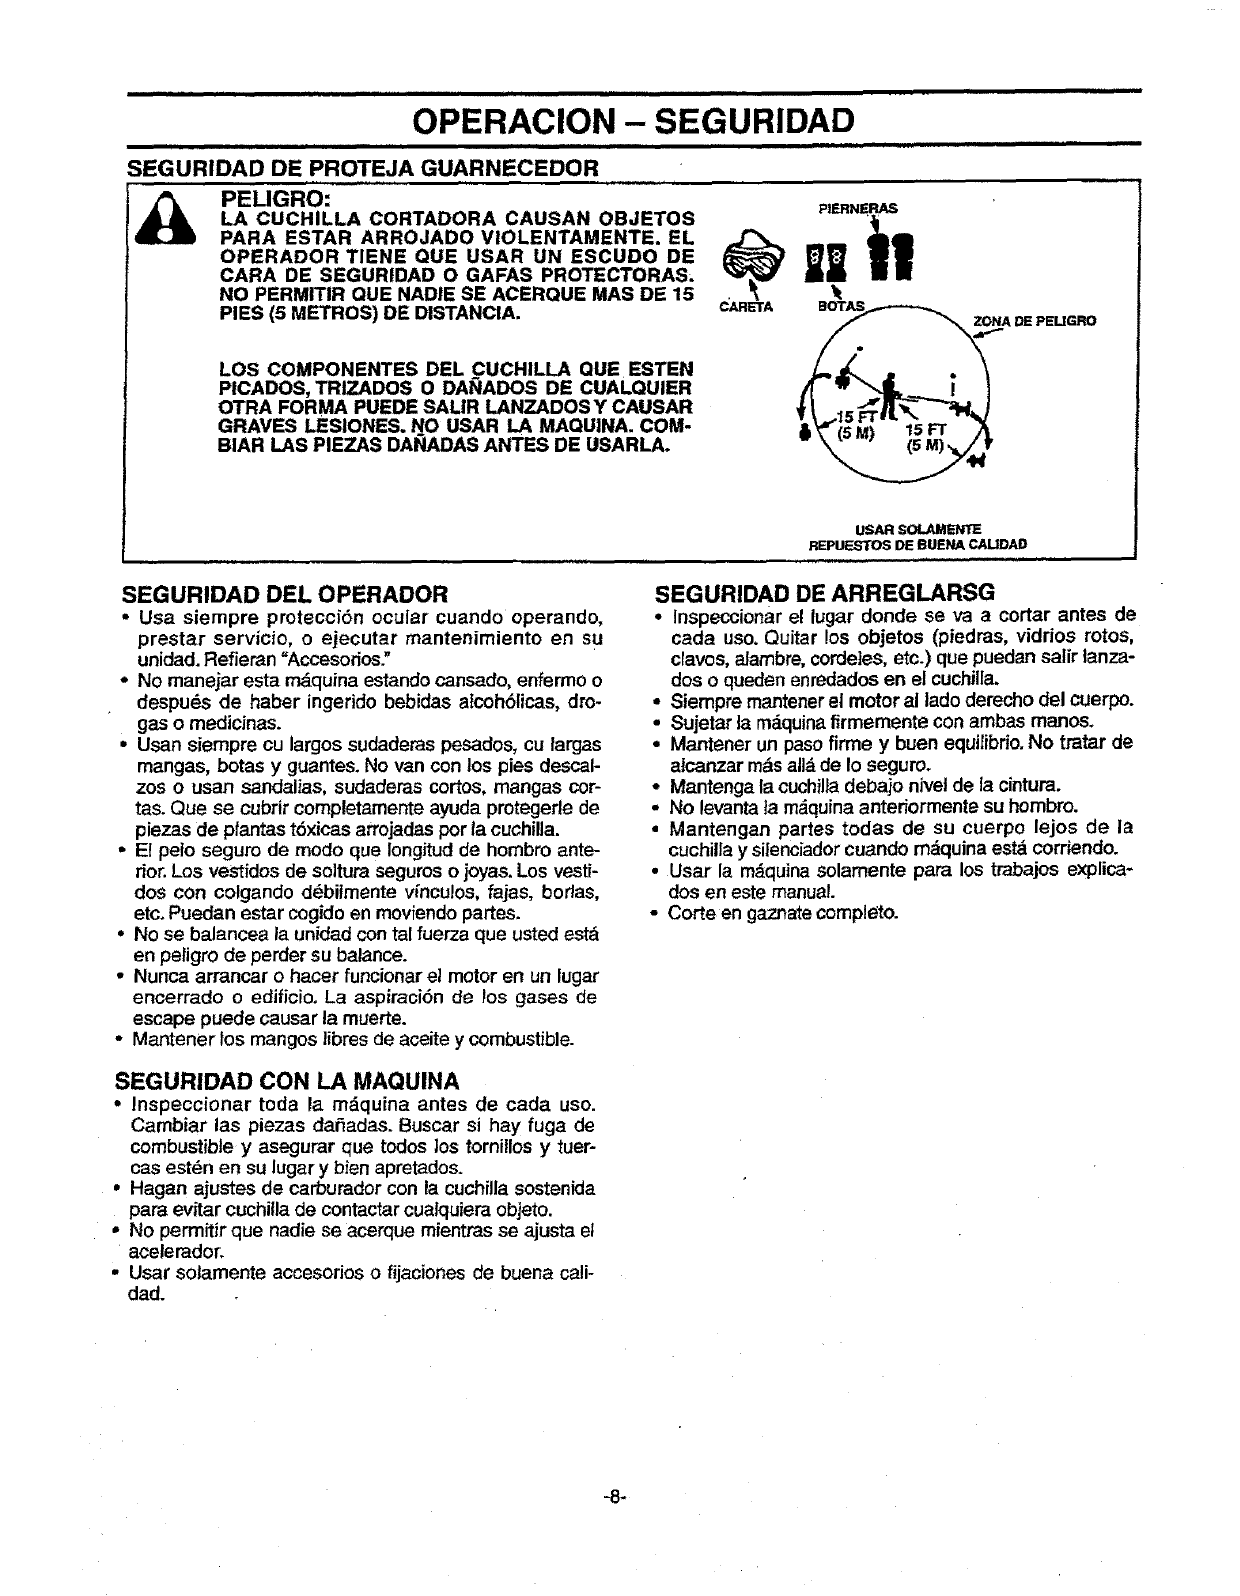
,,,,,HillIIII II == = ,,,,,,,I,1===H= = IIII ,,,,,,,,HH,= =I
OPERACION - SEGURIDAD
= = ,=,,,,,H ==H= = ,,,,,,,,,,,,,,,,,.,,,,,, =
SEGURIDAD DE PROTEJA GUARNECEDOR
PELIGRO: _I_.RNE_
LA CUCHILLA CORTADORA CAUSAN OBJETOS
PARA ESTAR ARROJADO VIOLENTAMENTE. EL
OPERADOR TIENE QUE USAR UN ESCUDO DE
CARA DE SEGURIDAD O GAFAS PROTECTORAS.
NO PERMITIR QUE NADIE SE ACERQUE MAS DE 15
PIES (5 METROS) DE DISTANClA.
LOS COMPONENTES DEL CUCHILLA QUE ESTEN
PICADOS, TRIZADOS O DAI_IADOS DE CUALQUIER
OTRA FORMA PUEDE SAMR LANZADOS Y CAUSAR
GRAVES LESIONES. NO USAR LA MAQUINA. COM-
BIAR LAS PIEZAS DAITIADASANTES DE USARLA.
ZONA DE PELIGRO
SEGURIDAD DEL OPERADOR
• Usa siempre protecci_n ocular cuando operando,
prestar servicio, o ejecutar mantenimiento en su
unidad.Refieran "Accesodos."
•No manejar esta mdquina estando cansado, enfermo o
despu_s de haber ingerido bebidas a;_'ohSlicas, dro-
gas o medicinas.
•Usan siernpre cu largos sudaderas pesados, cu largas
mangas, botas y guantes. No van con los pies descal-
zos o usan sandalias, sudaderas cortos, mangas cor-
tas. Que se cubrir completamente ayuda protegerle de
piezas de ptantastdxicas arrojadas por ta cuchilla.
• El pefo seguro de modo que Iongitud de hombro ante-
rior. Los vestidos de soltura seguros o joyas. Los vesti-
dos con colgando d_bilmente v[ncu!os, fajas, borlas,
etc. Puedan estar cegido en movfendo partes.
°No se balancea la unidad con tal fuerza que usted esta
en peligro de perder su balance.
•Nunca arrancar o hacer funcionar el motor en un lugar
encerrado o edificio, La aspiraci6n de los gases de
escape puede causar la muerte.
-Mantener los mangos ]ibres de aceite y combustible.
SEGURIDAD CON LA MAQUINA
• lnspeccionar toda la mdquina antes de cada uso.
Cambiar las piezas daSadas. Buscar si hay fuga de
combustible y asegurar que todos los tornillos y tuer-
cas estdn en su lugar y bien apretados.
°Hagan ajustes de carburador con la cuchilla sostenida
para evitar cuchitla de contactar cualquiera objeto.
•No perrnitir que nadie se acerque mientras se ajusta el
acelerador.
. Usar solamente accesorioso fijaciones de buena call-
dad.
USAR SOLAMENTE
REPUF_-_RTOSDE BUENA CALIDAD
,,,, H
SEGURIDAD DE ARREGLARSG
•lnspeccionar el lugar donde se va acortar antes de
cada uso. Quitar los objetos (piedras, viddos rotos,
clavos, aJambre,cordeIes, etc.) que puedan salir tanza-
dos o queden enredadosen el cuchilla.
• Siempre mantenerel motor al lade derecho del cuerpo.
•Sujetar la mdquina firmemente con ambas manos.
• Mantener un paso firme y buen equilibdo.No tratar de
aicanzar rods aridde Io seguro.
• Mantenga la cuchiliadebajo nivel de la cintura.
•No levanta _am_quina anteriormente su hombro.
• Mantengan partes todas de su cuerpo lejos de la
cuchilla y silenciador cuando mdquina estd corriendo.
• Usar la m&quina solamente para los trabajos explica-
dos en este manual.
• Corte en gaz.natecompleto.
-8-
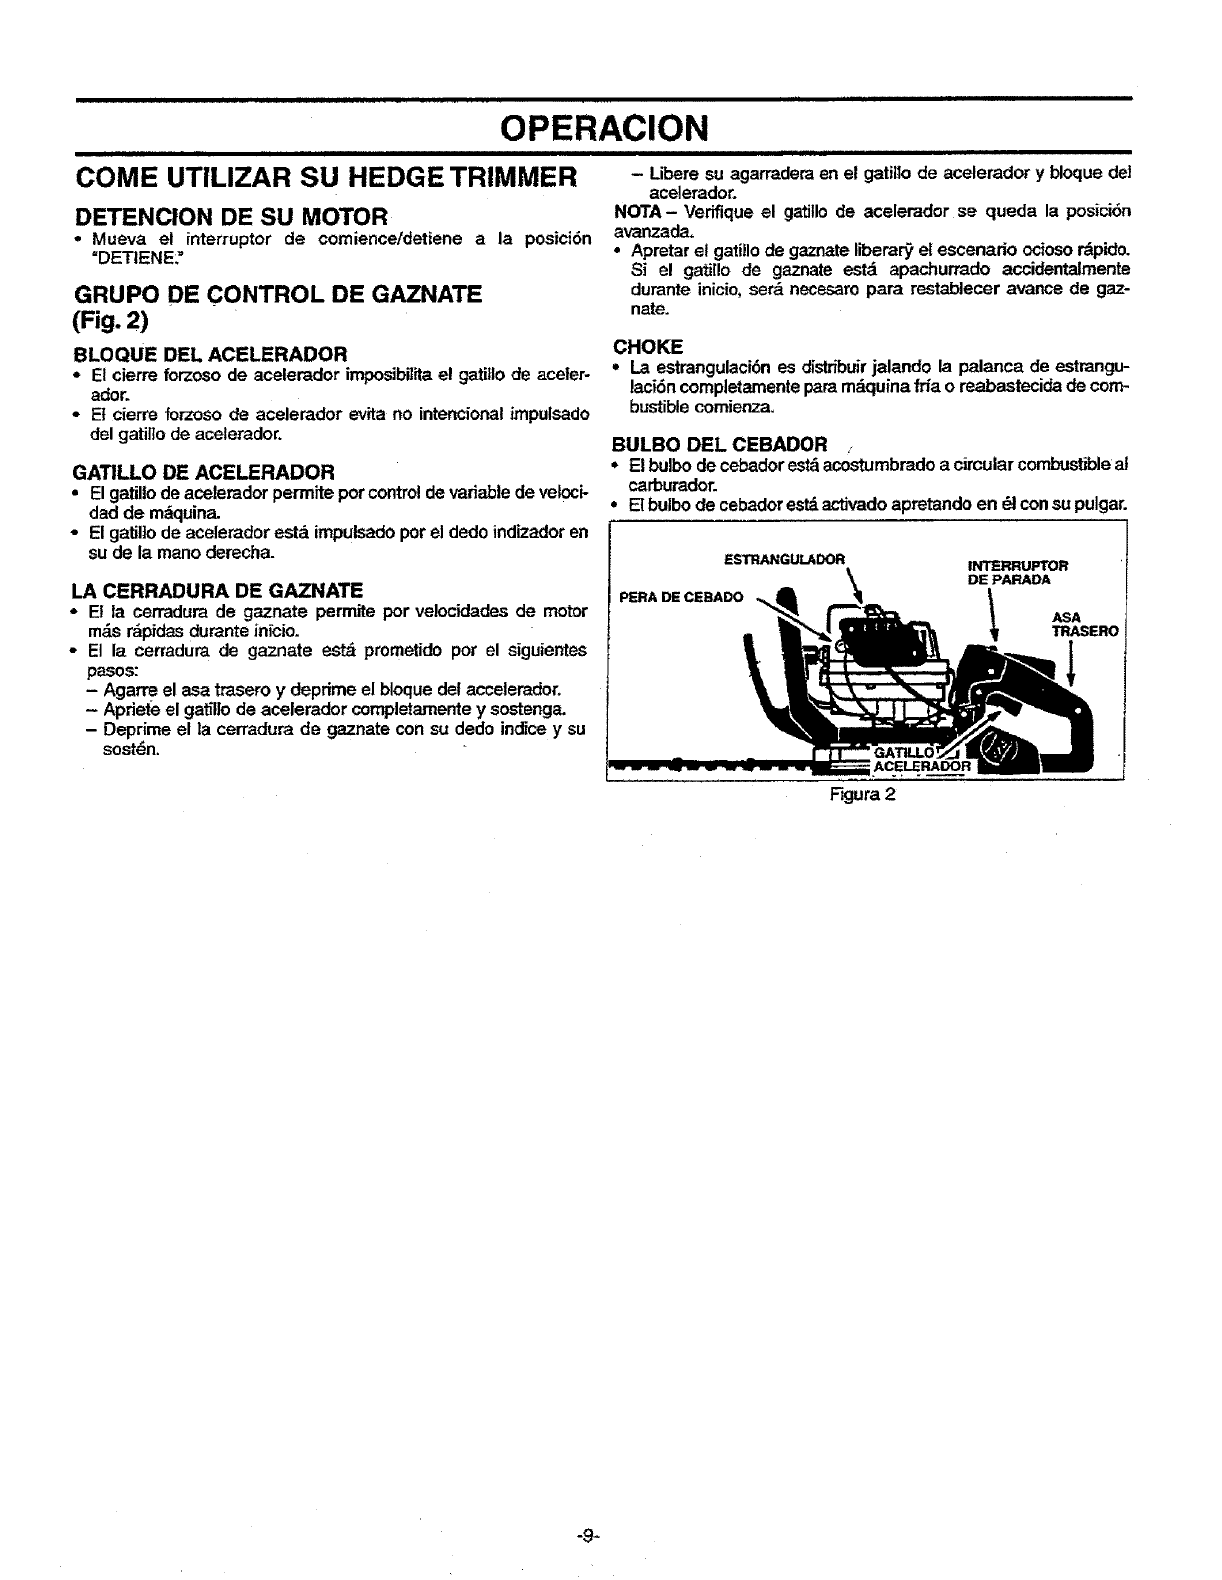
i ii ii ii H1,1,,,,
OPERACION
:::::::::::::::::::::: H, ,HI,H HI I H,H,H ,,,,,
COME UTILIZAR SU HEDGE TRIMMER
DETENCION DE SU MOTOR
•Mueva el interruptor de comience/detiene a la posici6n
=DETtENE?
GRUPO DE CONTROL DE GAZNATE
(Fig. 2)
BLOQUE DEL ACELERADOR
• El cierre forzoso de acelerador imposibilita el gatillo de acefer-
ador.
•Et cierre forzoso de acelerador evita no intencional impulsado
del gatil]o de acelerader.
GATILLO DE ACELERADOR
•El gatil|o de acelerador permite pot controlde variable de veloci-
dad de mdquina.
•El gat_lIode acelerader est.. impulsado pot"el dedo indizador en
su de la mano derecha.
LA CERRADURA DE GAZNATE
• El la cerradura de gaznate permite por ve!ocidades de motor
m&s r&pidasdurante inicio.
• El la cerradura de gaznate estd prometido pot el siguientes
pasos:
-Agarre el asa trasero y depdme el bloque del accelerador,
- Apriete el gatil|o de acelerador corr@letamente y sostenga.
- Deprime el la cerradura de gaznate con su dedo indice y su
sostdn.
IN.l,ll.I,
- Libere su agarradera en el gatillo de acelerador y bloque de!
acelerador.
NOTA- Verifique el gatillo de acelerador se queda la posici6n
avanzada+
°Apretar el gatillo de gaznate liberar_ el escenario ociosor_pido.
Si el gati!!o de gaznate estd apachurrado accidentalmente
durante inicio, ser& necesaro para restablecer avance de gaz-
nate.
CHOKE
• La estrangulaci6n es distrfbuirjalando la palanca de estrangu-
laci6n completarnente para mfiquina frfa o reabastecida de corm
bustible comienza+
BULBO DEL CEBADOR .,
El bulbo de cebador est_ acostumbrado a circular combustible al
carburador.
•El bulbode cebader estdactivado apretando en _1consu pulgar.
ESTRAnGUL4DOR mTERRUm'O_ '
DE PARADA
PERA DE CEBADO ASA
TRASERO
ACELERADOR
F'igura2
-9-
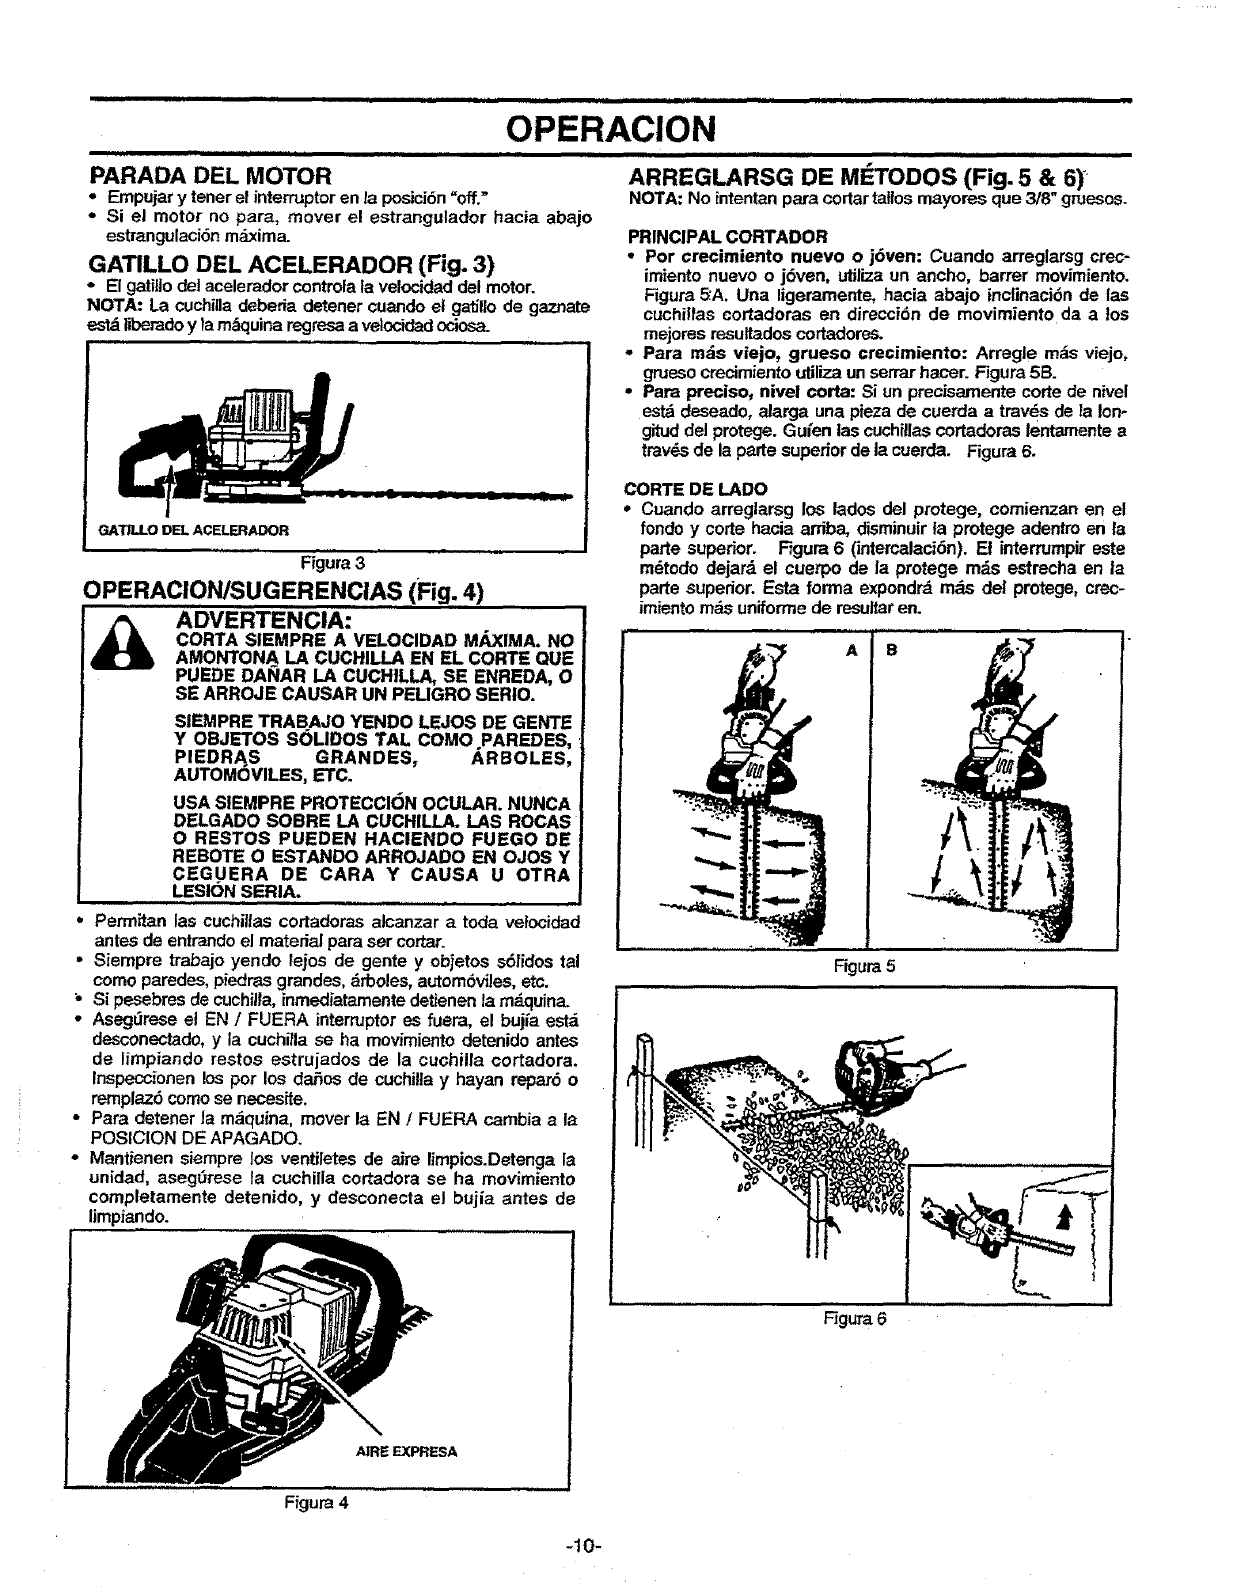
4_
I IIIIIIIIIIIIIIIII I III I I illllm i i ,,111111111111 i i ii=l i = i
OPERACION
i i i iiiiii ii iiii iiiii
PARADA DEL MOTOR
.Empujar y tener el interruptor en la posici6n "off."
•Si el motor no para, mover el estrangulador hacia abajo
estmngulaci6n m_xima.
GATILLO DEL ACELERADOR (Fig. 3)
• El gatil|o det acelerador controla fa velocidad del motor.
NOTA: La cuchilla deberfa detener cuando el gatillo de gaznate
estd liberadoy la m&quina regresa a velocidadociosa.
GAT;LILO DEL ACELERADOR
L_
Figura 3
OPERACION/SUGERENCIAS (Fig. 4)
ADVERTENCIA:
CORTA SIEMPRE A VELOCIDAD MJ_bXIMA.NO
AMONTONA LA CUCHILLA EN EL CORTE QUE
PUEDE DAI_AR I.A CUCHILLA, SE ENREDA, O
SE ARROJE CAUSAR UN PEUGRO SERIO.
SIEMPRE TRABAJO YENDO LEJOS DE GENTE
Y OBJETOS SOLIDOS TAL COMO PAREDES,
PIEDRAS GRANDES, ARBOLES,
AUTOM6VILES, ETC.
USA SIEMPRE PROTECCION OCULAR. NUNCA
DELGADO SOBRE LA CUCHILLA. LAS ROCAS
O RESTOS PUEDEN HAClENDO FUEGO DE
REBOTE O ESTANDO ARROJADO EN OJOS Y
CEGUERA DE CARA Y CAUSA U OTRA
LESION SERIA.
i ,,,, J p,,,,,,,,,iiii J,
Perrnitan las cuchiltas cortadoras alcanzar atoda velocidad
antes de entrando el material para ser cortar.
Siempre trabajo yendo lejos de gente y ob,ietos s6lidos tal
como peredes, piedras grandes, drboles, autom6viles, etc,
Si pesebres de cuchilla, inmediatamente detienen la md.quina.
Aseg,lrese el EN /FUERA interruptor es fuera, el buj_a estd
desconectado, y la cuchiila se ha movimiento detenido antes
de limpiando restos estrujados de la cuchilla cortadora.
Inspeccionen los pot los dafios de cuchilla y hayan reper6 o
remplaz6 como se necesite.
Para detener la m_iquina, mover la EN /FUERA cambia a la
POSIClON DE APAGADO.
Mantienen siempre los ventiletes de aire limpios.Detenga la
unidad, aseg_rese la cuchilla cortadora se ha movimiento
completamente detenido, y desconeeta el bujia antes de
limpiando.
AIRE EXPRESA
iiiiii i ii i
ARREGLARSG DE Mi_TODOS (Fig. 5 & 6)
NOTA: No intentan para co=tartalfos mayores que 3/8" gmesos.
PRINCIPAL CORTADOR
•Por crecimiento nuevo o j6ven: Cuando arreglarsg crec-
imiento nuevo o j6ven, utiliza un ancho, barter movimiento.
Figura 5"A. Una ligeramente, hacia abajo inclinaci6n de las
cuchiilas cortadoras en direccidn de movimiento da a los
mejores resuttados cortadores.
• Para rods vtejo, grueso crecimiento: Arregle rods viejo,
grueso crecimiento utiliza un serrar hacer. Figura 5B.
•Pare preciso, nivel ¢orta: Si un precisamente code de nivel
estd deseado, alarga una pieza de cuerda atravds de la Ion-
gitud del protege. Gufen tas cuchi!las cortadoras |entamente a
trav_.sde la parte superior de la cuerda. Figura 6.
CORTE DE LAD{:)
•Cuando arregiarsg los lados del protege, comienzan en el
fondo y corte hacia arriba, disminuir fa protege adentro en la
parte superior. Rgura 6 (intercalaci6n). Et interrumpir este
m_todo dejard el cuerpo de |a protege mds estrecha en la
parte superior. Esta forma expondrd mds de| protege, crec-
imJento rods uniforme de resultaren.
A B
Figure 5
Figure6
Figure 4
-10-
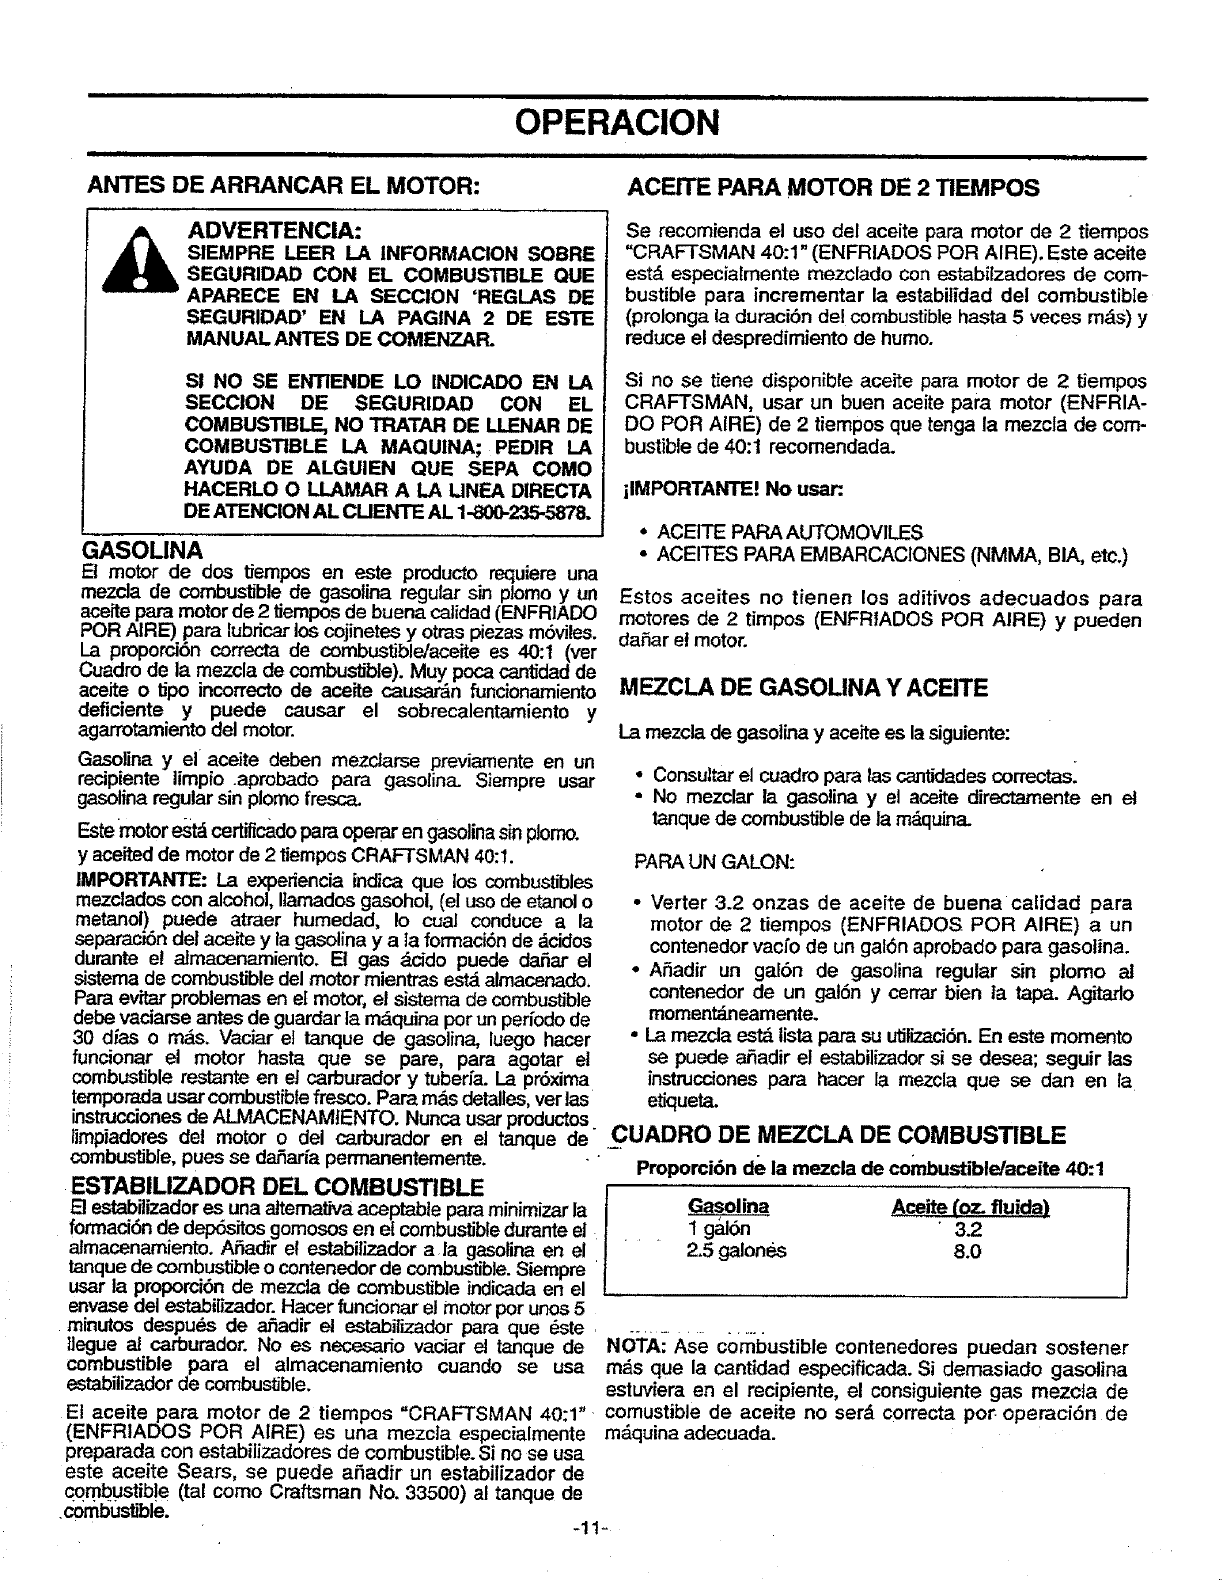
OPERACION
ii1,1 I IH IIIIIIIIIIIIIIIIIII III I III II
ANTES DE ARRANCAR EL MOTOR: ACEITE PAPA MOTOR DE 2 TIEMPOS
ADVERTENCIA:
SIEMPRE LEER LA INFORMACION SOBRE
SEGURIDAD CON EL COMBUSTIBLE QUE
APARECE EN LA SECClON 'REGLAS DE
SEGURIDAD' EN LA PAGINA 2 DE ESTE
MANUAL ANTES DE COMENZAR.
SI NO SE ENTIENDE LO INDICADO EN LA
SECCION DE SEGURIDAD CON EL
COMBUSTIBLE, NO TRATAR DE LLENAR DE
COMBUSTIBLE LA MAQUINA; PEDIR LA
AYUDA DE ALGUIEN QUE SEPA COMO
HACERLO O LLAMAR A LA UNEA DIRECTA
DE ATENClON AL CUENTE AL 1-800-235-5878.
Se recomienda el uso del aceite para motor de 2 tiempos
"CRAFTSMAN 40:1" (ENFRIADOS POR AIRE). Este aceite
estd especialmente mezclado con estabilzadores de com-
bustible para incrementar la estabilidad del combustible
(prolonga la duraci6n del combustible hasta 5 veces mds) y
reduce el despredimiento de humo.
Si no se tiene disponibte aceite para motor de 2 tiempos
CRAFTSMAN, usar un buen aceite para motor (ENFRIA-
DO POR AIRE) de 2 tiempos que tenga la mezcla de com-
bustible de 40:1 recomendada.
ilMPORTANTE! No usar:
GASOLINA
Et motor de dos tiempos en este producto requiem una
mezcla de combustible de gasolina regular sin plornoy un
acelte para motorde 2tiempos de buena calidad(ENFRIADO
POR AIRE) para lubricarlos cojinetes yotras piezas m6viles.
La proporci6n correcta de combustible/aceite es 40:1 (ver
Cuadro de la mezcla de combustible). Muy poca cantidadde
aceite o tipo incorrecto de aceite causardn funcionamiento
deficiente y puede causar el sobrecalentamiento y
agarrotamiento del motor.
Gasolina yel aceite deben mezclarse previarnente en un
recipiente limpio aprobado para gasolina. Siempre usar
gasolina regular sin plornofresca.
Estemotor P_tdcertificadopara operaren gasolina sinplomo.
y aceitedde motor de 2 tiempos CRAFTSMAN 40:1.
IMPORTANTE: La expedencia indica que los combustibles
mezclados con alcohol, Ilamados gasohol, (el uso de etanolo
metanoi) puede atraer humedad, Io cual conduce a la
separaci6n de! aceite y la gasolina ya taformaci6n de dcidos
durante e! atmacenamiento. El gas dcido puede deSar el
sistema de combustibledel motor mientras est_ almacenado,
Para ev_r problemas en el motor, el sistema de combustible
debe vaciarse antes de guarder la m_.quinapot un per[odode
30 dias o rods. Vaciar e] tanque de gasolina, luego hacer
funcionar el motor hasta que se pare, para agotar et
combustible resta,_e en et carburador y tuberia. La pr6xima
temporada usarcombustible fresco. Para rods detalles, ver ]as
instrucciones de ALMACENAMIENTO. Nur_.a usar productos
limpiadores del motor o del carburador en el tanque de
combustible, pues se da_afia permanentemente. -
ESTABIL_DOR DEL COMBUSTIBLE
El estabilizadores una altemativa aceptable paraminimizar la
formaci6n de dep6sitos gornososen el combustibledurante el
almacenamiento. A,fiadir et estabiSzador ala gasoSna en el
tanque de combustible ocontenedor de combustible.Siempre
usar la proporci6n de mezcla de combustible indicada en el
envase del estabilizador.Hacer funcionar e! motorpor unos 5
minutos despu_s de afiadir el estabilizador pard que _ste .....................
•ACEITE PARAAUTOMOVILES
•ACEITES PARA EMBARCACIONES (NMMA, BIA, etc.)
Estos aceites no tienen los aditivos adecuados para
motores de 2 timpos (ENFRIADOS POR AIRE) ypueden
da,fiaret motor.
MEZCLA DE GASOLINA Y ACEITE
La mezcla de gasolina yaceite es la siguiente:
• Consuttar el cuadro para las cantidadescorrectas_
•No mezclar la gasolina y el aceite directamente en el
tanque de combustible de la mdquina.
PAPA UN GALON:
• Verter 3.2 onzas de aceite de buena calidad para
motor de 2 tiempos (ENFRIADOS POR AIRE) a un
contenedor vacfo de un gal6n aprobado para gasolina.
•ASadir un gal6n de gasolina regular sen plomo el
contenedor de un galSn y cerrar bien la tapa. Agitarlo
moment_neamente.
• La mezcla es_ lista para su utitizaci6n. En este momento
se puede a_adir el estabilizador si se desea; seguir las
instrucciones para hacer la mezcla que se dan en la
etiqueta.
CUADRO DE MEZCLA DE COMBUSTIBLE
Proporci6n de la mezcla de combustible/aceite 40:1
Gasolina A,ceite (oz. fluida)
• 1 galon "3.2
23 galones 8.0
Ilegue al carburador. No es necesado vaciar el tanque de
combustible para el almacenamiento cuando se usa
estabilizador de combustible.
El aceite para motor de 2 tiempos "CRAFTSMAN 40:1"
(ENFRIADOS POR AIRE) es una mezcla especialmente
preparada con estabilizadores de combustible. Si no se usa
este aceite Sears, se puede aSadir un estabilizador de
¢0mbustib!e (tal como Craftsman No. 33500) al tanque de
•combustible. -11-
NOTA: Ase combustible contenedores puedan sostener
rods que la cantidad especificada. Si demasiado gasolina
estuviera en el recipiente, el consiguiente gas mezcta de
comustible de aceite no serd correcta pot operaci6n de
mdquina adecuada.
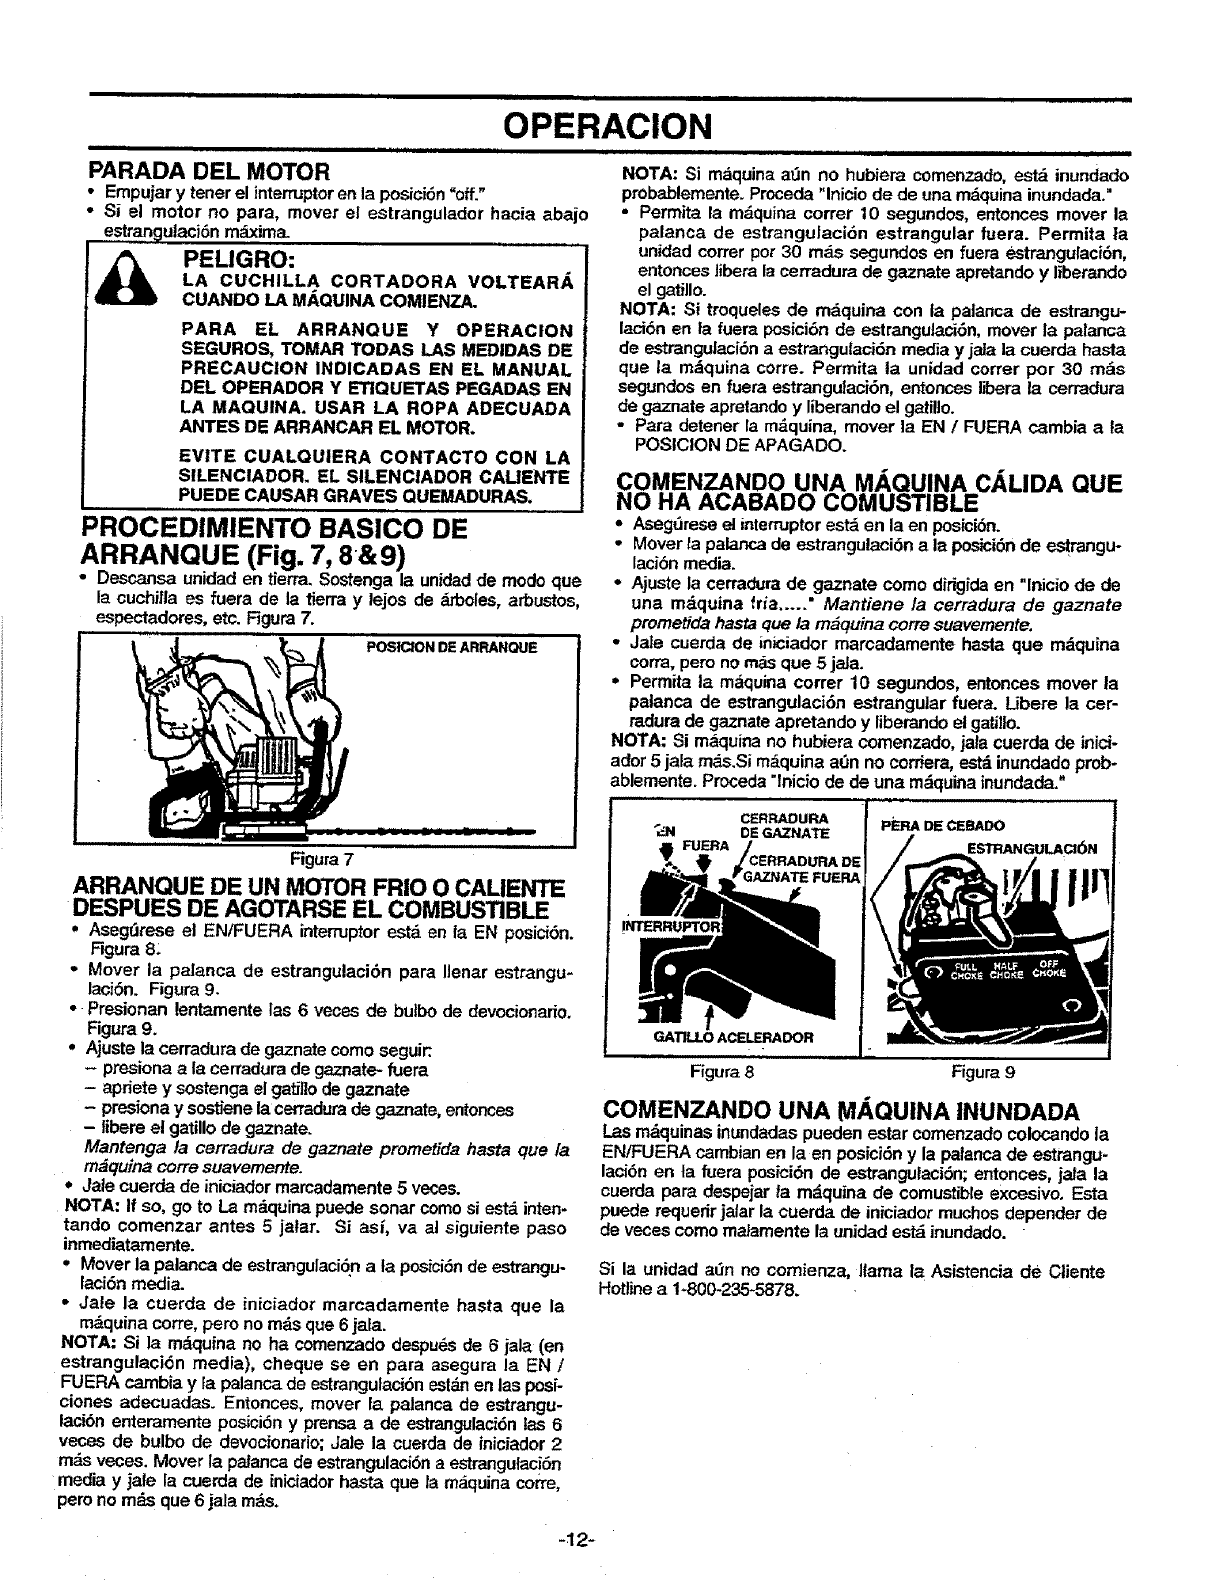
i| i i = = i,,,1=1IN=
OPERAClON
,,,===1 ==
PARADA DEL MOTOR
•Empujar y tener el interrupteren la posici6n "off."
•Si el motor no para, mover el estrangulador hacia abajo
estran_ulaci6n mdxima.
i_ PELIGRO:
LA CUCHILLA CORTADORA VOLTEAR._,
CUANDO LA M_,QUINA COMIENZA.
PARA EL ARRANQUE Y OPERACION
SEGUROS, TOMAR TODAS LAS MEDIDAS DE
PRECAUCION INDICADAS EN EL MANUAL
DEL OPERADOR Y ETIQUETAS PEGADAS EN
LA MAQUINA. USAR LA ROPA ADECUADA
ANTES DE ARRANCAR EL MOTOR.
EVITE CUALQUIERA CONTACTO CON LA
SILENCIADOR. EL SILENCIADOR CAMENTE
PUEDE CAUSAR GRAVES QUEMADURAS.
PROCEDIMIENTO BASlCO DE
ARRANQUE (Fig. 7, 8&@)
•Descansa unidad en fierra. Sostenga la unidad de mode que
la cuchilla es fuera de la tierra y lejos de dr'odes, arbustos,
espectadores, etc. Figura 7.
Figura 7
POSICION DE ARRANQUE
ARRANQUE DE UN MOTOR FRIO O CALIENTE
DESPUES DE AGOTARSE EL COMBUSTIBLE
•Aseg[3rese el EN/FUERA interrupter est& en fa EN posici6n.
Figura 8;
•Mover la palanca de estmngulaci6n para Ilenar estrangu-
laci6n. F'igura 9.
• -Presionan lentamente las 6 veces de butbo de devecionado.
Figura 9.
• Ajuste la cerradura de gaznate come seguir:
-presiona a la cerradura de gaznate- fuera
- apriete y sostenga el gatil}ode gaznate
- presiona ysostiene la cermdura de gaznate, entonces
-libere el gatillo de gaznate.
Mantenga /a cerradura de gaznate prometida hasta que /a
m_quina corre suavemente.
• Jale cuerda de iniciador marcadamente 5 veces.
NOTA: If so, go to La mdquina puede sonar come si est_ inten-
tando comenzar antes 5 jatar. Si as/, va al siguiente paso
inmediatamente.
• Mover la palanca de estrangulaci6n a la posiei6nde estrangu-
laci6n media.
• Jale la cuerda de iniciador marcadamente hasta que la
m&quina corre, pero no m_s que 6 jala.
NOTA: Si la m_quina no ha comenzado despu_s de 6jala (en
estrangulaci6n media), cheque seen para asegura la EN /
FUERA cambia y la palanca de estrangutaci6n estdnen las posi-
clones adecuadas. Entonoes, mover la palanca de estrangu-
lacibn enteramente pos_ci6ny prensa a de estrangulaci6n tas 6
veces de bulbo de devocionario; Jale la cuerda de iniciador 2
m_,sveces. Mover la palanca de estrangulaciSn a estrangulaci6n
media y jale la cuerda de iniciador hasta que la m&quina corre,
peru no rods que 6 jala m&s.
,,H,NH= ==N = INH, = = = , ,= =H,,
NOTA: Si m_quina a_n no hubiera comenzado, est& inundado
probablemente. Proceda "lnicio de de una m_quina inundada."
•Permita la mdquina correr t 0 segundos, entonces mover la
palanca de estrangulaci6n estrangular fuera. Permita la
unidad cotter per 30 m_Lssegundos en fuera estrangulaci6n,
entonces libera la cerradura de gaznate apretando y libemndo
el gatillo.
NOTA: Si troqueles de maquina con la palanca de estrangu-
laci_n en la fuera posici6n de estrangulaci6n, mover la palanca
de estrangulaci6n a estrangutacidn media y jala la cuerda hasta
que la mdquina corre. Permita la unidad correr per 30 rods
segundos en fuera estrangulaei6n, entonees libera la cerradura
de gaznate apretando y I_erando el gatillo.
•Para detener la m_quina, mover la EN /FUERA cambia ala
POSICION DE APAGADO.
COMENZANDO UNA MAQUINA C._LIDA QUE
NO HA ACABADO COMUSTIBLE
• Asegt_rese el internJptor est,. en la en posici6n.
o Mover la palanca de estrangulacidn a la posici6n de estrangu-
laci6n media.
°Aiuste la cerradura de gaznate come dirigida en "lnicio de de
una mdquina frfa ..... " Mantiene /a cerradura de gaznate
prometida hasta que /a m_quina corre suavemente.
•Ja_e cuerda de iniciador marcadamente hasta que mdquina
coma, pero no masque 5 jaJa.
• Permita la maquina correr 10 segundos, entonces mover la
palanca de estrangulaci6n estrangular fuera. Ubere la cer-
radura de gaz.nateapretando y liberando el gati!lo.
NOTA: Si maquina no hubiera comenzado, jala cuerda de inici-
ador 5 jala mds.Si mdquina at_n no corriera, estd inundado prob*
ablemente. Proceda "Inicio de de una mdquina inundada."
CF.RRADURA PERA DE CEBADO
DE GAZNATE
E_GULACI6N
I_RuFrOR
Figura 8Figura 9
COMENZANDO UNA MAQUINA INUNDADA
l_asmdquinas inundadas pueden estar comenzado colocando la
EN_UERA cambien en laen posici6n y la pafanca de estrangu-
laci6n en ta fuera posici6n de estrangulaciSn; entonces, jaJa la
cuerda para despejar la mdquina de comustible excesivo, Esta
puede requerir jalar la cuerda de iniciador muchos depender de
de veces come malamente la unidad es_ inundedo. -
Si la unidad adn no comienza, llama la Asistencia de CIiente
Hotline a 1-800235-5878.
-12-
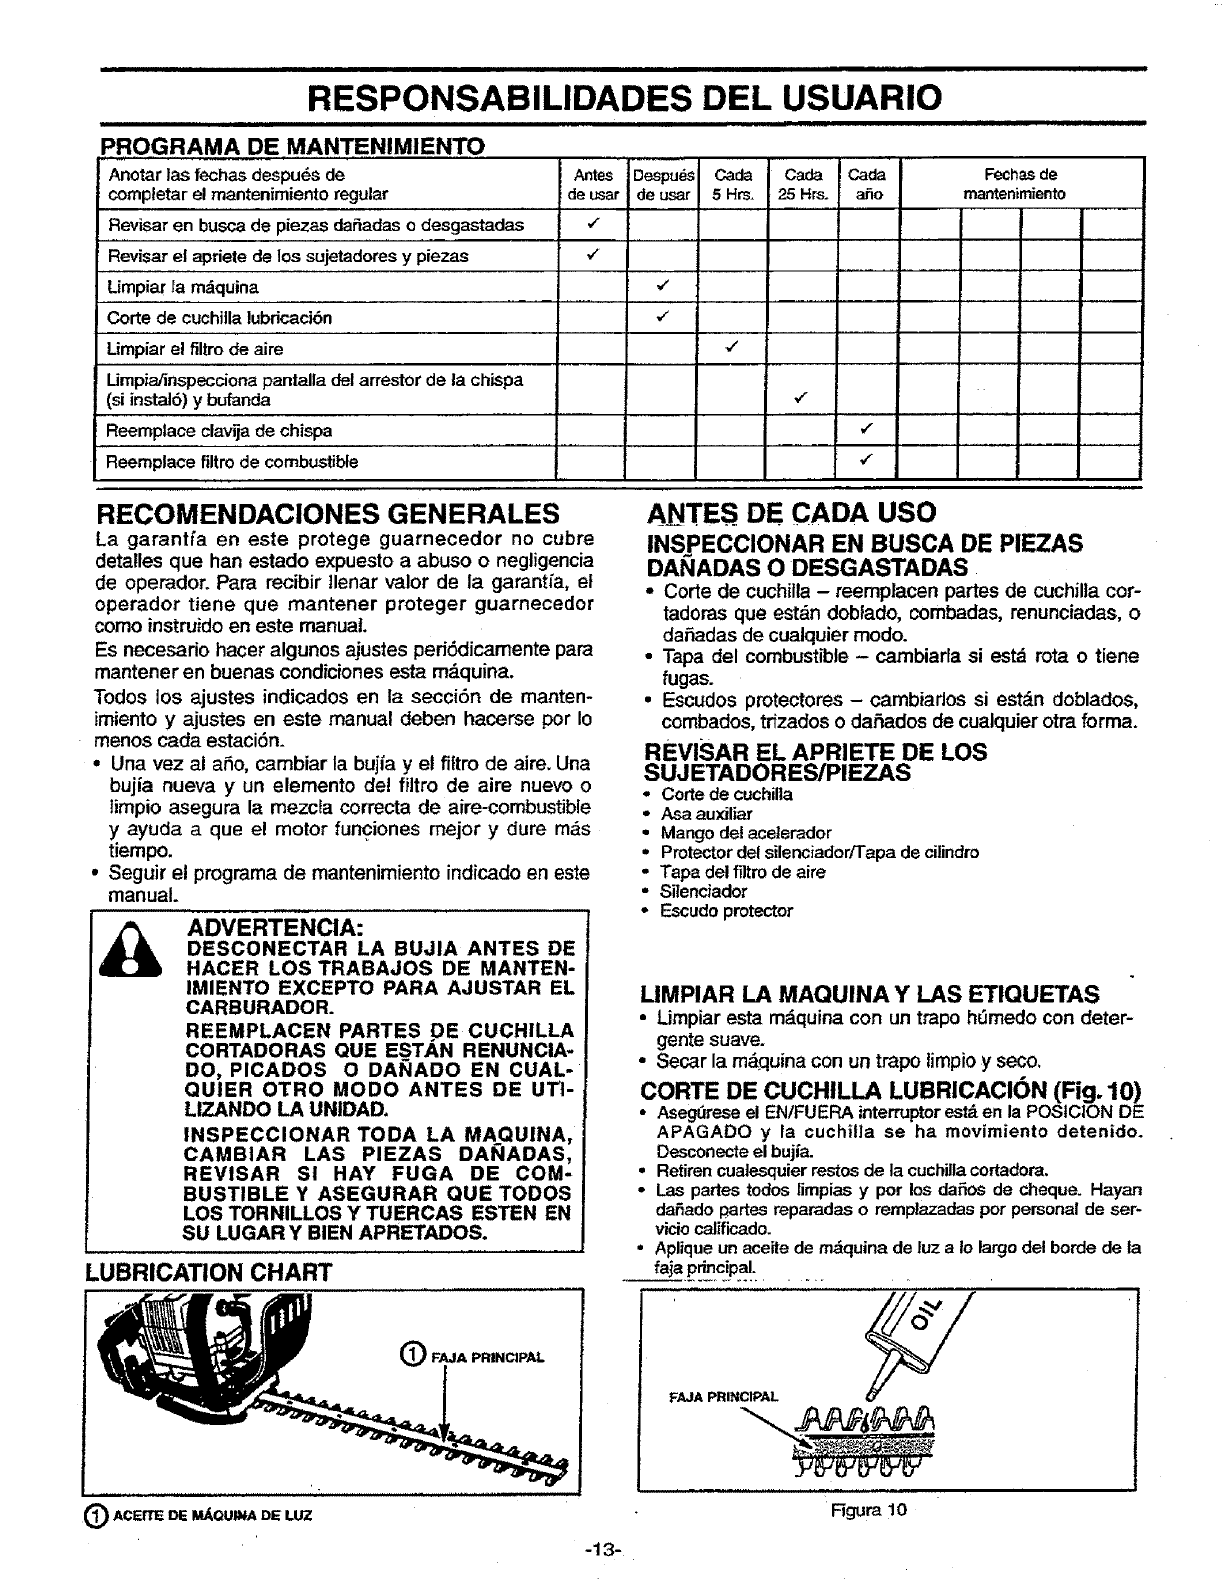
i, ,,,, m,,| ,,, m,=, I ""' "'
RESPONSABILIDADES DEL USUARIO
=iiiiiil,i
PRO.GRAMA DE.MAN,TENIMIENTO
Anotar las fechasdespu_sde
completar el mantenimiento regular
Revisar en buscade piezasda£tadaso desgastadas
Revisar et apriete de los sujetadores y piezas
Antes Despu_s
deusar deusar
v"
v"
,/
v"
Cada Cada Cada
5 Hrs. 25 Hrs. ar3o
i/i
Fechas de
mantenimiento
Umpiar Famg=quina
Corte de cuchilla lubricaci6n
Limpiarel filtro de aire v"
Urnpiaiinspecciona pantalladelarrestorde la chispa
(si instal6) y bufanda ,/
Reemplaceclav_ade chispa ,"
Reemplace firm de combustible "I
RECOMENDAClONES GENERALES
La garantfa en este protege guarnecedor no cubre
detalles que hart estado expuesto a abuso o negligencia
de operador. Para recibir Ilenar valor de la garant_a, el
operador tiene que rnantener proteger guarnecedor
como instruido en este manual.
Es necesado hacer algunos ajustes pedSdicamente para
mantener en buenas condiciones esta m_.quina.
Todos los ajustes indicados en la secci6n de manten-
imiento y ajustes en este rr_nual deben hacerse por Io
menos cada estaci6n.
•Una vez al aSo, cambiar la bujia y el filtro de aire. Una
bujia nueva y un elemento de! fiitro de aire nuevo o
timpio asegura la mezcla correcta de aire-combustible
yayuda a que el motor funciones mejor y dure m_s
tiempo.
•Seguir et programa de mantenimiento indicado en este
manual.
ADVERTENCIA:
DESCONECTAR LA BUJIA ANTES DE
HACER LOS TRABAJOS DE MANTEN-
IMIENTO EXCEPTO PARA AJUSTAR EL
CARBURADOR.
REEMPLACEN PARTES DE CUCHILLA
CORTADORAS QUE ESTAN RENUNClA-
DO, PICADOS O DA_IADO EN CUAL-
QUIER OTRO MODO ANTES DE UTI-
LIZANDO LA UNIDAD.
INSPECCIONAR TODA LA MAQUINA,
CAMBIAR LAS PIEZAS DANADAS,
REVISAR SI HAY FUGA DE COM-
BUSTIBLE Y ASEGURAR QUE TODOS
LOS TORNILLOS Y TUERCAS ESTEN EN
SU LUGAR Y BIEN APRETADOS.
LUBRICATION CHART
OFAJA PRINCIPAL
ANTES DE CADA USO
INSpECCIONAR EN BUSCA DE PIEZAS
DANADAS O DESGASTADAS
•Corte de cuchilla - reemplacen panes de cuchil]a cor-
tadoras que est&n dobtado, combadas, renunciadas, o
daSadas de cualquier modo.
•Tapa del combustible - cambiarla si estd rota o tiene
fugas.
• Escudos protectores - cambiarlos si estdn doblados,
combados, trfzados o daSados de cualquier otra forma.
REVISAR EL APRIETE DE LOS
SUJETADORES/PIEZAS
•Corte de cuchilla
- Asaauxiliar
•Mangode! acelerador
•ProtectordelsilenciadoriTapa de cilindro
•Tapa delfiltrode aire
•Sitenciador
- Escudoprotector
LIMPIAR LA MAQUINA Y LAS ETIQUETAS
• Limpiar esta mdquina con un trapo hOmedo con deter-
gente suave.
•Secar la mdquina con un trapo limpioy seco.
CORTE DE CUCHILLA LUBRlCACI(_N (Fig. 10)
• Asegfirese el EN/FUERAinterruptorest_en la POStCION DE
APAGADO y la cuchitla se ha movimiento detenido.
Desconecteel bujfa.
•Retirencualesquierrestosde la cuchillaco_adora.
•Las partestodos limp!as y por los dafiosde cheque. Hayan
daP,ado _artes reparadaso remplazadaspot personalde ser-
viciocalificado.
= Aplique un ace!rede mdquina de luz a Io largodei bordede la
faja principal.
FAJA PRINCIPAL
OACEITE DE IM_QUINA DE LUZ Figura 10
-13-
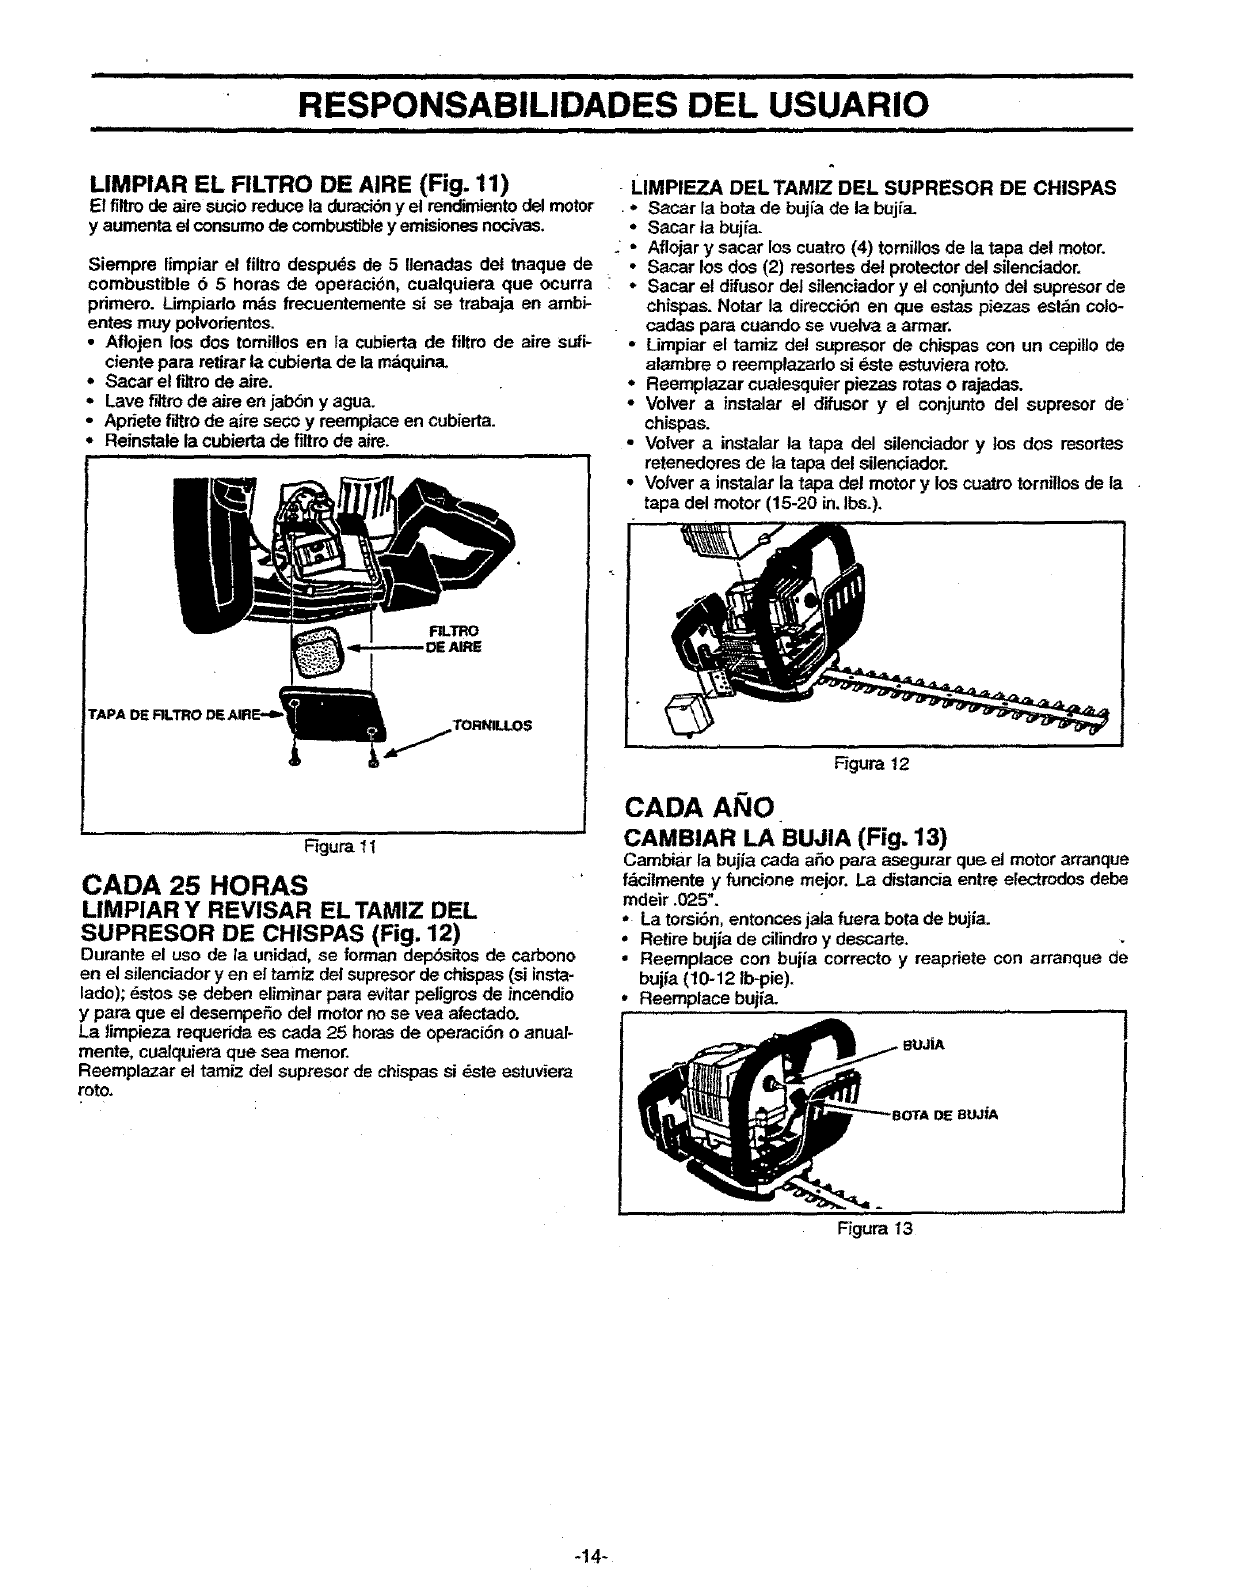
iiiii i i ,,,,H, II ,I I I III m= """"11111IIIII IIII,IIIIIHIII
RESPONSABILIDADES DEL USUARIO
el ii iii i iiiiiiiiiiiiiiii i i ................
LIMPIAR EL FILTRO DE AIRE (Fig. 11)
Et flltrode aire sueJoreduce la durac_n y el mndimiento del motor
yaumenta el consumo de combusb_bley emisiones nocivas. _.
Siempre limpiar el filtro despuds de 5 Ilenades del tnaque de •
combustible 65horas de operacibn, cualquiera que ocurra : •
primero. Limpiado rnds frecuentemente si se trabaja en ambi-
entes muy polvorientos.
•Aflojen los dos tomil!os en ia cubierta de filtro de aire sufi- •
ciente para retirar la cubieda de la mdquina.
• Sacar el filtro de aire. .
=Lave fiitm de aim en jabSn y agua.
•Apriete filtro de aim seco y reemplace en cubierta.
•Reinstale la cubierta de filtro de aim.
J i,i i i
FILTRO
DE AIRE
rAPA DE TORNILLOS
Figura 1t
CADA 25 HORAS
LIMPIAR Y REVISAR EL TAMIZ DEL
SUPRESOR DE CHISPAS (Fig. 12)
Durante el uso de la unidad, se forman dep6sitos de carbono
en el silenciador yen el tamiz dei supresor de chispas (si insta-
lado); dstos se deben eliminar para evitar peligros de incendio
y para que el desempefio del motor no se vea afectado.
La timpieza requerida es cada 25 horas de operaci6n o anual-
mente, cualquiera cluesea menor.
Reemplazar el tamiz del supresor de chispas si _ste estuviera
roto.
LIMPIEZA DEL TAMIZ DEL SUPRESOR DE CHISPAS
- Sacar la bota de bujfa de la bujfa,
Sacar ta bujfa.
Aflojar y sacar los cuatro (4) torni|los de la tapa del motor.
Sacar los dos (2) resortes del protector del silenciador,
Sacar et difusor del silenciador y el conjunto del supresor de
chispas. Notar la direcciSn en que estas piezas estdn colo-
cadas para cuando se vuelva aarmar.
Limpiar el tamiz de! supresor de chispas con un cepillo de
alambre o reemplazado si dste estuviera roto.
Reemplazar cuelesquier piezas rotas o rajadas.
• Volver a instelar el difusor yel conjunto del supresor de'
chispas.
•Volver ainstatar la tapa del silenciador y los dos msortes
retenedores de la tapa del silenciador,
•Volver a instalar la tapa de! motor y los cuatro torniltos de la •
tapa del motor (15-20 in. Ibs,),
F'igura 12
CADA AI_IO
CAMBIAR LA BUJIA (Fig. 13)
Cambiar la bujia cada afio para asegurar que el motor arranque
fdcilmente y funcione mejor. La distancia entre electrodos debe
mdelr .025".
• La torsiSn, entonces jaia fuera bota de bujia.
• Retire bujia de citindroy d_rte,
•Reemplace con bujia correcto y reapriete con arranque de
bujia (10-12 Ib-pie).
Reemplace buj_L
BuJiA
aUJiA
Figura 13
-14-
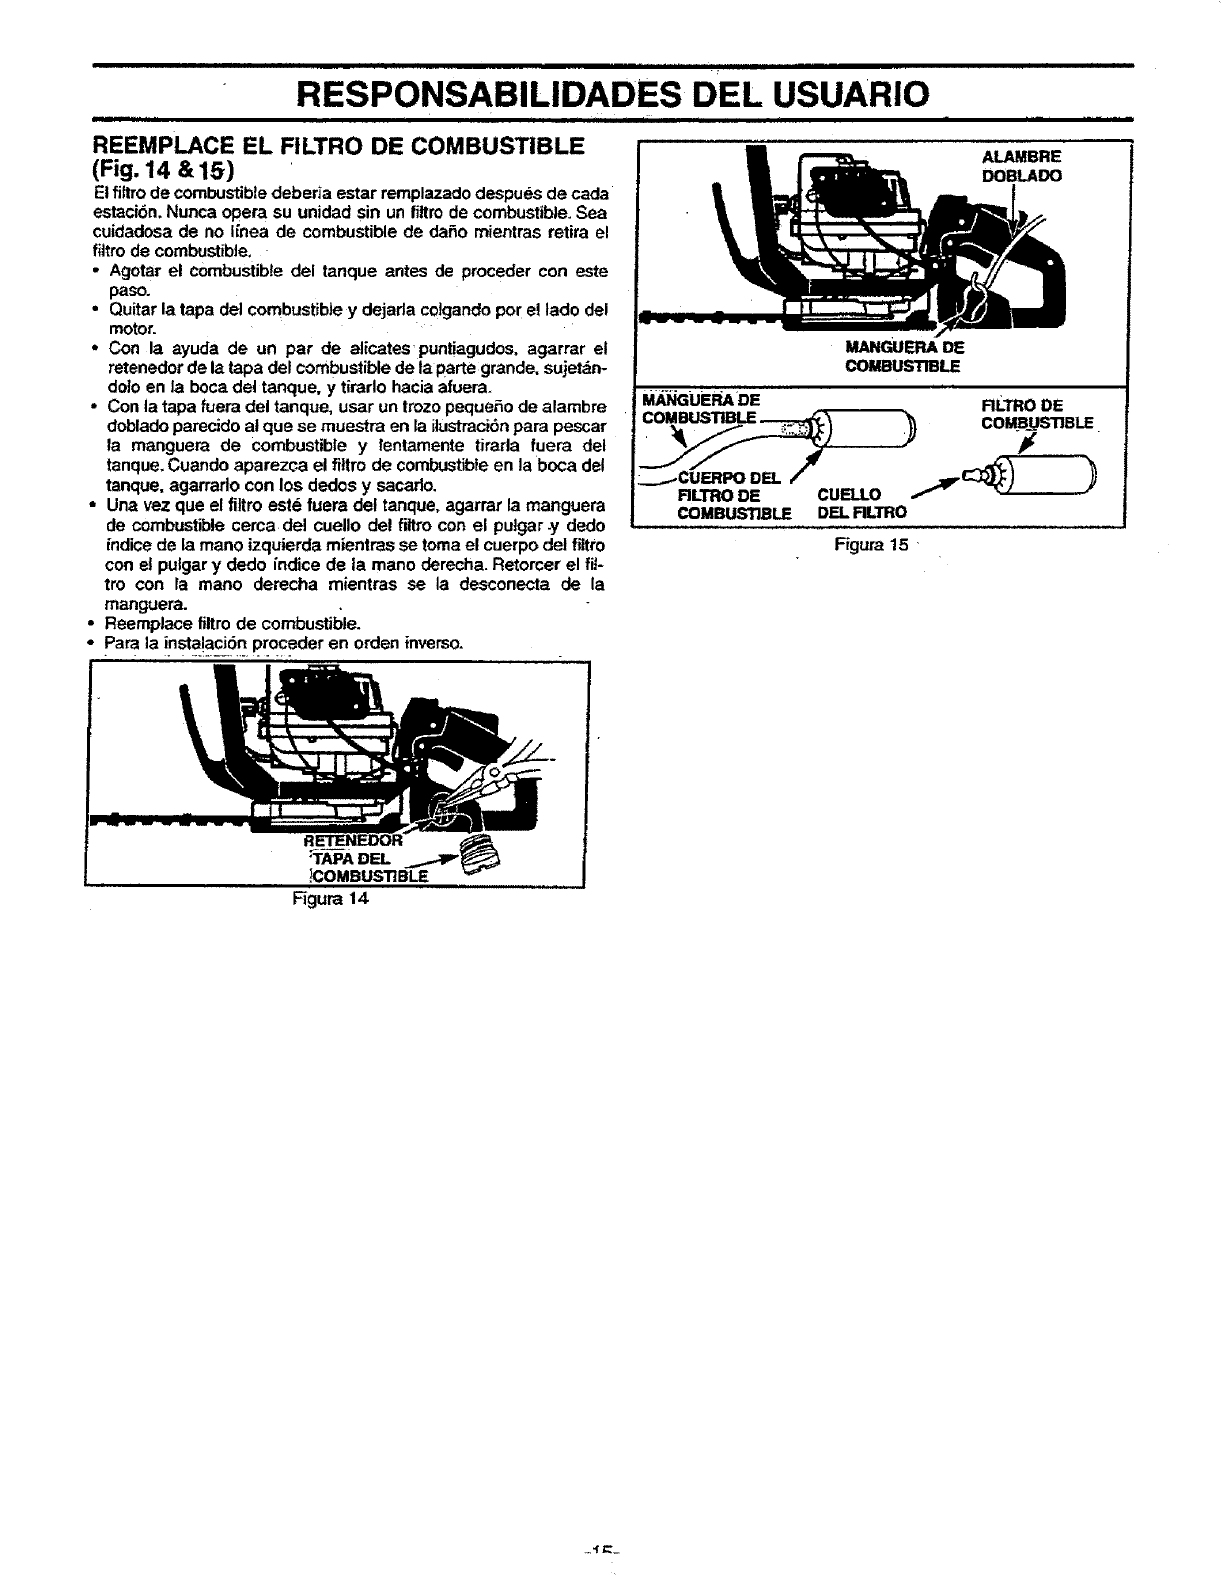
iii i ii :i
RESPONSABILIDADES DEL USUARIO
I I III i i iiiiii i iiiiii iiii iii iiiii
ALAMBRE
DOBLADO
REEMPLACE EL FILTRO DE COMBUSTIBLE
(Fig. 14 & 15)
Etfiltro de combustible deberia estar remplazado despues de cada
estaci6n. Nunca opera su unidad sin un fiftrode combustible. Sea
cuidadosa de no Ifnea de combustible de da_o mientras retira el
filtrode combustible.
•Agotar el combustible dei tanclue antes de proceder con este
paso.
•Quitar la tapa del combustible y dejada colganclopor e! tado del
motor.
•Con la ayuda de un par de alicates puntiagudos, agarrar el
retenedor de la tapa del combustible de la parte grande, sujetdn-
dolo en la boca del tanque, y tirarlo hacia afuera.
- Con la tapa fuera del tanque, usar un trozo peque_o de alambre
doblado parecido a! que se muestra en la ilustraci_npara pescar
la manguera de Combustible y lentamente tirarla fuera del
tanque, Cuando aparezca el filtro de combustibleen la boca del
tanque, agarrarlo con los dedcs y sacado.
•Una vez que el filtro este fuera del tanque, agarmr la manguera
de combustible cerca del cuello del filtro con el pulgar -y dedo
indice de la mano izquierda mientras se toma el cuerpo del filtro
con eJpulgar y dedo indice de la mano derecha. Retorcer el fil-
tro con la mano derecha mientras se la desconecta de la
manguera.
• Reemplace filtrode combustil_le.
• para la !nsta!aci_dn"p.roceder en orden inverso.
MANGUEP_DE
COMBUSTIBLE
MANGUERADE FILTRo DE
I
nLTRODE CUEU.O ._'_'_ '_---'----_
COMBUSTIBLE DEL FILTRO
Figura 15 '
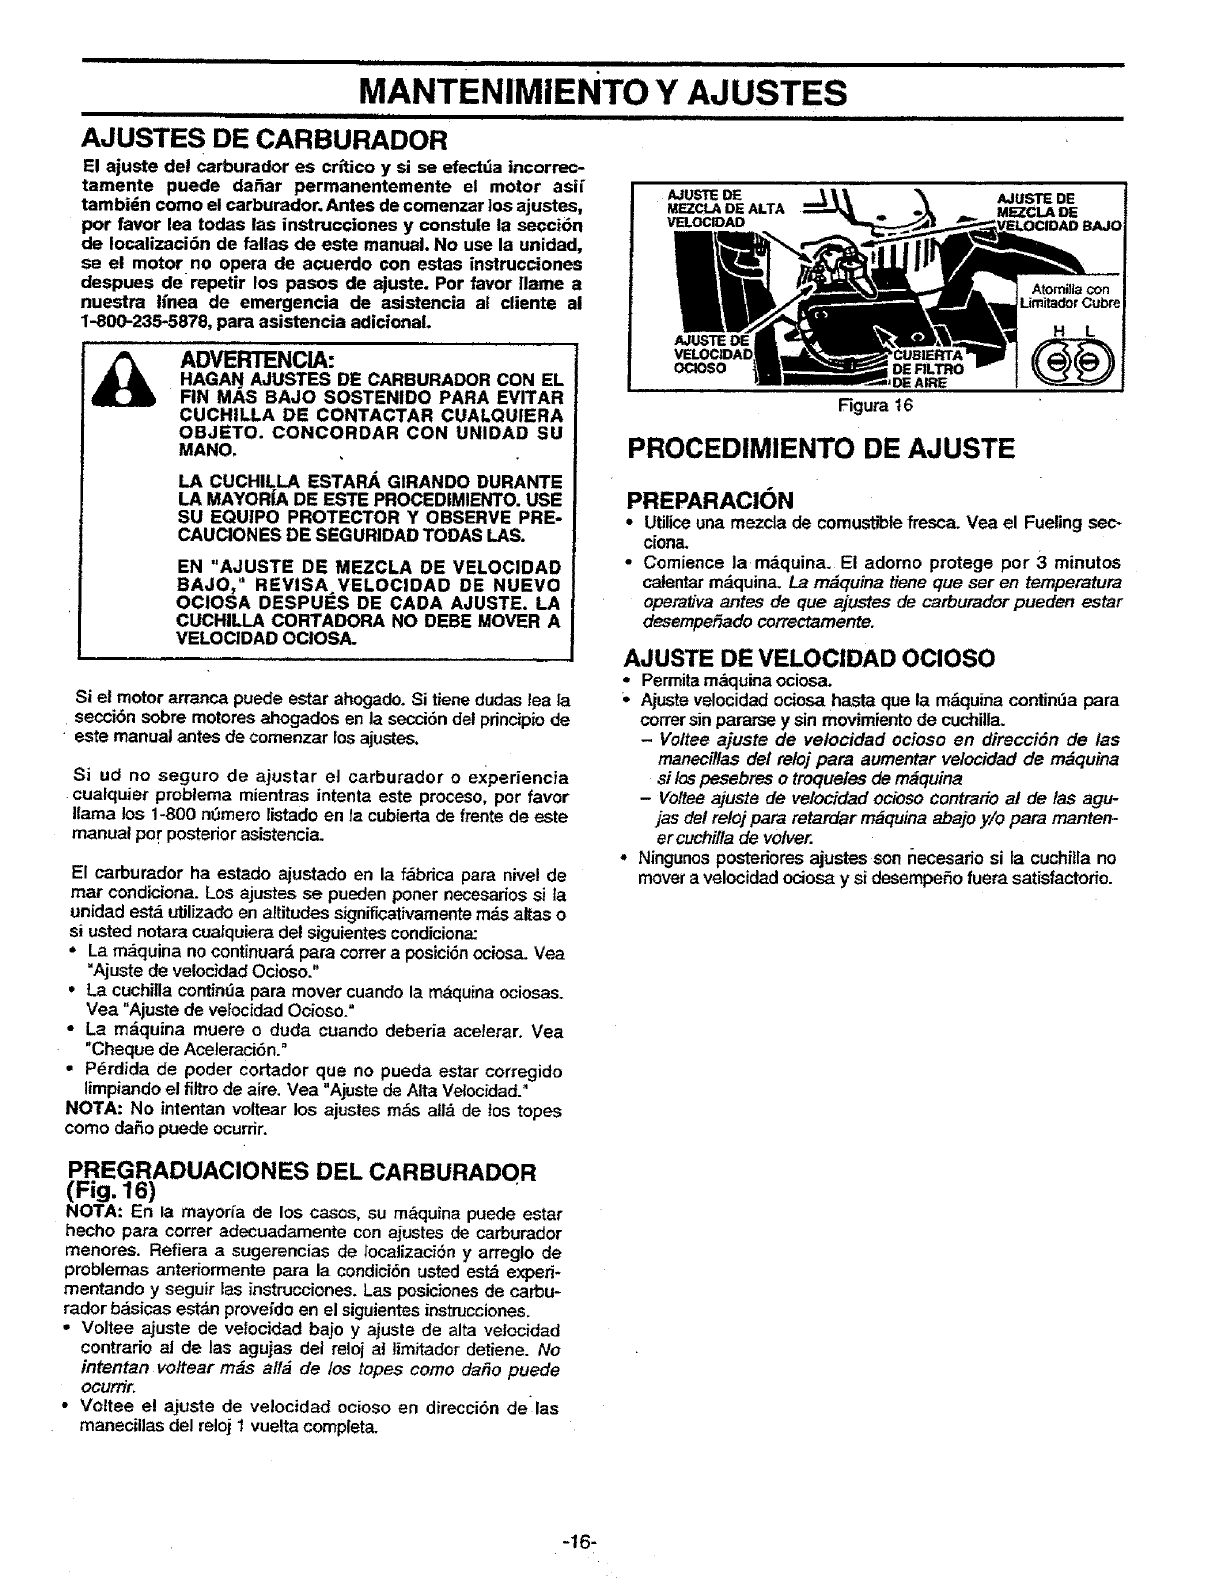
ii i i i .i iiii i i iiiii iiii i i
MANTENIMIENTO Y AJUSTES
ii i |111 iii ii i i ....... ................
AJUSTES DE CARBURADOR
El ajuste del carburador es orifice y si se efectda tncorrec-
tamente puede dafiar permanentemente el motor asif
tambidn come el carburador. Antes de comenzar los ajustes,
per favor lea todas la$ instrucciones y constule la secci6n
de Iocalizaoi6n de fallas de este manual. No use la unidad,
se el motor no opera de acuerdo con estas instruccionea
despues de repetir los pasos de ajuste. Per favor flame a
nuestra linea de emergencia de asistencla al cliente al
1-800-235-5878, para asistencia adicionaL
ADVERTENCIA:
HAGAN AJUSTES DE CARBURADOR CON EL
FIN MAS BAJO SOSTENIDO PARA EVITAR
CUCHILLA DE CONTACTAR CUALQUIERA
OBJETO. CONCORDAR CON UNIDAD SU
MANO,
LA CUCHILLA ESTAR_, GIRANDO DURANTE
LA MAYOR|A DE ESTE PROCEDIMIENTO. USE
SU EQU1PO PROTECTOR Y OBSERVE PRE-
CAUCIONES DE SEGURIDAD TODAS LAS.
EN "AJUSTE DE MEZCLA DE VELOCIDAD
BAJO," REVISA VELOClDAD DE NUEVO
OCIOSA DESPUES DE CADA AJUSTE. LA
CUCHILLA CORTADORA NO DEBE MOVER A
VELOCIDAD OCiOSA.
A-JUS_t'EDE A..IUSTE DE
MEZCLA DE ALTA MEZCLA DE
VELOCIDAD
Si el motor arranca puede estar ahogado. Si tiene dudes lea la
secci6n sobre motores ahogados en la secci6n def principio de
este manua| antes de comenzar los ajustes.
Si ud no seguro de ajustar et carburador o experiencia
.cualquier problema mientras intenta este proceso, per favor
llama los 1-800 nOmero listado en la cubierta de ffente de este
manual pol"posterior asistencia.
El carburador ha estado ajustado en la fdbrica para nivel de
mar condiciona. Los ajustes se pueden poner necesarios si la
unidad estd utilizade en altitudes significativamentemds altas o
si usted notara cualquiera del siguientes condiciona:
* La m_luina no continuar_ para correr a posici6n ociosa. Vea
"Ajuste de velocidad Ocioso."
,La cuchilla continda para mover cuande la maquina ociosas.
Vea "Ajuste de velecidad Ocio-so."
•La mdquina muere o duda cuando deberia acelerar. Vea
"Cheque de Aceleraci6n. °
,Pdrdida de peder cortador que no pueda estar corregido
limpiando el filtro de aire. Vea "Ajuste de Aita Velocidad."
NOTA: No intentan voltear los ajustes rods alld de tos topes
come dafio puede ocurrir.
AtorniHa con
Limitador Cubre
PROCEDIMIENTO DE AJUSTE
PREPARACION
• Utiliceuna mezcla de comustible fresca. Vea el Fueling sec-
ciona.
•Comiencs la mdquina. El adorno protege per 3minutes
calentar mdquina. La m_quina tiene que ser en temperatura
operaUva antes de que ajustes de carburador pueden estar
desempefiado correctamente.
AJUSTE DE VELOCIDAD OClOSO
•Permita mdquina ociosa.
_' Ajuste velocidad ociosa hasta que la m_.quina continda para
cower sin pararse y sin movimiento de cuchiila.
-Voltee ajuste de velocidad ocioso en direcci6n de/as
maneci!las de/reloj para aumentar velocidad de mdquina
si /ospesebres o troqueles de m_quina
-Voltee ajuste de velocidad ocioso contrario al de/as agu-
jas de/reloj para retardar m_quina abajo y/o para manten-
er cuchilla de velvet.
•Ningunos posteriores ajustes son r_ecesario si la cuchilla no
mover a velocidad ociosa y si desempefio fuera satisfactorio.
PREGRADUACIONES DEL CARBURADQR
(Fig. 16)
NOTA: En la mayor_a de los cases, su mdquina puede estar
hecho para correr adecuadamente con ajustes de carburador
menores. Refiera a sugerencias de iocalizaciSn y arreglo de
problemas anteriorrnente para la condici6n usted est_ experi-
mentando y seguir las instrucciones. Las posiciones de carbu-
rador basices estdn proveido en el siguientes instrucciones.
• Voltee ajuste de vetocidad bajo y ajuste de alta velocidad
contrado al de las agujas del reioj at limitador detiene. No
intentan voltear mds alld de los topes come dafio puede
ocurtiro
•Voltee el ajuste de velocidad ocioso en direcciSn de_las
maneclilas del reloj 1vuelta completa.
-16-
....... ALMACENAMIENTO .....
iiii iiii
Preparar inmediatamente la m&quina para guardada al final
de la temporada o si no se va a usar per 30 dias o rods.
ADVERTENClA:
DEJAR QUE EL MOTOR SE ENFRIE Y
SUJETAR BIEN LA MAQUINA ANTES DE
GUARDARLA O TRANSPORTARLA EN UN
VEHICULO.
GUARDAR LA MAQUINA YEL
COMBUSTIBLE EN UN LUGAR DONDE LOS
VAPORES DEL COMBUSTIBLE NO
ALCANCEN LAS CHISPAS O LLAMAS
EXPUESTAS DE CALENTADORES DE
AGUA, MOTORES ELECTRICOS O
INTERRUPTORES, CALEFACTORES, ETC.
GUARDAR LA MAQUINA CON LOS
PROTECTORES PUESTOS PARA QUE
NINGUNA PARTE AFILADA PUEDA
ACCIDENTALMENTE LESIONAR A UNA
PERSONA QUE PASE CERCA.
GUARDAR LA MAQUINA LEJOS DEL
ALCANCE DE LOS NllqOS.
INSTRUCCIONES PARA ALMACENAR LA
CORTADORA A GAS
Si la mdquina va a estar guardada per cierto tiempo,
limpiarla a fondo antes de guardada. Quitar toda ia tierra,
hojas, aceite, grasa, etc. Guardarla en un lugar limpio y
seco.
•Limpiar toda fa mdquina.
• Umpiar el fiZtro de aire. Vet "Responsabilidades del
usuarJo."
• Aceitar ligerarnente ]as superficies met&ticas extemas
•para impedir la oxidaci6n.
•Volver a armar todas las piezas, asegurando que todos
los mangos y protectores est_n en su lugary bien sujetos.
Cambiar las piezas que est_n da_adas.
°La posici6n de almacenamiento recomendada es ya sea
verticalrnente con la tapa de combustible enc_ma, u
horizontalmente con ia tapa de combustible hacia ardba.
No guardar la mdquina con el accesorio de corte
arriba, per encima del motor.
ATENCION: Usen guantes protectores I
cuando manipulando. La cuchilla es aguda f
y puede cortarle,
iiiiiiiiiirlliii i
COMBUSTIBLE SISTEMA
Nunca usar productos fimpiadores del motor o del
carburador en el tanque de combustible, pues se daSafian
permanentemente los componentes deJ sisterna de
combustible.
Seguir estas instrucciones:
•Vaciar el combustible de ta m_.quina a un recipiente
aprobado para combustible.
°Arrancar el motor y dejarlo funcionar hasta que se pare
para vaciar las mangueras de combustible y el
carburador.
°Dejar que el motor se enfrfe antes de guardar la
mdquina.
IMPORTANTE: Es importante impedir que se formen
dep6sitos gomosos en las piezas esenciales det sistema de
combustible tales come e! carburador, filtro de combustible,
manguera de combustible otanque durante el
aimacenamiento. Tarnbi6n, se sabe que los combustibles.
mezclados, con alcohol, come el use de etanol o metanol
(llamado gasohol o combustible oxigenado), pueden atraer
humedad y formar gas dcido, el cual dafiard el motor. Para
evitar problernas en el motor, vaciar el sistema antes de un
almacenamiento de 30 dfas o mds.
E! estabi}izador es una altemativa aceptable para minimizar
ta formaci6n de dep6sitos gomosos en el combustible
durante el almacenamiento. Afiadir el estabilizador ala
gasotina en el tanque de combustible o contenedor de
combustible. Siempre usar la proporci6n de mezcla de
combustible indicada en el envase del estabilizador. Hacer
funcionar el motor per unos 5 minutes despu_s de a_adir el
estabi{izador para que _ste ilegue al carburador.
El aceite para motor de 2 tiempos CRAFTSMAN 40:1
(ENFRIADOS POR AIRE) es una mezcla especiatmente
preparada con estabilizadores de combustible. Si no se usa
este aceite Sears, se puede afiadir un estabilizador de
combustible (tal come Craftsman No. 33500) ai tanque de
combustible.
MOTOR
•Sacar la bujla y verter 1cucharadita de aceite 40:t per la
abertura de la bujia. Tirar lentamente ta cuerda de
arranque unas 8 a 10 veces para distdbuir el aceite per la
superficie intema del motor.
Reemplazar la bujia con una nueva del tipo y gama de
_ ca!or recomendados. "Especificaciones det producto."
Ver
Limpiar et filtro de aire. Vet =Responsabilidades del
usuario".
• Reinstalar todas las tapas y tomillerfa que se sac6 para
tenet acceso; apretar todos los tomillos y sujetadores.
•Revisar toda la m&quina en busca de tornillos, tuercas y
pemos sueltos. Cambiar las piezas que est_n dafiadas,
rotas o desgastadas.
• Aceitar |igeramente las superficies de metal extedores
pare irnpedir la oxidaci6n.
•AI comienzo de la prSxima ternporada, usar cornbustible
fresco que tenga fa proporci6n correcta de gasolina y
aceite.
OTROS
• No guardar gasolina de una temporada a ta otra.
•Cambiar la lata de gaselina si comienza a oxidarse. El 6xido
y/o suciedad en el sistema de combustible causa problema.
-Guardar [a m&quina en un lugar bien ventitado y cubierto,
si es posible, para impedir la acumulaci6n de polvo y
suciedad. No cubrir con plastico. El pl_stico no permite la
respiraci6n e induce la condensaci6n y finalmente la
oxidaci6n.
IMPORTANTE: Nunca cubrir la m&quina mientras el motor
y las _.reas de escape est_n todavfa catientes.
L17-

i i iiiiiiiiiiiiiiiiiiiiiiiiii ii iii ii ii i iiiil,ll=ii ill i ii
PROBLEMAS APUNTAN
........................,, ......................................... ,,,,,,,,,,, i i ,, ,,,r ,i
TABLA DE LOCALIZACION DE AVERIAS
[] motor no arranca o
funciona solarnente por
unos pocos segundos
despu_s de arra,ncar.
B motor no funciona
bien avelocidad
lenta.
[] motor no acelera, le
falta potenda o se
apaga bajo carga.
El motor humea
excesivamente.
El motor no funciona
caEente.
El cortede adhesiSn
se mueve a velocidad
ociosa.
[] code de cuchilla
detiene bajo una carga
ono voltea cuando la
m&quina est,. acelerado.
,, .,_ .....
CAUSA
1. Ase combustible tanque vaciar.
2. Motor ahogado
3. Buj/a no tiene chispa.
4. Combustible no Ilega al carburador.
5. E! carburador requiem ajuste.
6. [] filtro de aire sucto.
7, El filtrode comustiblesucio.
8. Nada de Io anterior.
1. El conjuntode velocidad ocioso
demasiado rdpidamente o
demasiado lento.
2. [] carburador requiero ajuste.
3. Nada de Io anterior.
i•,,,,,,,,,,,,,,,,,,,,,,,,,,,
1. El filtro de aim sucio.
2. [] bujfa da,fi6.
3. El carburador requiero ajuste.
4. Los enchufes de sitenciador
conectaron.
5. Nada de !o anterior,
H
!1. Filtro de aire sucio.
2. Ase combustible incorrecto.
3. [] carburador requiero ajuste.
,,,,,,,,
1. Ase combustible incorrecto.
2, [] conjunto de carburador
demasiado bajo (dekjado).
3. [] bujla incorrecto.
4. Nada de Io anterior. 4.
!. El carburador requiere ajuste. 1.
2. El cable de gaznate obligatodo. 2.
3. La embrague requiero reparaci6n.
!. La cuchilla de forcing en corte
2 de set material.
•La cuchilla madrefia con restos.
3. Nada de Io anterior.
CORRECCION
1. Uene tanque con mezcla de comustibte correcta.
2. Ver "lnstrucciones para el arranque,"
3, Instalar una bujfa nueva/rev'_sarel interruptor de encendido.
4. Reemplace filtro de combustible; inspeccionar la manguera.
5. Ver =Ajustes del carburadoro"
6. Limpio o reemptaza filtro de aire.
7. Contactar al Centro/Depto. de servlcio SEARS.
8. Contactar al Centro/Depto. de servicio SEARS.
1. Ver "Ajustes de{carburador."
2. Vet "Ajustes (]el carburador."
3. Contactar al Centro/Depto. de servicio SEARS.
1. Limpio o reemplaza fitb'o de aim°
2. La brocha y limpia de nuevo o roemplaza buj{a.
3. Ver "Ajustes del carburador."
4. Contactar al Centro/Depto. de servicio SEARS.
5. Contactar al Centro_epto. de servicio SEARS.
Hi i i
1. Limpiar o cambiar el filtm de aire.
2. Reabasteca de combustible con mezcla
de comustible correcta.
3. Ver "Ajustes del carburador."
,, r , ,,,,,,,,,,,JL,[,
1. Vea" Fueling Su UnidEI. "
2. Vean" Ajustes de Carburador."
13. Reemplace con cfavija correcto.
Contactar al Centro/Depto. de servicio SEARS.
, , H,'H,
Ver "Ajustes del carburador."
Contactar al Centro/Depto. de servicio SEARS.
3. Contactar ai Centro/Depto. de servicio SEARS.
i
1. Reduzca la velocidad de code.
2. Los restos limpiosde cuchilla.
& Contactar at Centro/Depto. de servfcio SEARS.
Si Ilegaran a ocunfr situaciones no expticadas en este manual, tener cuidado y actuar juiciosamente.
En caso de neces#ar ayuda, contactar at Centro/Departarnento de servicio SEARS o Ilamar a la
UNEA DtRECTA DE ATENCION AL CLIENTE al 1.800-235-5878.
_18-

Manual del
Operario
Modelo No.
358.795631
SI USTED NECESITA
REPARAClON, SERVICIO
O PIEZAS:
SERVICIO DE REPARACION
1-800-4-REPAIR
(1-800-473-7247)
ORDENES DE PIEZAS
1-800-FON-PART
(1-800-366-7278)
AL CLIENTE
1-800-235-5878
HORARIO (CST)
aS_bado 7 a.m. - 7
10 a.m. *7p.m.
CRRFTSMRNo
MOTOR DE 2 TIEMPOS 21cc
22 Pulgada Cuchilla
GAS PROTEGE GUARNECEDOR
Cada Protege Guarnecedor a gaso]ina tiene su propio m_mero de
modelo. El mimero de modelo de ta maquina se encuentra en la cal-
coman_apegada en la mdquina,
Todas las piezas aqui listadas pueden ordenarse en cualquier Centro
de Servicio yen la mayor/a de las tiendas minorfstas de Seam,
Roebuck and Co.
AL ORDENAR I_AS PIEZAS DE REPUESTO SIEMPRE tNCLUYA LA
S¿GUIENTE INFORMACION COMO SE MUESTRA EN ESTA USTA:
•PRODUCTO-"GASPROTEGE GUARNECEDOR"
•NUMERO DE MODELO - 358.795631
•NUMERO DE LAPIEZA
• DESCRIPCION DE LA PrEZA
Su mercaden'a SEARS tiene mds valor cuando usted considere que
Sears _ene unidades de servicio en todo el pals con personal de tdc-
nicos entrenados pot Sears... t6cnicos profesionales entrenados
espec_ficamenteen los productos Sears con las piezas, herramientas
yequipo para asegurar que cumpiamos con nuestm promesa a
usted,servimos Io que vendemos.
Sears, Roebuck and Co., Hoffman Estates, IL 60179 U.S.A.
