Craftsman 917378211 User Manual LAWN MOWER Manuals And Guides L0104104
CRAFTSMAN Walk Behind Lawnmower, Gas Manual L0104104 CRAFTSMAN Walk Behind Lawnmower, Gas Owner's Manual, CRAFTSMAN Walk Behind Lawnmower, Gas installation guides
User Manual: Craftsman 917378211 917378211 CRAFTSMAN LAWN MOWER - Manuals and Guides View the owners manual for your CRAFTSMAN LAWN MOWER #917378211. Home:Lawn & Garden Parts:Craftsman Parts:Craftsman LAWN MOWER Manual
Open the PDF directly: View PDF ![]() .
.
Page Count: 48

Owner's Manual
5.5 HORSEPOWER
21" MULTI-CUT
POWER PROPELLED
ROTARY LAWN MOWER
Model No.
917.378211
•Safety
•Assembly
•Operation
•Maintenance
•EspaSol
•Repair Parts
CAUTION:
Read and followall
Safety Rules and Instructions
before operatingthis equipment
Sears, Roebuck and Co., Hoffman Estates, IL 60179
Visit our Craftsman website: www,seam.com/craftsman

Warranty ................................................. 2 Product Specifications .......................... 12
Safety Rules ........................................ 2-4 Service and Adjustments................. 14-15
Assembly ................................................ 5 Storage ............................................ 15-16
Operation ........................................... 6-10 Troubleshooting .............................. 16-17
Maintenance Schedule ........................ 11 Repair Parts.......................................... 37
Maintenance .................................... 1%15 Parts Ordedng ........................ Back Cover
LIMITEDTWOYEAR WARRAN'[Y ON CRAFTSMAN POWER MOWER
For two years from date of purchase, when this Craftsman Lawn Mower is maintained,
lubricated, and tuned up according to the operating and maintenance instructionsin
the owner's manual, Sears will repair free of charge any defect in material or workman-
ship.
If this Craftsman Lawn Mower is used for commercial or rental purposes, this warranty
applies for only 90 days from the date of purchase.
This Warranty does not cover:
• Expendable items which become worn dudng normal use, such as rotary mower
blades, blade adapters, belts, air cleaners and spark plug.
• Repairs necessary because of operator abuse or negligence, including bent
crankshaftsand the failure to maintain the equipment according to the instructions
contained in the owner's manual.
Warranty service is available by returning the Craftsman power mower to the nearest
Sears Service Center/Department in the United States. This warranty applies only
while this product is in use inthe United States.
This Warranty gives you specific legal dghts, and you may also have other rights which
vary from state to state.
Sears, Roebuck and Co., D/817 WA, Hoffman Estates, Illinois 60179
IMPORTANT: This cutting machine is capable of amputating hands and feet and
throwingobjects. Failure to observe the following safety instructionscould resultin
serious injury or death
I, GENERAL OPERATION
• Read, understand, and follow all
instructionson the machine and in the
manual(s) before starting Be thor-
oughly familiar with the controls and
the proper use of the machine before
starting.
•Do not put hands or feet near or under
rotating parts. Keep clear of the
discharge opening at all times.
Only allow responsible individuals,
who are familiar with the instructions,to
operate the machine.
•Clear the area of objects such as
rocks, toys, wire, bones, sticks, etc.,
which could be picked up and thrown
•Be sure the area is clear of other
people before mowing Stop machine if
anyone enters the area.
• Do not operate the mower when
barefoot or wearing open sandals.
Always wear substantial foot wear.
•Do not pull mower backwards unless
absolutely necessary. Always look
down and behind before and while
moving backwards.
•Do not operate the mower without
proper guards, plates, grass catcher or
other safety protective devices in place.
•See manufacturer's instructionsfor
proper operation and installation of
accassodes. Only use accessodes
approved by the manufacturer.
by the blade. 2

• Stop the blade(s) when crossing gravel
drives, walks, or roads.
•Stop the engine (motor) whenever you
leave the equipment, before cleaning
the mower or uncloggingthe chute.
•Shut the engine (motor) off and wait
until the blade comes to complete stop
before removing grass catcher.
• Mow only in daylight or good artificial
light.
•Do not operate the machine while
under the influence of alcohol or drugs.
•Never operate machine in wet grass.
Always be sure of your footing: keep a
firm hold on the handle and walk; never
run.
• Disengage the self-propelled mecha-
nism or drive clutch on mowers so
equipped before startingthe engine
(motor).
•If the equipment should start to vibrate
abnormally, stop the engine (motor)
and check immediately for the cause.
Vibration is generally a waming of
trouble.
• Always wear safety goggles or safety
glasses with side shields when
operating mower.
I1.SLOPE OPERATION
Slopes are a major factor related to slip
and fall accidents which can result in
severe injury.All slopes require extra
caution. If you feel uneasy on a slope, do
not mow it.
DO:
•Mow across the face of slopes: never
up and down. Exercise extreme caution
when changing direction on slopes.
•Remove obstacles such as rocks, tree
limbs,etc.
•Watch for holes, ruts, or bumps. Tall
grass can hide obstacles.
DO NOT:
• Do not trim near drop-offs, ditches or
embankments. The operator could lose
footing or balance.
•Do not trim excessively steep slopes.
•Do not mow on wet grass. Reduced
footing could cause slipping.
II1. CHILDREN
Tragic accidents can occur ff the operator
is not alert to the presence of children.
Children are often attracted to the
machine and the mowing activity. Never
assume that children will remain where
you lastsaw them.
•Keep children out of the tdmming area
and under the watchful care of another
responsible adult.
•Be alert and turn machine off if children
enter the area.
• Before and while walking backwards,
look behind and down for small
children.
• Never allow children to operate the
machine.
• Use extra care when approaching blind
comers, shrubs, trees, or other objects
that may obscure vision.
IV. SERVICE
•Use extra care in handling gasoline
and other fuels. They are flammable
and vapors are explosive.
-Use only an approved container.
- Never remove gas cap or add fuel
with the engine running. Allow
engine to cool before refueling.
Do not smoke.
- Never refuel the machine indoors.
- Never store the machine or fuel
container inside where there is an
open flame, such as a water heater.
•Never run a machine inside a closed
area.
•Never make adjustments or repairs with
the engine (motor) running. Disconnect
the spark plug wire, and keep the wire
away from the plug to prevent acciden-
tal starting.
• Keep nuts and bolts, especially blade
attachment bolts, tight and keep
equipment in good condition.
• Never tamper with safety devices.
Check their proper operation regulady.
• Keep machine free of grass, leaves, or
other debds build-up. Clean oil or fuel
spillage. Allow machine to cool before
storing.
•Stop and inspect the equipment ifyou
stdke an object. Repair, if necessary,
before restarting.
•Never attempt to make wheel height
adjustments while the engine (motor) is
running.
• Grass catcher components are subject
to wear, damage, and deterioration,
which could expose moving parts or
allow objects to be thrown. Frequently
check components and replace with
manufacturer's recommended parts,
when necessary.
•Mower blades are sharp and can cut.
Wrap the blade(s) or wear gloves, and
use extra caution when sewicing them.
• Do not change the engine governor
setting or overspeed the engine.
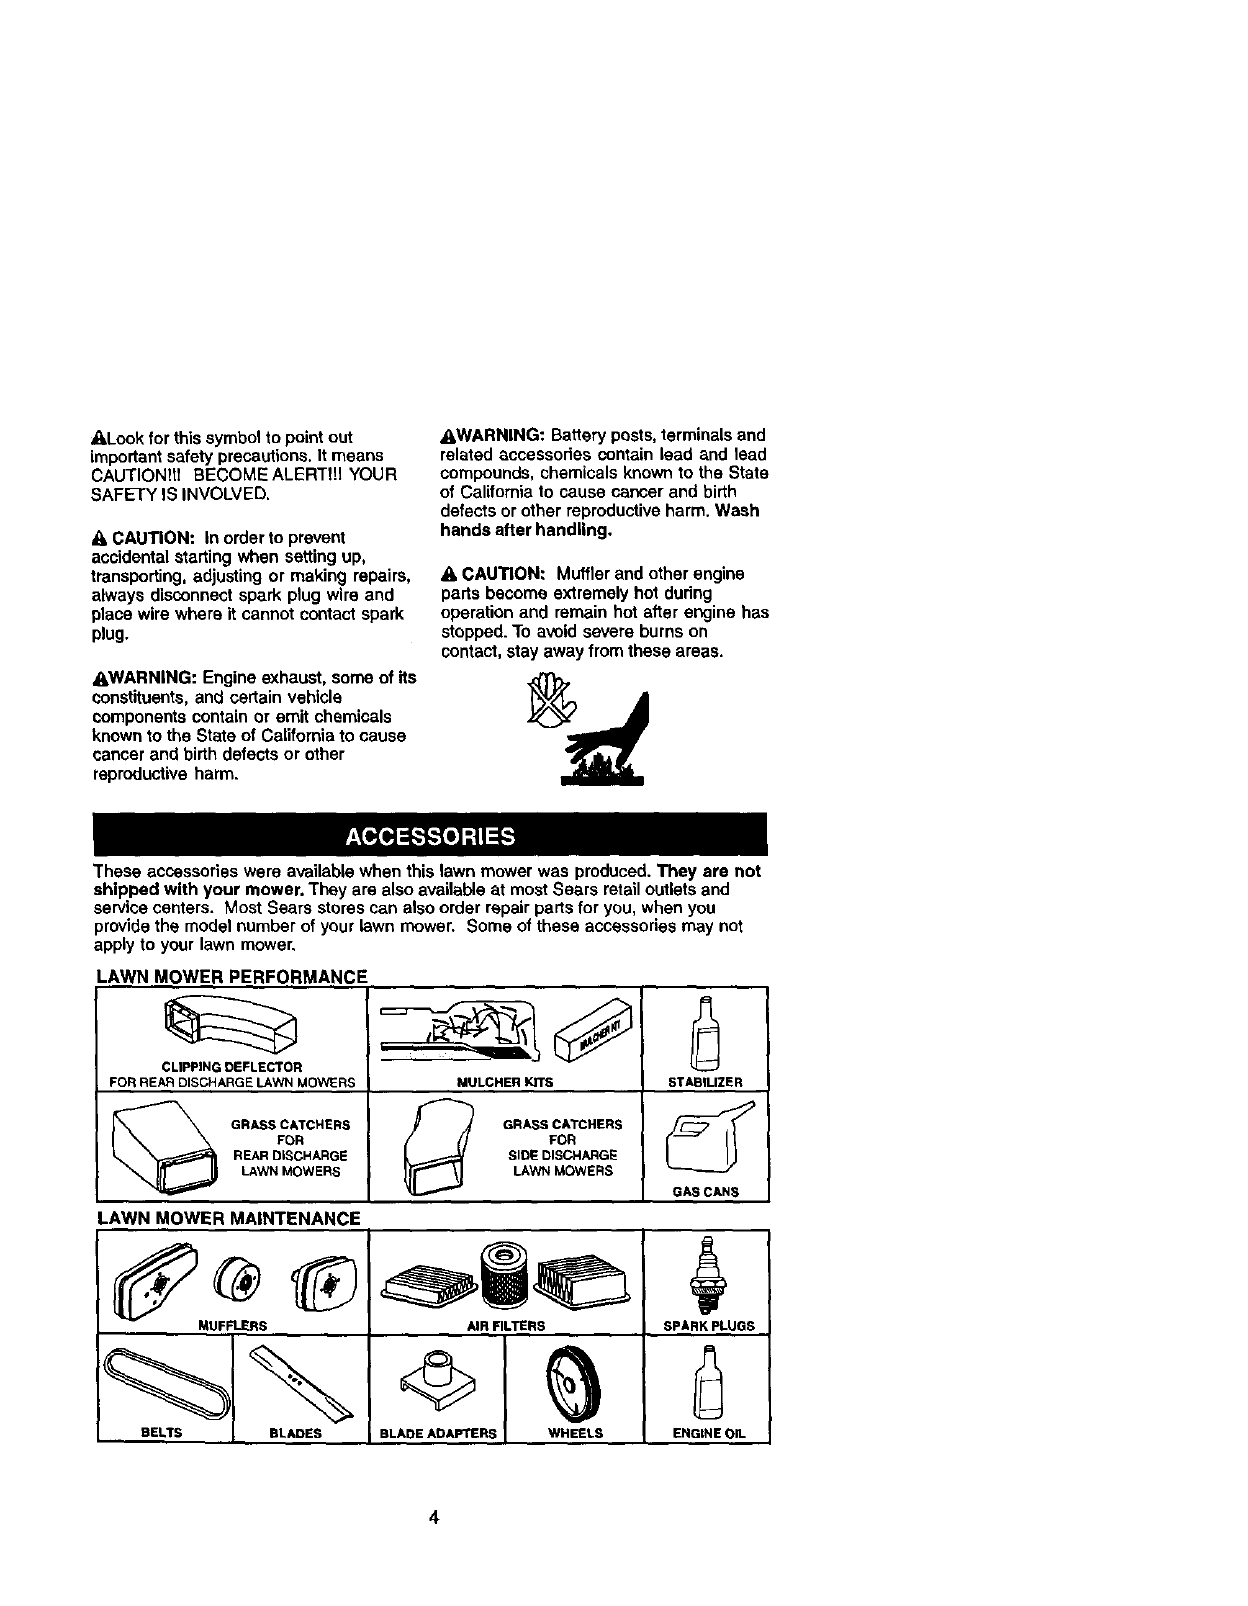
ALookforthissymboltopointout
importantsafetyprecautions. It means
CAUTIONltl BECOMEALERTt!I YOUR
SAFETY IS INVOLVED.
,_ CAUTION: in order to prevent
accidental starting when setting up,
transporting, adjusting or making repairs,
always disconnect spark plug wire and
place wire where it cannot contact spark
plug.
_I,WARNING: Engine exhaust, some of its
constituents,and certain vehicle
components contain or emit chemicals
known to the State of California to cause
cancer and birth defects or other
reproductive harm.
,&WARNING: Battery posts, terminals and
related accessories contain lead and lead
compounds, chemicals known to the State
of Calitomia to cause cancer and birth
defects or other reproductive harm. Wash
hands after handling.
,& CAUTION: Muffler and other engine
parts become extremely hot during
operation and remain hot after engine has
stopped. To avoid severe burns on
contact, stay away from these areas.
These accessories were available when this lawn mower was produced. They are not
shipped with your mower. They are also available at most Sears retailoutlets and
service centers. Most Sears stores can also order repair parts for you, when you
providethe model number of your lawn mower. Some of these accessories may not
apply to your lawn mower.
LAWN MOWER PERFORMANCE
CUPPING DEFLECTOR
FOR REAR DISCHARGE LAWN MOVERS MULCHER KITS
GRASS CATCHERS GRASS CATCHERS
FOR FOR
REAR DISCHARGE SIDE DISCHARGE
LAWN MOWERS LAWN MOWERS
LAWN MOWER MAINTENANCE
MUFFLERS AIR RLTERS SPARK PLUGS
BELTS BLADES BLADE ADAPTERS WHEELS ENGINE OIL
STABILIZER
GAS CANS
4
Read these instructions and this manual
in its entirety before you attempt to
assemble or operate your new lawn
mower.
IMPORTANT: This lawn mower is
shipped WITHOUT OIL OR GASOLINE in
the engine.
Your new lawn mower has been as-
sembled at the factory with the exception
of those parts left unassembled for
shipping purposes. All patts such as nuts,
washers, bolts, etc., necessary to com-
plete the assembly have been placed in
the parts bag. To ensure safe and proper
operation of your lawn mower, all ports
and hardware you assemble must be
tightened securely. Use the correct tools
as necessary to ensure proper tightness.
TO REMOVE LAWN MOWER FROM
CARTON
1. Remove loose parts included with
mower.
2. Cut down two end comers of carton
and lay end panel down flat.
3. Remove all packing marshals except
padding between upper and lower
handle and padding holding operator
presence control bar to upper handle.
4. Roll lawn mower out of carton and
check carton thorougly for additional
loose parts.
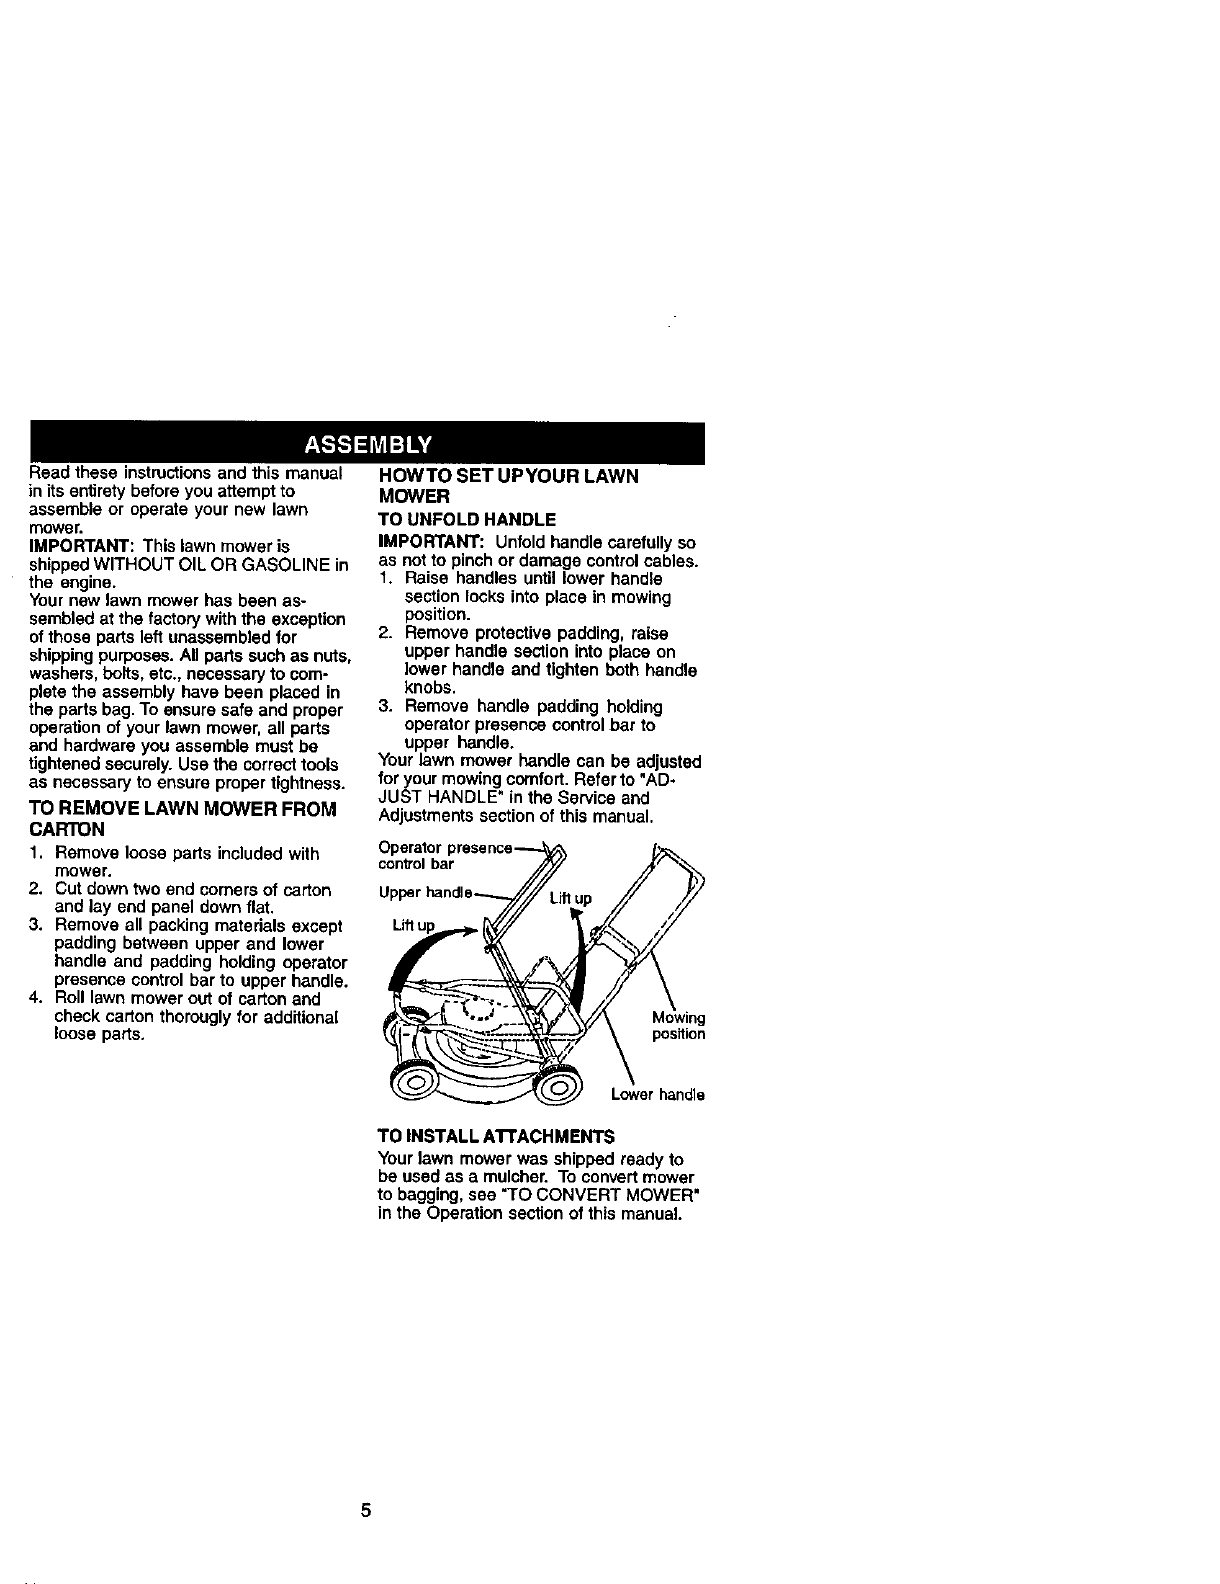
HOWTO SET UPYOUR LAWN
MOWER
TO UNFOLD HANDLE
IMPORTANT: Unfold handle carefully so
as not to pinch or damage controlcables.
I. Raisehandles until lowerhandle
section locks into place in mowing
position.
2. Remove protective podding, raise
upper handle section into place on
lower handle and tighten both handle
knobs.
3. Remove handle padding holding
operator presence control bar to
upper handle.
Your lawn mower handle can be adjusted
for your mowing comfort. Refer to "AD-
JUST HANDLE" in the Service and
Adjustments section of this manual.
control bar
Upper
Lift u
position
Lower handle
TO INSTALL AI"FACHMENTS
Your lawn mower was shipped ready to
be used as a mulcher. To convert mower
to bagging, see "TO CONVERT MOWER"
in the Operation section of this manual.
5
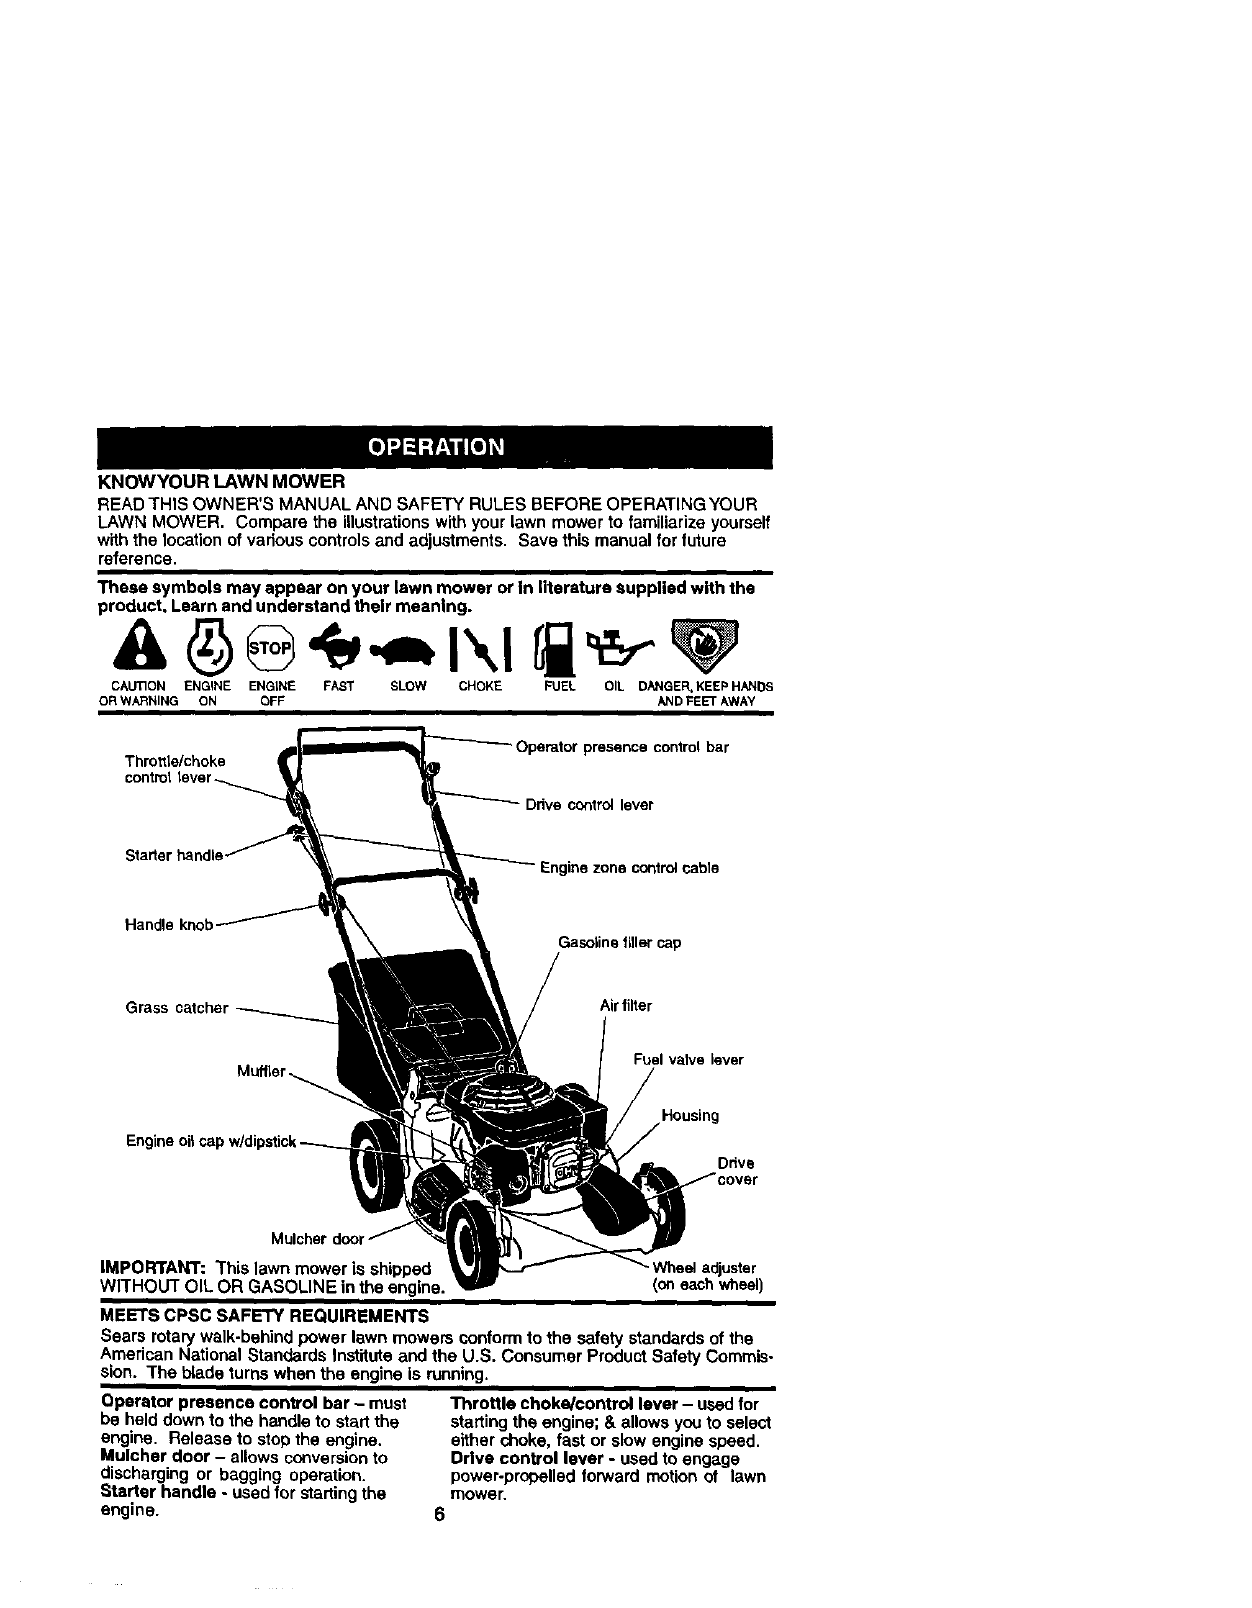
KNOWYOUR LAWN MOWER
READ THIS OWNER'S MANUAL AND SAFETY RULES BEFORE OPERATING YOUR
LAWN MOWER. Compare the illustrationswith your lawn mower to familiarize yourself
with the location of various controls and adjustments. Save this manual for future
reference.
These symbols may appear on your lawn mower or In literature supplied with the
product. Learn and understand their meaning.
CAUT1ON ENGINE ENGLNE FAST SLOW CHOKE FUEL OIL DANGER, KEEPHANDS
OR WARNING ON OFF AND FEET AWAY
ThrottLe/choke -Operator presence control bar
Ddve control lever
Starter handle zone control cable
Handle knob Gasoline filler cap
Air filter
Fuel valve lever
Housing
Drive
Mulcher door
IMPORTANT: This lawn mower is shipped Wheel adjuster
WITHOUT OIL OR GASOLINE in the engine. (on eachwheel)
MEETS CPSC SAFETY REQUIREMENTS
Sears rotary walk-behind power lawn mowers conform to the safety standards of the
American National Standards Institute and the U.S. Consumer Product Safety Commis-
sion, The blade turns when the engine is running.
Operator presence control bar -must
be held down to the handle to start the
engine. Release to stop the engine.
Mulcher door - allows conversion to
discharging or bagging operation.
Starter handle - used for starting the
engine.
Throttle choke/control lever - used for
starting the engine; & allows you to select
either choke, fast or slow engine speed.
Drive control lever -used to engage
power-propelled forward motion of lawn
mower.
6
Theoperationofanylawn
mowercanresultinforeign
objectsthrown into the
eyes, which can result in
severe eye damage.
Always wear safety glasses or eye
shields while operating your lawn mower
or performing any adjustments or repairs.
We recommend a wide vision safety
mask over spectacles or standard safety
glasses.
HOWTO USEYOUR LAWN MOWER
ENGINE SPEED
The engine speed is controlled by a
throttle control located on the side of the
upper handle. Choke position is for
starting a cold engine and fast position is
for normal cutting, trimming, and better
grass bagging. Slow positionis for light
cutting, trimming and fuel economy.
Slow
Fast ..
s_
ss....l \
Choke/_ t, I// II
III %" I II
/(,,
,,-;, /
ENGINE ZONE CONTROL
_,CAUTION: Federal regulations require
an engine controlto be installed on this
lawn mower in order to minimize the dsk
of blade contact injury.Do not under any
circumstances attempt to defeat the
function of the operator control.The blade
tums when the engine is running.
•Your lawn mower is equipped with an
operator presence control bar which
requires the operator to be positioned
behind the lawn mower handle to start
and operate the lawn mower.
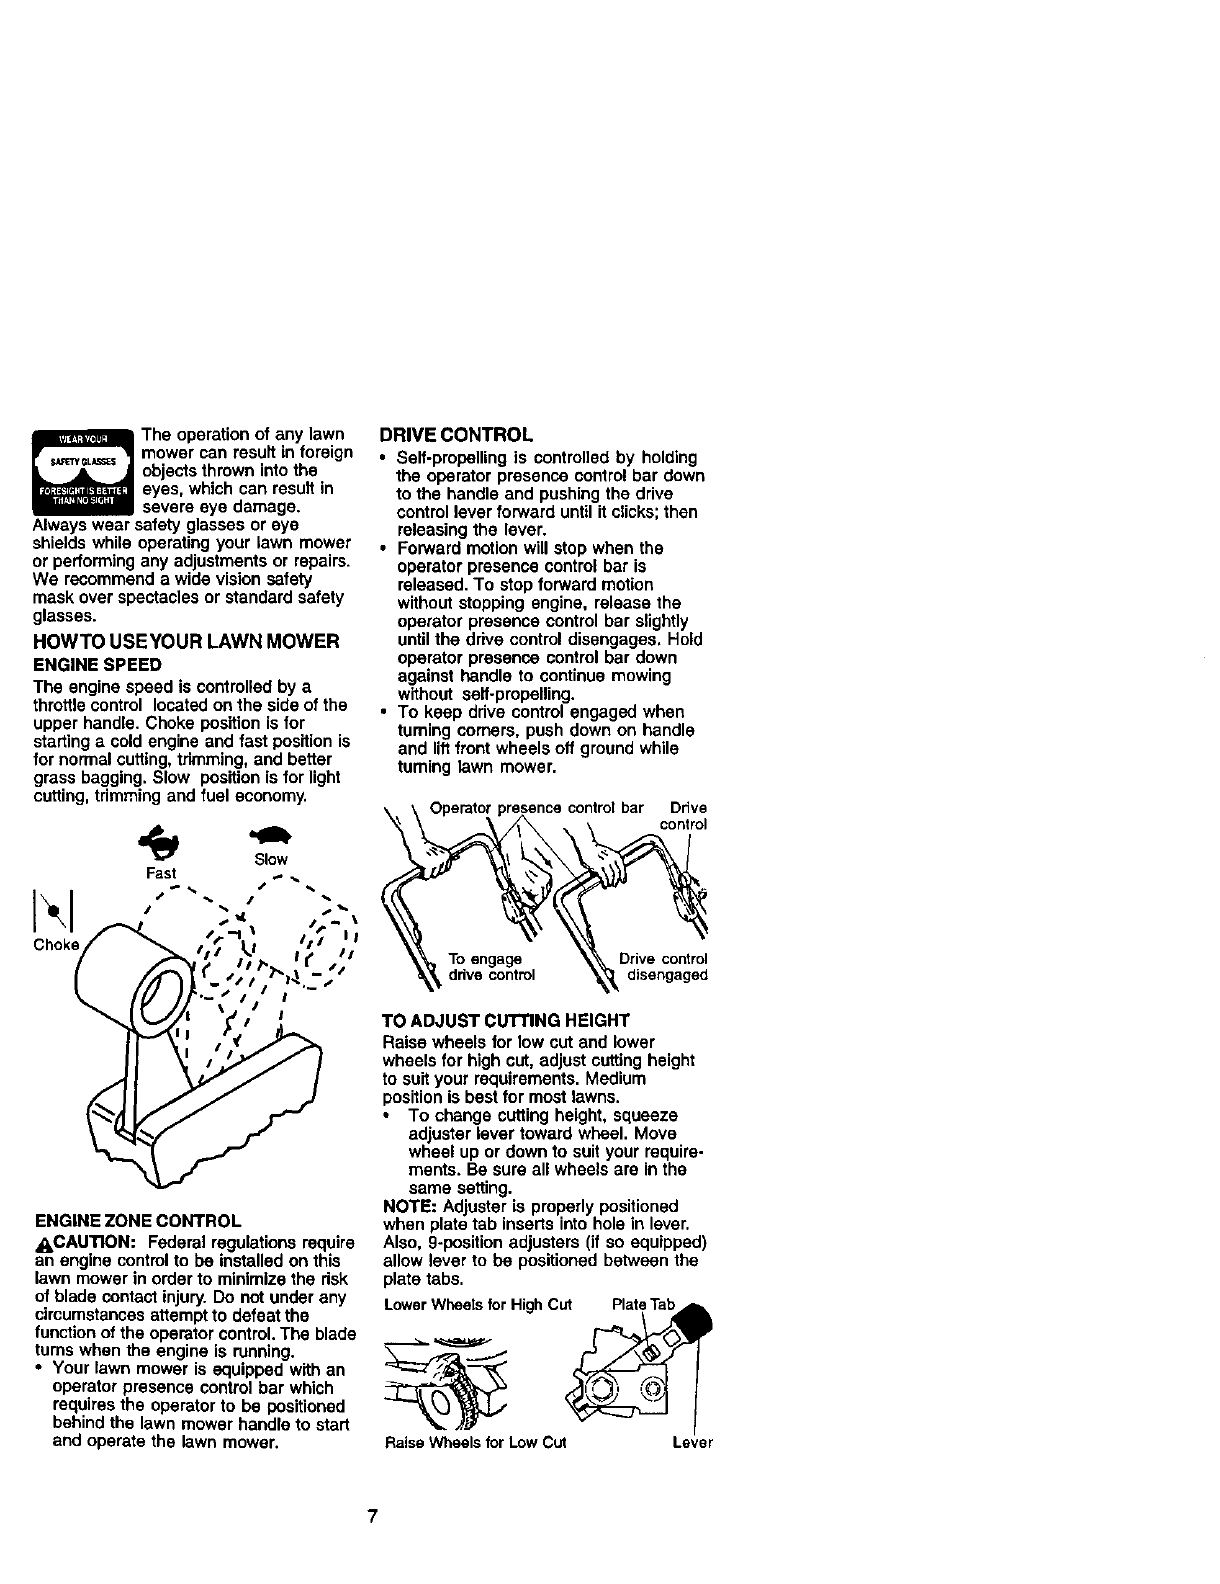
DRIVE CONTROL
• Self-propelling is controlled by holding
the operator presence control bar down
to the handle and pushingthe drive
control lever forward until it clicks;then
releasing the lever.
•Forward motion will stop when the
operator presence control bar is
released. To stop forward motion
without stopping engine, release the
operator presence control bar slightly
untilthe drive control disengages. Hold
operator presence control bar down
against handle to continue mowing
without serf-propelling.
•To keep ddve control engaged when
turning corners, push down on handle
and liftfront wheels off ground while
turning lawn mower.
\ \ Operatorpresencecontrolbar Drive
\control
TO ADJUST CUTTING HEIGHT
Raise wheels for low cut and lower
wheels for high cut, adjust cutting height
to suit your requirements. Medium
positionis best for most lawns.
•To change cutting height, squeeze
adjuster lever toward wheel. Move
wheel up or down to suit your require-
ments. Be sure all wheels are in the
same setting.
NOTE: Adjuster is properly positioned
when plate tab inserts into hole in lever.
Also, 9-position adjusters (if so equipped)
allow lever to be positioned between the
plate tabs.
LowerWheelsfor HighCut Plat_Ta_
RaiseWheelsfor Low Cut Lever
7
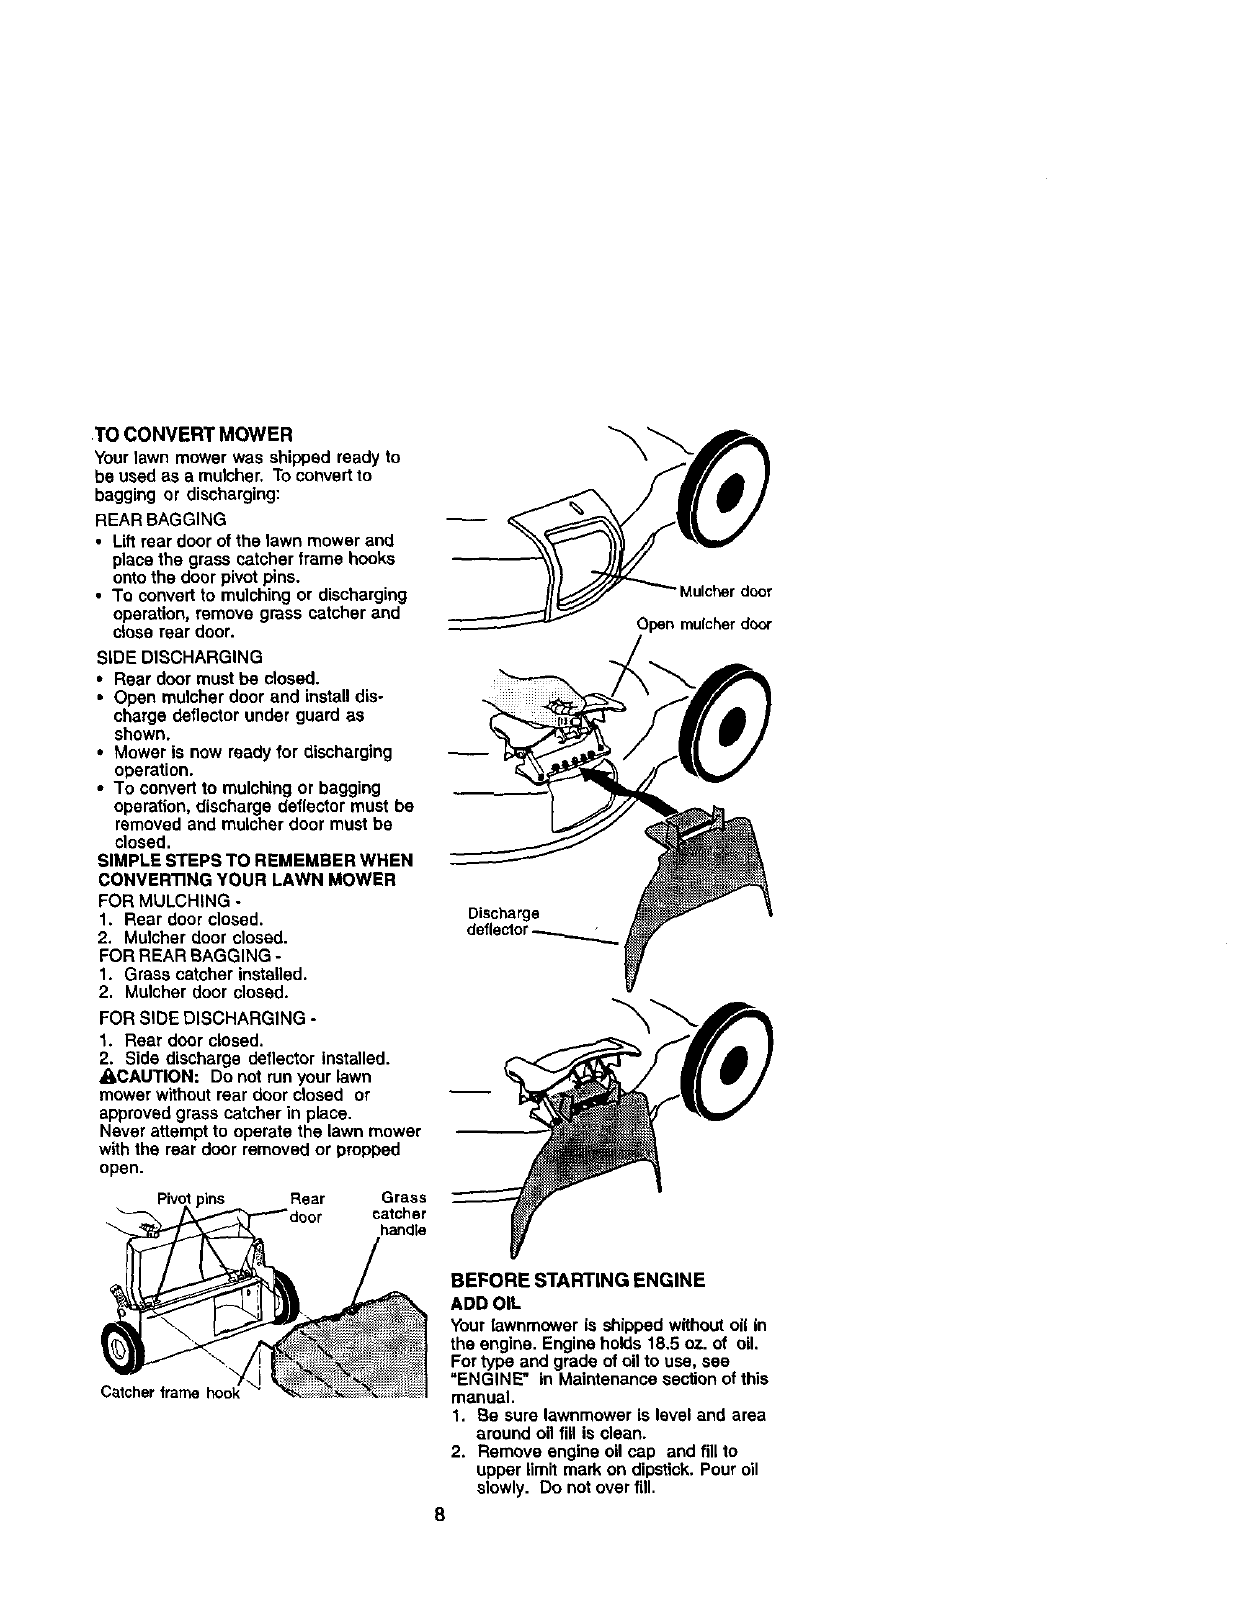
.TO CONVERT MOWER
Yourlawn mower was shipped ready to
be used as amulcher. Toconvert to
bagging or discharging:
REAR BAGGING
•Lif_rear door of the lawn mower and
place the grass catcher frame books
onto the door pivot pins.
•To convert to mulching or discharging
operation, remove grass catcher and
close rear door.
SIDE DISCHARGING
• Rear door must be closed.
• Open mulcher door and install dis-
charge deflector under guard as
shown.
•Mower is now ready for discharging
operation.
• To convert to mulching or bagging
operation, discharge deflector must be
removed and mulcher door must be
closed.
SIMPLE STEPS TO REMEMBER WHEN
CONVERTING YOUR LAWN MOWER
FOR MULCHING -
1. Rear door closed.
2. Mulcher door closed.
FOR REAR BAGGING -
1. Grass catcher installed.
2. Mulcher door closed.
FOR SIDE DISCHARGING -
1. Rear door closed.
2. Side discharge deflector installed.
ACAUTION: Do not run your lawn
mower without rear door closed or
approved grass catcher in place.
Never attempt to operate the lawn mower
with the rear door removed or propped
open.
Pivot "Rear Grass
catcher
Catcher frame hook
Open mulcher door
Discharge
BEFORE STARTING ENGINE
ADD OIL
Your lawnmowar is shipped without oil in
the engine. Engine holds 18.5 oz. of oil
For type and grade of oil to use, sea
"ENGINE" in Maintenance section of this
manual.
1. Be sure lawnmower is level and area
around oil fill is clean.
2. Remove engine oil cap and fill to
upper limit mark on dipstick. Pour oil
slowly. Do not over fill.
8
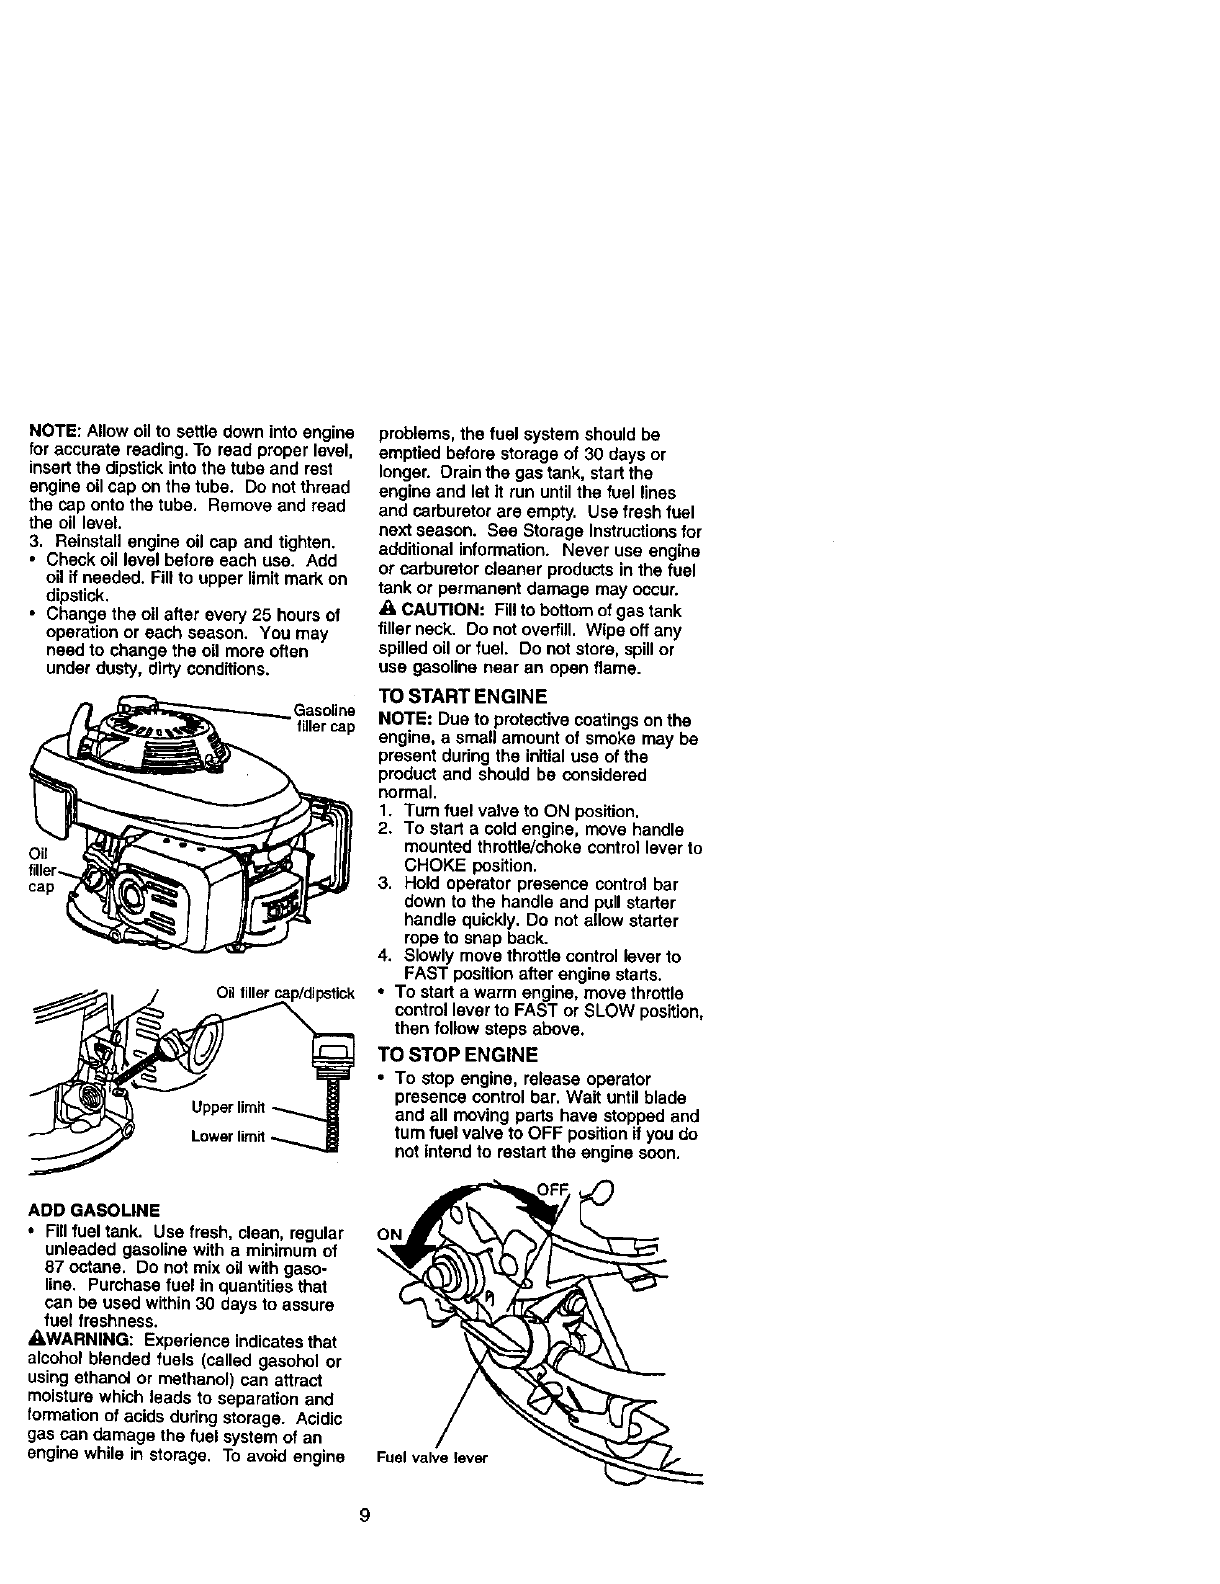
NOTE:Allowoiltosettledownintoengine
for accurate reading. To read proper level,
insert the dipstickinto the tube and rest
engine oil cap on the tube. Do not thread
the cap onto the tube. Remove and read
the oil level.
3. Reinstall engine oil cap and tighten.
• Check oil level before each use. Add
oil if needed. Fill to upper limit mark on
dipstick.
•Change the oil after every 25 hours of
operation or each season. You may
need to change the oil more often
under dusty, dirty conditions.
Gasoline
filler cap
cap
problems, the fuel system should be
emptied before storage of 30 days or
longer. Drainthe gas tank, start the
engine and let it run until the fuel lines
and carburetor are empty. Use fresh fuel
next season. See Storage Instructionsfor
additional information. Never use engine
or carburetor cleaner products in the fuel
tank or permanent damage may occur.
ACAUTION: Fill to bottom of gas tank
filler neck. 0o not overfill. Wipe off any
spilled oil or fuel. Do not store, spillor
use gasoline near an open flame.
TO START ENGINE
NOTE: Due to protective coatings on the
engine, a small amount of smoke may be
present duringthe Initialuse of the
product and should be considered
normal.
1. Turn fuel valve to ON position.
2. To start acold engine, move handle
mounted throttle/choke control lever to
CHOKE position.
3. Hold operator presence control bar
down to the handle and pullstarter
handle quickly. Do not allow starter
rope to snap back.
4. Slowly move throttle control lever to
FAST position alter engine starts.
•To start a warm engine, move throttle
controllever to FAST or SLOW position,
then follow steps above.
TO STOP ENGINE
•To stop engine, release operator
presence control bar. Wait until blade
and all moving parts have stopped and
turn fuel valve to OFF positionif you do
not intend to restart the engine soon.
ADD GASOLINE
•Fill fuel tank. Use fresh, clean, regular
unleaded gasoline with a mir_imum of
87 octane. Do not mix oil with gaso-
line. Purchase fuel in quantities that
can be used within 30 days to assure
fuel freshness.
AWARNING: Experience indicates that
alcohol blended fuels (called gasahol or
using ethanol or methanol) can attract
moisture which leads to separation and
formation of acids during storage. Acidic
gas can damage the fuel system of an
engine while in storage, To avoid engine
ON
Fuel valve lever
9
MOWINGTIPS
•Under certain conditions, such as very
tall grass, it may be necessary to raise
the height of cut to reduce pushing
effort and to keep from overloading the
engine and leaving clumps of grass
clippings. It may also be necessary to
reduce ground speed and/or run the
lawn mower over the area a second
time.
•For extremely heavy cutting, reduce the
width of cut by overlapping previously
cut path and mow slowly.
•For better grass bagging and most
cutting conditions, the engine speed
should be set in the fast position.
• Pores in cloth grass catchers can
become filted with dirt and dust with
use and catchers will collect less grass.
To prevent this, regulady hose catcher
off with water and let dry before using.
• Keep top of engine around starter clear
and clean of grass clippings and chaff.
This will help engine air flow and
extend engine life.
MULCHING MOWING TIPS
IMPORTANT: For best performance,
keep mower housing free of built-up
grass and trash. See "CLEANING" in the
Maintenance section of this manual.
•The special mulching blade will recut
the grass clippings many times and
reduce them in size so that as they fall
onto the lawn they will disperse into the
grass and not be noticed. Also, the
mulched grass will biodegrade quickly
to provide nutrients for the lawn.
Always mulch with your highest engine
(blade) speed as this will provide the
best recottingaction of the blades.
•Avoid cutting your lawn when it is wet.
Wet grass tends to form clumps and
interferes with the mulching action.
The best time to mow your lawn is the
early afternoon. At this time the grass
has dded and the newly cut area will
not be exposed to the direct sun.
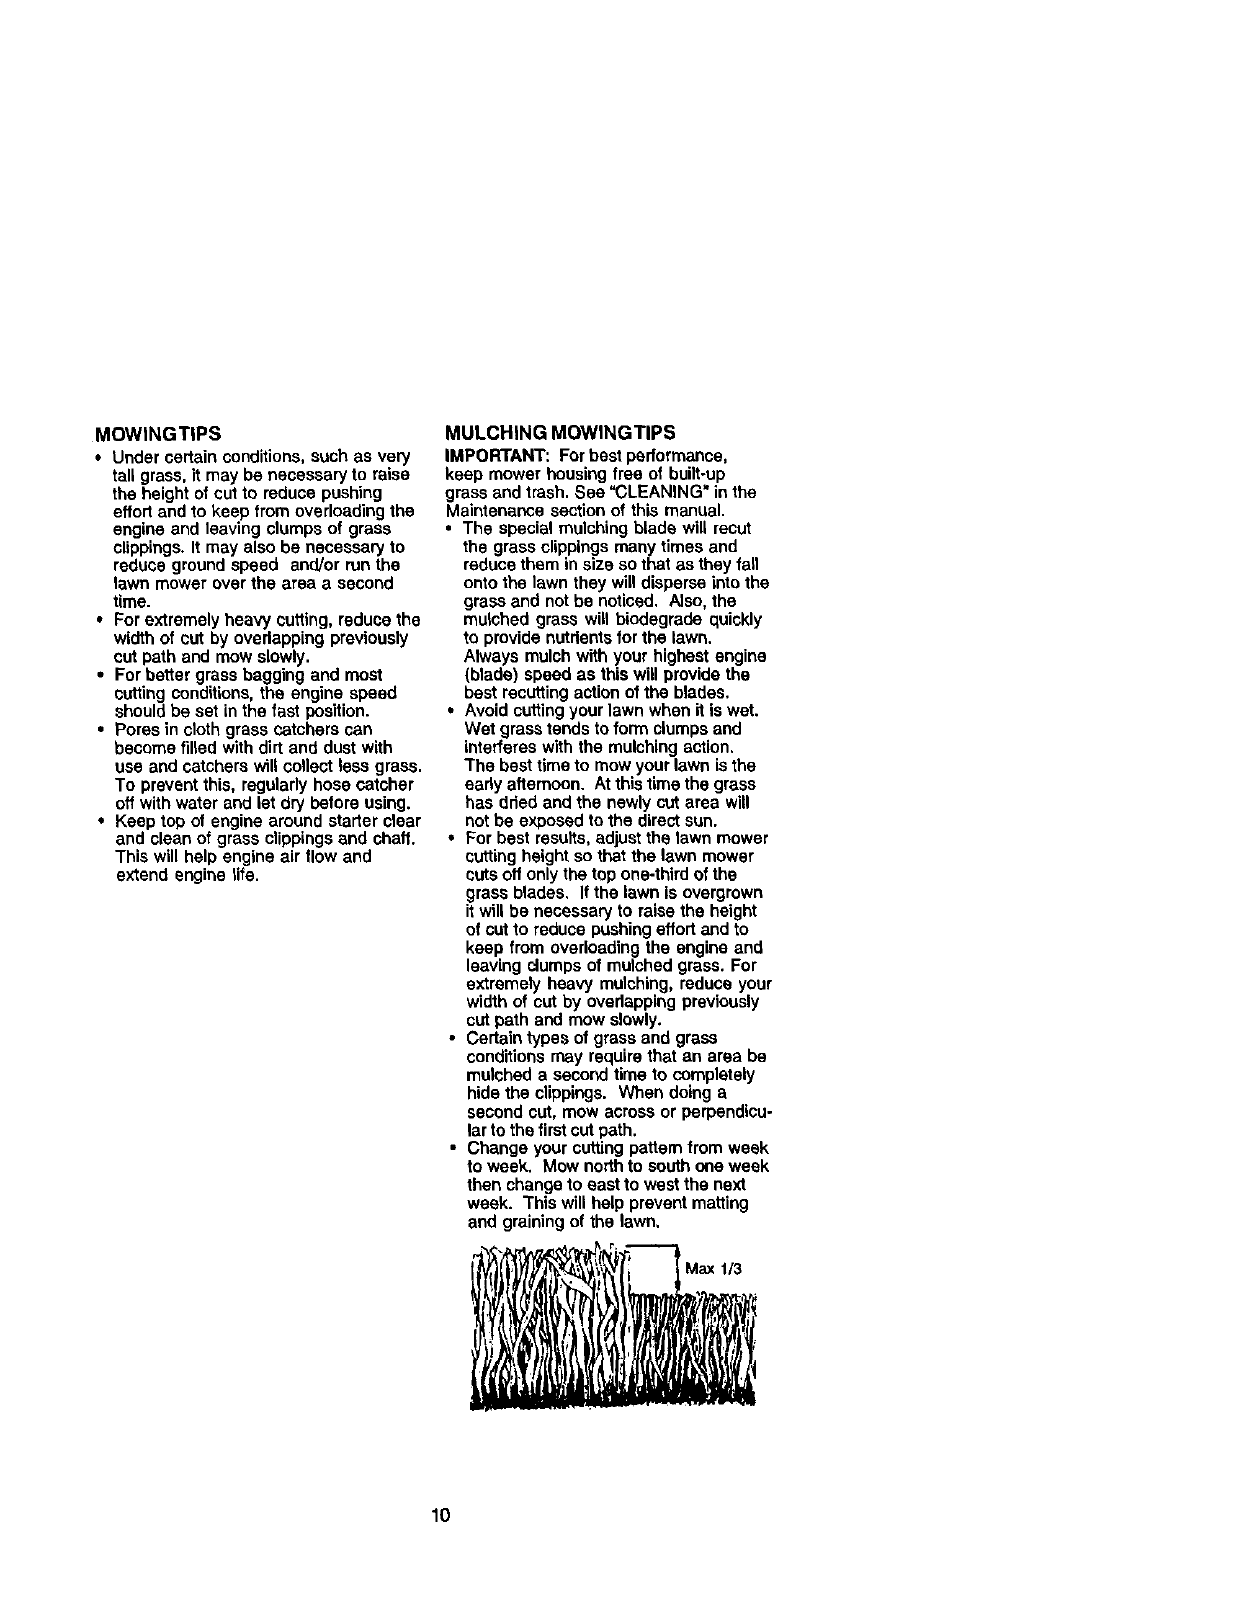
•For best results, adjust the lawn mower
cutting height so that the lawn mower
cuts off only the top one-third of the
grass blades, If the lawn is overgrown
it will be necessary to raise the height
of cut to reduce pushingeffort and to
keep from overloading the engine and
leaving clumps of mulched grass. For
extremely heavy mulching, reduce your
width of cut by overlapping previously
cut path and mow slowly.
•Certain types of grass and grass
conditions may require that an area be
mulched a second time to completely
hide the clippings. When doing a
second cut, mow across or perpendicu-
lar to the first cut path.
•Change your cutting pattern from week
to week. Mow north to south one week
then change to east to west the next
week. This will help prevent matting
and graining of the lawn,
10
AS YOU COMPLETE /__'_0_ .....
Check for Loose Fasteners _I_
Clean/Inspect Grass Catcher
IIfEquipped) 1#/_ _,/
Clean Lawn Mower I,/ t/
_W! Clean Under Drive Cover
Power-Propefled Mowers)
Check drive belt/ ulleys
RE (Power_propelle_PMowers) t/
Check/Sharpen/Replace Bla_ IV/:l
Lubrication Chart _ = _,/
Clean Battery/Rachar
Electric Start Mowe_ e I_411_4 i
E Check Engine Oil Level ¥/
_Chan_e Engine Oil t/l_
Clean A_r Filter ll/ =
]_ Inspect Muffler
Clean or Replace Spark Plug
E Replace Air Filter Paper Cart ddge t/2
1 - Change moreoften when operatingund_ a heavybad or mhigh ambient tsmperaturN.
2-Service more c41enwheatoperatinglit dlrlyor dustyconditions_
3. Replace _ades moreoften whe_ wowlr_ tnsandy sc_l.
4-Chsrge 48 hcurs at end c4season.
GENERAL RECOMMENDATIONS
The warranty on this lawn mower does
not cover items that have been subjected
to operator abuse or negligence. To
receive full value from the warranty,
operator must maintain mower as
instructed in this manual.
Some adjustments will need to be made
periodically to properly maintain your
unit.
All adjustments in the Service and
Adjustments section of this manual
should be checked at least once each
season.
•Once a year, replace the spark plug,
clean or replace air filter element and
check blade for wear. A new spark
plug and clean/new air filter element
assure proper air-fuel mixture and help
your engine run better and last longer.
• Follow the maintenance schedule in
this manual.
BEFORE EACH USE
1. Check engine oil level.
2, Check for loose fasteners.
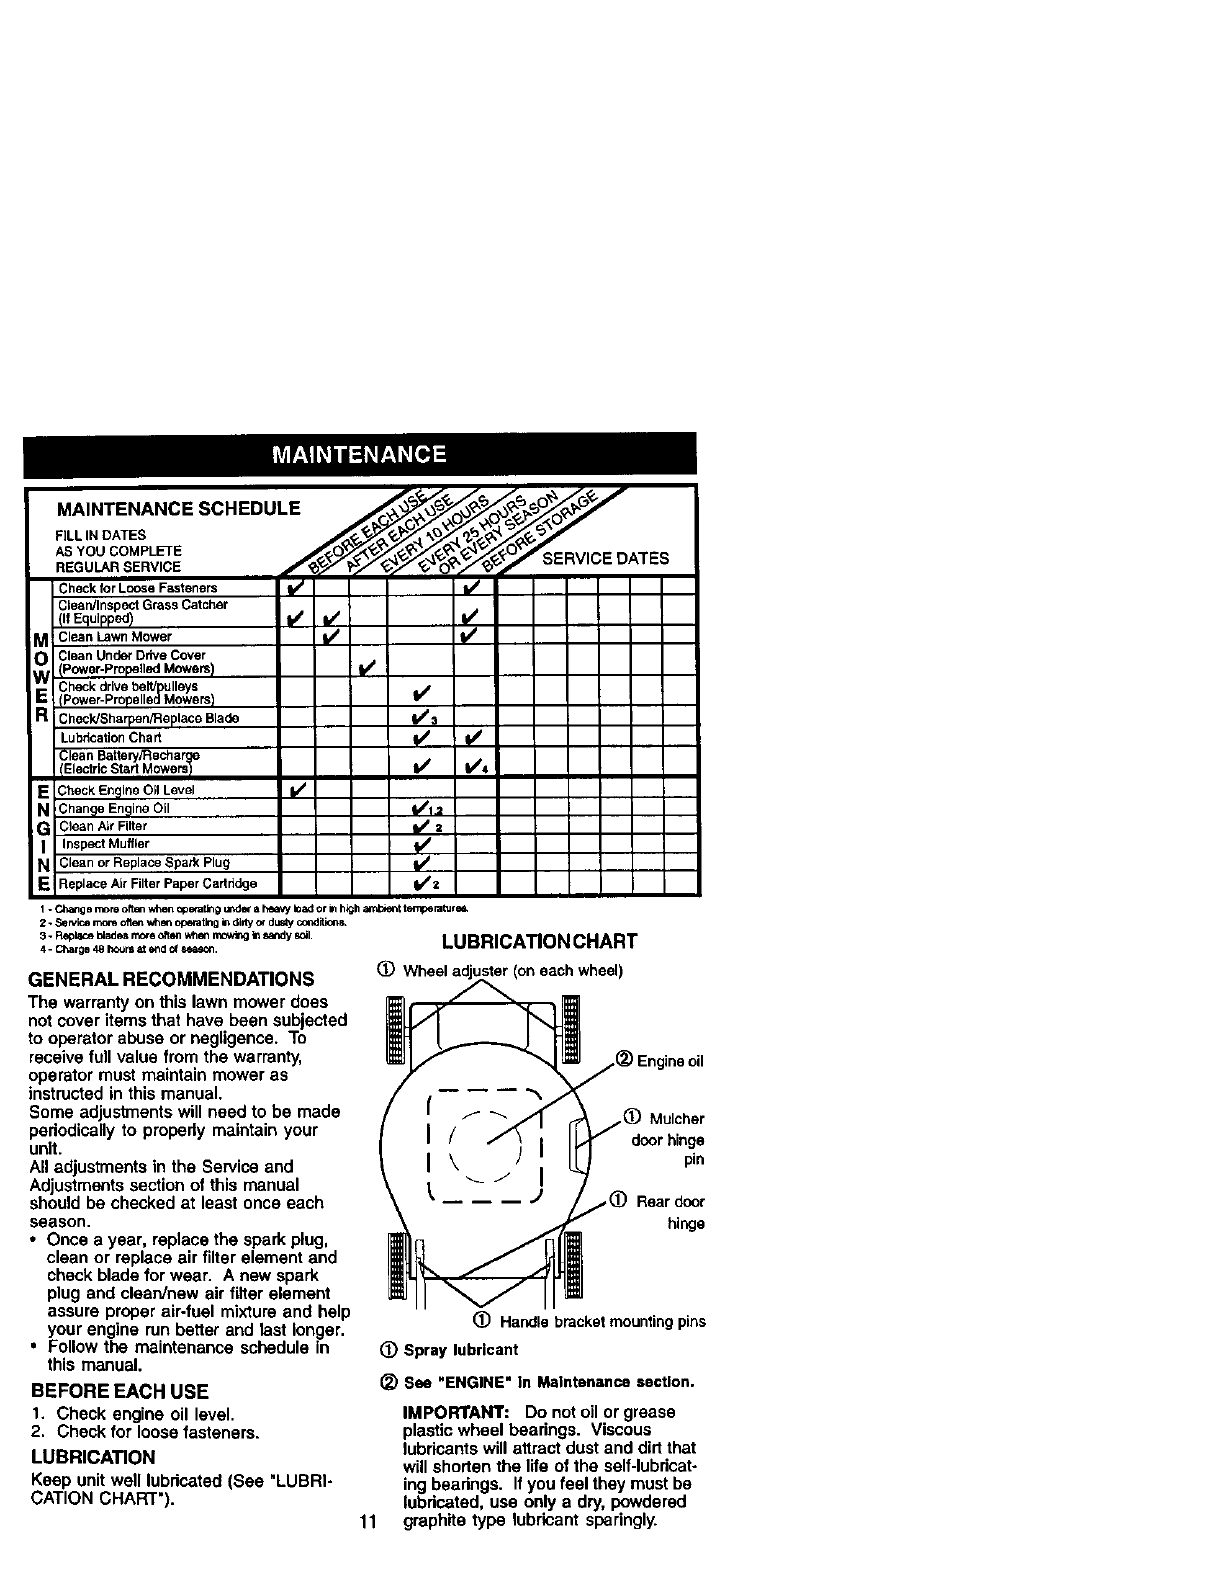
LUBRICATION
Keep unit well lubricated (See 'LUBRI-
CATION CHART").
LUBRICA_ONCHART
ne oil
(_) Mulcher
door hinge
pin
-- -- -- JRear door
hinge
(_) Handle bracket mounting pins
(_) Spray lubricant
(_) See "ENGINE" In Maintenance section.
11
IMPORTANT: Do not oil or grease
plastic wheel bearings. Viscous
lubricants will attract dust and dirt that
will shorten the llfe of the self-lubricat-
ing bearings. If you feel they must be
lubricated, use only a dry, powdered
graphite type lubricant sparingly.
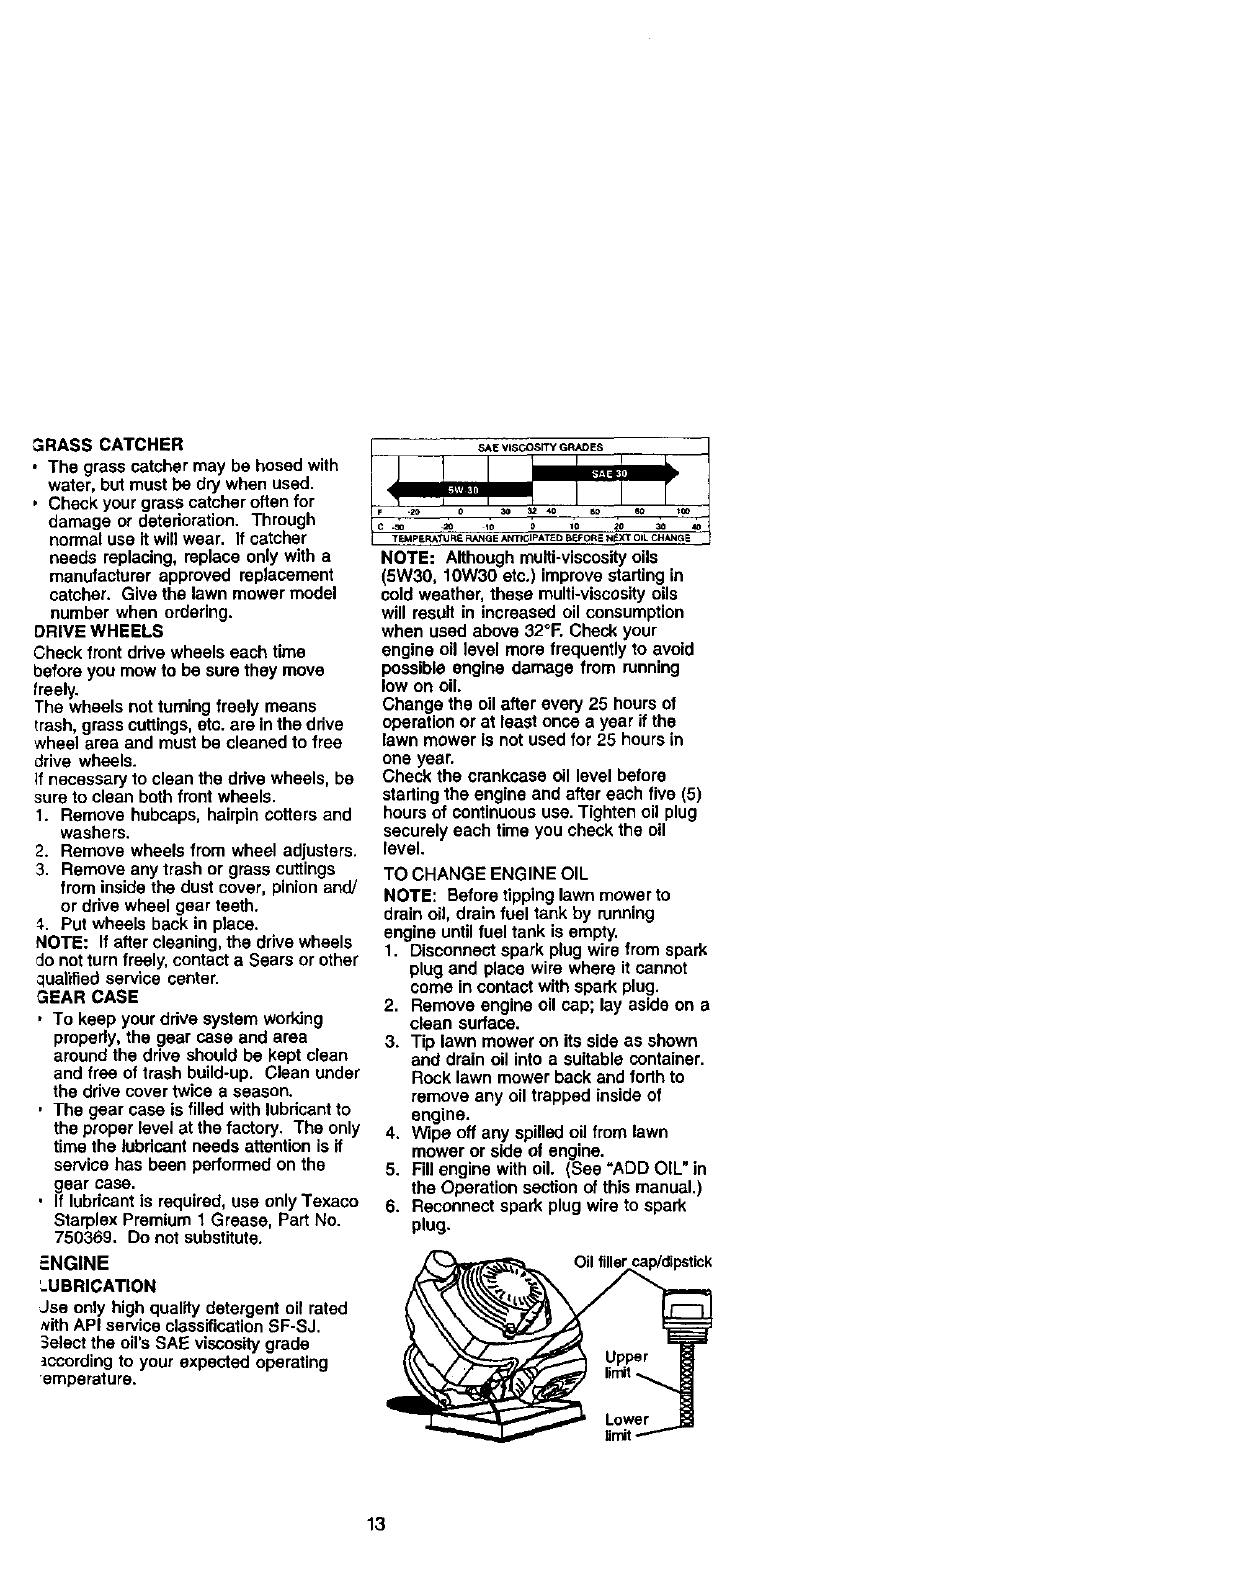
PRODUCT SPECIFICATIONS
ERIALNUMBER:
DATE OF PURCHASE:
GASOLINE CAPACITY/TYPE: 1.0 QUARTS UNLEADED REGULAR
OILTYPE (API-SF-SJ): SAE 30 (ABOVE 32°F); SAE 5W-30 (BELOW 32°F
OIL CAPACITY: 18.5 OUNCES
SPARK PLUG (GAP: .030") NGK BPR6ES
BLADE BOLTTORQUE: 35-40 FT. LBS.
•The model and sedal numbers will be found on a decal attached to the rear of the
lawn mower housing. Record both serial number and date of purchase in the space
pmvidod above.
LAWN MOWER
Always observe safety rules when
performing any maintenance.
TIRES
•Keep tires free of gasoline, oil, or insect
control chemicals which can harm
rubber.
• Avoid stumps, stones, deep ruts, sharp
objects and other hazards that may
cause tire damage.
BLADE CARE
For best results, mower blade must be
kept sharp. Replace bent or damaged
blades.
TO REMOVE BLADE
1. Disconnect spark plug wire from spark
plug and place wire where it cannot
come in contact with spark plug.
2. Tum lawn mower on its side. Make
sure air filter and carburetor are up.
3. Use a wood block between blade and
mower housing to prevent blade from
turning when removing blade bolt.
NOTE: Protect your hands with gloves
and/or wrap blade with heavy cloth.
4. Remove blade bolt by turning counter-
clockwise.
5. Remove blade and attaching hard-
ware (bolt, lock washer and hardened
washer).
NOTE: Remove the blade adapter and
check the key inside hub of blade
adapter. The key must be in good condi-
tion to work properly. Replace adopter if
damaged.
TO REPLACE BLADE
1. Position the blade adapter on the
engine crankshaft. Be sure key in
adapter and crankshaft keyway are
aligned.
2. Position blade on the blade adapter
aligning the two (2) holes in the blade
withthe raised lugs on the adapter.
3. Be sure the trailing edge of blade
(opposite sharp edge) is up toward
the engine.
4. Install the blade bolt with the lock
washer and hardened washer into
blade adapter and crankshaft.
5. Use block of wood between blade and
lawn mower housing and tighten the
blade bolt, turning clockwise.
• The recommended tightening torque is
35-40 ft. Ibs.
IMPORTANT: Blade bolt is grade 8 heat
treated.
TO SHARPEN BLADE
NOTE: We do not recommend sharpen-
ing blade - but if you do, be sure the
blade is balanced.
Care should be taken to keep the blade
balanced. An unbalanced blade will
cause eventual damage to lawn mower
or engine.
• The blade can be sharpened with a file
or on a gdnding wheel. Do not attempt
to sharpen while on the mower.
•To check blade balance, ddve a nail
into a beam or wall. Leave about one
inch of the straight nail exposed. Place
center hole of blade over the head of
the nail. If blade is balanced, it should
remain in a horizontal position. If either
end of the blade moves downward,
sharpen the heavy end untilthe blade
is balanced.
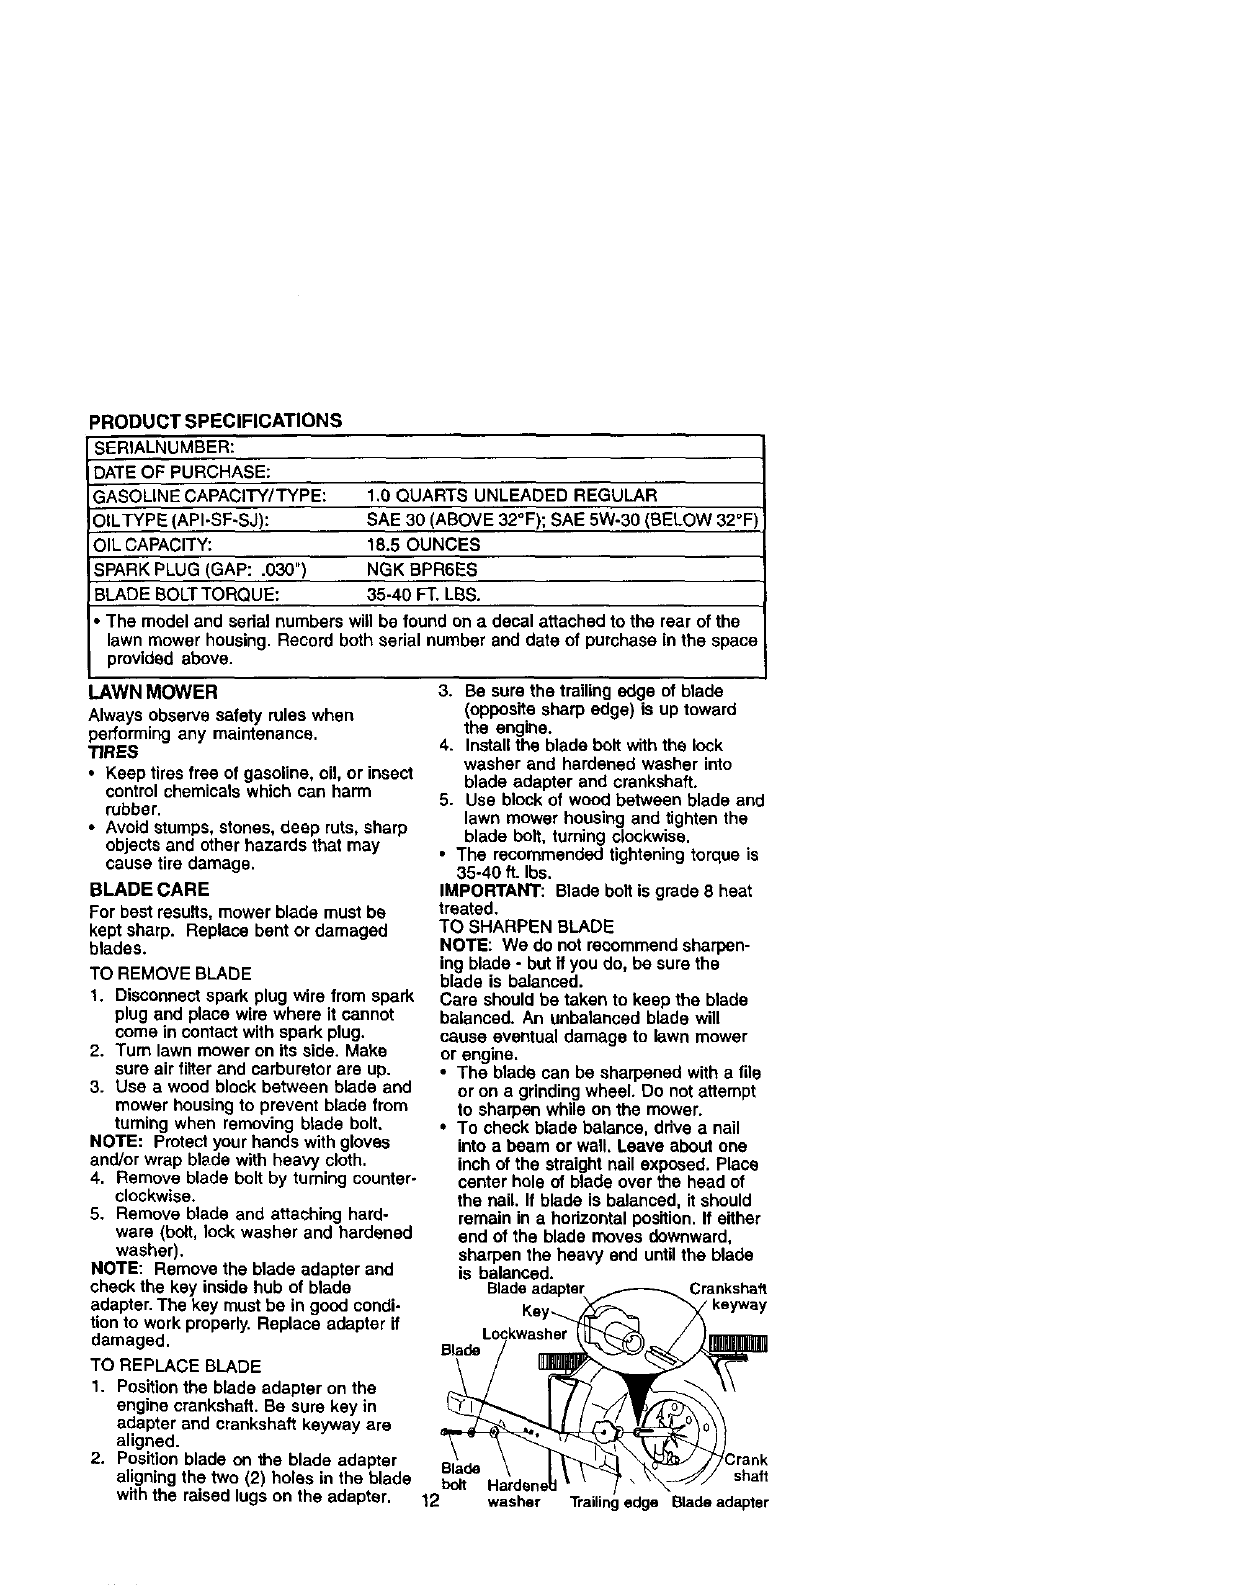
Bladeadapter _Crankshaft
Key-_ _ "_ keyway
BladeLockwasher
bolt Hardsnetl _' r _ _/,
12 washer Trailingedge Bladeadapter
GRASS CATCHER
• The grass catcher may be hosed with
water, but must be dry when used.
,Check your grass catcher often for
damage or deterioration. Through
normal use itwill wear. If catcher
needs replacing, replace only with a
manufacturer approved replacement
catcher. Give the lawn mower model
number when ordering.
DRIVE WHEELS
Check front drive wheels each time
before you mow to be sure they move
freely.
The wheels not turning freely means
trash, grass cuttings,etc. are in the drive
wheel area and must be cleaned to free
drive wheels.
If necessary to clean the drive wheels, be
sure to clean both front wheels.
1. Remove hubcaps, hairpin cotters and
washers.
2. Remove wheels from wheel adjusters,
3. Remove any trash or grass cuttings
from inside the dust cover, pinionand/
or drive wheel gear teeth.
_-. Put wheels back in place.
NOTE: If after cleaning, the drive wheels
do not turn freely, contact aSears or other
qualified service center.
GEAR CASE
,To keep your drive system woridng
properly, the gear case and area
around the drive should be kept clean
and free of trash build-up. Clean under
the drive cover twice a season.
,The gear case is filled with lubricant to
the proper level at the factory. The only
time the lubricant needs attention is if
service has been performed on the
gear case.
, If lubricantis required, use only Texaco
Starplex Premium 1 Grease, Part No.
750369. Do not substitute.
ENGINE
LUBRICATION
Jse only high quality detergent oil rated
NlthAPI service classification SF-SJ.
Select the oil's SAE viscositygrade
acoording to your expected operating
emperature.
NOTE: Although multi-viscosity oils
(5W30, 10W30 etc,) improve starting in
cold weather, these multi-viscosityoils
will result in increased oil consumption
when used above 32°F. Check your
engine oil level more frequently to avoid
possible engine damage from running
low on oil.
Change the oil after every 25 hours of
operation or at least once a year if the
lawn mower Is not used for 25 hours in
one year.
Check the crankcase oil level before
startingthe engine and after each five (5)
hours of continuoususe. Tighten oil plug
securely each time you check the oil
level.
TO CHANGE ENGINE OIL
NOTE: Before tipping lawn mower to
drain oil, drain fuel tank by running
engine until fuel tank is empty.
1. Disconnect spark plug wire from spark
plug and place wire where it cannot
come in contact with spark plug.
2. Remove engine oil cap; lay aside on e
clean surface.
3. Tip lawn mower on its side as shown
and drain oil into a suitable container.
Rock lawn mower back and forth to
remove any oil trapped inside of
engine.
4. Wipe off any spilled oil from lawn
mower or side of engine.
5. Fill engine with oil. (See =ADD OIL" in
the Operation section of this manual.)
6. Reconnect spark plug wire to spark
plug.
13
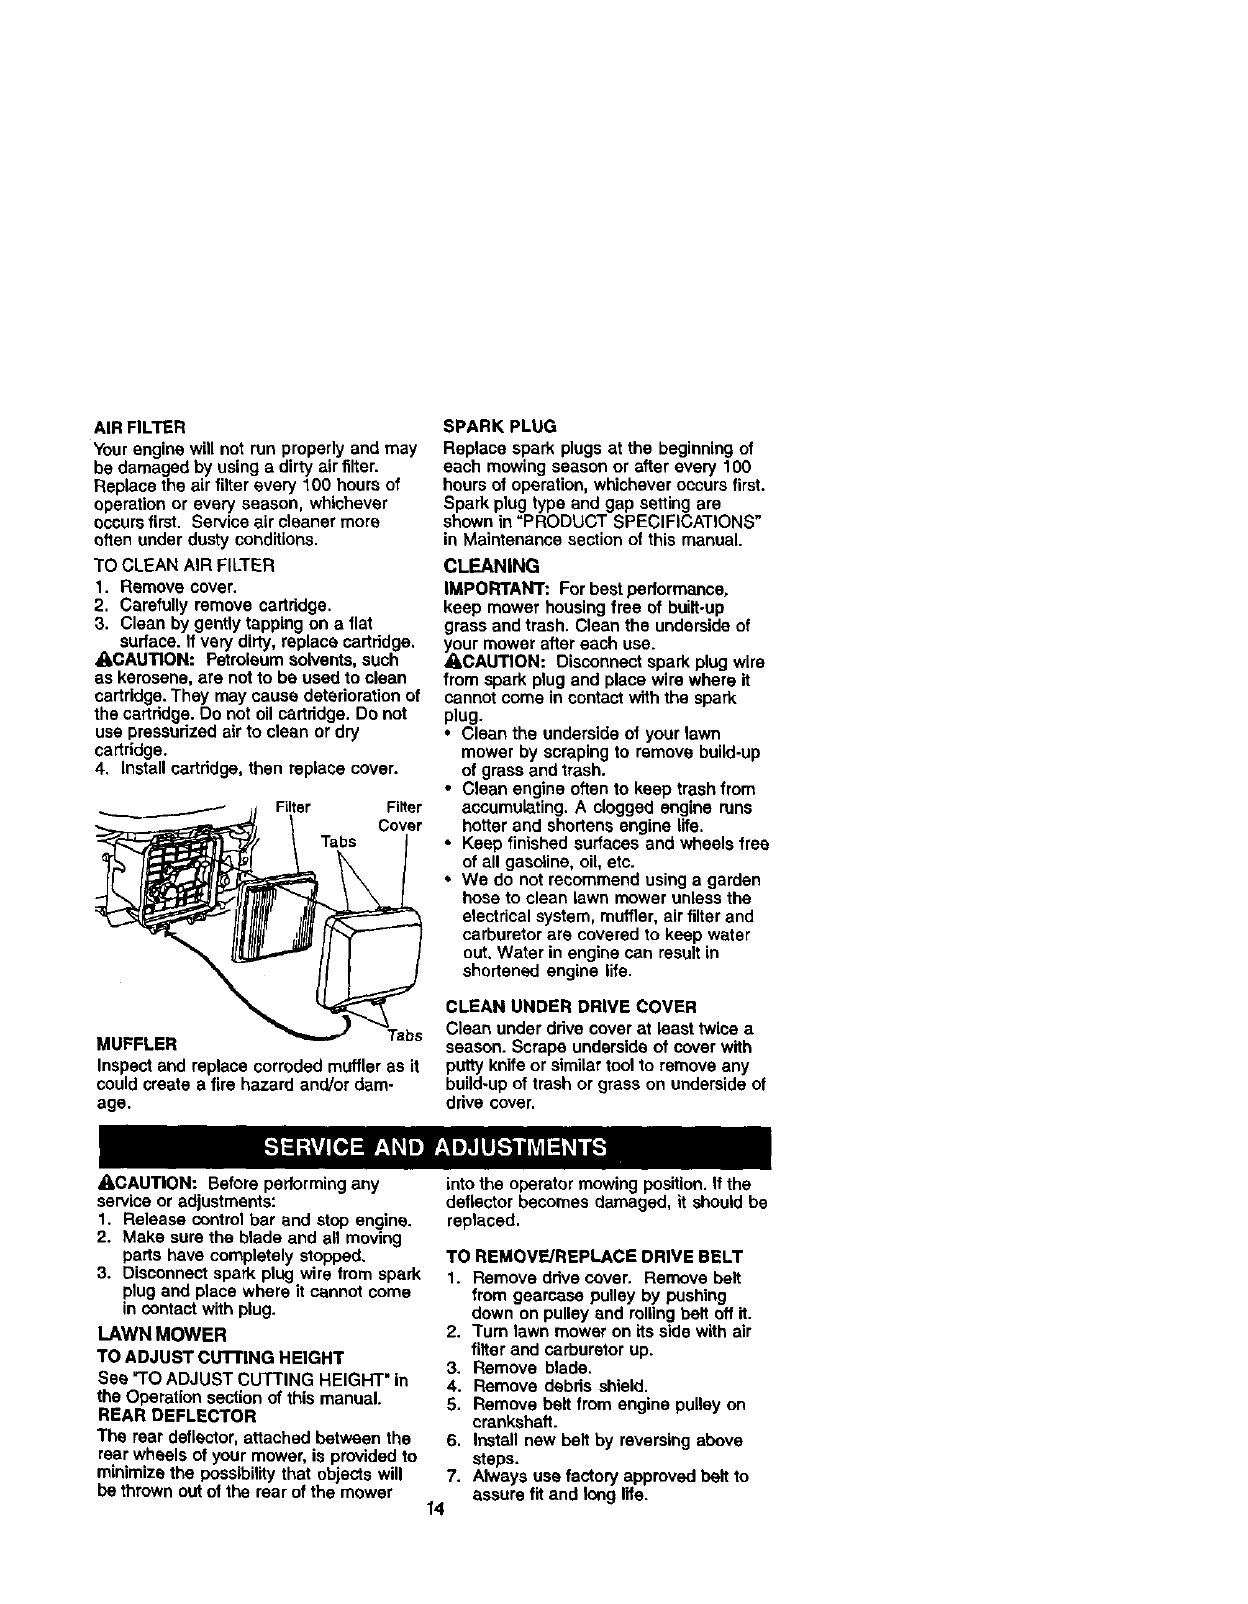
AIR FILTER
Your engine will not run properly and may
be damaged by using a dirty air filter.
Replace the air filter every 100 hours of
operation or every season, whichever
occursfirst. Service air cleaner more
often under dusty conditions.
TO CLEAN AIR FILTER
1. Remove cover.
2. Carefully remove cartridge.
3. Clean by gently tapping on a flat
surface. If very dirty, replace cadddge,
_CAUTION: P_roleum solvents, such
as kerosene, are not to be used to clean
cartridge. They may cause detedoration of
the cartridge. Do not oil cartddge. Do not
use pressurized air to clean or dry
cartddge.
4. Install cartddge, then replace cover.
MUFFLER Tabs
Inspect and replace corroded muffler as it
could create a fire hazard and/or dam-
age.
SPARK PLUG
Replace spark plugs at the beginning of
each mowing season or after every 100
hours of operation, whichever occurs first.
Spark plug type and gap setting are
shown in "PRODUCT SPECIFICATIONS"
in Maintenance section of this manual.
CLEANING
IMPORTANT: For best performance,
keep mower housing free of built.up
grass and trash. Clean the underside of
your mower after each use.
_CAUTION: Disconnect spark plug wire
from spark plug and place wire where it
cannot come in contact with the spark
plug.
• Clean the underside of your lawn
mower by scraping to remove build-up
of grass and trash.
•Clean engine often to keep trash from
accumulating. A clogged engine runs
hotter and shortens engine life.
•Keep finished surfaces and wheels free
of all gasoline, oil, etc.
We do not recommend using a garden
hose to clean lawn mower unless the
electrical system, muffler, air filter and
carburetor are covered to keep water
out. Water in engine can result in
shortened engine life.
CLEAN UNDER DRIVE COVER
Clean under ddve cover at least twice a
season. Scrape underside of cover with
putty knife or similar tool to remove any
build-up of trash or grass on underside of
drive cover.
ACAUTION: Before performingany
service or adjustments:
1. Release controlbar and stop engine.
2. Make sure the blade and all moving
parts have completely stopped.
3. Disconnect spark plug wire from spark
plug and place where it cannot come
in contact with plug.
LAWN MOWER
TO ADJUST CUI"RNG HEIGHT
See "1"OADJUST CUTTING HEIGHT" in
the Operation section of this manual.
REAR DEFLECTOR
The rear deflector, attached between the
rear wheels of your mower, is provided to
minimize the possibilitythat objects will
be thrown out of the rear of the mower
into the operator mowing position. If the
deflector becomes damaged, it should be
replaced.
TO REMOVE/REPLACE DRIVE BELT
1. Remove ddve cover. Remove belt
from gearcase pulley by pushing
down on pulley and rollingbelt off it.
2. Turn lawn mower on its side with air
filter and carburetor up.
3. Remove blade.
4. Remove debds shield.
5. Remove belt from engine pulley on
crankshaft.
6. Install new belt by reversing above
steps.
7. Always use factory approved belt to
assure fit and long life.
14
{:)rive
cover
Push
TO ADJUST HANDLE
The upper handle may be adjusted to
four (4) different height positions.
1. Loosen both handle knobs only
enough to allow the upper handle to
pivot to the desired adjustment
position.
2. Tighten both handle knobs securely.
Handle
knob
knob
TO ASSEMBLE GRASS CATCHER
1. Put grass catcher frame into grass bag
with rigidpart of bag on the bottom.
Make sure the frame handle is outside
of the bag top.
2. Slip vinyl bindings over frame.
NOTE: Ifvinyl bindingsare too stiff,hold
them in warm water for a few minutes. If
bag gets wet, let it dry before using.
_.CAUTION: Do not run your lawn mower
without clipping deflector or approved
grass catcher in place. Never attempt to
operate the lawn mower with the rear
door removed or propped open.
Catcher
frame
ENGINE
ENGINE SPEED
Yourengine speed has been factory set.
Do not attempt to increase engine speed
or it may result in personal injury, if you
believe that the engine is running too fast
or too slow,take your lawn mower to a
Sears or other qualified service center for
repair and adjustment.
CARBURETOR ADJUSTMENTS
The carburetor on your engine is low
emission. The idle mixture screw is fitted
with a limiter cap that prevents excessive
enrichment of the air-fuel mixture in order
to comply with emissions regulations and
is not adjustable.
Do not attempt to remove the limiter cap
to make adjustments. The limitercap
cannot be removed without breaking the
idle mixture screw.
IDLE SPEED SETTING -
Adjustment will require the assistance of
an additional person to hold down the
operator presence control bar.
1. Start engine and allow to warm for five
minutes.
2. With throttle control lever in slow
position, engine should idle at 2100
RPM. If engine idles too slowor fast,
turn throttle stop screw in or out until
correct idle is attained.
IMPORTANT: Never tamper with the
engine governor, which is factory set for
proper engine speed. Overspeeding the
engine above the factory high speed
setting can be dangerous. Ifyou think the
engine-governed high speed needs
adjusting, contact a Sears or other
qualified service center, which has
proper equipment and expedanca to
make any necessary adjustments.
Throtfie stop screw
Lirniter cap
Frame
ppening15
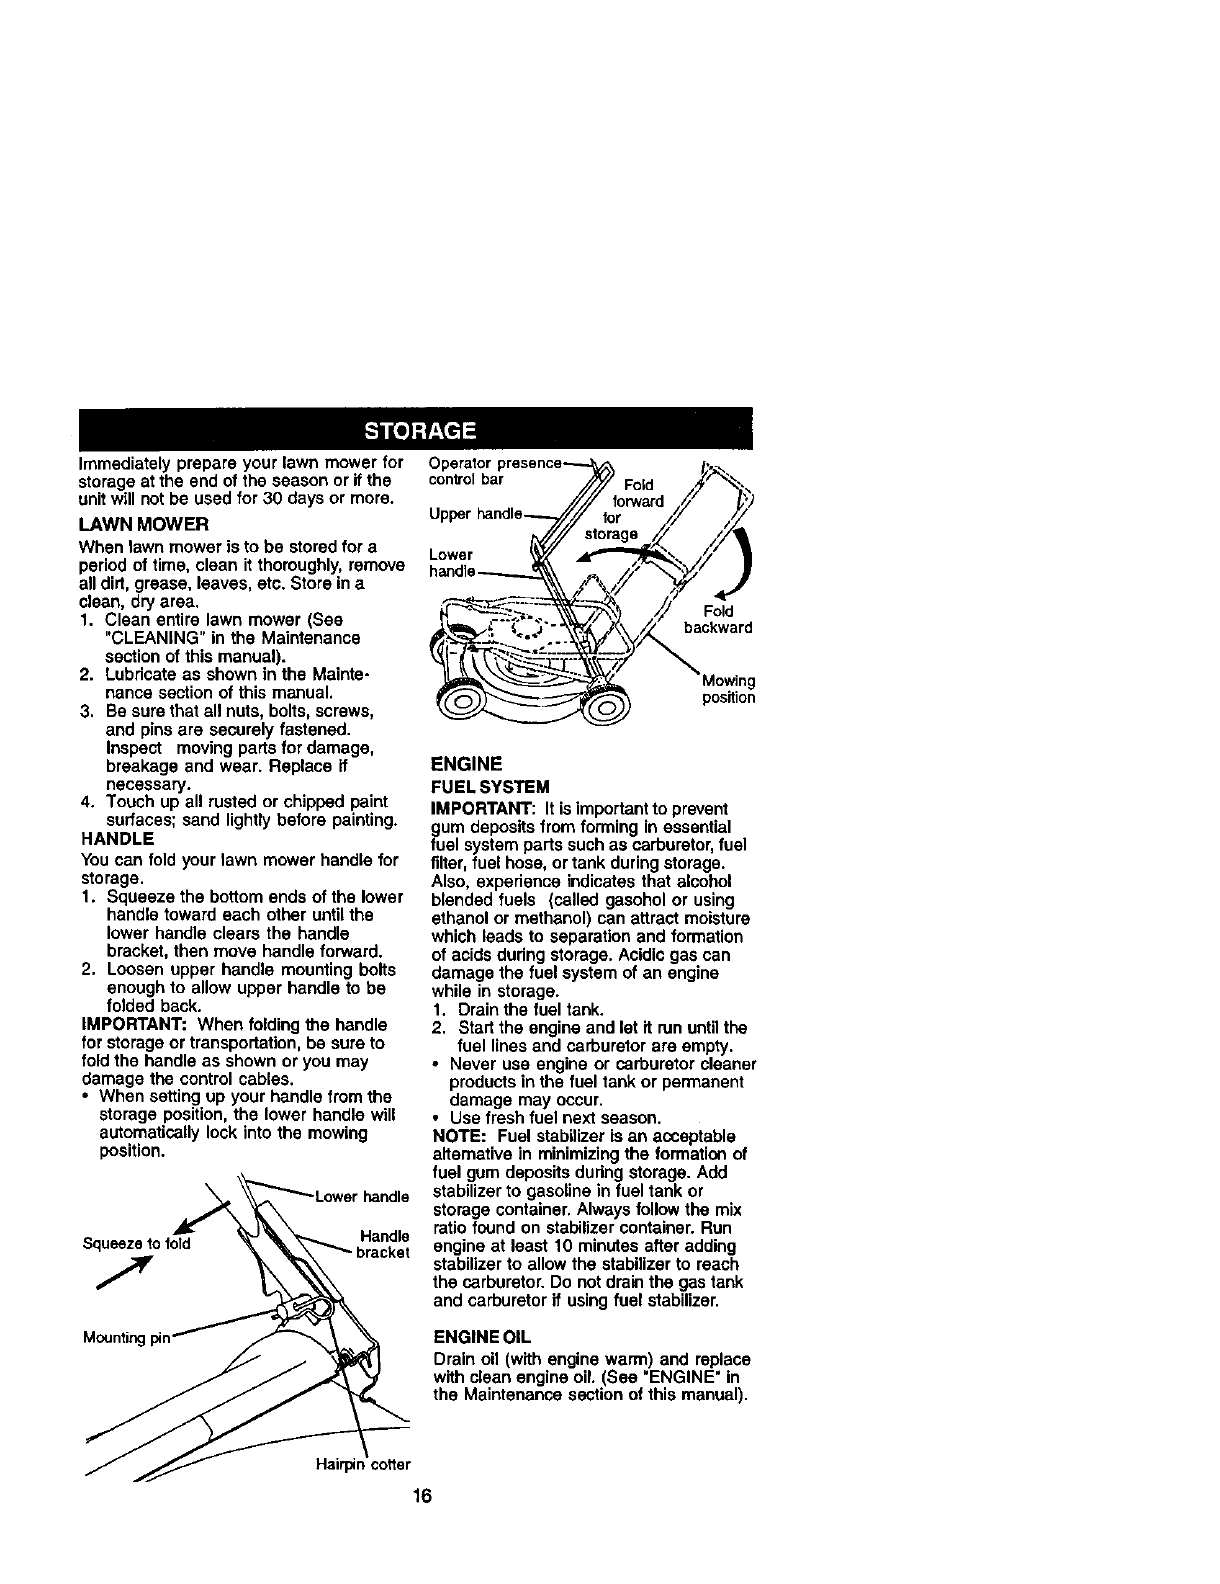
Immediatelyprepare your lawn mower for
storage at the end of the season or if the
unit will not be used for 30 days or more.
LAWN MOWER
When lawn mower is to be stored for a
period of time, clean it thoroughly, remove
all dirt, grease, leaves, etc. Store in a
clean, dry area.
1. Clean entire lawn mower (See
"CLEANING" in the Maintenance
section of this manual).
2. Lubricate as shown in the Mainte-
nance section of this manual.
3. Be sure that all nuts, bolts, screws,
and pins are securely fastened.
Inspect moving parts for damage,
breakage and wear. Replace if
necessary.
4. Touch up all rusted or chipped paint
surfaces; sand lightly before painting.
HANDLE
You can fold your lawn mower handle for
storage.
1. Squeeze the bottom ends of the lower
handle toward each other untilthe
lower handle clears the handle
bracket, then move handle forward.
2. Loosen upper handle mounting bolts
enough to allow upper handle to be
folded back.
IMPORTANT: When folding the handle
for storage or transportation, be sure to
fold the handle as shown or you may
damage the control cables.
•When setting up your handle from the
storage position, the lower handle will
automatically lock into the mowing
position.
handle
Squeeze to fold Handle
Mounting pin'
Hairpin cotter
control bar Fold
Lower
Fold
backward
position
ENGINE
FUEL SYSTEM
IMPORTANT: It is important to prevent
gum deposits from forming in essential
fuel system parts such as carburetor,fuel
filter, fuel hose, ortank duringstorage.
Also, experience indicates that alcohol
blended fuels (called gasohol or using
ethanol or methanol) can attract moisture
which leads to separation and formation
of acids dudng storage. Acidic gas can
damage the fuel system of an engine
while in storage.
1. Drain the fuel tank.
2. Start the engine and let if run until the
fuel lines and carburetor are empty.
•Never use engine or carburetor cleaner
products in the fuel tank or permanent
damage may occur.
•Use fresh fuel next season.
NOTE: Fuel stabilizer is an acceptable
alternative in minimizing the formafian of
fuel gum deposits during storage. Add
stabilizer to gasoline in fuel tank or
storage container. Always follow the mix
ratio found on stabilizer container. Run
engine at least 10 minutes after adding
stabilizer to allow the stabilizer to reach
the carburetor. Do not drain the gas tank
and carburetor if using fuel stabilizer.
ENGINE OIL
Drain oil (with engine warm) and replace
with clean engine oil. (See "ENGINE" in
the Maintenance section of this manual).
16
CYLINDER
1. Remove spark plug.
2. Pour one ounce (29 ml) of oil through
spark plug hole into cylinder.
3. Pull starter handle slowly a few times
to distribute oil.
4. Replace with new spark plug.
OTHER
• Do not store gasoline from one season
to another.
°Replace your gasoline can if your can
startsto rust. Rust and/or dirt in your
gasoline will cause problems.
•If possible, store your unit indoors and
cover itto give protectionfrom dust and
dirt.
•Cover your unit with a suitable protec-
tive cover that does not retain moisture.
Do not use plastic. Plastic cannot
breathe, which allows condensation to
form and will cause your unit to rust.
IMPORTANT: Never cover mower while
engone and exhaust areas are still warm.
ACAUTION:Never store the lawn mower
with gasoline in the tank inside a building
where fumes may reach an open flame or
spark. Allow the engine to cool before
storing in any enclosure.
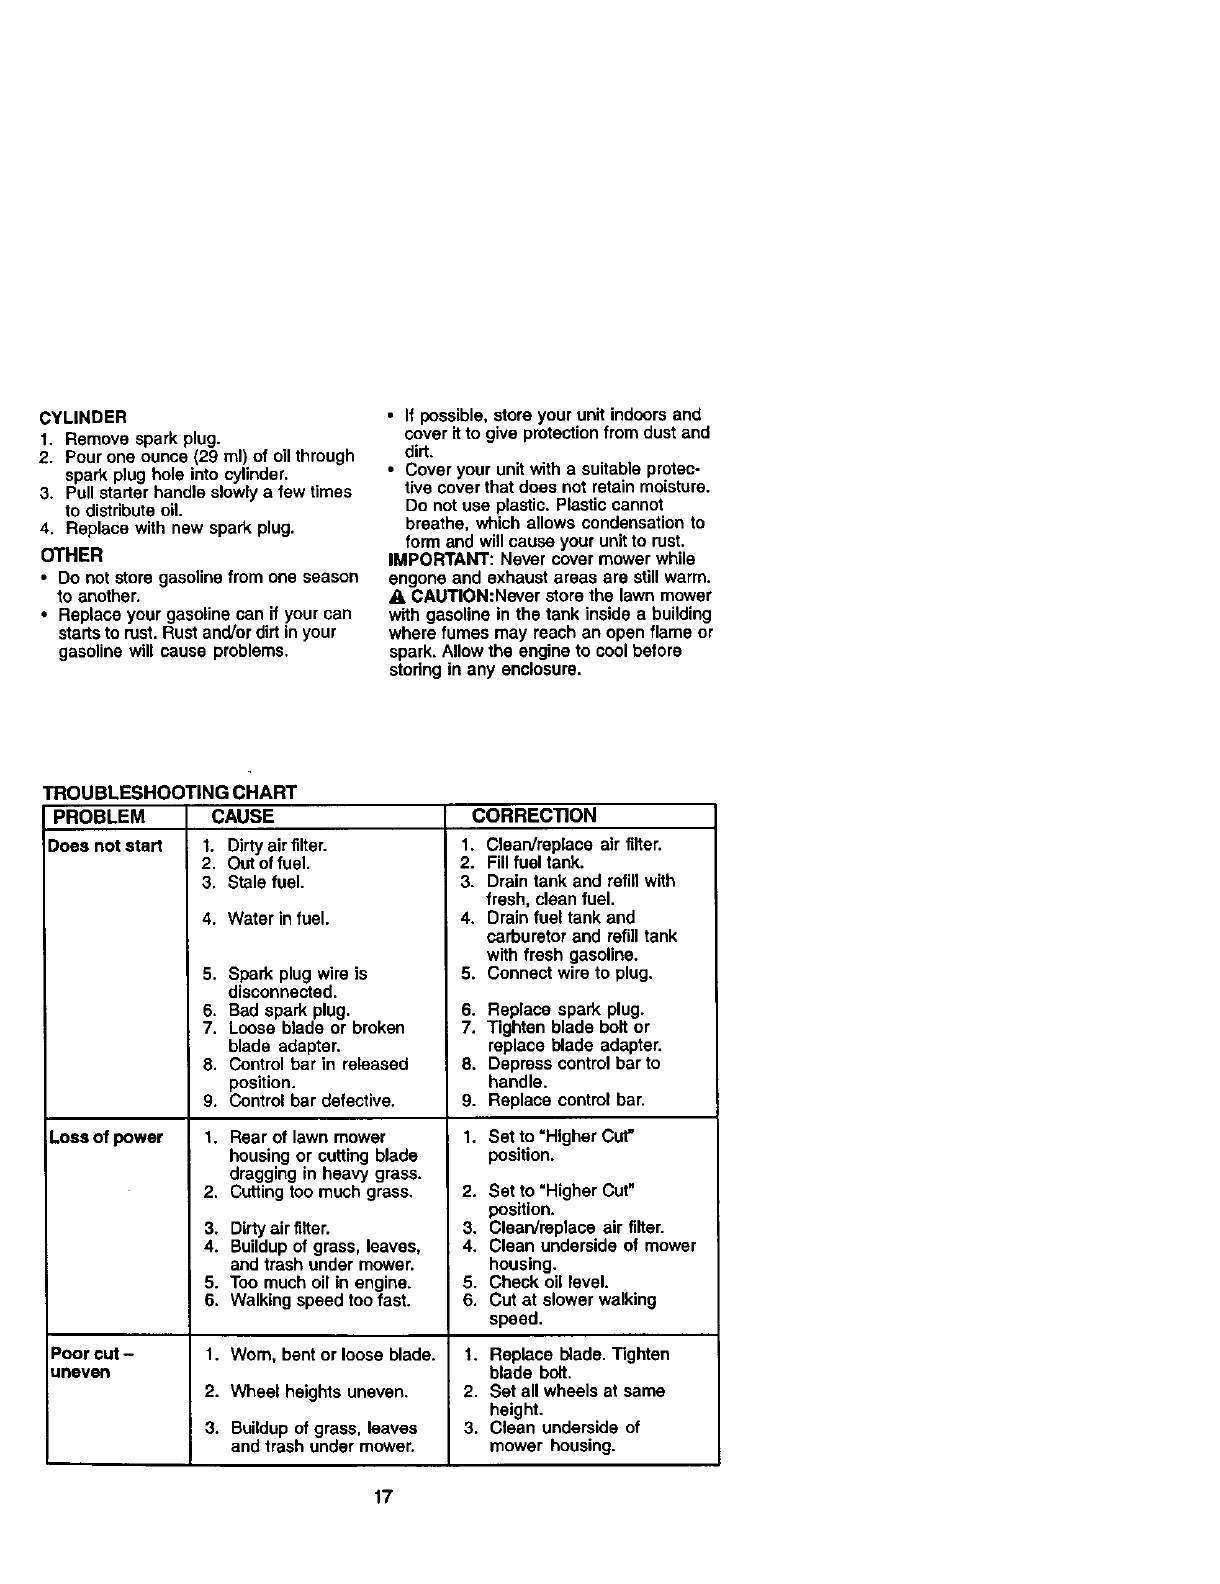
TROUBLESHOOTING CHART
PROBLEM CAUSE
Does not start f. Dirtyair filter.
2. Out of fuel.
3. Stale fuel.
4. Water in fuel.
5. Spark plug wire is
disconnected.
6. Bad spark plug.
7. Loose blade or broken
blade adapter.
8. Control bar in released
position.
9. Control bar defective.
Loss of power 1. Rear of lawn mower
housing or cutting blade
dragging in heavy grass.
2. Cuttingtoo much grass.
3. Dirty air filter.
4. Buildup of grass, leaves,
and trash under mower.
5. Toe much oil in engine.
6. Walking speed too fast.
Poor cut - 1. Worn, bent or loose blade.
uneven
2. Wheel heights uneven.
3. Buildup of grass, leaves
and trash under mower.
CORREC_ON
1. Clean/replace air filter.
2. Fill fuel tank.
3. Drain tank and refill with
fresh, clean fuel.
4. Drain fuel tank and
carburetor and refi]l tank
with fresh gasoline.
5. Connect wire to plug.
6. Replace spark plug.
7. Tighten blade bolt or
replace blade adapter.
8. Depress controlbar to
handle.
9. Replace control bar.
1. Set to "Higher Cur"
position.
2. Set to =Higher Cut"
position.
3. ClearVroplace air filter.
4. Clean underside of mower
housing.
5. Check oil level.
6. Cut at slower walking
speed.
f. Replace blade. Tighten
blade bolt.
2. Set all wheels at same
height.
3. Clean underside of
mower housing.
17
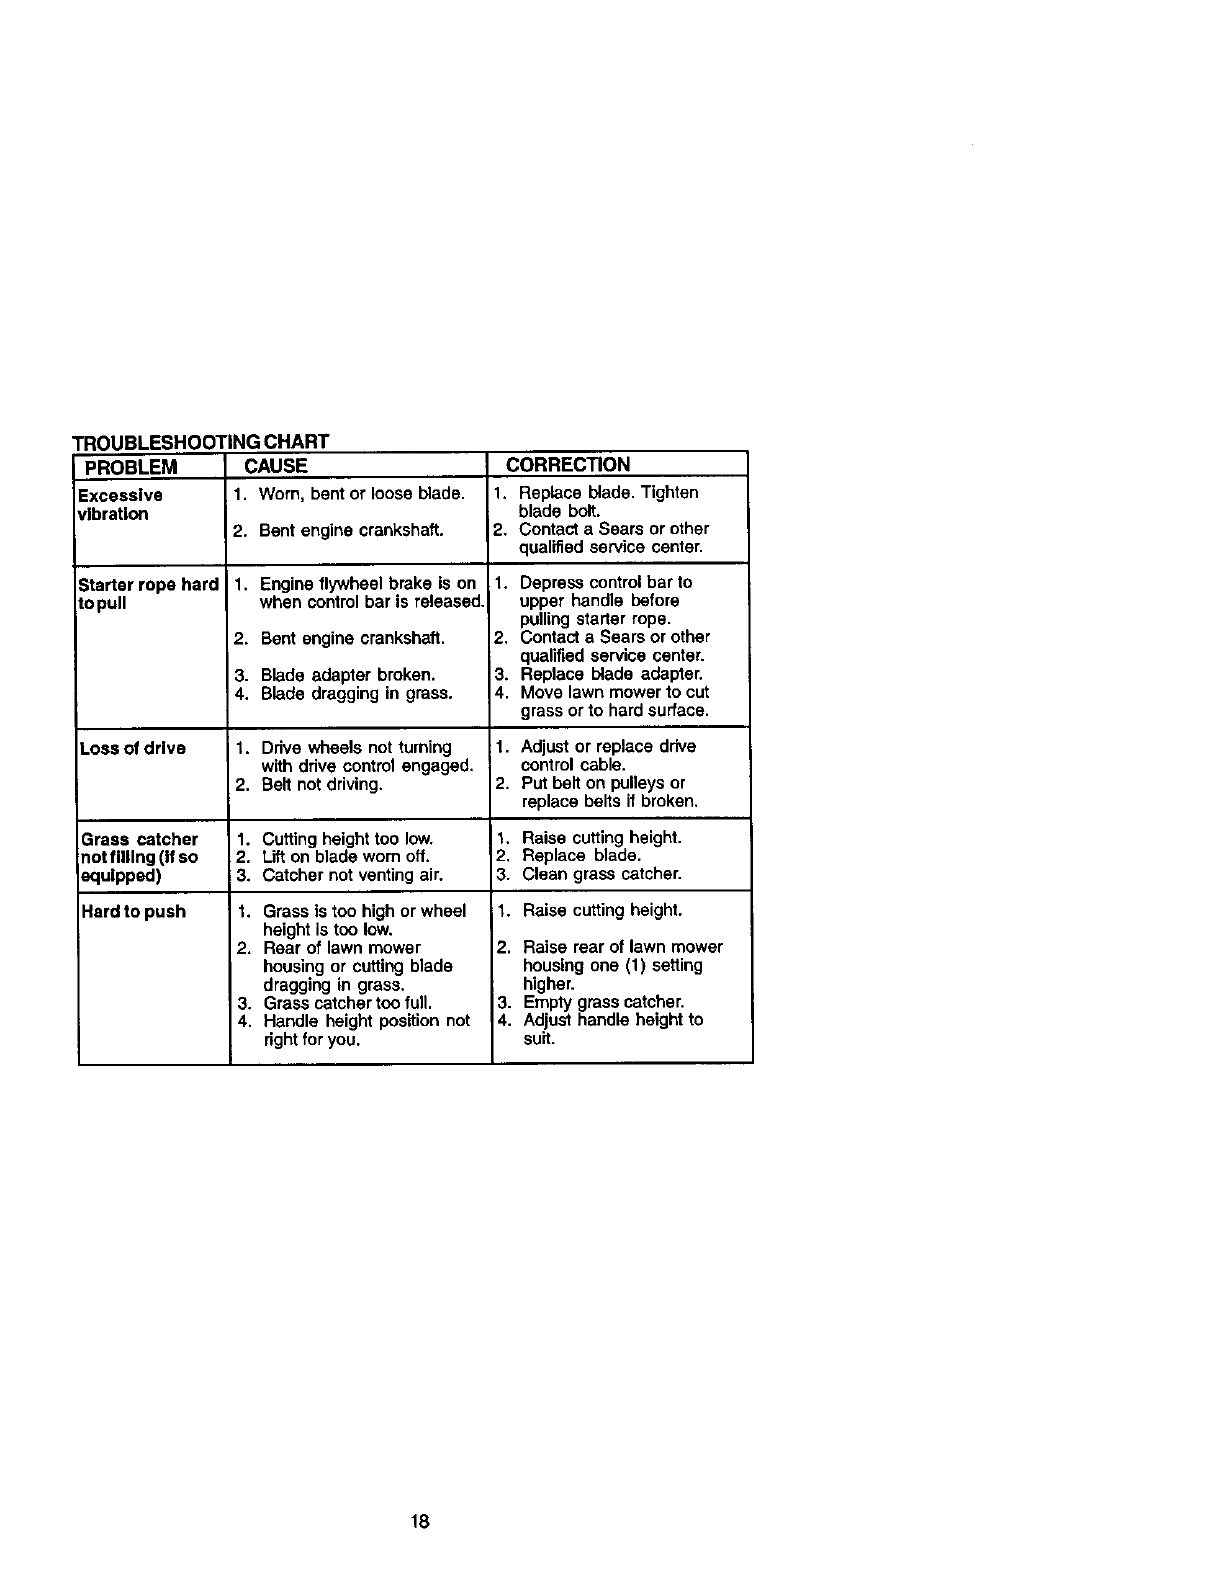
TROUBLESHOOTING CHART
PROBLEM CAUSE CORRECTION
Excessive 1. Worn, bent or loose blade. 1. Replace blade. Tighten
vibration blade bolt.
2. Bent engine crankshaft. 2, Contact a Sears or other
qualified service center.
Starter rope hard
topull 1. Engine flywheel brake is on
when control bar is released.
2. Bent engine crankshaft.
3. Blade adapter broken.
4. Blade dragging in grass.
1. Depress control bar to
upper handle before
pulling starter rope.
2, Contact aSears or other
qualified service center.
3. Replace blade adapter.
4. Move lawn mower to cut
grass or to hard surface.
Loss of drive 1. Drive wheels not turning 1. Adjust or replace drive
with drive control engaged, control cable.
2. Belt not driving. 2. Put belt on pulleys or
replace belts if broken.
Grass catcher 1. Cutting height too low. 1. Raise cutting height.
notfllllng (If so 2. Lift on blade wom off. 2. Replace blade.
equipped) 3. Catcher not venting air. 3. Clean grass catcher.
Hard to push 1. Raise cutting height.1. Grass istoo high or wheel
height is too low.
2. Rear of lawn mower
housing or cutting blade
dragging in grass.
3. Grass catcher too full.
4. Handle height position not
rightfor you.
2. Raise rear of lawn mower
housing one (1) setting
higher.
3. Empty grass catcher.
4, Adjust handle height to
suk.
18
Garant(a ................................................ 19
Reglas de $eguddad ...................... 19-21
Montaje ................................................. 22
Operaci6n ........................................ 23-27
Mantenimiento ...................................... 28
Programa de Mantenimiento ........... 28-31
Especificaciones del Producto............. 29
Servicio y Adjustes .......................... 32-33
Almacenamiento ............................. 33-34
Identificaci6n de problemas ............ 35-36
Partes de repuesto ............ Vea el manual
ingl6sdel duefio
GARANTIA LIMITADA DE DOS AltOS PARA LA SEGADORA A MOTOR CRAFTSMAN
Pot dos (2) afios, a partir de la fecha de compra, cuande esta Segadora Craftsman se
mantenga, lubrique yaline seg0n las instrucciones peru la operesibn y el rnantenimiento an el
manual del duefio, Sears reparara gratis todo defecto en el material yla mano de obra.
Si Is Segadora Craftsman se usa para fines comerciales o de arriando, esta garantia s61ose
aplica per noventa (90) dlas a partir de la fecha de compta.
Esta Garantfa no cubre:
• Articulos que se desgastan durante eTuso normal tales como las cuchillas segadoras
rotatorias, los adaptadores de la cuchilla, las correas, los filtros de airs y tas bujias.
• Reparaciones neoesarias debido al abuso o a la negligencia del operador, incluy_ndese a los
cig_3ehalesdoblados y ala talta de mantenimiento del equipo segi3nles instrucciones que se
incluyen en el manual del dueSo.
EL SERV]ClO DE GARANTiA ESTA DISPONIBLE al devolver la segadora a motor Craftsman al
Centro/Departmento de Servicio Sears mas cercano an los Estados Unidos. Esta garantla se
ap]ica solamente mientras el pmducto este en uso en los Estades Unidos.
Esta Garantla le otorga derechos legales especlficos, y puede que tambi6n tenga otros
derechos que vadan de estado a estado.
Seam, Roebuck and Co., D/817 WA, Hoflman Estates, Illinois60179 USA
IMPORTANTE: Esta maquina cortadaora es capez de amputar las manos ylos manos y los
pies y de lanzar objetos. Si no se obsei_'an las ir_strucciones de seguridad siguientes se pusden
pmducir lesiones graves o la muerts.
I. OPERAClON
• Antes de empezar, debe |amiliarizarse
completaroente con los controles y el uso
correcto de la maquina. Para esto, debe leer
y comprender todas las instrucciones que
aperecen en la maquina yen los manuales
de operacibn.
•No ponga las manos o los pies cerca o
debajo de las penes rotatorias. Mant_ngase
siempre lejos de la abertura de la descarga,
•Permita que solamente las personas
responsables que est_n |amiliarizadas con
las ir_trucciones operen la mdquina.
•Despeje el _.rea de objetos tales como
piedras, juguetes, alambres, huesos, palos,
etc. que pueden ser recogidos ylanzados
pot las cuchillas.
•Aseg0rese que el area no se hallan
personas, antes de segar. Pare la m_lquina
si alguien entra en el area.
•No opere la rnaquina sin zapatos o con
sar_lalias abiertas. Pbngase siempre
zapetos sblidos.
•No tire de la segadora hacia at_s a rnenos
que sea absolutamente necesado. Mire
siempre hacia abajo y hacia detrz_santes y
mientms qoe oe mueve hac_a atr_ts.
•No opere la segadora sin los respectivos
resguardos, las places, el recogedor de
cesped u otros aditamentos dise ados para
su pmteccibn y seguridad.
•Reti_rase alas instrucciones del fabricante
para el funcionarniento einstalacibn de
acoesorios. Use [3nicamente acoesodos
aprobados por el tabricante.
•Detenga la cuchilla o las cuchillascuando
cruoe pot calzades, calles o caminos de
grava.
•Parar el motor cada vez que se abandona
el aperato, antes de liml_ar la segadora o de
remover residuos del tubo.
•Apagar el motor y esperar basra que tes
cuchilles est_n completamente peradas
antes de rernover el receptor de hierba.
•Segar solarnente con luz de[ dla o con ona
buena luz artificial.
•No opere la m&quina bajo la influencia de]
alcohol o de las dtoges.
19
• Nunca opere la maquina cuando la hierba
est_ mojada. Aseg_rese siempre de tenet
buena traccien en sus pies; rnantenga el
mango firmemente y cam]ne; nunca corra.
•Desconectar el rnecanismo de propulsibn
autbnoma o el ernbrague de transm_si6nen
las segadoras que Io tienen antes de poner
en marcha el motor.
•Si el equipo ernpezara a vLbrarde una
manara anormal, pare el motor y revise de
inmediato para avenguar la causa.
Generalrnente la vibracibn suele indicar que
existe alguna averla.
• Siemp_e use gafas de seguddad o anteojos
con pmteccibn lateral cuando opere la
segadora.
II. OPERACION SOBRE LAS CUESTAS
Los accidentes ocurren con rods frecuencia
en las cuestas. Estos accidentes ocurren
debido a resbaladas o cafdas, las cuales
pueden resuttar en graves lesiones. Operar la
recorladora en cuestas rsquiere mayor
concentraci6n. Si se siente inseguro en una
cuesta, no la recorte,
HACER:
•Puede recortar a traves de la superficie de
la cuesta, nunca hacia arnba y hacia abajo.
Proceda con extrema precaucibn cuande
cambie de direccibn en las cuestas.
• Renueva todes los objetos extra_os, tales
como guijarros, ramas, etc.
• Deha prestar atenci6n a hoyos, baches o
protuberancias. Recuerde que la hierba afta
puede escondar obst_culos.
NO HACER:
•No recorte cema de pendientes, zanjas o
terraplenes. El operador puede perder la
tracci6n en los pies o el equilibrio.
•No recorte cuestas dernaelado inclinadas.
•No recorte en hierba rnojada. La reduccibn
en la tracci6n de la pLsadapuede causar
resbalones.
IILNII;IOS
Se pueden producir accidentes trdgicos si el
operador no Ixesta atenci6n ala presencia de
los niSos.A menudo, los niSosse elenten
atrafdos por la mdquina y por la actividad de la
siega. Nunca suponga que los niSos van a
permanecer en el rnisrno lugar donde los vio
por 01tirnavez.
•Mantenga alos niSos elejados del &rea de la
siega y bajo el cuidado estdoto de otra
persona adulta respo_sable.
•Estd alerta y apague la rndquina si hay n[_os
que entran al drea.
•Antes y cuando este rotmcediendo, mire
hacia atrds y hacia abajo para verificar si
hay niSos pequeSos.
•Nunca permita que los niSos operen la
rndquina.
•Tenga un cu]dedo extra cuando se acerque
a esquinas donde no hay visibilidad, a los
arbustos, drboles u otros objetos que
pueden interfedr con su linea de visibn.
IV, SERVIClO
• Tenga cuidado extra al manejar la gasolina
y Losdernds combustibles. Son inflamables
y los gases son explosivos.
-Use solamente un envase aprobado.
- Nunca rernueva la tapa del depesito de
gasolina o agregue combustible con el
motor tuncionando, perrnita que el motor
se enfde antes de volver apone
combustibla. No fume.
-Nunca vuelva a porter combustibla en la
rndquina en recintos cerrados.
-Nunca elmacene la mdquina o el envase
del combustible dentro de algt_n lugar en
donde haya una llama expuesta, tal como
ta del calentador de agua.
•Nunca haga funcionar una rndquinadentro
de un drea cen'ada.
• Nunca haga ajustes o reparaciones
mientras el motor estd en marcha.
Desconecte el cable de la bujla, y
mant_ngalo a cierla distancia de dsta para
prevenir un arranque accidental.
•Mantenga las tuercas y los pernos,
especielmente los pernos del accesorio de
la cuchilla, apretados y rnantenga el equipo
en buenas condiciones.
•Nunca manipule de torma indebida los
dispositivos de segundad. Contro_e
regularmente su tuncionarniento correcto.
•Mantenga la rn_quina libre de hierba, hojas
u otras acurnulaciones de desperdicio.
Lirnpie los den'ames de aceite o combus-
tible. Perrnita que la rn_quina se enfrIe antes
de elmacenada.
•Pare e inspeccione el equipo el le pega a un
objeto. Repdrelo, sLes necesade, antes de
hacerto arrancar.
•En ning_n caso hay que regular la altura de
las ruedas rnientras el motor estd en
marcha.
•Los componentes de] receptor de la hierba
van suietos a desgaste, da_os y detedero,
que pueden exponar las partes en
rnovImierdo o pennitir que objetos sean
disparados. Controlar frecuentemente y
cuando sea necesarla sustituir con partes
aconsejades por el fabdcante.
•Las cuchiLlasde la segadora estan afiladas
y pueden cortar. Cubdr las hojas o I1evar
guantes, y utilizar precauciones especlales
cuando se efectOa rnantenimiento sobre las
mismas.
• No cambie el ajuste del regulader del motor
ni exceda su velocided.
_Bqsque este sfmboloque se_ta tas prpcaucio-
nesde seguridadde imp<:_lanoa.Quiem dedr -
i[IATENCIC_N!!! iI[ESTE ALERTOtfl SU
SEGURIDAD ESTA COMPROMETIDA.
_I, PRECAUCI(_N: Slempre _e el
a_arnlxede la buj[ay p<_galodonde no pueda
enlraren corCactocon la bujla, para evitarel
arranqae poracciderrte,dtrante la pmparacibn,el
transporte,el ajusteo cuando se hacen
reparaciones.
2O
_ADVERTENCIA: [] _ubode escape del motor,
a_fanos de sus constituy_te_ y algun(_
componentes de_veh|culo con_enen o
desprenden produclosquirT_OSconocidosel el
Estado de Carrfomiacornocausa de cancery
defectos al nacimiento u ottos da6os
reproductivos.
_DVERTENCIA: Los b<xnes,tenninales y
acce.s<x_srelativosde la bateda con'_nen i_orno
o cornpuestosde plomo, pmductosqufmicos
conoddosen el Estado de CaJifomiacomo causa
de ct_ncery defectos al nacin_entou oVosdat3os
reproductvos.Laver las manos despuds de
manlpulados.
_IPRECAUCI6N: El silenciader yotras piezas
del motor Ilegan a ser extremadamente
calientes durante la operaci6n y siguen siendo
calientes despu6s de que el motor haya
parade. Para evitar quemaduras severas,
permanezca lejos de estas areas.
Estos accesorios estaban disponibles cuando se produjo la segadora. No son
facllltados Junto al cortacesped. Tambi_n est&n disponibles en la mayoda de las
tiendas de Sears yen los centms de servicio. La mayorfa de las tiendas Sears
tambien pueden mandar a pedir partes de repuesto para usted, si les proporcionael
ndmero del modelo de su segadora. Algunos de estos accesorios tal vez no se
apliquen a su sagadora.
RENDIMIENTO DE LA SEGADORA
PARA SEGADORAS CON DESCARGA TRASERA JUIEGOS PARA LA ACOLCHADORA ESTABIUZADORES
CON DESCARGA CON DESCARGA
TRASERA LATERAL ENVASES
DE GASOUNA
MANTENIMIENTO DE LA SEGADORA
SlLENCIADORE$ RLTROS DE AIRE 8UJJAS
¢ORREA$ CUCNIM.AS DE CU,_III. W_ I_L MOTOR
21
Lea estas instrucciones y el manual
completamente antes de tratar de montar u
operar su segadora nueva.
IMPORTANTE: ESTE CORTACESPED VIENE
SIN ACEITE O GASOLINA EN EL MOTOR.
Su segadora nueva ha sido rnontada en la
t_bdca con la excepcibn de aquellas pertes
que se dejaron sin montar gor razones de
envfo. Todas las partes como las tuercas, las
arandelas, los pemos, etc., que son
necesadas para completar el montaje ban sido
colocadas en la bolsa de pertes. Para
asegurarse que su segadora funcione an
forrna segura y adecuada, todas las partes y
los artfculos de ferreterfa que se rnonten
tienen que ser apretados seguramente. Use
las herramientas correctas, como sea
necesario, pare asegurar que se apdeten
adecuadamente.
PARA REMOVER LA SEGADORA DE
LA CAJA DE CART6N
1. Remueva las partes sueltas que se
incluyen con la segadora.
2. Corte las dos esquinas de los extremos de
la caja de cart6n ytienda el panel del
extremo piano.
3. Remueva todo el material de empaque,
excepto la cuSa entre el mango superior y
el inferior,y la cuSa que sujeta la harm de
los control que exige la presencia del
operador junto con el mango supedor.
4. Haga rodar la segadora hacia afuera de la
caja de car16n y revfsela cuidadosarnente
para verificar si todavla quedan partes
sueffas adicionales.
COMO PREPARAR SU SEGADORA
PARA DESDOBLAR EL MANGO
|MPORTANTE: Despliegue el mango con
mucho cuidado para no pellizcar o da6ar los
cables de contmI.
1. Levante los mangos basra que la secci6n
del mango infedor se asegure en su lugar,
en la posici6n Loamsegar.
2. Remueva la cuba protectora, levante la
secci6n det mango superior hasla su lugar
en el mango inferior, y apriete ambas
manillas del mango.
3. Remueva la cuSa del mango que sujeta la
barra de los control que exige la presencia
dal operador junto con el mango superior.
El mango de la segadora puede ajustame
segan Is acomode para segar. Re, erase a
=AJUSTE DEL MANGO" en la Secci6n de
Servicio y Ajustes de este manual.
Barradecontrolquesxigelapresencladeloperador
Mangosuperior
MangoInfedor Levantar /
Levantar ////
PARA INSTALAR LOS ACCESORIOS
Su segadora fue enviada lista para usarse
como una acblchadora de capa vegetal, Para
convertirla de modo que pueda ensacar,
refierase a =PARA CONVERIR LA
SEGADORA" en la Seccion de Operacibn de
este manual.
22
FAMIUARICESE CON SU SEGADORA
LEA ESTE MANUAL DEL DUEl;JOY I.AS REGLAS DE SEGURIDAD ANTES DE OPERAR SU
SEGADORA. Compare las ilustmciones con su segadora para familiadzarse con la ubicaci6n de
los direr'sos controles y ajustes, Guarde este manual para referencia en el futuro,
Estos sfmbolos puedan apareser sobre su segadora o en la llteratura proporcionada con
el producto. Aprenda y comprende sus slgnlflcados.
ATI"ENCIC_NO MOTOR MOTOR R_°IDO LENTO ESTRANGU COM- ACEITE PELIGRO,GU/,RDELAS
ADVERTENCIAENCENDIDOAPAGADO LACI(_N BUSTIBLE MANOSYLOSRESLE,X_.S
Barradecontrolquoexlge
la presendadeloperador
Cable decontrol
de zone del motor
Manilladetmangl
Sllenclader
Tapa del deposito de
aceite del motor con
Fil_'ode aire
V_iJvuladel
cad0uradcx
Cubleda de
_. la Impulsl6n
Puertade laacolchadora
IMPORTANT: Este cortacesped viene
SIN ACEITE 0GASOLINA en el motor. (encadarLJeda)
CUMPLE CON LOS REQUISITOS DE SEGURIDAD DE LA CPSC
Las segadoras a motor, que se conducen desde la parts de atr_s, rotatodas, Sears, cumplen
con los est&ndares de seguridad del Amedcan National Standards Institute y de la U.S. Con°
surner Product Safety Commission. La cuchilla gira cuando el motor est_ funcionando.
Barra de control que exlge la prencla del
operador - tiene que sujetar-se abajo, junto
con el mango, para hacer arrancar el motor.
Su_ltela pare parar el motor.
Control de acelerclon/estrangulacion - se
usa para hacer arrancar el motor y 18 permits
seleccionar la velocided der motor de ya sea
estmngulacibn, r_pida o lecta.
Puerta de acolchadore - permite la
conversi6n para la operacibn de descarga o
ensacado.
Cord6n arrancador -se usa pare hacer
arrancar el motor.
Palanca de control de la Impulsl6n - se
usa pare enganchar la segadora para
rnovimiento hacia adetante impulsada a motor,
23
_La operaci6n de cualquier
segadora puede hacer que
salten objetos exlra5os dentro
_de sus ojos. Io qua puede
producir da_os graves en estos.
Siempre use anteojos de seguddad o
protecci_ para los ojos mientras opere su
segadora o cuando haga ajustes o
reparaciones. Recomendamos una mascara
de seguddad de visi6n amplia, para uso
espejuelos o anteojos de seguridad
estandarte.
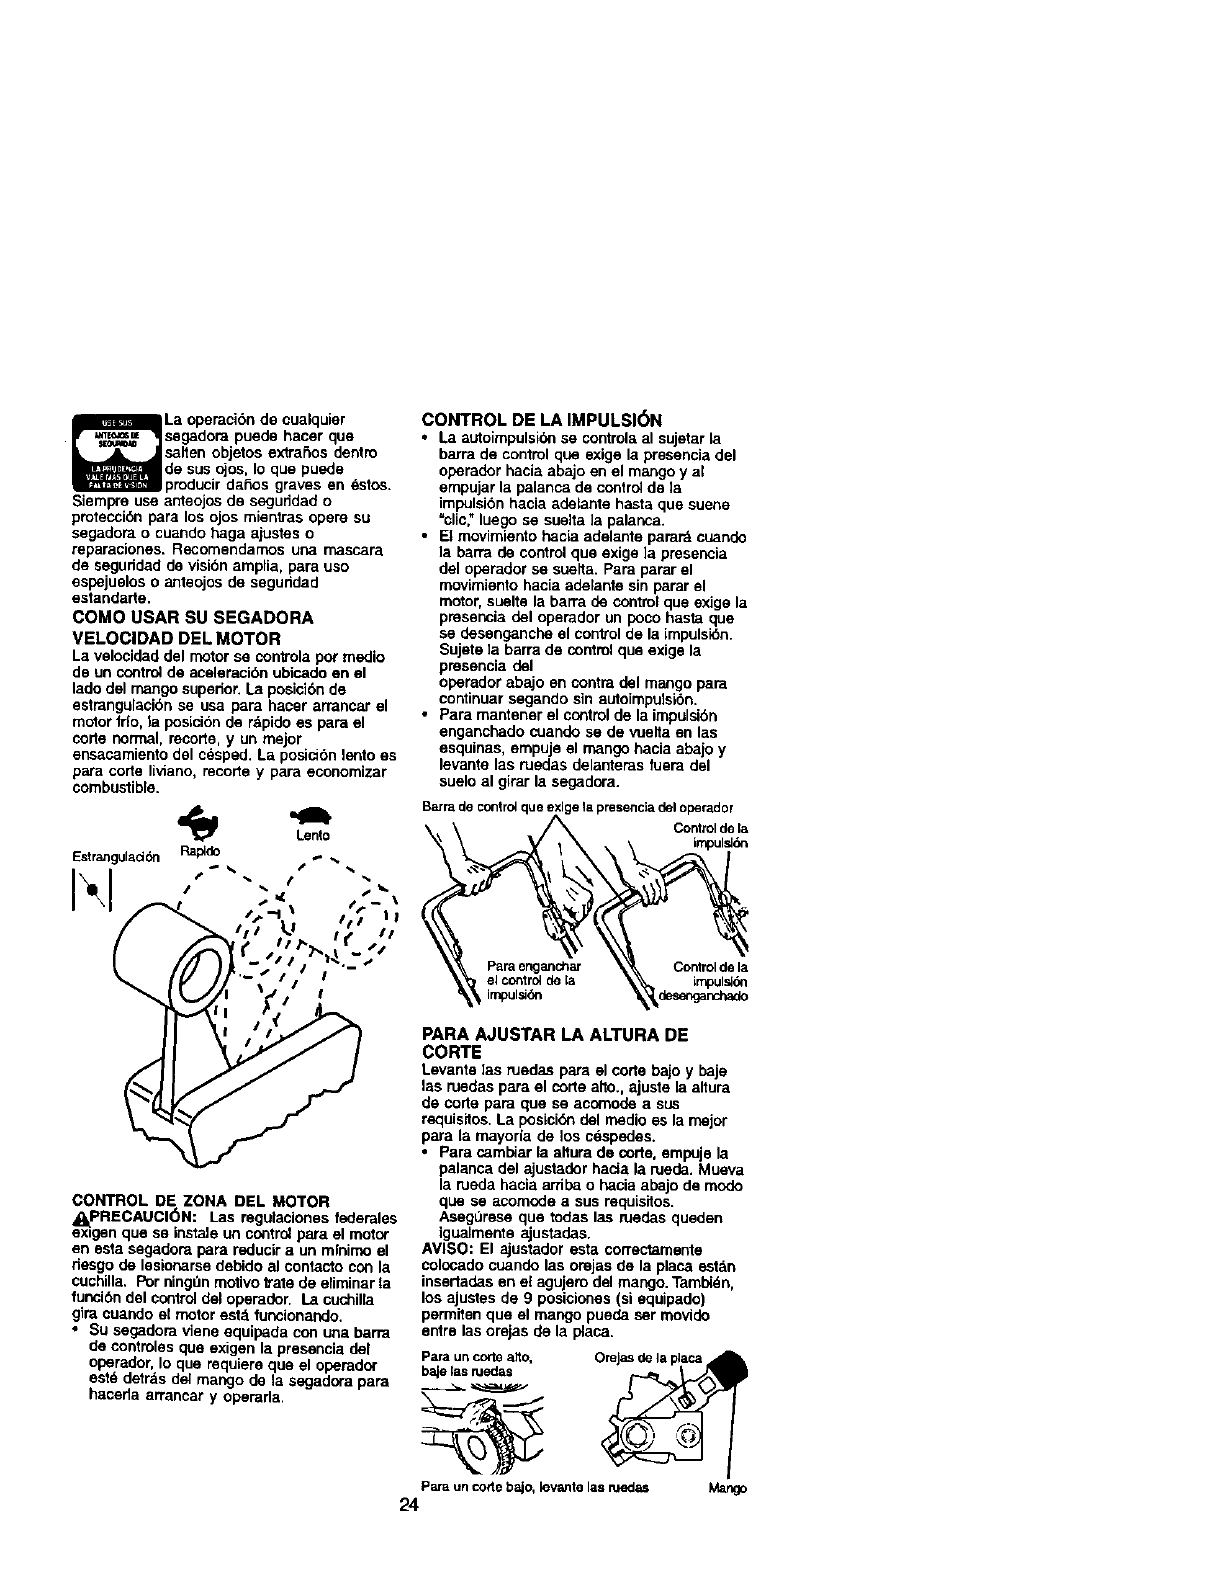
COMO USAR SU SEGADORA
VELOClDAD DEL MOTOR
La velocidad del motor se controla por medio
de un control de aceleraolbn ubicado en el
lado del mango supedor. La posici6n de
estrangulaci6n se usa para hacer arrancar el
motor fdo, la posicion de rdpido es para el
corte normal, recorte, y un ruajor
er_sacamientodel c_sped. La posicibn lento es
para corte liviano, recorle y para economizar
combustible.
Lento
Estra.qgulad_q Ra_d_ •*- _*
__l ll '-- s/ i I
I '_,4 I I
CONTROL DE ZONA DEL MOTOR
_.PRECAUCI(_N: Las regulaciones federales
exlgen que se instale un control para el motor
en esla segadora para reduolr a un mlnimo el
nesgo de lesionarse debido al contacto con la
cuchilla. Por ningDnrnotivotrate de efiminar la
funoibn del control del operader. La cuchilla
gira cuando el motor estd funcionando.
• Su segadora viene equipada con una barra
de contmles que exigen la presencia del
operador, Io qua requiere que el operador
estd detrds del mango de la segadora para
haceda arrancar y operada.
CONTROL DE LA IMPULSI6N
•La autoimpulsibn se controla al sujetar la
barra de control qua exige la presencia del
operador hacia abajo en el mango y al
ernpujar la palanca de control de la
impulsibn hacia adelante basra que suene
=clic," luego se suelta ]a palanca.
• Et movimiento hacia adelante pamr_ cuande
la barra de control que exige ]a presenola
del operador se suelta. Para parar el
rcovimiento hacia adelante sin parar el
motor, suelte la barra de control que exige la
presencia del operador un poco hasta que
se desenganche el control de la impulsi6n.
Sujete la barra de control qua exige la
presencia del
operador abajo en contm del mango para
continuar segando sin aotoimpulsi6n.
•Para mantener el control de la impulsibn
enganchado cuando se de vuelta en las
esquinas, empuje el mango hacia abajo y
levante las roedas delanteras fuem del
suelo al girar la segadora.
Basra de contrc4que e ,perador
Control de Ia
impulddn
Para enganchar Control de la
el contro_ de la impuls_
IrnpulsJ_ _e_gand_
PARA AJUSTAR LA ALTURA DE
CORTE
Levante ]as ruedas para el corte bajo y baje
las ruedas para el corte alto., ajuste la altura
de code para que se acomode a sus
requis_tos.La posici6n del modio es la mejor
para la mayorla de los cespedes.
•Para cambiar la altura de code, empuje la
palanca del ajustader haola la rueda. Mueva
la ruada hacia arriba o hacia abajo de modo
qua se acomode a sus requisitos.
Asegurese que todas las ruedas queden
igualmente ajustadas.
AVISO: El ajustador esta correctamente
colccado cuando las orejas de la placa est&n
inserladas en el agujero del mango. Tamb_dn,
los ajustes de 9 posiciones (st equipado)
permilen que el mango pueda ser movido
entre las orejas de la placa.
Para uncodeaRo, Orejasde la I_
bajelasruedas
Pa_ un co_e bajo, lewmte las n,mdas
24
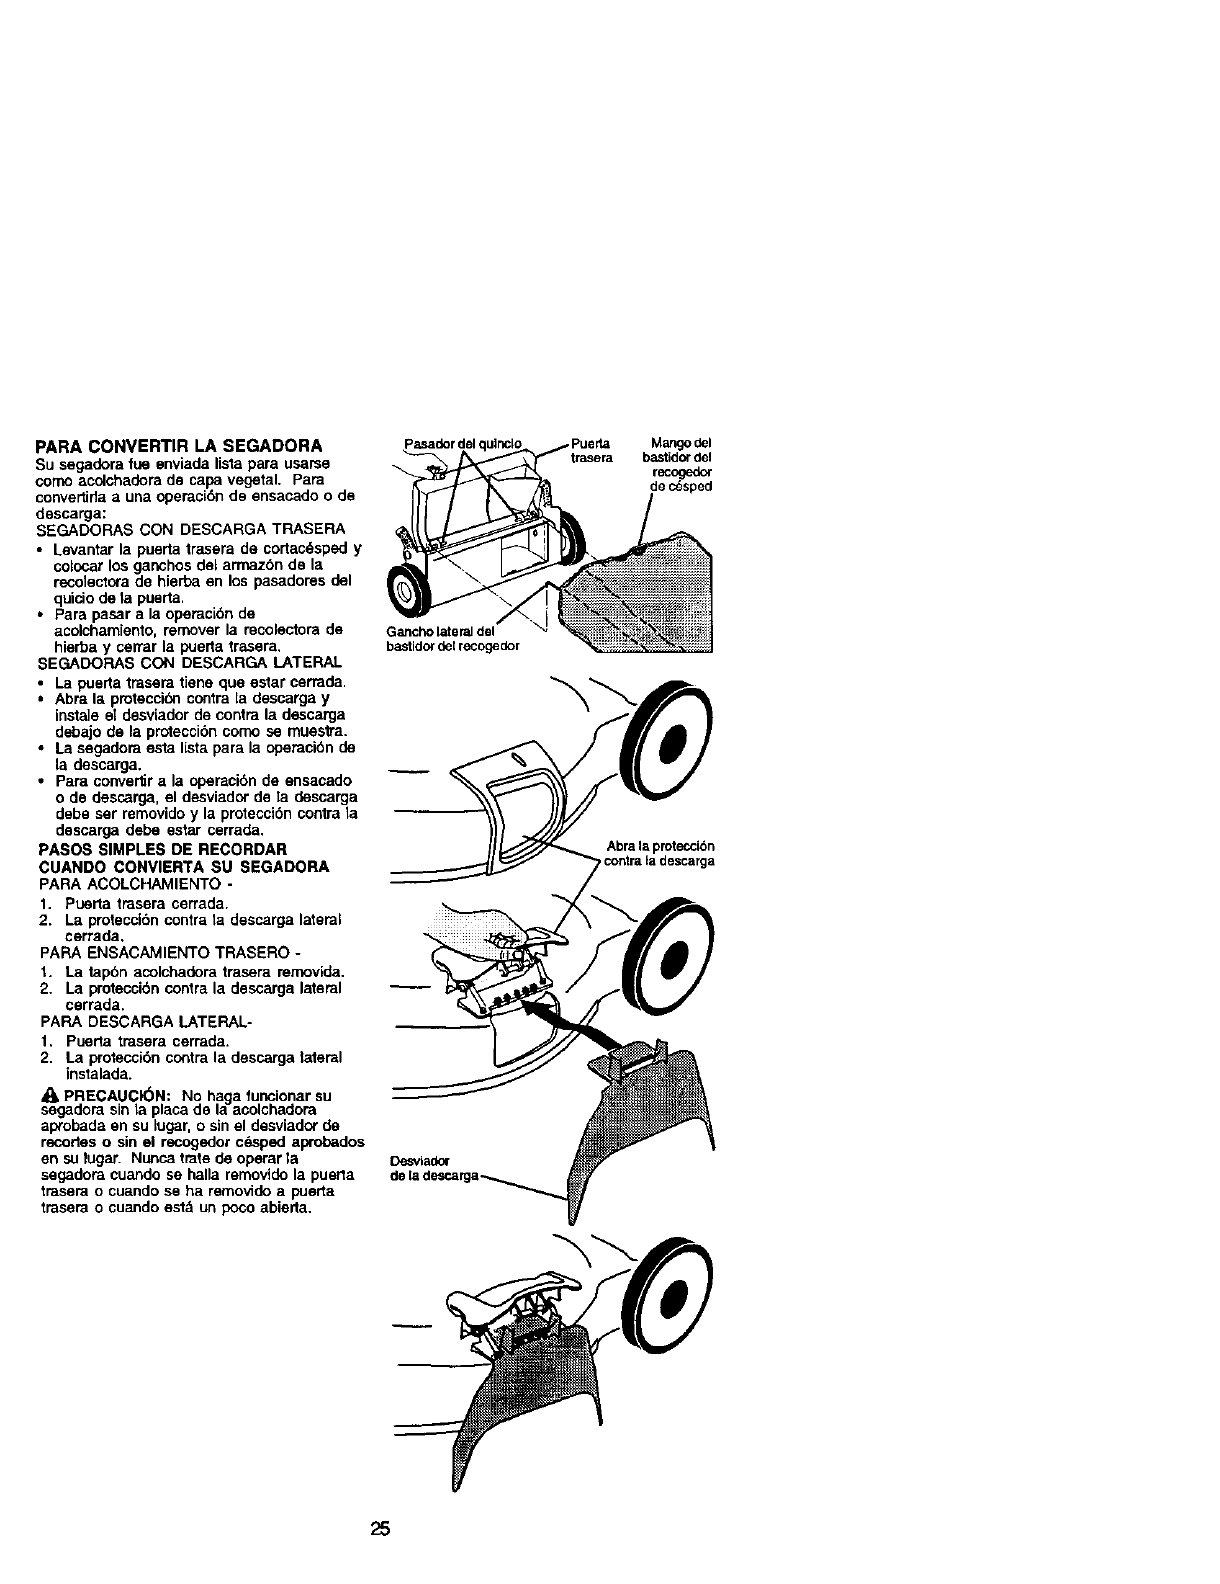
PARA CONVERTIR LA SEGADORA
Su segadora rue enviada lista para usarse
como acolchadora de capa vegetal, para
convertida a una operaci6n de ensacado o de
descarga:
SEGADORAS CON DESCARGA TRASERA
• Levantar la puerta trasera de cortac6sped y
colocar los ganchos del arrnazbn de la
recolectora de hierba en los pasadores del
quicio de la puerta.
• Para pasar a la operaci6n de
acolchamiento, remover la recolectora de
hierba y cerrar la puerta trasera,
SEGADORAS CON DESCARGA LATERAL
• La puerta trasera tiene que estar cerrada.
• Abra la proteccibn contra la descarga y
instale el desviador de contra la descarga
debajo de la protecci6n como se mues_'a.
• La segadora esta lista para la operaci6n de
la descarga.
•Para conve_r a la operaci6n de ensacado
ode descarga, el desviador de la descarga
debe ser removido y la proteccibn contra la
descarga debe estar cerrada,
PASOS SIMPLES DE RECORDAR
CUANDO CONVIERTA SU SEGADORA
PARA ACOLCHAMIENTO -
1. Puerta trasera cerrada.
2. I_a proteccibn contra la descarga lateral
cerrada,
PARA ENSACAMIENTO TRASERO -
1. La tap6n acolchadora trasera removida,
2. La proteccibn contra la descarga lateral
cerrada.
PARA DESCARGA LATERAL-
1. Puerta trasera cerrada.
2. La proteccibn contra la descarga lateral
instalada.
A(_ PRECAUCK_N: No haga funcionar su
segadora sin la placa de la acolchadora
aprobada en su lugar, o sin el desviador de
recortes o sin el recogedor cesped aprobados
en su lugar. Nunca irate de operar la
segadora cuando se halla removido la puerta
_rasera o cuando se ha removido a puerta
trasera o cuando est& un poco abierta,
pasadordel¢
Gancho lateral del
bastidor del recogedor
Desviadof
Mango del
trasera bastidor del
recogedor
de c_sped
Abra laprotecci6n
pcol3traLadoscarga
25
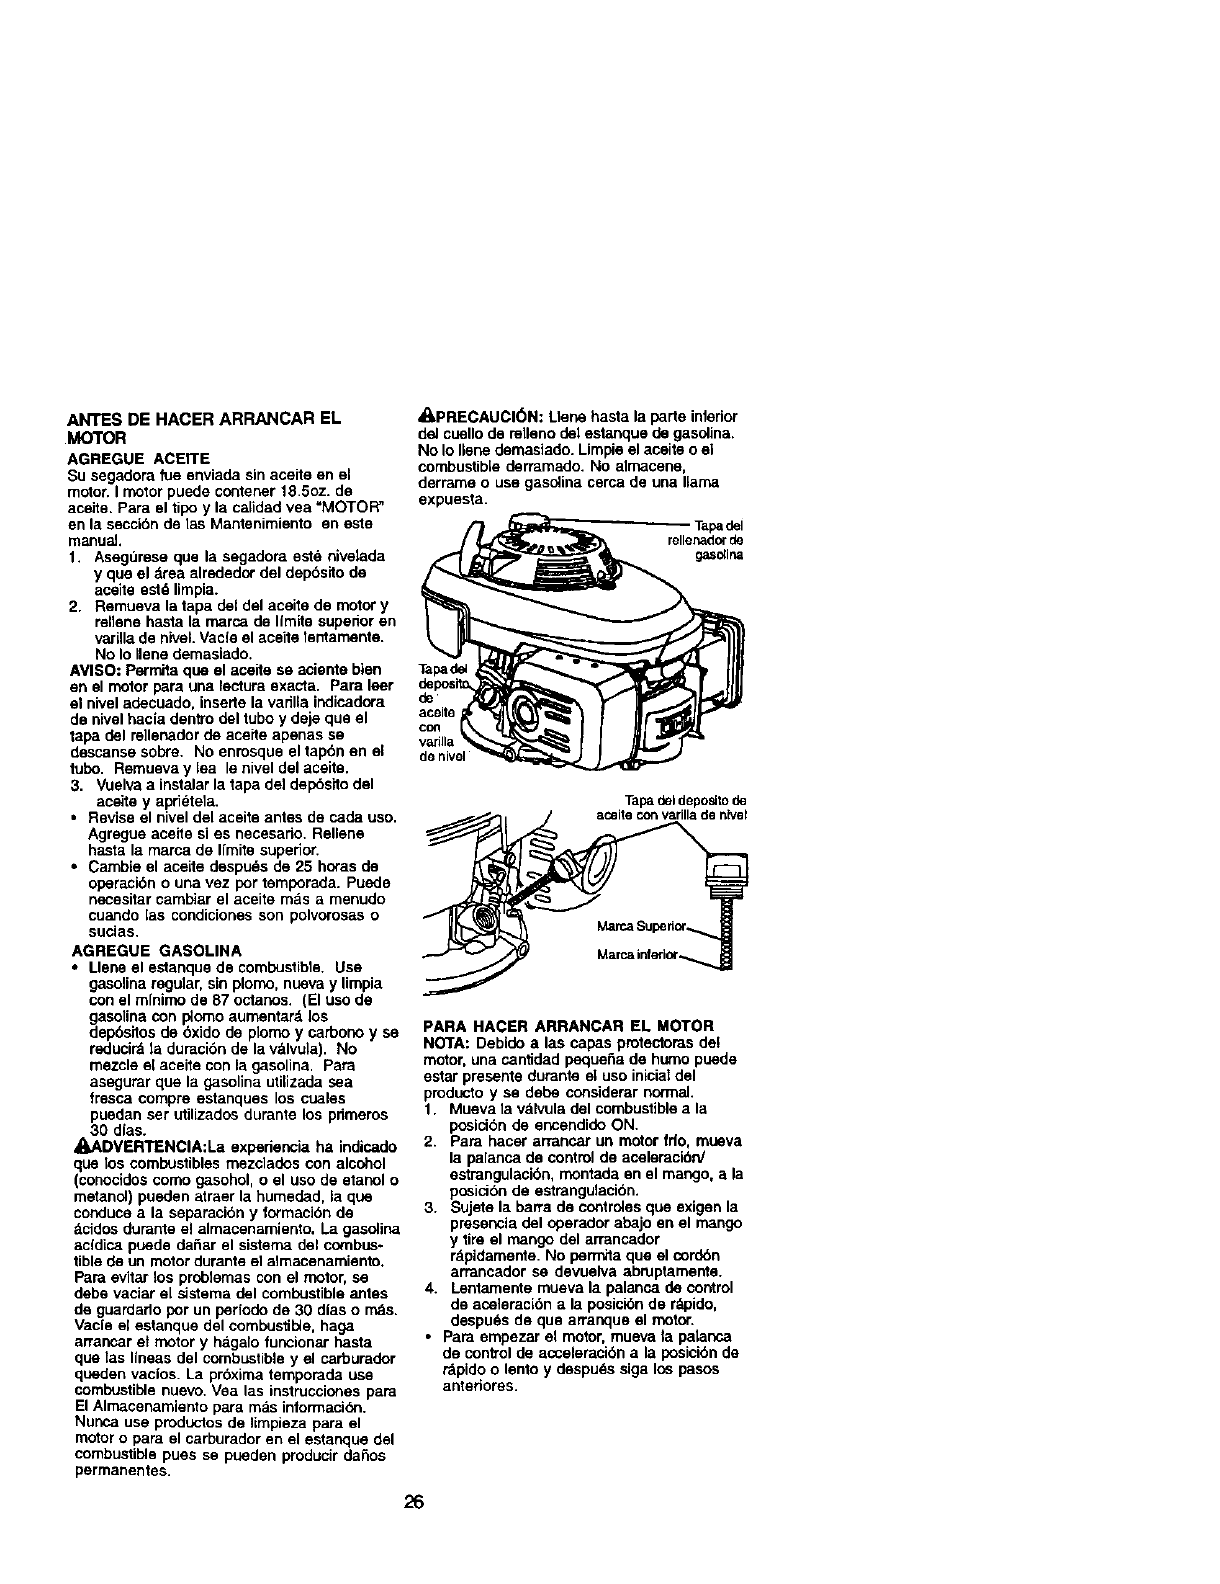
ANTES DE HACER ARRANCAR EL
MOTOR
AGREGUE ACEITE
Su segadora rue enviada sin acelte an el
motor. I motor puede contener 18,5oz. de
acel_e, Para el tipo y la calidad vea =MOTOR"
en la secci6n de las Mantenimiento en este
manual
1. Aseg0rese que la segadora est_ nivalada
y que el drea alrededor del depbsito de
aceite estd lirnpia.
2. Remueva la tapa del del aceite de motor y
rellene hasta la marca de llmite supenor an
varilla de niveLVacfe el aceite lentamente.
No Io Ilene demasiado.
AVISO: pormita que el acalte se aciente bien
en el motor para una lectura exacta. Para leer
el nivel adecuado, insede la varilla indicadora
de nivel hacia dentro del tube y deje que el
tapa del rellenador de aceffe apenas se
descanse sobre, No enrosque el tap6n en el
tube, Remueva y lea Is nivel del acalte.
3, Vuelva a instalar la tapa de] dep6sito del
acelte y apri(_tela,
• Revise el nivel del aceite antes de cada use,
Agregue acelle si es necesario, Rellene
hasta la marea de I[mite superior.
•Carnbie el acelte despu_s de 25 horas de
operaci6n o una vez got temgorada. Puede
necesi_ar cambiar el aceite rods a mei3udo
cuando las condiciones son polvorosas o
sucias.
AGREGUE GASOLINA
• Llene el estanque de combustible. Use
gasolina regular, sin plomo, nueva y limpia
con el rnlnimo de 87 octanes. (El use de
gasolina con i_omo aumentard los
depbsitos de 6xido de plomo y carbono y se
reducir_ la duraci6n de la vdlvula). No
mezcle el aceite con la gasolina. Para
asegorar que la gasolina utilizada sea
fresca COrnpre estanques los cuales
puedan ser utilizados durante los pdrneros
30 dlas.
_ADVERTENCIA:La expedencia ha indicado
que los combustibles mezclades con alcohol
(conocidos come gasohol, o el use de etanol o
metanol) pueden atraer la humedad, la que
conduce a la separaci6n y formacibn de
_cidos durante el almacenarniento. La gasolina
acldica puede daSar el sistema del combus-
tible de un motor durante el almacenamiento.
Para evitar los problernas con el motor, se
debe vaciar el s_stema del combustible antes
de guardado per un perfodo de 30 dlas o rods.
Vacie el estanque del cornbusti_e, haga
arrancar el motor y hagalo funcionar hasta
que las IIneas del combustible y el carburador
queden vacios. La prbxirna ternporada use
combustible nuevo. Vea las instrucciones para
El Almacenarniento para rnas intormaci6n.
Nunca use productos de lirnpieza para el
motor o para el carburador en el estanque del
combustible pues se pueden producir da_os
permanentes.
_,PRECAUCI(_N: L)ene hasta la parte infeder
del cuello de relleno del estanque de gasolina.
No Io Ilene demasiado. Limpie el aceite o el
combustible derramado, No elmacene,
derrame o use gasolina cerca de una llama
expuesta.
rapa del
rellenador de
gaso_lna
Tapa d_
de
aceite
coil
de nivel
Tapa del deposJtode
aosite con varilla de nlvet
Marca inferior._.
PARA HACER ARRANCAR EL MOTOR
NOTA: Debido a las capas pmtectoras de!
motor, una cantidad pequeSa de humo puede
estar presente doranto el use ialcial del
producto y se debe considerar normal.
1. Mueva la vdlvula del combustible a la
posicibn de encendide ON.
2. Para hacer arrancar un motor fdo, mueva
la palanca de control de aceleraci6n/
estrangulaci6n, montada en el mango, a la
posici6n de estrangulaci6n.
3. Sujete la barra de controles que exigen la
pmsencla del operador abajo en el mango
ytire el mango del arrancador
r_pidamente. No permita que el corden
arrancador se devuelva abruptamente.
4. Lentamente mueva la palanca de control
de aceleraci6n ala posici6n de r&pido,
despu6s de que arranque el motor.
• Para empezar el motor, mueva la palanca
de control de acceleraci6n a la posici6n de
rapido o lento y despu6s siga los pasos
antedores.
26
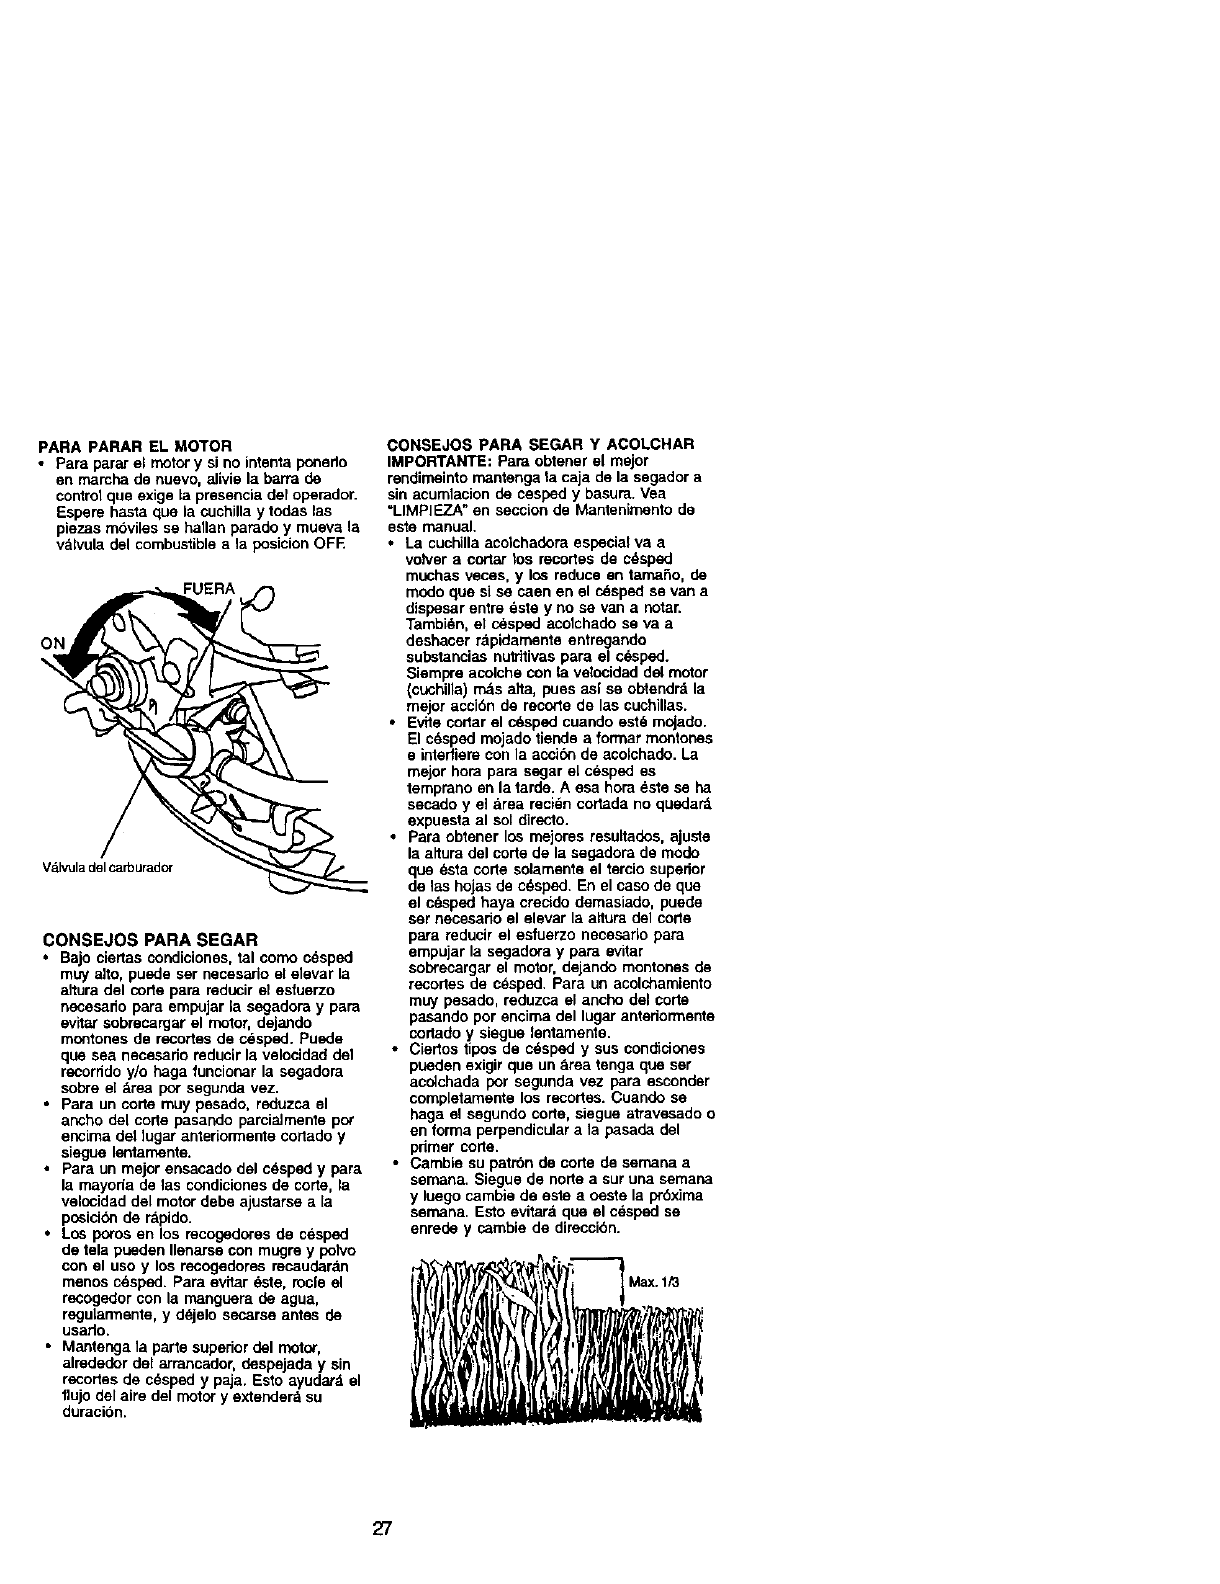
PARA PARAR EL MOTOR
• Para parar el motor y si no intenta ponedo
en marcha de nuevo, alivie la barra de
control que exige la presencia del operador.
Espere hasta que la cuchilla y todas las
p,iezas mbviles se hallan parado y mueva la
valvula del combustible a la posicion OFF.
Vdlvula del carburador
CONSEJOS PARA SEGAR
•Bajo ciedas condiciones, tal corn<)c_sped
muy alto, puede ser necesado el elevar la
altura del code para reducir el esfuerzo
necesano para empujar la segadora y para
evitar sobrecargar el motor, dejando
montones de recortes de c_sped. Pusde
que sea necesado reducir la velocidad del
recorddo y/o haga funcionar la segadora
sobre el _rea por segunda vez.
•Para un corte muy pesado, reduzca el
ancho de[ code pasando percialmente pot
encima de1lugar anteriormeote cortado y
siegue lentamente.
•Para un mejor ensacado del c_sped y para,
la mayoda de 1as condiciones de corte, la
velccidad del motor debe ajustarse a la
posicide de rapido.
•Los poros en los recogedores de cesped
de tela pueden Ilenarse con mugre ypelvo
con el uso y los recogederes recaudaran
menos crisped. Para evitar dste, rocle el
recogedor con la manguera de agua,
regularmente, y d_jelo secarse antes de
usado.
•Mantenga la parte supedor del motor,
alrededor del arrancador, despejade y sin
recortes de c_sped y paja. Esto ayudar_ el
flujo del aire del motor y extender& su
duracion.
CONSEJOS PARA SEGAR Y ACOLCHAR
IMPORTANTE: Para obtener el mejor
rendimointo mantenga ta caja de la segador a
sin acumlacion de cesped y basura. Vea
=LIMPIF..ZA"en seccion de Mantenimonto de
este manual.
•La cuchilla acotchadera especial va a
voh/er a cortar tos recortes de cdsped
muchas veces, y los reduce en tama5o, de
modo que si se caen en el cdsped se van a
dispesar entre _ste yno se van a notar.
Tambidn, el c_sped acolchade se va a
deshacer rapidarnente entregando
substancias notritivas para el c.&sped.
Siempre acolche con la velocidad del motor
(cuchilla) m_s a]ta, pues asl se obtendrd la
mejor acci6n de recorte de las cuchillas.
•Evite codar el cdsped cuando est6 mojado.
El cdsped mojado tiende a format montones
e interfiere con la accide de acoLchade.La
mejor hora para segar el c_sped es
temprano en la tarde. A esa hora este se ha
secado y e] &tea recien cortada no quedard
expuesta al sol direoto.
•Para obtener los mejores resultades, ajuste
la altura del corte de la segadora de modo
que _sta code solamente el tercio supedor
de las hojas de c_sped. En el caso de que
el cdsped haya crecido demasiado, puede
ser necesario el elevar la altura del corte
para reducir el esfuerzo necesado para
empujar la segadora y para evitar
sobrecargar el motor, dejando montones de
recortes de cesped. Para un acolchamiento
muy pesado, reduzca el ancho del corte
pasando por encima del lugar antedormente
codado y siegue lentamente.
• Ciertos tipos de c_sped y sus condiciones
pueden exigir que un area tenga que ser
acolchada por segunda vez para esconder
completamente los re,cortes. Cuando se
haga 64segundo code, siegue atravesado o
en forma perpendicular a la pasada del
pdmer code.
• Oambie su patrbn de code de semana a
semana. Siegue de node a sur una semana
y luego cambie de este a oeste la 1_(Sxima
semana. Esto evitard que el cdsped se
enrede y cambie de direccibn.
27
1 - Carrlbiarrn&sa menudo cuando Nopere bajo carga peeada o en arnbkmte6 con a_ _
2* De_ _m4clo ti_a amimudo cual!dc=se ape_e an COnd_ Buciaa o polvoro_,
3oCalnbie las cuCh_llaSr_s amenudo cuai_dosiegue an terreno a_os_
4°Cargar pot 48 hoPasal fll de la tellpc_de.
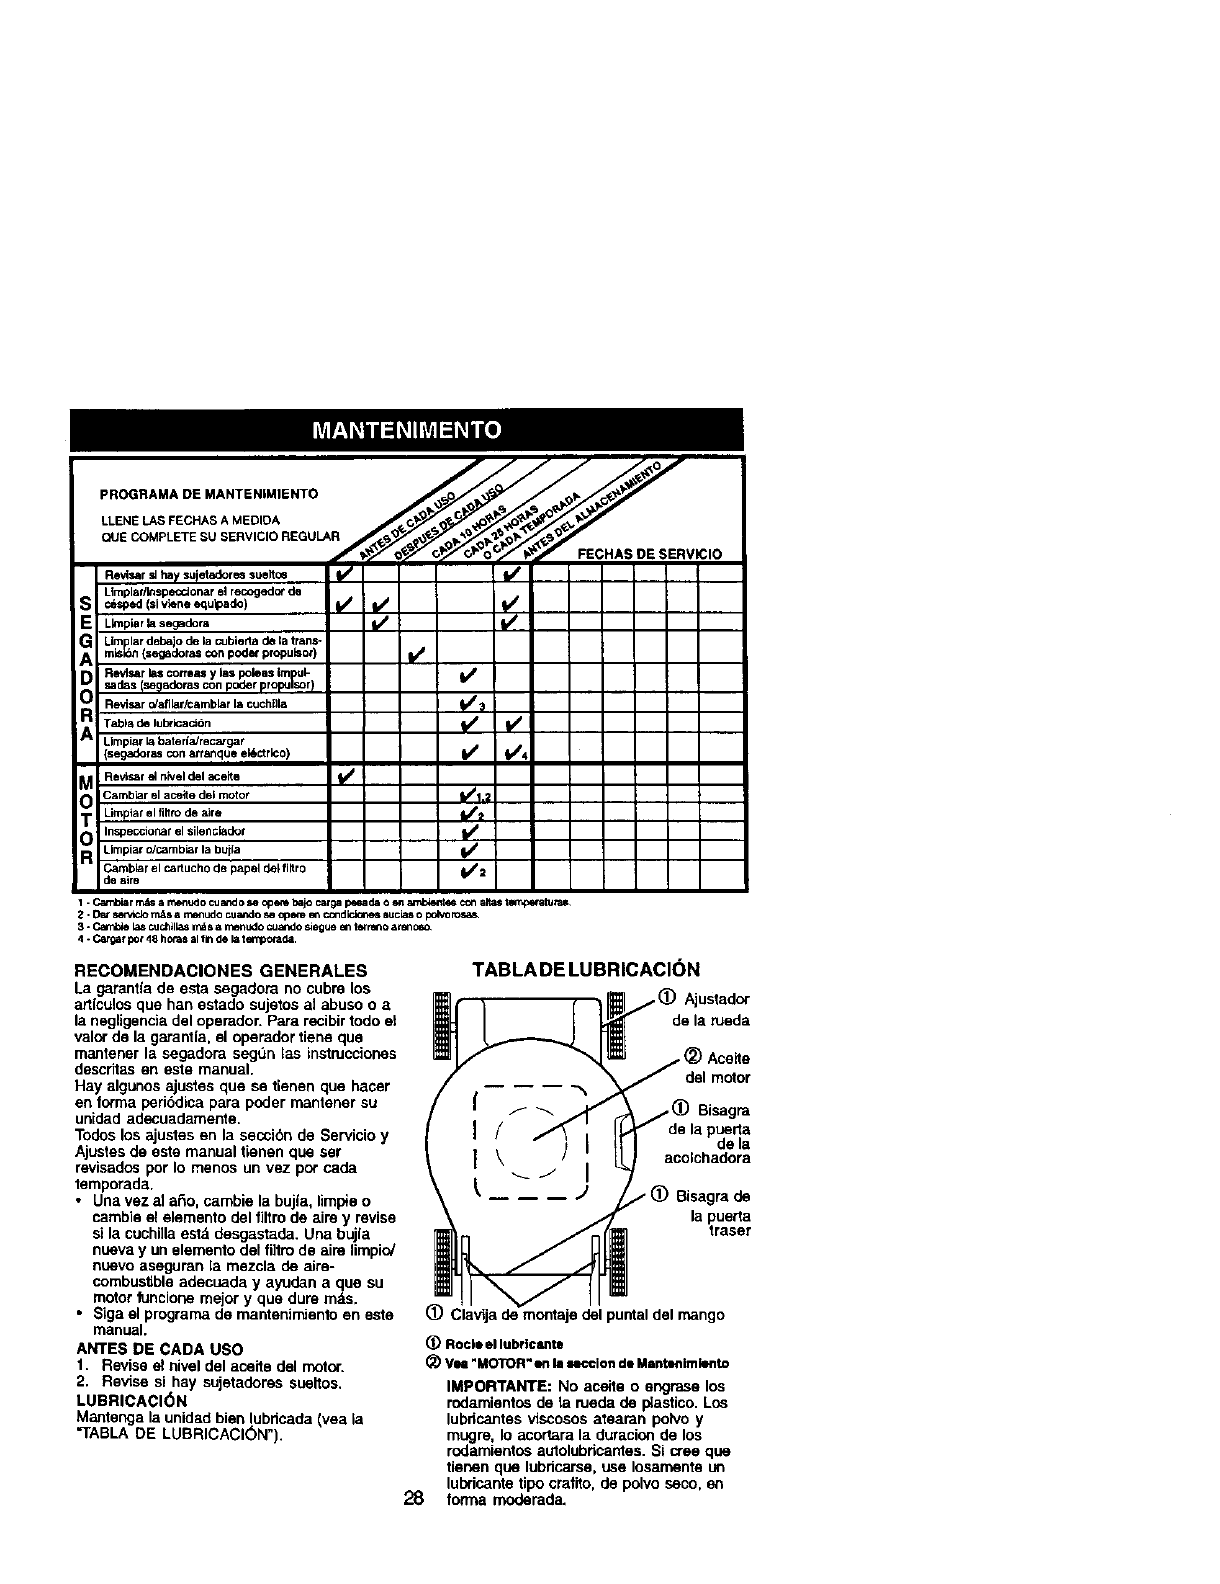
RECOMENDAClONES GENERALES
La garantla de esta segadora no cubre los
art[culos que hart estado sujetos al abuso o a
la negligencia del operador. Para recibir todo el
valor de la garantla, el operador fiene qua
mantener la segadora segQn tas instrucciones
descritas en este manual.
Hay algunos ajustes que se tienen que haser
en fonna peribdica para poder mantener su
unidad adecuaclamente.
Todos los ajustes en la seccibn de Servicio y
Ajustes de este manual tienen que set
revisados pot Io menos un vez pot cada
temporada.
• Una vez a] aRo, cambie la buj{a, limpie o
cambie el elemento del filtro de aim y revise
si la cuchi]la est_ desgastada. Una bujla
nueva y un elemento del filtm de aim limpio/
nuevo aseguran [a mezcla de aire-
combustible adecuada y ayudan a que su
motor funcione mejor y que dure rods.
•Siga el programa de mantenirniento en este
manual.
ANTES DE CADA USO
1. Revise el nivel del aceile del motor.
2. Revise si hay sujetadores sseltos.
LUBRICACI(_N
Mantenga la unidad bien lubricada (yea la
=TABLA DE LUBRICACI(_N').
TABLA DE LUBRICACI(_N
de la rueda
del motor
Bisagra
de la puerta
de la
acolchadora
_' -- -- -- J(_ Bisegra de
la puerta
fraser
(_) Clavija de montaje del puntel del mango
(_ Rocle el lubricants
(:_ Vea "MOTOR" en la seccion de Mantenimlento
28
IMPORTANTE: No acelte o engrase los
rodamientos de la rueda de p[astico. Los
lubricantes viscosos atearan polvo y
mugre, Io acortara la duracion de los
rodamientos autolubdcantes. Si cree que
tienen que lubdcarse, use Iosamente un
lulxicante tipo crafito, de polvo seco, en
forma moderada.
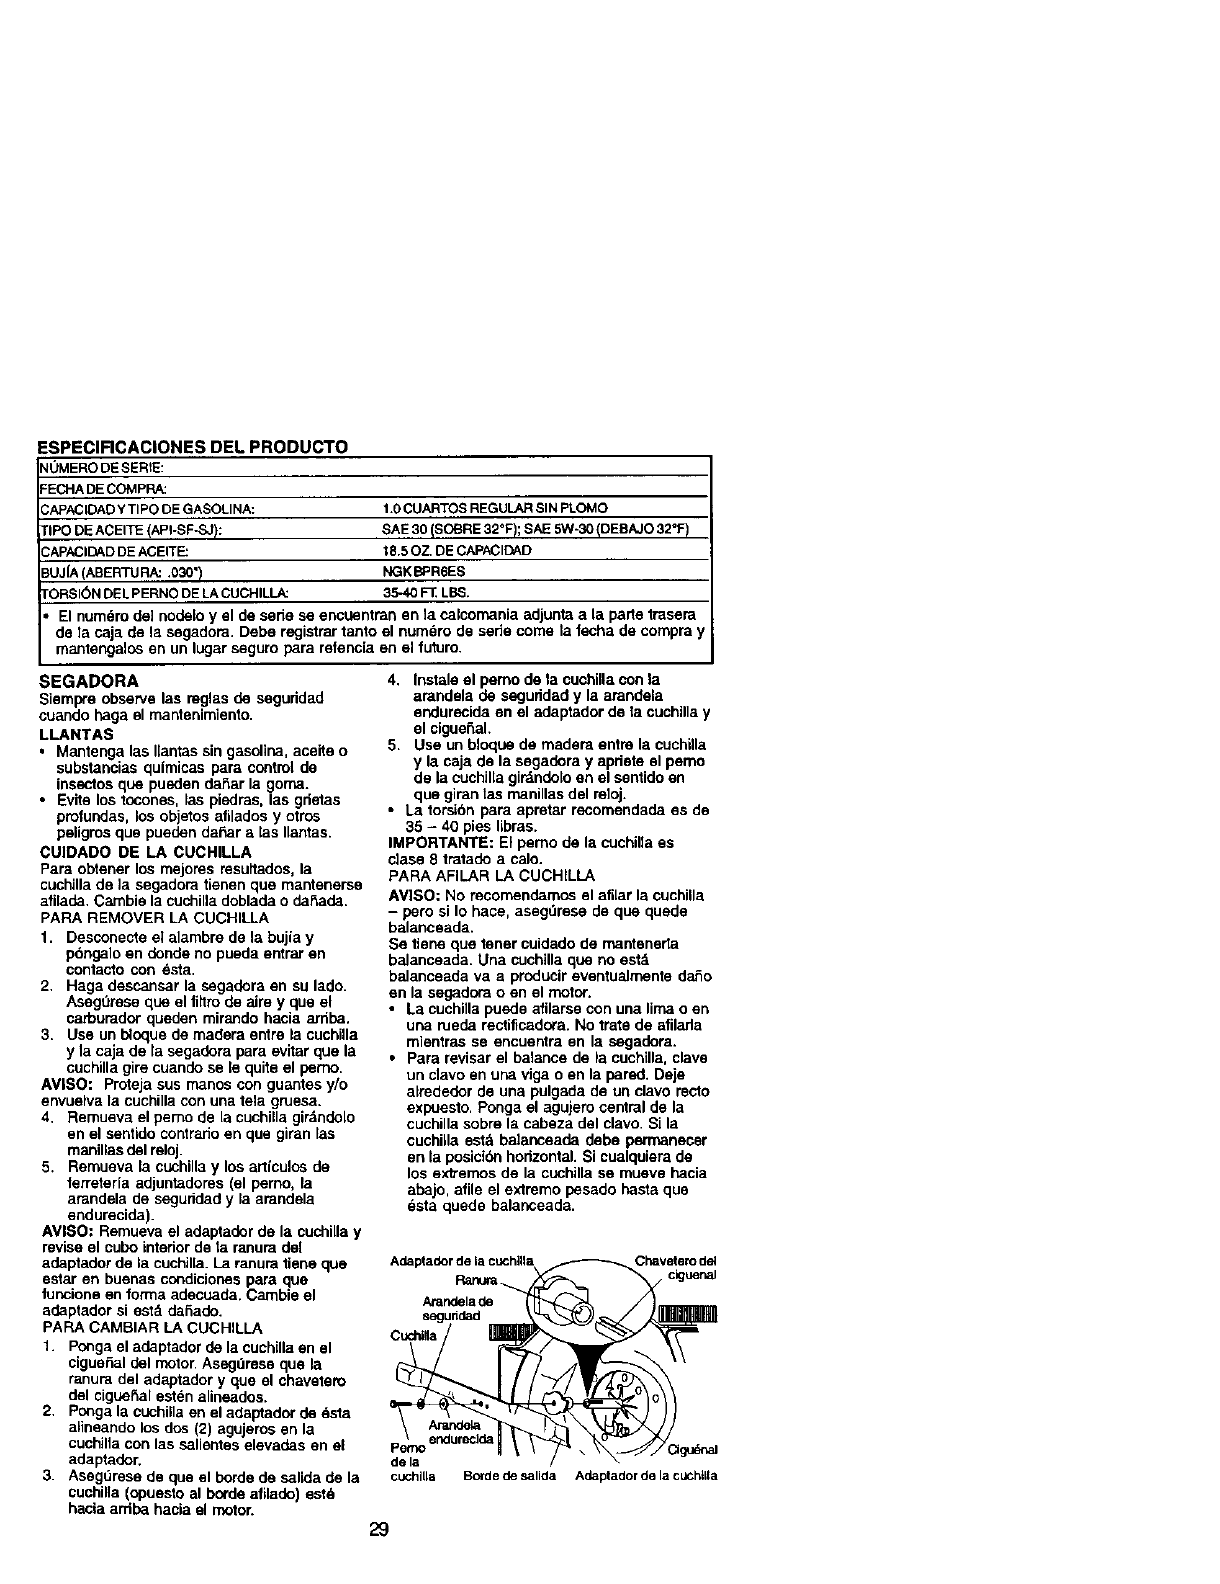
ESPECIRCACIONES DEL PRODUCTO
NUMERO DE SERIE:
FECHA DE COMPRA:
CAPAC[DAD Y TIPO DE GASOLINA:
TIPO DE ACEITE (API-SF*SJ):
CAPACIDAD DE ACEITE:
BUJ{A (ABERTURA: .030")
TORSION DEL PERNO DE LA CUCHILL_
• El num_ro de] nodelo y el de sede se encuentran en la calcomania adjunta a la parte trasera
de la caja de la segadom. Debe rs<:jistrar tanto el numero de sede come la fecha de compra y
mantengalos en un lugar seguro para refencla en el fuluro.
1.0 CUARTOS REGULAR SIN PLOMO
SAE 30 ISOBRE 32°F); SAE 5W-30 (DEBAJO 32°F)
18.5 OZ. DE CAPACIDAD
NGK BPR6ES
35-40 F-ELBS.
;EGADORA
Siempre observe las mglas de segurided
cuando haga el mantenimiento.
LLANTAS
• Mantenga las I[antas sin gasolina, aceite o
substancias quimicas para control de
insectos que pueden daSar la goma.
•Evite los tocones, las piedras, las gdetas
profundas, los objetos afilados y otros
peligros que pueden daFlaralas Ilantas.
CUIDADO DE LA CUCHILLA
Para obtener los mejores resultados, la
cuchillade la segadora tienen que mantenerse
afilada. Cambie la cuchilla doblada o dasada.
PARA REMOVER LA CUCHILLA
1. Desconecte el alambre de la bujia y
pbngalo en donde no pueda entrar en
contacto con esta.
2. Haga descansar la segadora en su lado.
AsegQrese que el fiffm de airs y qua el
carburador queden mirando hacia arriba.
3. Use un b_oquede rnadera entre la cuchilla
y la caja de la segadera para evitar qua la
cuchilla gire cuando se le quite el perno.
AV|SO: Proteja sus manos con guantes y/o
envuelva la cuchilla con una tela gruesa.
4. Remueva el perno de la cuchilla gir_nde[o
en el sentido contrarioen que giran las
manillas del reloj.
5. Remueva la cuchilla y los articulos de
ferreter[a adjuntadores (el pamo, la
arandela de seguridad y la arandela
endurecida).
AVISO: Remueva el adaptader de la cuchilla y
revise el cubo interior de ta ranura del
adaptador de la cuchilia.La ranura tiene qua
estar en buenas condiciones para que
funcione en forma adecuada. Cambie el
adaptador si estd daSado.
PARA CAMBIAR LA CUCHILLA
1. Ponga el adaptador de la cuchilla an el
cigueSal del motor, Asegdrese qua la
ranura del adaptador y que el chavetaro
del ciguef_alesten alineados.
2. Ponga la cuchilla en el adaptador de dsta,
alineando los dos (2) agujeros en la
cuchilla con las salientes elevadas en el
adaptador.
3. Aseg_rese de que el borde de salida de la
cuchilia (opuesto al borde afilado) estd
hacia arriba hacia el motor.
4. Instals el pemo de la cuchilla con la
amndela de seguddad y la amndela
eedurecida en el adaptador de la cuchilla y
el cigue5al.
5. Use un bloque de madam entre la cuchilla
y la caja de la segadora y apdete el pemo
de la cuchilla girdndelo en el sentido en
que giran tas manillas del reloj.
• La torsibn para apretar recomendada es de
35 - 40 pies libras.
IMPORTANTE: El pemo de la cuchilla as
ciase 8 tratade a calo.
PARA AFILAR LA CUCHILLA
AVISO: No recomendamos el afilar la cuchilla
- pero si Io hace, asegdresa de que quade
balanceada.
Se tiene que tener cuidado de manteneda
balanceada. Una cuchilla que no ect_
balanceada va a producir eventualmente daSo
en la segadom o en el motor.
• La cuchilla puede afllarse con una lima o en
una nJeda rectificadora. No irate de afilarla
mientras se encuentra en la segadera.
•Para revisar el balance de la cuchilla, clave
un clavo an una riga o en la pared. Deje
airededor de una pulgada de un clavo recto
expuesto. Ponga el agujero central de la
cuchilla sobre la cabeza del clavo. Si la
cuchilla est_ ba]anceada debe patrnanecer
en la posici6n horizontal. Si cualquiera de
los ex'b'emos de la cuchilla se mueve hacia
abajo, afile el extremo pasado hasta que
dsta quede balanceada.
RarlUi8 _
Arandela da
seguridad
CuchlHa
Chaveterodet
dguenal
Arande_a
perno endurecjd_
de la
cuchlLla Borde de sallda Adaptador de la cLJChtLta
29
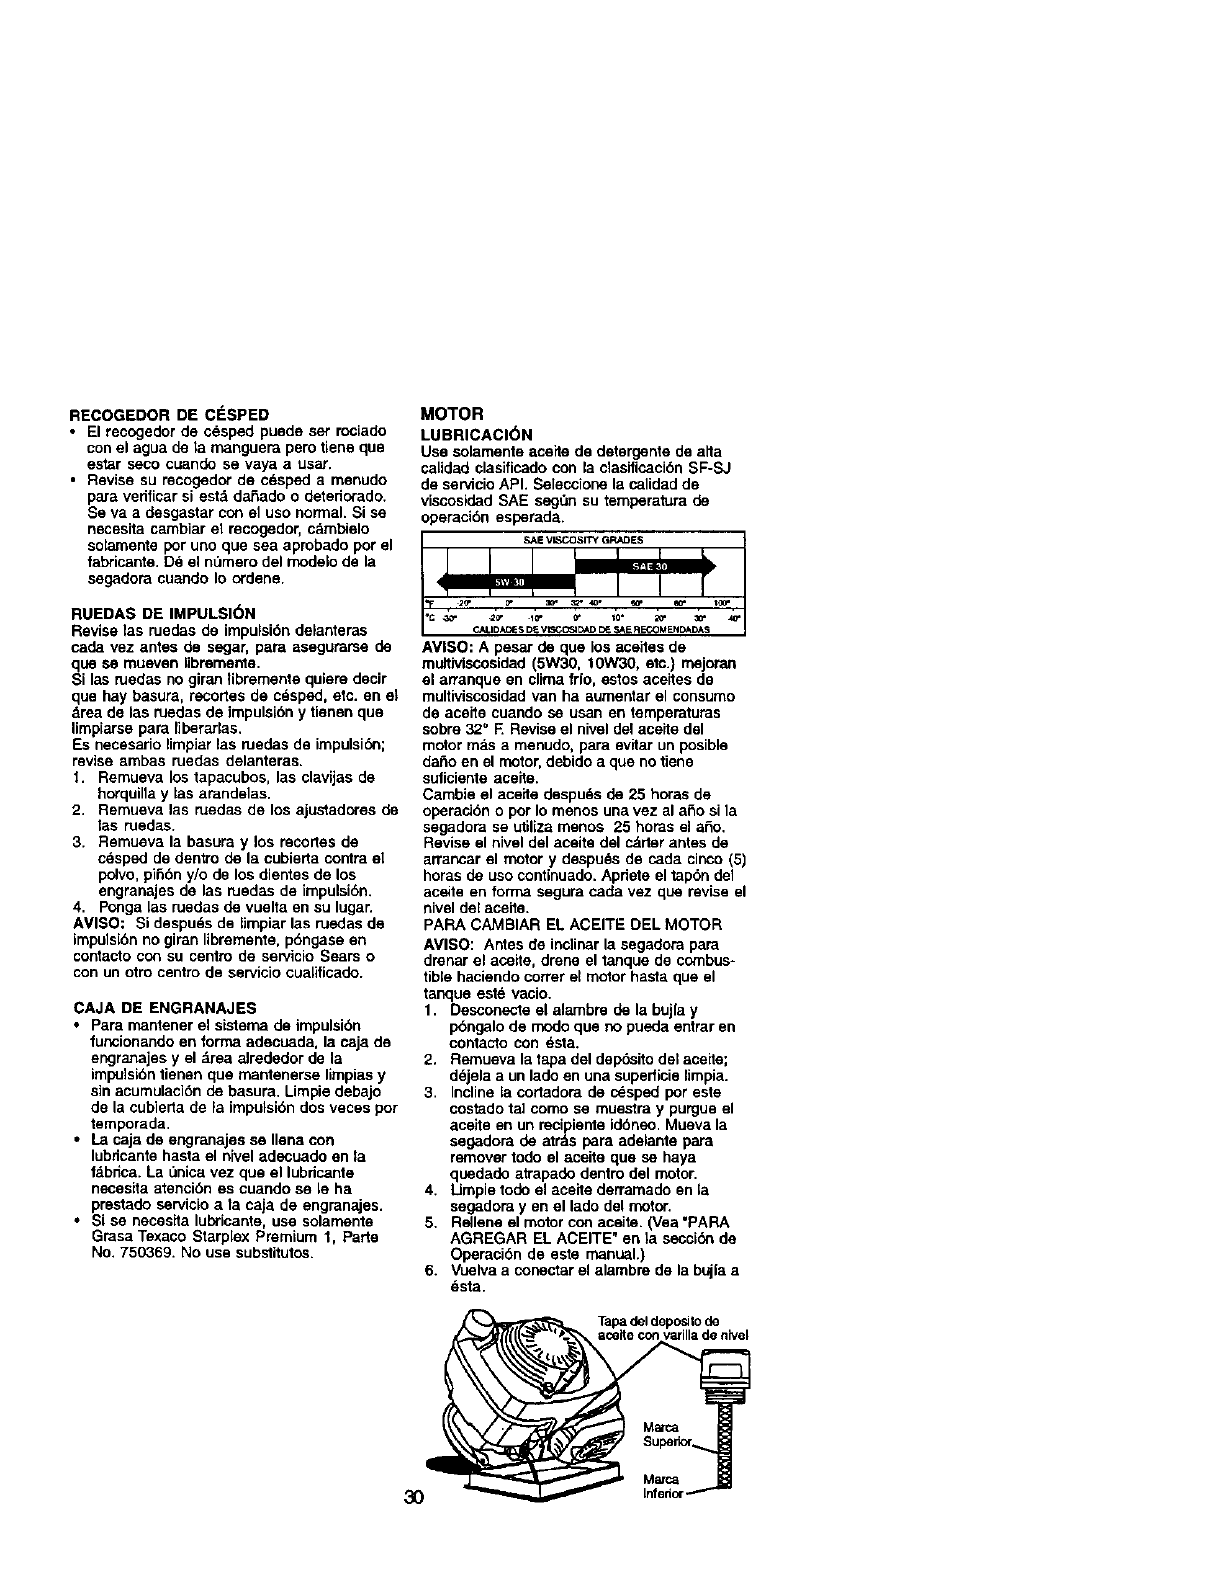
RECOGEDOR DE ClaSPED
•El recogedor de cesped puede set rociado
con el agua de ;a rnanguera pero tLenequa
es_r seco cuande se vaya a uaar.
• Revise su recogedor de cdsped a menudo
para vedficar si est_ daSade o detedorado.
Se va a desgastar con el uso normal. Si se
necesita cambiar el recogedor, c&mbielo
solamente por uno qua sea aprobado por el
fabricante. D_ el mimero del modelo de la
segadora cu_do Io ordene.
RUEDAS DE IMPULSION
Revise las ruedas de impuisi6n delanteras
cada vez antes de segar, para asegurarse de
qua se mueven libremeote.
Si las ruedas no giran libremente quiere decir
qua hay basura, recortes de cdsped, etc. en el
&rea de las ruedas de impulside y tienen qua
limp[arse para liberarlas.
Es necesario limpiar las nJedas de impulside;
revise ambas ruedas delanteras.
1. Remueva los tapacubos, las clavijas de
horquina y las amndelas.
2. Remueva las medas de los ajustadores de
las ruedas.
3. Remueva la basura y los mcortes de
c_sped de dentro de la cubierta contra el
polvo, pifi6n y/o de los dientes de los
engranajes de las ruedas de impulsi6n.
4. Ponga las ruedas de vuelta en su lugar.
AVISO: Si despuds de limpiar las nJedas de
impulsi6n no giran libremente, pdngase en
contacto COnSU centro de Sewicio Sears O
con un otro centro de servicio cualificado.
CAJA DE ENGRANAJES
•Para n_ntener el sistema de impulsi6n
funcionando en forma adecuada, la caja de
engranajes y el drea alrededor de la
impulsi6n tienen qua mantenerse limpias y
sin acumulaci6n de basura. Limpie debajo
de la cubierta de ia impulsi6n dos races pot
temporada.
•La caja de engranajes se liana con
lubdcante hasta el nivel adecuado en la
f&bdca. La Linica vez qua el lubricante
neces_ta atenci6n es cuando sele ha
prestado setvicio ata caja de engranajes.
•Si se necesffa lubricante, use solarnente
Grasa Texaco Starplex Premium 1, Parte
No. 750369. No use substitutos.
MOTOR
LUBRICACI()N
Use solamente aceite de detergente de alia
calidad clasificado con la clasificaci6n SF-SJ
de servicio API. Seleccione la calidad de
viscosidad SAE seg_n su temperatura de
operacibn esperada.
SAEVISCOSITY GRADES
CALIDACE_ DE
AVISO: A pesar de qua los aceites de
multiviscosidad (5W30, 10W30, etc.) mejoran
el artanque en clima frio, estos aceites de
multiviscosidad van ha aumentar el consumo
de aceile cuando se usan el-,tempemturas
sobre 32 ° E Revise el nivel del aceite del
motor mas a menudo, para evitar un posible
daSo en el motor, debido aqua no tiene
suliciente aceite.
Cambie el aceite despuds de 25 horas de
operac_6no por Io menos una vez al aSo si la
segadora se utiliza menos 25 horns el afio.
Revise el nivel del aceite del cdrter antes de
arrancar el motor y despu_s de cada cinco (5)
horas de uso continuado. Apdete el tap6n de1
acede en forma segura cada vez qua revise el
nivel del aceile.
PARA CAMBIAR EL ACEITE DEL MOTOR
AVISO: Antes de inclinar la segadora para
drenar el aceite, drene el tanque de combus*
tibia haciendo correr el motor hasta qua el
tanque est_ vacio.
1. Desconecte el alambre de la bujfa y
pbngalo de modo qua no pueda entrar en
contac_o con dsta.
2. Remueva la tapa del dep6silo del aceite;
dejela a un lado en una superficie limpia.
3. Incline la cortadora de c_sped pot este
costado tal como se muestra y purgue el
ace;le en un recipiente id6neo. Mueva la
segadora de atrds para adelante para
remover tode el aceite qua se haya
quedade atrapade dentro del motor.
4. Utopia todo el aceite derramade an la
segadora yen el lado del motor.
5. Rellene el motor con acede. (Vea "PARA
AGREGAR EL ACEITE" en la seccide de
Operaci6n de este manual.)
6. Vuelva a conectar el alambre de la bujla a
dsta.
Tapa del deposrio de
¢celte con varilla de nlvel
M_c_,
30 Inferior
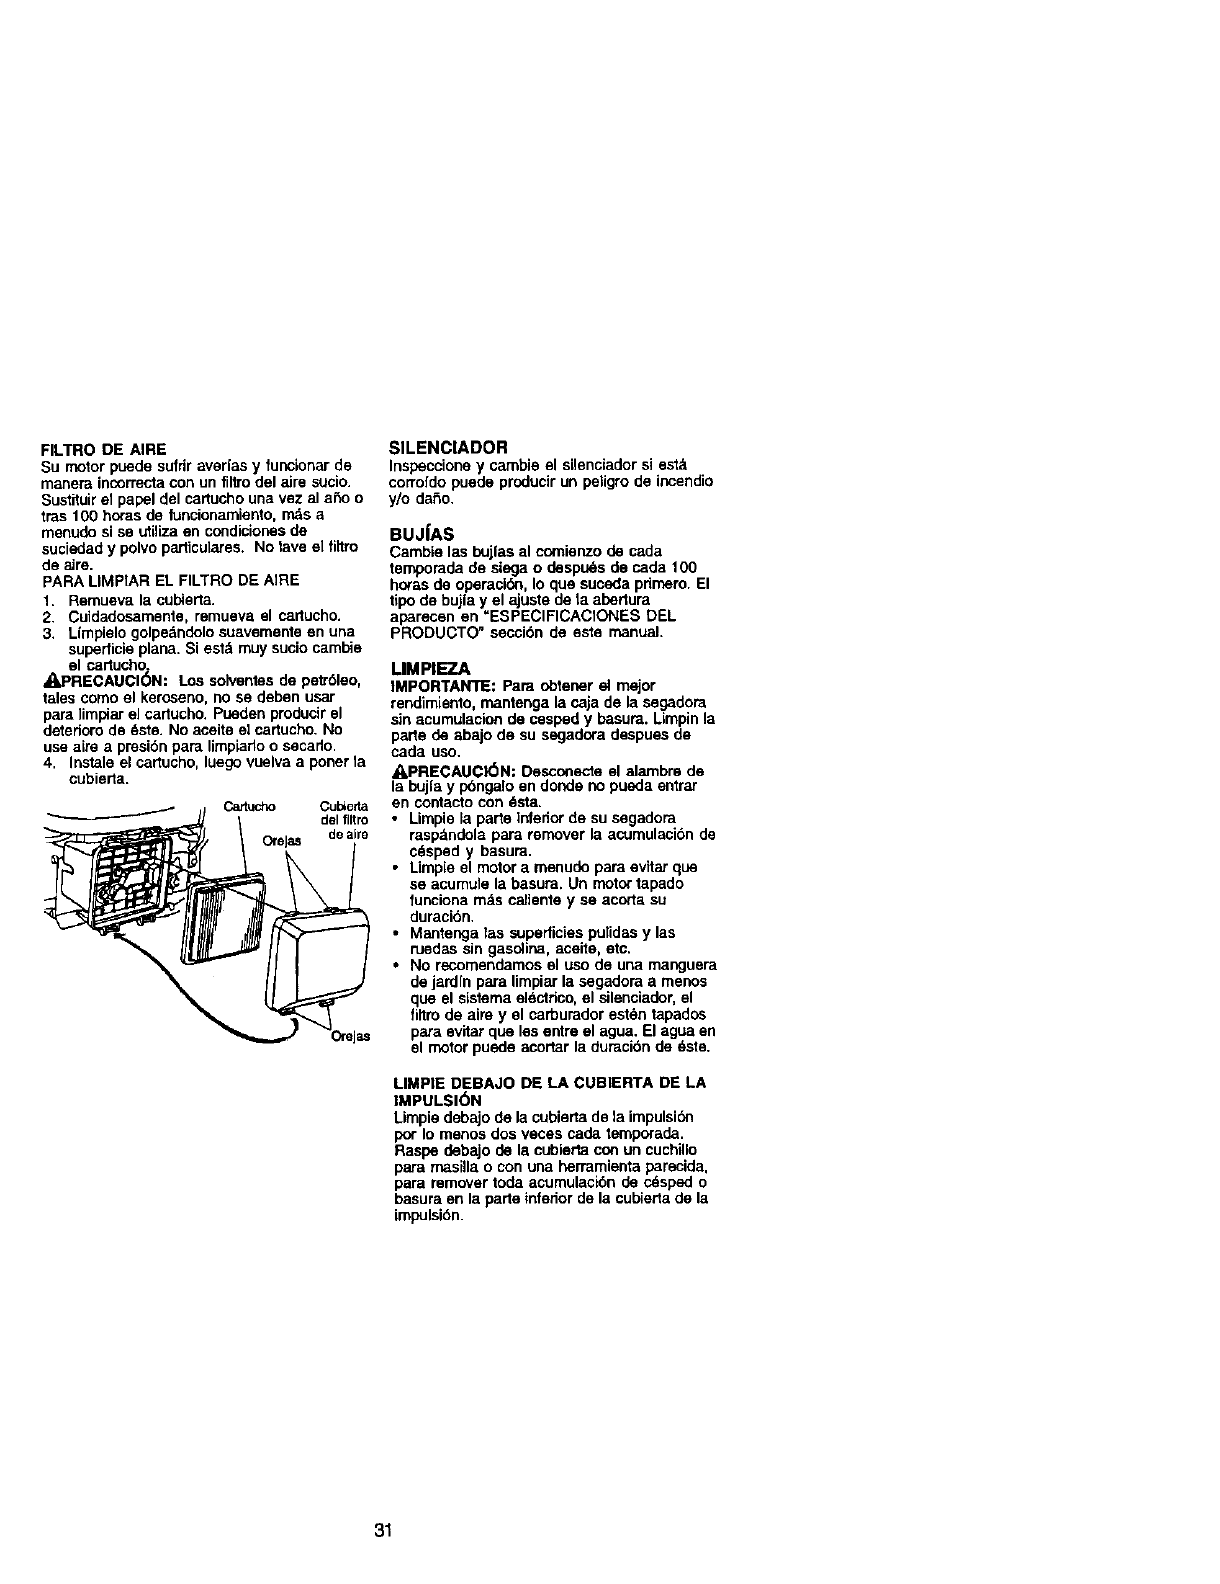
FILTRO DE AIRE
Su motor puede sufdr averias y funcionar de
manera incorrecta con un flltro del aire s_cio.
Sustituir el papel del cartucho una vez al a_o o
tras 100 horas de funcionarniento, rn_s a
menudo sl se utiliza en condiciones de
suciedad y polvo particulates. No lave el filtm
de aJre.
PARA LIMPIAR EL FILTRO DE AIRE
1. Remueva la cublerta.
2. Cuidadosamente, remueva el cartucho.
3. Limpielo golpe&ndolo suavemente en una
superficie plana. Si est_ muy sucio cambie
el cartucho.
_PRECAUCION: Los solventes de petr61eo,
tales como el keroseno, no so deben user
pare ]irnpiarel cartucho, pueden producir el
deterioro de dste. No aceite el cartucho. No
use aire a presi6n para limpiado o secado,
4. Instale el cartucho, luego vuelva a poner la
cubierta.
Cattucho Cub_eP.a
del fillro
OroJas de aim
SILENCIADOR
Inspeccione y cambie el silenciador si estzt
corrofdo puede producir un peligro de incendio
y/o daSo,
BUJ|AS
Cambie las bujias al comienzo de cada
temporada do siege o despuds de cada 100
bores de operack_n,Io que sucsda pdmero. El
tipo de bujla y el ajuste de ta abertura
aparecen en _ESPECIFICACIONES DEL
PRODUCTO" seccibn de este manual.
LIMPIEZA
IMPORTANTE: Para obtener el mejor
rendimiento, mantenga la caja de la segadora
sin acumulacion de cesped y basura. Limpin la
parle de abaJode su segadora despues do
cada uso.
A, PRECAUCK_N: Desconecle el alambre de
la bujla y pbngalo on donde no pueda entmr
en corrtacto con _sta.
• Limpie la parte Infedor de su segadora
rasp_tndola pare remover la acurnulaci6n de
cdsped y basura.
•Limpie el motor a menudo pare evitar que
so acumule la basura. Un motor tapade
funciona rods caliente y so acorta su
duracion.
• Mantenga las supedicies pulidas y las
ruedas sin gasoline, _ceite, etc,
•No recomendamos el uso de una manguera
de jardfn para limpiar la segadora a menos
que el sistema electrico, el silenciador, el
filtro de aire y el carburador est_n tapados
pare eviler que los entre el ague. El agua on
el motor puede acortar la duraci6n do dste.
LIMPIE DEBAJO DE LA CUBIERTA DE LA
IMPULSI(_N
Limpie debajo de la cublella de la impulsibn
pot Io menos dos veces cada temporada.
Raspe debajo de la cubierta con un cuchino
pare rnasilla o con una herramienta parecida.
para remover toda acumulacibn de cdsped o
basura on la parte inferior de la cubierta de la
impulsibn.
31

APRECAUCI6N: Antes de der calquier
servico o de hacer ajustes:
1. Suelte la barra de control y pare el molor.
2. Aseg_rese que la cuchilla y que todas tas
pe,'les movibles se hayan detenido
completamente.
3. Desconecte el alambre de la bujfa y
p6ngolo an donde no pueda entrar an
contaclo con _sta.
SEGADORA
PARA AJUSTAR LA ALTURA DE CORTE
Vea =PARA AJUSTAR LA ALTURA DE
CORTE" en la seccibn de Operaci6n de este
manual.
DESVIADOR TRASERO
Se propomiona un desviador trasero, adjunto
entre las ruedas traseras de su segadora,
para reducir aun mlnirno la posibilidad que
objetos sean lanzados hacia afuera de ta parte
tvasam de la segadora, en la posicibn en
donde se encuentra el operador. Si se dana el
desviador debe cambiarse.
PARA REMOVER/CAMBIAR LA CORREA
DE IMPULSION
1. Remueva la cubierta de la impulsibn.
Remueva la correa empujando hacia abajo
en la polea de la caja de engranajes.
2 Haga descansar la segadora en su lado
non el filtro de aire y el carburador mirando
hacia arriba.
3. Remueva la cUchilla.
4. Remueva la defensa en contra del
desperdicio.
5. Remueva la correa de la polea del motor
en el ciguerial.
6. Ins_ale la correa nueva siguiendo los
pasos antedores en el orden inverso.
7. Siempre use la correa aprobada pot la
fdbrica pare asegurarse que calce y dure.
Cublerta de ta
Impulsion
Correa
PARA AJUSTAR EL MANGO
El mango superior quede ser ajustado a
cuatro (4) distintas pesiciones de altura,
1. Afloje ambas penllas del mango solamente
bastante i_ara permitir que el mango
supenor gtre a la posicibn deseade.
2. Apriete ambas pedl[as del mango con
seguridad.
Manilla de
llango
PARA MONTAR Y ADJUNTAR EL
RECOGEDOR DE C_SPED
1. Ponga el bastidor del recngedor de cssped
en la bolsa del cesped con la p_u'terigide
de la bolsa en la parte inferior.AsegL_rese
que el mango del bastidor estd en el
exterior de la parte supedor de _abolsa.
2. Deslice los sujetadores de vinilo sobra el
bastidor,
AV1SO: Si los sujetadores de vinilo estdn muy
duros, rn_talos en agua caliente por algunos
minutos. Si se moja la bolsa, d6jela que se
seque antes de usarla.
PRECAUCI6N: No haga funcionar su
segadora sin el desviador _e recortes o sin el
recogedor de cdsped, aprobados, en su
lugar. Nunca irate de operar la segadora
cuando se ha mmovido la puerta trasera o
cuando esta un poco abierta.
Mango del
bastido_ del
Abenura
delbastlder
MOTOR
VELOCIDAD DEL MOTOR
La velocidad del motor ha sido ajustada en la
tdbdca. No trate de aumentar la velocidad del
motor pees se pueden producir lesiones
personales. Si cree que el molor est_
funcionando demasiado rdpido o demasiado
lento, Ileve su segadora a mas con su centro
de servicio Sears o con un otro centro de
servicio cualificado.
32
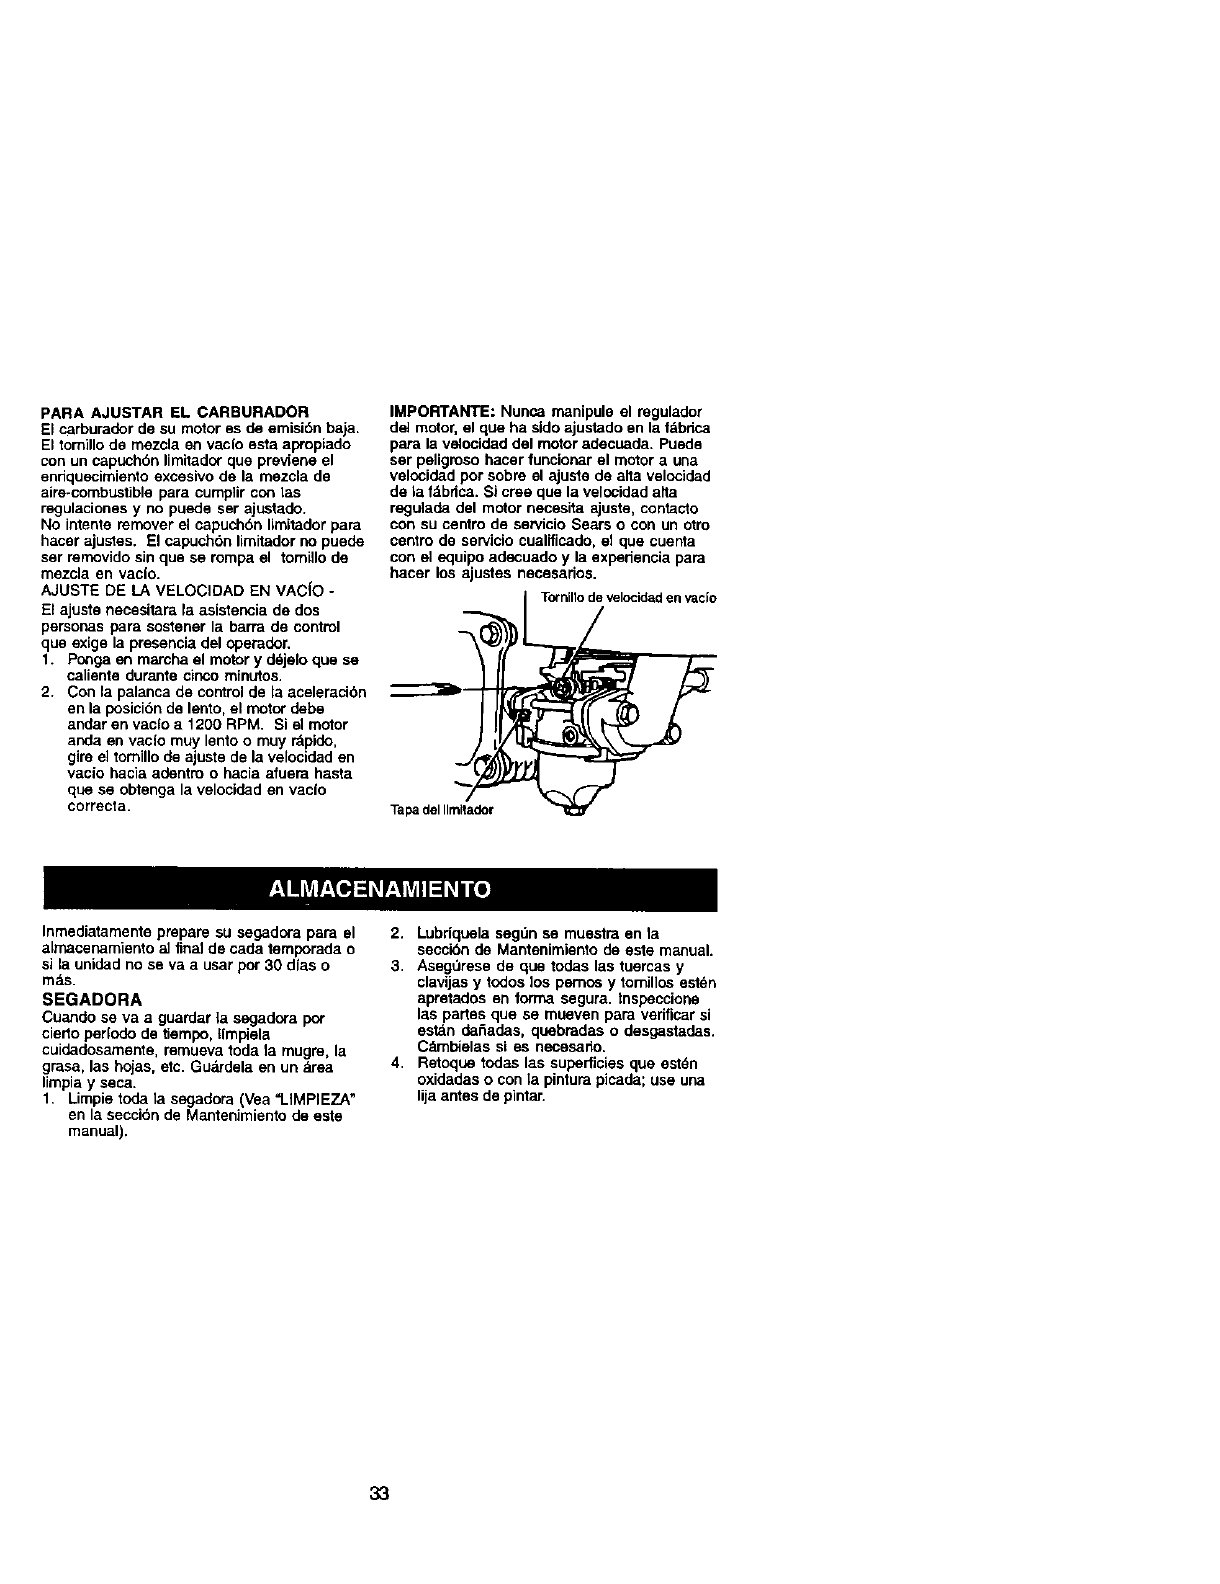
PARA AJUSTAR EL CARBURADOR
El carburador de su motor as de emisi6n baja.
El tornillo de mezcla on vaclo esta apropiado
con un capuchbn limitador que previene el
enriquecimiento exceelvo de la mezcla de
aim-combustible para cumplir con las
regulaciones y no puede ser ajustado.
No intente remover el capuchbn limitador para
hacer ajusles. El capuch0n limitador no puede
ser removido sin que se rompa el tornillo de
mezcla en vac[o.
AJUSTE DE LA VELOCIDAD EN VAC{O -
El ajuste necesitara la asistencia de dos
personas para sostener la barra de control
que exige la presencia del operador.
1. Penga en marcha el motor y d_jelo Clue se
calieote durante cinco minutos.
2. Con la palanca de control de la aceleraciOn
en la posiciOn de lento, el motor debe
ander en vaclo a 1200 RPM. Si el motor
anda en vacio muy lento o muy rdpido,
gire el tornillo de ajuste de la velocidad en
vacio haela adentm o hacia afuem hasta
que se obtenga la velocided en vacio
correcta.
IMPORTANTE: Nunca manipule el regulador
de] motor, el que ha side ajustado an la f&bdca
para la velocidad del motor adecuada. Puede
ser peligmso hacer funcionar el motor a una
velocidad por sobre el ajusle de alia velocided
de la fdbrica. Si cree que la velocidad atta
regulade del motor necesita ajuste, contacto
con su centro de setvicio Sears o con un ntro
centro de servielo cualfficado, el que cuenta
con el equipo adecuado y la expedencia para
hacer los ajustes necesarios.
Tol'ninodevelocidadenVacio
Tapa del Ilmltador
Inmediatamente prepare su segadora pare el
almacenamiento aJfinal de cade temporada o
si la unidad no se va a usar pot 30 dias o
m_s.
SEGADORA
Cuando se va a guardar la segadora pot
ciedo per[odo de tiempo, Ilmpiela
cuidadosamente, remueva toda la mugre, la
grasa, las hojas, etc. Gu&rdela en un _rea
limpia y seca.
1. Limpie toda la segadora (Vea =LiMPIEZA"
en la secciOn de Manteelmiento de este
manual).
2. Lubdquela segdn se muestra en la
seccibn do Mantenimiento de este manual.
3. AsegQrese de que todas las tuercas y
clavijas y todos los pernos y tomillos esten
apretados en forma segura, tnspeccione
las partes que se mueven para verificar si
est_n daSadas, quebtadas o desgastadas.
Cdrnbielas el es necesado.
4. Retoque todas las supedicies que est_n
oxidadas o con la pintum picada; use una
lija antes de pintar.
33
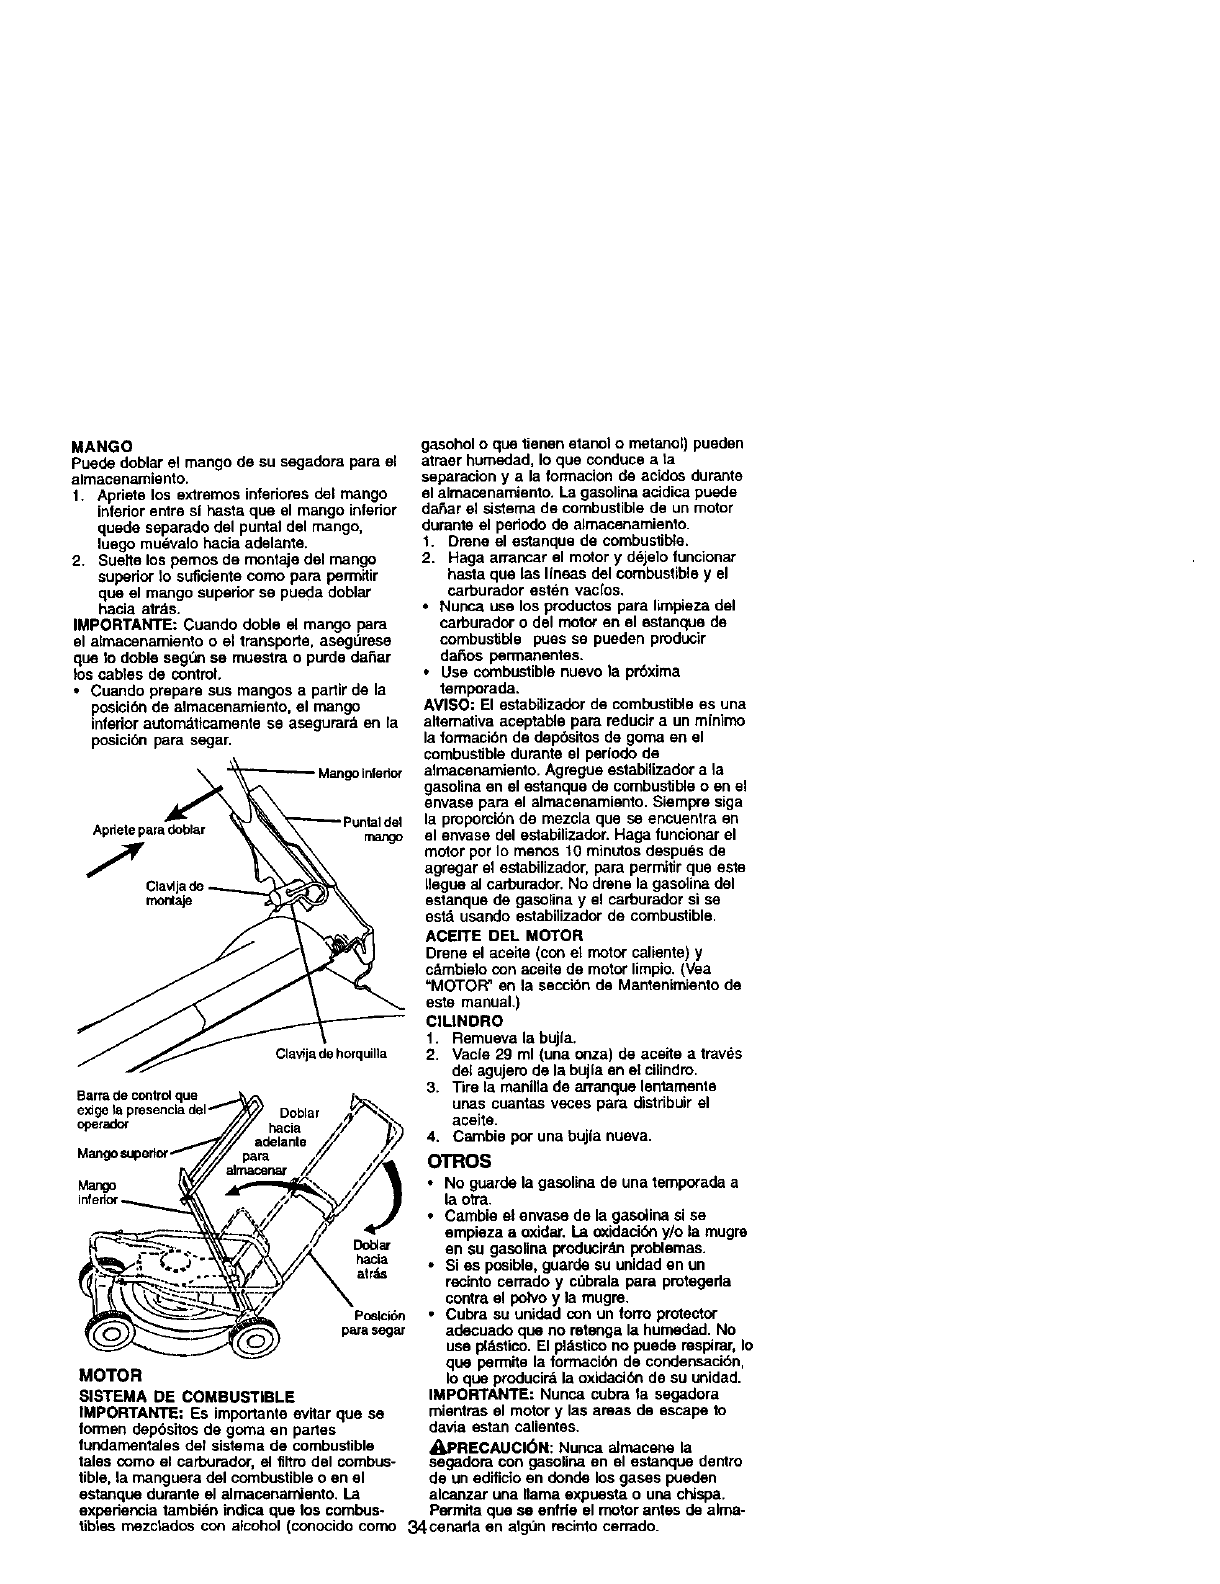
MANGO
Puede doblar el mango de su segadera para el
almacenamiento.
1. Apriete los exlremos inferiores del mango
infedor entre si basra que el mango infedor
quede separado del puntal del mango,
luego mu6valo hacia adelante.
2. Suelte los pemos de rnontaje del mango
supedor 1o suficiente como para permitir
que el mango superior se pueda doblar
hacia atr_s.
IMPORTANTE: Cuando doble el mango para
el elmacenamiento o el transporte, asegdrese
que Io doble seg_ se muestra o purde dahar
los cables de control.
• Cuando prepare sus mangos a partir de la
poelci6n de almacenamiecto, el mango
infedor autorndticamente se asegorard en la
posickSnpara segar.
o infedor
Apdete para doblar mango
Clav_ja de horquilla
Barradecontrolque _
extgela Presenciadel"'_)_ Doblar ._
operador - //7// hacia /2 _1_',
_/// adelante // _vy
Mangosupedor para x// /
alrnacenar /, //
_---:__':.-=..- _ Do,at
p_a _
MOTOR
SISTEMA DE COMBUSTIBLE
IMPORTANTE= Es importante evitar que se
formen depbeltos de goma en partes
fundarnentales del elstema de combustible
tales como el cart_Jrador, el filtro del combus-
tible, la manguera del combustible o en el
estanque dorante el alrnacenarniento. La
expadencia tambidn indica que los combus.
gasohol o que tienen etanol o rnetanol) pueden
atraer humedad, Io que conduce a ta
separacion y a la formacion de acidos durante
el almacenamiento. La gasolina acidica puede
dar3arel sistema de combustible de un motor
dorante el padodo de almacenamiento.
1. Drene el estanque de combustible.
2. Haga arrancar el motor ydejelo funcionar
hasta qua las Iineas del combustible y el
carburador esten vacfos.
•Nunca use los productos para limpieza del
carburador o del motor en el estanque de
combustible goes se pueden pmducir
daSos parmanentes.
•Use combustible nuevo la prbxima
temparada.
AVISO: El estabilizador de combustible es una
altemativa aceptable para reducir a un minimo
la formacidn de dep_itos de gon_ en el
combus_ble durante el periodo de
almacenamiento. Agmgoe estabilizador a ia
gasolina en el estanque de combustible o en el
envase para el alrnacenamiento. Siempre elga
la propami6n de mezcla que se encuentra an
el envase del estabilizador. Haga funcionar el
motor pot Io menos 10 minotos despues de
agregar el establlizador, para permitJrque este
Ilegue al carburador. No drene la gasblina del
estanque de gasolina y el carburador si se
es_ usando estabilizador de combustible.
AcErrE DEL MOTOR
Drene el aceite (con et motor caliente) y
cAmblelo con aceite de motor limpio. (Vea
"MOTOR" en la seccibn de Mantenimiento de
este manual.)
CILINDRO
1. Remueva la bujla.
2. Vacie 29 ml (una onza) de acelte a travds
del agujero de la bujla an et cilindm.
3. Tire la manilla de arranque lentamente
unas cuantas veces para distribuir el
aceite.
4. Carnble por una bujia nueva.
OTROS
•No guarde la gasolina de una temporada a
la otra.
•Cambie el envase de la gasolina si se
empieza a oxidar. La _xidacid_ y/o la mugre
en su gasollna producirzinptoblemas.
• Si as posible, guarde su unidad en un
recinto cerrado y cdbrala para protegeda
contra el polvo y la mugre.
• Cubra su unidad con un forro protector
adecuado que no retenga la humodad. No
use plztstico.El pl_stico no puede respirar, Io
que parmite la forrnacibn de condensaci6n,
Io que producint la oxidacibn de su unidad.
IMPORTANTE: Nunca cubra la segadora
mienttas el motor y las areas de escape to
davia estan calientes.
_PRECAUCI(_)N: Nunca elmacene la
segodora con gasolina en el estanque dentro
de un edificio en donde los gases paeden
alcanzar una llama expuesta o una chispa.
Permita qua se enffle el motor antes de alma-
tibtes mezclados con alcohol (conocido como 34cenada en algdn recinto cenado.
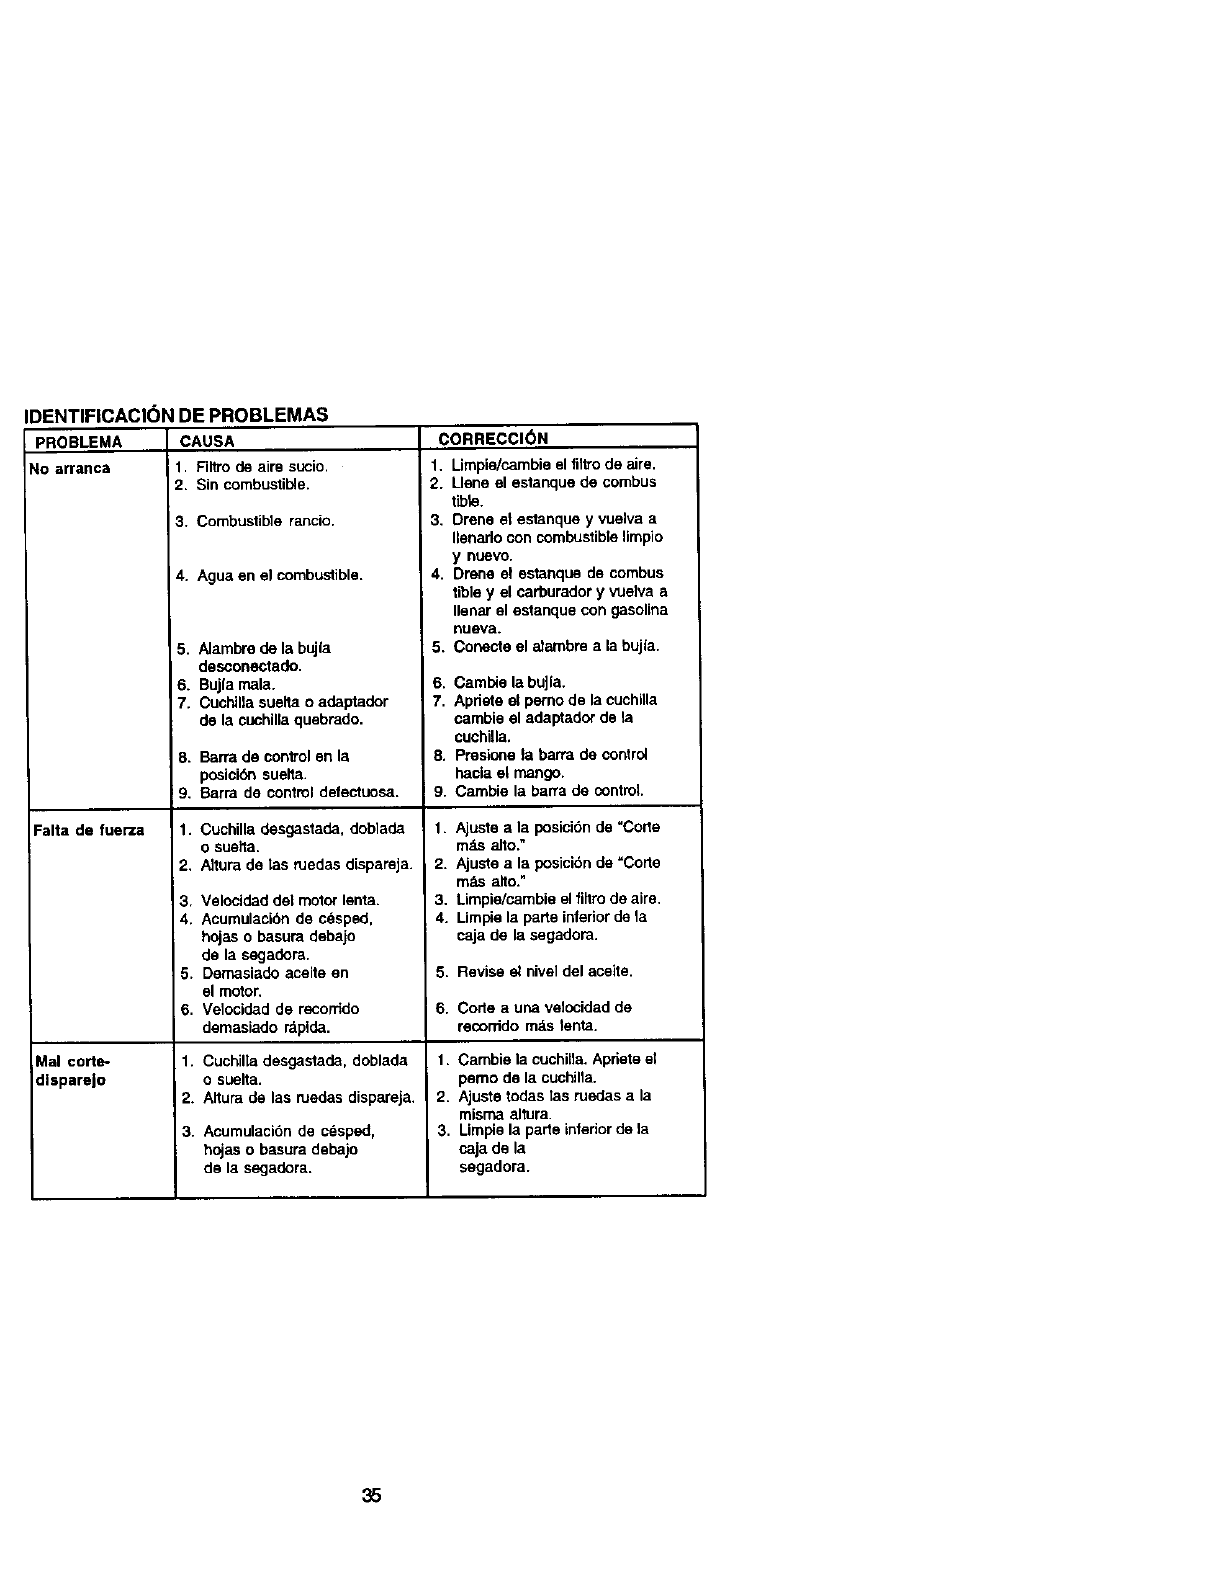
)ENTIFICACION DE PROBLEMAS
PROBLEMA CAUSA
No arranca 1. Filtro de aire sucio.
2. Sin combustible.
3. Combustible rancio.
4. Agua en el combustible.
5. Alambre de la bujla
desconectado.
6. Bujla mala.
7. Cuchilla suelta o adaptador
de la cuchillaquebrado.
8. Barra de control en la
posici6n suelta.
9. Barra de control defectuosa.
Falta de fuez-za 1. Cuchilla desgastada, doblada
O sue_ta.
2. _tura de tas ruedas dispareja.
3. Velocidad dei motor lenta.
4. Acumulacibn de cesped.
hojas o basura debajo
de la segadora.
5. Demasiado aceite en
el motor.
6. Velocidad de reconido
demasiado rdplda.
Mal corte- 1. Cuchilla desgastada, doblada
dlsparejo o suelta.
2. Altum de las ruedas dispareja.
3. Acurnulaci6n de cesped,
hojas o basura debajo
de la segadora.
CORRECCI(_N
1. Limpie/cambie el filtro de aire.
!2. Llene el estanque de combus
fibre.
3. Drene et estanque y vuelva a
Ilenarlo con combustible lirnpio
y nuevo.
4. Drene et estanque de combus
fible y el carburador y vuelva a
Ilenar el estanque con gasolina
nueva.
5. Conecte el atarnbre a la bujla.
6. Camble la buJla.
7. Apdete el perno de la cuchilla
cambie el adaptador de la
cuchilla.
8. Presione la barra de control
hacia el mango.
9. Cambie la barra de control
1. Ajuste a la posici6n de "Code
mztsal_o."
2. Ajuste a la posici6n de =Corte
mds alto."
3. Limpie/cambie el filtro de aire.
4. Lirnpie la parte inferior de I_
caja de la segadora.
5. Revise el nivel del acelte.
I6. Corte a una velocidad de
recorddo mds lenta.
1. Cambie la cuchilla. Apdete el
pemo de la cuchilla.
2. Ajusts todas tas ruedas a la
rnisma altura.
3. Limpie la parte infedor de I;z
caja de la
segadora.
35
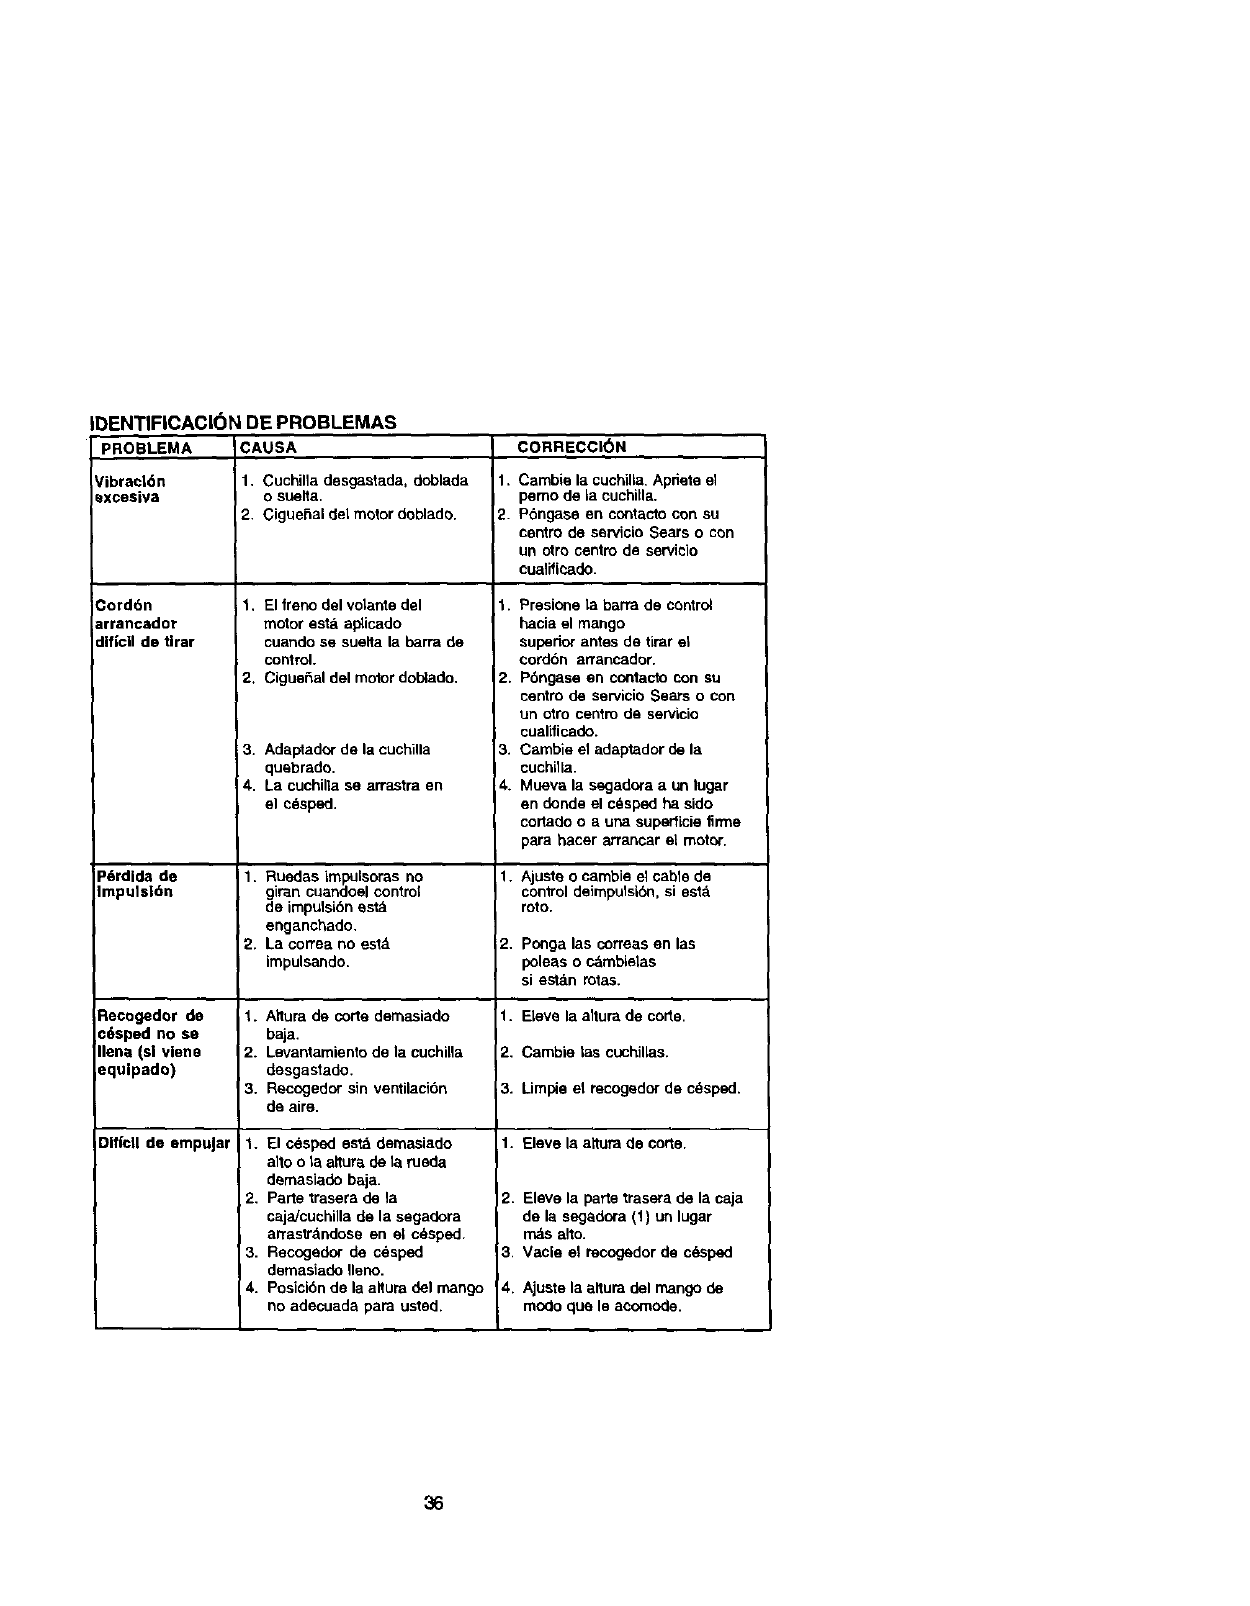
IDENTIFICACIC)NDE PROBLEMAS
PROBLEMA CAUSA CORRECCK_N
Vibrac|6n 1. Cuchilla desgastada, doblada 1. Cambie la cuchilla. Apdete el
excesiva o suelta, pemo de la cuchitla.
2. CigueSai del motor doblado. 2. P6ngase en contacto con su
centro de servicio Sears o con
un otto centro de sarvicio
cualificado.
iCord6n
arrancador
:llf|clt de tirar
P6rdlda de
Impuls|dn
Recogedor de
c6sped no se
Ilena (sl vlene
equlpado)
Dlflc|l de empuJar
i1. El freno del votante del
motor esta apticado
cuando se suelta la harra de
control.
2. CigueSal del motor doblado,
3. Adaptadorde la cuchilla
quebrado.
4. La cuchilla searrastraen
el c_sped.
1. Ruedas impulsoras no
giran cuandoelcontml
deimpulsibn es_
enganchado.
2. La cowea no estd
impulsando.
1. Altura de code demasiado
baja.
2. Levantamiento de la cuchilla
desgastado.
3. Recogedor sin ventilacibn
de aire.
1. El cesped est_ demasiado
alto o ta altura de ta rueda
demaelado baja.
2. Parte trasera de la
caja/cuchilla de la segadora
arrastr_ndose en el cdsped.
3. Recogedor de c_sped
demasiade Ileno.
4. Posicibn de la altura del mango
no adecuada para usted.
1. Presione la barra de control
hacia el mango
supedor antes de tirar el
cordbn arrancador.
2. P6ngase en contacto (:on su
centro de servicio Sears o con
un otro centro de servielo
cuallticado.
3. Cambie el adaptador de la
cuchilla.
4. Mueva la segadora aun lugar
en dende el c_sped ha side
cortado o auna superficie flrme
para hacer arrancar el motor.
1. Ajuste o cambie el cable de
control deimpulsibn, si es_a
roto.
;2. pongo las correas en las
ix)leas o c_mbLelas
si estdn rotas.
1. Beve la altura de code.
2, Cambie tas cuchillas.
3. Limpie el recogedor de c_sped.
1. Eleve la attura de code.
2. Eleve la parte trasara de la caja
de la segadora (1) un lugar
n_-Lsalto.
3. Vacle el recogedor de c6sped
4. Ajuste la altum del mango de
modo que le acomode.
36

CRAFTSMAN ROTARY LAWN MOWER- - MODEL NUMBER 917.378211
GEAR CASE ASSEMBLY-- PART NUM BER 175258
O
J" 16
r"
1
I
KEY PART
NO. NO. DESCRIPTION
I
2
3
4
8
7
a
3
10
II
17490416 Tapping Screw I/4-20x 1-1/4
175248X004 Engagement Bracket
137053 Shliter
57072 Seal
48373 Gear Case Halves
(Includes Key Numbers 4 and 7)
77881 Beadng
137051 Worm Shalt
175257 Ddve Shaft
57079 Hardened Washer
131484 Clutch Yoke
KEY PART
NO. NO. DESCRIPTION
12 700343 _shlng
13 86447 Plug
14 137050 HeIP..alGear
15 750436)( Clutch Jaw
16 750369 Grease
17 120(_00_ E-Ring
18 8,_848 HI-ProKey
19 81585X004 Spring _'acket
NOTE: All component dimensions given in U.S. inche_.
1 Inch = 25.4 mm
37
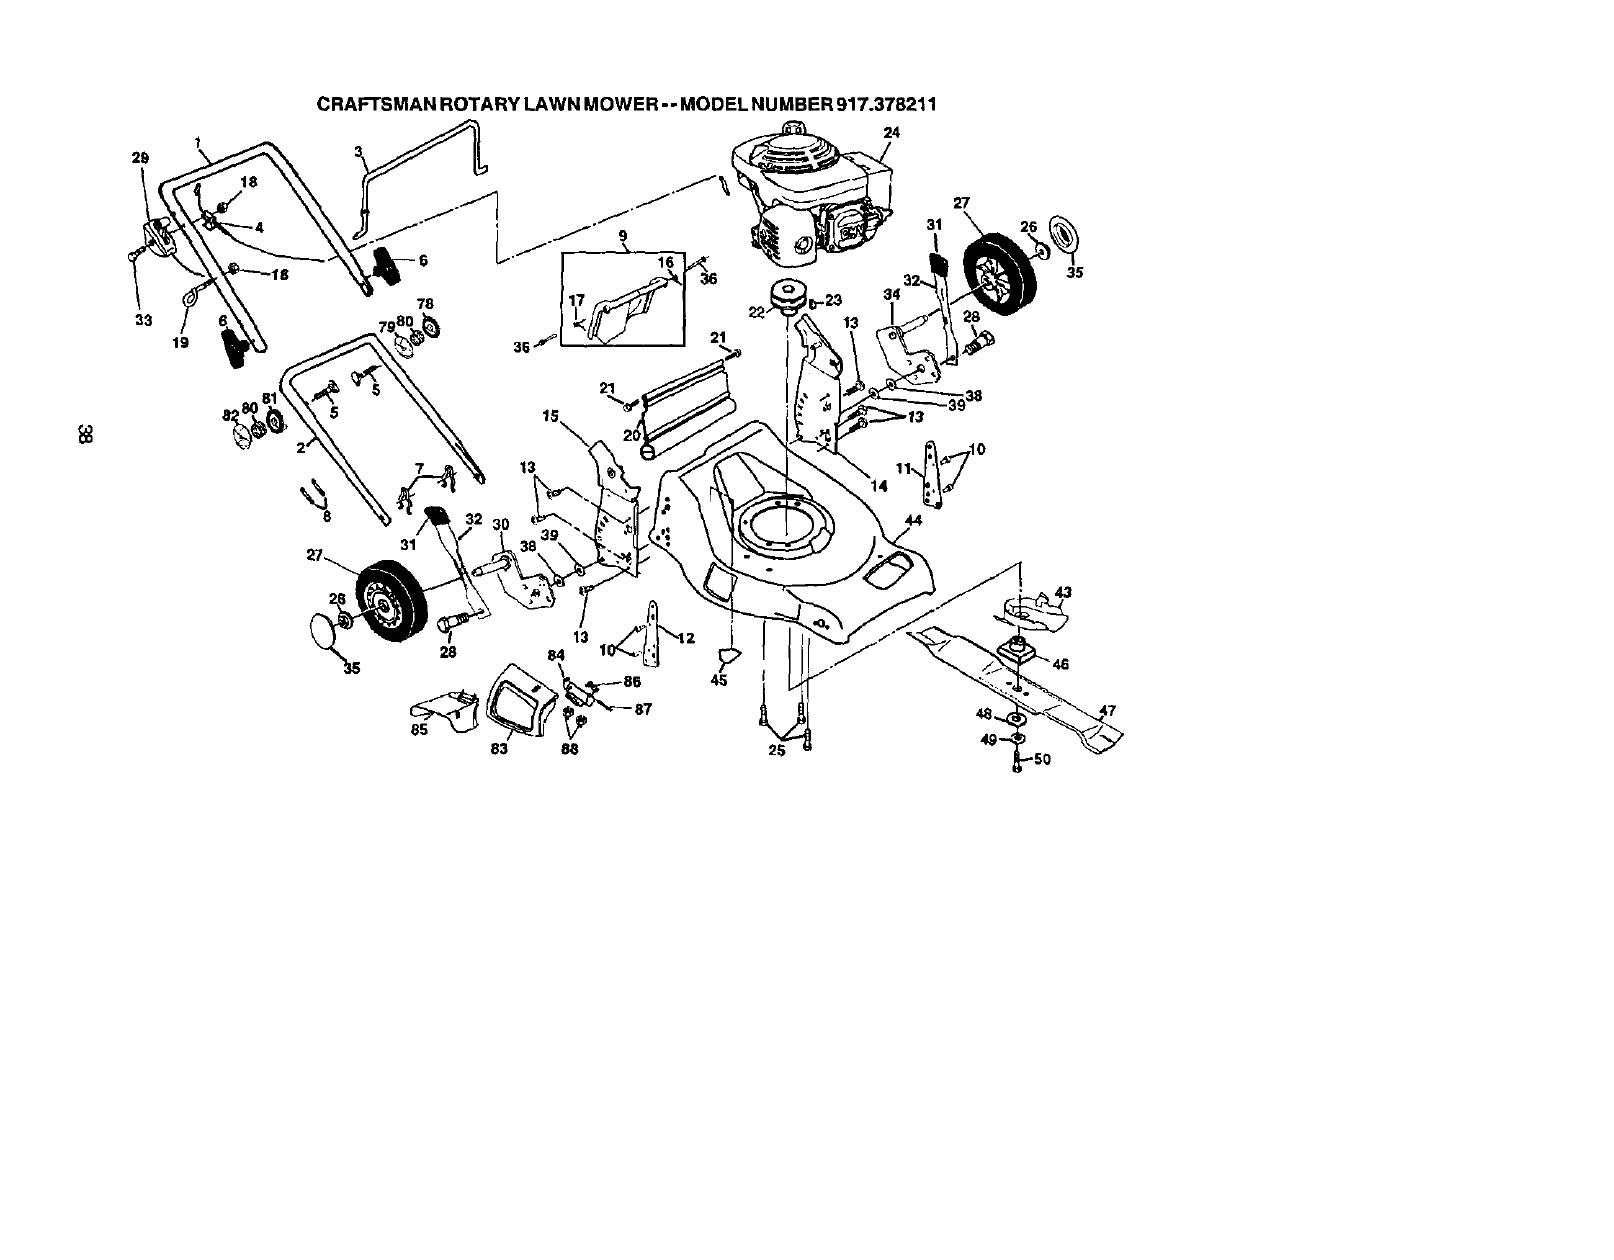
33
19
CRAFTSMAN ROTARY LAWN MOWER - -MODEL NU MBER 917.378211
24
21
lS
13
31
27
35
28 84 1
83 88 2S

CRAFTSMAN ROTARY LAWN MOWER- -MODEL NUMBER 917.378211
KEY PART
NO. NO, DESCRIPTION
1 175391X479 UpperHarldJe
2 151721X479 LowerHandle
3 169780 Co_drolBar
4130861 Engine Zone ControlCable
5 171407 Hazldle Bolt
6 136376 Handle Knob
75179_ HaJrpinCotler
8 66426 WireTie
9175794 Rear Door Kit (Incl. Key #16 & 17)
10 128415 Pop Rivet
11 175G6gx479 Support Bracket LH
12 175070X479 Supped Bracket RH
13 17060410 Screw 14-20 x 5_
14 175082X479 Handle Bracket Assembly (Left)
15 175081X479 Handle Bracket Assembly (Right)
16 175243 SpdngLH
17 175244 SpdngRH
19 132004 Keps Locknut 1/4-20
19 153638 RopeGulde
20 175573 Rear Skid
21 88652 Hinge Screw 1/4-20 x 1-1/4
22 84596 Engine Pulley
23 87677 Hi-Pro Key #505
24 °°- Engine, Honde, Mode_ Numbe¢ GCV 160-5.5 A1
(See Breakdewn)
25 150406 Hex Head Thread Rc41thgStew 3/8-16 x 1-1/8
26 83923 Hex Flange Nut
27 150341 Wheel
28 175231 Shoulder Bolt 5/16-18 x .33
29 147551 Throtlte/Choke Co ntrol
30 165761)(004 Axle Arm Assembly RR
31 701(_7 Selector Knob
32 175060X004 Selector Spdng
33 144_ Screw
KEY PART
NO. NO, DESCRIPTION
34 165762X004 Axle Arm Assembly LR
35 15018_ Hubcap
36 165912 Bolt
38 176185 Washer
39 176235 Pushnut
43 175083 Battom BeltCover
44 176313 L_wn Mower Housing (Includes Key #10, 11, 12 & 45)
45 85463 DangerDeal
46 851514 Blade Adepter
47 175(To4 Blade21"
48 851074 Hardened Washer
49 850263 Helical Washer 3/8-24 x 1.3/8 Gr. 8
50 851084 Hex Head Machine Screw 3/8-24 x 1-3/8 Gr. 8
78 170954 Handle Adjuster, Outside, LH
79 170953 Handle Adjuster, Inside, LH
80 178574 Handle Adjuster Spdng
81 170_To5 Handle Adjuster, Inside, RH
82 170956 Handle Adjuster, OutsJde, RH
83 175066 Mulcher Door
84 175735 Hinge Bracket Assembly
85 175071 Clipping Deflector
86 175285 Spltng
87 175650 HingeRad
88 63601 Nut, Hex
- - 161058 Warrdng Decal (Not Shown)
-. 179212 Ownm's Manual (Engllsh_ pa.nlsh)
Available accessodes notinctuded with lawn mower:
-- 71 33623 GasCan
-- 71 33500 FuelStabilzer
- - 71 33000 SAE 30W Oit (20 oz.)
NOTE: All component dimensions given in U.S. tnches.
1inch = 25.4 mm
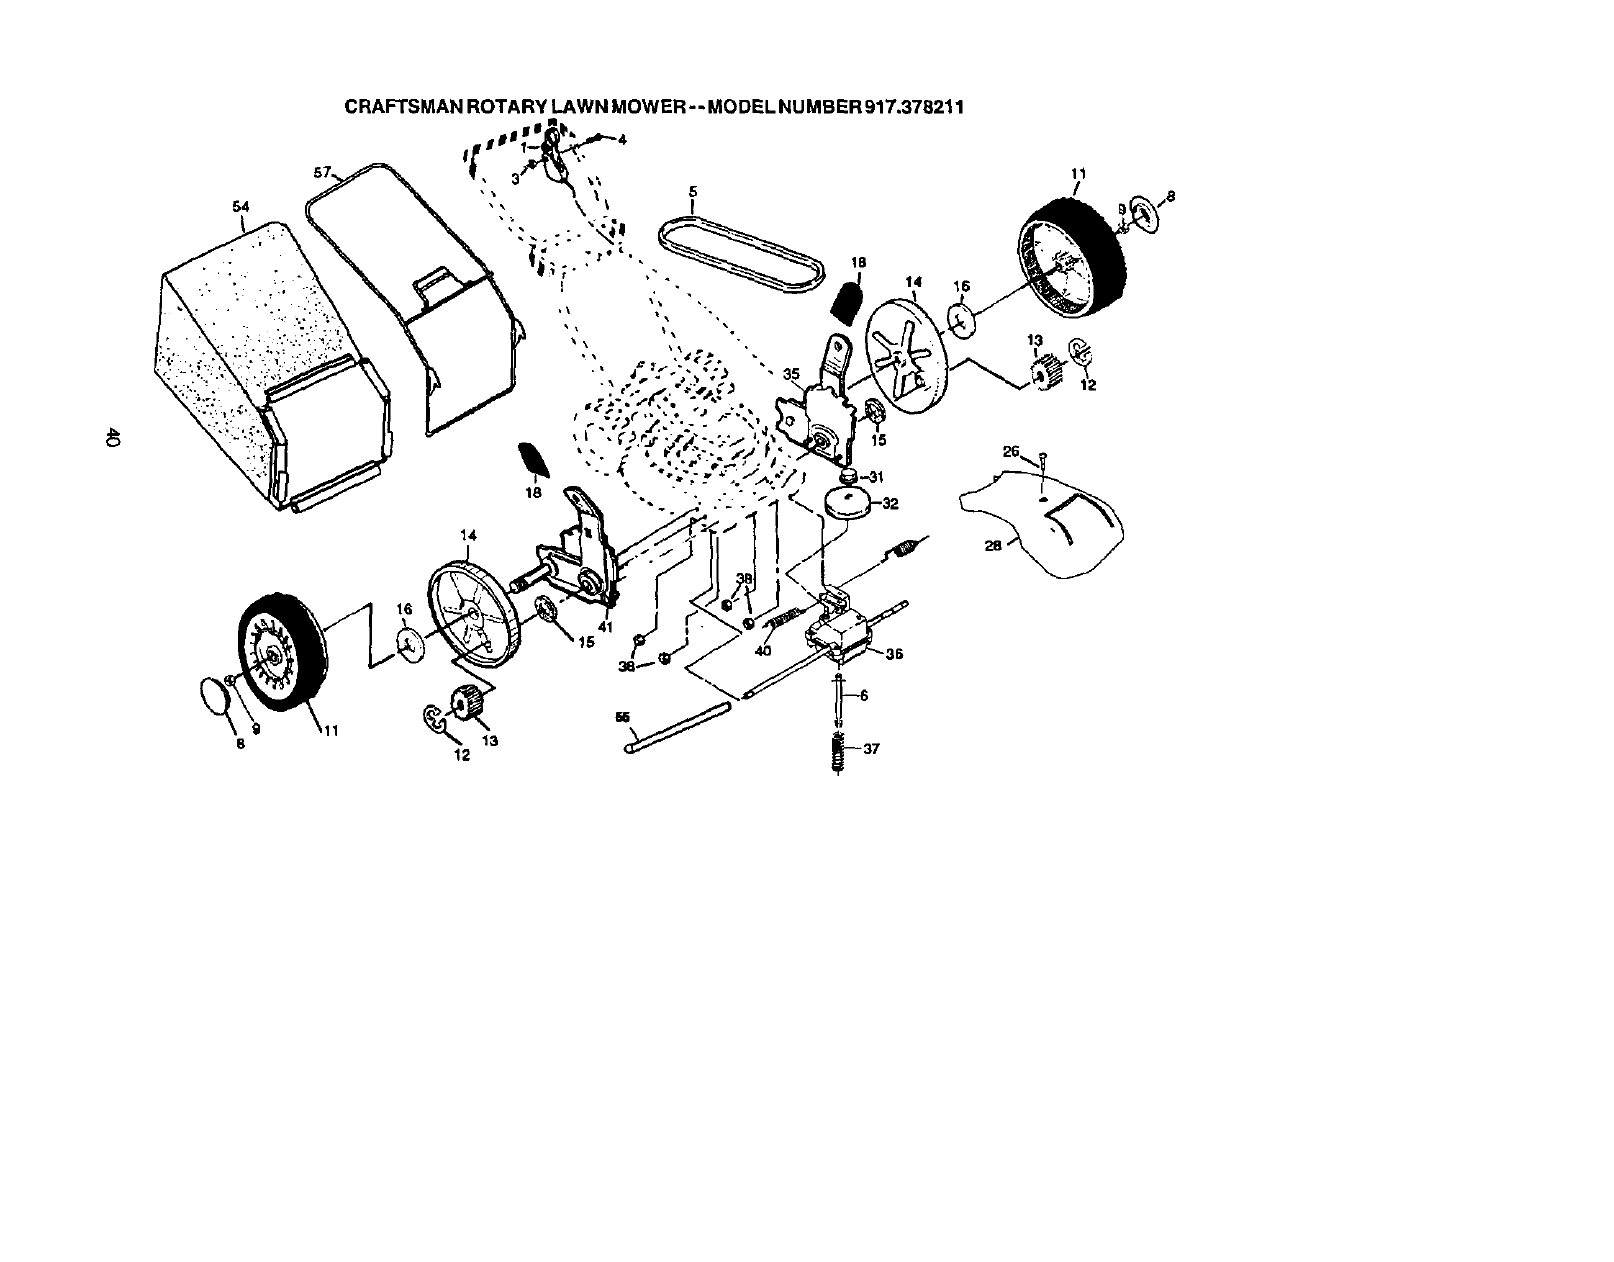
54
CRAFTSMAN ROTARY LAWN MOWER- -MODEL NUMBER 917.378211
ii .,.,..
;;., ,". lS
i14 16
'\ i\
\ %
35
13
11
/
14
15
/8
11 13
12
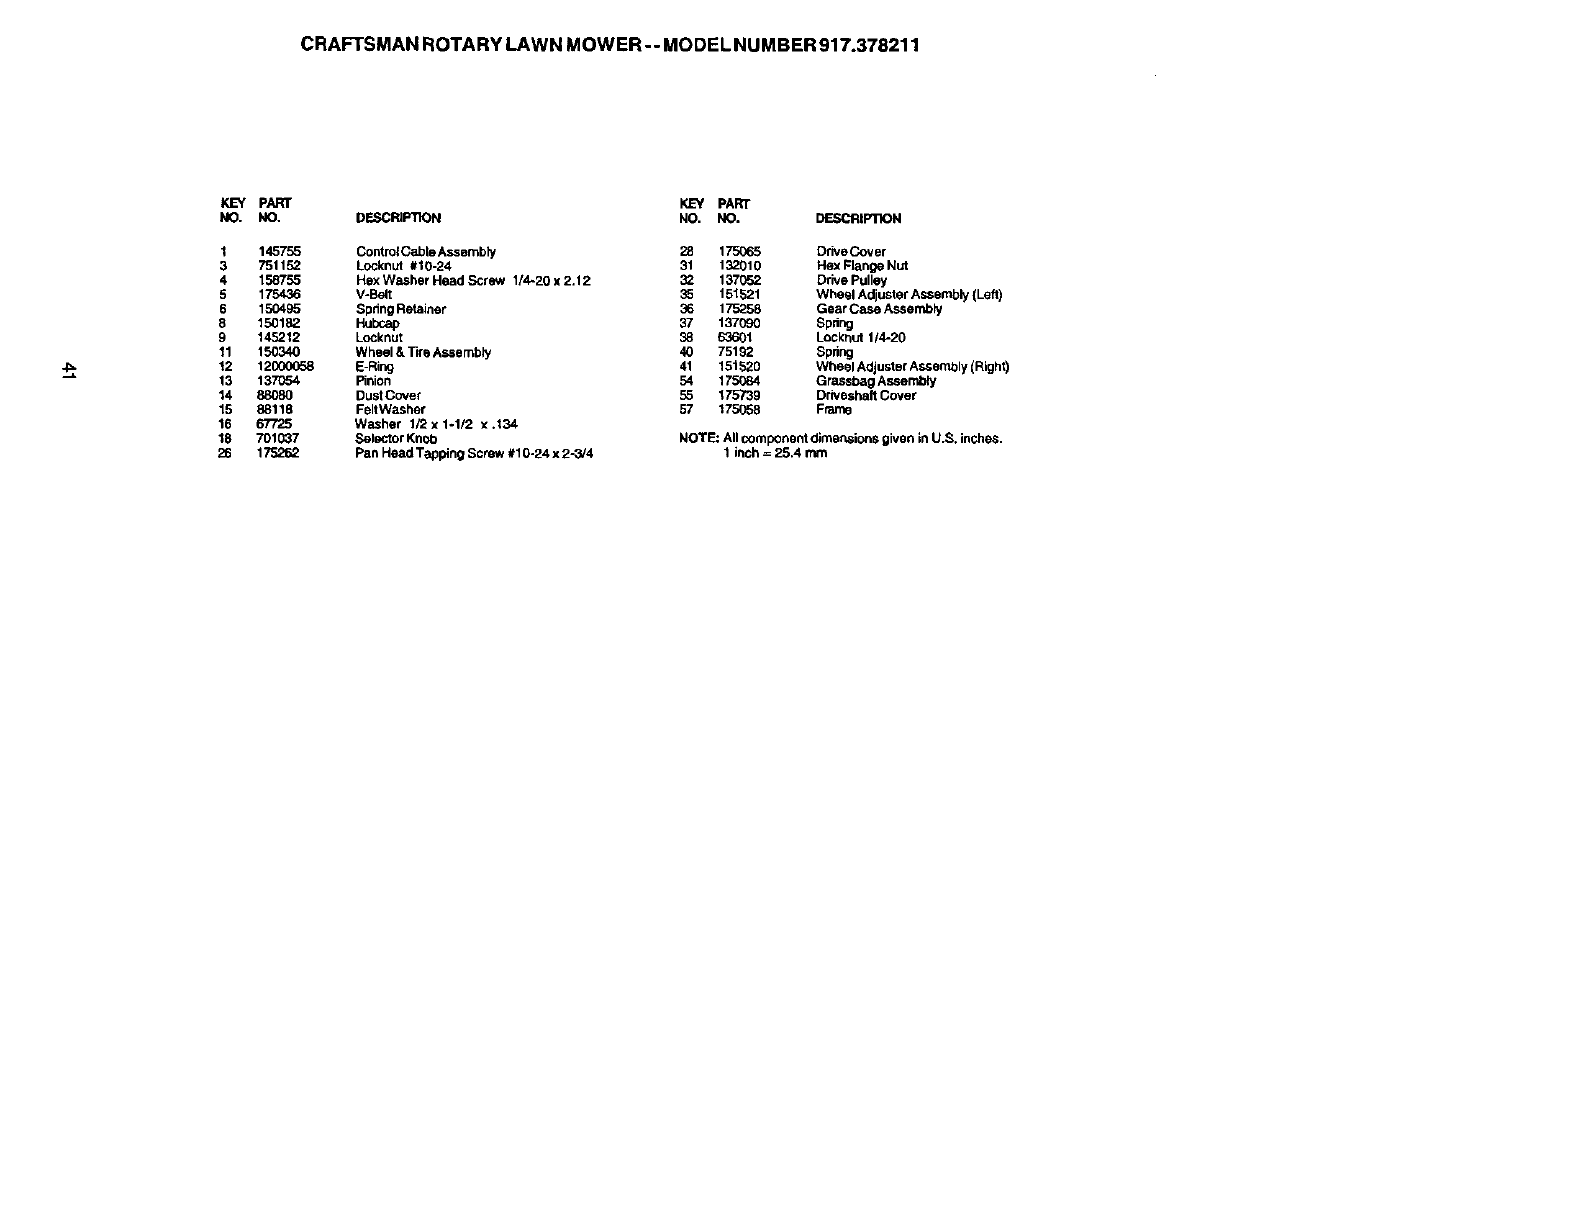
CRAFTSMAN ROTARY LAWN MOWER- -MODEL NUMBER 917.378211
KEY PART
NO. NO.
1 145755
3 751152
4 158755
5 175436
6 150485
8 150182
g 145212
11 150340
12 12000658
13 137_54
14 88080
15 88118
16 67725
18 7010_7
26 175262
KEY PART
DF.._CRIP11ON NO. NO. DE..%"RIP11ON
ControlCable Assembly 28 175G65
Locknut #10-24 31 132010
Hex Washer Head Screw 1/4-20 x 2.12 32 137(;62.
VoBelt 35 151521
Spring Re_.iner 36 175258
Hubcap 37 137090
Locknut 38 63601
Wheel &Tire Assembly 40 75192
E-Ring 41 151520
Pinion 54 175084
DustCover 55 175739
FeltWasher 57 175058
Washer 1/2x1-112 x.134
Selector Knob
Pan Head Tapping Screw #10-24 x 2-3/4
DdveCover
Hex Range Nut
Drive Pulley
Wheel Adjuster Assembly (Left)
Gear C_e Assembly
Spdng
Lockr=ut1/4-20
Spring
Wheel Adjuster Assembly (Right)
Grasobag Assembly
Driveshalt Cover
Frame
NOTE: All component dlmem;ions given in U.S. inches.
1 inch = 25A mm

HONDA 4-CYCLE ENGINE MODEL NUMBER GCV160-5.5-A1
CAMSHAFTJ
13._4,_ _ 1211 _,
1
14
4,2
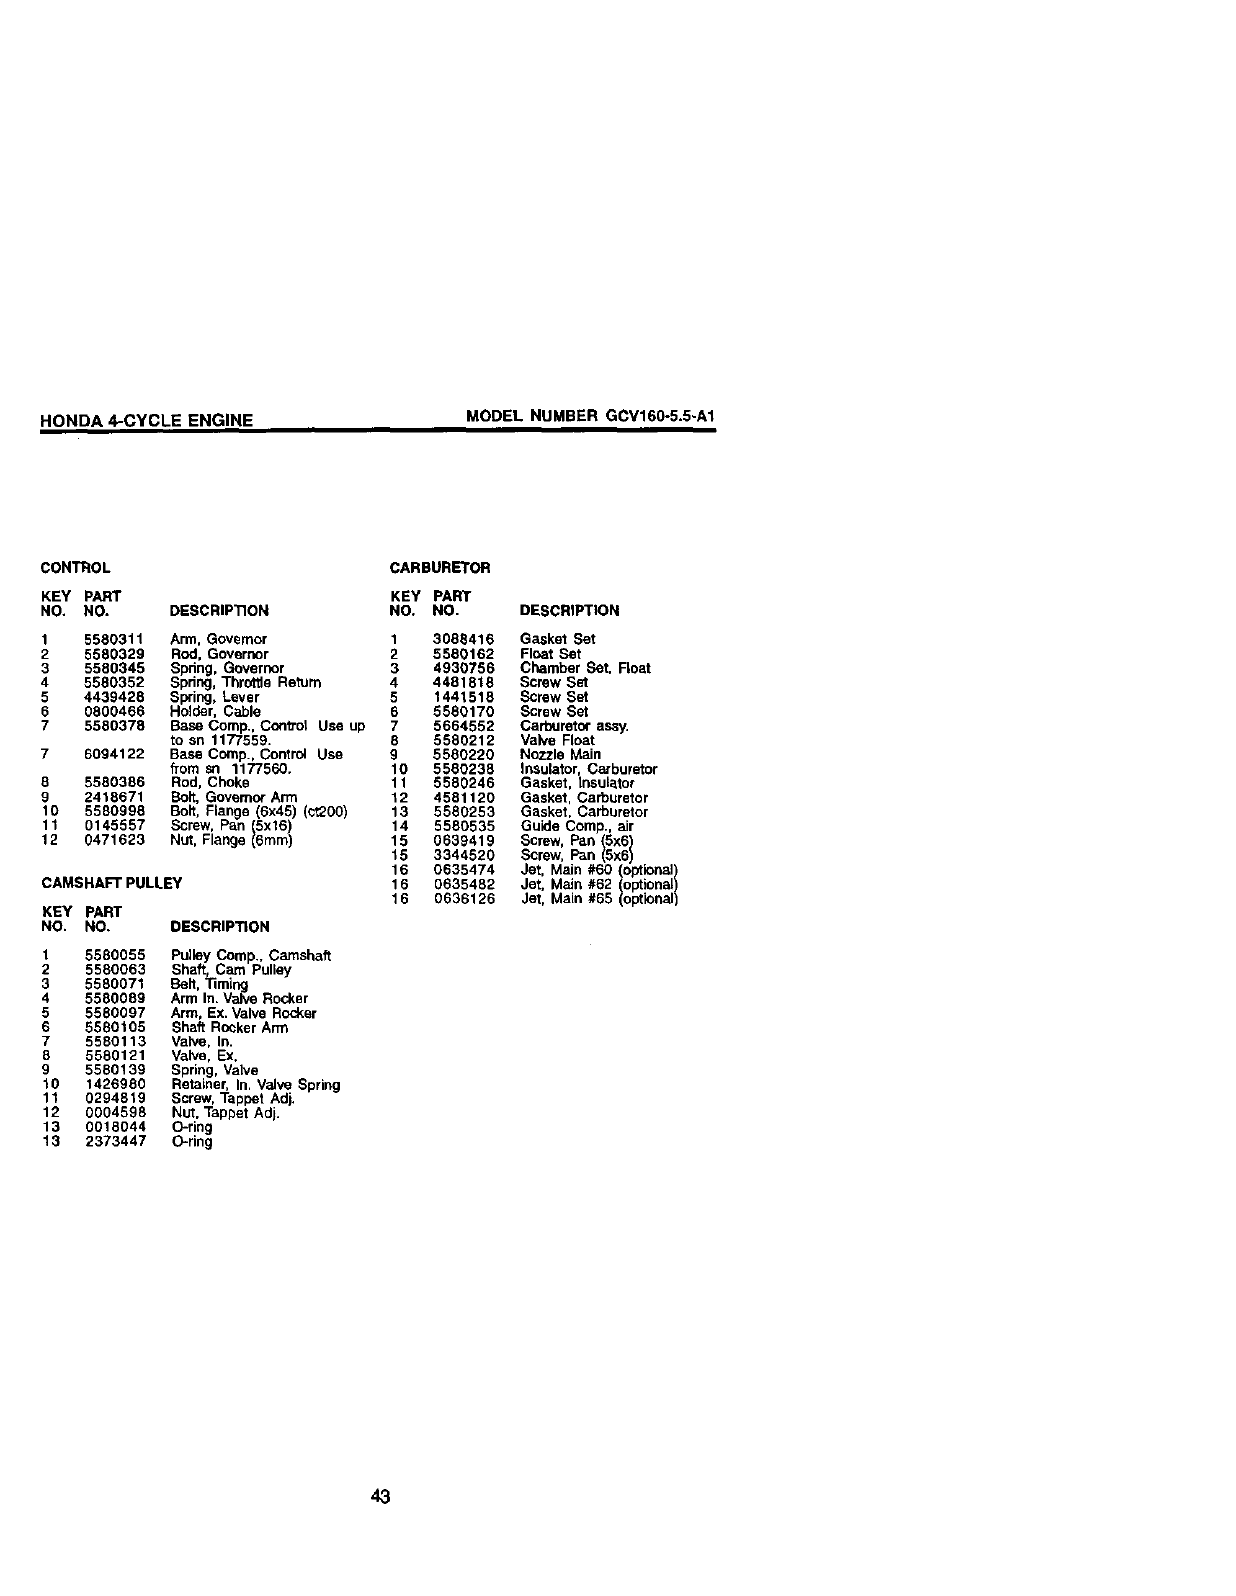
HONDA 4-CYCLE ENGINE MODEL NUMBER GCV160-5.5-A1
CONTROL CARBURETOR
KEY PART KEY PART
NO. NO. DESCRIPTION NO. NO.
1 5580311 Arm, Governor 1 3088416
2 5580329 Rod, Governor 2 5580162
3 5580345 Spdng, Governor 3 4930756
4 5580352 Spring, Throttle Return 4 4481818
5 4439428 Swing, Lever 5 1441518
6 0800466 Halder, Cable 6 5580170
7 5580378 Base Comp., Con'0"ol Use up 7 5664552
to sn 1177559. 8 5580212
7 6094122 Base Ccmp., Control Use 95580220
from sn 1177560. 10 5580238
8 5580386 Rod, Choke 11 5580246
9 2418671 Bolt, Govemor Arm 12 4581120
10 5580998 Bolt, Flange (6x45) (¢t200) 13 5580253
11 0145557 Screw. Pan 5x16) 14 5580535
12 0471623 Nut, Fange 6mm) 15 0639419
15 3344520
16 0635474
CAMSHAFT PULLEY 16 0635482
16 0636126
KEY PART
NO. NO. DESCRIPTION
1 5580055 Pulley Comp., Camshaft
2 5580063 Shaft, Cam Pulley
3 5580071 Belt, Timing
4 5580089 Arm In. Valve Rocker
5 5580097 Arm, Ex. Valve Rocker
6 5580105 Shaft Rocker Arm
7 5580113 Valve, In.
8 5580121 Valve, Ex.
9 5580139 Spring, Valve
10 1426980 Retainer, In. Valve Spring
1t 0294819 Screw, Tappet Adj.
12 0004598 Nut, Tappet Adj.
13 0018044 O-ring
13 2373447 O-ring
DESCRIPTION
Gasket Set
Float Set
Chamber Set, Float
Screw Set
Screw Set
Screw S_
Carburetor assy.
Valve Float
Nozzle Main
Insulator, Carburetor
Gasket, Insulator
Gasket, Carburetor
Gasket, Carburetor
Guide Comp., air
Screw, Pan 5x6
Screw, Pan 15x61
Jet, Main #60 (optional)
Jet. Main #62 (optional)
Jet, Main #65 (optional)
43
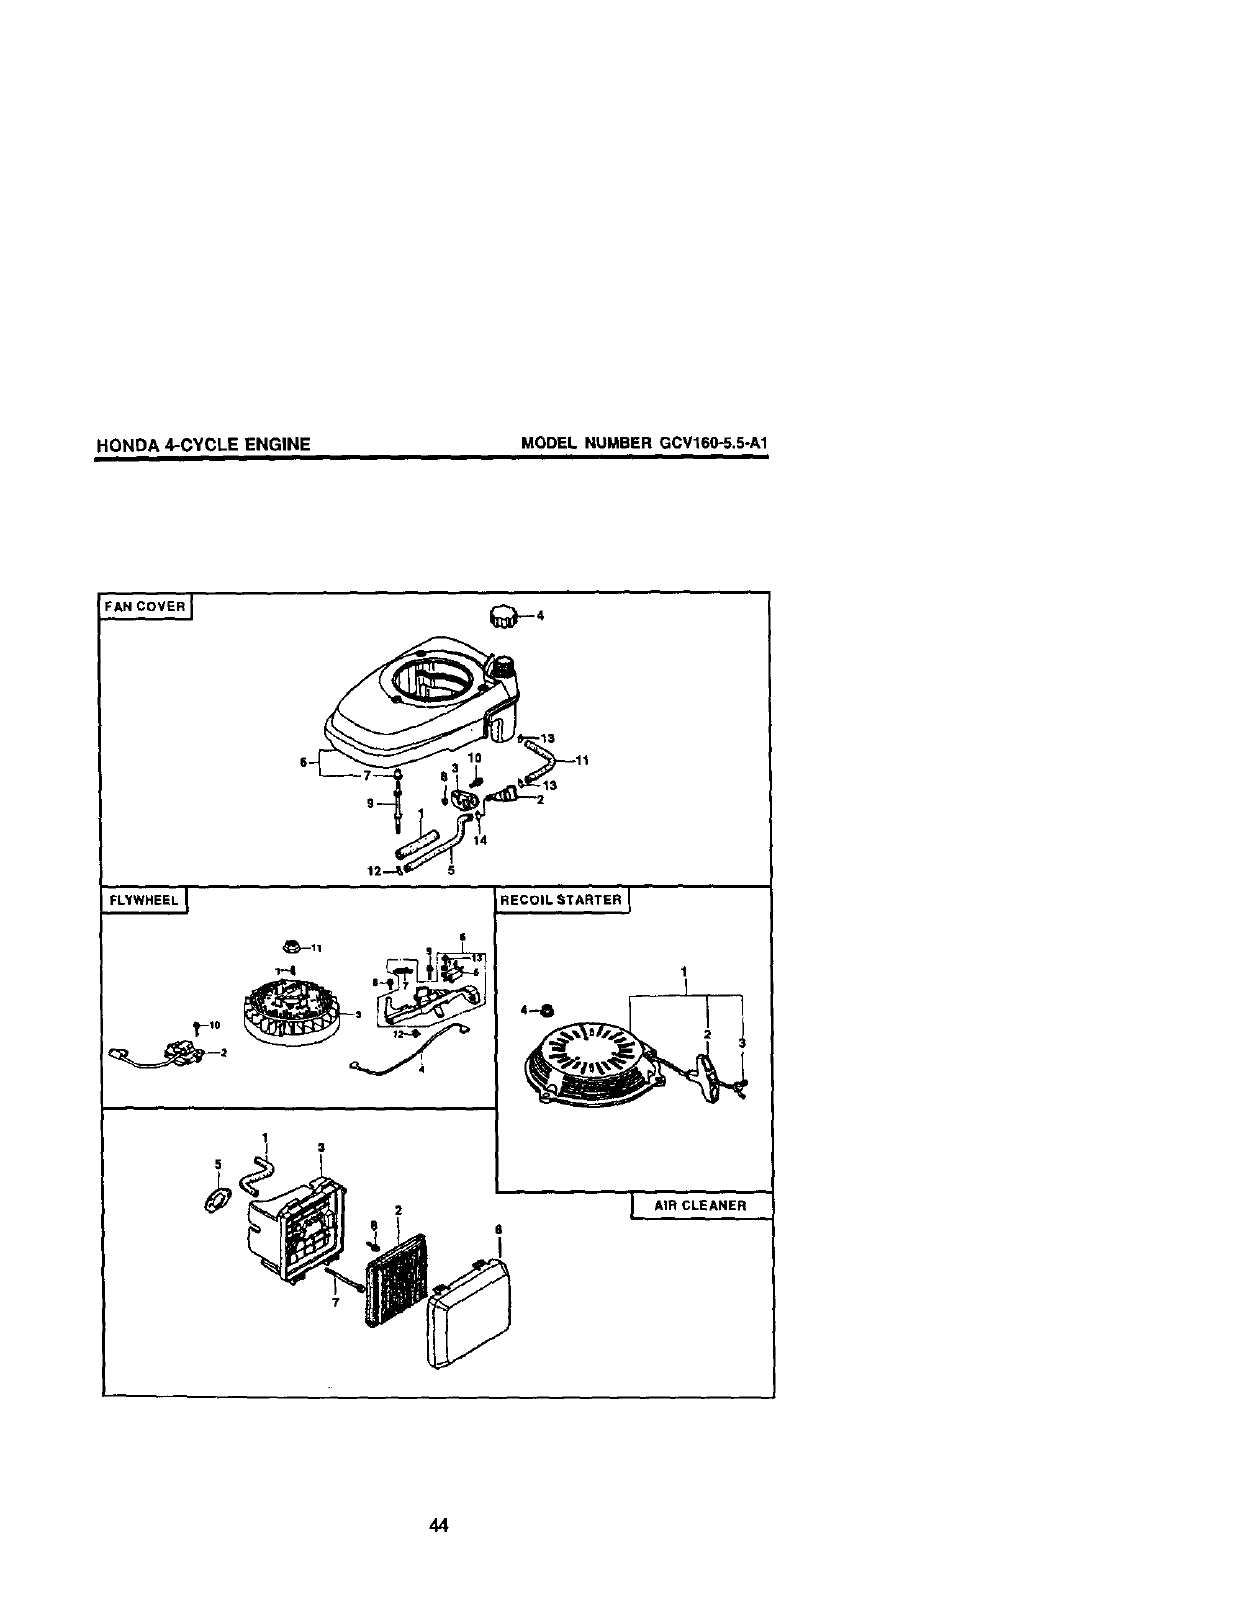
HONDA 4-CYCLE ENGINE MODEL NUMBER GCV160-5.5-A1
FAN COVER I
t4
FLYWHEEL.J
$
RECOIL STARTER I
I AIR CLEANER
44

HONDA 4-CYCLE ENGINE MODEL NUMBER GCV160-5.5-A1
FAN COVER
KEY PART
NO. NO. DESCRIP'rlON
1 3683646 Rubber, Supporter 107 mm
2 5028923 Petoock Assy. Man
3 5580394 Bracket, Petcock
4 5580451 Cap Assy., Fuel Tank
5 5580469 Tube, Fuel
6 5580519 Cover Comp., Fan NH1 Black
7 5580527 Coller, Fan Cover
8 2499440 Collar, Fr. Turn Signal
9 5581004 Bolt, Stud
10 0671636 Screw-Washer 5)(10
11 2449593 Bulk Hose, Fuel
12 0250647 Clip, Tube B8)
13 0250985 Clip, Tube (B10)
14 0053447 Clip, Tube (C9)
FLYWHEEL
KEY PART
NO. NO. DESCRIP_ON
1 0348433 Ke , Special Woodruff
(2_')(15)
2 5550659 Coil Ass., ignition
3 5723747 Fl_,whee_'Assy.
4 5580675 W=re, Stop Switch
5 5580683 Switch Assy., Engine Stop
6 5580782 8mke Assy.
7 5580790 Spltng, Brake Lever
8 0503619 BoltFlange (6X14)
91725050 Bolt,Flange (6X23)
10 0671552 Buff, Flange ( )6X20
11 6442038 Nut, Special 14mm
12 1824630 Clip Cable
13 0485946 Screw-Washer (4X12)
14 1510361 Washer, P_in
AIR CLEANER
KEY PART
NO. NO. DESCRIPTION
1 5580154 Tube, Breather
2 5580402 Element, Air Cleaner
3 5581410 Case Assy.,Air Cleaner
5 5664560 Gasket, A_rCleaner
6 5580444 Cover, Air Cleaner
6X86
7 5580964 Bott, Flange /6X141
8 2374742 Bolt, Flange
RECOIL STARTER
KEY PART
NO. NO. DESCRtPTION
5597869 Starter Assy,, RecoilNH1
Long Rope Slack
5580634 Knob, Recoil Starter
5580642 Rope, Recol_Starter
2866341 Nut. Flange 6mm
45
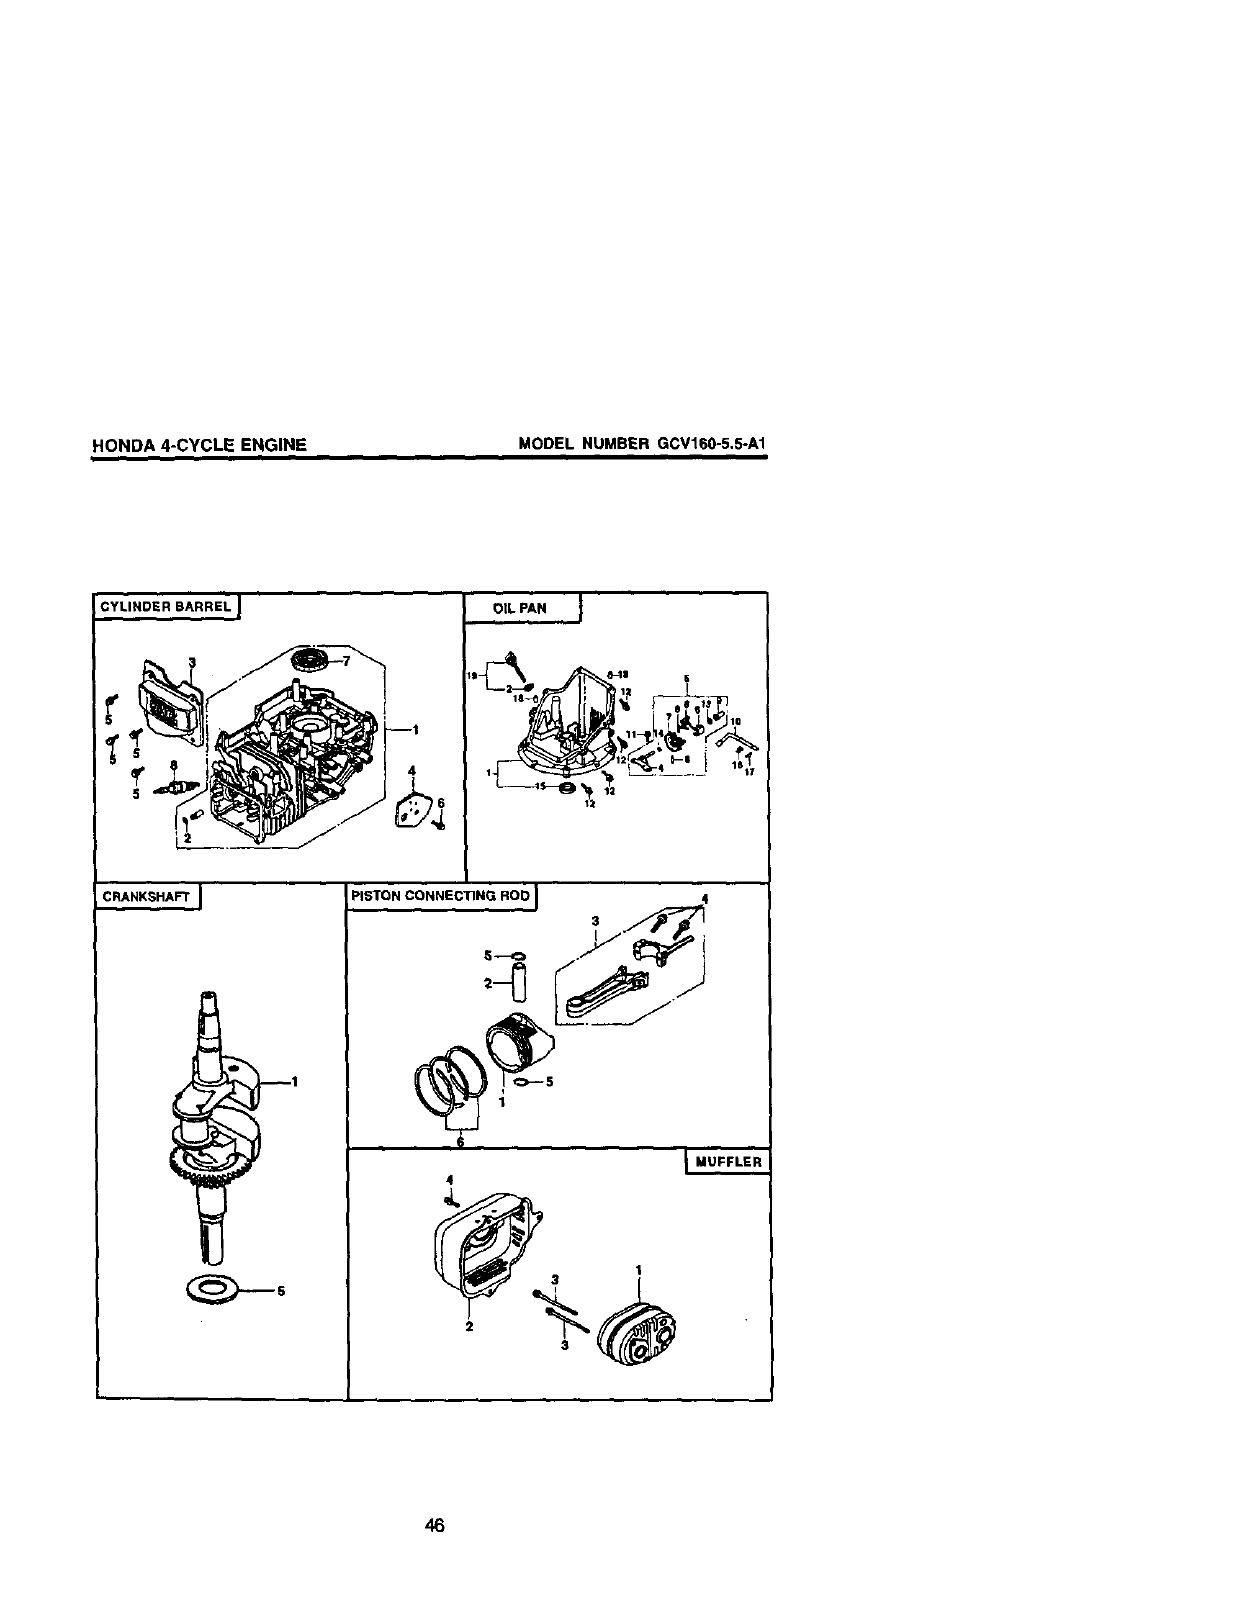
HONDA 4-CYCLE ENGINE MODEL NUMBER GCV160-5,5-A1
CYLINDER BARREL J OIL PAN I
CRANKSHAFT]
1
PISTON CONNECTING RODJ 4
._ ..__
4
46
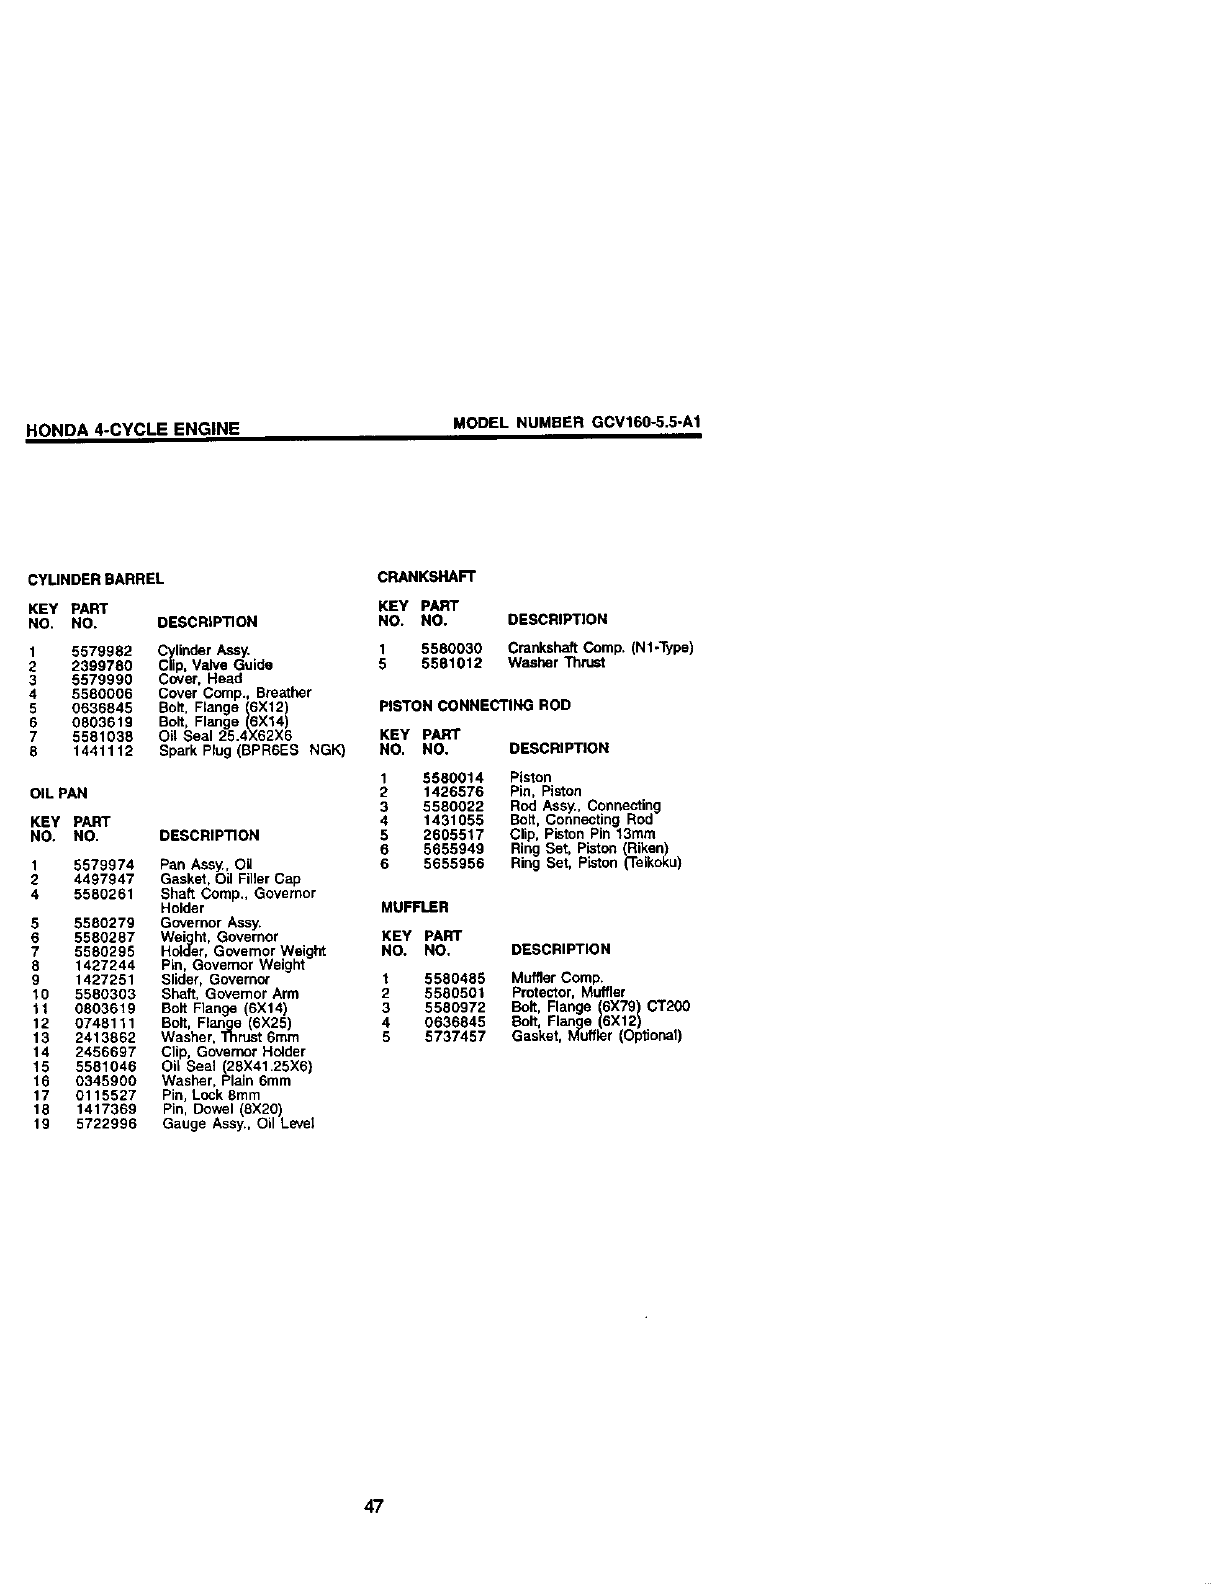
HONDA 4-CYCLE ENGINE MODEL NUMBER GCV16O-5.5-A1
CYLINDER BARREL
KEY PART
NO. NO,
1 5579982
2 2399780
3 5579990
4 5580006
5 0636845
6 0803819
7 5581038
8 1441112
DESCRIPTION
C linder Assy.
C_ip.Valve Guide
Cover, Head
Cover Comp., Breather
Bolt, Flange 6X12
Bolt, Flange /66X141
Oil Seal 25.4X62X6
Spark Plug (BPRTES NGK)
OIL PAN
KEY PART
NO. NO.
1 5579974
2 4497947
4 5580261
5 5580279
6 5580287
7 5580295
8 1427244
9 1427251
10 5580303
11 0803619
12 0748111
13 2413662
14 2456697
15 5581046
16 0345900
17 0115527
18 1417369
19 5722996
DESCRIPTION
Pan Ass_, Oi_
Gasket, Oil Filler Cap
Shaft Comp., Governor
Holder
Governor Assy.
Wei ht, Governor
HN_err, Governor Weight
Pin, Governor Weight
Slider, Governor
Shaft, Governor Arm
Bolt Range (6X14)
Bolt, Flange (6X25)
Washer. Thrust 6ram
Clip, Governor Holder
Oil Seal (28X41.25X6)
Washer, Plain 6mm
Pin, Lock 8ram
Pin, Dowel 6X20)
Gauge Assy., 0Leve
CRANKSHAFT
KEY PART
NO. NO.
1 5580030
5 5581012
DESCRIPTION
CrankshaftComp. (N1-Type)
Washer Thrust
PISTON CONNECTING ROD
KEY pART
NO. NO, DESCRIPTION
1
2
3
4
5
6
6
5880014 Piston
1426576 Pin, Piston
5580022 Rod Assy., Connecting
1431055 Bolt, Connecting Rod
2605517 Clip, Piston Pin 13ram
5655949 Ring Set, Piston/Riken)
5655956 Ring Set, Piston (leikoku)
MUFFLER
KEY PART
NO. NO.
15580485
2 5580501
3 5580972
4 0636845
5 5737457
DESCRIPTION
Muffler Comp.
Protector.Muffler
Bolt, Flange (6X79) CT200
Bolt, Flange (6X12)
Gasket, Muffler (Optional)
47
Forrepairofmajorbrandappliancesin your own home...
no matterwhomade it,nomatter whosold
1-SOO-4-MY-HOME_ Anytrne,dayorr_l_
(i-8004S9-4_) (U.S.A.andCanada)
w%_'w.se_lPs_oIn www.seal_.ca
Forrepairof carry-inproductslike vacuums,bwn equipment,and
electr_k;s, callfor me nearestSears Partsand Repair Center.
1-800-488-1222 Ar_me,dayo_r_l (U.S.A.rely)
Forthereptacementparts,accessoriesand owner'smanuals
thatyouneed todo-it-yoursell,callSears PartsDirect_t
1-800-366-PART Sa.m.- 11 p.m., 7 da_saweek
(1-seo,36_-7,2-/s) (u.s,/__y)
www.sea_comipadsdirect
To purchaseorinquireaboutaSearsServiceAgreement
orSearsMaintenanceAgreement:
1-800-827-6655 (u.S.A) 1-800-361-6665 (Canada)
7 a.m.- 5 p.m.,CST,Mort.-SaL 9 a.rr_- 8 pro. EST, M - F,4 p.m.Sa_.
ParapedrseiVcJodemparad_a AuC_b p_rs_e enfr'dn_s:
domiaT_ ypara ordenarpiezas: I._0.LE.FOYER_C
1-888_IJ-HOGAR mM (1-800-533-6_/)
(1-888-_7) www.sea_.ca _,
f++i +l ....+'
® Registered Trademark /"n_Trademark /mMService Mark of Sears, Roebuck and Ce.
®Marca Reglstrada /_Mama de Fdbdca /s_ Mama de Serviclo de Sears, Roebuck and Co,
_c Marque de commerce /_o Marque d_posde de Sears, Roebuck and Co.
179212 03.28.01 BY Printed in U.S.A.
