Craftsman 917387380 User Manual ROTARY MOWER Manuals And Guides L0707045
CRAFTSMAN Walk Behind Lawnmower, Gas Manual L0707045 CRAFTSMAN Walk Behind Lawnmower, Gas Owner's Manual, CRAFTSMAN Walk Behind Lawnmower, Gas installation guides
User Manual: Craftsman 917387380 917387380 CRAFTSMAN ROTARY MOWER - Manuals and Guides View the owners manual for your CRAFTSMAN ROTARY MOWER #917387380. Home:Lawn & Garden Parts:Craftsman Parts:Craftsman ROTARY MOWER Manual
Open the PDF directly: View PDF ![]() .
.
Page Count: 40
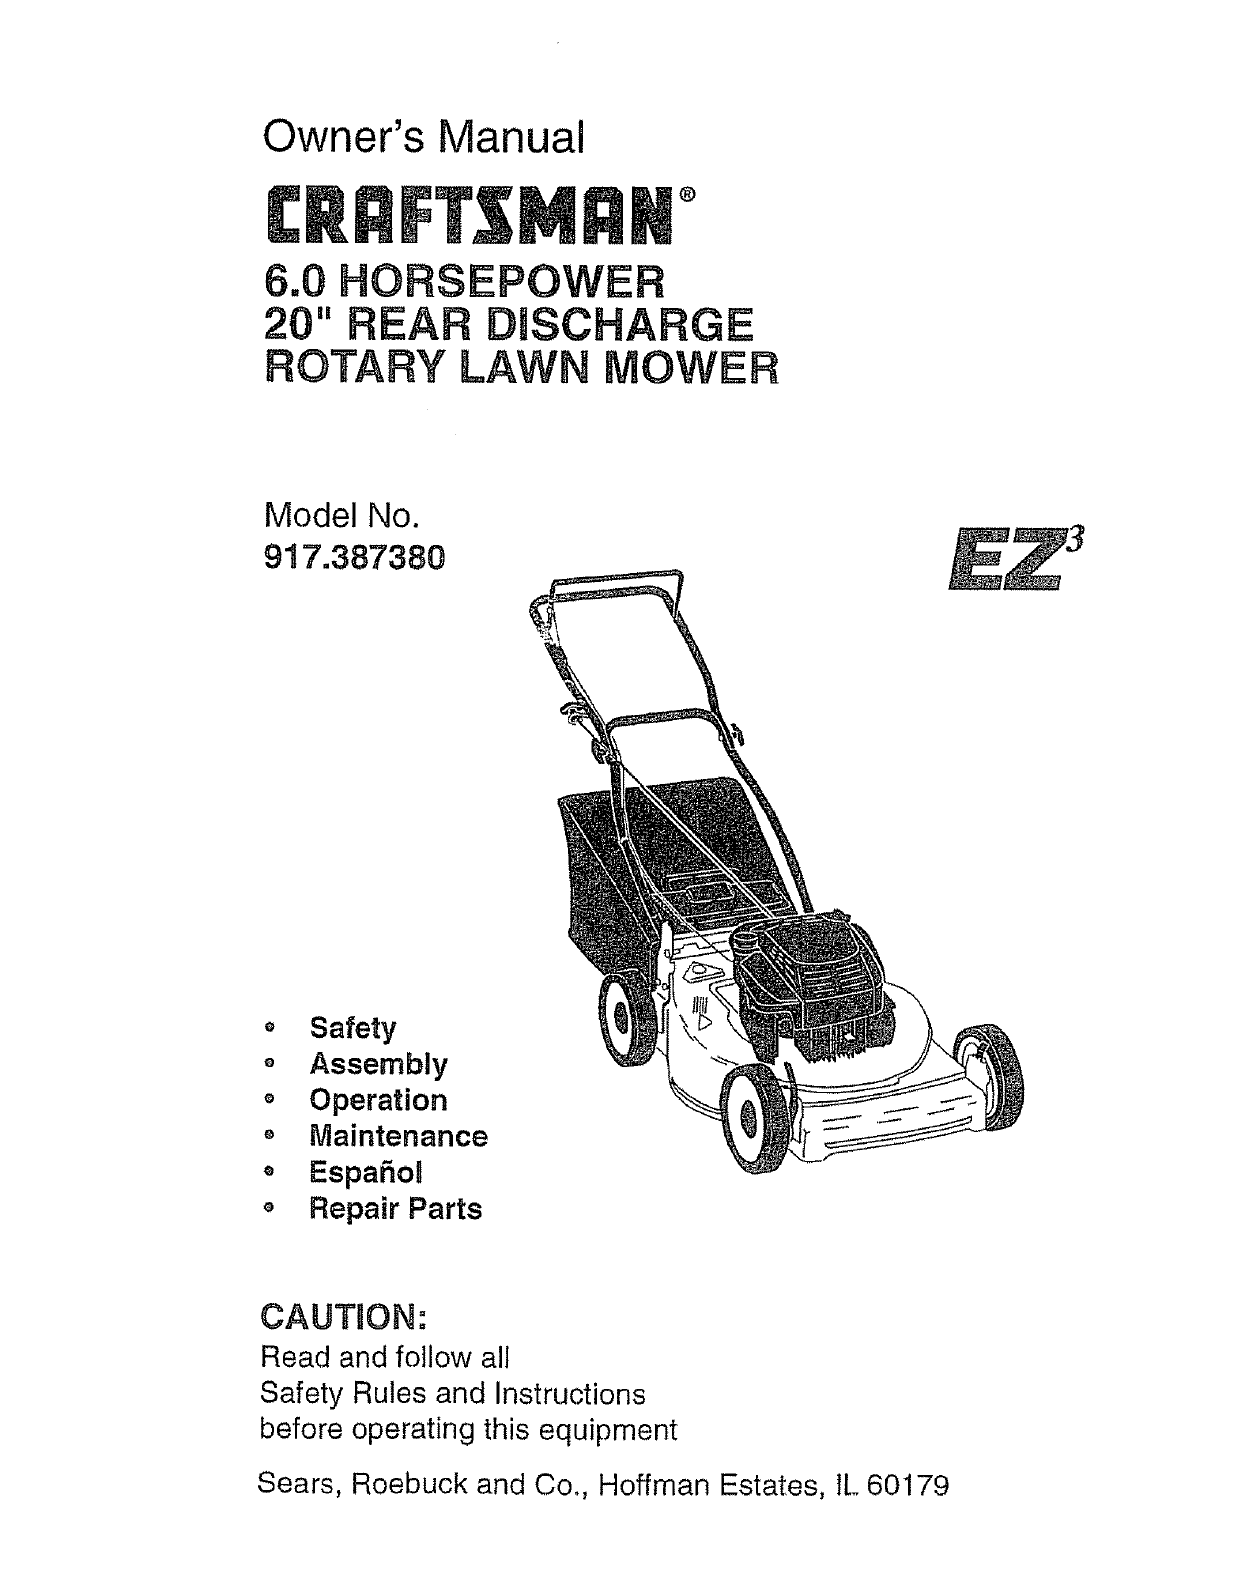
Owner's Manual
®
6.0 HORSEPOWER
20" REAR DISCHARGE
ROTARY LAWN MOWER
Model No.
917.387380
o Safety
o Assembly
oOperation
" Maintenance
EspaSo_
Repair Parts
CAUTaON:
Read and follow all
Safety Rules and Instructions
before operating this equipment
Sears, Roebuck and Co., Hoffman Estates, IL 60179

Warranty 2 Product Specifications 11
Safety Rules 2 Service and Adjustments 13
Assembly 4 Storage 14
Operation 6 Troubleshooting 15
Maintenance Schedule 10 Repair Parts 32
Maintenance 10 Parts Ordering Back Cover
LIMITED TWO YEAR WARRANTY ON CRAFTSMAN POWER MOWER
For two years from date of purchase, when this Craftsman Lawn Mower is maintained,
lubricated, and tuned up according to the operating and maintenance instructions in the
owner's manual, Sears will repair free of charge any defect in material or workmanship.
If this Craftsman Lawn Mower is used for commercial or rental purposes, this warranty
applies for only 90 days from the date of purchase°
This Warranty does not cover:
o Expendable items which become worn during normal use, such as rotary mower
blades, blade adapters, belts, air cleaners and spark plug.
o Repairs necessary because of operator abuse or negligence, including bent crank-
shafts and the failure to maintain the equipment according to the instructions con-
tained in the owner's manual_
Warranty service is available by returning the Craftsman power mower to the nearest
Sears Service Center/Department in the United States. This warranty applies only while
this product is in use in the United States.
This Warranty gives you specific legat rights, and you may also have other fights which
vary from state to state.
SEARS, ROEBUCK AND CO., D/817 WA, HOFFMAN ESTATES, ILLINOIS 60179
TRAINING:
oRead this operator's manual carefully.
Become familiar with the controls and
know how to operate your mower
properly. Learn how to quickly stop
mower,
Do not allow children to use your mower.
Never allow adults to use mower without
proper instructions.
= Keep the area of operation clear of all
persons, especially small children and
pets°
. Use mower only as the manufacturer
intended and as described in this manual.
• Do not operate mower if it has been
dropped or damaged in any manner.
Always have damage repaired before
using your mower.
• Do not use accessory attachments that
are not recommended by the manufac-
turer. Use of such attachments may be
hazardous.
oThe blade turns when the engine is
running.
PREPARATION:
• Always thoroughly check the area to be
mowed and clear it of all stones, sticks,
wires, bones, and other foreign objects.
These objects will be thrown by the blade
and can cause severe injury.
• Always wear safety glasses or eye
shields when starting and while using
your mower.
• Dress properly° Do not operate mower
when barefoot or wearing open sandals.
Wear only solid shoes with good traction
when mowing.
o Check fuel tank before starting engine°
Do not fitl gas tank indoors, when the
engine is running or when the engine is
2
hot.Allowtheengineto coolfor several
minutesbeforefillingthe gastank.Clean
offanyspilledgasolinebeforestartingthe
engine.
o Alwaysmakewheelheightadjustments
beforestartingyourmower.Never
attemptto dothiswhiletheengineis
running.
• Mowonlyindaylightor goodartificial
light°
OPERATION:
• Keepyoureyesand mindonyourmower
andtheareabeingcut.Donotletother
interestsdistractyour
° Donotmowwet orslipperygrass°Never
runwhileoperatingyour mower,Always
besureof yourfooting-- keepa firm
holdonthe handlesandwalko
o Donotputhandsor feet nearorunder
rotatingparts.Keepclearofthe discharge
openingatall times.
• Alwaysstoptheenginewheneveryou
leaveorarenotusing yourmower,or
beforecrossingdriveways,walks,roads,
andanygravel--coveredareas.
oNever direct discharge of material toward
bystanders nor allow anyone near the
mower while you are operating it.
• Before cleaning, inspecting, or repairing
your mower, stop the engine and make
absolutely sure the blade and all moving
parts have stopped. Then disconnect the
spark plug wire and keep it away from the
spark plug to prevent accidental starting.
• Do not continue to run your mower if you
hit a foreign object. Follow the procedure
outlined above, then repair any damage
before restarting and operating you
mower.
-Do not change the governor settings or
overspeed the engine. Engine damage or
personal injury may resulL
-Do not operate your mower if it vibrates
abnormally. Excessive vibration is an
indication of damage; stop the engine,
safely check for the cause of vibration
and repair as required.
• Do not run the engine indoors_ Exhaust
fumes are dangerous.
• Never cut grass by pulling the mower
towards you. Mow across the face of
slopes, never up and down or you might
lose your footing° De not mow exces-
sively steep slopes. Use caution when
operating the mower on uneven terrain
or when changing directions -- maintain
good footing.
o Never operate your mower without
proper guards, plates, grass catcher or
other safety devices in place.
MAINTENANCE AND STORAGE:
• Check the blade and the engine mount-
ing bolts often to be sure they are
tightened properly.
o Check all bolts, nuts and screws at
frequent intervals for proper tightness to
be sure mower is in safe working
condition.
• Keep all safety devices in place and
working.
• To reduce fire hazard, keep the engine
free of grass, leaves or excessive grease
and oil.
• Check grass catcher often for deteriora-
tion and wear and replace worn bags.
Use only replacement bags that are
recommended by and comply with
specifications of the manufacturer of your
mower°
• Always keep a sharp blade on your
mower.
-Allow engine to cool before storing in any
enclosure.
o Never store mower with fuel in the tank
inside a building where fumes may reach
an open flame or an ignition source such
as a hot water heater, space heater,
clothes dryer, etc_
CAUTION: Always disconnect spark
plug wire and place wire where it
cannot contact spark plug in order to
prevent accidental starting when
setting up, transporting, adjusting or
making repairs.
WARNING
The engine exhaust from this product
contains chemicals known to the State
of California to cause cancer, birth
defects, or other reproductive harm°
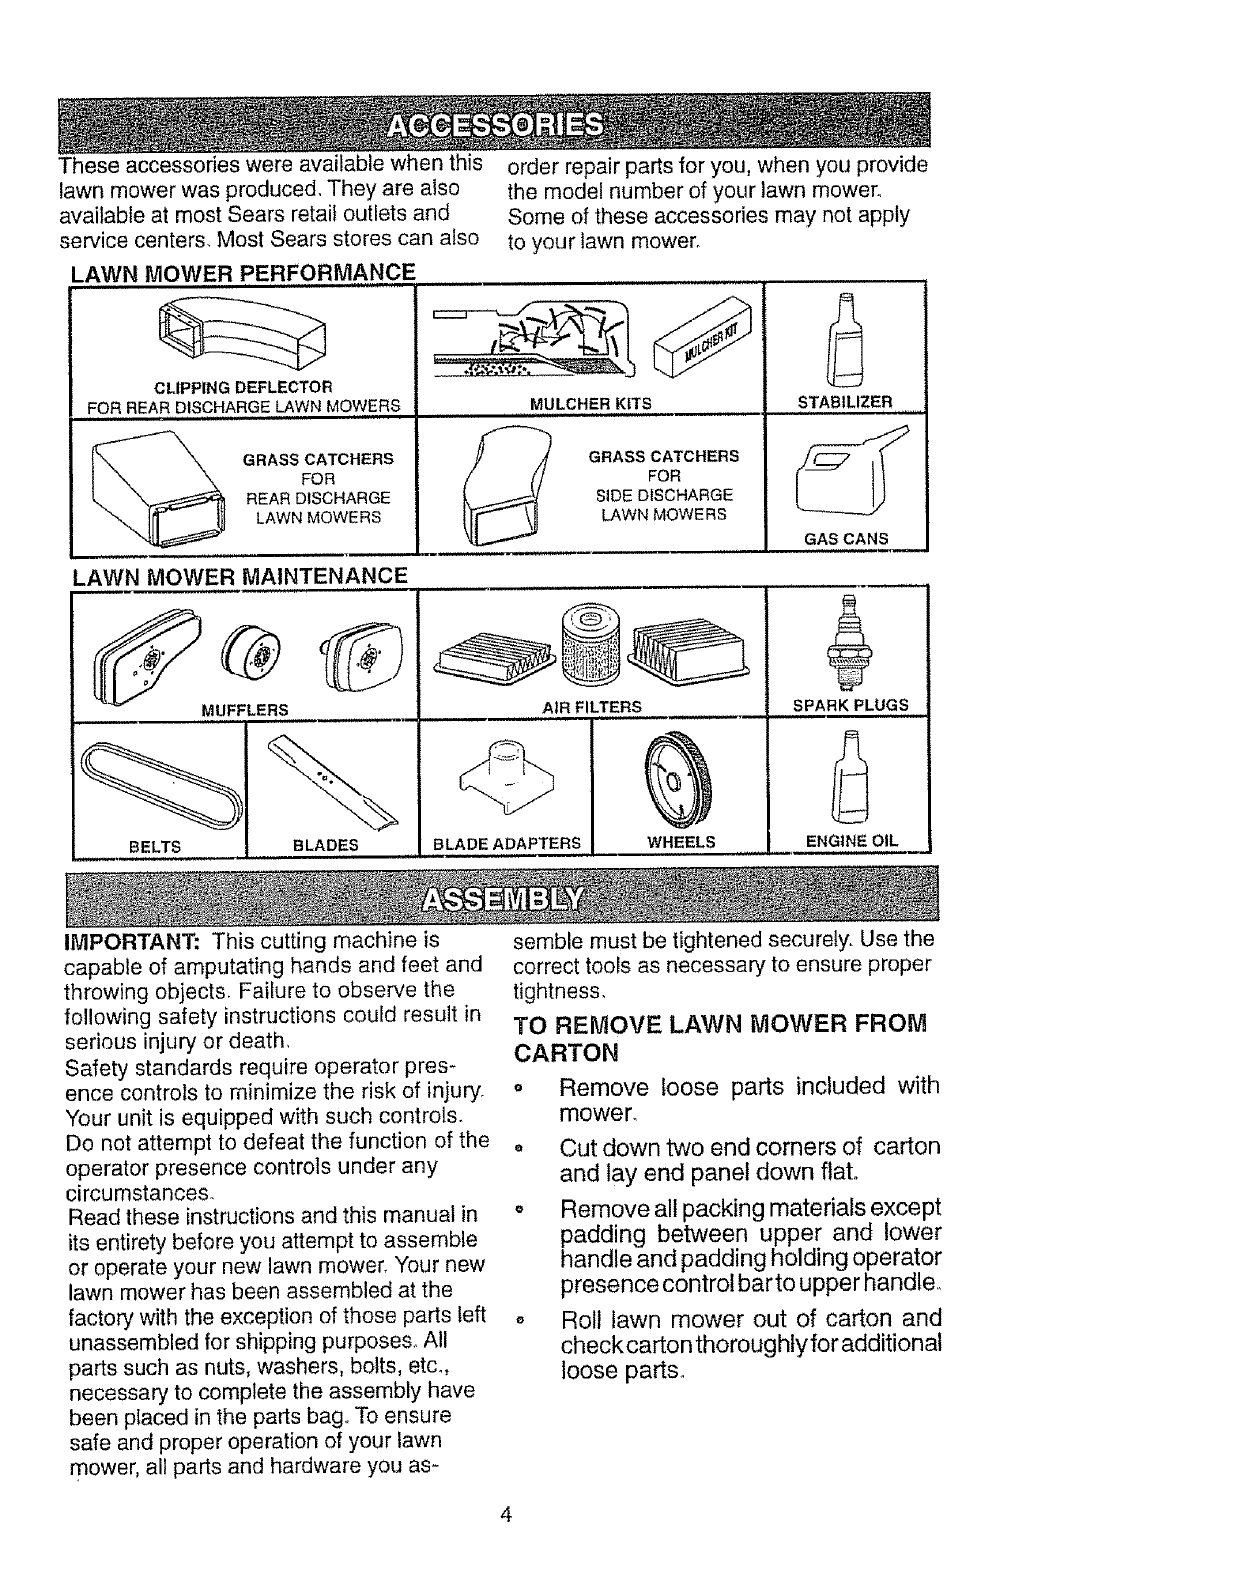
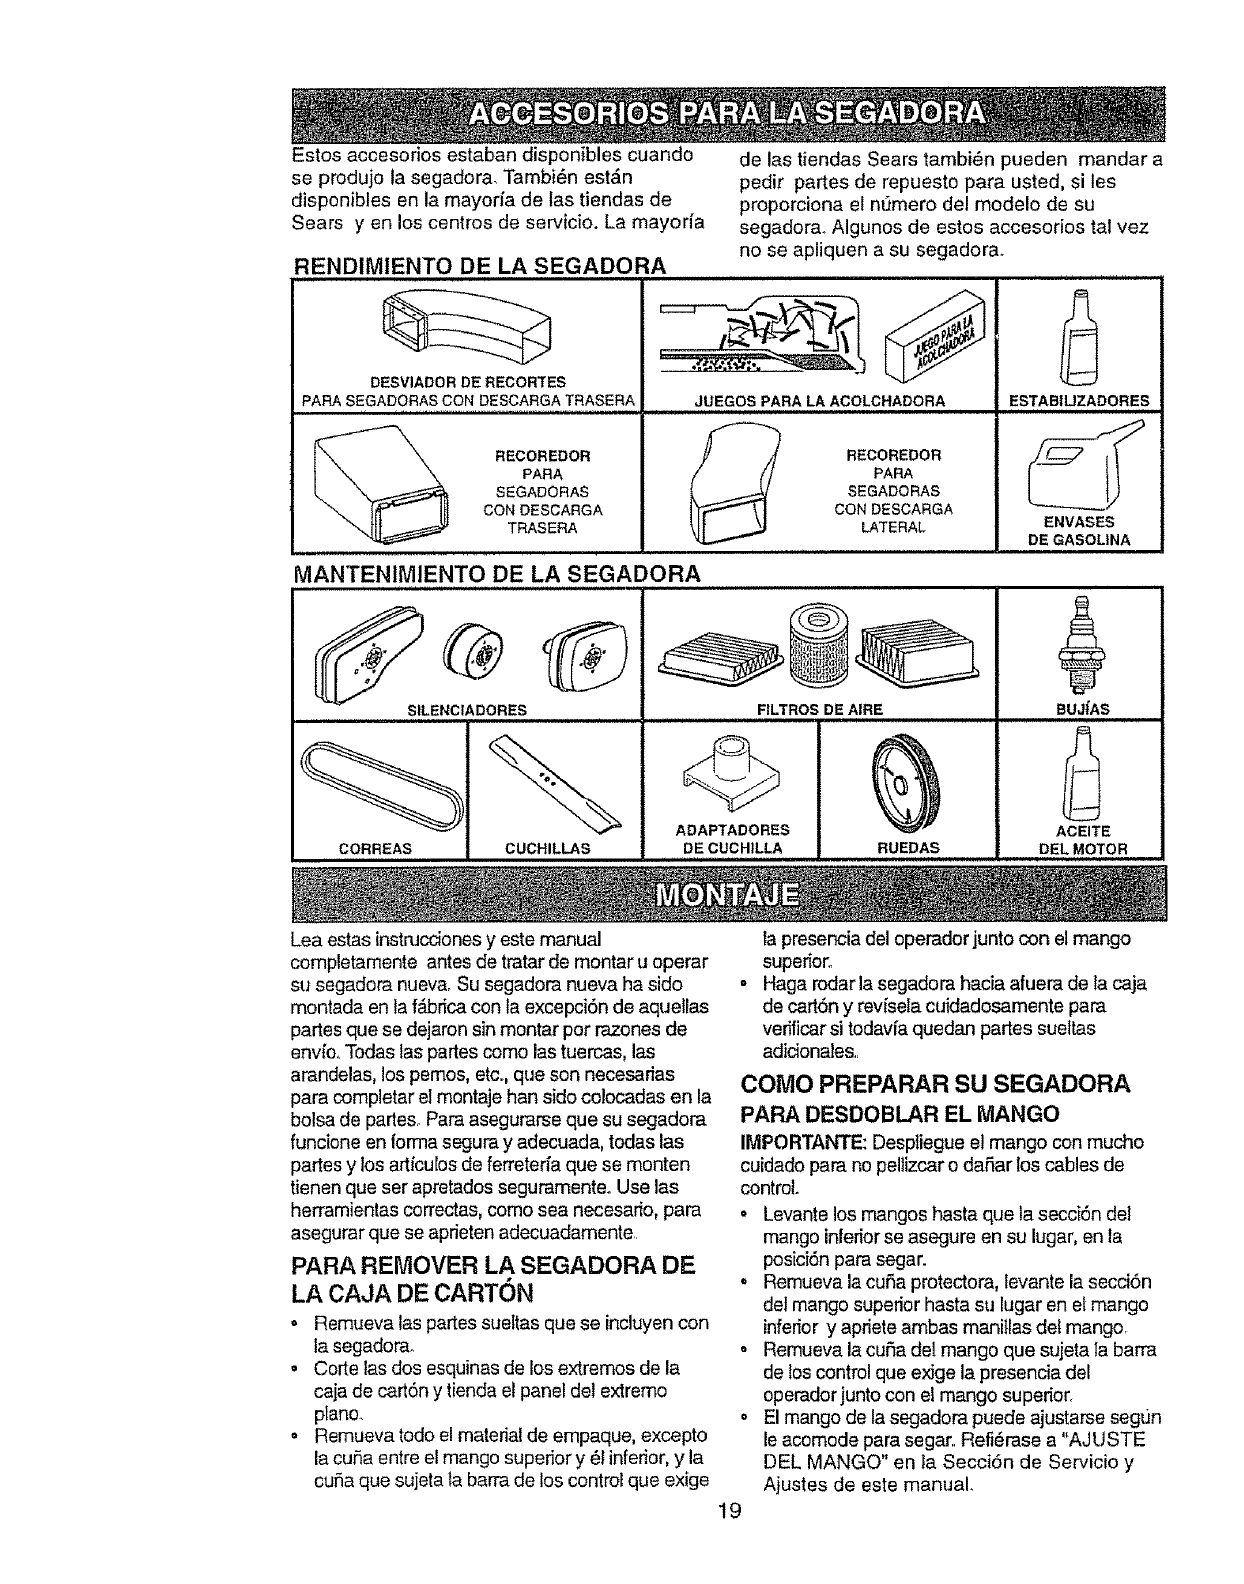
Theseaccessorieswereavailablewhenthis
lawnmowerwasproduced,Theyare also
availableat mostSearsretailoutletsand
servicecenters.MostSearsstorescanalso
LAWN MOWERPERFORMANCE
CLIPPING DEFLECTOR
FOR REAR,D!SCHARGE LAWN MOWERS
GRASS CATCHERS
FOR
REAR D1SCHARGE
LAWN MOWERS
, J,iJ,
LAWN MOWER MAINTENANCE
order repair parts for you, when you provide
the model number of your lawn mower.
Some of these accessories may not apply
to your lawn mower_
r , Illll '",,',
MUFFLERS
BELTS
,,,i,,,
BLADES
MULCHER KITS
i HIHH,,, , ,I,
GRASS CATCHERS
FOR
SiDE DISCHARGE
LAWN MOWERS
AIRFIg,g,R,S ........
BLADE ADAPTERS WHEELS
STABILIZERi Hll,i
GASCANS w
SPARK PLUGS
ENGINE OIL
IMPORTANT: This cutting machine is
capable of amputating hands and feet and
throwing objects. Failure to observe the
following safety instructions could result in
serious injury or death,
Safety standards require operator pres-
ence controls to minimize the risk of injury.
Your unit is equipped with such controls.
Do not attempt to defeat the function of the
operator presence controls under any
circumstances.
Read these instructions and this manual in
its entirety before you attempt to assemble
or operate your new lawn mower. Your new
lawn mower has been assembled at the
factory with the exception of those parts left
unassembled for shipping purposes. All
parts such as nuts, washers, bolts, etc.,
necessary to complete the assembly have
been placed in the parts bag_ To ensure
safe and proper operation of your lawn
mower, all parts and hardware you as-
semble must be tightened securely. Use the
correct tools as necessary to ensure proper
tightness.
TO REMOVE LAWN MOWER FROM
CARTON
o Remove loose parts included with
mower_
• Cut down two end corners of carton
and lay end panel down flato
o Remove all packing materials except
padding between upper and lower
handle and padding holding operator
presence control barto upper handle,,
o Roll lawn mower out of carton and
check carton thoroughly for additional
loose parts,,
HOW TO SET UP YOUR LAWN
MOWER
TO UNFOLD HANDLE
IMPORTANT: Unfold handles carefully so
as not to pinch or damage control cables°
° Raise handles until lower handle section
locks into place in mowing position.
= Remove protective padding, raise upper
handle section into place on lower
handles and tighten both handle knobs,
-Remove handle padding holding
operator presence control bar to upper
handle.
. Your lawn mower handle can be
adjusted for your mowing comfort. Refer
to "Adjust Handle" in the Service and
Adjustment section of this manual,
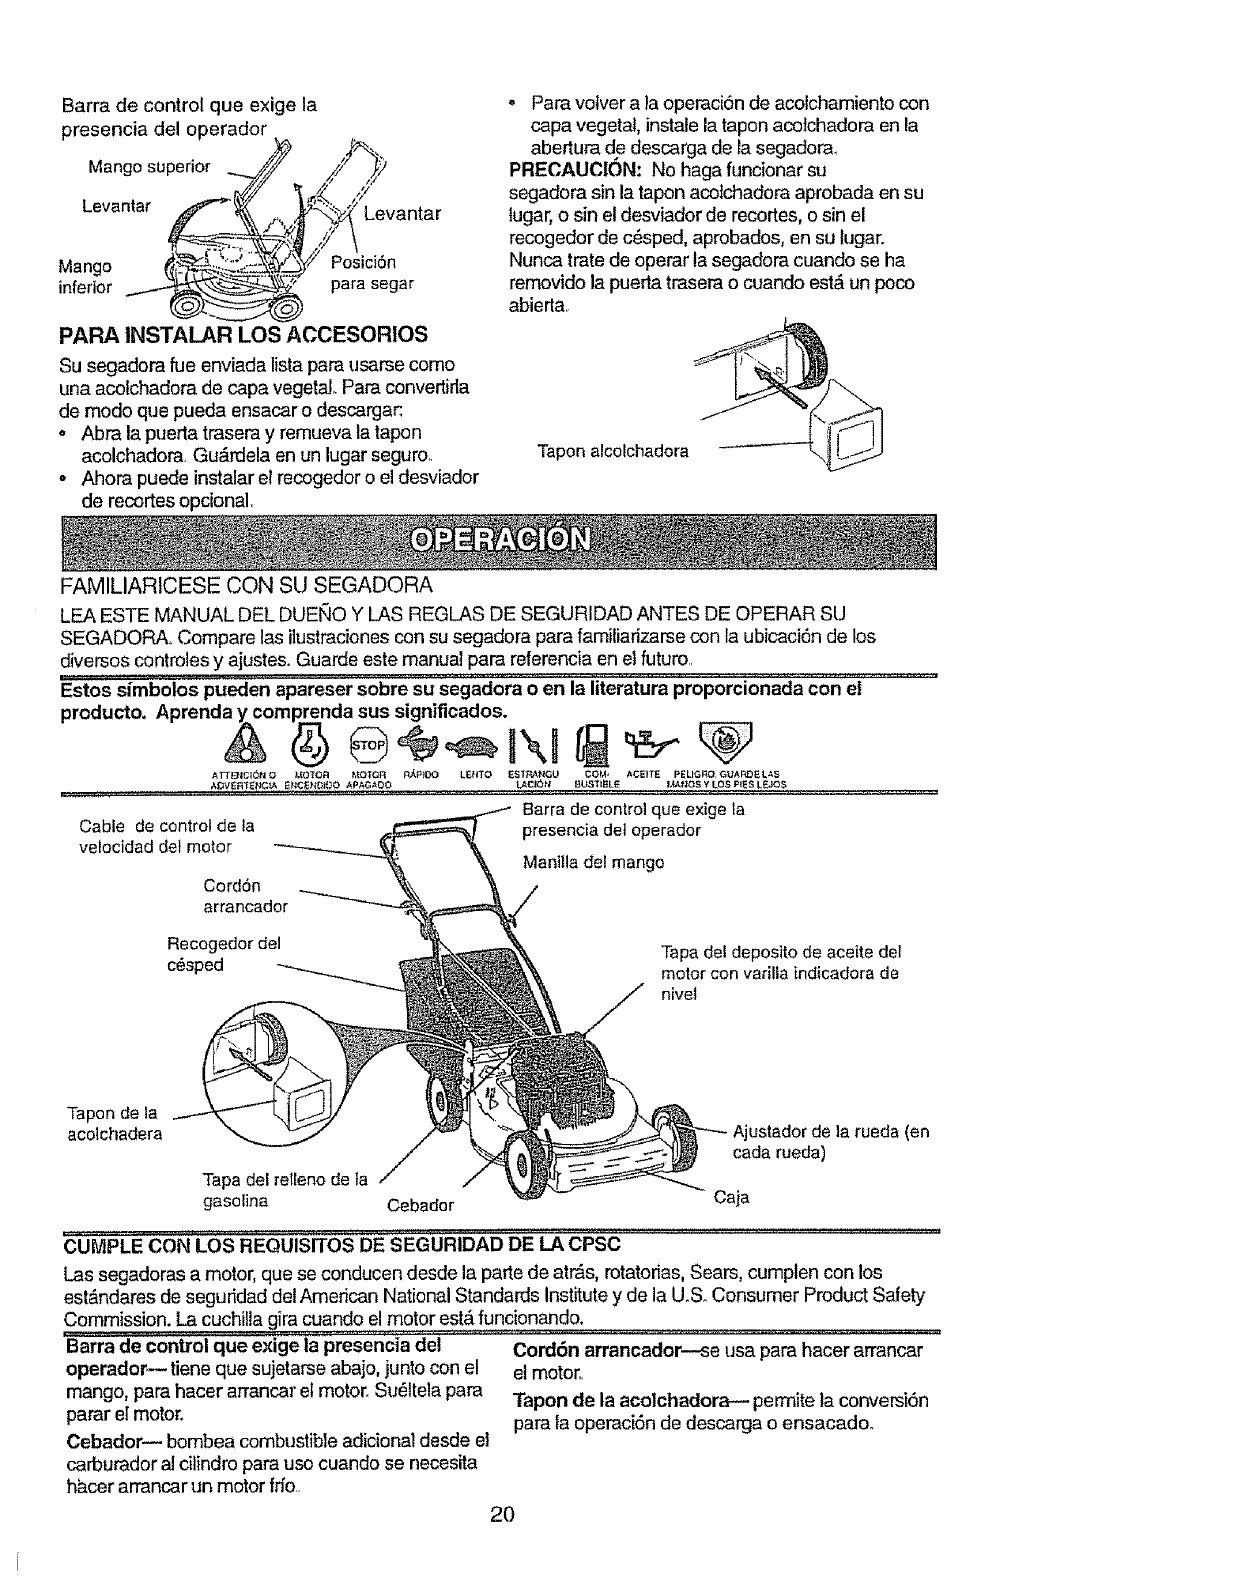
Operator presence
control bar
Upper handle
Lift up
TO INSTALL ATTACHMENTS
Your lawn mower was shipped ready to be
used as a mulcher, To convert to bagging
or discharging:
o Open rear door and remove mulcher
plug. Store mulcher plug in a safe place.
• You can now install catcher or optional
clipping deflector,
o To return to mulching operation, install
mulcher plug into discharge opening of
mower.
Mulcher plug _'_U__
CAUTION: Do not run your lawn mower
without mulcher plug in place or approved
clipping deflector or grass catcher in
place. Never attempt to operate the lawn
mower with the rear door removed or
propped open.
Lower
handle
Mowing
position
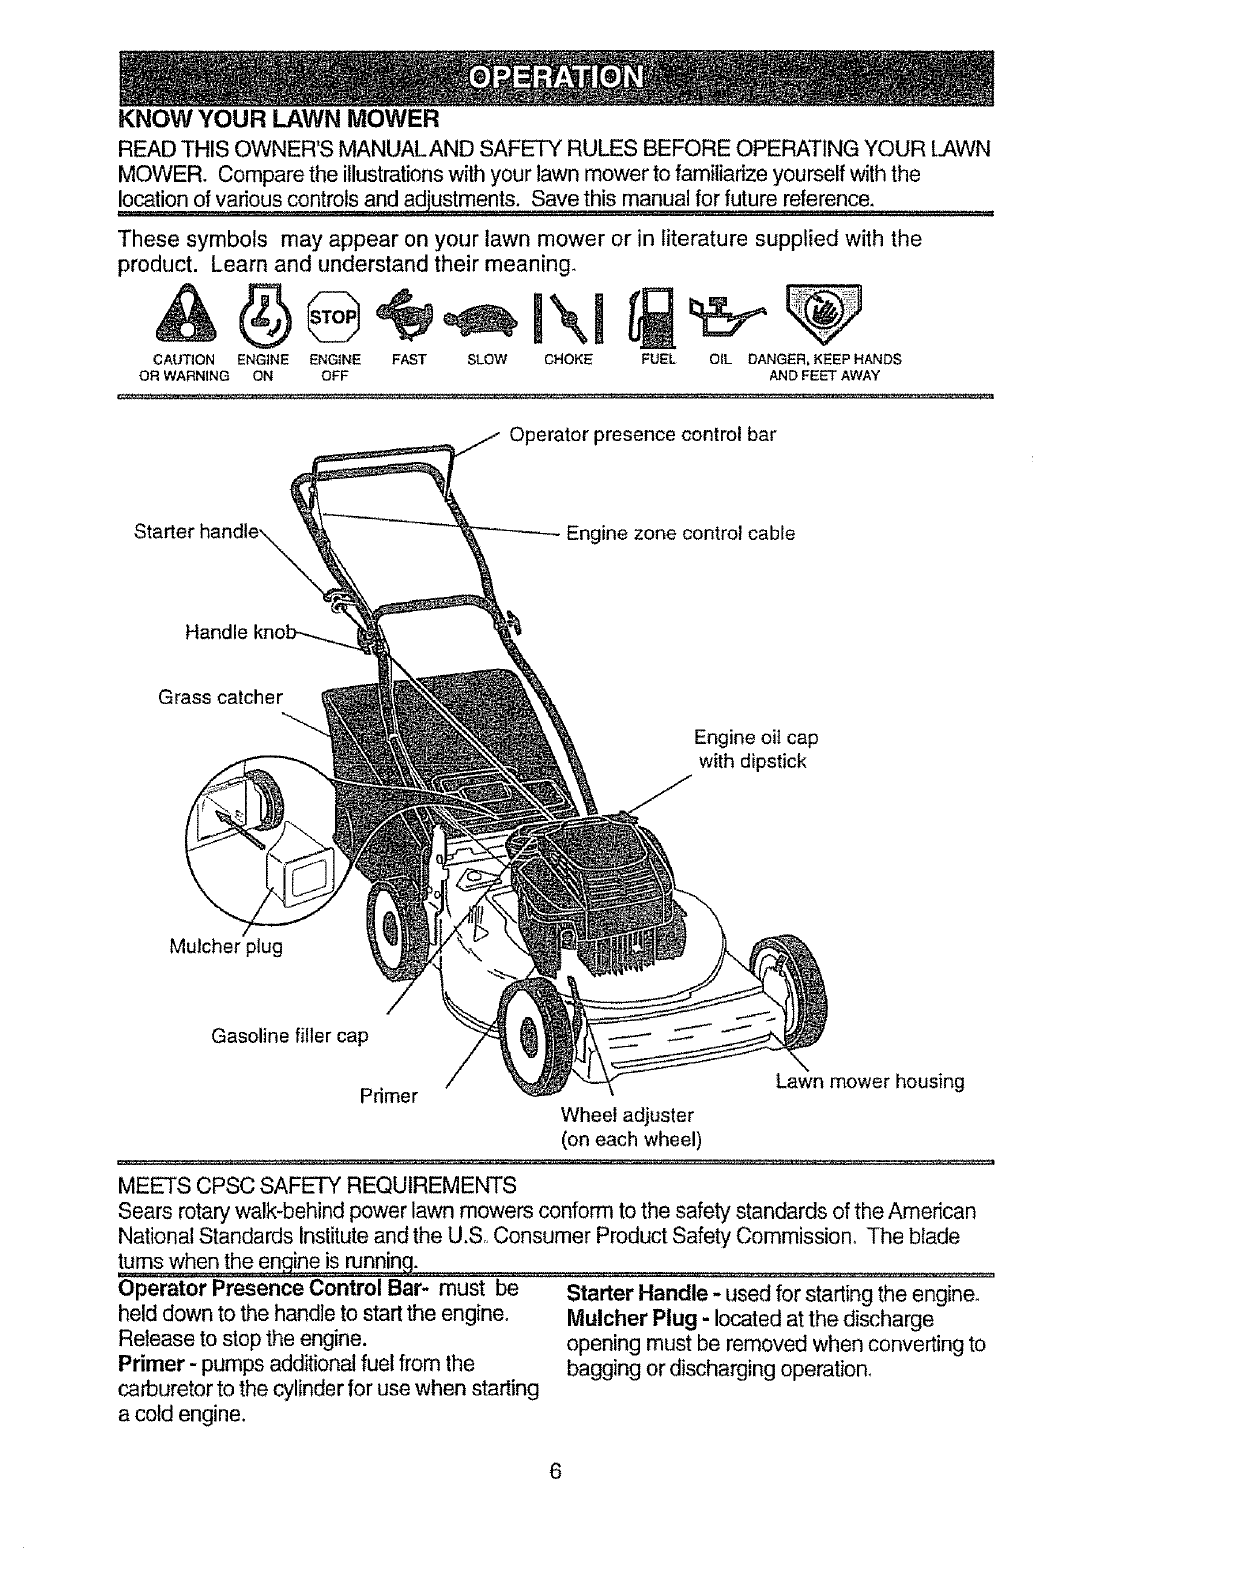
KNOW YOUR LAWN MOWER
READ THIS OWNER'S MANUALAND SAFETY RULES BEFORE OPERATING YOUR LAWN
MOWER. Compare the illustrations with your lawn mower to familiarize yourself with the
Iocat__stments. Savethismanual for future reference.
These symbols may appear on your lawn mower or in literature supplied with the
product. Learn and understand their meaning,
CAUTION ENGINE ENGINE FAST SLOW CHOKE
OR WARNING ON OFF
FUEL OIL DANGER, KEEP HANDS
AND FEET AWAY
Operator presence control bar
Engine zone control cable
Handle
Grass catcher
Engine oil cap
with dipstick
Mulcher plug
Gasoline filler cap
Primer Lawn mower housing
Wheel adjuster
(on each wheel)
MEETS CPSC SAFETY REQUIREMENTS
Sears rotary walk-behind power lawn mowers conform to the safety standards ofthe Amedcan
National Standards Institute and the U.S,,Consumer Product Safety Commission° The blade
turns when the engineis running, .......................................................................................
Operator Presence Control Bar- must be
held down to the handle to start the engine,
Release to stop the engine.
Primer - pumps additional fuel from the
carburetor to the cylinder for use when starting
a cold engine.
Starter Handle - used for starting the engine_
Niulcher Plug - located at the discharge
opening must be removed when converting to
bagging or discharging operation_
Theoperationof anylawnmowercan resultin
foreignobjectsthrownintotheeyes,whichcan
resultinsevereeyedamage,Alwayswear
safetyglassesor eyeshieldswhileoperating
yourlawnmowerorperforminganyadjust-
mentsorrepairs.Werecommendawide
visionsafetymaskoverthespectaclesor
standardsafetyglasses.
HOWTO USE YOUR LAWN MOWER
ENGINESPEEDCONTROl
Theenginespeed wasset at the factory
for optimumperformance. Speedis not
adjustable.
ENGINEZONE CONTROL
CAUTION; Federal regulationsrequire
anenginecontrolto beinstalledonthis
lawnmower in orderto minimizethe risk
of bladecontactinjury,,Do notunderany
circumstancesattemptto defeatthe
functionof the operatorcontrol.The blade
turnswhen the engine is running.
• Your lawn mower is equipped with an
operator presence control bar which
requires the operator to be positioned
behind the lawn mower handle to start and
operate the lawn mower°
TO ADJUST CUTTING HEIGHT
o Raise wheels for low cut and lower wheels
for high cut.
- Adjust cutting height to suit your require-
ments. Medium position is best for most
lawns.
° To change cutting height, squeeze adjuster
lever toward wheel. Move wheel up or down
to suit your requirements. Be sure all wheels
are in the same setting.
NOTE: Adjuster is properly positioned when
plate tab inserts into hole in lever. Also, g-
position adjusters (if so equipped) allow lever
to be positioned between the plate tabs.
Lower Wheels for High Cut
Plate Tab
Raise Wheels for Low Cut
Lever
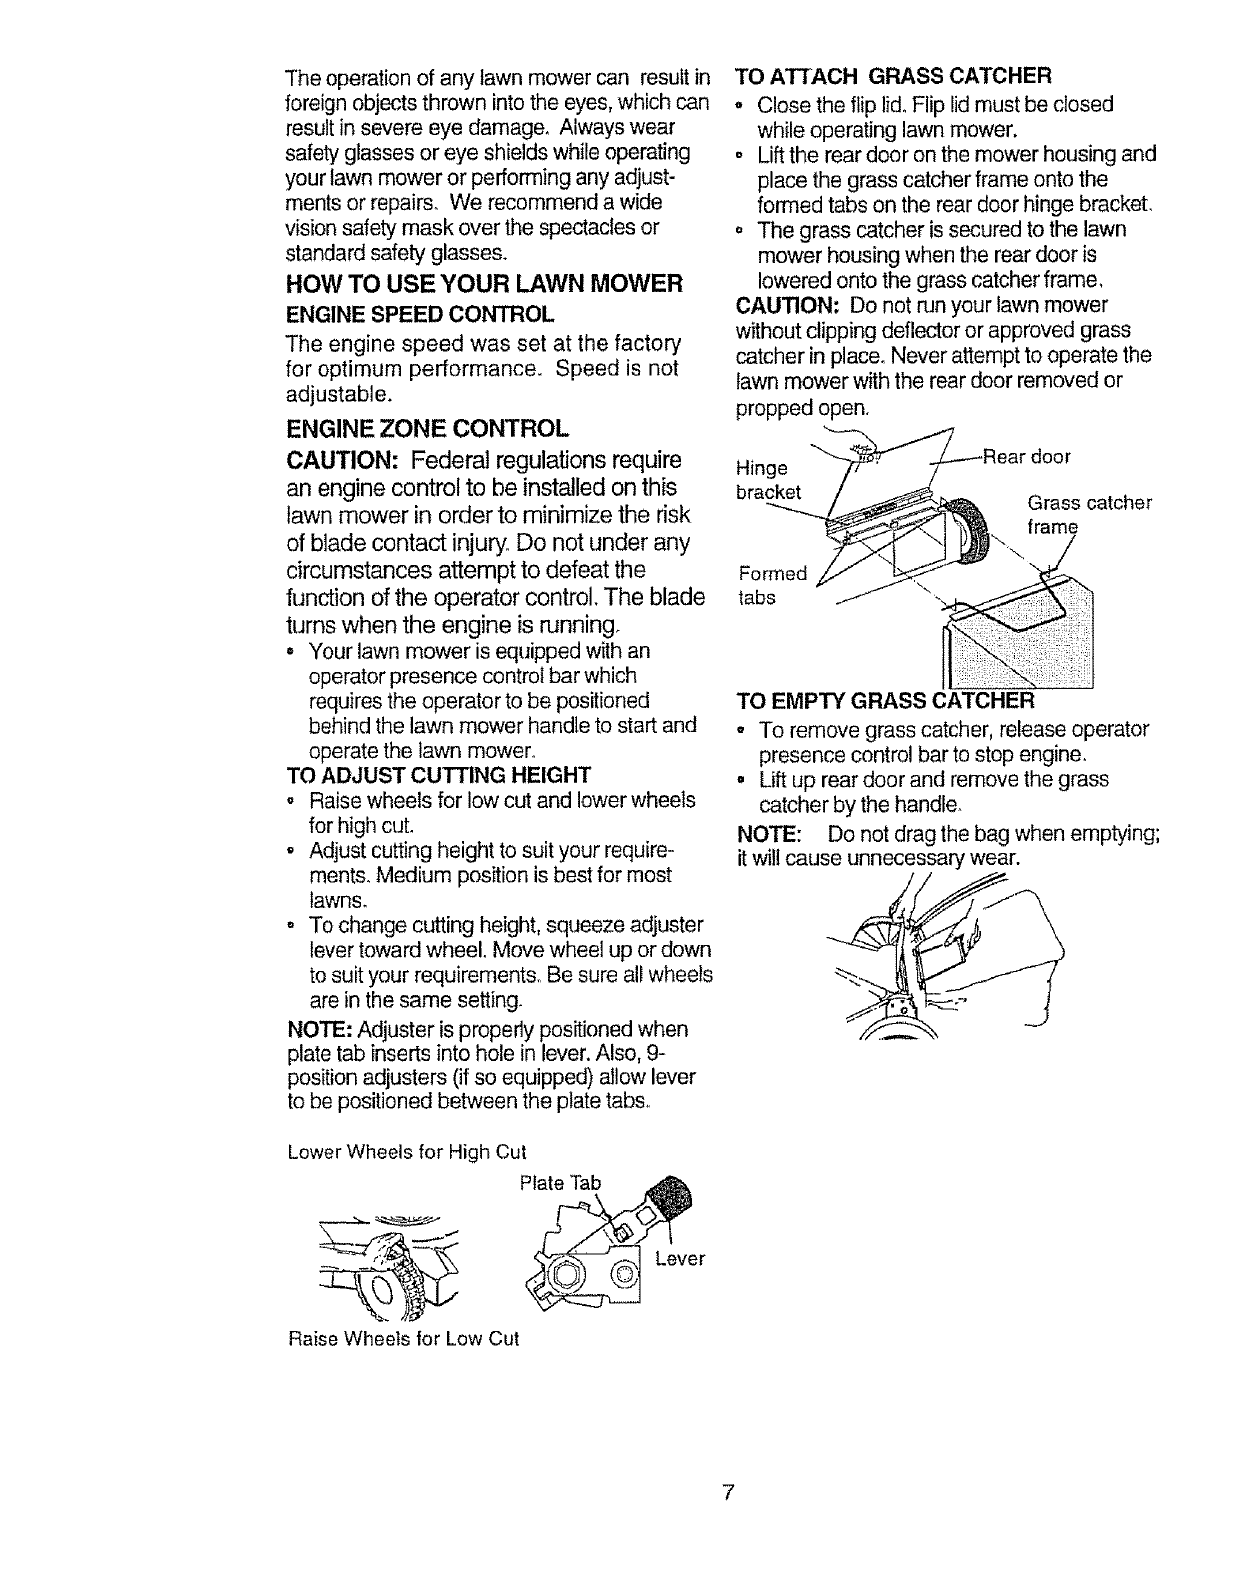
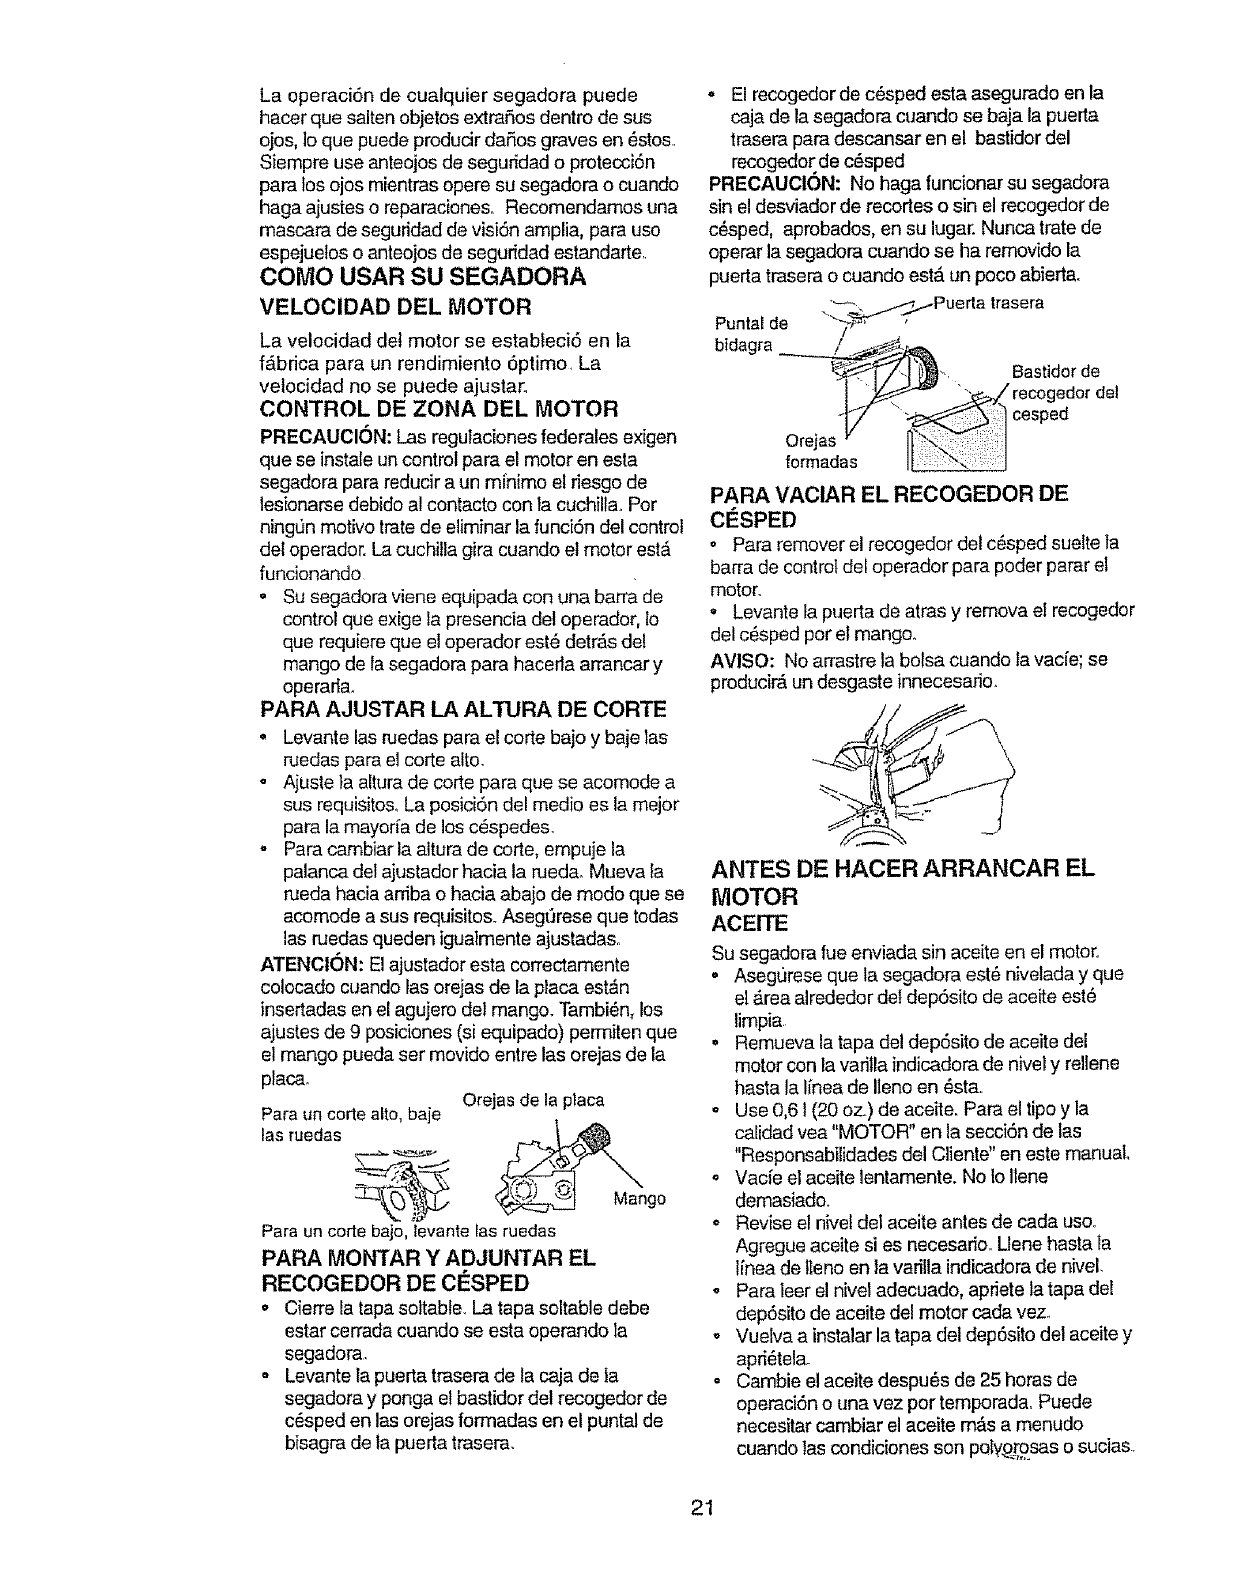
TO ATTACH GRASS CATCHER
oClose the flip lid. Flip lid must be closed
while operating lawn mower.
o Lift the rear door on the mower housing and
place the grass catcher frame onto the
formed tabs on the rear door hinge bracket.
. The grass catcher is secured to the lawn
mower housing when the rear door is
lowered onto the grass catcher frame,
CAUTION: Do not nJnyour lawn mower
without clipping deflector or approved grass
catcher in place. Never attempt to operate the
lawn mower with the rear door removed or
propped open.
Hinge
bracket Grass catcher
frame
Formed
tabs
TO EMPTY GRASS CATCHER
°To remove grass catcher, release operator
presence control bar to stop engine.
o Lift up rear door and remove the grass
catcher by the handle.
NOTE: Do not drag the bag when emptying;
it will cause unnecessary wear.
7
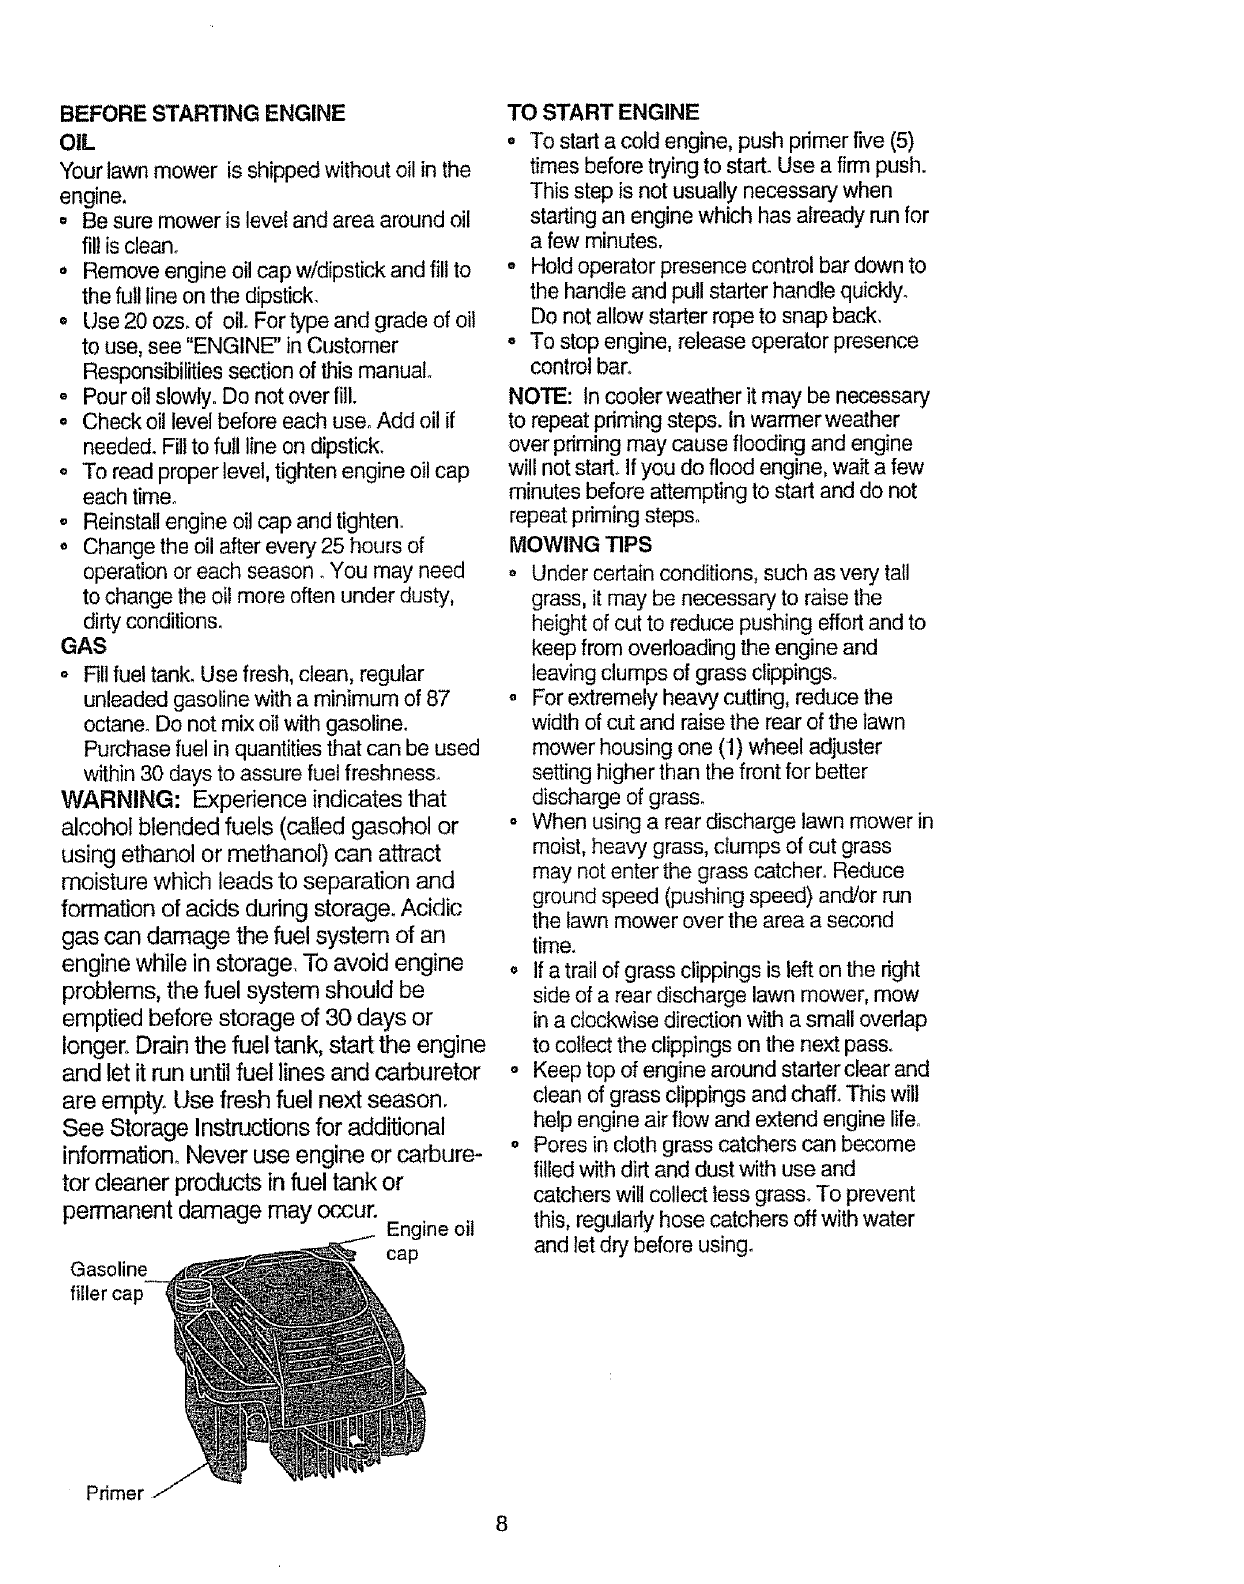
BEFORE STARTING ENGINE
OIL
Your lawn mower is shipped without oil in the
engine.
• Be sure mower is level and area around oil
fill is clean.
° Remove engine oil cap w/dipstick and fill to
the full line on the dipstick.
° Use 20 ozs. of oil. For type and grade of oit
to use, see "ENGINE" in Customer
Responsibilities section of this manual
o Pouroil slowly. Do not overfill.
° Check oil level before each use° Add oil if
needed_ Fill to full line on dipstick.
• To read proper level, tighten engine oil cap
each time°
= Reinstall engine oil cap and tighten.
• Change the oil after every 25 hours of
operation or each season° You may need
to change the oil more often under dusty,
dirty conditions.
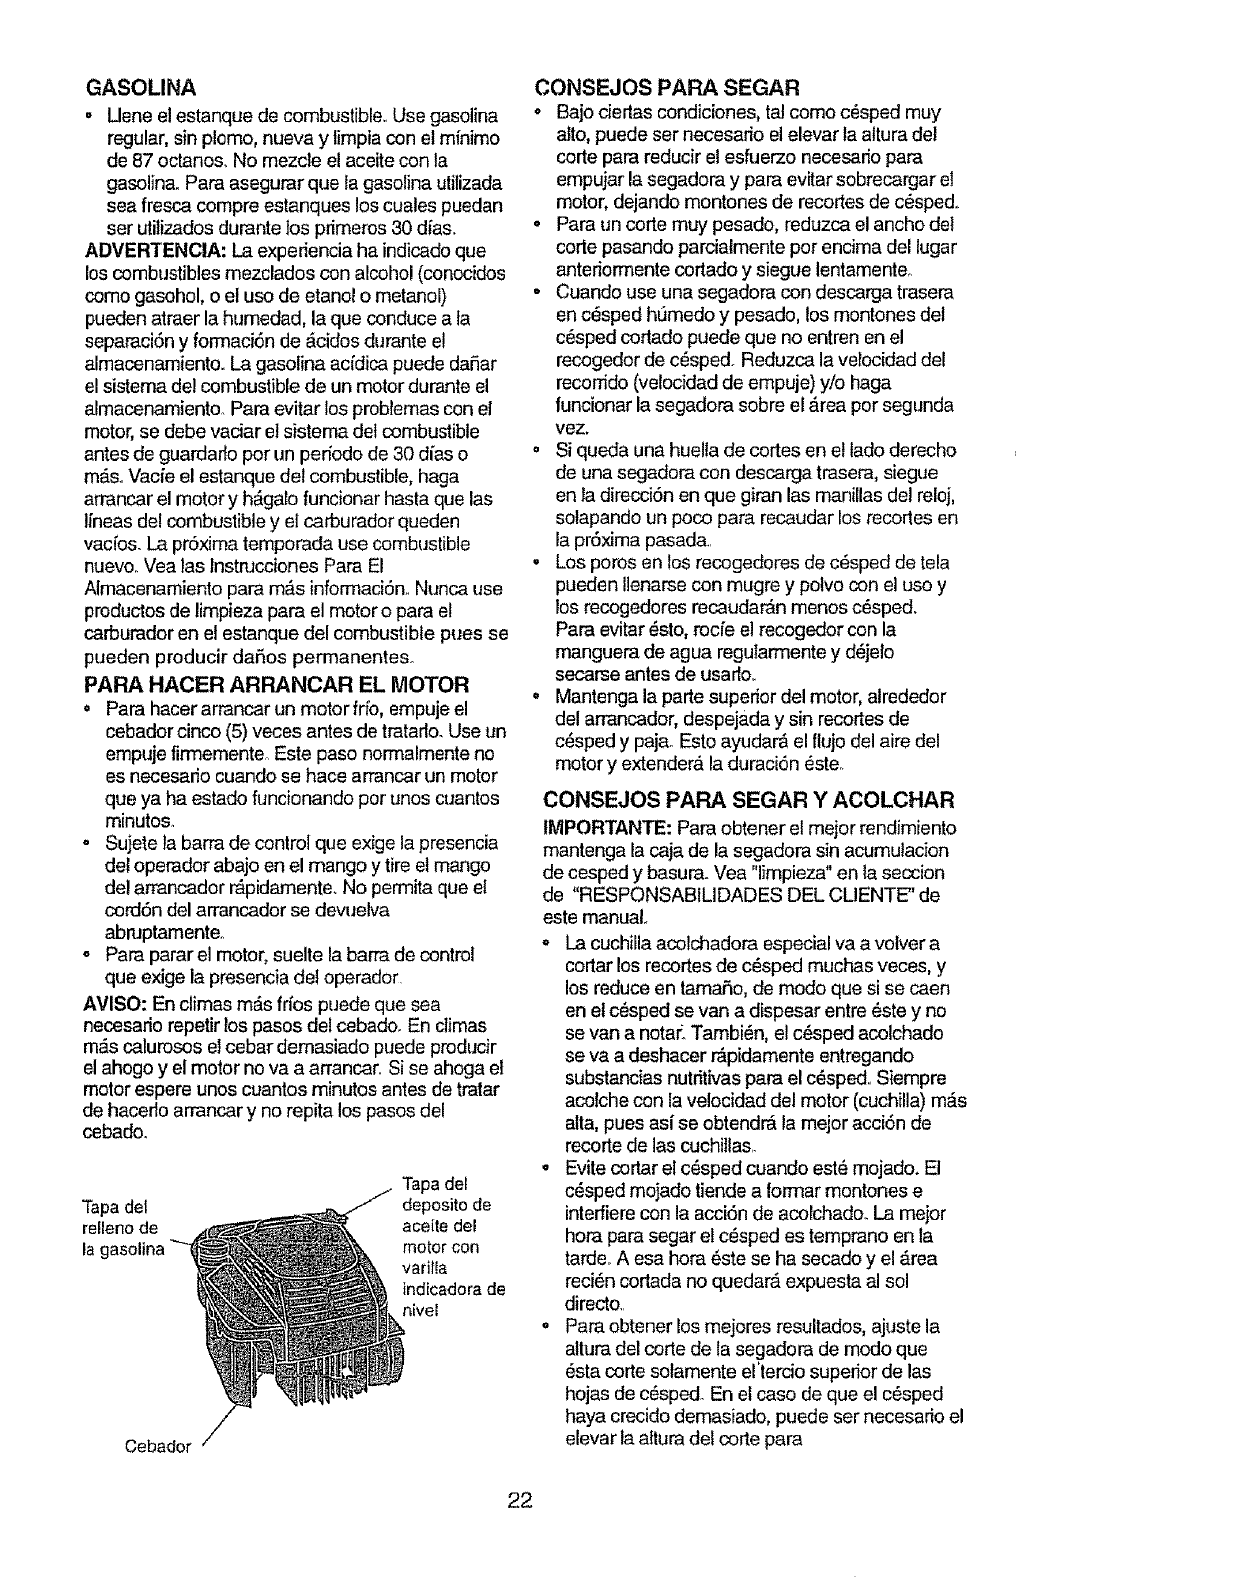
GAS
o Fill fuel tank. Use fresh, clean, regular
unleaded gasoline with a minimum of 87
octane. Do not mix oil with gasoline_
Purchase fuel in quantities that can be used
within 30 days to assure fuel freshness_
WARNING: Experience indicates that
alcohol blended fuels (called gasohol or
using ethanol or methanol) can attract
moisture which leads to separation and
formation of acids during storage. Acidic
gas can damage the fuel system of an
engine while in storage. To avoid engine
problems, the fuel system should be
emptied before storage of 30 days or
longer° Drain the fuel tank, start the engine
and let it run until fuel lines and carburetor
are empty_ Use fresh fuel next season.
See Storage Instructions for additional
information° Never use engine or carbure-
tor cleaner products in fuel tank or
permanent damage may occur. Engine oil
cap
Gasoline
filler cap
TO START ENGINE
o To start a cold engine, push primer five (5)
times before trying to starL Use a firm push.
This step is not usually necessary when
starting an engine which has already run for
a few minutes.
o Hold operator presence control bar down to
the handle and pull starter handle quickly_
Do not allow starter rope to snap back.
° To stop engine, release operator presence
control bar.
NOTE: tn cooler weather it may be necessary
to repeat priming steps. In warmer weather
over priming may cause flooding and engine
will not start° If you do flood engine, wait a few
minutes before attempting to start and do not
repeat priming steps.
MOWING TIPS
o Under certain conditions, such as very tall
grass, it may be necessary to raise the
height of cut to reduce pushing effort and to
keep from overloading the engine and
leaving clumps of grass clippings°
° For extremely heavy cutting, reduce the
width of cut and raise the rear of the lawn
mower housing one (1) wheel adjuster
setting higher than the front for better
discharge of grass.
° When using a rear discharge lawn mower in
moist, heavy grass, clumps of cut grass
may not enter the grass catcher. Reduce
ground speed (pushing speed) and/or run
the lawn mower over the area a second
time.
o If a trail of grass clippings is left on the right
side of a rear discharge lawn mower, mow
in a clockwise direction with asmall overlap
to collect the clippings on the next pass_
o Keep top of engine around starter clear and
clean of grass clippings and chaff. This will
help engine air flow and extend engine lifeo
o Pores in cloth grass catchers can become
filled with dirt and dust with use and
catchers wil! collect, less grass° To prevent
this, regularly hose catchers off with water
and let dry before using.
Primer
MULCHING MOWING TIPS
IMPORTANT: For best performance,
keep mower housing free of built-up grass
and trash. Clean UNDERSIDE OF
MOWER HOUSING after each use. See
"Cleaning" in CUSTOMER
RESPONSIBILITIES section of this
manual.
• The special mulching blade will recut the
grass clippings many times and reduce
them in size so that as they fall onto the
lawn they will disperse into the grass and
not be noticed. Also, the mulched grass wilf
biodegrade quickly to provide nutrients for
the lawn. Always mulch with your highest
engine (blade) speed as this will provide the
best recutting action of the blades.
• Avoid cutting your lawn when it is wet. Wet
grass tends to form clumps and interferes
with the mulching action. The best time to
mow your lawn is the early aftemoonoAt this
time the grass has dried and the newly cut
area will not be exposed to the direct sun.
o For best results, adjust the lawn mower
cutting height so that the lawn mower cuts
off only the top one-third of the grass blades.
Ifthe lawn is overgrown itwill be necessary
to raise the height of cut to reduce pushing
effort and to keep from overloading the
engine and leaving clumps of mulched
grass. For extremely heavy mulching,
reduce your width of cut, mow slowly and
raise the rear of the lawn mower one wheel
adjuster setting higher than the front.
o Certain types of grass and grass conditions
may require that an area be mulched a
second time to completely hide the
clippings. When doing a second cut, mow
across or perpendicular to the first cut path.
• Change your cutting pattern from week to
week. Mow north to south one week then
change to east to west the next week° This
will help prevent matting and graining of the
lawn.
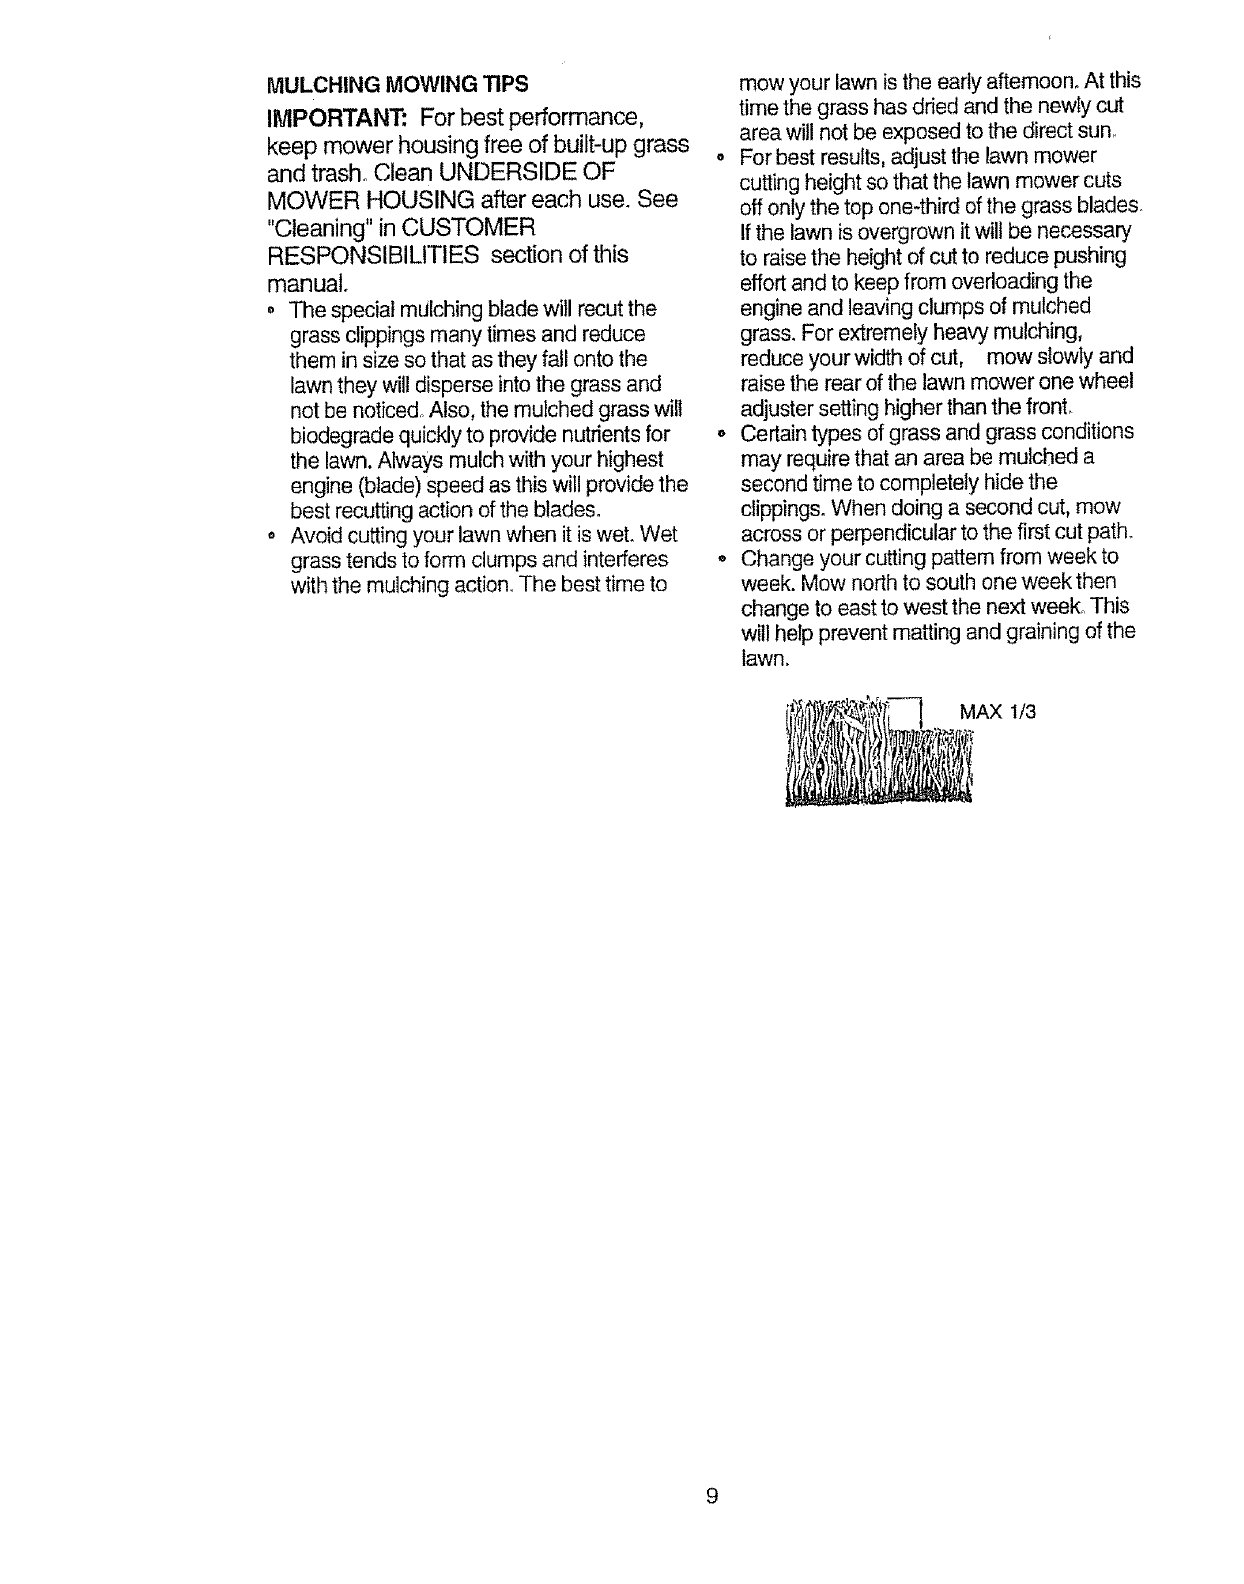
t/3
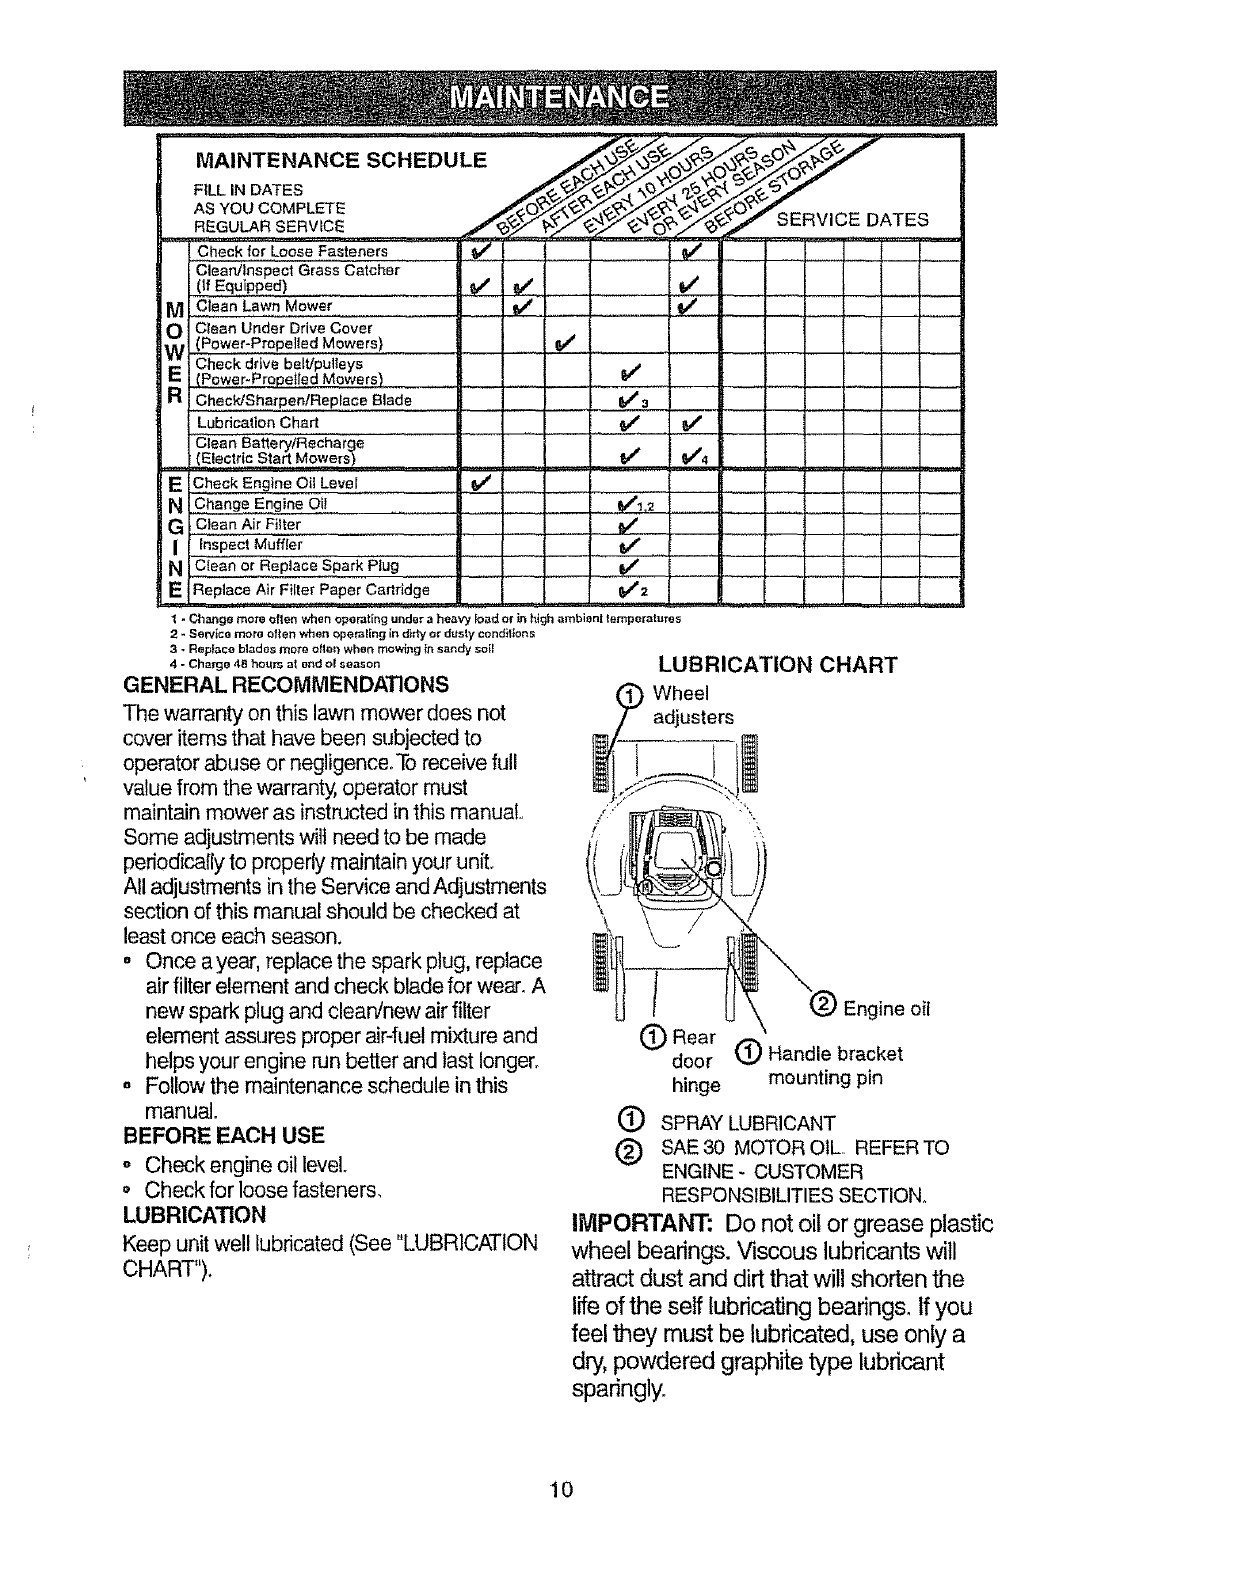
MAINTENANCE SCHEDULE
FILL IN DATES
AS YOU COMPLETE
REGULAR SERVICE
Check for Loo'se Fasteners ._
i Clean/Inspect Grass Catcher
i (tf Equipped) ..... _
MClean Lawn Mower .... . , V _'
O Clean Under Drive Cover{Powe,r:P,topelled Mowers! ..........
Check drive belt/pulleys
E(Power-Propelled Mowers) t
,,C,heck/Sha,rpentReplace Blade
iLubrication Chart
clean Battery/Recharge
{Elec!r cStart Mowers) I
EiCheck Engine Oit Leve! 6f
NChange Engine Oil
!G CieanAirFiffer
: inspect Muffler
i N CIean or Replace Spark Plug
EReplace Air Filter" Paper Cartridge
v'
v'
_ ...! ..,
v"
J_
v" _,'
v'
v"
_2
SERVICE DATES
.........
1-Change mote often when operating under aheavy _oad or _ _gh ambient temperatures
2- Se_ce mor_ often when opetaling in d}rb/or dusty conditions
3-Replace blades mete oftarlwhen me.nO Insandy soif
4-Cho,_o,_,o.,_.,.ridor,°2,°. LUB R ICATION CHART
GENERAL RECOMMENDATIONS Wheel
The warranty on this lawn mower does not adjusters
cover items that have been subjected to
operator abuse or negligence.To receive full t..._____
value from the warranty, operator must _<>_:,
maintain mower as instnJctedin this manual ._.
Some adjustments wilt need to be made /
periodically to properly maintain your unit.
All adjustments in the Service and Adjustments
section of this manual should be checked at ', /
leastonce each season.
o Once a year, replace the spark plug, replace
air filter element and check blade for wear. A l
new spark plug and clean/new air filter | Engine oil
element assures proper air-fuel mixture and (_) Rear (_) Handle bracket
helps your engine run better and last longer, door
. Follow the maintenance schedule in this hinge mounting pin
manual. (_) SPRAYLUBRICANT
BEFORE EACH USE
o Check engine oil level. (_) SAE30 MOTOROIL..REFERTO
ENGINE- CUSTOMER
o Check for loose fasteners. RESPONSIBILITIESSECTION.
LUBRICATION IMPORTANT: Do not oil or grease plastic
Keep unit well lubricated (See "LUBRICATION wheel bearings. Viscous lubricants will
CHART"). attract dust and dirt that will shorten the
life of the self lubricating bearings. If you
feel they must be lubricated, use only a
dry, powdered graphite type lubricant
sparingly.
10

PRODUCT SPECIFICATIONS
MODEL NUMBER 917.387380
SERIAL NUMBER
DATE OF PURCHASE
HORSEPOWER: 6.0
DISPLACEMENT: 11.5 CU. INo
GASOLINE CAPACITY/TYPE: 1,5 QUARTS
UNLEADED REGULAR
OIL TYPE (API-SF/SG/SH): SAE 30 (ABOVE 32°F)
SAE 5W-30 (BELOW 32°F)
OIL CAPACITY: 20 OZS.
SPARK PLUG(GAP: .030") CHAMPION J19LM
VALVECLEARANCE: INTAKE: ,005 - .007
EXHAUST: .007 - ,009
SOLID STATE IGNITION
AIR GAP: .010 IN.
BLADE BOLT TORQUE: 35-40 FT. LBS,
The model and serial numbers will be found on a decal attached to the rear of the
lawn mower housingRecord both serial number and date of purchase in space
provided above.
LAWN MOWER
Always observe safety rules when performing
any maintenance.
TIRES
- Keep tires free of gasoline, oi!, or insect
control chemicals which can harm rubber.
o Avoid stumps, stones, deep ruts, sharp
• Remove blade and attaching hardware
(bolt, lock washer and hardened washer)_
NOTE: Remove the blade adapter and
check the key inside hub of blade adapter,
The key must be in good condition to work
properly° Replace adapter if damaged.
TO REPLACE BLADE
objects and other hazards that may cause
tire damage.
BLADE CARE
For best results, mower blade must be kept
sharp. Replace bent or damaged blades.
TO REMOVE BLADE
o Disconnect spark plug wire from spark plug
and place wire where it cannot come in
contact with spark plug.
o Turn lawn mower on its side. Make sure air
filter and carburetor are upo
o Use a wood block between blade and
mower housing to prevent blade from
turning when removing blade bolt.
o Protect your hands with gloves and/or wrap
o Position the blade adapter on the engine
crankshafL Be sure key in adapter and
keyway in crankshaft are aligned.
o Position blade on the blade adapter
aligning the two (2) holes in the blade with
the raised lugs on the adapter.
o Be sure the trailing edge is up toward the
engine.
o Install the blade bolt with the lock washer
and hardened washer into blade adapter
and crankshaft.
o Use block of wood between blade and
lawn mower housing and tighten the blade
bolt, turning clockwise.
o The recommended tightening torque is 35-
40 ft Ibs.
IMPORTANT: Blade bolt is grade 8 heat
treated.
blade with heavy cloth.
Remove blade bolt by turning counter-
clockwise. Use a 9/16" box or open-end
wrench. 11
NOTE: We do not recommend sharpening
blade - but if you do, be sure the blade is
balanced_
TO SHARPEN BLADE
Care should be taken to keep the blade
balanced, An unbalanced blade will cause
eventual damage to lawn mower or engine,
o The blade can be sharpened with a file or
on a grinding wheel° Do not attempt to
sharpen while on the mower,
To check blade balance, drive a nail into a
beam or wail Leave about one inch of the
straight nail exposed° Place center hole of
blade over the head of the nail. If blade is
balanced, it should remain in a horizontal
position, If either end of the blade moves
downward, sharpen the heavy end until the
blade is balanced.
GRASS CATCHER
o The grass catcher may be hosed with
water, but must be dry when used.
o Check your grass catcher often for damage
or deterioration.. Through normal use itwill
wear, if catcher needs replacing, replace
only with a manufacturer approved
replacement catcher, Give the lawn mower
model number when ordering.
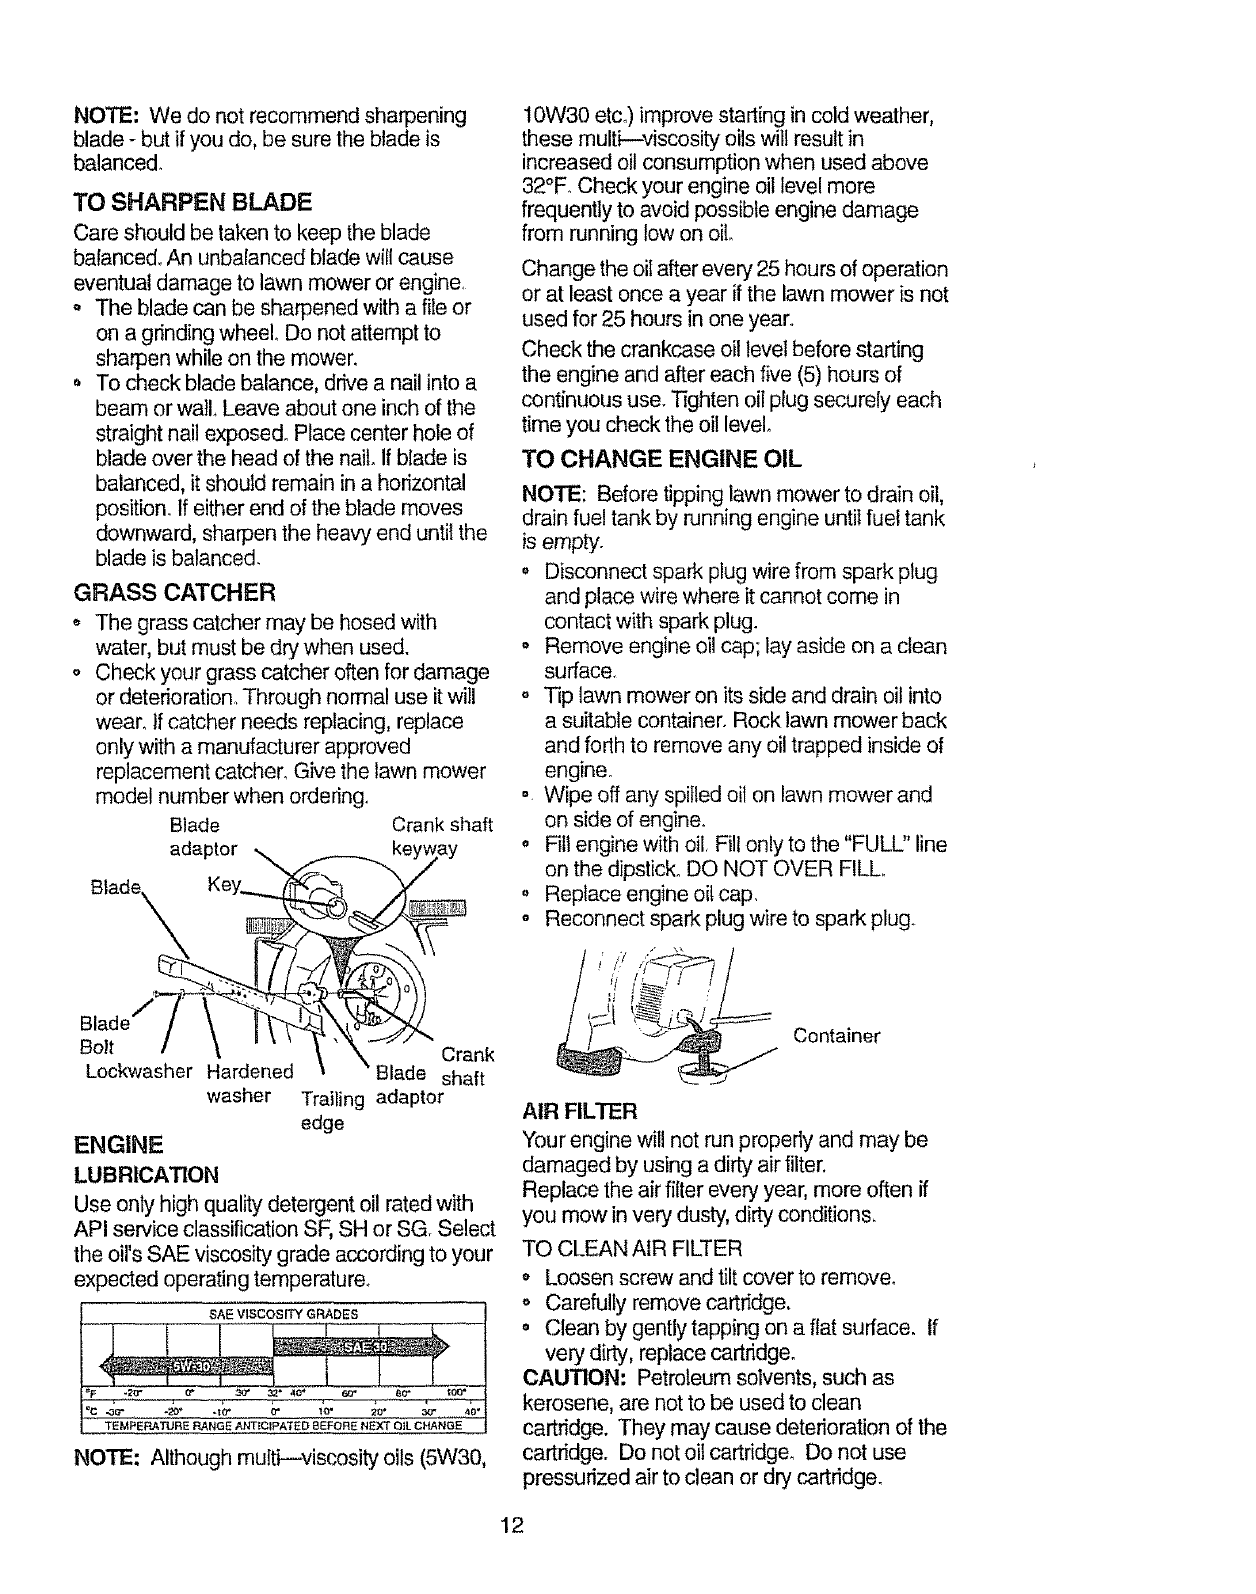
Blade Crank shaft
adaptor
BoJt Crank
Lockwasher Hardened Blade shaft
washer Trailing adaptor
edge
ENGINE
LUBRICATION
Use only high quality detergent oil rated with
API service classification SF, SH or SG Select
the oil's SAE viscosity grade according to your
expected operating temperature_
SAE VISCOS FlY GRADES
TEMPERATURE RANGE ANTICIPATED BEFORE NEXT _3_LCHANGE
NOTE: Although multi--viscosity oils (5W30,
10W30 etco)improvestarting in cold weather,
these multi--viscosity oils will result in
increased oil consumption when used above
32°F. Check your engine oil level more
frequently to avoid possible engine damage
from running low on oil,
Change the oil after every 25 hours of operation
or at least once a year if the lawn mower is not
used for 25 hours in one year.
Check the crankcase oil level before starting
the engine and after each five (5) hours of
continuous use. Tighten oil plug securely each
time you check the oil level°
TO CHANGE ENGINE OIL
NOTE: Before tipping lawn mower to drain oil,
drain fuel tank by running engine until fuel tank
is empty.
• Disconnect spark plug wire from spark plug
and place wire where it cannot come in
contact with spark plug.
° Remove engine oil cap; lay aside on a clean
surface,
o Tip lawn mower on its side and drain oil into
a suitable container. Rock lawn mower back
and forth to remove any oil trapped inside of
engine°
. Wipe off any spilled oil on lawn mower and
on side of engine.
° Fill engine with oil, Fill only to the "FULU' line
on the dipstick° DO NOT OVER FILL,
. Replace engine oit cap,
o Reconnect spark plug wire to spark plug.
t7 "/ \\
/,,_ l_ ! . /
Irl_ ,,I _
Container
AIR FILTER
Your engine will not run properly and may be
damaged by using a dirty air filter.
Replace the air filter every year, more often if
you mow in very dusty, dirty conditions.
TO CLEAN AtR FILTER
o Loosen screw and tilt cover to remove.
o Carefully remove cartridge.
o Clean by gently tapping on a flat surface. If
very dirty, replace cartridge.
CAUTION: Petroleum solvents, such as
kerosene, are not to be used to clean
cartridge. They may cause deterioration of the
cartridge. Do not oil cartridge, Do not use
pressurized air to clean or dry cartridge.
12
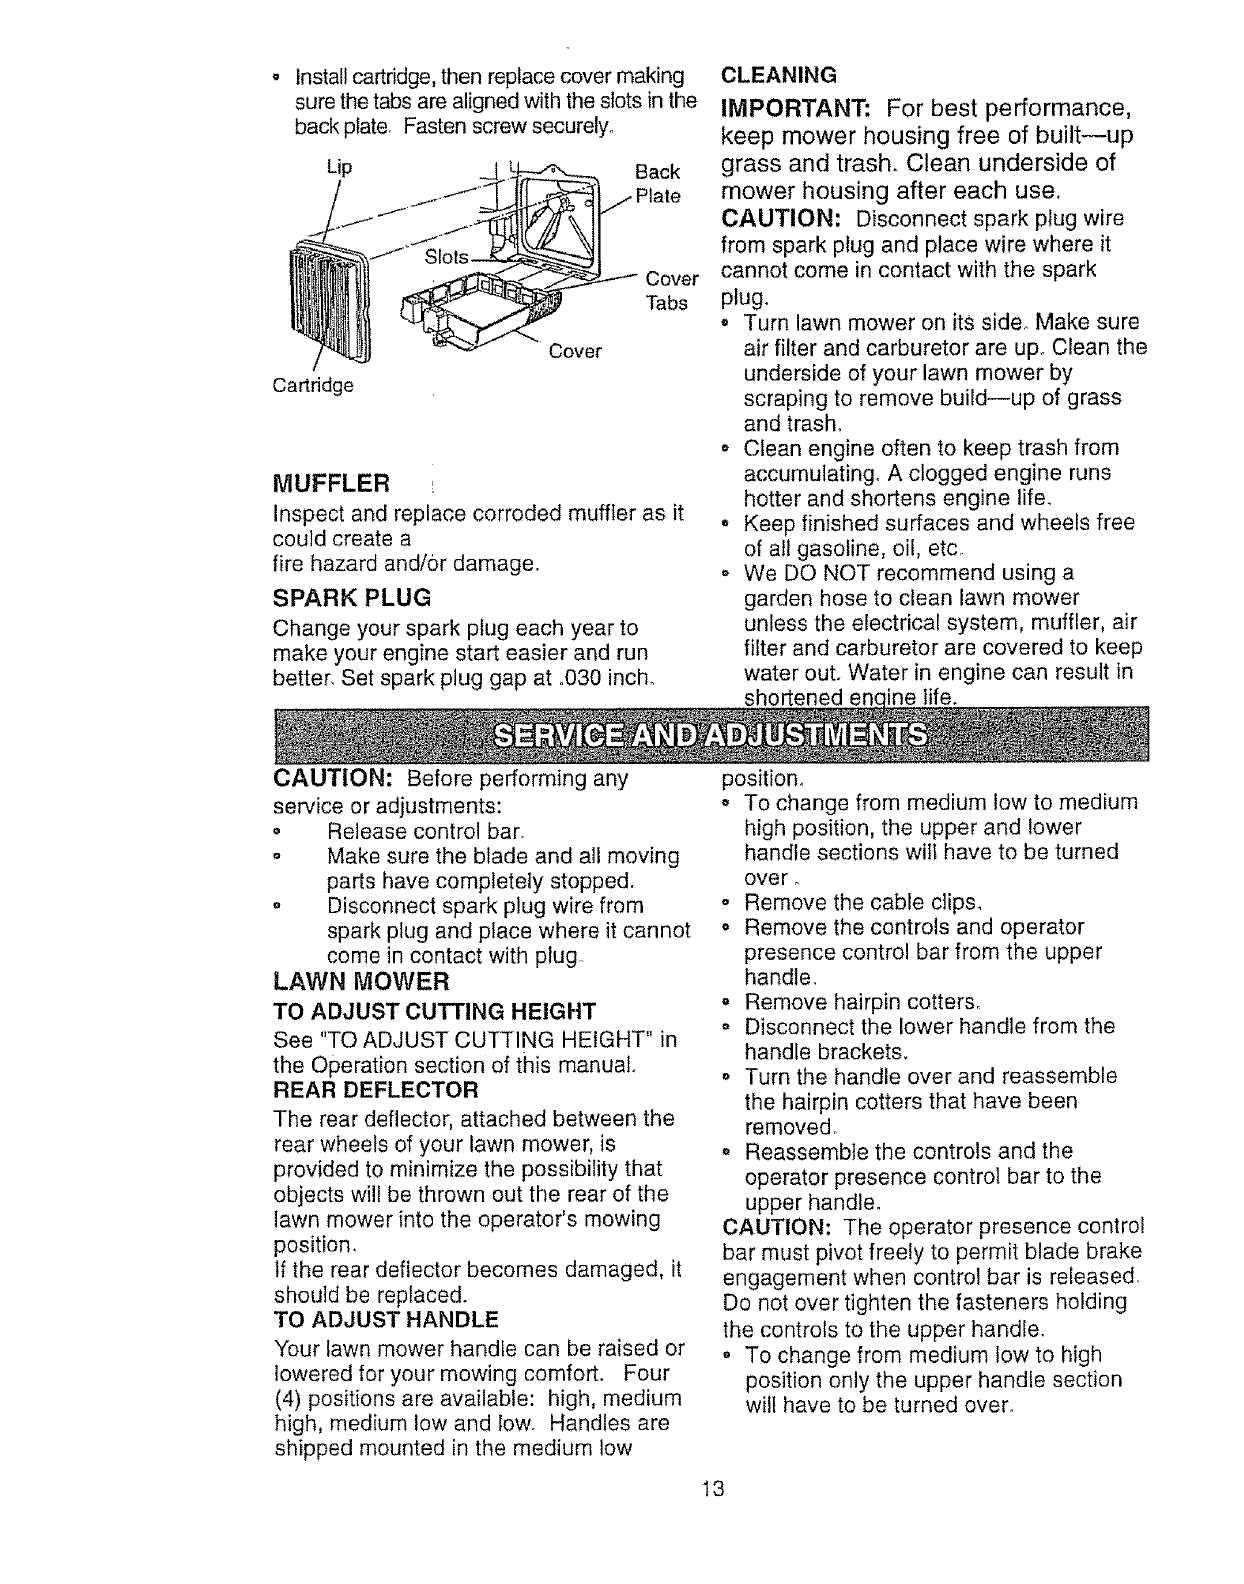
• installcartridge,thenreplacecovermaking
surethetabsarealignedwiththeslotsinthe
backplate.Fastenscrewsecurely.
Lip --f ,_ Back
IIi lIL til c°ver
_"Cover
Cadddge
MUFFLER I
Inspect and replace corroded muffler as it
could create a
fire hazard and/or damage•
SPARK PLUG
Change your spark plug each year to
make your engine start easier and run
better, Set spark plug gap at .030 inch.
CLEANING
IMPORTANT: For best performance,
keep mower housing free of built--up
grass and trash. Clean underside of
mower housing after each use.
CAUTION; Disconnect spark plug wire
from spark plug and place wire where it
cannot come in contact with the spark
plug.
o Turn lawn mower on its side_ Make sure
air filter and carburetor are upoClean the
underside of your lawn mower by
scraping to remove build--up of grass
and trash.
o Clean engine often to keep trash from
accumulatingo A clogged engine runs
hotter and shortens engine life.
o Keep finished surfaces and wheels free
of all gasoline, oil, etc
o We DO NOT recommend using a
garden hose to clean lawn mower
unless the electrical system, muffler, air
filter and carburetor are covered to keep
water out. Water in engine can result in
shortened enc ine life.
CAUTION: Before performing any
service or adjustments:
• Release control bar.
- Make sure the blade and all moving
parts have completely stopped.
o Disconnect spark plug wire from
spark plug and place where it cannot
come in contact with plug,
LAWN MOWER
TO ADJUST CUTTING HEIGHT
See "TO ADJUST CUTTING HEIGHT" in
the Operation section of this manual.
REAR DEFLECTOR
The rear deflector, attached between the
rear wheels of your lawn mower, is
provided to minimize the possibility that
objects will be thrown out the rear of the
lawn mower into the operator's mowing
position,
tf the rear deflector becomes damaged, it
should be replaced.
TO ADJUST HANDLE
Your lawn mower handle can be raised or
lowered for your mowing comfort. Four
(4) positions are available: high, medium
high, medium low and low. Handles are
shipped mounted in the medium low
position.
o To change from medium low to medium
high position, the upper and lower
handle sections wilt have to be turned
over o
o Remove the cable clips.
o Remove the controls and operator
presence control bar from the upper
handle.
. Remove hairpin cotters.
o Disconnect the lower handle from the
handle brackets.
o Turn the handle over and reassemble
the hairpin cotters that have been
removed,,
o Reassemble the controls and the
operator presence control bar to the
upper handle.
CAUTION: The operator presence control
bar must pivot freely to permit blade brake
engagement when control bar is released.
Do not over tighten the fasteners holding
the controls to the upper handle.
. To change from medium tow to high
position only the upper handle section
wilt have to be turned over,
t3
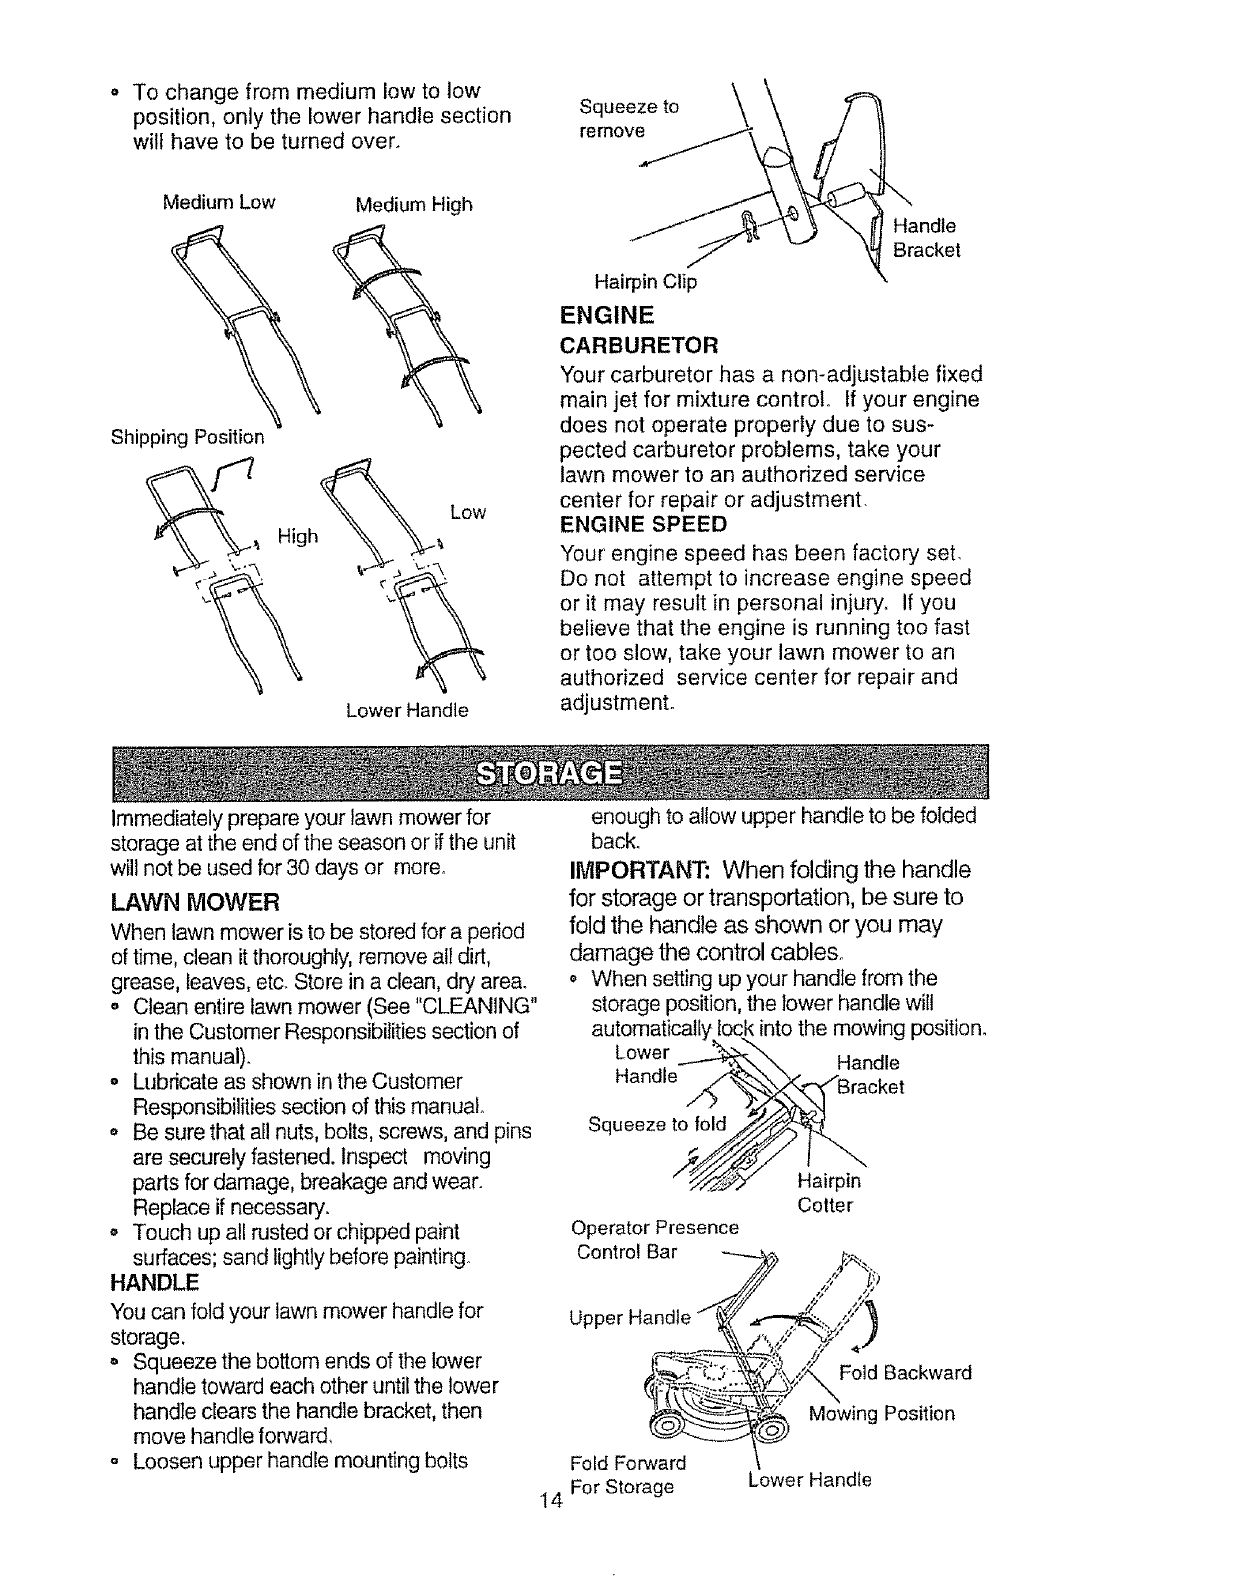
o To change from medium low to low
position, only the lower handle section
will have to be turned over.
Squeeze to
remove
Medium Low
Shipping Position
__ High
Medium High
Low
Lower Handle
Handle
Bracket
Hairpin Clip
ENGINE
CARBURETOR
Your carburetor has a non-adjustable fixed
main jet for mixture control If your engine
does not operate properly due to sus-
pected carburetor problems, take your
lawn mower to an authorized service
center for repair or adjustment.
ENGINE SPEED
Your engine speed has been factory set.
Do not attempt to increase engine speed
or it may result in personal injury. If you
believe that the engine is running too fast
or too slow, take your lawn mower to an
authorized service center for repair and
adjustment.
Immediately prepare your lawn mower for
storage at the end of the season or if the unit
will not be used for 30 days or more°
LAWN MOWER
When lawn mower is to be stored for a period
of time, clean it thoroughly, remove all dirt,
grease, leaves, etc_Store in a clean, dry area°
oClean entire lawn mower (See "CLEANING"
in the Customer Responsibilities section of
this manual).
o Lubricate as shown in the Customer
Responsibilities section of this manual
o Be sure that all nuts, bolts, screws, and pins
are securely fastened. Inspect moving
parts for damage, breakage and wear.
Replace if necessary.
o Touch up all rusted or chipped paint
surfaces; sand lightly before painting.
HANDLE
You can fold your lawn mower handle for
storage,
o Squeeze the bottom ends of the lower
handle toward each other until the lower
handle clears the handle bracket, then
move handle forwar&
o Loosen upper handle mounting bolts
14
enough to allow upper handle to be folded
back,
IMPORTANT: When folding the handle
for storage or transportation, be sure to
fold the handle as shown or you may
damage the control cable&
• When setting up your handle from the
storage position, the lower handle wilt
automatically, lock into the mowing position.
Lower .__ Handle
Handle ../__Bracket
Squeeze to fol_.v/__..
Cotter
Operator Presence
Control Bar
Upper Handle
Fold Forward
For Storage
Fold Backward
Mowing Position
Lower Handle
ENGINE
FUEL SYSTEM
IMPORTANT: It is important to prevent
gum deposits from forming in essential
fuel system parts such as carburetor, fuel
filter, fuel hose, or tank during storage.
Also, experience indicates that alcolol
blended fuels (called gasohol or using
ethanol or methanol) can attract moisture
which leads to separation and forma_on
of acids during storage. Acidic gas can
damage the fuel system of an engine
while in storage.
o Drain the fuel tank.
= Start the engine and let it run until the fuel
lines and carburetor are empty°
o Never use engine or carburetor cleaner
products in the fuel tank or permanent
damage may occur.
o Use fresh fuel next season.
NOTE: Fuel stabilizer is an acceptable
aitemative in minimizing the formation of fuel
gum deposits during storage. Add stabilizer to
gasoline in fuel tank or storage container.
Always follow the mix ratio found on stabilizer
container, Run engine at least tO minutes
after adding stabilizer to allow the stabilizer to
reach the carburetor. Do not drain the gas
tank and carburetor ifusing fuel stabilizer.
TROUBLESHOOTING CHART
ENGINE OIL
Drain oil (with engine warm) and replace with
clean engine oil. (See "ENGINE" in the
Customer Responsibilities section of this
manual).
CYLINDER
• Remove spark plug.
o Pour one ounce (29 ml) of oil through spark
plug hole intocylinder_
°Pull starter handle slowly afew times to
distribute oil.
oReplace with new spark plug.
OTHER
o Do not store gasoline from one season to
another.
o Replace your gasoline can ifyour can starts
to rust. Rust and/or dirt in your gasoline will
cause problem&
• Ifpossible, store your unit indoors and cover
it to give protection from dust and dirt.
° Cover your unit with a suitable protective
cover that does not retain moisture. Do not
use plastic° Plastic cannot breathe which
allows condensation to form and will cause
your unit to rust,
IMPORTANT: Never cover mower while
engine and exhaust areas are still warm_
CAUTION: Never store the lawnmower with
gasoline inthe tank inside a building where
fumes may reach an open flame or spark.
Allow the engine to cool before storing inany
enclosure.
PROBLEM
Does not start
CAUSE
o Dirty air _ter.
o Out of fuel.
o Stale fuel.
o Water in fuel.
O
0
o
0
0
@
0
0
Spark plug wire is =
disconnected.
Bad spark plug_ o
Loose blade or broken blade o
adapter,
Control bar in released °
position°
Control bar defective, °
CORRECTION
Clean/replace air filter_
Fill fuel tank,
Drain tank and refill with
fresh clean fue!.
Drain fuel tank and
carburetor and refill tank
with fresh gasoline.
Connect wire to plug.
Replace spark plug.
T_ghtenblade bolt or
replace blade adapter.
Depress control bar to
handle.
Replace control bar.
15
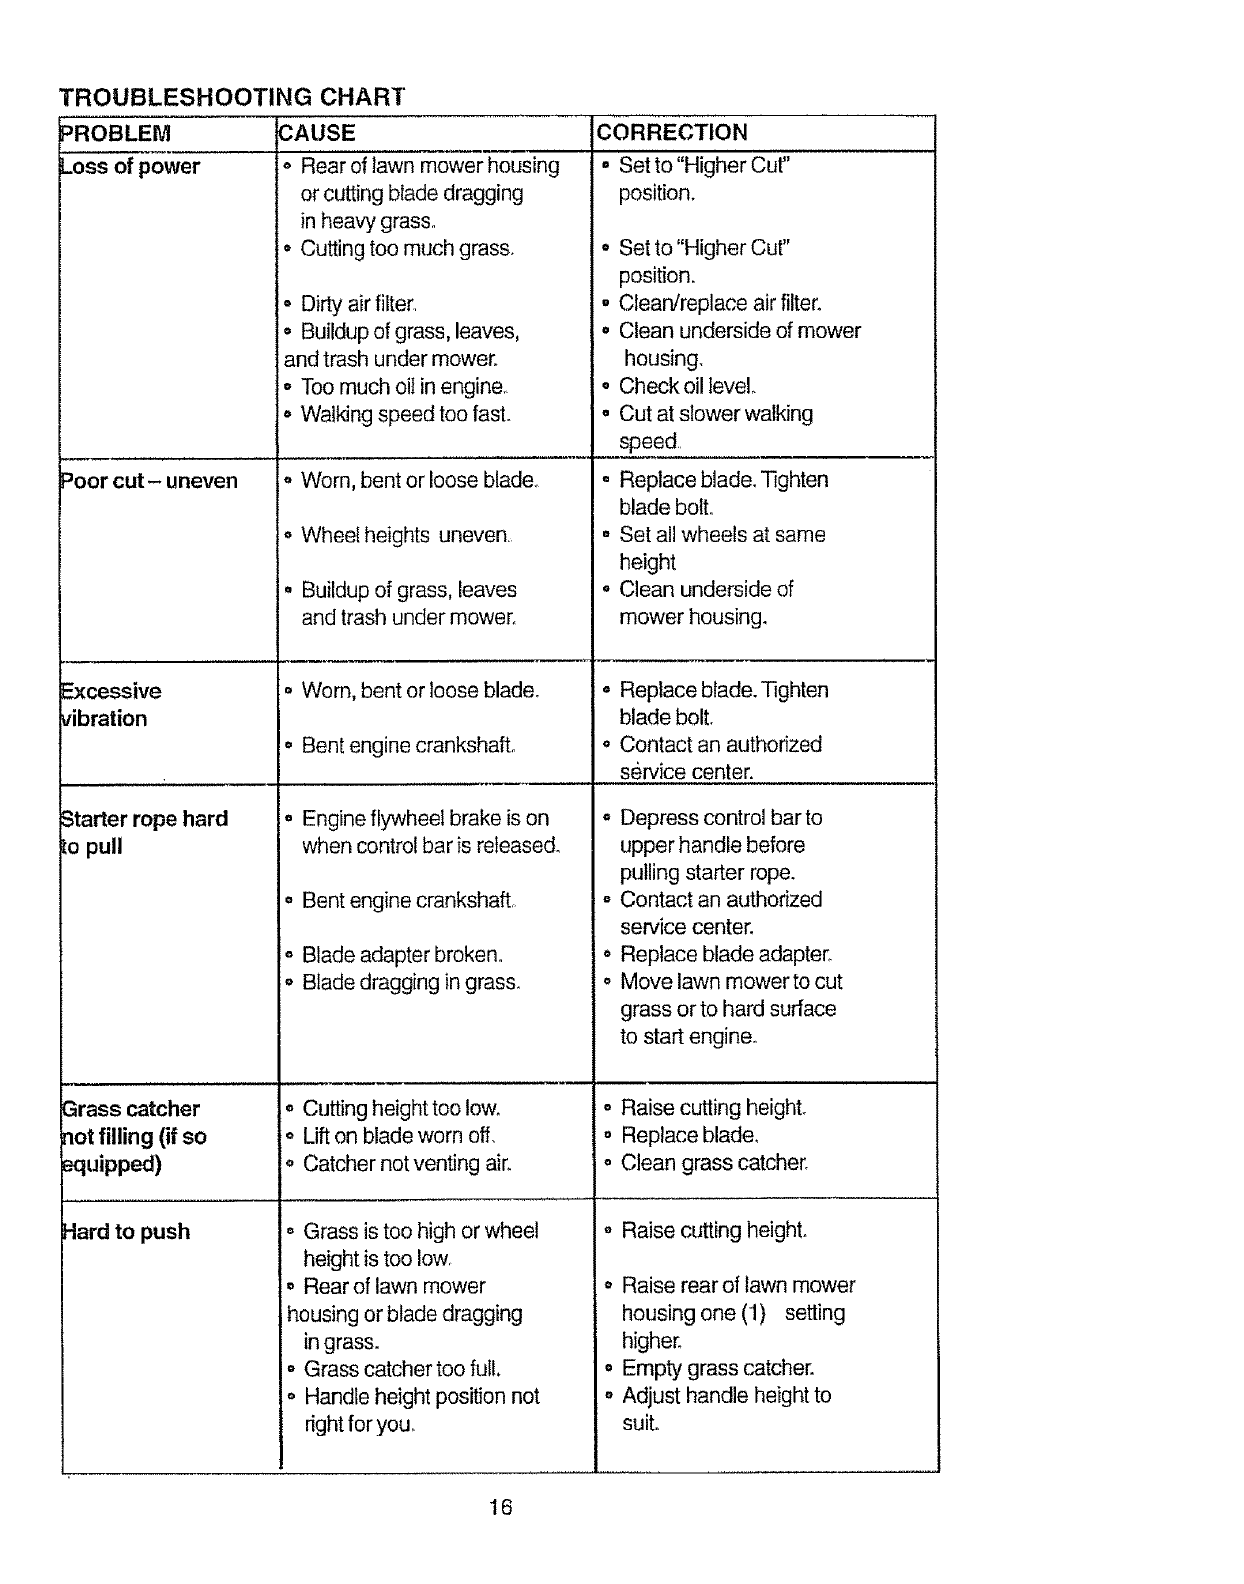
TROUBLESHOOTING CHART
__ 3AUSE
Loss of power Rear of lawn mower housing
=oorcut-uneven
_cessive
/ibration
Starter rope hard
:opull
3rass catcher
rmt filling (if so
.=quipped)
Hard to push
or cutting blade dragging
in heavy grass,
Cutting too much grass.
Dirty air filter,
Buildup of grass, leaves,
md trash under mower.
oToo much oil in engine+
o Walking speed too fast.
.Worn, bent or loose blade,
°Wheel heights uneven.
= Buildup of grass, leaves
and trash under mower+
o Worn, bent or loose blade.
° Bent engine crankshaft.
°Engine flywheel brake is on
when control bar is released°
o Bent engine crankshaft,
o Blade adapter broken°
=Blade dragging in grass.
, Cutting height too low+
o Lift on blade worn off,
o Catcher not venting air+
o Grass is too high or wheel
height is too low,
° Rear of lawn mower
housing or blade dragging
in grass.
- Grass catcher too full.
= Handle height position not
right for you,
CORRECTION
• Set to "Higher Cut"
position.
o Set to "Higher Cut"
position.
•Clean/replace air filter+
= Clean underside of mower
housing,
o Checkoil level+
° Cut at slower walking
speed,,
° Replace blade. Tighten
blade boll
o Set all wheels at same
height
oClean underside of
mower housing_
o Replace blade. Tighten
blade bolt.
o Contact an authorized
service center.
o Depress control bar to
upper handle before
pulling starter rope.
= Contact an authorized
service center.
• Replace blade adapter+
= Move lawn mower to cut
grass or to hard surface
to start engine.,
o Raise cutting height+
= Replace blade,
o Clean grass catcher.
O
O
Raise cutting height°
Raise rear of lawn mower
housing one (1) setting
higher_
Empty grass catcher.
Adjust handle height to
suit.
16
CRAFTSMAN iVlodel No. 917,387380
Garant_a
Regias de Seguridad
Montaje
Operaci6n
Mantenimiento
Programa de Mantenimiento
17 Especificaciones del Producto 25
17 Servicio y Adjustes 27
19 Atmacenamiento 28
20 Identificaci6n de problemas 30
24 Partes de repuesto Vea el manual
24 ingl6s del duefio
Orden de Partes Contratapa
GARANTfA LIMITADA DE DOS AI_OS PARA LA SEGADORAA MOTOR CRAFTSMAN
Per dos (2) aSos, a parlirde la fecha de compra, cuando esta Segadora Craftsman se mantanga, lubrique
y afine segun las instrucciones para ta eperaci6n y el mantenimiento en et manual del duefio, Sears
reparar_ gratis todo defecto en el material y la mane de obra.
Si la Segadora Craftsman se usa para fines comerciales o de arriendo, esta garantfa s61ose aplica per
noventa (90) di'as a partir de lafecha de compra.
Esta Garantfa no cubre:
o Arficulos que se desgastan durante el use normal tales come las cuchillas segadoras rotatorias, los
adaptadores de la cuchilla, las con'eas, los filtros de aire y las bujfas.
o Reparaciones necesarias debido al abuse o a tanegligencia del operador, incluy6ndosealos
cig_eSales doblados y a ta falta de mantenimiento del equipo seg6n las instmccionesque se incluyen
en et manual de{duefio.
EL SERV!CIO DE GARANTiA ESTA DISPONIBLE al devolver la segadpra a motor Craftsman al centre/
departmento de servicio Sears mas cercano en los estados unities. Esta garantfa se aplica solamente
mientras el producto este an use en los Estados Unidos.
Esta Garantfa le otorga derechos legales especificos, y puede que tambi_n tenga otros derechos que
varfan de estado a estadoo
Sears, Roebuck and Con,t9/817WA, Hoffman Estates, IL 60179 USA
Los estandrares de seguddad exigen la presencia
del operator en los controles para reducira un
minimo el riesgo de lesionarse. S u unidad viene
equipada con dichos contmles. Per ningun motive
trate del eliminar la funci6n de loscontroles que
exigen la presencia del operador.
ENTRENAMIENTO"
• Lea este manual del operador
cuidadosamenteoFarnitiaficesecon los
controlesy aprendaa operar su segadora an
forrna adecuadao Aprenda a parar su
segadora r_pidamente.
, No permita que losnifios usen su segadora_
Nunca perrnita que los adultos operen la
segadora sin contar con las instrucciones
adecuadas.
o Mantenga el &rea de operaci6n despejada
de genre, especialmente de nifios pequefios
y de animates dom_sticos.
Use ia segadora solamente para los
fines propuestos per et fabricante y
segfin tas explicaciones descritas en
este manual.
o No opere la segadora si se ha cafdo odafiado
en cualquiera formaoSiempre repare los dafios
antes de usarla.
-No use accesorios que no hayan side
recomendados per el fabricante. El use de
cliches accesorios puede ser peligroso.
o La cuchilla gira cuando el motor est,.
funcionando.
PREPARACION:
,, Siempre revise cuidadosamente el _,rea que
se va a segar y desp_jela de todas las piedras,
palos, alarnbres, huesos y otros
objetos extrafios. Estos objetos
ser_n lanzados con ta cuchitla y pueden
producir lesiones graves.
= Siempre use anteojos de seguridad o
protectores de ojos cuando arranque y du-
rante el tiempo que use la segadorao
o V[stase en forma adecuada. No opere la
segadora sin zapatos o con sandalias
abiertas. Use solamente zapatos s6Iidos con
buena tracci6n cuando siegue.
17
o Vistase en forma adecuada.. No opere la
segadora sin zapatos o con sandalias
mientras que el motor est_ funcionando.
o Siegue siempre durante el dia o con buena
tuz artificial°
OPERACi()N:
• Mantenga sus ojos y su mente en la
segadora yen el &rea que se est_ cortandoo
No permita que otros intereses !o distraigan.
" No corte c_sped mojado o resbaloso.. Nunca
corra mientras est_ operando su segadora.
Siempre asegtirese de mantener el equilibrio
- mantenga el mango agarrado firmemente y
camine.
o No ponga las manos o los pies cerca odebajo
de las partes rotatorias. Mant_ngase
alejado de la abertura de descarga en todo
momento.
° Siempre pare et motor cuando se vaya
ocuando no est_ usando su segadora, o
antes de atravesar las entradas para autos,
los senderos, caminos y &reas cubiertas de
dpio..
• Nunca dirija la descarga del material hacia
los espectadores ni permita a nadie cerca de
fa segadora mientras ta est6 operando.
o Antes de limpiar, inspeccionar o de reparar I
a segadora, pare el motor y est@
completamente seguro de que la cuchiHa y
que todas las partes que se mueven se
hayan detenido.. Luego, desconecte el
alambre de la bujia y mant_nga!o alejado de
8sta para evitar el arranque por accidenteo
o No continue haciendo funcionar su segadora
si le pega a un objeto extrafio_ Siga el
procedimiento descrito antedormente, luego
repare cualquier daiSoantes de volver a
arrancar y de operar su segadorao
o No cambie tos ajustes del regulador o
hagaque el motor ande a una velocidad
excesiva. Se pueden producir dafios en el
motor y I esiones personaleso
o No opere su segadora si vibra fuera de Io
normal. La vibraci6n excesiva es una
indicaci6n de dafio; pare el motor, revise en
forma segura la causa de la vibraci6n y haga
tas reparaciones segLin sea necesario.
o No haga funcionar el motor en
recintoscerradoso Los gases de escape son
peligrosos..
o Nunca corte el c_sped tirando la segadora
hacia usted. Siegue a trav_s de la cara de
las pendientes, nunca hacia arriba o hacia
abajo pues puede perder el equilibdo No
siegue pendientes demasiado empinadas_
Tenga cuidado cuando opere la segadora en
terreno disparejo o cuando cambie de
direcci6n - mantenga un buen equilibrio.
o Nunca opere la segadora sin tas
protecciones adecuadas, las planchas, el
recogedor de c_sped y otros dispositivos de
seguridad en su tugar.
MANTENIMIENTO Y ALMACENAMIEN-
TO:
o Revise la cuchilla y los pemos de montaje
del motor a menudo, para asegurarse que
est_n apretados en la lorma adecuada.
o Revise todos los pemos, tuercas y tomillos a
intervalos frecuentes, para verificar si est_n
apretados en forma adecuada, y
asegurarseque la segadora se encuentra en
condiciones de luncionamiento seguro.
- Mantenga todos los dispositivos de seguridad
en su lugar y listos para funcionar.
° Para reducir el peligro de incendio,
mantenga el motor sin c6sped, hojas y grasa
o aceite en exceso
o Revise el recogedor de c_sped a menudo
para verificar si hay deterioro y desgaste y
cambie las bolsas desgastadas. Use
solamente las bolsas de repuesto
recomendadas por e! fabricante de su
segadora o que cumplen con 1as
especificaciones de 6ste.
o Siempre mantenga una cuchilla afilada en su
segadora..
o Siempre permita que el motor se enfde
antes de guardarla en cualquier recinto
cerrado_
°Nunca guarde la segadora con combustible
en el estanque dentro de un edificio endonde
los gases pueden alcanzar una llama
expuesta o una fuente de ignici6n, tal como el
calentador de agua, la estufa de
calelacci6n, Ia secadora de ropa, etc.
PRECAUClON: Siempre desconecte et
atambre de la bdj_ay p6ngalo donde no pueda
entrar en contacto con la bujia, para evitar el
arranque por accidente, durante la preparaci6n,
el transporte, el ajuste o cuando se hacen
reparacioneso
PRECAUClON: Es conocido por et Estado de
California que los gases de escape del motor de
este productor contienen quimicos los cuales a
ciertos niveles, pueden ocasionar, c_,ncer,
defectos de nacimiento, y otros dafios at sistema
reproductivo_
18
Estos accesorios estaban disponibles cuando
se produjo ta segadora. Tambi_n est_.n
disponibles en la mayoria de tas tiendas de
Sears yen los centros de servicio. La mayoria
RENDIMIENTO DE LA SEGADORA
DESVIADOR DE RECORTES
PARA SEGADORAS CON DESCARGA TRASERA
de las tiendas Sears tambi_n pueden mandar a
pedir partes de repuesto para usted, si les
proporciona el n,Jmero de! modelo de su
segadorao Algunos de estos accesorios tal vez
no se apliquen a su segadora,.
JUEGOS PARA LA ACOLCHADORA
RECOREDOR
PARA
8EGADORAS
CON DESCARGA
TRASERA
MANTENIMIENTO DE LA SEGADORA
:_,=: .....
S|LENCIADORES
RECOREDOR
PARA
SEGADORAS
CON DESCARGA
LATERAL
FILTROS DE AIRE
ADAPTADORES
CORREAS CUCHILLAS
,iii ii HIH ,
ESTABIUZADORES
ENVASES
DE GASOL|NA
DE CUCHtLLA
BUJfAS
ACEITE
RUEDAS DI=L MOTOR
Lea estas instruccionesy este manual
completamente antes de tratar de montar u operar
su segadora nueva, Su segadora nueva ha sido
montada en la f_.bricacon ta excepci6n de aquetlas
partes que se dejaron sin montar pot razonesde
env[ooTodas las partes como las tuercas, las
arandelas, lospemos, etc..,que son necesarias
para completar eI montaje han sido colocadas en la
bolsa de partesoPara asegurarse que su segadora
funcione en forrna segura y adecuada, todas las
partes y los articu[os de ferreteria que se monten
tienen que ser apretados seguramenteo Use las
herramienlas correctas, como sea necesario, para
asegurar que se aprieten adecuadamente
PARA REMOVER LA SEGADORA DE
LA CAJA DE CARTON
.Remueva las partes sueltas que se inclwen con
la segadorao
• Corte las dos esquinas de losextremos de la
caja de cart6n y tienda el panel del extremo
p[aRo.
o Remueva todo el material de empaque, excepto
la curia entre el mango superior y _1inferior,y la
curia que sujeta la barra de los control que exige
la presencia del operador juntocon el mango
supedor.
Haga rodar la segadora hacia afuera de la caja
de cart6n y revisela cuidadosamente para
verificar si todavia quedan partes sueltas
adicionales,.
COMO PREPARAR SU SEGADORA
PARA DFSDOBLAR EL MANGO
IMPORTANTE: Desptiegue e! mango con mucho
cuidado para no peltizcar oda,fiarlos cables de
control.
•Levante los mangos hasta clue la secci6n del
mango inferiorse asegure en su lugar, en la
posici6n para segar.
.Remueva la curia protectora, levante la secci6n
del mango superior hasta su lugar en el mango
infedory apriete ambas manitlas det mango.
° Remueva la curia dei mango que sujeta la barra
de los control que exige la presencia del
operador junto con el mango superior.
oEl mango de la segadora puede ajustarse segt_n
le acomode para segar..Refi_rase a "AJUSTE
DEL MANGO" en la Secci6n de Servicio y
Ajustes de este manual.
19
Barra de control que exige la
presencia del operador
Mango superior
Levantar Levantar
Mango PosiciSn
inferior para segar
PAPA INSTALAR LOS ACCESORIOS
Su segadora rue enviada lista pare usarse como
una acolchadora de capa vegetal Pare convertNa
de modo que pueda ensacar o descargac
o Abra la puerta trasera y remueva ta tapon
acolchadora. Gu_rdela en un lugar seguro.
oAhore puede instalar el recogedor o el desviador
de recortes optional
.Para vofver a la opereciSn de acolchamiento con
capa vegetal, instate la tapon acotchadore en la
abertura de descarga de rasegador&
PRECAUCION: No haga funcionar su
segadora sin la tapon acotchadora aprobada en su
tugar,o sin el desviador de recortes, o sin el
recogedor de c_sped, aprobados, en su lugaro
Nunca trete de operar la segadora cuando se ha
removido la puerta trasera o cuando est_ un poco
abierta.
Tapon alcolchadora__
FAMILIARICESE CON SU SEGADORA
LEA ESTE MANUAL DEL DUEI_IOY LAS REGLAS DE SEGURIDAD ANTES DE OPERAR StJ
SEGADORA_ Compare las ilustraciones con su segadore para familiarizarse con la ubicaci6n de los
diversos controles y ajustes. Guarde este manual para referencia en el futuro
Estos simbolos pueden apareser sobre su segadora o en la literatura proporcionada con el
producto. Aprenda y comprenda sus significados.
Oable de control de la
velocidad del motor
CordSn
arrancador
Manitla del mango
Recogedordel
c_sped Tapa del deposito de aceite del
motor con varilla indicadora de
nivel
Tapon dela
acotchadera Ajustador de la rueda (en
cada rueda)
Tapa del relleno de la
gasolina Cebador Caja
'CLIMPLECON Los REQtJISITOS 'DE SE'GLIRIDAD DE _CPSO ...........................................................................
Las segadoras a motor, que se oonducen desde la parle de atr_s, rotatorias, Sears, oumplen con los
est&ndares de seguridad del American National Standards Institute y de la U.SoConsumer Product Safety
Commission. La cuchilla gira cuando el motor est& funcionando.
T3arrade control que exige la presencia del CordSn arrancador--se usa para hacer arrancar
operador-- tiene que sujetarse abajo, junto con el
mango, para hacer arrancar el motor. Su_ltela para
parar e[ motor,,
Cebador-- bombea combustible adicional desde et
carburador al dlindro para uso cuando se necesita
hhcer arrancar un motor fn'o
el motor.
Tapon de la acolchadora--permite la conversi6n
para la operaci6n de descarga o ensacadoo
20
La operaci6n de cualquier segadora puede
hacer que salten objetos extrafios dentro de sus
ojos, ioque puede producir dafios graves en _stos,
Siempre use anteojos de segur_dado protecci6n
para los ojos mientras opere su segadora o cuando
haga ajustes o reparacioneso Recomendamos una
mascara de seguridad de visi6n amplia, para uso
espejuelos o anteojos de seguridad estandarte.
COMO USAR SU SEGADORA
VELOClDAD DEL MOTOR
La velocidad det motor se estableci6 en la
f_bdca para un rendimiento 6primo, La
vetocidad no se puede ajustar.
CONTROL DE ZONA DEL MOTOR
PRECAUClON: Las regulac[ones federales ex[gen
que se instale un control para el motor en esta
segadora para reducir a un minimo el riesgo de
lesionarse debido al contacto con ta cuchill& Pot
ningtJn motivo trate de eliminar la funci6n del control
dei operador. Lacuchiila gira cuando et motor est&
fundonando
• Su segadora viene equ[pada con una barra de
control que exige la presencia del operador, 1o
que requiere que el operador est_ detr_s del
mango de la segadora para hacerla arrancar y
operafla.
PARA AJUSTAR LA ALTURA DE CORTE
• Levante las ruedas para el corte bajo y baje las
ruedas para e] corte alto.
. Ajuste }a altura de corte para que se acomode a
sus requisitosoLa posici6n del medio es la mejor
para la mayoda de los c_spedes.
- Para cambiar la aitura de core, empuje la
palanca del ajustador hacia ta rued& Mueva Ia
rueda hada arriba o hacia abajo de modo que se
acomode a sus requisitos. Aseg6rese que todas
las ruedas queden igualmenteajustadaso
ATENClON: El ajustador esta correctamente
colocado cuando Iasore]as de la placa est_n
insertadas en el agujero del mango. Tambi_n, los
ajustes de 9 posicbnes (si equipado) permiten que
el mango pueda ser movido entre las orejas de la
plac&
Para un corte alto,baje
las ruedas
Orejas de la placa
Para un corte bajo, _evante Ias ruedas
PAPA MONTAR Y ADJUNTAR EL
REOOGEDOR DE ClaSPED
,, Cierre la tapa soltabte. La tapa soltable debe
estar cerrada cuando se esta operando la
segadora.
- Levante la puerta trasera de ta caja de la
segadora y ponga el bastidor del recogedor de
c_sped en las orejas formadas en el puntal de
bisagra de la puerta trasera,
• El recogedorde c6sped esta asegurado en la
caja de la segadora cuando se baja la puerta
trasera para descansar en el bastidor del
recogedorde c_sped
PRECAUCION: No haga funcionar su segadora
sin el desviador de recortes o sin el recogedor de
c_sped, aprobados, en su iugar` Nunca trate de
operar la segadora cuando se ha removido la
puerta trasera o cuando est,. un poco abiert&
-_.._f-Puerta trasera
Puntai de _'_ "/"
bidagra __t-_ _.,._
j _v_.--I_" ""_/recogedor del
cesped
Orejas
formadas
PARA VAClAR EL RECOGEDOR DE
ClaSPED
" Para remover el recogedor del c_sped suelte la
barra de controt del operador para poder parar el
motor..
• Levante la puerta de arras y remova el recogedor
del c_sped por el mango_
AVISO: No arrastre la bolsa cuando ta vacfe; se
producir& un desgaste innecesario.
ANTES DE HACER ARRANCAR EL
MOTOR
ACEITE
Su segadora rue enviada sin aceite en el motor,
o Asegurese que la segadora est6 nivetada y que
el &rea airededor del dep6sito de aceite est_
limpia.
o Remueva la tapa del depSsito de aceite del
motor con la vafiIla indicadora de nivel y re]lene
hasta la linea de Ileno en _sta..
*Use 0,61 (20 oz,) de aceite. Para el tipo y la
calidad vea "MOTOR" en la secci6n de las
"Responsabilidades del Cliente" en este manual
o Vacfe et aceite lentamente. No Io irene
demasiado.
. Revise el nivel del aceite antes de cada uso,
Agregue aceite si es necesario. Uene basra la
l[neade tleno en la varilta indicadora de nk,el.
° Para leer e! nivel adecuado, apdete la tapa del
dep6sito de aceite del motor cada vez.
o Vuelva a instalar latapa del dep6sito del aceite y
apri_tela.
o Cambie el aceite despu6s de 25 horas de
operaci6n o una vez por temporad& Puede
necesitar cambiar el aceite m&sa menudo
cuando las condiciones son pot¥o_r,osas o sucias,
21
GASOLINA
° Uene el estanque de combustible.. Use gasolina
regular, sin plomo, nueva y tirnpia con el mfnimo
de 87 octanos, No mezde el aceite con ta
gasolinaoPara asegurar que la gasolina ulilizada
sea fresca compre estanques los cuales puedan
ser utilizados durante los primeros 30 dfas..
ADVERTENClA: La experiencia ha indicado que
los combustibles mezclados con alcohol (conocidos
como gasohol, o et uso de etanol o metanol)
pueden atraer la humedad, la que conduce a la
separaci6n y formaci6n de _.cidos durante el
almacenarniento. La gasolina acfdica puede dafiar
el sistema de! combustible de un motor durante el
almacenamiento. Para evitar los probtemas con el
motor, se debe vadar e! sistema del combustible
antes de guardarlo por un perfodo de 30 dias o
m&soVac[e el estanque del combustible, haga
arrancar el motor y h_galo funcionar hasta que las
Ifneas del combustible y el carburador queden
vacios. La pr6xima temporada use combustible
nuevooVea las Instrucciones Para El
Almacenamiento para m&s informaci6n. Nunca use
productos de limpieza para el motor o para el
carburador en el estanque del combustible pues se
pueden producir dafios permanentes.
PARA HACER ARRANCAR EL MOTOR
=Para hacerarrancar un motor frfo, empujeel
cebador cinco (5) veces antes de tratarlo. Use un
empuje firmementeo Este paso normalmente no
es necesario cuando se hace arrancar un motor
que ya ha estado funcionando pot unos cuantos
minutos.
o Sujete la barra de control que exige la presencia
del operador abajo en el mango y tire el mango
del arrancador r_pidamente.No permita que el
cord6n del arrancador se dew_elva
abruptarnente_
o Para parar el motor, suelte la barra de control
que exige la presencia del operador.
AVISO: En climas m_.sfrfos puede que sea
necesario repetir los pasos del cebado, En climas
m_s calurosos el cebar demasiado puede producir
el ahogo y el motor no va a arrancar. Si se ahoga et
motor espere unos cuantos minutos antes de tratar
de hacerlo arrancar y no repita los pasos del
cebado.
Tapa del
relleno de
Tapa del
deposito de
aceite del
motor con
varilla
indicadora de
nivel
Cebador
CONSEJOS PAPA SEGAR
o Bajo dertas condiciones, tal come c_sped muy
alto, puede ser necesarioel elevar ta attura det
corte para reducir el esfuerzo necesario para
empujar la segadora y para evitar sobrecargar el
motor, dejando montones de recortes de c#sped.
oPara un corte muy pesado, reduzca el ancho del
corte pasando parcialmente por encima del lugar
anteriormente cortado y siegue lentamente..
•Cuando use una segadora con descarga trasera
an c_sped h_3medoy pesado, los montones det
c_sped cortado puede que no entrenen el
recogedor de c_spedo Reduzca la velocidad del
recorrido (velocidad de empuje) y/o haga
funcionar la segadora sobre el _rea por segunda
vez.
o Si queda una huella de cortes en el lado derecho
de una segadora con descarga trasera, siegue
en ia direcci6n en que giran las manillas del reloj,
sotapando un poco para recaudar los recortes en
la pr6xima pasada..
•Los poros en los recogedores de c_sped de tela
pueden Uenarsecon mugre y potvo con el uso y
los recogedores recaudar&n menos c_sped.
Para evitar _sto, rode el recogedor con la
manguera de agua regularmente y d_jelo
secarse antes de usartoo
. Mantenga la parte supedor del motor, alrededor
del arrancador, despejada y sin recortes de
c_sped y pajaoEsto ayudar'a el flujo del aire del
motor y extender& la duraci6n _ste.
CONSEJOS PAPA SEGAR YACOLCHAR
llVlPORTANTE:Para obtenerel mejor rendimiento
mantanga la caja de la segadora sin acumulacion
de cesped y basura. Vea "limpieza" en la secoion
de "RESPONSABtLIDADES DEL CLIENTE" de
este manual.
o La cuchilla acolchadora especial va a volver a
cortar los recortes de c_sped muchas veces, y
los reduce en tamafio, de modo que si se caen
en et c_sped se van a dispesar entre _ste y no
se van a notaL Tambi_,n,el c_sped acolchado
se va a deshacer _pidamente entregando
substancias nutritivas para el c_sped.,Siempre
acolche con la velocidad del motor (cuchilla) m_.s
alla, pues asi se obtendra la mejor acci6n de
recorte de las cuchitlas,.
o Evite cortar el c_sped cuando est_ mojado. El
c_sped mojado tiende a formar montones e
interfiere con la acci6n de acolchado. La mejor
hora para segar el c_sped es temprano en la
tarde.,A esa hora 6ste se ha secado y el &tea
reci_n cortada no quedarA expuesta al sol
directo..
° Para obtener los mejores resultados, ajuste la
attura del corte de la segadora de modo que
_,stacorte solamente el'terdo superior de las
hojas de c_spedo En el caso de que el c_sped
haya crecido demasiado, puede ser necesario el
elevar la attura del corte para
22
re la segadora en
cambie de
en equilibdo.
n las
planchas, el
s dispositivos de
ACENAMIEN-
os de montaje
segurarse que
adecuada,,
.=rcasy tomillos a
lerificar si estAn
da, y
se encuentra en
nto seguro.
Jvos de seguridad
cionar,
cendio,
ed, hojas y grasa
3ed a menudo
o y desgaste y
das_ Use
_uesto
_nte de su
n las
hil]a afilada an su
or se enfrie
Euierrecinto
;on combustible
edificio endonde
Jna llama
nicJ6n, tal como el
a de
ropa, etc.
sconecte el
donde no pueda
, para evitar el
te la preparaci6n,
b se hacen
reducir el esfuerzo necesar_o para empujar la
segadora y para evitar sobrecargar el motor,
dejando montenes de recortes de c_sped.,
Para un acolchamiento muy pesado, reduzca
el ancho del corte pasando por encima del
lugar anteriormente cortado y siegue
lentamente,,
. Ciertos tipos de c6sped y sus condiciones
pueden exigir que un Area tenga que ser
acolchada por segunda vez para esconder
completamente los recorteso Cuando se haga
el segundo code, siegue atravesado o en
forma perpendicuJar a la pasada del primer
corte..
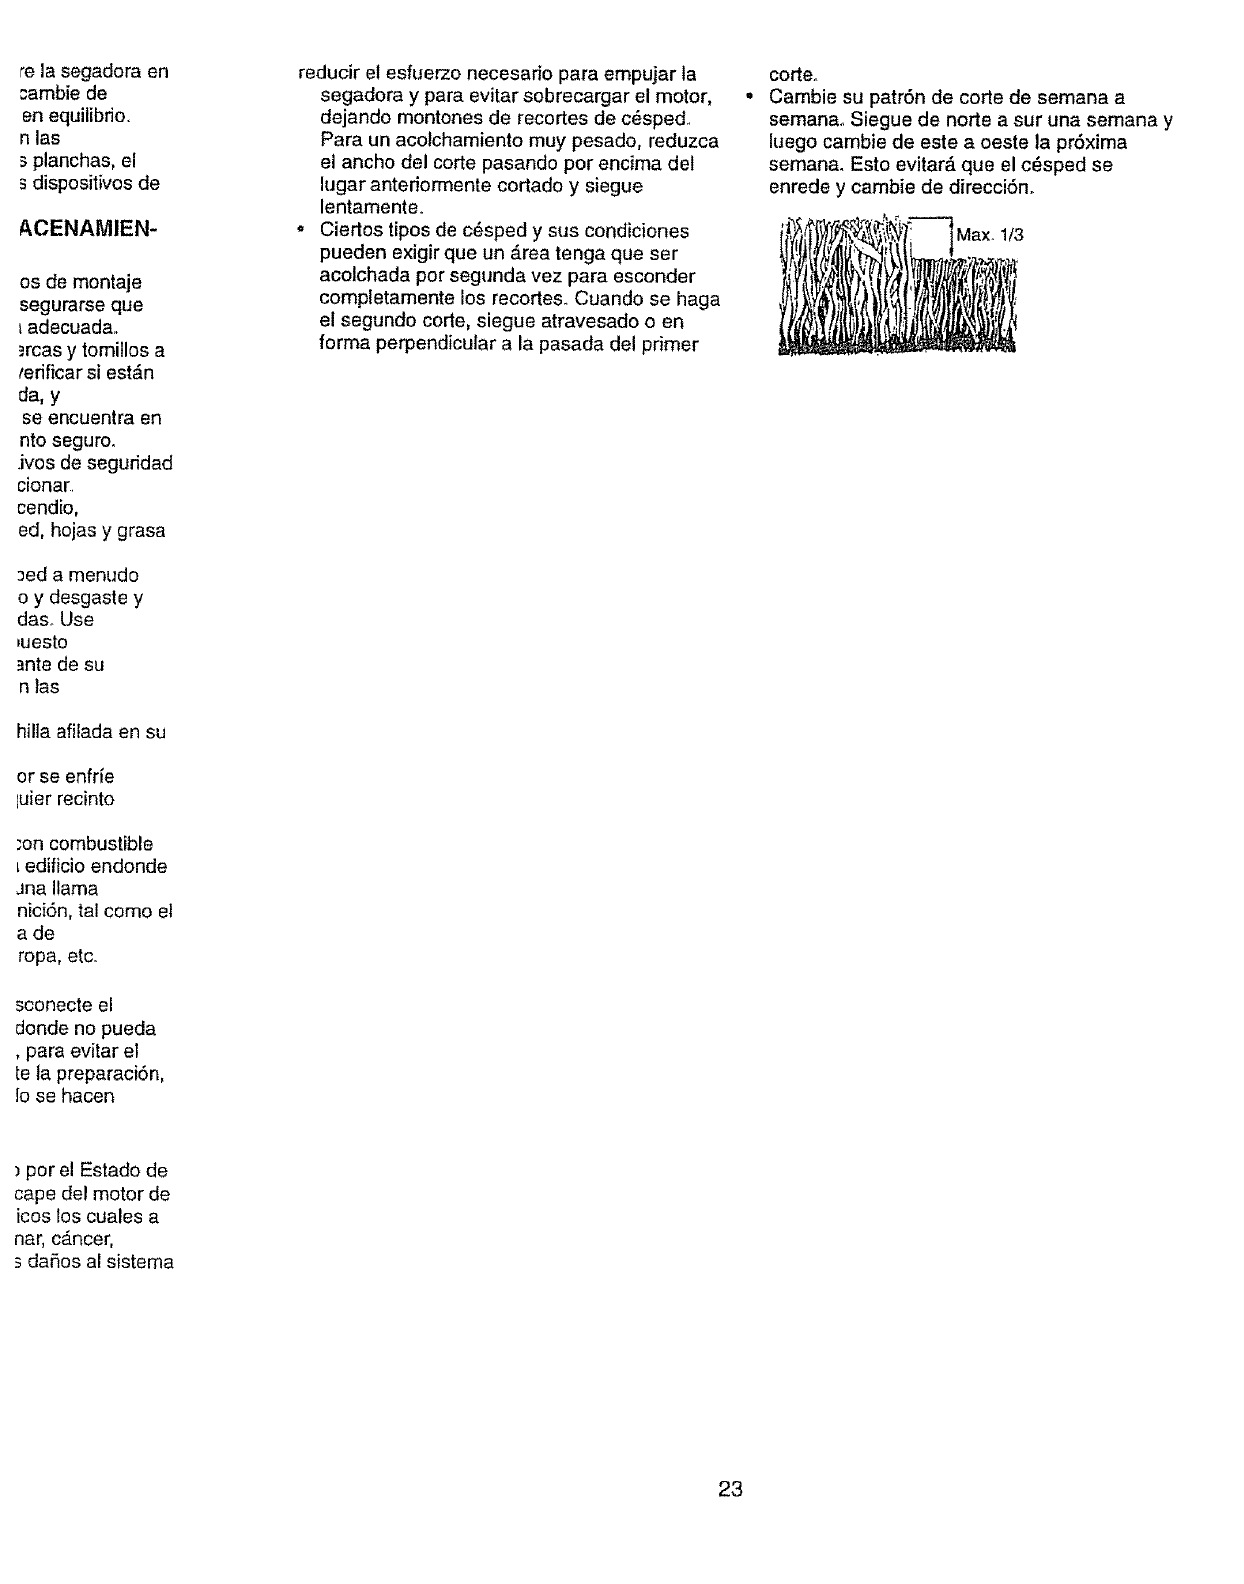
. Cambie su patr6n de corte de semana a
semana, Siegue de notre a sur una semana y
luego cambie de este a oeste la pr6xima
semana. Esto evitarA que el c_sped se
enrede y cambie de direcci6n.
Max, 1/3
por el Estado de
cape del motor de
icos los cuales a
nar, cancer,
daQos al sistema
23
P°OO.AOAOOOA.TE.,O,O.TO
LLENE'AS EO.ASAMEO,OA
Revisarsi hay sujeladores suellos, , , 6/
Umplar/inspeccionar el recogedorde
S c_sped (si viene equipado) ,, ,. _ . V _' _ t_
Eumpiar la segadora _
G Ltmpiat deba o de la cubiella'de"ia ttans-
rots _n (segadoras con poder propulsor)
(_) Revlsar tas correasy fas poleas tmpuF
sadas (segadoras con poder proputsor)
Limp]atla bateda#ecargar -- --
(segadoras con arranque el_ctrico) , , _ 6,/, ,..........................
Revisar e] nive] del aceite _ .......
O_ Cambiar e_aceite del motor ff"_t ,2
m ]nspecci0nar el silenciador
RLimpiar olcambtar la bujia ............
Cambtar el cartucho de papel del fiftro 6,,_2
de atre
1- Cambfar rods a menudo cuando se opere ba}o ¢arga pesada o en ambienles con alias temperaturas
2-Dat' serviclo rn_s a menudo cuar1_o se opero en condiciones suc_as o polv0rosas
3-Cambie _s cuchillas rn_s a rnenudo cu_ndo sSegueen terret_o arettoso
4- Cargar per 48 hems al fin de la temporada
RECOiVlENDACIONES GENERALES
La garantia de esta segadora no cubre los art/culos
que han estado sujetos al abuso o a la negtigenda
def operador, Para recibir todo el valor de la
garant_a,el operadortieneque mantener la
segadora segun las instrucciones descritas en este
manual.
Hay algunos ajustes que se tienen que hacer en
forrna peri6dica para poder mantener su unidad
adecuadamente,
Todos los ajustes en la secciSn de Servicioy
Ajustes de este manual tienen que ser revisados
por Io menos un vez por cada temporad&
. Una vez aJar3o,cambie la buj_a,limpieo cambie
el elemento del filtro de aire y revise si la cuchilla
est,, desgastad& Una buj_anueva y un elemento
del fiitro de aire limpioinuevo aseguran la mezcla
de aire-combuslJble adecuada y ayudan a que su
motor funcione mejor y que dure m_s,
o Siga el programa de mantenimiento en este
manual.
ANTES DE CADA USO
•Revise el nivel del aceite del motor,
o Revise si hay sujetadores sueltos,
LUBRICACI(_N
Mantenga ta unidad bien lubricada
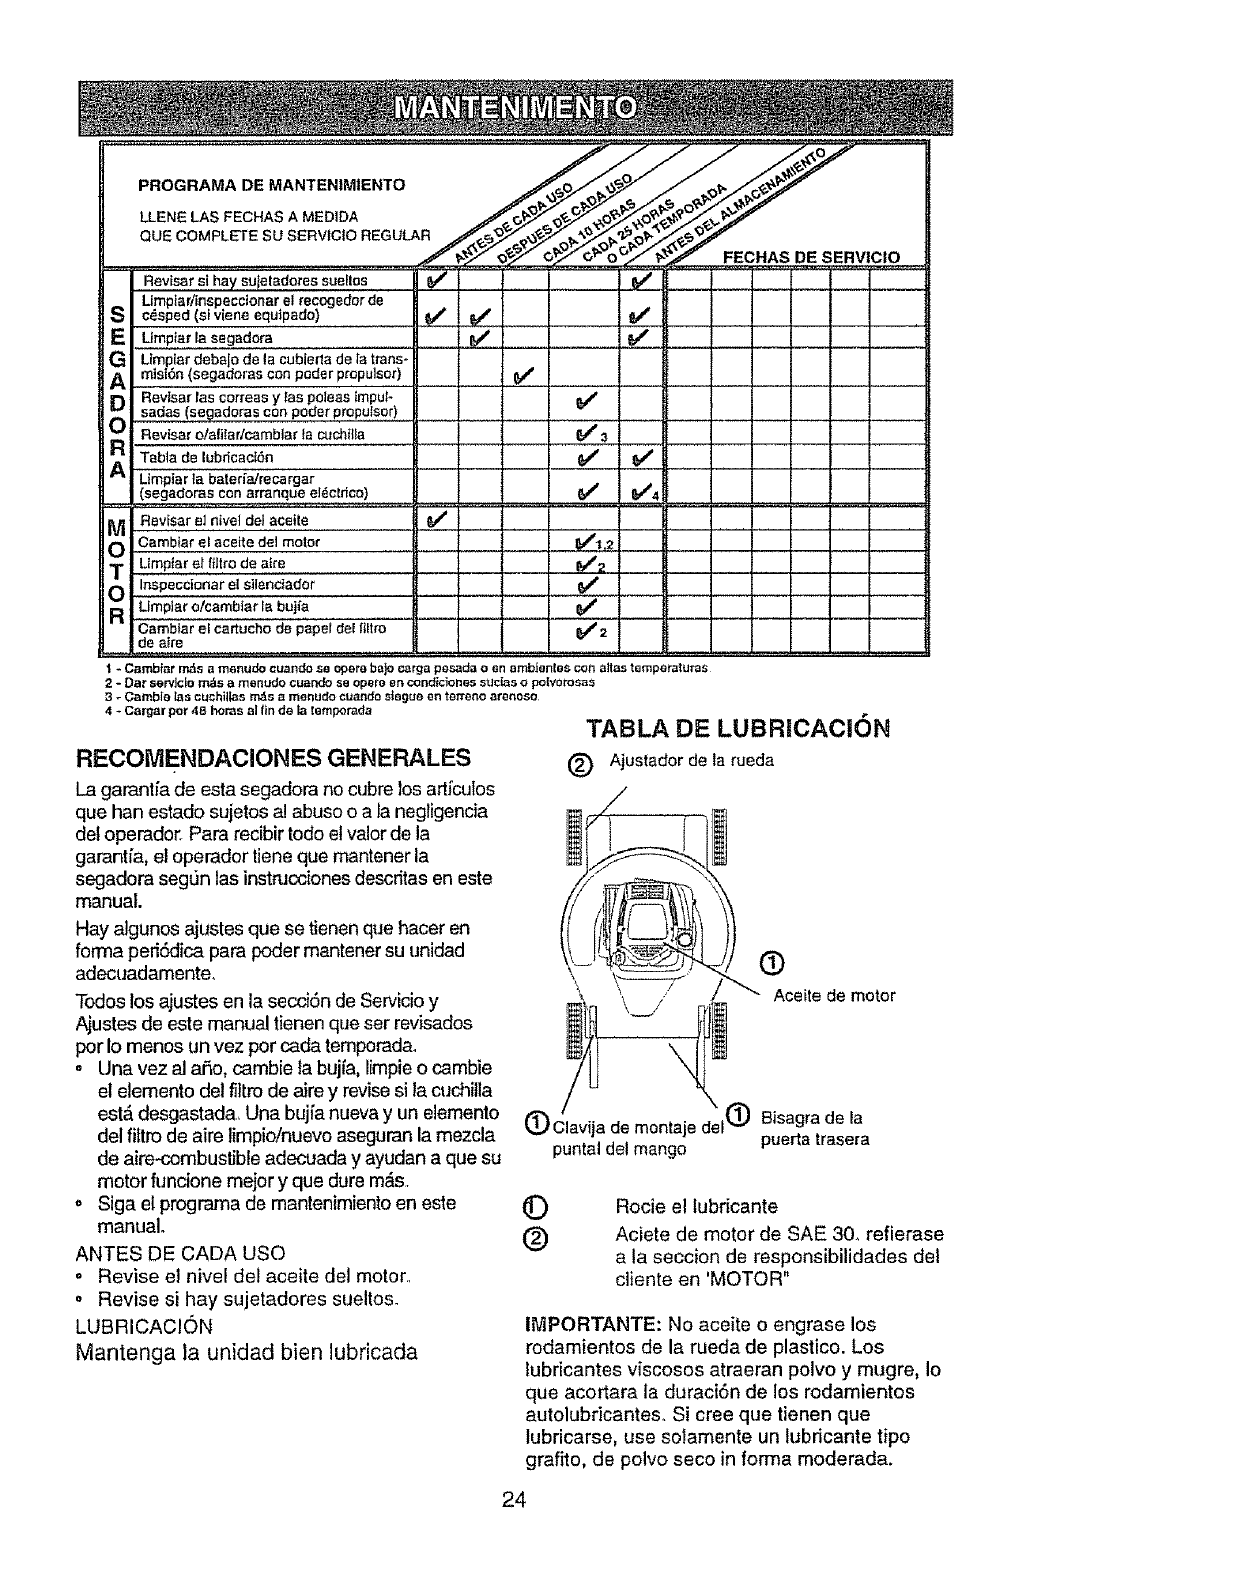
TABLA DE LUBRiCACiON
(_) Ajustador de la rueda
\
(_Clavija de montajedel(_ Bisagra de la
puntal del mango puerta trasera
(9
Aceite de motor
©
®
Rocie el tubricante
Aciete de motor de SAE 30, refierase
a la seccion de responsibilidades del
cliente en 'MOTOR"
itVlPORTANTE: No aceite o engrase los
rodamientos de la rueda de plastico. Los
lubricantes viscosos atraeran polvo y mugre, Io
que acortara ta duraci6n de los rodamientos
autolubricantes. Si cree que tienen que
lubricarse, use sotamente un lubdcante tipo
grafito, de polvo seco in forma moderada.
24
917.387380
ESPECJFMCACIONES DEL PRODUCTO
iNOMERO DE MODELO
NUMERO DE SERIE
FECHA DE COMPRA
CABALLOS DE FUERZA: 6°0
DESPLAZAMIENTO: 11.5 CU. iN,
CAPACIDAD Y TIPO t,5 Cuartos
DE GASOLINA: REGULAR SIN PLOMO
TIPO DE ACEITE: SAE 30 (sobre 32°F)
(API-SF/SH/SG) SAE 5W-30 (debajo 32°F)
CAPAClDAD DE ACEITE: 20 oz. de capacidad
BUJfA (ABERTURA: .030") CHAMPION J19LM
TOLERANCtA DE VALVULA: ADMISlON: .005 - .007
DESCARGA: .007 -.009
SENCENDtDO DE ESTADO
SOLIDO ABERTURA DE AIRE: .0101N.
TORSION DEL PERNO
DE LA CUCHILLA: 35-40 FT. LBS,
o Et num_ro del nodelo y et de serie se encuentran en la calcomania adjunta a la parte
trasera de la caja de la segadora, Debe registrar tanto el num_ro de serie come la
fecha de compra y mantengalos en un lugar seguro para refencia en el futuro.
SEGADORA el sentido contrario en que giran las manillas
Siempre observe las reglas de seguridad
cuando haga el mantenimiento,.
LLANTAS
o Mantenga las rlantas sin gasolina, aceite o
substancias qufmicas para control de
insectos que pueden dafiar ta goma,.
o Evite los tocones, las piedras, las grietas
profundas, los ebjetos afilados y otros
peligros que pueden daSar a las ilantas.
CUIDADO DE LA CUCHILLA
Para obtener los mejores resultados, la cuchilla ,,
de la segadora tiene que mantenerse afilada,
Cambie la cuchiEladoblada o daSada.
PARA REMOVER LA CUCHILLA
-Desconecte el alambre de la bujfa y p6ngalo "
en donde no pueda entrar en contacto con
_sta,
° Haga descansar ta segadora en su lado_ °
AsegtJrese que et fittro de aire y que el
carburador queden mirando hacia arriba.
o Use un bloque de madera entre la cuchilla y "
la caja de la segadora para evitar que la
cuchilla gire cuando se le quite el perno,
o Proteja sus manos con guantes y/o envuelva °
la cuchiila con una tela gruesa,,
o Remueva el perno de la cuchilla gir_ndolo en 25
del reloj.
• Remueva la cuchilla y los arti'culos de
ferreterfa adjuntadores (et perno, ta arandela
de seguridad y la arandela endurecida).
AVlSO: Remueva el adaptador de la cuchilla y
revise el cubo interior de la ranura del
adaptador de la cuchilla. La ranura tiene que
estar en buenas condiciones para que funcione
en forma adecuada. Cambie el adaptador si
est& da#adoo
PARA CAMBIAR LA CUCHILLA
Ponga el adaptador de la cuchilla en el
cigueSal del motor° Asegt]rese que la ranura
del adaptador y que el chavetero det cigueSal
est_n alineados.
Ponga ta cuchilla en el adaptador de _sta
alineando los dos (2) agujeros en ta cuchilla
con las salientes elevadas en e! adaptador.
AsegSrese de que el borde de salida de la
cuchilla (opuesto al borde afitado) est_ hacia
arriba hacia el motor.
Instale el pemo de la cuchilla con la arandela
de seguridad y la arandeta endurecida en el
adaptador de la cuchilla y el ciguefial.
Use un bloque de madera entre la cuchilla y
la caja de la segadora y apriete el pemo de ta
cuchilla gir&ndolo en el sentido en que giran
las manillas del retoj.
o La torsi6n para apretar recomendada es de
35 - 40 pies libras.
IMPORTANTE: EL PERNO DE LA CUCHILLA
ES CLASE 8 TRATADO A CALOR
AMISO: No recomendamos el afilar la cuchilla -
pero si !o hace, aseg0rese de que quede
balanceada.
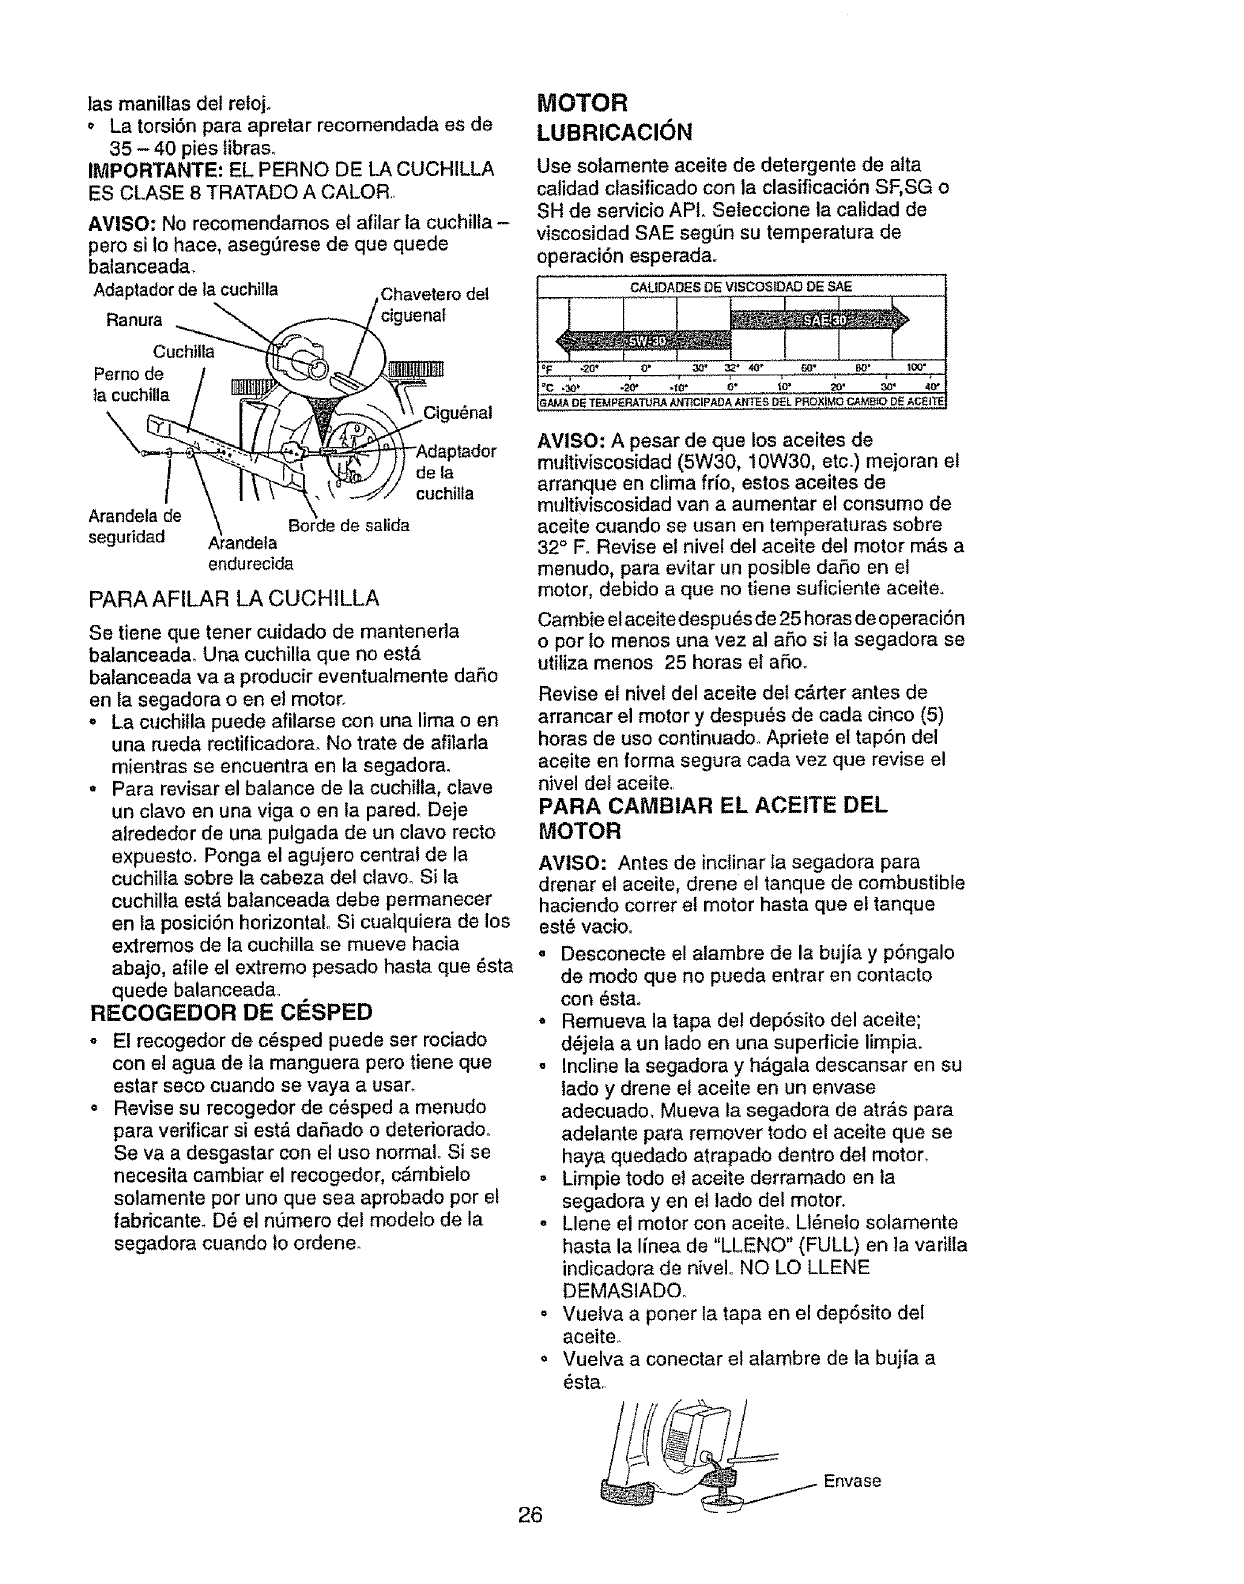
Adaptadorde la cuchitla ,Chaveterodel
Cuchilla '"--.(_._1 /
Pemode/
}acuchilla /u___ _\
\
segunaaa Arandeta
endurecida
PARA AFILAR LA CUCHILLA
Se tiene que tener cuidado de manteneda
balanceada. Una cuchilla que no est&
balanceada va a producir eventualmente dafio
en la segadora o en el motor.
o La cuchilla puede afilarse con una lima o en
una rueda rectificadora_ No trate de afilarla
mientras se encuentra en la segadorao
o Para revisar el balance de la cuchilla, clave
un clavo en una riga o en la pared° Deje
alrededor de una pulgada de un clavo recto
expuesto. Ponga el agujero central de la
cuchilta sobre la cabeza del clave° Si la
cuchilla est,. balanceada debe permanecer
en la posici6n horizontal. Si cualquiera de los
extremos de la cuchilla se mueve hacia
abajo, afile el extremo pesado hasta que _sta
quede balanceada
RECOGEDOR DE CESPED
oEl recogedor de c_sped puede ser rociado
con el agua de la manguera pero tiene que
estar seco cuando se vaya a usar_
oRevise su recogedor de c_sped a menudo
para verificar si est,. daSado o deteriorado.
Se va a desgastar con el uso normal. Si se
necesita cambiar el recogedor, c&mbielo
solamente por uno que sea aprobado por el
fabricante. D_ el nt]mero del modelo de la
segadora cuando 1oordene.
MOTOR
LUBRiCACION
Use solamente aceite de detergente de alta
calidad clasificado con la clasificaci6n SF,SG o
SH de servicio APL Seteccione la calidad de
viscosidad SAE seg0n su temperatura de
operaci6n esperada,r
CALIDADES DE V!SCOSIDAD DE SAE t
!I [ 1
i
AMISO: A pesar de que los aceites de
multiviscosidad (5W30, 10W30, etc.) mejoran el
arranque en clima frio, estos aceites de
multiviscosidad van a aumentar el consumo de
aceite cuando se usan en temperaturas sobre
32° F. Revise el nivet del aceite del motor m&s a
menudo, para evitar un posible daSo en el
motor, debido a que no tiene suficiente aceite.
Cambie elaceite despu_s de 25 horas de operaci6n
o por to menos una vez a! aSo si la segadora se
utiliza menos 25 horas el aSo,.
Revise et nivel del aceite del c_rter antes de
arrancar el motor y despu_s de cada cinco (5)
horas de uso continuado. Apriete el tap6n del
aceite en forma segura cada vez que revise el
nivel del aceite,
PARA CAMBIAR EL ACEITE DEL
MOTOR
AVISO: Antes de inclinar Ia segadora para
drenar et aceite, drene el tanque de combustible
haciendo correr e! motor hasta que el tanque
est_ vacioo
. Desconecte el alambre de la bujia y p6ngalo
de modo que no pueda entrar en contacto
con _stao
o Remueva la tapa del dep6sito del aceite;
d_jela a un tado en una superficie limpia.
o Incline la segadora y h&gala descansar en su
lado y drene el aceite en un envase
adecuado. Mueva la segadora de atr&s para
adelante para remover todo el aceite que se
haya quedado atrapado dentro del motor,
= Limpie todo el aceite derramado en la
segadora yen el lado del motor.
° Llene el motor con aceite_ LI6nelo solamente
hasta la linea de "LLENO" (FULL) en la vari!la
indicadora de niveloNO LO LLENE
DEMASIADO_
• Vueiva a poner la tapa en el dep6sito del
aceite,,
• Vuelva a conectar el alambre de la bujia a
_sta,.
26
_lse
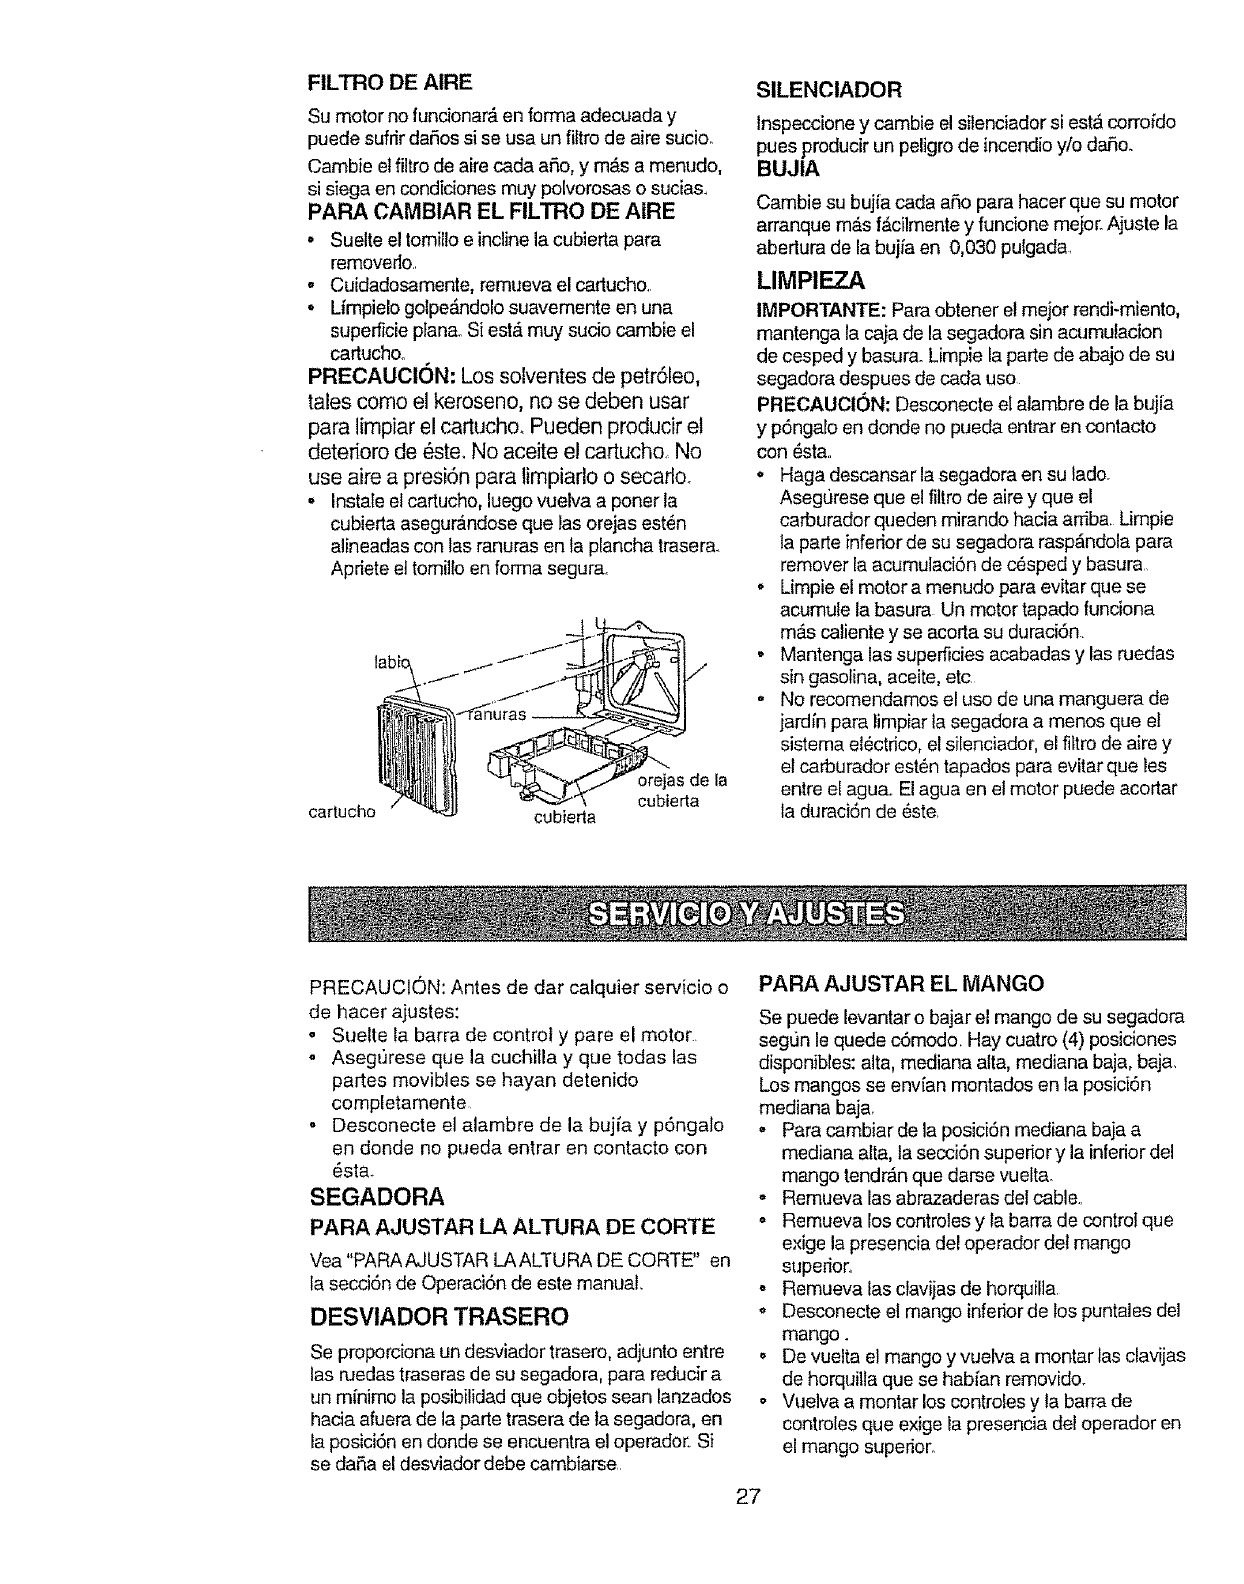
FILTRO DE AIRE
Su motor no funcionar_,en forma adecuada y
puede sufrir da6os si se usa un filtro de aire sucio°
Cambie et _tro de aire cada a_o, y m&s a menudo,
si siega en condiciones muy polvorosas o sucia&
PARA CAMBIAR EL FILTRO DE AIRE
° Suelte el tomillo e incline la cubierta para
removedo
, Cuidadosamente, remueva el cartucho.
o Limpielo golpe_,ndolosuavemente en una
superfide ptana. Si est,. muy sucio cambie el
cartuchoo
PRECAUClON: Los solventes de petr61eo,
tales como el keroseno, no se deben usar
para limpiar e! cartucho. Pueden produdr el
detefioro de 6ste. No aceite el cartucho. No
use aire a presi6n para timpiarlo o secarlo.
,, Instate el cartucho, luego vuelva a poner la
cubierta asegur_.ndoseque las orejas est6n
alineadas con las ranuras en la plancha trasera.
Apriete et tomillo en forma segura.
tabio, ///_f.._
cartucho cubierta cubierta
SILENCIADOR
lnspeccione y cambie el silenciador si est& corroido
pues producir un peligro de incendio y/o daSo.
BUJIA
Cambie su buj(a cada a5o para hacer que su motor
arranque m_s f_cilmente y fundone mejor. Ajuste la
aberlura de la bujfa en 0,030 pulgada.
LIMPIEZA
IMPORTANTE: Para obtenerel mejor rendi-miento,
mantenga la caja de la segadora sin acumulacion
de cesped y basura. Limpie la parte de abajo de su
segadora despues de cada uso
PRECAUClON: Desconecte el alambre de la bujia
y p6ngalo en donde no pueda entrar en contacto
con 6sta..
o Haga descansar la segadora en su lado.
Asegurese que elfiltrode aire y que el
carburador queden mirando hacia arriba. Limpie
la parte inferior de su segadora rasp6ndola para
remover la acumulaci6n de c_sped y basura
,' Limpie el motor a menudo para evitar que se
acumule la basura Un motor tapado funciona
mAs caliente y se acorta su duraciSn.
° Mantenga las superlicies acabadas y las ruedas
sin gasolina, aceite, etc
o No recomendamos el uso de una manguera de
jard[n para limpiar la segadora a menos que el
sistema el_ctrice, el si[enciador, el filtro de aire y
el carburador est6n tapados para evitar que les
entre el agua. El agua en el motor puede acortar
la duraci6n de 6ste.
PRECAUCION: Antes de dar calquier sewicio o
de hacer ajustes:
° Sueite ta barra de control y pare el motor..
o Asegurese que la cuchilla y que todas las
partes movibles se hayan detenido
completamente
° Desconecte el alambre de la bujia y p6ngalo
en donde no pueda entrar en contacto con
6sta.
SEGADORA
PARA AJUSTAR LA ALTURA DE CORTE
Vea "PARAAJUSTAR LAALTURA DE CORTE" en
ta secci6n de Operaci6n de este manual. ,,
DESVIADOR TRASERO °
Se proporciona un desviador trasem, adjunto entre
las ruedastraserasde su segadora, para reducir a
un mfnimo la posibilidad que objetos sean lanzades
hacia afuera de la parte trasera de Ia segadora, en
la posici6n en donde se encuentra el operador. Si
se daSa el desviador debe cambiarse
PAPA AJUSTAR EL MANGO
27
Se puede levantar o bajar el mango de su segadora
segun ie quede c6modo. Hay cuatro (4) posiciones
disponibles: alta, mediana alta, mediana baja, baja.
Los mangos se env[an montados en la posici6n
mediana baja.
°Para cambiar de la posici6n mediana baja a
mediana alta, la secci6n superior y la inferior del
mango tendr_nque darse vuelta.
o Remueva las abrazaderas del cable..
o Remueva los controtes y la barra de controI que
exige la presencia del operador det mango
superion
Remueva las clavijas de horquilla
Desconecte el mango inferior de los puntales del
mango.
,' De vuelta el mango y vuelva a montar tas clavijas
de horquilla que se hab[an removido.
o Vuelva a montar los controfes y la barra de
controles que exige la presenda del operador en
el mango superior.
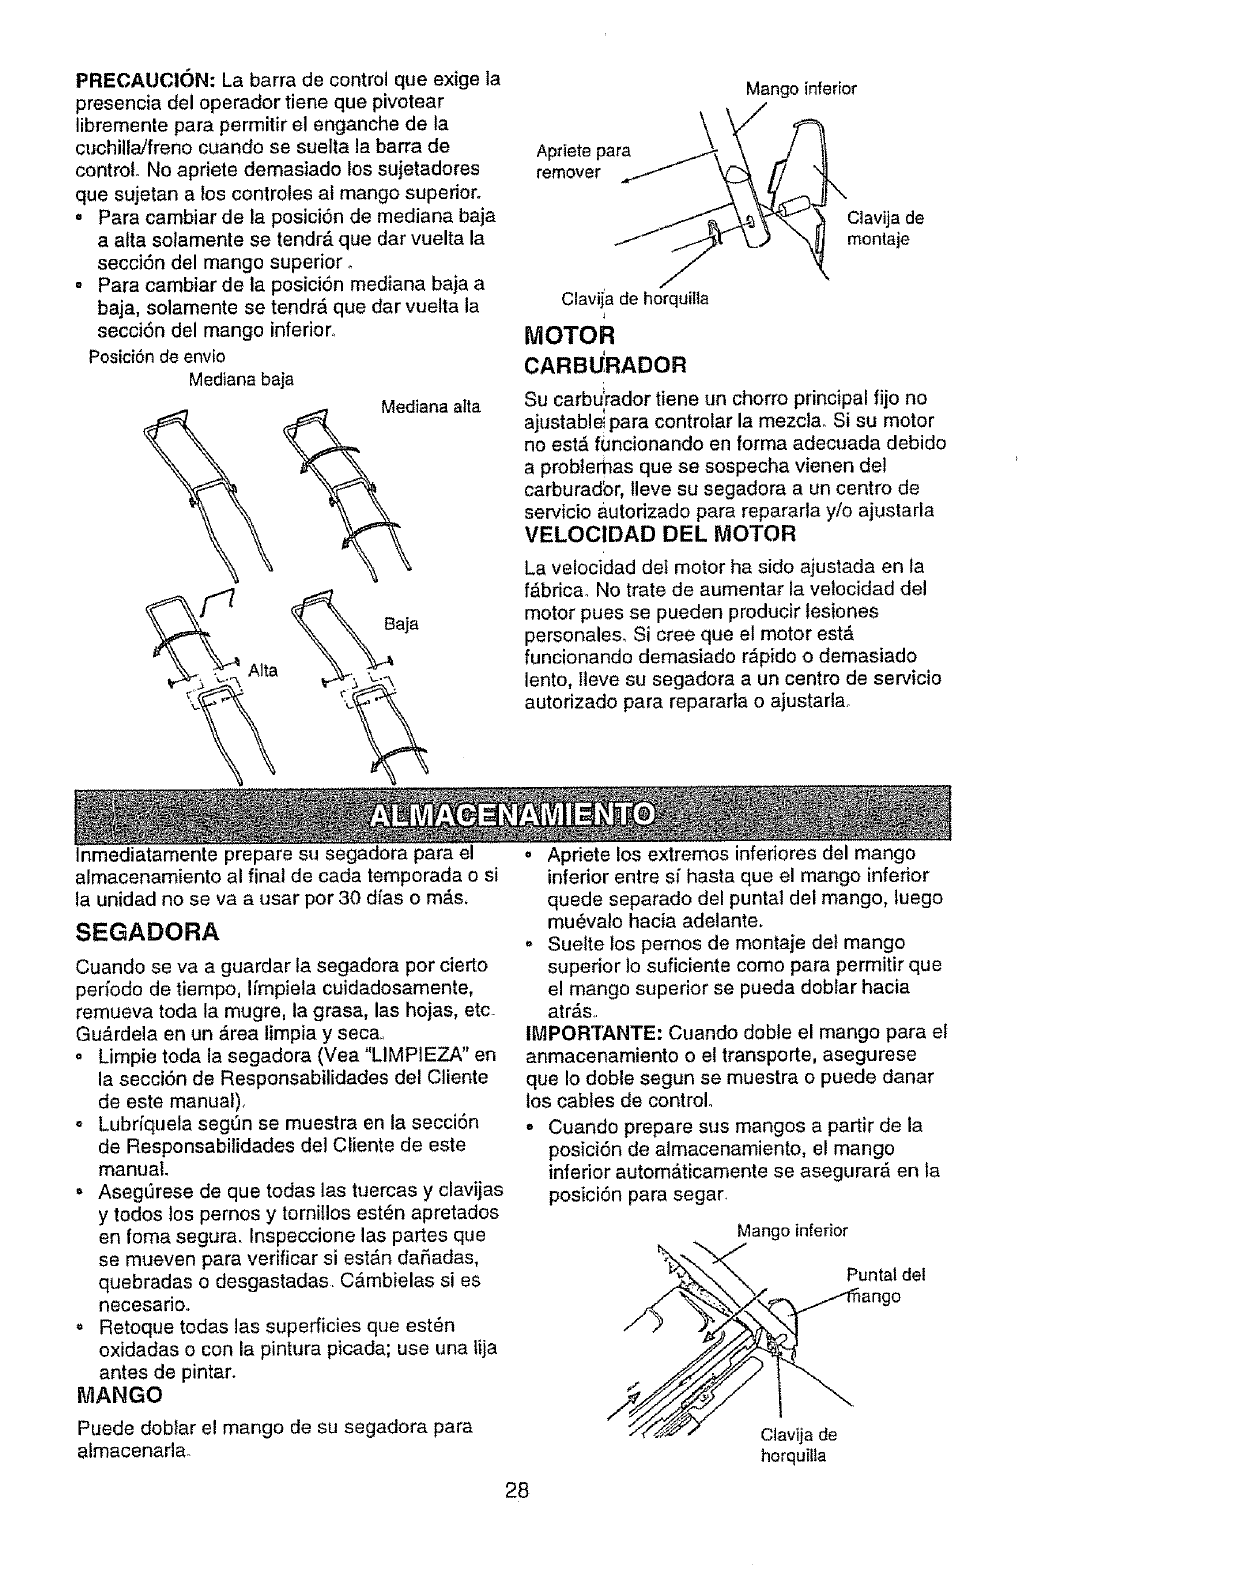
PRECAUClON:Labarradecontrolqueexigela
presenciadeloperadortienequepivotear
librementeparapermitirelenganchedela
cuchilla/frenocuandosesueltalabarrade
control.Noaprietedemasiadolossujetadores
quesujetanaloscontrolesalmangosuperior.
. Paracambiardelaposici6ndemedianabaja
a attasotamentesetendr&quedarvueltala
secci6ndelmangosuperior°
° Paracambiardelaposici6nmedianabajaa
baja,solamentesetendr_,quedarvueltala
secci6ndelmangoinferior,
Posici6ndeenvio
Medianabaja Medianaalia
Alta
t- ¢
Aptiete para
remover
\Mango inferior
Clavija de
montaje
Clavi_ade horquilla
MOTOR
CARBU'RADOR
Su carbu'rador tiene un chorro principal fijo no
ajustablei para controlar la mezcla. Si su motor
no est_ funcionando en forma adecuada debido
a problemas que se sospecha vienen del
carburadbr, Ileve su segadora a un centro de
servicio autorizado para repararla y/o ajustarla
VELOClDAD DEL MOTOR
La velocidad det motor ha sido ajustada en la
f_ibricao No trate de aumentar la velocidad del
motor pues se pueden producir tesiones
personales. Si cree que el motor est&
funcionando demasiado r&pido o demasiado
lento, lleve su segadora a un centro de servicio
autorizado para repararta o ajustarla.
Inmediatamente prepare su segadora para el
almacenamiento al final de carla temporada o si
la unidad no se va a usar por 30 dfas o m_.s,
SEGADORA
Cuando se va a guardar la segadora por cierto
periodo de tiempo, Ifmpiela cuidadosamente,
remueva toda la mugre, la grasa, las hojas, etc.
Gu&rdela en un _.rea limpia y seca.
•Limpie toda la segadora (Vea "LIMPIEZA" en
la secci6n de Responsabilidades del Cliente
de este manual).
oLubrfquela segtJn se muestra en la secci6n
de Responsabilidades del Cliente de este
manual.
.Asegt_rese de que todas las tuercas y clavijas
y todos los pernos y tornillos est_n apretados
en foma segura. Inspeccione las partes que
se mueven para verificar si est&n dafiadas,
quebradas o desgastadas, C_tmbielas si es
necesario,,
.Retoque todas las superficies que est_n
oxidadas o con la pintura picada; use una lija
antes de pintar.
MANGO
Puede doblar el mango de su segadora para
almacenarla_
28
o Apriete los extremos inferiores del mango
inferior entre sf hasta que el mango inferior
quede separado del puntal del mango, tuego
mu_valo hacia adelante.
o Suelte los pernos de montaje del mango
superior 1osuficiente como para permitir que
el mango superior se pueda doblar hacia
atr_s,.
IMPORTANTE: Cuando doble el mango para et
anmacenamiento o el transporte, asegurese
que Io doble segun se muestra o puede danar
los cables de control.
o Cuando prepare sus mangos a partir de la
posici6n de almacenamiento, el mango
inferior automAticamente se asegurarA en ta
posici6n para segar.
Mango inferior
Puntal del
Ctavija de
horquilia
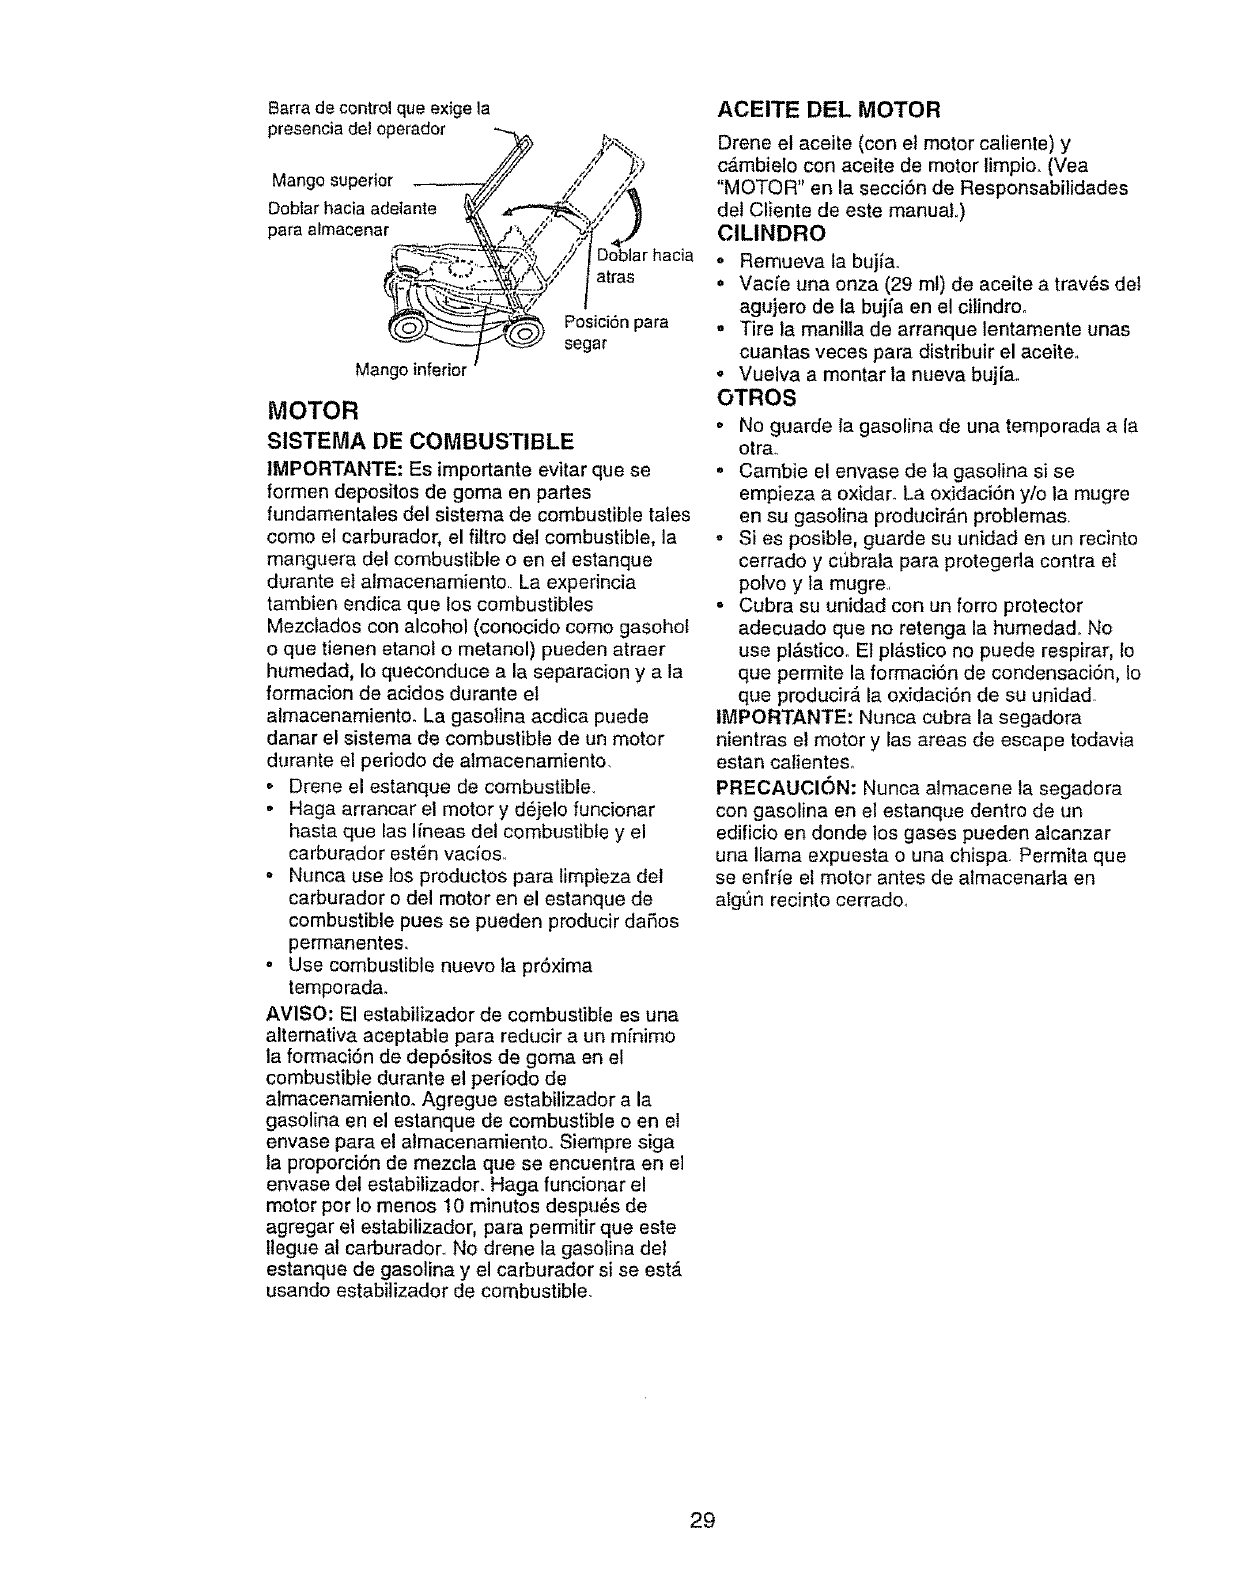
Barrade control que exige la
presenciade1operador //y/
Mango superior J/ /,,_ "/_)
Doblarhacla adelante _ _////.,_t'-"_ /_
pare almacenar ,, _.... ,,y Ooblarh c,a
'_-l+"' .'-_! s'bJ;' arras
__-_) Posici6npara
_J"_"---.--- _ _ segar
Mango inferior
MOTOR
SlSTEMA DE COMBUSTIBLE
IMPORTANTE: Es importante evitar que se
formen depositos de goma en panes
fundamentales del sistema de combustible tales
como el carburador, el filtro del combustible, la
manguera del combustible o en el estanque
durante el almacenamiento. La experincia
tambien endica que los combustibles
Mezclados con alcohol (conocido como gasohol
o que tienen etanol o metanol) pueden atraer
humedad, Io queconduce a la separacion y a la
formacion de acidos durante el
almacenamientoo La gasolina acdica puede
danar el sistema de combustible de un motor
durante el pedodo de atmacenamiento.
.Drene el estanque de combustible.
• Haga arrancar el motor y d_jelo funcionar
hasta que las lineas del combustible y el
carburador est_n vacfos,,
- Nunca use los productos para limpieza del
carburador o del motor en el estanque de
combustible pues se pueden producir daSos
permanentes.
. Use combustible nuevo la pr6xima
temporada.
AVlSO: El estabilizador de combustible es una
altemativa aceptable para reducir aun mfnimo
la formaci6n de dep6sitos de goma en e!
combustible durante el periodo de
almacenamiento. Agregue estabilizador a la
gasolina en el estanque de combustible o en el
envase para el almacenamiento. Siempre sign
la proporciOn de mezcla que se encuentra en el
envase del estabilizador. Haga funcionar el
motor por Io menos 10 minutos despu_s de
agregar el estabilizador, para permitir que este
ttegue al carburador_ No drene la gasolina del
estanque de gasolina y el carburador si se est6
usando estabilizador de combustible.
ACEITE DEL MOTOR
Drene el aceite (con el motor caliente) y
c_mbielo con aceite de motor limpio. (Vea
"MOTOR" en la secciSn de Responsabilidades
del Cliente de este manual,,)
ClLINDRO
o Remueva la bujfao
• Vacfe una onza (29 ml) de aceite a tray,s det
agujero de la bujfa en el citindroo
. Tire la manilla de arranque lentamente unas
cuantas veces para distribuir el aceiteo
o Vuelva a montar la nueva bujia,
OTROS
o No guarde ta gasolina de una temporada a la
otra,,
°Cambie e! envase de la gasotina si se
empieza a oxidar. La oxidaciSn y/o la mugre
en su gasolina producir6n problemas,
o Si es posible, guarde su unidad en un recinto
cerrado y ct]brala para protegeda contra el
polvo y la mugre.,
. Cubra su unidad con un forro protector
adecuado que no retenga la humedad. No
use pl&stico_ E1plAstico no puede respirar, fo
que permite la formaci6n de condensaci6n, Io
que producir_ la oxidaciSn de su unidad,
IMPORTANTE: Nunca cubra la segadora
nientras el motor y las areas de escape todavia
estan calienteso
PRECAUClON: Nunca almacene la segadora
con gasolina en el estanque dentro de un
edificio en donde los gases pueden alcanzar
una llama expuesta o una chispa. Permita que
se enfrfe el motor antes de almacenarla en
atgt_n recinto cerrado_
29
IDENTIFICACI6N DE PROBLEMAS
CAUSAPROBLEMA
No arranca
Falta de fuerza
oFiltro de aire sucio°
• Sin combustible.
oCombustible rancio.
oAgua en el combustible.
-Alambre de la bujfa
desconectado.
oBujfa mala.
oCuchilla suelta o adaptador
de la cuchitla quebrado.
• Barra de control en la posici6n
suelta.
° Barra de control defectuosa.
° Parte trasera de la cajacuchilla
de la segadoraarrastr&ndose
en el c6sped pesadoo
• EstA cortando mucho c_spedo
,Filtro de aire sucio.,
oAcumulaci6n de c_sped, hojas
y basura debajo de la sega-
dora,
oDemasiado aceite en el motor,
CORRECCION
o Limpielcambie el filtro de aire.
oLlene el estanque de combustible.
•Drene el estanque yvuelva a
Ilenado con combustible limpio y
nuevo.
oDrene el estanque de combustible y
el carburador y vuelva aIlenar el
estanque con gasolina nuevao
,Conecte el alambre ala bujfao
o Cambie la bujfa.
= Apriete el pemo de la cuchilla o
cambie el adaptador de la cuchilla.
o Presione la barra de control hacia el
mango.
o Cambie la barra de control.,
Ajuste a la posici6n de "Code m&s
alto."
Ajuste a la posici6n de "Corte mAs
alto."
Limpie/cambie el filtro de aire.,
Limpie la parte inferior de la caja de
la segadora.
Revise el nivel del aceite.
Corte a una velocidad de recorrido
m&s lenta.
3O
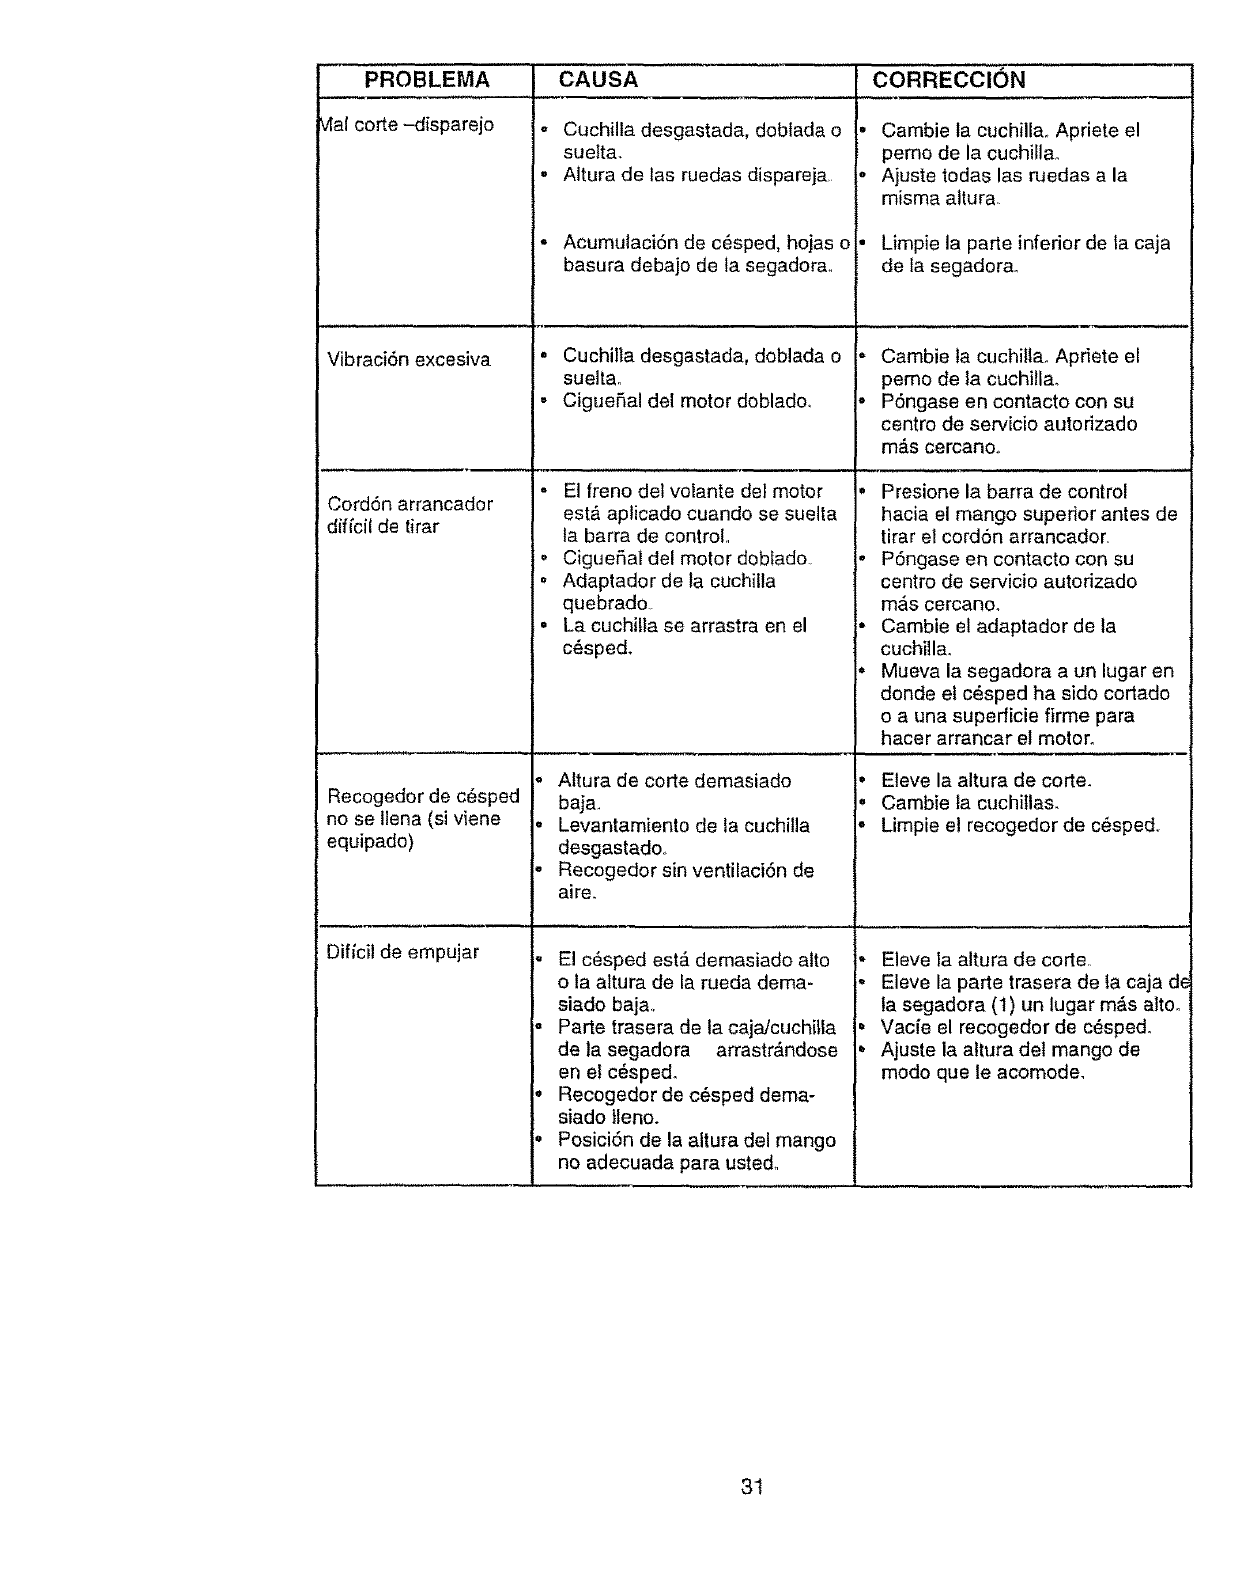
PROBLEMA
_4alcorte -disparejo
Vibraci6n excesiva
a
Cord6n arrancador
diffcil de tirar
e
D
i
Recogedor de c_sped
no se !lena (si viene
equipado)
Dificil de empujar
CAUSA CORRECCION
= Cuchilla desgastada, dobtada o
suelta.
•Altura de las ruedas dispareja,
" Acumulaci6n de c_sped, hojas o
basura debajo de la segadorao
• Cuchilla desgastada, doblada o
suelta,
= CigueBal del motor doblado,,
El freno del volante del motor
est& aplicado cuando se suelta
la barra de control,,
Ciguefial del motor doblado
Adaptador de la cuchilla
quebrado.
La cuchi!ta se arrastra en el
c_sped.
Altura de corte demasiado
baj&
Levantamiento de la cuchilla
desgastadoo
Recogedor sin ventilaciSn de
aire.
E! c6sped est_ demasiado alto
o la altura de la rueda dema-
siado baja,,
Parte trasera de la caja/cuchitla
de la segadora arrastrAndose
en el c6sped.
Recogedor de c_sped dema-
siado tleno.
Posici6n de la altura del mango
no adecuada para usted,,
Cambie la cuchilla,, Apriete el
pemo de la cuchillao
Ajuste todas las ruedas a la
misma altura.
Limpie la parte inferior de la caja
de ta segadorao
Cambie ta cuchill& Apdete el
pemo de la cuchilla.
P6ngase en contacto con su
centro de servicio autodzado
mAs cercano,,
Presione la barra de control
hacia el mango superior antes de
tirar el cord6n arrancador.
PSngase en contacto con su
centro de servicio autorizado
mAs cercano.
Cambie el adaptador de ta
cuchilla.
Mueva la segadora a un lugar en
donde et c6sped ha sido cortado
o a una superficie firme para
hacer arrancar el motor_
Eleve la altura de corte.
Cambie ta cuchillas.
Limpie el recogedor de c_sped.r
Eleve la altura de corter
Eleve la parte trasera de ta caja d_
ta segadora (1) un lugar m&s altOo
Vacfe el recogedor de c_spedo
Ajuste la altura det mango de
modo que le acomode,
31
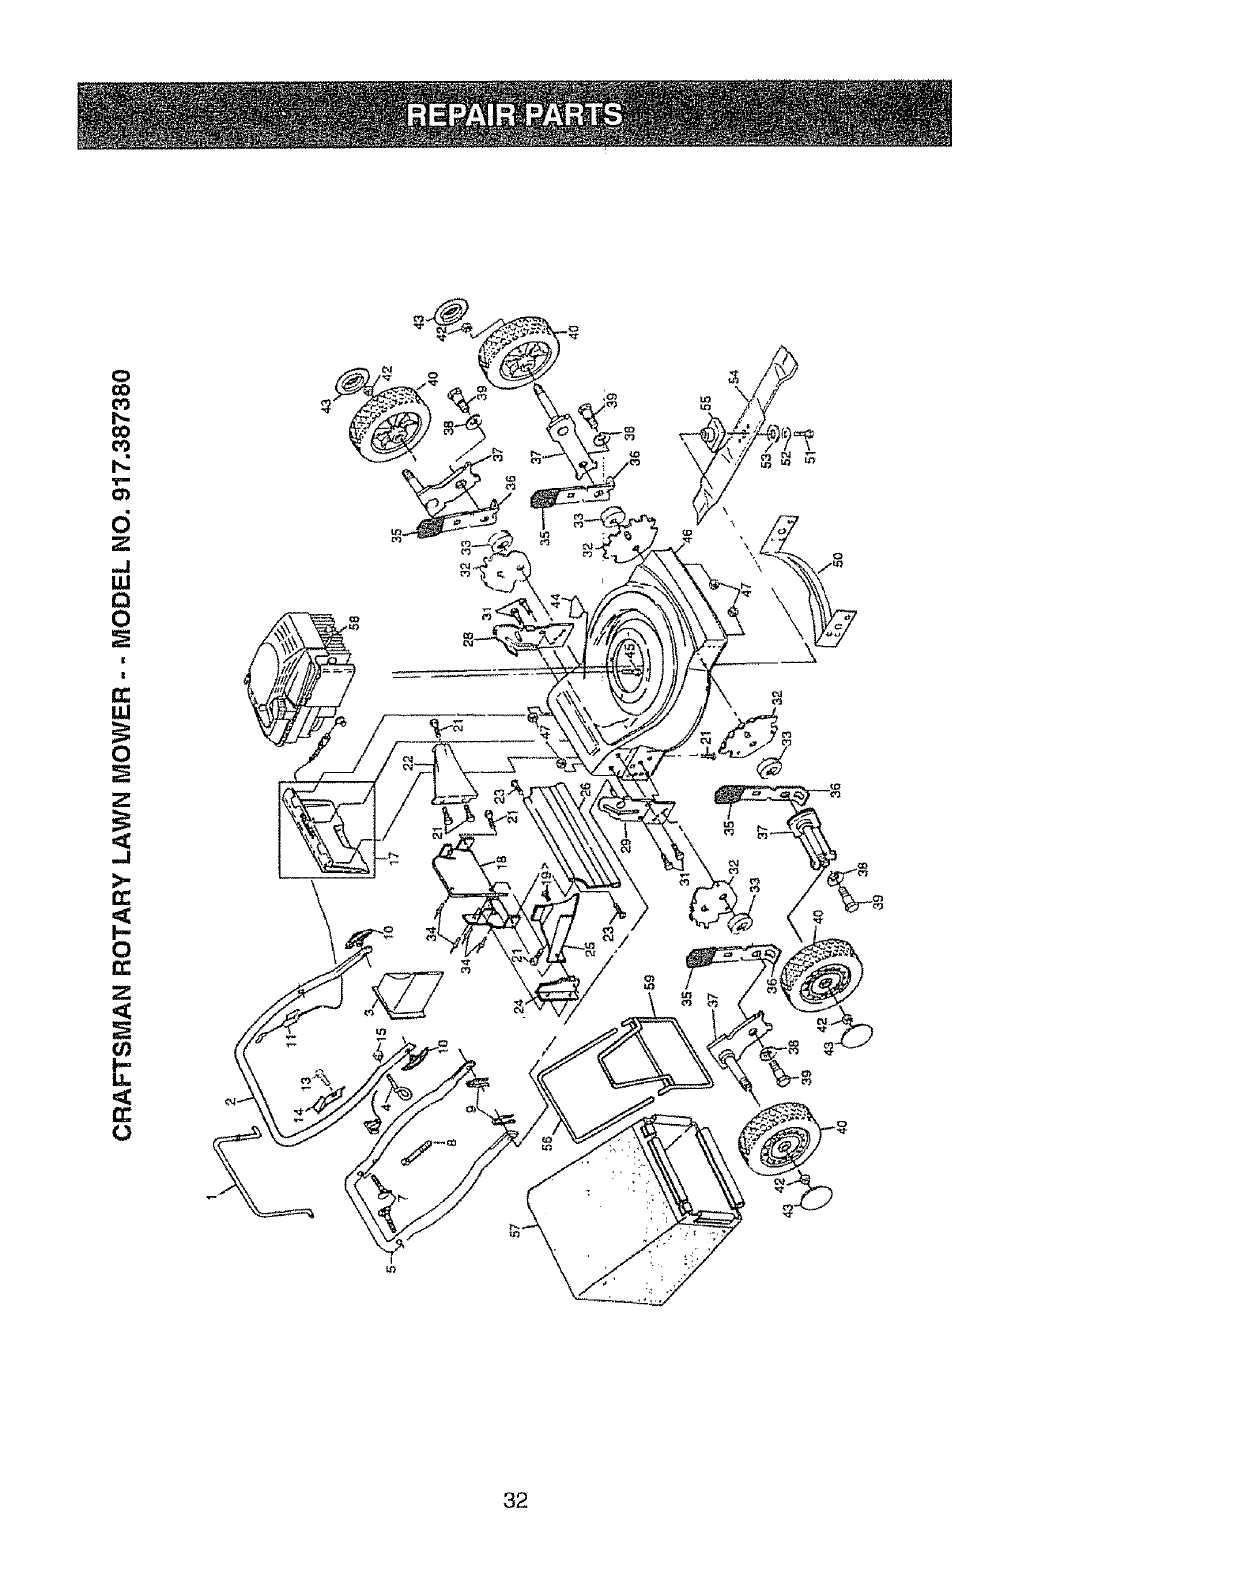
o
GO
co
T m
o_
d
Z
.d
LLI
r_
0
r_
LU
0
Z
.d
>-
rr"
I--
0
Z
€_
I'-
LL
n"
(3
/
32

CRAFTSMAN ROTARY LAWN MOWER-- MODEL NO. 917.387380
KEY PART
NO. NO.
DESCRIPTION KEY PART DESCRIPTION
NO. NO.
03
r_
1 86902
2 145646X479
3 150424
4 132001
5 157081X479
7 131959
8 66426
9 51793
10 136376
11 162778
13 750097
14 86899X004
15 63601
17 147613
18 700357X479
19 150050
21 54583
22 700063X479
23 88652
24 700363X479
25 144875X479
26 140657
28 15t512X479
29 151511X479
31 150076
32 700325X007
33 146630
34 128415
35 87877
36 700331X004
37 145935X004
38 62335
Control Bar 39 142748
Upper Handle 40 151157
Mutcher Plug 42 83923
Rope Guide 43 77400
Lower Handle 44 85463
Handle Bolt 45 150406
Wire Tie 46 161857
Hairpin Cotter
Handle Knob 47 751592
Engine Zone Controt Cabie 50 700938X479
Hex Washer Head Screw 10-24 x !/2 51 851084
Up-Stop Bracket
Keps Locknut 1/4-20 52 850263
Rear Door Assembly Kit 53 851074
Back Plate 54 145106
Self Tapping Screw 10-24 x 5/8 55 850977
Hex Head Tapping Screw 1/4-20 x 1/2 56 144748
Rear Baffle 57 154870
Hinge Screw 1/4-20 x 1-1/4 58 ......
Side Baffle
Discharge Baffle 59 144747
Rear Deffector - - 163716
Handle Bracket Assembly (Left)
Handle Bracket Assembly (Right)
Screw 5/16-18 x 3/4 7"1 33723
Wheel Ad{usting Bracket "7._!.133623
Spacer 7.1 33500
Pop Rivet 7.1 33300
Selector Knob 7_LI.33417
Selector Spring "/'1 33316
Axle Arm Assembiy Z.t 33303
Believiife Washer
Shoulder Bolt
Wheel and Tire Assembly
Hex Flange Locknut
Hubcap
Danger Decal
Hex Head Thread Rolling Screw 3t8-16 x 1
Lawn Mower Housing (Incl. Key #18, 22, 24,
44, 50)
Locknut 3/8-16
Front Baffle
Hex Head Machine Screw 3/8-24 x 1-3/8 (Grd,
8)
Helical Lockwasher 3/8
Washer
Blade 20"
B_adeAdapter
Tube Frame
Grass Bag
Engine - (See Breakdown) Briggs & Stratton
Model 12H802
Throat Frame
Owner's Manual
Available accessones not inc{uded with lawn mower:
Hi-Wheel Kit
Gas Can (2.5 gal.)
Fuel Stabilizer
SAE 30W Oti (20 oz.)
Dust Shield
Mower Cover
Chute Deflector
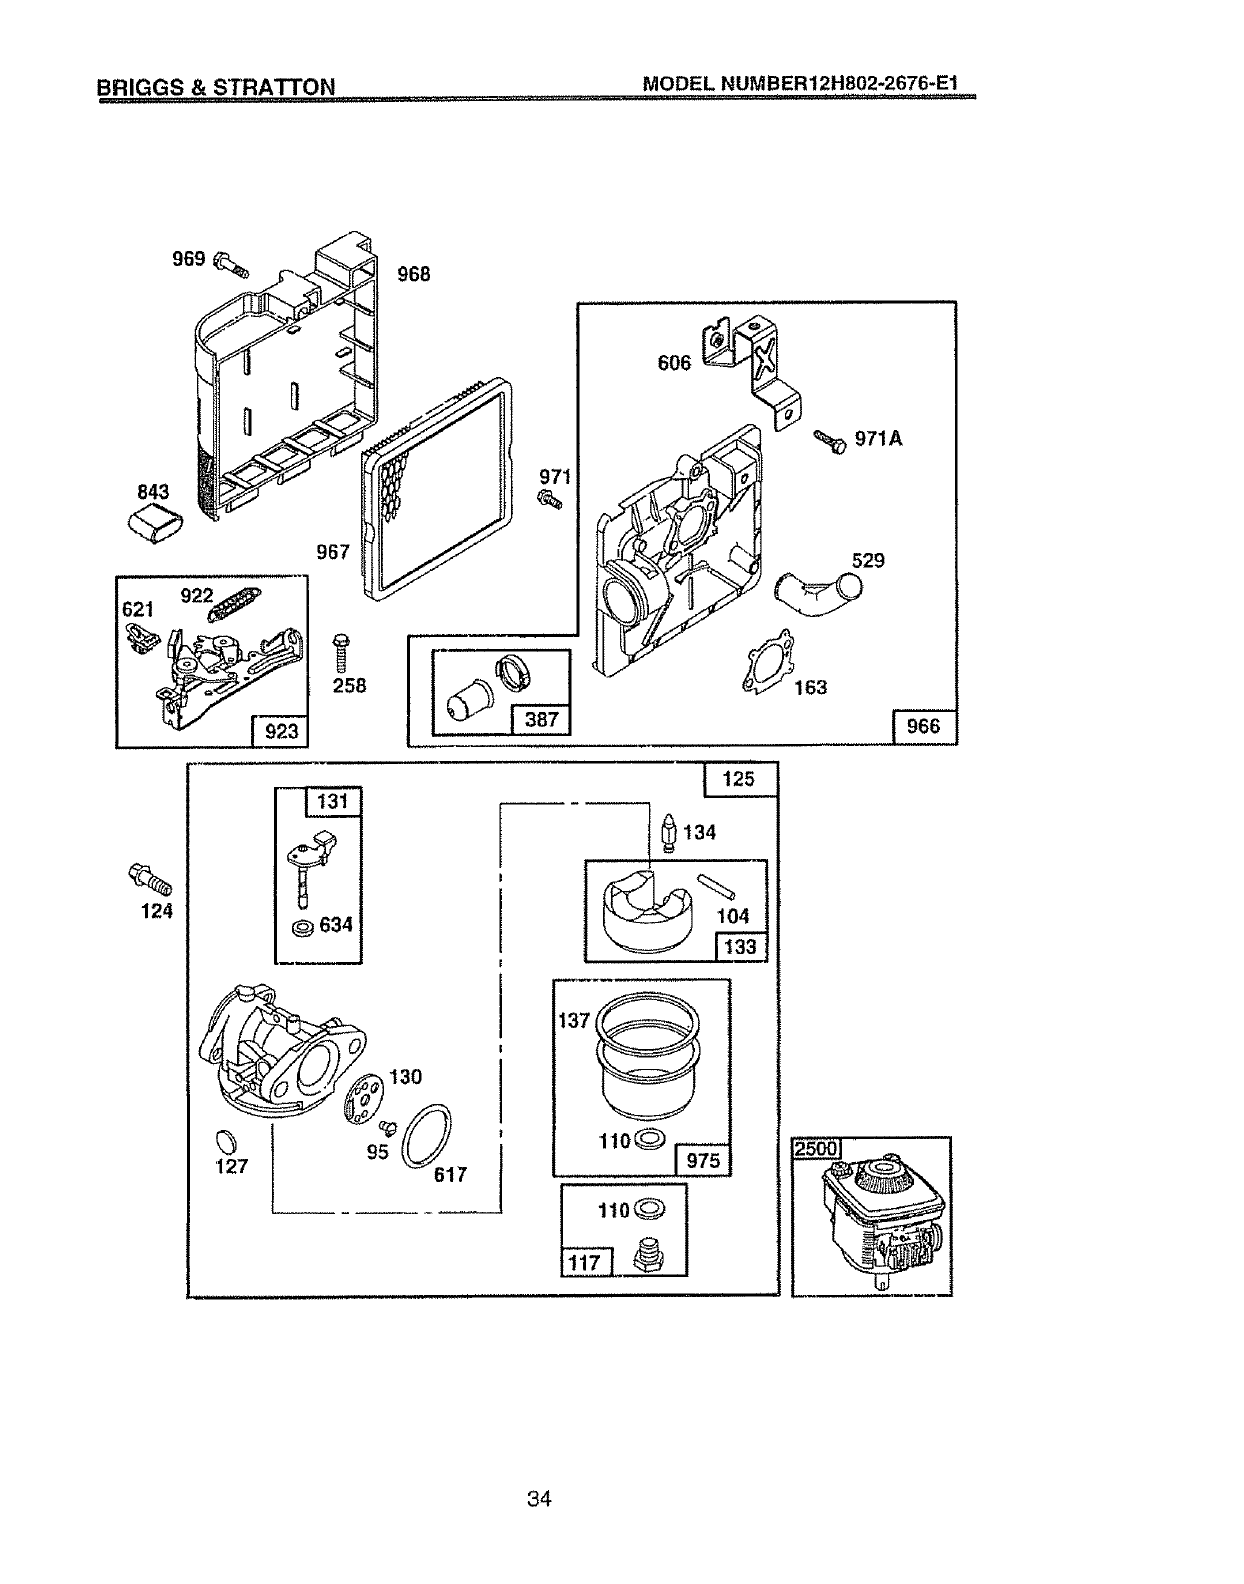
BRIGGS & STRATTON !:! .... MODEL NUMBER12H802-2676-E1
967
621 92_j_P
258
%
124 ?
Q634
968
606
130
95 _7
137
'_ 971A
529
_163
1 13,
11oO_
11oO t
34
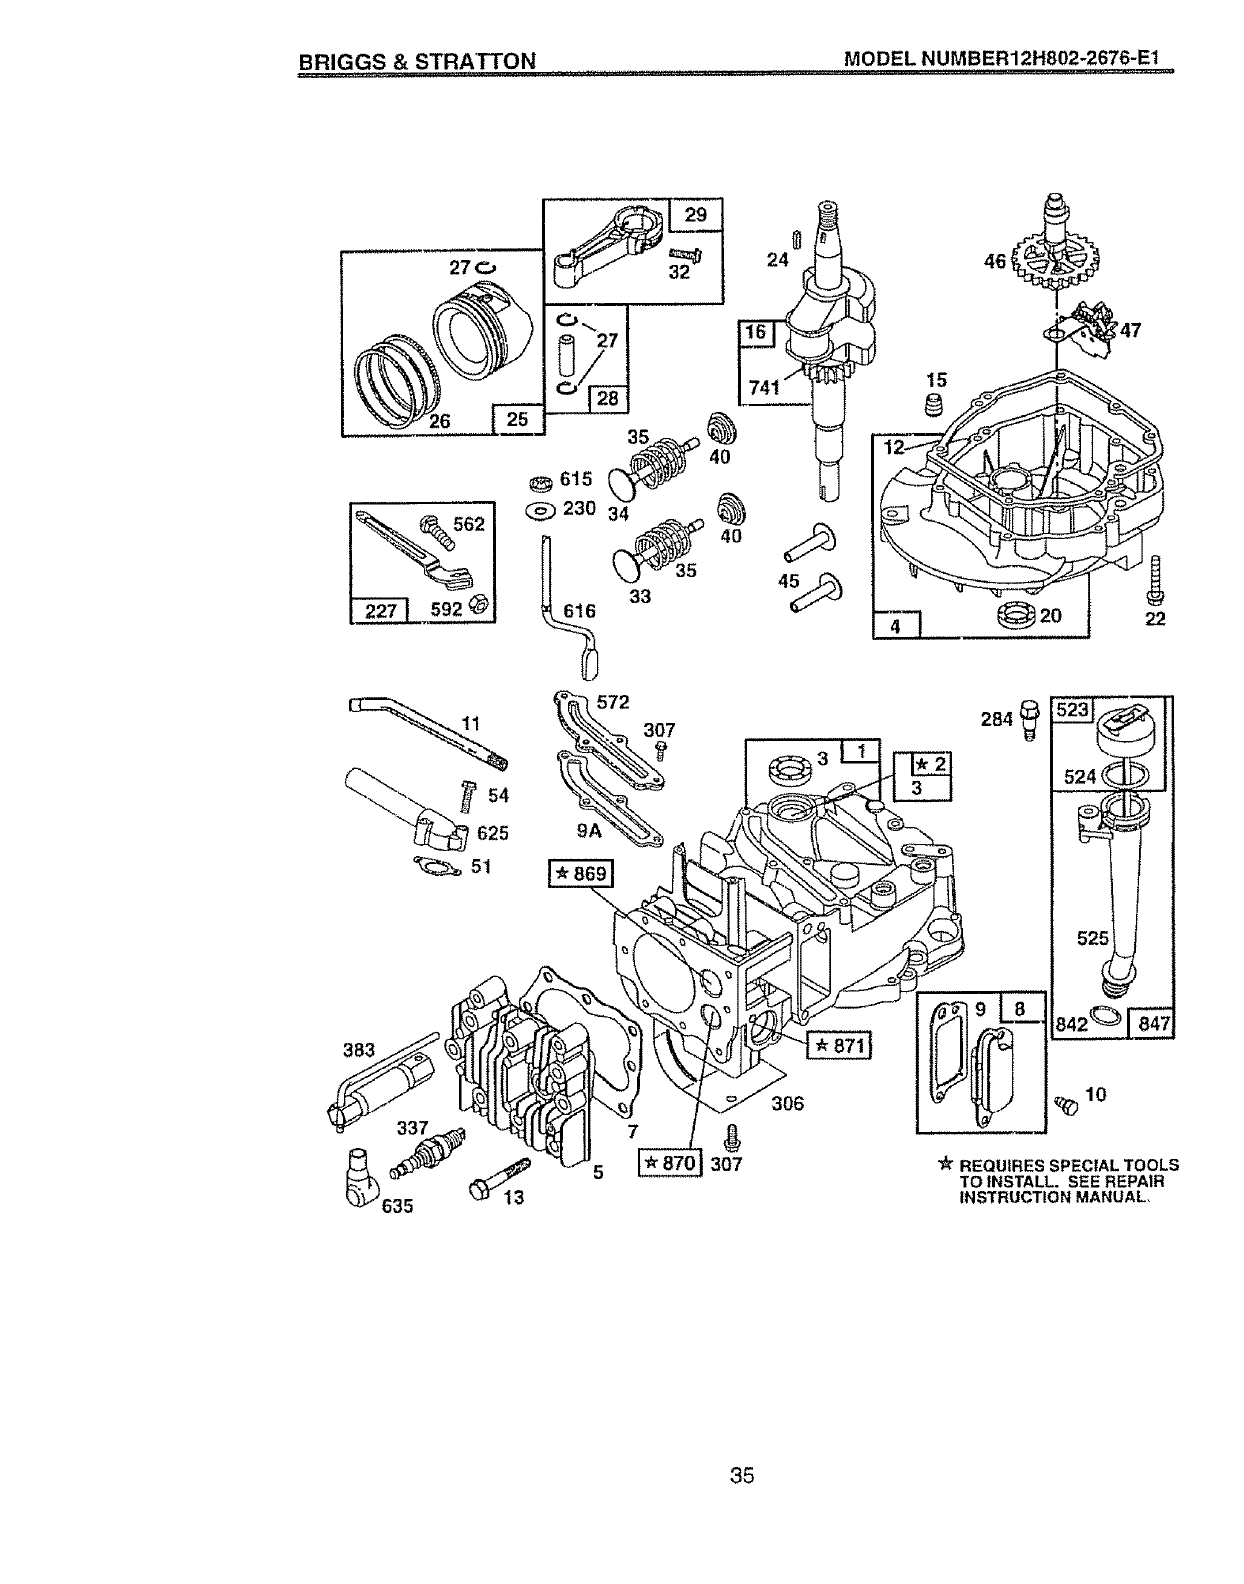
BRIGGS & STRATTON MODEL NUMBER12H802-2676-E1
REQUIRES SPECIAL TOOLS
TO INSTALL. SEE REPAIR
INSTRUCTION MANUAL.
35
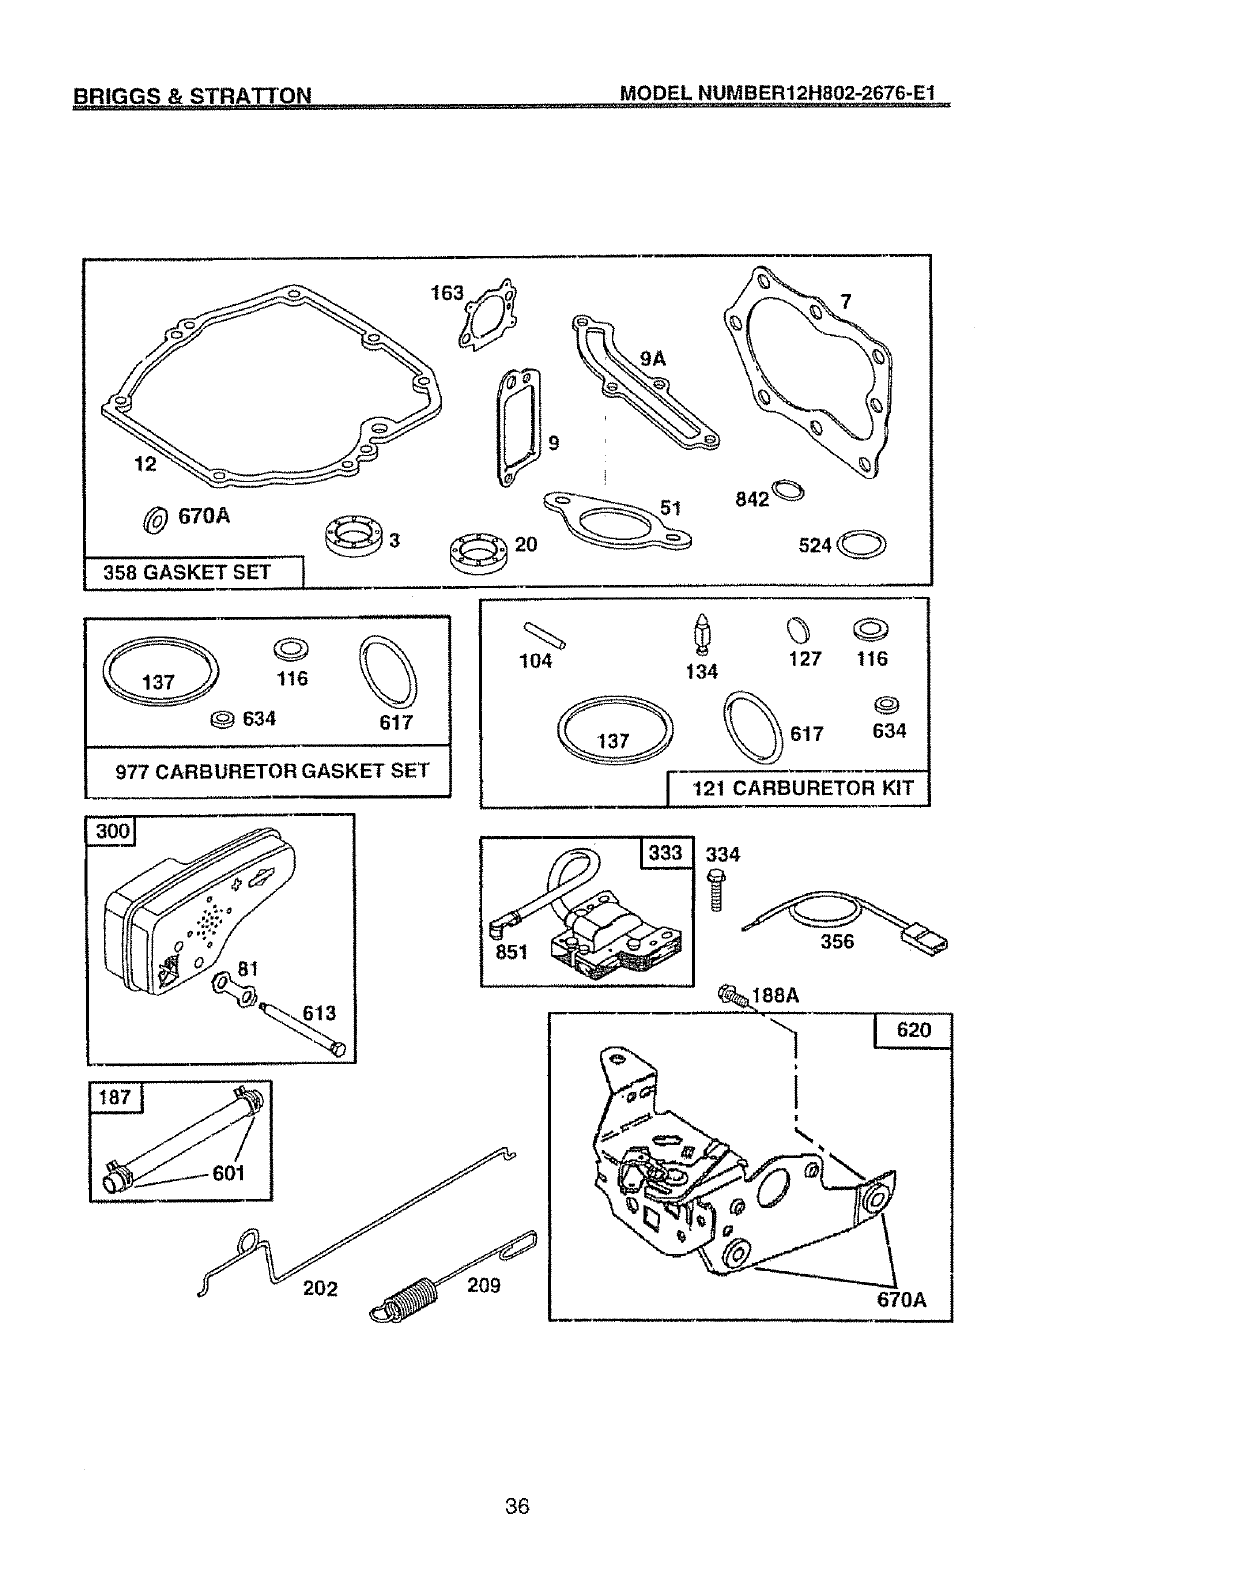
BRIGGS & STRATTON MODEL NUMBER12H802-2676-E1
_) 670A
358 GASKET SET 1
524 0
116
_) 634 617
977 CARBURETOR GASKET SET
202
104
r
127 116
134 °
617 634
121 CARBURETOR KIT
334
356
_188A
t
\
670A
36
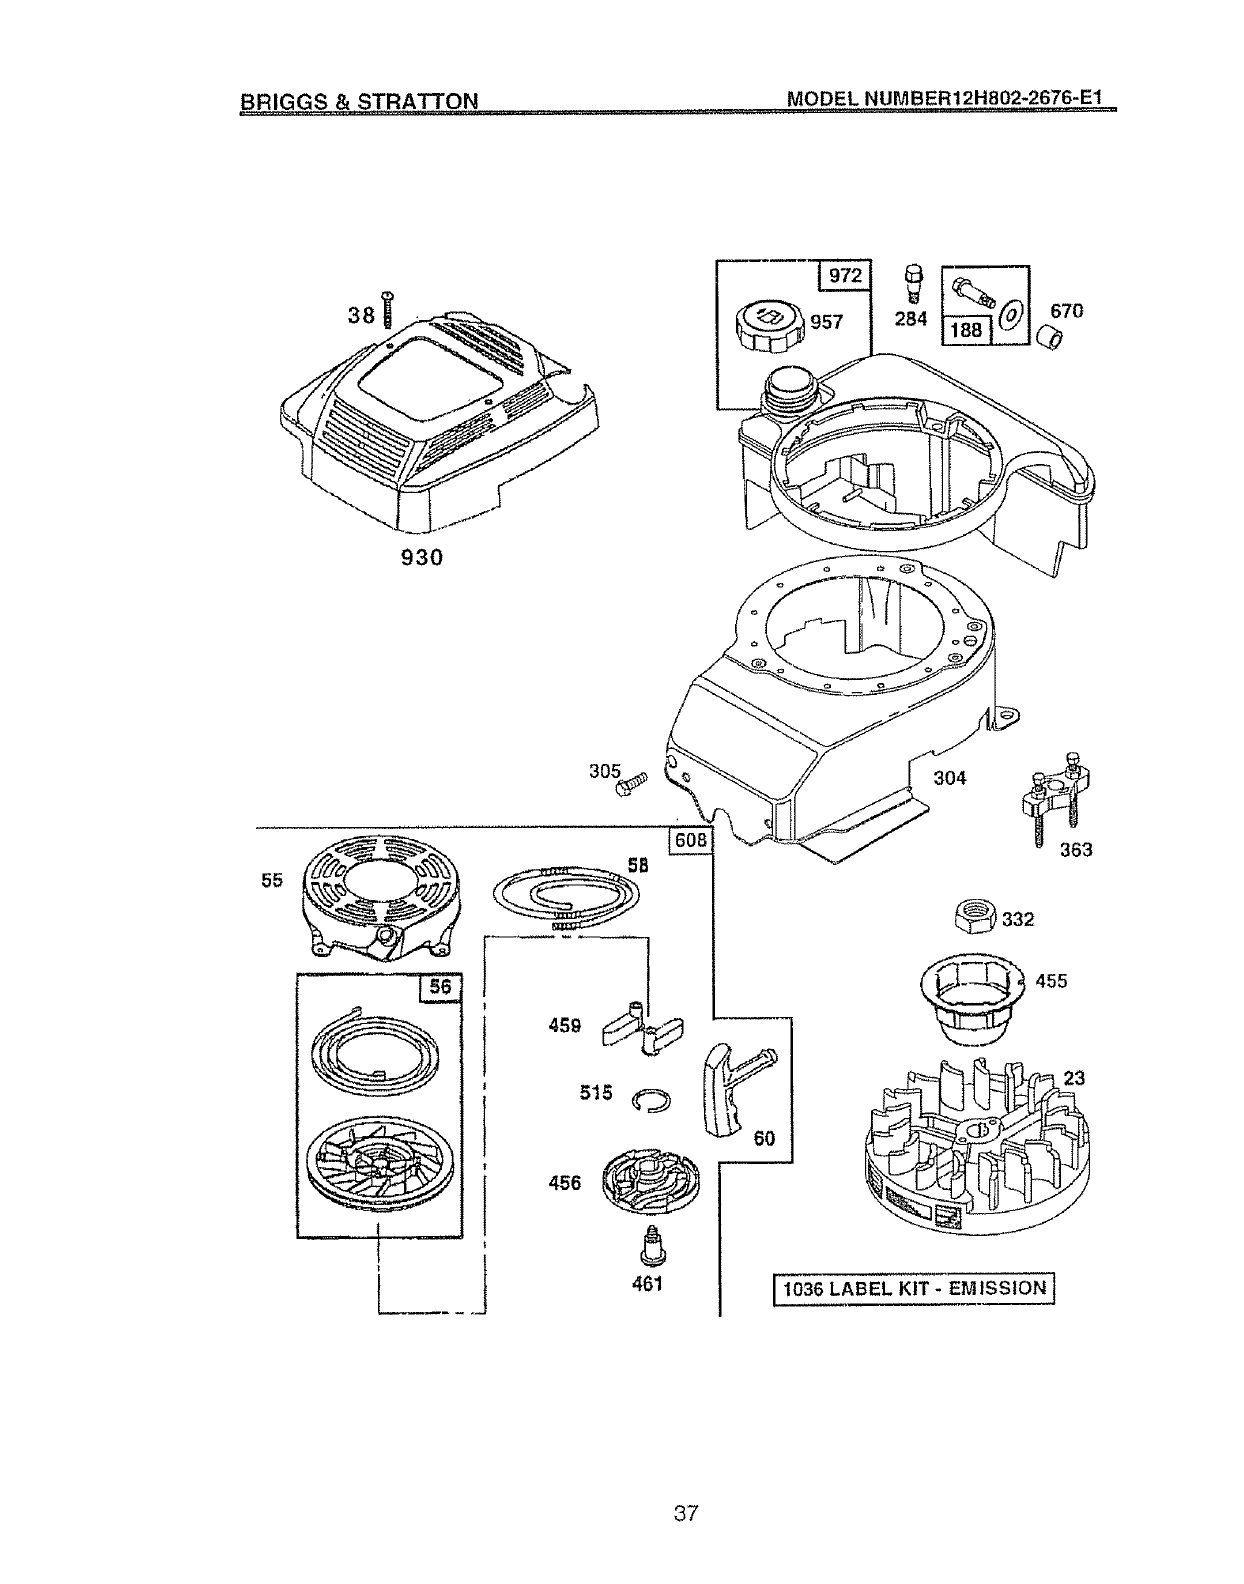
BRIGGS & STRATTON MODEL NUMBER12H802-2676-E1
ii rll i ii ..........
930
55
L
J
I
t
i456
461
332
455
1036 LABEL KIT - EMISSION]
37
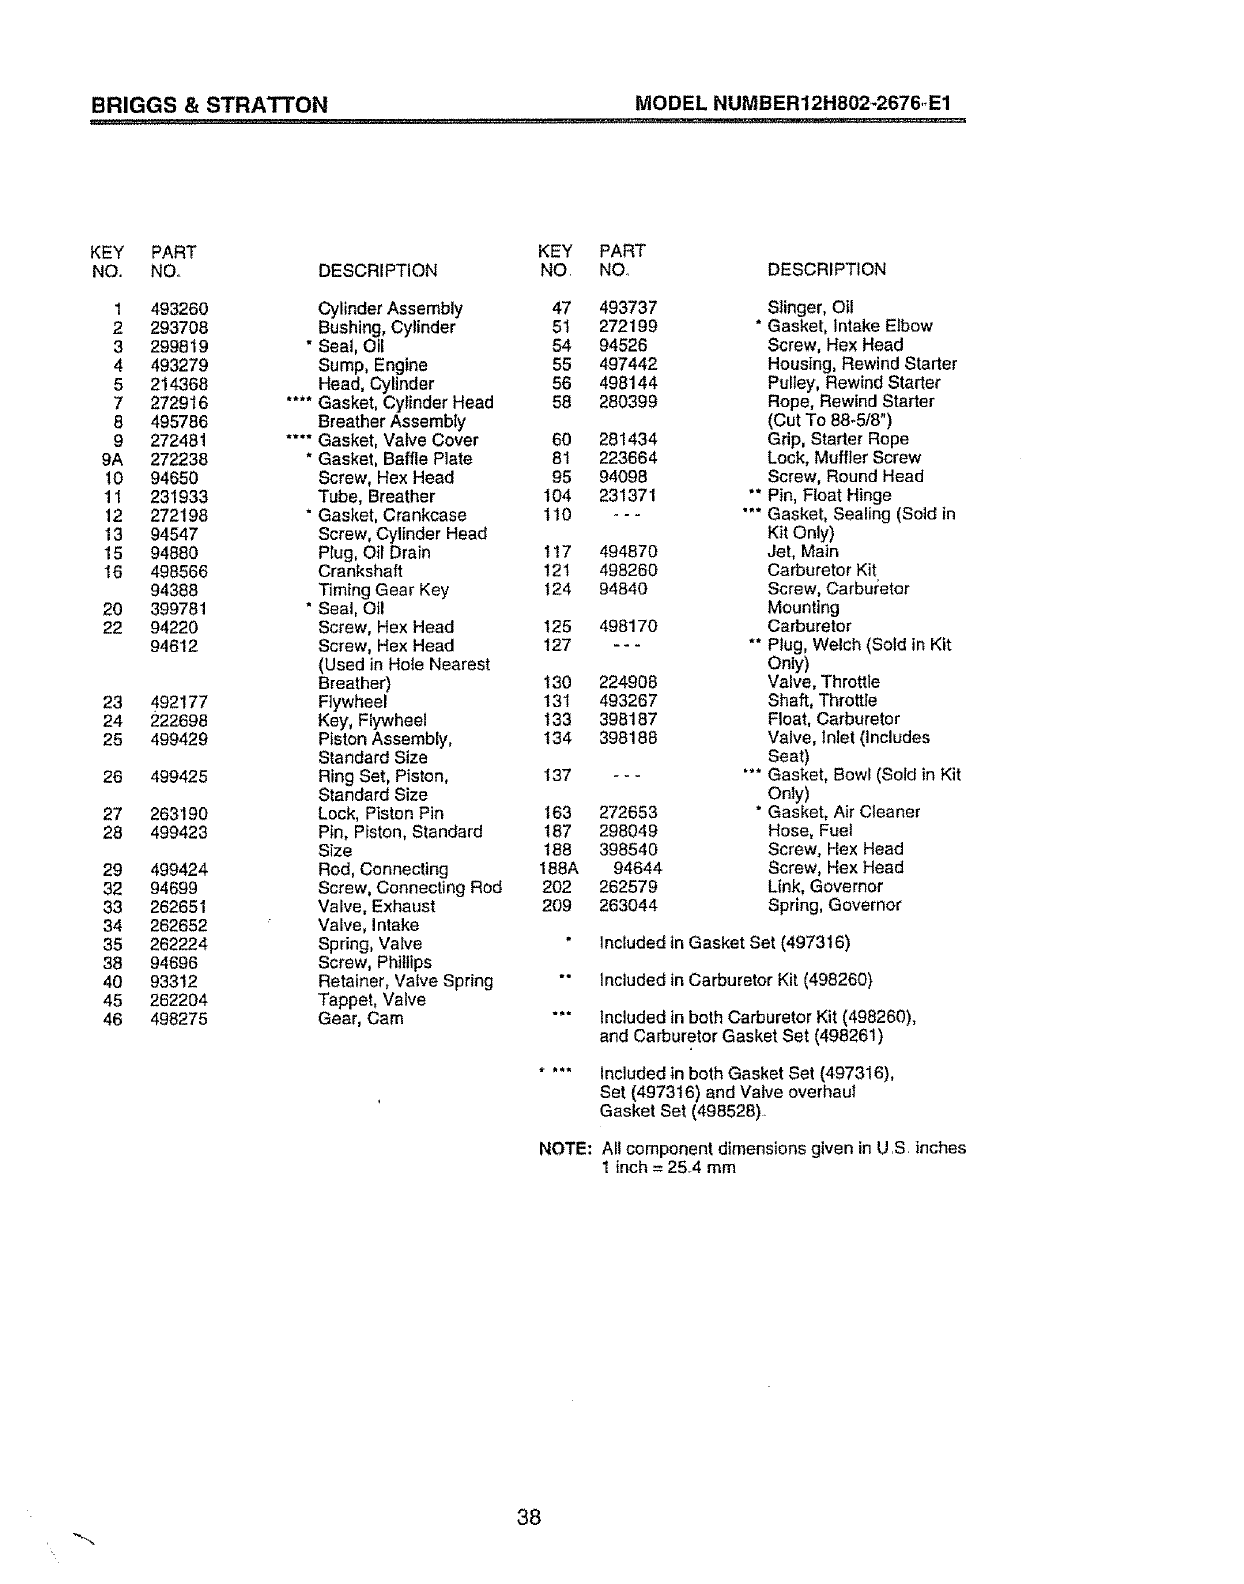
BRIGGS & STRATTON MODEL NUMBER12H802-2676,_E1
KEY PART
NO. NO.
1 493260
2 293708
3 299819
4 493279
5 214368
7272916
8 495786
9 272481
9A 272238
10 94650
11 231933
12 272198
13 94547
15 94880
16 498566
94388
20 399781
22 94220
94612
23 492177
24 222698
25 499429
26 499425
27 263190
28 499423
29 499424
32 94699
33 262651
34 262652
35 262224
38 94696
40 93312
45 262204
46 498275
DESCRIPTION KEY
NO.
PART
NOo DESCRIPTION
Cylinder Assembly 47 493737
Bushing, Cylinder 51 272199
" Seal, Oil 54 94526
Sump, Engine 55 497442
Head, Cylinder 56 498144
Gasket, Cylinder Head 58 280399
Breather Assembly
Gasket, Valve Cover 60 281434
Gasket, Baffle Plate 81 223664
Screw, Hex Head 95 94098
Tube, Breather 104 231371
= Gasket, Crankcase 110 - - -
Screw, Cylinder Head
Plug, Oit Drain t 17 494870
Crankshaft 121 498260
Timing Gear Key 124 94840
* Seal, Oil
Screw, Hex Head 125 498170
Screw, Hex Head 127 -- -
(Used in Ho{e Nearest
Breather) 130 224908
Fiywheel 131 493267
Key, Flywheel t33 398187
Piston Assembly, 134 398188
Standard Size
Ring Set, Piston, 137 - - -
Standard Size
Lock, Piston Pin t63 272653
Pin, Piston, Standard t87 298049
Size 188 398540
Rod, Connecting 188A 94644
Screw, Connecting Rod 202 262579
Valve, Exhaust 209 263044
Valve, Intake
Spring, Valve
Screw, Phillips
Retainer, Valve Spring ""
Tappet, Valve
Gear, Cam """
NOTE:
Slinger, Oil
*Gasket, Intake Elbow
Screw, Hex Head
Housing, Rewind Starter
Pulley, Rewind Starter
Rope, Rewind Starter
(Cut To 88-5/8")
Grip, Starter Rope
Lock, Muffler Screw
Screw, Round Head
"* Pin, Float Hinge
'"* Gasket, Sealing (Sold in
Kit Only)
Jet, Main
Carburetor Kit
Screw, Carbut:etor
Mounting
Carburetor
** Plug, Welch (Sold in Kit
Only)
Valve, Throttle
Shaft, Throttle
Float, Carburetor
Valve, Inlet (Includes
Seat)
"** Gasket, Bowl (Sold in Kit
Only)
" Gasket, Air Cleaner
Hose, Fuel
Screw, Hex Head
Screw, Hex Head
Link, Governor
Spring, Governor
Included in Gasket Set (497316)
included in Carburetor Kit (498260)
included in both Carburetor Kit (498260),
and Carburetor Gasket Set (498261)
Included in both Gasket Set (497316),
Set (497316) and Valve overhaul
Gasket Set (498528),
All component dimensions given in U,S. inches
1inch = 25,4 mm
38
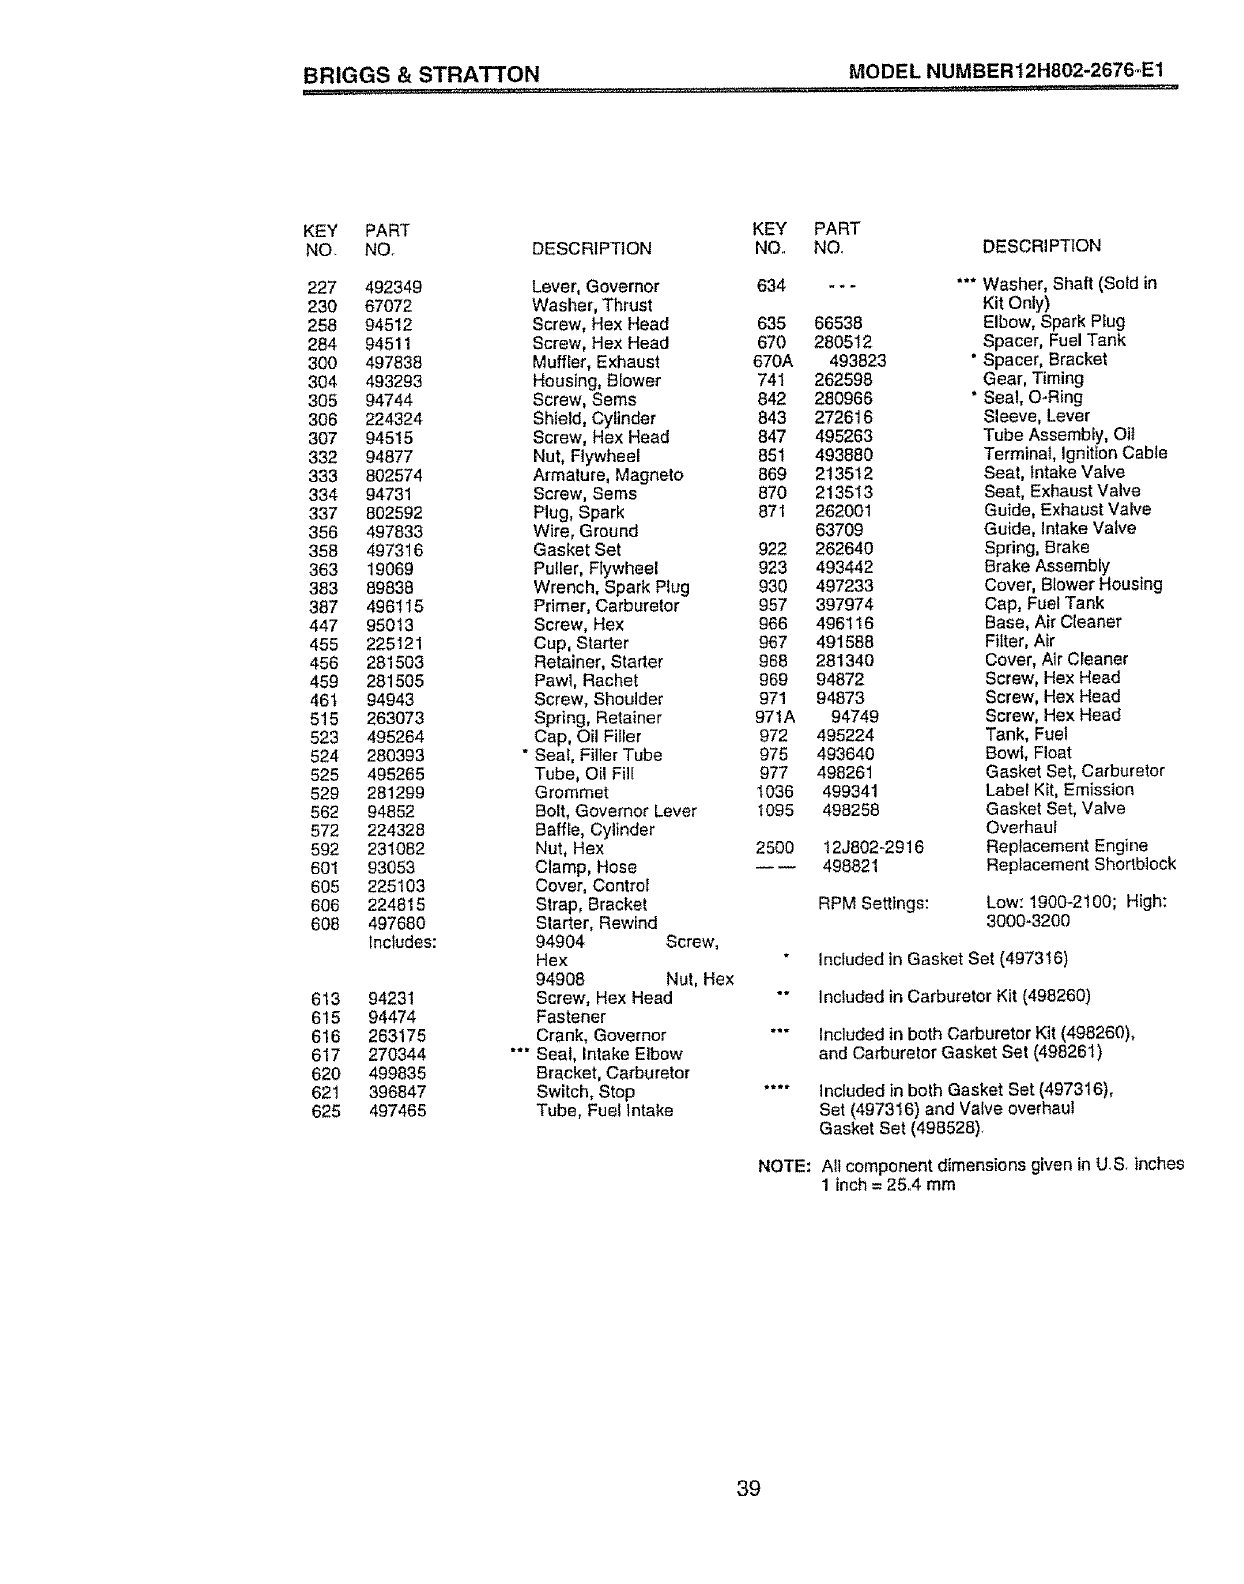
BRIGGS & STRATTON MODEL NUMBER12H802-2676_E1
KEY PART
NO. NO. DESCRIPTION
227 492349
230 67072
258 94512
284 94511
300 497838
304 493293
305 94744
306 224324
307 94515
332 94877
333 802574
334 94731
337 802592
356 497833
358 497316
363 19069
383 89838
387 496115
447 95013
455 225121
456 281503
459 281505
46t 94943
515 263073
523 495264
524 280393
525 495265
529 281299
562 94852
572 224328
592 231082
601 93053
605 225103
606 224815
608 497680
Includes:
613 94231
615 94474
616 263175
617 270344
620 499835
621 396847
625 497465
KEY PART
NO.. NO.
Lever, Governor 634 _- -
Washer, Thrust
Screw, Hex Head 635 66538
Screw, Hex Head 670 280512
Muffler, Exhaust 670A 493823
Housing, Blower 741 262598
Screw, Seres 842 280966
Shield, Cylinder 843 272616
Screw, Hex Head 847 495263
Nut, Flywheel 851 493880
Armature, Magneto 869 213512
Screw, Sems 870 213513
Plug, Spark 871 262001
Wire, Ground 63709
Gasket Set 922 262640
Puller, Flywheel 923 493442
Wrench, Spark Plug 930 497233
Primer, Carburetor 957 397974
Screw, Hex 966 496116
Cup, Starter 967 491588
Retainer, Starter 968 281340
Paw1, Rachet 969 94872
Screw, Shoulder 971 94873
Spring, Retainer 971A 94749
Cap, Oil FiIler 972 495224
• Seal, Filter Tube 975 493640
Tube, Oil Fill 977 498261
Grommet 1036 499341
Bolt, Governor Lever 1095 498258
Baffle, Cylinder
Nut, Hex 2500 12J802-2916
Clamp, Hose 498821
Cover, Control
Strap, Bracket RPM Settings:
Starter, Rewind
94904 Screw,
Hex
94908 Nut, Hex
Screw, Hex Head
Fastener
Crank, Governor
"*" Seal, Intake Elbow
Bracket, Carburetor
Switch, Stop
Tube, Fuel lntake
DESCRI PT|ON
Washer, Shaft (Sold in
Kit Only)
Elbow, Spark PIug
Spacer, Fuel Tank
Spacer, Bracket
Gear, Timing
Seal, O-Ring
Sleeve, Lever
Tube Assembly, Oil
Terminal, Ignltion Cable
Seat, intake Valve
Seat, Exhaust Valve
Guide, Exhaust Valve
Guide, Intake Valve
Spring, Brake
Brake Assembly
Cover, Blower Housing
Cap, Fuel Tank
Base, Air Cleaner
Filter, Air
Cover, Air Cleaner
Screw, Hex Head
Screw, Hex Head
Screw, Hex Head
Tank, Fuel
Bowl, Float
Gasket Set, Carburetor
Label Kit, Emission
Gasket Set, Valve
Overhaul
Replacement Engine
Replacement Shortbiock
Low: 1900-2100; High:
3000-3200
Included in Gasket Set (497316)
*" Included in Carburetor Kit (498260)
"'" Included in both Carburetor Kit (498260),
and Carburetor Gasket Set (498261)
.... Included in both Gasket Set (497316),
Set (497316) and Valve overhaul
Gasket Set (498528).
NOTE: All component dimensions given in U.S. inches
1 inch = 25.4 mm
39
For the repair or replacement parts you need
delivered directly to your home
Call 7 am - 7 pro, 7 days a week
1o800-386oPART
(1-800-366-7278)
Para ordenar piezas con entrega a
domicitio - 1-800-659-7084
For in-house major brand repair service
Call 24 hours a day, 7 days a week
1=800=4=REPAIR
(1-800-473-7274)
Para pedir servicio de reparaci6n a
domicilio - 1-800-676-5811
For the location of a Sears Parts and
Repair Center in your area
Call 24 hours a day, 7 days a week
1=800=488=1222
For information on purchasing a Sears
Maintenance Agreement or to inquire
about an existing Agreement
Call 9 am - 5 pm, Monday-Saturday
1°800°827=6655
When requesting service or ordering
parts, always provide the following
information:
oProduct Type o Part Number
oModel Number o Part Description
America's Repair Speciaflsts
163716 REV.2 02.03.98 VB Printed in UoS.Ao
