Craftsman 917388280 User Manual WALK BEHIND LAWN MOWER Manuals And Guides L0805388
CRAFTSMAN Walk Behind Lawnmower, Gas Manual L0805388 CRAFTSMAN Walk Behind Lawnmower, Gas Owner's Manual, CRAFTSMAN Walk Behind Lawnmower, Gas installation guides
User Manual: Craftsman 917388280 917388280 CRAFTSMAN WALK BEHIND LAWN MOWER - Manuals and Guides View the owners manual for your CRAFTSMAN WALK BEHIND LAWN MOWER #917388280. Home:Lawn & Garden Parts:Craftsman Parts:Craftsman WALK BEHIND LAWN MOWER Manual
Open the PDF directly: View PDF ![]() .
.
Page Count: 40

Owner's Manual
CRAFTSMAN°
6.0 HORSEPOWER
21" MULTI-CUT
ROTARY LAWN MOWER
Model No.
917.388280
oSafety
°Assembly
°Operation
° Maintenance
°Espa_ol
° Repair Parts
CAUTION:
Read and follow all
Safety Rules and Instructions
before operating this equipment
Sears, Roebuck and Co., Hoffman Estates, tL 60179
Visit our Craftsman website: www_sears.comlcraftsman
Warranty 2 Product Specifications ! 1
Safety Rules 2 Service and Adjustments 13
Assembly 4 Storage 14
Operation 6 Troubleshooting 15
Maintenance Schedule 10 Repair Parts 34
Maintenance 10 Parts Ordering Back Cover
LIMITED TWO YEAR WARRANTY ON CRAFTSMAN POWER MOWER
For two years from date of purchase, when this Craftsman Lawn Mower is maintained,
lubricated, and tuned up according to the operating and maintenance instructions in
the owner's manual, Sears wilt repair free of charge any defect in material or workman-
ship.
If this Craftsman Lawn Mower is used for commercial or rental purposes, this warranty
applies for only 90 days from the date of purchase°
This Warranty does not cover:
• Expendable items which become worn during normal use, such as rotary mower
blades, blade adapters, belts, air cleaners and spark plug.
• Repairs necessary because of operator abuse or negligence, including bent
crankshafts and the failure to maintain the equipment according to the instructions
contained in the owner's manual.
Warranty service is available by returning the Craftsman power mower to the nearest
Sears Service Center/Department in the United States. This warranty applies only
while this product is in use in the United States°
This Warranty gives you specific legal rights, and you may also have other rights which
vary from state to state°
SEARS, ROEBUCKAND CO., D/817 WA, HOFFMAN ESTATES, ILLINOIS 60179
Safety standards require operator
presence control to minimize the risk of
injury. Your unit is equipped with cuch
controls, do not attempt to defeat the
function of the operator presence controls
under any circumstances.
TRAINING:
•Read this operator's manual carefully_
Become familiar with the controls and
know how to operate your mower
properly. Learn how to quickly stop
mower.
•Do not allow children to use your
mower. Never allow adults to use
mower without proper instructions.
•Keep the area of operation clear of all
persons, especially small children and
pets.
•Use mower only as the manufacturer
intended and as described in this
manual.
• Do not operate mower if it has been
dropped or damaged in any manner.
Always have damage repaired before
using your mower.
• Do not use accessory attachments that
are not recommended by the manufac-
turer. Use of such attachments may be
hazardous.
°The blade turns when the engine is
running.
PREPARATION:
• Always thoroughly check the area to be
mowed and clear it of att stones, sticks,
wires, bones, and other foreign objects.
These objects will be thrown by the
blade and can cause severe injury.
• Always wear safety glasses or eye
shields when starting and while using
your mower_
Dress properly. Do not operate mower
when barefoot or wearing open
2
sandals. Wearonly solidshoeswith
goodtractionwhen mowing.
• Checkfuel tank beforestartingengine.
Do notfill gastank indoors,when the
engineis runningor when the engineis
hot Allow the engineto cool for several
minutesbeforefillingthe gastank.
Cleanoff any spilledgasolinebefore
startingthe engine_
• Always makewheelheight adjustments
beforestartingyour mower. Never
attemptto dothis whilethe engineis
runningo
• Mowonly in daylightor good artificial
light°
OPERATION:
• Keep your eyes and mind on your
mower and the area being cut, Do not
let other interests distract you.
• Do not mow wet or slippery grass,
Never run while operating your mower.
Always be sure of your footing - keep a
firm hold on the handles and walk.
•Do not put hands or feet near or under
rotating parts, Keep clear of the
discharge opening at all times.
• Always stop the engine whenever you
leave or are not using your mower, or
before crossing driveways, walks,
roads, and any gravel-covered areas°
• Never direct discharge of material
toward bystanders nor allow anyone
near the mower while you are operating
it.
° Before cleaning, inspecting, or repair-
ing your mower, stop the engine and
make absolutely sure the blade and all
moving parts have stopped, Then
disconnect the spark plug wire and
keep it away from the spark plug to
prevent accidental starting.
•Do not continue to run your mower if
you hit a foreign object. Follow the
procedure outlined above, then repair
any damage before restarting and
operating your mower.
•Do not change the governor settings or
overspeed the engine. Engine damage
or personal injury may result.
• Do not operate your mower if it vibrates
abnormally. Excessive vibration is an
indication of damage; stop the engine,
safely check for the cause of vibration
and repair as required.
• Do not run the engine indoors. Exhaust
fumes are dangerous,
3
•Never cut grass by pulling the mower
towards you. Mow across the face of
slopes, never up and down or you
might lose your footing. Do not mow
excessively steep slopes. Use caution
when operating the mower on uneven
terrain or when changing directions -
maintain good footing.
•Never operate your mower without
proper guards, plates, grass catcher or
other safety devices in place,
MAINTENANCE AND STORAGE:
• Check the blade and the engine
mounting bolts often to be sure they are
tightened propedy_
•Check all bolts, nuts and screws at
frequent intervals for proper tightness to
be sure mower is in safe working
condition,
•Keep all safety devices in place and
working_
•To reduce fire hazard, keep the engine
free of grass, leaves or excessive
grease and oi!.
• Check grass catcher often for deteriora-
tion and wear and replace worn bags.
Use only replacement bags that are
recommended by and comply with
specifications of the manufacturer of
your mower.
• Always keep a sharp blade on your
mower.
• Allow engine to cool before storing in
any enclosure.
• Never store mower with fuel in the tank
inside a building where fumes may
reach an open flame or an ignition
source such as a hot water heater,
space heater, clothes dryer, etc.
_Look for this symbol to point out
important safety precautions, it means
CAUTION!!I BECOMEALERT!I! YOUR
SAFETY 1SiNVOLVED.
_,CAUTION: Always disconnect spark
plug wire and place wire where it cannot
contact spark plug in order to prevent
accidental starting when setting up,
transporting, adjusting or making repairs.
_WARNING: The engine exhaust from
this product contains chemicals known to
the State of California to cause cancer,
birth defects, or other reproductive harm°
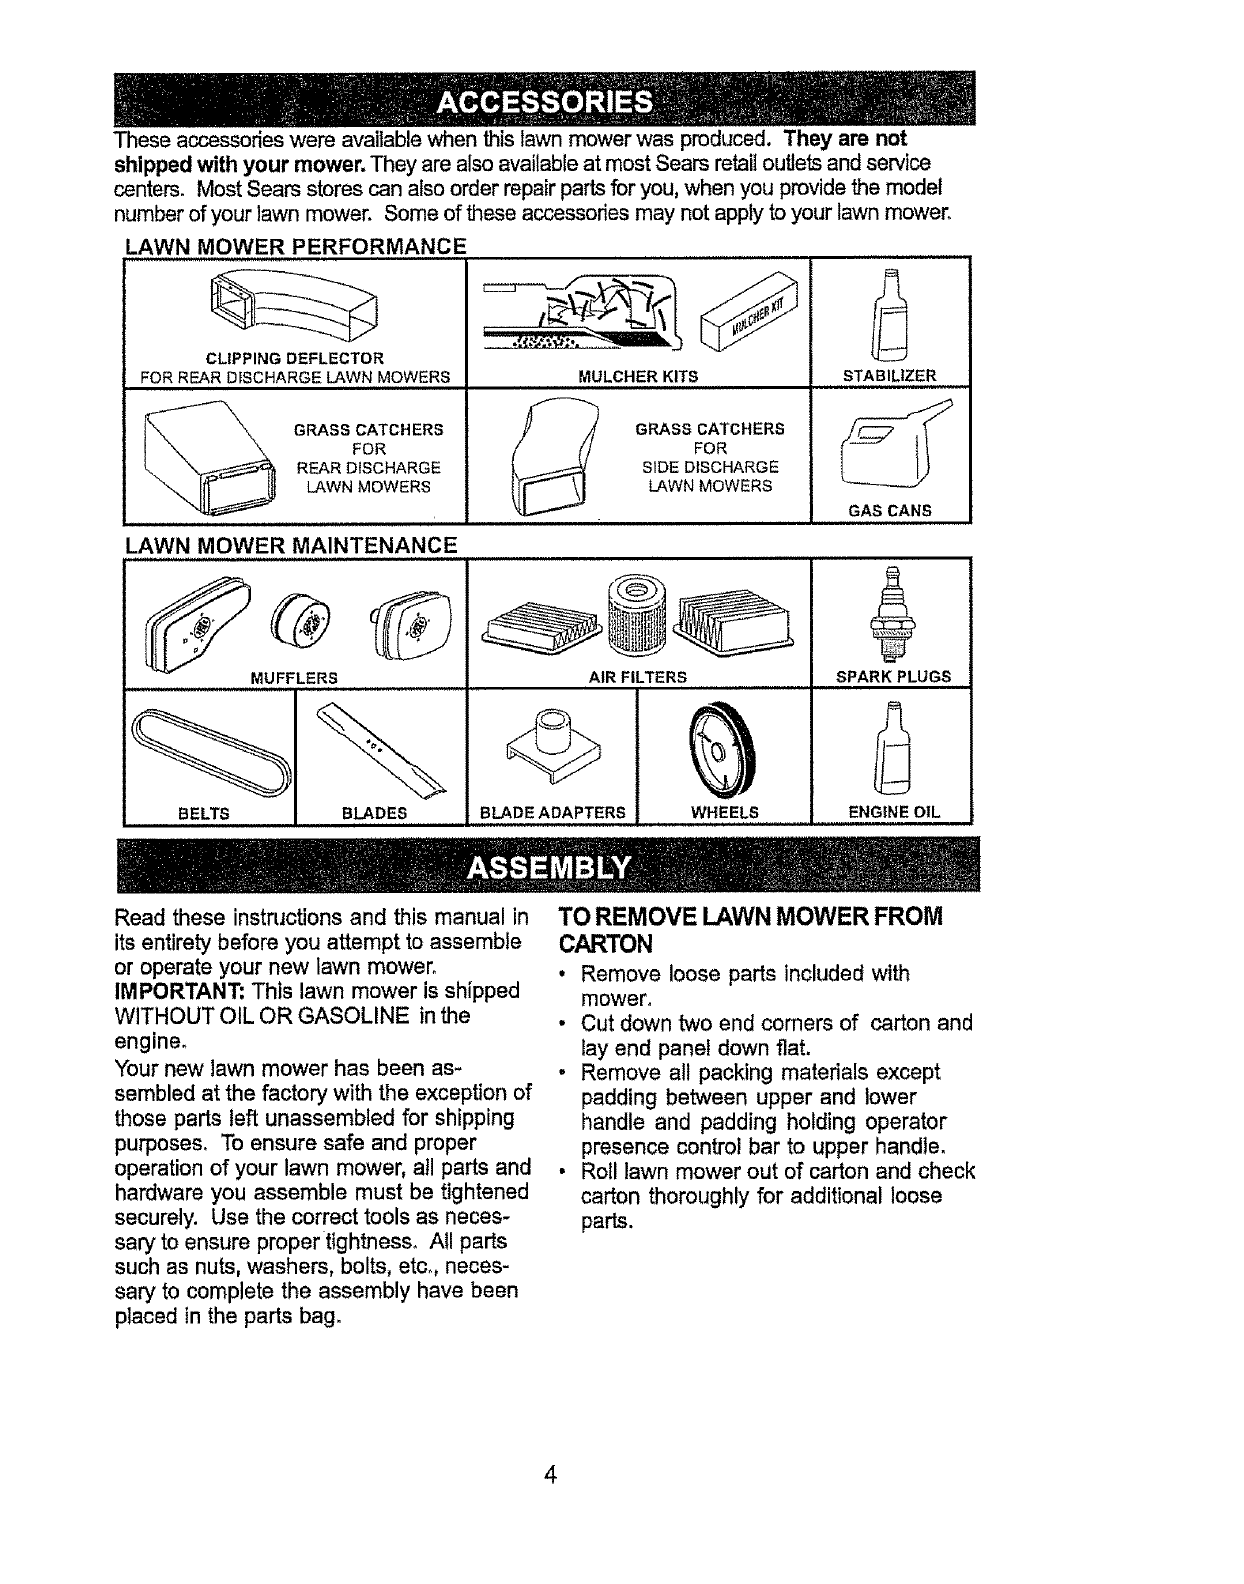
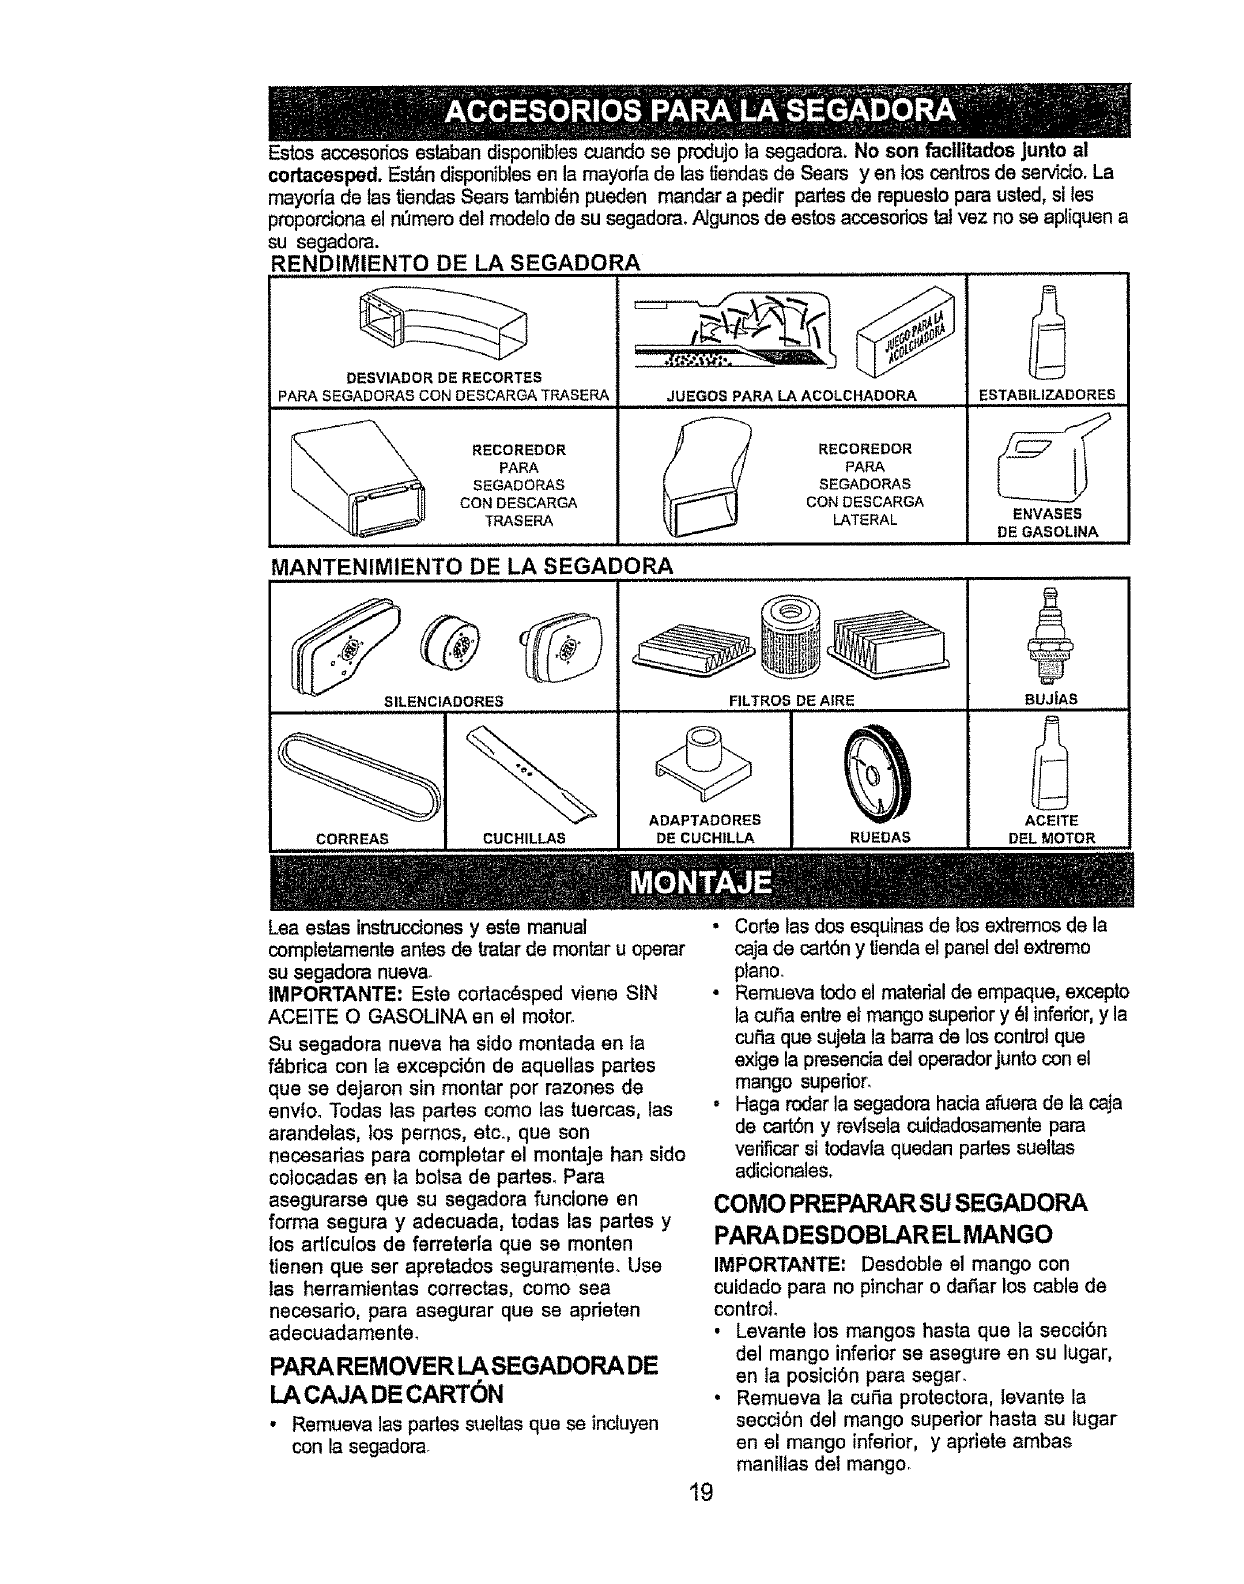
These accessories were available when this lawn mower was produced. They are not
shipped with your mower. They are also available at most Sears retail outlets and service
centers. Most Sears stores can also order repair parts for you, when you provide the model
number of your lawn mower. Some of these accessories may not apply to your lawn mower.
CLIPPING DEFLECTOR
FOR REAR D;SCHARGE LAWN MOWERS
LAWN MOWER PERFORMANCE A
2
STABILIZER
GRASS CATCHERS
FOR
REAR DISCHARGE
LAWN MOWERS
illll, lll,l,l,i ii,i ,,, ,i,,
LAWN MOWER MAINTENANCE
MULCHER KITS
GRAss CATCHERS
FOR
SIDE DISCHARGE
LAWN MOWERS
GAS CANS
MUFFLERS
BELTS
............... ,i i
BLADES
AIR FILTERS
BLADE ADAPTERS WHEELS
SPARK PLUGS
ENGINE OIL
Read these instructions and this manual in
its entirety before you attempt to assemble
or operate your new lawn mower°
IMPORTANT: This lawn mower is shipped
WITHOUT OIL OR GASOLINE in the
engine°
Your new lawn mower has been as-
sembled at the factory with the exception of
those parts left unassembled for shipping
purposes. To ensure safe and proper
operation of your lawn mower, atl parts and
hardware you assemble must be tightened
securely. Use the correct tools as neces-
sary to ensure proper tightness. All parts
such as nuts, washers, bolts, etc. neces-
sary to complete the assembly have been
placed in the parts bag.
TO REMOVE LAWN MOWER FROM
CARTON
• Remove loose parts included with
mower,
• Cut down two end comers of carton and
lay end panel down flat.
•Remove all packing materials except
padding between upper and lower
handle and padding holding operator
presence control bar to upper handle.
• Roll lawn mower out of carton and check
carton thoroughly for additional loose
parts.
4
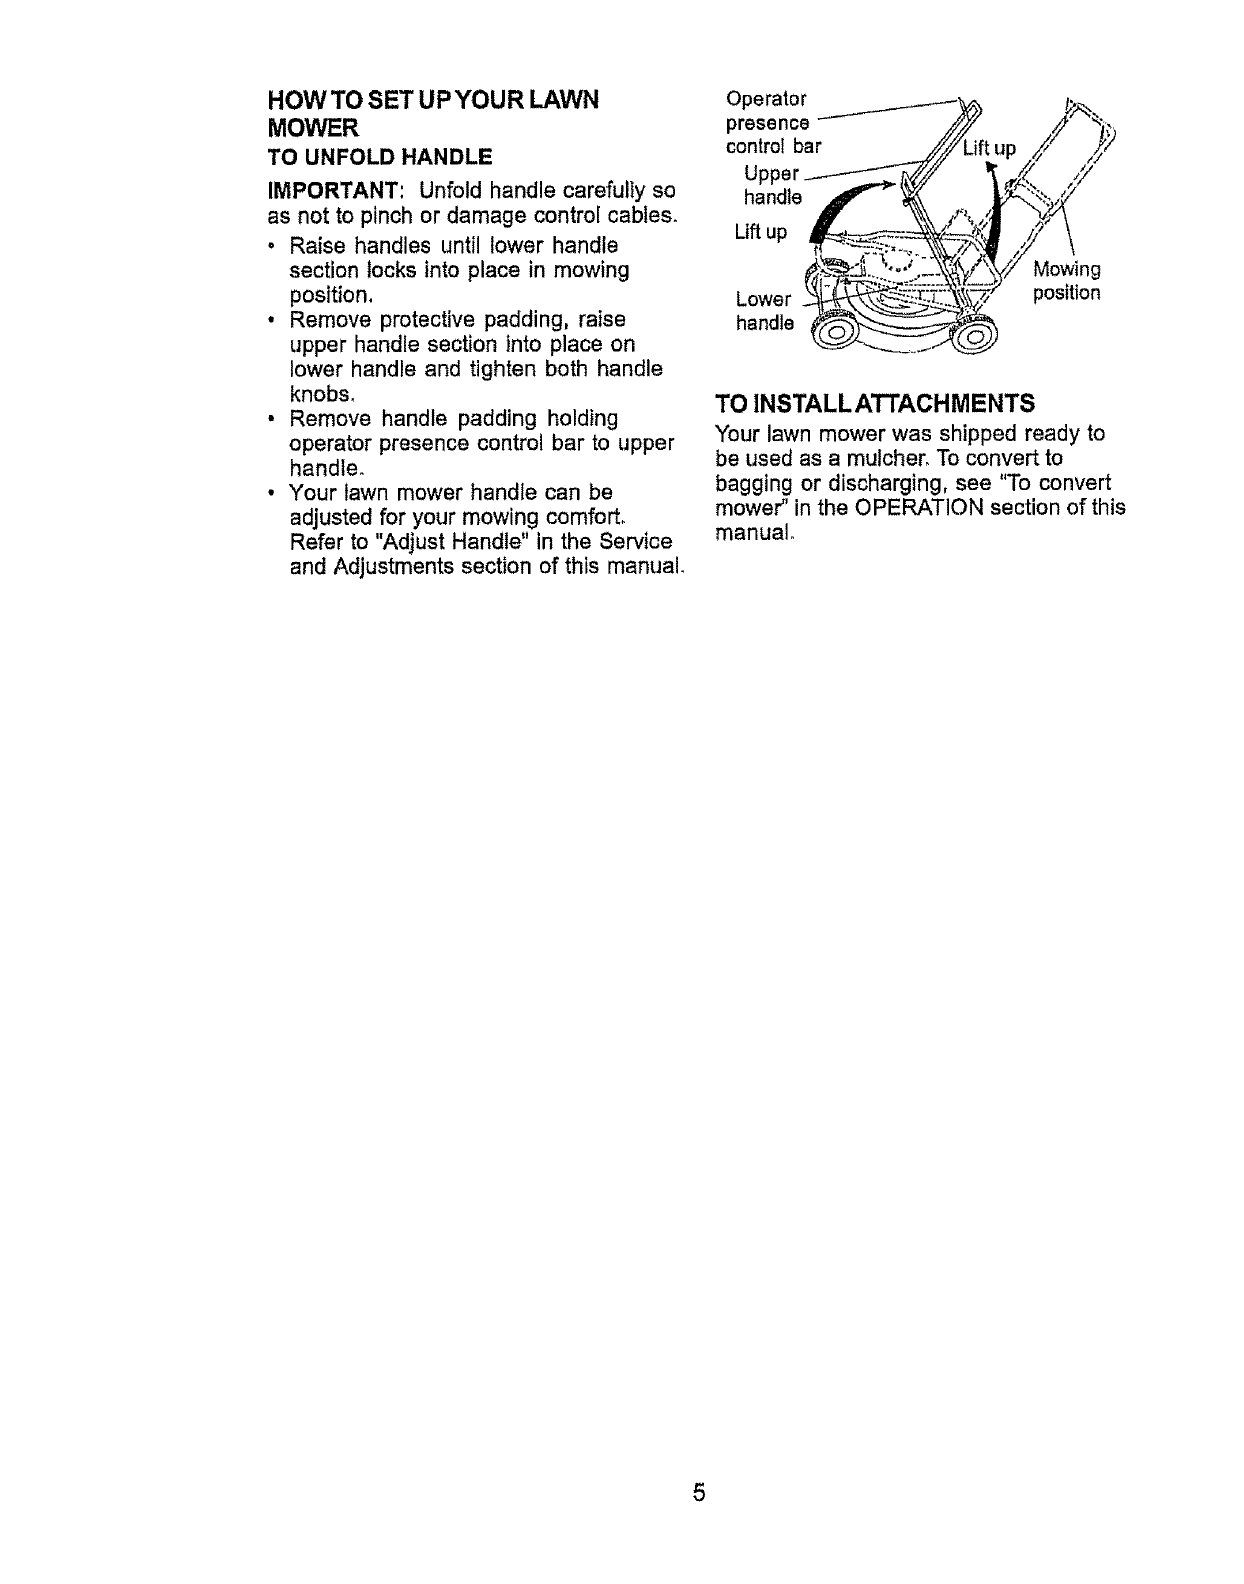
HOW TO SET U PYOU R LAWN
MOWER
TO UNFOLD HANDLE
IMPORTANT: Unfold handle carefully so
as not to pinch or damage control cables.
• Raise handles until lower handle
section locks into place in mowing
position,
•Remove protective padding, raise
upper handle section into place on
lower handle and tighten both handle
knobs.
• Remove handle padding holding
operator presence control bar to upper
handle°
• Your lawn mower handle can be
adjusted for your mowing comfort
Refer to "Adjust Handle" in the Service
and Adjustments section of this manual
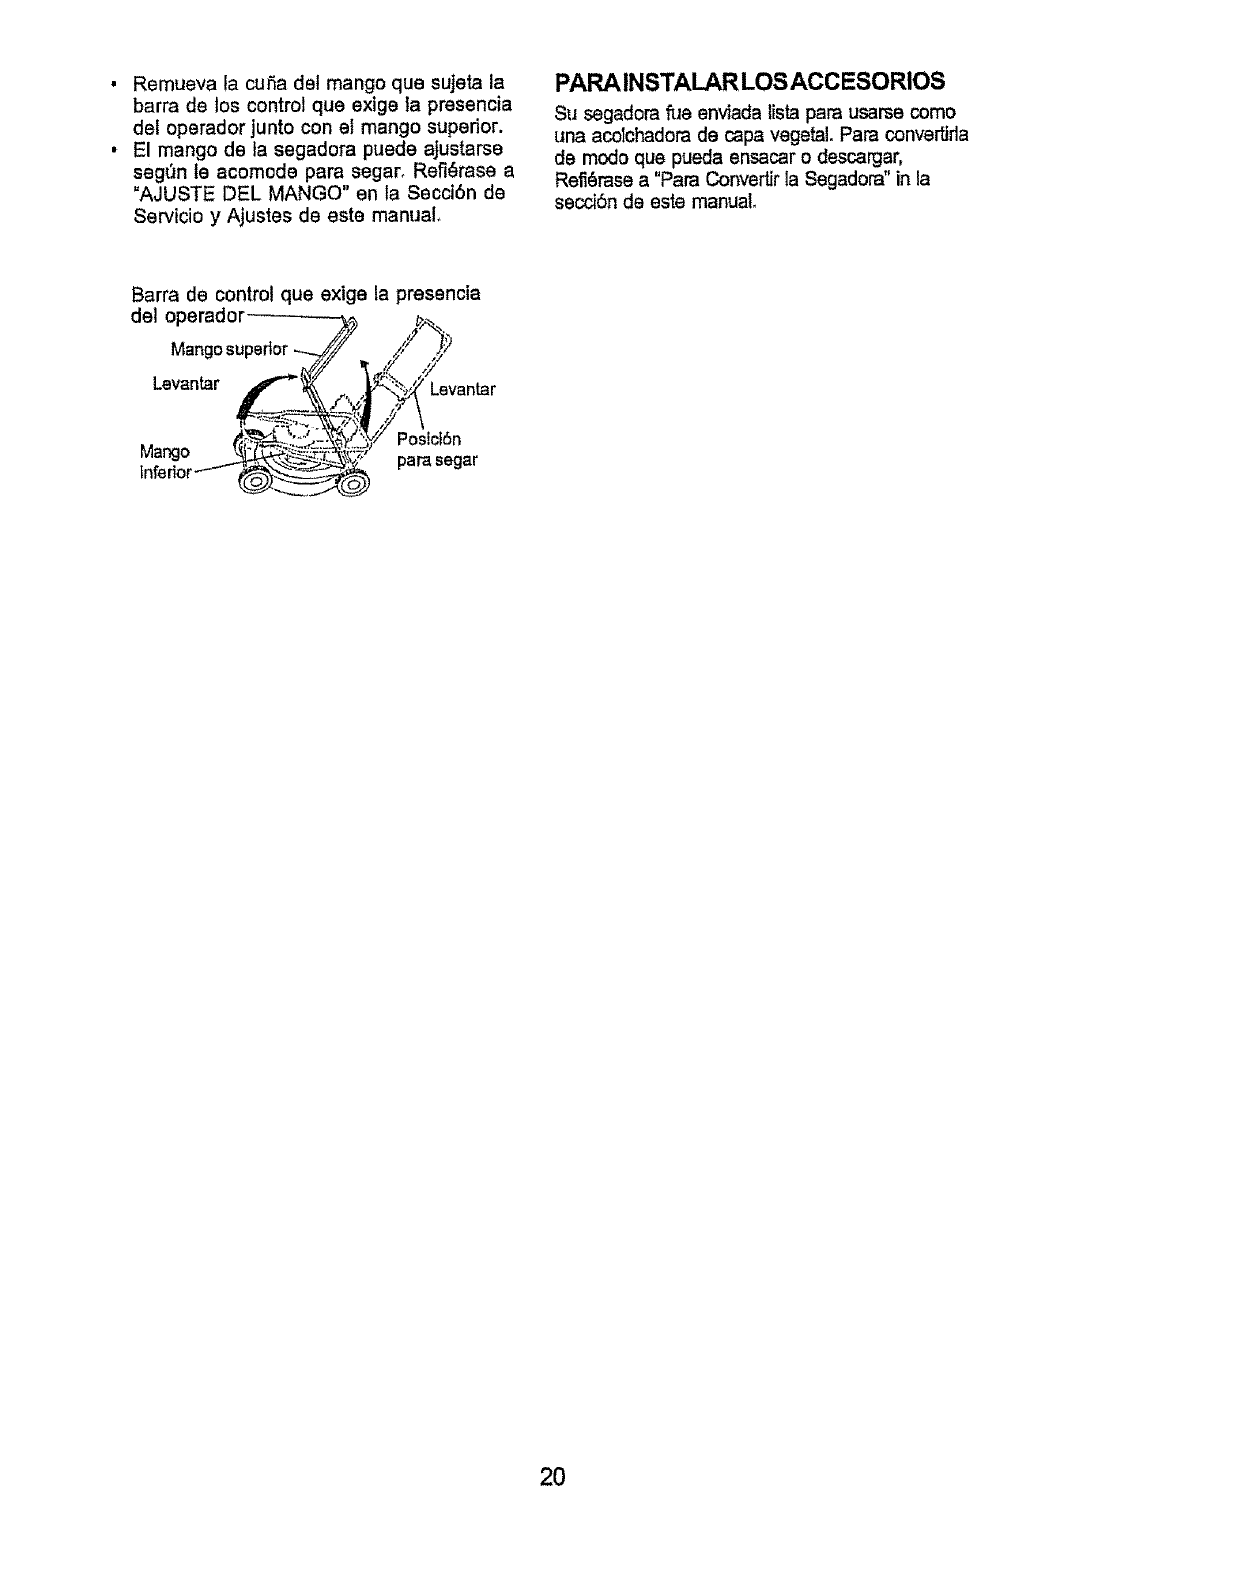
Operator
presence
control bar
handle
Lift up
Lower
handle
Mowing
position
TO INSTALL ATTACHMENTS
Your lawn mower was shipped ready to
be used as amufcher, To convert to
bagging or discharging, see "To convert
mower" in the OPERATION section of this
manual,
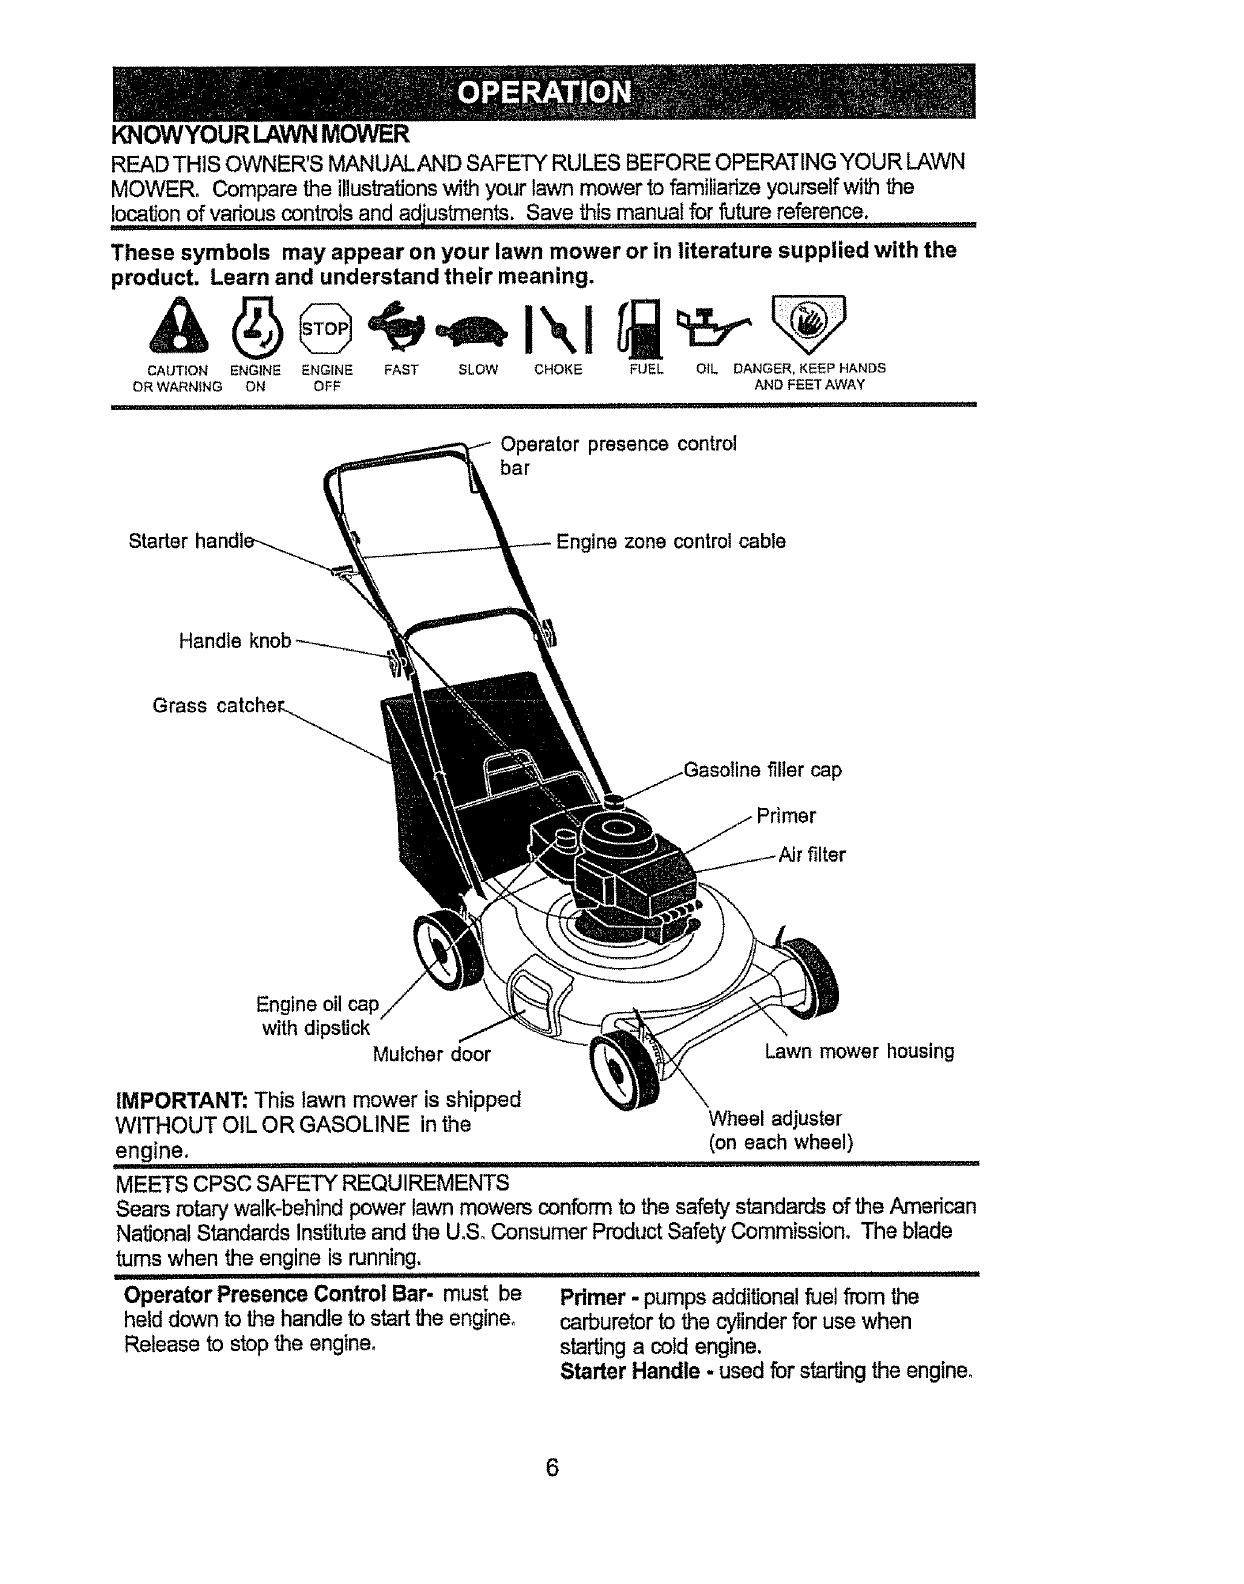
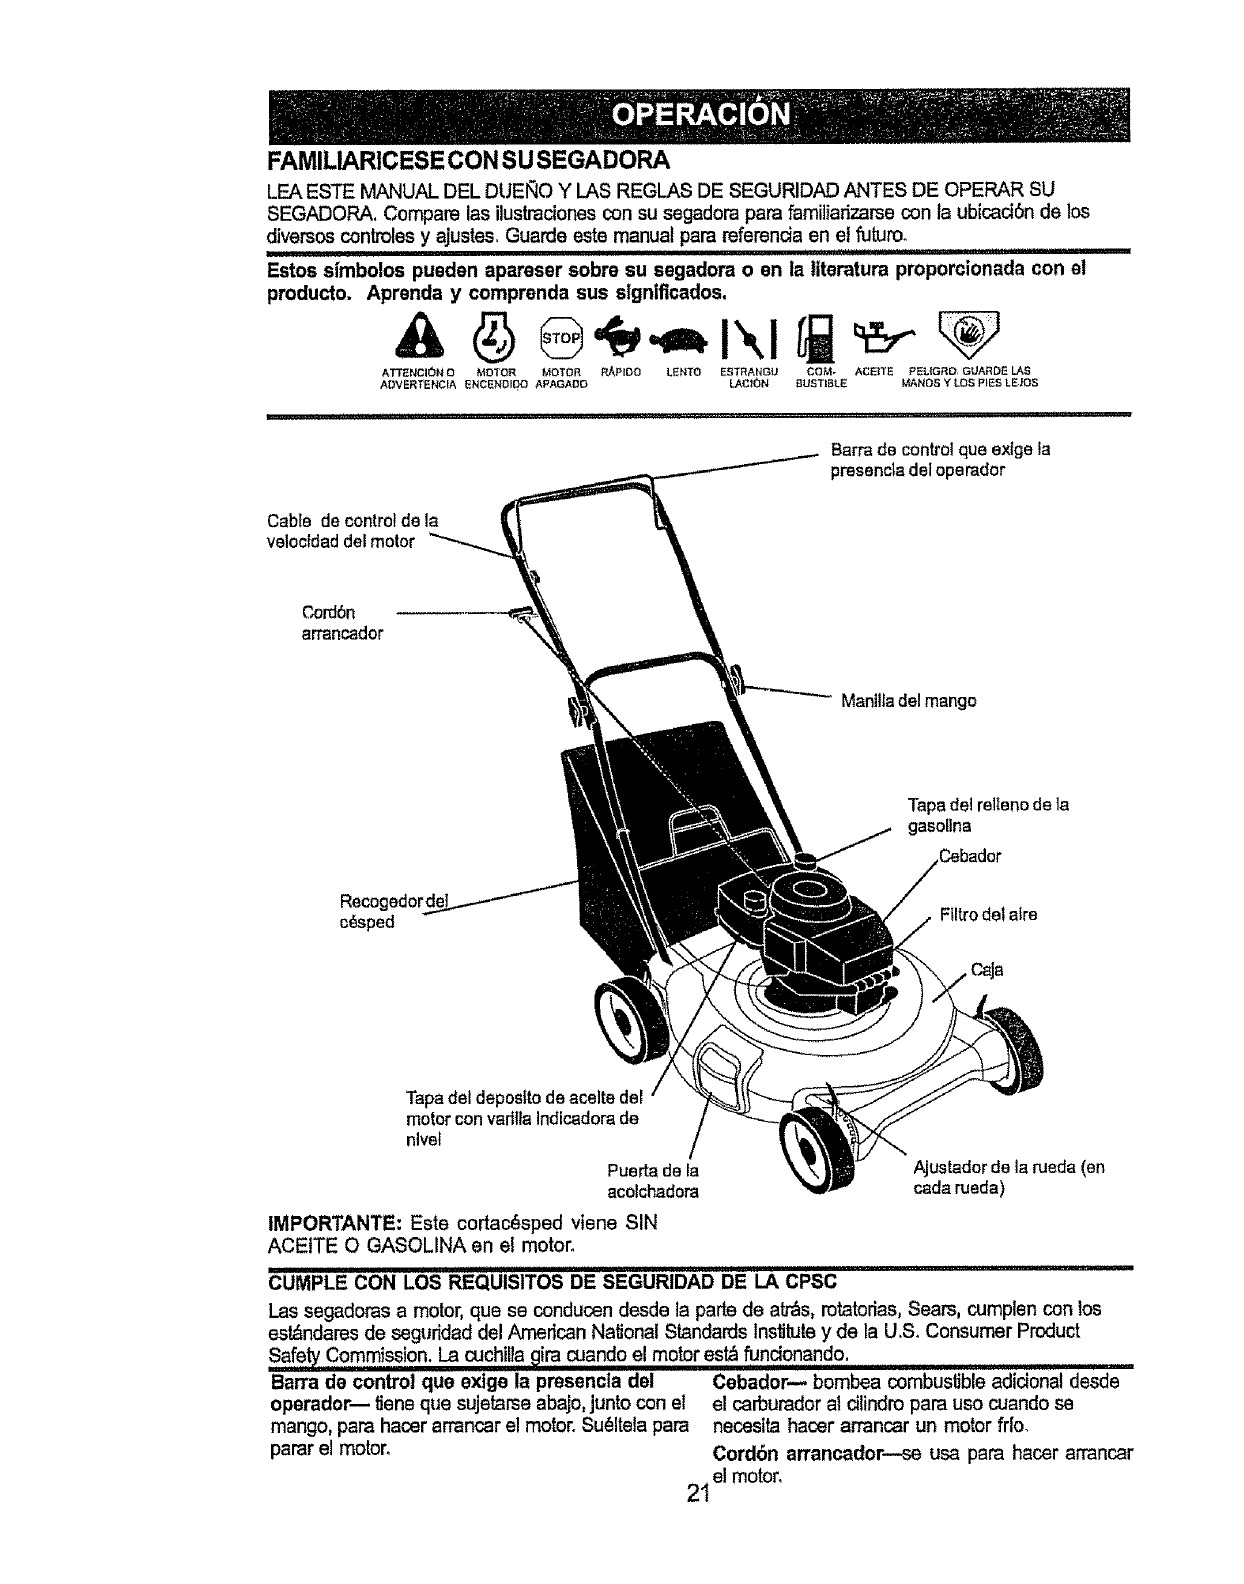
KNOWYOUR LAWN MOWER
READ THIS OWNER'S MANUALAND SAFETY RULES BEFORE OPERATING YOUR LAWN
MOWER, Compare the illustrationswith your lawn mower tofamiliarize yoursetf with the
location of various controls and adjustments, Save _is manua[ _[..future reference.
These symbols may appear on your lawn mower or in literature supplied with the
product. Learn and understand their meaning.
CAUTION ENGINE ENGINE FAST SLOW CHOKE FUEL OIL DANGER, KEEP HANDS
OR WARNING ON OFF AND FEET AWAY
i,11 iil,llHrll I IIHI,I ,qlllqlllql
Operator presence control
bar
Starter tne zone control cable
Handle
Grass
filler cap
filter
Engine oil ca
with dipsUck
Mulcher door Lawn mower housing
IMPORTANT: This lawn mower is shipped
WITHOUT OtL OR GASOLINE in the Wheel adjuster
(on each wheel)
engine. .................................................
MEETS CPSC SAFETY REQUIREMENTS
Sears rotary walk-behind power lawn mowers conform to the safety standards of the American
National Standards InsUtute and the U.S. Consumer Product Safety Commission. The blade
tums when the engine is running,
Operator Presence Control Bar- must be
held down to the handle to start the engine.
Release to stop the engine°
Palmer -pumps additional fuel from the
carburetor to the cylinder for use when
starting a cotd engine.
Starter Handle -used for starting the engine°
6
The operation of any lawn mower
can result in foreign objects thrown
nto the eyes, which can result in
severe eye damage. Always wear safety
glasses or eye shields while operating your
lawn mower or performing any adjustments
or repairs. We recommend a wide vision
safety mask over spectacles or standard
safety glasses.
HOWTO USEYOUR LAWN MOWER
ENGINE SPEED CONTROL
The engine speed was set at the factory for
optimum performance. Speed is not adjust-
able.
ENGINE ZONE CONTROL
_bCAUTION: Federal regulations
require an engine control to be installed
on this lawn mower in order to minimize
the risk of blade contact injury. Do not
under any circumstances attempt to
defeat the function of the operator control.
The blade turns when the engine is
running.
• Your lawn mower is equipped with an
operator presence control bar which
requires the operator to be positioned
behind the lawn mower handle to start and
operate the lawn mower.
TO ADJUST CUTTING HEIGHT
• Raise wheels for low cut and lower wheels
for hlgh cut,
• Adjust cutting height to suit your require-
ments, Medium position is best for most
lawns,
• To change cutting height, squeeze adjuster
lever toward wheel° Move wheel up or
down to suit your requirements. Be sure all
wheels are in ',he same setting.
NOTE: Adjuster is properly positioned when
plate tab inserts into hole in lever, Also, 9-
position adjusters (if so equipped) allow lever
to be positioned between the plate tabs.
Lower Wheels for High Cut
Plate Tab
Raise Wheels for Low Cut
Lever
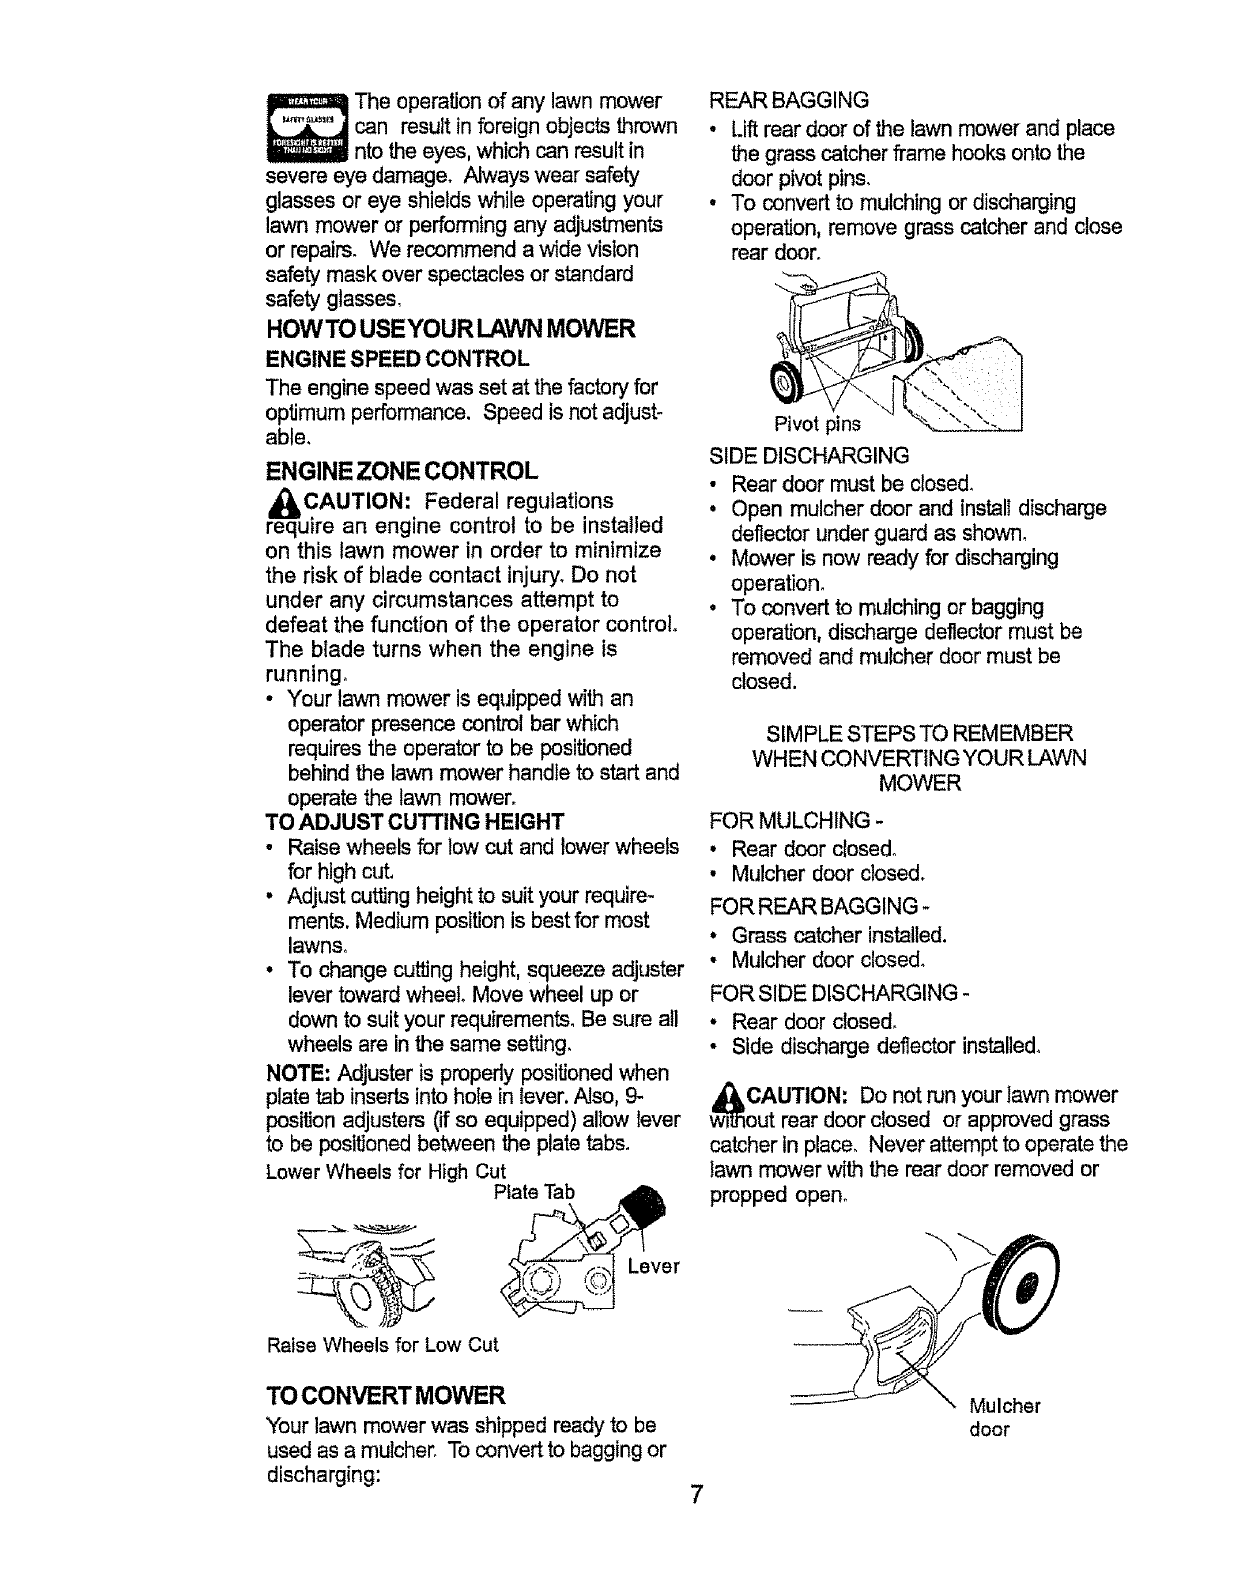
TO CONVERT MOVER
Your lawn mower was shippedreadyto be
used as a mulcher, To convert to bagging or
discharging:
REAR BAGGING
, Lift rear door of the lawn mower and place
the grass catcher frame hooks onto the
door pivot pins.
•To convert to mulching or discharging
operation, remove grass catcher and close
rear door.
Pivot pins
SIDE DISCHARGING
•Rear door must be closed.
oOpen mulcher door and install discharge
deflector under guard as shown_
°Mower is now ready for discharging
operation_
• To convert to mulching or bagging
operation, discharge deflector must be
removed and mulcher door must be
closed.
SIMPLE STEPS TO REMEMBER
WHEN CONVERTING YOUR LAWN
MOWER
FOR MULCHING -
•Rear door closed°
•Mulcher door closed.
FOR REAR BAGGING -
•Grass catcher installed.
• Mulcher door closed.
FOR SIDE DISCHARGING -
• Rear door dosed.
•Side discharge deflector installed.
wi_CAUTION: Do not run your lawn mower
out rear door closed or approved grass
catcher inplace. Never attempt to operatethe
lawn mower with the rear door removed or
propped open°
Mulcher
door
7
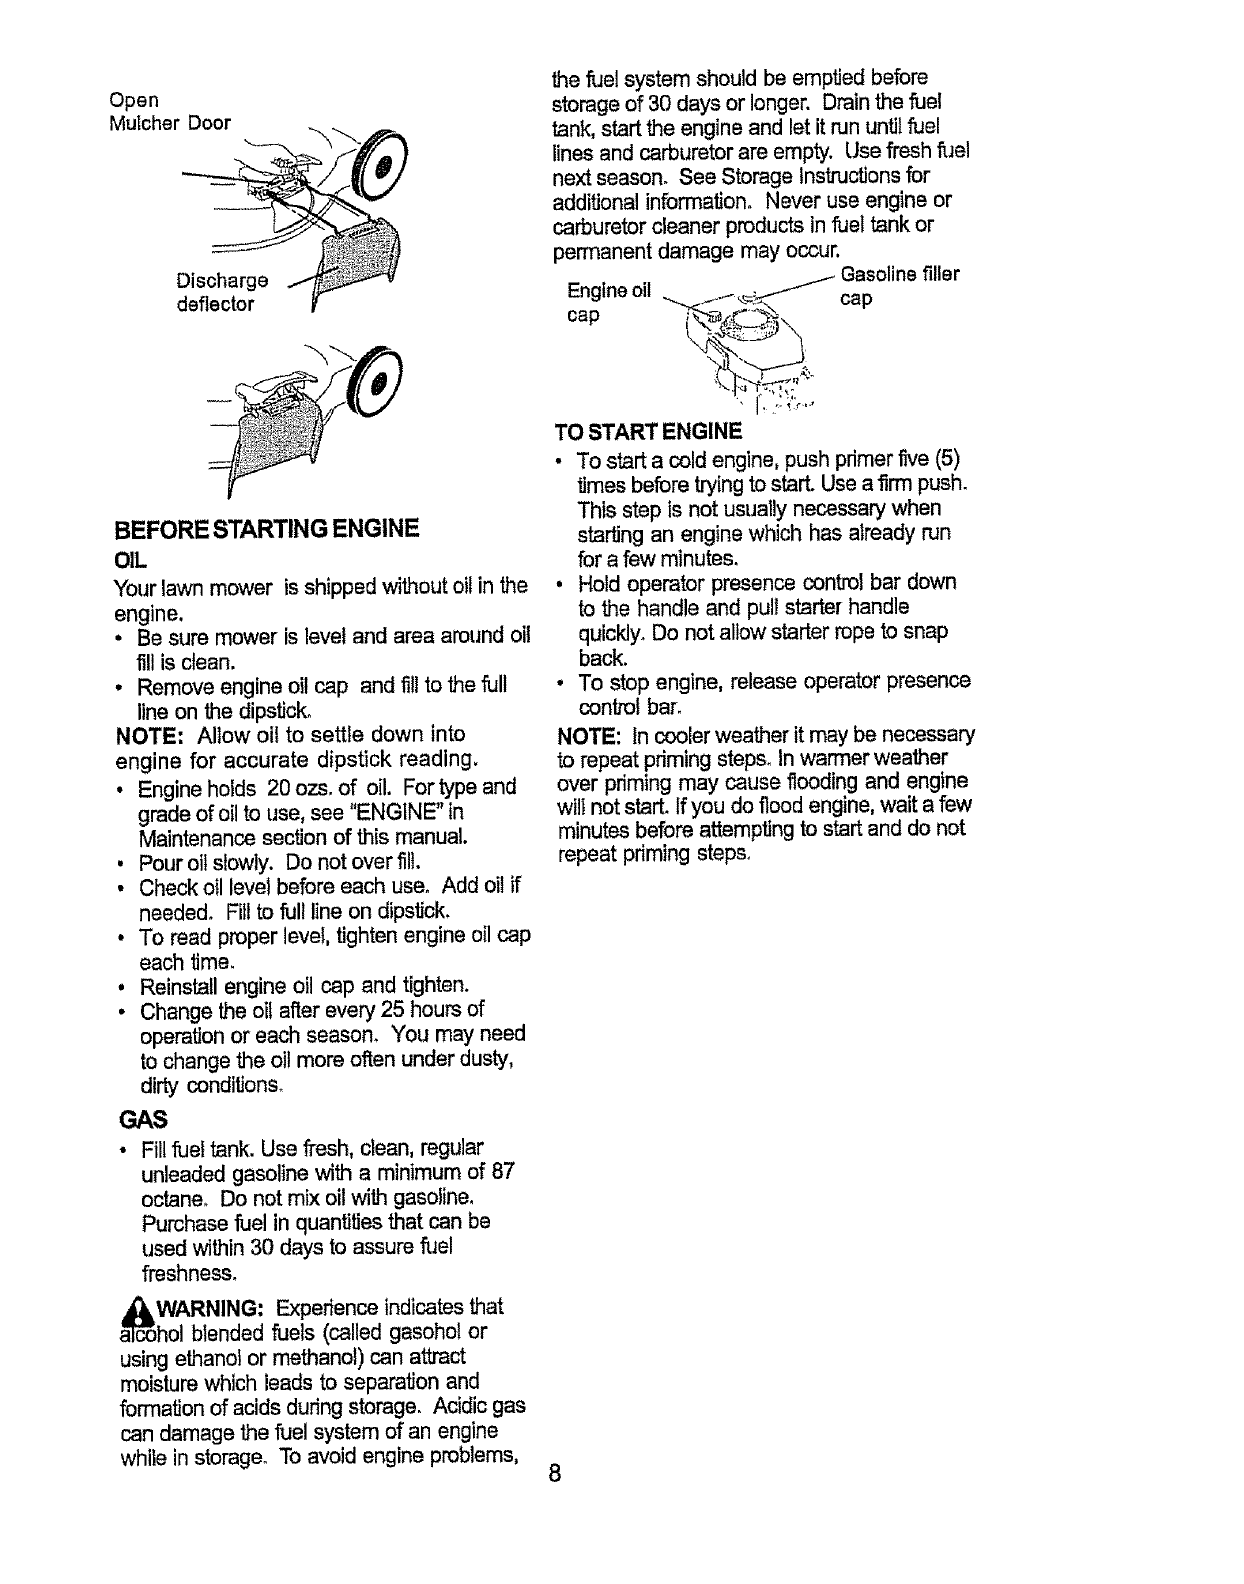
Open
Muicher Door
Discharge
deflector
BEFORE STARTING ENGINE
OIL
Your lawn mower is shipped without oil in the
engine,
• Be sure mower is level and area around oil
fill is dean.
• Remove engine oil cap and fl!l to the full
line on the dipstick_
NOTE: Allow oil to settle down into
engine for accurate dipstick reading.
• Engine holds 20 ozs. of oil. For type and
grade ofoU to use, see "ENGINE" in
Maintenance section of this manual.
• Pour oil slowly. Do not over fill
• Check oil level before each use. Add oil if
needed. Fill to full line on dipstick,
• To read proper level, tighten engine oil cap
each time_
• Reinstall engine oil cap and tighten.
• Change the oil after every 25 hours of
operation or each season. You may need
to change the oil more often under dusty,
dirty conditions_
GAS
• Fill fuel tank. Use fresh, clean, regular
unleaded gasoline with a minimum of 87
octane° Do not mix oil with gasoline,
Purchase fuel in quantities that can be
used within 30 days to assure fuel
freshness.
a_WARNING: Experience indicates that
hol blended fuels (called gasohol or
using ethanoi or methanol) can attract
moisture which leads to separation and
formation of acids during storage. Acidic gas
can damage the fuel system of an engine
while in storage. To avoid engine problems,
the fuel system should be emptied before
storage of 30 days or longer. Drain the fuel
tank, start the engine and let it run until fuel
lines and carburetor are empty. Use fresh fuel
next season. See Storage Instructions for
additional information. Never use engine or
carburetor cleaner products in fuel tank or
permanent damage may occur, Gasoline filler
/
Engine Oil . :.:_ _{_/- cap
cap . _ _:!_
TO START ENGINE
• To start a cold engine, push primer five (5)
times before trying to start. Use a firm push.
This step is not usuatly necessary when
starling an engine which has already run
for a few minutes.
• Hold operator presence control bar down
to the handle and puff starter handle
quickly_ Do not allow starter rope to snap
back.
• To stop engine, release operator presence
control bar_
NOTE: In cooler weather it may be necessary
to repeat priming steps, In warmer weather
over priming may cause flooding and engine
wilI not start If you do flood engine, wait a few
minutes before attempting to start and do not
repeat priming steps.
MOWINGTIPS
•Under certain conditions, such as very tall
grass, it may be necessary to raise the
height of cut to reduce pushing effort and to
keep from overloading the engine and
leaving clumps of grass clippings. It may
also be necessary to reduce ground speed
and/or run the lawn mower over the area a
second time.
•For extremely heavy cutting, reduce the
width of cut by overlapping previously cut
path and mow slowly.
•For better grass bagging and most curling
conditions, the engine speed should be set
in the fast position.
• Pores in cloth grass catchers can become
filled with dirt and dust with use and
catchers will collect less grass. To prevent
this, regularly hose catcher off with water
and let dry before using.
• Keep top of engine around starter clear
and clean of grass clippings and chaff_
This will help engine air flow and extend
engine life.
MULCHING MOWING TIPS
IMPORTANT: For bestperformance,keep
mower housing free of built-up grassand
trash, Clean UNDERSIDE OF MOWER
HOUSING aftereach use. See "Cleaning" in
MAINTENANCE secUonof thismanual,
• The special mulching blade will recurthe
grass clippingsmany times and reduce
them insize so that as they fall ontothe
lawntheywill disperseintothe grass and
notbe noticed, Also, the mulchedgrasswill
biodegradequicklyto providenutrientsfor
the lawn,Always mulch with your highest
engine (blade)speed as this will provide
the best recurringactionof the bladeso
•Avoid cuttingyour lawnwhen it iswet, Wet
grasstendstoform clumpsand interferes
withthe mulchingaction.The best time to
mow yourlawn is the early afternoon, At
thistime the grass has dried and the newly
cutarea willnot be exposedtothe direct
sun,
• For best results, adjust the lawn mower
curling height so that the lawn mower cuts
off only the top one-third of the grass
blades. Ifthe lawn is overgrown itwill be
necessary to raise the height of cut to
reduce pushing effort and to keep from
overloading the engine and leaving
clumps of mulched grass. For extremely
heavy mulching, reduce your width of cut,
mow slowly and raise the rear of the lawn
mower one wheel adjuster setting higher
than the front.
•Certain types of grass and grass conditions
may require that an area be mulched a
second time to completely hide the
clippings. When doing a second cut, mow
across or perpendicular to the first cut path_
• Change your cutting pattern from week to
Week. Mow north to south one week then
change to east to west the next week. This
will help prevent matting and graining of
the lawn.
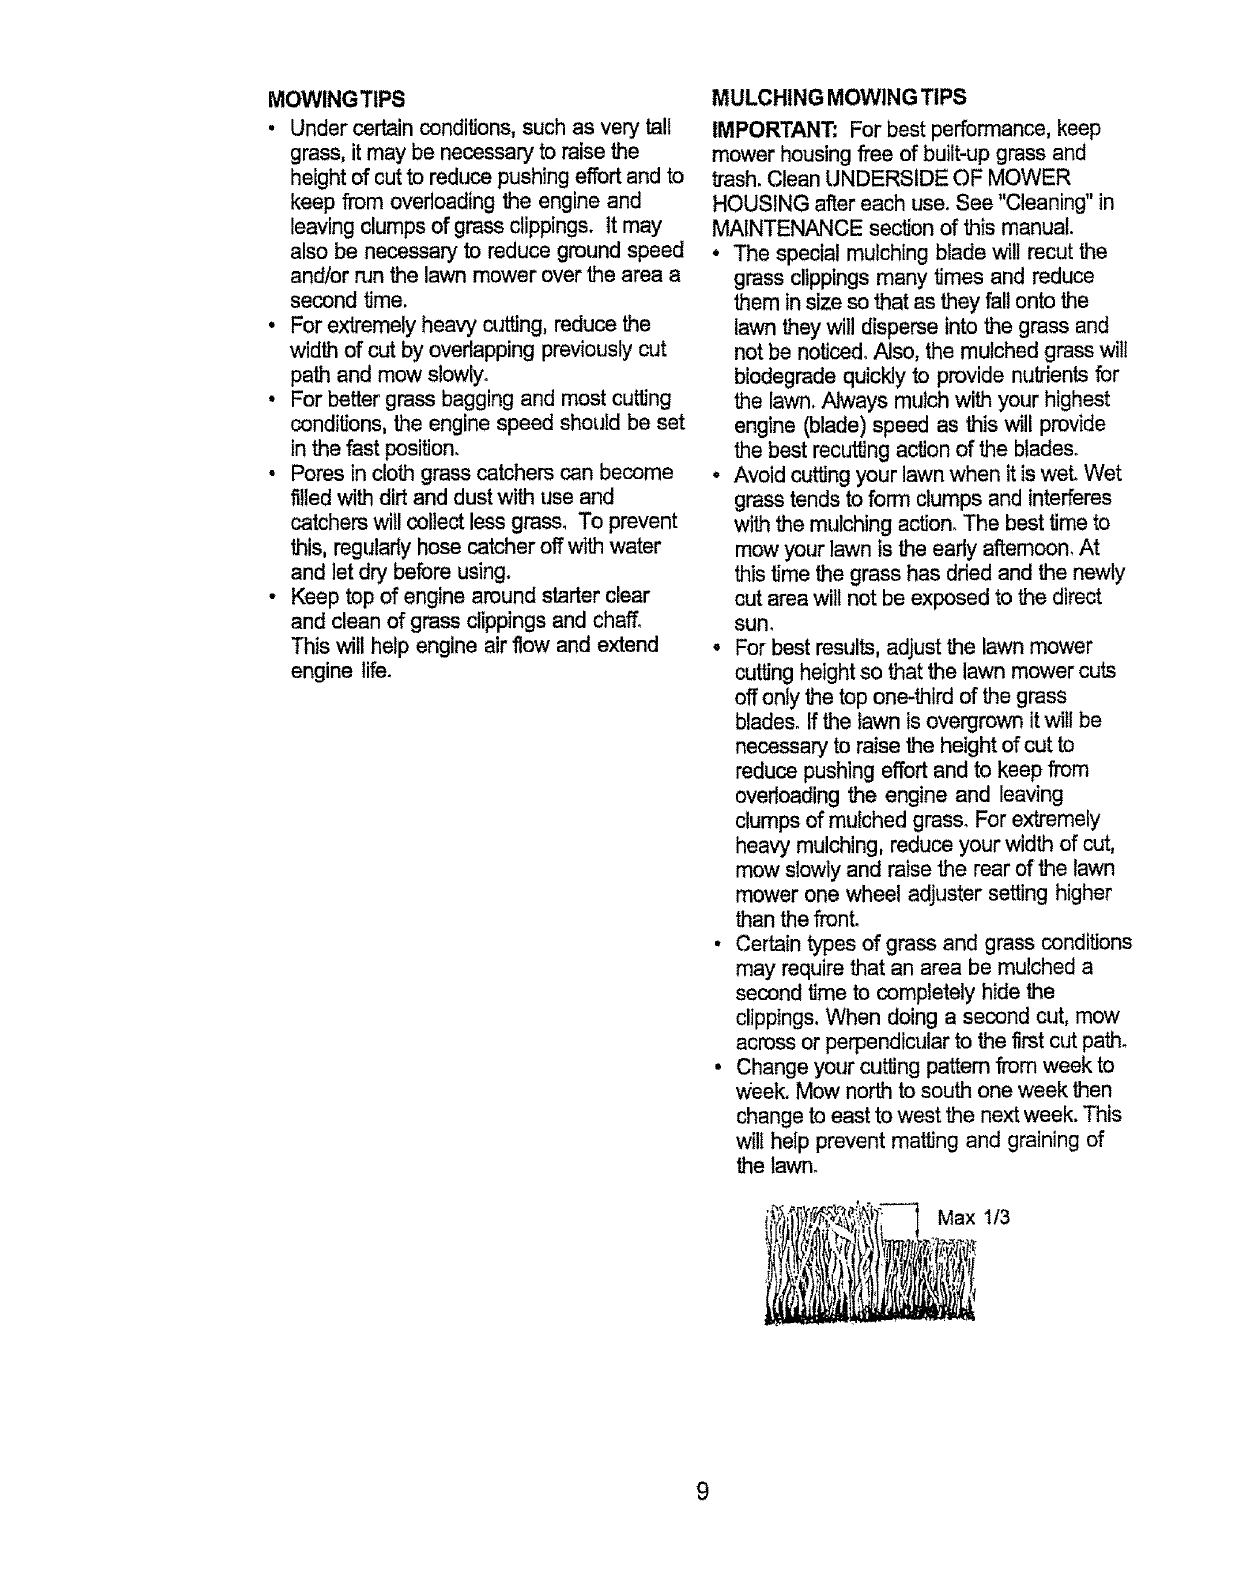
Max 1/3
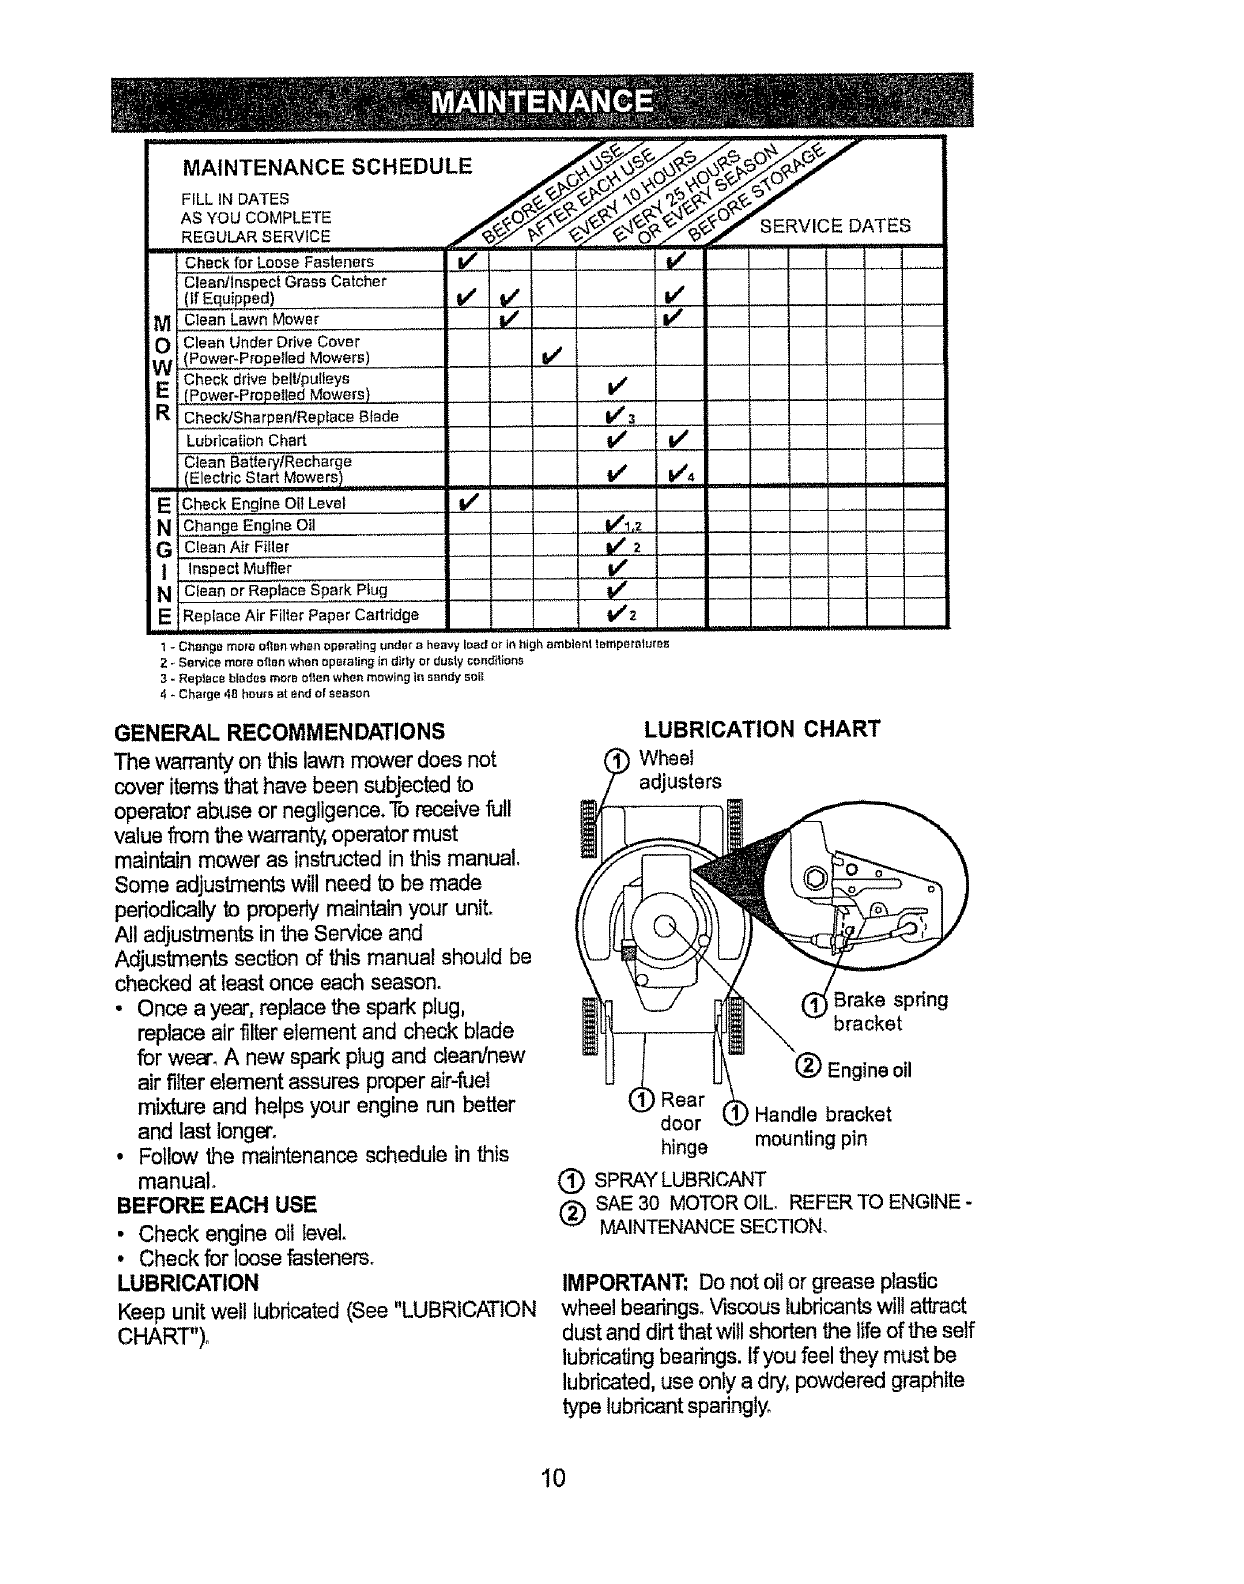
F LLINDATES
AS YOU COMPLETE ,_.' _ _.,_ _.O VICE D
_. SERVICE DATES
REGULAR SERVICE , ,
Check,far Loose Fasteners V' ! l'/ I .........
Cleanllnspect Grass Catcher t
(If Equipped) V' V' i_ ........
M Clean Lawn Mowe'r............ t/ I/ , I
O Clean Under Drive Cover i
(Power-Propelled Mowers) I/ ................
Check drive halt'pulleys
E(Power-Propefl#,d Mowers) , V/
ChecPJSharpenlRepface Btade b/,,_
Lubrication Chart 6/ V'
Clean SatterytRecharge
IElectric Start Mowers 1.......... t_ V'4 .........
E Check Engine Oil Level V' ..........
N Change Eng,lne Oil ......._l,Z .....
G c!ean Air FiIier ................ I/ 2
IInspect Muffler ........... V t
U Clea,n,°,r Replace Sp,ark Plug t/ .........
ERepface Air Filter Paper Cartridge t,/z
1- C118_gemore oI'tenwhen operating unde_aheavy load or in high ambient temperoturos
2 _Service rnorooften whenoperating in dirty or dusty conditions
3- IRepface blades more often when mowing in sandy soil
4 - Charge 48 hours at end of season
GENERAL RECOMMENDATIONS
The warrantyon thislawn mowerdoes not
coveritems that have been subjected to
operator abuse or negligence. Toreceive full
value from the warranty,operator must
maintain mower as instnJcted in this manual.
Some adjustments will need to be made
periodically to properly maintain your unit.
All adjustments in the Service and
Adjustments section of this manual should be
checked at least once each season.
• Once a year, replace the spark plug,
replace air filter etement and check blade
for wear. A new spark ptug and dean/new
air filter element assures proper air-fuef
mixture and helps your engine run better
and last Ionger.
• Follow the maintenance schedule in this
manual.
BEFORE EACH USE
• Check engine oil level
• Check for loose fasteners.
LUBRICATION
Keep unit well lubricated (See "LUBRICATION
CHART").
LUBRICATION CHART
Wheel
adjusters
spring
bracket
=gineoil
Rear
door _Handle bracket
hinge mounting pin
(_ SPRAY LUBRICANT
SAE 30 MOTOR OIL. REFER TO ENGINE -
MAINTENANCE SECTION.
IMPORTANT: Do not oit or grease plastic
wheel bearings. Viscous lubricants wilt attract
dust and dirt thatwill shorten the life of the self
lubricating bearings. If you feel they must be
lubricated, use only a dry, powdered graphite
type lubricant sparingly.
10
PRODUCT SPECIFICATIONS
MODEL NUMBER 917,388280
SERIAL NUMBER
DATE OF PURCHASE
HORSEPOWER: 6.0
GASOLINE CAPACITY/TYPE: 1o5 QUARTS
UNLEADED REGULAR
OILTYPE (APFSF/SG/SH): SAE 30 (ABOVE 32°F)
SAE 5W-30 (BELOW 32°F)
OIL CAPACITY: 20 OZS,
SPARK PLUG(GAP: ,030") CHAMPION RJ 19LM OR J 19LM
VALVE CLEARANCE: INTAKE: _004 - .008
EXHAUST: .004 -°008
SOLID STATE IGNITION
AIR GAP: o0125 1N_
BLADE BOLT TORQUE: 35-40 FT. LBS.
The model and serial numbers will be found on a decal attached to the rear of the
lawn mower housing.Record both serial number and date of purchase in space
provided above.
LAWN MOWER
Always observe safety rules when performing
any maintenance.
TIRES
• Keep tires free of gasoline, oil, or insect
control chemicals which can harm rubber.
• Avoid stumps, stones, deep ruts, sharp
objects and other hazards that may cause
tire damacle,
BLADE CARE
For best results, mower blade must be
kept sharp. Replace bent or damaged
blades_
TO REMOVE BLADE
• Disconnect spark plug wire from spark
plug and place wire where it cannot
come in contact with spark plug.
• Turn lawn mower on its side. Make
sure air filter and carburetor are up.
• Use a wood block between blade and
mower housing to prevent blade from
turning when removing blade bolto
• Protect your hands with gloves and/or
wrap blade with heavy cloth.
• Remove blade bolt by turning counter-
clockwise.
• Remove blade and attaching hardware
(bolt, lock washer and hardened
washer)°
NOTE: Remove the blade adapter and
check the key inside hub of blade adapter°
The key must be in good condition to work
properly. Replace adapter if damaged,
TO REPLACE BLADE
•Position the blade adapter on the
engine crankshaft. Be sure key in
adapter and crankshaft keyway are
aligned.
• Position blade on the blade adapter
aligning the two (2) holes in the blade
with the raised lugs on the adapter.
• Be sure the trailing edge of blade
(opposite sharp edge) is up toward the
engine.
• Install the blade bolt with the tock
washer and hardened washer into
blade adapter and crankshaft.
° Use block of wood between blade and
lawn mower housing and tighten the
blade bolt, turning clockwise.
• The recommended tightening torque is
35-40 ft. lbs.
11
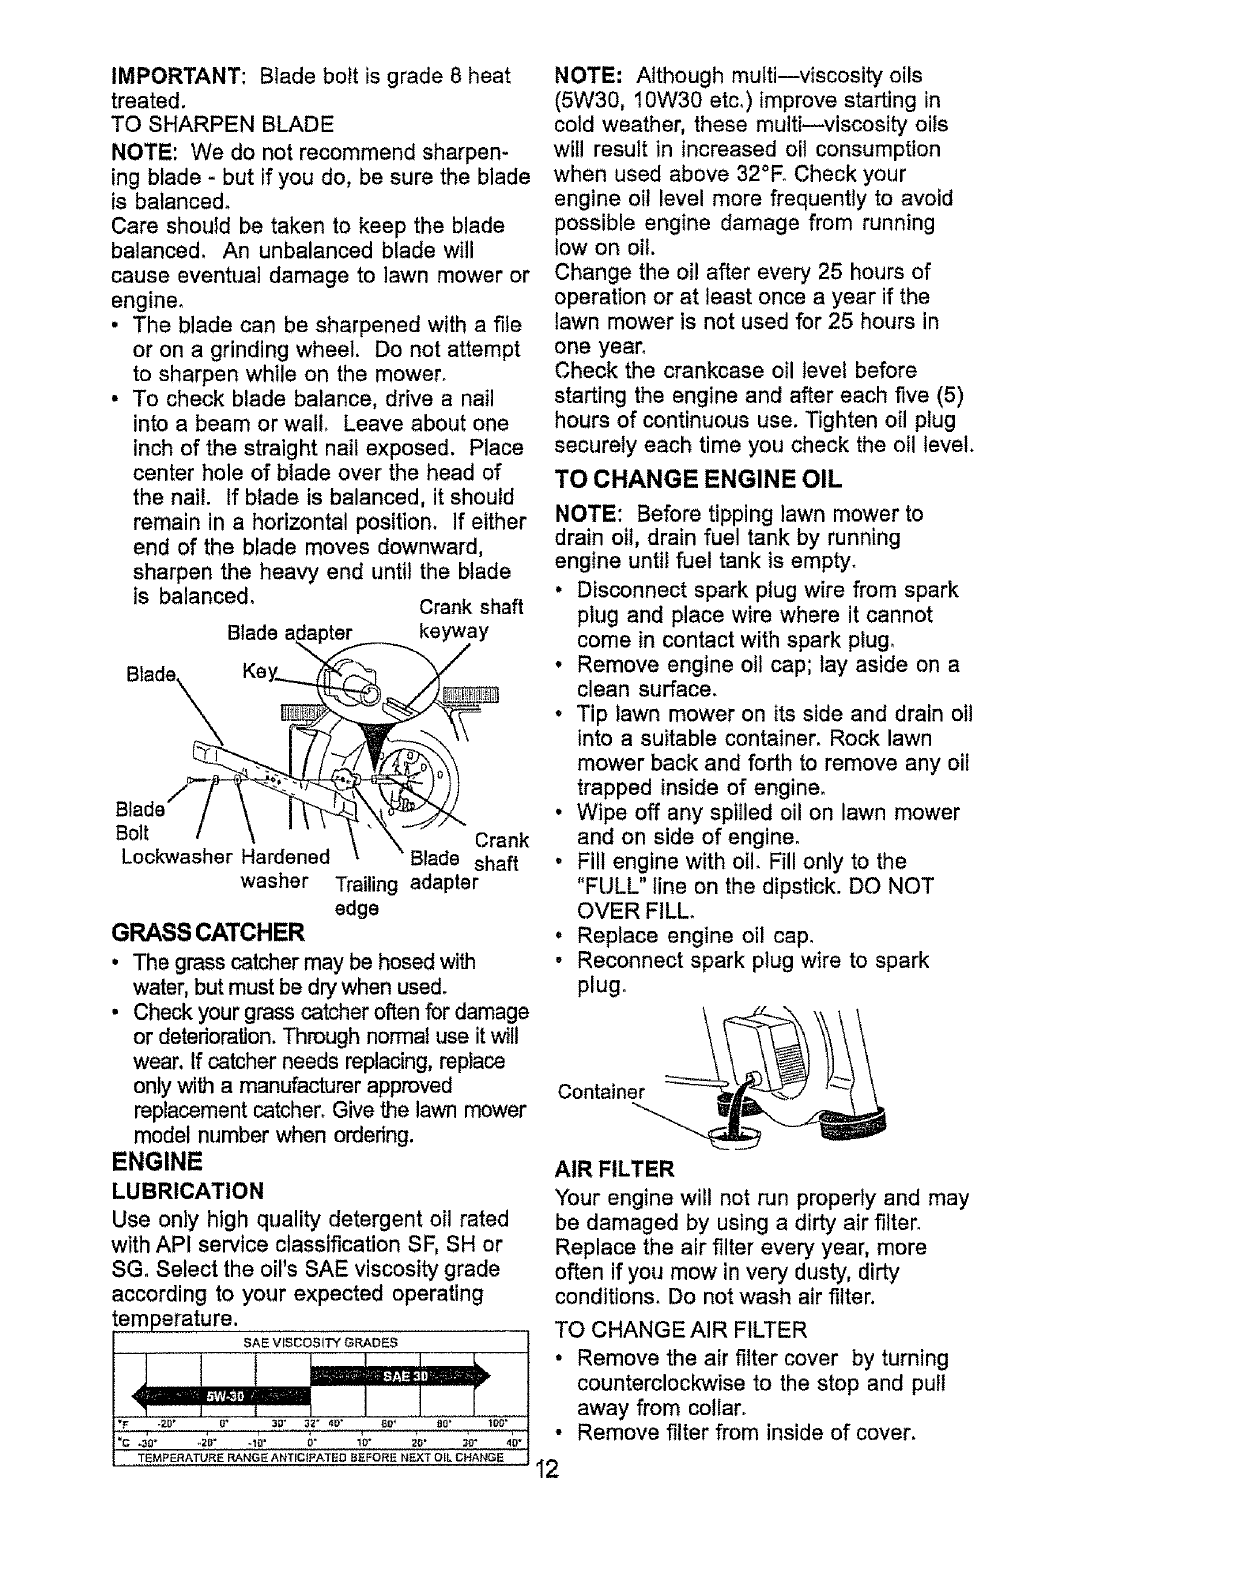
IMPORTANT: Blade boit is grade 8 heat
treated.
TO SHARPEN BLADE
NOTE: We do not recommend sharpen-
ing blade - but if you do, be sure the blade
is balanced.
Care should be taken to keep the blade
balanced. An unbalanced blade will
cause eventual damage to lawn mower or
engine_
• The blade can be sharpened with a fife
or on a grinding wheel. Do not attempt
to sharpen while on the mower.
• To check blade balance, drive a nail
into a beam or walt. Leave about one
inch of the straight nail exposed. Place
center hole of blade over the head of
the nail. If blade is balanced, it should
remain in a horizontal position. If either
end of the blade moves downward,
sharpen the heavy end until the blade
is balanced. Crank shaft
Blade ada keyway
Ke
Blade /
Bolt Crank
Lockwasher Hardened Blade shaft
washer Trailing adapter
edge
GRASS CATCHER
oThe grass catcher may be hosed with
water, but must be dry when used.
• Check your grass catcher often for damage
or deterioration. Through normal use it will
wear, If catcher needs replacing, replace
only with a manufacturer approved
replacement catcher. Give the lawn mower
model number when ordering.
ENGINE
LUBRICATION
Use only high quality detergent oil rated
with API service classification SF, SH or
SG. Select the oil's SAE viscosity grade
according to your expected operating
temperature.
NOTE: Although multi--viscosity oils
(5W30, 10W30 etco)improve starting in
cold weather, these multimviscosity oils
will result in increased oil consumption
when used above 32°E Check your
engine oil level more frequently to avoid
possible engine damage from running
low on oil.
Change the oil after every 25 hours of
operation or at least once a year if the
lawn mower is not used for 25 hours in
one year.
Check the crankcase oil level before
starting the engine and after each five (5)
hours of continuous use. Tighten oil plug
securely each time you check the oil level.
TO CHANGE ENGINE OIL
NOTE: Before tipping lawn mower to
drain oil, drain fuel tank by running
engine untit fuel tank is empty°
• Disconnect spark plug wire from spark
plug and place wire where it cannot
come in contact with spark plug_
• Remove engine oil cap; lay aside on a
clean surface.
• Tip lawn mower on its side and drain oil
into a suitable container. Rock lawn
mower back and forth to remove any oil
trapped inside of engine.
, Wipe off any spilled oil on lawn mower
and on side of engine.
, Fill engine with oil. Fill only to the
"FULL" line on the dipstick. DO NOT
OVER FILL.
• Replace engine oi! cap.
• Reconnect spark plug wire to spark
plug.
Container
AIR FILTER
Your engine will not run properly and may
be damaged by using a dirty air filter.
Replace the air filter every year, more
often if you mow in very dusty, dirty
conditions. Do not wash air filter.
TO CHANGEAIR FILTER
•Remove the air filter cover by turning
counterclockwise to the stop and pu!l
away from co!lar_
•Remove filter from inside of cover.
I2
° Clean the inside of the cover and the
collar to remove any dirt accumulation.
• Insert new filter into cover.
• Put air filter cover and filter into collar
aligning the tab with the slot.
• Push in on cover and turn clockwise to
tighten.
Collar Clip
Slot
Air filter
Turn
counter--
clockwise to
remove
clockwise
Air filter cover to tighten
MUFFLER
Inspect and replace corroded muffler as it
could create afire hazard and/or damage,
SPARK PLUG
Change your spark plug each year to
make your engine start easier and run
better. Set spark plug gap at ,030 inch°
CLEANING
IMPORTANT: For best performance, keep
mower housing free of built--up grass
and trash. Clean underside of mower
housing after each use.
_,CAUTION: Disconnect spark plug wire
from spark plug and place wire whereit cannot
come in contact with the spark plug.
• Turn lawn mower on its side. Make sure
air filter and carburetor are up. Clean
the underside of your lawn mower by
scraping to remove build--up of grass
and trash.
•Clean engine often to keep trash from
accumulating. A clogged engine runs
hotter and shortens engine life.
• Keep finished surfaces and wheels free
of all gasoline, oil, etco
• We DO NOT recommend using a
garden hose to clean lawn mower
unless the electrical system, muffler, air
filter and carburetor are covered to
keep water ouL Water in engine can
result in shortened engine life_
_tb.CAUTION: Before performing any
service or adjustments:
•Release control bar and stop engine.
•Make sure the blade and all moving
parts have completely stopped.
•Disconnect spark plug wire from spark
plug and place where it cannot come in
contact with plug.
LAWN MOWER
TO ADJUST CUTTING HEIGHT
See "TO ADJUST CUTTING HEIGHT" in
the Operation section of this manual.
REAR DEFLECTOR
The rear deflector, attached between the
rear wheels of your lawn mower, is
provided to minimize the possibility that
objects will be thrown out the rear of the
lawn mower into the operator's mowing
position_
If the rear deflector becomes damaged, it
should be replaced°
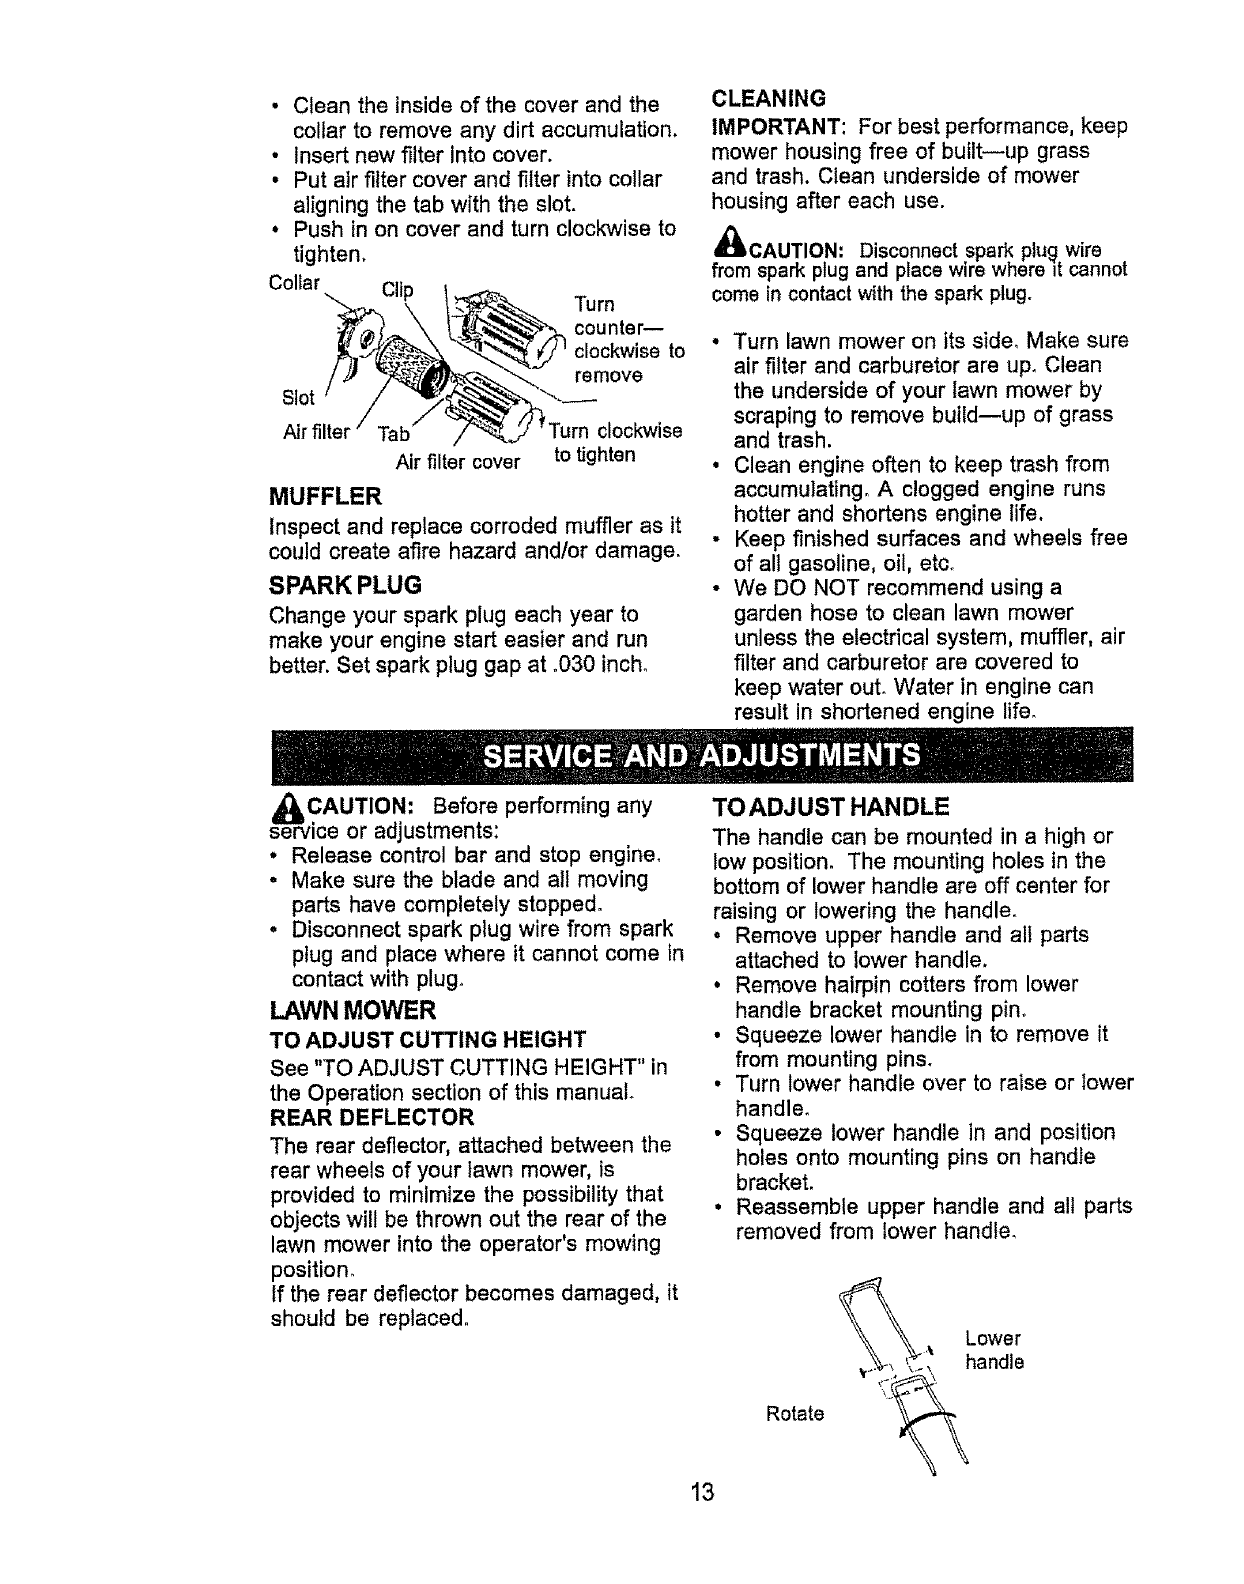
TO ADJ UST HAN DLE
The handle can be mounted in a high or
low position. The mounting holes in the
bottom of lower handle are off center for
raising or lowering the handle,
• Remove upper handle and all parts
attached to lower handle,
° Remove hairpin cotters from lower
handle bracket mounting pin°
•Squeeze lower handle in to remove it
from mounting pins.
• Turn lower handle over to raise or lower
handle.
• Squeeze lower handle in and position
holes onto mounting pins on handle
bracket.
•Reassemble upper handle and all parts
removed from lower handle.
Rotate
Lower
handle
13
ENGINE
CARBURETOR
Your carburetor has a non-adjustable fixed
mainjet for mixture control. If your engine
does not operate propedy due to suspected
carburetor problems, take your lawn mower to
an authorized service center for repair or
adjustment_
IMPORTANT; Never tamper with the engine
govemor, which is factory set for proper
engine speed, Overspeeding the engine
above the factory high speed setUngcan be
dangerous, if you think the engine-governed
high speed needs adjusting, contact your
nearest authorized service center, which has
proper equipment and experience to make
any necessary adjustments.
ENGINE SPEED
Your engine speed has been factory set. Do
not attempt to increase engine speed or it
may result in personal injury. If you believe
that the engine is running too fast or too slow,
take your lawn mower to an authorized
service center for repair and adjustment.
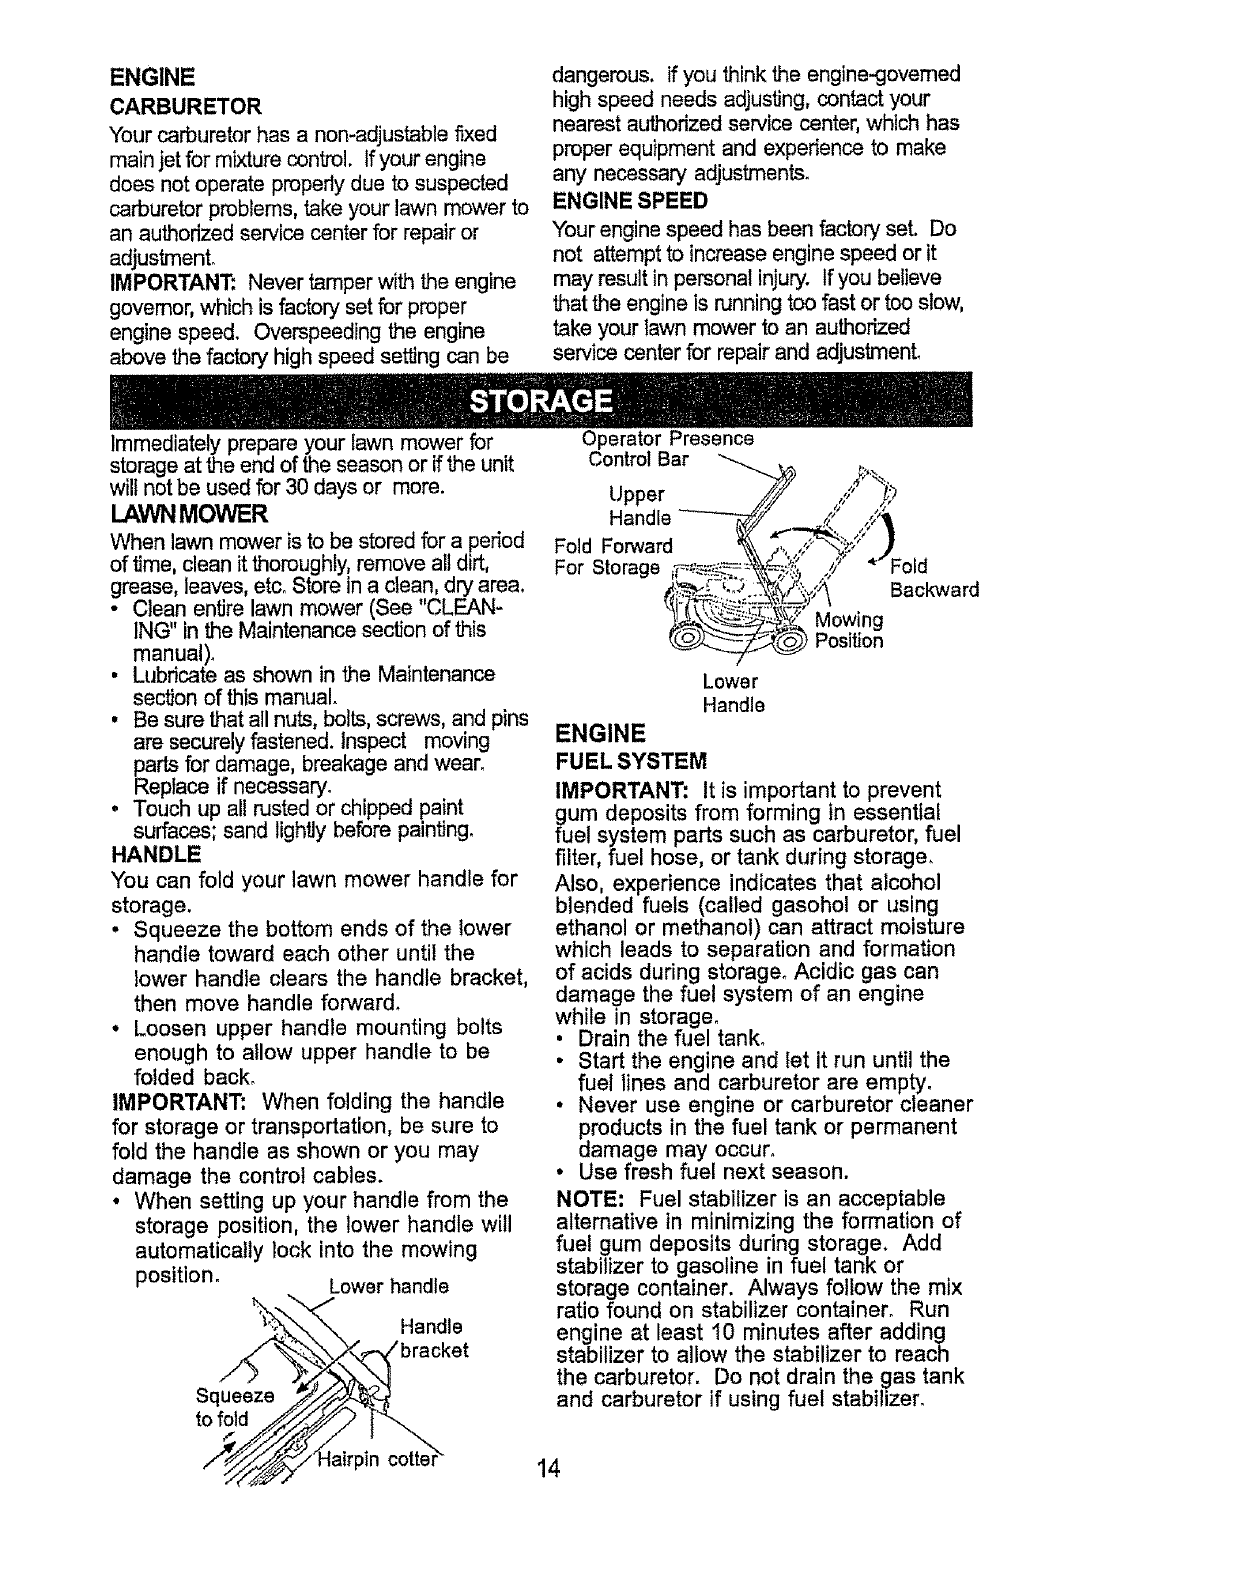
Immediately prepare your lawn mower for
storage at the end of the season or if the unit
will not be used for 30 days or more.
LAWNMOWER
When lawn mower is to be stored for a period
of time, clean it thoroughly, remove all dirt,
grease, leaves, etco Store in a clean, dry area.
• Clean entire lawn mower (See "CLEAN-
ING" in the Maintenance section of this
manual).
• Lubricate as shown in the Maintenance
section of this manual.
, Be sure that all nuts, bolts, screws, and pins
are securely fastened, inspect moving
i_eartsfor damage, breakage and wear.
place if necessary.
o Touch up all rusted or chipped paint
surfaces; sand lightly before painting.
HANDLE
You can fold your lawn mower handle for
storage.
o Squeeze the bottom ends of the lower
handle toward each other until the
lower handle clears the handle bracket,
then move handle forward.
• Loosen upper handle mounting bolts
enough to allow upper handle to be
folded back.
IMPORTANT; When folding the handle
for storage or transportation, be sure to
fold the handle as shown or you may
damage the control cables.
• When setting up your handle from the
storage position, the lower handle will
automatically lock into the mowing
position. Lower handle
Handle
}racket
Squeeze
to fold
Operator Presence
Control Bar
Upper
Handle
Fold Forward
For Storage
Mowing
Position
-'old
Backward
Lower
Handle
ENGINE
FUEL SYSTEM
IMPORTANT: It is important to prevent
_uUmdeposits from forming fn essential
el system parts such as carburetor, fuel
filter, fuel hose, or tank during storage.
Also, experience indicates that alcohol
blended fuels (called gasohol or using
ethanol or methanol) can attract moisture
which leads to separation and formation
of acids during storage. Acidic gas can
damage the fuel system of an engine
while in storage.
• Drain the fuel tank°
•Start the engine and let it run until the
fuel lines and carburetor are empty.
• Never use engine or carburetor cleaner
products in the fuel tank or permanent
damage may occur.
•Use fresh fuel next season.
NOTE: Fuel stabilizer is an acceptable
alternative in minimizing the formation of
fuel gum deposits during storage. Add
stabilizer to gasoline in fuel tank or
storage container. Always follow the mix
ratio found on stabilizer container. Run
engine at least t0 minutes after adding
stabilizer to allow the stabilizer to reach
the carburetor. Do not drain the gas tank
and carburetor if using fuel stabilizer_
airpin 14
ENGINE OIL
Drain oil (with engine warm) and replace
with clean engine oil (See "ENGINE" in
the Maintenance section of this manual)°
CYLINDER
• Remove spark plug_
• Pour one ounce (29 ml) of oil through
spark plug hole into cylinder.
• Pull starter handle slowly afew times to
distribute oil.
• Replace with new spark plugo
OTHER
. Do not store gasoline from one season
to another.
•Replace your gasoline can if your can
starts to rust. Rust and/or dirt in your
gasoline will cause problems_
•If possible, store your unit indoors and
cover it to give protection from dust and
dirt,
• Cover your unit with a suitable protec-
tive cover that does not retain moisture,
Do not use plastic. Plastic cannot
breathe which allows condensation to
form and will cause your unit to rust,
IMPORTANT: Never cover mower while
engine and exhaust areas are still warm,
4_IbCAUTION: Never store the lawn
mower with gasoline in the tank inside a
building where fumes may reach an open
flame or spark. Allow the engine to coo!
before storing in any enclosure.
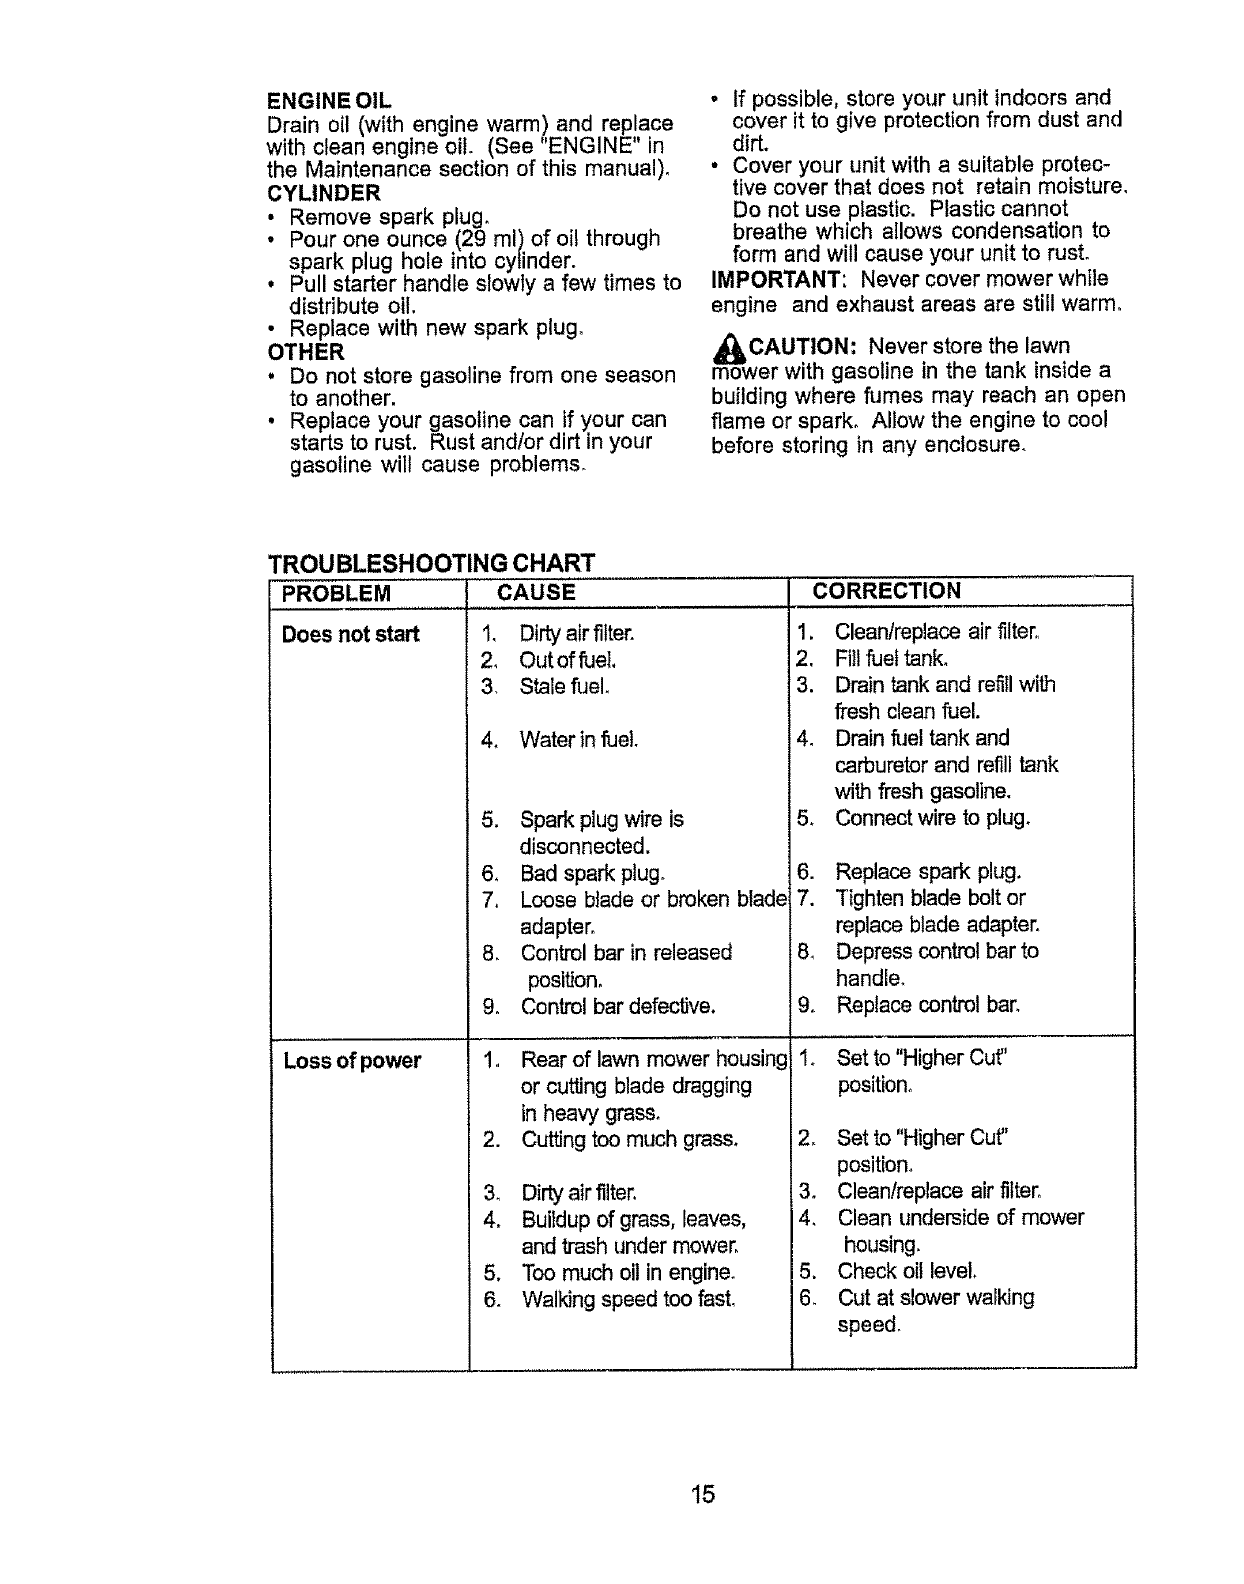
TROU BLESHOOTING CHART
,, , ,,,,,, ,,,,,,,,,,
PROBLEM
Does not start 1,
2,
3,
4,
5.
6,
7.
8_
9.
Loss of power 1,
2.
3,
4,
,,,,, ,,,, ,,, ,,,i ,,,,,,................
Dirty air filter.
Out of fuel.
Stale fuel,
Water in fuel.
Spark plug wire is
disconnected.
Bad spark plug.
Loose blade or broken blad_
adapter.
Control bar in released
position.
Control bar defective.
Rear of lawn mower housing
or cutting blade dragging
in heavy grass_
Cutting too much grass,
Dirtyair filter.
Buildup of grass, leaves,
CORRECTION
1. Clean/replace air filter,
2, Fill fuet tank_
3. Drain tank and refill with
fresh clean fuel.
4, Drain fuel tank and
carburetor and refill tank
with fresh gasoline.
5, Connect wire to plug,
6. Replace spark plug.
7. Tighten blade bolt or
replace blade adapter,
8_ Depress control bar to
handle,
9. Replace control bar_
I, Set to "Higher Cut"
position°
2, Set to "Higher Cut"
position°
3, Clean/replace air filter°
4, Clean underside of mower
and trash under mower,
5. Too much oil in engine.
6_ Walking speed too fast,
housing.
5, Check oi! level
6, Cut at slower walking
speed,
15
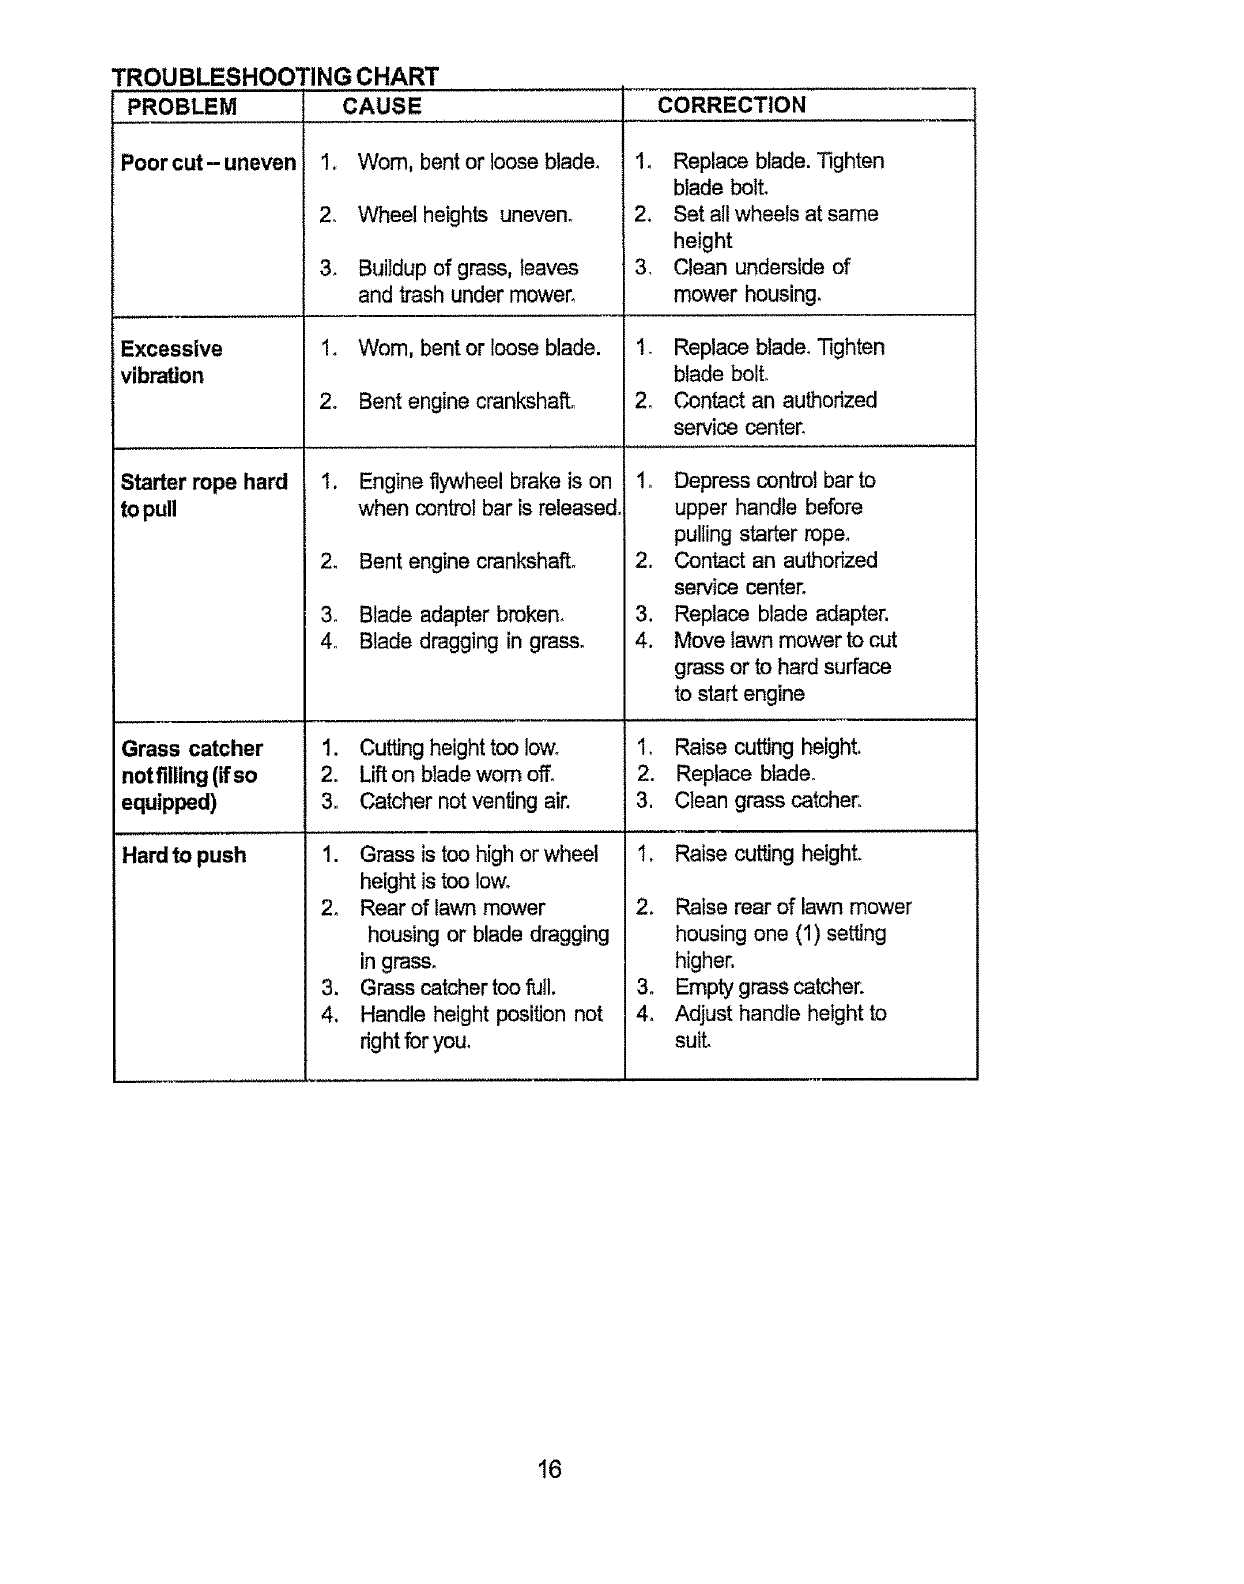
TROU BLESHOOTING CHART
PROBLEM CAUSE
Poor cut- uneven 1.
2,
3_
Excessive
vibration
Starter rope hard
topull
Grass catcher
notfilling (ifso
equipped)
Hard to push
2o
Wom, bent or loose blade.
Wheel heights uneven.
Buildup of grass, leaves
and trash under mower_
Worn. bent or loose blade.
Bent engine crankshaft°
1.
.
3_
4o
Engine flywheelbrake is on
when control bar is released,
Bent engine crankshaft.
Blade adapter broken.
Blade dragging in grass.
1. Cutting height too low.
2. Lifton blade wom off.
3, Catcher not venting air.
1. Grass is too high or wheel
height is too Iowo
2o Rear of lawn mower
housing or blade dragging
in grass°
3. Grass catcher too full.
4. Handle height position not
right for you,
CORRECTION
1. Replace blade. Tighten
blade bolt.
2. Set all wheels at same
height
3. Clean underside of
mower housing.
1. Replace blade. Tighten
blade bolt.
2. Contact an authorized
service center.
1. Depress control bar to
upper handle before
pulling starter roper
2. Contact an authorized
service center.
3. Replace blade adapter.
4. Move lawn mower to cut
grass or to hard surface
to start engine
1o Raise cutting height.
2. Replace blade.
3. Clean grass catcher.
1. Raise cutting height.
2. Raise rear of lawn mower
housing one (1) setting
higher.
3. Empty grass catcher.
4. Adjust handle height to
suit.
16
Garantfa
Reglas de Seguddad
Montaje
Operaci6n
Mantenimiento
Programa de Mantenimiento
17 Especificaciones del Product{} 26
17 Servicio y Adjustes 28
19 Atmacenamiento 30
21 Identificaci6n de problemas 31
25 Partes de repuesto Vea e! manual
25 ing1_s del duefio
Orden de Partes Contratapa
GARANT[A LIMtTADA DE DOS AltOS PARA LA SEGADORAA MOTOR CRAFTSMAN
Por dos (2) afios, a pa_r de la fecha de compra, cuando esta Segadora Craftsman se mantenga,
Iubrique y afine segen tas instrucciones para la operad6n y el mantenimiento en el manual del duefio,
Sears reparar._gratis tedo defecto en el material y la mano de obra
Si la Segadora Craftsman se usa para fines comerciales o de arriendo, esta garantla s61ose aplica por
novenla (90) d[as a partJrde la fecha de compra
Esta GaranlJa no cubre:
• Artlculos que se desgastan durante el uso normal tales como las cuchiltas segadoras rotatorias, los
adaptadores de la cuchitla, Ias correas, los filtros de aira y las bujlas°
•Reparaciones necesarias debido al abuso o a la negligenda del operador, induySnciose a los
cig_efiales doblados y a la falta de mantenimiento det equiposeg_n las instrucdonesqua se incluyen
en el manuel del duefiOo
EL SERVICIO DE GARANT_ ESTA DISPONIBLE al devolver ta segadpra a motor Craftsman el Centre]
Department{} de Servido Sears mas cercano en los Estados Unidos. Esta garantla se aplica solamente
mientras el product{} este en use en los Estados Unidos
Esta Gerantfa le otorga derechos legales especlficos, y puede que lambi_n tenga otros derechos que
varlan de estado a estadoo
Sears, Roebuck and Co, DIB17WA, Hoffman Estates, IL 60179 USA
Los estandrares de seguridad exigen la presencia
del operator en loscontroles para reducir a un
minimo el fiesgo de lesionarse S u unidad viene
equipada con dichos controIesoPor ningun molivo
bate del eliminar la funci6n de los conb'olesqua
exigen ta presencia del operador.
ENTRENAMIENTO:
• Lea este manual del operador cuidadosamante
Familiarloese con los controles y apranda a
operar su segadora en forma adecuada
Aprenda a parar su segadora r_pidamente
• No permita que los nifios usen su segadora.
Nunca perrnita qua los adultos operen la
segadora sin contar con las tnstrucciones
adecuadas
• Mantenga el _rea de operad6n despejada de
genre, especialmente de nifios pequefiosy de
animales dom_sticos°
.Use la segadora solamente para los fines
propuestos por el fabricante y seg0n las
explicadones descfitas en este manual
• No opera la segadora si se ha caldo o dafiado
en cualquiera forma° Siempre repare los
dafios antes de usarla,
• No use accesorios qua no hayan sido
recomendados por el fabricante El us{} de
dichos acsesofios puede set peligroso
• La cuchilla gira cuando el motor est,_
fundonando.
PREPARAClON:
• Siempre revise cuidadosamente et &tea
qua se va a segar y desp_jela de todas les
piedras, palos, alambres0 huesos y otros
objetos extraBos. Estos objetos ser&n
lanzados con la cuchilla y pueden producir
lesiones graves°
• Siempre use anteojos de seguridad o
protectores de ojos cuando arranque y
durante e! tiempo qua use la segadora
• Vlstase en forma adecuada No opere la
segadora sin zapatos o con sandalias
abiertas Use solamente zapatos s61idos
con buena tracci6n cuando siegue
17
• Revise el estanque de combustible antes de
hacer arrancar el motor. No Iiene el
estanque de gasolina en recintos cerrados,
ni cuando el motor est& funcionando o
cuando est& caliente. Permita qua el motor
se enfrle por varios minutos antes de Ilenar
el estanque de gasoiina, Limpie toda la
gasolina derramada antes de hacer
arrancar el motor.
• Siempre haga los ajustes de altura de las
ruedas antes de hacer arrancar su
segadora. Nunca trate de hater _sto
mientras que el motor est_ functonando.
• Siegue siempre durante el dia o con buena
luz artificial.
OPERACI6N:
= Mantenga sus ojos y su manta en la
segadora y en el _rea qua se est_ cortando.
No permita que otros intereses Io distraigan.
• No corte c_sped mojado o resbaloso. Nunca
corra mientras est_ operando su segadorao
Siempre aseg_rese de mantener el equilibdo
° mantenga el mango agarrado firmemente y
camine.
• No ponga las manos o los pies cerca odebajo
de las partes rotatorias. Mant_ngase atejado
de la abertura de descarga en todo momento.
• Siempre pare el motor cuando se vaya
ocuando no est_ usando su segadora, o
antes de atravesar las entradas para autos,
los senderos, caminos y _reas cubiedas de
ripio.
• Nunca didja la descarga del material hacia los
aspectadores ni permita a nadie cerca de la
segadora mientras la est_ oparando.
• Antes de ltmpiar, inspeccionar o de reparar la
segadora, pare el motor y est_
completamente seguro de qua la cuchilla y
qua todas las partes qua se mueven se
hayan detenldo. Luego, desconecte el
alambre de la bujla y mant_ngalo alejado de
_sta para evitar el arranque por accidente.
• No continue haciendo funcionar su segadora
si le pega a un objeto extraSo. Siga el
procadimiento descdto antedonnente, luego
repare cualquier datio antes de volver a
arrancar y de operar su segadora.
•No cambie los ajustes det regulador o
hagaqua el motor ande a una velocidad
excesiva. Se pueden producir daSos en el
motor y I esiones personates_
• No opera su segadora si vibra fuera de lo
normal. La vibraci6n excesiva es una
indicaci6n de datio; pare el motor, revise en
forma segura la causa de la vibraci6n y haga
las reparaciones segt'm sea necesado.
• No haga funcionar el motor en
recintoscerrados, Los gases de escape son
peligrososo
• Nunca corte el c_sped tirando fa segadora
hacia usted. Siegue a trav_s de la cara de las
pendientes, nunca hacia arriba o hacia abajo
pues puede perder e! equilibdo. No siegue
pendientes demasiado empinadas° Tenga
cuidado cuando opera ta segadora en terreno
disparejo o cuando cambie de direcci6n -
mantenga un buen equilibdo°
• Nunca opera la segadora sin las
protecciones adecuadas, las planchas, el
recogedor de c_sped y otros dispositivos de
seguddad en su lugaro
MANTENIMIENTOY
ALMACENAMIENTO:
• Revise la cuchilla y los pemos de montaJe del
motor a menudo, para asegurarsa qua est_n
apretados en la forrna adecuadao
• Revise todos los pemos, tuercas y tomillos a
intervalos frecuentes, para verificar st est_n
apretados en forma adecuada, y
asegurarseque la segadora se encuentra en
condiciones de funcionamiento seguro.
• Mantenga todos los dispositivos de seguddad
en su lugar y listos para funcionar.
• Para reducir el peligro de incendio, mantenga
el motor sin c6sped, hojas y grasa o aceite
en exceso.
• Revise el recogedor de c_sped a menudo
para vedficar si hay deterioro y desgaste y
cambie las bolsas desgastadas. Use
solamente las bolsas de repuesto
recomendadas per el fabdcante de su
segadora o qua cumplen con las
especificaciones de _ste.
• Siempre mantenga una cuchitla afilada en su
segadora.
• Stempra permita qua el motor se enfr{e antes
de guardarla an cualquier recinto cerradoo
• Nunca guarde la segadora con combustible
en et estanque dentro de un edificio en donde
los gases pueden alcanzar una llama
expuesta o una fuente de ignici6n, tal como el
calentador de agua, la estufa de calefacci6n,
la secadora de ropa, etc.
dl_l_Busque este slmbolo qua setiala las
precauciones de seguridad de impor-tancia.
Quiere decir- IiiATENCIONIII iHESTE
ALERTOlll SU SEGURtDAD ESTA
COMPROMETIDA.
_IbPRECAUCI6N: Siempre desconecte el
alambre de la bujla y p6ngalo donde no pueda
entrar en contacto con la bujia, para evitar el
arranque por accidente, durante la preparaci6n,
el transporte, el ajuste o cuando se hacen
reparaciones.
_IbPRECAUCt6N: Es conocido por el Estado
de California qua los gases de escape del motor
de este productor contienen qulmicos los
cuales a ciertos nivetes0 pueden ocasionar,
cdncer, defectos de nacimiento, y otros dalios
al sistema reproductivo.
18
Estos accesorioseslaban disponibles cuando se produjo la segadora. No son facllitados junto al
cortacesped. Est_n disponibles en la mayoda de las Uendasde Sears yen los centros de se_clo. La
mayoda de las tiendas Sears tambi_n pueden mandar a pedir partes de repuesto para usted, si les
proporciona el nOmero del modelo de su segadora. Algunos de estos accesorios tal vez no se apliquena
su segadora.
RENDIMIENTO DE LA SEGADORA
DESVIADOR DE RECORTES
PARA SEGADORAS CON DESCARGA TRASERA
i,,,, ,,,,,,,,,,,,, =,,, ,,,,,,,,,,,, ,, ,iul,,l/
RECOREDOR
PARA
SEGADORAS
CON DESCARGA
TRASERA
JUEGOS PARA LA ACOLCHADORA
MANTENIMIENTO DE LA SEGADORA
RECOREDOR
PAPA
SEGADORAS
CON DESCARGA
LATERAL
SILENC|ADORES FILTROS DE AIRE
ADAPTADORES
DE CUCH|LLA
,, ,, ,,,,,,
ESTABILIZADORES
ENVASES
DE GASOLINA
BUJ{AS
,,, ,,,,,,,,,,,,,
ACEITE
DEL MOTOR
Lea estas instruccionesyeste manual
completamente antes de tratar de montar u operar
su segadora nueva.
tMPORTANTE: Este cortac_sped viene SIN
ACEITE O GASOLINA en el motor°
Su segadora nueva ha sido montada en fa
f&bdca con la excapcibn de aquellas partes
que se deJaron sin montar par razones de
envlo. Todas las partes coma las tuercas, las
arandelas, los pernos, etco, que son
necesadas para completar el montaje hart sido
colocadas en la balsa de partes. Para
asegurarse que su segadora funcione en
forma segura y adecuada, todas las partes y
los artlculos de ferreteda que se monten
tienen que ser apretados seguramenteo Use
las herramientas correctas, coma sea
necesario, para asegurar que se apdeten
adecuadamente.
PARA REMOVER LASEGADORADE
LACAJA DE CARTON
•Remueva las partes sueltas que se incluyen
con la segadara,
•Carte las dos esquinas de los extremos de la
caja de carton y f_endael panel del extremo
plano_
• Remueva todo e! material de empaque, excepto
la curia enlre el mango superior y _t inferior,y la
curia que sujeta la barra de los control que
exige la presencia del operador junto con el
mango superior.
• Haga radar la segadora hacia afuera de la caja
de cart6n yrevlsela cuidadosamente para
verificar si todavfa quedan partes sueltas
adicionales.
COMa PREPARAR SU SEGADORA
PARA DESDOBLAR EL MAN GO
IMPORTANTE: Desdoble el mango con
cuidado para no pinchar o dafiar los cable de
control.
• Levante los mangos hasta que la secci6n
del mango infedor se asegure en su lugar,
en fa posici6n para segar.
• Remueva la curia protectora, levante la
seccibn de! mango superior hasta su lugar
en el mango inferior, y apriete ambas
manillas del mango.
t9
Remueva la cuSa del mango qua sujeta la
barra de los control qua exiga ta presencia
del operador junto con el mango superior.
El mango de la segadora puede ajustarse
seg_'m {e acomode para segar, Refi_rase a
"AJUSTE DEL MANGO" en la Secci6n de
Servicio y Ajustes de esta manual,
PARAINSTALAR LOSAGOESORIOS
Su segadora rue enviada lista para usarse como
una acoIchadora de capa vegetal, Para converf.Jda
de modo qua pueda ensacar o descargar,
RefiSrase a "Para ConverUr Ia Segadora" in la
secci6n de este manual
Barra de control que exiga la presencia
del ope rador --------_
Levantar __.___ _ Levantar
2O
FAMILIARICESE CON SU SEGADORA
LEA ESTE MANUAL DEL DUEI_O Y LAS REGLAS DE SEGURIDAD ANTES DE OPERAR SU
SEGADORA. Compare las ilustradonescon su segadora para familiarizarse con la ubicad6n de los
diversos controles y ajustes. Guards este manual para referenda en el futuro_
i i i !1! i, i,i ii1,11iiiiijl
Estos simbolos pueden apareser sobre su segadora o an la literatura proporcionada con el
producto. Aprenda y comprenda sus slgnificados,
ATTENCION O MOTOR MOTOR RJ_PIOO LENTO ESTRANGU COM- ACEITE PELtGRO GUARDE LA_
ADVERTENClA ENCENDII30 APAGADO LAC_0N t]U_TIB_.E k'tANO_ Y L{3S PIES LEJOS
Barra de controlque exlge la
presencla del operador
Cabte de control de la
velocidaddel motor
Cord6n
arrancador
ManiHadel mango
Tapa del relteno de ta
gaso[tna
Recogedor_
c_ped Filtro del airs
Tapa del deposfto de acelte del
motor con vadlla Indicadora de
nlvef
Puerta de la
acolchadora
/_justador de la rueda (en
cada rueda)
IMPORTANTE: Este cortac_sped viane SIN
ACEITE O GASOLINA en el motor.
CUMPLE CON LOS REQuiSiTos DE SEGURIDAD DE_CPSC
Las segadoras a motor, que se conducen desde la parte de atr_s, mtatodas, Sears, cumplen con los
est_ndares de seguridad del American National Standardslnstituta y de la U.S. Consumer Product
Safe_ Commission. La cuchilla _ira cuando el motor esl_ fuaci,onand.o,:.......
Barra de control qua extge la presencta del Cebador_ bombea combustible adidonal desde
operadorm _ene qua sujetarse abajo, junto con el el carburador al cilindro pare uso cuando se
mango, para hacer arrancar el motor. Su6ltela para necesita hacar arrancar un motor fr[o.
parar el motor. Cord6n arrancador--se usa para hacer arrancar
21el motor,

Laoperaci6ndecualquiersegadora
puedehacerquasaltenobjetos
extraCiosdentrodesusojos,Ioque
puedeproducirdaSosgravesen_stos.Siempre
usaanteojosdeseguridadoprotecci6nparalos
ojos_entrasoperasusegadoraocuandohaga
ajusteso reparaciones.Recomendamosuna
mascaradeseguddaddevisi6namplia,parauso
espejuelosoanteojosdeseguddadestandarte.
COMO USAR SU SEGADORA
VELOClDAD DEL MOTOR
La velocidad del motor se estableci6 en la
f&brica para un rendimiento 6ptimo. La
velocidad no se puede ajustar,
CONTROL DE ZONA DEL MOTOR
_IbPRECAUCI6N: Las regulaciones federales
exngen que sa instate un control para el motor
en esta segadora para reducir a un minimo el
dasgo de ]esionarse debido al contacto con la
cuchilla. Por ningOn motivo trate de eliminar la
funci6n del control del operador. La cuchilla gira
cuando el motor estd funcionando.
• Su segadora viena equipada con una barra de
control que exige la presencia del operador, Io
que requiem qua el operador est_ dates del
mango de la segadora para hacerla arrancar y
operarla,
PARA AJUSTAR LA ALTURA DE CORTE
•Levante las ruedas para el code bajo y baje las
ruedas para el code alto.
• Ajuste la altura de corte para que se acomode a
sus requisitos° La posici6n de! rnedio es la major
para la rnayorla de los c_spedes.
• Para cambiar la altura de corte, empuje la
palanca del ajustador hada la rueda. Mueva la
rueda hacia arriba o hacia abajo de modo qua
se acomode a sus requisitOSoAseg_rese qua
todas_asn]edasqueden igualmente ajustadas.
AVISO: El ajustador esta correctamente
colocado cuando las orejas de la placa est_n
insededas an el agujero del mango. Tambi_n, los
ajustes de 9 posiciones (si equipado) permiten qua
el mango pueda ser movido entre las orejas de la
placa.
Para un code alto, baJe Orejasde la placa
las ruedas _-_" _,-_.--.- _'__Ma_n
Paraun cortebaJo,levantelas ruedas
PARA CONVERTIR LA SEGADORA
Su segadora fue enviada lista para usarse
como acolchadora de capa vegetal. Para
convertida a una operaci6n de ensacado o de
descarga:
SEGADORAS CON DESCARGA
TRASERA
• Levantar la puerta trasera de cortac_sped y
colocar los ganchos del armaz6n de la
recolectora de hierba en los pasadores del
quicio de la puerta.
• Para pasar a la opercai6n de acolchamiento,
remover la recolectora de hierba y cerrar la
puerta trasera_
Pasador
de! quicio
SEGADORAS CON DESCARGA
LATERAL
•La puerta trasera tiene que estar cerrada.
• Abra la protecci6n contra la descarga y
instale el dasviador de contra la descarga
debajo de la protecci6n como se muestra.
• La segadora esta lista para la operaci6n de
la descarga.
* Para convertir a la operacl6n de ensacado o
de descarga, el desviador de la descarga
debe ser removido y la protecci6n contra la
descarga debe estar cerradao
PASOS SIMPLES DE RECORDAR
CUANDO CONVIERTA SU SEGADORA
PARA ACOLCHAMIENTO -
•Puerta trasera cerrada,
, La puerta de la acotchadora cerrada.
PARA ENSACAMIENTO TRASERO -
• Recogedor del c_sped instalado.
• La puerta de la acolchadora carrada_
PAPA DESCARGA LATERAL-
, Puerta trasera cerrada.
• La protecci6n contra la descarga lateral
instalada°
_I_PRECAUCION" No poner en marcha el
cortac_sped si la puerta trasera no est&
cerrada o la recolectora de hierba adecuada no
estd colocada. Nunca trate de operar la
segadora cuando se halla removido la puerta
trasera o cuando se ha removido a puerta
trasera o cuando est& un poco abierta.
22
Puerta de la
acolchadora
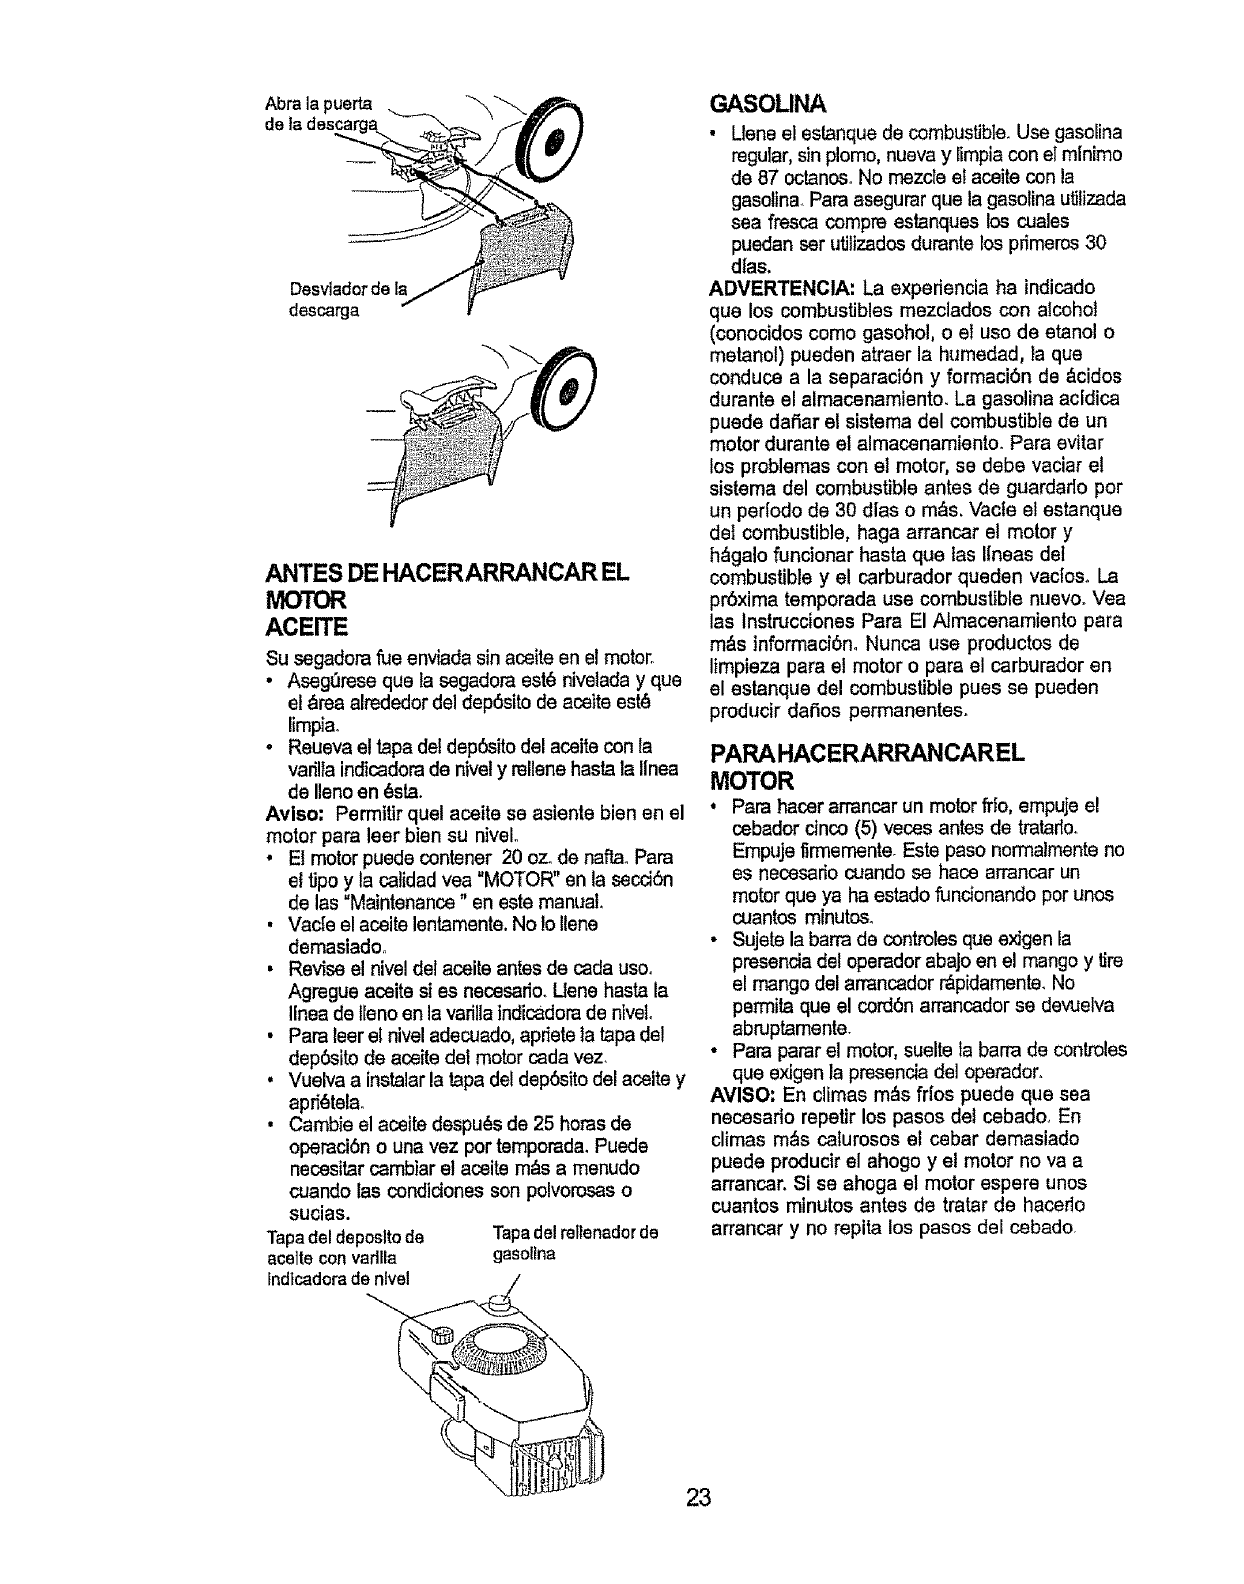
Abralapuerta _'-
Desviadorde la
descarga
ANTES DE HACERARRANCAR EL
MOTOR
ACEITE
Su segadora rue enviada sin aceite en e!motor.
•Aseg0rese que la segadora est_ niveiada y que
el ,_reaalrededor del depSsito de aceite est_
limpia.
•Reueva el tapa del depSsito del aceite con la
vari!ia indicadora de nivel y rellene hasfa la Ilnea
de Ileno en _sta.
Aviso: Permitir quel aceite se asiente bien en el
motor para leer bien su nivel.
• El motor puede contener 20 oz. de naff,a_Para
et tipo y ta calidad vea "MOTOR" en la secci6n
de las "Maintenance" en este manual
, Vacfe el aceite lentamente. No Ioliene
demasiadoo
• Revise el nivel del aceite antes de cada usoo
Agregue aceite si es necesario. Uene hasta la
llnea de tleno en la varilla tndicadorade niveL
• Para leer el nive! adecuado, apriete la tapa de!
dep6sitode aceite del motor cada vez.
•Vuelva a instalar la tapa del dep6sito del aceite y
apr_tala.
• Cambie el aceite despu_s de 25 horas de
operaci6n o una vez por temporada. Puede
necesitar cembiar el aceite m&s a menudo
cuando las condiciones son polvorosas o
sucias.
Tapadeldeposltode Tapadel retlenadorde
aceite convadlla gasollna
Indlcadorade nlvel
GASOLINA
• Uene el estanque de combusUble. Use gasolina
regular, sin plomo, nueva y Iimpiacon el mlnimo
de 87 octanes. No rnezcte et aceite con la
gasotina. Para asegurar que la gasolina u_lizada
sea fresca compre estanques los cuales
puedan ser utilizades durante los pr_meros30
dIas,
ADVERTENClA: La experiencia ha indicado
que los combustibles mezclados con alcohol
(conocidos como gasohol, o el uso de etanol o
metanol) pueden atraer la humedad, ta que
conduce a la separacibn y formaci6n de &cidos
durante el almacenamiento. La gasolina acldica
puede dafiar el sistema del combustible de un
motor durante el almacenamientoo Para evitar
los problemas con el motor, se debe vaciar et
sistema del combustible antes de guardado por
un per[odo de 30 dlas o m,_s. Vacte et estanque
dei combustible, haga arrancar el motor y
h_galo funcionar hasta que las Itneas det
combustible y el carburador queden vac|eso La
pr6xima temporada use combustible nuevo. Vea
las instrucciones Para El Atmacenamiento para
m&s informaci6noNunca use productos de
limpieza para el motor o para el carburador en
el estanque del combustible pues se pueden
producir datios permanentes.
PARAHACERARRANCAREL
MOTOR
,Para hacer arrancar un motor fifo, empuje e!
cebador cinco (5) veces antes de tratarEo.
Empuje firmemente. Este paso norrnaimente no
es necesario cuando se hace arrancarun
motor que ya ha estado fundenando por unes
cuantes minutes.
• Sujete la barra de controles que exigen la
presencia del operador abajo en el mango y tire
el mango del arrancador _pidamente. No
permila que el cord6n arrancador se devuelva
abruptamente.
•Para parar el motor, suelte la barra de conLroles
que exigen la presencia del operador.
AVISO: En climas m_s fries puede que sea
necesario repetir los pasos del cebado. En
climas m&s caturosos el cebar demasiado
puede producir el ahogo y el motor no va a
arrancar. Si se ahoga el motor espere unes
cuantos minutes antes de tratar de hacedo
arrancer y no repita los pasos del cebado.
23

CONSEJOS PARASEGAR
•Bajo dedas condiciones, tal como c_sped muy
alto, puede ser necesar_oel elsvar la altura del
corte para redudr el esfuerzo necesario para
empujar la segadora y para evitar sobrecargar
el motor, dejando montones de recortes de
c_sped. Puede que sea necesario reducir la
velocidad det recorrido yio haga funcionar ta
segadora sobre el _rea por segunda vez.
• Para un code muy pesado, reduzca el ancho
del corte pesando parcialmente per encima del
lugar anteriormente cortado y siegue
lentamente.
• Para un mejor ensacado del c_sped ypara la
mayoda de las condicionesde corte,la
vetoddad del motor debe ajustarse a la posici6n
de r_pido_
• Los poros en los recogedores de c_.sped de
tela pueden _lenarsecon mugre y polvo con el
use y los recogedores recaudar_n menos
c_sped. Para evitar _sto, rocle el recogedor
con la manguera de agua regularmente y d_jelo
secarse antes de usarto.
• Mantenga ta parle superior del motor, alrededor
del arrancador, despejada y sin recortes de
c_.spedy pajaoEsto ayudar_ el flujo del aim del
motor y extender_ su duraci6n.
CONSEJOS PARA SEGAR Y
ACOLCHAR
IMPORTANTE: Para obtener el mejor
rendimiento mantenga la caja de fa segadora sin
acumulacion de cesped y basura, Vea "limpieza"
en la seccion de "Mantenimento "de este
manual.
•La cuchilla acolchadora especial va a volver
a cortar los recortes de c6sped muchas
vecas, y los reduce en tamaSo, de modo
que si se caen en el c_sped se van a
dispesar entre _ste y no se van a notar.
Tambi6n, el c_sped acolchado se va a
deshacer r_pidamente entregando
substancias nutritivas para el c_sped.
Siempre acolche con la velocidad del motor
(cuchilla) m_s alta, puss as{ se obtendr& la
mejor acci6n de recorte de fas cuchillas.
• Evite cortar el c_sped cuando est_ mojado.
E! c6sped mojado tiende aformar montones
e interfiere con la acci6n de acolchado. La
meJor hora para segar el c_sped es
temprano en la tarde. A esa hora _ste se ha
secado y el &rea reci_n cortada no quedar&
expuesta al sol directo.
• Para obtener los mejores resultados, ajuste
la altura del corte de ia segadora de modo
que 6sta corte solamente e! tercio superior
de las hoJas de c_spedo En el case de que el
c_sped haya crecido demasiado, puede set
necesario el elevar la altura del corte
parareducir el esfuerzo necesario para
empujar la segadora y para evitar
sobrecargar el motor, dejando montones de
recortes de c_sped. Para un acolchamiento
muy pesado, reduzca et ancho del corte
pasando por encima del lugar anteriormente
cortado y siegue lentamente.
• Ciertos tipos de c_spsd y sus condiciones
pueden exigir que un &rea tenga que ser
acoIchada por segunda vez para esconder
completamente los recortes. Cuando se
haga el segundo code, siegue atravesado o
en forma perpendicuiar a la pasada del
primer code,
• Cambie su patr6n de corte de semana a
semana. Siegue de notre a sur una semana
y luego cambie de este a oeste la prSxima
semana, Esto evitar& que el c_sped se
enrede y cambie de direcci6n.
Max° 1/3
24
/i/J
/'_¢,_r FECHAS DE SERV|ClO
Reviser st hay su etadores sueltos If I,/' .......
S Llmpiadinspecc_onar el recogedor de
c_sped (el vlene equtpado) if V'
ELimptarla segadora _ tf
GLimptar debaJo de fa cublerta de ta trans-
Amtsibn.......(segadoras con poder propulsor) if ............
OD Revtsa!r fas coffees y las poleas tmpui- Vt
sadas (segadoras con poder ptopulsor) .................
Reviser o/alilar/camb,!a,[.la cuch$1ta Vt3.....
AR Table de lubr_caci0n t/* IP/
L$mpiar la batertafrecargar '
(ssgadoras con arr_nque ei_ctrico) if I/'4
i Reviser et nivel det aceite if
01C.n_bF_rst_Ceitedermoto_ V'li=
TLlmNat' st liltro de alre ....... '...........
O inspecci0nar el sllenclador v'
I_ L_mpi'aro/cambiar la' bujIa .......... Vr
C'ambiar el csrtucho de papal del l}Itre
V°2
deelre l/z
1-Camblar ml_s amenudo cuando se opera bale {:alga pes_da oasamb_eeleecon elias lemperaluras
2-Oar eewfclom&s a menudo cuendo se opera es condI{:Ioneeeuclese poJvofes_3e
3-Cambie tas {:uchilleem_e e menudo cuendo etegL_een terrsno erenoso
4- Ca_ar per48 ho_esel _rt de ta lemporeda
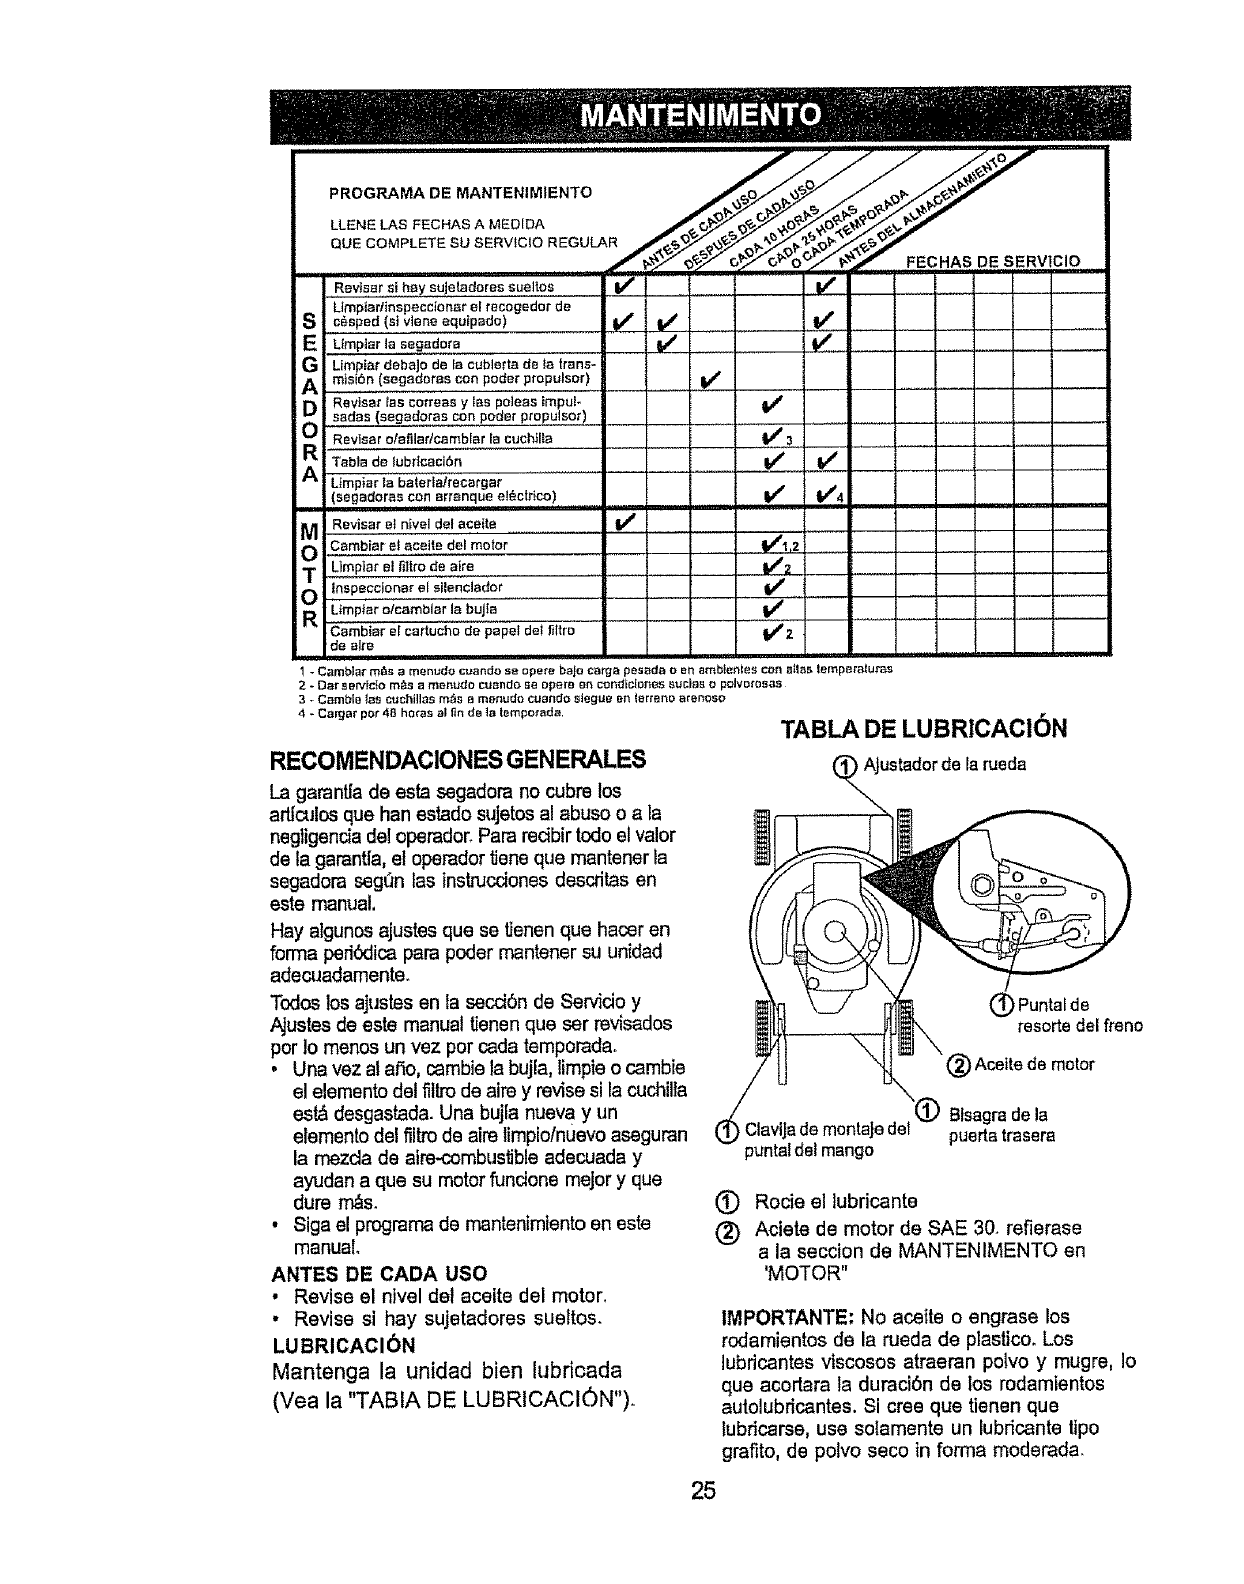
RECOMENDACIONES GENERALES
La garantiade esta segadorano cubre los
articulosque hanestado sujetos al abuse oa la
negligencia deloperador_Pare redbir todo el valor
de la garant{a,et operadortJenequa mantener la
segadora seg(_nlas tnstrucciones descritas en
este manual,
Hay atgunosajustes qua sa Uenenqua haosr en
forma pedOdicapare poder rnantener su unidad
adecuadamente,
To:loslosajustesan la section de Servido y
/_ustes de este manual Uenenqua ser revisados
per !o manes un vez per cada temporada,.
•Una vez al aSo, cambiela bujla,limpie o cambie
el elementodel filtro de aire y revisesi la cuchilla
est,:h,desgastada.Una bujia nueva yun
elementodet filtro de aim timpiolnuevo aseguran
la rnezda de aire-combustible adecuada y
ayudan a qua su motor funcione major y qua
dure rn_s.
• Siga el programa de rnantenimiento en este
manual
ANTES DE CADA use
• Revise el nivel del aceite del motor.
• Revise si hay sujetadores sueltos_
LUBRICACl6N
Mantenga la unidad bien lubdcada
(Vea la "TABIA DE LUBRICACIC')N")°
TABLA DE LUBRICACION
Ajustador de la rueda
ClaviJ=
puntaldel mango
(_) Puntaf de
resorte del freno
Acette de motor
Blsagra de la
puerta trasera
(_) Rocie el lubricants
(_ Aciete de motor de SAE 30. refierase
a la seccion de MANTENIMENTO en
'MOTOR"
IMPORTANTE: No aceite o engrase los
rodamientos de la rueda de plastico. Los
lubricantes viscosos atraeran polvo y mugre, Io
qua acortara la duracl0n de los rodamientos
autolubricantes. Si cree qua tienen que
Iubricarsa, use solamente un lubdcante ripe
grafito, de polvo seco in forma moderada_
25

ESPECIFICACIONES DEL PRODUCTO
NOMERO DE MODELO 917.388280
q0MERO DE SERIE
'ECHA DE COMPRA
CABALLOS DE FUERZA: 6.0
CAPACIDAD Y TIPO 1.5 Cuartos
DE GASOLINA: REGULAR SIN PLOMO
TIPO DE ACEITE: SAE 30 (sobre 32°F)
(API-SF/SH/SG) SAE 5W-30 (debajo 32°F)
CAPACIDAD DE ACEITE: 20 oz. de capacidad
BUJIA (ABERTURA: _030") CHAMPION RJ19LM O J19LM
TOLERANClA DE VALVULA: ADMISl6N: °004 - ,008
DESCARGA: .004 - .008
SENCEND1DO DE ESTADO
SOLIDO ABERTURA DE AtRE: .0125 IN,
TORSION DEL PERNO
DE LA CUCHfLLA: 35-40 FT, LBS.
El num6ro del nodelo y el de serie se encuentran en la calcomania adjunta a la parte
trasera de la caja de la segadora. Debe registrar tanto el num6ro de sede come la fecha de
compra y mantengalos en un lugar seguro para refencia en e! futuro.
SEGADORA • Remueva el perno de la cuchiUa gir&ndolo en
el sentido contrario en que giran las manillas
Siempre observe las reglas de segur_dad
cuando haga el mantenimiento°
LLANTA8
•Mantenga las llantas sin gasolina, aceite o
substancias quimicas para control de
insectos que pueden da5ar la goma,
•Evite los tocones, las piedras, las gdetas
proflmdas, los objetos afilados y otros
peligms que pueden daSar alas llantaso
CUIDADO DE LACUCHILLA
del reloj.
• Remueva la cuchilta y los artlculos de
ferreterla adjuntadores (el perno, la arandela
de seguridad y la arandela endureoida),
AVISO; Remueva et adaptador de la cuchilla y
revise el cubo interior de la ranura del
adaptador de la cuchilla. La ranura tiene que
estar en buenas condiciones para que funcione
en forma adecuada. Cambie el adaptador si
est_ dadado.
Para obtener los mejores resultados, la
cuchitla de la segadora tienen que mantenerse
afilada. Cambie la cuchilla doblada o daSada.
PAPA REMOVER LA CUCHILLA
• Desconecte el alambre de la bujia y p6ngalo
en donde no pueda entrar en contacto con
_stao
• Haga descansar la segadora en su lado.
Aseg_rese que el filtro de aire y que el
carburador queden mirando hacia arriba°
• Use un bloque de madera entre la cuchilla y
la caja de la segadora para evitar que la
cuchilla gire cuando se le quite el perno.
• Proteja sus manos con guantes y/o
envuelva la cuchilla con una tela gruesa°
PAPA CAMB1AR LA CUCHILLA
•Ponga el adaptador de la cuchilla en el
cigueCial del motor, Aseg,3rese que la ranura
del adaptador y que el chavetero del
cigueSal est_n alineados.
• Ponga ta cuchilla en el adaptador de _sta
alineando los dos (2) agujeros en la cuchilla
con las salientes elevadas en et adaptador,
• Asegt)rese de que el borde de safida de la
cuchilla (opuesto al borde afilado) est6 hacia
arriba hacia el motor.
, Instale el perno de la cuchilla con la arandela
de seguridad y la arandela endurecida en el
adaptador de la cuchilla y el cigueSat.
26
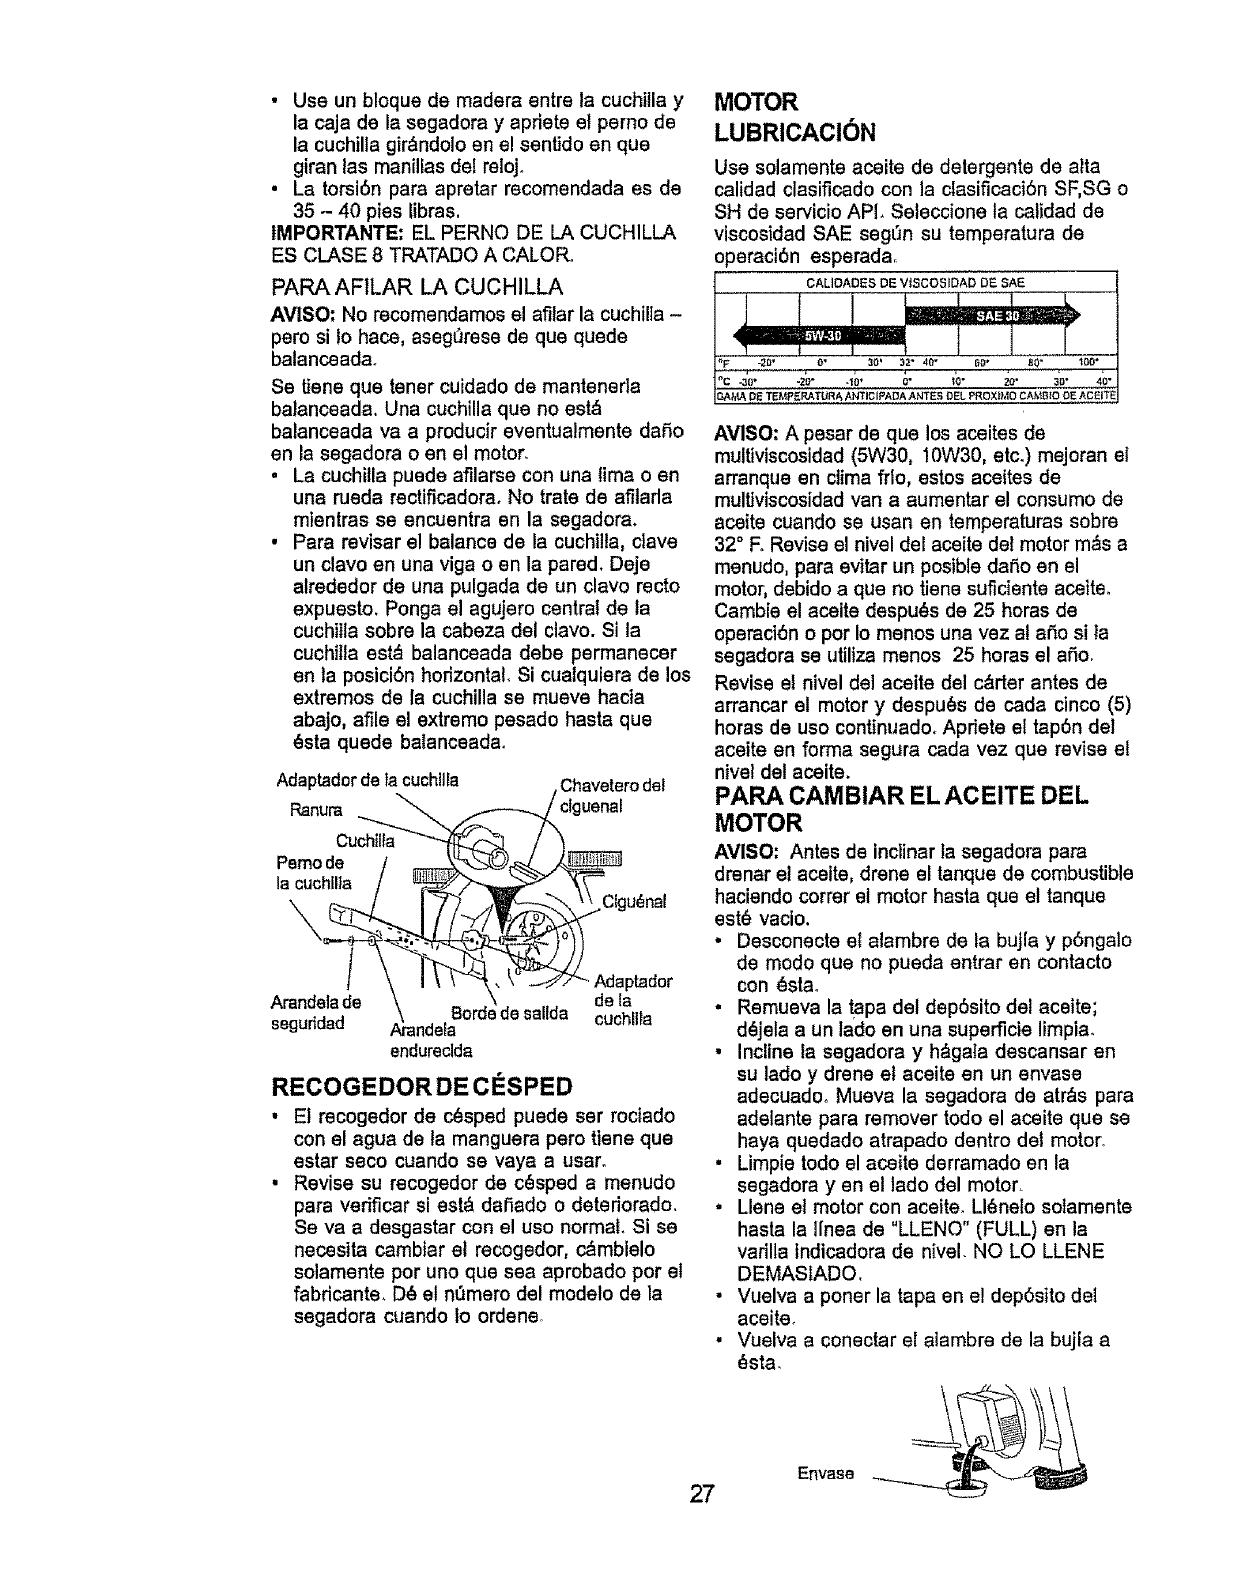
• Use un bloque de madera entre la cuchilla y
la caja de la segadora y apriete el perno de
la cuchilla girdndoio en e! sentido en que
giran las manillas del reloj.
• La torsi6n para apretar recomendada es de
35 - 40 pies libras,
IMPORTANTE: EL PERNO DE LA CUCHILLA
ES CLASE 8 TRATADO A CALORo
PARA AFILAR LA CUCHILLA
AVISO: No recomendamos el afilar la cuchi,a -
pero si Io hace, aseg_rese de que quede
balanceadao
Se Uene que taner cuidado de manteneda
balanceada. Una cuchilla que no est&
balanceada va a producir eventualmente dado
en la segadora o en el motor.
•La cuchilla puede afilarse con una lima o en
una rueda rectificadora. No trate de afilarla
mientras se encuentra en la segadora.
• Para revisar e! balance de la cuchilla, clave
un clavo en una viga o en la pared. Deje
alrededor de una pulgada de un clavo recto
expuesto. Ponga el agujero central de la
cuchilla sobre la cabeza del clavo. Si la
cuchitla est_ balanceada debe permanecer
en la posici6n horizontal. Si cualquiera de los
extremos de la cuchilla se mueve hacia
abajo, afile el extremo pesado hasta que
_sta quede balanceadao
Adaptadorde la cuchilla
Cuchtll_
Pemode r_"_
la cuchflla
Arandelade
segurtdad _krandelaBOrc
endureclda
•Chaveterode!
clguenal
i,.___ _--Clgu(_nal
_idaptador
_de de la
saUda cuchlita
RECOGEDOR DE C#SPED
• El recogedor de c_sped puede ser rociado
con el agua de la manguera pero tiene que
estar seco cuando se vaya a usar°
•Revise su recogedor de c_sped a menudo
para verificar si estCJdafiado o detedorado.
Se va a desgastar con el uso normal Si se
necesita cambiar et recogedor, c_mbielo
solamente por uno que sea aprobado por el
fabdcante. D_ el n0mero del modelo de la
segadora cuando to ordene.
MOTOR
LUBRICACi6N
Use solamente aceite de detergente de atta
calidad clasificado con la clasificaci6n SF,SG o
SH de servicio API. Seleccione ta calidad de
viscosidad SAE seg0n su temperatura de
operacibn esperadao
CALIOADES DE VtSCOSIDAD DE SAE
AVISO: A pesar de que los aceites de
multiviscosidad (5W30, 10W30, etc.) mejoran el
arranque en clima frlo, estos aceites de
multJviscosidad van a aumentar el consumo de
aceite cuando se usan en temperaturas sobre
32° E Revise el nivel del aceite del motor m_,s a
menudo, para evitar un posible dado en el
motor, debido a que no tiene suficiente aceiteo
Cambie el aceite despu_s de 25 horas de
operaci6n o por io menos una vez a! ado si ta
segadora se utiliza menos 25 horas el ado.
Revise e! nivel del aceite del carter antes de
arrancar et motor y despu_s de cada cinco (5)
horas de uso continuado. Apriete el tap6n de]
aceite en forma segura cada vez que revise e!
nivel del aceite.
PAPA CAMBIAR EL AGEITE DEL
MOTOR
AVISO: Antes de inclinar la segadora para
drenar el aceite, drene el tanque de combustible
haciendo cotter el motor hasta que el tanque
est6 vacio.
•Desconecte el alambre de la buJlayp6ngalo
de modo que no pueda entrar en contacto
con _stao
•Remueva la tapa del dep6sito del aceite;
d_jela a un lado en una superficie limpia.
•Incline la segadora y h_gala descansar en
su lado ydrene el aceite en un envase
adecuado. Mueva la segadora de atr&s para
adelante para remover todo el aceite que se
haya quedado atrapado dentro del motor,
• Limpie todo el aceite derramado en la
segadora yen el lado del motor,
° Llene el motor con aceiteoLl_nelo sotamente
hasta la l[nea de "LLENO" (FULL) en la
varilla indicadora de nivel_NO LO LLENE
DEMASIADO.
• Vuelva a poner la tapa en el dep6sito deI
aceite+
• Vuelva a conectar el alambre de la bujla a
_sta.
ERvsse
27
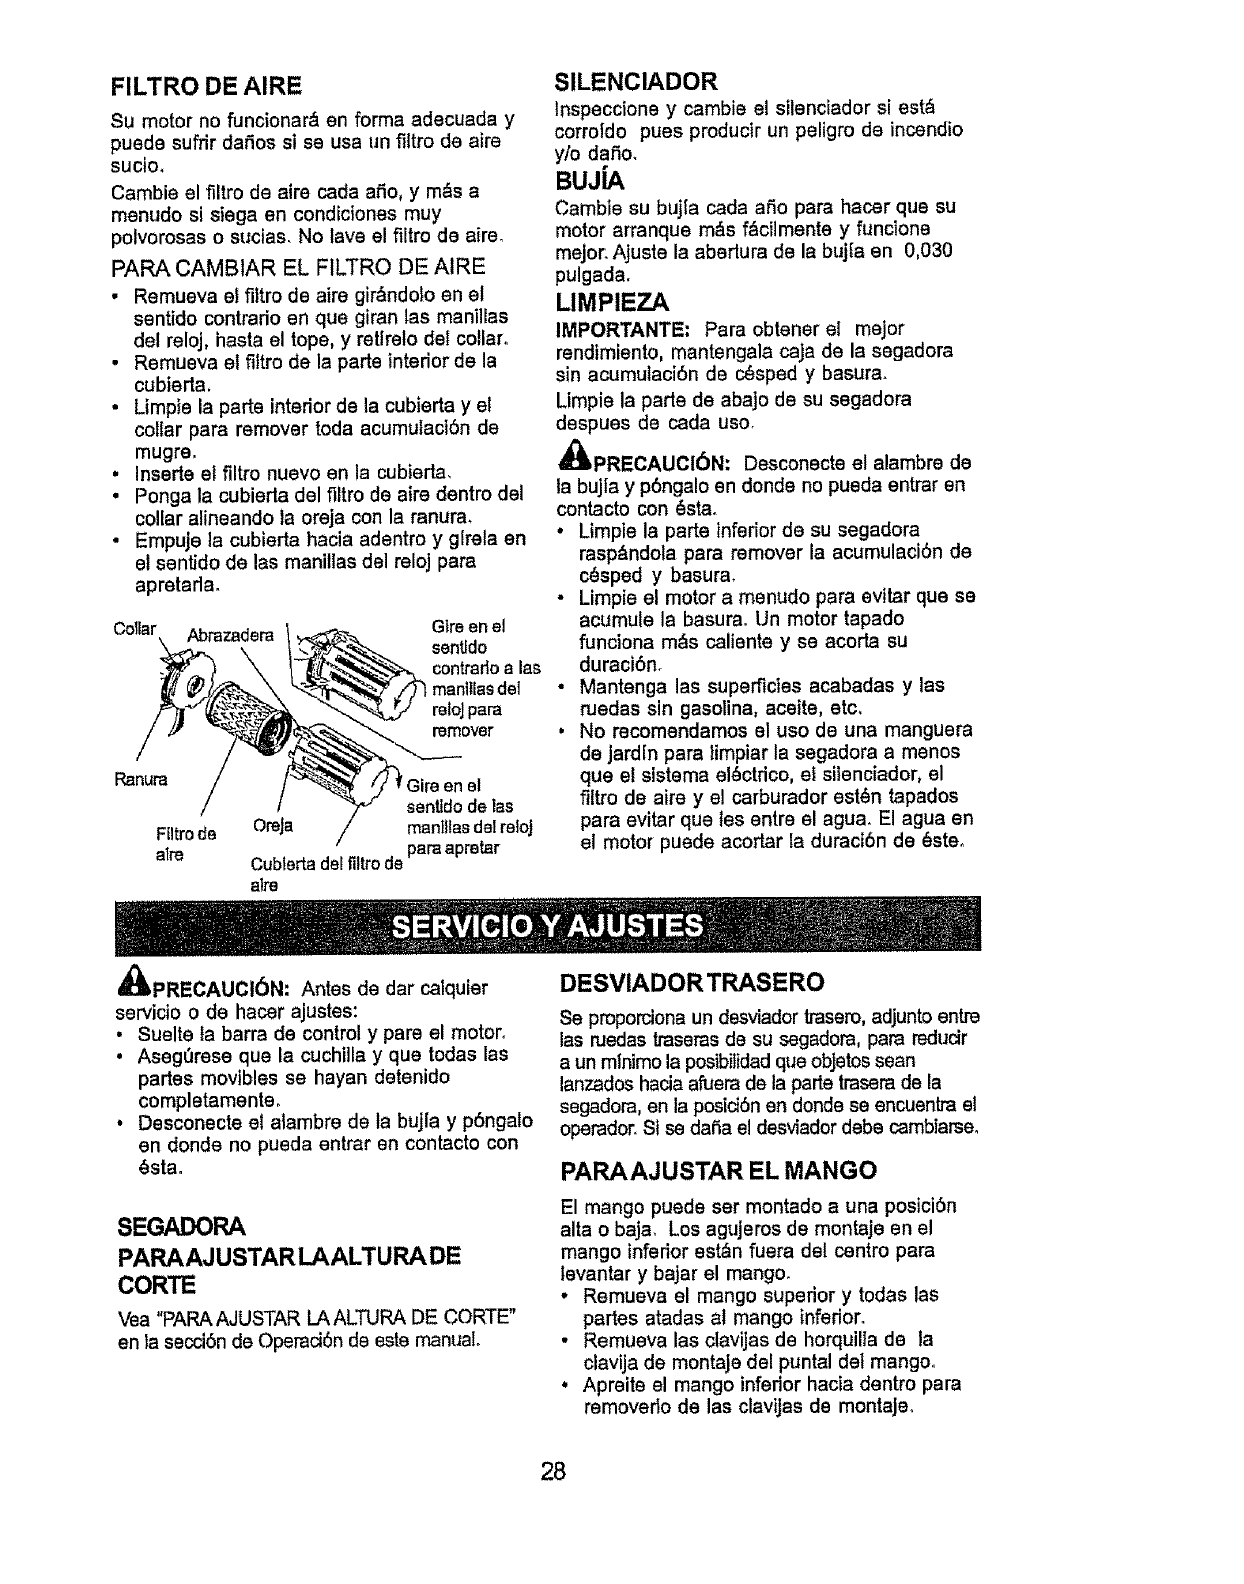
FILTRO DE AIRE
Su motor no funcionar& en forma adecuada y
puede sufrir da_os si se usa un f_ltro de aire
sucio.
Cambie el filtro de aire cada aSo, y m&s a
menudo si siega en condiciones muy
polvorosas o sucias. No lave el filtro de aire.
PAPA CAMBIAR EL F1LTRO DE AIRE
•Remueva el filtro de aim gir,'_ndoloen et
sentido contrario an qua giran las manillas
del reloj, hasta el tope, y retlrelo del collar°
•Remueva el fittro de la parte interior de la
cubierta.
• Limpia la parta interiorde la cubierta yel
collar para remover toda acumulaci6n de
mugre,
•Inserte el filtro nuevo en la cubierta,
• Ponga la cubierta del filtro de aire dentro del
collar alineando la oreja con la ranura,
•Empuje la cubierta hacia adentro y glrela en
el sentido de las manillas del reloj para
apretadao
Collar Abrazadera Glre en el
sentfdo
contraflo alas
manitlas dei
reloJpara
remover
Ranura _el
sentldo de las
FIItro 6e OreJa mantltas dei reloJ
/
atre Cublerta del filtro de para apmtar
aim
SILENCIADOR
lnspeccione y cambie el silenciador si est_
corroldo pues producir un paligro de incendio
y/o daSo.
BUJiA
Cambie su bujla cada aSo para hacer qua su
motor arranque m&s f,'_cilmente y funcione
mejor_Ajusta la abertura de la bujfa en 0,030
pulgada.
LIMPIEZA
IMPORTANTE: Para obtener el major
rendimlento, mantengala caja de la segadora
sin acumutacibn de c_sped y basura.
Llmpie la parle de abajo de su segadora
despues de cada uso.
PRECAUCI6N: Desconecte el alambre de
la buj|a y p6nga!o en donde no pueda entrar en
contacto con _sta.
•Limpie la parte inferior de su segadora
rasp_,ndola para remover la acumulaci6n de
c_sped y basura.
*Limpie el motor a menudo para evitar que sa
acumule la basura. Un motor tapado
funciona m_s caliente y sa acorta su
duracibn.
• Mantenga las superficies acabadas y las
ruedas sin gasolina, aceite, etc.
,No recomendamos el uso de una manguera
de jardin para limpiar la segadora a menos
que e! sistema el_ctrico, el siienciador, el
filtro de aire y el carburador est_n tapados
para evitar qua les entre e! agua° El agua en
el motor puede acortar la duracl6n de _ste.
_IiPRECAUCION: Antes de dar calquier
servicio ode hacer ajustes:
• Suelte la barra de control y pare el motor.
•Aseg_rese que la cuchilla y que todas las
partes movlbles se hayan detenido
completamente.
• Desconecte el alambre de la bujl'a y p6ngalo
en donde no pueda entrar en contacto con
_sta.
SEGADORA
PARAAJUSTAR LAALTURA DE
CORTE
Vea "PAPA AJUSTAR LAALTURA DE CORTE"
en la secci6n de Operaci6n de este manual
DESVIADORTRASERO
Se pmporciona un desviador trasero, adjunto entre
las ruedas traseras de su segadora, para reducir
a un mlnimo la posibilidad que objetos sean
lanzados hacia afuera de la parle traserade la
segadora, en la posidbn en donde se encuentrael
operador. St se daSa el desviador debe cambiarse.
PARAAJUSTAR EL MANGO
El mango puede set montado a una posici6n
alta o baja. Los agujeros de montaje an el
mango inferior est_n fuera del centro para
levantar y bajar el mango.
•Remueva el mango superior y todas las
partes atadas at mango inferior.
•Remueva las clavijas de horquilla de la
clavija de montaje del puntal del mango.
,Apreite el mango inferior hacia dentro para
removerio de las ciavijas de montajeo
28
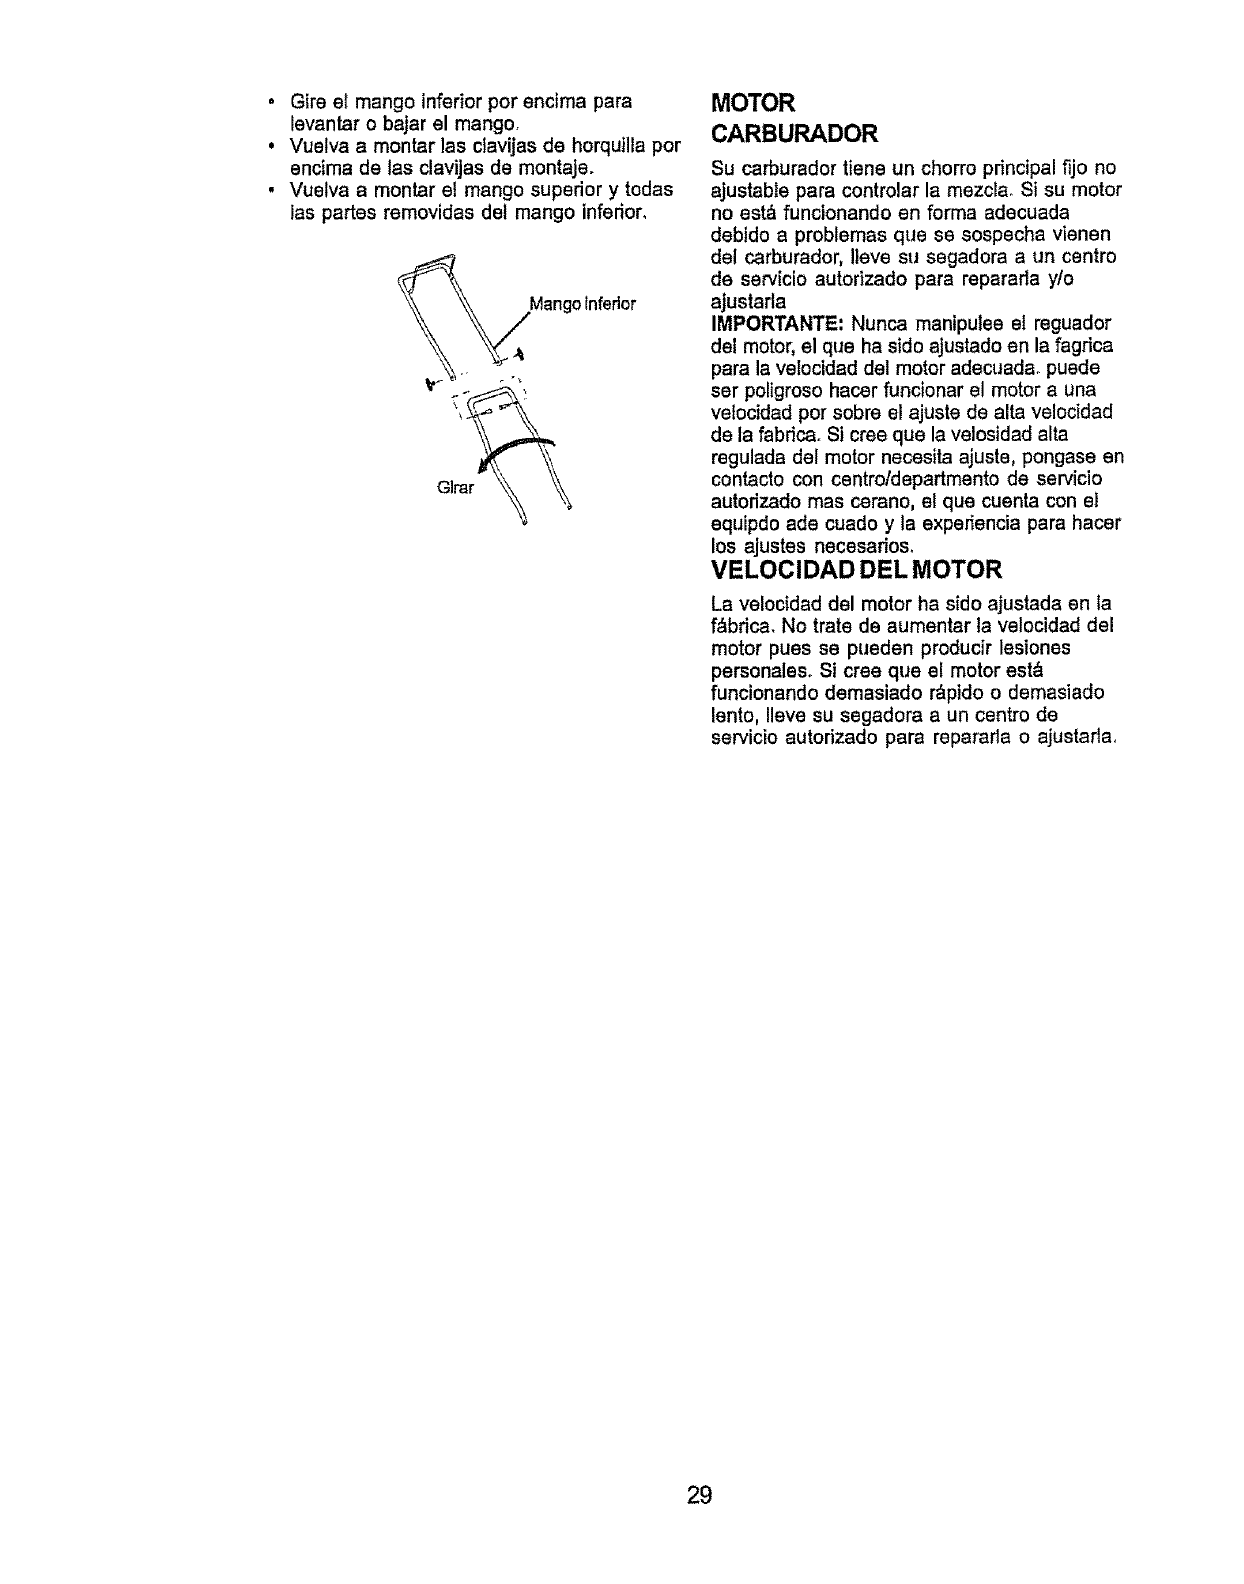
•Gire el mango inferior por enctma para
levantar o bajar el mango,
.Vuelva a montar las davijas de horquilla por
encima de las clavijas de montaje,
•Vuelva a montar el mango supedor y todas
las partes removidas de! mango inferior,
MOTOR
CARBURADOR
Su carburador tiene un chorro principal fijo no
ajustable para controlar la mezcla, Si su motor
no est_ funcionando en forma adecuada
debldo a problemas que se sospecha vienen
del carburador, Ileve su segadora a un centro
de servicio autofizado para raparada y/o
ajustarla
IMPORTANTE: Nunca manipulee el reguador
del motor, el que ha sido ajustado en la fagrica
para la velocidad del motor adecuada, puede
ser poligrosohacer funcionar el motor a una
velocidad pot sobre el ajuste de alta velocidad
de la fabdca, Si crae que la velosidad alta
regulada del motor necasita ajuste, pongase en
contacto con centro/departmento de servicio
autorizado mas cerano, el que cuanta con el
equipdo ade cuado y la expe_encia para hacer
los ajustes necesarios,
VELOClDAD DEL MOTOR
La velocidad del motor ha sido ajustada an la
f_lbrica, No trate de aumentar la velocidad del
motor pues se pueden producir lesionas
personales. Si crae que el motor est&
funcionando demasiado _pido o demasiado
lento. Ileve su segadora a un centro de
servicio autorizado para reparada o ajustafla,
29
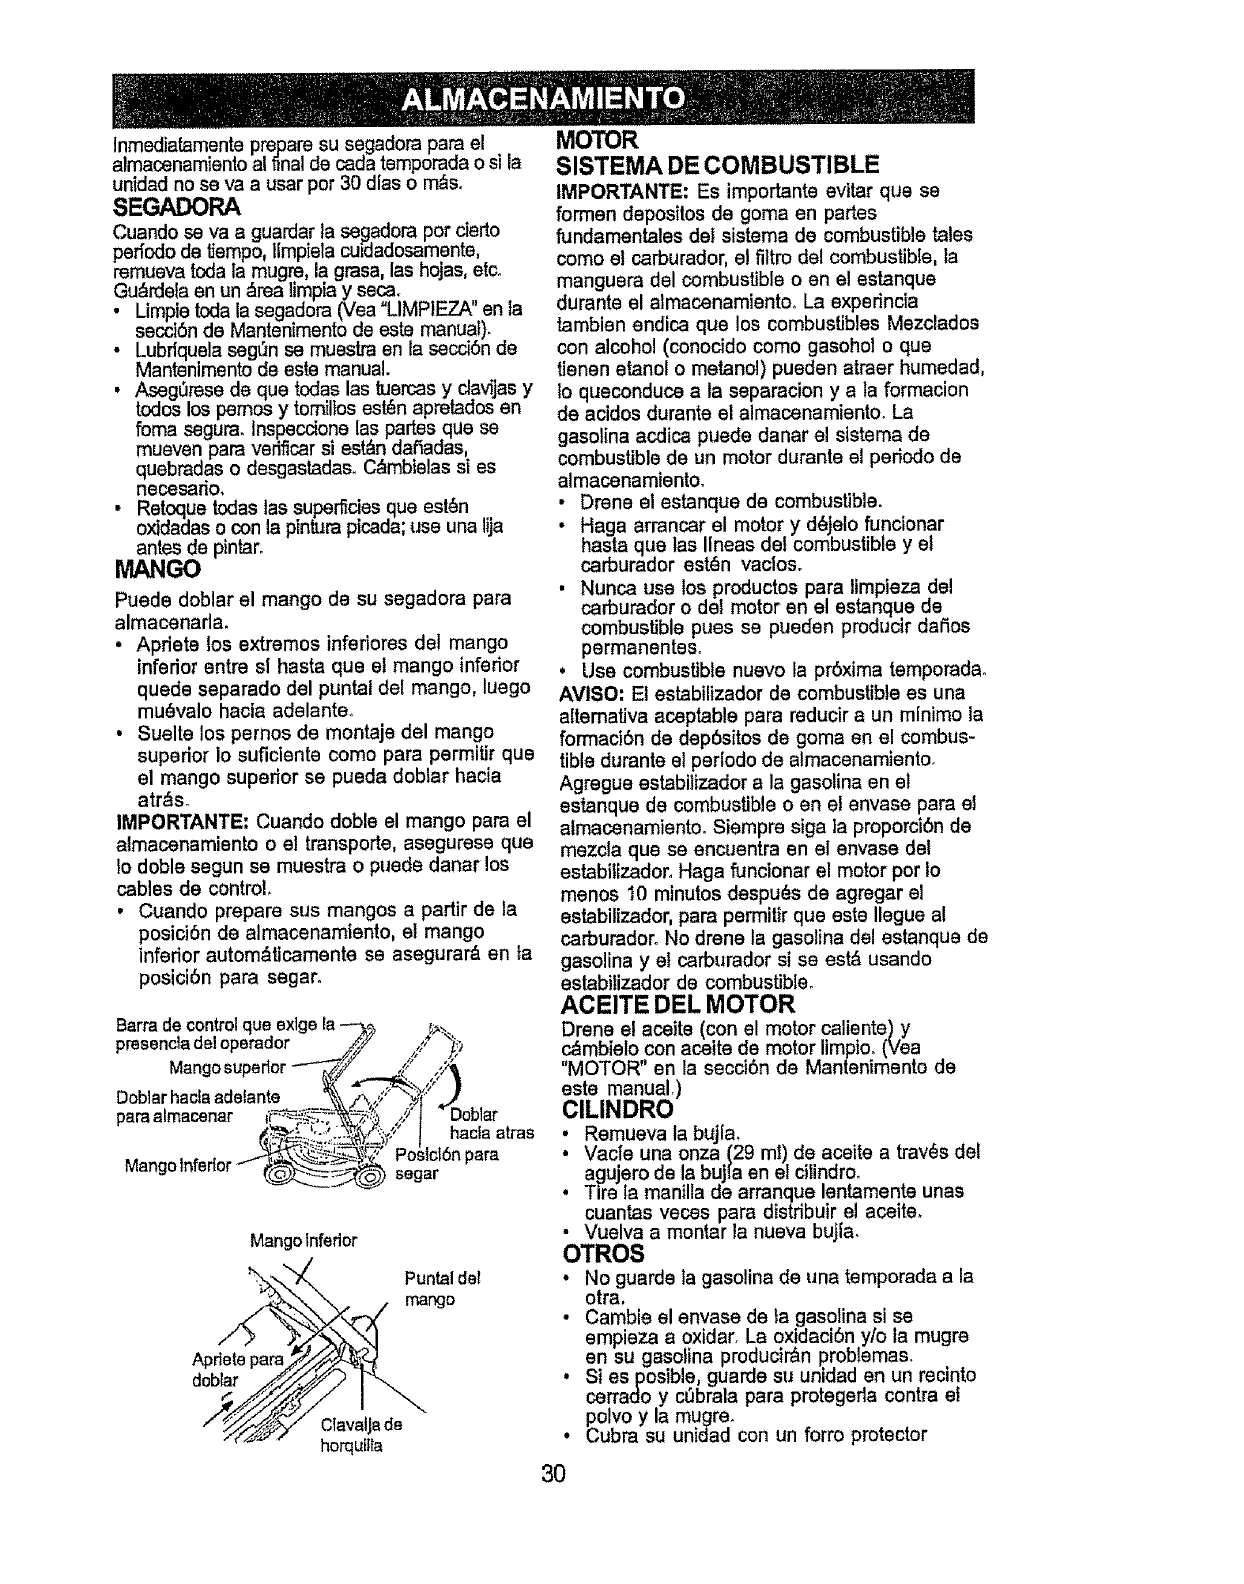
Inmediatamente prepare su segaclora para el
almacenamiento al final de cada temporada o si la
unidad no se vaa usar por 30 dins o m&s.
SEGADORA
Cuando se vaa guardar la segadora por cierto
peffodo de tiempo, Ilmpiela cuidadosamente,
remueva toda la mugre, la grasa, Ins hojas, etc_
Gu_rdela en un _rea limpia y seca.
• Limpie toda la segadora (Vea "LIMPIEZA" en la
secciSn de Mantenimento de este manual).
• Lubrlquela segun se muestra en la secciSn de
Mantenimento de este manual.
• Aseg_rese de qua todas Ins tuercas y,clavijas y
todos los pemos y tomillos esten apre[aaos en
foma segura. Inspeccione Ins partes qua se
mueven para verificar si est_n daffadas,
quebradas o desgastadas_ C&mbtelas si es
necesano.
•Retoque todas Ins superficies que est_n
oxidadas o con la pintura picada; use una lija
antes de pintar.
MANGO
Puede doblar el mango de su segadora para
almacenarla.
•Apdete los extremos inferiores del mango
inferior entre sl hasta qua el mango inferior
quede separado del puntal del mango, luego
mu_valo hacia adelanta.
• Suelte los pernos de montaje del mango
superior Io suficiente como para permitir qua
el mango superior se pueda doblar hacia
atr_s-
IMPORTANTE: Cuando doble el mango para el
almacenamiento o el transporte, asegurese que
to doble segun se muestra o puede danar los
cables de control,
•Cuando prepare sus mangos a partir de la
posicibn de almacenamiento, el mango
inferior autom&ticamente se asegurar& en ta
posiciSn para segaro
Barrade controlque exlge la
presencladel operador ////
Mangosuperior-'--_
Dobtarhacla adelante .... _.Z
paraalmacenar i'__,_-_
MangoInferior _-'
,,.YI Doblar
!_),;.;"_ hacFaarras
"PositiOnpara
_ segar
MangoInferior
//_ _._. _._ Puntaldel
mango
doblar ,_
/_/" Clavallade
..... horquflla
MOTOR
SISTEMA DE COMBUSTIBLE
IMPORTANTE: Es importante evitar que se
formen depositos de goma en partes
fundamentales del sistema de combustibletales
como el carburador, el filtro de! combustible, la
manguera del oombustible o en el estanque
durante el almacenamientoo La experincia
tambien endica qua los combustibles Mezclados
con alcohol (conocido como gasohol o qua
tienen etanol o metanol) pueden atraer humedad,
1oqueconduce a la separacion y a la formacion
de acidos durante el almacenamiento° La
gasolina acdica puede danar el sistema de
combustible de un motor durante el periodo de
almacenamlentoo
• Drene et estanque de combustible.
•Haga arrancar el motor y d_jelo funcionar
hasta qua las linens del combustible y el
carburador est_n vacloso
• Nunca use los productos para limpieza del
carburador o def motor en el estanque de
combustible pues se pueden producir daffos
permanenteso
oUse combustible nuevo la pr6xima temporadao
AVlSO: Et estabilizador de combustible es una
altemativa acaptable para reducir aun minimo la
formaciOn de dep6sitos de goma en e! combus-
tible durante el periodo de almacanamiento.
Agregue estabilizador a la gasolina en el
estanque de combustible o en el envase para el
almacenamiento. Siempre sign la proporciOn de
mezcla qua se encuentra en el envase de!
estabitizadoro Haga funcionar el motor por Io
menos 10 minutos despu_s de agregar el
estabilizador, para permitir que este Ilegue al
carburador. No drene la gasolina del estanque de
gasolina y el carburador sise est,. usando
estabilizador de combustible.
ACEITE DEL MOTOR
Drene el aceite (con el motor caliente) y
c_mbielo con aceite de motor limpio. (Vea
"MOTOR" en la secciOn de Mantenimento de
este manual.)
ClLINDRO
• Remueva la bujia.
i acle una onza (29 ml) de aceite a tray,s dela_ujero de la buj{a en el cilindro.
Tire la manilla de arranque lentamenta unas
cuantas veces para distribuir el aceite_
• Vuelva a montar la nueva bujia.
OTROS
•No guarde la gasolina de una temporada a la
otra.
i ambie el envase de la gasotina si se
empie za a oxidar. La oxldacibn y/o la mugre
en su g_solina produci_n problemas.
Si espo, ;ible, guarde su unidad en un recinto
cerrado '_ cubrala para protegefla contra el
polvo y mugre.
•Cubra su unidad con un forro protector
3O
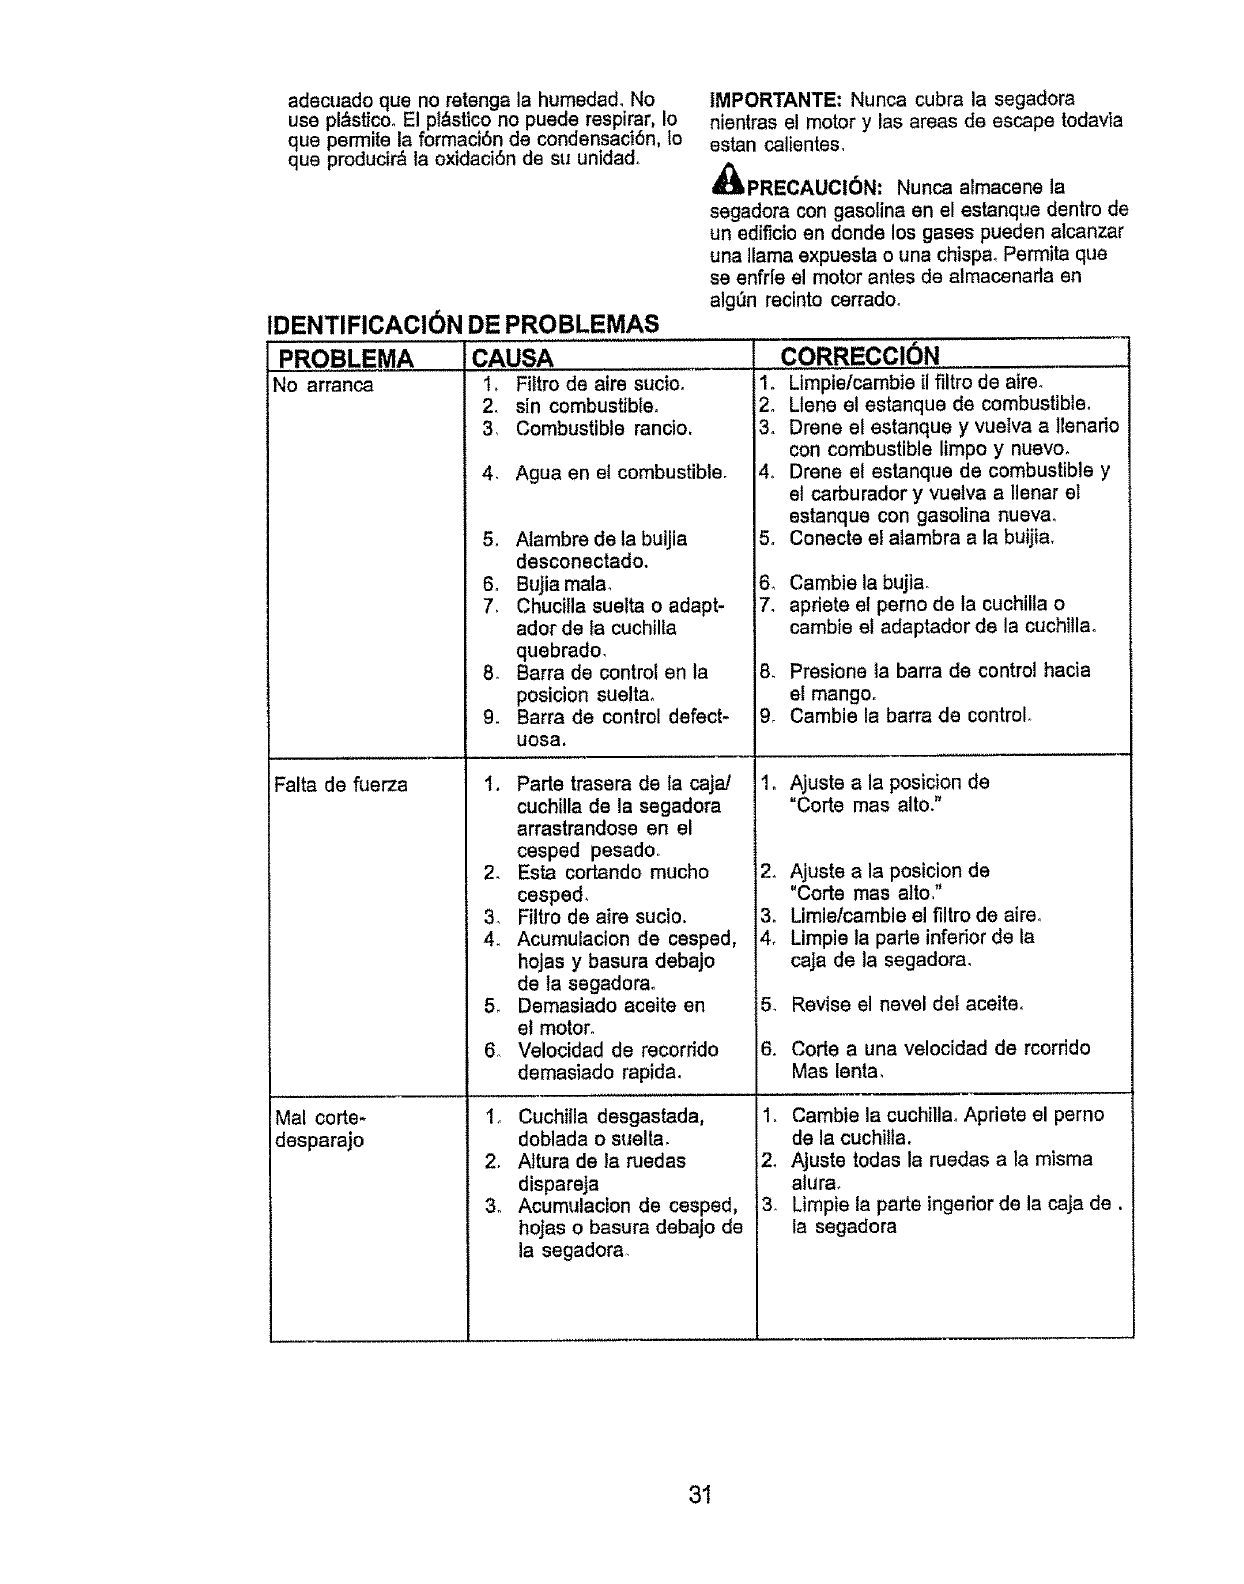
adecuado que no retenga la humedad. No
use pl&sticoo El pl_sttco no puede respirar, I0
que permite la formaci6n de condensaci6n, to
que producir& la oxidaci6n de su unidad.
IDENTIFICACI6N DE PROBLEMAS
PROBLEMA CAUSA
No arranca
Falta de fuerza
Mal corte-
desparajo
|MPORTANTE: Nunca cubra la segadora
nientras el motor y las areas de escape todavia
estan calientes.
PRECAUCl6N: Nunca almacane la
segadora con gasolina en el estanque dentro de
un edificio en donde los gases pueden atcanzar
una llama expuesta o una chispa_ Permita que
se enfr[e el motor antes de almacenafla en
alg_n recinto carradoo
I. Filtro de aire sucioo
2. sin combustible°
3, Combustible rancio,
4. Agua en et combustible.
5. Alambre de la buijia
desconectado.
6. Bujia mala_
7_ Chucilla suelta o adapt-
ador de la cuchilla
quebrado.
8. Barra de control en la
posicion sueltao
9. Barra de control defect-
uosa,
t. Parle trasera de la caja!
cuchi!la de la segadora
arrastrandose en el
cesped pesado,
2. Esta cortando mucho
cesped.
3. Filtro de aire sucio.
4. Acumulacion de cesped,
hojas y basura debajo
de la segadorao
5. Demasiado aceite en
et motor.
6 Velocidad de recorrido
demasiado rapida.
1o Cuchilla desgastada,
doblada o suelta.
2. Aitura de la ruedas
dispareja
3o Acumulacion de cesped,
hojas o basura debajo de
la segadom
CORRECClC)N
1. Limpielcambie il filtro de aire_
2. Llene el estanque de combustible.
3. Drene el estanque y vuelva a llenado
con combustible limpo y nuevo.
4. Drene el estanque de combustible y
el carburador y vuetva aIlenar el
estanque con gasolina nueva°
5. Conecte el atambra a la buijia.
6_ Cambie la bujla_
7. apriete el perno de la cuchilla o
cambie el adaptador de la cuchilla.
8. Presione ta barra de control hacia
el mango°
9. Cambie la barra de control.
1. Ajuste a la posicion de
"Corte mas alto."
2. Ajuste a la posicion de
"Code mas alto."
3. Limielcambie el filtro de aireo
4. Limpie la parle infedor de la
caja de la segadora,
5. Revise el nevel del aceite.
6. Corte auna velocidad de rcorrido
Mas lenta_
1. Cambie la cuchillao Apriete el perno
de la cuchitla.
2. Ajuste todas la ruedas a la misma
alurao
3. Limpie la parte ingerior de la caja de.
la segadora
31
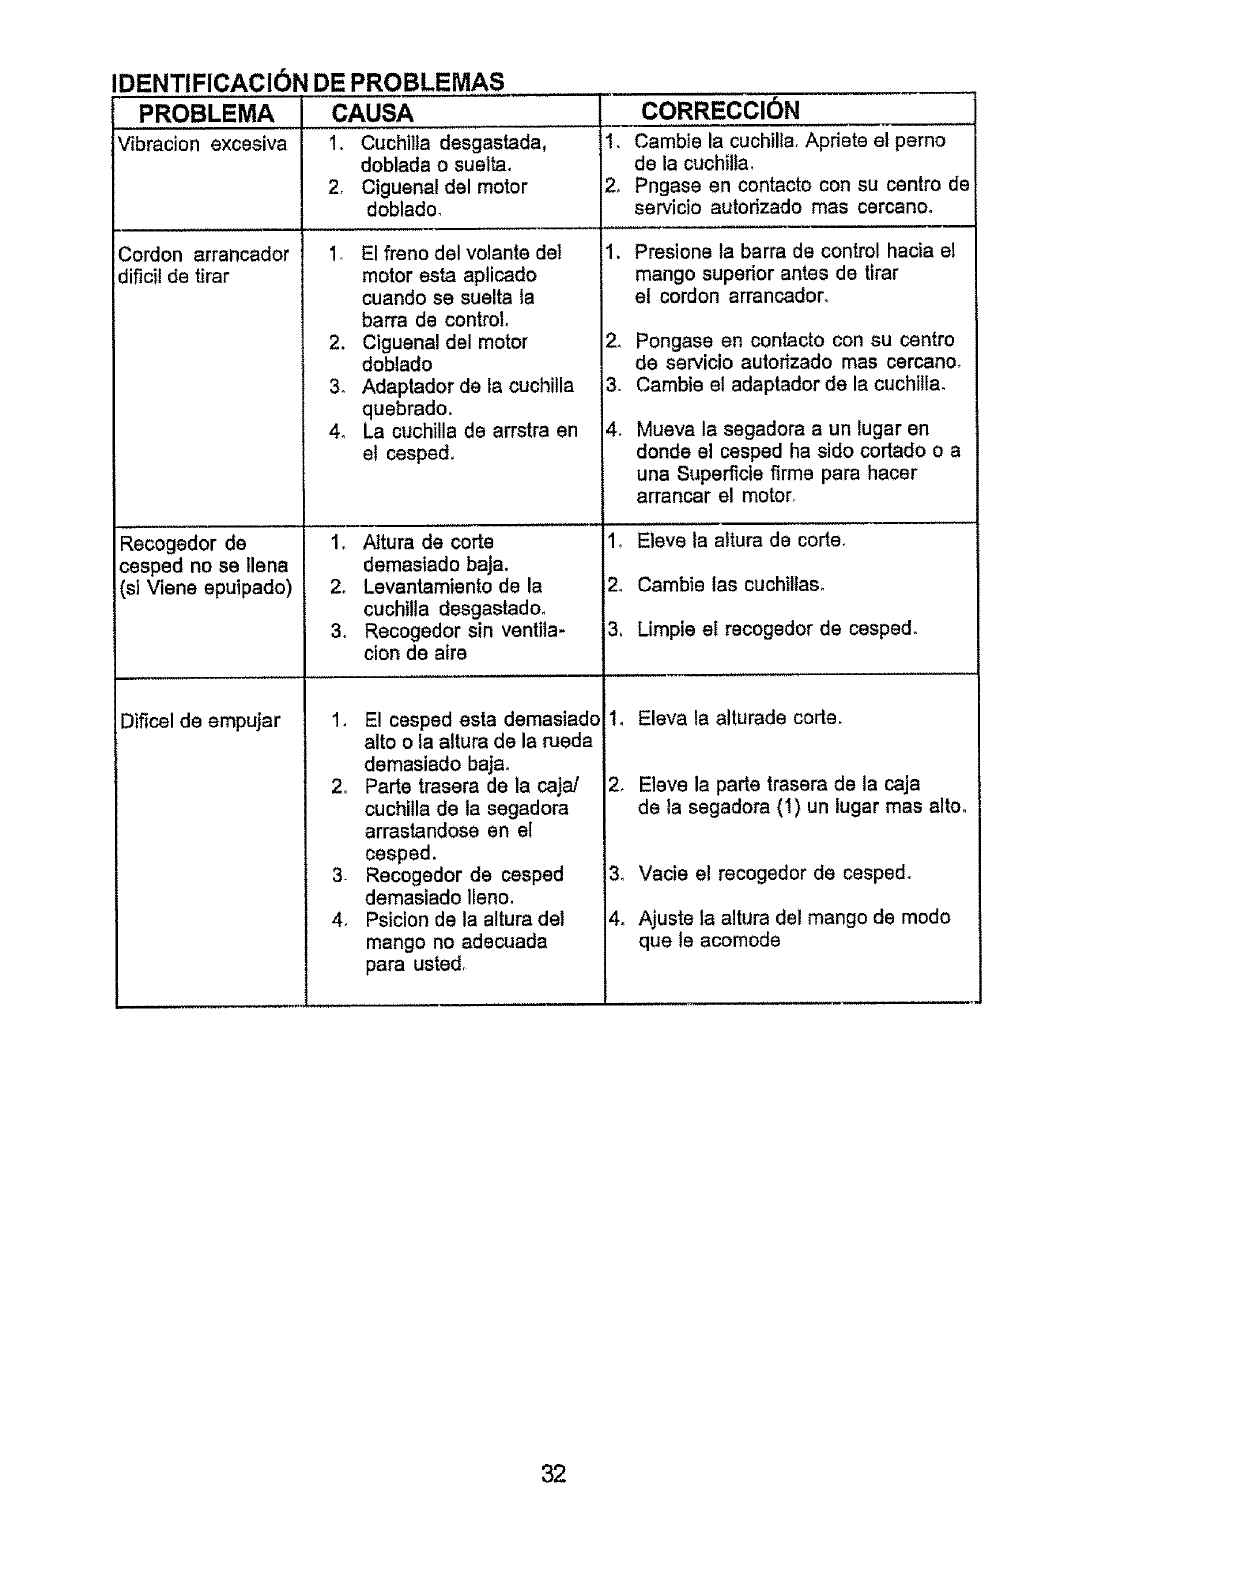
IDENTIFICACI6N DE PROBLEMAS
PROBLEMA CAUSA
V_bracion excesiva 1. Cuchilla desgastada,
Cordon arrancador
dificit de tirar
Recogedor de
cesped no se liana
(sl Viena epuipado)
doblada osuelta,
2, Ciguena! del motor
doblado_
1_ El franc del volante de!
motor esta aplicado
cuando se suelta ta
barra de control,
2. Ciguenal del motor
doblado
3_ Adaptador de la cuchilla
quebrado.
4. La cuchilla de arrstra en
el cesped,
1_ Ntura de corte
demasiado baja.
2. Levantamiento de la
cuchilla desgastado.
3. Recogedor sin ventila-
cion de aire
1, E! cesped esta demasiado
alto o la altura de la rueda
demasiado baja.
2, Parle trasera de la caja/
cuchilla de la segadora
arrastandose en el
cesped.
3 Recogedor de cesped
demasiado llano.
4, Psicion de ta altura del
mango no adecuada
para usted,
Dificel de empujar
CORRECCI6N
1. Cambie la cuchilla, Apriete el perno
de la cuchilta,
2, Pngase en contacto con su centro de
servicio autorizado mas cercano.
1. Presione la barra de control hacia el
mango superior antes de tirar
el cordon arrancador_
2_
3.
4,
In
2_
3,
Pongase en contacto con su centro
de servicio autorizado mas cercano_
Cambie el adaptador de la cuchilla,
Mueva la segadora a un lugar en
donde el cesped ha sido cortado o a
una Superficie firme para hacer
arrancar el motor,
Eleve la altura de corte_
Cambie las cuchillas°
Limpie ei recogedor de cesped°
!. Eleva la alturade corte.
2, Eleve la parte trasera de la caja
de la segadora (1) un lugar mas altoo
3. Vacie el recogedor de cespedo
4_ Ajuste la altura del mango de modo
qua le acomode
32

33
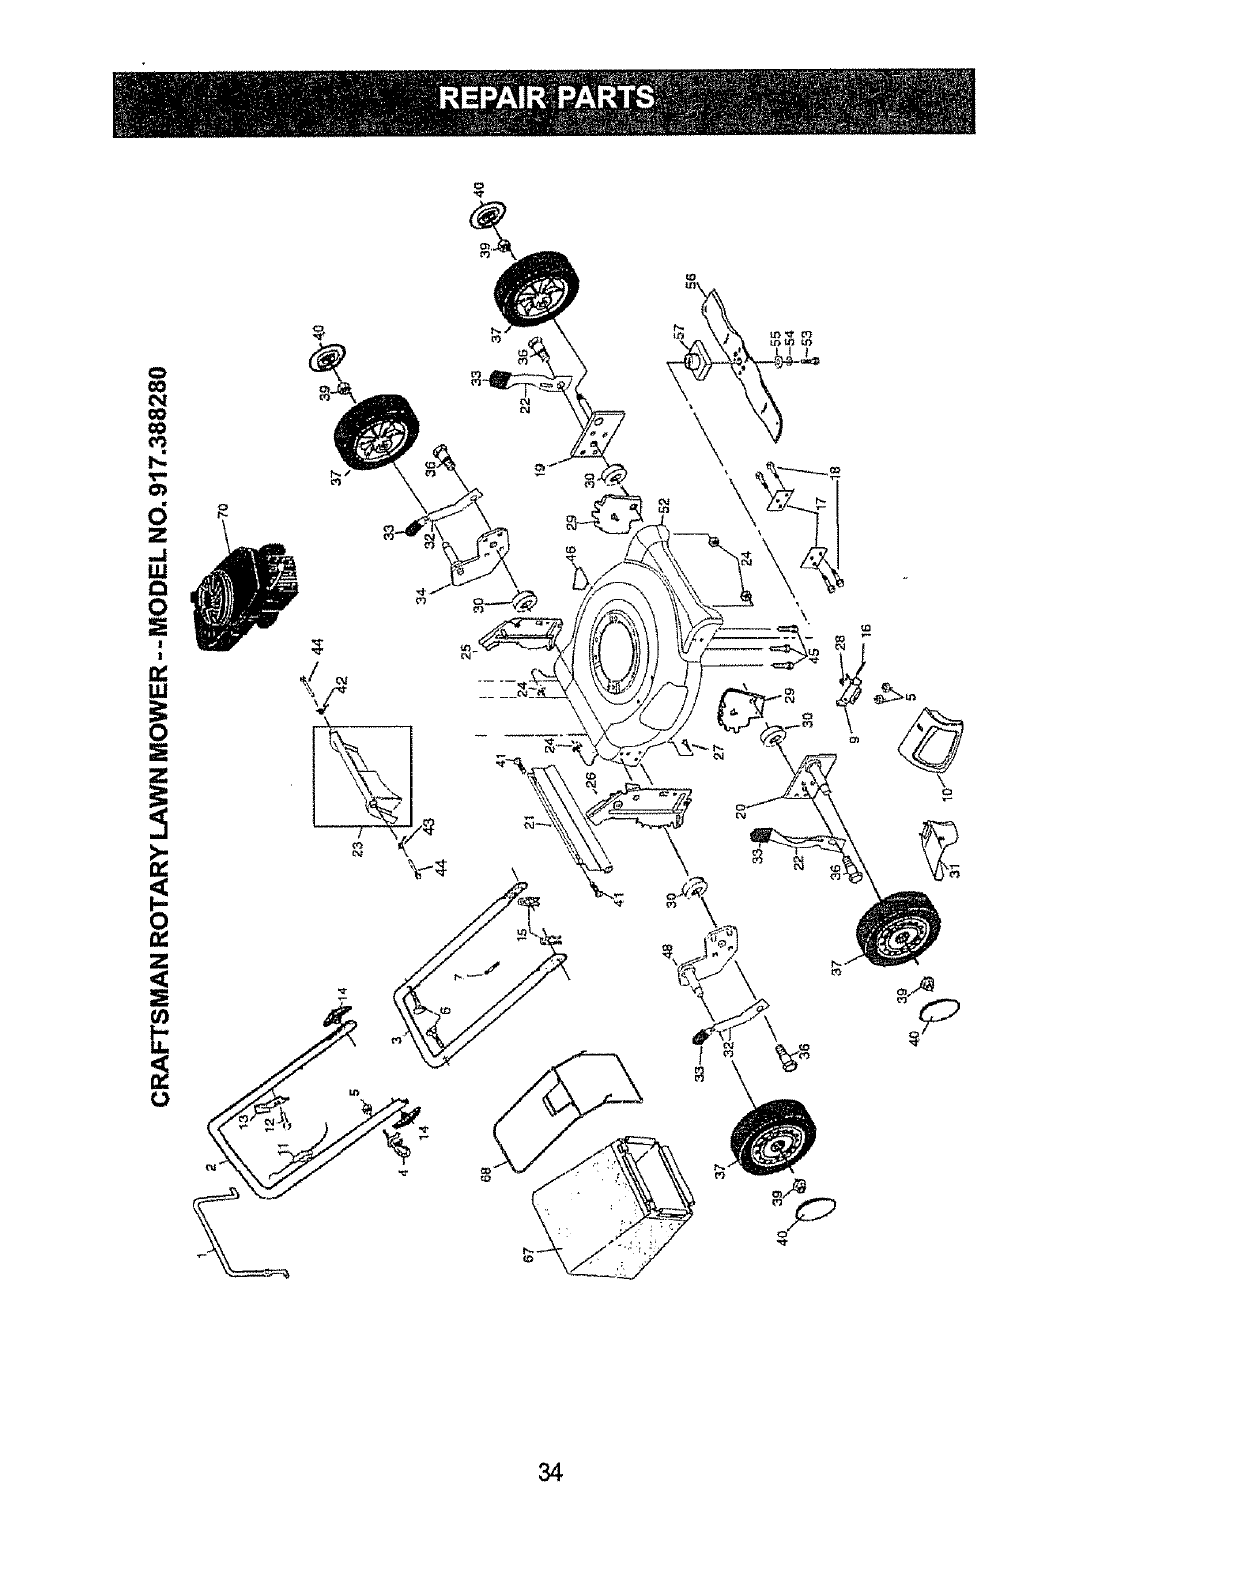
o
1',,,..
,%,,.,
0
Z
lii
0
Iii
!
!
!
X
0
34
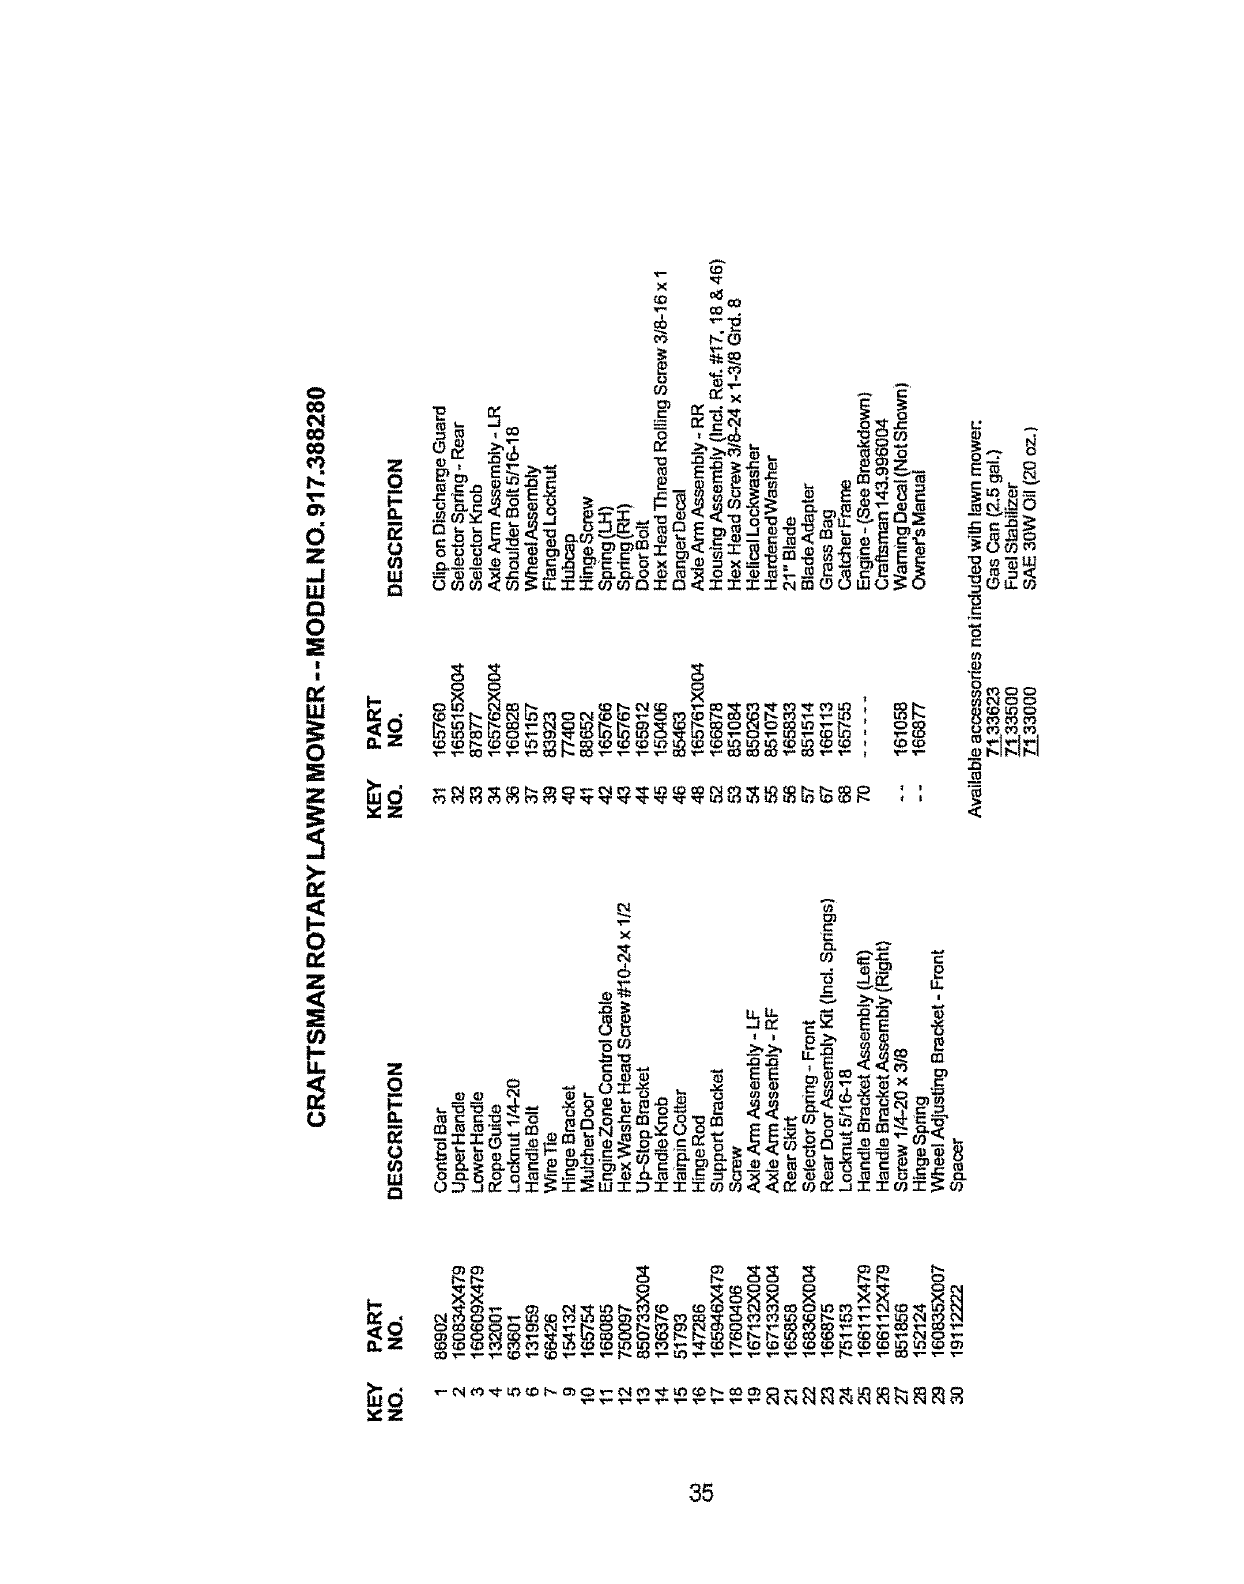
o
cx_ z
,.1 ul
8
IE
|
I
Z
z _o
_O_ "_ CD _ _'_ C_ C_I (D _I_ _'- _ _i_ I_ t_ _,_ v" "_-__
A
_._o
ll_m ID
_ U t.t. u'/-
__,J,J,-I
Z
tr, Z
9
II1
Z
_z
35

.C_FTSMAN 4-CYCLE ENGINE MODEL NUMBER I43,996004 ,
0-- S70K
g00
370C"
4O0
135
120
416
11g
110 f _'_325
103!
lol
126
I
125
/
275
/287
/
<245
250
238
36
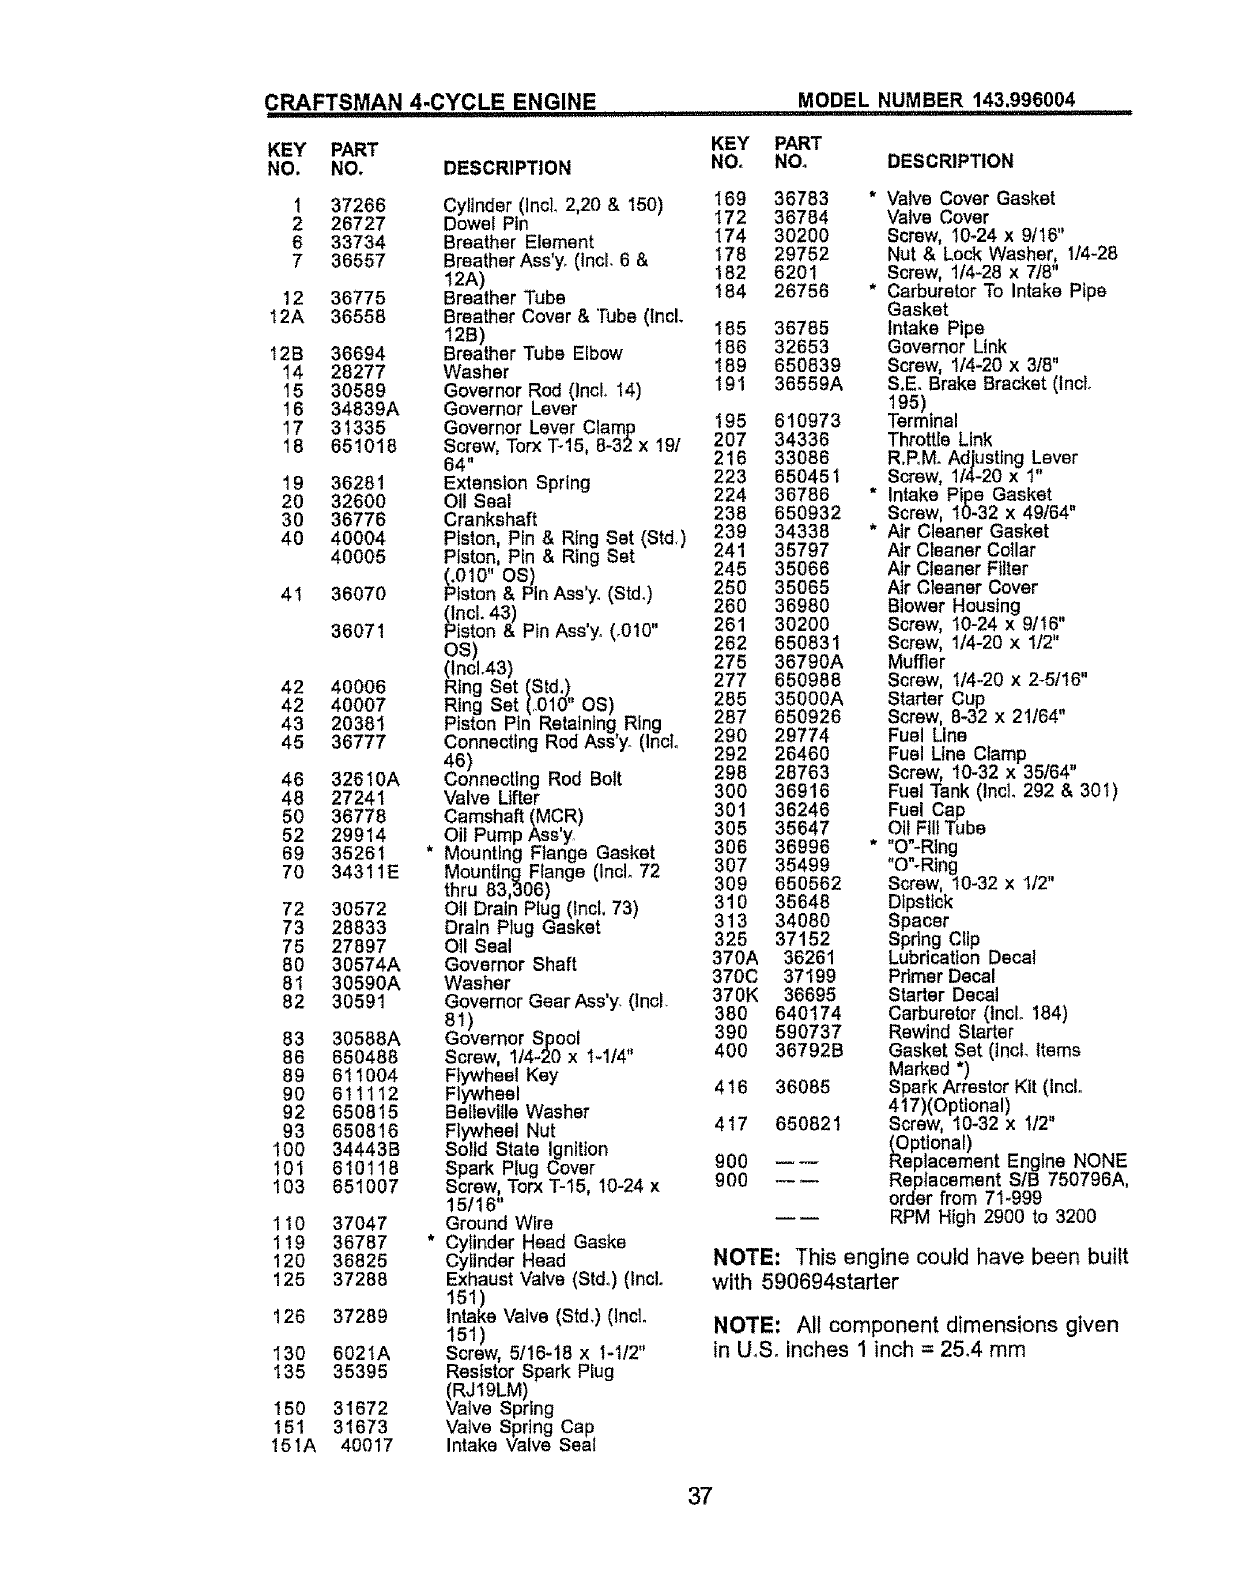
CRAFTSMAN 4-CYCLE ENGINE MODEL NUMBER 143.996004
i i =1 = iiiiq HIIII=, , i=1 ,iii ......................... i1,111 i , iii
KEY PART
NO. NO, DESCRIPTION
137266
2 26727
633734
736557
12 36775
12A 36558
12B 36694
14 28277
15 30589
16 34839A
17 31335
18 651018
19 36281
20 32600
30 36776
40 40004
40005
41 36070
36071
42 40006
42 40007
43 20381
45 36777
46 32610A
48 27241
50 36778
52 29914
69 35261
70 34311E
72 30572
73 28833
75 27897
80 30574A
81 30590A
82 30591
83 30588A
86 650488
89 611004
90 611112
92 650815
93 650816
100 34443B
10i 610118
103 651007
110 37047
119 36787
120 36825
125 37288
126 37289
130 602tA
135 35395
150 31672
!51 31673
151A 40017
KEY PART
NO. NO.
Cylinder (IncL 2,20 & I50) 169 36783
Dowel Pin 172 36784
Breather Element I74 30200
Breather Ass'y_ (Incl 6 & 178 29752
182 6201
12A)
Breather Tube 184 26756
BreatherCover & Tube (tncL
12B) 185 36785
Breather Tube Elbow 186 32653
Washer 189 650839
Governor Rod (lncL 14) 19t 36559A
Governor Lever
Governor Lever Clamp 195 610973
Screw, Torx T_15, 6-32x 19/ 207 34336
64" 216 33086
Extension Spring 223 650451
Oil Seal 224 36786
Crankshaft 238 650932
Piston, Pin & Ring Set (Std.) 239 34338
Piston, Pin & Ring Sat 241 35797
245 35066
gOlO"nAss'y"(Std.)250 36065
fston 260 36980
_ncL 43)
iston & Pin Ass'y. (.010" 261 30200
262 650831
os)
(Incl.43) 275 36790A
Ring Set (Std,) 277 650988
Ring Set (,.010" OS) 285 35000A
Piston Pin RetainingRing 287 650926
Connecting Rod Ass'y. (IncL 290 29774
292 26460
46)
Connecting Rod Bolt 298 28763
Valve Lifter 300 36916
Camshaft (MCR) 301 36246
Oil Pump Ass'y. 305 35647
* Mounting Flange Gasket 306 36996
Mounting Flange (Inclo72 307 35499
thru 83,306) 309 650562
Otl Drain Plug (Incl, 73) 310 35648
Drain Plug Gasket 313 34080
Oil Seal 325 37152
Governor Shaft 370A 36261
Washer 370C 37199
Governor Gear,_ss'y. (lncL 370K 36695
380 64O174
81)
Governor Spool 390 590737
Screw, 114-20x t-1/4" 400 36792B
FlywheelKey
Flywheel 416 36085
Bellevitle Washer
Flywheel Nut 417 650821
Solid State Ignition
Spark Plug Cover 900
Screw, Torx T-15, 10-24 x 900 --
15/16"
Ground Wire
* Cylinder Head Gaska
Cylinder Head
Exhaust Valve (Std.) (IncL
151)
Intake Valve (Std.) (IncL
151)
Screw, 5/16-18 x 1-1/2"
Resistor Spark Plug
(RJ19LM)
Valve Spring
Valve Spring Cap
Intake Valve Seal
DESCRIPTION
*Valve Cover Gasket
Valve Cover
Screw, 10-24 x 9/16"
Nut & Lock Washer, 1/4-28
Screw, 1/4-28 x 7/8"
* Carburetor To Intake Pipe
Gasket
Intake Pipe
Governor Link
Screw, 1/4-20 x 3/8"
S.E. Brake Bracket (IncL
195)
Terminal
Throttle Link
R.P,M. Adjusting Lever
Screw, 1/4-20 x 1
* Intake Pipe Gasket
Screw, 10-32 x 49/64"
* Air Cleaner Gasket
Air Cleaner Collar
Air Cleaner Filter
Air Cleaner Cover
Blower Housing
Screw, t0-24 x 9/I6"
Screw, 1/4-20 x I12"
Muffler
Screw, II4-20 x 2-5t16"
Starter Cup
Screw, 8-32 x 21/64"
Fuel Line
Fuel Line Clamp
Screw, 10-32 x 35/64"
Fuel Tank (Incl. 292 & 30t)
Fuel Cap
O11FillTube
* "O"-Rtng
"O"oRtng
Screw, 10-32 x 1/2"
Dipstick
Spacer
Spdng Clip
Lubrication Decal
Pdmer Decal
Starter Decal
Carburetor (lnclo 184)
Rewind Starter
Gasket Set (lncL items
Marked *)
Spark Arrestor Kit (IncL
417)(Opttona!)
Screw, 10-32 x 1/2"
_Optional)
eplacement Engine NONE
Replacement S/B 750796A,
order from 71-999
RPM High 2900 to 3200
NOTE: This engine could have been built
with 590694starter
NOTE: All component dimensions given
in U.S, inches 1 inch = 25,4 mm
37
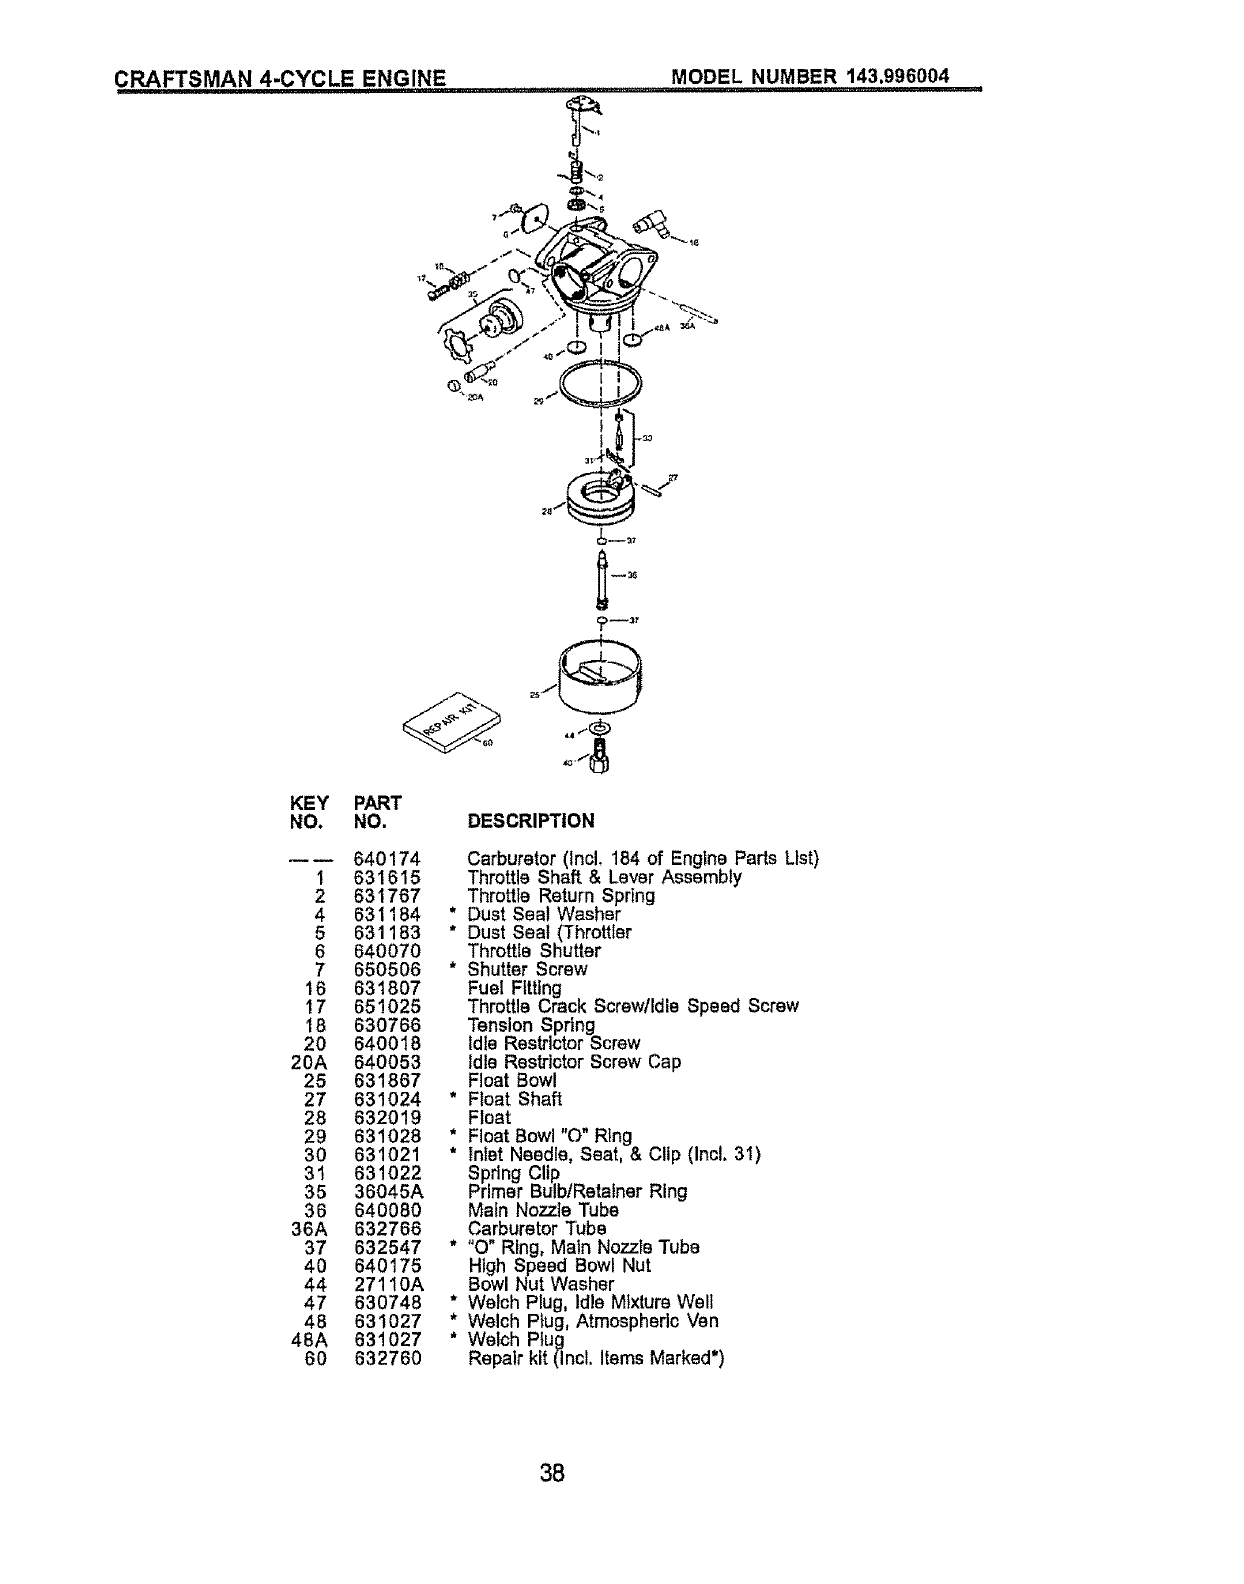
CRAFTSMAN4-CYCL E ENGINE MODEL NUMBER 143.996004
KEY
NO.
I
2
4
5
6
7
16
17
18
20
20A
25
27
28
29
30
31
35
36
36A
37
4O
44
47
48
48A
6O
PART
NO. DESCRIPTION
640174
631615
631767
631184
631183
640070
650506
631807
651025
630766
640016
640053
631867
631024
632019
631028
631021
631022
36045A
640080
632766
632547
640175
27110A
630748
631027
631027
632760
Carburetor (lncl. 184 of Engine Parts List)
Throttle Shaft & Lever Assembly
Throttle Return Spring
* Dust Seal Washer
* Dust Seat (Throttler
Throttle Shutter
* Shutter Screw
Fuel Fitting
Throttle Crack Screw/Idle Speed Screw
Tension Spring
Idle RestdctorScrew
Idle RestrictorScrew Cap
Float Bowl
* Float Shaft
Float
* Float Bowl "O" Ring
* inlet Needle, Seat, & Clip (Incl. 31)
Spring Clip
Primer BulblRetalnerRing
Main Nozzle Tube
Carburetor Tube
* "0" Ring, Main Nozzle Tube
High Speed Bowl Nut
Bowl Nut Washer
* Welch Plug, Idle Mixture Well
* Welch Plug, Atmospheric Ven
* Welch Ptug
Repair kit (Incl. Items Marked*)
38
CRAFTSMAN 4-CYCLE ENGINE MODEL NUMBER 143,996004
,--8 II--,
KEY
NO°
1
2
3
4
5
6
7
8
11
12
I3
PART
NO. DESCRIPTION
590694 Recoil Starter
590599A Spring Pin (Incl. 4)
590600 Washer
590696 Retainer
590601 Washer
590697 Brake Spring
590698 Starter Dog
590699 Dog Spring
590700 Pulley & Rewind Spring
Ass'yo
590695 Starter Housing Ass'y,
(40 degree grommet)
590535 Starter Rope
(98" X 9/64" dla.)
590701 Starter Handle
KEY
NO.
3
6
7
8
1 t
12
13
14
PART
NO, DESCRIPTION
590737 Rewind Starter
590740 Retainer
590616 Starter Dog
590617 Dog Sl_ring
590618A Pulley & Rewind Spring
Ass'y
590687A Starter Housing Ass'y
(40 degree grommet)
590535 Starter Rope
(Length 98" x 9/64" dla,)
590701 Starter Handle
590760 Spdng Clip
39

i_i,i ,, ,, i=_.,,_:a,ii,,,111i
For in-home major brand repair service:
Call 24 hours a day, 7 days a week
1-800-4-MY-Home _M(1-800-469-4663)
Para pedir servicio de reparacibn a domicilio
1-800-676-5811
In Canada for all your service and parts needs call
Au Canada pour tout le service ou les pi6ces
1-800-665-4455
For the repair or replacement parts you need:
Call 6 am-11pm CST, 7 days a week
PartsDirect sM
1-800-366-PART (1-800-366-7278)
Para ordenar piezas con entrega a domicilio
1-800-659-7084
For the location of a Sears Parts and Repair Center
in your area:
Call 24 Hours a day, 7days a week
1-800-488-1222
For information on purchasing a Sears Maintenance
Agreement or to inquire about an existing Agreement:
Call 9am-5 pro, Monday - Saturday
1-800-827-6655
MomeCentrar
166877 Rev,2 07°26°99 VB Printed in U,S.A.
