Crestron Electronics HR310 Zigbee Handheld Remote User Manual DO Guide HR 310
Crestron Electronics Inc Zigbee Handheld Remote DO Guide HR 310
User manual
DO GUIDE
HR-310
Handheld Remote
Joining an inNET EX Network
1. Press the ACQUIRE button on the inNET EX gateway to enter Acquire mode, or enter
Acquire mode from Crestron Toolbox™ software. For more information, refer to the
CEN-GWEXER Installation Guide (Doc. 7723), the DIN-AP3MEX Installation Guide (Doc.
7492), or the MC3 DO Guide (Doc. 7774) at www.crestron.com/manuals.
NOTE: In an environment where there are multiple gateways installed, only one gateway
should be placed in Acquire mode at any time.
2. Quickly press the (Home) button on the HR-310 three times, and then press and hold
the button (press, press, press, press + hold) until the backlight on the remote blinks
once. (This process can take up to 10 seconds.)
3. Release the button to start the acquire process. The backlight blinks slowly to show that
the remote is actively scanning the inNET EX network.
4. Conrm the status of the acquire process:
• If the HR-310 is acquired by the inNET EX network, the backlight turns on for ve
seconds.
• If the HR-310 is not acquired by the inNET EX network, the backlight rapidly blinks.
Press the button to cancel the acquire process. Ensure the gateway is in Acquire
mode and that the HR-310 is in range before attempting the acquire process again.
5. After the acquire process is complete, remove the gateway from Acquire mode as
described by the gateway’s documentation.
NOTE: Firmware updates can only be performed by connecting the HR-310 to Crestron Toolbox
via USB. Remove the battery cover on the rear of the HR-310 to locate the micro USB port, and then
connect the remote to the computer using a micro USB to USB A cable (not included). For more
information on performing rmware updates in Crestron Toolbox, refer to the embedded Crestron
Toolbox help le.
Leaving an inNET EX Network
To leave an inNET EX network, put the HR-310 into Acquire mode as described in “Joining an
inNET EX Network” when no gateway has been placed in Acquire mode.
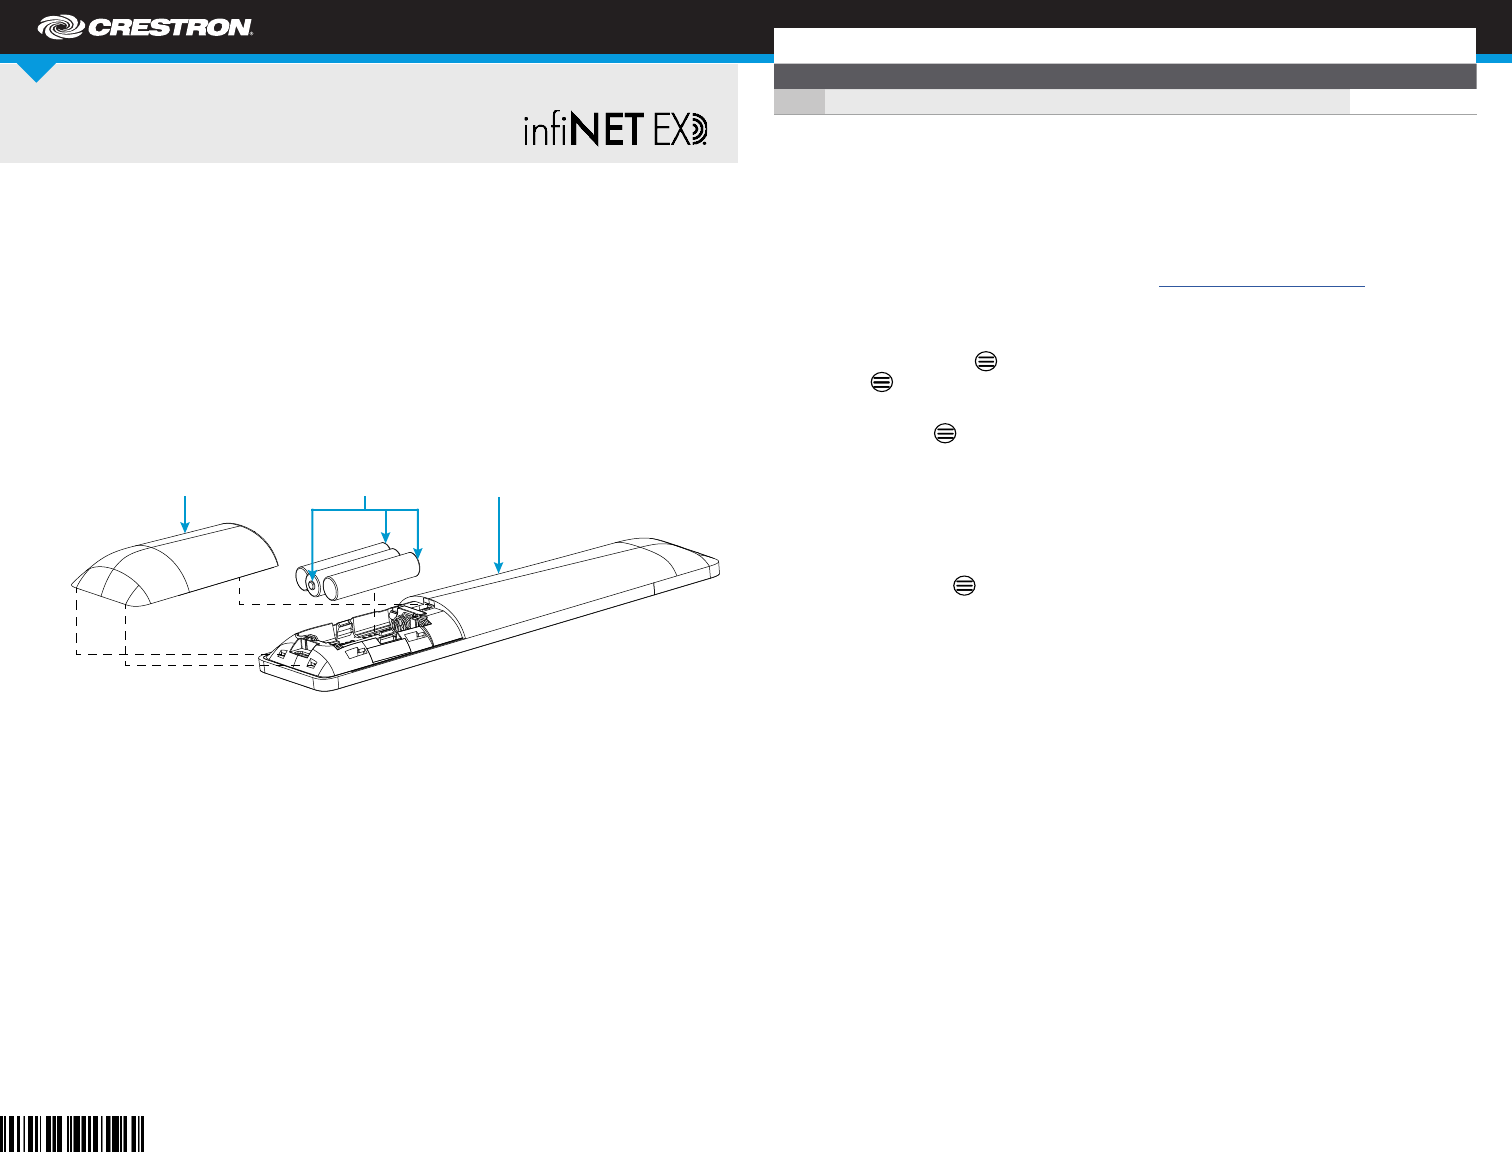
DO Install the Battery Pack
The Crestron® HR-310 ships with three AAA alkaline batteries that must be installed prior to
operating the remote. Use the following procedure to install the battery pack.
1. Locate the battery cover on the rear of the HR-310. Gently push on the battery cover while
sliding it down and away from the remote until the tabs connecting the cover to the remote
disengage.
2. Install the included AAA batteries as shown in the illustration following step 3. Observe the
correct polarity when inserting the batteries into the compartment.
3. Reattach the battery cover by aligning the tabs on the top and bottom of the cover with
their respective slots on the bottom of the HR-310, and then gently push the cover upward
until the tabs snap into place.
DO Acquire the Remote
The HR-310 must be acquired by an inNET EX® wireless gateway or by a control system with a
built-in inNET EX gateway (both not included) before it can be used with a Crestron control
system. Supported devices with inNET EX gateways currently include the Crestron CEN-GWEXER,
DIN-AP3MEX, and MC3. Use the procedures outlined in this section to join or leave an inNET EX
network and to verify communications between the device and the control system.
DO Check the Box
QTY PRODUCT PART NUM.
1Batteries, AAA Alkaline, x3 2022558
Battery cover
AAA batteries (3):
positive (+) terminals
HR-310
(rear view)
PRELIMINARY
DO GUIDE DOC. 8228A (2049525) 11.17
Specications subject to change without notice.
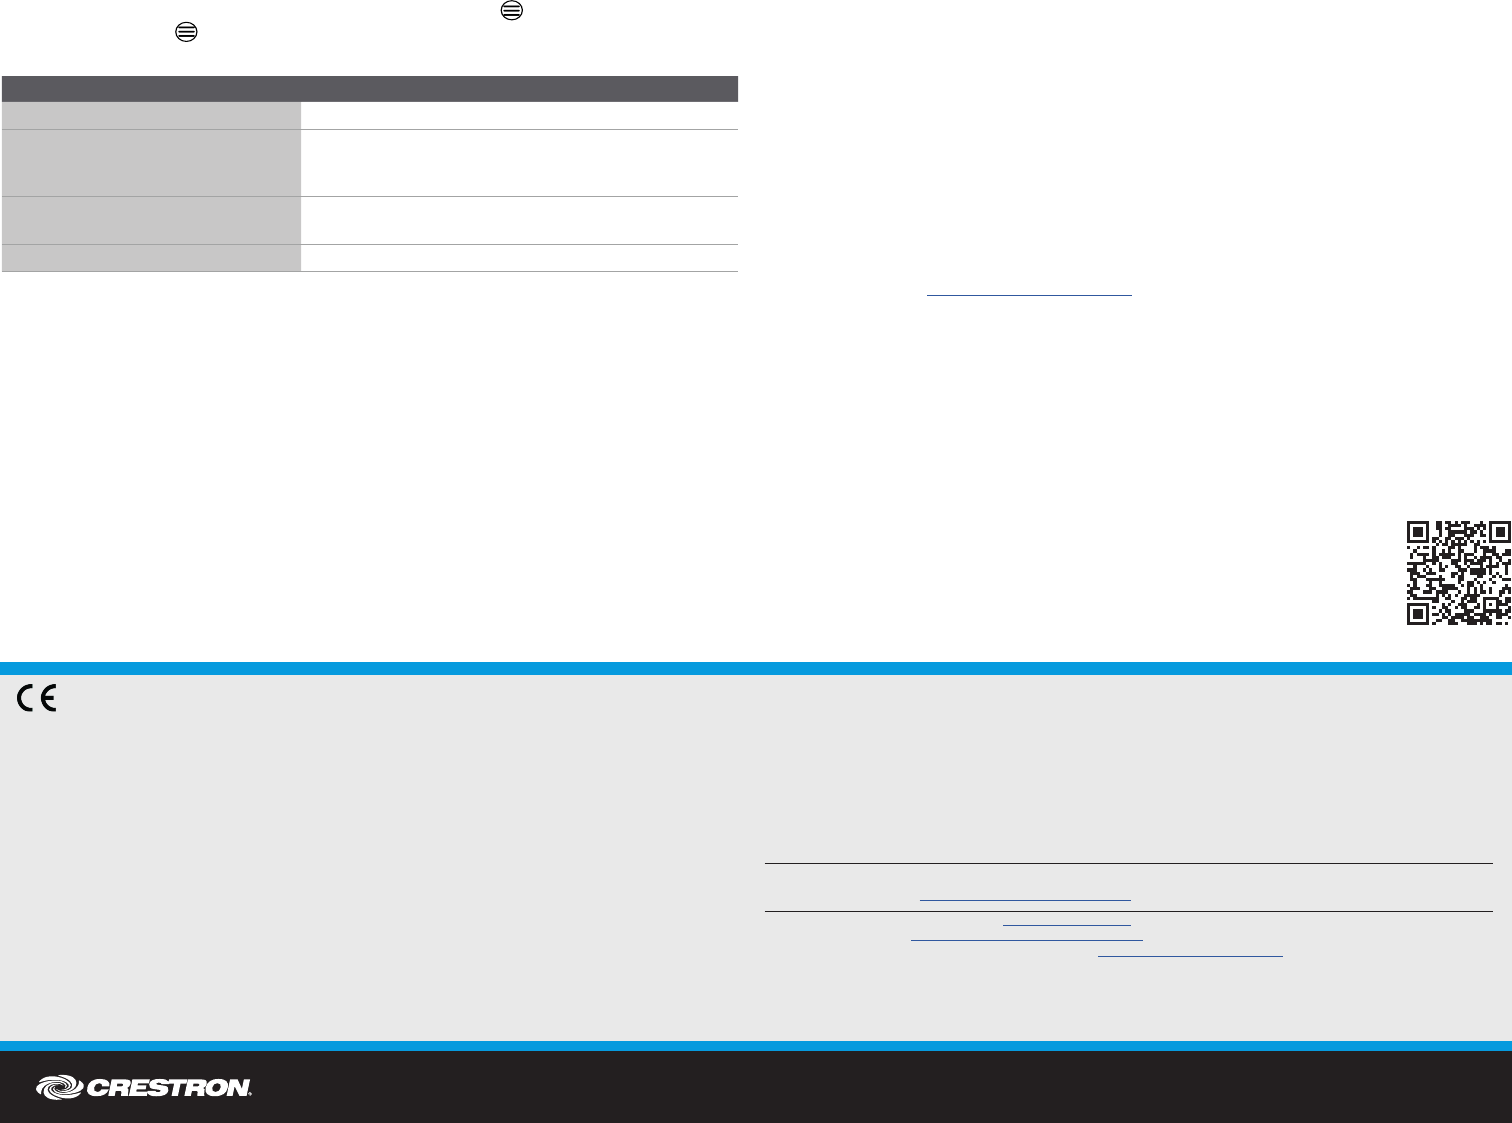
Verifying Communication Status
To check the communication status of the HR-310, quickly press the button three times, and
then press and hold the button for up to two seconds. The backlight blinks to indicate the current
communication status as described in the table below.
DO Set the Device RFID
If required, use the following procedure to set the RFID (radio-frequency identication) of the
HR-310.
NOTE: The HR-310 RFID is set to “01” by default.
NOTE: The HR-310 must be kept awake to maintain communications while setting the device RFID
via a wireless connection. After completeing the below procedure, press any button on the HR-310 to
wake the remote so that it receives the change ID command from the gateway.
1. Ensure that the HR-310 has been acquired to the inNET EX wireless gateway as described
in the “DO Acquire the Remote” section above.
2. Open Crestron Toolbox and select the InNetEx Diagnostic Tool. The tool scans the inNET
EX network for the wireless gateway and all acquired devices.
3. Once the gateway has been discovered, locate the HR-310 in the Connected Devices
table.
4. Right click on the HR-310’s entry in the Connected Devices table, and then click
inNET(EX) ID.
5. Select a new RFID from the provided drop-down menu, and then click Apply to send the
new RFID to the device. Click OK to exit.
Alternatively, the device RFID can also be set through the Text Console tool in Crestron Toolbox.
Remove the battery cover on the rear of the HR-310 to locate the micro USB port, and then connect
the remote to the computer using a micro USB to USB A cable. Open the Text Console tool in
Crestron Toolbox, and then issue the M N ETID [x x] command, where xx is the desired RFID. The
HR-310 remains awake when connected to a USB host.
DO Customize the Hard Buttons
The HR-310 ships with a default set of nine congurable hard buttons installed. Custom-engraved
buttons can be created and ordered using Crestron Studio® software to replace the default button
set. For more information on installing the custom hard buttons, refer to the HR-310-BTN Installation
Guide (Doc. 8224) at www.crestron.com/manuals.
DO Learn More
Visit the website for additional information and the latest rmware updates. To learn
more about this product, use a QR reader application on your mobile device to scan
the QR image.
Crestron Electronics
15 Volvo Drive, Rockleigh, NJ 07647
888.CRESTRON | www.crestron.com
As of the date of manufacture, the product has been tested and found to comply with specications for CE marking.
Federal Communications Commission (FCC) Compliance Statement
This device complies with part 15 of the FCC Rules. Operation is subject to the following two conditions:
(1) This device may not cause harmful interference, and (2) this device must accept any interference received, including interference
that may cause undesired operation.
CAUTION: Changes or modications not expressly approved by the manufacturer responsible for compliance could void the
user’s authority to operate the equipment.
NOTE: This equipment has been tested and found to comply with the limits for a Class B digital device, pursuant to part 15 of the
FCC Rules. These limits are designed to provide reasonable protection against harmful interference in a residential installation.
This equipment generates, uses and can radiate radio frequency energy and, if not installed and used in accordance with the
instructions, may cause harmful interference to radio communications. However, there is no guarantee that interference will not
occur in a particular installation.
If this equipment does cause harmful interference to radio or television reception, which can be determined by turning the
equipment off and on, the user is encouraged to try to correct the interference by one or more of the following measures:
• Reorient or relocate the receiving antenna.
• Increase the separation between the equipment and receiver.
• Connect the equipment into an outlet on a circuit different from that to which the receiver is connected.
• Consult the dealer or an experienced radio/TV technician for help.
Industry Canada (IC) Compliance Statement
CAN ICES-3(B)/NMB-3(B)
This equipment should be installed and operated with a minimum distance 20cm between the radiator and your body
Cet équipement doit être installé et utilisé à une distance minimale de 20 cm entre le radiateur et votre corps.
This device complies with Industry Canada license-exempt RSS standard(s). Operation is subject to the following two conditions:
(1) this device may not cause interference, and (2) this device must accept any interference, including interference that may cause
undesired operation of the device.
Le présent appareil est conforme aux CNR d’Industrie Canada applicables aux appareils radio exempts de licence. L’exploitation
est autorisée aux deux conditions suivantes : (1) l’appareil ne doit pas produire de brouillage, et (2) l’utilisateur de l’appareil doit
accepter tout brouillage radioélectrique subi, même si le brouillage est susceptible d’en compromettre le fonctionnement.
Crestron product development software is licensed to Crestron dealers and Crestron Service Providers (CSPs) under a limited non-exclusive, non-transferable Software Development Tools
License Agreement. Crestron product operating system software is licensed to Crestron dealers, CSPs, and end-users under a separate End-User License Agreement. Both of these Agreements
can be found on the Crestron website at www.crestron.com/legal/software_license_agreement.
The specic patents that cover Crestron products are listed at www.crestron.com/legal/patents.
The product warranty can be found at www.crestron.com/legal/sales-terms-conditions-warranties.
Certain Crestron products contain open source software. For specic information, visit www.crestron.com/legal/open-source-software.
Crestron, the Crestron logo, Crestron Studio, Crestron Toolbox, inNET EX, and the inNET EX logo are either trademarks or registered trademarks of Crestron Electronics, Inc. in the United
States and/or other countries. Other trademarks, registered trademarks, and trade names may be used in this document to refer to either the entities claiming the marks and names or their
products. Crestron disclaims any proprietary interest in the marks and names of others. Crestron is not responsible for errors in typography or photography.
This document was written by the Technical Publications department at Crestron.
©2017 Crestron Electronics, Inc.
BACKLIGHT BEHAVIOR COMMUNICATION STATUS
The backlight turns on for ve seconds. The HR-310 is communicating with the control system.
The backlight blinks three times.
The HR-310 is communicating with the control system,
but the gateway is not communicating with the control
system.
The backlight blinks twice. The HR-310 was previously joined to the network but is
no longer communicating with the gateway.
The backlight blinks once. The HR-310 is not joined to the network.
PRELIMINARY