Crestron Electronics TX3 Handheld Touchpanel User Manual Quickstart PTX3
Crestron Electronics Inc Handheld Touchpanel Quickstart PTX3
Contents
- 1. Manual MTX-3
- 2. Manual PTX3
- 3. Manual PTX3 Compliance Statements
Manual PTX3
1
quickstart guide
PTX3
PTX3
Prodigy® Handheld Touchpanel
QUICKSTART DOC. 7001A (2027729) 03.10
www.crestron.com/prodigy
888.273.7876 201.767.3400
©2010 Specifications subject to
change without notice.
All brand names, product names, and trademarks
are the property of their respective owners.
The Prodigy® PTX3 is a versatile yet cost effective home
theater remote control. This state of the art handheld
two-way controller includes a 2.8” active matrix
touchscreen capable of displaying stunning graphics and
dynamic text with true feedback.
The ergonomic layout of pushbuttons provides intuitive,
tactile control for hands and fingers of all sizes. Its
compact size and design offer easy one handed
operation, while its 802.15.4 wireless technology affords
reliable communications over everything from home
theater to whole house automation as part of a complete
Prodigy system.
Introduction
1
Perform the following procedure to install the battery
pack in a PTX3 touchpanel:
Power
A. Install the Battery
3Configure the Touchpanel
4
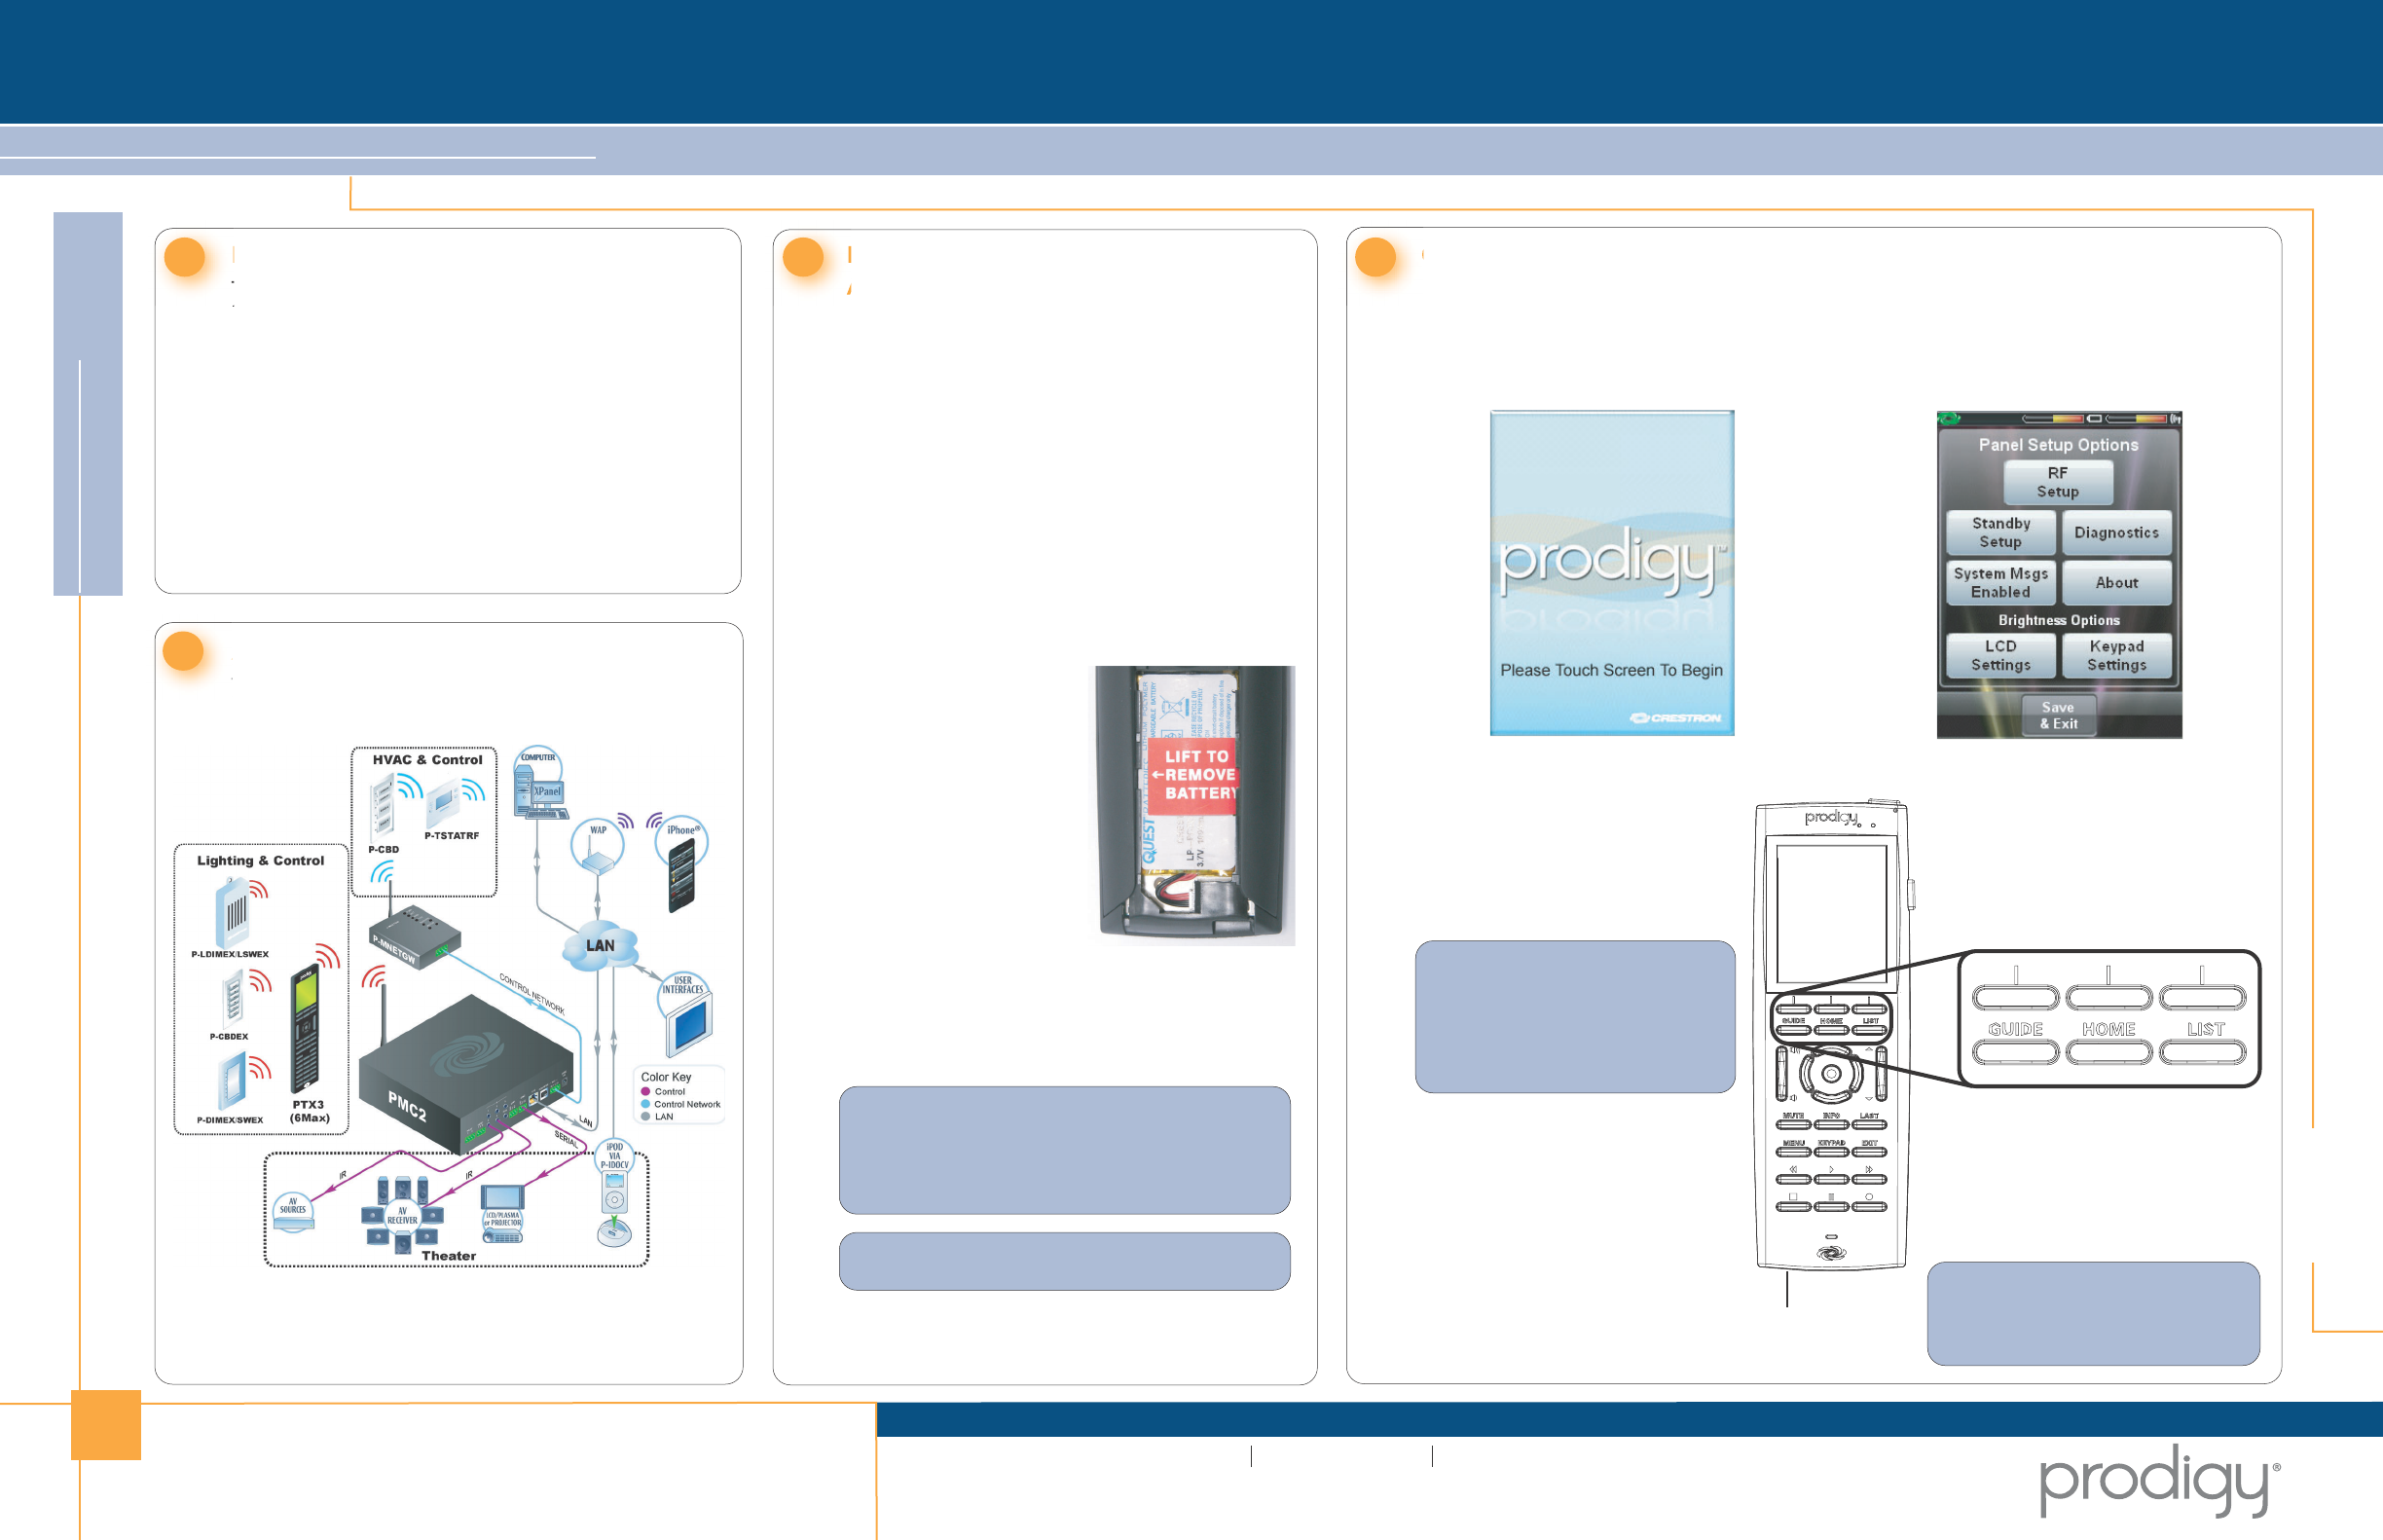
The following diagram illustrates a PTX3 in a system with
other Prodigy devices.
Application
2
1. Place the touchpanel screen side down on a
clean, soft surface.
2. Remove the battery compartment cover on the
rear of the touchpanel.
3. Carefully connect the multi-pin connector of the
battery with the corresponding connector inside
the battery compartment. The pin side of the
connector should be facing upward (toward the
rear of the touchpanel). Red wires should be
above black wires (toward the top of the
touchpanel). Ensure the connector is fully
seated.
4. Place the battery in
the compartment,
oriented so the wires
for the multi-pin
connector are on the
bottom, as shown
in the illustration to
the right.
5. Re-attach the battery
compartment cover.
B. Charge the Battery
To charge the battery pack, the PTX3 must be
placed on the included PTX3-DS docking
station/charger. Connect the included power pack
to the PTX3-DS.
NOTE: Before using the PTX3 for the first time,
charge its battery for a least two hours by placing
it on the PTX3-DS docking station/charger. The
green LED on the front of the PTX3 will blink while
the battery is charging.
NOTE: When not using the PTX3, store the unit
on its docking station/charger.
The setup screen is the starting point for
configuring the PTX3. When power is applied
for the first time, the screen shown below
appears.
NOTE: During regular operation
of the touchpanel, to activate the
setup functions, press hard keys
1, 2, 3, and 4 in sequence twice
(i.e. press 1, 2, 3, 4, 1, 2, 3, 4)
within a five second period.
Touch the screen to display the PTX3 setup
screen, as shown in the illustration below.
The setup screen enables basic configuration
procedures prior to regular operation of the
touchpanel.
USB Port Location
NOTE: USB port for loading projects
and upgrading firmware, is located
behind the battery compartment
cover on the rear of the unit.
4
321
For Regulatory Compliance information, refer to the latest
version of Doc. 7002.
2
quickstart guide
PTX3
PTX3
QUICKSTART DOC. 7001A (2027729) 03.10
Prodigy® Handheld Touchpanel
www.crestron.com/prodigy
888.273.7876 201.767.3400
©2010 Specifications subject to
change without notice.
All brand names, product names, and trademarks
are the property of their respective owners.
Use the Prodigy Composer software (available for download from www.crestron.com/prodigycomposer) to configure your Prodigy system. A Prodigy
Network Setup Wizard is included with Prodigy Composer. Before a PTX3 can be used, it must first be acquired by a PMC2 that is connected to a
Prodigy system. To acquire the PTX3, perform the following when prompted by the Prodigy Network Setup Wizard.
1. Put the PMC2 in Acquire mode by pressing its ACQUIRE button (or follow the prompts in the Network Setup Wizard to do this automatically).
2. Put the PTX3 in Acquire mode by doing the following:
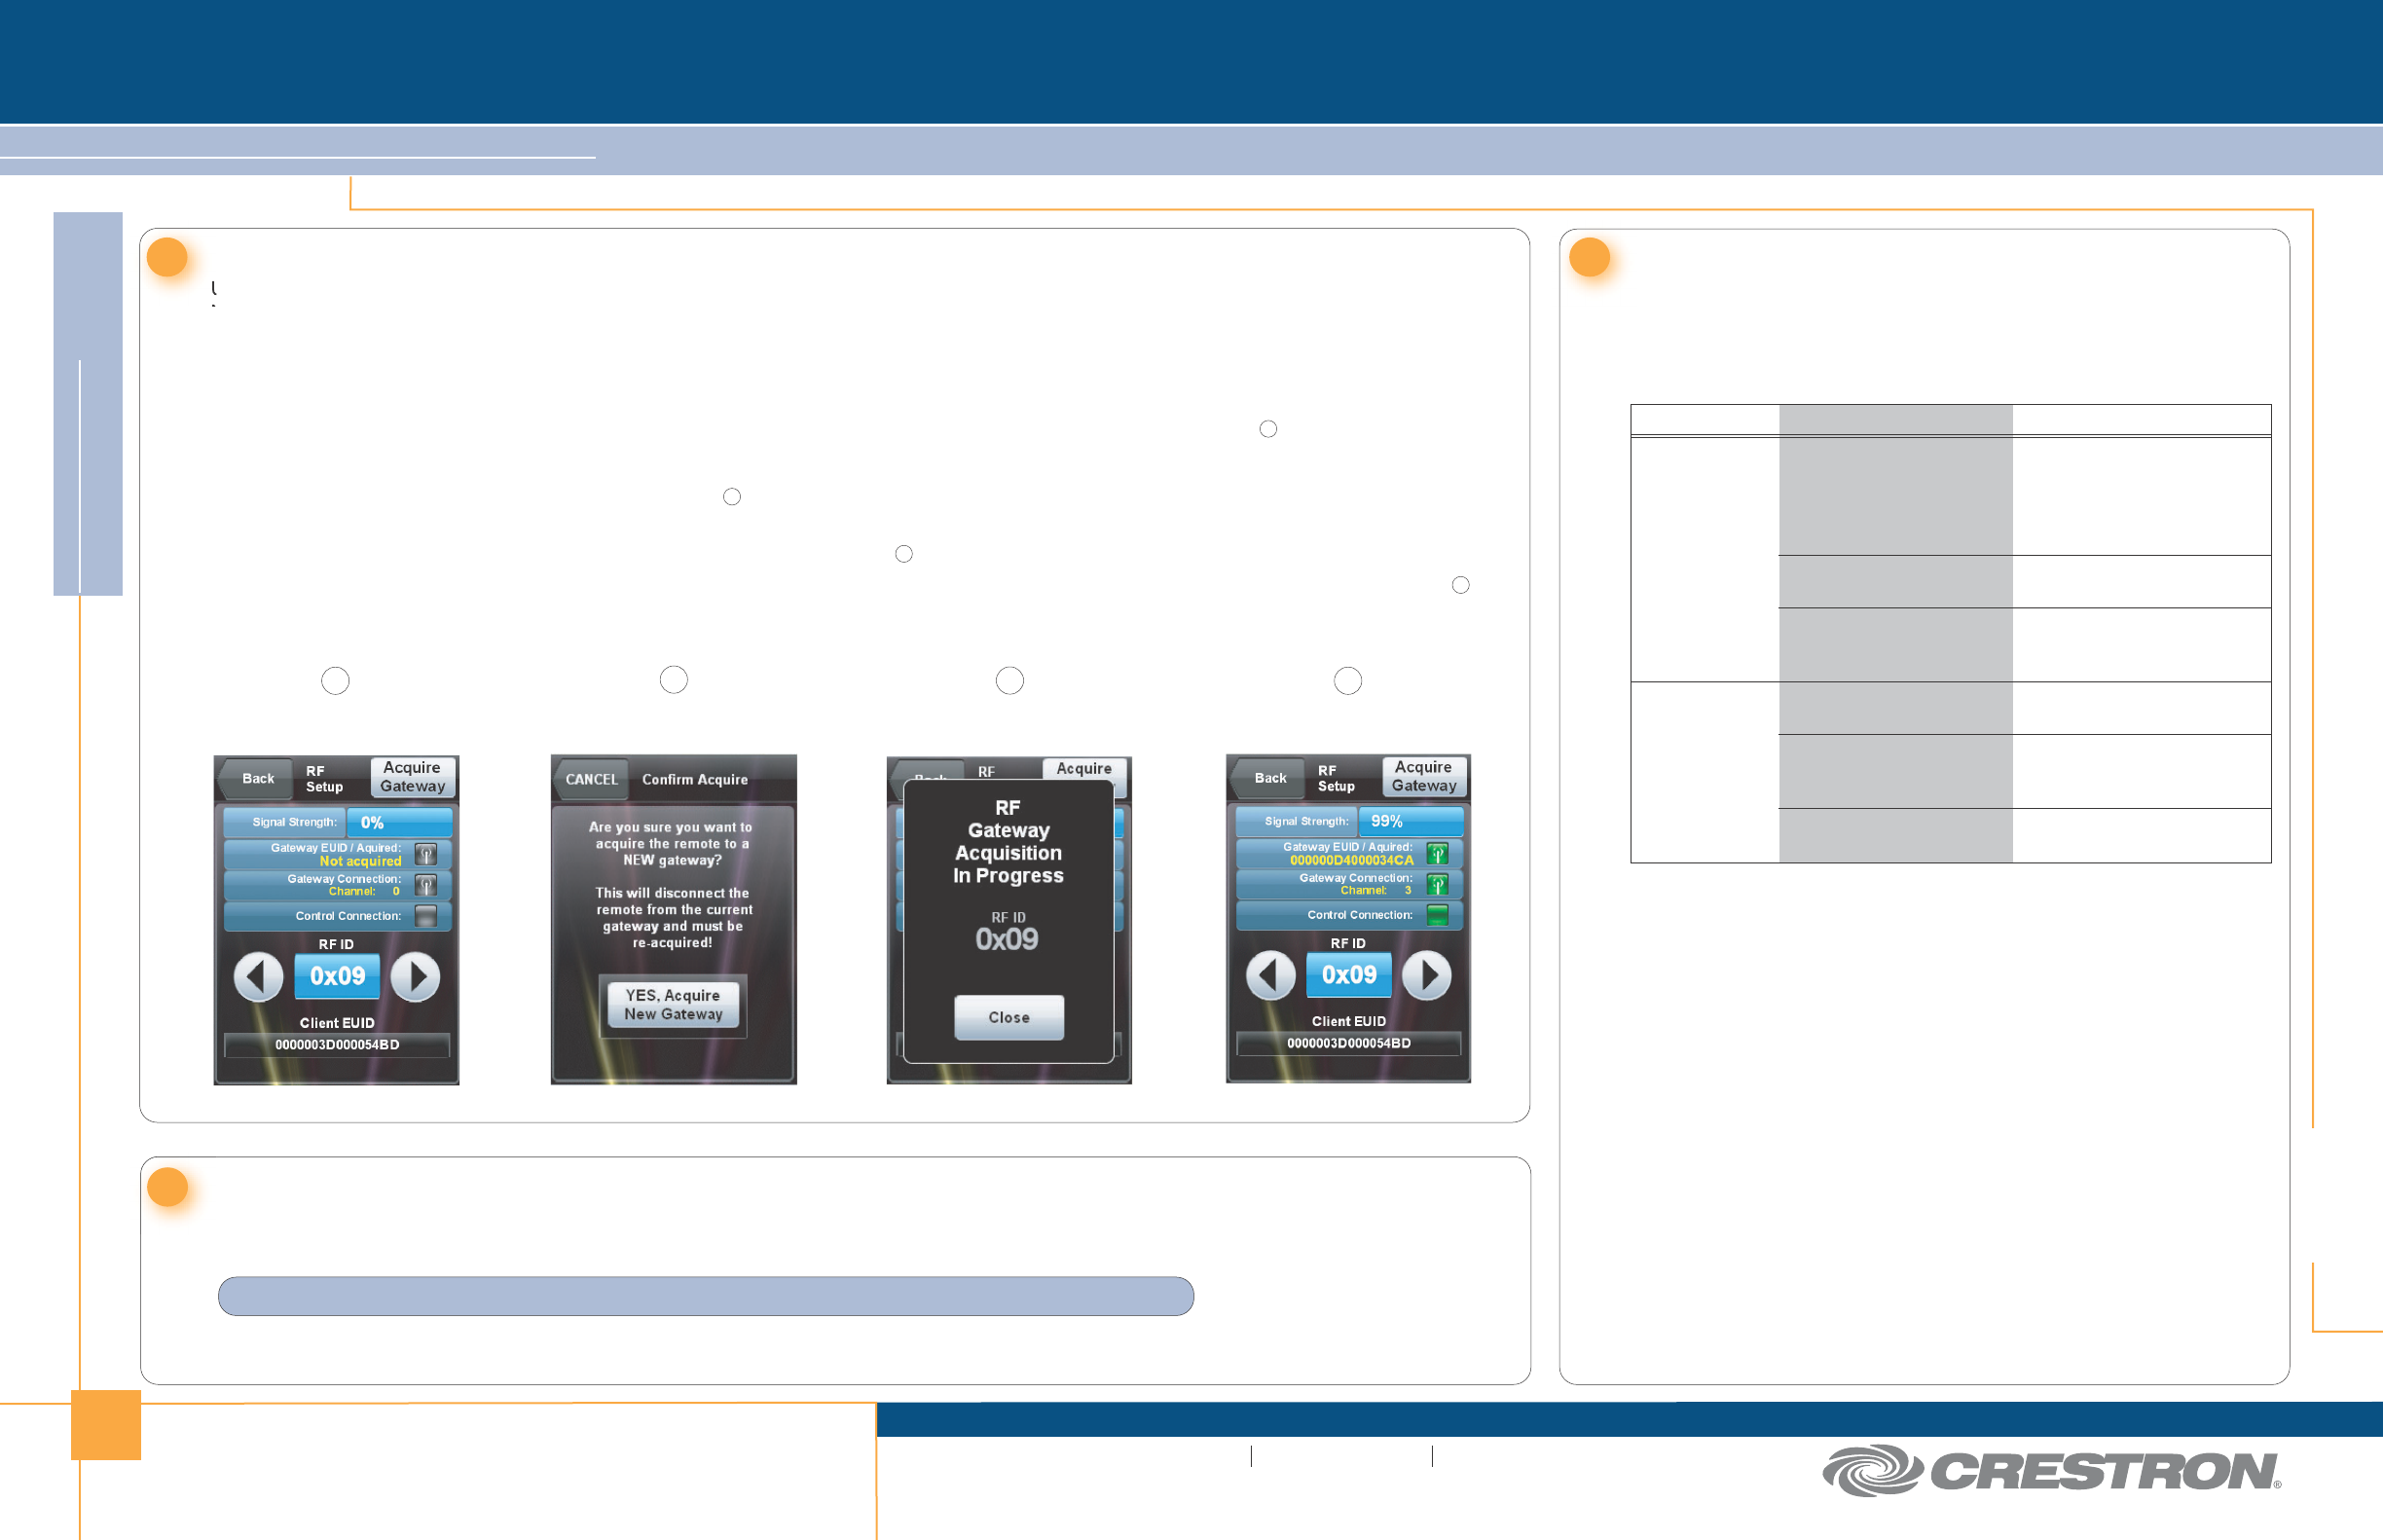
a. On the main setup screen shown on page 1, touch RF Setup to go to the “RF Setup” screen, shown in illustration below.
b. Touch Acquire Gateway.
c. The “Confirm Acquire” screen, shown in illustration below, will be displayed. Touch YES, Acquire New Gateway to begin the
process.
d. The “RF Gateway Acquisition In Progress” screen, shown in illustration below, will be displayed.
5Acquire the PTX3 7
The following table provides corrective action for possible trouble
situations. If further assistance is required, please contact a Crestron
customer service representative.
Problem Solving
Further Inquiries
If you cannot locate specific information or have questions after
reviewing this guide, please take advantage of Crestron's award
winning customer service team by calling Crestron at
1-888-CRESTRON [1-888-273-7876].
You can also log onto the online help section of the Crestron website
(www.crestron.com/onlinehelp) to ask questions about Crestron
products. First-time users will need to establish a user account to fully
benefit from all available features.
Future Updates
As Crestron improves functions, adds new features and extends the
capabilities of the PTX3, additional information may be made available
as manual updates. These updates are solely electronic and serve as
intermediary supplements prior to the release of a complete technical
documentation revision.
Check the Crestron website periodically for manual update availability
and its relevance. Updates are identified as an “Addendum” in the
Download column.
Troubleshooting
6Load the Project
Use the Prodigy Composer software (available for download from www.crestron.com/prodigycomposer) to configure your Prodigy system.
Refer to the help file for instructions on loading the project.
3. When the acquire is complete, the “RF Setup” screen will show the gateway’s EUID, the channel number and RF ID, as shown in illustration
below. Take the PMC2 out of the Acquire mode by pressing its ACQUIRE button (or follow the prompts in the Network Setup Wizard to do this
automatically).
“RF Setup” Screen “Confirm Acquire” Screen
“RF Gateway Acquisition
In Progress” Screen
“RF Setup” Screen
(After Acquire)
124
3
3
4
1
2
TROUBLE POSSIBLE CAUSE(S) CORRECTIVE ACTION
PTX3 does not
function.
Battery was not charged
or is discharged.
Place the PTX3 on its
docking station/charger and
charge the battery. (Refer to
Section 3 B “Charge the
Battery”.)
Battery connector is not
fully seated.
Verify battery is properly
connected.
PTX3 is off or in standby
mode or has no power.
Verify the PTX3 has power
and is on.
PTX3 shows
unexpected or
intermittent
feedback and/or
does not control
any devices.
PTX3 is out of range or
has poor access to PMC2.
Move back within range of the
PMC2 or other Prodigy
wireless network devices.
Power pack connector is
not fully seated in docking
station.
Verify power pack is properly
connected.
PTX3 RF ID does not
match ID in the program.
Change the RF ID or rerun the
Network Setup Wizard.
NOTE: To prevent the panel from going to sleep during project uploads, place the PTX3 on its docking station.
For Regulatory Compliance information, refer to the latest
version of Doc. 7002.