CyberBank CB-9020-US Personal Digital Assistant User Manual manual table of contents
CyberBank Corp Personal Digital Assistant manual table of contents
Contents
- 1. User Manual 1 of 4
- 2. User Manual 2 of 4
- 3. User Manual 3 of 4
- 4. User Manual 4 of 4
User Manual 2 of 4
PC-EPhone Customizing & Maintenance Page 3-5
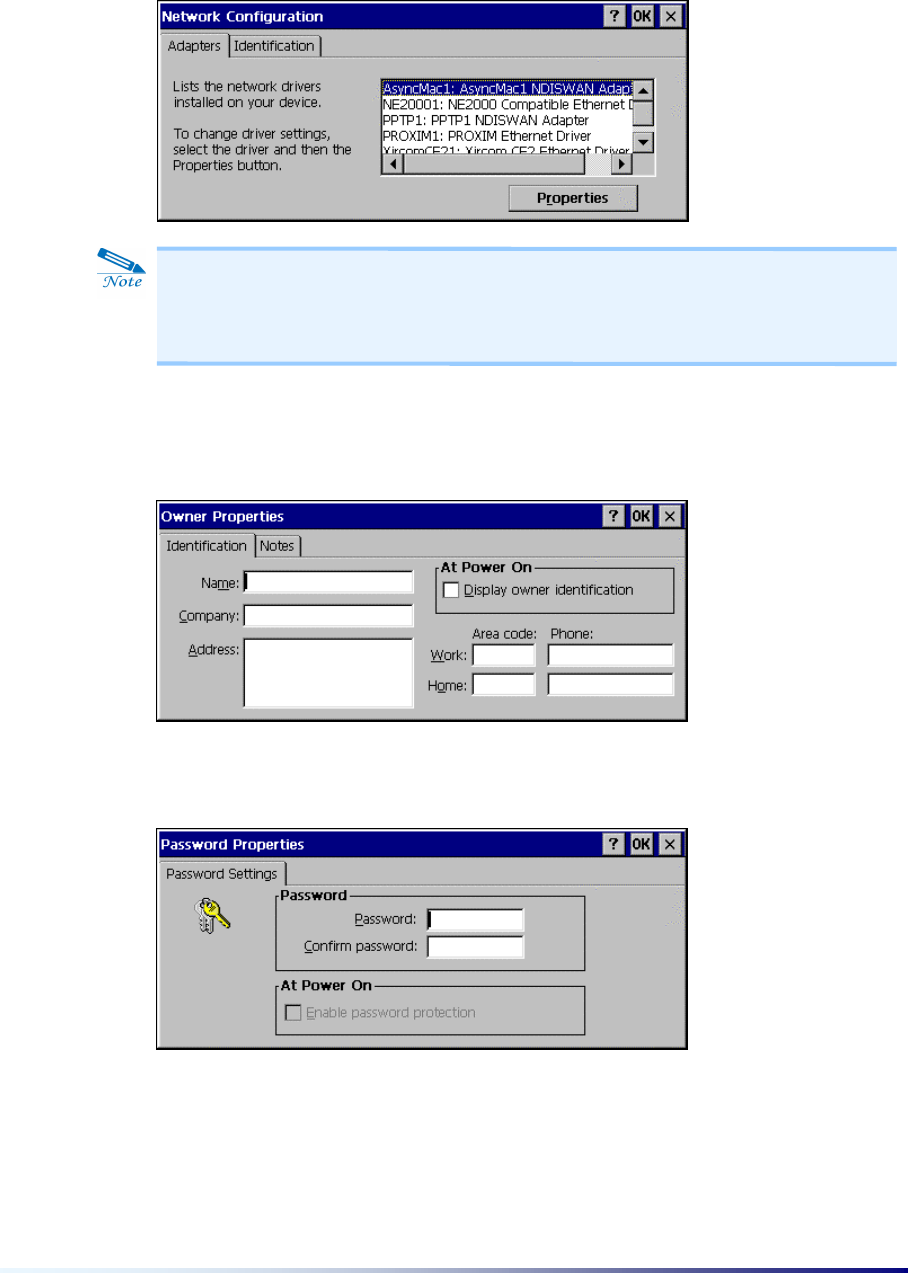
(8) Network
To change the network driver settings, select the corresponding driver and tap the
Properties button.
(9) Owner
This enables you to set the general information of the Owner.
(10) Password
Your PC-EPhone comes with this password so that unauthorized users cannot view
the entries you wish to protect.
You can set a password for security while using system. However, password should
consist of only 4 digit Numerals.
You can use drivers compatible to Network drivers displayed in the list.
Otherwise, insert the driver to install the corresponding driver provided with
the package. After displayed the selected driver, tap the Properties button.
Page 3-6 Ch 3
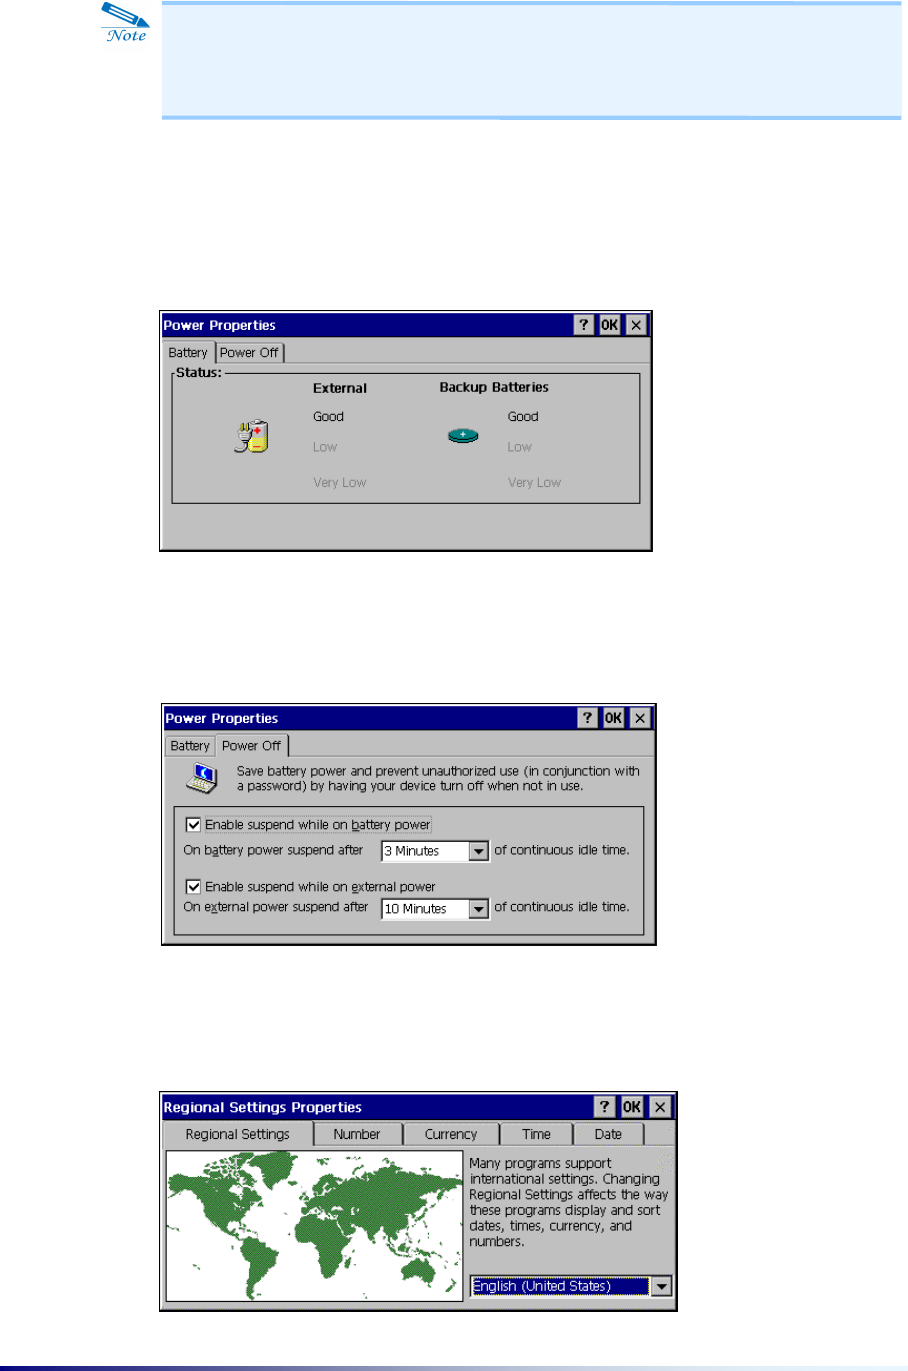
(11) Power
1) Battery
Indicates the kind of battery currently in use and the status of the main and backup
battery.
2) Power Off
this enables you to set the battery power to automatically suspend after a certain period
of continuous idle time to minimize battery drainage.
(12) Regional Settings
First choose the national language in order to change program Date, Time, Currency,
and Number display forms and how to line up numbers through Regional Settings.
If you forget your password, you will have to perform a Hard Reset. All data
(including file, DB data) stored in the RAM will be lost when a Hard Reset is
performed. So be careful not to forget it.
PC-EPhone Customizing & Maintenance Page 3-7
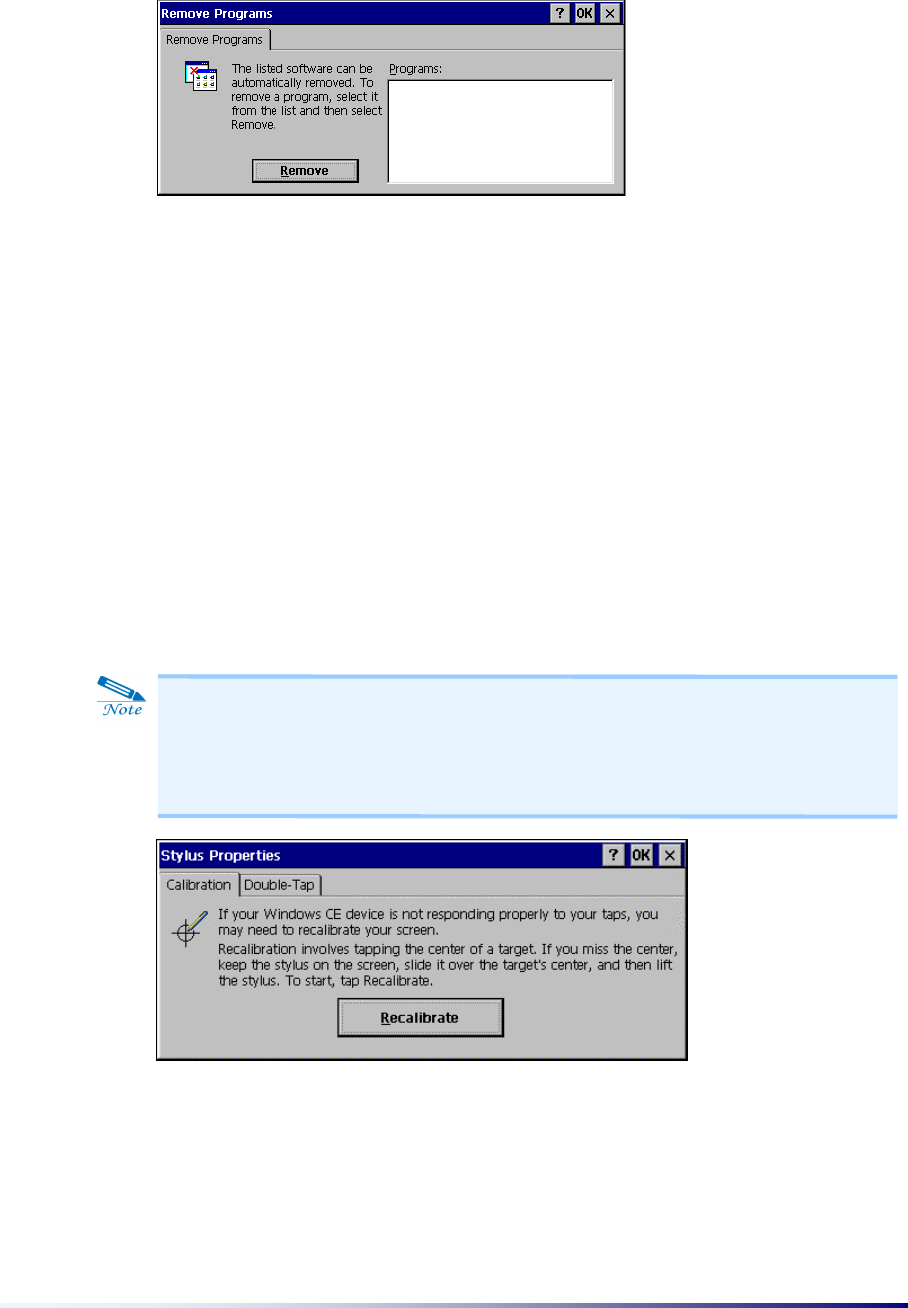
(13) Remove Programs
This enables you to delete or uninstall a program no longer in use.
(14) Stylus
Like using a mouse to click elements on a computer screen, using the stylus to tap
elements on your PC-EPhone screen is the basic action that gets things done on your
PC-EPhone.
The first time you start your PC-EPhone, setup instructions appear on the screen.
These instructions include a calibration screen. Calibration aligns the internal circuitry
of your handheld with its touch-sensitive screen so that when you tap an element on
the screen, PC-EPhone can detect exactly which task you want to perform.
Important: Always use the point of the stylus for tapping on PC-EPhone screen. Never
use an actual pen, pencil, or other sharp object to write on PC-EPhone screen.
Just as you can drag the mouse to select text or move objects on your desktop PC, you
can also drag the stylus to select text. You can also use the stylus to drag the slider of
any scroll bar.
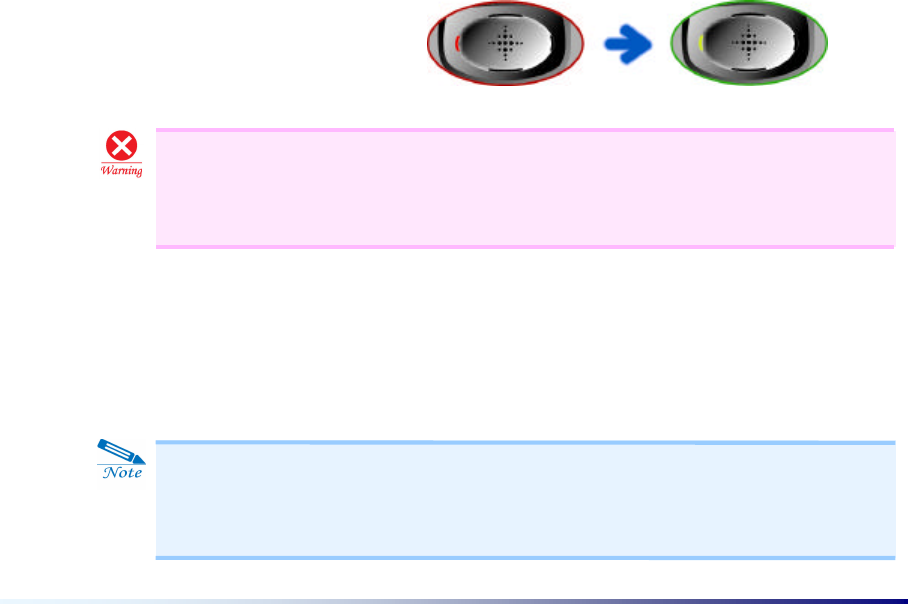
You have to perform this action whenevr performing the Hard Reset. Lightly
holding the stylus, tap the exact center of the target (+). The target moves
around on your screen in the order of “center→upper left→lower left→lower
right→upper right”.
Page 3-8 Ch 3
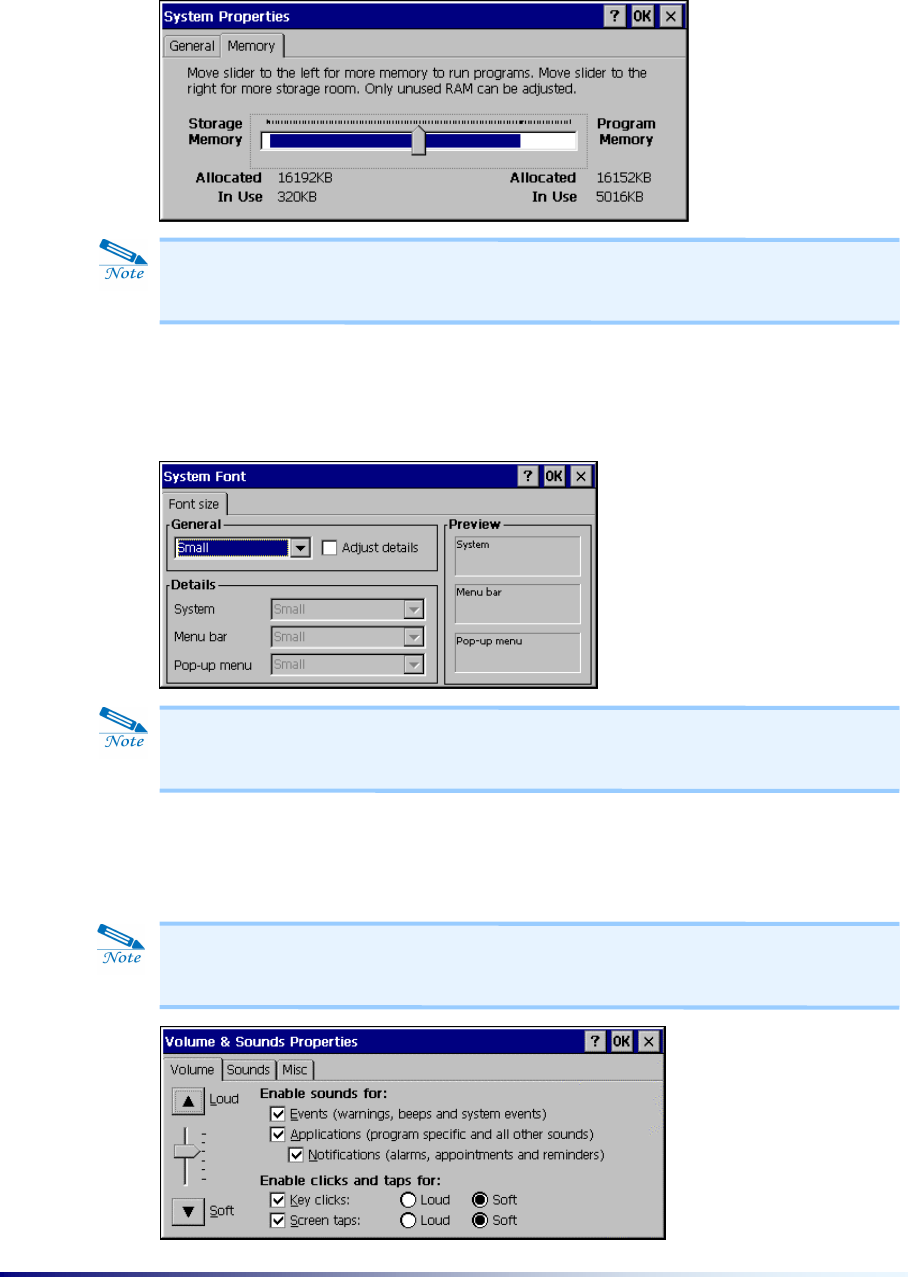
(15) System
This enables you to allocate the memories between storage memory and program
memory by using the slider.
(16) System Font
You can adjust system font sizes. In the Details field, you can adjust the font size of the
System, Menu bar and Pop-up menu.
(17) Volume & Sounds
This enables you to set the volume of sounds coming through the headset and your
PC-EPhone speakers.
In order not to hear the sound coming through speaker when tapping any Hot
Keys, clear the Screen taps check box.
Be careful that system operations may be suspended when either the storage
memory or program memory is allocated to the extreme.
The Soft Reset have to be reset after adjusting the System Font, so perform
this after saving all necessary data.
PC-EPhone Customizing & Maintenance Page 3-9
I
II
I.
.
M
Ma
an
na
ag
gi
in
ng
g
B
Ba
at
tt
te
er
ry
y
P
Po
ow
we
er
r
The files or data you have drawn up are saved in your PC-EPhone’s volatile RAM, non-
volatile IPSM, or in external memory storage card. When your PC-EPhone’s battery
(Main Battery and Backup Battery) is fully drained out, all data stored in the volatile
RAM is lost. This section will inform you of how to manage the batteries to maximize
its use and to secure data.
Your PC-EPhone comes with two types of batteries-Main Battery and Backup
Battery. The Main Battery acts as a power supplier when you are using your PC-
EPhone, while the Backup Battery supplies your PC-EPhone with the minimum
amount of power needed to preserve the data stored in RAM when you are exchanging
the Main Battery or when the Main Battery is fully drained.
(1) Charging the Battery
1) Charging the Main Battery
You can charge the main battery using the cradle (charger and desktop connector). The
cradle can charge up to two Main Batteries simultaneously. When charging the Main
Battery, the color of the first LED from the left indicates the charging status of the
battery currently attached to your PC-EPhone. The second LED color represents the
charging status of the separate battery. Although it may differ according to the battery
charging status, it takes approximately 2 ~ 3 hours to fully charge the Main Battery.
▶Red : charging
▶Green : fully charged
2) Charging the Backup Battery
The Backup Battery is automatically charged when your PC-EPhone is placed in the
cradle, and is charged by the Main Battery when your PC-EPhone is removed from the
cradle.
It takes long time(about 4 ~ 5 hours) charging PC-EPhone when ON. In order
to charge it quickly, press the Power button on the right side of PC-EPhone to
turn PC-EPhone OFF.
As a substantial amount of time(about 24 hours) is required in recharging the
Backup Battery, use your PC-EPhone placed in the cradle so the Backup
Battery does not become fully drained.
Page 3-10 Ch 3
3) Checking the battery’s charging status
You can check the status of the Main Battery charge in the Control Panel. The
Backup Battery’s charging status can be checked in Power of the Control Panel. In
other words, on the Start menu, point to Settings and tap Control Panel, and then
tap Power, which will show you the remaining battery power.
(2) Replacing and Installing the Battery
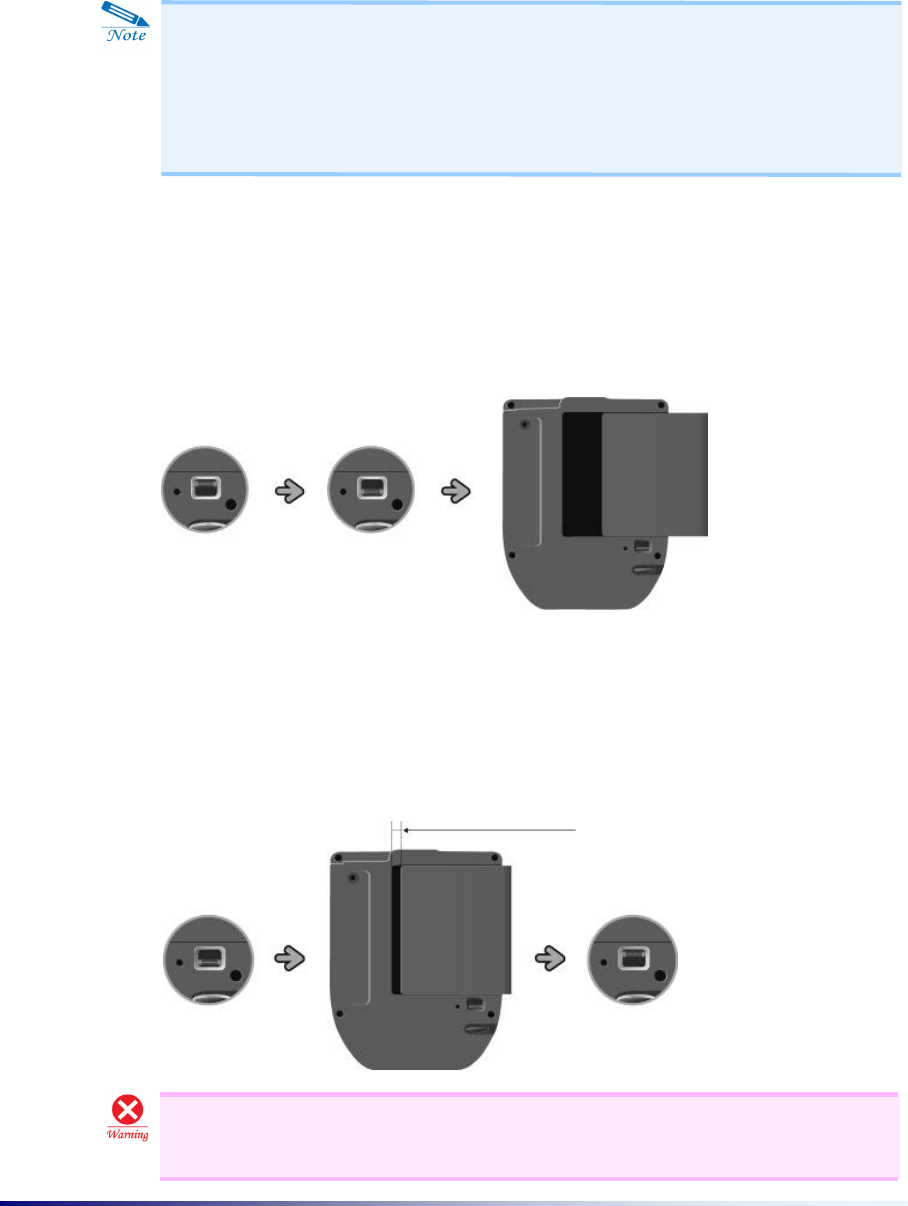
1) How to detach a battery
Switch the Battery Lock on the back of your PC-EPhone downwards and slightly slip
the battery out.
2) How to install a battery
With switching the Battery Lock on the back of your PC-EPhone downwards, place
the battery in the slot leaving a 4 ~ 5mm space. After pushing the battery to the left to
click it into place, switch the Battery Lock upwards again.
The battery’s charging status may be temporarily displayed differently
according to the condition in which it is used. In other words, an amount of
electric power is needed when connected to the Internet or during a phone
call. In these cases, the battery’s charging status will appear to be very
insufficient.
Place the battery in the battery slot leaving a 4 ~ 5mm space as shown above
and then push the battery to the left to click it into place.
leaving 4~5mm space and push

PC-EPhone Customizing & Maintenance Page 3-11
(3) When to Replace and Charge the Battery
When the “Very Low Main Battery” warning message appears while using your PC-
EPhone, replace the battery with a fully charged one or recharge it by placing it in the
cradle. If you continue to use your PC-EPhone even after this message appears, your
PC-EPhone will automatically be converted to the “Very Low Battery Sleep Mode”
and power will be off. (PC-EPhone’s function keys will no longer operate in this state.)
(4) Battery Maintenance
In order to maximize the Main Battery’s life span and keep it in its best working state,
you should follow the tips given below.
l Charge the Lithium-ion Main Battery in room temperatures. If surrounding
temperatures fall below 5°C(or 41°F) or rise over 35°C(or 95°F), you should stop
charging.
l When recharging a new Lithium-ion Main Battery or recharging after a long period
of negligence, the charging time and usage time may be shortened. This is a
characteristic of a Lithium-ion battery, but 4 ~ 5 repeats of Full Discharging /
Full Recharging will go back to normal operation.
l For the Lithium-ion battery to maintain its best performance, you should
periodically perform a Full Discharge / Full Recharge.
l As the Lithium-ion battery is a consumable goods, it does have a set life span. Its
battery life will be shortened with repeated Recharge / Discharge. Therefore,
when usage time falls to half of that when you first used it, you had better
purchase and use a new Lithium-ion battery.
(5) How to effectively use Electricity
l When supplying power with the Main Battery, you can follow the steps given
below to automatically convert your PC-EPhone to the Sleep mode after a
continuous period of idle time.
Ÿ On the Start menu, point to Settings, and select Control Panel. The Control
Panel will be displayed. Tap the Power icon on the Control Panel to activate the
Power window, then select the Power Off tab and set it to the shortest time
interval.
Ÿ On the Start menu, point to Settings, and select Control Panel. The Control
When replacing batteries, install the fully charged battery as quickly as
possible after detaching the discharged battery. Your PC-EPhone’s built-in
Backup Battery preserves data for a certain period while you replace a
battery with the fully charged one. All stored data is lost when the battery is
fully drained.

Page 3-12 Ch 3
Panel will be displayed. Tap the Display icon on the Control Panel to activate the
Display window, then select the Backlight tab and set it to the shortest time
interval.
l Make sure all unnecessary sounds are turned off.
Ÿ On the Start menu, point to Settings, and select Control Panel. The Control
Panel will be displayed. Tap the Volume & Sounds icon on the Control Panel to
activate the Volume & Sounds window, and then set only the sounds you need.
l When using your PC-EPhone for extended period of time, place it in the cradle if
possible. Especially, Power drainage is severe during Internet Connection, so it is
recommended that you use your PC-EPhone placed in the cradle.
What is PC-EPhone’s Sleep Mode?
It is a state where your PC-EPhone power is off leaving only the minimum
amount of power needed, to conserve battery power when not in use. Even
when it is turned off, minimum power is supplied to your PC-EPhone in order
to maintain memory data.
There are 4 ways to put your PC-EPhone into the “Sleep Mode”:
▶ system settings
Converts to the “Sleep Mode” according to the idle time set in Power of
Windows CE Control Panel.
▶ insufficient battery power (Very Low Battery Sleep Mode)
Converts to the “Sleep Mode” in order to preserve data when the Main
Battery is drained.
▶ selecting Suspend on the Start Menu of Windows CE desktop.
Converts to the Sleep Mode when you directly tap Suspend on the Start
menu, using the stylus.
▶ Use the Power button on the right to put your PC-EPhone into the Sleep
Mode when not in use.

PC-EPhone Customizing & Maintenance Page 3-13
I
II
II
I.
.
M
Ma
an
na
ag
gi
in
ng
g
a
an
nd
d
A
Ap
pp
pl
ly
yi
in
ng
g
M
Me
em
mo
or
ry
y
There are 3 types of memories in the PC-EPhone that you can use: RAM, IPSM, and
CF Memory Card.
(1) RAM
RAM is used as storage space where you can store data or files, and as program space.
In other words, you can either save data and files or install programs in RAM. RAM
memory is mainly used when running a program.
1) When running several programs at the same time, running may slow down due to
memory shortage, or when RAM space is being entirely used, your PC-EPhone may
not be able to carry out operations properly. Be sure to run only the programs that you
need.
2) Delete files and data that you do not need right away or store them in IPSM or CF
Card memory in order to secure sufficient RAM space needed in running programs.
(2) IPSM(Intel Persistent Storage Management)
IPSM, a non-volatile memory, performs the same role as the hard disk of the desktop
PC. As no damage is done to data stored in IPSM even in the event of power shortage
or a Hard Reset, you had better copy important data to IPSM and gain security.
(3) CF Memory Card
CF Memory Card is a device that performs the same functions as the floppy disk of a
desktop PC, thus the CF Memory Card can be used to store data when it is installed in
the CF Card slot of your PC-EPhone. And because a CF Memory Card can store data
permanently, you can use it to back up data from RAM to safely preserve it.
Since RAM is a volatile memory, all data stored in it is lost when there is no
power supply to the PC-EPhone (full drainage of Main & Backup Battery) and
when a Hard Reset is performed on the system. Consequently, you should
back up your data using Backup Utility from time to time in order to restore
lost data.
Saving and reading speed to and from IPSM’s data is slower than those of
RAM. So don’t install the execution programs in IPSM. Copy frequently used
data or data requiring quick speeds onto RAM.
Extend the quantity of program memory when it happens that PC-EPhone
runs too slow or malfunctioning and extend the quantity of storage memory
when spaces are needed for files or documents.

Page 3-14 Ch 3
I
IV
V.
.
R
Re
es
se
et
tt
ti
in
ng
g
S
Sy
ys
st
te
em
ms
s
You can get your PC-EPhone back to normal by performing a system reset when it is
not operating properly. There are 2 types of system resets : Soft Reset, and Hard
Reset.
(1) Soft Reset
Performs a Soft Reset when your PC-EPhone operating system suddenly responds
slowly or is temporarily out of order. To perform a Soft Reset, press the Reset button
on the back of your PC-EPhone using the stylus.
(2) Hard Reset
You can perform a Hard Reset when the system does not return to proper operation
even after performing a Soft Reset. To perform a Hard Reset, simultaneously press the
Reset button on the back of your PC-EPhone with stylus and the Power button on
the right side, and first lift the stylus from the Reset button and then let go of the
Power button about 0.5 second later. After a Hard Reset, the CYBERBANK logo
appears and then gives way to the touch screen calibration.
When you perform a Soft Reset, you will lose unsaved data in all open
documents or programs. Be sure to save all data beforehand.
All data stored in RAM is lost as a result of a Hard Reset, so it is best that you
store all RAM data in non-volatile storage devices (IPSM or CF Card, desktop
PC hard disk) before performing a Hard Reset.
Your PC-EPhone will automatically perform a Hard Reset when the Main
Battery and Backup Battery are both fully drained, in turn resulting in a loss of
all stored data and installed programs in RAM.
Connecting to desktop PC Page 4-1
C
Co
on
nn
ne
ec
ct
ti
in
ng
g
t
to
o
a
a
d
de
es
sk
kt
to
op
p
P
PC
C
Synchronization is the process of comparing data on your PC-EPhone and your
desktop PC and updating both computers with the most recent information. As these
features are provided through Microsoft ActiveSync with the desktop PC and your PC-
EPhone physically connected, you must install ActiveSync on the desktop PC before
you connect.
I
I.
.
I
In
ns
st
ta
al
ll
li
in
ng
g
A
Ac
ct
ti
iv
ve
eS
Sy
yn
nc
c
o
on
n
y
yo
ou
ur
r
D
De
es
sk
kt
to
op
p
P
PC
C
Using Microsoft ActiveSync, you are able to copy or back up PC-EPhone data to your
desktop PC or synchronize data between your PC-EPhone and desktop PC.
(1) Installing Microsoft ActiveSync Program
1. On the Start button, select Settings, point to Control Panel to activate Control
Panel screen.
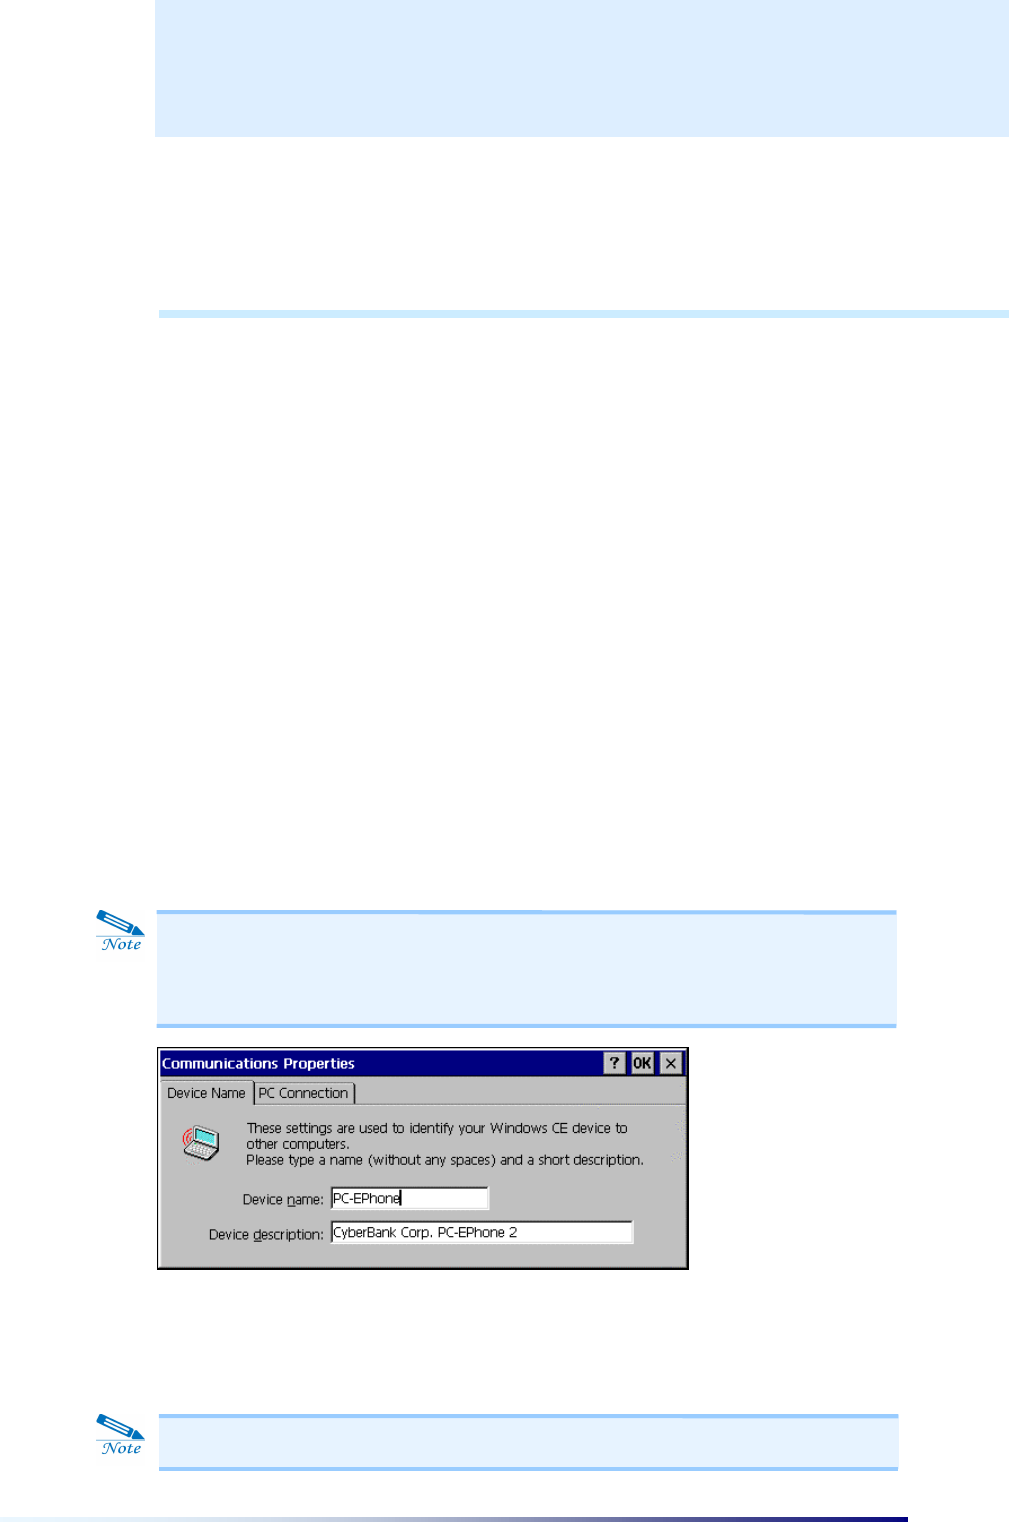
2. Select the Communication icon to activate the Communication Properties screen.
Input the corresponding names in Device name.
3. Tap the PC Connect tab.
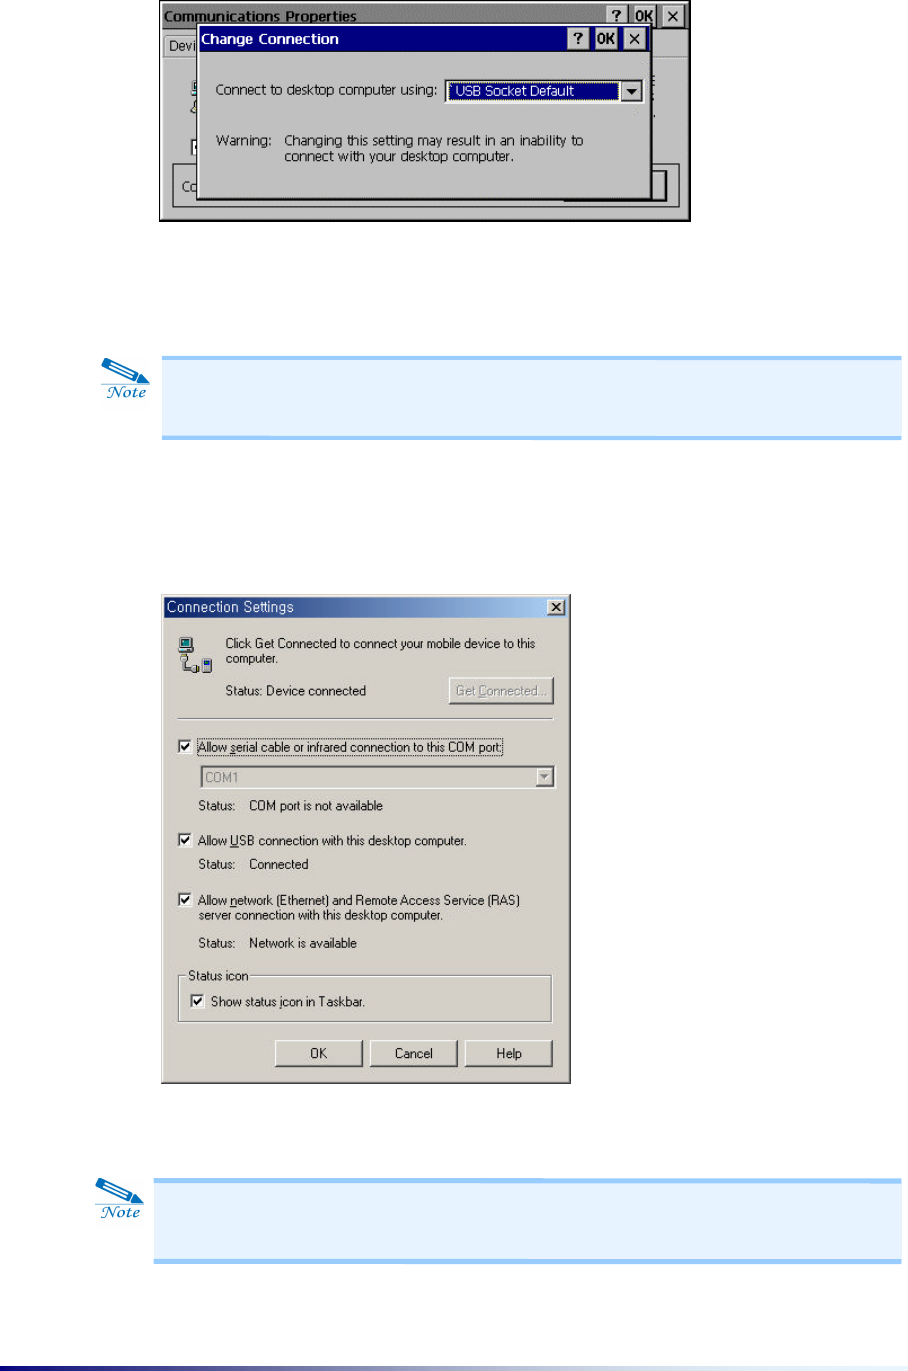
4. Tap the Change button to activate the Change Connection dialog box. Select
USB Socket Default in the drop-down list box.
C
C
H
H
A
A
P
P
T
T
E
E
R
R
4
4
Device name is used in establishing Partership and set as PC-EPhone 2 by
default. The name must start with a letter, and it can be anything you
choose(up to 15 characters, no spaces).
PC-EPhone is supposed to set as USB Socket Default.
Page 4-2 Ch 4
(2) Installing Microsoft ActiveSync Program & Setting Preference
1. Download Microsoft ActiveSync program in your desktop PC.
2. Run msasync.exe to start the ActiveSync Setup Wizard and finish the Wizard.
3. Double-click the ActiveSync icon of your desktop PC.
4. Select the Connection Settings from the File menu.
5. Set it as the dialog box above
You can download the latest version of Microsoft ActiveSync program from
Microsoft Web site (http://www.microsoft.com/mobile/ pocketpc/downloads).
Check to see if the new version of PC-Ephone is set to USB connection as
default. This is different from old PC-Ephone version that uses the Serial port.

Connecting to desktop PC Page 4-3
(3) Installing PIMSSync program
You can customize your PC-EPhone by using the Preferences application. You can
enter personal information such as your name and address; change the time and date;
view different date and time formats when you travel; turn off sounds; and configure
your PC-EPhone to work with a modem or network.
The cradle that comes with your PC-EPhone enables you to synchronize the
information on your PC-EPhone with PIMSSync using ActiveSync.
Note: Any game or application that you install on your PC-EPhone resides in RAM
memory; you can delete them at any time.
PIMSSync program is used to synchronize your PC-EPhone PIMS data(PC-EPhone
Calendar, PC-EPhone Tasks, PC-EPhone Contacts & E-Mail) and files with
data(Outlook) and files of your desktop PC. You must install the PIMSSync program
before synchronizing PIMS data.
1. Run Setup.exe needed in PIMS data synchronization with PC-EPhone from
PIMSSync program of PC-EPhone Software CD.
2. The PIMSSync installation wizard starts.
3. After PIMSSync installation, connect to desktop PC through ActiveSync. Tap the
Options icon, and select PC-EPhone Calendar, PC-EPhone Tasks, PC-EPhone
Contacts and E-Mail as items to synchronize.
If you have finished installing the Microsoft ActiveSync program, setting
preferences, now the partnership should be established.
If Microsoft ActiveSync program is running, after disabling it, install PIMSSync
program.
Page 4-4 Ch 4
(4) Removing PIMSSync
If you no longer want to use PIMSSync, you can remove it from your desktop PC.
To remove PIMSSync:
1. From the Windows Start menu, choose Settings, and then Control Panel.
2. Double-click the Add/Remove Programs icon.
3. On the Install/Uninstall tab, select PIMSSync.
4. Click Add/Remove.
5. Note: You need to install the PIMSSync from the installation CD if you want to
synchronize data with another PIMS.
(5) Establishing Partnership
1. When you place your PC-EPhone in the cradle, ActiveSync is automatically run on
your desktop PC and the ActiveSync screen is activated.
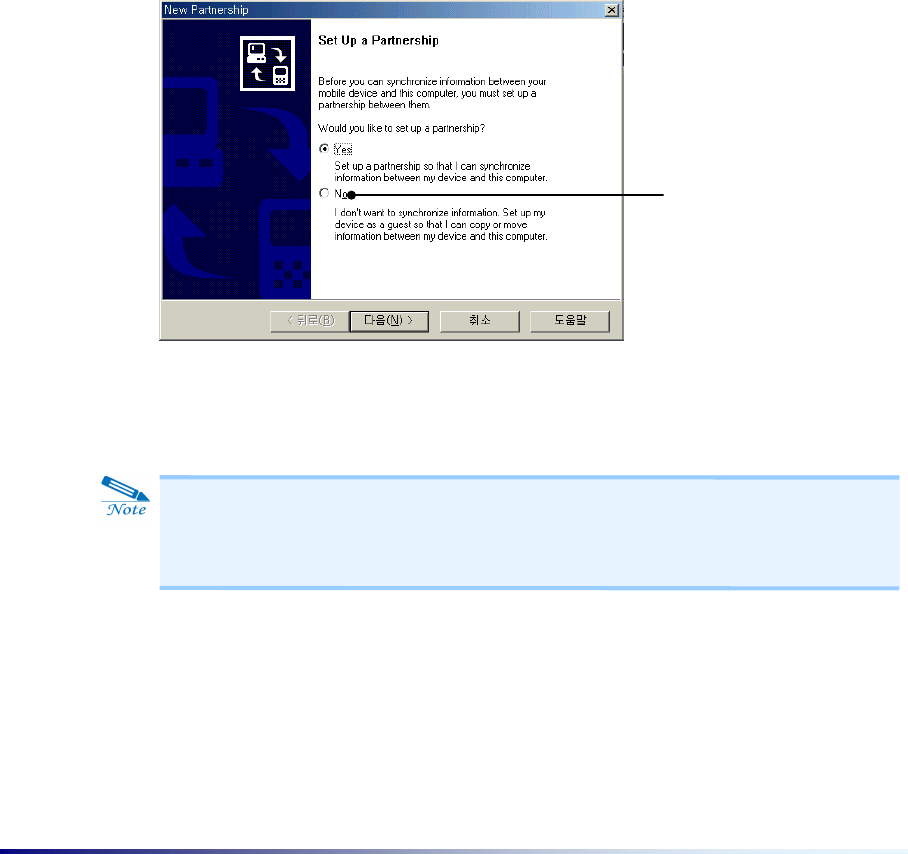
2. The New Partnership screen appears. Tap the Next button.
3. Select the items you want to synchronize such as PC-EPhone Calendar, PC-
EPhone Mail, PC-EPhone Tasks, PC-EPhone Contacts, Favorites, Files and click the
OK button. The unselected items are not synchronized.
Select No so that Partnership is not
established and your device is
connected to computer as Guest.
A desktop PC can establish partnerships with several Windows CE base
Palm-size PCs, while one Windows CE base Palm-size PC can establish
partnerships with up to two desktop PCs.

Connecting to desktop PC Page 4-5
(6) Microsoft ActiveSync Window
Allows you to control Microsoft ActiveSync program and check the connection status.
It also shows synchronized items and status.
l
Sync button
:
Conducts synchronization between your PC-EPhone and desktop
PC.
l Stop button : Used to stop operations during synchronization.
l Details button : Shows or hides information on the synchronized items and status.
l Explore button : Activates the Mobile Device display and enables you to move,
copy, and delete files between your PC-EPhone and desktop PC.
l Options button : Activates a window for setting synchronization options.
Page 4-6 Ch 4
I
II
I.
.
C
Co
on
nn
ne
ec
ct
ti
in
ng
g
y
yo
ou
ur
r
d
de
es
sk
kt
to
op
p
P
PC
C
t
to
o
P
PC
C-
-E
EP
Ph
ho
on
ne
e
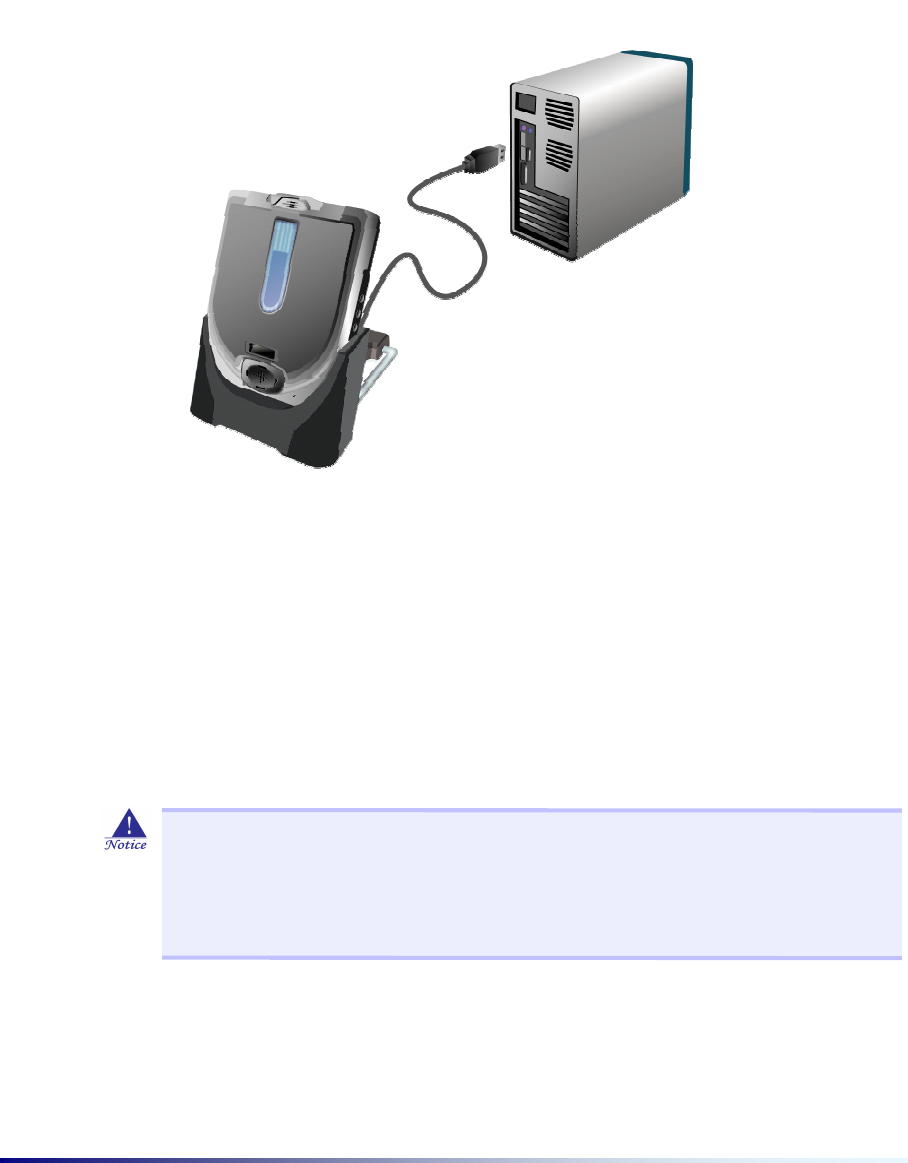
l Connection using the USB Cable
l Connection using the Infrared Port
(1) Connection using the USB Cable
Connection between the desktop PC and PC-EPhone.
(2) Connection using the Infrared Port
PC-EPhone’s infrared port enables you to perform a wireless connection to your
notebook without cables or a cradle. Most laptop PCs manufactured recently support
infrared communication. To connect your PC-EPhone to one of these laptop PCs and
execute communication, you must first install an infrared port on the notebook PC and
set preferences. (See the “Setting PC -EPhone and desktop PC preferences ” section
in Installing ActiveSync) For detailed information, see the notebook manufacturer’s
manual or Help.
For infrared communication, there must not be any obstruction between the
Notebook and the PC-EPhone, and the distance between the two IR ports
must be under 1m. Also, you must align the IR windows of the two devices so
that they are aimed directly at one another.
Connecting to desktop PC Page 4-7
I
II
II
I.
.
H
Ho
ow
w
t
to
o
S
Sy
yn
nc
ch
hr
ro
on
ni
iz
ze
e
d
da
at
ta
a
a
an
nd
d
D
Di
is
sa
ab
bl
le
e
S
Sy
yn
nc
ch
hr
ro
on
ni
iz
za
at
ti
io
on
n
(1) Disabling Synchronization
You can disable synchronization by removing your PC-EPhone from the cradle, by
powering off your PC-EPhone, or by disconnecting the serial cable. When using
infrared ports, you can disable synchronization by separating the desktop PC’s IR port
from your PC-EPhone so that they maintain a distance of over 1m.
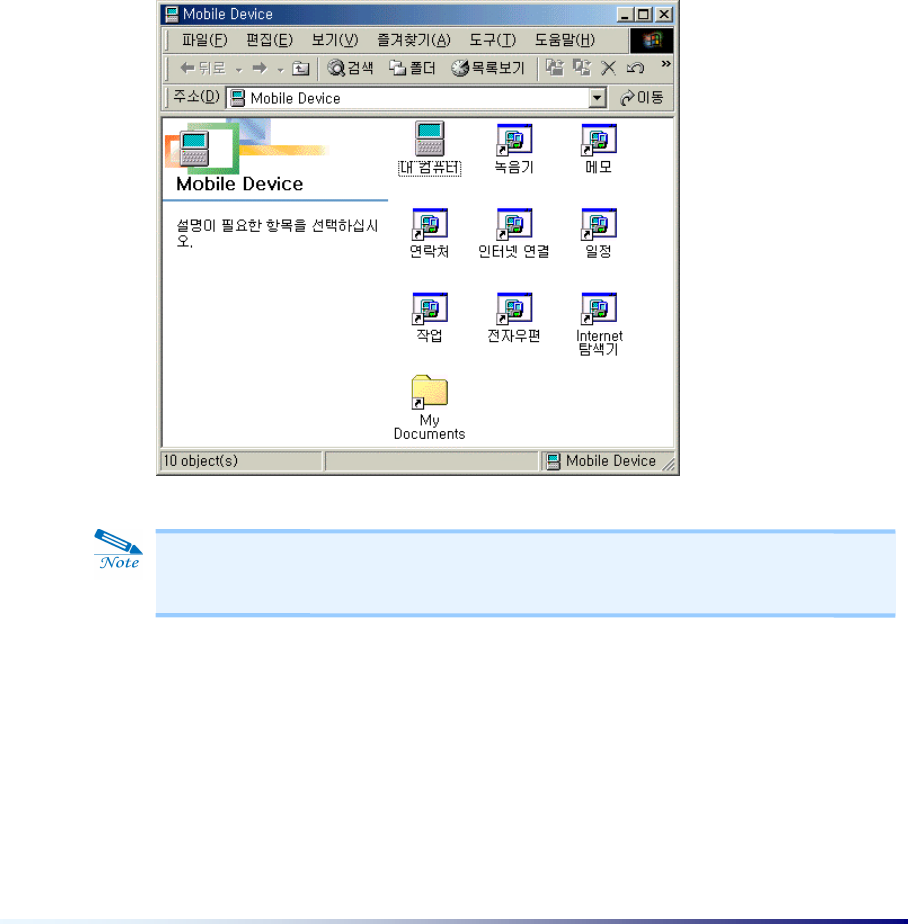
(2) Viewing PC-EPhone contents on your desktop PC
You can view PC-EPhone contents on your desktop PC through ActiveSync when your
PC-EPhone is already connected to your desktop.
Tap the Explorer button on the ActiveSync window or tap Explorer on the File menu,
and the Mobile Device dialog box appears.
You cannot open files or start programs stored on your PC-EPhone by
double-clicking their icons in the Mobile Device window on your desktop PC.
Page 4-8 Ch 4
I
IV
V.
.
H
Ho
ow
w
t
to
o
c
co
op
py
y
f
fi
il
le
es
s
b
be
et
tw
we
ee
en
n
y
yo
ou
ur
r
d
de
es
sk
kt
to
op
p
P
PC
C
a
an
nd
d
P
PC
C-
-E
EP
Ph
ho
on
ne
e
You can copy files between your desktop PC and PC-EPhone by dragging the icons
from the Mobile Device window, or by using Cut, Copy, and Paste on the Edit menu.
When files are copied, moved, and synchronized between your PC-EPhone and
desktop PC, file conversions are set in the following manner.
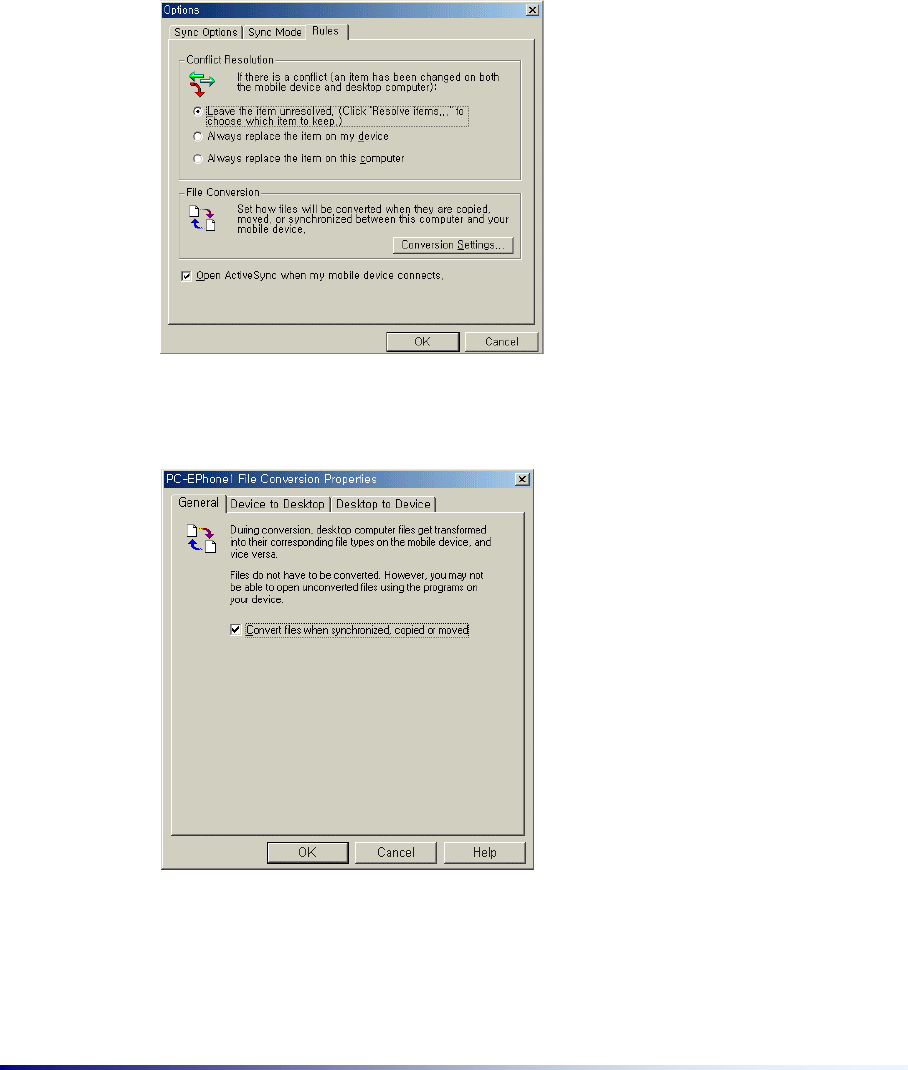
1. On the Tools menu in the ActiveSync screen, select Options, and then select the
Rules tab.
2. When you tap the Conversion Settings… button, the File Conversion dialog box
appears as shown below.
3. Check the “Convert files when synchronized copied or moved” box, and after
selecting the Device to Desktop tab or Desktop to Device tab to modify pertaining
data, tap OK.
Connecting to desktop PC Page 4-9
V
V.
.
I
In
ns
st
ta
al
ll
li
in
ng
g/
/U
Un
ni
in
ns
st
ta
al
ll
li
in
ng
g
P
Pr
ro
og
gr
ra
am
ms
s
u
us
si
in
ng
g
A
Ac
ct
ti
iv
ve
eS
Sy
yn
nc
c
Microsoft ActiveSync enables you to install new programs or uninstall programs on
your PC-EPhone.
(1) Installing Programs
You are able to install new programs through Microsoft ActiveSync.
1. Download a new program using ActiveSync with your desktop PC and PC-EPhone
connected.
2. Run the installation program(Setup.exe or Install.exe) of the downloaded program
to activate the Add/Remove Programs dialog box as shown below.
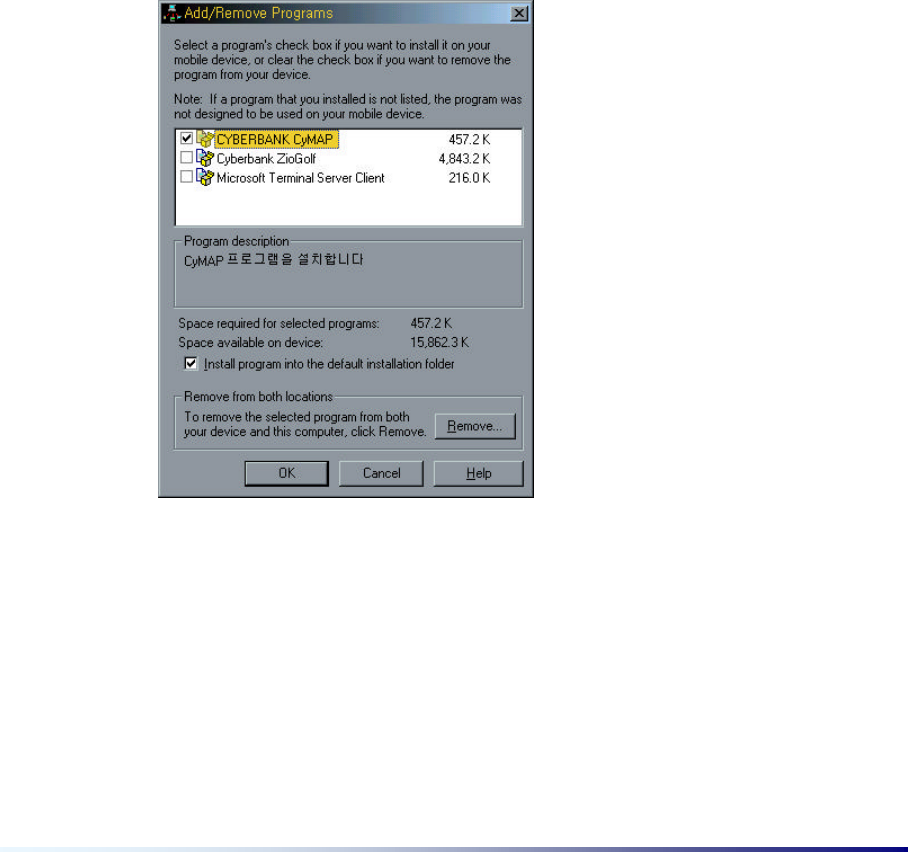
(2) Uninstalling Programs
1. On the Microsoft ActiveSync screen, tap Add/Remove Programs on the Tools
menu and the programs installed in your PC-EPhone are displayed as shown below.
1. Check the box next to the program to be uninstalled, tap the Remove… button,
then the following dialog box appears. Tap the OK button to proceed with
uninstallation, and tap the Cancel button to cancel uninstallation.

Page 4-10 Ch 4
1) Uninstalling from PC-EPhone
1. On your PC-EPhone’s Start menu, point to Settings, then tap Control Panel, and
the settings window appears.
2. When you tap the Remove Programs icon, the Remove Programs dialog box
appears.
3. After selecting the program to be uninstalled, tap Remove and the program is
uninstalled.

Backup/Restore Page 5-1
B
Ba
ac
ck
ki
in
ng
g
u
up
p
a
an
nd
d
R
Re
es
st
to
or
ri
in
ng
g
D
Da
at
ta
a
PC-EPhone’s storage memory consists largely of volatile memory RAM and IPSM &
CF card of non-volatile memory Flash ROM. When the power source is disconnected,
all data stored in volatile memory is lost, so it is best that you back up your PC-EPhone
data frequently. As for the non-volatile memory IPSM, data loss may occur when your
PC-EPhone is damaged so it is also recommended that you back up your data to
devices(desktop PC or CF card) other than your PC-EPhone.
I
I.
.
B
Ba
ac
ck
ku
up
p/
/R
Re
es
st
to
or
re
e
o
of
f
A
Ac
ct
ti
iv
ve
eS
Sy
yn
nc
c
t
to
o
D
De
es
sk
kt
to
op
p
P
PC
C
You can back up files created on your PC-EPhone, database, PIM data and programs
installed in RAM to your desktop PC using Microsoft ActiveSync, and restore them
when needed.
Backup can either be performed automatically when your PC-EPhone is connected to
your desktop PC, or manually whenever needed. Also, you can back up updated or new
data only or choose to back up the entire lot.
1) Automatic Backup
1. Connect your PC-EPhone to desktop PC.
2. Tap Backup/Restore on the Tools menu of the ActiveSync screen to activate the
Backup/Restore screen.
3. Select “Automatically back up each time the device connects”.
4. If you wish to use a backup file other than an existing one, tap “Change …” and
select a file.
5. Select “Full backup” or “Incremental backup” according to your needs.
6. Tap “Back Up Now” to start the backup, or perform backup the next time you
connect.
C
C
H
H
A
A
P
P
T
T
E
E
R
R
5
5
Automatic backup is only possible when a Partnership is established with a
desktop PC. Only a manual backup is possible when the partnership is
established as Guest.
For more information on Backup/Restoring to a desktop PC, see Microsoft
ActiveSync Help.

Page 5-2 Ch 5
2) Restore
1. Connect your PC-EPhone to desktop PC.
2. Close all programs running on your PC-EPhone.
3. Tap Backup/Restore on the Tools menu of the ActiveSync screen, and select the
Restore tab.
4. Tap “Restore Now”.
5. When Restoring is complete, perform a Soft Reset on your PC-EPhone.
Do not remove your PC-EPhone from the cradle during a backup.
As newly installed programs or new files created on your PC-EPhone since
your last backup will be lost during restoration, you had better move them to
your desktop PC or to IPSM folder before you restore data.
Do not use your PC-EPhone until Restoring is complete.

Backup/Restore Page 5-3
I
II
I.
.
F
Fu
ul
ll
l
B
Ba
ac
ck
ku
up
p
a
an
nd
d
R
Re
es
st
to
or
ri
in
ng
g
t
to
o
a
a
C
CF
F
M
Me
em
mo
or
ry
y
C
Ca
ar
rd
d
1) Backing up to a CF Memory Card
1. On the Start menu, point to Programs, Accessories, then tap Backup &
Restore and the bUSEFUL Backup Plus Wizard is activated. (In case that the
“Show Backup/Restore Wizard on startup” option is selected in the Other tab of
Options on the Tool menu.)
2. Select “Back up your device”, then tap Next and the bUSEFUL Backup Plus
Wizard screen appears.
2) Restoring from a CF Memory Card
1. On the Start menu, point to Programs, Accessories, then tap Backup & Restore
and the bUSEFUL Backup Plus Wizard is activated. (When the “Show Backup/Restore
Wizard on startup” option is selected in the Other tab of Options on the Tool menu.)
2. Select Restore your device from a backup, then tap Next, and the bUSEFUL
Backup Plus Wizard screen appears.
3) Backing up selected file, Database, and Registry
1. On the Start menu, tap Programs, Accessories, then Backup & Restore and the
bUSEFUL Backup Plus Wizard is activated. (When the “Show Backup/Restore Wizard
on startup” option is selected in the Other tab of Options in the Tools menu)
2. Close the Wizard screen by tapping Close, and then select from DB or registry in
the file or system folder of your choice in the file selection window on the left. Tap
Start Backup under the File menu to activate the Backup Details screen.

Page 5-4 Ch 5
From hereon, refer to the Backing up to a CF Card section .
Using Internet & E-Mail Page 6-1
U
Us
si
in
ng
g
I
In
nt
te
er
rn
ne
et
t
&
&
E
E-
-M
Ma
ai
il
l
I
I.
.
C
Co
on
nn
ne
ec
ct
ti
in
ng
g
t
to
o
t
th
he
e
I
In
nt
te
er
rn
ne
et
t
u
us
si
in
ng
g
a
a
L
LA
AN
N
C
Ca
ar
rd
d
Your PC-EPhone supports Web-based wireless Internet services. PC-EPhone provides
a Web Browser that is compatible to Microsoft Internet Explorer 4.0 Browser and
supports HTML4.0 and JavaScript. Using a wireless communication module you may
access Internet services equal to that of a desktop PC anywhere and anyplace.
1. Either tap the Internet Explorer icon on your desktop or the ‘WWW’ icon on the
touch screen to open the PC-EPhone Web Browser screen.
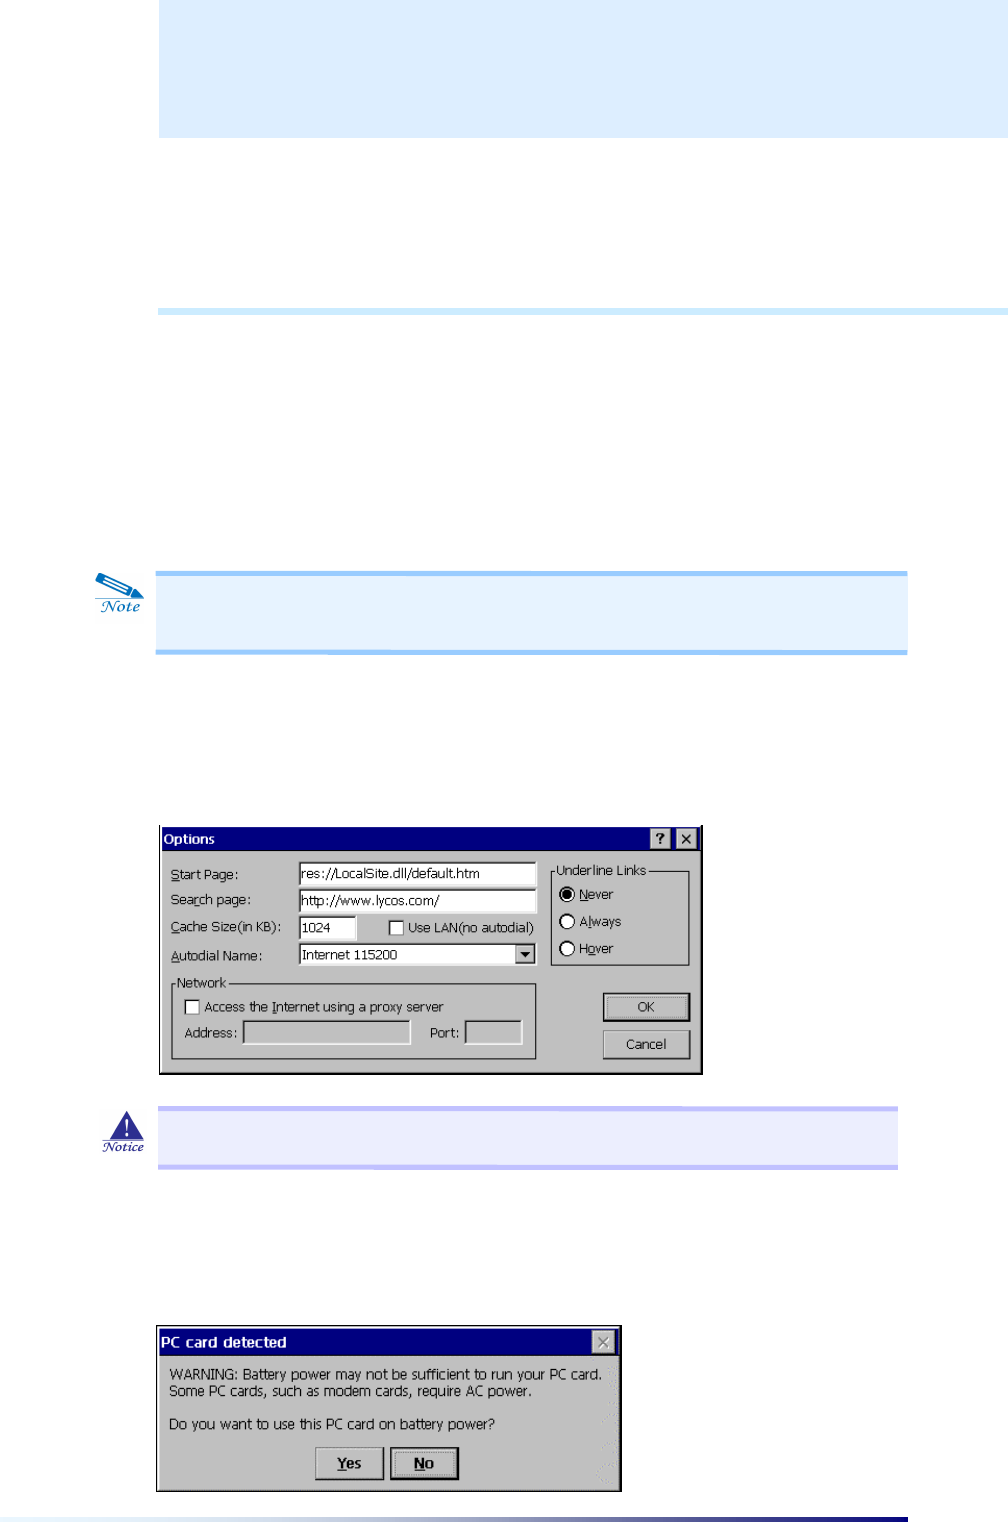
2. Tap Internet Options on the View menu of the PC-EPhone Web Browser Screen,
and the Options screen appears as shown below.
3. Select the Use LAN box, and tap the OK button.
4. Insert the LAN card in the CF Memory Card Slot.
5. If LAN card is detected, the PC card detected dialog box appears.
C
C
H
H
A
A
P
P
T
T
E
E
R
R
6
6
First disconnect USB cable from PC-EPhone, insert LAN card and then try to
connect Internet through LAN card.
Select the Use LAN(no autodial) to use the LAN card.