CyberBank CP-X315 CDMA Pocket PC/POZ PDA Cellular Phone User Manual table of contents
CyberBank Corp CDMA Pocket PC/POZ PDA Cellular Phone table of contents
UserManual.wiki
>
CyberBank
>
CP-X315 User Manual
>
Revised Part 1
Contents
1.
Revised Part 1
2.
Part 2
Revised Part 1
Navigation menu
Upload a User Manual
Namespaces
Wiki Guide
HTML
PDF
Info
Views
User Manual
Discussion / Help
Navigation


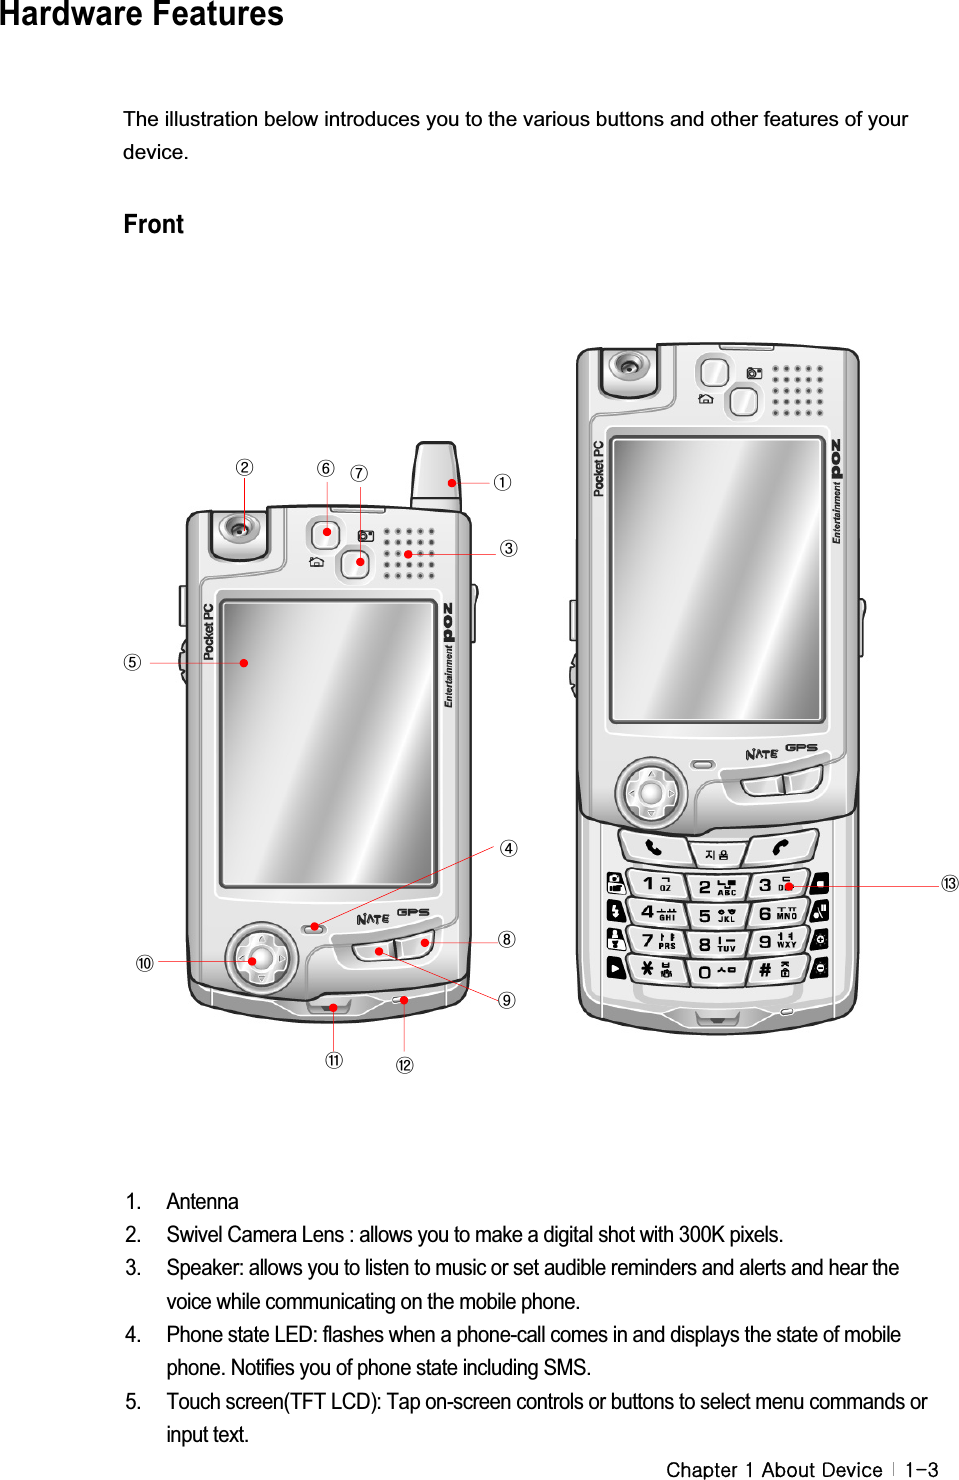
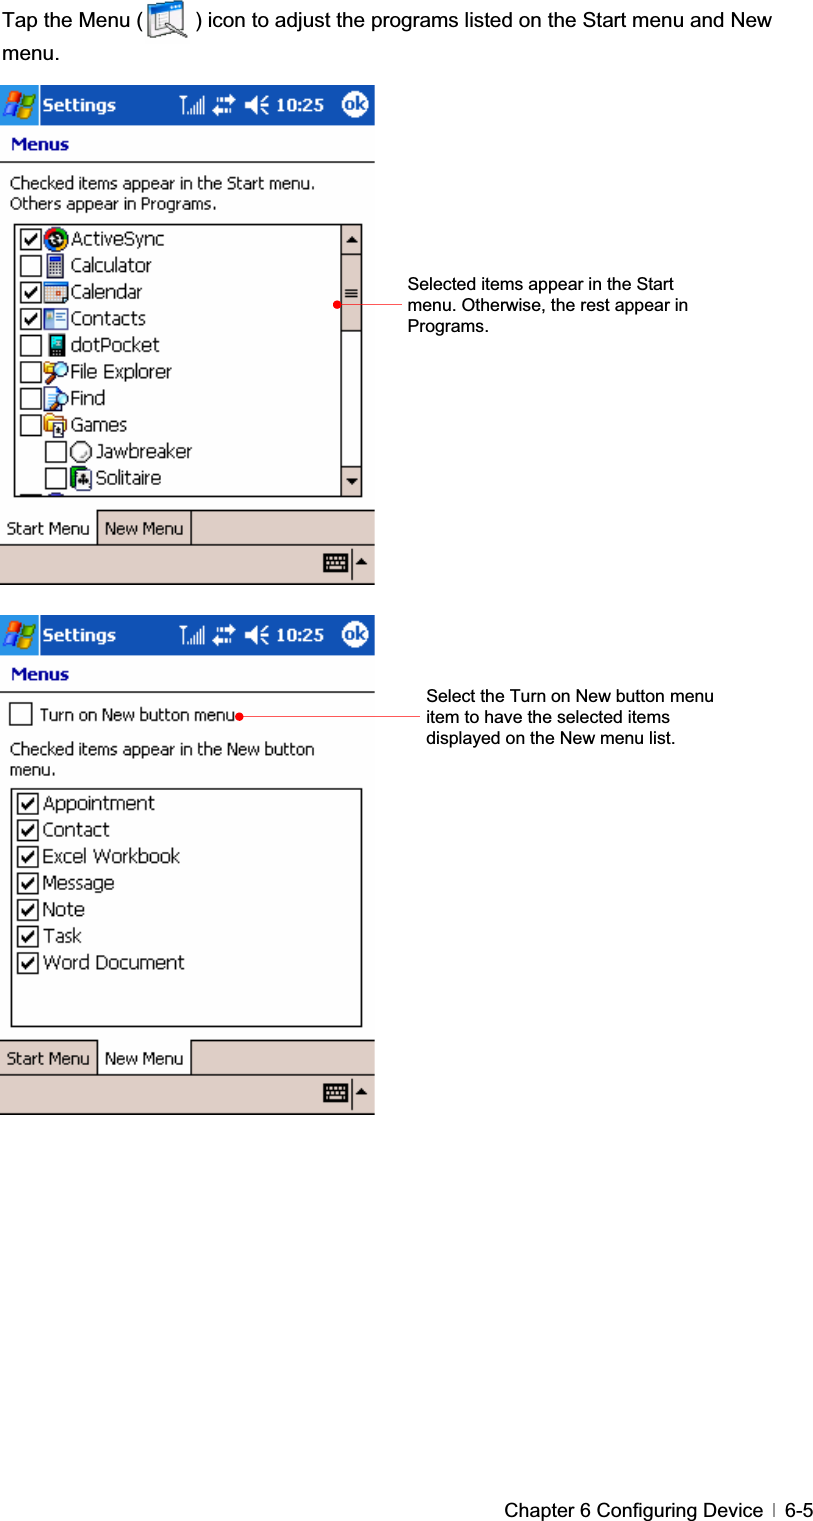
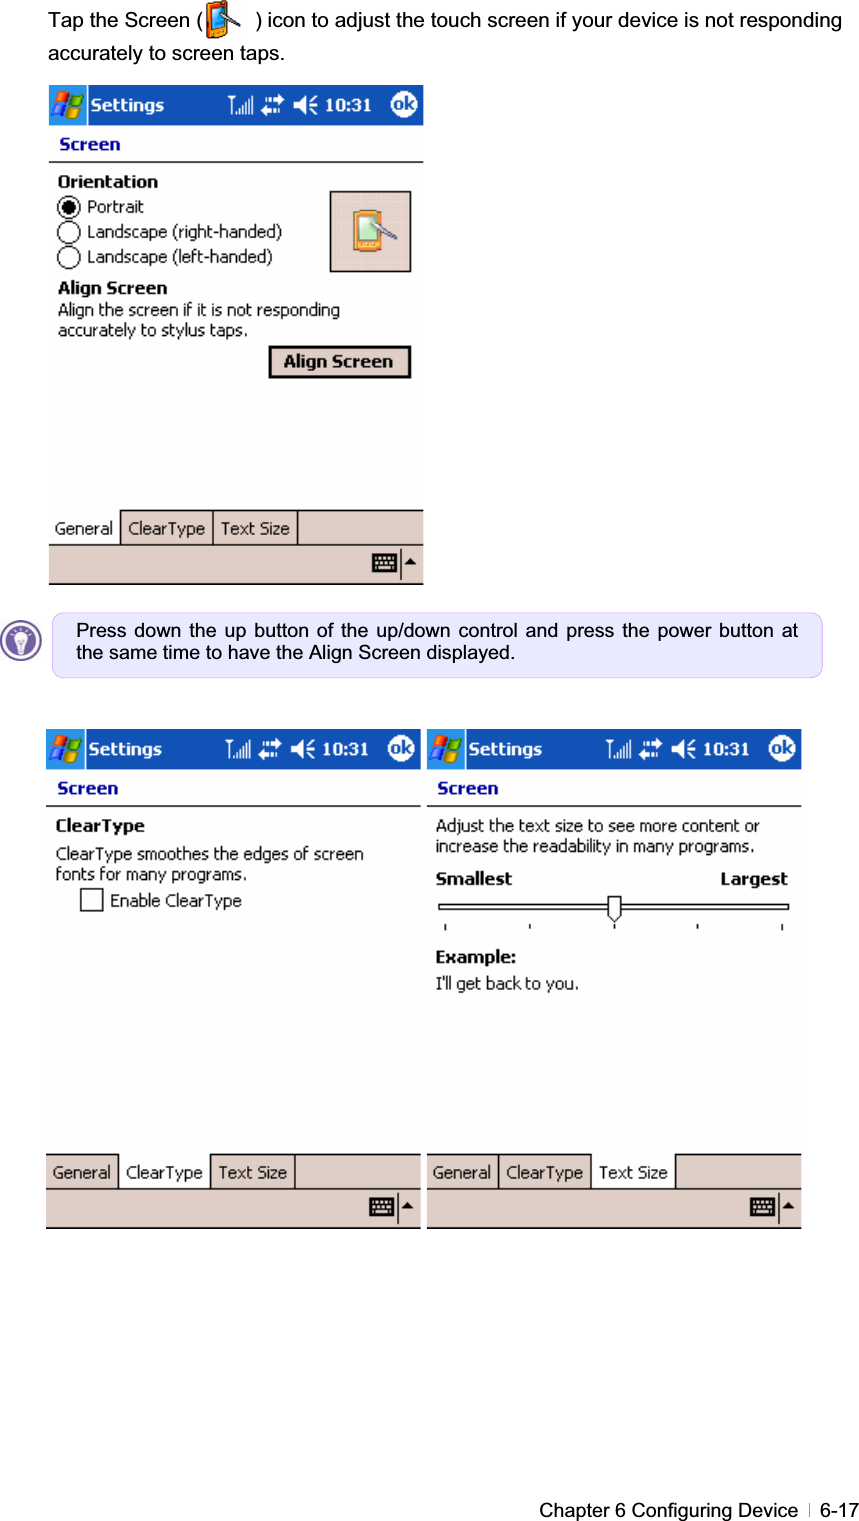
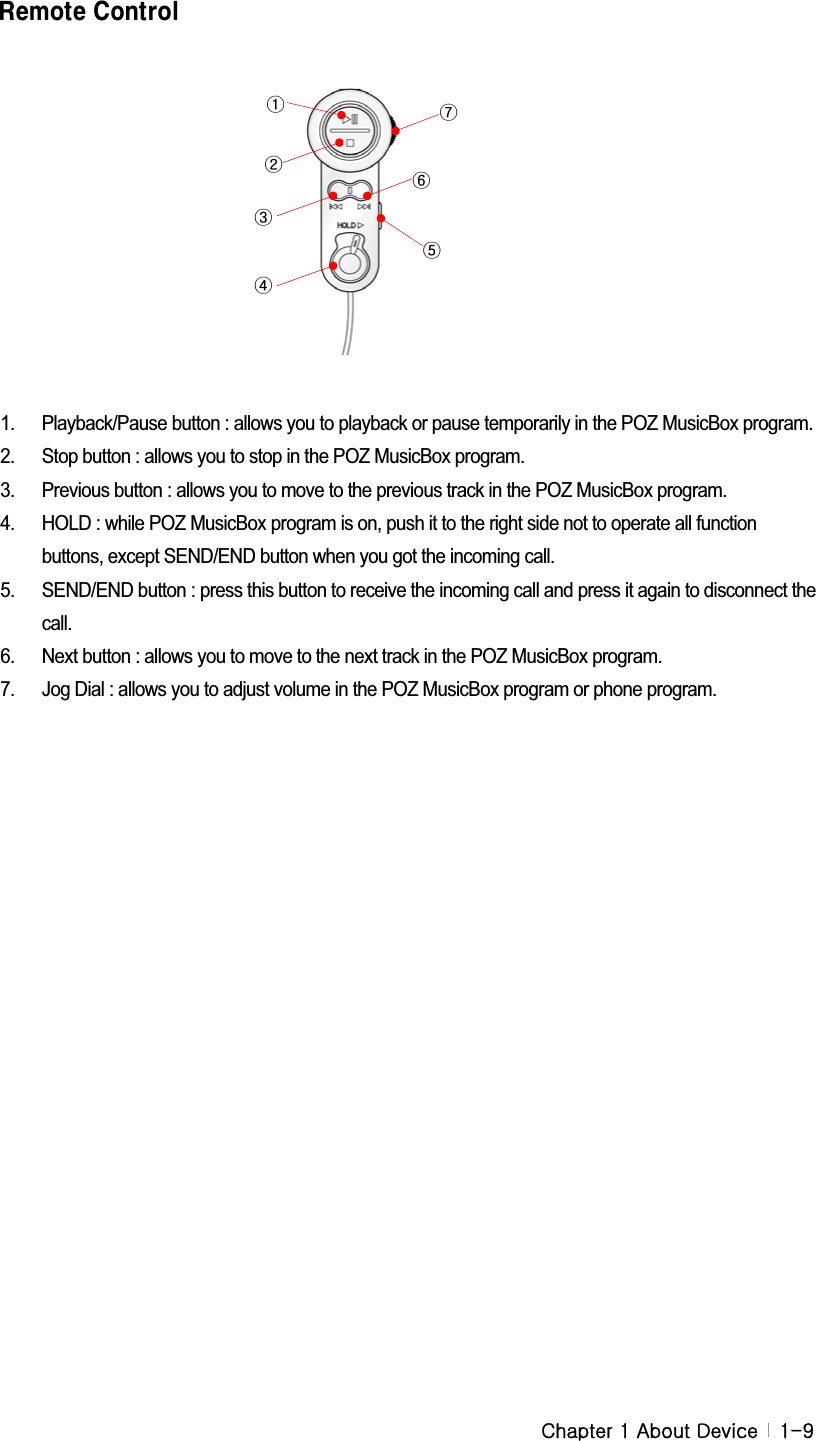
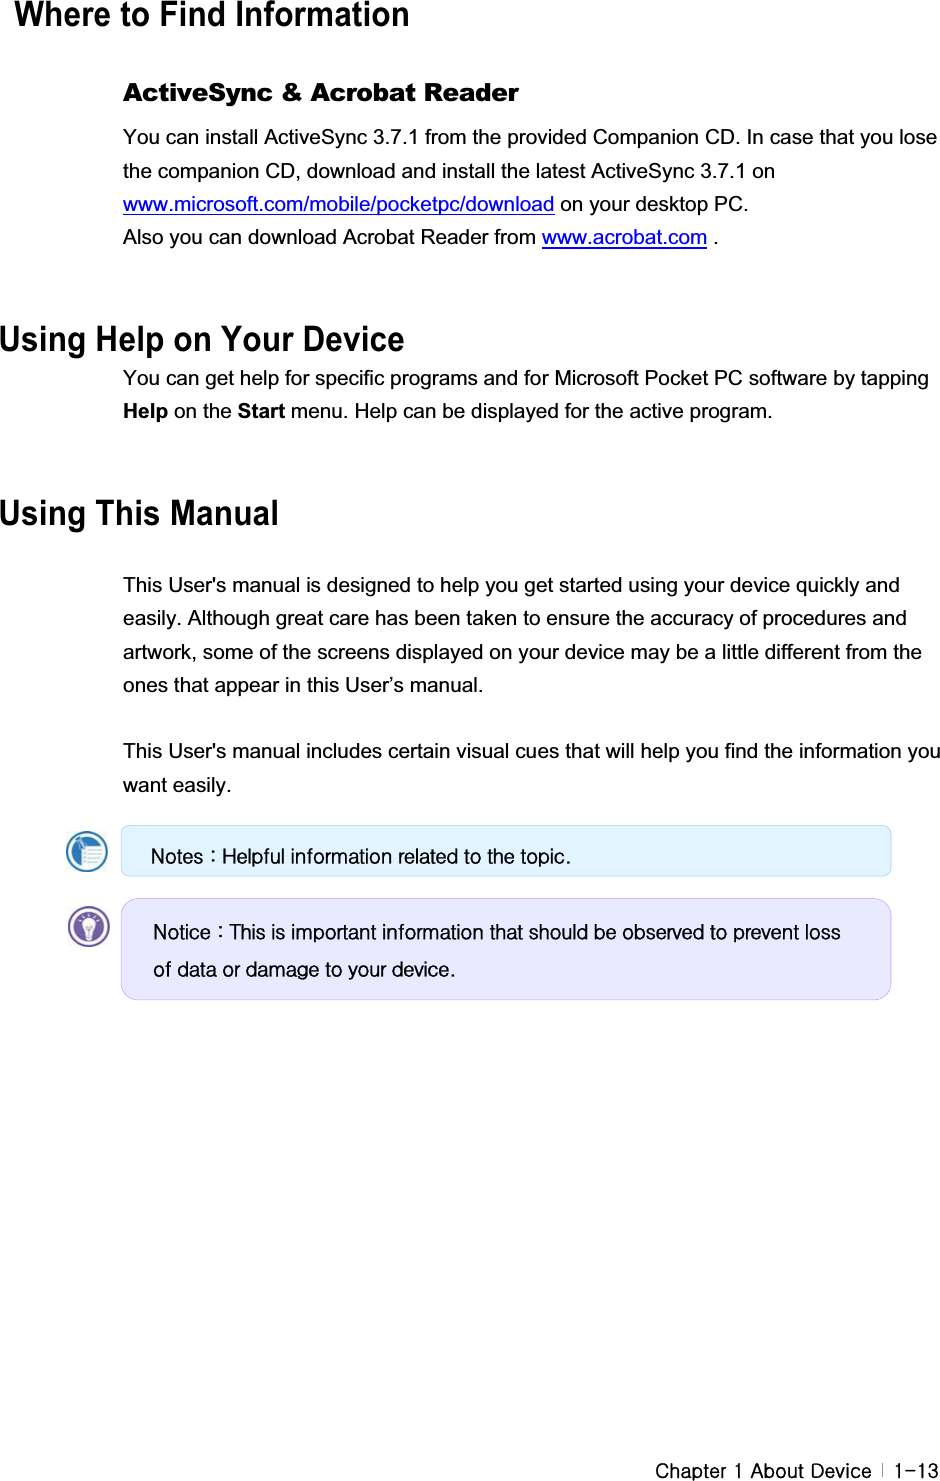
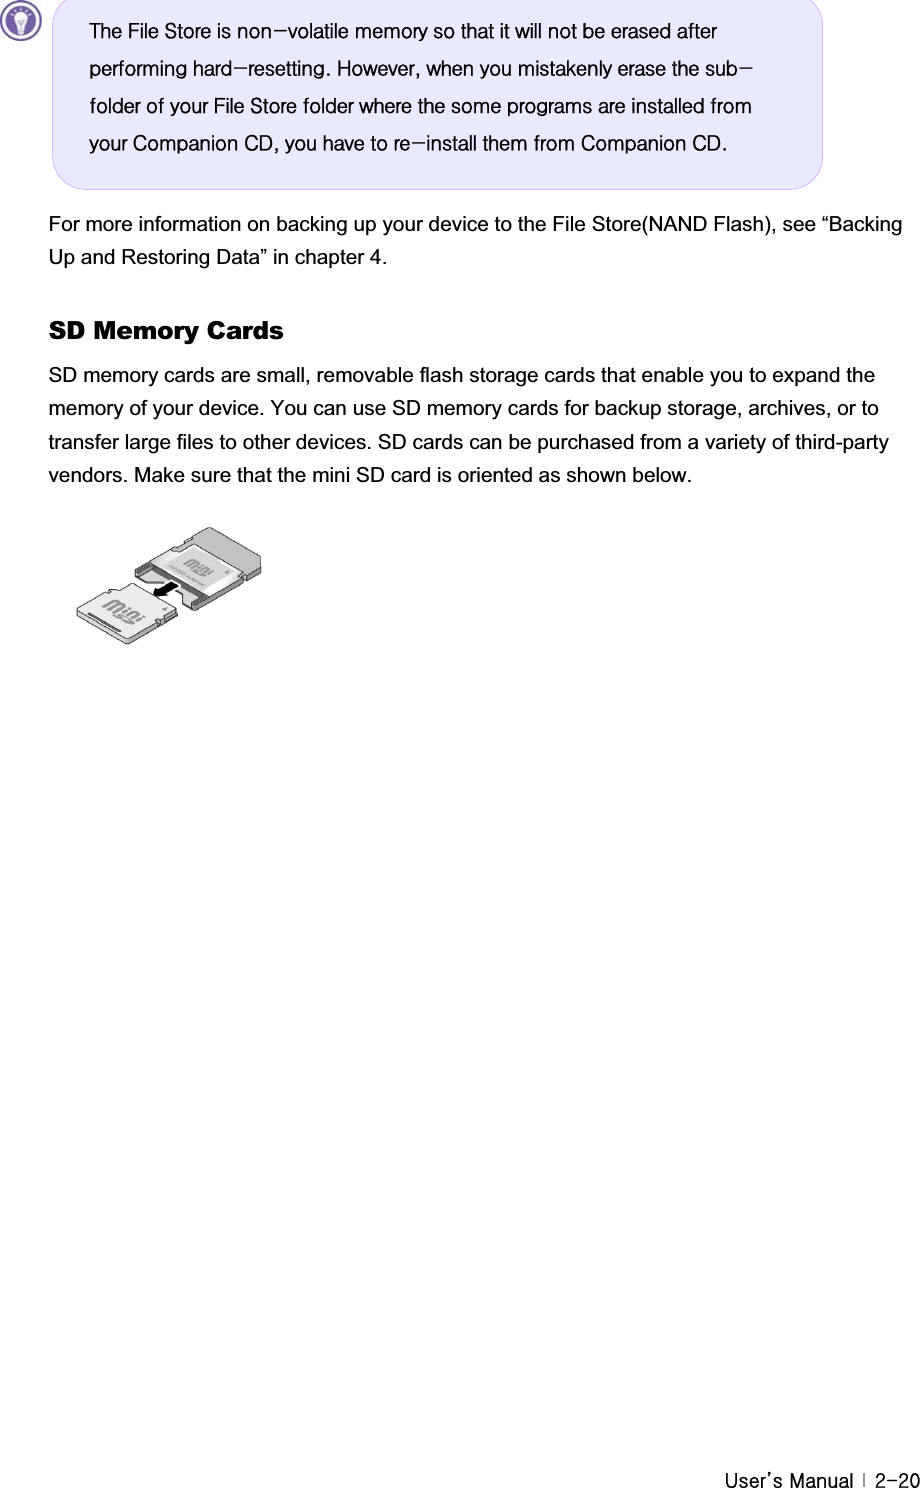
![G G GjGXGhGkG G XT\@YZhG]XYGGGGGGGGGGGGGGGGGGGGGGG1. Stereo headphone jack: Connect a proprietary stereo headphone. 2. Up/down control button: Scroll through documents. Enter button: Press it once to have the last called phone number displayed on the phone display with the phone program on and press it once to finish your communication you want. 3. Mini SD (Secure Digital) card slot: Insert an optional SD card to add memory. Take out the Mini SD card as shown below and lift the rubber and slide the card into the slot, pressing the card gently but firmly until it snaps into place in the slot. GGGGGGGGGGྚGྙGྛG](https://usermanual.wiki/CyberBank/CP-X315.Revised-Part-1/User-Guide-526671-Page-12.png)
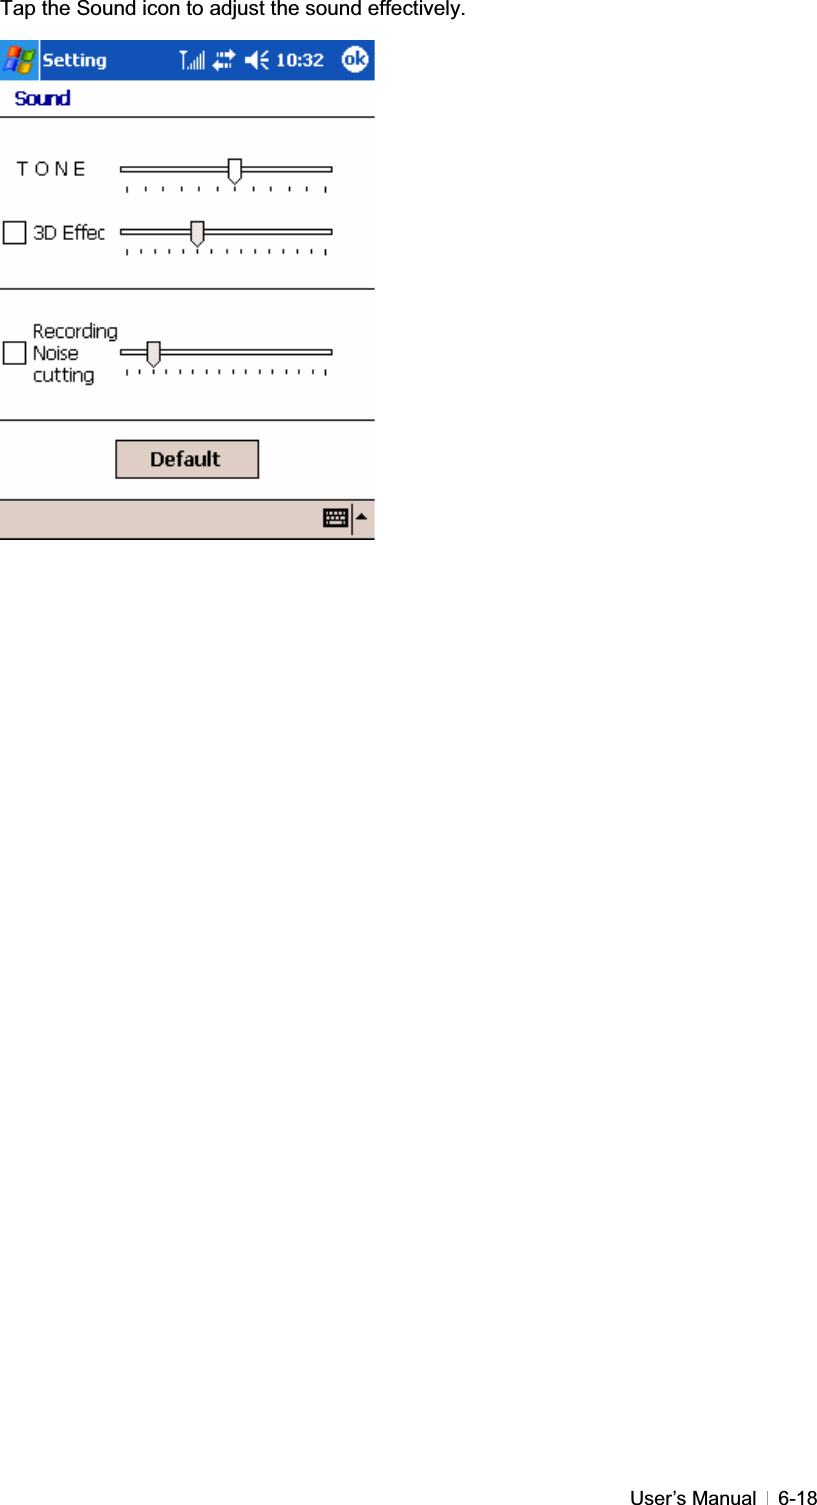
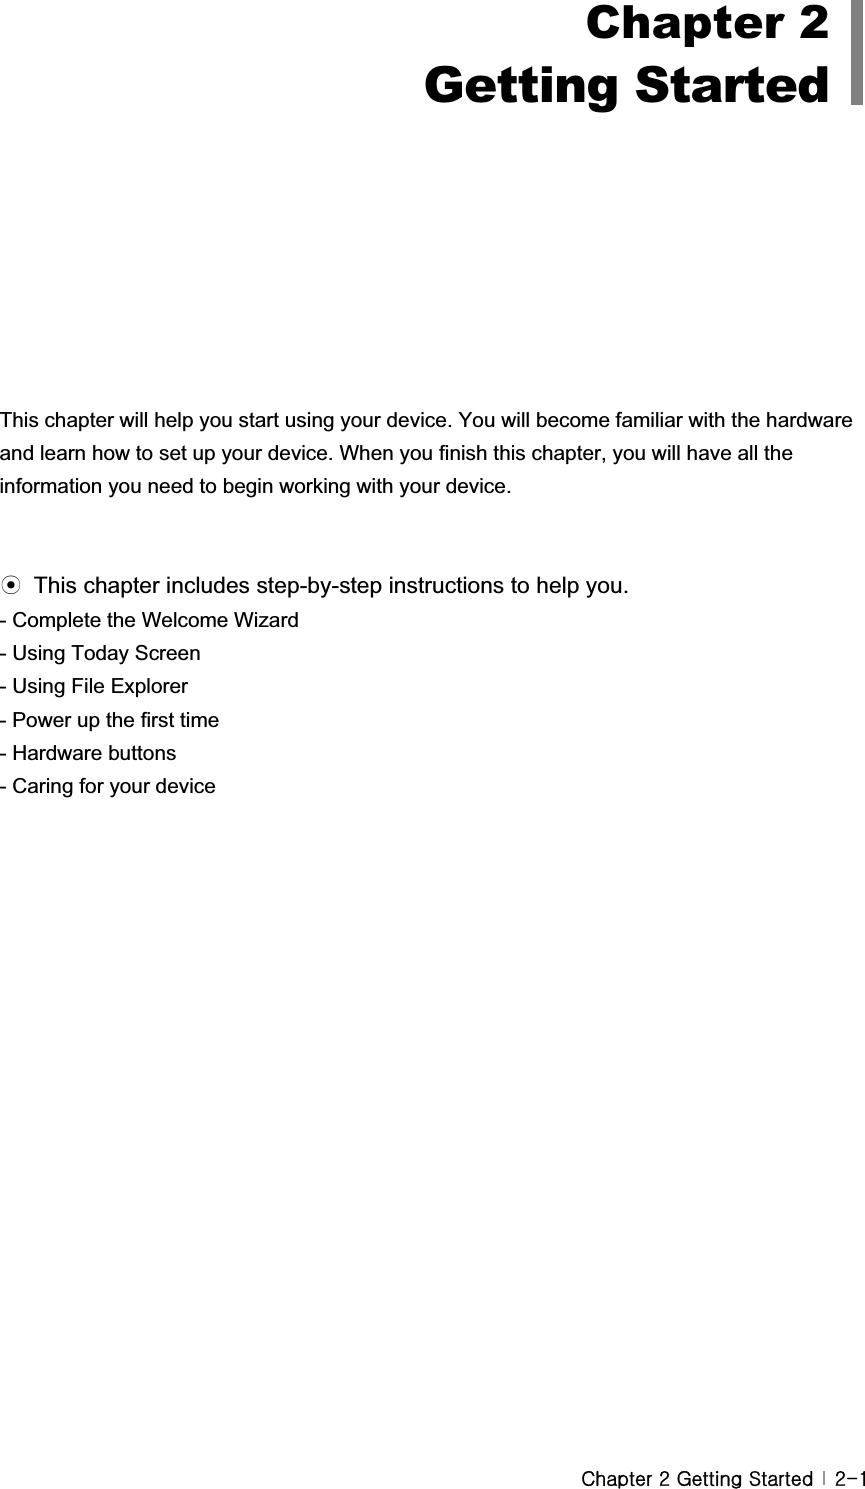
![G|˅GtG G XT]GF][\hg]XYGGGGGGGGGGGGGGGGGGGGGGGGG1. Power( ) button: Press to turn your device on and off. 2. Stylus: Use the stylus to navigate on the touch screen. Gྚྙ](https://usermanual.wiki/CyberBank/CP-X315.Revised-Part-1/User-Guide-526671-Page-13.png)
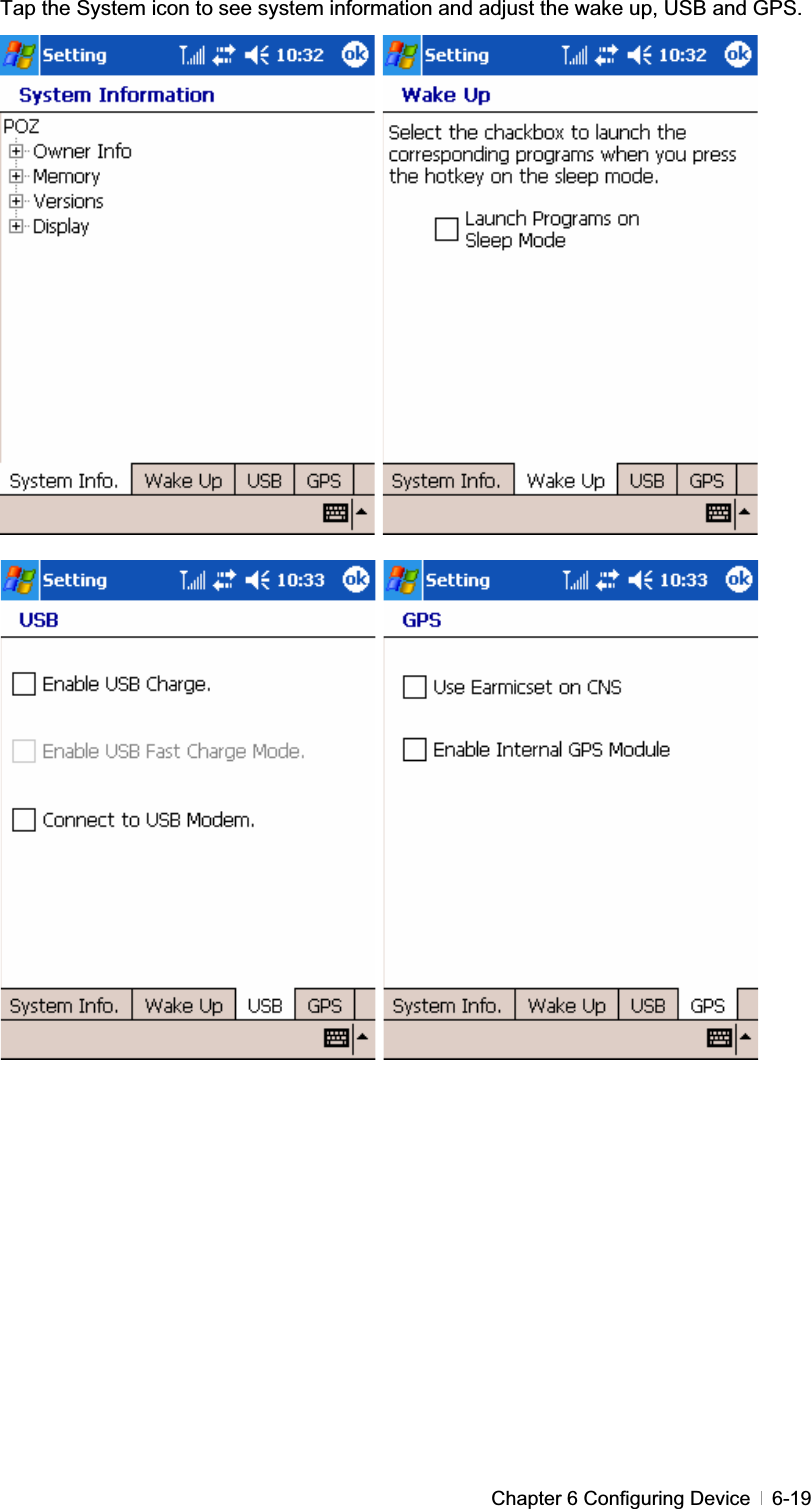
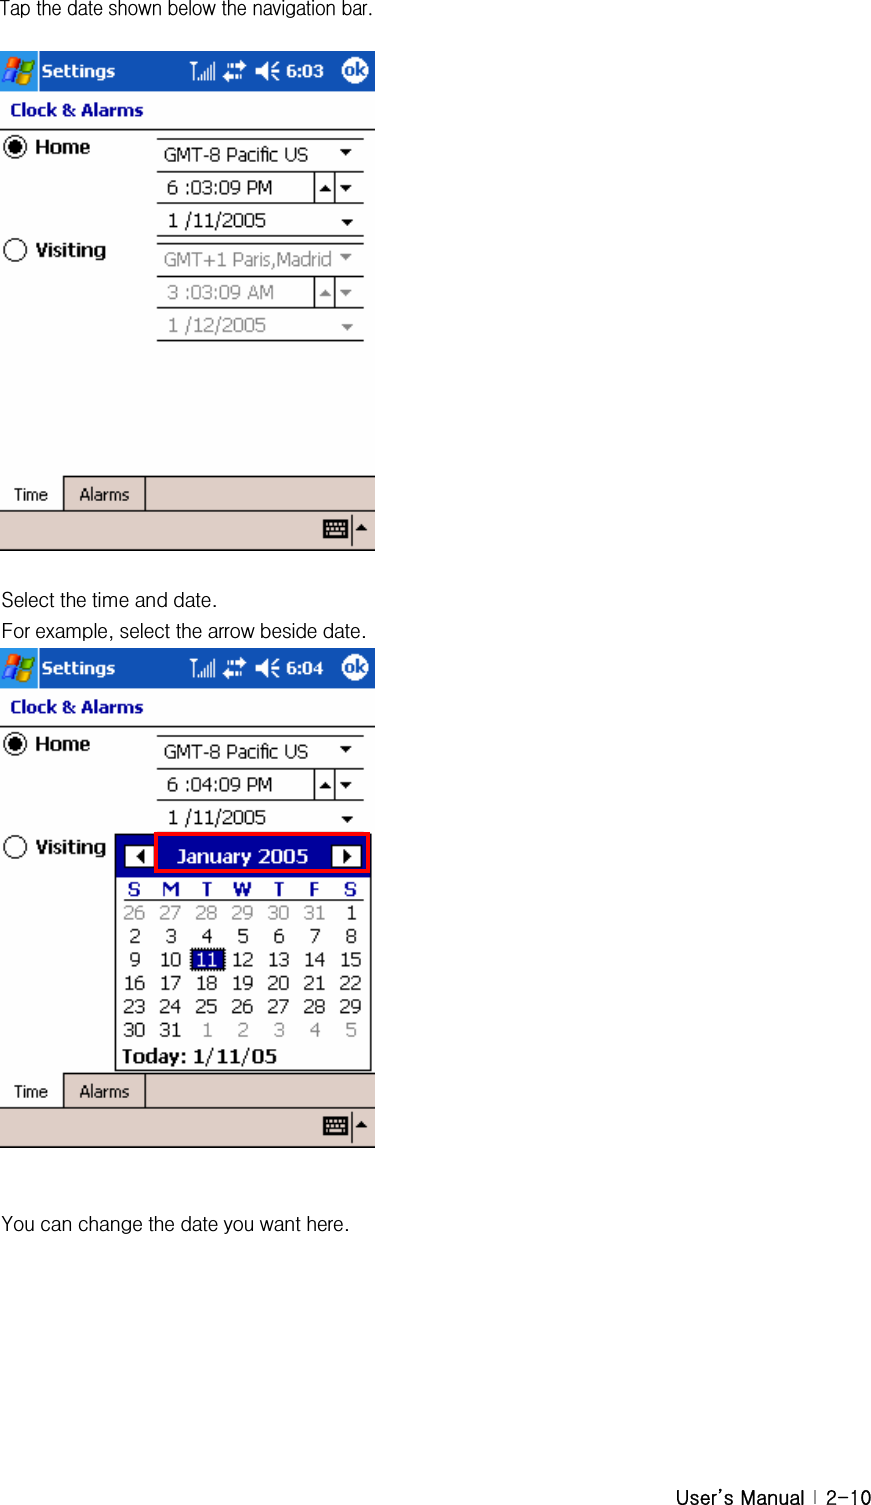
![G|˅GtG G YT]Select a time zone you stay from the drop-down list box. Tap the screen to finish the Welcome wizard.](https://usermanual.wiki/CyberBank/CP-X315.Revised-Part-1/User-Guide-526671-Page-26.png)
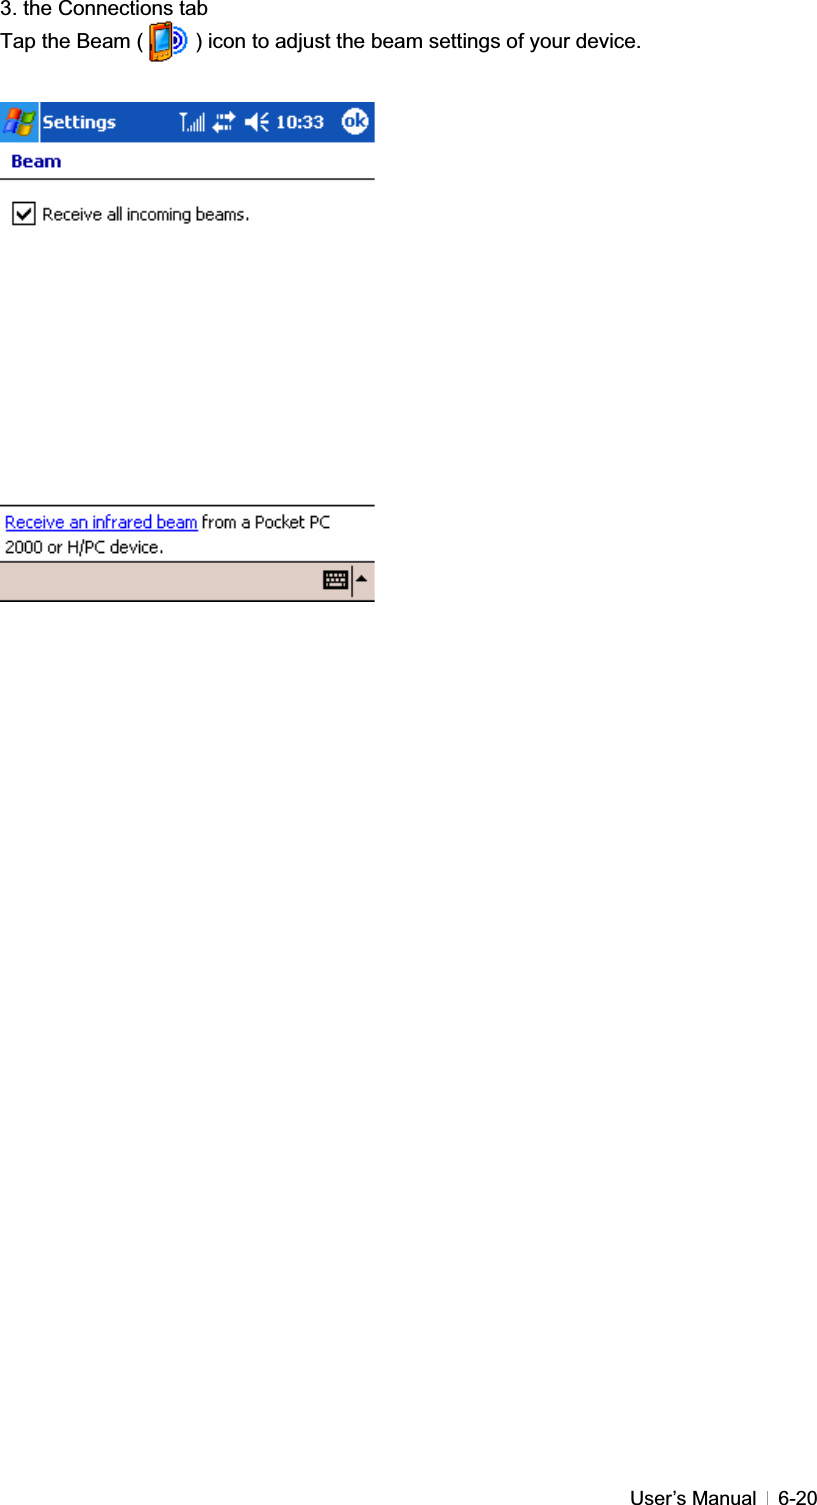
![GjGYGnGzG G YT`Jc`iaY{GGGGGGGGGGGUG GGGGGGGGGGGGGGGGGGH]aY{GGGGGGGGGGGGGSGGGGUG GGGGGGGGGGGGGGGGGGGGGGGGaGGGGGUGGaGGGGGGGGGUGuGG](https://usermanual.wiki/CyberBank/CP-X315.Revised-Part-1/User-Guide-526671-Page-29.png)
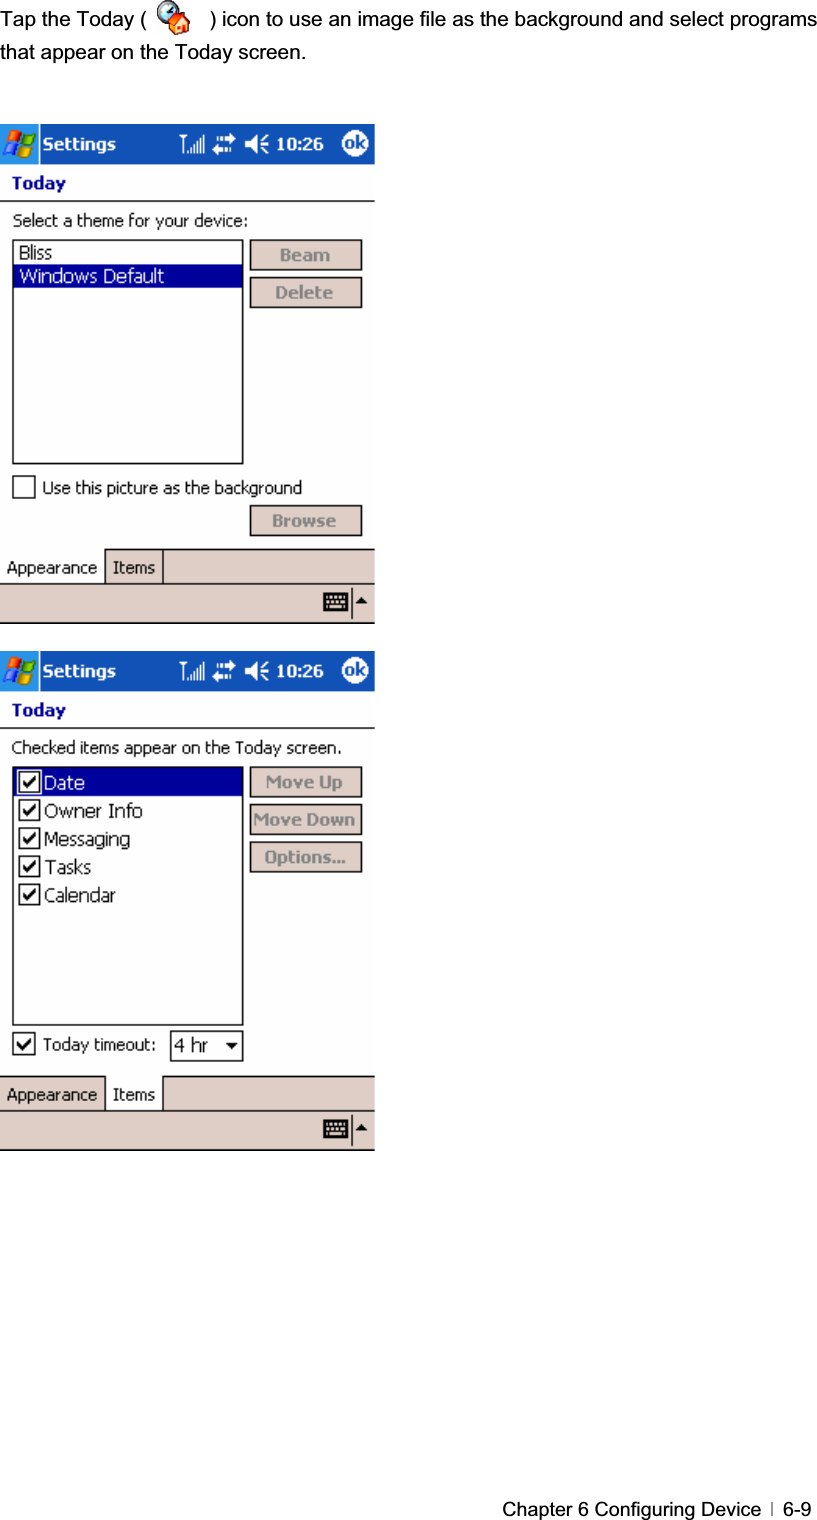
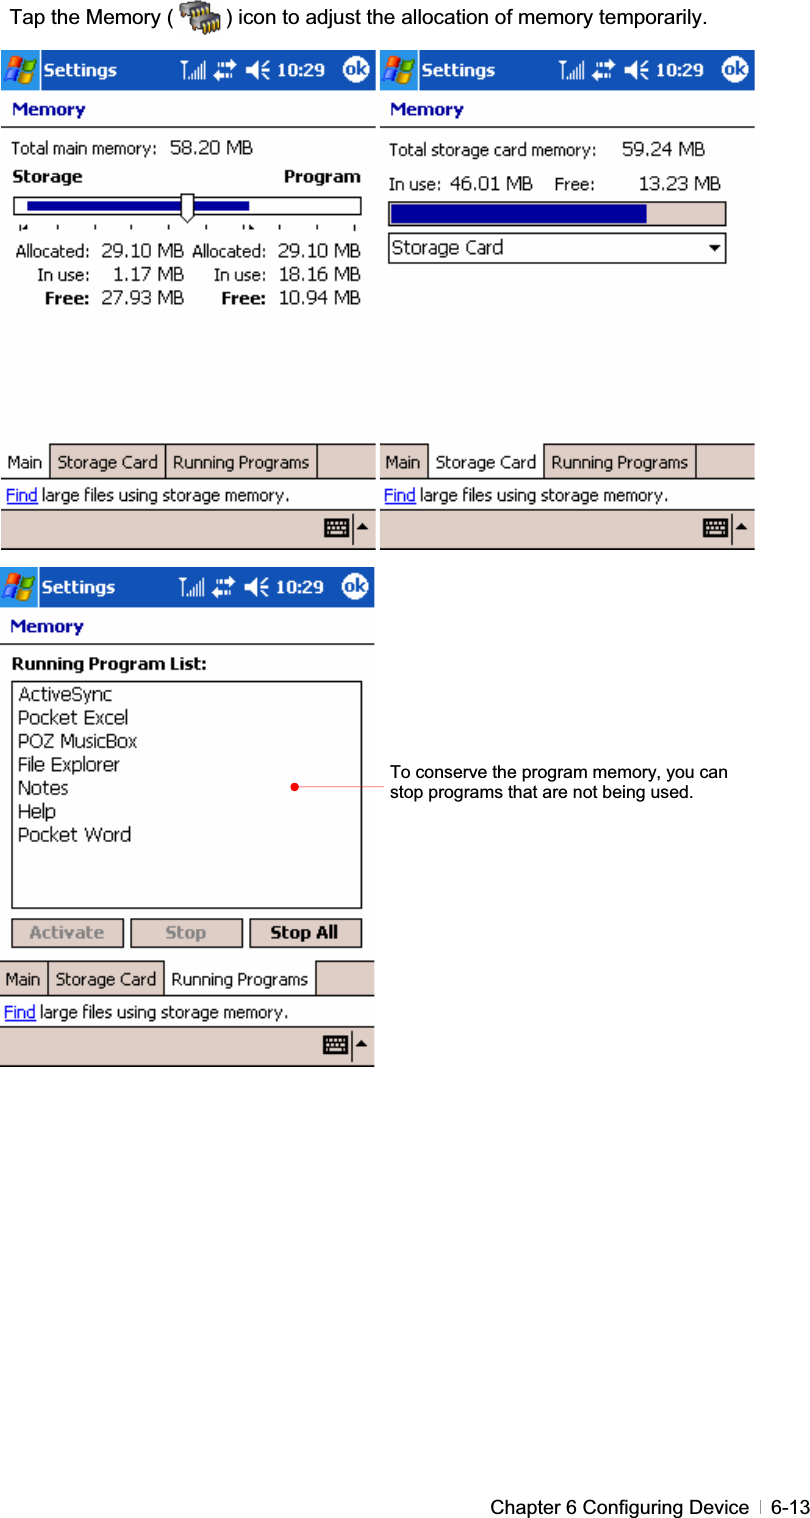
![GjGYGnGzG G YTXXCdYbh\YfYWYbh`migYXdfc[fUaghUfhh\Ydfc[fUamcikUbhXU GGz GUGYU GGGGGGGGGGzGGGGGGGGGGUGGCdYbdfc[fUaX]fYWh`mmcikUbhZfcah\YHcXUmggWfYYb{GˈuˉGGGjGGGGGGGGGG{GUGGGGGGGGGGGGGGGGGzGGGGGGGGGUGuGizGGGGGGUzGGG{GGzGG¡UGjGiG](https://usermanual.wiki/CyberBank/CP-X315.Revised-Part-1/User-Guide-526671-Page-31.png)
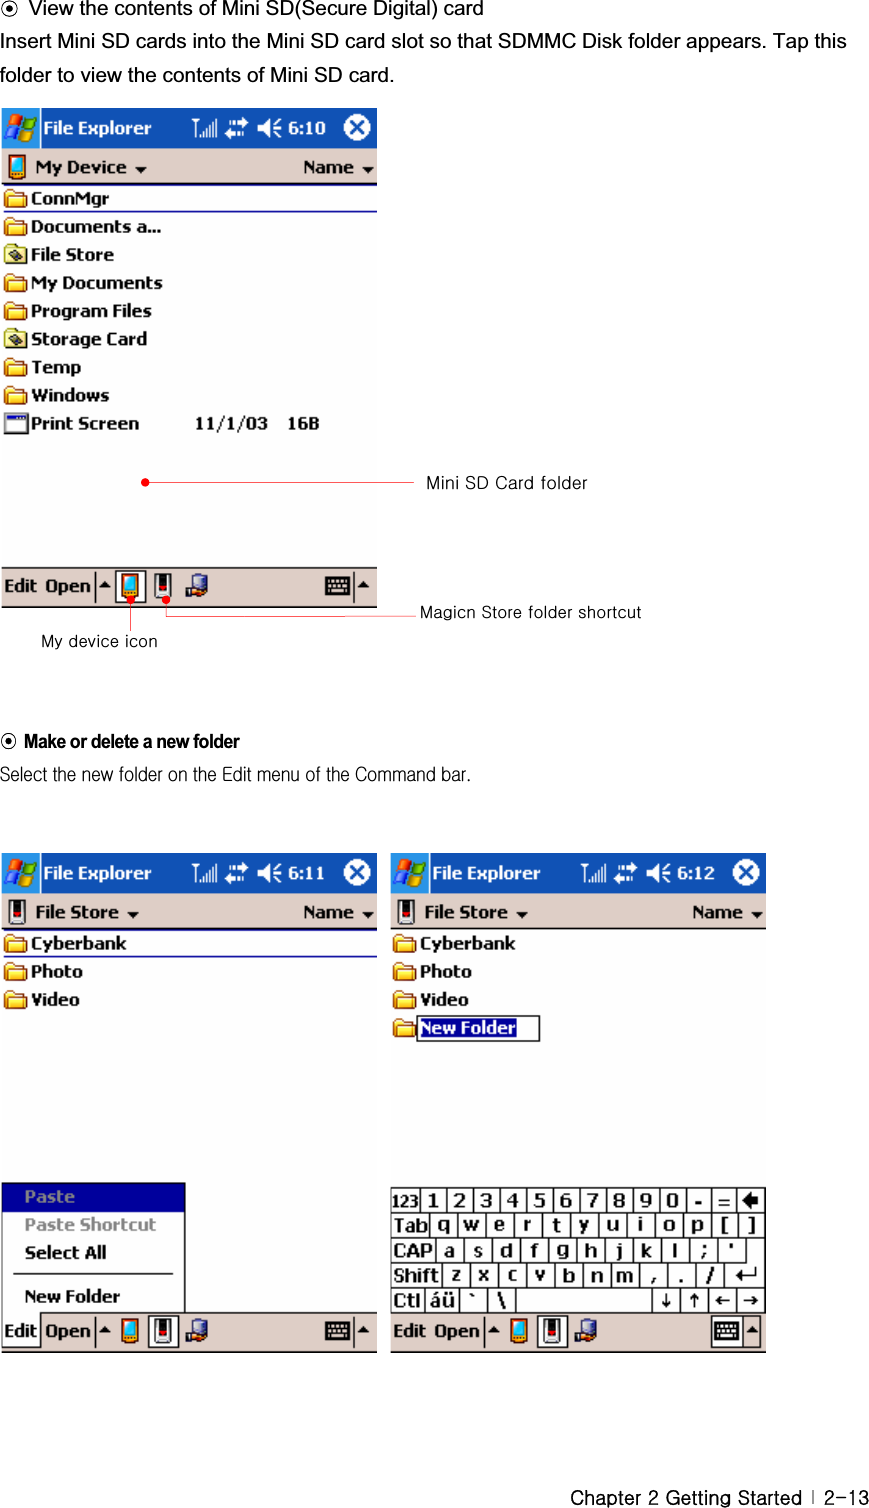
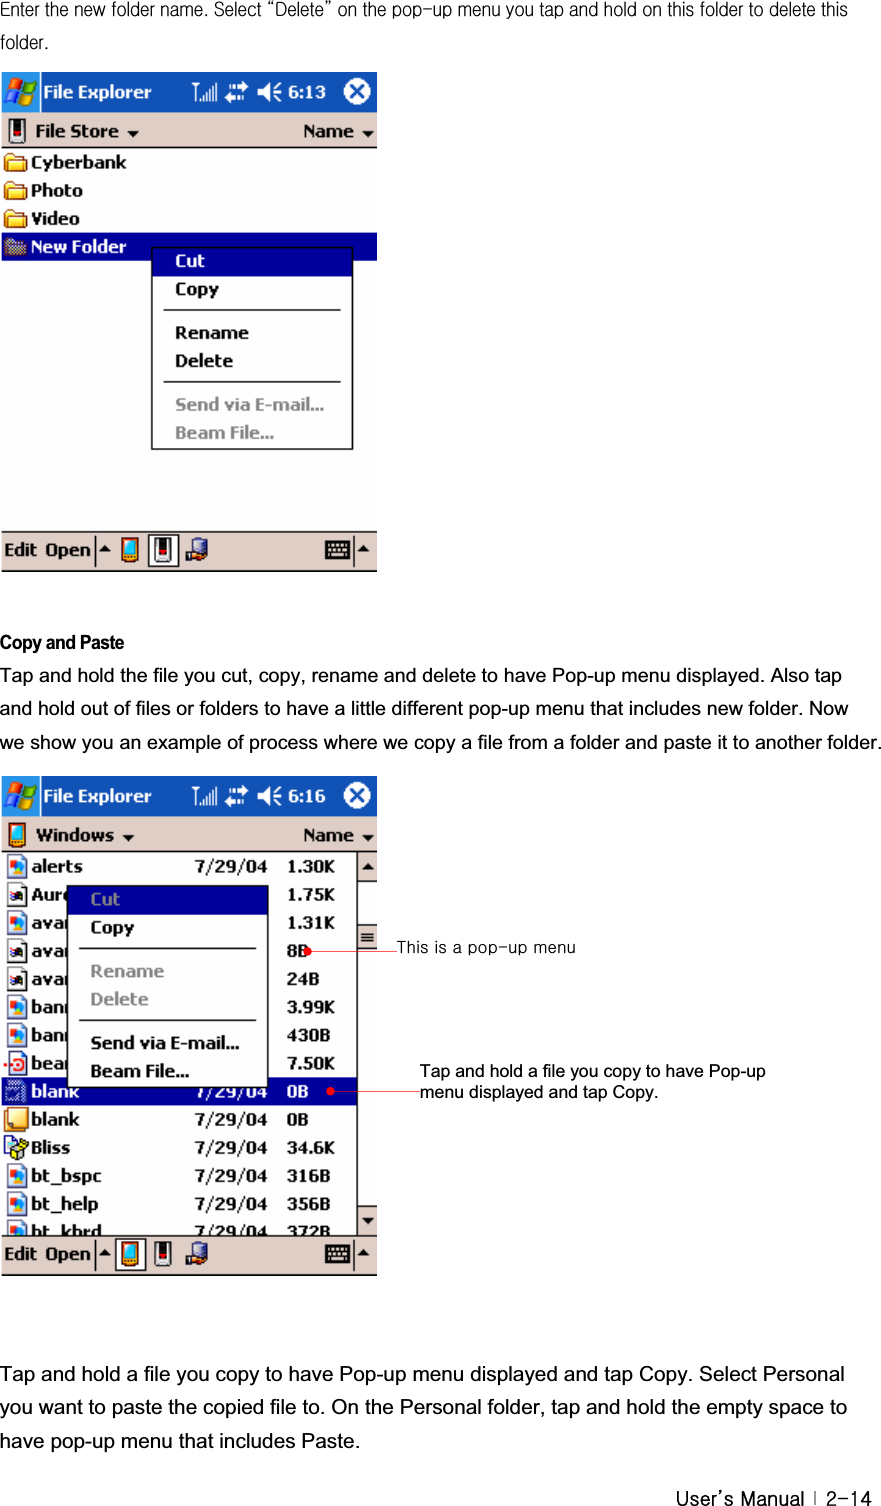
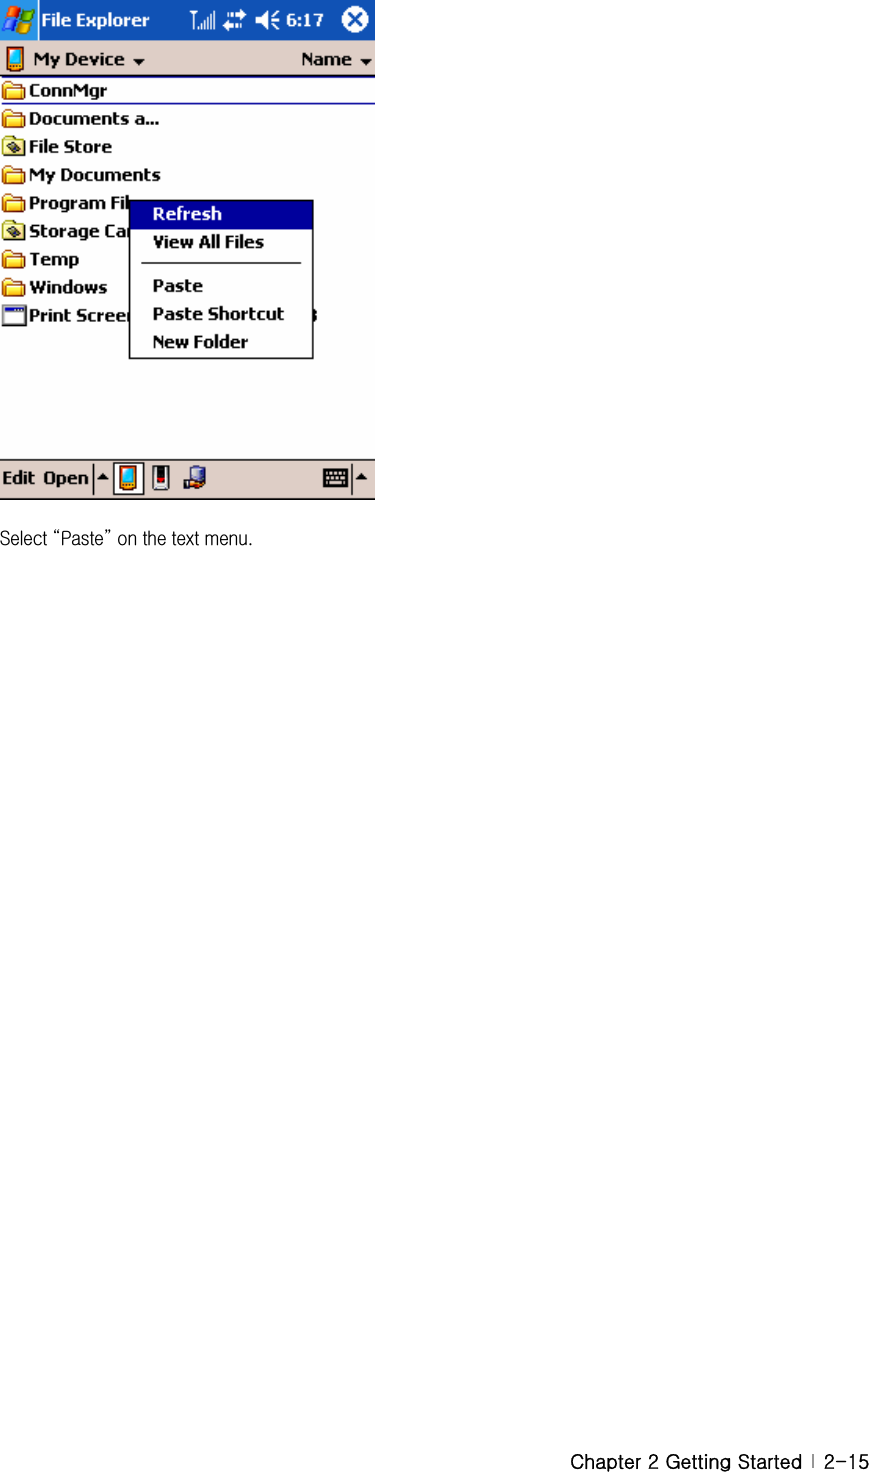
![G|˅GtG G YTXY{GzG G G eGzGeGwGGeGtG G GG¡GGzGGGGuGGGUGTap OK to save these settings. :]`Y9ld`cfYfThis File Explorer of your device is similar to Window Explorer of desktop PC. Select the Start menu > Programs > File Explorer.Select to go to the higher level of a folder. Select a folder below My Device you want to move to.](https://usermanual.wiki/CyberBank/CP-X315.Revised-Part-1/User-Guide-526671-Page-32.png)
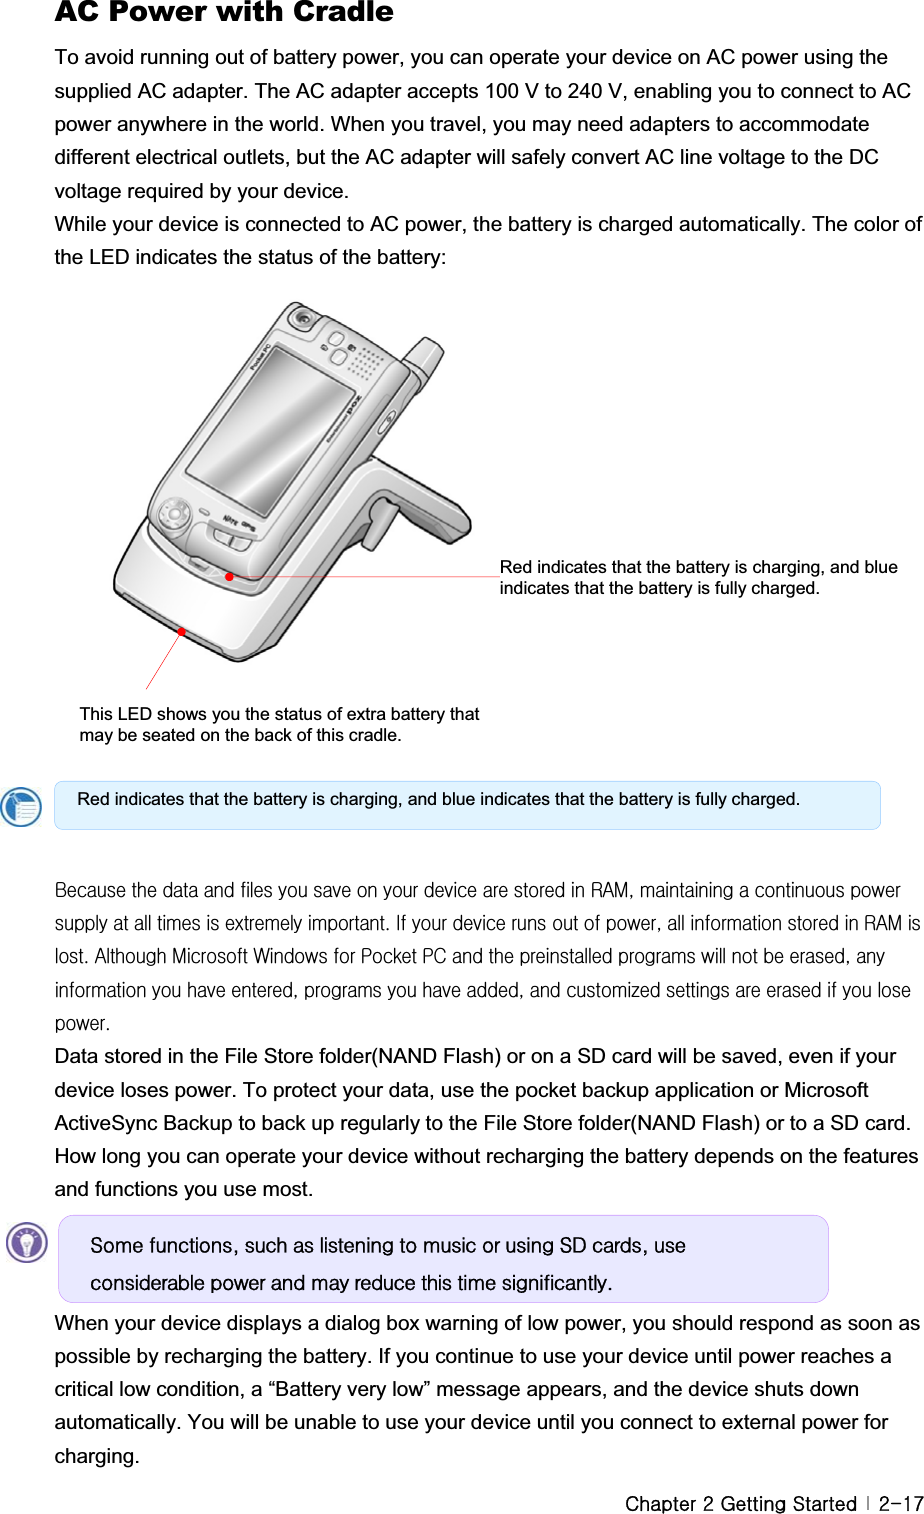
![G|˅GtG G YTX]Powering up device GAU]bVUhhYfm@]!Dc`maYfBecause the data and files you save on your device are stored in RAM, maintaining a continuous power supply to the device at all times is extremely important. If your device runs out of power, all information stored in RAM is lost. The preinstalled programs will not be deleted even if your device suffers a loss of power; however, any custom settings and programs you have added will be erased. To safeguard data against loss in the event of power failure, you can save or back up files to NAND Flash memory(called “File Store” here). The lithium-ion battery pack provides power to your device while it is not connected to ac power. Actual battery life will vary depending on how you use your device. Some functions, such as listening to music, using the backlight, or operating mini SD cards, use considerable power and may reduce this time significantly. The battery is charged whenever your device is connected to an ac power source—either the AC adapter or the USB cradle. Usually, it takes 3.5 hours to charge your battery fully depending on the battery status. Connect your device to AC power or place it in the cradle when it is not in use, to ensure that the battery is fully charged when you need to take it with you. When the battery is fully charged, charging stops automatically; the battery will not overcharge even if it is left upon being connected to AC power. G{GGGGGGGUGGGGGGGGGhGGSGGGGGGGGGGUGG{GGGGUGGGGGGGGG](https://usermanual.wiki/CyberBank/CP-X315.Revised-Part-1/User-Guide-526671-Page-36.png)
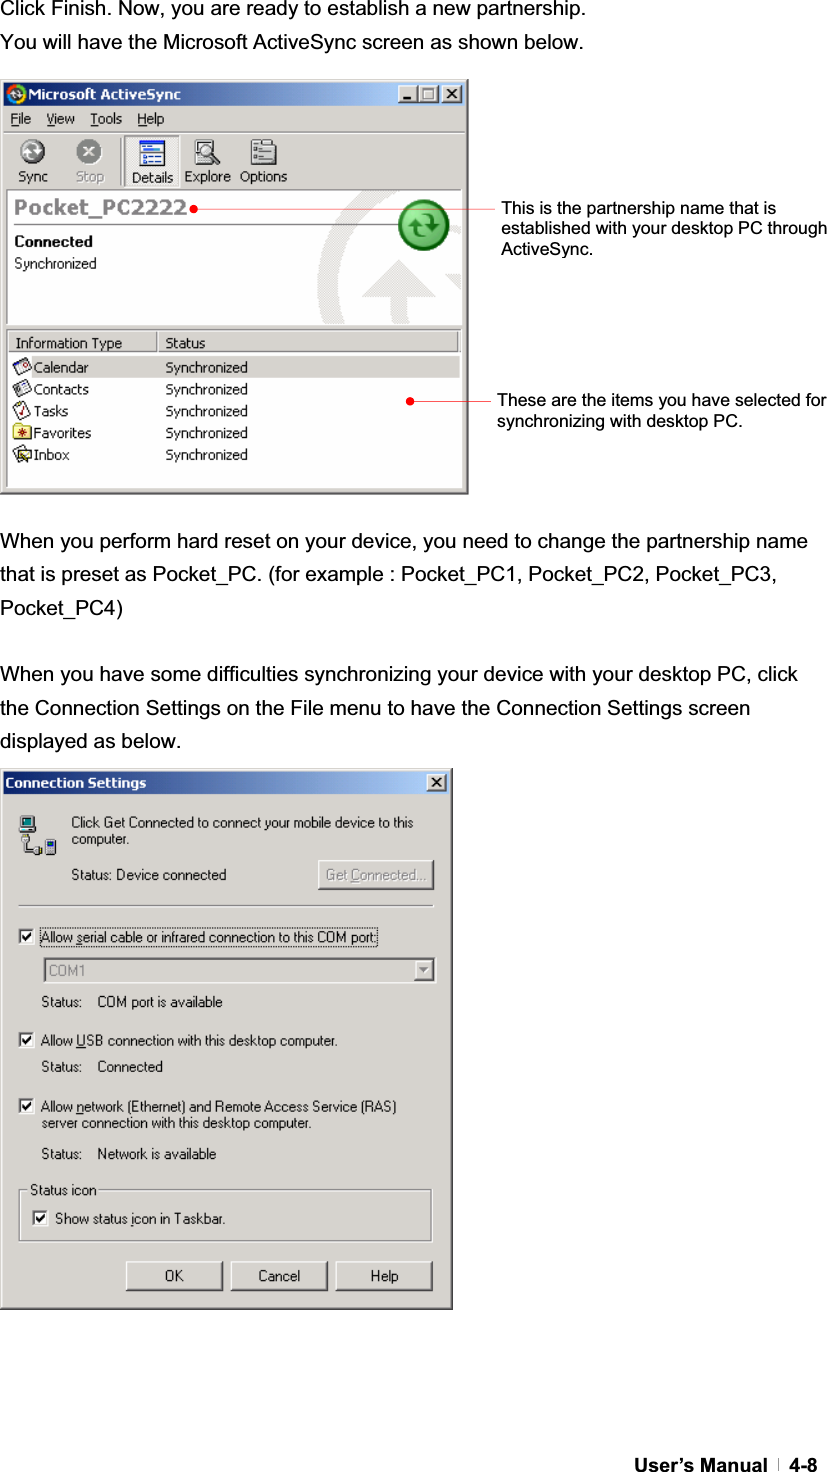
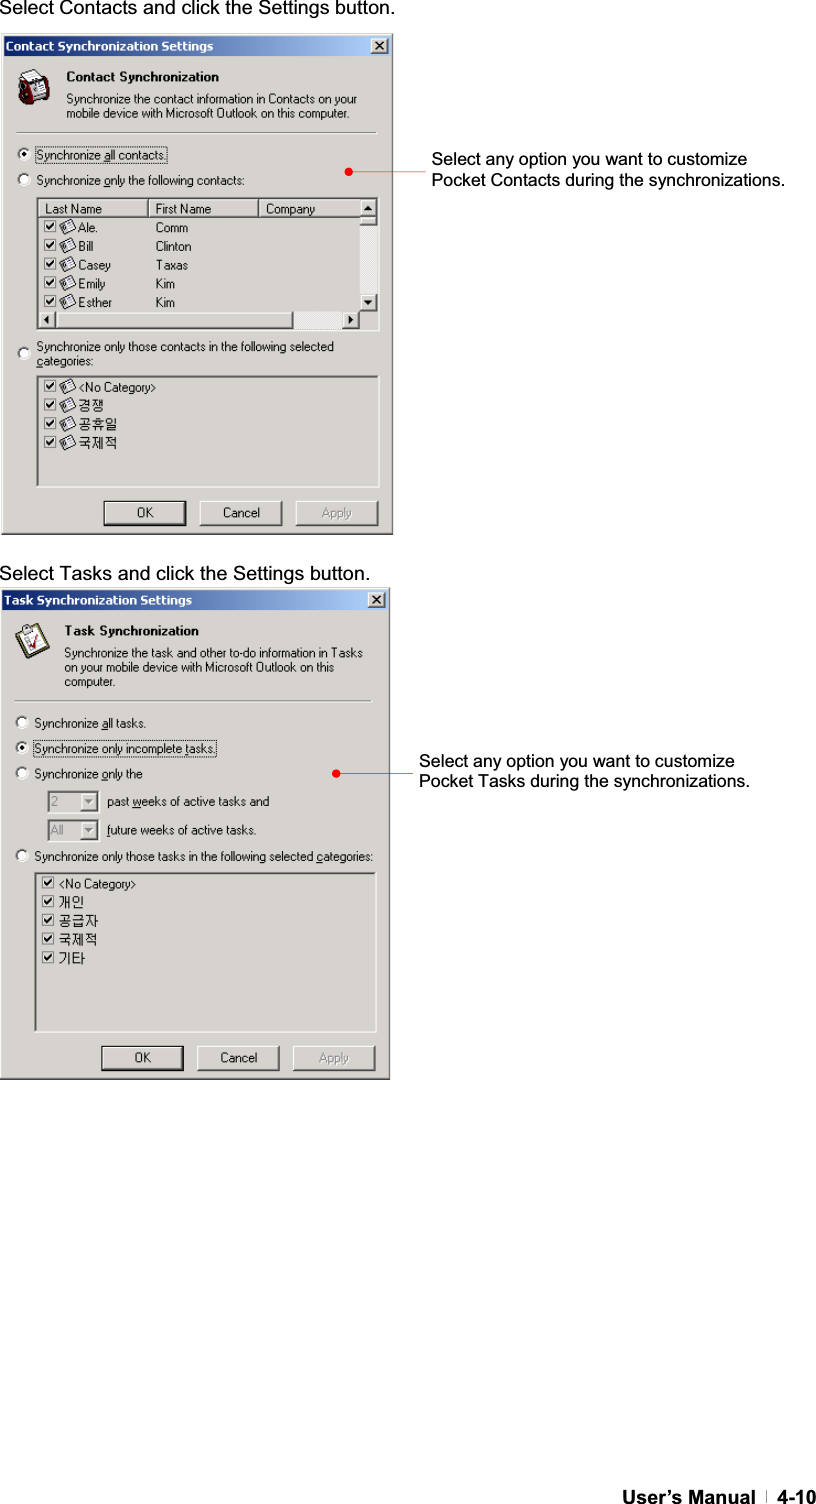
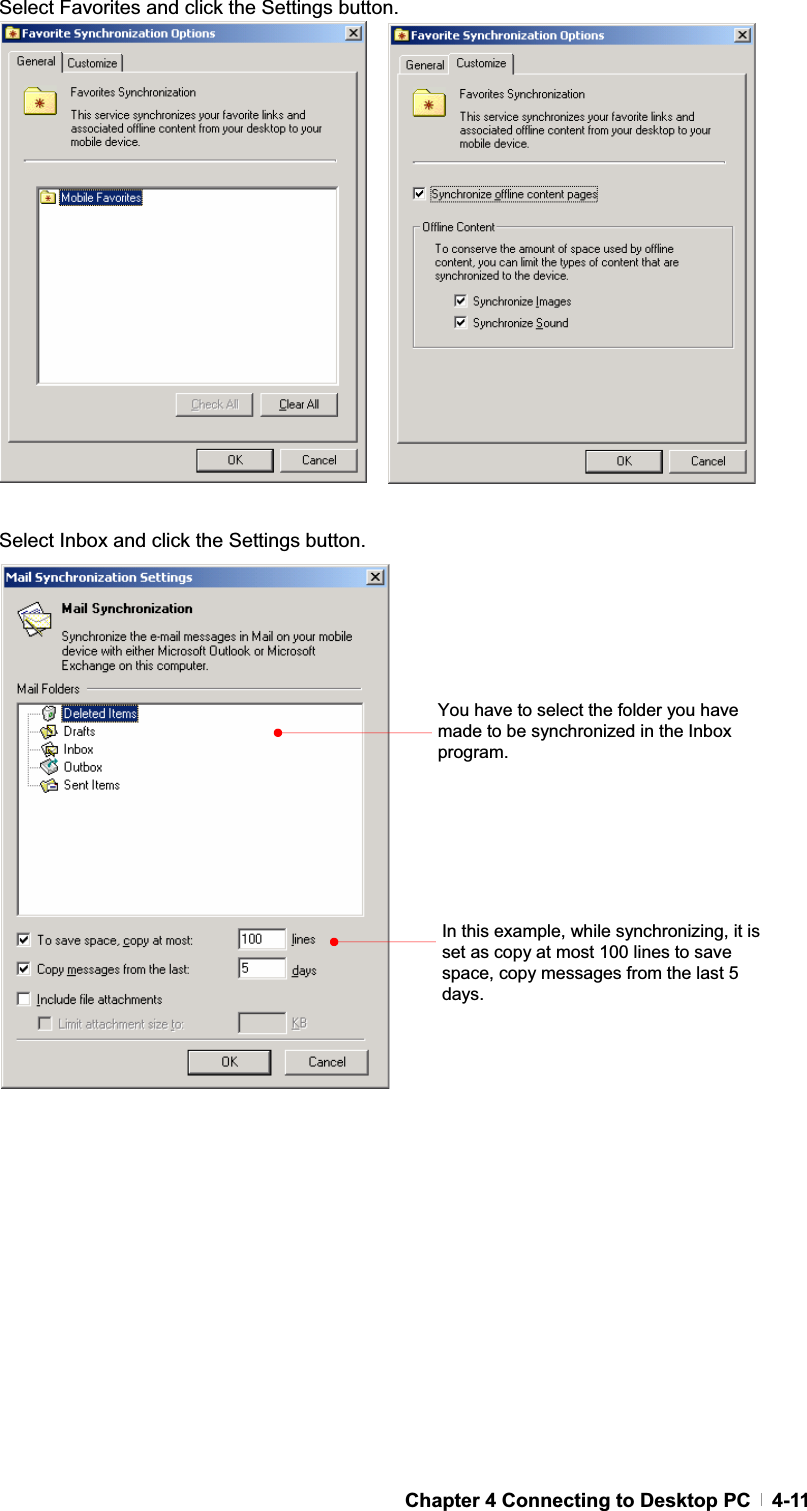
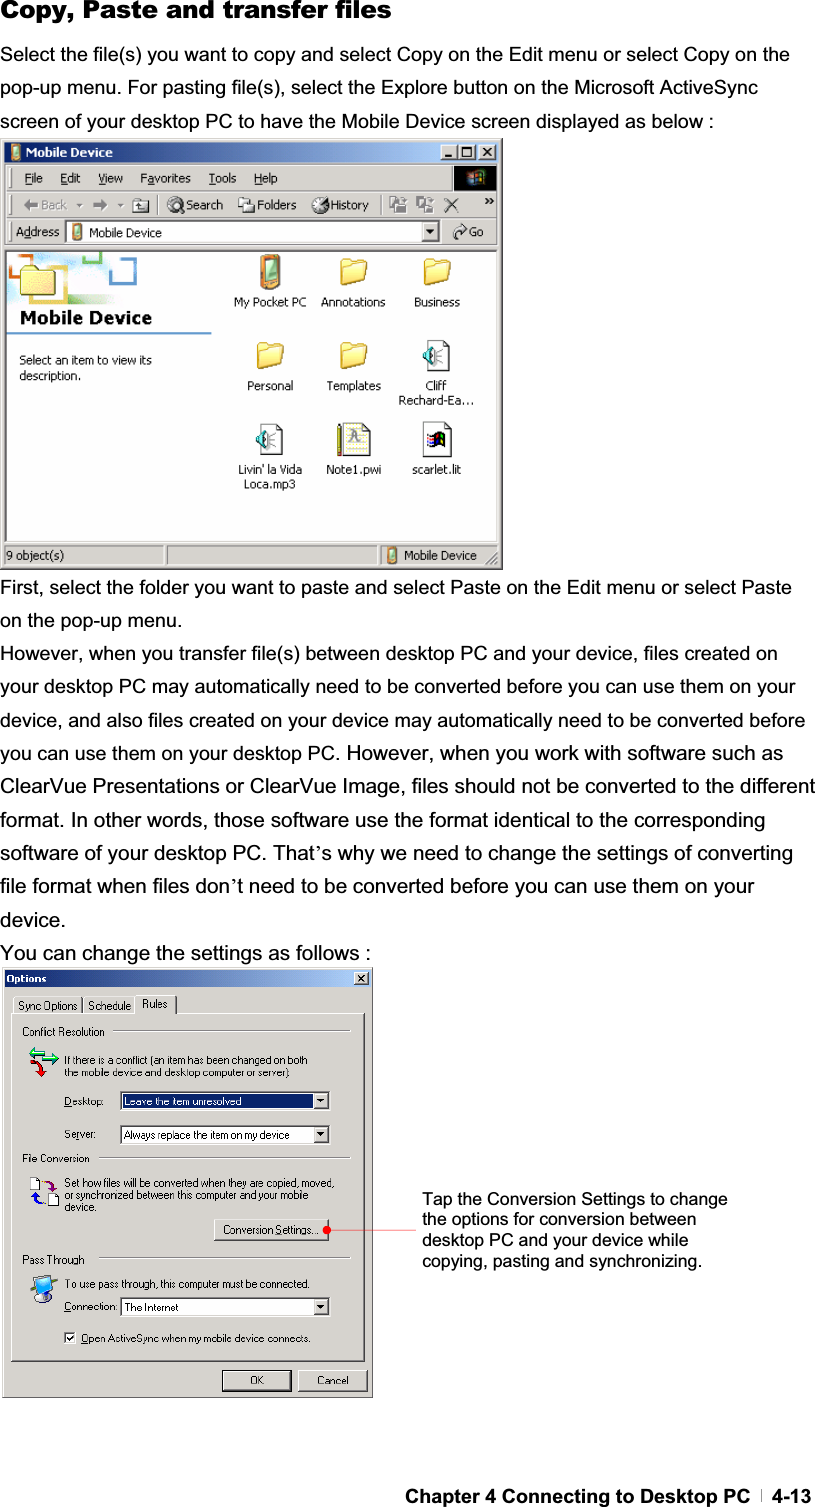
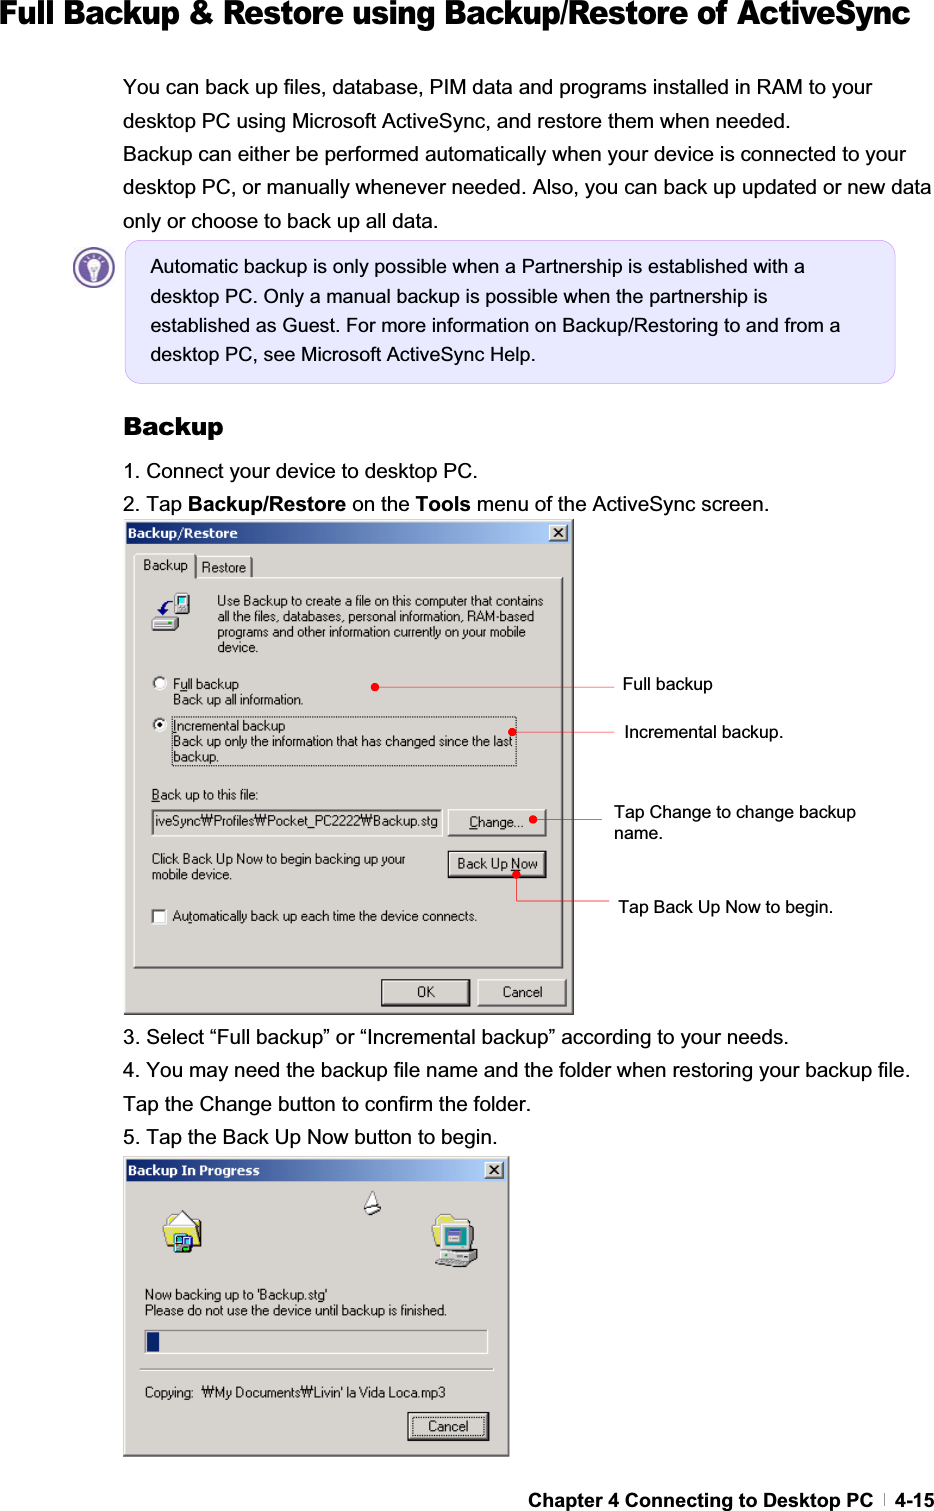
![GChapter 4 Connecting to Desktop PC 4-1To get the most from your device, you will want to connect to your desktop or notebook PC. This chapter describes how to establish the connection between your device and your desktop PC, and how to synchronize and transfer files between your device and your desktop (or any PC that has Microsoft ActiveSync installed). G wGwjGYWWYG G wGwjGYWWZG GhzGZU^UXG ̺G ̺GhzGZU]G̺GGhzGZU\G̺GGiGwGwjGYWWZGGGGGGSGGGGGhzGZU^UXGGGGGGhzGZU]GGhzGZU\UGඝ In this chapter, you will learn the followings : - Install Microsoft ActiveSync and establish a partnership - Full Backup & Restore using Backup/Restore of ActiveSync - How to install programs using ActiveSync - Connecting to Device Chapter 4Connecting to Desktop](https://usermanual.wiki/CyberBank/CP-X315.Revised-Part-1/User-Guide-526671-Page-47.png)
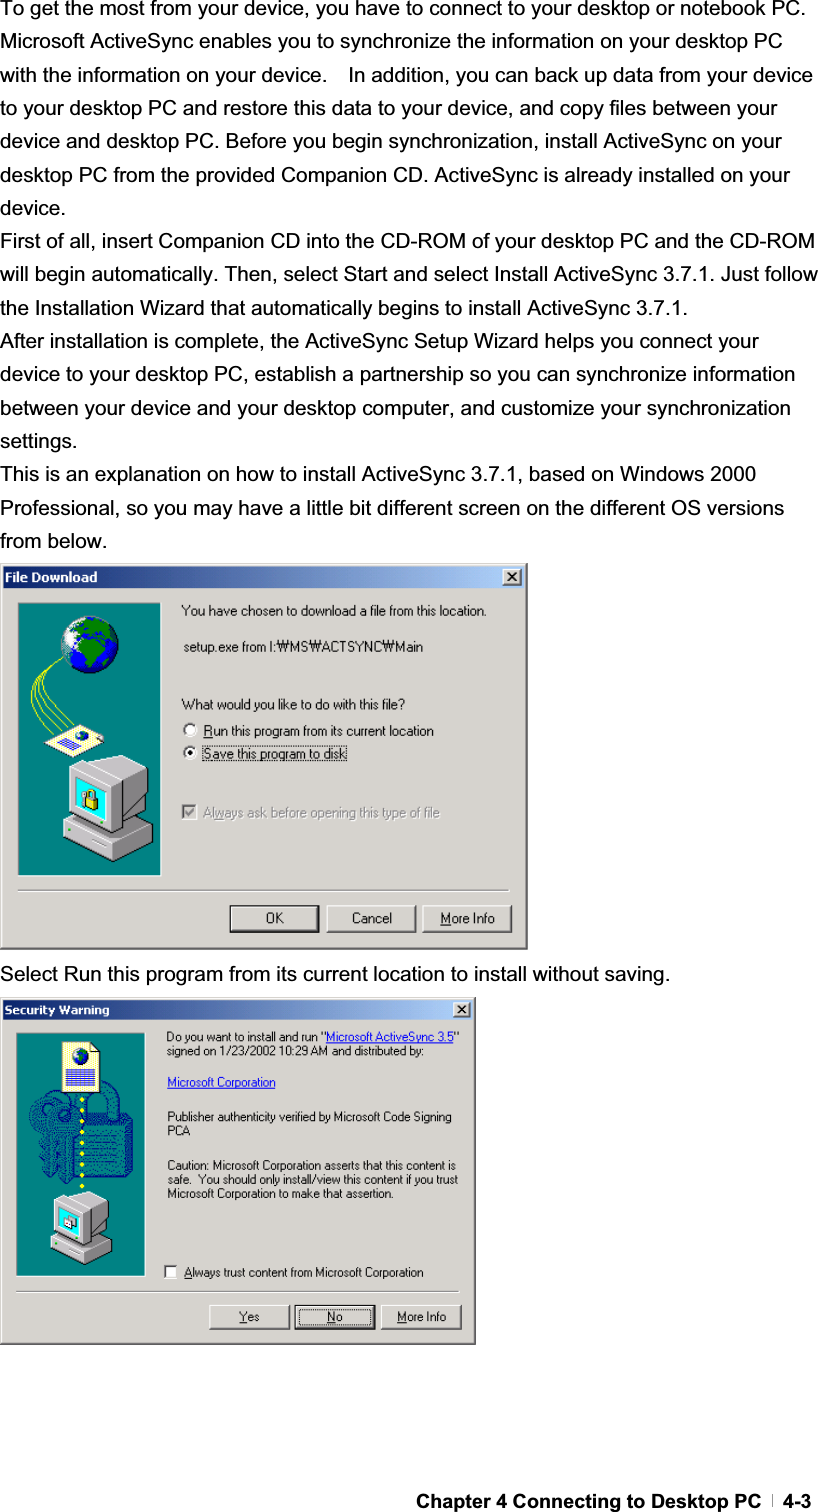
![GUser’s Manual 4-2Install Microsoft ActiveSync and establish a partnership =bghU``A]WfcgcZh5Wh]jYGmbW GGGGGGGGGGGGGGGhzGZU^UXGGGGGaGzjGjkGzjGGGUUUGztGGGUUVVGhzGZU^UXGGGGGzUGGGjkSGGhzGZU^UXGGGGGtzhzujUllGGGGGGGUGGGG{GGGSGGGGGG|ziGGGGGGGGGGUGGGGGGGGGGGpGGjGjkGGjkTyvtGGGGGUG GmGGGGGjGjkSGGGzGGeGpGtGhzGZU^UXUGGGGGGRq#ghvnwrs#frpsxwhu/#zlwkrxw#Dxwruxq#hqdeohg/#Plfurvriw#DfwlyhV|qf#vhwxs#fdq#eh#odxqfkhg#e|#vxlqj#wkh#uxq#frppdqg1#Folfn#rq#Vwduw/#dqg#wkhq#Uxq1#Lq#wkh#wh{w#gldorj#er{/#hqwhu#wkh#sdwk#iru#wkh#vhwxs#iloh1#W|slfdoo|/#|rx#zrxog#w|sh#[=䭱Vhwxs1h{h/#zkhuh#[#lv#wkh#ohwwhu#iru#|rxu#FG0URP#gulyh1##zGyGz~GYWWWGUGztGvGYWWYGUGzvGYWWWGUGztGpG[UWXGzwXGGGUGzXYG¥G]\GtiGGGGG Gz`GGY\TGGSGpkhGGG|ziO|GzGiPGG GzjkTyvtGGz}nhGGGGY\]GGGGGzrGMGtGThis is an explanation on how to install ActiveSync 3.7.1, based on Windows 2000 Professional, so you may have a little bit different screen on the different OS versions from below.](https://usermanual.wiki/CyberBank/CP-X315.Revised-Part-1/User-Guide-526671-Page-48.png)