CyberBank CP-X315 CDMA Pocket PC/POZ PDA Cellular Phone User Manual table of contents
CyberBank Corp CDMA Pocket PC/POZ PDA Cellular Phone table of contents
Contents
- 1. Revised Part 1
- 2. Part 2
Revised Part 1

G
G
Pocket PC/POZ
G
User’s Manual

GTable of Contents 2
G
G
G
G
The information contained in this document is provided “as is” and is subject to change
without notice. Cyberbank makes no warranty of any kind with regard to this manual,
including, but not limited to, the implied warranties of merchantability and fitness for a
particular purpose. Cyberbank shall not be liable for any errors contained herein or for
incidental or consequential damages in connection with the furnishing, performance, or
use of this manual or the examples herein.
This document contains proprietary information that is protected by copyright. All rights
are reserved. No part of this document may be photocopied, reproduced, adapted, or
translated to another language without the prior written consent of Cyberbank, except as
allowed under the copyright laws.
The programs that control this product are copyrighted and all rights are reserved.
Reproduction, adaptation, or translation of those programs without prior written
permission of Cyberbank is also prohibited. Microsoft, ActiveSync, MSN, Outlook,
Windows, Windows Media, Windows NT, and the Windows logo are either registered
trademarks or trademarks of Microsoft Corporation in the United States and/or other
countries. Microsoft products are licensed to OEMs by Microsoft Licensing, Inc., a wholly
owned subsidiary of Microsoft Corporation.
All other brand names and product names used in this document are trade names,
service marks, trademarks, or registered trademarks of their respective owners.
CYBERBANK. CORP.
3, 4, 5th Fl. Mirae B/D Dogok-dong, Kangnam-gu, Seoul, Korea
Copyright
Cyberbank assumes no responsibility for any damage or loss resulting from the
use of this manual. And also Cyberbank assumes no responsibility for any
damage or loss caused by deletion of data as a result of malfunction, dead
battery, or repairs. Be sure to make backup copies of all-important data on other
media to protect against data loss.

Table of Contents 3
In August 1996 the Federal Communications Commission (FCC) of the United States with its action in
Report and Order FCC 96-326 adopted an updated safety standard for human exposure to radio
frequency electromagnetic energy emitted by FCC regulated transmitters. Those guidelines are consistent
with the safety standard previously set by both U.S. and international standards bodies. The design of POZ
complies with the FCC guidelines and these international standards.
Use only the supplied or an approved antenna. Unauthorized antennas, modifications, or attachments
could impair call quality, damage your POZ, or result in violation of FCC regulations.
Do not use your POZ with a damaged antenna. If a damaged antenna comes into contact with the skin, a
minor burn may result. Please contact your local dealer for replacement antenna.
POZ was tested for typical body-worn operations using the optional belt-clip / holster placed touch (0cm)
from the body. To comply with FCC RF exposure requirements, a separation distance of touch (0cm)
must be maintained between the user's body and POZ, including the antenna, whether extended or
retracted. The use of non-tested accessories or other body-worn operations may not comply with FCC RF
exposure requirements and should be avoided. Contact your local dealer for optional accessory items.
For more information about RF exposure, please visit the FCC website at www.fcc.gov
Specific Absorption Rate (SAR) for Wireless Phones
The SAR is a value that corresponds to the relative amount of RF energy absorbed in the
head of a user for a wireless handset. The SAR value of a phone is the result of an
extensive testing, measuring and calculation process. It does not represent how much
RF the phone emits. All phone models are tested at their highest value in strict laboratory
settings. But when in operation, the SAR of a phone can be substantially less that the
level reported to the FCC. This is because of a variety of factors including its proximity to
a base station antenna, phone design and other factors. What is important to remember
is that each phone meets strict federal guidelines. Variations in SARs do not represent a
variation in safety. All phones must meet the federal standard, which incorporates a
substantial margin of safety. As stated above, variations in SAR values between different
model phones do not mean variations in safety. SAR values at or below the federal
standard of 1.6W/kg are considered safe for use by the public.
The highest reported SAR values of CP-X315 are:
CDMA mode (Part 22)- Head: 0.933 W/kg; Body-worn: 0.929 W/kg
FCC Radio Frequency Emission
This phone meets the FCC Radio Frequency Emission Guidelines. FCC ID number:
PGVCP-X315. More information on the phone’s SAR can be found from the following FCC website:
http://www.fcc.gov/oet/fccid
FCC RF Exposure Information

GTable of Contents 4
Please read these simple guidelines before using your phone. Failure to comply with these guidelines may
be dangerous or illegal.
Do not use a hand held phone whilst driving a vehicle; park the vehicle first.
Switch off your phone when in an aircraft. The use of cellular phones whilst airborne is illegal in some
countries. It may disrupt the operation of the aircraft. Follow any regulations or rules regarding air travel.
Wireless phones can cause interference. Switch off your phone near medical equipment.
Do not use your mobile phone at a petrol station or near fuel, chemicals or in any area where blasting is in
progress. Observe restrictions and follow all rules and regulations.
Use the phone only in a normal manner as instructed in this manual and do not handle the antenna
unnecessarily.
Only qualified service personnel must install or repair equipment. Breaking the warranty seal and opening
the casing of the phone will void your warranty.
Use only approved accessories and batteries. Do not connect to incompatible products.
Avoid any contact with water and any type of moisture.
Safety Information

Table of Contents 5
Acknowledging Special Precautions and
the FCC Industry Canada Notice
Cautions
Modifications not expressly approved by the party responsible for compliance
could void the user’s authority to operate the equipment.
FCC compliance Information
When used the This device complies with part 15 of FCC Rules.
When used a computer peripheral,
Operation is subject to the following two conditions:
1. This device may not cause harmful interference, and
2. This device must accept any interference received.
Including interference that may cause undesired operation.
Information to User
This equipment has been tested and found to comply with the limits for a
Class B digital device, Pursuant to part 15 of the FCC Rules. These limits are
designed to provide reasonable protection against harmful interference in a
residential installation.
This equipment generates, uses and can radiate radio Frequency energy and,
if not installed and used in accordance with the instructions, may cause
harmful interference to radio communications.
However, there is no guarantee that interference will not occur in a particular
installation. If this equipment does cause harmful interference to radio or
television reception, which can be determined by turning the equipment off
and on, the user is encouraged to try to correct the interference by one or
more of the following measures:
▪ Reorient or relocate the receiving antenna.
▪ Increase the separation between the equipment and receiver
▪ Connect the equipment into an outlet on a circuit different from that to
which the receiver is connected.
Consult the dealer or an experienced radio/TV technician for help.
USER INFORMATION

GTable of Contents 6
G
G
1 | About Device...................................................................................................... 1-1
What’s in the Box...................................................................................................... 1-2
Hardware Features ................................................................................................... 1-3
Using the Stylus........................................................................................................ 1-10
Soft Reset & Hard Reset .......................................................................................... 1-11
Microsoft Pocket PC Software .................................................................................. 1-12
Where to Find Information ........................................................................................ 1-13
Using Help on Your Device....................................................................................... 1-13
Using This Manual .................................................................................................... 1-13
2 | Getting Started ................................................................................................. 2-1
Complete the Welcome wizard ................................................................................. 2-2
Using Today Screen ................................................................................................. 2-7
Open the recently used program & start the program you want ............................. 2-11
File Explorer ............................................................................................................ 2-12
Powering up device .................................................................................................. 2-16
AC power with cradle................................................................................................ 2-17
Managing Memory .................................................................................................. 2-19
3 | Using Input Panel .............................................................................................. 3-1
Using Input Panel ..................................................................................................... 3-2
Block Recognizer...................................................................................................... 3-2
Keyboard................................................................................................................... 3-3
Letter Recognizer ..................................................................................................... 3-3
Transcriber................................................................................................................ 3-4
4 | Connecting to Desktop ..................................................................................... 4-1
Install Microsoft ActiveSync and establish a partnership ......................................... 4-2
Synchronizing Data................................................................................................... 4-9
Copy, Paste and Transfer files ................................................................................. 4-13
Full Backup & Restore using Backup/Restore of ActiveSync................................... 4-15
How to install programs using ActiveSync................................................................ 4-18
Connecting to Device................................................................................................ 4-19
5 | Using the Internet & E-mail............................................................................... 5-1
Browsing the Web on your device ............................................................................ 5-2
Sending and Receiving E-mail.................................................................................. 5-7
Connecting Directly to an E-Mail Server................................................................... 5-13
Contents

GTable of Contents 7
6 | Configuring Device............................................................................................ 6-1
Settings ..................................................................................................................... 6-2
7 | Using the Mobile Phone .................................................................................... 7-1
Phone Program......................................................................................................... 7-2
SMS(Short Message Service) .................................................................................. 7-60
8 | Microsoft Pocket Outlook ................................................................................. 8-1
Calendar: Scheduling Appointments and Meetings.................................................. 8-2
Contacts: Tracking Friends and Colleagues............................................................. 8-8
Tasks: Keeping a To-Do List .................................................................................... 8-12
Notes: Capturing Thoughts and Ideas...................................................................... 8-15
9 | Microsoft Programs ......................................................................................... 9-1
Microsoft Pocket Word.............................................................................................. 9-2
Microsoft Pocket Excel ............................................................................................. 9-5
Microsoft Windows Media Player.............................................................................. 9-7
Using Terminal Services Client................................................................................. 9-12
Pictures ..................................................................................................................... 9-14
MSN Messenger ....................................................................................................... 9-23
10 | Applications .................................................................................................... 10-1
POZ Launcher........................................................................................................... 10-2
POZ MusicBox.......................................................................................................... 10-3
POZ Camera............................................................................................................. 10-6
POZ Camcorder........................................................................................................ 10-11
POZ Album ............................................................................................................... 10-17
11 | Support & Service .......................................................................................... 11-1
Web Site ................................................................................................................... 11-1
Service ...................................................................................................................... 11-1
Appendix
A. Hardware Specifications....................................................................................... A-1
B. Warranty ............................................................................................................... B-1
C. Glossary ............................................................................................................... C-1

G G G
jGXGhGkG G XTX
#
#
#
Congratulations on purchasing PDA (personal digital assistant/model CP-X315) device
powered by Microsoft® Windows® for Pocket PC 2003. Your device lets you keep your
most important business and personal information current and close at hand. Your
device includes Microsoft Pocket PC Software 2003 second edition, which includes the
latest version of Microsoft Pocket Outlook®, so you can read and write e-mail while on
the road and manage your appointments and contacts. You will find that your device is
also the perfect companion to your desktop or notebook PC, allowing you to take vital
business data and documents with you and easily upload updated information. The
device offers you the highest quality in performance and power management as well as
rich programs and utilities designed by cyberbank.
ඝIn this chapter, you will find:
- What’s in the Box?
- Hardware Features
- Using Stylus
- Soft Reset & Hard Reset
- Microsoft Pocket PC Software
- The 3rd programs
- Where to Find Information
- Using This Manual
G
#
Chapter 1
About Device
G|˅GtG G XTY
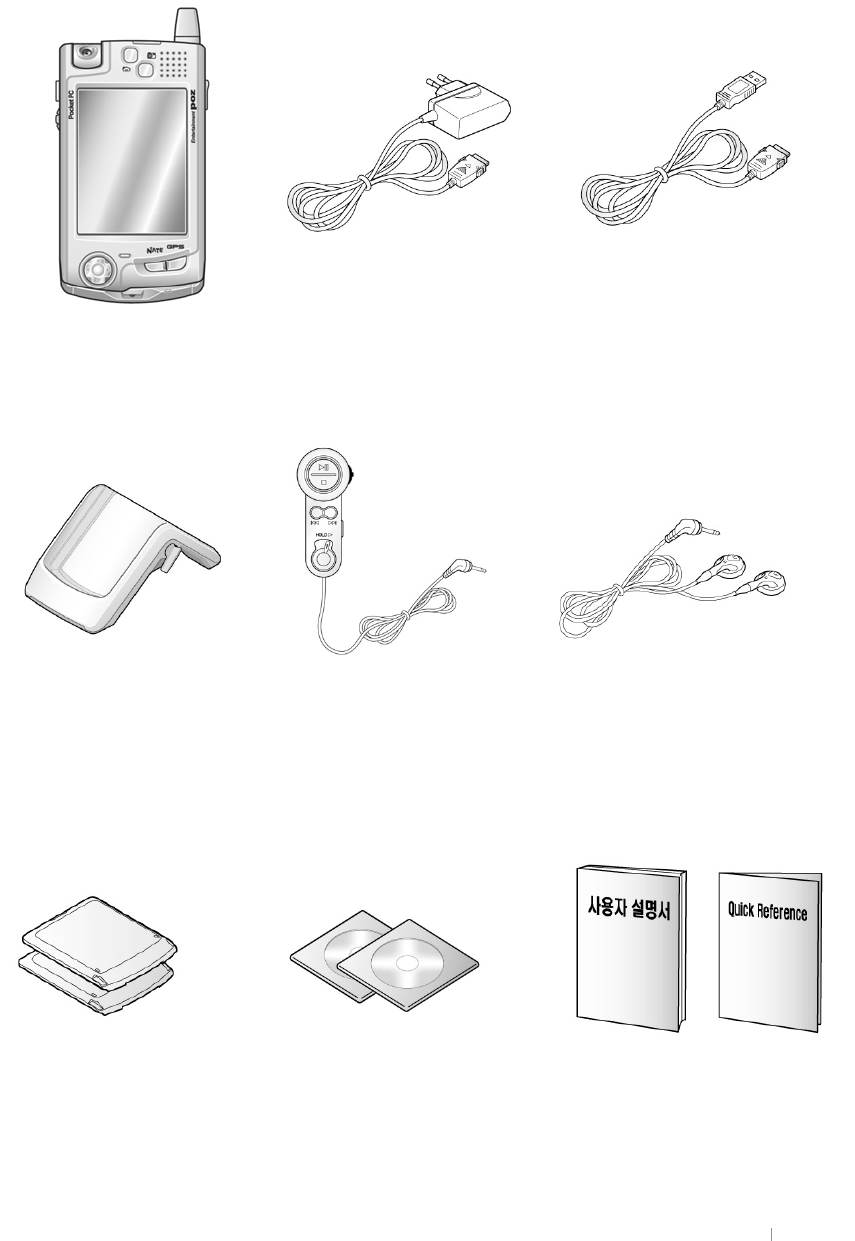
What’s in the Box?
Your device package includes the following items:
G
kG
j
wGjOhjGhP
lTwG
|GtGMGxGy
|ziGjG
jGjkGMGiGjk
iGOGGjPG
yGjG
G G G
jGXGhGkG G XTZ
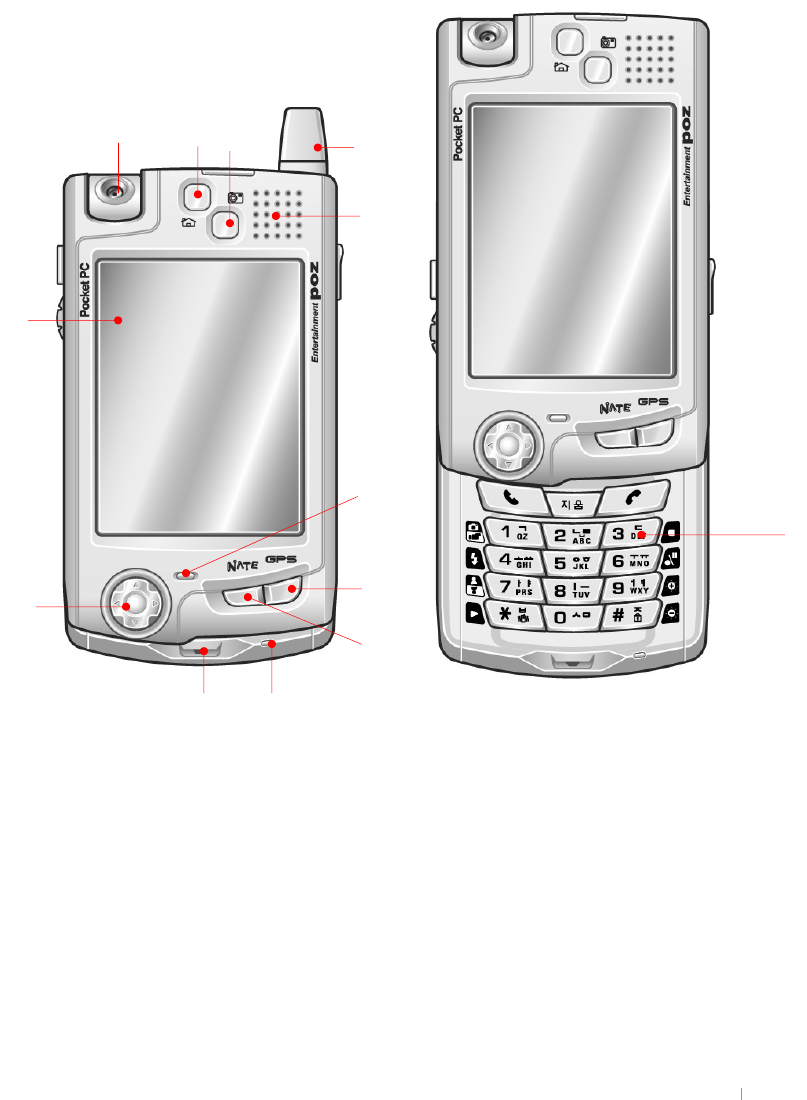
Hardware Features
G
G
The illustration below introduces you to the various buttons and other features of your
device.
G
:fcbh
G
G
G
G
G
G
G
G
G
G
G
G
G
G
G
G
G
G
G
G
G
G
G
G
G
G
G
G
1. Antenna
2. Swivel Camera Lens : allows you to make a digital shot with 300K pixels.
3. Speaker: allows you to listen to music or set audible reminders and alerts and hear the
voice while communicating on the mobile phone.
4. Phone state LED: flashes when a phone-call comes in and displays the state of mobile
phone. Notifies you of phone state including SMS.
5. Touch screen(TFT LCD): Tap on-screen controls or buttons to select menu commands or
input text.
ྚGྞG
ྠ
ྙ
ྜྷG
ྟ
ྛ
ྡ
ྡྷG
ྣG
ྜ
ྥ
ྤ

G|˅GtG G XT[
6. Hot key(POZ Launcher) : Press to open POZ Launcher program. This program allows you
to easily open other program you want. When LCD is off, if you want to open POZ
Launcher, then change the settings, as follows : tap Start( ) button > Settings > System
tab > “System” icon > “Wake up” tab > select “Open program while in Sleep mode”. Also, if
you want to change the program assigned to each hot key, tap Start( ) button > Settngs
> Personal tab > “Button” icon > Program button tab and assign the program to any hot key.
7. Hot key(POZ Camera) : allows you to open POZ Camera program. When LCD is off, if you
want to open POZ Launcher, then change the settings, as follows : tap Start( ) button >
Settings > System tab > “System” icon > “Wake up” tab > select “Open program while in
Sleep mode”. Also, if you want to change the program assigned to each hot key, tap
Start( ) button > Settngs > Personal tab > “Button” icon > Program button tab and
assign the program to any hot key.
8. Hot key(GPS) : allows you to open MagicN browser. When LCD is off, if you want to open
POZ Launcher, then change the settings, as follows : tap Start( ) button > Settings >
System tab > “System” icon > “Wake up” tab > select “Open program while in Sleep mode”.
Also, if you want to change the program assigned to each hot key, tap Start( ) button >
Settngs > Personal tab > “Button” icon > Program button tab and assign the program to
any hot key.
9. Hot Key(NATE) : allows you to open imanPlus browser. However, you have to connect to
NESPOT AP first through NESPOT CM before using this browser. When LCD is off, if you
want to open POZ Launcher, then change the settings, as follows : tap Start( ) button >
Settings > System tab > “System” icon > “Wake up” tab > select “Open program while in
Sleep mode”. Also, if you want to change the program assigned to each hot key, tap
Start( ) button > Settngs > Personal tab > “Button” icon > Program button tab and
assign the program to any hot key.
10. Navigation key( ): Press to navigate through documents or open menu bar while
phone program is open.
11. Microphone: Speak into the microphone to record voice notes and communicate on the
mobile phone.
12. Charging state LED: indicates power state while recharging. (Blue : fully charged, Red :
charging)
13. phone keypad : allows you to input the phone number.
G G G
jGXGhGkG G XT\
@YZhG]XY
G
G
G
G
G
G
G
G
G
G
G
G
G
G
G
G
G
G
G
G
G
G
G
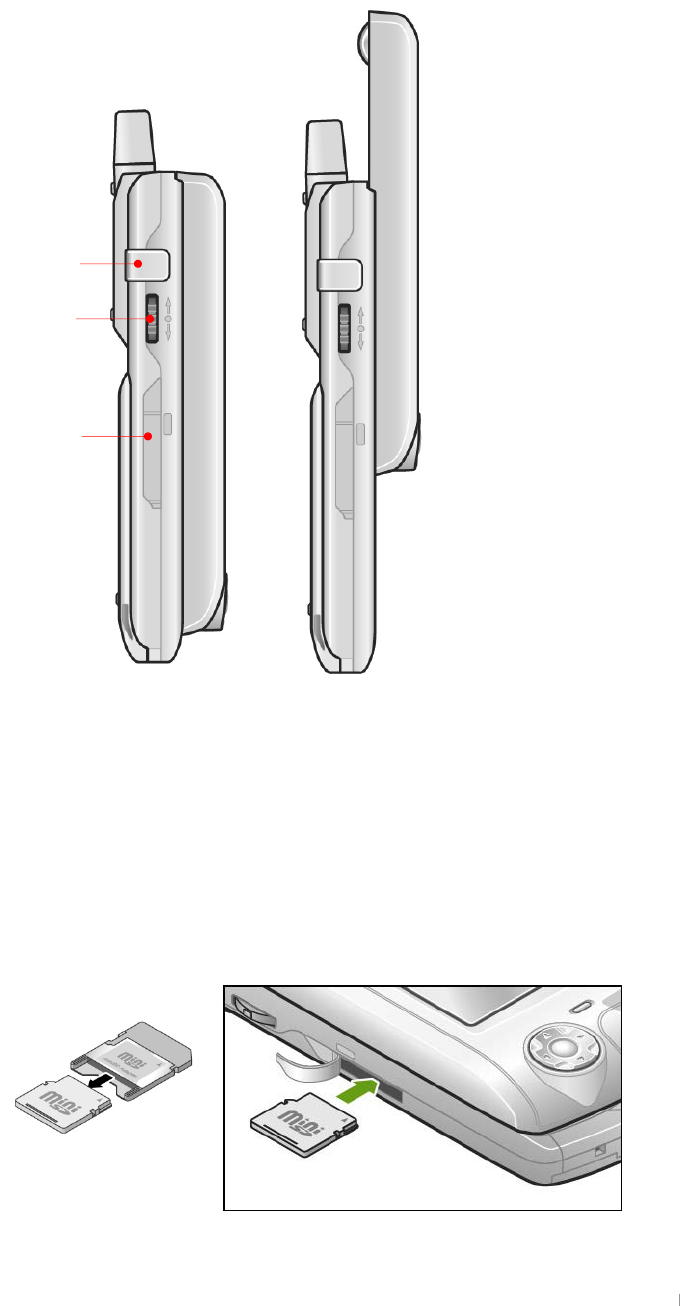
1. Stereo headphone jack: Connect a proprietary stereo headphone.
2. Up/down control button: Scroll through documents. Enter button: Press it once to have the
last called phone number displayed on the phone display with the phone program on and
press it once to finish your communication you want.
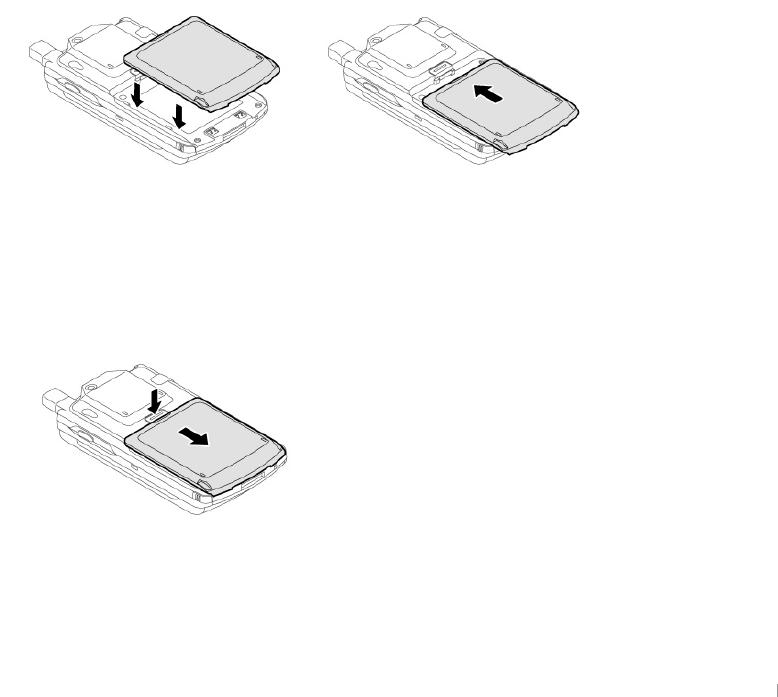
3. Mini SD (Secure Digital) card slot: Insert an optional SD card to add memory. Take out the
Mini SD card as shown below and lift the rubber and slide the card into the slot, pressing
the card gently but firmly until it snaps into place in the slot.
G
G
G
G
G
G
G
G
G
G
ྚG
ྙG
ྛG
G|˅GtG G XT]
G
F][\hg]XY
G
G
G
G
G
G
G
G
G
G
G
G
G
G
G
G
G
G
G
G
G
G
G
G
G
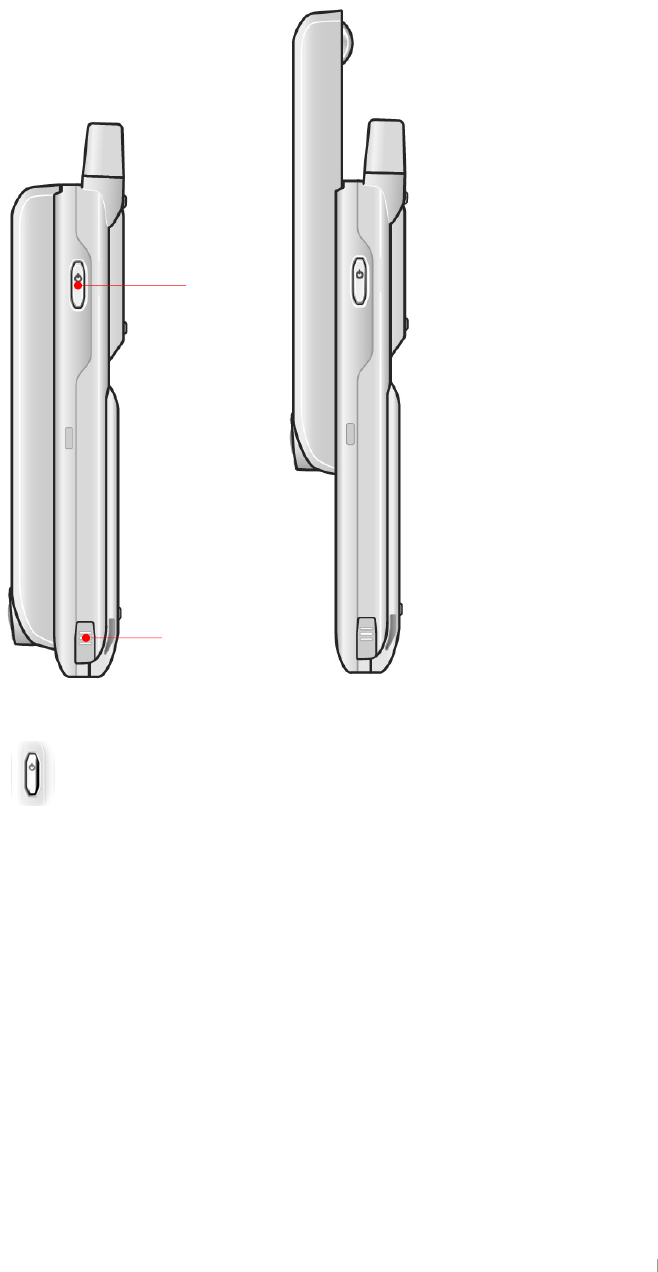
1. Power( ) button: Press to turn your device on and off.
2. Stylus: Use the stylus to navigate on the touch screen.
G
ྚ
ྙ

G G G
jGXGhGkG G XT^
G
IddYf
G
G
G
G
G
G
G
G
G
1. GPS :
2. Infrared port: Beam files to other mobile devices.
G
6chhca
G
G
G
G
G
G
G
1. USB port: Connect to your desktop PC using the supplied cradle, or directly through an optional sync
cable.
2. Soft Reset switch: Use the stylus to press the reset button and restart your device so that all your
unsaved files will be deleted.
G
G
ྚ
ྙG
ྚGྙ
G|˅GtG G XT_
G
FYUf
G
G
G
G
G
G
G
G
G
G
G
G
G
G
G
G
G
G
G
G
G
G
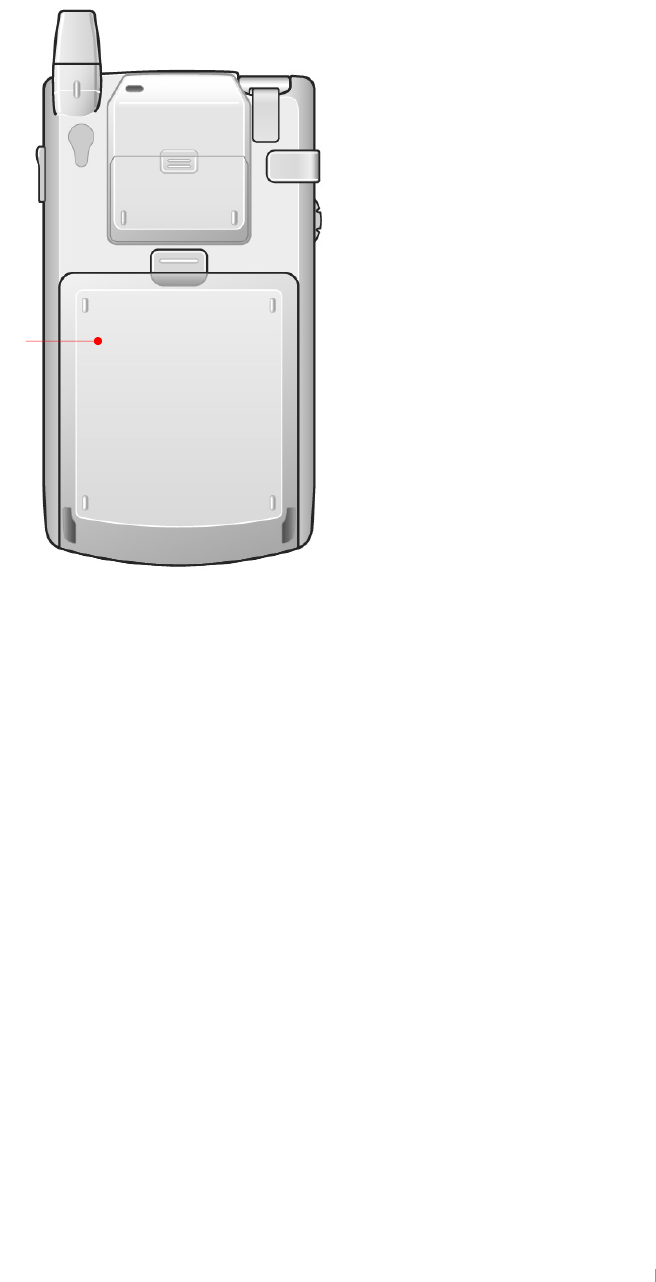
1. Battery: main battery(1500 or 1200mAh). The main battery may be drained during the transportation
from the factory to the user; therefore you should connect AC power to the cradle and place device in
it in order to charge the battery when using your device fir the first time.
ྙ
G G G
jGXGhGkG G XT`
G
FYachY7cbhfc`
G
G
G
G
G
G
G
G
G
G
G
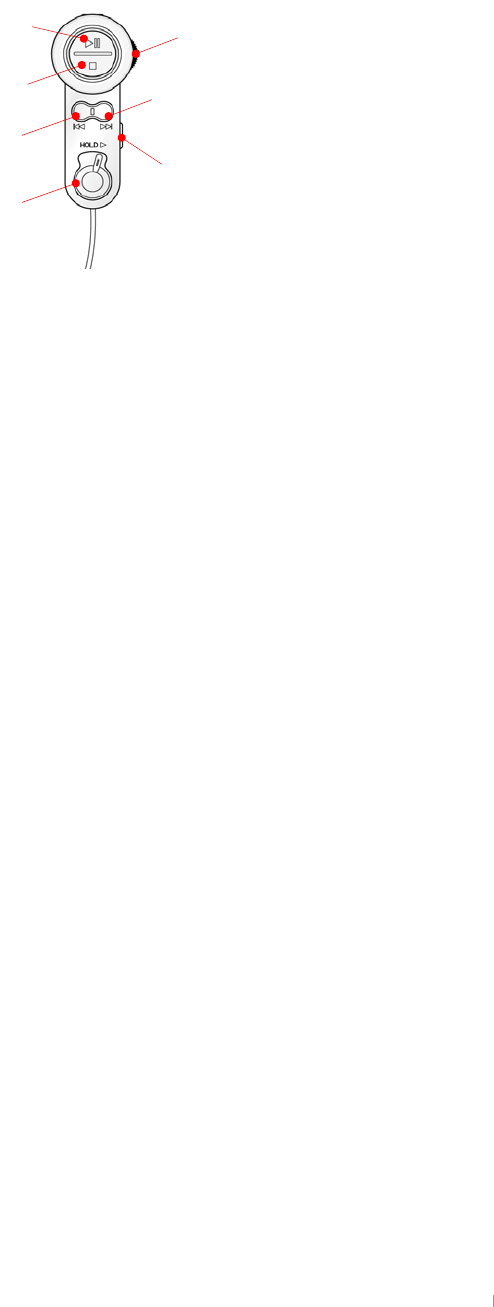
1. Playback/Pause button : allows you to playback or pause temporarily in the POZ MusicBox program.
2. Stop button : allows you to stop in the POZ MusicBox program.
3. Previous button : allows you to move to the previous track in the POZ MusicBox program.
4. HOLD : while POZ MusicBox program is on, push it to the right side not to operate all function
buttons, except SEND/END button when you got the incoming call.
5. SEND/END button : press this button to receive the incoming call and press it again to disconnect the
call.
6. Next button : allows you to move to the next track in the POZ MusicBox program.
7. Jog Dial : allows you to adjust volume in the POZ MusicBox program or phone program.
G
G
G
ྚ
ྙ
ྛ
ྜ
ྜྷ
ྞ
ྟ

G|˅GtG G XTXW
Using the Stylus
Use the stylus to navigate and select objects on the screen.
Wds#dqg#krog#
Tap and hold the stylus on an item to see a list of actions available for that item.
On the pop-up menu that appears, tap the action you want to perform.
#
Gudj#
Hold the stylus on the screen and drag across the screen to select text and
images. Drag in a list to select multiple items.
#
Wds#
Wrxfk#wkh#vfuhhq#rqfh#zlwk#wkh#vw|oxv#wr#rshq#lwhpv#dqg#vhohfw#rswlrqv1#
G G G
jGXGhGkG G XTXX
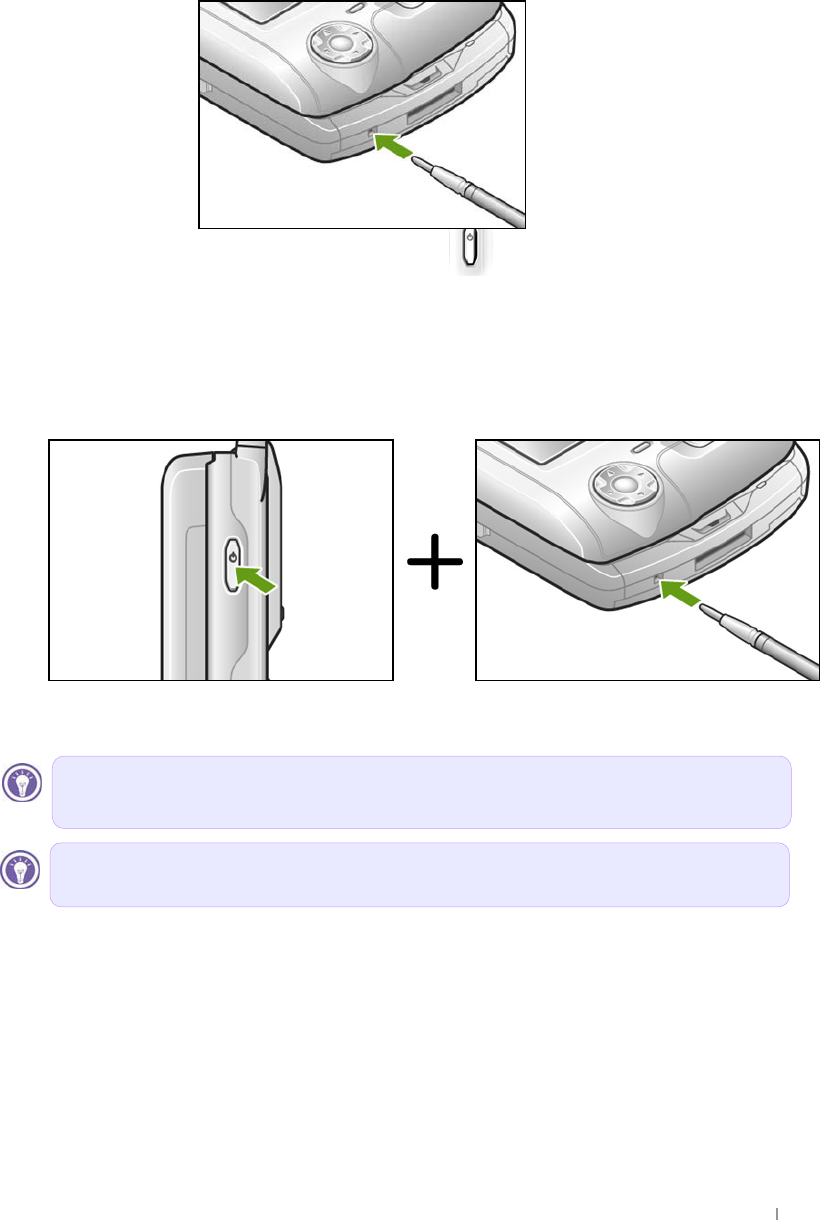
Soft Reset & Hard Reset
When your device is running slow or improperly, use the stylus to press the Reset button
located on the bottom. This is called “Soft Reset” in this manual. When you perform a
Soft Reset, you will lose all unsaved data. Be sure to save all data in open documents or
programs beforehand. This is similar to pressing the Reset button on your desktop.
Performing Hard Reset is to press the power( ) button located on the right side of
your device and press down the Soft Reset switch with stylus at the same time. When
you perform Hard Reset, you will lose all information that is stored in the RAM. However,
Magicn Store folder, which is one of the NAND flash memory, will not be deleted even
after performing Hard Reset.
Eh#vxuh#wr#vdyh#doo#gdwd#xvlqj#DfwlyhV|qf#ru#wkh#Edfnxs#xwlolw|#ehiruh#|rx#shuirup#
Kdug#Uhvhw1#
Xvh#rqo|#wkh#vw|oxv#surylghg#e|#F|ehuedqn1#
G|˅GtG G XTXY
Microsoft Pocket PC Software
Your device already includes the full suite of software you need to function as a mobile
professional. These programs are introduced below.
Detailed information can be found in later chapters.
The programs listed below are preinstalled in Flash ROM or in the Built-in Flash. These
preinstalled programs will not be deleted if your device suffers a loss of power.
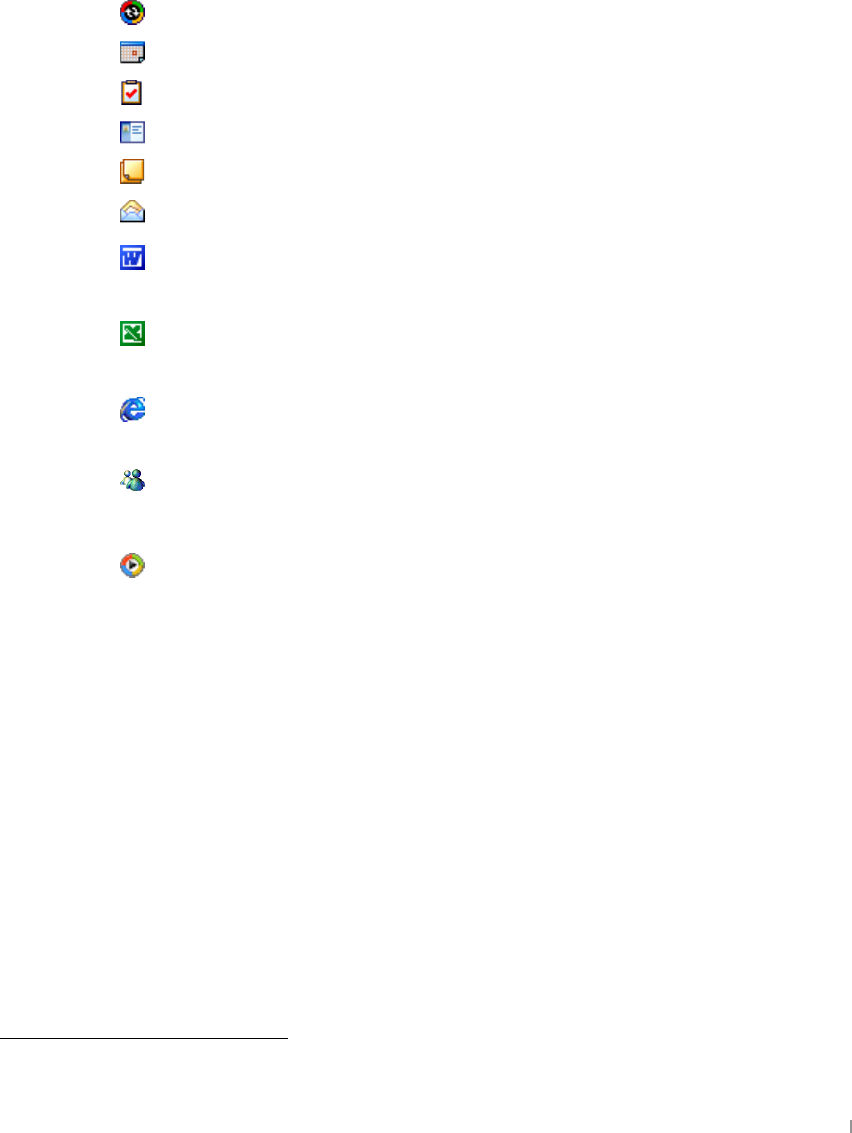
ActiveSync. Synchronize information between your device and desktop computer.
Calendar. Keep track of your appointments and create meeting requests.
Tasks. Keep track of your to-do list.
Contacts. Keep track of your friends and colleagues.
Notes. Create handwritten or typed notes, drawings, and recordings.
Inbox. Send and receive e-mail messages from your device.
Pocket Word. Create new documents or view and edit Word documents created on
your desktop PC.
Pocket Excel. Create new workbooks or view and edit Excel workbooks created on
your desktop PC.
Microsoft Pocket Internet Explorer. Browse the Web and view channels and
subscription content.
MSN Messenger.1Send and receive instant messages with your MSN® Messenger
contacts.
Microsoft Windows Media Player for Pocket PC.2Play audio and video clips on
your device. Windows Media™ Player lets you play songs and video files that have
been recorded in the MP3 or WMA formats.
GGGGGGGGGGGGGGGGGGGGGGGGGGGGGGGGGGGGGGGGGGGG
1 Requires an account with an Internet service provider.
2 Check the Microsoft Mobile Devices Web site for updates to Windows Media Player, including details on
support for video file formats and streaming audio and video capabilities.#

G G G
jGXGhGkG G XTXZ
Where to Find Information
G
ActiveSync & Acrobat Reader
You can install ActiveSync 3.7.1 from the provided Companion CD. In case that you lose
the companion CD, download and install the latest ActiveSync 3.7.1 on
www.microsoft.com/mobile/pocketpc/download on your desktop PC.
Also you can download Acrobat Reader from www.acrobat.com .
Using Help on Your Device
You can get help for specific programs and for Microsoft Pocket PC software by tapping
Help on the Start menu. Help can be displayed for the active program.
G
G
Using This Manual
G
This User's manual is designed to help you get started using your device quickly and
easily. Although great care has been taken to ensure the accuracy of procedures and
artwork, some of the screens displayed on your device may be a little different from the
ones that appear in this User’s manual.
This User's manual includes certain visual cues that will help you find the information you
want easily.
G
Qrwhv#=#Khosixo#lqirupdwlrq#uhodwhg#wr#wkh#wrslf1#
Qrwlfh#=#Wklv#lv#lpsruwdqw#lqirupdwlrq#wkdw#vkrxog#eh#revhuyhg#wr#suhyhqw#orvv#
ri#gdwd#ru#gdpdjh#wr#|rxu#ghylfh1#

GjGYGnGzG G YTX
This chapter will help you start using your device. You will become familiar with the hardware
and learn how to set up your device. When you finish this chapter, you will have all the
information you need to begin working with your device.
ඝ This chapter includes step-by-step instructions to help you.
- Complete the Welcome Wizard
- Using Today Screen
- Using File Explorer
- Power up the first time
- Hardware buttons
- Caring for your device
Chapter 2
Gettin
g
Started
G|˅GtG G YTY
Complete the Welcome wizard
G
Follow the steps in this section to start using your device for the first time or after performing
hard-reset.
G
G
G
G
G
G
G
G
G
G
G
G
G
G
G
G
G
G
G
G
G
G
G
G
G
G
G
G
G
G
G
G
G
G
G
G
G
G
G
G
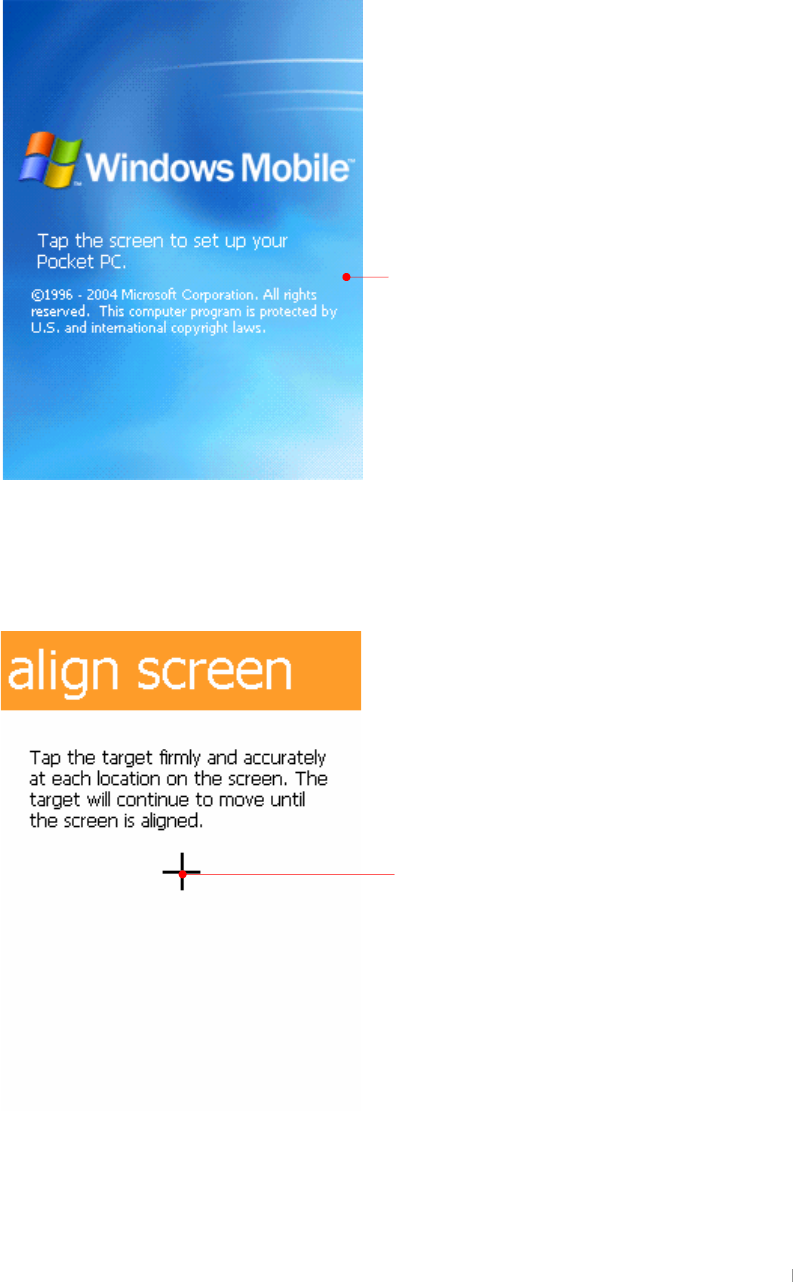
Gently touch the screen with stylus. From
now on, it is called “tap”.
A
target (+) will move in the order of “center
o upper left o lower left o lower right o
upper right” on your screen. Since
calibrating the touch screen has a direct
affect on the recognition ability of your touch
screen, be sure to accurately tap the center
of the target (+) with your stylus.
GjGYGnGzG G YTZ
G
G
G
G
G
G
G
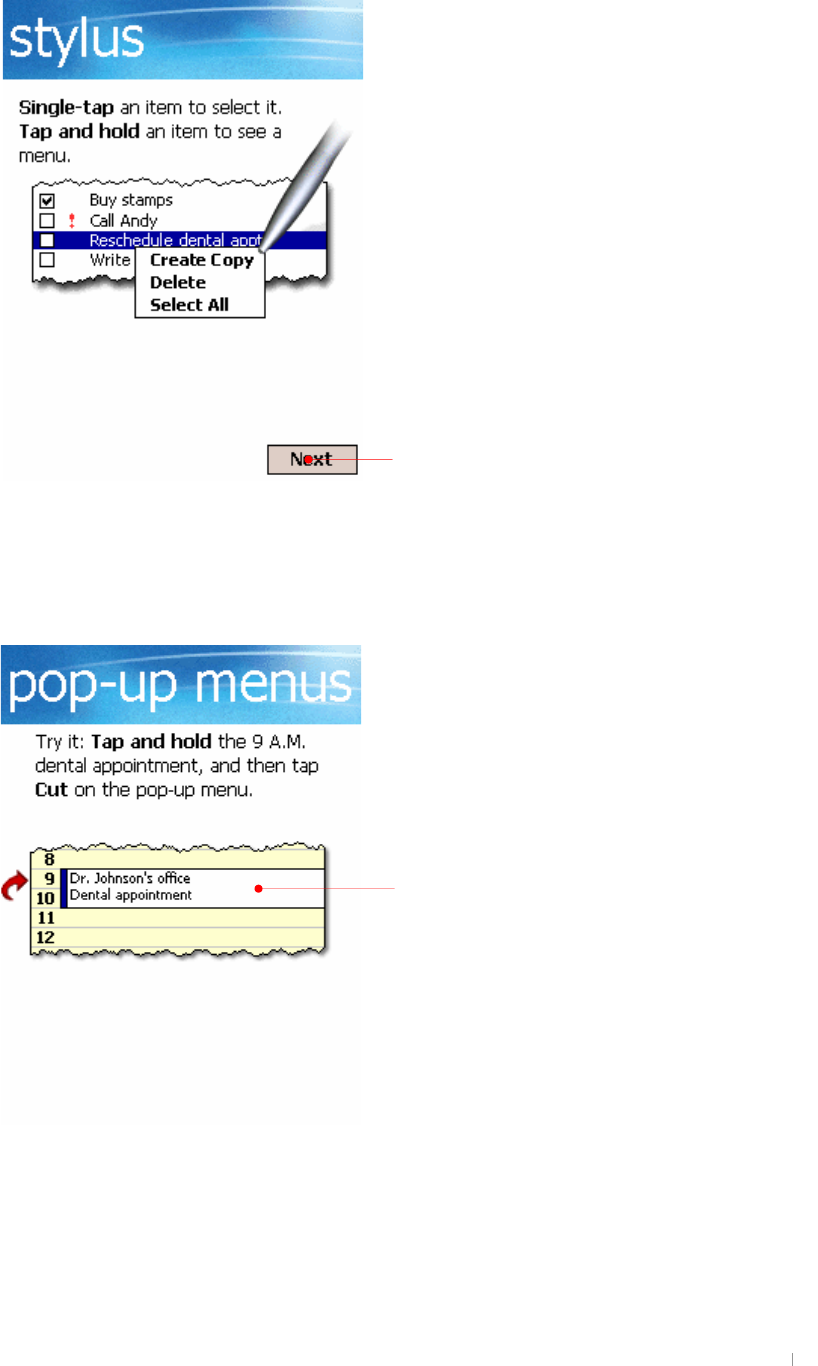
This is the way of how to single-tap and tap and
hold, tap the Next button.
Tap and hold this location to have next window.
G|˅GtG G YT[
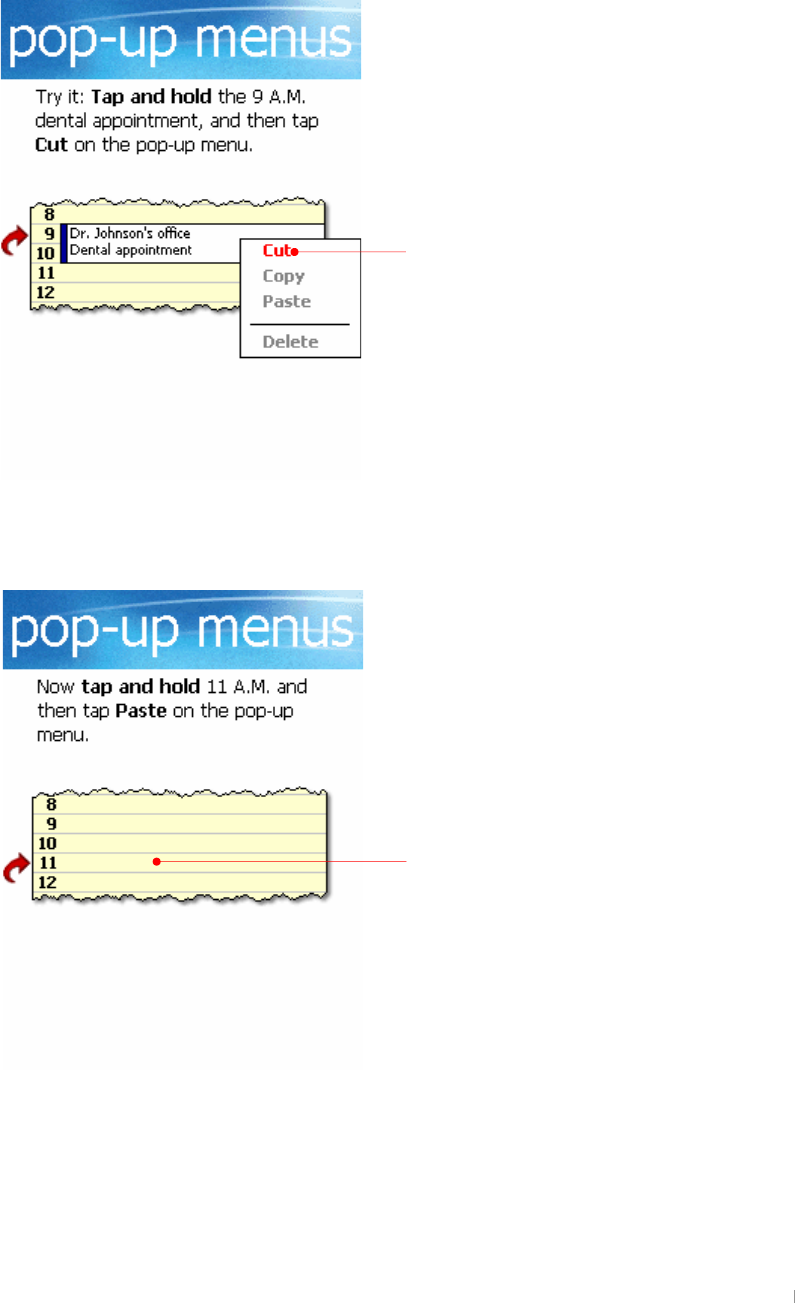
Tap and hold this location next to 11 to paste the
cut contents. Then you will have the new pop-up
menu.
It is called “Pop-up” menu. Select Cut..
GjGYGnGzG G YT\
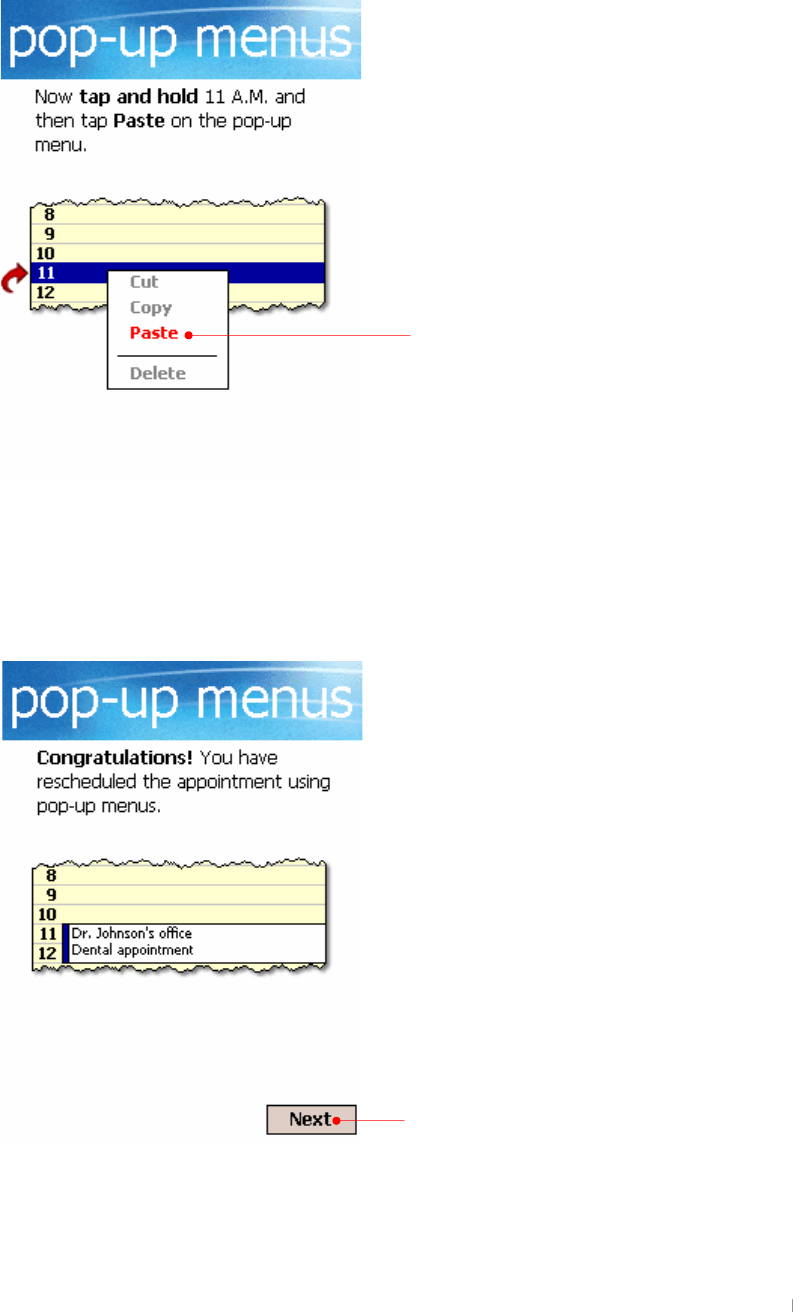
Select Paste on this list.
The pasted contents have appeared. Tap the Next
button.
G|˅GtG G YT]
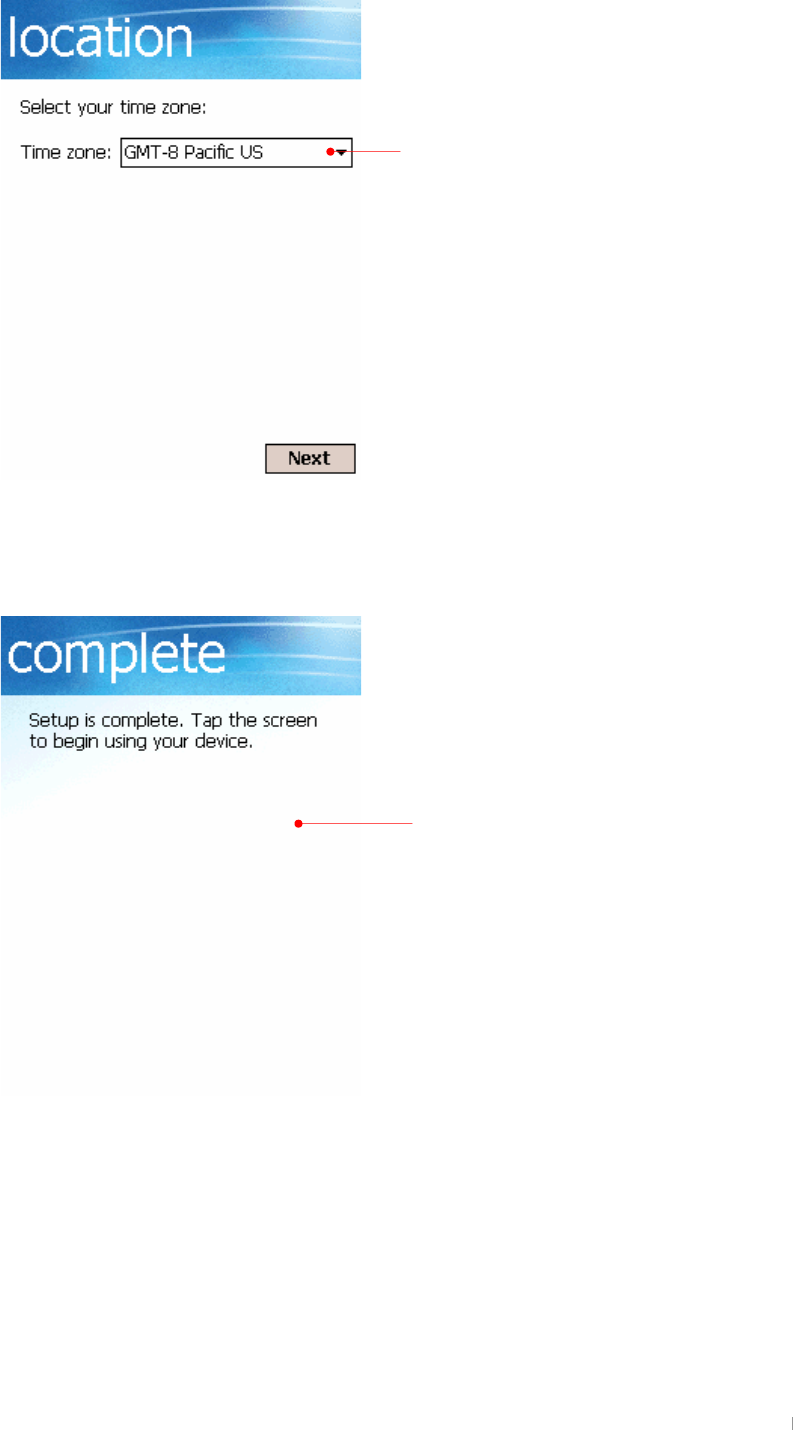
Select a time zone you stay from
the drop-down list box.
Tap the screen to finish the Welcome wizard.
GjGYGnGzG G YT^
Using Today Screen
After finishing the Welcome wizard, put your device on the cradle connected to your desktop
PC to automatically synchronize through Microsoft ActiveSync so that you have the next screen.
G
G
G
G
G
G
G
G
G
G
G
G
G
G
G
G
G
G
G
G
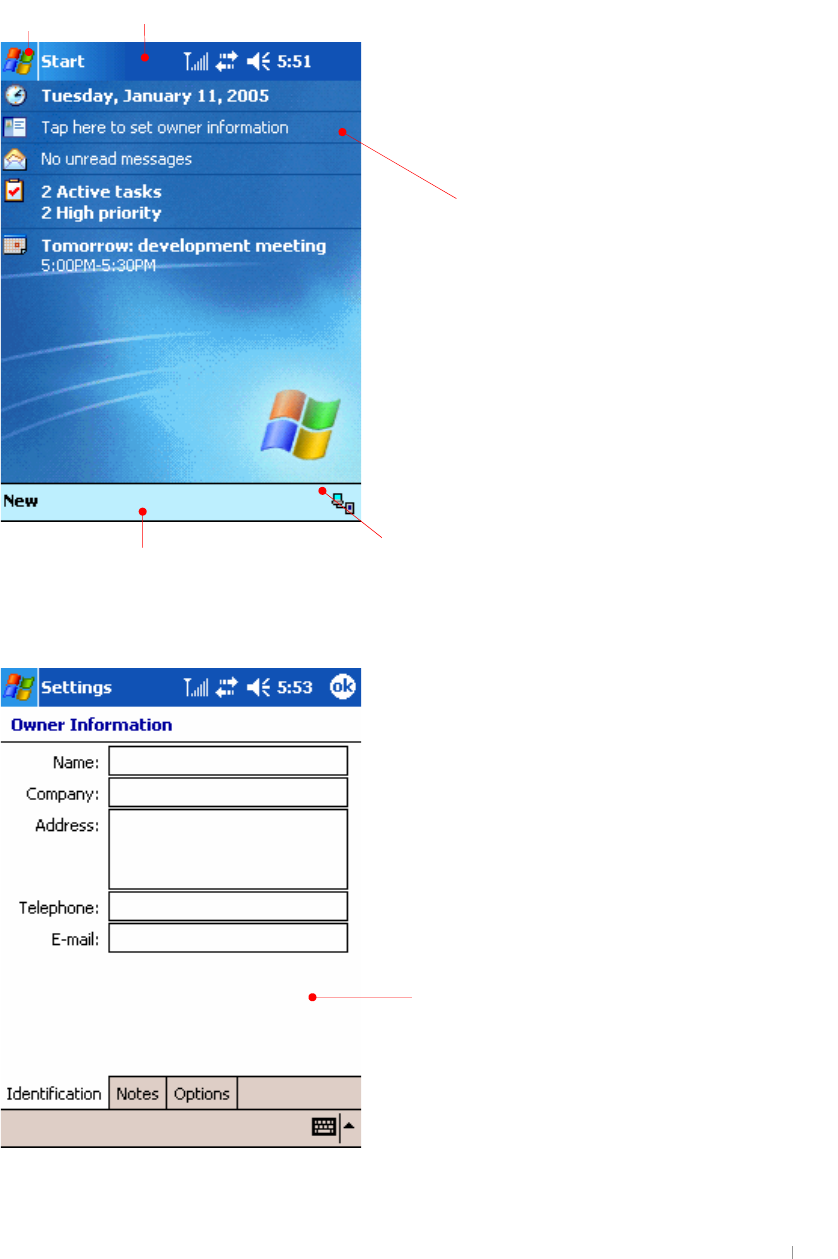
|GpG
Now, you are ready to enter Owner information. Tap Owner information to have next screen.
G
G
G
G
G
G
G
G
G
G
G
G
G
G
G
G
Tap any text box where you want to enter information to have input panel displayed. For more
detailed information on input panel, see chapter 3.
Enter your personal information which is not synchronized
with your desktop PC.
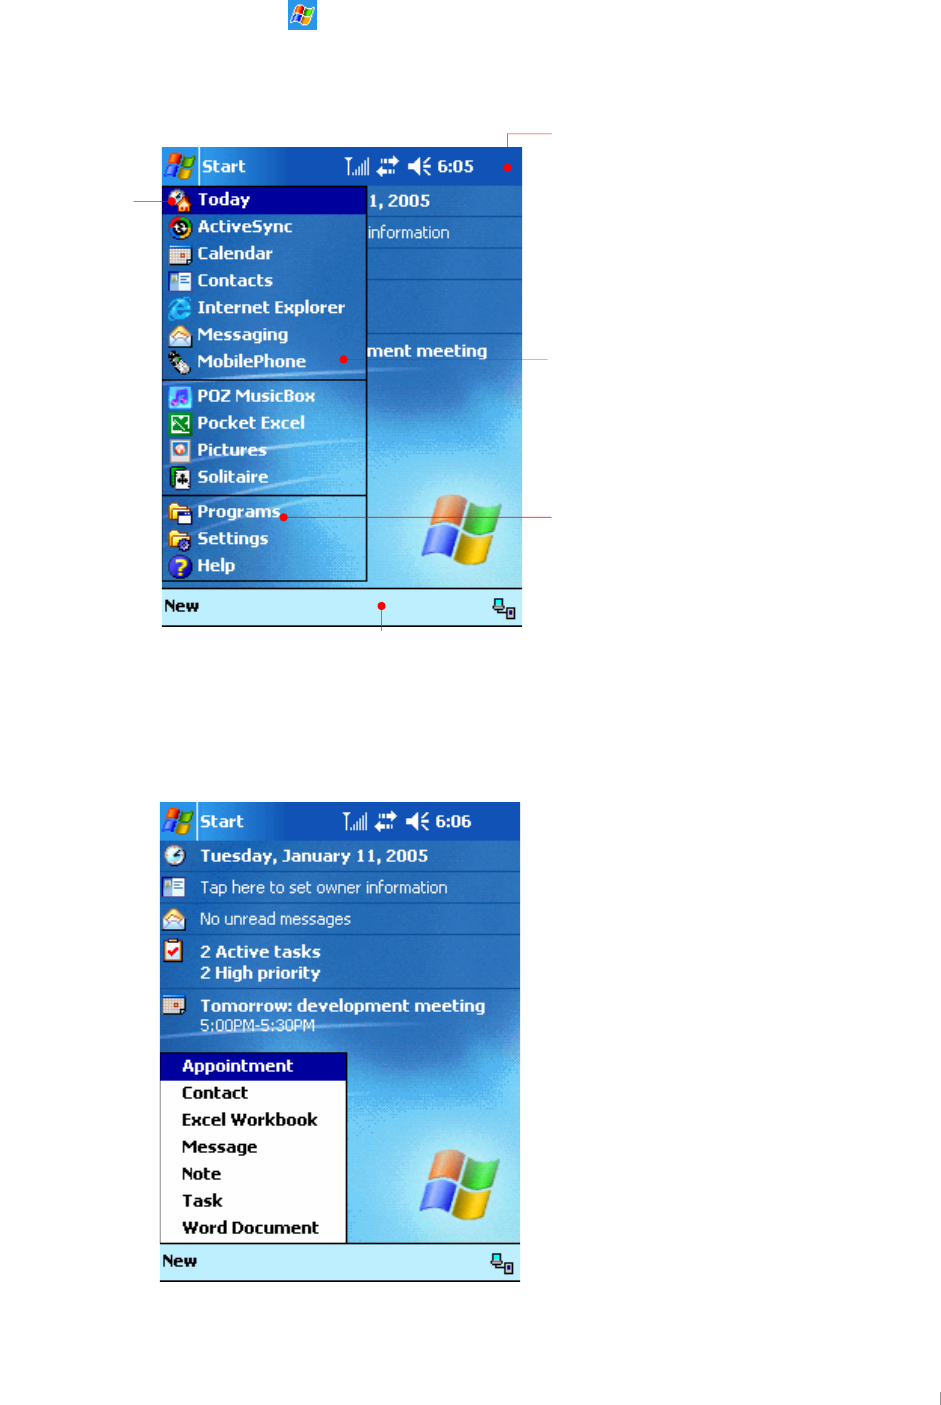
Start menu
Select this option box to have your personal
information displayed whenever you turn on
y
our device.
Synchronize today with your desktop PC through
A
ctiveSync.
jGG
uGG
G|˅GtG G YT_
G
G
G
G
G
G
G
G
G
G
G
G
G
G
G
G
G
G
G
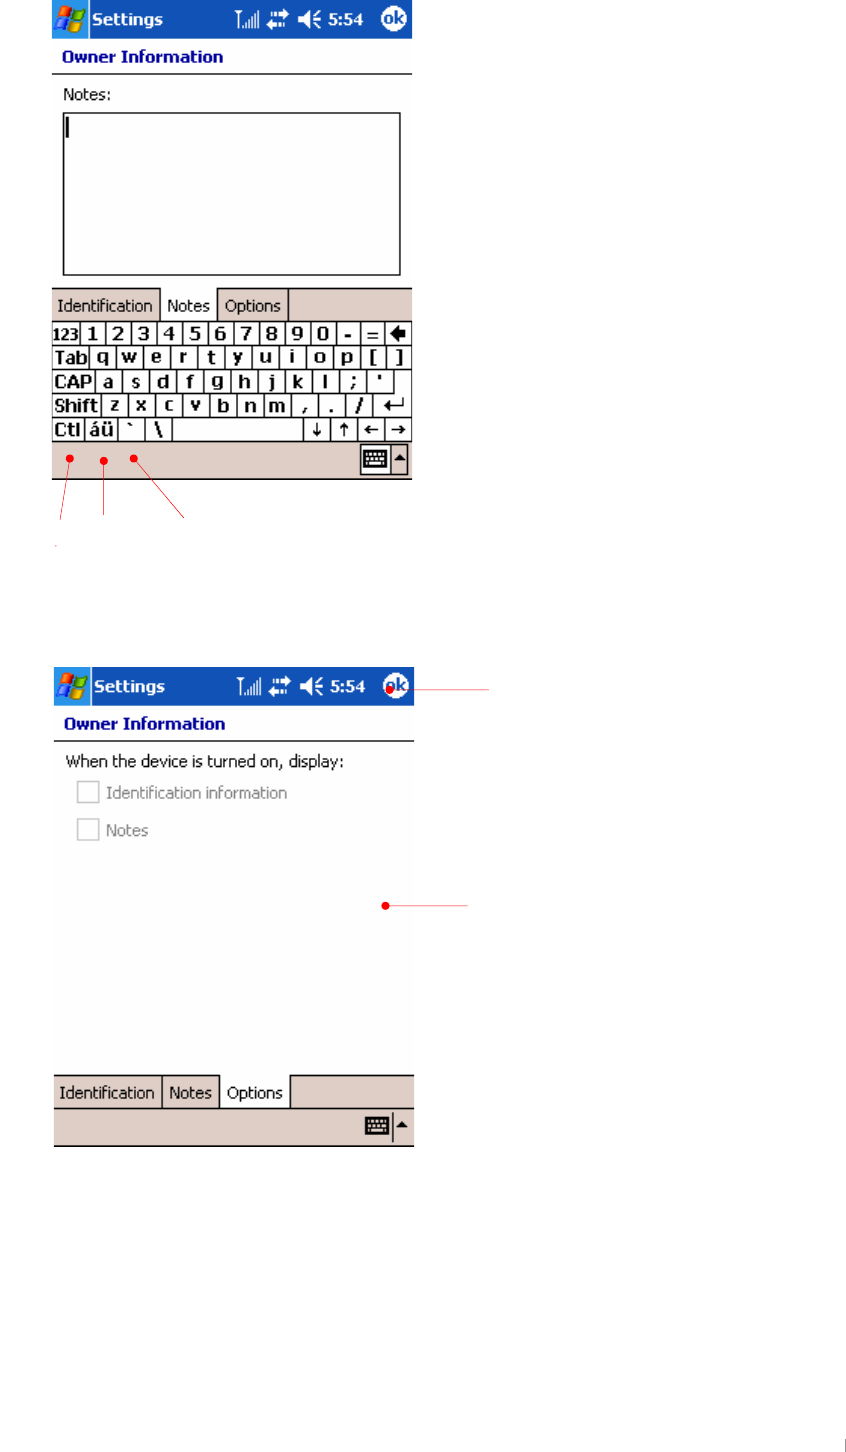
For more personal information if needed, select the Notes tab.
G
G
G
G
G
G
G
G
G
G
G
G
G
G
G
G
lG
rG G
Select this option box to have your personal
information displayed whenever you turn on
your device.
uSGGG
{GvrGGGGGUG
GjGYGnGzG G YT`
Jc`iaY
{GGGGGGGGGGGUG G
G
G
G
G
G
G
G
G
G
G
G
G
G
G
G
G
G
H]aY
{GGGGGGGGGGGGGSGGGGUG G
G
G
G
G
G
G
G
G
G
G
G
G
G
G
G
G
G
G
G
G
G
G
GaGGGGGUG
GaGGGGGGGGG
UG
uGG
G|˅GtG G YTXW
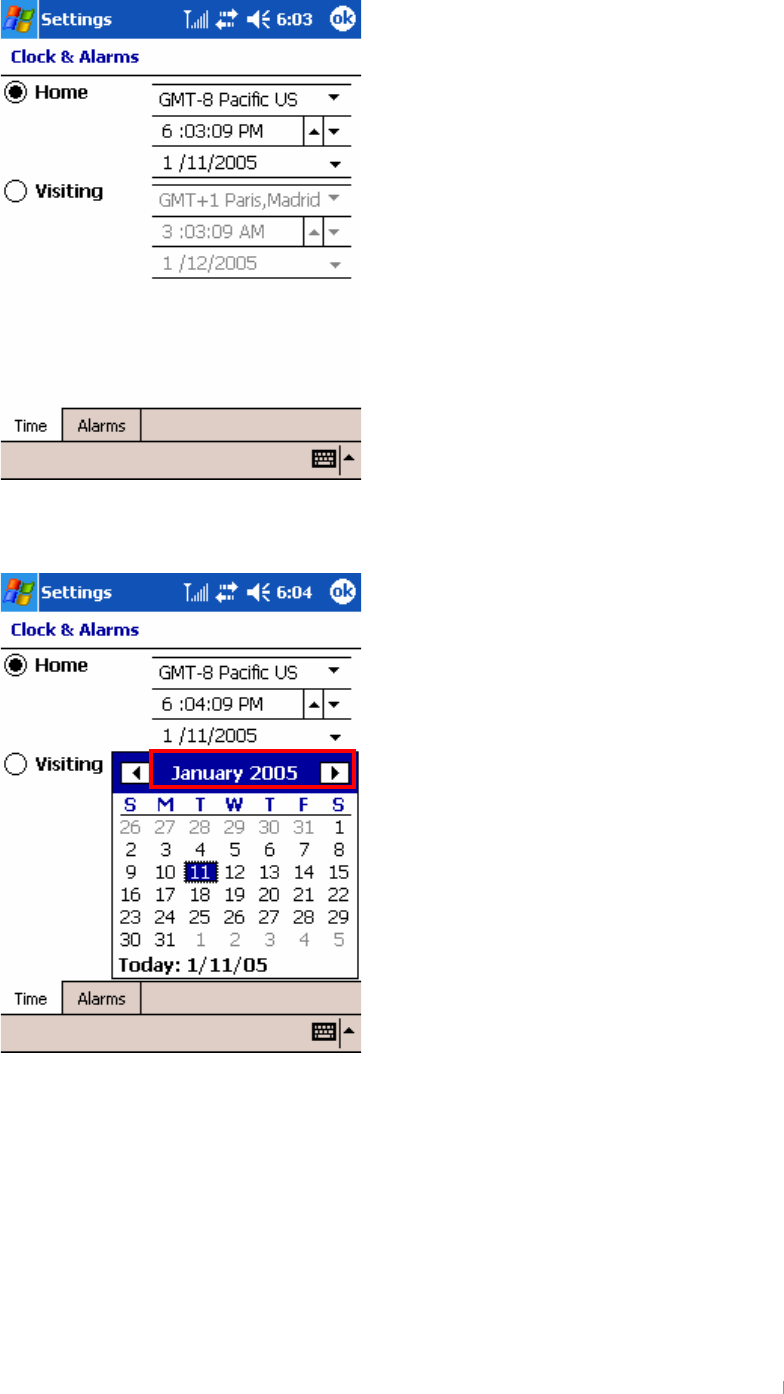
{GGGGGGGUG G
G
Vhohfw#wkh#wlph#dqg#gdwh1#
Iru#h{dpsoh/#vhohfw#wkh#duurz#ehvlgh#gdwh1#
#
#
#
#
#
#
#
#
#
#
#
#
#
#
#
#
#
#
\rx#fdq#fkdqjh#wkh#gdwh#|rx#zdqw#khuh1#
#
#
#
#
GjGYGnGzG G YTXX
CdYbh\YfYWYbh`migYXdfc[fUaghUfhh\Ydfc[fUamcikUbh
XU GGz GUG
YU GGGGGGGGGGzGGGGGGGGGG
UG
G
CdYbdfc[fUaX]fYWh`mmcikUbhZfcah\YHcXUmggWfYYb
{GˈuˉGGGjGGGGGGGGGG{GUG
G
G
G
G
G
G
G
G
G
G
G
G
G
G
G
G
zGGGGGGGGGUG
uGi
zGG
GG
GG
U
zGGG
{GGzGG¡UG
jGiG

G|˅GtG G YTXY
{GzG G G eGzGeGwGGeGtG G GG¡GGzGGGGuG
GGUG
Tap OK to save these settings.
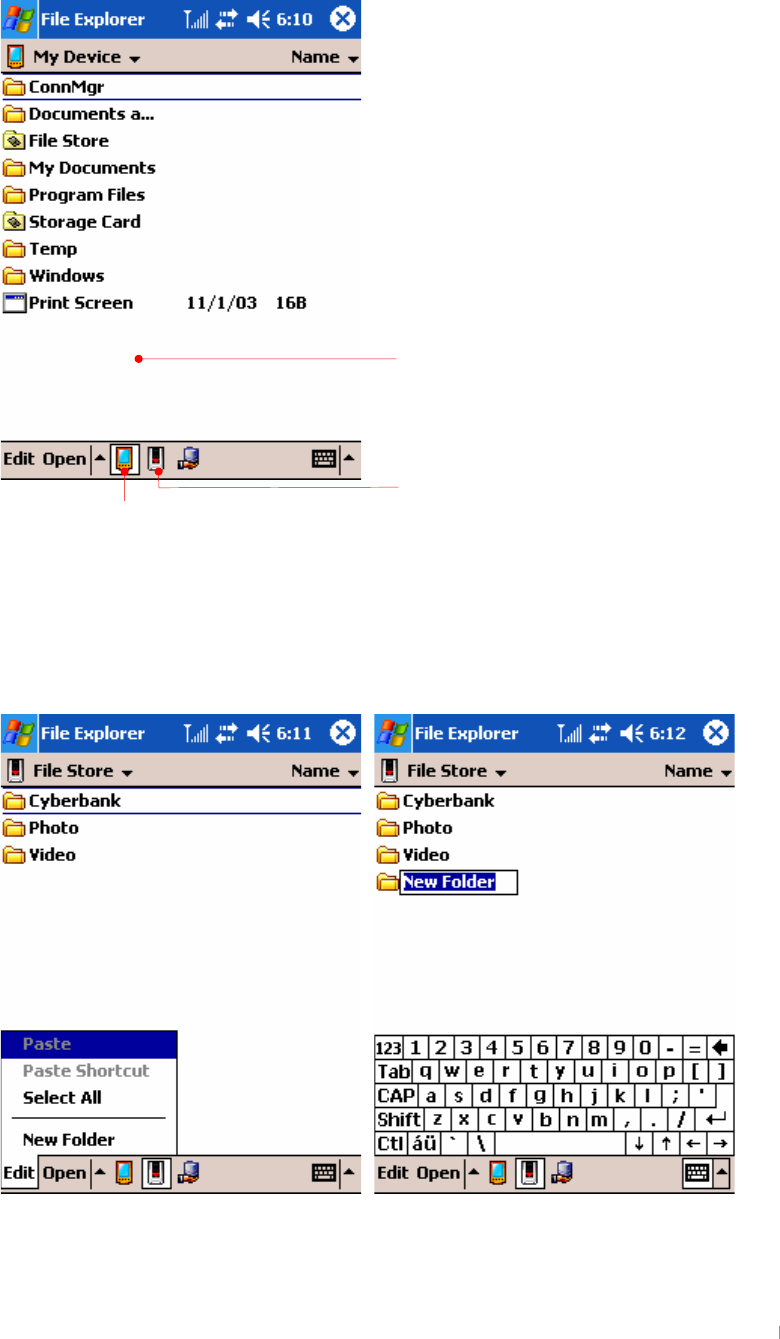
:]`Y9ld`cfYf
This File Explorer of your device is similar to Window Explorer of desktop PC.
Select the Start menu > Programs > File Explorer.
Select to go to the higher level of
a folder.
Select a folder below My
Device you want to move to.
GjGYGnGzG G YTXZ
ඝView the contents of Mini SD(Secure Digital) card
Insert Mini SD cards into the Mini SD card slot so that SDMMC Disk folder appears. Tap this
folder to view the contents of Mini SD card.
ඝ
Make or delete a new folder
zGGGGGGlGGGGjGUG
G
G
G
G
G
G
G
G
G
G
G
G
G
G
G
G
G
G
G
G
tGzkGjG
tGGG
tGzGGG G
G|˅GtG G YTX[
lGGGGUGzGˈkˉGGGTGGGGGGGGGGGG
UG
G
G
G
G
G
G
G
G
G
G
G
G
G
G
G
G
G
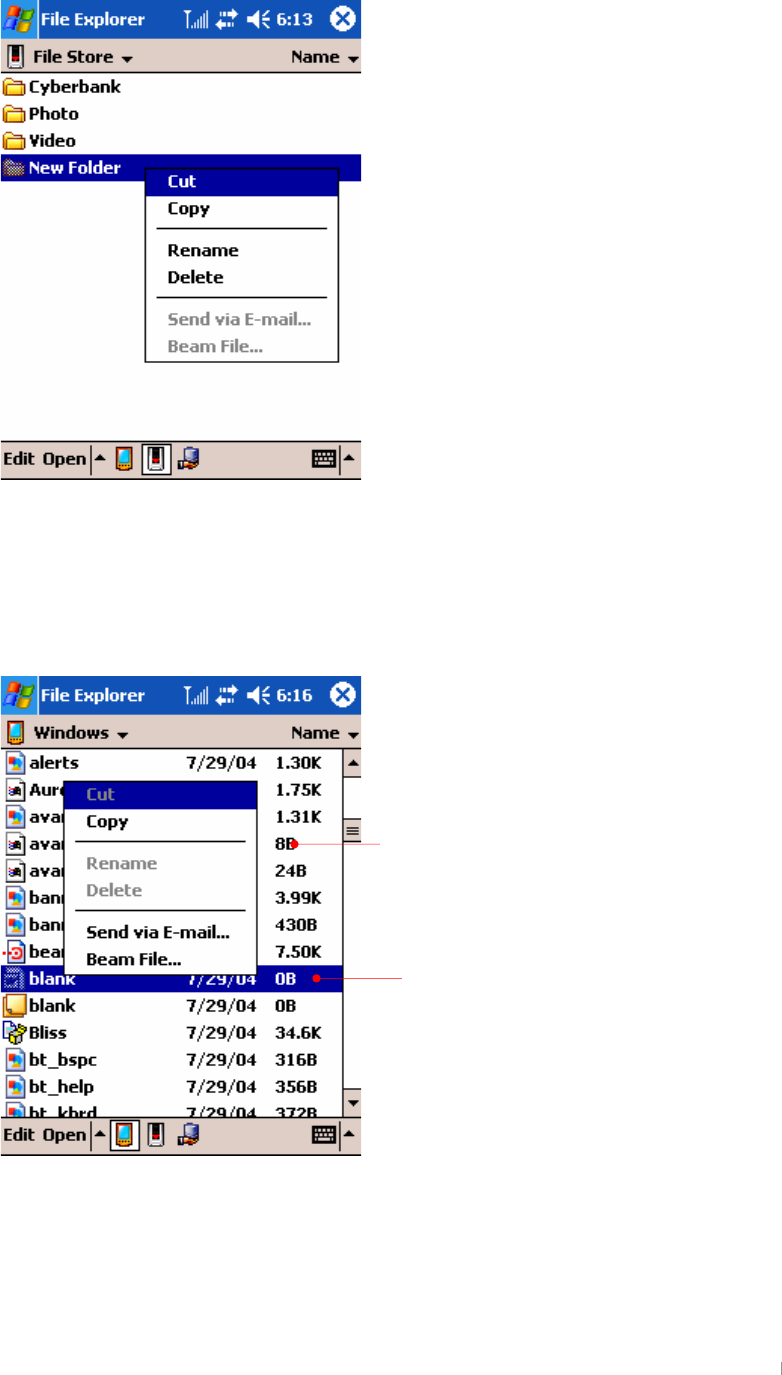
Copy and Paste
Tap and hold the file you cut, copy, rename and delete to have Pop-up menu displayed. Also tap
and hold out of files or folders to have a little different pop-up menu that includes new folder. Now
we show you an example of process where we copy a file from a folder and paste it to another folder.
G
G
G
Tap and hold a file you copy to have Pop-up menu displayed and tap Copy. Select Personal
you want to paste the copied file to. On the Personal folder, tap and hold the empty space to
have pop-up menu that includes Paste.
Tap and hold a file you copy to have Pop-up
menu displayed and tap Copy.
{GGGTGG

GjGYGnGzG G YTX\
zGˈwˉGGGGUG
G
G|˅GtG G YTX]
Powering up device
G
AU]bVUhhYfm@]!Dc`maYf
Because the data and files you save on your device are stored in RAM, maintaining a
continuous power supply to the device at all times is extremely important. If your device runs
out of power, all information stored in RAM is lost. The preinstalled programs will not be deleted
even if your device suffers a loss of power; however, any custom settings and programs you
have added will be erased.
To safeguard data against loss in the event of power failure, you can save or back up files to NAND Flash
memory(called “File Store” here).
The lithium-ion battery pack provides power to your device while it is not connected to ac power.
Actual battery life will vary depending on how you use your device. Some functions, such as
listening to music, using the backlight, or operating mini SD cards, use considerable power and
may reduce this time significantly.
The battery is charged whenever your device is connected to an ac power source—either the
AC adapter or the USB cradle. Usually, it takes 3.5 hours to charge your battery fully
depending on the battery status. Connect your device to AC power or place it in the cradle
when it is not in use, to ensure that the battery is fully charged when you need to take it with
you. When the battery is fully charged, charging stops automatically; the battery will not
overcharge even if it is left upon being connected to AC power.
G
{GGGGGGGUG
G
G
G
G
G
G
G
G
hGGSGGGGGGGGGGUG
G
{GGGGUG
G
G
G
G
G
G
G
G
GjGYGnGzG G YTX^
AC Power with Cradle
To avoid running out of battery power, you can operate your device on AC power using the
supplied AC adapter. The AC adapter accepts 100 V to 240 V, enabling you to connect to AC
power anywhere in the world. When you travel, you may need adapters to accommodate
different electrical outlets, but the AC adapter will safely convert AC line voltage to the DC
voltage required by your device.
While your device is connected to AC power, the battery is charged automatically. The color of
the LED indicates the status of the battery:
G
G
G
G
G
G
G
G
G
G
G
G
G
G
G
G
G
G
iGGGGGGGGGGGGGyhtSGGGGG
GGGGGGUGpGGGGGGSGGGGGyhtGG
UGhGtG~GGwGwjGGGGGGGGSGG
GGGSGGGGSGG¡GGGGGGG
UG
Data stored in the File Store folder(NAND Flash) or on a SD card will be saved, even if your
device loses power. To protect your data, use the pocket backup application or Microsoft
ActiveSync Backup to back up regularly to the File Store folder(NAND Flash) or to a SD card.
How long you can operate your device without recharging the battery depends on the features
and functions you use most.
When your device displays a dialog box warning of low power, you should respond as soon as
possible by recharging the battery. If you continue to use your device until power reaches a
critical low condition, a “Battery very low” message appears, and the device shuts down
automatically. You will be unable to use your device until you connect to external power for
charging.
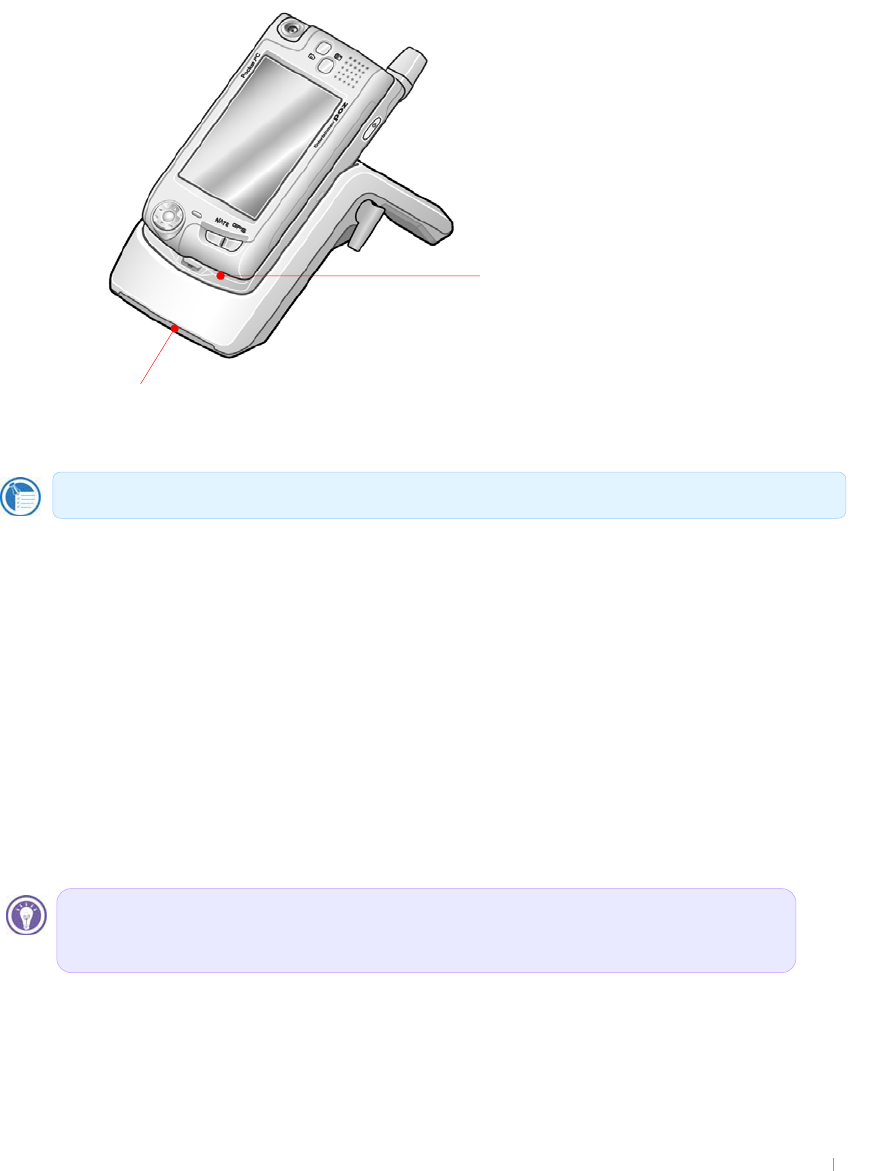
Red indicates that the battery is charging, and blue indicates that the battery is fully charged.
Red indicates that the battery is charging, and blue
indicates that the battery is fully charged.
This LED shows you the status of extra battery that
may be seated on the back of this cradle.
Vrph#ixqfwlrqv/#vxfk#dv#olvwhqlqj#wr#pxvlf#ru#xvlqj#VG#fdugv/#xvh#
frqvlghudeoh#srzhu#dqg#pd|#uhgxfh#wklv#wlph#vljqlilfdqwo|1#

G|˅GtG G YTX_
Because the battery is charged automatically whenever your device is connected to ac power,
simply connect the AC power adapter or put your device on the USB cradle to recharge it when
the power is low.
Power Tips
ඝFollow these tips to ensure the longest use of your device between charges:
Turn off the display manually.
If you are playing music or using other functions that do not require the display, turn off the
display by pressing and holding the power button. (Turn on the display by pressing and
holding the power button again.)
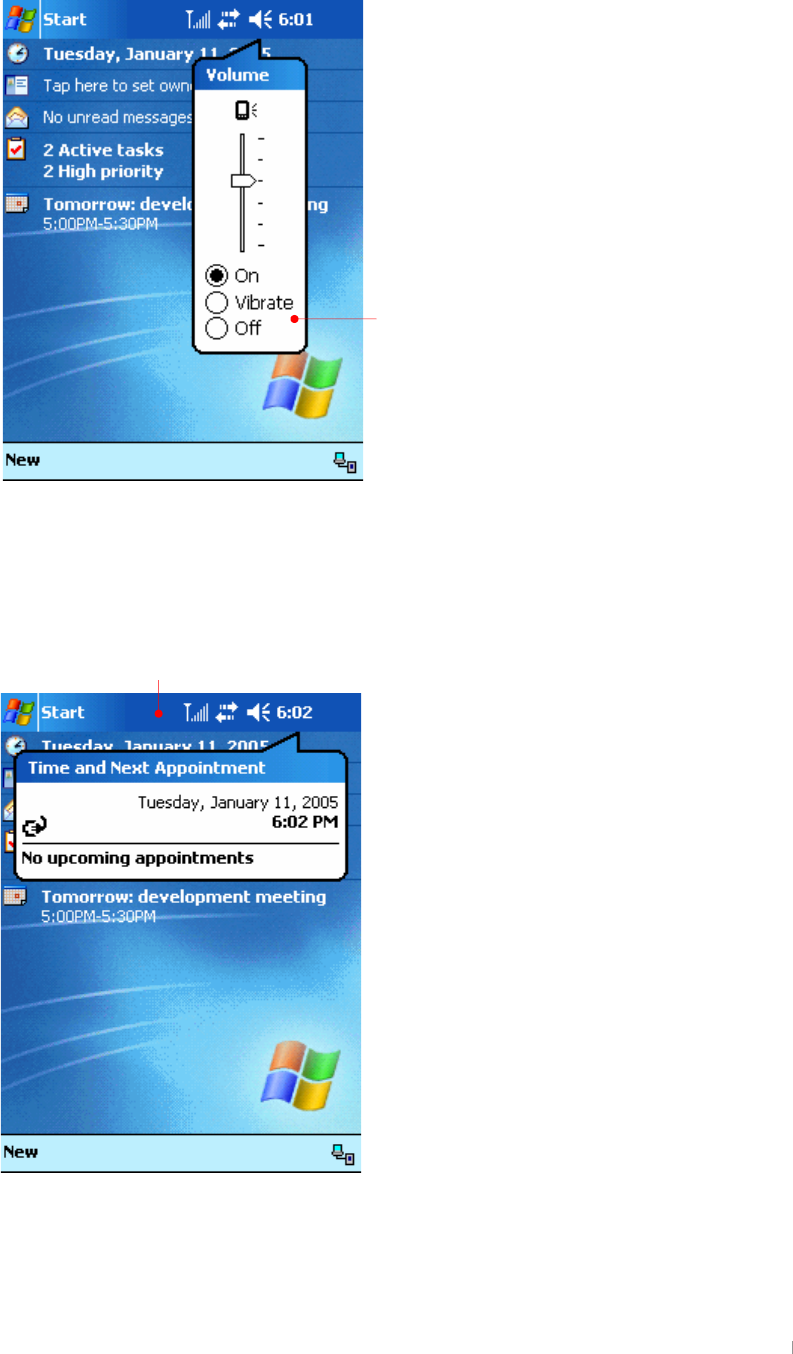
Turn off sounds.
Use the settings to mute the speaker, or use the Sounds & Notifications settings to turn off
all but the most necessary system sounds.
Avoid using SD card while on battery power.
Most SD cards use considerable power and will quickly drain your battery.
G
Zkloh#|rxu#ghylfh#lv#frqqhfwhg#wr#DF#srzhu/#wkh#fkdujlqj#vwdwxv#OHG#
lqglfdwhv#dv#iroorzv#=#
ଝଝ#Uhg#=#fkdujlqj+qrw#ixoo|#fkdujhg,/#Eoxh#=#ixoo|#fkdujhg1#

GjGYGnGzG G YTX`
G
Managing Memory
Your device uses three kinds of memory: 64 MB of ROM, 64MB of storage and program
memory (RAM), and optional SD memory cards.
Storage and Program Memory (64MB of RAM)
The volatile RAM memory on your device is allocated between storage memory and program
memory. The operating system automatically manages the allocation between storage and
program memory; however, in some situations—such as when memory is low—it may not be
able to adjust the memory properly. Bad sectors amongst the 64 Mb of RAM memory may
cause shortages of memory.
If you receive a message stating that storage or program memory is unavailable, try the
following solutions.
ඝTo increase storage memory, you can
Move files or programs into the File Store(NAND Flash).
Buy an optional SD extended memory card, and move files from internal memory to the
card.
Remove Web pages stored for viewing offline in Internet Explorer folders.
ඝTo increase program memory, you can
Use Task Manager or the Memory settings to stop programs you are not currently using. In
most cases, programs automatically stop to free needed memory. However, in some
situations, such as when a dialog box is waiting for a response, the program may not be
able to stop automatically.
Remove your device from the cradle, remove the SD card (if inserted), and reset your device.
ROM(32MB NAND Flash out of 64MB)
This uses nonvolatile memory; that is, it will not be erased if your device loses power. In other
words, ROM is composed of 32MB NOR memory and 32MB File Store(NAND Flash). The
system codes and applications, including Inbox, Tasks, Calendar and Contacts, etc., are
installed on the NOR memory so that you cannot erase or install those applications. However,
the phone program is installed on the File Store(NAND Flash) and you can use the rest
memory of the File Store(NAND Flash) to store your most important files or as a location for
your backup file.
However, when you erase the Cyberbank and CallNotes folder of the File Store memory, you
have to upgrade your device. Maybe you will find memory that is less than 32MB of File Store
because some memory is used on system.
Wkh#Iloh#Vwruh#dsshduv#xqghu#wkh#P|#Ghylfh#iroghu#ri#|rxu#ghylfh1#Ilohv#vwruhg#
lq#wkh#Iloh#Vwruh#duh#qrw#lqfoxghg#zkhq#|rx#edfn#xs#|rxu#ilohv#xvlqj#DfwlyhV|qf#
ru#wkh#
s
rfnhw#edfnx
s
#d
ss
olfdwlrq1

G|˅GtG G YTYW
For more information on backing up your device to the File Store(NAND Flash), see “Backing
Up and Restoring Data” in chapter 4.
SD Memory Cards
SD memory cards are small, removable flash storage cards that enable you to expand the
memory of your device. You can use SD memory cards for backup storage, archives, or to
transfer large files to other devices. SD cards can be purchased from a variety of third-party
vendors. Make sure that the mini SD card is oriented as shown below.
G
G
G
G
G
Wkh#Iloh#Vwruh#lv#qrq0yrodwloh#phpru|#vr#wkdw#lw#zloo#qrw#eh#hudvhg#diwhu#
shuiruplqj#kdug0uhvhwwlqj1#Krzhyhu/#zkhq#|rx#plvwdnhqo|#hudvh#wkh#vxe0
iroghu#ri#|rxu#Iloh#Vwruh#iroghu#zkhuh#wkh#vrph#surjudpv#duh#lqvwdoohg#iurp#
|rxu#Frpsdqlrq#FG/#|rx#kdyh#wr#uh0lqvwdoo#wkhp#iurp#Frpsdqlrq#FG1#

GChapter 3 Pocket PC Overview 3-1
ඝ In this chapter you have several options for entering new information:
-Block Recognizer
-Keyboard
-Letter Recognizer
- Phone Dialer
-Transcriber
Chapter 3
Using Input Panel
GUser’s Manual 3-2
Using the Input Panel
G
Use the Input panel to enter information in any program on your device. You can write
using keyboard, Block Recognizer, Letter Recognizer, or Transcriber. In any case, the
characters appear as typed text on the screen.
To show or hide the Input panel, tap the Input panel button. Tap the arrow next to the
Input Panel button to see your choice.
G
G
G
G
G
G
G
G
G
G
G
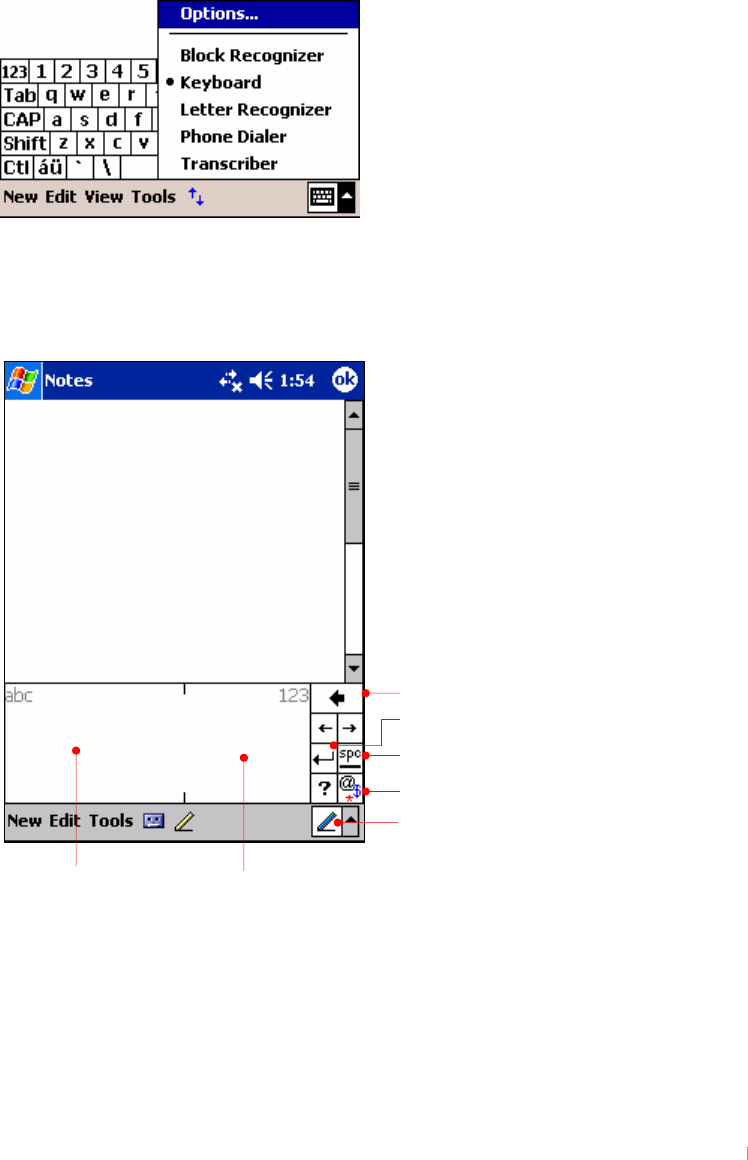
Block Recognizer
ඝ Using Block Recognizer
1. Tap the arrow next to the Input panel button, and then tap Block Recognizer.
2. Write a letter in the box.
When you write a letter, it is converted to typed text that appears on the screen. For
specific instructions on using Block Recognizer, open Block Recognizer, and then
tap the question mark next to the writing area.
Punctuation & symbol
S
p
ace
English entry area Number entry area
Return
Back space
Input Panel for Block Recognizer
GChapter 3 Pocket PC Overview 3-3
Keyboard
G
G
G
G
G
G
G
G
G
G
G
G
G
G
G
G
G
G
G
G
G
G
G
ඝ To type with the soft keyboard
1. Tap the arrow next to the Input panel button, and then tap Keyboard.
2. On the keyboard that is displayed, tap the keys with your stylus.
G
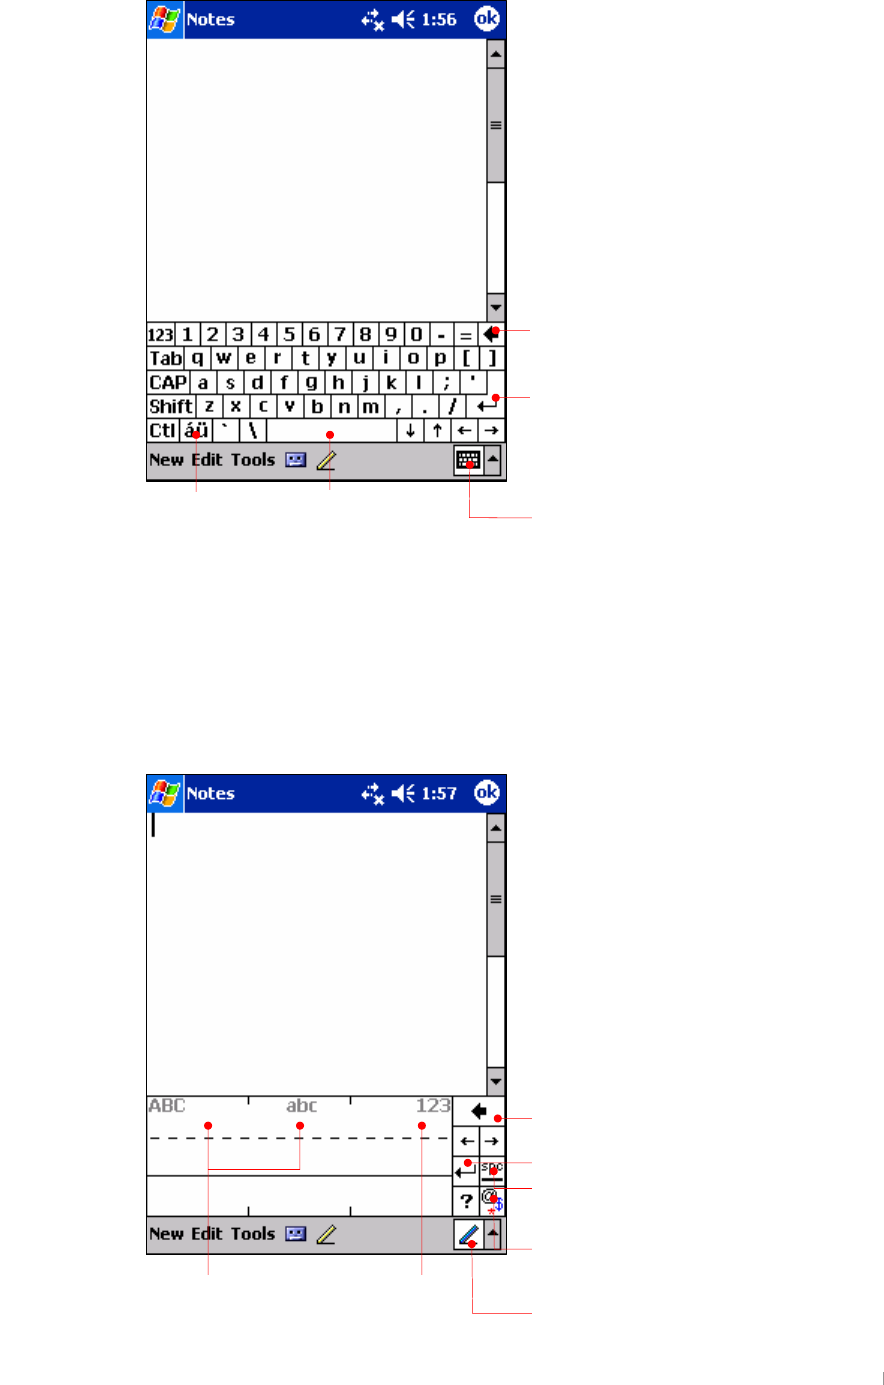
Letter Recognizer
G
G
G
G
G
G
G
G
G
G
G
G
G
G
G
G
G
G
G
G
G
G
G
Back space
Return
Space Input Panel for Keyboard
Back space
Return
Space
Punctuation & symbol entry
Number entry areaEnglish upper/lower case entry area
Input Panel for Letter Recognizer
Punctuation entry
GUser’s Manual 3-4
ඝ Using Letter Recognizer
1. Tap the arrow next to the Input panel button, and then tap Letter Recognizer.
2. Write a letter in the box.
When you write a letter, it is converted to typed text that appears on the screen. For
specific instructions on using Letter Recognizer, open Letter Recognizer and then
tap the question mark next to the writing area.
G
G
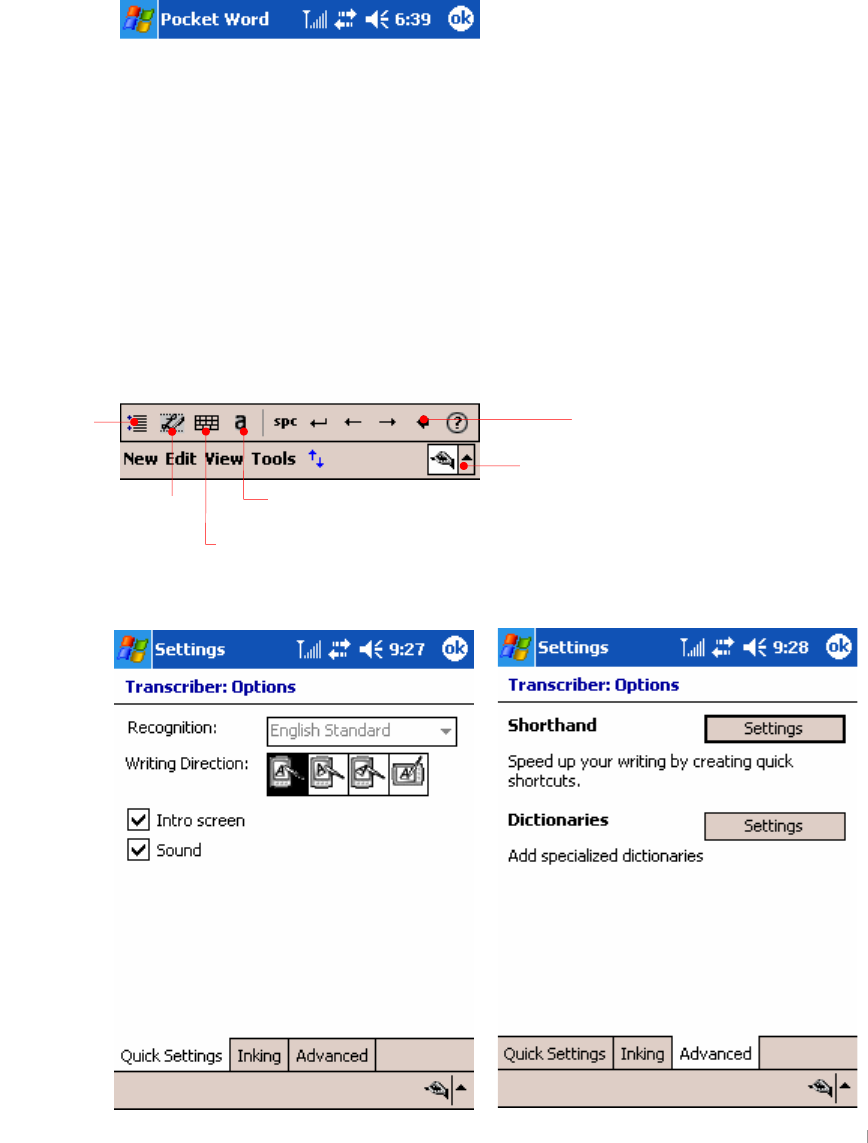
Transcriber
Tap the Settings button to have the next window displayed.
Tap here to select Transcriber
backs
p
ace
Letter shapes
Settings
Display the current mode.
Mini keyboard.
GChapter 3 Pocket PC Overview 3-5
Tap the button to refer to how to make strokes.
G
G
G
G
G
G
G
G
G
G
G
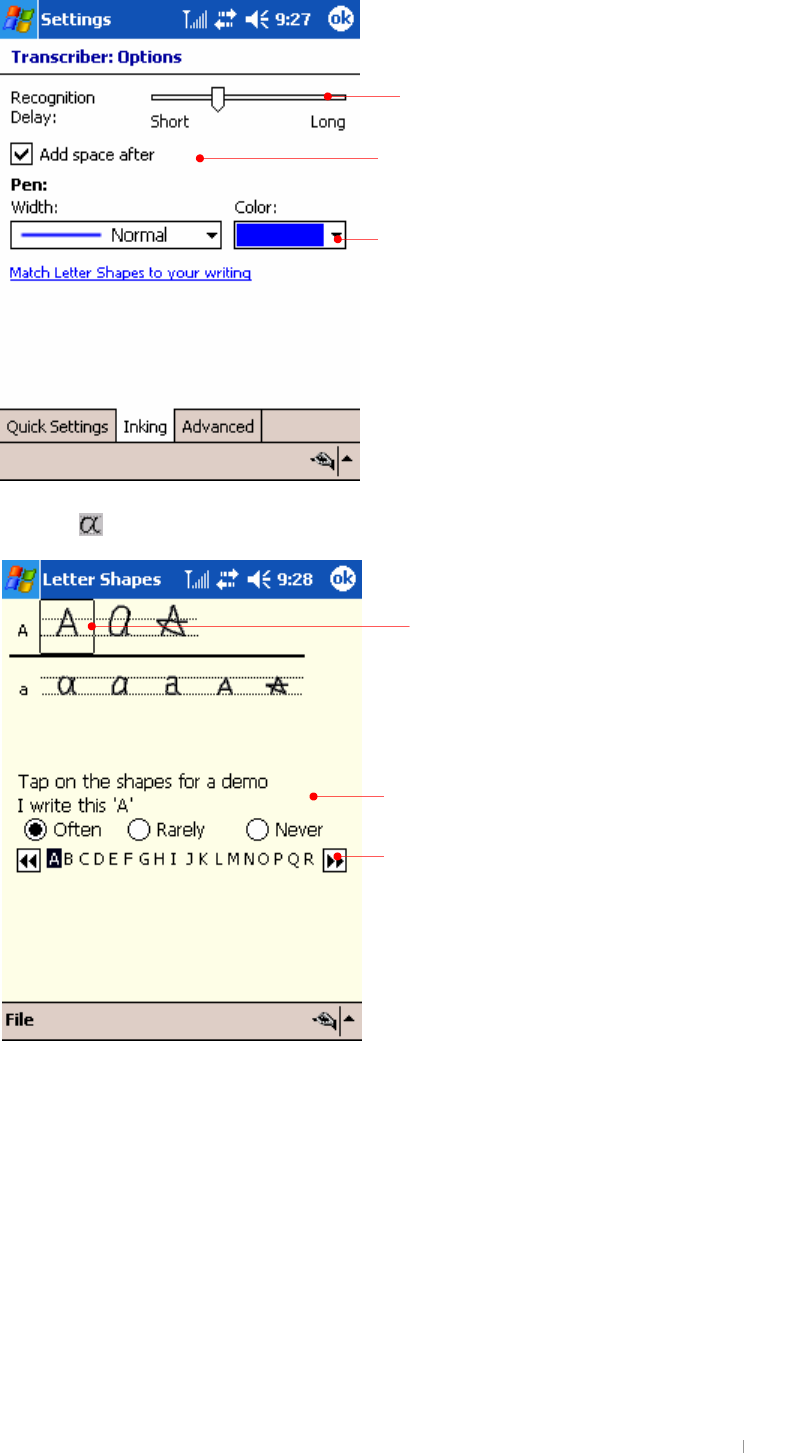
G
Select the width of pen and see
sample displayed below
Add space after entry
Move the slide to right/left side to select speed
and quality.
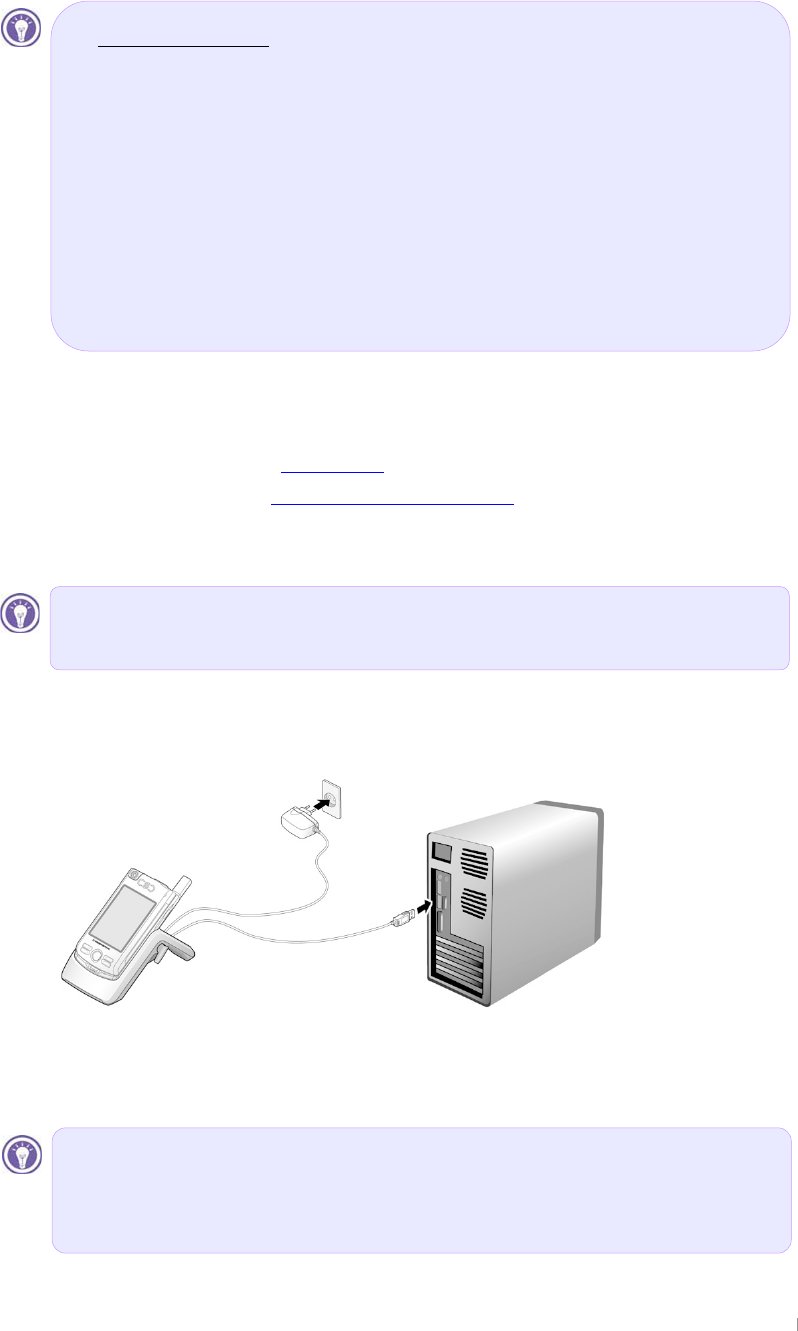
Selected character
Select one of 3 options according to how often you use
the selected shape.
Tap these arrows to see more choices.

GUser’s Manual 3-6
G
{GGGMGGGGGGGGGU
With Transcriber you can write anywhere on the screen using the stylus just as you
would on paper. Unlike Letter Recognizer and Block Recognizer, you can write a
sentence or more of information; then, you pause and let Transcriber change the written
characters to typed characters.
ඝ To type with Transcriber
1. Tap the arrow next to the Input panel button, and then tap Transcriber.
2. Write anywhere on the screen.
For specific instructions on using Transcriber, open Transcriber and then tap the
question mark in the lower-right corner of the screen.

GChapter 4 Connecting to Desktop PC 4-1
To get the most from your device, you will want to connect to your desktop or notebook
PC. This chapter describes how to establish the connection between your device and
your desktop PC, and how to synchronize and transfer files between your device and
your desktop (or any PC that has Microsoft ActiveSync installed).
G wGwjGYWWYG G wGwjGYWWZG G
hzGZU^UXG ̺G ̺G
hzGZU]G
̺G
G
hzGZU\G
̺G
G
iGwGwjGYWWZGGGGGGSGGGGGhzGZU^UXG
GGGGGhzGZU]GGhzGZU\UG
ඝ In this chapter, you will learn the followings :
- Install Microsoft ActiveSync and establish a partnership
- Full Backup & Restore using Backup/Restore of ActiveSync
- How to install programs using ActiveSync
- Connecting to Device
Chapter 4
Connecting to Desktop
GUser’s Manual 4-2
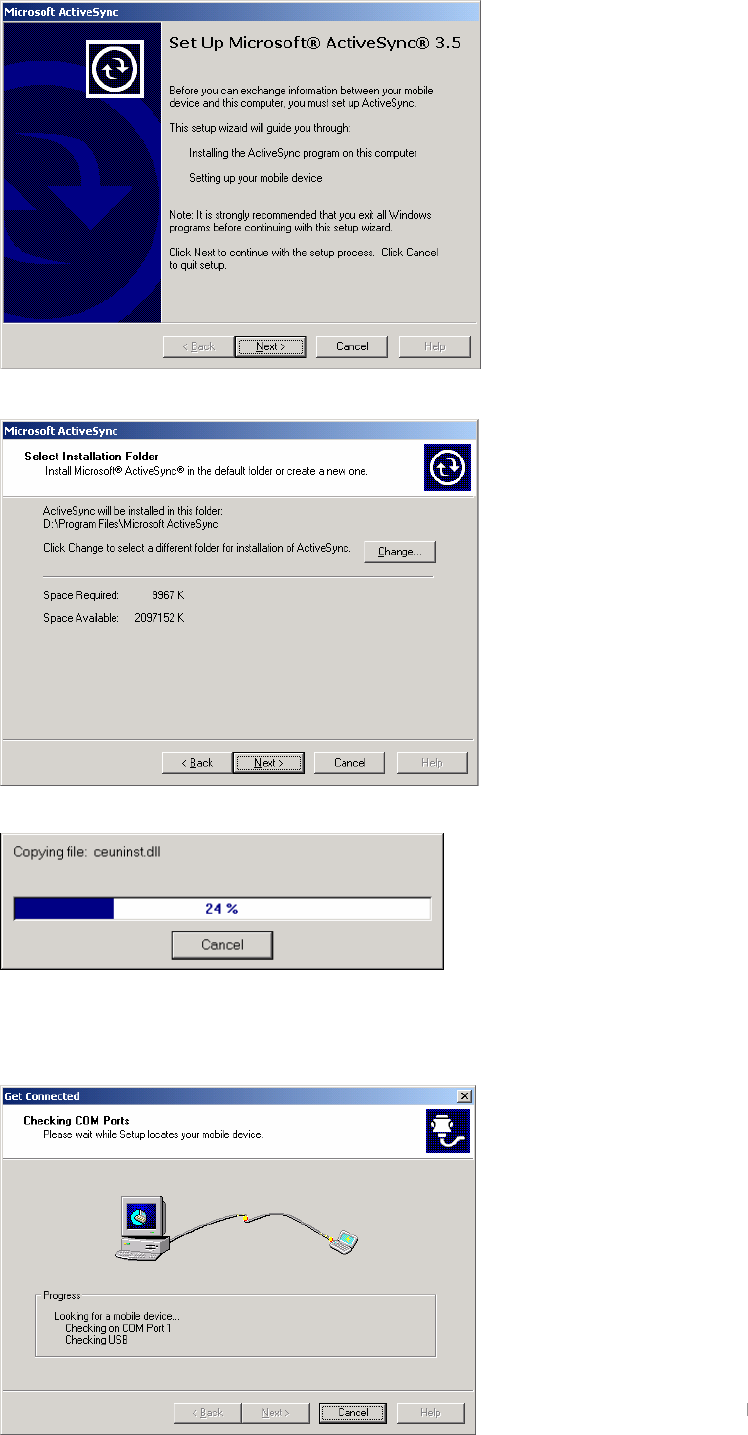
Install Microsoft ActiveSync and establish a partnership
=bghU``A]WfcgcZh5Wh]jYGmbW
G
G
G
G
G
G
G
G
G
G
G
G
GGGhzGZU^UXGGGGGaG
z
jGjkG
z
jGGGUUUG
z
tGGGUUVVG
hzGZU^UXGGGGGzUGGGjkSGGhzGZU^UXGGGGG
tzhzujUllGGGGGGGUG
G
G
G
{GGGSGGGGGG|ziGGGGGGGGG
GUG
G
G
G
G
G
G
G
G
G
G
pGGjGjkGGjkTyvtGGGGGUG G
mGGGGGjGjkSGGGzGGeGpGtGhzGZU^UXUG
G
G
G
G
G
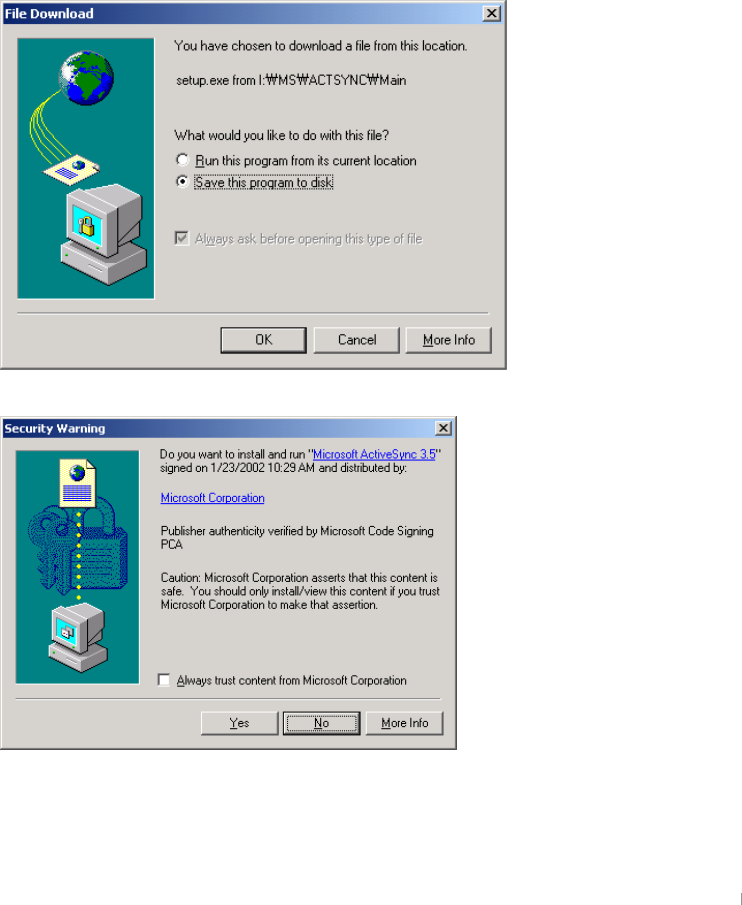
Rq#ghvnwrs#frpsxwhu/#zlwkrxw#Dxwruxq#hqdeohg/#Plfurvriw#DfwlyhV|qf#vhwxs#fdq#eh#
odxqfkhg#e|#vxlqj#wkh#uxq#frppdqg1#Folfn#rq#Vwduw/#dqg#wkhq#Uxq1#Lq#wkh#wh{w#gldorj#
er{/#hqwhu#wkh#sdwk#iru#wkh#vhwxs#iloh1#W|slfdoo|/#|rx#zrxog#w|sh#[=䭱Vhwxs1h{h/#zkhuh#[#
lv#wkh#ohwwhu#iru#|rxu#FG0URP#gulyh1#
#
zGyG
z
~GYWWWGUG
z
tGvGYWWYGUG
z
vGYWWWGUG
z
tGpG[UWXGzwXGGGUG
z
XYG¥G]\GtiGGGGG G
z
`GGY\TGGSGpkhGGG|ziO|GzGiPGG G
z
jkTyvtGG
z
}nhGGGGY\]GGGGG
z
rGMGtG
This is an explanation on how to install ActiveSync 3.7.1, based on Windows 2000
Professional, so you may have a little bit different screen on the different OS versions from
below.
GChapter 4 Connecting to Desktop PC 4-3
To get the most from your device, you have to connect to your desktop or notebook PC.
Microsoft ActiveSync enables you to synchronize the information on your desktop PC
with the information on your device. In addition, you can back up data from your device
to your desktop PC and restore this data to your device, and copy files between your
device and desktop PC. Before you begin synchronization, install ActiveSync on your
desktop PC from the provided Companion CD. ActiveSync is already installed on your
device.
First of all, insert Companion CD into the CD-ROM of your desktop PC and the CD-ROM
will begin automatically. Then, select Start and select Install ActiveSync 3.7.1. Just follow
the Installation Wizard that automatically begins to install ActiveSync 3.7.1.
After installation is complete, the ActiveSync Setup Wizard helps you connect your
device to your desktop PC, establish a partnership so you can synchronize information
between your device and your desktop computer, and customize your synchronization
settings.
This is an explanation on how to install ActiveSync 3.7.1, based on Windows 2000
Professional, so you may have a little bit different screen on the different OS versions
from below.
Select Run this program from its current location to install without saving.
GUser’s Manual 4-4
Click Yes to move to the next screen.
Click Next.
Click Next.
When the process becomes 100%, automatically it will go to the next screen.
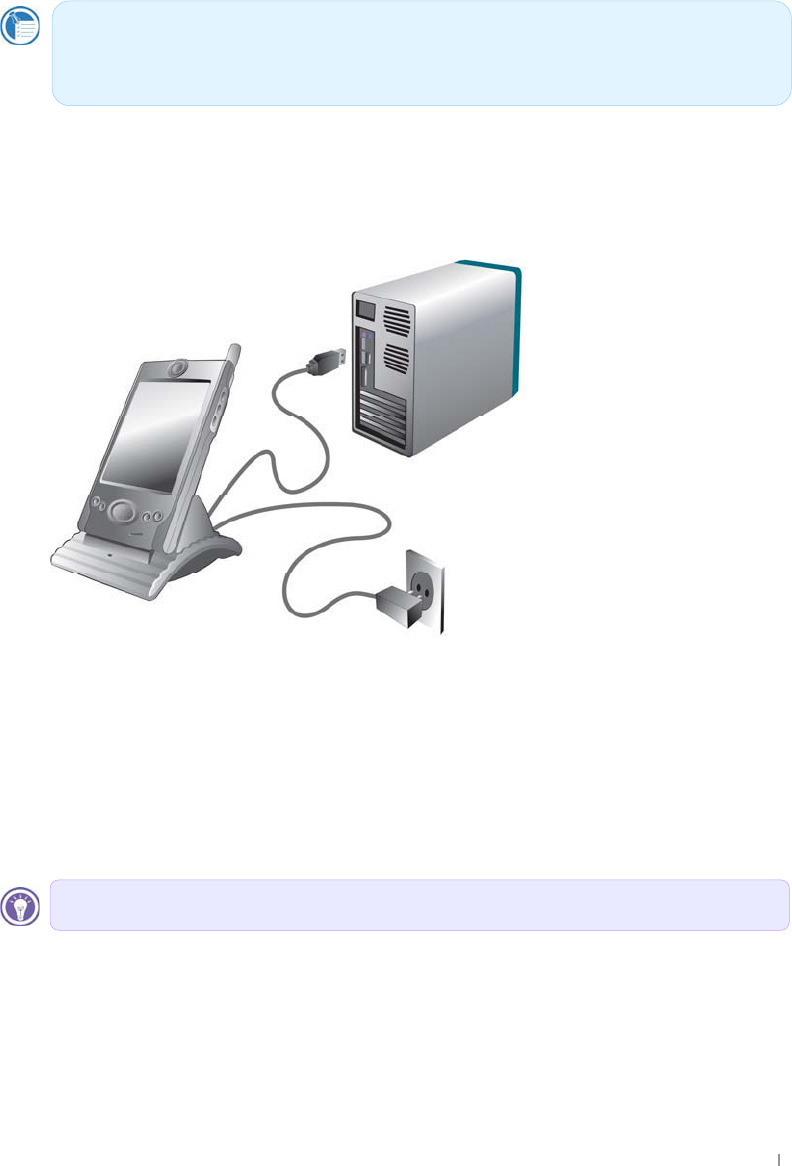
Connect USB port to desktop PC and the power cable to cradle. Then seat your device
into USB cradle.

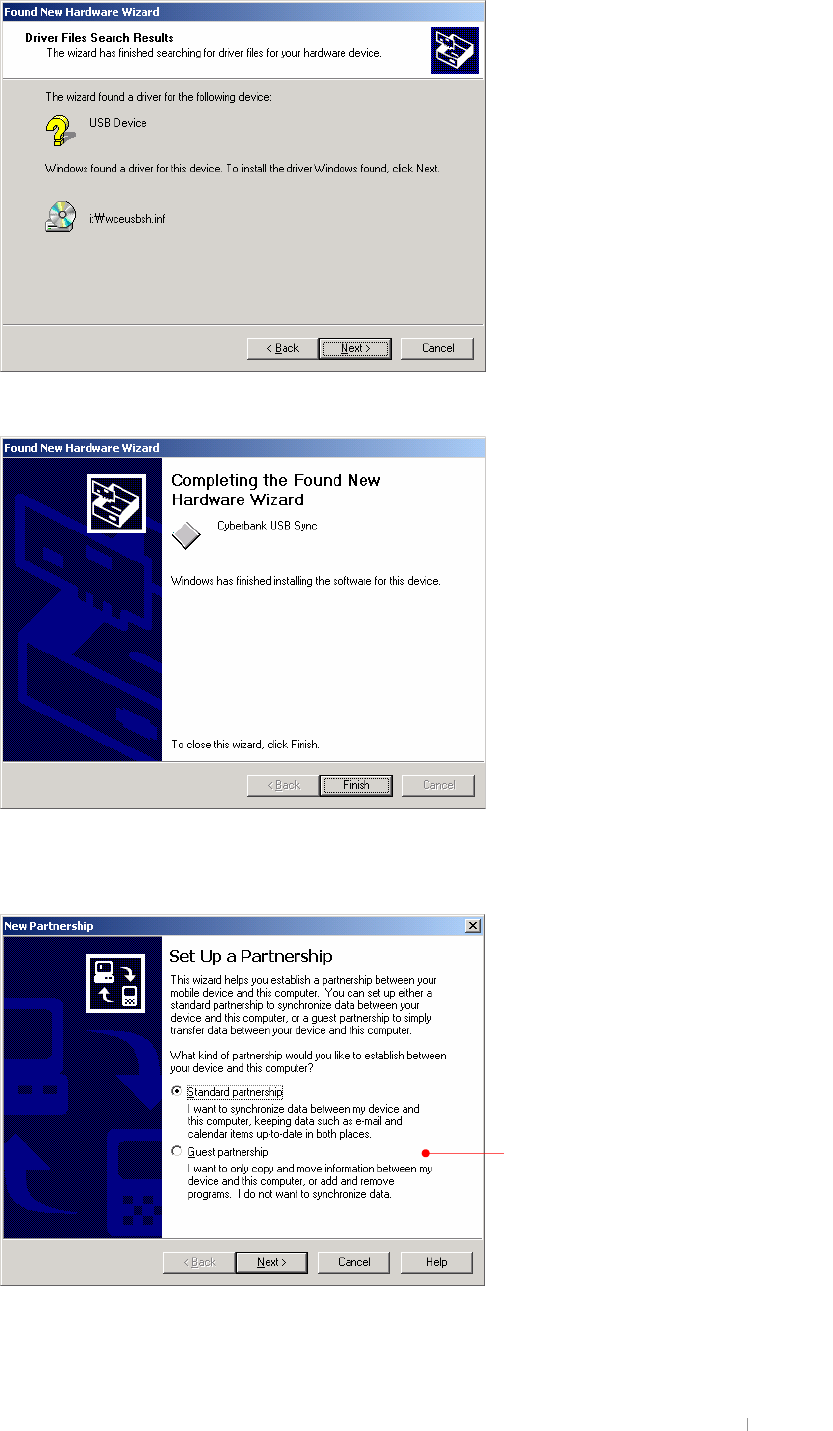
GChapter 4 Connecting to Desktop PC 4-5
A wizard of finding a new hardware will begin automatically as below.
Click Next.
Click Next.
Select CD-ROM drive and click Next.
GUser’s Manual 4-6
Click Next.
Click Finish and automatically the synchronization process will begin. And then the
following processes will appear on your desktop PC.
Instead of synchronizing, you may set up your device as guest. Even though a guest,
you may transfer files and data between your device and your desktop PC.
When you perform hard reset or re-establish a new partnership after deleting the existing
Now you are ready to synchronise
between your device and the desktop PC.
It may take a while for synchronisation to
finish. When set up as a Guest, you can
find files by pressing the Explore button
on the Toolbar.
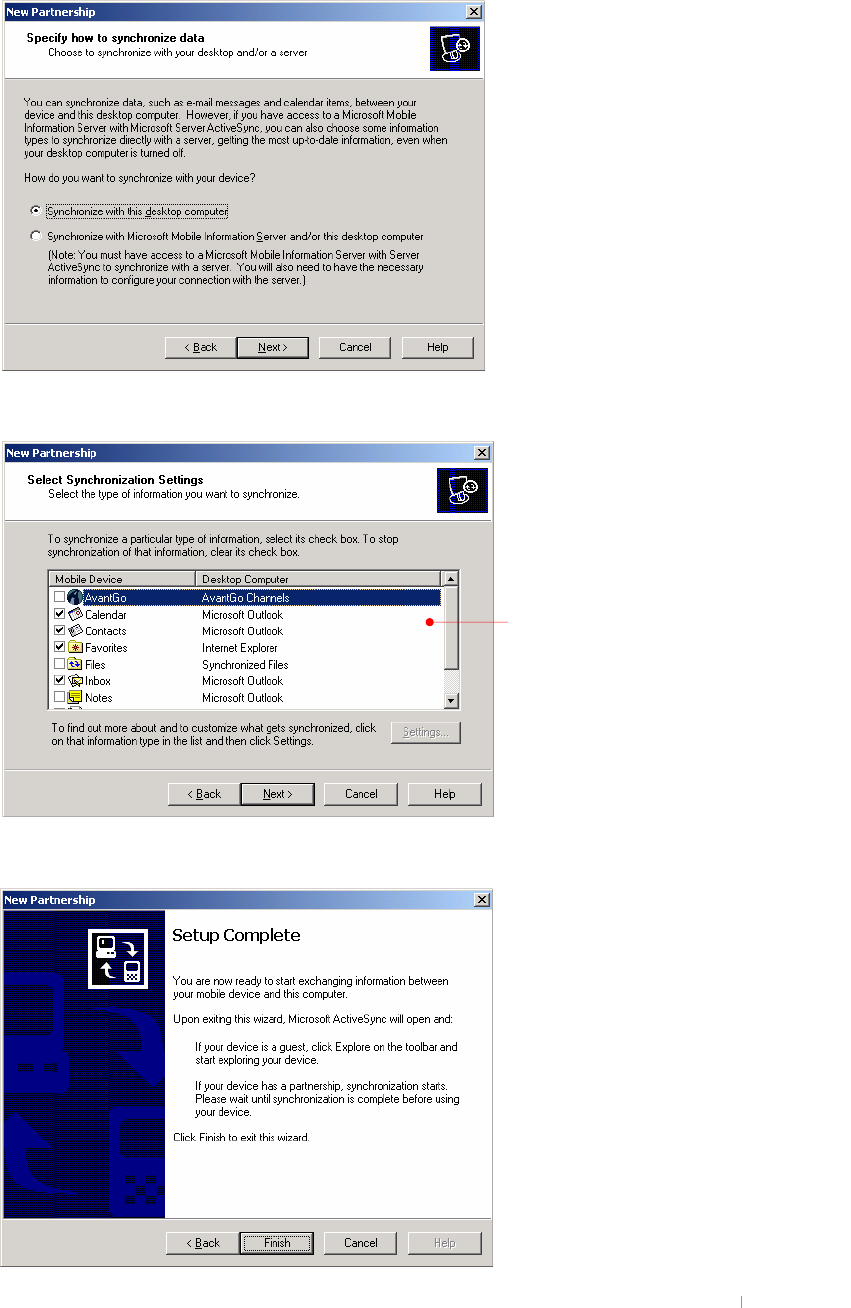
GChapter 4 Connecting to Desktop PC 4-7
partnership, you can select one of the options.
A desktop PC can establish partnerships with several devices while one device can
establish partnerships with up to two desktop PCs. However, you cannot synchronize
two devices with one desktop PC at the same time.
Click Next.
Click Next.
Select any items you want to synchronize
and otherwise, deselect the others.
GUser’s Manual 4-8
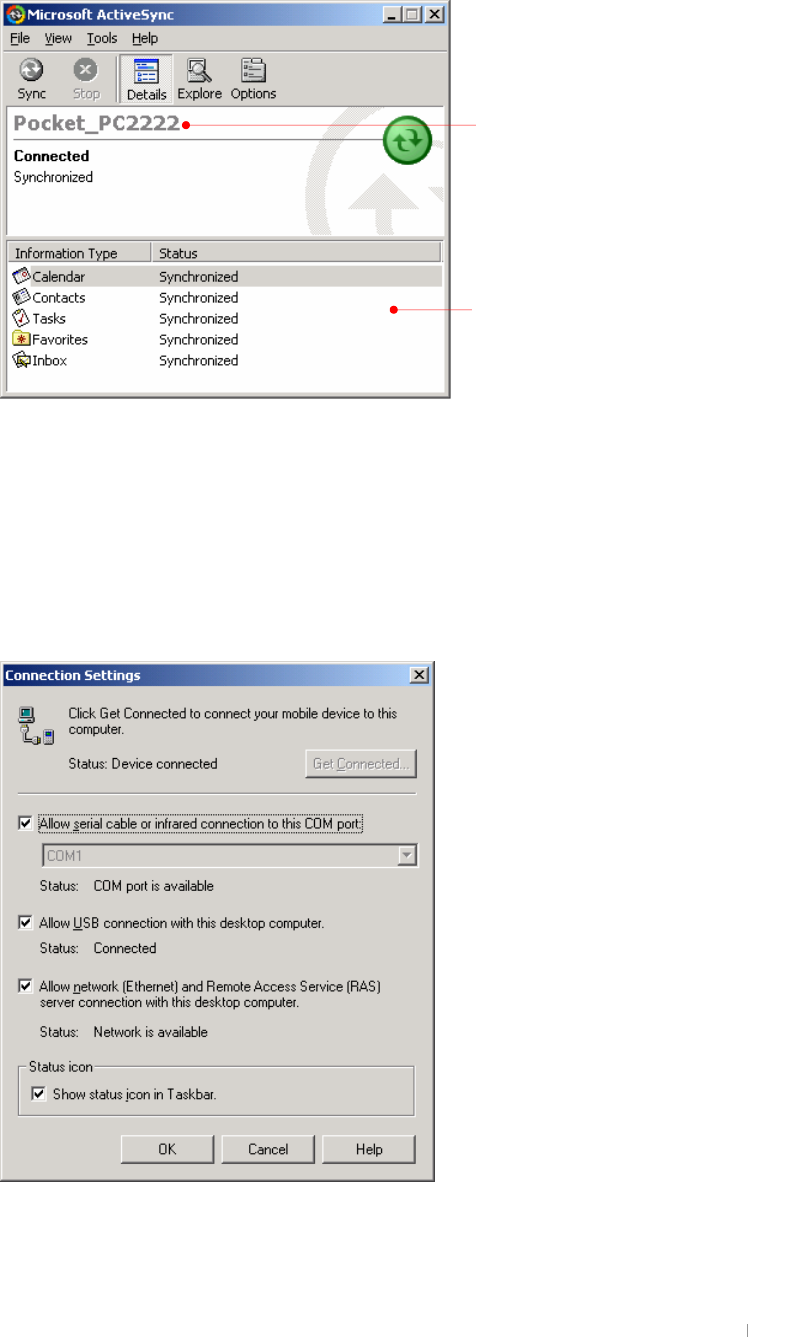
Click Finish. Now, you are ready to establish a new partnership.
You will have the Microsoft ActiveSync screen as shown below.
When you perform hard reset on your device, you need to change the partnership name
that is preset as Pocket_PC. (for example : Pocket_PC1, Pocket_PC2, Pocket_PC3,
Pocket_PC4)
When you have some difficulties synchronizing your device with your desktop PC, click
the Connection Settings on the File menu to have the Connection Settings screen
displayed as below.
This is the partnership name that is
established with your desktop PC through
ActiveS
y
nc.
These are the items you have selected for
synchronizing with desktop PC.
GChapter 4 Connecting to Desktop PC 4-9
Synchronizing Data
Synchronization compares the data on your device with your desktop PC and updates both
computers with the most recent information. For example, you can synchronize Microsoft
Word and Microsoft Excel files between your device and desktop PC. Your files are
automatically converted to the correct format. And you can synchronize e-mail messages in
Inbox on your device with e-mail messages in Microsoft Outlook on your desktop PC. And
you can keep your Pocket Outlook Contacts, Calendar, and Tasks databases up-to-dated by
synchronizing your device with Microsoft Outlook data on your desktop PC. Use the
ActiveSync options to select which information should be synchronized and to control how
much data is synchronized. By default, ActiveSync does not automatically synchronize all
types of information.
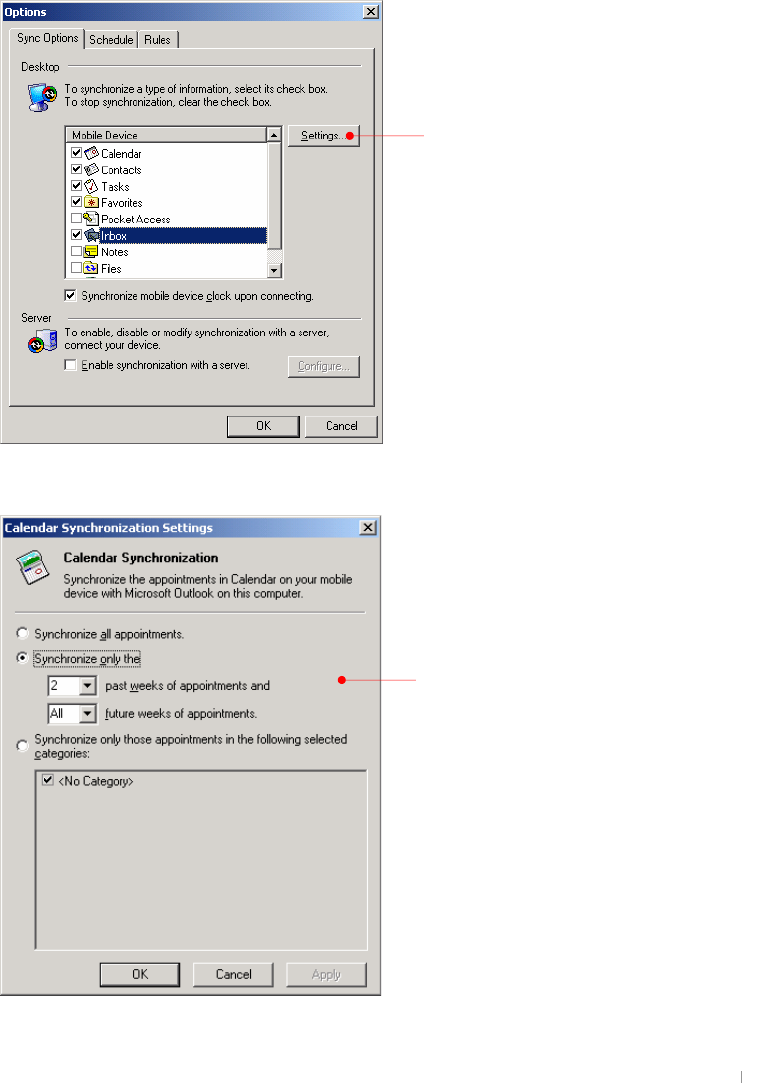
Select Calendar and click the Settings button.
Tap Settings to customize the selected
item.
Select any option you want to customize
Pocket Calendar during the synchronizations.
GUser’s Manual 4-10
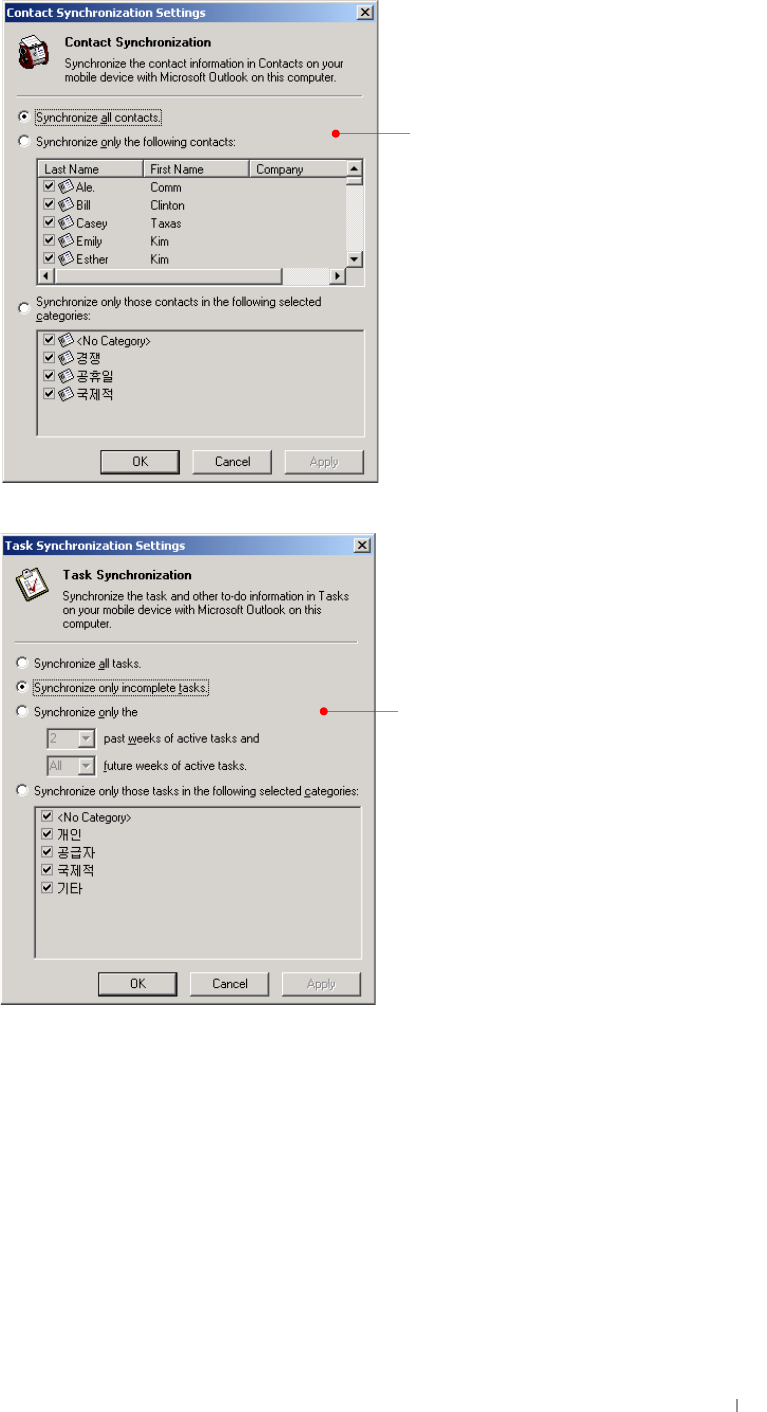
Select Contacts and click the Settings button.
Select Tasks and click the Settings button.
Select any option you want to customize
Pocket Contacts during the synchronizations.
Select any option you want to customize
Pocket Tasks during the synchronizations.
GChapter 4 Connecting to Desktop PC 4-11
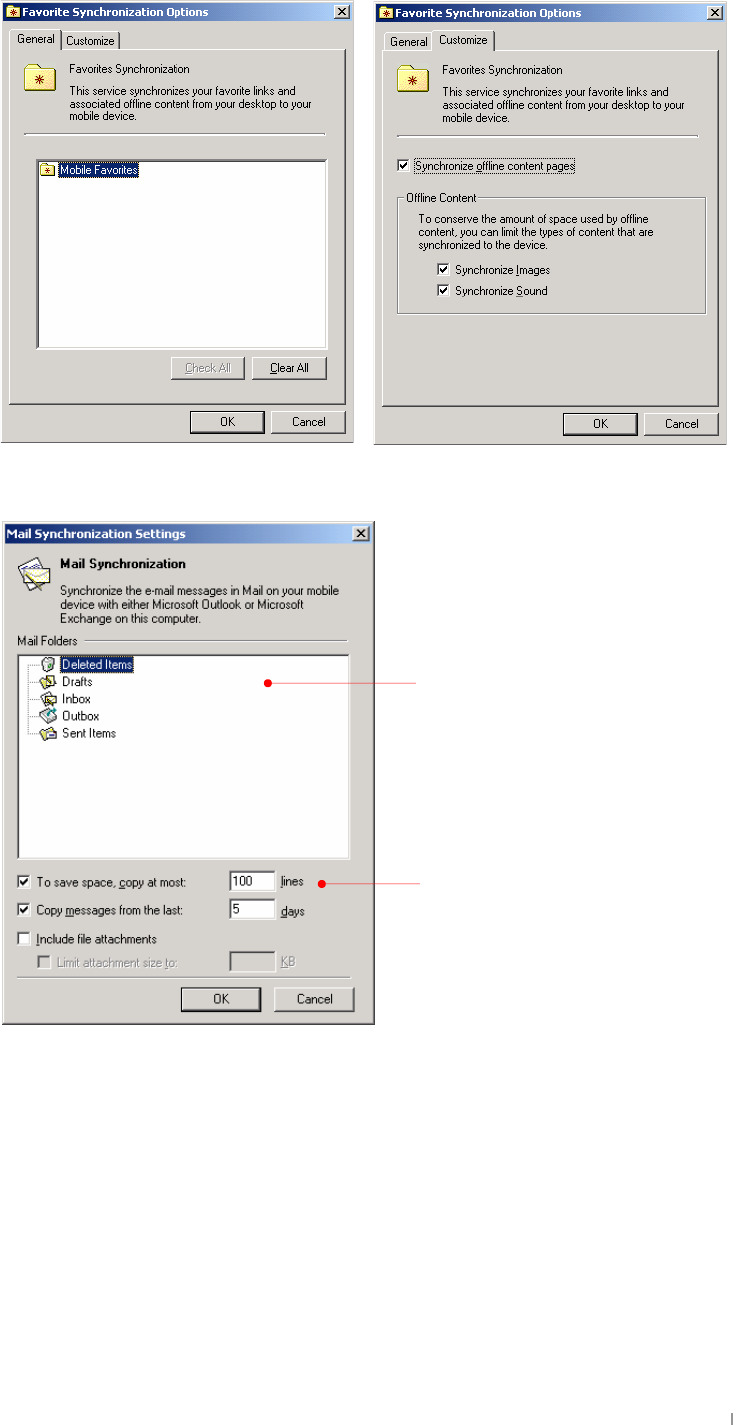
Select Favorites and click the Settings button.
Select Inbox and click the Settings button.
You have to select the folder you have
made to be synchronized in the Inbox
program.
In this example, while synchronizing, it is
set as copy at most 100 lines to save
space, copy messages from the last 5
days.
GUser’s Manual 4-12
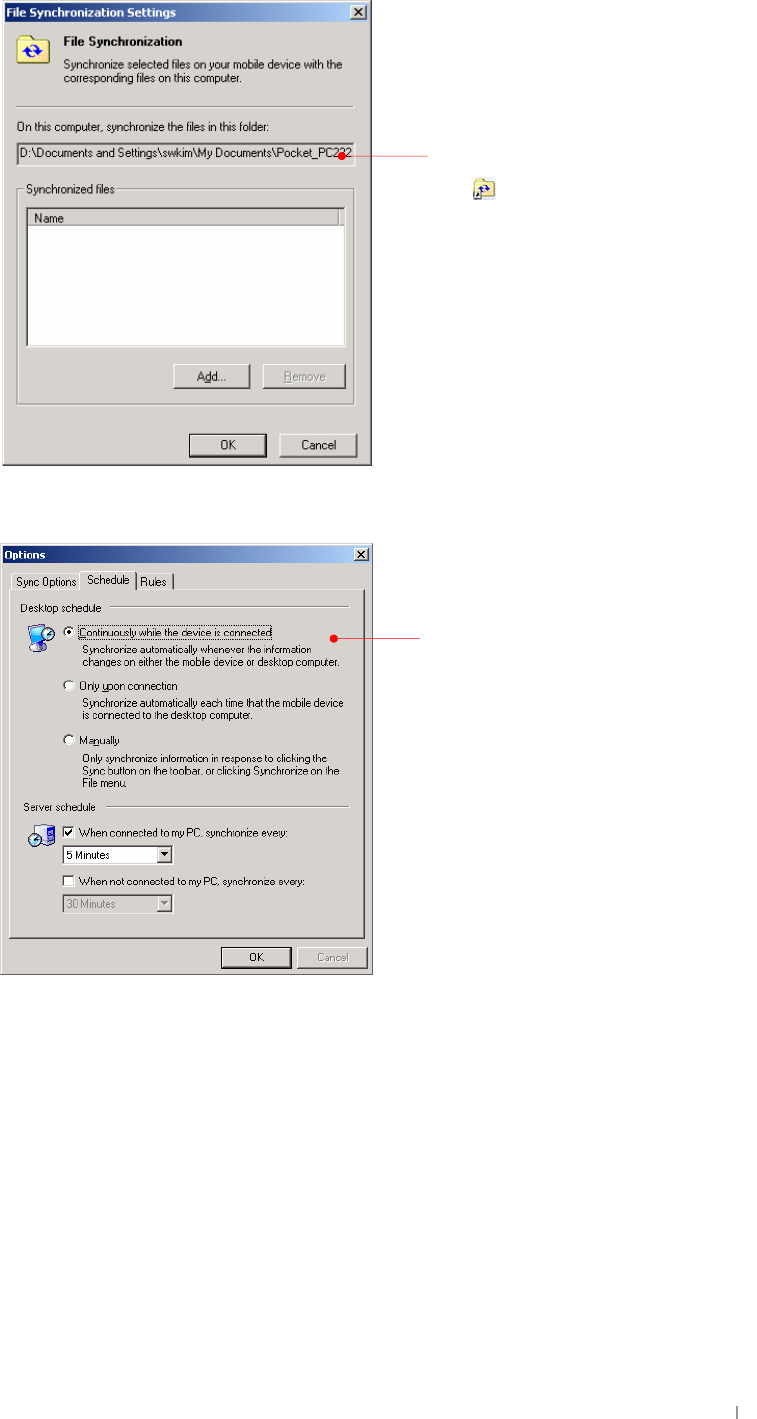
Select Files and click the Settings button.
After you customized ActiveSync and completed the first synchronization, you can control
when synchronization occurs by selecting a synchronization mode.
Select one of the 3 options: continuously
while the device is connected, only upon
connection and manuall
y
.
This is the folder that includes the file
synchronized with your desktop PC. You
will find the Shortcut to the Files
icon( )on your desktop PC.
GChapter 4 Connecting to Desktop PC 4-13
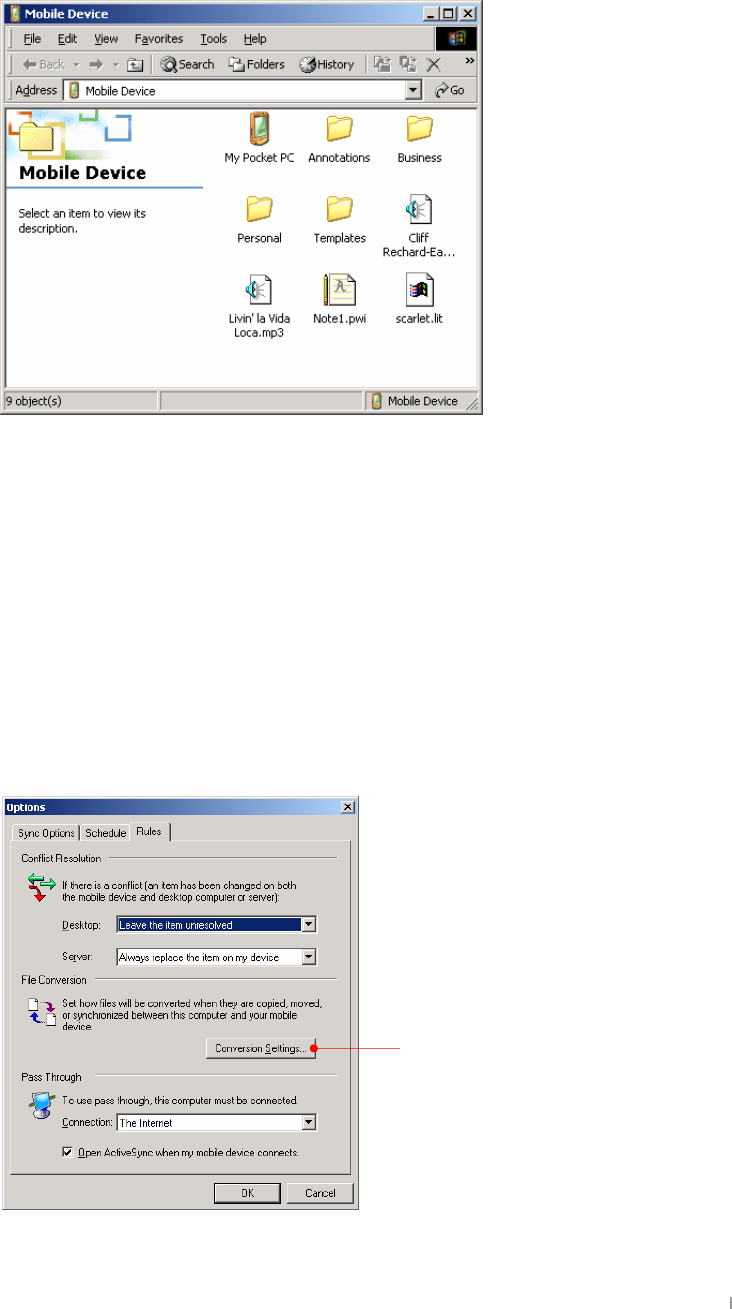
Copy, Paste and transfer files
Select the file(s) you want to copy and select Copy on the Edit menu or select Copy on the
pop-up menu. For pasting file(s), select the Explore button on the Microsoft ActiveSync
screen of your desktop PC to have the Mobile Device screen displayed as below :
First, select the folder you want to paste and select Paste on the Edit menu or select Paste
on the pop-up menu.
However, when you transfer file(s) between desktop PC and your device, files created on
your desktop PC may automatically need to be converted before you can use them on your
device, and also files created on your device may automatically need to be converted before
you can use them on your desktop PC. However, when you work with software such as
ClearVue Presentations or ClearVue Image, files should not be converted to the different
format. In other words, those software use the format identical to the corresponding
software of your desktop PC. That’s why we need to change the settings of converting
file format when files don’t need to be converted before you can use them on your
device.
You can change the settings as follows :
Tap the Conversion Settings to change
the options for conversion between
desktop PC and your device while
copying, pasting and synchronizing.

GUser’s Manual 4-14
Select Conversion Settings.
Deselect this option box not to change the
file format.
GChapter 4 Connecting to Desktop PC 4-15
Full Backup & Restore using Backup/Restore of ActiveSync
You can back up files, database, PIM data and programs installed in RAM to your
desktop PC using Microsoft ActiveSync, and restore them when needed.
Backup can either be performed automatically when your device is connected to your
desktop PC, or manually whenever needed. Also, you can back up updated or new data
only or choose to back up all data.
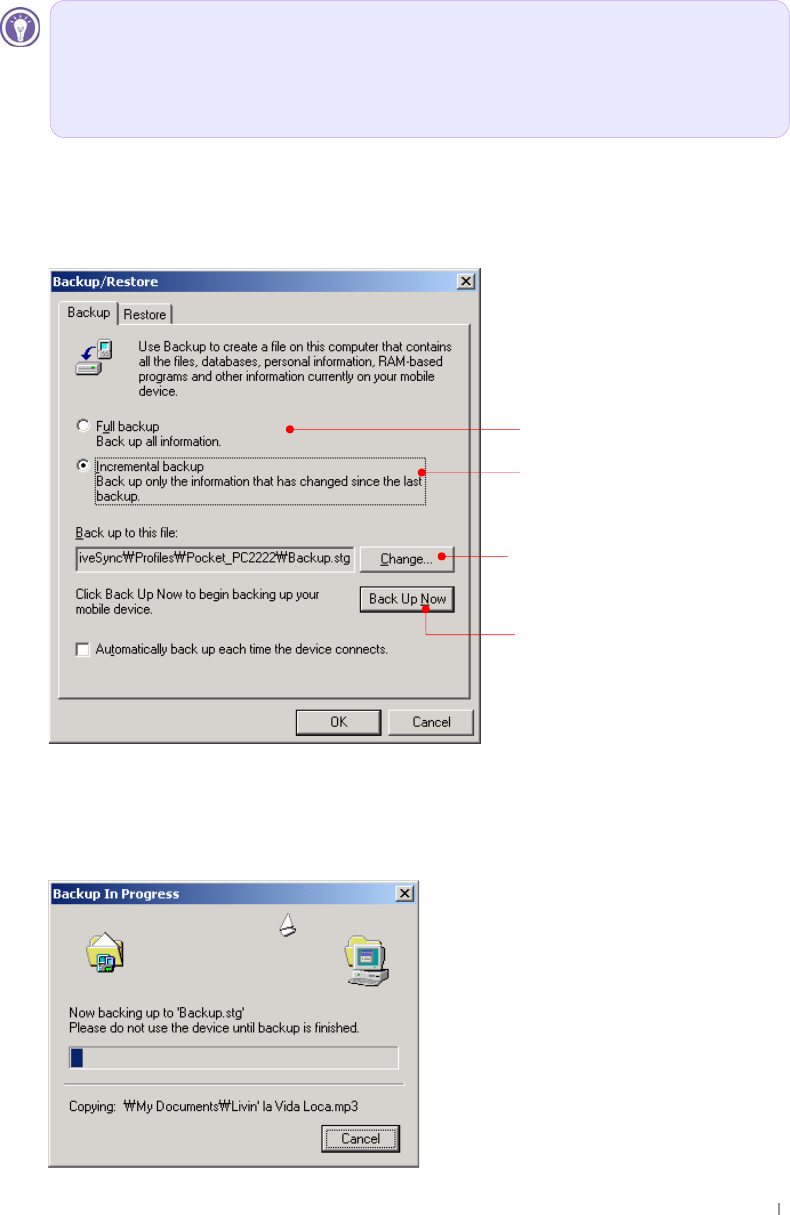
Backup
1. Connect your device to desktop PC.
2. Tap Backup/Restore on the Tools menu of the ActiveSync screen.
3. Select “Full backup” or “Incremental backup” according to your needs.
4. You may need the backup file name and the folder when restoring your backup file.
Tap the Change button to confirm the folder.
5. Tap the Back Up Now button to begin.
Tap Back Up Now to begin.
Tap Change to change backup
name.
Full backup
Incremental backup.
Automatic backup is only possible when a Partnership is established with a
desktop PC. Only a manual backup is possible when the partnership is
established as Guest. For more information on Backup/Restoring to and from a
desktop PC, see Microsoft ActiveSync Help.
GUser’s Manual 4-16
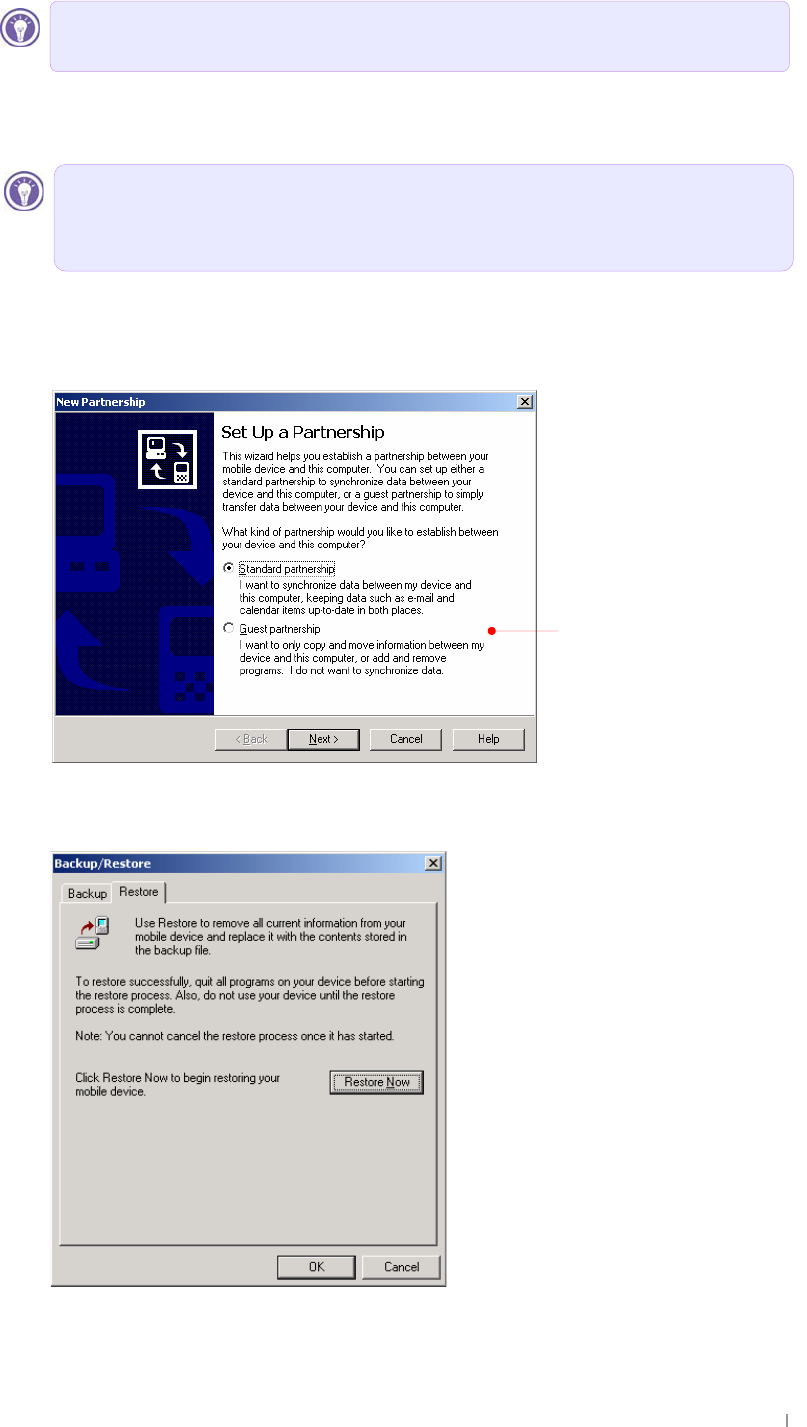
Restore
1. Connect your device to desktop PC.
2. Close all programs running on your device.
3. Establish a partnership as Guest.
4. Tap Backup/Restore on the Tools menu of the ActiveSync screen, and select the
Restore tab.
Do not remove your device from the cradle or disconnect the USB cable during
backup.
As newly installed programs or new files created on your device since your last
backup will be lost after restore, you should move them to your desktop PC or to
File Store (NAND Flash memory) before you restore data.
Select this options box to set
up your device as guest.
GChapter 4 Connecting to Desktop PC 4-17
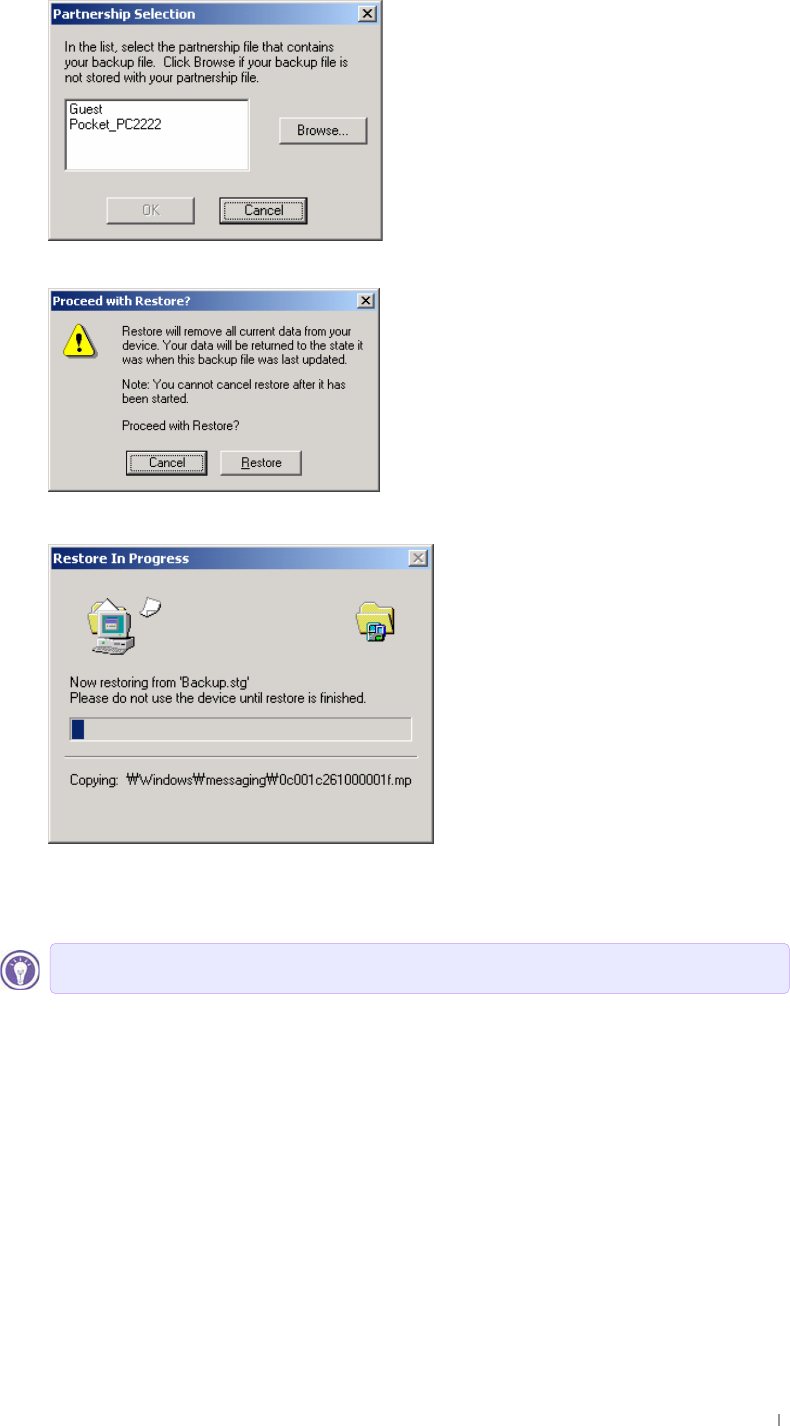
5. Tap the Restore Now button.
6. Select the backup file you want to restore and select OK to begin.
7. Click Restore to begin the restore process.
8. When completed, perform soft Reset on your device with your stylus and seat your
device on your cradle to synchronize.
Gr#qrw#xvh#|rxu#ghylfh#xqwlo#Uhvwruh#lv#frpsohwhg1#

GUser’s Manual 4-18
How to install programs using ActiveSync
Using Setup.exe or Install.exe
1. Download the program to your desktop computer (or insert the CD or disk that
contains the program into your desktop computer).
2. Connect your device to your desktop PC.
3. If the program includes an installer program (typically named Setup.exe or Install.exe),
double-click the installer program on the desktop PC. The installer program copies the
necessary files to your device.
Using cabinet (*.cab) file
1. Download the program to your desktop computer (or insert the CD or disk that
contains the program into your desktop computer).
2. Connect your device to your desktop PC.
3. Use the ActiveSync Explore button to copy the cabinet (*.cab) file to the Program Files
folder on your device, and then double-tap the icon on your device to install the program.
4. Refer to the Read Me file or documentation that came with the program to be sure you
have copied the necessary file(s). For more information on copying files using
ActiveSync, see ActiveSync Help.
GChapter 4 Connecting to Desktop PC 4-19
Connecting to Device
Connecting by USB Cradle
Using the USB cradle, you can charge and synchronize your device at the same time
even though the charging circuit is not included on your cradle.
Keep your device in the cradle when you are not carrying it with you, so it is always
charged, synchronized, and ready to go.
Turn off your device or remove it from the cradle before you shut down your desktop PC.
When you remove your device from the cradle, hold the cradle with one hand, and gently lift
your device with the other to avoid putting stress on the connectors.
1. Connect your device to your desktop PC as below:
2. How to use the Infrared port of your device:
The infrared port on your device provides a convenient way to connect to an IrDA-equipped
PC without using a cable or cradle. Many notebook computers have built-in infrared ports;
however, you may need to install and configure an infrared port on a desktop PC. To install
the port, follow the manufacturers instructions.
Before you connect, be sure of the following: your desktop PC is on, you have
installed ActiveSync on your desktop PC, and ActiveSync is configured to allow a
USB connection.
Windows 95 and Windows NT® do not support USB or infrared connectivity.

GChapter 5 Using the Internet & E-mail 5-1
G
G
G
G
G
G
G
G
G
In addition to connecting your device to your desktop PC, you may want to connect to
remote computers so you can access e-mail, browse the Internet, or retrieve files from a
corporate network, whether you are at home or on the road.
ඝTo start the connection, simply open a program that requires a connection to the
Internet. Your device will attempt to connect automatically.
Visit Internet or intranet Web or WAP pages by using Pocket Internet Explorer.
Send and receive e-mail messages by using Inbox. Before you can use Inbox, you
need to provide the information it needs to communicate with the e-mail server.
Send and receive instant messages with MSN Messenger. For more information, see
“MSN Messenger” in chapter 9.
ඝThis chapter describes
browsing the Web using Microsoft Pocket Internet Explorer and Mobile Favorites
sending and receiving e-mail messages
Chapter 5
Using the Internet & E-mail
GUser’s Manual 5-2
Browsing the Web on your device
You have to set up the Internet Settings before you use the Internet Explorer for the first
time. For more information, refer to the Internet Settings section later in Chapter 6.
Once you are connected to an ISP or to a network, you can browse the Internet or a
corporate intranet. You can also use Pocket Internet Explorer to browse Web and WAP
content while you are not connected—by downloading mobile favorites and channels to
your device.
Using Microsoft Pocket Internet Explorer
Use Microsoft Pocket Internet Explorer to view Web pages in either of these ways:
Connect to an ISP or network and browse the Web. To do this, you will need to
create the connection first.
During synchronization with your desktop PC, download mobile favorites that are
stored in the Mobile Favorites subfolder in Internet Explorer on the desktop PC.
While you are connected to an ISP or network, you can also download files and
programs from the Internet or an intranet.
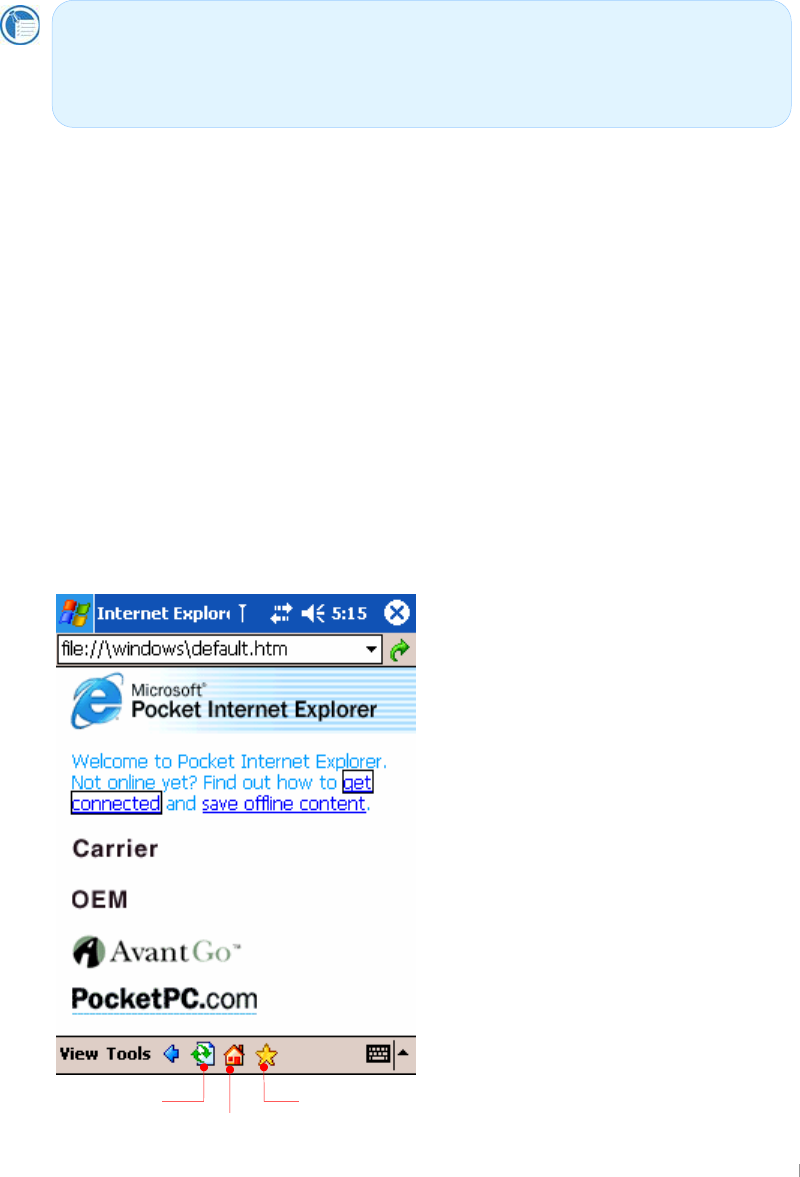
To start Pocket Internet Explorer
1. On the Start menu, tap Internet Explorer.
Mobile Favorites button
Home button
Refresh button
This device cannot be connected to another computer or laptop and used as an
external modem to gain access to the Internet or email.
Access to the Internet is through using the built-in 1xRTT modem in this device.

GChapter 5 Using the Internet & E-mail 5-3
2. On the View menu, tap Address Bar.
3. Enter address you want on the address bar located on the top of screen and tap the
arrow next to the address bar, then it will automatically connect to the Internet using
CDMA module.
4. When the internet connection is completed, the internet connect ( ) icon will
appear on the Navigation bar.
5. When you want to finish using Internet, tap the stop ( ) button on the Command bar
so that you have the Internet browse( ) icon stopped. And also you need to tap X on
the right-upper corner and tap the Internet connect ( ) icon and tab the End button on
the Connected pop-up screen to stop your Internet connection completely.
GUser’s Manual 5-4
Mobile Favorites folder
Only items stored in the Mobile Favorites subfolder in the Favorites folder in Internet
Explorer on your desktop PC will be synchronized with your device. This folder is created
automatically when you install ActiveSync.
You can only view the mobile favorites offline that was synchronized with your desktop
PC. If the page is not synchronized with your desktop PC, it will be dimmed in the
Favorites list of your device. You will need to synchronize with your desktop PC again to
download the page to your device, or connect to the Internet to view the page.
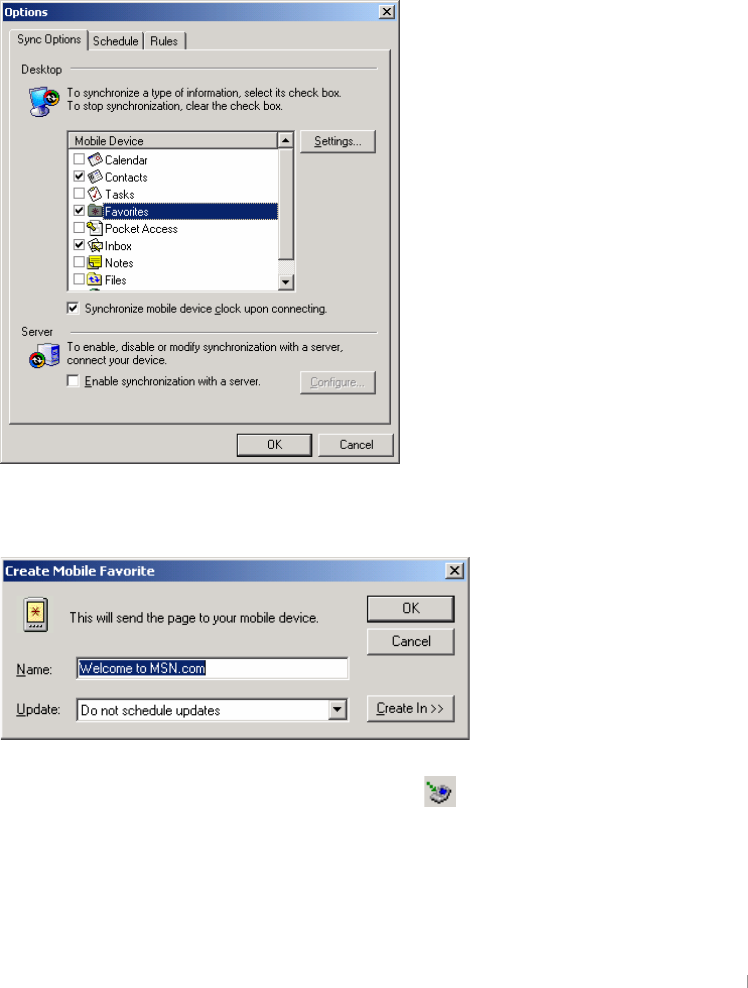
To make Mobile Favorites
1. Select Options on the Tools menu or click the Options button to have the Options
screen displayed. Then select the Favorites check box and click OK.
2. Select Create Mobile Favorites on the Tools menu of Microsoft Internet Explorer of
your desktop PC.
3. When you select OK, the Internet Explorer will download the latest version of the
corresponding page. Then you will find the icon( ) on the task tray bar of your desktop
PC.
GChapter 5 Using the Internet & E-mail 5-5
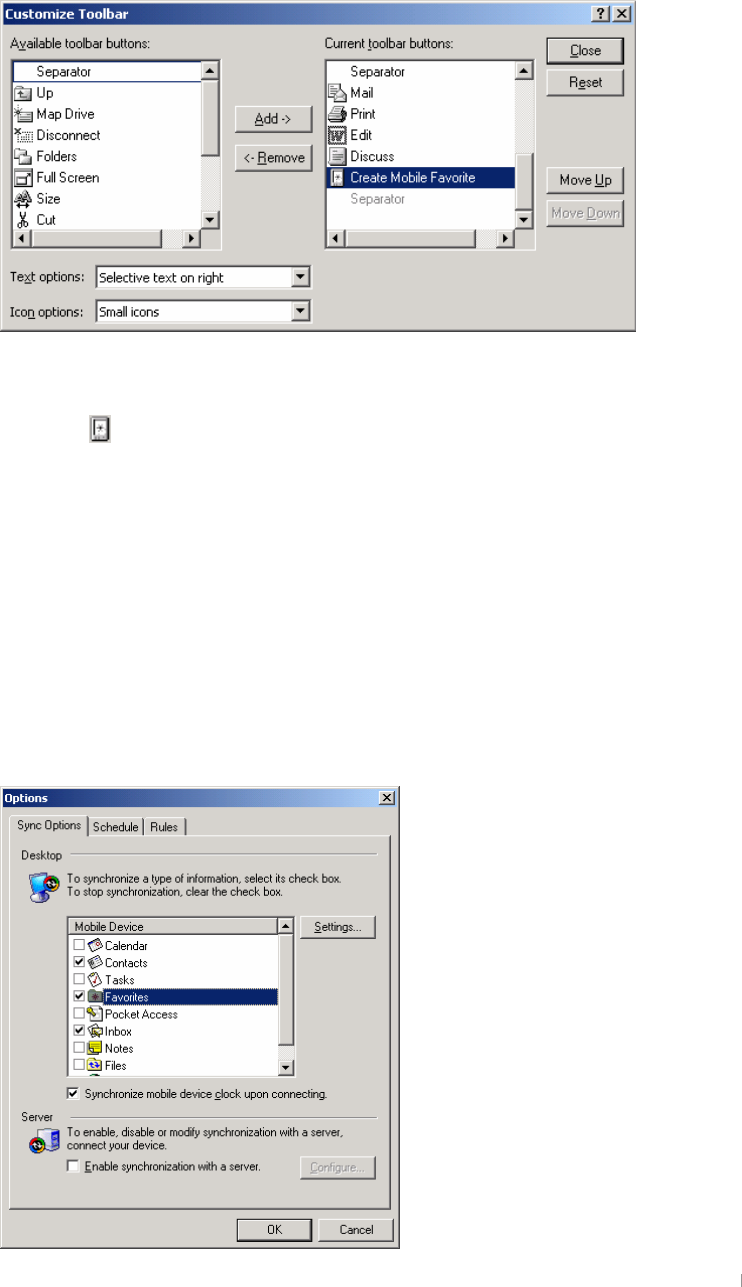
To make the Mobile Favorites button on the Tools menu of
your desktop PC
Select Tools bar > Customize on the View menu of Microsoft Internet Explorer to add the
Mobile Favorites button on the Tools bar.
Select Create Mobile Favorites on your left pane and click the Add button to send that
item you select to the right pane as described above. Then you will find the Mobile
Favorites( ) button on your tools bar of your Microsoft Internet Explorer.
To reduce the amount of memory caused by Mobile Favorites
Mobile favorites take up storage memory on your device. Follow these tips to minimize
the amount of memory used:
Use ActiveSync settings to turn off pictures and sounds for the Mobile Favorites or to
stop some mobile favorites from being downloaded to your device. For more
information, see ActiveSync Help.G
1. Select Options on the Tools menu or click the Options button to have the Options
screen displayed.
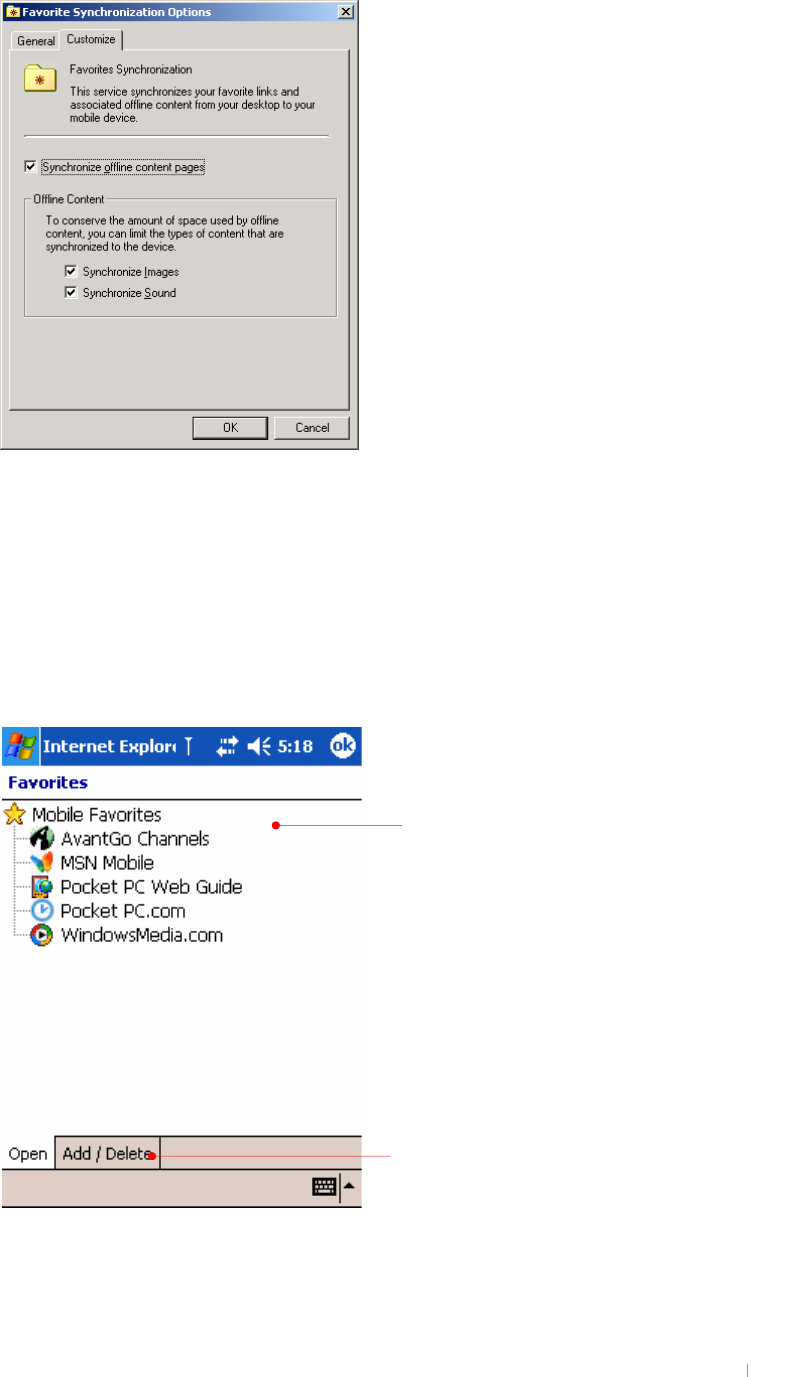
GUser’s Manual 5-6
2. Then select the Favorites check box and click the Settings button.
3. Deselect pictures and sounds for the Mobile Favorites and click OK.
To view Mobile Favorites offline
1. Tap the Favorites button on Pocket Internet Explorer of your device to display your list
of favorites.
2. In the list, tap the page you want to view.
Tap the favorite you want to view.
Tap to add or delete a folder or favorite link.
GChapter 5 Using the Internet & E-mail 5-7
Sending and Receiving E-mail
If you have an e-mail account with an ISP or on a corporate network, you can use Inbox
to send and receive e-mail messages in two ways:
Synchronize e-mail messages with Microsoft Outlook on your desktop PC.
Send and receive e-mail messages by connecting directly to an e-mail server
through an ISP or a network.
G
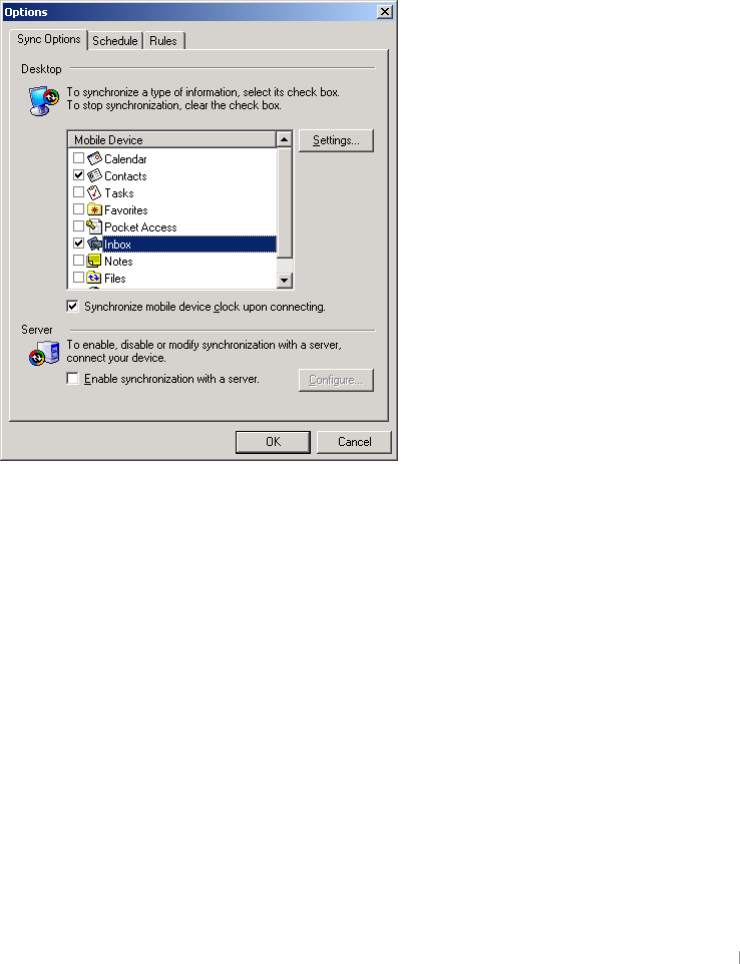
Synchronizing E-mail Messages
You can synchronize e-mail messages as part of the general synchronization process
whenever you connect your device to your desktop PC. First, you must enable Inbox
synchronization in ActiveSync.
Select the Options button on the Microsoft ActiveSync screen.
Select Inbox and click the Settings button.
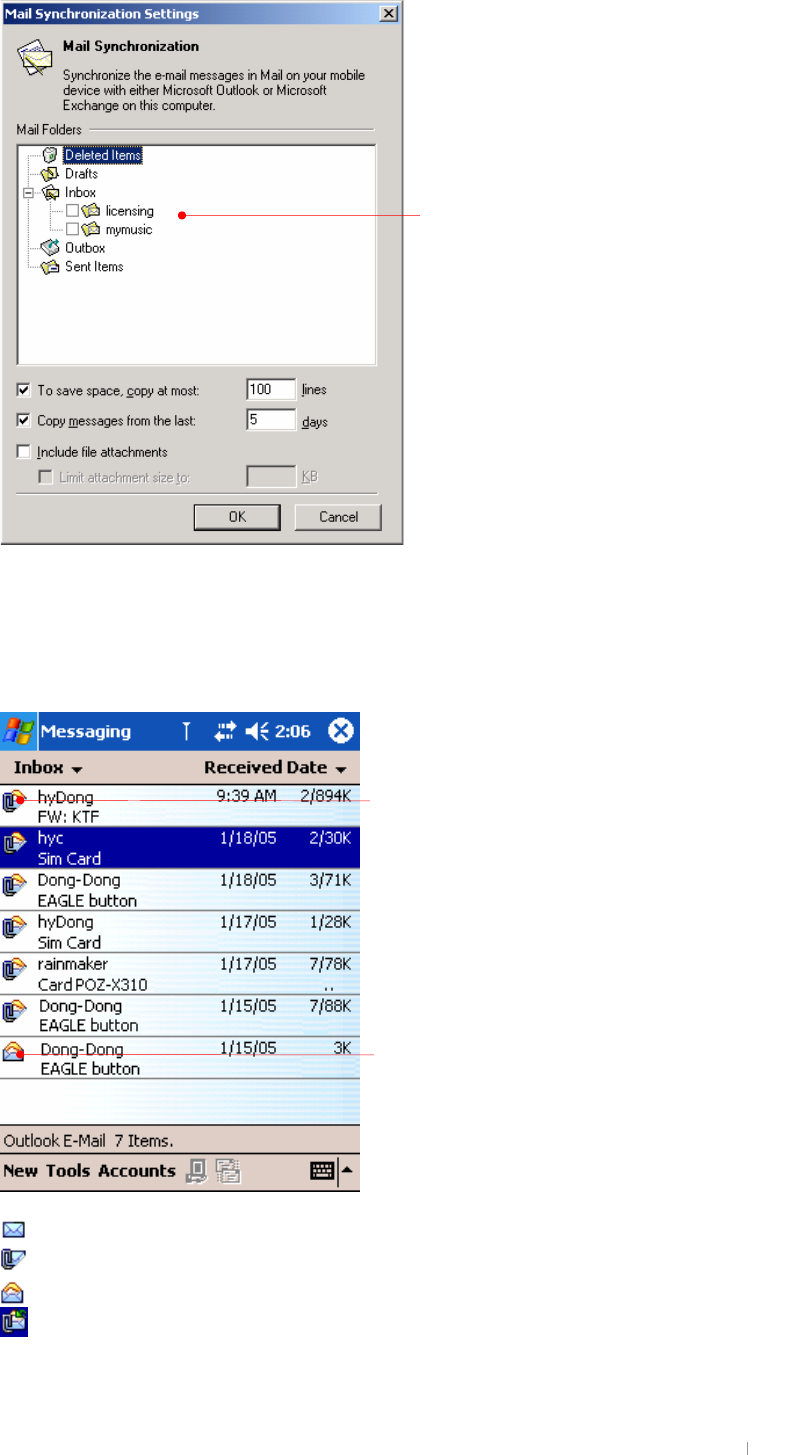
GUser’s Manual 5-8
Make selections as you want and click OK to copy the Inbox folder of your desktop PC to
the Inbox folder of your device.
Here is the list of mail messages after you synchronize through ActiveSync.
This is unread message.
This is unread message with attachments that need to be downloaded.
This is already read message.
This is read message with attachments that is already downloaded.
Select the folders you want to synchronize.
Shows you this is a read mail message.
Shows you this is a mail message with attachments
that need to be downloaded.
GChapter 5 Using the Internet & E-mail 5-9
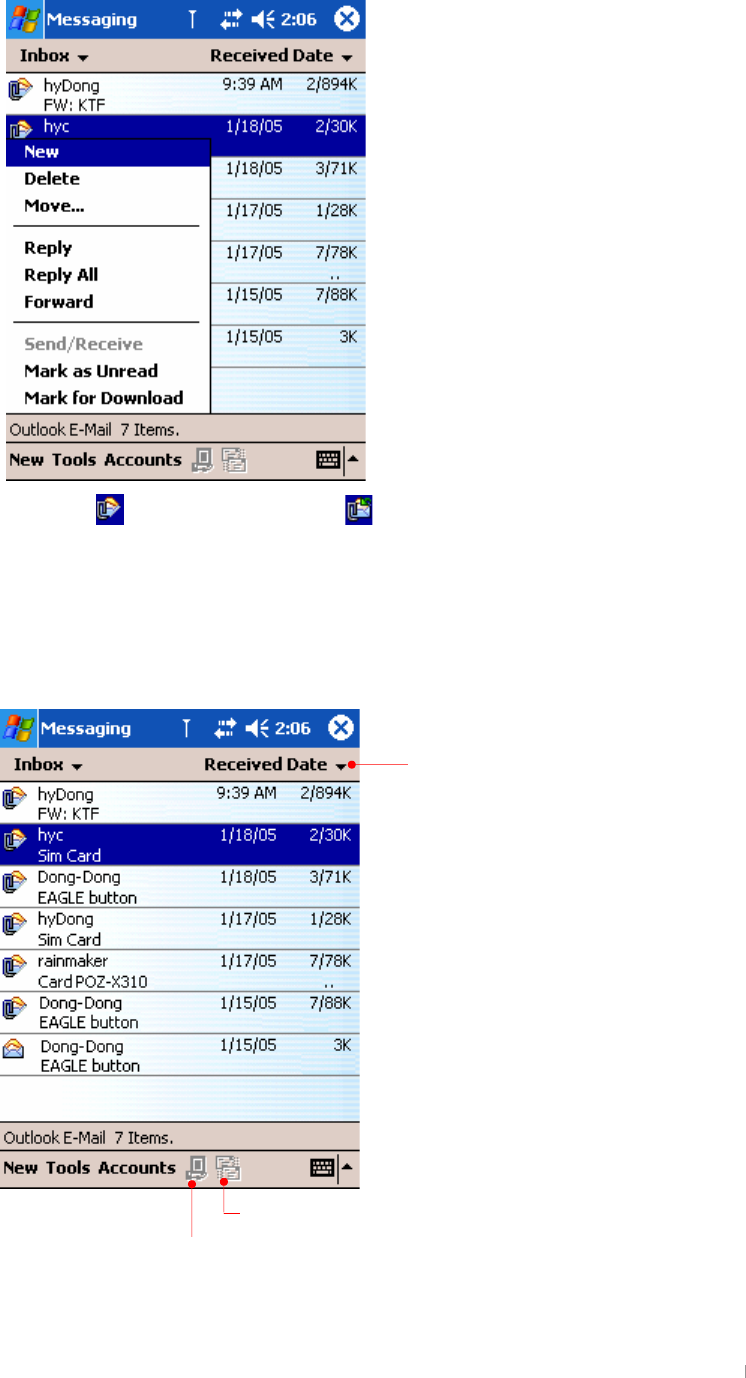
If you want to download the attachments, tap and hold the corresponding message to
have pop-up menu displayed. Then select Mark for Download.
Then this icon will be changed to .
Using the Message List
Messages you receive are displayed in the message list. By default, the most recently
received messages are displayed first in the list.
Select the sort order for messages.
Ta
p
to connect and to send and receive e-mail.
Tap to connect to the
selected service.
GUser’s Manual 5-10
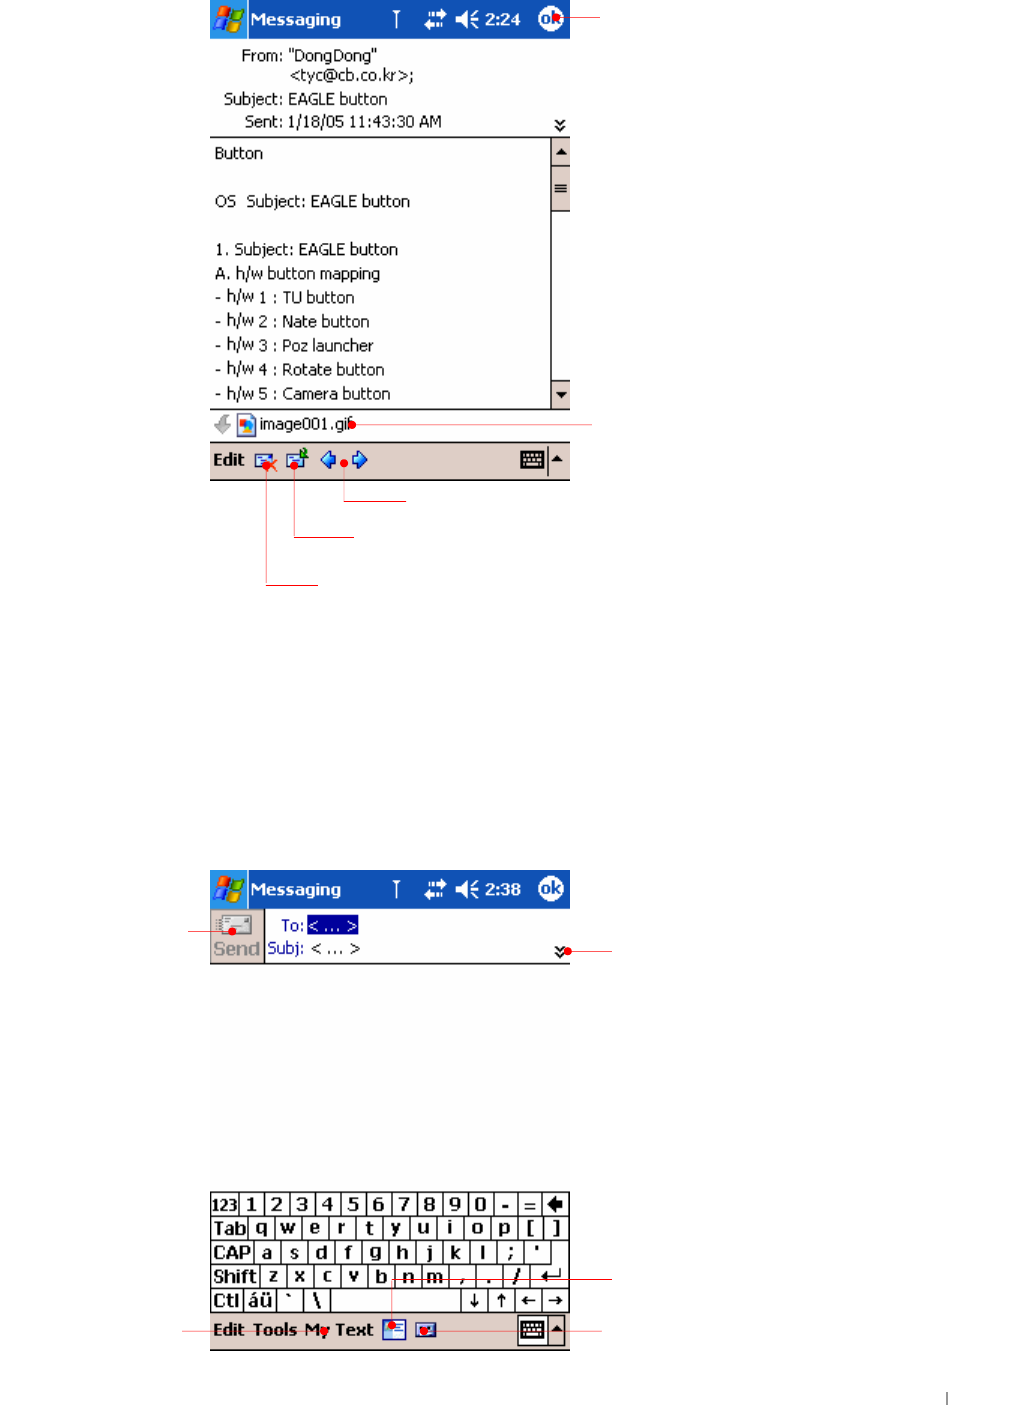
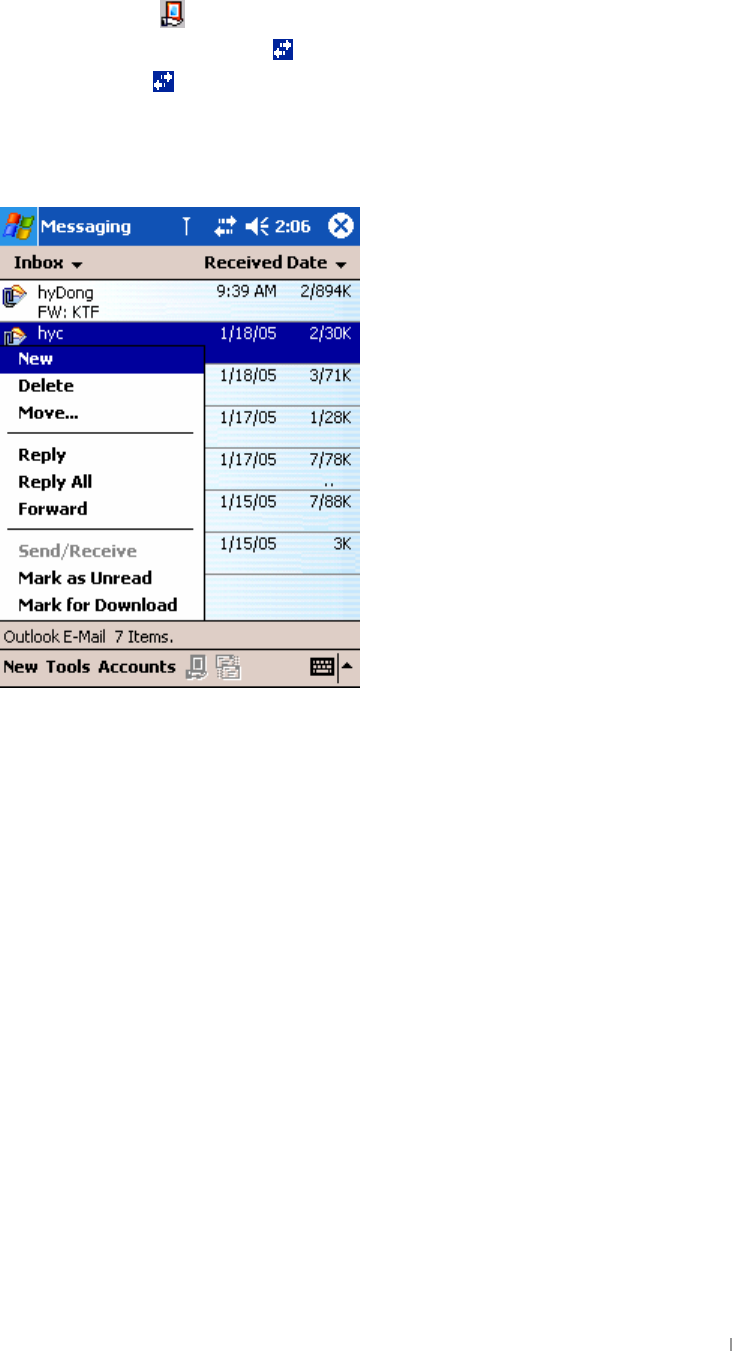
When you receive a message, tap it to open it.
You can mark the messages that you want to retrieve in full during your next
synchronization. In the message list, tap and hold the message you want to retrieve. On
the pop-up menu, tap Mark for Download. The icons in the Inbox message list give you
visual indications of message status.
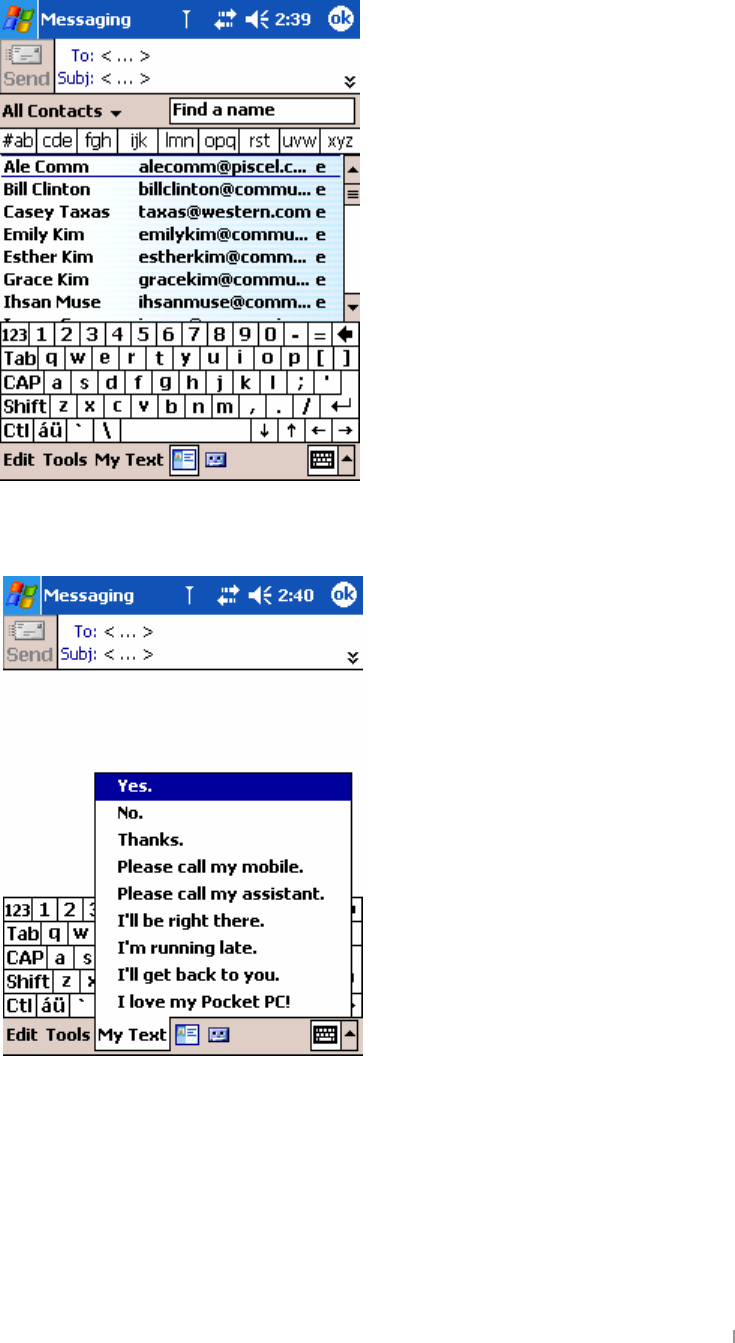
Make a new message
1. Tap New.
Tap to show or hide the complete header.
Tap to show / hide the recording toolbar.
Tap to display the Address Book.
Tap to return to the message list.
Tap to delete this message.
Tap to view the previous or next message.
Tap to reply to or forward this message.
When you select this message with attachments that
is already downloaded, the message will open with
attachments displayed on the bottom of screen.
Tap to send the message.
Tap to insert common
messa
g
es.
GChapter 5 Using the Internet & E-mail 5-11
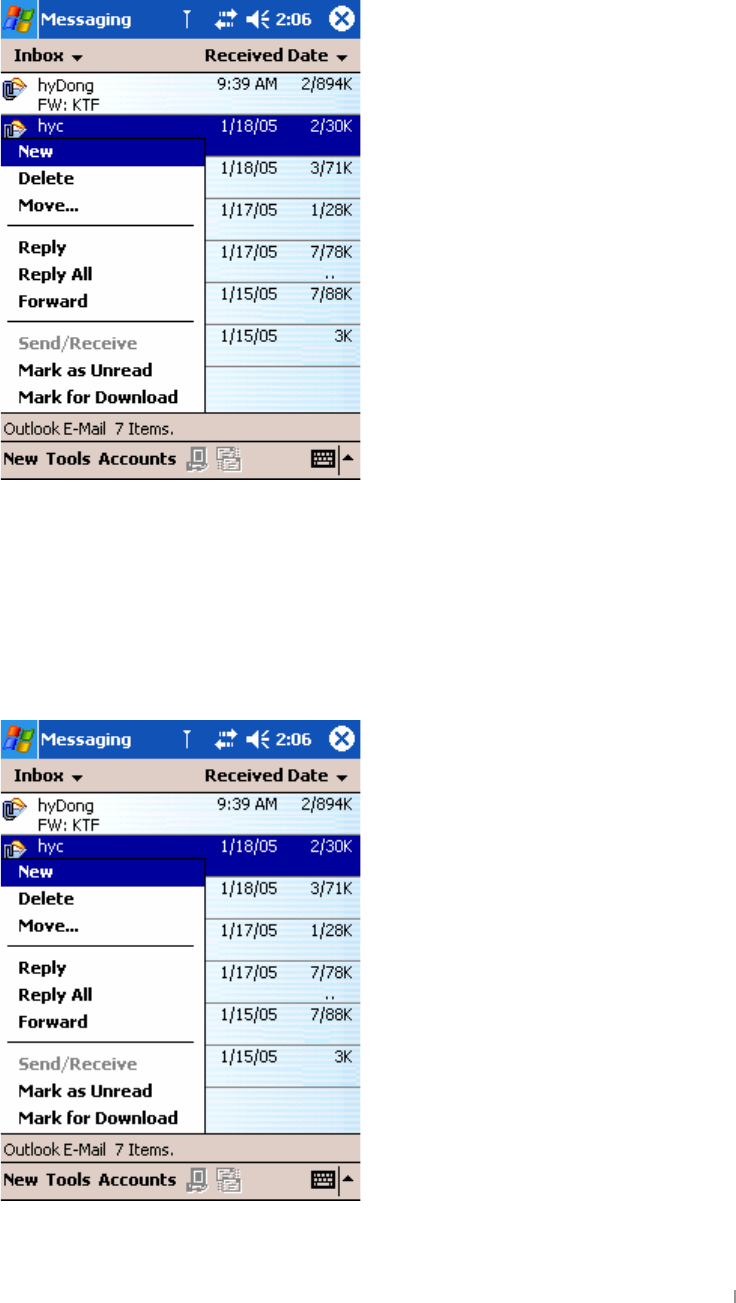
2. In the To field, enter an e-mail address of one or more recipients, separating them
with a semicolon, or select a name from the contact list by tapping the Contacts
button.
3. Compose your message. To enter preset or frequently used messages, tap My Text
and select a message.
4. When you have finished the message, tap Send.
GUser’s Manual 5-12
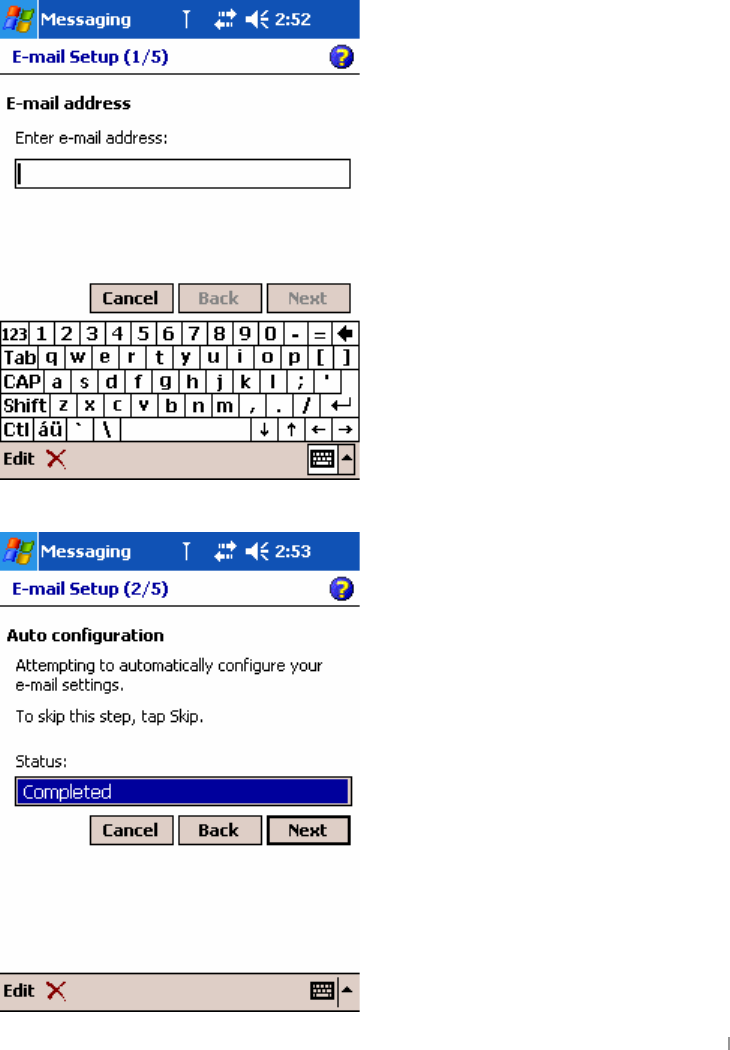
Delete a message
When your device is synchronized with your desktop PC, and when you want to delete a
message on your device, tap and hold the message to have pop-up menu displayed.
Then select Delete.
If your device is not synchronized with your device, the next time your device is
synchronized, the corresponding message on your desktop PC will be deleted.
Reply, Reply all or Forward a message
When you want to reply, reply all or forward a message on your device, tap and hold the
message to have pop-up menu displayed. Then select Reply, Reply all or Forward.
GChapter 5 Using the Internet & E-mail 5-13
Connecting Directly to an E-mail Server
In addition to synchronizing e-mail messages with your desktop PC, you can send and
receive e-mail messages by Inbox on your device using CDMA module.
The ISP or network must use a POP3 or IMAP4 e-mail server and an SMTP gateway.
Customize a new mail service
You can use multiple e-mail services to receive your messages. For each email service
you intend to use, first set up and name the e-mail service. If you use the same service
to connect to different mailboxes, set up a separate service for each mailbox.
In Inbox, tap Accounts, and then tap New Account. Follow the directions in the New
Service Wizard. Here is just parts of setting a wizard.
Enter e-mail address and tap Next.
GUser’s Manual 5-14
After the status becomes Completed as shown above, tap Next.
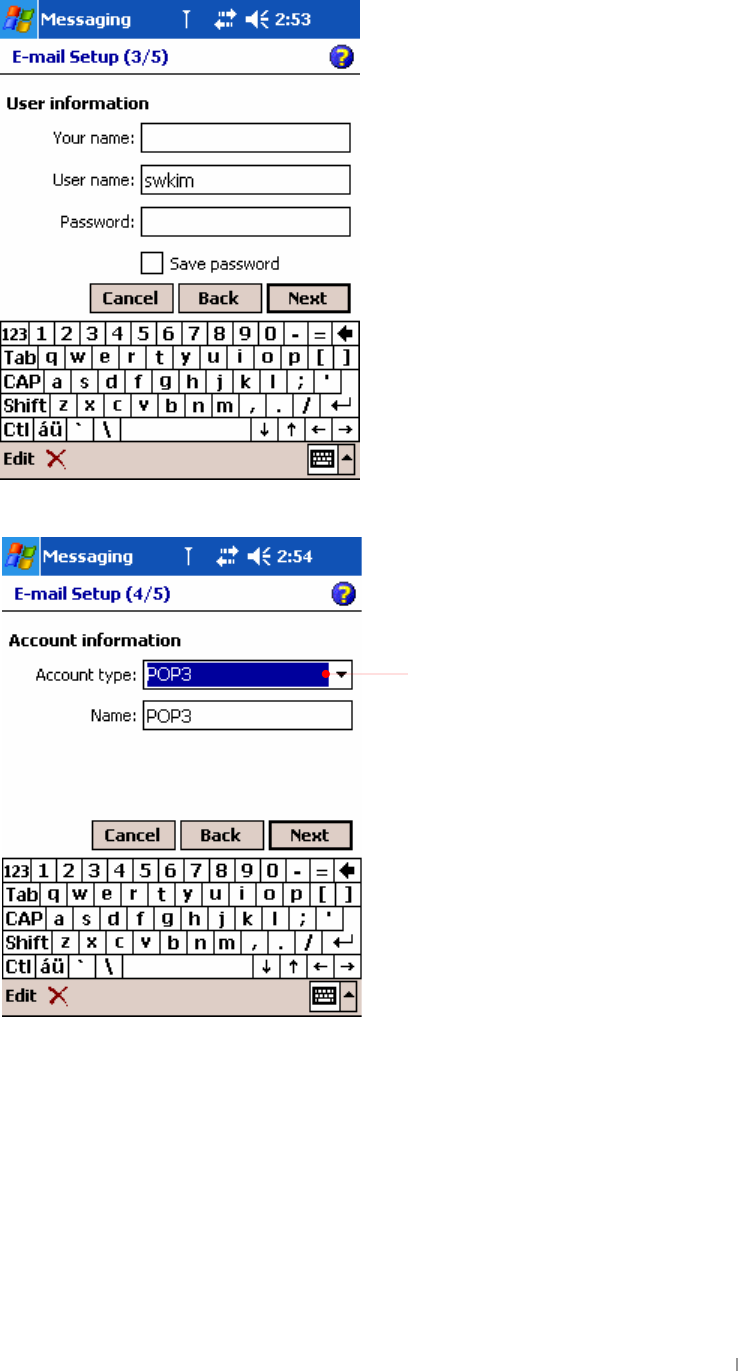
Enter your name and password and then tap Next.
G
G
G
G
G
G
G
G
G
G
Select POP3 or IMAP4 if it is supported,
enter a name in the Name box (for
exam
p
le
,
M
y
Mail
)
.
GChapter 5 Using the Internet & E-mail 5-15
lGGGGGuGGOGSGtGtPGGGuU
G
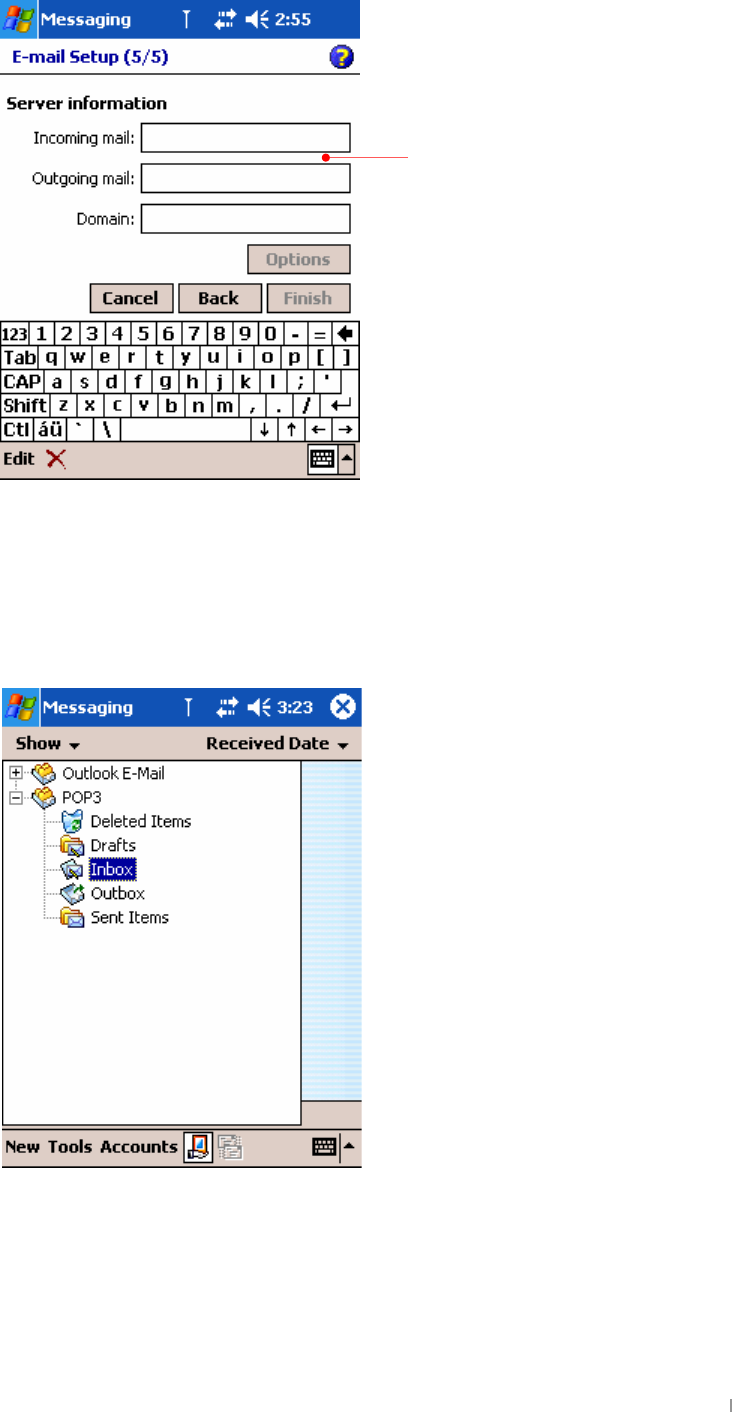
To connect to an e-mail service
In Inbox, tap Services, and then tap Connect. Then through CDMA module, you will be
connected to mail server. Messages in your own local folder will be downloaded from this
mail server directly.
Enter server names in the Incoming mail
box and the Outgoing mail box(for example,
mail.bigpond.com), and if needed, tap
Options to set the other options. For more
detailed information, ask your the network
administrator or corporate mail-server
administrator.

GUser’s Manual 5-16
To synchronize your own local folder through ActiveSync
If you want to synchronize your own local folder through ActiveSync, select the local
folder(for example, POP3 as shown below) and on the Tools menu, select Manage
Folders.
Select the subfolder you want to synchronize through ActiveSync and tap OK on the
upper-right corner.
By default, each mail service is composed of 5 subfolders.
z Inbox
z Outbox
z Sent Items
z Deleted Items
z Drafts
When you connect to the e-mail server, new messages are downloaded to the Inbox
folder on your device, messages in the Outbox folder are sent, and messages that have
been deleted on the e-mail server are removed from the Inbox folder on your device.
You can work online or offline. When working online, you read and respond to messages
while connected to the e-mail server. Messages are sent as soon as you tap Send,
which saves space on your device.
When working offline, you should download new message headers or partial messages,
and then you can disconnect from the e-mail server while you decide which messages to
download completely. The next time you connect, Inbox downloads any messages you
marked for retrieval and sends the messages in your Outbox folder.
G
GChapter 5 Using the Internet & E-mail 5-17
To download the attachments of message
You can download the attachments of message through directly connecting to mail
server using the CDMA module.
Tap the Connect ( ) icon to directly connect to the mail server.
Then you will find the connect icon on the navigation bar.
Tap the connect icon on the navigation bar to finish this connection.
Tap and hold the message to download the attachments and select Mark for Download
on the pop-up menu.

GChapter 6 Configuring Device 6-1
G
G
G
G
G
G
G
G
G
G
G
G
This chapter details ways you can optimize your device using the Settings, and
describes ways you can expand features and functionality by adding programs. This
chapter also offers important tips on safeguarding your data by managing power and
memory.
- Settings
Chapter 6
Configuring Device
GUser’s Manual 6-2
Settings
G
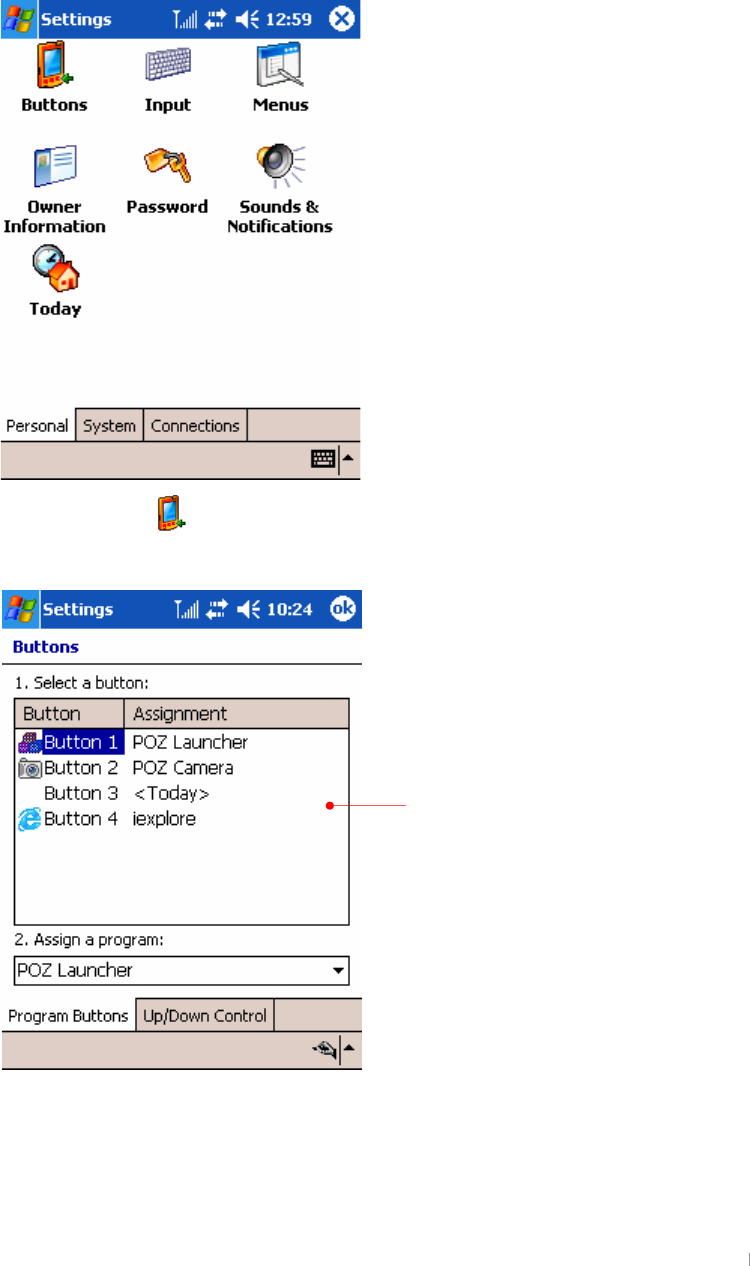
On the Start menu, tap Settings. You will see 3 tabs: Personal, System and
Connections.
1. the Personal tab
Tap the Buttons ( ) icon to assign functions to the 4 buttons located on the front of
your device. You can assign some functions to the hardware buttons using this setting.
G
G
G
G
G
G
G
G
G
G
G
G
G
G
G
G
G
G
G
G
G
First, select a button among the 4 buttons
and select a program you want for that
button on the assignment.

GChapter 6 Configuring Device 6-3
G
G
G
G
G
G
G
G
G
G
G
G
G
G
G
G
G
Move the slide to adjust the delay before
first repeat.
Move the slide to adjust the repeat rate.
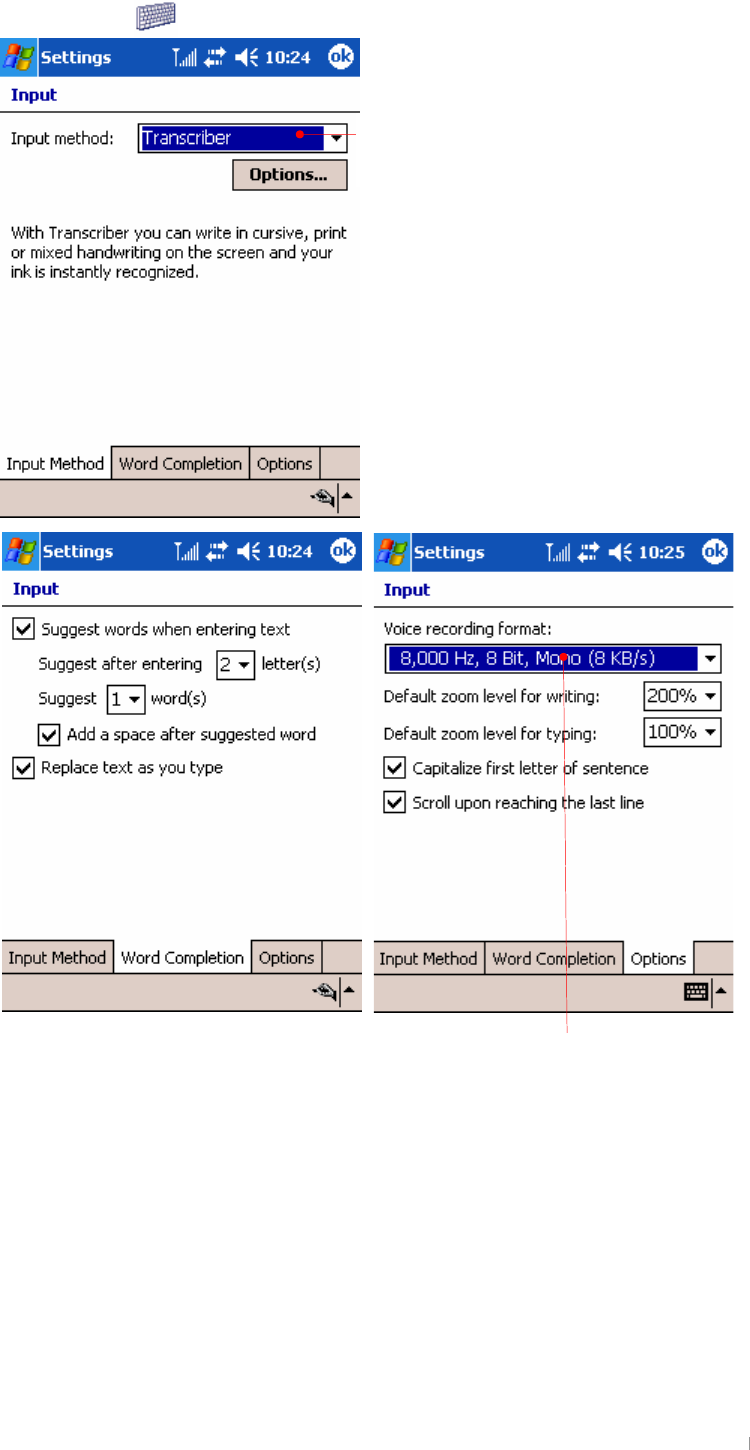
GUser’s Manual 6-4
Tap the Input ( ) icon to adjust a setting on the Input Panel.
G
G
G
G
G
G
G
G
G
G
G
G
G
G
G
G
G
G
G
G
G
G
G
G
G
G
G
G
G
G
G
G
G
G
G
G
It is recommended that you select the
default mode of voice recording format to
conserve your memory size.
Select the default mode among Block
Recognizer, keyboard, Letter Recognizer,
Phone Dialer and Transcriber.
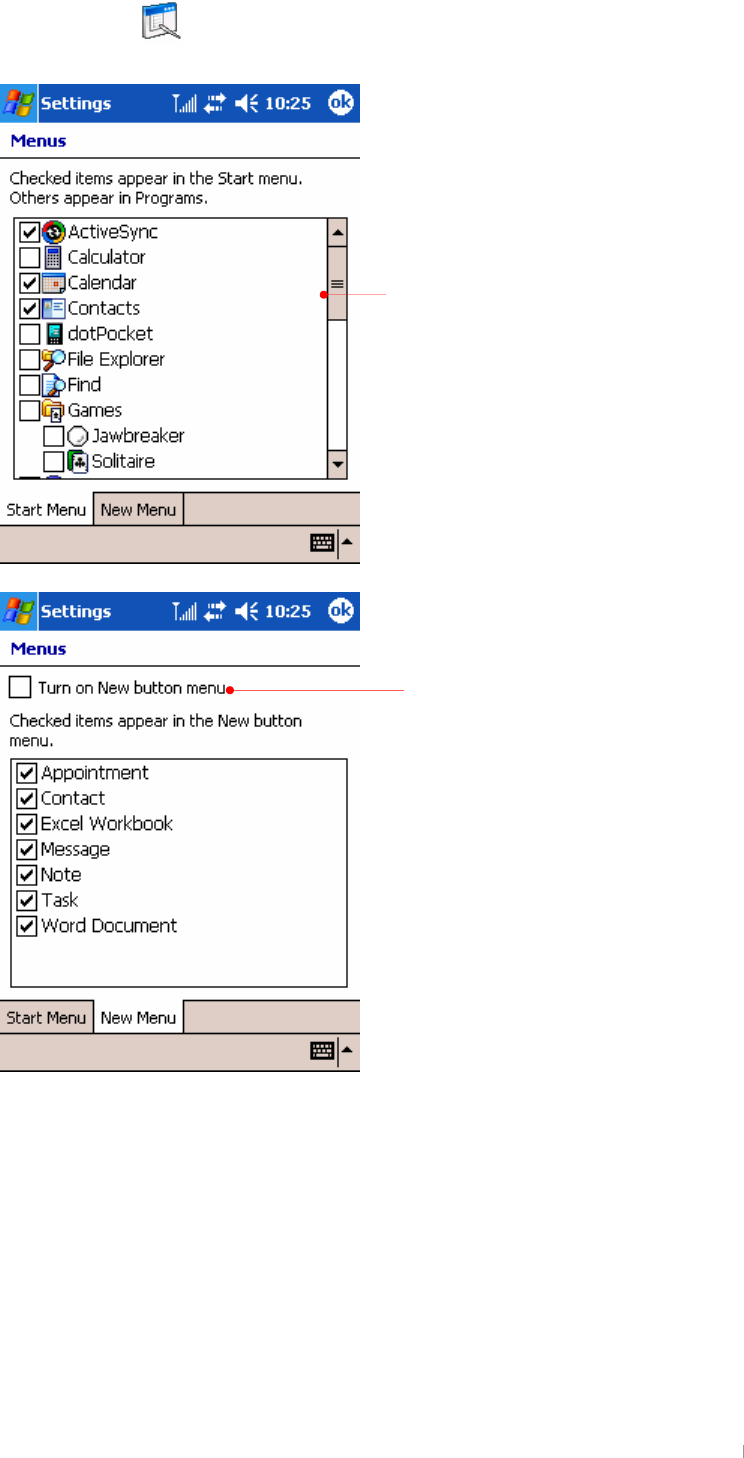
GChapter 6 Configuring Device 6-5
Tap the Menu ( ) icon to adjust the programs listed on the Start menu and New
menu.
G
G
G
G
G
G
G
G
G
G
G
G
G
G
G
G
G
G
G
G
G
G
G
G
G
G
G
G
G
G
G
G
G
G
Selected items appear in the Start
menu. Otherwise, the rest appear in
Programs.
Select the Turn on New button menu
item to have the selected items
displayed on the New menu list.
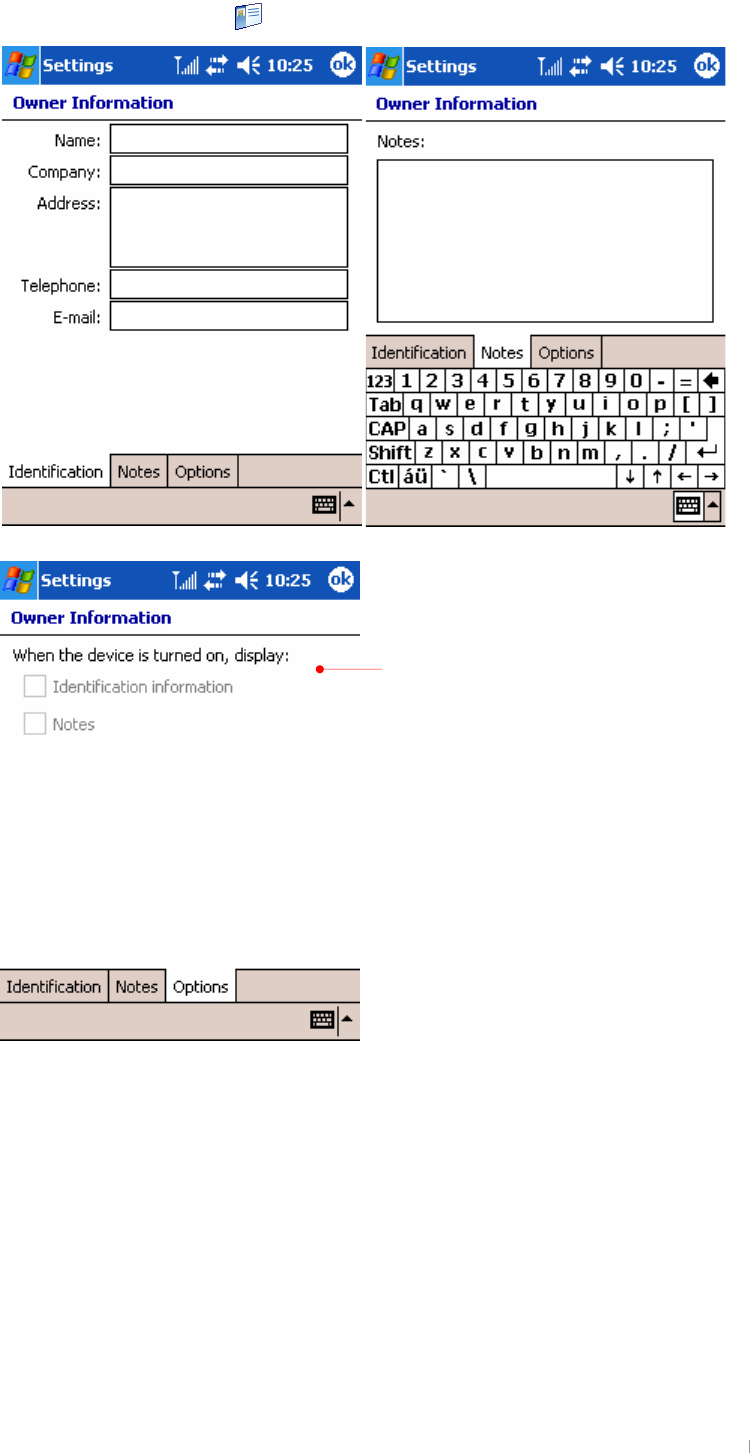
GUser’s Manual 6-6
{GGvGpGOGGGGGPGGGGGGUG
G
G
G
G
G
G
G
G
G
G
G
G
G
G
G
G
G
G
G
G
G
G
G
G
G
G
G
G
G
G
G
G
G
G
Select this option box to show this
information when device is turned on.
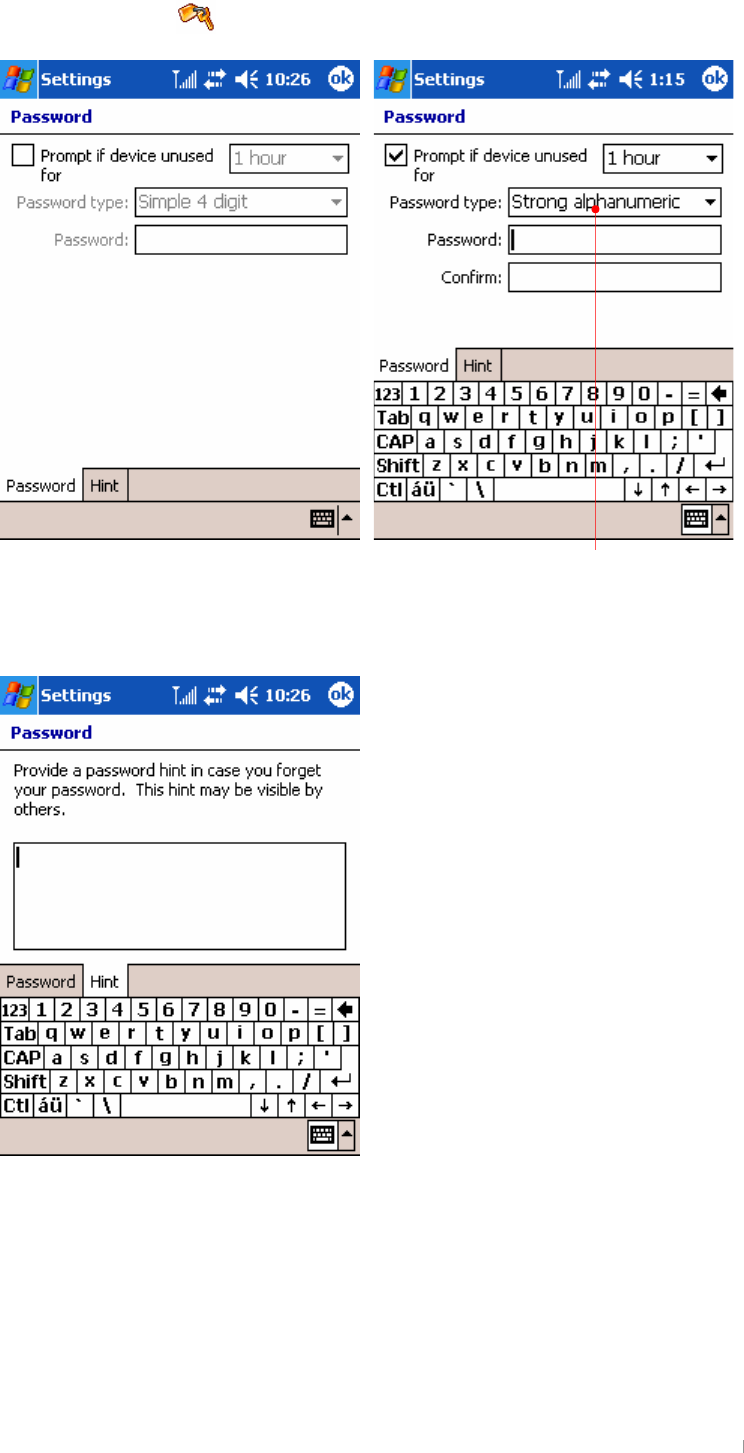
GChapter 6 Configuring Device 6-7
Tap the Password ( ) icon to change a password.
G
G
G
G
G
G
G
G
G
G
G
G
G
G
G
G
G
G
G
G
G
G
G
G
G
G
G
G
G
G
G
G
G
G
G
G
G
G
When you select the Strong alphanumeric
password item, you have to enter the 7-digit
password: a combination of the English upper
case and lower case letters.
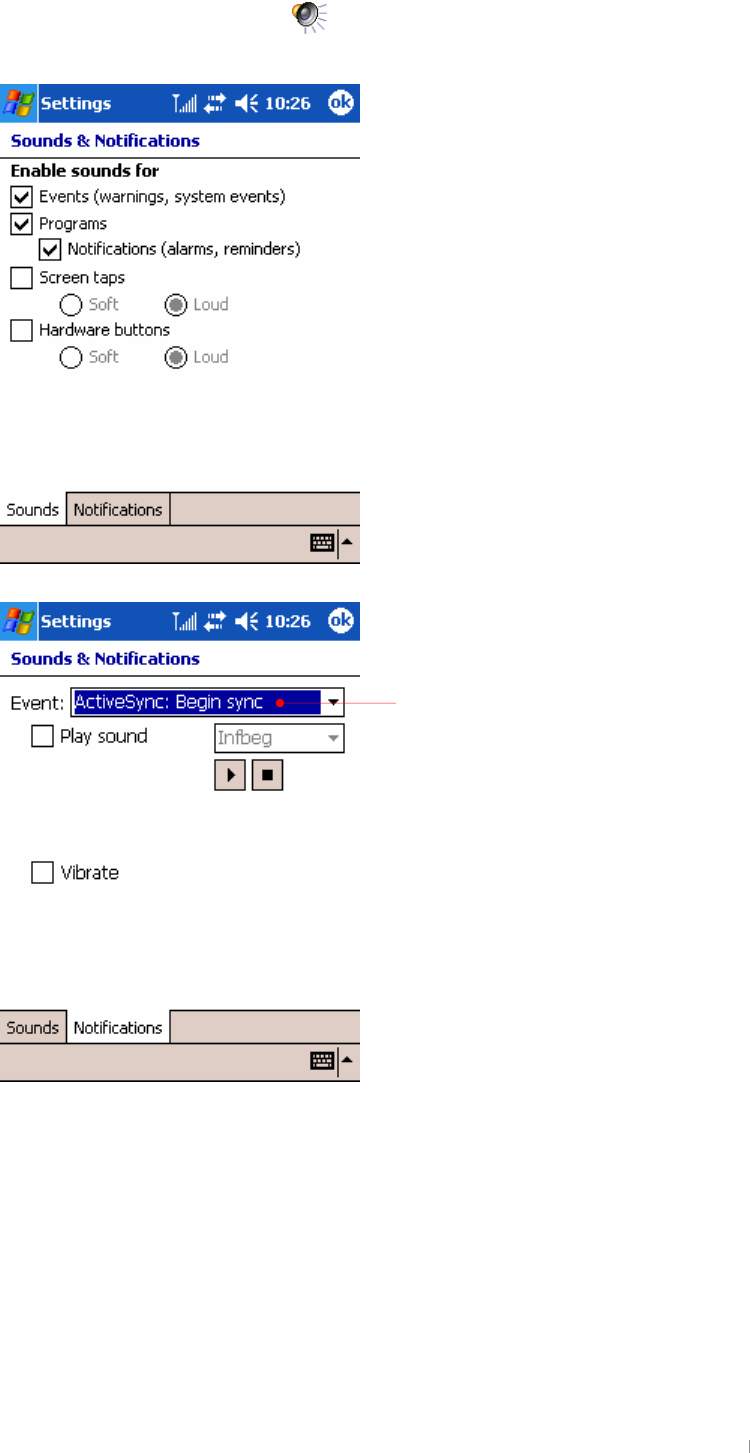
GUser’s Manual 6-8
Tap the Sounds & Notifications ( ) icon to adjust sounds that is enabled for events,
programs, screen taps and hardware buttons.
G
G
G
G
G
G
G
G
G
G
G
G
G
G
G
G
G
G
G
G
G
G
G
G
G
G
G
G
G
G
G
G
G
G
According to each event, select the
corresponding sounds or
notifications.
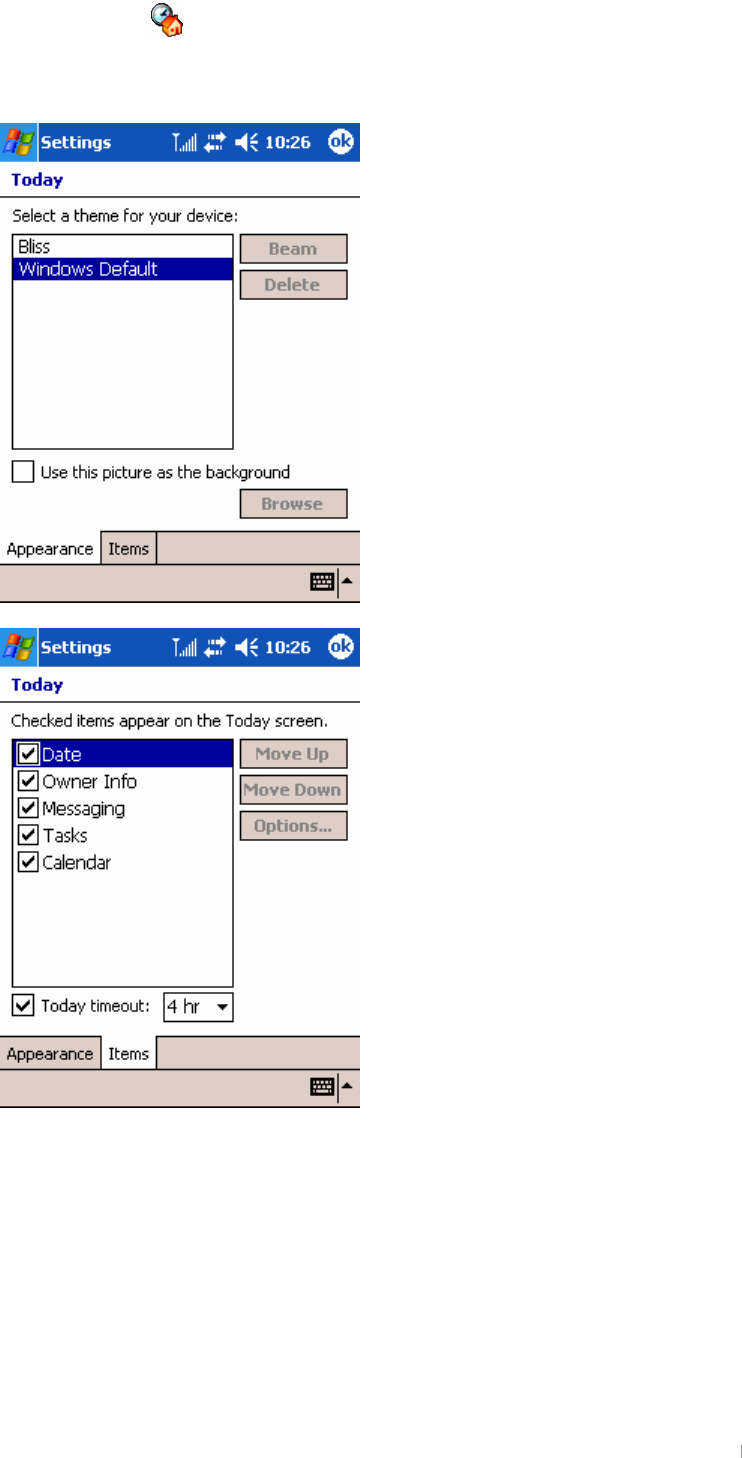
GChapter 6 Configuring Device 6-9
Tap the Today ( ) icon to use an image file as the background and select programs
that appear on the Today screen.
G
G
G
G
G
G
G
G
G
G
G
G
G
G
G
G
G
G
G
G
G
G
G
G
G
G
G
G
G
G
G
G
G
G
G
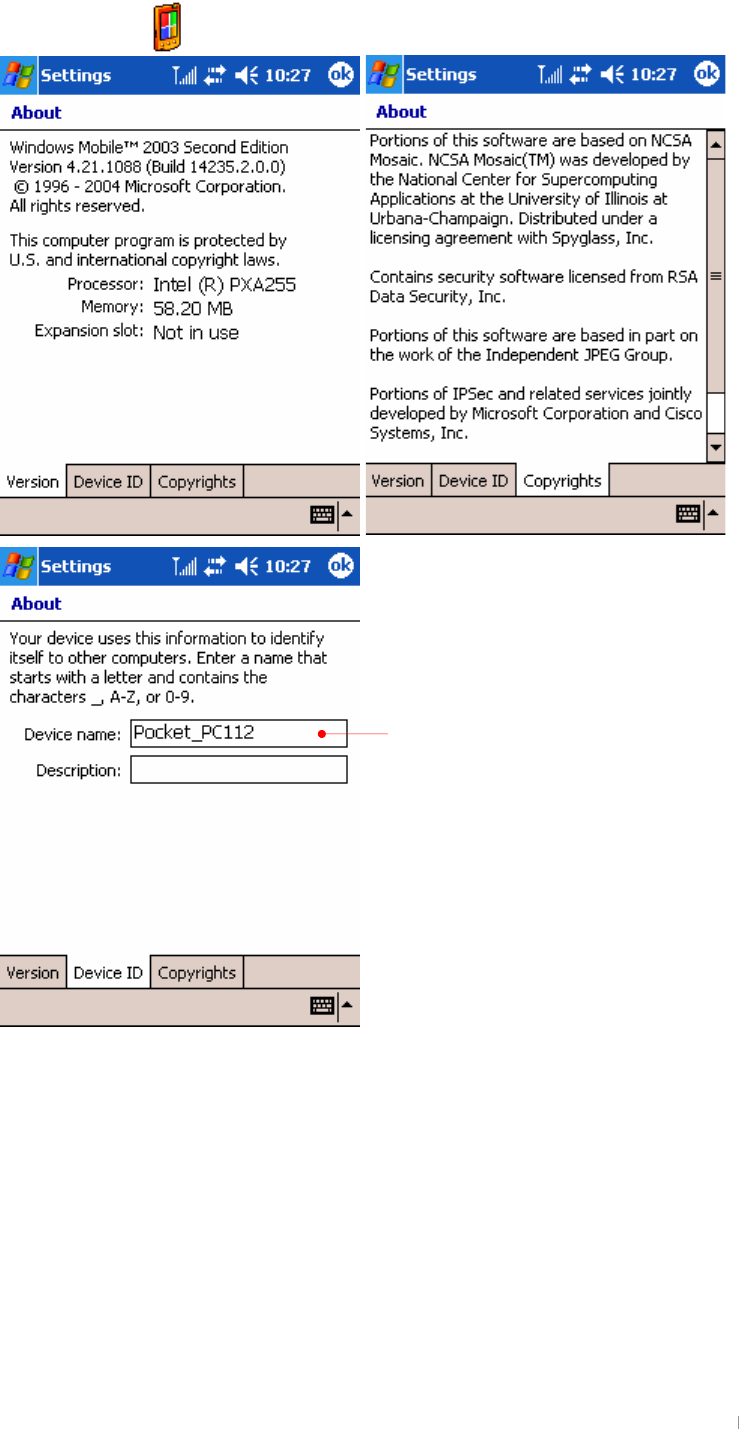
GUser’s Manual 6-10
2. the System tab
Tap the About ( ) icon to see the version and copyright.
G
G
G
G
G
G
G
G
G
G
G
G
G
G
G
G
G
G
G
G
G
G
G
G
G
G
G
G
G
G
G
G
G
G
G
While synchronized, this will be used
for identifying itself and establishing
a
p
artnershi
p
.
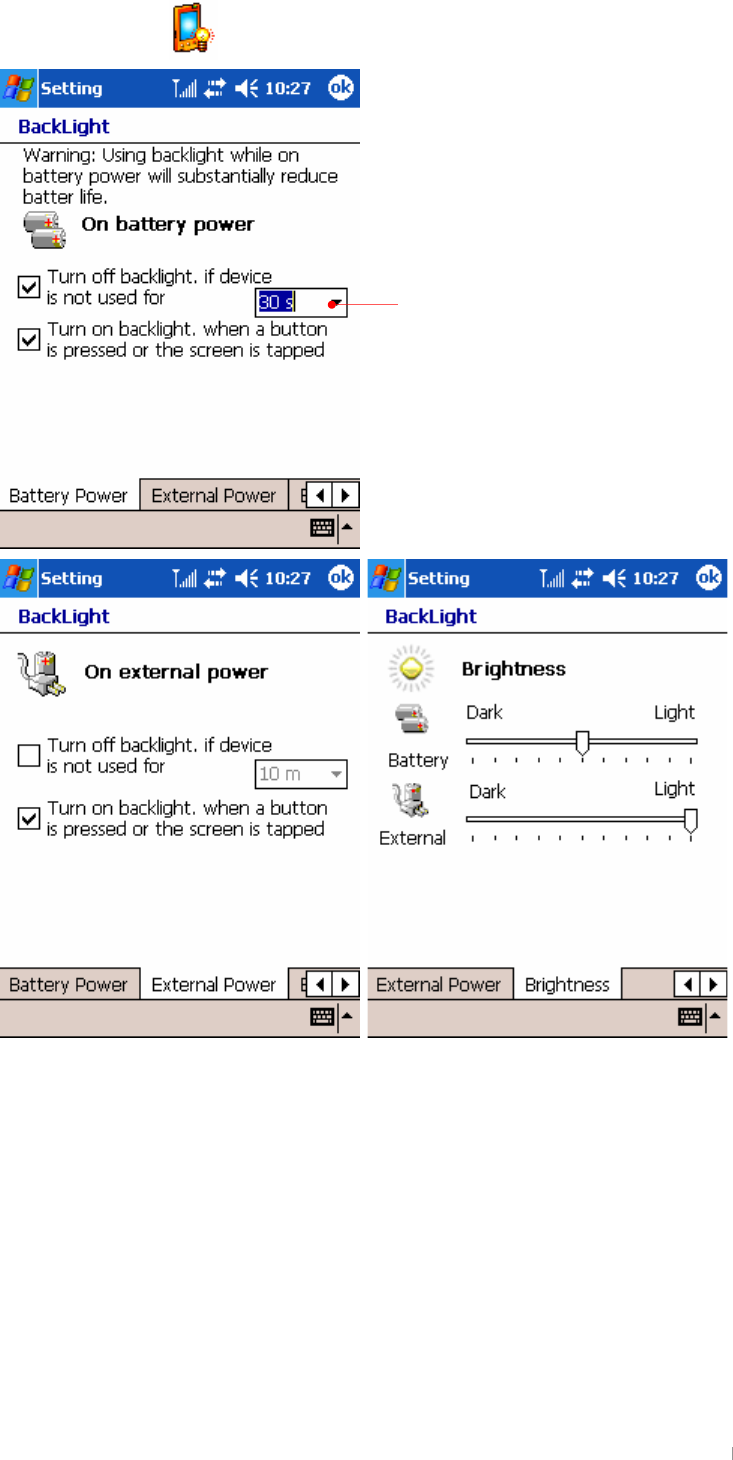
GChapter 6 Configuring Device 6-11
Tap the Backlight ( ) icon to adjust the backlight.
It is recommended to conserve your
battery life that you turn off backlight
if device is not used for the time you
select here.
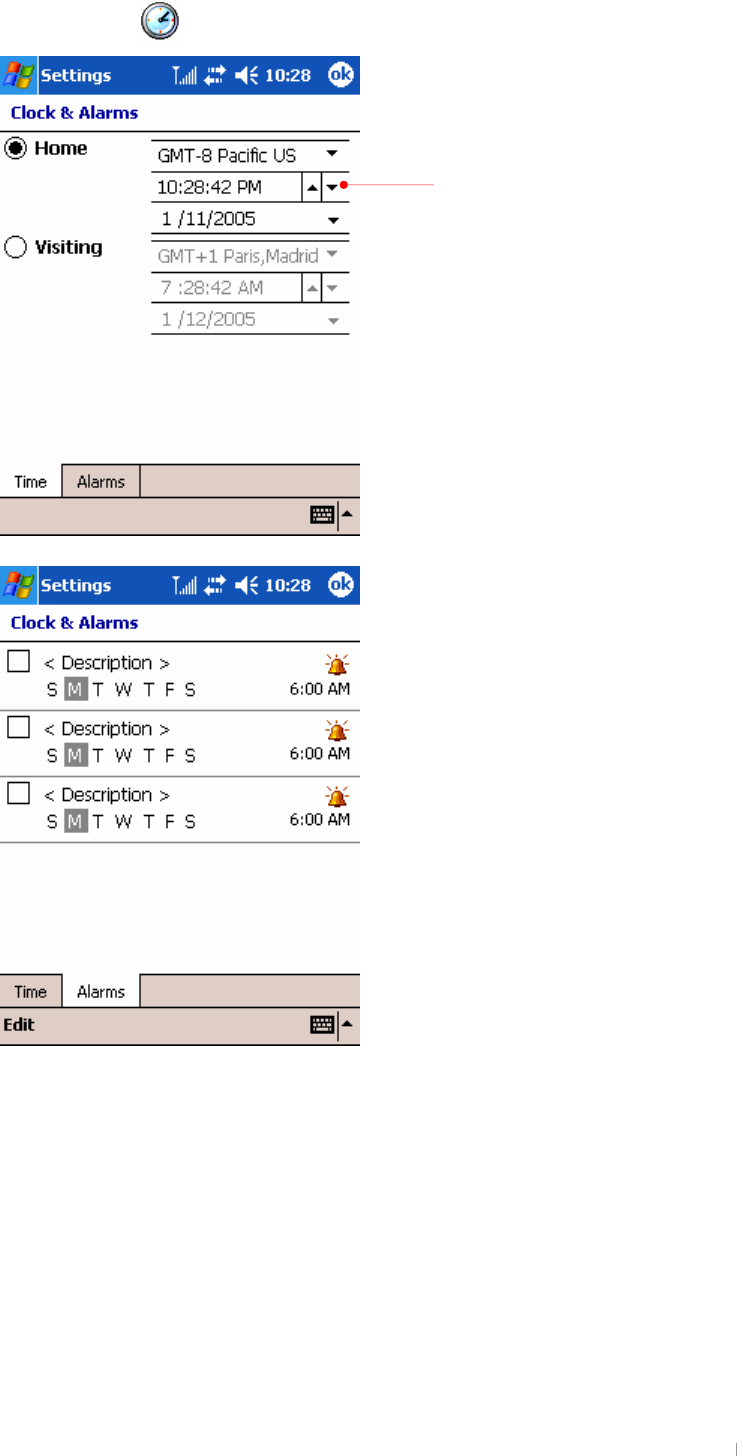
GUser’s Manual 6-12
Tap the Clock ( ) icon to adjust the current time and alarms.
Select the right one according to where
you stay.
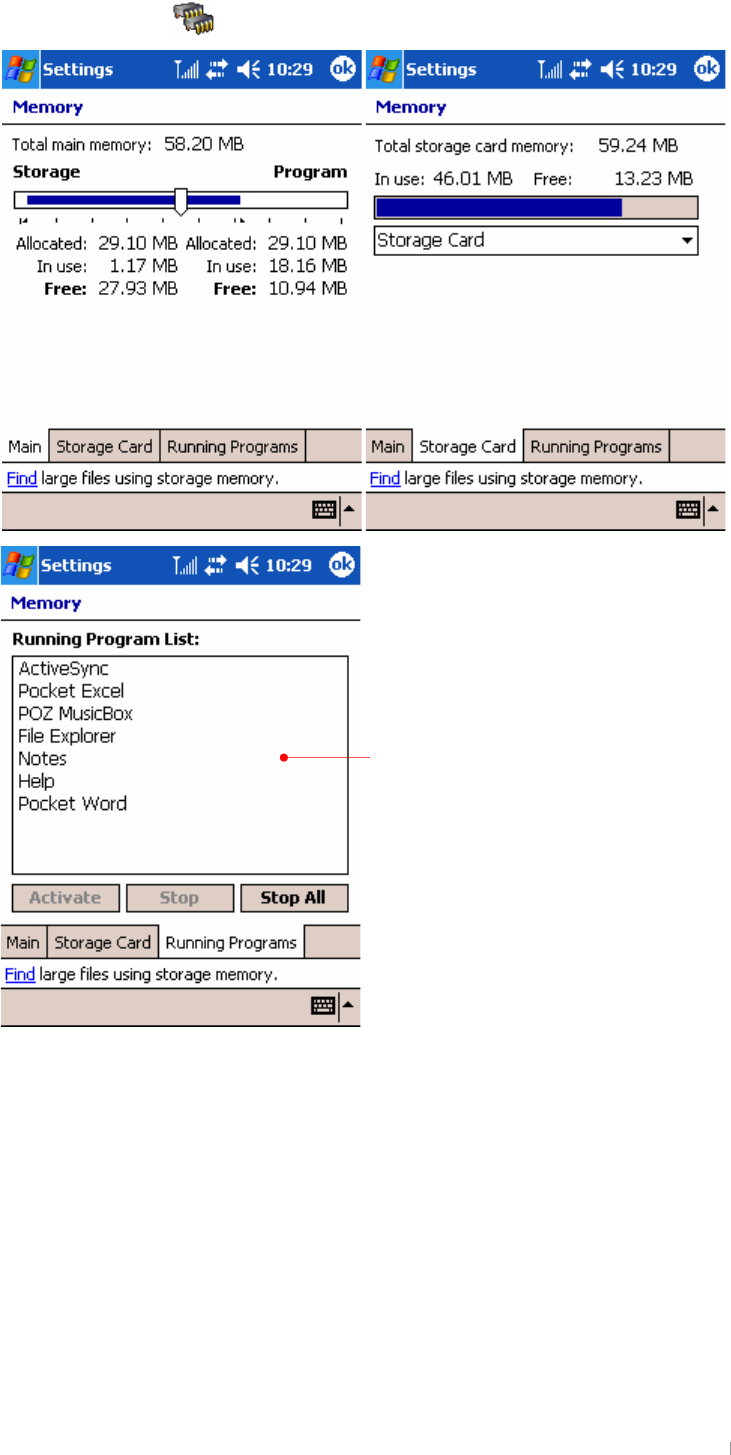
GChapter 6 Configuring Device 6-13
Tap the Memory ( ) icon to adjust the allocation of memory temporarily.
To conserve the program memory, you can
stop programs that are not being used.
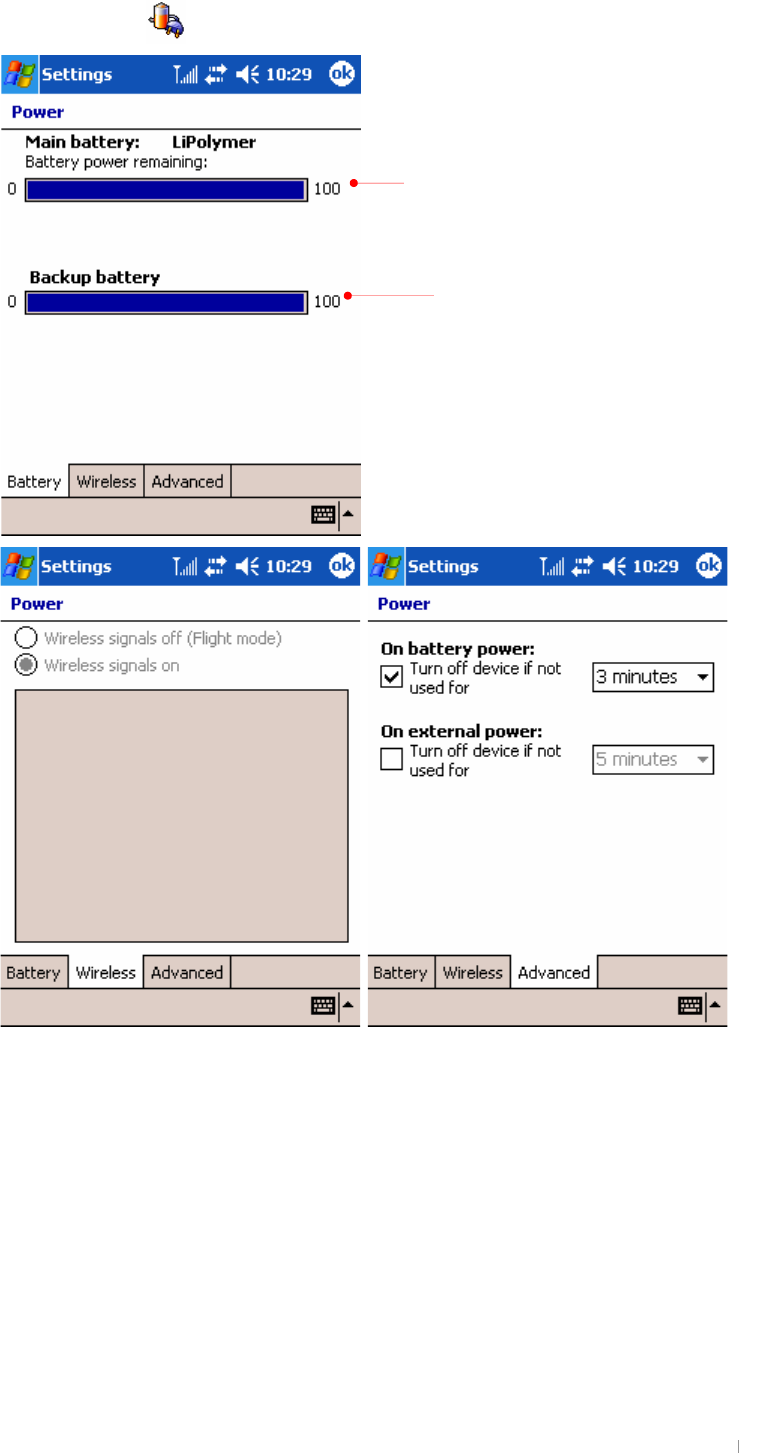
GUser’s Manual 6-14
Tap the Power ( ) icon to see the state of battery.
G
Display the state of backup battery.
While being seated on cradle, if main battery
is not fully charged, it will move from 0 to
100% on the charging bar
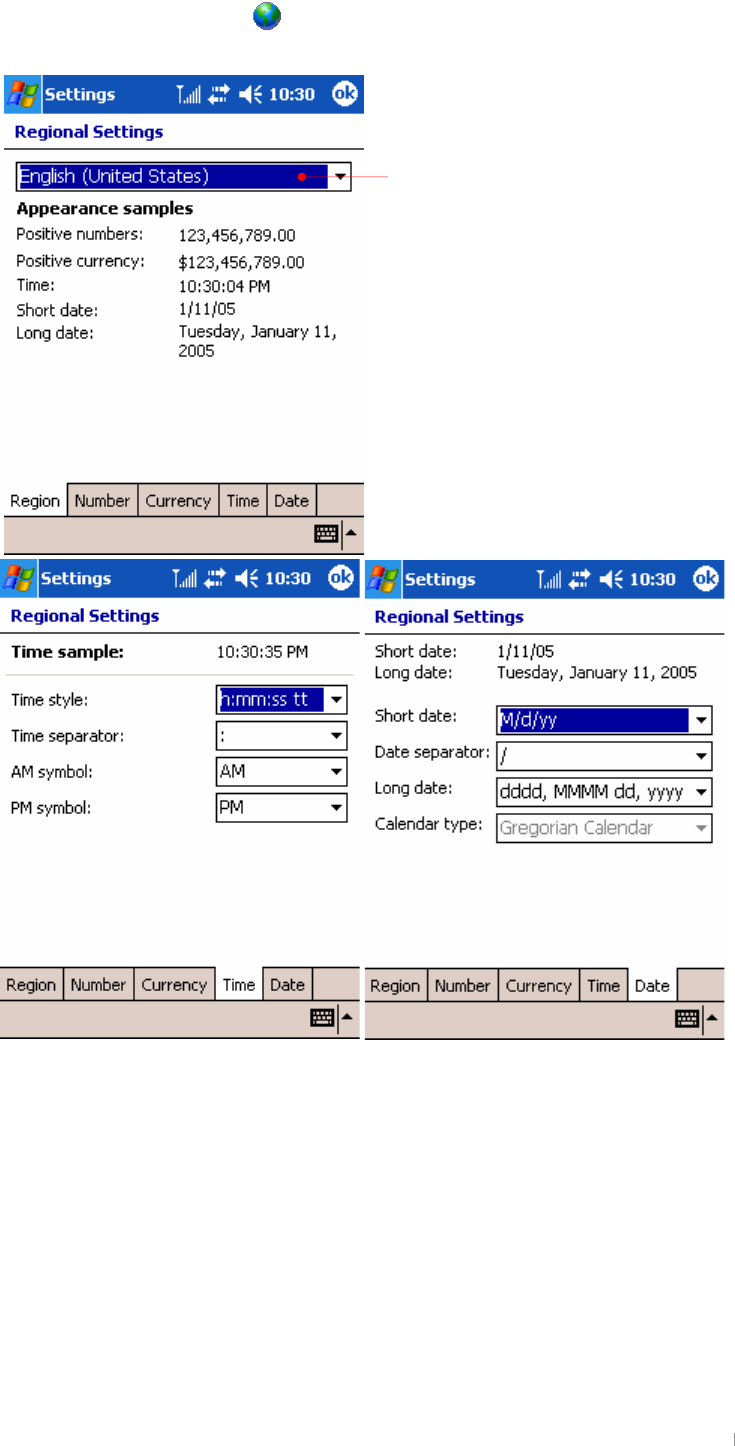
GChapter 6 Configuring Device 6-15
Tap the Regional Settings ( ) icon to adjust the time, number, especially period,
money and data type.
Select where you stay.
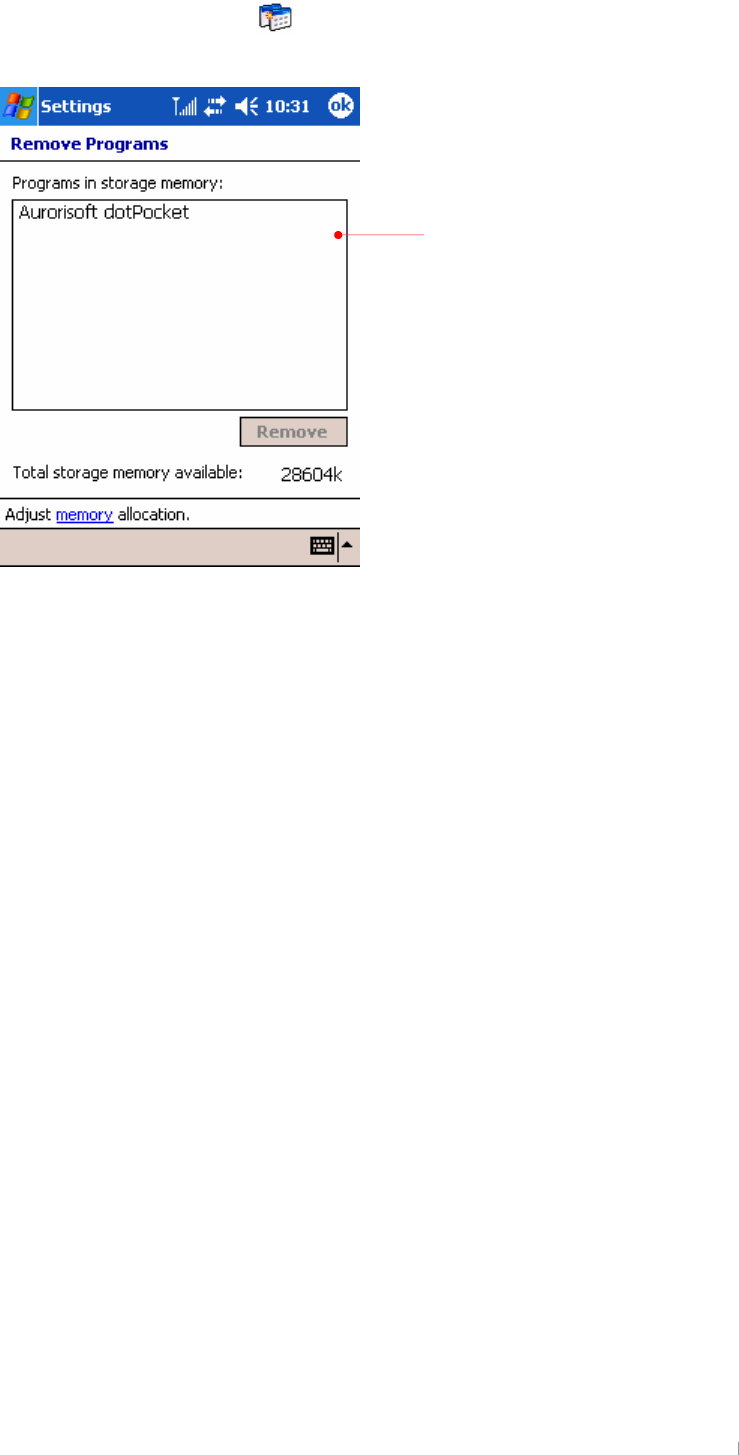
GUser’s Manual 6-16
Tap the Remove Programs ( ) icon to remove the programs that are installed on
your device.
When the storage memory is
short, remove the program
installed on your device.
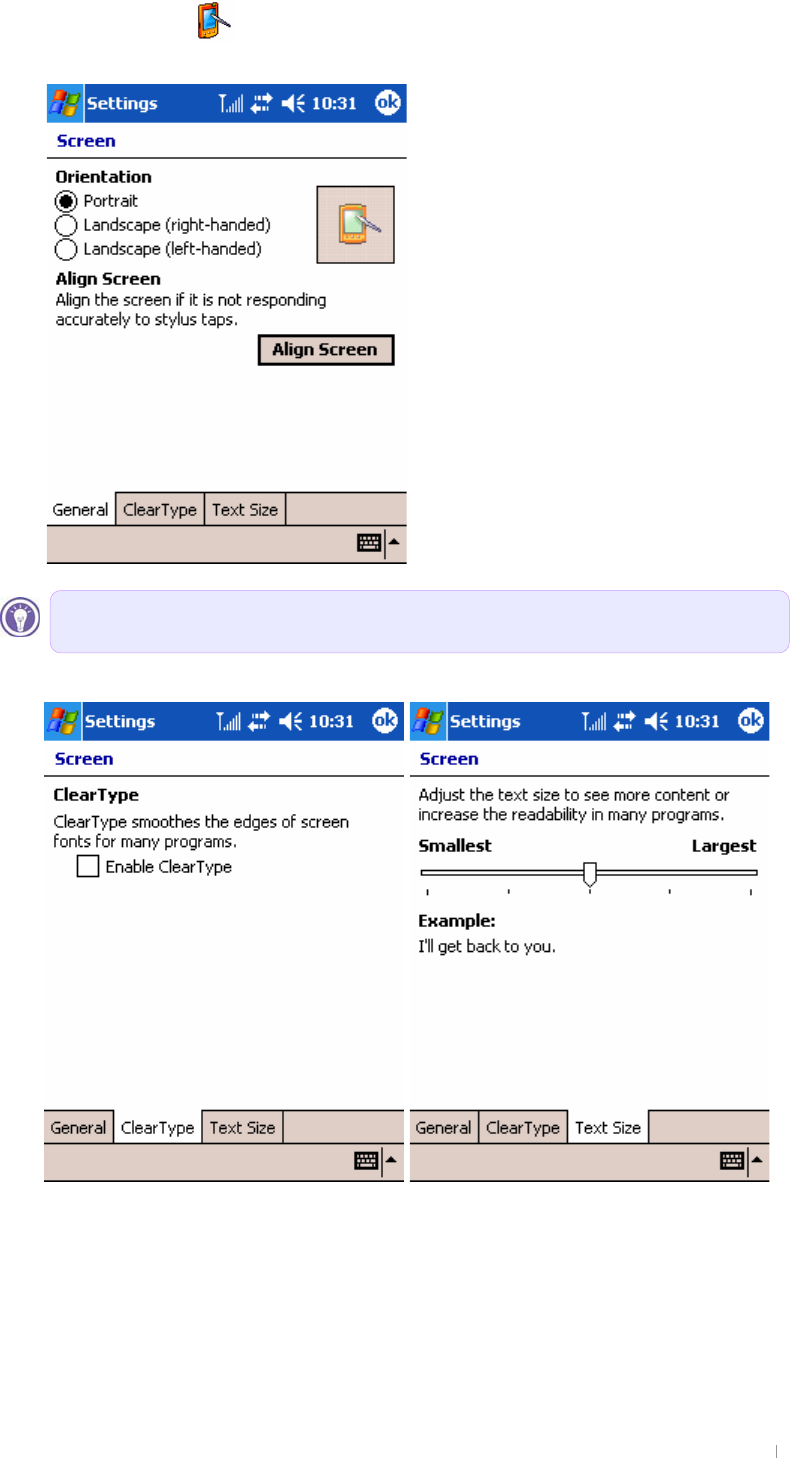
GChapter 6 Configuring Device 6-17
Tap the Screen ( ) icon to adjust the touch screen if your device is not responding
accurately to screen taps.
Press down the up button of the up/down control and press the power button at
the same time to have the Align Screen displayed.G
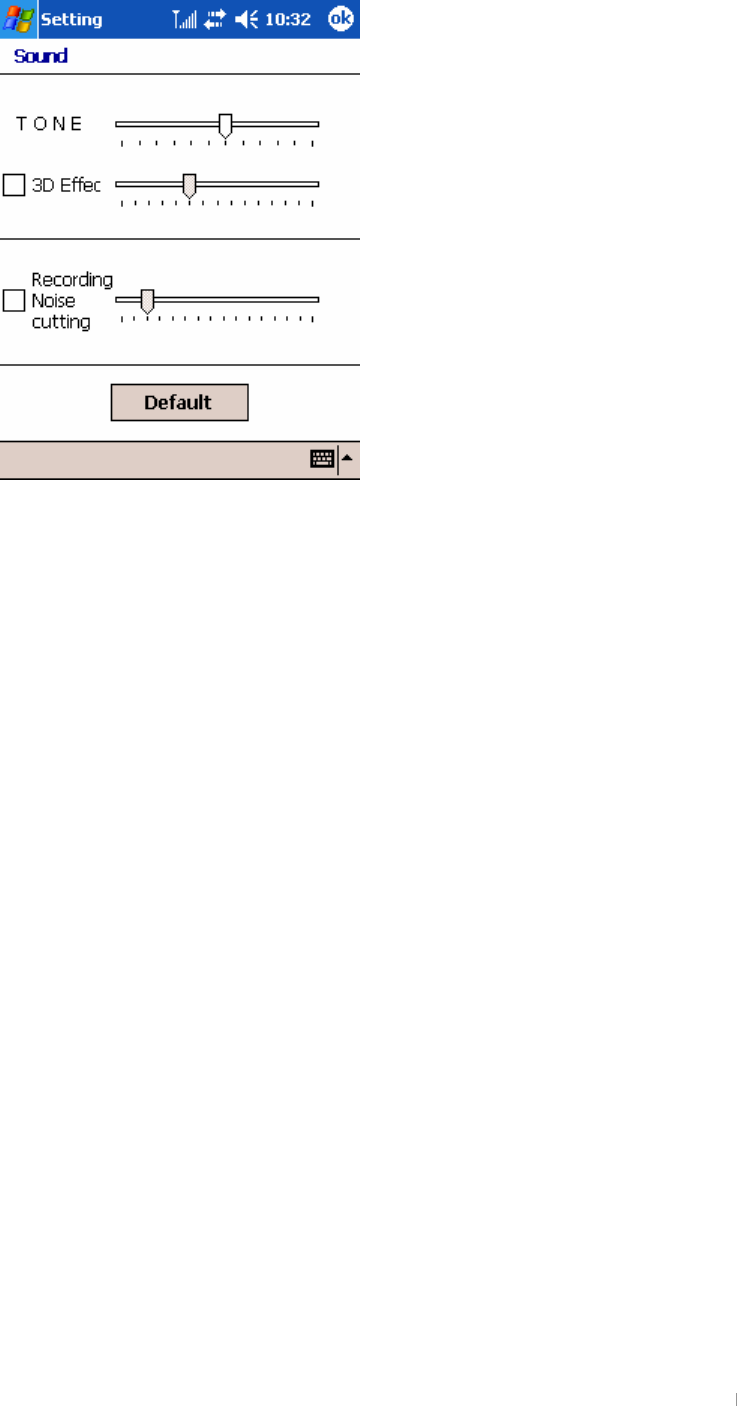
GUser’s Manual 6-18
Tap the Sound icon to adjust the sound effectively.
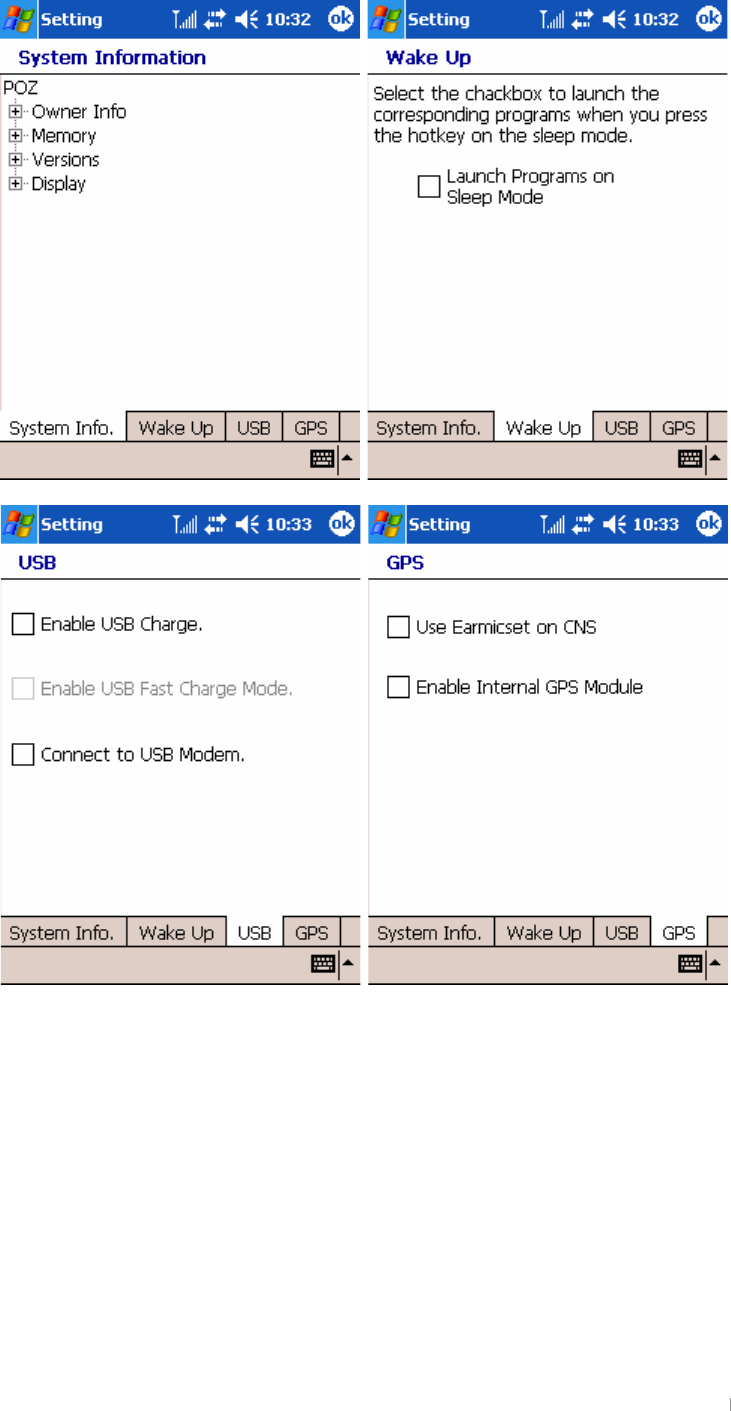
GChapter 6 Configuring Device 6-19
Tap the System icon to see system information and adjust the wake up, USB and GPS.

GUser’s Manual 6-20
3. the Connections tab
Tap the Beam ( ) icon to adjust the beam settings of your device.
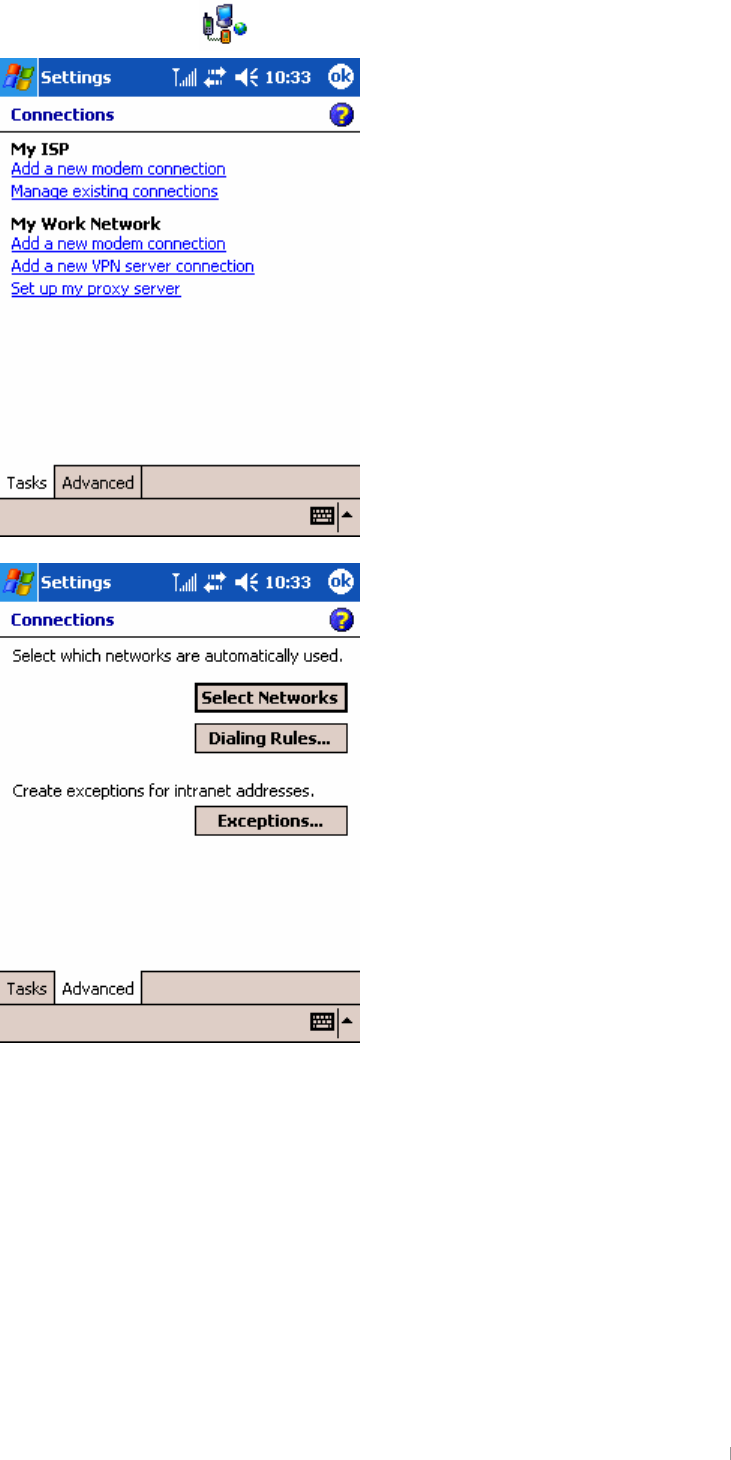
GChapter 6 Configuring Device 6-21
Tap the Connections ( ) icon to set the options for a modem connection.
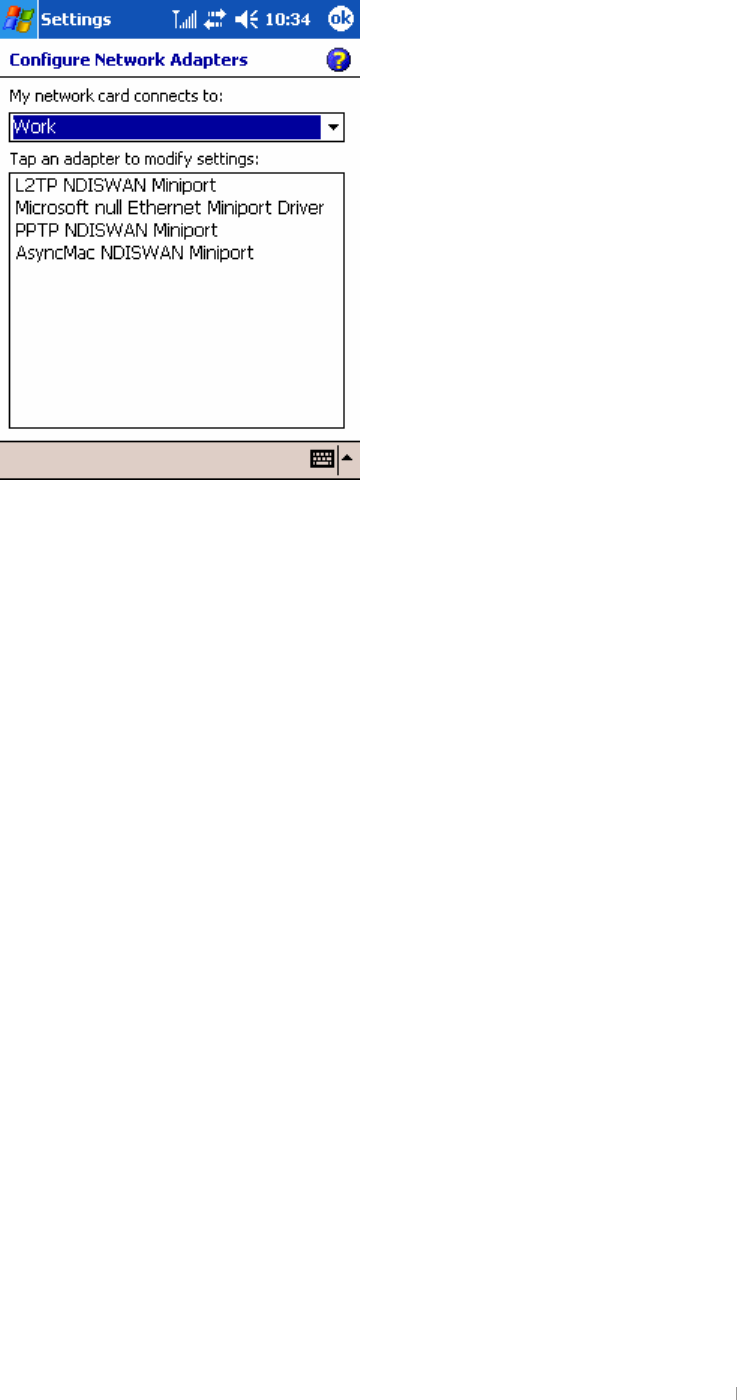
GUser’s Manual 6-22
{GGuGjGGGGGGGGUG