CyberBank CP-X315 CDMA Pocket PC/POZ PDA Cellular Phone User Manual chapter 07
CyberBank Corp CDMA Pocket PC/POZ PDA Cellular Phone chapter 07
Contents
- 1. Revised Part 1
- 2. Part 2
Part 2

GjG^GtGwG G ^TX
G
G
G
G
G
G
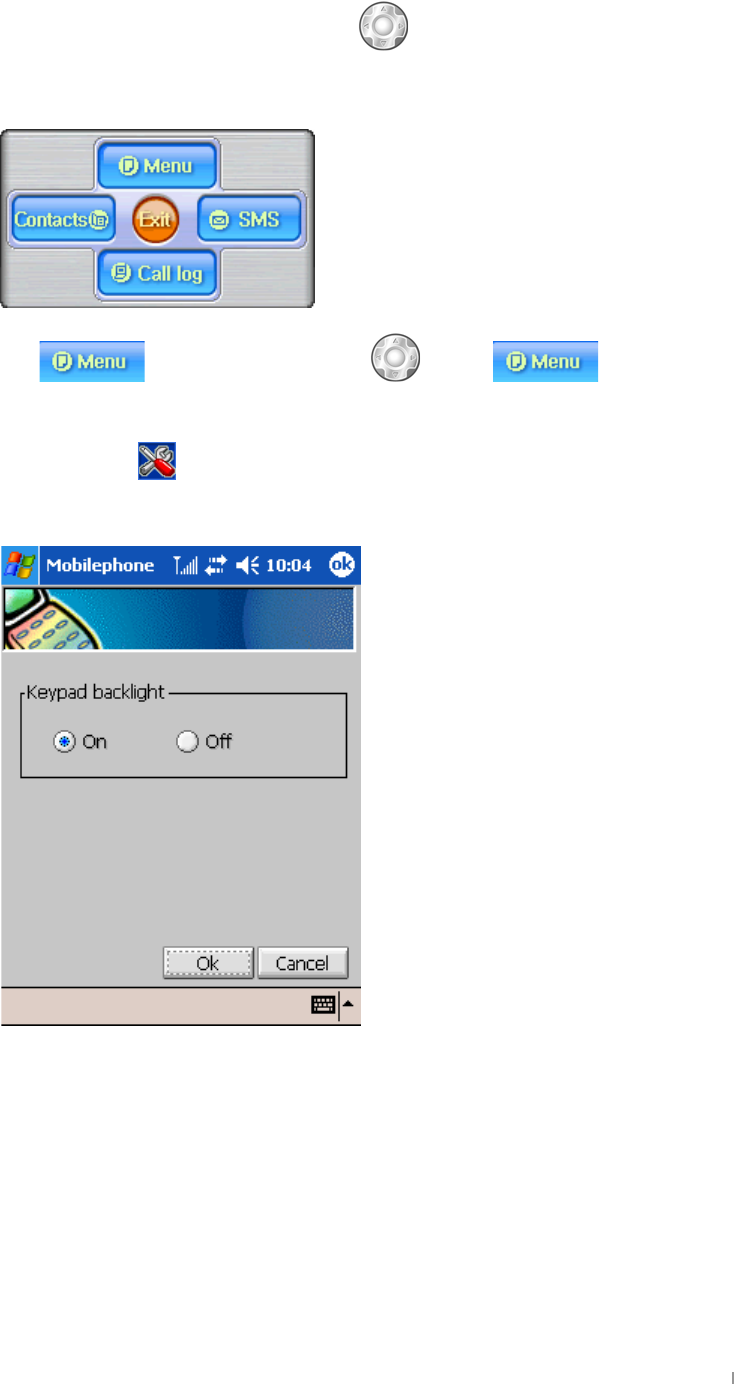
Your device has a built-in CDMA module that supports wide-range data communication
and additional features including SMS (Short Messaging Services), along with voice calls.
These features save you the trouble of having to purchase another cellular phone with a
phone number. Remember that you have no other right to copy the ESN number against
the communication law.
G
G
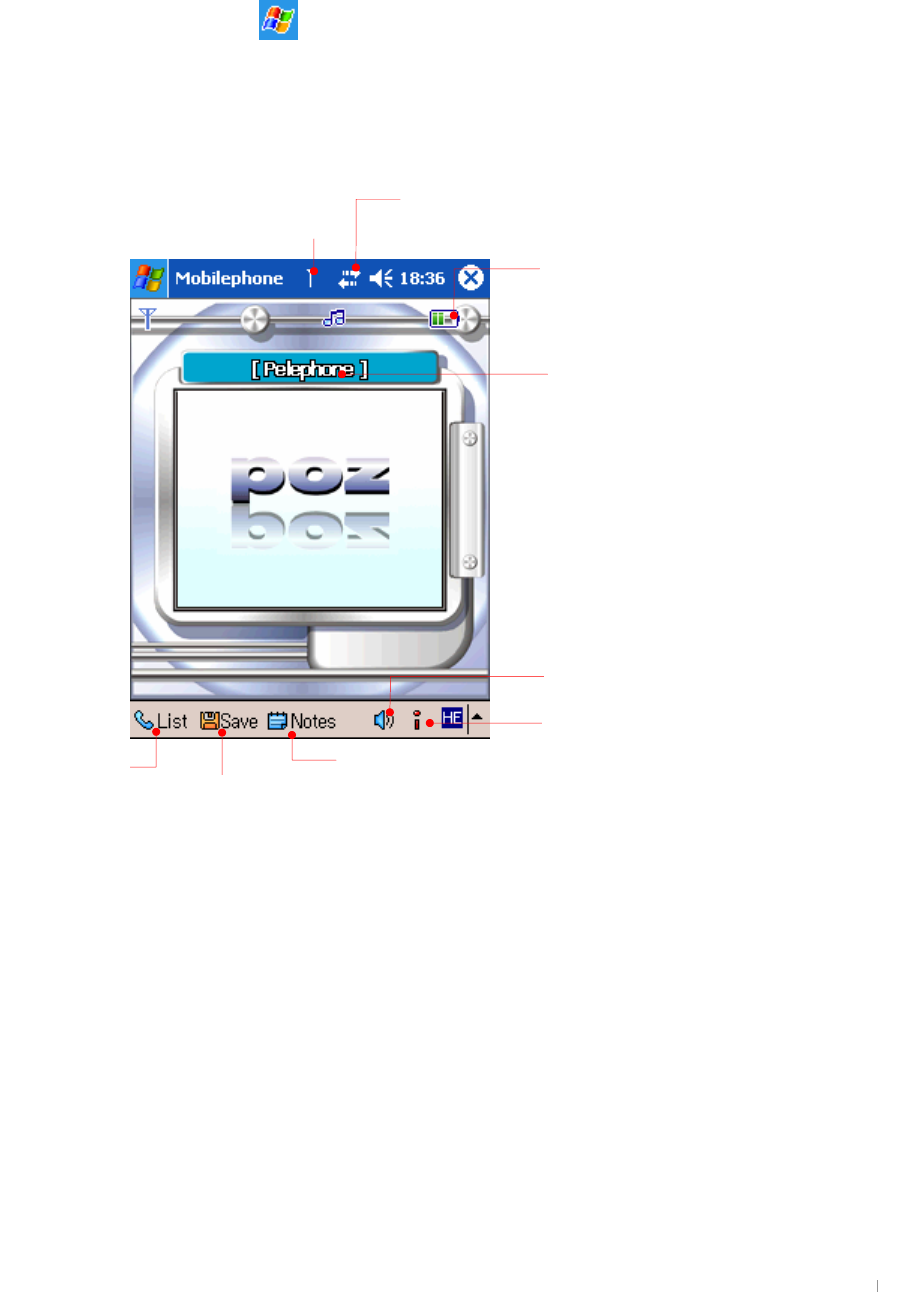
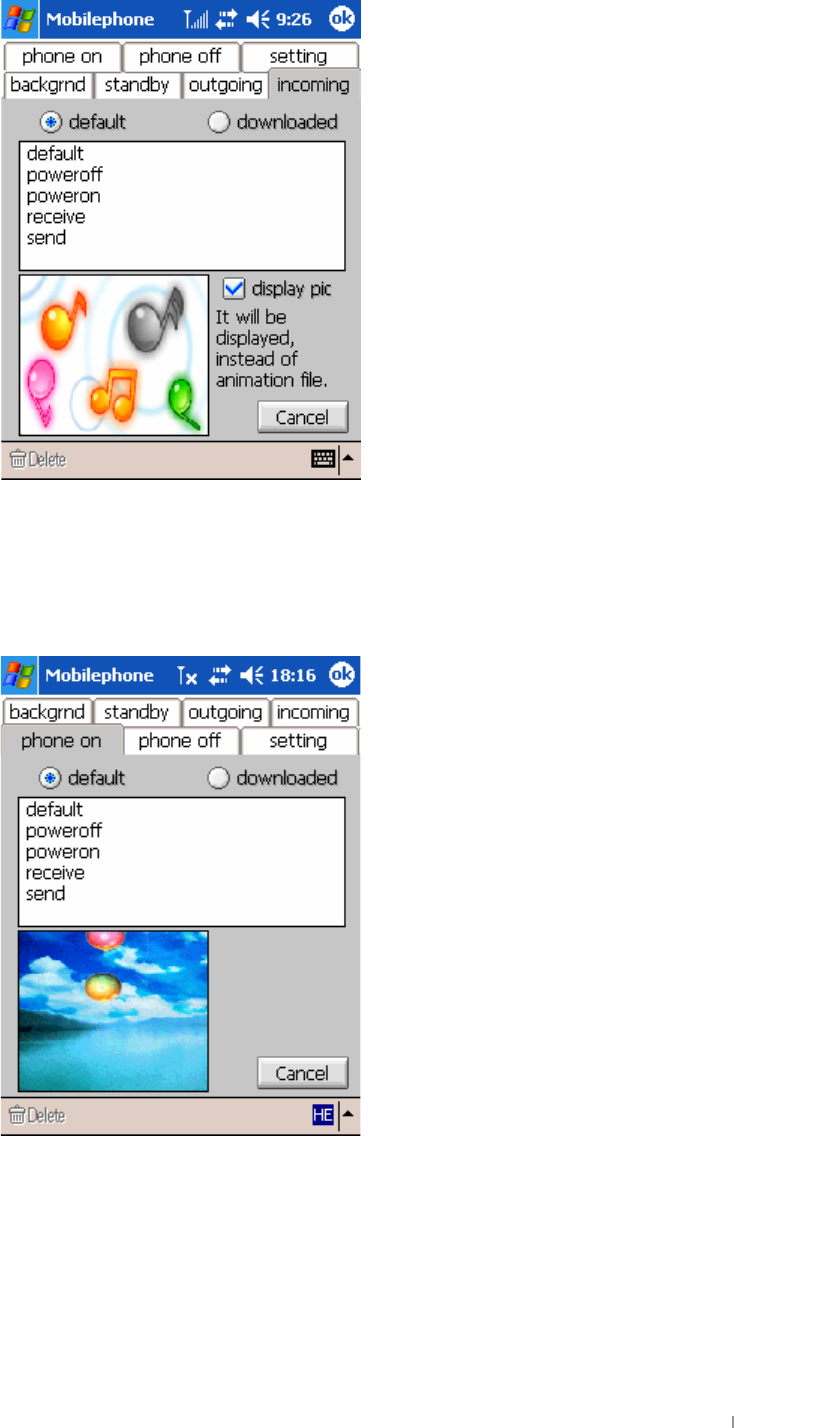
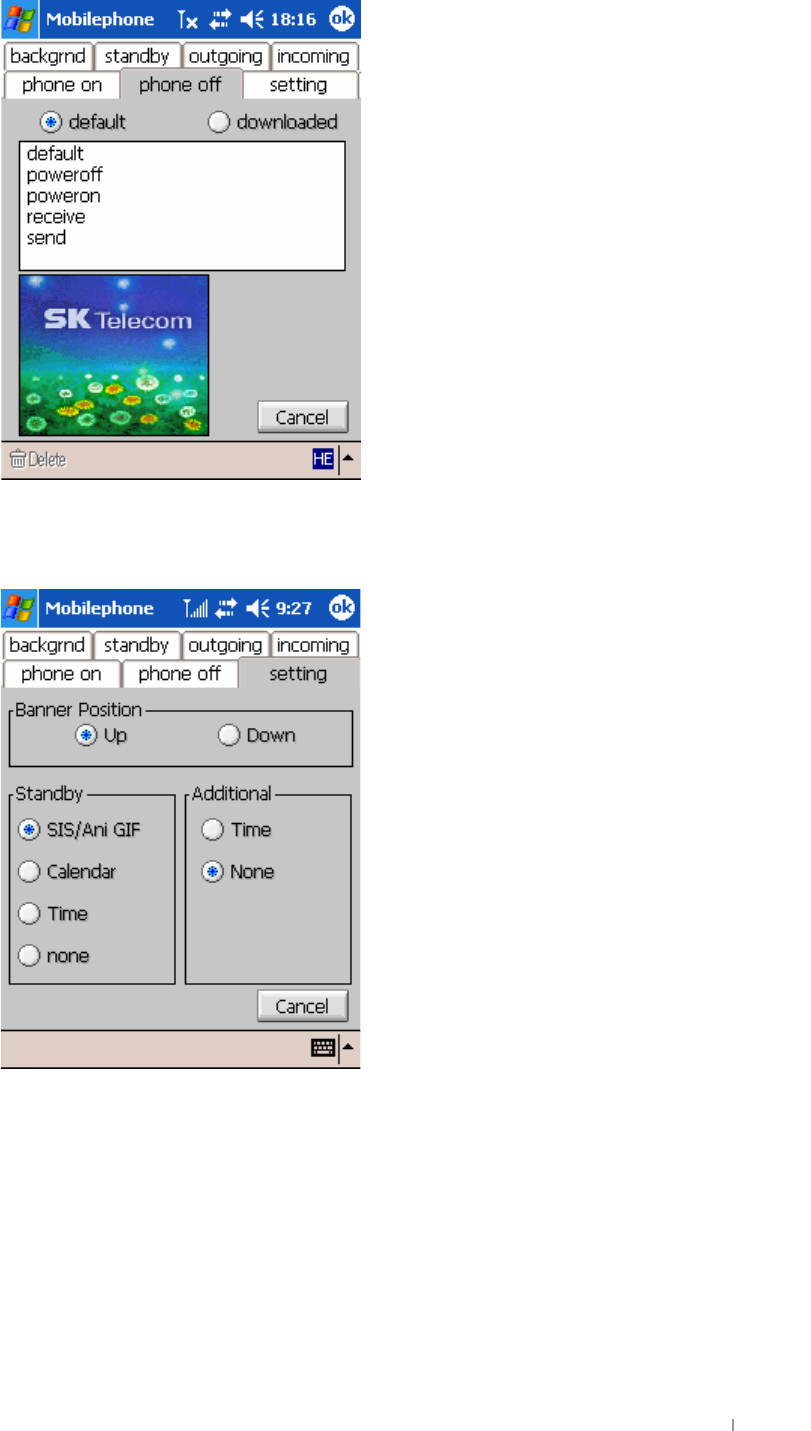
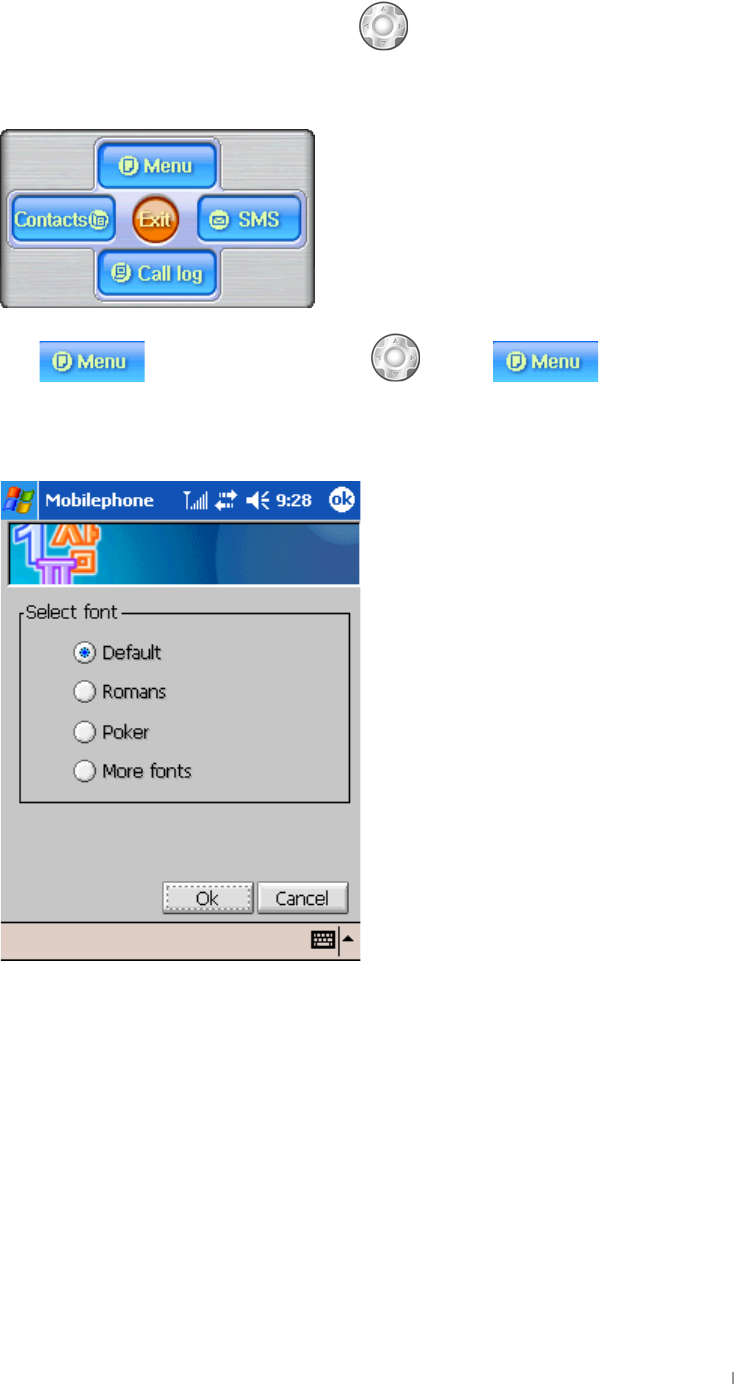
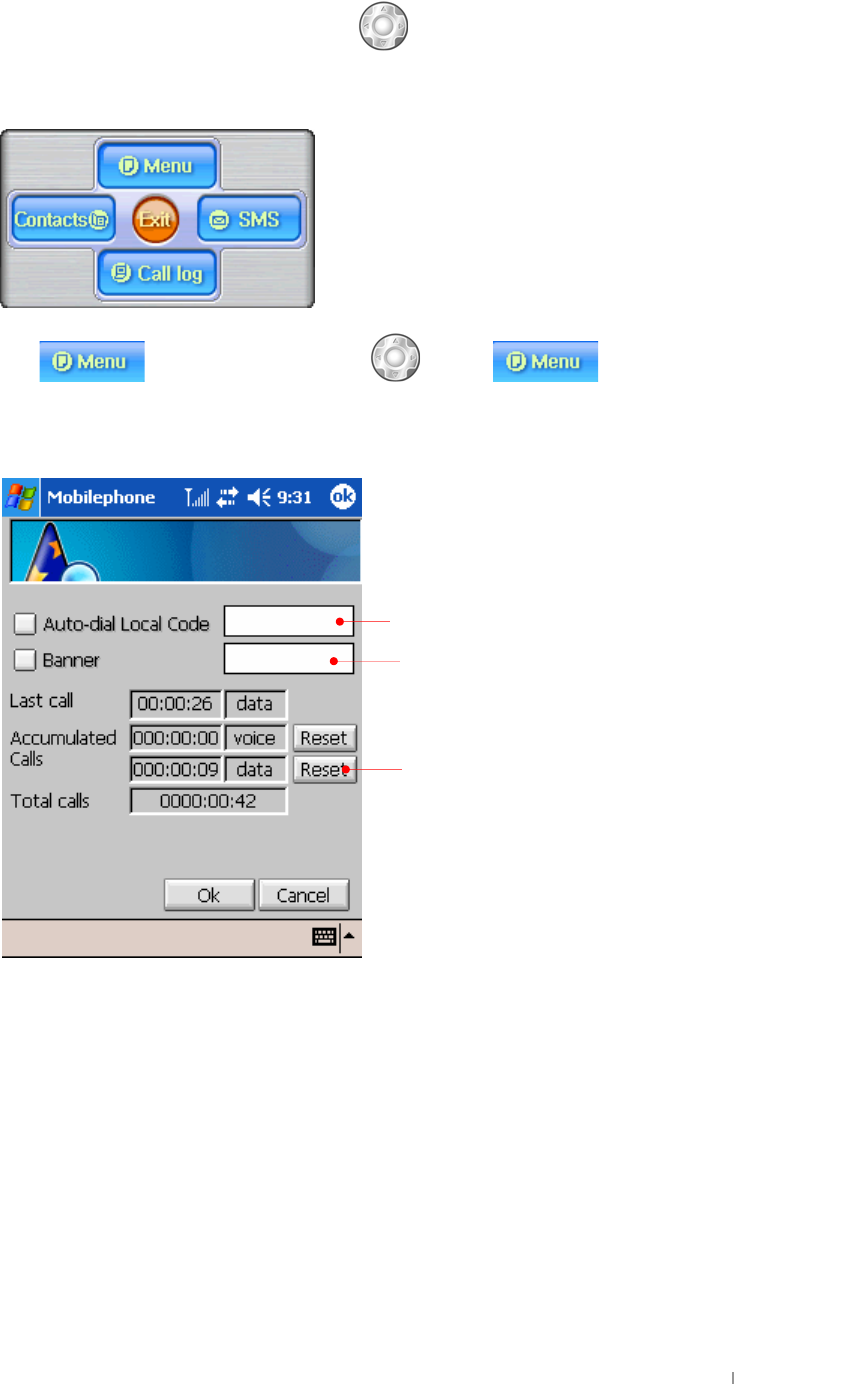
ඝThis chapter includes information on:
Phone Program
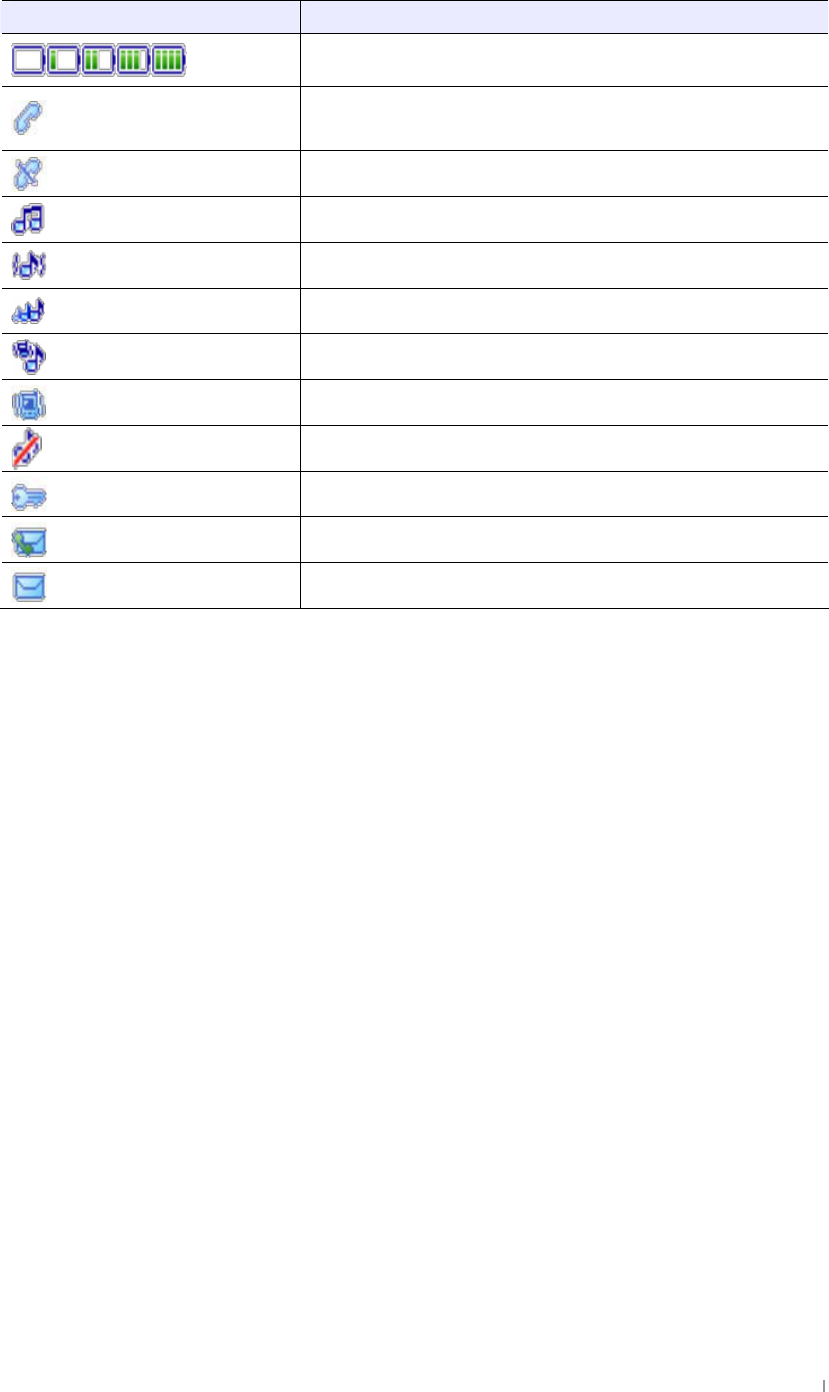
SMS : Short Messaging Service
Fkd
s
whu#:#
Preloh#Skrqh
G|˅ GtG G ^TY
Phone Program
G
GGGGGGGGGaG
z
zG G GeGˈ twˉ UG
z
wGGGUG
z
zGˈ twˉ GGwvGsGUG
G
G
G
G
G
G
G
G
G
G
G
G
G
G
G
G
G
G
G
G
G
G
uG G
zGzG
kGG¡GGGGG
GwjGGtGhzG
kGGGG
kGGGGGGG
yGjGsG
z
G G G G G G
GGUGmGG
SG G ˈ jˉ G
GGUG
hGG
GjG^GtGwG G ^TZ
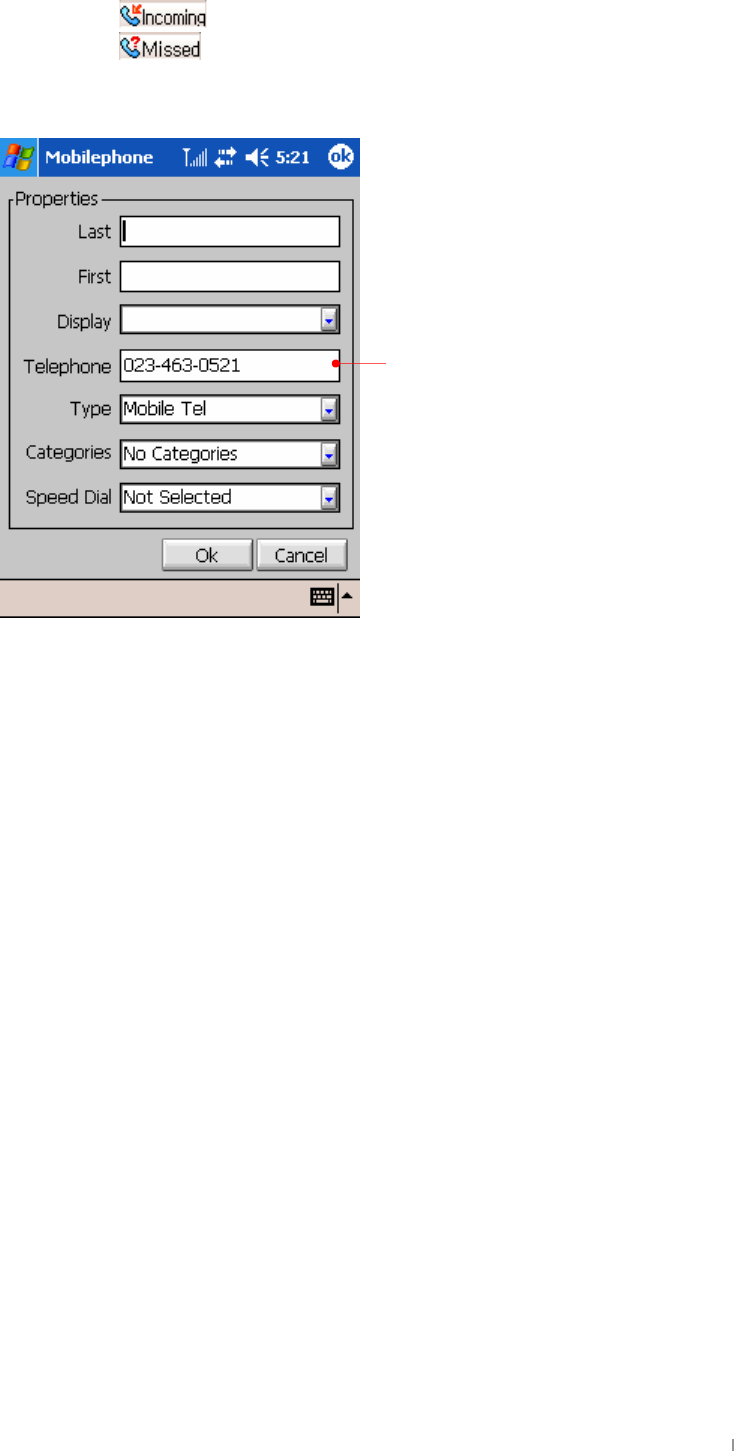
Indicators in the Phone display
Lqglfdwruv# Ghvfulswlrqv##
#Glvsod|#wkh#edwwhu|#ohyho1#
#
Zkhq#|rxu#fdoo#lv#wu|lqj#wr#eh#frqqhfwhg/#lw#eolqnv#dqg#zkhq#
|rxu#fdoo#lv#frqqhfwhg/#lw#wxuqv#rq1#
#Zkhq#|rx#duh#qrw#lq#wkh#vhuylfh#duhd/#lw#wxuqv#rq1#
#Ehoo#vrxqg#prgh#
#Ehoo#vrxqg#.#Yleudwh#prgh#
#Jhwwlqj#orxghu#prgh#
#Yleudwh#.#Ehoo#vrxqg#prgh#
#Yleudwh#prgh1#
#Pxwh#prgh#
#Orfn#prgh1#
#Yrlfh#phvvdjh#
#VPV#phvvdjh1#
G
G|˅ GtG G ^T[
}GG
~GGGG # lfrq#dsshduv/#suhvv# G GGG
GGGGGGUG
G
FYWYbh7U``@c[
{G G GG G GGGGGGUG
G
G
G
G
G
G
G
G
G
G
G
G
G
G
G
G
zGGGGGGG G GGGUG G
GjG^GtGwG G ^T\
:]bXmcifWc``YU[iYgig]b[(!X][]hbiaVYf
{GGGGGGG˅ GGGGGG[TGGG
UG G
lG[TGGG UG
G
G
G
G
G
G
G
G
G
G
G
G
G
G
G
G
zGGGGGGGG GUGG
G|˅ GtG G ^T]
gUjY
GzG G GGGGGGGGGG G
G
G
G
G
G
G
G
G
G
G
G
G
G
G
G
G
lGGGGGGGUG
{GkGGGGGGGGZGGUG
G
G
G
G
G
G
pGGGGkSGGGGGGGGGGG
GGUG
pGGGGGGSGGGGGGGGGGGUG
{GvrGGGUG G
G
zhGGGGGGGGGG
UG
z{GGGGGGGGGG
UG G
zuGGGGGGGGGUG
GjG^GtGwG G ^T^
5X^ighjc]WYVYhkYYbmciUbXmcifdUfhm
{G G GGGGGGGGGGUGvSGGGGG
GGGGGGGGUG
G
G
G
G
G
G
G
G
G
G
G
G
G
G
G
G
zGGGGGGGGGGUG
G
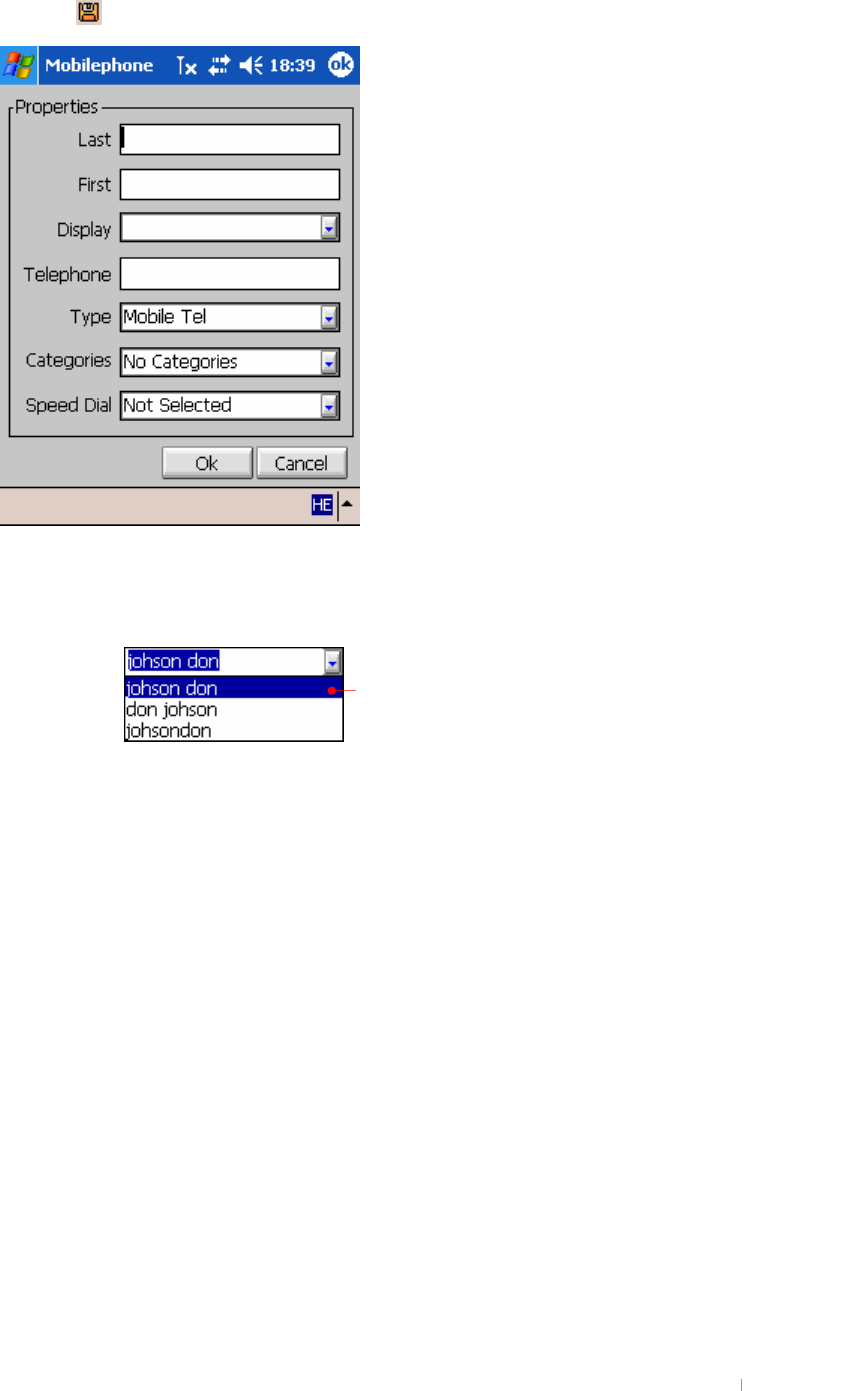
GYYmcifckbd\cbYbiaVYfUbXd\cbYjYfg]cb
{G G GGGGGGGGGGUG
G
G
G
G
G
G
G
G
G
G
G
G
G
G
G
G
G
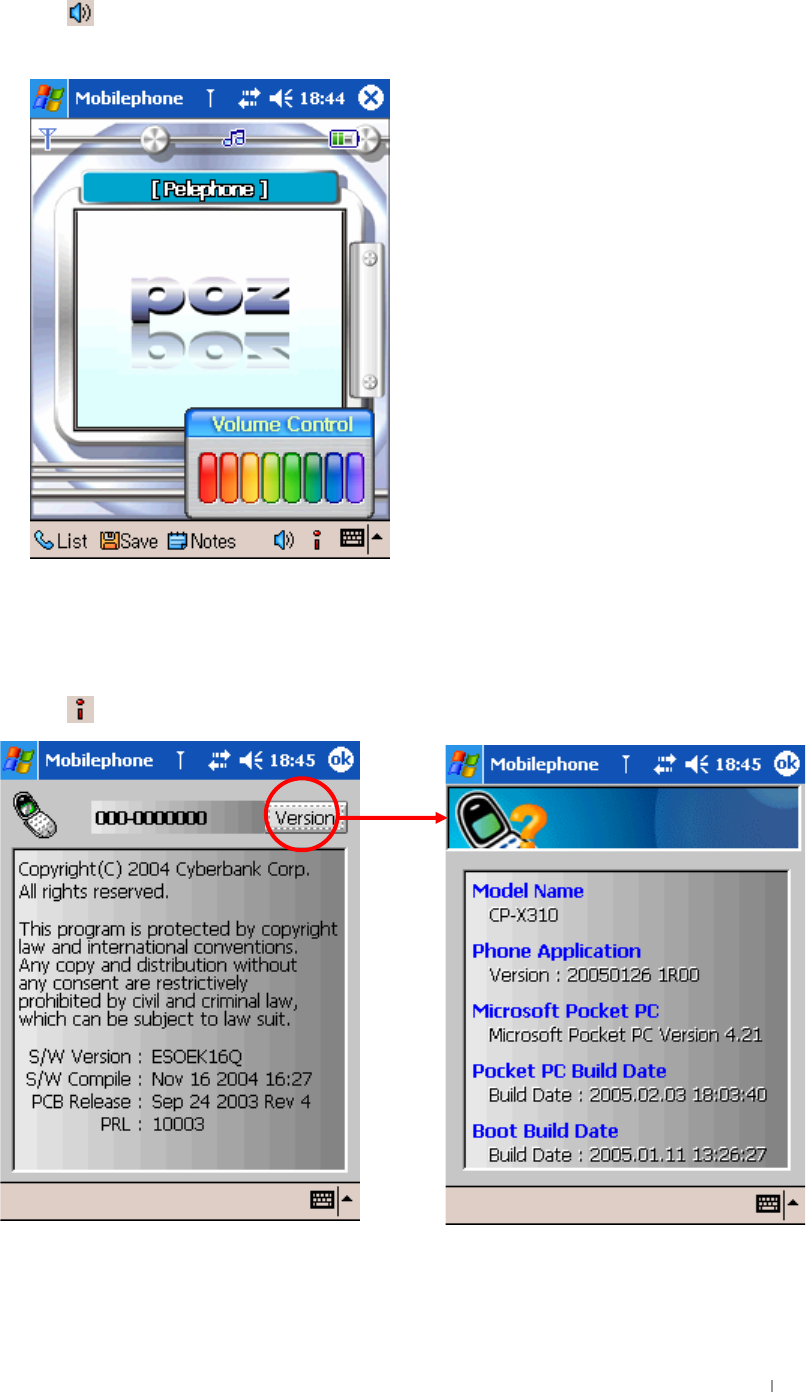
G|˅ GtG G ^T_
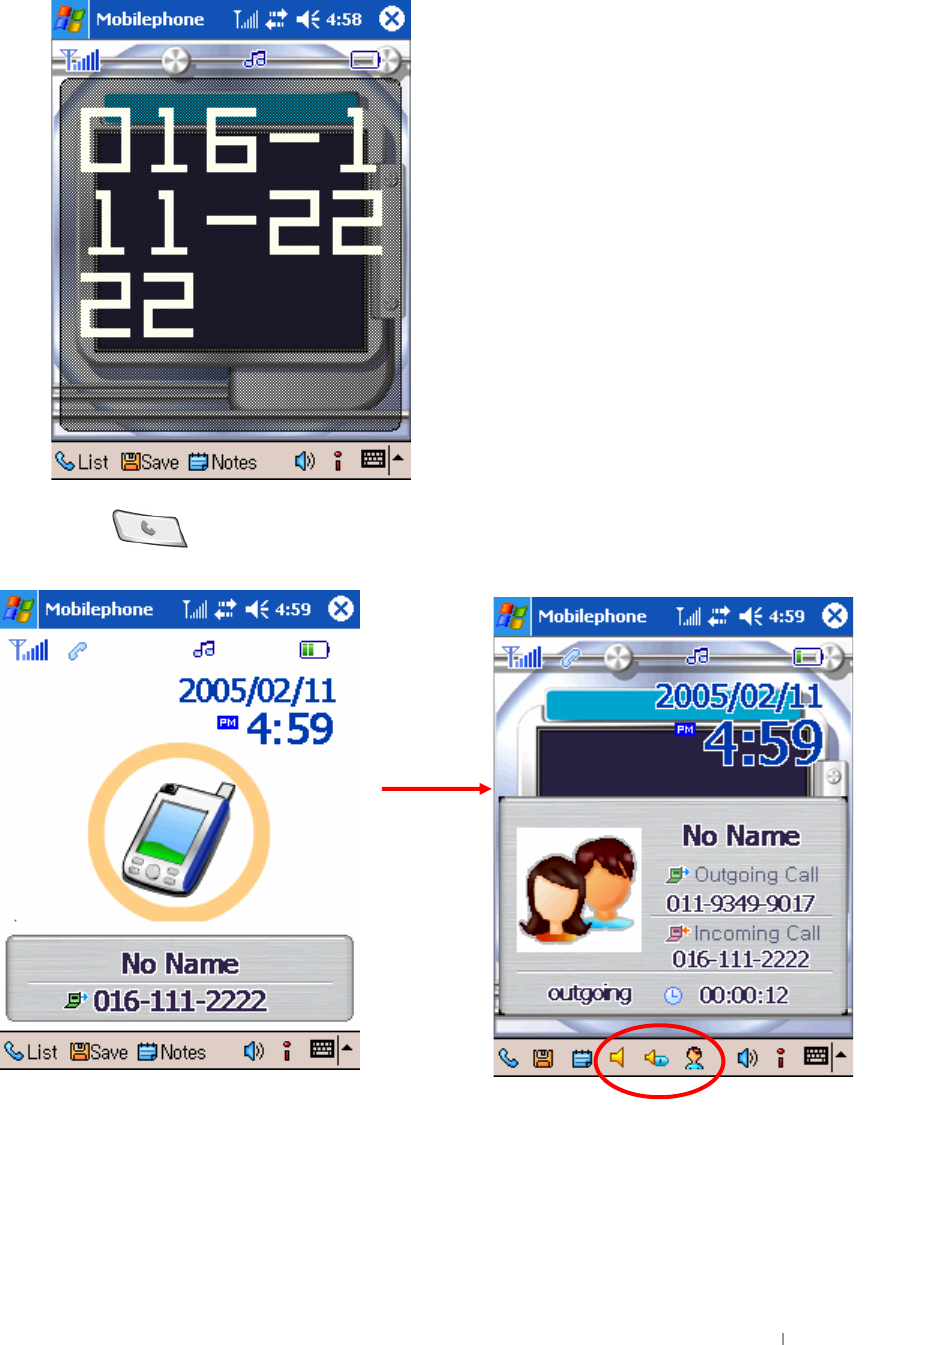
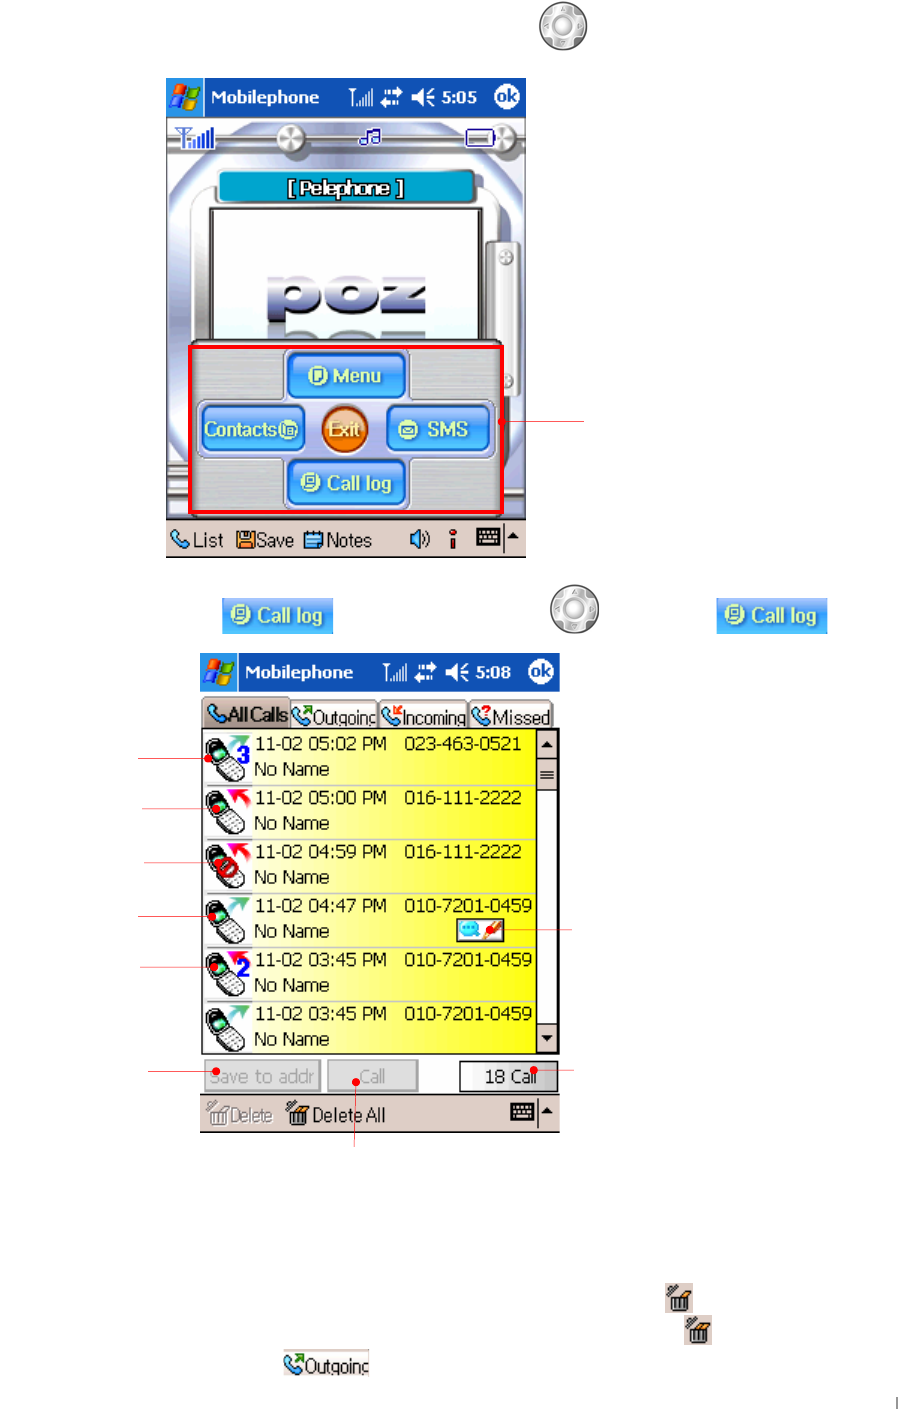
K\]`YcbUWU`` h\Y]Wcbgcbh\YWcaaUbXVUf
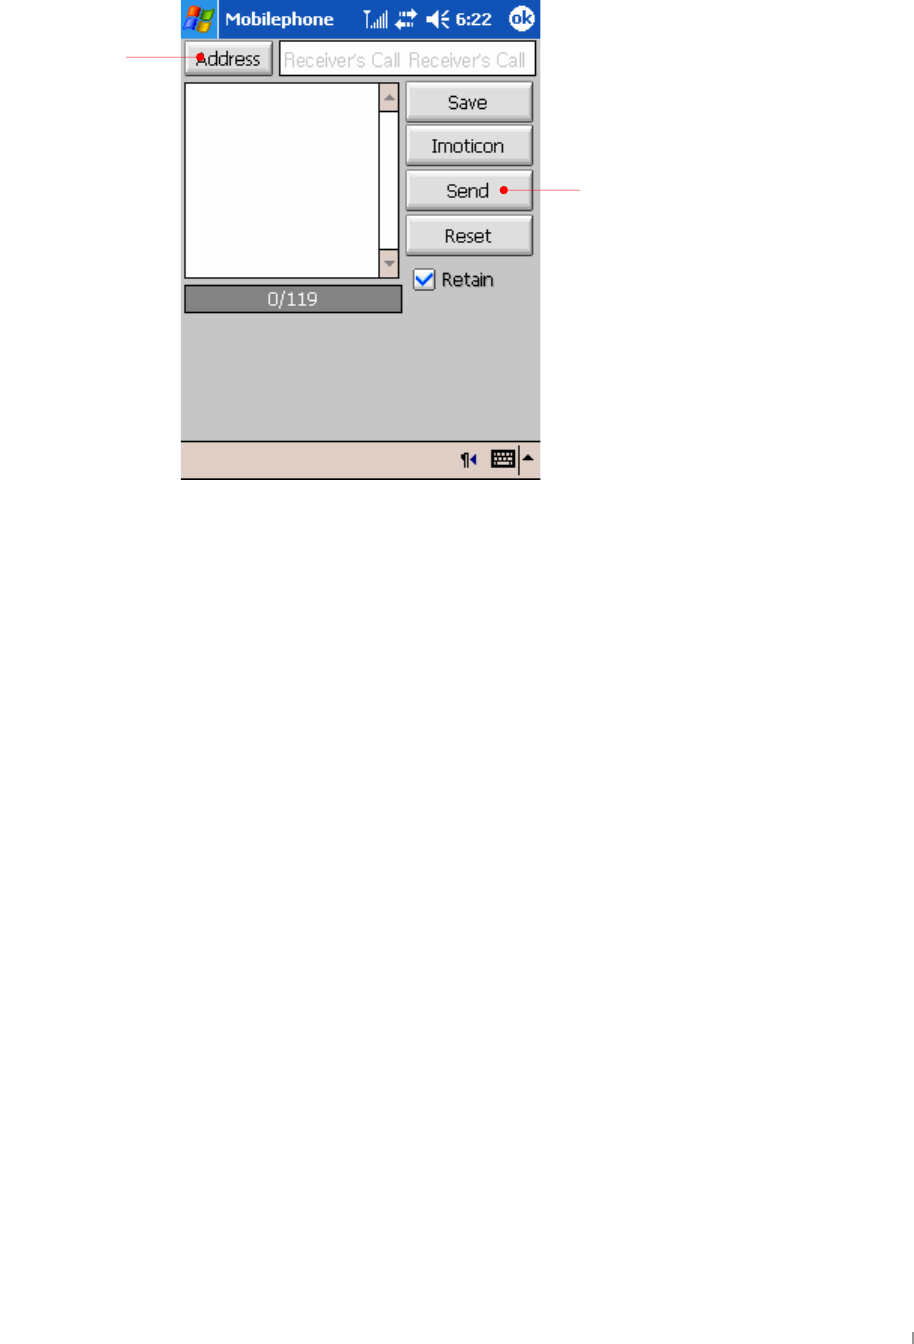
While communicating over your phone, you will also see icons on the Command bar as follows
UG G
G
Icons
G
Descriptions
G
Mute
GVG
Un-mute
G
Tap one icon to have the other icon display.
You can un-mute while communicating.
Remove Key Sound
G
V
Key Sound
G
Tap icon to have the other icon display.
You cannot hear any key sound while tapping any key on your dial
pad.
User Information
G
Tap this icon to have the User Information screen display and you
can select any number you have entered before to send out.
G
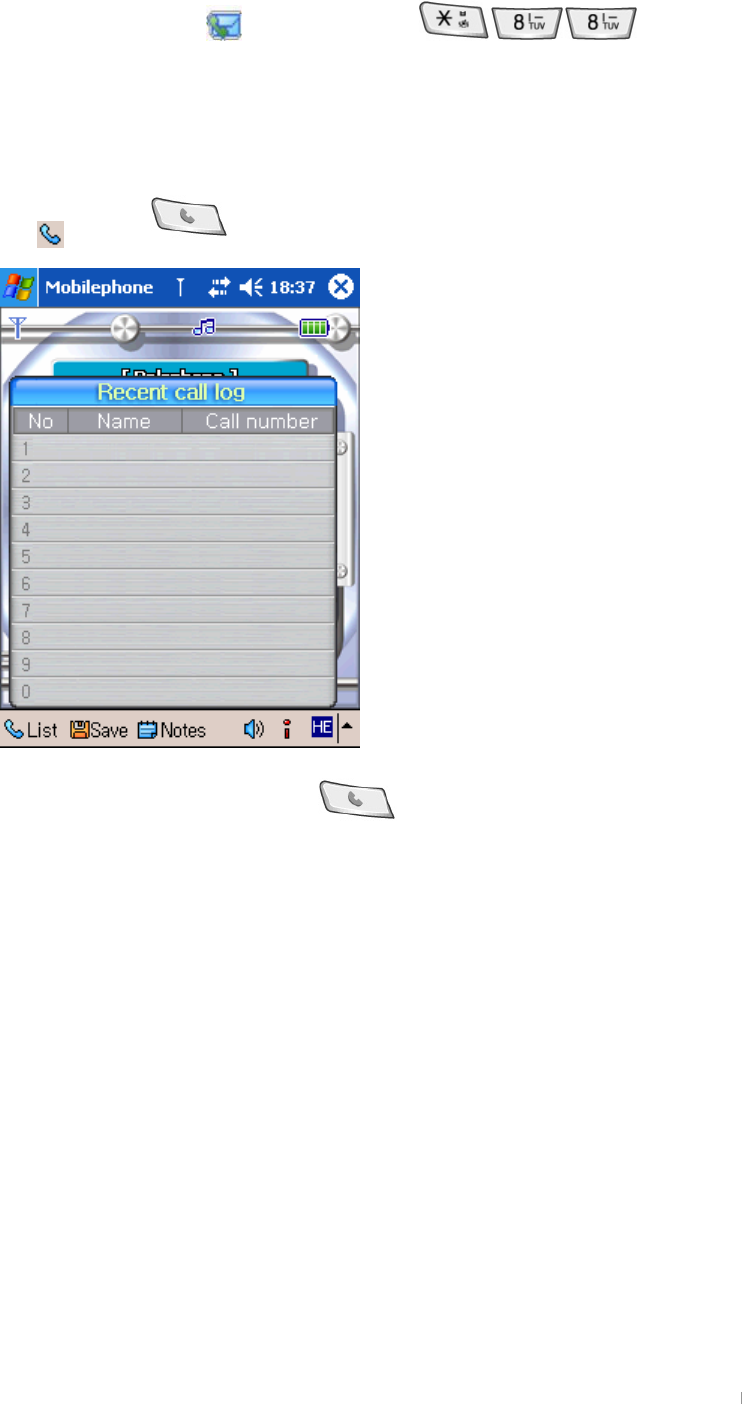
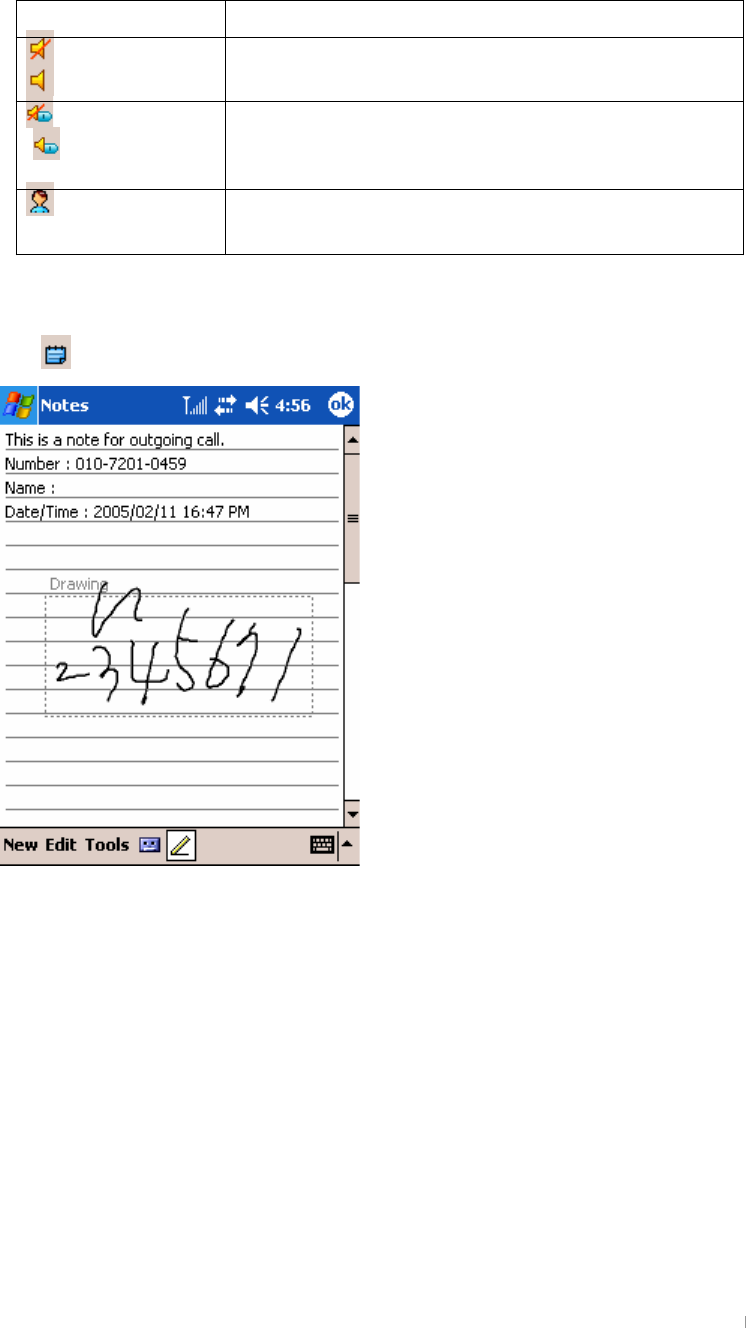
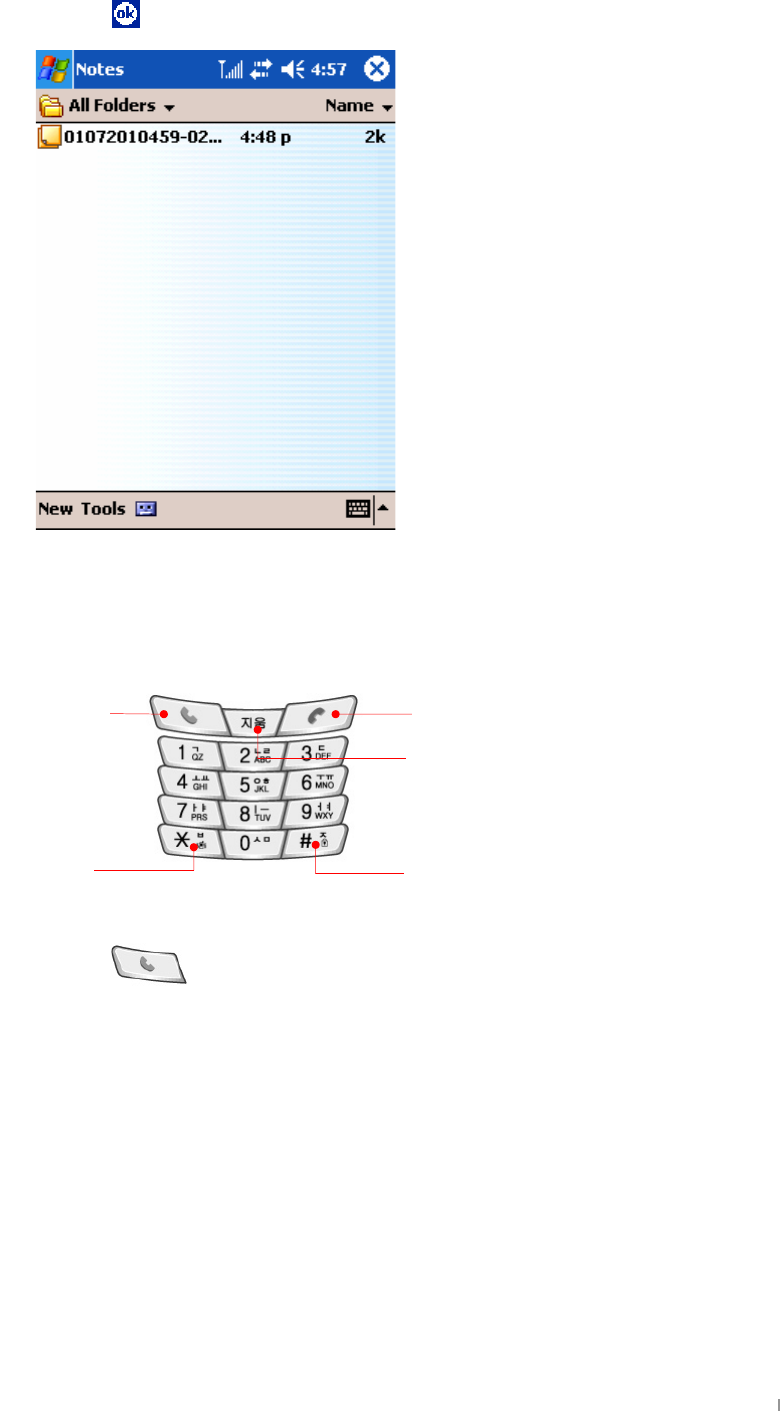
jGuGG
{G G GGGGG
make notes during a voice call
UG G
G
G
G
G
G
G
G
G
G
G
G
G
G
G
G
G
GjG^GtGwG G ^T`
You can enter any contents you want and record your voice. When you finish entering any contents you
want, tap to display the folder(File Store\CallNotes).
G
G
G
G
G
G
G
G
G
G
G
G
G
G
G
G
G
G
D\cbY?YmdUX
wGGGGGGGGGGGGUG G
G
G
G
G
G
G
G
G
GYbX Vihhcb
z
hGGGGGGSGGGzGGGGGUG G
z
wGGzGGGGGGGGUGzGGGGG
GGGGzGGGGGGUG G
z
lGG[TGGGGGGGGzGGGGG
GGGGGG[TGUGzGGGGGG
GGGzGGGGGGUG G G
G
lUG
zUG
lG
sG
}G

G|˅ GtG G ^TXW
8Y`YhY Vihhcb
z
wGGkGGGGGGUG G
z
wGGGGkGGGGGUG G
G
9bX Vihhcb
wGGlGGGGGUG
G
G
G
G
G
J]VfUhY Vihhcb
wGGGG}G G GGGGGGGG}GUGG
GGG}G G GGGGUGpGGGGGGSGGG
GG}GGUG
G
@cW_ Vihhcb
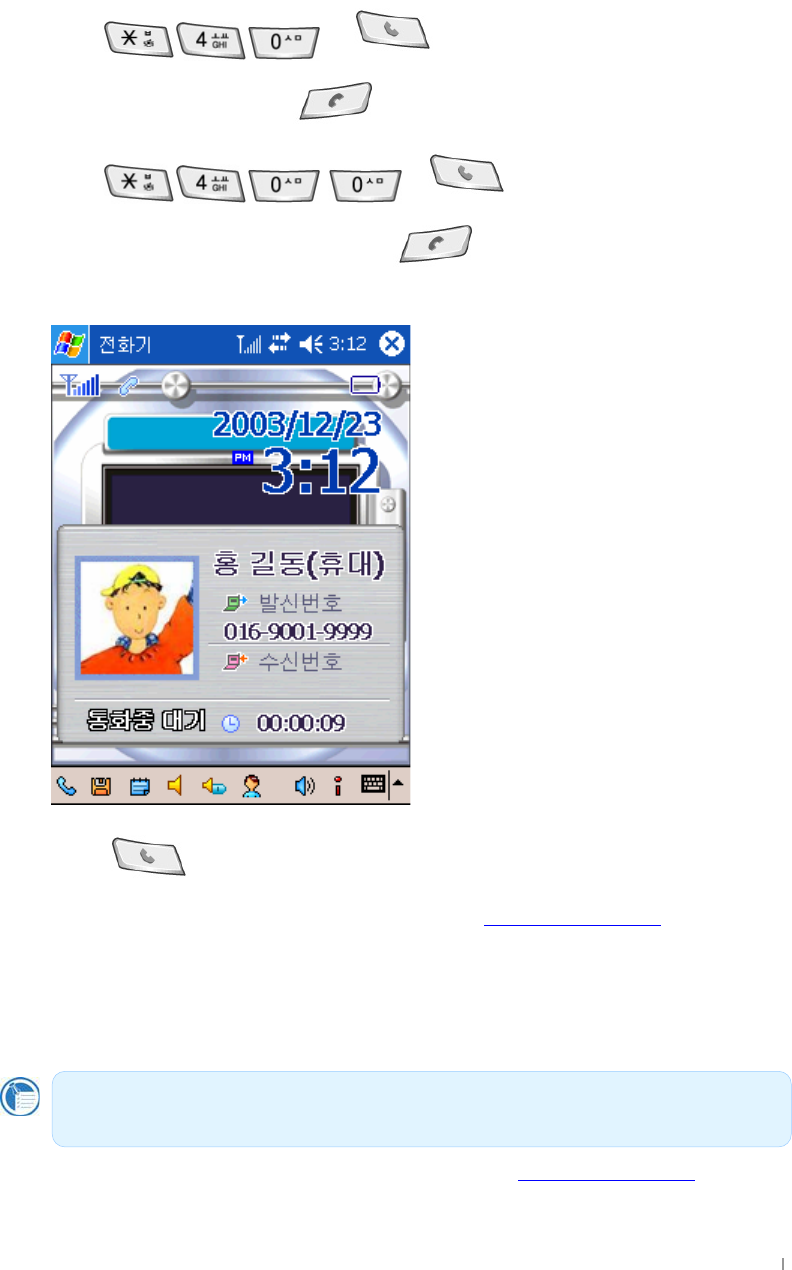
Press and hold the Lock button to lock your phone. When you try to use a locked phone, it asks you to
enter the unlock code(the default code is “0000”). A locked phone still rings or vibrates for incoming calls or
messages, but you must unlock it to answer.
GG
G
>c[8]U`
z
~GGGGGOGPSGGGqGkGGGGGG
GUGwGGqGkGGGGGUG
z
~GGGSGGVGGqGkGGGGGUG
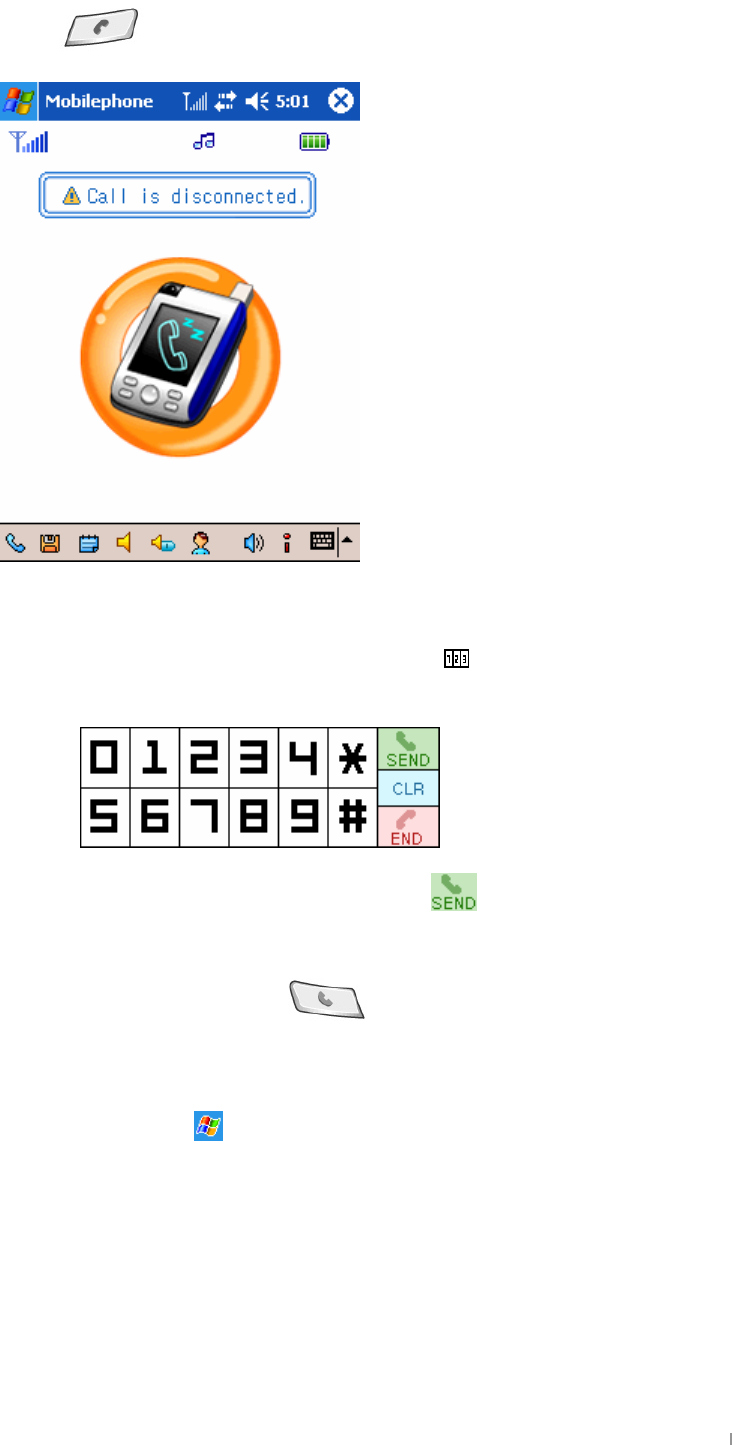
Suhvv#dqg#krog#wkh#Hqg#exwwrq#wr#wxuq#wkh#FGPD#prgxoh#rii#vr#wkdw#|rx#fdqqrw#
pdnh#dqg#uhfhlyh#d#fdoo#ru#hyhq#|rx#fdqqrw#pdnh#wkh#lqwhuqhw#ru#phvvhqjhu#
frqqhfwhg1#Suhvv#dqg#krog#djdlq#wkh#Hqg#exwwrq#wr#wxuq#rq#wkh#FGPD#prgxoh1#
GjG^GtGwG G ^TXX
AU_YUWU``
wGGGGGGGGGGGGUG
G
G
G
G
G
G
G
G
G
G
G
G
G
G
G
G
wG UG
G
G
G
G
G
G
G
G
G
G
G
G
G
G
G
G
G
G
G
pGGG
GG
zGˈ GGGSGG
GGGG
ˉ G
G|˅ GtG G ^TXY
wG G GGGUG
G
G
G
G
G
G
G
G
G
G
G
G
G
G
G
G
G
hGGGGGGGGaG
z
~GGGGGGSGG G GGGGGGG
UG G
G
hGGGGGGSGG UG
z
~GGGGGGGGGSGGGGGG
GGGGG UG
z
wGGGGGGGGGGGGGGGUG
z
wGGGGGGGGGGGGGGGUG
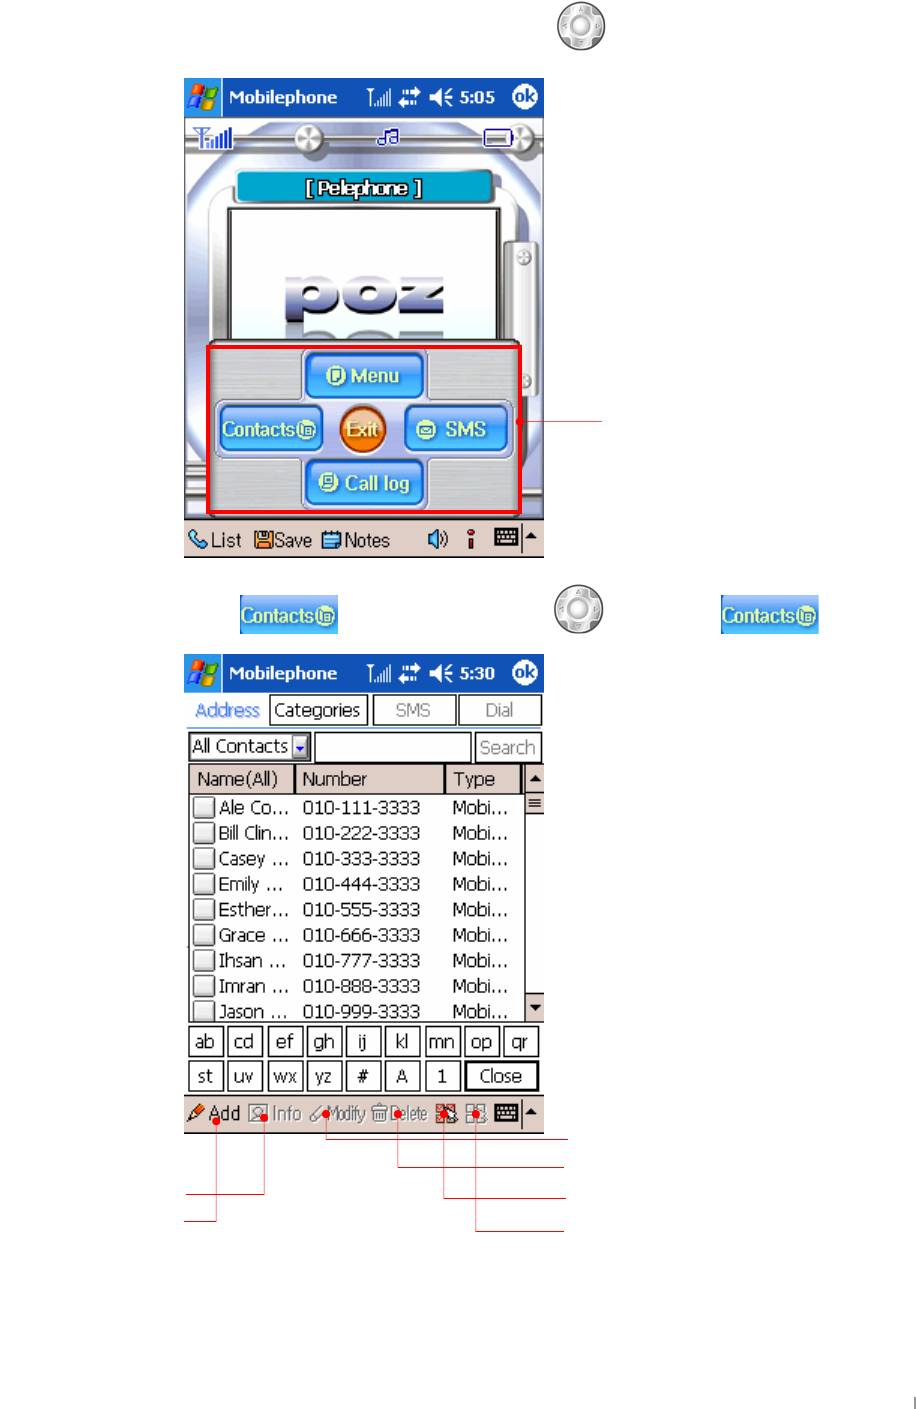
z
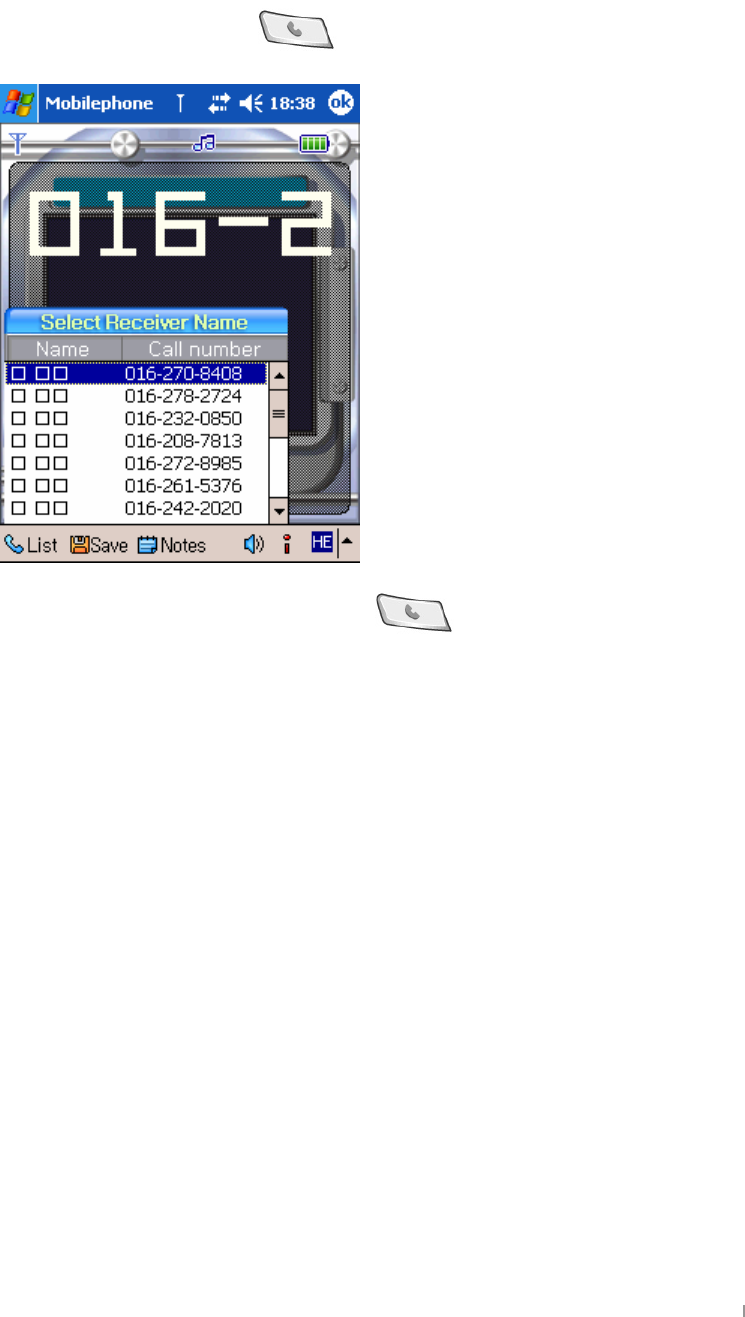
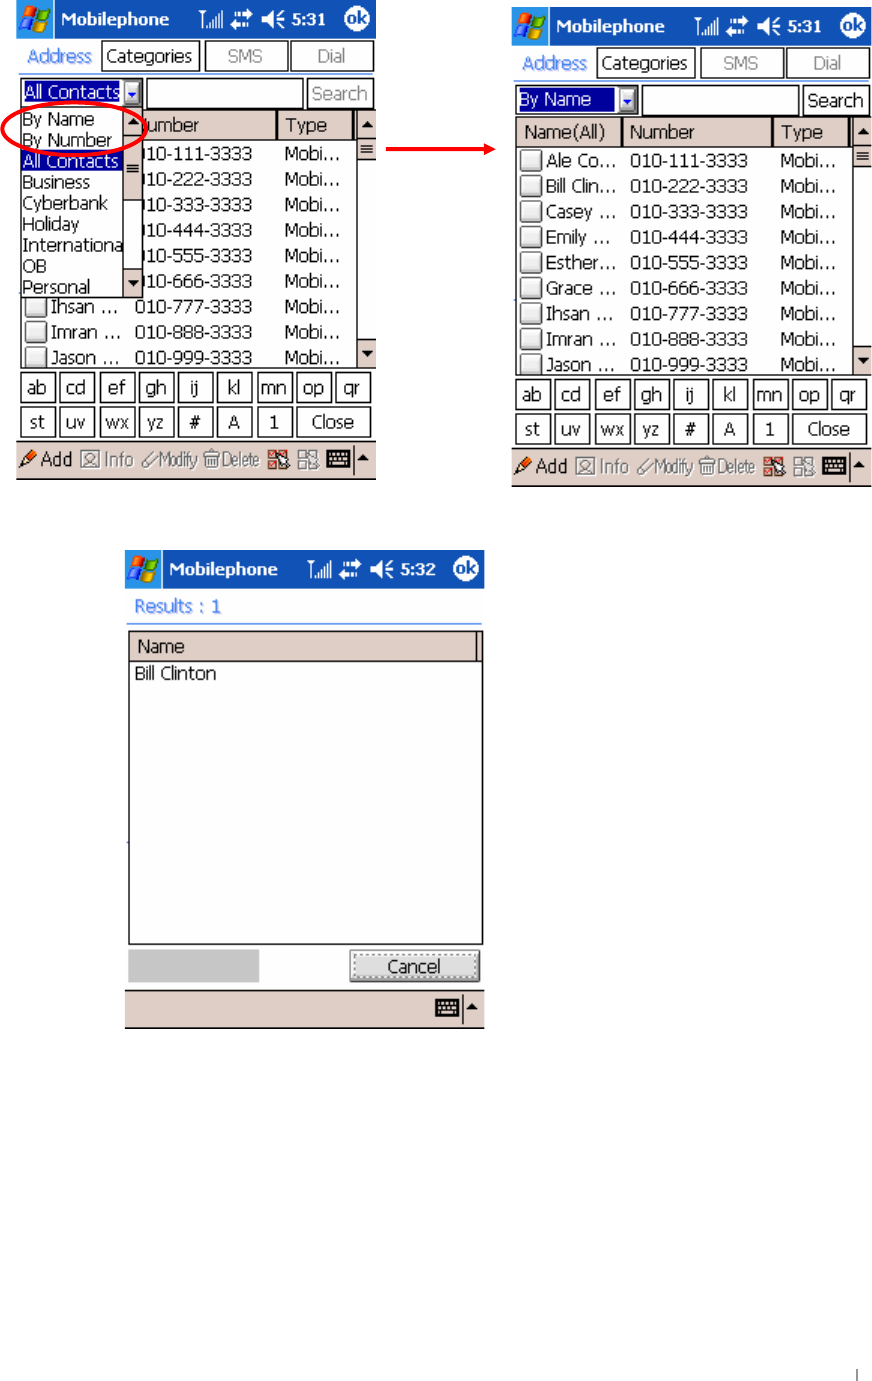
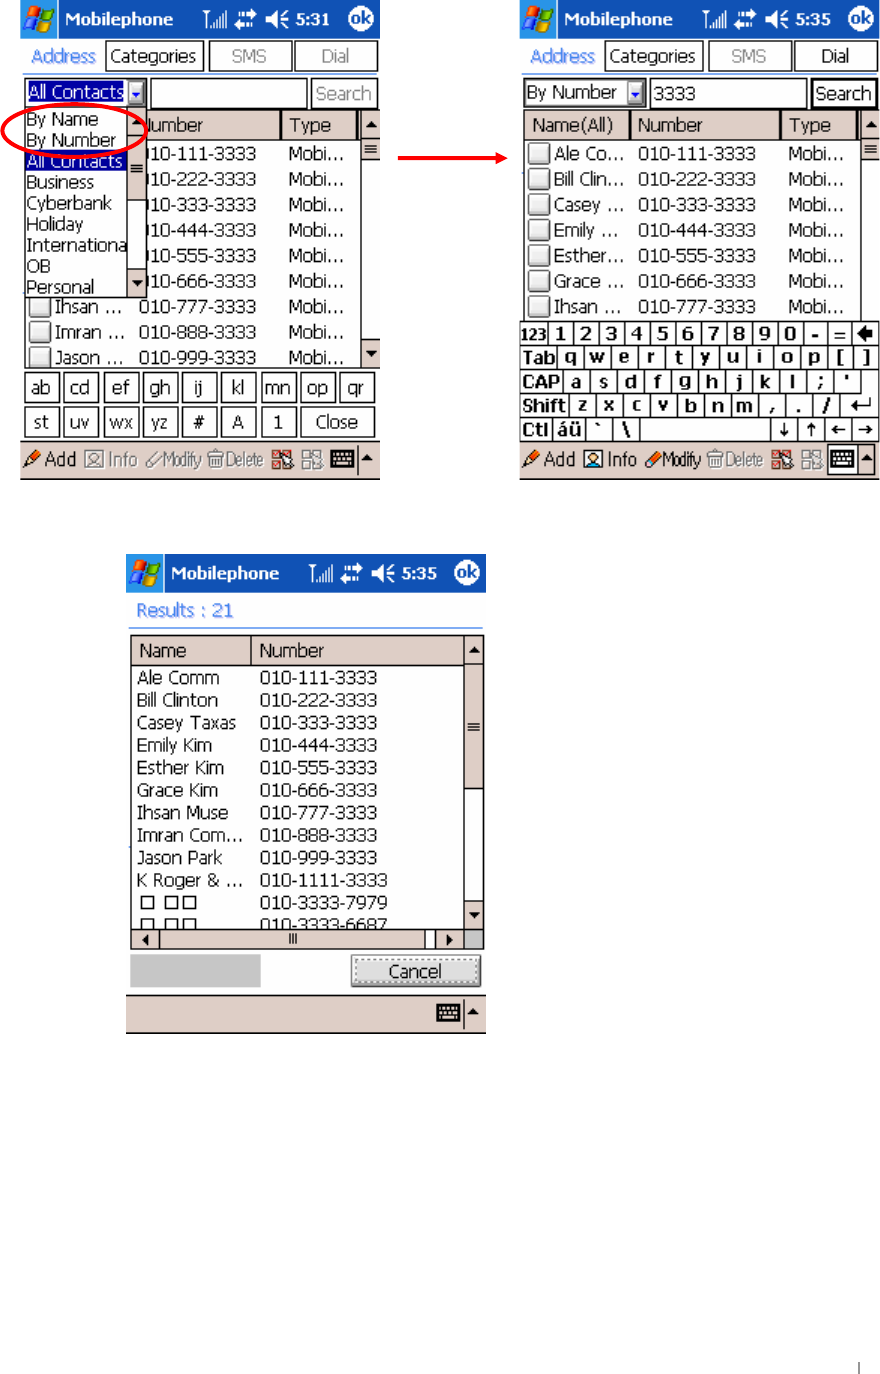
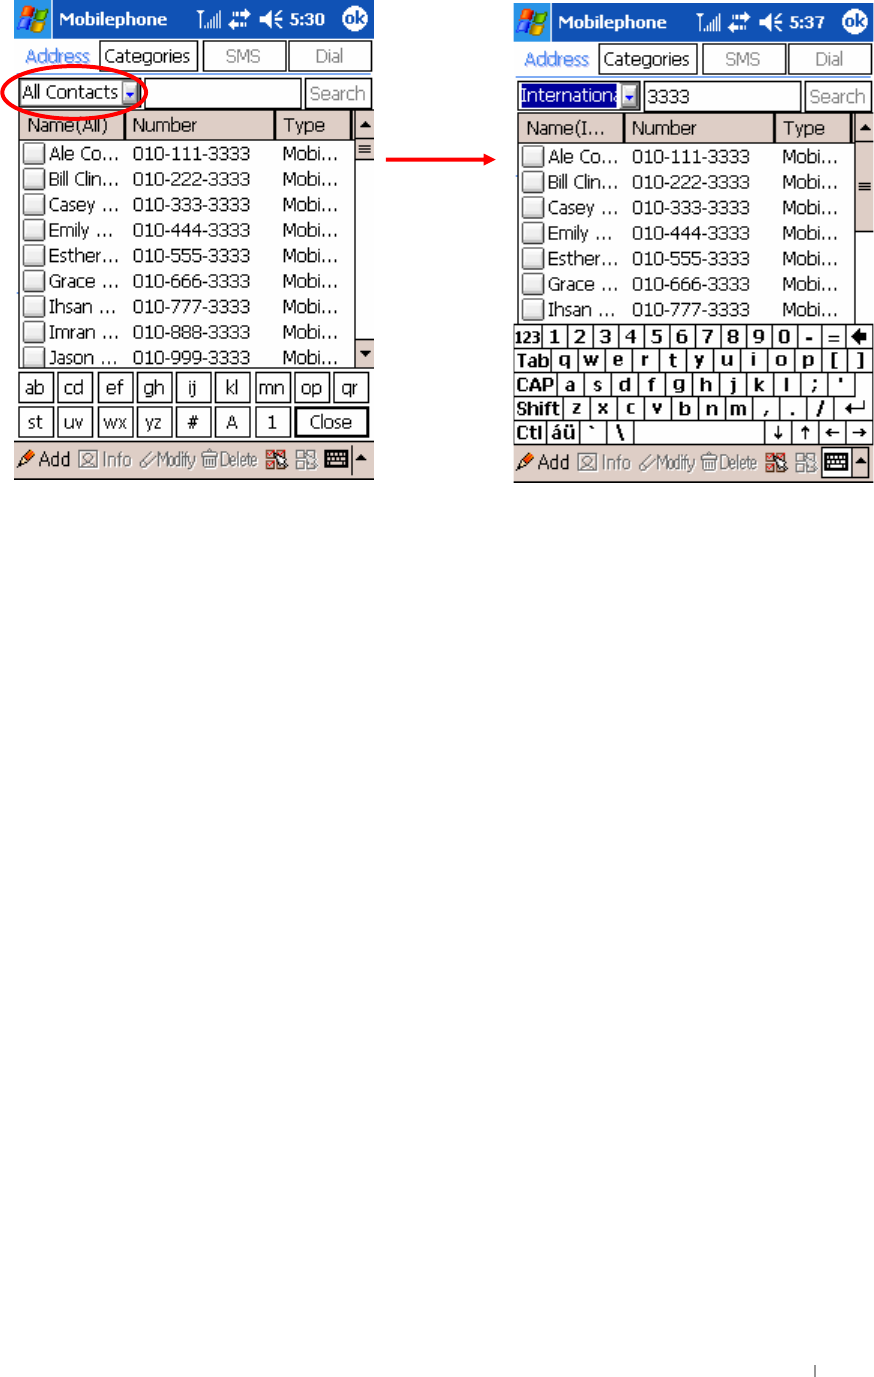
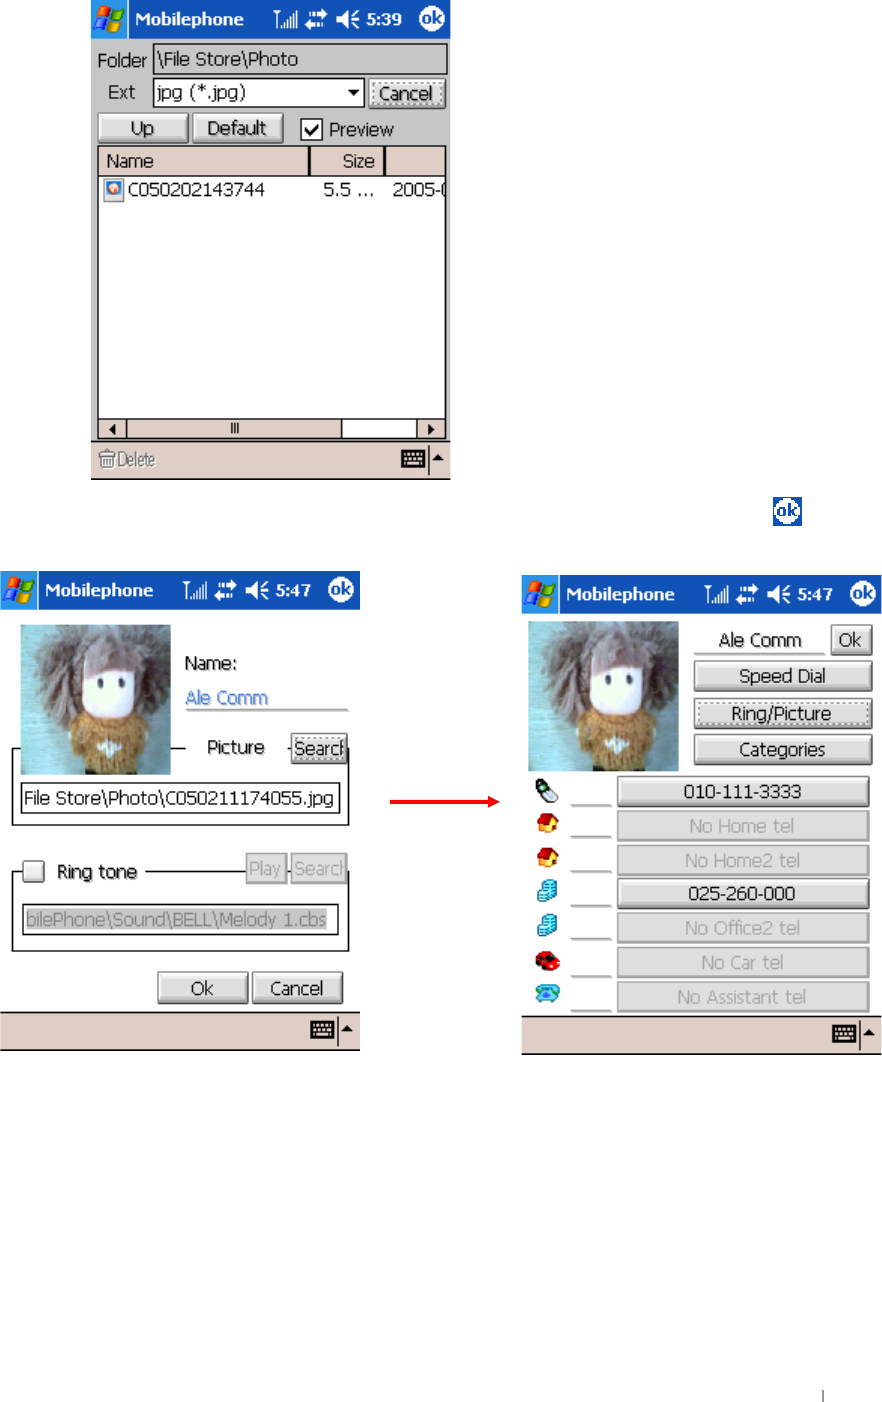
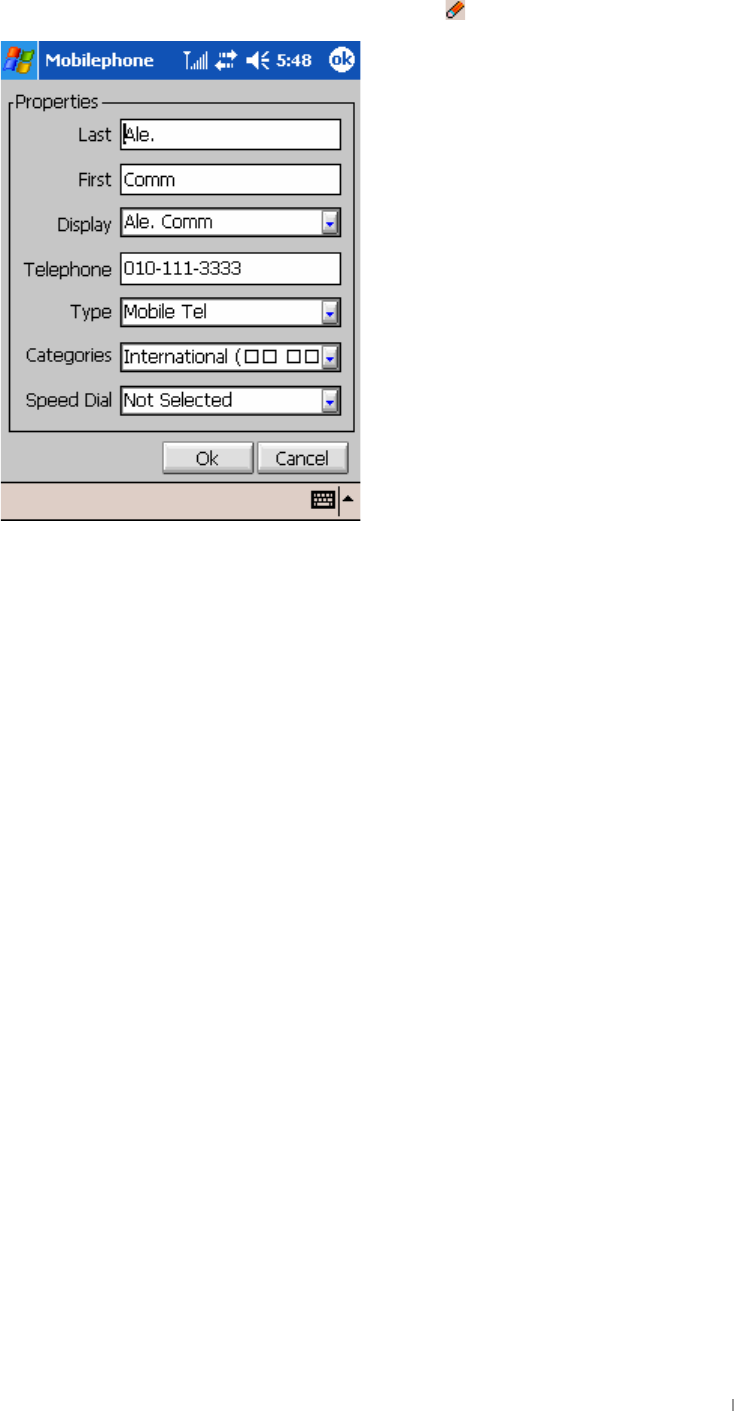
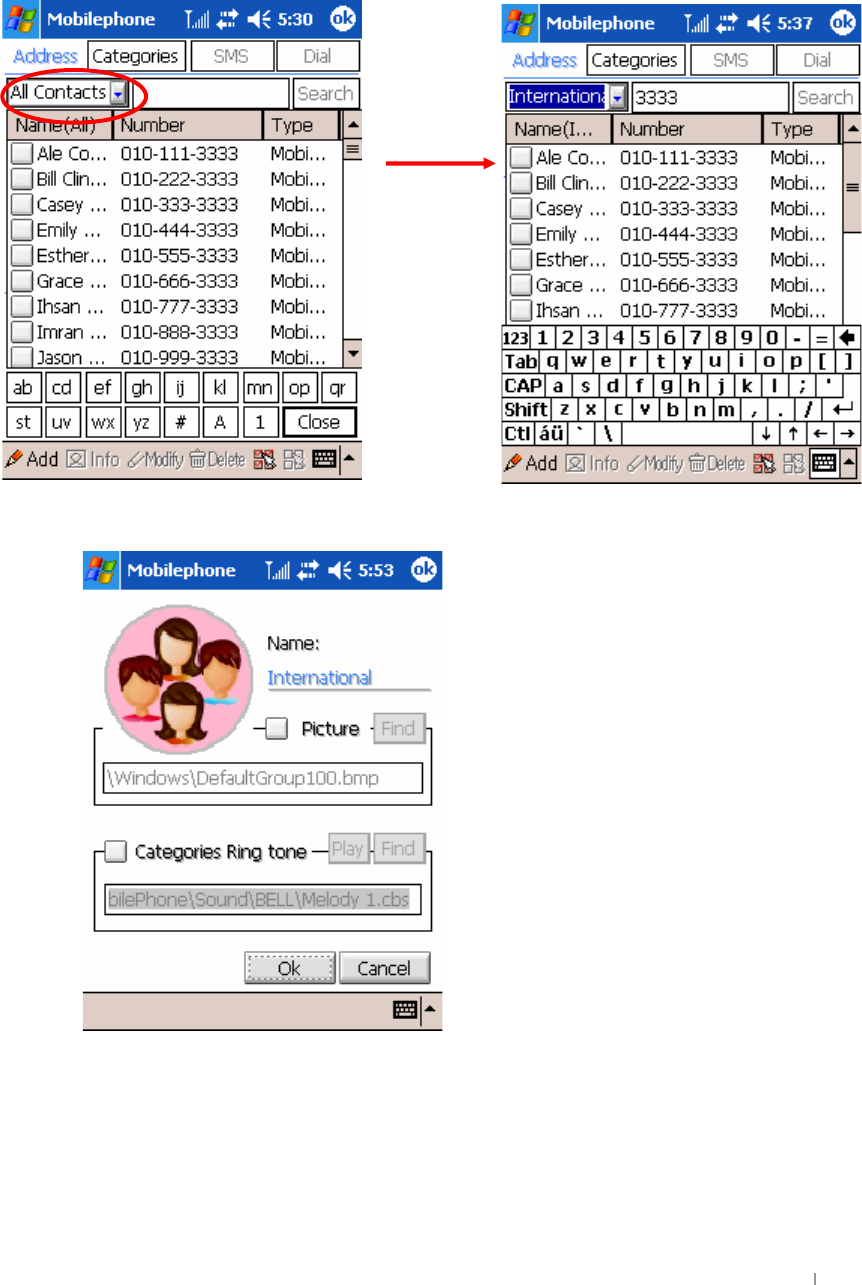
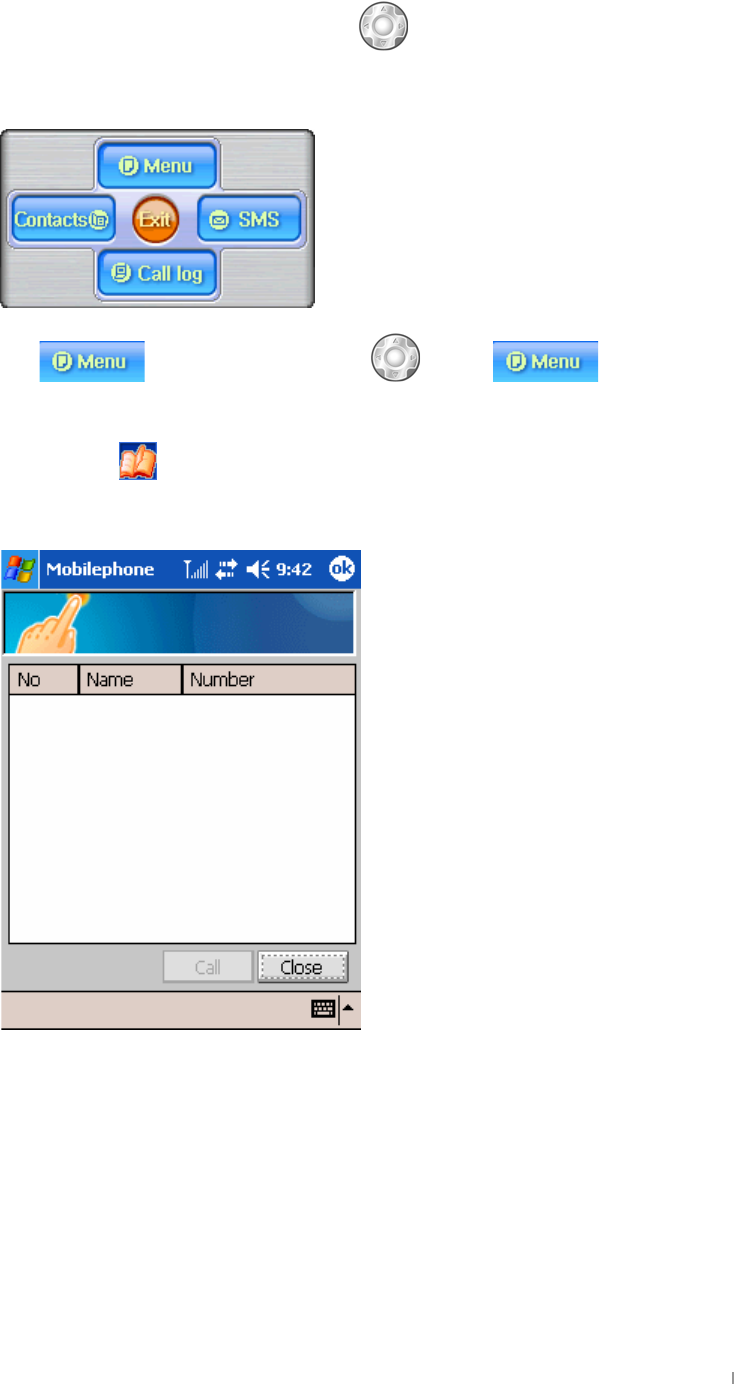
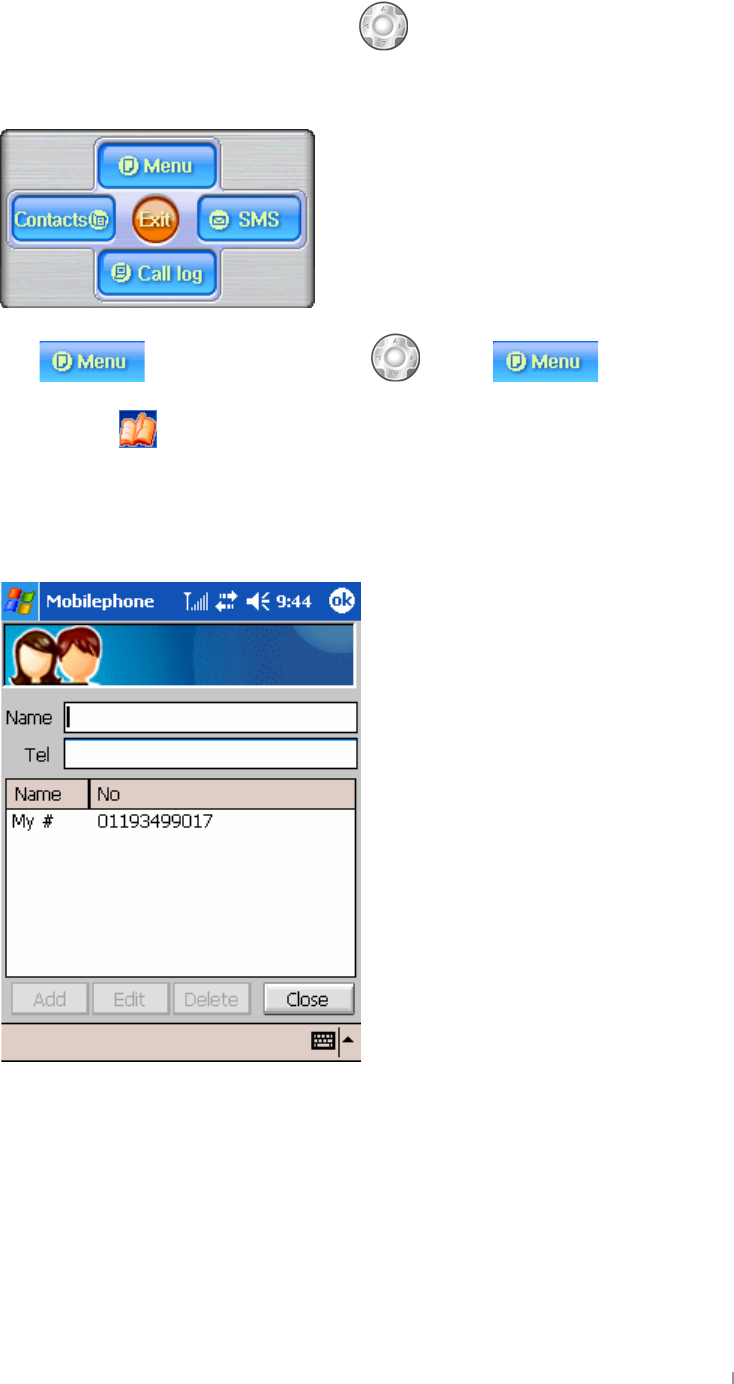
Select the Start button > Contacts and
GGGGGGGGGGG
TGUG{Gˈ jˉ GGGGGUG
G
G
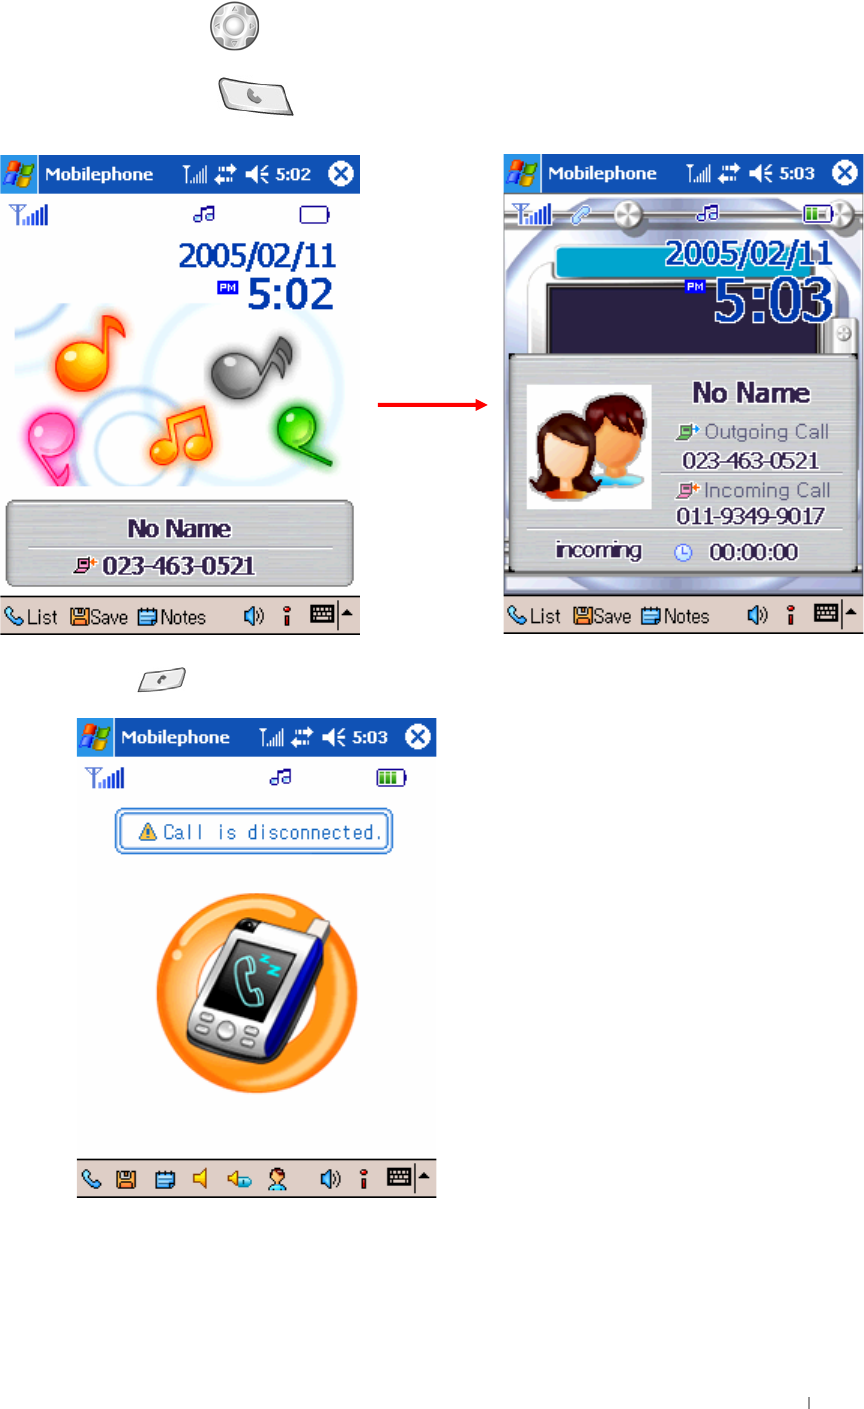
FYWY]jYUb]bWca]b[WU``
~GGGGSGGGGGGGGUGpGGG
GGGSGGGGaG G
G
GjG^GtGwG G ^TXZ
z
wGGqGkSGGGGGGGGGUG
z
wG
,
GGGGGGGGUG
z
wG UG
G
G
G
G
G
G
G
G
G
G
G
G
G
G
G
G
wG GGGUG G
G
G
G
G
G
G
G
G
G
G
G
G
G
G
G
G
G
䋩䞈ᴴG 㐐㣅╌⮨G
␘㢀G 䞈⮨㡰⦐G
≌㛨G ᵄG
G|˅ GtG G ^TX[
Ig]b[h\YFYachY7cbhfc``Yf
~GGGSGGGzlukVlukGGGGGGGGG
GUG G
G
G
G
G
G
G
G
G
G
G
wGGGGGqGkGGGGGUG G
hGGGzlukVlukGGGGGGGGGUG
G
G
ovsk
zlukVlukGG
qGkG
GjG^GtGwG G ^TX\
jGsG
~GGGGGSGG
to display the mini launcher screen
UG G
G
G
G
G
G
G
G
G
G
G
G
G
G
G
G
G
zG G GGGGG
down to select
UG
G
G
G
G
G
G
G
G
G
G
G
G
G
G
G
G
G
z
yGGjGpkGGGGGGGGUG
z
zGGGGGGGGGGˈ zGGjˉ GGGGGjUG G
z
zGGGGGGGGGGˈ tGGˉ GGGGGUG
z
zGGGGGGGGGˈ kˉ G GGGGGGUG
z
zGGGGGGGGGˈ kGhˉ G GGGGGGUG
z
{G G GGGGUG G
uGGGGG
zGGjG
jGG
jGG
tGGUG
tGGG
kGGGGGUG
tGG
pGG
vGG
G|˅ GtG G ^TX]
z
{G G GGGGUG G
z
{G G GGGGUG
G
{Gˈ zGGjˉ GGGGGGˈ uGuˉ GGjUG G
G
G
G
G
G
G
G
G
G
G
G
G
G
G
G
G
lGGGGUG G
pGSGGGGGGGGGGGvrGGGUG
G
{GGGGGGUG
GjG^GtGwG G ^TX^
jG~G
If you have subscribed to Call Waiting, your phone will
G
beep during a call let you know you have an
incoming
G
call. Your phone may also display the incoming caller’s
G
identification
UG G
You can also activate this feature with your phone; simply ask your service provider for the feature code,
store it into your phone, then activate it.
G
wG GRG G GGGUG~GGGGG
GGGSGG UG G
wG GRG G GTGGUG~GG
GGGGGGSGG UG G G
~GGGGSGGGGGGGGGGGGUG G
G
G
G
G
G
G
G
G
G
G
G
G
G
G
wG G GGGGUG G
mGGGGSGGˈ jG~ˉ GGUUUG
G
jGjG
This feature allows you to add a third party to a call. You can use this feature with local and long distance
calls.
G
G
G
mGGGGSGGˈ jGjˉ GGUUUG
G
Wklv#ihdwxuh#pd|#qrw#eh#dydlodeoh#lq#doo#zluhohvv#v|vwhpv1##
Vhh#|rxu#vhuylfh#surylghu#iru#ghwdlov#dqg#dydlodelolw|1#
G|˅ GtG G ^TX_
jGGGGGG
~GGGGGSGG
to display the mini launcher screen
UG G
G
G
G
G
G
G
G
G
G
G
G
G
G
G
G
G
zG G GGGGG
down to select
UG
G
G
G
G
G
G
G
G
G
G
G
G
G
G
G
G
G
G
G
zGGGGGˈ ztzˉ GGGGUOGGGGUPG
zGGGGGˈ kˉ GGGGUGˈ G
G
G
tGGGUG
kGGGUG
zGGGUG
kGGGGUG
zGGGG
GGG
GUG
tGGGUG
tGGG

GjG^GtGwG G ^TX`
tGGGGGGGGUG
{Gˈ hˉ G G GGGGGGGGUG
G
G
G
G
G
G
G
G
G
G
G
G
G
G
G
lGGGGGGGvrGGGUG G
zGGGGGGGGGjGGGGˈ kˉ G GGUG
G
G|˅ GtG G ^TYW
zGGGGGGGG
{Gˈ Gˉ GTGGGGGˈ Gˉ UG
G
G
G
G
G
G
G
G
G
G
G
G
G
G
G
G
lGGGGGGGˈ zˉ UG
G
G
G
G
G
G
G
G
G
G
G
G
G
G
G
G
G
G
lGG
GG
UG
GjG^GtGwG G ^TYX
zGGGGGGG
{Gˈ Gˉ GTGGGGGˈ Gˉ UG
G
G
G
G
G
G
G
G
G
G
G
G
G
G
G
G
lGGGGGGGGGGGˈ zˉ UG
G
G
G
G
G
G
G
G
G
G
G
G
G
G
G
G
G
G
G
G
lGG
G
GG
UG
G|˅ GtG G ^TYY
zGGGGGGG
{Gˈ Gˉ GTGGGGGGGUG
G
G
G
G
G
G
G
G
G
G
G
G
G
G
G
G
zGGGUG
G
ˈ ᵐ㢬ˉ G ⷈ㨰⪰G
㉔䈑䚌⮨G ␘㢀G
䞈⮨㢨G
⇌䇴⇝⏼␘UG
GjG^GtGwG G ^TYZ
|GGGGGGGG
zGGGGGGGGˈ k
\Magicn Store\Cyberbank\MobilePhone\USERFILES
ˉG
GtGhzUG
zGjGGGtGsGGGGGGUG G
{Gˈ pˉ G GGGGUG
G
G
G
G
G
G
G
G
G
G
G
G
G
G
G
G
{Gˈ yVwˉ UG
G
G
G
G
G
G
G
G
G
G
G
G
G
G
G
G
G|˅ GtG G ^TY[
{Gˈ zGˈ GGGGGGGGGGUG G
G
G
G
G
G
G
G
G
G
G
G
G
G
G
G
G
zGGGGOXWWXWWGSGitwGGPGGGGG GGG
GGUG G
G
G
G
G
G
G
G
G
G
G
G
G
G
G
G
G
hSGGGGGGGSGGGGGGGˈ GGˉ GG
G G ˈ ˉ GGGGGOG][GPGGUG{GvrGGUG
G
{Gˈ vrˉ GG
GG
GGG
GU
GjG^GtGwG G ^TY\
tGGGGGGGGGGG
~GGGGGGSGGˈ tˉ G UG
G
G
G
G
G
G
G
G
G
G
G
G
G
G
G
G
zGGGGGG{GGUGGGGGGGGGGG
GGGUGpGGGGGGGGGSGGGGGG
GvrGGGGGGGGGGGGGUG G
pGSGGGGGGGGGGvrGGGUG
G
G|˅ GtG G ^TY]
hSGGGGGGGGGGGGGGGG
vGGjGGGGˈ pˉ G UG
G
G
G
G
G
G
G
G
G
G
G
G
G
G
G
G
{Gˈ zGkˉ UG
G
G
G
G
G
G
G
G
G
G
G
G
G
G
G
G
zGGGGGGˈ uˉ GGGGGGGGUG
zGGGGGGGGGGGGGGGzGkGG
UG
z
{Gˈ hˉ GGGUG
z
{Gˈ lˉ GGˈ kˉ GGGGGGGGUG G
GGGGGGGGGUG
G
{GGG
GG
GGG
GGG
GGU

GjG^GtGwG G ^TY^
kGGGGGGGGG
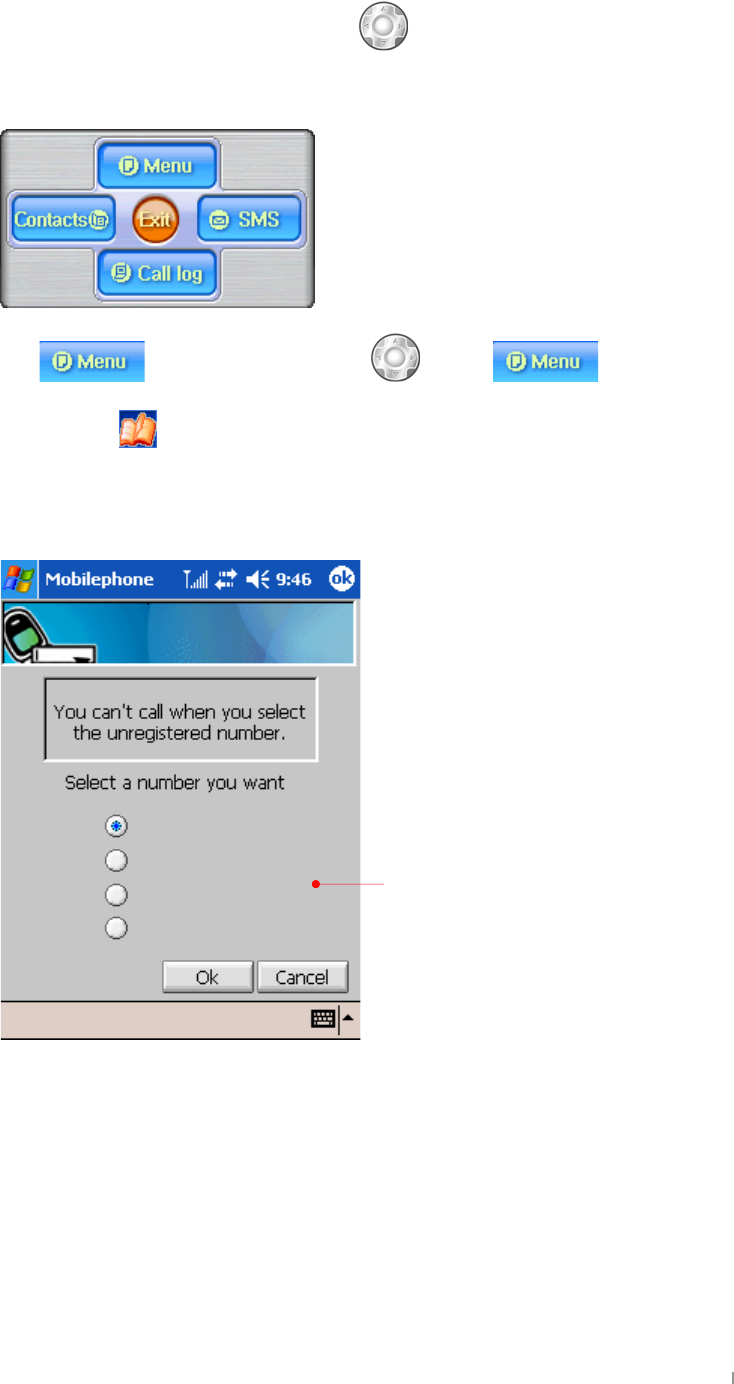
pGGGGGGGGGGSGGGGaG
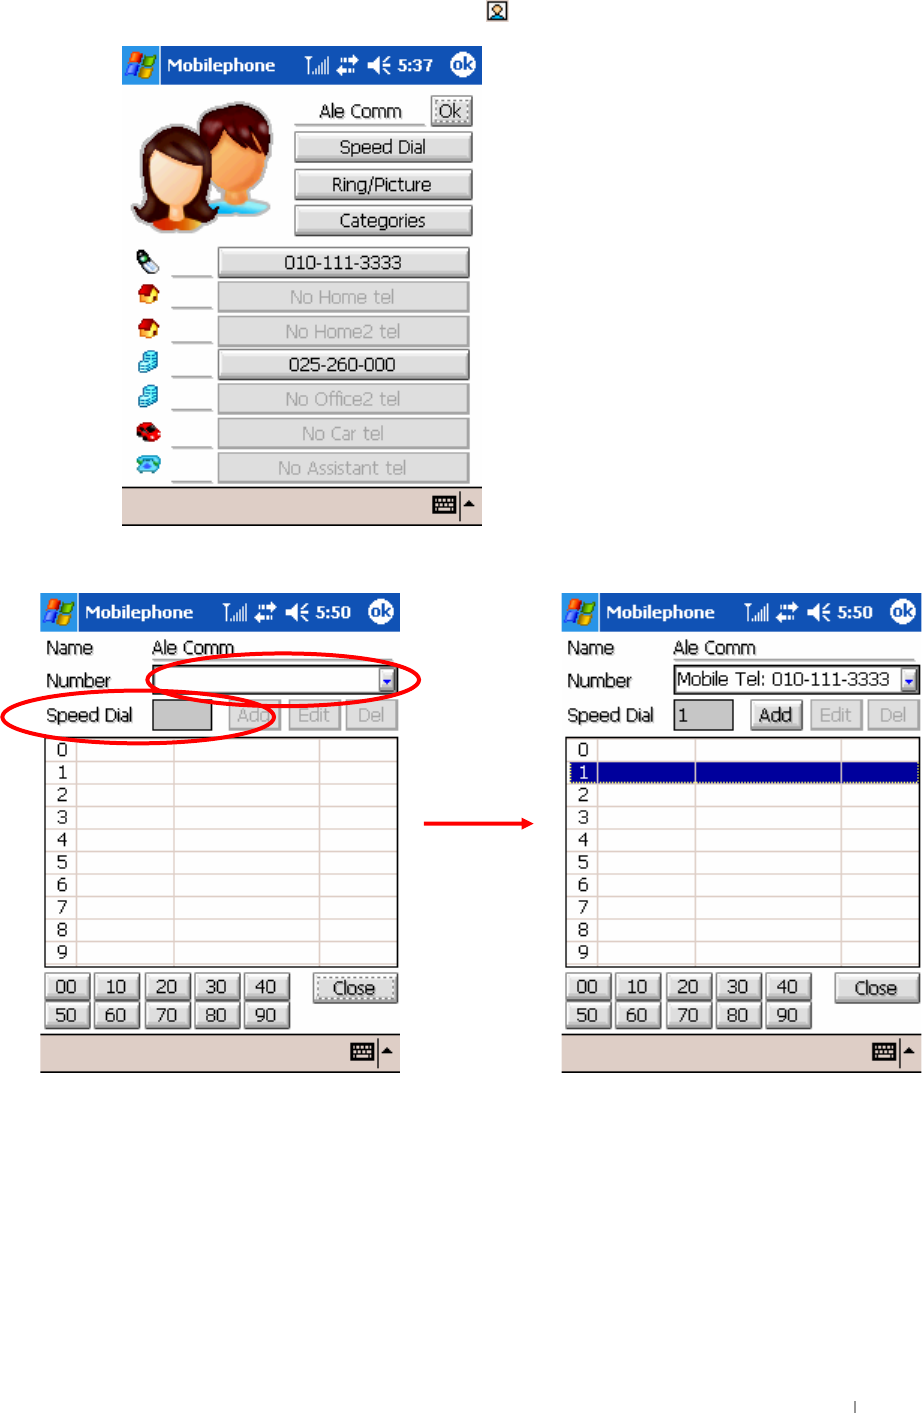
z One-digit number (0 ~ 9): Tap and hold the corresponding speed dial number.
z Two-digit number (10 ~ 99): tap the first digit of the speed dial number, and
then tap and hold the second digit of the speed dial number.
z
Ru#wds#wkh#fruuhvsrqglqj#vshhg#gldo#dqg#wds# 1#
z
~GGGGGGGSGG
and select
GUG{G
jO PGGGzGkUGzGGGGGGGGˈ jˉ G
GGUG
G
G|˅ GtG G ^TY_
jGGGGG
zGGGGˈ tG
\File Store\Cyberbank\MobilePhone\USERFILES
ˉ GGGtG
hzUG
pGGGGGGGGGGGGGGSG{Gˈ Gˉ GT
GGGGGGGGUG G
G
G
G
G
G
G
G
G
G
G
G
G
G
G
G
G
{Gˈ jˉ UG
G
G
G
G
G
G
G
G
G
G
G
G
G
G
G
G
zGG
GG
G
GjG^GtGwG G ^TY`
zGGˈ wˉ GGGGGGGGGGGGGG
GGˈ zˉ UG G
G
G
G
G
G
G
G
G
G
G
G
G
G
G
G
G
zGGOXWWXWWGSGitwGGPGGGGG G GGUG G
G
G
G
G
G
G
G
G
G
G
G
G
G
G
G
G
pGGGGGGGGGGGSGGGˈ jGyˉ G
GGGGˈ zˉ GGGGGGUG
G
G
G
G|˅ GtG G ^TZW
GhGGGGjG
zGGGGGGGGGˈ pˉ GGGGUG
G
G
G
G
G
G
G
G
G
G
G
G
G
G
G
G
{Gˈ jˉ UG
G
G
G
G
G
G
G
G
G
G
G
G
G
G
G
G
~GGGGGGGGGSGGGGGGG
GGGUG G
{GvrGGGUG
G
GGGUG
GjG^GtGwG G ^TZX
7\Ub[YG_]b
~GGGGGSGG G GGGGGGGG
UG G
G
G
G
G
G
G
G
{G G GGGGGG GGG G UG G
{Gˈ jGzˉ GGGGGGGGGUG
GGGG^GGGGG^GUG
G
G
G
G
G
G
G
G
G
G
G
G
G
G
G
G
zGGGGGG
GUG
tGGG
G|˅ GtG G ^TZY
G
G
G
G
G
G
G
G
G
G
G
G
G
G
G
G
G
G
G
G
G
G
G
G
G
G
G
G
G
G
G
G
G
G
G
G
G
G
zGGGGGGGGG
GGGGGUG
zGGGGGGGGG
GGGGGGGUG
GjG^GtGwG G ^TZZ
G
G
G
G
G
G
G
G
G
G
G
G
G
G
G
G
G
G
G
G
G
G
G
G
G
G
G
G
G
G
G
G
G
G
G
G
G
G
G
G
G
G
G
G
zGGGGGGGGGG
GGjkthGUG
zGGGGGGGGG
GGGGGGGUG
G|˅ GtG G ^TZ[
G
G
G
G
G
G
G
G
G
G
G
G
G
G
G
G
G
G
G
G
G
G
G
G
G
G
G
G
G
G
G
G
G
G
G
G
G
G
G
G
zGGGGGGGGGG
GGUGpGGGGGG
jGGGSGG
ˈ jˉ GGG
UG
zGGGGGGGGGG
GGjkthGUG
GjG^GtGwG G ^TZ\
7\Ub[YbiaVYfZcbhg
~GGGGGSGG G GGGGGGGG
UG G
G
G
G
G
G
G
G
{G G GGGGGG GGG G UG G
{Gˈ uGmˉ GGGGGGGGGGGGGG
GGGGGGGUG
G
G
G
G
G
G
G
G
G
G
G
G
G
G
G
G
tGGG

G|˅ GtG G ^TZ]
mGSGGGGGGGSGGGGGGGG
UG
G
G
G
G
G
G
G
G
G
G
G
G
G
G
G
G
G
GjG^GtGwG G ^TZ^
FYgYh7U``g
~GGGGGSGG G GGGGGGGG
UG G
G
G
G
G
G
G
G
{G G GGGGGG GGG G UG G
{Gˈ yGjˉ GGGGGGGSGGGGGGG
GGGGGGGGGUG G
G
G
G
G
G
G
G
G
G
G
G
G
G
G
G
G
G
G
G
G
lGGGGGGUG
{GGGGGGGGGGG
GGUGpGG˅ GGGGG
SGGGGGGGGGGG
GUGmGGSGG
ˈ p¡ˉ GGGGUGˈ G
lGGGGGGGwUG G
tGGG
G|˅ GtG G ^TZ_
DUggkcfX
~GGGGGSGG G GGGGGGGG
UG G
G
G
G
G
G
G
G
{G G GGGGGG GGG G UG G
zGGGGGGGGUGpGGGGGGSG
Gˉ wˉ UG G
G
G
G
G
G
G
G
G
G
G
G
G
G
G
G
G
G
G
G
G
G
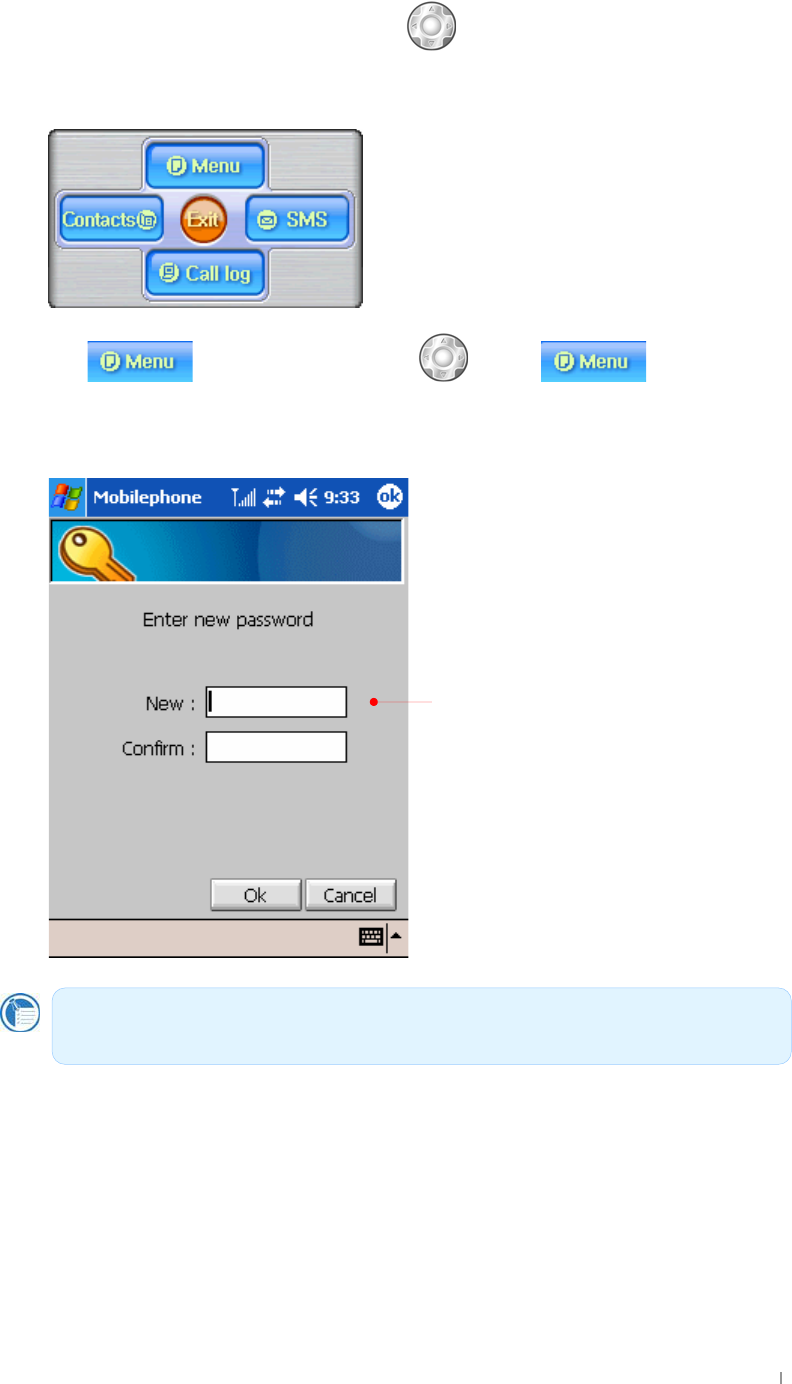
{GGGGˈ WWWWˉ UGpG
GGGGGG
GG[TGUG
Sohdvh#phprul}h#|rxu#qhz#sdvvzrug1#Vhh#|rxu#orfdo#ghdohu#ru#vhuylfh#fhqwhu#zkhq#
|rx#irujhw#|rxu#qhz#sdvvzrug1##
tGGG

GjG^GtGwG G ^TZ`
GYhh\YGYbX#9bXVihhcb
~GGGGGSGG G GGGGGGGG
UG G
G
G
G
G
G
G
G
{G G GGGGGG GGG G UG G
~GGGGSGGGGGGGGGGGGGGzG
GGGlGSGGˈ zVlGiˉ UG G
G
G
G
G
G
G
G
G
G
G
G
G
G
G
G
G
G
G
tGGG
G|˅ GtG G ^T[W
6Y``F]b[
~GGGGGSGG G GGGGGGGG
UG G
G
G
G
G
G
G
G
{G G GGGGGG GGG G UG G
{GzGjGO PUG G
pGGGGGSGGGGGGGGGGGGG
SGGˈ yGzˉ UG
G
G
G
G
G
G
G
G
G
G
G
G
G
G
G
G
G
G
G
G
G
G
tGGGGGGGUG
~GSGG
GG
˅ GG
UG
tGGG

GjG^GtGwG G ^T[X
?YmhcbYGYhh]b[
~GGGGGSGG G GGGGGGGG
UG G
G
G
G
G
G
G
G
{G G GGGGGG GGG G UG G
G
{GzGjGO PUG G
pGGGGGGGGGGGVGGGGGGGGG
GGGGGGGGGSGGˈ rGzˉ UG
G
G
G
G
G
G
G
G
G
G
G
G
G
G
G
G
G
G
G
G
tGGG
G|˅ GtG G ^T[Y
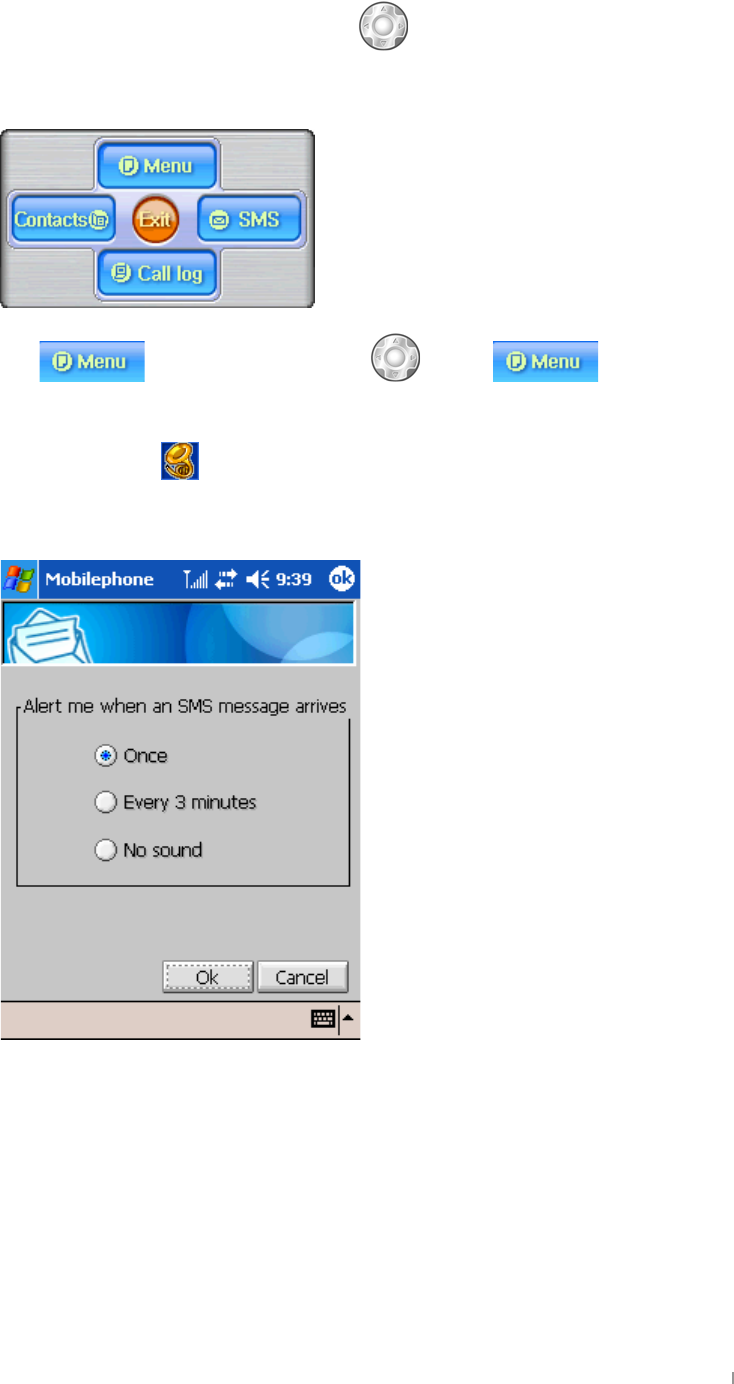
GAGG\cfhAYggU[]b[GYfj]WY
~GGGGGSGG G GGGGGGGG
UG G
G
G
G
G
G
G
G
{G G GGGGGG GGG G UG G
G
{GzGjGO PUG G
{Gˈ ztzˉ GGGGGGGGGOztzPGUG
G
G
G
G
G
G
G
G
G
G
G
G
G
G
G
G
G
tGGG

GjG^GtGwG G ^T[Z
9Ufd\cbY
~GGGGGSGG G GGGGGGGG
UG G
G
G
G
G
G
G
G
{G G GGGGGG GGG G UG G
G
{GzGjGO PUG G
{Gˈ lˉ GGGGUG G
G
G
G
G
G
G
G
G
G
G
G
G
G
G
G
G
G
G
G
G
tGGG
G|˅ GtG G ^T[[
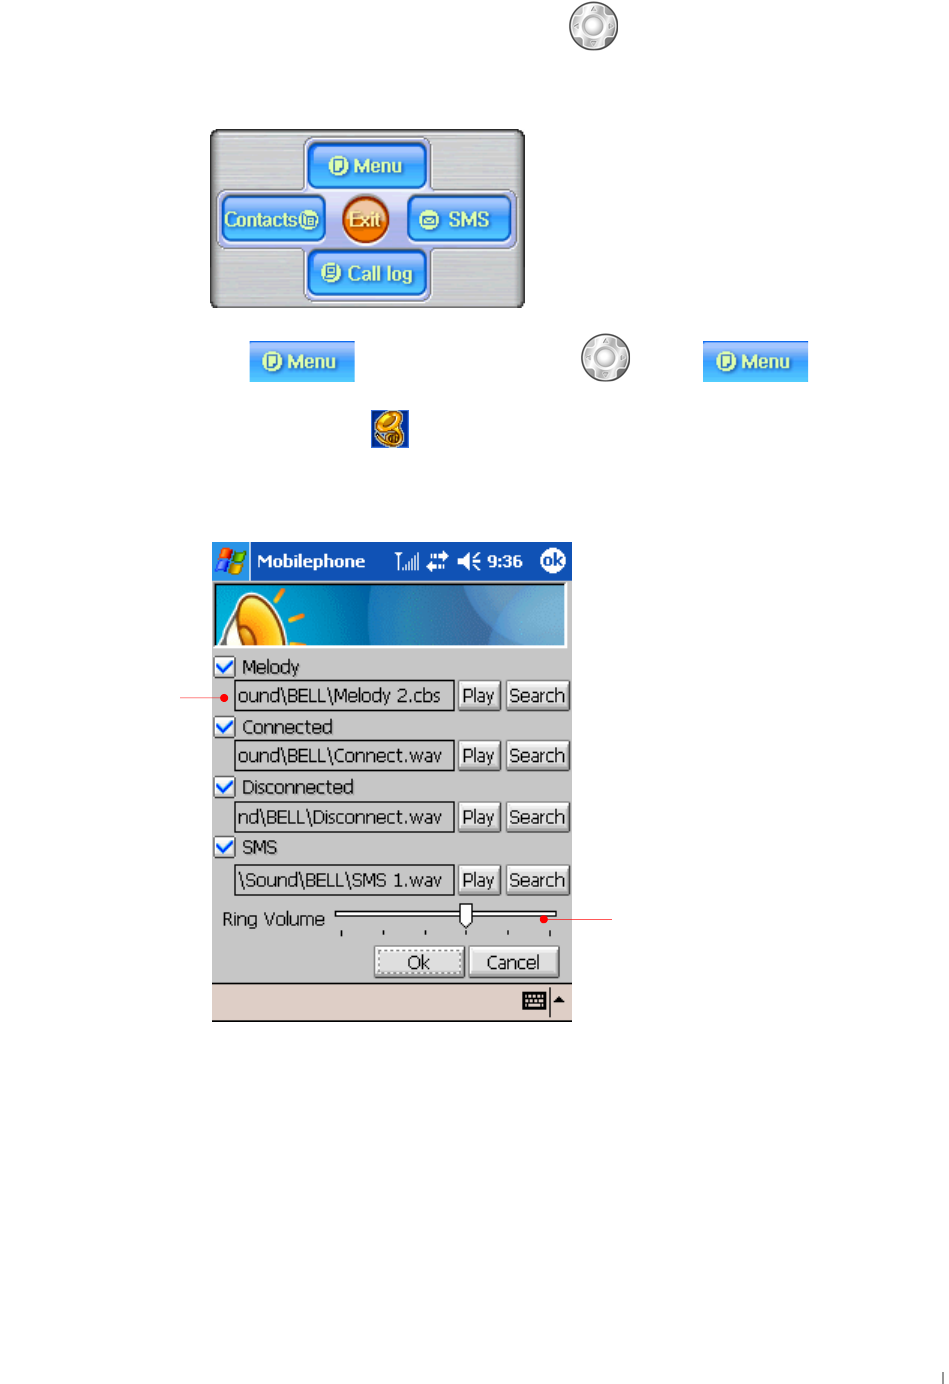
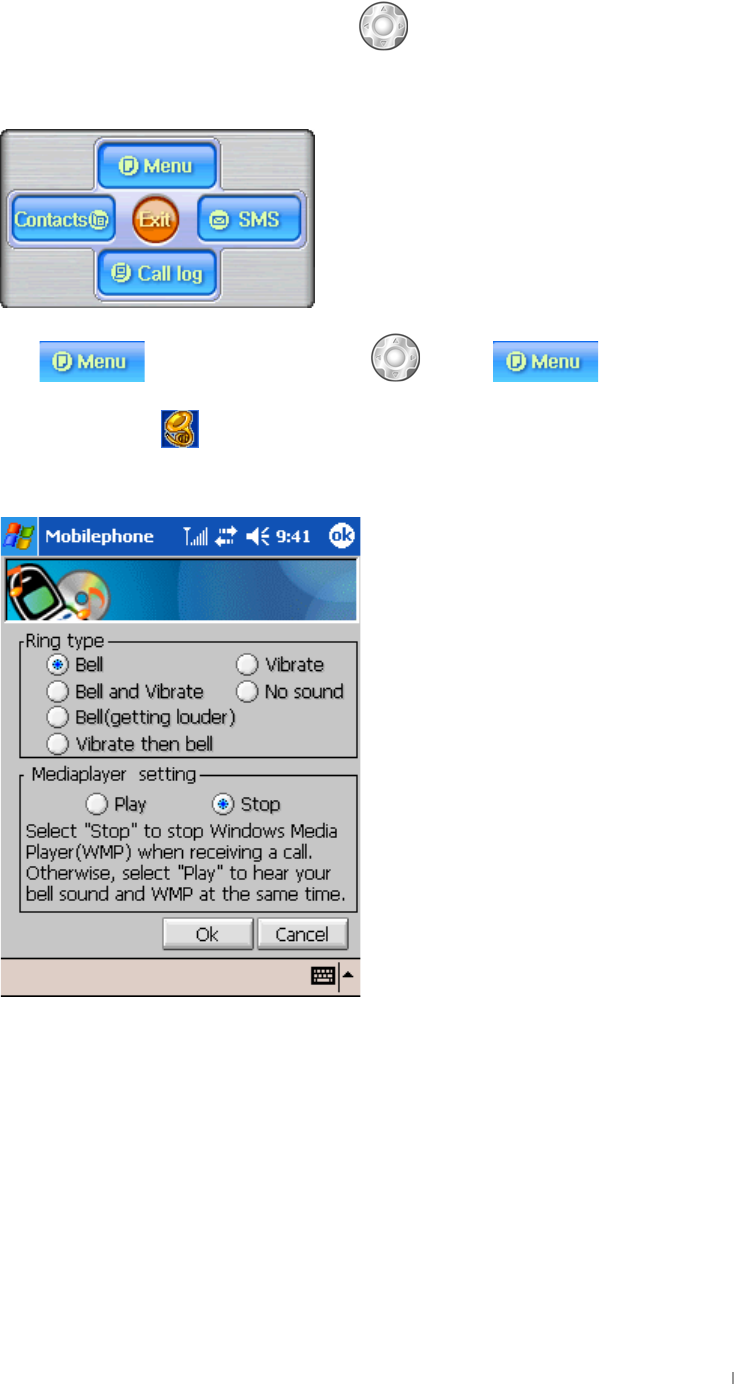
F]b[HmdY
~GGGGGSGG G GGGGGGGG
UG G
G
G
G
G
G
G
G
{G G GGGGGG GGG G UG G
{GzGjGO PUG G
{Gˈ yG{ˉ GGGGGGGG~GtGwGGGGGUG G
G
G
G
G
G
G
G
G
G
G
G
G
G
G
G
G
G
G
G
tGGG
GjG^GtGwG G ^T[\
GdYYX8]U`
~GGGGGSGG G GGGGGGGG
UG G
G
G
G
G
G
G
G
{G G GGGGGG GGG G UG G
G
{GjGO PUG G
pGGGGGGGGGGGGGSGGˈ zGkˉ UG G
G
G
G
G
G
G
G
G
G
G
G
G
G
G
G
G
G
tGGG
G|˅ GtG G ^T[]
IgYf]bZcfaUh]cb
~GGGGGSGG G GGGGGGGG
UG G
G
G
G
G
G
G
G
{G G GGGGGG GGG G UG G
{GjGO PUG G
~GGGGGGGGGGGGGSGGGGG
GGGGGGGGGGGGSGGGG
GGGGUG{Gˈ |Gpˉ GGGGGGUG G
G
G
G
G
G
G
G
G
G
G
G
G
G
G
G
G
G
G
G
G
tGGG

GjG^GtGwG G ^T[^
9aYf[YbWm7U``
~GGGGGSGG G GGGGGGGG
UG G
G
G
G
G
G
G
G
{G G GGGGGG GGG G UG G
G
{GjGO PUG G
{Gˈ lGjˉ GGSGGGGGGUG G
G
G
G
G
G
G
G
G
G
G
G
G
G
G
G
G
G
tGGG
G|˅ GtG G ^T[_
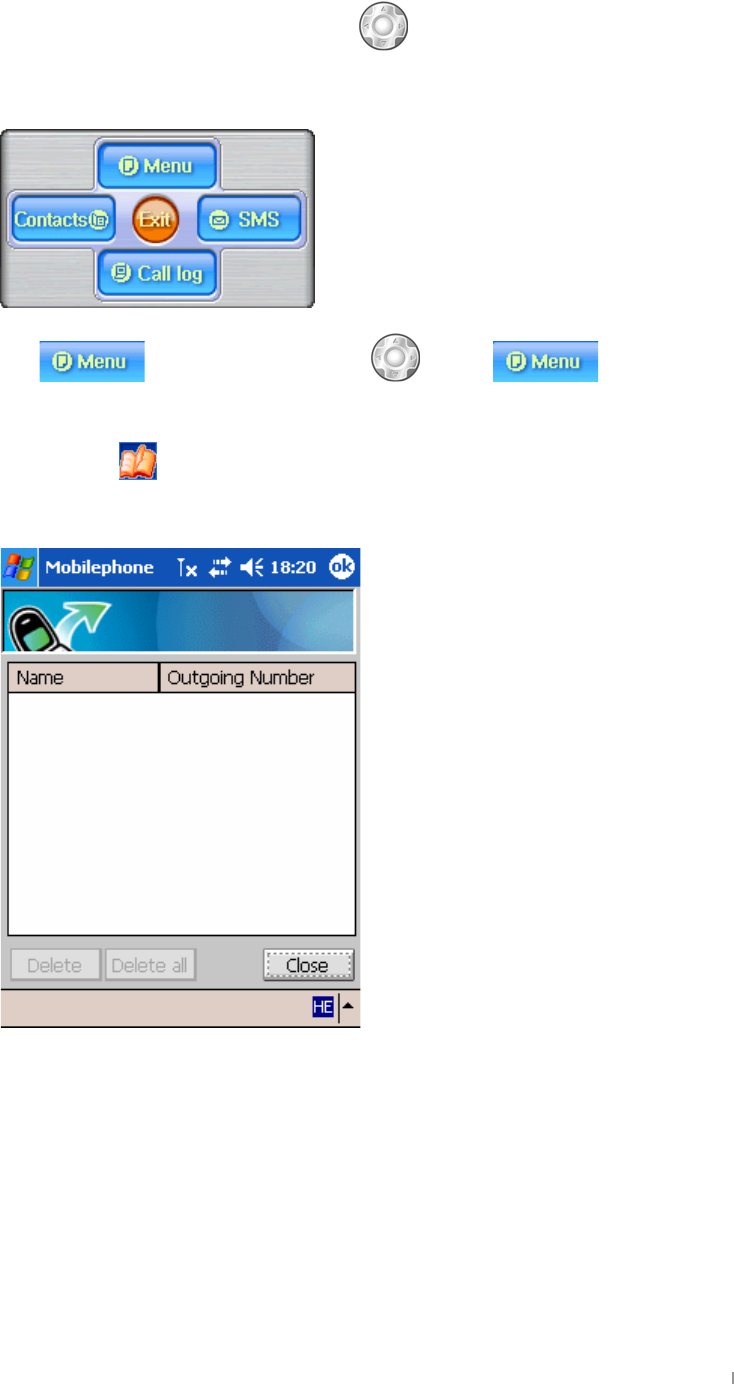
FYWYbhCih[c]b[7U``g
~GGGGGSGG G GGGGGGGG
UG G
G
G
G
G
G
G
G
{G G GGGGGG GGG G UG G
G
{GjGO PUG G
{Gˈ yGvˉ GGGGGGGGGGGUG G
G
G
G
G
G
G
G
G
G
G
G
G
G
G
G
G
G
G
G
tGGG
GjG^GtGwG G ^T[`
B5A
~GGGGGSGG G GGGGGGGG
UG G
G
G
G
G
G
G
G
{G G GGGGGG GGG G UG G
{GjGO PUG G
{Gˈ zGuhtˉ GGGGGGGGGGGGGG
UGOjGGGGGUPG
G
G
G
G
G
G
G
G
G
G
G
G
G
G
G
G
G
uaGGGGGGGGGGUG
GGGGGGuhtGGGGGUG
G
~GGGGGGG
SGGGGGGG
UGG
tGGG
G|˅ GtG G ^T\W
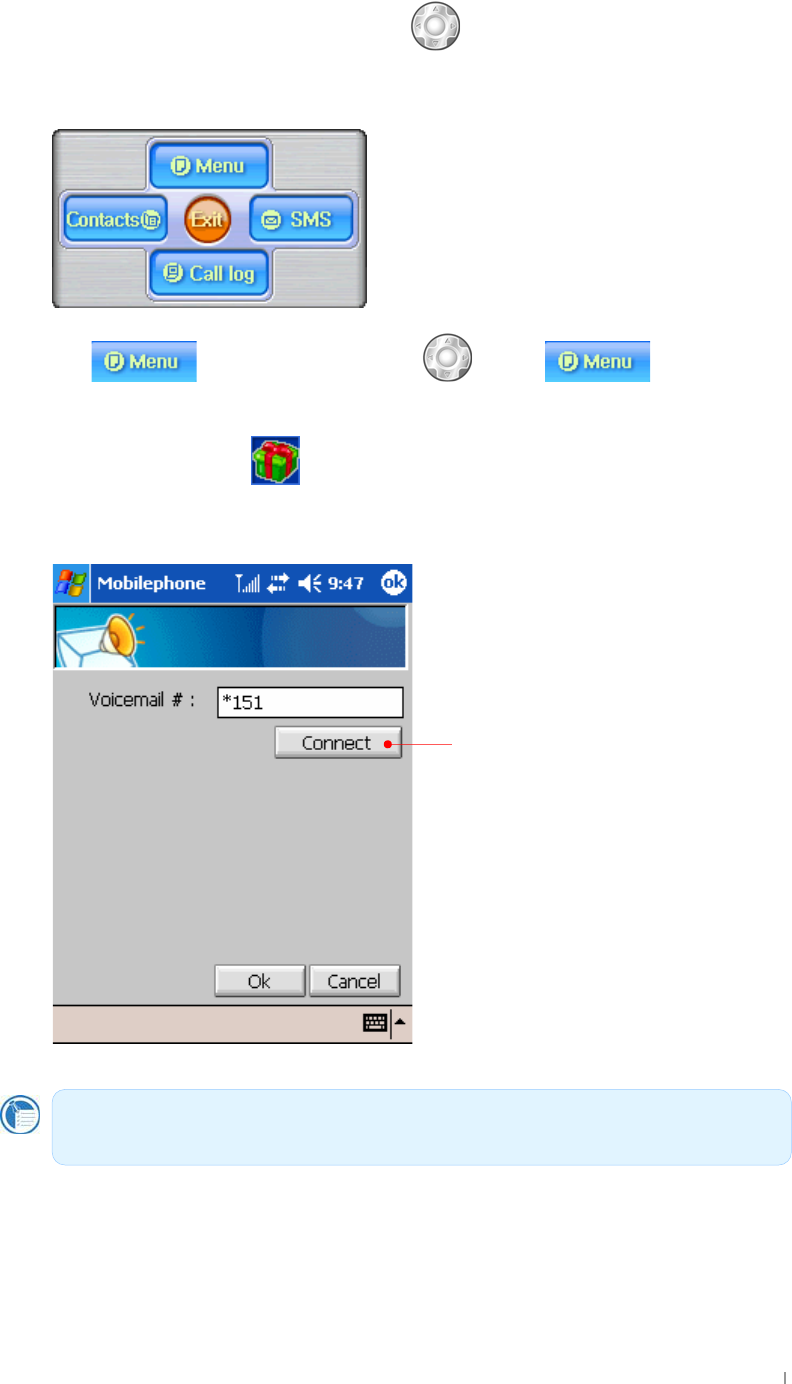
Jc]WYAU]`
~GGGGGSGG G GGGGGGGG
UG G
G
G
G
G
G
G
G
{G G GGGGGG GGG G UG G
G
{Gˈ hGvGzˉ O PUG G
{Gˈ }ˉ GGGGGGUG G
G
G
G
G
G
G
G
G
G
G
G
G
G
G
G
G
G
G
G
G
G
{Gˈ ˉ GGGG
GUG{Gˈ |ˉ G
GGGG
UGjGGG
GGGUG
Yrlfh#pdlo#lv#wkh#qhwzrun#vhuylfh#wkdw#uhtxluhv#d#vxevfulswlrq#iurp#|rxu#vhuylfh#
surylghu1#
tGGG
GjG^GtGwG G ^T\X
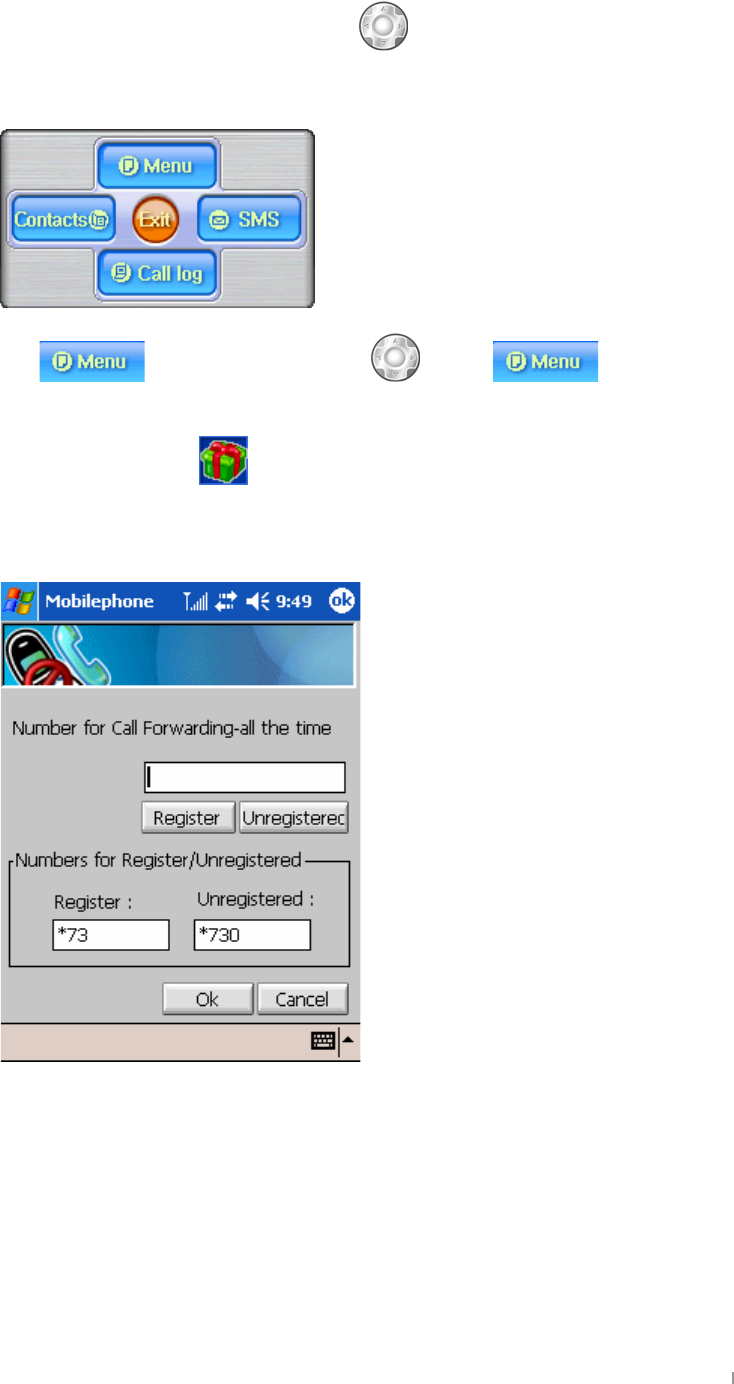
7U``:cfkUfX]b[
~GGGGGSGG G GGGGGGGG
UG G
G
G
G
G
G
G
G
{G G GGGGGG GGG G UG G
G
{Gˈ hGvGzˉ O PUG G
{Gˈ jGmˉ GGGGGGGGGG˅ GGG
GUG G
G
G
G
G
G
G
G
G
G
G
G
G
G
G
G
G
G
G
tGGG
G|˅ GtG G ^T\Y
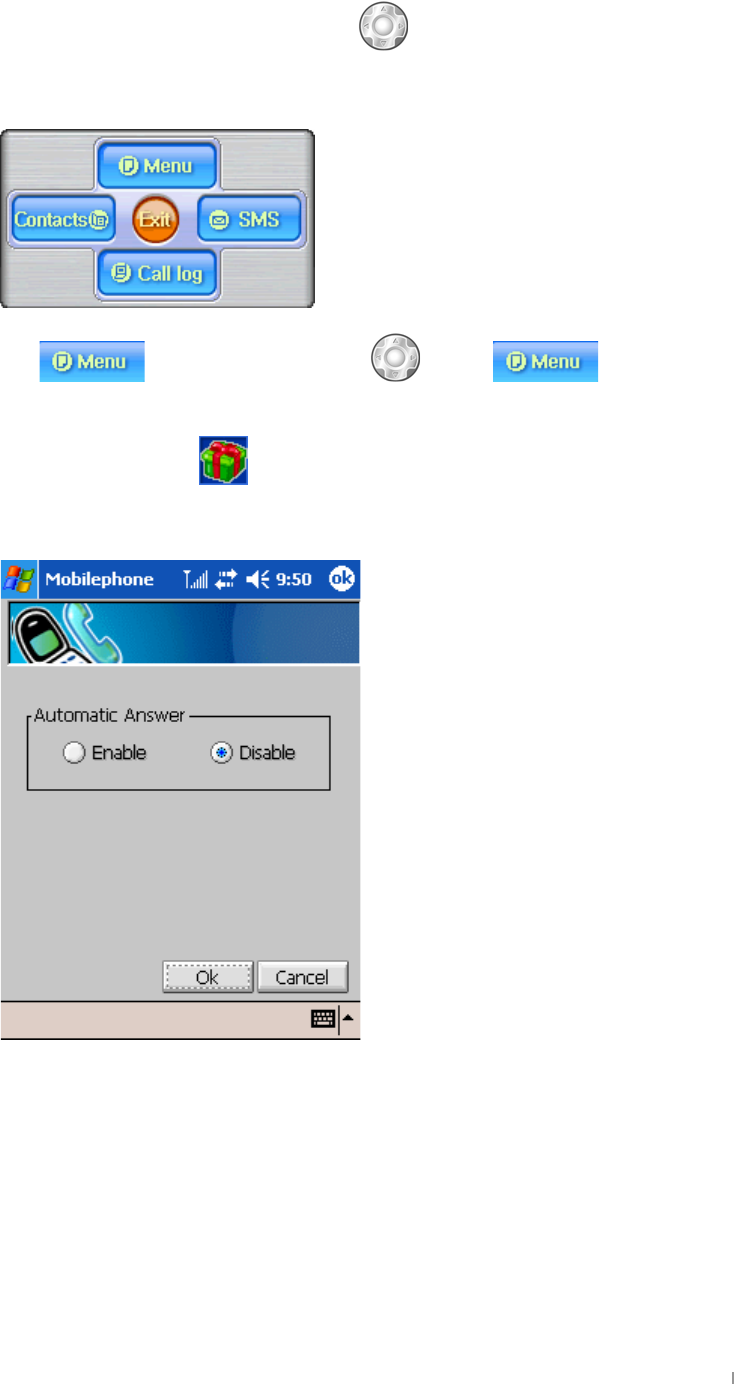
5ihcaUh]W5bgkYf
~GGGGGSGG G GGGGGGGG
UG G
G
G
G
G
G
G
G
{G G GGGGGG GGG G UG G
G
{Gˈ hGvGzˉ O PUG G
With this on, your phone answers
G
incoming voice calls after two ring.
G
G
G
G
G
G
G
G
G
G
G
G
G
G
G
G
G
G
G
G
tGGG
GjG^GtGwG G ^T\Z
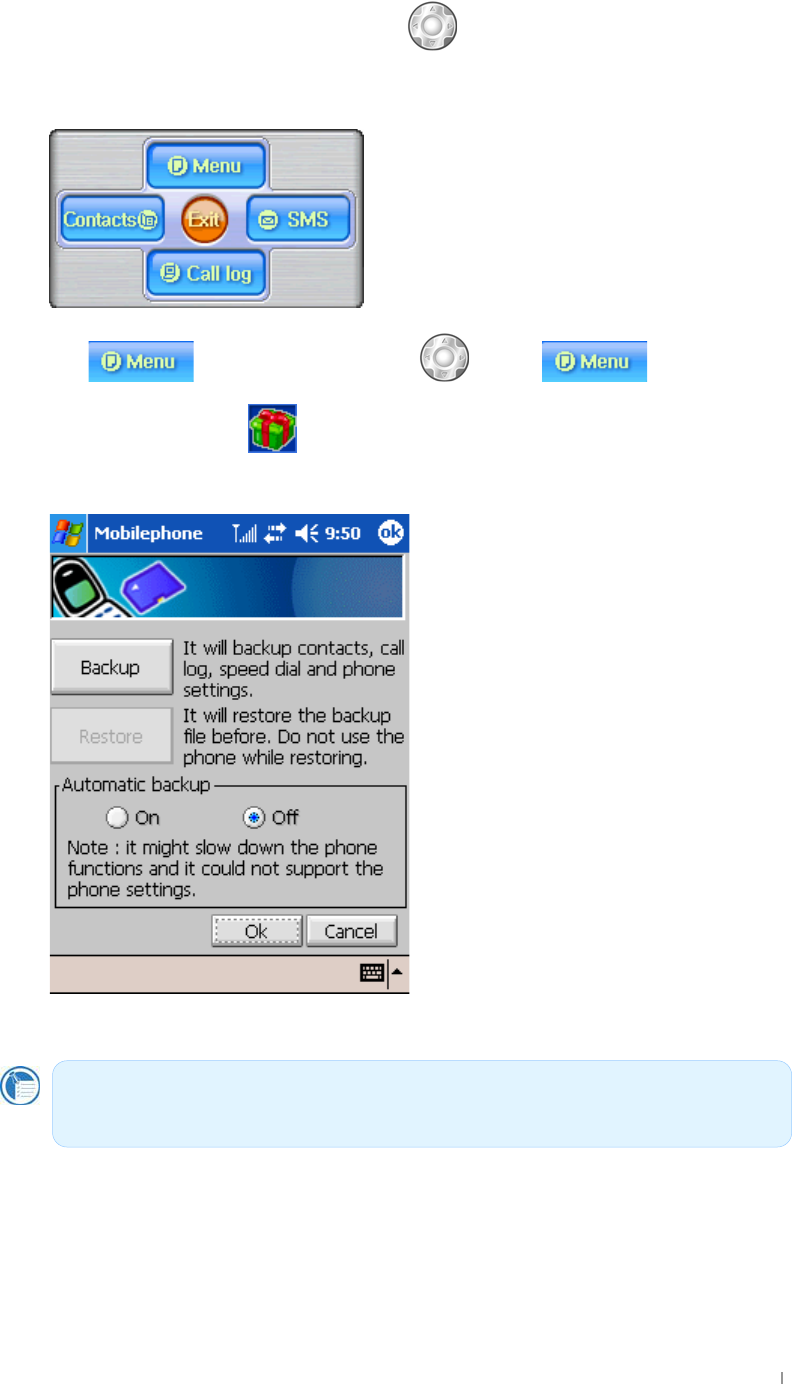
8UhU6UW_id
~GGGGGSGG G GGGGGGGG
UG G
G
G
G
G
G
G
G
{G G GGGGGG GGG G UG G
{Gˈ hGvGzˉ O PUG G
{Gˈ kGiˉ GGGUG G
G
G
G
G
G
G
G
G
G
G
G
G
G
G
G
G
{GGGGGGGGGGˈ tGk
\File Store\Cyberbank\
ˉ GUG
G
G
G
G
G
Zkloh#exloglqj#wkh#edfnxs#gdwd/#gr#qrw#shuirup#vriw#uhvhw1#Wklv#pd|#fdxvh#wkh#
huuruv#lq#edfnxs1##
tGGG
G|˅ GtG G ^T\[
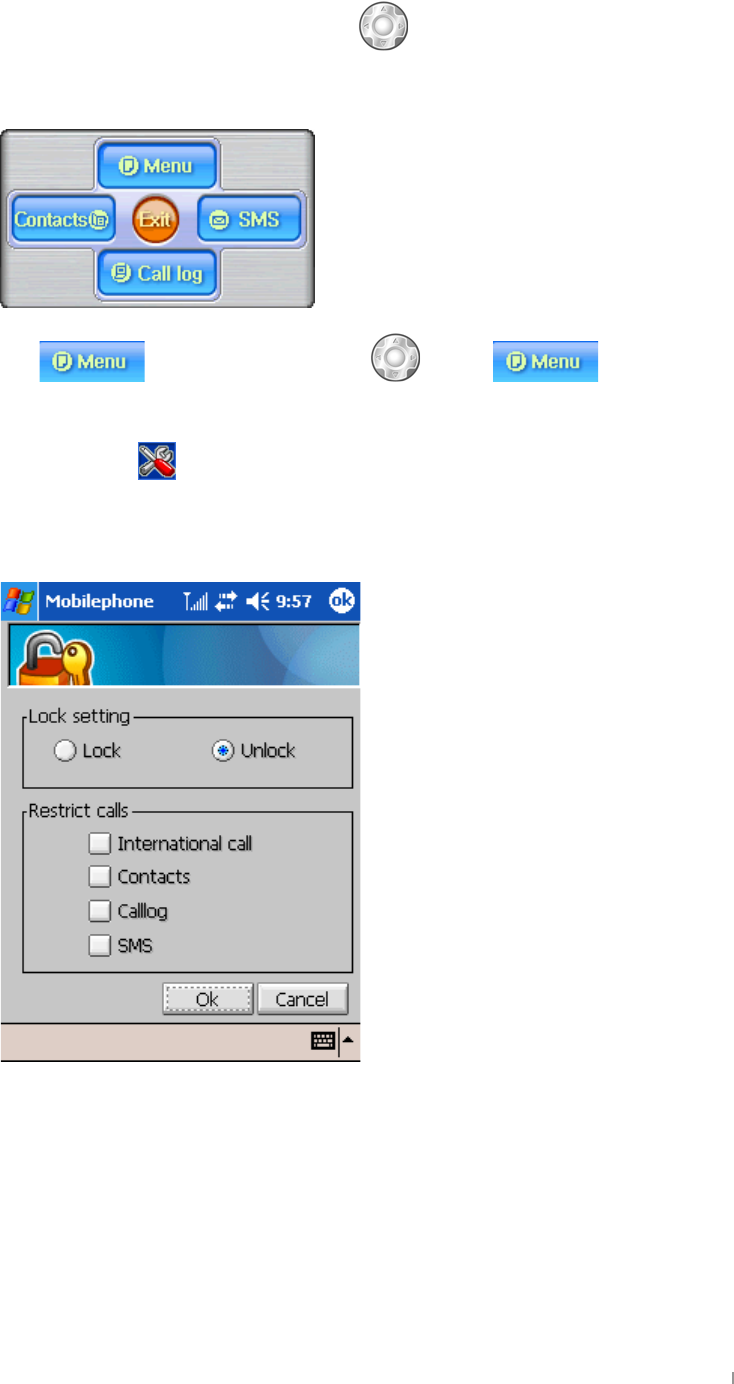
FYghf]Wh7U``g
~GGGGGSGG G GGGGGGGG
UG G
G
G
G
G
G
G
G
{G G GGGGGG GGG G UG G
G
{Gˈ vˉ O PUG G
Tap “Restrict Calls” to restrict incoming and outgoing calls. Outgoing calls are restricted from a list of
restrictions that you create yourself.
G
G
G
G
G
G
G
G
G
G
G
G
G
G
G
G
G
tGGG
GjG^GtGwG G ^T\\
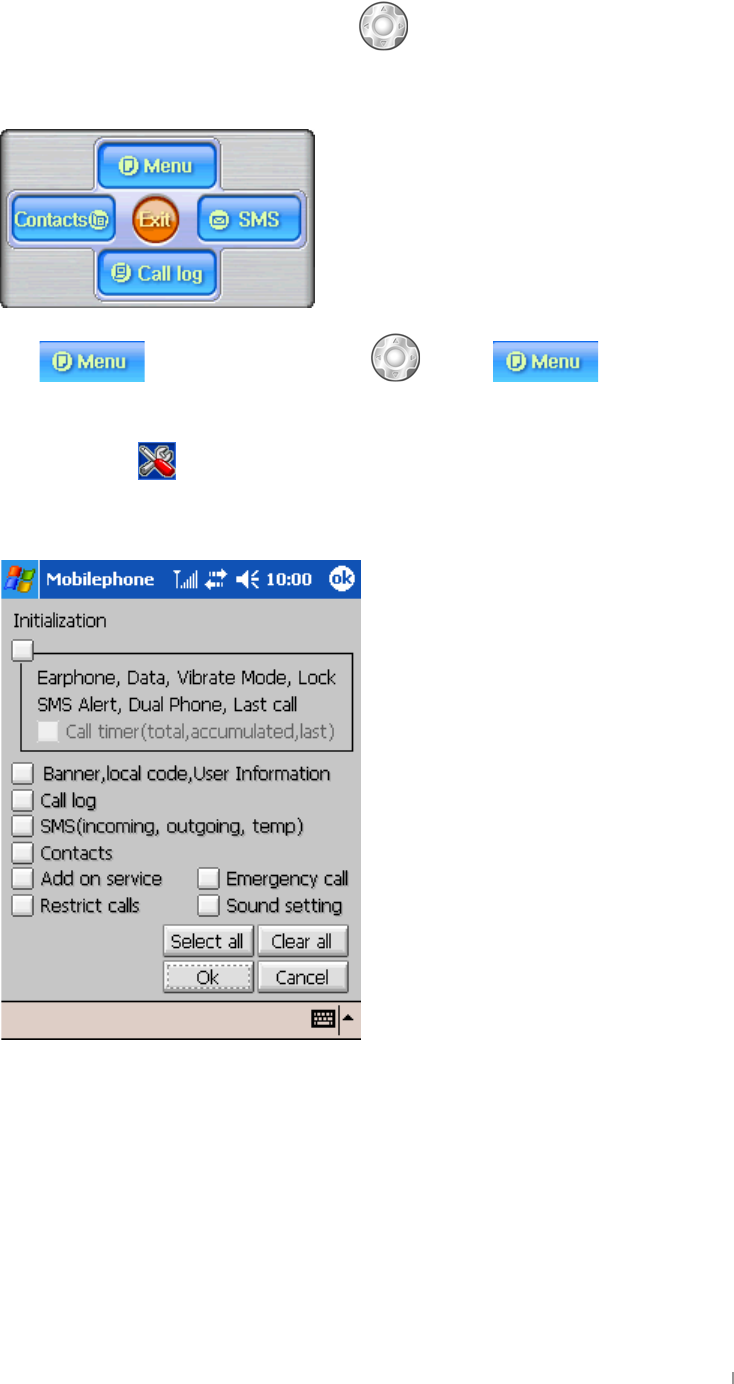
=b]h]U`]nUh]cb
~GGGGGSGG G GGGGGGGG
UG G
G
G
G
G
G
G
G
{G G GGGGGG GGG G UG G
G
{Gˈ vˉ O PUG G
{Gˈ wGp¡ˉ GGGGGGGGUG G
G
G
G
G
G
G
G
G
G
G
G
G
G
G
G
G
G
G
tGGG
G|˅ GtG G ^T\]
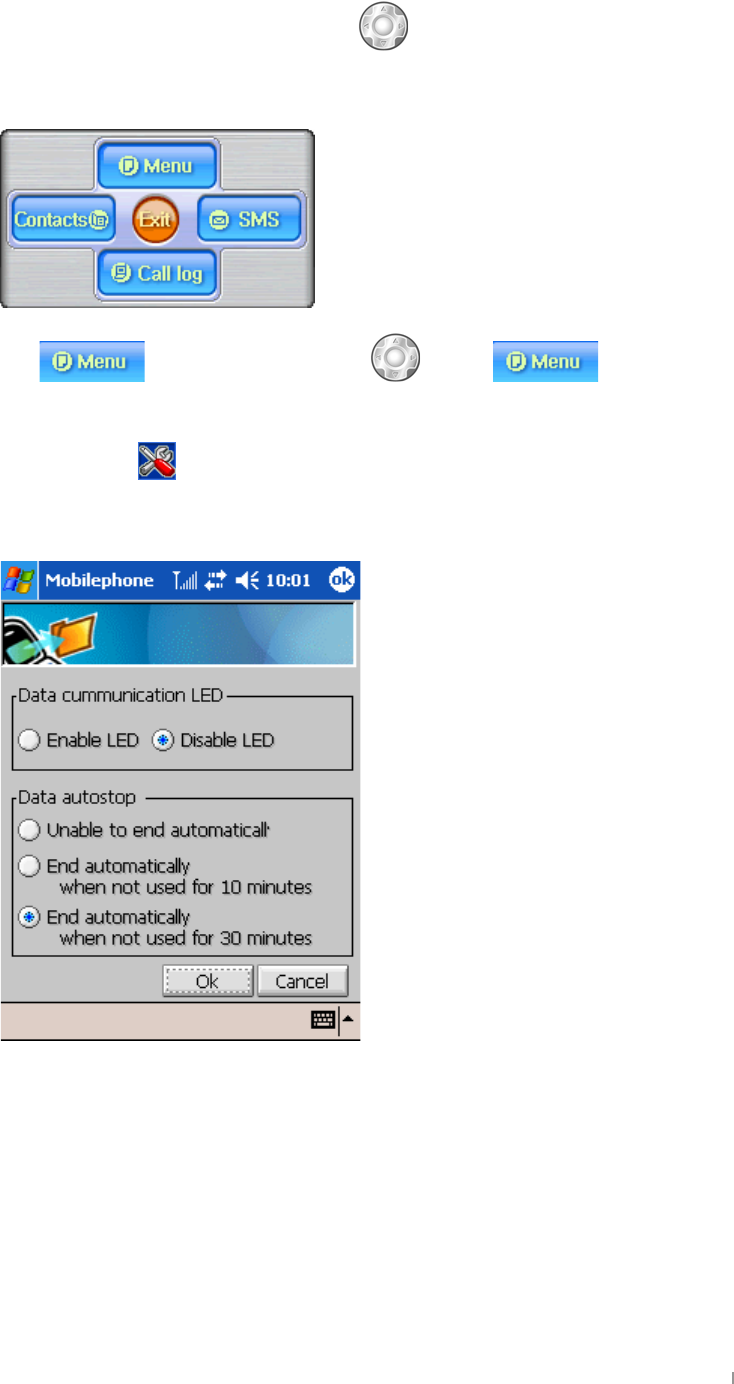
8UhU7caaib]WUh]cbg
~GGGGGSGG G GGGGGGGG
UG G
G
G
G
G
G
G
G
{G G GGGGGG GGG G UG G
G
{Gˈ vˉ O PUG G
{Gˈ kGjˉ GGGGGGUG G
G
G
G
G
G
G
G
G
G
G
G
G
G
G
G
G
G
G
tGGG
GjG^GtGwG G ^T\^
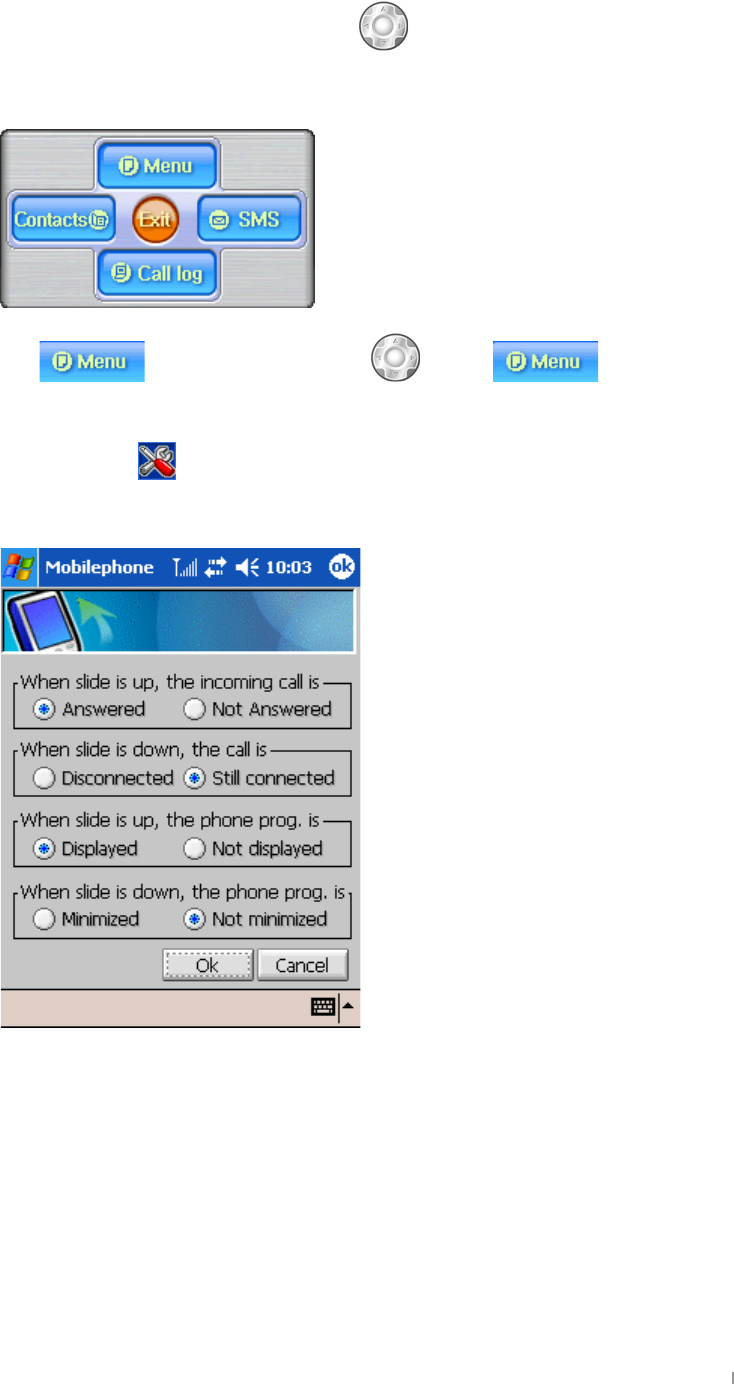
G`]XY!Id5Wh]cb
~GGGGGSGG G GGGGGGGG
UG G
G
G
G
G
G
G
G
{G G GGGGGG GGG G UG G
G
{Gˈ vˉ O PUG G
{Gˈ zT|Ghˉ GGGGGGGGGGGGUG G
G
G
G
G
G
G
G
G
G
G
G
G
G
G
G
G
G
tGGG
G|˅ GtG G ^T\_
?YmdUXVUW_`][\h
~GGGGGSGG G GGGGGGGG
UG G
G
G
G
G
G
G
G
{G G GGGGGG GGG G UG G
G
{Gˈ vˉ O PUG G
{Gˈ rGiTsˉ GGGGGUG G
G
G
G
G
G
G
G
G
G
G
G
G
G
G
G
G
G
G
G
tGGG

GjG^GtGwG G ^T\`
78A5ghUhig@98
~GGGGGSGG G GGGGGGGG
UG G
G
G
G
G
G
G
G
{G G GGGGGG GGG G UG G
G
{Gˈ vˉ O PGGG UG G
{Gˈ jkthGz{h{|zGslkˉ GGGjkthGGslkGGUG G
G
G
G
G
G
G
G
G
G
G
G
G
G
G
G
G
G
G
G
G
tGGG
G|˅ GtG G ^T]W
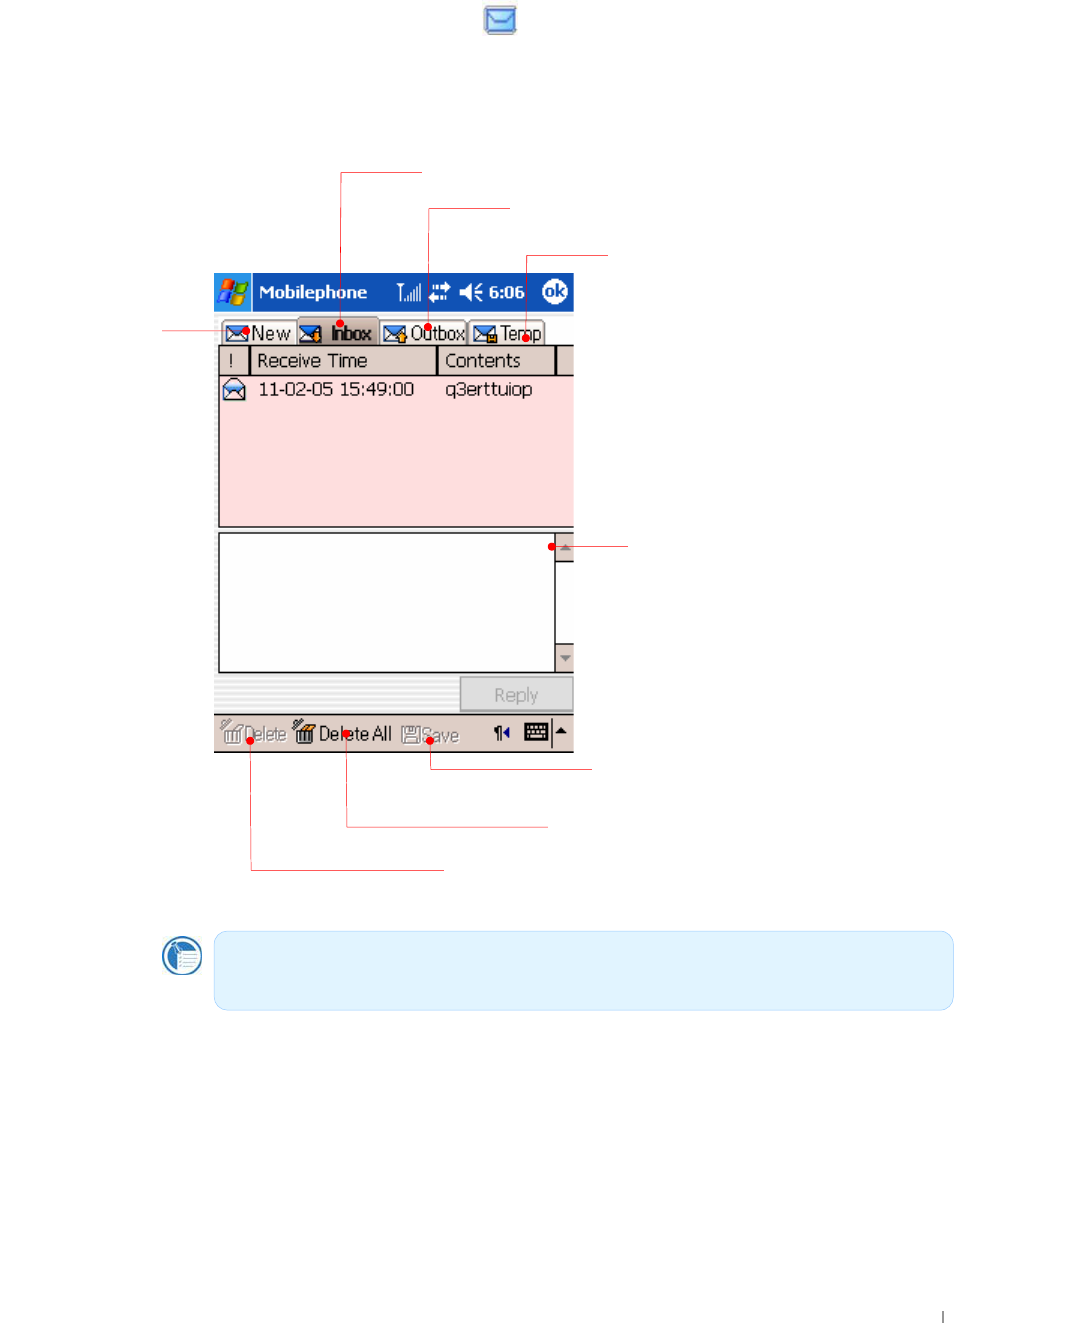
SMS(Short Message Service)
Contact your service provider before using this function.
Tap the MSG button on the phone program to display the SMS message screen. When
you receive a SMS message, #appears on the phone status pane of the phone
program. When you tap this icon on the phone status pane of the phone program,
nothing happens and you have to tap the SMS button on the right side of the phone
program.
Gxulqj#gdwd#frppxqlfdwlrqv+Lqwhuqhw,/#li#VPV#phvvdjh#lv#vhqw#ru#uhfhlyhg/#wkh#
Lqwhuqhw#pd|#eh#glvfrqqhfwhg#ghshqglqj#rq#wkh#vhwwlqjv#ri#|rxu#vhuylfh#surylghu1#
zGGGGGztzG G G
{GuGGGG
GztzGUG
{GGGGGGztzGpUG
{GGGGGGztzGvU
{GGGGGGztzG{GUG
{GGGGGGU
{GGGGGGUGzGG
GGGGGGUG
{GzGGG˅ GGGGUG
GjG^GtGwG G ^T]X
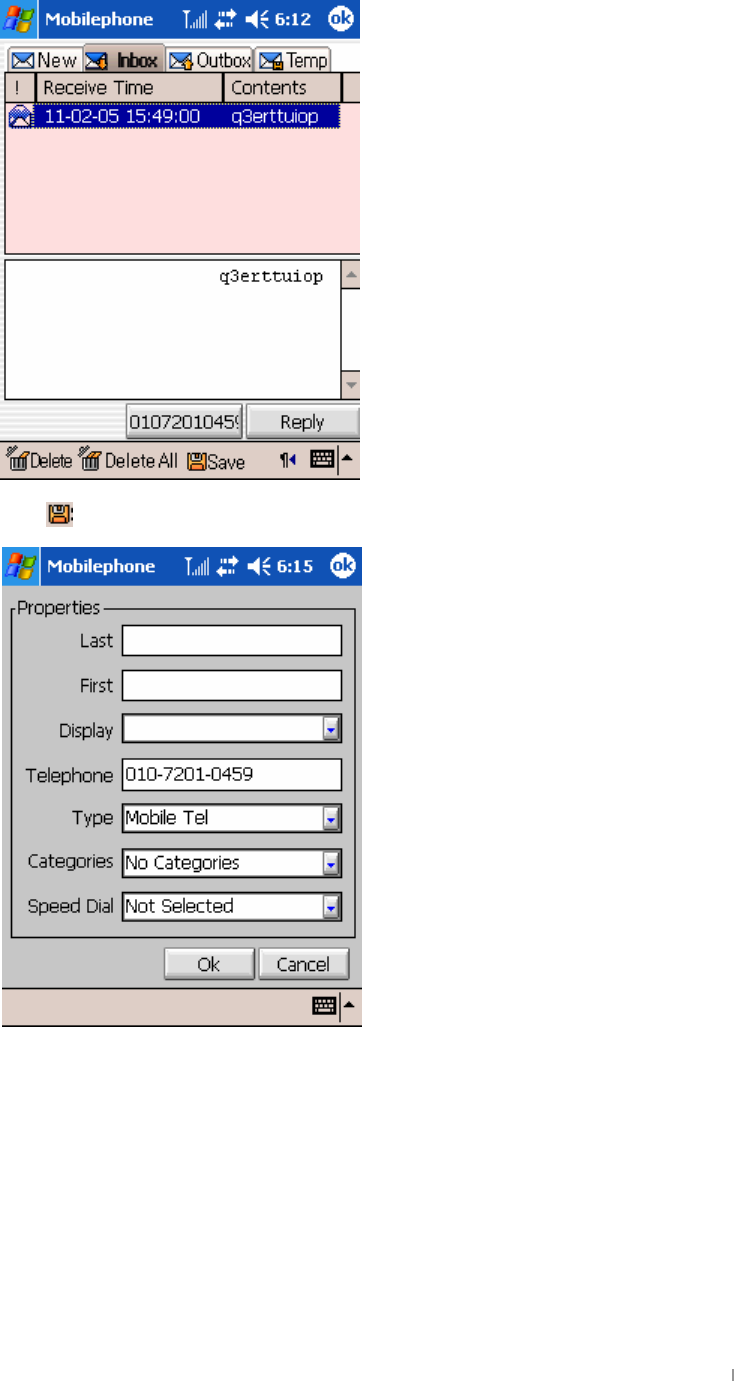
Add sender’s phone number to your contacts
Tap to save the sender’s phone number.
Enter any necessary information and tap OK.
G|˅ GtG G ^T]Y
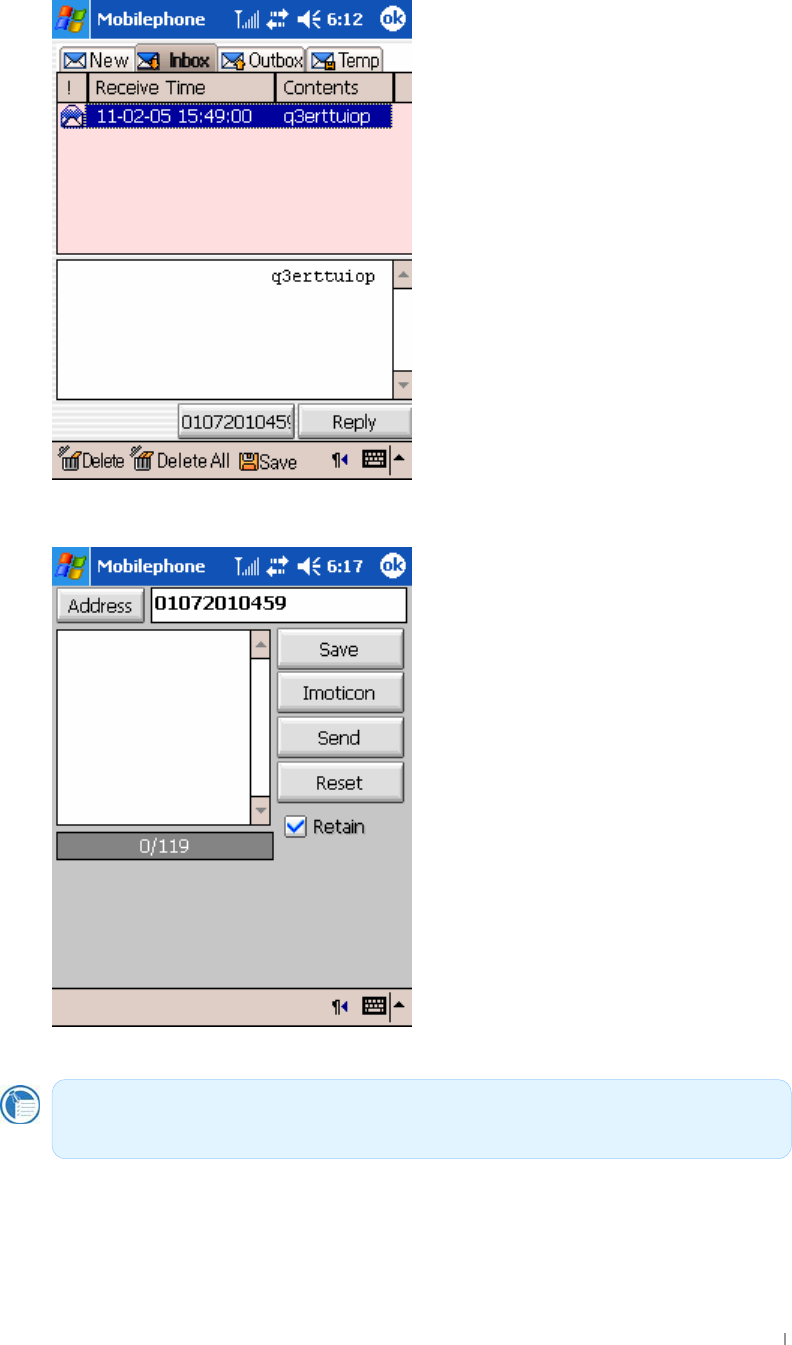
Reply to SMS
Among the messages listed on the Inbox, select a message you want to reply to.
Tap the Reply button
When you finish the contents, tap Send to this message.
Zkhq# |rx# hqwhu# vhyhudo# skrqh# qxpehuv/# hdfk# skrqh# qxpehu# vkrxog# eh#
vhsdudwhg#e|#vhplfrorq#+>,1#
GjG^GtGwG G ^T]Z
Compose a new message
Tap New to compose a new SMS.
Enter messages on the text box and tap the Send button to send the message.
G
{GGG
GUG
{GGGGGUG G

GChapter 8 Microsoft Pocket Outlook 8-1
G
G
G
G
G
G
G
G
G
G
G
Microsoft Pocket Outlook includes Calendar, Contacts, Tasks, Inbox, and Notes. You
can use these programs individually or together. For example, e-mail addresses stored
in Contacts can be used to address e-mail messages in Inbox.
Using ActiveSync, you can synchronize information in Microsoft Outlook on your desktop
PC with information in Pocket Outlook on your device. Each time you synchronize,
ActiveSync compares the changes you made on your device and desktop PC and
updates both computers with the latest information. For information on using ActiveSync,
see ActiveSync Help on your desktop PC.
ඝIn this chapter, you will learn to
Schedule appointments and meetings using Calendar.
Keep track of friends and colleagues using Contacts.
Keep a to-do list in Tasks.
Capture thoughts and ideas with Notes.
For details on using Inbox to send and receive e-mail messages, see “Sending and
Receiving E-mail” in chapter 5.
Chapter 8
Microsoft Pocket Outloo
k
GUser’s Manual 8-2
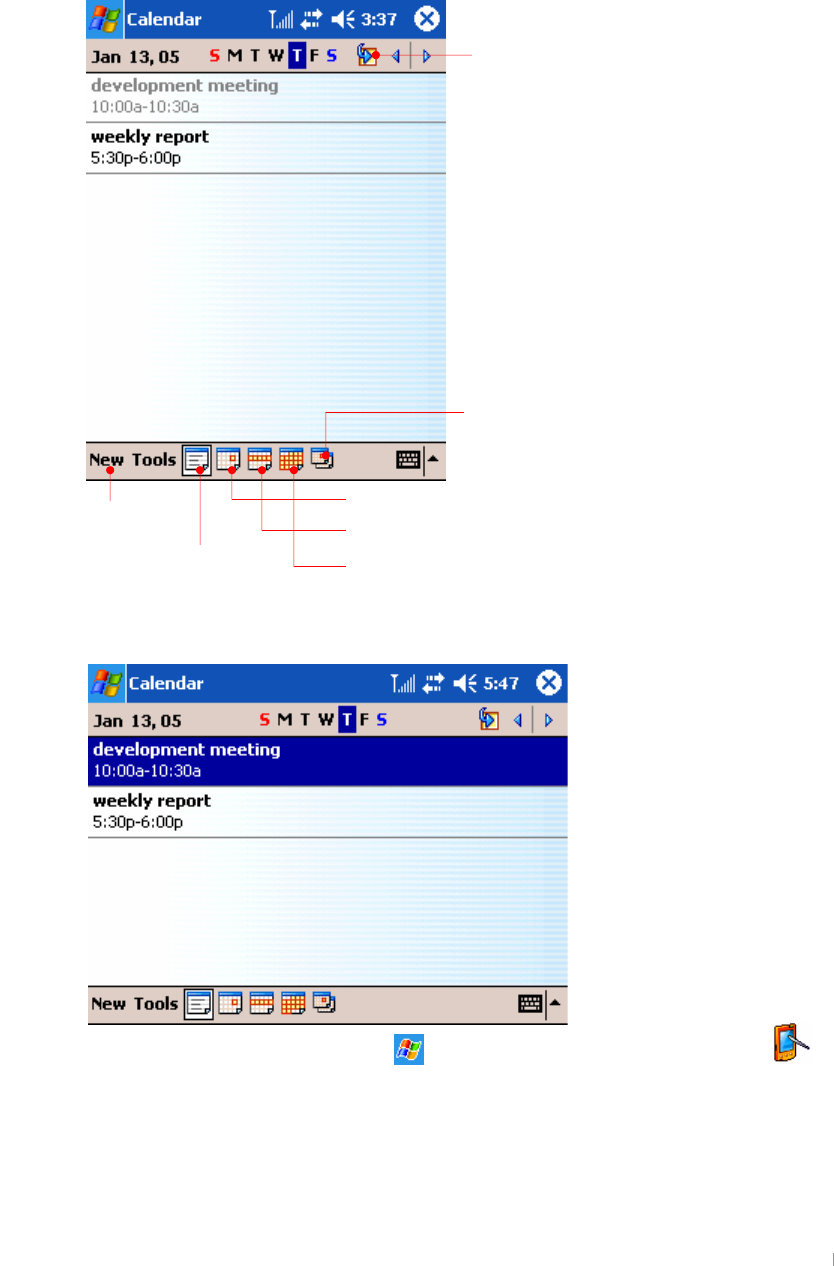
Calendar : Scheduling Appointments and Meetings
Use Calendar to schedule appointments, including meetings and other events. You can
check your appointments in one of several views (Agenda, Day, Week, Month, and Year)
and easily switch views by using the View menu.
When you select landscape on the settings you will have a screen as follows :
(If you want to select “landscape”, > “Settings” > “System” tab > “Screen ” icon.
For more detailed information, see the screen setting on chapter 6 Configuring Device.)
For description below, portrait screens are used.
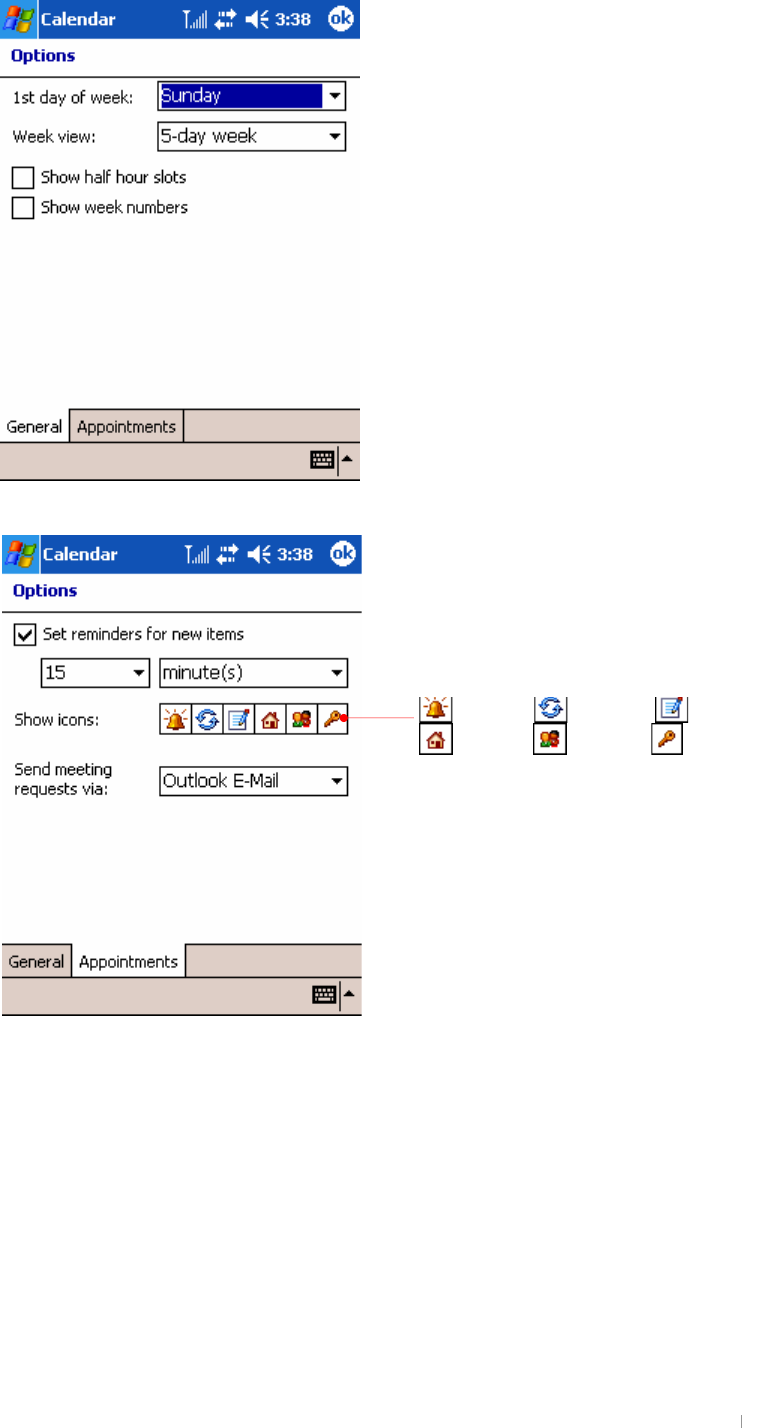
You can customize the Calendar display (for example, change the first day of the week),
by tapping Options on the Tools menu.
Tap to
g
o to toda
y
.
Tap to create a new
a
pp
ointment.
Agenda view
Day view
Week view
Month view
Year view
GChapter 8 Microsoft Pocket Outlook 8-3
Reminder Recurs Note
Location Attendees Private
GUser’s Manual 8-4
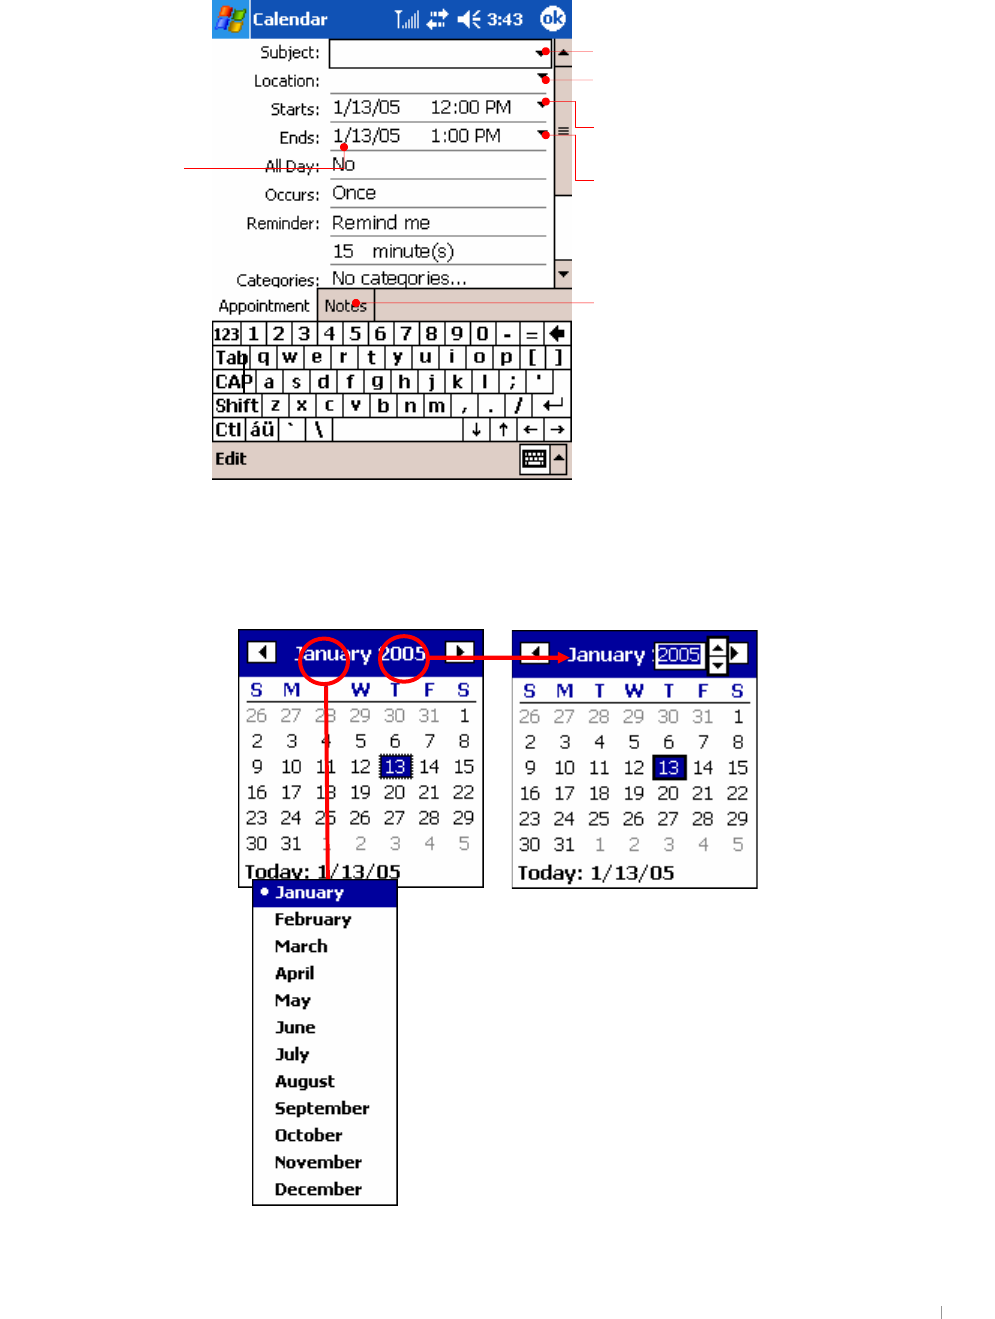
To create an appointment
1. In Day or Week view, tap the desired date and time for the appointment.
2. Tap New.
3. Using the Input panel, tap first to select the field, and then enter a description and a
location.
4. If needed, tap the date and time to change them.
For example, select the date to have the calendar pane displayed as below.
5. Enter other desired information. You will need to hide the Input panel to see all
Tap to choose from predefined text.
Tap to choose from previously entered locations.
Tap to return to the calendar (the
a
pp
ointment is saved automaticall
y)
.
Tap to select a time.
Tap to select a date.
The Notes tab is a good place for maps
and directions.
GChapter 8 Microsoft Pocket Outlook 8-5
available fields.
6. To add notes, tap the Notes tab. You can enter text, draw, or create a recording. For
more information on creating notes, see “Notes: Capturing Thoughts and Ideas,”
later in this chapter.
7. Tap OK to return to Calendar.
If you select Remind me in an appointment, your device will remind you according to the
options set in the Sounds & Notifications control panel.
Using the Summary Screen
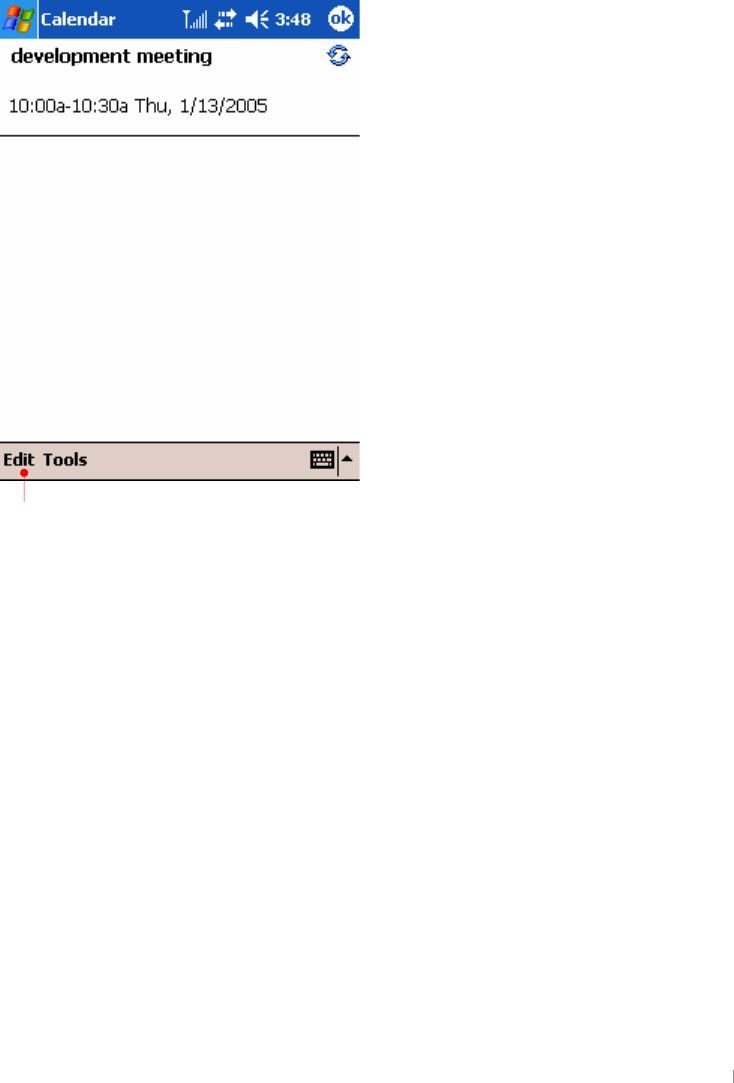
When you tap an appointment in Calendar, a summary screen is displayed. To change
the appointment, tap Edit.
Tap to change appointment.
GUser’s Manual 8-6
Creating Meeting Requests
You can use Calendar to set up meetings with users of Outlook or Pocket Outlook. The
meeting notices will be created automatically and sent either when you synchronize
Inbox or when you connect to your e-mail server.
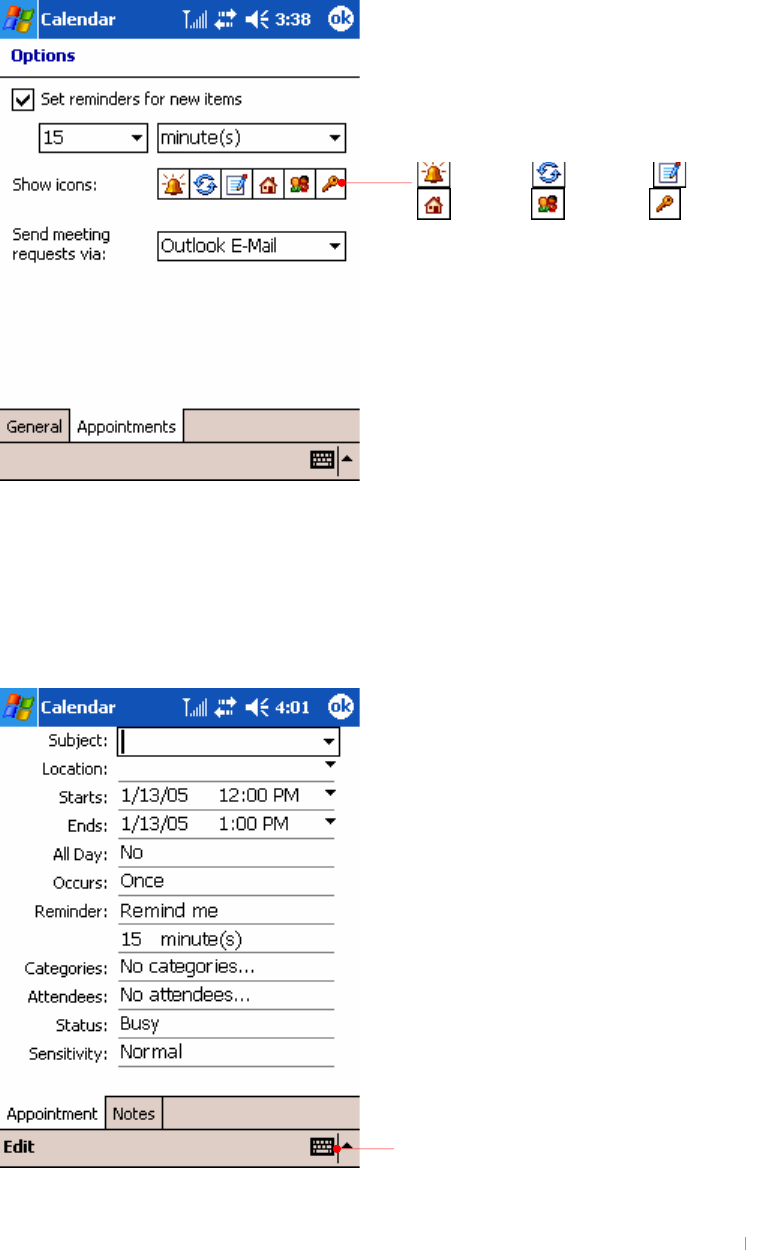
Indicate how you want meeting requests sent by tapping Tools and then Options.
If you send and receive e-mail messages through ActiveSync, select ActiveSync.
ඝTo schedule a meeting
1. Create an appointment.
2. In the appointment details, hide the Input panel, and then tap Attendees.
3. From the list of e-mail addresses in Contacts, select the meeting attendees.
Tap to show Input Panel.
Reminder Recurs Note
Location Attendees Private

GChapter 8 Microsoft Pocket Outlook 8-7
The meeting notice is created automatically and placed in the Outbox folder.
For more information on sending and receiving meeting requests, see Calendar Help
and Inbox Help on your device.
GUser’s Manual 8-8
Contacts: Tracking Friends and Colleagues
Contacts maintains a list of your friends and colleagues so that you can easily find the
information you are looking for, whether you are at home or on the road. Using the
infrared port of your device, you can quickly share Contacts information with users of
Pocket PCs and other mobile devices.
When you select landscape on the settings you will have a screen as follows :
(If you want to select “landscape”, > “Settings” > “System” tab > “Screen ” icon.
For more detailed information, see the screen setting on chapter 6 Configuring Device.)
For description below, portrait screens are used.
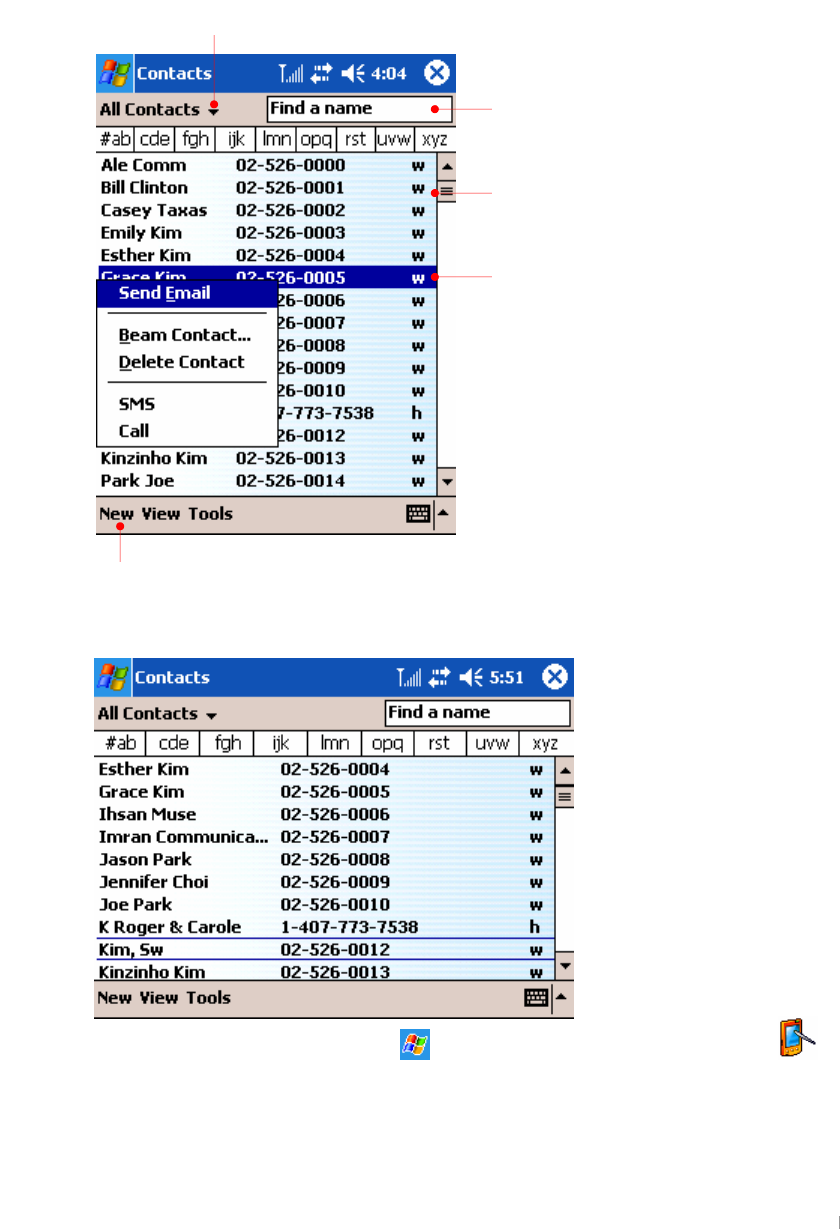
Tap and enter part of a name to quickly
find it in the list.
Select the category of contacts you want displayed in the list.
Tap to display or edit the contact details.
Tap and hold to display a pop-up menu of
actions.
Tap to create a new contact.
GChapter 8 Microsoft Pocket Outlook 8-9
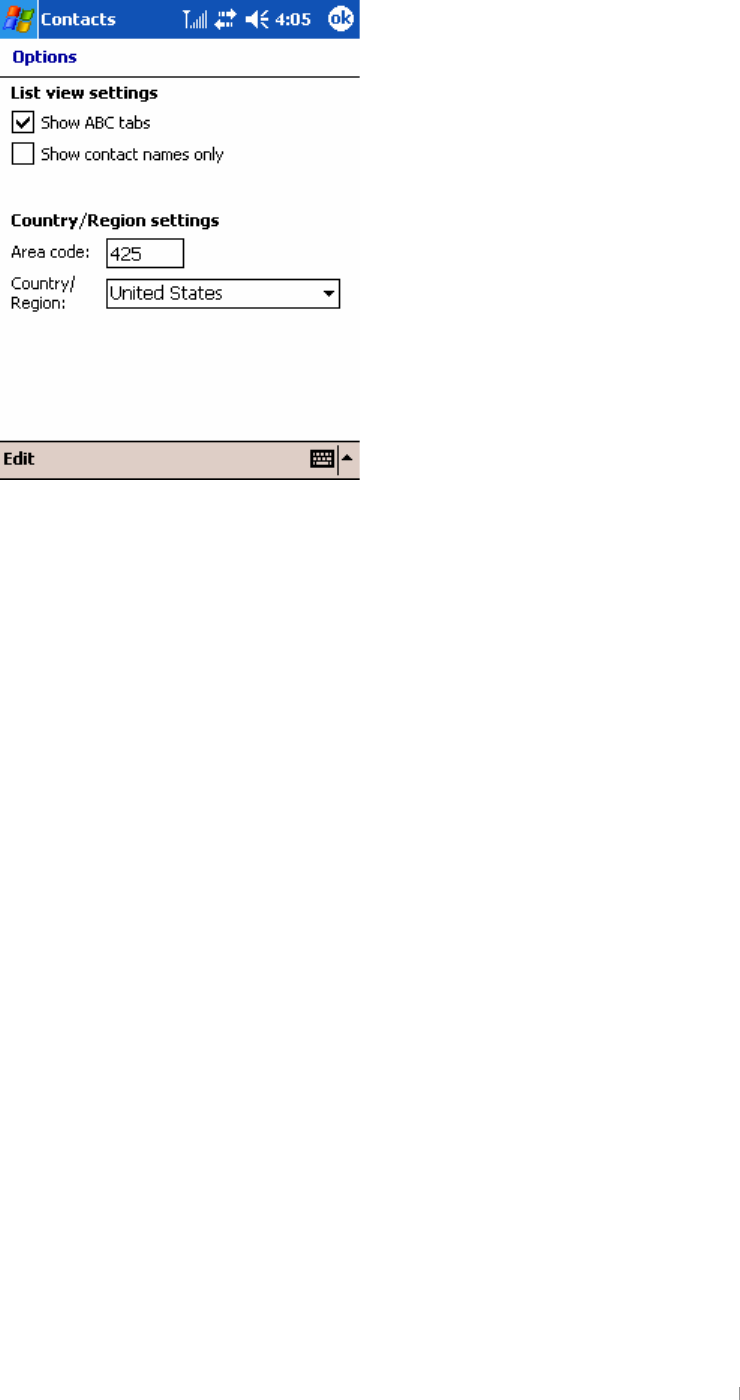
To change the way information is displayed in the list, tap Tools, and then tap Options.
GUser’s Manual 8-10
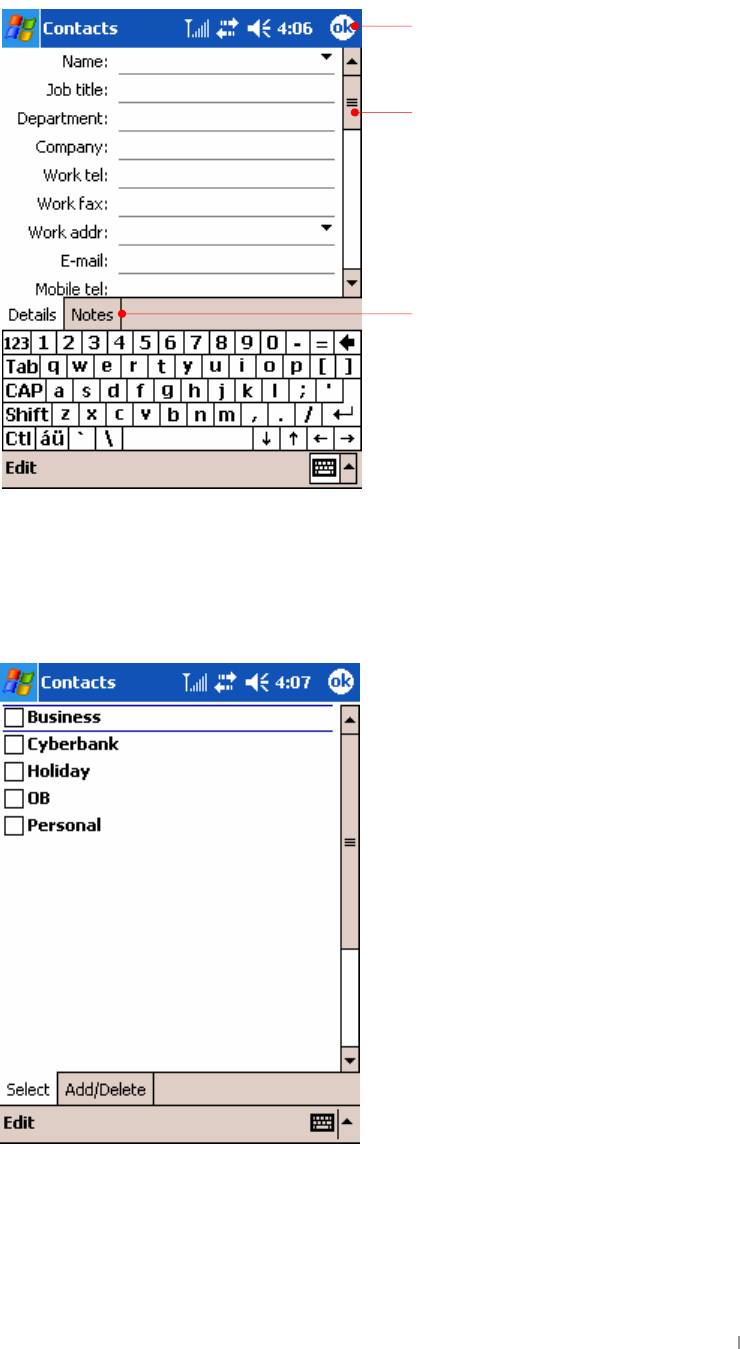
To create a contact
1. Tap New.
2. Using the Input panel, enter a name and other contact information. You will need to
scroll down to see all available fields.
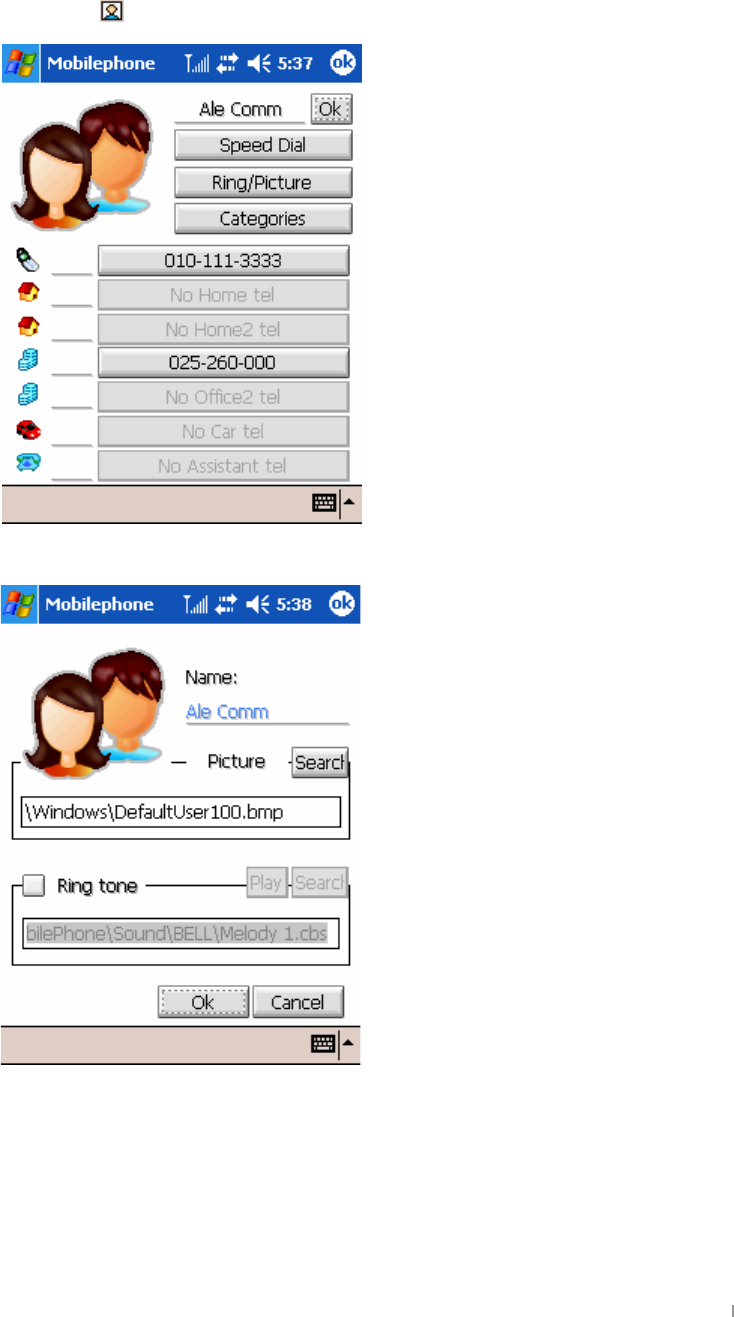
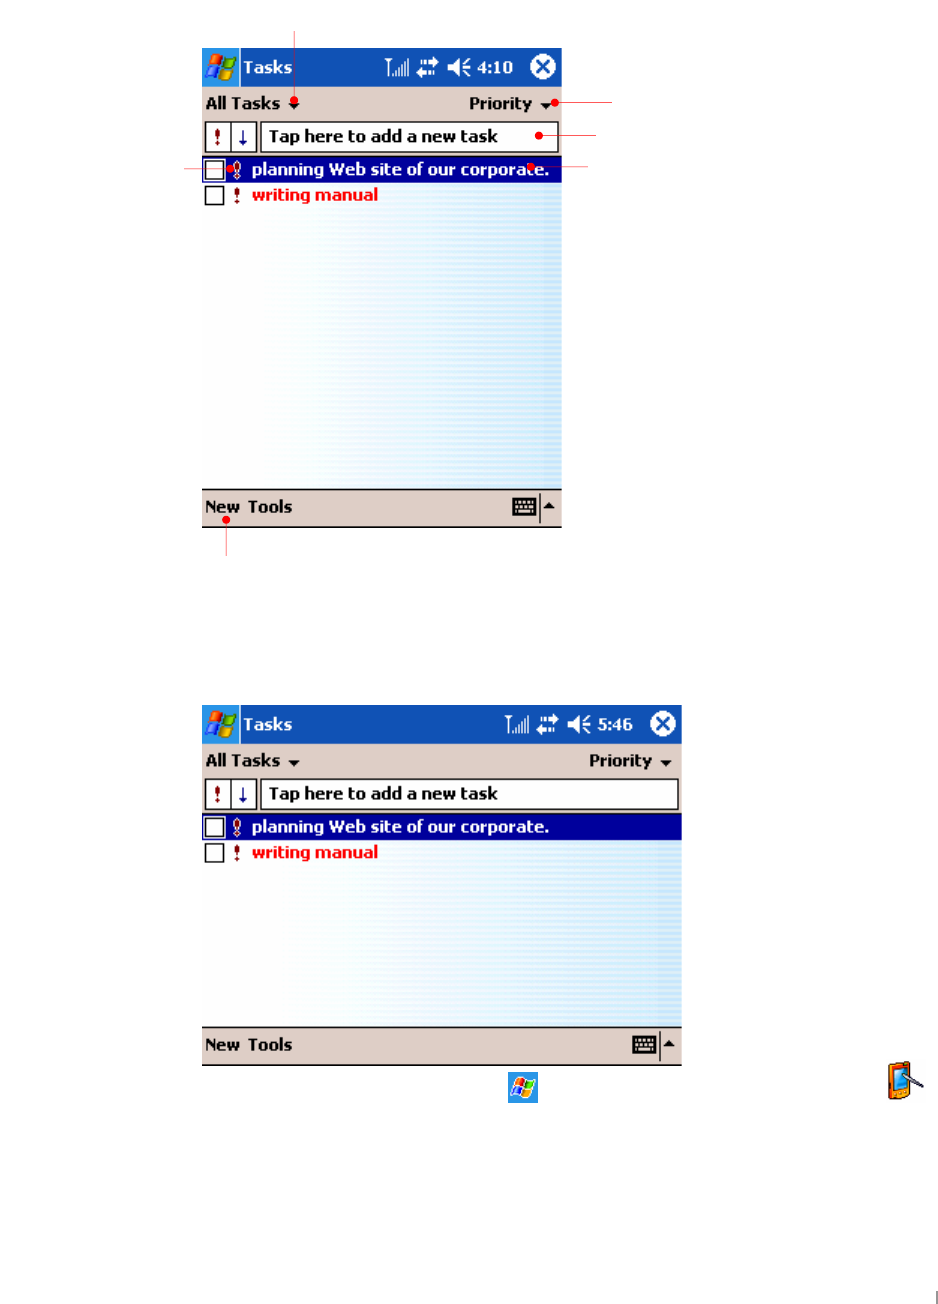
3. To assign the contact to a category, scroll to and tap Categories and select a
category from the list. In the contact list, you can display contacts by category.
4. To add notes, tap the Notes tab. You can enter text, draw, or create a recording. For
more information on creating notes, see “Notes: Capturing Thoughts and Ideas,”
later in this chapter.
5. Tap OK to return to the contact list.
Tap to return to the contact list (the
contact is saved automaticall
y)
.
Scroll to see more fields.
The Notes tab is a good place
for maps and directions.

GChapter 8 Microsoft Pocket Outlook 8-11
Using the Summary Screen
When you tap a contact in the contact list, a summary screen is displayed.
Tap to view notes.
Tap to change contact
information.
GUser’s Manual 8-12
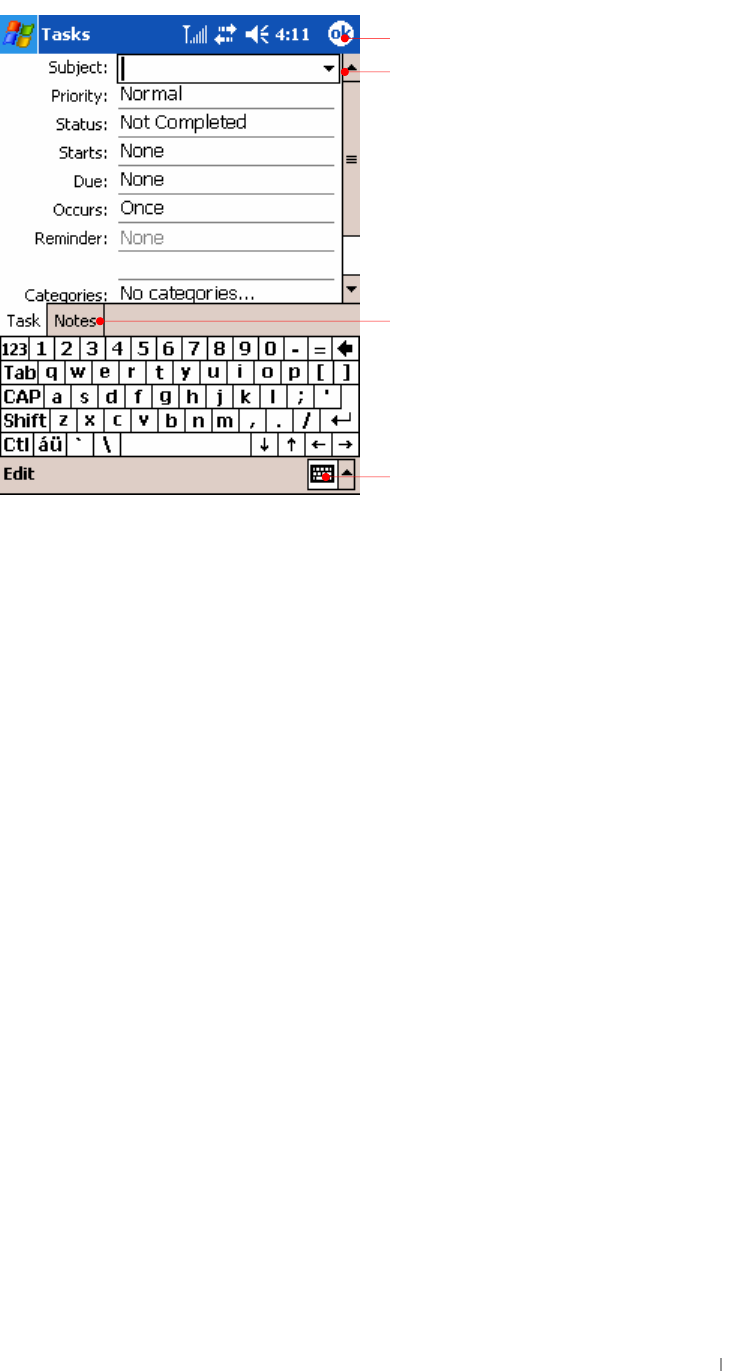
Tasks : Keeping a To-Do List
Use Tasks to keep track of what you have to do.
To change the way information is displayed in the list, tap Tools, and then tap Options.
When you select landscape on the settings you will have a screen as follows :
(If you want to select “landscape”, > “Settings” > “System” tab > “Screen ” icon.
For more detailed information, see the screen setting on chapter 6 Configuring Device.)
For description below, portrait screens are used.
Select the sort order of the list.
Select the category of tasks you want displayed in the list.
Tap to create a new task.
Indicates high priority.
Tap to display or edit the task details.
Tap and hold to display a pop-up menu
of actions.
GChapter 8 Microsoft Pocket Outlook 8-13
To create a task
1. Tap New.
2. Using the Input panel, enter a description.
3. You can enter a start date and due date or enter other information by first tapping
the field. If the Input panel is open, you will need to hide it to see all available fields.
4. To assign the task to a category, tap Categories and select a category from the list.
In the task list, you can display tasks by category.
5. To add notes, tap the Notes tab. You can enter text, draw, or create a recording. For
more information on creating notes, see “Notes: Capturing Thoughts and Ideas,”
later in this chapter.
6. Tap OK to return to the task list.
To quickly create a task with only a subject, tap Entry Bar on the Tools menu, and then
tap Tap here to add a new task.
Tap to return to the task list (the task is
saved automatically).
Tap to choose from predefined subjects.
Notes is a good place for maps
and drawin
g
s.
Tap to hide Input Panel.
GUser’s Manual 8-14
Using the Summary Screen
When you tap a task in the task list, a summary screen is displayed. To change the task,
tap Edit.
View task details.
Tap to show and hide additional summary
information.
View notes.
Tap to change task.

GChapter 8 Microsoft Pocket Outlook 8-15
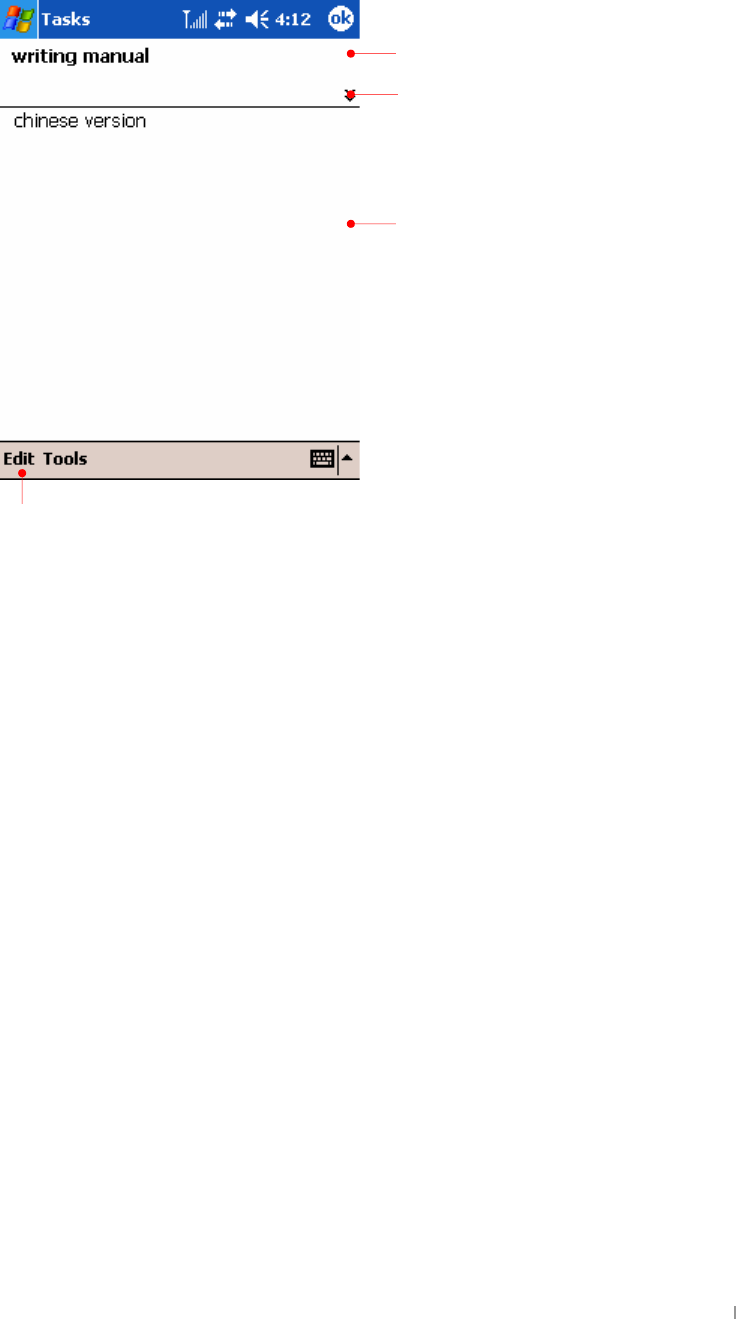
Notes : Capturing Thoughts and Ideas
Quickly capture thoughts, reminders, ideas, drawings, and phone numbers with Notes.
You can create a written note or a recording. If a note is open when you create the
recording, it will be included in the note as an icon. If the note list is displayed, it will be
created as a stand-alone recording.
When you select landscape on the settings you will have a screen as follows :
(If you want to select “landscape”, > “Settings” > “System” tab > “Screen ” icon.
For more detailed information, see the screen setting on chapter 6 Configuring Device.)
For description below, portrait screens are used.
Tap to change the sort order of the list.
Tap and hold to display a pop-up
menu of actions.
Tap to show or hide the Recording
toolbar.
Tap to create a new item.
GUser’s Manual 8-16
To create a note
1. Tap New.
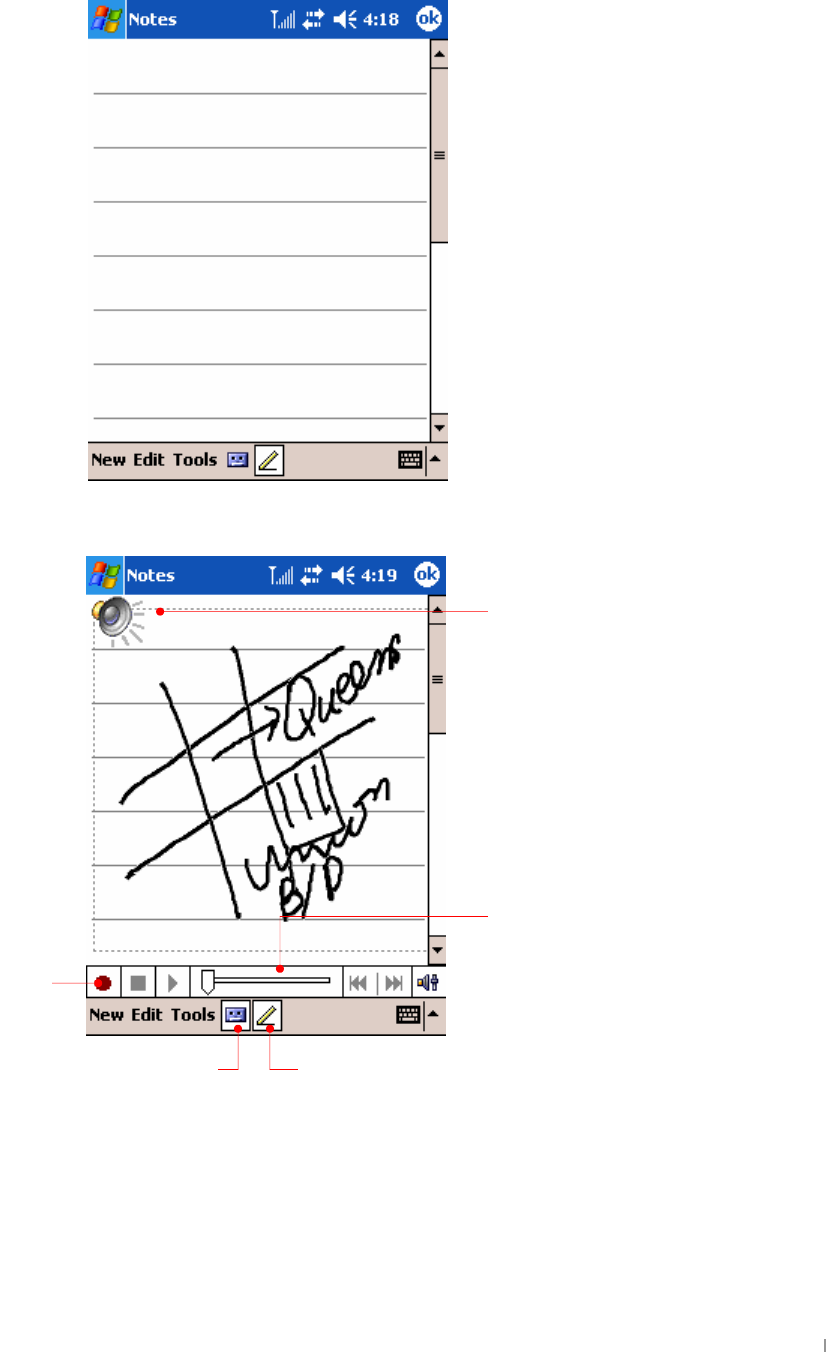
2. Create your note by writing, drawing, typing, or recording.
Create your note by writing, drawing, typing, or recording. For more information about
using the Input panel, writing and drawing on the screen, and creating recordings, see
“Entering Information Using the Input Panel” in chapter 3.
G
These icon display the voice recording.
Record button
Display the process of recording.
Pen buttonTap to show or hide the
Recordin
g
toolbar.

GChapter 9 Microsoft Programs 9-1
G
G
G
G
G
G
G
G
G
G
G
Your device includes Microsoft Pocket PC Software 2003(Microsoft Pocket Word,
Microsoft Pocket Excel, Windows Media Player for Pocket PC, Microsoft Reader, and
Microsoft Messenger). This section provides an overview of these programs and enough
information to get you started. For complete instructions on using a program, refer to
online Help for that program.
ඝIn this chapter, you will learn about
Microsoft Pocket Word
Microsoft Pocket Excel
Microsoft Windows Media Player
Terminal Service Client
Pictures
Microsoft Messenger
Chapter 9
Microsoft Programs
GUser’s Manual 9-2
Microsoft Pocket Word
Microsoft Pocket Word works with Microsoft Word on your desktop PC to give you easy
access to copies of your documents. You can create new documents on your device, or
you can copy documents from your desktop PC. Synchronize documents between your
desktop PC and your device regularly so that you have the most up-to-date content in
both locations.
To use Pocket Word
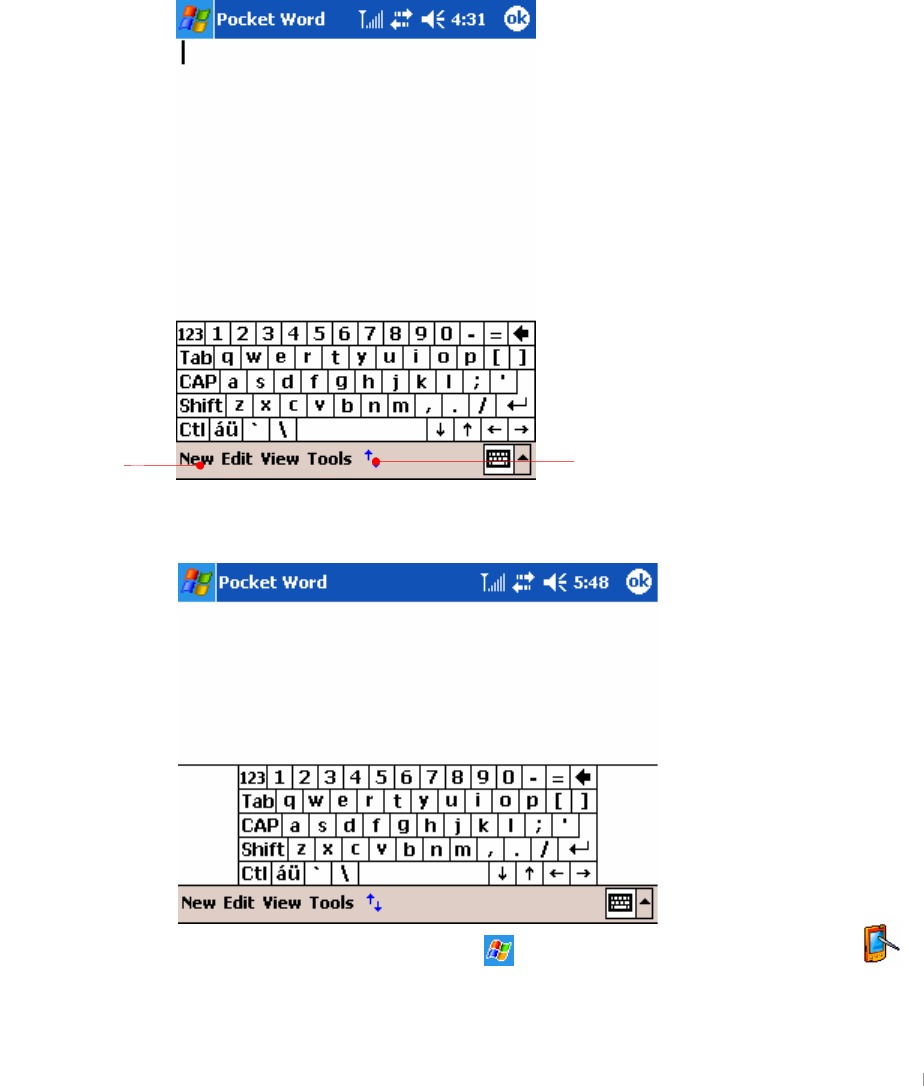
1. On the Start menu, tap Programs, and then tap the Pocket Word icon.
When you select landscape on the settings you will have a screen as follows :
(If you want to select “landscape”, > “Settings” > “System” tab > “Screen ” icon.
For more detailed information, see the screen setting on chapter 6 Configuring Device.)
For description below, portrait screens are used.
Tap to show and hide toolbar.
Tap to make a
new word file.
GChapter 9 Microsoft Programs 9-3
2. Tap New to open a blank document.
You can open only one document at a time; when you open a second document, you will
be asked to save the first. You can save a document you create or edit in a variety of
formats, including Pocket Word (.psw), Rich Text Format (.rtf), and Plain Text (.txt).
You can enter information in Pocket Word in four modes: typing, writing, drawing, and
recording. Use the View menu to switch between modes. Each mode has its own toolbar,
which you can show and hide by tapping the Show/Hide Toolbar button on the
Command bar.
Typing Mode. Use the Input panel to enter typed text into the document with either the
keyboard or the Letter Recognizer.
For more information on entering typed text, see “Entering Information” in chapter 3.
Writing Mode. In writing mode, use your stylus to write directly on the screen. Ruled
lines are displayed as a guide, and the zoom magnification is greater than in typing
mode to allow you to write more easily. For more information on writing and selecting
writing, see “Entering Information” in chapter 3.
Written words are converted to graphics (metafiles) when a Pocket Word document is
converted to a Word document on your desktop PC.
Drawing mode. In drawing mode, use your stylus to draw on the screen. Gridlines
appear as a guide. When you lift your stylus off the screen after the first stroke, you will
see a drawing box indicating the boundaries of the drawing. Every subsequent stroke
within or touching the drawing box becomes part of the drawing. For more information on
drawing and selecting drawings, see “Entering Information” in chapter3.
Recording mode. Use recording mode to embed a recording into your document.
Recordings are saved as WAV files. For more information on recording, see “Entering
Information” in chapter3.
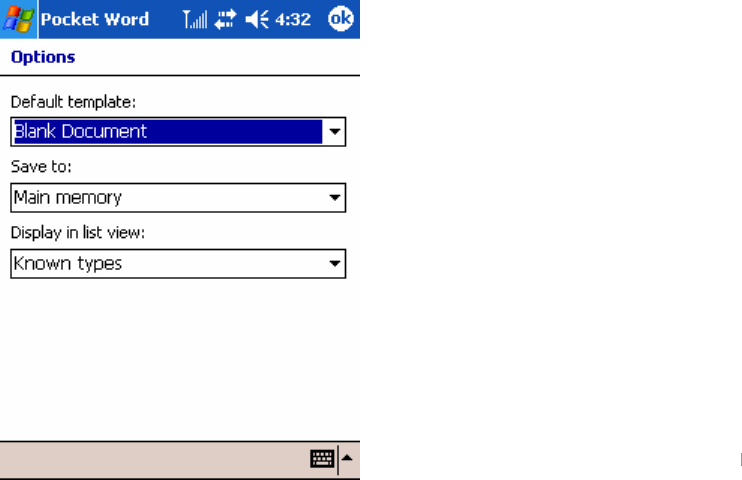
To open a template rather than a blank document, select a template for new documents.
On the Tools menu, tap Options, and then browse to select the default template. When
you tap New, the template appears with appropriate text and formatting already provided.

GUser’s Manual 9-4
Tips for Working in Pocket Word
You can change the zoom magnification by tapping View and then Zoom. Then
select the percentage you want. Select a higher percentage to enter text and a lower
one to see more of your document.
If you are opening a Word document created on a desktop PC, select Wrap to
Window on the View menu so that you can see the entire document.
GChapter 9 Microsoft Programs 9-5
Microsoft Pocket Excel
Microsoft Pocket Excel works with Microsoft Excel on your desktop PC to give you easy
access to copies of your workbooks. You can create new workbooks on your device, or
you can copy workbooks from your desktop PC to your device. Synchronize workbooks
between your desktop PC and your device so that you have the most up-to-date content
in both locations. Pocket Excel provides fundamental spreadsheet tools, such as
formulas, functions, sorting, and filtering, which enable you to create simple workbooks,
such as expense reports and mileage logs.
To use Pocket Excel
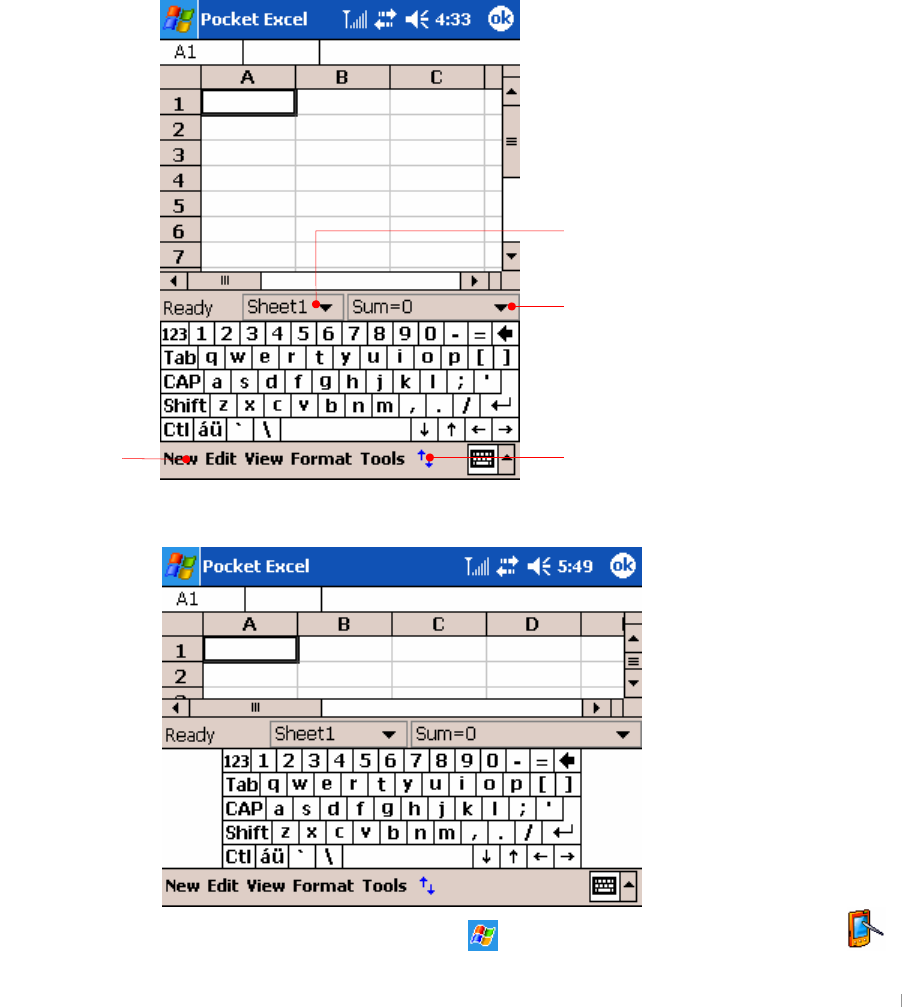
1. On the Start menu, tap Programs, and then tap the Pocket Excel icon.
When you select landscape on the settings you will have a screen as follows :
(If you want to select “landscape”, > “Settings” > “System” tab > “Screen ” icon.
Tap to select a function you want.
Tap to select a sheet.
Tap to show and hide toolbar.
Tap to make a
new Excel file.

GUser’s Manual 9-6
For more detailed information, see the screen setting on chapter 6 Configuring Device.)
For description below, portrait screens are used.
2. Tap New to open a blank workbook.
To open a template rather than a blank workbook, select a template for new workbooks.
On the Tools menu, tap Options, and then browse to select the default template. When
you tap New, the template appears with appropriate text and formatting already provided.
You can open only one workbook at a time; when you open a second workbook, you will be
asked to save the first. You can save a workbook you create or edit in a variety of formats,
including Pocket Excel (.pxl) and Excel (.xls).
Tips for Working in Pocket Excel
View in full-screen mode to see as much of your worksheet as possible. Tap View
and then tap Full Screen.
If your workbook contains sensitive information, you can protect it with a password.
To do so, open the workbook, tap Edit, and then tap Password.
Freeze panes on a worksheet. First, select the cell where you want to freeze panes.
Tap View and then tap Freeze Panes. You might want to freeze the top and leftmost
panes in a worksheet to keep row and column labels visible as you scroll through a
sheet.
Split panes to view different areas of a large worksheet. Tap View and then tap Split.
Then drag the split bar to where you want it. To remove the split, tap View and then
tap Remove Split.
Show and hide rows and columns. To hide a row or column, select a cell in the row
or column you want to hide. Tap Format, then tap Row or Column, and then tap
Hide. To show a hidden row or column, tap Tools, then tap Go To, and then type a
reference that is in the hidden row or column. Tap Format, then tap Row or Column,
and then tap Unhide.
GChapter 9 Microsoft Programs 9-7
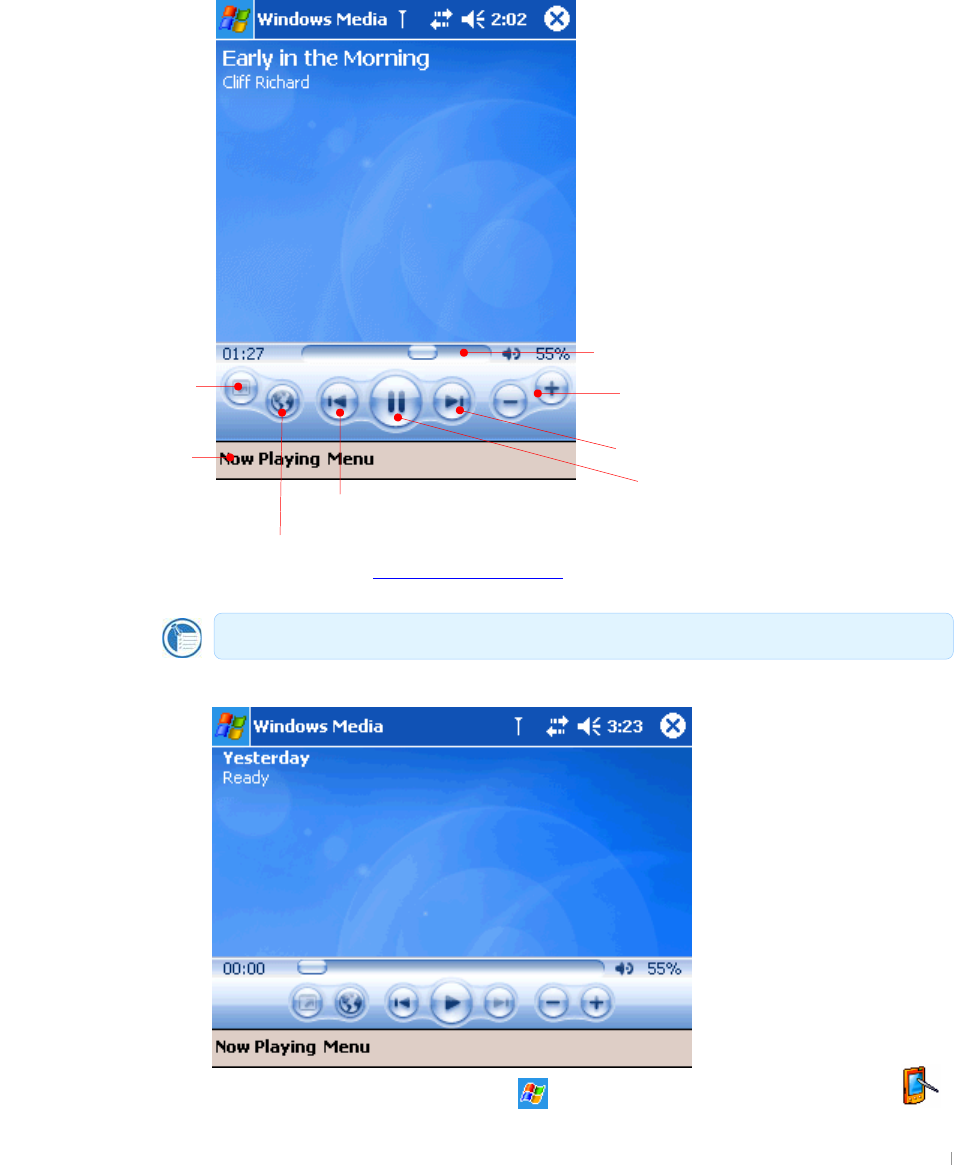
Microsoft Windows Media Player
Use Microsoft Windows Media Player for Pocket PC to listen to digital audio and video
files, such as songs or movie clips.
Media Player supports file formats, such as MP3, WMA, WMV, ASF and WMP.
To start Windows Media Player
On the Start menu, tap Programs, and then tap the Windows Media Player icon.
When you select landscape on the settings you will have a screen as follows :
(If you want to select “landscape”, > “Settings” > “System” tab > “Screen” icon.
Indicates the progress of the
current track.
Tap to go back to the previous file.
Tap to pla
y
a previous song.
Tap to skip to the next file.
Tap to fit window.
Tap to select a song
y
ou want to
p
la
y
back.
To play the music file repeatedly, on the Menu, Shuffle/Repeat and select Repeat.
Tap to adjust volume.
Tap here to see movie files through streaming and you will
be connected to www.windowsmedia.com
GUser’s Manual 9-8
For more detailed information, see the screen setting on chapter 6 Configuring Device.)
For description below, portrait screens are used.
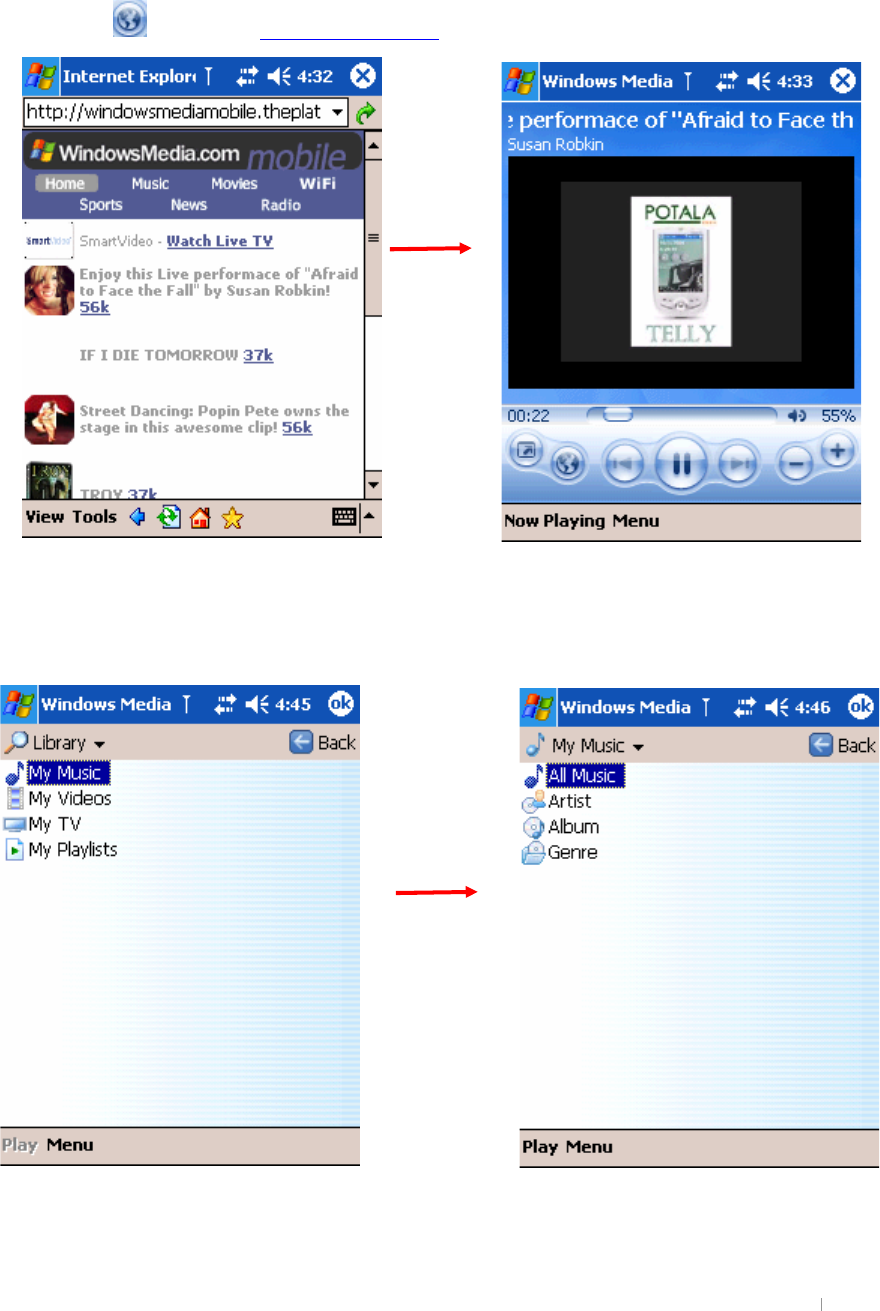
7cbbYWhhcK]bXckgaYX]U"Wca
Tap to connect to
www.windowsmedia.com
.
D`Um`]gh
Tap “Menu” > “Library” to have screen displayed as below.
Tap “My Music”
Select the file
you want.

GChapter 9 Microsoft Programs 9-9
Tap “All Music”.
Tap “Now Playing” to see what is played.
Working with Audio Files on a SD Card
Because songs and audio files can use a lot of storage memory, you may store them on a
mini SD memory card.
Tap Play.
Delete.
Display all music files.
Move files up or down.
This is the same as tapping
“Properties” on the Men.
GUser’s Manual 9-10
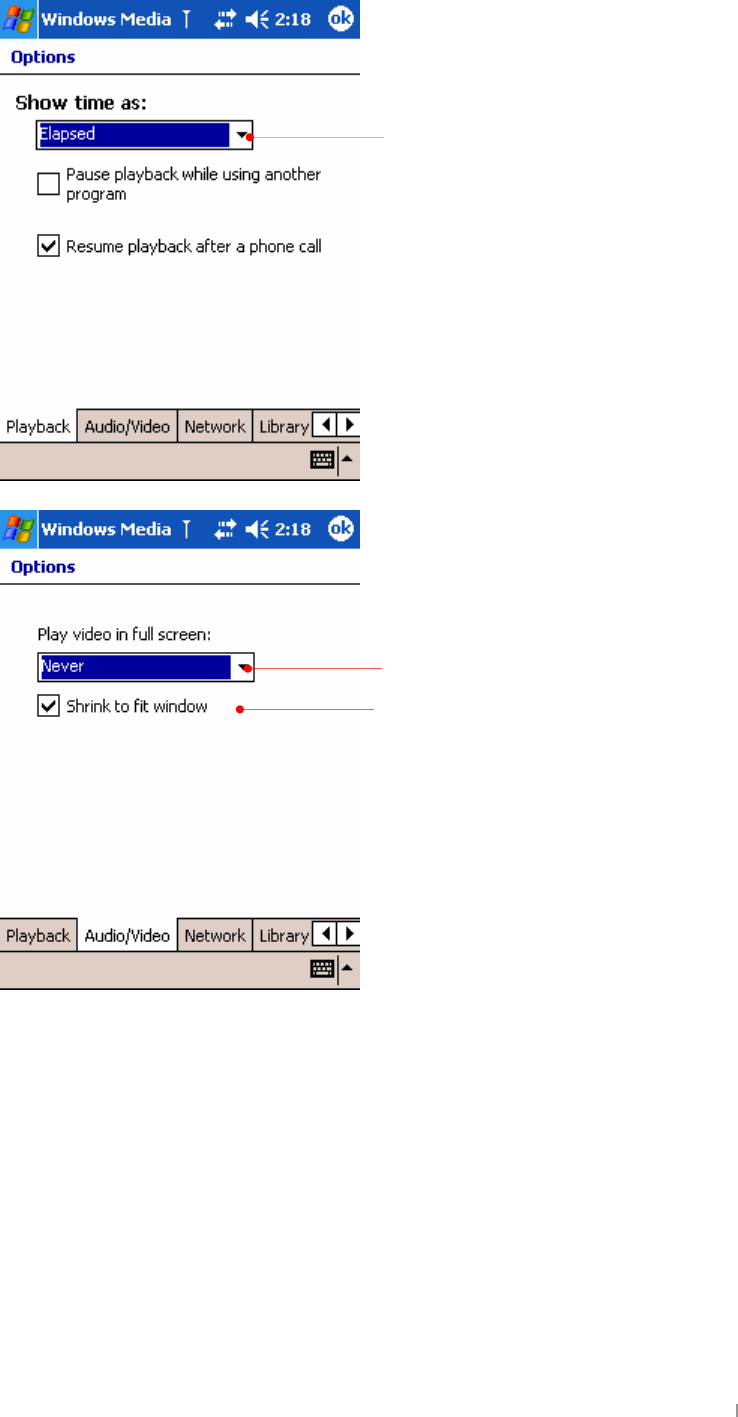
{GGSGGvGGGtUG
Tap to set the size of screen when
playing back a video file.
Select Elapsed or Remaining
Select one of options your want :
z Never
z Only when oversized
z Always
GChapter 9 Microsoft Programs 9-11
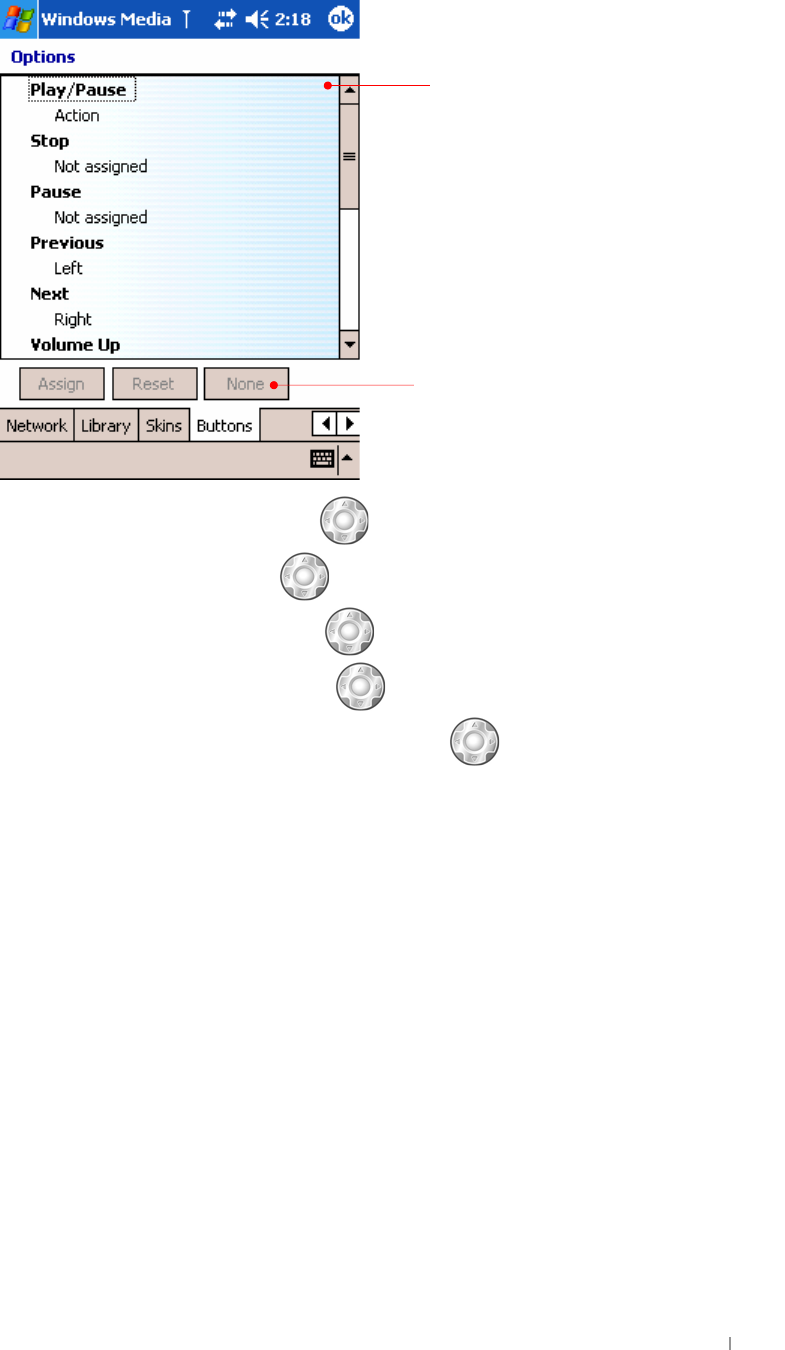
5gg][bVihhcbg
On the Menu, tap Options > “Buttons” tab to get the settings of button mapping.
The assigned buttons are limited to , and the description word means as follows :
zˈActionˉ means to press
U
z
ˈ|ˉ
means to press the up of
G U
z
ˈLeftˉ means to press the left of
UG
z
ˈHold Leftˉ means to press and hold the left of
UG
Play/Pause
Stop
Pause
Previous
Next
Volume Up
Volume Down
Mute
Full Screen
Fast Forward
Rewind
Screen To
gg
le
Tap this to have the assigned button disabled.
First select the function you want and then
select “None”
GUser’s Manual 9-12
Using Terminal Services Client
Using the Terminal Services Client (TSC), you can log onto a desktop computer running
Terminal Services (pre-Windows XP) or Remote Desktop (Windows XP and later) and
use all of the programs available on that computer from your mobile device.
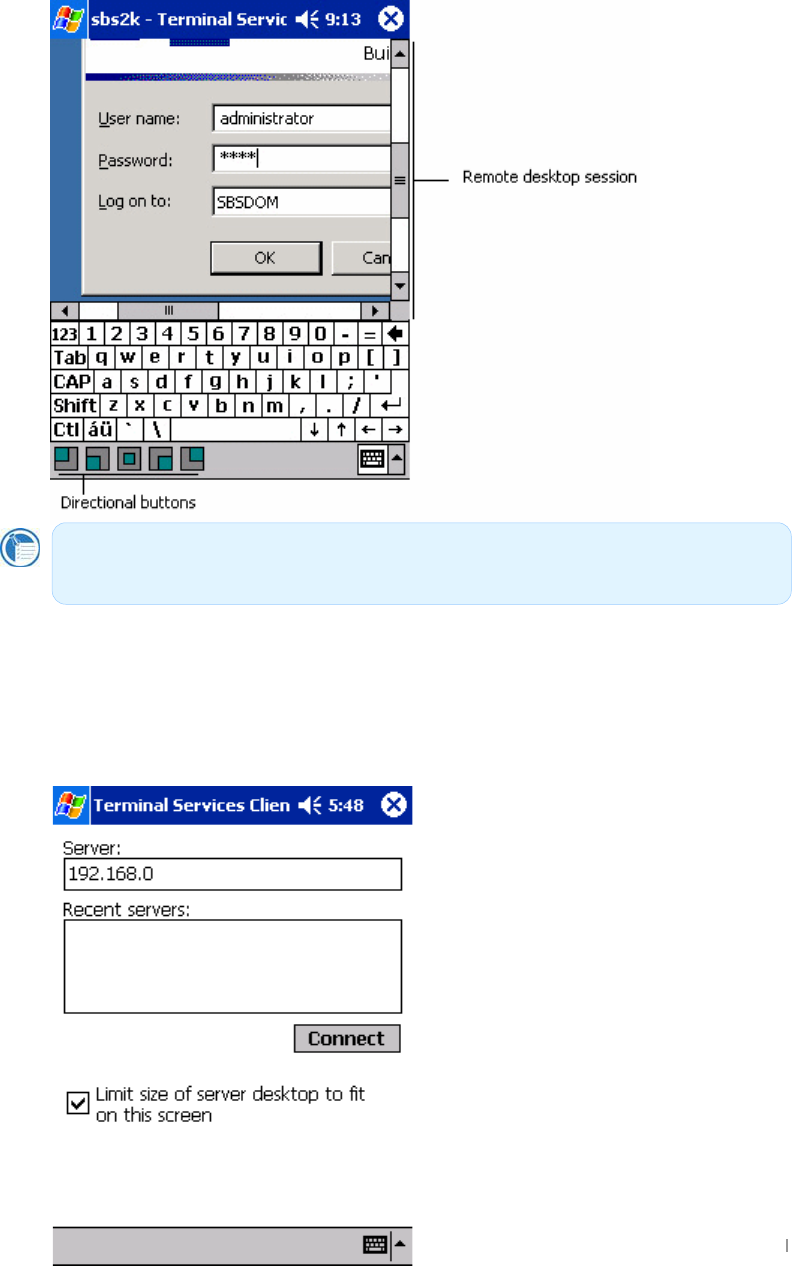
7cbbYWh]b[UbXIg]b[HG7
Before attempting a Terminal Services connection, you must have authorized access to
a desktop or server that supports this service.
1. Launch TSC
Transcriber is not supported as an input method during a Terminal Services
session. You must use Keyboard, Block Recognizer, or Letter Recognizer.
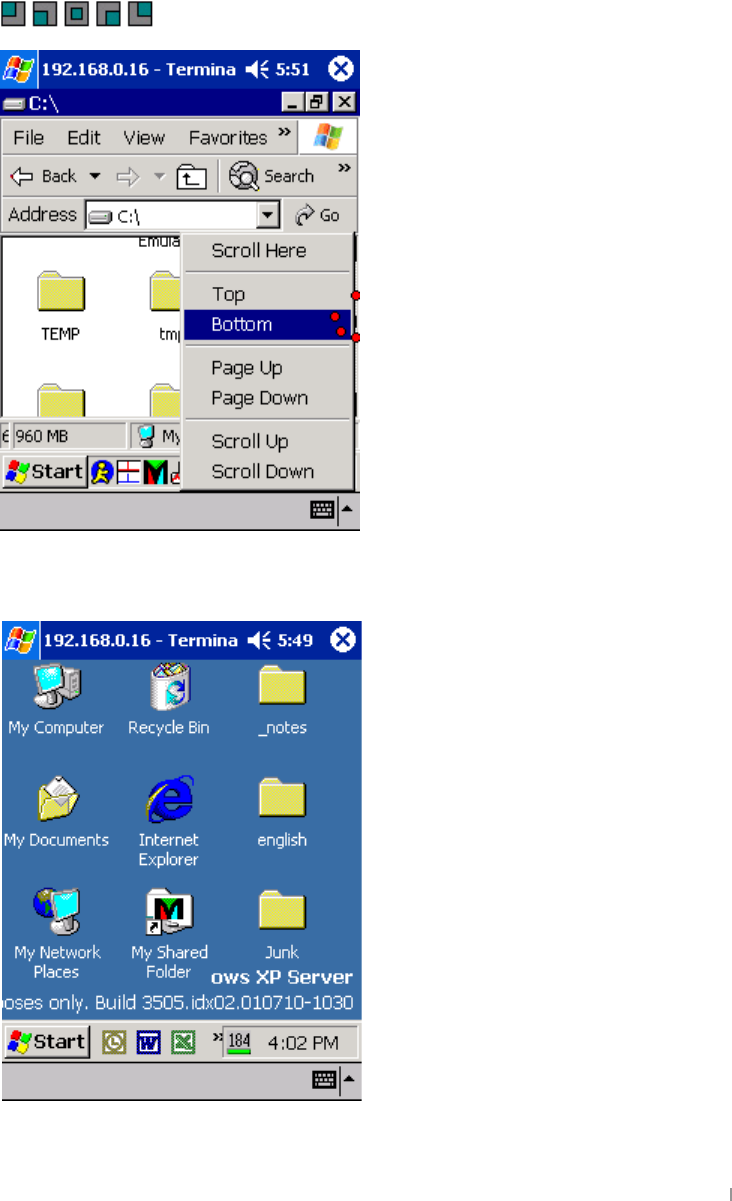
GChapter 9 Microsoft Programs 9-13
2. Enter the IP address or host name of a valid TS server. Checking Limit size of
server… attempts to compress the remote desktop screen to minimize scrolling. Press
Connect to start connection.
3. Typically you will be asked to login. Do so using one of the acceptable input
methods.
4. If server desktop size is not in optimized mode, you can use one of the five
buttons to jump to the indicated positions on the screen.
Otherwise, you can tap and hold on the screen to get those same options in a context
menu form.
5. Use the remote server as if you were using it directly.
GUser’s Manual 9-14
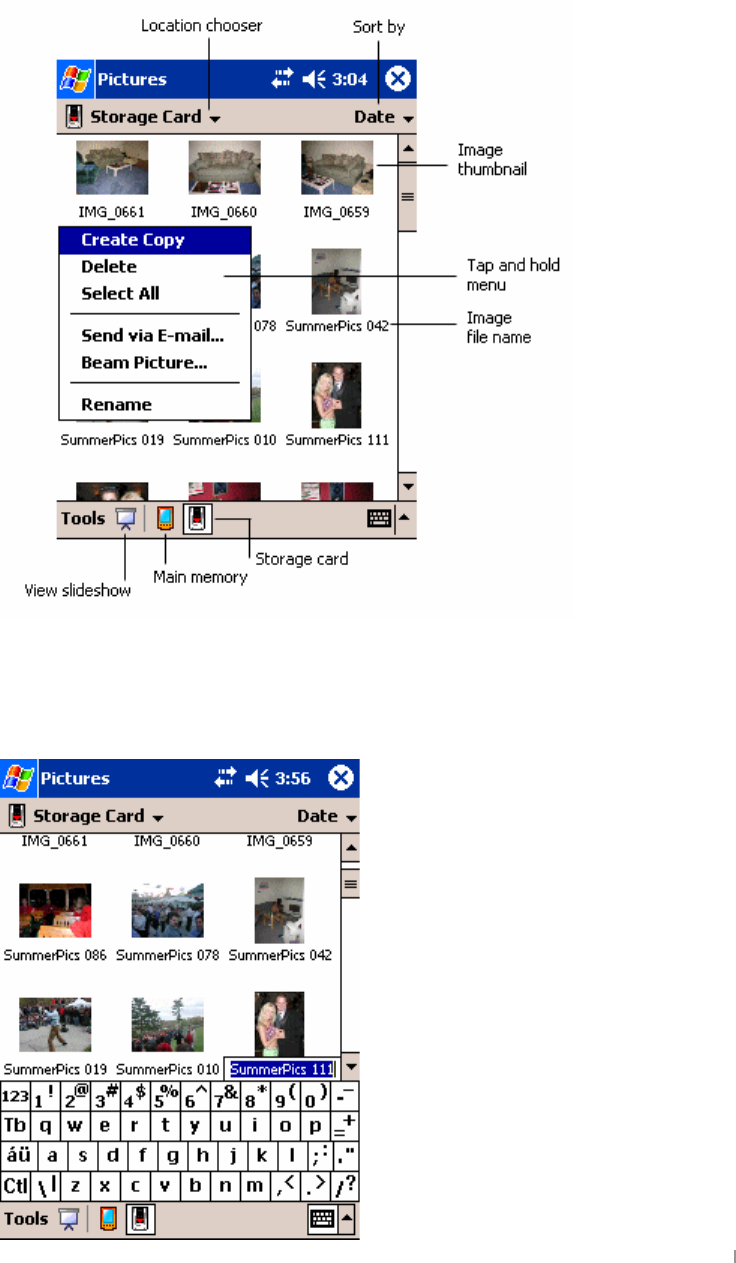
Pictures
Use Pictures to view JPEG pictures stored on your device or in a storage card, send
pictures to others, view a slideshow of your pictures, or set a picture as the background
on the Today screen. You can even set Pictures to launch itself when a digital camera
storage card is inserted into your device!
To begin, run Pictures and either choose to view main memory or storage card contents.
By tapping and holding on an image, you can create a clone of that file, delete that file,
select all files, send file via e-mail, beam picture, or rename the image.
GChapter 9 Microsoft Programs 9-15
If you choose to Rename, type in the new file name.
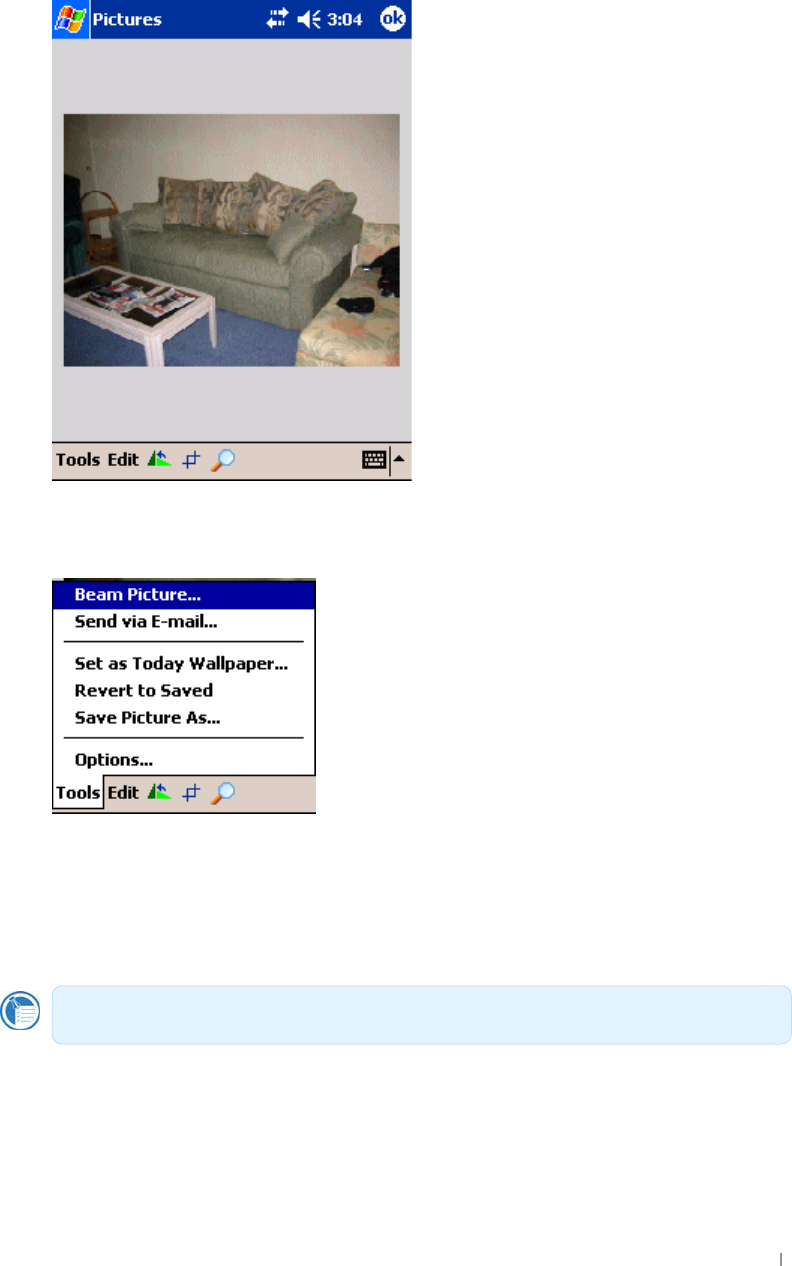
Kcf_]b[k]h\=aU[Yg
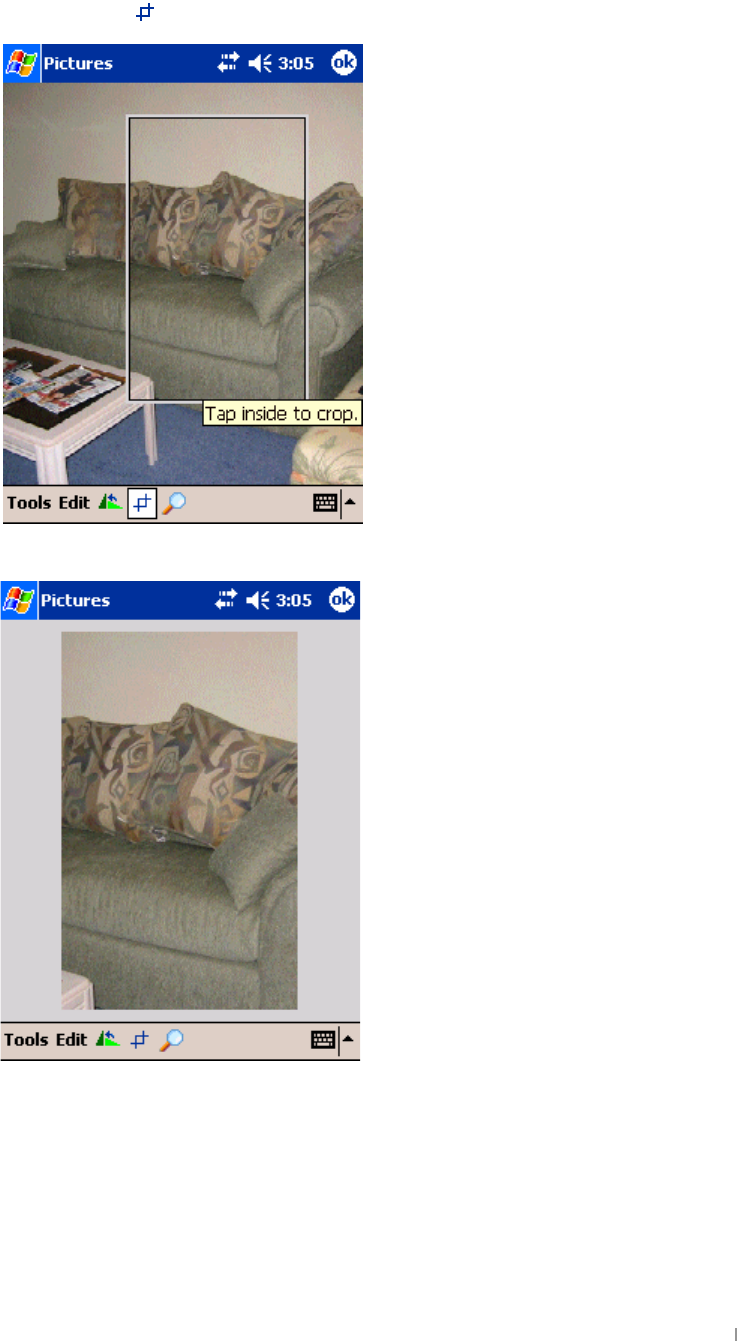
Single clicking on a thumbnail presents a zoomed-in version of the picture.
From here, you can rotate, crop, zoom, share, or change brightness and contrast levels
of a picture.
=aU[YHcc`g
Both Beam Picture and Send via e-mail allow you to share your pictures.
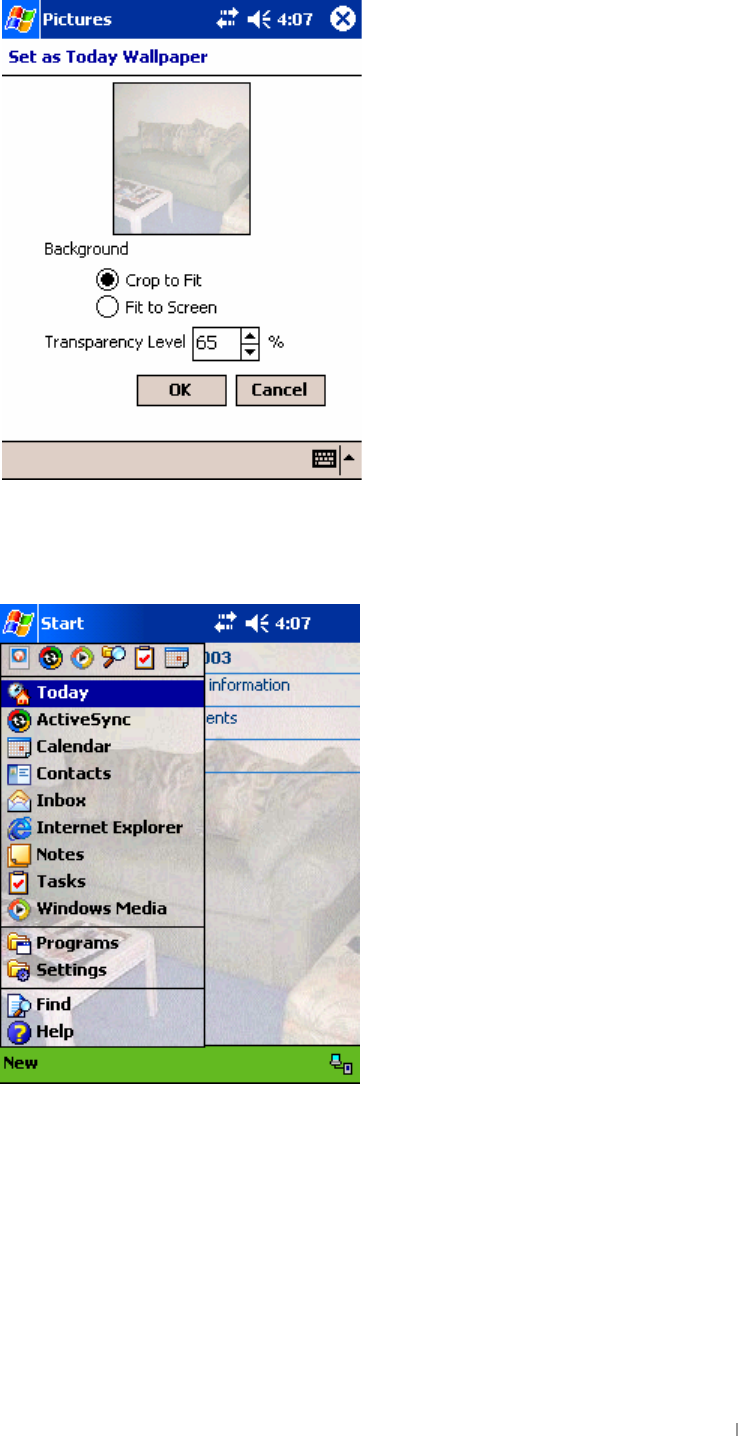
Set as Today Wallpaper… will set the loaded image as your Today screen background.
An improperly sized image will not appear without distortion on the Today screen.
GUser’s Manual 9-16
You will be able to either crop the image to fit to the Today screen (for large images) or
fit to screen (for small images). You can also set the transparency level so that Today
screen content is still legible.
Above is the result of our Today screen.
Revert to Saved discards all changes since the last saving of the image and displays
the original image.
Save Picture As…performs a save operation on the picture.
GChapter 9 Microsoft Programs 9-17
i. Choose the file name and destination for the image then select OK.
ii. Image quality might decrease as a result of the save process, so you are reminded
of this when saving.
Options: See below
9X]h]b[=aU[Yg
Pictures allows you to rotate, crop, and adjust brightness and contrast levels of your
pictures.
FchUh]b[=aU[Yg
1. Press the button.
GUser’s Manual 9-18
2. The picture will be rotated 90 degrees counter-clockwise.
7fcdd]b[=aU[Yg
1. Press the button.
2. Draw a box with the stylus around the area you wish to crop and save.
3. Tap once inside the box you have drawn and your picture will be cropped.
GChapter 9 Microsoft Programs 9-19
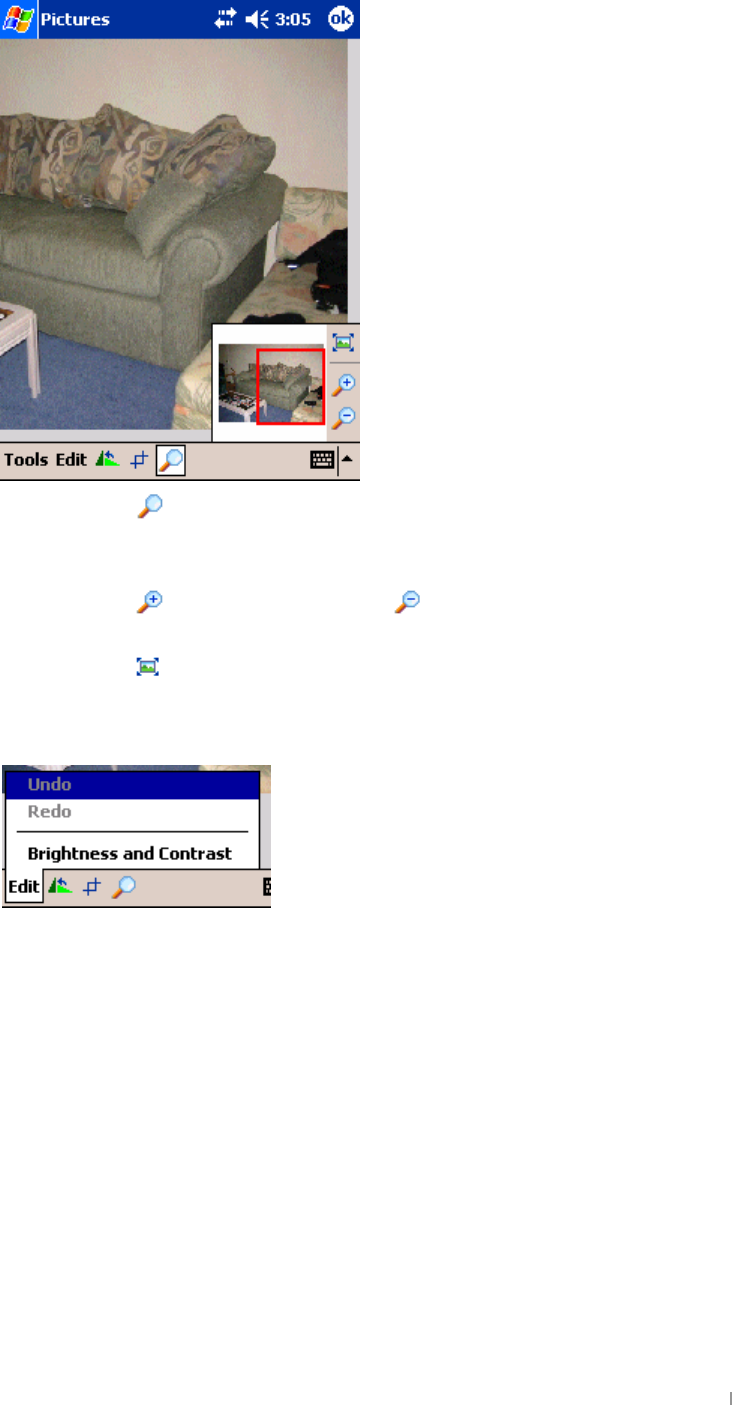
Zooming into Images
1. Press the button to raise the Zoom panel. By default your image is in Best Fit
view mode when you open the image.
2. Pan around the red boxed area to focus a portion of the picture into view.
3. Press the button to zoom in or the button to zoom out of the area
highlighted by the red box.
4. Press the button to return to Best Fit view mode.
IbXc]b[7\Ub[Yg
Press Edit—Undo or Edit—Redo to undo or redo the last change made.
GUser’s Manual 9-20
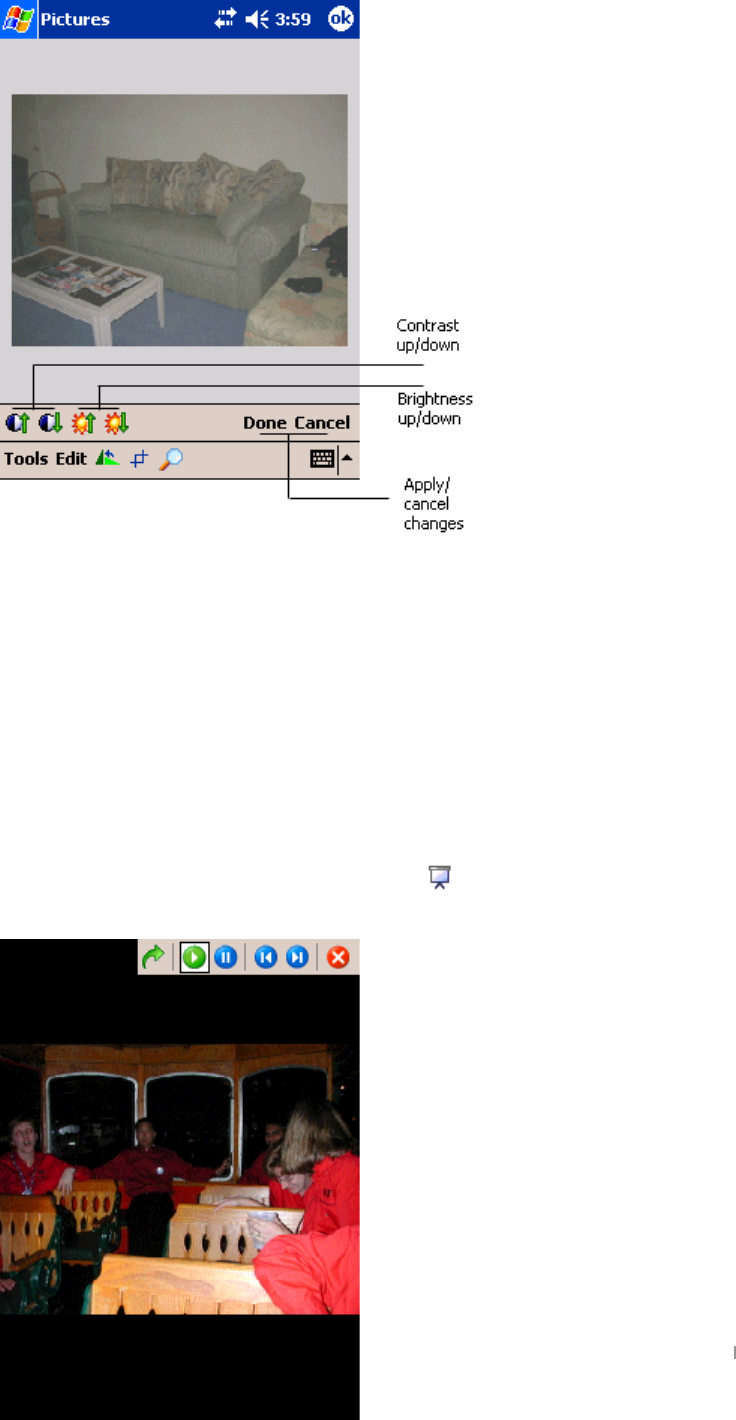
7\Ub[]b[=aU[Y6f][\hbYggUbX7cbhfUgh
1. Select Edit—Brightness and Contrast
2. Select the Brightness Up,Brightness Down,Contrast Up, or Contrast Down
button. With each change in brightness or contrast level, Edit—Undo will undo that last
change.
3. Press Done to save changes or Cancel to cancel changes.
J]Yk]b[=aU[Yg]bUG`]XYg\ck
With the click of a button, you can create a slideshow of the images located in a folder to
present to friends, family, or co-workers.
1. From the main Pictures window, press the button.
2. Automatic playback in vertical viewing mode will begin.

GChapter 9 Microsoft Programs 9-21
3. To manipulate the slideshow, single tap anywhere on the screen.
Above is a description of each of the buttons
4. To change from vertical to horizontal viewing mode, press the Flip view button.
GUser’s Manual 9-22
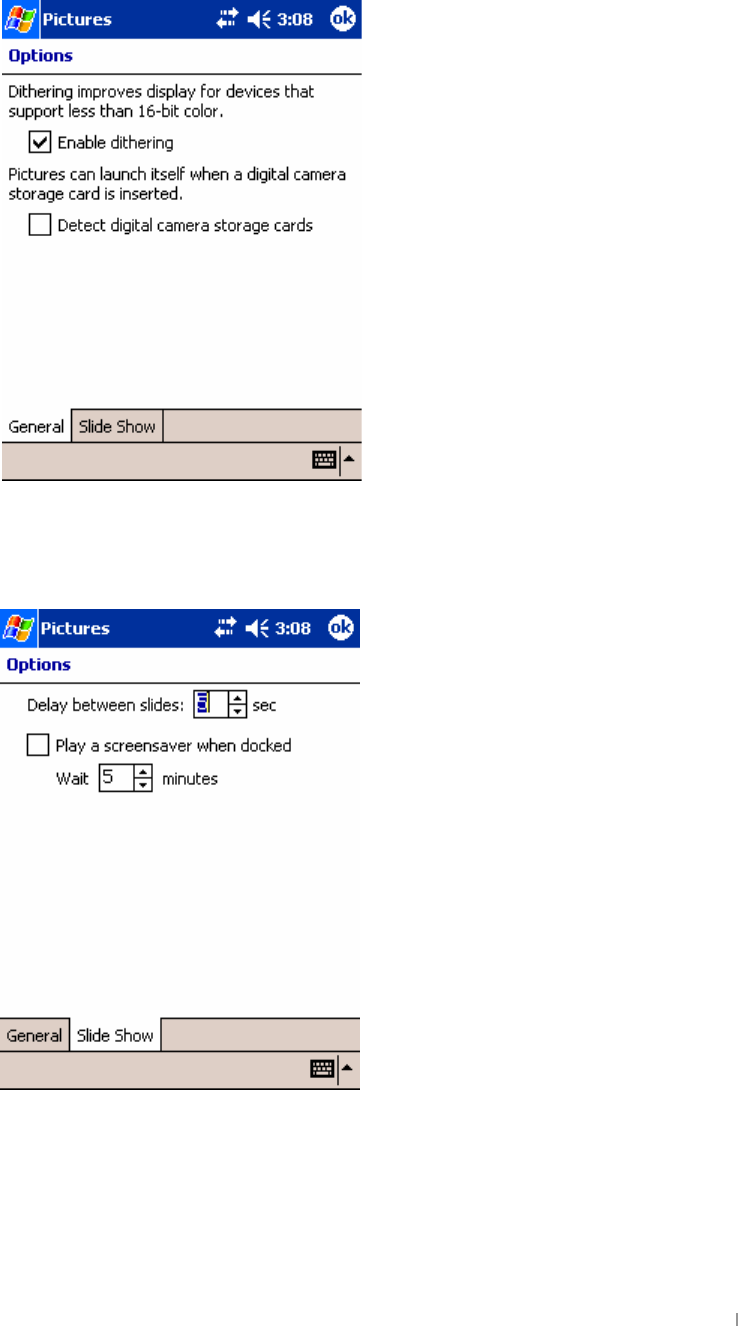
7cbZ][if]b[D]WhifYg
Tools—Options from either the main screen or while viewing an image allows you to set
various properties about image display and slideshow playback.
In the General tab, you can turn on dithering to improve image display for Pocket PCs
with less than 16-bit color screens. A useful feature is that Pictures can launch itself
when a digital camera storage card is inserted.
In the Slide Show tab, you can change the delay between slides or turn on the
slideshow as a screensaver when your device has been idle a set amount of time.

GChapter 9 Microsoft Programs 9-23
MSN Messenger
MSN Messenger is an instant messaging program that lets you see who is online, send
and receive instant messages and have instant message conversations with groups of
contacts.
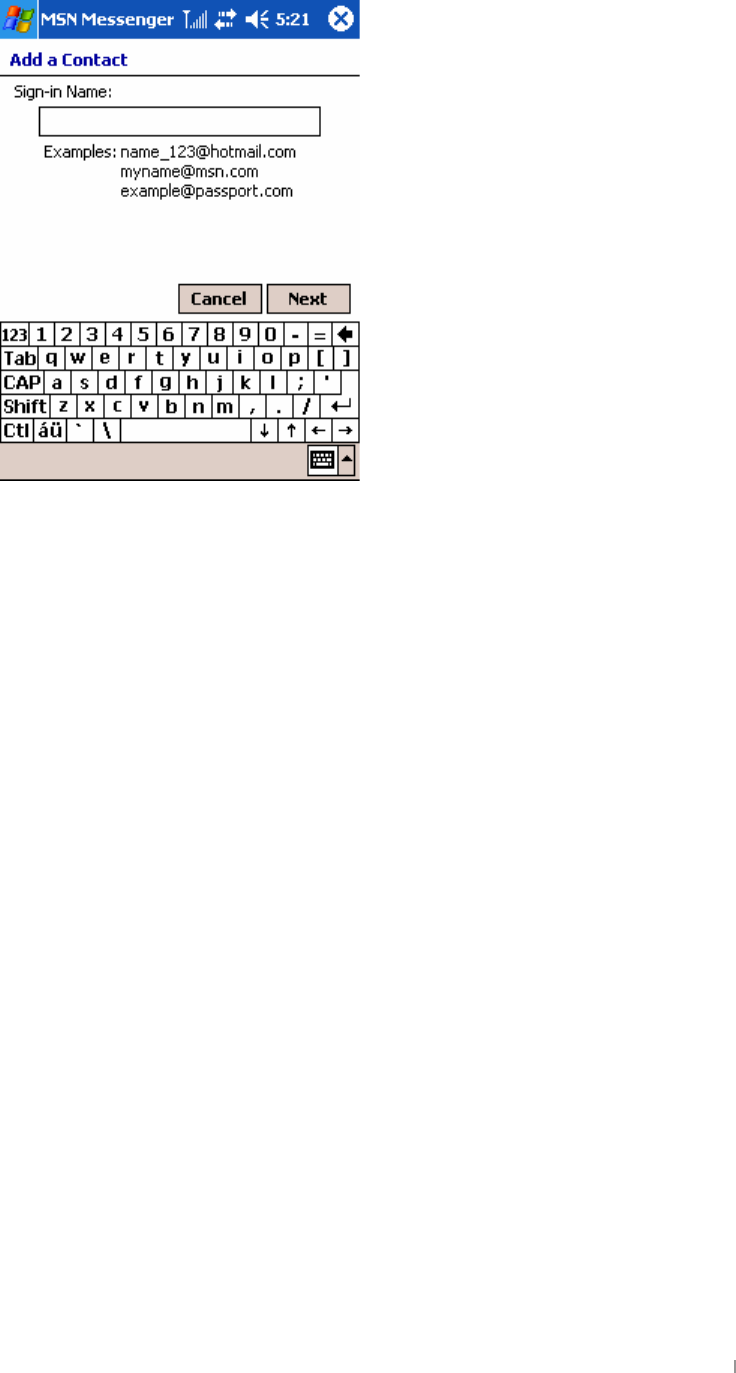
To use MSN Messenger, you must have a Microsoft Passport account. If you have a
Hotmail® or MSN account, you already have a Passport. Once you have obtained a
Microsoft Passport, you are ready to set up your account.
To set up an account and sign in
1. On the Start menu, tap Programs, and then tap the MSN Messenger icon.
2. To sign in, tap the sign-in screen and enter your e-mail address and password.
Tap here to sign in. The account you entered before displays.
Sign up for a Microsoft Passport account at http://www.passport.com . Get a free
Microsoft Hotmail e-mail address at http://www.hotmail.com.
If you already use MSN Messenger on your desktop PC, your contacts will show
up on your device without being added again.
GUser’s Manual 9-24
When you select landscape on the settings you will have a screen as follows :
(If you want to select “landscape”, > “Settings” > “System” tab > “Screen ” icon.
For more detailed information, see the screen setting on chapter 6 Configuring Device.)
For description below, portrait screens are used.
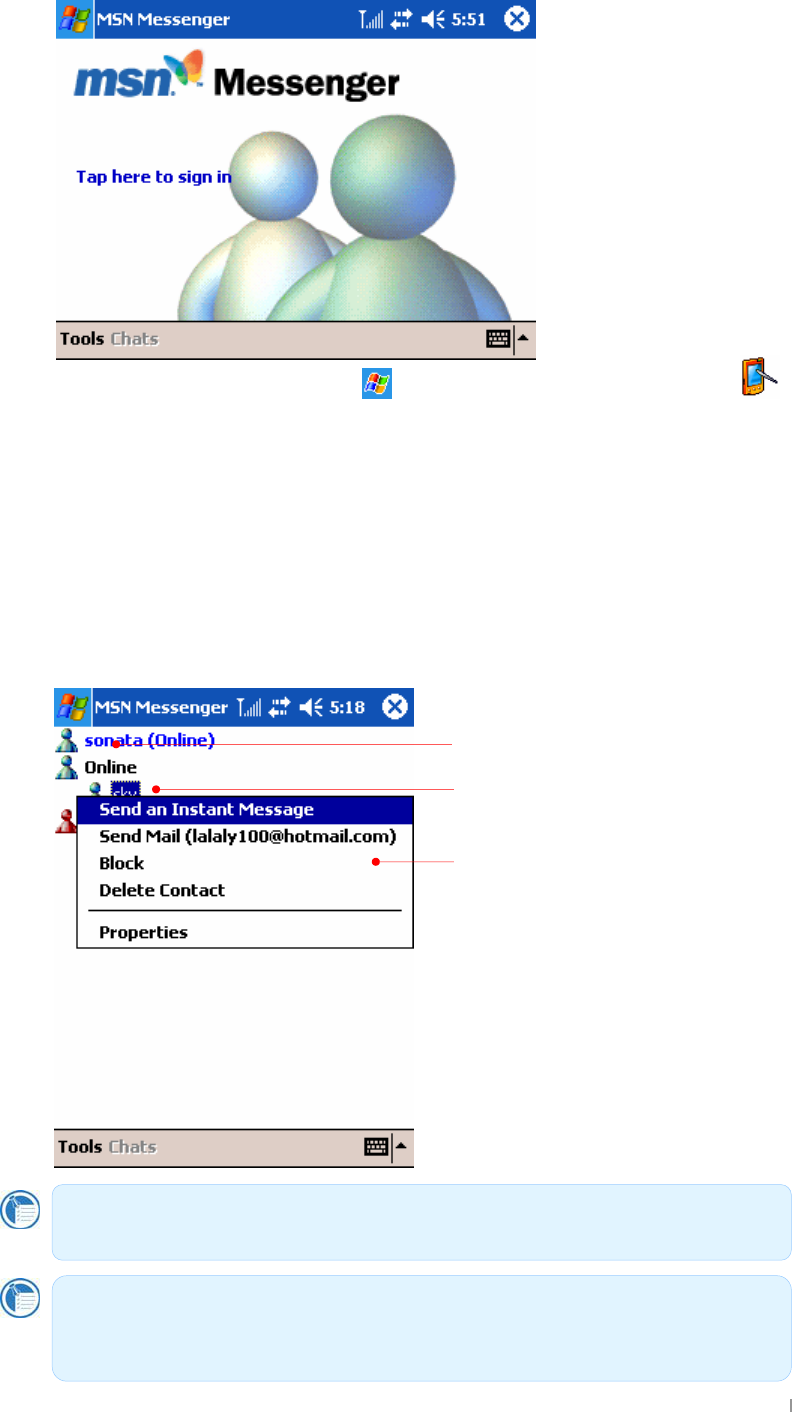
Working with Contacts
The MSN Messenger window shows all of your messenger contacts at a glance, divided
into Online and Not Online categories. From this view, while connected, you can chat,
send e-mail messages, block the contact from chatting with you, or delete contacts from
your list using the pop-up menu.
Tap and hold to display a pop-up menu of
actions.
Tap a contact to start a chat.
To make a new name for chat, tap
O
p
tions on the Tools menu.
To see others online without being seen, on the Tools menu,tap My Status, and
then tap Appear Offline.
If you block a contact, you will appear offline but will remain on the blocked
contact’s list. To unblock a contact, tap and hold the contact, then tap Unblock
on the pop-up menu.
GChapter 9 Microsoft Programs 9-25
Editing My Text Messages
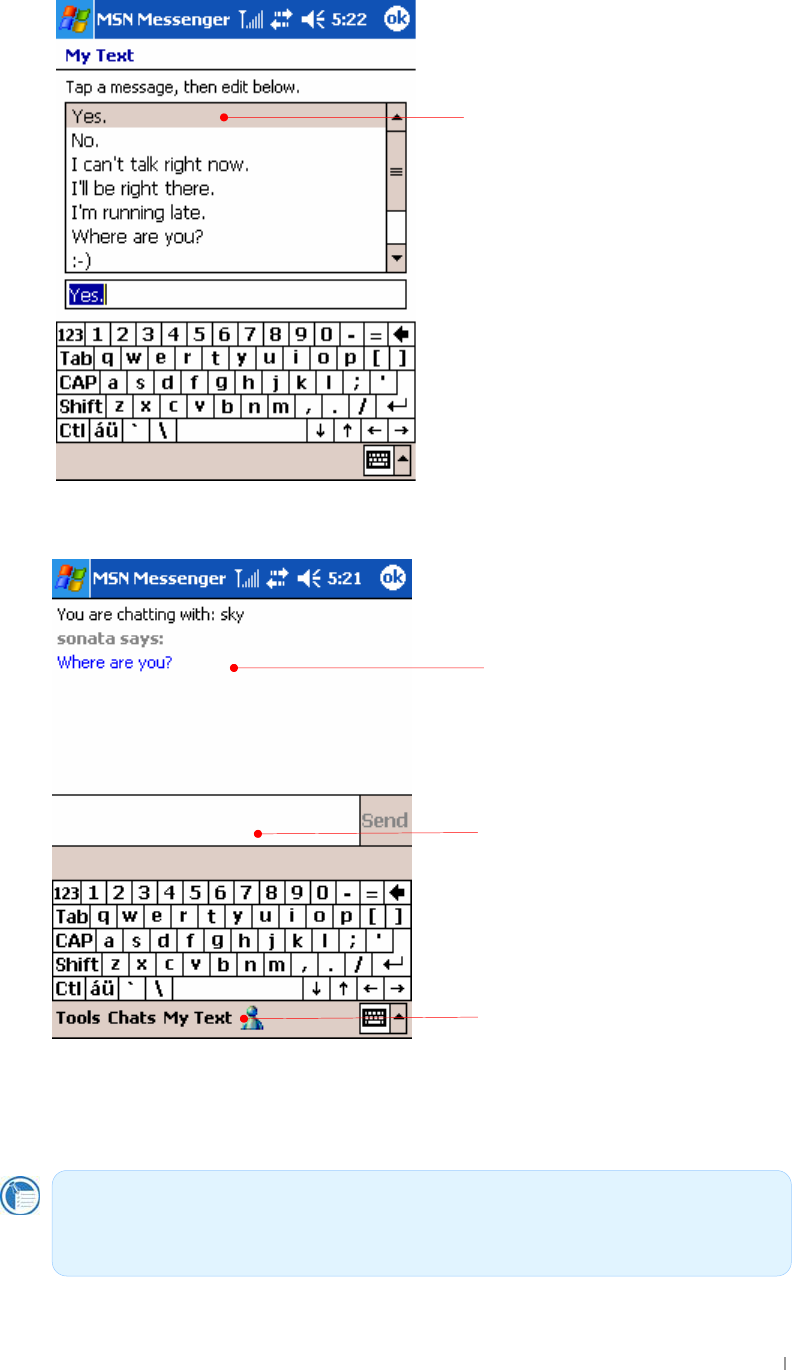
Tap Edit My Text Messages on the Tools menu to enter a preset message.
Chatting with Contacts
Tap a contact name to open a chat window.
Enter your message in the text entry area at the bottom of the screen (or tap My Text to
enter a preset message), and then tap Send. To invite another contact to a multi-user
chat, on the Tools menu, tap Invite, and then tap the contact you want to invite.
Contacts icon
The message you enter
display here.
Text entry area
To switch back to the main window without closing a chat, tap the Contacts
button. To revert to your chat window, tap Chats, and then select the person with
whom you were chatting.
Select a message among the list
that is preset.
GUser’s Manual 9-26
Adding a Contact
To add a new contact, tap Add a Contact on the Tools menu.
GChapter 9 Microsoft Programs 9-27
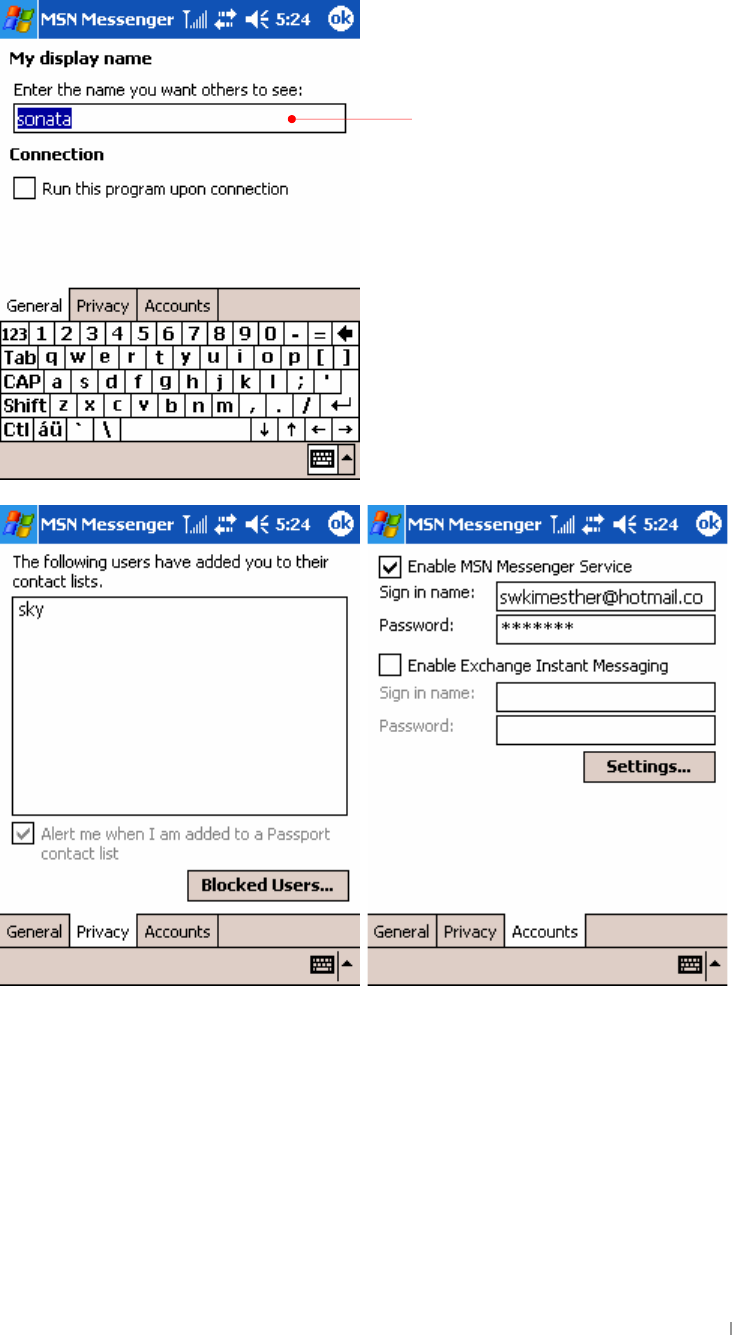
Set Options
On the Tools menu, tap Options. On the Accounts tab, enter your Passport account
information.
Enter your name for chat.

GjGXWGhG G XWTX
G
G
G
G
G
G
G
wvGsGGGGGGGGGGGGwvGtiGGG
GGGGG
POZ Camera to snap a picture and save it POZ Camcorder to record a video file and
save it using the digital camera lens and POZ Album to edit, save and manage the pictures you snap.
G
ඝIn this chapter, you will learn about
POZ Launcher
POZ Musicbox
POZ Camera
POZ Camcorder
POZ Album
Fkdswhu#43
Dssolfdwlrqv
G|˅GtG G XWTY
DCN@UibW\Yf
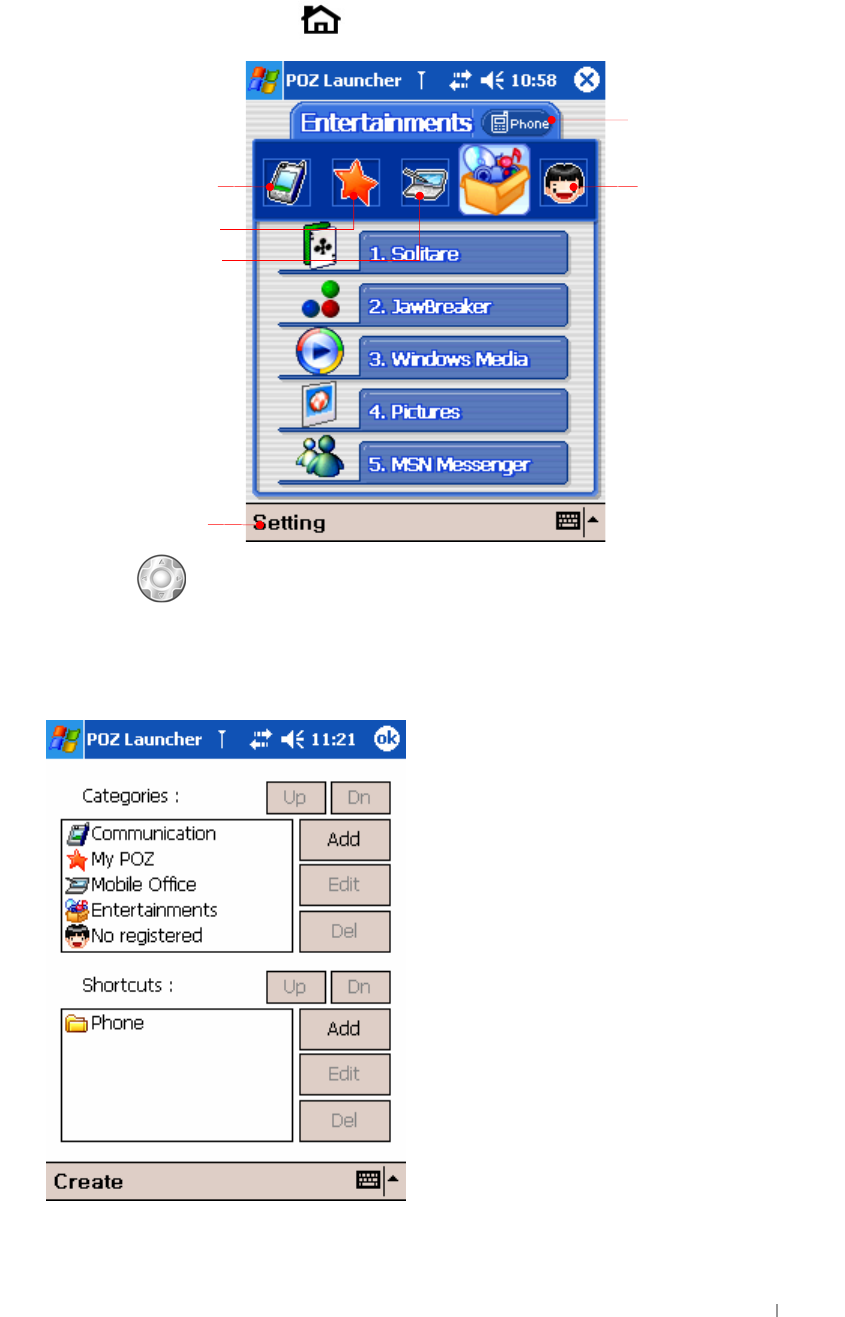
POZ Launcher enables you easily to launch any programs you want.
You can open POZ Launcher as follows :
z
Press the POZ Launcher hot key.
You can use to move to other items and to select the item you want.
;YhgYhh]b[gcZDCN@UibW\Yf
To set the options on category and shortcuts, tap Setting on the command bar.
You can add, edit and delete the categories and shortcuts listed and registered on POZ Launcher.
{GGGGUG
y
G
tGwvG
tGvG
jG
{GGGGGGG
GGwGG
GjGXWGhG G XWTZ
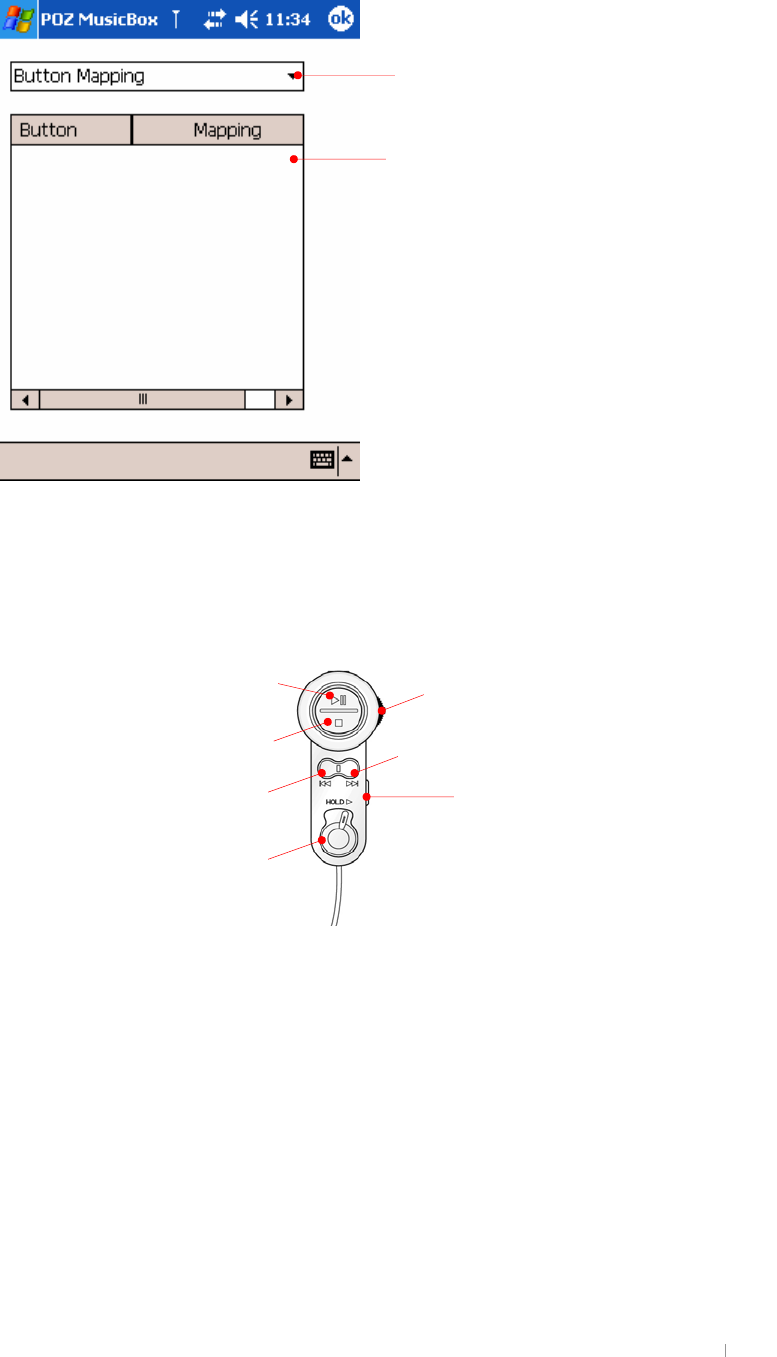
DCNAig]W6cl
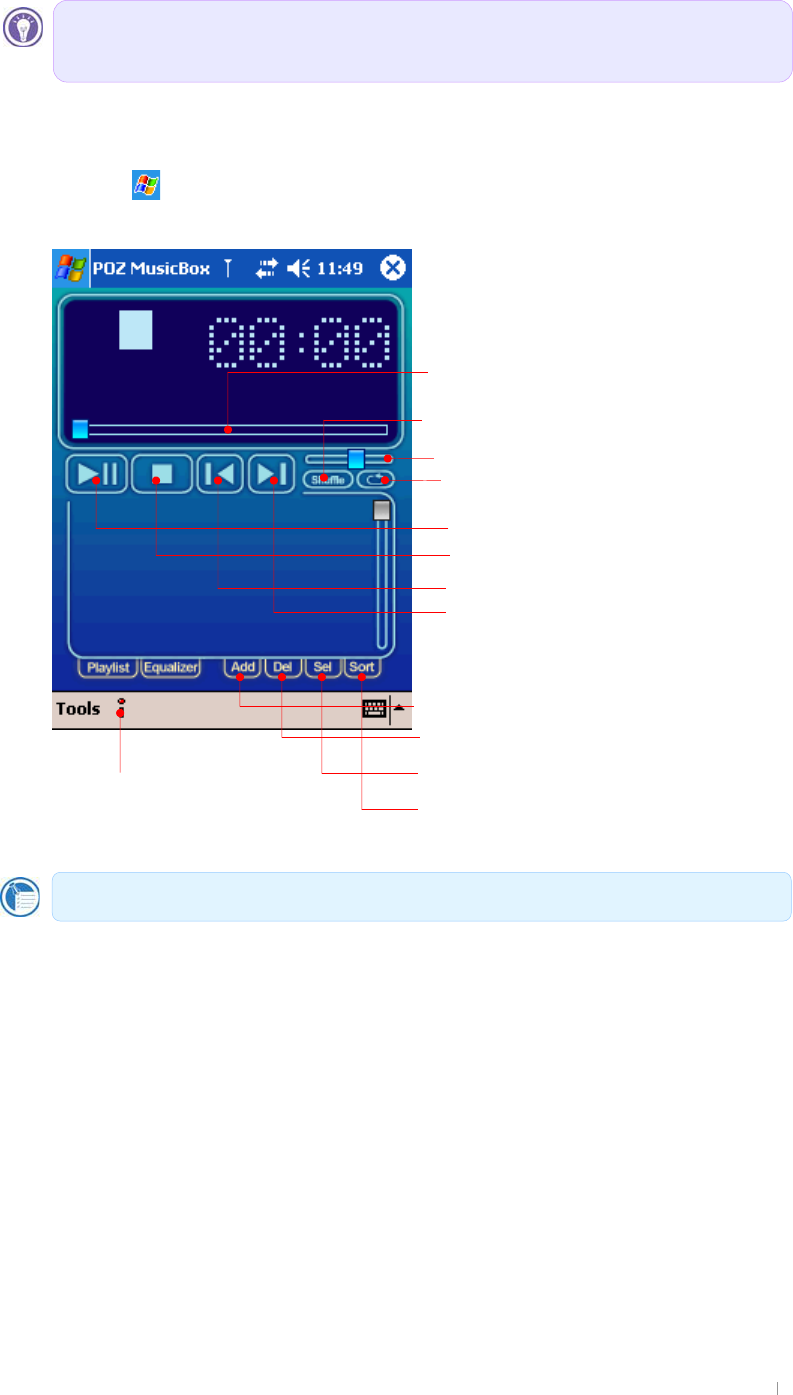
Use POZ MusicBox to listen to digital audio files.
You can open POZ MusicBox as follows :
z
> Programs > select “POZ MusicBox” icon.
z
Select “POZ MusicBox” on POZ Launcher.
wvGtiGG
hGG
kGG
zGGG
zGGG
wVwG
z
w
uG
wG
zG
yG
wvGtiGGGGG~GtGwUG{GGGGG
GGGGGjUG
Sod|olvw#dqg#Htxdol}hu#exwwrqv#dfwv#dv#d#wrjjoh#wkdw#vkrzv#dqg#klghv#hdfk#rwkhu1#
}
G|˅GtG G XWT[
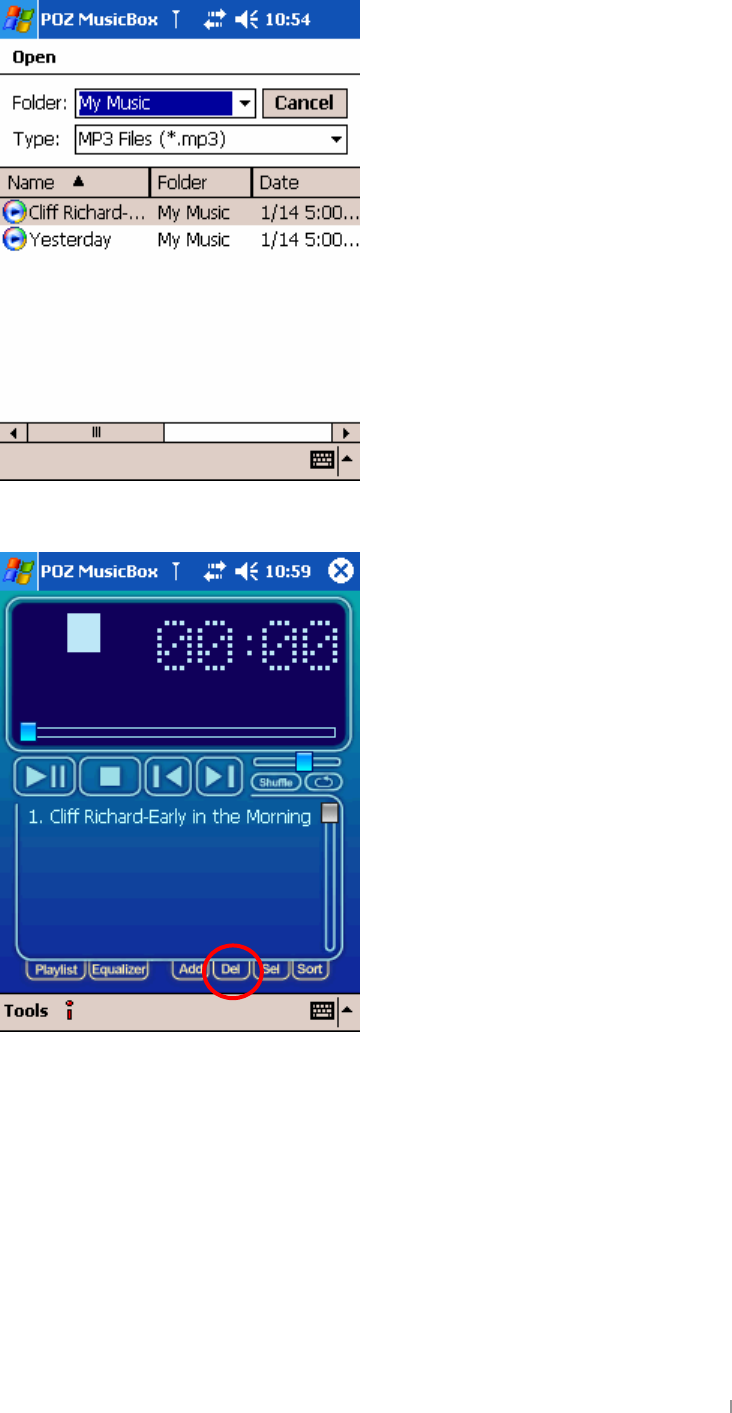
Tap Add > “Add File” to select music file you want.
Select a music file you want in the list.
Tap “Del” to delete a music file you want to delete.
GjGXWGhG G XWT\
6ihhcbAUdd]b[
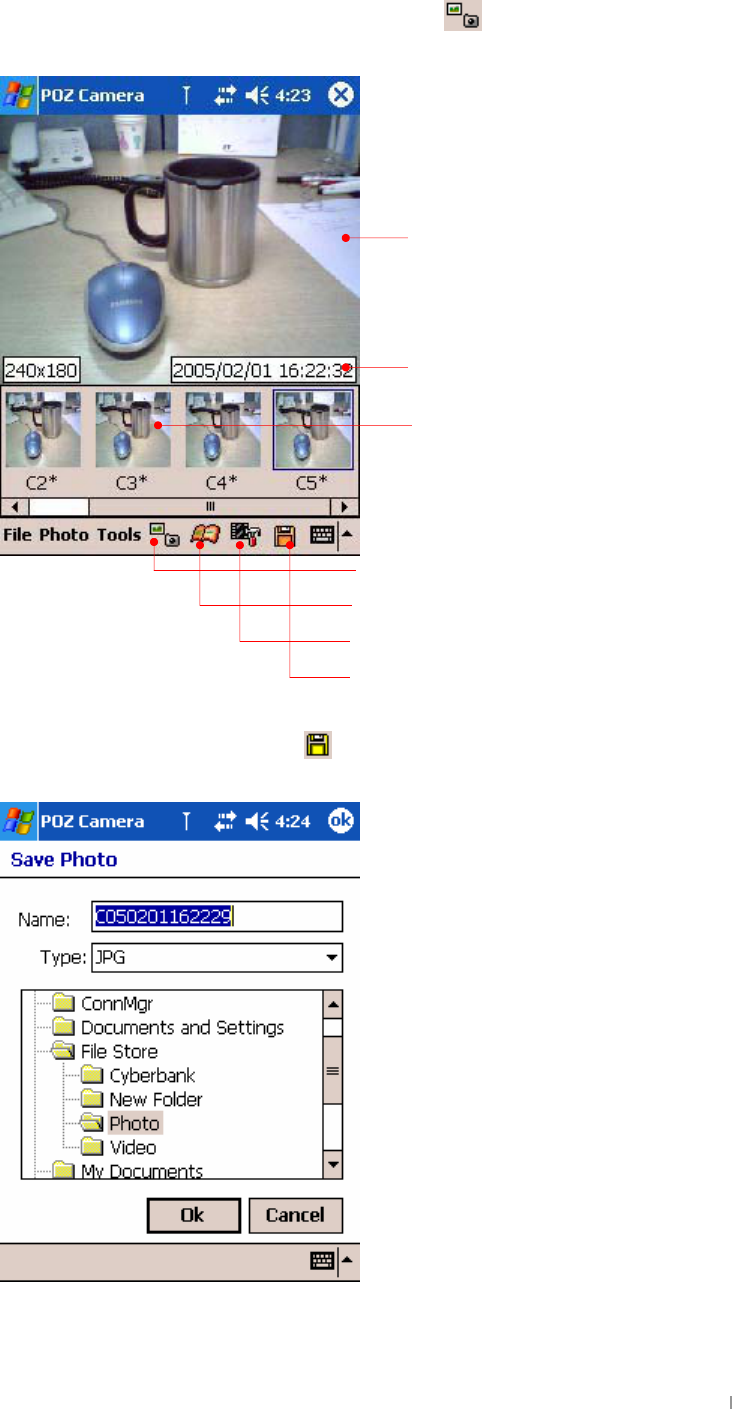
Tap “Button Mapping” on the Tools menu to map the buttons in the POZ MusicBox.
Select the arrow next to “Button Mapping” to select functions you want.
Select the function you want to map in the list popped up and then press the corresponding button(navigation
key and 4 hardware buttons) according to the selected function.
Ig]b[FYachY7cbhfc``Yf
G
G
G
G
G
G
G
G
G
z
Press the Playback/Pause button to playback or pause music
U
z
wGGzGGGGUG
z
wGGuGGGGGGUG
z
wGGwGGGGGGUG
z
~GGGSGGGoGGGGGGGGGGGGUG
oSGGGGoGGGGGGSGGzVlGGGUG
z
wGVGGqGGGGGGGUG
{GGGGUG
kGGGGGGUG
zG
wVwG
w
ovsk
uG
qGG
{GzVlGG

G|˅GtG G XWT]
DCN7UaYfU
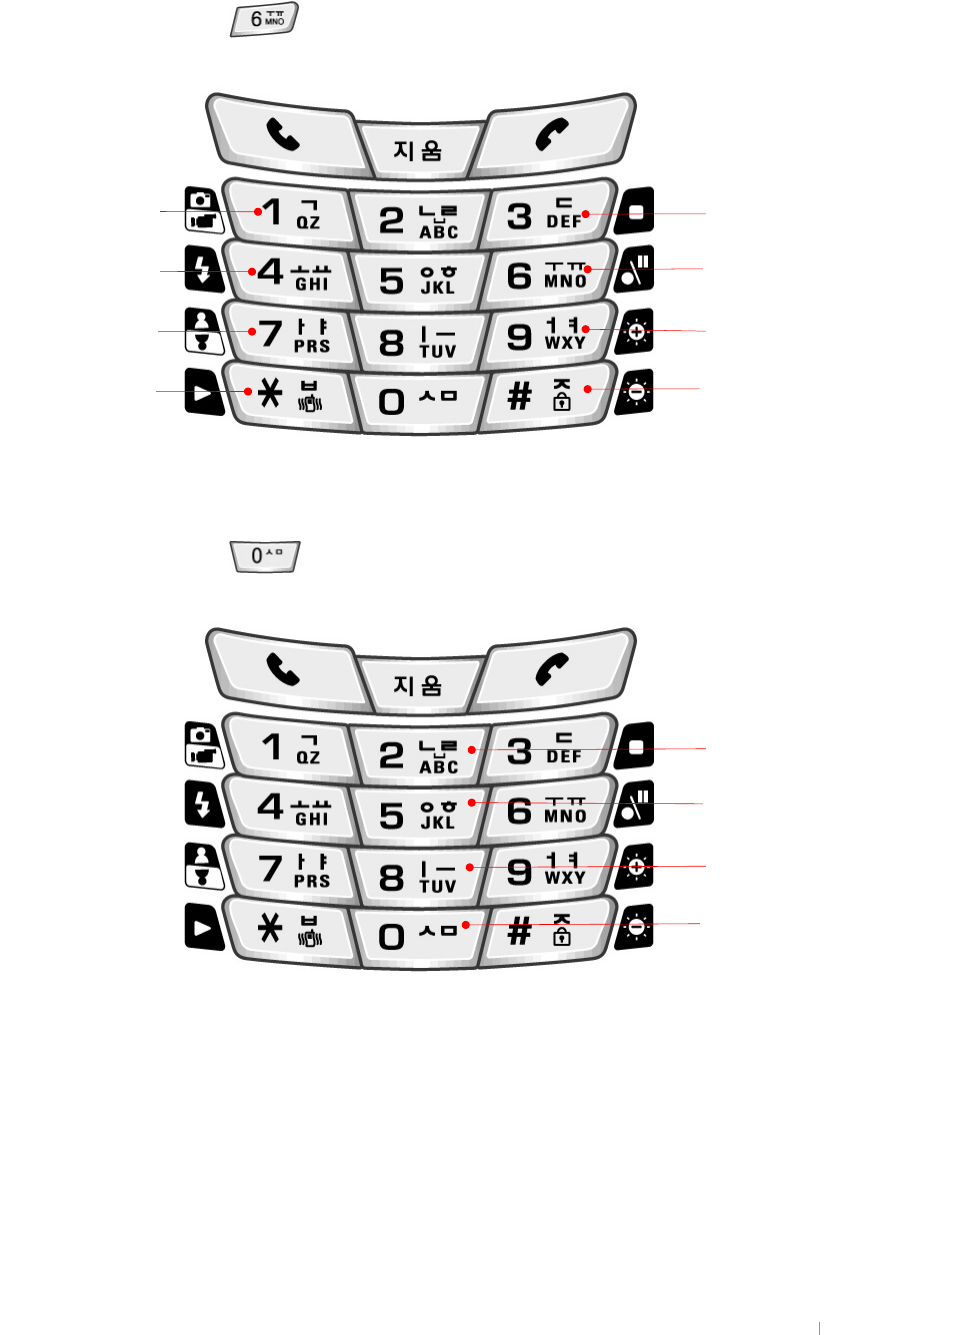
POZ Camera helps you to snap a picture and save it using the digital camera lens.
You can open POZ Camera program as follows :
z
Start button > Programs > “POZ Camera” icon.
z
Select the “POZ camera “on the POZ Launcher.
z
Select the shortcut for POZ camera on the POZ Camcorder program.
Tap the shutter button when the subject is framed.
{GG
jG
jGV}GG
zG
zGGwvGhG
zGGwvG
jG
zG
i
G
GG
zGG
wG¡G k
{GGGGVGGG
GUGO{GGGGGGG
GGGGGGUPG

GjGXWGhG G XWT^
jGGGG
z
kGGGGSGGGGGGGUG
z
~GGGGGGGGSGGGGGGGG
GUG
z
kGGGGGGGGUG
z
|GGGGGGGGGGG
GGGGTGGTUGkGGGGGG
GGGGGGGGGUG
zGsG
G|˅GtG G XWT_
GUjYd]WhifYg
If you want to enter the View mode, tap “Capture mode/View mode” icon and tap again to return to the Capture
mode.
To save the pictures you snapped, tap “save” icon on the command bar or select “save” or “save all” on the Photo
menu.
Tap OK to save. The default folder is
File Store\Photo
.
{
kGGMG
wG
jGV}GG
zG
zGGwvGhG
zG
GjGXWGhG G XWT`
G\cfhWihgdfcj]XYXcbh\Y_YmdUXZcfYUW\ZibWh]cbcZDCNWUaYfU
When POZ camera program opens and it is in the Capture mode, you can have the shortcut for each function on the
keypad.
For example, press on the keypad in the Capture mode to snap a picture.
When POZ camera program opens and it is in the View mode, you can have the shortcut for each function on the
keypad.
For example, press on the keypad in the View mode to open POZ Album program.
zG
zG
iGOPG
iGOPG
jVjG
mGG G
|GG G
jVhG
wGG
uGG
G
zGGwvGh
G|˅GtG G XWTXW
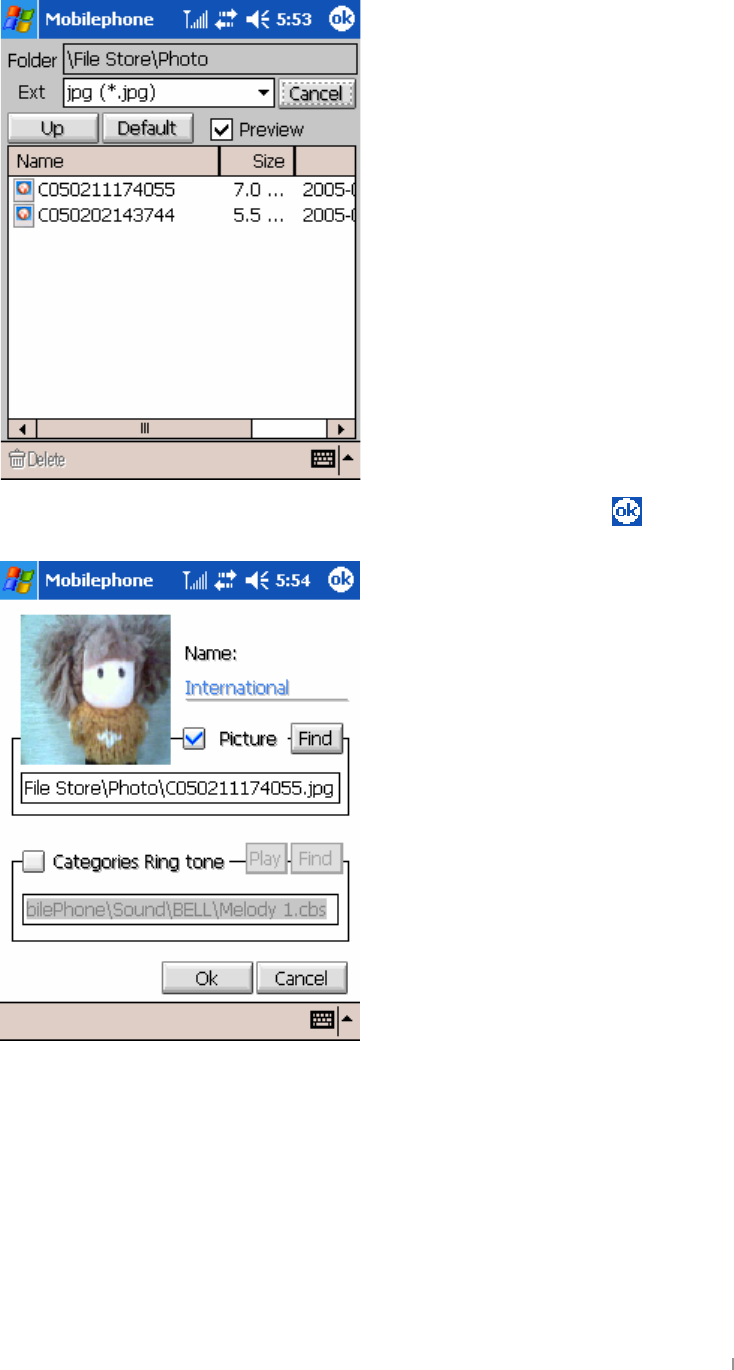
G\cfhWihZcfDCN5`Via
Tap “Shortcut for POZ Album” icon on the command bar to open the POZ Album program which helps you to
view the stored pictures.
GYhh]b[g
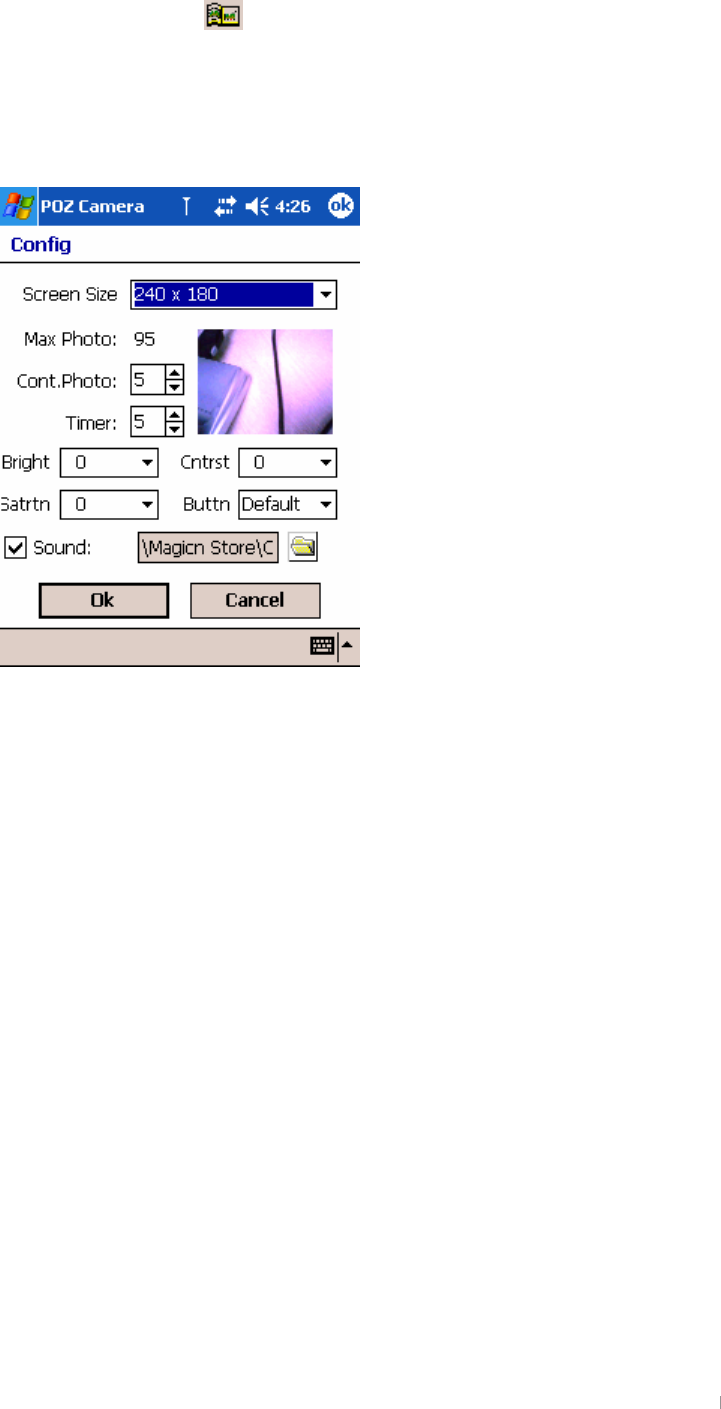
Tap “Setting” on the Tools menu to set POZ Camera program.
Tap OK to save on Screen size, the maximum number of images, Timer, Brightness, button and shutter sound.
GjGXWGhG G XWTXX
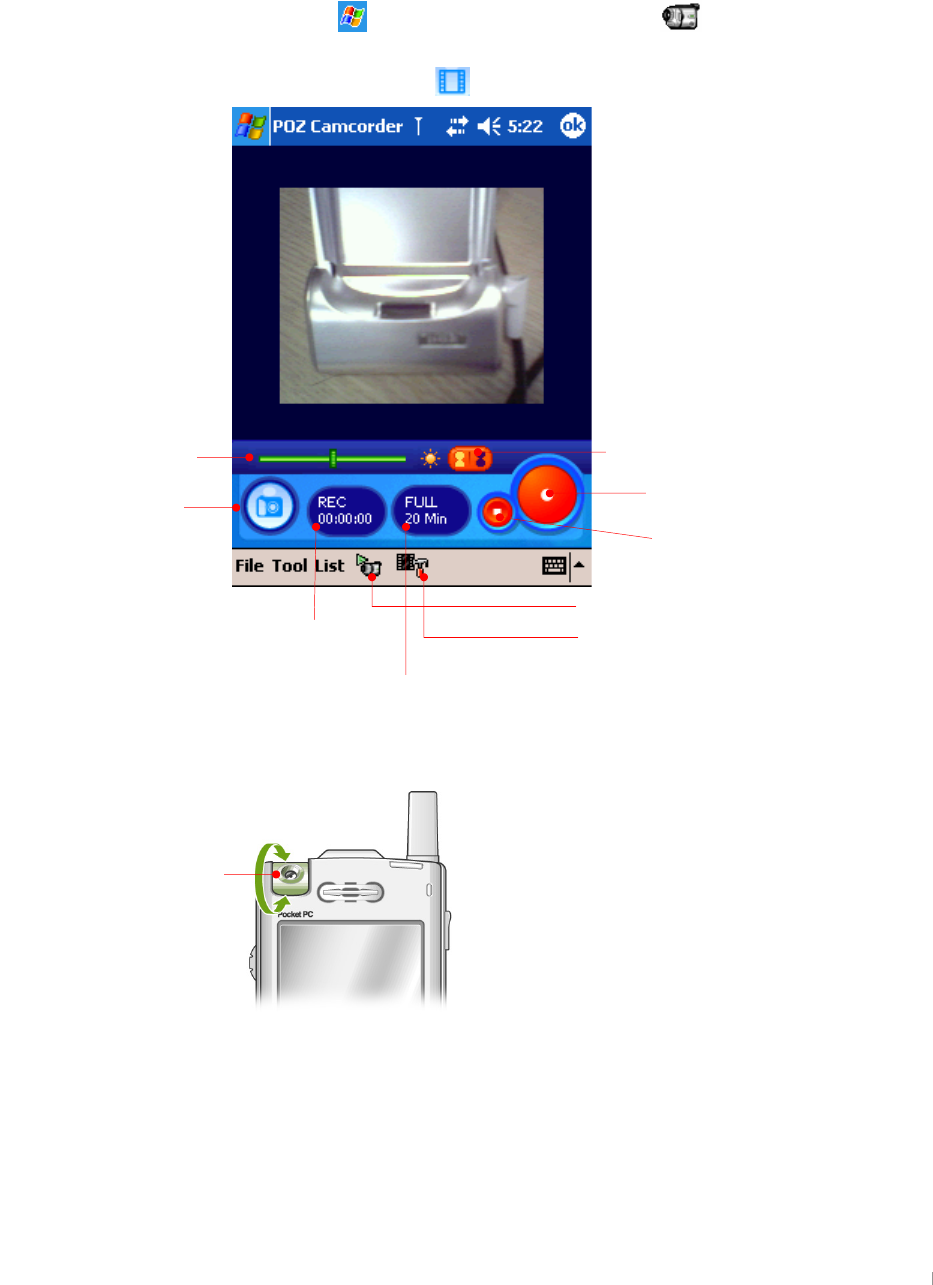
DCN7UaWcfXYf
POZ Camcorder helps you to record a video file and save it using the digital camera lens.
You can open POZ Camcorder program as follows :
z
Start button > Programs > “POZ Camcorder ” icon.
z
Select the “POZ Camcorder “on the POZ Launcher.
z
Select the shortcut for POZ Camcorder on the POZ Camera program.
Tap the shutter button when the subject is framed.
|GG
kGGGG
GGGG
GGGUGO{GGGGGGGG
GGGGUPG
jGVG
Shortcut for POZ
jG
z
iGG
G
zVwGG
zG
zGsG
G|˅GtG G XWTXY
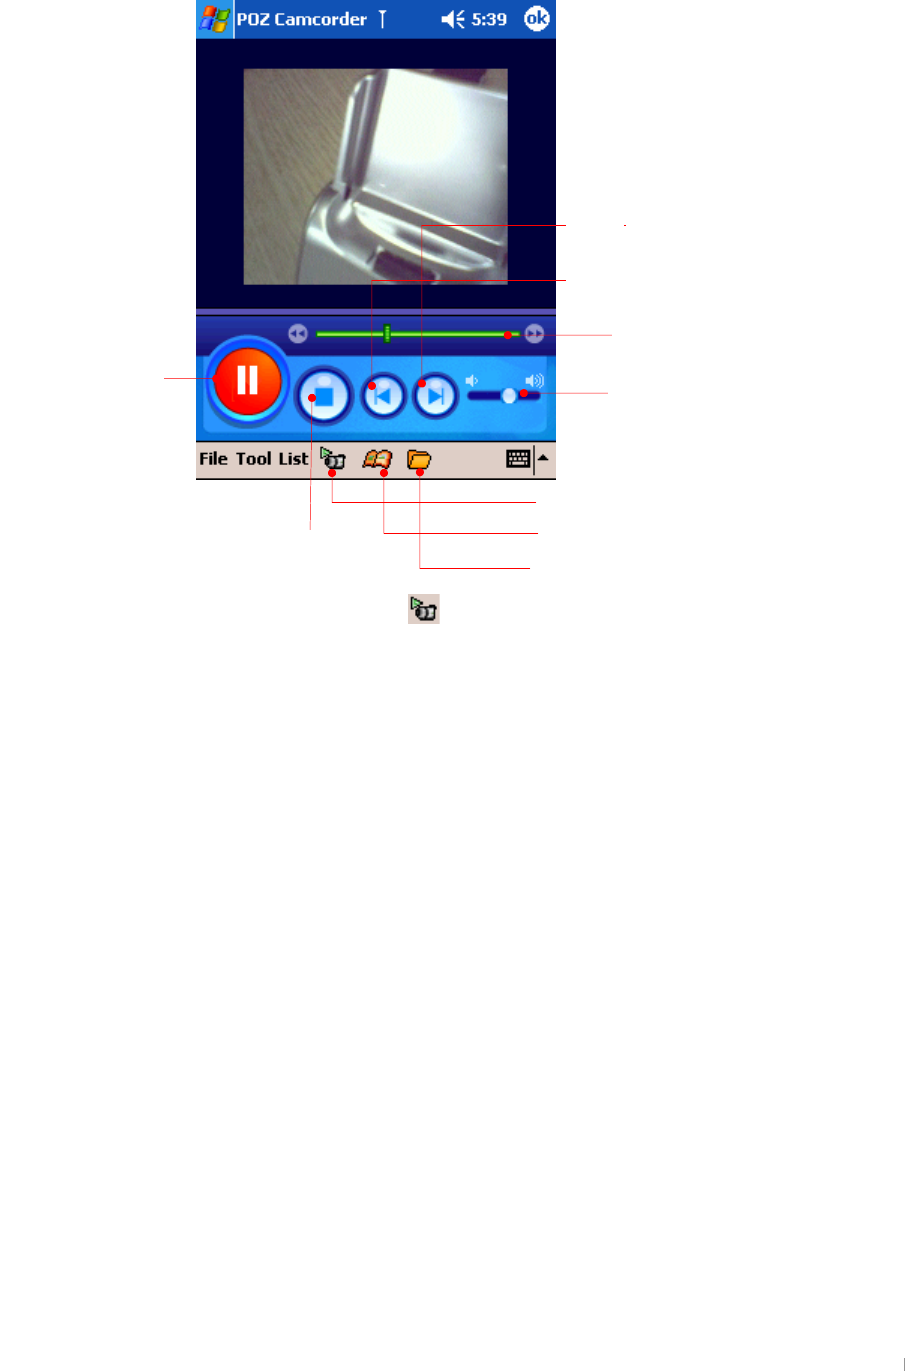
D`UmVUW_
Select the file you want on the List menu to playback.
Tap “Capture mode/View mode ” icon to return to Capture mode.
jGV}GG
mGtG
vGm
wGG
wVwG
}G
z
G
wG
uG
GjGXWGhG G XWTXZ
AU_YUbYkU`Via
The file you have recorded on the Capture mode will be saved in “
File Store\video” folder.
Tap “File Manage” on the File menu or tap “File Manage” icon on the command bar to make a new album.
Tap “Add” to select the items you want to add.
After selecting the file you want, tap OK.
}GVG
}GG
}GG
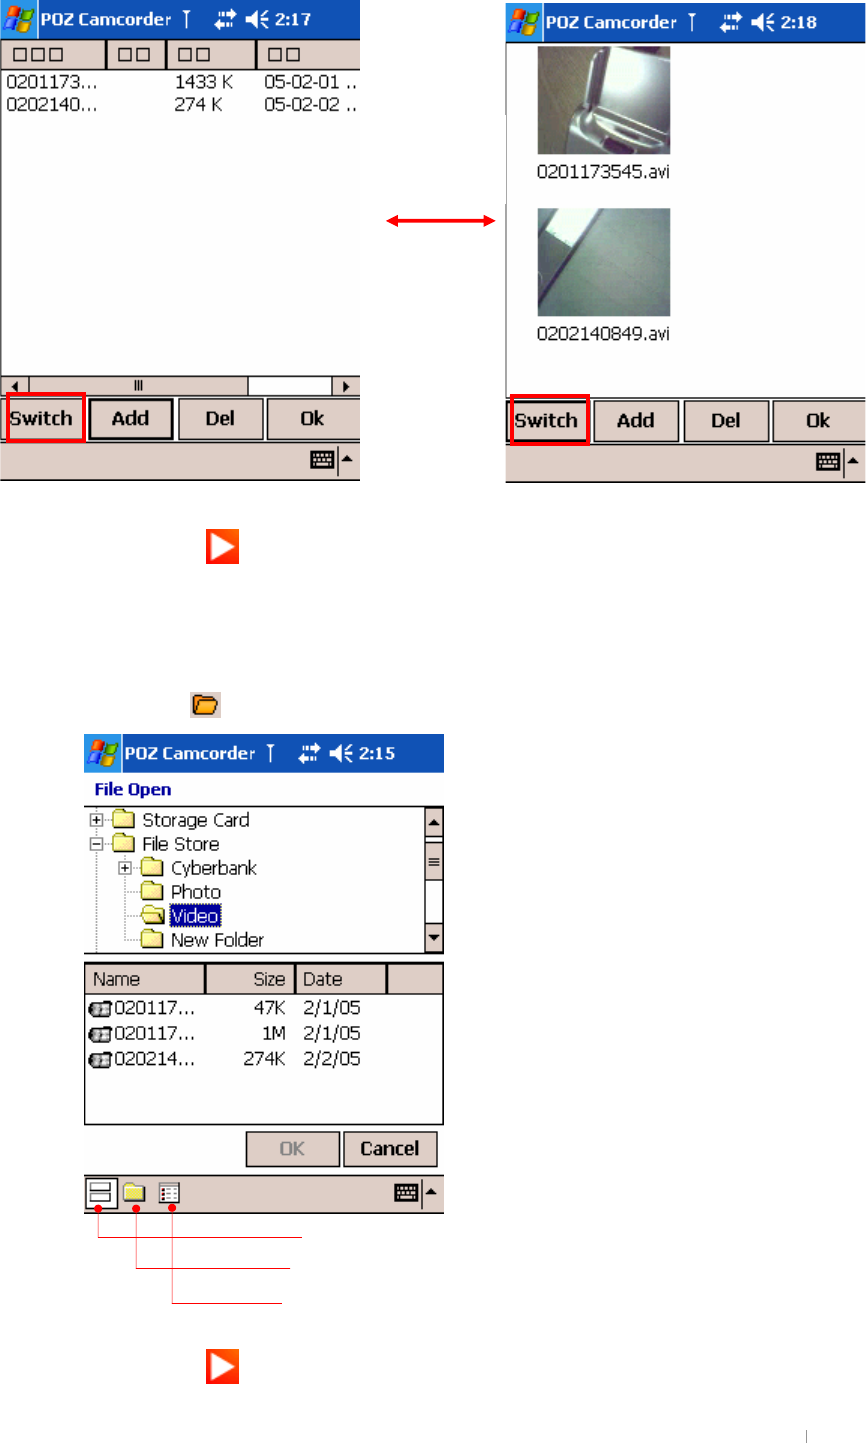
G|˅GtG G XWTX[
Tap OK to save the video album.
Tap the playback button to playback all video files saved on the video album.
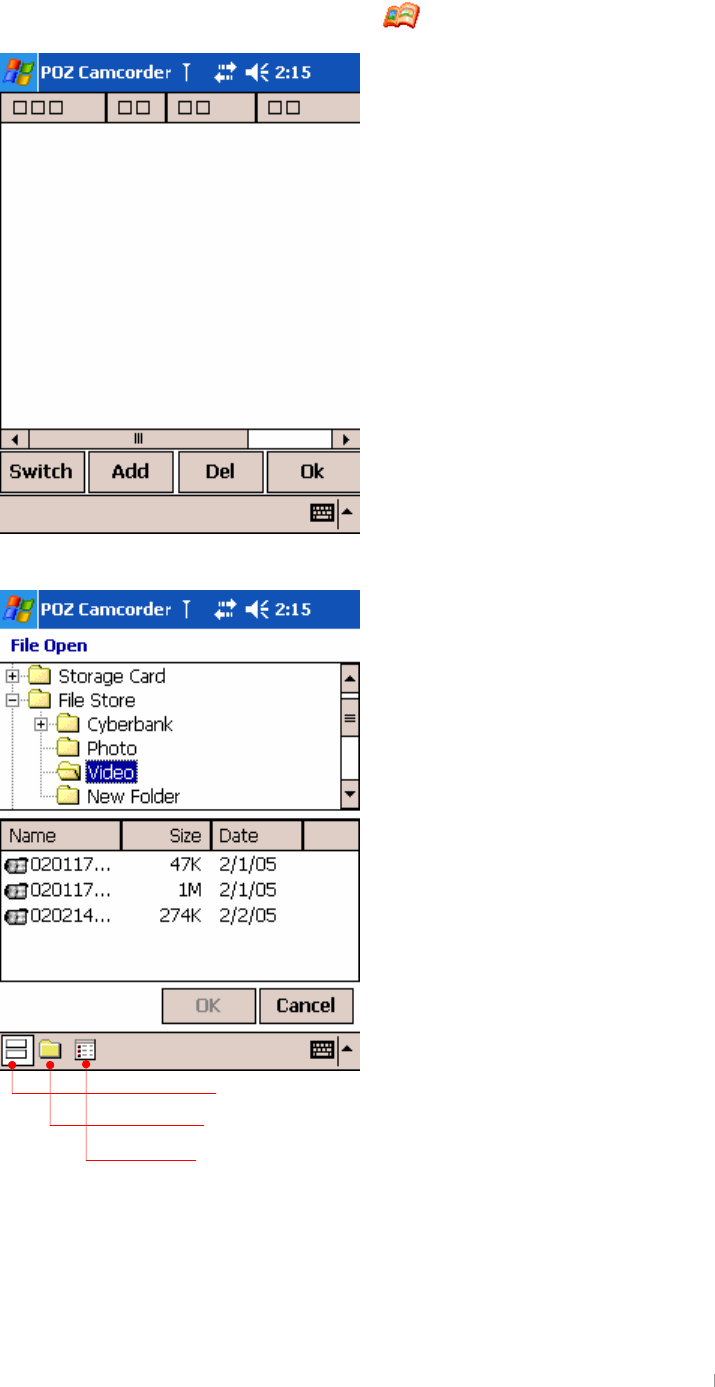
CdYbj]XYcZ]`Y
Select the files you want on “
File Store\video” folder to open among the existing video file a file which is not saved
on the video album.
Tap “Open File” icon on the View mode to open a file you want.
Select a file you want and tap OK to return to normal.
Tap the playback button to playback the file you have selected.
{GˈˉG
GG
GG
U
}GVG
}GG
}GG
GjGXWGhG G XWTX\
G\cfhWihgdfcj]XYXcbh\Y_YmdUXZcfYUW\ZibWh]cbcZDCN7UaWcfXYf
When POZ camcorder program opens and it is in the Capture mode, you can have the shortcut for each function on the
keypad.
For example, press on the keypad in the Capture mode to snap a picture and pause.
When POZ camcorder program opens and it is in the View mode, you can have the shortcut for each function on the
keypad.
For example, press on the keypad in the View mode to
V
.
wVwG
wVwG
zG
zGVwG
iGOPG
iGOPG
jVjG
mGG G
|GG G
jGV}GG
wGG
uGG
zG
zG
G|˅GtG G XWTX]
Cdh]cbg
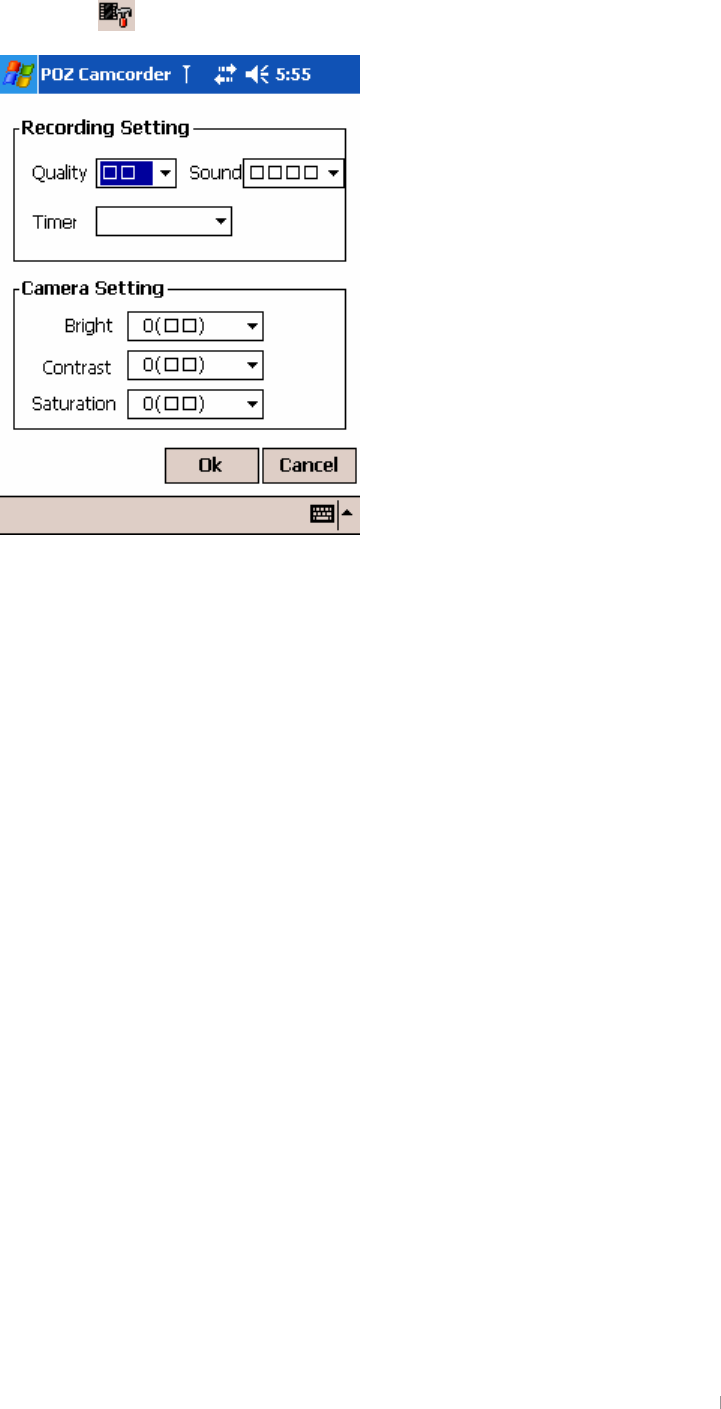
Tap “Options” icon in the Capture mode to optimize POZ Camcorder program.
GjGXWGhG G XWTX^
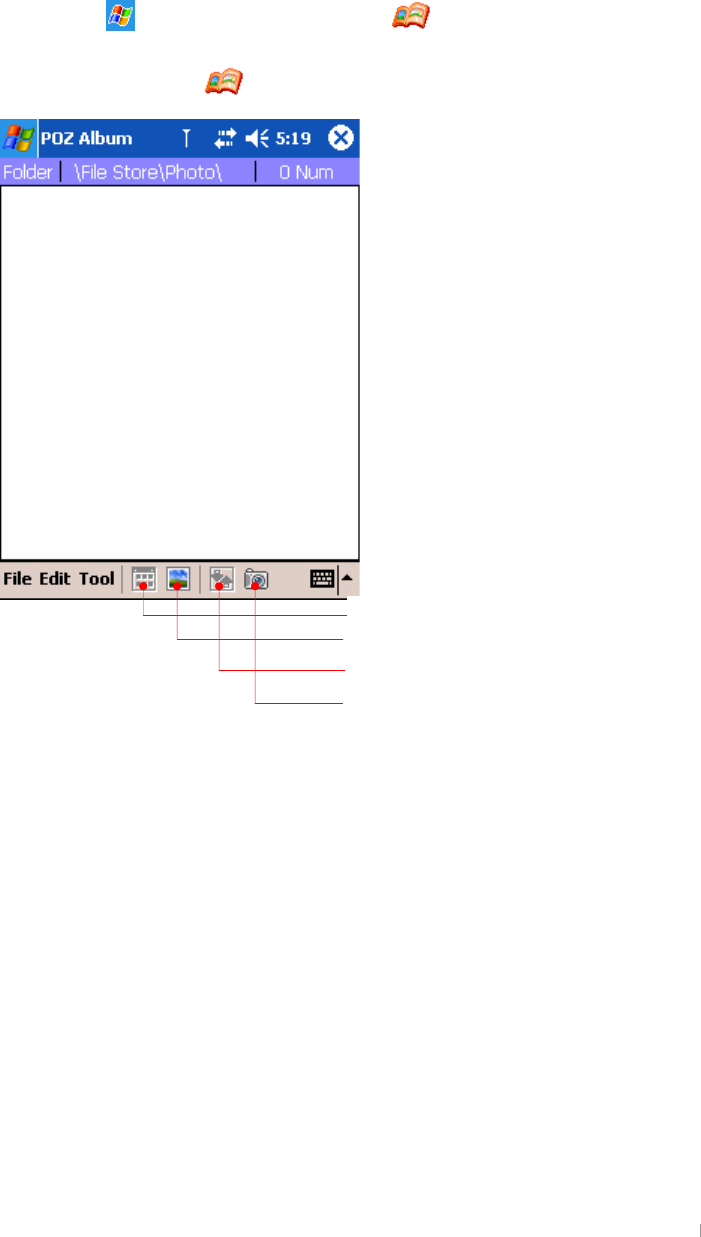
DCN5`Via
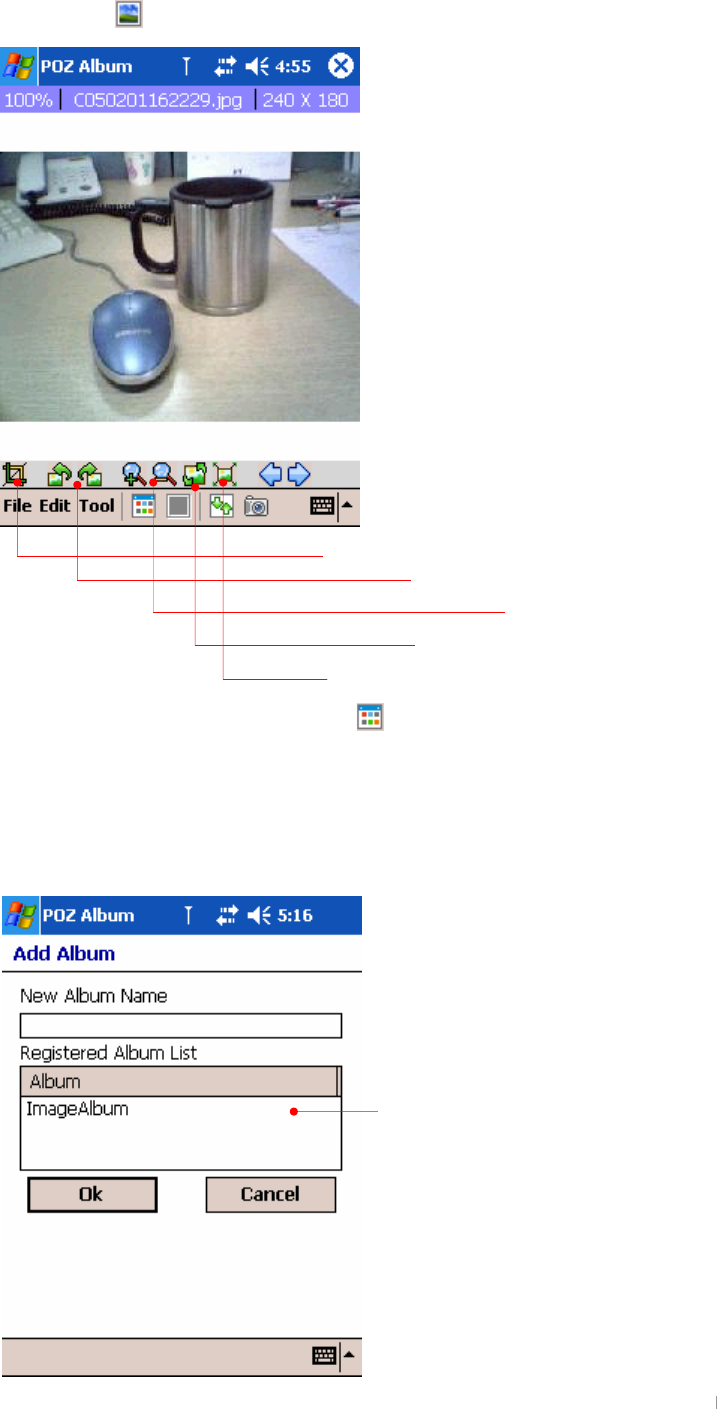
POZ Album helps you to edit, save and manage the pictures you snap using the digital Camera lens.
CdYbDCN5`Via
You can open POZ Album program as follows :
z
Start button > Programs > “POZ Album” icon.
z
Select “POZ Album “on the POZ Launcher.
z
Select the shortcut icon for POZ Album on the POZ Camera program.
G
G
G
G
G
G
G
G
G
G
G
G
G
G
G
G
G
G
G
G
G
zGG
lGG
zVGGG
zGGwvGj
G|˅GtG G XWTX_
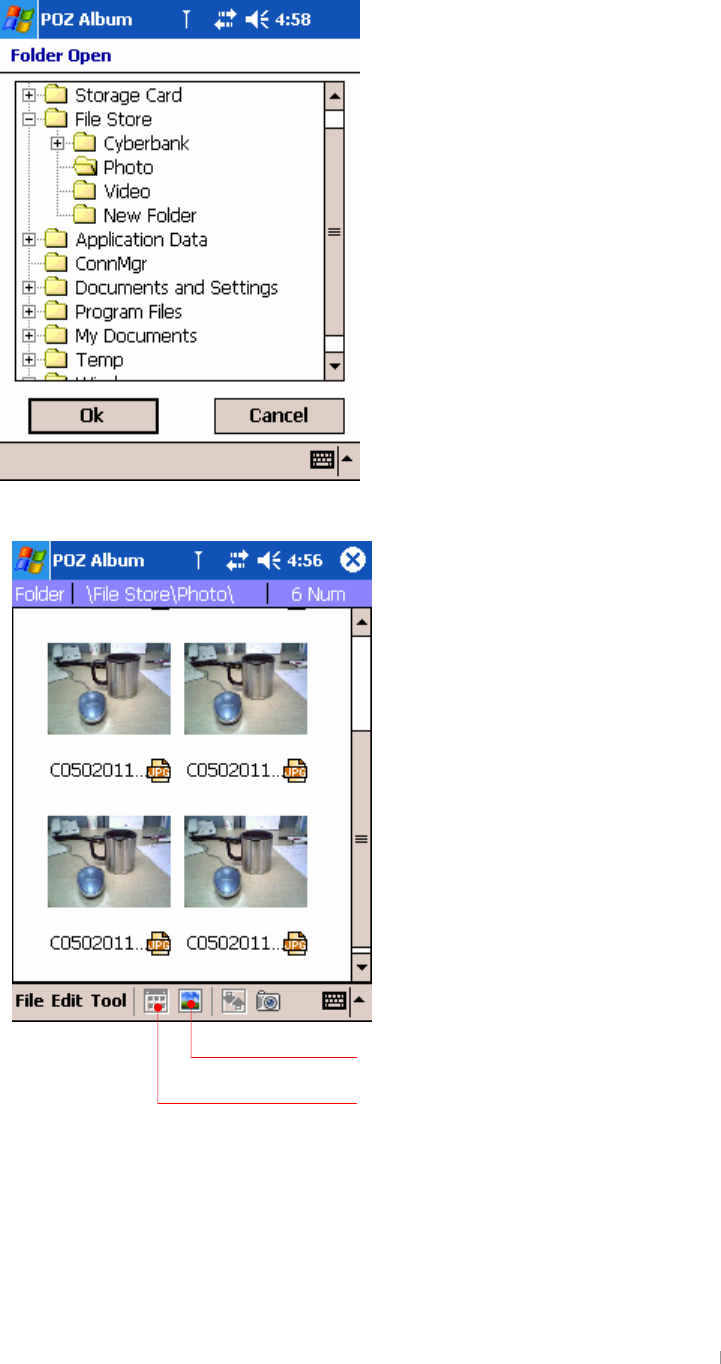
CdYbh\YD\chcZc`XYf
{GˈvGmˉGGGmGGGGGGGGGGwvGjUG
G
G
G
G
G
G
G
G
G
G
G
G
G
G
G
G
zGGO
File Store\Photo
PGGGvrUG
G
G
G
G
G
G
G
G
G
G
G
G
G
G
G
G
G
G
G
G
G
lGG
zGG
GjGXWGhG G XWTX`
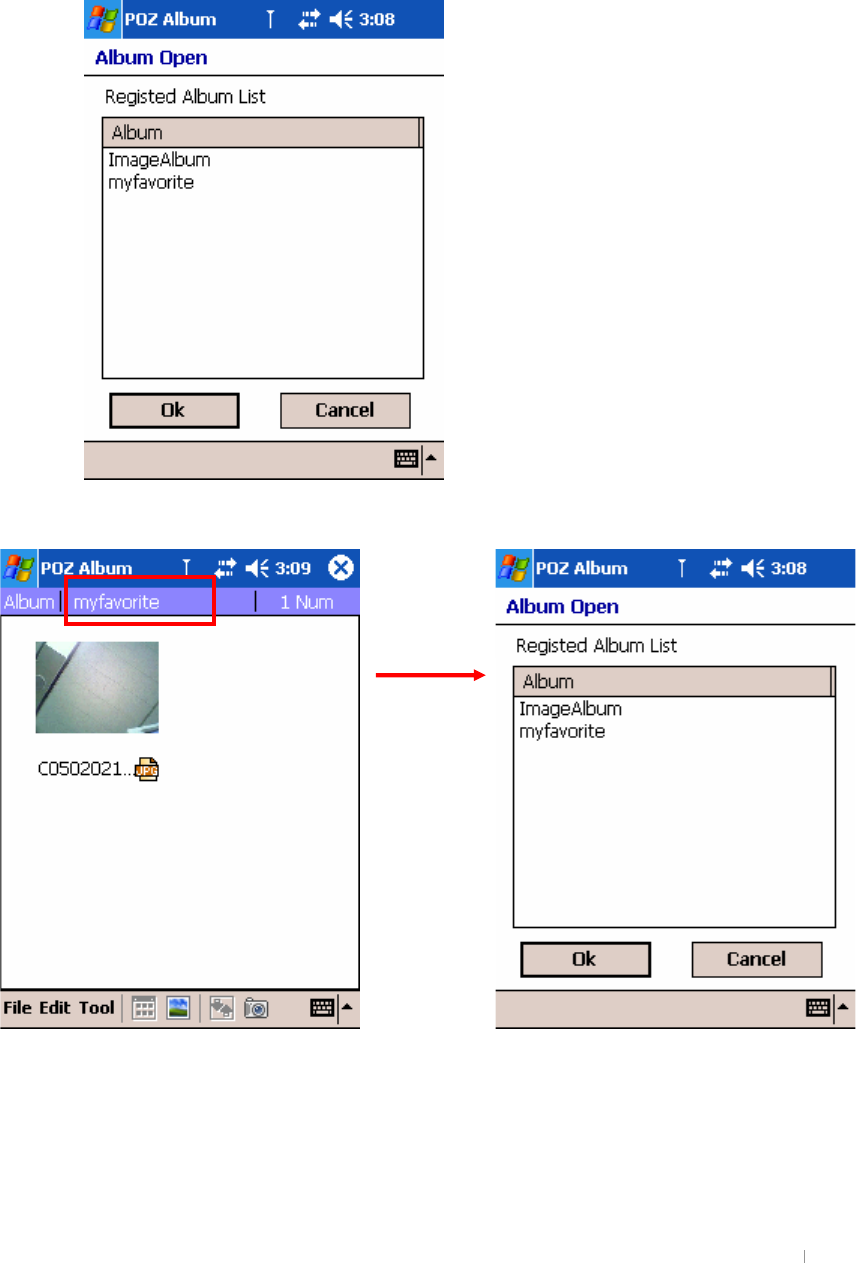
9X]h:]`Y
Tap “Edit mode” icon on the command bar.
G
G
G
G
G
G
G
G
G
G
G
G
G
G
G
G
G
G
G
G
G
hGGGGSGGˈzGˉG G GGGGUG
G
AU_YUbYkU`Via
pGGGGGGGSGGˈhGhˉGGGmGUGOpGGGGGG
GSGGˈhGhˉGGGmGUPG
G
G
G
G
G
G
G
G
G
G
G
G
G
G
G
jG
yG
G
vG
mGz
kGG
G|˅GtG G XWTYW
G
hGGGGGGGGGGvrUG
G
CdYbh\YYl]gh]b[U`Via
Tap “Open Album” to open the existing album.
G
G
G
G
G
G
G
G
G
G
G
G
G
G
G
G
zGGGGGGGvrUG
G
G
G
G
G
G
G
G
G
G
G
G
G
G
G
G
G
G
G
G
G
G
{GGG
GGG
GGG
UG
GjGXWGhG G XWTYX
G`]XYg\ck
Tap “Slideshow” on the Tools menu to have slideshow display the saved list. You can choose whether the
slideshow automatically displays the next picture in sequence after short delay which is set on options
UG
G
Cdh]cbg
Tap “Options” on the Tools menu to set options.
G
G
G
G
G
G
G
G
G
G
G
G
G
G
G
G
G

GChapter 11 Support & Service 11-1
G
G
G
G
G
G
G
G
G
G
Web site
You can obtain product information as well as tips and hints on how to get more from the
product at our Web site. This computer service is provided free of charge; you pay only
for telephone charges and Internet service fees. To connect to this Web site from a
computer via the Internet, go to www.cyberbank.com
Service
For diagnostic instructions and other service information, contact one of the technical
support numbers. Please do not ship your device for service without first contacting a
CYBERBANK office. If your device qualifies for in-warranty service, be ready to supply a
dated proof of purchase.
Before you contact us for help, be sure to:
1. Review the manuals whenever possible.
2. Have the following information about the product:
model number
serial number
purchase date
3. Have your product ready to use. The support personnel may ask you to run tests
and other operations.
4. Organize your question or problem. The more detailed information you can provide,
the quicker the support personnel can help you.
Chapter 11
Support & Service

G
GAppendix A Hardware Specification A-1
Hardware Specifications
G
Items Descriptions
OS Pocket PC 2003 English version
PDA Xscale/PXA255(Cotulla) – up to 400MHz
Processor CDMA MSM5500 supports IS95/A/B/1x RTT/EvDO
Flash Pocket PC 2003 OS : 32Mbyte
Program and files : 256Mbyte
Memory
RAM 64Mbyte
Main
Li-Polymer
Standard battery : 1500mAh
Slim battery : 1200mAh
Battery
Backup Li-Ion, 43mAh
Size (mm)
width䱹length䱹height
Standard battery : 63.5 x116 x 22~26
Slim battery : 63.5 x116 x 22~25
Weight (g) 199g : Standard battery
193g : Slim battery
Resolutions 240 X 320
Screen Color 3.0 " Transflective, TFT LCD 260K Color
External Power 110~220V(charging : 800mAh)
Camera VGA/300K pixels
USB
(Universal Serial Bus) Supports specification 1.1.
Mini-SD
(Secure Digital) External memory card
I/O
Connector
IrDA Supports 115.2Kbps
Stand-by 80~130 hours(standard battery)
voice communications 3 hours 20 minutes (PDA Sleep mode)
Time
Data communications 2 hours 50 minutes(standard battery)
LED Battery charging state (Red, Blue)
Phone State (Red, Green, Blue)
Sound Chip Yamaha 64poly MA5
Operating conditions Temperature : -10~50䮎/#kxplglw|=3<8(
G
Appendix
A

GAppendix B Warranty B-1
G
G
G
G
G
G
G
G
G
Warranty
G
Important: This is your hardware product warranty statement. Read it carefully. Warranty
terms may be different in your country. If so, your authorized dealer or sales and service
office can give you details.
One year limited hardware warranty
CYBERBANK warrants this hardware product against defects in material and
workmanship for a period of one year from receipt by the original end-user purchaser. If
CYBERBANK receives notice of the above-defined defects during the warranty period,
CYBERBANK will either, at its option, repair or replace products that prove to be
defective. Should CYBERBANK be unable to repair or replace the product within a
reasonable amount of time, the customer's alternate exclusive remedy shall be a refund
of the purchase price upon return of the product.
Limitation of warranty
The above warranty shall not apply to defects resulting from: misuse;
unauthorized modification; opening for any reason; operation or storage outside the
environmental specifications for the product; in-transit damage;
improper maintenance; or defect resulting from use of non-CYBERBANK software,
accessories, media, supplies, consumables, or such items not designed for use with the
product.
CYBERBANK makes no other express warranty, whether written or oral, with respect to
this product.
Any implied warranty of merchantability or fitness for a particular purpose is limited to the
one-year duration of this written warranty.
Some states, provinces, or countries do not allow limitations on how long an implied
warranty lasts, so the above limitation or exclusion may not apply to you.
This warranty gives you specific legal rights, and you may also have other rights that
vary from state to state, province to province, or country to country.
Appendix B

GUser’s Manual B-2
CYBERBANK Software Product License Agreement and
CYBERBANK Software Product Limited Warranty
This CYBERBANK product contains preinstalled software programs. Please read the
CYBERBANK Software Product License Agreement before proceeding.
Important: Carefully read this License Agreement and the Limited Warranty statement
before operating the equipment. The rights to the software are licensed, not sold.
CYBERBANK or its licensors continue to own all intellectual property rights to the
software, and you will be granted certain rights to use the software upon your
acceptance of this license. Rights in the software are offered only on the condition that
you agree to all terms and conditions of the License Agreement. Operating the
equipment indicates your acceptance of these terms and conditions. If you do not agree
to the terms and conditions of the License Agreement, return the complete package for a
full refund now.
CYBERBANK Software Product License Agreement
The CYBERBANK Software Product License Agreement shall govern the use of all
software that is provided to you, the customer, as part of this CYBERBANK product with
the exception of Microsoft Software. Microsoft Products are licensed to you under the
Microsoft End User License Agreement (EULA) contained in the Microsoft
documentation. Any third-party software supplier's warranty terms that may be found
online, or in any documentation or other materials contained in the product packaging,
shall govern the use of that third-party software.
Use
You may only use the software on a single computer. You may not reverse, assemble, or
decompile the software.
Copies and adaptations
You may make copies or adaptations of the software (a) for archival purposes, or (b)
when copying or adaptation is an essential step in the use of the software with a
computer so long as the copies and adaptations are used in no other manner.
You have no other rights to copy unless you acquire an appropriate license to reproduce
which is available from CYBERBANK for some software.
You agree that CYBERBANK provides no warranty, free installation, or free training for
any copies or adaptations made by you.
All copies and adaptations of the software must bear the copyright notice(s) contained in
or on the original.

GAppendix B Warranty B-3
Ownership
You agree that you do not have any title to or ownership of the software, other than
ownership of the physical media. You acknowledge and agree that the software is
copyrighted and protected under the copyright laws.
You acknowledge and agree that the software or part thereof may have been developed
by a third-party software supplier named in the copyright notice(s) included with the
software, who shall be authorized to hold you responsible for any copyright infringement
or violation of this or their own License Agreement.
Transfer of rights in software
You may transfer rights to the software to a third party only as part of the transfer of all your
rights and only if you obtain the prior agreement of the third party to be bound by the terms of
this License Agreement. Upon such a transfer, you agree that your rights to the software are
terminated and that you will either destroy all your copies and adaptations or deliver them to
the third party. Transfer to a U.S. government department or agency or to a prime or lower
tier contractor in connection with a U.S. government contract shall be made only upon prior
written agreement to terms required by CYBERBANK.
Sublicensing and distribution
You may not lease, sublicense the software, or distribute copies or adaptations of the
software to the public in physical media, by telecommunication or at all without the prior
written consent of CYBERBANK.
Termination
CYBERBANK may terminate this software license for failure to comply with any of these
terms, provided CYBERBANK has requested you to cure the failure and you have failed to do
so within thirty (30) days of such notice.
Updates and upgrades
You agree that the software does not include updates and upgrades that may be available
from CYBERBANK under a separate support agreement.
G

GAppendix C Glossary C-1
G
G
G
G
G
G
G
Glossary
G
G
AC adapter
An external power supply that converts AC power from a standard household electrical
outlet to the low-voltage DC power required to operate your device.
G
Backup
A duplicate copy of your device files and data that is stored on your desktop PC, on a
SD card, or in the Built-in Flash.
G
Cradle
A desktop base for your device that allows instant connectivity to a desktop PC.
G
DHCP (Dynamic Host Configuration Protocol)
A protocol that assigns a dynamic IP address to your device each time you connect to a
network.
DNS (Domain Name System)
An Internet service that translates domain names into IP addresses. For example, the
domain name www.NATE.com might translate as 198.125.247.4.
Driver
A control program that enables a computer to work with a specific peripheral device.
IMAP4 (Internet Messaging Access Protocol v4).
A protocol that enables a computer to retrieve messages from a mail server.
Appendix C

GUser’s Manual C-2
IP (Internet Protocol)
The standard by which packets of information are transmitted over the Internet.
IrDA (Infrared Data Association Protocol)
An established standard for infrared communications between computers and other
peripherals and devices.
ISP (Internet Service Provider)
A commercial business that provides Internet access to individuals or businesses,
usually for a fee.
LAN (local area network)
A group of computers, usually in close proximity (either in the same building or in
buildings in close proximity), that are linked together to share files and exchange data.
POP3 (Post Office Protocol v3)
A protocol that enables a computer to retrieve messages from a mail server.
Reset
The process of restarting your device and reinitializing the operating system. Performing
a reset erases any unsaved data in open documents, but preserves data that has been
saved.
Partnership
An established relationship between your device and your desktop PC for the purpose
of synchronizing and transferring data.
PIM (Personal Information Manager)
An application or set of applications that organizes information such as addresses,
appointments, and notes.
Proxy server
A server that sits between a client computer or Web browser and the Internet. A proxy
server provides security by filtering requests and can improve performance by storing
local copies of requested information.

GUser’s Manual C-3
Restore
To return your device to the state it was in when data was last backed up. This involves
copying your backup data to your device.
RAM (Random Access Memory)
Volatile memory that can be read and written. Data stored in RAM is retained only while
power is maintained.
ROM (Read-Only Memory)
Nonvolatile flash memory that contains the Microsoft Windows for Pocket PC operating
system and pre-installed programs.
G
SD(Secure Digital) Memory Card
A removable media for high-performance memory cards.
SMTP (Simplified Mail Transport Protocol)
A protocol for sending e-mail messages between computers on the Internet.
Stylus
A pen-like utensil designed to select items on a touch screen.
Synchronization
The process of comparing the files or data between device and desktop PC to ensure
that they contain exactly the same information.
Touch screen
A touch-sensitive screen that allows you to open files, launch programs, and select text
by touching or tapping the screen with the stylus.
USB (Universal Serial Bus)
A newer standard for connecting peripheral devices. USB supports relatively fast data
transfer rates and can be used to connect multiple devices to a single computer.

GUser’s Manual C-4
G