CyberTAN Technology MM230M IEEE802.11b/g+Bluetooth 2.0+EDR and GPS User Manual 5762593
CyberTAN Technology Inc. IEEE802.11b/g+Bluetooth 2.0+EDR and GPS 5762593
Contents
User manual 1 of 2

Chapter 1.
Getting Started
Product Features 2
Before You Start 4
Contents 8
Safety Precautions 9
Proper Posture During Computer Use 26
Important Safety Information 28
Replacement Parts and Accessories 31
Regulatory Compliance Statements 33
WEEE SYMBOL INFORMATION 45
Overview 47
Turning the Computer On and Off 53
2
Product Features
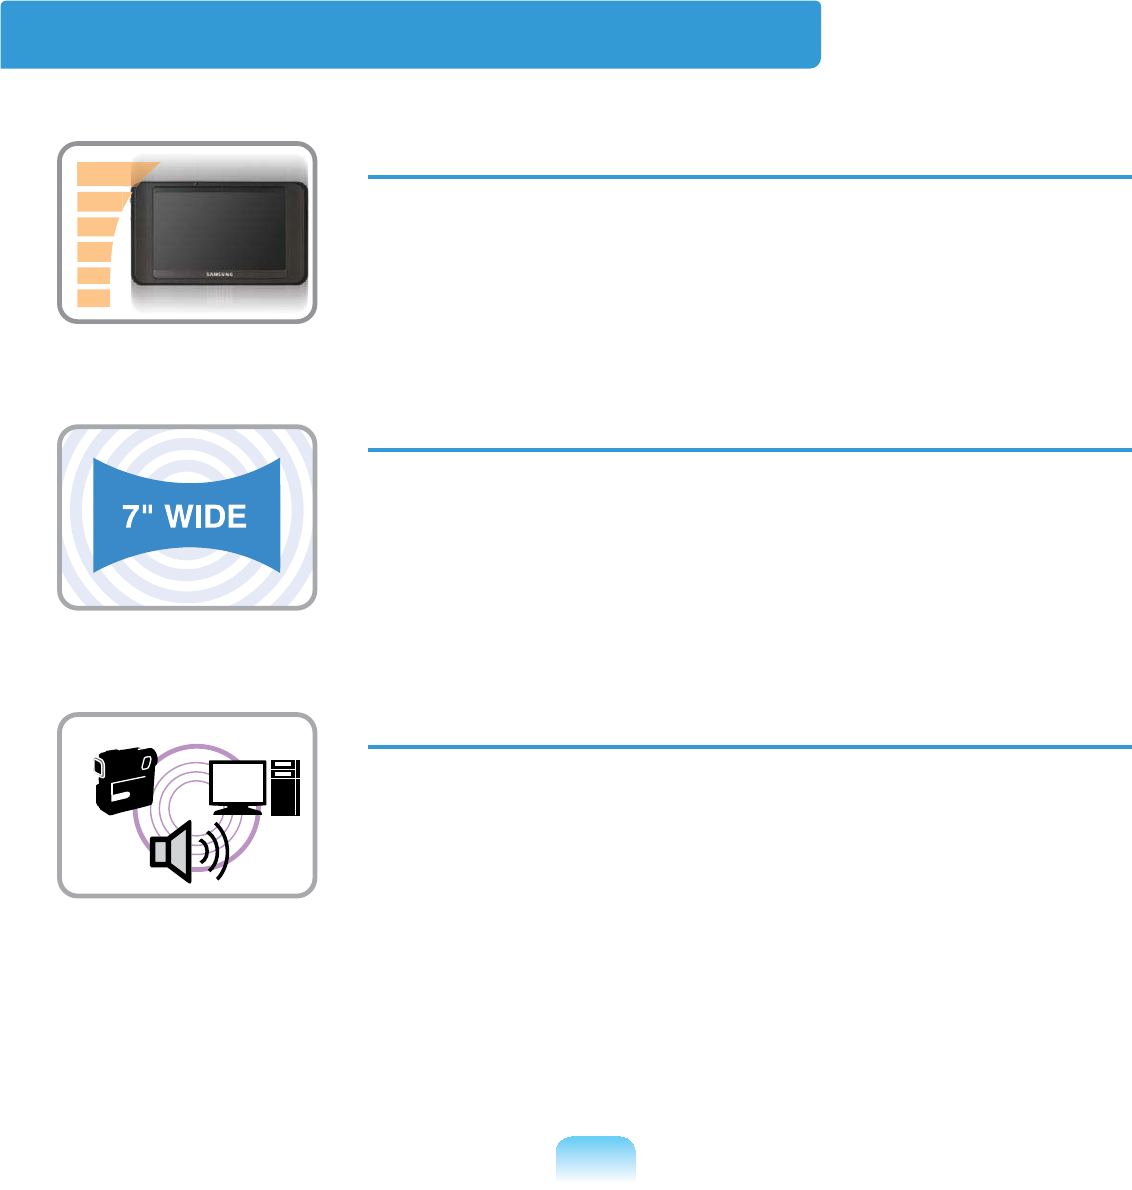
Small but Strong UMPC (Ultra Mobile PC)
z VIAIsaiahCPU
z DDR2Memory(Optional)
7” WSVGA LCD
z Basic Resolution of 1024x600 Pixels, Maximum Resolution
of 2048x1536Pixels(Whenanexternaldisplaydeviceis
connected with the Organizer)
z A Touch Screen has been adopted allowing convenient
LQSXWZLWK\RXU¿QJHUV
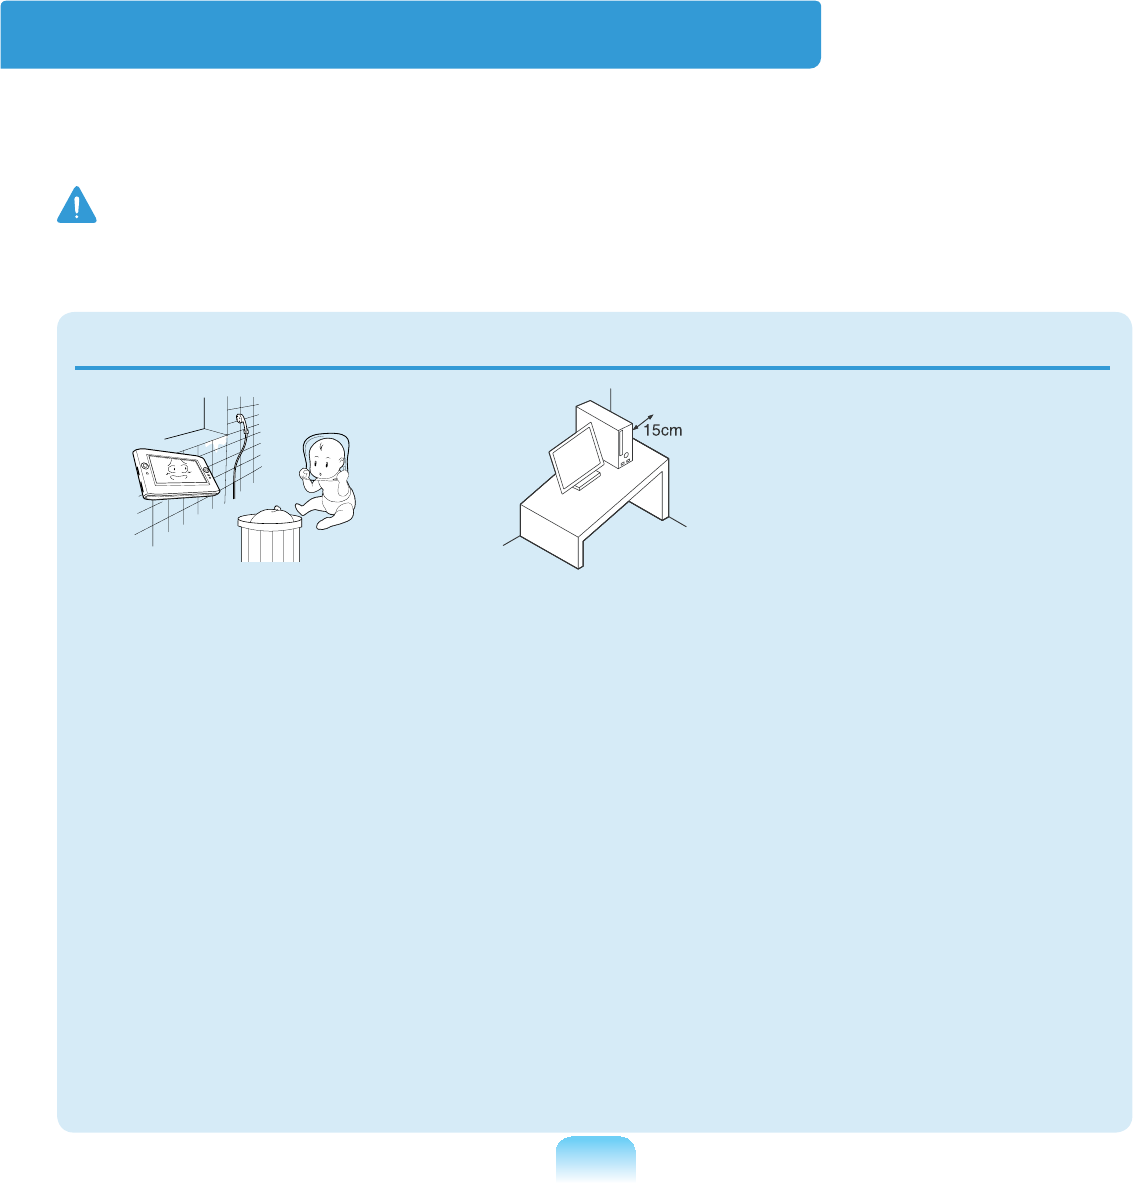
Powerful Multimedia Functions
z Camera for photographing and video recording (Optional)
3
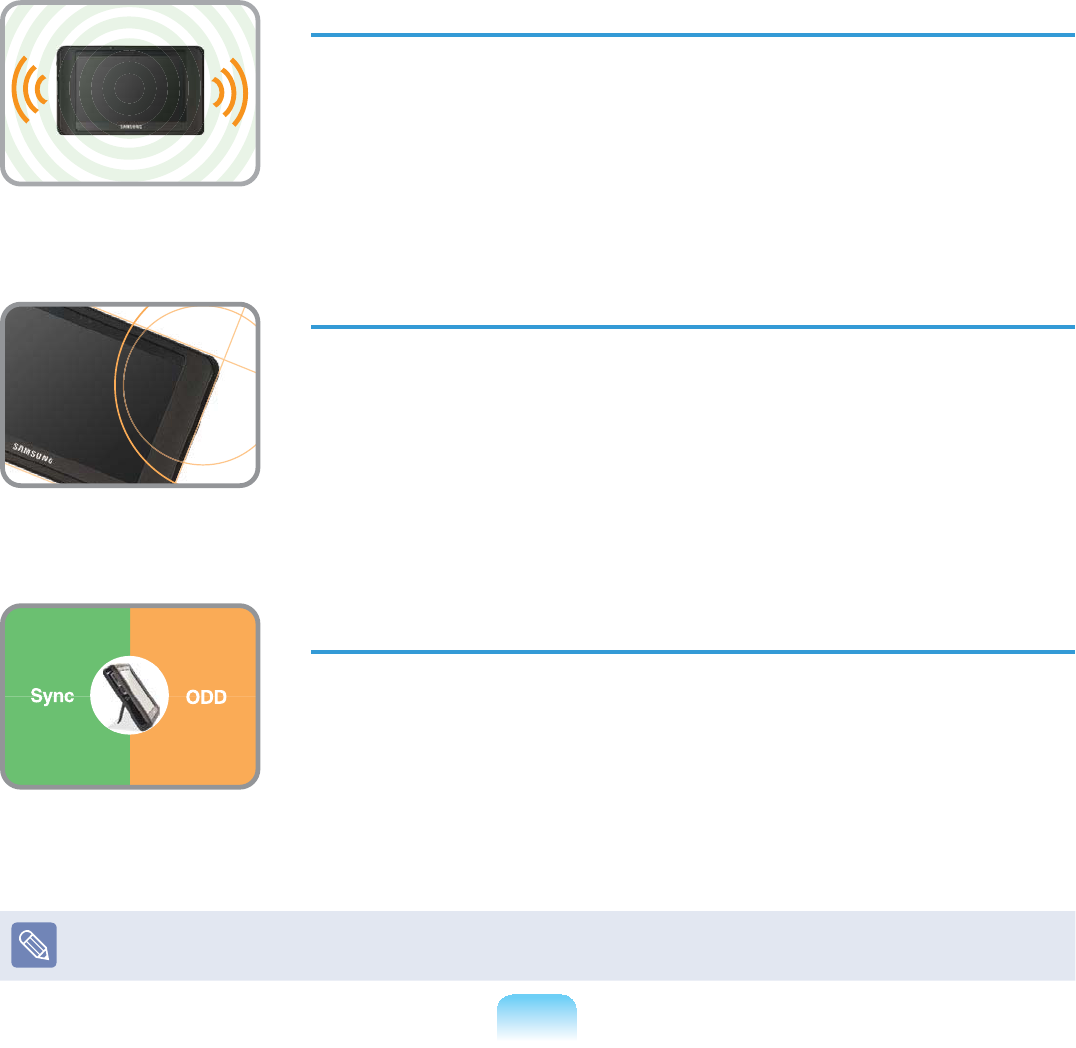
Multiple Network Support
z Wireless LAN, Bluetooth (Optional)
z Resolves Space Restrictions through the Wireless
Communication Function
PC in Hand
z Improvedportabilitythroughitscompactsizeandlight-
weight design
z Slim, Polished Design
Optional Accessories for Additional Convenience
(Optional)
z Organizer for convenient operations
z86%'DWD&DEOH(QDEOLQJ'DWD([FKDQJHZLWKDQRWKHU3&
z USBExternalODD(OpticalDiskDrive),Ultra-SlimUSB
External Keyboard
Optionalitemsmaybechangedormaynotbeprovideddependingonthecomputer
PRGHO

4
Before You Start
%HIRUHUHDGLQJWKH8VHU*XLGH¿UVWFKHFNWKHIROORZLQJLQIRUPDWLRQ
User Guide Information
ThisproductissuppliedwithanGetting
Started Guide,andaUser Guide
You can even more easily and
convenientlyusethecomputerbyusing
anyoftheguidesdependingonyour
QHHGV
Getting Started Guide
Thisguideisprovidedsothatyoucan
convenientlyrefertothisguidewhen
XVLQJWKHFRPSXWHUIRUWKH¿UVWWLPHDIWHU
SXUFKDVLQJLW
User Guide
<RXDUHFXUUHQWO\UHDGLQJWKH8VHU*XLGH
7RRSHQWKH¿OHDWDQ\WLPHGRXEOHFOLFN
WKHLFRQRQWKH'HVNWRS
Alternatively, select Start > All Programs
> Samsung>User Guide > User Guide
This document includes the computer
functions,howtousethefunctions,and
KRZWRXVHWKHSURJUDP
Utilizating the User Guide
nBe sure to read the Safety
Precautions before using the
FRPSXWHU
lFor basic usage of the computer refer
to the additionally supplied Getting
Started Guide
WRefertotheUser Guide for the
SURFHGXUHVWRXVHWKHFRPSXWHU
jUsing the Index oftheUserGuide,
\RXFDQHDVLO\¿QGDQ\LQIRUPDWLRQ\RX
DUHORRNLQJIRU
VUsing the Glossary of the User Guide,
\RXFDQHDVLO\¿QGPHDQLQJVIRU
WHFKQLFDOWHUPV
bIfaproblemoccurs,refertotheQ & A
LQFOXGHGLQWKH8VHU*XLGH
z Some devices and software
referredintheUserGuidemaynot
be provided and/or changed by
XSJUDGH
Note that the computer
environment referred in the User
Guidemaynotbethesameas
\RXURZQHQYLURQPHQW
z Theimageusedforthecoverand
text of the User Guide may not be
WKHVDPHDVDFWXDORQHV

5
z7KLVJXLGHGHFULEHVSURFHGXUHVIRUERWKWKHPRXVHDQGWKHVW\OXVSHQWRJHWKHU
A‘Click’inthismanualreferstoa‘Single-tap’IRUWKH6W\OXV3HQ
z7KH¿JXUHVLQWKLVJXLGHDUHSURYLGHGDVVXPLQJWKDW\RXURSHUDWLQJV\VWHPLV
Windows XP Tablet PC Edition or Windows XP Home7KH¿JXUHVDUHVXEMHFWWR
FKDQJH
z7KH8VHUJXLGHVXSSOLHGZLWKFRPSXWHUPD\EHYDULHGGHSHQGLQJRQPRGHO
Safety Precaution Notations
Icon Notation Description
Warning Failing to follow instructions marked with this symbol, may cause
SHUVRQDOLQMXU\DQGRUIDWDOLW\
Caution Failing to follow instructions marked with this symbol, may cause
VOLJKWLQMXU\WR\RXUVHOIRUGDPDJH\RXUSURSHUW\
Text Notations
Icon Notation Description
Before You
Start
Contentincludedinthissectionincludesinformationrequired
EHIRUHXVLQJDIXQFWLRQ
Caution Contentincludedinthissectionincludesinformationrequired
DERXWWKHIXQFWLRQ
Note Contentincludedinthissectionincludeshelpfulinformationto
XVHWKHIXQFWLRQ
Page XX This notation represents the page number you can refer to for
LQIRUPDWLRQDERXWUHODWHGIXQFWLRQVRUDVDUHIHUHQFH
Start > All Programs
> Samsung > User
Guide > User Guide
7KLVUHSUHVHQWVDPHQXSDWKWRUXQDSURJUDP
Click the Start button and then select All Programs > Samsung
> User Guide > User GuideLQWKLVRUGHUIURPWKHPHQX

6
Copyright
© 2008 Samsung Electronics Co., Ltd.
6DPVXQJ(OHFWURQLFV&R/WGRZQVWKHFRS\ULJKWRIWKLVPDQXDO
Nopartofthismanualmaybereproducedortransmittedinanyformorbyanymeans,
HOHFWURQLFRUPHFKDQLFDOZLWKRXWWKHFRQVHQWRI6DPVXQJ(OHFWURQLFV&R/WG
7KHLQIRUPDWLRQLQWKLVGRFXPHQWLVVXEMHFWWRFKDQJHZLWKRXWQRWLFHGXHWRLPSURYLQJ
WKHSHUIRUPDQFHRIWKHSURGXFW
6DPVXQJ(OHFWURQLFVVKDOOQRWEHOLDEOHIRUDQ\GDWDORVV3OHDVHWDNHFDUHWRDYRLG
ORVLQJDQ\LPSRUWDQWGDWDDQGEDFNXS\RXUGDWDWRSUHYHQWDQ\VXFKGDWDORVV
Precautions for Operating System Support
If a problem occurs because of the reinstallation of other operating systems(OS) or a
previousversionofaOSpre-installedonthiscomputer,orasoftwarethatdoesnot
supporttheOS,thecompanywillnotprovidetechnicalsupport,areplacementor
refund, and if our service engineer visits you due to this problem, a service charge will
EHDSSOLHG
Constraints of the Operating System
The Windows XP Home operatingsystemdoesnotsupportthefunctionthatallows
FKDUDFWHUVWREHZULWWHQGLUHFWO\
Performance Restrictions
nOnlinegamesandsomegames(3D,2D)maynotbesupportedandFullHDvideo
DQGVRPHKLJKELWUDWH+'YLGHRSOD\EDFNPD\EHVORZDQGVWXWWHURQWKLVFRPSXWHU
l7KHUHLVRQHPHPRU\VORWSURYLGHGRQWKLVFRPSXWHU,WVXSSRUWV*%PHPRU\
PD[7RXSJUDGHWR*%PHPRU\UHSODFHWKHFXUUHQWPHPRU\ZLWKD*%PHPRU\
PRGXOH

7
About the Product Capacity Representation Standard
About HDD Capacity Representation
Thecapacityofthestoragedevice(HDD,SSD)ofthemanufactureriscalculated
DVVXPLQJWKDW.% %\WHV
However,theoperatingsystem(Windows)calculatesthestoragedevicecapacity
assuming that 1KB=1,024 Bytes, and therefore the capacity representation of the
HDDinWindowsissmallerthantheactualcapacityduetothedifferenceincapacity
FDOFXODWLRQ
(J)RUD*%+'':LQGRZVUHSUHVHQWVWKHFDSDFLW\DV*%
[[[E\WH[[E\WH *%
Inaddition,thecapacityrepresentationinWindowsmaybeevensmallerbecausesome
SURJUDPVVXFKDV5HFRYHU\6ROXWLRQPD\UHVLGHLQDKLGGHQDUHDRIWKH+''
About Memory Capacity Representation
ThememorycapacityreportedinWindowsislesserthantheactualcapacityof
PHPRU\
ThisisbecauseBIOSoravideoadapterusesaportionofmemoryorclaimsitfor
IXUWKHUXVH
(J)RU*% 0%PHPRU\LQVWDOOHG:LQGRZVPD\UHSRUWWKHFDSDFLW\DV
1,022MBorless)

8
Contents
Chapter 1. Getting Started
Product Features 2
Before You Start 4
Contents 8
Safety Precautions 9
Proper Posture During Computer Use 26
Important Safety Information 28
Replacement Parts and Accessories 31
Regulatory Compliance Statements 33
WEEE SYMBOL INFORMATION 45
Overview 47
Turning the Computer On and Off 53
Chapter 2. Using the Computer
Stylus Pen 56
Entering Text 59
Using the Buttons 64
Multi Card Slot 67
Organizer (Optional) 70
Connecting a monitor / TV 77
Adjusting the Volume 81
Voice Recorder 84
Chapter 3. Using Microsoft
Windows XP
About Microsoft Windows XP 87
The Windows XP Screen Layout 91
Control Panel 95
Chapter 4. Using the Network
Wired Network 101
Wireless Network 104
Using the Easy Network Manager
(Optional) 107
Bluetooth (Optional) 111
Chapter 5. Using Applications
Introducing Programs 116
CyberLink YouCam (Optional) 119
Samsung Update Plus (Optional) 121
McAfee SecurityCenter (Optional) 123
Using Samsung Magic Doctor
(Optional) 128
Reinstalling Software 129
Chapter 6. Settings and Upgrade
BIOS Setup 132
Setting a Boot Password 136
Changing the Boot Priority 139
Battery 140
Chapter 7. Appendix
Reinstalling Windows XP 147
Using Samsung Recovery Solution
(Optional) 152
Q & A 161
3URGXFW6SHFL¿FDWLRQV 7
Glossary 188
Index 192
Contact SAMSUNG WORLD WIDE 193
9
Safety Precautions
For your security and to prevent damage, please read the following safety instructions
FDUHIXOO\6LQFHWKLVLVFRPPRQO\DSSOLHGWR6DPVXQJ&RPSXWHUVVRPH¿JXUHVPD\
GLIIHUIURPDFWXDOSURGXFW
Warning
)DLOLQJWRIROORZLQVWUXFWLRQVPDUNHGZLWKWKLVV\PEROPD\FDXVHSHUVRQDOLQMXU\DQG
HYHQIDWDOLW\
Installation Related
Do not install the
product in places
exposed to humidity
such as a bathrooms.
There is a danger of
HOHFWULFVKRFN8VH
the product within the
operating conditions
VSHFL¿HGLQWKH
Manufacturers User
*XLGH
Keep the plastic bags
out of the reach of
children.
There is a danger of
VXIIRFDWLRQ
Keep a distance of 15cm
or more between the
computer and the wall
and do not place any
objects between them.
This may increase the
internal temperature of the
computer and may cause
DQLQMXU\
Do not install the
computer on a slant
or a place prone to
vibrations, or avoid
using the computer in
that location for a long
time.
This increases the risk that
a malfunction or damage
WRWKHSURGXFWZLOORFFXU
XPSF#y417
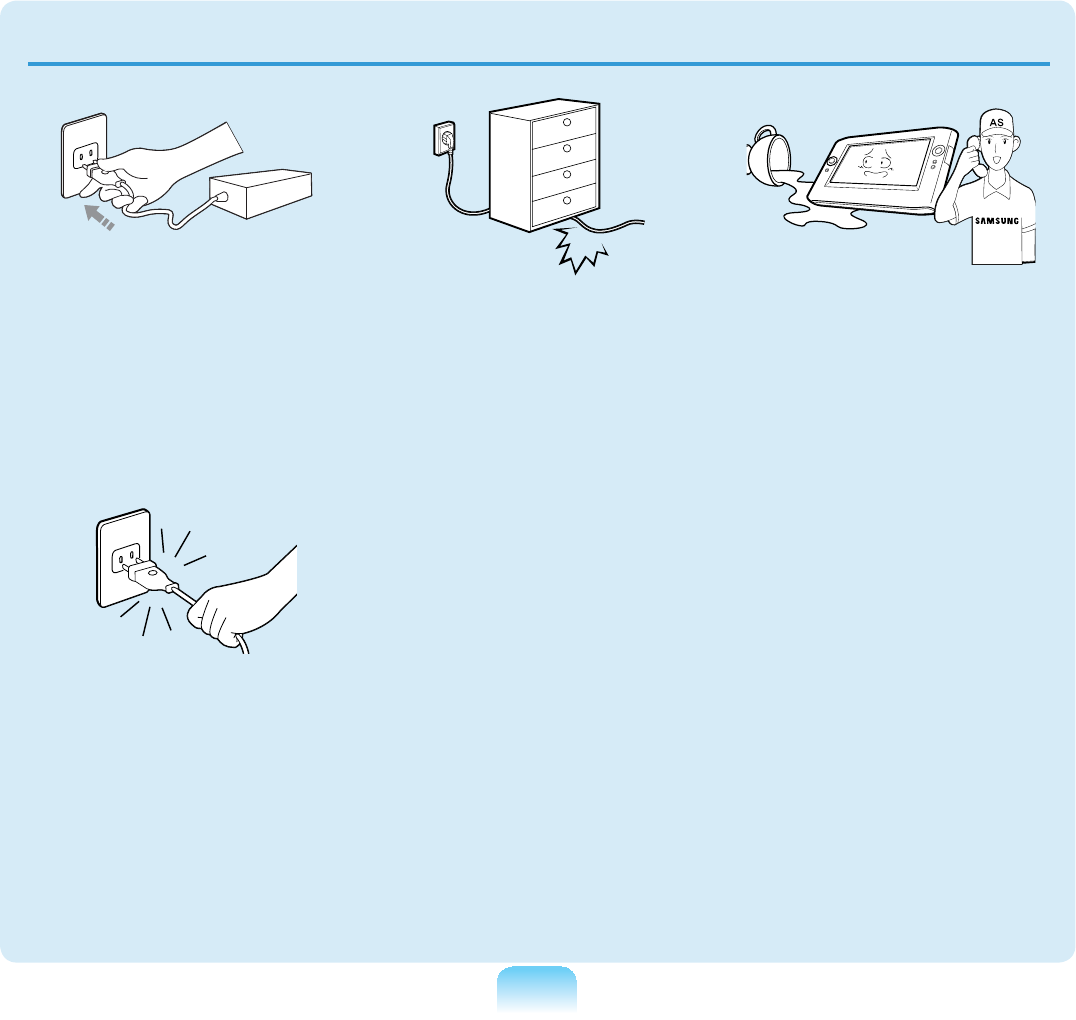
10
The power plug and
ZDOORXWOHW¿JXUHVPD\
differ depending on the
FRXQWU\VSHFL¿FDWLRQV
and the product model.
Do not touch the mains
plug or power cord with
wet hands.
There is a danger of
HOHFWULFVKRFN
Do not exceed the
standard capacity
(voltage/current) of a
multi-plug or power
outlet extension when
using it for the product.
There is a danger of
HOHFWULFVKRFNRU¿UH
KD]DUG
G
If the power cord or
power outlet makes a
noise, disconnect the
power cord from the
wall outlet and contact
a service center.
There is a danger of
HOHFWULFVKRFNRU¿UH
KD]DUG
Do not use a damaged
or loose mains plug or
power cord or power
outlet.
There is a danger of
HOHFWULFVKRFNRU¿UH
KD]DUG
Power Related
Avoid exposing any
part of your body
to the heat from the
computer vent for a
long time when it is on.
Exposingapartofyour
bodytotheheatfromthe
ventforlongperiodsof
WLPHPD\FDXVHDEXUQ
Avoid blocking the
vent at the bottom or
side of the computer
when using it on a bed
or cushion.
Iftheventisblocked,
there is a danger of
damaging the computer
or overheating the inside
RIWKHFRPSXWHU
11
Plug the power cord
¿UPO\LQWRWKHSRZHU
outlet and AC adapter.
Failingtodosomaycause
¿UHKD]DUG
Do not unplug the power
cord out by pulling the
cable only.
Ifthecordisdamaged,it
PD\FDXVHHOHFWULFVKRFN
Do not bend the power
cord excessively or do
not place a heavy object
over the power cord. It is
especially important to
keep the power cord out
of reach of infants and
pets.
Ifthecordisdamaged,it
may cause electric shock
RU¿UH
If water or another
substance enters the
power input jack, AC
adapter or the computer,
disconnect the power
cord and contact the
service center.
Damage to the device
within the computer may
FDXVHHOHFWULFVKRFNRU¿UH
KD]DUG

12
Do not place heavy
objects or step onto
the power cord or
AC adapter to avoid
damaging the power
cord or AC adapter.
Ifthecordisdamaged,
there is a danger of
HOHFWULFVKRFNRU¿UH
Use only the AC adapter
supplied with the
product.
Using another adapter
maycausethescreento
ÀLFNHU
Connect the power cord
WRWKH$&DGDSWHU¿UPO\
Otherwise, there is a
GDQJHURI¿UHGXHWRDQ
LQFRPSOHWHFRQWDFW
AC Adapter Usage Precautions
13
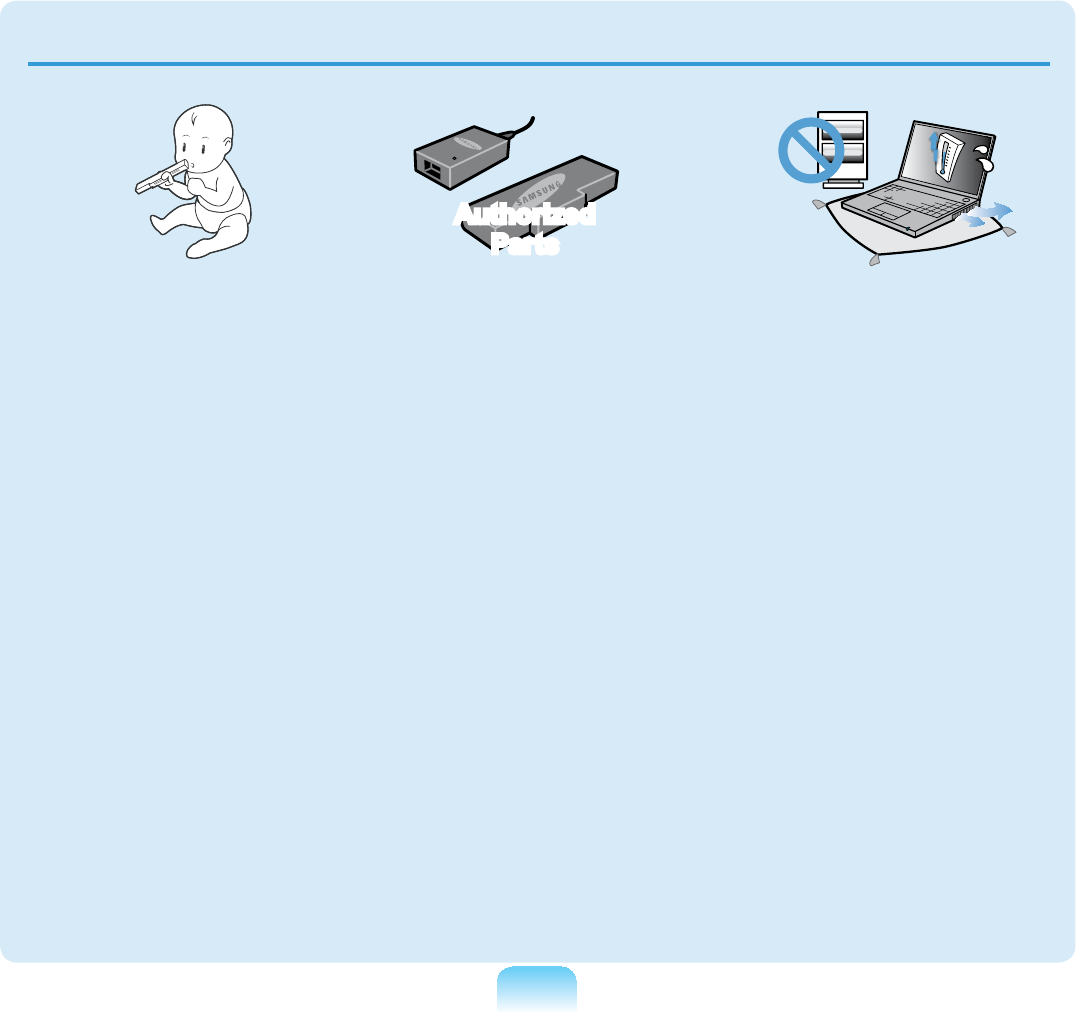
Keep the battery out of
the reach of infants and
pets, as they could put
the battery into their
mouths.
There is a danger of
HOHFWULFVKRFNRUFKRNLQJ
Authorized
Parts
Use an authorized
battery and AC adapter
only.
Please use an authorized
battery and adapter
approved by Samsung
(OHFWURQLFV
Unauthorized batteries
and adapters may not
meet the proper safety
requirements and may
cause problems or
malfunctions and result in
DQH[SORVLRQRU¿UH
Do not use the computer
in a badly ventilated
location such as on
bedding, on a pillow or
cushion, etc, and do
not use it in a location
such as room with
ÀRRUKHDWLQJDVLWPD\
cause the computer to
overheat.
Take care that the
computervents(onthe
side or the bottom) are
not blocked especially in
WKHVHHQYLURQPHQWV,I
theventsareblocked,the
computer may overheat
anditmaycausea
computer problem, or even
H[SORVLRQ
Battery Usage Related
14
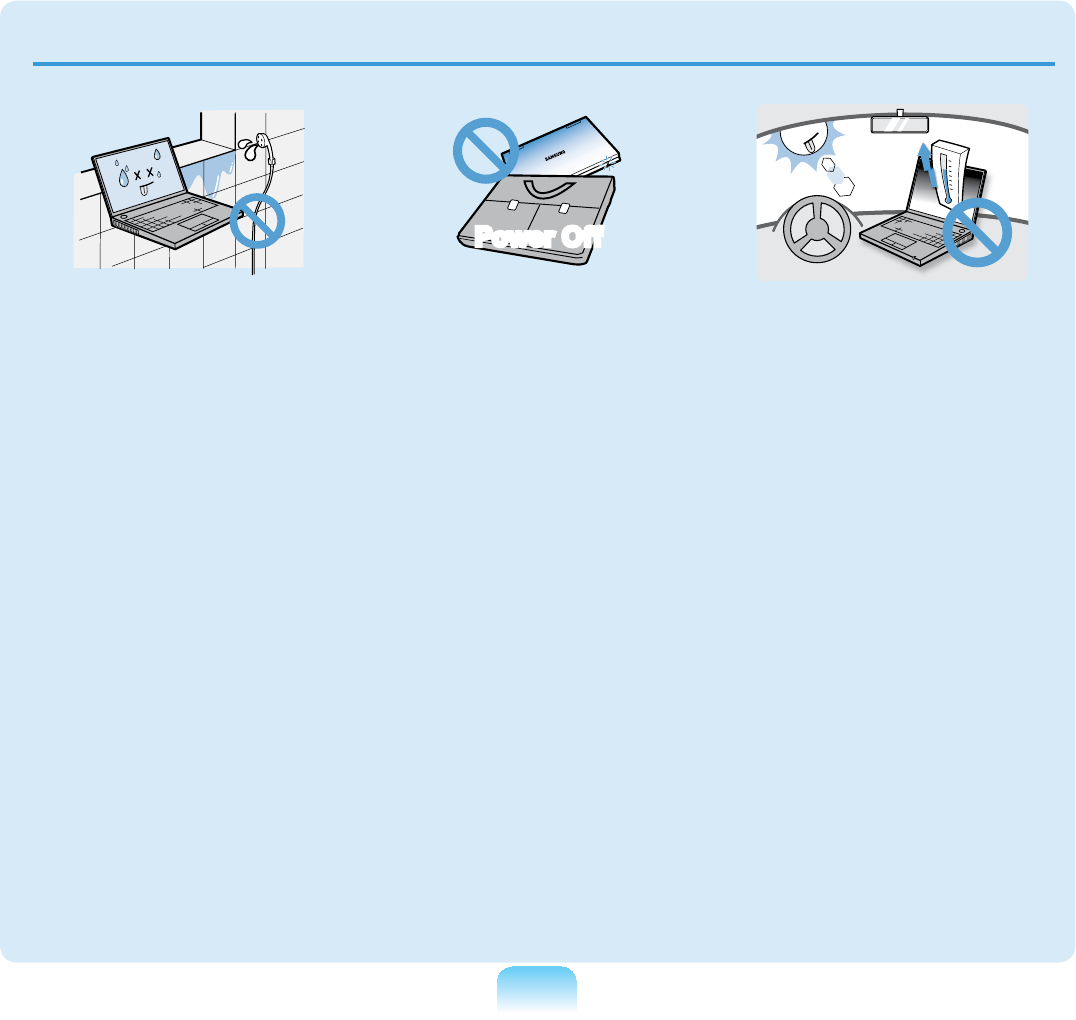
Do not use the computer
in a humid location such
as a bathroom or sauna.
Please use the computer
within the recommended
temperature and humidity
range (10~32ºC, 20~80%
5+
Power Off
Do not close the LCD
panel and put the
computer into your bag
to move it when it is still
turned on.
If you put the computer
into your bag without
turningitoff,thecomputer
mayoverheatandthereis
DGDQJHURI¿UH6KXWWKH
computerdownproperly
EHIRUHPRYLQJLW
Never heat the battery
or put the battery into
D¿UH'RQRWSXWRU
use the battery in a
hot location such as a
sauna, inside a vehicle
exposed to the heat, and
so on.
Thereisadangerofan
H[SORVLRQRU¿UH
15
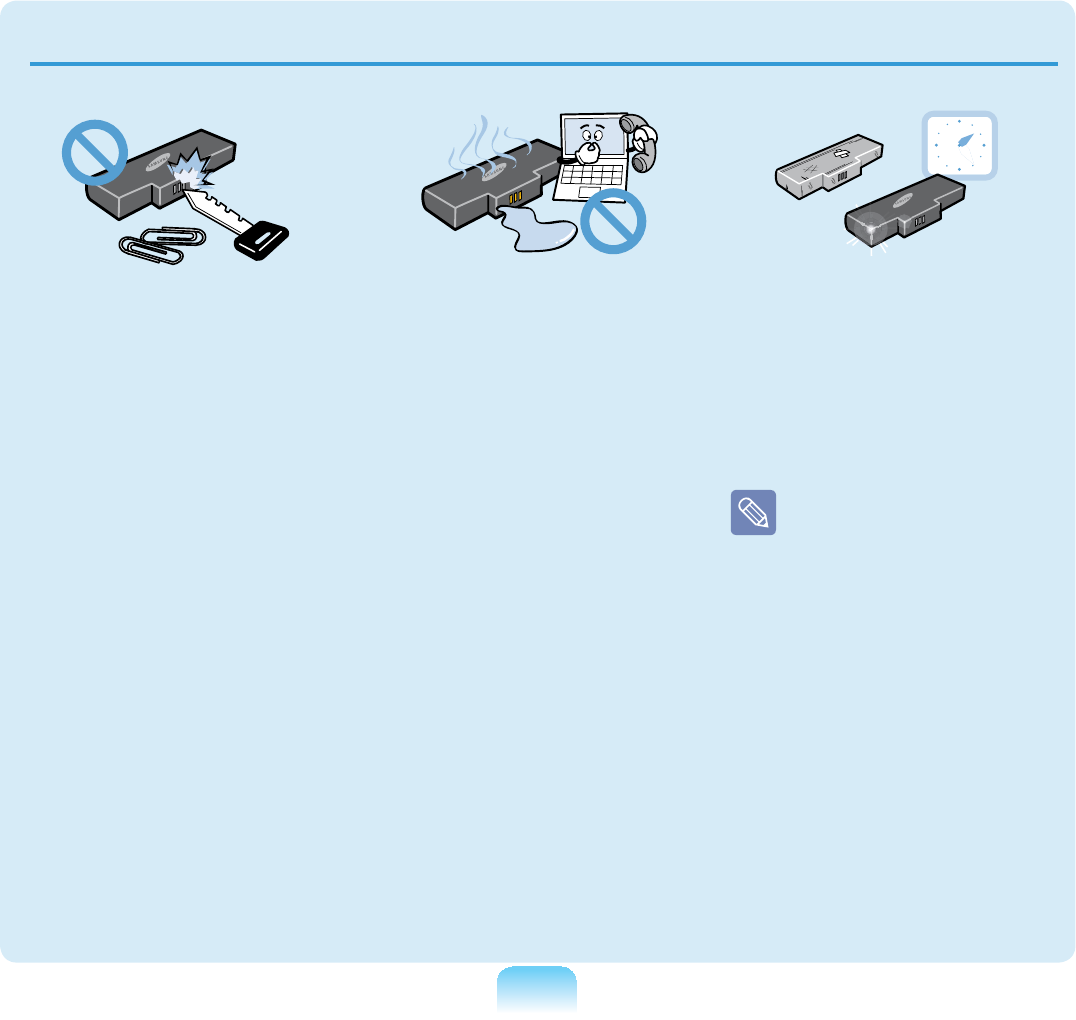
Take care not to allow
metal objects such as a
key or clip to touch the
battery terminal (metal
parts).
,IDPHWDOREMHFWWRXFKHV
the battery terminals, it
may cause excessive
FXUUHQWÀRZDQGLWPD\
damage the battery, or
UHVXOWLQD¿UH
If liquid leaks out of
the battery or there is
a funny smell coming
from the battery, remove
the battery from the
computer and contact a
service center.
Thereisadangerofan
H[SORVLRQRU¿UH
To use the computer
safely, replace a dead
battery with a new,
authorized battery.
Please charge the
battery fully before
using the computer
IRUWKH¿UVWWLPH
16
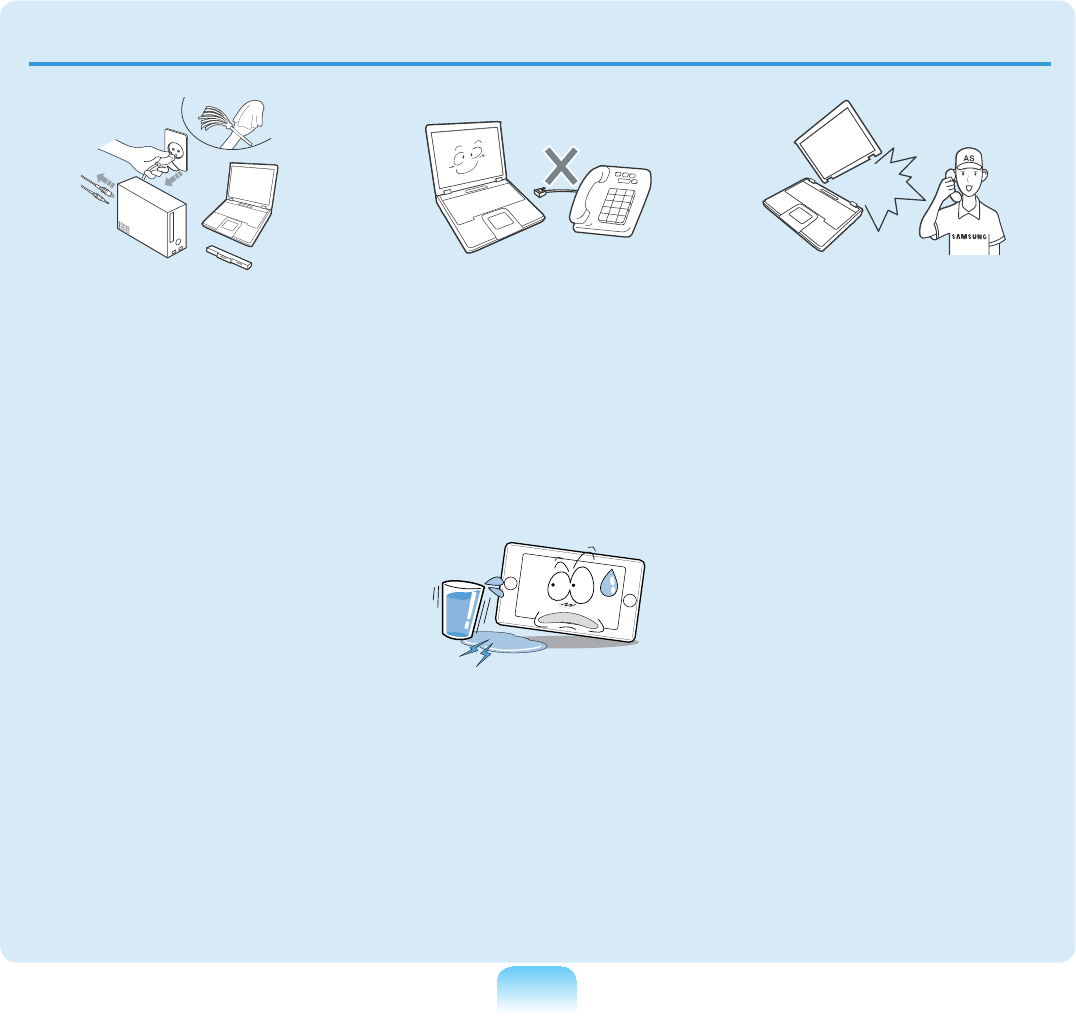
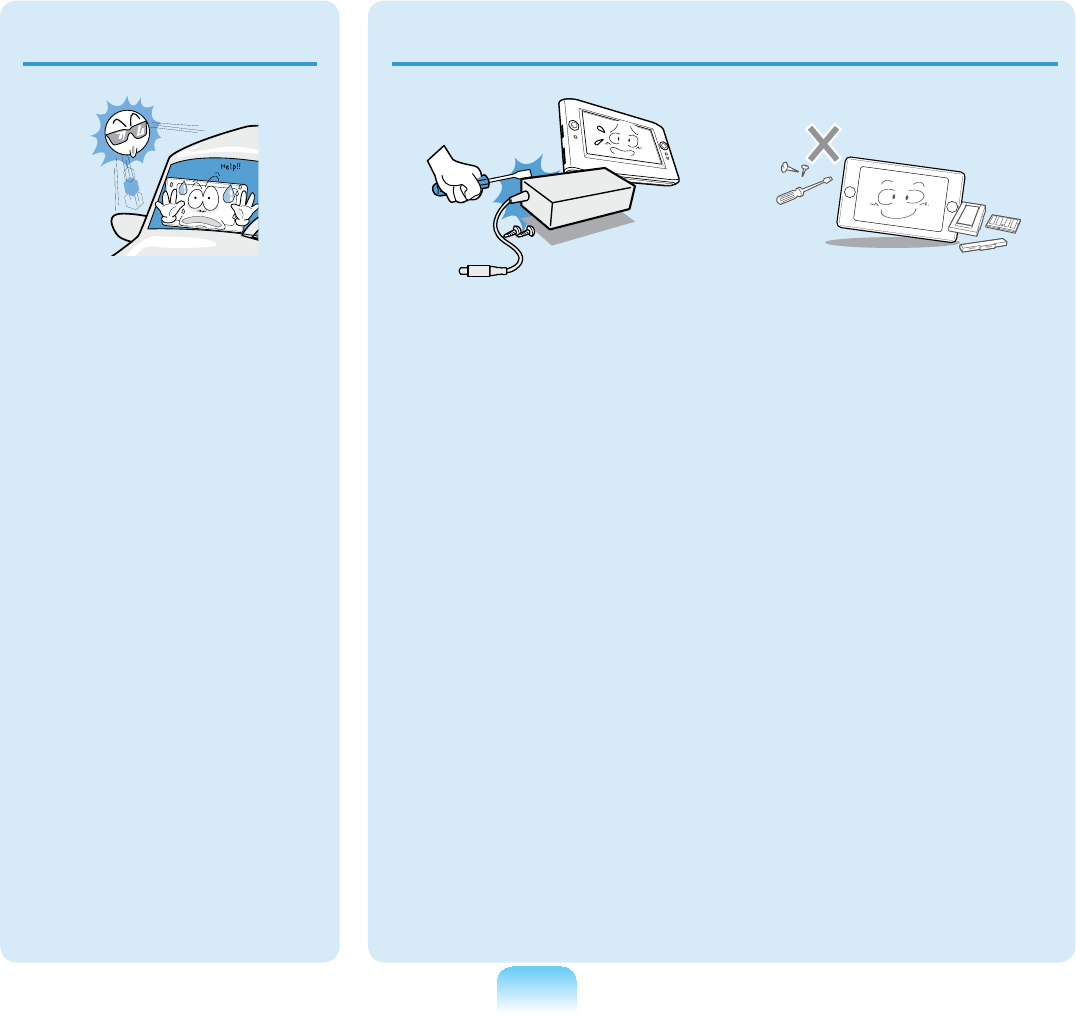
Disconnect all cables
connected to the
computer before
cleaning it. If you are
using a notebook
computer, remove the
battery.
There is a danger of
electric shock or damage
WRWKHSURGXFW
Do not connect a phone
line connected to a
digital phone to the
modem.
Thereisadangerofa
HOHFWULFVKRFN¿UHRU
GDPDJHWRWKHSURGXFW
Do not place any
FRQWDLQHU¿OOHGZLWK
water or chemicals over
or near the computer.
If water or chemicals
enter the computer, this
PD\FDXVH¿UHRUHOHFWULF
VKRFN
If the computer is
broken or dropped,
disconnect the power
cord and contact a
service center for a
safety check.
Usingabrokencomputer
may cause electric shock
RU¿UHKD]DUG
Usage Related
17
Never disassemble the
power supply or AC
adapter.
There is a danger of
HOHFWULFVKRFN
When removing the
RTC (Real Time Clock)
battery, keep it out of
the reach of children as
they could touch and/or
swallow it.
There is a danger of
FKRNLQJ,IDFKLOGKDV
swallowedit,contacta
GRFWRULPPHGLDWHO\
Use only authorized
parts (multi-plug,
battery and memory)
and never disassemble
parts.
There is a danger of
damaging the product,
HOHFWULFVKRFNRU¿UH
KD]DUG
Upgrade Related
Avoid direct sunlight
when the computer is
in an air-tight location
such as inside a
vehicle.
There is a danger of
D¿UHKD]DUG7KH
computer may overheat
and also present
RSSRUWXQLW\WRWKLHYHV
18
Custody and Movement Related
Follow the instructions
for the relevant
location (e.g. airplane,
hospital, etc.) when
using a wireless
communication
device (wireless LAN,
Bluetooth, etc.).
When carrying the
notebook computer
with other items, such
as the adapter, mouse,
books etc, take care
not to press anything
against the notebook
computer.
,IDKHDY\REMHFWLV
pressed against the
notebook computer, a
whitestoporstainmay
DSSHDURQWKH/&'
Therefore, take care not
to apply any pressure to
WKHQRWHERRN
In this case, place the
notebook computer in a
separate compartment
away from the other
REMHFWV
Shut down the
computer and
disconnect all cables
before disassembling
the computer. If
there is a modem,
disconnect the phone
line. If you are using
a notebook computer,
make sure to remove
the battery.
Failingtodoso,may
FDXVHHOHFWULFVKRFN

19
Caution
)DLOLQJWRIROORZLQVWUXFWLRQVPDUNHGZLWKWKLVV\PEROPD\FDXVHVOLJKWLQMXU\RUGDPDJH
WRWKHSURGXFW
Installation Related Battery Usage
Related
Do not block the ports
(holes), vents, etc. of
the product and do not
insert objects.
Damage to a component
within the computer may
cause electric shock or
¿UH
When using the
computer with it lying
on its side, place it
so that the vents face
upwards.
Failingtodoso,may
cause the internal
temperature of the
computertoriseandthe
computertomalfunctionor
KDOW
Do not place a heavy
object over the product.
Thismaycauseaproblem
ZLWKWKHFRPSXWHU,Q
DGGLWLRQWKHREMHFWPD\
IDOODQGFDXVHLQMXU\RU
GDPDJHWKHFRPSXWHU
Dispose of worn-out
batteries properly.
Ŷ7KHUHLVDGDQJHURI
¿UHRUH[SORVLRQ
Ŷ7KHEDWWHU\GLVSRVDO
method may differ
depending on your
FRXQWU\DQGUHJLRQ
Disposeofthe
used battery in an
DSSURSULDWHZD\
Do not throw or
disassemble the
battery and do not put
it into water.
This may cause an
LQMXU\¿UHRUH[SORVLRQ

20
Use only a battery
authorized by Samsung
Electronics.
Failingtodosomay
FDXVHDQH[SORVLRQ
Avoid contact with
metal objects such as
car keys or clips when
keeping or carrying a
battery.
Contactwithametalmay
cause excessive current
andahightemperature
and may damage the
EDWWHU\RUFDXVHD¿UH
Charge the battery
according to the
instructions in the
manual.
Failingtodoso,may
causeanexplosionor
¿UHIURPGDPDJHWRWKH
SURGXFW
Do not heat the battery
or expose it to heat (e.g.
inside a vehicle during
the summer).
There is a danger of
H[SORVLRQRU¿UH
Usage Related
Do not place a candle,
lighted cigar, etc. over
or on the product.
7KHUHLVDGDQJHURI¿UH
Use a wall outlet or
multi-plug with a
grounding part.
Failingtodosomay
causeanelectricshock
KD]DUG
Make sure to have the
product tested by a
safety service engineer
after repairing the
product.
Authorized Samsung
Repair Centers will carry
outsafetychecksaftera
UHSDLU8VLQJDUHSDLUHG
product without testing it
forsafetymaycausean
HOHFWULFVKRFNRU¿UH

21
In case of lightning,
immediately turn the
system off, disconnect
the power cord from
the wall outlet and line
do not use a modem or
phone.
There is a danger of
HOHFWULFVKRFNRU¿UH
Do not use your
computer and AC-
Adapter on your lap or
soft surfaces.
If the computer
temperature increases,
there is a danger of
EXUQLQJ\RXUVHOI
Connect only permitted
devices to the
connectors or ports of
the computer.
Failingtodoso,may
cause electric shock and
¿UH
Close the LCD panel
only after checking if the
notebook computer is
turned off.
The temperature may
riseanditmaycause
overheating and
GHIRUPDWLRQRIWKHSURGXFW
Do not press the Eject
Button while the Floppy
Disk/CD-ROM drive is in
operation.
You might lose data and
thediskmightbesuddenly
HMHFWHGDQGFRXOGFDXVH
DQLQMXU\
Take care not to drop the
product while using it.
This may cause personal
LQMXU\RUORVVRIGDWD
Do not contact the
antenna with electricity
facility such as the
power outlet.
There is a danger of
HOHFWULFVKRFN
When handling
computer parts, follow
the instructions on the
manual supplied with the
parts.
Failingtodoso,may
causedamagetothe
SURGXFW
If the computer emits
smoke, or there is
a burning smell,
disconnect the power
plug from the wall outlet
and contact a service
center. If your computer
is a notebook computer,
make sure to remove the
battery.
7KHUHLVDGDQJHURI¿UH

22
Upgrade Related
Do not use a damaged
RUPRGL¿HG&')ORSS\
Disk.
There is a danger of
damaging the product or
SHUVRQDOLQMXU\
Do not insert your
¿QJHUVLQWRWKH3&&DUG
Slot.
7KHUHLVDGDQJHURILQMXU\
RUHOHFWULFVKRFN
Use recommended
computer cleansing
solution when cleaning
the product and only use
the computer when it is
completely dried.
Failingtodosomaycause
HOHFWULFVKRFNRU¿UH
Emergency disk eject
method using paperclip
should not be used
while the disk is in
motion. Make sure to
use the emergency disk
eject method only when
the Optical Disk Drive is
stopped.
7KHUHLVDGDQJHURILQMXU\
Do not place your face
close to the Optical Disk
Drive tray when it is
operating.
7KHUHLVDGDQJHURILQMXU\
GXHWRDQDEUXSWHMHFWLRQ
Check CDs for cracks
and damage prior to use.
It may damage the disc
andcausedisorderof
GHYLFHDQGLQMXU\RIXVHU
Take care when
touching the product
or parts.
Thedevicemaybe
damaged or you may be
LQMXUHG
Take care not to throw
or drop a computer
part or device.
7KLVPD\FDXVHLQMXU\RU
GDPDJHWRWKHSURGXFW
Make sure to close the
computer cover before
connecting the power
after a reassembly.
There is a danger of
electric shock if your
body touches an internal
SDUW

23
Use parts authorized
by Samsung
Electronics only.
Failingtodoso,may
FDXVH¿UHRUGDPDJH
WKHSURGXFW
Never disassemble or
repair the product by
yourself.
There is a danger of
HOHFWULFVKRFNRU¿UH
To connect a
device that is not
manufactured
or authorized by
Samsung Electronics,
enquire at your
service center before
connecting the
device.
There is a danger of
GDPDJLQJWKHSURGXFW
Custody and Movement Related
When moving the
product, turn the power
off and separate all
FRQQHFWHGFDEOHV¿UVW
Theproductmightbe
damaged or users may
WULSRYHUWKHFDEOHV
For long periods
of not using the
notebook computer,
discharge the battery
and preserve as it is
detached.
The battery will be
preserved at its best
FRQGLWLRQ
Keep the Stylus Pen out of
reach of children.
KLOGUHQPD\LQMXUH
themselves by swallowing
LWRUGDPDJLQJWKHLUH\HV
Use a computer
cleansing solution
when cleaning the
product.
Using a cleansing solution
orchemicalthatisnot
developedforacomputer
PD\GDPDJHWKHSURGXFW
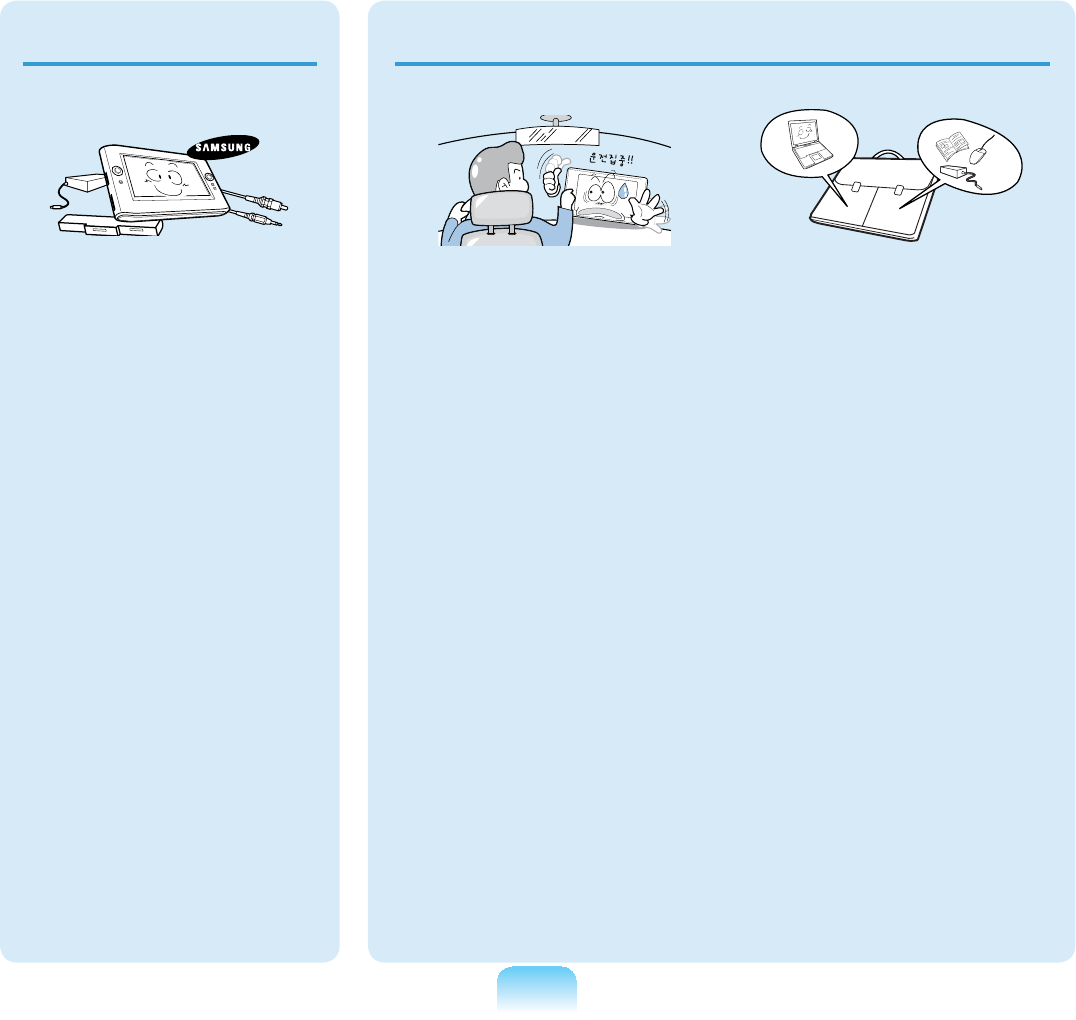
Do not operate or watch
the computer while
driving a vehicle.
Thereisadangerofa
WUDI¿FDFFLGHQW3OHDVH
FRQFHQWUDWHRQGULYLQJ

24
LCD Bad Pixels
ThelimitsofLCD
manufacturing
technology permit a
maximumof4abnormal
or bad pixels, which
doesnotaffectthe
V\VWHPSHUIRUPDQFH
This system may have
thesamelevelof
abnormalorbadpixels
as any other company’s
SURGXFWV
Cleaning the LCD
When cleaning the
LCDpanel,useonly
FRPSXWHUVSHFL¿F
cleanerswithasoft
cloth, and lightly wipe in
RQHGLUHFWLRQ
Pressing down hard
PD\GDPDJHWKH/&'
LCD Related

25
Cautions on Preventing Data Loss (Hard Disk Management)
Take care not to damage the data on
a hard disk drive.
z Aharddiskdriveissosensitiveto
external impact that an external
impact may cause loss of data on the
VXUIDFHRIWKHGLVN
z Takeextracare,becausemoving
thecomputeroranimpactonthe
computer when it is turned on may
damagethedataoftheharddisk
GULYH
z The company is not liable for any loss
ofanydatacausedbyacustomer’s
careless usage or bad environmental
FRQGLWLRQV
Causes that may damage the data of
a hard disk drive and the hard disk
drive itself.
z Thedatamaybelostwhenan
external impact is applied to the disk
while disassembling or assembling the
FRPSXWHU
z Thedatamaybelostwhenthe
computeristurnedofforresetbya
powerfailurewhiletheharddiskdrive
LVRSHUDWLQJ
z Thedatamaybelostand
irrecoverableduetoacomputervirus
LQIHFWLRQ
z Thedatamaybelostifthepoweris
WXUQHGRIIZKLOHUXQQLQJDSURJUDP
z Moving or causing an impact to the
computerwhiletheharddiskdrive
LVRSHUDWLQJPD\FDXVH¿OHVWREH
corrupted or bad sectors on the hard
GLVN
To prevent data loss due to damage to the hard disk drive, please backup your
data frequently.

26
Proper Posture
z Donotusethecomputeronyourlapor
FORVHWR\RXUVNLQIRUDORQJWLPH
Thereisadangerofburnsduetothe
KLJKWHPSHUDWXUHRIWKHFRPSXWHU
z Tousethecomputerwhiletalkingover
the telephone, use the ear-microphone
SKRQH
When using the computer while holding
a phone over your shoulder and talking
onthephone,yourposturebecomes
EDG
z Keep frequently used work items within
an easy working range (where you can
UHDFKWKHPZLWK\RXUKDQGVHDVLO\
Eye Position
Keep a distance of at least 50cm
between the LCD and your eyes.
z$GMXVWWKHKHLJKWRIWKH/&'VFUHHQVR
thatitstopheightisequaltoorlower
WKDQ\RXUH\HV
z Avoid setting the LCD excessively
EULJKW
z.HHSWKH/&'VFUHHQFOHDQ
z When wearing glasses, clean them
EHIRUHXVLQJWKHFRPSXWHU
Proper Posture During Computer Use
Maintaining a proper posture during computer use is very important to prevent physical
KDUP
The following instructions are about maintaining a proper posture during computer use
GHYHORSHGWKURXJKKXPDQHQJLQHHULQJ3OHDVHUHDGDQGIROORZWKHPFDUHIXOO\ZKHQ
XVLQJWKHFRPSXWHU
2WKHUZLVHWKHSUREDELOLW\RI56,5HSHWLWLYH6WUDLQ,QMXU\IURPUHSHDWHGRSHUDWLRQV
PD\LQFUHDVHDQGVHULRXVSK\VLFDOKDUPPD\EHFDXVHG
Theinstructionsinthismanualhavebeenpreparedsothattheycanbeapplied
ZLWKLQWKHFRYHUDJHRIJHQHUDOXVHUV,IWKHXVHULVQRWLQFOXGHGLQWKHFRYHUDJHWKH
UHFRPPHQGDWLRQLVWREHDSSOLHGDFFRUGLQJWRWKHXVHU¶VQHHGV
6LQFHWKLVLVFRPPRQO\DSSOLHGWR6DPVXQJ&RPSXWHUVVRPH¿JXUHVPD\GLIIHUIURP
DFWXDOSURGXFW
27
Hand Position
z It is recommended to connect and use
an external keyboard and mouse when
XVLQJWKHFRPSXWHUIRUDORQJWLPH
z DonotholdtheStylusPenwith
H[FHVVLYHIRUFH
z Do not press the touch screen with
H[FHVVLYHIRUFH
Volume Control
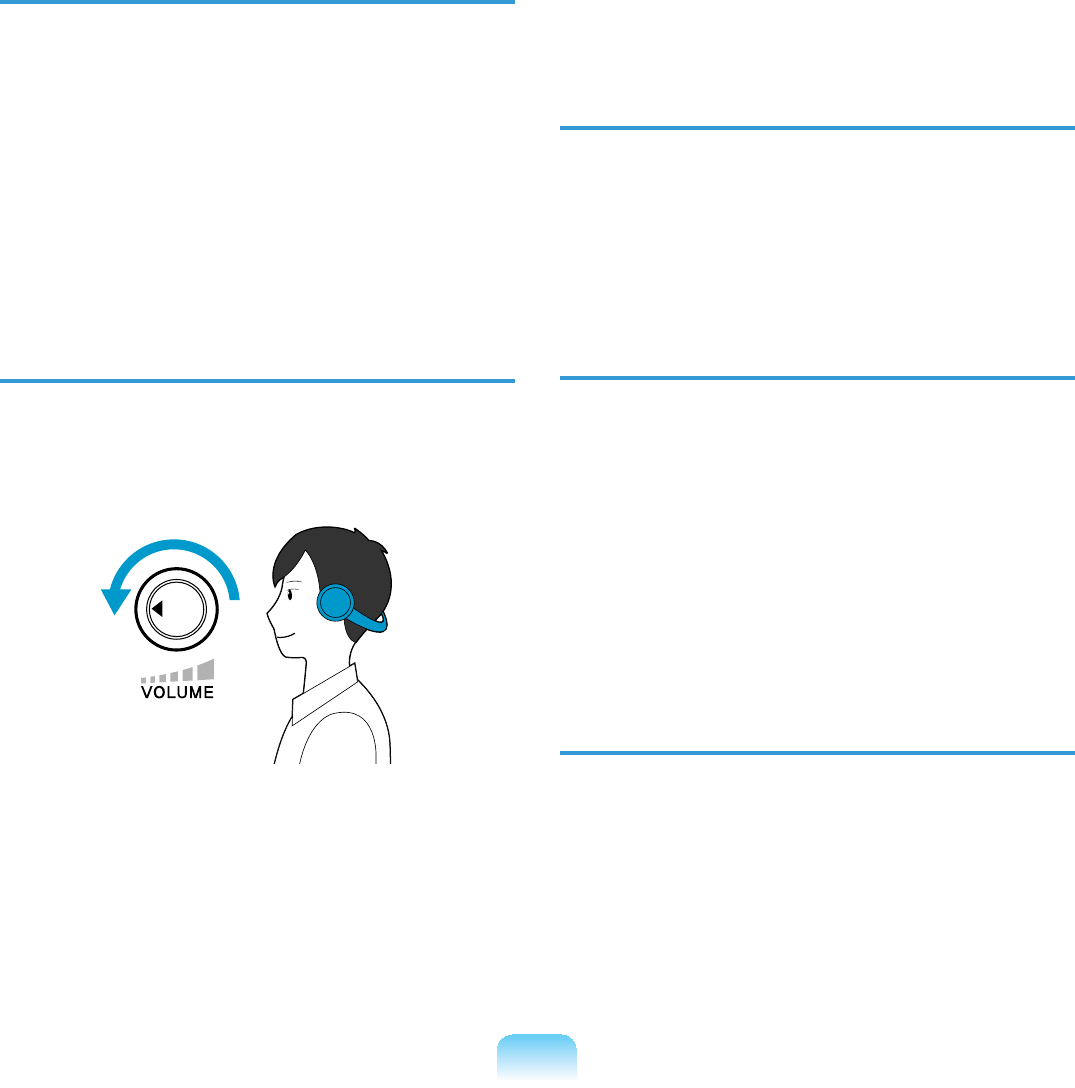
(Headphones and Speakers)
&KHFN\RXUYROXPH¿UVWWROLVWHQWR
music.
Check your
volume!!
z Checkifthevolumeistooloudbefore
XVLQJKHDGSKRQHV
z Donotturnthevolumetothemaximum
OHYHOULJKWIURPWKHVWDUW,QVWHDGVWDUW
thevolumeatalowlevelandincrease
LWVORZO\ZKLOHOLVWHQLQJWRWKHVRXQG
z It is not recommended using
KHDGSKRQHVIRUORQJSHULRGVRIWLPH
Use Time (Break Time)
z Takeabreakfor10minutesormore
after a 50-minute period when working
IRUPRUHWKDQRQHKRXU
Illumination
z Donotusethecomputerindark
ORFDWLRQV7KHLOOXPLQDWLRQOHYHOIRU
computerusemustbeasbrightsofor
UHDGLQJDERRN
z,QGLUHFWLOOXPLQDWLRQLVUHFRPPHQGHG
8VHDFXUWDLQWRSUHYHQWUHÀHFWLRQRQ
WKH/&'VFUHHQ
Operation Condition
z Donotusethecomputerinhotand
KXPLGORFDWLRQV
z Usethecomputerwithintheallowed
temperature and humidity range
VSHFL¿HGLQWKH8VHU*XLGH

28
Safety Instructions
Your system is designed and tested
to meet the latest standards for safety
RILQIRUPDWLRQWHFKQRORJ\HTXLSPHQW
However, to ensure safe use of this
product, it is important that the safety
instructions marked on the product and in
WKHGRFXPHQWDWLRQDUHIROORZHG
Always follow these instructions to
KHOSJXDUGDJDLQVWSHUVRQDOLQMXU\
DQGGDPDJHWR\RXUV\VWHP
Setting Up your System
z Read and follow all instructions
markedontheproductandinthe
documentation before you operate your
V\VWHP5HWDLQDOOVDIHW\DQGRSHUDWLQJ
LQVWUXFWLRQVIRUIXWXUHXVH
z Do not use this product near water or a
KHDWVRXUFHVXFKDVDUDGLDWRU
z Setupthesystemonastablework
VXUIDFH
z The product should be operated only
with the type of power source indicated
RQWKHUDWLQJODEHO
z Ensure that the electrical outlet you
are using to power your equipment is
HDVLO\DFFHVVLEOHLQFDVHRI¿UHRUVKRUW
FLUFXLW
z If your computer has a voltage selector
switch,makesurethattheswitchisin
WKHSURSHUSRVLWLRQIRU\RXUDUHD
z Openingsinthecomputercaseare
SURYLGHGIRUYHQWLODWLRQ'RQRWEORFN
RUFRYHUWKHVHRSHQLQJV0DNHVXUH
youprovideadequatespace,atleast6
inches (15 cm), around the system for
ventilation when you set up your work
DUHD1HYHULQVHUWREMHFWVRIDQ\NLQG
LQWRWKHFRPSXWHUYHQWLODWLRQRSHQLQJV
z Ensurethatthefanventsonthebottom
RIWKHFDVLQJDUHFOHDUDWDOOWLPHV
Donotplacethecomputeronasoft
surface,doingsowillblockthebottom
YHQWV
z Ifyouuseanextensioncordwiththis
system,makesurethatthetotalpower
rating on the products plugged into the
extensioncorddoesnotexceedthe
H[WHQVLRQFRUGSRZHUUDWLQJ
Important Safety Information

29
Care During Use
z'RQRWZDONRQWKHSRZHUFRUGRUDOORZDQ\WKLQJWRUHVWRQLW
z'RQRWVSLOODQ\WKLQJRQWKHV\VWHP7KHEHVWZD\WRDYRLGVSLOOVLVWRQRWHDWRUGULQN
QHDU\RXUV\VWHP
z6RPHSURGXFWVKDYHDUHSODFHDEOH&026EDWWHU\RQWKHV\VWHPERDUG7KHUHLVD
GDQJHURIH[SORVLRQLIWKH&026EDWWHU\LVUHSODFHGLQFRUUHFWO\5HSODFHWKHEDWWHU\
ZLWKWKHVDPHRUHTXLYDOHQWW\SHUHFRPPHQGHGE\WKHPDQXIDFWXUHU
'LVSRVHRIEDWWHULHVDFFRUGLQJWRWKHPDQXIDFWXUHUVLQVWUXFWLRQV,IWKH&026EDWWHU\
UHTXLUHVUHSODFHPHQWLQVXUHWKDWDTXDOL¿HGWHFKQLFLDQSHUIRUPVWKHWDVN
z:KHQWKHFRPSXWHULVWXUQHGRIIDVPDOODPRXQWRIHOHFWULFDOFXUUHQWVWLOOÀRZV
WKURXJKWKHFRPSXWHU
To avoid electrical shock, always unplug all power cables, remove the battery and
PRGHPFDEOHVIURPWKHZDOORXWOHWVEHIRUHFOHDQLQJWKHV\VWHP
z8QSOXJWKHV\VWHPIURPWKHZDOORXWOHWDQGUHIHUVHUYLFLQJWRTXDOL¿HGSHUVRQQHOLI
±7KHSRZHUFRUGRUSOXJLVGDPDJHG
±/LTXLGKDVEHHQVSLOOHGLQWRWKHV\VWHP
±7KHV\VWHPGRHVQRWRSHUDWHSURSHUO\ZKHQWKHRSHUDWLQJLQVWUXFWLRQVDUHIROORZHG
±7KHV\VWHPZDVGURSSHGRUWKHFDVLQJLVGDPDJHG
±7KHV\VWHPSHUIRUPDQFHFKDQJHV

30
The Instruction On Safety Operation of NotePC
n When installing and operating devices please refer to safety requirements in the
XVHUJXLGH
l'HYLFHVFDQEHXVHGRQO\ZLWKWKHHTXLSPHQWVSHFL¿HGLQWKHWHFKQLFDO
VSHFL¿FDWLRQVRIWKHGHYLFHV
W Ifanysmellofburningorsmokefromthecomputertheunitshouldbeswitchedoff
DQGEDWWHU\UHPRYHG7KHXQLWVKRXOGEHFKHFNHGE\DTXDOL¿HGWHFKQLFLDQEHIRUH
UHXVH
j6HUYLFHDQGUHSDLURIGHYLFHVVKRXOGEHFDUULHGRXWE\DXWKRUL]HGVHUYLFHFHQWHUV
V Donotallowyourportablecomputertooperatewiththebaserestingdirectlyon
H[SRVHGVNLQIRUH[WHQGHGSHULRGVRIWLPH7KHVXUIDFHWHPSHUDWXUHRIWKHEDVH
ZLOOULVHGXULQJQRUPDORSHUDWLRQSDUWLFXODUO\ZKHQ$&3RZHULVSUHVHQW$OORZLQJ
VXVWDLQHGFRQWDFWZLWKH[SRVHGVNLQFDQFDXVHGLVFRPIRUWRUHYHQWXDOO\DEXUQ

31
Battery Disposal
Do not put rechargeable batteries or products powered by non-removable
UHFKDUJHDEOHEDWWHULHVLQWKHJDUEDJH
ContacttheSamsungHelplineforinformationonhowtodisposeofbatteriesthatyou
FDQQRWXVHRUUHFKDUJHDQ\ORQJHU
)ROORZDOOORFDOUHJXODWLRQVZKHQGLVSRVLQJRIROGEDWWHULHV
THEREISARISKOFEXPLOSIONIFBATTERYISREPLACEDBYAN
,1&255(&77<3(
',6326(2)86('%$77(5,(6$&&25',1*727+(,16758&7,216
Replacement Parts and Accessories
8VHRQO\UHSODFHPHQWSDUWVDQGDFFHVVRULHVUHFRPPHQGHGE\PDQXIDFWXUHU
'RQRWXVHWKLVSURGXFWLQDUHDVFODVVL¿HGDVKD]DUGRXV6XFKDUHDVLQFOXGHSDWLHQW
care areas of medical and dental facilities, oxygen rich environments, or industrial
DUHDV

32
Connect and Disconnect the AC adapter
7KHVRFNHWRXWOHWVKDOOEHLQVWDOOHGQHDUWKHHTXLSPHQWDQGVKDOOEHHDVLO\DFFHVVLEOH
Do not unplug the power cord out by pulling the cable only.
Power Cord Requirements
Thepowercordset(wallplug,cableandACadapterplug)youreceivedwithyour
computer meets the requirements for use in the country where you purchased your
HTXLSPHQW
Power cord sets for use in other countries must meet the requirements of the country
ZKHUH\RXXVHWKHFRPSXWHU)RUPRUHLQIRUPDWLRQRQSRZHUFRUGVHWUHTXLUHPHQWV
FRQWDFW\RXUDXWKRUL]HGGHDOHUUHVHOOHURUVHUYLFHSURYLGHU
General Requirements
The requirements listed below are applicable to all countries:
z7KHOHQJWKRIWKHSRZHUFRUGVHWPXVWEHDWOHDVWIHHWPDQGDPD[LPXPRI
IHHWP
z All power cord sets must be approved by an acceptable accredited agency
UHVSRQVLEOHIRUHYDOXDWLRQLQWKHFRXQWU\ZKHUHWKHSRZHUFRUGVHWZLOOEHXVHG
z Thepowercordsetmusthaveaminimumcurrentcapacityof 7 Aandanominal
YROWDJHUDWLQJRIRUYROWV$&DVUHTXLUHGE\HDFKFRXQWU\¶VSRZHUV\VWHP
z7KHDSSOLDQFHFRXSOHUPXVWPHHWWKHPHFKDQLFDOFRQ¿JXUDWLRQRIDQ(1,(&
6WDQGDUG6KHHW&FRQQHFWRUIRUPDWLQJZLWKDSSOLDQFHLQOHWRQWKHFRPSXWHU

33
Regulatory Compliance Statements
Wireless Guidance
Low power, Radio LAN type devices (radio frequency (RF) wireless communication
GHYLFHVRSHUDWLQJLQWKH*+]*+]%DQGPD\EHSUHVHQWHPEHGGHGLQ\RXU
QRWHERRNV\VWHP7KHIROORZLQJVHFWLRQLVDJHQHUDORYHUYLHZRIFRQVLGHUDWLRQVZKLOH
RSHUDWLQJDZLUHOHVVGHYLFH
$GGLWLRQDOOLPLWDWLRQVFDXWLRQVDQGFRQFHUQVIRUVSHFL¿FFRXQWULHVDUHOLVWHGLQWKH
VSHFL¿FFRXQWU\VHFWLRQVRUFRXQWU\JURXSVHFWLRQV7KHZLUHOHVVGHYLFHVLQ\RXU
V\VWHPDUHRQO\TXDOL¿HGIRUXVHLQWKHFRXQWULHVLGHQWL¿HGE\WKH5DGLR$SSURYDO0DUNV
RQWKHV\VWHPUDWLQJODEHO,IWKHFRXQWU\\RXZLOOEHXVLQJWKHZLUHOHVVGHYLFHLQLVQRW
OLVWHGSOHDVHFRQWDFW\RXUORFDO5DGLR$SSURYDODJHQF\IRUUHTXLUHPHQWV:LUHOHVV
GHYLFHVDUHFORVHO\UHJXODWHGDQGXVHPD\QRWEHDOORZHG
7KH5)¿HOGVWUHQJWKRIWKHZLUHOHVVGHYLFHRUGHYLFHVWKDWPD\EHHPEHGGHGLQ\RXU
QRWHERRNDUHZHOOEHORZDOOLQWHUQDWLRQDO5)H[SRVXUHOLPLWVDVNQRZQDWWKLVWLPH
Becausethewirelessdevices(whichmaybeembeddedintoyournotebook)emitless
energy than is allowed in radio frequency safety standards and recommendations,
PDQXIDFWXUHUEHOLHYHVWKHVHGHYLFHVDUHVDIHIRUXVH5HJDUGOHVVRIWKHSRZHUOHYHOV
FDUHVKRXOGEHWDNHQWRPLQLPL]HKXPDQFRQWDFWGXULQJQRUPDORSHUDWLRQ
7KLVWUDQVPLWWHUPXVWQRWEHFROORFDWHGRURSHUDWHLQFRQMXQFWLRQZLWKDQ\RWKHUDQWHQQD
RUWUDQVPLWWHUH[FHSWWKHLQVWDOOHG%OXHWRRWKWUDQVPLWWHU
6RPHFLUFXPVWDQFHVUHTXLUHUHVWULFWLRQVRQZLUHOHVVGHYLFHV([DPSOHVRIFRPPRQ
restrictions are listed on the next page:

34
z Radio frequency wireless communication can interfere with equipment on
FRPPHUFLDODLUFUDIW&XUUHQWDYLDWLRQUHJXODWLRQVUHTXLUHZLUHOHVVGHYLFHVWREH
WXUQHGRIIZKLOHWUDYHOLQJLQDQDLUSODQH
$%*1DOVRNQRZQDVZLUHOHVV(WKHUQHWRU:L¿DQG%OXHWRRWK
communication devices are examples of devices that provide wireless
FRPPXQLFDWLRQ
z In environments where the risk of interference to other devices or services is
harmful or perceived as harmful, the option to use a wireless device may be
UHVWULFWHGRUHOLPLQDWHG$LUSRUWV+RVSLWDOVDQG2[\JHQRUÀDPPDEOHJDVODGHQ
atmospheresarelimitedexampleswhereuseofwirelessdevicesmayberestricted
RUHOLPLQDWHG:KHQLQHQYLURQPHQWVZKHUH\RXDUHXQFHUWDLQRIWKHVDQFWLRQWRXVH
wireless devices, ask the applicable authority for authorization prior to use or turning
RQWKHZLUHOHVVGHYLFH
z(YHU\FRXQWU\KDVGLIIHUHQWUHVWULFWLRQVRQWKHXVHRIZLUHOHVVGHYLFHV6LQFH\RXU
system is equipped with a wireless device, when traveling between countries with
your system, check with the local Radio Approval authorities prior to any move or
WULSIRUDQ\UHVWULFWLRQVRQWKHXVHRIDZLUHOHVVGHYLFHLQWKHGHVWLQDWLRQFRXQWU\
z If your system came equipped with an internal embedded wireless device, do not
operate the wireless device unless all covers and shields are in place and the
V\VWHPLVIXOO\DVVHPEOHG
z:LUHOHVVGHYLFHVDUHQRWXVHUVHUYLFHDEOH'RQRWPRGLI\WKHPLQDQ\ZD\
0RGL¿FDWLRQWRDZLUHOHVVGHYLFHZLOOYRLGWKHDXWKRUL]DWLRQWRXVHLW3OHDVHFRQWDFW
PDQXIDFWXUHUIRUVHUYLFH
z2QO\XVHGULYHUVDSSURYHGIRUWKHFRXQWU\LQZKLFKWKHGHYLFHZLOOEHXVHG6HHWKH
manufacturer System Restoration Kit, or contact manufacturer Technical Support for
DGGLWLRQDOLQIRUPDWLRQ

35
USA and Canada Safety
Requirements and Notices
Do not touch or move antenna while the
XQLWLVWUDQVPLWWLQJRUUHFHLYLQJ
Donotholdanycomponentcontaining
the radio such that the antenna is very
closeortouchinganyexposedpartsof
thebody,especiallythefaceoreyes,
ZKLOHWUDQVPLWWLQJ
Do not operate the radio or attempt
to transmit data unless the antenna
is connected; if not, the radio may be
GDPDJHG
8VHLQVSHFL¿FHQYLURQPHQWV
Theuseofwirelessdevicesinhazardous
locations is limited by the constraints
posedbythesafetydirectorsofsuch
HQYLURQPHQWV
Theuseofwirelessdevicesonairplanes
is governed by the Federal Aviation
$GPLQLVWUDWLRQ)$$
Theuseofwirelessdevicesinhospitals
isrestrictedtothelimitssetforthbyeach
KRVSLWDO
Explosive Device Proximity
Warning
Donotoperateaportabletransmitter
(such as a wireless network device)
near unshielded blasting caps or in
an explosive environment unless
WKHGHYLFHKDVEHHQPRGL¿HGWREH
TXDOL¿HGIRUVXFKXVH
Use On Aircraft Caution
RegulationsoftheFCCandFAA
prohibit airborne operation of radio-
frequency wireless devices because
their signals could interfere with
FULWLFDODLUFUDIWLQVWUXPHQWV
Other Wireless Devices
Safety Notices for Other Devices in
the Wireless Network: Refertothe
documentation supplied with wireless
Ethernet adapters or other devices in the
ZLUHOHVVQHWZRUN
ThePart15radiodeviceoperateson
a non-interference basis with other
GHYLFHVRSHUDWLQJDWWKLVIUHTXHQF\
$Q\FKDQJHVRUPRGL¿FDWLRQWRVDLG
product not expressly approved by
Intelcouldvoidtheuser’sauthorityto
RSHUDWHWKLVGHYLFH
United States of America

36
Unintentional Emitter per FCC Part
15
This device complies with Part 15 of the
)&&5XOHV2SHUDWLRQLVVXEMHFWWRWKH
following two conditions:(1) this device
may not cause harmful interference,
and (2) this device must accept any
interference received, including
interferencethatmaycauseundesired
RSHUDWLRQ
This equipment has been tested
and found to comply with the limits
for a Class B digital device pursuant
WR3DUWRIWKH)&&5XOHV7KHVH
limitsaredesignedtoprovide
reasonable protection against
harmful interference in a residential
LQVWDOODWLRQ7KLVHTXLSPHQWJHQHUDWH
uses and can radiate radio frequency
energyandifnotinstalledandused
in accordance with the instructions
may cause harmful interference will
QRWRFFXULQDSDUWLFXODULQVWDOODWLRQ
If this equipment does cause harmful
interference to radio or television
reception, which can be determined
by turning the equipment off and
on, the user is encouraged to try to
correct the interference by one or
more of the following measures:
z Reorient or relocate the receiving
DQWHQQD
z Increase the separation between
WKHHTXLSPHQWDQGUHFHLYHU
z Connecttheequipmentintoan
outletonacircuitdifferentfrom
that to which the receiver is
FRQQHFWHG
z Consult the dealer or an
experienced radio/TV technician
IRUKHOS
Ifnecessary,theusershouldconsultthe
dealer or an experienced radio/television
WHFKQLFLDQIRUDGGLWLRQDOVXJJHVWLRQV
7KHXVHUPD\¿QGWKHIROORZLQJERRNOHW
KHOSIXO³6RPHWKLQJ$ERXW,QWHUIHUHQFH´
This is available at FCC local regional
RI¿FHV2XUFRPSDQ\LVQRWUHVSRQVLEOH
for any radio or television interference
FDXVHGE\XQDXWKRUL]HGPRGL¿FDWLRQV
of this equipment or the substitution or
attachment of connecting cables and
HTXLSPHQWRWKHUWKDQWKRVHVSHFL¿HG
E\RXUFRPSDQ\7KHFRUUHFWLRQZLOOEH
WKHUHVSRQVLELOLW\RIWKHXVHU8VHRQO\
VKLHOGHGGDWDFDEOHVZLWKWKLVV\VWHP

38
FCC Part 68
,I¿WWHGZLWKDPRGHPGHYLFH
This equipment compiles with part
RIWKH)&&UXOHV2QWKHEDFNRIWKLV
equipmentisalabelthatcontains,among
otherinformation,theFCCregistration
number and ringer equivalence number
5(1IRUWKLVHTXLSPHQW,IUHTXHVWHG
thisinformationmustbeprovidedtothe
WHOHSKRQHFRPSDQ\
This equipment uses the following USOC
MDFNV5-&
An FCC compliant telephone cord
and modular plug is provided with this
HTXLSPHQW7KLVHTXLSPHQWLVGHVLJQHG
tobeconnectedtothetelephonenetwork
or promises wiring using a compatible
PRGXODUMDFNZKLFKLV3DUWFRPSOLDQW
6HH,QVWDOODWLRQ,QVWUXFWLRQVIRUGHWDLOV
The REN is used to determine the
quantity of devices which may be
FRQQHFWHGWRWHOHSKRQHOLQH([FHVVLYH
RENsonthetelephonelinemayresultin
the devices not ringing in response to an
LQFRPLQJFDOO,QPRVWEXWQRWDOODUHDV
thesumofRENsshouldnotexceed
¿YH7REHFHUWDLQRIWKHQXPEHURI
devicesthatmaybeconnectedtoaline,
as determined by total RENs, contact the
localtelephonecompanytodeterminethe
PD[LPXP5(1IRUWKHFDOOLQJDUHD
Iftheterminalequipmentcausesharm
tothetelephonenetwork,theTelephone
Companywillnotifyyouinadvancethat
temporary discontinuance of service may
EHUHTXLUHG%XWLIDGYDQFHQRWLFHLVQRW
practical, the telephone company will
QRWLI\WKHFXVWRPHUDVVRRQDVSRVVLEOH
Also,youwillbeadvisedofyourright
WR¿OHDFRPSODLQWZLWKWKH)&&LI\RX
EHOLHYHLWLVQHFHVVDU\
The telephone company may make
changesinitsfacilities,equipment,
operations,orproceduresthatcould
DIIHFWWKHRSHUDWLRQRIWKHHTXLSPHQW,I
this happens, the telephone company
willprovideadvancednoticeinorderfor
\RXWRPDNHQHFHVVDU\PRGL¿FDWLRQVWR
PDLQWDLQXQLQWHUUXSWHGVHUYLFH
If trouble is experienced with this
equipment (Modem) for repair or warranty
information, please contact your local
GLVWULEXWRU,IWKHHTXLSPHQWLVFDXVLQJ
harmtothetelephonenetwork,the
telephone company may request that
youdisconnecttheequipmentuntilthe
SUREOHPLVUHVROYHG
Theusermustusetheaccessoriesand
cablessuppliedbythemanufacturer
togetoptimumperformancefromthe
SURGXFW

39
1RUHSDLUVPD\EHGRQHE\WKHFXVWRPHU
This equipment cannot be used on public
coin phone service provided by the
WHOHSKRQHFRPSDQ\&RQQHFWLRQWRSDUW\
OLQHVHUYLFHLVVXEMHFWWRVWDWHWDULIIV
TheTelephoneConsumerProtectionAct
of1991makesitunlawfulforanyperson
to use a computer or other electronic
device, including fax machines, to send
any message unless such message
clearlycontainsinamarginatthetopor
bottom of each transmitted page or on
WKH¿UVWSDJHRIWKHWUDQVPLVVLRQWKHGDWH
DQGWLPHLWLVVHQWDQGDQLGHQWL¿FDWLRQ
of the business or other entity, or other
individual sending the message and
thetelephonenumberofthesending
machineorsuchbusiness,otherentity,
RULQGLYLGXDO7KHWHOHSKRQHQXPEHU
provided may not be any number for
whichchargesexceedlocalorlong-
GLVWDQFHWUDQVPLVVLRQFKDUJHV
In order to program this information
into your fax machine, refer to your
FRPPXQLFDWLRQVVRIWZDUHXVHUPDQXDO

40
European Union CE Marking and
Compliance Notices
Products intended for sale within the
European Union are marked with the
Conformité Européene (CE) Marking,
which indicates compliance with the
applicable Directives and European
VWDQGDUGVDQGDPHQGPHQWVLGHQWL¿HG
EHORZ7KLVHTXLSPHQWDOVRFDUULHVWKH
&ODVVLGHQWL¿HU
Thefollowinginformationisonly
applicable to systems labeled with the CE
mark
European Directives
This Information Technology Equipment
hasbeentestedandfoundtocomplywith
the following European directives:
zEMC Directive 89/336/EEC with
amending directives 92/31/EEC &
93/68/EEC as per
– EN 55022 Class B
– EN 61000-3-2
– EN 61000-3-3
–EN55024
zLow Voltage Directive (Safety) 73/23/
EEC as per EN 60950-1:2001+A11
zRadio and Telecom Terminal
Equipment Directive 1999/5/EC as
per
±&75LI¿WWHGZLWKDPRGHP
device)
±(1LI¿WWHGZLWKD*+]
band embedded wireless device)
±(1LI¿WWHGZLWKD
GHzbandembeddedwireless
device)
±(1LI¿WWHGZLWKD
GHzbandembeddedwireless
device)
±(1LI¿WWHGZLWKD*+]
band embedded wireless device)
European Union

41
European Radio Approval
,QIRUPDWLRQIRUSURGXFWV¿WWHGZLWK
EU-approved radio devices)
ThisProductisaNotebookcomputer;
lowpower,RadioLANtypedevices(radio
frequency (RF) wireless communication
GHYLFHVRSHUDWLQJLQWKH*+]*+]
band,maybepresent(embedded)inyour
notebooksystemwhichisintendedfor
KRPHRURI¿FHXVH7KLVVHFWLRQLVRQO\
DSSOLFDEOHLIWKHVHGHYLFHVDUHSUHVHQW
Refertothesystemlabeltoverifythe
SUHVHQFHRIZLUHOHVVGHYLFHV
Wireless devices that may be in your
V\VWHPDUHRQO\TXDOL¿HGIRUXVHLQWKH
EuropeanUnionorassociatedareas
ifaCEmark ZLWKD1RWL¿HG%RG\
Registration Number and the Alert
6\PEROLVRQWKHV\VWHPODEHO
The power output of the wireless device
ordevicesthatmaybeembeddedinyou
notebook is well below the RF exposure
limits as set by the European Commission
WKURXJKWKH577(GLUHFWLYH
7KHORZEDQG*+]LVIRU
LQGRRUXVHRQO\
6HHEDQGJUHVWULFWLRQV
IRUVSHFL¿FFRXQWULHVRUUHJLRQV
within countries under the heading
“European Economic Area
5HVWULFWLRQV´EHORZ
Translated Statements of Compliance
[English]
Thisproductfollowstheprovisionsofthe
(XURSHDQ'LUHFWLYH(&
[Danish]
Dette produkt er i overensstemmelse med
deteuropæiskedirektiv1999/5/EC
[Dutch]
Dit product is in navolging van de
bepalingen van Europees Directief
(&
[Finnish]
Tämä tuote noudattaa EU-direktiivin
(&PllUl\NVLl
[French]
Ce produit est conforme aux exigences
GHOD'LUHFWLYH(XURSpHQQH(&
[German]
Dieses Produkt entspricht den
Bestimmungen der Europäischen
Richtlinie 1999/5/EC
[Greek]
ȉȠʌȡȠȧȩȞĮȣIJȩʌȜȘȡȠȓIJȚȢʌȡȠȕȜȑȥİȚȢ
IJȘȢǼȣȡȦʌĮȧțȒȢȅįȘȖȓĮȢǼ&
[Icelandic]
Þessi vara stenst reglugerð Evrópska
Efnahags Bandalagsins númer 1999/5/EC
[Italian]
QuestoprodottoèconformeallaDirettiva
(XURSHD(&

42
[Norwegian]
Detteprodukteterihenholdtil
bestemmelsene i det europeiske direktivet
(&
[Portuguese]
Esteprodutocumprecomasnormasda
'LUHWLYD(XURSpLD(&
[Spanish]
Esteproductocumpleconlasnormasdel
'LUHFWLYR(XURSHR(&
[Swedish]
Denna produkt har tillverkats i enlighet
PHG(*GLUHNWLY(&
European Economic Area Restrictions
Local Restriction of 802.11b/802.11g
Radio Usage
[Notetointegrator:Thefollowing
statements on local restrictions must be
published in all end-user documentation
provided with the system or product
LQFRUSRUDWLQJWKHZLUHOHVVSURGXFW@
Duetothefactthatthefrequencies
XVHGE\EJZLUHOHVV
LAN devices may not yet be
harmonized in all countries,
EJSURGXFWVDUH
GHVLJQHGIRUXVHRQO\LQVSHFL¿F
countriesorregions,andarenot
allowedtobeoperatedincountries
or regions other than those of
GHVLJQDWHGXVH
Asauseroftheseproducts,you
are responsible for ensuring that
theproductsareusedonlyinthe
countriesorregionsforwhichthey
were intended and for verifying
WKDWWKH\DUHFRQ¿JXUHGZLWKWKH
correctselectionoffrequencyand
channelforthecountryorregionof
XVH$Q\GHYLDWLRQIURPSHUPLVVLEOH
settingsandrestrictionsinthe
countryorregionofusecouldbean
infringement of local law and may be
SXQLVKHGDVVXFK

43
The European variant is intended for
use throughout the European Economic
$UHD+RZHYHUDXWKRUL]DWLRQIRUXVHLV
furtherrestrictedinparticularcountriesor
regionswithincountries,asfollows:
General
European standards dictate maximum
radiatedtransmitpowerof100mW
effective isotropic radiated power (EIRP)
DQGWKHIUHTXHQF\UDQJH±
0+]
7KHORZEDQG*+]LVIRU
LQGRRUXVHRQO\
Belgium
Theproductmaybeusedoutdoors,but
for outdoor transmissions over a distance
of 300m or more, a license from the BIPT
LVUHTXLUHG
This restriction should be indicated in the
manual as follows:
Dans le cas d’une utilisation privée, à
l’extérieur d’un bâtiment, au-dessus d’un
espace public, aucun enregistrement n’est
nécessairepourunedistancedemoins
GHP3RXUXQHGLVWDQFHVXSpULHXUH
à300munenregistrementauprèsde
O¶,%37HVWUHTXLVH3RXUXQHXWLOLVDWLRQ
publique à l’extérieur de bâtiments, une
OLFHQFHGHO¶,%37HVWUHTXLVH3RXUOHV
enregistrements et licences, veuillez
FRQWDFWHUO¶,%37
France
ForMetropolitandepartments:
*+]IRULQGRRUXVH
*+]FKDQQHOVWRIRU
RXWGRRUXVH
ForGuadeloupe,Martinique,StPierreet
Miquelon, Mayotte:
*+]IRULQGRRUDQG
RXWGRRUXVH
ForReunion,Guyane:
*+]IRULQGRRUXVH
*+]IRURXWGRRUXVH
(channels5to13)
7KHORZEDQG*+]LVIRU
LQGRRUXVHRQO\

44
European Telecommunication
,QIRUPDWLRQIRUSURGXFWV¿WWHGZLWK
EU-approved modems)
Markingbythesymbol indicates
compliance of this equipment to the
Radio and Telecom Terminal Equipment
'LUHFWLYH(&6XFKPDUNLQJLV
indicative that this equipment meets or
exceeds the following technical standards:
CTR 21 - Attachment requirements for
pan-European approval for connection to
theanaloguePublicSwitchedTelephone
Networks(PSTNs)ofTE(excludingTE
supporting voice telephony services) in
which network addressing, if provided, is
by means of Dual Tone Multi-Frequency
'70)VLJQDOLQJ
Although this equipment can use
either loop disconnect (pulse) or
DTMF (tone) signaling, only the
performance of the DTMF signaling
LVVXEMHFWWRUHJXODWRU\UHTXLUHPHQWV
IRUFRUUHFWRSHUDWLRQ
It is therefore strongly recommended
that the equipment is set to use
DTMF signaling for access to public
RUSULYDWHHPHUJHQF\VHUYLFHV
DTMF signaling also provides faster
FDOOVHWXS
This equipment has been approved to
Council Decision 98/482/EEC - “CTR
´IRU3DQ(XURSHDQVLQJOHWHUPLQDO
connection to the Public Switched
7HOHSKRQH1HWZRUN3671
However, due to differences between
the individual PSTNs provided in
different countries, the approval does
not, of itself, give an unconditional
assurance of successful operation on
HYHU\3671WHUPLQDWLRQSRLQW,QWKH
event of problems, you should contact
PDQXIDFWXUHU7HFKQLFDO6XSSRUW

45
WEEE SYMBOL INFORMATION
Correct disposal of this product
(Waste Electrical & Electronic Equipment)
(Applicable in the European Union and other European countries with separate
collection systems.)
Thismarkingshownontheproductoritsliterature,indicatesthatitshouldnotbe
GLVSRVHGZLWKRWKHUKRXVHKROGZDVWHVDWWKHHQGRILWVZRUNLQJOLIH7RSUHYHQWSRVVLEOH
harmtotheenvironmentorhumanhealthfromuncontrolledwastedisposal,please
separate this from other types of wastes and recycle it responsibly to promote the
VXVWDLQDEOHUHXVHRIPDWHULDOUHVRXUFHV
Household users should contact either the retailer where they purchased this product,
RUWKHLUORFDOJRYHUQPHQWRI¿FHIRUGHWDLOVRIZKHUHDQGKRZWKH\FDQWDNHWKLVLWHPIRU
HQYLURQPHQWDOO\VDIHUHF\FOLQJ
Business users should contact their supplier and check the terms and conditions of the
SXUFKDVHFRQWUDFW
7KLVSURGXFWVKRXOGQRWEHPL[HGZLWKRWKHUFRPPHUFLDOZDVWHVIRUGLVSRVDO

46
Correct disposal of batteries in this product
Pb
(Applicable in the European Union and other European countries with separate
battery return systems.)
This marking on the battery, manual or packaging indicates that the batteries in this
productshouldnotbedisposedofwithotherhouseholdwasteattheendoftheir
ZRUNLQJOLIH:KHUHPDUNHGWKHFKHPLFDOV\PEROV+J&GRU3ELQGLFDWHWKDWWKH
batterycontainsmercury,cadmiumorleadabovethereferencelevelsinECDirective
,IEDWWHULHVDUHQRWSURSHUO\GLVSRVHGRIWKHVHVXEVWDQFHVFDQFDXVHKDUPWR
KXPDQKHDOWKRUWKHHQYLURQPHQW
To protect natural resources and to promote material reuse, please separate batteries
fromothertypesofwasteandrecyclethemthroughyourlocal,freebatteryreturn
V\VWHP
USA ONLY
This Perchlorate warning applies only to primary CR (Maganese Dioxide) Lithium coin
FHOOVLQWKHSURGXFWVROGRUGLVWULEXWHG21/<LQ&DOLIRUQLD86$
³3HUFKORUDWH0DWHULDOVSHFLDOKDQGOLQJPD\DSSO\6HHZZZGWVFFDJRY
KD]DUGRXVZDVWHSHUFKORUDWH´
&RQWDLQV0HUFXU\'LVSRVH$FFRUGLQJWR/RFDO6WDWHRU)HGHUDO/DZV
)RUGHWDLOVVHHODPSUHF\FOHRUJHLVHRUJRUFDOO6DPVXQJ
47
Overview
z Optionalitemsmaybechangedormaynotbeprovideddependingonthecomputer
PRGHO
z Theactualcolorandappearanceofthecomputermaydifferfromthepicturesused
LQWKLVJXLGH
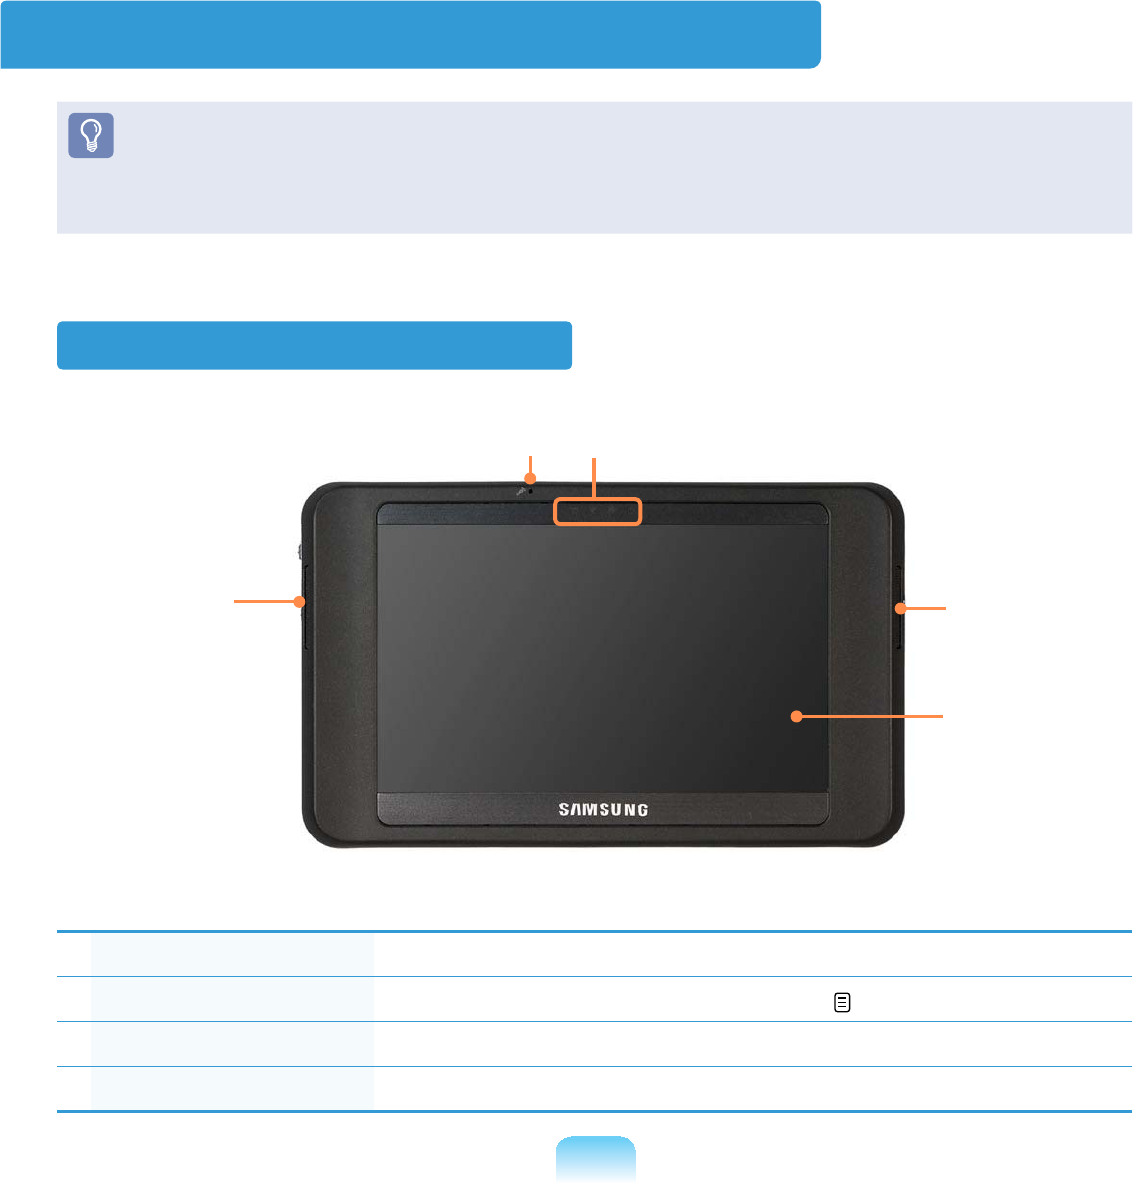
Front View
1Microphone 7KHPLFURSKRQHLVXVHGWRPDNHDVRXQGUHFRUGLQJ
2Status Indicators 6KRZVWKHFRPSXWHURSHUDWLQJVWDWXV 48
3Speaker *HQHUDWHVVRXQGIURPWKHFRPSXWHU
4LCD 'LVSOD\VWKHFRPSXWHUVFUHHQ
1
4
2
33
48
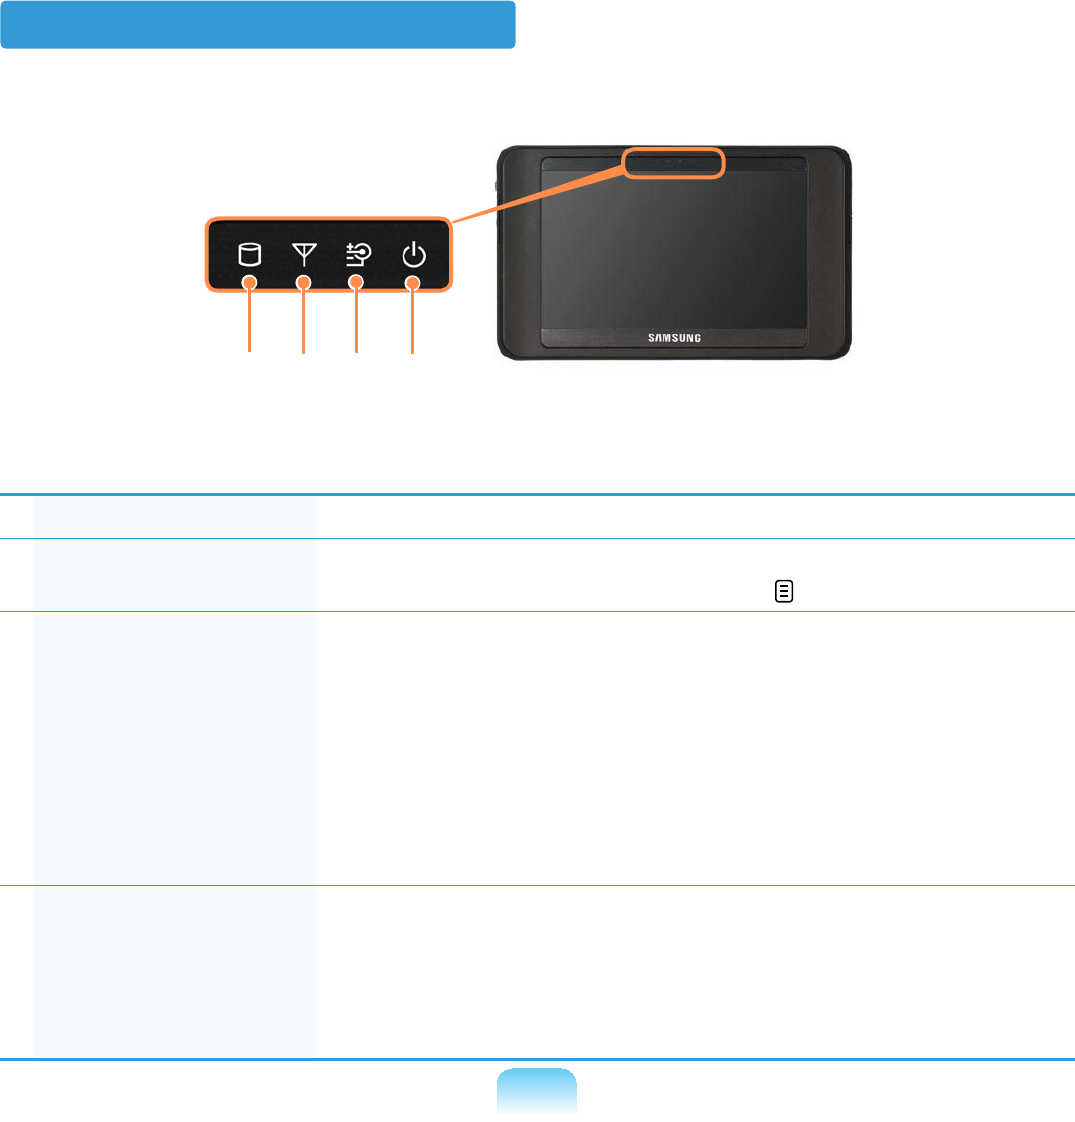
Status Indicators
1HDD 7KLVLVOLWZKHQWKHKDUGGLVNGULYHLVDFFHVVHG
2Wireless LAN This is lit for models with wireless LAN capability when the
:LUHOHVV/$1IXQFWLRQLVLQRSHUDWLRQ 104
3Charge 7KLVVKRZVWKH$&DGDSWHUDQGEDWWHU\VWDWXV
Green: Whenthebatteryiscompletelychargedorisnot
LQVWDOOHG
Amber:KHQWKHEDWWHU\LVEHLQJFKDUJHG
Blink: When the HOLD switchislifteduporabuttonis
pressed in the HOLD/RFNVWDWXV
Off: When the computer is running on battery power
ZLWKRXWDQ$&SRZHUVXSSO\
4Power 7KLVVKRZVWKHFRPSXWHU¶VRSHUDWLQJVWDWXV
On:KHQWKHFRPSXWHULVWXUQHGRQ
Blink:KHQWKHFRPSXWHULVLQ6OHHSPRGH
TowakethecomputerupfromSleepmode,slidethe
Power SwitchGRZQZDUGV
4567

49
Top View
1Headphone Jack <RXFDQFRQQHFWKHDGSKRQHVXVLQJWKLVMDFN
2Multi-Card Slot
(Optional)
$FDUGVORWWKDWVXSSRUWV6'&DUG6'+&DQG00&
3Vents (PLWVKHDWJHQHUDWHGLQVLGHWKHFRPSXWHU
$YRLGEORFNLQJWKHYHQWVDVWKLVPD\RYHUKHDWWKHFRPSXWHU
Bottom View
1Organizer Port When connecting the computer and the Organizer (optional),
connect through the organizer connector of the Organizer to
DQFKRUWKHFRPSXWHU
46
5
4
50
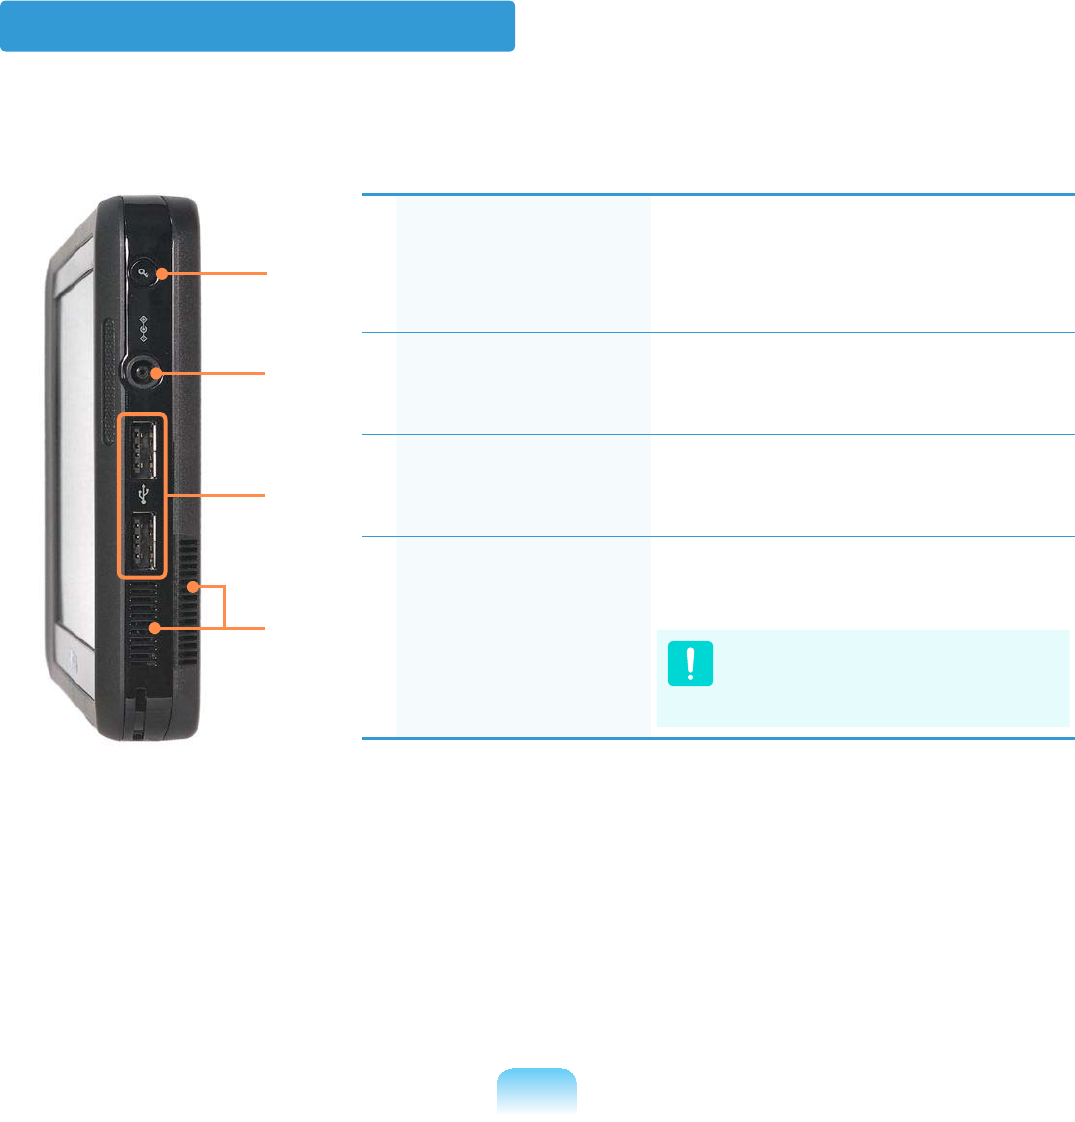
Right View
1Windows Security
Button
Pressing this button is the same as
pressing the <Ctrl>+<Alt>+<Del>
NH\VRQWKHNH\ERDUG
3UHVVZLWKWKH6W\OXV3HQ
2Power IN Jack The AC adapter which supplies
powerforthecomputeris
FRQQHFWHGKHUH
3USB Port You can connect USB devices
such as a USB keyboard/mouse,
86%2''HWFXVLQJWKLVSRUW
4Vents Emitsheatgeneratedinsidethe
FRPSXWHU
Avoidblockingthevents
as this may overheat the
FRPSXWHU
7
6
5
4
51
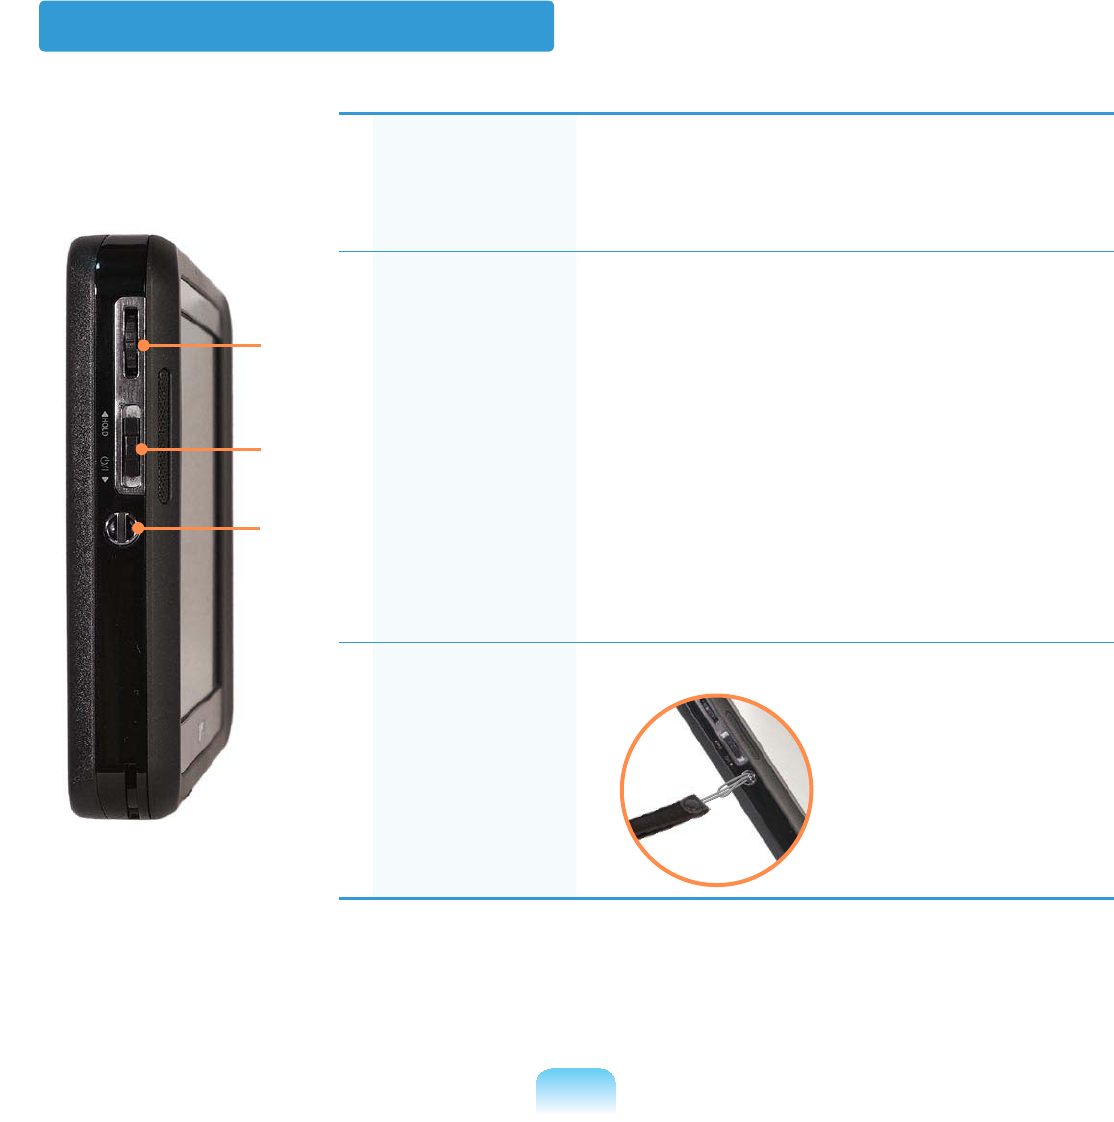
Left View
1Wheel Button Press the Wheel button to run the MENU
SURJUDP
Turn the Wheel button up or down to select
WKHPHQX
2Power Switch /
HOLD Switch
nPower Switch Function
Slide the switch downwardstoturnthe
FRPSXWHURQ
lHOLD Switch (Lock) Function
If you slide the switch upwardstothe
end(HOLDposition),theLockicon
appearsandthecomputerisLockedand
\RXZLOOQRWEHDEOHWRXVHDQ\IXQFWLRQ
Slide the switch to the mid position to
UHOHDVHWKHORFN
7KHQ\RXFDQXVHWKHFRPSXWHUQRUPDOO\
3Hand Strap
Hole
<RXFDQDWWDFKDKDQGVWUDSXVLQJWKLVKROH
6
5
4
52
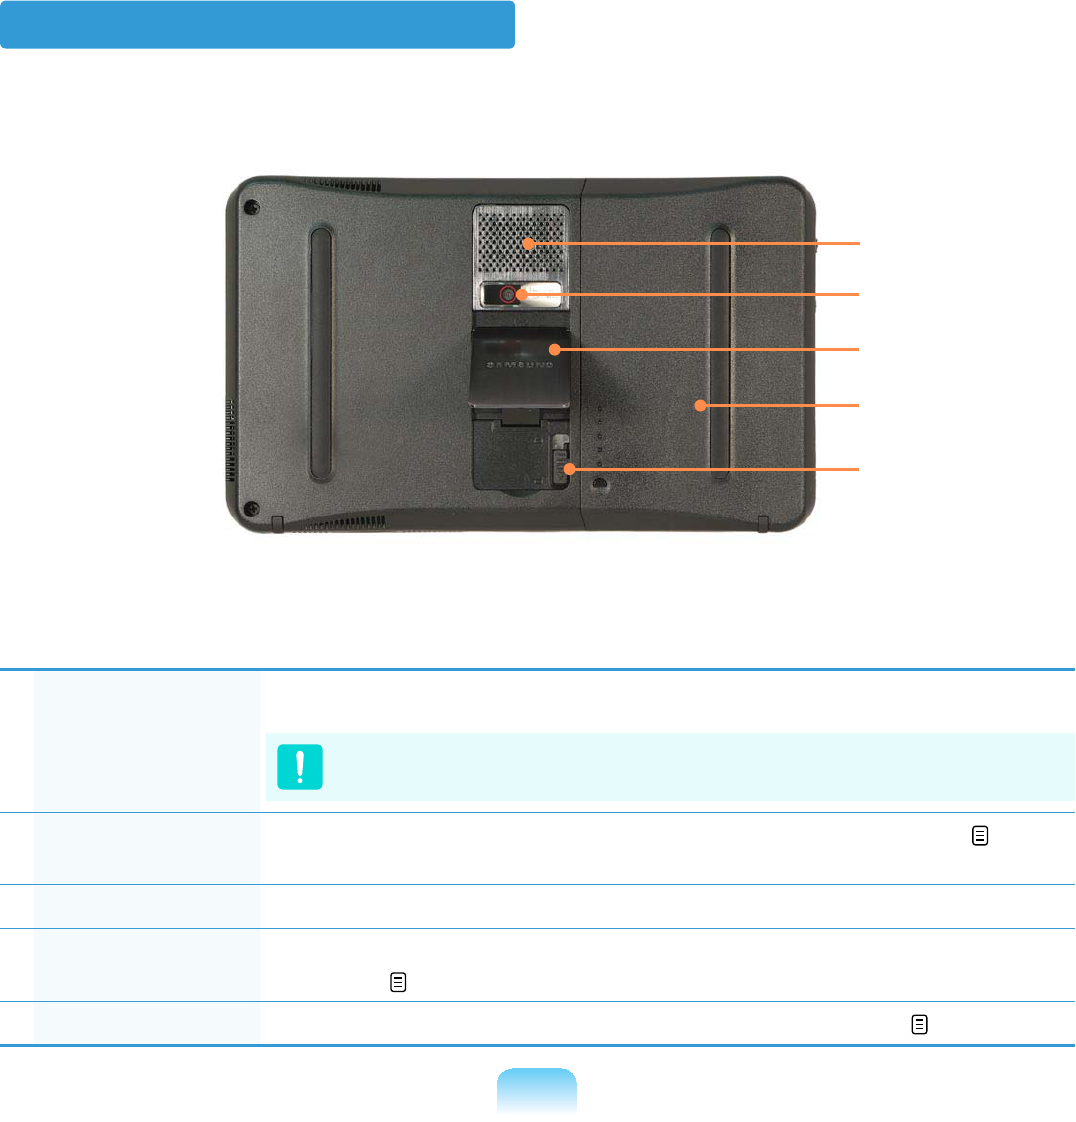
Back View
1Vents (PLWVKHDWJHQHUDWHGLQVLGHWKHFRPSXWHU
$YRLGEORFNLQJWKHYHQWVDVWKLVPD\RYHUKHDWWKHFRPSXWHU
2Camera Lens
(Optional)
8VLQJWKLVOHQV\RXFDQWDNHVWLOOSLFWXUHVDQGUHFRUGYLGHR 119
3Stand 8VLQJWKHVWDQG\RXFDQXVHWKHVFUHHQDWDFRPIRUWDEOHDQJOH
4Battery A lithium-Ion rechargeable battery that supplies power for the
FRPSXWHU 140
5Battery Latch 7KHEDWWHU\ODWFKLVXVHGWRVHSDUDWHRU¿[WKHEDWWHU\ 140
4
5
6
7
8
53
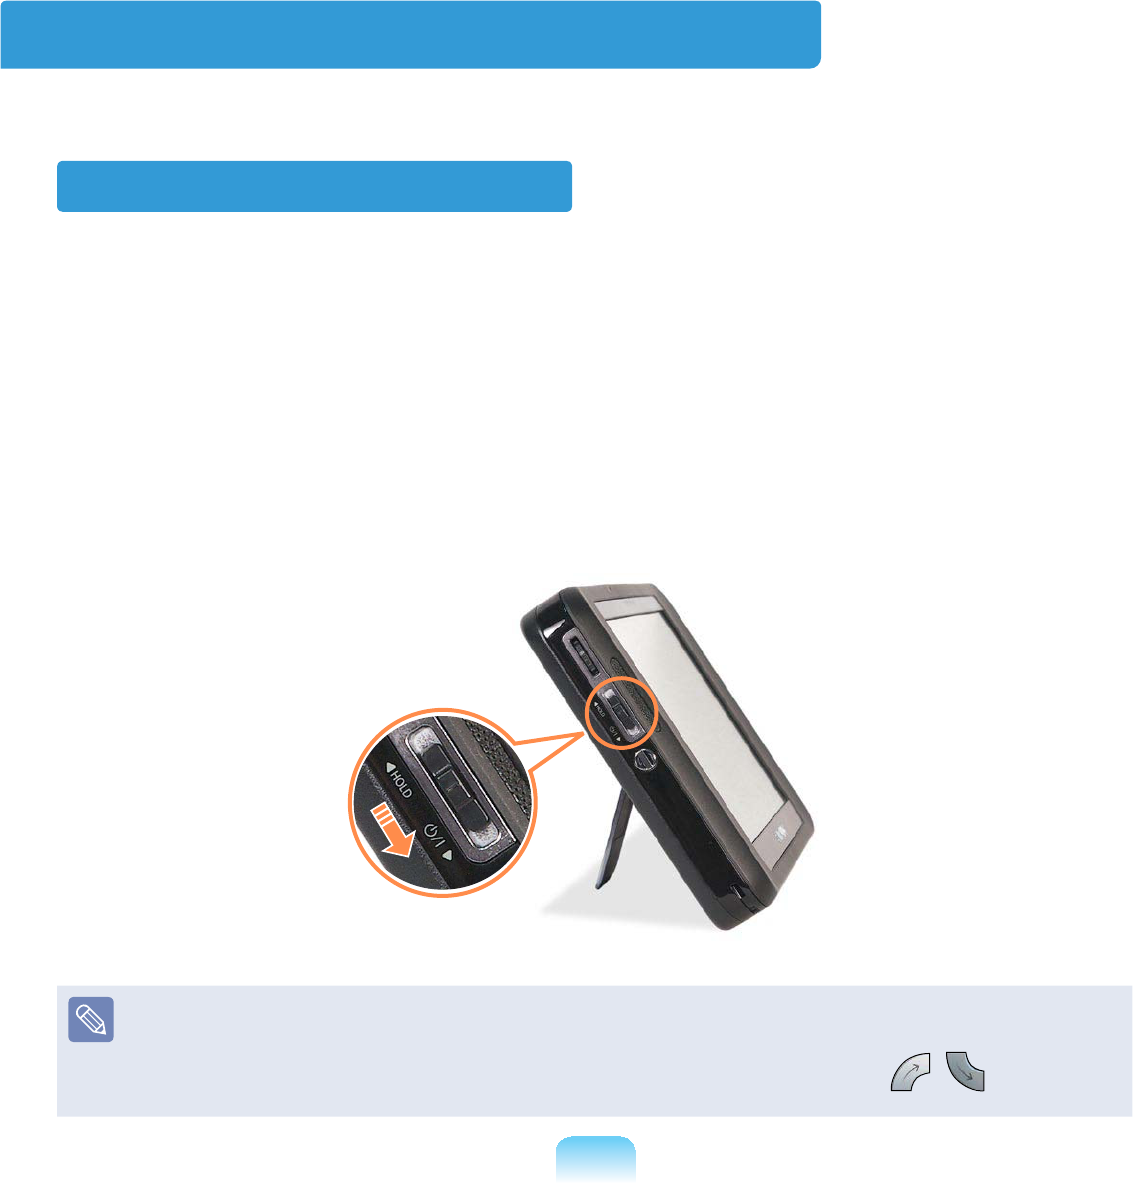
Turning the Computer On and Off
Turning the computer on
1 Install the battery and connect the AC adapter
(Refer to the Getting Started Guide
2 $GMXVWWKHstandDWWKHEDFNRIWKHFRPSXWHUWRDFRPIRUWDEOHDQJOH
3 Slide the Power SwitchGRZQZDUGV
7KHFRPSXWHULVWXUQHGRQ
Whenrunningthecomputeronbatterypower,theLCDbrightnessisdimmed
DXWRPDWLFDOO\WRVDYHEDWWHU\SRZHU
Press the Wheel button to run the MENU program and press the ,of the
BrightnessWRDGMXVWWKH/&'EULJKWQHVV
54
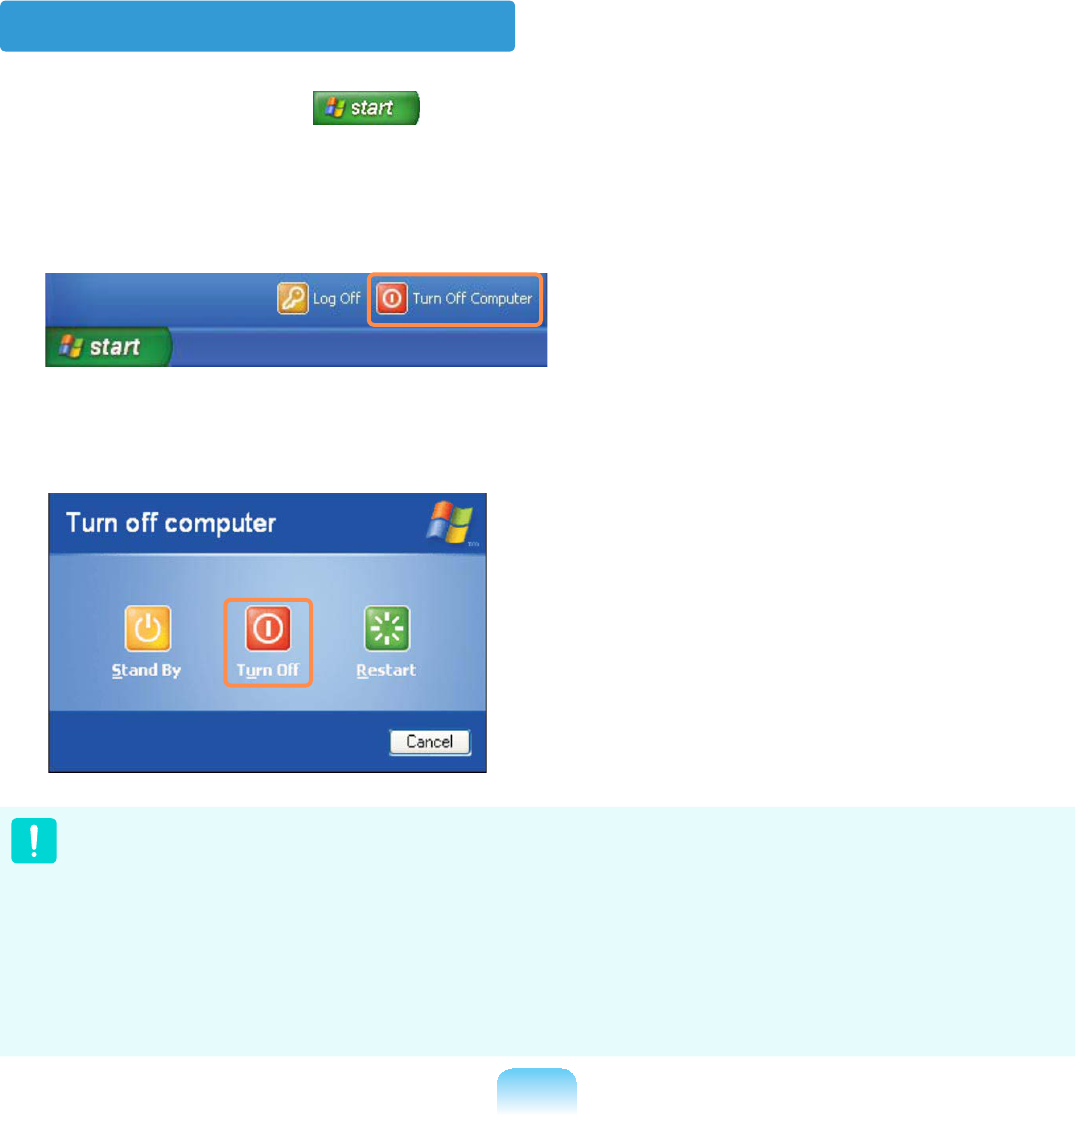
Turning the computer off
1 Click the start button RQWKHWDVNEDU
2 Click Turn Off Computer
3 Click Turn Of f
z Ifthecomputerdoesnotshutdownduetoasystemerror,slidethepowerswitch
GRZQDQGKROGLWIRUPRUHWKDQVHFRQGVWRIRUFHIXOO\WXUQLWRII
z Whenturningthecomputeronagainafteritwasturnedoffbyslidingthepower
VZLWFKGRZQDQGKROGLQJLWWKHV\VWHPH[DPLQDWLRQSURJUDPPD\UXQ
z Whenbootingthecomputerafteraforcedshutdown,theWindowserrorrecovery
VFUHHQPD\DSSHDURYHUDEODFNEDFNJURXQG,QWKLVFDVHVHOHFWDERRWLQJPRGHE\
turningtheWheelbuttonandthenpressandholdtheWheelbuttonfor 2 seconds
RUPRUHWRERRWWKHV\VWHPXSLQWKHVHOHFWHGPRGH

Chapter 2.
Using the computer
Stylus Pen 56
Entering Text 59
Using the Buttons 64
Multi Card Slot 67
Organizer (Optional) 70
Connecting a monitor / TV 77
Adjusting the Volume 81
Voice Recorder 84
56
Stylus Pen
$6W\OXV3HQLVXVHGLQVWHDGRIDPRXVHDQGSURYLGHVWKHVDPHIXQFWLRQ
z ItisrecommendedtoconnectanduseaUSBkeyboardandmousewhenusingthe
FRPSXWHUIRUDORQJWLPH
z:KHQ\RX¿QLVKXVLQJWKHVW\OXVSHQNHHSLWWRWKH6W\OXVSHQKROGHURIWKHKDQG
VWUDSRUWKH2UJDQL]HURSWLRQDO
Operate the touch screen LCD with a Stylus Pen or your ¿QJHU6KDUSREMHFWVPD\
VFUDWFKRUGDPDJHWKH/&'VXUIDFH
Stylus Pen Functions
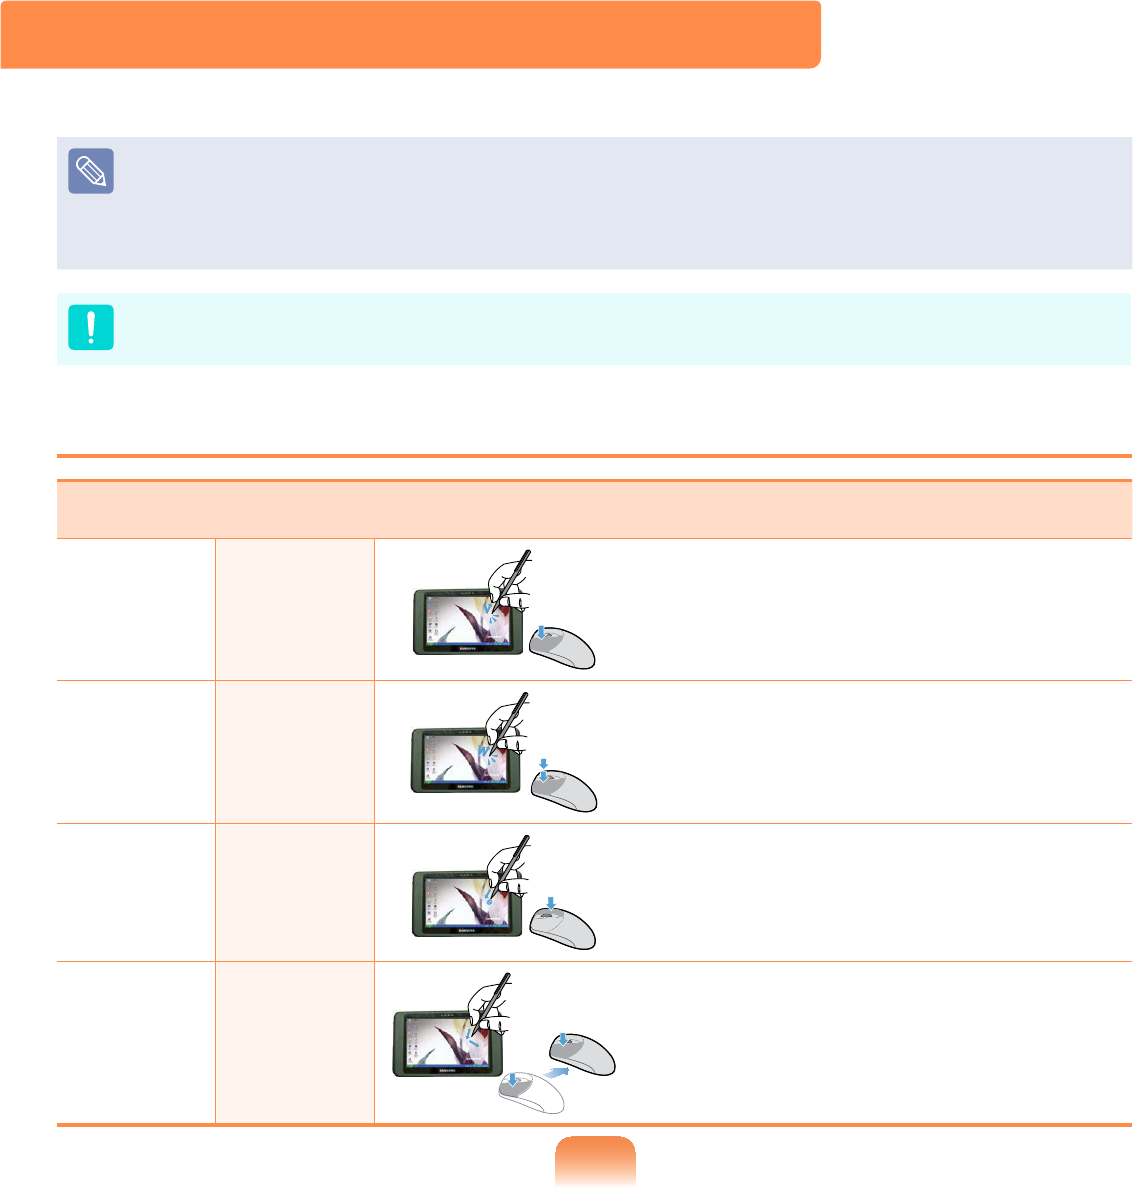
Mouse Using the Stylus Pen Function
Single-
click
Single-
tap 6LQJOHWDSZLWKWKHSHQWRVHOHFWDQLWHP
Double-
click
Double-
tap 'RXEOHWDSZLWKWKHSHQWRUXQDQLWHP
Right-
click
Press and
Hold
Pressandholdformorethan3seconds
with the pen to display the Pop-up
PHQX
Drag Drag Tapanitemanddragitwiththepento
PRYHWKHLWHP
57
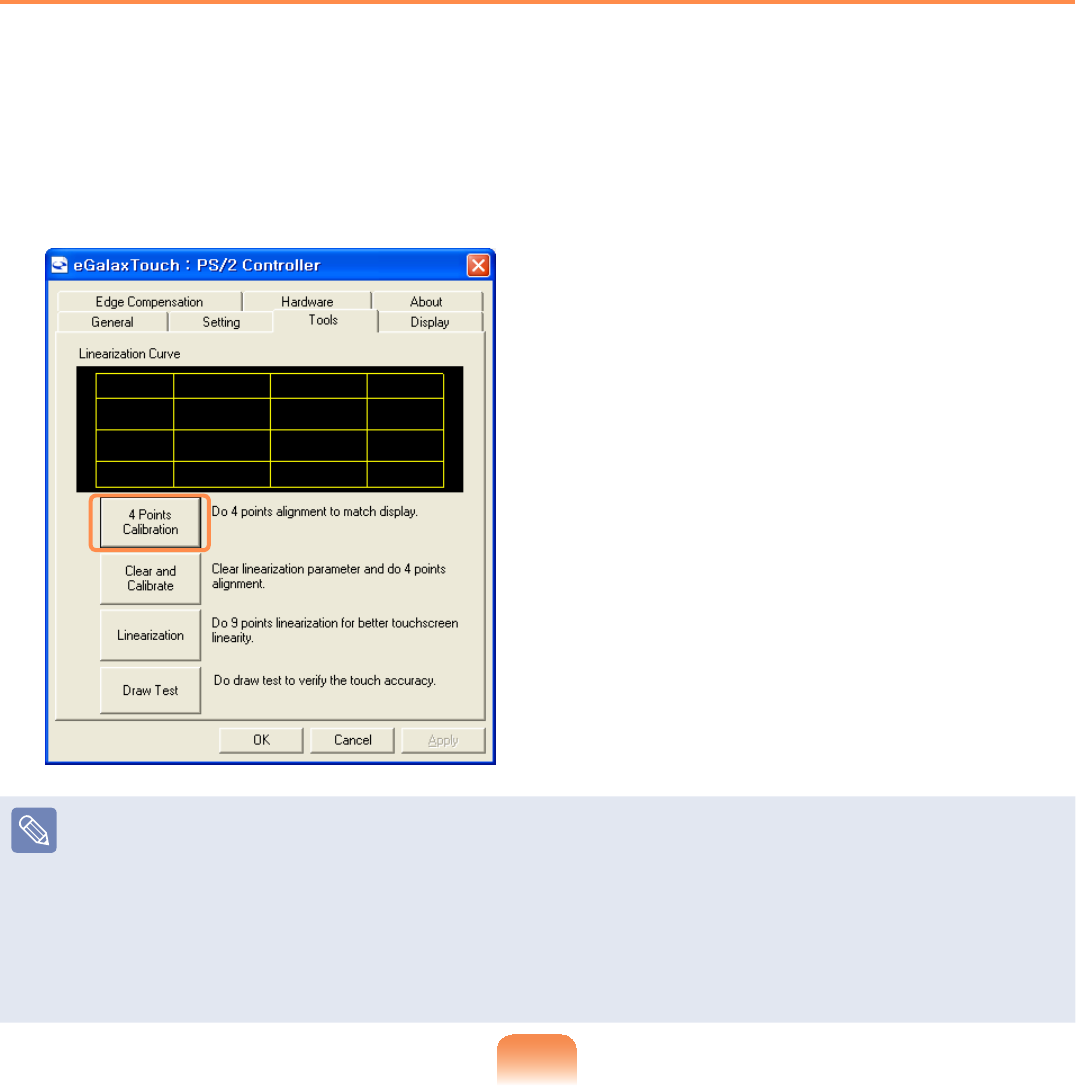
Calibrating the Screen
:KHQXVLQJWKH6W\OXV3HQIRUWKH¿UVWWLPHRUWKHSRLQWLQJSRVLWLRQRIWKH6W\OXV3HQLV
incorrect, you can correct the pointing position using the eGalax TouchSURJUDP
1 Select 6WDUW!$OO3URJUDPV!H*DOD[7RXFK!&RQ¿JXUH8WLOLW\
2 In the Tools tab, select 4 Points Calibration
Enhancing the Accuracy
If greater precision is required, you can correct the pointing position by using 9-Points
or 25-Points&DOLEUDWLRQ
1,QWKHLinearization Style item in the Settings tab, select 9-Points or 25-Points
and then press the ApplyEXWWRQ
26HOHFWLinearization from the ToolsWDE7KHKLJKHUWKHQXPEHUWKHPRUHSUHFLVH
WKHFRUUHFWLRQ
58
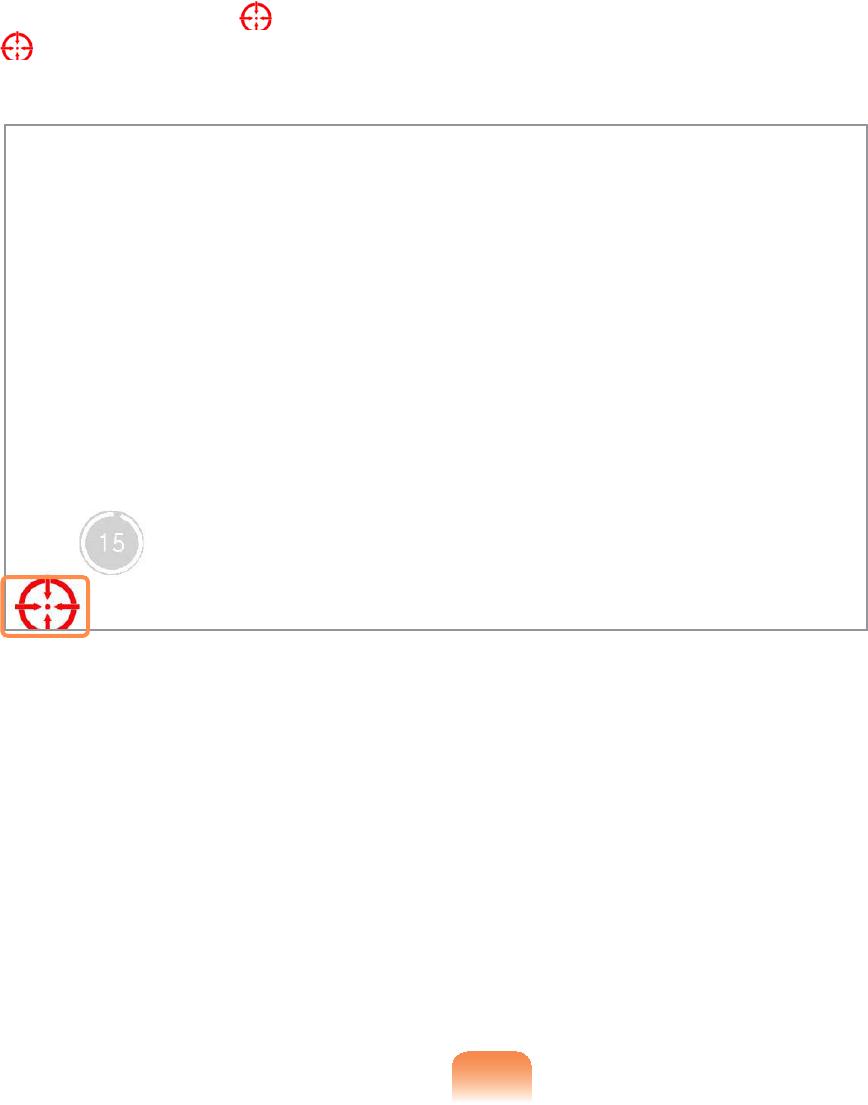
3 Press and hold the -symbol displayed on the screen until the OK appears. The
-symbol appears repeatedly according to the selected number of points.
4 If the Calibration Result window appears, click the OK button.
ThepointingpositionoftheStylusPeniscorrected.
59
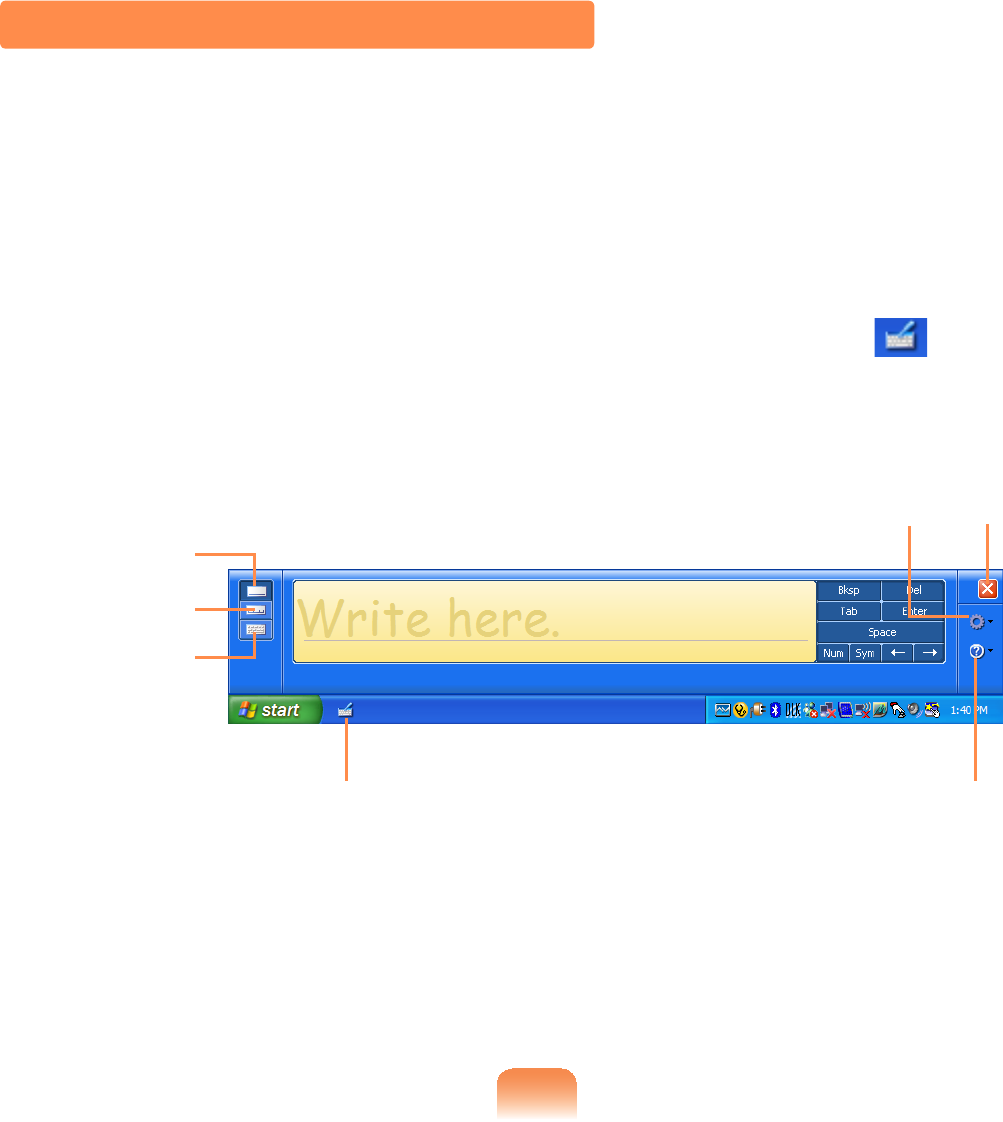
Entering Text
You can enter characters using the Samsung Screen Keyboard (Windows XP Home)
or Tablet PC Input Panel (Windows XP Tablet) depending on your Windows Operating
6\VWHP
z)RUORQJSHULRGVRIXVHXVHD86%NH\ERDUGIRU\RXUFRQYHQLHQFH
z)RUH[DPSOHWKHSURFHGXUHVWRHQWHUWH[WLQWKH1RWHSDGZLOOEHGHVFULEHGEHORZ
For models with Windows XP Home
YoucanentercharacterswiththeSamsung Screen Keyboard
The Samsung Screen Keyboard is a program that enables entering characters with the
VW\OXVSHQZKHQDNH\ERDUGLVQRWDYDLODEOH
Running the Samsung Screen
Keyboard
Press the Wheel button to run the
MENU program and click Samsung
Screen Keyboard
Alternatively, click the Samsung Screen
Keyboard icon on the Desktop or click
the Samsung Screen Keyboard icon in
thesystemtrayoftheTaskbartorunthe
6DPVXQJ6FUHHQ.H\ERDUG Samsung
Screen Keyboard
60
Using the Samsung Screen Keyboard
ThelocationandshapeoftheSamsungScreenKeyboardmenubuttonmaydiffer
GHSHQGLQJRQWKHVHWWLQJV
Resize Input Tools CloseSettings
Right Mouse Button
Close If you click this button, the Samsung Screen Keyboard is
minimized to the icon LQWKHV\VWHPWUD\RIWKH7DVNEDU
Input Tools
<RXFDQFKDQJHWKHLQSXWODQJXDJH,I\RXFOLFNWKH&KDQJH
/DQJXDJHEXWWRQDOOWKHVXSSRUWHGODQJXDJHVDUHOLVWHG
6HOHFWDODQJXDJHIURPWKHOLVW
Resize If you click this button, the Samsung Screen Keyboard is
UHVL]HGWRDVPDOOHUVL]H
Settings
YoucandeterminetheSamsungScreenKeyboardcolor,the
defaultkeyboardsize,thelocationoftheSamsungScreen
KeyboardmenubuttonandwhethertoruntheSamsung
6FUHHQ.H\ERDUGDXWRPDWLFDOO\
Right Mouse
Button 3HUIRUPVWKHUROHRIWKHULJKWPRXVHWRXFKSDGEXWWRQ
(QWHUE\SUHVVLQJDNH\ZLWKWKHVW\OXVSHQ
61
For models with Windows XP Tablet
YoucanentercharacterswiththeTablet PC Input PanelE\GLUHFWO\ZULWLQJFKDUDFWHUV
The Tablet PC Input PanelLVDQRQVFUHHQOHWWHULQSXWSDGSURYLGHGE\:LQGRZV
/HWWHUVFDQEHHQWHUHGZLWKWKH6W\OXV3HQZKHQDNH\ERDUGLVQRWDYDLODEOH7KHUHDUH
threewaysinwhichletterscanbeenteredusingtheTablet PC
Input Panel:withtheWritingPad,withtheCharacterPad,andwiththeOn-Screen
.H\SDG
ToopentheTabletPCInputPanel,clickontheTablet PC Input Panel icon on the
WDVNEDU$SLFWXUHRIWKH7DEOHW3&,QSXW3DQHOLVGLVSOD\HGEHORZ
Close
Writing Pad
Character
Pad
On-Screen
Keyboard
Help
Youcanlearndetailedusage
IRUWKH7DEOHW3&,QSXW3DQHO
Tablet PC Input
Panel icon
Tools and
Options
62
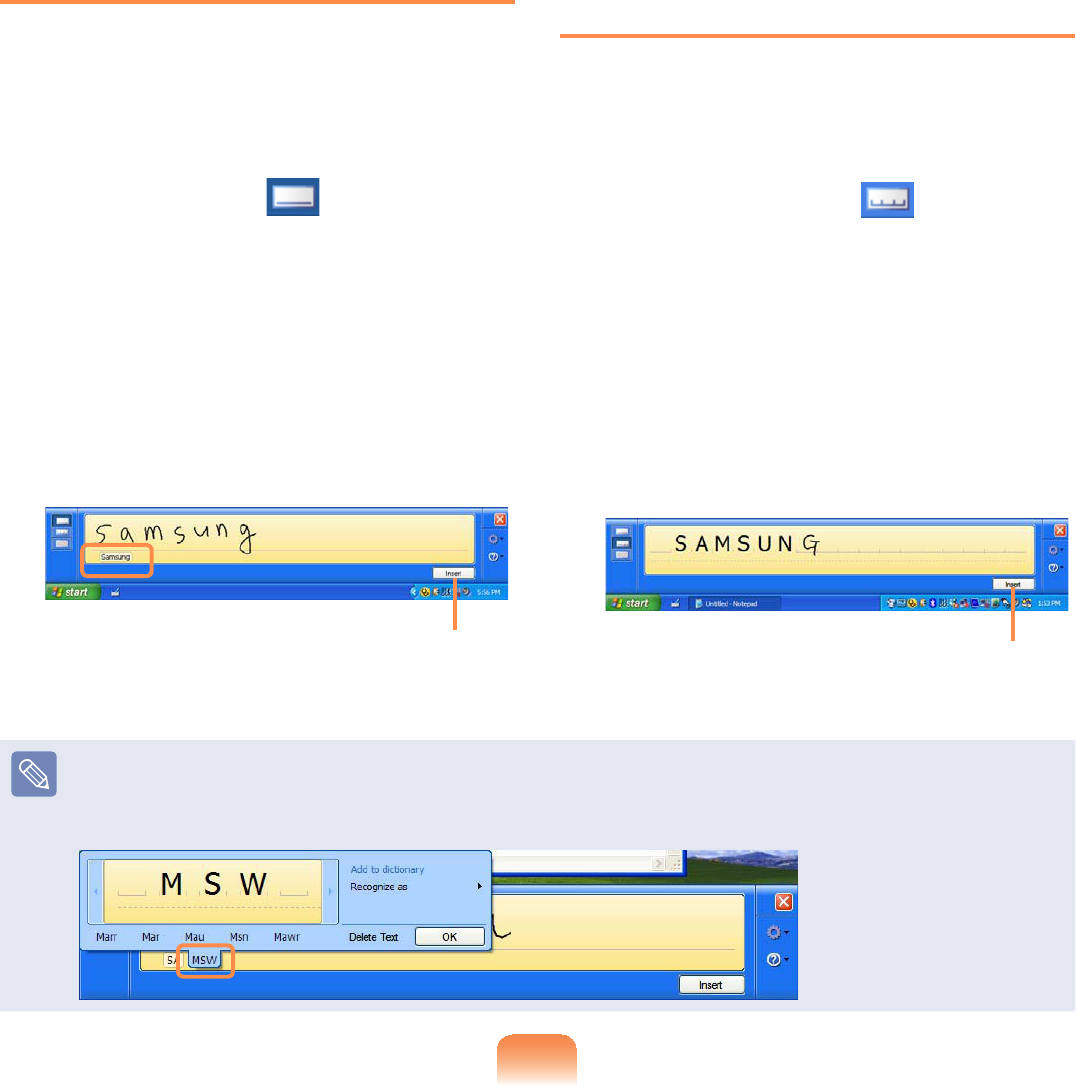
Entering text using the Writing Pad
You can enter characters by writing
characters on the Stylus Pen Writing Pad
GLUHFWO\
1 In the Tablet PC Input Panel,tapthe
Writing Pad icon
2 Writetextintheinputareaofthe
WritingPadwiththeStylusPenand
ZDLWDPRPHQW7KHZULWWHQOHWWHUV
are converted into the corresponding
FRPSXWHUFKDUDFWHUV
Tap the Insert button to enter the
FRQYHUWHGOHWWHUV
Insert
Entering text
using the Character Pad
Youcanwritealetterineachcellofthe
&KDUDFWHU3DGZLWKWKH6W\OXV3HQ
1 In the Tablet PC Input Panel,tapthe
Character Pad icon
2 Writealetterinthecellofthe
Character Pad with the Stylus Pen
DQGZDLWDPRPHQW7KHZULWWHQOHWWHU
is converted into the corresponding
FRPSXWHUFKDUDFWHU
Tap the Insert buttontoentera
FRQYHUWHGOHWWHU
Insert
Modifying Text
Writeoverincorrectlettersorpressthelowerpartofalettertoselectanotherletter
IURPWKHGLVSOD\HGOHWWHUV
63
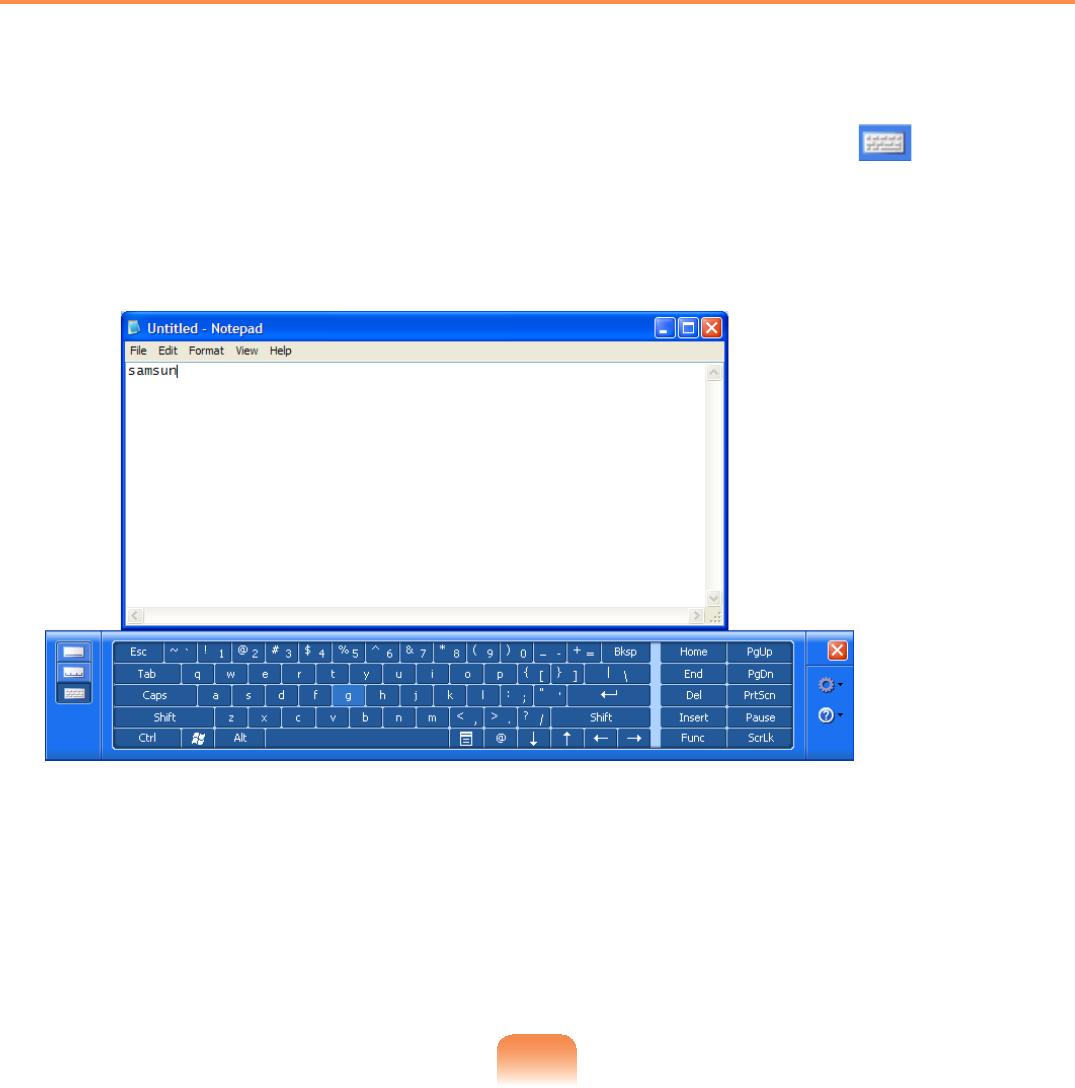
Entering text using the On-Screen Keyboard
TheOn-ScreenKeyboarddisplaysastandardkeyboardonthescreensothatyoucan
HQWHUDOHWWHUE\SUHVVLQJWKHFRUUHVSRQGLQJNH\RQWKHVFUHHQ
1 In the Tablet PC Input Panel,taptheOn-Screen Keyboard icon
2 7DSDFKDUDFWHUNH\ZLWKWKH6W\OXV3HQWRHQWHUWKHFKDUDFWHU
64
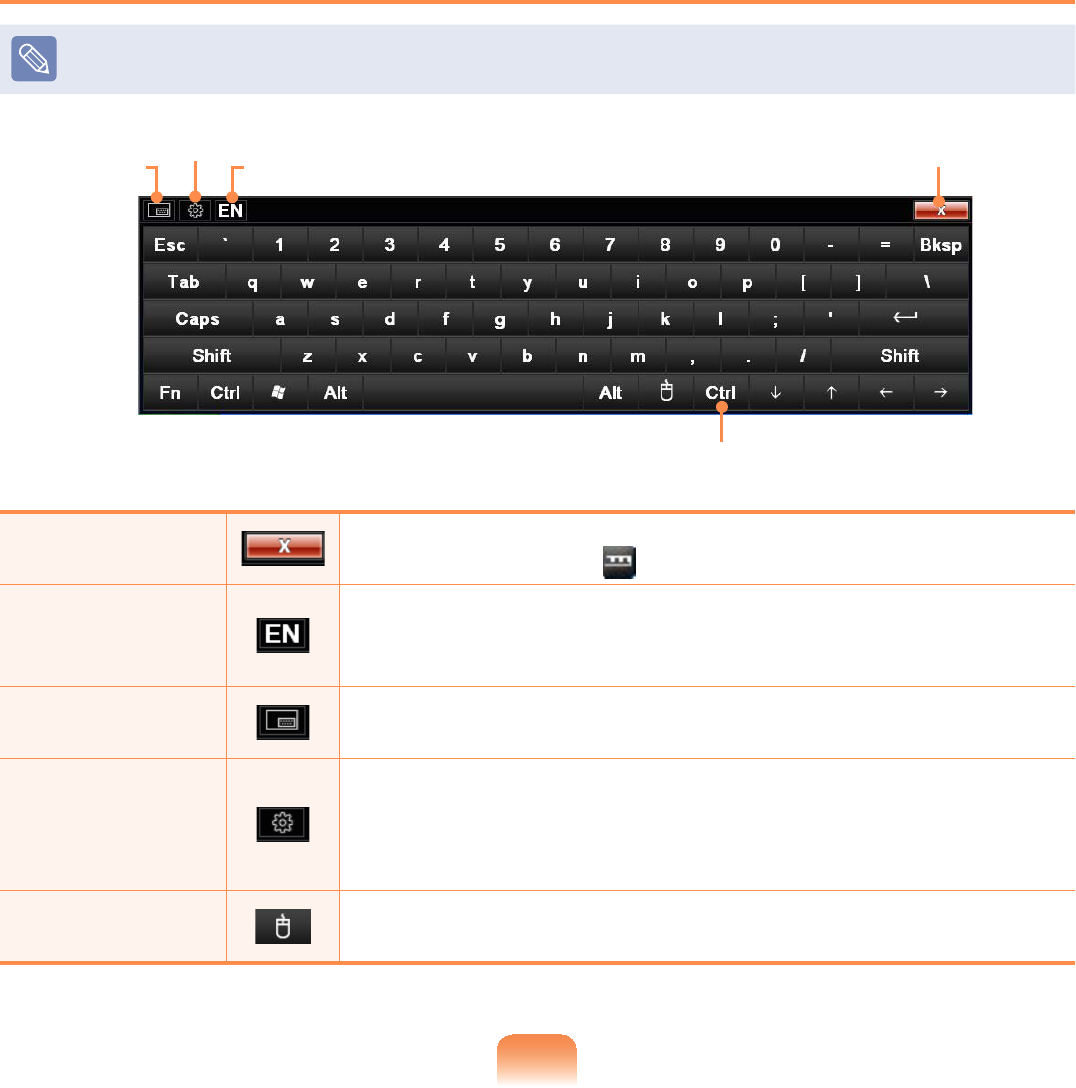
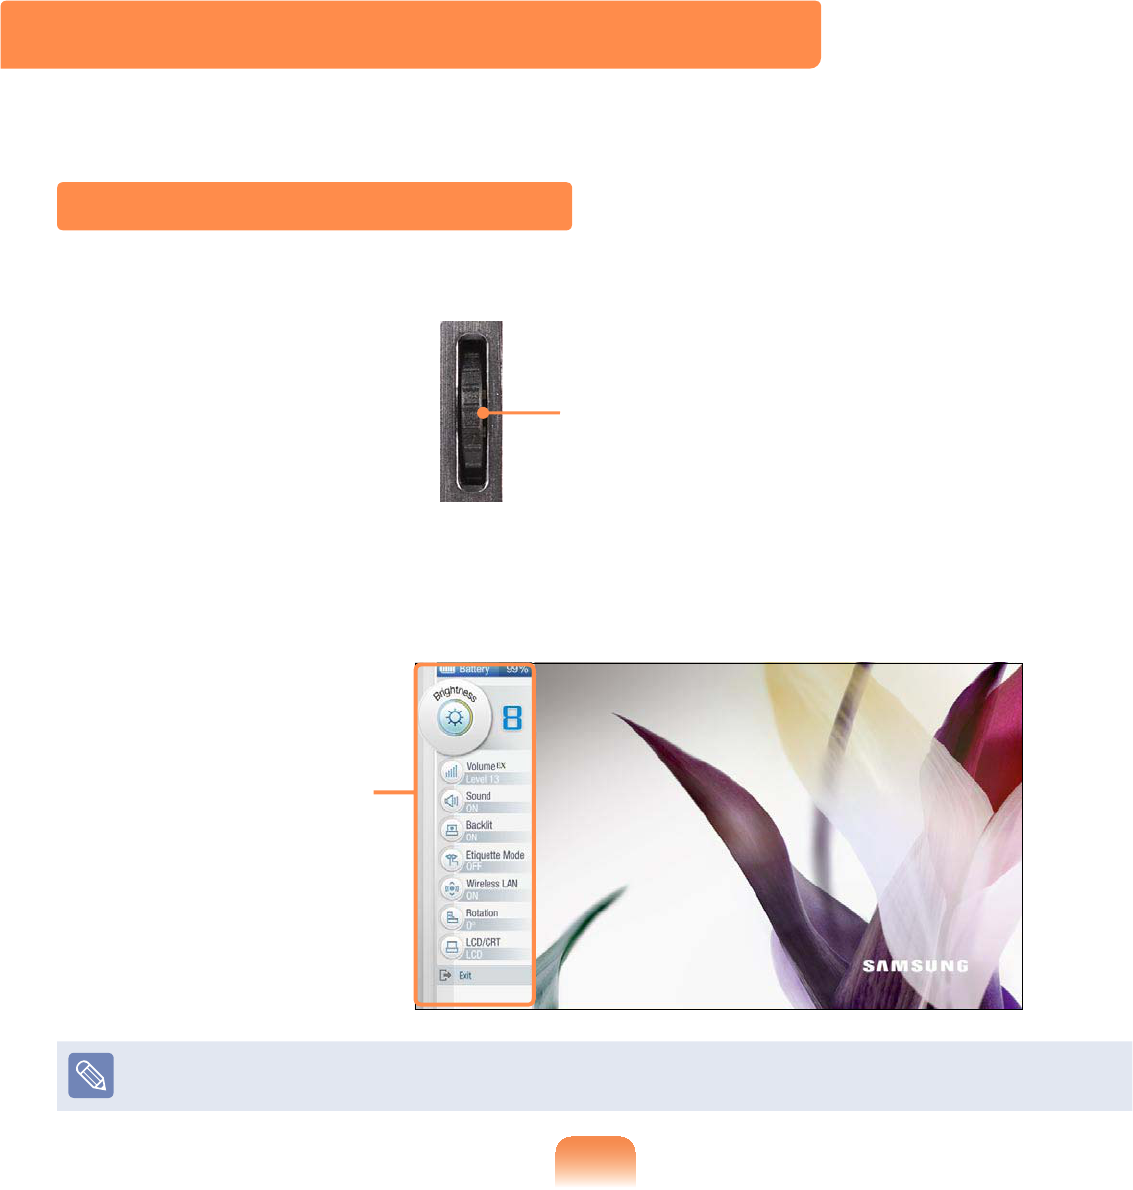
Using the Buttons
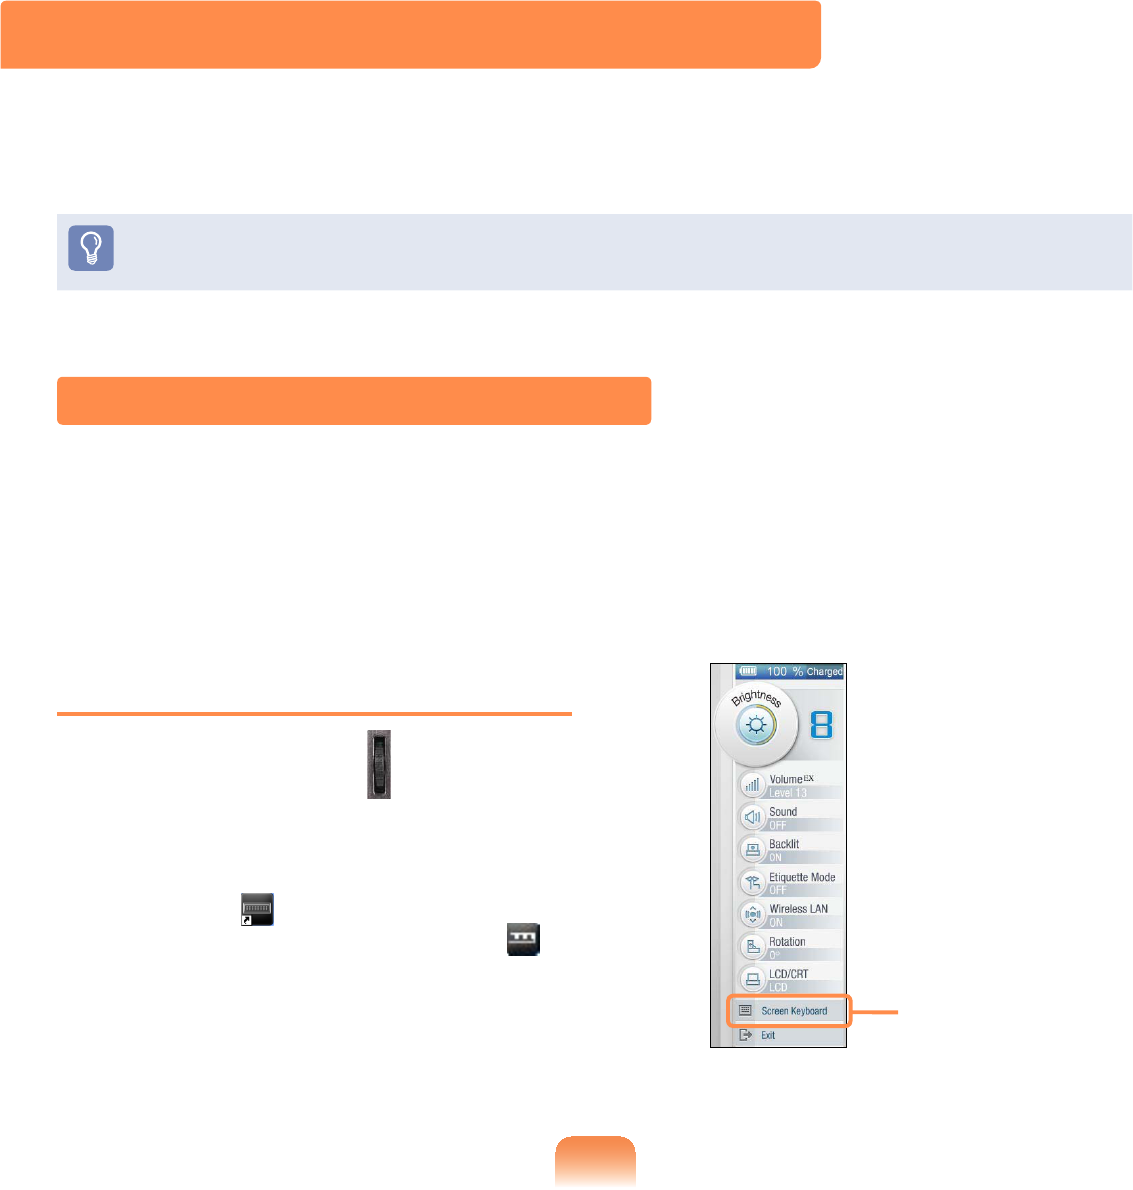
ThefunctionoftheWheel buttonLVGHVFULEHGEHORZ
The Wheel Button
When the Wheel button is pressed, the MENU programDSSHDUV
Wheel button
7KH0(183URJUDPSURYLGHVVKRUWFXWVWRIUHTXHQWO\XVHGIXQFWLRQVRQWKHFRPSXWHU
<RXFDQHDVLO\FKDQJHWKHVHWWLQJV
Press EXITRUSUHVVDSRLQWRQWKHVFUHHQWRKLGHWKH0(183URJUDP
MENU program
ThescreenthatappearsatthistimemaydifferdependingontheinstalledWindows
RSHUDWLQJV\VWHP
65
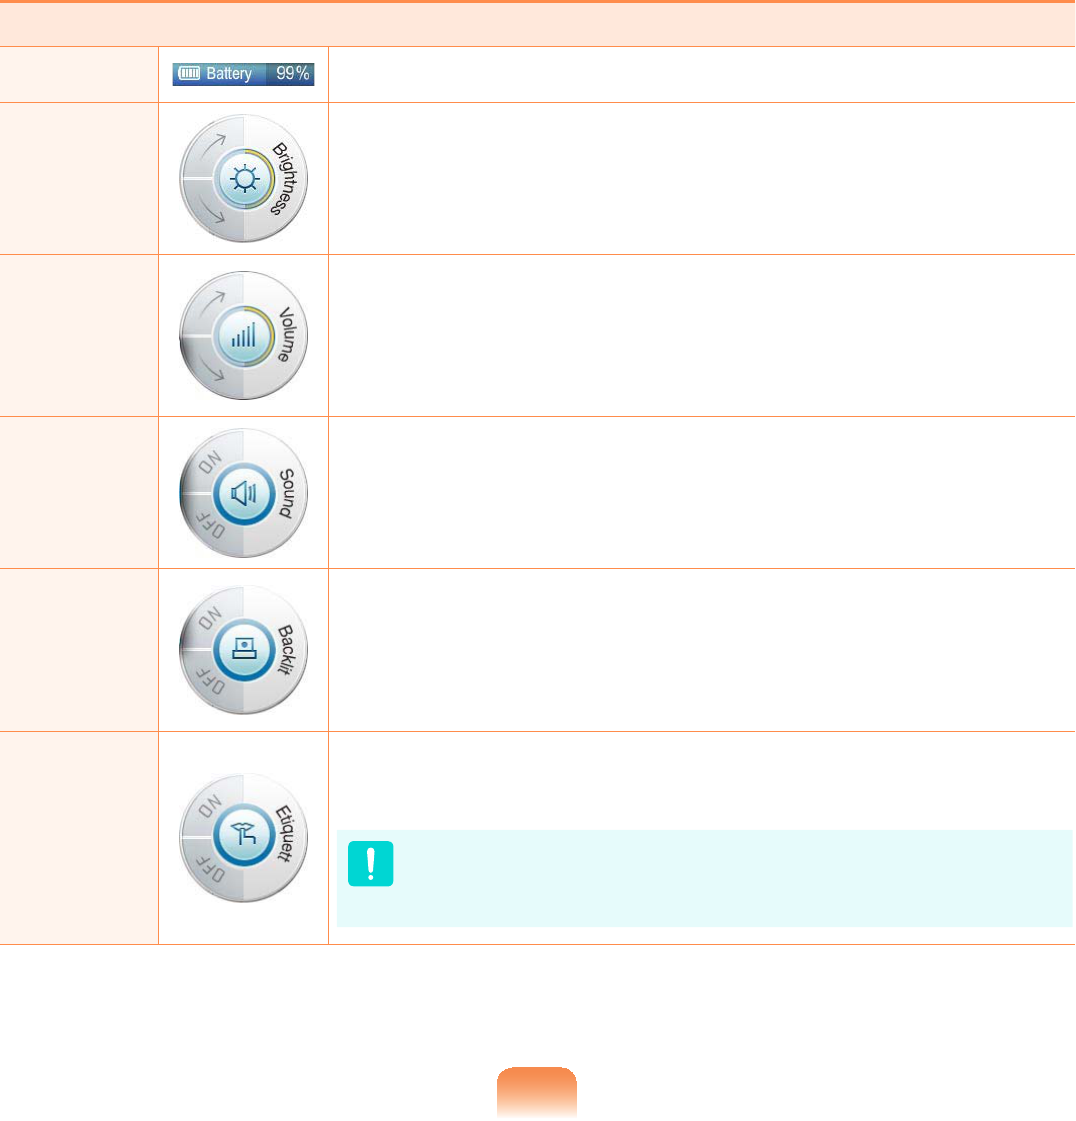
MENU Items Function
Battery 6KRZVWKHUHPDLQLQJEDWWHU\FKDUJH
Brightness Whenever you press this button, the LCD brightness is
LQFUHDVHGGHFUHDVHGE\RQHVWHS
Volume Whenever you press this button, the volume is increased
GHFUHDVHGE\RQHVWHS
Sound 3UHVVWKLVLWHPWRWXUQWKHYROXPHRQRURII
Backlit ,I\RXSUHVV2IIWKH/&'VFUHHQLVWXUQHGRII7RWXUQLWRQ
again, press the Wheel buttonRUWRXFKWKHVFUHHQOLJKWO\
Etiquette
Mode
7XUQV(WLTXHWWHPRGHRQRURII8VH(WLTXHWWHPRGHZKHQ\RX
QHHGDTXLHWZRUNLQJHQYLURQPHQW
SinceEtiquetteModemakestheCPUrunatitsslowest,
theprogramoperatingspeedmayslowdownandthe
FRPSXWHUPD\RYHUKHDWGXHWRWKHVORZIDQVSHHG

66
MENU Items Function
Wireless
LAN 3UHVVWKLVLWHPWRWXUQWKH:LUHOHVV/$1RQRURII
Rotation
Whenever you press this button, the screen rotates clockwise
RUFRXQWHUFORFNZLVHE\,180,270,360GHJUHHV
Whenrotatingthescreen,apartofthescreenimage
PD\QRWEHGLVSOD\HGLQVRPHVRIWZDUHSURJUDPV
LCD / CRT
Using this item, you can view the screen when an external
displaydeviceisconnectedafterconnectingtheOrganizer
Whenever you press the button, the computer screen is
output to LCD > CRT > Clone View > Dual View mode, in
WKLVVHTXHQFH
The LCD/ CRT button isactivatedwhentheOrganizer
LVFRQQHFWHGZLWKDQH[WHUQDOGLVSOD\GHYLFH
67
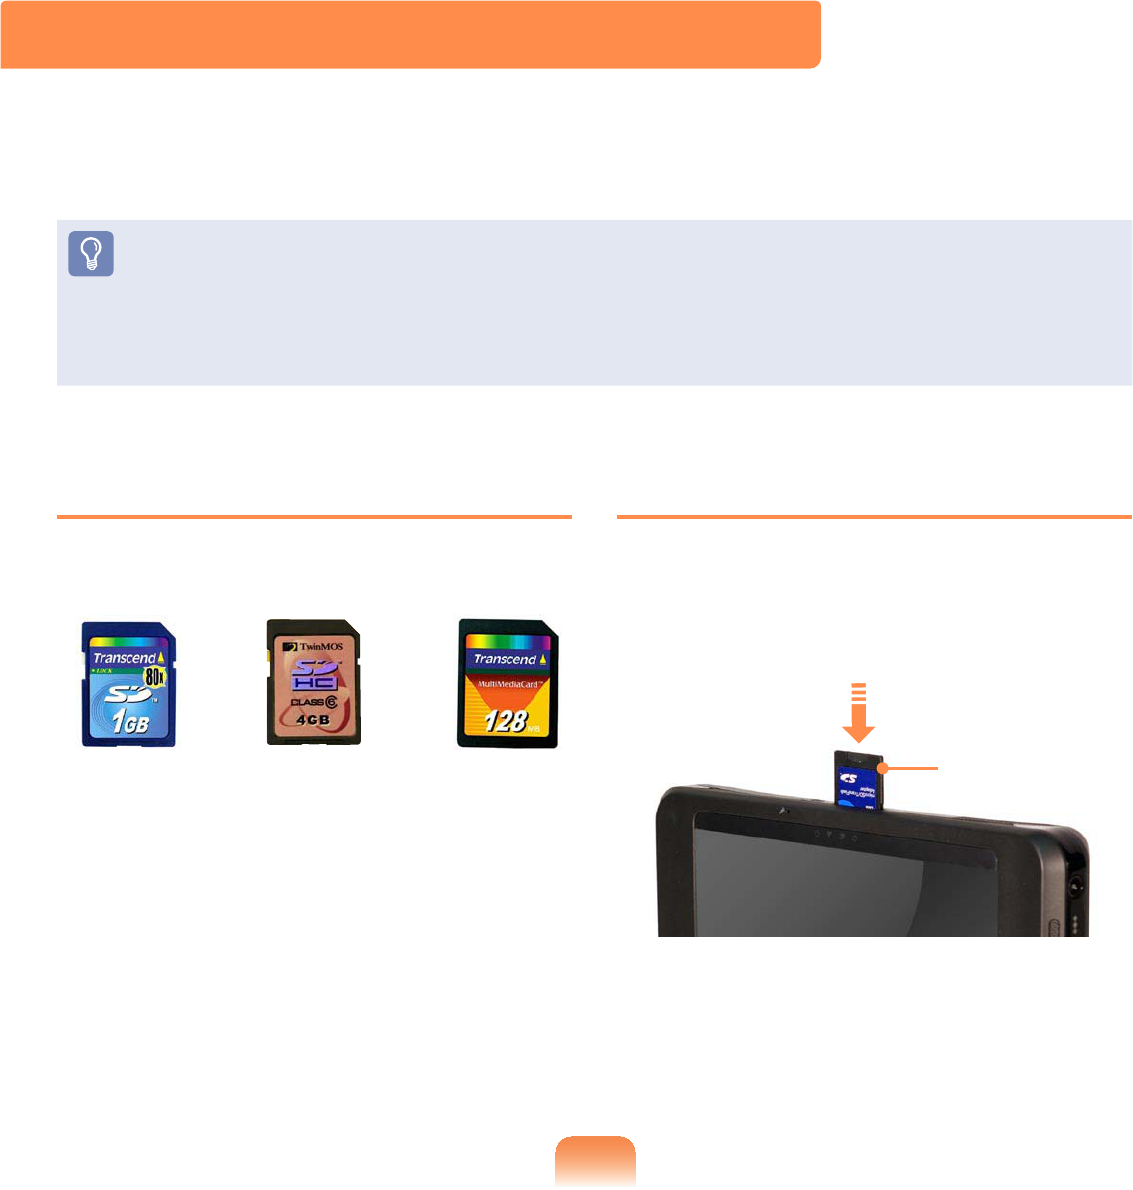
Supported Cards
SD Card MMC
SDHC Card
Using a Memory Card
1 Insertthememorycardintothemulti
card slot according to the direction
SULQWHGRQWKHVORW
Example)
SD Card
Multi Card Slot
8VLQJWKHPXOWLFDUGVORW\RXFDQUHDGDQGZULWHGDWDWRD6'FDUG6'+&FDUG00&
Youcanuseacardasaremovablediskandconvenientlyexchangedatawithdigital
GHYLFHVVXFKDVDGLJLWDOFDPHUDGLJLWDOFDPFRUGHU03HWF
z Youhavetoadditionallypurchaseamulticardwiththenecessarycapacity
GHSHQGLQJRQ\RXUUHTXLUHPHQWV
z<RXFDQXVHDPXOWLFDUGMXVWOLNHDQ\GDWDVWRUDJHGHYLFH$FRS\ULJKWSURWHFWLRQ
IXQFWLRQLVQRWVXSSRUWHG
z6LQFH\RXFDQORVHDFDUGZKHQPRYLQJWKHFRPSXWHUNHHSWKHFDUGVHSDUDWHO\
68
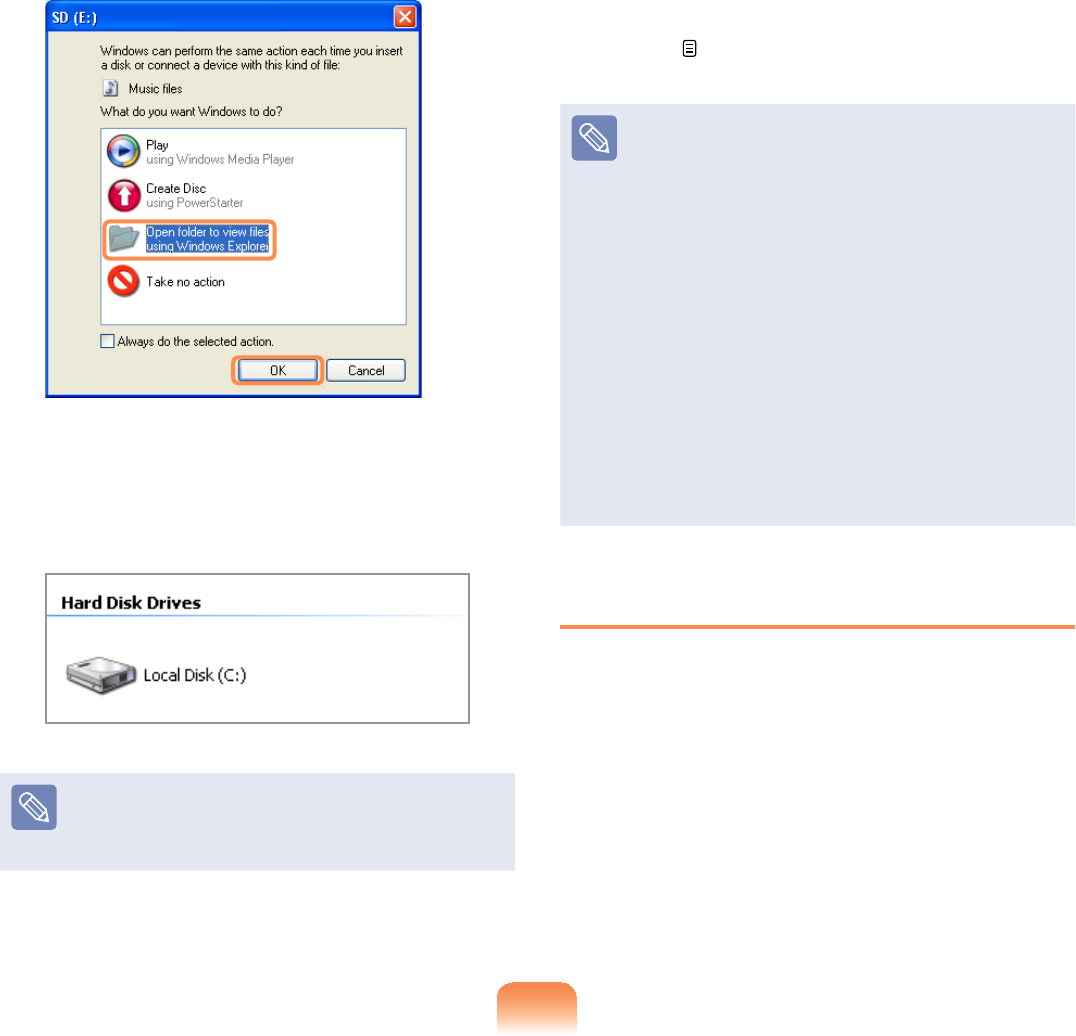
2 Click Start > My Computer7KH
LQVHUWHGPHPRU\FDUGLVGLVSOD\HG
3 You can save, move and delete data
by double-clicking the corresponding
GULYH
Thedevicenameofthecarddrive
maydifferdependingonyour
FRPSXWHUPRGHO
Sinceyoucanonlyusethecardafter
formattingit,ifitisnotformatted,
format the card referring to the
descriptionsof“Toformatamemory
FDUG´ 69
Using a Mini SD snd RS-MMC
Since the above cards are too small,
youcannotinsertthecardsintothe
VORWGLUHFWO\
Insert the card into the dedicated
adapter(availablefrommost
electronic retailers) and then insert
WKHDGDSWHULQWRWKHPXOWLFDUGVORW
However, depending on the adapter’s
body material, some RS-MMC cards
PD\QRWEHUHFRJQL]HGSURSHUO\
Samsung recommend that you check
thecardisrecognizedcorrectlyprior
WRSXUFKDVLQJ
Removing a Card
1 3XVKWKHHQGRIWKHFDUGVOLJKWO\
2 7KHFDUGFOLFNVDQGSRSVRXW
5HPRYHWKHFDUGIURPWKHVORW

69
Formatting a Card
:KHQXVLQJWKHPHPRU\FDUGIRUWKH¿UVW
time,youmustformatthecardbefore
XVLQJLW
Formattingacarddeletesalldata
VDYHGRQWKHFDUG,IWKHFDUG
includes data, backup the data
EHIRUHIRUPDWWLQJLW
1 Select Start > My Computer
2 Right-clickoverthecarddriveand
select FormatIURPWKHSRSXSPHQX
3 If you click StartIRUPDWWLQJZLOOEHJLQ
z Touseacardtoexchangedata
with a digital device such as a
digital camera, formatting the
data using the digital device is
UHFRPPHQGHG
z When you try to use a card, which
is formatted in the computer, in
another digital device, you may
have to format the card again in
WKHGHYLFH
z You cannot format, write or delete
data from a SD, or SDHC card
with a write protection tab when it
LVLQWKH/RFNSRVLWLRQ
z Inserting and removing a memory
card repeatedly may damage the
PHPRU\FDUG
70
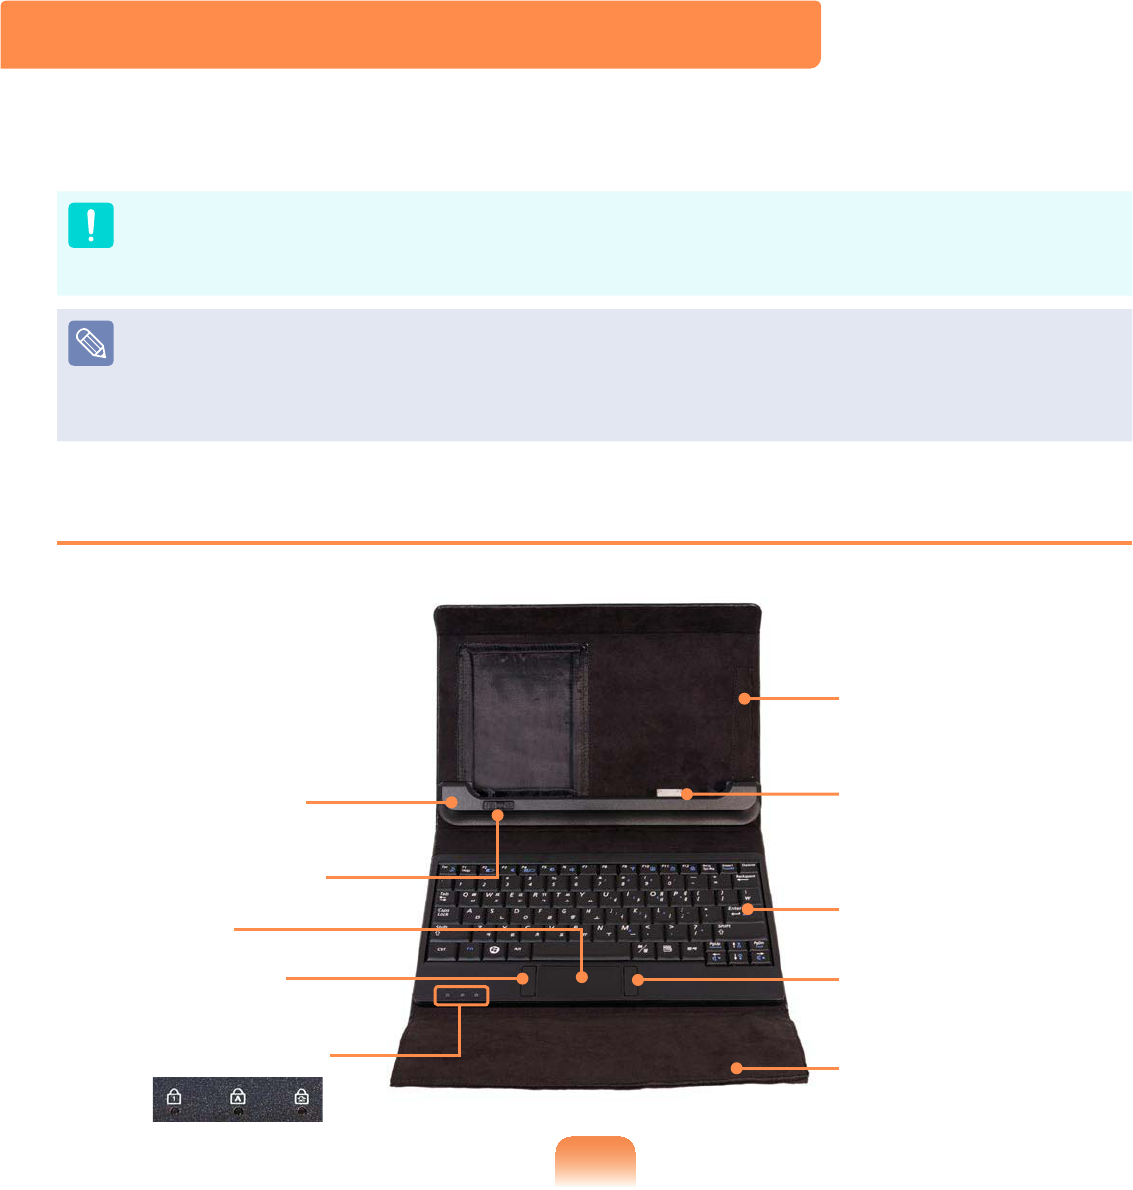
Organizer (Optional)
The Organizer isaportabledevicethatcanbeconnectedtoacomputerandyoucan
FDUU\FRQYHQLHQWO\7KHOrganizer providesakeyboardanddockingdeviceforyour
FRQYHQLHQWXVH
z YoucanonlyusetheOrganizerZLWKVRPHVSHFL¿HGFRPSXWHUVZLWKWKH2UJDQL]HU
SRUWIURPDPRQJ6DPVXQJ803&FRPSXWHUV
z:KHQPRYLQJWKH2UJDQL]HUWDNHFDUHQRWWRGLVFRQQHFWWKHFRQQHFWHGFRPSXWHU
z The OrganizerLVRSWLRQDO,WPD\EHSURYLGHGIRUVRPHPRGHOVRQO\RUPD\KDYHWR
EHSXUFKDVHGDGGLWLRQDOO\
z Theactualcolorandappearanceoftheorganizerandthecomputermaydifferfrom
WKHSLFWXUH
Front View
"Organizer
Connector
n Docking Device
lComputer
Separation Latch
jLeft Touchpad
Button
W Touchpad
V Status Indicators
a Wired Keyboard
bRight Touchpad
Button
VLCD Protection
Cover
#Stylus Pen
Holder

71
n Docking Device 8VLQJWKLVGHYLFH\RXFRQQHFWDFRPSXWHUDQGDQRUJDQL]HU
lComputer
Separation Latch
Usingthislatch,youcanseparatethecomputerfroman
RUJDQL]HU
To separate the computer, slide the latch to the left position and
SXOORXWWKHFRPSXWHU
W Touchpad 3HUIRUPVWKHUROHRIDPRXVH
jLeft Touchpad
Button
3HUIRUPVWKHUROHRIWKHOHIWPRXVHEXWWRQ
V Status Indicators 6KRZVWKHRSHUDWLQJVWDWXVRIWKHFRPSXWHU
ThisturnsonwhentheNumLockkeyispressedand
QXPHULFNH\SDGLVDFWLYDWHG
ThisturnsonwhentheCapsLockkeyispressedallowing
capitalletterstobetypedwithoutholdingtheShiftbutton
GRZQ
ThisturnsonwhentheScrollLockkeyispressedandscreen
VFUROOLVORFNHG
bLCD Protection
Cover
ProtectstheLCDpanelwhentheorganizerisclosedafter
FRQQHFWLQJWKHFRPSXWHUWRWKHRUJDQL]HU:KHQXVLQJDQ
organizer,youcanusetheLCDprotectioncoverasawristpad
E\VHSDUDWLQJWKHFRYHUDQG¿[LQJLWZLWKWKHPDJQHW
aRight Touchpad
Button
3HUIRUPVWKHUROHRIWKHULJKWPRXVHEXWWRQ
Wired Keyboard $GHYLFHWKDWHQDEOHVHQWHULQJLQIRUPDWLRQE\SUHVVLQJWKHNH\V
"Organizer
Connector
&RQQHFWDQG¿[LWWRWKHRUJDQL]HUSRUWDWWKHERWWRPRIWKH
FRPSXWHU
#Stylus Pen Holder <RXFDQNHHSWKHVW\OXVSHQLQWKH6W\OXV3HQ+ROGHU
72
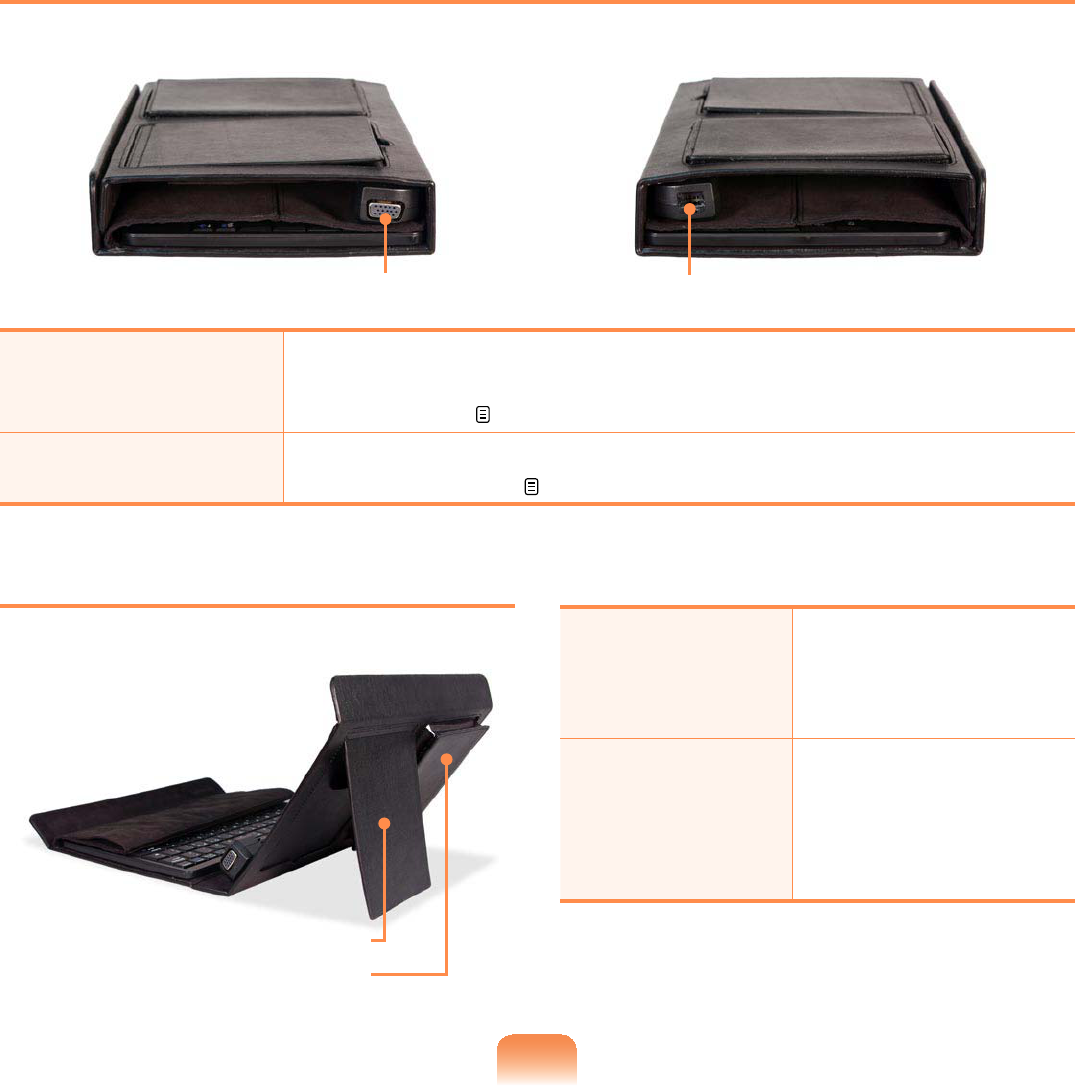
Right View / Left View
[ Right View ] [ Left View ]
n Monitor Port l Wired LAN Port
nMonitor Port $SRUWXVHGWRFRQQHFWDPRQLWRU79RUSURMHFWRUVXSSRUWLQJD
SLQ'68%LQWHUIDFH)RUGHWDLOHGXVDJHUHIHUWRConnecting
a monitor/ TV 77
lWired LAN Port &RQQHFWWKH(WKHUQHWFDEOHWRWKLVSRUW)RUGHWDLOHGXVDJHUHIHU
to Wired Network101
Back View
n Stand
lHigh Capacity Battery
Extension Compartment
nStand Youcanplacethe
screen on the stand
formorecomfortable
YLHZLQJ
lHigh Capacity
Battery
Extension
Compartment
You can expand the
spacebyexpanding
this part when using a
computerwithahigh
FDSDFLW\EDWWHU\
73
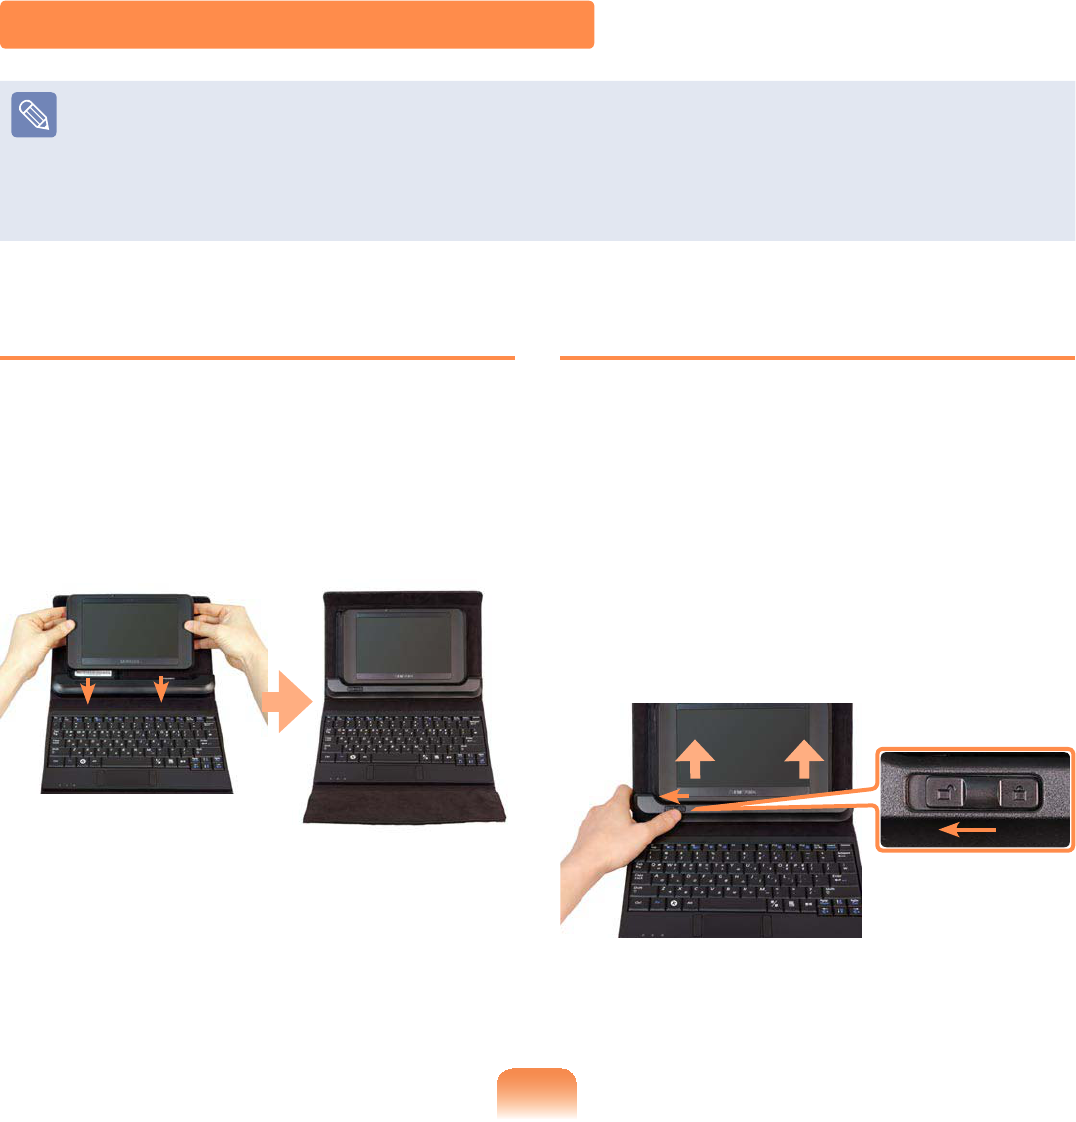
Installing / Removing the Computer
z Makesuretoremoveallthecablesconnectedtothecomputerbeforeinstallingthe
RUJDQL]HU
z AlthoughyoucaninstallontoorremovethecomputerfromtheOrganizerregardless
ofwhetherthecomputeristurnedonoroff,doingthiswhenthecomputeristurned
RIILVUHFRPPHQGHG
Installing the Computer
1 Place the computer over the
Organizer aligning the bottom of the
computertothedockingdeviceof
theOrganizerandthenpressthe
FRPSXWHUGRZQXQWLOLWFOLFNVWR¿[LW
2 $GMXVWWKHVWDQGDWWKHEDFNRIWKH
Organizertoacomfortableangleand
XVHLW
Removing the Computer
1 6KXWGRZQWKHFRPSXWHU
2 Slide and hold the Computer
SeparationLatchatthebottomleftof
the Organizer docking device into the
leftpositionandliftthecomputerupto
VHSDUDWHLW
74
Using the Keyboard
The OrganizerLVHTXLSSHGZLWKDZLUHGNH\ERDUG<RXFDQFRQYHQLHQWO\XVHYDULRXV
IXQFWLRQVXVLQJWKHVKRUWFXWNH\VRIWKHNH\ERDUG
z7KHNH\ERDUGLVVXSSOLHGDFFRUGLQJWRWKHFRUUHVSRQGLQJFRXQWU\
z7KHNH\ERDUGLPDJHDQGFRORUPD\GLIIHUIURPWKHDFWXDONH\ERDUG
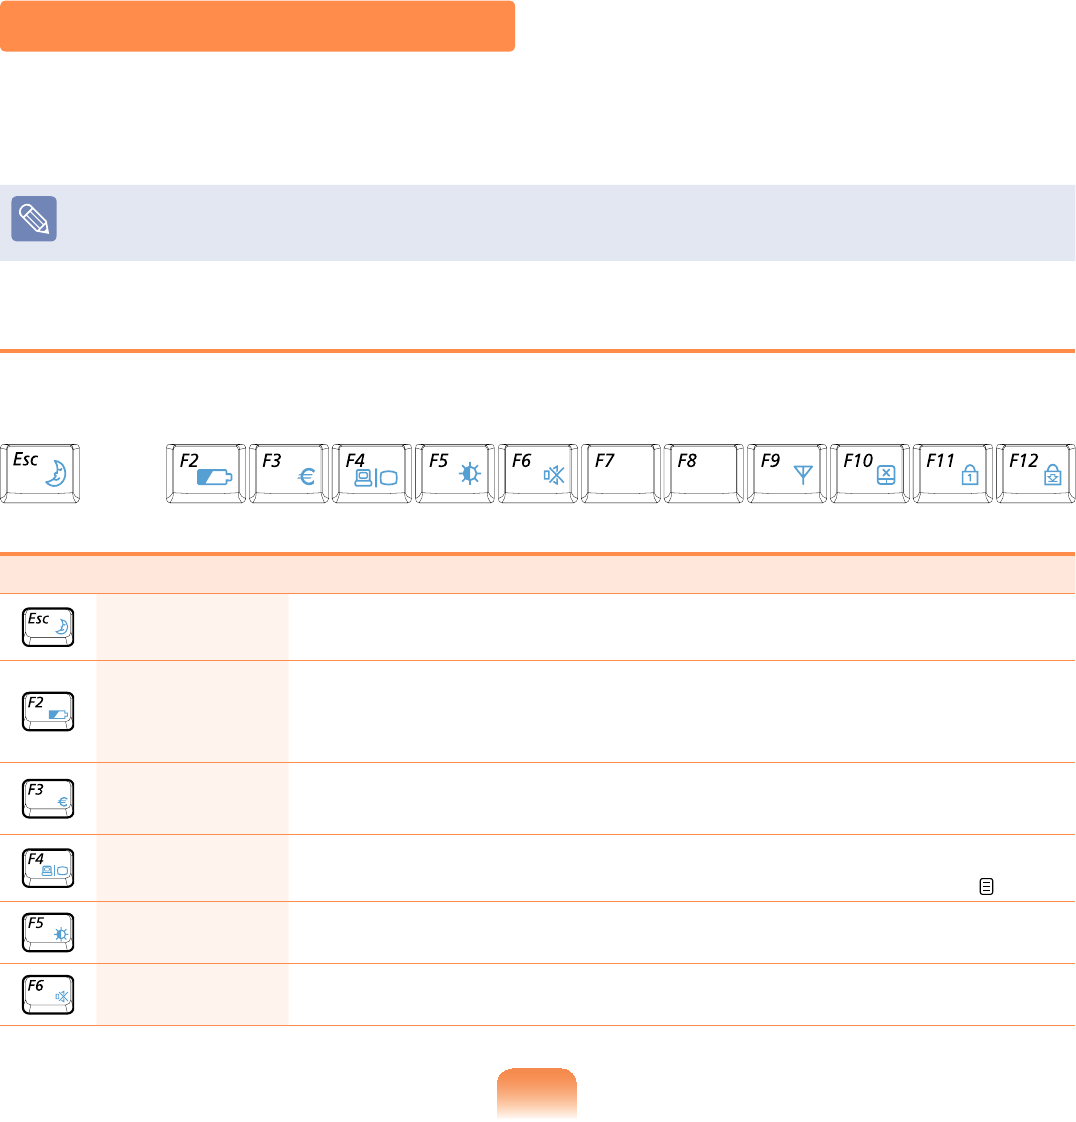
Shortcut Keys
YoucanusethefollowingfunctionsbypressingthekeysbelowwiththeFnNH\
Fn+ Name Function
REST
(Sleep Mode)
6ZLWFKHVWR6OHHSPRGH7RZDNHWKHFRPSXWHUXSVOLGHWKH
Power SwitchGRZQZDUGV
Gauge
6KRZVWKHUHPDLQLQJEDWWHU\FKDUJH
YoucanonlyusethisfunctionwhentheEasyDisplayManager
SURJUDPLVLQVWDOOHG
Euro (QWHUVWKH(XURPRQHWDU\XQLWV\PERO
7KLVNH\PD\QRWEHSURYLGHGGHSHQGLQJRQWKHNH\ERDUGW\SH
CRT/LCD SwitchesthescreenoutputtotheLCDorexternalmonitorwhen
DQH[WHUQDOPRQLWRURU79LVFRQQHFWHGWRWKHFRPSXWHU 78
Backlit 7XUQVWKH/&'EDFNOLJKWRQRURII
Mute 0XWHVRUFDQFHOVPXWH

75
Fn+ Name Function
Wireless LAN TurnsthewirelessLANfunctiononoroffinmodelswithwireless
/$1FDSDELOLW\
Touchpad
7XUQVWKH7RXFKSDGIXQFWLRQRQRURII
When using an external mouse only, you can turn the Touchpad
RII
Num Lock 7XUQVWKHQXPHULFNH\ERDUGRQRURII
Scroll Lock IfyouturntheScrollLockon,youcanscrollthescreenupor
GRZQZLWKRXWFKDQJLQJWKHFXUVRUORFDWLRQLQVRPHDSSOLFDWLRQV
Screen Brightness Control
7RDGMXVWWKH/&'EULJKWQHVVSUHVVWKH
Fn +key combination or the
Fn +NH\FRPELQDWLRQ
Thechangedscreenbrightnessis
displayedatthecenterofthescreenfora
PRPHQW
Volume Control
To control the volume, press the
Fn +key combination or the
Fn +NH\FRPELQDWLRQ
Youcanmutethesoundorcancelthe
mutefunctionbyclickingtheFn +
NH\FRPELQDWLRQ
Numeric Key
The numbers are printed in blue on the
QXPHULFNH\V
IfNumLockisturnedonbypressingthe
Fn +key combination, you can use
WKHQXPHULFNH\VWRHQWHUGLJLWV
Other Function Keys
Application Key
Performs the right-click mouse function
WRXFKSDG
76
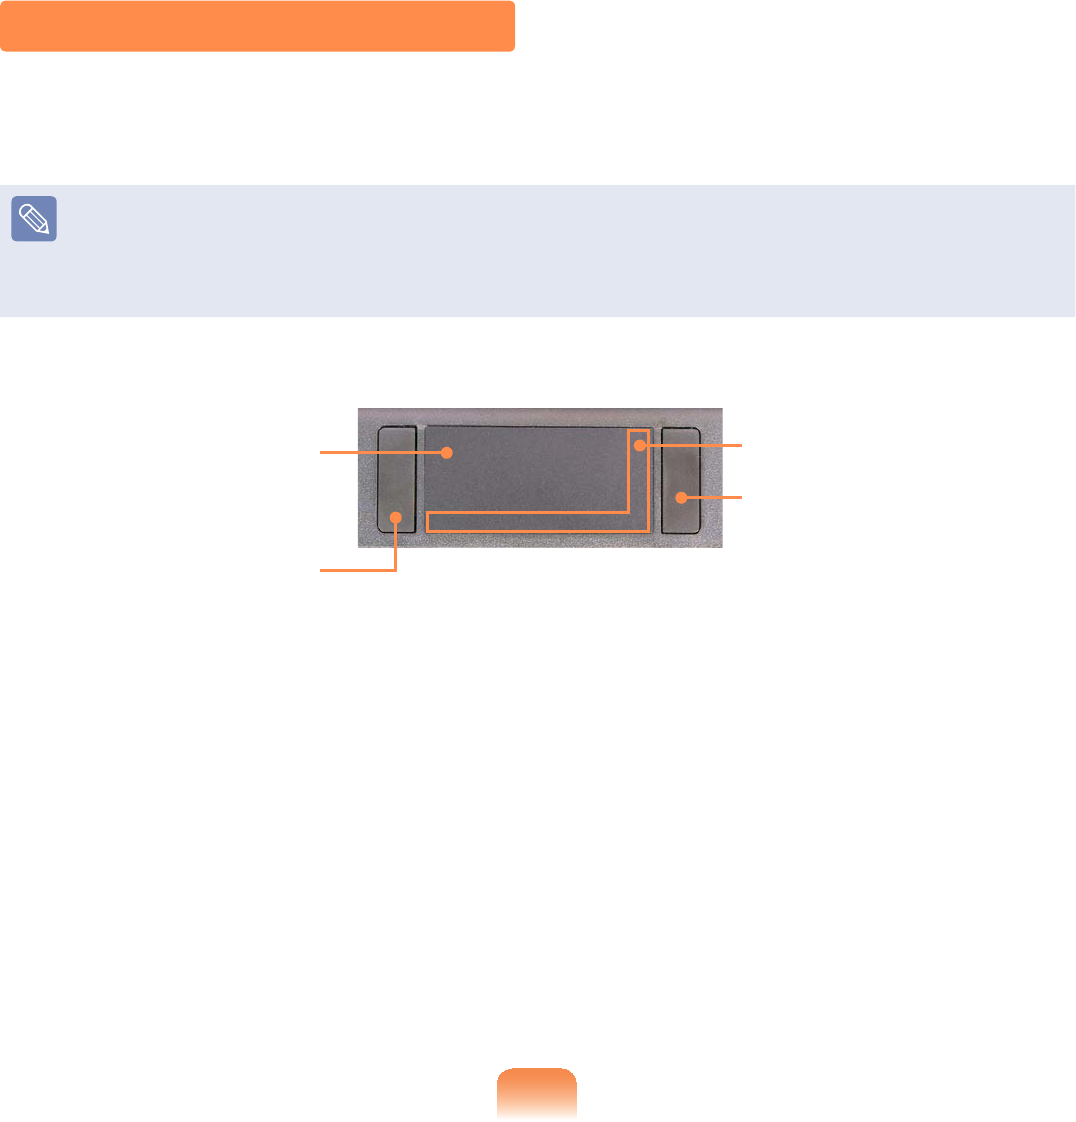
Touchpad
Thetouchpadprovidesthesamefunctionasamouseandtheleftandrightbuttonsof
WKHWRXFKSDGSOD\VWKHUROHRIWKHOHIWDQGULJKWEXWWRQVRIDPRXVH
z8VHWKH7RXFKSDGZLWK\RXU¿QJHUV8VLQJDVKDUSREMHFWPD\GDPDJHWKH
7RXFKSDG
z If you touch the Touchpad or press the Touchpad buttons while booting up, the
:LQGRZVERRWWLPHPD\EHH[WHQGHG
Touchpad
8VHWRPRYHWKHFXUVRU
Touchpad Left Button
You can select or run a
SURJUDPXVLQJWKLVEXWWRQ
Touchpad Right Button
Plays the role of the right
PRXVHEXWWRQ
Scroll Area
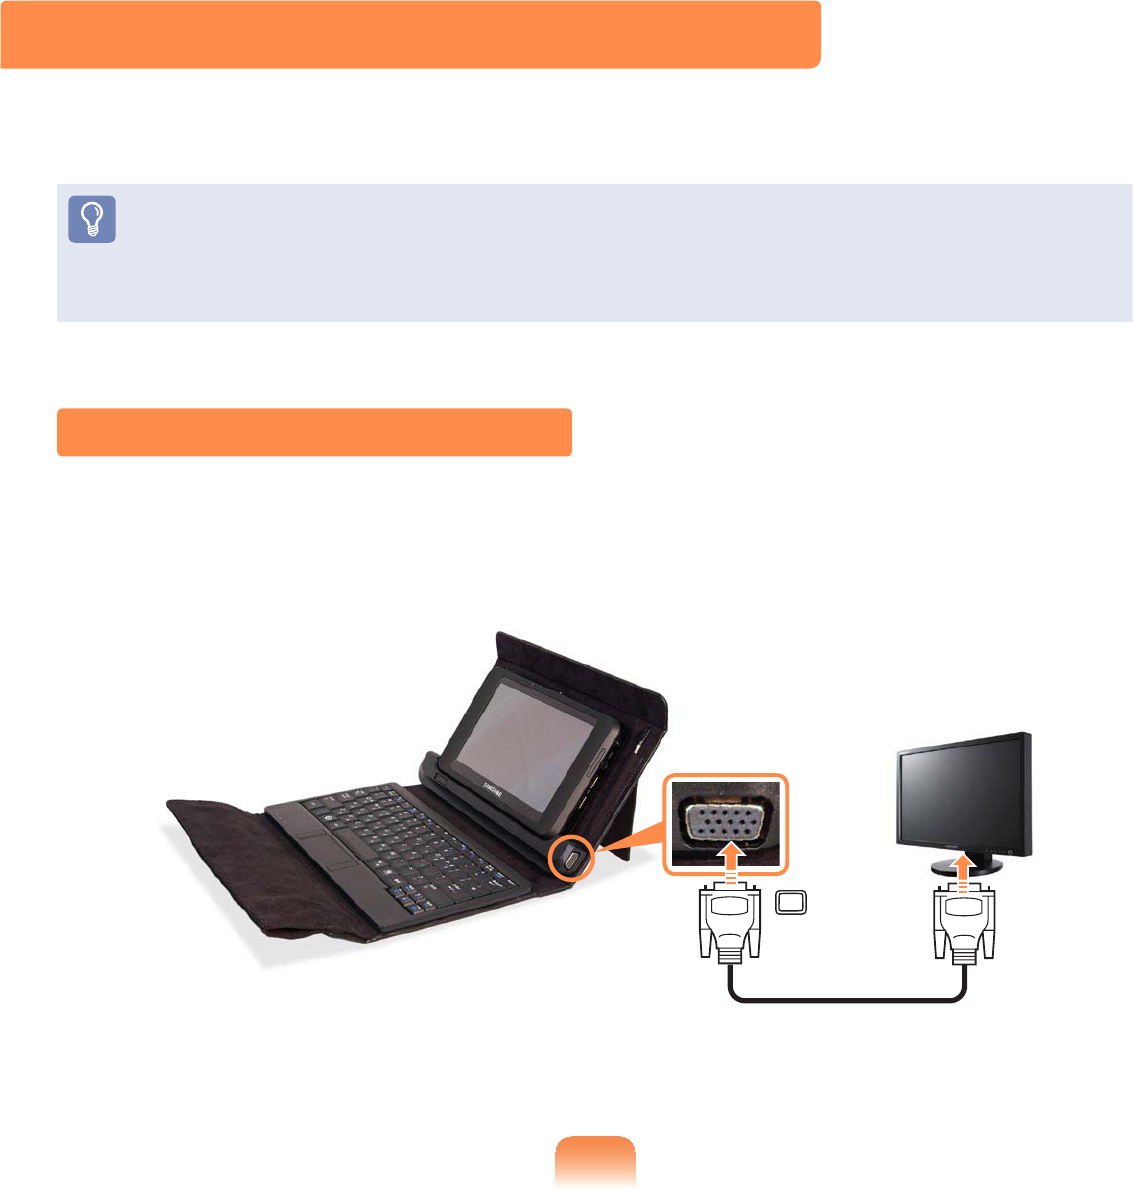
77
Connecting a monitor / TVmonitor / TV
Usinganexternaldisplaydeviceisusefulwhenyouaregivingapresentationor
ZDWFKLQJDYLGHRRUPRYLHWKURXJK\RXUPRQLWRU
z YoucanusetheConnect Monitor/ TV function only when you have an Organizer
The OrganizerLVRSWLRQDO,WPD\EHSURYLGHGIRUVRPHPRGHOVRQO\RUVKRXOGEH
SXUFKDVHGDGGLWLRQDOO\
z<RXKDYHWREX\DFRQQHFWLRQFDEOHDGGLWLRQDOO\
Connecting to the Monitor / TV
ConnectthecomputertotheRGBportofthemonitororTVusingamonitorcable
SLQ

78
Switching the Display Device using
the Shortcut Key
Press the Fn +key combination
RQFH7KHQWKHEasy Display Manager
screenappearsinwhichyoucanselecta
GLVSOD\GHYLFH
Whenever you press the key while
holdingdowntheFn key, the selected
RSWLRQLVFKDQJHG
Example) Selecting LCD+CRT
Dual View
Switching to the MENU Program
Screen
4 Press the wheel button to run the
MENUSURJUDP
5 Pressing the LCD/CRT button once
cycles through the following modes:
LCD > CRT > Clone View > Dual
View
zLCD:ComputerScreen
zCRT: External Monitor Screen
zLCD+CRT Clone View: Computer
+ExternalMonitorScreen
zLCD+CRT DualView: Computer
+ExternalMonitorScreeninDual
View
zWhat is Dual View?
DualViewisafunctionthat
enables you to view a computer
VFUHHQRYHUWZRGLVSOD\GHYLFHV
It is convenient when you need a
ZLGHVFUHHQ
ExternalMonitor/TVisnot
supportedintheDOSCommand
3URPSWZLQGRZ
Viewing Through a Monitor / TV
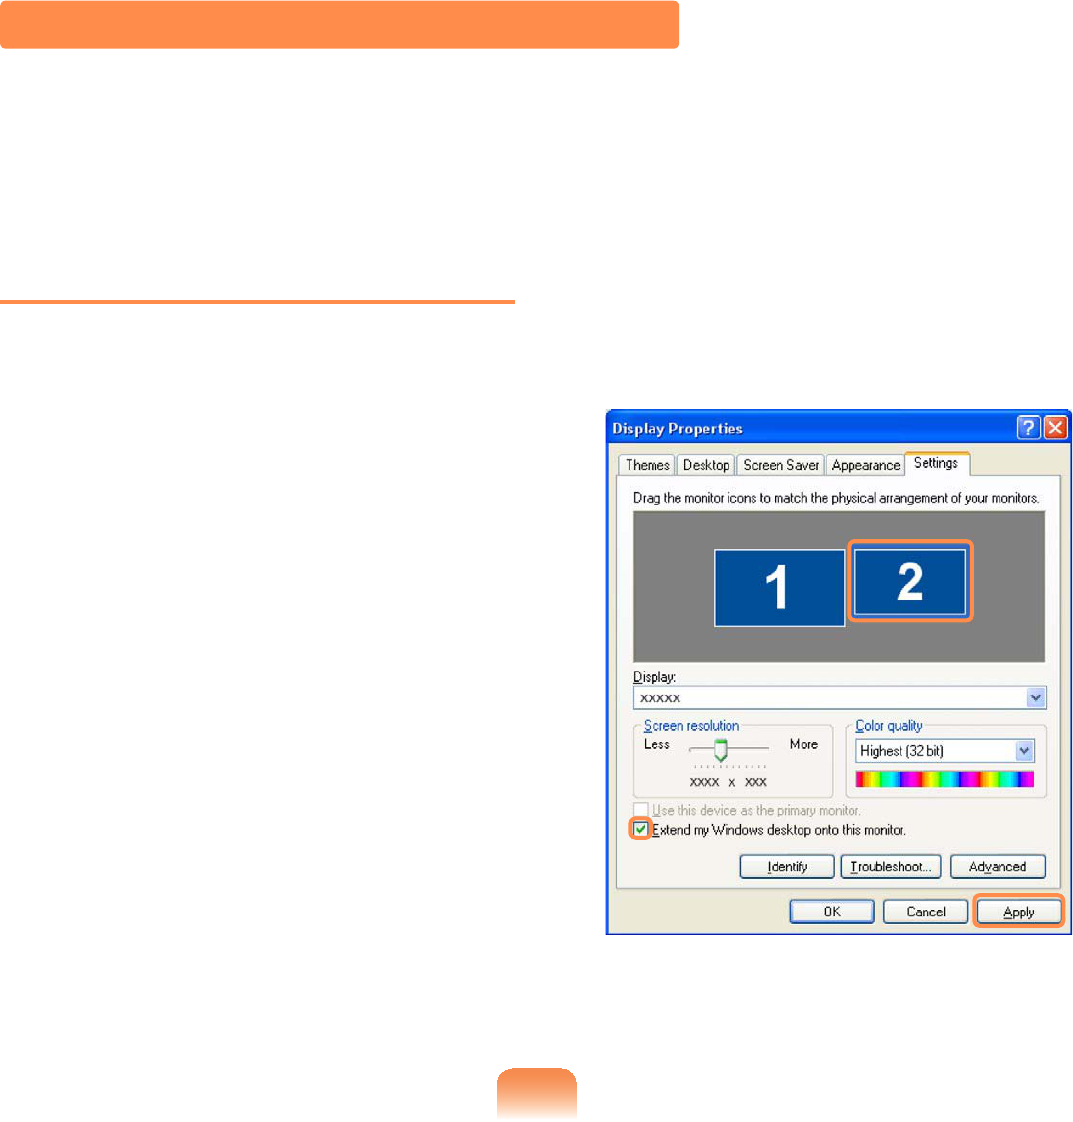
79
Using Dual View to View Extended Screen
Dual View is a function that enables you to view a computer screen over two display
GHYLFHV7KLVLVFRQYHQLHQWZKHQQHHGLQJDZLGHVFUHHQIRUZRUN
In Dual View mode, you can select the screen resolution and colour quality for each
GLVSOD\GHYLFHDVLIWKHUHZHUHWZRVHSDUDWHJUDSKLFVFDUGV
Setting Dual View Mode
1 Connect the external display device
HJDPRQLWRURUDSURMHFWRUWRWKH
FRUUHVSRQGLQJSRUWRIWKHV\VWHP7R
connectaTV,connecttheTVtothe
79RXWSXWSRUWRIWKHV\VWHP
2 Right-clickontheDesktop,click
Properties, and then click the
SettingsWDE
3 Click the monitor 2icon, select the
Extend my Windows desktop onto
this monitor checkbox,clickApply
and then click OK
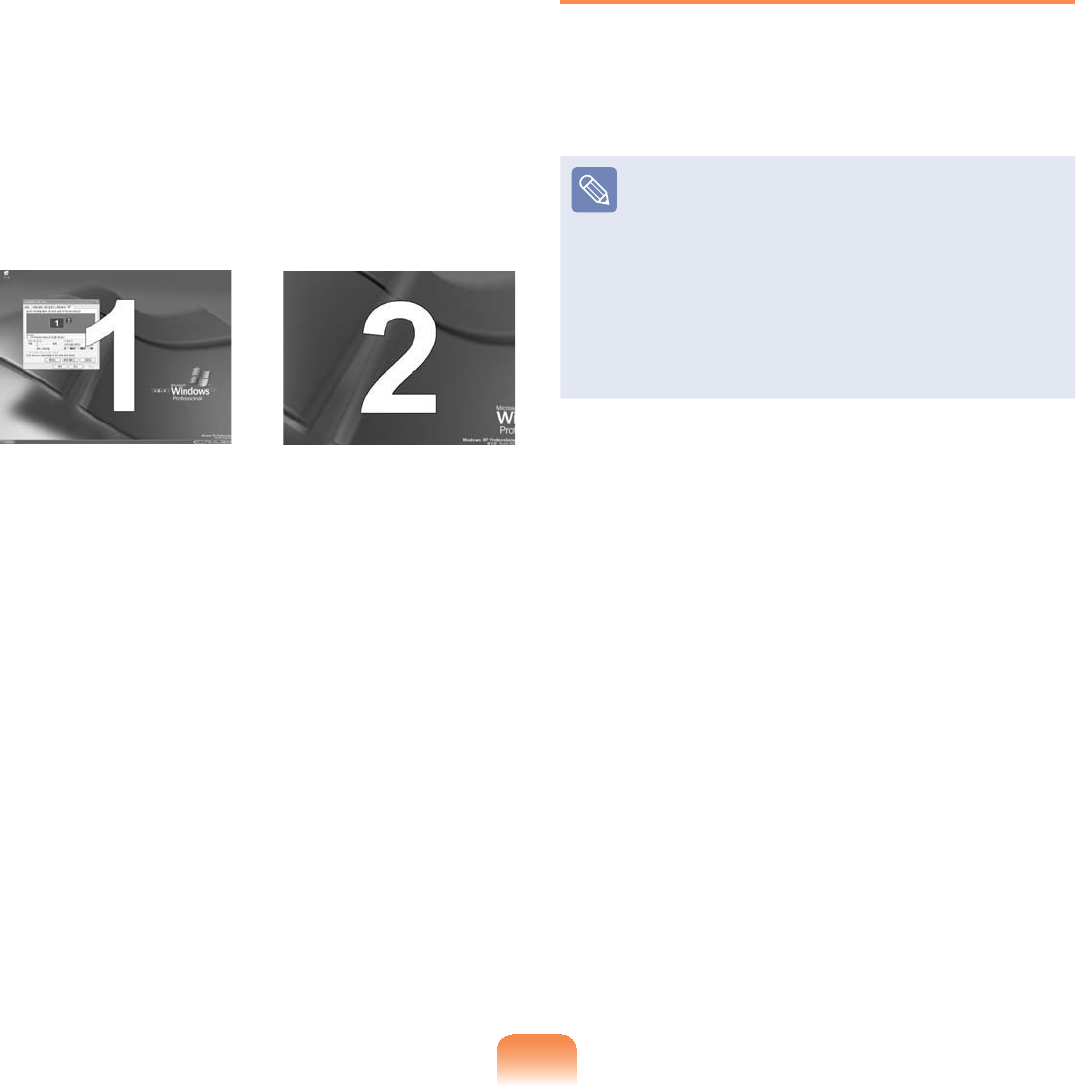
80
4 Theprimarydisplaydevice(theLCD)
is indicated as 1, and the secondary
displaydeviceisindicatedas21RZ
youcanviewthescreenthroughtwo
PRQLWRUV
:KHQ\RXXVH'XDO9LHZFRQ¿JXULQJ
the LCD as the 'Primary' monitor is
UHFRPPHQGHG
1 : Primary 2 : Secondary
Ifthescreenofthesecondary
displaydeviceisdisplayed,change
the settings to the desired screen
resolutionandcolourqualityinthe
>'LVSOD\3URSHUWLHV@GLDORJER[
Deactivating Dual View Mode
Click the monitor 2icon, clear the
Extend my Windows desktop onto this
monitor check box, and then click Apply
To move a window between
display devices in Dual View
mode
Clickthetitlebarofthewindowinthe
primary display device (1, the LCD),
anddragittothesecondarydisplay
GHYLFH7KHZLQGRZLVPRYHGWR
WKHVHFRQGDU\GLVSOD\GHYLFH
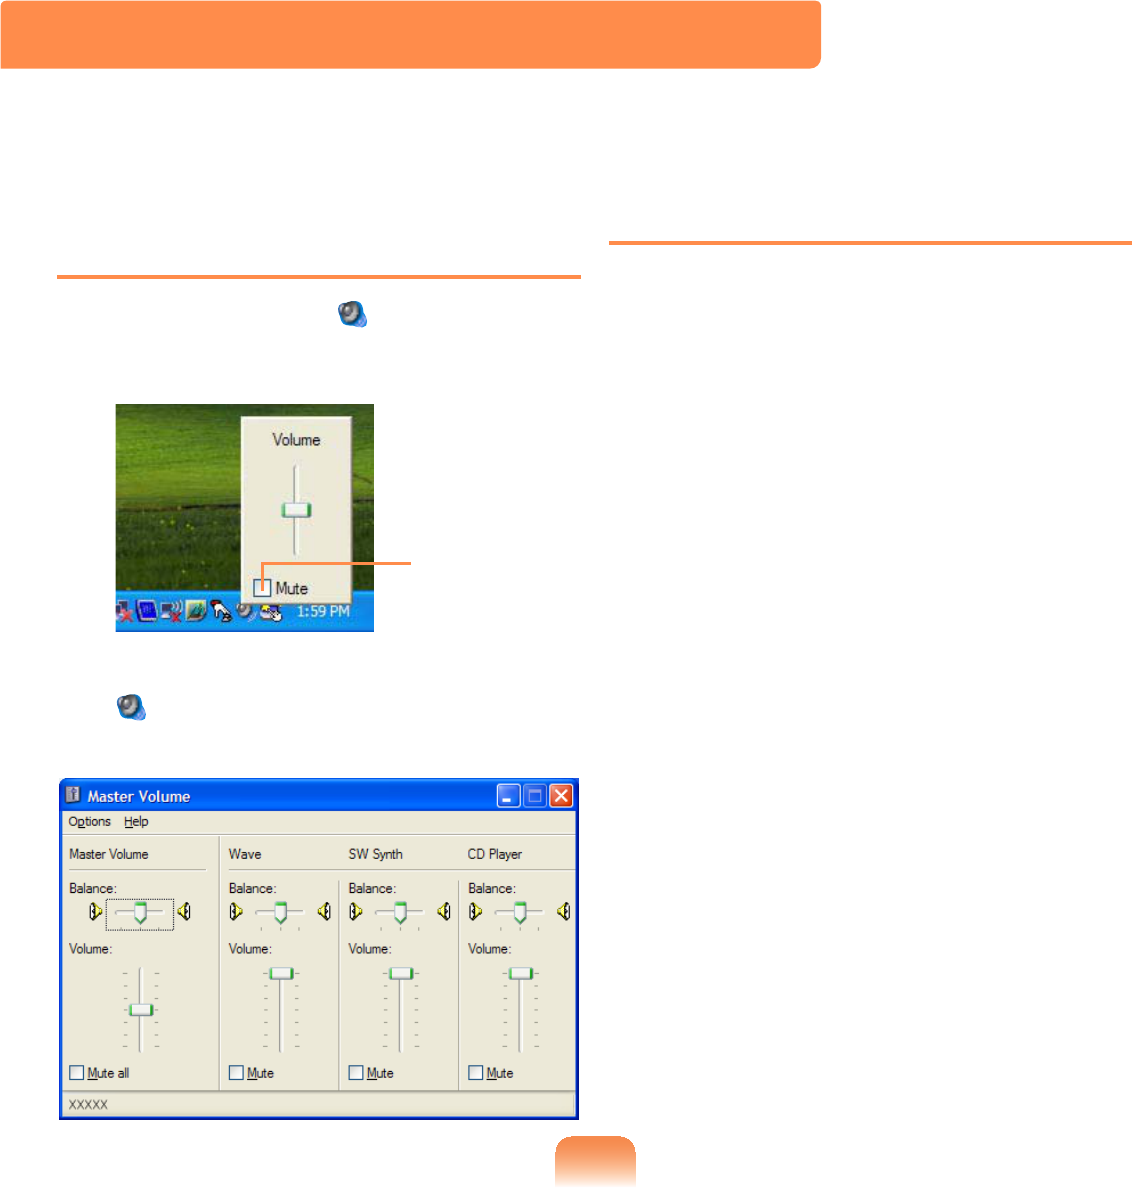
81
Adjusting the Volume using the
Volume Adjustment Program
Click the Volume icon on the taskbar
DQGVOLGHWKHYROXPHFRQWUROEDUWRDGMXVW
WKHYROXPH
Mute
Alternatively, double-click on the Volume
icon DQGDGMXVWWKHPDVWHUYROXPH
FRQWURO
Using the Sound Recorder
Theprocedurestorecordsoundusingthe
:LQGRZV5HFRUGHUDUHGHVFULEHGEHORZ
1 Connect a microphone to the
PLFURSKRQHMDFN
2 Click Start > Control Panel >
Sounds, Speech, and Audio
Devices > Sounds and Audio
Devices
3Click Advanced from Volume and
then, click Options > Properties.
Adjusting the Volume
<RXFDQFRQWUROWKHYROXPHZLWKWKH9ROXPH&RQWUROSURJUDP
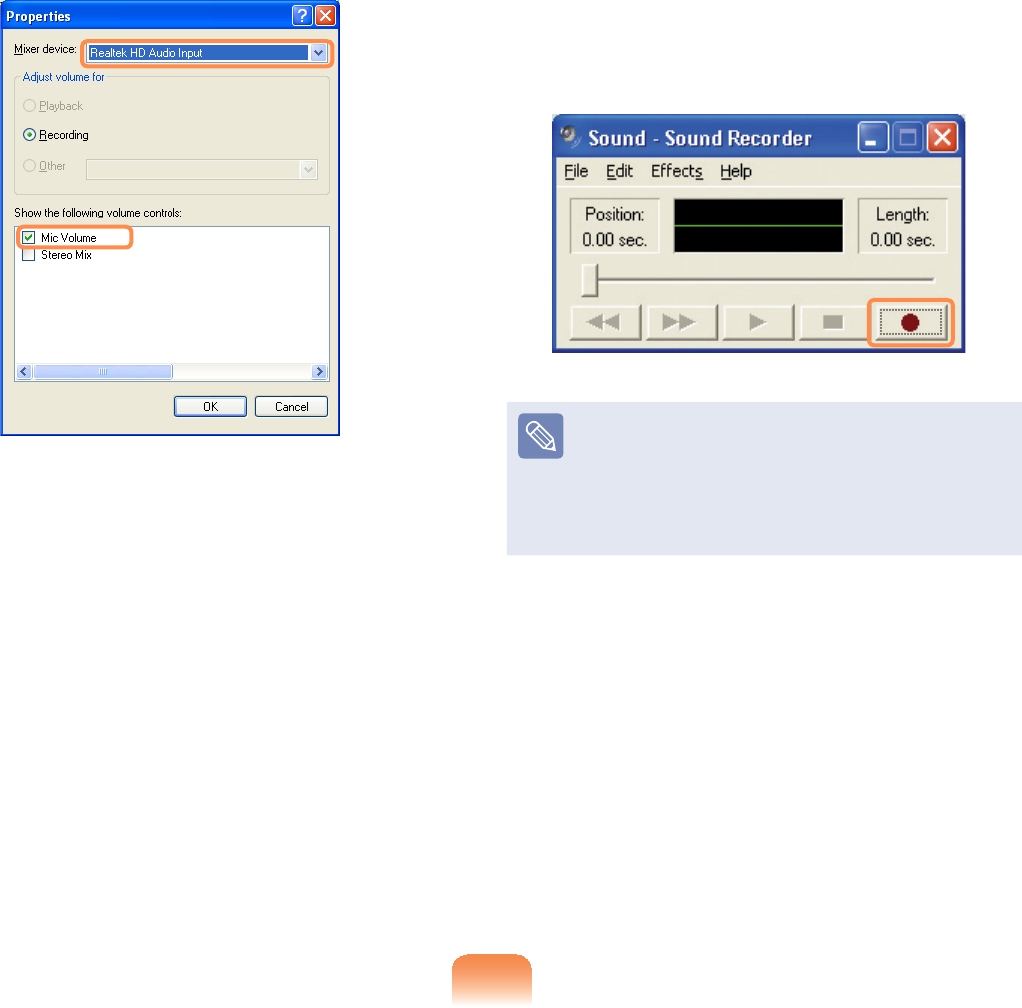
82
4 Select Realtek HD Audio input from
the mixer device to select Recording
from Adjust Volume for
5 Select Mic Volume from Show the
following volume controls and click
OK
6 When Recording Control window
appears, make sure all the Mute
ER[HVDUHXQFKHFNHG,QFUHDVHWKH
recording volume to increase the
recording sensitivity and close the
ZLQGRZ
7 Click Start > All Programs >
Accessories >Entertainment >
Sound Recorder
8 Click the Record button to perform
UHFRUGLQJ
Thedefaultrecordingdurationof
:LQGRZVLVVHFRQGV'RZQORDG
a dedicated recording program from
theInternettorecordaudiodatafora
ORQJWLPH
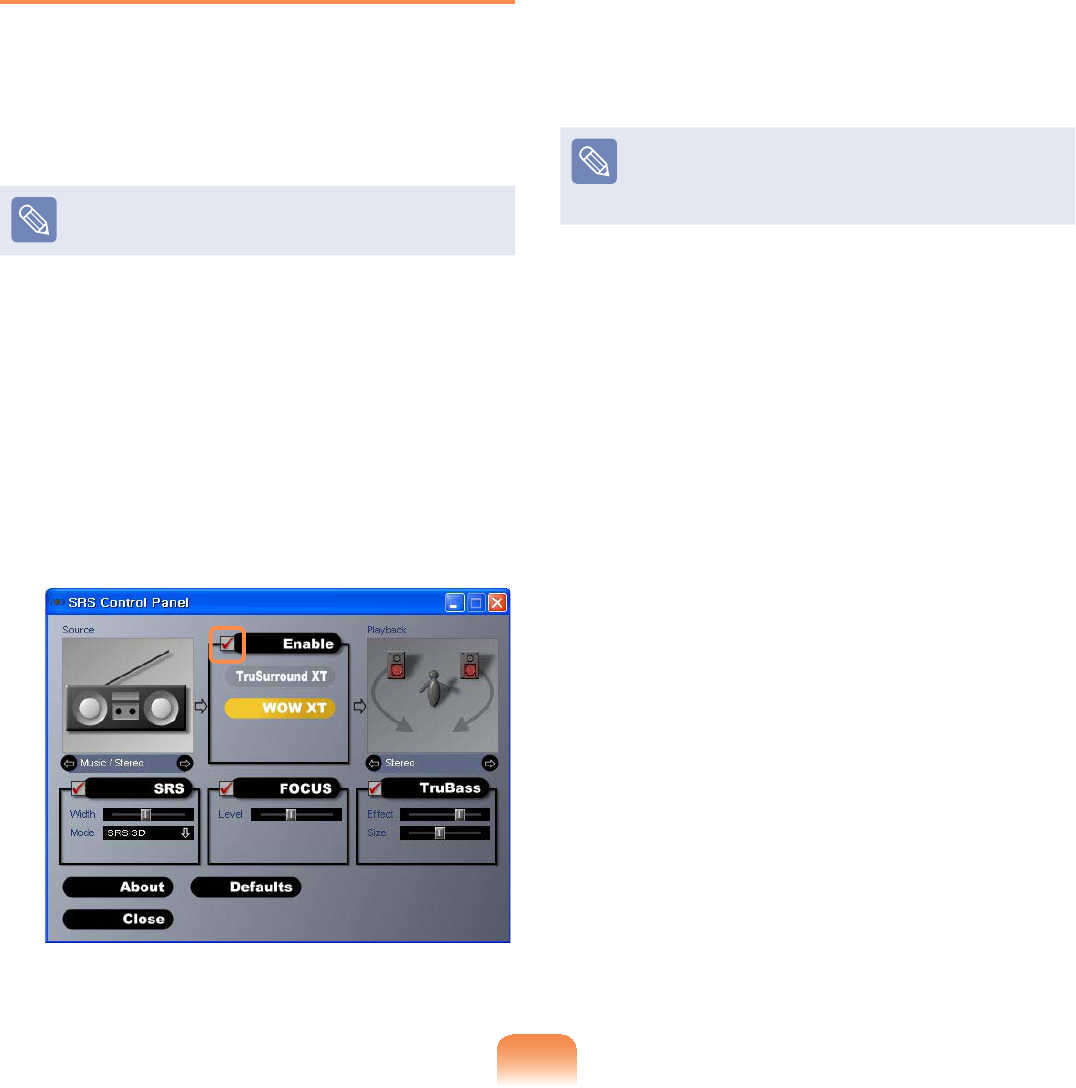
83
Using SRS
The SRS function enables you to
experiencemorestereophonicsoundby
expanding the space-perception through
WKHVWHUHRVSHDNHU
7KLVIXQFWLRQLVDYDLODEOHIRUVSHFL¿F
PRGHOVRQO\
1 Click Start > Control Panel >
Sound, Speech and Audio Devices
> SRS Control Panel
2 Check the Enable checkbox and
VHOHFWDPRGH7KHQ\RXFDQOLVWHQ
to sound through the selected SRS
HIIHFW
zWOW XT (Music): Select to listen to
PXVLF
zTruSurround XT (Movie/Video):
6HOHFWWRZDWFKDPRYLH
The SRS function supports the
computer’s built-in speaker and
KHDGSKRQHVRQO\

84
1 Click Start > All Programs >
Samsung > Voice Recorder > Voice
Recorder
2 Start recording near the built-
in microphone at the front of the
computerbyclickingtheRecord
EXWWRQ
STOP
OPEN
SETTING
HELP
RECORDPLAY
3 If the recording is complete, click the
Stop EXWWRQ,QWKH6DYHZLQGRZ
HQWHUWKH¿OHQDPHDQGFOLFNSave
$UHFRUGLQJ¿OHLVVDYHGWRWKHµ&?0\
5HFRUGHG)LOHV?¶IROGHU
4 7RSOD\DUHFRUGHG¿OHFOLFNWKHPlay
EXWWRQ
7RSOD\DSUHYLRXVO\UHFRUGHG¿OH
click the Open DQGVHOHFWWKH¿OH
Voice Recorder
9RLFH5HFRUGHULVDSURJUDPZKLFKHQDEOHVXVHUVWRPDNHUHFRUGLQJV
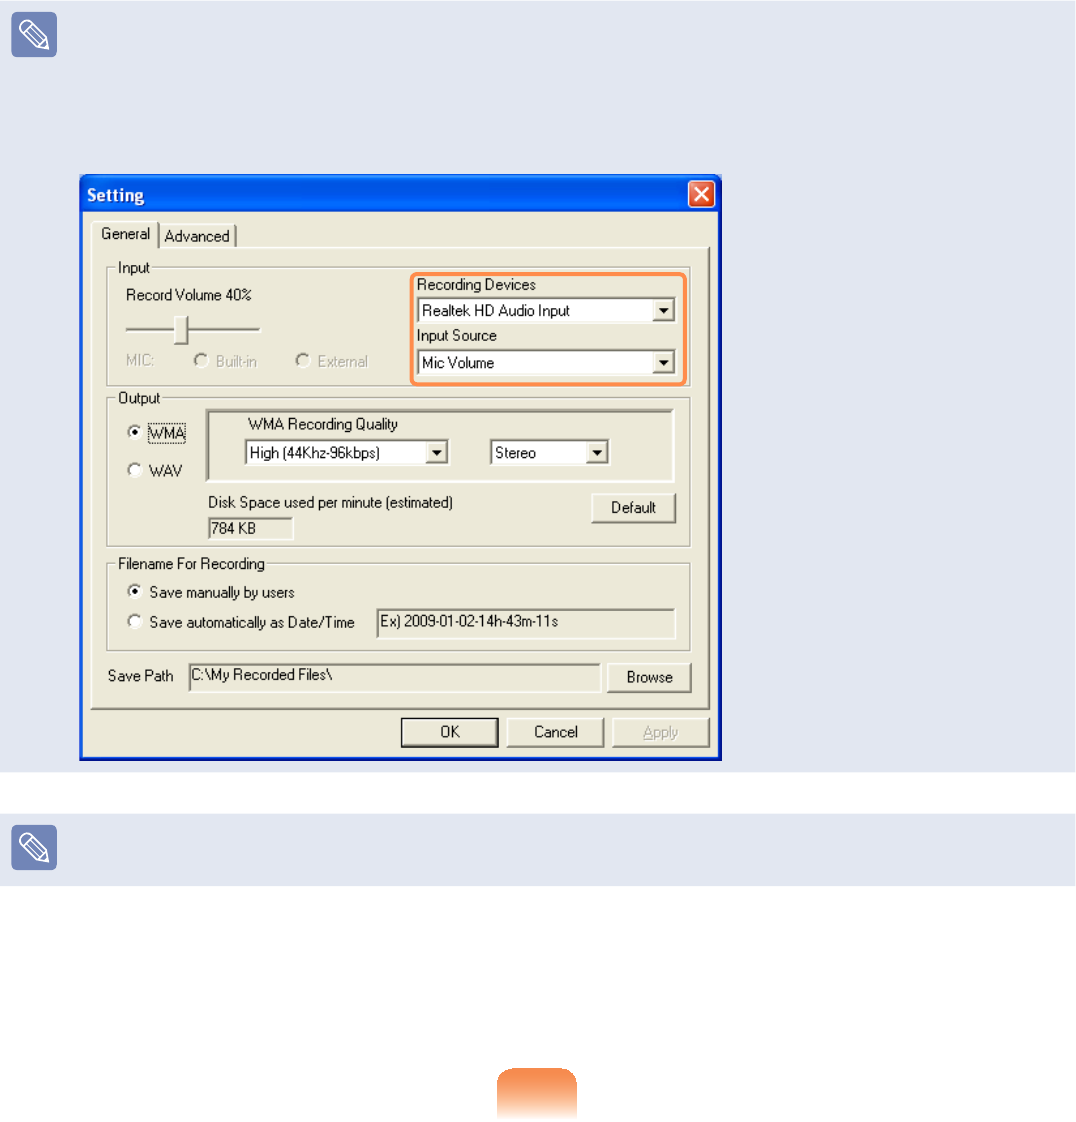
85
When unable to make a recording using the built-in microphone
Click the SETTING buttonandcheckiftheRecording device is set to Realtek HD
Audio Input,andtheInputSourceissettoMic Volume,IWKHVHWWLQJLVQRWGRQH
SURSHUO\\RXZLOOQRWEHDEOHWRPDNHDSURSHUUHFRUGLQJ
Formoredetailedusage,clicktheHelpEXWWRQ

Chapter 3.
The screen shots used in this chapter may differ from actual
screens depending on the Windows XP version and model.
Using Microsoft
Windows Vista
About Microsoft Windows XP 87
The Windows XP Screen Layout 91
Control Panel 95
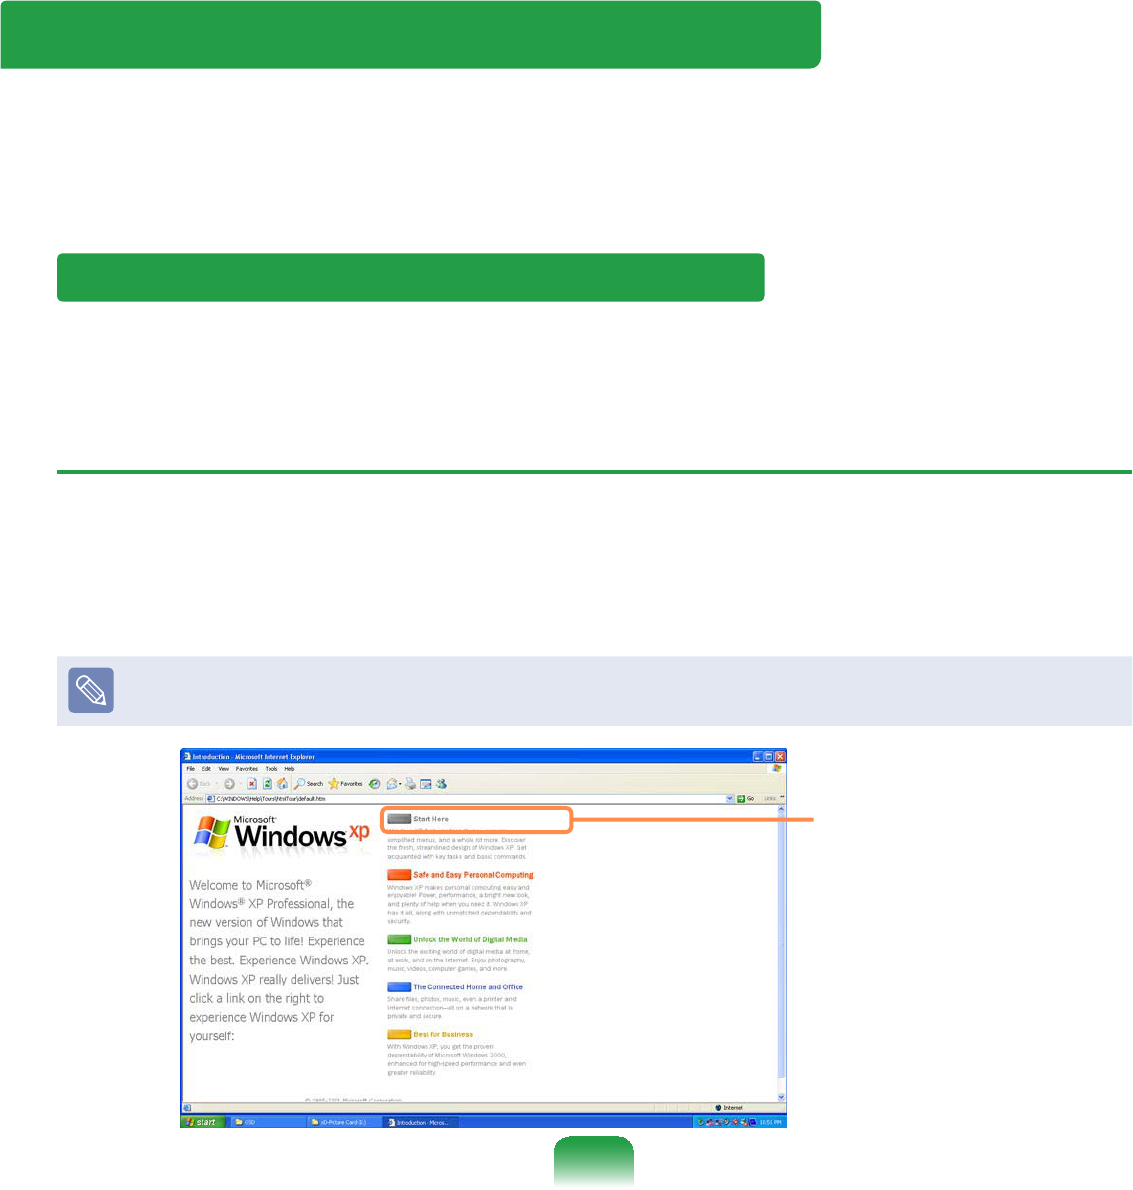
87
About Microsoft Windows XP
Microsoft Windows XP (hereafter, Windows) is the basic operating system used to
RSHUDWHWKHFRPSXWHU
On this computer, The Microsoft Windows XP Tablet PC Edition or the Microsoft
Windows XP Home EditionRSHUDWLQJV\VWHPLVLQVWDOOHG
Using Microsoft Windows XP Home Edition
<RXVKRXOGNQRZKRZWRXVH:LQGRZVLQRUGHUWRXVH\RXUFRPSXWHUSURSHUO\8VH
Tour Windows XP as well as Help and SupportWROHDUQDERXWKRZWRXVH:LQGRZV
Tour Windows XP
7RXU:LQGRZV;3LQWURGXFHVWKHEDVLFIHDWXUHVDQGFKDUDFWHULVWLFVRI:LQGRZV
Click Start > Tour Windows XP.
Or, click Start > All Programs > Accessories > Tour Windows XP.
&OLFNWKHWLWOHDWWKHULJKWWRYLHZWKHGHVFULSWLRQRIWKH:LQGRZVIHDWXUHV
Thescreenlayoutmaydifferdependingonthecomputermodelandtheoperating
V\VWHP
&OLFNWKHWLWOH
88
Help and Support
+HOSDQG6XSSRUWDOORZV\RXWRYLHZWKHIHDWXUHVDQGXVDJHRI:LQGRZV$OVRLWDOORZV
\RXWRVHDUFKWKHLQIRUPDWLRQ\RXZDQWE\HQWHULQJDVHDUFKNH\ZRUG
Click Start > Help and Support.
Search(QWHUDVHDUFKNH\ZRUGWRYLHZWKH+HOS
Fixing a problem,IDSUREOHPRFFXUV\RXFDQJHWKHOS
How to Change Desktop (Background Picture)
What's new in Windows XP > Windows XP articles : Walkthrough ways to use
your PC$IWHUFOLFNLQJWalkthrough : Personalize your PC,youcanviewthewayto
change the background picture on Customize Desktop

89
Using Microsoft Windows XP Tablet Edition
TheMicrosoftWindowsXPTabletPCEditionisanoperatingsystembasedon
0LFURVRIW:LQGRZV;33URIHVVLRQDO$GGLWLRQDOIHDWXUHVIRUWKHWDEOHW3&VXFKDVD
KDQGZULWLQJUHFRJQLWLRQIXQFWLRQKDYHEHHQDGGHG
You can learn elementary functions for using this PC through the Get Going with
Tablet PC and Tablet PC Tutorials
7KLVFRPSXWHUKDVWRXFKVFUHHQVVRWKDW\RXFDQRSHUDWHLWZLWK\RXUKDQGV
In addition, since a Stylus Pen is provided instead of a Tablet Pen, the Tablet and Pen
Settings provided by the Windows XP Tablet PC Edition are not completely supported
by the Pen Options
To calibrate the Pen, use the TouchkitSURJUDP 57
Get Going with the Tablet PCTablet PC
Select Start > All Programs > Get Going with Tablet PC
The Welcome to Tablet ComputingVFUHHQDSSHDUV&OLFNStart to learn how to use
\RXUWDEOHW3&
90
Tablet PC Tutorials
YoucantourelementaryfunctionsofyourtabletPCandlearnhowtohand-writeonthe
:ULWLQJ3DGWKURXJKWKH7DEOHW3&7RXU
Select Start > All Programs > Tablet PC > Tablet PC Tutorials
7KH7DEOHW3&7RXUVFUHHQDSSHDUV&OLFNNext to learn how to perform ‘Note Writing’,
µ(QWHULQJWH[WVZLWKWKH7DEOHW3&,QSXW3DQHO¶HWF
91
The Windows XP Screen Layout
Desktop
:KHQWXUQLQJWKHFRPSXWHURQWKH'HVNWRSVFUHHQDSSHDUV
7KHGHVNWRSLVWKHZRUNLQJDUHDRQWKHFRPSXWHU,WFRQVLVWVRIDODUJHZRUNVSDFHDQG
DWDVNEDUDWWKHERWWRPDVVKRZQLQWKH¿JXUHEHORZ
ThescreenthatappearsatthistimemaydifferdependingontheinstalledWindows
RSHUDWLQJV\VWHP
Start
Taskbar System Tray
with Clock
Tablet PC Input Panel
(For the Windows XP
TabletPCEditiononly)
Start 2SHQVWKH6WDUWPHQX
Taskbar 3URJUDPVFXUUHQWO\UXQQLQJDUHGLVSOD\HGKHUH
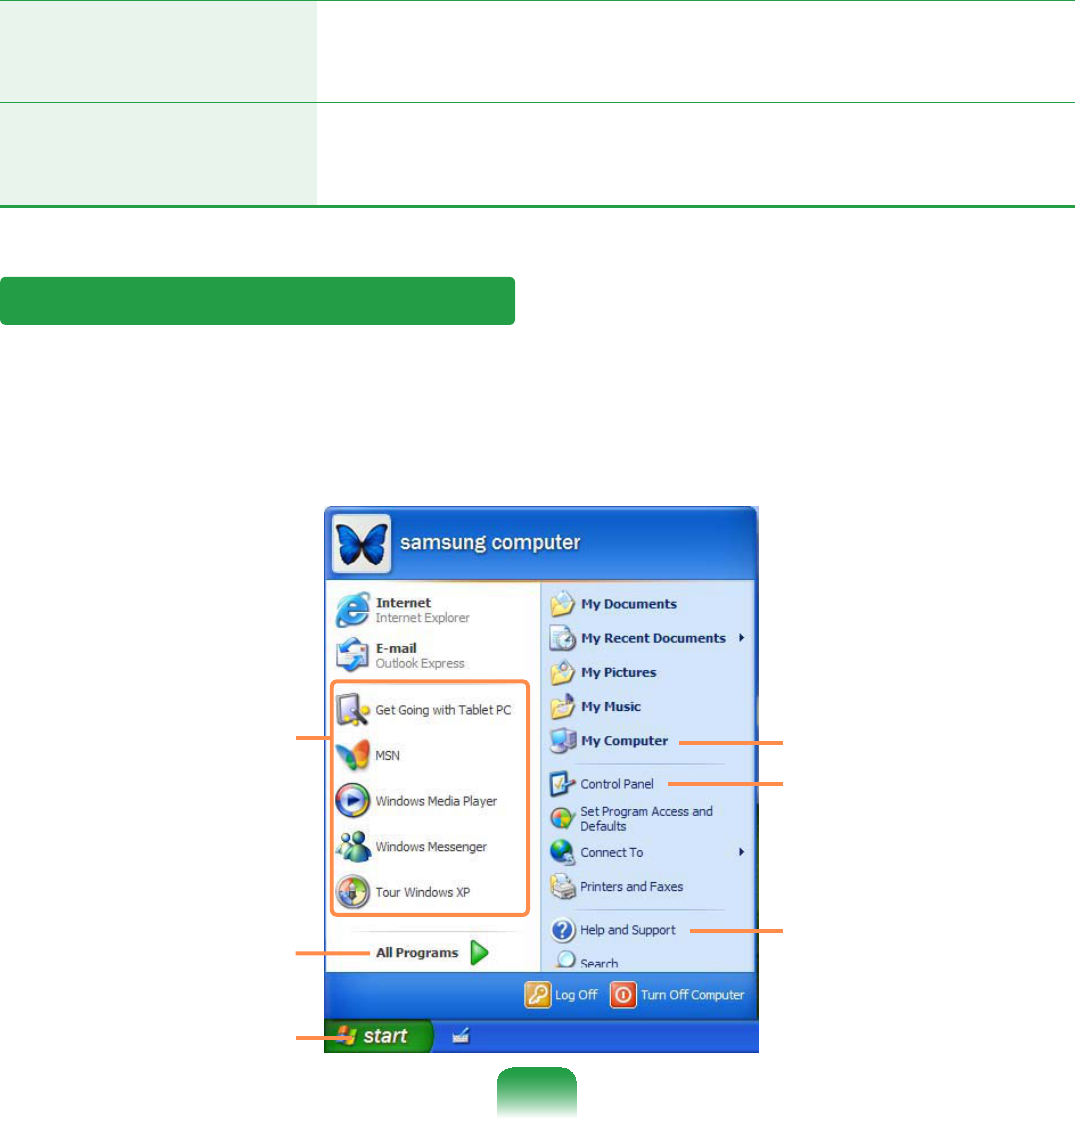
92
System Tray with
Clock
'LVSOD\VVRPHSURJUDPLFRQVWKDWDUHFXUUHQWO\UXQQLQJ
,QIUHTXHQWO\XVHGLFRQVDUHKLGGHQ&OLFNLQJWKHOHIWDUURZ
LFRQGLVSOD\VKLGGHQLFRQV
Tablet PC Input Panel
(For the Windows XP
TabletPCEditiononly)
7KH,QSXW3DGXVHGWRHQWHUOHWWHUV
Understanding the Start Menu
7KH6WDUWPHQXLQFOXGHVHYHU\WKLQJUHTXLUHGWRVWDUW:LQGRZV
)URPWKH6WDUWPHQXLWLVSRVVLEOHWRUXQDSURJUDPRSHQD¿OHDVVLJQV\VWHPXVHUV
with the Control Panel, receive support by selecting Help and Support, and search for
itemsonthecomputerorontheInternetbyselectingSearch
Frequently used
programs
All Programs
My Computer
Control Panel
Help and Support
Start Button

93
My Computer
Displaysthecontentsoftheharddisk,theCD-ROMdrive,
WKHQHWZRUNGULYHVDQGÀRSS\GLVNV,WFDQDOVREHXVHGWR
VHDUFKDQGRSHQ¿OHVDQGIROGHUV
Control Panel (QDEOHVXVHUVWRFRQ¿JXUHVHWWLQJVRQWKHFRPSXWHU 93
Help and
Support
Provideson-linehelp,informationonWindowsand
WURXEOHVKRRWLQJ
Search (QDEOHVXVHUVWRVHDUFKIRULQIRUPDWLRQLQ¿OHVRUWKH,QWHUQHW
Run 5XQVSURJUDPVRUGRFXPHQWV
Understanding a Window
$ZLQGRZLVWKHEDVLFGLVSOD\FRPSRQHQWRI:LQGRZVFRPSXWHUV7KHMy Computer
window,whichdisplaysinformationonthecomputer’sharddrive,willbeusedasan
H[DPSOHWRVKRZWKHEDVLFFRPSRVLWLRQRIDZLQGRZ
Click Start > My Computer
'RXEOHFOLFNWKHKDUGGULYHORFDOGLVNWRYLHZWKHIROGHUVDQG¿OHVVWRUHGRQLQLW,IWKH
contents do not appear, click Show the contents of this folder

94
Title Bar
Menu Bar
Tool Bar
Close Button
Maximize Button
MinimizeButton
Folder Icon
Quick Task
Window
Drive Icon
(Storage Device)
zWhat is a drive?
$VWRUDJHGHYLFHRQZKLFK¿OHVDQGIROGHUVDUHVDYHGLQDQGUHDGIURP
zWhat is a folder?
$IROGHULVXVHGWRJURXSDQGPDQDJH¿OHVV\VWHPDWLFDOO\DQGPD\LQFOXGH¿OHVLQ
VXEIROGHUV,WLVVLPLODUWRD¿OLQJFDELQHW
z:KDWLVD¿OH"
$¿OHLVDGRFXPHQWRUDFROOHFWLRQRIYDULRXVNLQGVRIGDWDJHQHUDWHGDVDUHVXOWRI
SURJUDPRSHUDWLRQ
zTo view the entire structure of the drive
&OLFNWKH)ROGHULFRQLQWKHWDVNEDUWRYLHZWKHHQWLUHVWUXFWXUH&OLFNWKHLFRQDJDLQ
WRUHWXUQWRWKH4XLFN7DVN:LQGRZ

95
Control Panel
7KH&RQWURO3DQHOFRQWDLQVWRROVWRFRQ¿JXUH:LQGRZV
Opening the Control Panel
Click Start > Control Panel

96
Appearance and
Themes
&KDQJHVWKHDSSHDUDQFHRI:LQGRZV
This function is used to change the Desktop, apply a theme
andascreensavertothecomputer,andchangetheStart
PHQXDQG7DVNEDU
Network
and internet
Connections
7KLVIXQFWLRQLVXVHGWRFRQ¿JXUHWKHQHWZRUNVHWWLQJVRU
FRQ¿JXUHDQGDGG,QWHUQHWFRQQHFWLRQV
Add or Remove
Programs
This function is used to add remove a program from
:LQGRZV
Sound, Speech
and Audio
Devices
7KLVIXQFWLRQLVXVHGWRDGMXVWWKHYROXPHVHOHFWDVRXQG
VFKHPHDQGVHWXSWKHVSHDNHUV
Performance and
Maintenance
7KLVIXQFWLRQLVXVHGWRFRQ¿JXUHWKH:LQGRZVSHUIRUPDQFH
RSWLRQV
Inaddition,youcanmanagetheharddiskdriveand
KDUGZDUH
Printers and
Other Hardware
7KLVIXQFWLRQLVXVHGWRDGGRUFRQ¿JXUHDSULQWHUPRXVH
NH\ERDUGVFDQQHUFDPHUDRUJDPLQJGHYLFHHWF
User Accounts This function is used to add or set up a Windows XP user
DFFRXQW
Date, Time,
Language and
Regional Options
7KLVIXQFWLRQLVXVHGWRFRQ¿JXUHWKHGDWHWLPHODQJXDJH
DQGUHJLRQDOVHWWLQJV
Accessibility
Options
This function is used to select options for disabled persons
DQGSHRSOHZLWKEDGYLVLRQ
Security Center
This function is used to check the current security status to
SURWHFWDXVHU¶VFRPSXWHUDQGFRQ¿JXUHWKHVHFXULW\VHWWLQJV
IRUWKH¿UHZDOOYLUXVDQWLYLUXVSURJUDPHWF

97
Adding a User Account
1Select Start > Control Panel
2Double-click User Accounts and
click Create a New account
3EnteranameandthenclicktheNext
EXWWRQ
4Select an account type, click Create
Account, and then check the newly
createdaccountintheuseraccount
VFUHHQ
Ifyoucannotseethebottomofthe
screen, press and drag the scroll bar
RIWKHZLQGRZZLWKWKH6W\OXV3HQ
5 To change the user account
information,clickonaccounttobe
FKDQJHG
You can change the account name,
SDVVZRUGW\SHDQGSLFWXUH
User Accounts
:LQGRZV;3DOORZVPXOWLSOHXVHUWRXVHDFRPSXWHUZLWKWKHLURZQXVHUDFFRXQW
Theprocedurestoaddauseraccountandswitchbetweenuseraccountsaredescribed
EHORZ
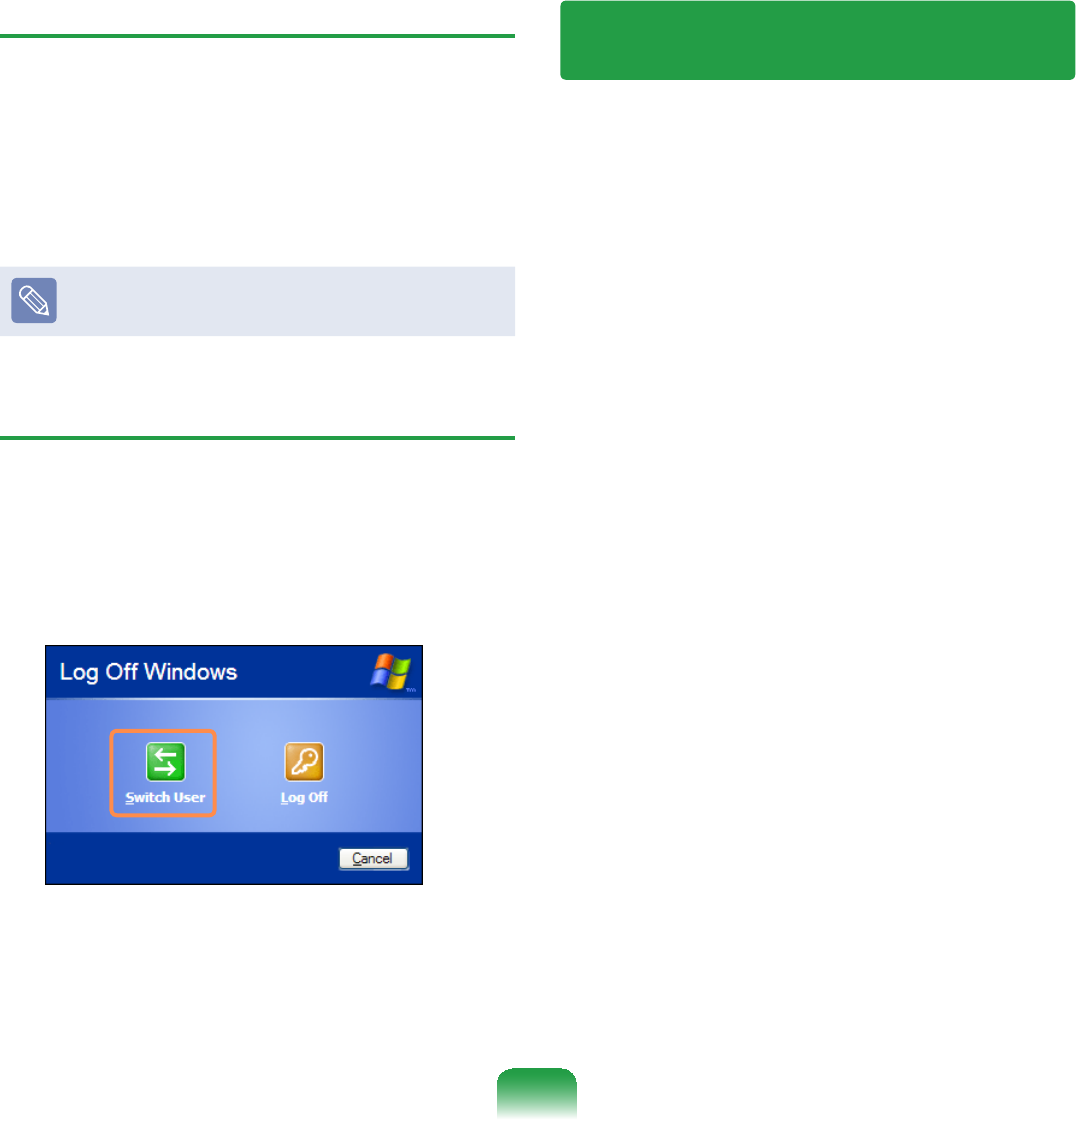
98
Deleting a User Account
1Select Start > Control Panel > User
Accounts
2Click on user account to be deleted
and click Delete Account
Youcannotdeleteacurrentlylogged
LQXVHUDFFRXQW
Switching Users
1 Select Start > Log Off
2 Click Switch User
3 Clickonuseraccounttologintothe
6WDUWVFUHHQ
/RJLQZLWKDQHZXVHUDFFRXQW
Changing the Resolution and
Colors
The resolution means the number of
SL[HOVGLVSOD\HGRQWKHVFUHHQ:KHQ
selectingahigherresolution,itemsonthe
Desktopbecomesmallerandmoreitems
FDQEHGLVSOD\HGRQWKHVFUHHQ7KHFRORU
TXDOLW\FDQDOVREHFRQ¿JXUHG7KHKLJKHU
thecolorquality,themorecolorsare
GLVSOD\HGRQWKHVFUHHQ
To change the screen resolution or color
quality, follow these steps:
1 Select Start > Control Panel >
Appearance and Themes > Display
2 Click on Settings and change the
Screen Resolution and Color
Quality
3 Click OK
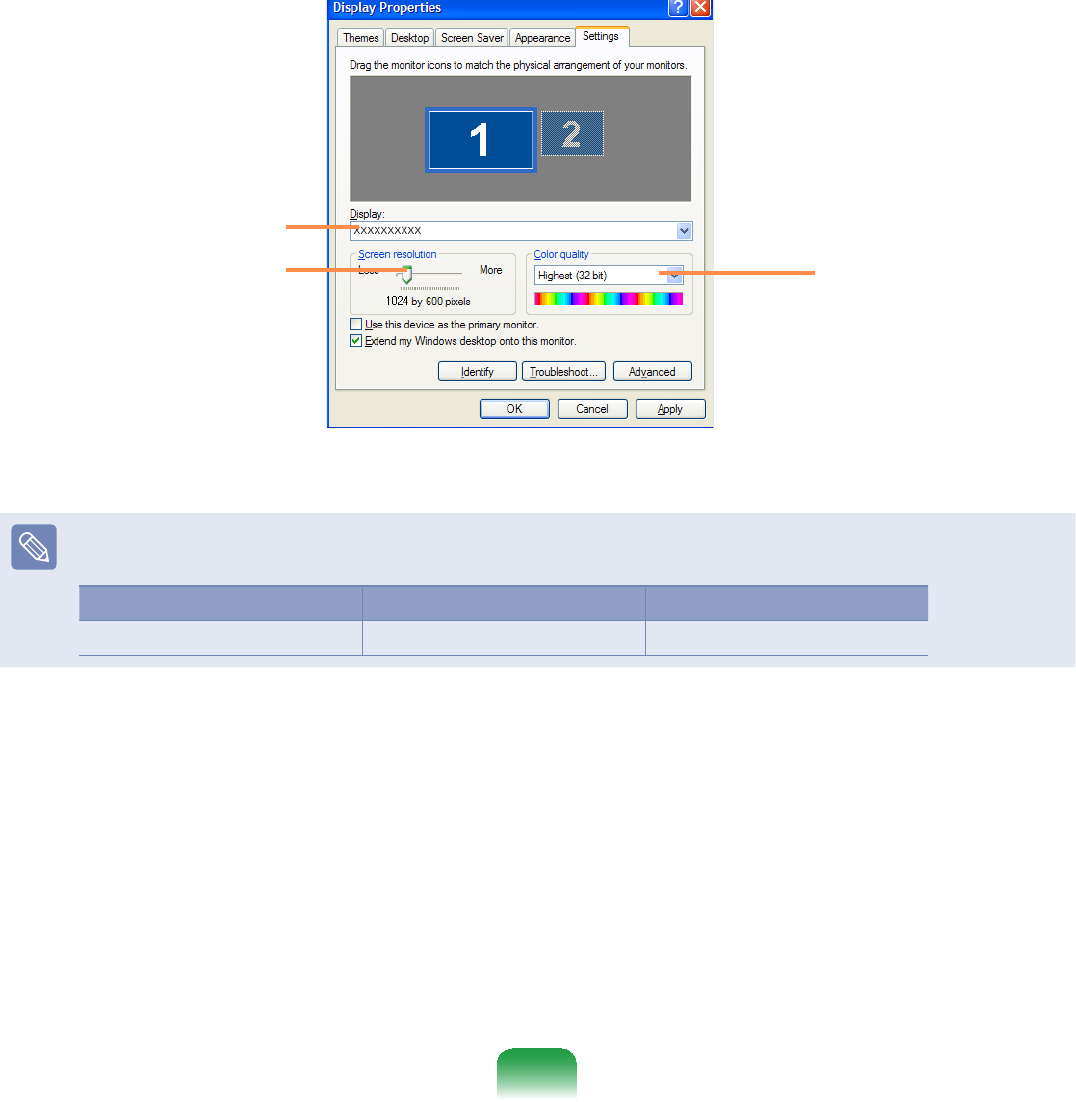
99
To set the color
quality, select a color
qualityintheColor
TXDOLW\¿HOG
To set the resolution,
slide the resolution
slidebartoadesired
resolutionintheScreen
UHVROXWLRQ¿HOG
Youcancheckyour
JUDSKLFVFKLSVHW
The following resolutions and color qualities are recommended according to the
FRPSXWHU/&'SDQHOW\SH
LCD Type Resolution Color Quality
´:69*$ 1024x600 VeryHigh(32bit)