CyberTAN Technology MM230M IEEE 802.11b/g Bluetooth 2.0+ EDR and GPS User Manual EX XP Eng2 System 2009 03 01 pd
CyberTAN Technology Inc. IEEE 802.11b/g Bluetooth 2.0+ EDR and GPS EX XP Eng2 System 2009 03 01 pd
Contents
Host user manual 2 of 2

Using the Network
Wired Network 101
Wireless Network 104
Using the Easy Network Manager
(Optional) 107
Bluetooth (Optional) 111
Chapter 4.

101
1 ConnectaLANcabletothe
Organizer’s LAN port
2
Click Start > Control Panel >
Network and Internet Connections
> Network Connection
3
Select Local Area Connection and
click the right button of the touch pad
and select Properties
The LAN Device name may differ
dependingonyourcomputer’s
1HWZRUN'HYLFH
Wired Network
Awirednetworkisanetworkenvironmentusedforacompanynetworkorbroadband
LQWHUQHWFRQQHFWLRQDWKRPH
z YoucanonlyusetheWired networkIXQFWLRQZKHQ\RXKDYHDQ2UJDQL]HU
The OrganizerLVRSWLRQDO,WPD\EHSURYLGHGIRUVRPHPRGHOVRQO\RUVKRXOGEH
SXUFKDVHGDGGLWLRQDOO\
z<RXFDQDOVRFRQ¿JXUHWKHQHWZRUNVHWWLQJVXVLQJWKH(DV\1HWZRUN0DQDJHU
107
102
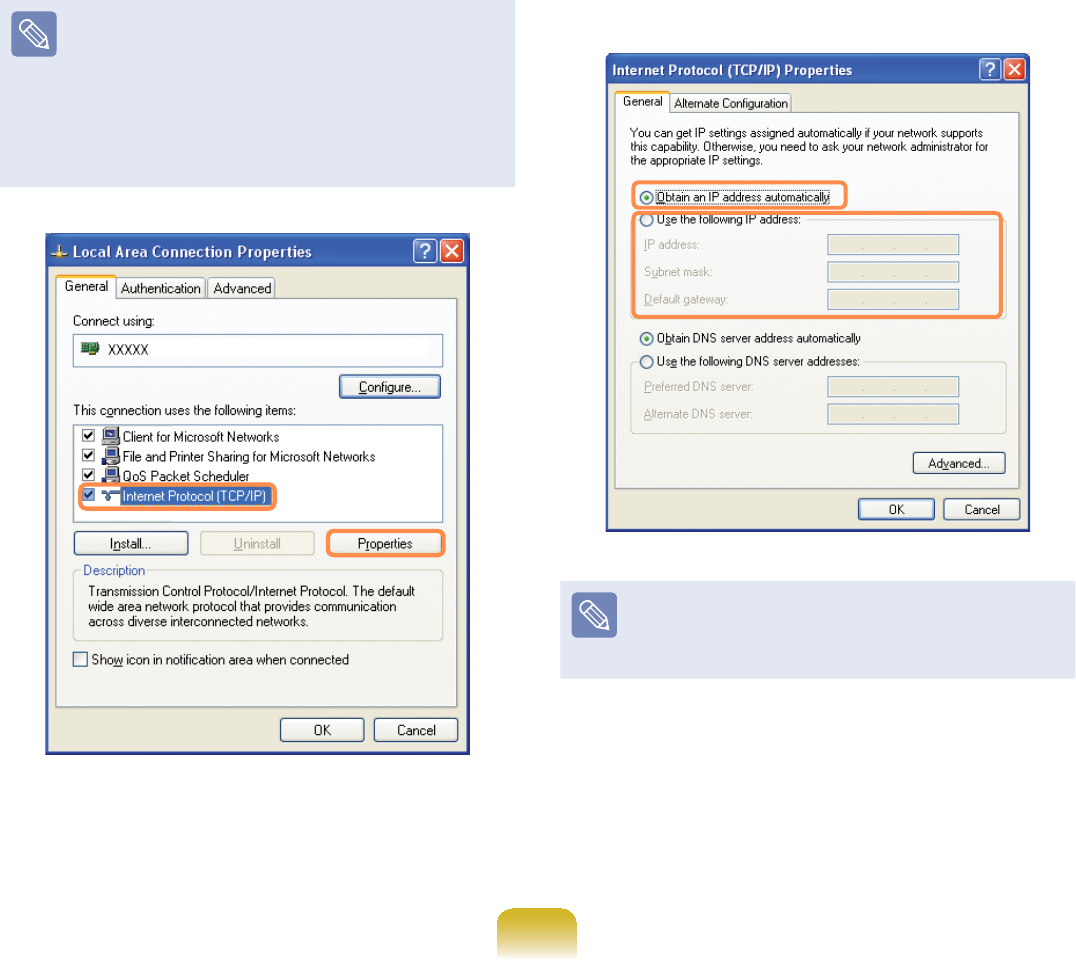
4 Click General tab and select a LAN
driver from Connect using:6HOHFW
Internet Protocol(TCP/IP) and click
Properties
ThedisplayedLANdrivermayvary
GHSHQGLQJRQWKH/$1GHYLFHW\SH
Click Install toaddanetwork
FRPSRQHQWDVVKRZQLQWKH¿JXUH
below: You can add a client, a
VHUYLFHRUDSURWRFRO
5 &RQ¿JXUH,3VHWWLQJV
Select Obtain an IP address
automaticallyZKHQXVLQJ'+&3,I
you use a static IP, select Use the
following IP address and enter the
YDOXHV
IftheIPofyourcomputerisnot
automaticallyassigned,contactthe
QHWZRUNDGPLQLVWUDWRU
6 If all settings are made, click OK1RZ
WKHQHWZRUNFRQ¿JXUDWLRQLV¿QLVKHG

103
8VLQJERWK'+&3DQGD¿[HG,3
simultaneously
Using the $OWHUQDWH&RQ¿JXUDWLRQ
providing by Windows XP, you can set
ERWKDXWRPDWLFDQG¿[HG,3DGGUHVVHV
andthenyoucanselecttouseeitherof
WKHPWRFRQQHFWWRWKH,QWHUQHW
1 Click Start > Control Panel >
Network and Internet Connections
> Network Connection > Local
Area Connection by using the right
button of the touch pad and click
Properties
2 Select Internet Protocol (TCP/IP)
and click Properties
3 Select the $OWHUQDWH&RQ¿JXUDWLRQ
tab, select 8VHUFRQ¿JXUHGDQG¿OOLQ
WKH¿HOGV
4 When the setting completes, click OK

104
Wireless Network
A wireless network allows computers to share resources or an internet connection
ZLWKRXWXVLQJ/$1FDEOHVEHWZHHQWKHP
z This description is applied only to the models equipped with wireless LAN cards or
GHYLFHV<RXFDQVHWDZLUHOHVVQHWZRUNE\XVLQJEasy Network ManagerDVZHOO
107
$ZLUHOHVV/$1GHYLFHLVRSWLRQDOZKHQSXUFKDVLQJ&OLFNDV\PERO.
,fromStart
> Control Panel > Performance and Maintenance > System > Hardware Tab >
Device Manager > Network AdapterWRFKHFNWKHGHYLFHW\SH
Some of the pictures shown in this description may vary depending on the wireless
/$1GHYLFH
z To use the wireless LAN, press the wheel button and set the Wireless LAN item
of the MENU program to ONWRWXUQWKHZLUHOHVV/$1RQ:KHQWKHZLUHOHVV/$1LV
turned on, the Wireless LAN Operation LEDLVWXUQHGRQ
Types of Wireless LAN Connections
The types of wireless LAN connections
DUHDVIROORZV7KHIROORZLQJGHVFULEHV
howtousethewirelessLANbasedon
$3FRQQHFWLRQV
zAP Connections
YoucanconnecttotheInternetora
computeronthenetworkbyconnecting
WR$3RQDQ$3HQDEOHGQHWZRUN
What is Access Point (AP)?
AP is a network device that connects
wired LAN to wireless LAN and
corresponds to the wireless hub of a
ZLUHGQHWZRUN$OVR$3DOORZV\RX
to connect more than one computer
ZKHUHZLUHOHVV/$1LVHQDEOHG
z6PDOO2I¿FH1HWZRUN
7KHVPDOORI¿FHQHWZRUNLQWHUFRQQHFWV
computers where wireless LAN is
enabled wirelessly and is called Peer-
WR3HHURU$G+2&7KLVPHWKRG
HQDEOHVWKHFRQ¿JXUDWLRQRIDVPDOO
RI¿FHQHWZRUNLQRQHFRPSXWHU
Then,anothercomputerisconnected
to the computer wirelessly for
FRPPXQLFDWLRQV
For more information on how to
establish connections, see the
information from Start > Help and
Support > Networking and Web
WhenyouuseAd-Hoc,youhaveto
FKDQJHWKH0F$IHH)LUHZDOOVHWWLQJV
170
105
Connecting to Wireless LAN
If an AP exists near your location, you can easily connect to wireless LAN in the
PHWKRGSURYLGHGE\:LQGRZV;3
ThefollowingdescriptionisbasedonWindowsXPServicePack 2;thus,thepictures
PD\YDU\
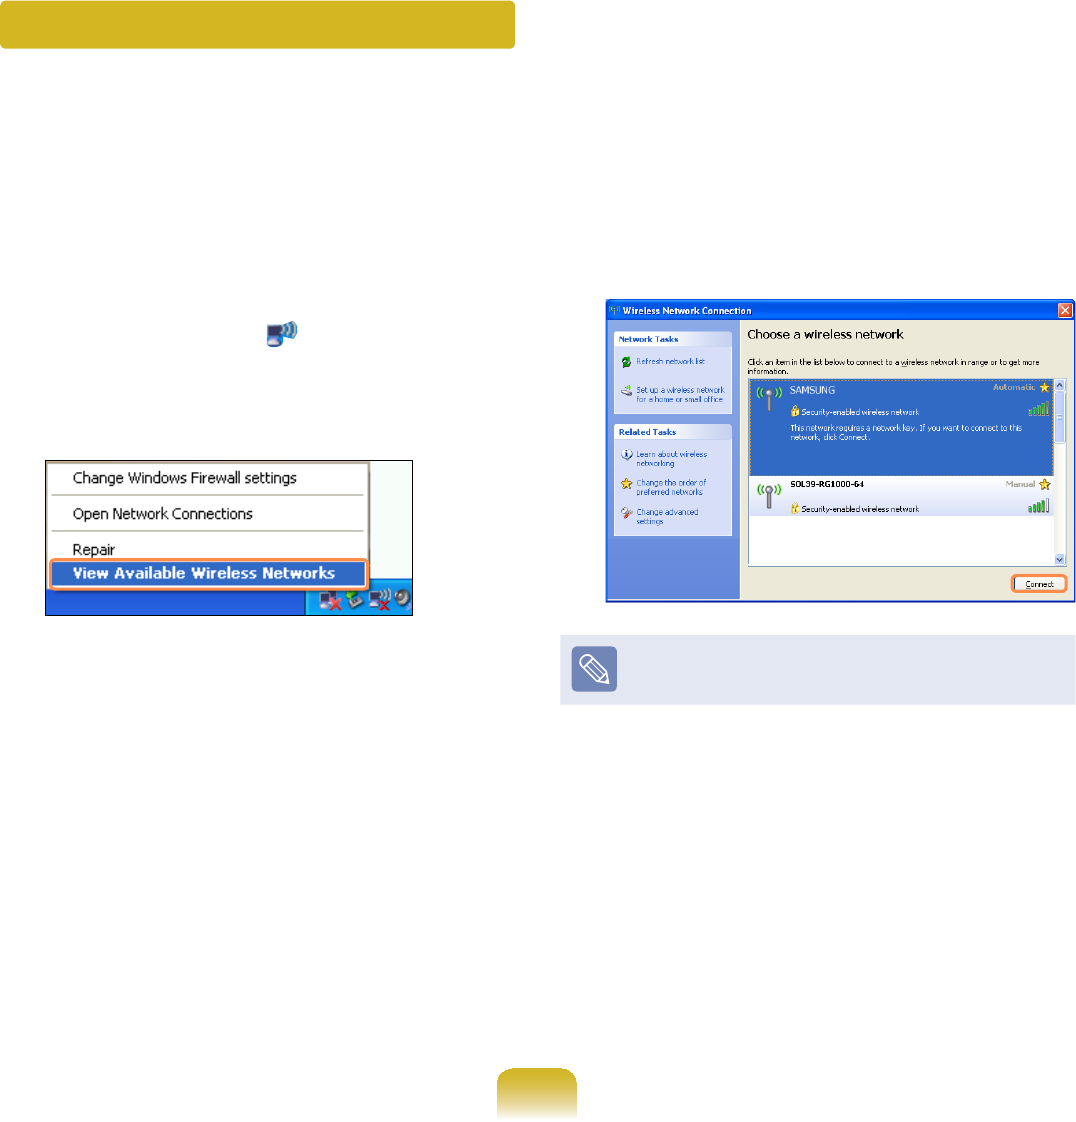
1 Click the Wireless Network
Connection icon from the Taskbar
using the right button of the touch
SDG7KHQFOLFNView Available
Wireless Networks
2 Select an AP to be connected and
click Connect
IfanetworkkeyissetintheAP,the
QHWZRUNNH\LQSXWZLQGRZZLOODSSHDU
Enter the network key in the input
window and click OK
Foranetworkkey,contactthe
QHWZRUNDGPLQLVWUDWRU
3 Once Connected to AP is displayed,
\RXFDQXVHDZLUHOHVVQHWZRUN

106
To check the network connections
PlacethemouseontheWireless
Network Connection icon from the
7DVNEDU7KHQWKHVWDWXVZLOODSSHDU

107
Using the Easy Network ManagerEasy Network Manager (Optional)
(DV\1HWZRUN0DQDJHULVDSURJUDPWKDWKHOSVFRQ¿JXUHWKHQHWZRUNVHWWLQJV
(DV\1HWZRUN0DQDJHUSURYLGHVWKHIROORZLQJIHDWXUHV
z<RXFDQHDVLO\FRQ¿JXUHWKHQHWZRUNDQGSULQWHUVHWWLQJV 107~108
z<RXFDQLPPHGLDWHO\XVHWKHQHWZRUNZLWKRXWKDYLQJWRGH¿QHQHZQHWZRUN
settings again after moving to another location. 109
%\FRQ¿JXULQJWKHQHWZRUNVHWWLQJV,3DGGUHVVSULQWHUVHWWLQJVHWFIRUHDFK
location,youcanimmediatelyaccessthenetworkwithoutfollowingthenetwork
VHWWLQJSURFHGXUHVHDFKWLPHUHJDUGOHVVRI\RXUORFDWLRQ
zYou can diagnose the network status. 110
Network Settings
ThissectiondescribestheprocedurestoconnecttotheInternetbysettingupa
QHWZRUN7KHVHWWLQJXSSURFHGXUHVLQFOXGHSURFHGXUHVWRDGGDSULQWHUWRWKHQHWZRUN
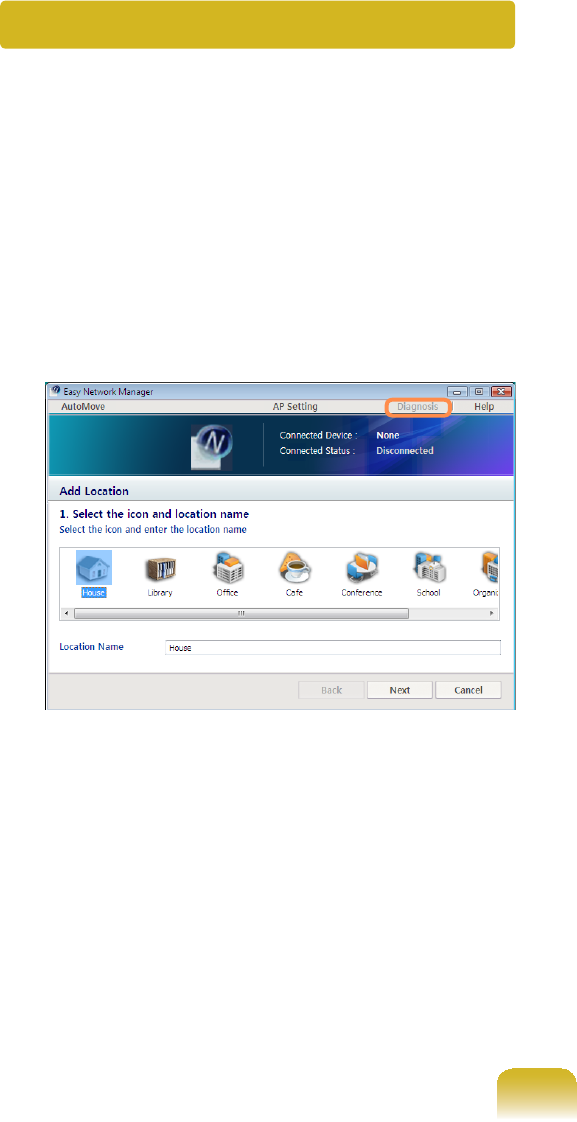
1 To use the wireless LAN, press the
wheel button and set the Wireless
LAN item of the MENU program
to ONWRWXUQWKHZLUHOHVV/$1RQ
WhenthewirelessLANisturnedon,
the Wireless LAN Operation LED is
WXUQHGRQ
2 Click Start > All Programs >
Samsung > Easy Network Manager
> Easy Network Manager
3 Click the AddEXWWRQ
4 Select a network location icon and
HQWHUWKHQDPHRIWKHORFDWLRQHJ
+RPH&OLFNWKHNextEXWWRQ

108
5 Select Direct Connection and click
the NextEXWWRQ
6 Select the LAN device, setup the IP
address and click the NextEXWWRQ
Select Device
Selectadevicetobeconnected
WRWKH,QWHUQHW6HOHFWHLWKHU
:LUHG/$1RU:LUHOHVV/$1
IP Settings
7RXVHDVWDWLF,3DGGUHVV¿OOLQWKH
¿HOGV)RUWKH,3DGGUHVVLQIRUPDWLRQ
DVN\RXUQHWZRUNDGPLQLVWUDWRU
Obtain an IP address automatically
SelectDHCPtousethisoption
DXWRPDWLF,3VHWWLQJ
7 Click Add Printer andsetupaprinter
DFFRUGLQJWRWKHZL]DUG
When the printer has been added,
click the Refresh button, select the
newly added printer and then click the
FinishEXWWRQ
Tonotaddaprinter,clicktheFinish
EXWWRQ
8 When the network settings are
complete, the Do you want to move
to the newly added location now?
PHVVDJHDSSHDUVClick the Cancel
EXWWRQ
An icon for the added location is
FUHDWHG7KHQHWZRUNVHWWLQJVKDYH
EHHQFRPSOHWHG
If you select OK, the network settings
IRUWKHDGGHGORFDWLRQDUHDSSOLHG
Toaddanewlocation,repeatthe
SURFHGXUHVIURP6WHSDERYH

109
1 Click Start > All Programs >
Samsung > Easy Network Manager
> Easy Network Manager when
FRQQHFWHGWRWKH,QWHUQHW
2 Select an icon that represents the
correspondinglocationfromthe
SavedLocationswindowandthen
click Move
3 To connect to a wireless LAN, select
the AP SettingIURPWKHPHQX
The available APs are represented
DVLFRQV,I\RXGRXEOHFOLFNDQ$3
icon to connect to, the computer is
connectedtotheAPthroughthe
wireless LAN and you are moved to
WKHFRUUHVSRQGLQJORFDWLRQ
Click the AP Setting menu item at the
top of the screen and double-click one
RIWKHDYDLODEOH$3V
Available
AP Icon
PC Icon
z TheclosertothePCicon at the
bottom of the screen, the stronger
thesignalfromtheAPis,whilethe
furtherfromtheicon,theweaker
WKHVLJQDOVWUHQJWKLV
z Ifanetworkkeyisrequired,
requestthekeyfromyournetwork
DGPLQLVWUDWRU
z AP Setting is supported in Windows
;363RUKLJKHUDQG9LVWDRQO\
z Windows XP Tablet PC Edition
FortheWindowsXPTabletPC
Edition operating system, set up
the AP referring to Connecting to a
:LUHOHVV/$1 105
Using in Another LocationAnother Location
%\FRQ¿JXULQJWKHQHWZRUNVHWWLQJV,3DGGUHVVSULQWHUVHWWLQJHWFIRUHDFKORFDWLRQ
youcanimmediatelyaccessthenetworkinoneclick,withoutperformingthenetwork
VHWWLQJSURFHGXUHVUHJDUGOHVVRI\RXUORFDWLRQ
110
1 Launch Easy Network Manager
2 Select DiagnosisIURPWKHPHQX
3 TheNetworkConnectionswindow
DSSHDUV
Click Start to start the network
GLDJQRVLV
4 When the diagnosis is complete, a
devicewithaproblemismarkedbya
Xmark icon with a description of the
SUREOHPDWWKHERWWRPRIWKHZLQGRZ
Diagnosing the Network Status
<RXFDQGLDJQRVHWKHQHWZRUNVWDWHDQG¿QGVROXWLRQVIRUZK\\RXFDQQRWFRQQHFWWR
WKHQHWZRUN

111
Bluetooth (Optional)
Bluetooth is wireless communications technology that allows access to nearby devices
VXFKDVDQRWKHUFRPSXWHUFHOOSKRQHSULQWHUNH\ERDUGPRXVHHWFZLWKRXWDFDEOH
FRQQHFWLRQ8VLQJ%OXHWRRWK\RXFDQH[FKDQJH¿OHVFRQQHFWWRWKH,QWHUQHWDQG
FRQVWUXFWDSULYDWHQHWZRUN
z TheBluetoothfunctionisonlyavailablebetweendevicessupportingBluetooth
FRPSXWHUVPRELOHSKRQHV3'$VSULQWHUVHWFDQGWKHIXQFWLRQPD\EHUHVWULFWHG
GHSHQGLQJRQWKHGHYLFHSUR¿OH
z TheBluetoothfunctionisoptionalandmaynotbesupporteddependingonyour
PRGHO
z&RPSDWLELOLW\ZLWKD%OXHWRRWKGHYLFHQRWFHUWL¿HGE\D%OXHWRRWKFHUWL¿FDWLRQRUORJR
LVQRWJXDUDQWHHG
Bluetooth Functions
File Transmission
<RXFDQH[FKDQJH¿OHVEHWZHHQWZR%OXHWRRWKGHYLFHV
<RXFDQH[FKDQJH¿OHVZLWKDQRWKHU%OXHWRRWKGHYLFHVXFKDV
DQRWKHUFRPSXWHUFHOOSKRQH3'$HWF
Network Access
YoucanconnecttoanotherBluetooth-installedcomputerinthe
samewayasanAd-HocmodeinwirelessLANandconnectto
WKHQHWZRUNYLDDQ$3RUDQ,QWHUQHWFRQQHFWLRQVKDULQJVHUYHU
Network Access through
a Phone Connection <RXFDQFRQQHFWWRWKHQHWZRUNYLDD%OXHWRRWKFHOOSKRQH
Electronic Business Card
(Vcard) Exchange
You can exchange PIMS data (Outlook e-mail address data)
and electronic business cards with Bluetooth devices such as
PRELOHSKRQHV3'$VQRWHERRNFRPSXWHUVHWF
Sound Output You can output computer sound to another Bluetooth device or
YLFHYHUVD
HID Connections YoucanconnectanduseBluetoothperipheralssuchasa
NH\ERDUGPRXVHMR\VWLFNHWF
112
FormoreinformationaboutusingtheBluetoothfunction,refertotheonlinehelpofthe
%OXHWRRWK'HYLFH
Exchanging Files between
Bluetooth Computers
7KHSURFHGXUHVWRWUDQVPLW¿OHVDQG
folders between Bluetooth computers are
GHVFULEHGEHORZ
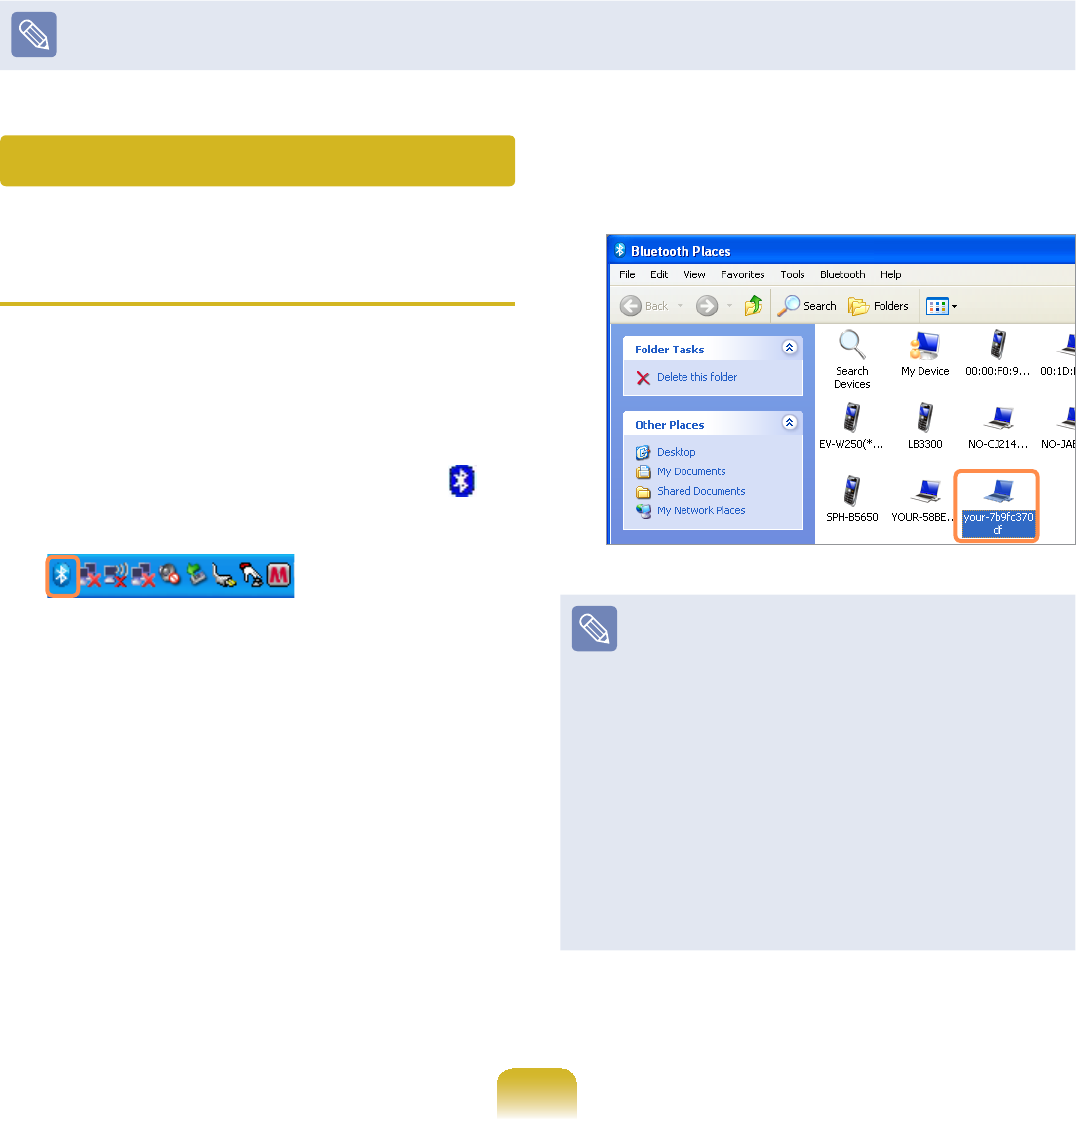
4 Double-click the Bluetooth icon in
WKHV\VWHPWUD\RIWKH7DVNEDU
5 When the Bluetooth Places window
appears, double-click on Search
Device to search for surrounding
%OXHWRRWKGHYLFHV
6 When devices are found, available
%OXHWRRWKGHYLFHVDUHOLVWHG'RXEOH
clickthecomputerontowhichyou
ZLVKWRVHQG¿OHVDPRQJWKHIRXQG
GHYLFHOLVW
z<RXFDQ¿QGWKHGHYLFHRQO\ZKHQ
WKHGHYLFHWRUHFHLYH¿OHVLVVHWDV
VHDUFKDEOH)RUPRUHLQIRUPDWLRQ
on the setting, refer to the manual
RIWKHFRUUHVSRQGLQJGHYLFH
z In this computer, to change the
setting, right-click over the
Bluetooth icon in the Taskbar >
select My Device Properties >
Accessibility tab > “Allow other
%OXHWRRWKGHYLFHVWR¿QGWKLV
device”DQGFKDQJHWKHVHWWLQJ
7 Double-click on Bluetooth File
Transfer
Using Bluetooth

113
8 &RS\WKH¿OHVWREHWUDQVPLWWHGWRWKH
Bluetooth File Transfer window and
WKHQVWDUWWKH¿OHWUDQVPLVVLRQ
9 Afterawhile,iftheBluetooth
Passkey windowappearsonthe
FRPSXWHUWRUHFHLYHWKH¿OHVHQWHUWKH
passkey and click OKHJ
z A passkey (PIN code) is the
password used between two
devices connected through
%OXHWRRWK<RXFDQHQWHUWKHVDPH
QXPEHURQERWKGHYLFHV
z The Bluetooth Password window
or message may differ from above
dependingonthecomputerthatis
UHFHLYLQJWKH¿OHV
z The Bluetooth Password window
mayappearonthecomputerto
WUDQVPLW¿OHV¿UVWGHSHQGLQJRQ
WKHFRPSXWHUV
: When the Bluetooth Passkey
window appears, enter the passkey
thatyouhaveenteredonthe
FRPSXWHUWRUHFHLYH¿OHVDQGFOLFNOK
HJ
Oncetheparingisdonebetween
twocomputers,theBluetooth
PasskeyZLQGRZGRHVQRWDSSHDU
; Ifamessageappearsaskingyou
ifyouwanttoallowaccessonthe
FRPSXWHUWRUHFHLYHWKH¿OHVFOLFN
Yes
< 7KH¿OHVDUHFRSLHG:KHQWKH
¿OHWUDQVPLVVLRQLVFRPSOHWHWKH
¿OHUHFHSWLRQFRPSOHWLRQPHVVDJH
appears in the Taskbar of the
FRPSXWHUWKDWUHFHLYHGWKH¿OHV

114
Usage Instructions
z Generally, Bluetooth devices deliever
stable performance while connected
ZLWKLQDPIWGLVWDQFH
z For Bluetooth to operate smoothly, use
thecomputerinanopenenvironment
with no walls or obstacles in the way
DQGKDYLQJORZUDGLRLQWHUIHUHQFH
z Youcanconnecttoonlyone
Bluetoothdeviceatatimeforaphone
connection, data syncing, electronic
business card exchange, FAX
transmission/reception, sound related
IXQFWLRQVDQGVHULDOSRUWIXQFWLRQV
z It is recommended using only
oneBluetoothdeviceatatimeas
connecting multiple Bluetooth or other
wirelessdevicesatthesametime
mayslowordestabilizetheBluetooth
FRQQHFWLRQ
z Data communications via Bluetooth
maybepoorwhentheCPUloadisat
IXOOFDSDFLW\RUWKHUHDUHLQVXI¿FLHQW
V\VWHPUHVRXUFHV
z The Bluetooth function of a Bluetooth
PDA, mobile phone, mouse or
NH\ERDUGPD\EHWXUQHGRII7RXVH
them in connection with a Samsung
computersupportingBluetooth,you
must check if the Bluetooth function of
WKHGHYLFHWRFRQQHFWWRLVWXUQHGRQ
Fortheproceduresonturningonthe
Bluetoothfunctionofadevice,referto
WKHUHOHYDQWGHYLFHPDQXDO
z TheservicesprovidedbyBluetooth
devicesmayvarydependingontheir
FDSDELOLWLHV)RUWKHVHUYLFHVSURYLGHG
by the Bluetooth device, refer to the
GHYLFHPDQXDO

Chapter 5.
Using Applications
Introducing Programs 116
CyberLink YouCam (Optional) 119
Samsung Update Plus (Optional) 121
McAfee SecurityCenter (Optional) 123
Using Samsung Magic Doctor (Optional) 128
Reinstalling Software 129
116
Introducing Programs
Using the software supplied with the Samsung computer, you can easily use functions
DQGWURXEOHVKRRWSUREOHPV
7U\WRXVHWKHVRIWZDUHDIWHUOHDUQLQJDERXWWKHEDVLFXVHRIWKHVRIWZDUH)RUGHWDLOHG
LQIRUPDWLRQUHIHUWRWKHKHOSVHFWLRQRIWKHFRUUHVSRQGLQJVRIWZDUH
Everysoftwareprogrammaynotbeprovidedortheversionmaydifferdependingon
\RXUFRPSXWHUPRGHO
Inaddition,thescreencaptureimagesmaydifferfromactualonesdependingonthe
FRPSXWHUPRGHODQGVRIWZDUHYHUVLRQ

117
Multi Media Functions
zCyberLink YouCam (Optional)
Using this program, you can easily
capturephotosandvideoswithyour
ZHEFDPHUD&\EHU/LQN<RX&DP
makes it more fun to have online video
chatsortorecordvideoswithlive
HIIHFWV 119
Management Functions
zSamsung Update Plus (Optional)
Samsung Update Plus is a software
function that examines and updates the
Samsung software and drivers installed
on your Samsung computer to the
RSWLPDOYHUVLRQV 121
zMcAfee SecurityCenter (Optional)
Thisisasecuritysolutionthatdetects
and removes computer viruses and
protects the computer from Internet
WKUHDWV 123
zEasy Network Manager
(Optional)
Easy Network Manager is a program
WKDWHQDEOHV\RXWRHDVLO\FRQ¿JXUHWKH
QHWZRUNVHWWLQJV
<RXFDQFRQ¿JXUHWKHQHWZRUNVHWWLQJV
foreachlocationandyoucanalso
GLDJQRVHWKHQHWZRUNVWDWXV 107
z Samsung Battery ManagerSamsung Battery Manager
(Optional)
SamsungBatteryManagerisapowerSamsungBatteryManagerisapower
managementprogramthatprovides
easy-to-use power management and
power saving settings so that the
EDWWHU\XVDJHWLPHFDQEHH[WHQGHG
143
zeGalax Touch (Optional)
eGalax Touch is a program used to
calibrate the Stylus Pen when the
SRLQWHUSRVLWLRQLVQRWFRUUHFW
57

118
Troubleshooting Functions
zSAMSUNG Magic Doctor
(Optional)
SAMSUNGMagicDoctoris
troubleshooting software provided
by Samsung Computer for system
GLDJQRVLVDQGUHVWRULQJWKHV\VWHP
The system diagnosis function enables
users to diagnose system problems
ZLWKRXWDVVLVWDQFHIURPRWKHUV 128
zSamsung Recovery Solution
(Optional)
SamsungRecoverySolutionprovides
aRestore Function that enables you
to easily restore your computer to a
previous, normal state when a problem
occurs with your computer, as well as
aBackup Function that enables you
to easily save your computer’s current
VWDWXVDQG\RXUGDWD
119
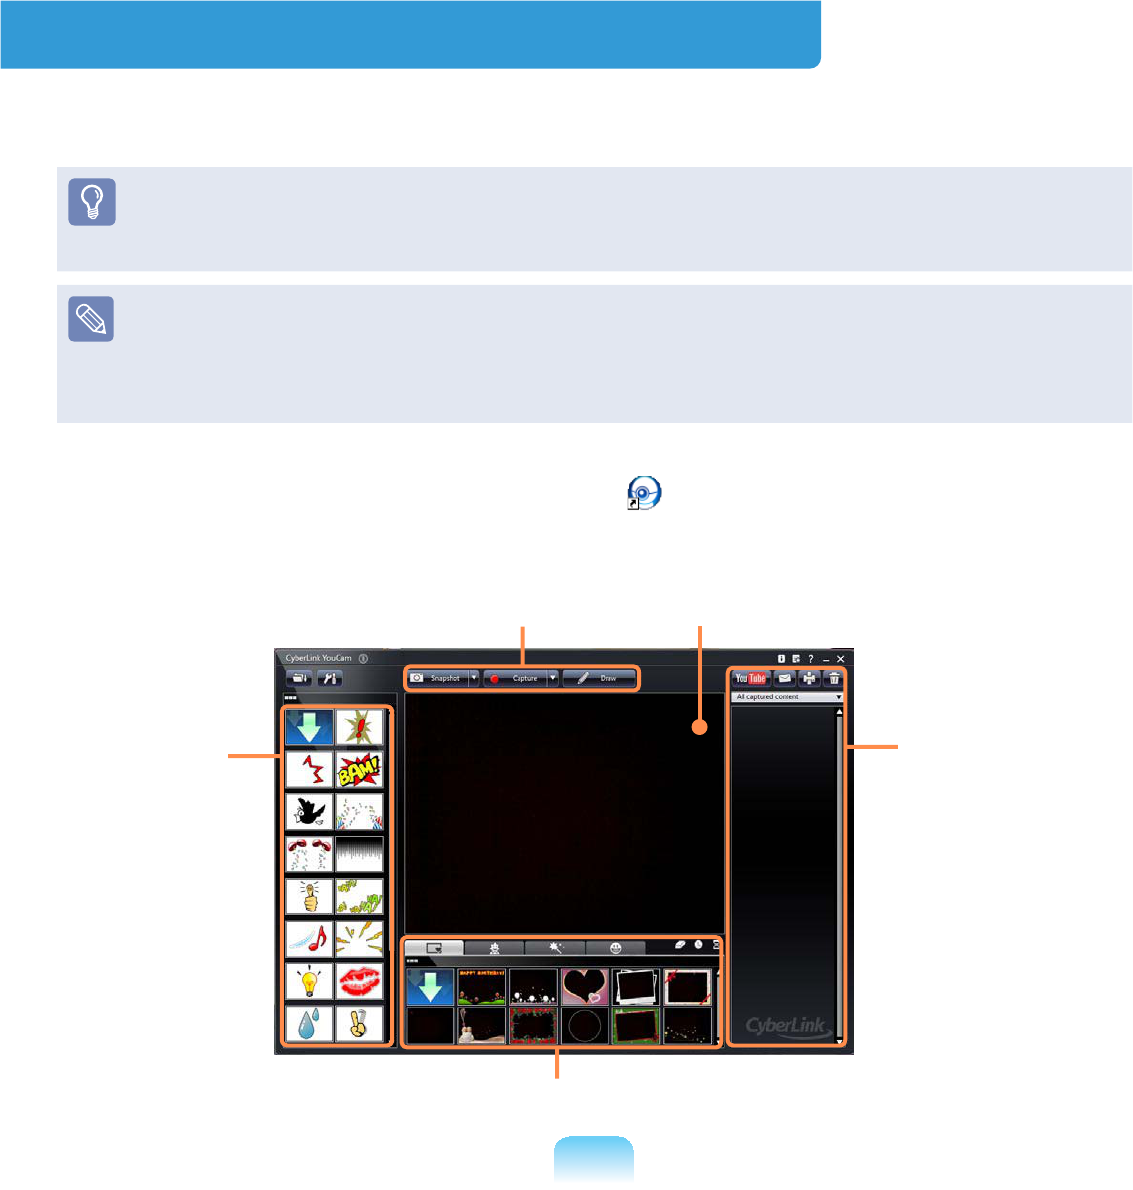
CyberLink YouCam (Optional)
CyberLinkYouCammakesitmorefuntohaveonlinevideochatsortorecordvideos
ZLWKOLYHHIIHFWV
z7KHSURJUDPYHUVLRQVGHVFULEHGLQWKLVPDQXDODUHVXEMHFWWRFKDQJHDQGWKH
VFUHHQLPDJHVDQGWHUPVLQWKLVPDQXDOPD\GLIIHUIURPDFWXDOSURGXFW
z)RUPRUHLQIRUPDWLRQRQKRZWRXVHWKHSURJUDPUHIHUWRWKHRQOLQHKHOS
z'RQRWWDNHSLFWXUHVRUUHFRUGYLGHRRIVRPHRQHZLWKRXWWKHLUSHUPLVVLRQ
z'RQRWWDNHSLFWXUHVRUUHFRUGYLGHRLQORFDWLRQVZKHUHSKRWRJUDSK\LVSURKLELWHG
z Donottakepicturesorrecordvideoinlocationswhereyoucouldviolateanother
SHUVRQ¶VSULYDF\
1 Double click the CyberLink YouCam icon RQWKH'HVNWRS2UFOLFNStart > All
programs > Samsung > CyberLink YouCam > CyberLink YouCam
Function buttons
All captured
content
Avatars, Frames, Filters and Distortions
Emotion
effects
Preview Window

120
If you click the settings button ,
\RXFDQFRQ¿JXUHWKHFDSWXUH
GLVSOD\DQGGRFXPHQWVHWWLQJV
2 Click the Snapshot or
Capture button in front of
WKHFDPHUD$VQDSVKRWLVWDNHQRU
YLGHRVWDUWVUHFRUGLQJ
z To stop a video recording, click
the Stop EXWWRQ7KH
UHFRUGLQJLVVWRSSHG
z By applying several effects or
avatarstoyourphotosorvideos
whilecapturing,youcanmake
your own contents fun and
LQWHUHVWLQJ
3 You can view your captured photos
andvideosintheAll captured
contentZLQGRZ
Youcanviewapictureorwatcha
YLGHRE\GRXEOHFOLFNLQJLW
121
Samsung Update Plus (Optional)
Samsung Update Plus is software that examines and updates the Samsung software
DQGGULYHUVLQVWDOOHGRQ\RXU6DPVXQJFRPSXWHUWRWKHRSWLPDOYHUVLRQ
z To check for updates and update your computer using Samsung Update Plus, your
FRPSXWHUPXVWEHFRQQHFWHGWRWKH,QWHUQHW
z7KHXSGDWHVHDUFKUHVXOWPD\GLIIHUGHSHQGLQJRQ\RXUFRPSXWHUPRGHO
z7KHSURJUDPYHUVLRQVGHVFULEHGLQWKLVPDQXDODUHVXEMHFWWRFKDQJHDQGWKH
VFUHHQLPDJHVDQGWHUPVLQWKLVPDQXDOPD\GLIIHUIURPDFWXDOSURGXFW
Samsung Update Plus does not provide updates for applications installed after
SXUFKDVLQJWKHFRPSXWHU
To update the software and drivers
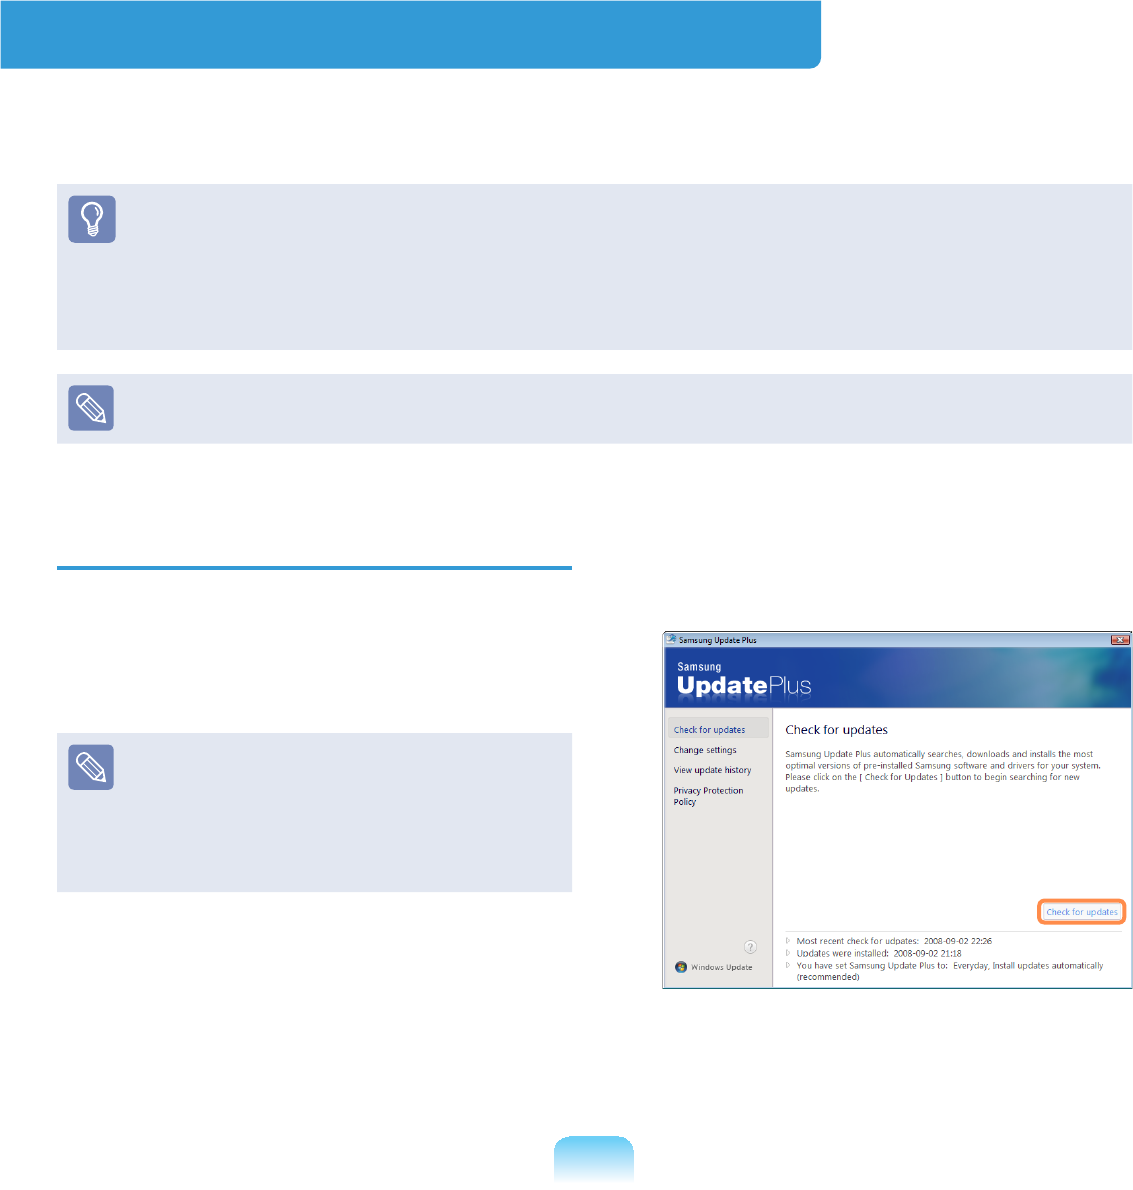
1 Select Start > All Programs >
Samsung > Samsung Update Plus
> Samsung Update Plus
,IWKLVLVWKH¿UVWWLPH\RXDUHUXQQLQJ
theprogram,awindowwillappear
askingyouifyouagreetothe
DJUHHPHQWLQWKHZLQGRZ
Click AgreeWRXVHWKLVVRIWZDUH
2 If you click on Check for updates,
QHZXSGDWHVDUHVHDUFKHGIRU
122
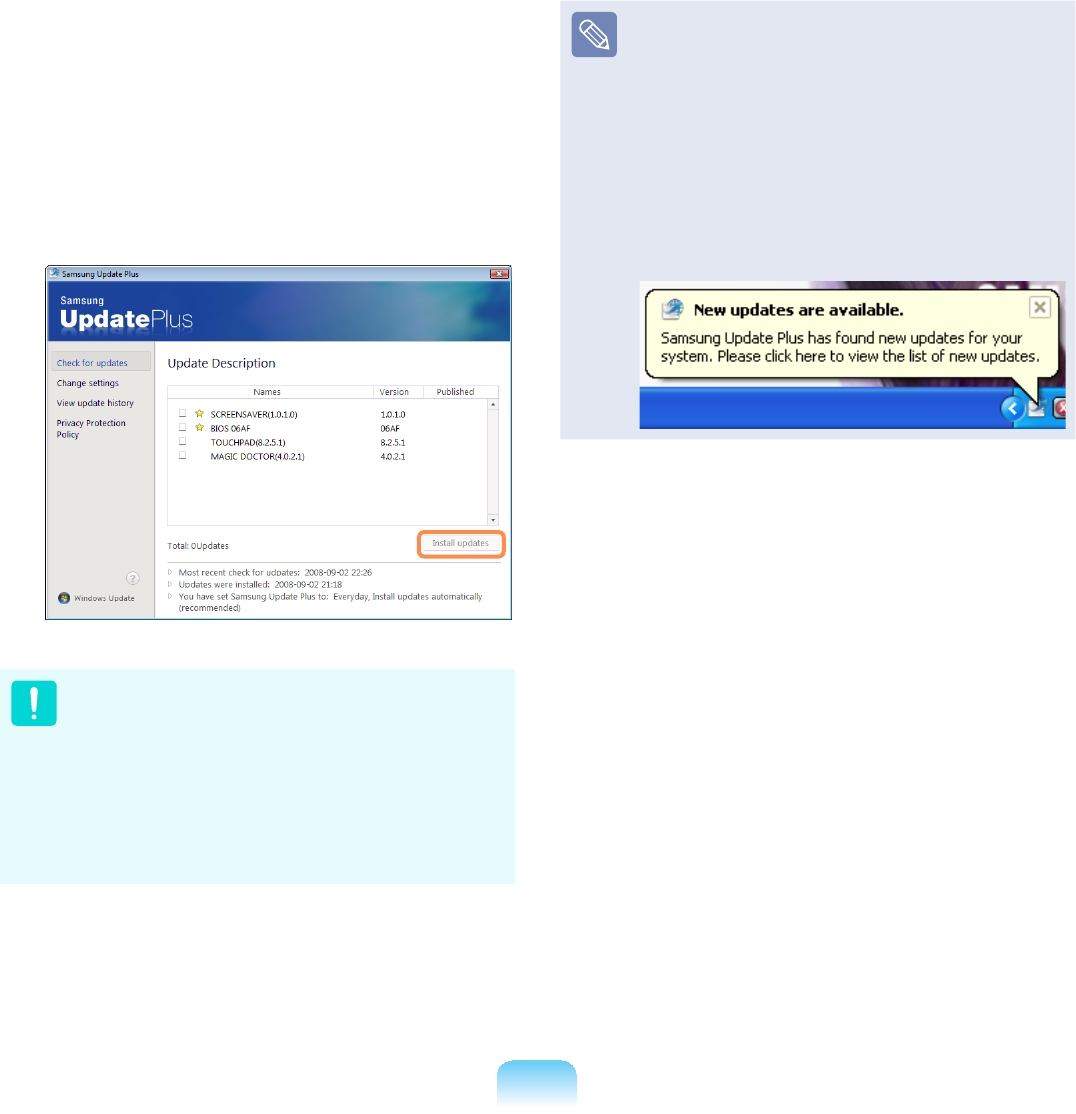
3 If there are available software or
driver updates for your computer, the
DYDLODEOHXSGDWHVZLOOEHOLVWHG6HOHFW
therequiredupdatesfromthelist
and click Install Update to start the
XSGDWH7KHXSGDWHOLVWRQWKHVFUHHQ
maydifferdependingonthecomputer
PRGHO
Updates that must be installed
separately.
If you select an update item that
mustbeinstalledseparately,a
message appears informing you of
WKLV)ROORZWKHLQVWUXFWLRQPHVVDJH
WRFRUUHFWO\LQVWDOOLW
Automatic update items display
By default, your computer is
FRQ¿JXUHGWRDXWRPDWLFDOO\FKHFN
IRUXSGDWHV,IWKHUHLVDQHZXSGDWH
DYDLODEOHWKLVLVQRWL¿HGLQWKH
QRWL¿FDWLRQDUHD&OLFNWKHEDOORRQ
KHOSLFRQLQWKHQRWL¿FDWLRQDUHD
+HUH\RXZLOOEHDEOHWR¿QGWKH
ODWHVWDYDLODEOHXSGDWHV
123
McAfee SecurityCenter (Optional)
McAfeeSecurityCenter(avirus/spywaredetectionandprotectionsoftwarethatincludes
D¿UHZDOOIXQFWLRQ+HUHDIWHUUHIHUUHGWRDV³0F$IHH´LVVRIWZDUHWKDWSURWHFWV\RXU3&
IURPYDULRXV,QWHUQHWWKUHDWVDVZHOODVGHWHFWLQJDQGUHPRYLQJYLUXVHV
z)RUPRUHGHWDLOHGLQIRUPDWLRQRQWKHSURJUDPUHIHUWRWKH0F$IHHKHOS
z<RXFDQUHJLVWHU0F$IHHZKHQFRQQHFWHGWRWKH,QWHUQHW
z0F$IHHVRIWZDUHLVRSWLRQDO,WPD\QRWEHVXSSOLHGIRUVRPHPRGHOVRULWPD\EH
VXSSOLHGWKURXJKWKH0F$IHHLQVWDOODWLRQLFRQ:KHQWKHLQVWDOODWLRQLFRQLVSURYLGHG
\RXKDYHWRLQVWDOOWKHSURJUDPUHIHUULQJWRWKH,QVWDOOLQJ0F$IHHVHFWLRQ
z$GLIIHUHQWDQWLYLUXVSURJUDPPD\EHSURYLGHGGHSHQGLQJRQWKHFRPSXWHUPRGHO
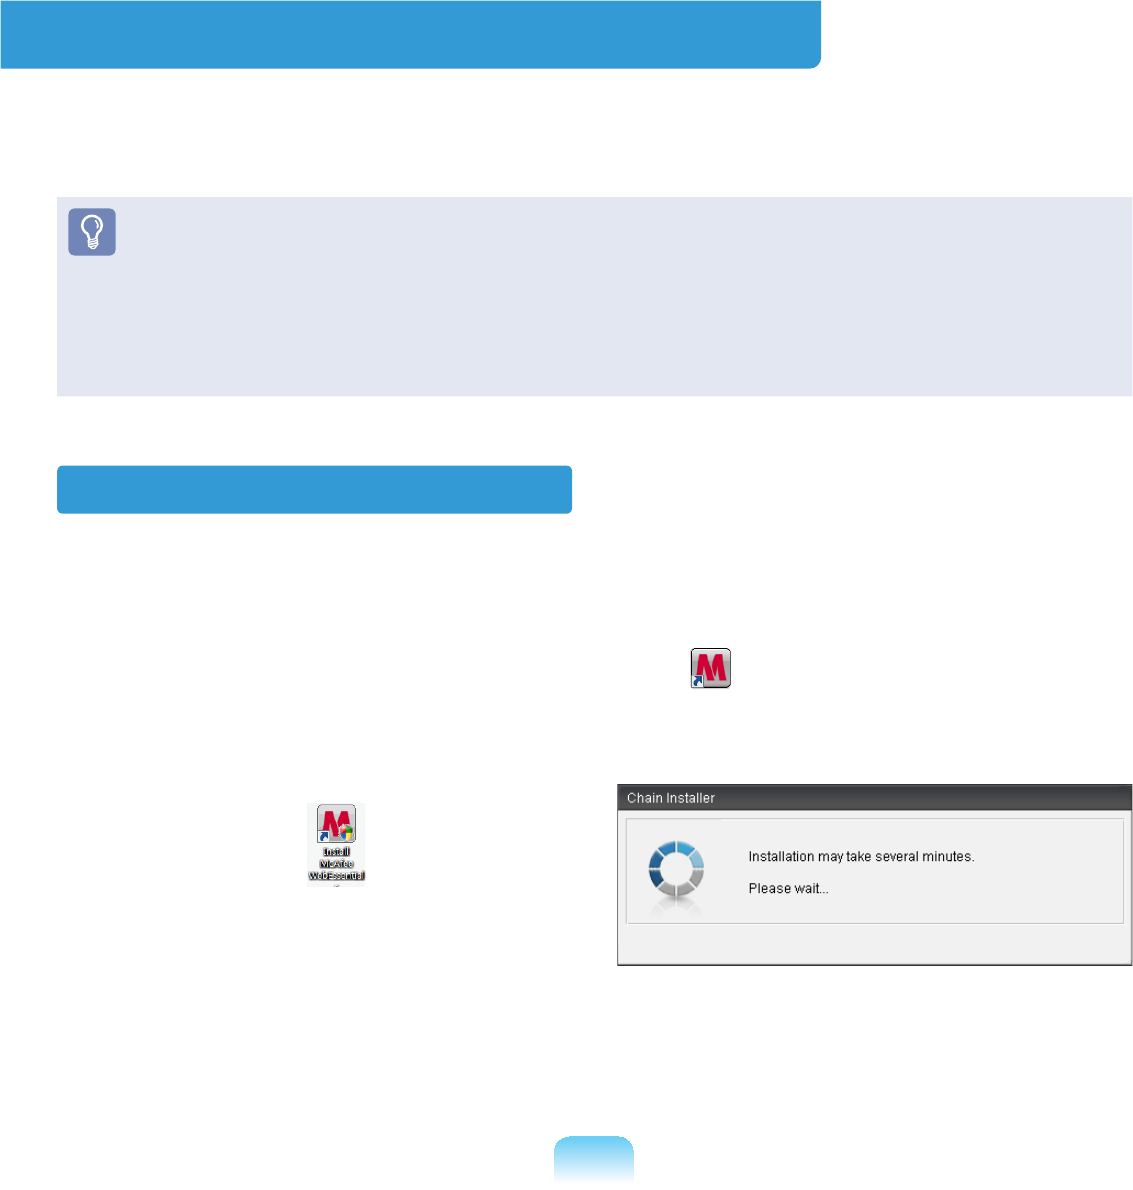
Installing McAfee
Forsomemodels,anInstall McAfee Web EssentialsLFRQLVORFDWHGRQWKH'HVNWRS
Inthiscase,youcaninstalltheMcAfeesoftwareaccordingtothefollowingprocedures
DQGWKHQXVHWKH0F$IHHVRIWZDUH
Forsomemodels,aMcAfee Security Center icon islocatedontheDesktop,since
WKHVRIWZDUHLVDOUHDG\LQVWDOOHGWKHLQVWDOODWLRQVWHSLVQRWUHTXLUHG
n Double click the Install McAfee Web
Essentials icon RQWKH'HVNWRS
l The Chain Installer window
opens and the installation begins
DXWRPDWLFDOO\3OHDVHZDLWIRUD
PRPHQW W When the installation is complete, the
Chain InstallerZLQGRZGLVDSSHDUV
124
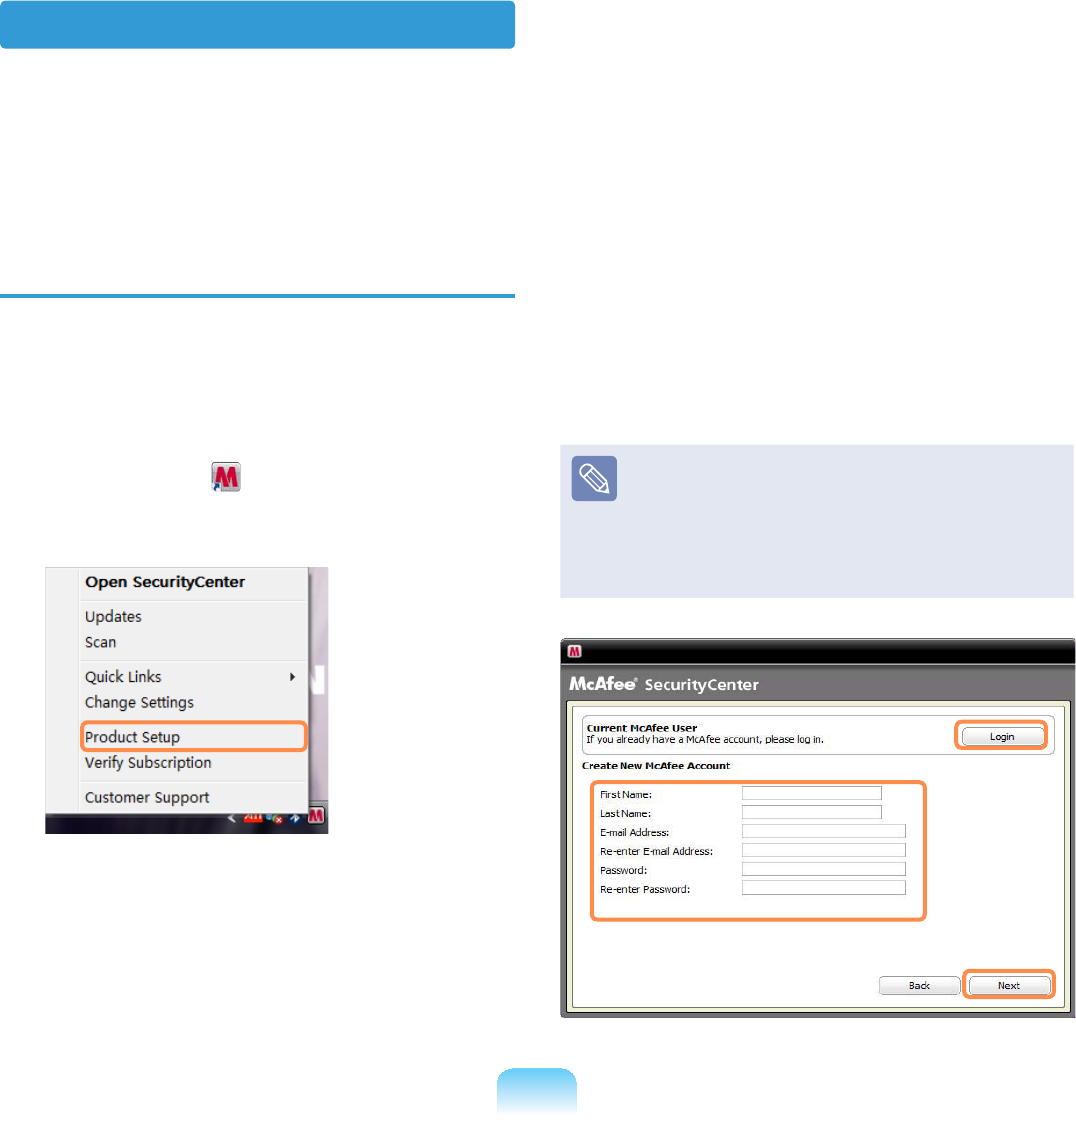
User Registration
1 The Program Setup screen appears
ZKLOHERRWLQJ&OLFNNext
If the Program Setup screen does
notappear,right-clickoverthe
McAfee icon in the Taskbar and
then select Product Setup from the
SRSXSPHQX
2 The End User License Agreement
DSSHDUV
Checkifthecountryhasbeen
correctly selected and then click
Accept
3 The Create New McAfee Account
LWHPDSSHDUV
%HVXUHWR¿OOLQDOOWKH¿HOGVDQG
click Next7KHProgram Setup
CompletedZLQGRZDSSHDUV
Ifyouhavealreadyregisteredwith
McAfee, click Login and enter
the registered email address and
SDVVZRUGWRORJLQ7KHProgram
Setup CompletedZLQGRZDSSHDUV
Using McAfee
7RXVH0F$IHHXVHUUHJLVWUDWLRQLVUHTXLUHG,IDXVHULVQRWUHJLVWHUHGHYHQWKRXJK
virusinspectionissupported,yourPCwillnotbecompletelyprotectedbecausethe
YLUXVLQIRUPDWLRQZLOOQRWEHXSGDWHGZLWKWKHODWHVWLQIRUPDWLRQ7KHSURFHGXUHVWR
LQVSHFWDQGKHDOYLUXVHVDIWHUWKHXVHUUHJLVWUDWLRQZLOOEHGHVFULEHGEHORZ
125
Inspecting and Healing Viruses
The procedures to check if the computer’s
¿OHVRULQIRUPDWLRQKDYHEHHQLQIHFWHG
byavirusandtohealvirusesfoundby
0F$IHHDUHGHVFULEHGEHORZ
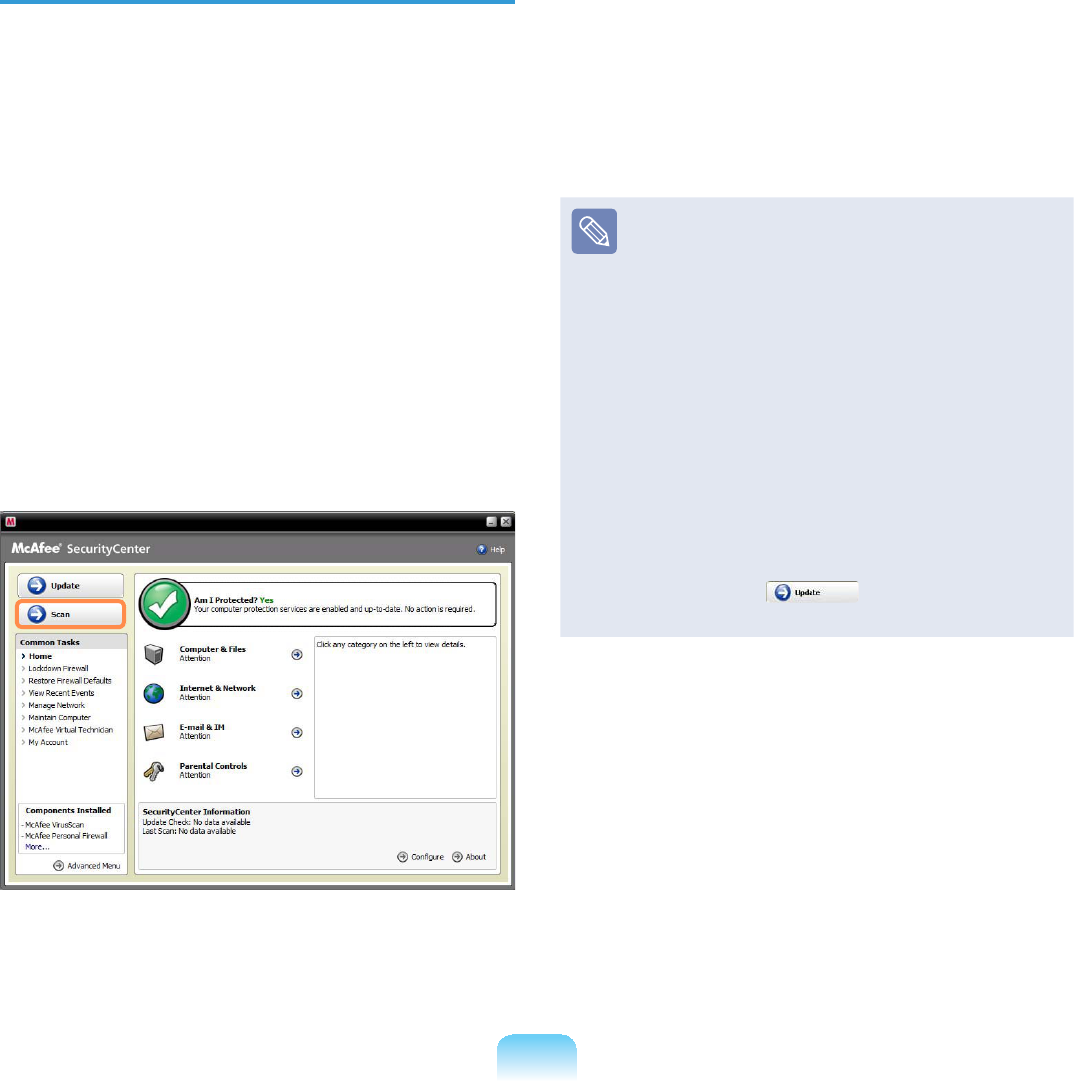
1 Click Start > All Programs > McAfee
> McAfeeSecurityCenter
2 Click the Scan button on the left side
RIWKHSURJUDP7KHScanEHJLQV
At this time, if a virus is found, it
is immediately healed during the
LQVSHFWLRQ
3 Ifavirushasbeenfound,clickView
Results
7KHYLUXVHVDUHOLVWHG6LQFHWKH
corresponding viruses have already
beenremoved,youcanuseyour
FRPSXWHUZLWKRXWDQ\FRQFHUQ
z For possible virus infections
(where it is not completely certain),
the DetectedPHVVDJHDSSHDUV
In this case, the items will be
maintained or deleted depending
RQ\RXUGHFLVLRQ
z To deal with new viruses,
please always keep
0F$IHH6HFXULW\&HQWHUXSWRGDWH
In general, it is automatically
updatedwhenconnectedtothe
,QWHUQHW$OWHUQDWLYHO\\RXFDQ
update it manually by clicking
Update after connecting
WRWKH,QWHUQHW
126
&RQ¿JXULQJWKH0F$IHH)LUHZDOO
7KH0F$IHH)LUHZDOOLVFRQ¿JXUHG
for the product when purchasing the
product in order to protect the computer
IURPYLUXVHV+RZHYHULIWKH¿UHZDOOLV
activated,youmaynotconnecttothe
QHWZRUNRUWKH,QWHUQHWSURSHUO\,QWKLV
case, you have to change the settings as
IROORZV
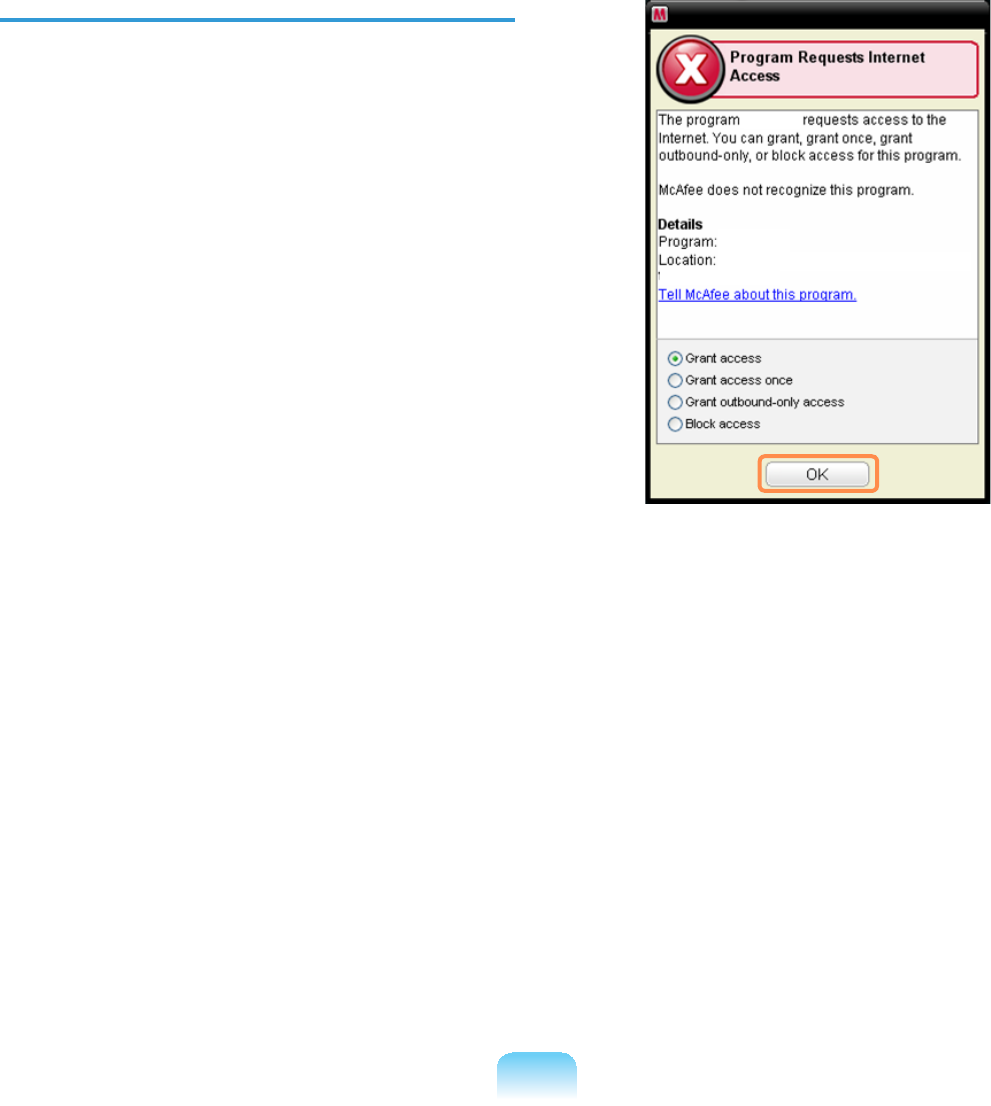
Method 1) When you need to select
Allow Access in the Server
or Internet Access Request
window.
Whenyouconnecttoabank,stock
market,orgamingwebsite,anaccess
UHTXHVWZLQGRZDSSHDUV,QWKLVFDVH
select Allow Access in the window
and click OK7KHQ\RXFDQLQVWDOOWKH
SURJUDPQRUPDOO\RURSHQWKHSDJH

127
Method 2) When you need to
deactivate the Firewall
If you cannot connect to the Internet when
using a broadband Internet service, you
canconnecttotheInternalnormallyifyou
GLVDEOHWKH0F$IHH)LUHZDOO+RZHYHU
sinceitmaycauseasecurityproblem,be
FDUHIXOZKHQGRLQJVR
n Double-click the McAfee Security
CenterLFRQIURPWKH'HVNWRS
l Click the Advanced menu at the
bottom left and click &RQ¿JXUH!
Internet&Network
W Turn the Internet&Network at the
right to Off,settheSelect when to
UHHQDEOH¿UHZDOO to Never and then
click OK
j Click Home intheleftmenupane
and click Ignore next to the ‘Firewall
protection is disabled’PHVVDJH
It is recommended activating
the Windows Firewall for your
computer'ssafetywhenyouhave
GLVDEOHGWKH0F$IHH)LUHZDOO7R
activate the Windows Firewall, click
Start > Control Panel > Windows
Firewall > Change Settings >
On(recommended)

128
Using Samsung Magic Doctor (Optional)
0DJLF'RFWRULVWURXEOHVKRRWLQJVRIWZDUHSURYLGHGE\6DPVXQJ&RPSXWHU$XVHUFDQ
GLDJQRVHV\VWHPSUREOHPVYLDRQHFOLFNRUE\VHOHFWLQJGLDJQRVWLFLWHPV
Thescreensusedinthismanualmaydifferfromactualscreensaccordingtothe
SURJUDPYHUVLRQ
Diagnosing the System
1 Select Start > All Programs >
Samsung > Samsung Magic Doctor
> Samsung Magic Doctor
2 &OLFNWKH'LDJQRVHWKH6\VWHPLFRQ
7KHV\VWHPVWDWXVGLDJQRVWLFVVWDUW
3 When the system status diagnostics
are complete, the diagnostics result
DSSHDUV
If a problem has been found, click on
Cure for Samsung Magic Doctor to
FXUHWKHSUREOHP

129
Reinstalling Software
IfyouhavereinstalledtheWindowsoperatingsystem,orthesystemandprogram
do not operate properly, you can re-install the driver and program using the System
6RIWZDUH0HGLD
z When software is not working properly, it is recommended removing the software
using the Add or Remove Programs of the Control Panel and reinstalling the
VRIWZDUHXVLQJWKH6\VWHP6RIWZDUH0HGLD
TheSystemSoftwareMediaissuppliedasaCDorDVDdependingonyour
FRPSXWHUPRGHO
z TousetheSystemSoftwareMedia,theexternalUSBODDmustbeconnectedto
WKHFRPSXWHU7KHIROORZLQJGHVFULSWLRQVSUHVXSSRVHWKDWWKHH[WHUQDO86%2''LV
FRQQHFWHG
Running the System Software
Media
Insert the System Software Media into
WKH&'520GULYH7KHLQLWLDOVFUHHQ
DSSHDUVDXWRPDWLFDOO\
Standard
Installation
Thisdisplaysalistof
driversorprogramsthat
are not currently installed
onyourcomputerfromthe
system software Media
SURYLGHG$OOQHFHVVDU\
components are installed
XVLQJWKHIDFWRU\GHIDXOWV
Minimum
Installation
This displays the
components (driver,
Windows programs,etc)
that,ifnotinstalled,may
cause problems with the
V\VWHPSHUIRUPDQFH<RX
can install only required
FRPSRQHQWV
Custom
Installation
Youcancustomizethe
installation of drivers and
SURJUDPV

130
Installing drivers and programs
1 Select Standard Installation in
the System Software Media main
VFUHHQ
2 The system is scanned to display the
drivers and programs that need to be
LQVWDOOHG
3 Click OK
Thedriversandprogramsare
automatically installed as factory
GHIDXOWV
4 :KHQGRQHUHVWDUWWKHV\VWHP

Chapter 6.
Settings
BIOS Setup 132
Setting a Boot Password 136
Changing the Boot Priority 139
Battery 140

465
BIOS Setup
7KH%,266HWXSHQDEOHV\RXWRFRQ¿JXUH\RXUFRPSXWHUKDUGZDUHDFFRUGLQJWR\RXU
QHHGV
:KHQFRQ¿JXULQJWKH6HWXSFRQQHFWLQJDQGXVLQJDQexternal USB keyboard or
OrganizerRSWLRQDOLVPRUHFRQYHQLHQW
This manual describes the procedures assuming that an external keyboard has been
FRQQHFWHG
The Wheel button supports entering Setup, navigating the menu and selecting some
LWHPV
z8VHWKH%,26VHWXSWRGH¿QHDERRWSDVVZRUGFKDQJHWKHERRWLQJSULRULW\RUDGGD
QHZGHYLFH
Sinceincorrectsettingsmaycauseyoursystemtomalfunctionorcrash,takecare
ZKHQFRQ¿JXULQJWKH%,26
z7KHIXQFWLRQVRIWKH%,26VHWXSDUHVXEMHFWWRFKDQJHIRUSURGXFWIXQFWLRQ
HQKDQFHPHQWSXUSRVHV
7KH%,266HWXSPHQXVDQGLWHPVPD\GLIIHUGHSHQGLQJRQ\RXUFRPSXWHUPRGHO
Entering the BIOS Setup
1 Slide the Power SwitchGRZQ7KH
FRPSXWHULVWXUQHGRQ
2 When the booting screen (SAMSUNG
logo) appears, press the F2 key to
HQWHUWKH%,266HWXS
466
Press the F12 key while the booting screen(SAMSUNG logo) appears, the system will
WU\WRERRWIURPWKHQHWZRUN
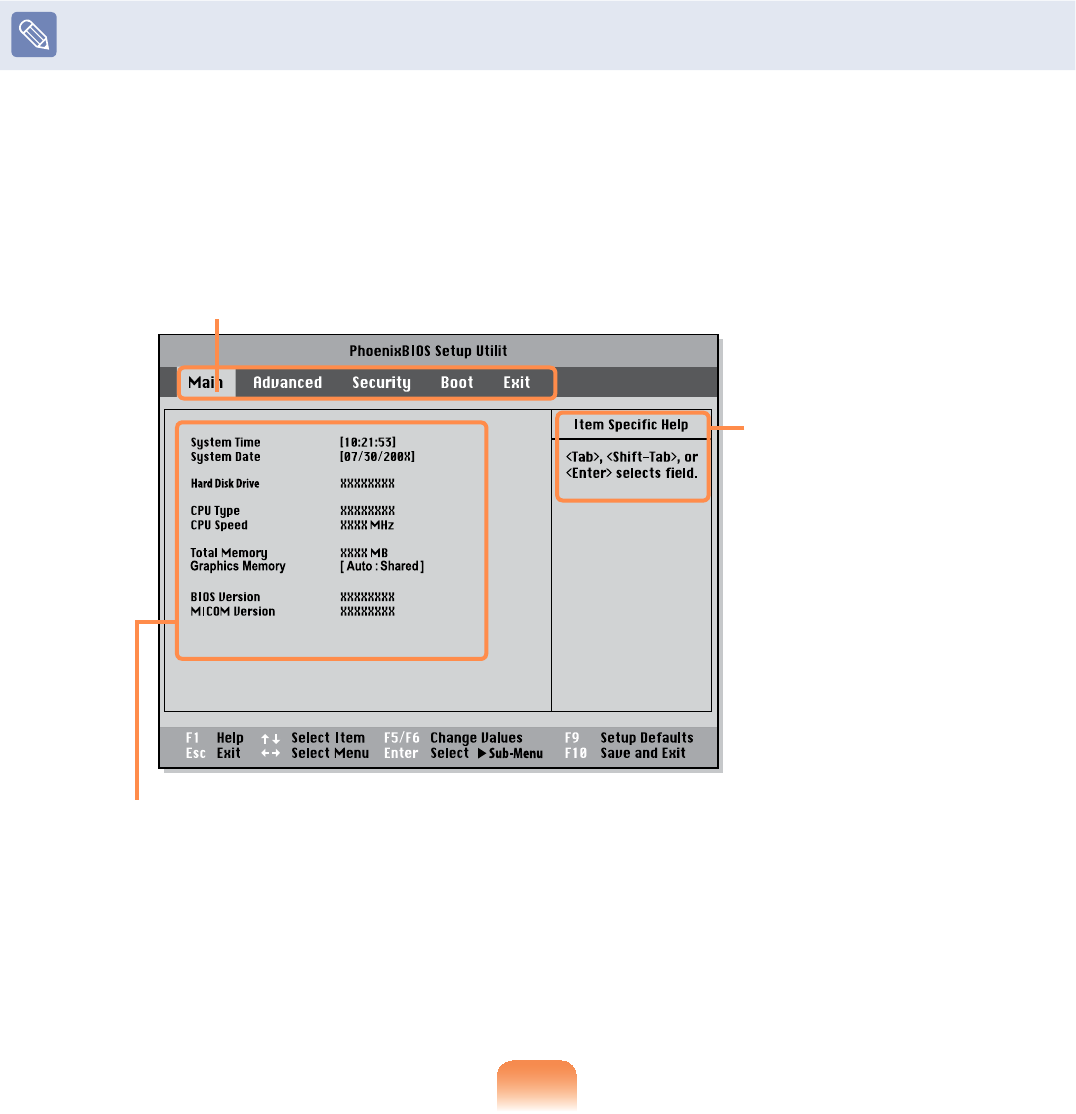
3 $IWHUDPRPHQWWKH%,26VHWXSVFUHHQDSSHDUV
7KHLWHPVLQWKH%,26VHWXSPD\GLIIHUGHSHQGLQJRQWKHSURGXFW
Setup Menu
Setup Items
Help
Help for the
selected
item appears
DXWRPDWLFDOO\
467
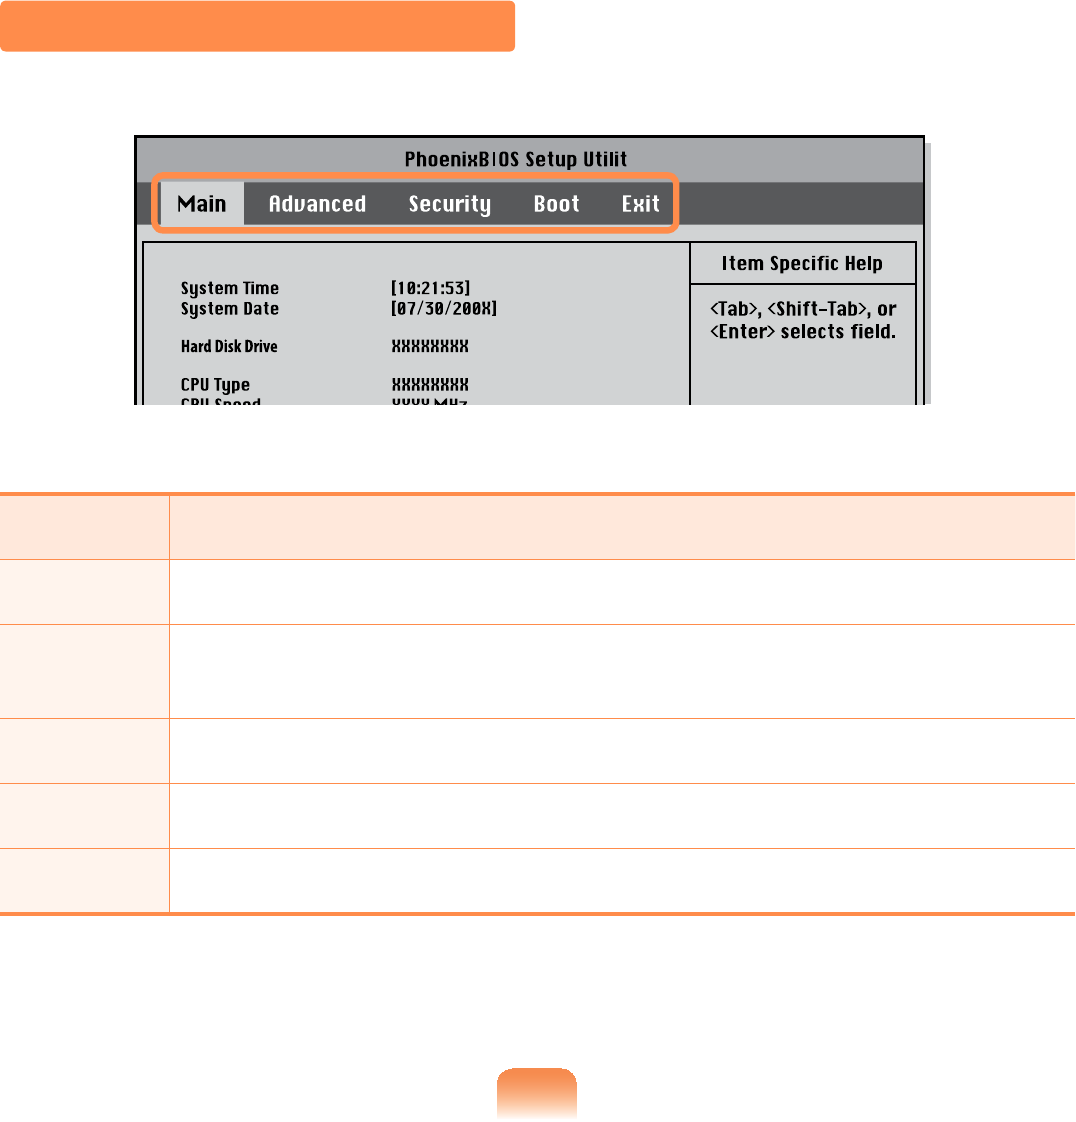
The BIOS Setup Screen
Menu Description
Main 8VHGWRFKDQJHWKHEDVLFV\VWHPDQGHQYLURQPHQWVHWWLQJV
Advanced 8VHGWRFRQ¿JXUHDGYDQFHGIXQFWLRQVRQ\RXUFRPSXWHUDURXQGGHYLFHV
DQGFKLSVHWV
Security 8VHGWRFRQ¿JXUHVHFXULW\IXQFWLRQVLQFOXGLQJSDVVZRUGV
Boot Used to set the boot priority and other boot options
Exit 8VHGWRH[LWWKH6HWXSHLWKHUVDYLQJWKHFKDQJHVRUQRW

468
System Setup Buttons (Keys)
<RXFDQFKDQJHWKH6HWXSFRQ¿JXUDWLRQE\FRQQHFWLQJDQexternal keyboard
Whenanexternalkeyboardisnotconnected,youcannavigatethemenuandselect
some items with the Wheel button
Function Function Description
To move to the
up or down item.
Turn the Wheel button up or down or press the Up ĹRUDown
ĻNH\RQWKHH[WHUQDONH\ERDUG
To move to
another menu.
SelectthemainmenuandturntheWheel button up or down or
press the Left ĸRURight ĺNH\RQWKHH[WHUQDONH\ERDUG
To select an item or to
enter a submenu.
Press the Wheel button or press the Enter keyoftheexternal
NH\ERDUG
To move to the high-
level menu or to move
to the Exit menu.
To return to the high-level menu from a submenu or to move to
theExitmenu,presstheEscNH\RQWKHH[WHUQDONH\ERDUG
To view the help. Press the F1NH\RQWKHH[WHUQDONH\ERDUG
To change
an item value. Press the F5/F6NH\RQWKHH[WHUQDONH\ERDUG
To restore the
Setup defaults.
Press the F9NH\RIWKHH[WHUQDONH\ERDUG
When no external keyboard is connected, select Exit > Load
Setup DefaultIURPWKH6HWXSPHQX
To save the
6HWXSFRQ¿JXUDWLRQ
Press the F10NH\RIWKHH[WHUQDONH\ERDUG
When no external keyboard is connected, select Exit > Exit
Saving ChangesIURPWKH6HWXSPHQX
Exiting the System Setup
1. Move to Exit Menu > Exit Saving Changes and press the EnterEXWWRQ
2. Select Yes and press the EnterEXWWRQ7KH6\VWHP6HWXSLVFORVHGDQG:LQGRZV
LVVWDUWHG

469
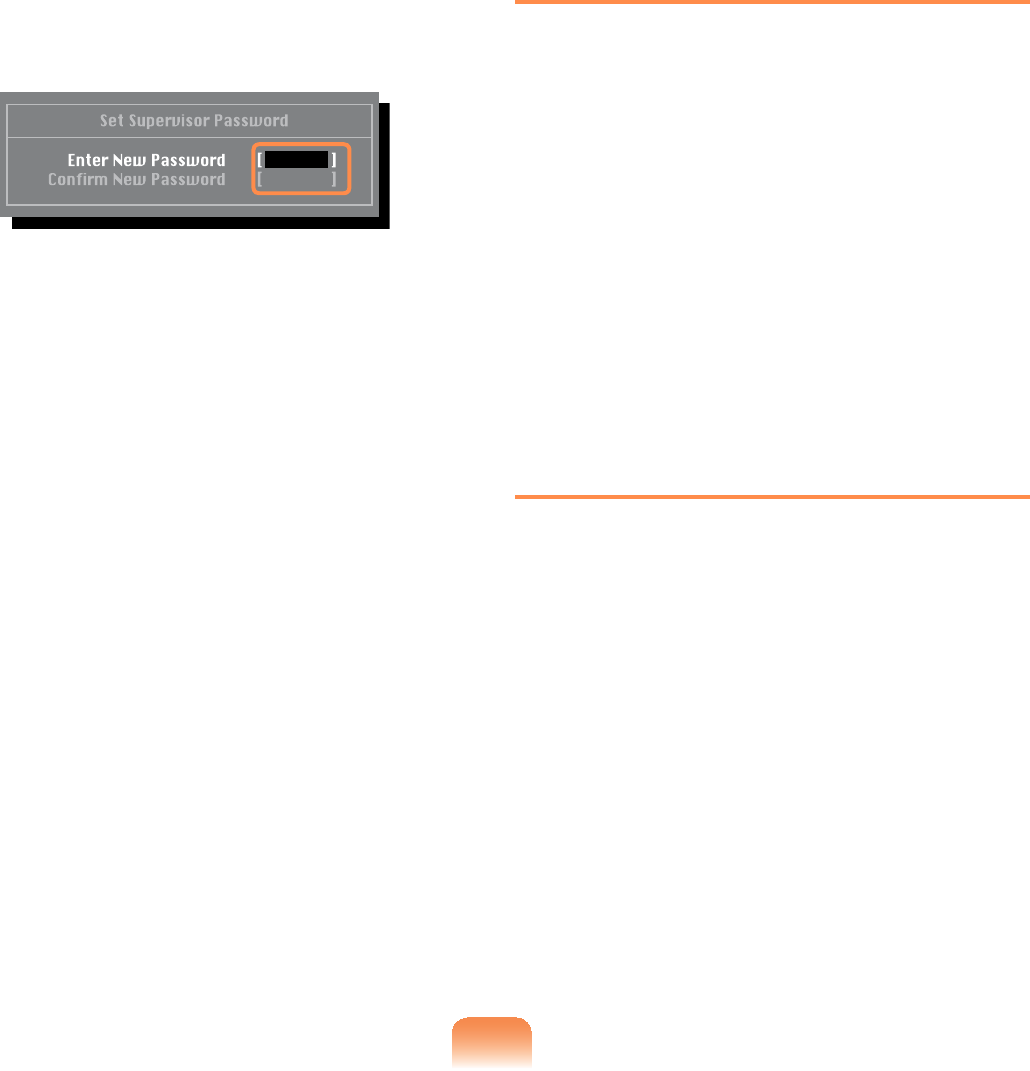
Setting a Supervisor Password
ASupervisorPasswordisrequiredtoturn
thecomputeronortostarttheSystem
6HWXS
WhensettingaSupervisorPassword,
usersotherthanasupervisorcannotuse
WKHFRPSXWHU
1 Select the Security menu in the BIOS
6HWXS
2 In the Set Supervisor Password
item, press <Enter!
Setting a Boot Password
Whensettingapassword,youhavetoenterapasswordtousethecomputerorenter
WKH%,266HWXS
%\FRQ¿JXULQJDSDVVZRUG\RXFDQUHVWULFWV\VWHPDFFHVVWRDXWKRUL]HGXVHUVRQO\DQG
SURWHFWGDWDDQG¿OHVVDYHGRQWKHFRPSXWHU
z'RQRWORVHRUIRUJHW\RXUSDVVZRUG
,I\RXKDYHIRUJRWWHQ\RXUSDVVZRUGFRQWDFWD6DPVXQJVHUYLFHFHQWHU,QWKLV
FDVHDVHUYLFHIHHZLOOEHFKDUJHG
z)RUWKHVHWXSEXWWRQVUHIHUWRWKHGHVFULSWLRQRIµ6\VWHP6HWXS%XWWRQV.H\V
135
46:
3 Youcanuseupto8alphanumeric
characters for a password but you
FDQQRWXVHVSHFLDOFKDUDFWHUV
4 :KHQDPHVVDJHFRQ¿UPLQJWKH
SDVVZRUGFRQ¿JXUDWLRQDSSHDUVLQ
the [Setup Notice@ZLQGRZSUHVV
<Enter!
The supervisor password has been
VHW7KHVXSHUYLVRUSDVVZRUGLV
requiredtoturnthecomputeronorto
HQWHU6\VWHP6HWXS
Setting a User Password
Users can start the system with a user
password, but cannot enter the System
6HWXS%\GRLQJWKLV\RXFDQSUHYHQW
RWKHUXVHUVIURPHQWHULQJ6HWXS
%HIRUHFRQ¿JXULQJDXVHUSDVVZRUGD
supervisor password must have been
FRQ¿JXUHG'HDFWLYDWLQJWKHVXSHUYLVRU
password also deactivates the user
SDVVZRUG
In the Set User Password item, press
<Enter>andcompletetheproceduresof
6WHSRI6HWWLQJD6XSHUYLVRU3DVVZRUG
Activating the Booting Password
Before activating the booting password,
asupervisorpasswordmusthavebeen
FRQ¿JXUHG
Set the Password on boot option to
Enabled)URPQRZRQV\VWHPERRWLQJ
ZLOOQRWSURFHHGZLWKRXWWKHSDVVZRUG

46;
Deactivating the Password
1 Onthepasswordtobedeactivated,
press <Enter!)RUH[DPSOHWR
deactivateasupervisorpasswordin
the Set Supervisor Password item,
press <Enter!
2 In the Enter Current Password item,
enter the current password and press
<Enter!
3 Leave the Enter New Password item
¿HOGHPSW\DQGSUHVVEnter!
4 Leave the &RQ¿UP1HZ3DVVZRUG
¿HOGHPSW\DQGSUHVVEnter!
5 In the [Setup Notice@ZLQGRZSUHVV
<Enter!
7KHSDVVZRUGLVGHDFWLYDWHG
46<
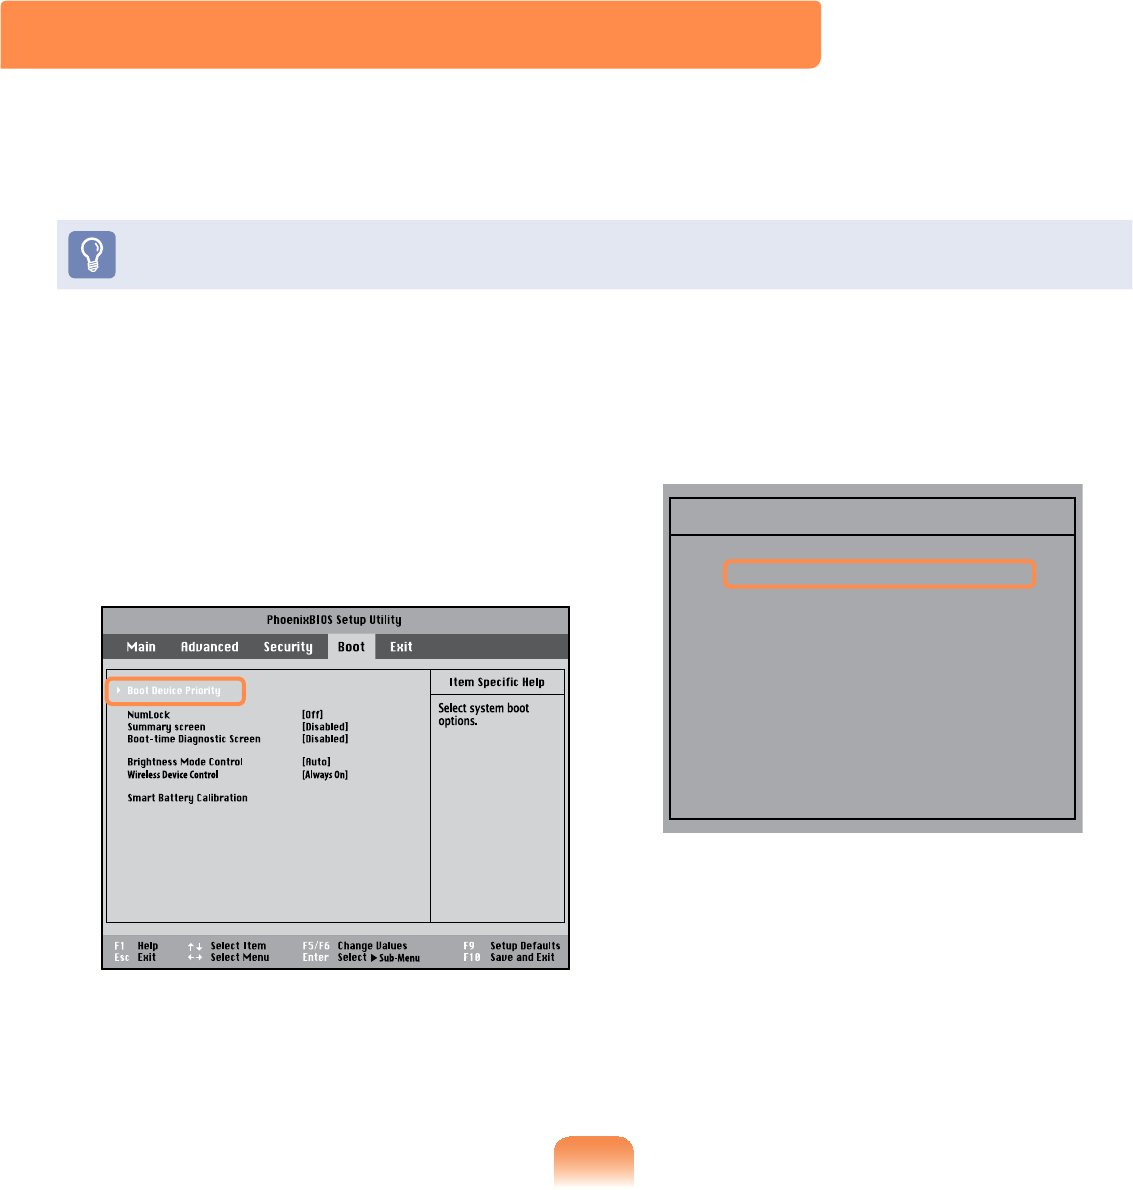
1 Select the Boot menu in the BIOS
6HWXS
2 Press <Enter>ontheBoot Device
PriorityLWHP
3 3UHVVWKHGRZQNH\ĻWRPRYHWRWKH
IDE HDD item and press the F6 key
WRPRYHXSWRWKHWRSLWHP
[ Boot priority order ]
1. USB CD : N/A
2. IDE HDD : XXXXXXXXXXXXXXXX
3. USB KEY : N/A
4. USB FDD : N/A
5. USB HDD : N/A
6. PCI BEV : XXXXXXXXXXXXXXXX
7.
8.
- USB ZIP : N/A
- USB LS120 : N/A
[Excluded from boot order]
4 Press the F10 keytosavethesettings
DQGH[LW6HWXS
The highest boot priority device is
QRZVHWWRWKH+DUG'ULYH
Changing the Boot Priority
7KLVFRPSXWHULVFRQ¿JXUHGWRERRWIURPDQH[WHUQDOW\SH2''¿UVW
Thischapterdescribeshowtochangethebootprioritysothatthecomputerbootsfrom
WKHKDUGGLVNGULYH¿UVW
Thefunctionisonlyavailablewhenanexternal USB keyboard or Organizer
RSWLRQDOLVLQVWDOOHG
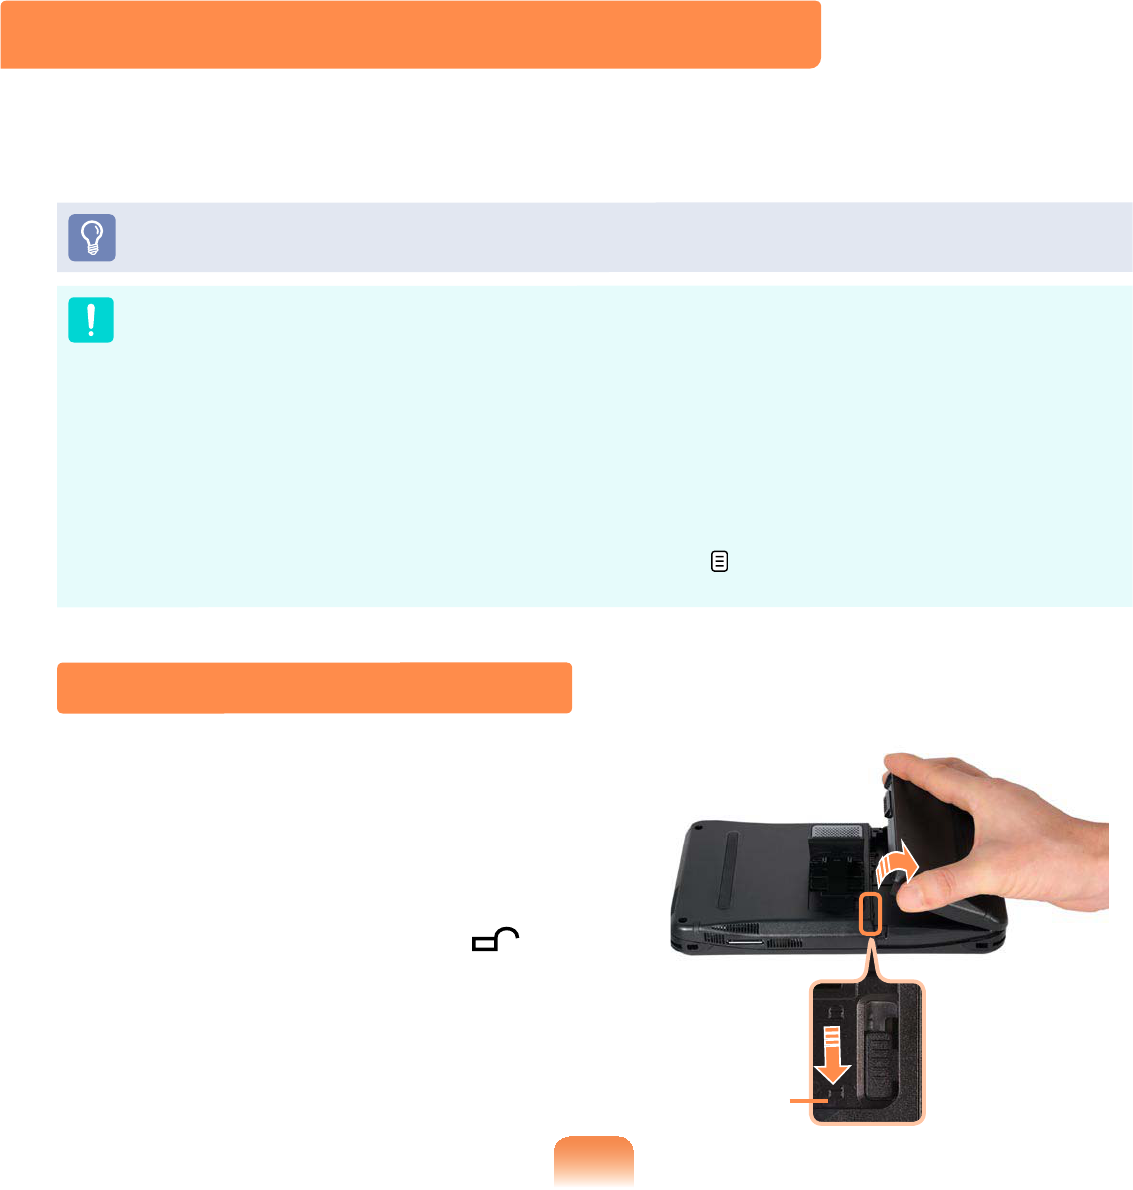
473
1 Shutdown the system and place
WKHFRPSXWHUXSVLGHGRZQRQDÀDW
VXUIDFH
2 LifttheStandupandpushtheBattery
LatchdownintotheRelease ()
SRVLWLRQ
/LIWWKHEDWWHU\XSDQGVHSDUDWHLW
Release
Battery
Pleaserefertothefollowinginstructionswhenrunningthecomputeronbatterypower
ZLWKRXWFRQQHFWLQJWKH$&SRZHU
$/LWKLXP,RQVPDUWEDWWHU\LVVXSSOLHGZLWKWKLVFRPSXWHU
Carefullyreadandfollowtheprecautionsprintedonthebatterybeforeusingthe
EDWWHU\
Precautions
8VHRQO\FKDUJHUVVSHFL¿HGLQWKH8VHU*XLGH
1HYHUKHDWWKHEDWWHU\SDFNSXWLWQHDURULQD¿UHRUXVHDWDWHPSHUDWXUHKLJKHUWKDQ
&DVWKLVPD\FDXVH¿UH
Never cause a short circuit between the battery pack terminals or disassemble the
EDWWHU\SDFN
Carefullyreadandfollowtheprecautionsprintedonthebatteryandthesafety
LQVWUXFWLRQVLQWKH8VHU*XLGHEHIRUHXVLQJWKHEDWWHU\
Please refer to the system operation environment (
177RIWKLVJXLGH2SHUDWHDQG
VWRUHWKHEDWWHU\DWURRPWHPSHUDWXUH
Installing/Removing the Battery
474
Charging the Battery
1 Attach the battery and connect the
$&DGDSWHUWRWKH'&LQMDFNRIWKH
FRPSXWHU
7KHEDWWHU\ZLOOWKHQVWDUWFKDUJLQJ
2 When charging is complete, the
&KDUJH/('WXUQVJUHHQ
Status Charge LED
Charging Amber
Charging complete Green
AC adapter not connected Off
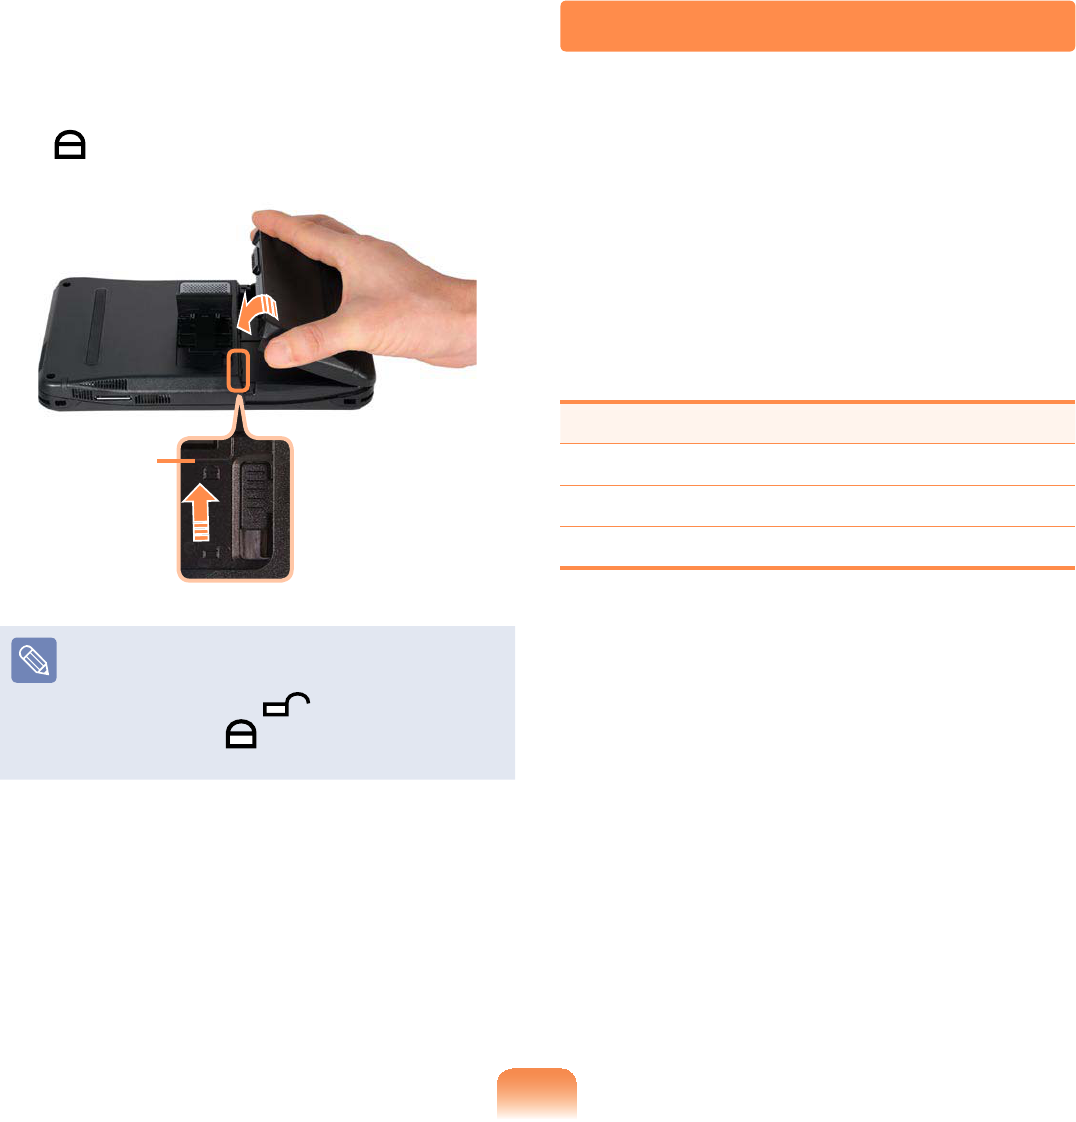
3 To reinstall the battery, align the
batterytotheoutsideofthecomputer
DQGLQVHUWWKHEDWWHU\
LiftthebatterylatchuptotheLock
(SRVLWLRQDQGSXWWKH6WDQGGRZQ
Lock
When you are unable to insert the
battery, check if the battery latch is
in the Release (
SRVLWLRQ,ILWLV
in the Lock () position, you cannot
LQVHUWWKHEDWWH\
475
Measuring the Remaining Battery Charge
<RXFDQYLHZWKHEDWWHU\FKDUJHVWDWXVE\FRPSOHWLQJWKHIROORZLQJSURFHGXUHV
Viewing through the MENU Program
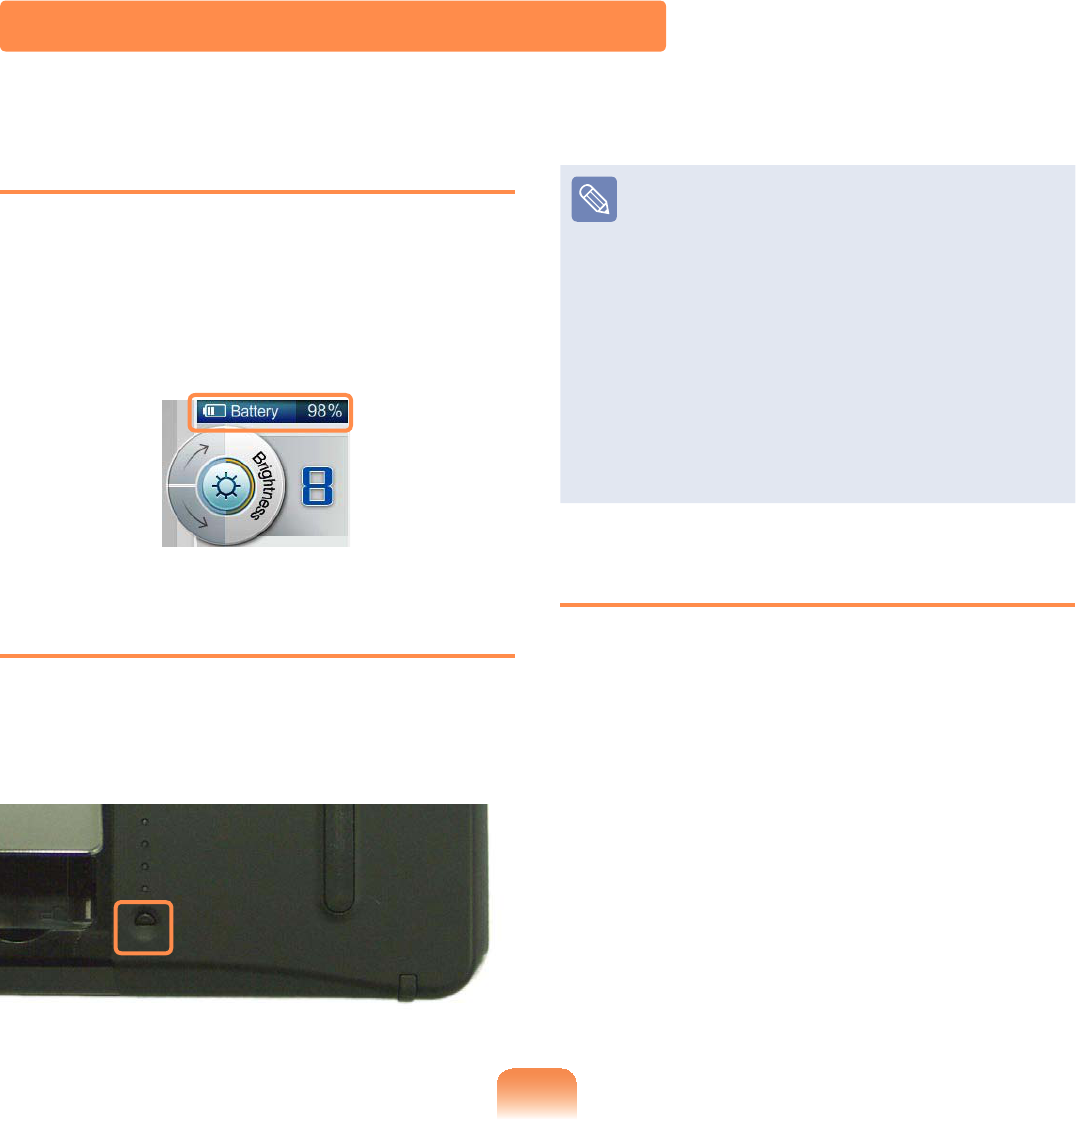
Press the Wheel button to run the
MENUSURJUDP
&RQ¿UPWKHEDWWHU\LFRQDWWKHWRSRIWKH
MENUSURJUDP
To view on the battery
Pressthebuttonontheoutsideofthe
battery to check the remaining battery
FKDUJH
Battery Warning
z Youwillhearanalarmwhenthe
remaining battery charge reaches
EHORZ
In this case, connect the AC
adapterorturnoffthecomputer
DQGLQVWDOODIXOO\FKDUJHGEDWWHU\
z When the remaining battery
charge is under 3%, the computer
automatically saves the current
ZRUNDQGWXUQVRII
Battery Usage Time Information
A battery is an expendable supply,
sowhenusingitoveralongtime,the
FDSDFLW\EDWWHU\OLIHLVVKRUWHQHG,IWKH
batterylifeisreducedtounderhalfofits
initial time, we recommend purchasing a
QHZEDWWHU\
Forlongperiodsofnotusingthebattery,
NHHSWKHEDWWHU\DIWHUGLVFKDUJLQJLW7KLV
H[WHQGVWKHEDWWHU\OLIHWLPH
476
Extending the Battery Usage Time
Decreasing the LCD Brightness
Press the Wheel button to run the MENU program and turn the Wheel button down
while the Brightness is selected or press to make the LCD brightness dimmer and
WRH[WHQGWKHEDWWHU\XVHWLPH
Using Samsung Battery Manager
SamsungBatteryManagerisapowermanagementprogramthatenablesusingthe
EDWWHU\SRZHUHI¿FLHQWO\<RXFDQVHOHFWDQRSWLPL]HGSRZHUPRGHDFFRUGLQJWR\RXU
UHTXLUHPHQWV
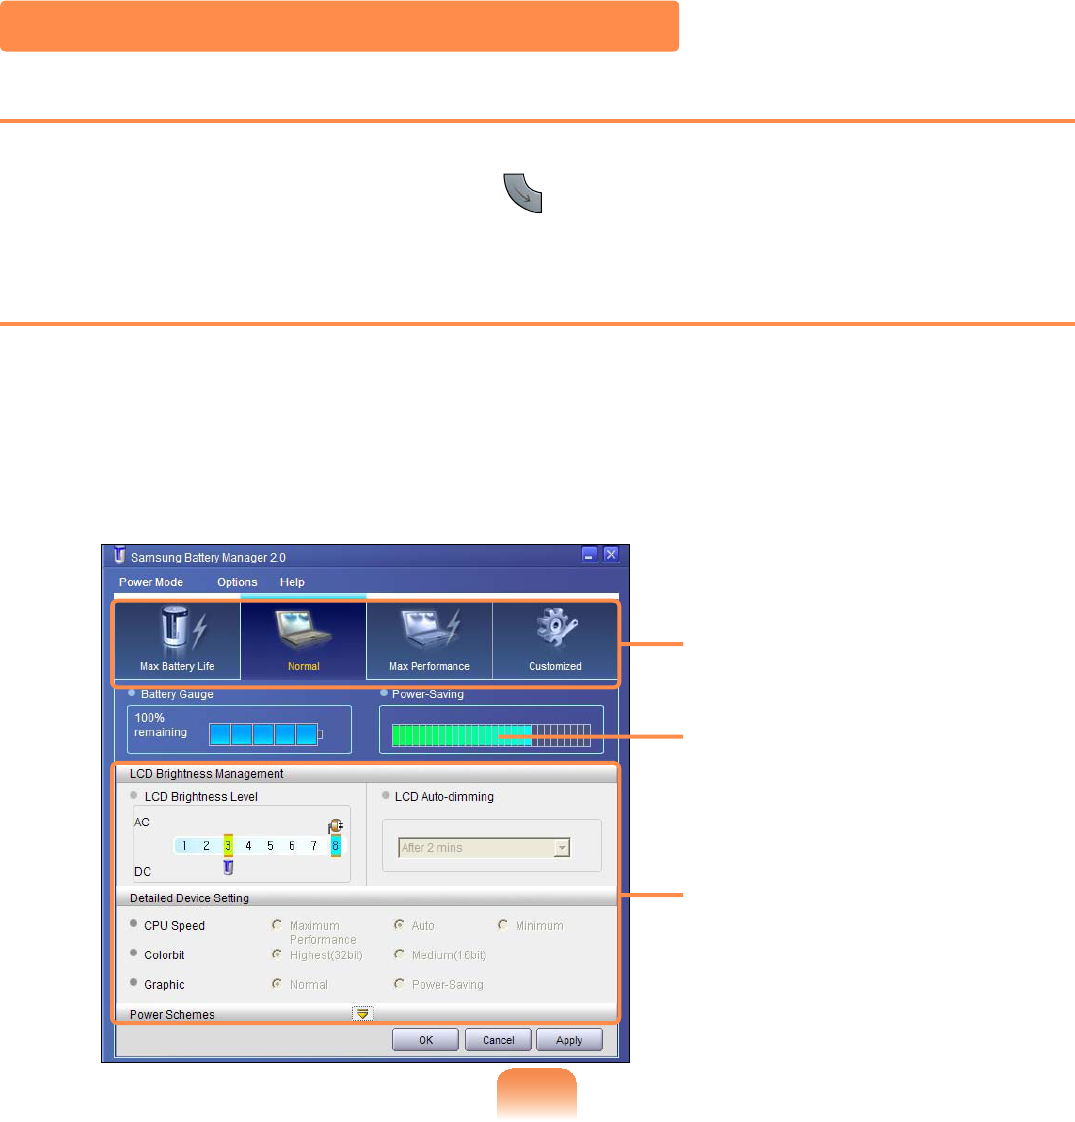
Click Start > All Programs > Samsung > Samsung Battery Manager > Samsung
Battery Manager
Power Saving
Effects
Change Power
Mode
You can only change the
GHWDLOHGFRQ¿JXUDWLRQLQ
&XVWRP0RGH

477
Maximum Battery
Saving Mode
This mode is appropriate for conditions which require the
PD[LPXPEDWWHU\XVDJHWLPH7KLVPD\GHJUDGHWKHSHUIRUPDQFH
RIWKHV\VWHP
Normal Mode 7KLVPRGHLVDSSURSULDWHIRUQRUPDOFRQGLWLRQV%RWKV\VWHP
SHUIRUPDQFHDQGEDWWHU\XVDJHWLPHDUHRSWLPL]HG
Maximum
Performance Mode
This mode is appropriate for conditions that require maximum
V\VWHPSHUIRUPDQFH7KHUHIRUHWKHEDWWHU\XVDJHWLPHPD\EH
UHGXFHGLQWKLVPRGH
Custom Mode
,QWKLVPRGH\RXFDQFRQ¿JXUHWKHXQLWWRVDYHEDWWHU\XVDJH
<RXFDQDGMXVWWKH/&'EULJKWQHVVWKHV\VWHPVWDQGE\WLPHWKH
VFUHHQFRORUTXDOLW\DQGWKHJUDSKLFVPRGHYDOXHV
Power Saving Effect
7KLVVKRZVWKHUHODWLYHEDWWHU\XVDJHWLPHIRUHDFKSRZHUPRGH7KHPRUHHIIHFWLYH
WKHSRZHUVDYLQJWKHORQJHUWKHJUDSKZLOODSSHDU
When Running a Game or Multimedia Application
AgameormultimediaapplicationmaynotworksmoothlyinMaximumBatterySaving
0RGH8VLQJWKLVLVUHFRPPHQGHGZKHQWKH$&DGDSWHULVFRQQHFWHGRULQ1RUPDORU
KLJKHUPRGHV
Samsung Battery Manager Power Modes
z Since the Maximum Battery Saving Mode of the Samsung Battery Manager controls
the system
operatingspeedtoextendthebatteryusagetime,theperformanceofthesystem
PD\EHGHJUDGHG
z WhenchangingthepowersettingsinCustomModeintheSamsungBattery
Manager, the settings of the Power Options Properties window are changed
DFFRUGLQJO\
z To use Normal Mode in Samsung Battery Manager after reinstalling Windows XP,
\RXKDYHWRLQVWDOOWKH6DPVXQJ%DWWHU\0DQDJHUXVLQJWKHV\VWHPVRIWZDUHPHGLD
478
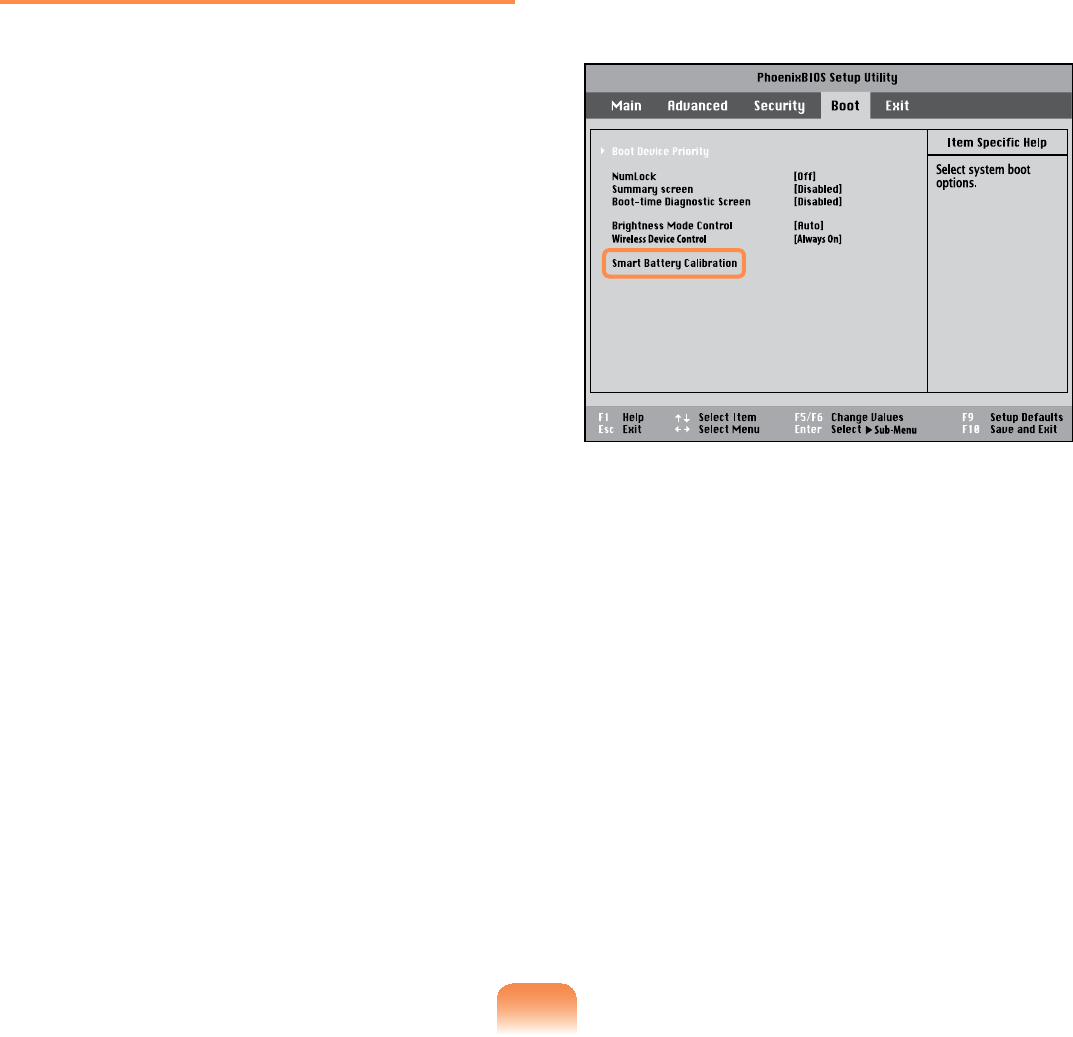
Using the Battery Calibration
Function
When charging/discharging the battery
repeatedlyforashorttimeonly,the
battery usage time may be reduced by
thedifferencebetweentheactualbattery
FKDUJHDQGWKHUHPDLQLQJFKDUJHGLVSOD\
In this case, the actual battery charge
and the remaining charge display will
be the same by discharging the battery
completely using the Battery Calibration
IXQFWLRQDQGWKHQUHFKDUJLQJLWDJDLQ
1 Disconnect the AC power adapter
DIWHUWXUQLQJRIIWKHFRPSXWHU
2 Restartyourcomputerandpressthe
F2 button when the Samsung logo
DSSHDUVWRVWDUWWKH%,266HWXS
3 Using the arrow keys, select Smart
Battery Calibration in the Boot
menu and press Enter
4 Highlight Yes in the Battery
&DOLEUDWLRQ&RQ¿UPDWLRQZLQGRZDQG
press Enter
The Battery Calibration function is
activated and the battery is forcefully
GLVFKDUJHG7RVWRSWKHRSHUDWLRQ
press the EscEXWWRQ
This operation requires 3~5 hours
depending on the battery capacity
DQGWKHUHPDLQLQJEDWWHU\FKDUJH

Chapter 7.
Appendix
Reinstalling Windows XP 147
Using Samsung Recovery Solution
(Optional) 152
Q & A 161
Display Related 161
Organizer Related 164
Sound Related 165
Wireless Network (WLAN) Related 166
Bluetooth 171
Game and Program Related 173
Samsung Recovery Solution 174
Other 175
3URGXFW6SHFL¿FDWLRQV 7
Glossary 188
Index 192
Contact SAMSUNG WORLD WIDE 193

147
Reinstalling Windows XP
You can reinstall Windows using the System Recovery CD whenWindowsdoesnot
ZRUNSURSHUO\
zSystem Recovery CD is optional and may not be provided depending on your
FRPSXWHUPRGHO
z To install Windows, an external-type ODD and a USB keyboardDUHUHTXLUHG
Connect the external-type ODD and USB keyboard before turning the
computer on. If you connect a USB keyboard during the installation, the
computer will fail to recognize the USB keyboard.
The following descriptions assume that an external ODD and an external USB
NH\ERDUGDUHFRQQHFWHG
z To reinstall Windows when Windows does not boot, refer to 151
5HLQVWDOOLQJ:LQGRZVPD\GHOHWHGDWD¿OHVDQGSURJUDPVVDYHGRQWKHKDUG
disk drive.
0DNHVXUHWREDFNXSDOOLPSRUWDQWGDWD6DPVXQJ(OHFWURQLFVVKDOOQRWEHKHOGOLDEOHIRU
DQ\ORVVRIGDWD
Running the System Recovery CD
ƔPreparation
1. Connectanexternal-typeODDthroughtheUSB PortRIWKHFRPSXWHU
2. Connect the external-type USB keyboard
3.7XUQWKHFRPSXWHURQWRERRWXS:LQGRZV
Insert the System Recovery CDLQWRWKHH[WHUQDO86%2''7KHVWDUWVFUHHQZLOO
DSSHDUDXWRPDWLFDOO\

148
zStandard installation
You can change the settings for
partitioning, the installation folder,
HWFGXULQJWKH:LQGRZVLQVWDOODWLRQ
However, reinstalling Windows may
deletethedataontheharddiskdrive
VXFKDV¿OHVSURJUDPVHWF,QRUGHU
to minimize damage from data loss,
pleaseremembertoalwaysbackup
GDWD
zQuick Installation
This re-installs Windows with the user
GDWDDQGWKHV\VWHPFRQ¿JXUDWLRQ
LQWDFW7KHXVHUGDWDLQWKHDOUHDG\
existing Windows folders may be
preserved as the existing Windows
IROGHUVDUHRYHUZULWWHQ
Standard Installation
The Windows Standard Installation
SURFHGXUHVDUHGHVFULEHGEHORZ
To install Windows, an external-
type ODD and a USB keyboard are
UHTXLUHG
Connect the external-type ODD
and USB keyboard before turning
the computer on. If you connect
a USB keyboard during the
installation, the computer will fail
to recognize the USB keyboard.
1 In the System Recovery CD start
screen, click Standard Installation
2 The description for the Standard
,QVWDOODWLRQDSSHDUV

149
Click Yes to start the Windows
LQVWDOODWLRQ7KHV\VWHPUHVWDUWVDQG
WKH:LQGRZVLQVWDOODWLRQEHJLQV
Ifyouhavesetabootingpassword,
enter the booting password when
booting the system to continue the
LQVWDOODWLRQ
3 Afterthesystemhasrestarted,the
message ‘Press any key to boot
from CD¶DSSHDUV'RQRWSUHVVDQ\
NH\DWWKLVWLPH
Afteramomentthepartition
FRQ¿JXUDWLRQVFUHHQDSSHDUV
You must select partition C: and
press the Enter keyoftheexternal
NH\ERDUG
Partitionsettingisafunctionthat
dividestheharddiskdriveintooneor
VHYHUDOSDUWLWLRQV1RWHWKDWFKDQJLQJ
the partition deletes all data on the
KDUGGLVNGULYH
4 Select the folder to install the
:LQGRZVRSHUDWLQJV\VWHP
To delete the previous version of
Windows and install in the current
folder, press <L!RQWKHNH\ERDUG
When pressing the <ESC>key
to select another folder for the
installation, a new Windows folder
iscreatedcausingtheriskofdual
ERRWLQJ
5 After the installation process copies
the necessary folders for the Windows
installation, restart the system, and
the message “Press any key to boot
from CD´LVGLVSOD\HG<RXGRQRW
QHHGWRHQWHUDQ\WKLQJ7KH:LQGRZV
XP installation screen will appear
VKRUWO\WRSURFHHGZLWKWKHLQVWDOODWLRQ
6 When the Regional and Language
Options window appears, click Next

150
7 Whenawindowthatrequiresyour
name and organization pops up, enter
your name and the organization and
click Next
Awindowthatrequiresthecomputer
name and the administrator password
DSSHDUV(QWHUWKHFRPSXWHUQDPH
and the administrator password and
click Next
8 When the Date and Time Settings
window appears, click Next6HWXS
FRQWLQXHVDQGWKHV\VWHPUHVWDUWV
9 When the system restarts, the
message “Press any key to boot
from CD´LVGLVSOD\HG<RXGRQRW
QHHGWRHQWHUDQ\WKLQJ,QDPRPHQW
WKH:LQGRZV;3'HVNWRSDSSHDUV
When you see the Windows desktop,
this means that the installation
SURFHVVLVFRPSOHWHG
10 Remove the System Recovery
CD and install the device drivers
andapplicationsfromtheSystem
Software Media129
Quick Installation
The Windows Quick Installation
SURFHGXUHVDUHGHVFULEHGEHORZ
To install Windows, an external-
type ODD and a USB keyboard are
UHTXLUHG
Connect the external-type ODD
and USB keyboard before turning
the computer on. If you connect
a USB keyboard during the
installation, the computer will fail
to recognize the USB keyboard.
1 In the System Recovery CD start
screen, click Quick Installation
2 The description for the Quick
,QVWDOODWLRQDSSHDUV
Click Yes to start Windows
LQVWDOODWLRQ
When the installation is complete, the
:LQGRZV'HVNWRSDSSHDUV5HPRYH
the System Recovery CD from the
2''

151
Reinstalling when Windows does not start
WhenWindowsdoesnotstart,bootupwiththeSystem Recovery CD andfromthere
\RXFDQUHLQVWDOO:LQGRZV
To install Windows, an external-type ODD and a USB keyboardDUHUHTXLUHG
Connect the external-type ODD and USB keyboard before turning the computer
on. If you connect a USB keyboard during the installation, the computer will fail
to recognize the USB keyboard.
1 Insert the System Recovery CD into
theexternalUSBODDandrestartthe
FRPSXWHU
2 If the Press any key to boot from
CD messageappearswhilebooting,
SUHVVDQ\NH\RQWKHNH\ERDUG
3 7KHSDUWLWLRQFRQ¿JXUDWLRQVFUHHQ
ZLOODSSHDU7RLQVWDOO:LQGRZVLQWKH
selected partition without change,
press <Enter!
4 Select a ¿OHV\VWHPIRUPDW7R
NHHSWKHFXUUHQW¿OHV\VWHPSUHVV
<Enter!
5 Select the folder to install the
:LQGRZVRSHUDWLQJV\VWHP
To delete the previous version of
Windows and install in the current
folder, press <L!RQWKHNH\ERDUG
6 Thesubsequentproceduresare
thesameasthoseafterStep5of
<Standard Installation! 148

152
Using Samsung Recovery Solution (Optional)
SamsungRecoverySolutionprovidesaRestore Function that enables you to
easily restore your computer to a previous, normal state when a problem occurs with
your computer, as well as a Backup Function that enables you to easily save your
FRPSXWHU¶VFXUUHQWVWDWXVDQG\RXUGDWD
z Samsung Recovery Solution may not be provided or the version may differ
dependingonyourcomputermodelandtheusageproceduresmaydifferdepending
RQWKHYHUVLRQ7KHVFUHHQLPDJHVLQWKLVGRFXPHQWPD\GLIIHUIURPDFWXDORQHV
z For models with an SSD (Solid State Disk), Samsung Recovery Solution is not
SURYLGHG
z To use the backup and restore function to DVD, an external ODD must be
FRQQHFWHG7KHIROORZLQJGHVFULSWLRQVDVVXPHWKDWDQH[WHUQDO2''LVFRQQHFWHG
z TouseSamsungRecoverySolution,anexternal-typeODDandaUSBkeyboard
DUHUHTXLUHG
The following descriptions assume that an external ODD and an external USB
NH\ERDUGDUHFRQQHFWHG
Samsung Recovery Solution Functions
}Restore Function
Using this function, you can easily restore your computer to a previous, normal state
withoutusingtheSystemRecoveryMediaortheWindowsInstallationCD,whenyour
FRPSXWHULVQRORQJHUZRUNLQJSURSHUO\RUIDLOVWRERRWXSGXHWRDSUREOHP,I\RX
KDYHEDFNHGXSGDWD\RXFDQUHVWRUHWKHEDFNXSGDWD

153
Basic Restore Complete Restore Data Restore
This function quickly
UHVWRUHVPDMRU
:LQGRZV¿OHV&?
Windows) without
touching the user
FRQ¿JXUDWLRQDQG
GDWDRQWKH&GULYH
This function deletes the entire C
driveandthenrestoresthecontents
RIWKH&GULYHFRPSOHWHO\
This function
restores the user
data if the user
previously backed up
GDWD
zInitial Status Restore
This function restores the computer
to the initial status saved when the
FRPSXWHUZDVUXQIRUWKH¿UVWWLPH
DIWHULWZDVSXUFKDVHG
zComplete Backup Restore
This function restores the computer
to the point where the user
performed a Complete Backup
Restore Functions
}Backup Function
YoucanbackuptheentireCdriveorallyourdatatoanother hard disk drive or
DVD<RXFDQUHVWRUHWKHEDFNHGXSGULYHRUGDWDXVLQJWKH5HVWRUHIXQFWLRQ
Backup Functions
This function backs up
theinitialstatusofthe
FRPSXWHU
Initial Status Backup
This function backs up
VSHFL¿FIROGHUVRU¿OHV
Data Backup
This function backs up
WKHHQWLUHGULYH&
Complete Backup

154
Using Samsung Recovery Solution
NotonlycanyouuseSamsungRecoverySolutionwhenWindowsisrunning,but
DOVRZKHQ\RXDUHXQDEOHWRERRWXSLQWR:LQGRZV/HW¶VOHDUQKRZWRXVH6DPVXQJ
5HFRYHU\6ROXWLRQ
Initial Status Backup
,I\RXWXUQ\RXUFRPSXWHURQIRUWKH¿UVW
time,theInitialStatusBackupfunction
LVSHUIRUPHGDIWHUUHJLVWHULQJ:LQGRZV
This function saves an image of the Initial
StatusoftheCdrivetoasecurelocation
so that users can restore the computer
to the Initial Status using the Complete
5HVWRUHIXQFWLRQ$Q,QLWLDO6WDWXV%DFNXS
is only performed once immediately after
WKHFRPSXWHULVSXUFKDVHG
1 ,I\RXWXUQWKHSRZHURQIRUWKH¿UVW
time, the Register Windows screen
DSSHDUV,I\RXUHJLVWHU:LQGRZV
according to the instructions on the
VFUHHQWKHFRPSXWHUZLOOEHUHVWDUWHG
2 When the computer has been
restarted, the User Registration
&RPSOHWHPHVVDJHDSSHDUV&OLFN
OK7KHFRPSXWHUZLOOUHVWDUW
3 The Initial Status Backup screen
DSSHDUV
ToresizetheCandDdrives,click
Advanced and partition the disk
DFFRUGLQJO\$GMXVWWKHSDUWLWLRQVL]H
using the slide bar and then click
Next
The partition disk function is only
available when the computer is
WXUQHGRQIRUWKH¿UVWWLPHDQGZLOO
QRWEHDYDLODEOHDIWHUZDUGV2QFH
you have completed the partitions,
\RXFDQQRWUHVL]HWKHSDUWLWLRQV
7KHUHIRUHSDUWLWLRQWKHGLVNFDUHIXOO\
4 The Initial Status Backup is performed
tobackuptheinitialstatusofthe
&GULYHWRDVHFXUHORFDWLRQ7KLV
backupimageisusedforthe
Complete Restore function that
restores your computer to the initial
statuswhenthecomputerisnot
ZRUNLQJSURSHUO\
5 When the Initial Status Backup is
FRPSOHWHUHVWDUW:LQGRZV

155
Quick Restore
Quick Restore enables you to easily
restoreyourcomputertoaprevious,
normalstatewhenaproblemoccurswith
\RXUFRPSXWHU4XLFN5HVWRUHSURYLGHV
BasicRestoreandCompleteRestore
&RPSXWHU,QLWLDO6WDWXV5HVWRUHRSWLRQV
1– When Windows is running:
Click Start > All Programs >
Samsung > Samsung Recovery
Solution > Samsung Recovery
Solution
– When Windows does not start:
Turnthecomputeronandpress
the F4 keywhenthebootscreen
6$0681*ORJRDSSHDUV$IWHUD
moment,thecomputerbootsupin
RestorationmodeandtheSamsung
5HFRYHU\6ROXWLRQVFUHHQDSSHDUV
The touch screen function is not
supportedinthismodeevenifyour
PRGHOVXSSRUWVDWRXFKVFUHHQ,Q
this mode, please use the touchpad
or mouse instead of the touch
VFUHHQ
2 If the Samsung Recovery Solution
SURJUDPLVODXQFKHGIRUWKH¿UVWWLPH
after purchasing the computer, the
license agreement screen appears
EHIRUHWKHUHVWRUDWLRQLVVWDUWHG5HDG
the agreement and click Agree to
FRQWLQXH
3 If the initial menu screen appears,
click Restore
If you click Select by Symptom,
theSelectbySymptommenu
DSSHDUV,I\RXVHOHFWDV\PSWRPD
recommended restoration option will
EOLQN&OLFNWKHUHVWRUDWLRQRSWLRQWR
FRQWLQXH
4 Select either Basic Restore or
Complete Restore from the Restore
PHQX
zABasic RestoreUHVWRUHVWKHPDMRU
:LQGRZV¿OHVRQO\ZKLOHPDLQWDLQLQJ
WKHXVHUFRQ¿JXUDWLRQDQGGDWDRQWKH
&GULYHLQDVKRUWWLPH
zAComplete Restore deletes the
entireCdriveandthenrestoresthe
FRQWHQWVRIWKH&GULYH

156
Run Complete Restore if the
computer does not work even after
Basic RestoreKDVEHHQFRPSOHWHG
4-1 IfyouhaveselectedBasic Restore:
In the Basic Restore screen, click
the NextEXWWRQ7KHV\VWHPZLOOEH
UHVWDUWHG
4-2 IfyouhaveselectedComplete
Restore:
In the restoration point selection
screen, select the restoration point
describedas‘ComputerInitial
Status’ and click the NextEXWWRQ
7KHV\VWHPZLOOEHUHVWDUWHG
SinceaCompleteRestoredeletes
alluserdataaswellasadditionally
installed programs, please backup
\RXULPSRUWDQWGDWD¿UVWXVLQJWKH
Data Backup function, before running
&RPSOHWH5HVWRUH
5 Thecomputerbootsupinto
restorationmodeandtherestoration
SURJUHVVPHVVDJHDSSHDUV,I\RX
click OKWKHUHVWRUDWLRQEHJLQV7KH
restoration may take some time,
SOHDVHZDLWIRUDPRPHQW
6 When the ‘Restart the System’
message appears after the restoration
is complete, click OK to restart the
V\VWHP
Make sure that the power cord is
connected while the restoration is in
SURFHVV7KH¿UVWWLPHWKHFRPSXWHU
bootsupafteraCompleteRestorehas
beenperformed,thespeedoftheboot
process may be slowed down due to
WKHV\VWHPRSWLPL]DWLRQSURFHVV$WWKLV
time,donotshutthecomputerdownby
IRUFH
User Complete Backup/Restore
AComplete Backup saves the complete
imageoftheCdriveontoanotherdriveor
'9'$Complete Restore restores the
LPDJH¿OHVDYHGE\WKH&RPSOHWH%DFNXS
RQWRWKH&GULYH7KLVJXLGHGHVFULEHVWKH
Complete Backup and Complete Restore
procedures on the basis of backing up
DQGUHVWRULQJE\XVLQJ'9'

157
}Complete Backup
z If you run Complete Backup
usingaDVD,youcanrestorethe
computerevenwhenaproblem
occurswiththeharddiskorwhen
WKHUHVWRUDWLRQDUHDLVUHPRYHG
z To perform a complete backup
onto DVD, an external ODD that
supports DVD burning must be
FRQQHFWHG
1 Click Start > All Programs >
Samsung > Samsung Recovery
Solution > Samsung Recovery
Solution
When you cannot start Windows,
turnthecomputeronandpressthe
F4keyinthebootscreentoenter
UHVWRUDWLRQPRGH
2 When the initial menu screen
appears, click Backup
3 Click Complete Backup in the
EDFNXSPHQX
4 Enter a description for the backup
regarding the current computer status
LQWKH'HVFULSWLRQ¿HOGVRWKDW\RXFDQ
easily recognize it later, and specify
WKH6DYH3DWK,I\RXUFRPSXWHUKDVD
DVD-Writer, you can specify the DVD
GULYHDVWKH6DYH3DWK
Select Drive D.
Select the DVD drive.
5 If you click the Next button, the
system restarts in restoration mode
and the Complete BackupEHJLQV
IfyouhaveselectedtheDVDdrive
astheSavePath,the“Enterablank
'9'´PHVVDJHDSSHDUV,QVHUWD
blank DVD and click the OKEXWWRQ
Samsung Recovery Solution
supports DVD+R, DVD-R, DVD+RW,
andDVD-RW,butdoesnotsupport
CD-R,CD-RW,DVD-RAM,DVD-DL
'XDO/D\HU+''9'DQG%OX5D\

158
6 7KH&RPSOHWH%DFNXSEHJLQV
If multiple DVDs are required,
theexpectednumberofDVDsis
GLVSOD\HGLQWKHSURJUHVVVFUHHQ
Whenever burning a DVD is
FRPSOHWHGWKH³,QVHUWWKHQH[W'9'´
PHVVDJHZLOODSSHDU&RQWLQXHWKH
EDFNXSDFFRUGLQJWRWKHLQVWUXFWLRQV
7
When the ‘Restart the System’ message
appearsafterthebackupiscomplete,
click OKWRUHVWDUWWKHV\VWHP
}Complete Restore
1– When backing up onto DVD
Turnthecomputeronandinsertthe
EDFNXS'9'LQWRWKH'9'GULYH
IftherearemultiplebackupDVDs,
LQVHUWWKH¿UVW'9'
– When backing up to another
drive
3URFHHGWR6WHS
2 Click Start > All Programs >
Samsung > Samsung Recovery
Solution > Samsung Recovery
Solution
When you cannot start Windows,
turnthecomputeronandpressthe
F4keyinthebootscreentoenter
UHVWRUDWLRQPRGH
3 When the initial menu screen
appears, click Restore and then click
Complete Restore
4 Select a Complete Backup
restoration point in the restoration
point selection screen and click the
NextEXWWRQ7KHV\VWHPLVUHVWDUWHG
5 The restoration progress message
appears after the computer boots up
LQUHVWRUDWLRQPRGH,I\RXFOLFNOK,
WKHUHVWRUDWLRQEHJLQV
If multiple DVDs have been used
for a Complete Backup, whenever
burning a DVD is completed, the
³,QVHUWWKHQH[W'9'´PHVVDJHZLOO
DSSHDU
6 When the ‘Restart the System’
message appears after the restoration
is complete, click OK to restart the
V\VWHP7KH&RPSOHWH5HVWRUHKDV
EHHQFRPSOHWHG

159
User Data Backup/Restore
Data Backup enables you to save
VSHFL¿F¿OHVRUIROGHUVRQWRDQRWKHUGULYH
RU'9'Data Restore enables you to
restoredatausingthedatasavedby
D'DWD%DFNXSZKHQGDWDLVORVW7KLV
guidedescribestheBackupandRestore
procedures on the basis of backing up
DQGUHVWRULQJE\XVLQJ'9'
}Data Backup
1 Click Start > All Programs >
Samsung > Samsung Recovery
Solution > Samsung Recovery
Solution
When you cannot start Windows,
turnthecomputeronandpressthe
F4keyinthebootscreentoenter
UHVWRUDWLRQPRGH
2 When the initial menu screen
appears, click Backup and then click
Data Backup
3 In the data selection screen, select
either Basic Selection or Select
from allVHOHFWDIROGHURU¿OHWREH
backed up, and then click the Next
EXWWRQ
4 Enter a description for the backup in
the Description¿HOGVRWKDW\RXFDQ
easily recognize it later and specify
the Save Path,I\RXUFRPSXWHUKDVD
DVD-Writer, you can specify the DVD
GULYHDVWKH6DYH3DWK
,I\RXKDYHVSHFL¿HGDKDUGGLVN
drive or a removable disk as the
Save Path, the SamsungRecovery\
SamsungData folder is created on
WKHFRUUHVSRQGLQJGULYHHJ'?
DQGWKHGDWDLVVDYHGWRWKHIROGHU
Takecaretonotdeletethefolderby
PLVWDNHRURQSXUSRVH
5 If you click the Next button, the Data
%DFNXSEHJLQV,I\RXKDYHVHOHFWHG
theDVDdriveastheSavePath,
WKH³(QWHUDEODQN'9'´PHVVDJH
DSSHDUV,QVHUWDEODQN'9'DQGFOLFN
the OKEXWWRQ
6 7KH³%DFNXSLVFRPSOHWHG´PHVVDJH
DSSHDUV

160
}Data Restore
1– When backing up onto DVD
Turnthecomputeronandinsertthe
EDFNXS'9'LQWRWKH'9'GULYH
– When backing up to another
drive
3URFHHGWR6WHS
2 Click Start > All Programs >
Samsung > Samsung Recovery
Solution > Samsung Recovery
Solution
When you cannot start Windows,
turnthecomputeronandpressthe
F4keyinthebootscreentoenter
UHVWRUDWLRQPRGH
3 When the initial menu screen
appears, click Restore and then click
Data Restore
4 Select a backup item to be restored
in the backup list and click the Next
EXWWRQ
5 Select a folder for the restoration and
click the NextEXWWRQ'DWD5HVWRUH
EHJLQV
6 When Data Restore is completed,
checkifthedatahasbeenrestoredto
WKHVSHFL¿HGIROGHU

161
Q & A
This section provides information on possible problems, solutions and other references
IRUXVLQJWKHV\VWHP
TThe LCD screen is too dark or too
bright.
A $GMXVWWKH/&'EULJKWQHVV
Press the Wheel button to run the
MENU program and click of
Brightness
TThe screen saver disturbs Media
Player playing a movie or video clip
after the screen saver is activated
while Media Player is playing.
A Unselect Tools > Options > Player
> Allow screen saver during
playbackLQWKH0HGLD3OD\HU
TIn the following cases, the screen
blinks or displays noise for a short
time.
Click the Graphics Related tab,
Change Resolution, Change
Display Device, Remove the AC
Adapter, Restart the System,
Change Power Scheme.
A This may happen while the video
driver is examining the connected
GHYLFH:KLOHEXV\GHWHFWLQJDQ\
connected display devices may blink
RUVRPHQRLVHPD\RFFXU
Display Related

162
TI have pressed the Wheel button
after connecting the Organizer and
changed the output to both the
LED and the projector in the MENU
program, but the screen is not
displayed properly.
A Press the Wheel button to run the
MENU program and select LCD+CRT
Clone in LCD/CRT
Thescreenmaynotbedisplayed
or only part of the screen may be
displayed when the LCD resolution is
WRRORZRUWRRZLGHDQGWKHSURMHFWRU
FDQQRWVXSSRUWWKHUHVROXWLRQ
Right-click over the Desktop, select
Properties, select the Settings
tab and change the Resolution to
[
TI have connected a monitor (or
projector) to the computer, but
the colors on the monitor are
abnormally displayed.
A Checkifthemonitorandcomputer
are properly connected with the signal
cable and reconnect the cable if
QHFHVVDU\
TThe picture on the screen
trembles.
A Thepictureonthescreenmay
tremble when you view some Internet
SDJHVRUSOD\VRPHRQOLQHJDPHV,Q
this case, using an external monitor is
UHFRPPHQGHG

163
TI’ve run the Rotation function from
the Menu, and the pointer on the
screen does not correspond to the
pointer position.
A It is recommended using an external
USBmousewhenthescreenis
SLYRWHG
If the above problem appears,
FRPSOHWHWKHIROORZLQJVWHSV
n Right-clickontheeGalax Touch#
LFRQIURPWKH7DVNEDUDQGFRQ¿UP
that the Display Pivot Support
function is selected9,ILWLVQRW
selected, select it by selecting the
Display Pivot Function
,I\RXFDQQRW¿QGWKH7RXFK.LW
icon on the Taskbar, click Start >
All Programs > eGalax Touch >
TouchMon
l Click on Start > All Programs >
H*DOD[7RXFK!&RQ¿JXUH8WLOLW\
and click on 4-Point Calibration
from the ToolsWDE,IWKH6W\OXV3HQ
Calibration screen appears, proceed
according to the instructions on the
VFUHHQ

164
TWhen I connect an external
display and change the settings
to display the screen image on
both the LCD and the external
display by pressing the Fn +
key combination, the screen is not
displayed properly.
APress Fn +key combination
DJDLQ,IWKHVFUHHQLVVWLOOQRW
displayedoronlypartofthescreen
isdisplayedbydoingthis,thatmeans
theLCDresolutionistoolowortoo
wide and the external display support
WKHUHVROXWLRQ5LJKWFOLFNRYHUWKH
Desktop, select Properties, select
the Settings tab and change the
UHVROXWLRQWR[
TThe Taskbar on the bottom of the
screen does not appear when a
projector is used as the display
device.
A7KLVPD\KDSSHQLIWKHSURMHFWRU
GRHVQRWVXSSRUW/&'UHVROXWLRQ,Q
this case change the resolution to
800x600(recommended)onyour
FRPSXWHU
TThe shortcut icons are not
displayed on the screen even if I
press the shortcut key.
ATheshortcuticonsonlyappearwhen
theEasyDisplayManagerprogramis
LQVWDOOHG
TThe color is strange when the
picture is displayed on the
connected monitor (or projector).
ACheckthemonitorsignalcable
FRQQHFWLRQDQGUHFRQQHFWWKHFDEOH
Organizer Related

165
T+RZFDQ,FRQ¿JXUHWKH5HFRUGLQJ
Mixer while I am video or audio
chatting?
A1 Playback Mixer Settings
n Double-click the volume icon from
the Taskbar and select Opti ons >
PropertiesIURPWKHPHQX
l,QWKH0L[HUGHYLFH¿HOGVHOHFW
Realtek HD Audio Input
W Select Mic Volume
A2 Realtek HD Sound Effect Manager
Settings
n Click Start > Control Panel >
Sounds, Speech, and Audio
Devices > Realtek HD Sound Effect
Manager
l Click MicrophoneWDE
W Select Noise Suppression and
Acoustic Echo Cancellation and
Click OK
Using Acoustic Echo Cancellation
option keeps the Microphone Volume
PXWHGLQWKH3OD\EDFN0L[HU
T+RZFDQ,FRQ¿JXUHWKH5HFRUGLQJ
Mixer while broadcasting music in
WinAMP?
A1 Playback Mixer Settings
nDouble-click the Volume icon in the
Taskbar and click on Options
l,QWKH0L[HUGHYLFH¿HOGVHOHFW
Realtek HD Audio Input
W Select Stereo Mix
A2 Realtek HD Sound Effect Manager
Settings
n Click Start > Control Panel >
Sounds, Speech, and Audio
Devices > Realtek HD Sound Effect
Manager
l Click MicrophoneWDE
W Unselect Noise Suppression and
Acoustic Echo Cancellation and
Click OK
Sound Related

166
T,FDQQRW¿QGDQ$3
zCheck the Wireless LAN LED.
A&KHFNLIWKH:LUHOHVV/$1/('LVRQ
If it is turned off, press the Wheel
button to run the MENU button
and set Wireless LAN to On7KH
ZLUHOHVV/$1LVWXUQHGRQ
zReinstall the driver.
AReinstall the driver using the software
PHGLD
zCheck the Wireless Zero
&RQ¿JXUDWLRQ:=&VHUYLFH
AIfthe“Windowscannotmakethis
ZLUHOHVVFRQQHFWLRQ´PHVVDJH
appears while searching for wireless
networks,itindicatesthataprogram
otherthanWindowsissettomanage
WKHZLUHOHVV/$1VHWWLQJV
zTo use the wireless LAN settings
using Windows:
AnClick Start > Control Panel
> Network and Internet
Connections > Network
Connections > Wireless LAN
Connection, right-click and check
if the “Windows manages wireless
QHWZRUNVHWWLQJV:´RSWLRQLV
selected in the Wireless Network
tabofthePropertiesZLQGRZ,IQRW
VHOHFWWKHRSWLRQ
l Click Start > Control Panel >
Performance and Maintenance >
Administrative Tools > Computer
Management and click Services
and Applications > Services
In the right pane, double-click
:LUHOHVV=HUR&RQ¿JXUDWLRQ
andcheckiftheStartupTypeis
$XWRPDWLFDQGWKH6WDWXVLV6WDUWHG
Wireless Network (WLAN) Related

167
TI cannot connect to an AP.
(The wireless connection is
disconnected frequently.)
zCheck the Network Key.
ARight-click the Wireless Network
Connections icon from the Taskbar
and click View available wireless
networks,IZLUHOHVVQHWZRUNVDUH
found, it indicates that the device is
operatingproperlybutthenetwork
VHWWLQJVPD\KDYHDSUREOHP3OHDVH
check the Network Key (Encryption
Key) and the AP settings
zCheck if there is a device nearby
using the same frequency band.
A1 Ifthereisadevicenearbyusingthe
same frequency band such as another
wireless LAN device, wireless video
transceiver, microwave oven, plasma
EXOEHWFFKDQQHOLQWHUIHUHQFH
PD\RFFXU,I\RXH[SHULHQFH
interference from another device, it
is recommended changing the AP
FKDQQHO
A2 :KHQRSHUDWLQJLQ(((JPRGH
LIWKHUHLVD,(((EGHYLFH
operating nearby, you may experience
lowdataratesorevendisconnection
DVLWRSHUDWHVLQ+\EULGPRGH
zCheck the authentication type.
AAconnectionmaybedisconnected
afteraperiodoftimeifthe“Use
,((([QHWZRUNDXWKHQWLFDWLRQ´
RSWLRQLVVHOHFWHGZKHQ,((([
DXWKHQWLFDWLRQLVQRWEHLQJXVHG
Viewthepropertiesofthe
correspondingAPintheWireless
1HWZRUN3URSHUWLHV,QWKH
Authentication tab, unselect the “Use
,((([DXWKHQWLFDWLRQLQWKLV
QHWZRUN´RSWLRQ
For detailed information on the
authentication server, ask your
QHWZRUNDGPLQLVWUDWRU
zCheck the AP settings.
A1 Check if the surroundings are
DSSURSULDWHIRUDZLUHOHVV/$1
AwirelessLANconnectionmay
belimitedbythesurrounding
HQYLURQPHQWDQGGLVWDQFH2EVWDFOHV
such as walls and door mats affect
WKHTXDOLW\RIWKHZLUHOHVV/$1VLJQDO
You have to install an AP in a high,
open position far away from any other
UDGLRVLJQDOVRXUFHV

168
IftheAPisexcessivelyfaraway,or
isinstalledattheendofabuilding
and you are attempting to use the
wireless LAN from the other end, you
may not be able to use the wireless
communication normally because
thesignalisblockedbyobstacles
betweenyouandtheAP(suchasa
ZDOO
A2 &KHFNLIWKH$3RSHUDWHVSURSHUO\,I
theAPisnotoperatingproperly,turn
LWRIIDQGRQDJDLQDQGWU\DJDLQ
A3 &KHFNLIWKH$3¿UPZDUHLVWKHODWHVW
YHUVLRQ)RUPRUHLQIRUPDWLRQRQWKH
$3¿UPZDUHDVNWKH$3PDQXIDFWXUHU
RU\RXUSURGXFWSURYLGHU
A4 Check if the AP is properly connected
WRWKHQHWZRUN&RQQHFWWKH/$1
cablefromtheAPtoacomputerand
checkifthenetworkisconnected
SURSHUO\
A5 Check the Network Key (Encryption
.H\VHWWLQJVDJDLQ,IWKHDXWRPDWLF
password converting function
(passphrase function) is enabled and
the wireless connection is normal
but you cannot send data over the
connection, please enter the Network
Key(QFU\SWLRQ.H\PDQXDOO\
A6 &KHFNWKH$3VHWWLQJVDVIROORZV
If there are multiple APs running at
the same time, check the channel
VHWWLQJRIHDFK$3,IWKHLQWHUYDO
between the channels of the APs
is narrow, you may experience
HOHFWURPDJQHWLFLQWHUIHUHQFH6HWWKH
channel numbers of the APs so that
the internals between the channels
DUHPD[LPL]HGIRUH[DPSOH&K
&K&K&KFRPSXWHU
It is recommended unselecting the
+LGHRSWLRQRIWKH$366,'6HUYLFH
SetID)isanameusedtodistinguish
a wireless LAN from other wireless
/$1V
It is recommended using Long
3UHDPEOH3UHDPEOHLVDVLJQDOIRU
GDWDWUDQVPLVVLRQV\QFKURQL]DWLRQ
Although some APs support
Short Preamble, there might be a
FRPSDWLELOLW\SUREOHP
%HFDXVH³)L[HG´FKDQQHOVHOHFWLRQ
is more stable then ‘Auto’ channel
VHOHFWLRQ³)L[HG´FKDQQHOVHOHFWLRQ
LVUHFRPPHQGHG,WLVUHFRPPHQGHG
QRWXVLQJWKH³%ORFN$Q\´DQG³$Q\
&RQQHFWLRQ%ORFN´IXQFWLRQV$OWKRXJK
these functions block connections
attheclientsidewhenthenetwork
name is Any or Blank,itmaycausea
FRPSDWLELOLW\SUREOHP

169
For more information on the AP
settings,seetheowner’smanual
VXSSOLHGZLWKWKH$3
TAlthough a connection has been
established, I cannot connect to the
Internet.
zCheck the TCP/IP settings.
AIfyoucannotconnecttotheInternet
butyouareconnectedtoanAP,check
LIWKH7&3,3VHWWLQJVDUHFRQ¿JXUHG
SURSHUO\
When you are not connected to an AP,
an Xmark appears over the ‘Wireless
Network Connections’ icon in the
7DVNEDU,I\RXGRXEOHFOLFNWKHLFRQ
the Search for Wireless Connections
ZLQGRZDSSHDUV5HFRQQHFWWRD
wireless network referring to the
descriptions of Connecting to a
Wireless LAN in the Using the
1HWZRUNVHFWLRQ
WhenyouareconnectedtoanAP,an
Xmarkappearsoverthe“Wireless
1HWZRUN&RQQHFWLRQV´LFRQ in the
7DVNEDU'RXEOHFOLFNWKHLFRQDQG
check if the IP address is properly
DOORFDWHGRQWKH6XSSRUWWDE,IWKH,3
address is not properly allocated, the
IP address will be displayed as follows;
IRUH[DPSOH[[[[[[
If your network does not support
'+&3\RXKDYHWRPDQXDOO\FRQ¿JXUH
an IP address by asking your network
DGPLQLVWUDWRU
In addition, even if your network
supports DHCP, the Internet
connection may not be available if the
DHCP server fails to allocate an IP
DGGUHVVWR\RXUFRPSXWHU
T,KDYHFRQ¿JXUHGERWKZLUHGDQG
wireless connections with the
same IP address, but the network
connections do not work properly.
AYou cannot use the same IP address
IRUZLUHGDQGZLUHOHVVFRQQHFWLRQV7R
useonlyoneIPaddressforbothwired
and wireless connections, you must
disableoneofthemaccordingtoyour
requirements in Network Connections
LQWKH&RQWURO3DQHO

170
TI cannot share Internet access/
¿OHVZKHQDVPDOORI¿FHQHWZRUN
has been set up.
ACheck the McAfee SecurityCenter
VHWWLQJV
Launch McAfee SecurityCenter
and select Advanced > Settings >
Internet and Network > Advanced >
Trusted or Prohibited IP
CheckiftheIPaddressyouwishto
XVHKDVDOUHDG\EHHQDGGHG,IWKH
IP address is not added, add it by
clicking the ‘Add¶EXWWRQ

171
Bluetooth
TThe Korean or Chinese characters
in a business card received via
Bluetooth are broken.
A1 If you send a business card including
Korean or Chinese characters by
selecting a Select a business card
LQWKH¿OHYFIYFG option, the
charactersonthereceivedcardwill
EHEURNHQ
# Wklv#lv#ehfdxvh#wkh#frqwhqwv#ri#
wkh#exvlqhvv#fdug#iloh#duh#qrw#vhw#
wr#Nruhdq#ru#Fklqhvh#fkdudfwhuv#
+FKDUVHW,1#Wr#uhvroyh#wklv#sureohp/#
hglw#wkh#frqwhqwv#ri#wkh#exvlqhvv#fdug#
iloh#pdqxdoo|#dv#iroorzv1
n Right-click over a business card
¿OHYFIYFGWREHVHQWDQG
select Connect Program > Select
Program
l Select NotepadIURPWKHSURJUDPOLVW
W(GLWWKH¿OHDVIROORZV
([DPSOH³10DJLF6HQV´ !
“N;CHARSET=KS_C_5601:Magic
6HQV´
For Korean, add “CHARSET=KS_C_
´
)RU&KLQHVH6LPSOL¿HG&+6DGG
³&+$56(7 JE´
ForChineseTraditional(CHT),add
³&+$56(7 %LJ´
A2 Perform Send business card
immediately in the Address Book
of Microsoft Outlook or select
Transmission by Outlook business
card selection,andyouwillbeable
to transmit a business card without
broken characters and without editing
WKH9&)¿OH
TWhen no headset is found or
cannot be connected.
A1 If the headset is already connected to
anotherdevice,youwillnotbeableto
¿QGWKHKHDGVHWDQGFDQQRWFRQQHFW
totheheadseteveniftheheadsetis
IRXQG'LVFRQQHFWWKHFRQQHFWLRQWR
the other device and then start the
VHDUFKDJDLQ
A2 Iftheheadsetisconnectedtoapower
adapter, you cannot make a Bluetooth
FRQQHFWLRQ
Disconnectthepoweradapterand
WKHQUHWU\
A3 In general, a Bluetooth headset has 2
operatingmodes,On/Offmodeand
3DLULQJPRGH

172
Toconnecttheheadsettoanother
BluetoothdevicesuchasaPCorcell
phone, the headset must be in Pairing
PRGH
Switch the headset to Pairing mode
DQGWKHQUHWU\WKHVHDUFKRSHUDWLRQ
In general, the headset in Pairing
mode automatically returns to On/Off
PRGHDIWHUDFHUWDLQSHULRGRIWLPH
TThere is no sound or sound is
intermittently interrupted after
connecting a headset.
A1 IfaBluetoothheadsetisconnected
toaPC,theSound playback
device in the Control Panel is to be
changed to Bluetooth Audio (for
a mono headset) or High Quality
Bluetooth Audio (for a stereo
KHDGVHW,IWKHSound playback
device in the Control Panel is not
changedproperly,theremaybeno
VRXQGWKURXJKWKHKHDGVHW&KHFNWKH
audio settings of the Control Panel
accordingtotheproceduresgiven
EHORZ
&RQ¿JXULQJWKH$XGLR'HYLFHLQ
the Control Panel
n Click Start > Control Panel and
double-click on Sound and Audio
Devices
l Select the Audio tabintheSound
and Audio Devices Properties
ZLQGRZ
W CheckiftheSoundplaybackdevice
and the Sound recording device are
set to Bluetooth Audio (for a mono
headset) or High Quality Bluetooth
$XGLRIRUDVWHUHRKHDGVHW
A2 Checkiftheheadsetisproperly
FRQQHFWHGDQGZRUNLQJSURSHUO\
A3 Checkthevolumeleveloftheheadset
DQG3&
A4 When running a multimedia program
such as Windows Media Player that
accessestheaudiodevice,aheadset
may not be properly connected or
XVHG7RUHVROYHWKLVSUREOHPH[LW
the multimedia program, connect
the headset and then launch the
PXOWLPHGLDSURJUDPDJDLQ

173
Game and Program Related
TA 3D game does not work, or some
functions are not working.
AChange the graphics settings of the
game to ‘2D’ or ‘Software Renderer’,
WKHQUXQWKHSURJUDPDJDLQ
TRunning speed of a game is too
slow or fast.
A Change the setting of the Power
Schemesto‘Always On
(Click the Start > Control Panel >
Performance and Maintenance >
Power Options > Power Schemes
WDEWKHQFRQ¿JXUHWKH3RZHU
VFKHPHV¿HOGWRµ$OZD\V2Q
TThe picture is not displayed
properly for some games.
A Somegamessuchas‘HarryPotter
and the Sorcerer’s Stone’, ‘Harry
PotterandtheChamberofSecrets’,
HWFPD\QRWGLVSOD\WKHSLFWXUH
properlywhenthescreenresolutionis
setto1024x768andthecolorquality
LVVHWWRELW
For these games, set the screen
resolutionto1024x768,andthecolor
TXDOLW\WRELW
TThe game is not displayed
smoothly on the screen.
AFor3Dgames,thetexturedatafor
the3Dscreendisplayissavedtothe
V\VWHPPHPRU\
,IWKHUHLVLQVXI¿FLHQWV\VWHPPHPRU\
thedataissavedtotheharddisk
drive and loaded to memory when
UHTXLUHG7KLVRSHUDWLRQPD\
temporarily stop displaying the picture
RQWKHVFUHHQ
In this case, lower the game
UHVROXWLRQRUWKHVFUHHQVHWWLQJV

174
Samsung Recovery Solution
TAfter performing a User Backup,
WKHµ,QVXI¿FLHQWIUHHVSDFHLQWKH
hard disk drive’ message appears.
Ź 7KLVPHVVDJHDSSHDUVZKHQWKHUH
LVLQVXI¿FLHQWIUHHVSDFHIRUWKH
User Backup.
A ,IWKHUHLVLQVXI¿FLHQWIUHHVSDFHRQ
theharddiskdrive,theUserBackup
¿OHFDQQRWEHVDYHG
FortheUserBackup,moveordelete
VRPH¿OHVIURPWKHKDUGGLVNGULYH
DQGWKHQWU\DJDLQ
TThe hard disk drive capacity is
GLIIHUHQWIURPWKHVSHFL¿FDWLRQV
A Since Samsung Recovery Solution
is installed on your computer and it
reserves approximately 10 GB to save
the restoration image, the hard disk
drive capacity will be smaller than
theactualcapacityinMyComputer
RU:LQGRZV([SORUHU7KHDPRXQW
of hard disk drive space used by
SamsungRecoverySolutionmay
differ depending on the computer
PRGHO

175
Other
TI cannot run any functions.
A1 This may happen when the computer
LVLQWKH+2/'VWDWXV:KHQSUHVVLQJ
abuttonorswitchintheHOLDstatus,
the Charge LEDEOLQNVIRUDPRPHQW
SlidetheHOLDswitchdownwards
DQGWU\DJDLQ
A2 Ifthecomputerisrunningonbattery
power, check the battery charge
VWDWXV
TThe [Power Switch] does not work.
A1 This may happen when the computer
LVLQWKH+2/'VWDWXV:KHQSUHVVLQJ
abuttonorswitchintheHOLDstatus,
the Charge LEDEOLQNVIRUDPRPHQW
SlidetheHOLDswitchdownwards
DQGWU\DJDLQ
A2 Ifthecomputerisrunningonbattery
power, check the battery charge
VWDWXV
THow can I install the program?
A You can additionally purchase and
LQVWDOOWKHIROORZLQJGHYLFHVIRU803&
(See the Installing Programs section
RIWKHµ*HWWLQJ6WDUWHG*XLGH
Ɣ([WHUQDO86%2''GHGLFDWHGWR
UMPC or Compatible External USB
ODD
Ɣ([WHUQDO86%+''
Ɣ86%'DWD&DEOH
TI have turned the LCD screen off
with a portable USB keyboard, but
I cannot turn it on again.
A Whenyouareusinganoptional
Portable USB Keyboard Dedicated
to UMPC,ifyouhaveturnedthe
Backlit OFF (ScreenOff)bypressing
the <Fn>+<F5> keys, press the
<Fn>+<F5>keysonthekeyboard
again to turn the Backlit ON (Screen
2Q

176
TI want to replace the pointing stick
cap of a portable USB keyboard.
A AportableUSBkeyboardhasa
pointing stick that can be used instead
RIDPRXVH6LQFHDVSDUHSRLQWLQJ
stick cap is supplied when you
purchaseaUSBkeyboard,youcan
removethecapandtheninsertanew
RQHLIQHFHVVDU\

177
3URGXFW6SHFL¿FDWLRQV
7KHV\VWHPVSHFL¿FDWLRQVPD\GLIIHUGHSHQGLQJRQWKHGHULYHGPRGHOV)RUGHWDLOHG
V\VWHPVSHFL¿FDWLRQVUHIHUWRWKHSURGXFWFDWDORJ
CPU 9,$,VDLDK3URFHVVRU*+]
Cache Memory 1,024 KB
Main Memory (Optional) Memorytype:DDR2SODIMM
Main Chipset VIA VX820
Hard Disk Drive (Optional) 5mmH HDD
Graphics VIAChrome9HC3IGP
Sound Chipset HD Audio, ALC272 Codec
Network (Optional) :LUHOHVV/$1%* (Optional)
%OXHWRRWK('5 (Optional)
Multi Card Slot SD card/ SDHC/ MMC
Ports (Optional) 86%[+HDGSKRQH-DFN'&LQ-DFN
OrganizerPort(Optional)
Dimensions [[PP
LCD ´:69*$[
Battery (Optional) Lithium-Ion smart battery: 4 Cells
Operating Environment Temperature(storage):-5~40°C(operation):10~32°C
Humidity(storage):5%~ 90%(operation): 20%~80%
Operating Voltage 100 - 240VAC
Frequency 50/60Hz
Output Power (Optional) BT:0.0025W ; WLAN:0.0627W
Output Voltage 9'&$:2SWLRQDO

178
z Theweightanddimensionlistedareapproximatevaluesandmayvaryabitfrom
WKHDFWXDOSURGXFW
z Optional components may not be provided or different components may be provided
GHSHQGLQJRQWKHFRPSXWHUPRGHO
z7KHV\VWHPVSHFL¿FDWLRQVDUHVXEMHFWWRFKDQJHZLWKRXWQRWLFH
z TheharddiskdrivecapacityofacomputerinwhichSamsungRecoverySolutionis
LQVWDOOHGLVUHSUHVHQWHGDVVPDOOHUWKDQWKHSURGXFWVSHFL¿FDWLRQ

179
:LUHOHVV/$16SHFL¿FDWLRQVDEJQ&DUG
Intel 802.11ABG WLAN
zThe Name of the Registered Equipment :SpecialLowPowerWirelessDevicefor
:LUHOHVV'DWD&RPPXQLFDWLRQ6\VWHPV
Item 'HWDLOHG6SHFL¿FDWLRQV
Physical
6SHFL¿FDWLRQV
Dimensions îPP:LGWK;+HLJKW
Operating
Temperature And
Humidity
Same as System Operations
7HPSHUDWXUH%HW&DQG&
Humidity:Lessthan85%
Power
6SHFL¿FDWLRQV Power 9
Network
6SHFL¿FDWLRQV
Compatibility ,(((D,(((E,(((J
Operating System Microsoft Windows XP/Vista
Media Access
Protocol (MAC)
CSMA/CA (Collision Avoidance) with
Acknowledgement (ACK)
Security Wired Equivalent Privacy support (WEP)
64bit/128bit WPA
7KLVGHYLFHVXSSRUWVWKH:LUHOHVV/$16HFXULW\6SHFL¿FDWLRQV:3$:L)L3URWHFWHG
$FFHVVIRU:L)L
7RFRQQHFWWRD:3$ZLUHOHVVQHWZRUN\RXKDYHWRFRQ¿JXUHWKHVHWWLQJVDFFRUGLQJWR
WKHQHWZRUNFRQQHFWLRQHQYLURQPHQW)RUGHWDLOHGVHWWLQJLQIRUPDWLRQDVN\RXUQHWZRUN
DGPLQLVWUDWRU

180
z5DGLR6SHFL¿FDWLRQV
RF Band *+]*+]
Supported Channels &KDQQHOVDOORZHGSHUFRXQWU\
Device Transceiver
Standard Output Power MAX 10mW
Modulation Scheme
11amode:OFDM
11bmode:DSSS
11gmode:OFDM
Data Rate (Mbps)
11a mode :MAX54Mbps
11bmode:MAX11Mbps
11g mode :MAX54Mbps
Antenna Type Built-in Antenna
7KHGDWDUDWHPD\GLIIHUIURPWKHUHDOGDWDWUDQVPLVVLRQUDWH
DPRGHLVRQO\VXSSRUWHGZKHQWKHGHYLFHLVFRQQHFWHGWRDQ,(((DGHYLFH
HJ$FFHVV3RLQWVXSSRUWLQJ,(((D
JPRGHLVRQO\VXSSRUWHGZKHQWKHGHYLFHLVFRQQHFWHGWRDQ,(((JGHYLFH
HJ$FFHVV3RLQWVXSSRUWLQJ,(((J

181
Intel 802.11AGN WLAN
zThe Name of the Registered Equipment :SpecialLowPowerWirelessDevicefor
:LUHOHVV'DWD&RPPXQLFDWLRQ6\VWHPV
Item 'HWDLOHG6SHFL¿FDWLRQV
Physical
6SHFL¿FDWLRQV
Dimensions îPP:LGWK;+HLJKW
Operating
Temperature And
Humidity
Same as System Operations
7HPSHUDWXUH%HW&DQG&
Humidity:Lessthan85%
Power
6SHFL¿FDWLRQV Power 9
Network
6SHFL¿FDWLRQV
Compatibility ,(((D,(((E,(((J
,(((Q
Operating System Microsoft Windows XP/Vista
Media Access
Protocol (MAC)
CSMA/CA (Collision Avoidance) with
Acknowledgement (ACK)
Security Wired Equivalent Privacy support (WEP)
64bit/128bit WPA
7KLVGHYLFHVXSSRUWVWKH:LUHOHVV/$16HFXULW\6SHFL¿FDWLRQV:3$:L)L3URWHFWHG
$FFHVVIRU:L)L
7RFRQQHFWWRD:3$ZLUHOHVVQHWZRUN\RXKDYHWRFRQ¿JXUHWKHVHWWLQJVDFFRUGLQJWR
WKHQHWZRUNFRQQHFWLRQHQYLURQPHQW)RUGHWDLOHGVHWWLQJLQIRUPDWLRQDVN\RXUQHWZRUN
DGPLQLVWUDWRU

182
z5DGLR6SHFL¿FDWLRQV
RF Band *+]*+]
Supported Channels &KDQQHOVDOORZHGSHUFRXQWU\
Device Transceiver
Standard Output Power MAX 10mW
Modulation Scheme
11amode:OFDM
11bmode:DSSS
11gmode:OFDM
11nmode:MIMO
Data Rate (Mbps)
11a mode :MAX54Mbps
11bmode :MAX11Mbps
11g mode :MAX54Mbps
11n mode :MAX450Mbps,MAX300Mbps
Antenna Type Built-in Antenna
7KHGDWDUDWHPD\GLIIHUIURPWKHUHDOGDWDWUDQVPLVVLRQUDWH
DPRGHLVRQO\VXSSRUWHGZKHQWKHGHYLFHLVFRQQHFWHGWRDQ,(((DGHYLFH
HJ$FFHVV3RLQWVXSSRUWLQJ,(((D
JPRGHLVRQO\VXSSRUWHGZKHQWKHGHYLFHLVFRQQHFWHGWRDQ,(((JGHYLFH
HJ$FFHVV3RLQWVXSSRUWLQJ,(((J
QPRGHLVRQO\VXSSRUWHGZKHQLWLVFRQQHFWHGWRDQ,(((QGHYLFHHJ
$FFHVV3RLQWVXSSRUWLQJ,(((Q

183
:LUHOHVV/$16SHFL¿FDWLRQV%*&DUG
Intel 802.11BG WLAN
zThe Name of the Registered Equipment :SpecialLowPowerWirelessDevicefor
:LUHOHVV'DWD&RPPXQLFDWLRQ6\VWHPV
Item 'HWDLOHG6SHFL¿FDWLRQV
Physical
6SHFL¿FDWLRQV
Dimensions îPP:LGWK;+HLJKW
Operating
Temperature And
Humidity
Same as System Operations
7HPSHUDWXUH%HW&DQG&
Humidity:Lessthan85%
Power
6SHFL¿FDWLRQV Power 9
Network
6SHFL¿FDWLRQV
Compatibility ,(((E,(((J
Operating System Microsoft Windows XP/Vista
Media Access
Protocol (MAC)
CSMA/CA (Collision Avoidance) with
Acknowledgement (ACK)
Security WiredEquivalentPrivacysupport(WEP)
64bit/128bit WPA
7KLVGHYLFHVXSSRUWVWKH:LUHOHVV/$16HFXULW\6SHFL¿FDWLRQV:3$:L)L3URWHFWHG
$FFHVVIRU:L)L
7RFRQQHFWWRD:3$ZLUHOHVVQHWZRUN\RXKDYHWRFRQ¿JXUHWKHVHWWLQJVDFFRUGLQJWR
WKHQHWZRUNFRQQHFWLRQHQYLURQPHQW)RUGHWDLOHGVHWWLQJLQIRUPDWLRQDVN\RXUQHWZRUN
DGPLQLVWUDWRU

184
z5DGLR6SHFL¿FDWLRQV
RF Band *+]
Supported Channels &KDQQHOVDOORZHGSHUFRXQWU\
Device Transceiver
Standard Output Power MAX 10mW
Modulation Scheme 11bmode:DSSS
11gmode:OFDM
Data Rate (Mbps)11bmode:MAX11Mbps
11g mode :MAX54Mbps
Antenna Type Built-in Antenna
7KHGDWDUDWHPD\GLIIHUIURPWKHUHDOGDWDWUDQVPLVVLRQUDWH
JPRGHLVRQO\VXSSRUWHGZKHQWKHGHYLFHLVFRQQHFWHGWRDQ,(((JGHYLFH
HJ$FFHVV3RLQWVXSSRUWLQJ,(((J

185
Marvell 802.11BG WLAN
zThe Name of the Registered Equipment :SpecialLowPowerWirelessDevicefor
:LUHOHVV'DWD&RPPXQLFDWLRQ6\VWHPV
Item 'HWDLOHG6SHFL¿FDWLRQV
Physical
6SHFL¿FDWLRQV
Dimensions îPP:LGWK;+HLJKW
Operating
Temperature And
Humidity
Temperature: Between 0°C and 70°C,
Maximum Humidity: 85%
Power
6SHFL¿FDWLRQV Power 9
Network
6SHFL¿FDWLRQV
Compatibility ,(((E,(((J
Operating System Microsoft Windows XP/Vista
Media Access
Protocol (MAC)
CSMA/CA (Collision Avoidance) with
Acknowledgement (ACK)
Security Wired Equivalent Privacy support (WEP)
64bit/128bit WPA
7KLVGHYLFHVXSSRUWVWKH:LUHOHVV/$16HFXULW\6SHFL¿FDWLRQV:3$:L)L3URWHFWHG
$FFHVVIRU:L)L
7RFRQQHFWWRD:3$ZLUHOHVVQHWZRUN\RXKDYHWRFRQ¿JXUHWKHVHWWLQJVDFFRUGLQJWR
WKHQHWZRUNFRQQHFWLRQHQYLURQPHQW)RUGHWDLOHGVHWWLQJLQIRUPDWLRQDVN\RXUQHWZRUN
DGPLQLVWUDWRU
7KLVGHYLFHGRHVQRWVXSSRUWWKH&LVFR6HFXULW\6SHFL¿FDWLRQ&LVFR&RPSDWLEOH
H;WHQVLRQ&&;

186
z5DGLR6SHFL¿FDWLRQV
RF Band *+]
Supported Channels &KDQQHOVDOORZHGSHUFRXQWU\
Device Transceiver
Standard Output Power MAX 10mW
Modulation Scheme 11bmode:DSSS
11gmode:OFDM
Data Rate (Mbps)11bmode:MAX11Mbps
11g mode :MAX54Mbps
Antenna Type Built-in Antenna
7KHGDWDUDWHPD\GLIIHUIURPWKHUHDOGDWDWUDQVPLVVLRQUDWH
JPRGHLVVXSSRUWHGRQO\ZKHQ\RXDUHFRQQHFWHGWRDQ,(((JGHYLFHHJ$Q
$FFHVV3RLQWVXSSRUWLQJ,(((J

187
Registered Trademarks
Samsungisaregisteredtrademarkof
6DPVXQJ&R/WG
SENS is a registered trademark of
6DPVXQJ(OHFWURQLFV&R/WG
VIA, Isaiah are registered trademarks of
WKH9,$&RUSRUDWLRQ
Microsoft, MS-DOS, and Windows are
registered trademarks of the Microsoft
&RUSRUDWLRQ
³0HPRU\6WLFN´DQG are trademarks
RIWKH6RQ\&RUSRUDWLRQ
Allotherproductorcompanynames
mentioned herein are registered
WUDGHPDUNVRIWKHLUUHVSHFWLYHFRPSDQLHV
ENERGY STAR® Partner
As an ENERGY STAR® Partner,
SAMSUNG has determined that
this product meets the ENERGY
STAR® guidelines for energy
HI¿FLHQF\

188
Glossary
7KH*ORVVDU\OLVWVWKHWHUPLQRORJLHVXVHGLQWKLV8VHU*XLGH
)RUWHUPLQRORJLHVRWKHUWKDQWKHVHORRNLQ:LQGRZV+HOS
Backup
A way to save the current data to restore
LWODWHULIQHFHVVDU\$EDFNXSLVDZD\
torestorecomputerdatawhenthedata
RUFRPSXWHULVGDPDJHG
Client
Thisreferstoacomputerthatusesa
shared network resource provided by a
VHUYHU
DDR SDRAM (Double Data Rate
Synchronous Dynamic Random Access
Memory)
DRAMisamemorytypewhosecells
consistofacapacitorandtransistor
PDQXIDFWXUHGDWDORZSULFH6'5$0
isamemorytypewhoseperformance
hasbeenimprovedbysynchronizing
WKHFORFNZLWKWKHH[WHUQDO&38FORFN
DDRSDRAMisamemorytypewhose
performancehasbeenimprovedby
doubling the operating speed of the
6'5$0DQGLVZLGHO\XVHGQRZDGD\V
7KLVFRPSXWHUXVHV''56'5$0
Device Manager
An administrative tool used to manage
FRPSXWHUGHYLFHV<RXFDQDGGRU
removehardwareorupdateadevice
GULYHUXVLQJWKH'HYLFH0DQDJHU
Direct X
An application interface developed to
enable Windows application programs
toaccesshardwaredevicesatavery
KLJKVSHHG6LQFHWKHRSHUDWLQJVSHHG
ofgraphics,memoryandsoundcards
mustbeveryfasttoprovidehigh
quality video and sound for games,
DirectXenablesfastercontroland
interaction between applications and
KDUGZDUHGHYLFHV%\XVLQJ'LUHFW;
the multimedia performance of Windows
KDVEHHQKXJHO\LPSURYHG
Driver
Software that interacts between the
KDUGZDUHDQGWKHRSHUDWLQJV\VWHP$Q
operating system knows the hardware
LQIRUPDWLRQDQGFRQWUROVWKHKDUGZDUH
Ingeneral,adriverissuppliedwiththe
FRUUHVSRQGLQJKDUGZDUHGHYLFH

189
DVD (Digital Versatile Disk)
DVDwasdevelopedtoreplaceCD
FRPSDFWGLVN$OWKRXJKWKHVKDSHDQG
size of the disc are the same as that of
aCD,thecapacityofaDVDisatleast
*%ZKLOHWKHFDSDFLW\RID&'LV
0%'9'YLGHRLVGLJLWDOXQOLNH9+6
(analog) video and supports MPEG2
FRPSUHVVLRQDQGGLJLWDODXGLR7RSOD\D
'9'D'9'GULYHLVUHTXLUHG
Firewall
A security system used to protect an
internalnetworkorintranetfromexternal
networks through an authentication
SURFHGXUH
Hibernation Mode
Apowermodethatsavesalldatain
memorytotheharddiskandturnsthe
&38DQGKDUGGLVNRII:KHQFDQFHOLQJ
Hibernation Mode, all application
programs that were running are restored
WRWKHLUODVWVWDWH
Icon
This refers to a small image that
UHSUHVHQWVD¿OHWKDWXVHUVFDQXVH
LAN (LocalAreaNetwork)
A communications network connecting
computers,printersandotherdevices
within a local area such as within a
EXLOGLQJ$/$1HQDEOHVDOOFRQQHFWHG
devicestointeractwithotherdevices
RQWKHQHWZRUN7KHFXUUHQW/$1XVHV
the Ethernet media access control
PHWKRGGHYHORSHGLQWKHHDUO\V
ToconnecttoanEthernet,anetwork
cardcalledaLANcard,Ethernetcard
RUQHWZRUNLQWHUIDFHFDUGLVUHTXLUHG
To exchange data between computers,
aprotocolisrequiredbesidesthe
KDUGZDUHHTXLSPHQW:LQGRZV9LVWD
XVHV7&3,3DVWKHGHIDXOWSURWRFRO
LCD (Liquid Crystal Display)
TherearePassiveMatrixandActive
0DWUL[/&'W\SHV7KLVFRPSXWHUXVHV
theActiveMatrixtypeLCDcalledaTFT
/&'6LQFHDQ/&'LVLPSOHPHQWHGE\
transistorsinsteadofacathode-raytube
XQOLNHD&57LWVVL]HFDQEHVOLP$QG
becauseitdoesnotblink,itreduceseye
VWUDLQ

190
Network
Agroupofcomputersanddevices,such
as printers and scanners, connected
E\DFRPPXQLFDWLRQVOLQN$QHWZRUN
canbeeithersmallorlargeandcanbe
connected permanently through cables
or temporarily through telephone lines
RUZLUHOHVVOLQNV7KHELJJHVWQHWZRUNLV
WKH,QWHUQHWDZRUOGZLGHQHWZRUN
Network Administrator
$XVHUZKRSODQVFRQ¿JXUHVDQG
PDQDJHVQHWZRUNRSHUDWLRQV
Sometimes,anetworkadministratoris
FDOOHGDV\VWHPDGPLQLVWUDWRU
1RWL¿FDWLRQ$UHD
This refers to the right area of the
Taskbar including program icons such
asthevolumecontrol,thepoweroptions
DQGWKHWLPH
Power Schemes
This refers to a pre-determined power
PDQDJHPHQWRSWLRQJURXS)RUH[DPSOH
youcansetthetimethecomputerwaits
before entering Standby Mode, or before
WKHPRQLWRURUKDUGGULYHWXUQVRII7KH
VHWWLQJVDUHVDYHGDVDSRZHUVFKHPH
Quick Launch
Thisreferstoatoolbarthatcanbe
FRQ¿JXUHGVRWKDW\RXFDQODXQFKD
programsuchasInternetExploreror
display the Windows Desktop with one
FOLFN<RXFDQDGGDQ\LFRQWRWKHTXLFN
launch area of the Taskbar and launch
frequently used program by clicking that
LFRQ
Server
Ingeneral,aserverreferstoacomputer
that provides shared resources for
QHWZRUNXVHUV
Share
Thisreferstosettingaresourceofa
computersuchasafolderorprinterso
WKDWRWKHUXVHUVFDQDOVRXVHLW
Shared Folder
Afolderthatcanbeusedbyotherusers
RQWKHQHWZRUN

191
Sleep Mode
A power mode that enables computers
to save power consumption when they
DUHQRWEHLQJXVHG:KHQDFRPSXWHU
isinSleepMode,thedataonthe
computermemoryisnotsavedtothe
KDUGGLVN,IWKHSRZHULVWXQHGRIIWKH
GDWDLQPHPRU\ZLOOEHORVW
System File
6\VWHP)LOHVUHIHUWR¿OHVWKDWDUHUHDG
andusedbytheWindowsoperating
V\VWHP,QJHQHUDOV\VWHP¿OHVPXVWQRW
EHGHOHWHGRUPRYHG
USB (Universal Serial Bus)
This refers to a serial interface standard
developedtoreplacetheconventional
interface standards such as Serial and
36:KLOH86%VXSSRUWV0ESV
PLOOLRQELWVSHUVHFRQG86%
supports a data rate that is 40 times
0SEVIDVWHUWKDQWKDWRI86%
7KHGDWDUDWHRI86%LVHTXLYDOHQWWR
WKDWRI,(((7KHUHIRUH86%LV
used for A/V devices supported by IEEE
1394anda 2ndHDDandCDRWthat
UHTXLUHDKLJKGDWDUDWH
Windows Media Player
A multimedia program included with
:LQGRZV8VLQJWKLVSURJUDP\RXFDQ
SOD\DPHGLD¿OHFUHDWHDQDXGLR&'
listen to a radio broadcast, search and
PDQDJHPHGLD¿OHVDQGFRS\¿OHVWRD
SRUWDEOHGHYLFHHWF

192
Index
A
$GMXVWLQJWKH9ROXPH 69
B
Battery 147
Battery Calibration 152
BIOS 138
Bluetooth 96
Boot Priority 146
Button 55
C
Charge 148
Connect / Output Monitor 65
Connecting AP / AP 87
Control Panel 79
D
Desktop / Change 75
E
Entering Text 49
H
Help 77
M
Multi Media 105
N
Network 84
Network Status Diagnosis 95
P
Password 143
3URGXFW6SHFL¿FDWLRQV 191
Program 104
R
Recorder 69
Remaining Battery Charge 148
Resolution / Color 83
S
Safety Precautions 8
Samsung Update Plus 111
Status Indicators 35
Stylus Pen 45
U
User Accounts / Switch User 81
V
Volume Control 69
W
Windows XP 72
Wired Network 85
Wireless Network 87

193
Contact SAMSUNG WORLD WIDE
[U.S.A. / U.K.] Contact SAMSUNG WORLD WIDE
IfyouhaveanycommentsorquestionsregardingaSamsungproducts,contactthe
6$0681*FXVWRPHUFDUHFHQWHU
Customer Care Center TEL Web Site
U.S.A. 1-800-SAMSUNG (726-7864) ZZZVDPVXQJFRPXV
U.K. 0845-SAMSUNG (726-7864) ZZZVDPVXQJFRPXN
Ireland 0818 717100 ZZZVDPVXQJFRPLH
[CANADA] Contact SAMSUNG WORLD WIDE /
Comment contacter Samsung dans le monde
IfyouhaveanycommentsorquestionsregardingaSamsungproducts,contactthe
6$0681*FXVWRPHUFDUHFHQWHU
Si vous avez des suggestions ou des questions concernant les produits Samsung, veuillez
FRQWDFWHUOH6HUYLFH&RQVRPPDWHXUV6DPVXQJ
Customer Care Center TEL Web Site
CANADA 1-800-SAMSUNG (726-7864) ZZZVDPVXQJFD
[GERMANY] Kontakt zu Samsung
Falls Sie Fragen oder Anregungen zu Samsung-Produkten haben, wenden Sie sich bitte
DQGHQ6DPVXQJ.XQGHQGLHQVW
Customer Care Center TEL Web Site
GERMANY 01805-SAMSUNG (726-7864)
¼0LQ
ZZZVDPVXQJGH
[FRANCE] Comment contacter Samsung dans le monde
Si vous avez des suggestions ou des questions concernant les produits Samsung, veuillez
FRQWDFWHUOH6HUYLFH&RQVRPPDWHXUV6DPVXQJ
Customer Care Center TEL Web Site
FRANCE 3260 SAMSUNG (726-7864)
¼0LQ
ZZZVDPVXQJFRPIU
5HY

194
[SPAIN] Contacte con SAMSUNG WORLD WIDE
Sitienealgunapreguntaocomentarioreferenteanuestrosproductos,porfavorcontacte
FRQQXHVWUR6HUYLFLRGH$WHQFLRQDO&OLHQWH
Customer Care Center TEL Web Site
SPAIN 902101130 ZZZVDPVXQJFRPHV
[ITALY] Contatta SAMSUNG
6HKDLFRPPHQWLRULFKLHVWHVXLSURGRWWL6DPVXQJFRQWDWWDLOQRVWUR6HUYL]LR&OLHQWL
Customer Care Center TEL Web Site
ITALY 800-SAMSUNG (726-7864) ZZZVDPVXQJFRPLW
>32/$1'@.RQWDNW]¿UPą6$0681*
:VSUDZLHMDNLFKNROZLHNS\WDĔF]\ZąWSOLZRĞFLGRW\F]ąF\FKSURGXNWyZ6$0681*
SURVLP\RNRQWDNW]WHOHIRQLF]Q\P&HQWUXP2EVáXJL.OLHQWD
Customer Care Center TEL Web Site
POLAND 0801-1-SAMSUNG (726-78)
022 607 93 33
ZZZVDPVXQJFRPSO
[NETHERLANDS / BELGIUM] Contact opnemen met Samsung klantenservice /
Comment contacter Samsung dans le monde
AlsuvragenofopmerkingenheeftmetbetrekkingtoteenSamsung-product,kuntu
contactopnemenmetdeSamsungklantenservice:
Si vous avez des suggestions ou des questions concernant les produits Samsung, veuillez
FRQWDFWHUOH6HUYLFH&RQVRPPDWHXUV6DPVXQJ
Customer Care Center TEL Web Site
NETHERLANDS 0900-SAMSUNG (726-7864)
¼0LQ
ZZZVDPVXQJFRPQO
BELGIUM 02 201 24 18 ZZZVDPVXQJFRPEH
195
[SWEDEN] Contact SAMSUNG WORLD WIDE
Om Du har några synpunkter eller frågor angående en Samsungprodukt, kontakta
6$0681*6XSSRUW
Customer Care Center TEL Web Site
SWEDEN 075-SAMSUNG (726-7864) ZZZVDPVXQJFRPVH
[DENMARK] Contact SAMSUNG WORLD WIDE
Hvis du har nogen kommentare eller spørgsmål til et Samsung produkt, kontakt
6$0681*6XSSRUW&HQWHU
Customer Care Center TEL Web Site
DENMARK 8-SAMSUNG (726-7864) ZZZVDPVXQJFRPGN
[FINLAND] Contact SAMSUNG WORLD WIDE
-RVVLQXOODRQNRPPHQWWHMDWDLN\V\P\NVLl6DPVXQJWXRWWHLVLLQOLLWW\HQRWD\KWH\WWl
6$0681*DVLDNDVSDOYHOXXQ
Customer Care Center TEL Web Site
FINLAND 30-6227 515 ZZZVDPVXQJFRP¿
[RUSSIA / UKRAINE]
Customer Care Center TEL Web Site
RUSSIA 8-800-555-55-55 ZZZVDPVXQJUX
UKRAINE 8-800-502-0000 ZZZVDPVXQJXD
[CHINA]
Customer Care Center TEL Web Site
CHINA 400-810-5858 ZZZVDPVXQJFRPFQ

196
[HONG KONG] Contact SAMSUNG WORLD WIDE
IfyouhaveanycommentsorquestionsregardingaSamsungproducts,contactthe
6$0681*FXVWRPHUFDUHFHQWHU
Customer Care Center TEL Web Site
HONG KONG 3698-4698 ZZZVDPVXQJFRPKN
[SINGAPORE] Contact SAMSUNG WORLD WIDE
IfyouhaveanycommentsorquestionsregardingaSamsungproducts,contactthe
6$0681*FXVWRPHUFDUHFHQWHU
Customer Care Center TEL Web Site
SINGAPORE 1-800-SAMSUNG (726-7864) ZZZVDPVXQJFRPVJ
[INDIA] Contact SAMSUNG WORLD WIDE
IfyouhaveanycommentsorquestionsregardingaSamsungproducts,contactthe
6$0681*FXVWRPHUFDUHFHQWHU
Customer Care Center TEL Web Site
INDIA 3030 8282
1800 110011
1-800-3000-8282
ZZZVDPVXQJFRPLQ
[TURKEY] SAMSUNG Turkiye’ye Ulasin
6DPVXQJUQOHUL\OHLOJLOLWPVRUXYH\RUXPODUÕQÕ]LoLQ6DPVXQJdD÷UÕ0HUNH]LLOHWHPDVD
JHoHELOLUVLQL]
Customer Care Center TEL Web Site
TURKEY 444 77 11 ZZZVDPVXQJFRPWU
[U.A.E] Contact SAMSUNG WORLD WIDE
IfyouhaveanycommentsorquestionsregardingaSamsungproducts,contactthe
6$0681*FXVWRPHUFDUHFHQWHU
Customer Care Center TEL Web Site
U.A.E 800-SAMSUNG (726-7864) ZZZVDPVXQJFRPDH

197
[SOUTH AFRICA] Contact SAMSUNG WORLD WIDE
IfyouhaveanycommentsorquestionsregardingaSamsungproducts,contactthe
6$0681*FXVWRPHUFDUHFHQWHU
Customer Care Center TEL Web Site
SOUTH AFRICA 0860-SAMSUNG (726-7864) ZZZVDPVXQJFRP]D
NK1_Q