CyberTAN Technology MM230M IEEE 802.11b/g Bluetooth 2.0+ EDR and GPS User Manual EX XP Eng2 System 2009 03 01 pd
CyberTAN Technology Inc. IEEE 802.11b/g Bluetooth 2.0+ EDR and GPS EX XP Eng2 System 2009 03 01 pd
UserManual.wiki
>
CyberTAN Technology
>
MM230M User Manual
>
Host user manual 2 of 2
Contents
1.
Users Manual
2.
manual
3.
User manual host specification
4.
Host user manual 1 of 2
5.
Host user manual 2 of 2
6.
User manual 1 of 2
7.
User manual 2 of 2
Host user manual 2 of 2
Navigation menu
Upload a User Manual
Namespaces
Wiki Guide
HTML
PDF
Info
Views
User Manual
Discussion / Help
Navigation
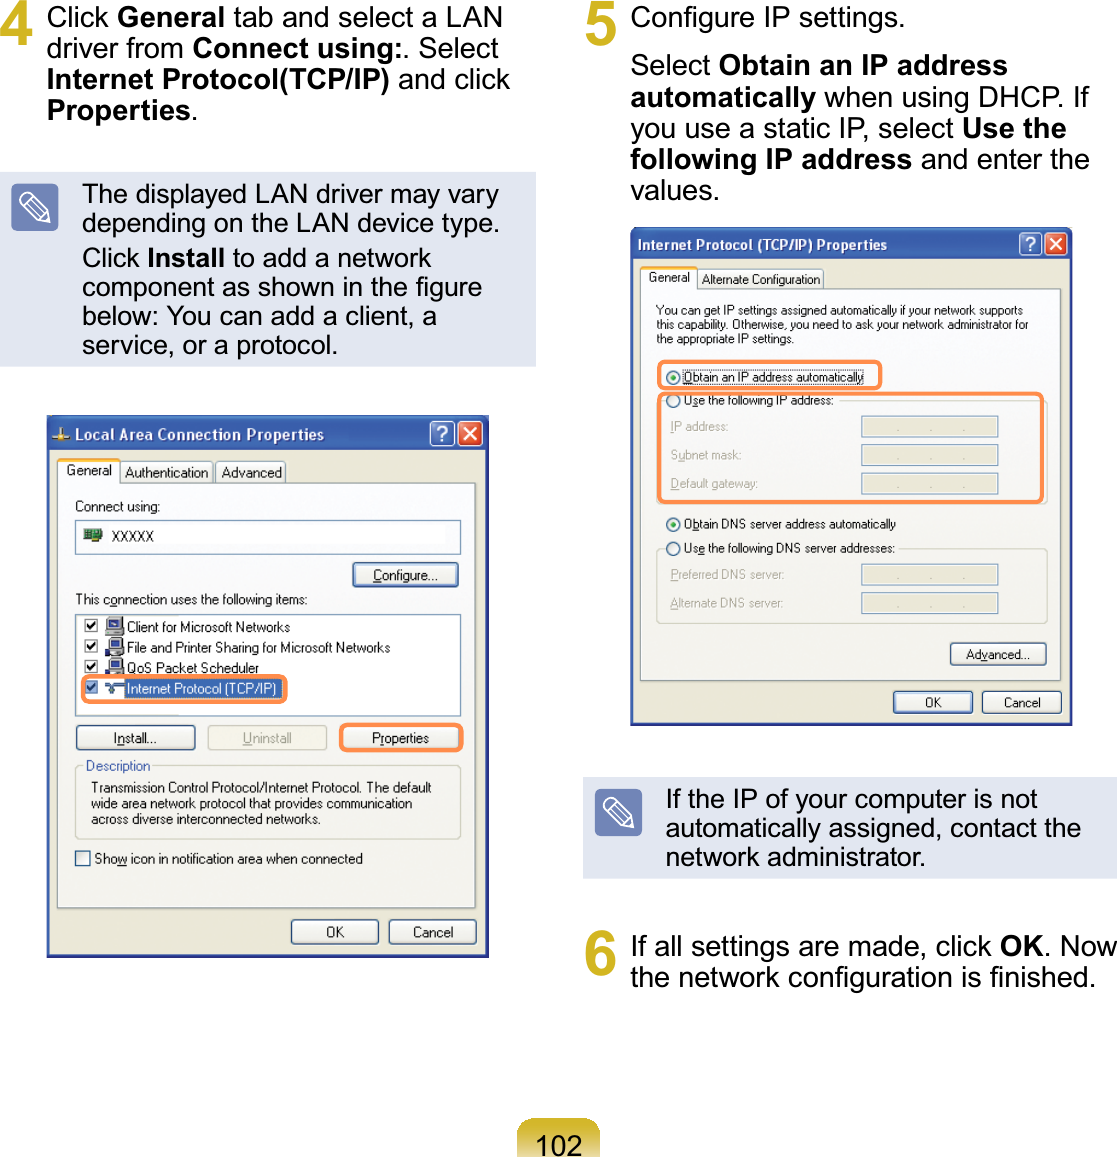
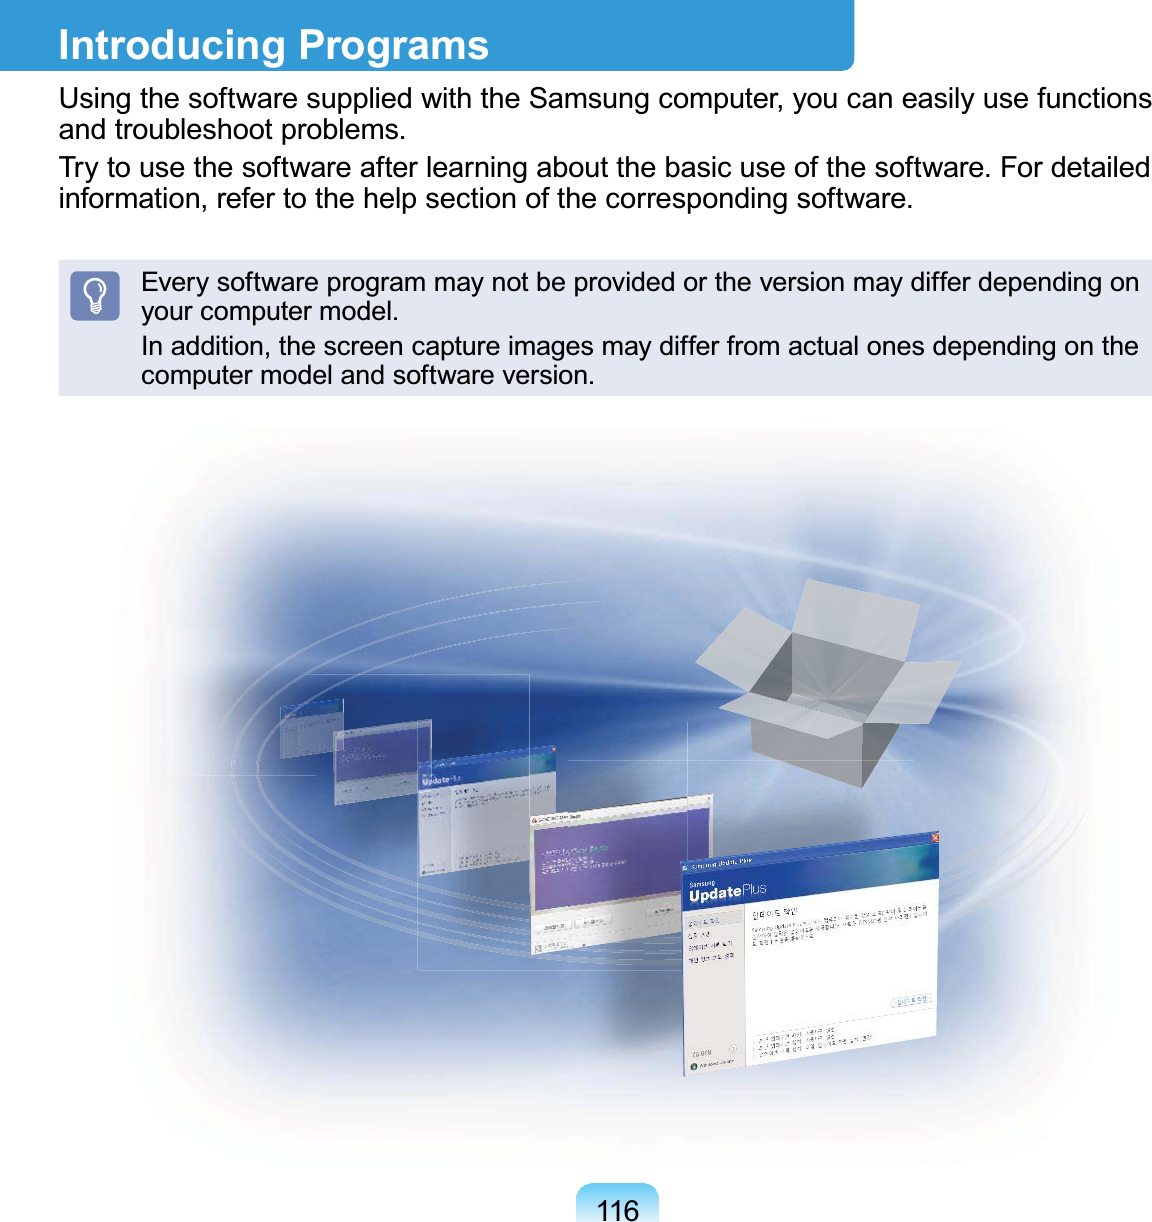
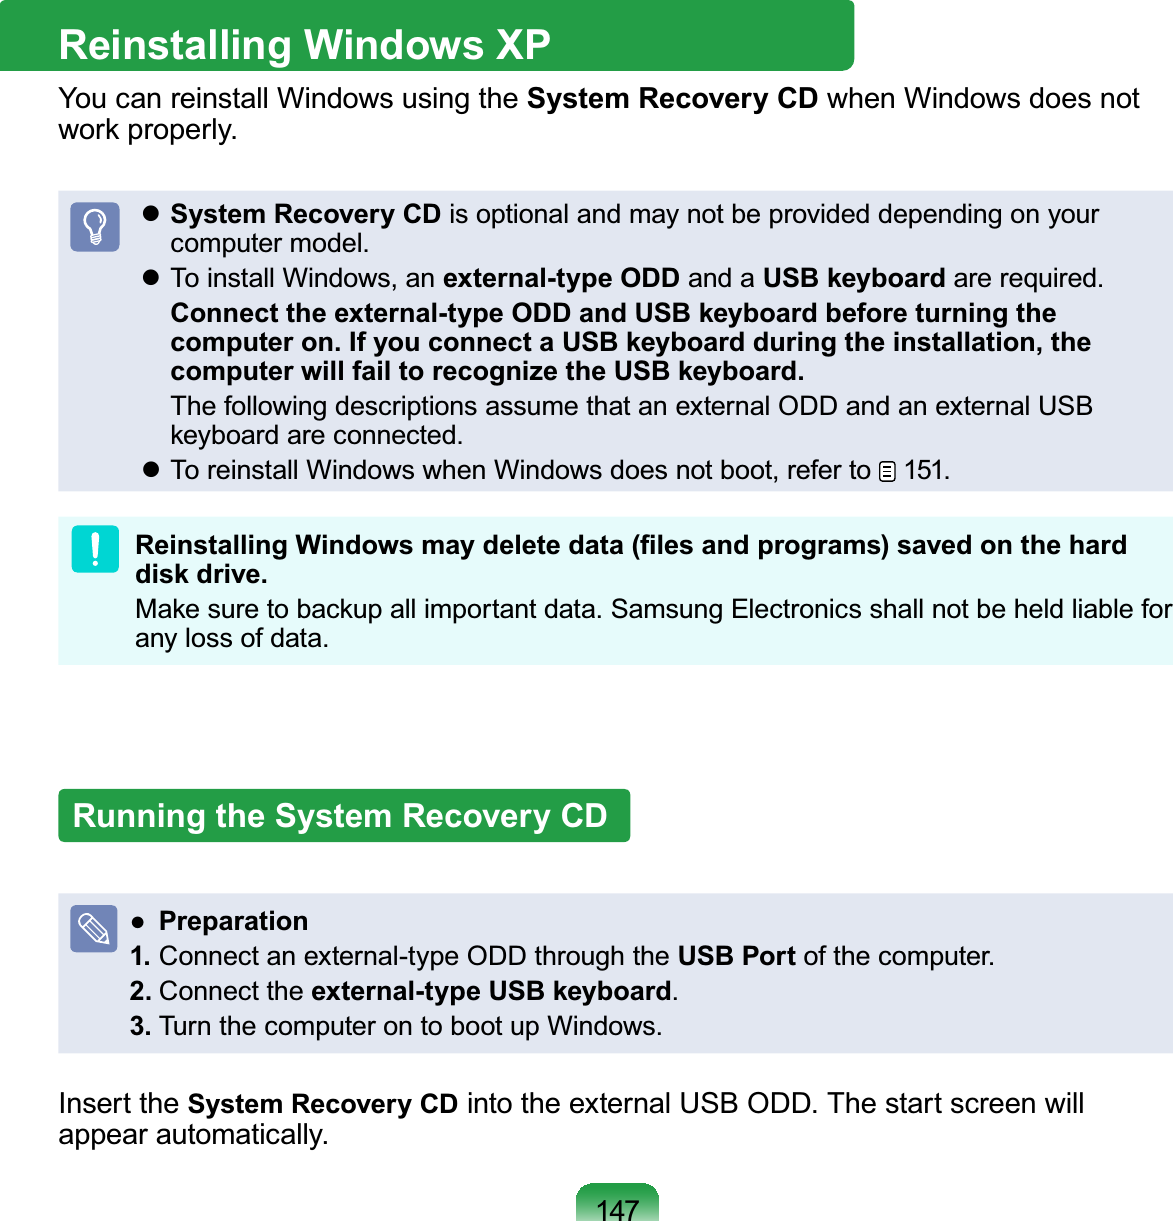
![1011 ConnectaLANcabletotheOrganizer’s LAN port2 Click Start > Control Panel > Network and Internet Connections > Network Connection3 Select Local Area Connection andclick the right button of the touch padand select PropertiesThe LAN Device name may differdependingonyourcomputer’s1HWZRUN'HYLFHWired NetworkAwirednetworkisanetworkenvironmentusedforacompanynetworkorbroadbandLQWHUQHWFRQQHFWLRQDWKRPHz YoucanonlyusetheWired networkIXQFWLRQZKHQ\RXKDYHDQ2UJDQL]HU The OrganizerLVRSWLRQDO,WPD\EHSURYLGHGIRUVRPHPRGHOVRQO\RUVKRXOGEHSXUFKDVHGDGGLWLRQDOO\z<RXFDQDOVRFRQ¿JXUHWKHQHWZRUNVHWWLQJVXVLQJWKH(DV\1HWZRUN0DQDJHU107](https://usermanual.wiki/CyberTAN-Technology/MM230M.Host-user-manual-2-of-2/User-Guide-1075933-Page-2.png)
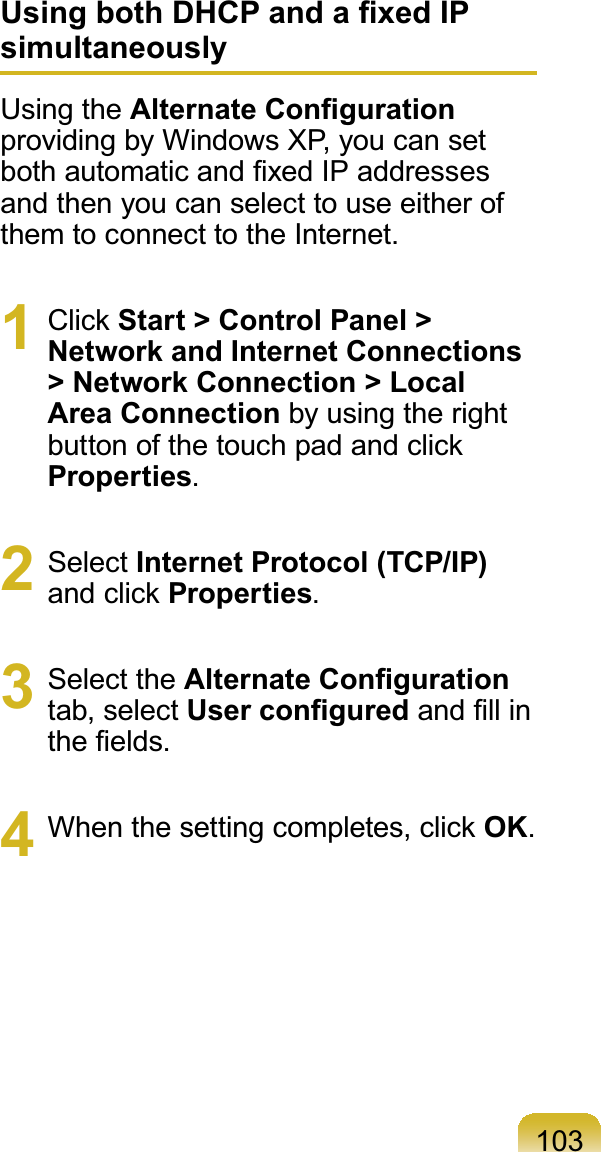
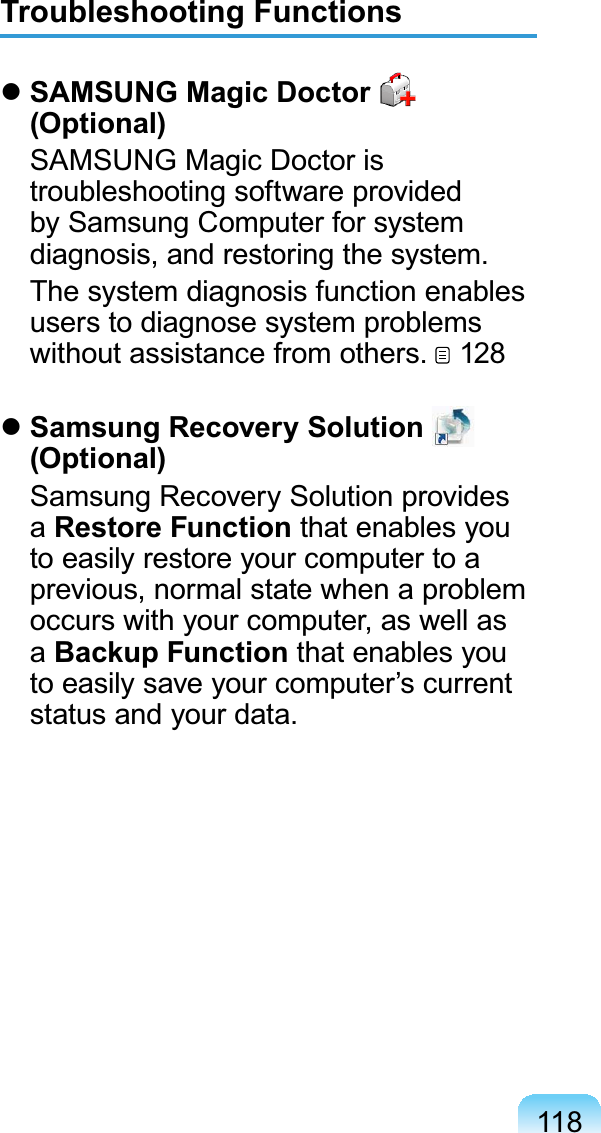
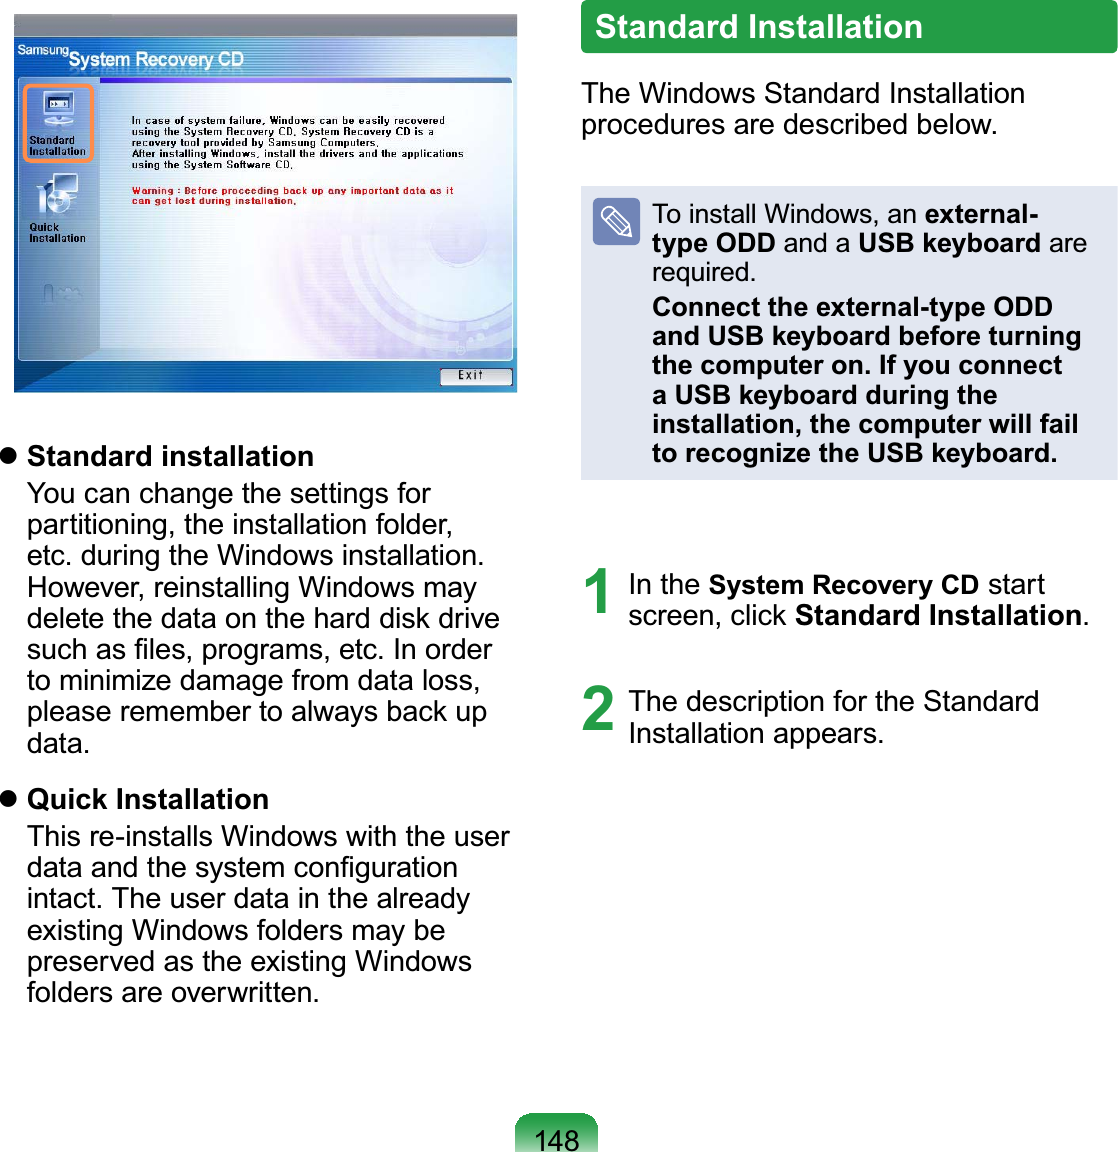
![1085 Select Direct Connection and clickthe NextEXWWRQ6 Select the LAN device, setup the IPaddress and click the NextEXWWRQSelect DeviceSelectadevicetobeconnectedWRWKH,QWHUQHW6HOHFWHLWKHU:LUHG/$1RU:LUHOHVV/$1IP Settings7RXVHDVWDWLF,3DGGUHVV¿OOLQWKH¿HOGV)RUWKH,3DGGUHVVLQIRUPDWLRQDVN\RXUQHWZRUNDGPLQLVWUDWRUObtain an IP address automaticallySelectDHCPtousethisoptionDXWRPDWLF,3VHWWLQJ7 Click Add Printer andsetupaprinterDFFRUGLQJWRWKHZL]DUGWhen the printer has been added,click the Refresh button, select thenewly added printer and then click theFinishEXWWRQTonotaddaprinter,clicktheFinishEXWWRQ8 When the network settings arecomplete, the Do you want to move to the newly added location now?PHVVDJHDSSHDUVClick the CancelEXWWRQAn icon for the added location isFUHDWHG7KHQHWZRUNVHWWLQJVKDYHEHHQFRPSOHWHGIf you select OK, the network settingsIRUWKHDGGHGORFDWLRQDUHDSSOLHGToaddanewlocation,repeattheSURFHGXUHVIURP6WHSDERYH](https://usermanual.wiki/CyberTAN-Technology/MM230M.Host-user-manual-2-of-2/User-Guide-1075933-Page-9.png)


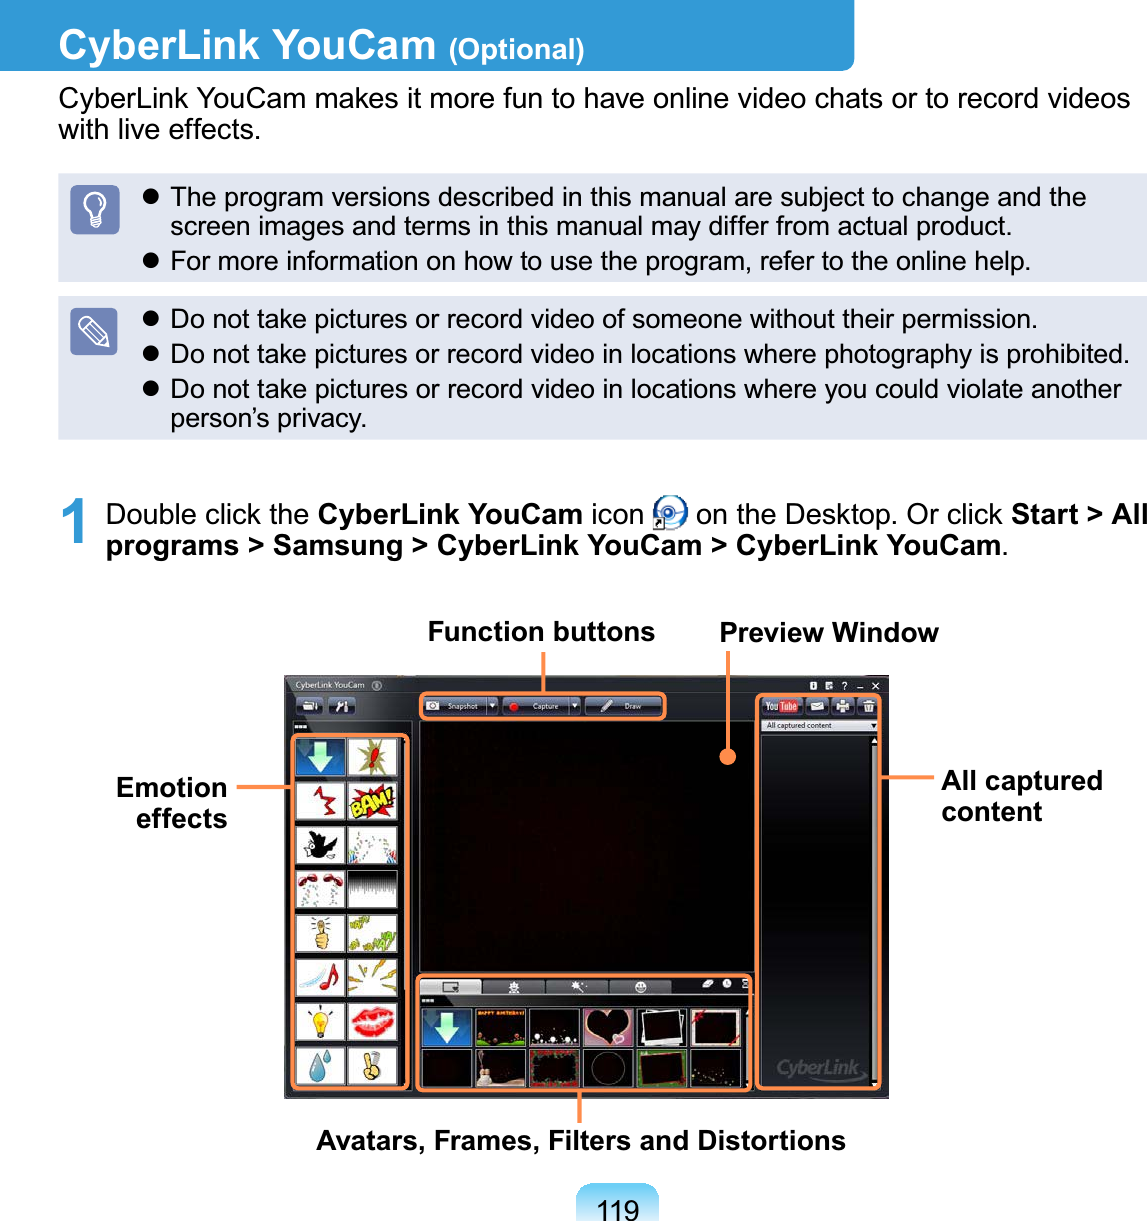


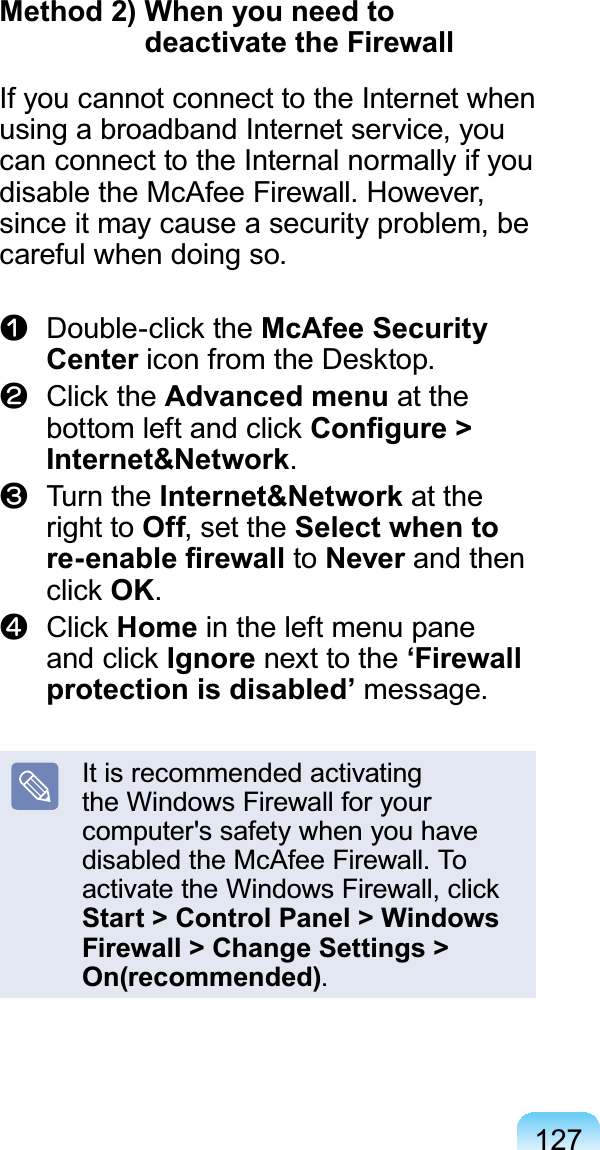
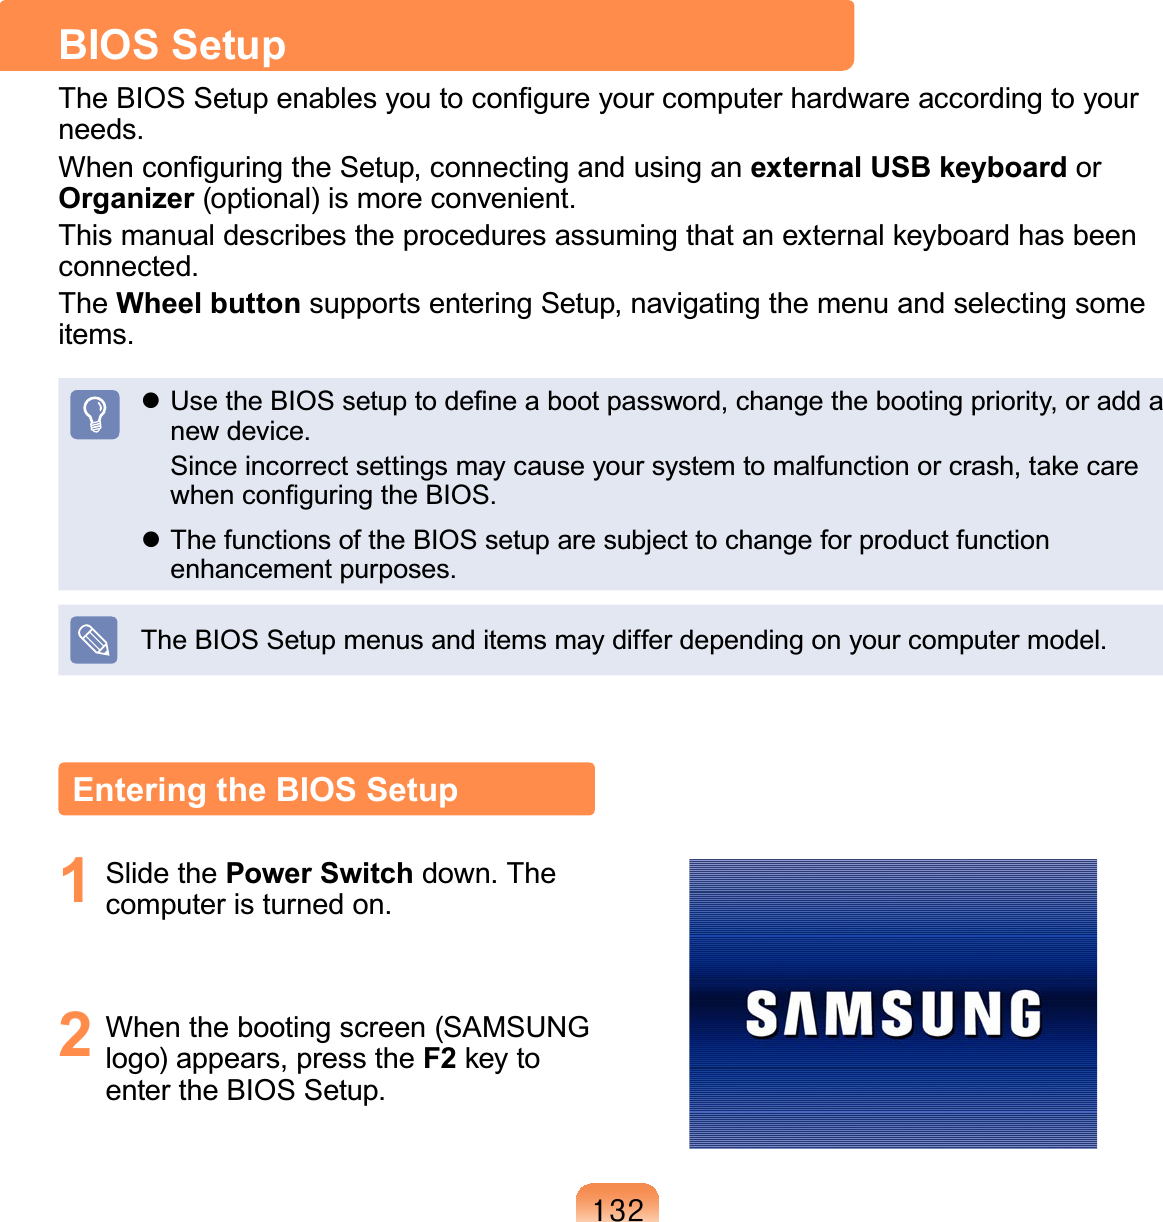
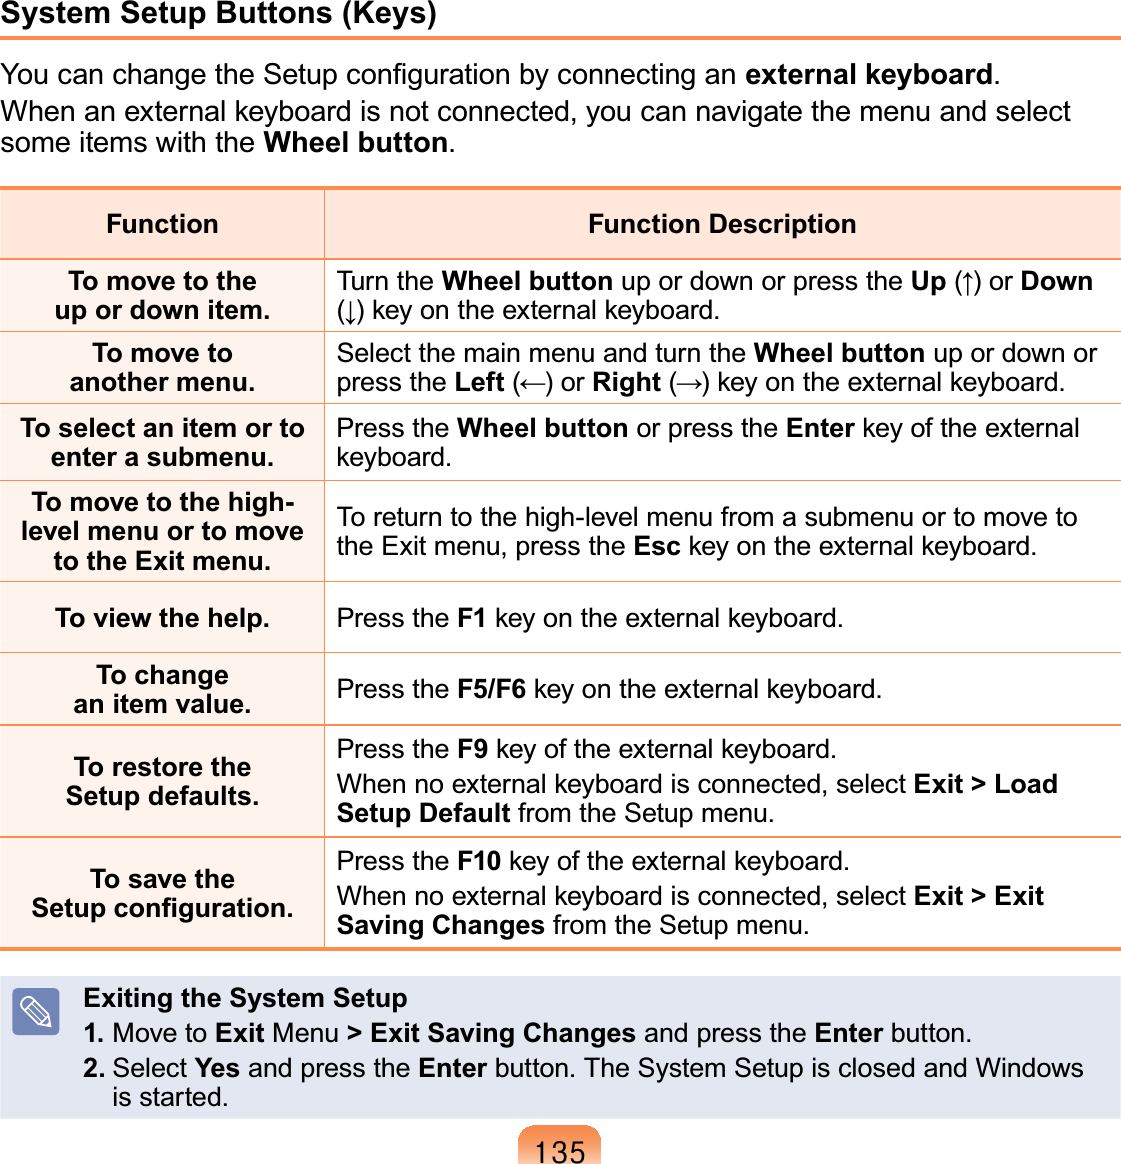
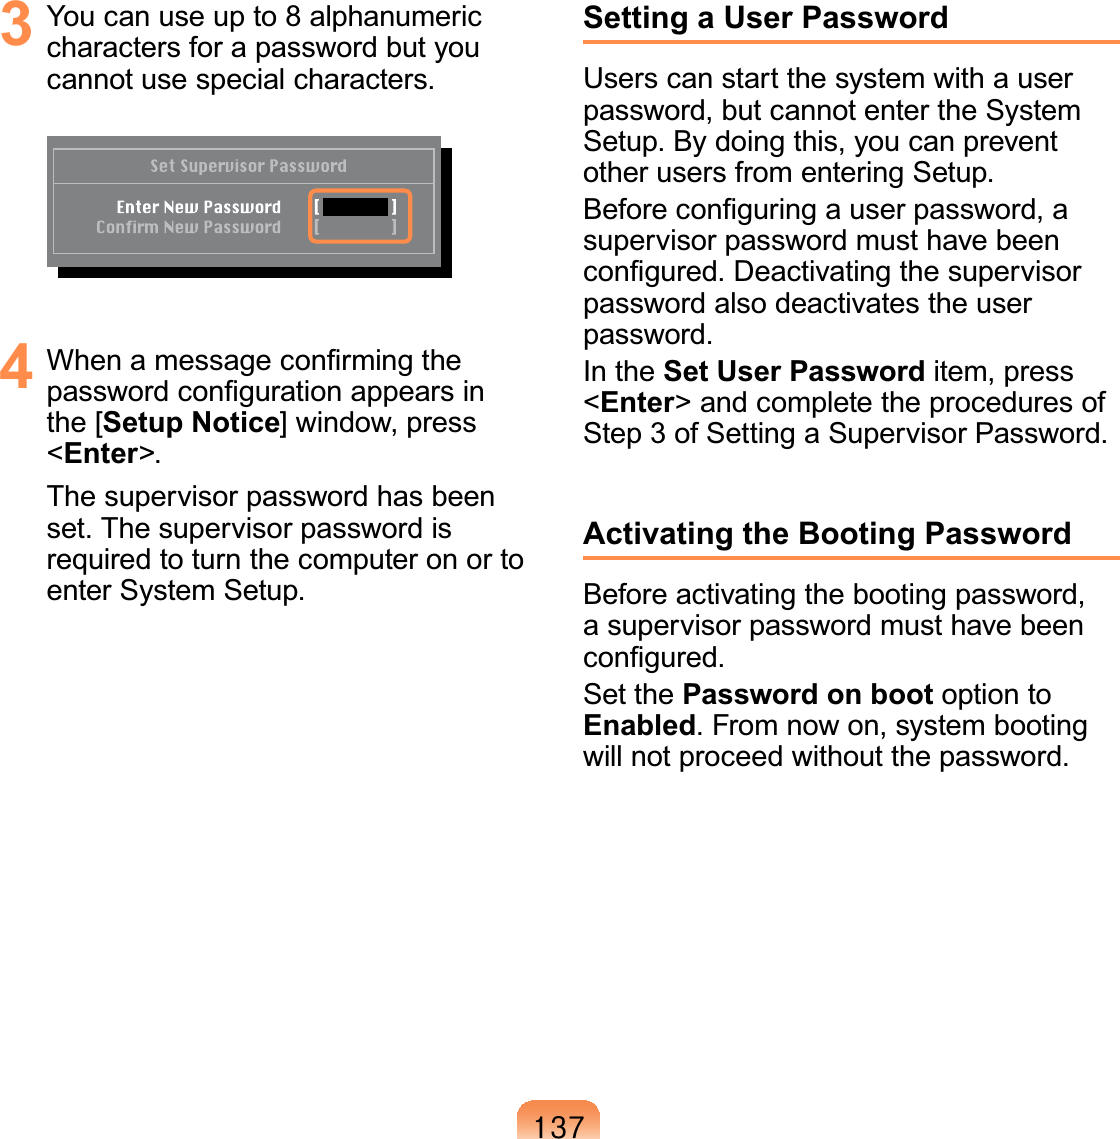
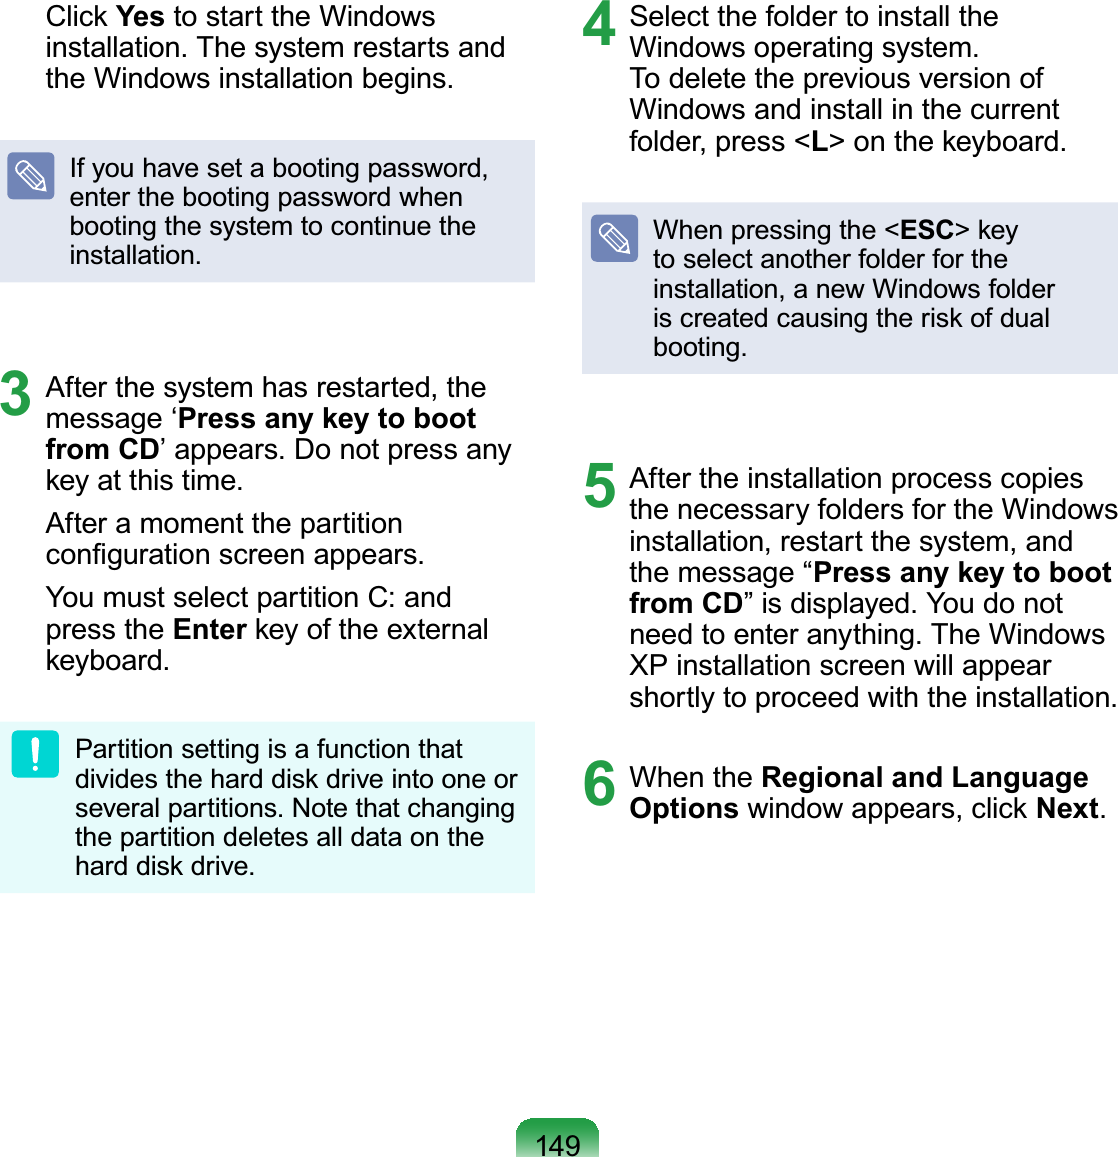
![469Setting a Supervisor PasswordASupervisorPasswordisrequiredtoturnthecomputeronortostarttheSystem6HWXSWhensettingaSupervisorPassword,usersotherthanasupervisorcannotuseWKHFRPSXWHU1 Select the Security menu in the BIOS6HWXS2 In the Set Supervisor Passworditem, press <Enter!Setting a Boot PasswordWhensettingapassword,youhavetoenterapasswordtousethecomputerorenterWKH%,266HWXS%\FRQ¿JXULQJDSDVVZRUG\RXFDQUHVWULFWV\VWHPDFFHVVWRDXWKRUL]HGXVHUVRQO\DQGSURWHFWGDWDDQG¿OHVVDYHGRQWKHFRPSXWHUz'RQRWORVHRUIRUJHW\RXUSDVVZRUG ,I\RXKDYHIRUJRWWHQ\RXUSDVVZRUGFRQWDFWD6DPVXQJVHUYLFHFHQWHU,QWKLVFDVHDVHUYLFHIHHZLOOEHFKDUJHGz)RUWKHVHWXSEXWWRQVUHIHUWRWKHGHVFULSWLRQRIµ6\VWHP6HWXS%XWWRQV.H\V¶135](https://usermanual.wiki/CyberTAN-Technology/MM230M.Host-user-manual-2-of-2/User-Guide-1075933-Page-37.png)
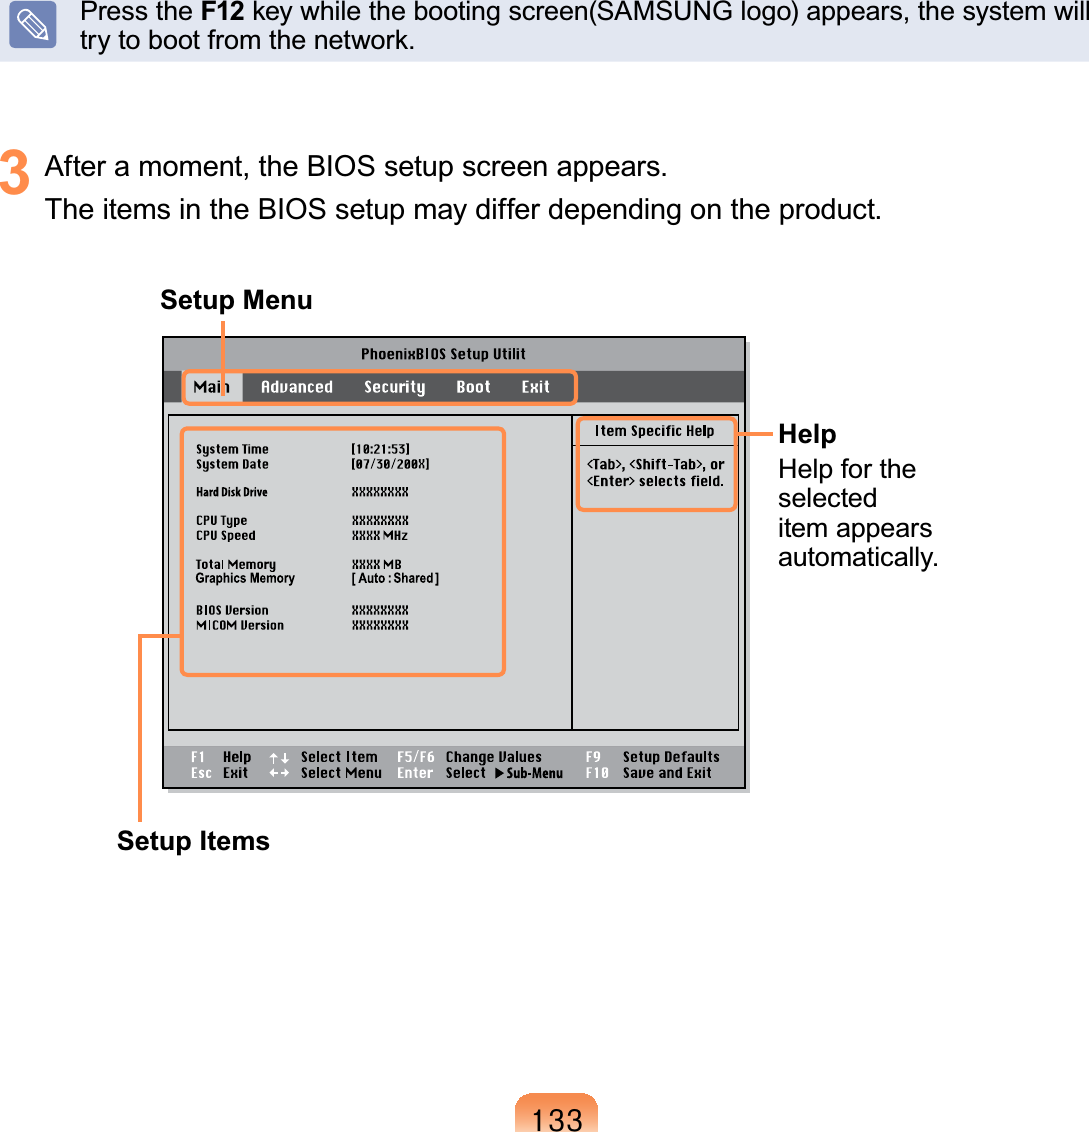
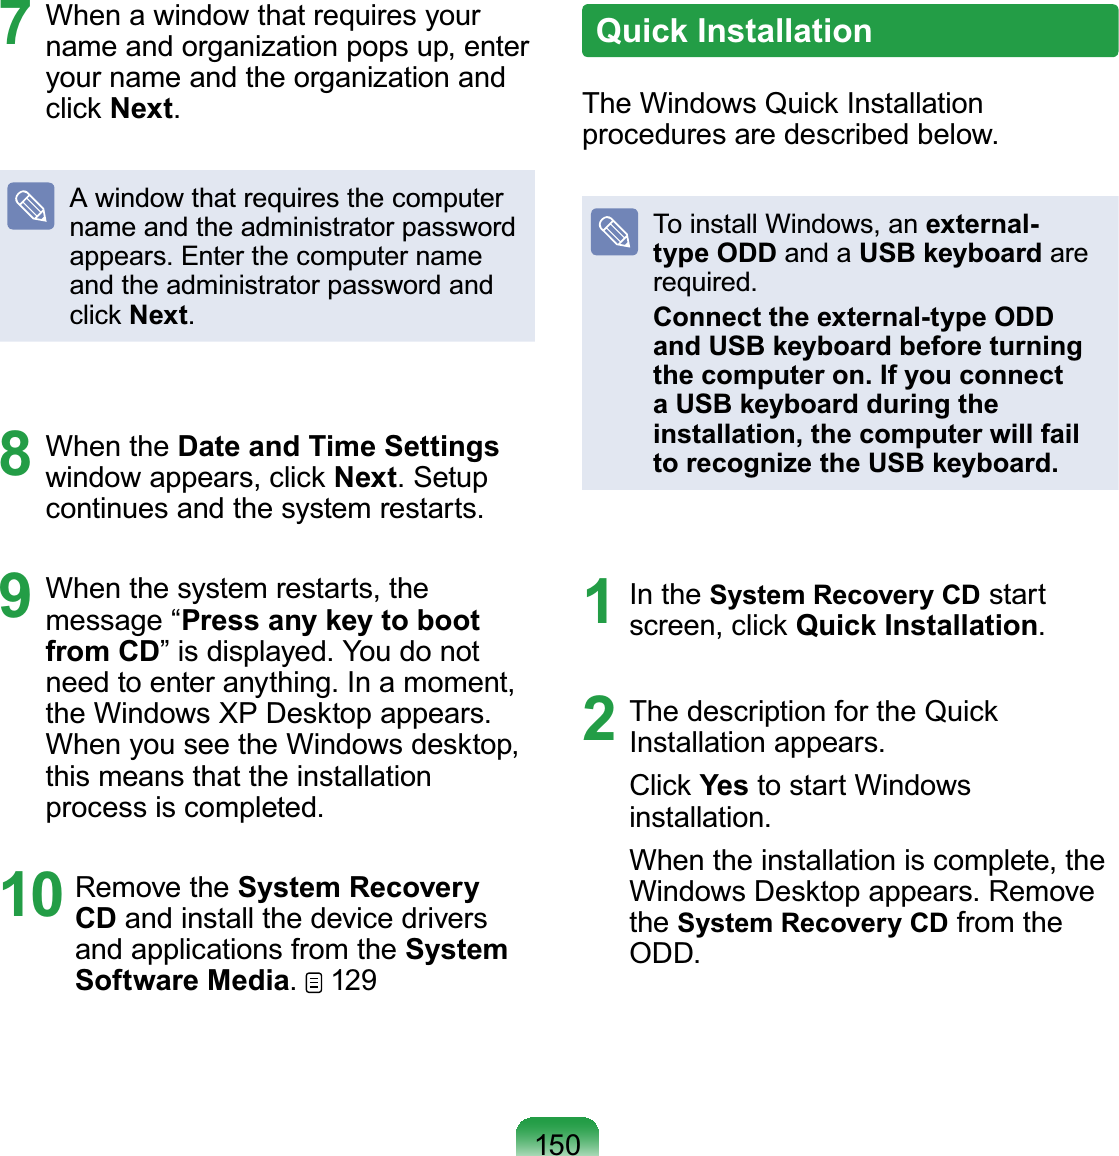
![46<1 Select the Boot menu in the BIOS6HWXS2 Press <Enter>ontheBoot Device PriorityLWHP3 3UHVVWKHGRZQNH\ĻWRPRYHWRWKHIDE HDD item and press the F6 keyWRPRYHXSWRWKHWRSLWHP[ Boot priority order ]1. USB CD : N/A2. IDE HDD : XXXXXXXXXXXXXXXX3. USB KEY : N/A4. USB FDD : N/A5. USB HDD : N/A6. PCI BEV : XXXXXXXXXXXXXXXX7.8.- USB ZIP : N/A- USB LS120 : N/A[Excluded from boot order]4 Press the F10 keytosavethesettingsDQGH[LW6HWXSThe highest boot priority device isQRZVHWWRWKH+DUG'ULYHChanging the Boot Priority7KLVFRPSXWHULVFRQ¿JXUHGWRERRWIURPDQH[WHUQDOW\SH2''¿UVWThischapterdescribeshowtochangethebootprioritysothatthecomputerbootsfromWKHKDUGGLVNGULYH¿UVWThefunctionisonlyavailablewhenanexternal USB keyboard or OrganizerRSWLRQDOLVLQVWDOOHG](https://usermanual.wiki/CyberTAN-Technology/MM230M.Host-user-manual-2-of-2/User-Guide-1075933-Page-40.png)
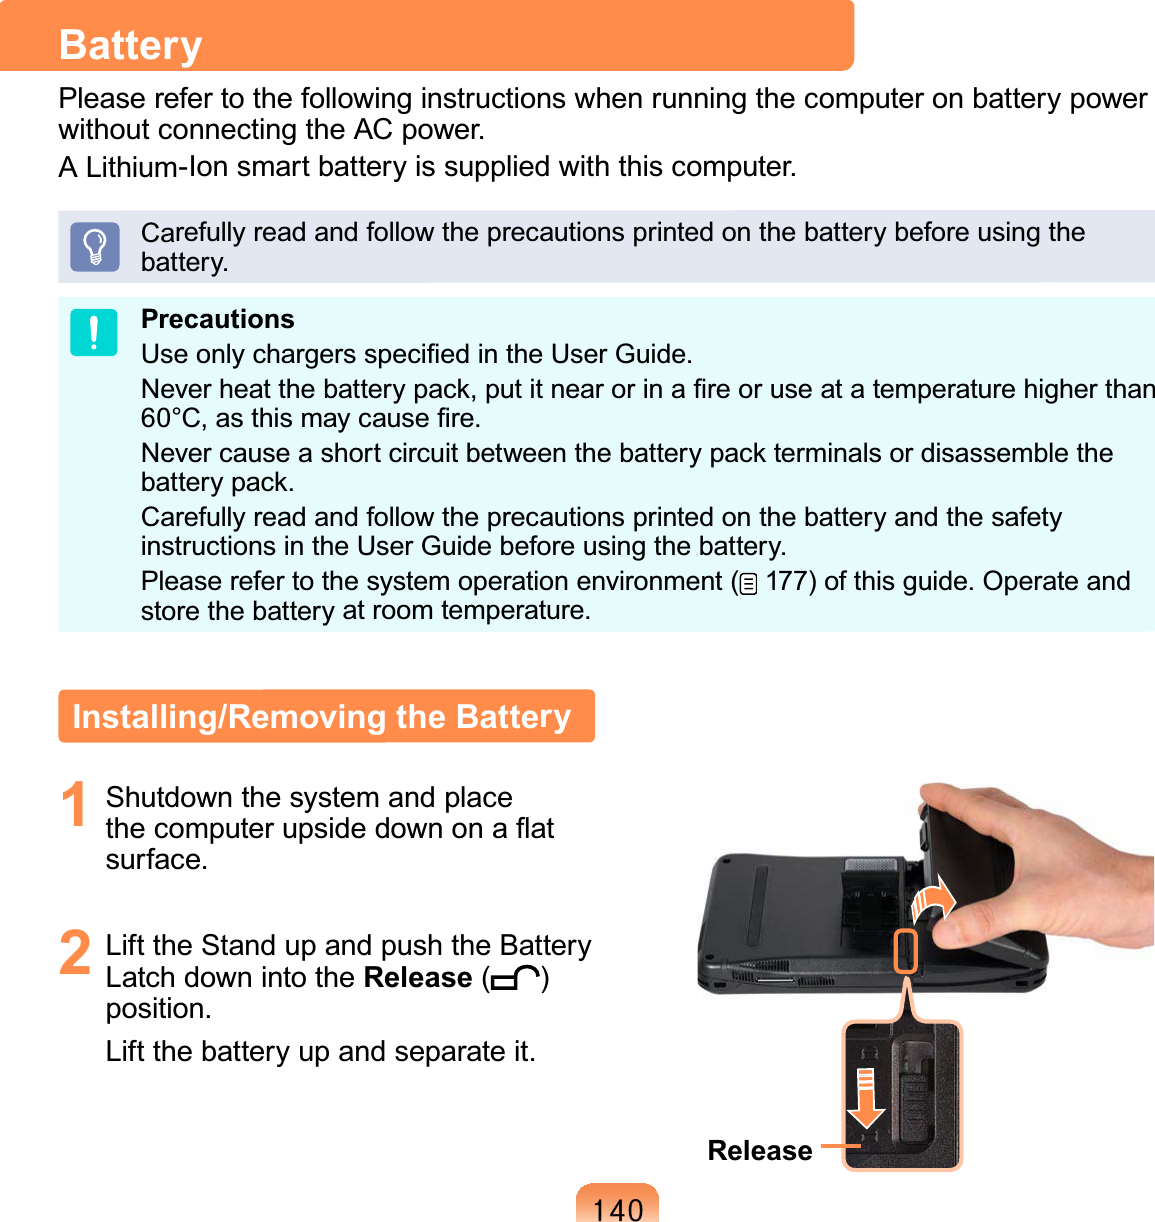
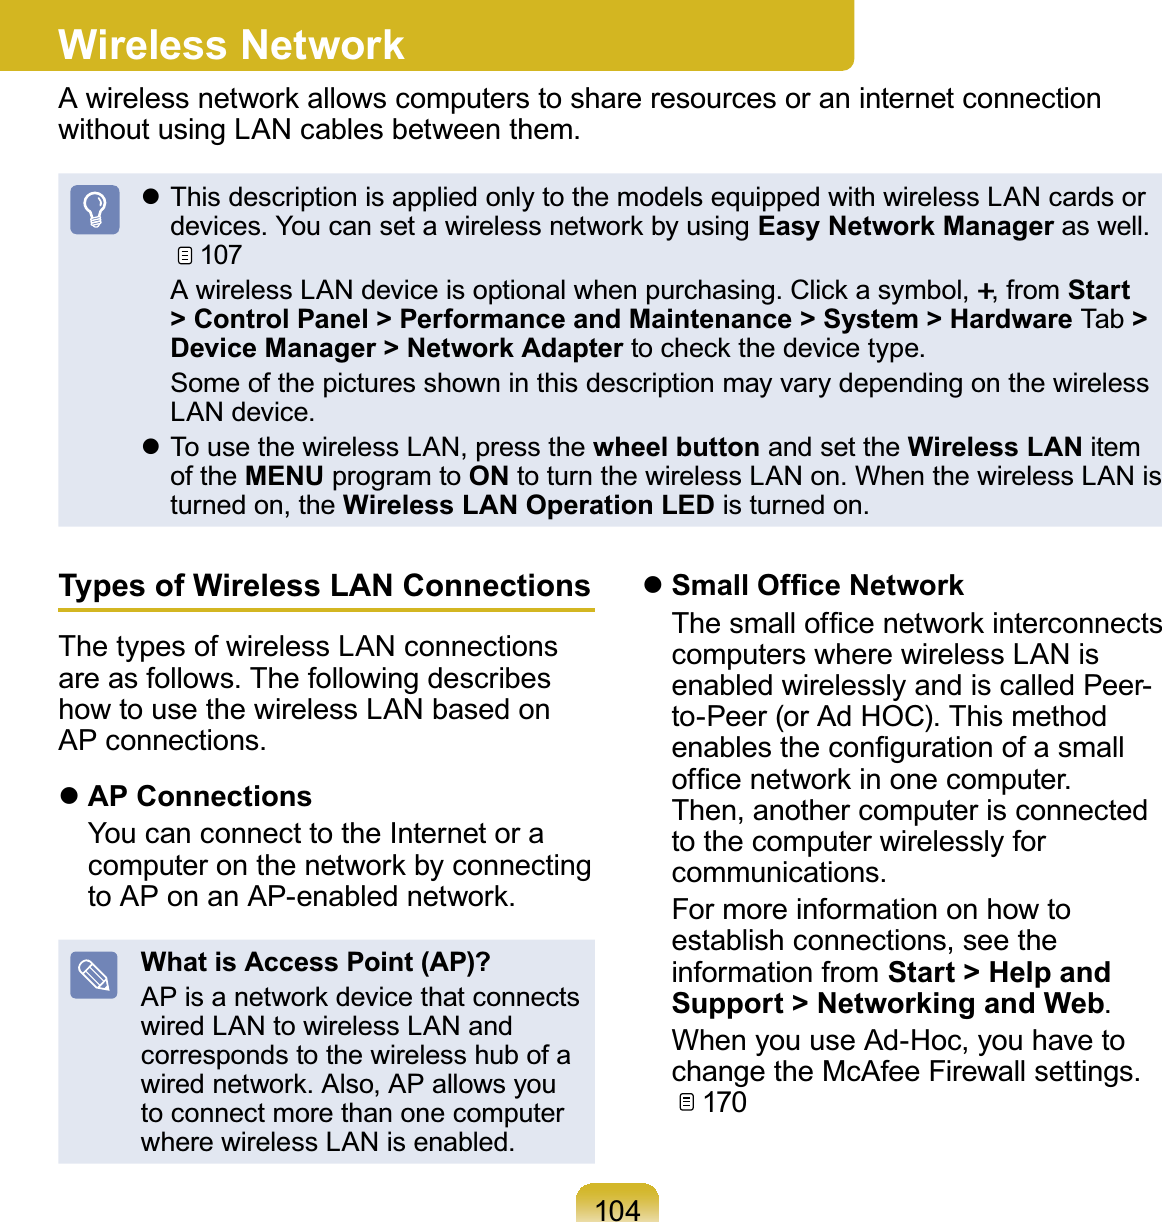
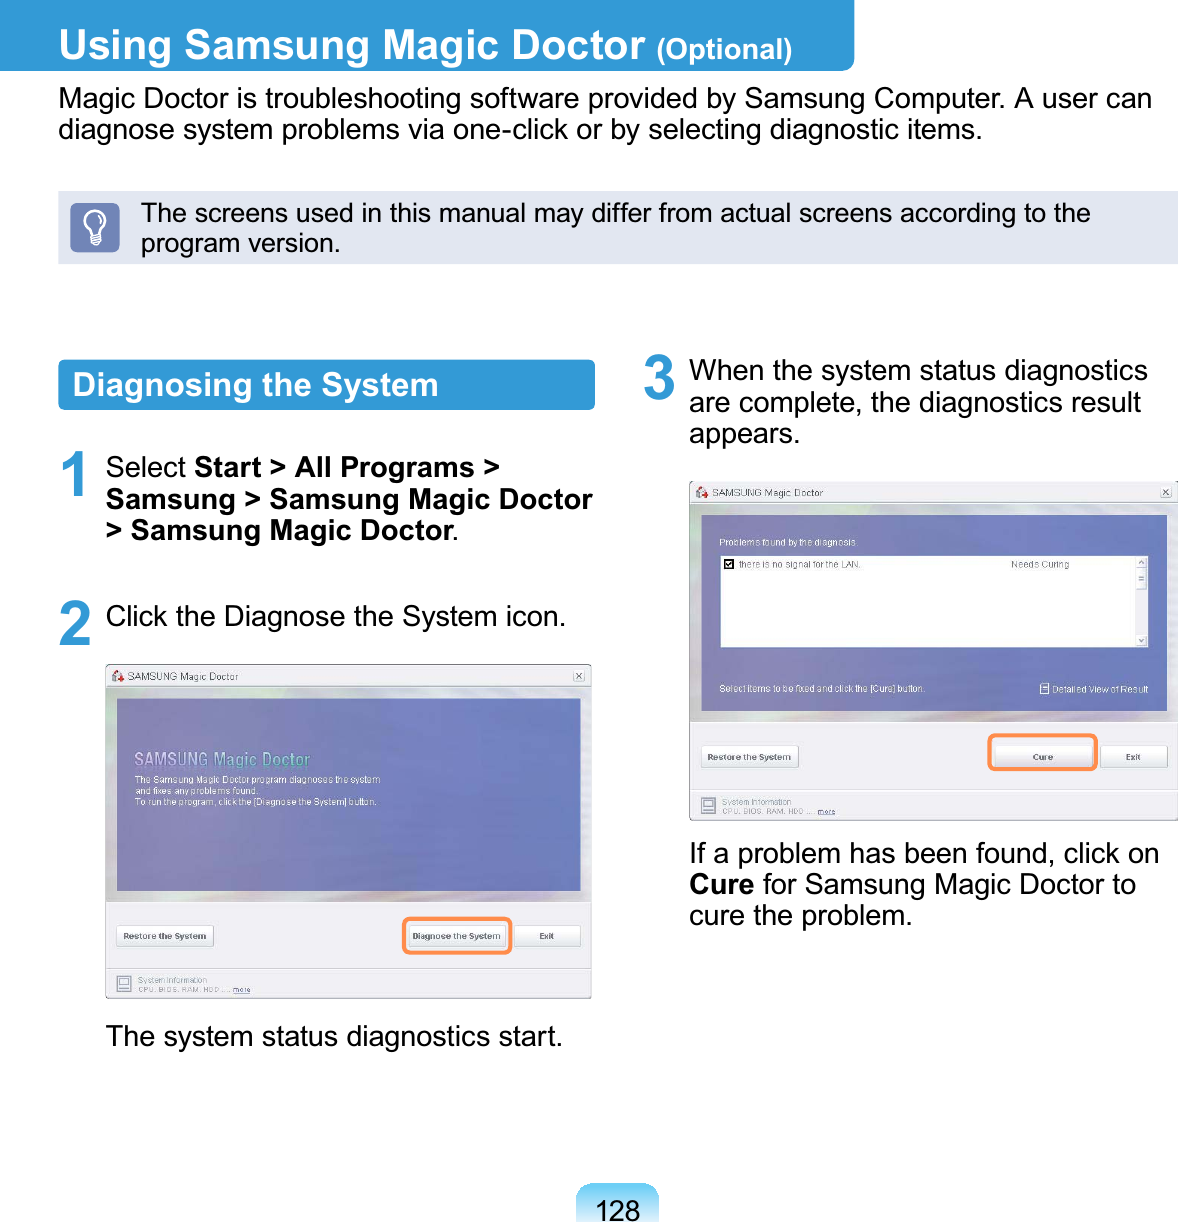
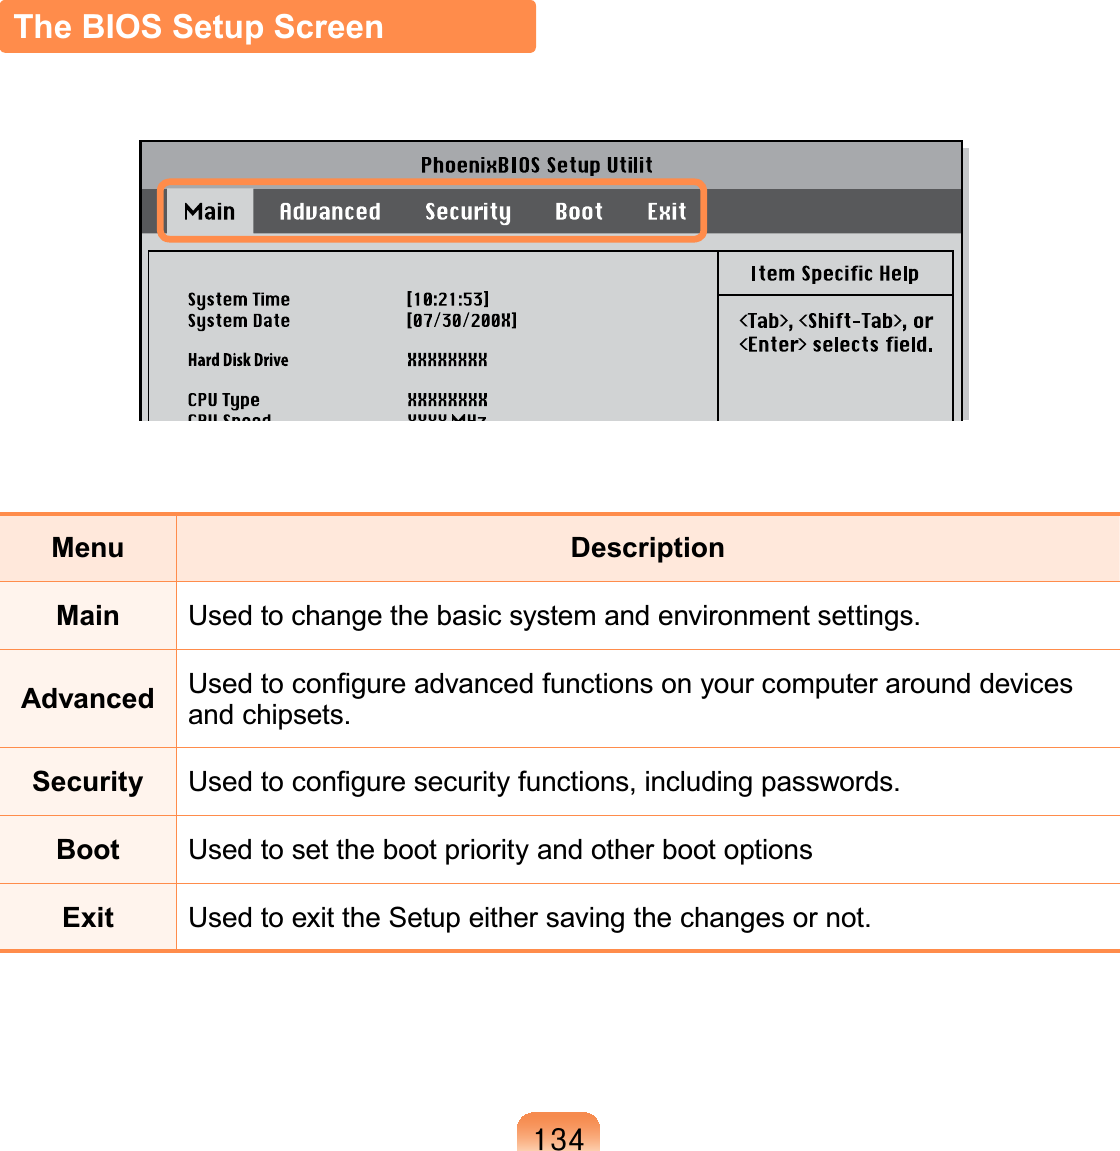
![476Extending the Battery Usage TimeDecreasing the LCD BrightnessPress the Wheel button to run the MENU program and turn the Wheel button downwhile the Brightness is selected or press to make the LCD brightness dimmer andWRH[WHQGWKHEDWWHU\XVHWLPHUsing Samsung Battery ManagerSamsungBatteryManagerisapowermanagementprogramthatenablesusingtheEDWWHU\SRZHUHI¿FLHQWO\<RXFDQVHOHFWDQRSWLPL]HGSRZHUPRGHDFFRUGLQJWR\RXUUHTXLUHPHQWVClick Start > All Programs > Samsung > Samsung Battery Manager > Samsung Battery ManagerPower Saving EffectsChange Power ModeYou can only change theGHWDLOHGFRQ¿JXUDWLRQLQ&XVWRP0RGH](https://usermanual.wiki/CyberTAN-Technology/MM230M.Host-user-manual-2-of-2/User-Guide-1075933-Page-44.png)
![477Maximum Battery Saving ModeThis mode is appropriate for conditions which require thePD[LPXPEDWWHU\XVDJHWLPH7KLVPD\GHJUDGHWKHSHUIRUPDQFHRIWKHV\VWHPNormal Mode 7KLVPRGHLVDSSURSULDWHIRUQRUPDOFRQGLWLRQV%RWKV\VWHPSHUIRUPDQFHDQGEDWWHU\XVDJHWLPHDUHRSWLPL]HGMaximum Performance ModeThis mode is appropriate for conditions that require maximumV\VWHPSHUIRUPDQFH7KHUHIRUHWKHEDWWHU\XVDJHWLPHPD\EHUHGXFHGLQWKLVPRGHCustom Mode,QWKLVPRGH\RXFDQFRQ¿JXUHWKHXQLWWRVDYHEDWWHU\XVDJH<RXFDQDGMXVWWKH/&'EULJKWQHVVWKHV\VWHPVWDQGE\WLPHWKHVFUHHQFRORUTXDOLW\DQGWKHJUDSKLFVPRGHYDOXHVPower Saving Effect7KLVVKRZVWKHUHODWLYHEDWWHU\XVDJHWLPHIRUHDFKSRZHUPRGH7KHPRUHHIIHFWLYHWKHSRZHUVDYLQJWKHORQJHUWKHJUDSKZLOODSSHDUWhen Running a Game or Multimedia ApplicationAgameormultimediaapplicationmaynotworksmoothlyinMaximumBatterySaving0RGH8VLQJWKLVLVUHFRPPHQGHGZKHQWKH$&DGDSWHULVFRQQHFWHGRULQ1RUPDORUKLJKHUPRGHVSamsung Battery Manager Power Modesz Since the Maximum Battery Saving Mode of the Samsung Battery Manager controlsthe systemoperatingspeedtoextendthebatteryusagetime,theperformanceofthesystemPD\EHGHJUDGHGz WhenchangingthepowersettingsinCustomModeintheSamsungBatteryManager, the settings of the Power Options Properties window are changedDFFRUGLQJO\z To use Normal Mode in Samsung Battery Manager after reinstalling Windows XP,\RXKDYHWRLQVWDOOWKH6DPVXQJ%DWWHU\0DQDJHUXVLQJWKHV\VWHPVRIWZDUHPHGLD](https://usermanual.wiki/CyberTAN-Technology/MM230M.Host-user-manual-2-of-2/User-Guide-1075933-Page-45.png)
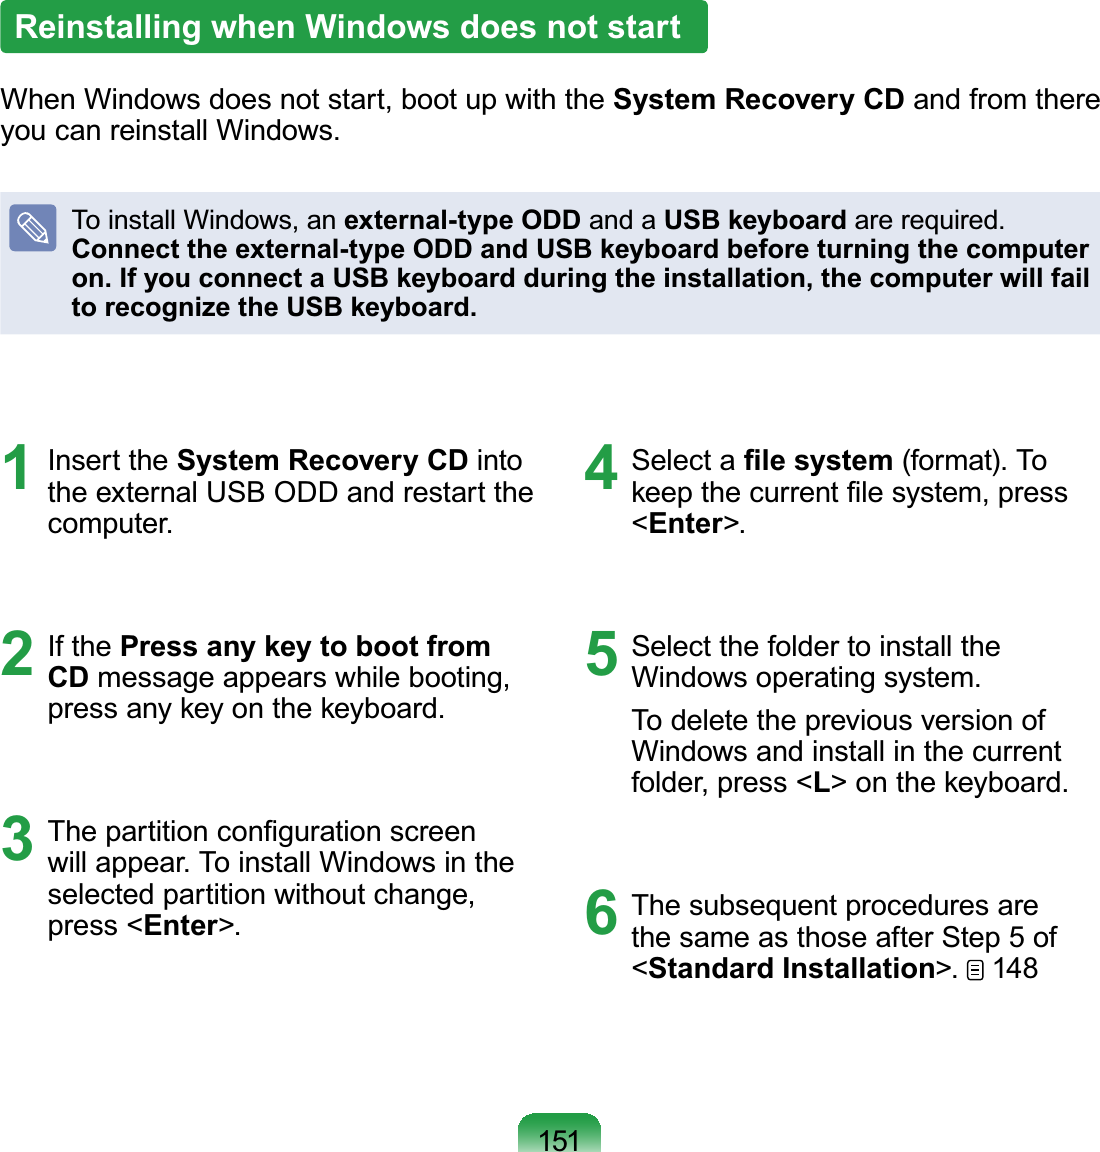
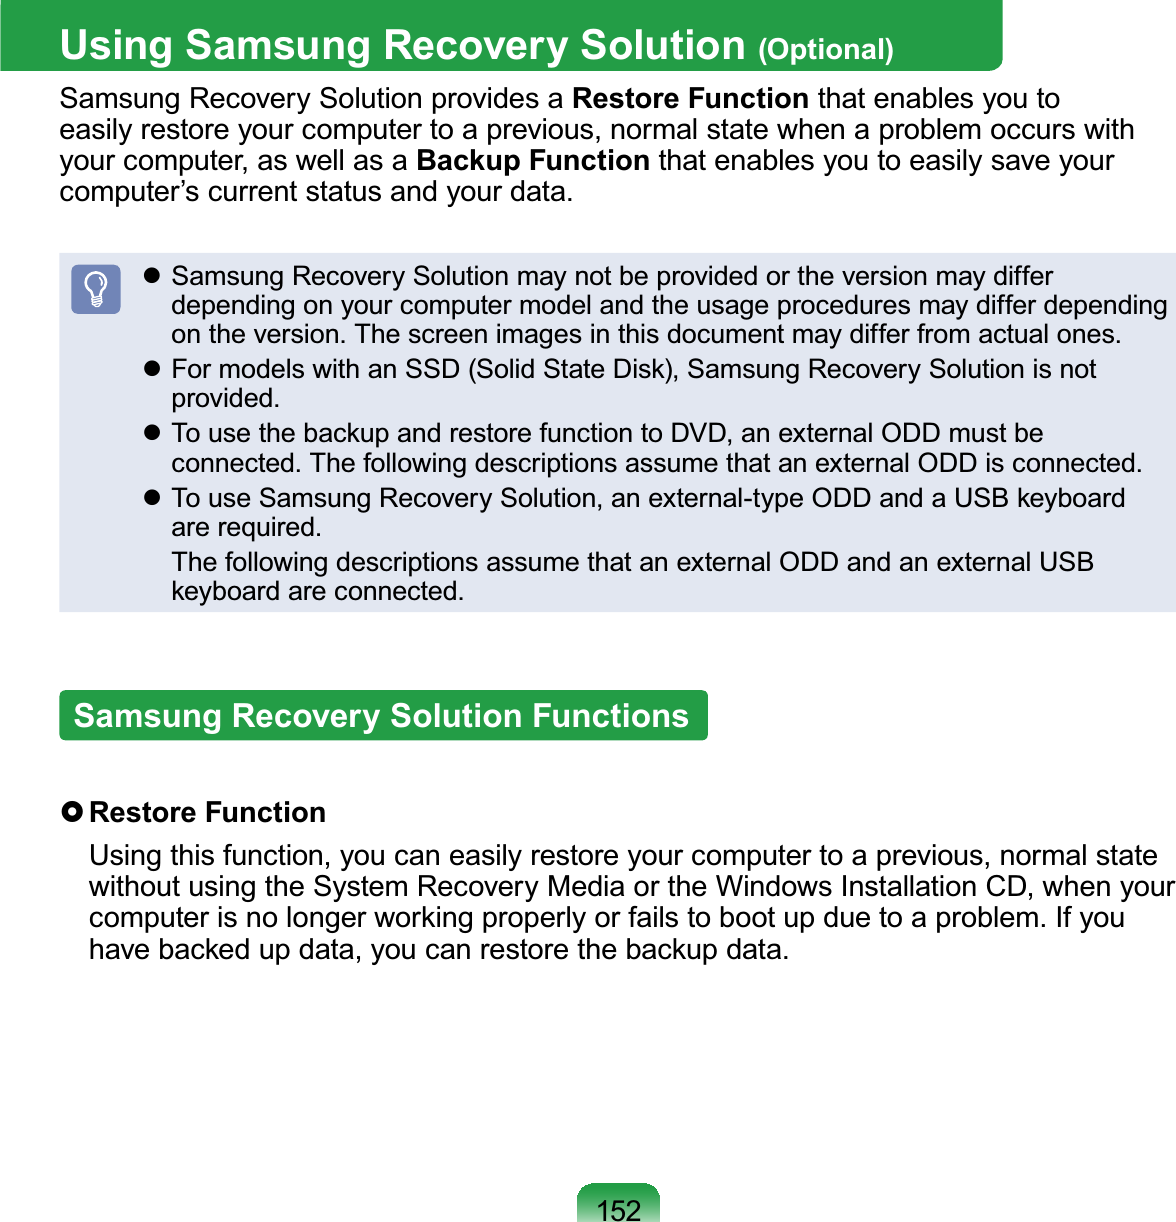
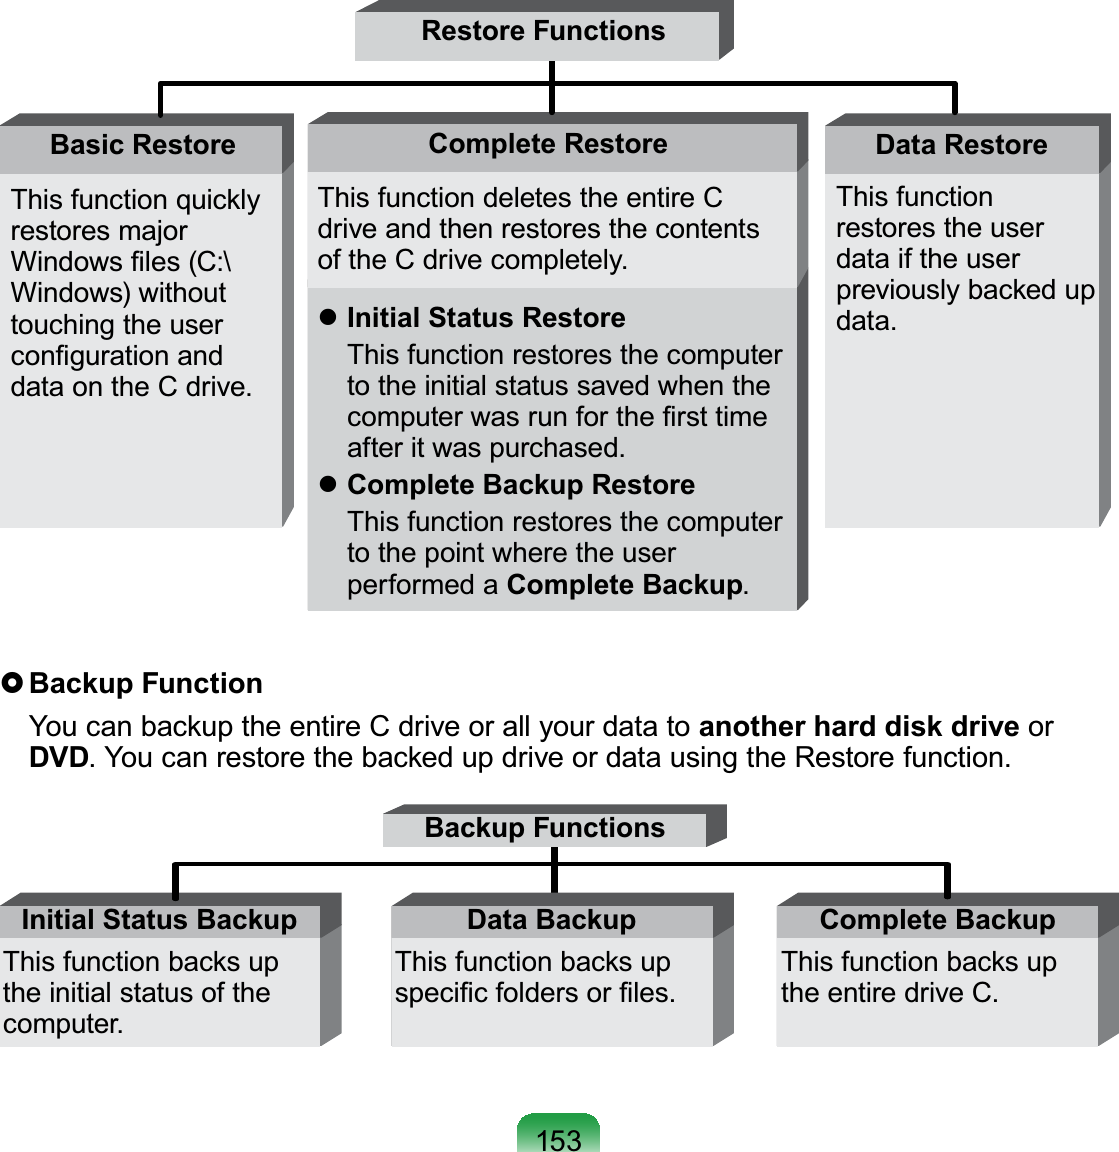
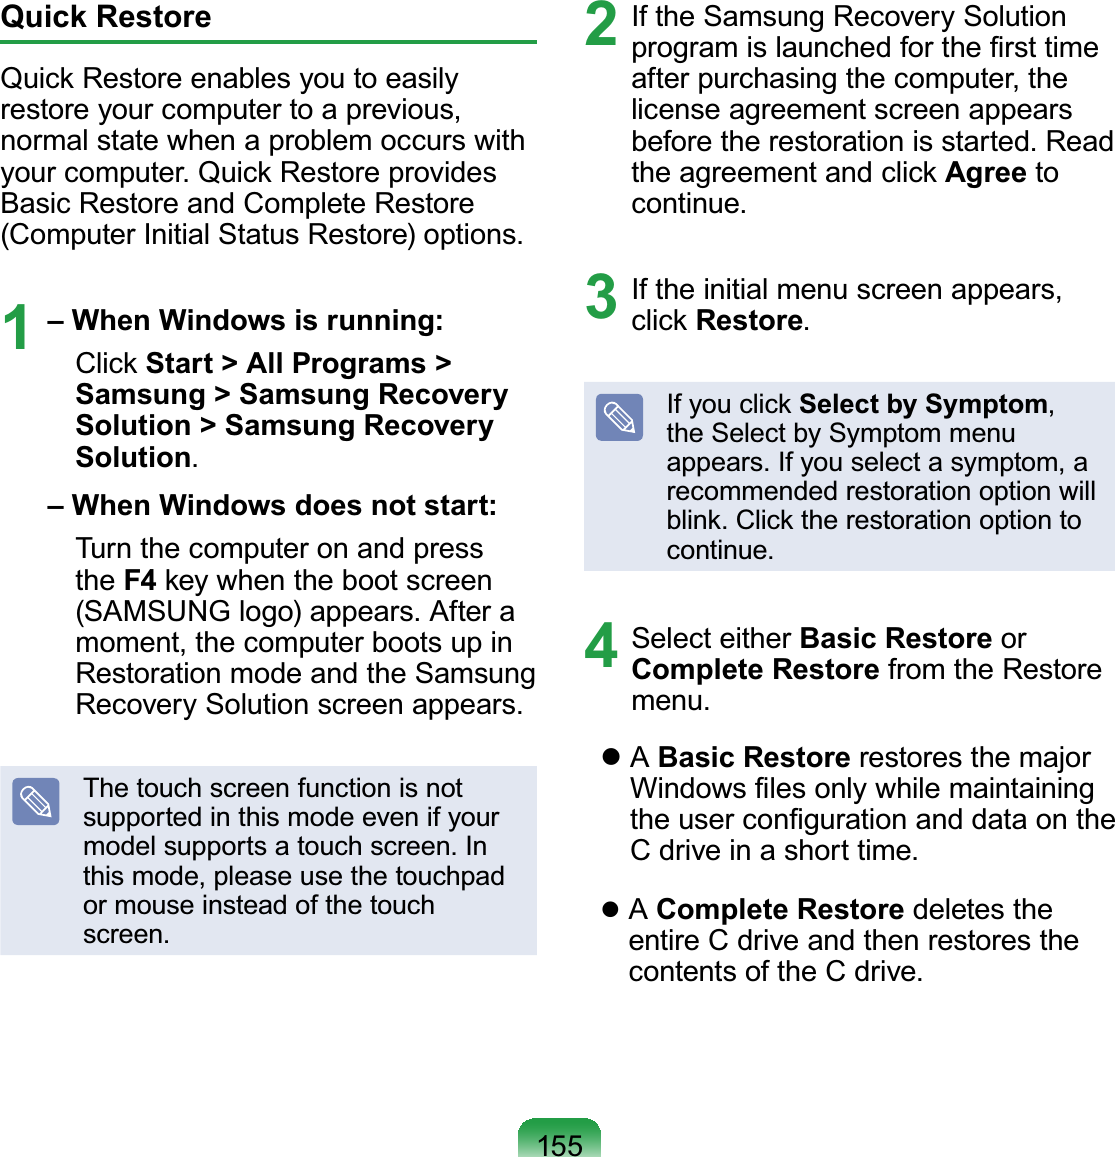
![154Using Samsung Recovery SolutionNotonlycanyouuseSamsungRecoverySolutionwhenWindowsisrunning,butDOVRZKHQ\RXDUHXQDEOHWRERRWXSLQWR:LQGRZV/HW¶VOHDUQKRZWRXVH6DPVXQJ5HFRYHU\6ROXWLRQInitial Status Backup,I\RXWXUQ\RXUFRPSXWHURQIRUWKH¿UVWtime,theInitialStatusBackupfunctionLVSHUIRUPHGDIWHUUHJLVWHULQJ:LQGRZVThis function saves an image of the InitialStatusoftheCdrivetoasecurelocationso that users can restore the computerto the Initial Status using the Complete5HVWRUHIXQFWLRQ$Q,QLWLDO6WDWXV%DFNXSis only performed once immediately afterWKHFRPSXWHULVSXUFKDVHG1 ,I\RXWXUQWKHSRZHURQIRUWKH¿UVWtime, the Register Windows screenDSSHDUV,I\RXUHJLVWHU:LQGRZVaccording to the instructions on theVFUHHQWKHFRPSXWHUZLOOEHUHVWDUWHG2 When the computer has beenrestarted, the User Registration&RPSOHWHPHVVDJHDSSHDUV&OLFNOK7KHFRPSXWHUZLOOUHVWDUW3 The Initial Status Backup screenDSSHDUVToresizetheCandDdrives,clickAdvanced and partition the diskDFFRUGLQJO\$GMXVWWKHSDUWLWLRQVL]Husing the slide bar and then clickNextThe partition disk function is onlyavailable when the computer isWXUQHGRQIRUWKH¿UVWWLPHDQGZLOOQRWEHDYDLODEOHDIWHUZDUGV2QFHyou have completed the partitions,\RXFDQQRWUHVL]HWKHSDUWLWLRQV7KHUHIRUHSDUWLWLRQWKHGLVNFDUHIXOO\4 The Initial Status Backup is performedtobackuptheinitialstatusofthe&GULYHWRDVHFXUHORFDWLRQ7KLVbackupimageisusedfortheComplete Restore function thatrestores your computer to the initialstatuswhenthecomputerisnotZRUNLQJSURSHUO\5 When the Initial Status Backup isFRPSOHWHUHVWDUW:LQGRZV](https://usermanual.wiki/CyberTAN-Technology/MM230M.Host-user-manual-2-of-2/User-Guide-1075933-Page-55.png)
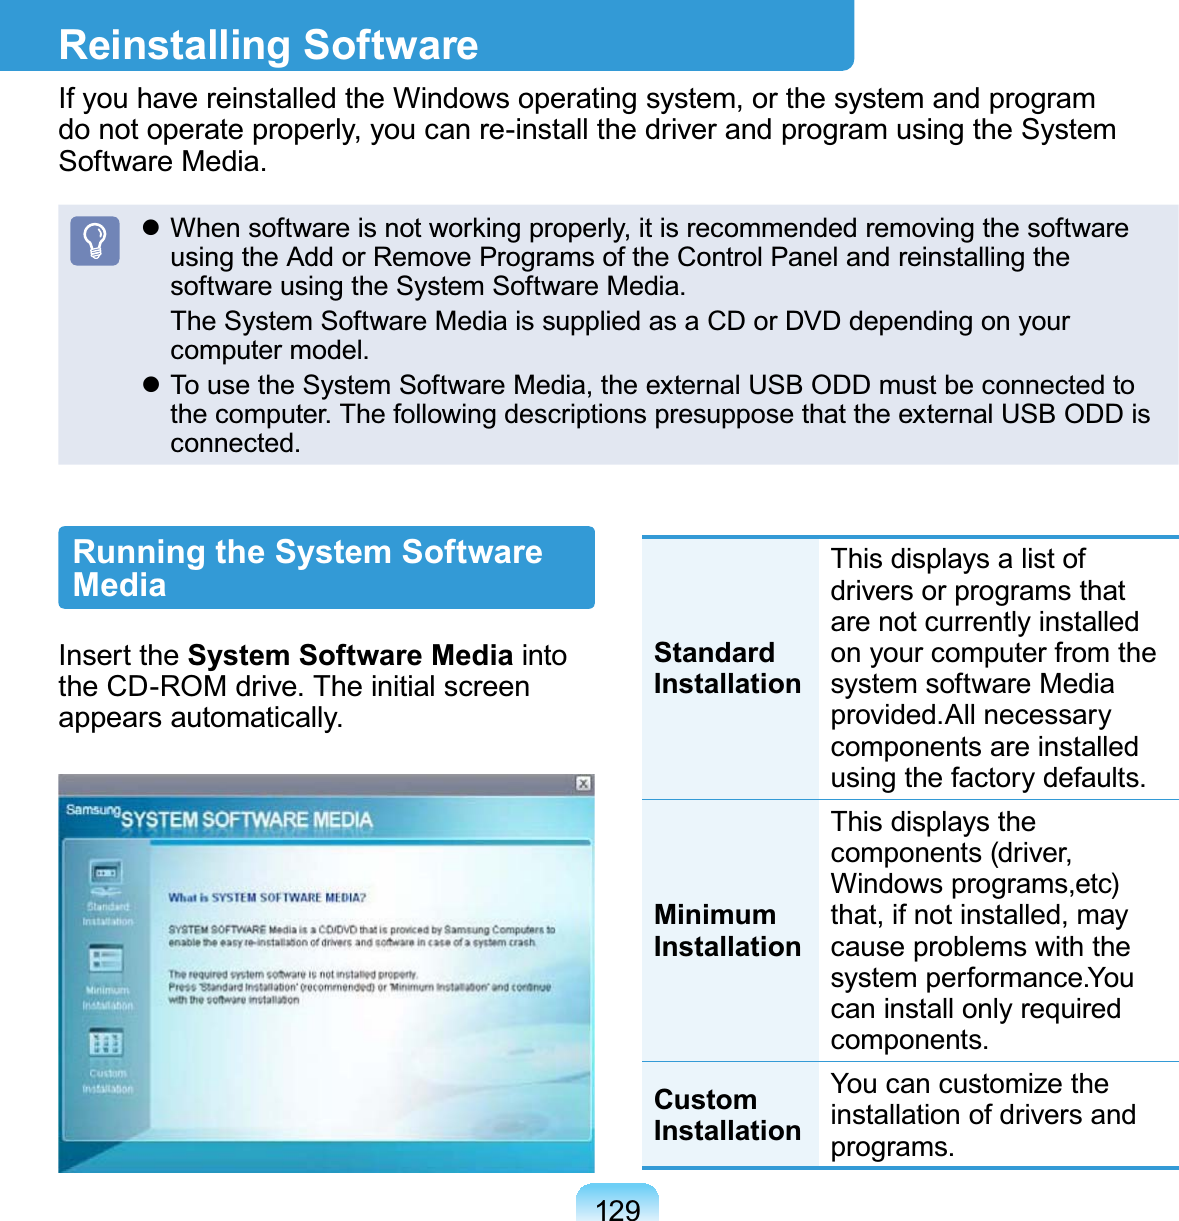
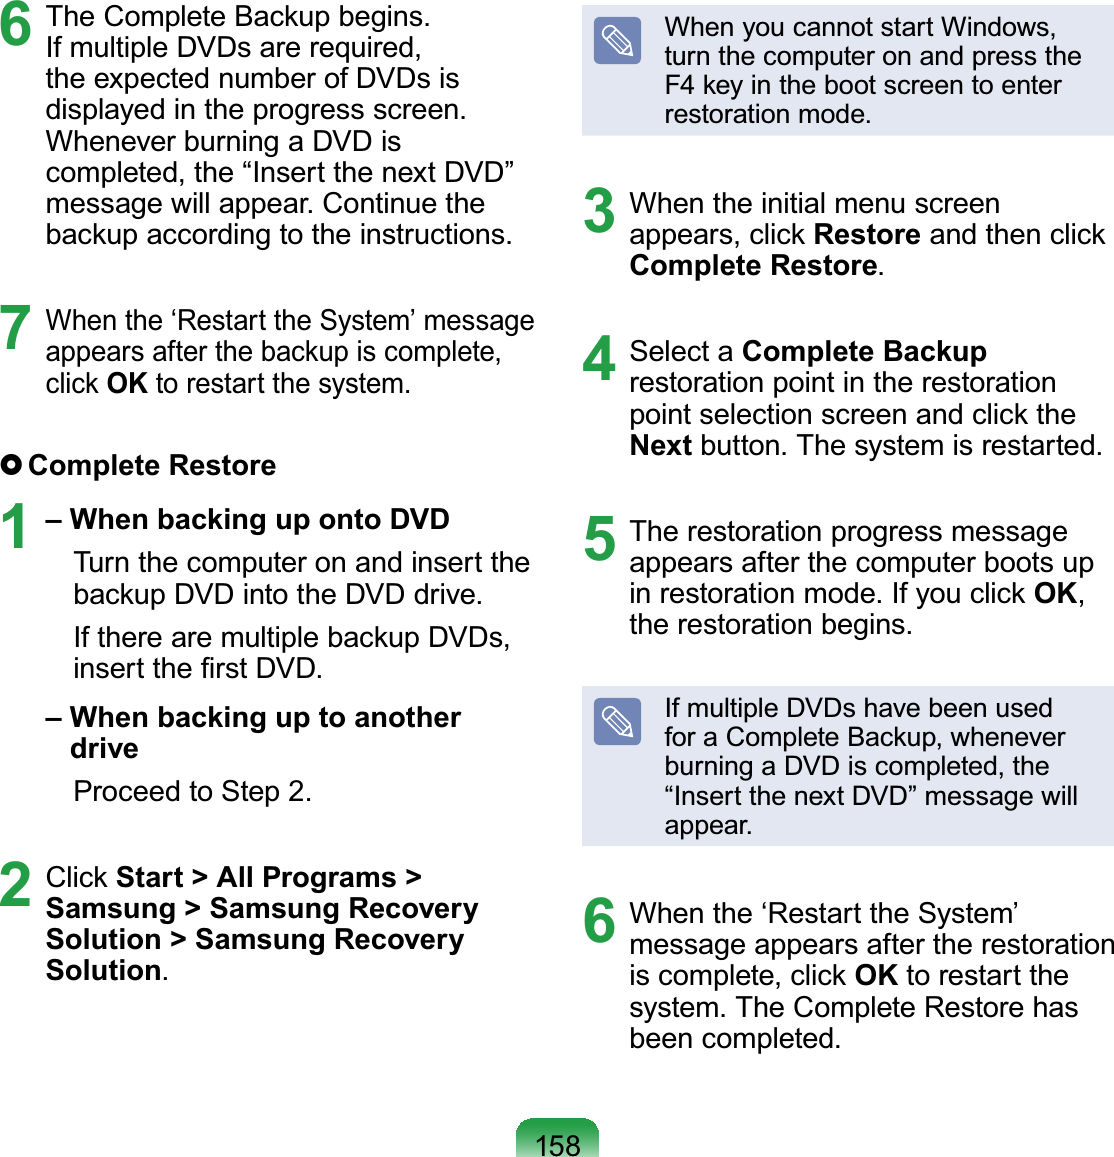
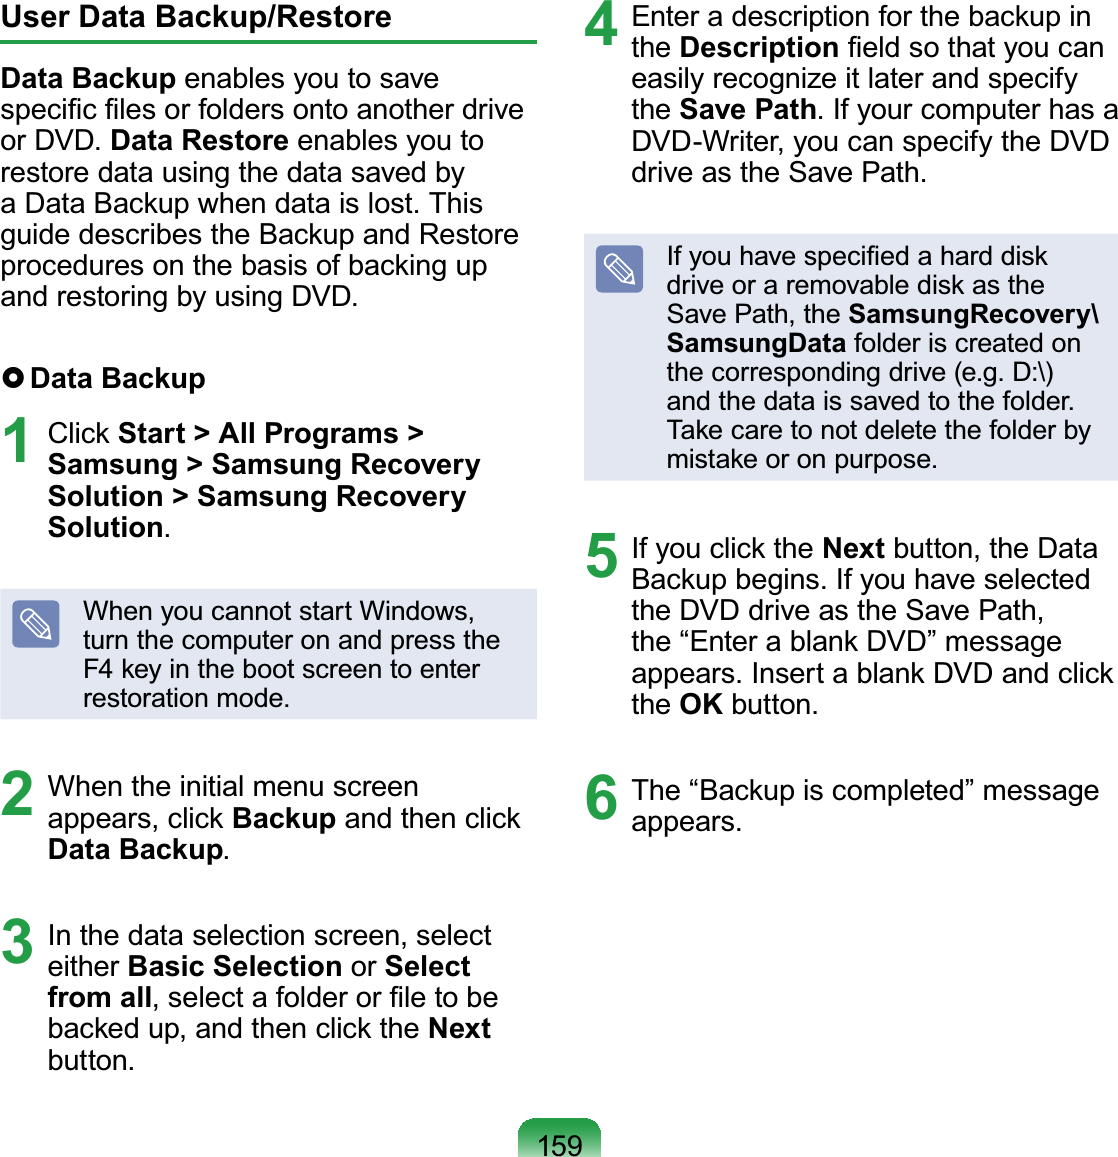
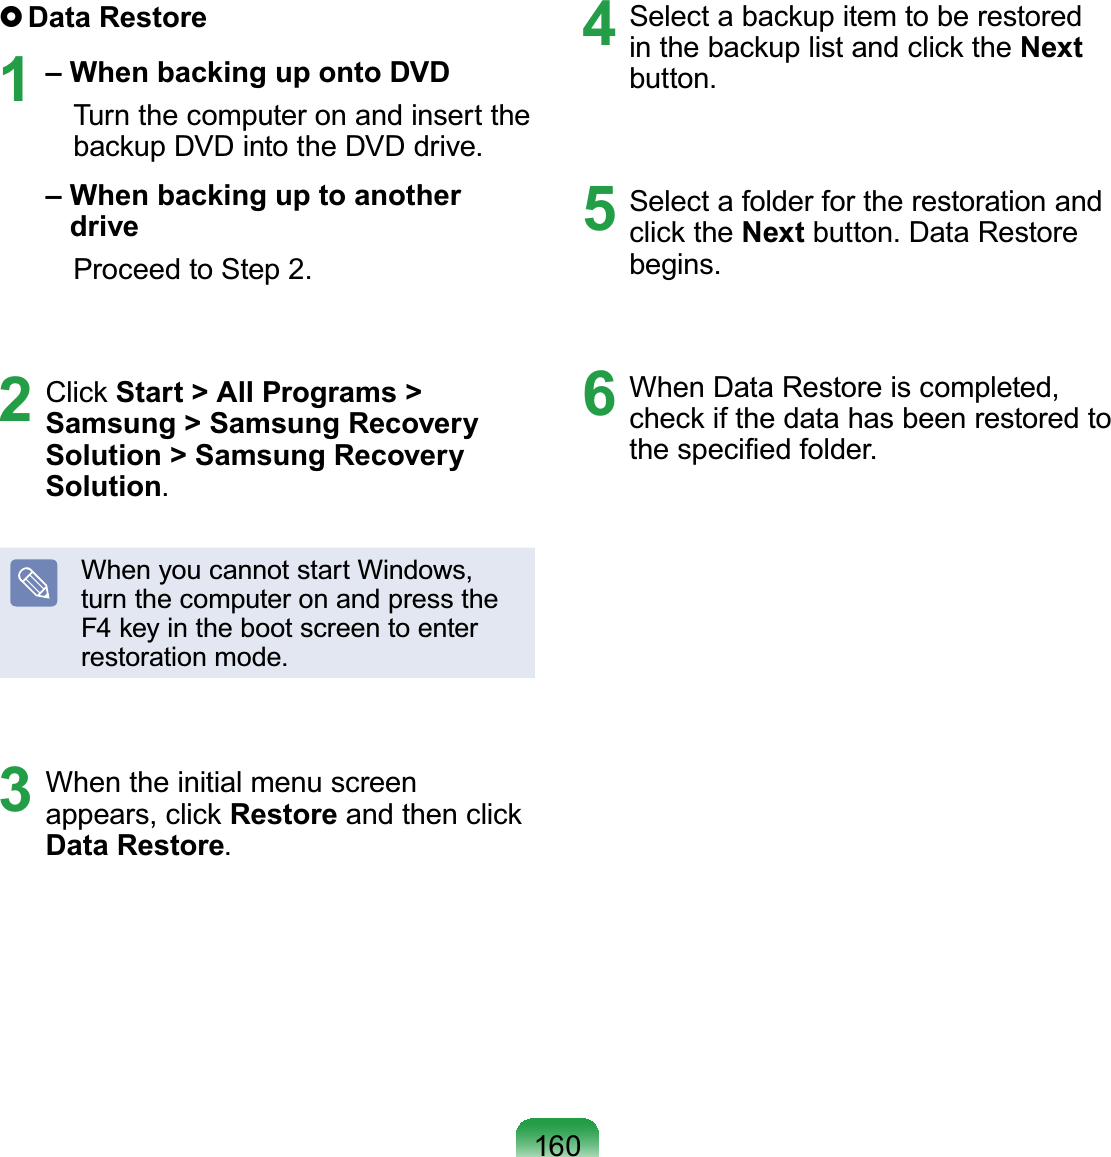
![156Run Complete Restore if thecomputer does not work even afterBasic RestoreKDVEHHQFRPSOHWHG4-1 IfyouhaveselectedBasic Restore:In the Basic Restore screen, clickthe NextEXWWRQ7KHV\VWHPZLOOEHUHVWDUWHG4-2 IfyouhaveselectedComplete Restore:In the restoration point selectionscreen, select the restoration pointdescribedas‘ComputerInitialStatus’ and click the NextEXWWRQ7KHV\VWHPZLOOEHUHVWDUWHGSinceaCompleteRestoredeletesalluserdataaswellasadditionallyinstalled programs, please backup\RXULPSRUWDQWGDWD¿UVWXVLQJWKHData Backup function, before running&RPSOHWH5HVWRUH5 ThecomputerbootsupintorestorationmodeandtherestorationSURJUHVVPHVVDJHDSSHDUV,I\RXclick OKWKHUHVWRUDWLRQEHJLQV7KHrestoration may take some time,SOHDVHZDLWIRUDPRPHQW6 When the ‘Restart the System’message appears after the restorationis complete, click OK to restart theV\VWHPMake sure that the power cord isconnected while the restoration is inSURFHVV7KH¿UVWWLPHWKHFRPSXWHUbootsupafteraCompleteRestorehasbeenperformed,thespeedofthebootprocess may be slowed down due toWKHV\VWHPRSWLPL]DWLRQSURFHVV$WWKLVtime,donotshutthecomputerdownbyIRUFHUser Complete Backup/RestoreAComplete Backup saves the completeimageoftheCdriveontoanotherdriveor'9'$Complete Restore restores theLPDJH¿OHVDYHGE\WKH&RPSOHWH%DFNXSRQWRWKH&GULYH7KLVJXLGHGHVFULEHVWKHComplete Backup and Complete Restoreprocedures on the basis of backing upDQGUHVWRULQJE\XVLQJ'9'](https://usermanual.wiki/CyberTAN-Technology/MM230M.Host-user-manual-2-of-2/User-Guide-1075933-Page-57.png)


![168 IftheAPisexcessivelyfaraway,orisinstalledattheendofabuildingand you are attempting to use thewireless LAN from the other end, youmay not be able to use the wirelesscommunication normally becausethesignalisblockedbyobstaclesbetweenyouandtheAP(suchasaZDOOA2 &KHFNLIWKH$3RSHUDWHVSURSHUO\,ItheAPisnotoperatingproperly,turnLWRIIDQGRQDJDLQDQGWU\DJDLQA3 &KHFNLIWKH$3¿UPZDUHLVWKHODWHVWYHUVLRQ)RUPRUHLQIRUPDWLRQRQWKH$3¿UPZDUHDVNWKH$3PDQXIDFWXUHURU\RXUSURGXFWSURYLGHUA4 Check if the AP is properly connectedWRWKHQHWZRUN&RQQHFWWKH/$1cablefromtheAPtoacomputerandcheckifthenetworkisconnectedSURSHUO\A5 Check the Network Key (Encryption.H\VHWWLQJVDJDLQ,IWKHDXWRPDWLFpassword converting function(passphrase function) is enabled andthe wireless connection is normalbut you cannot send data over theconnection, please enter the Network Key(QFU\SWLRQ.H\PDQXDOO\A6 &KHFNWKH$3VHWWLQJVDVIROORZV If there are multiple APs running atthe same time, check the channelVHWWLQJRIHDFK$3,IWKHLQWHUYDObetween the channels of the APsis narrow, you may experienceHOHFWURPDJQHWLFLQWHUIHUHQFH6HWWKHchannel numbers of the APs so thatthe internals between the channelsDUHPD[LPL]HGIRUH[DPSOH&K&K&K&KFRPSXWHU It is recommended unselecting the+LGHRSWLRQRIWKH$366,'6HUYLFHSetID)isanameusedtodistinguisha wireless LAN from other wireless/$1V It is recommended using Long3UHDPEOH3UHDPEOHLVDVLJQDOIRUGDWDWUDQVPLVVLRQV\QFKURQL]DWLRQAlthough some APs supportShort Preamble, there might be aFRPSDWLELOLW\SUREOHP %HFDXVH³)L[HG´FKDQQHOVHOHFWLRQis more stable then ‘Auto’ channelVHOHFWLRQ³)L[HG´FKDQQHOVHOHFWLRQLVUHFRPPHQGHG,WLVUHFRPPHQGHGQRWXVLQJWKH³%ORFN$Q\´DQG³$Q\&RQQHFWLRQ%ORFN´IXQFWLRQV$OWKRXJKthese functions block connectionsattheclientsidewhenthenetworkname is Any or Blank,itmaycauseaFRPSDWLELOLW\SUREOHP](https://usermanual.wiki/CyberTAN-Technology/MM230M.Host-user-manual-2-of-2/User-Guide-1075933-Page-69.png)

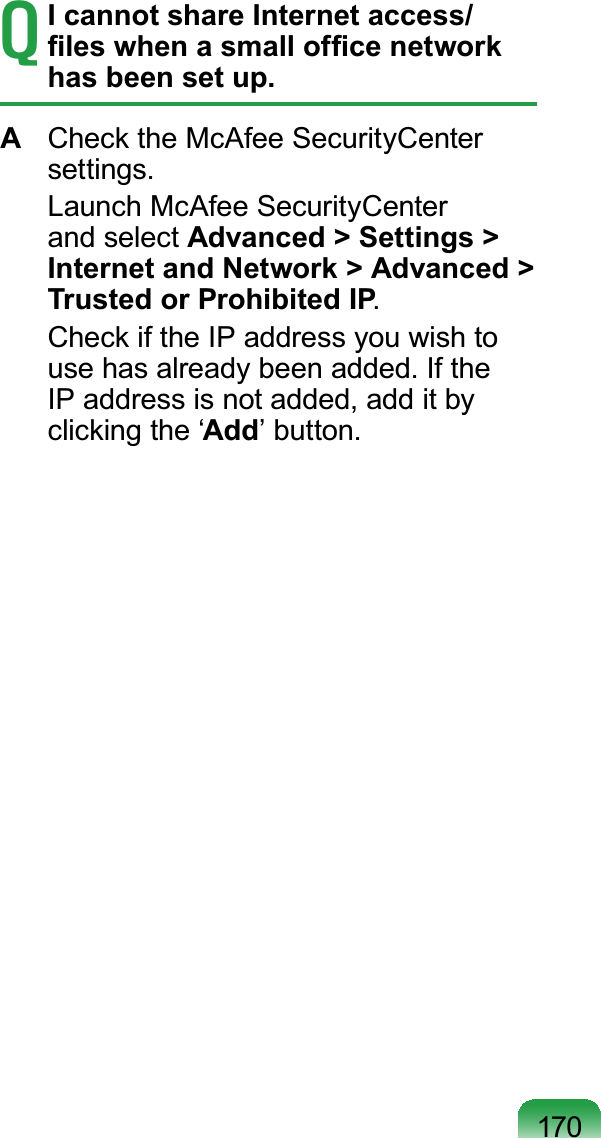
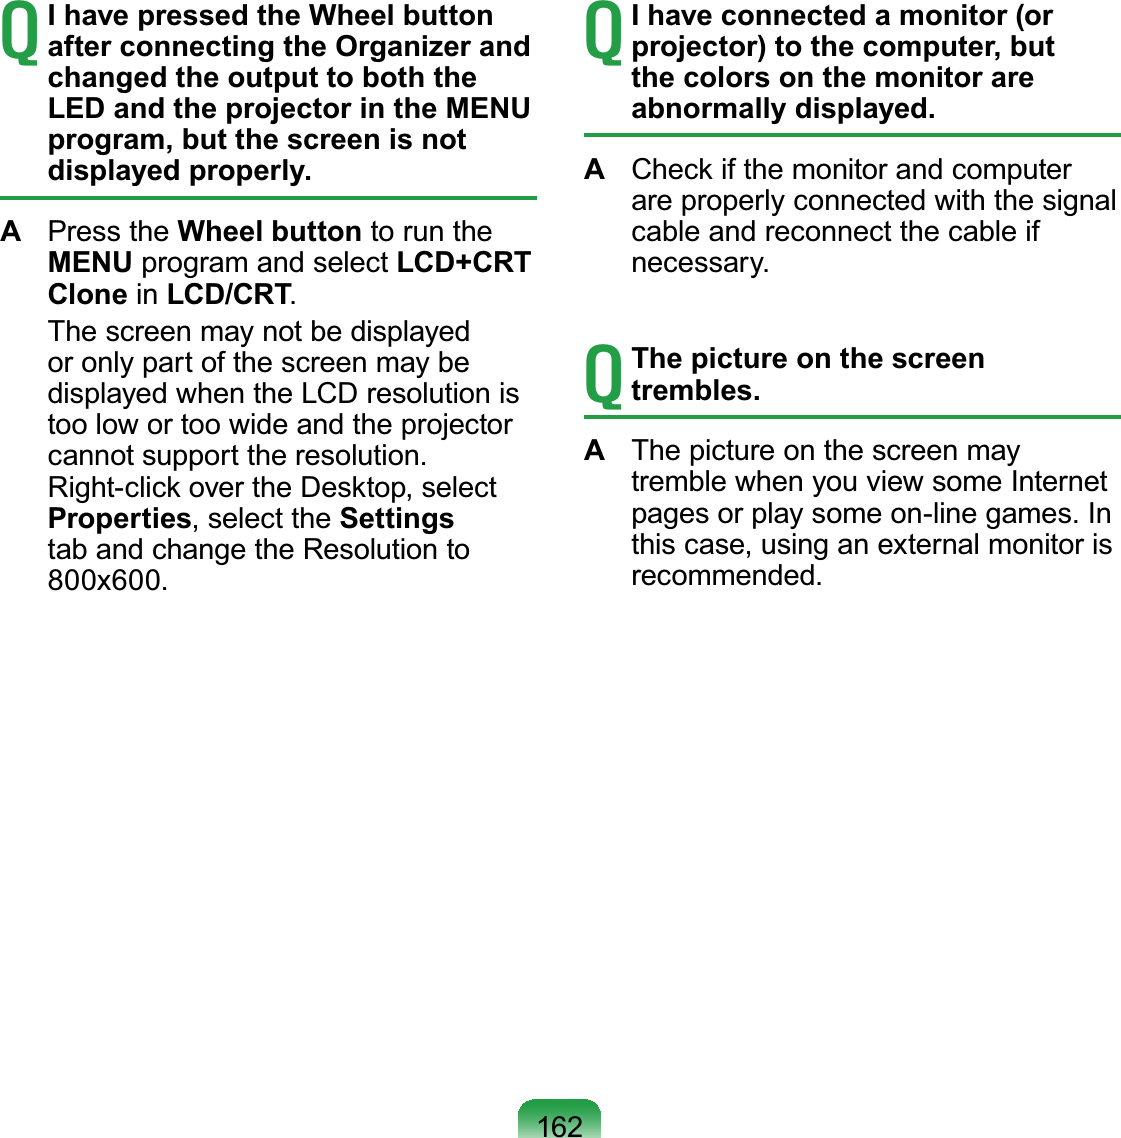
![175OtherTI cannot run any functions.A1 This may happen when the computerLVLQWKH+2/'VWDWXV:KHQSUHVVLQJabuttonorswitchintheHOLDstatus,the Charge LEDEOLQNVIRUDPRPHQWSlidetheHOLDswitchdownwardsDQGWU\DJDLQA2 Ifthecomputerisrunningonbatterypower, check the battery chargeVWDWXVTThe [Power Switch] does not work.A1 This may happen when the computerLVLQWKH+2/'VWDWXV:KHQSUHVVLQJabuttonorswitchintheHOLDstatus,the Charge LEDEOLQNVIRUDPRPHQWSlidetheHOLDswitchdownwardsDQGWU\DJDLQA2 Ifthecomputerisrunningonbatterypower, check the battery chargeVWDWXVTHow can I install the program? A You can additionally purchase andLQVWDOOWKHIROORZLQJGHYLFHVIRU803&(See the Installing Programs sectionRIWKHµ*HWWLQJ6WDUWHG*XLGH¶Ɣ([WHUQDO86%2''GHGLFDWHGWRUMPC or Compatible External USB ODDƔ([WHUQDO86%+''Ɣ86%'DWD&DEOHTI have turned the LCD screen off with a portable USB keyboard, but I cannot turn it on again. A WhenyouareusinganoptionalPortable USB Keyboard Dedicated to UMPC,ifyouhaveturnedtheBacklit OFF (ScreenOff)bypressingthe <Fn>+<F5> keys, press the<Fn>+<F5>keysonthekeyboardagain to turn the Backlit ON (Screen2Q](https://usermanual.wiki/CyberTAN-Technology/MM230M.Host-user-manual-2-of-2/User-Guide-1075933-Page-76.png)
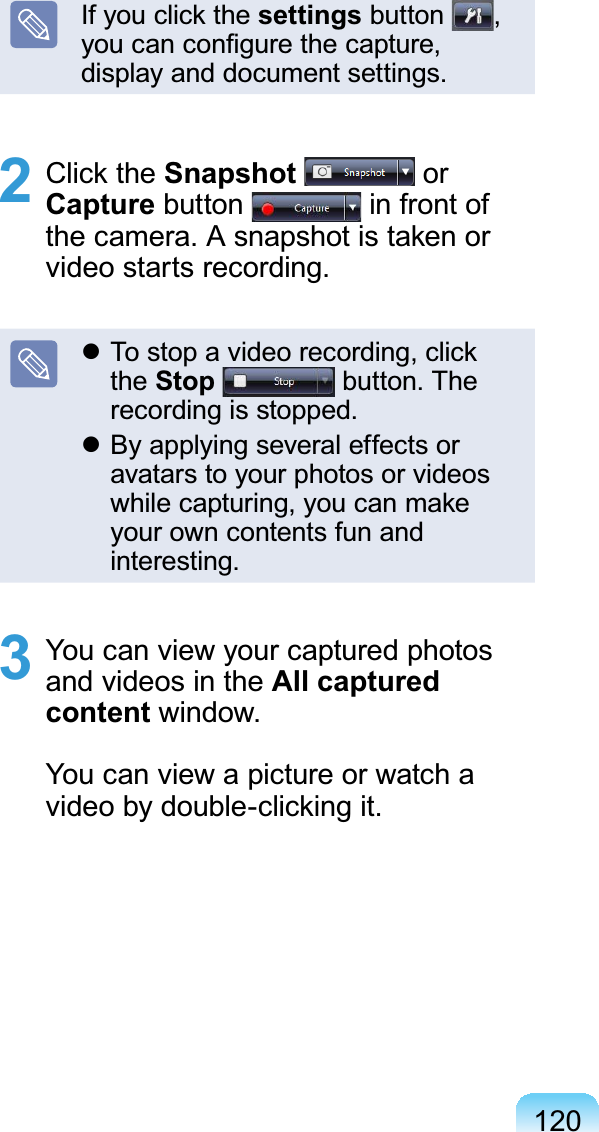
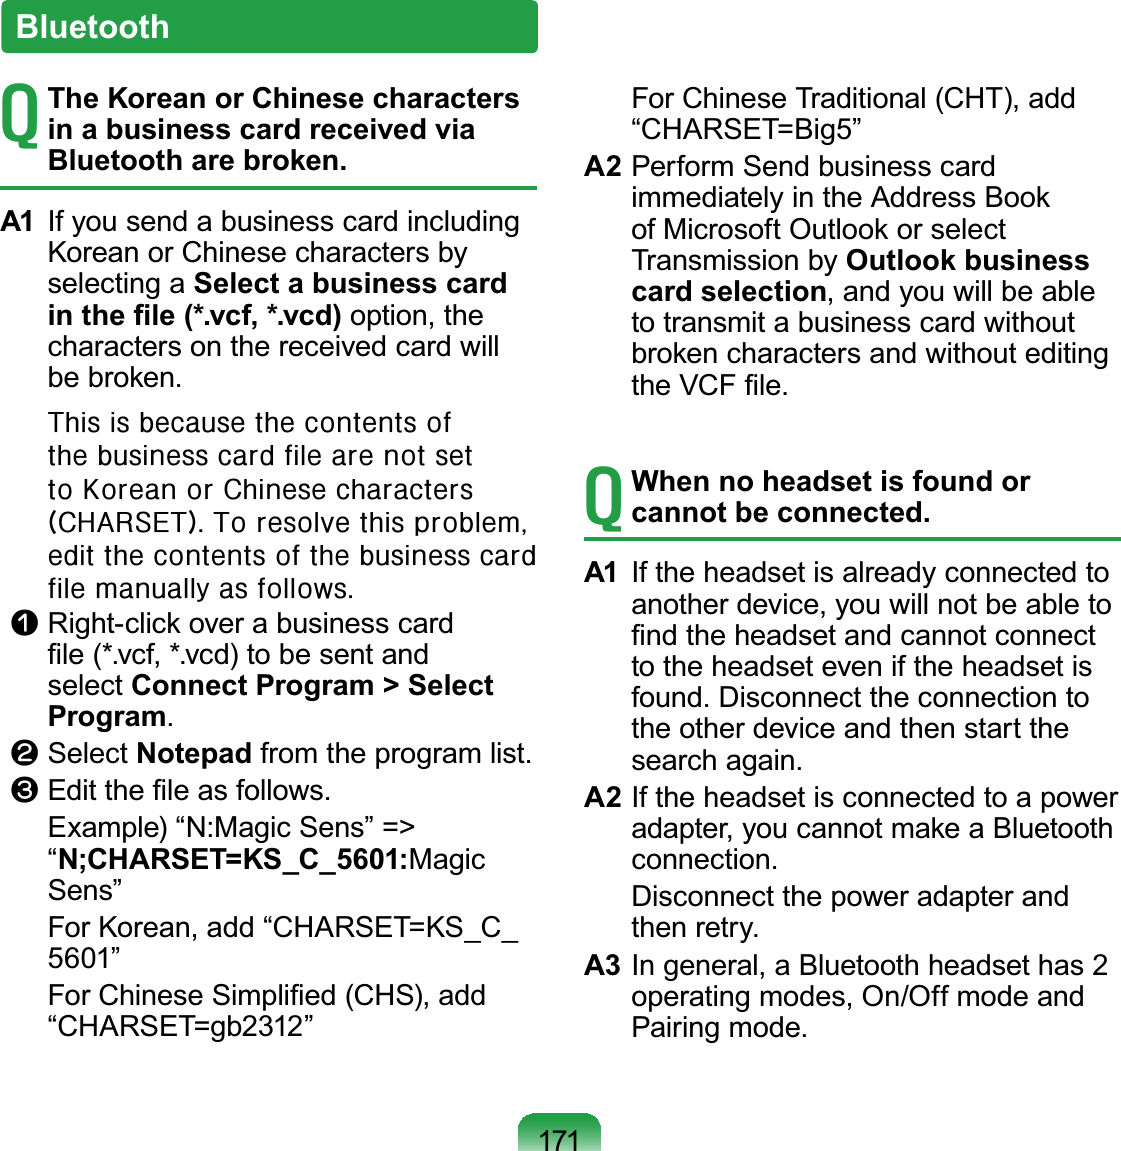
![1773URGXFW6SHFL¿FDWLRQV7KHV\VWHPVSHFL¿FDWLRQVPD\GLIIHUGHSHQGLQJRQWKHGHULYHGPRGHOV)RUGHWDLOHGV\VWHPVSHFL¿FDWLRQVUHIHUWRWKHSURGXFWFDWDORJCPU 9,$,VDLDK3URFHVVRU*+]Cache Memory 1,024 KBMain Memory (Optional) Memorytype:DDR2SODIMMMain Chipset VIA VX820Hard Disk Drive (Optional) 5mmH HDDGraphics VIAChrome9HC3IGPSound Chipset HD Audio, ALC272 CodecNetwork (Optional) :LUHOHVV/$1%* (Optional)%OXHWRRWK('5 (Optional)Multi Card Slot SD card/ SDHC/ MMCPorts (Optional) 86%[+HDGSKRQH-DFN'&LQ-DFNOrganizerPort(Optional)Dimensions [[PPLCD ´:69*$[Battery (Optional) Lithium-Ion smart battery: 4 CellsOperating Environment Temperature(storage):-5~40°C(operation):10~32°CHumidity(storage):5%~ 90%(operation): 20%~80%Operating Voltage 100 - 240VACFrequency 50/60HzOutput Power (Optional) BT:0.0025W ; WLAN:0.0627WOutput Voltage 9'&$:2SWLRQDO](https://usermanual.wiki/CyberTAN-Technology/MM230M.Host-user-manual-2-of-2/User-Guide-1075933-Page-78.png)
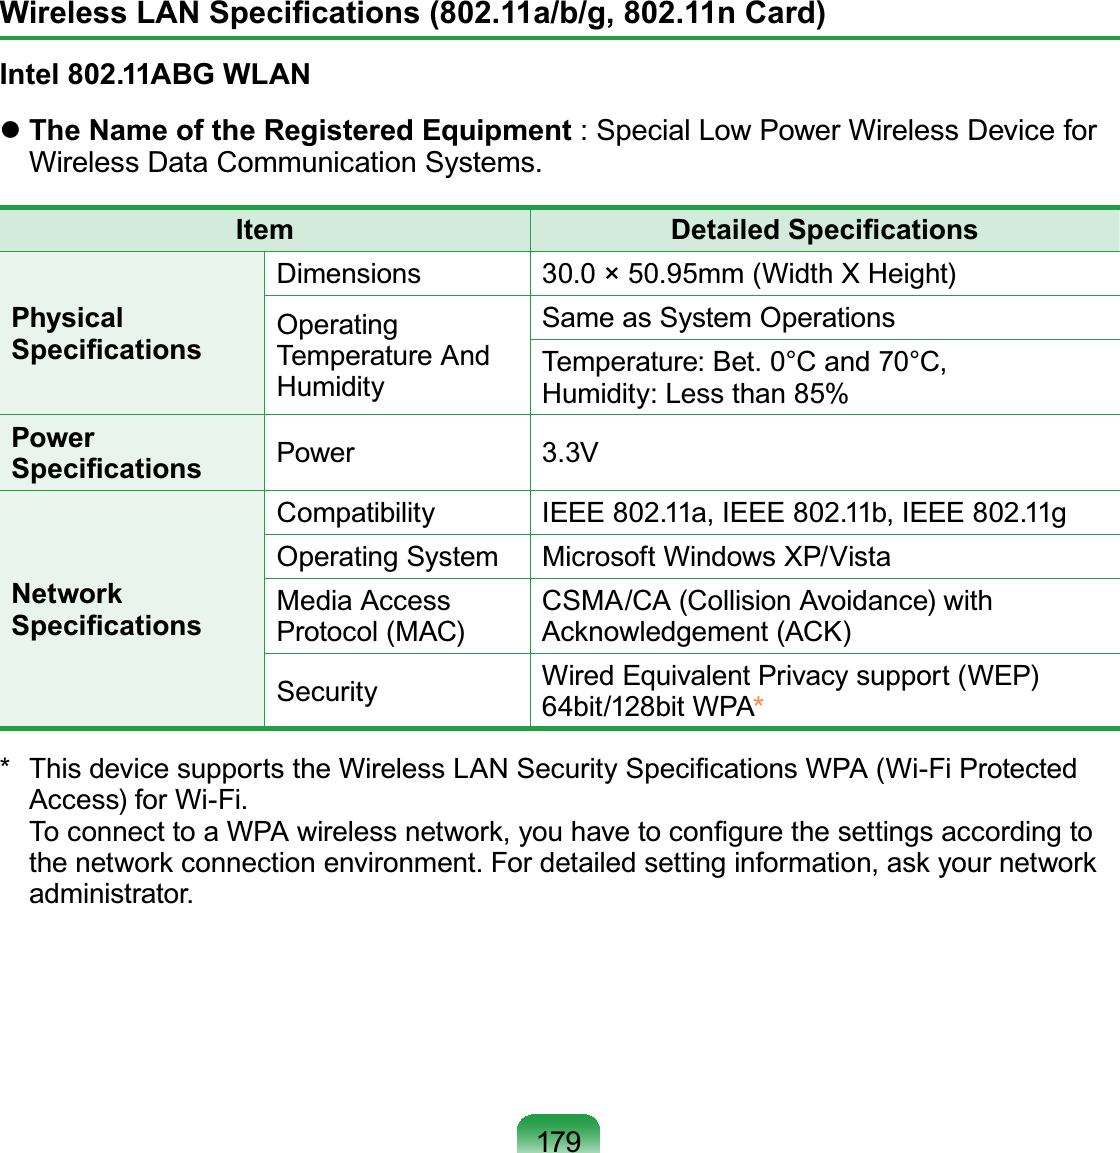
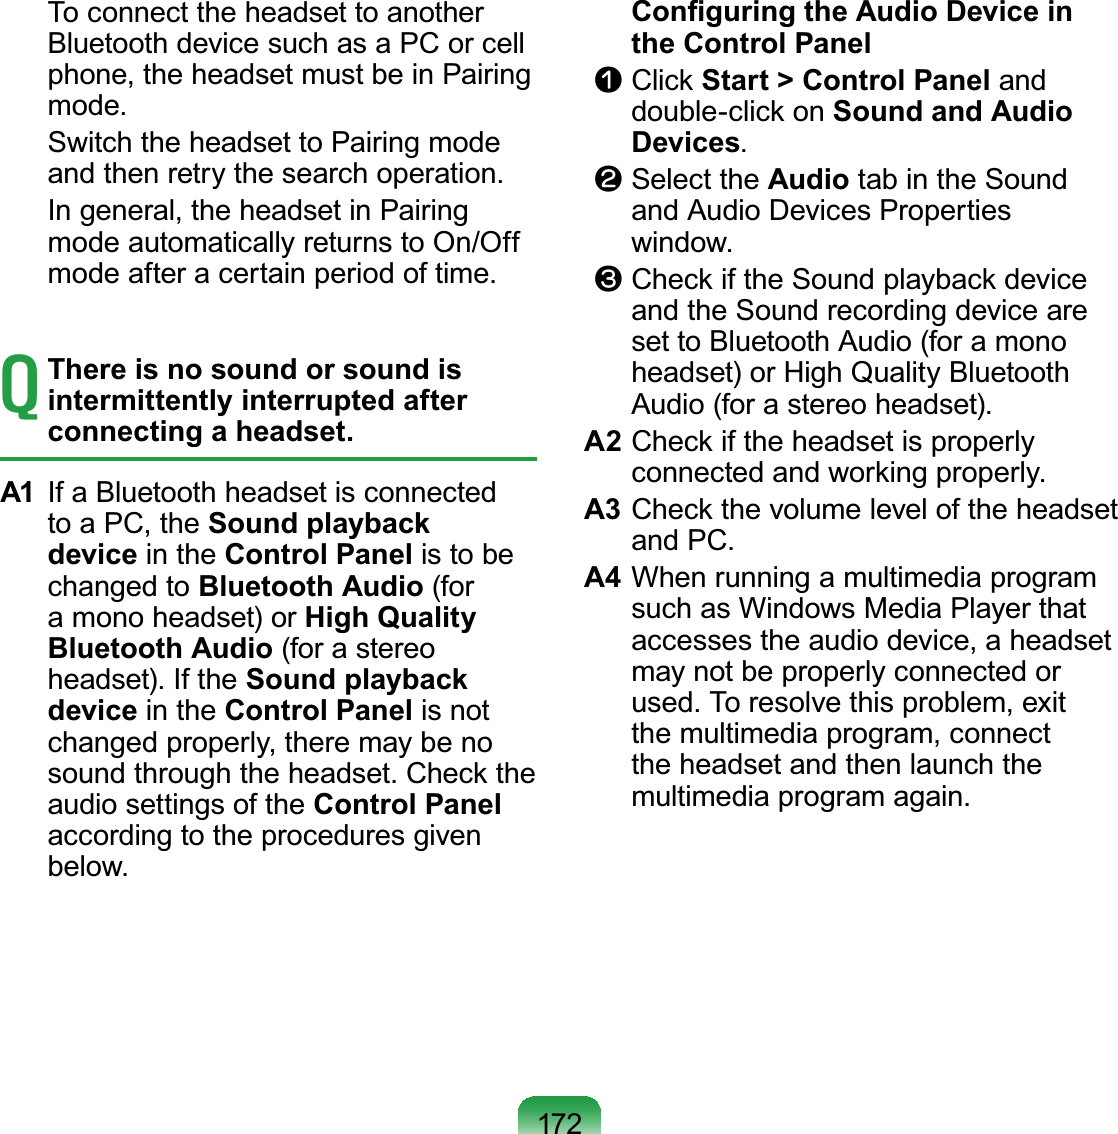
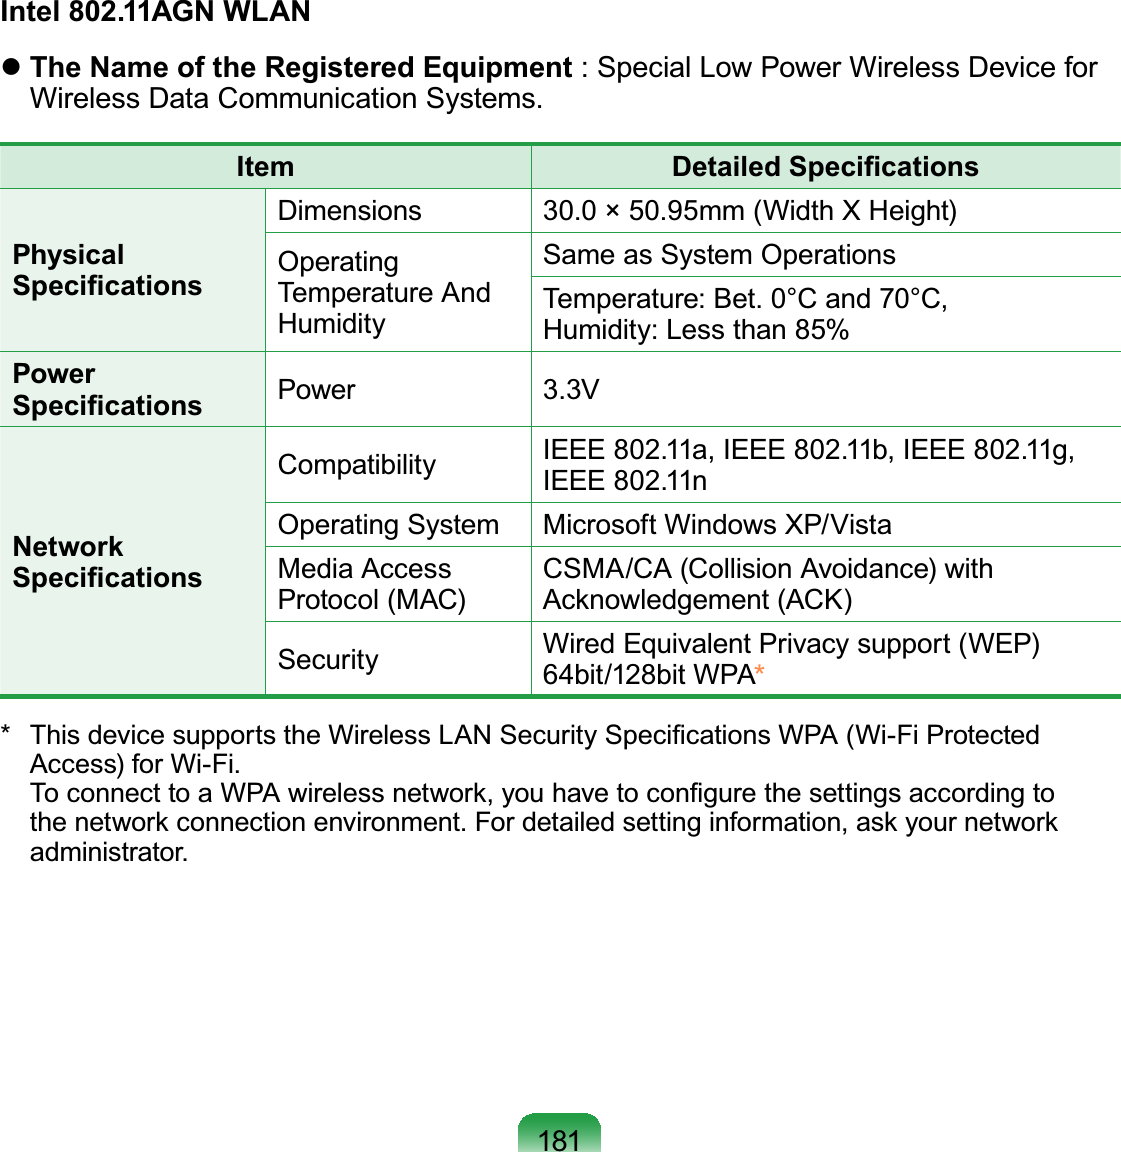
![180z5DGLR6SHFL¿FDWLRQVRF Band *+]*+]Supported Channels &KDQQHOVDOORZHGSHUFRXQWU\Device TransceiverStandard Output Power MAX 10mWModulation Scheme11amode:OFDM11bmode:DSSS11gmode:OFDMData Rate (Mbps)11a mode :MAX54Mbps11bmode:MAX11Mbps11g mode :MAX54MbpsAntenna Type Built-in Antenna 7KHGDWDUDWHPD\GLIIHUIURPWKHUHDOGDWDWUDQVPLVVLRQUDWHDPRGHLVRQO\VXSSRUWHGZKHQWKHGHYLFHLVFRQQHFWHGWRDQ,(((DGHYLFHHJ$FFHVV3RLQWVXSSRUWLQJ,(((DJPRGHLVRQO\VXSSRUWHGZKHQWKHGHYLFHLVFRQQHFWHGWRDQ,(((JGHYLFHHJ$FFHVV3RLQWVXSSRUWLQJ,(((J](https://usermanual.wiki/CyberTAN-Technology/MM230M.Host-user-manual-2-of-2/User-Guide-1075933-Page-81.png)
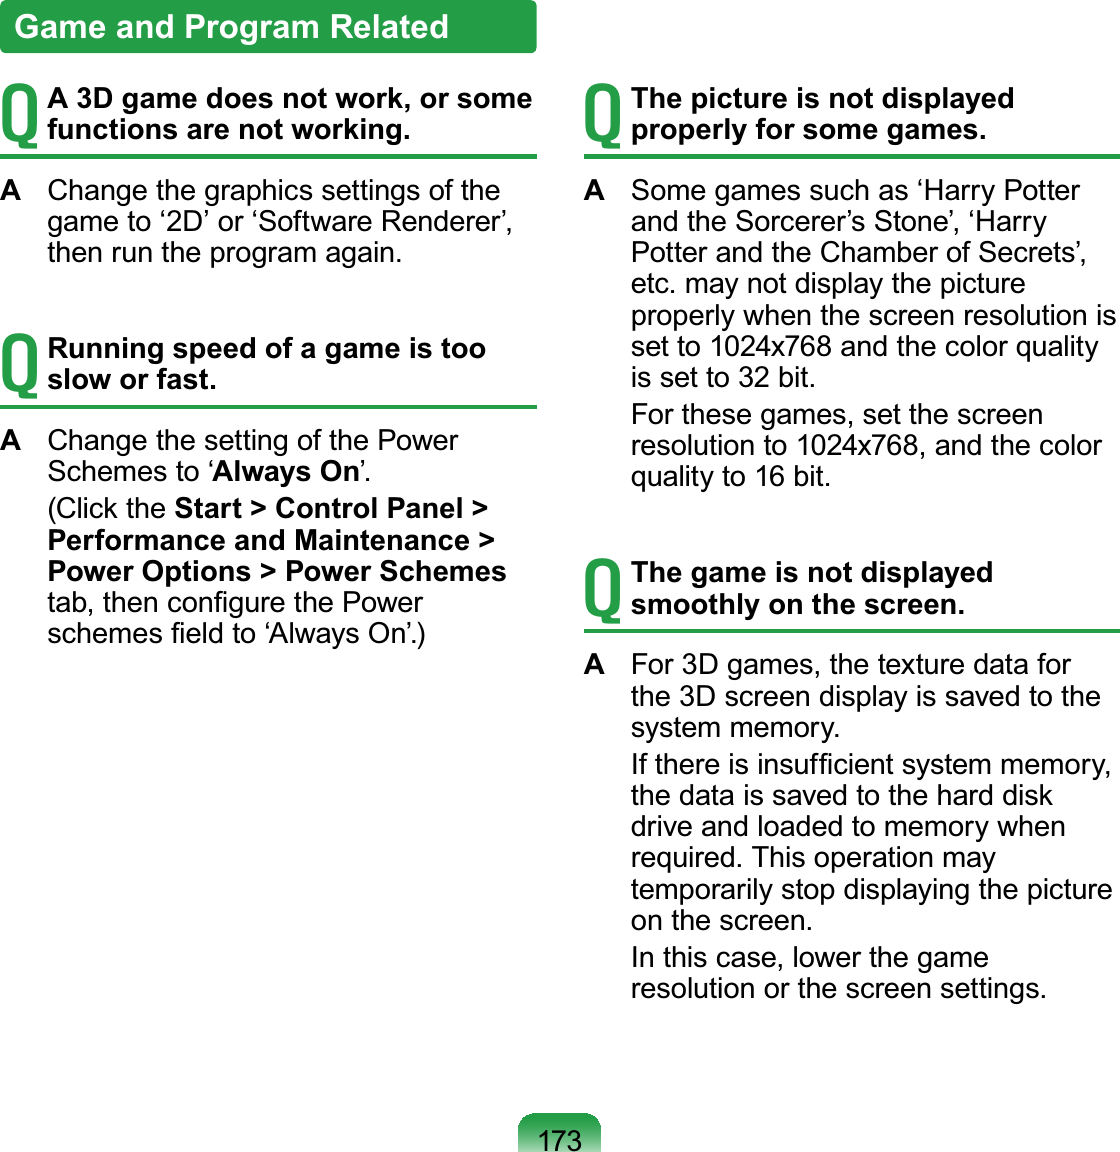
![182z5DGLR6SHFL¿FDWLRQVRF Band *+]*+]Supported Channels &KDQQHOVDOORZHGSHUFRXQWU\Device TransceiverStandard Output Power MAX 10mWModulation Scheme11amode:OFDM11bmode:DSSS11gmode:OFDM11nmode:MIMOData Rate (Mbps)11a mode :MAX54Mbps11bmode :MAX11Mbps11g mode :MAX54Mbps11n mode :MAX450Mbps,MAX300MbpsAntenna Type Built-in Antenna 7KHGDWDUDWHPD\GLIIHUIURPWKHUHDOGDWDWUDQVPLVVLRQUDWHDPRGHLVRQO\VXSSRUWHGZKHQWKHGHYLFHLVFRQQHFWHGWRDQ,(((DGHYLFHHJ$FFHVV3RLQWVXSSRUWLQJ,(((DJPRGHLVRQO\VXSSRUWHGZKHQWKHGHYLFHLVFRQQHFWHGWRDQ,(((JGHYLFHHJ$FFHVV3RLQWVXSSRUWLQJ,(((JQPRGHLVRQO\VXSSRUWHGZKHQLWLVFRQQHFWHGWRDQ,(((QGHYLFHHJ$FFHVV3RLQWVXSSRUWLQJ,(((Q](https://usermanual.wiki/CyberTAN-Technology/MM230M.Host-user-manual-2-of-2/User-Guide-1075933-Page-83.png)
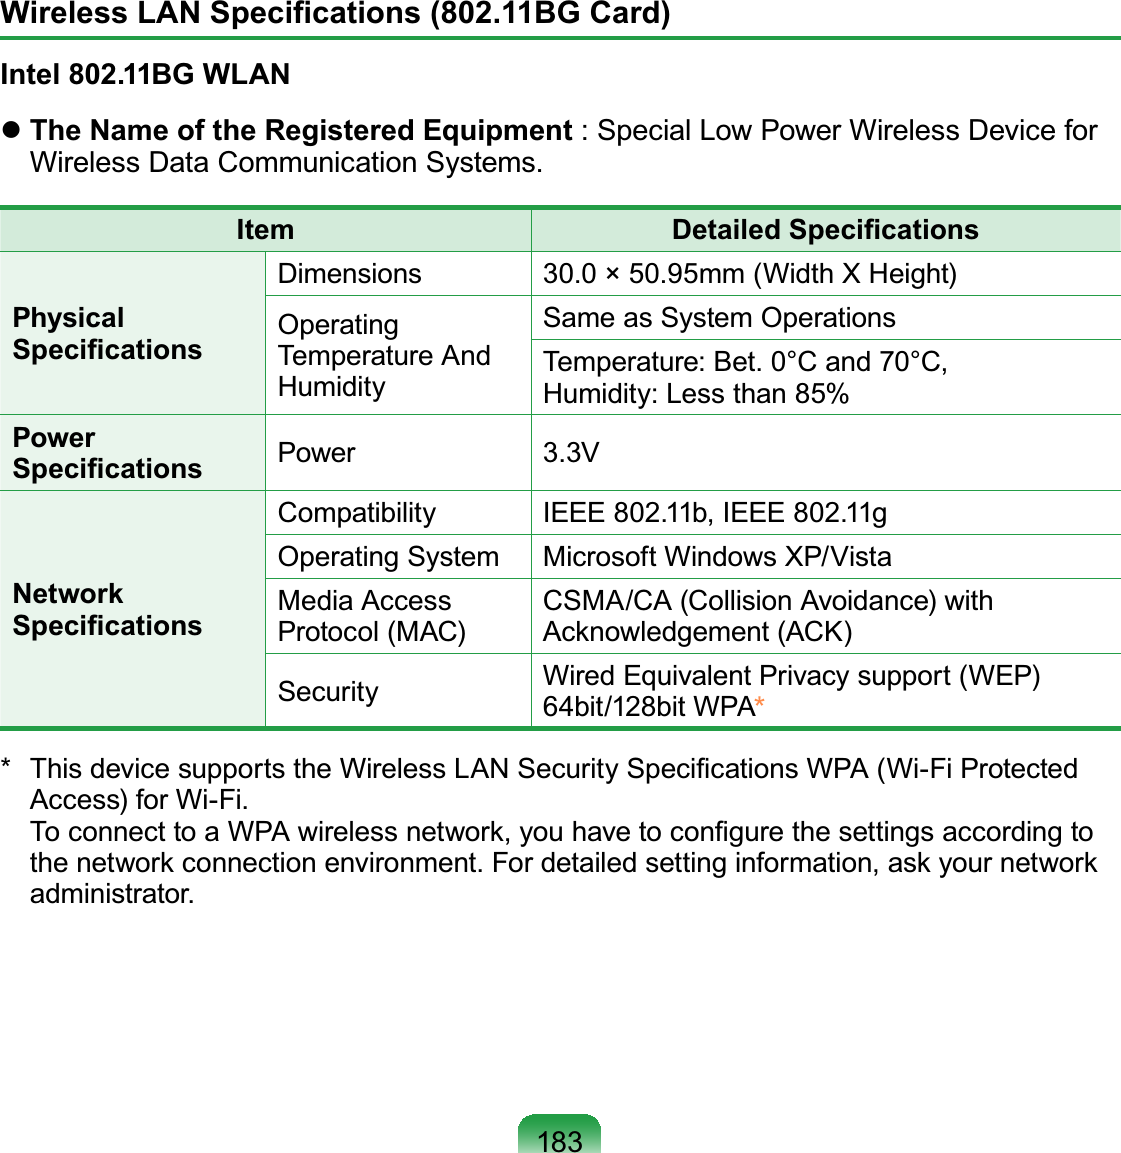
![184z5DGLR6SHFL¿FDWLRQVRF Band *+]Supported Channels &KDQQHOVDOORZHGSHUFRXQWU\Device TransceiverStandard Output Power MAX 10mWModulation Scheme 11bmode:DSSS11gmode:OFDMData Rate (Mbps)11bmode:MAX11Mbps11g mode :MAX54MbpsAntenna Type Built-in Antenna 7KHGDWDUDWHPD\GLIIHUIURPWKHUHDOGDWDWUDQVPLVVLRQUDWHJPRGHLVRQO\VXSSRUWHGZKHQWKHGHYLFHLVFRQQHFWHGWRDQ,(((JGHYLFHHJ$FFHVV3RLQWVXSSRUWLQJ,(((J](https://usermanual.wiki/CyberTAN-Technology/MM230M.Host-user-manual-2-of-2/User-Guide-1075933-Page-85.png)
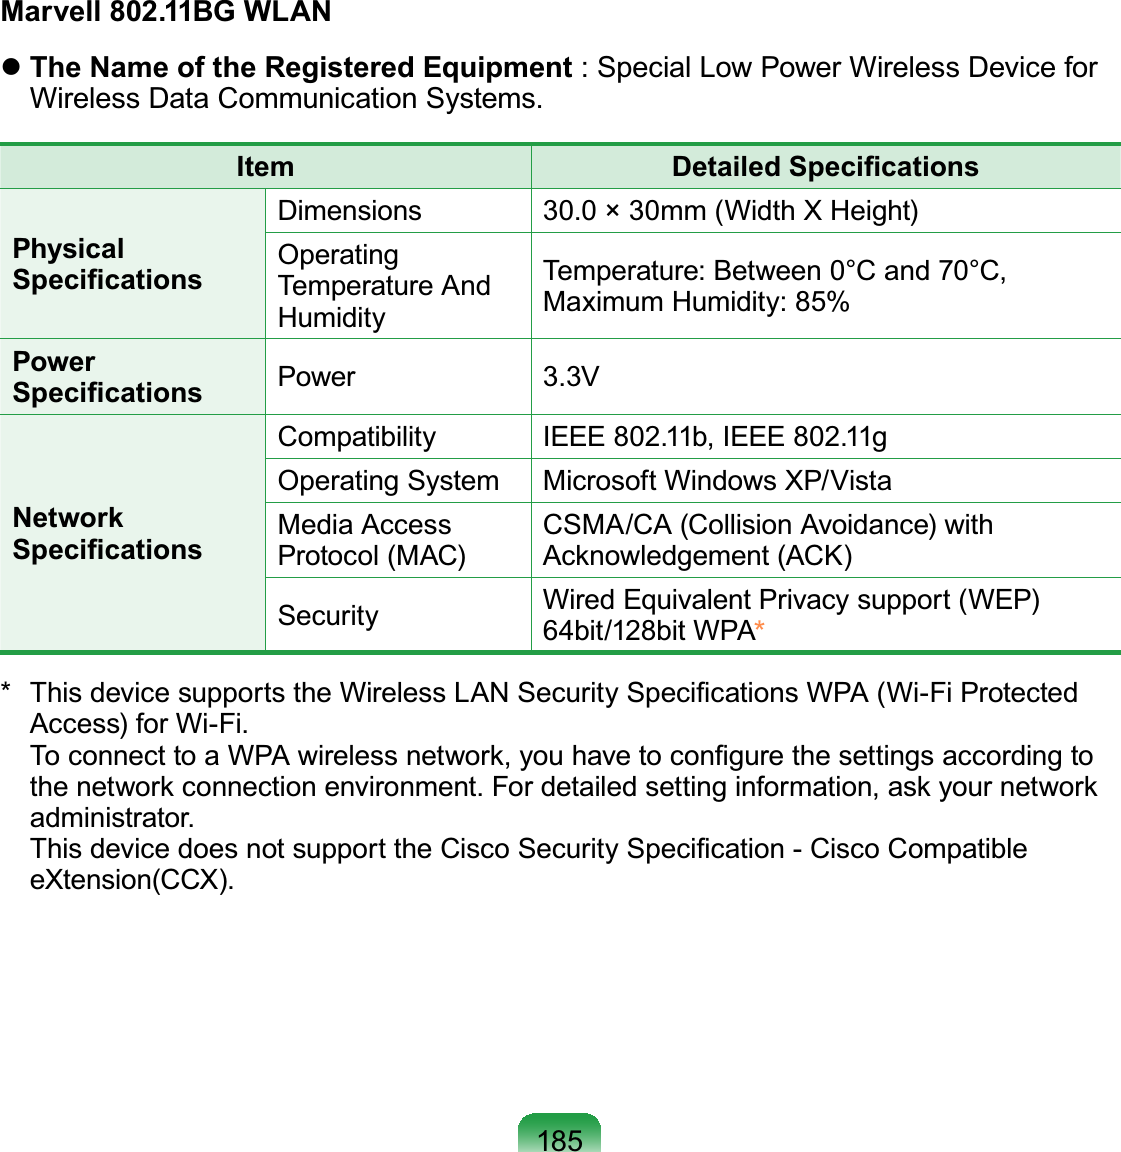
![186z5DGLR6SHFL¿FDWLRQVRF Band *+]Supported Channels &KDQQHOVDOORZHGSHUFRXQWU\Device TransceiverStandard Output Power MAX 10mWModulation Scheme 11bmode:DSSS11gmode:OFDMData Rate (Mbps)11bmode:MAX11Mbps11g mode :MAX54MbpsAntenna Type Built-in Antenna 7KHGDWDUDWHPD\GLIIHUIURPWKHUHDOGDWDWUDQVPLVVLRQUDWHJPRGHLVVXSSRUWHGRQO\ZKHQ\RXDUHFRQQHFWHGWRDQ,(((JGHYLFHHJ$Q$FFHVV3RLQWVXSSRUWLQJ,(((J](https://usermanual.wiki/CyberTAN-Technology/MM230M.Host-user-manual-2-of-2/User-Guide-1075933-Page-87.png)
![189DVD (Digital Versatile Disk)DVDwasdevelopedtoreplaceCDFRPSDFWGLVN$OWKRXJKWKHVKDSHDQGsize of the disc are the same as that ofaCD,thecapacityofaDVDisatleast*%ZKLOHWKHFDSDFLW\RID&'LV0%'9'YLGHRLVGLJLWDOXQOLNH9+6(analog) video and supports MPEG2FRPSUHVVLRQDQGGLJLWDODXGLR7RSOD\D'9'D'9'GULYHLVUHTXLUHGFirewallA security system used to protect aninternalnetworkorintranetfromexternalnetworks through an authenticationSURFHGXUHHibernation ModeApowermodethatsavesalldatainmemorytotheharddiskandturnsthe&38DQGKDUGGLVNRII:KHQFDQFHOLQJHibernation Mode, all applicationprograms that were running are restoredWRWKHLUODVWVWDWHIconThis refers to a small image thatUHSUHVHQWVD¿OHWKDWXVHUVFDQXVHLAN (LocalAreaNetwork)A communications network connectingcomputers,printersandotherdeviceswithin a local area such as within aEXLOGLQJ$/$1HQDEOHVDOOFRQQHFWHGdevicestointeractwithotherdevicesRQWKHQHWZRUN7KHFXUUHQW/$1XVHVthe Ethernet media access controlPHWKRGGHYHORSHGLQWKHHDUO\VToconnecttoanEthernet,anetworkcardcalledaLANcard,EthernetcardRUQHWZRUNLQWHUIDFHFDUGLVUHTXLUHGTo exchange data between computers,aprotocolisrequiredbesidestheKDUGZDUHHTXLSPHQW:LQGRZV9LVWDXVHV7&3,3DVWKHGHIDXOWSURWRFROLCD (Liquid Crystal Display)TherearePassiveMatrixandActive0DWUL[/&'W\SHV7KLVFRPSXWHUXVHVtheActiveMatrixtypeLCDcalledaTFT/&'6LQFHDQ/&'LVLPSOHPHQWHGE\transistorsinsteadofacathode-raytubeXQOLNHD&57LWVVL]HFDQEHVOLP$QGbecauseitdoesnotblink,itreduceseyeVWUDLQ](https://usermanual.wiki/CyberTAN-Technology/MM230M.Host-user-manual-2-of-2/User-Guide-1075933-Page-90.png)
![193Contact SAMSUNG WORLD WIDE[U.S.A. / U.K.] Contact SAMSUNG WORLD WIDEIfyouhaveanycommentsorquestionsregardingaSamsungproducts,contactthe6$0681*FXVWRPHUFDUHFHQWHUCustomer Care Center TEL Web SiteU.S.A. 1-800-SAMSUNG (726-7864) ZZZVDPVXQJFRPXVU.K. 0845-SAMSUNG (726-7864) ZZZVDPVXQJFRPXNIreland 0818 717100 ZZZVDPVXQJFRPLH[CANADA] Contact SAMSUNG WORLD WIDE / Comment contacter Samsung dans le mondeIfyouhaveanycommentsorquestionsregardingaSamsungproducts,contactthe6$0681*FXVWRPHUFDUHFHQWHUSi vous avez des suggestions ou des questions concernant les produits Samsung, veuillezFRQWDFWHUOH6HUYLFH&RQVRPPDWHXUV6DPVXQJCustomer Care Center TEL Web SiteCANADA 1-800-SAMSUNG (726-7864) ZZZVDPVXQJFD[GERMANY] Kontakt zu SamsungFalls Sie Fragen oder Anregungen zu Samsung-Produkten haben, wenden Sie sich bitteDQGHQ6DPVXQJ.XQGHQGLHQVWCustomer Care Center TEL Web SiteGERMANY 01805-SAMSUNG (726-7864)¼0LQZZZVDPVXQJGH[FRANCE] Comment contacter Samsung dans le mondeSi vous avez des suggestions ou des questions concernant les produits Samsung, veuillezFRQWDFWHUOH6HUYLFH&RQVRPPDWHXUV6DPVXQJCustomer Care Center TEL Web SiteFRANCE 3260 SAMSUNG (726-7864)¼0LQZZZVDPVXQJFRPIU5HY](https://usermanual.wiki/CyberTAN-Technology/MM230M.Host-user-manual-2-of-2/User-Guide-1075933-Page-94.png)
![194[SPAIN] Contacte con SAMSUNG WORLD WIDESitienealgunapreguntaocomentarioreferenteanuestrosproductos,porfavorcontacteFRQQXHVWUR6HUYLFLRGH$WHQFLRQDO&OLHQWHCustomer Care Center TEL Web SiteSPAIN 902101130 ZZZVDPVXQJFRPHV[ITALY] Contatta SAMSUNG6HKDLFRPPHQWLRULFKLHVWHVXLSURGRWWL6DPVXQJFRQWDWWDLOQRVWUR6HUYL]LR&OLHQWLCustomer Care Center TEL Web SiteITALY 800-SAMSUNG (726-7864) ZZZVDPVXQJFRPLW>32/$1'@.RQWDNW]¿UPą6$0681*:VSUDZLHMDNLFKNROZLHNS\WDĔF]\ZąWSOLZRĞFLGRW\F]ąF\FKSURGXNWyZ6$0681*SURVLP\RNRQWDNW]WHOHIRQLF]Q\P&HQWUXP2EVáXJL.OLHQWDCustomer Care Center TEL Web SitePOLAND 0801-1-SAMSUNG (726-78)022 607 93 33ZZZVDPVXQJFRPSO[NETHERLANDS / BELGIUM] Contact opnemen met Samsung klantenservice / Comment contacter Samsung dans le mondeAlsuvragenofopmerkingenheeftmetbetrekkingtoteenSamsung-product,kuntucontactopnemenmetdeSamsungklantenservice:Si vous avez des suggestions ou des questions concernant les produits Samsung, veuillezFRQWDFWHUOH6HUYLFH&RQVRPPDWHXUV6DPVXQJCustomer Care Center TEL Web SiteNETHERLANDS 0900-SAMSUNG (726-7864)¼0LQZZZVDPVXQJFRPQOBELGIUM 02 201 24 18 ZZZVDPVXQJFRPEH](https://usermanual.wiki/CyberTAN-Technology/MM230M.Host-user-manual-2-of-2/User-Guide-1075933-Page-95.png)
![195[SWEDEN] Contact SAMSUNG WORLD WIDEOm Du har några synpunkter eller frågor angående en Samsungprodukt, kontakta6$0681*6XSSRUWCustomer Care Center TEL Web SiteSWEDEN 075-SAMSUNG (726-7864) ZZZVDPVXQJFRPVH[DENMARK] Contact SAMSUNG WORLD WIDEHvis du har nogen kommentare eller spørgsmål til et Samsung produkt, kontakt6$0681*6XSSRUW&HQWHUCustomer Care Center TEL Web SiteDENMARK 8-SAMSUNG (726-7864) ZZZVDPVXQJFRPGN[FINLAND] Contact SAMSUNG WORLD WIDE-RVVLQXOODRQNRPPHQWWHMDWDLN\V\P\NVLl6DPVXQJWXRWWHLVLLQOLLWW\HQRWD\KWH\WWl6$0681*DVLDNDVSDOYHOXXQCustomer Care Center TEL Web SiteFINLAND 30-6227 515 ZZZVDPVXQJFRP¿[RUSSIA / UKRAINE] Customer Care Center TEL Web SiteRUSSIA 8-800-555-55-55 ZZZVDPVXQJUXUKRAINE 8-800-502-0000 ZZZVDPVXQJXD[CHINA] Customer Care Center TEL Web SiteCHINA 400-810-5858 ZZZVDPVXQJFRPFQ](https://usermanual.wiki/CyberTAN-Technology/MM230M.Host-user-manual-2-of-2/User-Guide-1075933-Page-96.png)
![196[HONG KONG] Contact SAMSUNG WORLD WIDEIfyouhaveanycommentsorquestionsregardingaSamsungproducts,contactthe6$0681*FXVWRPHUFDUHFHQWHUCustomer Care Center TEL Web SiteHONG KONG 3698-4698 ZZZVDPVXQJFRPKN[SINGAPORE] Contact SAMSUNG WORLD WIDEIfyouhaveanycommentsorquestionsregardingaSamsungproducts,contactthe6$0681*FXVWRPHUFDUHFHQWHUCustomer Care Center TEL Web SiteSINGAPORE 1-800-SAMSUNG (726-7864) ZZZVDPVXQJFRPVJ[INDIA] Contact SAMSUNG WORLD WIDEIfyouhaveanycommentsorquestionsregardingaSamsungproducts,contactthe6$0681*FXVWRPHUFDUHFHQWHUCustomer Care Center TEL Web SiteINDIA 3030 82821800 1100111-800-3000-8282ZZZVDPVXQJFRPLQ[TURKEY] SAMSUNG Turkiye’ye Ulasin6DPVXQJUQOHUL\OHLOJLOLWPVRUXYH\RUXPODUÕQÕ]LoLQ6DPVXQJdD÷UÕ0HUNH]LLOHWHPDVDJHoHELOLUVLQL]Customer Care Center TEL Web SiteTURKEY 444 77 11 ZZZVDPVXQJFRPWU[U.A.E] Contact SAMSUNG WORLD WIDEIfyouhaveanycommentsorquestionsregardingaSamsungproducts,contactthe6$0681*FXVWRPHUFDUHFHQWHUCustomer Care Center TEL Web SiteU.A.E 800-SAMSUNG (726-7864) ZZZVDPVXQJFRPDH](https://usermanual.wiki/CyberTAN-Technology/MM230M.Host-user-manual-2-of-2/User-Guide-1075933-Page-97.png)
![197[SOUTH AFRICA] Contact SAMSUNG WORLD WIDEIfyouhaveanycommentsorquestionsregardingaSamsungproducts,contactthe6$0681*FXVWRPHUFDUHFHQWHUCustomer Care Center TEL Web SiteSOUTH AFRICA 0860-SAMSUNG (726-7864) ZZZVDPVXQJFRP]DNK1_Q](https://usermanual.wiki/CyberTAN-Technology/MM230M.Host-user-manual-2-of-2/User-Guide-1075933-Page-98.png)