Cybiotronics 383001 2.4GHz FHSS Cordless Phone w/ CID User Manual 383 VZ for FCC
Cybiotronics Limited 2.4GHz FHSS Cordless Phone w/ CID 383 VZ for FCC
UserManual.wiki
>
Cybiotronics
>
383001 User Manual
User Manual
Navigation menu
Upload a User Manual
Namespaces
Wiki Guide
HTML
PDF
Info
Views
User Manual
Discussion / Help
Navigation

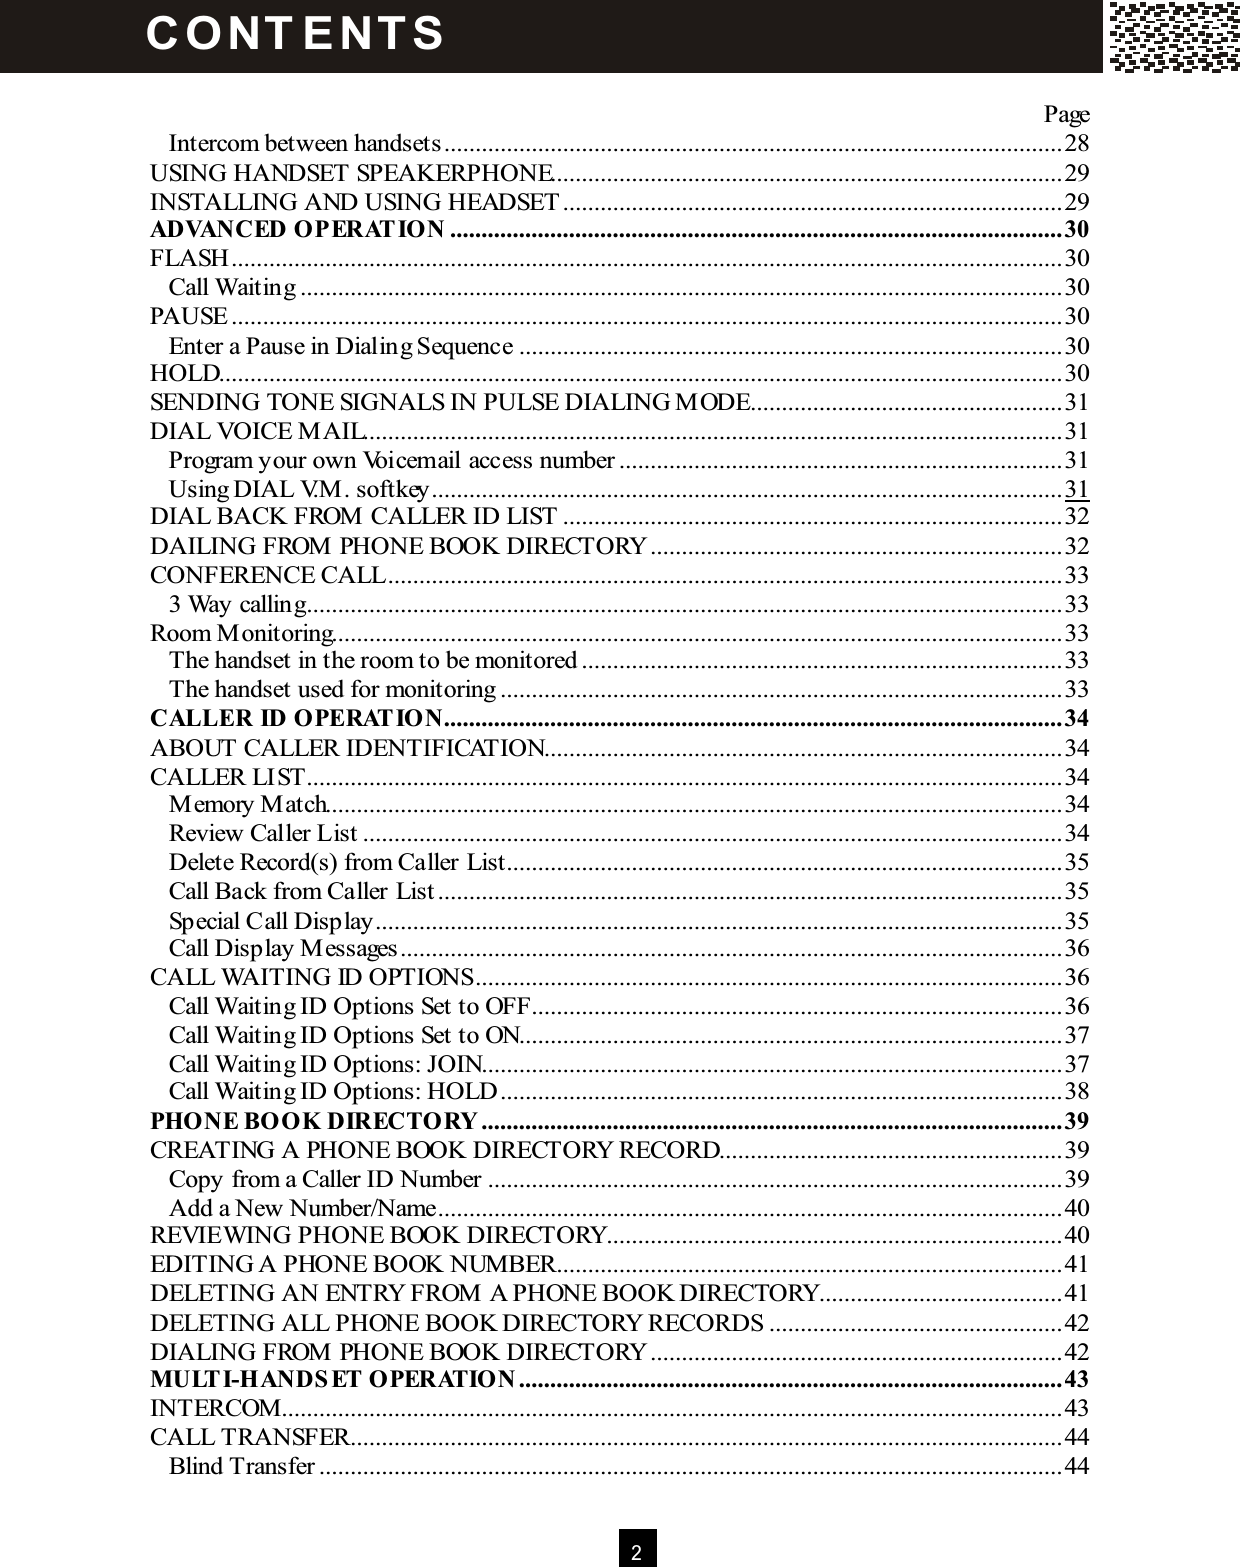
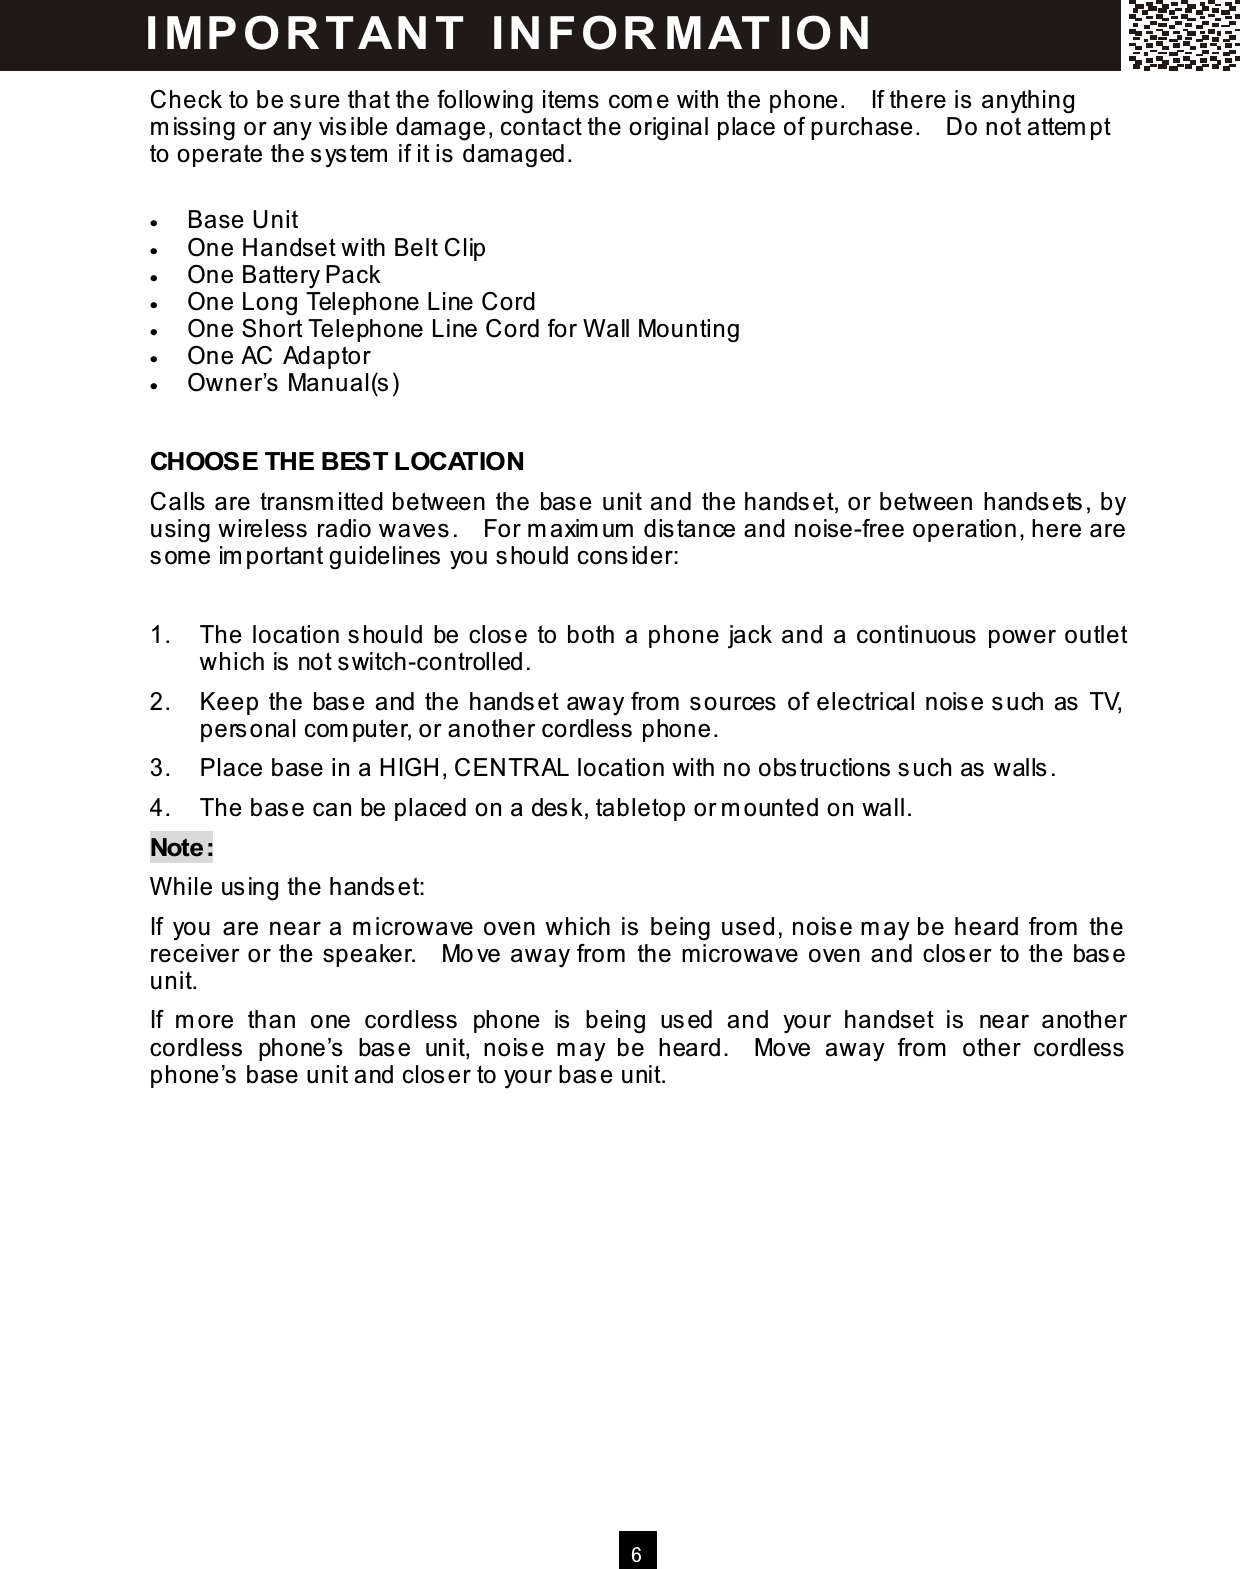
![7 LOCATION OF CONTROLS Handset Line Indicator (a) Flashes rapidly when ringing. (b) Flashes regularly if you have m essage in your voicem ail or new Caller ID in Call Log. (c) Lights when the handset is in use. Talk / OFF Key Allows you to access the telephone line or to release the line. Speakerphone Indicator Lights when s peakerphone is in us e. Speakerphone Key [Spk.] (a) Press to activate / deactivate the handsfree s peakerphone during a call (b) Dial the num ber on the dis play with speakerphone m ode. You are still required to press [OFF] to end your call. Mute / Dial 7 Key (a) W hile reviewing the Call ID Record, press [Dial 7] to Call Back in 7-digit form at. (b) W hile on a call, press [Mute] to m ute the m icrophone for privacy. Redial / Pause / Dial 10 Key (a) W hile reviewing the Call ID Record, press [Dial 10] to Call Back in 10-digit form at. (b) W hile off-hook, press [Redial] to recall and dial the last phone num ber dialed. (c) W hile on-hook, press [Redial] to access the Redial Lis t. Using [▼ ] or [▲ ] to select the desired num ber and press [Talk] or [O.K.] softkey to dial it. (d) Pressing the key during Pre-dial or Phone book directory number entry will enter a 3-second pause into a dialing sequence, indicated by “P”. I MP O R TAN T IN FO R MAT IO N](https://usermanual.wiki/Cybiotronics/383001/User-Guide-562480-Page-8.png)
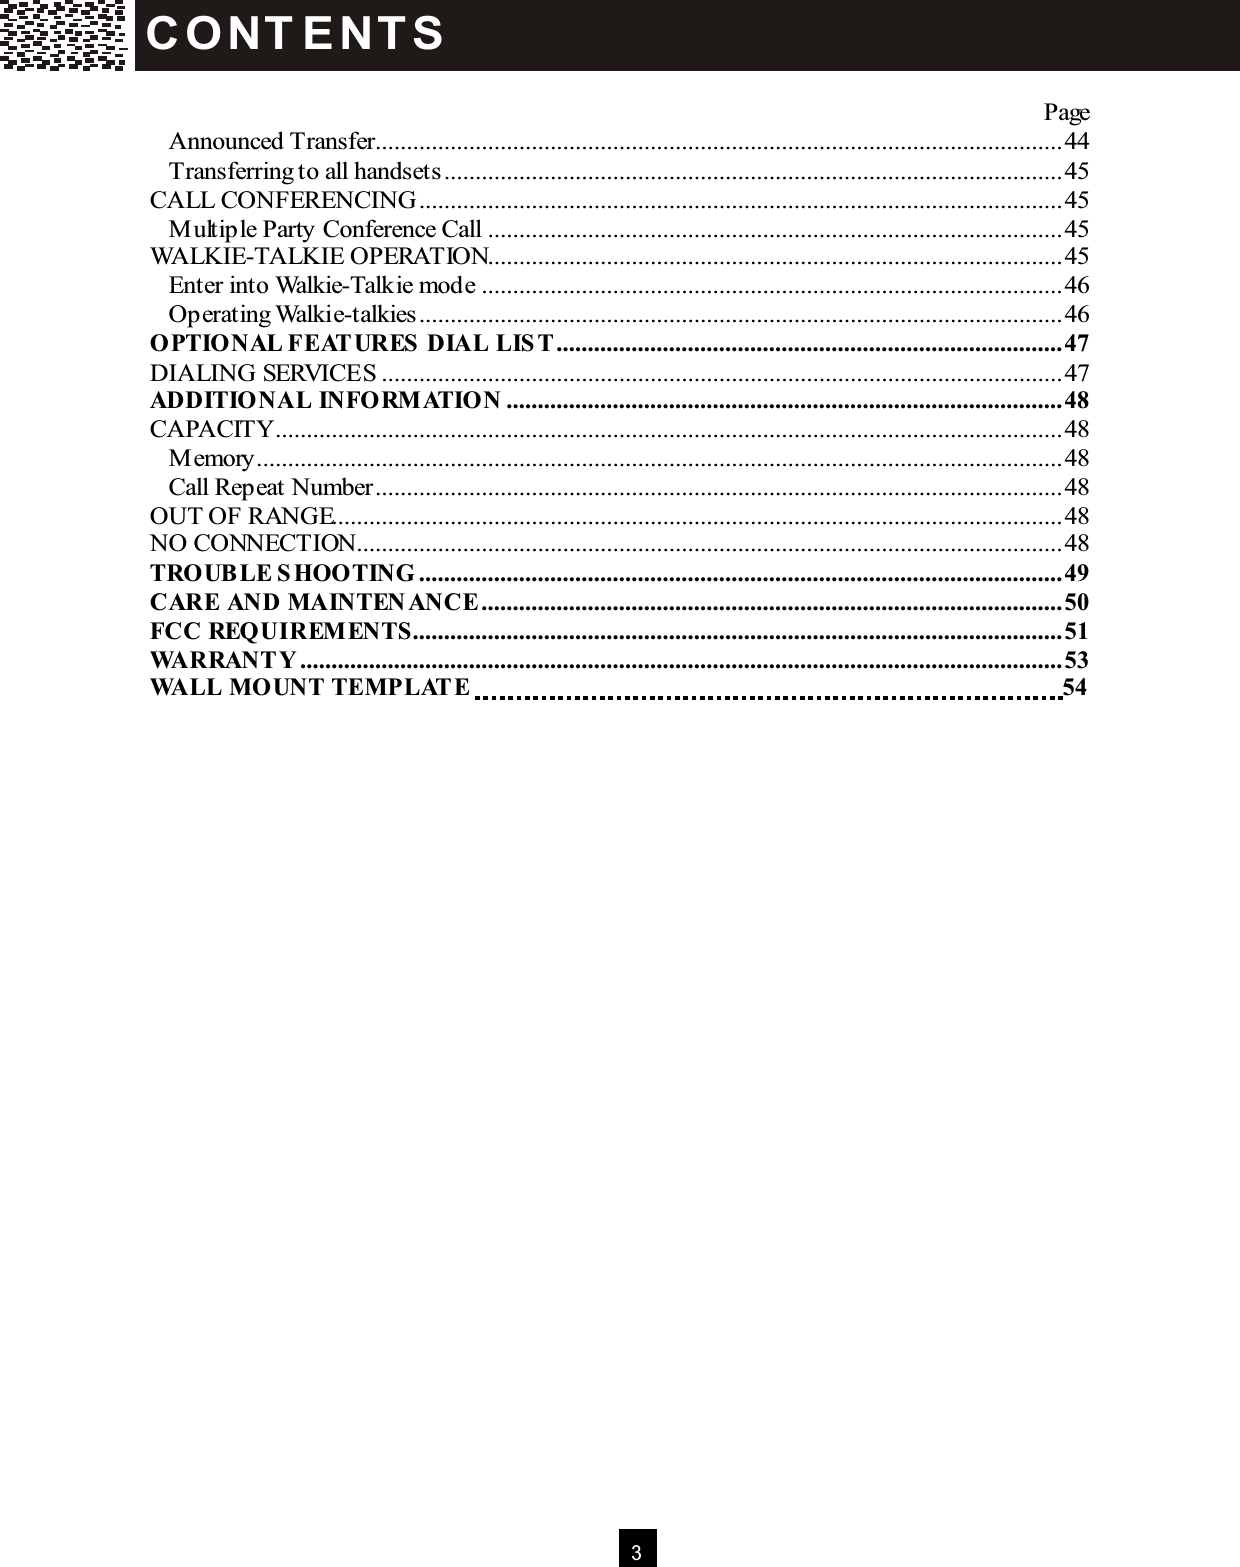
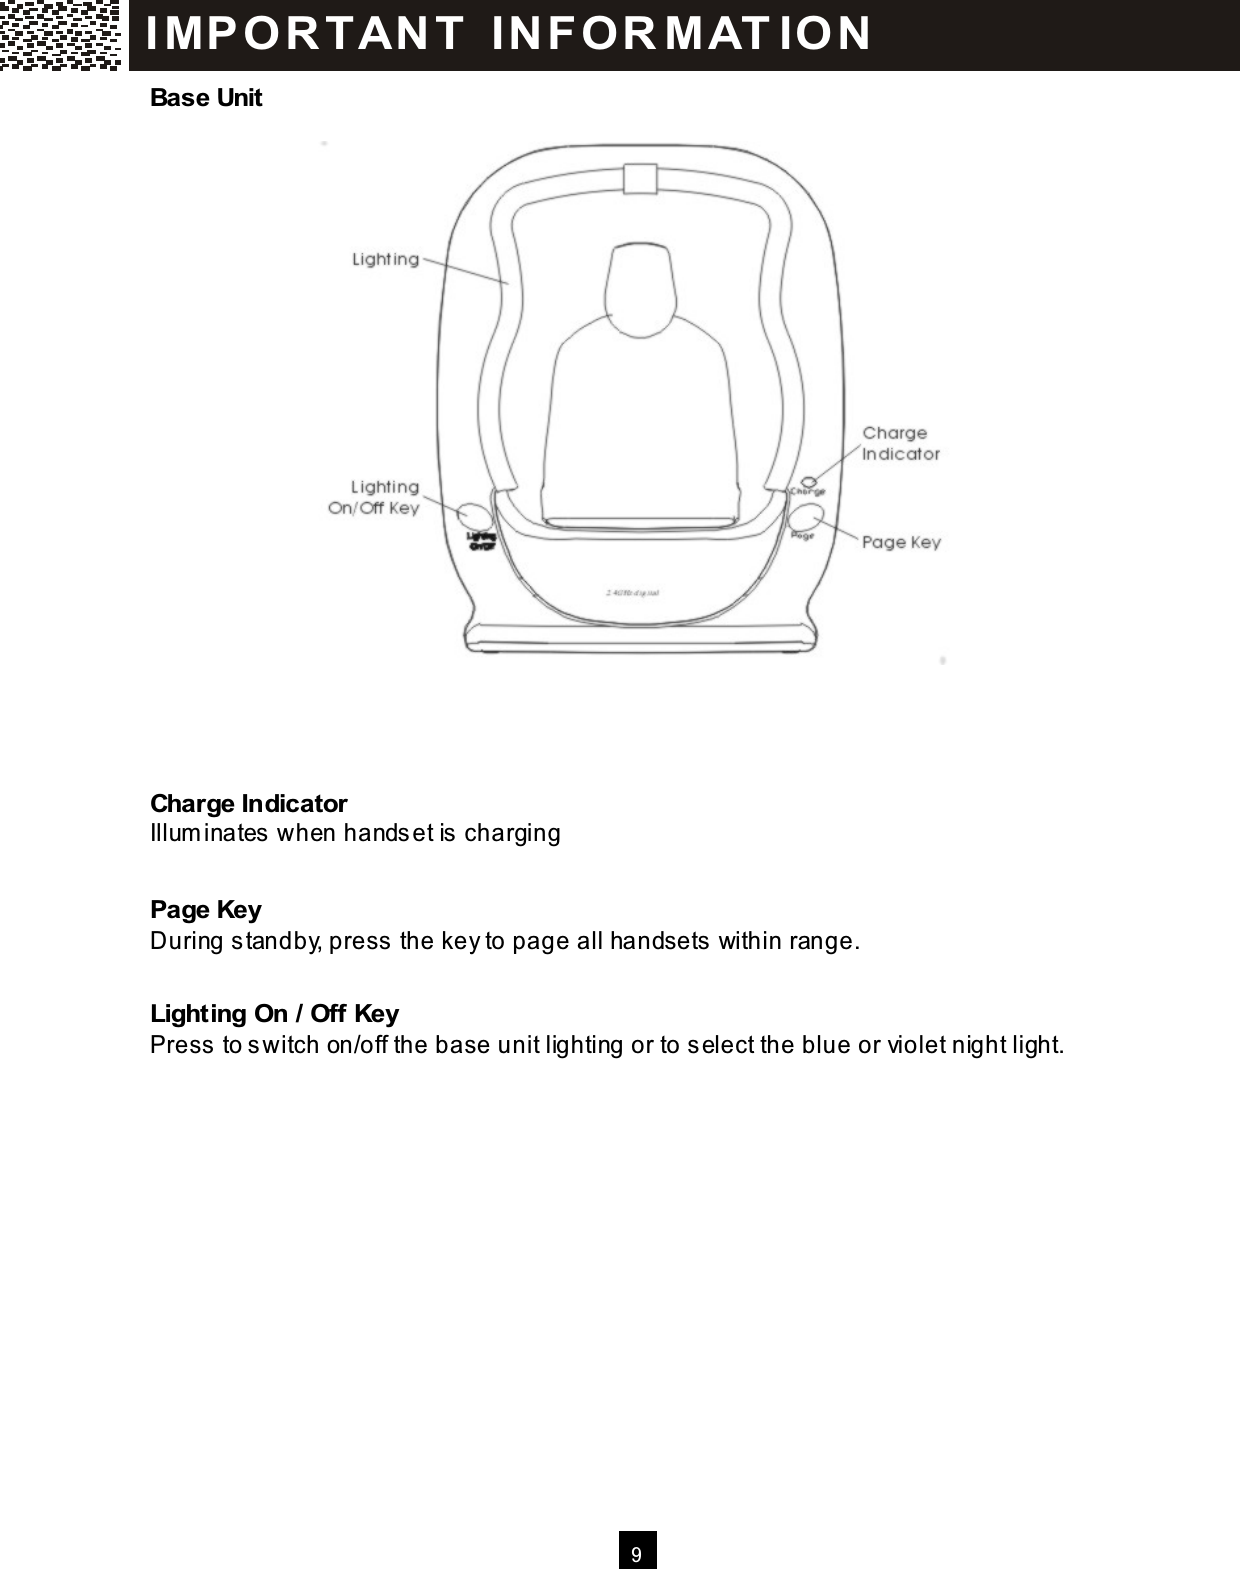
![8 Flash / Dial 11 Key (a) W hile reviewing the Call ID Record, press [Dial 11] to Call Back in 11-digit form at. (b) The [Flas h] key is used to access telephone com pany services such as Call W aiting. Scroll Keys [▼] / [▲] (a) W hile on a call, press [▼ ] / [▲ ] to adjus t the volume. (b) During standby, press [▼ ] / [▲ ] to scroll through Menu options; access Caller ID Records, Phonebook Directory Records and Redial Lis t. Intercom Key [Int.] During standby, press the key to activate the intercom function between hands ets, answer a paging call, or term inate an intercom call. W hile on a line, press the key to trans fer the call to a particular handset. 5 Softkeys These softkeys are used to select functions dis played directly above the keys . Functions displayed above the keys will change depending on the m ode of operation. For exam ple, on the dis play below, [SAVE], [SERVICE], [M ENU], [DIR.] & [DIAL V.M.] are dis played above the sofkeys . To operate the phone book directory, press the second softkey from the right-hand-side. I MP O R TAN T IN FO R MAT IO N e.g. Pressing this softkey during idle m ode will enter into phone book directory.](https://usermanual.wiki/Cybiotronics/383001/User-Guide-562480-Page-9.png)
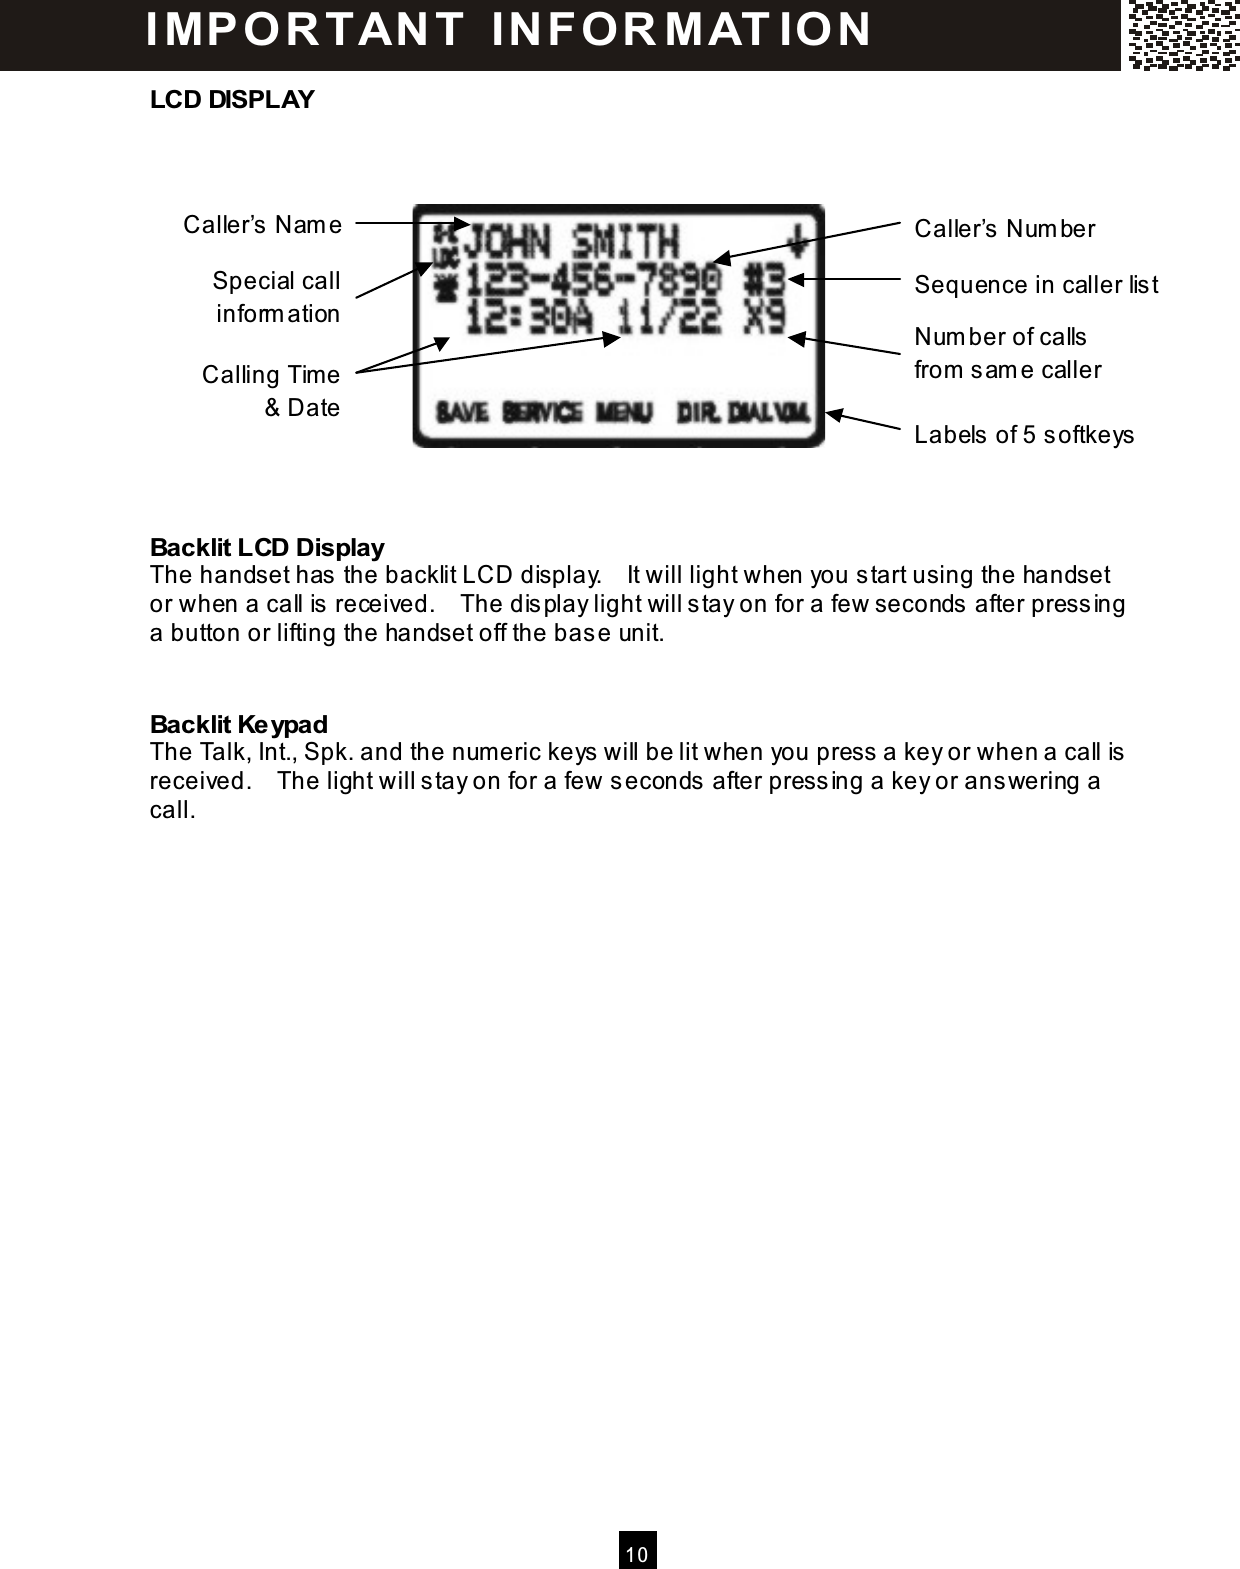
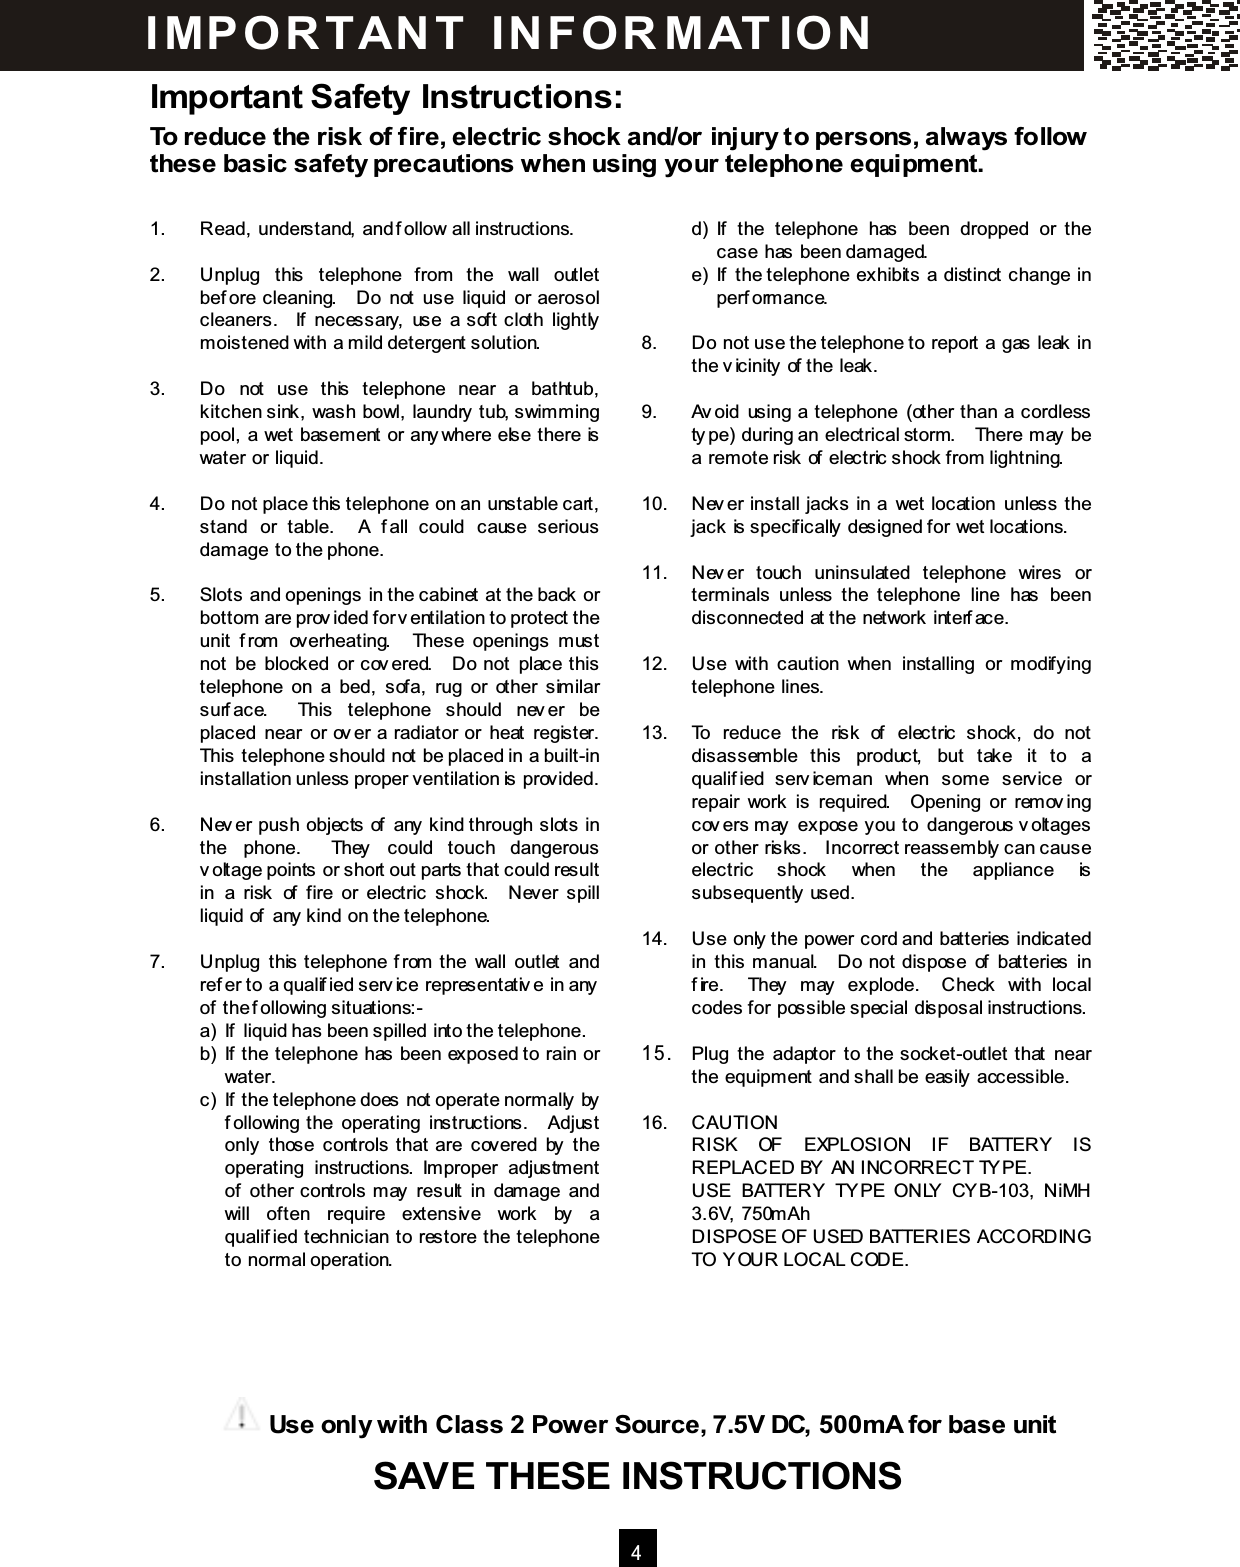
![11 QUICK REFERENCE Task Steps Page 1 Adjust receiver / Speakerphone volum e The handset has 4 Adjus table volum e levels (VOL-1 – VOL-4) showing the current dis play during off hook. Press [▼ ] / [▲ ] to adjus t during a call. 28 2 Making a call 1. Press [Talk] or [Spk.] on the handset and lis ten for a dial tone. 2. Dial num ber. 3. To hang up, press [OFF] on the handset or return the handset to charge cradle. 26 3 Answering a call Auto m ode is the default m ode setting of the phone: If the handset is on the charge cradle, jus t lift the handset and the line is autom atically connected. If the phone is set to Manual m ode, or whenever the handset is not on the charge cradle, to answer a call: 1. Press [Talk] or [Spk.] key on the handset to pick up a call 2. To hang up, press [OFF] on the handset or return the handset to charge cradle. 27 4 Last num ber redial 1. Press [Talk] key and lis ten for dial tone. 2. Press [Redial] to dial the last dialed num ber. 27 5 Dial from the Redial List 1. Press [Redial]. 2. Use [▼ ] / [▲ ] scroll keys to access desired num ber from the lis t of up to 22 last dialed num bers . 3. Press [Talk] or [OK] ke y to dial the num ber. 27 6 Review Caller List Use [▼ ] / [▲ ] scroll keys to review caller’s inform ation during s tandby m ode. 34 I MP O R TAN T IN FO R MAT IO N](https://usermanual.wiki/Cybiotronics/383001/User-Guide-562480-Page-12.png)
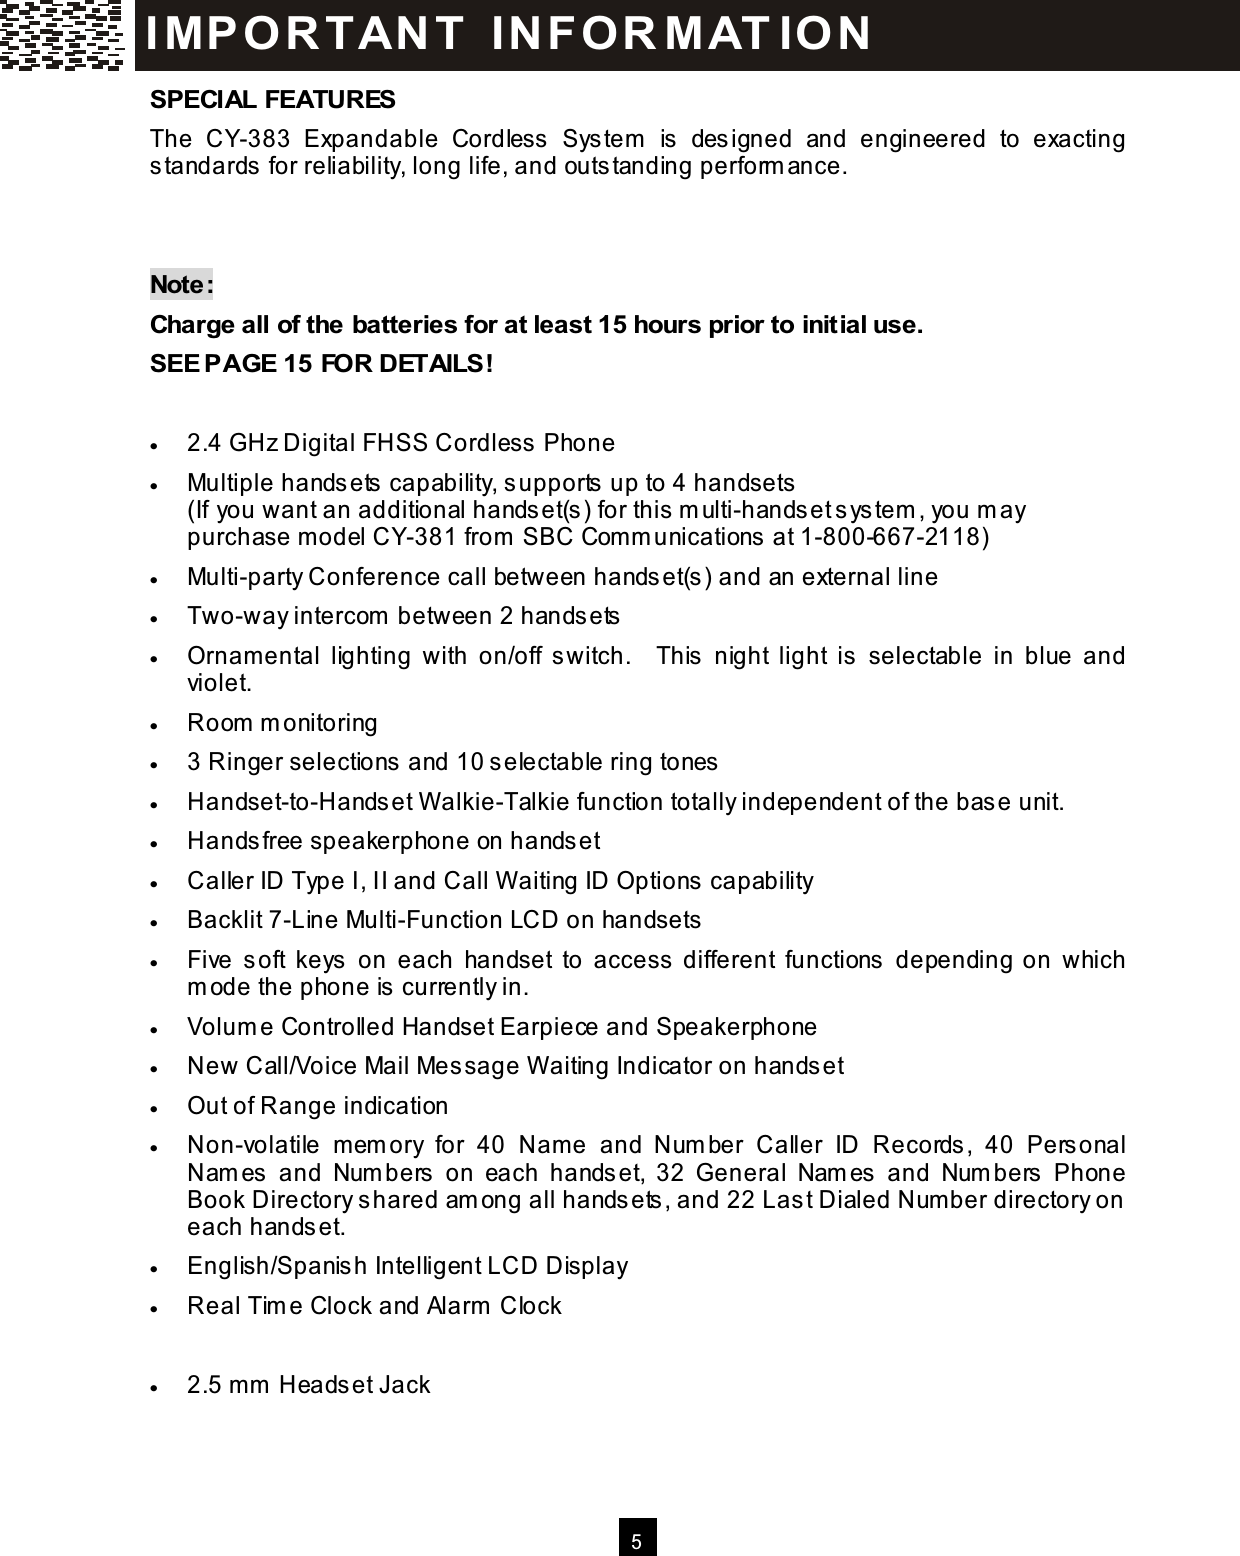
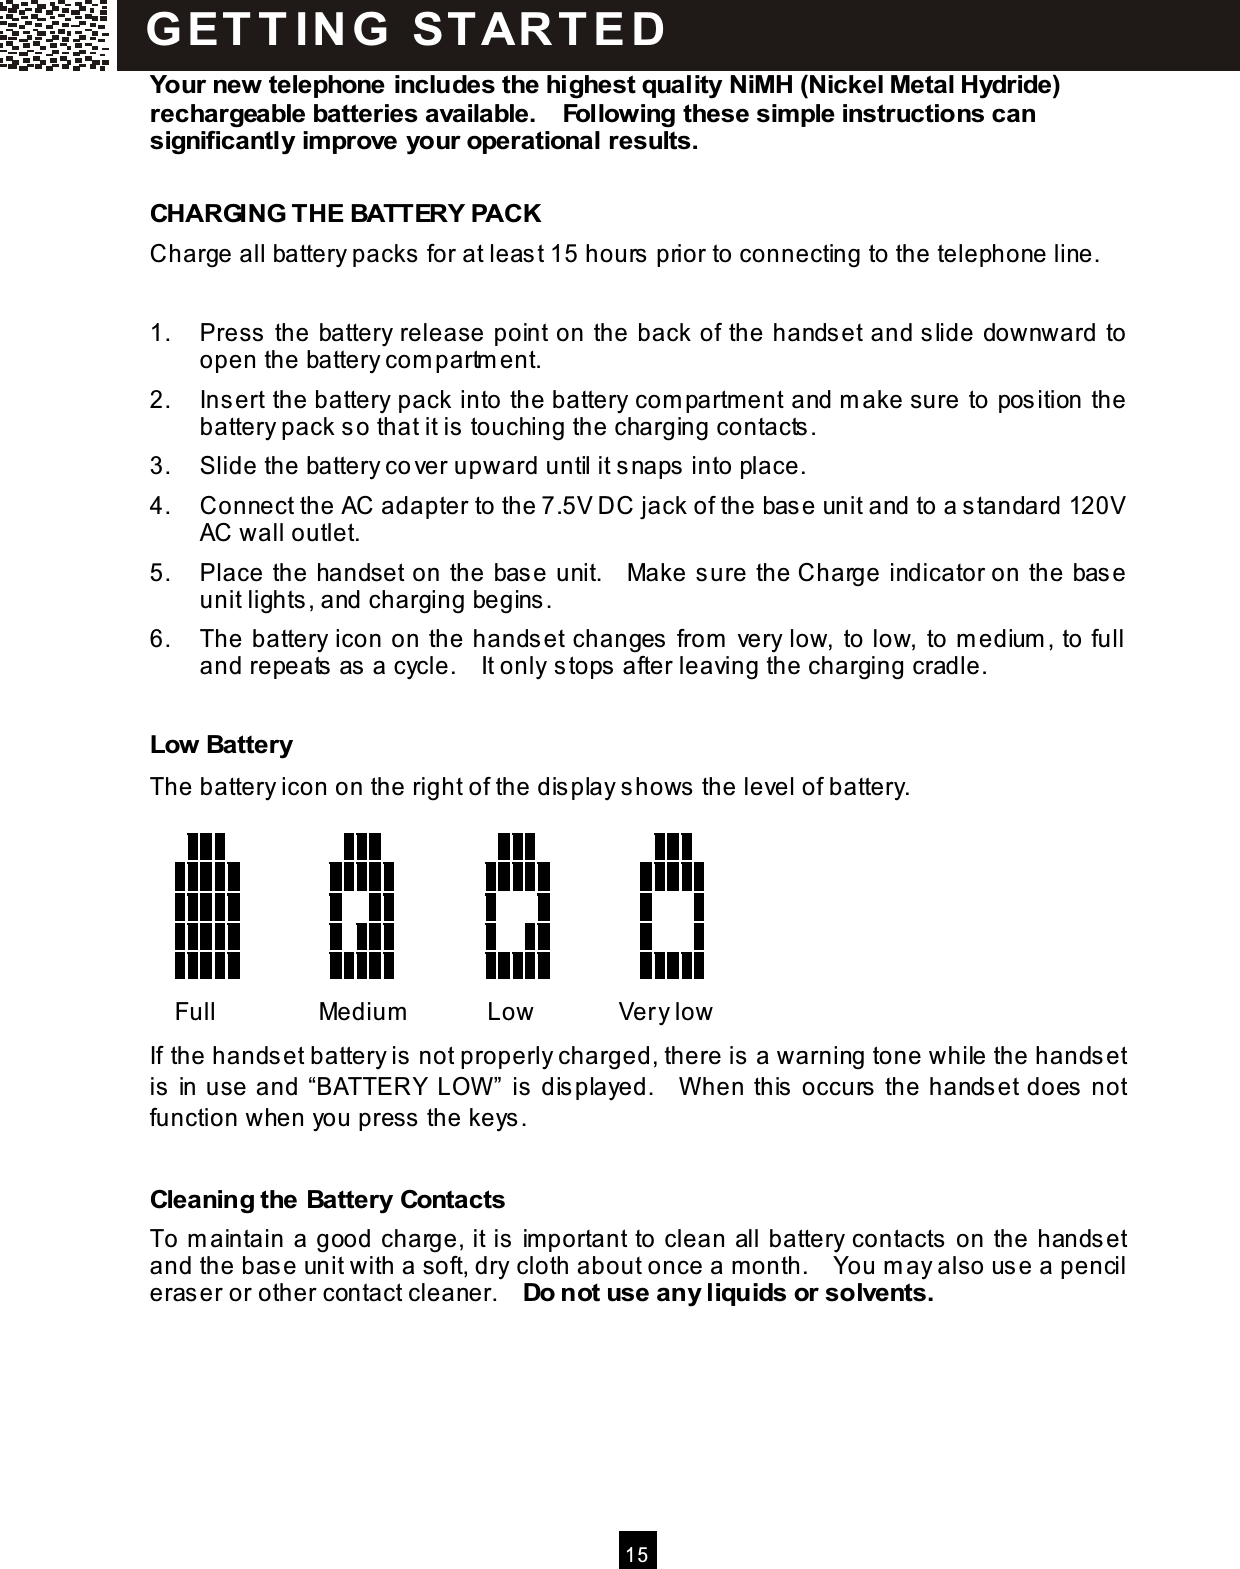
![12 QUICK REFERENCE Task Steps Page 7 Call back a num ber in Caller Lis t 1. Scroll to a desired record in Caller Lis t. 2. Press [Talk] to dial. 3. If the num ber dis played is not in the desired dialing pattern, press [Dial7], [Dial10] or [Dial11] to dial in the correct num ber of digits . 35 8 Store Caller ID num ber into Phone Book Directory 1. Scroll to the desired Caller ID num ber. 2. Press [SAVE] softkey to store. 3. Press [OK] or [JOIN] softkey to select storing in Private or General Directory 39 9 Manually add a new num ber into Phone Book Directory 1. Press [DIR.] softkey. 2. Press [SAVE] softkey to store. 3. Press [OK] or [JOIN] softkey to select storing in Private or General Directory 4. Follow the on-screen instructions to enter the phone num ber, nam e, and to select the ring tone. 39 10 Dial from Phone Book Directory 1. Press [DIR.] softkey. 2. Press [OK] or [JOIN] softkey to select from Private or General Directory 3. Use [▼ ] / [▲ ] scroll keys to find the desired directory record. 4. Press [Talk] or [Spk.] to dial. 5. If the num ber dis played is not in the desired dialing pattern, press [Dial7], [Dial10] or [Dial11] to dial in the correct num ber of digits . 42 11 Switch to a waiting call Press [Flash] to put the talking party on hold and talk to the waiting party. If Call W aiting ID OPTIONS is subscribed to, m ore options are available. 30 36 12 Page from base to handset(s) 1. Press [Page] key. 2. To term inate the paging, press [EXIT] softkey on handset or [Page] key on base unit again. 28 I MP O R TAN T IN FO R MAT IO N](https://usermanual.wiki/Cybiotronics/383001/User-Guide-562480-Page-13.png)
![13 QUICK REFERENCE Task Steps Page 13 Intercom call between two handsets 1. Press [Int.]. 2. Use [▼ ] / [▲ ] scroll keys to select the desired hands et and press [O.K.]. 3. To term inate the paging, press [EXIT] softkey or [Int] key. 28 43 14 Blind Call Transfer 1. W hile connected to an external line, press [Int.] ke y. 2. Use [▼ ] / [▲ ] scroll keys to select the handset to which the call is transferred. 3. On the recipient side, press [O.K.] s oft- key or [Talk] to take the call. 44 15 Announced Call Transfer 1. W hile connected to an external line, press [HOLD] softkey to put the line on hold. 2. Press [Int.] and scroll to the desired recipient and press [O.K.]. 3. After the private conversation, the recipient presses [Talk] to take the call. 44 16 Multiple Handsets Conference W hile a hands et is engaged in an external call, another handset can press [Talk] key to join the convers ation. The maxim um num ber of parties in the conference is 2 handsets. 45 I MP O R TAN T IN FO R MAT IO N](https://usermanual.wiki/Cybiotronics/383001/User-Guide-562480-Page-14.png)
![14 QUICK REFERENCE Task Steps Page 17 Room Monitoring On the handset in the room to be m onitored: 1. Press [MENU] softkey 2. Scroll to the [MONITOR ROO M] m enu and press [O.K.]. The handset will dis play “ READY TO ROO M MONITORING”. On the handset used for m onitoring: 1. Press [Int.] key. 2. Using [▼ ] / [▲ ] scroll keys to select the handset in the room to be m onitored and press [O.K.] to start. The link is autom atically set up while the com m unication is only one-way. To end the m onitoring, press [EXIT] or [Int.] key on either handset. 33 18 W alkie-Talkie m ode Two or m ore handsets entered into walkie-talkie m ode can comm unicate with each other totally independent of the base unit if they are within range of each other. To enter walkie-talkie (FRS) m ode: 1. Press [MENU] softkey. 2. Using [▼ ] / [▲ ] scroll keys to access W alkie- talkie m enu. 3. Press [O.K.] to confirm selection and the dis play shows “W ALKIE-TALKIE”. To operate as walkie-talkie (FRS): 1. Press [Int.] key. 2. Press the handset num ber which is in W alkie-talkie m ode. The called handset can answer by press ing [Talk], [Int.] or [O.K.] key. 45 I MP O R TAN T IN FO R MAT IO N](https://usermanual.wiki/Cybiotronics/383001/User-Guide-562480-Page-15.png)
![17 Press [MENU] soft key, “REGISTR ATION” is displayed. Press [O.K.] and ADD A HANDSET?” is displayed. Press [O.K.] again. “PRESS AND HOLD BASE [PAGE] KEY UNTIL HS BEEPS” will be displayed. On the Base unit Press and hold the [Page] button until beeps are heard. The regis tration process is now com plete. De-register a handset You can de-register a registered handset from the base unit. On the Handset: Press [M ENU] and “REGISTRATION” appears on the display. Press [OK] to enter Regis tration m enu. Using [▼ ] / [▲ ] to select “DEL HANDSET?”. Press [O.K.] and “DEREGISTER HS (#)” is displayed. REGISTRATION NAME HANDSET USE / =REVIEW O.K. EXIT ADD A HANDSET? O.K. EXIT . PRESS AND HOLD BASE [PAGE] KEY UNTIL HS BEEPS EXIT REGISTRATION NAME HANDSET USE / =REVIEW O.K. EXIT DEREGISTER HS (1)? O.K. EXIT G ET T IN G STAR T E D](https://usermanual.wiki/Cybiotronics/383001/User-Guide-562480-Page-18.png)
![1 8 Press [OK] to confirm . “DEREGISTERING…” will be displayed during the process. W hen deregistration process is com pleted, the unit will return to Registration m enu. “HS_ _” will be shown after the handset return to standby. CHOOSE THE DIALING M ODE If your telephone is equipped with a touchtone dialing system , the phone will be ready to use as soon as the battery is charged. If your line uses pulse (rotary) dialing, you will need to set the dialing m ode as follows: Press [M ENU] and “REGISTRATION” appears on the display. Using [▼ ] / [▲ ] to access “DIAL M ODE”. Press [OK] to enter Dial m ode m enu. Using [▼ ] / [▲ ] to select “PULSE MODE”. Press [SAVE] to confirm . The display will return to “DIAL MODE”, press [EXIT] to return to standby. You are now ready to use your new telephone REGISTRATION NAME HANDSET DIAL MODE O.K. EXIT REGISTRATION RINGER & BEEP USE / =REVIEW O.K. EXIT WALKIE-TALKIE v NAME HANDSET DIAL MODE O.K. EXIT TONE v PULSE USE SAVE = DONE EXIT MESSAGES HS (2) 10:08AM 01/15 SAVE SERVICE MENU DIR. DIAL V.M. SAVE G ET T IN G STAR T E D](https://usermanual.wiki/Cybiotronics/383001/User-Guide-562480-Page-19.png)
![20 STRUCTURE AND OPTIONS The phone offers an extensive range of functions which are grouped in m enus. You can custom ize your phone by pressing the Menu key and using [▼ ] / [▲ ] scroll keys to scroll through the options. Note: The settings are independent on each handset. Registration Add a Handset? P res s a n d hol d b a s e [ pa g e] ke y u n til HS be e ps Del Handset? Deregister HS (#)? Ringer & Beep Ring Type Ringer 1 Ringer 2 Ringer 3 Turkish M arch O ld M c Donald G reensleeves Swinging Boat O ld Fisherm an Rom ance Beethoven Say Hello Twinkle stars Elise Day Volum e High / M edium / Low / O ff Night Volum e High / M edium / Low / O ff Key Beep O n / O ff Intercom Setup See Answer M ode Auto After 1 Ring W alkie-Talkie Auto After 3 Ring Nam e Handset _ Dial M ode Tone Pulse Language English Espanol Answer M ode Auto M ode M anual M ode Contrast 1 - 8 Call W aiting ID O ption O n/ Off New Call Lam p O n / O ff Set Date / Tim e Tim e Date (M M /DD) Set Alarm O n / O ff Tim e: M onitor Room Ready to Room M onitoring Last Call Tim e Last Call Tim er 0-0 0 -00 Del M essage? M E N U](https://usermanual.wiki/Cybiotronics/383001/User-Guide-562480-Page-21.png)
![21 Prior to using your phone, you m ay custom ize it to fit your preference. Nam ing Each handset is defaulted as HS (#) where # is the sequence of handset registered to the base unit. They can be personalized with nam es, e.g. JOHN, M ARY, G ARAGE or ROOM 2, etc. Press [MENU] on the handset during standby. Using the [▼ ] / [▲ ] to select “NAME H ANDSET”. Press [O.K.] to enter into the selection. Press [EDIT] and start entering the assigned nam e. The m axim um length is 6 alpha-num eric digits or sym bols. Press [SAVE] to confirm settings. Each num eric key is assigned a set of letters and sym bols as printed below. Press the corresponding num ber until the desired letter is displayed. If two consecutive letters from the sam e key is required, wait until the cursor m oves to the next blank space. Num eric: 1 2 3 4 5 6 7 8 9 0 Alpha: Space A,B,C D,E,F G,H,I J,K,L M,N,O P,Q,R,S T,U,V W ,X,Y,Z Sym bols You can also us e [] or [#] to ins ert the following special s ym bols in the name field. + , - . / @ : ; < = > ? { ¦ } ~ [ \ ] ^ _ ` ! ″ # $ % & ´ ( ) Note: The nam e m ust be s tarted with an alpha character. Language The phone can be operated in Englis h or Spanish. Press [MENU]. Using [▼ ] / [▲ ] to s elect “LANGUAGE”. Press [O.K.] to enter into the selection. Using [▼ ] / [▲ ] to s elect ENGLISH or SPANISH m enu. Press [SAVE] to confirm setting. Following the confirm ation beeps , the screen will return to the 1st level m enu. NAME HANDSET(1): HS USE EDIT=CHANGE EDIT EXIT NAME HANDSET(1): EXT .... 2_ USE SAVE = DONE EXIT DELETE SAVE ENGLISH v ESPANOL USE =CHANGE EXIT SAVE NAME HANDSET v DIAL MODE LANGUAGE O.K. EXIT IN IT I AL S E T T IN G S](https://usermanual.wiki/Cybiotronics/383001/User-Guide-562480-Page-22.png)
![2 2 Ringer & Beep Each handset can be assigned with a specific ring type and volum e. Different volume levels can be set for day and night. You can also choose between having a confirm ation beep or have silent operation. Ring Type There are 3 ringer patterns + 10 m elodies in the handset. Press [MENU]. Using [▼ ] / [▲ ] to select “RINGER & BEEP”. Press [O.K.] to enter into the selection. Press [EDIT] to play the current ringer type. Using [▼ ] / [▲ ] to play while scrolling through the list of ringers and m elody options. Press [SAVE] to confirm setting Day Volum e Ringer volume level between 6:00 AM and 9:00 PM . Press [MENU]. Using [▼ ] / [▲ ] to select “RINGER & BEEP”. Press [O.K.] to enter into the selection. Using [▼ ] / [▲ ] to select “DAY VOLUME” and press [EDIT]. Current volume level will be displayed. Using [▼ ] / [▲ ] to switch between HIGH, MEDIUM , LOW & OFF then press [SAVE] to confirm . Ni ght Volum e Operation sim ilar to Day Volum e setting. “Night” denotes 9 PM to 6 AM Key Beep A key depression can be audible (beep) or silent. Press [MENU]. Using [▼ ] / [▲ ] to select “RINGER & BEEP”. Press [O.K.] to enter into the selection. RING TYPE DAY VOLUME NIGHT VOLUME EDIT EXIT RINGER 2 v RINGER 3 TURKISH MARCH EXIT SAVE RING TYPE v DAY VOLUME NIGHT VOLUME EDIT EXIT DAY VOLUME HIGH (6 AM – 9 PM) EXIT SAVE DAY VOLUME NIGHT VOLUME KEY BEEP EDIT E XIT IN IT I AL S E T T IN G S](https://usermanual.wiki/Cybiotronics/383001/User-Guide-562480-Page-23.png)
![2 3 Using [▼ ] / [▲ ] to select “KEY BEEP” and press [EDIT]. Current setting will be displayed. Using [▼ ] / [▲ ] to switch between ON & OFF then press [SAVE] to confirm . Answer Modes Handsets m ay be program m ed to either auto or m anual answer m ode. W hen the handset is not in the base unit or the charge cradle, [Talk] (or [Spk.]) key m ust be pressed to answer incom ing calls. Auto answer m ode will only be activated when the handset is in the base unit or in the charge cradle. In which case, the line is autom atically connected when handset is picked up from the charge cradle. Press [MENU]. Using [▼ ] / [▲ ] to select “ANSW ER M ODE”. Press [O.K.] to enter into the selection. Using [▼ ] / [▲ ] to switch between AUTO & M ANUAL then press [SAVE] to confirm . Contrast Choose from 8 (1 – 8) different levels of display contrast to fit your operating environm ent. Press [MENU]. Using [▼ ] / [▲ ] to access “CONTRAST”. Press [O.K.] to enter into the selection. Using [▼ ] / [▲ ] to adjust the contrast level. Press [SAVE] to confirm setting. Call W aiting ID Options * Call W aiting ID Options provide more options of disposing a waiting call. 5 dedicated soft key labels displays when there is an incom ing waiting call. Press [MENU]. Using [▼ ] / [▲ ] to access “CW ID OPTION”. Press [O.K.] to enter into the selection. Using [▼ ] / [▲ ] to switch between ON or OFF. Press [SAVE] to confirm , and then press [EXIT] to return to stand-by. Note: * Call W aiting ID Options m ay be available from your telephone com pany. Subscription m ay be required. KEY BEEP: v ON USE =CHANGE EXIT SAVE AUTO MODE MANUAL MODE USE =CHANGE EXIT SAVE CONTRAST:5 v USE =CHANGE E XIT S AVE CW ID OPTION v ON USE =CHANGE E XIT S AVE IN IT I AL S E T T IN G S](https://usermanual.wiki/Cybiotronics/383001/User-Guide-562480-Page-24.png)
![2 4 New Call Lam p The Message W aiting Indicator / New Call Lam p will flash when there are new or unviewed Caller ID entries in call log if the lam p is switched on. Press [MENU]. Using [▼ ] / [▲ ] to access “NEW CALL LAMP”. Press [O.K.] to enter into the selection. Using [▼ ] / [▲ ] to switch the New Call Lam p ON or OFF. Press [SAVE] to confirm . Tim e and Date Setting Press [MENU]. Using [▼ ] / [▲ ] to select “SET DATE/TIME”. Press [O.K.] to enter into the selection. Enter tim e with the num eric keys. Press [EDIT] softkey to swap between AM and PM. Using [▼ ] / [▲ ] to switch to date setting. Enter the date with num eric keys. Press [SAVE] to confirm setting. Intercom Set Up Choose the num ber of rings before the handset answers to an intercom call. W hen “AUTO AFT 1 RING” or “AUTO AFT 3 RING” is selected, the unit will autom atically answer an intercom call with speakerphone m ode. Press [MENU]. Using [▼ ] / [▲ ] to access “INTERCOM SETUP”. Press [O.K.] to enter into the selection. Using [▼ ] / [▲ ] to select the desired option. Press [SAVE] to confirm setting. NEW CALL LAMP:v ON USE -CHANGE EXIT S AVE TIME: v 10:05 (AM) [EDIT]->AM/PM EDIT O.K. EXIT S AVE DATE(MM/DD): v 03/25 O.K. EXIT SAVE DATE(MM/DD): v 03/25 O.K. EXIT SAVE SEE ANS MODE AUTO AFT 1RING AUTO AFT 3RING EXIT S AVE IN IT I AL S E T T IN G S](https://usermanual.wiki/Cybiotronics/383001/User-Guide-562480-Page-25.png)
![2 5 Message W aiting Indicator The m enu item “DEL MESSAGE” is only available when there are new or non-read m essage(s) in you voicem ail box. “DEL MESSAGE” does not delete your m essage, but rather deactivate the Message W aiting Indicator from flashing until a new m essage arrives. (To read or delete the message, use “Dial Voice Mail”, for details see page 31) W hen “MESSAGE” is displayed and the line indicator keeps flashing. Press [MENU]. Using [▼ ] / [▲ ] to access “DEL MESSAGE?” Press [O.K] to enter into the selection. Press [O.K.] to deactivate the m essage waiting indicator. Note: The word “m essage” and the visual message waiting indicator will be cleared. Alarm Setting An alarm m ay be set to rem ind you of an im portant tim e of the day. Press [MENU]. Using [▼ ] / [▲ ] to access “SET ALARM”. Press [O.K.] to enter into the selection. Using [EDIT] to switch the alarm On / Off. Using [▼ ] / [▲ ] and the keypad to set the alarm tim e. Press [SAVE] to confirm setting. W hen alarm is switched on, an alarm icon will be displayed Note: The alarm is only active when the phone is idle. If you are accessing the m enu or having a conversation at the alarm tim e, the alarm will be delayed until the phone becom es idle. MESSAGE HS (1) 10:05AM 05/30 SAV E S ERVICE ME NU DIR. DIAL V.M. WALKIE-TALKIE LAST CALL TIME DEL MESSAGE? O.K. EXIT S AVE DELETE MESSAGE O.K. EXIT ALARM: v OFF [EDIT]->ON/OFF EDIT EXIT SAVE 30 NEW CALLS HS (1) 09:38AM 01/01 S A V E S E R V I C E ME N U D I R . D I A L V . M. IN IT I AL S E T T IN G S](https://usermanual.wiki/Cybiotronics/383001/User-Guide-562480-Page-26.png)
![2 6 MAKING A CALL Direct Dial Press [Talk] key and lis ten for the dial tone. The “In-Use” indicator on the handset and the base unit will be turned ON. — OR — Press [Spk.] and listen for the dial tone. The Speakerphone indicator on the handset will be turned ON. Note: If the line is engaged by another Handset, “CONFERENCE” will appear on the displays of both handsets and you can join the conversation. (for details see page 33) Once you have a dial tone, key in the phone number. The phone number will be shown on the display along with the call timer. Press [OFF] to end your call. Pre-dial Pre-dial allows you to key-in the phone num ber or verify it before dialing. Key-in the phone number. To edit the number on the display, press [DELETE] to clear the last digit. To clear the entire number, press [EXIT]. Re-enter the correct digits. Press [Talk] or [Spk.] on the handset to dial the number. The call timer will start counting. Press [OFF] on the handset to end your call. TALK VOL-2 HOLD SERVICE DIR. DIAL V.M. TALK VOL-2 HOLD SERVICE DIR. DIAL V.M. 1234567 0:01:35 VOL-2 HOLD 3W AY SERVICE DIR. DIAL V.M. 123456█ O.K. EXIT DELETE SAVE 1234567 0:01:35 VOL-2 HOLD 3W AY SERVICE DIR. DIAL V.M. B AS IC O P E R AT IO N](https://usermanual.wiki/Cybiotronics/383001/User-Guide-562480-Page-27.png)
![2 7 ANSW ERING A CALL Press the [Talk] or [Spk.] ke y to ans wer. If the phone is set to Auto Answer m ode and the hands et is on the charging cradle, you can ans wer a call by lifting the handset off the bas e unit, or the charging cradle, without press ing any key. To end the call, press [OFF]. TO REDIAL A CALL Directly Redial Last Dialed Num ber Press [Talk] or [Spk.] key on the handset and listen for the dial tone. Press [Redial] to dial the last dialed num ber. Dial from the List of Dialed Num bers The Lis t of Dialed Num bers stores up to 22 latest dialed phone num bers , each one can be up to 24 digits . Num ber more than 24 digits will be truncated with the first 24 digits rem aining. Each hands et stores its own Lis t of Dial Num bers . In Standby Mode, press [Redial] once to access the list of Dialed Num bers . Press [▼ ] / [▲ ] to review the lates t 22 dialed num bers. Scroll to the desired num ber, and press [Talk] key or [O.K.] softkey to dial the num ber. Note: You m ay delete an individual record from the Redial Lis t or enter the record to the Phone book directory. Scroll to the num ber you want. Press [DELETE] once and “DELETED!” is displayed to confirm the deletion, or press [SAVE] and “SAVED TO DIR!” is dis played to confirm the entry. 0:01:35 VOL-2 HOLD 3W AY SERVICE DIR. DIAL V.M. TALK VOL-2 HOLD SERVICE DIR. DIAL V.M. 1234568 0:00:02 VOL-2 HOLD 3W AY SERVICE DIR. DIAL V.M. DIALED NUMBERS 18 ITEMS USE / =REVIEW EXIT DELETE 1234567 0:00:30 VOL-2 HOLD 3WAY SERVICE DIR. B AS IC O P E R AT IO N](https://usermanual.wiki/Cybiotronics/383001/User-Guide-562480-Page-28.png)
![2 8 ADJUSTING HANDSET RECEIVER VOLUME There are 4 receiver volume levels in the handset(s). The current level is displayed while the line is in use. It can be adjusted by pressing [▼ ] / [▲ ] during talk mode or intercom mode. (Also applies to headset operation) TO MUTE A CALL W hile on a call, press [MUTE] to turn OFF the m icrophone. The display will show “MUTE” and the other party will not hear you. Press [MUTE] again to resum e conversation and the “MUTE ” on the display will disappear. PAGING and INTERCOM Locate m isplaced handset(s) To locate the handset(s) while not on the base unit, press [Page] on the base unit. All the handset(s) in range will display “PAGING FROM BASE”, and emit an alert signal that is different from others, e.g. incoming call. To stop a paging call, press [Page] again or press [EXIT]. If no handset answers, the paging call will automatically stop after 30 seconds. Note: The handset(s) will ring even if the ringer is set to OFF. Intercom between handsets A handset can intercom with another handset registered to the same base unit. For details, please refer to page 43. 1234567 0:01:30 VOL-2 HOLD 3WAY SE R VICE DIR. DIA L V.M . MUTE 1234567 0:01:30 VOL-2 HOLD 3WAY SE R VICE DIR. DIA L V.M . INTERCOM HS (2) HS (3) O.K. EXIT B AS IC O P E R AT IO N](https://usermanual.wiki/Cybiotronics/383001/User-Guide-562480-Page-29.png)
![2 9 USING HANDSET SPEAKERPHONE To make a call or while on a call, press [Spk.] to turn the speakerphone ON and OFF. The Speakerphone Light comes ON when the speakerphone is in use. INSTALLING AND USING HEADSET Whenever a compatible 2.5mm headset is plugged-in the jack located at the side of the handset, either before or during a call, the audio signal will be diverted to the headset. Unplugging the headset from the jack will return the signal to the handset earpiece and microphone immediately. B AS IC O P E R AT IO N](https://usermanual.wiki/Cybiotronics/383001/User-Guide-562480-Page-30.png)
![30 FLASH Call W aiting 1. Use [Flash] for accessing Call W aiting service. For exam ple, if you receive a second call during your initial call, press [Flash] to swap to the waiting call and put the initial caller on hold. 2. After you finish the conversation with the second caller, press [Flash] to return to the first caller. Note: If you also have Conference Three-W ay Calling service, press [Flash] to allow the first caller to enter into a conference call with you and the second caller. 3 W ay Calling 3 way calling can be achieved either by pressing [3WAY] softkey or [Flash] key. For details, please refer to 3 Way Calling section on page 33. Note: M ay require subscription from you telephone company or may be available on a charged usage basis. PAUSE The [Pause] key allows you to add a 3-second pause in a phone number sequence during pre-dialing or storing number in the Phone Book Directory. Enter a Pause in Dialing Sequence To add a pause, press [Redial/Pause] at the desired position when you are creating or editing a phone number and “ P ” appears on the display. For a longer delay, press [Pause] additional times. Note: Rem em ber, the phone num ber you wish to store cannot have m ore than 24 digits, including any pause. Each “ P ” counts as one digit. HOLD A call can be put on hold during conversation to allow you to talk to another handset using Intercom or to transfer the call to another handset. When engaged with an external line on the handset, press [HOLD] softkey. 1234567 0:01:30 VOL-2 HOLD 3WAY SE R VICE DIR. D IA L V.M. ADVAN C E D O P E R AT IO N](https://usermanual.wiki/Cybiotronics/383001/User-Guide-562480-Page-31.png)
![31 W hen the line is on hold, “CALL ON HOLD” appears on all the handsets. Press [HOLD] key again or [Talk] key to release. Note : The call can be picked up by any handset registered to the sam e base unit by pressing the [Talk] key. SENDING TONE SIGNALS IN PULSE DIALING MODE If your telephone line uses pulse dialing (such as for a rotary dial phone), you can temporarily override the Pulse M ode setting with the Tone M ode until the unit goes back on-hook. This may be necessary to access certain special services such as bank-by-phone services: 1. Use pulse dialing to call the service. 2. W hen the service answers, press []. 3. Follow the norm al procedure for the special service you are using. Any additional num bers you dial are sent as tone signals. 4. W hen you hang up, the telephone returns to pulse mode. DIAL VOICE MAIL If you have subscribed to the Voice Mail and Message W aiting Indicator services, you can access your voice m ail system by pressing [DIAL V.M.]. To use this feature, you m ust first program your voicem ail access num ber into the handset. Program your own Voicem ail access num ber Press the [DIAL V.M.] softkey. Press the [SAVE] softkey to add your access num ber. Enter your access num ber. If you m ake a m istake, press [DELETE] to erase the last digit and re-enter. Press [SAVE] to confirm program m ing. You are now ready to use the Dial voicem ail key. CALL ON HOLD HOLD DIAL VOICE MAIL ----------------------- USE SAVE = +N EW EXIT SAVE DIAL VOIC E MA IL 1234567 〔OK〕TO DIAL EDIT O.K. EXIT SAVE AD VAN C E D O P E R AT IO N](https://usermanual.wiki/Cybiotronics/383001/User-Guide-562480-Page-32.png)
![3 2 Using DIAL V.M. softkey Press the [DIAL V.M.] softkey. Your 7-digit access num ber will be displayed. Press [O.K] or [Talk] key to dial. Follow the voice prom pt after the line is connected. Im portant Note: 1. Voice m ail system s operate differently and m ay require additional pauses to be entered. DIAL BACK FROM CALLER ID LIST See Call Back from Caller ID List in CALLER ID OPERATION for details. (see page 35) DAILING FROM PHONE BOOK DIRECTORY In standby m ode, press [DIR.] softkey and then press [OK] or [JOIN] to select the Directory. Using [▼ ] / [▲ ] scroll through the m em ory contents in alphabetical order to the nam e and num ber you want. Press [O.K.] softkey to call the num ber. Tip: To quickly find a nam e and phone num ber, press [DIR.] softkey in standby m ode. Key in the first letter of the nam e, and scroll to the nam e you want. DIAL VOICE MAIL 1234567 USE OK = DIAL EDIT O.K. EXIT 1234567 0:00:30 V OL-2 HOLD 3W AT SE R V IC E D I R . AD VAN C E D O P E R AT IO N](https://usermanual.wiki/Cybiotronics/383001/User-Guide-562480-Page-33.png)
![3 3 CONFERENCE CALL Your new cordless system supports conference calls up to 4 parties: • 1 handset and 2 external calls (3 way calling); • 2 handsets and 1 external call; • 2 handsets and 2 external calls. (For detail operations involving 2 handsets, please refer to Multi-handset Operation Section.) 3 W AY CALLING W hile on a call, press [3W AY] softkey to access 3 W ay Calling service. The system will dial a long Flash to put the initial call on hold and obtain a new dial tone to make a second call. Key in the phone num ber of the second party. After the private conversation with the second caller, press [3W AY] softkey to add the first caller into the conference call. Note: When the handset is engaged in 3-way conference call, pressing the [Talk] key of another handset can join the 3-way conference call. 3-way Calling may require subscription from your telephone company or may be available on a charged use basis. ROOM MONITORING The phone can be used as a room m onitor/baby m onitor. Leave one handset in the room to be m onitored and you can listen to that room from another handset. This lets you keep an “ear” on the room while staying/working in another room . The handset in the room to be m onitored: Press [M ENU] softkey Scroll to the [M ONITOR ROOM] menu and press [O.K.]. The handset will display “ READY TO ROOM MONITORING”. The handset in the room to m onitor the other: Press [Int.] key. Using [▼ ] / [▲ ] scroll keys to select the handset where the room is to be monitored and press [O.K.] to start. The link is automatically set up while the communication is one-way only. To end the monitoring, press [EXIT] softkey on handset which is placed in the room to be monitored. TALK VOL-2 HOLD SERVICE DIR. DIAL V.M. 1234567 0:00:30 VOL-2 HOLD 3W AT SERVICE DI R . HS (1) READY TO ROOM MONITORING EXIT SAVE SERVICE M ENU DIR. DIAL V.M . MONITORING HS (1) VOL-2 EXIT SAVE SERVICE M ENU DIR. DIAL V.M . AD VAN C E D O P E R AT IO N](https://usermanual.wiki/Cybiotronics/383001/User-Guide-562480-Page-34.png)
![3 4 ABOUT CALLER IDENTIFICATION This telephone supports Caller ID service and Call W aiting ID Option service provided by your local telephone com pany. There m ay be a fee for this service, and it m ay not be available in all areas. This phone can provide inform ation only if both you and the caller are in areas offering Caller ID service, and if both telephone com panies use com patible equipm ent. Depending on your service, you will be able to see the num ber, or the nam e and num ber of your caller. If you have Caller ID service, the incom ing call inform ation including num ber and nam e (if available), tim e and date will be shown on the display. The phone will also save the call inform ation in the Caller ID List. CALLER LIST The Caller List is your incom ing call history. W hen a new Caller ID record arrives, it is assigned a num ber from #01 to #40. The m ost recent record will have the lowest num ber. W hen the Caller List is full, the oldest record is deleted to m ake room for new record, and all the record num bers are shifted one num ber higher. Mem ory Match Names stored in the Phone Book Directory will override Caller Name signal sent from the telephone company. For example, if you store your parents’ telephone number with their nickname, “M OM AND DAD”, in memory, the Caller ID display will show “M OM AND DAD” whenever you receive an incoming call from their phone number. Review Caller List Press [▼ ] / [▲ ] during standby m ode. Press [▼ ] to show the latest record. W hile reviewing the Caller List, pressing [SAVE] softkey can copy the displayed record into the Phone Book Directory. JOHN SMITH v 1234567890 #20 11:08P 01/18 X1 EXIT DELETE SAVE CALLS 40 ITEMS USE / =REVIEW EXIT DELETE JOHN SMITH 123-123-4568 #1 10:00P 01/18 X1 EXIT DELETE SAVE C AL LE R ID O P E R AT IO N](https://usermanual.wiki/Cybiotronics/383001/User-Guide-562480-Page-35.png)
![3 5 Delete Record(s) from Caller List To delete all Caller ID records: Press [▼ ] / [▲ ] during standby m ode to enter into Caller List default page. Press [DELETE] softkey and “DELETE ALL?” is displayed, then press [O.K.] softkey to confirm deletion. To delete an individual Caller ID record: W hile reviewing the Caller List, press [DELETE] softkey to erase the displayed record from the list. Call Back from Caller List Your phone is equipped with three Caller ID Call Back keys, which allow you to dial a Caller ID record in the correct form at. W hile you are reviewing the Call List, you can dial a displayed num ber in the correct form at by pressing [Dial 7], [Dial 10] or [Dial 11] key. For instance, if a 10-digit phone num ber is displayed and you want to call back in a 7-digit form at, you can sim ply press [Dial 7] to dial only the last seven digits of the num ber. Note: [Dial 7]:Dials only the last seven digits of the number you are calling, i.e. without an area code. [Dial 10]:Dials all 10 digits on the display, i.e. 3 digits of area code plus 7 digits of local phone number. [Dial 11]: Dials all 10 digits on the display plus automatically inserteds a “1” before the area code. Special Call Display Long Distance Call W hen a long distance call is received, the [LDC] icon will appear on the screen with the call inform ation. DELETE ALL? USE OK = YES USE EXIT = NO O.K. EXIT ENTRY DELETED! JOHN SMITH v LDC 123-123-4568 #18 10:08A 01/24 X1 EXIT DELETE SAVE 1234567 TALK VOL-2 JOHN SMITH v LDC123-123-4568 #1 10:00A 1/21 X4 EXIT DELETE SAVE C AL LE R ID O P E R AT IO N](https://usermanual.wiki/Cybiotronics/383001/User-Guide-562480-Page-36.png)
![36 Forwarded Call If the call was forwarded from another num ber through the call forwarding service provided by the telephone com pany, the icon will appear on the screen with the call information. Repeated Call If a call is received from the sam e phone num ber m ore than once, the num ber of times repeated will be shown on the display. For exam ple “X6” appears after the date indicating the sam e num ber has been received six tim es. Call Display Messages W hen a new Caller ID record arrives with incom plete call inform ation, the following call display m essages will be shown. The messages m ay accompany, if available, an actual nam e or an actual num ber. 1. “PRIVATE NAME” – The other party is blocking nam e inform ation. 2. “PRIVATE NUM” – The other party is blocking telephone num ber inform ation. 3. “UNKNOW N NAME” – Caller’s nam e is not available. 4. “UNKNOW N NUM ” – Caller’s num ber is not available. The situations for call display m essages m ay include, but are not lim ited to, the following reasons: 1. The Caller ID was blocked for privacy reasons. 2. The call originates from an area office or a long-distance service provider that does not support Caller ID service. 3. The call is m ade with a calling card. 4. The call is an operator-assisted call. CALL W AITING ID OPTIONS If you have subscribed the Call W aiting and Call W aiting ID Options from your local telephone com pany, you will hear a Call W aiting tone when a new call com es in while you are talking. You can either swap between calls or dispose of the call. Call W aiting ID Options Set to OFF (see page 23) If there is an incom ing call during a conversation, the Caller ID Call W aiting inform ation appears on the display. Press [Flash] key to answer the Call W aiting party and put the first call on hold. JOHN SMITH v 123-123-4568 #18 10:00A 1/01 X5 EXIT DELETE SAVE JOHN SMITH v 123-123-4568 #1 10:00A 1/21 X4 EXIT DELETE SAVE JOHN SMITH 123-123-4568 10:08 01/18 X1 C AL LE R ID O P E R AT IO N](https://usermanual.wiki/Cybiotronics/383001/User-Guide-562480-Page-37.png)
![37 Call W aiting ID Options Set to ON (see page 23) If there is an incom ing call during a conversation, all the five labels for Call W aiting ID Options features will be autom atically shown on the display. W hen you hear the Call W aiting tone, press the corresponding softkey to apply a disposition to the call. Note: You must disposition the call within 26 seconds of the Call Waiting tone. The following options are available. [JOIN]: Add the waiting call to your first call. [DROP ANS]: End the first call and answer the waiting call. [HOLD]: Place the waiting call on hold and send a hold announcement. [SAY BUSY]: Play a pre-recorded message from your phone company that the line is busy and end the waiting call. [SEND V.M .]: Forward the waiting call to your voice mail or answering service. Tip: Call Waiting ID Options may not be available in all areas. Contact your local telephone company for details. Call W aiting ID Option: JOIN If [JOIN] softkey is pressed, “CONFERENCE” will be displayed for a short while and then the waiting party is being added to the original call as a 3-parties conference call. After the 3-parties conference call, you m ay select to drop a line and retain the other: • To drop the first caller (the original call), press [DROP] softkey and “DROPPED #1” will be displayed. • To drop the second caller (the waiting call), press [Flash] and “DROPPED #2” will be displayed. JOHN SMITH 123-123-4568 10:08 01/18 X1 J OI N D R OP A N S H O LD S A Y B US Y S EN D V .M . 0:00:30 VOL -2 HOLD 3W AT SERVICE DIR JOHN SMITH 123-123-4568 10:08 01/18 X1 D R OP DROPPED #1 0:01:05 3W AY SERVICE C AL LE R ID O P E R AT IO N](https://usermanual.wiki/Cybiotronics/383001/User-Guide-562480-Page-38.png)
![3 8 Call Waiting ID Option: HOLD If [HOLD] softkey is pressed, “HOLD” will be displayed. A hold announcem ent will be sent and the waiting call will be placed on hold. After the private conversation with the original caller, you m ay select to drop the original call and take the waiting call or to add the waiting caller into the call conference. • To drop the talking line and answer the waiting call, press [DROP] softkey. • To add the waiting caller into the call and form a 3-party conference call, press [JOIN] softkey. For further disposition of the 3-party call conference, refer to Call Waiting ID Option: JOIN section above. JOHN SMITH 123-123-4568 10:08 01/18 X1 J OI N D R OP TALK VOL-2 HOLD 3W AY SERVICE C AL LE R ID O P E R AT IO N](https://usermanual.wiki/Cybiotronics/383001/User-Guide-562480-Page-39.png)
![3 9 Your phone has a Personal Phone Book Directory for storing up to 40 im portant nam es and num bers on each handset and a General Phone Book Directory for 32 nam es and num bers shared am ong all handsets. Each m em ory location can store up to 24 digits and 15 characters. You can edit the Phone Book Directory records, but not the Caller ID List records. The Directory records are saved in alphabetical order. The Phone Book Directory can be accessed by pressing [DIR.] softkey during standby m ode. CREATING A PHONE BOOK DIRECTORY RECORD Copy from a Caller ID Num ber During Caller ID reviewing, select the valid record you want to save into Phone Book Directory. Press [SAVE] softkey and “SELECT DIR.” will be prom pted. Select Personal or General Directory by pressing [OK] or [JOIN] softkey. Press [OK] or [JOIN] softkey and “NUMBER:” will be prom pted. If the num ber is correct, press [O.K.] and “NAME:” will be prom pted. If the num ber is incorrect, you m ust delete it and start over. Repeat this process for adding a “NAME”. Note: A nam e must start with an Alpha character. Press [SAVE] softkey when done and “DISTINCT RING?” will be prom pted. Follow the on screen instructions to add a distinct ring tone to this entry. W hen a call is received from this caller, the selected ring tone will be played. Entering Alphanumeric Characters: Each num eric key is assigned a set of letters and sym bols as printed on the key. Press the corresponding num ber until the desired letter is displayed. Num eric: 1 2 3 4 5 6 7 8 9 0 Characters: Space A,B,C D,E,F G,H,I J,K,L M,N,O P,Q,R,S T,U,V W ,X,Y,Z Adding Special Symbols You can also use [] or [#] to ins ert the following special sym bols in the name field. + , - . / @ : ; < = > ? { ¦ } ~ [ \ ] ^ _ ` ! ″ # $ % & ´ ( ) JOHN SMITH v 1234567890 #20 11:08P 01/18 X2 EXIT DELETE SAVE SELECT DIR. USE OK=PESONAL JOIN=GENERAL JOIN O.K. EXIT NUMBER: 1234567890╴ USE OK = END O.K. EXIT DELETE JOHN SMITH 1234567890 #1 DISTINCT RING? O.K. EXIT DELETE P H O N E B O OK D IR E CT O RY](https://usermanual.wiki/Cybiotronics/383001/User-Guide-562480-Page-40.png)
![4 0 Add a New Number/Name Press [SAVE] and then [OK] or [JOIN] during standby mode. “EM PTY LIST” appears if no records in the directory, or “# ITEM S” appears if there are # records in the directory. If the memory locations are full, the message “LIST FULL” will appear and your request is rejected. “NUMBER:” will be prom pted. Enter the num ber. Tip: 1. Press [Pause] to add a 3-second delay (pause) in the num ber field. P is displayed. 2. Press [Flash] to add a flash in the num ber field. F is displayed. After num ber entry, press [O.K.] softkey and “NAME:” is displayed. Use the digit keys to enter the nam e. If you m ake a m istake, press [DELETE] softkey and re-enter. Press [SAVE] to m ove to ring tone assignm ent. Press [O.K.] to change the ring tone. Using [▼ ] / [▲ ] to scroll through and play the ring tone. Press [SAVE] to confirm setting. REVIEW ING PHONE BOOK DIRECTORY Press [DIR.] softkey during standby m ode. Press [OK] or [JOIN] to select Personal or General Directory. Press [▼ ] / [▲ ] to review the Directory in alphabetical order. Tip: To quickly find a name and phone number, before scrolling the directory, key in the first letter of the name, and the display will jump to the first record starting with that letter. PERSONAL DIR. EMPTY LIST USE SAVE = +NEW EXIT DELETE SAVE NUMBER: 1F23P45_ O.K. EXIT DELETE NAME: JOHN SMITH EXIT DELETE SAVE RINGER 1 RINGER 2 USE =CHANGE EXIT SAVE PERSONAL DIR. 40 ITEMS USE =REVIEW EXIT DELETE SAVE JOHN SMITH ↓ 123-123-4568 EDIT O.K. EXIT DELETE SAVE P H O N E B O OK D IR E CT O RY](https://usermanual.wiki/Cybiotronics/383001/User-Guide-562480-Page-41.png)
![4 1 EDITING A PHONE BOOK NUMBER Select the record you want to edit. W hen you see the record you want to edit displayed, press [EDIT] softkey and then edit the num ber. Press [DELETE] softkey to rem ove any error and enter the correction as needed. Press [O.K.] softkey to confirm the edited num ber. Repeat the process for “NAME”. Press [SAVE] and “DISTINCT RING?” appears on the display. Press [O.K.] if you want to change the distinct ring tone as well, or press [EXIT] to finish. “SAVED!” is displayed. W hen finished the screen will display the edited entry. Deleting an entry from a Phone Book Directory Scroll to the record to be deleted. Press [DELETE] and you will see “ENTRIES DELETED” on the display to confirm the deletion of the current record. The phone will then m ove to the next available record in the directory. Press [EXIT] to return to standby m ode. JOHN SMITH ↓ 1231234568 EDIT O.K. EXIT DELETE SAVE ENTER NUMBER: 1231234568_ O.K. EXIT DELETE JOHN SMITH_ 1231234568 EXIT DELETE SAVE JOHNNY SMITH ↓ 1231234568 EDIT O.K. EXIT DELETE SAVE JOHN SMITH v 123-123-4568 PERSONAL DIR. EDIT O.K. EXIT DELETE SAVE ENTRIES DELETED EXIT P H O N E B O OK D IR E CT O RY](https://usermanual.wiki/Cybiotronics/383001/User-Guide-562480-Page-42.png)
![4 2 DELETING ALL PHONE BOOK DIRECTORY RECORDS Press [DIR.] softkey to enter into Phone Book Directory default page. Press [DELETE] softkey and “DELETE ALL?” is displayed. To confirm the deletion of all records, press [O.K.]. To exit without deleting, press [EXIT]. DIALING FROM THE PHONE BOOK DIRECTORY During stand-by m ode, press [DIR.] and find the entry you want to call. Press [Talk] key or [O.K.] soft key to call the num ber. PERSONAL DIR. 38 ITEMS USE / =REVIEW EXIT DELETE SAVE DELETE ALL? USE OK = YES USE EXIT = NO O.K. EXIT P H O N E B O OK D IR E CT O RY](https://usermanual.wiki/Cybiotronics/383001/User-Guide-562480-Page-43.png)
![4 3 CY-383 provides a multiple handset capability which supports up to 4 handsets. Each additional handset (m odel CY-381) com es with a charging cradle you can plug into any electrical outlet. No extra phone jack is required. Many extra functions becom e possible when there are m ore than one handset in your system . Register the additional handsets (CY-381) see page 16. INTERCOM Handset-to-Handset two-way intercom is operated independent of the base unit. It is possible to make an intercom call between two handsets while another handset is engaging the external line. W hen a HS is in standby m ode, press [Int.] key, LCD display shows all the other available handsets in range of the base unit. Using the [▼ ] / [▲ ] keys to m ove to the handset you want to intercom with and then press [OK]. For instance, if HS (2) is being paged by HS (1), then HS (1) LCD display shows “PAGING HS (2) Handset (2) will ring and display “PAGING FROM HS (1)”. Press [Talk], [Int.] or [O.K.] on the called handset to answer the intercom. If you do not want to answer it, press [EXIT] soft key and the ringing will stop. HS (2) HS (3) O.K. EXIT PAGING HS (2) EXIT PAGING FROM HS (1) EXIT INTERCOM HS (2) HS (1) VOL-2 EXIT MU LT I- H ANDSET O PERAT IO N](https://usermanual.wiki/Cybiotronics/383001/User-Guide-562480-Page-44.png)
![4 4 CALL TRANSFER CY-383 cordless phone allows you to transfer calls between handsets. Blind Transfer You can transfer a call to another handset without advance notice. When the handset is engaged in an external call. Press [Int.] and scroll to the name of the handset you want to transfer the call to. Press [O.K.] to transfer. If you did this from HS (1) to HS (2) then HS (2) rings and “TRANSFER FROM HS (1)” is displayed. Press [talk] or [O.K.] to take the line. If you are busy and do not want to take the line, press [EXIT] softkey to reject the transferred call. The call will then be returned to the original handset. The original handset will ring and displays “CALL BACK”. Press [O.K.] to take back the call or press [EXIT] to end the call. Announced Transfer You can talk to the other handset before transferring the call to the recipient. When the handset is engaged in an external call. Press [HOLD] soft key to put the call on hold. Press [Int.] and scroll to the name of the handset you want to transfer the call to. Press [O.K.]. If you did this from HS (1) to HS (2) then HS (2) rings and “PAGING FROM HS (1)” is displayed. Press [Talk], [Int.] or [O.K.] to take the internal call. Note: If Intercom auto answer is set, no need to press any key and the speakerphone m ode will be activated. CALL ON HOLD v HS (2) HS (3) O.K. EXIT SAVE SERVICE M ENU DIR. DIAL V.M . TRANSFER FROM HS (1) O.K. EXIT SAVE SERVICE M ENU DIR. DIAL V.M . MESSAGES HS (2) 03:55PM 01/15 SAVE SERVICE M ENU DIR. DIAL V .M. SAVE SERVICE M ENU DIR. DIAL V.M . CALL BACK O.K. EXIT SAVE SERVICE M ENU DIR. DIAL V.M . CALL ON HOLD HOLD SAVE SERVICE M ENU DIR. DIAL V.M . CALL ON HOLD v HS (2) HS (3) O.K. EXIT SAVE SERVICE M ENU DIR. DIAL V.M . INTERCOM HOLD HS (2) HS (1) VOL-2 EXIT SAVE SERVICE M ENU DIR. DIAL V.M . MU LT I- H ANDSET O PERAT IO N](https://usermanual.wiki/Cybiotronics/383001/User-Guide-562480-Page-45.png)
![4 5 If you are busy and do not want to answer the call, press [EXIT] softkey to reject the paging call. The ring will be stopped and the handset returns to standby. If answered: After the internal conversation, press [Talk] to take the call. The external call is now completely transferred to this handset. Transferring to all handsets Following the sam e steps above, you can select to transfer the call to all handsets by selecting “ALL” after pressing the [Int.] key. All handsets in range will ring. The first one responding will set up the com m unication link. CALL CONFERENCING Your CY-383 cordless phone supports conference calls up to 4 parties : 2 handsets and 2 external calls. (For details of conferencing between 2 external calls, please refer to 3 W ay Calling Section). Multiple Party Conference Call When engaged with an external line on the handset, press [Talk] or [Spk.] key and other handset(s) will enter into a conference call. “CONFERENCE” appears on the displays. Press [Talk] on any handset to retreat from the conference. To end the call, make sure all parties have disconnected from the line. W ALKIE-TALKIE OPERATION Your CY-383 is ready to function like a walkie-talkie (FRS). It functions totally independent of the base unit. You can take a pair of handsets to use in the shopping m all or in the park. MESSAGES HS (2) 03:55PM 01/15 SAVE SERVICE M ENU DIR. DIAL V .M. SAVE SERVICE M ENU DIR. DIAL V.M . TALK VOL-2 HOLD SERVICE DIR. DIAL V.M. SAVE SERVICE M ENU DIR. DIAL V.M . 1234567 0:01:15 VOL-1 HOLD 3W AY SERVICE DIR. CONFERENCE 1 2 . MU LT I- H ANDSET O PERAT IO N](https://usermanual.wiki/Cybiotronics/383001/User-Guide-562480-Page-46.png)
![4 6 Enter into Walkie-Talkie m ode Press [MENU] soft key and using [▼ ] / [▲ ] keys scroll to the “W ALKIE-TALKIE” m enu. Press [O.K.] to confirm selection. Repeat the sam e steps on another handset. The W alkie-talkies are now ready to use. Operating Walkie-talkies Press [Talk] or [Int.] followed by the handset num ber you want to call. Both parties will ring. W hen the handset is paged, it will display “PAGING FROM HS #” Press [Talk], [Int.] or [O.K.] key and a full duplex link between 2 walkie-talkies is set up. Note: Both handsets are now detached from the base unit. Even if they are within range of the base unit, they do not respond to any paging, intercom or external line. Press [EXIT] to end the com m unication. Press [EXIT] to return to telephone-m ode. RINGER & BEEP v INTERCOM SETUP WALKIE-TALKIE O.K. EXIT SAVE SE RVICE ME N U D IR. DIA L V.M. HS (1) WALKIE-TALKIE EXIT SAVE SE RVICE ME N U D IR. DIA L V.M. HS (2) WALKIE-TALKIE EXIT SAVE SE RVICE ME N U D IR. DIA L V.M. WALKIE-TALKIE PAGING HS (2) EXIT SAVE SE RVICE ME N U D IR. DIA L V.M. PAGING FROM HS (1) WALKIE-TALKIE EXIT SAVE SE RVICE ME N U D IR. DIA L V.M. WALKIE-TALKIE HS (1) HS (2) VOL-2 EXIT SAVE SE RVICE ME N U D IR. DIA L V.M. MU LT I- H ANDSET O PERAT IO N](https://usermanual.wiki/Cybiotronics/383001/User-Guide-562480-Page-47.png)
![4 7 You phone has been pre-program m ed at the factory with an optional services dial list. DISPLAY CLASS SERVICE DIAL CODE 411 National DA 1411 RPT DIAL Activate Repeat Dialing 66 FW D ON Activate Call Forwarding 72# FW D OFF Cancel Call Forwarding 73# CALL RTN Activate Return Call 69 Note: These optional s ervices , except 1411, are accessible only if you have s ubscribed from your local telephone com pany. DIALING SERVICES In standby m ode, press [SERVICE] softkey to prom pt the pre-programm ed optional features dial lis t. Press the corresponding softkey to select the optional service you wis h to activate. Or, press [▼ ] / [▲ ] if you want to return to standby m ode. For instance, if you want to activate Repeat Dialing function, press [RPT DIAL] softke y. The dial code will be shown on the display. W hen you can hear a second dial tone, the code is accepted. Press [OFF] on the handset or return it to the cradle to hang up. 30 NEW CALLS HS (1) 10:05AM 05/15 411 R TN CALL RP T D IA L FW D O N CW O FF 66 0:00:05 VOL-2 HOLD 3WAY S E RVIC E D IR. DIAL V.M. OPT ION A L FE AT U R E S D IAL L IS T](https://usermanual.wiki/Cybiotronics/383001/User-Guide-562480-Page-48.png)
![51 This equipm ent complies with Part 68 of FCC rules and the requirem ents adopted by the ACTA. On the b ottom of this equipment is a label that contains, am ong other inform ation, a product identifier in the form at US:CACW100B383001. If requested, this num ber m ust be provided to the telephone com pany. The REN is used to determ ine the num ber of devices that may be connected to a telephone line. Excessive RENs on a telephone line may result in the devices not ringing in response to an incoming call. In m ost but not all areas, the sum of the RENs should not exceed five (5.0). To be certain of the num ber of devices that m ay be connected to a line, as determined by the total RENs , contact the local telephone company. [For products approved after July 23, 2001, the REN for this product is part of the product identifier that has the format US:CACW100B383001. The digits repres ented by 00B are the REN without a decim al point (e.g., 03B is a REN of 0.3B). For earlier products , the REN is s eparately s hown on the label.] Should you experience trouble with this equipm ent, please contact Verizon at: 1-800-233-5961 for repair or warranty inform ation. If the equipment is causing harm to the telephone network, the telephone com pany m ay request that you disconnect the equipment until the problem is resolved. NOTICE: If your hom e has specially wired alarm equipment connected to the telephone line, ensure the installation of this equipm ent ID does not dis able your alarm equipm ent. If you have questions about what will disable alarm equipm ent, consult your telephone company or a qualified installer. If your equipm ent CY-383 causes harm to the telephone network, the telephone company will notify you in advance that tem porary discontinuance of service m ay be required. But if advance notice isn’t practical, the telephone com pany will notify the customer as soon as possible. Also, you will be advised of your right to file a com plaint with the FCC if you believe it is necess ary. The telephone com pany m ay m ake changes in its facilities, equipment, operations , or procedures that could affect the operation of the equipment. It this happens the telephone com pany will provide advance notice in order for you to m ake necess ary m odifications to maintain uninterrupted s ervice. FCC R E Q U IR E M E N T S](https://usermanual.wiki/Cybiotronics/383001/User-Guide-562480-Page-52.png)