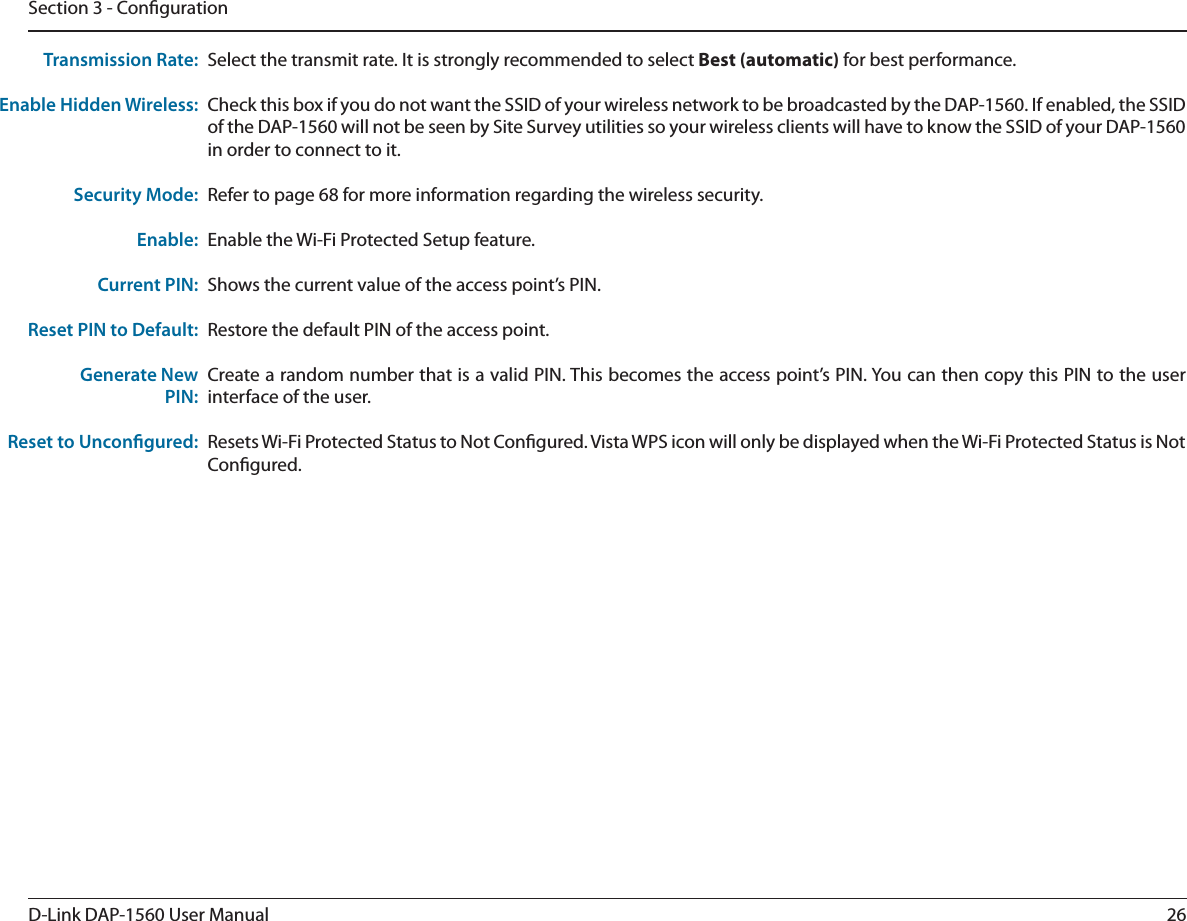
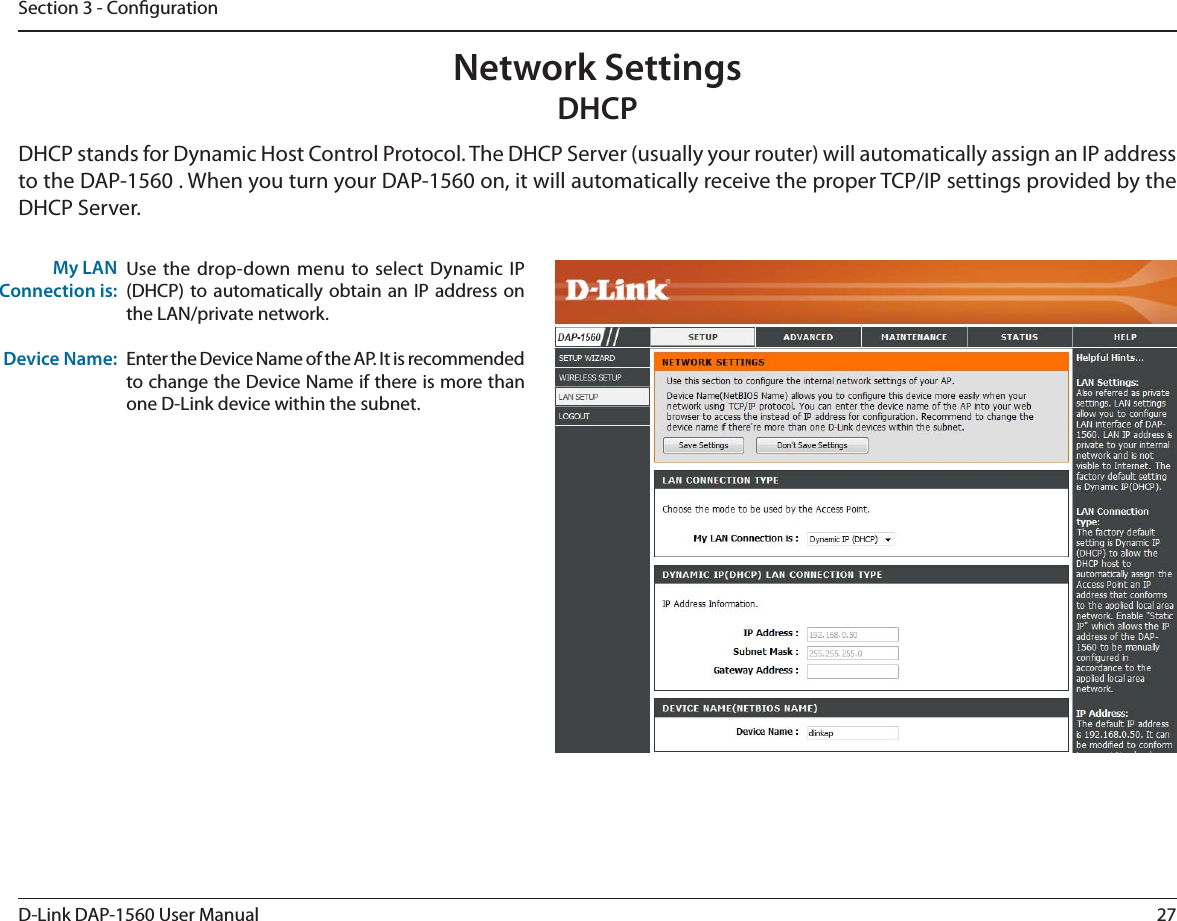
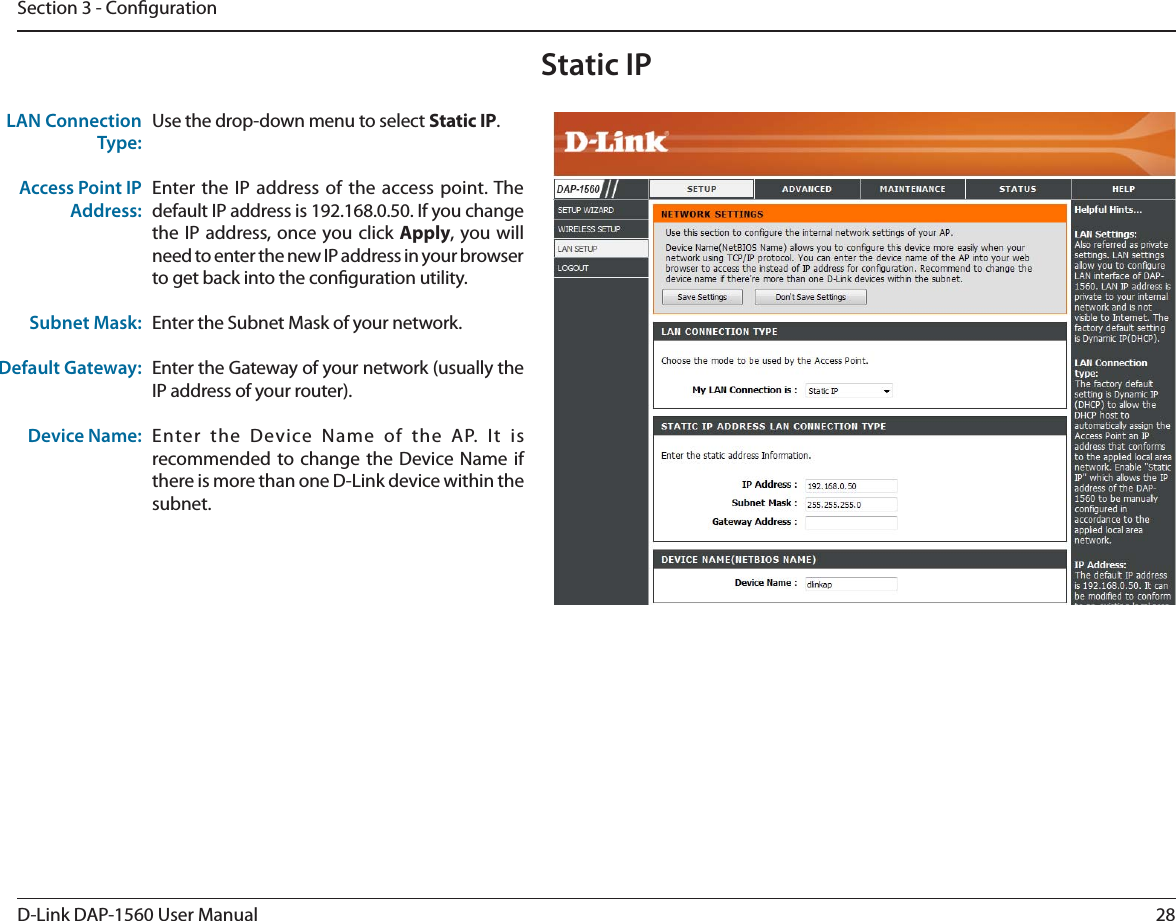
D Link AP1560A1 Media Streaming Adapter / Media Streaming Kit User Manual UserMan KA2AP1560A1

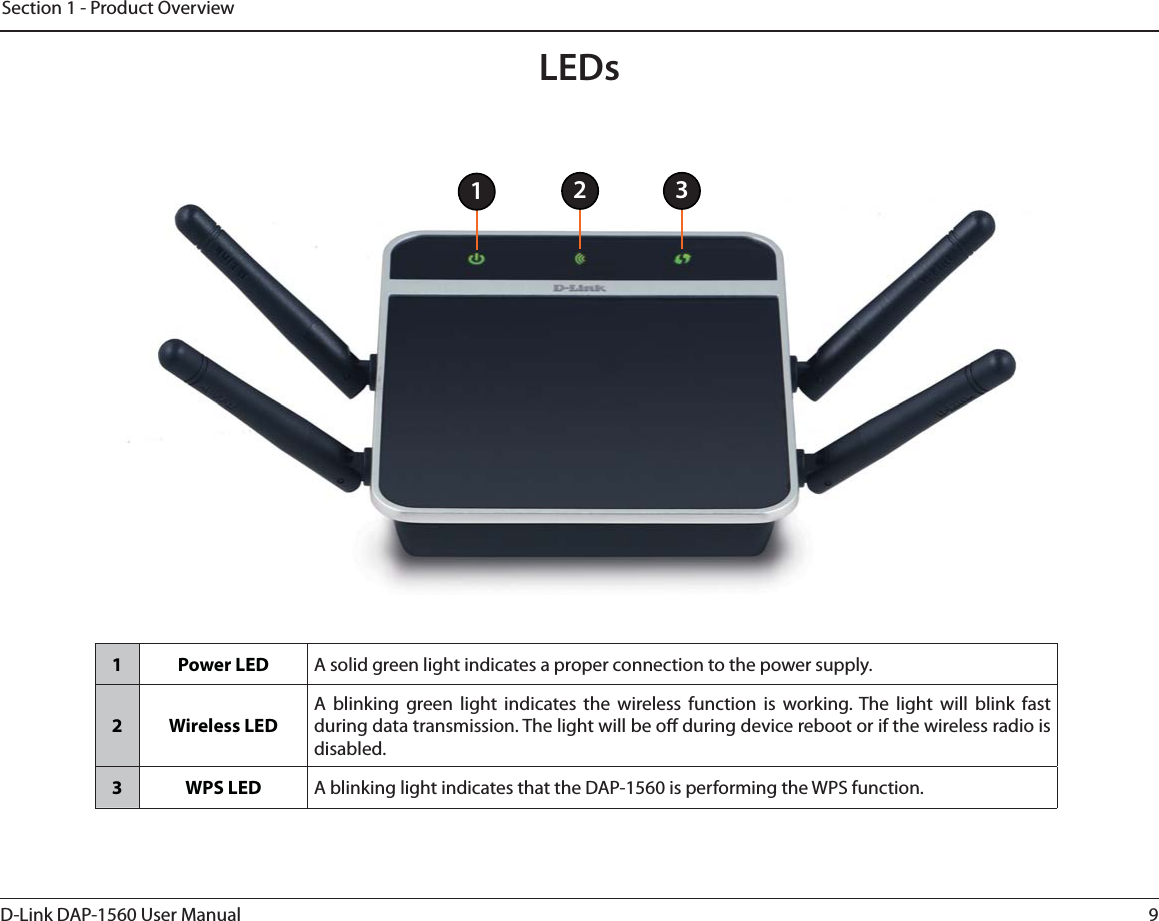
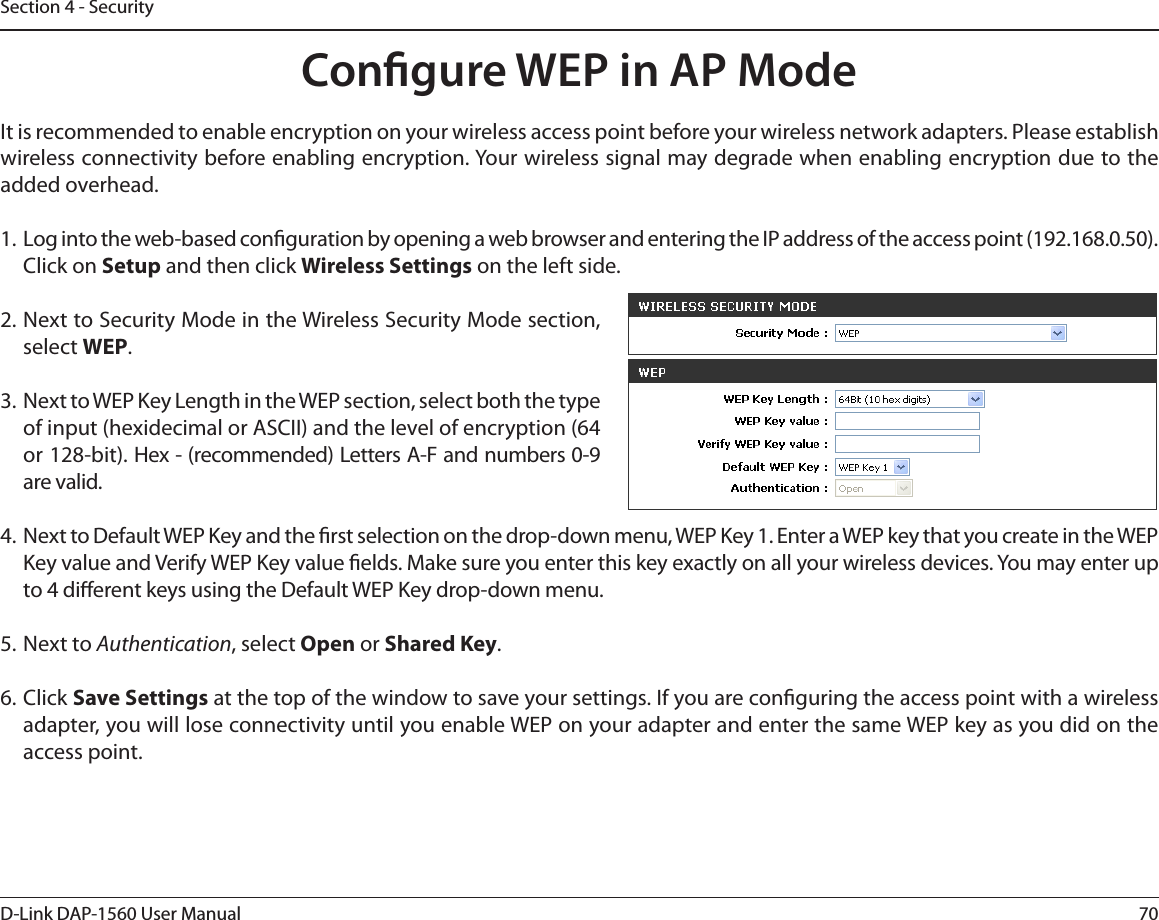
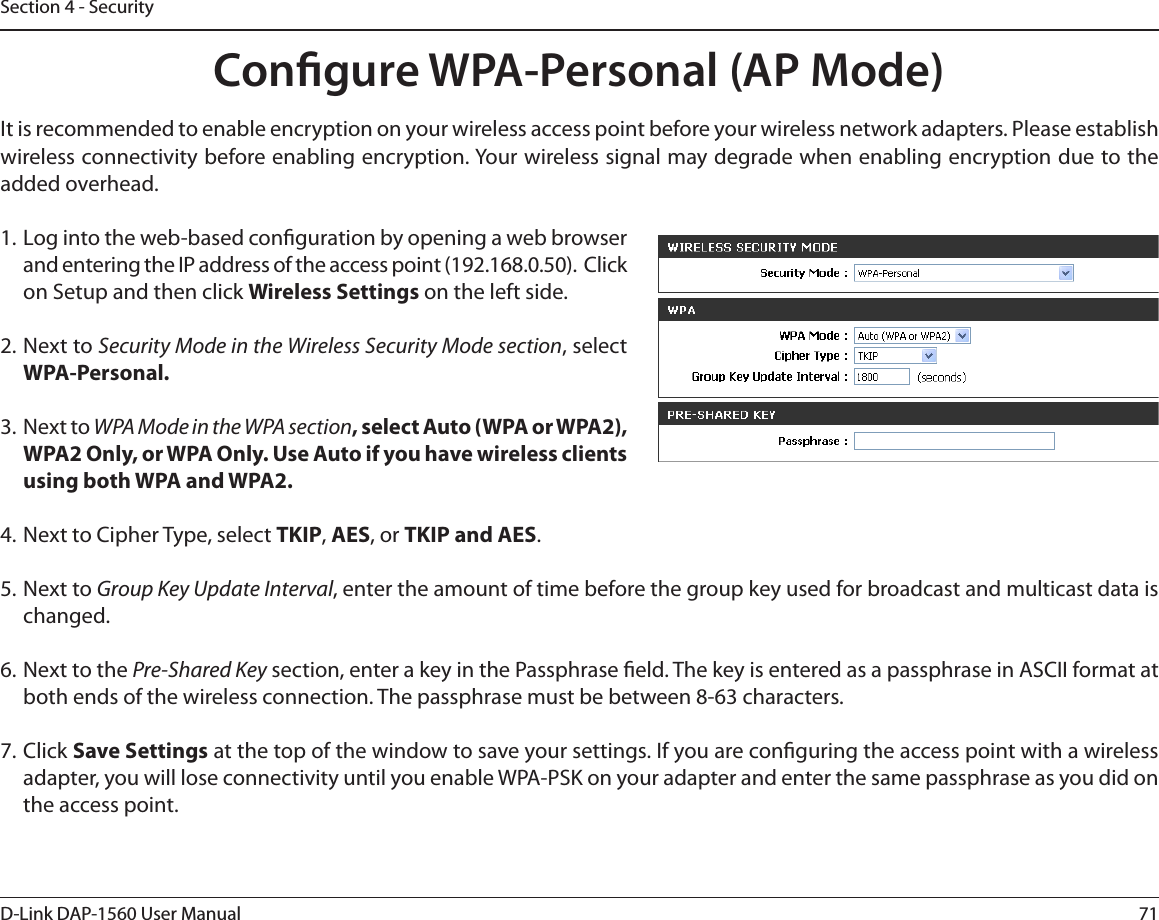
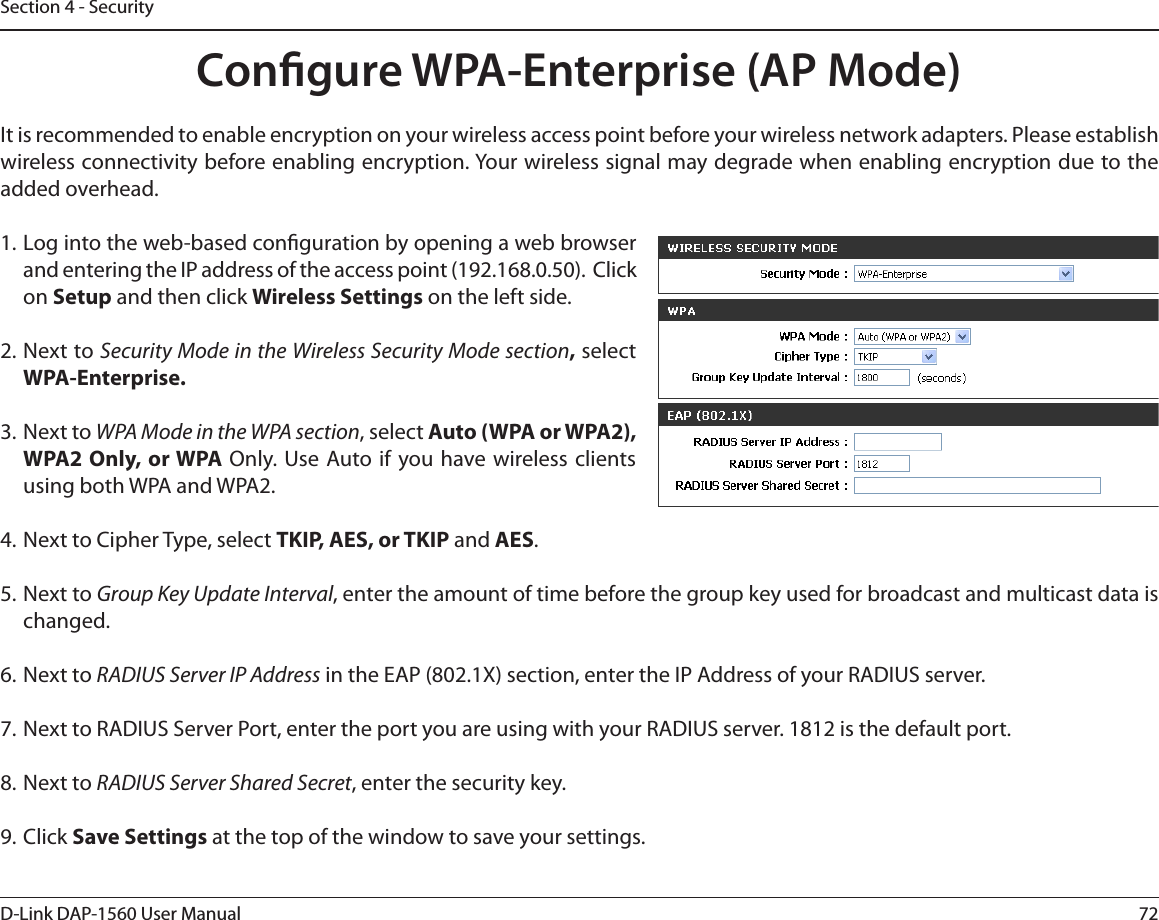
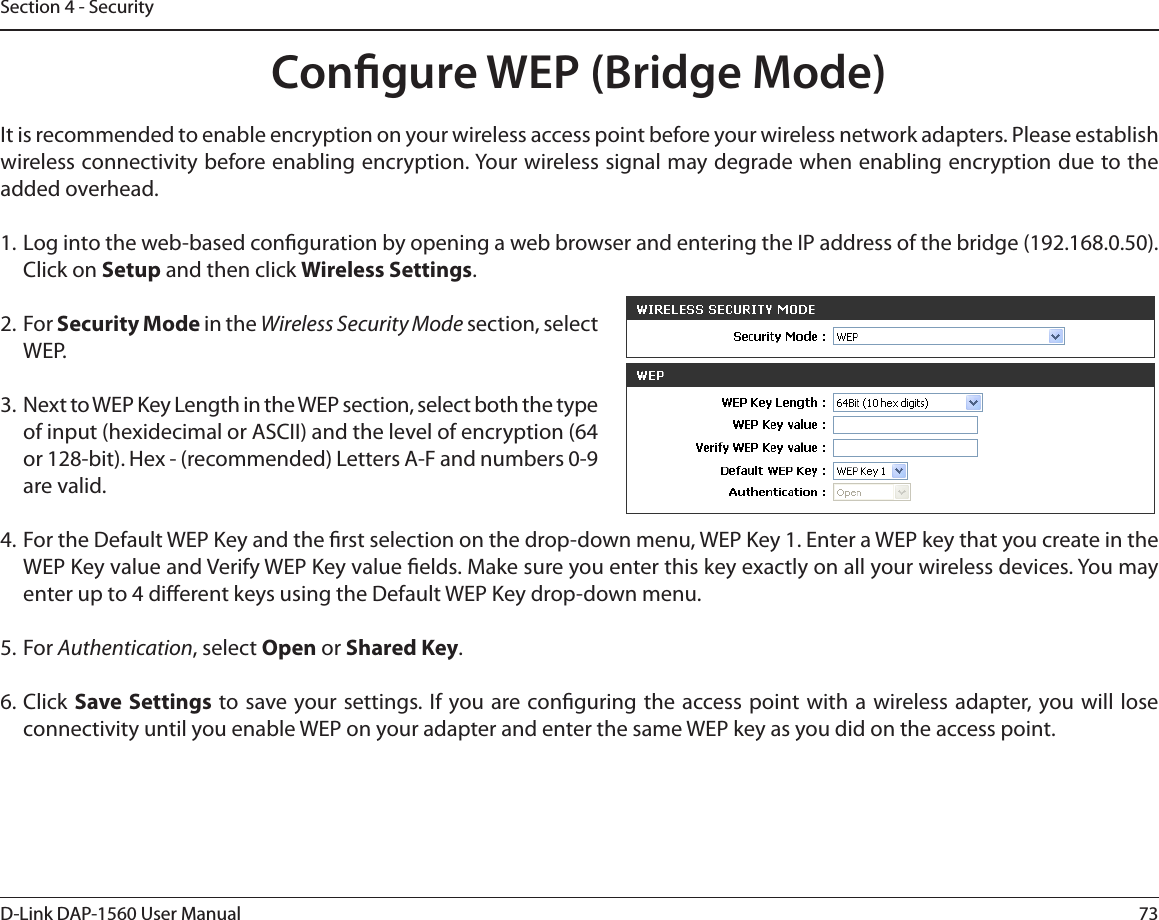
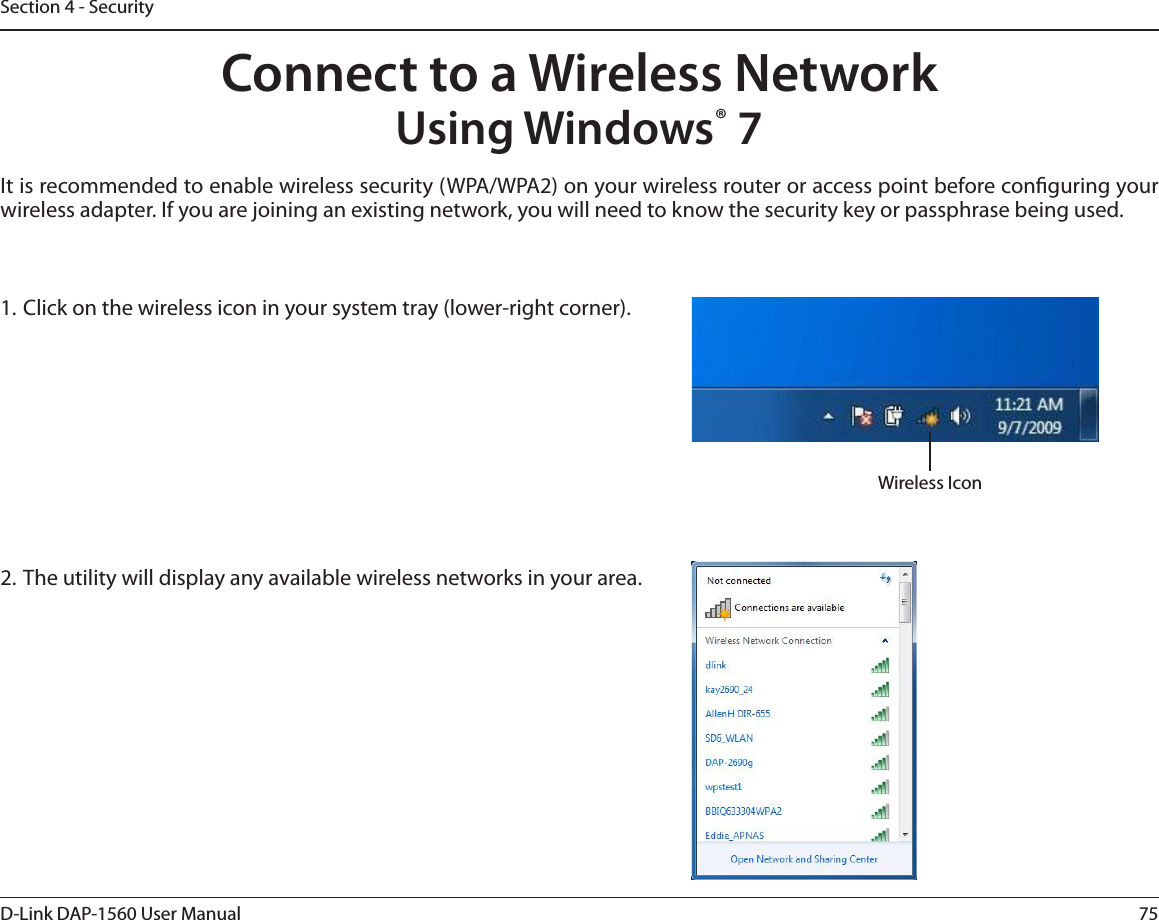
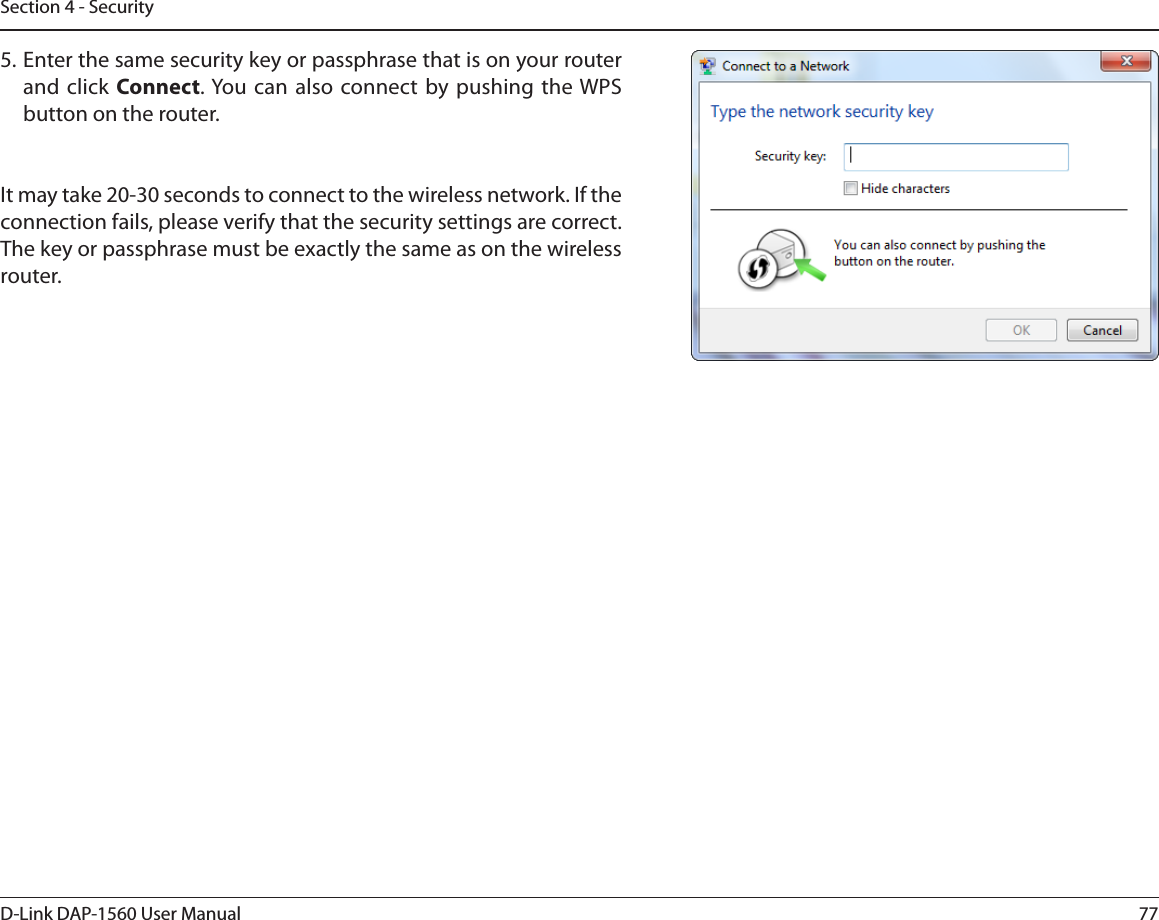
D Link Corporation Media Streaming Adapter / Media Streaming Kit UserMan KA2AP1560A1

Contents

User Manual Part 1

2D-Link DAP-1560 User ManualTable of ContentsProduct Overview.............................................................. 4Package Contents......................................................................... 4System Requirements.................................................................5Introduction ................................................................................... 6Features.................................................................................... 7Hardware Overview..................................................................... 8Connections ........................................................................... 8LEDs ........................................................................................... 9Installation .......................................................................10Wireless Modes............................................................................10AP Mode.................................................................................10Bridge Mode.........................................................................11Wireless Installation Considerations....................................13Conguration (AP Mode) ................................................14Web-based Conguration Utility..........................................14Setup Wizard ................................................................................15Wireless Setup Wizard.......................................................16Add Wireless Device With WPS ..............................................23Manual Conguration...............................................................25Wireless Settings.................................................................25Network Settings ................................................................27DHCP ..................................................................................27Static IP..............................................................................28Advanced ......................................................................................29MAC Address Filter .............................................................29Advanced Wireless .............................................................30Guest Zone............................................................................31Maintenance ................................................................................32Admin .....................................................................................32System ....................................................................................33Language Pack.....................................................................34Firmware ................................................................................34Time.........................................................................................36Schedules ..............................................................................37Watchdog ..............................................................................38Status ..............................................................................................39Device Info ............................................................................39Logs .........................................................................................40Statistics .................................................................................41Wireless ..................................................................................42Help .................................................................................................43Conguration (Bridge Mode)..........................................44Web-based Conguration Utility..........................................44Setup Wizard ........................................................................45Wireless ..................................................................................53Wireless MAC Cloning...............................................................54Network Settings ................................................................55Static...................................................................................55DHCP ..................................................................................56Advanced ......................................................................................57Advanced Wireless .............................................................57Maintenance ................................................................................58Admin .....................................................................................58Table of Contents
3D-Link DAP-1560 User ManualTable of ContentsSystem ....................................................................................59Language Pack.....................................................................60Firmware ................................................................................60Time.........................................................................................62Watchdog ..............................................................................63Status ..............................................................................................64Device Info ............................................................................64Logs .........................................................................................65Statistics .................................................................................66Help .................................................................................................67Wireless Security .............................................................68What is WEP? ................................................................................68What is WPA?................................................................................69Congure WEP in AP Mode.....................................................70Congure WPA-Personal (AP Mode)....................................71Congure WPA-Enterprise (AP Mode).................................72Congure WEP (Bridge Mode) ...............................................73Congure WPA-Personal (Bridge Mode) ............................74Connect to a Wireless Network.......................................75Using Windows® 7.......................................................................75Congure WPS.....................................................................78Using Windows Vista®................................................................82Congure WEP.....................................................................84Congure WPA-PSK............................................................85Using Windows® XP ....................................................................86Congure WEP.....................................................................87Congure WPA-PSK............................................................89Troubleshooting ..............................................................91Wireless Basics.................................................................93What is Wireless?.........................................................................94Tips...................................................................................................96Wireless Modes............................................................................97Networking Basics...........................................................98Check your IP address...............................................................98Statically Assign an IP address...............................................99Technical Specications................................................100Contacting Technical Support ......................................102Warranty.........................................................................103Registration ...................................................................110
4D-Link DAP-1560 User ManualSection 1 - Product OverviewProduct OverviewNote: Using a power supply with a dierent voltage rating than the one included with the DAP-1560 will cause damage and void the warranty for this product.Package ContentsDAP-1560 Media Streaming AdapterEthernet CablePower AdapterCD-ROM
5D-Link DAP-1560 User ManualSection 1 - Product OverviewNetwork Requirementst "O&UIFSOFUCBTFE/FUXPSLt *&&&OHXJSFMFTTDMJFOUTt *&&&BXJSFMFTTDMJFOUTt &UIFSOFUWeb-based Conguration Utility RequirementsComputer with the following:t 8JOEPXT¥.BDJOUPTIPS-JOVYCBTFEPQFSBUJOHTZTUFNt "OJOTUBMMFE&UIFSOFUBEBQUFSBrowser Requirements:t *OUFSOFU&YQMPSFS¥BOEIJHIFSt .P[JMMB'JSFGPYBOEIJHIFSt (PPHMF$ISPNFBOEIJHIFSt "QQMF4BGBSJBOEIJHIFSWindows® Users: Make sure you have the latest version of Java installed. Visit www.java.com to download the latest version.CD Installation Wizard RequirementsComputer with the following:t 8JOEPXT®7JTUB®914FSWJDF1BDLt "OJOTUBMMFE&UIFSOFUBEBQUFSt $%30.ESJWFSystem Requirements
6D-Link DAP-1560 User ManualSection 1 - Product OverviewIntroductionThe D-Link Media Streaming Adapter (DAP-1560) enable you to easily upgrade any router to support streaming of High-Denition (HD) multimedia content over a wireless connection. This device lets you create a ‘bridge’ between two dierent physical media types. This versatile kit transforms your wired device into a wireless one without the added hassle of installing Ethernet cables.5IF%"1JTUIFöSTUUSVFYTQBUJBMTUSFBNJOH8-"/POUIFNBSLFUJUVTFTBMMGPVSPGJUTBOUFOOBTUPTFOEPVUNVMUJQMFEBUBTUSFBNTTJNVMUBOFPVTMZCPPTUJOHUIFEBUBSBUFVQUP.CQTSelectable Dual Band technology enables you to stream HD videos and enjoy lag free gaming with less interference on the ()[CBOEPSDIBUFNBJMBOETVSGUIFXFCPOUIF()[CBOE.BYJNVNXJSFMFTTTJHOBMSBUFEFSJWFEGSPN*&&& 4UBOEBSEHB BOE%SBGU O TQFDJöDBUJPOT "DUVBM EBUB UISPVHIQVU XJMM WBSZ /FUXPSLDPOEJUJPOT BOEFOWJSPONFOUBMGBDUPSTJODMVEJOHWPMVNFPGOFUXPSLUSBóDCVJMEJOHNBUFSJBMTBOEDPOTUSVDUJPOBOEOFUXPSLPWFSIFBEMPXFSBDUVBMEBUBUISPVHIQVUSBUF&OWJSPONFOUBMconditions will adversely aect wireless signal range.
7D-Link DAP-1560 User ManualSection 1 - Product OverviewFeaturesHigh-Denition PerformanceThe D-Link Media Streaming Adapter (DAP-1560) enables you to easily upgrade any router to support streaming of High-Denition (HD) multimedia content over a wireless connection. Connect any Ethernet-enabled devices in your entertainment DFOUFSMJLFZPVSHBNFDPOTPMFT%JHJUBM7JEFP3FDPSEFS%73PS%JHJUBM.FEJB"EBQUFST%."UPUIF%"1UPVQHSBEFyour network and enable dual-band wireless streaming.Faster Speed and Performance5IF%"1JTUIFöSTUUSVFYTQBUJBMTUSFBNJOH8-"/POUIFNBSLFUJUVTFTBMMGPVSPGJUTBOUFOOBTUPTFOEPVUNVMUJQMFEBUBTUSFBNTTJNVMUBOFPVTMZCPPTUJOHUIFEBUBSBUFVQUP.CQTQSPWJEJOHZPVXJUIGBTUFSTQFFEBOEQFSGPSNBODFUPFOIBODFZPVSHBNJOHBOE)%WJEFPTUSFBNJOHFYQFSJFODF5IF%"1BMTPVTFT*OUFMMJHFOU"OUFOOBUFDIOPMPHZUPUSBOTNJUmultiple streams of data by bouncing multiple wireless signals o of walls and ceilings to work around obstructions and help FMJNJOBUFEFBETQPUTFOBCMJOHZPVUPSFDFJWFXJSFMFTTTJHOBMTJOUIFGBSUIFTUDPSOFSTPGZPVSIPNFBetter Wireless ExperienceSelectable dual band (2.4GHz or 5GHz) enables you to select the wireless signal that best ts your network usage. With speeds VQUP.CQTZPVDBOVTFUIFDMFBSFS()[CBOEUPTUSFBN)JHI%FöOJUJPONPWJFTBOEPUIFSNFEJBBOEFOKPZMBHGSFFHBNJOHXJUIMFTTJOUFSGFSFODFHJWJOHZPVBCFUUFSXJSFMFTTFYQFSJFODFXJUIUIFGBTUFTUTQFFETQPTTJCMFQuality of Service5IF%"1JTFRVJQQFEXJUI2VBMJUZPG4FSWJDF2P4XIJDIIFMQTPSHBOJ[FBOEQSJPSJUJ[FUIFEBUBTUSFBNTJOZPVSOFUXPSLTPZPVS7P*1)%7JEFPTUSFBNJOHBOEHBNJOHSVOTTNPPUIFSPWFSZPVSXJSFMFTTOFUXPSLGreen Ethernet Technology5IF%"1JTB%-JOL(SFFOQSPEVDUXIJDINFBOTJUIFMQTZPVDPOTFSWFFOFSHZ.BYJNVNXJSFMFTTTJHOBMSBUFEFSJWFEGSPN*&&& 4UBOEBSEHB BOE%SBGU O TQFDJöDBUJPOT "DUVBM EBUB UISPVHIQVU XJMM WBSZ /FUXPSLDPOEJUJPOT BOEFOWJSPONFOUBMGBDUPSTJODMVEJOHWPMVNFPGOFUXPSLUSBóDCVJMEJOHNBUFSJBMTBOEDPOTUSVDUJPOBOEOFUXPSLPWFSIFBEMPXFSBDUVBMEBUBUISPVHIQVUSBUF&OWJSPONFOUBMconditions will adversely aect wireless signal range.
8D-Link DAP-1560 User ManualSection 1 - Product Overview1 WPS Press the WPS button to automatically connect to a WPS-enabled wireless client.2 LAN Port $POOFDU&UIFSOFUEFWJDFTTVDIBTDPNQVUFSTTXJUDIFTBOEIVCT3 Mode Selecter Slide to the left for Access Point (AP) Mode or to the right for Bridge mode.4 Power Receptor Receptor for the supplied power adapter.5 Reset Button Hold the reset button for at least 6 seconds to reset the device back to the factory default settings. All the LEDs will turn on for 2 second and then begin the reboot process.1 2 53 4Hardware OverviewConnections
9D-Link DAP-1560 User ManualSection 1 - Product OverviewLEDs1 Power LED A solid green light indicates a proper connection to the power supply.2 Wireless LEDA blinking green light indicates the wireless function is working. The light will blink fast during data transmission. The light will be o during device reboot or if the wireless radio is disabled. 3 WPS LED A blinking light indicates that the DAP-1560 is performing the WPS function. 132
10D-Link DAP-1560 User ManualSection 2 - InstallationDepending on how you want to use your DAP-1560 will determine which mode you use. This section will help you gure out which setting works with your setup.*GZPVBMSFBEZIBWFBXJSFEPSXJSFMFTTSPVUFSBOEXBOUUPBEEB.FEJB#BOE()[XJSFMFTTUPZPVSOFUXPSLZPVXJMMOFFEUPmove the switch on the back panel of the DAP-1560 to AP. Refer to page 14 for conguration instructions.Wireless ModesComputerInternet Modem Router DAP-1560ComputerTVMedia PlayerAP ModeInstallationThis section will walk you through the installation process. Placement of the DAP-1560 is very important. Do not place the %"1JOBOFODMPTFEBSFBTVDIBTBDMPTFUDBCJOFUPSJOUIFBUUJDPSHBSBHF
11D-Link DAP-1560 User ManualSection 2 - Installation*GZPVXBOU UPXJSFMFTTMZDPOOFDUNVMUJQMF &UIFSOFUFOBCMFEEFWJDFTTVDI BTHBNF DPOTPMFTNFEJB QMBZFSTPSOFUXPSLattached storage devices you will need to move the switch on the back panel of the DAP-1560 to Bridge. Refer to page 44 for conguration instructions.SwitchDAP-1560ComputerInternet Modem RouterDigital Media PlayerNetwork TV ViewerDVRGaming ConsoleBridge Mode
12D-Link DAP-1560 User ManualSection 2 - InstallationCreate a Full MediaBand (5GHz wireless) NetworkIf you have two DAP-1560 devices and want to create a wireless network with full MediaBand technology you will need to connect one DAP-1560 to your router and move the switch on the back panel to AP. The second DAP-1560 will need to be QMBDFEOFYUUPZPVS&UIFSOFUFOBCMFEEFWJDFTBOEZPVXJMMOFFEUPNPWFUIFTXJUDIPOUIFCBDLQBOFMUPBridge.SwitchDigital Media PlayerNetwork TV ViewerDVRGaming ConsoleComputerInternet Modem Router DAP-1560 DAP-1560
13D-Link DAP-1560 User ManualSection 2 - InstallationWireless Installation ConsiderationsThe D-Link wireless access point lets you access your network using a wireless connection from virtually anywhere within the PQFSBUJOHSBOHFPGZPVSXJSFMFTTOFUXPSL,FFQJONJOEIPXFWFSUIBUUIFOVNCFSUIJDLOFTTBOEMPDBUJPOPGXBMMTDFJMJOHTPSPUIFSPCKFDUTUIBUUIFXJSFMFTTTJHOBMTNVTUQBTTUISPVHINBZMJNJUUIFSBOHF5ZQJDBMSBOHFTWBSZEFQFOEJOHPOUIFUZQFTPGNBUFSJBMTBOECBDLHSPVOE3'SBEJPGSFRVFODZOPJTFJOZPVSIPNFPSCVTJOFTT5IFLFZUPNBYJNJ[JOHXJSFMFTTSBOHFJTUPfollow these basic guidelines:1. Keep the number of walls and ceilings between the D-Link access point and other network devices to a minimum. Each wall or ceiling can reduce your adapter’s range from 3-90 feet (1-30 meters.) Position your devices so that the number of walls or ceilings is minimized.#FBXBSFPG UIF EJSFDUMJOF CFUXFFOOFUXPSLEFWJDFT" XBMM UIBUJT GFFUUIJDL NFUFSTBUB45-degree angle appears to be almost 3 feet (1 meter) thick. At a 2-degree angle it looks over 42 feet (14 meters) thick! Position devices so that the signal will travel straight through a wall or ceiling (instead of at an angle) for better reception.3. Building Materials make a dierence. A solid metal door or aluminum studs may have a negative eect on SBOHF5SZUPQPTJUJPOBDDFTTQPJOUTXJSFMFTTBDDFTTQPJOUTBOEDPNQVUFSTTPUIBUUIFTJHOBMQBTTFTUISPVHIESZXBMMPSPQFOEPPSXBZT.BUFSJBMTBOEPCKFDUTTVDIBTHMBTTTUFFMNFUBMXBMMTXJUIJOTVMBUJPOXBUFSöTIUBOLTNJSSPSTöMFDBCJOFUTCSJDLBOEDPODSFUFXJMMEFHSBEFZPVSXJSFMFTTTJHOBM4. Keep your product away (at least 3-6 feet or 1-2 meters) from electrical devices or appliances that generate RF noise.*GZPVBSFVTJOH()[DPSEMFTTQIPOFTPS9XJSFMFTTQSPEVDUTTVDIBTDFJMJOHGBOTMJHIUTBOEIPNFTFDVSJUZTZTUFNTZPVSXJSFMFTTDPOOFDUJPONBZEFHSBEFESBNBUJDBMMZPSESPQDPNQMFUFMZ.BLFTVSFZPVS()[QIPOFbase is as far away from your wireless devices as possible. The base transmits a signal even if the phone is not in use.
14D-Link DAP-1560 User ManualSection 3 - CongurationConguration (AP Mode)This section will show you how to congure your new D-Link wireless access point using the web-based conguration utility.Web-based Conguration Utility 0OUIFCBDLPGUIF%"1TMJEFUIFNPEFTFMFDUPSto the left (AP Mode).  5PBDDFTTUIF DPOGJHVSBUJPO VUJMJUZPQFOB XFCCSPXTFSTVDIBT*OUFSOFU&YQMPSFSBOEFOUFSdlinkapor 192.168.0.50 in the address eld.3. Enter admin and then enter your password. Leave the password blank by default.If you get a Page Cannot be DisplayedFSSPSQMFBTFSFGFSto the Troubleshooting section for assistance.
15D-Link DAP-1560 User ManualSection 3 - CongurationClick Launch Wireless Setup Wizard to quickly congure your access point.If you want to enter your settings without running the XJ[BSEDMJDLWIRELESS SETUP on the left side and skip to page 25.Setup Wizard
16D-Link DAP-1560 User ManualSection 3 - CongurationThis Wizard is designed to assist you in connecting your wireless device to your access point. It will guide you throughstep-by-step instructions on how to get your wireless device connected.*GZPVXBOU UPDIBOHFUIF BENJOBDDPVOUQBTTXPSEenter a new password and click Next.Wireless Setup WizardEnter the Device Name of the AP and click Next to continue. It is recommended to change the Device Name if there is more than one D-Link device within the subnet.Select Auto as the conguration method only if your wireless device supports Wi-Fi Protected Setup.Skip to page 18 for Manual conguration.Click Next to continue.
17D-Link DAP-1560 User ManualSection 3 - CongurationClick Save to save your network settings. The following screen opens to indicate that you have successfully saved your new settings.
18D-Link DAP-1560 User ManualSection 3 - CongurationSelect Manual as the conguration method to set up your network manually.Click Next to continue. Enter a network name and select Automatically assign a network key.5PNBOVBMMZBTTJHOBOFUXPSLLFZTLJQUPQBHFClick Next to continue.
19D-Link DAP-1560 User ManualSection 3 - Conguration*GZPVDIPPTF81"14,FODSZQUJPOUIFGPMMPXJOHTDSFFOwill show you your Network Key to enter on your wireless clients. Click Save to nish the Setup Wizard.*GZPVDIPPTF8&1FODSZQUJPOUIFGPMMPXJOHTDSFFOXJMMshow you your Network Key to enter on your wireless clients. Click Save to nish the Setup Wizard.
20D-Link DAP-1560 User ManualSection 3 - CongurationSelect Manually assign a network key to create your own key.Click Next to continue.'PS81" FODSZQUJPOFOUFSB/FUXPSL,FZ CFUXFFOBOEDIBSBDUFSTMPOHPSFOUFSFYBDUMZDIBSBDUFSTusing 0-9 and A-F.Click Next to continue.
21D-Link DAP-1560 User ManualSection 3 - Conguration*GZPVTFMFDU81"FODSZQUJPOUIFGPMMPXJOHTDSFFOXJMMshow you your network key to enter on your wireless clients. Click Save to nish the Setup Wizard.For WEPFODSZQUJPOFOUFSB/FUXPSL,FZFYBDUMZPSDIBSBDUFSTMPOHPSFYBDUMZPSDIBSBDUFSTVTJOH0-9 and A-F.Click Next to continue.
22D-Link DAP-1560 User ManualSection 3 - CongurationIf you select WEPFODSZQUJPOUIFGPMMPXJOHTDSFFOXJMMshow you your network key to enter on your wireless clients. Click Save to nish the Setup Wizard.
23D-Link DAP-1560 User ManualSection 3 - CongurationThis Wizard is designed to assist you in your wireless network setup. It will guide you through step-by-step instructions on how to set up your wireless network and how to make it secure.Select PIN to use your PIN number from your wireless device to connect to your network. For PBCDPOöHVSBUJPOTLJQUPUIFOFYUQBHFClick Connect to continue. Start WPS on the wireless device within 2 minutes (120 seconds) you are adding to your wireless network to complete the setup. Add Wireless Device With WPS
24D-Link DAP-1560 User ManualSection 3 - CongurationPress down the Push Button on the wireless device that you are adding to your network to complete the setup within 2 minutes (120 seconds).Select PBC to use the Push Button Conguration in order to connect to your network.Click Connect to continue.
25D-Link DAP-1560 User ManualSection 3 - CongurationEnable Wireless:Wireless Mode: Wireless Network Name:Enable Auto Channel Scan:Wireless Channel:802.11 Band:802.11  Mode:            $IFDLUIFCPYUPFOBCMFUIFXJSFMFTTGVODUJPO*GZPVEPOPUXBOUUPVTFXJSFMFTTVODIFDLUIFCPYUPEJTBCMFBMMUIFXJSFMFTTfunctions.The current wireless mode is set to Access PointJUXJMMDSFBUFBwireless infrastructure network.8IFOZPVBSFCSPXTJOHGPSBWBJMBCMFXJSFMFTTOFUXPSLTUIJTJTthe name that will appear in the list (unless Visibility Status is TFUUP*OWJTJCMFTFFCFMPX5IJTOBNFJTBMTPSFGFSSFEUPBTUIF44*%'PSTFDVSJUZQVSQPTFTJUJTIJHIMZSFDPNNFOEFEUPDIBOHFfrom the default network name.The Auto Channel Scan setting can be selected to allow the DAP-1560 to choose the channel with the least amount of interference. Indicates the channel setting for the DAP-1560. If you enable "VUP$IBOOFM4DBOUIJTPQUJPOXJMMCFHSBZFEPVUOperating frequency band. Choose 2.4GHz for visibility to legacy devices and for longer range. Choose 5GHz for least interference.*GZPVDIPPTF()[CBOEUIFOTFMFDUPOFPGUIFGPMMPXJOH802.11g Only - Select if all of your wireless clients are 802.11g.Mixed 802.11n and 802.11g - Select if you are using both 802.11n and 802.11g wireless clients.802.11n Only - Select only if all of your wireless clients are 802.11n.Mixed 802.11n, 802.11g, and 802.11b4FMFDUJGZPVBSFVTJOHOHBOECXJSFMFTTDMJFOUT*GZPVDIPPTF()[CBOEUIFOTFMFDUFJUIFS802.11a Only, 802.11n Only, or Mixed 802.11n and 802.11a.Manual CongurationWireless Settings
26D-Link DAP-1560 User ManualSection 3 - CongurationSelect the transmit rate. It is strongly recommended to select Best (automatic) for best performance.$IFDLUIJTCPYJGZPVEPOPUXBOUUIF44*%PGZPVSXJSFMFTTOFUXPSLUPCFCSPBEDBTUFECZUIF%"1*GFOBCMFEUIF44*%of the DAP-1560 will not be seen by Site Survey utilities so your wireless clients will have to know the SSID of your DAP-1560 in order to connect to it.Refer to page 68 for more information regarding the wireless security. Enable the Wi-Fi Protected Setup feature.Shows the current value of the access point’s PIN.Restore the default PIN of the access point. Create a random number that is a valid PIN. This becomes the access point’s PIN. You can then copy this PIN to the user interface of the user. Resets Wi-Fi Protected Status to Not Congured. Vista WPS icon will only be displayed when the Wi-Fi Protected Status is Not Congured.Transmission Rate:Enable Hidden Wireless:Security Mode:Enable:Current PIN:Reset PIN to Default:Generate New PIN:Reset to Uncongured:
27D-Link DAP-1560 User ManualSection 3 - CongurationNetwork SettingsDHCPDHCP stands for Dynamic Host Control Protocol. The DHCP Server (usually your router) will automatically assign an IP address UPUIF%"18IFOZPVUVSOZPVS%"1POJUXJMMBVUPNBUJDBMMZSFDFJWFUIFQSPQFS5$1*1TFUUJOHTQSPWJEFECZUIFDHCP Server.My LAN Connection is:Device Name:Use the drop-down menu to select Dynamic IP (DHCP) to automatically obtain an IP address on UIF-"/QSJWBUFOFUXPSLEnter the Device Name of the AP. It is recommended to change the Device Name if there is more than one D-Link device within the subnet.
28D-Link DAP-1560 User ManualSection 3 - CongurationLAN Connection Type:Access Point IP Address:Subnet Mask:Default Gateway:Device Name:Use the drop-down menu to select Static IP.Enter the IP address of the access point. The default IP address is 192.168.0.50. If you change UIF*1 BEESFTTPODFZPVDMJDL ApplyZPV XJMMneed to enter the new IP address in your browser to get back into the conguration utility.Enter the Subnet Mask of your network.Enter the Gateway of your network (usually the IP address of your router).Enter the Device Name of the AP. It is recommended to change the Device Name if there is more than one D-Link device within the subnet.Static IP
29D-Link DAP-1560 User ManualSection 3 - CongurationAdvancedMAC Address FilterThe MAC address lter section can be used to lter network access by machines based on the unique MAC addresses of their network adapter(s). It is most useful to prevent unauthorized wireless devices from connecting to your network. A MAC address is a unique ID assigned by the manufacturer of the network adapter. MAC Address Filter:MAC Address:When Turn MAC Filtering OFF JT TFMFDUFE."$addresses are not used to control network access. When  Turn MAC Filtering ON and ALLOW computers listed to access the networkJTTFMFDUFEonly computers with MAC addresses listed in the MAC Address List are granted network access. When Turn MAC Filtering ON and DENY computers listed to access the networkJTTFMFDUFEBOZDPNQVUFSXJUIBMAC address listed in the MAC Address List is refused access to the network. Enter the MAC address of the adapter (client) that you want to lter. Click Save Settings at the top to save the lter rule.
30D-Link DAP-1560 User ManualSection 3 - CongurationTransmit Power:Beacon Period:DTIM Interval:RTS Threshold:Fragmentation Threshold:WMM Enable:Short GI:WLAN Partition:Sets the transmit power of the antennas (LowMediumPSHigh).Beacons are packets sent by an Access Point to synchronize a wireless network. Specify a value. 100 is the default setting and is recommended. %FMJWFSZ5SBóD*OEJDBUJPO.FTTBHFJT UIFEFGBVMUsetting. A DTIM is a countdown informing clients of the OFYUXJOEPXGPSMJTUFOJOHUPCSPBEDBTUBOENVMUJDBTUmessages.This value should remain at its default setting of 2347. *GJODPOTJTUFOUEBUB øPXJT BQSPCMFNPOMZ BNJOPSmodication should be made.5IFGSBHNFOUBUJPOUISFTIPMEXIJDIJT TQFDJöFE JOCZUFTEFUFSNJOFTXIFUIFSQBDLFUTXJMMCFGSBHNFOUFE1BDLFUTFYDFFEJOHUIFCZUFTFUUJOHXJMMCFGSBHNFOUFECFGPSFUSBOTNJTTJPO2000 is the default setting.WMM is QoS for your wireless network. This will improve the quality of video and voice applications for your wireless clients.$IFDLUIJTCPYUPSFEVDFUIFHVBSEJOUFSWBMUJNFUIFSFGPSFJODSFBTJOHUIFEBUBDBQBDJUZ)PXFWFSJUJTMFTTSFMJBCMFBOENBZDSFBUFhigher data loss.Check to enable WLAN Partition. Advanced Wireless
31D-Link DAP-1560 User ManualSection 3 - CongurationEnable Guest Zone:Wireless Band:Wireless Network Name:Enable Routing Between Zones:Check to enable the Guest Zone feature. Select the schedule of time when the Guest Zone will CFBDUJWF5IF TDIFEVMFNBZ CF TFUUP "MXBZTwhich will allow the particular service to always be enabled. You can create your own times in the Tools > Schedules section.Select Auto2.4GHzPS5GHz.Enter a wireless network name (SSID) that is dierent from your main wireless network.Check to allow network connectivity between the dierent zones created. Guest ZoneThe Guest Zone feature will allow you to create temporary zones that can be used by guests to access the Internet. These zones will be separate from your main wireless network.
32D-Link DAP-1560 User ManualSection 3 - CongurationPassword:Verify Password:EnableGraphical Authentication:Enter a new password for the Administrator Login Name. The administrator can make changes to the settings.Enter the same password that you entered in the QSFWJPVTUFYUCPYJOPSEFSUPDPOöSNJUTBDDVSBDZ$IFDLUIJTCPYUPSFRVJSFVTFSTUPUZQFMFUUFSTPSnumbers from a distorted image displayed on the login screen to prevent online hackers and unauthorized users from gaining access to your router’s network settings.MaintenanceAdmin5IJTQBHFXJMMBMMPXZPVUPDIBOHFUIF"ENJOJTUSBUPSQBTTXPSE5IFBENJOJTUSBUPSQBTTXPSEIBTSFBEXSJUFBDDFTT
33D-Link DAP-1560 User ManualSection 3 - CongurationSave Settings to Local Hard Drive:Load Settings from Local Hard Drive:Restore to Factory Default Settings:Reboot the Device:Clear Language Pack:Use this option to save the current access point conguration settings to a le on the hard disk PGUIF DPNQVUFSZPVBSFVTJOH'JSTUDMJDLUIFSave CVUUPO:PVXJMMUIFOTFFBöMFEJBMPHXIFSFyou can select a location and le name for the settings. Use this option to load previously saved access QPJOUDPOöHVSBUJPOTFUUJOHT'JSTUDMJDLUIFBrowsebutton to nd a previously save le of conguration TFUUJOHT5IFODMJDL UIF Load button to transfer those settings to the access point. This option will restore all conguration settings back to the settings that were in eect at the time the access point was shipped from the factory. "OZTFUUJOHTUIBUIBWFOPUCFFOTBWFEXJMMCFMPTUincluding any rules that you have created. If you want to save the current access point conguration TFUUJOHTVTFUIFSave button above. Note: Restoring the factory default settings will not reset the Wi-Fi Protected Status to Not Congured.Click to reboot the access point.Click to clear the language pack. This will put the web UI back to English.System
34D-Link DAP-1560 User ManualSection 3 - CongurationBrowse:Upload:"GUFSZPVIBWFEPXOMPBEFEUIF OFXöSNXBSFclick Browse to locate the rmware update on your hard drive. Click Upload to complete the rmware upgrade.Once you have a firmware update on your DPNQVUFSVTF UIJTPQUJPOUP CSPXTFGPSUIFöMFand then upload the information into the access point. FirmwareYou can upgrade the rmware of the access point here. Make sure the rmware you want to use is on the local hard drive of the computer. Click on Browse to locate the rmware le to be used for the update. Please check the D-Link support website GPSöSNXBSFVQEBUFTBUIUUQTVQQPSUEMJOLDPN:PVDBOEPXOMPBEöSNXBSFVQHSBEFTUPZPVSIBSEESJWFGSPNUIJTTJUFAfter you have downloaded the new language QBDLDMJDLBrowse to locate the language pack le on your hard drive. Click Upload to complete the language pack upgrade.Language PackYou can change the language of the web UI by uploading available language packs.Browse:
35D-Link DAP-1560 User ManualSection 3 - Conguration*GZPVMPBEBMBOHVBHFQBDLBOEXPVMEMJLFUPHPCBDLUP&OHMJTIDMJDLMaintenance > System and click on ClearOFYUUPClear Language Pack.
36D-Link DAP-1560 User ManualSection 3 - CongurationTime5IF5JNF$POöHVSBUJPOPQUJPOBMMPXTZPVUPDPOöHVSFVQEBUFBOENBJOUBJOUIFDPSSFDUUJNFPOUIFJOUFSOBMTZTUFNDMPDLFrom this section you can set the time zone that you are in. Daylight Saving can also be congured to automatically adjust the time when needed.Time Zone:Daylight Saving:Enable NTP Server:NTP Server Used:Manual:Select the Time Zone from the drop-down menu.5PTFMFDU %BZMJHIU4BWJOH UJNFNBOVBMMZ DMJDLthe Enable Daylight SavingCPY/FYUVTFUIFdrop-down menu to select a Daylight Saving Oset and then enter a start date and an end date for daylight saving time.NTP is short for Network Time Protocol. NTP synchronizes computer clock times in a network PGDPNQVUFST$IFDLUIJTCPYUPVTFB/51TFSWFS5IJTXJMMPOMZDPOOFDUUPBTFSWFSPOUIF*OUFSOFUnot a local server.Enter the NTP server or select one from the drop-down menu.5PNBOVBMMZ JOQVUUIF UJNFFOUFS UIF WBMVFTJOUIFTFöFMETGPSUIF:FBS.POUI%BZ)PVS.JOVUFand Second and then click Save Settings. You can also click the Copy Your Computer’s Time Settings button at the bottom of the screen.
37D-Link DAP-1560 User ManualSection 3 - CongurationSchedulesName:Days:Time:Save:Schedule Rules List:Enter a name for your new schedule.4FMFDUBEBZBSBOHFPGEBZTPSAll Week to include every day.Check All Day - 24hrs or enter a start and end time for your schedule.Click Save to save your schedule. You must click Save Settings at the top for your schedules to go into eect.The list of schedules will be listed here. Click the Edit icon to make changes or click the Delete icon to remove the schedule.
38D-Link DAP-1560 User ManualSection 3 - CongurationWatchdog5IF8BUDIEPHGFBUVSFQJOHTBTQFDJöD*1BEESFTT*GUIF*1BEESFTTTUPQTSFTQPOEJOHUPQJOHTZPVSBDDFTTQPJOUXJMMCFSFCPPUFE:PVDBOBMTPTFMFDUBOPQUJPOUPIBWFUIFTFOEBOFNBJMBMFSUJGUIFTQFDJöFE*1BEESFTTTUPQTSFTQPOEJOHUPQJOHTEnable:Update Time Interval:Watchdog Response IP:Enable Mail Alert:SMTP Server:Sender E-mail:Receiver E-mail:EnableAuthentication:Account Name:Password:Verify Password:Check to enable Watchdog.Enter the interval to ping the entered address.Enter the IP address of a device that can respond back to the access point.Check to have the DAP-1560 email you if it cannot ping the above IP address. Syslog must be enabled for this feature to work.Enter the SMTP mail server address (IP address or URL)Enter the “From” E-mail address.Enter the E-mail address to send to.*GZPVS&NBJMTFSWFSSFRVJSFTBVUIFOUJDBUJPODIFDLUIJTCPYEnter the account name.Enter the account password.Enter the password again to verify.
39D-Link DAP-1560 User ManualSection 3 - CongurationGeneral:LAN:Wireless LAN:Displays the access point’s time and firmware version.Displays the MAC address and the private (local) IP settings for the access point.Displays the wireless MAC address and your wireless settings such as SSID and Channel.StatusDevice InfoThis page displays the current information for the DAP-1560. It will display the LAN and wireless LAN information.
40D-Link DAP-1560 User ManualSection 3 - CongurationLog Type:Apply Log Settings Now:Refresh:Clear:Save Log:There are ve types of logs that can be viewed: System ActivityDebug InformationAttacksDropped PacketsBOENotice$MJDLUIFDPSSFTQPOEJOHDIFDLCPYfor the type(s) that you want displayed in the log.Click this button to immediately lter the log results so that only the selected options appear in the Log Details section of this screen.Updates the log details on the screen so it displays any recent activity.Clear all of the log contents.This option will save the access point to a log le on your computer.LogsThe access point automatically logs (records) events of possible interest in its internal memory. If there isn’t enough internal memory GPSBMMFWFOUTMPHTPGPMEFSFWFOUTBSFEFMFUFECVUMPHTPGUIFMBUFTUFWFOUTBSFSFUBJOFE5IF-PHTPQUJPOBMMPXTZPVUPWJFXUIFaccess point logs. You can dene what types of events you want to view and the level of the events to view. This access point also IBTFYUFSOBM4ZTMPH4FSWFSTVQQPSUTPZPVDBOTFOEUIFMPHöMFTUPBDPNQVUFSPOZPVSOFUXPSLUIBUJTSVOOJOHB4ZTMPHVUJMJUZ
41D-Link DAP-1560 User ManualSection 3 - CongurationStatisticsThe Statistics page displays all of the LAN (Ethernet port) and Wireless packets transmit and receive statistics.Sent:Received:TX Packets Dropped:RX Packets Dropped:Collisions:Errors:The total number of packets sent from the access point. The total number of packets received by the access point.Displays the number of packets that were dropped XIJMFTFOEJOHEVFUPFSSPSTDPMMJTJPOTPSBDDFTTpoint resource limitations.Displays the number of packets that were dropped XIJMFSFDFJWJOHEVFUPFSSPSTDPMMJTJPOTPSBDDFTTpoint resource limitations.Displays the number of collisions.Displays the number of errors.
42D-Link DAP-1560 User ManualSection 3 - CongurationWirelessThe wireless section allows you to view the wireless clients that are connected to your wireless access point.Connection TIme:MAC Address:Displays the amount of time the wireless client has been connected to the access point.Displays the MAC address of the wireless client.
43D-Link DAP-1560 User ManualSection 3 - CongurationHelp
44D-Link DAP-1560 User ManualSection 3 - CongurationConguration (Bridge Mode)This section will show you how to congure your new D-Link wireless access point using the web-based conguration utility.Web-based Conguration Utility 0OUIFCBDLPGUIF%"1TMJEFUIFNPEFTFMFDUPSto the right (Bridge Mode).  5P BDDFTTUIF DPOGJHVSBUJPOVUJMJUZPQFOB XFCCSPXTFSTVDIBT*OUFSOFU&YQMPSFSBOEFOUFSdlinkapor 192.168.0.50 in the address eld.3. Enter admin and then enter your password. Leave the password blank by default.If you get a Page Cannot be DisplayedFSSPSQMFBTFSFGFSto the Troubleshooting section for assistance.
45D-Link DAP-1560 User ManualSection 3 - CongurationThis wizard is designed to assist you in conguring the wireless settings for your bridge. It will guide you through step-by-step instructions on how to setup your wireless network. Setup WizardEnter the Device Name of the AP and click Next to continue. It is recommended to change the Device Name if there is more than one D-Link device within the subnet.Click Launch Wireless Setup Wizard
46D-Link DAP-1560 User ManualSection 3 - CongurationSelect  Auto configuration if you want to use Wi-Fi Protected Setup. *GZPVXBOUUPTFUVQZPVSOFUXPSLNBOVBMMZTLJQUPQBHF48.Click Next to continue. *GZPVXBOU UPDIBOHFUIF BENJOBDDPVOUQBTTXPSEenter a new password and click Next.
47D-Link DAP-1560 User ManualSection 3 - CongurationStart WPS on the wireless device you are adding to you wireless network to complete the setup.Select PIN to connect your wireless device with WPS. For PBCDPOöHVSBUJPOTLJQUPUIFOFYUQBHFEnter the PIN number used into you access point and click Connect.
48D-Link DAP-1560 User ManualSection 3 - CongurationPress down the WPS Button on the wireless device you are adding to your network to complete the setup.Select  PBC to use the Push Button Conguration to connect to your network.Click Connect to continue.Select  Manual conguration to set up your network manually.Click Next to continue.
49D-Link DAP-1560 User ManualSection 3 - CongurationEnter the Wireless Network Name of the AP or click the Site Survey button to nd the AP.Click Next to continue.
50D-Link DAP-1560 User ManualSection 3 - CongurationIf you clicked on Site SurveyUIFGPMMPXJOHTDSFFOXJMMbe displayed. Find your access point from the list and click Connect to complete the Setup Wizard.Choose which Security Mode you want to use and click Next to continue.
51D-Link DAP-1560 User ManualSection 3 - CongurationIf you choose WEPFOUFSUIFXJSFMFTTTFDVSJUZQBTTXPSEand click Next to complete the Setup Wizard.If you choose WPAFOUFSUIFWPA Personal Passphrase and click Next to complete the Setup Wizard.*GZPVDIPPTF81"FOUFSUIF81"1FSTPOBM1BTTQISBTFand click Next to complete the Setup Wizard.
52D-Link DAP-1560 User ManualSection 3 - CongurationThe following screen opens to indicate that you have successfully saved your new settings.
53D-Link DAP-1560 User ManualSection 3 - CongurationWireless Mode:Site Survey:Wireless Type:Wireless Network Name:Wireless Channel:802.11 Band802.11 Mode: Transmission Rate:Channel Width:Wireless Client will be displayed.Click to display available wireless networks within range of the DAP-1560. Select the network you want to connect to and enter any security settings required. Select  Infrastructure if connecting to a wireless router or access point (most common) or Ad-Hoc if connecting directly to another wireless client in Ad-Hoc mode.*GZPVEJE OPUVTFUIF 4JUF4VSWFZPQUJPO FOUFS UIF44*% PSOFUXPSLOBNF FYBDUMZ BT JUJTTFU PO ZPVSXJSFMFTTSPVUFSPSaccess point.Indicates the channel setting for the DAP-1560. The Channel can CFDIBOHFEUPöUUIFDIBOOFMTFUUJOHGPSBOFYJTUJOHXJSFMFTTnetwork or to customize the wireless network (Ad-Hoc mode). 5IFPQUJPOTJODMVEF()[()[BOE()[()[If all of the wireless devices in your wireless network can DPOOFDUJOUIF TBNF USBOTNJTTJPONPEFZPVDBO JNQSPWFperformance slightly by choosing the appropriate “Only” mode. If you have some devices that use a dierent transmission NPEFDIPPTFUIFBQQSPQSJBUFi.JYFEwNPEFSelect the transmit rate. It is strongly suggested to select Best (automatic) for best performance. This option is unavailable in Bridge Mode.Select the Channel Width:Auto 20/40 - Select if you are using both 802.11n and non-802.11n wireless devices.20MHz - Select if you are not using any 802.11n wireless clients.Wireless
54D-Link DAP-1560 User ManualSection 3 - CongurationSecurity Mode:Enable:Refer to page 68 for more information regarding wireless security.Enable the Wi-Fi Protected Setup feature.Enabling this option allows the user to manually assign the source MAC address to packets forwarded by the DAP-1560. If OPUNBOVBMMZBTTJHOFEUIFQBDLFUTTPVSDF."$BEESFTTöFMEXJMMCFBVUPNBUJDBMMZTFMFDUFEBTUIF%"1T."$BEESFTTWireless MAC CloningMAC Address:Scan:Enter the desired MAC address connected to your DAP-1560 to enable the clone function. Click the Scan button to search for all available devices connected to your DAP-1560’s Ethernet ports
55D-Link DAP-1560 User ManualSection 3 - CongurationLAN Connection Type:Access Point IP Address:Subnet Mask: Default Gateway:Device Name:Use the drop-down menu to select Static IP if you XBOUUP NBOVBMMZBTTJHOUIF *1BEESFTTTVCOFUNBTLBOEHBUFXBZBEESFTTFT4FMFDUDynamic IP (DHCP) to automatically receive an IP address from your DHCP server or router.Enter the IP address you want to assign the bridge.Enter the Subnet Mask you want to assign the bridge.Enter the Gateway you want to assign the bridge.Enter the Device Name of the AP and click Next to continue. It is recommended to change the Device Name if there is more than one D-Link device within the subnet.This section will allow you to change the local network settings of the bridge and to congure the Static settings.Network SettingsStatic
56D-Link DAP-1560 User ManualSection 3 - CongurationDHCPSelect DHCP to automatically obtain an IP address POUIF-"/QSJWBUFOFUXPSLEnter the Device Name of the AP and click Next to continue. It is recommended to change the Device Name if there is more than one D-Link device within the subnet.LAN Connection Type:Device Name:
57D-Link DAP-1560 User ManualSection 3 - CongurationTransmit Power:RTS Threshold:Fragmentation Threshold:Short GI:Set the transmit power of the antennas.This value should remain at its default setting of *GJODPOTJTUFOUEBUBøPXJTBQSPCMFNPOMZBminor modication should be made.5IFGSBHNFOUBUJPOUISFTIPMEXIJDIJT TQFDJöFEJOCZUFTEFUFSNJOFTXIFUIFSQBDLFUT XJMM CFGSBHNFOUFE1BDLFUTFYDFFEJOHUIF CZUFsetting will be fragmented before transmission. 2346 is the default setting.$IFDLUIJTCPYUPSFEVDFUIFHVBSEJOUFSWBMUJNFUIFSFGPSFJODSFBTJOHUIF EBUB DBQBDJUZ)PXFWFSit is less reliable and may create higher data loss.AdvancedAdvanced Wireless
58D-Link DAP-1560 User ManualSection 3 - CongurationPassword:Verify Password:Enable Graphical Authentication:Enter a new password for the Administrator Login Name. The administrator can make changes to the settings.Enter the same password that you entered in the QSFWJPVTUFYUCPYJOPSEFSUPDPOöSNJUTBDDVSBDZ$IFDLUIJTCPYUPSFRVJSFVTFSTUPUZQFMFUUFSTPSnumbers from a distorted image displayed on the login screen to prevent online hackers and unauthorized users from gaining access to your router’s network settings.MaintenanceAdmin5IJTQBHFXJMMBMMPXZPVUPDIBOHFUIF"ENJOJTUSBUPSQBTTXPSE"ENJOIBTSFBEXSJUFBDDFTT
59D-Link DAP-1560 User ManualSection 3 - CongurationSave Settings To Local Hard Drive:Load Settings From Local Hard Drive:Restore To Factory Default:Reboot The Device:Clear Language Pack:Use this option to save the current access point conguration settings to a le on the hard disk PGUIF DPNQVUFSZPV BSFVTJOH'JSTUDMJDL UIFSaveCVUUPO:PVXJMMUIFOTFFBöMFEJBMPHXIFSFyou can select a location and le name for the settings.Use this option to load previously saved access QPJOUDPOGJHVSBUJPO TFUUJOHT'JSTUDMJDLUIFBrowse button to find a previously save file PGDPOöHVSBUJPO TFUUJOHT5IFO DMJDL UIFLoadbutton to transfer those settings to the access point.This option will restore all conguration settings back to the settings that were in eect at the time the access point was shipped from the factory. Any settings that have not been saved XJMMCF MPTU JODMVEJOHBOZ SVMFTUIBUZPVIBWFcreated. If you want to save the current access QPJOUDPOöHVSBUJPOTFUUJOHTVTFUIFSave button above.Click to reboot the bridge.Click to clear the language pack. This will put the web UI back to English.System
60D-Link DAP-1560 User ManualSection 3 - CongurationBrowse:Upload:"GUFSZPVIBWFEPXOMPBEFEUIF OFXöSNXBSFclick Browse to locate the rmware update on your hard drive. Click Upload to complete the rmware upgrade.Once you have a firmware update on your DPNQVUFSVTFUIJTPQUJPOUPCSPXTFGPSUIFöMFBOEthen upload the information into the bridge.FirmwareYou can upgrade the rmware of the access point here. Make sure the rmware you want to use is on the local hard drive of the computer. Click on Browse to locate the rmware le to be used for the update. Please check the D-Link support site GPSöSNXBSFVQEBUFTBUIUUQTVQQPSUEMJOLDPN:PVDBOEPXOMPBEöSNXBSFVQHSBEFTUPZPVSIBSEESJWFGSPNUIF%-JOLsupport site.After you have downloaded the new language QBDLDMJDLBrowse to locate the language pack le on your hard drive. Click Upload to complete the language pack upgrade.Language PackYou can change the language of the web UI by uploading available language packs.Browse:
61D-Link DAP-1560 User ManualSection 3 - Conguration*GZPVMPBEBMBOHVBHFQBDLBOEXPVMEMJLFUPHPCBDLUP&OHMJTIDMJDLMaintenance > System and click on ClearOFYUUPClear Language Pack.
62D-Link DAP-1560 User ManualSection 3 - CongurationTime5IF5JNF$POöHVSBUJPOPQUJPOBMMPXTZPVUPDPOöHVSFVQEBUFBOENBJOUBJOUIFDPSSFDUUJNFPOUIFJOUFSOBMTZTUFNDMPDLFrom this section you can set the time zone that you are in. Daylight Saving can also be congured to automatically adjust the time when needed.Time Zone:Daylight Saving:Enable NTP Server:NTP Server Used:Manual:Select the Time Zone from the drop-down menu.5PTFMFDU %BZMJHIU4BWJOH UJNFNBOVBMMZ DMJDLthe Enable Daylight SavingCPY/FYUVTFUIFdrop-down menu to select a Daylight Saving Oset and then enter a start date and an end date for daylight saving time.NTP is short for Network Time Protocol. NTP synchronizes computer clock times in a network PGDPNQVUFST$IFDLUIJTCPYUPVTFB/51TFSWFS5IJTXJMMPOMZDPOOFDUUPBTFSWFSPOUIF*OUFSOFUnot a local server.Enter the NTP server or select one from the drop-down menu.5PNBOVBMMZ JOQVUUIF UJNFFOUFS UIF WBMVFTJOUIFTFöFMETGPSUIF:FBS.POUI%BZ)PVS.JOVUFand Second and then click Save Settings. You can also click the Copy Your Computer’s Time Settings button at the bottom of the screen.
63D-Link DAP-1560 User ManualSection 3 - CongurationWatchdog5IF8BUDIEPHGFBUVSFQJOHTBTQFDJöD*1BEESFTT*GUIF*1BEESFTTTUPQTSFTQPOEJOHUPQJOHTZPVSBDDFTTQPJOUXJMMCFSFCPPUFE:PVDBOBMTPTFMFDUBOPQUJPOUPIBWFUIFTFOEBOFNBJMBMFSUJGUIFTQFDJöFE*1BEESFTTTUPQTSFTQPOEJOHUPQJOHTEnable:Update Time Interval:Watchdog Response IP:Enable Mail Alert:SMTP Server:Sender E-mail:Receiver E-mail:EnableAuthentication:Account Name:Password:Verify Password:Check to enable Watchdog.Enter the interval to ping the entered address.Enter the IP address of a device that can respond back to the access point.Check to have the DAP-1560 email you if it cannot ping the above IP address. Syslog must be enabled for this feature to work.Enter the SMTP mail server address (IP address or URL)Enter the “From” E-mail address.Enter the E-mail address to send to.*GZPVS&NBJMTFSWFSSFRVJSFTBVUIFOUJDBUJPODIFDLUIJTCPYEnter the account name.Enter the account password.Enter the password again to verify.
64D-Link DAP-1560 User ManualSection 3 - CongurationDisplays the DAP-1560’s time and rmware version.Displays the MAC address and the private (local) IP settings for the access point.Displays the wireless MAC address and your wireless settings such as SSID and Channel.General:LAN:Wireless LAN:StatusDevice InfoThis page displays the current information for the DAP-1560. It will display the LAN and wireless LAN information.
65D-Link DAP-1560 User ManualSection 3 - CongurationLogsThe access point automatically logs (records) events of possible interest in its internal memory. If there isn’t enough internal NFNPSZGPSBMMFWFOUTMPHTPGPMEFSFWFOUTBSFEFMFUFECVUMPHTPGUIFMBUFTUFWFOUTBSFSFUBJOFE5IF-PHTPQUJPOBMMPXTZPVto view the access point logs. You can dene what types of events you want to view and the level of the events to view. This BDDFTTQPJOUBMTPIBTFYUFSOBM4ZTMPH4FSWFSTVQQPSUTPZPVDBOTFOEUIFMPHöMFTUPBDPNQVUFSPOZPVSOFUXPSLUIBUJTSVOOJOHa Syslog utility.Log Type:Apply Log Settings Now:Refresh:Clear:Save Log:There are ve types of logs that can be viewed: System ActivityDebug InformationAttacksDropped PacketsBOENotice. Click the corresponding check CPYGPSUIF UZQFT UIBUZPV XBOUEJTQMBZFEJOUIFlog.Click this button to immediately lter the log results so that only the selected options appear in the Log Details section of this screen.Updates the log details on the screen so it displays any recent activity.Clear all of the log contents.This option will save the access point to a log le on your computer.
66D-Link DAP-1560 User ManualSection 3 - CongurationStatisticsThe Statistics page displays all of the LAN and Wireless packets transmit and receive statistics.Sent:Received:TX Packets Dropped:RX Packets Dropped:Collisions:Errors:The total number of packets sent from the bridge. The total number of packets received by the bridge.Displays the number of packets that were dropped XIJMFTFOEJOHEVFUPFSSPSTDPMMJTJPOTPSBDDFTTQPJOUresource limitations.Displays the number of packets that were dropped XIJMFSFDFJWJOHEVFUPFSSPSTDPMMJTJPOTPSBDDFTTQPJOUresource limitations.Displays the number of collisions.Displays the number of errors.
67D-Link DAP-1560 User ManualSection 3 - CongurationHelp
68D-Link DAP-1560 User ManualSection 4 - SecurityWireless SecurityThis section will show you the dierent levels of security you can use to protect your data from intruders. The DAP-1560 oers the following types of security:t81"8J'J1SPUFDUFE"DDFTT  t81"14,1SF4IBSFE,FZt81"8J'J1SPUFDUFE"DDFTT   t81"14,1SF4IBSFE,FZt8&18JSFE&RVJWBMFOU1SJWBDZWhat is WEP?WEP stands for Wired Equivalent Privacy. It is based on the IEEE 802.11 standard and uses the RC4 encryption algorithm. WEP provides security by encrypting data over your wireless network so that it is protected as it is transmitted from one wireless device to another.5PHBJOBDDFTTUPB8&1OFUXPSLZPVNVTULOPXUIFLFZ5IFLFZJTBTUSJOHPGDIBSBDUFSTUIBUZPVDSFBUF8IFOVTJOH8&1you must determine the level of encryption. The type of encryption determines the key length. 128-bit encryption requires a MPOHFSLFZUIBOCJUFODSZQUJPO,FZTBSFEFöOFECZFOUFSJOHJOBTUSJOHJO)&9IFYBEFDJNBMVTJOHDIBSBDUFST"'PSASCII (American Standard Code for Information Interchange – alphanumeric characters) format. ASCII format is provided so you can enter a string that is easier to remember. The ASCII string is converted to HEX for use over the network. Four keys can be dened so that you can change keys easily.
69D-Link DAP-1560 User ManualSection 4 - SecurityWhat is WPA?81"PS8J'J1SPUFDUFE"DDFTTJTB8J'JTUBOEBSEUIBUXBTEFTJHOFEUPJNQSPWFUIFTFDVSJUZGFBUVSFTPG8&18JSFE&RVJWBMFOUPrivacy).  The 2 major improvements over WEP: t*NQSPWFEEBUBFODSZQUJPOUISPVHIUIF5FNQPSBM,FZ*OUFHSJUZ1SPUPDPM5,*15,*1TDSBNCMFTUIFLFZTVTJOHBIBTIJOHBMHPSJUINBOECZBEEJOHBOJOUFHSJUZDIFDLJOHGFBUVSFFOTVSFTUIBUUIFLFZTIBWFOUCFFOUBNQFSFEwith. WPA2 is based on 802.11i and uses Advanced Encryption Standard (AES) instead of TKIP.t6TFSBVUIFOUJDBUJPOXIJDIJTHFOFSBMMZNJTTJOHJO8&1UISPVHIUIFFYUFOTJCMFBVUIFOUJDBUJPOQSPUPDPM&"18&1SFHVMBUFTBDDFTTUPBXJSFMFTTOFUXPSLCBTFEPOBDPNQVUFSTIBSEXBSFTQFDJöD."$BEESFTTXIJDIJTrelatively simple to be snied out and stolen. EAP is built on a more secure public-key encryption system to ensure that only authorized network users can access the network.81"14,81"14,VTFTBQBTTQISBTFPSLFZUPBVUIFOUJDBUFZPVSXJSFMFTTDPOOFDUJPO5IFLFZJTBOBMQIBOVNFSJDQBTTXPSECFUXFFOBOEDIBSBDUFSTMPOH5IFQBTTXPSEDBOJODMVEFTZNCPMT @BOETQBDFT5IJTLFZNVTUCFUIFFYBDUTBNFLFZentered on your wireless bridge or access point.81"81"JODPSQPSBUFTVTFSBVUIFOUJDBUJPOUISPVHIUIF&YUFOTJCMF"VUIFOUJDBUJPO1SPUPDPM&"1&"1JTCVJMUPOBNPSFsecure public key encryption system to ensure that only authorized network users can access the network.
70D-Link DAP-1560 User ManualSection 4 - SecurityCongure WEP in AP ModeIt is recommended to enable encryption on your wireless access point before your wireless network adapters. Please establish wireless connectivity before enabling encryption. Your wireless signal may degrade when enabling encryption due to the added overhead.1. Log into the web-based conguration by opening a web browser and entering the IP address of the access point (192.168.0.50).  Click on Setup and then click Wireless Settings on the left side./FYUUP4FDVSJUZ.PEFJOUIF8JSFMFTT4FDVSJUZ.PEFTFDUJPOselect WEP./FYUUP8&1,FZ-FOHUIJOUIF8&1TFDUJPOTFMFDUCPUIUIFUZQFPGJOQVUIFYJEFDJNBMPS"4$**BOEUIFMFWFMPGFODSZQUJPOPSCJU)FYSFDPNNFOEFE-FUUFST"'BOEOVNCFSTare valid. /FYUUP%FGBVMU8&1,FZBOEUIFöSTUTFMFDUJPOPOUIFESPQEPXONFOV8&1,FZ&OUFSB8&1LFZUIBUZPVDSFBUFJOUIF8&1,FZWBMVFBOE7FSJGZ8&1,FZWBMVFöFMET.BLFTVSFZPVFOUFSUIJTLFZFYBDUMZPOBMMZPVSXJSFMFTTEFWJDFT:PVNBZFOUFSVQto 4 dierent keys using the Default WEP Key drop-down menu./FYUUPAuthenticationTFMFDUOpen or Shared Key.6. Click Save Settings at the top of the window to save your settings. If you are conguring the access point with a wireless BEBQUFSZPVXJMMMPTFDPOOFDUJWJUZVOUJMZPVFOBCMF8&1POZPVSBEBQUFSBOEFOUFSUIFTBNF8&1LFZBTZPVEJEPOUIFaccess point.
71D-Link DAP-1560 User ManualSection 4 - SecurityCongure WPA-Personal (AP Mode)It is recommended to enable encryption on your wireless access point before your wireless network adapters. Please establish wireless connectivity before enabling encryption. Your wireless signal may degrade when enabling encryption due to the added overhead.1. Log into the web-based conguration by opening a web browser and entering the IP address of the access point (192.168.0.50).  Click on Setup and then click Wireless Settings on the left side./FYUUPSecurity Mode in the Wireless Security Mode sectionTFMFDUWPA-Personal./FYUUPWPA Mode in the WPA section, select Auto (WPA or WPA2), WPA2 Only, or WPA Only. Use Auto if you have wireless clients using both WPA and WPA2./FYUUP$JQIFS5ZQFTFMFDUTKIPAESPSTKIP and AES./FYUUPGroup Key Update IntervalFOUFSUIFBNPVOUPGUJNFCFGPSFUIFHSPVQLFZVTFEGPSCSPBEDBTUBOENVMUJDBTUEBUBJTchanged./FYUUPUIFPre-Shared KeyTFDUJPOFOUFSBLFZJOUIF1BTTQISBTFöFME5IFLFZJTFOUFSFEBTBQBTTQISBTFJO"4$**GPSNBUBUboth ends of the wireless connection. The passphrase must be between 8-63 characters. 7. Click Save Settings at the top of the window to save your settings. If you are conguring the access point with a wireless BEBQUFSZPVXJMMMPTFDPOOFDUJWJUZVOUJMZPVFOBCMF81"14,POZPVSBEBQUFSBOEFOUFSUIFTBNFQBTTQISBTFBTZPVEJEPOthe access point.
72D-Link DAP-1560 User ManualSection 4 - SecurityIt is recommended to enable encryption on your wireless access point before your wireless network adapters. Please establish wireless connectivity before enabling encryption. Your wireless signal may degrade when enabling encryption due to the added overhead.1. Log into the web-based conguration by opening a web browser and entering the IP address of the access point (192.168.0.50).  Click on Setup and then click Wireless Settings on the left side./FYUUPSecurity Mode in the Wireless Security Mode section,select WPA-Enterprise./FYUUPWPA Mode in the WPA sectionTFMFDUAuto (WPA or WPA2), WPA2 Only, or WPA Only. Use Auto if you have wireless clients using both WPA and WPA2./FYUUP$JQIFS5ZQFTFMFDUTKIP, AES, or TKIP and AES./FYUUPGroup Key Update IntervalFOUFSUIFBNPVOUPGUJNFCFGPSFUIFHSPVQLFZVTFEGPSCSPBEDBTUBOENVMUJDBTUEBUBJTchanged./FYUUPRADIUS Server IP AddressJOUIF&"19TFDUJPOFOUFSUIF*1"EESFTTPGZPVS3"%*64TFSWFS/FYUUP3"%*644FSWFS1PSUFOUFSUIFQPSUZPVBSFVTJOHXJUIZPVS3"%*64TFSWFSJTUIFEFGBVMUQPSU/FYUUPRADIUS Server Shared SecretFOUFSUIFTFDVSJUZLFZ9. Click Save Settings at the top of the window to save your settings.Congure WPA-Enterprise (AP Mode)
73D-Link DAP-1560 User ManualSection 4 - SecurityCongure WEP (Bridge Mode)It is recommended to enable encryption on your wireless access point before your wireless network adapters. Please establish wireless connectivity before enabling encryption. Your wireless signal may degrade when enabling encryption due to the added overhead. 1. Log into the web-based conguration by opening a web browser and entering the IP address of the bridge (192.168.0.50).  Click on Setup and then click Wireless Settings.2. For Security Mode in the Wireless Security ModeTFDUJPOTFMFDUWEP./FYUUP8&1,FZ-FOHUIJOUIF8&1TFDUJPOselect both the type PGJOQVUIFYJEFDJNBMPS"4$**BOEUIFMFWFMPGFODSZQUJPOPSCJU)FYSFDPNNFOEFE-FUUFST"'BOEOVNCFSTare valid.  4. 'PSUIF%FGBVMU8&1,FZBOEUIFöSTUTFMFDUJPOPOUIFESPQEPXONFOV8&1,FZ&OUFSB8&1LFZUIBUZPVDSFBUFJOUIF8&1,FZWBMVFBOE7FSJGZ8&1,FZWBMVFöFMET.BLFTVSFZPVFOUFSUIJTLFZFYBDUMZPOBMMZPVSXJSFMFTTEFWJDFT:PVNBZenter up to 4 dierent keys using the Default WEP Key drop-down menu.5. For AuthenticationTFMFDUOpen or Shared Key.6. Click Save SettingsUPTBWFZPVSTFUUJOHT*G ZPVBSFDPOöHVSJOHUIFBDDFTTQPJOUXJUIB XJSFMFTTBEBQUFSZPVXJMMMPTFconnectivity until you enable WEP on your adapter and enter the same WEP key as you did on the access point.
74D-Link DAP-1560 User ManualSection 4 - SecurityCongure WPA-Personal (Bridge Mode)It is recommended to enable encryption on your wireless access point before your wireless network adapters. Please establish wireless connectivity before enabling encryption. Your wireless signal may degrade when enabling encryption due to the added overhead.1. Log into the web-based conguration by opening a web browser and entering the IP address of the bridge (192.168.0.50).  Click on Setup and then click Wireless Settings on the left side./FYUUPSecurity Mode in the Wireless Security Mode sectionTFMFDUWPA-Personal./FYUUPWPA Mode in the WPA sectionTFMFDUAuto (WPA  or WPA2), WPA2 Only, or WPA Only. Use Auto if you have wireless clients using both WPA and WPA2./FYUUP$JQIFS5ZQFTFMFDUTKIP, AES, or TKIP and AES./FYUUPGroup Key Update IntervalFOUFSUIFBNPVOUPGUJNFCFGPSFUIFHSPVQLFZVTFEGPSCSPBEDBTUBOENVMUJDBTUEBUBJTchanged./FYUUPUIFPre-Shared Key sectionFOUFSBLFZJOUIF1BTTQISBTFöFME5IFLFZJTFOUFSFEBTBQBTTQISBTFJO"4$**GPSNBUBUboth ends of the wireless connection. The passphrase must be between 8-63 characters. 7. Click Save Settings at the top of the window to save your settings. If you are conguring the access point with a wireless BEBQUFSZPVXJMMMPTFDPOOFDUJWJUZVOUJMZPVFOBCMF81"14,POZPVSBEBQUFSBOEFOUFSUIFTBNFQBTTQISBTFBTZPVEJEPOthe access point.
75D-Link DAP-1560 User ManualSection 4 - SecurityUsing Windows® 7*UJTSFDPNNFOEFEUPFOBCMFXJSFMFTTTFDVSJUZ81"81"POZPVSXJSFMFTTSPVUFSPSBDDFTTQPJOUCFGPSFDPOöHVSJOHZPVSXJSFMFTTBEBQUFS*GZPVBSFKPJOJOHBOFYJTUJOHOFUXPSLZPVXJMMOFFEUPLOPXUIFTFDVSJUZLFZPSQBTTQISBTFCFJOHVTFE1. Click on the wireless icon in your system tray (lower-right corner).2. The utility will display any available wireless networks in your area.Connect to a Wireless NetworkWireless Icon
76D-Link DAP-1560 User ManualSection 4 - Security3. Highlight the wireless network (SSID) you would like to connect to and click the Connect button. *GZPVHFUBHPPETJHOBMCVUDBOOPUBDDFTTUIF*OUFSOFUDIFDLZPVS5$1*1TFUUJOHTGPSZPVSXJSFMFTTBEBQUFS3FGFSUPUIF/FUXPSLJOHBasics section in this manual for more information.4. The following window appears while your computer tries to connect to the router.
77D-Link DAP-1560 User ManualSection 4 - Security5. Enter the same security key or passphrase that is on your router and click Connect. You can also connect by pushing the WPS button on the router.It may take 20-30 seconds to connect to the wireless network. If the DPOOFDUJPOGBJMTQMFBTFWFSJGZUIBUUIFTFDVSJUZTFUUJOHTBSFDPSSFDU5IFLFZPSQBTTQISBTFNVTUCFFYBDUMZUIFTBNFBTPOUIFXJSFMFTTrouter.
78D-Link DAP-1560 User ManualSection 4 - SecurityCongure WPSThe WPS feature of the DAP-1560 can be congured using Windows® 7. Carry out the following steps to use Windows® 7 to congure the WPS feature of the DAP-1560:1. Click the Start button and select Computer from the Start menu.2. Click the Network option.
79D-Link DAP-1560 User ManualSection 4 - Security3. Double-click the DAP-1560.4. Input the WPS PIN number (displayed in the WPS window on the Router’s LCD screen or in the Setup >Wireless Setup menu in the Router’s Web UI) and click Next.
80D-Link DAP-1560 User ManualSection 4 - Security5. Type a name to identify the network.5PDPOöHVSFBEWBODFETFUUJOHTDMJDLUIFJDPOClick Next to continue.
81D-Link DAP-1560 User ManualSection 4 - Security7. The following window appears while the Router is being congured.Wait for the conguration to complete.8. The following window informs you that WPS on the DAP-1560 has been setup successfully.Make a note of the security key as you may need to provide this security key if adding an older wireless device to the network in the future.9. Click Close to complete WPS setup.

Navigation menu