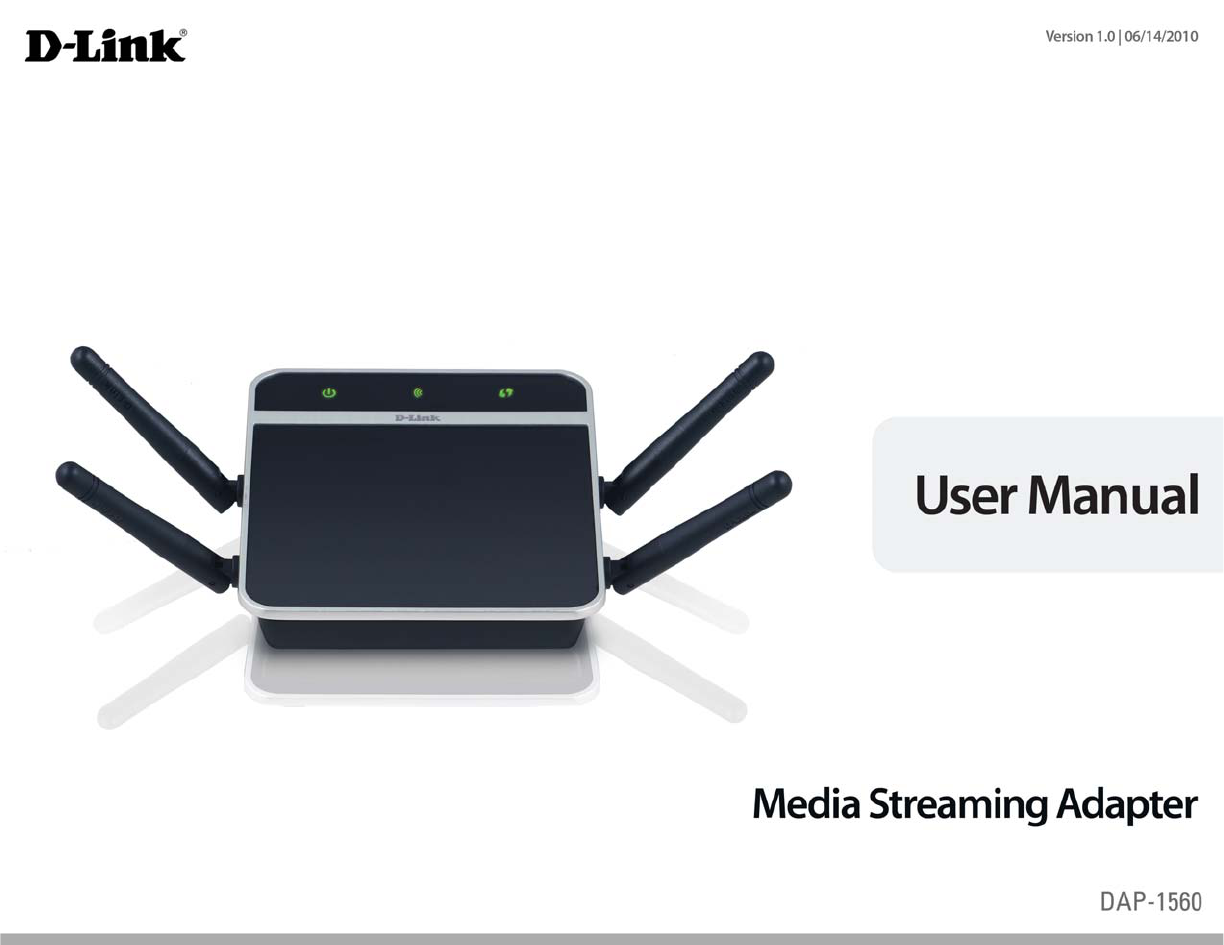
D Link AP1560A1 Media Streaming Adapter / Media Streaming Kit User Manual UserMan KA2AP1560A1
D Link Corporation Media Streaming Adapter / Media Streaming Kit UserMan KA2AP1560A1
D Link >
Contents
- 1. User Manual Part 1
- 2. User Manual Part 2
User Manual Part 1

2D-Link DAP-1560 User Manual
Table of Contents
Product Overview.............................................................. 4
Package Contents......................................................................... 4
System Requirements.................................................................5
Introduction ................................................................................... 6
Features.................................................................................... 7
Hardware Overview..................................................................... 8
Connections ........................................................................... 8
LEDs ........................................................................................... 9
Installation .......................................................................10
Wireless Modes............................................................................10
AP Mode.................................................................................10
Bridge Mode.........................................................................11
Wireless Installation Considerations....................................13
Conguration (AP Mode) ................................................14
Web-based Conguration Utility..........................................14
Setup Wizard ................................................................................15
Wireless Setup Wizard.......................................................16
Add Wireless Device With WPS ..............................................23
Manual Conguration...............................................................25
Wireless Settings.................................................................25
Network Settings ................................................................27
DHCP ..................................................................................27
Static IP..............................................................................28
Advanced ......................................................................................29
MAC Address Filter .............................................................29
Advanced Wireless .............................................................30
Guest Zone............................................................................31
Maintenance ................................................................................32
Admin .....................................................................................32
System ....................................................................................33
Language Pack.....................................................................34
Firmware ................................................................................34
Time.........................................................................................36
Schedules ..............................................................................37
Watchdog ..............................................................................38
Status ..............................................................................................39
Device Info ............................................................................39
Logs .........................................................................................40
Statistics .................................................................................41
Wireless ..................................................................................42
Help .................................................................................................43
Conguration (Bridge Mode)..........................................44
Web-based Conguration Utility..........................................44
Setup Wizard ........................................................................45
Wireless ..................................................................................53
Wireless MAC Cloning...............................................................54
Network Settings ................................................................55
Static...................................................................................55
DHCP ..................................................................................56
Advanced ......................................................................................57
Advanced Wireless .............................................................57
Maintenance ................................................................................58
Admin .....................................................................................58
Table of Contents

3D-Link DAP-1560 User Manual
Table of Contents
System ....................................................................................59
Language Pack.....................................................................60
Firmware ................................................................................60
Time.........................................................................................62
Watchdog ..............................................................................63
Status ..............................................................................................64
Device Info ............................................................................64
Logs .........................................................................................65
Statistics .................................................................................66
Help .................................................................................................67
Wireless Security .............................................................68
What is WEP? ................................................................................68
What is WPA?................................................................................69
Congure WEP in AP Mode.....................................................70
Congure WPA-Personal (AP Mode)....................................71
Congure WPA-Enterprise (AP Mode).................................72
Congure WEP (Bridge Mode) ...............................................73
Congure WPA-Personal (Bridge Mode) ............................74
Connect to a Wireless Network.......................................75
Using Windows® 7.......................................................................75
Congure WPS.....................................................................78
Using Windows Vista®................................................................82
Congure WEP.....................................................................84
Congure WPA-PSK............................................................85
Using Windows® XP ....................................................................86
Congure WEP.....................................................................87
Congure WPA-PSK............................................................89
Troubleshooting ..............................................................91
Wireless Basics.................................................................93
What is Wireless?.........................................................................94
Tips...................................................................................................96
Wireless Modes............................................................................97
Networking Basics...........................................................98
Check your IP address...............................................................98
Statically Assign an IP address...............................................99
Technical Specications................................................100
Contacting Technical Support ......................................102
Warranty.........................................................................103
Registration ...................................................................110

4D-Link DAP-1560 User Manual
Section 1 - Product Overview
Product Overview
Note: Using a power supply with a dierent voltage rating than the one included with the DAP-1560 will cause damage and void
the warranty for this product.
Package Contents
DAP-1560 Media Streaming Adapter
Ethernet Cable
Power Adapter
CD-ROM

5D-Link DAP-1560 User Manual
Section 1 - Product Overview
Network Requirements
t "O&UIFSOFUCBTFE/FUXPSL
t *&&&OHXJSFMFTTDMJFOUT
t *&&&BXJSFMFTTDMJFOUT
t &UIFSOFU
Web-based Conguration
Utility Requirements
Computer with the following:
t 8JOEPXT¥.BDJOUPTIPS-JOVYCBTFEPQFSBUJOHTZTUFN
t "OJOTUBMMFE&UIFSOFUBEBQUFS
Browser Requirements:
t *OUFSOFU&YQMPSFS¥BOEIJHIFS
t .P[JMMB'JSFGPYBOEIJHIFS
t (PPHMF$ISPNFBOEIJHIFS
t "QQMF4BGBSJBOEIJHIFS
Windows® Users: Make sure you have the latest version of Java
installed. Visit www.java.com to download the latest version.
CD Installation Wizard
Requirements
Computer with the following:
t 8JOEPXT®7JTUB®914FSWJDF1BDL
t "OJOTUBMMFE&UIFSOFUBEBQUFS
t $%30.ESJWF
System Requirements

6D-Link DAP-1560 User Manual
Section 1 - Product Overview
Introduction
The D-Link Media Streaming Adapter (DAP-1560) enable you to easily upgrade any router to support streaming of High-Denition
(HD) multimedia content over a wireless connection. This device lets you create a ‘bridge’ between two dierent physical media
types. This versatile kit transforms your wired device into a wireless one without the added hassle of installing Ethernet cables.
5IF%"1JTUIFöSTUUSVFYTQBUJBMTUSFBNJOH8-"/POUIFNBSLFUJUVTFTBMMGPVSPGJUTBOUFOOBTUPTFOEPVUNVMUJQMF
EBUBTUSFBNTTJNVMUBOFPVTMZCPPTUJOHUIFEBUBSBUFVQUP.CQT
Selectable Dual Band technology enables you to stream HD videos and enjoy lag free gaming with less interference on the
()[CBOEPSDIBUFNBJMBOETVSGUIFXFCPOUIF()[CBOE
.BYJNVNXJSFMFTTTJHOBMSBUFEFSJWFEGSPN*&&& 4UBOEBSEHB BOE%SBGU O TQFDJöDBUJPOT "DUVBM EBUB UISPVHIQVU XJMM WBSZ /FUXPSLDPOEJUJPOT BOE
FOWJSPONFOUBMGBDUPSTJODMVEJOHWPMVNFPGOFUXPSLUSBóDCVJMEJOHNBUFSJBMTBOEDPOTUSVDUJPOBOEOFUXPSLPWFSIFBEMPXFSBDUVBMEBUBUISPVHIQVUSBUF&OWJSPONFOUBM
conditions will adversely aect wireless signal range.

7D-Link DAP-1560 User Manual
Section 1 - Product Overview
Features
High-Denition Performance
The D-Link Media Streaming Adapter (DAP-1560) enables you to easily upgrade any router to support streaming of High-
Denition (HD) multimedia content over a wireless connection. Connect any Ethernet-enabled devices in your entertainment
DFOUFSMJLFZPVSHBNFDPOTPMFT%JHJUBM7JEFP3FDPSEFS%73PS%JHJUBM.FEJB"EBQUFST%."UPUIF%"1UPVQHSBEF
your network and enable dual-band wireless streaming.
Faster Speed and Performance
5IF%"1JTUIFöSTUUSVFYTQBUJBMTUSFBNJOH8-"/POUIFNBSLFUJUVTFTBMMGPVSPGJUTBOUFOOBTUPTFOEPVUNVMUJQMF
EBUBTUSFBNTTJNVMUBOFPVTMZCPPTUJOHUIFEBUBSBUFVQUP.CQTQSPWJEJOHZPVXJUIGBTUFSTQFFEBOEQFSGPSNBODFUP
FOIBODFZPVSHBNJOHBOE)%WJEFPTUSFBNJOHFYQFSJFODF5IF%"1BMTPVTFT*OUFMMJHFOU"OUFOOBUFDIOPMPHZUPUSBOTNJU
multiple streams of data by bouncing multiple wireless signals o of walls and ceilings to work around obstructions and help
FMJNJOBUFEFBETQPUTFOBCMJOHZPVUPSFDFJWFXJSFMFTTTJHOBMTJOUIFGBSUIFTUDPSOFSTPGZPVSIPNF
Better Wireless Experience
Selectable dual band (2.4GHz or 5GHz) enables you to select the wireless signal that best ts your network usage. With speeds
VQUP.CQTZPVDBOVTFUIFDMFBSFS()[CBOEUPTUSFBN)JHI%FöOJUJPONPWJFTBOEPUIFSNFEJBBOEFOKPZMBHGSFF
HBNJOHXJUIMFTTJOUFSGFSFODFHJWJOHZPVBCFUUFSXJSFMFTTFYQFSJFODFXJUIUIFGBTUFTUTQFFETQPTTJCMF
Quality of Service
5IF%"1JTFRVJQQFEXJUI2VBMJUZPG4FSWJDF2P4XIJDIIFMQTPSHBOJ[FBOEQSJPSJUJ[FUIFEBUBTUSFBNTJOZPVSOFUXPSL
TPZPVS7P*1)%7JEFPTUSFBNJOHBOEHBNJOHSVOTTNPPUIFSPWFSZPVSXJSFMFTTOFUXPSL
Green Ethernet Technology
5IF%"1JTB%-JOL(SFFOQSPEVDUXIJDINFBOTJUIFMQTZPVDPOTFSWFFOFSHZ
.BYJNVNXJSFMFTTTJHOBMSBUFEFSJWFEGSPN*&&& 4UBOEBSEHB BOE%SBGU O TQFDJöDBUJPOT "DUVBM EBUB UISPVHIQVU XJMM WBSZ /FUXPSLDPOEJUJPOT BOE
FOWJSPONFOUBMGBDUPSTJODMVEJOHWPMVNFPGOFUXPSLUSBóDCVJMEJOHNBUFSJBMTBOEDPOTUSVDUJPOBOEOFUXPSLPWFSIFBEMPXFSBDUVBMEBUBUISPVHIQVUSBUF&OWJSPONFOUBM
conditions will adversely aect wireless signal range.
8D-Link DAP-1560 User Manual
Section 1 - Product Overview
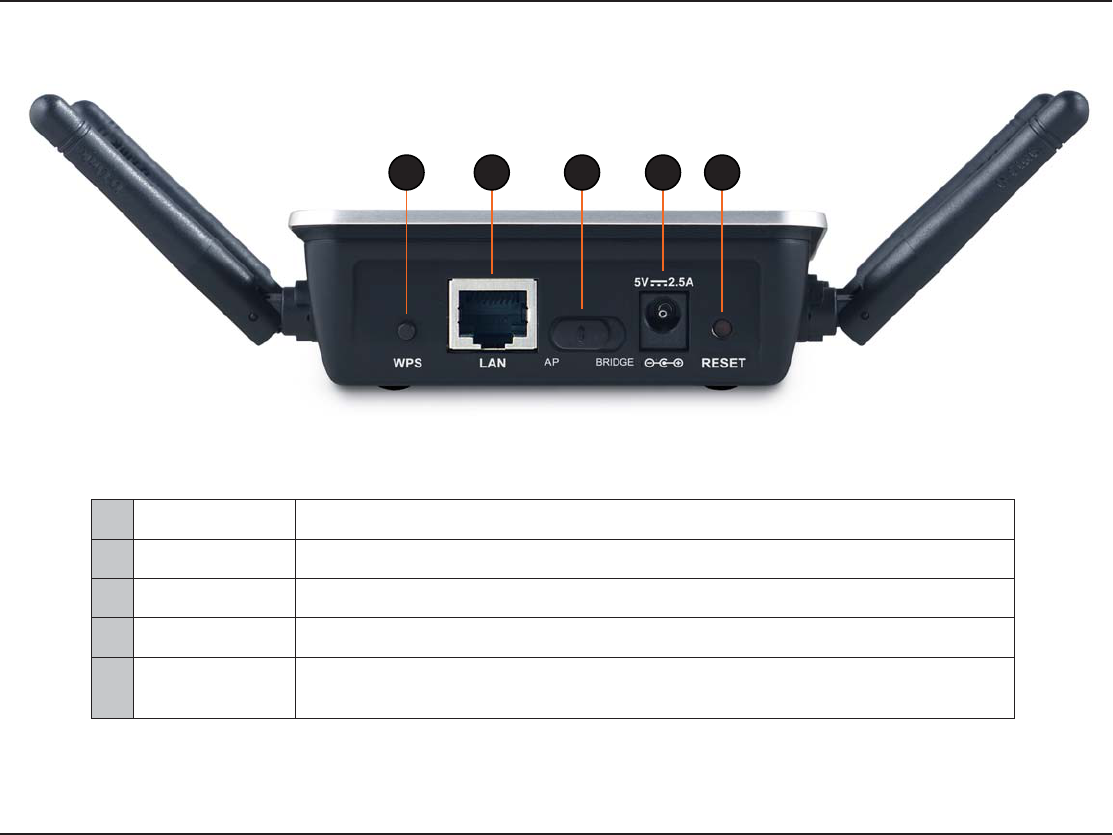
1 WPS Press the WPS button to automatically connect to a WPS-enabled wireless client.
2 LAN Port $POOFDU&UIFSOFUEFWJDFTTVDIBTDPNQVUFSTTXJUDIFTBOEIVCT
3 Mode Selecter Slide to the left for Access Point (AP) Mode or to the right for Bridge mode.
4 Power Receptor Receptor for the supplied power adapter.
5 Reset Button Hold the reset button for at least 6 seconds to reset the device back to the factory default
settings. All the LEDs will turn on for 2 second and then begin the reboot process.
1 2 53 4
Hardware Overview
Connections
9D-Link DAP-1560 User Manual
Section 1 - Product Overview
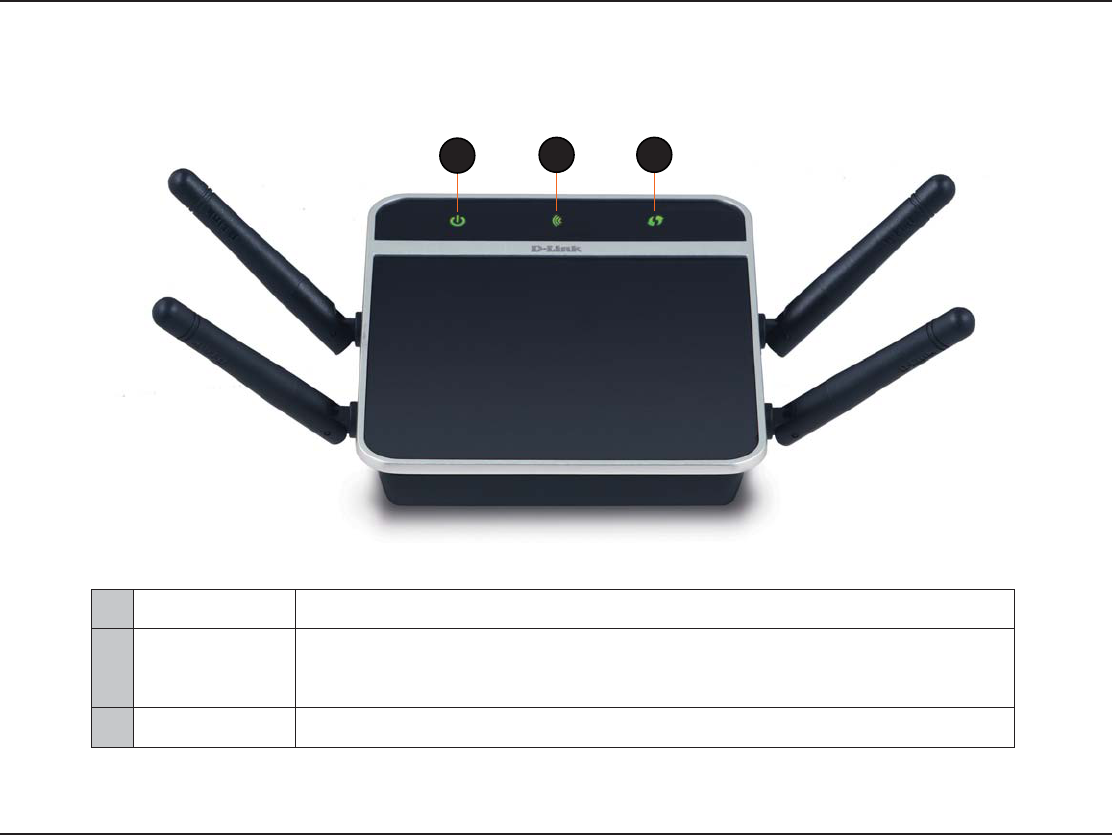
LEDs
1 Power LED A solid green light indicates a proper connection to the power supply.
2 Wireless LED
A blinking green light indicates the wireless function is working. The light will blink fast
during data transmission. The light will be o during device reboot or if the wireless radio is
disabled.
3 WPS LED A blinking light indicates that the DAP-1560 is performing the WPS function.
132
10D-Link DAP-1560 User Manual
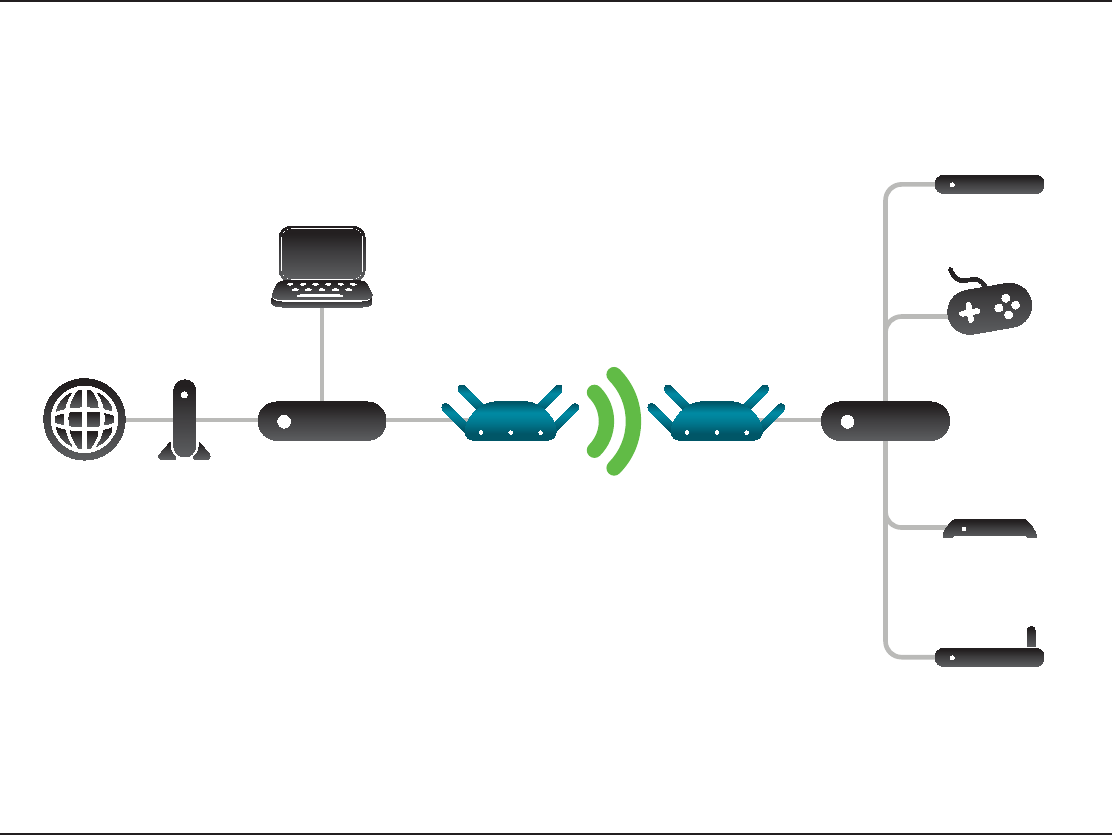
Section 2 - Installation
Depending on how you want to use your DAP-1560 will determine which mode you use. This section will help you gure out
which setting works with your setup.
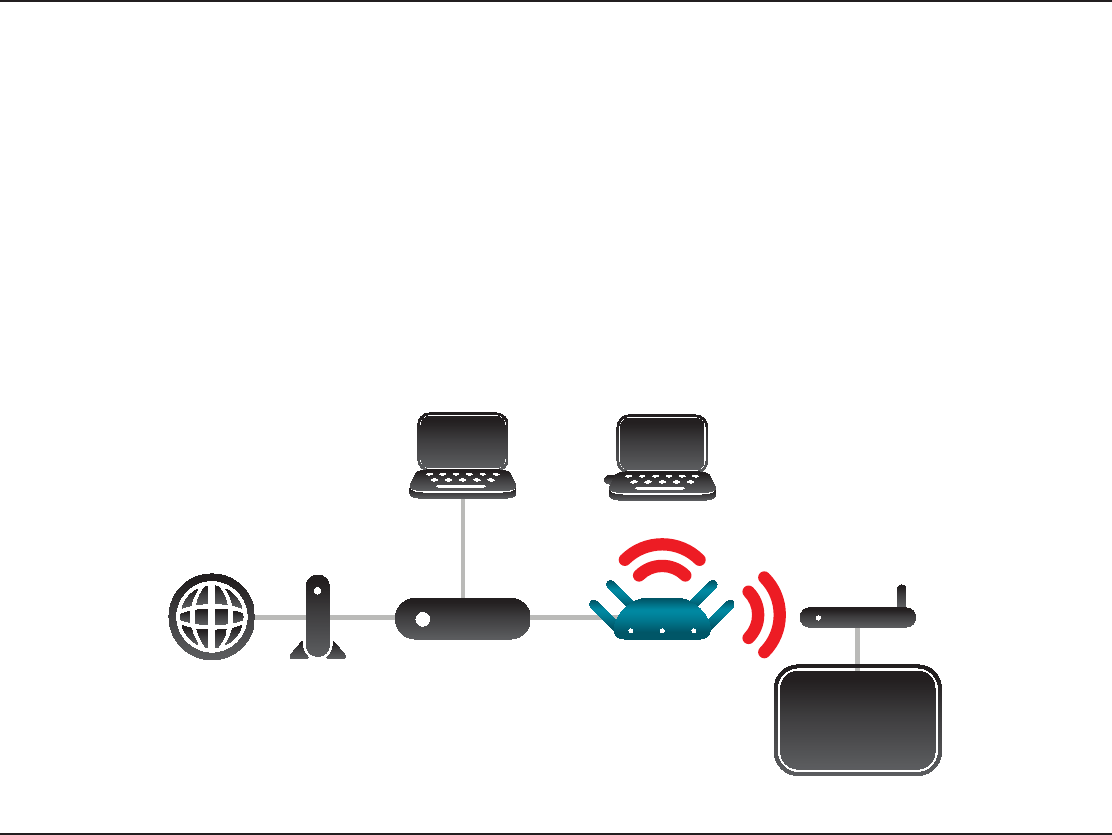
*GZPVBMSFBEZIBWFBXJSFEPSXJSFMFTTSPVUFSBOEXBOUUPBEEB.FEJB#BOE()[XJSFMFTTUPZPVSOFUXPSLZPVXJMMOFFEUP
move the switch on the back panel of the DAP-1560 to AP. Refer to page 14 for conguration instructions.
Wireless Modes
Computer
Internet Modem Router DAP-1560
Computer
TV
Media Player
AP Mode
Installation
This section will walk you through the installation process. Placement of the DAP-1560 is very important. Do not place the
%"1JOBOFODMPTFEBSFBTVDIBTBDMPTFUDBCJOFUPSJOUIFBUUJDPSHBSBHF

11D-Link DAP-1560 User Manual
Section 2 - Installation
*GZPVXBOU UPXJSFMFTTMZDPOOFDUNVMUJQMF &UIFSOFUFOBCMFEEFWJDFTTVDI BTHBNF DPOTPMFTNFEJB QMBZFSTPSOFUXPSL
attached storage devices you will need to move the switch on the back panel of the DAP-1560 to Bridge. Refer to page 44 for
conguration instructions.
SwitchDAP-1560
Computer
Internet Modem Router
Digital Media Player
Network TV Viewer
DVR
Gaming Console
Bridge Mode
12D-Link DAP-1560 User Manual
Section 2 - Installation
Create a Full MediaBand (5GHz wireless) Network
If you have two DAP-1560 devices and want to create a wireless network with full MediaBand technology you will need to
connect one DAP-1560 to your router and move the switch on the back panel to AP. The second DAP-1560 will need to be
QMBDFEOFYUUPZPVS&UIFSOFUFOBCMFEEFWJDFTBOEZPVXJMMOFFEUPNPWFUIFTXJUDIPOUIFCBDLQBOFMUPBridge.
Switch
Digital Media Player
Network TV Viewer
DVR
Gaming Console
Computer
Internet Modem Router DAP-1560 DAP-1560

13D-Link DAP-1560 User Manual
Section 2 - Installation
Wireless Installation Considerations
The D-Link wireless access point lets you access your network using a wireless connection from virtually anywhere within the
PQFSBUJOHSBOHFPGZPVSXJSFMFTTOFUXPSL,FFQJONJOEIPXFWFSUIBUUIFOVNCFSUIJDLOFTTBOEMPDBUJPOPGXBMMTDFJMJOHT
PSPUIFSPCKFDUTUIBUUIFXJSFMFTTTJHOBMTNVTUQBTTUISPVHINBZMJNJUUIFSBOHF5ZQJDBMSBOHFTWBSZEFQFOEJOHPOUIFUZQFT
PGNBUFSJBMTBOECBDLHSPVOE3'SBEJPGSFRVFODZOPJTFJOZPVSIPNFPSCVTJOFTT5IFLFZUPNBYJNJ[JOHXJSFMFTTSBOHFJTUP
follow these basic guidelines:
1. Keep the number of walls and ceilings between the D-Link access point and other network devices to a minimum.
Each wall or ceiling can reduce your adapter’s range from 3-90 feet (1-30 meters.) Position your devices so that
the number of walls or ceilings is minimized.
#FBXBSFPG UIF EJSFDUMJOF CFUXFFOOFUXPSLEFWJDFT" XBMM UIBUJT GFFUUIJDL NFUFSTBUB
45-degree angle appears to be almost 3 feet (1 meter) thick. At a 2-degree angle it looks over 42 feet (14 meters)
thick! Position devices so that the signal will travel straight through a wall or ceiling (instead of at an angle) for
better reception.
3. Building Materials make a dierence. A solid metal door or aluminum studs may have a negative eect on
SBOHF5SZUPQPTJUJPOBDDFTTQPJOUTXJSFMFTTBDDFTTQPJOUTBOEDPNQVUFSTTPUIBUUIFTJHOBMQBTTFTUISPVHI
ESZXBMMPSPQFOEPPSXBZT.BUFSJBMTBOEPCKFDUTTVDIBTHMBTTTUFFMNFUBMXBMMTXJUIJOTVMBUJPOXBUFSöTI
UBOLTNJSSPSTöMFDBCJOFUTCSJDLBOEDPODSFUFXJMMEFHSBEFZPVSXJSFMFTTTJHOBM
4. Keep your product away (at least 3-6 feet or 1-2 meters) from electrical devices or appliances that generate RF
noise.
*GZPVBSFVTJOH()[DPSEMFTTQIPOFTPS9XJSFMFTTQSPEVDUTTVDIBTDFJMJOHGBOTMJHIUTBOEIPNFTFDVSJUZ
TZTUFNTZPVSXJSFMFTTDPOOFDUJPONBZEFHSBEFESBNBUJDBMMZPSESPQDPNQMFUFMZ.BLFTVSFZPVS()[QIPOF
base is as far away from your wireless devices as possible. The base transmits a signal even if the phone is not
in use.
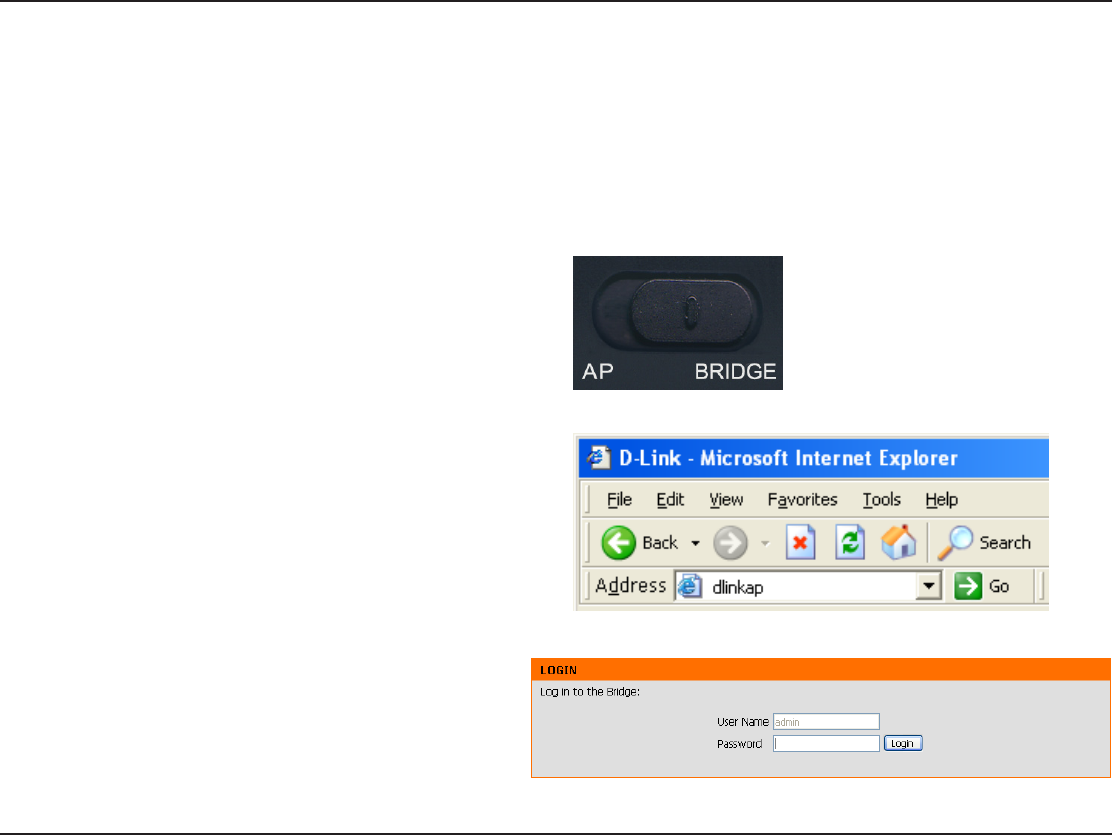
14D-Link DAP-1560 User Manual
Section 3 - Conguration
Conguration (AP Mode)
This section will show you how to congure your new D-Link wireless access point using the web-based conguration utility.
Web-based Conguration Utility
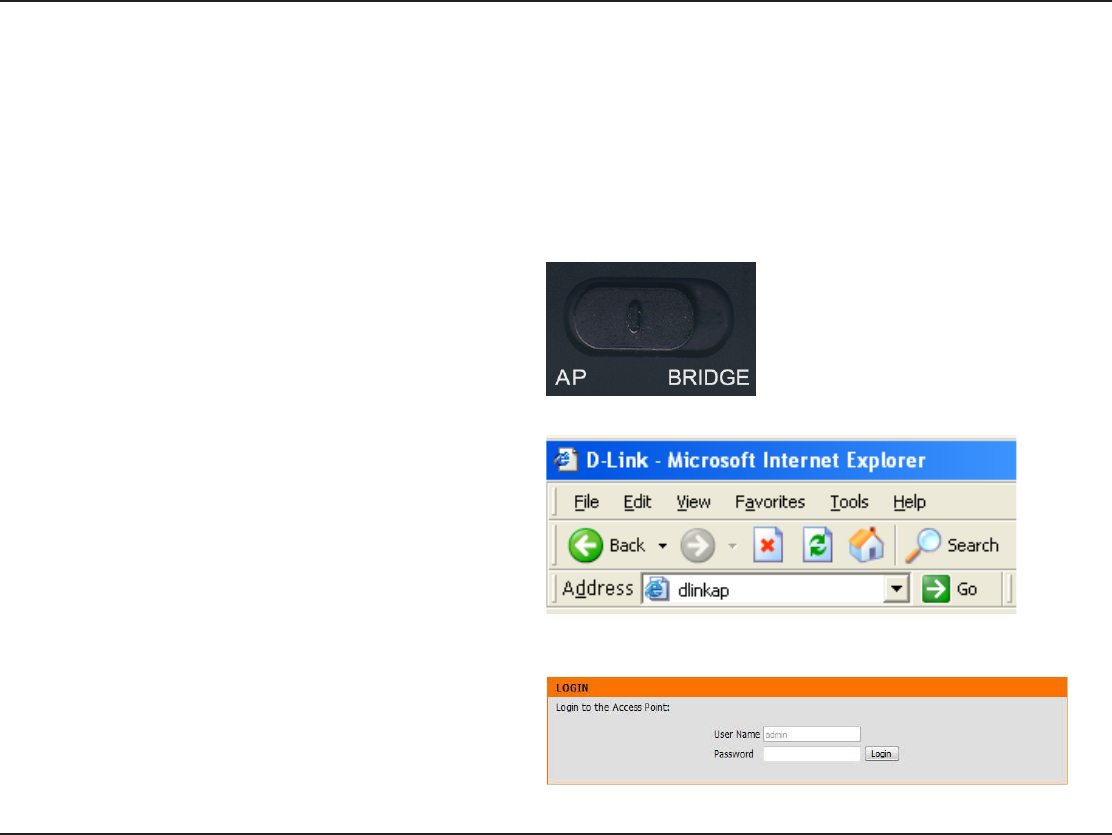
0OUIFCBDLPGUIF%"1TMJEFUIFNPEFTFMFDUPS
to the left (AP Mode).
5PBDDFTTUIF DPOGJHVSBUJPO VUJMJUZPQFOB XFC
CSPXTFSTVDIBT*OUFSOFU&YQMPSFSBOEFOUFSdlinkap
or 192.168.0.50 in the address eld.
3. Enter admin and then enter your password. Leave
the password blank by default.
If you get a Page Cannot be DisplayedFSSPSQMFBTFSFGFS
to the Troubleshooting section for assistance.
15D-Link DAP-1560 User Manual
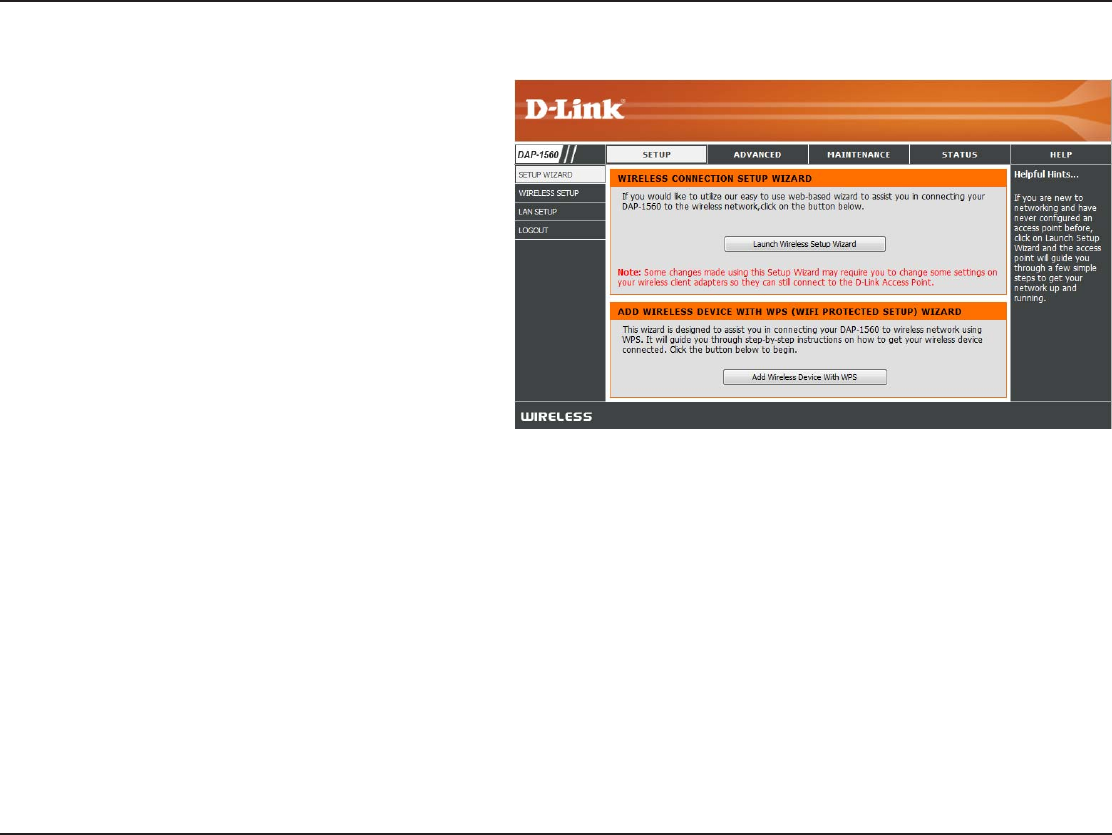
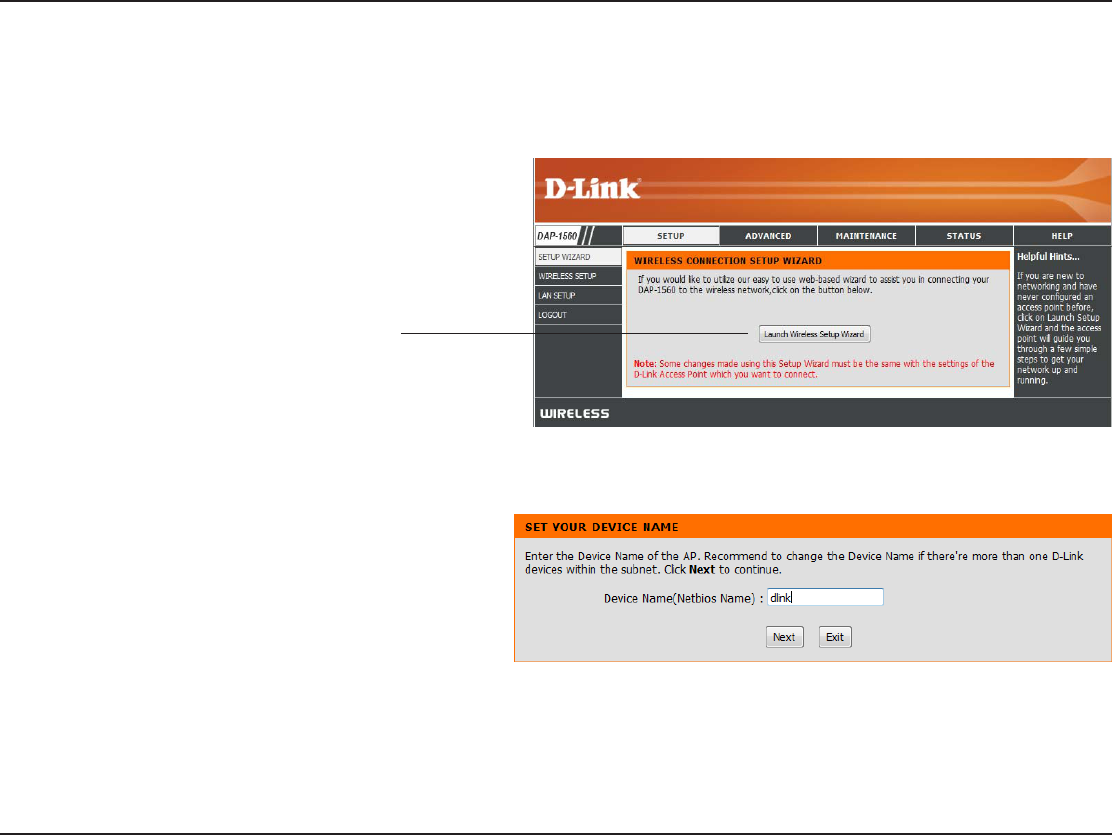
Section 3 - Conguration
Click Launch Wireless Setup Wizard to quickly congure
your access point.
If you want to enter your settings without running the
XJ[BSEDMJDLWIRELESS SETUP on the left side and skip
to page 25.
Setup Wizard
16D-Link DAP-1560 User Manual
Section 3 - Conguration
This Wizard is designed to assist you in connecting your wireless device to your access point. It will guide you through
step-by-step instructions on how to get your wireless device connected.
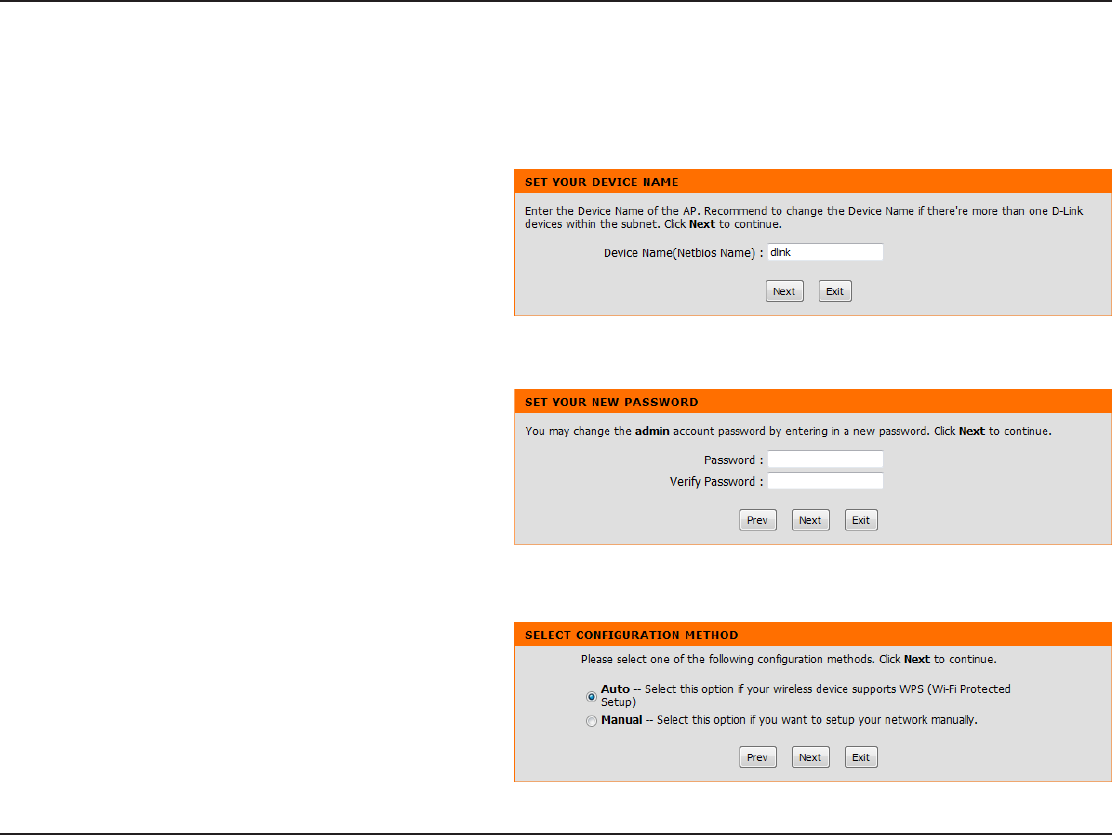
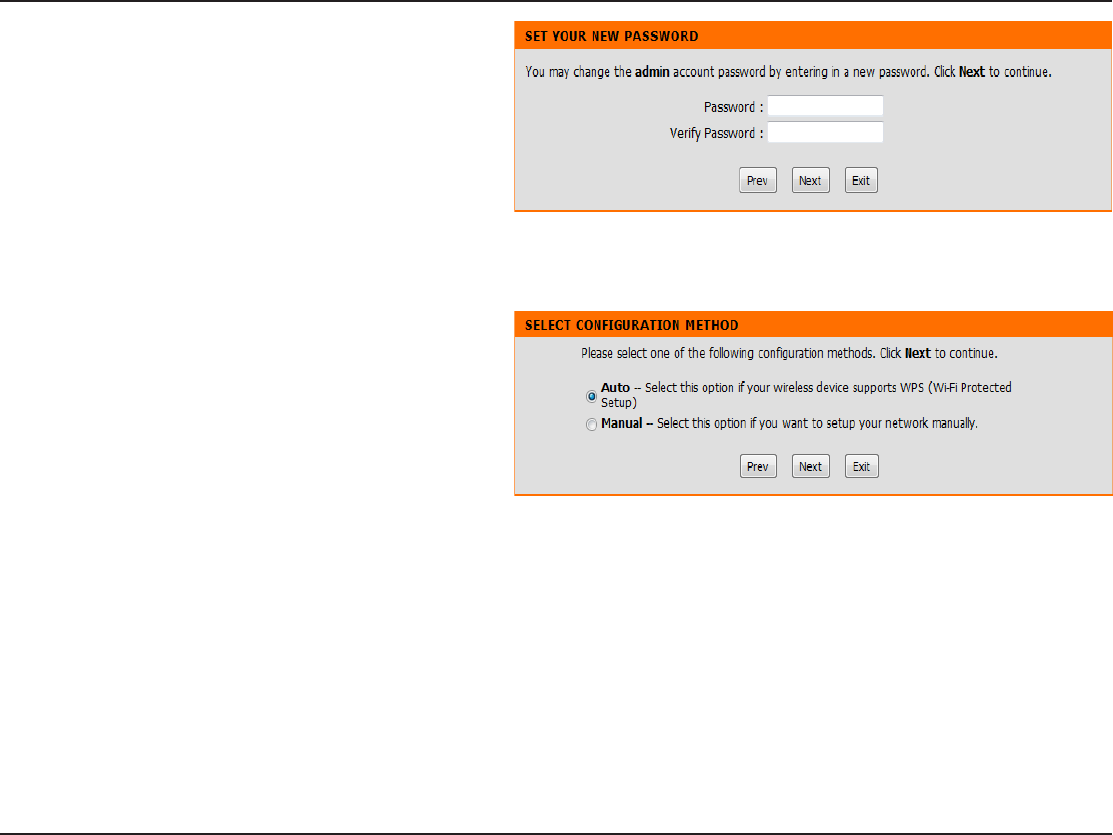
*GZPVXBOU UPDIBOHFUIF BENJOBDDPVOUQBTTXPSE
enter a new password and click Next.
Wireless Setup Wizard
Enter the Device Name of the AP and click Next to
continue. It is recommended to change the Device
Name if there is more than one D-Link device within
the subnet.
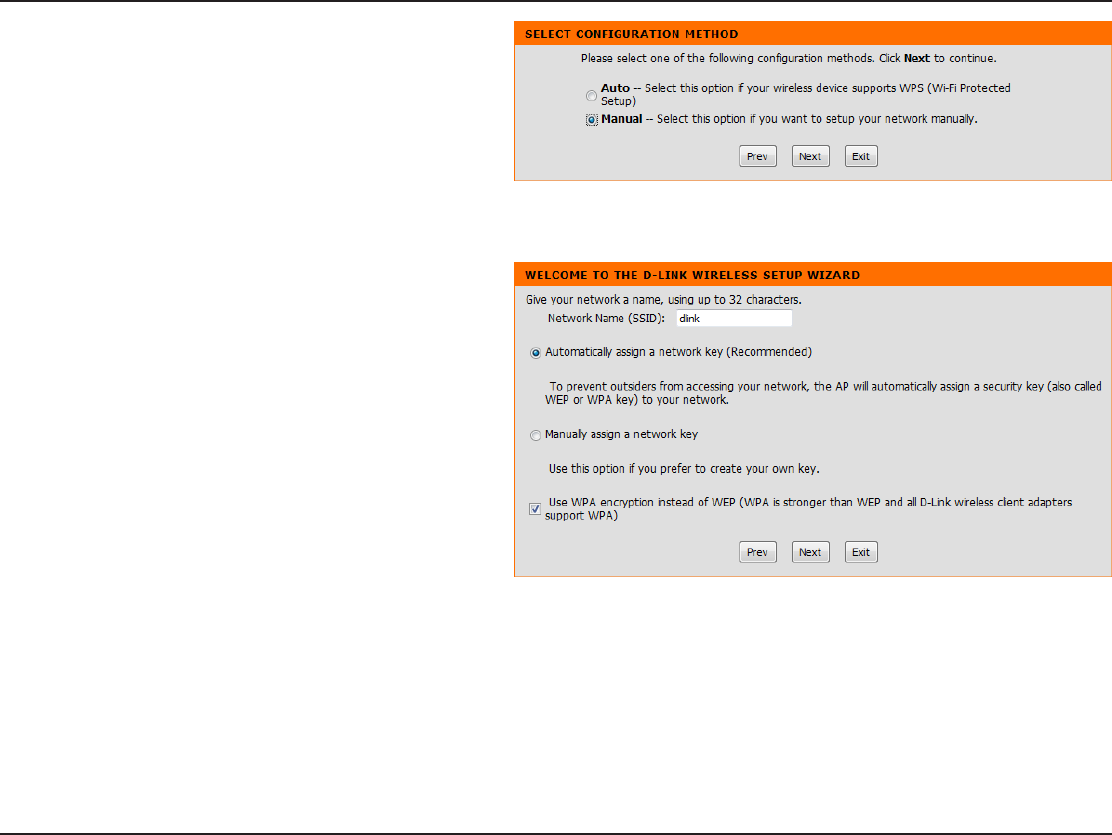
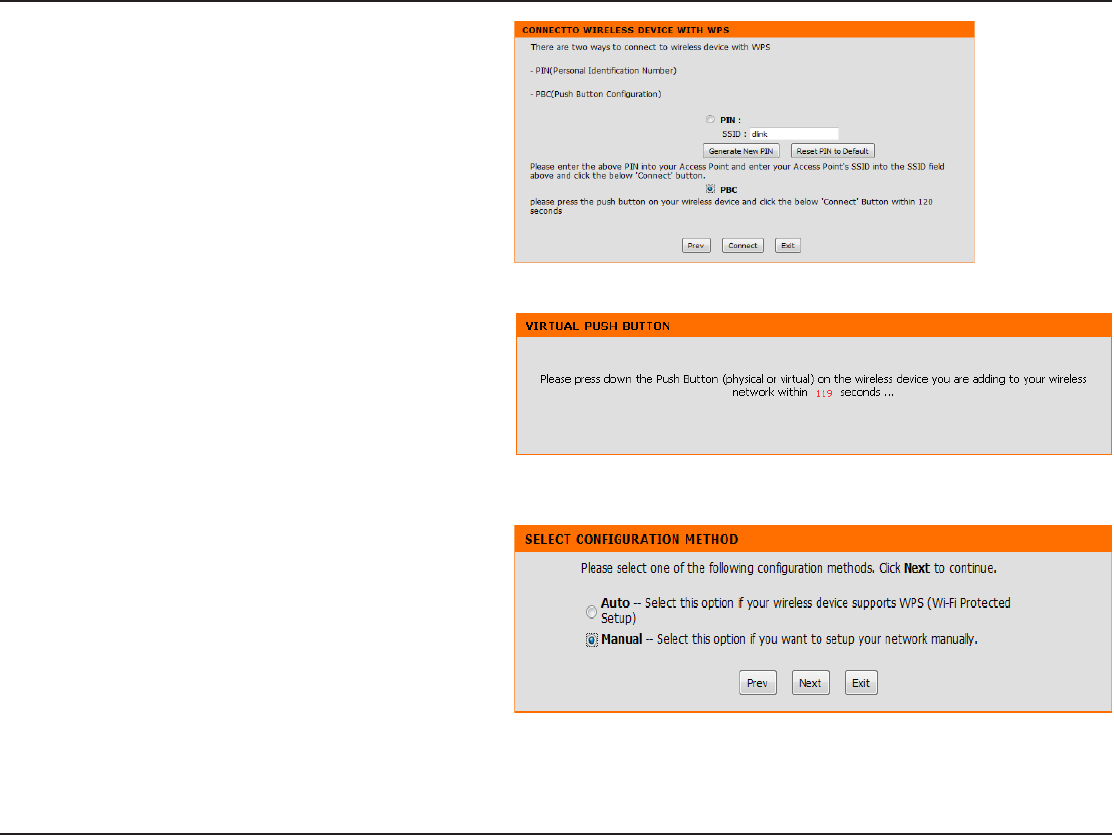
Select Auto as the conguration method only if your
wireless device supports Wi-Fi Protected Setup.
Skip to page 18 for Manual conguration.
Click Next to continue.
17D-Link DAP-1560 User Manual
Section 3 - Conguration
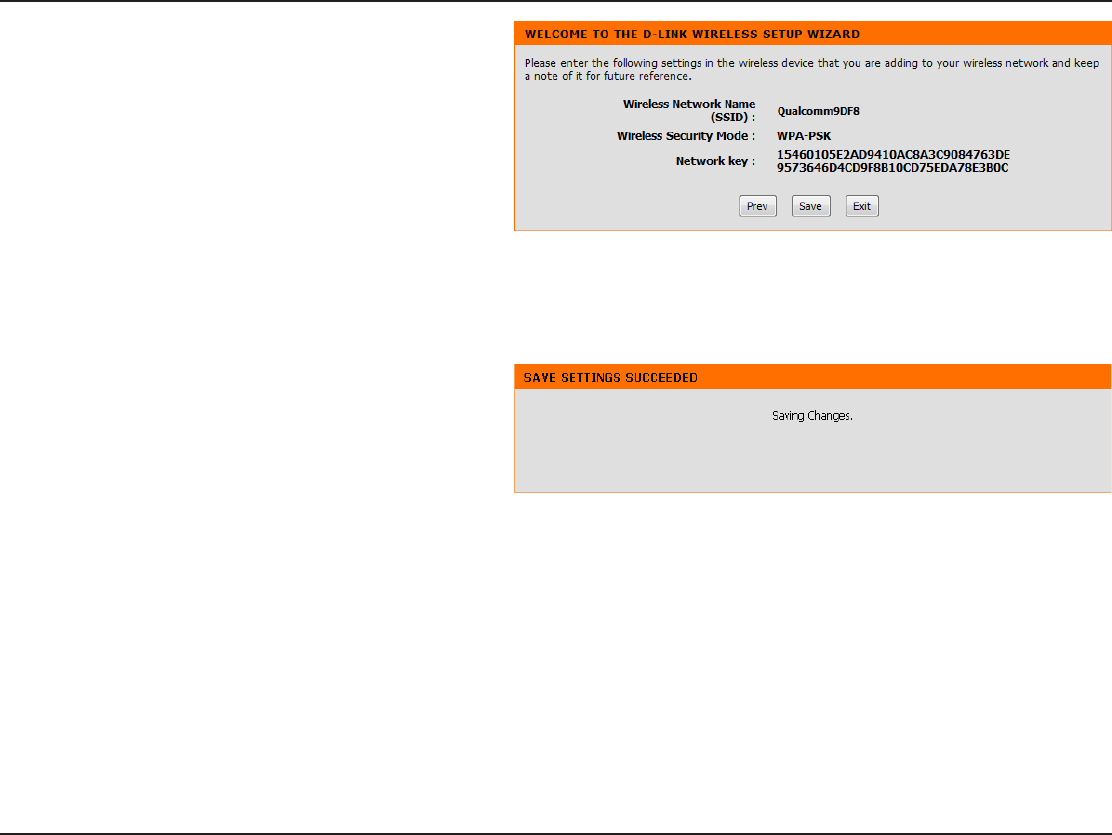
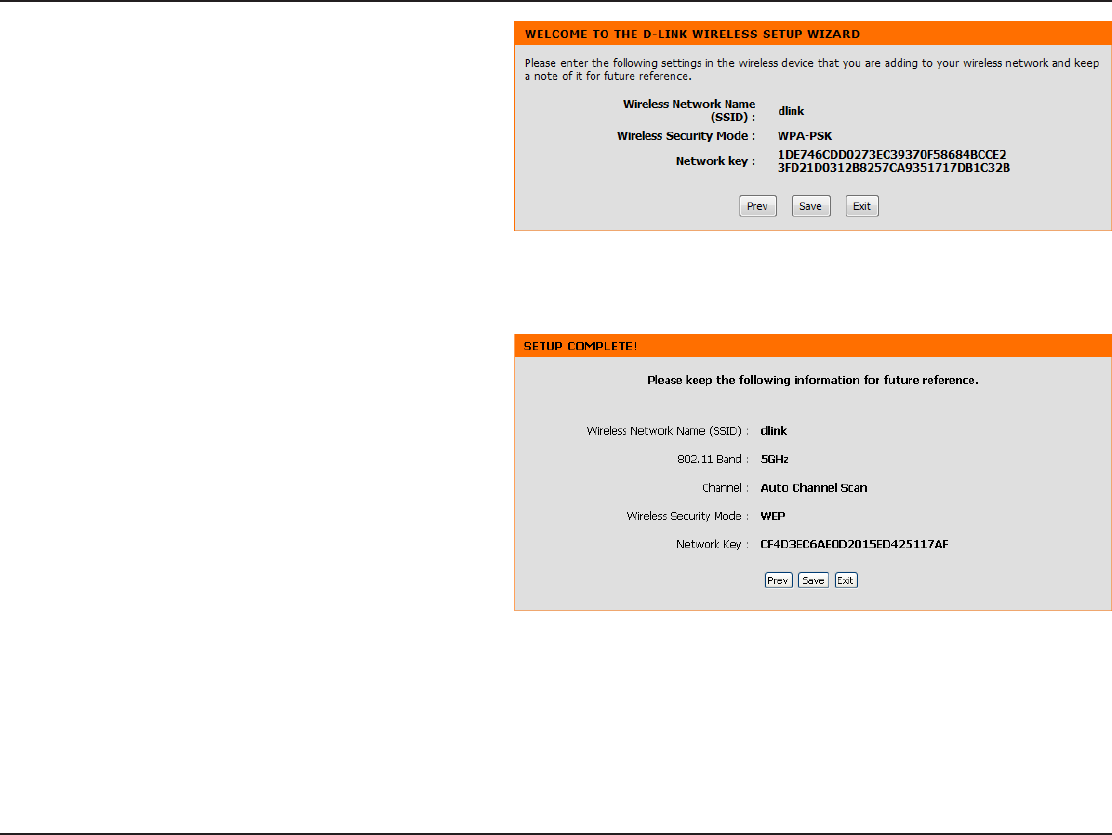
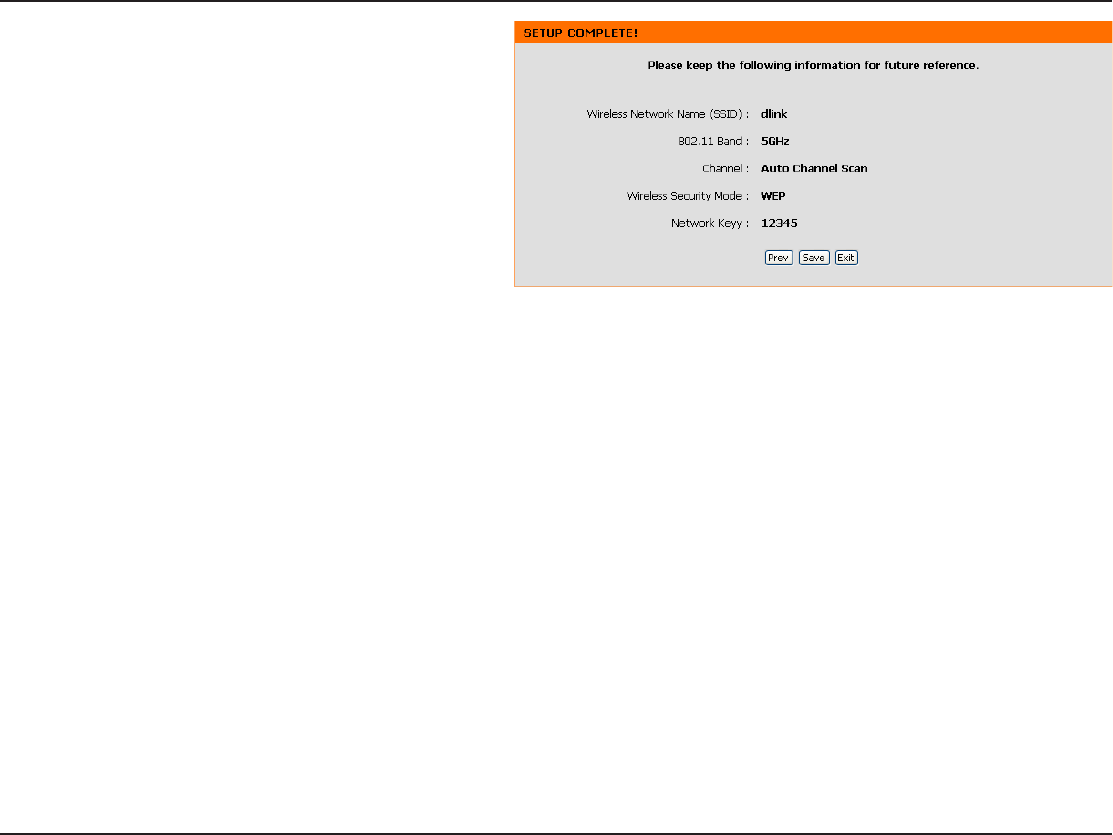
Click Save to save your network settings.
The following screen opens to indicate that you have
successfully saved your new settings.
18D-Link DAP-1560 User Manual
Section 3 - Conguration
Select Manual as the conguration method to set up
your network manually.
Click Next to continue.
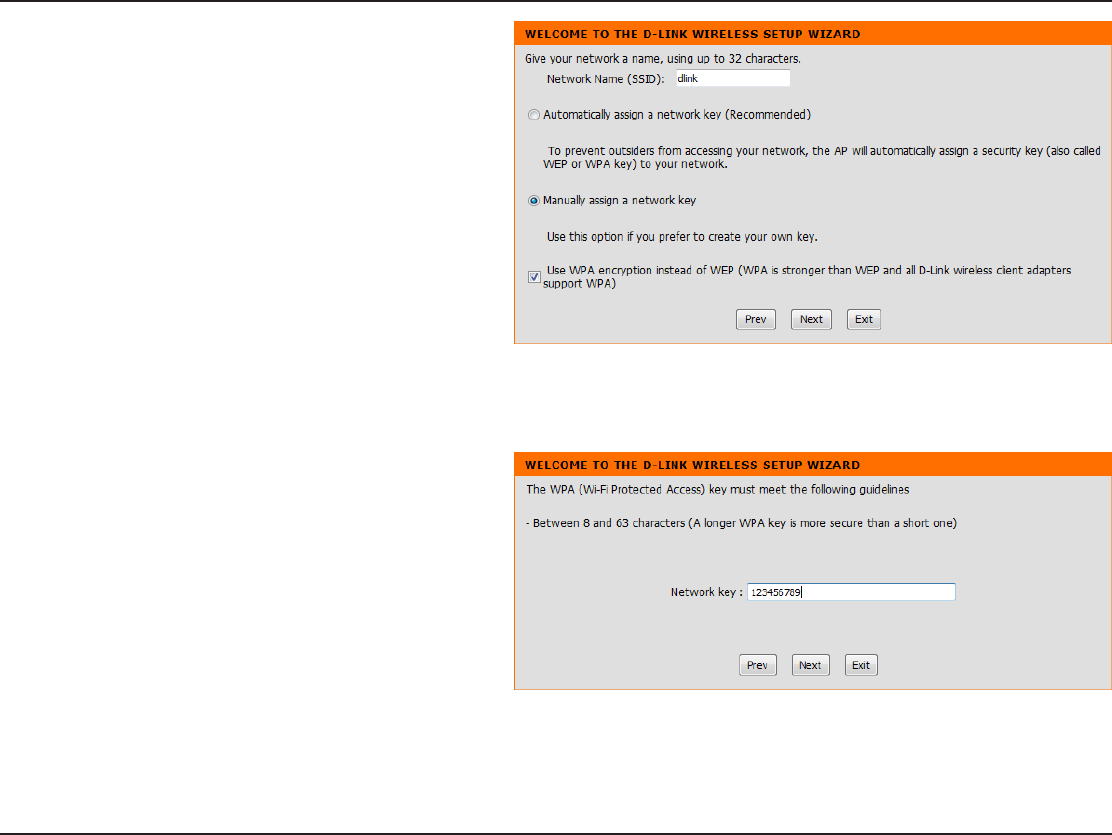
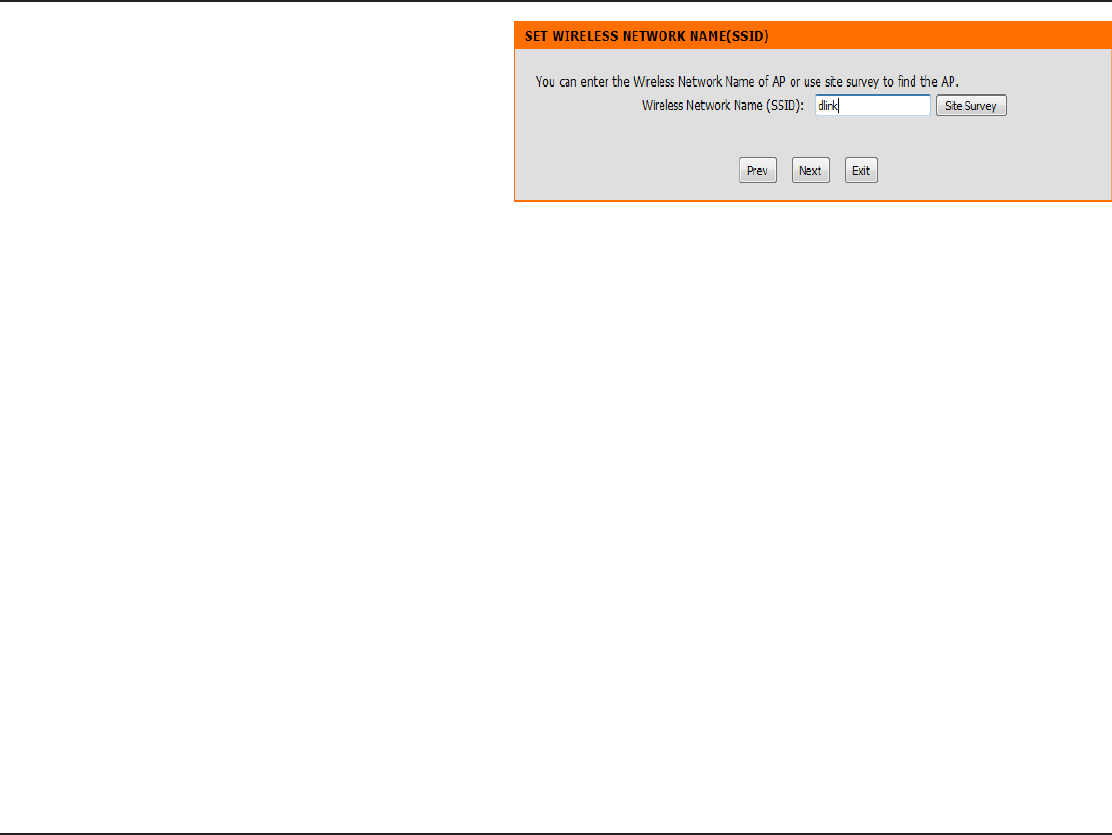
Enter a network name and select Automatically assign
a network key.
5PNBOVBMMZBTTJHOBOFUXPSLLFZTLJQUPQBHF
Click Next to continue.
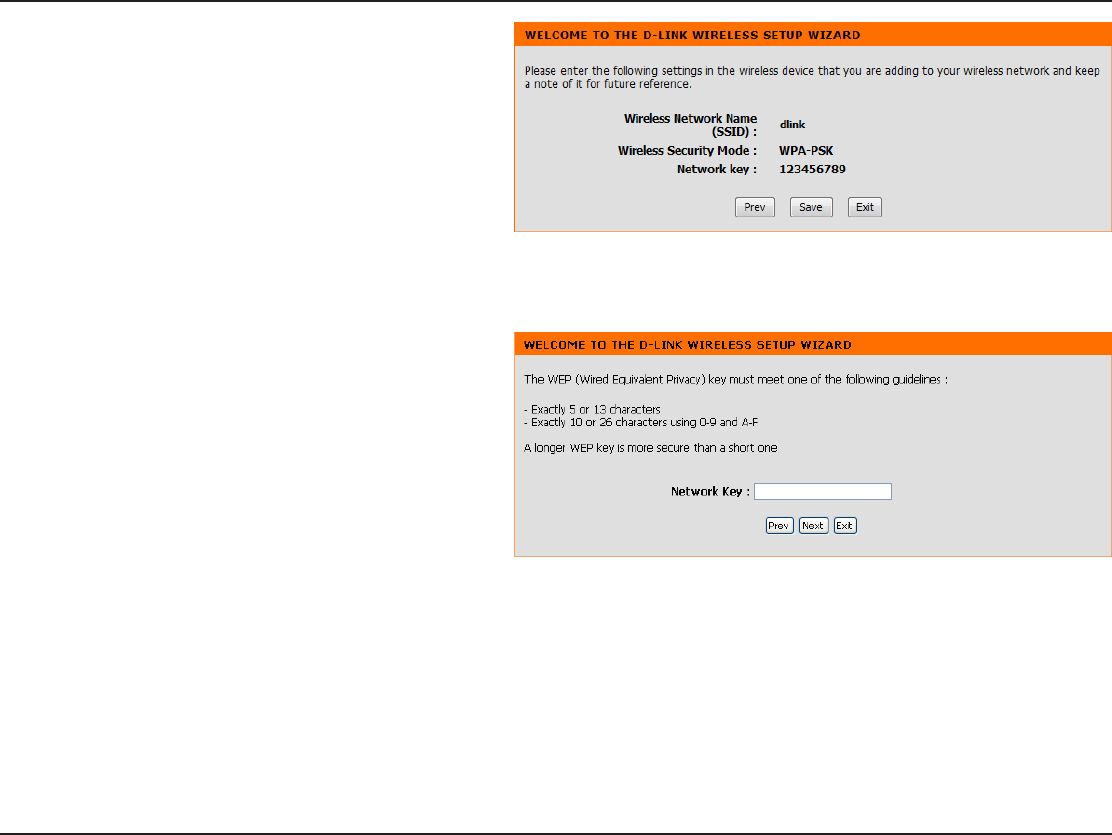
19D-Link DAP-1560 User Manual
Section 3 - Conguration
*GZPVDIPPTF81"14,FODSZQUJPOUIFGPMMPXJOHTDSFFO
will show you your Network Key to enter on your wireless
clients.
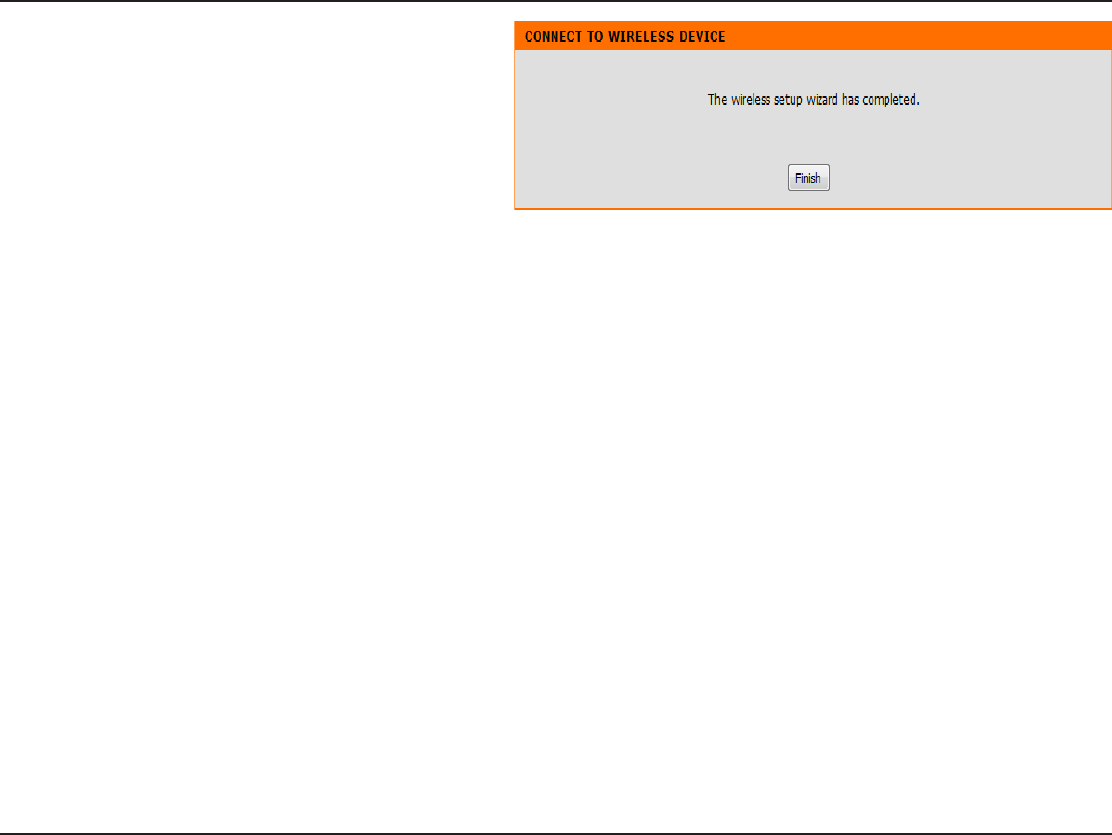
Click Save to nish the Setup Wizard.
*GZPVDIPPTF8&1FODSZQUJPOUIFGPMMPXJOHTDSFFOXJMM
show you your Network Key to enter on your wireless
clients.
Click Save to nish the Setup Wizard.
20D-Link DAP-1560 User Manual
Section 3 - Conguration
Select Manually assign a network key to create your
own key.
Click Next to continue.
'PS81" FODSZQUJPOFOUFSB/FUXPSL,FZ CFUXFFO
BOEDIBSBDUFSTMPOHPSFOUFSFYBDUMZDIBSBDUFST
using 0-9 and A-F.
Click Next to continue.
21D-Link DAP-1560 User Manual
Section 3 - Conguration
*GZPVTFMFDU81"FODSZQUJPOUIFGPMMPXJOHTDSFFOXJMM
show you your network key to enter on your wireless
clients.
Click Save to nish the Setup Wizard.
For WEPFODSZQUJPOFOUFSB/FUXPSL,FZFYBDUMZPS
DIBSBDUFSTMPOHPSFYBDUMZPSDIBSBDUFSTVTJOH
0-9 and A-F.
Click Next to continue.
22D-Link DAP-1560 User Manual
Section 3 - Conguration
If you select WEPFODSZQUJPOUIFGPMMPXJOHTDSFFOXJMM
show you your network key to enter on your wireless
clients.
Click Save to nish the Setup Wizard.
23D-Link DAP-1560 User Manual
Section 3 - Conguration
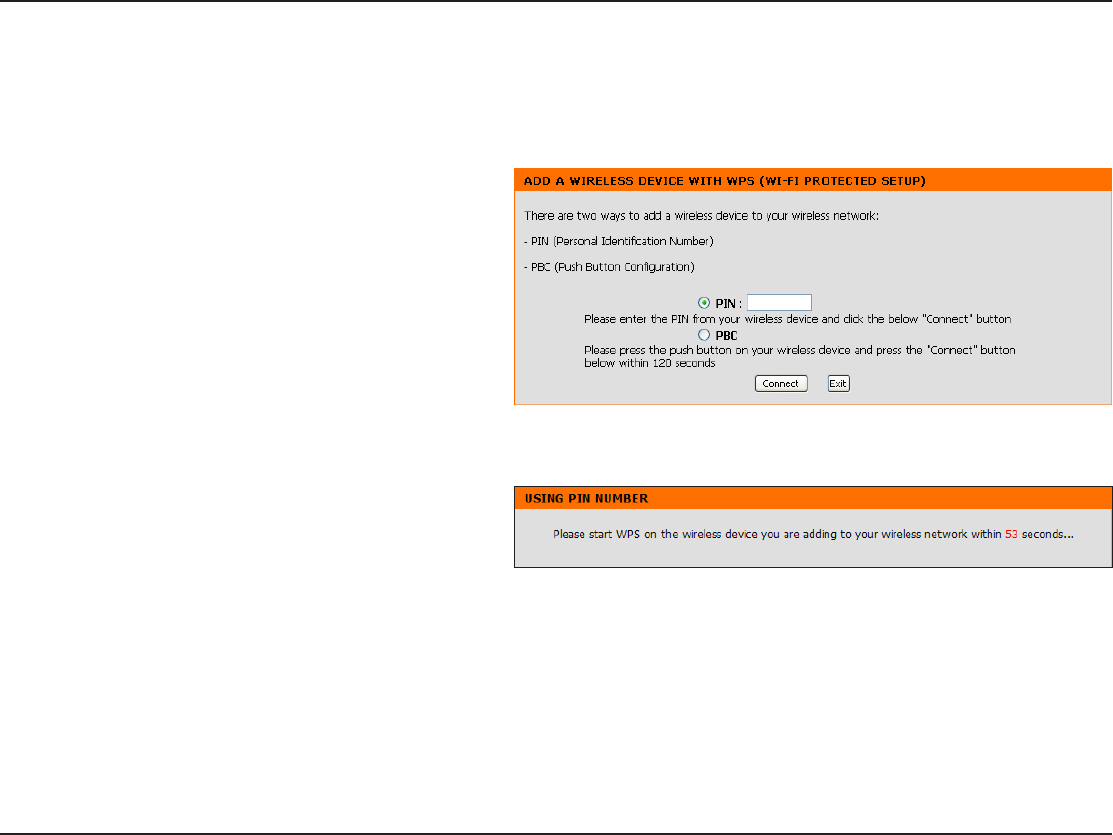
This Wizard is designed to assist you in your wireless network setup. It will guide you through step-by-step instructions on how
to set up your wireless network and how to make it secure.
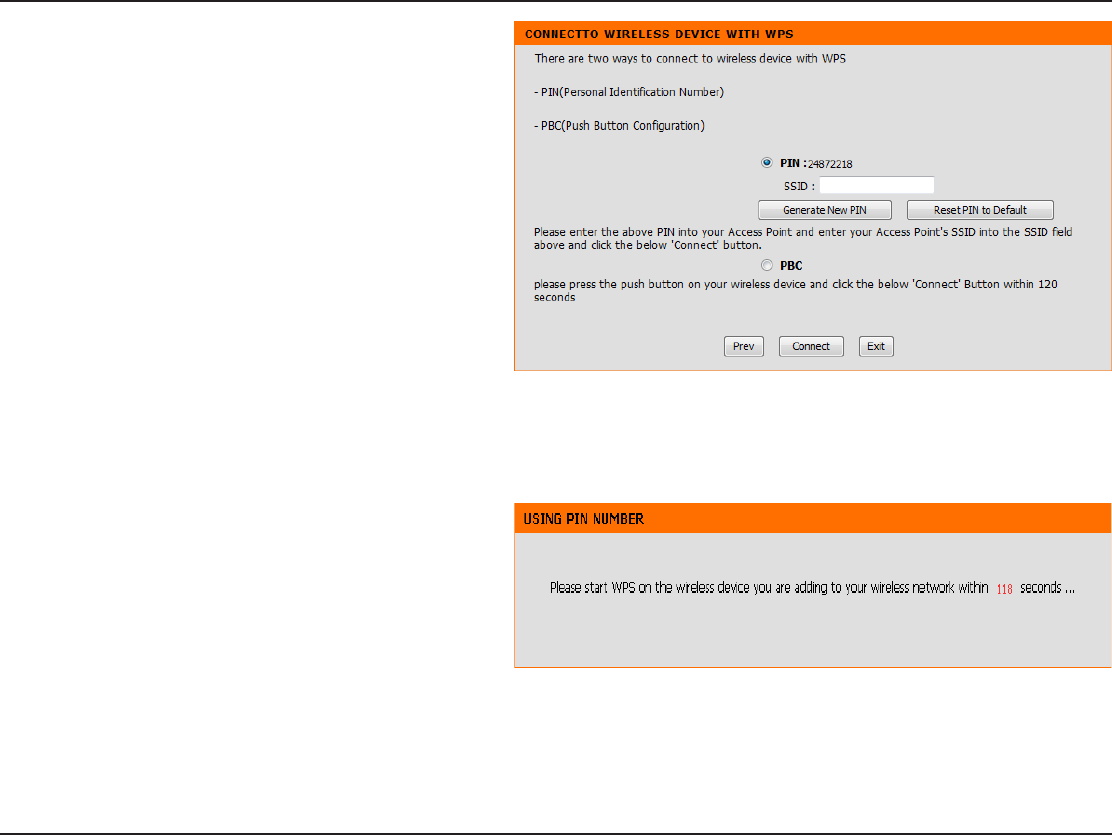
Select PIN to use your PIN number from your wireless
device to connect to your network.
For PBCDPOöHVSBUJPOTLJQUPUIFOFYUQBHF
Click Connect to continue.
Start WPS on the wireless device within 2 minutes (120
seconds) you are adding to your wireless network to
complete the setup.
Add Wireless Device With WPS
24D-Link DAP-1560 User Manual
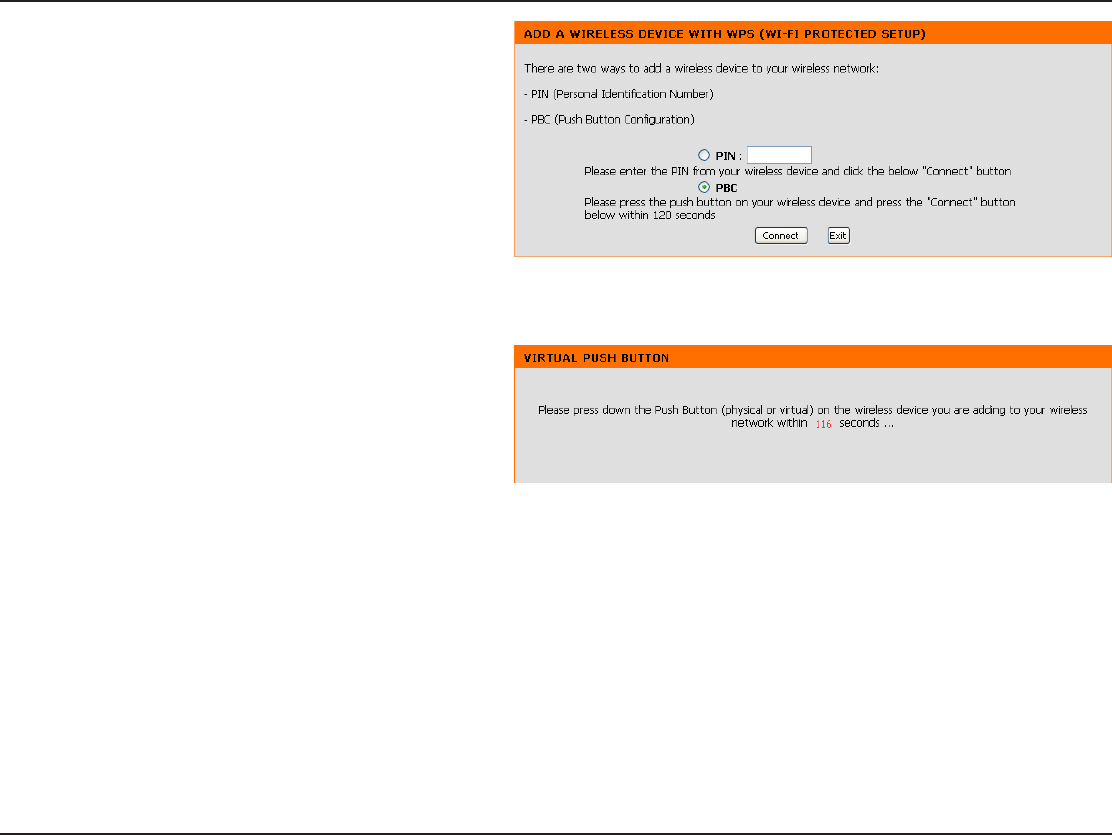
Section 3 - Conguration
Press down the Push Button on the wireless device that
you are adding to your network to complete the setup
within 2 minutes (120 seconds).
Select PBC to use the Push Button Conguration in order
to connect to your network.
Click Connect to continue.
25D-Link DAP-1560 User Manual
Section 3 - Conguration
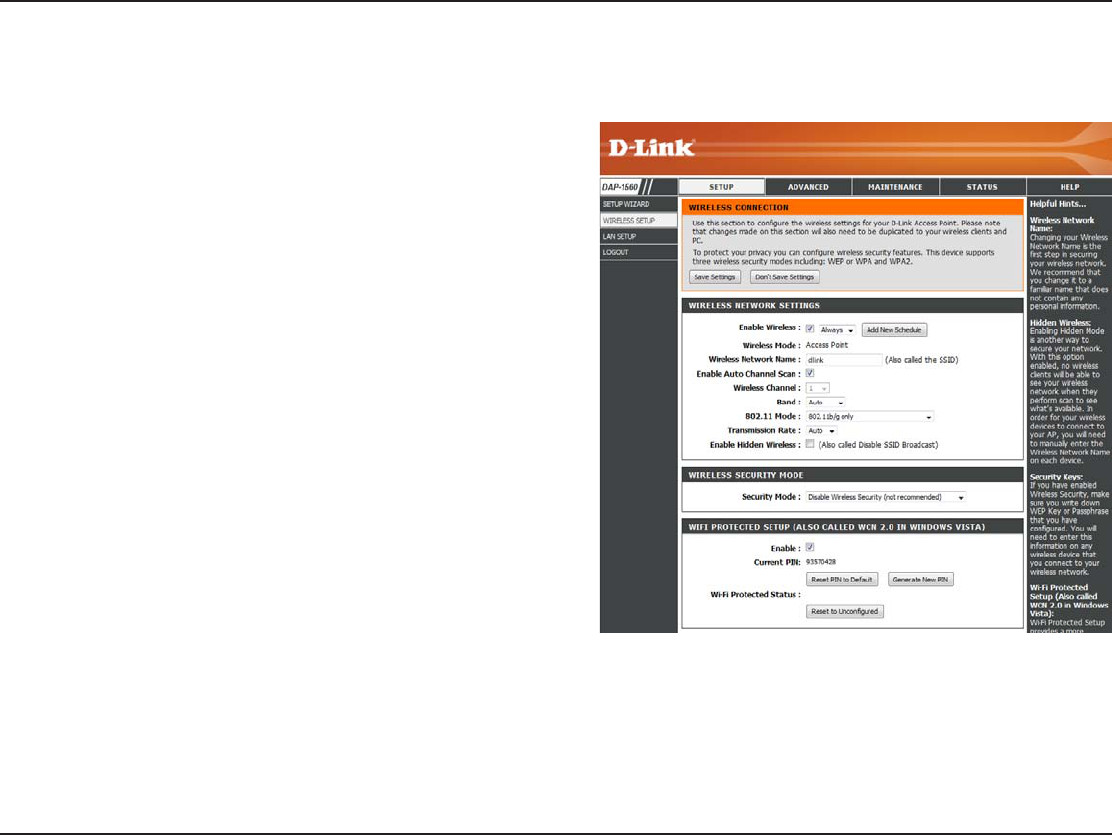
Enable Wireless:
Wireless Mode:
Wireless Network
Name:
Enable Auto
Channel Scan:
Wireless
Channel:
802.11 Band:
802.11 Mode:
$IFDLUIFCPYUPFOBCMFUIFXJSFMFTTGVODUJPO*GZPVEPOPU
XBOUUPVTFXJSFMFTTVODIFDLUIFCPYUPEJTBCMFBMMUIFXJSFMFTT
functions.
The current wireless mode is set to Access PointJUXJMMDSFBUFB
wireless infrastructure network.
8IFOZPVBSFCSPXTJOHGPSBWBJMBCMFXJSFMFTTOFUXPSLTUIJTJT
the name that will appear in the list (unless Visibility Status is
TFUUP*OWJTJCMFTFFCFMPX5IJTOBNFJTBMTPSFGFSSFEUPBTUIF
44*%'PSTFDVSJUZQVSQPTFTJUJTIJHIMZSFDPNNFOEFEUPDIBOHF
from the default network name.
The Auto Channel Scan setting can be selected to allow the
DAP-1560 to choose the channel with the least amount of
interference.
Indicates the channel setting for the DAP-1560. If you enable
"VUP$IBOOFM4DBOUIJTPQUJPOXJMMCFHSBZFEPVU
Operating frequency band. Choose 2.4GHz for visibility to
legacy devices and for longer range. Choose 5GHz for least
interference.
*GZPVDIPPTF()[CBOEUIFOTFMFDUPOFPGUIFGPMMPXJOH
802.11g Only - Select if all of your wireless clients are 802.11g.
Mixed 802.11n and 802.11g - Select if you are using both 802.11n and 802.11g wireless clients.
802.11n Only - Select only if all of your wireless clients are 802.11n.
Mixed 802.11n, 802.11g, and 802.11b4FMFDUJGZPVBSFVTJOHOHBOECXJSFMFTTDMJFOUT
*GZPVDIPPTF()[CBOEUIFOTFMFDUFJUIFS802.11a Only, 802.11n Only, or Mixed 802.11n and 802.11a.
Manual Conguration
Wireless Settings

26D-Link DAP-1560 User Manual
Section 3 - Conguration
Select the transmit rate. It is strongly recommended to select Best (automatic) for best performance.
$IFDLUIJTCPYJGZPVEPOPUXBOUUIF44*%PGZPVSXJSFMFTTOFUXPSLUPCFCSPBEDBTUFECZUIF%"1*GFOBCMFEUIF44*%
of the DAP-1560 will not be seen by Site Survey utilities so your wireless clients will have to know the SSID of your DAP-1560
in order to connect to it.
Refer to page 68 for more information regarding the wireless security.
Enable the Wi-Fi Protected Setup feature.
Shows the current value of the access point’s PIN.
Restore the default PIN of the access point.
Create a random number that is a valid PIN. This becomes the access point’s PIN. You can then copy this PIN to the user
interface of the user.
Resets Wi-Fi Protected Status to Not Congured. Vista WPS icon will only be displayed when the Wi-Fi Protected Status is Not
Congured.
Transmission Rate:
Enable Hidden Wireless:
Security Mode:
Enable:
Current PIN:
Reset PIN to Default:
Generate New
PIN:
Reset to Uncongured:
27D-Link DAP-1560 User Manual
Section 3 - Conguration
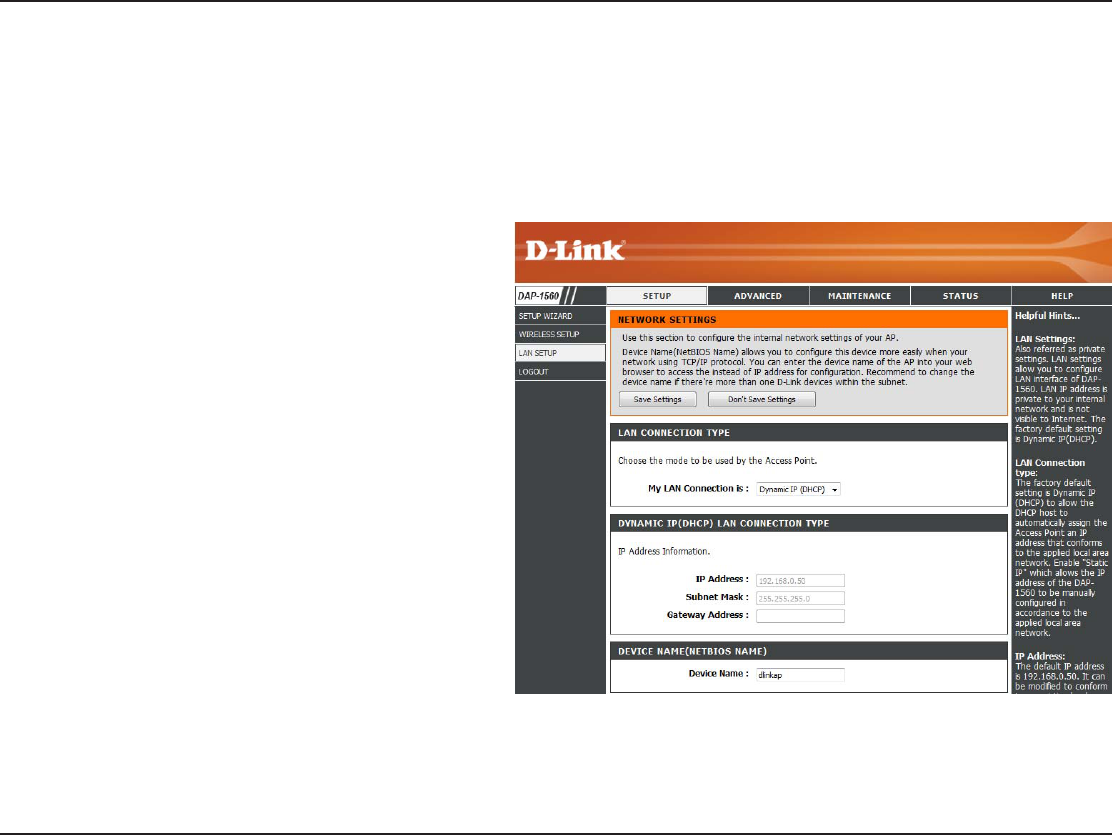
Network Settings
DHCP
DHCP stands for Dynamic Host Control Protocol. The DHCP Server (usually your router) will automatically assign an IP address
UPUIF%"18IFOZPVUVSOZPVS%"1POJUXJMMBVUPNBUJDBMMZSFDFJWFUIFQSPQFS5$1*1TFUUJOHTQSPWJEFECZUIF
DHCP Server.
My LAN
Connection is:
Device Name:
Use the drop-down menu to select Dynamic IP
(DHCP) to automatically obtain an IP address on
UIF-"/QSJWBUFOFUXPSL
Enter the Device Name of the AP. It is recommended
to change the Device Name if there is more than
one D-Link device within the subnet.
28D-Link DAP-1560 User Manual
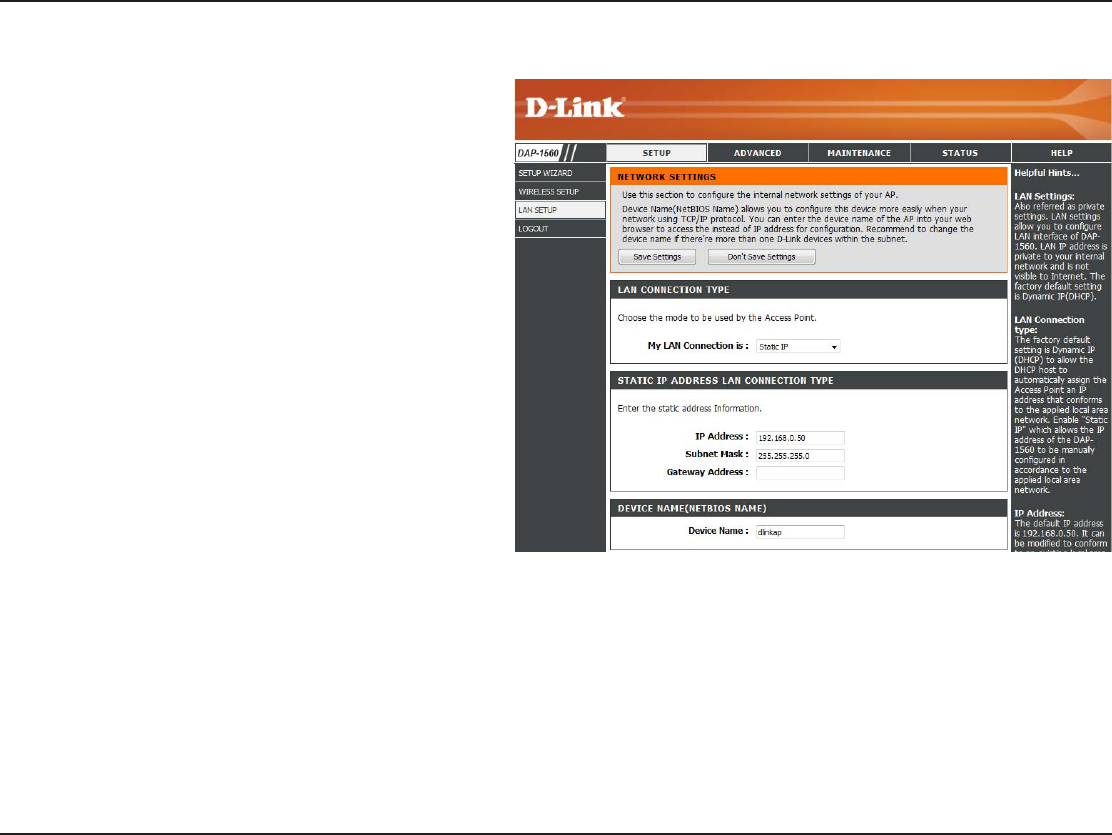
Section 3 - Conguration
LAN Connection
Type:
Access Point IP
Address:
Subnet Mask:
Default Gateway:
Device Name:
Use the drop-down menu to select Static IP.
Enter the IP address of the access point. The
default IP address is 192.168.0.50. If you change
UIF*1 BEESFTTPODFZPVDMJDL ApplyZPV XJMM
need to enter the new IP address in your browser
to get back into the conguration utility.
Enter the Subnet Mask of your network.
Enter the Gateway of your network (usually the
IP address of your router).
Enter the Device Name of the AP. It is
recommended to change the Device Name if
there is more than one D-Link device within the
subnet.
Static IP
29D-Link DAP-1560 User Manual
Section 3 - Conguration
Advanced
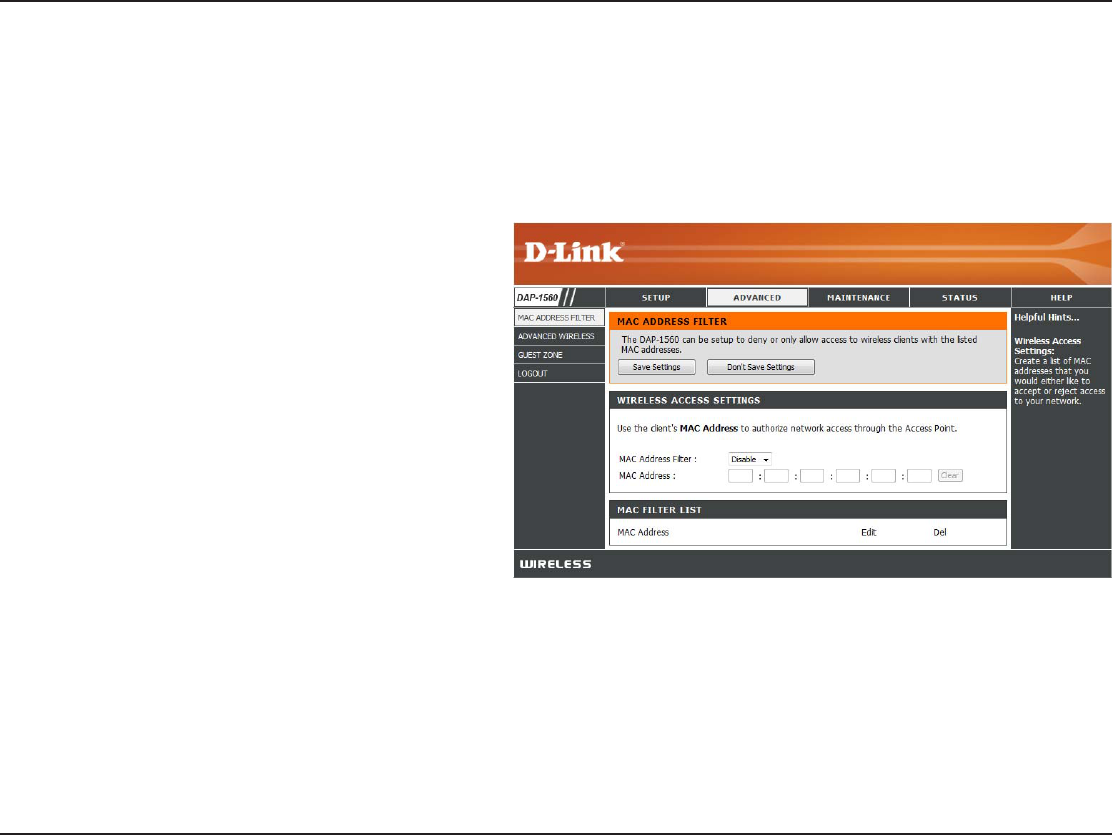
MAC Address Filter
The MAC address lter section can be used to lter network access by machines based on the unique MAC addresses of their
network adapter(s). It is most useful to prevent unauthorized wireless devices from connecting to your network. A MAC address
is a unique ID assigned by the manufacturer of the network adapter.
MAC Address
Filter:
MAC Address:
When Turn MAC Filtering OFF JT TFMFDUFE."$
addresses are not used to control network access.
When Turn MAC Filtering ON and ALLOW
computers listed to access the networkJTTFMFDUFE
only computers with MAC addresses listed in the MAC
Address List are granted network access. When Turn
MAC Filtering ON and DENY computers listed to
access the networkJTTFMFDUFEBOZDPNQVUFSXJUIB
MAC address listed in the MAC Address List is refused
access to the network.
Enter the MAC address of the adapter (client) that
you want to lter. Click Save Settings at the top to
save the lter rule.
30D-Link DAP-1560 User Manual
Section 3 - Conguration
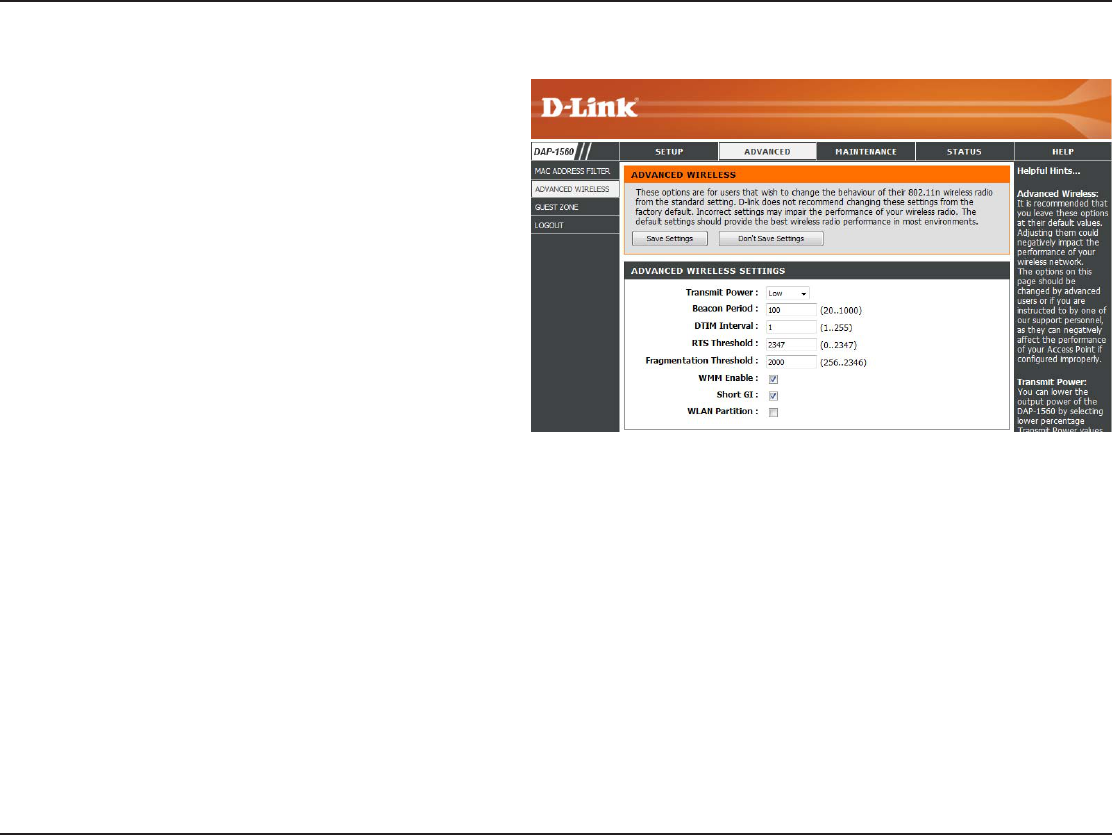
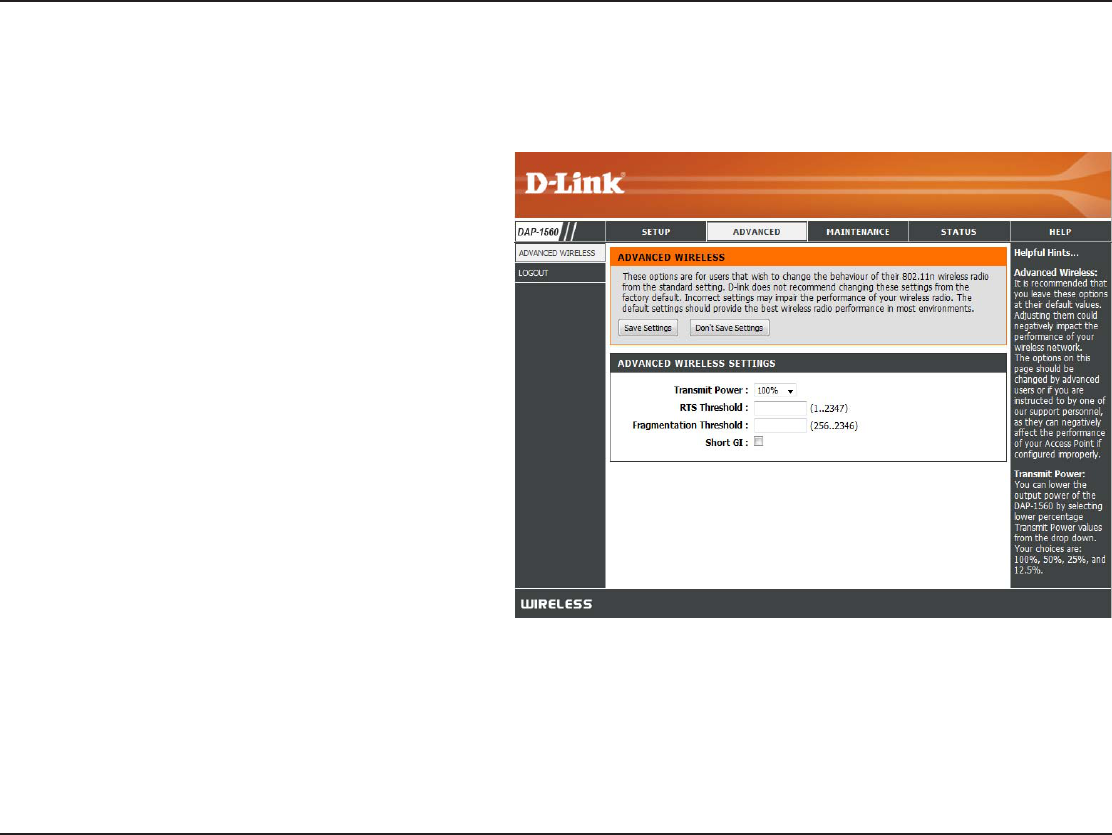
Transmit Power:
Beacon Period:
DTIM Interval:
RTS Threshold:
Fragmentation
Threshold:
WMM Enable:
Short GI:
WLAN Partition:
Sets the transmit power of the antennas (Low
MediumPSHigh).
Beacons are packets sent by an Access Point to
synchronize a wireless network. Specify a value. 100
is the default setting and is recommended.
%FMJWFSZ5SBóD*OEJDBUJPO.FTTBHFJT UIFEFGBVMU
setting. A DTIM is a countdown informing clients of the
OFYUXJOEPXGPSMJTUFOJOHUPCSPBEDBTUBOENVMUJDBTU
messages.
This value should remain at its default setting of 2347.
*GJODPOTJTUFOUEBUB øPXJT BQSPCMFNPOMZ BNJOPS
modication should be made.
5IFGSBHNFOUBUJPOUISFTIPMEXIJDIJT TQFDJöFE JO
CZUFTEFUFSNJOFTXIFUIFSQBDLFUTXJMMCFGSBHNFOUFE1BDLFUTFYDFFEJOHUIFCZUFTFUUJOHXJMMCFGSBHNFOUFECFGPSFUSBOTNJTTJPO
2000 is the default setting.
WMM is QoS for your wireless network. This will improve the quality of video and voice applications for your wireless clients.
$IFDLUIJTCPYUPSFEVDFUIFHVBSEJOUFSWBMUJNFUIFSFGPSFJODSFBTJOHUIFEBUBDBQBDJUZ)PXFWFSJUJTMFTTSFMJBCMFBOENBZDSFBUF
higher data loss.
Check to enable WLAN Partition.
Advanced Wireless
31D-Link DAP-1560 User Manual
Section 3 - Conguration
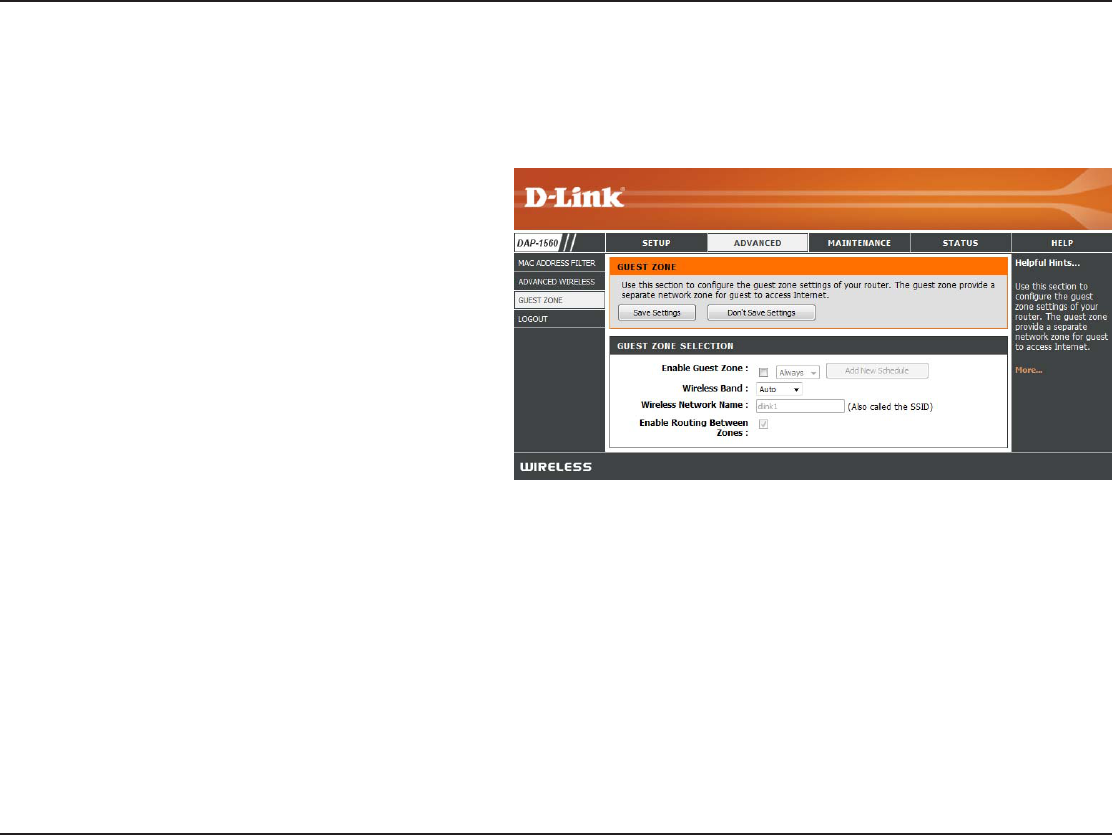
Enable Guest
Zone:
Wireless Band:
Wireless Network
Name:
Enable Routing
Between Zones:
Check to enable the Guest Zone feature. Select
the schedule of time when the Guest Zone will
CFBDUJWF5IF TDIFEVMFNBZ CF TFUUP "MXBZT
which will allow the particular service to always
be enabled. You can create your own times in the
Tools > Schedules section.
Select Auto2.4GHzPS5GHz.
Enter a wireless network name (SSID) that is
dierent from your main wireless network.
Check to allow network connectivity between
the dierent zones created.
Guest Zone
The Guest Zone feature will allow you to create temporary zones that can be used by guests to access the Internet. These zones
will be separate from your main wireless network.
32D-Link DAP-1560 User Manual
Section 3 - Conguration
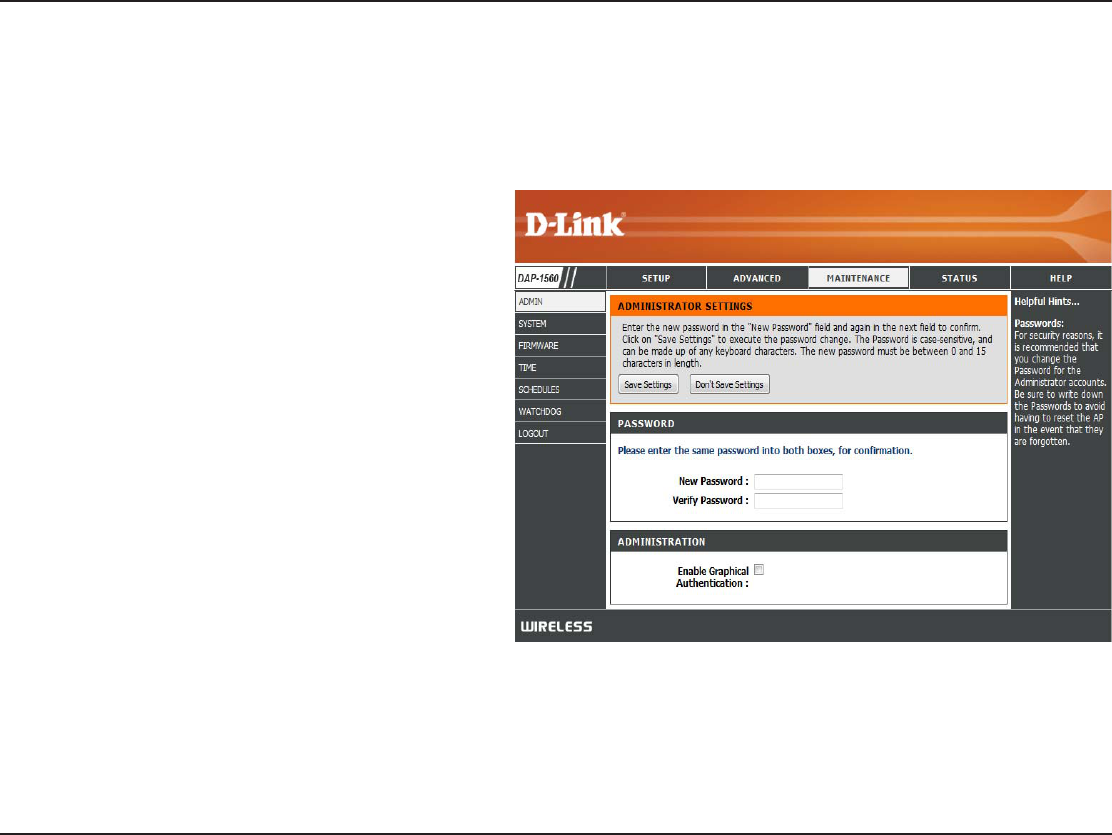
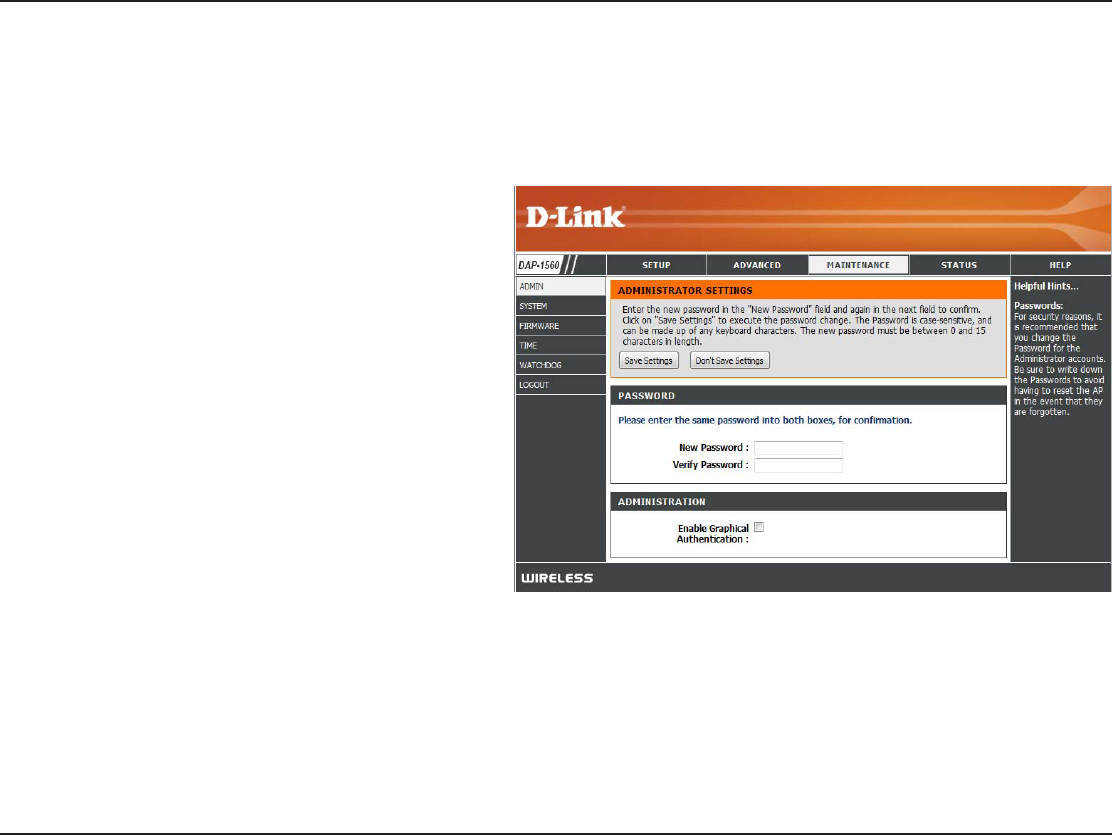
Password:
Verify
Password:
Enable
Graphical
Authentication:
Enter a new password for the Administrator Login
Name. The administrator can make changes to the
settings.
Enter the same password that you entered in the
QSFWJPVTUFYUCPYJOPSEFSUPDPOöSNJUTBDDVSBDZ
$IFDLUIJTCPYUPSFRVJSFVTFSTUPUZQFMFUUFSTPS
numbers from a distorted image displayed on
the login screen to prevent online hackers and
unauthorized users from gaining access to your
router’s network settings.
Maintenance
Admin
5IJTQBHFXJMMBMMPXZPVUPDIBOHFUIF"ENJOJTUSBUPSQBTTXPSE5IFBENJOJTUSBUPSQBTTXPSEIBTSFBEXSJUFBDDFTT
33D-Link DAP-1560 User Manual
Section 3 - Conguration
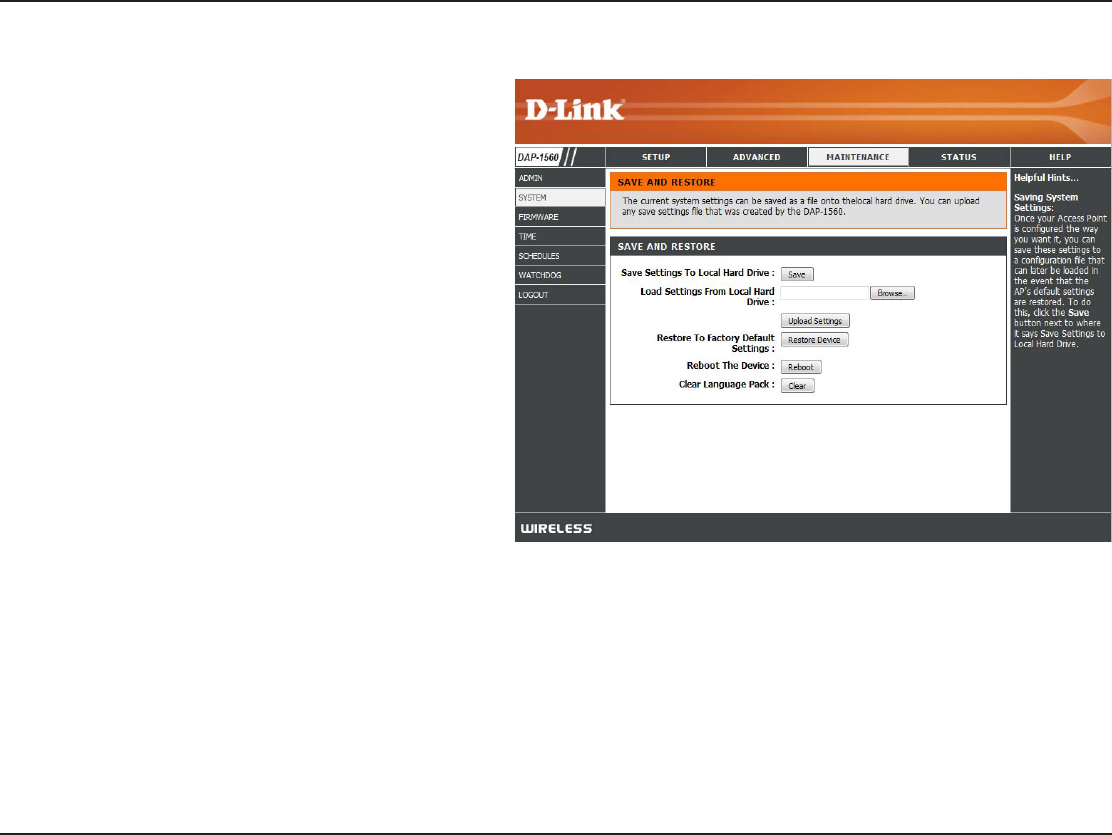
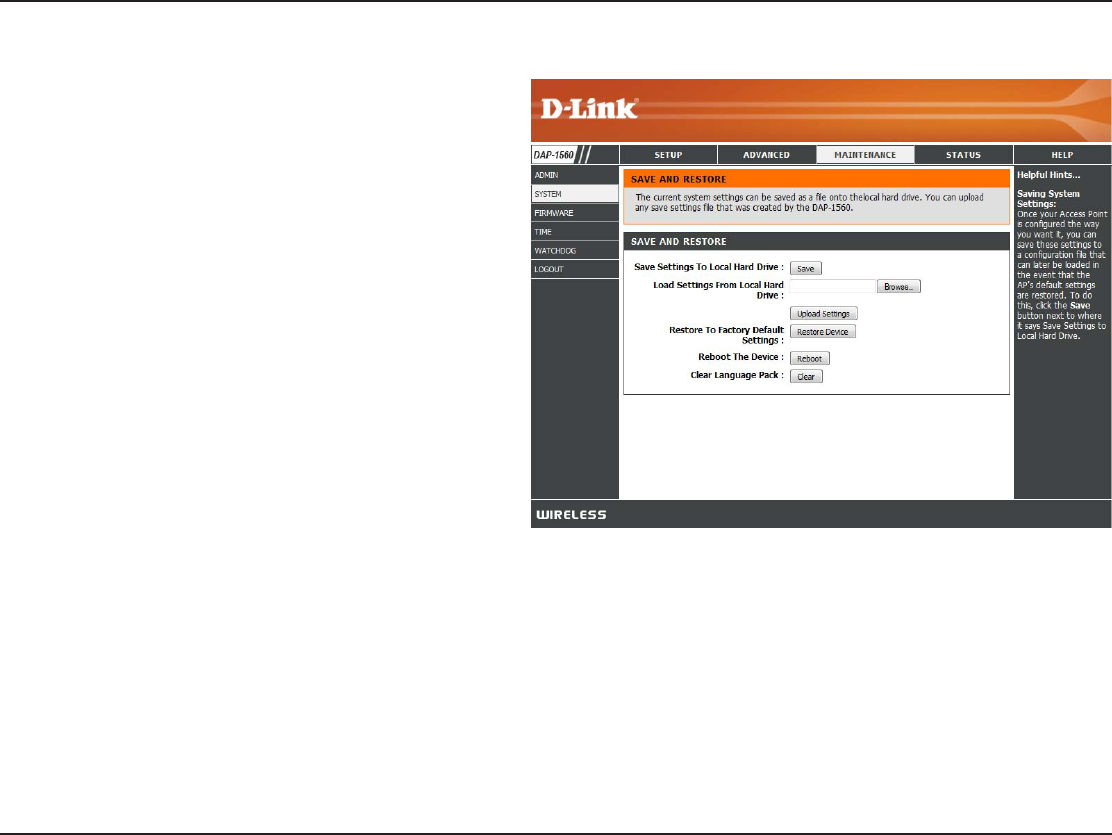
Save Settings to
Local Hard Drive:
Load Settings
from Local Hard
Drive:
Restore to
Factory Default
Settings:
Reboot the
Device:
Clear Language
Pack:
Use this option to save the current access point
conguration settings to a le on the hard disk
PGUIF DPNQVUFSZPVBSFVTJOH'JSTUDMJDLUIF
Save CVUUPO:PVXJMMUIFOTFFBöMFEJBMPHXIFSF
you can select a location and le name for the
settings.
Use this option to load previously saved access
QPJOUDPOöHVSBUJPOTFUUJOHT'JSTUDMJDLUIFBrowse
button to nd a previously save le of conguration
TFUUJOHT5IFODMJDL UIF Load button to transfer
those settings to the access point.
This option will restore all conguration settings
back to the settings that were in eect at the time
the access point was shipped from the factory.
"OZTFUUJOHTUIBUIBWFOPUCFFOTBWFEXJMMCFMPTU
including any rules that you have created. If you
want to save the current access point conguration
TFUUJOHTVTFUIFSave button above.
Note: Restoring the factory default settings will not
reset the Wi-Fi Protected Status to Not Congured.
Click to reboot the access point.
Click to clear the language pack. This will put the
web UI back to English.
System
34D-Link DAP-1560 User Manual
Section 3 - Conguration
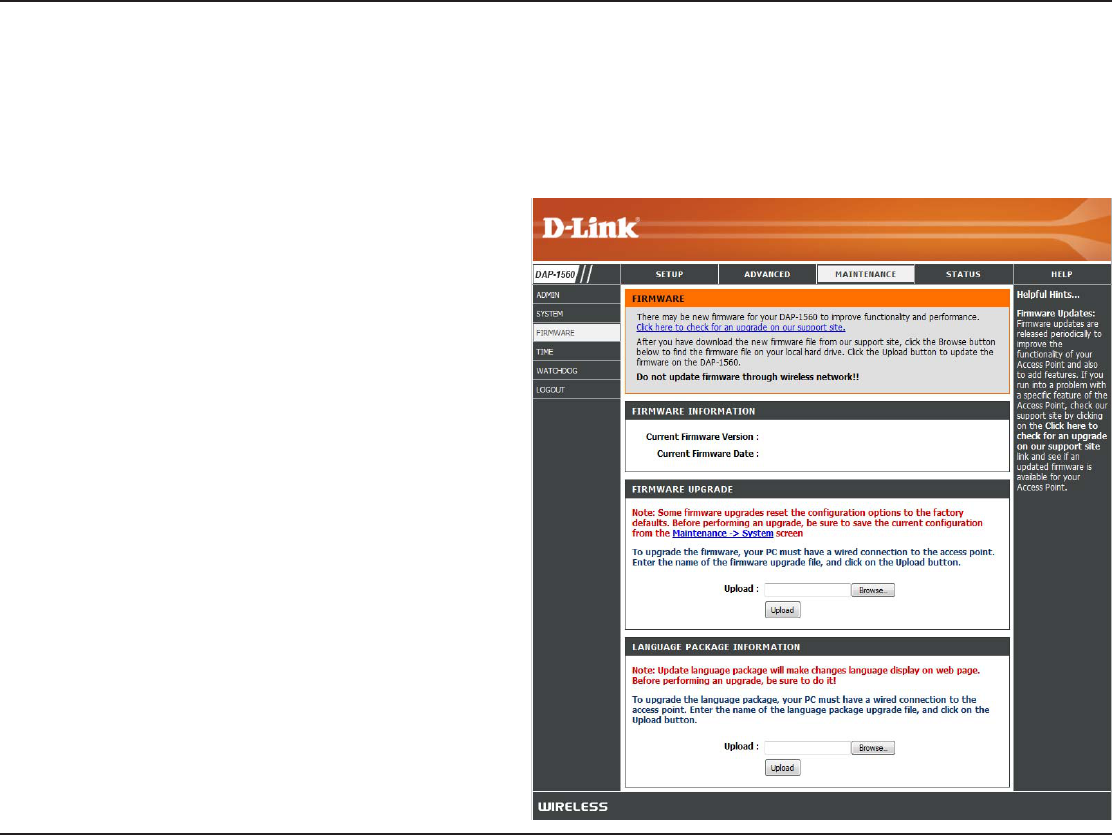
Browse:
Upload:
"GUFSZPVIBWFEPXOMPBEFEUIF OFXöSNXBSF
click Browse to locate the rmware update on your
hard drive. Click Upload to complete the rmware
upgrade.
Once you have a firmware update on your
DPNQVUFSVTF UIJTPQUJPOUP CSPXTFGPSUIFöMF
and then upload the information into the access
point.
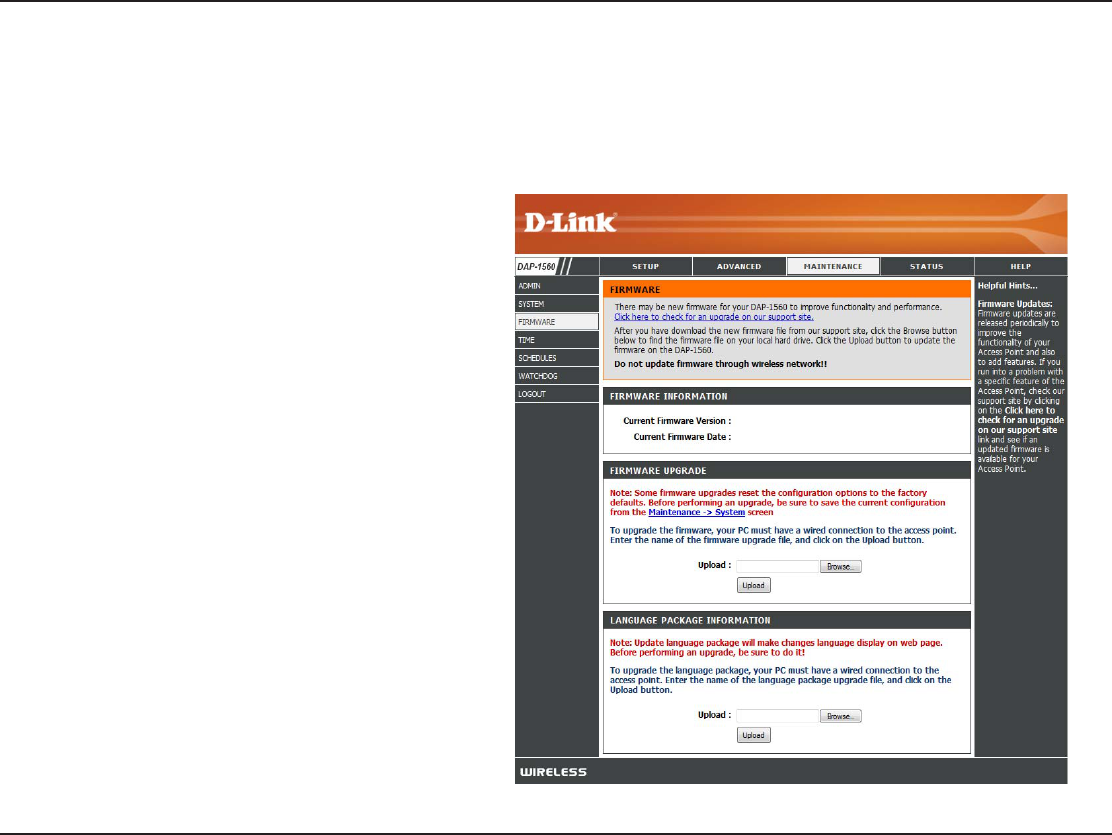
Firmware
You can upgrade the rmware of the access point here. Make sure the rmware you want to use is on the local hard drive of
the computer. Click on Browse to locate the rmware le to be used for the update. Please check the D-Link support website
GPSöSNXBSFVQEBUFTBUIUUQTVQQPSUEMJOLDPN:PVDBOEPXOMPBEöSNXBSFVQHSBEFTUPZPVSIBSEESJWFGSPNUIJTTJUF
After you have downloaded the new language
QBDLDMJDLBrowse to locate the language pack le
on your hard drive. Click Upload to complete the
language pack upgrade.
Language Pack
You can change the language of the web UI by uploading
available language packs.
Browse:
35D-Link DAP-1560 User Manual
Section 3 - Conguration
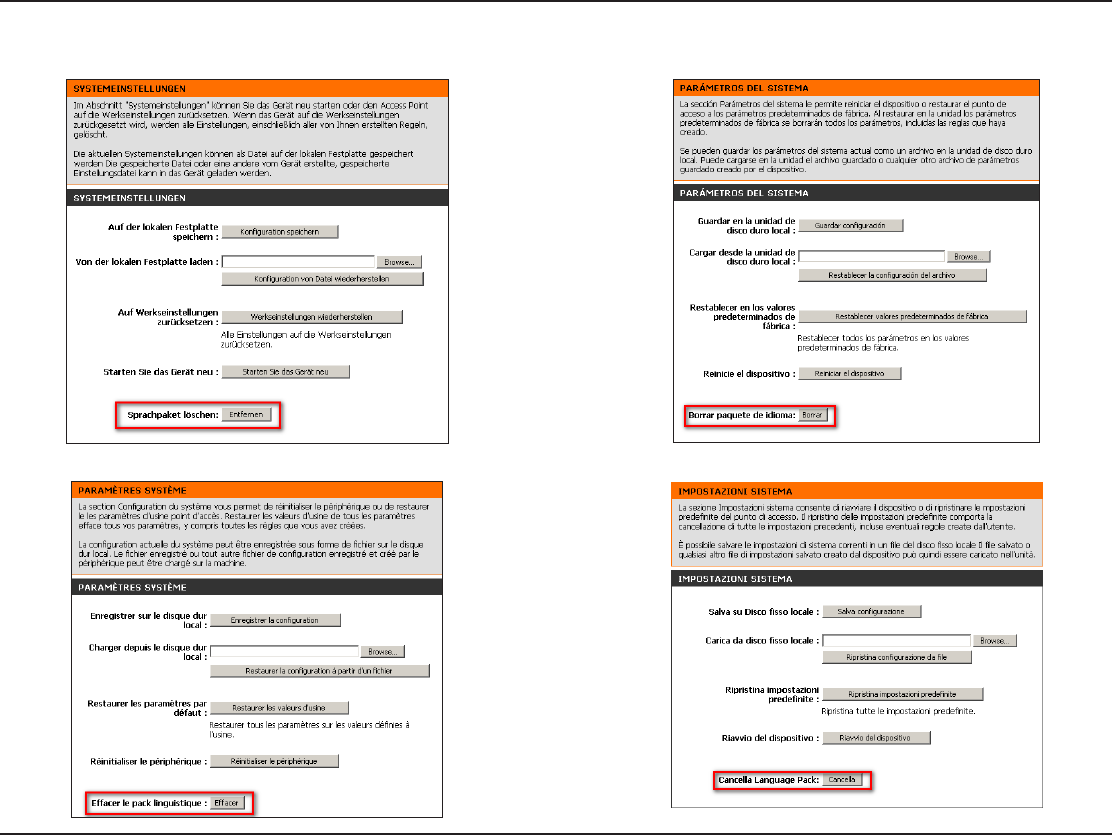
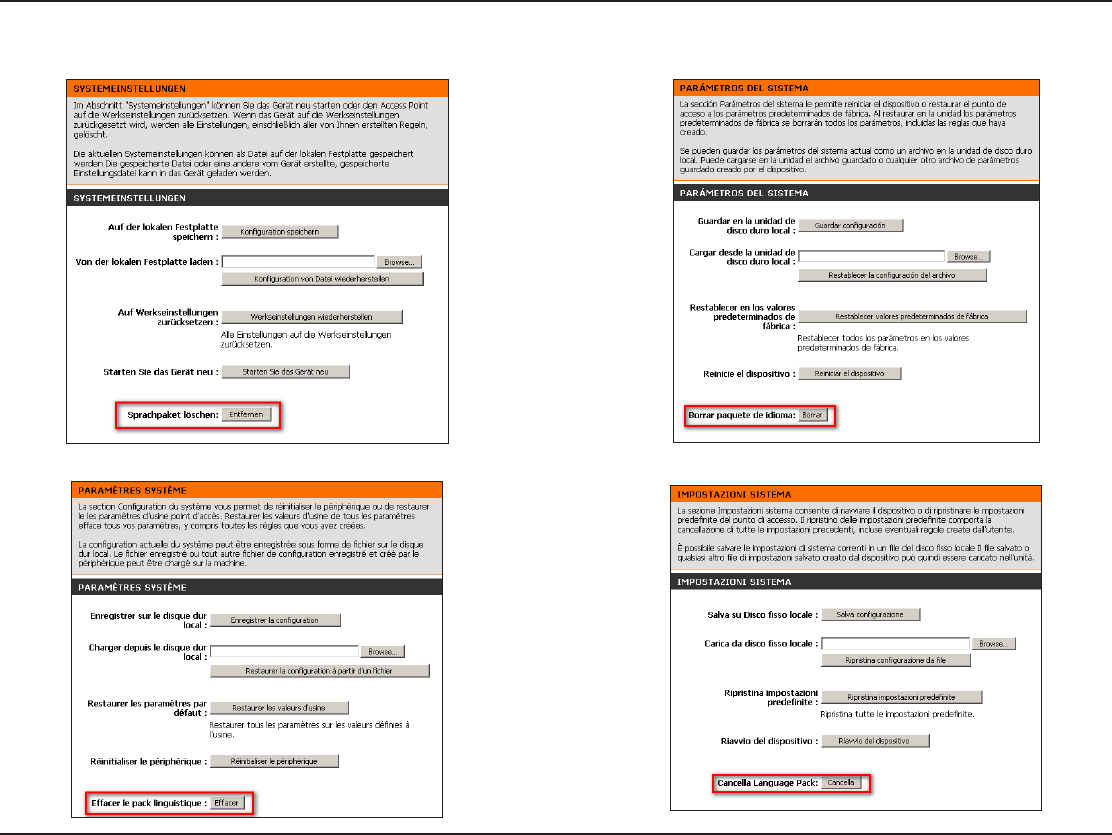
*GZPVMPBEBMBOHVBHFQBDLBOEXPVMEMJLFUPHPCBDLUP&OHMJTIDMJDLMaintenance > System and click on ClearOFYUUPClear
Language Pack.

36D-Link DAP-1560 User Manual
Section 3 - Conguration
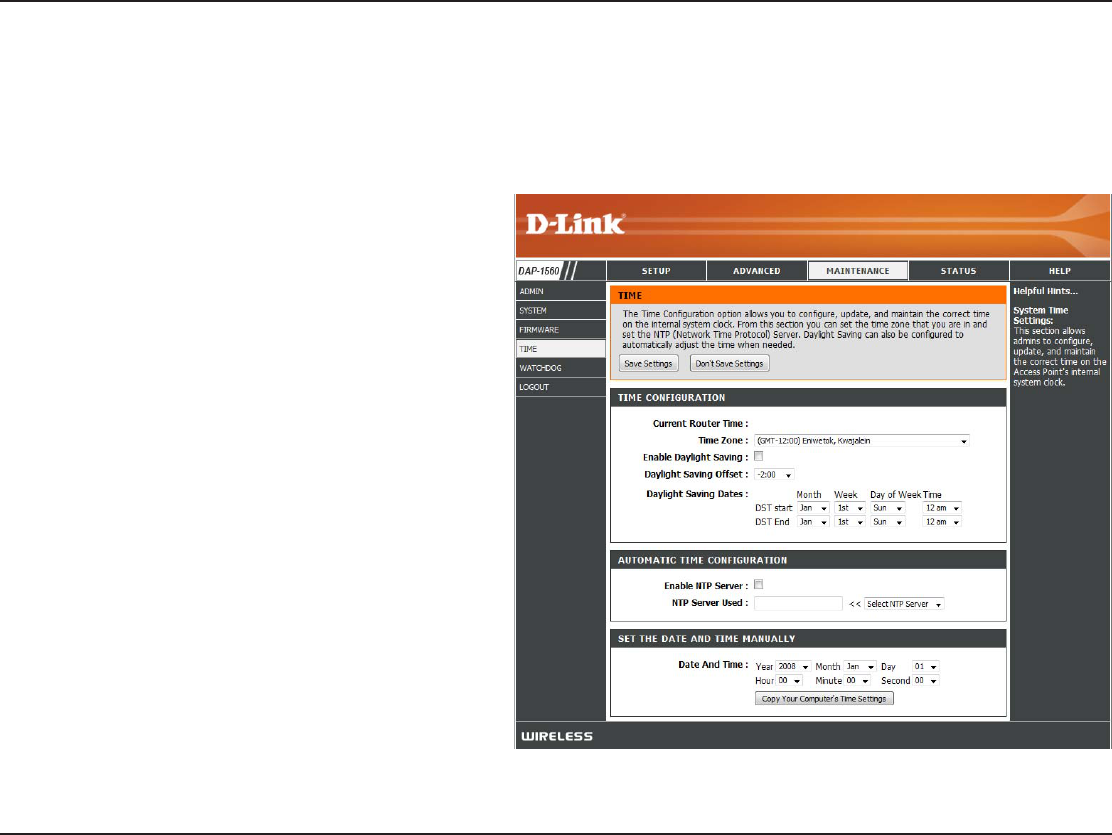
Time
5IF5JNF$POöHVSBUJPOPQUJPOBMMPXTZPVUPDPOöHVSFVQEBUFBOENBJOUBJOUIFDPSSFDUUJNFPOUIFJOUFSOBMTZTUFNDMPDL
From this section you can set the time zone that you are in. Daylight Saving can also be congured to automatically adjust the
time when needed.
Time Zone:
Daylight
Saving:
Enable NTP
Server:
NTP Server
Used:
Manual:
Select the Time Zone from the drop-down menu.
5PTFMFDU %BZMJHIU4BWJOH UJNFNBOVBMMZ DMJDL
the Enable Daylight SavingCPY/FYUVTFUIF
drop-down menu to select a Daylight Saving Oset
and then enter a start date and an end date for
daylight saving time.
NTP is short for Network Time Protocol. NTP
synchronizes computer clock times in a network
PGDPNQVUFST$IFDLUIJTCPYUPVTFB/51TFSWFS
5IJTXJMMPOMZDPOOFDUUPBTFSWFSPOUIF*OUFSOFU
not a local server.
Enter the NTP server or select one from the drop-down
menu.
5PNBOVBMMZ JOQVUUIF UJNFFOUFS UIF WBMVFTJO
UIFTFöFMETGPSUIF:FBS.POUI%BZ)PVS.JOVUF
and Second and then click Save Settings. You
can also click the Copy Your Computer’s Time
Settings button at the bottom of the screen.
37D-Link DAP-1560 User Manual
Section 3 - Conguration
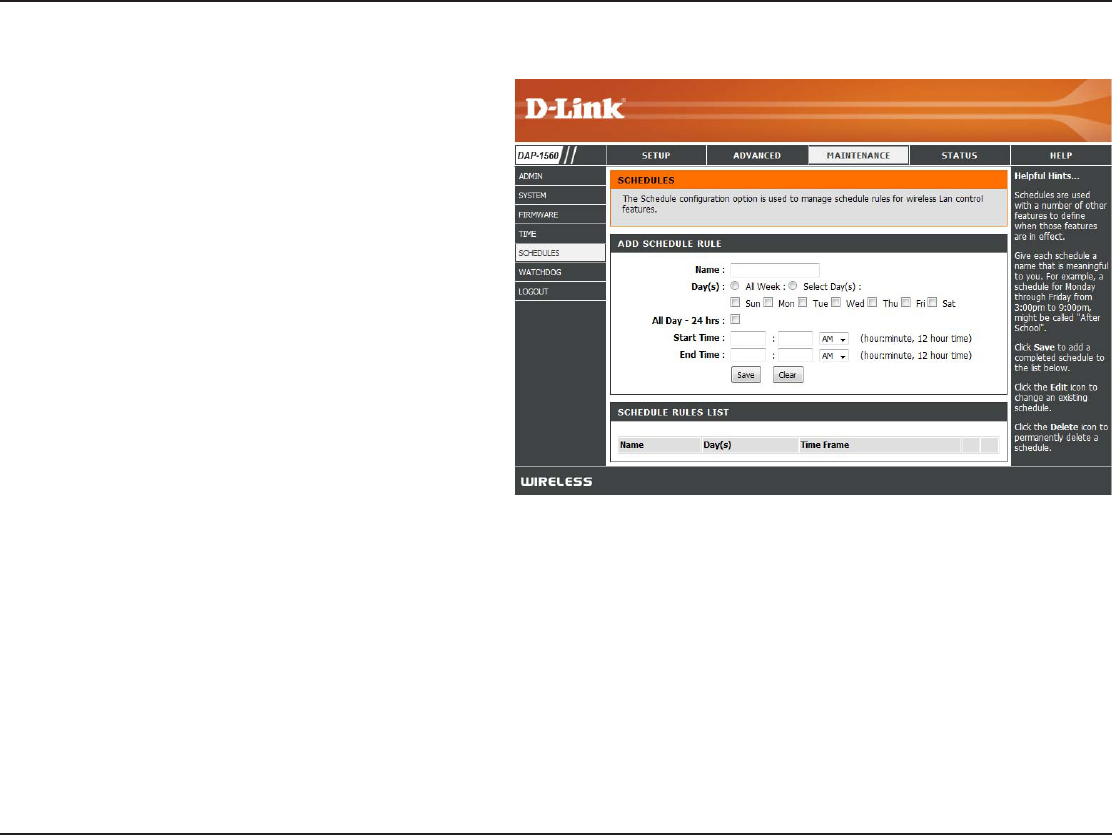
Schedules
Name:
Days:
Time:
Save:
Schedule Rules
List:
Enter a name for your new schedule.
4FMFDUBEBZBSBOHFPGEBZTPSAll Week to include
every day.
Check All Day - 24hrs or enter a start and end time
for your schedule.
Click Save to save your schedule. You must click
Save Settings at the top for your schedules to go
into eect.
The list of schedules will be listed here. Click the
Edit icon to make changes or click the Delete icon
to remove the schedule.
38D-Link DAP-1560 User Manual
Section 3 - Conguration
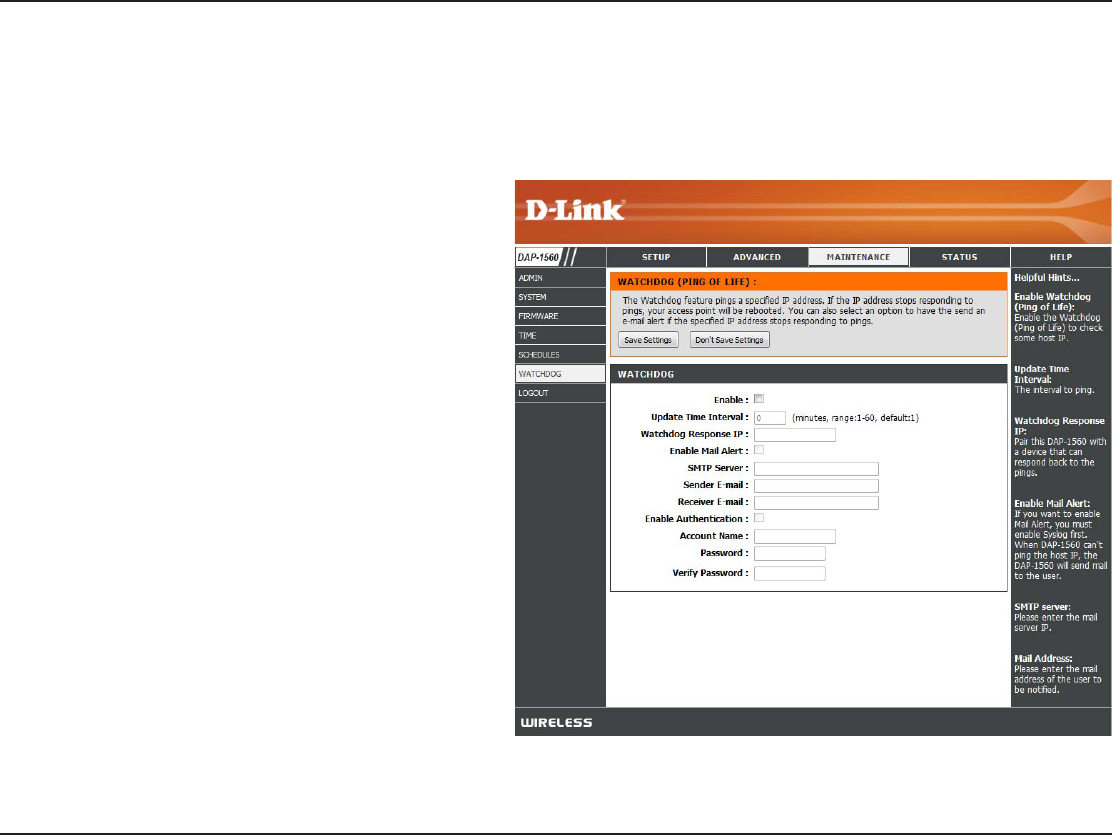
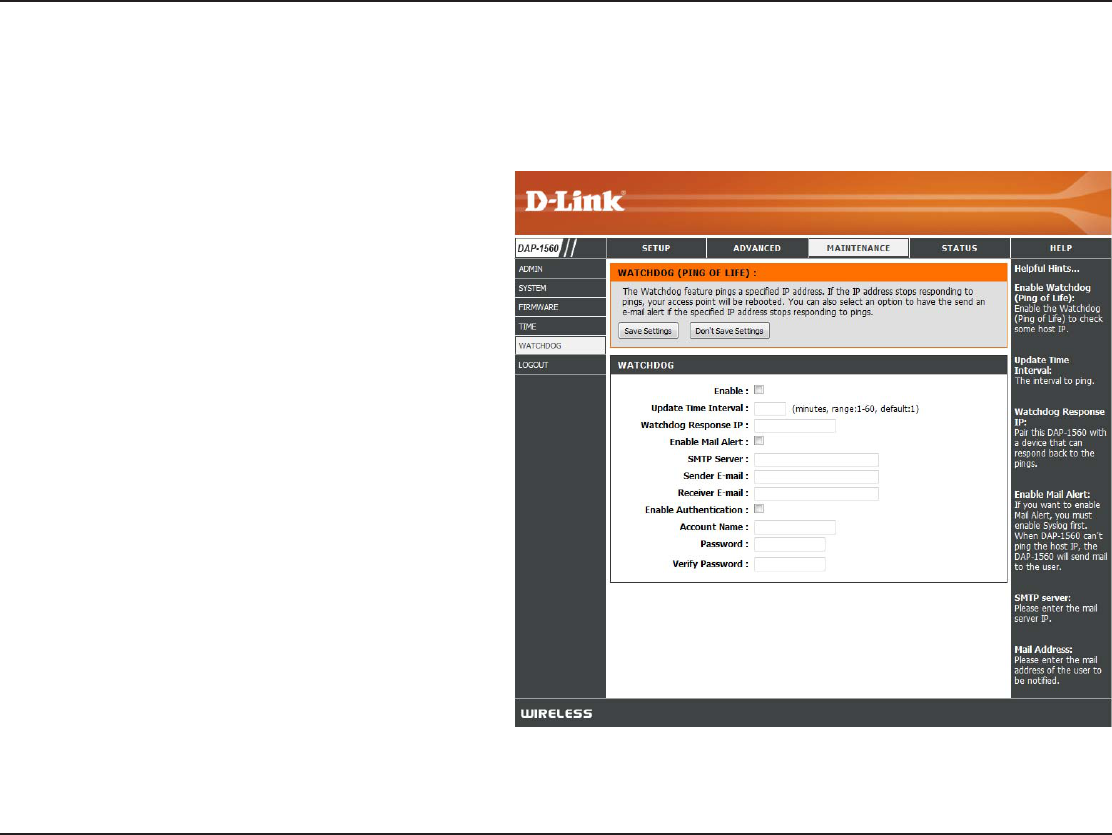
Watchdog
5IF8BUDIEPHGFBUVSFQJOHTBTQFDJöD*1BEESFTT*GUIF*1BEESFTTTUPQTSFTQPOEJOHUPQJOHTZPVSBDDFTTQPJOUXJMMCFSFCPPUFE
:PVDBOBMTPTFMFDUBOPQUJPOUPIBWFUIFTFOEBOFNBJMBMFSUJGUIFTQFDJöFE*1BEESFTTTUPQTSFTQPOEJOHUPQJOHT
Enable:
Update Time
Interval:
Watchdog
Response IP:
Enable Mail Alert:
SMTP Server:
Sender E-mail:
Receiver E-mail:
Enable
Authentication:
Account Name:
Password:
Verify Password:
Check to enable Watchdog.
Enter the interval to ping the entered address.
Enter the IP address of a device that can respond
back to the access point.
Check to have the DAP-1560 email you if it cannot
ping the above IP address. Syslog must be enabled
for this feature to work.
Enter the SMTP mail server address (IP address or
URL)
Enter the “From” E-mail address.
Enter the E-mail address to send to.
*GZPVS&NBJMTFSWFSSFRVJSFTBVUIFOUJDBUJPODIFDL
UIJTCPY
Enter the account name.
Enter the account password.
Enter the password again to verify.

39D-Link DAP-1560 User Manual
Section 3 - Conguration
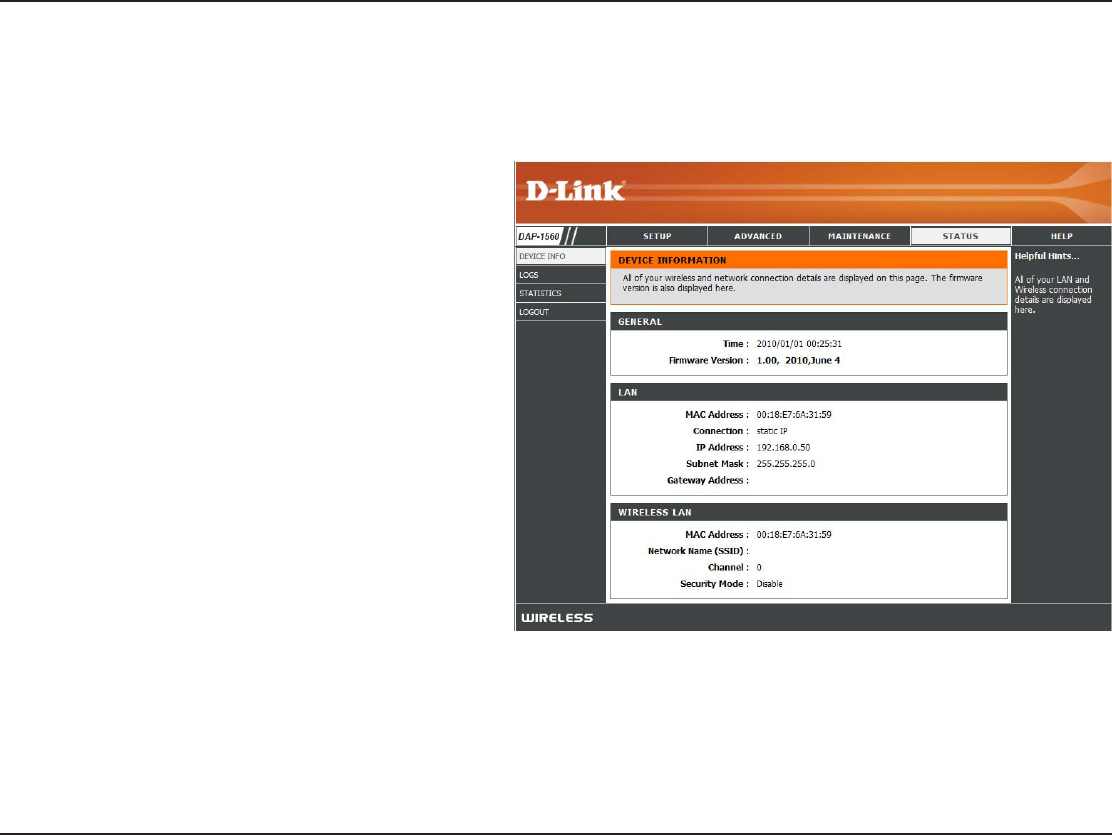
General:
LAN:
Wireless LAN:
Displays the access point’s time and firmware
version.
Displays the MAC address and the private (local) IP
settings for the access point.
Displays the wireless MAC address and your
wireless settings such as SSID and Channel.
Status
Device Info
This page displays the current information for the DAP-1560. It will display the LAN and wireless LAN information.
40D-Link DAP-1560 User Manual
Section 3 - Conguration
Log Type:
Apply Log
Settings Now:
Refresh:
Clear:
Save Log:
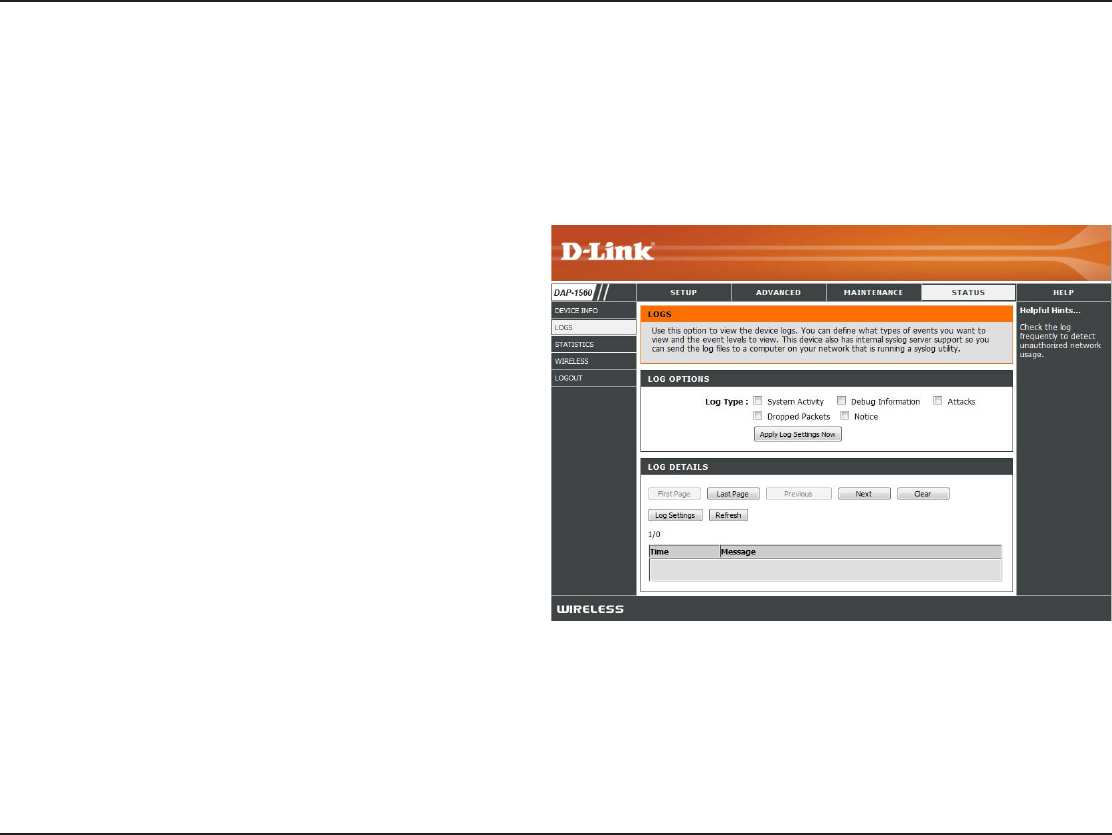
There are ve types of logs that can be viewed: System
ActivityDebug InformationAttacksDropped
PacketsBOENotice$MJDLUIFDPSSFTQPOEJOHDIFDLCPY
for the type(s) that you want displayed in the log.
Click this button to immediately lter the log results so
that only the selected options appear in the Log Details
section of this screen.
Updates the log details on the screen so it displays any
recent activity.
Clear all of the log contents.
This option will save the access point to a log le on
your computer.
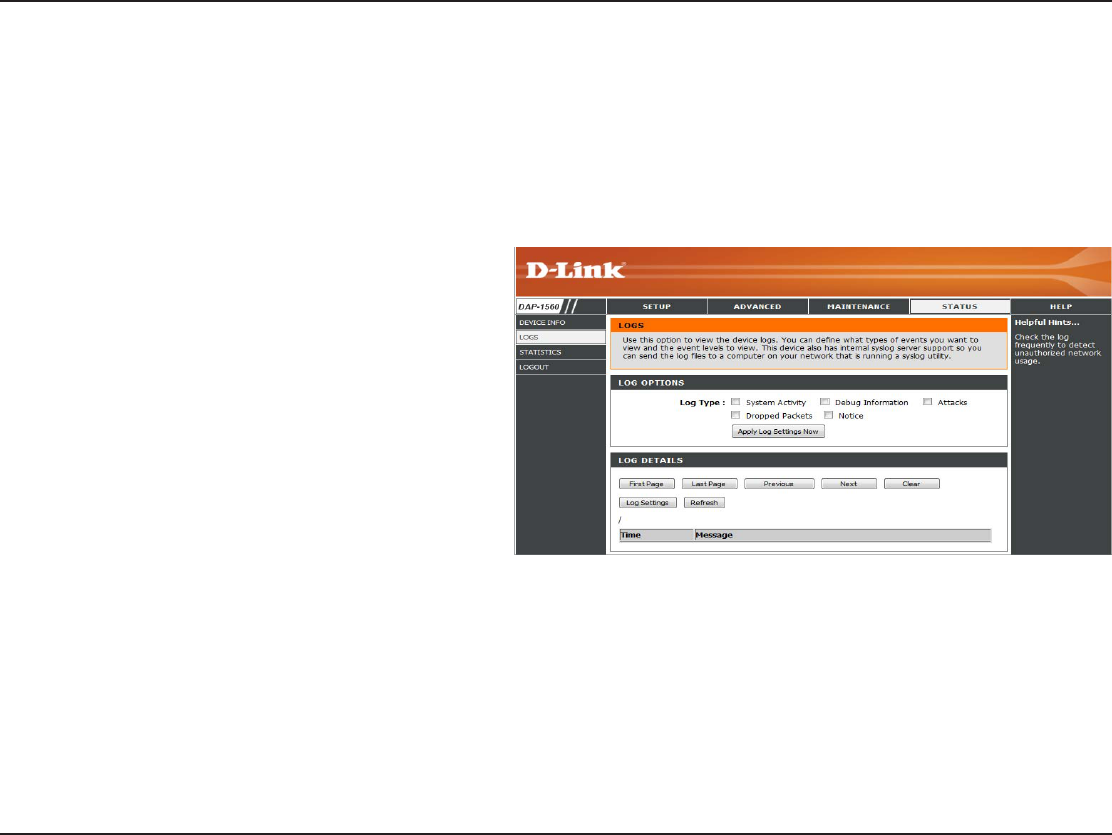
Logs
The access point automatically logs (records) events of possible interest in its internal memory. If there isn’t enough internal memory
GPSBMMFWFOUTMPHTPGPMEFSFWFOUTBSFEFMFUFECVUMPHTPGUIFMBUFTUFWFOUTBSFSFUBJOFE5IF-PHTPQUJPOBMMPXTZPVUPWJFXUIF
access point logs. You can dene what types of events you want to view and the level of the events to view. This access point also
IBTFYUFSOBM4ZTMPH4FSWFSTVQQPSUTPZPVDBOTFOEUIFMPHöMFTUPBDPNQVUFSPOZPVSOFUXPSLUIBUJTSVOOJOHB4ZTMPHVUJMJUZ
41D-Link DAP-1560 User Manual
Section 3 - Conguration
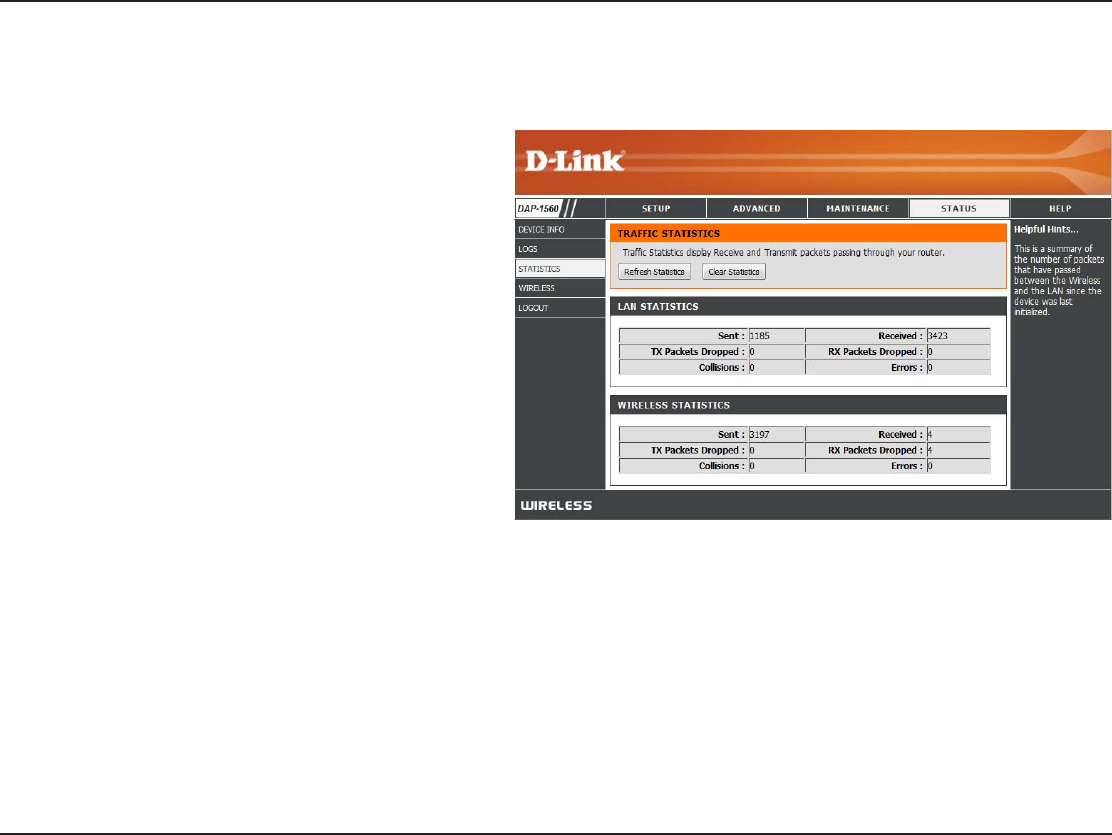
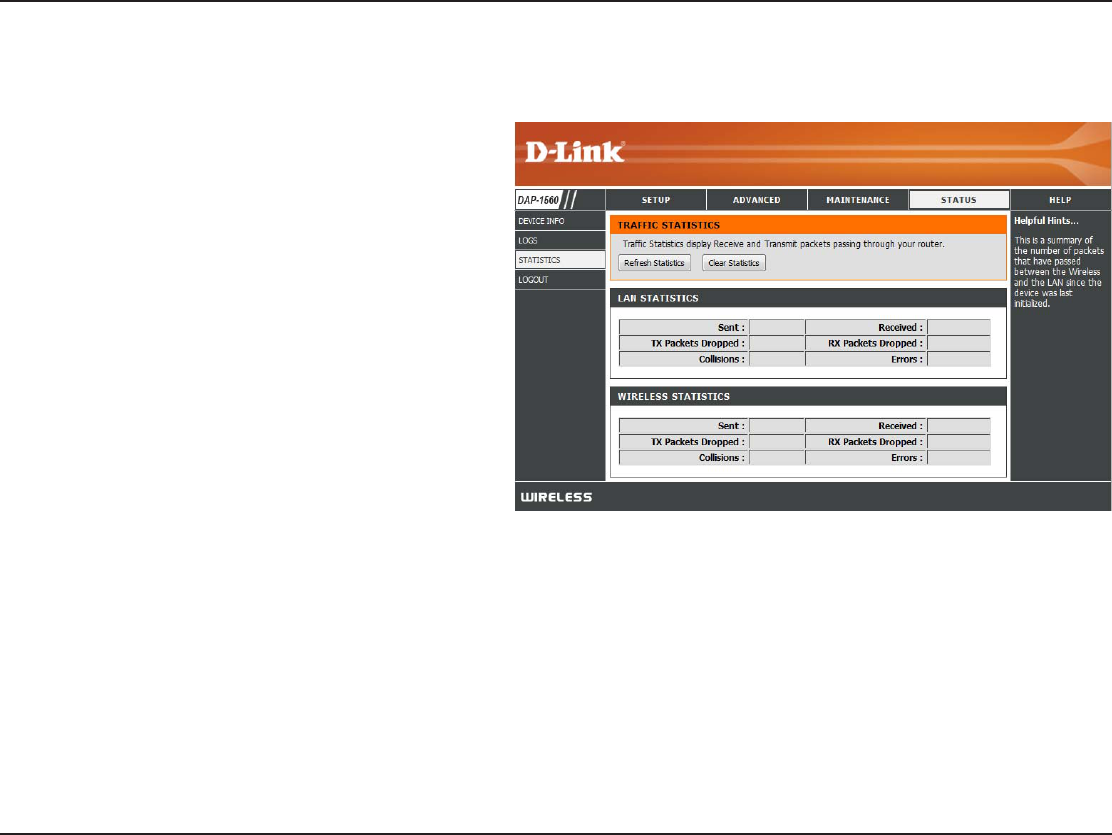
Statistics
The Statistics page displays all of the LAN (Ethernet port) and Wireless packets transmit and receive statistics.
Sent:
Received:
TX Packets
Dropped:
RX Packets
Dropped:
Collisions:
Errors:
The total number of packets sent from the access
point.
The total number of packets received by the access
point.
Displays the number of packets that were dropped
XIJMFTFOEJOHEVFUPFSSPSTDPMMJTJPOTPSBDDFTT
point resource limitations.
Displays the number of packets that were dropped
XIJMFSFDFJWJOHEVFUPFSSPSTDPMMJTJPOTPSBDDFTT
point resource limitations.
Displays the number of collisions.
Displays the number of errors.
42D-Link DAP-1560 User Manual
Section 3 - Conguration
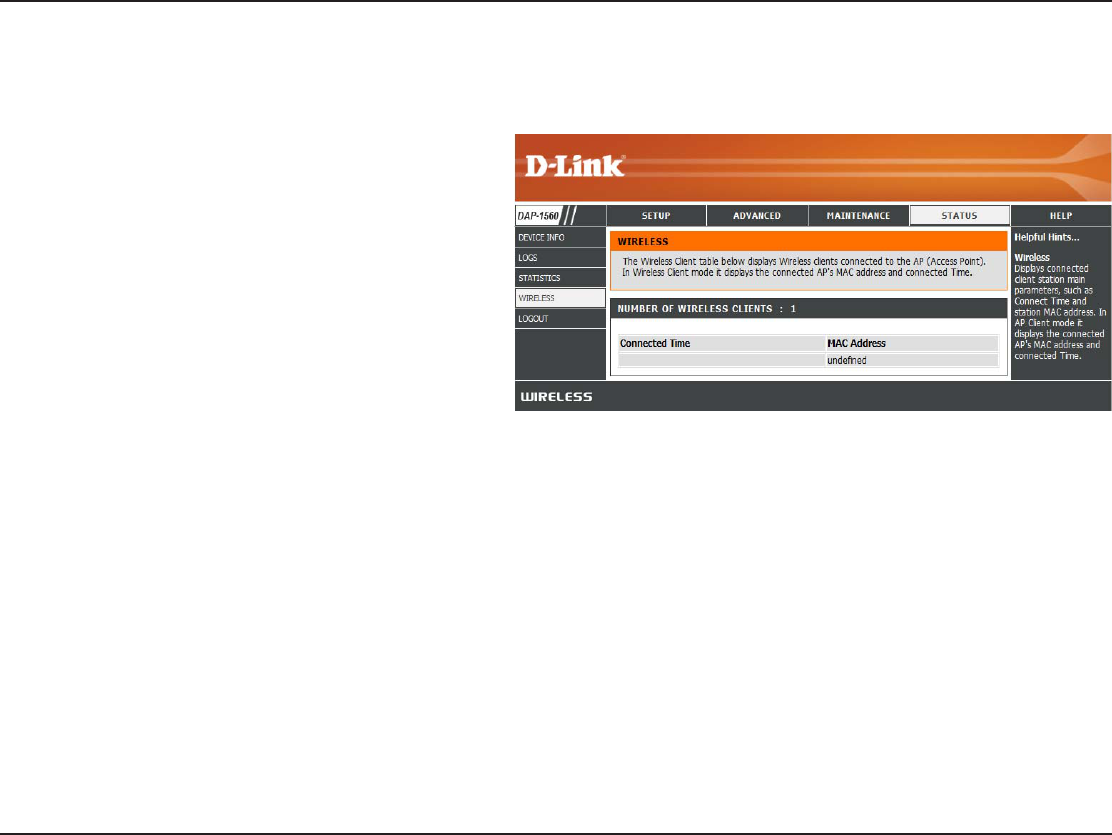
Wireless
The wireless section allows you to view the wireless clients that are connected to your wireless access point.
Connection TIme:
MAC Address:
Displays the amount of time the wireless client has
been connected to the access point.
Displays the MAC address of the wireless client.
43D-Link DAP-1560 User Manual
Section 3 - Conguration
Help
44D-Link DAP-1560 User Manual
Section 3 - Conguration
Conguration (Bridge Mode)
This section will show you how to congure your new D-Link wireless access point using the web-based conguration utility.
Web-based Conguration Utility
0OUIFCBDLPGUIF%"1TMJEFUIFNPEFTFMFDUPS
to the right (Bridge Mode).
5P BDDFTTUIF DPOGJHVSBUJPOVUJMJUZPQFOB XFC
CSPXTFSTVDIBT*OUFSOFU&YQMPSFSBOEFOUFSdlinkap
or 192.168.0.50 in the address eld.
3. Enter admin and then enter your password. Leave the
password blank by default.
If you get a Page Cannot be DisplayedFSSPSQMFBTFSFGFS
to the Troubleshooting section for assistance.
45D-Link DAP-1560 User Manual
Section 3 - Conguration
This wizard is designed to assist you in conguring the wireless settings for your bridge. It will guide you through step-by-step
instructions on how to setup your wireless network.
Setup Wizard
Enter the Device Name of the AP and click Next to
continue. It is recommended to change the Device
Name if there is more than one D-Link device within
the subnet.
Click Launch Wireless Setup Wizard
46D-Link DAP-1560 User Manual
Section 3 - Conguration
Select Auto configuration if you want to use Wi-Fi
Protected Setup.
*GZPVXBOUUPTFUVQZPVSOFUXPSLNBOVBMMZTLJQUPQBHF
48.
Click Next to continue.
*GZPVXBOU UPDIBOHFUIF BENJOBDDPVOUQBTTXPSE
enter a new password and click Next.
47D-Link DAP-1560 User Manual
Section 3 - Conguration
Start WPS on the wireless device you are adding to you
wireless network to complete the setup.
Select PIN to connect your wireless device with WPS.
For PBCDPOöHVSBUJPOTLJQUPUIFOFYUQBHF
Enter the PIN number used into you access point and
click Connect.
48D-Link DAP-1560 User Manual
Section 3 - Conguration
Press down the WPS Button on the wireless device you
are adding to your network to complete the setup.
Select PBC to use the Push Button Conguration to
connect to your network.
Click Connect to continue.
Select Manual conguration to set up your network
manually.
Click Next to continue.
49D-Link DAP-1560 User Manual
Section 3 - Conguration
Enter the Wireless Network Name of the AP or click the
Site Survey button to nd the AP.
Click Next to continue.
50D-Link DAP-1560 User Manual
Section 3 - Conguration
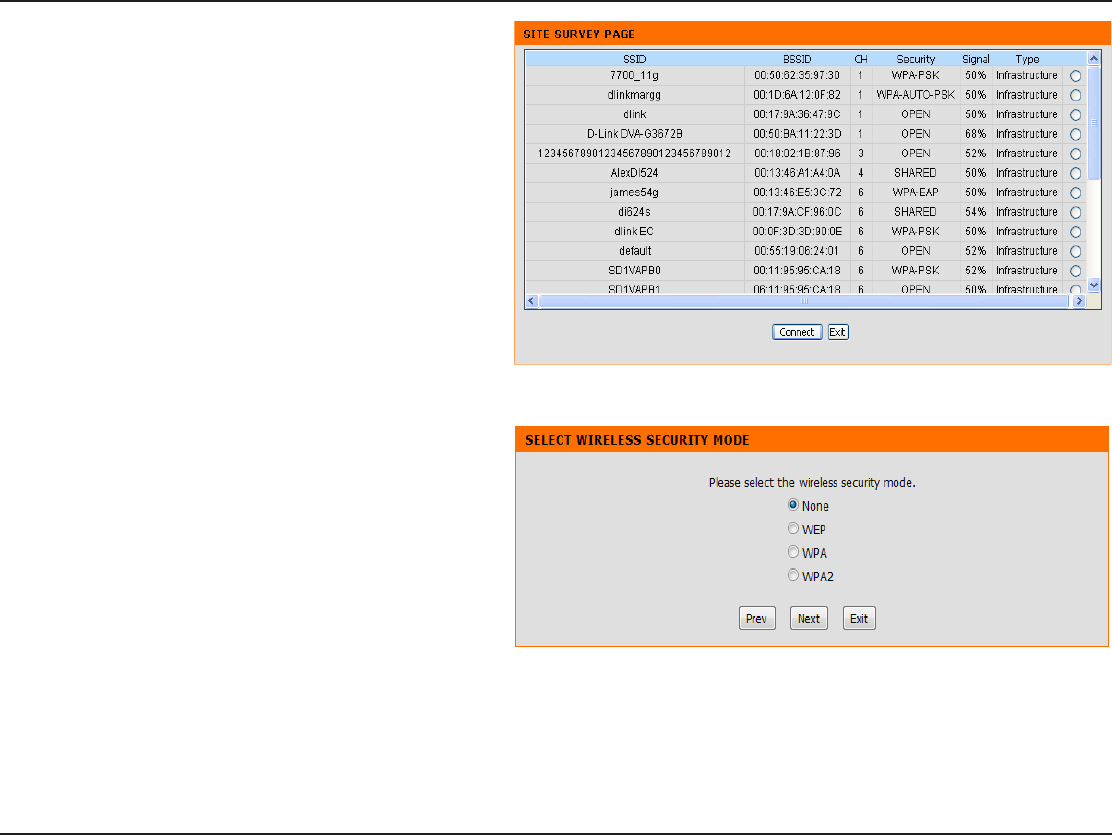
If you clicked on Site SurveyUIFGPMMPXJOHTDSFFOXJMM
be displayed.
Find your access point from the list and click Connect to
complete the Setup Wizard.
Choose which Security Mode you want to use and click
Next to continue.
51D-Link DAP-1560 User Manual
Section 3 - Conguration
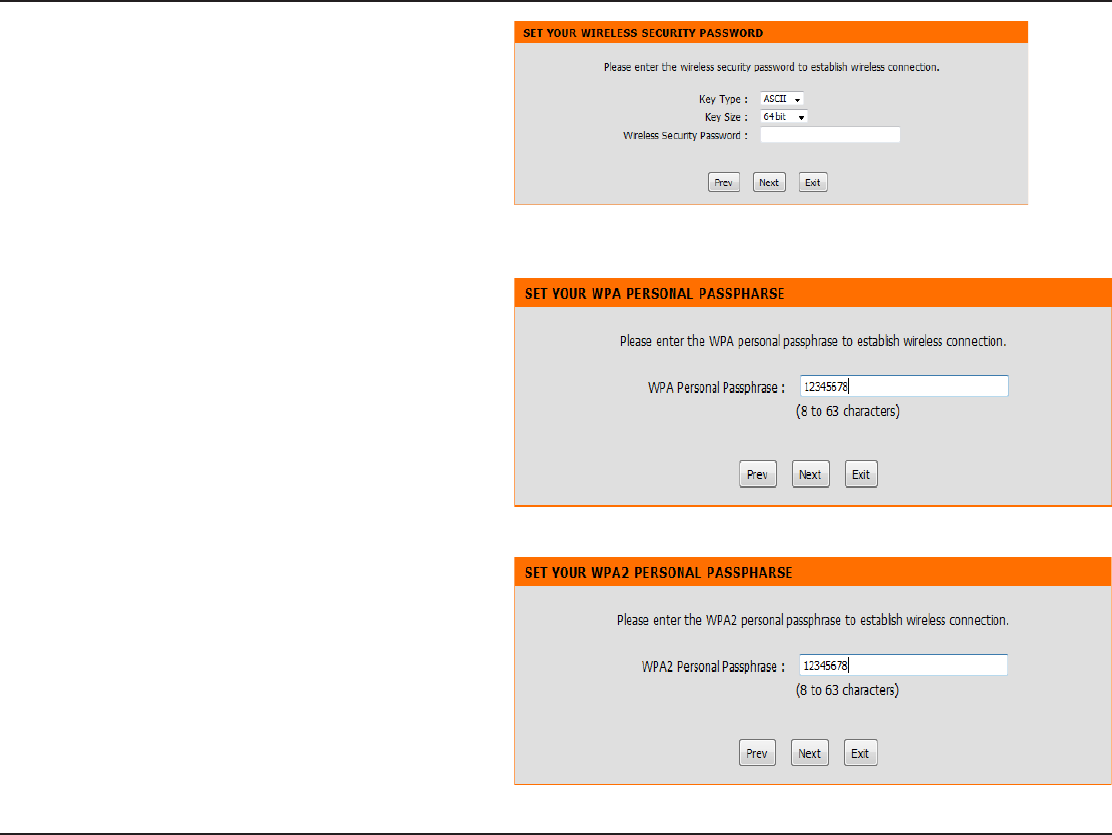
If you choose WEPFOUFSUIFXJSFMFTTTFDVSJUZQBTTXPSE
and click Next to complete the Setup Wizard.
If you choose WPAFOUFSUIFWPA Personal Passphrase
and click Next to complete the Setup Wizard.
*GZPVDIPPTF81"FOUFSUIF81"1FSTPOBM1BTTQISBTF
and click Next to complete the Setup Wizard.
52D-Link DAP-1560 User Manual
Section 3 - Conguration
The following screen opens to indicate that you have
successfully saved your new settings.
53D-Link DAP-1560 User Manual
Section 3 - Conguration
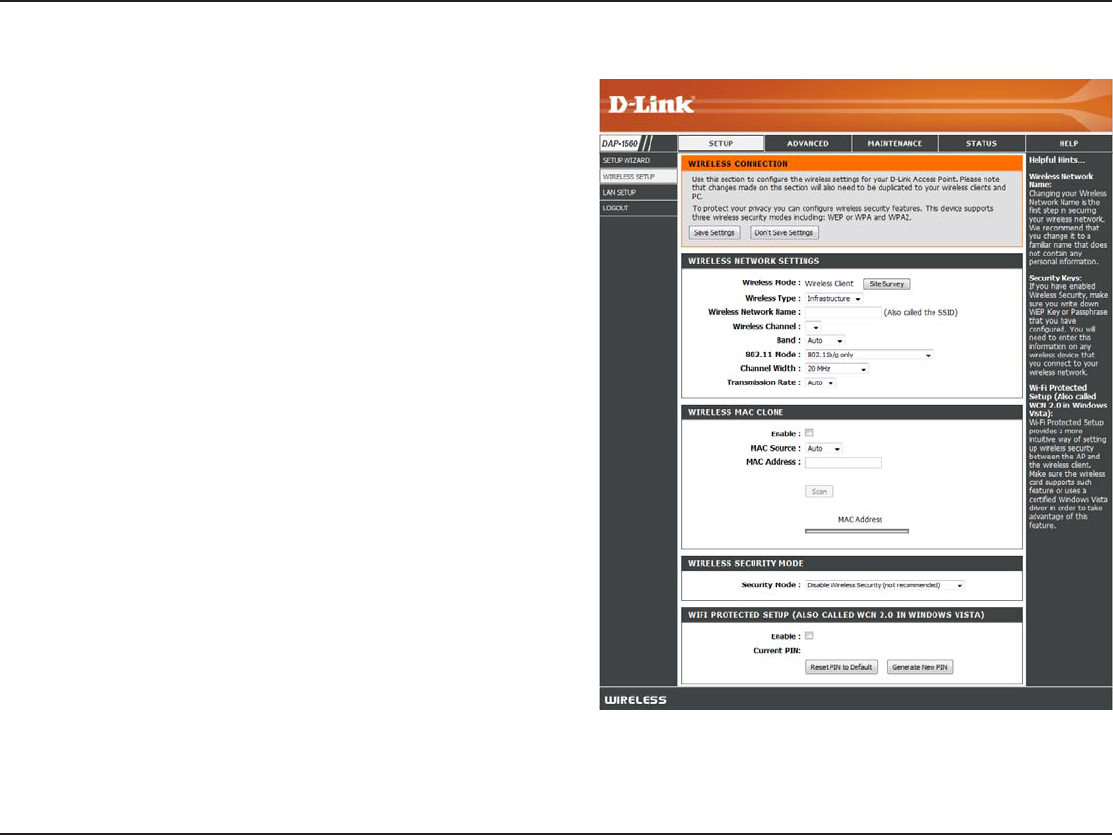
Wireless Mode:
Site Survey:
Wireless Type:
Wireless
Network
Name:
Wireless
Channel:
802.11 Band
802.11 Mode:
Transmission
Rate:
Channel Width:
Wireless Client will be displayed.
Click to display available wireless networks within range of the
DAP-1560. Select the network you want to connect to and enter
any security settings required.
Select Infrastructure if connecting to a wireless router or
access point (most common) or Ad-Hoc if connecting directly
to another wireless client in Ad-Hoc mode.
*GZPVEJE OPUVTFUIF 4JUF4VSWFZPQUJPO FOUFS UIF44*% PS
OFUXPSLOBNF FYBDUMZ BT JUJTTFU PO ZPVSXJSFMFTTSPVUFSPS
access point.
Indicates the channel setting for the DAP-1560. The Channel can
CFDIBOHFEUPöUUIFDIBOOFMTFUUJOHGPSBOFYJTUJOHXJSFMFTT
network or to customize the wireless network (Ad-Hoc mode).
5IFPQUJPOTJODMVEF()[()[BOE()[()[
If all of the wireless devices in your wireless network can
DPOOFDUJOUIF TBNF USBOTNJTTJPONPEFZPVDBO JNQSPWF
performance slightly by choosing the appropriate “Only” mode.
If you have some devices that use a dierent transmission
NPEFDIPPTFUIFBQQSPQSJBUFi.JYFEwNPEF
Select the transmit rate. It is strongly suggested to select Best
(automatic) for best performance. This option is unavailable in
Bridge Mode.
Select the Channel Width:
Auto 20/40 - Select if you are using both 802.11n and non-802.11n wireless devices.
20MHz - Select if you are not using any 802.11n wireless clients.
Wireless

54D-Link DAP-1560 User Manual
Section 3 - Conguration
Security Mode:
Enable:
Refer to page 68 for more information regarding wireless security.
Enable the Wi-Fi Protected Setup feature.
Enabling this option allows the user to manually assign the source MAC address to packets forwarded by the DAP-1560. If
OPUNBOVBMMZBTTJHOFEUIFQBDLFUTTPVSDF."$BEESFTTöFMEXJMMCFBVUPNBUJDBMMZTFMFDUFEBTUIF%"1T."$BEESFTT
Wireless MAC Cloning
MAC Address:
Scan:
Enter the desired MAC address connected to your DAP-1560 to enable the clone function.
Click the Scan button to search for all available devices connected to your DAP-1560’s Ethernet ports
55D-Link DAP-1560 User Manual
Section 3 - Conguration
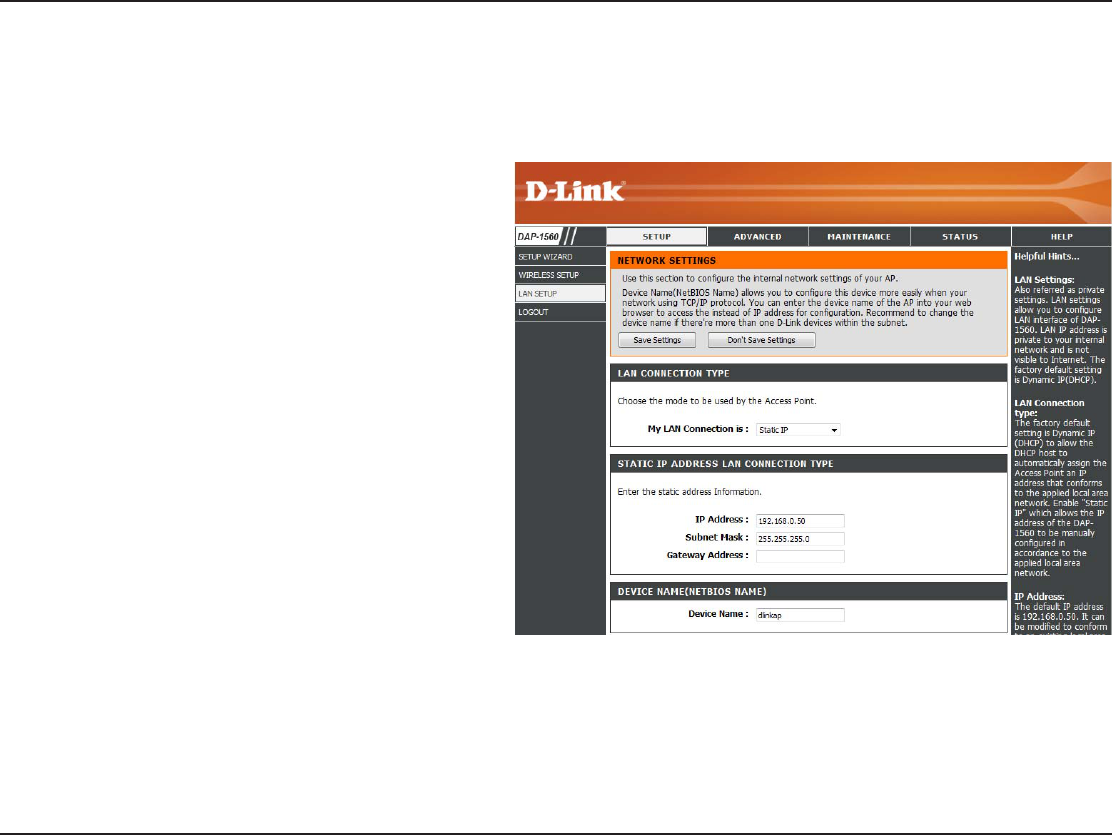
LAN Connection
Type:
Access Point IP
Address:
Subnet Mask:
Default Gateway:
Device Name:
Use the drop-down menu to select Static IP if you
XBOUUP NBOVBMMZBTTJHOUIF *1BEESFTTTVCOFU
NBTLBOEHBUFXBZBEESFTTFT4FMFDUDynamic IP
(DHCP) to automatically receive an IP address from
your DHCP server or router.
Enter the IP address you want to assign the bridge.
Enter the Subnet Mask you want to assign the
bridge.
Enter the Gateway you want to assign the bridge.
Enter the Device Name of the AP and click Next to
continue. It is recommended to change the Device
Name if there is more than one D-Link device within
the subnet.
This section will allow you to change the local network settings of the bridge and to congure the Static settings.
Network Settings
Static
56D-Link DAP-1560 User Manual
Section 3 - Conguration
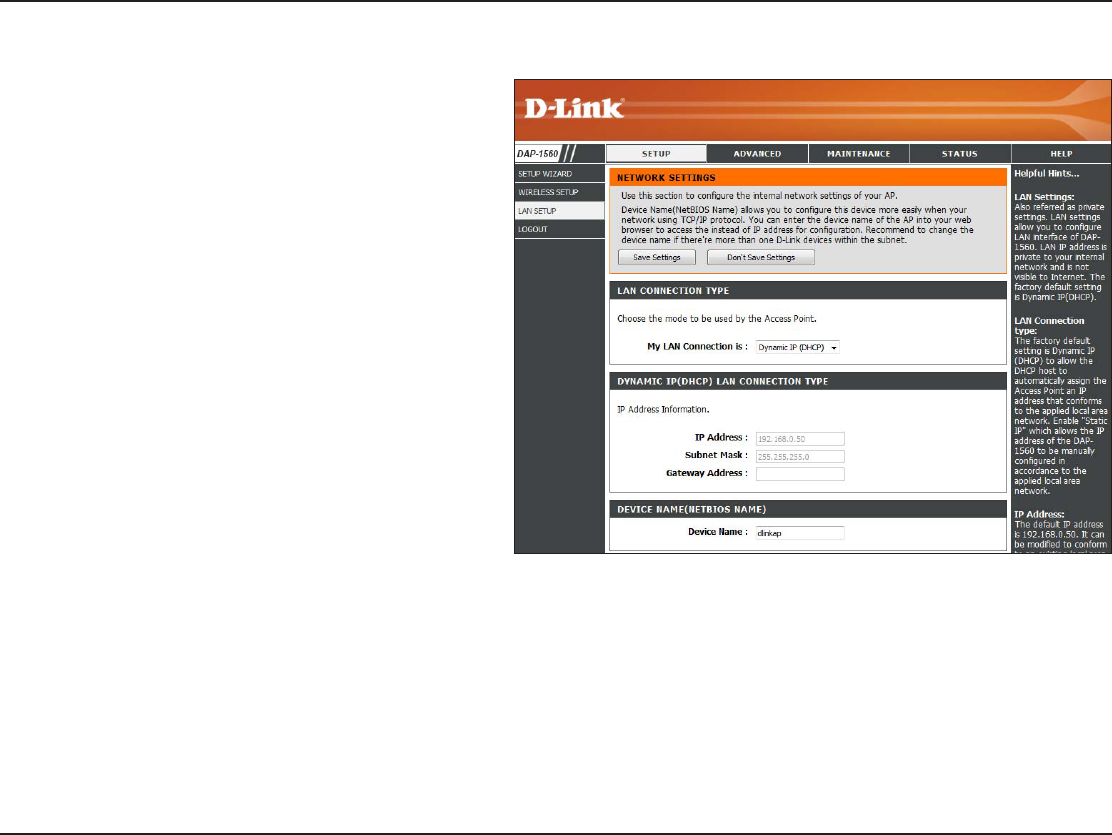
DHCP
Select DHCP to automatically obtain an IP address
POUIF-"/QSJWBUFOFUXPSL
Enter the Device Name of the AP and click Next to
continue. It is recommended to change the Device
Name if there is more than one D-Link device
within the subnet.
LAN Connection
Type:
Device Name:
57D-Link DAP-1560 User Manual
Section 3 - Conguration
Transmit Power:
RTS Threshold:
Fragmentation
Threshold:
Short GI:
Set the transmit power of the antennas.
This value should remain at its default setting of
*GJODPOTJTUFOUEBUBøPXJTBQSPCMFNPOMZB
minor modication should be made.
5IFGSBHNFOUBUJPOUISFTIPMEXIJDIJT TQFDJöFE
JOCZUFTEFUFSNJOFTXIFUIFSQBDLFUT XJMM CF
GSBHNFOUFE1BDLFUTFYDFFEJOHUIF CZUF
setting will be fragmented before transmission.
2346 is the default setting.
$IFDLUIJTCPYUPSFEVDFUIFHVBSEJOUFSWBMUJNF
UIFSFGPSFJODSFBTJOHUIF EBUB DBQBDJUZ)PXFWFS
it is less reliable and may create higher data loss.
Advanced
Advanced Wireless
58D-Link DAP-1560 User Manual
Section 3 - Conguration
Password:
Verify Password:
Enable Graphical
Authentication:
Enter a new password for the Administrator Login
Name. The administrator can make changes to
the settings.
Enter the same password that you entered in the
QSFWJPVTUFYUCPYJOPSEFSUPDPOöSNJUTBDDVSBDZ
$IFDLUIJTCPYUPSFRVJSFVTFSTUPUZQFMFUUFSTPS
numbers from a distorted image displayed on
the login screen to prevent online hackers and
unauthorized users from gaining access to your
router’s network settings.
Maintenance
Admin
5IJTQBHFXJMMBMMPXZPVUPDIBOHFUIF"ENJOJTUSBUPSQBTTXPSE"ENJOIBTSFBEXSJUFBDDFTT
59D-Link DAP-1560 User Manual
Section 3 - Conguration
Save Settings To
Local Hard Drive:
Load Settings From
Local Hard Drive:
Restore To Factory
Default:
Reboot The Device:
Clear Language
Pack:
Use this option to save the current access point
conguration settings to a le on the hard disk
PGUIF DPNQVUFSZPV BSFVTJOH'JSTUDMJDL UIF
SaveCVUUPO:PVXJMMUIFOTFFBöMFEJBMPHXIFSF
you can select a location and le name for the
settings.
Use this option to load previously saved access
QPJOUDPOGJHVSBUJPO TFUUJOHT'JSTUDMJDLUIF
Browse button to find a previously save file
PGDPOöHVSBUJPO TFUUJOHT5IFO DMJDL UIFLoad
button to transfer those settings to the access
point.
This option will restore all conguration settings
back to the settings that were in eect at the
time the access point was shipped from the
factory. Any settings that have not been saved
XJMMCF MPTU JODMVEJOHBOZ SVMFTUIBUZPVIBWF
created. If you want to save the current access
QPJOUDPOöHVSBUJPOTFUUJOHTVTFUIFSave button
above.
Click to reboot the bridge.
Click to clear the language pack. This will put the web UI back to English.
System
60D-Link DAP-1560 User Manual
Section 3 - Conguration
Browse:
Upload:
"GUFSZPVIBWFEPXOMPBEFEUIF OFXöSNXBSF
click Browse to locate the rmware update on your
hard drive. Click Upload to complete the rmware
upgrade.
Once you have a firmware update on your
DPNQVUFSVTFUIJTPQUJPOUPCSPXTFGPSUIFöMFBOE
then upload the information into the bridge.
Firmware
You can upgrade the rmware of the access point here. Make sure the rmware you want to use is on the local hard drive
of the computer. Click on Browse to locate the rmware le to be used for the update. Please check the D-Link support site
GPSöSNXBSFVQEBUFTBUIUUQTVQQPSUEMJOLDPN:PVDBOEPXOMPBEöSNXBSFVQHSBEFTUPZPVSIBSEESJWFGSPNUIF%-JOL
support site.
After you have downloaded the new language
QBDLDMJDLBrowse to locate the language pack le
on your hard drive. Click Upload to complete the
language pack upgrade.
Language Pack
You can change the language of the web UI by uploading
available language packs.
Browse:
61D-Link DAP-1560 User Manual
Section 3 - Conguration
*GZPVMPBEBMBOHVBHFQBDLBOEXPVMEMJLFUPHPCBDLUP&OHMJTIDMJDLMaintenance > System and click on ClearOFYUUPClear
Language Pack.
62D-Link DAP-1560 User Manual
Section 3 - Conguration
Time
5IF5JNF$POöHVSBUJPOPQUJPOBMMPXTZPVUPDPOöHVSFVQEBUFBOENBJOUBJOUIFDPSSFDUUJNFPOUIFJOUFSOBMTZTUFNDMPDL
From this section you can set the time zone that you are in. Daylight Saving can also be congured to automatically adjust the
time when needed.
Time Zone:
Daylight
Saving:
Enable NTP
Server:
NTP Server
Used:
Manual:
Select the Time Zone from the drop-down menu.
5PTFMFDU %BZMJHIU4BWJOH UJNFNBOVBMMZ DMJDL
the Enable Daylight SavingCPY/FYUVTFUIF
drop-down menu to select a Daylight Saving Oset
and then enter a start date and an end date for
daylight saving time.
NTP is short for Network Time Protocol. NTP
synchronizes computer clock times in a network
PGDPNQVUFST$IFDLUIJTCPYUPVTFB/51TFSWFS
5IJTXJMMPOMZDPOOFDUUPBTFSWFSPOUIF*OUFSOFU
not a local server.
Enter the NTP server or select one from the
drop-down menu.
5PNBOVBMMZ JOQVUUIF UJNFFOUFS UIF WBMVFTJO
UIFTFöFMETGPSUIF:FBS.POUI%BZ)PVS.JOVUF
and Second and then click Save Settings. You
can also click the Copy Your Computer’s Time
Settings button at the bottom of the screen.
63D-Link DAP-1560 User Manual
Section 3 - Conguration
Watchdog
5IF8BUDIEPHGFBUVSFQJOHTBTQFDJöD*1BEESFTT*GUIF*1BEESFTTTUPQTSFTQPOEJOHUPQJOHTZPVSBDDFTTQPJOUXJMMCFSFCPPUFE
:PVDBOBMTPTFMFDUBOPQUJPOUPIBWFUIFTFOEBOFNBJMBMFSUJGUIFTQFDJöFE*1BEESFTTTUPQTSFTQPOEJOHUPQJOHT
Enable:
Update Time
Interval:
Watchdog
Response IP:
Enable Mail Alert:
SMTP Server:
Sender E-mail:
Receiver E-mail:
Enable
Authentication:
Account Name:
Password:
Verify Password:
Check to enable Watchdog.
Enter the interval to ping the entered address.
Enter the IP address of a device that can respond
back to the access point.
Check to have the DAP-1560 email you if it cannot
ping the above IP address. Syslog must be enabled
for this feature to work.
Enter the SMTP mail server address (IP address or
URL)
Enter the “From” E-mail address.
Enter the E-mail address to send to.
*GZPVS&NBJMTFSWFSSFRVJSFTBVUIFOUJDBUJPODIFDL
UIJTCPY
Enter the account name.
Enter the account password.
Enter the password again to verify.
64D-Link DAP-1560 User Manual
Section 3 - Conguration
Displays the DAP-1560’s time and rmware version.
Displays the MAC address and the private (local) IP
settings for the access point.
Displays the wireless MAC address and your
wireless settings such as SSID and Channel.
General:
LAN:
Wireless LAN:
Status
Device Info
This page displays the current information for the DAP-1560. It will display the LAN and wireless LAN information.
65D-Link DAP-1560 User Manual
Section 3 - Conguration
Logs
The access point automatically logs (records) events of possible interest in its internal memory. If there isn’t enough internal
NFNPSZGPSBMMFWFOUTMPHTPGPMEFSFWFOUTBSFEFMFUFECVUMPHTPGUIFMBUFTUFWFOUTBSFSFUBJOFE5IF-PHTPQUJPOBMMPXTZPV
to view the access point logs. You can dene what types of events you want to view and the level of the events to view. This
BDDFTTQPJOUBMTPIBTFYUFSOBM4ZTMPH4FSWFSTVQQPSUTPZPVDBOTFOEUIFMPHöMFTUPBDPNQVUFSPOZPVSOFUXPSLUIBUJTSVOOJOH
a Syslog utility.
Log Type:
Apply Log
Settings Now:
Refresh:
Clear:
Save Log:
There are ve types of logs that can be viewed: System
ActivityDebug InformationAttacksDropped
PacketsBOENotice. Click the corresponding check
CPYGPSUIF UZQFT UIBUZPV XBOUEJTQMBZFEJOUIF
log.
Click this button to immediately lter the log results
so that only the selected options appear in the Log
Details section of this screen.
Updates the log details on the screen so it displays
any recent activity.
Clear all of the log contents.
This option will save the access point to a log le
on your computer.
66D-Link DAP-1560 User Manual
Section 3 - Conguration
Statistics
The Statistics page displays all of the LAN and Wireless packets transmit and receive statistics.
Sent:
Received:
TX Packets
Dropped:
RX Packets
Dropped:
Collisions:
Errors:
The total number of packets sent from the bridge.
The total number of packets received by the bridge.
Displays the number of packets that were dropped
XIJMFTFOEJOHEVFUPFSSPSTDPMMJTJPOTPSBDDFTTQPJOU
resource limitations.
Displays the number of packets that were dropped
XIJMFSFDFJWJOHEVFUPFSSPSTDPMMJTJPOTPSBDDFTTQPJOU
resource limitations.
Displays the number of collisions.
Displays the number of errors.
67D-Link DAP-1560 User Manual
Section 3 - Conguration
Help

68D-Link DAP-1560 User Manual
Section 4 - Security
Wireless Security
This section will show you the dierent levels of security you can use to protect your data from intruders. The DAP-1560 oers
the following types of security:
t81"8J'J1SPUFDUFE"DDFTT t81"14,1SF4IBSFE,FZ
t81"8J'J1SPUFDUFE"DDFTT t81"14,1SF4IBSFE,FZ
t8&18JSFE&RVJWBMFOU1SJWBDZ
What is WEP?
WEP stands for Wired Equivalent Privacy. It is based on the IEEE 802.11 standard and uses the RC4 encryption algorithm. WEP
provides security by encrypting data over your wireless network so that it is protected as it is transmitted from one wireless
device to another.
5PHBJOBDDFTTUPB8&1OFUXPSLZPVNVTULOPXUIFLFZ5IFLFZJTBTUSJOHPGDIBSBDUFSTUIBUZPVDSFBUF8IFOVTJOH8&1
you must determine the level of encryption. The type of encryption determines the key length. 128-bit encryption requires a
MPOHFSLFZUIBOCJUFODSZQUJPO,FZTBSFEFöOFECZFOUFSJOHJOBTUSJOHJO)&9IFYBEFDJNBMVTJOHDIBSBDUFST"'PS
ASCII (American Standard Code for Information Interchange – alphanumeric characters) format. ASCII format is provided so
you can enter a string that is easier to remember. The ASCII string is converted to HEX for use over the network. Four keys can
be dened so that you can change keys easily.

69D-Link DAP-1560 User Manual
Section 4 - Security
What is WPA?
81"PS8J'J1SPUFDUFE"DDFTTJTB8J'JTUBOEBSEUIBUXBTEFTJHOFEUPJNQSPWFUIFTFDVSJUZGFBUVSFTPG8&18JSFE&RVJWBMFOU
Privacy).
The 2 major improvements over WEP:
t*NQSPWFEEBUBFODSZQUJPOUISPVHIUIF5FNQPSBM,FZ*OUFHSJUZ1SPUPDPM5,*15,*1TDSBNCMFTUIFLFZTVTJOHB
IBTIJOHBMHPSJUINBOECZBEEJOHBOJOUFHSJUZDIFDLJOHGFBUVSFFOTVSFTUIBUUIFLFZTIBWFOUCFFOUBNQFSFE
with. WPA2 is based on 802.11i and uses Advanced Encryption Standard (AES) instead of TKIP.
t6TFSBVUIFOUJDBUJPOXIJDIJTHFOFSBMMZNJTTJOHJO8&1UISPVHIUIFFYUFOTJCMFBVUIFOUJDBUJPOQSPUPDPM&"1
8&1SFHVMBUFTBDDFTTUPBXJSFMFTTOFUXPSLCBTFEPOBDPNQVUFSTIBSEXBSFTQFDJöD."$BEESFTTXIJDIJT
relatively simple to be snied out and stolen. EAP is built on a more secure public-key encryption system to
ensure that only authorized network users can access the network.
81"14,81"14,VTFTBQBTTQISBTFPSLFZUPBVUIFOUJDBUFZPVSXJSFMFTTDPOOFDUJPO5IFLFZJTBOBMQIBOVNFSJDQBTTXPSE
CFUXFFOBOEDIBSBDUFSTMPOH5IFQBTTXPSEDBOJODMVEFTZNCPMT @BOETQBDFT5IJTLFZNVTUCFUIFFYBDUTBNFLFZ
entered on your wireless bridge or access point.
81"81"JODPSQPSBUFTVTFSBVUIFOUJDBUJPOUISPVHIUIF&YUFOTJCMF"VUIFOUJDBUJPO1SPUPDPM&"1&"1JTCVJMUPOBNPSF
secure public key encryption system to ensure that only authorized network users can access the network.
70D-Link DAP-1560 User Manual
Section 4 - Security
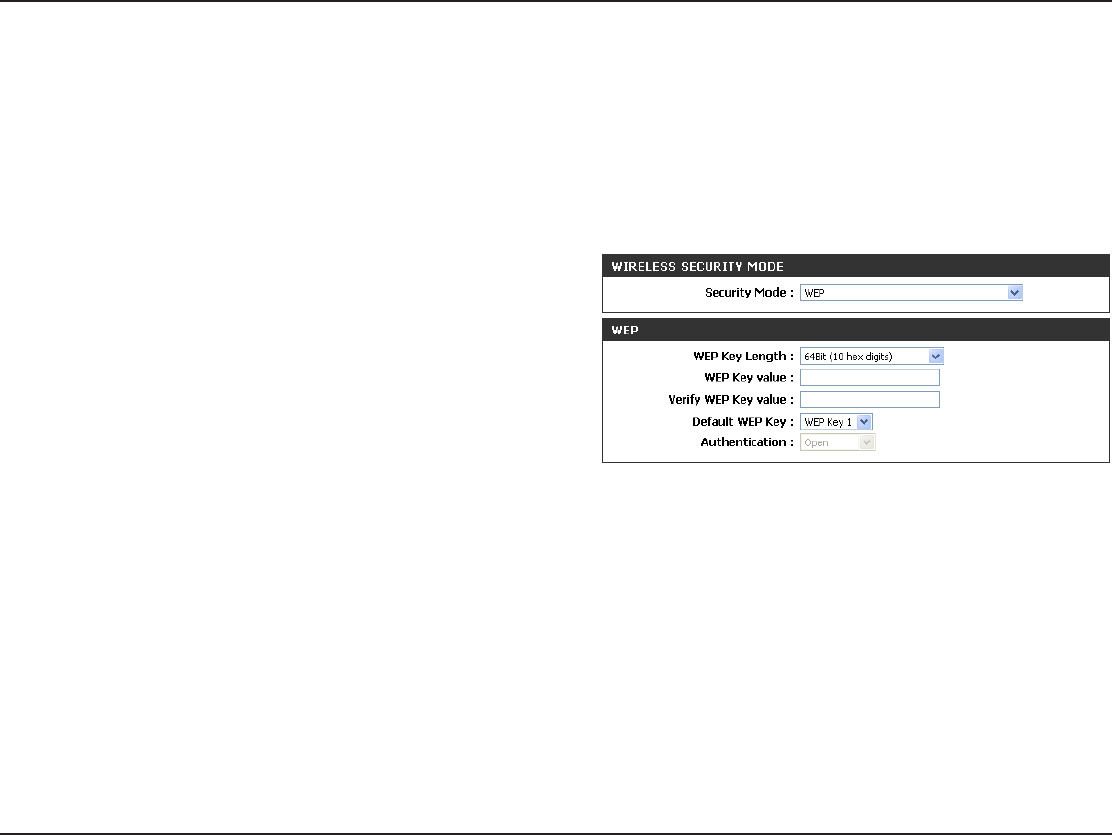
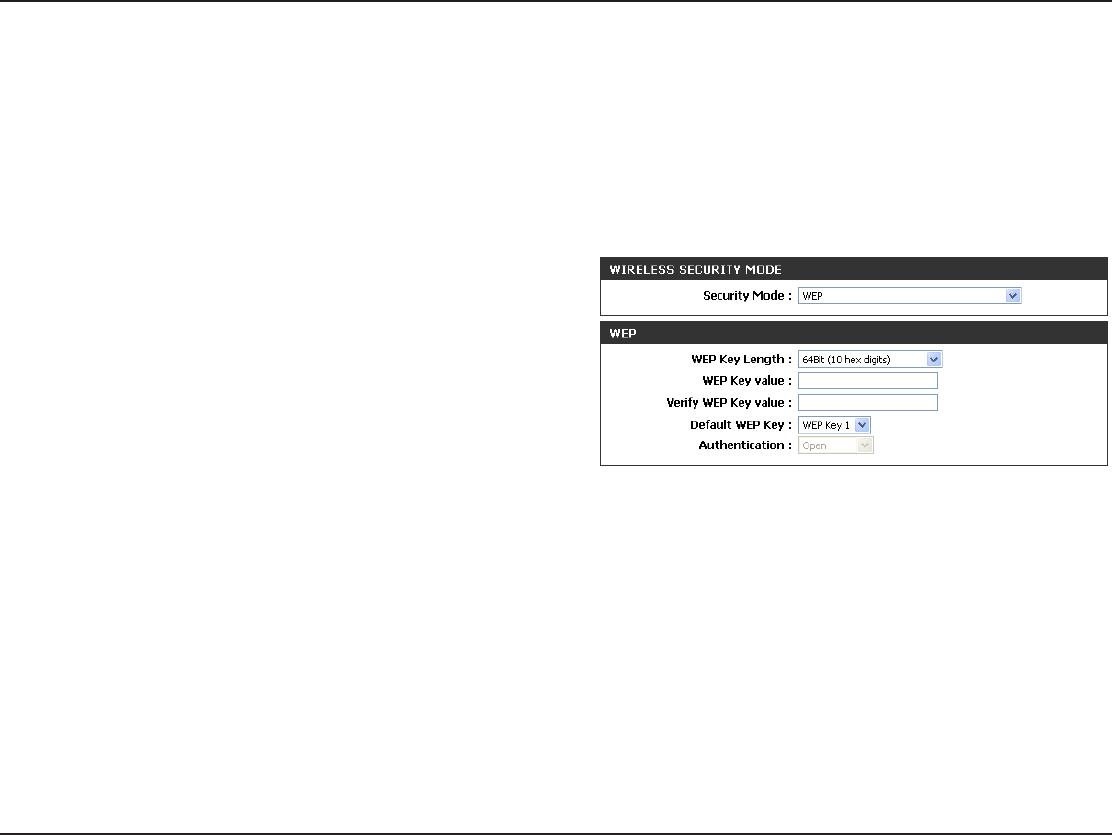
Congure WEP in AP Mode
It is recommended to enable encryption on your wireless access point before your wireless network adapters. Please establish
wireless connectivity before enabling encryption. Your wireless signal may degrade when enabling encryption due to the
added overhead.
1. Log into the web-based conguration by opening a web browser and entering the IP address of the access point (192.168.0.50).
Click on Setup and then click Wireless Settings on the left side.
/FYUUP4FDVSJUZ.PEFJOUIF8JSFMFTT4FDVSJUZ.PEFTFDUJPO
select WEP.
/FYUUP8&1,FZ-FOHUIJOUIF8&1TFDUJPOTFMFDUCPUIUIFUZQF
PGJOQVUIFYJEFDJNBMPS"4$**BOEUIFMFWFMPGFODSZQUJPO
PSCJU)FYSFDPNNFOEFE-FUUFST"'BOEOVNCFST
are valid.
/FYUUP%FGBVMU8&1,FZBOEUIFöSTUTFMFDUJPOPOUIFESPQEPXONFOV8&1,FZ&OUFSB8&1LFZUIBUZPVDSFBUFJOUIF8&1
,FZWBMVFBOE7FSJGZ8&1,FZWBMVFöFMET.BLFTVSFZPVFOUFSUIJTLFZFYBDUMZPOBMMZPVSXJSFMFTTEFWJDFT:PVNBZFOUFSVQ
to 4 dierent keys using the Default WEP Key drop-down menu.
/FYUUPAuthenticationTFMFDUOpen or Shared Key.
6. Click Save Settings at the top of the window to save your settings. If you are conguring the access point with a wireless
BEBQUFSZPVXJMMMPTFDPOOFDUJWJUZVOUJMZPVFOBCMF8&1POZPVSBEBQUFSBOEFOUFSUIFTBNF8&1LFZBTZPVEJEPOUIF
access point.
71D-Link DAP-1560 User Manual
Section 4 - Security
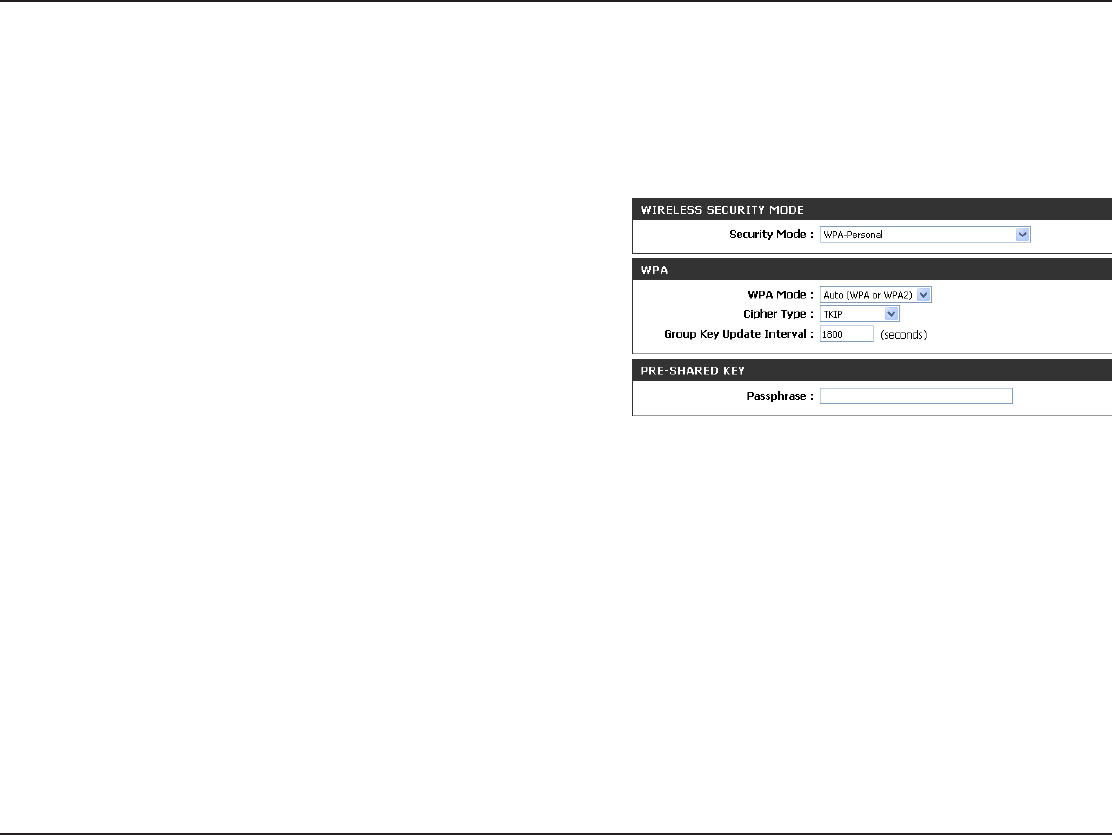
Congure WPA-Personal (AP Mode)
It is recommended to enable encryption on your wireless access point before your wireless network adapters. Please establish
wireless connectivity before enabling encryption. Your wireless signal may degrade when enabling encryption due to the
added overhead.
1. Log into the web-based conguration by opening a web browser
and entering the IP address of the access point (192.168.0.50). Click
on Setup and then click Wireless Settings on the left side.
/FYUUPSecurity Mode in the Wireless Security Mode sectionTFMFDU
WPA-Personal.
/FYUUPWPA Mode in the WPA section, select Auto (WPA or WPA2),
WPA2 Only, or WPA Only. Use Auto if you have wireless clients
using both WPA and WPA2.
/FYUUP$JQIFS5ZQFTFMFDUTKIPAESPSTKIP and AES.
/FYUUPGroup Key Update IntervalFOUFSUIFBNPVOUPGUJNFCFGPSFUIFHSPVQLFZVTFEGPSCSPBEDBTUBOENVMUJDBTUEBUBJT
changed.
/FYUUPUIFPre-Shared KeyTFDUJPOFOUFSBLFZJOUIF1BTTQISBTFöFME5IFLFZJTFOUFSFEBTBQBTTQISBTFJO"4$**GPSNBUBU
both ends of the wireless connection. The passphrase must be between 8-63 characters.
7. Click Save Settings at the top of the window to save your settings. If you are conguring the access point with a wireless
BEBQUFSZPVXJMMMPTFDPOOFDUJWJUZVOUJMZPVFOBCMF81"14,POZPVSBEBQUFSBOEFOUFSUIFTBNFQBTTQISBTFBTZPVEJEPO
the access point.
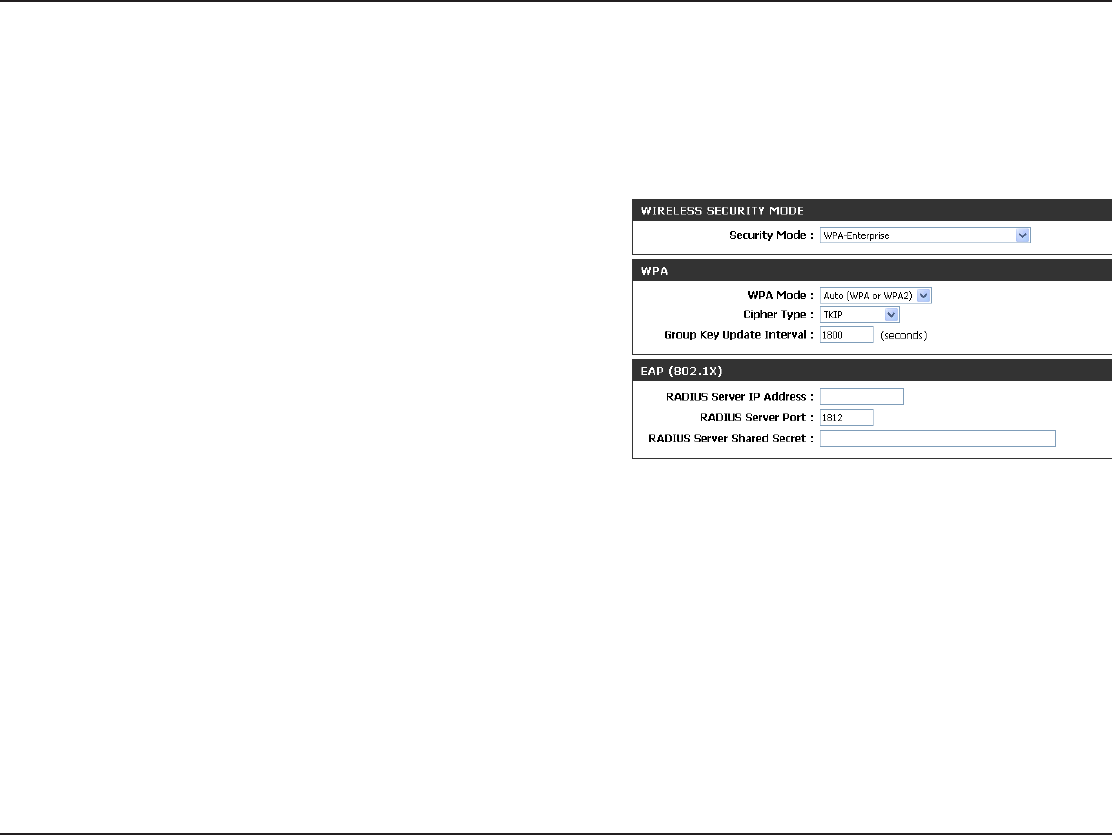
72D-Link DAP-1560 User Manual
Section 4 - Security
It is recommended to enable encryption on your wireless access point before your wireless network adapters. Please establish
wireless connectivity before enabling encryption. Your wireless signal may degrade when enabling encryption due to the
added overhead.
1. Log into the web-based conguration by opening a web browser
and entering the IP address of the access point (192.168.0.50). Click
on Setup and then click Wireless Settings on the left side.
/FYUUPSecurity Mode in the Wireless Security Mode section,select
WPA-Enterprise.
/FYUUPWPA Mode in the WPA sectionTFMFDUAuto (WPA or WPA2),
WPA2 Only, or WPA Only. Use Auto if you have wireless clients
using both WPA and WPA2.
/FYUUP$JQIFS5ZQFTFMFDUTKIP, AES, or TKIP and AES.
/FYUUPGroup Key Update IntervalFOUFSUIFBNPVOUPGUJNFCFGPSFUIFHSPVQLFZVTFEGPSCSPBEDBTUBOENVMUJDBTUEBUBJT
changed.
/FYUUPRADIUS Server IP AddressJOUIF&"19TFDUJPOFOUFSUIF*1"EESFTTPGZPVS3"%*64TFSWFS
/FYUUP3"%*644FSWFS1PSUFOUFSUIFQPSUZPVBSFVTJOHXJUIZPVS3"%*64TFSWFSJTUIFEFGBVMUQPSU
/FYUUPRADIUS Server Shared SecretFOUFSUIFTFDVSJUZLFZ
9. Click Save Settings at the top of the window to save your settings.
Congure WPA-Enterprise (AP Mode)
73D-Link DAP-1560 User Manual
Section 4 - Security
Congure WEP (Bridge Mode)
It is recommended to enable encryption on your wireless access point before your wireless network adapters. Please establish
wireless connectivity before enabling encryption. Your wireless signal may degrade when enabling encryption due to the
added overhead.
1. Log into the web-based conguration by opening a web browser and entering the IP address of the bridge (192.168.0.50).
Click on Setup and then click Wireless Settings.
2. For Security Mode in the Wireless Security ModeTFDUJPOTFMFDU
WEP.
/FYUUP8&1,FZ-FOHUIJOUIF8&1TFDUJPOselect both the type
PGJOQVUIFYJEFDJNBMPS"4$**BOEUIFMFWFMPGFODSZQUJPO
PSCJU)FYSFDPNNFOEFE-FUUFST"'BOEOVNCFST
are valid.
4. 'PSUIF%FGBVMU8&1,FZBOEUIFöSTUTFMFDUJPOPOUIFESPQEPXONFOV8&1,FZ&OUFSB8&1LFZUIBUZPVDSFBUFJOUIF
8&1,FZWBMVFBOE7FSJGZ8&1,FZWBMVFöFMET.BLFTVSFZPVFOUFSUIJTLFZFYBDUMZPOBMMZPVSXJSFMFTTEFWJDFT:PVNBZ
enter up to 4 dierent keys using the Default WEP Key drop-down menu.
5. For AuthenticationTFMFDUOpen or Shared Key.
6. Click Save SettingsUPTBWFZPVSTFUUJOHT*G ZPVBSFDPOöHVSJOHUIFBDDFTTQPJOUXJUIB XJSFMFTTBEBQUFSZPVXJMMMPTF
connectivity until you enable WEP on your adapter and enter the same WEP key as you did on the access point.
74D-Link DAP-1560 User Manual
Section 4 - Security
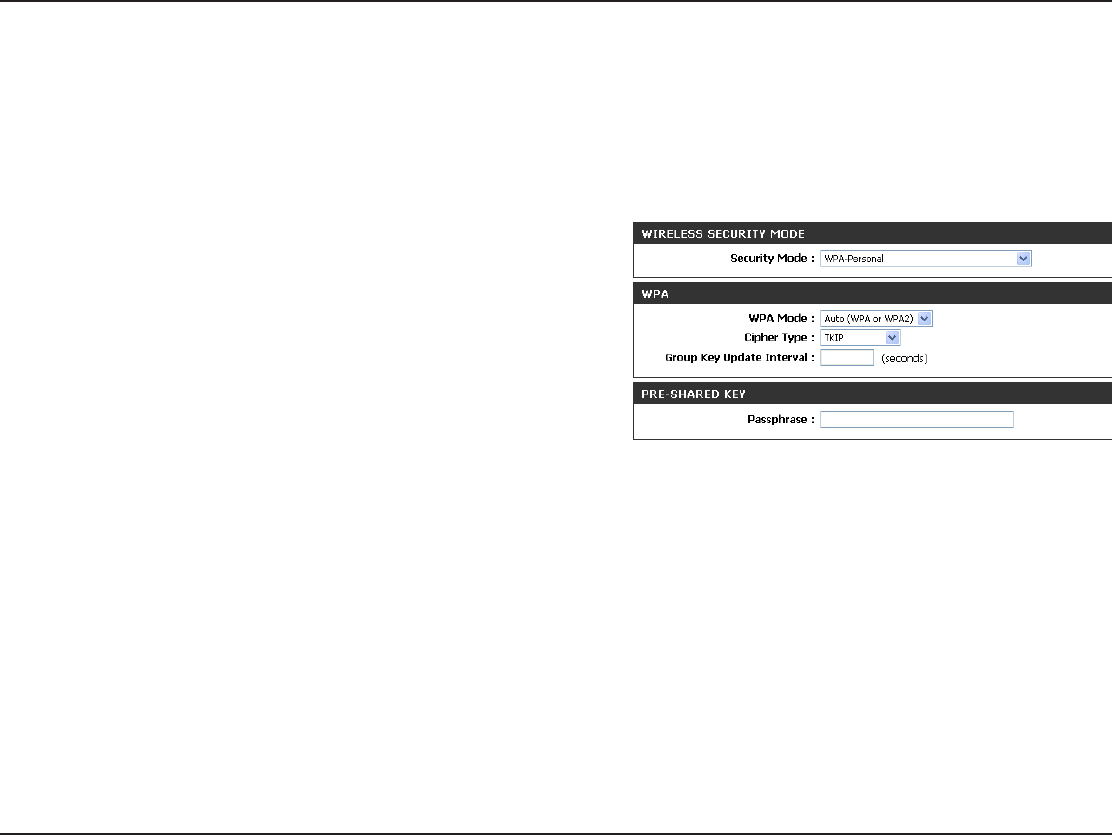
Congure WPA-Personal (Bridge Mode)
It is recommended to enable encryption on your wireless access point before your wireless network adapters. Please establish
wireless connectivity before enabling encryption. Your wireless signal may degrade when enabling encryption due to the
added overhead.
1. Log into the web-based conguration by opening a web browser and entering the IP address of the bridge (192.168.0.50).
Click on Setup and then click Wireless Settings on the left side.
/FYUUPSecurity Mode in the Wireless Security Mode sectionTFMFDU
WPA-Personal.
/FYUUPWPA Mode in the WPA sectionTFMFDUAuto (WPA or WPA2),
WPA2 Only, or WPA Only. Use Auto if you have wireless clients
using both WPA and WPA2.
/FYUUP$JQIFS5ZQFTFMFDUTKIP, AES, or TKIP and AES.
/FYUUPGroup Key Update IntervalFOUFSUIFBNPVOUPGUJNFCFGPSFUIFHSPVQLFZVTFEGPSCSPBEDBTUBOENVMUJDBTUEBUBJT
changed.
/FYUUPUIFPre-Shared Key sectionFOUFSBLFZJOUIF1BTTQISBTFöFME5IFLFZJTFOUFSFEBTBQBTTQISBTFJO"4$**GPSNBUBU
both ends of the wireless connection. The passphrase must be between 8-63 characters.
7. Click Save Settings at the top of the window to save your settings. If you are conguring the access point with a wireless
BEBQUFSZPVXJMMMPTFDPOOFDUJWJUZVOUJMZPVFOBCMF81"14,POZPVSBEBQUFSBOEFOUFSUIFTBNFQBTTQISBTFBTZPVEJEPO
the access point.
75D-Link DAP-1560 User Manual
Section 4 - Security
Using Windows® 7
*UJTSFDPNNFOEFEUPFOBCMFXJSFMFTTTFDVSJUZ81"81"POZPVSXJSFMFTTSPVUFSPSBDDFTTQPJOUCFGPSFDPOöHVSJOHZPVS
XJSFMFTTBEBQUFS*GZPVBSFKPJOJOHBOFYJTUJOHOFUXPSLZPVXJMMOFFEUPLOPXUIFTFDVSJUZLFZPSQBTTQISBTFCFJOHVTFE
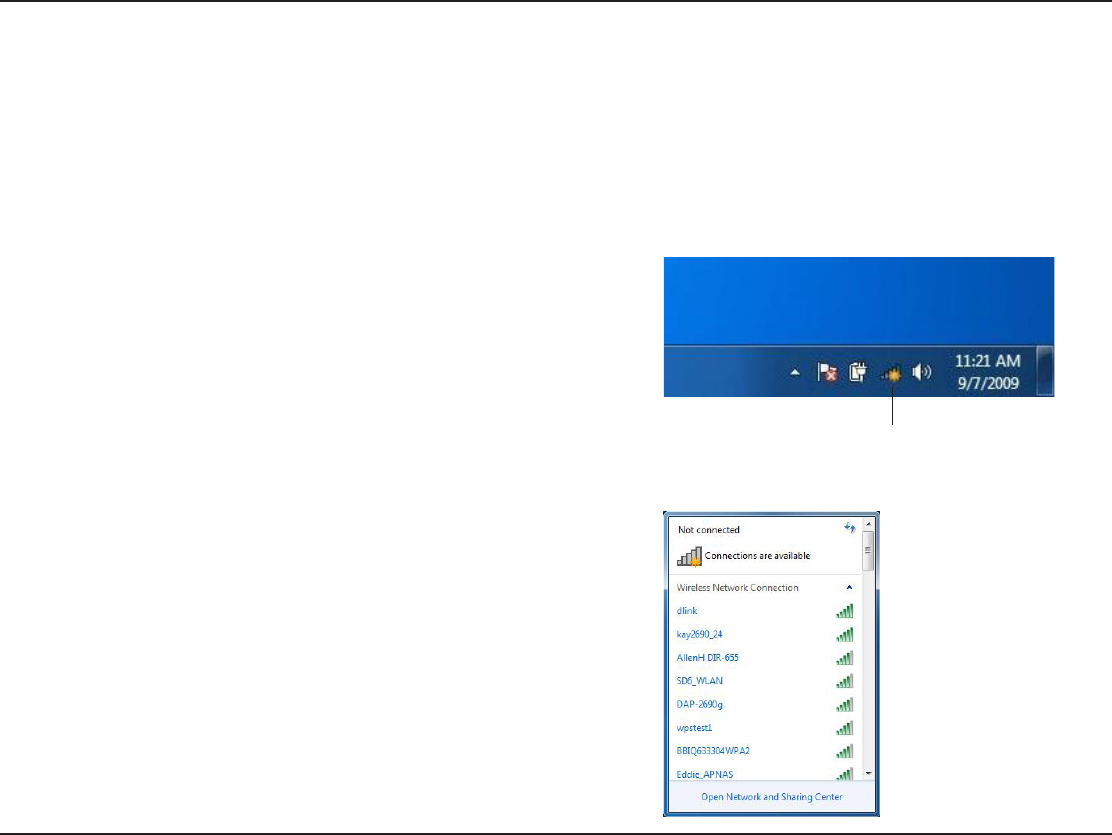
1. Click on the wireless icon in your system tray (lower-right corner).
2. The utility will display any available wireless networks in your area.
Connect to a Wireless Network
Wireless Icon
76D-Link DAP-1560 User Manual
Section 4 - Security
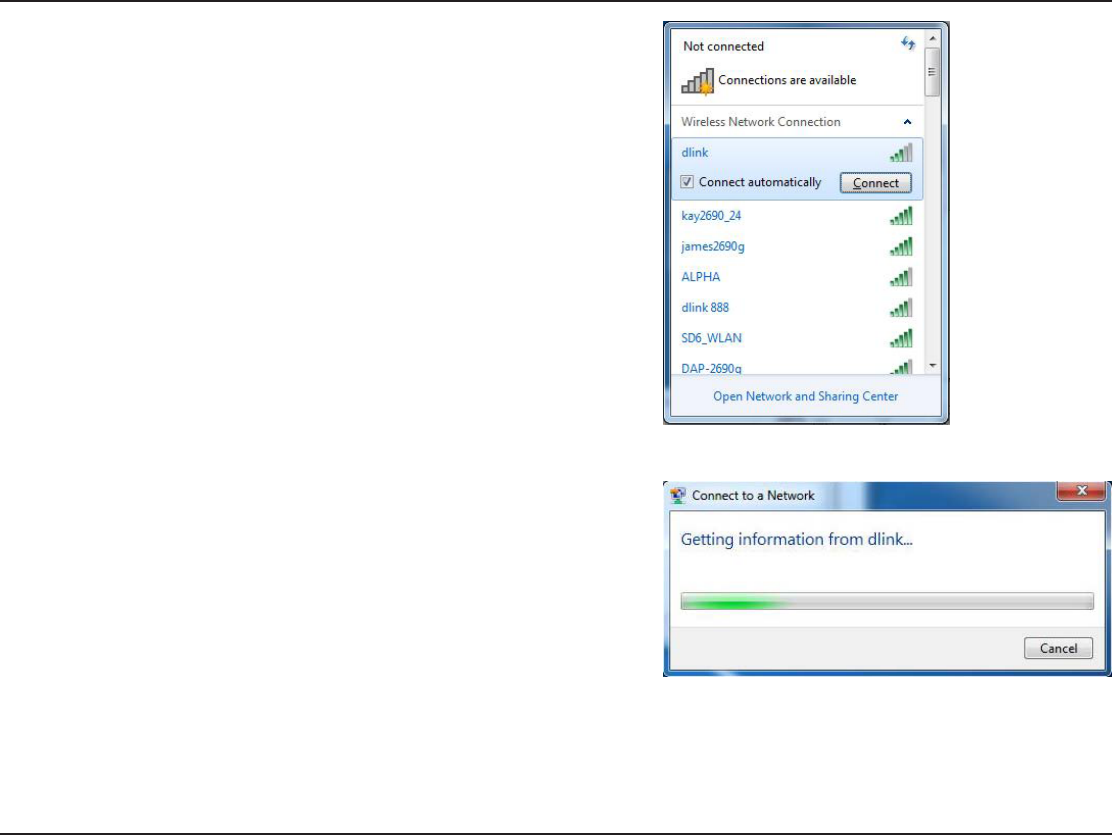
3. Highlight the wireless network (SSID) you would like to connect to
and click the Connect button.
*GZPVHFUBHPPETJHOBMCVUDBOOPUBDDFTTUIF*OUFSOFUDIFDLZPVS
5$1*1TFUUJOHTGPSZPVSXJSFMFTTBEBQUFS3FGFSUPUIF/FUXPSLJOH
Basics section in this manual for more information.
4. The following window appears while your computer tries to
connect to the router.
77D-Link DAP-1560 User Manual
Section 4 - Security
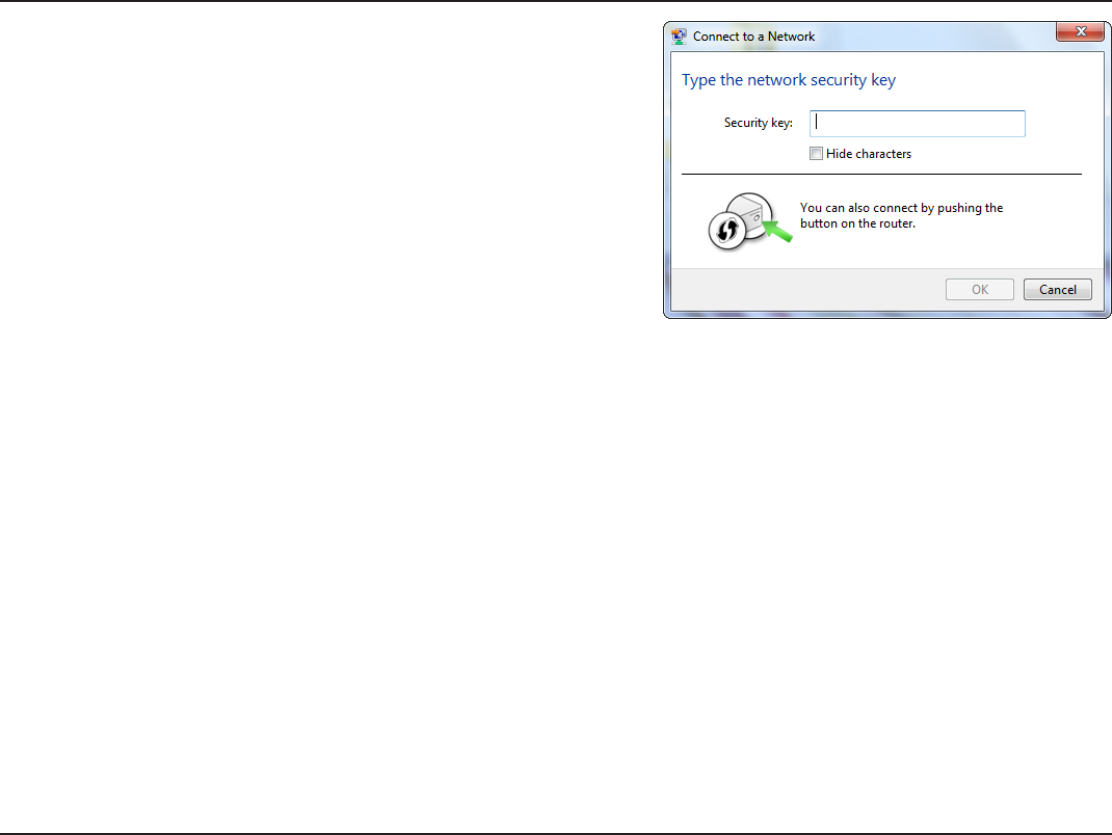
5. Enter the same security key or passphrase that is on your router
and click Connect. You can also connect by pushing the WPS
button on the router.
It may take 20-30 seconds to connect to the wireless network. If the
DPOOFDUJPOGBJMTQMFBTFWFSJGZUIBUUIFTFDVSJUZTFUUJOHTBSFDPSSFDU
5IFLFZPSQBTTQISBTFNVTUCFFYBDUMZUIFTBNFBTPOUIFXJSFMFTT
router.
78D-Link DAP-1560 User Manual
Section 4 - Security
Congure WPS
The WPS feature of the DAP-1560 can be congured using Windows® 7. Carry out the following steps to use Windows® 7 to
congure the WPS feature of the DAP-1560:
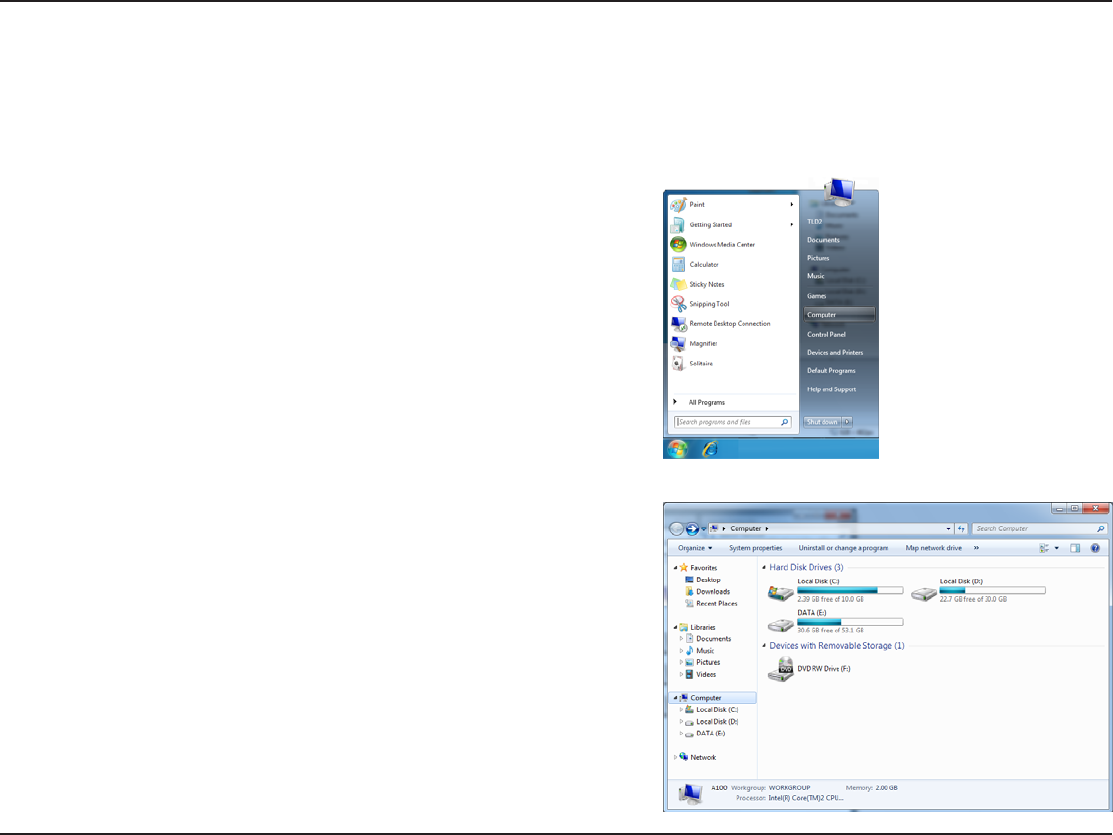
1. Click the Start button and select Computer from the Start
menu.
2. Click the Network option.
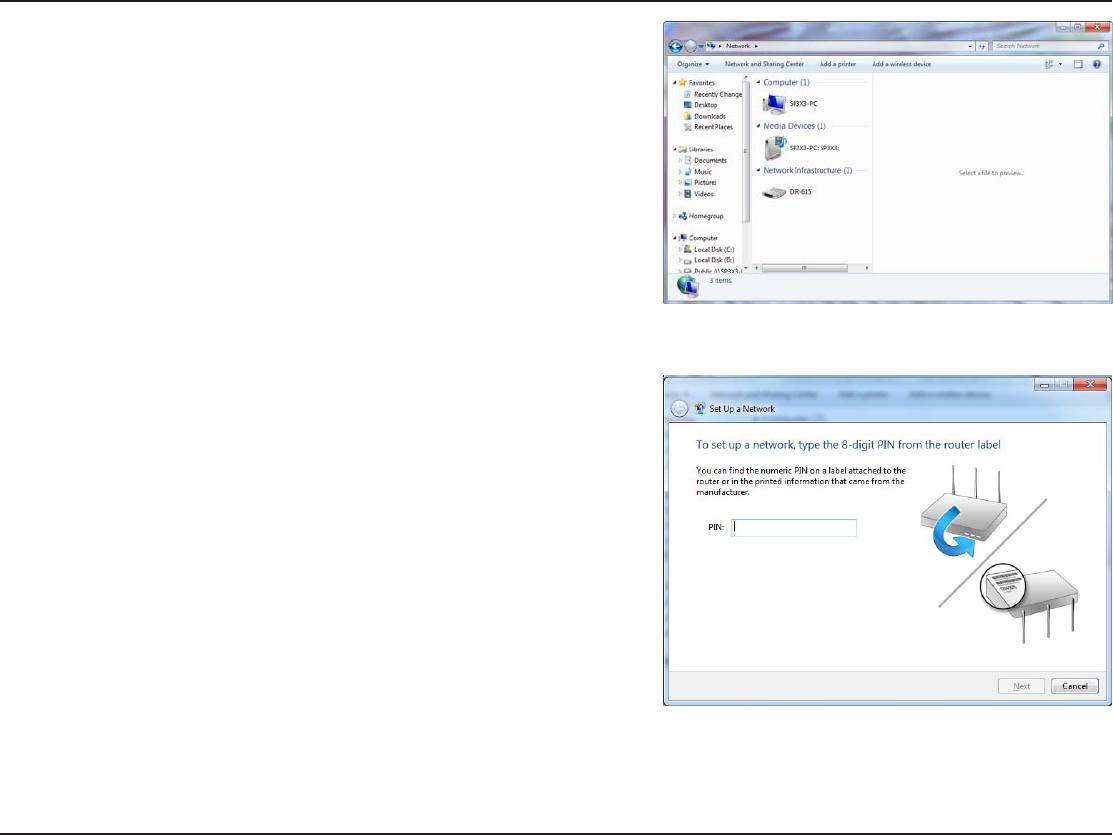
79D-Link DAP-1560 User Manual
Section 4 - Security
3. Double-click the DAP-1560.
4. Input the WPS PIN number (displayed in the WPS window on the
Router’s LCD screen or in the Setup >Wireless Setup menu in
the Router’s Web UI) and click Next.
80D-Link DAP-1560 User Manual
Section 4 - Security
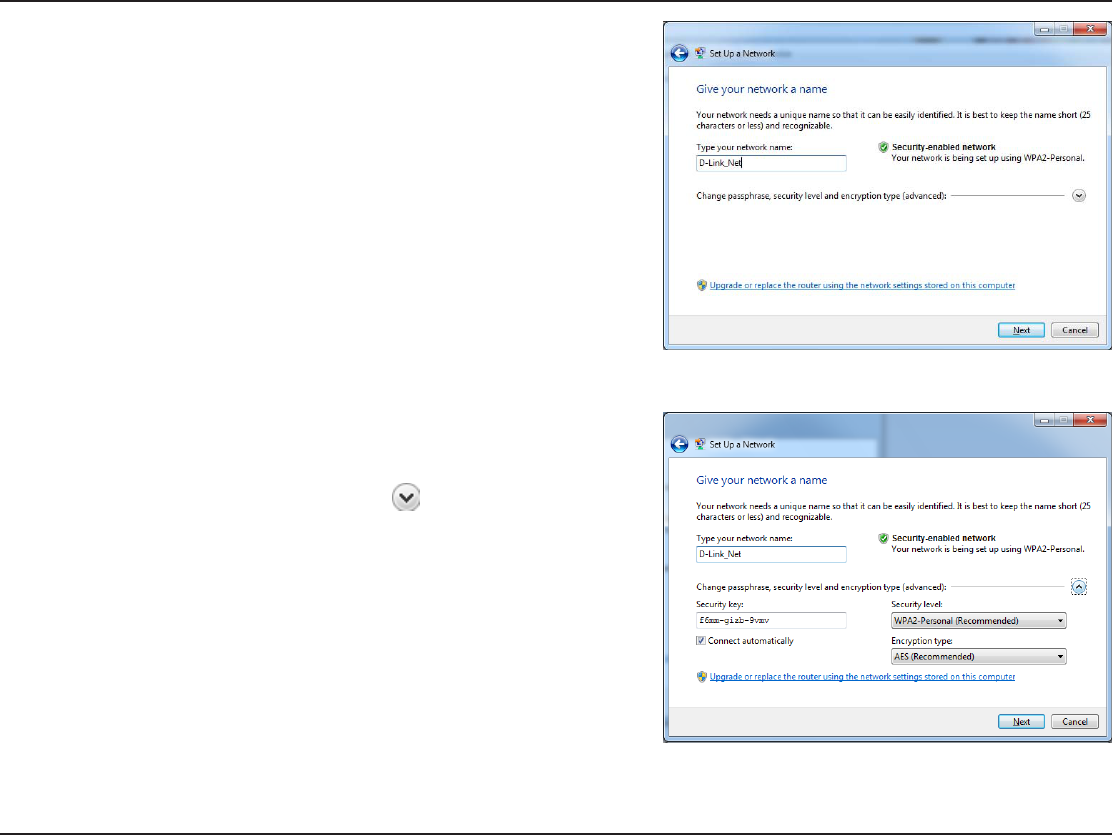
5. Type a name to identify the network.
5PDPOöHVSFBEWBODFETFUUJOHTDMJDLUIFJDPO
Click Next to continue.
81D-Link DAP-1560 User Manual
Section 4 - Security
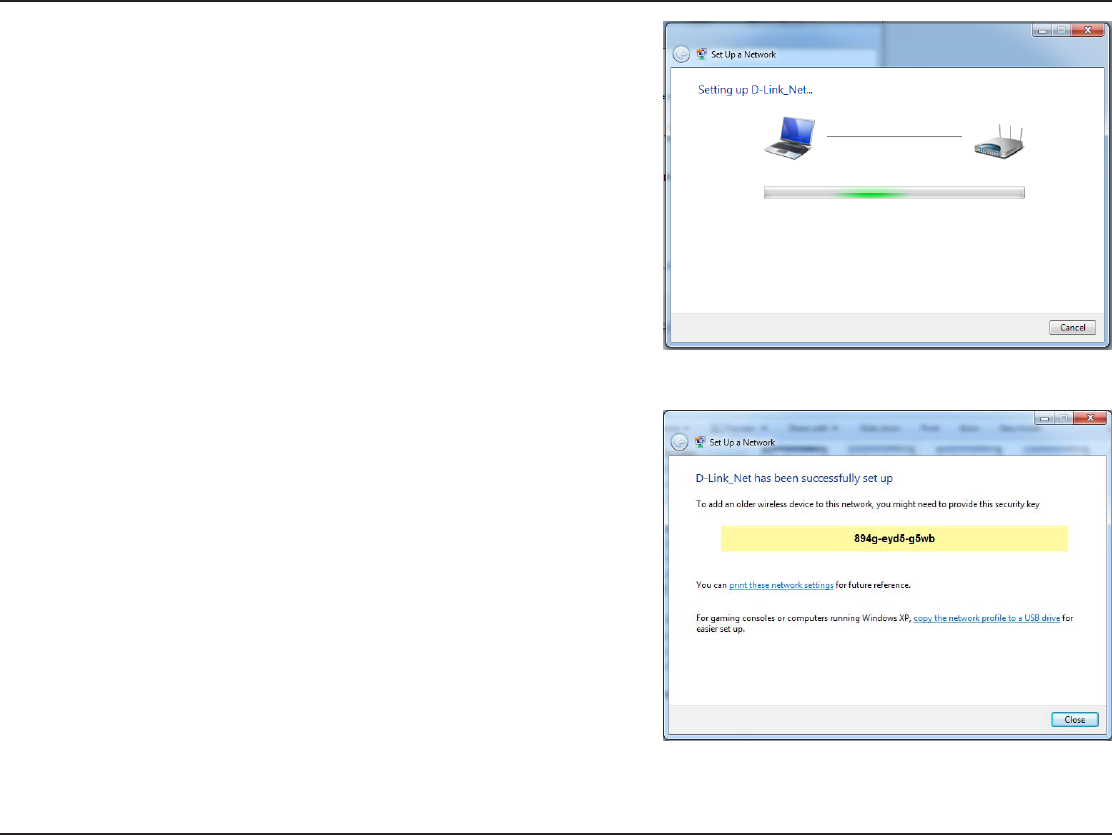
7. The following window appears while the Router is being
congured.
Wait for the conguration to complete.
8. The following window informs you that WPS on the DAP-1560 has
been setup successfully.
Make a note of the security key as you may need to provide this
security key if adding an older wireless device to the network in
the future.
9. Click Close to complete WPS setup.