D Link BA1510PA1 Business Cloud Access Point User Manual 1
D Link Corporation Business Cloud Access Point 1
D Link >
Users Manual
This document will guide you through the basic installation
process for your D-Link Wireless AC Access Point.
DBA-1510P
Documentation is also available on the D-Link website
Quick Installation Guide
Business Cloud Access Point
2
ENGLISH
About This Instruction Guide
This installation guide provides instructions
for installing the DBA-1510P Business Cloud
Access Point on your network. For additional
information about how to use the DBA-1510P,
please see the User’s Manual which is available
from the D-Link support website.
Setup Preparation
Please ensure that the following items are
readily available before continuing the quick
installation process.
D-Link Business Cloud License
DBA-1510P Registration in D-Link Business
Cloud
DBA-1510P is able to connect to D-Link
Business Cloud through internet.
System Requirements
If you are unable to connect to the D-Link
Business Cloud through the Internet due to
your networking conguration you will need to
manually congure the DBA-1510P. Below are
the minimum system requirements needed to
manually congure the device.
An Ethernet port, or an installed Ethernet
adapter
Internet Explorer 9.0, Safari 5.0, Firefox 19,
Chrome 25 or later versions of these browsers
Package Contents
DBA-1510P Business Cloud Access Point
Mounting Ring
Power Adapter
Ethernet Cable
Console Cable
Rubber Feet
If any of the above items are missing, please
contact your reseller.
Note: Using a power supply with a different
voltage than the one included with the DBA-
1510P will damage the device and void the
warranty for this product.
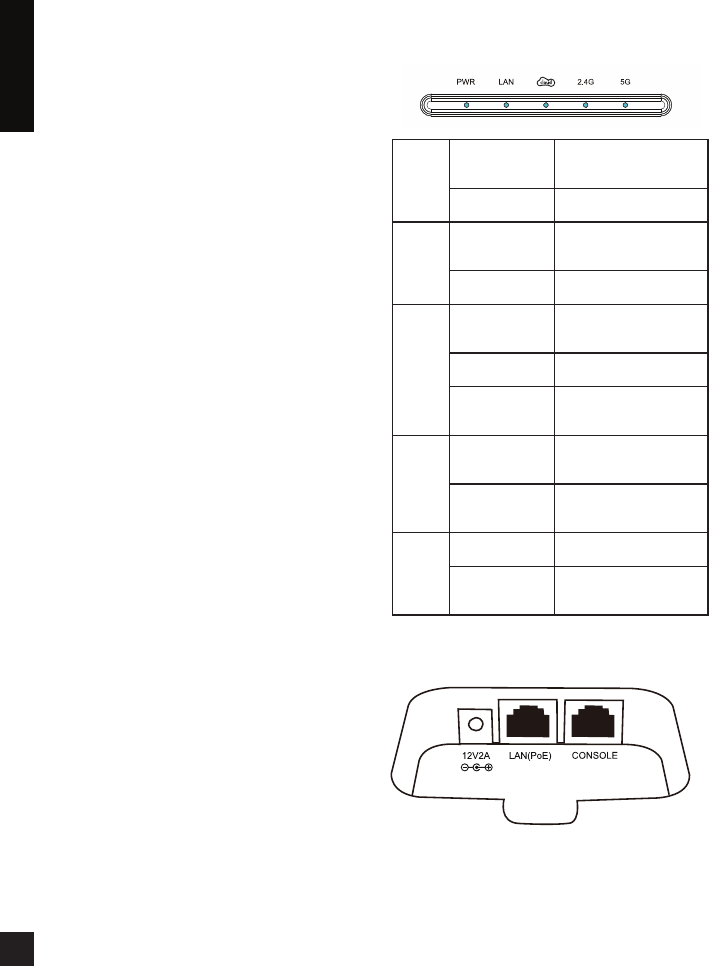
Hardware Overview
LEDs
Power Solid Orange The DBA-1510P is
performing its startup
procedure
Solid Green The DBA-1510P is ready
to use
LAN Solid Green The DBA-1510P is
connected to another
device on the network
Blinking Green The DBA-1510P is
transferring data
Cloud Solid Orange The DBA-1510P is
connecting to the D-Link
Business Cloud
Solid Green The DBA-1510P is
currently in Cloud mode
Solid Red The DBA-1510P is not
working properly in Cloud
mode
2.4 Ghz Solid Green The DBA-1510P is
operating in 2.4 Ghz
mode
Blinking Green The DBA-1510P is
transferring data over
2.4 Ghz
5 Ghz Solid Green The DBA-1510P is
operating in 5 Ghz mode
Blinking Green The DBA-1510P is
transferring data over
5 Ghz
Interfaces
3
ENGLISH
Bottom
Power Receptor
LAN Port (PoE)
Serial Console Port
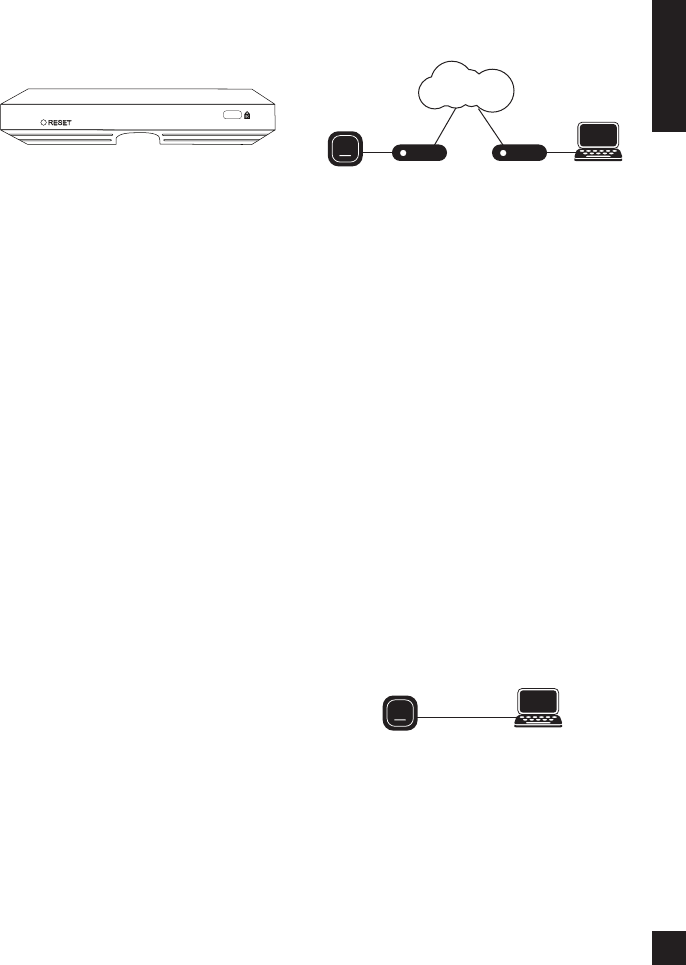
Front
Kensington Security Slot
Reset Button
Press the Reset Button between 2 to 5
seconds to restart the device.
Press the Reset Button between 6 to 15
seconds to restore the device to its factory
default settings.
Press the Reset Button more than 15 seconds
to restore the device to its factory default
settings and also force the loading of alternate
rmware.
Installation
Step 1 – Powering The Device
To power on the DBA-1510P, you can use one
of the two following methods:
1. Connect the supplied power adapter
2. Plug one end of your Ethernet cable into
the LAN port of the DBA-1510P, and the
other end into a port on a Power over
Ethernet enabled switch.
Step 2 – Congure The Device
The easiest way to congure the DBA-1510P
is to connect the DBA-1510P to the Internet
through a switch or router. Connect your
computer to the Internet and manage the
DBA-1510P via D-Link Business Cloud.
The DBA-1510P will automatically connect
to the D-Link Business Cloud, download its
conguration, and join the appropriate network.
If you are unable to connect the DBA-1510P to
the D-Link Business Cloud through the Internet
due to your networking conguration you will
need to manually congure the DBA-1510P
using one of the following options.
1. Connect the DBA-1510P and your
computer directly via a straight-through
Ethernet cable. You can then manage the
access point from your computer using the
following steps.
Enter the DBA-1510P hostname in the
address eld of your browser and then
press Enter. The default hostname is
“DBA-1510P-XXXX” where XXXX is the
last 4 digits of the MAC address listed on
the device label located on the bottom of
the device.
Log in to the administration web pages. The
default login information is:
Username: admin
Password: admin
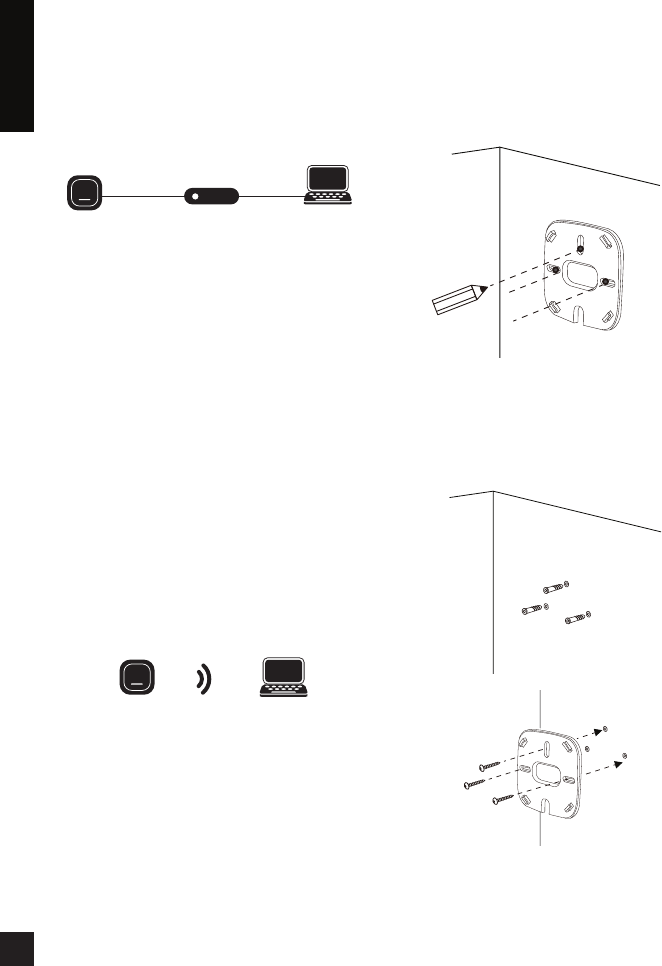
2. Connect the DBA-1510P and your
computer to the same switch or router. You
can then manage the access point from
your computer using the following steps.
Enter the DBA-1510P hostname in the
address eld of your browser and then
press Enter. The default hostname is
D-Link DBA-1510P Quick Install Guide
6
ENGLISH
Switch or RouterSwitch or Router
Switch or Router
Management
Management
DBA-1510P
DBA-1510P
DBA-1510P
DBA-1510P
Management
Management
D-Link Business Cloud
D-Link DBA-1510P Quick Install Guide
6
ENGLISH
Switch or RouterSwitch or Router
Switch or Router
Management
Management
DBA-1510P
DBA-1510P
DBA-1510P
DBA-1510P
Management
Management
D-Link Business Cloud
4
ENGLISH
“DBA-1510P-XXXX” where XXXX is the
last 4 digits of the MAC address listed on
the device label located on the bottom of
the device.
Log in to the administration web pages.
The default login information is:
Username: admin
Password: admin
3. Connect your computer to the
DBA-1510P wirelessly via the SSID
“DBA-1510P-XXXX” where XXXX is the
last 4 digits of the MAC address listed on
the device label located on the bottom
of the device. You can then manage the
access point from your computer using the
following steps.
Enter the DBA-1510P hostname in the
address eld of your browser and then
press Enter. The default hostname is
“DBA-1510P-XXXX” where XXXX is the
last 4 digits of the MAC address listed on
the device label located on the bottom of
the device.
Log in to the administration web pages.
The default login information is:
Username: admin
Password: admin
Note: Once the device has been manually
congured, it must be able to connect to the
D-Link Business Cloud in order to continue
functioning properly.
Step 3 – Mounting The Device
To mount the DBA-1510P, use one of the
following methods:
Mounting on a Solid Wall
Place the plastic wall mounting ring on a wall
or ceiling.
1. Mark the points where you will insert the
screws. Remove the mounting ring.
2. Drill holes in the marked points and insert
the plastic wall anchors.
3. Use the supplied screws to attach the
mounting ring to the wall.
4. Plug the Ethernet cable into the LAN port
on the access point.
D-Link DBA-1510P Quick Install Guide
6
ENGLISH
Switch or RouterSwitch or Router
Switch or Router
Management
Management
DBA-1510P
DBA-1510P
DBA-1510P
DBA-1510P
Management
Management
D-Link Business Cloud
D-Link DBA-1510P Quick Install Guide
6
ENGLISH
Switch or RouterSwitch or Router
Switch or Router
Management
Management
DBA-1510P
DBA-1510P
DBA-1510P
DBA-1510P
Management
Management
D-Link Business Cloud
5
ENGLISH
5. If you are not using a PoE switch or router
with the DBA-1510P, plug the power
cable into the Power Receptor on the
access point.
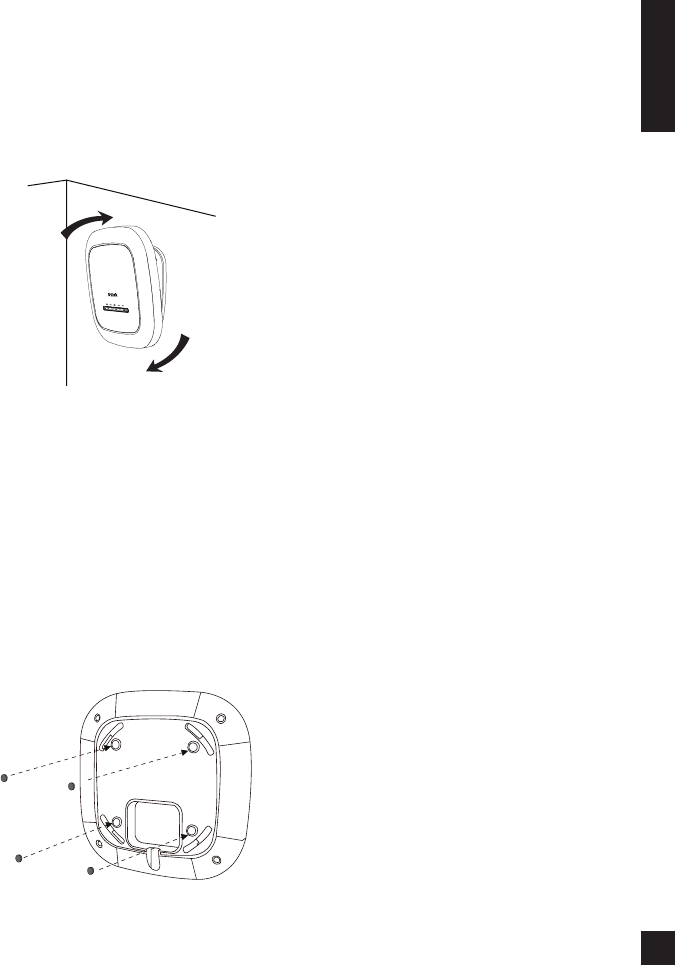
6. Place the DBA-1510P onto the mounting
ring brackets. Lock the DBA-1510P
into place by rotating the DBA-1510P
clockwise.
Placement on a Desktop
1. Attach the provided rubber feet to the
holes located on the back of the DBA-
1510P housing.
2. Plug the Ethernet cable into the LAN port
on the access point.
3. If you are not using a PoE switch or router
with the DBA-1510P, plug the power
cable into the Power Receptor on the
access point.
Additional Information
If you are encountering problems setting up
your network, please refer to the user manual
that can be obtained from the D-Link website. It
contains many more rules, charts, explanations,
and examples to help you get your network up
and running.
Additional help is available through our ofces
listed at the back of the user manual or online.
To nd out more about D-Link products or
marketing information, please visit the website
http://www.dlink.com.
Warranty Information
The Warranty information is available at http://
warranty.dlink.com/
Federal Communication Commission Interference Statement
This equipment has been tested and found to comply with the limits for a Class B digital device,
pursuant to Part 15 of the FCC Rules. These limits are designed to provide reasonable protection
against harmful interference in a residential installation. This equipment generates, uses, and can
radiate radio frequency energy and, if not installed and used in accordance with the instructions, may
cause harmful interference to radio communications. However, there is no guarantee that interference
will not occur in a particular installation. If this equipment does cause harmful interference to radio or
television reception, which can be determined by turning the equipment off and on, the user is
encouraged to try to correct the interference by one or more of the following measures:
• Reorient or relocate the receiving antenna.
• Increase the separation between the equipment and receiver.
• Connect the equipment into an outlet on a circuit different from that to which the receiver is connected.
• Consult the dealer or an experienced radio/TV technician for help.
FCC Caution:
This device complies with Part 15 of the FCC Rules. Operation is subject to the following two conditions:
(1) This device may not cause harmful interference, and (2) this device must accept any interference
received, including interference that may cause undesired operation.
Non-modification Statement:
Changes or modifications not expressly approved by the party responsible for compliance could void the user's
authority to operate the equipment.
FCC Radiation Exposure Statement:
This equipment complies with FCC radiation exposure limits set forth for an uncontrolled environment.
This equipment should be installed and operated with minimum distance 20cm between the radiator &
your body.