D Link DI524E1 IEEE802.11g Wireless Router User Manual DI 524 manual indd
D Link Corporation IEEE802.11g Wireless Router DI 524 manual indd
D Link >
Contents
Users Manual 4
41
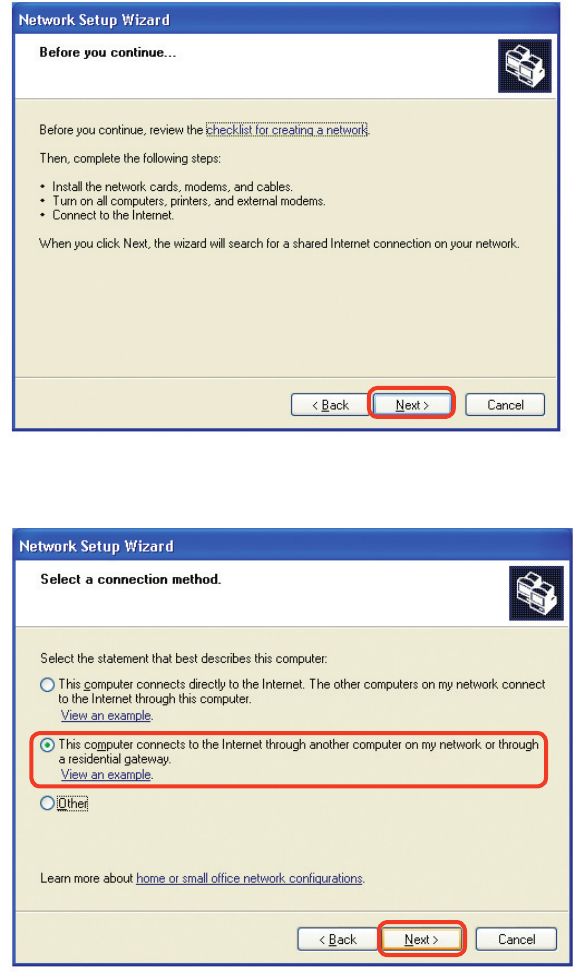
Please follow all the instructions in this window:
Networking Basics
Click Next
In the following window, select the best description of your computer. If your computer
connects to the internet through a gateway/router, select the second option as shown.
Click Next
42
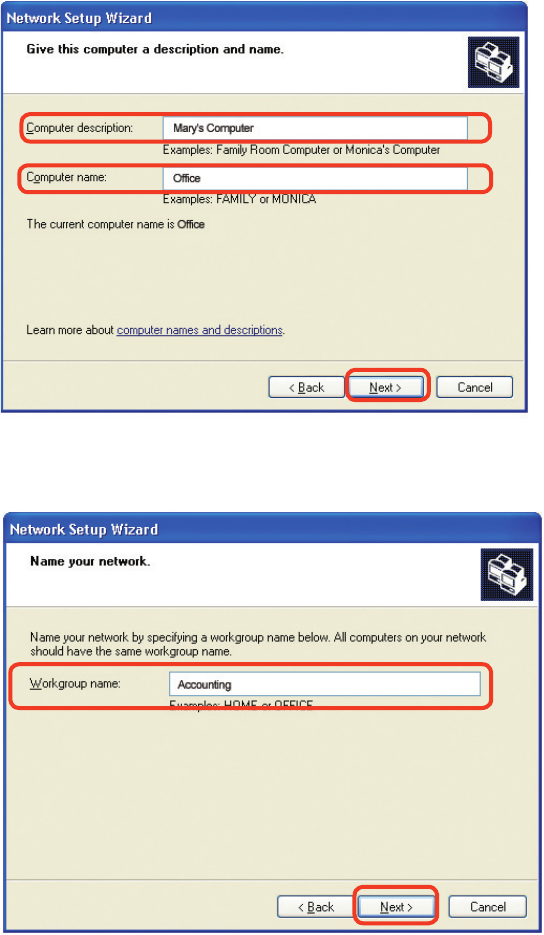
Enter a Computer description and a Computer name (optional.)
Networking Basics
Click Next
Enter a Workgroup name. All computers on your network should have the same
Workgroup name.
Click Next
43
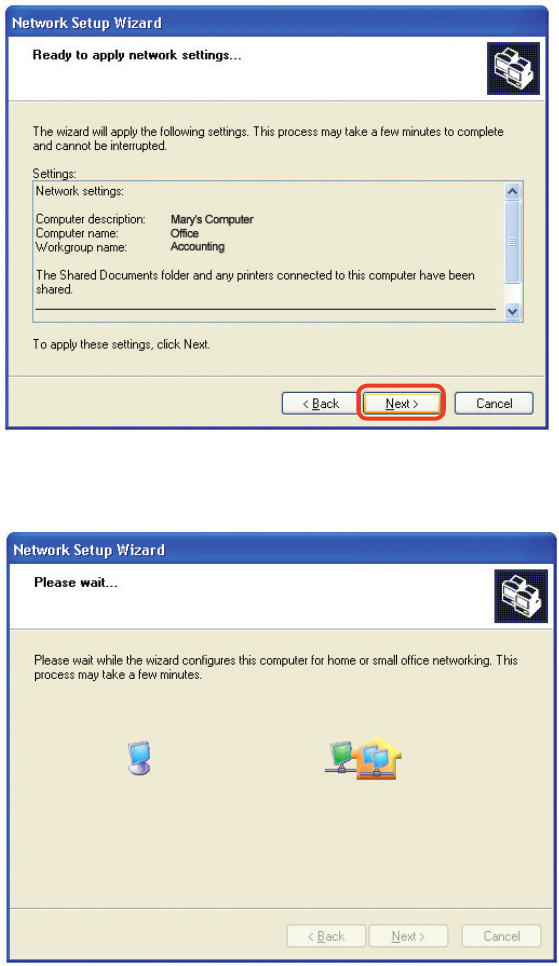
Please wait while the Network Setup Wizard applies the changes.
Networking Basics
When the changes are complete, click Next.
Please wait while the Network Setup Wizard configures the computer.
This may take a few minutes.
44
Networking Basics
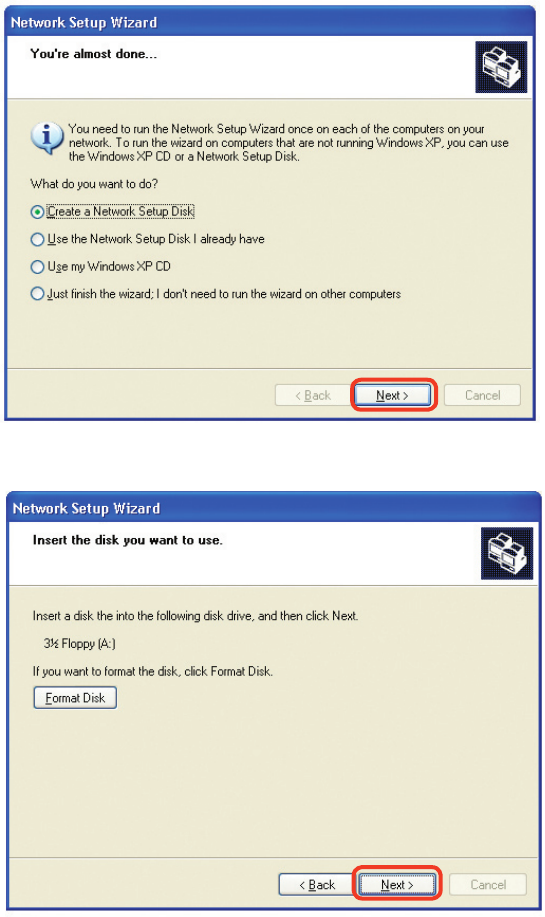
In the window below, select the option that fits your needs. In this example, Create
a Network Setup Disk has been selected. You will run this disk on each of the
computers on your network. Click Next.
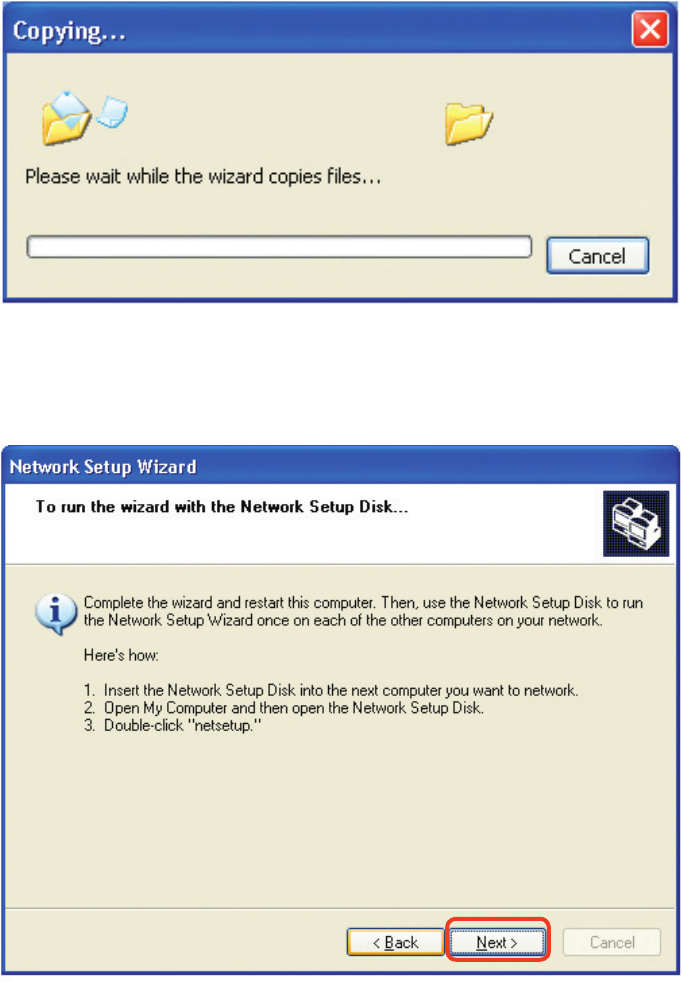
Insert a disk into the Floppy Disk Drive, in this case drive A.
Click Next.
45
Networking Basics
Please read the information under Here’s how in the screen below. After you complete
the Network Setup Wizard you will use the Network Setup Disk to run the Network
Setup Wizard once on each of the computers on your network. To continue click Next.
46
Networking Basics
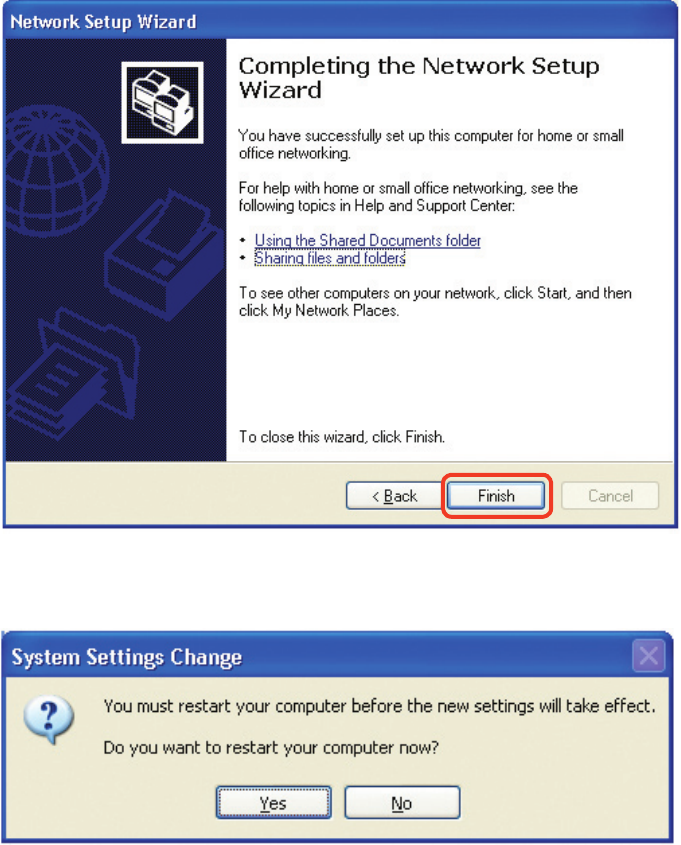
Please read the information on this screen, then click Finish to complete the
Network Setup Wizard.
The new settings will take effect when you restart the computer. Click Yes to restart
the computer.
You have completed configuring this computer. Next, you will need to run the Network
Setup Disk on all the other computers on your network. After running the Network
Setup Disk on all your computers, your new wireless network will be ready to use.
47
Networking Basics
Naming your Computer
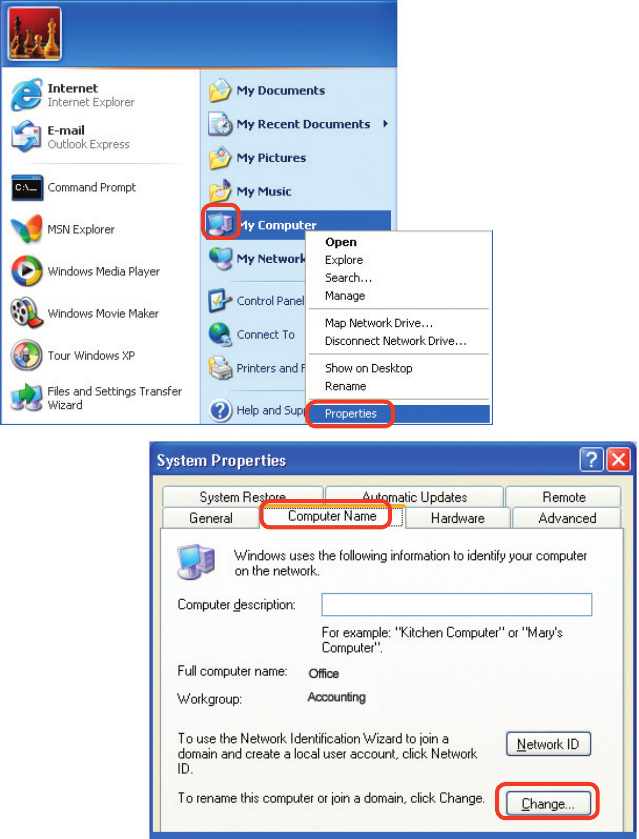
To name your computer, please follow these directions:In Windows XP:
Click Start (in the lower left corner of the screen)
Right-click on My Computer
Select Properties and click
Select the Computer
Name Tab in the System
Properties window.
You may enter a
Computer Description
if you wish; this field is
optional.
To rename the computer
and join a domain, Click
Change.
48
Networking Basics
Naming your Computer
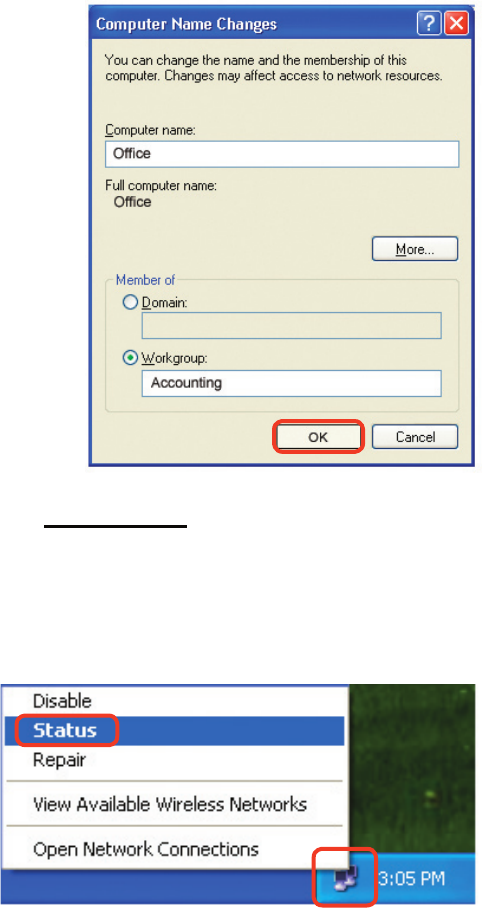
In this window, enter the
Computer name
Select Workgroup and enter
the name of the Workgroup
All computers on your
network must have the same
Workgroup name.
Click OK
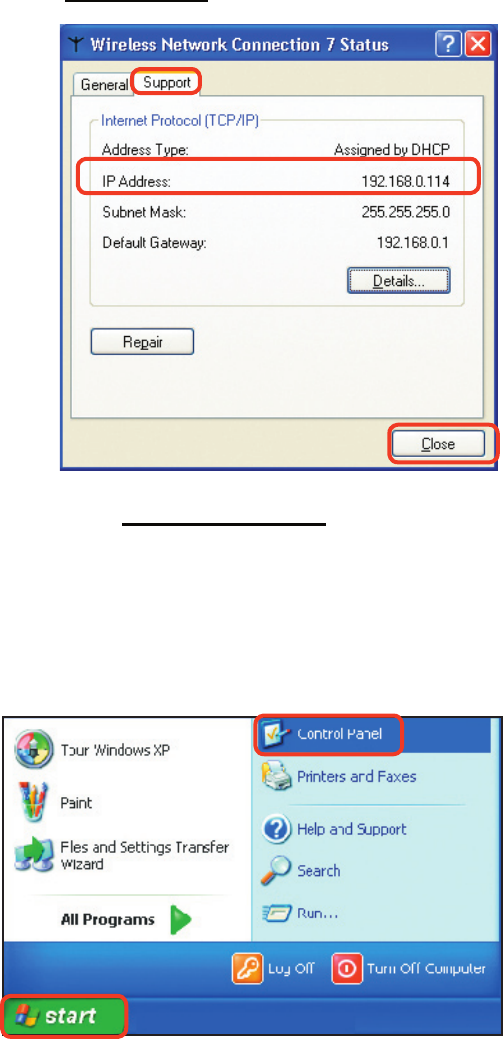
Checking the IP Address in Windows XP
The wireless adapter-equipped computers in your network must be in the same IP Ad-
dress range (see Getting Started in this manual for a definition of IP Address Range.)
To check on the IP Address of the adapter, please do the following:
Right-click on
the Local Area
Connection icon
in the task bar
Click on Status
49
Networking Basics
Checking the IP Address in Windows XP
This window will appear.
Click the
Support tab
Click Close
Assigning a Static IP Address in Windows XP/2000
Note: Residential Gateways/Broadband Routers will automatically assign IP Addresses
to the computers on the network, using DHCP (Dynamic Host Configuration Protocol)
technology. If you are using a DHCP-capable Gateway/Router you will not need to
assign Static IP Addresses.
If you are not using a DHCP capable Gateway/Router, or you need to assign a Static
IP Address, please follow these instructions:
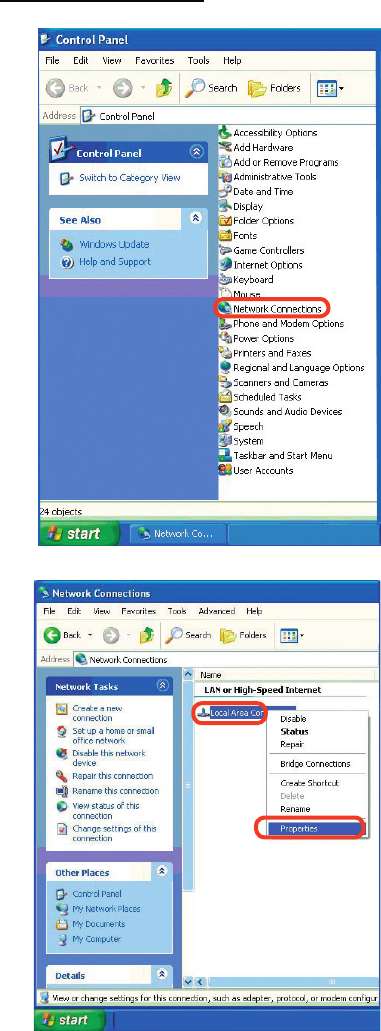
Go to Start
Double-click on
Control Panel
50
Networking Basics
Assigning a Static IP Address in Windows XP/2000
Double-click
on Network
Connections
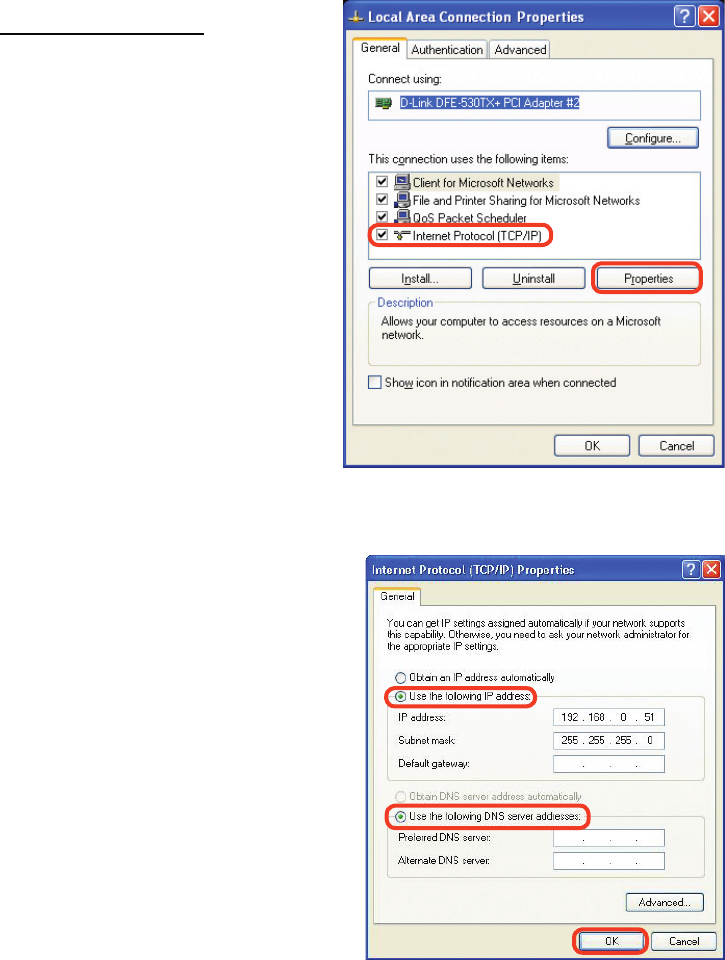
Double-click on
Properties
Right-click on Local Area
Connections
51
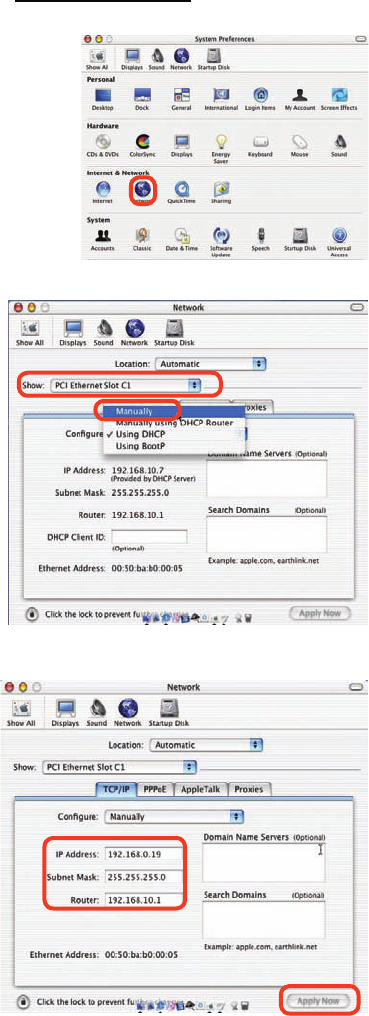
Input your IP address and
subnet mask. (The IP
Addresses on your network
must be within the same
range. For example, if
one computer has an IP
Address of 192.168.0.2,
the other computers should
have IP Addresses that are
sequential, like 192.168.0.3
and 192.168.0.4. The subnet
mask must be the same for
all the computers on the
network.)
Networking Basics
Assigning a Static IP Address
in Windows XP/2000
Input your DNS server
addresses. (Note: If you
are entering a DNS server,
you must enter the IP
Address of the Default
Gateway.)
The DNS server information will be supplied
by your ISP (Internet Service Provider.)
Click OK
Click on Internet Protocol
(TCP/IP)
Click Properties
52
Networking Basics
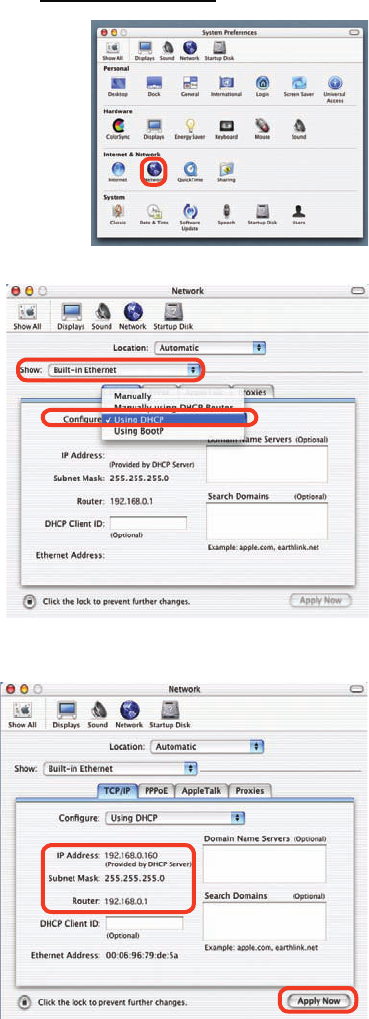
Assigning a Static IP Address with Macintosh OSX
Go to the Apple Menu and select
System Preferences
cClick on Network
Select Built-in Ethernet in the
Show pull-down menu
Select Manually in the
Configure pull-down menu
Input the Static IP Address,
the Subnet Mask and the
Router IP Address in the
appropriate fields
Click Apply Now
53
Networking Basics
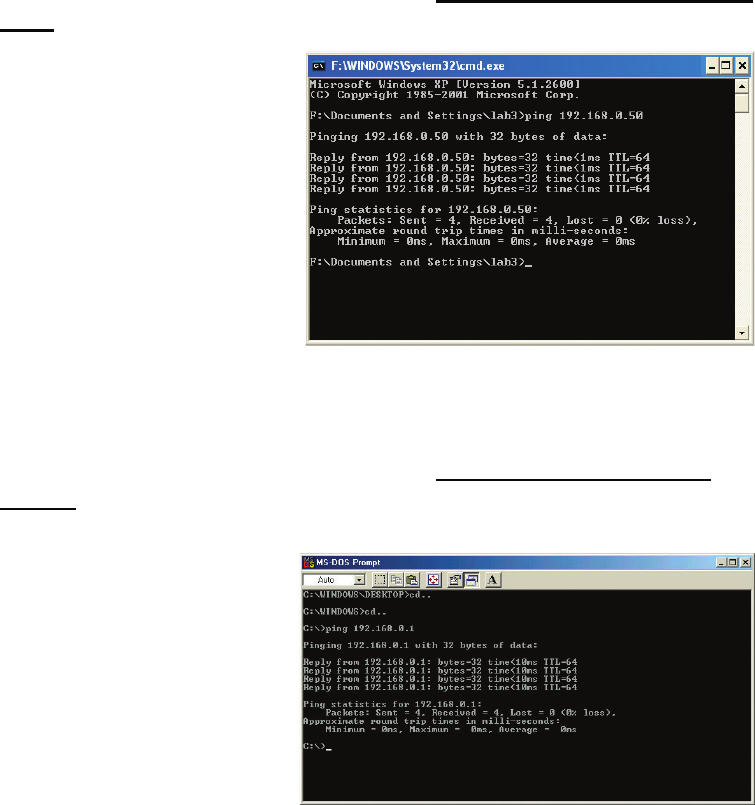
Selecting a Dynamic IP Address with Macintosh OSX
Go to the Apple Menu and select
System Preferences
Click on Network
Select Built-in Ethernet in the
Show pull-down menu
Select Using DHCP in the
Configure pull-down menu
Click Apply Now
The IP Address, Subnet
mask, and the Router’s IP
Address will appear in a few
seconds
54
Networking Basics
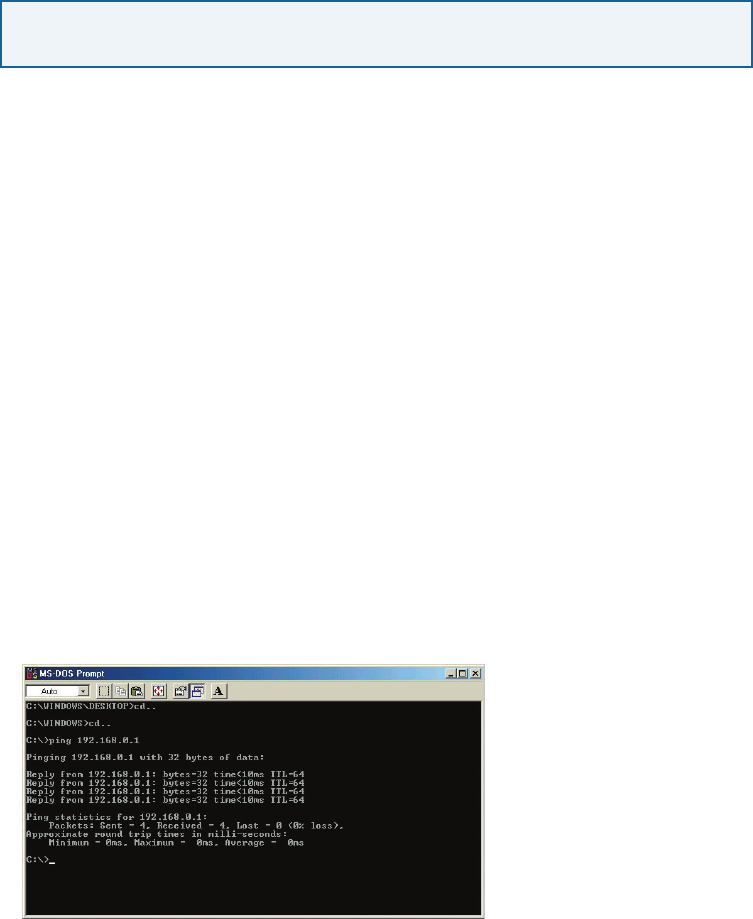
Checking the Wireless Connection by Pinging in Windows XP and
2000
Checking the Wireless Connection by Pinging in Windows Me
and 98
Go to Start > Run >
type cmd. A window
similar to this one
will appear. Type
ping xxx.xxx.xxx.
xxx, where xxx is
the IP Address of
the Wireless Router
or Access Point.
A good wireless
connection will show
four replies from
the Wireless Router
or Acess Point, as
shown.
Go to Start > Run
> type command.
A window similar
to this will appear.
Type ping xxx.xxx.
xxx.xxx where xxx
is the IP Address
of the Wireless
Router or Access
Point. A good
wireless connection
will show four
replies from the
wireless router or
access point, as
shown.
55
Troubleshooting
This Chapter provides solutions to problems that can occur during the installation and
operation of the DI-524 Wireless Broadband Router. We cover various aspects of the
network setup, including the network adapters. Please read the following if you are
having problems.
Note: If you have
changed the default IP
Address, make sure to
ping the correct IP Ad-
dress assigned to the
DI-524.
Note: It is recommended that you use an Ethernet connection to
configure the DI-524 Wireless Broadband Router.
1. The computer used to configure the DI-524 cannot access the
Configuration menu.
Check that the Ethernet LED on the DI-524 is ON. If the LED is not
ON, check that the cable for the Ethernet connection is securely
inserted.
Check that the Ethernet Adapter is working properly. Please see
item 3 (Check that the drivers for the network adapters are
installed properly) in this Troubleshooting section to check that
the drivers are loaded properly.
Check that the IP Address is in the same range and subnet as the
DI-524. Please see Checking the IP Address in Windows XP in
the Networking Basics section of this manual.
Note: The IP Address of the DI-524 is 192.168.0.1. All the computers on the
network must have a unique IP Address in the same range, e.g., 192.168.0.x.
Any computers that have identical IP Addresses will not be visible on the
network. They must all have the same subnet mask, e.g., 255.255.255.0
Do a Ping test to make sure that the DI-524 is responding. Go to
Start>Run>Type Command>Type ping 192.168.0.1. A successful
ping will show four replies.