D Link DIR320A1 802.11g Wireless Cable/DSL Internet Gateway w/USB User Manual Users manual2
D Link Corporation 802.11g Wireless Cable/DSL Internet Gateway w/USB Users manual2
D Link >
Contents
- 1. Users manual1
- 2. Users manual2
- 3. Users manual3
- 4. Users manual4
Users manual2
Section 1 - Product Overview
D-Link DIR-320 User Manual 3
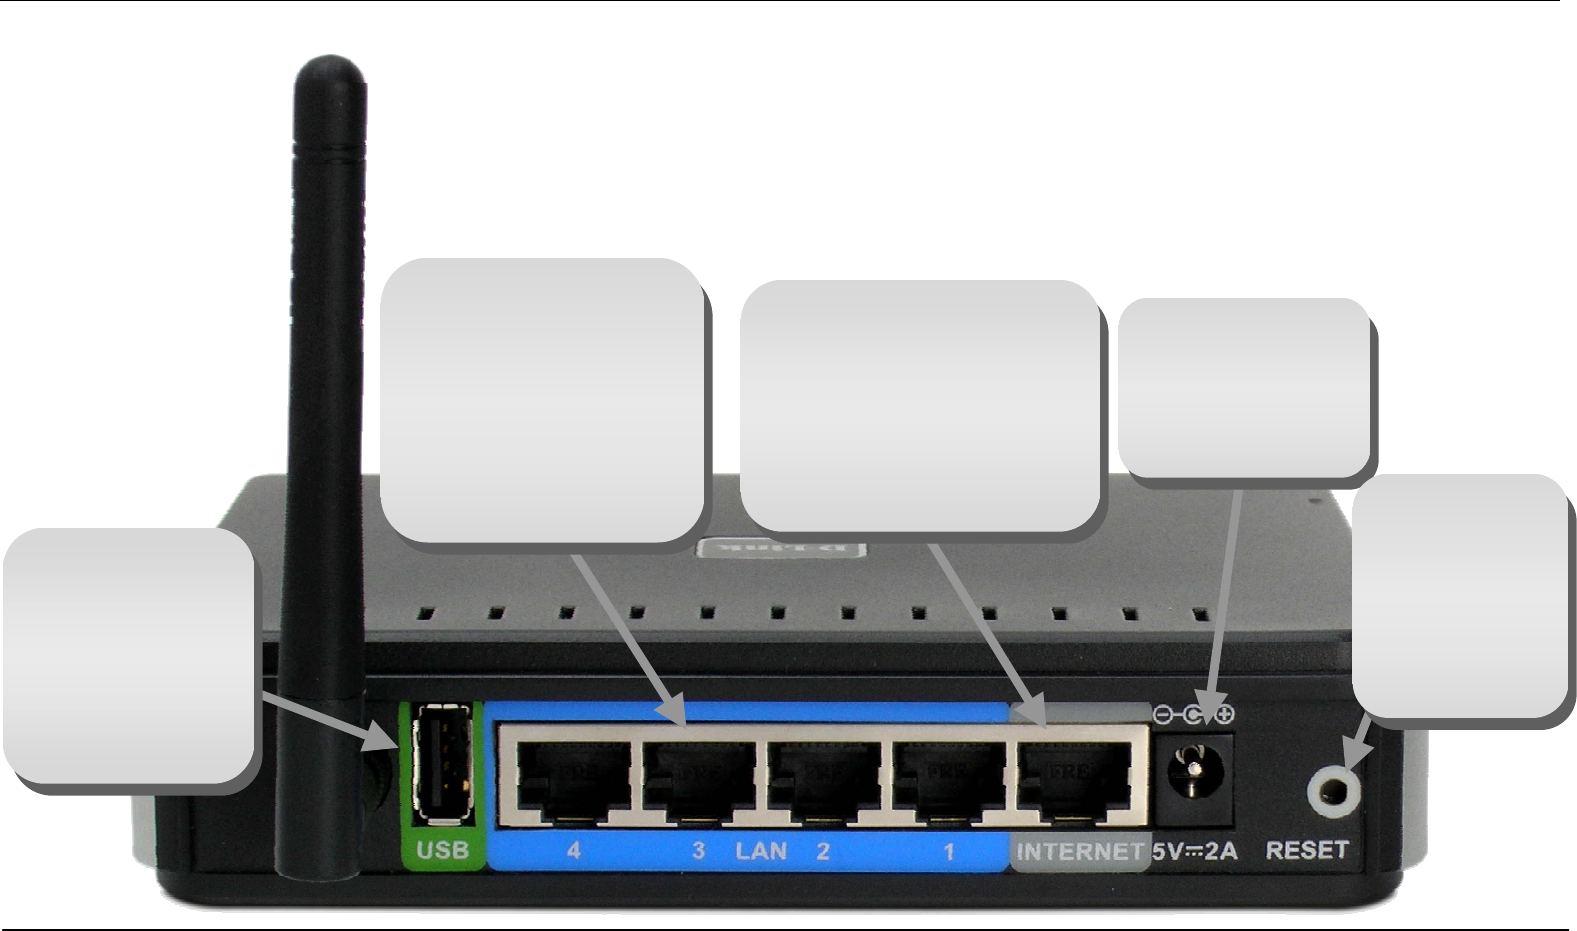
Hardware Overview
Power Insert
Use the adapter
shipped with the
Router to connect
to
p
ower source
Internet Port
The auto MID/MDIX Internet
(WAN) port is used for
connection to a broadband
cable or ADSL modem. Use
the included Ethernet cable
for the connection to a
broadband device.
USB Port
Connect to a
single computer or
network printer.
Use included USB
cable to make
connection.
LAN Ports
Use the Ethernet LAN
ports to connect the
Router to computers or
network devices on an
Ethernet LAN. Use
Ethernet cables for all
LAN connections. Reset Button
To manually
reset, depress
button with the
power on for at
least seven
seconds
Section 1 - Product Overview
D-Link DIR-320 User Manual 4
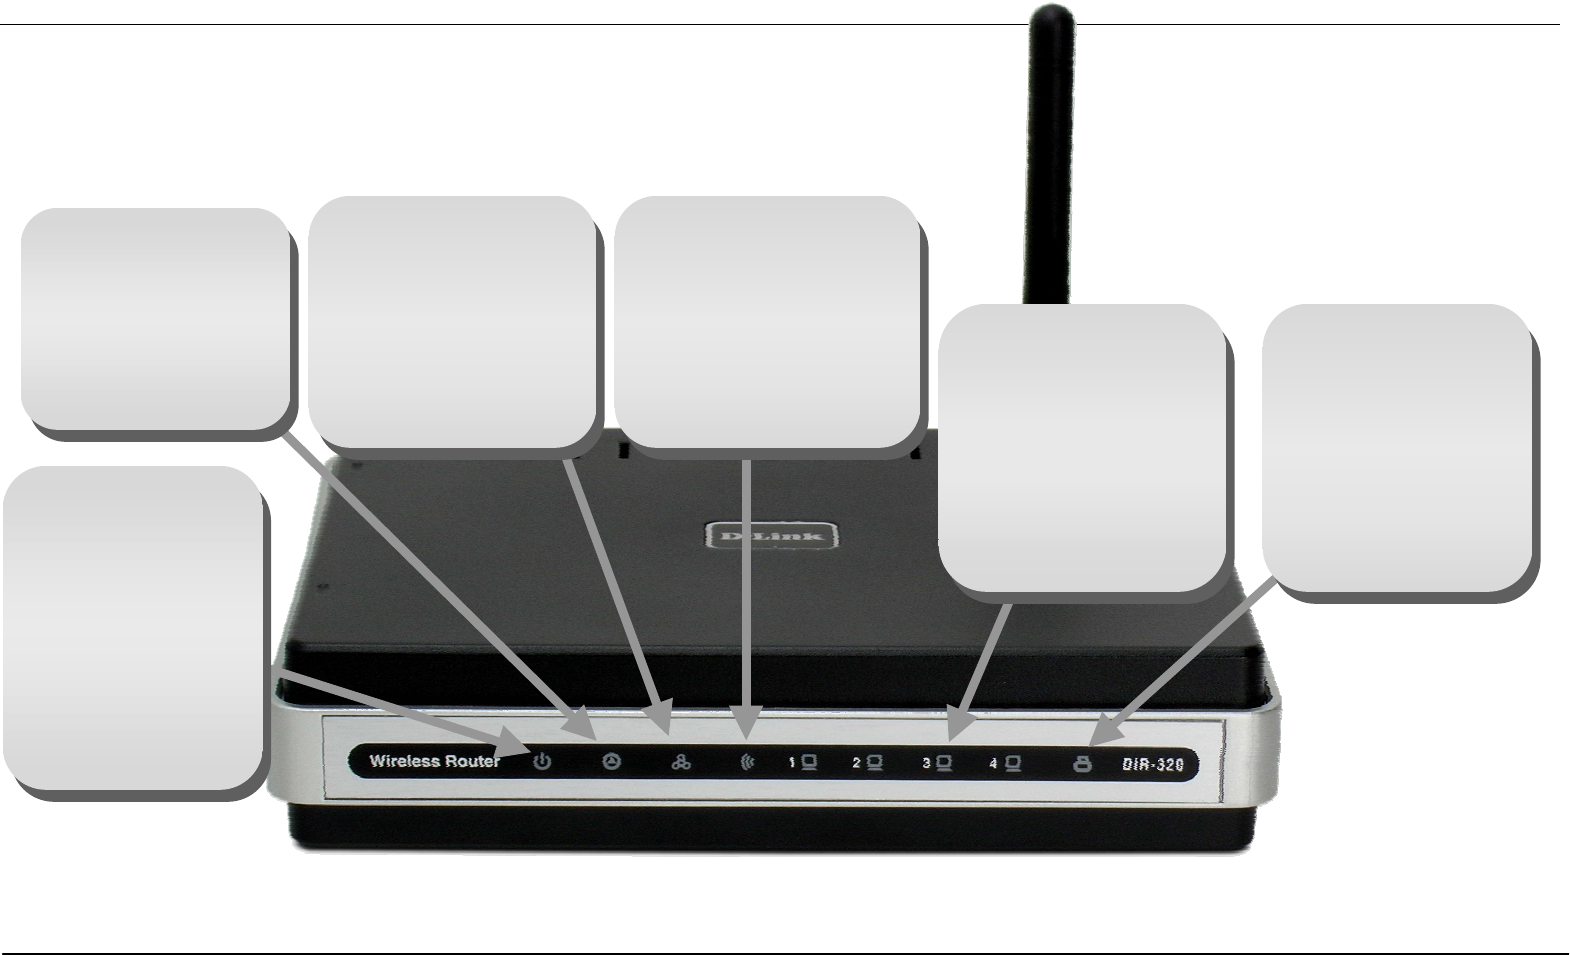
LED Indicators
Power
Steady green light
indicates the unit is
powered on. When
the device is
powered off this
remains dark. A red
colored Power LED
indicates system
failure.
USB (Printer Port)
A
steady green light
indicates a valid
link. This light will
blink when there is
activity currently
passing through the
USB port.
WAN (Internet)
A steady green light
indicates a valid WAN
connection. A blinking
green light indicates
activity on the WAN
(Internet) interface.
LAN
A steady green light
indicates a valid link
on startup. This light
will blink when there
is activity currently
passing through the
Ethernet port.
WLAN
Steady green light
indicates a wireless
connection. A blinking
green light indicates
activity on the Wireless
LAN interface.
Status
Blinking green light
indicates normal
function. Dark
indicator means the
system has failed.

Section 2 – Installation
D-Link DIR-320 User Manual 5
Installation
This section will walk you through the installation process. Placement of the Wireless Broadband Router is very important. Do not place the router in
an enclosed area such as a closet, cabinet, or in the attic or garage. Place the Wireless Broadband Router in a location where it can be easily
connected to Ethernet devices, the telephone line as well as to a power source.
Before You Begin
Please read and make sure you understand all the prerequisites for proper installation of your new router. Have all the necessary information and
equipment on hand before beginning the installation.
Operating Systems
The DIR-320 uses an HTML-based web interface for setup and management. The web configuration manager may be accessed using any
operating system capable of running web browser software, including Windows 98 SE, Windows ME, Windows 2000, Windows XP, and Windows
Vista.
Web Browser
Any common web browser can be used to configure the router using the web configuration management software. The web browser must have
JavaScript enabled. JavaScript is enabled by default on many browsers. Make sure JavaScript has not been disabled by other software (such as
virus protection or web user security packages) that may be running on your computer.
Ethernet Port (NIC Adapter)
Any computer that uses the router must be able to connect to it through the Ethernet port on the router. Most notebook computers and fully
assembled desktop computers are now sold with an Ethernet port already installed. If your computer does not have an Ethernet port, you must
install an Ethernet NIC adapter before you can use the router.
Wireless LAN
Computers using the Wireless network can access the Internet or use the embedded 802.1g wireless access point. Wireless workstations must
have an 802.1g or 802.1b wireless network card installed to use the Wireless Broadband Router. In addition the workstations must be configured to
operate on the same channel and SSID as the Wireless Broadband Router. If wireless security is used, the wireless workstations must be properly
configured for the security settings used.

Section 2 – Installation
D-Link DIR-320 User Manual 6
Wireless Installation Considerations
The D-Link wireless router lets you access your network using a wireless connection from virtually anywhere within the operating range of your
wireless network. Keep in mind, however, that the number, thickness and location of walls, ceilings, or other objects that the wireless signals must
pass through, may limit the range. Typical ranges vary depending on the types of materials and background RF (radio frequency) noise in your
home or business. The key to maximizing wireless range is to follow these basic guidelines:
1. Keep the number of walls and ceilings between the D-Link router and other network devices to a minimum – each wall or ceiling can
reduce your adapter's range from 3-90 feet (1-30 meters.) Position your devices so that the number of walls or ceilings is minimized.
2. Be aware of the direct line between network devices. A wall that is 1.5 feet thick (.5 meters), at a 45-degree angle appears to be almost 3
feet (1 meter) thick. At a 2-degree angle it looks over 42 feet (14 meters) thick! Position devices so that the signal will travel straight
through a wall or ceiling (instead of at an angle) for better reception.
3. Building Materials make a difference. A solid metal door or aluminum studs may have a negative effect on range. Try to position access
points, wireless routers, and computers so that the signal passes through drywall or open doorways. Materials and objects such as glass,
steel, metal, walls with insulation, water (fish tanks), mirrors, file cabinets, brick, and concrete will degrade your wireless signal.
4. Keep your product away (at least 3-6 feet or 1-2 meters) from electrical devices or appliances that generate RF noise.
5. If you are using 2.4GHz cordless phones or X-10 (wireless products such as ceiling fans, lights, and home security systems), your
wireless connection may degrade dramatically or drop completely. Make sure your 2.4GHz phone base is as far away from your wireless
devices as possible. The base transmits a signal even if the phone in not in use.

Section 2 – Installation
D-Link DIR-320 User Manual 7
Connect to Cable/DSL/Satellite Modem
If you are connecting the router to a cable/DSL/satellite modem, please follow the steps below:
1. Place the router in an open and central location. Do not plug the power adapter into the router.
2. Turn the power off on your modem. If there is no on/off switch, then unplug the modem's power adapter. Shut down your computer.
3. Unplug the Ethernet cable (that connects your computer to your modem) from your computer and place it into the port labeled “Internet”
on the router.
4. Plug an Ethernet cable into one of the four LAN ports on the router. Plug the other end into the Ethernet port on your computer.
5. Turn on or plug in your modem. Wait for the modem to boot (about 30 seconds).
6. Plug the power adapter to the router and connect to an outlet or power strip. Wait about 30 seconds for the router to boot.
7. Turn on your computer.
8. Verify the link lights on the router. The power light, WAN light, and the LAN light (the port that your computer is plugged into) should be lit.
If not, make sure your computer, modem, and router are powered on and verify the cable connections are correct.
9. Use the instructions found in this manual to complete the configuration of the router.

Section 2 – Installation
D-Link DIR-320 User Manual 8
Connect to Another Router
If you are connecting the D-Link router to another router to use as a wireless access point and/or switch, you will have to do the following before
connecting the router to your network:
• Disable UPnP™
• Disable DHCP
• Change the LAN IP address to an available address on your network. The LAN ports on the router cannot accept a DHCP address from your
other router.
To connect to another router, please follow the steps below:
1. Plug the power into the router. Connect one of your computers to the router (LAN port) using an Ethernet cable. Make sure your IP
address on the computer is 192.168.0.xxx (where xxx is between 2 and 254). Please see the Networking Basics section for more
information. If you need to change the settings, write down your existing settings before making any changes. In most cases, your
computer should be set to receive an IP address automatically in which case you will not have to do anything to your computer.
2. Open a web browser and enter http://192.168.0.1 and press Enter. When the login window appears, set the user name to admin and
leave the password box empty. Click OK to continue.
3. Click on Advanced and then click Advanced Network. Uncheck the Enable UPnP checkbox. Click Save Settings to continue.
4. Click Setup and then click Network Settings. Uncheck the Enable DHCP Server server checkbox. Click Save Settings to continue.
5. Under Router Settings, enter an available IP address and the subnet mask of your network. Click Save Settings to save your settings.
Use this new IP address to access the configuration utility of the router in the future. Close the browser and change your computer’s IP
settings back to the original values as in Step 1.
6. Disconnect the Ethernet cable from the router and reconnect your computer to your network.
7. Connect an Ethernet cable in one of the LAN ports of the router and connect it to your other router. Do not plug anything into the WAN
port of the D-Link router.
8. You may now use the other three LAN ports to connect other Ethernet devices and computers. To configure your wireless network, open
a web browser and enter the IP address you assigned to the router. Refer to the Configuration and Wireless Security sections for more
information on setting up your wireless network.