user manual

iD-Link DIR-615 User Manual
Table of Contents
Package Contents ......................................................................1
System Requirements ...........................................................1
Features.................................................................................2
Hardware Overview ...............................................................3
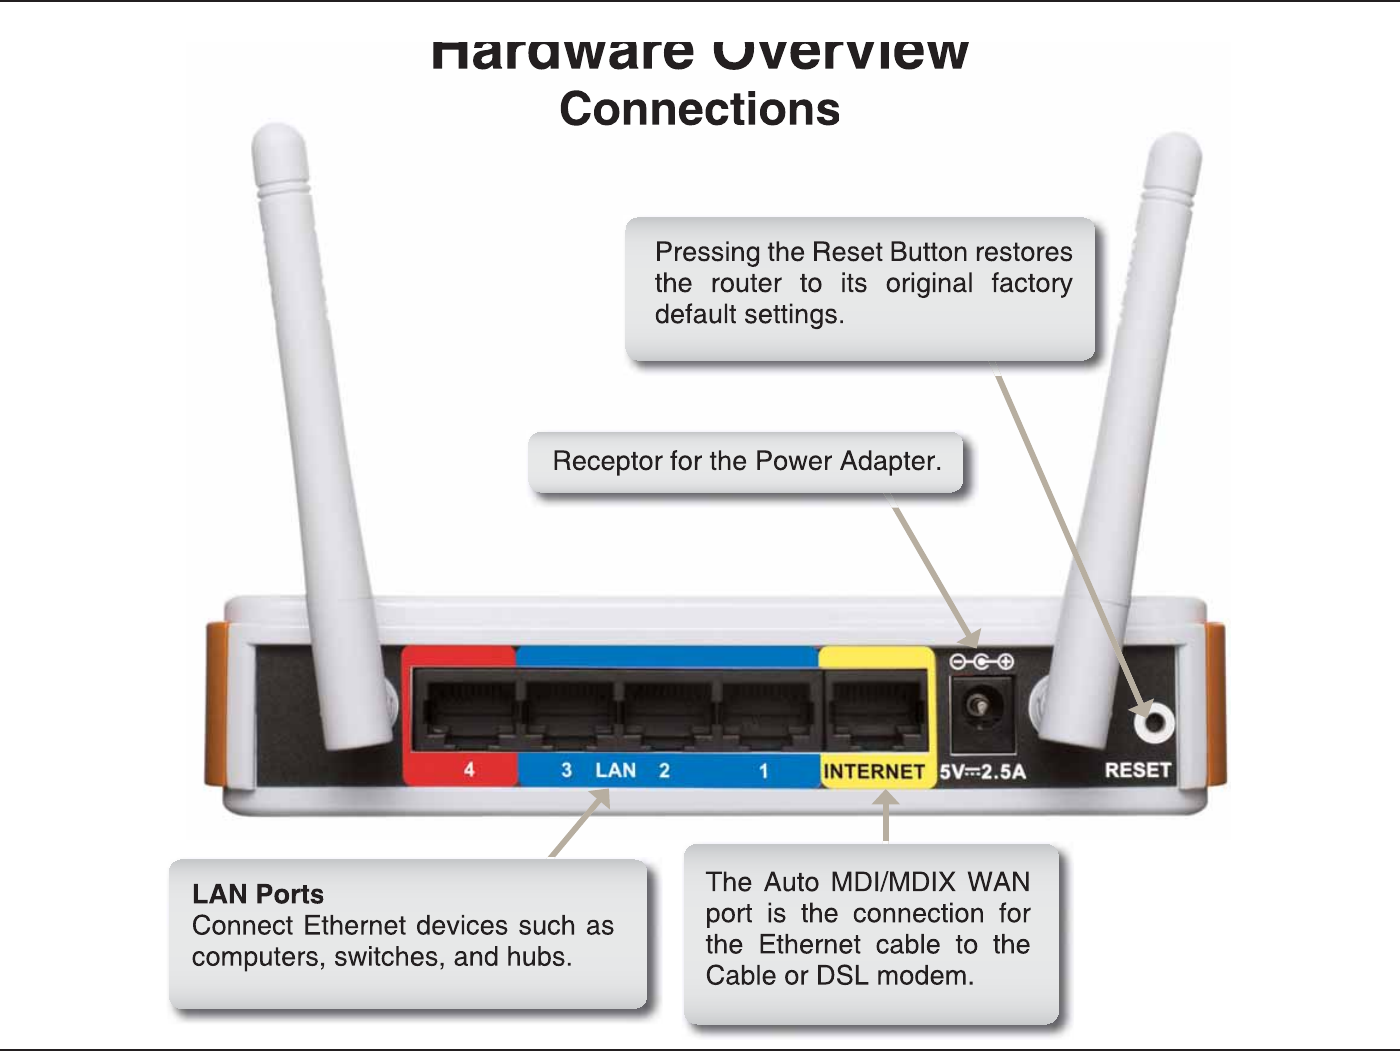
Connections....................................................................3
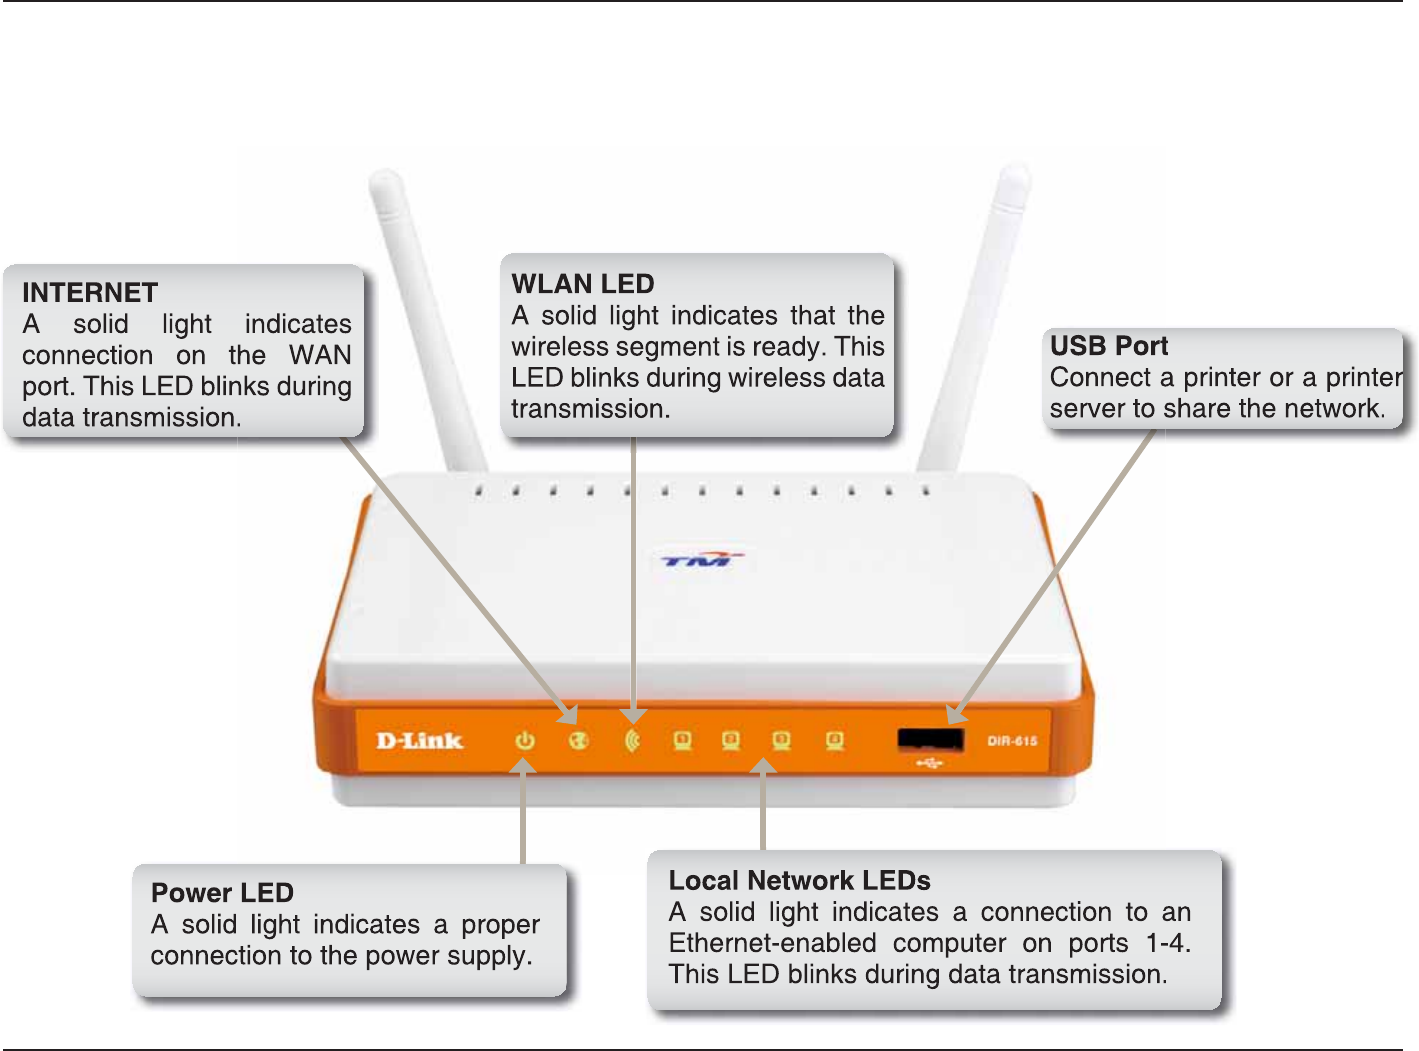
LEDs and USB Port ........................................................4
Installation...................................................................................5
Before you Begin ...................................................................5
Wireless Installation Considerations......................................6
Wall Mounting Your Device ...................................................7
Connect to Cable/DSL/Satellite Modem ................................8
Connect to Another Router....................................................9
%QPſIWTCVKQP............................................................................11
9GDDCUGF%QPſIWTCVKQP7VKNKV[ ..........................................11
Setup Wizard ................................................................12
Internet Setup ...............................................................18
Static (assigned by ISP) ...........................................19
Dynamic....................................................................20
PPPoE .....................................................................21
Wireless Setup..............................................................23
LAN Setup.....................................................................30
DHCP Server Settings ..................................................31
Time and Date ..............................................................32
Parental Control............................................................33
Port Forwarding ............................................................34
Port Mapping.................................................................35
SNMP............................................................................36
QoS Engine...................................................................37
QoS Engine...................................................................37
Filter Rules....................................................................38
Firewall & DMZ .............................................................39
Advanced Wireless .......................................................40
Advanced Network........................................................42
Routing..........................................................................43
TR-069..........................................................................44
Device Administration ...................................................46
Save and Restore .........................................................48
Firmware Update ..........................................................49
DDNS Setting................................................................50
System Check...............................................................51
Schedules .....................................................................52
Log Settings..................................................................53
Device Info....................................................................54
Log................................................................................55
Statistics........................................................................56
Active Session .............................................................56
Wireless ........................................................................57
Help...............................................................................58
9KTGNGUU5GEWTKV[......................................................................59
What is WEP?......................................................................59
%QPſIWTG9'2....................................................................60
What is WPA?......................................................................61
%QPſIWTG92#25-CPF92#25-.................................62
%QPſIWTG92#92#25- ................................................63
%QPſIWTG92#92#CPF92#92#4#&+75 ..........64
%QPPGEVVQC9KTGNGUU0GVYQTM...............................................65
Using Windows® XP.............................................................65
%QPſIWTG9'2....................................................................66
Table of Contents

iiD-Link DIR-615 User Manual
Table of Contents
%QPſIWTG92#25-............................................................68
5GVVKPI7R9K(K2TQVGEVKQP.....................................................70
9%0KP9KPFQYU8KUVC....................................................70
+PKVKCN4QWVGT%QPſIWTCVKQPHQT9K(K2TQVGEVKQP ..................70
5GVVKPI7RC%QPſIWTGF4QWVGT...........................................71
%JCPIKPIVJG%QORWVGT0COGCPF,QKPKPIC9QTMITQWR ...
%QPſIWTKPIVJG+2#FFTGUUKP8KUVC .......................................74
5GVVKPI7RC%QPPGEVKQPQT0GVYQTM9KTGNGUUN[ ...................77
%QPPGEVKPIVQC5GEWTGF9KTGNGUU0GVYQTM9'292#25-
92#25-............................................................................
%QPPGEVKPIVQCP7PUGEWTGF9KTGNGUU0GVYQTM....................86
6TQWDNGUJQQVKPI .......................................................................90
9KTGNGUU$CUKEU ........................................................................94
What is Wireless?................................................................95
Tips......................................................................................97
Wireless Modes ...................................................................98
0GVYQTMKPI$CUKEU ...................................................................99
Check your IP address ........................................................99
Statically Assign an IP address .........................................100
6GEJPKECN5RGEKſECVKQPU........................................................101
1D-Link DIR-615 User Manual
Section 1 - Product Overview
Ŗ&.KPM&+49KTGNGUU4QWVGT
Ŗ2QYGT#FCRVGT
Ŗ'VJGTPGV%CDNG
Ŗ/CPWCNCPF9CTTCPV[QP%&
5[UVGO4GSWKTGOGPVU
Ŗ'VJGTPGVDCUGF%CDNGQT&5./QFGO
Ŗ%QORWVGTUYKVJ9KPFQYU®/CEKPVQUJ®QT.KPWZDCUGFQRGTCVKPIU[UVGOUYKVJCPKPUVCNNGF'VJGTPGV
adapter
Ŗ+PVGTPGV'ZRNQTGTQT(KTGHQZQTCDQXGHQTEQPſIWTCVKQP
Package Contents
0QVGUsing a power supply with a different voltage rating than the one included
with the DIR-615 will cause damage and void the warranty for this product.
0QVG#NYC[UCVVCEJVJGRQYGTEQTFRNWIVQVJGRQYGTUWRRN[DGHQTGKPUGTVKPI
the power cord and connected power supply to the wall outlet.

2D-Link DIR-615 User Manual
Section 1 - Product Overview
Ŗ(CUVGT9KTGNGUU0GVYQTMKPI - The DIR-615 provides up to 300Mbps* wireless connection with other
PYKTGNGUUENKGPVU6JKUECRCDKNKV[CNNQYUWUGTUVQRCTVKEKRCVGKPTGCNVKOGCEVKXKVKGUQPNKPGUWEJCU
XKFGQUVTGCOKPIQPNKPGICOKPICPFTGCNVKOGCWFKQ
Ŗ%QORCVKDNGYKVJDCPFI&GXKEGU - The DIR-615 is still fully compatible with the IEEE
DCPF+'''IUVCPFCTFUQKVECPEQPPGEVYKVJGZKUVKPIDCPF+'''I2%+
USB and Cardbus adapters.
Ŗ#FXCPEGF(KTGYCNN(GCVWTGU - The Web-based user interface displays a number of advanced network
management features including:
Ŗ%QPVGPV(KNVGTKPI 'CUKN[CRRNKGFEQPVGPVſNVGTKPI DCUGFQP/#%#FFTGUU74.CPFQT
Domain Name.
Ŗ(KNVGT5EJGFWNKPI6JGUGſNVGTUECP DGUEJGFWNGFVQ DGCEVKXGQP EGTVCKPFC[UQT HQTC
duration of hours or minutes.
Ŗ5GEWTG/WNVKRNG%QPEWTTGPV5GUUKQPU - The DIR-615 can pass through VPN sessions. It
UWRRQTVUOWNVKRNGCPFEQPEWTTGPV+25GECPF2262UGUUKQPUUQWUGTUDGJKPFVJG&+4
can securely access corporate networks.
Ŗ7UGTHTKGPFN[5GVWR9K\CTF6JTQWIJKVUGCU[VQWUG9GDDCUGFWUGTKPVGTHCEGVJG&+4NGVU[QW
EQPVTQNYJCVKPHQTOCVKQPKUCEEGUUKDNGVQVJQUGQPVJGYKTGNGUUPGVYQTMYJGVJGTHTQOVJG+PVGTPGVQTHTQO
[QWTEQORCP[ŏUUGTXGT%QPſIWTG[QWTTQWVGTVQ[QWTURGEKſEUGVVKPIUYKVJKPOKPWVGU
/CZKOWOYKTGNGUUUKIPCNTCVGFGTKXGFHTQO+'''5VCPFCTFICPF&TCHVPURGEKſECVKQPU#EVWCNFCVCVJTQWIJRWVYKNNXCT[0GVYQTMEQPFKVKQPUCPF
GPXKTQPOGPVCNHCEVQTUKPENWFKPIXQNWOGQHPGVYQTMVTCHſEDWKNFKPIOCVGTKCNUCPFEQPUVTWEVKQPCPFPGVYQTMQXGTJGCFNQYGTCEVWCNFCVCVJTQWIJRWVTCVG'PXKTQPOGPVCN
conditions will adversely affect wireless signal range.
(GCVWTGU
3
D-L
i
nk DIR-615
U
ser Manua
l
S
ection 1 - Product
O
vervie
w
*CTFYCTG 1XGTXKGY
4
D-L
i
nk DIR-615
U
ser Manua
l
S
ection 1 - Product
O
vervie
w
*CTFYCTG
1
XGTXKGY
.
'&UCPF
75
$2QT
V

5D-Link DIR-615 User Manual
Section 2 - Installation
$GHQTG[QW$GIKP
Installation
This section will walk you through the installation process. Placement of the router is very important. Do not place the
TQWVGTKPCPGPENQUGFCTGCUWEJCUCENQUGVECDKPGVQTKPVJGCVVKEQTICTCIG
2NGCUGEQPſIWTGVJGTQWVGTYKVJVJGEQORWVGTVJCVYCUNCUVEQPPGEVGFFKTGEVN[VQ[QWTOQFGO#NUQ[QWECPQPN[WUG
VJG'VJGTPGVRQTVQP[QWTOQFGO+H[QWYGTGWUKPIVJG75$EQPPGEVKQPDGHQTGWUKPIVJGTQWVGTVJGP[QWOWUVVWTPQHH
[QWTOQFGOFKUEQPPGEVVJG75$ECDNGCPFEQPPGEVCP'VJGTPGVECDNGVQVJG9#0RQTVQPVJGTQWVGTCPFVJGPVWTP
VJGOQFGODCEMQP+PUQOGECUGU[QWOC[PGGFVQECNN[QWT+52VQEJCPIGEQPPGEVKQPV[RGU75$VQ'VJGTPGV
+H[QWJCXG&5.CPFCTGEQPPGEVKPIXKC222Q'OCMGUWTG[QWFKUCDNGQTWPKPUVCNNCP[222Q'UQHVYCTGUWEJCU
9KP2QGV$TQCFLWORQT'VJGTPGVHTQO[QWTEQORWVGTQT[QWYKNNPQVDGCDNGVQEQPPGEVVQVJG+PVGTPGV

6D-Link DIR-615 User Manual
Section 2 - Installation
9KTGNGUU+PUVCNNCVKQP%QPUKFGTCVKQPU
The D-Link wireless router lets you access your network using a wireless connection from virtually anywhere within
VJGQRGTCVKPI TCPIG QH[QWTYKTGNGUU PGVYQTM -GGRKP OKPF JQYGXGT VJCVVJG PWODGT VJKEMPGUUCPFNQECVKQP QH
YCNNUEGKNKPIUQTQVJGTQDLGEVUVJCVVJGYKTGNGUUUKIPCNUOWUVRCUUVJTQWIJOC[NKOKVVJGTCPIG6[RKECNTCPIGUXCT[
depending on the types of materials and background RF (radio frequency) noise in your home or business. The key
VQOCZKOK\KPIYKTGNGUUTCPIGKUVQHQNNQYVJGUGDCUKEIWKFGNKPGU
1.-GGR VJG PWODGT QH YCNNU CPF EGKNKPIU DGVYGGP VJG &.KPM TQWVGT CPF QVJGT PGVYQTM FGXKEGU VQ C
minimum - each wall or ceiling can reduce your adapter’s range from 3-90 feet (1-30 meters.) Position
your devices so that the number of walls or ceilings is minimized.
$G CYCTG QH VJG FKTGEV NKPG DGVYGGP PGVYQTM FGXKEGU # YCNN VJCV KU HGGV VJKEM OGVGTU CV C
45-degree angle appears to be almost 3 feet (1 meter) thick. At a 2-degree angle it looks over 42 feet
(14 meters) thick! Position devices so that the signal will travel straight through a wall or ceiling (instead
of at an angle) for better reception.
3. Building Materials make a difference. A solid metal door or aluminum studs may have a negative effect on
TCPIG6T[VQRQUKVKQPCEEGUURQKPVUYKTGNGUUTQWVGTUCPFEQORWVGTUUQVJCVVJGUKIPCNRCUUGUVJTQWIJ
FT[YCNNQTQRGPFQQTYC[U/CVGTKCNUCPFQDLGEVUUWEJCUINCUUUVGGNOGVCNYCNNUYKVJKPUWNCVKQPYCVGT
ſUJVCPMUOKTTQTUſNGECDKPGVUDTKEMCPFEQPETGVGYKNNFGITCFG[QWTYKTGNGUUUKIPCN
4.-GGR[QWT RTQFWEVCYC[ CVNGCUV HGGV QT OGVGTUHTQO GNGEVTKECNFGXKEGU QTCRRNKCPEGU VJCV
generate RF noise.
5.+H[QWCTGWUKPI)*\EQTFNGUURJQPGUQT:YKTGNGUURTQFWEVUUWEJCUEGKNKPIHCPUNKIJVUCPF
JQOGUGEWTKV[U[UVGOU[QWTYKTGNGUUEQPPGEVKQPOC[FGITCFGFTCOCVKECNN[QTFTQREQORNGVGN[/CMG
sure your 2.4GHz phone base is as far away from your wireless devices as possible. The base transmits
a signal even if the phone in not in use.

8D-Link DIR-615 User Manual
Section 2 - Installation
+H[QWCTGEQPPGEVKPIVJGTQWVGTVQCECDNG&5.UCVGNNKVGOQFGORNGCUGHQNNQYVJGUVGRUDGNQY
1. Place the router in an open and central location. Do not plug the power adapter into the router.
6WTPVJGRQYGTQHHQP[QWTOQFGO+HVJGTGKUPQQPQHHUYKVEJVJGPWPRNWIVJGOQFGOŏURQYGTCFCRVGT5JWVFQYP
your computer.
3. Unplug the Ethernet cable (that connects your computer to your modem) from your computer and place it into the
WAN port on the router.
4. Plug an Ethernet cable into one of the four LAN ports on the router. Plug the other end into the Ethernet port on
your computer.
5. Turn on or plug in your modem. Wait for the modem to boot (about 30 seconds).
6. Plug the power adapter to the router and connect to an outlet or power strip. Wait about 30 seconds for the router
to boot.
7. Turn on your computer.
8.8GTKH[VJGNKPMNKIJVUQPVJGTQWVGT6JGRQYGTNKIJV9#0NKIJVCPFVJG.#0NKIJVVJGRQTVVJCV[QWTEQORWVGTKU
RNWIIGFKPVQUJQWNFDGNKV+HPQVOCMGUWTG[QWTEQORWVGTOQFGOCPFTQWVGTCTGRQYGTGFQPCPFXGTKH[VJGECDNG
connections are correct.
9.5MKRVQRCIGVQEQPſIWTG[QWTTQWVGT
%QPPGEVVQ%CDNG&5.5CVGNNKVG/QFGO

9D-Link DIR-615 User Manual
Section 2 - Installation
+H[QWCTGEQPPGEVKPIVJG&.KPMTQWVGTVQCPQVJGTTQWVGTVQWUGCUCYKTGNGUUCEEGUURQKPVCPFQTUYKVEJ[QWYKNNJCXG
to do the following before connecting the router to your network:
Ŗ&KUCDNG72P2™
Ŗ&KUCDNG&*%2
Ŗ%JCPIGVJG.#0+2CFFTGUUVQCPCXCKNCDNGCFFTGUUQP[QWTPGVYQTM6JG.#0RQTVUQPVJGTQWVGTECPPQV
accept a DHCP address from your other router.
6QEQPPGEVVQCPQVJGTTQWVGTRNGCUGHQNNQYVJGUVGRUDGNQY
1. Plug the power into the router. Connect one of your computers to the router (LAN port) using an Ethernet cable.
/CMGUWTG[QWT+2CFFTGUUQPVJGEQORWVGTKUZZZYJGTGZZZKUDGVYGGPCPF2NGCUGUGGVJG
0GVYQTMKPI$CUKEUUGEVKQPHQTOQTGKPHQTOCVKQP+H[QWPGGFVQEJCPIGVJGUGVVKPIUYTKVGFQYP[QWTGZKUVKPIUGVVKPIU
DGHQTGOCMKPICP[EJCPIGU+POQUVECUGU[QWTEQORWVGTUJQWNFDGUGVVQTGEGKXGCP+2CFFTGUUCWVQOCVKECNN[KP
which case you will not have to do anything to your computer.
Open a web browser and enter JVVR and press 'PVGT9JGPVJGNQIKPYKPFQYCRRGCTUUGVVJGWUGT
name to CFOKPCPFNGCXGVJGRCUUYQTFDQZGORV[%NKEM1- to continue.
3. Click on #FXCPEGF and then click #FXCPEGF0GVYQTM7PEJGEMVJG'PCDNG72P2EJGEMDQZ%NKEM5CXG5GVVKPIU
to continue.
4. Click 5GVWR and then click 0GVYQTM5GVVKPIU7PEJGEMVJG'PCDNG&*%25GTXGTUGTXGTEJGEMDQZ%NKEM5CXG
5GVVKPIU to continue.
5.7PFGT4QWVGT5GVVKPIUGPVGTCPCXCKNCDNG+2CFFTGUUCPFVJGUWDPGVOCUMQH[QWTPGVYQTM%NKEM5CXG5GVVKPIU to
UCXG[QWTUGVVKPIU7UGVJKUPGY+2CFFTGUUVQCEEGUUVJGEQPſIWTCVKQPWVKNKV[QHVJGTQWVGTKPVJGHWVWTG%NQUGVJG
browser and change your computer’s IP settings back to the original values as in Step 1.
%QPPGEVVQ#PQVJGT4QWVGT

10D-Link DIR-615 User Manual
Section 2 - Installation
6. Disconnect the Ethernet cable from the router and reconnect your computer to your network.
7. Connect an Ethernet cable in one of the LAN ports of the router and connect it to your other router. Do not plug
anything into the WAN port of the D-Link router.
8.;QWOC[PQYWUGVJGQVJGTVJTGG.#0RQTVUVQEQPPGEVQVJGT'VJGTPGVFGXKEGUCPFEQORWVGTU6QEQPſIWTG[QWT
YKTGNGUUPGVYQTMQRGPCYGDDTQYUGTCPFGPVGTVJG+2CFFTGUU[QWCUUKIPGFVQVJGTQWVGT4GHGTVQVJG%QPſIWTCVKQP
and 9KTGNGUU 5GEWTKV[ sections for more information on setting up your wireless network.
11D-Link DIR-615 User Manual
5GEVKQP%QPſIWTCVKQP
%QPſIWTCVKQP
6JKU UGEVKQP YKNN UJQY [QW JQY VQ EQPſIWTG [QWT PGY &.KPM YKTGNGUU TQWVGT WUKPI VJG YGDDCUGF EQPſIWTCVKQP
utility.
9GDDCUGF%QPſIWTCVKQP7VKNKV[
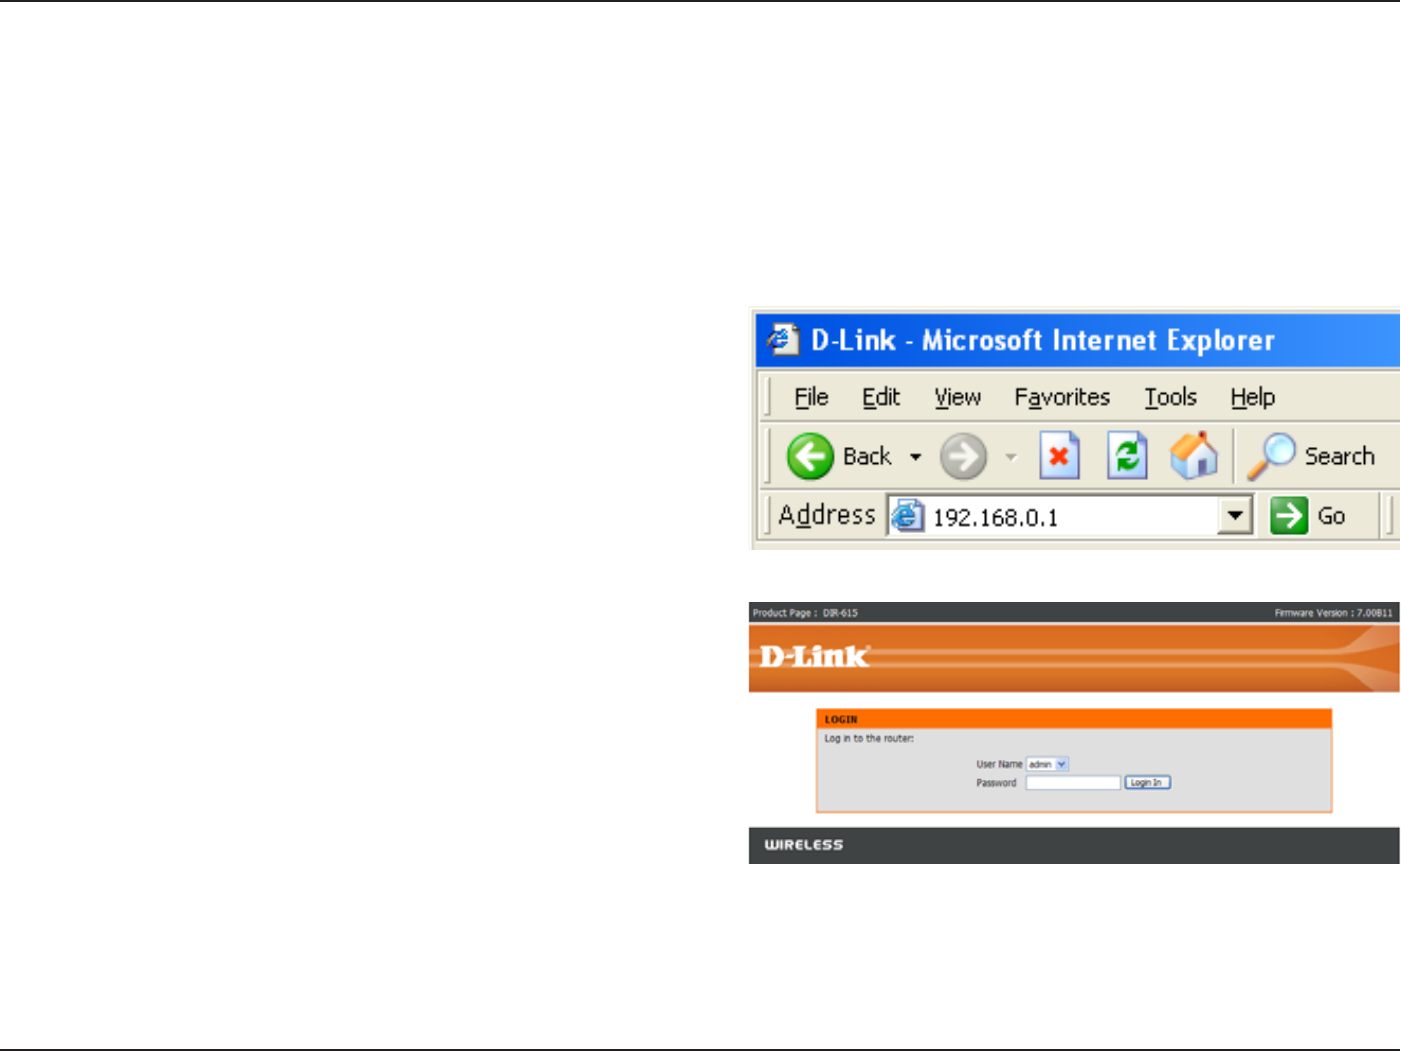
6QCEEGUUVJGEQPſIWTCVKQPWVKNKV[QRGPCYGDDTQYUGT
UWEJCU+PVGTPGV'ZRNQTGTCPFGPVGTVJG+2CFFTGUUQH
the router (192.168.0.1).
Enter the user name (admin) and your password. Leave
the password blank by default.
If you get a 2CIG%CPPQVDG&KURNC[GFGTTQTRNGCUG
refer to the 6TQWDNGUJQQVKPI section for assistance.

12D-Link DIR-615 User Manual
5GEVKQP%QPſIWTCVKQP
5GVWR9K\CTF
You may run the setup wizard from the opening
Internet Setup window to quickly set up your router.
Click +PVGTPGV%QPPGEVKQP 5GVWR9K\CTFCPFVJGſTUV
window of the wizard will open.
Click 0GZV to continue.
%TGCVGCPGYRCUUYQTFCPFVJGPENKEM0GZV to continue.
13D-Link DIR-615 User Manual
5GEVKQP%QPſIWTCVKQP
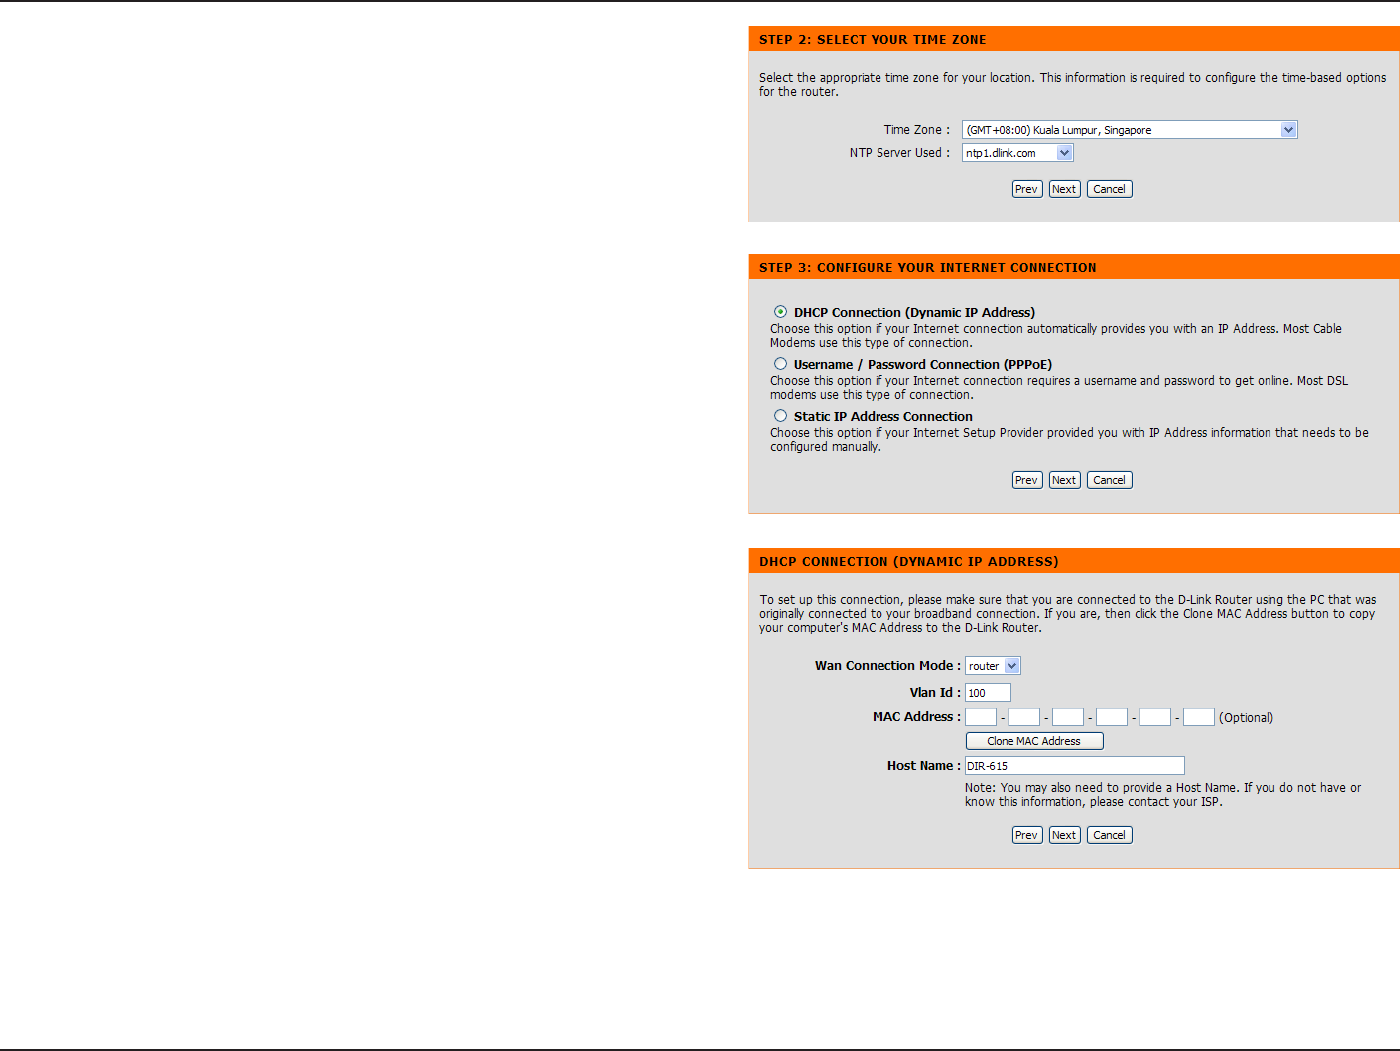
Select your time zone and prefered NTP Server from
VJGFTQRFQYPOGPWUCPFVJGPENKEM0GZV to continue.
Select the type of Internet connection you use and then
click 0GZV to continue.
If selecting &*%2%QPPGEVKQP&[PCOKE+2#FFTGUU
idntify VLAN in the 8.#0+&ſGNF;QW OC[PGGFVQ
enter the MAC address of the computer that was last
connected directly to your modem. If you are currently
WUKPIVJCVEQORWVGTENKEM%NQPG/#%#FFTGUU and
then 0GZV to continue.
The *QUV 0COG is optional but may be required by
some ISPs. The default host name is the device name
of the Router and may be changed.
14D-Link DIR-615 User Manual
5GEVKQP%QPſIWTCVKQP
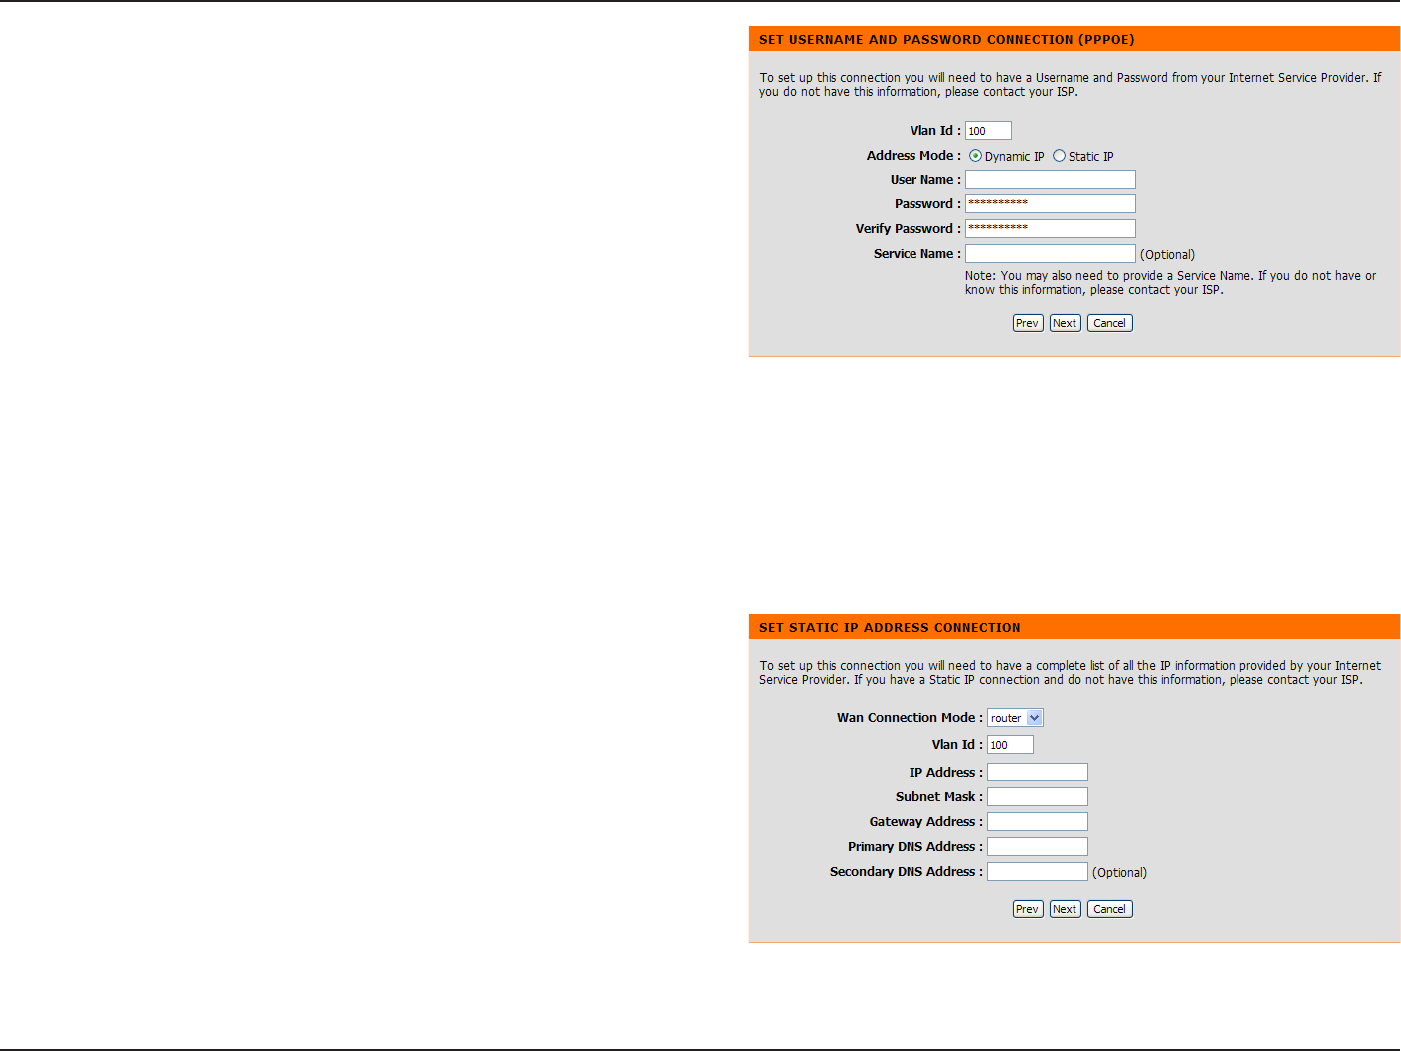
If selecting 7UGTPCOG 2CUUYQTF %QPPGEVKQP
222Q'GPVGT 8.#0 +& RTQXKFGF D[VJG+52 +H VJG
+52FQGUPŏVRTQXKFGCURGEKſGF+2CFFTGUUKPHQTOCVKQP
simply enter your PPPoE username and password.
Click the 5VCVKE +2 radio button if the ISP assigned
[QW VJG +2 CFFTGUU UWDPGV OCUM CPF UVCTVGPF
LAN IP address. Enter the required information in IP
7PPWODGTGF #FFTGUU +2 7PPWODGTGF 0GVOCUM
.#05VCTV+2 and .#0'PF+2.
Click 0GZV to continue.
Note: Make sure to remove your PPPoE software from
your computer. The software is no longer needed and
will not work through a router.
If selecting 5VCVKE+2#FFTGUU%QPPGEVKQPGPVGT[QWT
network settings provided by your ISP. Click 0GZV to
continue.
15D-Link DIR-615 User Manual
5GEVKQP%QPſIWTCVKQP
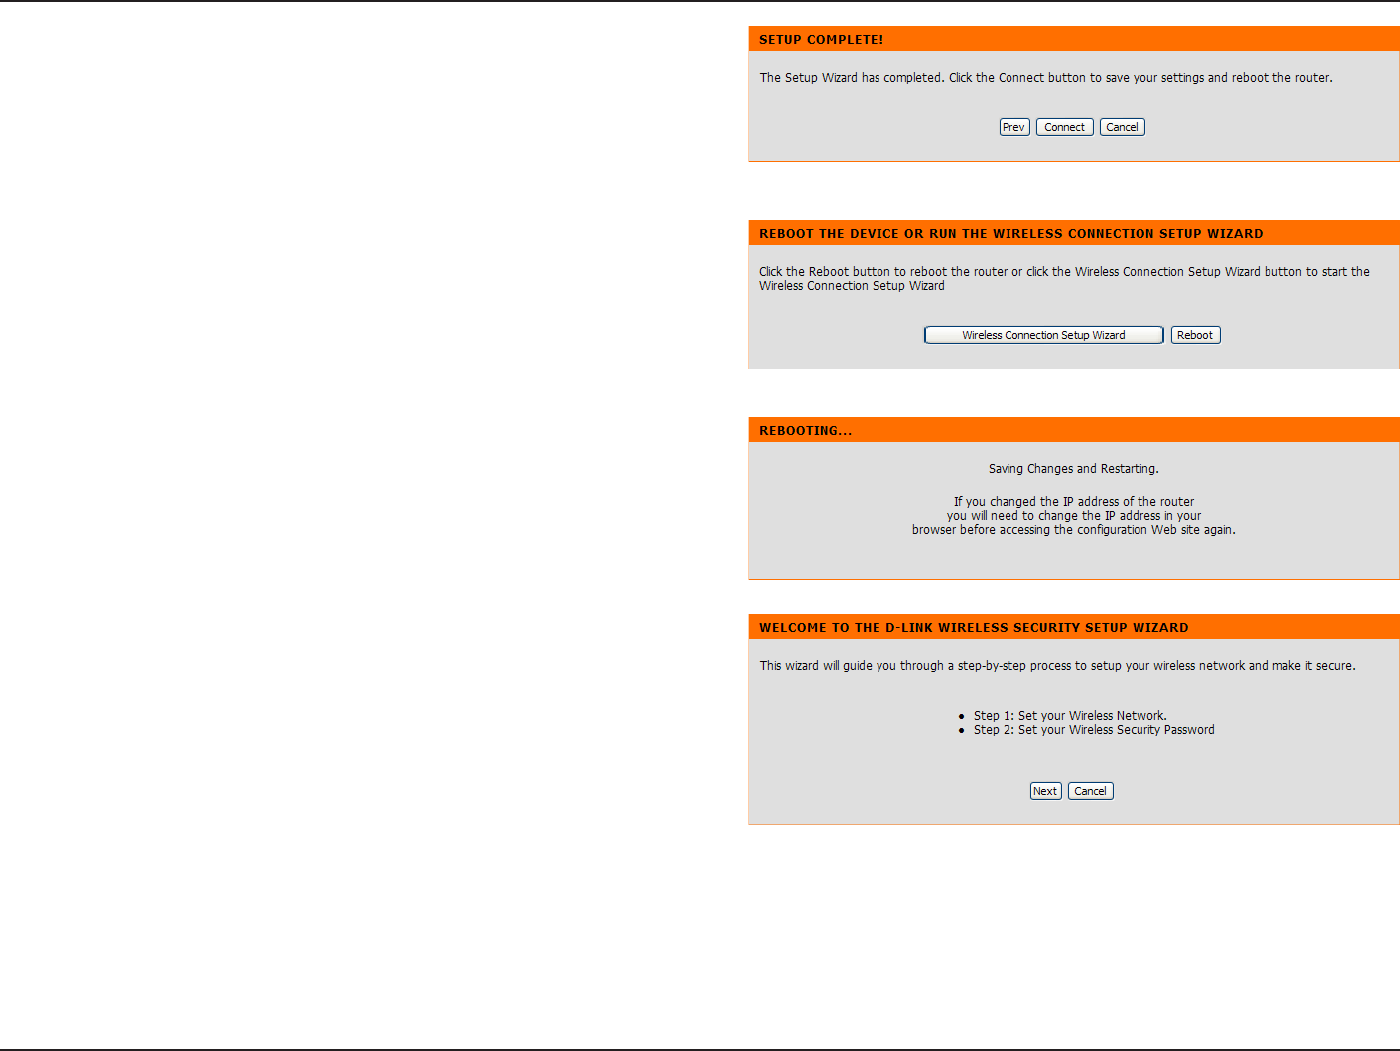
Click ConnectVQIQVQVJGPGZVRCIG
Click 9KTGNGUU%QPPGEVKQP5GVWR9K\CTF to open the
YK\CTFYKPFQYQHEQPſIWTKPIYKTGNGUUEQPPGEVKQP%NKEM
4GDQQV to directly restart the Router.
If clicking 4GDQQVthe Router will save the new settings
and reboot. Please allow 1-2 minutes for rebooting.
9JGPVJG TQWVGTJCU ſPKUJGFTGDQQVKPI VJGQRGPKPI
window will be displayed.
If clicking 9KTGNGUU %QPPGEVKQP 5GVWR 9K\CTF VJKU
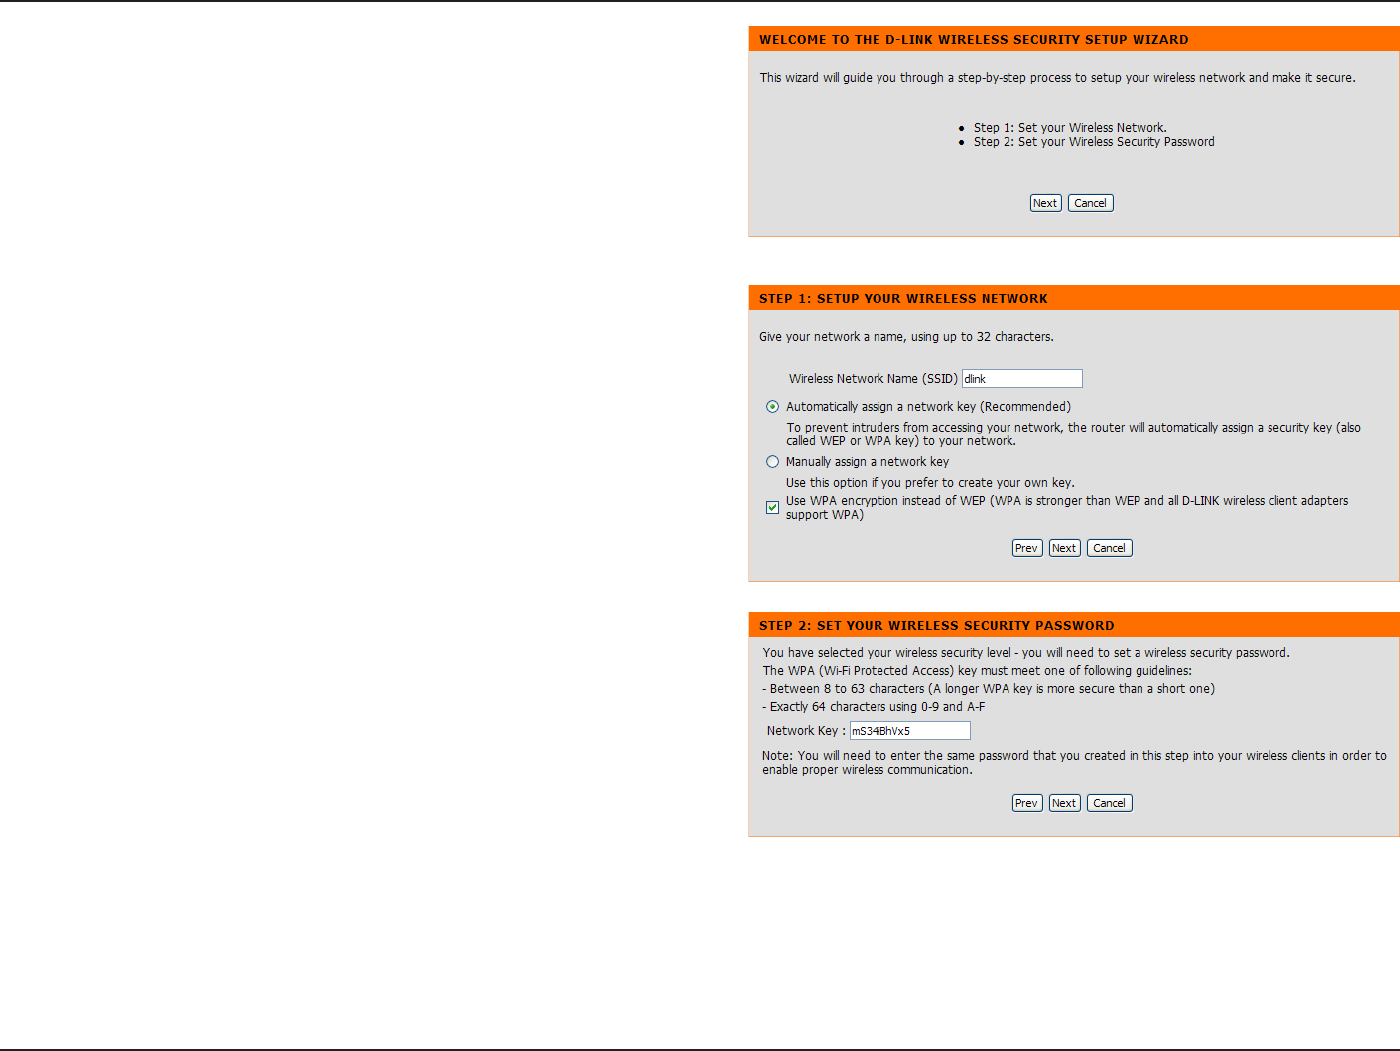
window will open. Click 0GZV to continue.
16D-Link DIR-615 User Manual
5GEVKQP%QPſIWTCVKQP
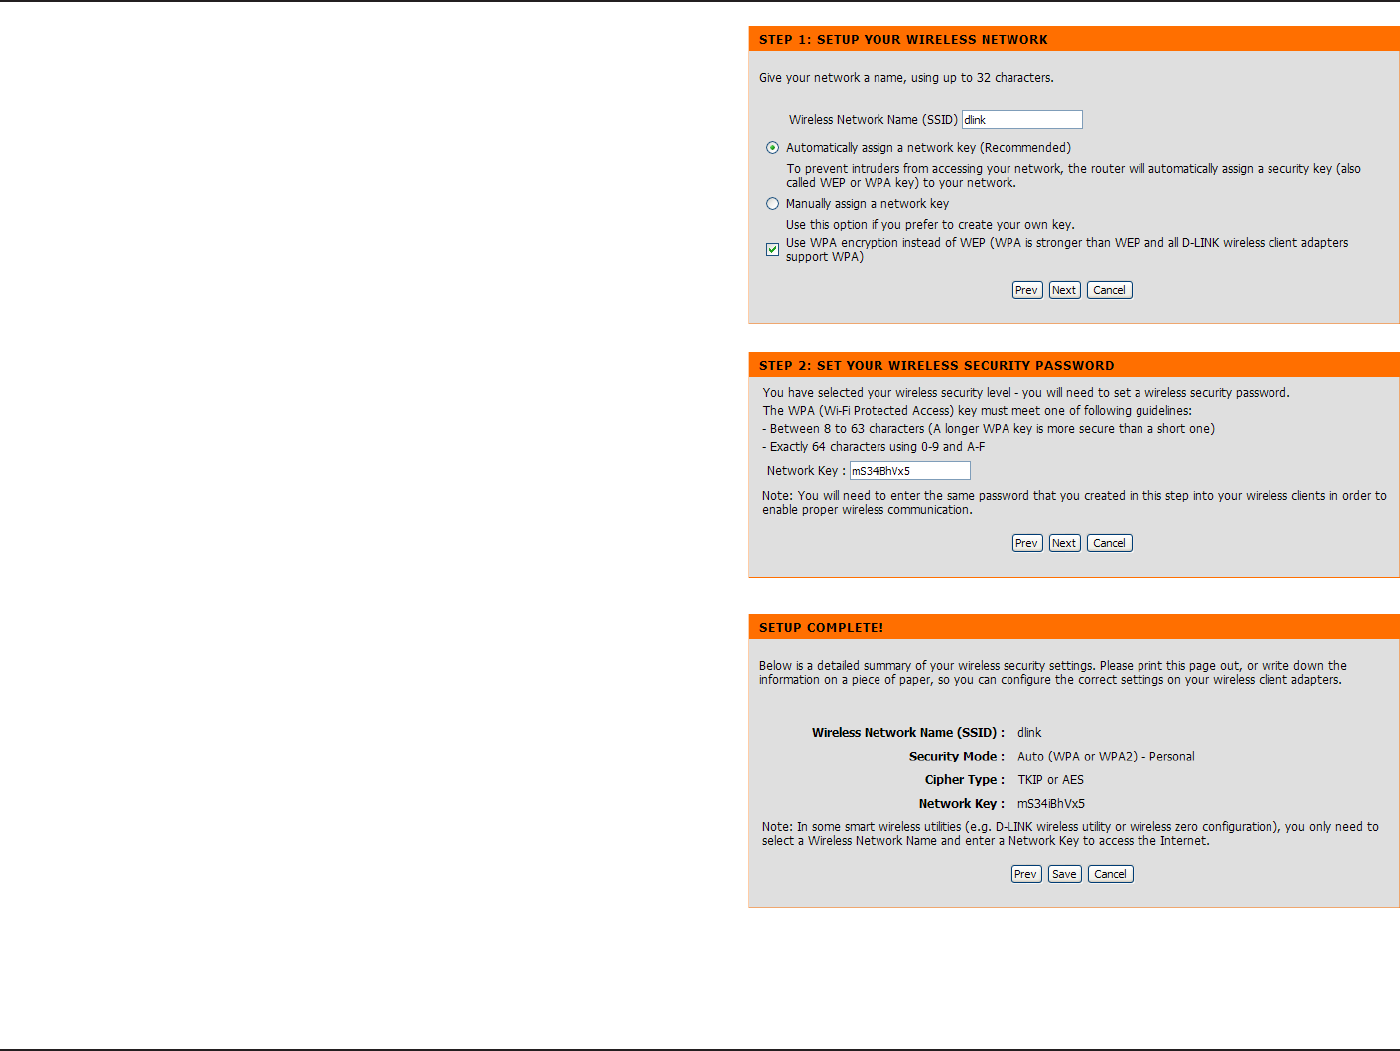
'PVGTC9KTGNGUU0GVYQTM0COGCNUQMPQYPCU55+&
KPVJGVGZVDQZ%NKEM#WVQOCVKECNN[CUUKIPCPGVYQTM
MG[4GEQOOGPFGF or /CPWCNN[CUUKPICPGVYQTM
MG[HQTVJGYKTGNGUUUGEWTKV[MG[CPFWUGVJGEJGEMDQZ
VQUGNGEVVJGFGUKTGFNGXGNQHYKTGNGUUUGEWTKV[9'2
WPA. and then click 0GZV to continue.
If selecting Manually assign a network key in the
RTGXKQWUYKPFQYVJKUYKPFQYYKNNQRGP'PVGTCYKTGNGUU
UGEWTKV[RCUUYQTFKPVJG0GVYQTM-G[DQZ%NKEM0GZV
to continue.
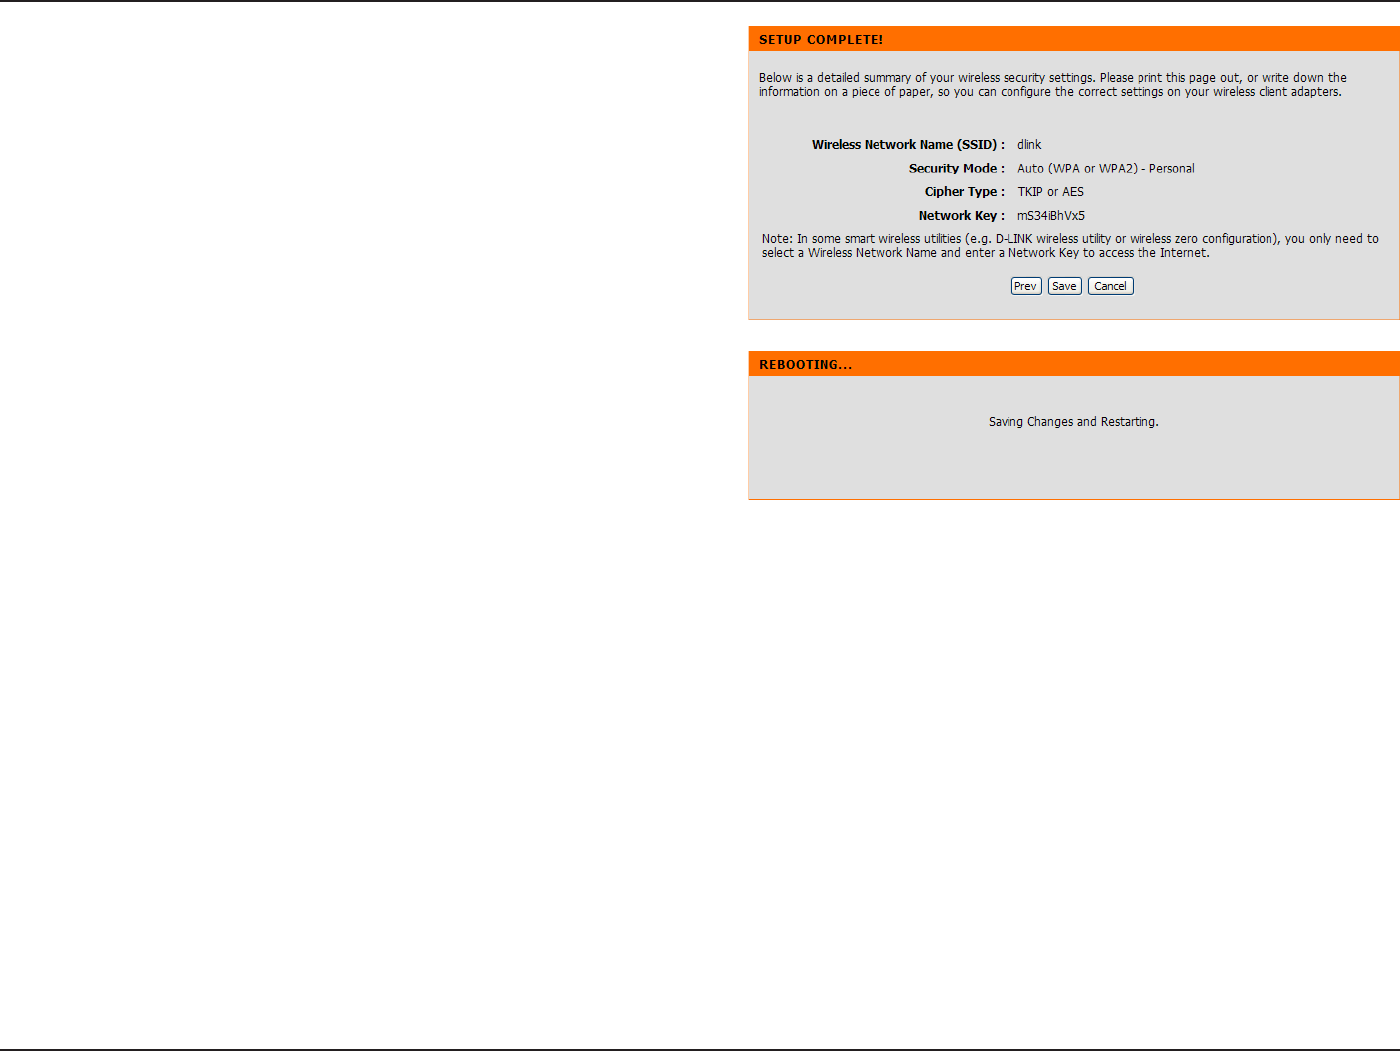
This window displays a summary of your wireless
security settings. Please print this out or record this
information in a safe place and then click 5CXG to
continue.
17D-Link DIR-615 User Manual
5GEVKQP%QPſIWTCVKQP
The Router will save the new settings and reboot.
Please allow 1-2 minutes for rebooting. When the router
JCU ſPKUJGF TGDQQVKPI VJG QRGPKPI 9KTGNGUU 5GVWR
window is displayed.
18D-Link DIR-615 User Manual
5GEVKQP%QPſIWTCVKQP
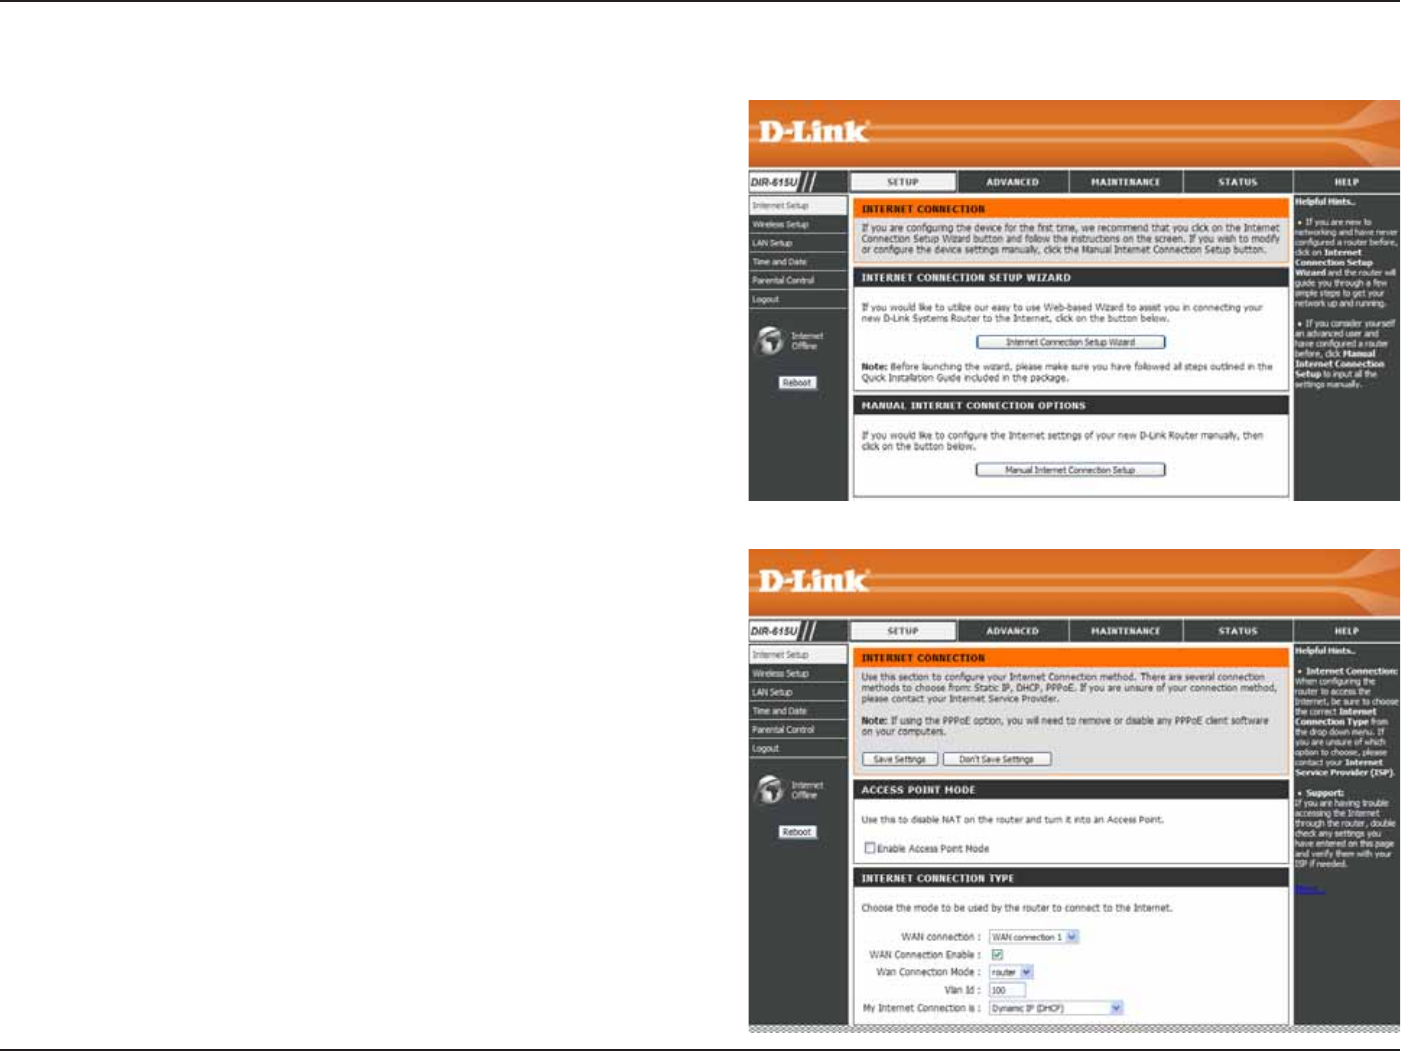
+PVGTPGV5GVWR
+H[QWYCPVVQEQPſIWTGVJG4QWVGTOCPWCNN[YKVJQWVWUKPIVJG
YK\CTFENKEMVJG/CPWCN+PVGTPGV%QPPGEVKQP5GVWR button.
6JKUYKPFQYYKNNFKURNC[HQT[QWEQPſIWTGVJG+PVGTPGVEQPPGEVKQP
manually.
Tick 'PCDNG #EEGUU 2QKPV /QFG if you want to change the
Router to an access point.
+P +PVGTPGV %QPPGEVKQP 6[RG UGEVKQP [QW OC[ EJQQUG WR VQ
4 WAN connections from the 9#0 %QPPGEVKQP drop-down
OGPWCPFEJQQUGQPGQHVJGOCUVJGWUKPIQPGD[VKEMKPI9#0
%QPPGEVKQP'PCDNG. You can also choose the WAN Connection
/QFGDGVYGGPTQWVGTCPFDTKFIGCPFGPVGTVJG8.#0+&5GNGEV
the Internet connection type from /[+PVGTPGV%QPPGEVKQPKU
FTQRFQYP NKUV CPF FKHHGTGPV EQPſIWTCVKQPU DCUGF QP XCTKQWU
connection types will display below.

19D-Link DIR-615 User Manual
5GEVKQP%QPſIWTCVKQP
Enter the IP address assigned by your ISP.
Enter the Subnet Mask assigned by your ISP.
Enter the Gateway assigned by your ISP.
The default MAC Address is set to the WAN’s physical
interface MAC address on the Broadband Router. It is not
recommended that you change the default MAC address
unless required by your ISP.
The default MAC address is set to the WAN’s physical
interface MAC address on the Broadband Router. You
can use the %NQPG/#%#FFTGUU button to copy the MAC
address of the Ethernet Card installed by your ISP and
replace the WAN MAC address with the MAC address of the
router. It is not recommended that you change the default
MAC address unless required by your ISP.
Enter the Primary DNS (Domain Name Server) server IP address assigned by your ISP.
Enter the Secondary DNS server IP address assigned by your ISP. This is optional.
/CZKOWO6TCPUOKUUKQP7PKV[QWOC[PGGFVQEJCPIGVJG/67HQTQRVKOCNRGTHQTOCPEGYKVJ[QWTURGEKſE+521492 is the
default MTU.
+2#FFTGUU
5WDPGV/CUM
+52)CVGYC[
#FFTGUU
/#%#FFTGUU
%NQPG/#%
#FFTGUU
2TKOCT[&05
#FFTGUU
5GEQPFCT[&05
#FFTGUU
/67
+PVGTPGV5GVWR
5VCVKECUUKIPGFD[+52
5GNGEV5VCVKE+2#FFTGUUKHCNN9#0+2KPHQTOCVKQPKURTQXKFGFVQ[QWD[[QWT+52;QWYKNNPGGFVQGPVGTKPVJG+2CFFTGUUUWDPGVOCUM
ICVGYC[CFFTGUUCPF&05CFFTGUUGURTQXKFGFVQ[QWD[[QWT+52'CEJ+2CFFTGUUGPVGTGFKPVJGſGNFUOWUVDGKPVJGCRRTQRTKCVG+2
HQTOYJKEJCTGHQWTQEVGVUUGRCTCVGFD[CFQVZZZZ6JG4QWVGTYKNNPQVCEEGRVVJG+2CFFTGUUKHKVKUPQVKPVJKUHQTOCV
20D-Link DIR-615 User Manual
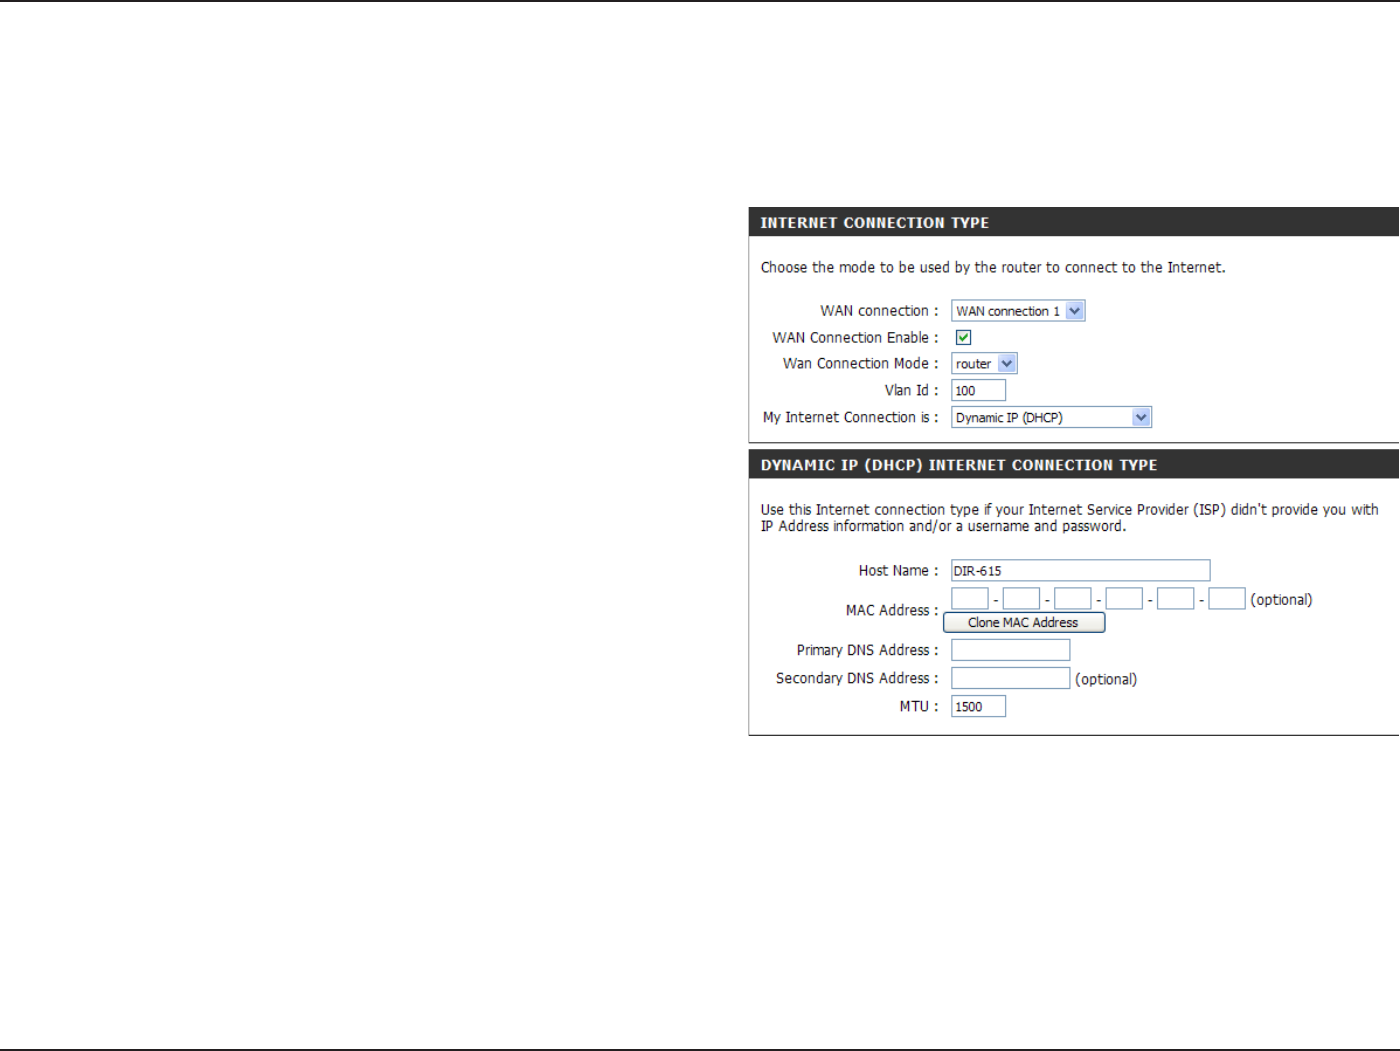
5GEVKQP%QPſIWTCVKQP
The Host Name is optional but may be required by some
ISPs. The default host name is the device name of the
Router and may be changed.
The default MAC Address is set to the WAN’s physical
interface MAC address on the Broadband Router. It is not
recommended that you change the default MAC address
unless required by your ISP.
The default MAC address is set to the WAN’s physical
interface MAC address on the Broadband Router. Click
the %NQPG/#%#FFTGUU button to copy the MAC address
of the Ethernet Card installed by your ISP and replace the
WAN MAC address with the MAC address of the router.
It is not recommended that you change the default MAC
address unless required by your ISP.
Enter the Primary and Secondary DNS Server Addresses.
/CZKOWO6TCPUOKUUKQP7PKV;QWOC[PGGFVQEJCPIG
VJG/67HQTQRVKOCNRGTHQTOCPEGYKVJ[QWTURGEKſE+52
+PVGTPGV5GVWR
&[PCOKE
Choose Dynamic IP Address to obtain IP Address information automatically from your ISP. Select this option if your ISP does not give
you any IP numbers to use. This option is commonly used for Cable modem services.
*QUV0COG
/#%#FFTGUU
%NQPG/#%
#FFTGUU
&05#FFTGUU
/67
21D-Link DIR-615 User Manual
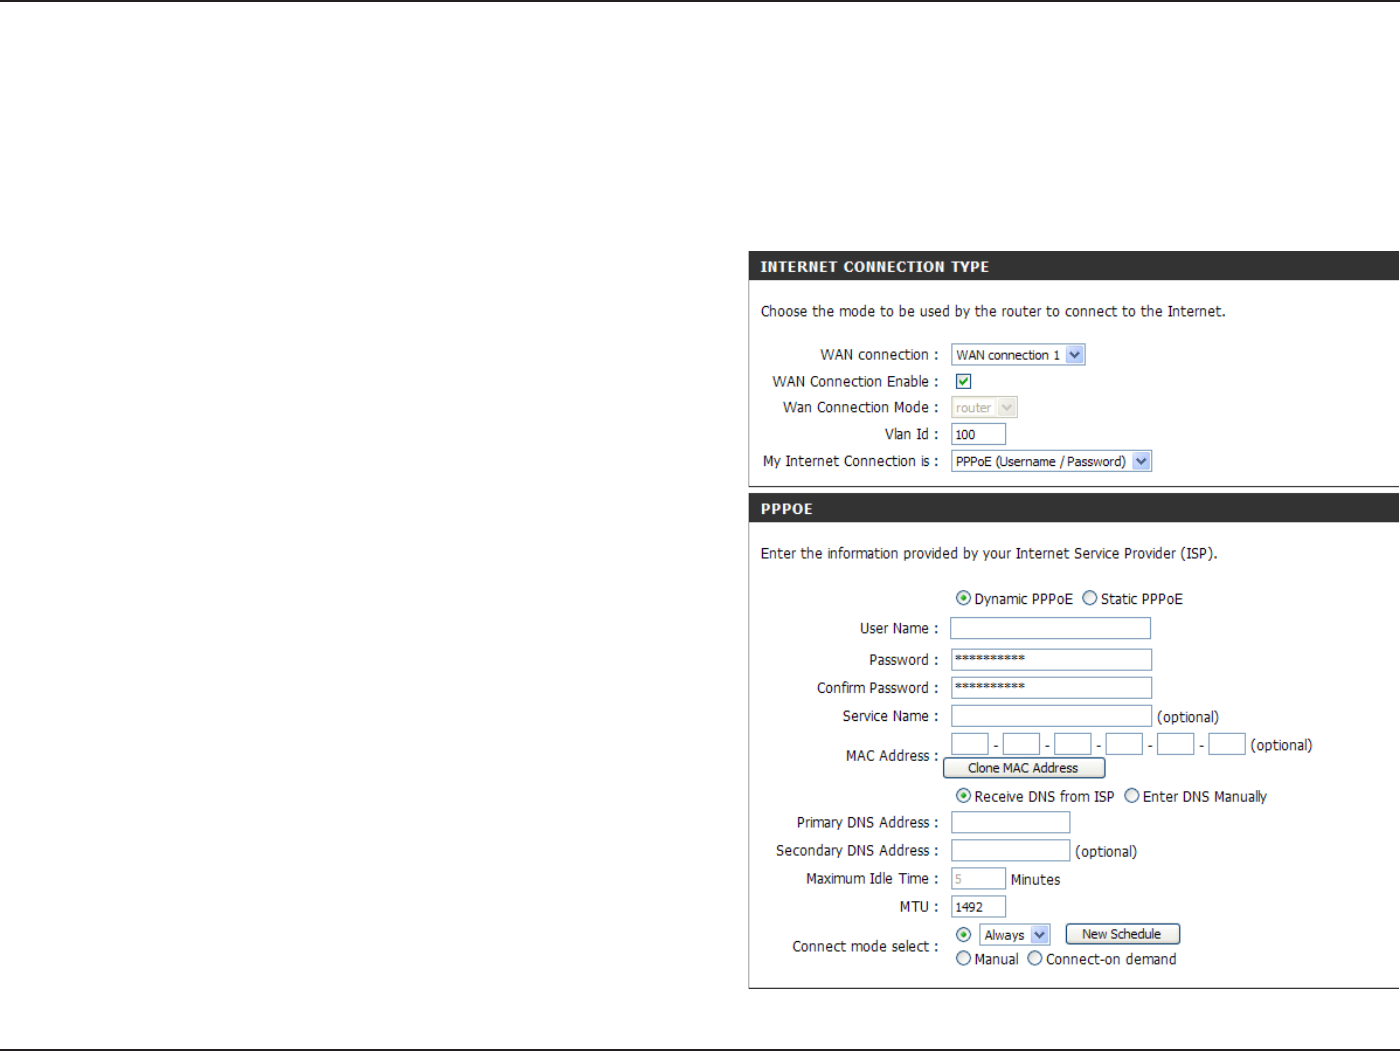
5GEVKQP%QPſIWTCVKQP
Select &[PCOKE (most common) or 5VCVKE. Select 5VCVKE
KH [QWT +52 CUUKIPGF [QW VJG +2 CFFTGUU UWDPGV OCUM
ICVGYC[CPF&05UGTXGTCFFTGUUGU
Enter your PPPoE user name.
Enter your PPPoE password.
Retype the new password.
Enter the ISP Service Name (optional).
Enter the IP address (Static PPPoE only).
Enter the IP netmask (Static PPPoE only).
Enter Start and End LAN IP address.
Click 4GEKGXG&05HTQO+52 to get the DNS automatically.
Click 'PVGT&05/CPWCNN[ to enter the DNS information
below.
Enter the Primary and Secondary DNS Server Addresses.
222Q'
7UGT0COG
2CUUYQTF
%QPſTO
2CUUYQTF
5GTXKEG0COG
+27PPWODGTGF
#FFTGUU
+27PPWODGTGF
0GVOCUM
.#0+2
&05
&05
#FFTGUUGU
+PVGTPGV5GVWR
222Q'
Choose PPPoE (Point to Point Protocol over Ethernet) if your ISP uses a PPPoE connection. Your ISP will provide
you with a username and password. This option is typically used for DSL services. Make sure to remove your PPPoE
software from your computer. The software is no longer needed and will not work through a router.

22D-Link DIR-615 User Manual
5GEVKQP%QPſIWTCVKQP
/CZKOWO+FNG
6KOG
/67
Connection
/QFG5GNGEV
'PVGTCOCZKOWOKFNGVKOGFWTKPIYJKEJVJG+PVGTPGVEQPPGEVKQPKUOCKPVCKPGFFWTKPIKPCEVKXKV[6QFKUCDNGVJKUHGCVWTG
enable Auto-reconnect.
/CZKOWO6TCPUOKUUKQP7PKV;QWOC[PGGFVQEJCPIGVJG/67HQTQRVKOCNRGTHQTOCPEGYKVJ[QWTURGEKſE+521492 is
the default MTU.
Select either #NYC[UQP/CPWCNQT%QPPGEVQP FGOCPF.
23D-Link DIR-615 User Manual
5GEVKQP%QPſIWTCVKQP
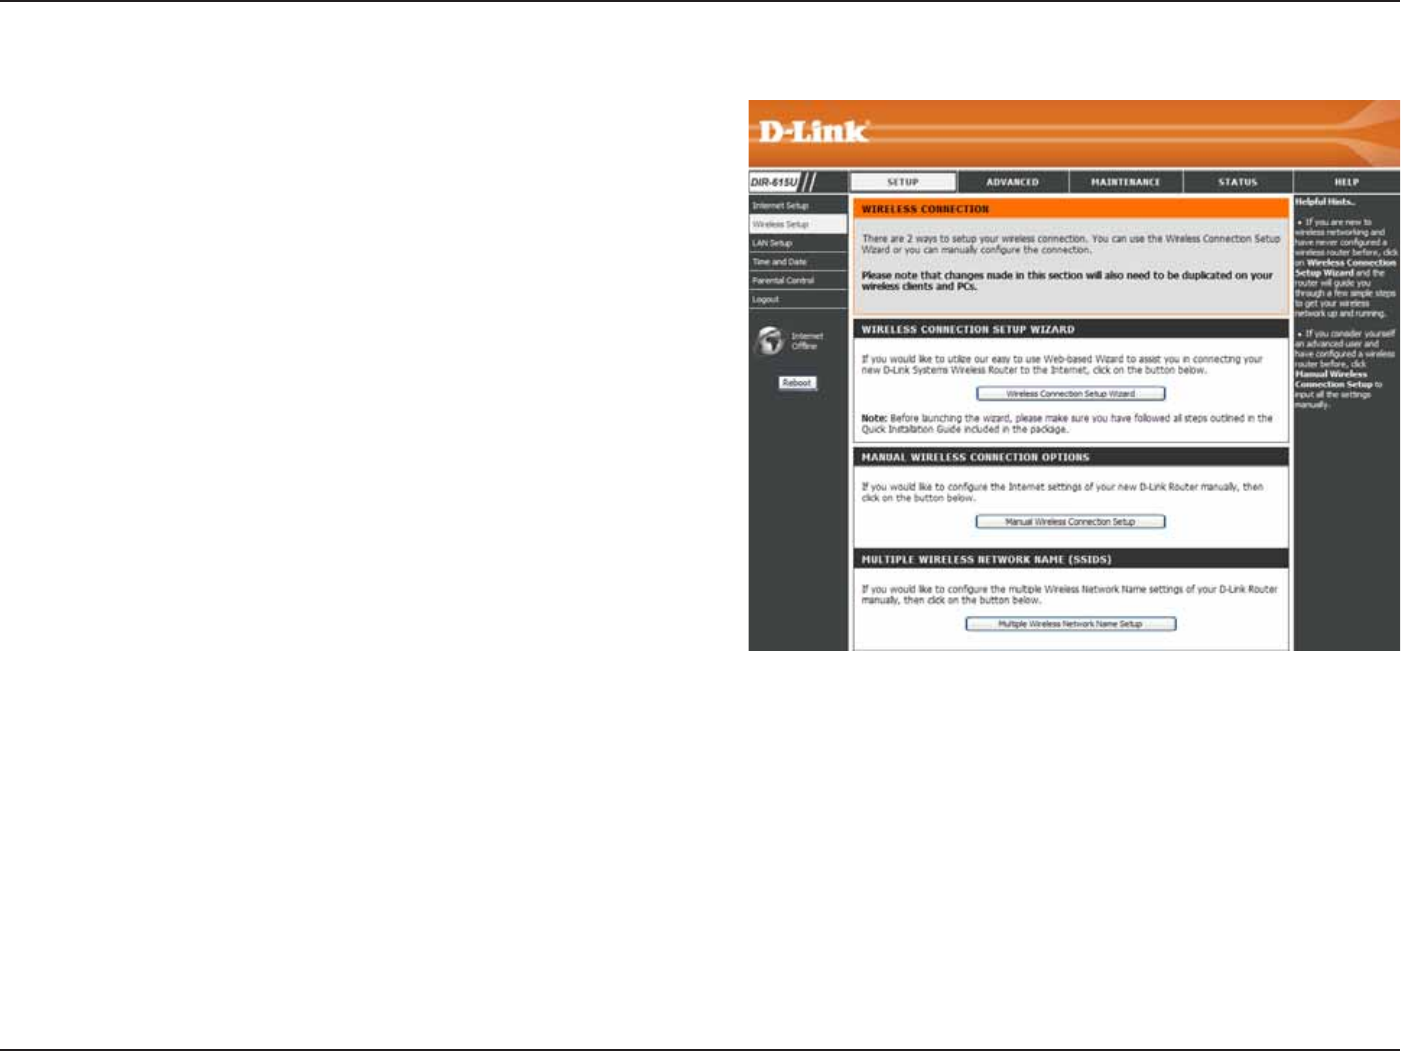
9KTGNGUU5GVWR
9KTGNGUUUGVVKPIUHQTVJGTQWVGTOC[DGEQPſIWTGF
OCPWCNN[QTD[WUKPICYK\CTF6QWUGVJGYK\CTF
click the 9KTGNGUU%QPPGEVKQP5GVWR9K\CTF button
and then follow the steps that are described below.
6QEQPſIWTGVJGYKTGNGUUUGVVKPIUOCPWCNN[ENKEMVJG
/CPWCN9KTGNGUU%QPPGEVKQP 5GVWRbutton. The
parameters for this window are described later in this
section. The Wireless Security section that directly
HQNNQYUVJKU%QPſIWTCVKQPUGEVKQPRTQXKFGUCFFKVKQPCN
GZRNCPCVKQP HQT JQY VQ EQPſIWTG VJG 9'2 92#
92# CPF 92#92# YKTGNGUU UGEWTKV[ OQFG
options. If you want to have more wireless network
PCOG CNUQ MPQYP CU 55+& ENKEM VJG /WNVKRNG
9KTGNGUUPGVYQTM0COG5GVWR button.
24D-Link DIR-615 User Manual
5GEVKQP%QPſIWTCVKQP
Click 9KTGNGUU %QPPGEVKQP 5GVWR 9K\CTF to start
wireless setup wizard. Click 0GZV to continue.
'PVGTC9KTGNGUU0GVYQTM0COGCNUQMPQYPCU55+&
KPVJGVGZVDQZ%NKEM#WVQOCVKECNN[CUUKIPCPGVYQTM
MG[4GEQOOGPFGF or /CPWCNN[CUUKPICPGVYQTM
MG[HQTVJGYKTGNGUUUGEWTKV[MG[CPFWUGVJGEJGEMDQZ
VQUGNGEVVJGFGUKTGFNGXGNQHYKTGNGUUUGEWTKV[9'2
WPA. and then click 0GZV to continue.
If selecting Manually assign a network key in the
RTGXKQWUYKPFQYVJKUYKPFQYYKNNQRGP'PVGTCYKTGNGUU
UGEWTKV[RCUUYQTFKPVJG0GVYQTM-G[DQZ%NKEM0GZV
to continue.
25D-Link DIR-615 User Manual
5GEVKQP%QPſIWTCVKQP
This window displays a summary of your wireless
security settings. Please print this out or record this
information in a safe place and then click 5CXG to
continue.
The Router will save the new settings and reboot.
Please allow 1-2 minutes for rebooting. When the router
JCU ſPKUJGF TGDQQVKPI VJG QRGPKPI 9KTGNGUU 5GVWR
window is displayed.

26D-Link DIR-615 User Manual
5GEVKQP%QPſIWTCVKQP
6QKORNGOGPV9K(KRTQVGEVKQPQT9%0VKEMVJG'PCDNG
EJGEMDQZENKEMGKVJGT)GPGTCVG0GY2+0or 4GUGV2+0VQ
&GHCWNVCPFVJGPEQPſIWTGVJG9K(KUGVVKPIUDGNQY2NGCUG
see the Setting Up Wi-Fi Protection (WCN 2.0 in Windows
8KUVCUGEVKQPNCVGTKPVJKUOCPWCNHQTFGVCKNGFEQPſIWTCVKQP
information.
%JGEMVJGDQZVQGPCDNGVJGYKTGNGUUHWPEVKQP+H[QWFQ
PQVYCPVVQWUGYKTGNGUUWPEJGEMVJGDQZVQFKUCDNGCNNVJG
wireless functions.
Indicates the channel setting for the DIR-615. By default
the channel is set to 6. The Channel can be changed to
ſVVJGEJCPPGNUGVVKPIHQTCPGZKUVKPIYKTGNGUUPGVYQTMQT
to customize the wireless network. The #WVQ %JCPPGN
5GNGEVKQP setting can be selected to allow the DIR-615 to
choose the channel with the least amount of interference.
Use the drop-down menu to select the appropriate
Transmission Rate in Mbits per second. Many users will
YCPVVQWUGVJGFGHCWNVUGVVKPIBest (automatic).
5GTXKEG5GV+FGPVKſGT55+&KUVJGPCOGQH[QWTYKTGNGUU
network. Once created and enabled a name in Multiple
9KTGNGUU0GVYQTM0COG55+&UYKPFQY[QWOC[UGNGEVHTQOVJGFTQRFQYPOGPW
'PCDNG9K(K/WNVKOGFKCVQGPLQ[DCUKESWCNKV[QHUGTXKEGHGCVWTGU9//RTKQTKVK\GUVTCHſECEEQTFKPIVQHQWTCEEGUUECVGIQTKGU
XQKEGXKFGQDGUVGHHQTVCPFDCEMITQWPF
Check this option if you would not like the SSID of your wireless network to be broadcasted by the DIR-615. If this option is
EJGEMGFVJG55+&QHVJG&+4YKNNPQVDGUGGPD[5KVG5WTXG[WVKNKVKGUUQ[QWTYKTGNGUUENKGPVUYKNNJCXGVQMPQYVJG55+&
of your DIR-615 in order to connect to it.
9K(K
2TQVGEVGF
5GVWR
'PCDNG9KTGNGUU
%JCPPGN
9KTGNGUU
0GVYQTM0COG
6TCPUOKUUKQP
4CVG
9//'PCDNG
'PCDNG
'PCDNG*KFFGP
9KTGNGUU
27D-Link DIR-615 User Manual
5GEVKQP%QPſIWTCVKQP
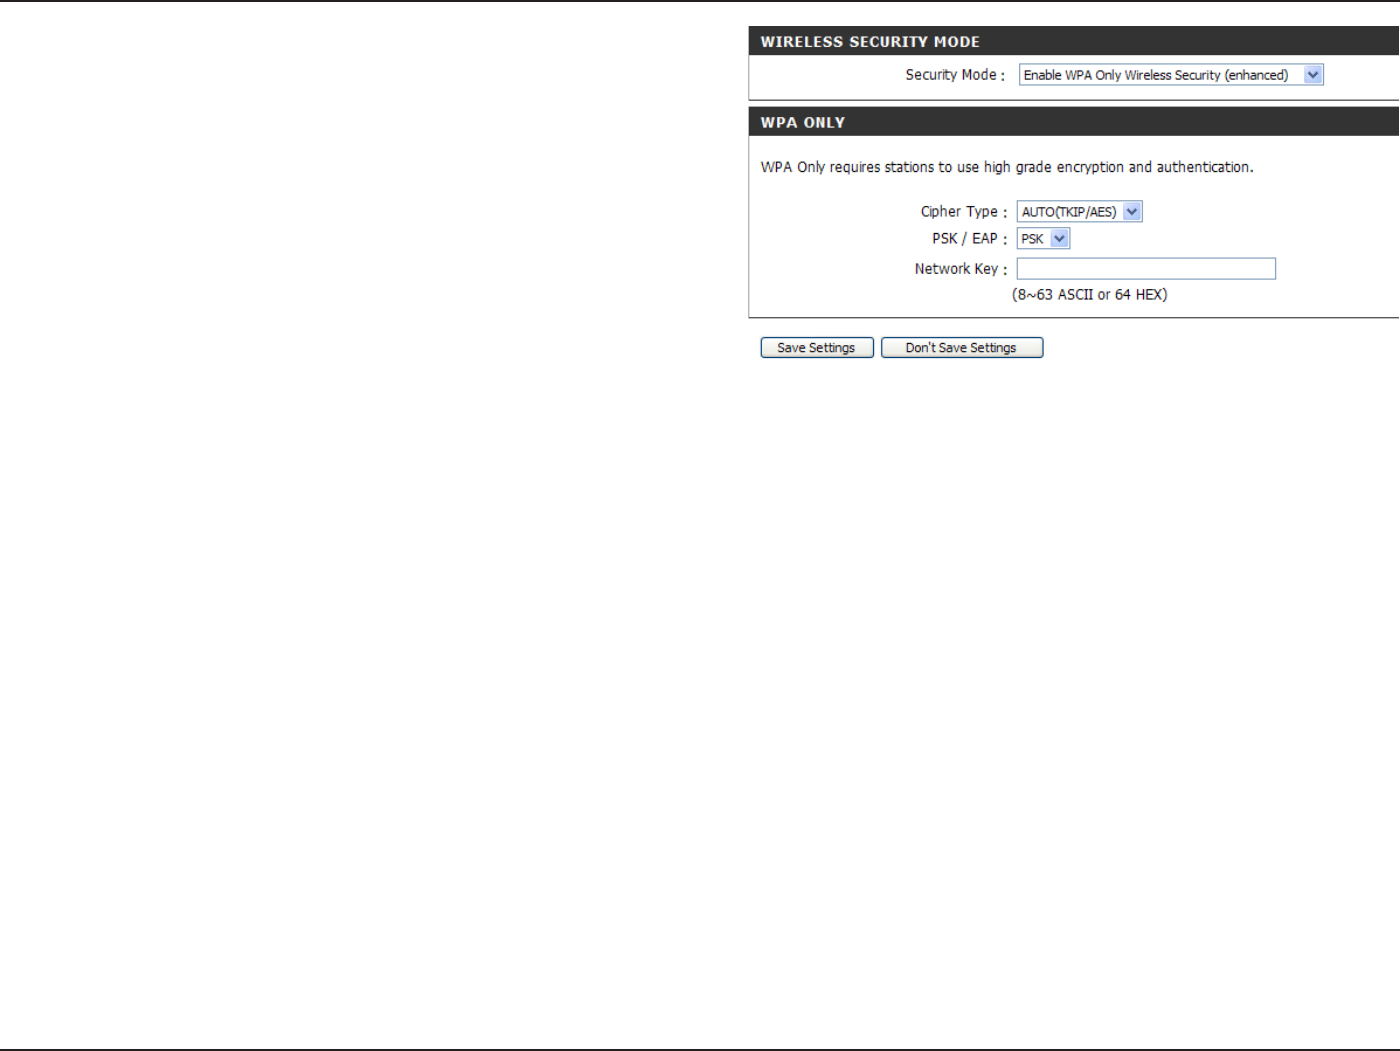
1. To enable Enable WPA/WPA2 Wireless Security
(enhanced).
0GZV VQ %KRJGT 6[RG UGNGEV TKIPAESor
AUTO(TKIP/AES).
3.0GZVVQ25-'#2UGNGEVPSK.
4.0GZVVQ0GVYQTM-G[GPVGTCRCUURJTCUG6JG
key is an alpha-numeric password between 8 and
63 characters long. The password can include
symbols (!?*&_) and spaces. Make sure you enter
VJKU MG[ GZCEVN[ VJG UCOG QP CNN QVJGT YKTGNGUU
clients.
5. Click 5CXG5GVVKPIU to save your settings. If you
CTGEQPſIWTKPIVJGTQWVGTYKVJCYKTGNGUUCFCRVGT
[QWYKNNNQUGEQPPGEVKXKV[WPVKN[QWGPCDNG92#
92# QT 92#92# YJKEJGXGT QH VJG VJTGG
options you have selected above) on your adapter
and enter the same network key as you did on the
router.
28D-Link DIR-615 User Manual
5GEVKQP%QPſIWTCVKQP
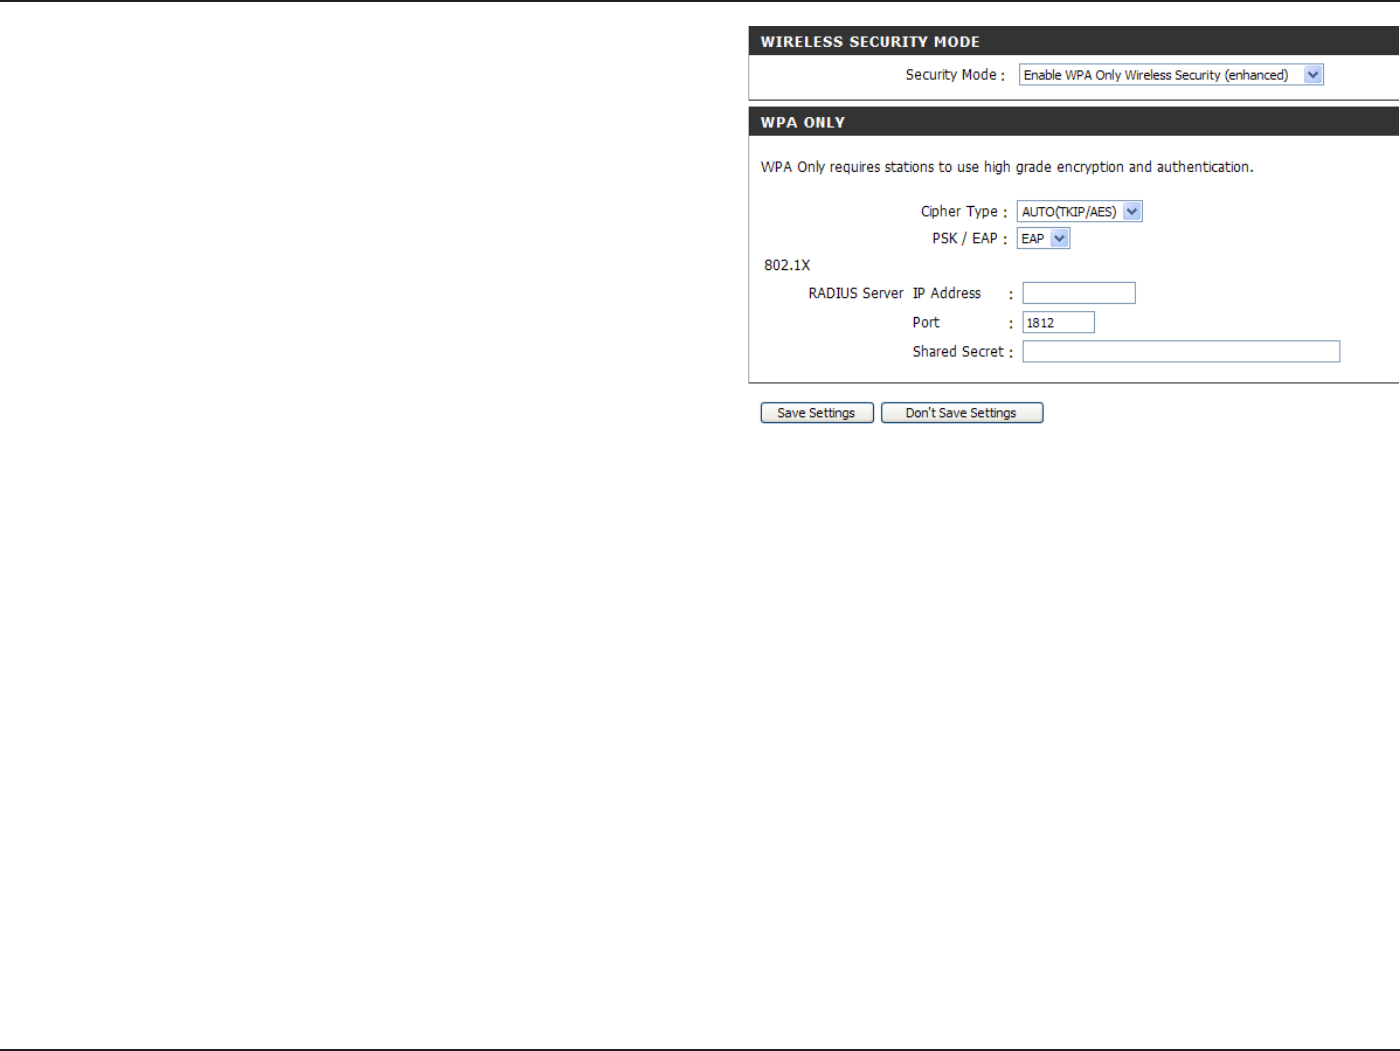
1. To enable Enable WPA/WPA2 Wireless Security
(enhanced).
0GZV VQ %KRJGT 6[RG UGNGEV TKIPAESor
AUTO(TKIP/AES).
3.0GZVVQ25-'#2UGNGEVEAP.
4.0GZVVQ4#&+755GTXGT+2#FFTGUU enter the IP
address of your RADIUS server.
5.0GZVVQ2QTVGPVGTVJGRQTV[QWCTGWUKPIYKVJ[QWT
RADIUS server. 1812 is the default port.
6.0GZVVQ5JCTGF5GETGVGPVGTVJGUGEWTKV[MG[
7. Click 5CXG5GVVKPIU to save your settings.
29D-Link DIR-615 User Manual
5GEVKQP%QPſIWTCVKQP
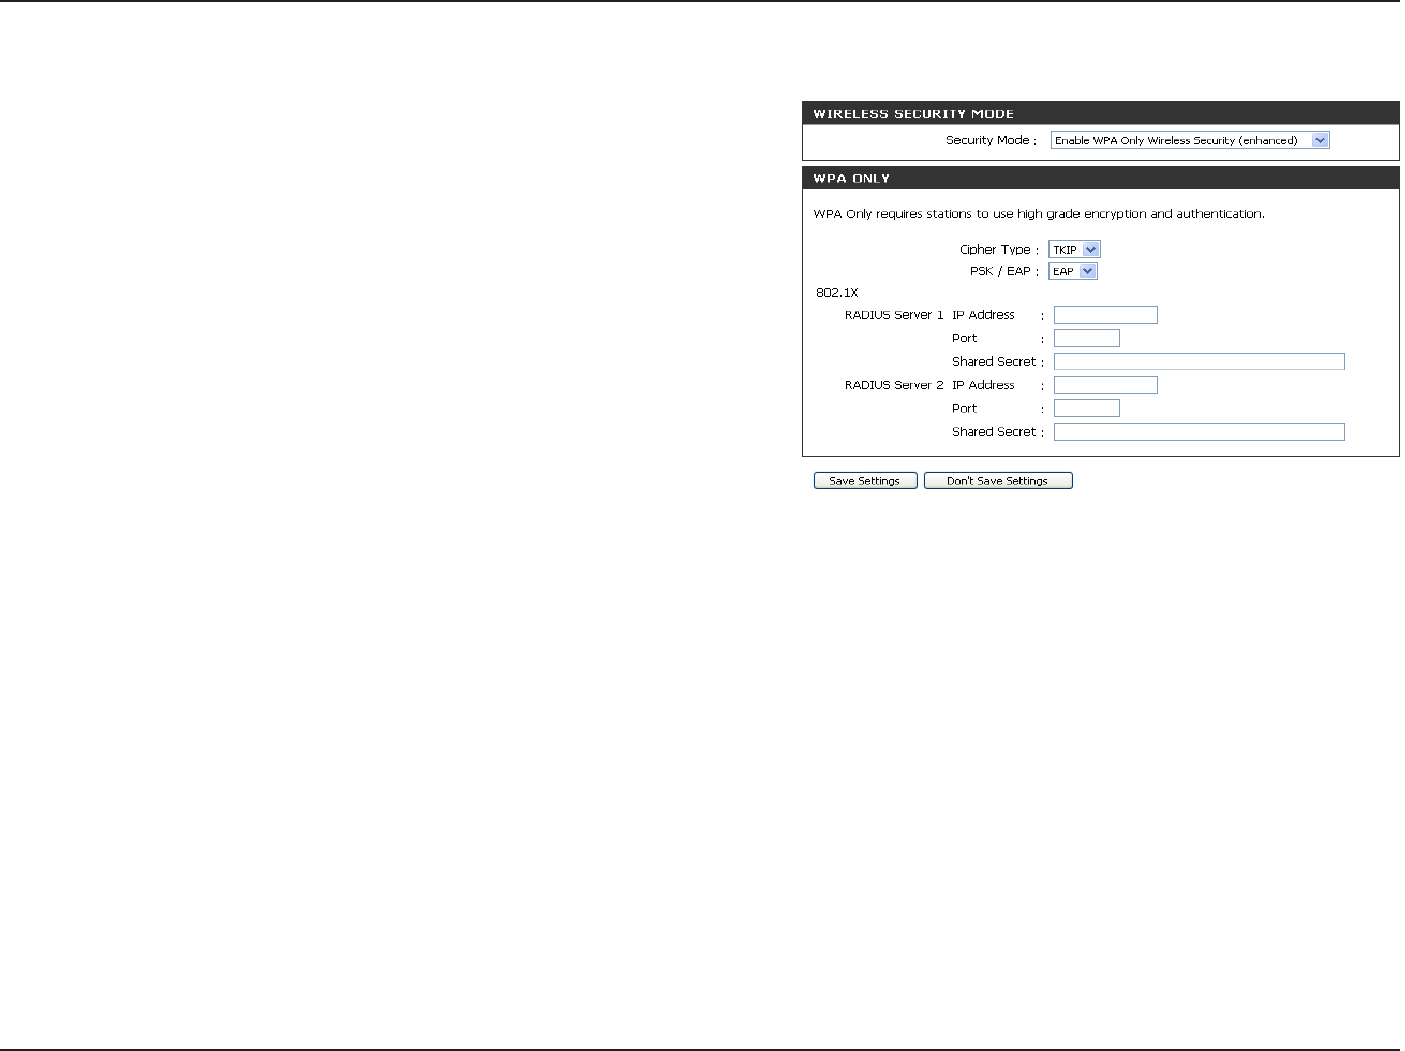
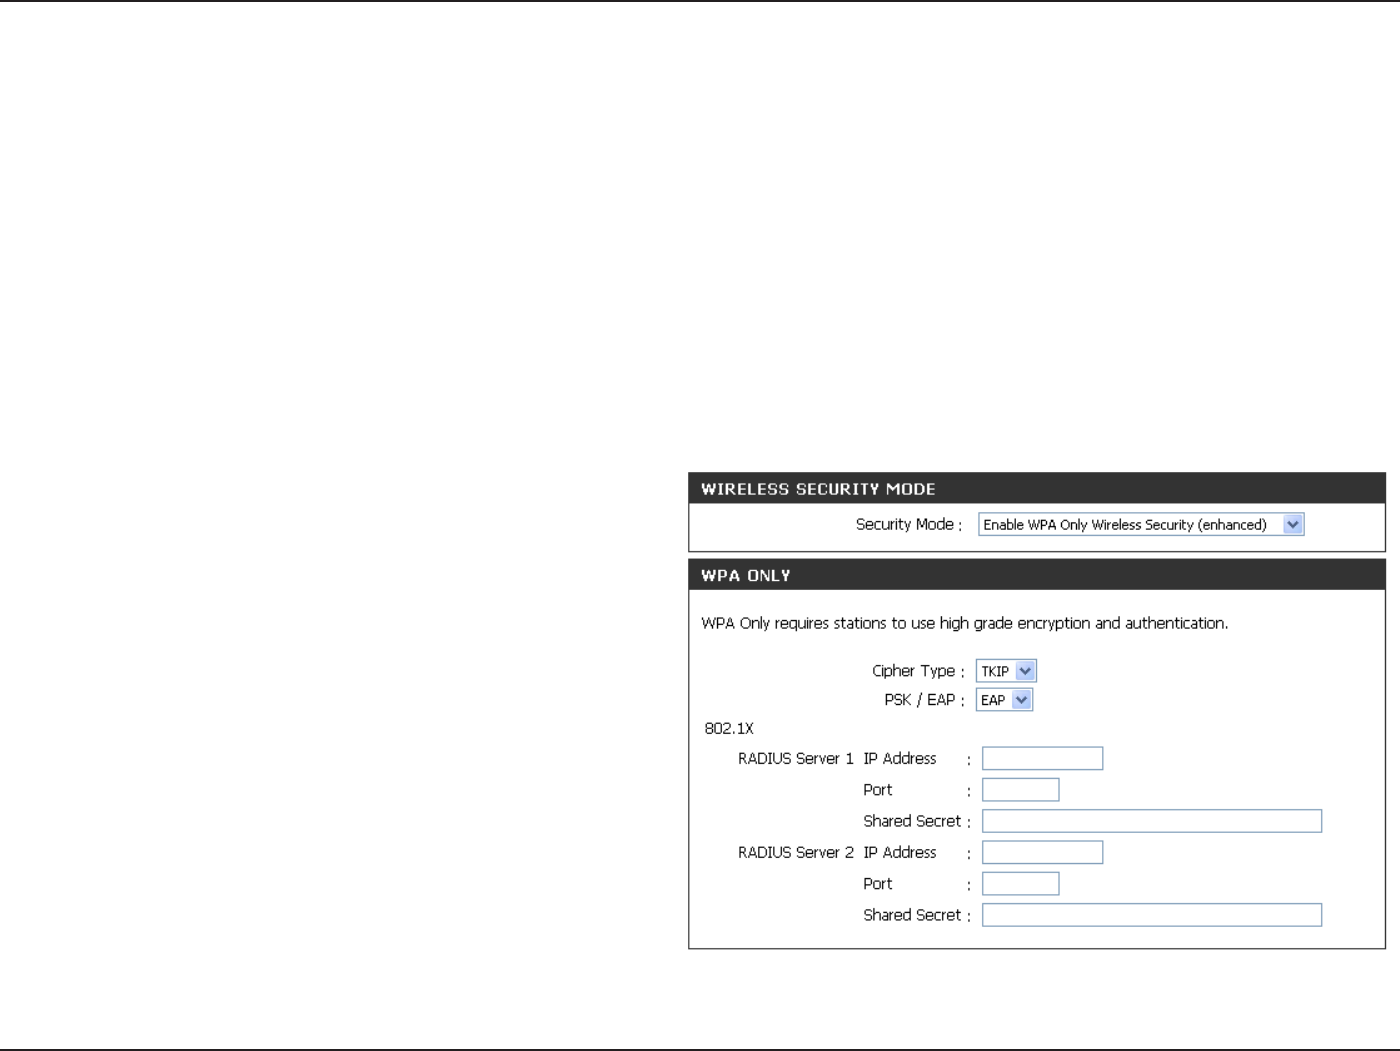
1.6Q GPCDNG 92# 92# QT 92#92# HQT
C 4#&+75 UGTXGT PGZV VQ 5GEWTKV[ /QFG
select Enable WPA Only Wireless Security
(enhanced), Enable WPA2 Only Wireless Security
(enhanced), or Enable WPA/WPA2 Wireless
Security (enhanced).
0GZV VQ %KRJGT 6[RG UGNGEV TKIP AESor
Auto.
3.0GZVVQ25-'#2UGNGEVEAP.
4.0GZVVQ4#&+755GTXGT enter the +2#FFTGUU
of your RADIUS server.
5.0GZVVQ2QTVGPVGTVJGRQTV[QWCTGWUKPIYKVJ[QWT
RADIUS server. 1812 is the default port.
6.0GZVVQ5JCTGF5GETGVGPVGTVJGUGEWTKV[MG[
7.+H[QWJCXGCUGEQPFCT[4#&+75UGTXGTGPVGTKVU
+2CFFTGUURQTVCPFUGETGVMG[
8. Click 5CXG5GVVKPIU to save your settings.
30D-Link DIR-615 User Manual
5GEVKQP%QPſIWTCVKQP
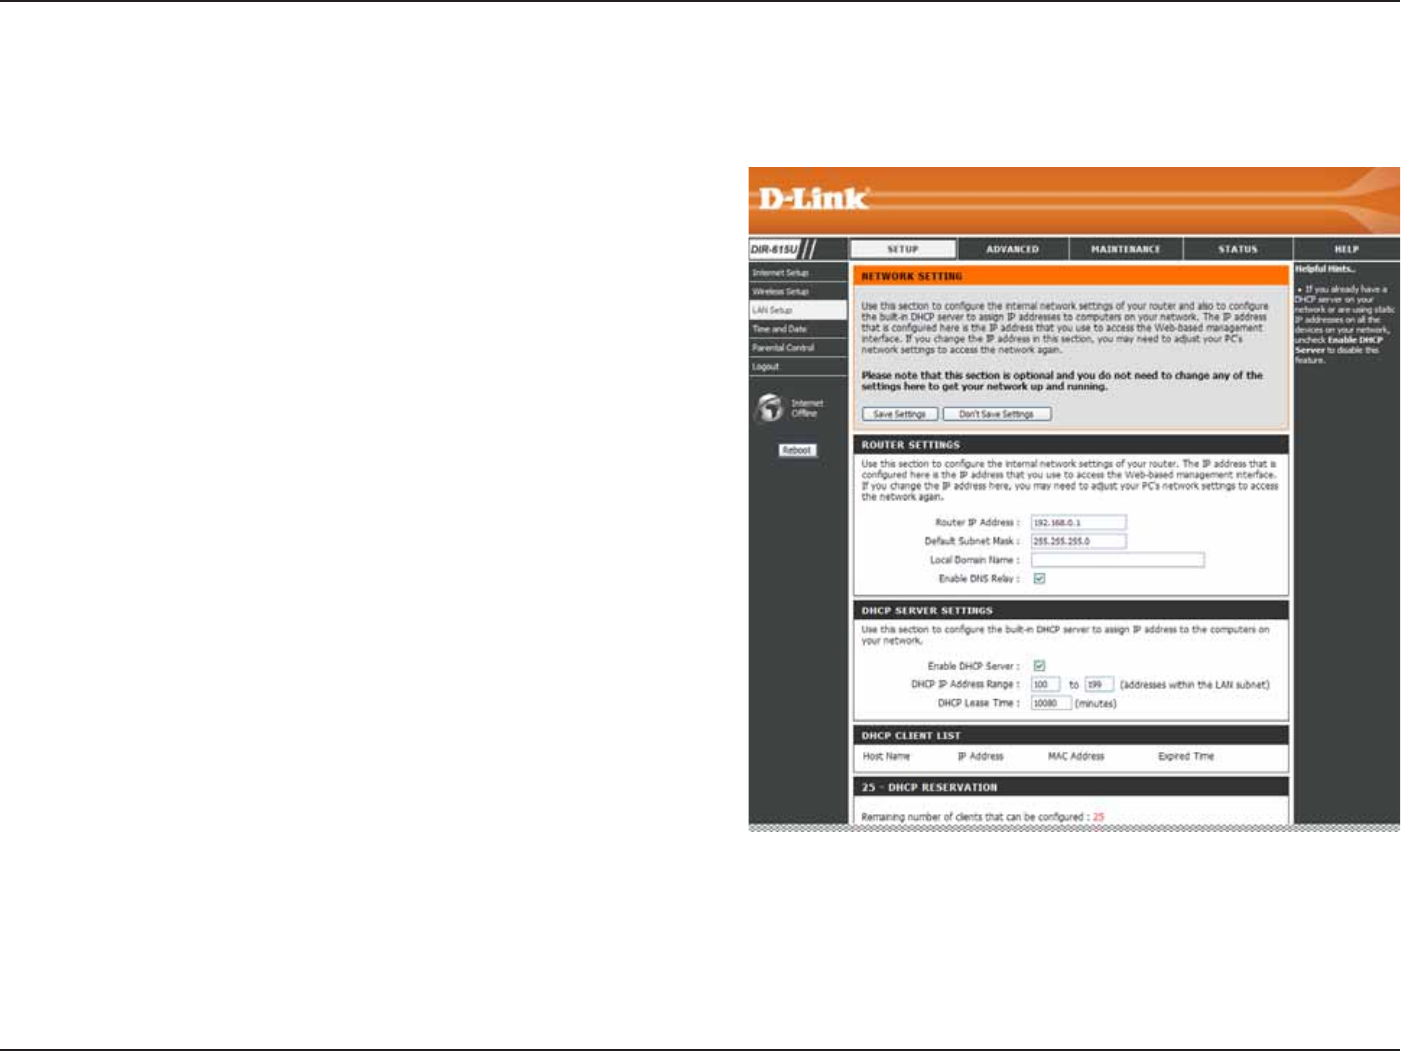
6JKUUGEVKQPYKNNCNNQY[QWVQEJCPIGVJGNQECNPGVYQTMUGVVKPIUQHVJGTQWVGTCPFVQEQPſIWTGVJG&*%2UGVVKPIU
.#05GVWR
Enter the IP address of the router. The default
IP address is 192.168.0.1.
+H [QW EJCPIG VJG +2 CFFTGUU QPEG [QW ENKEM
#RRN[[QWYKNNPGGFVQGPVGTVJGPGY+2CFFTGUU
KP[QWTDTQYUGTVQIGVDCEMKPVQVJGEQPſIWTCVKQP
utility.
Enter the Subnet Mask. The default subnet mask
is 255.255.255.0.
Enter the Domain name (Optional).
%JGEM VJG DQZ VQ VTCPUHGT VJG &05 UGTXGT
information from your ISP to your computers. If
WPEJGEMGF[QWTEQORWVGTUYKNNWUGVJGTQWVGT
for a DNS server.
4QWVGTIP
#FFTGUU
&GHCWNV5WDPGV
/CUM
.QECN&QOCKP
0COG
'PCDNG&05
4GNC[
4GHGTVQVJGPGZVRCIGHQT&*%2KPHQTOCVKQP
31D-Link DIR-615 User Manual
5GEVKQP%QPſIWTCVKQP
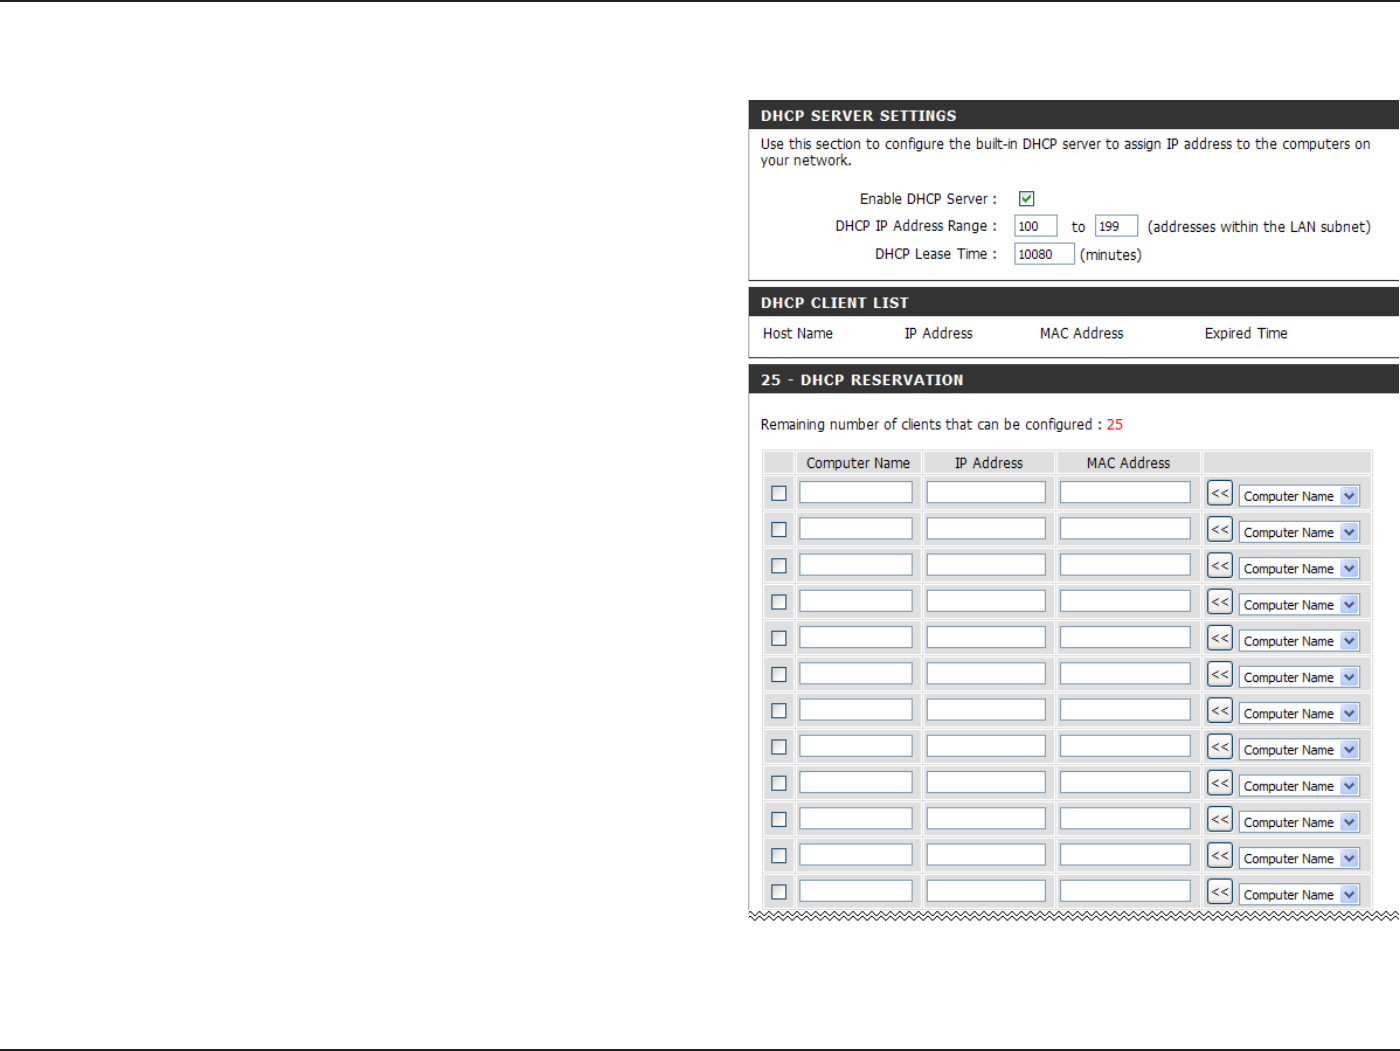
%JGEMVJGDQZVQGPCDNGVJG&*%2UGTXGTQP
your router. Uncheck to disable this function.
Enter the starting and ending IP addresses for
the DHCP server’s IP assignment.
The length of time for the IP address lease.
Enter the Lease time in minutes.
'PCDNG&*%2
5GTXGT
&*%2+2
#FFTGUU4CPIG
&*%2.GCUG
6KOG
&*%25GTXGT5GVVKPIU
DHCP stands for Dynamic Host Control Protocol.
The DIR-615 has a built-in DHCP server. The DHCP
Server will automatically assign an IP address to the
computers on the LAN/private network. Be sure to
set your computers to be DHCP clients by setting
their TCP/IP settings to “Obtain an IP Address
Automatically.” When you turn your computers
QPVJG[YKNNCWVQOCVKECNN[NQCFVJGRTQRGT6%2+2
settings provided by the DIR-615. The DHCP Server
will automatically allocate an unused IP address from
the IP address pool to the requesting computer. You
must specify the starting and ending address of the
IP address pool.
32D-Link DIR-615 User Manual
5GEVKQP%QPſIWTCVKQP
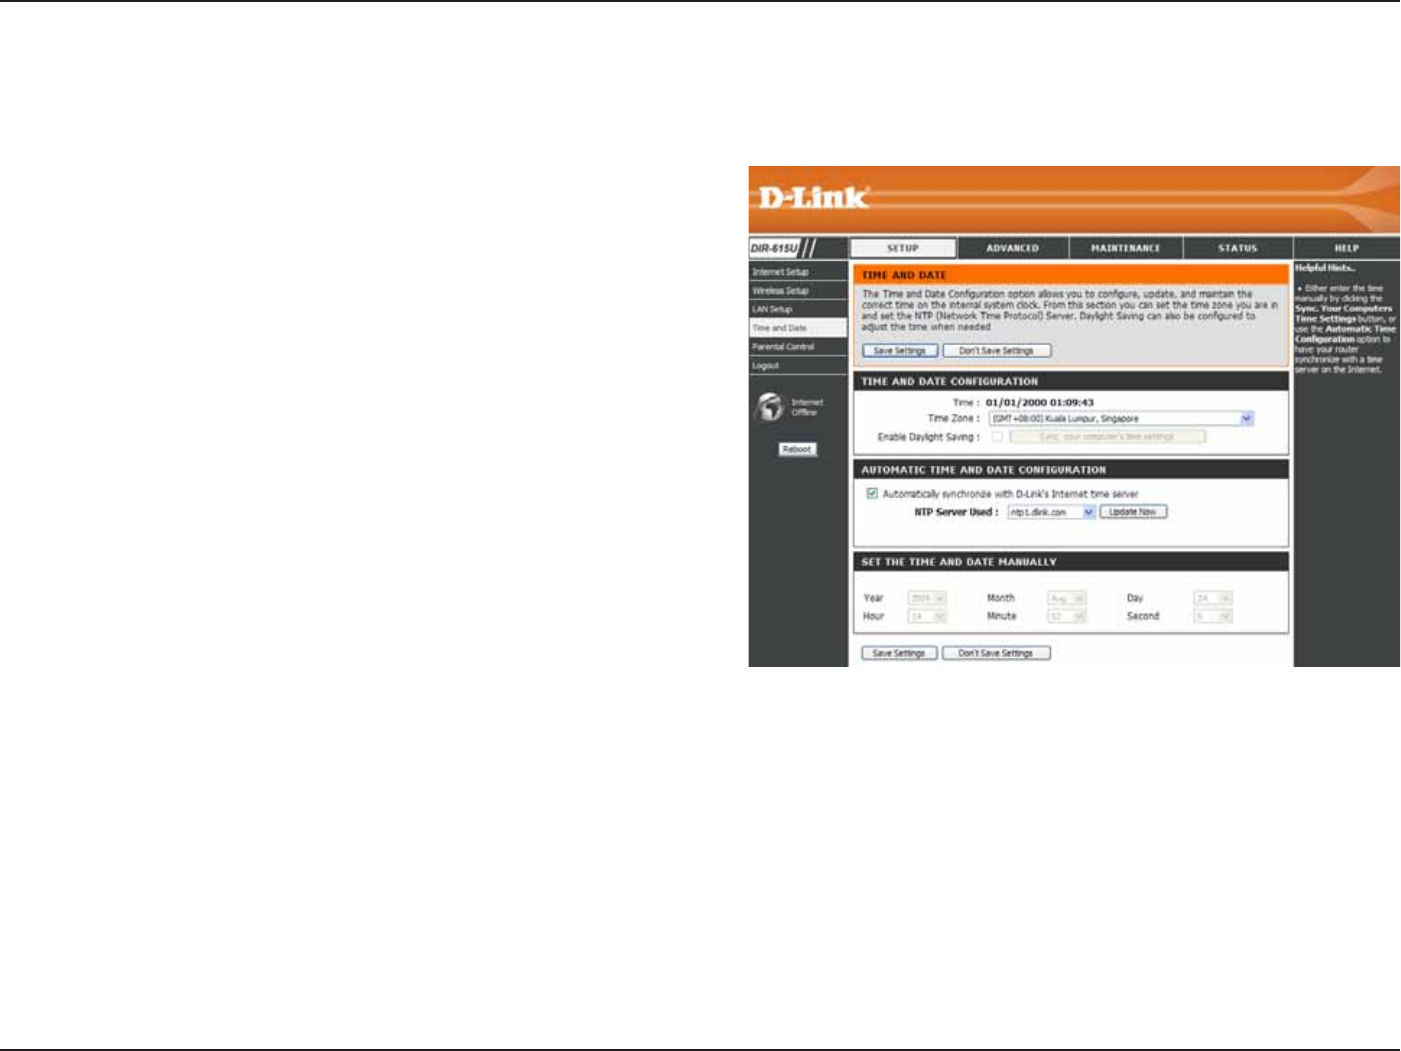
6JKUUGEVKQPYKNNCNNQY[QWVQEQPſIWTGWRFCVGCPFOCKPVCKPVJGEQTTGEVVKOGQPVJGKPVGTPCNU[UVGOENQEM
6KOGCPF&CVG
Select the Time Zone from the drop-down
menu.
6KEMKPIVJKUEJGEMDQZGPCDNGU&C[NKIJV5CXKPI
time. Click 5[PE [QWT EQORWVGTŏU VKOG
settings to copy your PC’s time settings.
Tick the #WVQOCVKECNN[ U[PEJTQPK\G YKVJ
&.KPMŏU+PVGTPGVVKOGUGTXGTEJGEMDQZCPF
then use the drop-down menu to select an NTP
server. NTP is short for Network Time Protocol.
NTP synchronizes computer clock times in a
network of computers.
6Q OCPWCNN[ KPRWV VJG VKOG FGUGNGEV
#WVQOCVKECNN[ U[PEJTQPK\G YKVJ &.KPMŏU
+PVGTPGVVKOGUGTXGTEJGEMDQZCPFVJGPGPVGT
VJGXCNWGUKPVJGUGſGNFUHQTVJG;GCT/QPVJ
&C[ *QWT /KPWVG CPF 5GEQPF %NKEM 5CXG
5GVVKPIU.
Time
<QPG
'PCDNG
&C[NKIJV
5CXKPI
062
5GTXGT
7UGF
/CPWCN
33D-Link DIR-615 User Manual
5GEVKQP%QPſIWTCVKQP
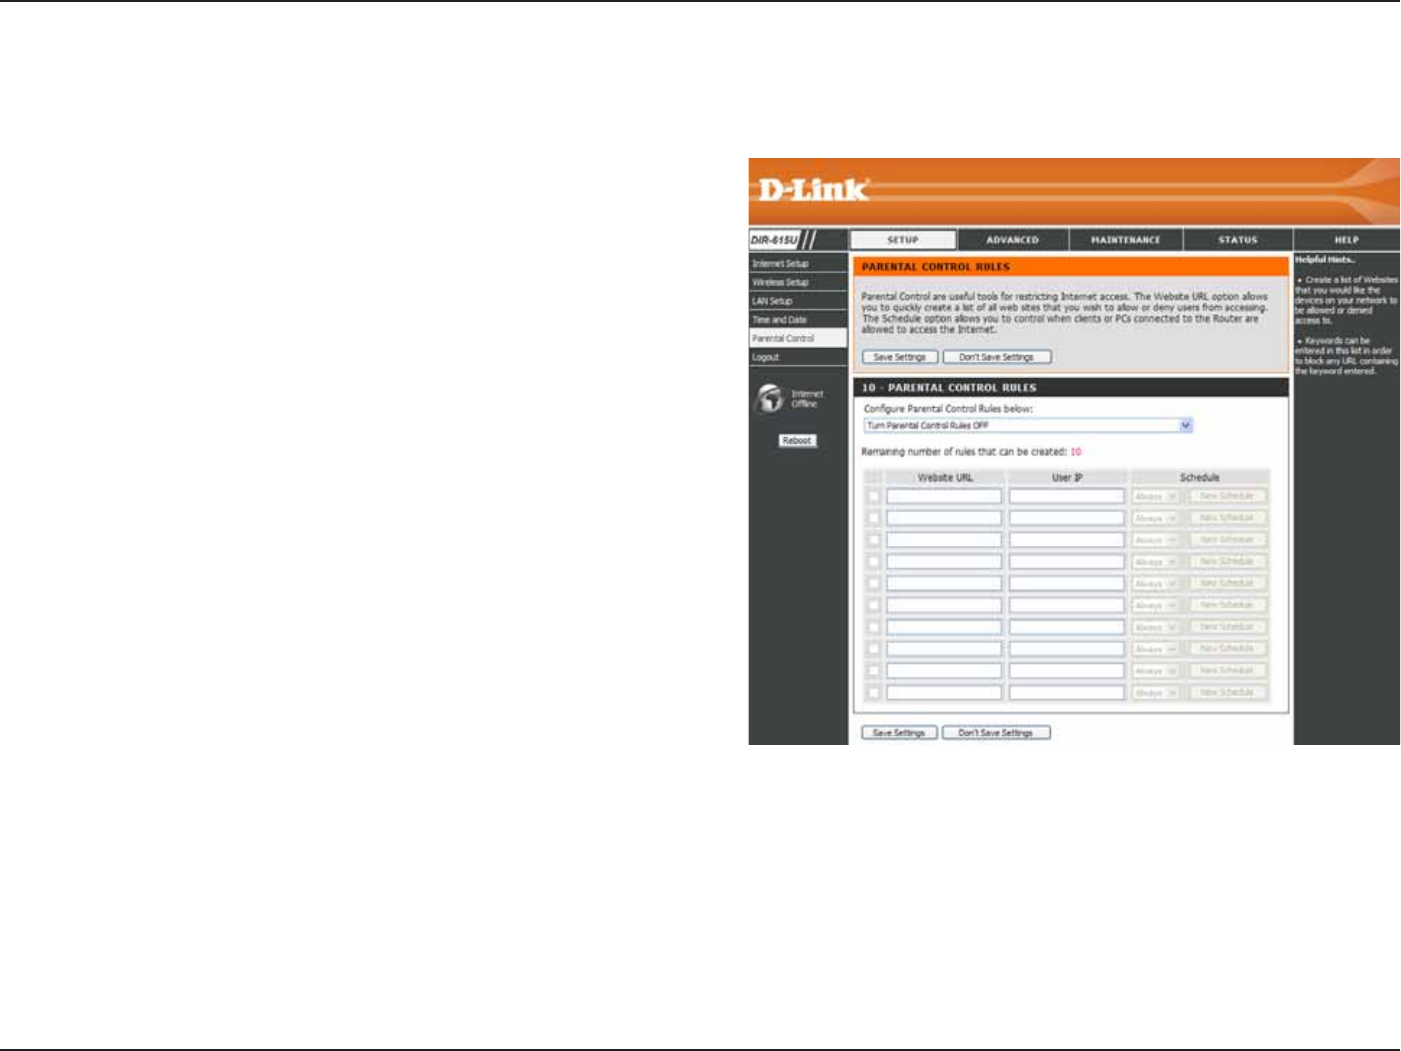
This feature allows you to create a list of websites that you want to either allow or deny users access.
2CTGPVCN%QPVTQN
Select Turn Parental Control OFFTurn Parental
Control ON and ALLOW computers access to
ONLY these sitesQTTurn Parental Control ON
and DENY computers access to ONLY these
sites.
Enter the keywords or URLs that you want to
block (or allow). Any URL with the keyword in
it will be blocked.
The schedule of time when the parental control
ſNVGTYKNNDGGPCDNGF6JGUEJGFWNGOC[DGUGV
VQ#NYC[UYJKEJYKNNCNNQYVJGRCTVKEWNCTUGTXKEG
to always be enabled. You can create your
own times in the /CKPVGPCPEG > 5EJGFWNGU
section.
%QPſIWTG
2CTGPVCN
%QPVTQN
9GDUKVG74.
5EJGFWNG
34D-Link DIR-615 User Manual
5GEVKQP%QPſIWTCVKQP
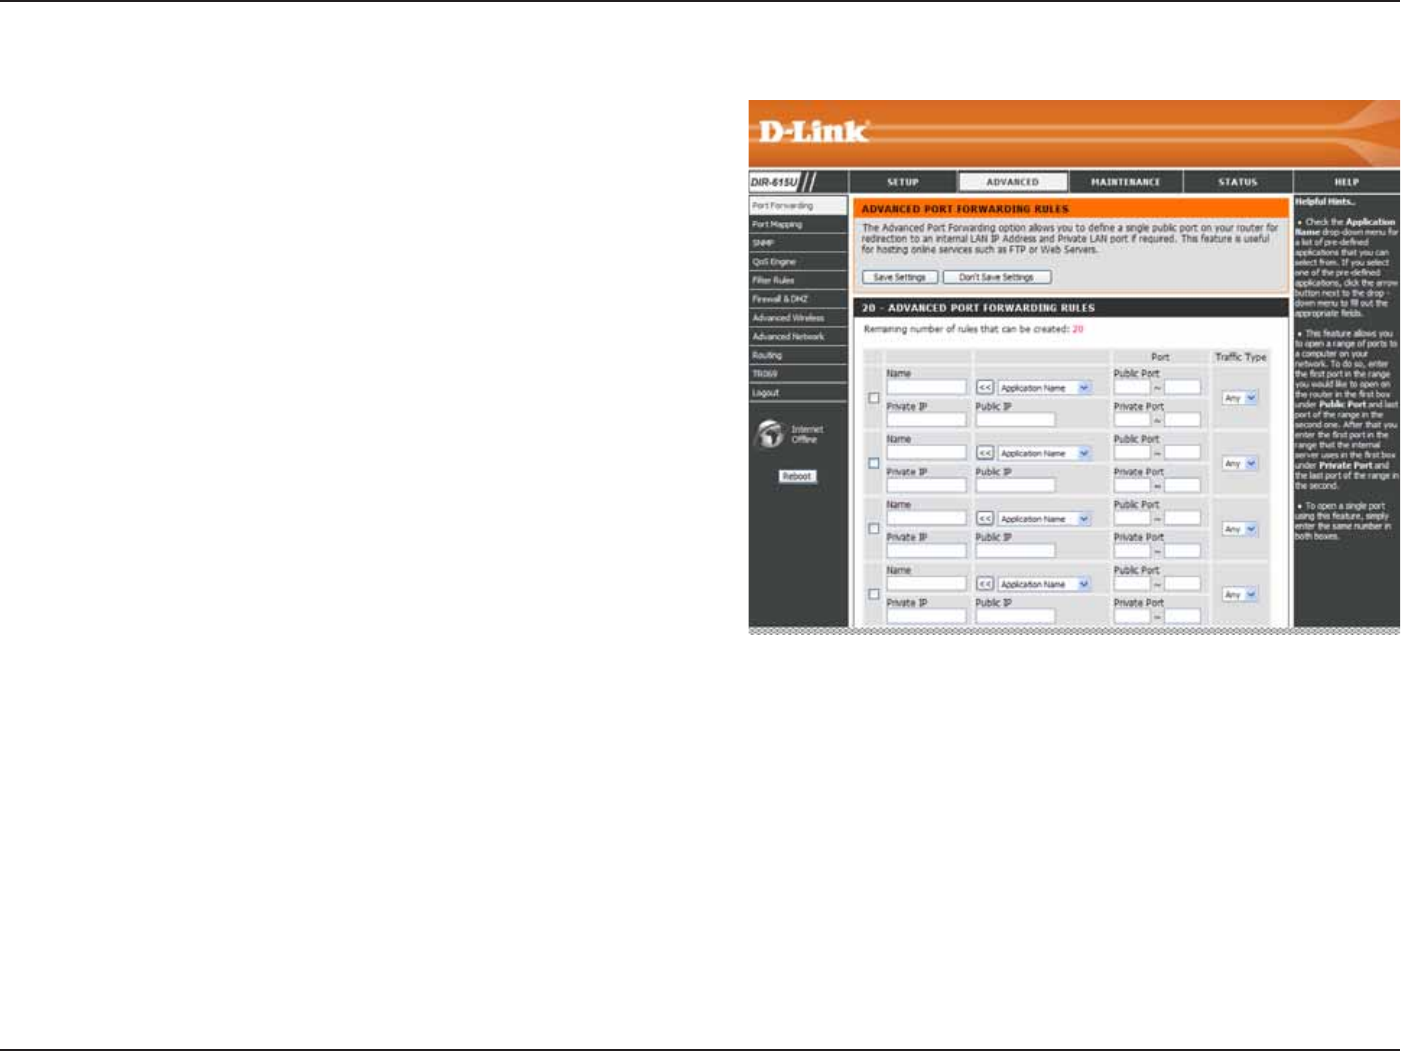
2QTV(QTYCTFKPI
This will allow you to open a single port or a range of ports.
%JGEMVJGDQZVQGPCDNGFVJGTWNG
Enter a name for the rule.
Enter the IP address of the computer on your local
network that you want to allow the incoming service
to.
Enter the port or ports that you want to open. If
[QWYCPVVQQRGPQPGRQTVGPVGTVJGUCOGRQTVKP
DQVJDQZGU
Select TCPUDPQTAny
4WNG
0COG
+2#FFTGUU
5VCTV2QTV
'PF2QTV
6TCHſE6[RG
35D-Link DIR-615 User Manual
5GEVKQP%QPſIWTCVKQP
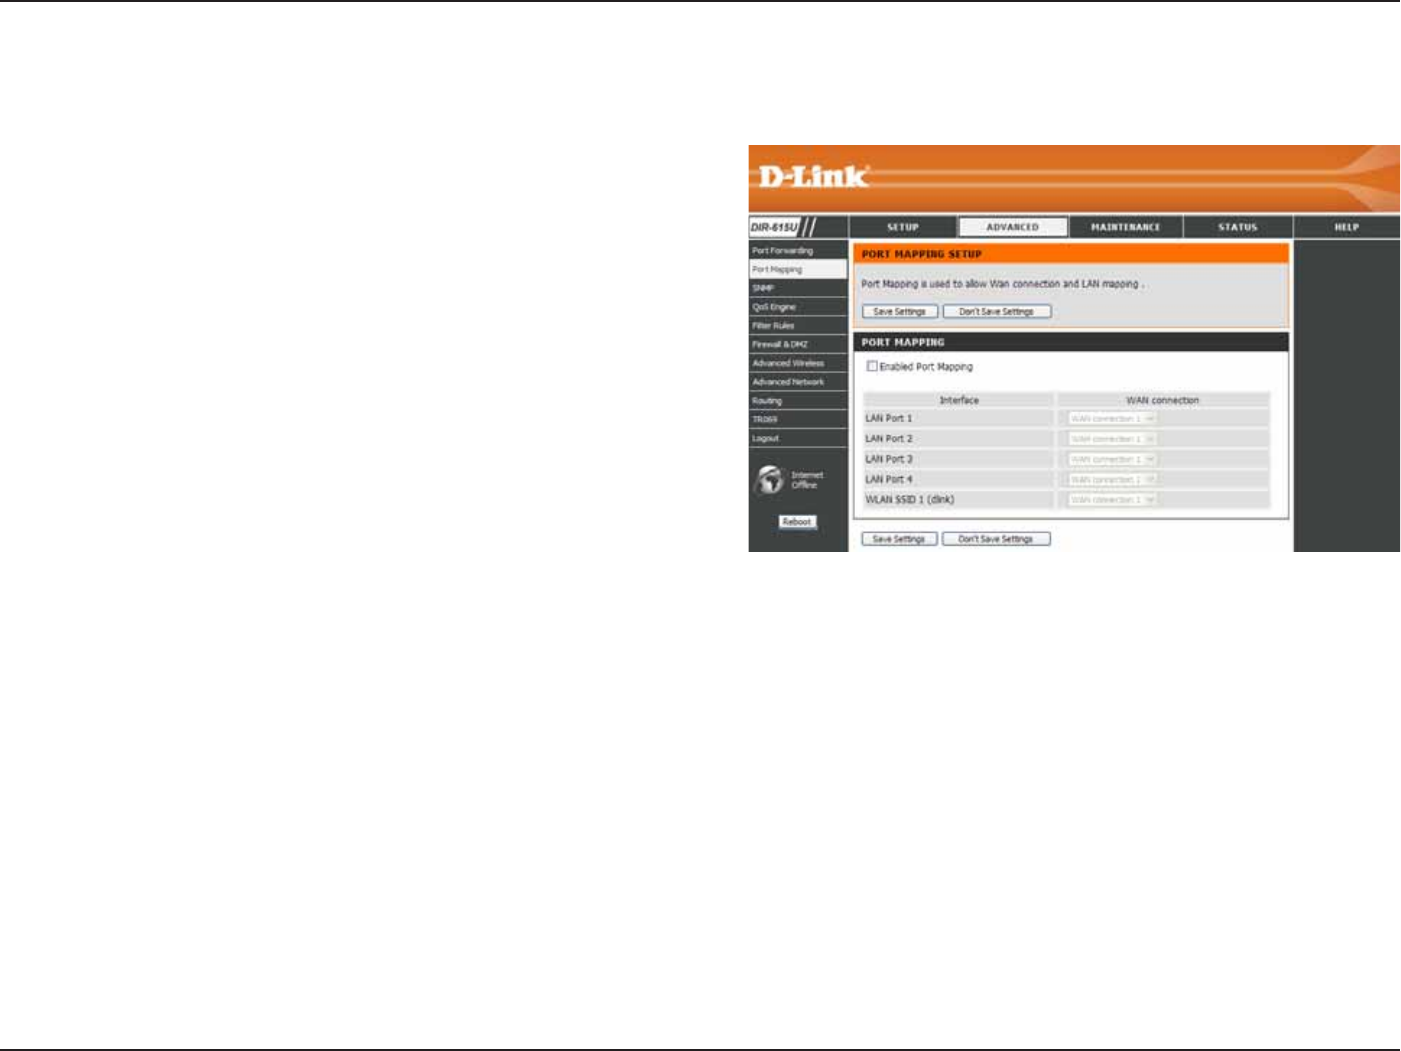
2QTV/CRRKPI
Port Mapping allows you to redirect the LAN ports or SSIDs to WAN connection.
Tick to enable port mapping function.
This column displays the available LAN port
and SSIDs
Use the drop-down menu to select which WAN
connection will be used for port mapping.
'PCDNG2QTV
/CRRKPI
+PVGTHCEG
9#0
%QPPGEVKQP
36D-Link DIR-615 User Manual
5GEVKQP%QPſIWTCVKQP
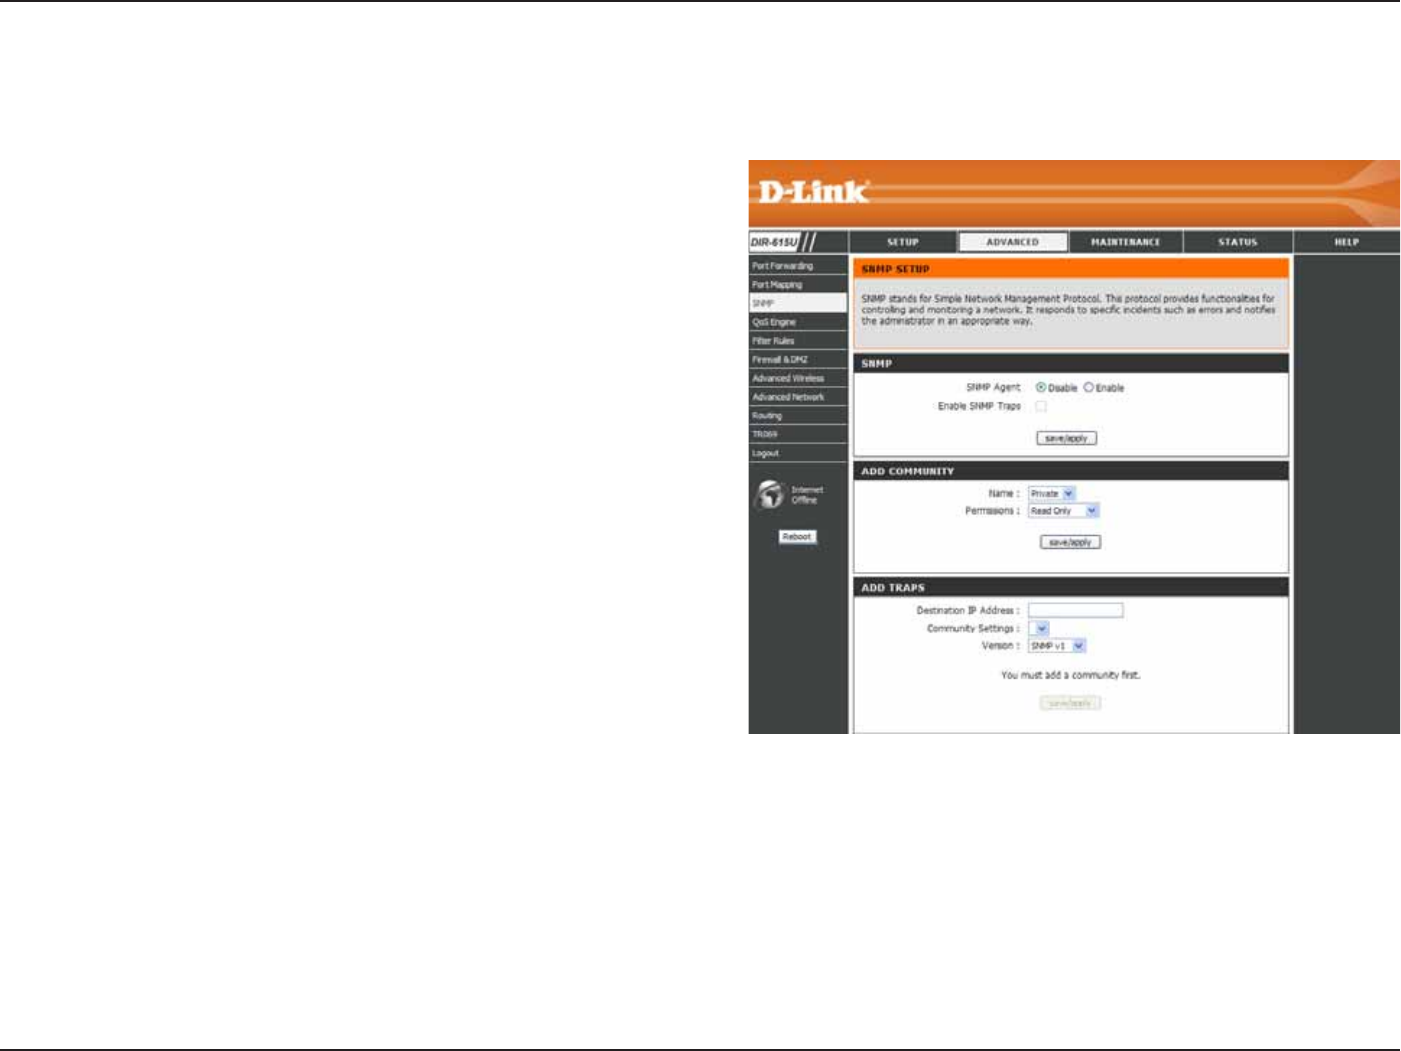
50/2
Click the 'PCDNG radio button to enable a network-management
software.
6JG OCPCIGOGPV CIGPV ECP UGPF CP GXGPV PQVKſECVKQP
to the management system to identify the occurrence of
EQPFKVKQPUUWEJCUVJTGUJQNFVJCVGZEGGFUCRTGFGVGTOKPGF
XCNWG6KEMVJGEJGEMDQZVQGPCDNGVJGHWPEVKQP
This section allows you to add client community for SNMP
access. Click 5CXG#RRN[ to add the community to the
'ZKUVKPI %QOOWPKV[ UGEVKQP +P VJKU UGEVKQP [QW OC[
remove or edit the community.
Use the drop-down menu to select the community name
between 2WDNKE and 2TKXCVG.
Use the drop-down menu to select the access right between
4GCFQPN[ and 4GCF9TKVG.
Enter the destination IP address to launch trap message.
7UGVJGFTQRFQYPOGPWVQUGNGEVVJGGZKUVKPIEQOOWPKV[PCOG
Use the drop-down menu to select between 50/2X and 50/2XE.
50/2#IGPV
'PCDNG50/2
6TCRU
#FF
%QOOWPKV[
0COG
2GTOKUUKQPU
&GUVKPCVKQP+2
#FFTGUU
%QOOWPKV[
5GVVKPIU
8GTUKQP
SNMP (Simple Network Management Protocol) is used to monitor and control a network.
37D-Link DIR-615 User Manual
5GEVKQP%QPſIWTCVKQP
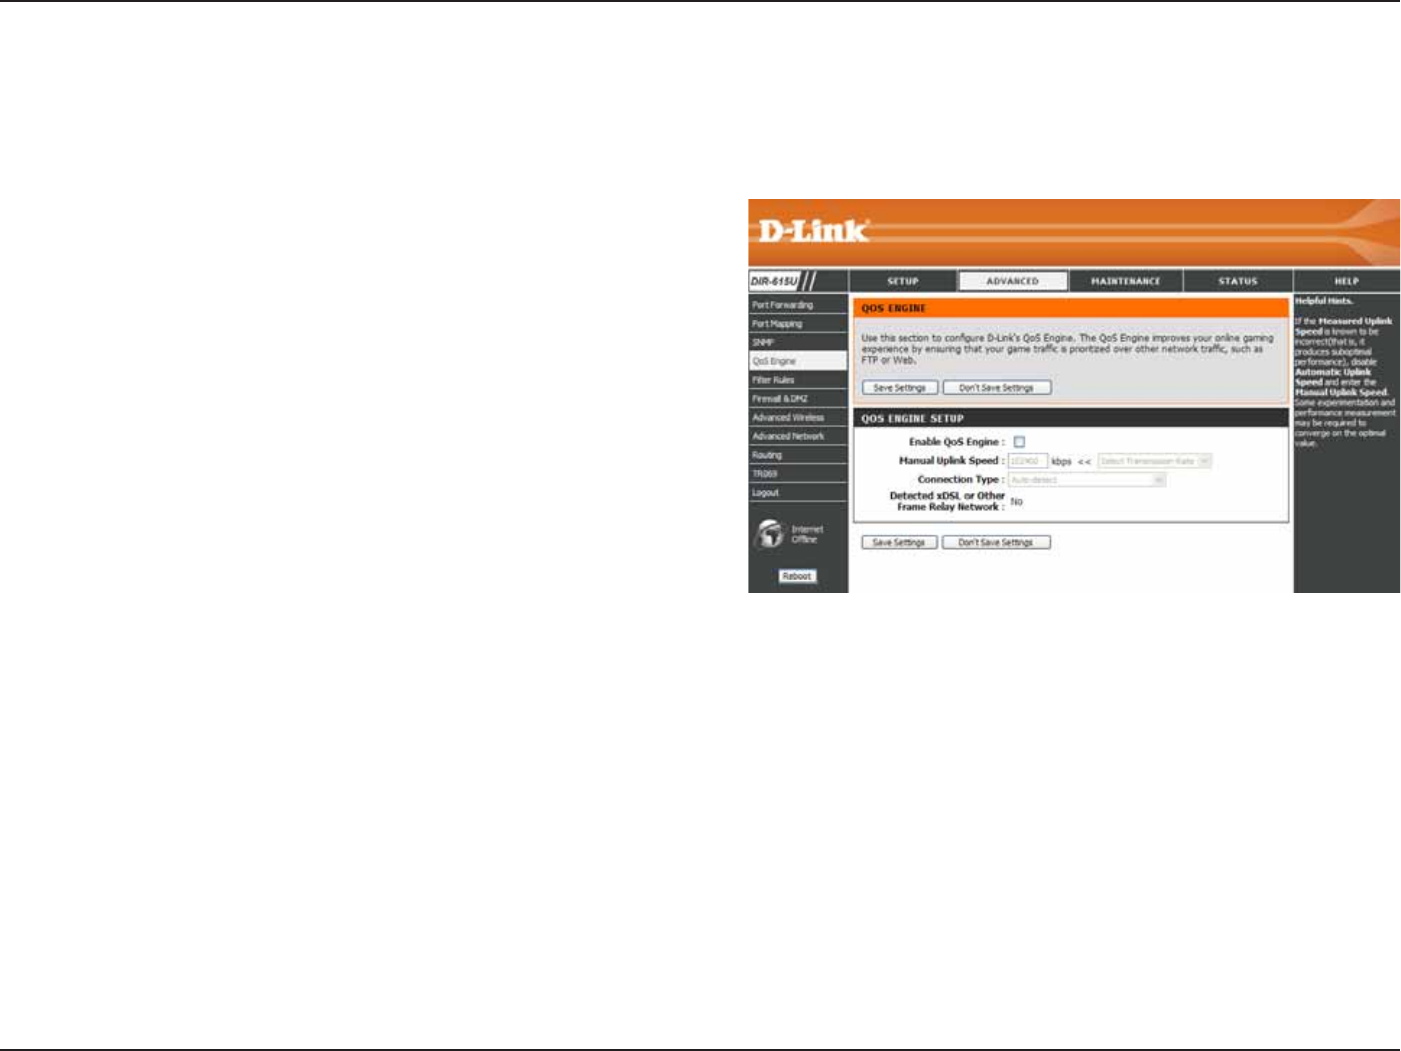
3Q5'PIKPG
This option is disabled by default. Enable this option for
DGVVGTRGTHQTOCPEGCPFGZRGTKGPEGYKVJQPNKPGICOGUCPF
QVJGTKPVGTCEVKXGCRRNKECVKQPUUWEJCU8Q+2
The speed at which data can be transferred from the router
to your ISP. This is determined by your ISP. ISP’s often
speed as a download/upload
RCKT(QTGZCORNG/DKVU-DKVU7UKPIVJKUGZCORNG
you would enter 284. Alternatively you can test your uplink
speed with a service such as www.dslreports.com.
$[ FGHCWNV VJG TQWVGT CWVQOCVKECNN[ FGVGTOKPGU YJGVJGT
VJGWPFGTN[KPIEQPPGEVKQPKUCPZ&5.(TCOGTGNC[PGVYQTM
or some other connection type (such as cable modem or
'VJGTPGVCPFKVFKURNC[UVJGTGUWNVCU&GVGEVGFZ&5.QT
(TCOG4GNC[0GVYQTM+H[QWJCXGCPWPWUWCNPGVYQTMEQPPGEVKQPKPYJKEJ[QWCTGCEVWCNN[EQPPGEVGFXKCZ&5.DWVHQTYJKEJ
[QWEQPſIWTGGKVJGTő5VCVKEŒQTő&*%2ŒKPVJG+PVGTPGVUGVVKPIUUGVVKPIVJKUQRVKQPVQZ&5.QT1VJGT(TCOG4GNC[0GVYQTM
GPUWTGUVJCVVJGTQWVGTYKNNTGEQIPK\GVJCVKVPGGFUVQUJCRGVTCHſEUNKIJVN[FKHHGTGPVN[KPQTFGTVQIKXGVJGDGUVRGTHQTOCPEG
Choosing Z&5.QT1VJGT(TCOG4GNC[0GVYQTM causes the measured uplink speed to be reported slightly lower than before
QPUWEJEQPPGEVKQPUDWVIKXGUOWEJDGVVGTTGUWNVU
When Connection Type is set to #WVQFGVGEVVJGCWVQOCVKECNN[FGVGEVGFEQPPGEVKQPV[RGKUFKURNC[GFJGTG
'PCDNG3Q5
'PIKPG
/CPWCN7RNKPM
5RGGF
Connection
6[RG
&GVGEVGFZ&5.
QT1VJGT(TCOG
4GNC[0GVYQTM
The QoS Engine option helps improve your network gaming performance by prioritizing applications. By default the
3Q5'PIKPGUGVVKPIUCTGFKUCDNGFCPFCRRNKECVKQPRTKQTKV[KUPQVENCUUKſGFCWVQOCVKECNN[

38D-Link DIR-615 User Manual
5GEVKQP%QPſIWTCVKQP
Enter the MAC or IP address of a network
CFCRVGTHQTCſNVGTTWNG
Enter a port or range of ports of TCP or UDP
HQTVJGſNVGTTWNG
5GNGEVCVTCHſEV[RGTCPUDPQTAny) that will
DGWUGFHQTVJGſNVGTTWNG
Use the drop-down menu to select #NNQY or
&GP[ the network access.
Select #NYC[U VQ CRRN[ HQT VJKU ſNVGT TWNG CNN
VJGVKOGQTUGNGEVQPGQHVJGUEJGFWNGFVKOG
6JG UEJGFWNGF VKOG UJQWNF DG EQPſIWTGF KP
/CKPVGPCPEG > 5EJGFWNGU section in advance.
/#%+2
#FFTGUU
&GUVKPCVKQP
2QTV
6TCHſE6[RG
#EVKQP
5EJGFWNG
6JG(KNVGT4WNGUCNNQYU[QWVQEQPſIWTG+2QT/#%CFFTGUUQHCPGVYQTMCFCRVGTCPFCNNQYQTFGP[KVUPGVYQTMCEEGUU
at certain time.
(KNVGT4WNGU
39D-Link DIR-615 User Manual
5GEVKQP%QPſIWTCVKQP
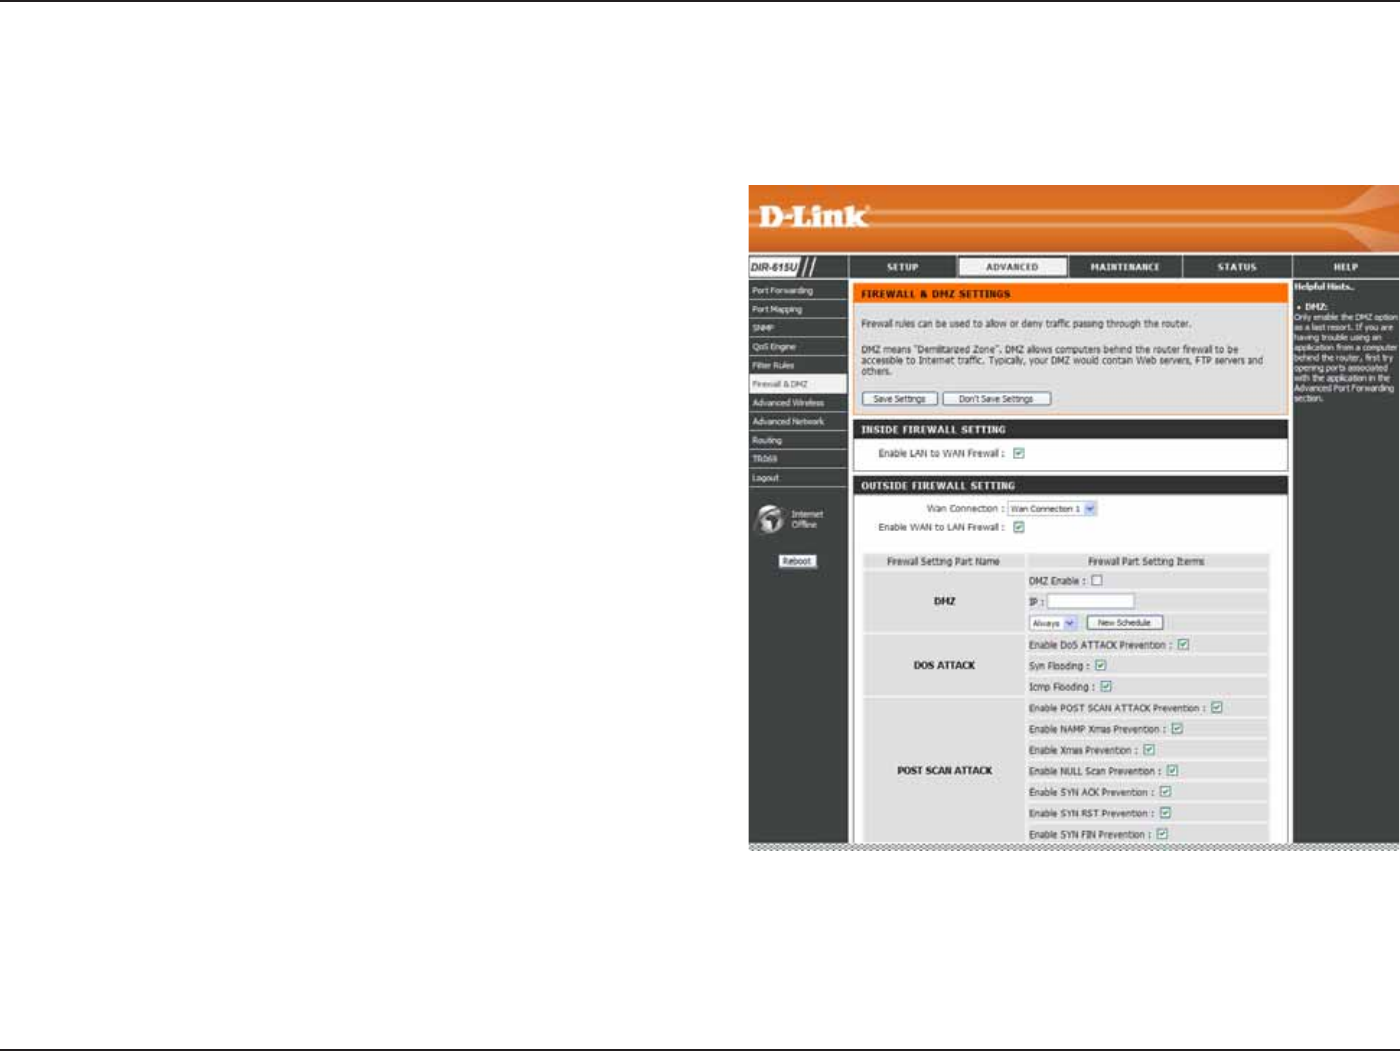
(KTGYCNN&/<
6JKUUGEVKQPYKNNCNNQY[QWVQUGVWRKPUKFGCPFQWVUKFGſTGYCNN6JGQWVUKFGſTGYCNNECPEJQQUGXCTKQWUYJKEJRCTV
you want to prevernt from.
6KEMVQGPCDNGVJGſTGYCNNHTQO.#0VQ9#0
5GNGEVVJG9#0%QPPGEVKQP[QWYCPVVQUGVWRVJGſTGYCNN
6KEMVQGPCDNGVJGſTGYCNNHTQO9#0VQ.#0
Tick &/<'PCDNGEJGEMDQZVQGPCDNG&/<CPFGPVGTCP
IP adrees of a computer in the IPſGNFVQDGCEEGUUKDNGVQ
+PVGTPGVVTCHſE
DoS (Denial-of-service) attack makes the computer
resources unavailabel for intened users. Tick the 'PCDNG
&Q5#VVCEM2TGXGPVKQPEJGEMDQZVQGPCDNGVJGHWPEVKQP
CPFVKEMVJGTGUVQHVJGEJGEMDQZGUVQRTGXGPVHTQOXCTKQWU
type of DoS attack.
Post scan attack targets the opening ports and attacks those
ports. Tick the 'PCDNG2QUV5ECP#VVCEM2TGXGPVKQP check
DQZVQGPCDNGVJGHWPEVKQPCPFVKEMVJGTGUVQHVJGEJGEM
DQZGUVQRTGXGPVHTQOXCTKQWUV[RGQHRQUVUECPCVVCEM
Service FilterTick the 'PCDNG 5GTXKEG (KNVGT $NQEMKPI
EJGEMDQZVQGPCDNGVJGHWPEVKQPCPFVKEMVJGTGUVQHVJG
EJGEMDQZGUVQFGP[VJGCEEGUUHTQOXCTKQWUVQQNU
'PCDNG.#0VQ
9#0(KTGYCNN
9#0
%QPPGEVKQP
'PCDNG9#0VQ
.#0(KTGYCNN
&/<
&Q5#VVCEM
2QUV5ECP
#VVCEM
5GTXKEG(KNVGT
40D-Link DIR-615 User Manual
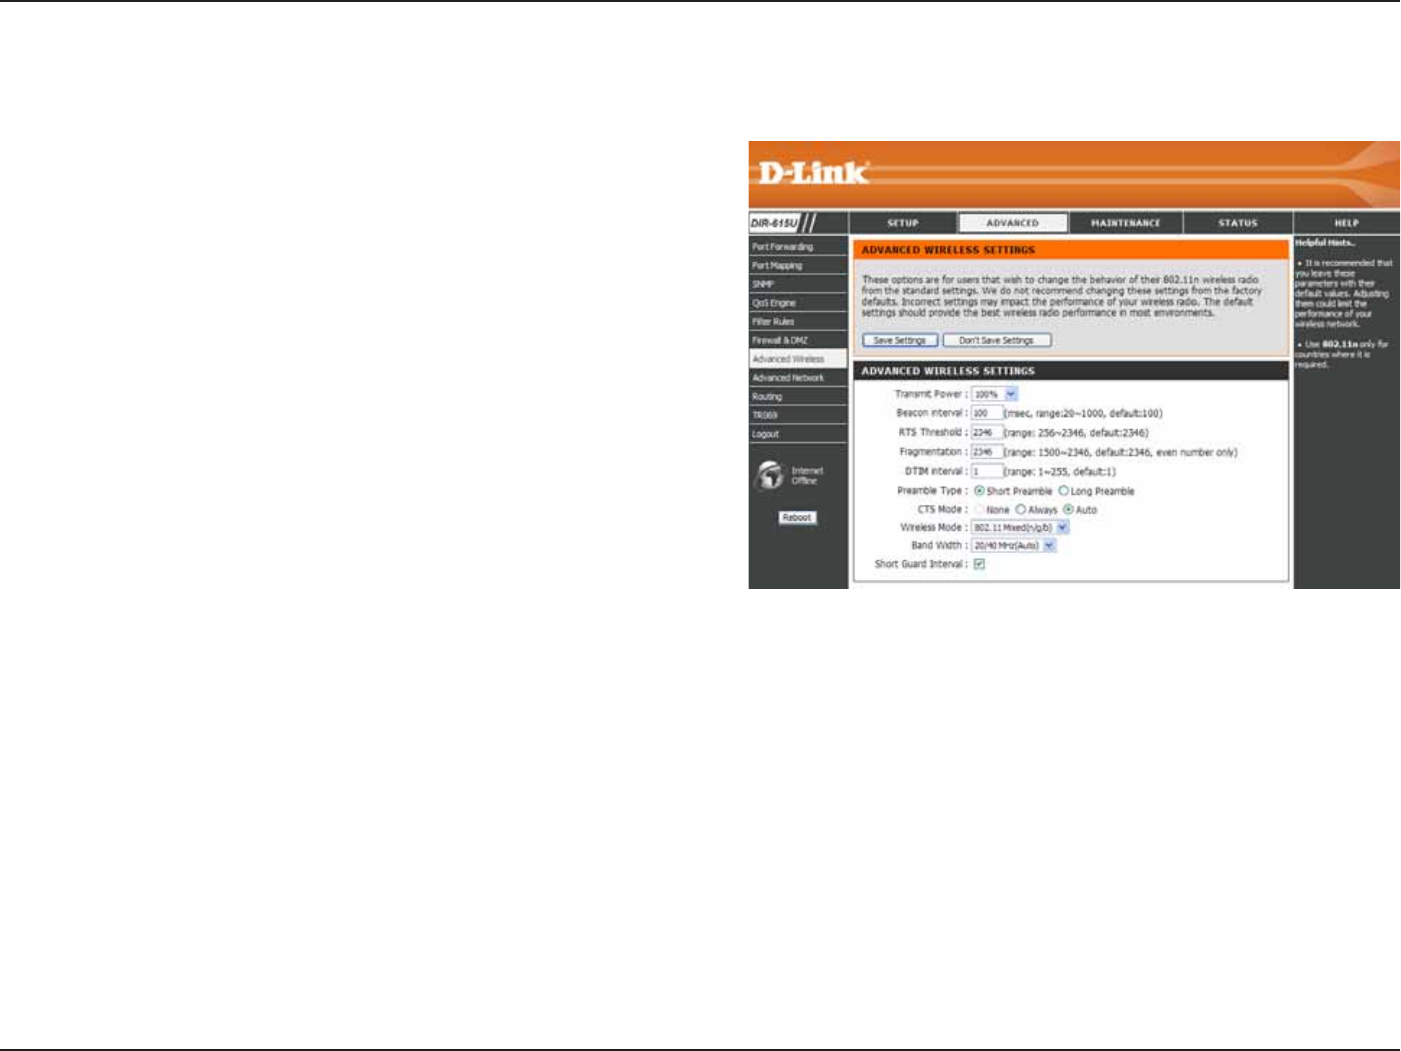
5GEVKQP%QPſIWTCVKQP
Set the transmit power of the antennas.
Beacons are packets sent by an Access Point to synchronize
a wireless network. Specify a value. 100 is the default
setting and is recommended.
This value should remain at its default setting of 2346. If
KPEQPUKUVGPVFCVCƀQYKUCRTQDNGOQPN[COKPQTOQFKſECVKQP
should be made.
6JGHTCIOGPVCVKQPVJTGUJQNFYJKEJKUURGEKſGFKPD[VGU
determines whether packets will be fragmented. Packets
GZEGGFKPIVJGD[VGUGVVKPIYKNNDGHTCIOGPVGFDGHQTG
transmission. 2346 is the default setting.
&GNKXGT[6TCHſE+PFKECVKQP/GUUCIG1KUVJGFGHCWNVUGVVKPI#&6+/KUCEQWPVFQYPKPHQTOKPIENKGPVUQHVJGPGZVYKPFQYHQT
listening to broadcast and multicast messages.
5GNGEV5JQTVQT.QPI2TGCODNG6JG2TGCODNGFGſPGUVJGNGPIVJQHVJG%4%DNQEM%[ENKE4GFWPFCPE[%JGEMKUCEQOOQP
technique for detecting data transmission errors) for communication between the wireless router and the roaming wireless
PGVYQTMCFCRVGTU#WVQKUVJGFGHCWNVUGVVKPI0QVG*KIJPGVYQTMVTCHſECTGCUUJQWNFWUGVJGUJQTVGTRTGCODNGV[RG
CTS (Clear To Send) is a function used to minimize collisions among wireless devices on a wireless local area network (LAN).
CTS will make sure the wireless network is clear before a wireless client attempts to send wireless data. Enabling CTS will
add overhead and may lower wireless through put. 0QPG CTS is typically used in a pure 802.11g environment. If CTS is
UGVVQő0QPGŒKPCOKZGFOQFGGPXKTQPOGPVRQRWNCVGFD[DENKGPVUYKTGNGUUEQNNKUKQPUOC[QEEWTHTGSWGPVN[#NYC[U
CTS will always be used to make sure the wireless LAN is clear before sending data. #WVQ CTS will monitor the wireless
PGVYQTMCPFCWVQOCVKECNN[FGEKFGYJGVJGTVQKORNGOGPV%65DCUGFQPVJGCOQWPVQHVTCHſECPFEQNNKUKQPUVJCVQEEWTUQP
the wireless network.
6TCPUOKV
2QYGT
$GCEQP
KPVGTXCN
4656JTGUJQNF
(TCIOGPVCVKQP
&6+/+PVGTXCN
2TGCODNG6[RG
%65/QFG
#FXCPEGF9KTGNGUU
This window allows you to change the behavior of the 802.11g wireless radio from the standard settings. Please be aware that any changes
to the factory default settings may adversely affect the behavior of your network.

41D-Link DIR-615 User Manual
5GEVKQP%QPſIWTCVKQP
Select one of the following:
P1PN[ - Select only if all of your wireless clients are 802.11n.
/KZGFID - Select if you are using both 802.11b and 802.11g wireless clients.
/KZGFPID5GNGEVKH[QWCTGWUKPICOKZQHPICPFDYKTGNGUUENKGPVU
Select the Channel Width:
/*\ - Select if you are not using any 802.11n wireless clients. This is the default setting.
/*\#WVQ - Select if you are using both 802.11n and non-802.11n wireless devices.
%JGEMVJKUDQZVQTGFWEGVJGIWCTFKPVGTXCNVKOGVJGTGHQTGKPETGCUKPIVJGFCVCECRCEKV[*QYGXGTKVŏUNGUUTGNKCDNGCPFOC[
create higher data loss.
9KTGNGUU/QFG
%JCPPGN9KFVJ
5JQTV)+
42D-Link DIR-615 User Manual
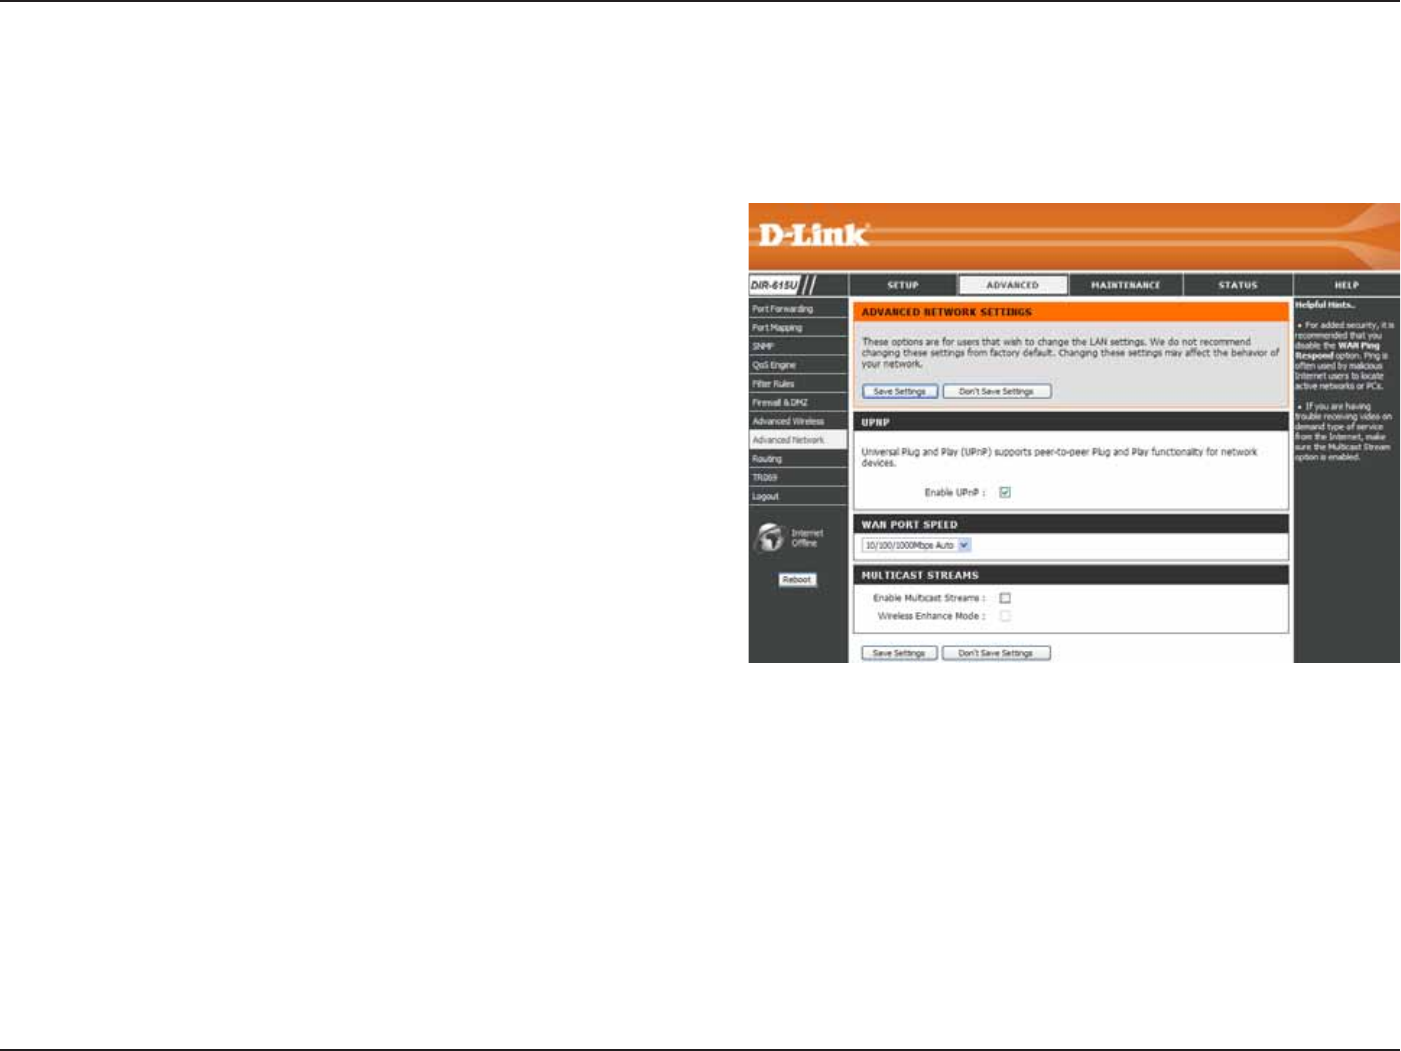
5GEVKQP%QPſIWTCVKQP
To use the Universal Plug and Play (UPnP™)
HGCVWTG VKEM VJKU EJGEMDQZ 7202 RTQXKFGU
EQORCVKDKNKV[YKVJPGVYQTMKPIGSWKROGPVUQHVYCTG
and peripherals.
You may set the port speed of the WAN port to
10Mbps100MbpsQT10/100Mbps Auto. Some
older cable or DSL modems may require you to
set the port speed to 10Mbps.
6KEMVJGEJGEMDQZVQCNNQYOWNVKECUVVTCHſEVQRCUU
through the router from the Internet.
6KEM VJG EJGEM DQZ VQ CNNQY YKTGNGUU OWNVKECUV
VTCHſEVQRCUUVJTQWIJVJGTQWVGT
'PCDNG72P2
9#02QTV
5RGGF
'PCDNG
/WNVKECUV
5VTGCOU
9KTGNGUU
'PJCPEG/QFG
#FXCPEGF0GVYQTM
This window allows you to change the LAN settings. Please be aware that any changes to the factory default settings
may affect the behavior of your network.

43D-Link DIR-615 User Manual
5GEVKQP%QPſIWTCVKQP
6KEM VJKU EJGEMDQZ VQ GPCDNG QT FKUCDNG ſZGF
TQWVGUVQFGſPGFFGUVKPCVKQPU
Use the drop-down menu to choose the WAN or
WAN (Physical Port) Interface the IP packet must
use to transit out of the Router.
The IP address of the packets that will take this
route.
The subnet of the IP address of the packets that
will take this route.
5RGEKſGUVJGPGZVJQRVQDGVCMGPKHVJKUTQWVGKU
used.
'PCDNG
+PVGTHCEG
Destination:
Subnet Mask:
Gateway:
4QWVKPI
6JKUQRVKQPCNNQYU[QWVQFGſPGſZGFTQWVGUVQFGſPGFFGUVKPCVKQPU
44D-Link DIR-615 User Manual
5GEVKQP%QPſIWTCVKQP
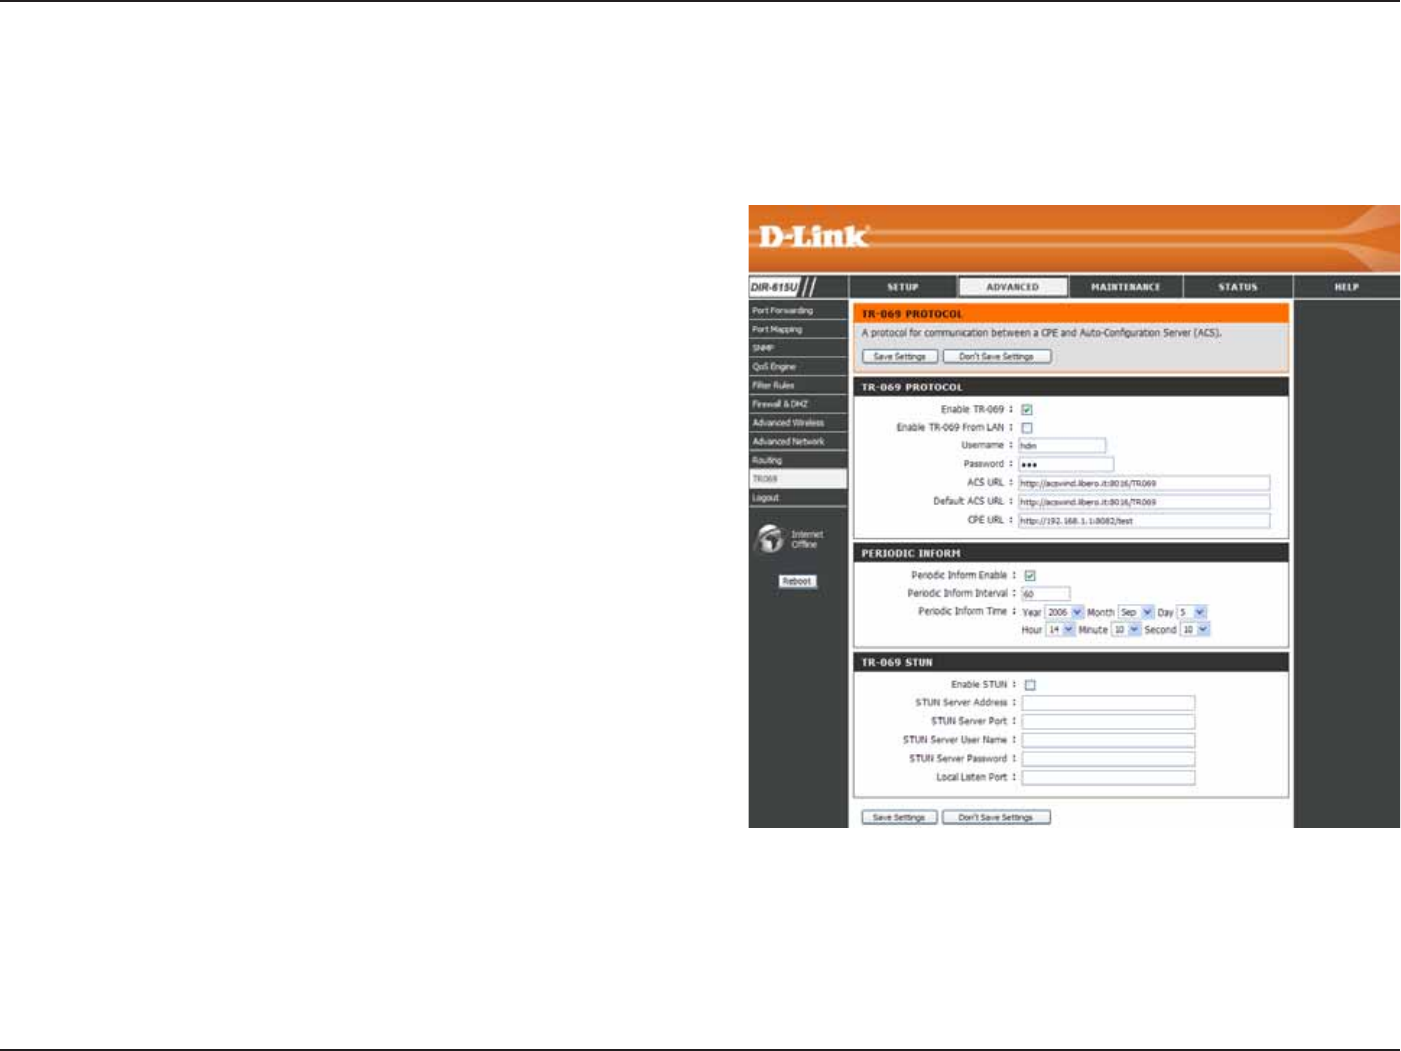
6KEMVJKUEJGEMDQZVQGPCDNG64HWPEVKQP
Tick this to enable TR-069 function from LAN
instead of WAN port.
Enter the username for the remote server to be
able to login to the router.
Enter the password for the remote server to be
able to login to the router
'PVGTVJG+2CFFTGUUQH#%5#WVQEQPſIWTCVKQP
Server).
Enter the IP address of default ACS.
Enter the IP Address of the CPE (Customer-
premises equipment).
6KEM VJG EJGEM DQZ VQ UGPF VJG KPHQTOCVKQP
periodically.
The duration for sending the information.
Configure the specific time and date to start
sending the information.
'PCDNG64
'PCDNG64
(TQO.#0
Username:
Password:
ACS URL:
Default ACS URL:
CPE URL:
Periodic Inform
Enable:
Periodic Infrom
Interval:
Periodic Inform
Time:
64
649#0/CPCIGOGPV2TQVQEQNCNNQYUVJGTGOQVGUGTXGTVQEQPPGEVVQVJGFGXKEGCPFEQPſIWTGVJGFGXKEG
9JGPWUKPIVJKUHWPEVKQPWUWCNN[VJGTQWVGTPGGFUVQJCXGCRJ[UKECN+2CFFTGUU9KVJ645670[QWECPGXGTP
EQPſIWTGVJGTQWVGTYJGPKVKUDGJKPF0#6

45D-Link DIR-615 User Manual
5GEVKQP%QPſIWTCVKQP
6KEMVJGEJGEMDQZVQGPCDNGVJG5670HWPEVKQPHQT64
Enter the IP address of a STUN server.
Enter the port of the STUN server.
Enter the username of the STUN server.
Enter the password of the STUN server
Enter a port of the router that allow STUN server to get through.
Enable STUN:
STUN Server
Address:
STUN Server Port:
STUN Server User
Name:
STUN Server
Password:
Local Listen Port
46D-Link DIR-615 User Manual
5GEVKQP%QPſIWTCVKQP
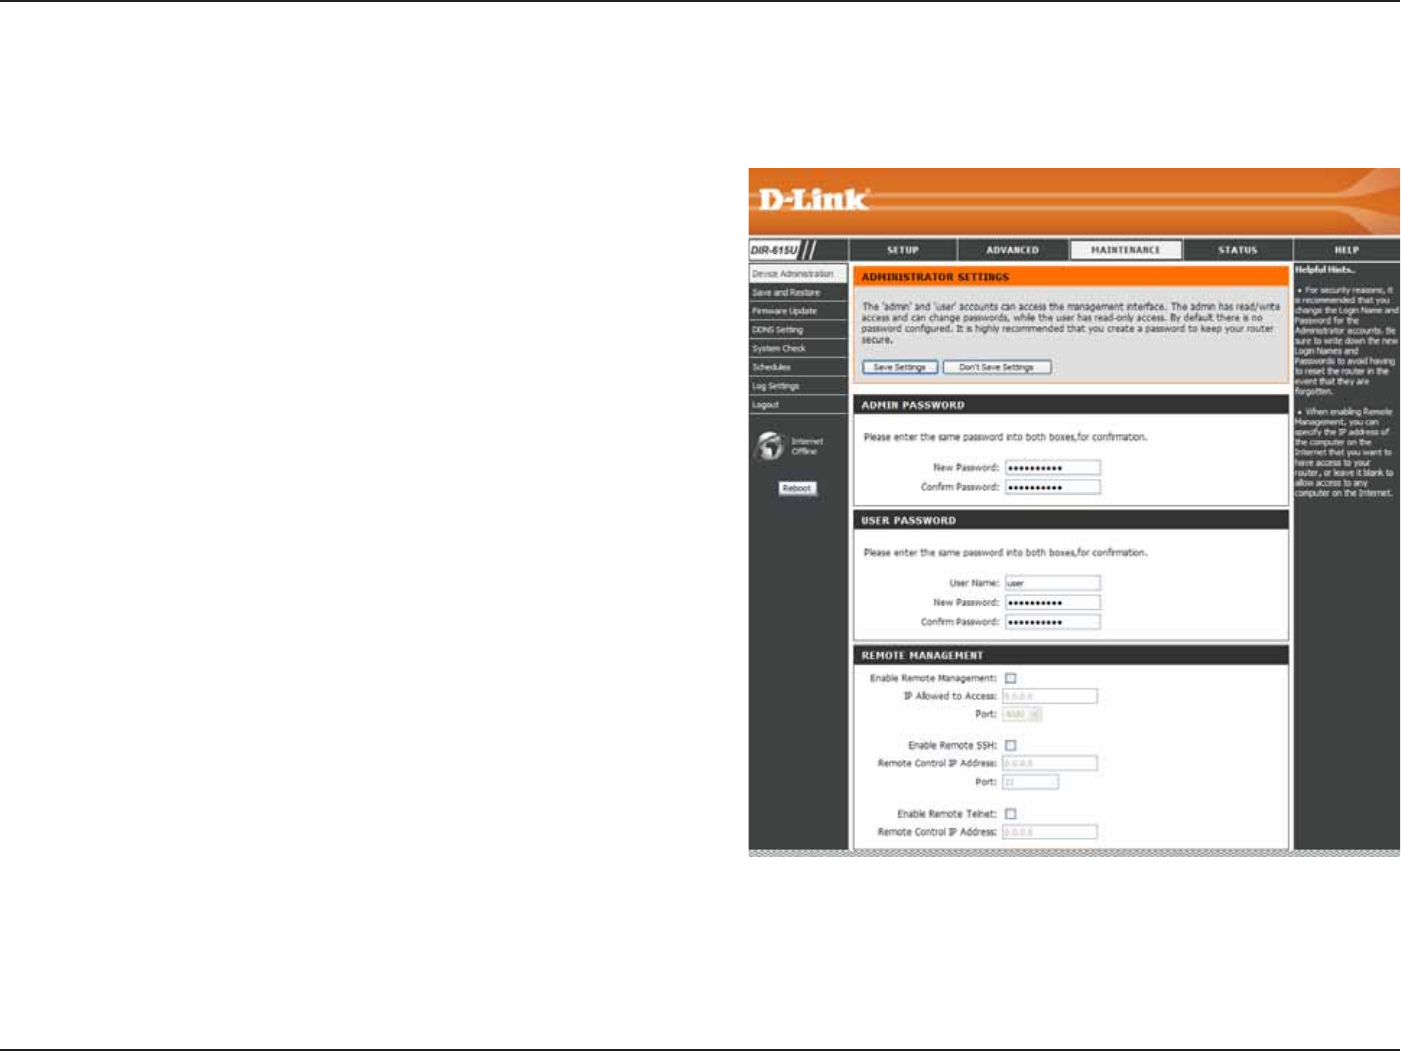
Enter a new password for the Administrator Login Name
CPFVJGPTGV[RGVJGPGYRCUUYQTFKPVJG%QPſTO2CUUYQTF
VGZVDQZ 6JG CFOKPKUVTCVQT ECP OCMG EJCPIGU VQ VJG
settings.
Enter a new Login Name for the User account.
Enter a new password for the User Login Name and then
TGV[RGVJGPGYRCUUYQTFKPVJG%QPſTO2CUUYQTFVGZVDQZ
The administrator can make changes to the settings.
4GOQVGOCPCIGOGPVCNNQYUVJG&+4VQDGEQPſIWTGF
from the Internet by a web browser. A username and
password is still required to access the Web-Management
KPVGTHCEG+PIGPGTCNQPN[COGODGTQH[QWTPGVYQTMECP
browse the built-in web pages to perform Administrator
tasks. This feature enables you to perform Administrator
tasks from the remote (Internet) host.
The Internet IP address of the computer that has access to
VJG$TQCFDCPF4QWVGT+H[QWNGCXGVJKUſGNFDNCPMQTV[RG
0.0.0.0VJGPCP[EQORWVGTYKNNDGCDNGVQCEEGUUVJG4QWVGT
This would present a security risk and is not recommended.
6JGRQTVPWODGTWUGFVQCEEGUUVJG&+4(QTGZCORNG
JVVRZZZZYJGTGCUZZZZKUVJG9#0+2CFFTGUU
of the DIR-615 and 8080 is the port used for the Web-Management interface.
6KEMVJKUEJGEMDQZVQCNNQYVJGTGOQVG55*VQDGCDNGVQEQPſIWTG&+4
#FOKPKUVTCVQT
2CUUYQTF
7UGT.QIKP
0COG
7UGT2CUUYQTF
'PCDNG4GOQVG
/CPCIGOGPV
+2#NNQYGFVQ
#EEGUU
2QTV
'PCDNG4GOQVG
55*
&GXKEG#FOKPKUVTCVKQP
This window will allow you to change the Administrator password. You can also enable Remote Management.

47D-Link DIR-615 User Manual
5GEVKQP%QPſIWTCVKQP
'PVGTC+2CFFTGUUVJCVVJGTGOQVG55*YKVJVJKU+2CFFTGUUECPCEEGUUVJGTQWVGT+H[QWNGCXGVJKUſGNFDNCPMQTV[RG0.0.0.0
then any computer will be able to access the Router. This would present a security risk and is not recommended.
The port number used to access the DIR-615.
6KEMVJKUEJGEMDQZVQCNNQYVJGTGOQVG6GNPGVVQDGCDNGVQEQPſIWTG&+4
'PVGTC+2CFFTGUUVJCVVJGTGOQVG6GNPGVYKVJVJKU+2CFFTGUUECPCEEGUUVJGTQWVGT+H[QWNGCXGVJKUſGNFDNCPMQTV[RG
VJGPCP[EQORWVGTYKNNDGCDNGVQCEEGUUVJG4QWVGT6JKUYQWNFRTGUGPVCUGEWTKV[TKUMCPFKUPQVTGEQOOGPFGF
4GOQVG%QPVTQN
+2#FFTGUU
2QTV
'PCDNG4GOQVG
6GNPGV
4GOQVG%QPVTQN
+2#FFTGUU
48D-Link DIR-615 User Manual
5GEVKQP%QPſIWTCVKQP
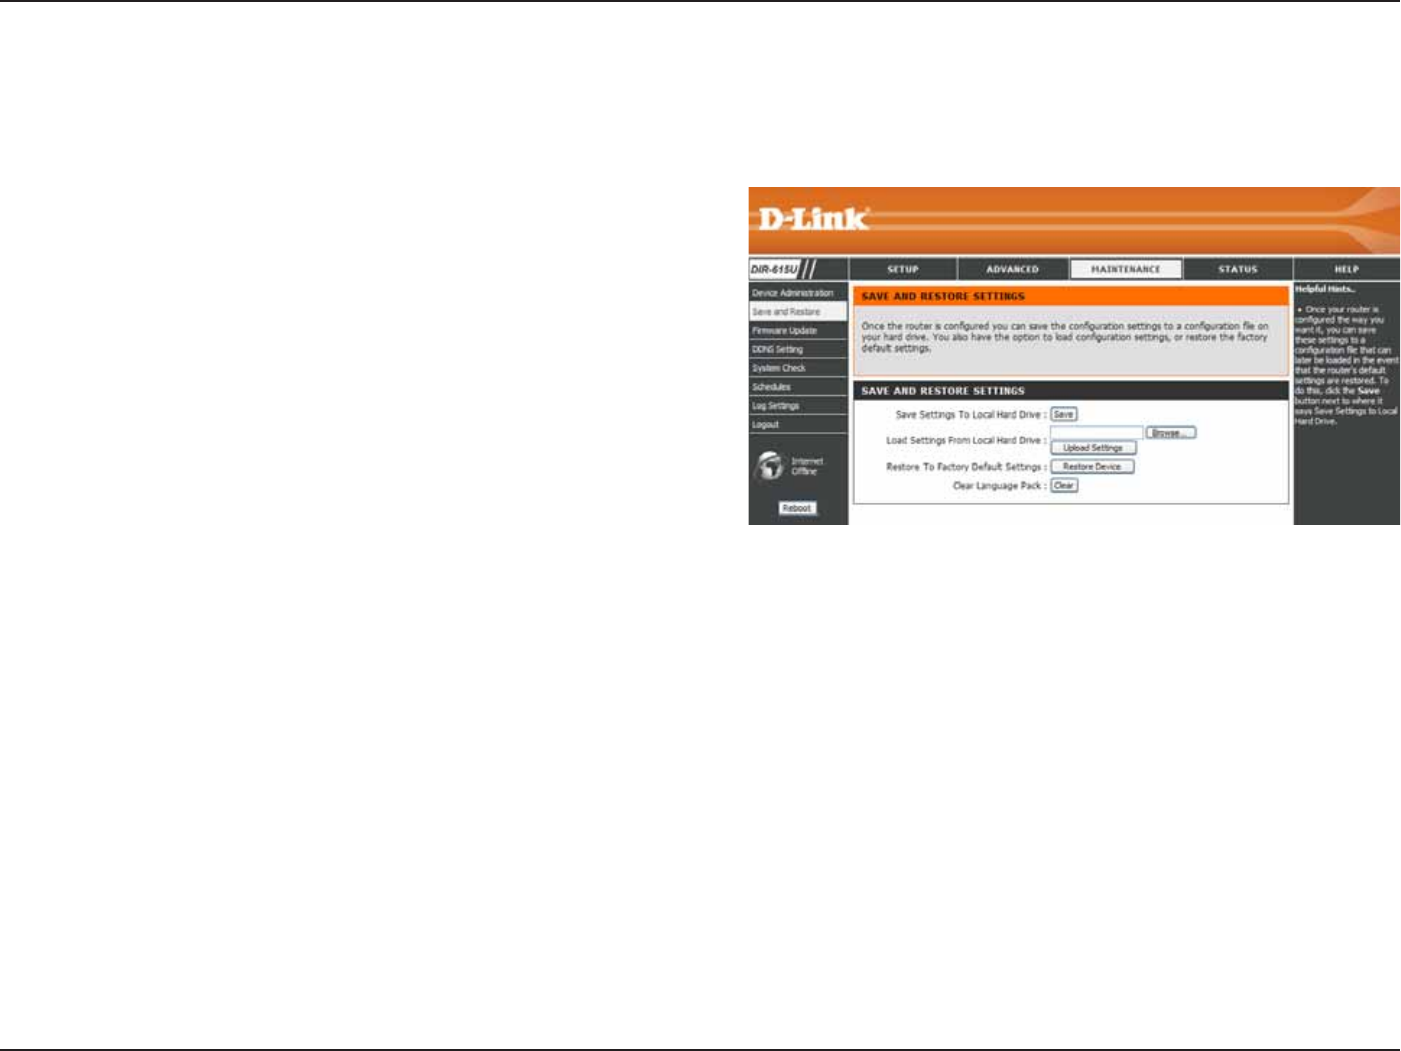
5CXGCPF4GUVQTG
Use this option to save the current router
EQPſIWTCVKQPUGVVKPIUVQCſNGQPVJGJCTFFKUMQHVJG
EQORWVGT[QWCTGWUKPI(KTUVENKEMVJG5CXG button.
;QWYKNNVJGPUGGCſNGFKCNQIYJGTG[QWECPUGNGEV
CNQECVKQPCPFſNGPCOGHQTVJGUGVVKPIU
Use this option to load previously saved router
EQPHKIWTCVKQP UGVVKPIU (KTUV WUG VJG $TQYUG
EQPVTQNVQſPFCRTGXKQWUN[UCXGſNGQHEQPſIWTCVKQP
UGVVKPIU6JGPENKEMVJG7RNQCF5GVVKPIUbutton to
transfer those settings to the Router.
6JKU QRVKQP YKNN TGUVQTG CNN EQPſIWTCVKQP UGVVKPIU
back to the settings that were in effect at the time
the router was shipped from the factory. Any settings
VJCVJCXGPQVDGGPUCXGFYKNNDGNQUVKPENWFKPICP[
rules that you have created. If you want to save the
EWTTGPVTQWVGTEQPſIWTCVKQPUGVVKPIUWUGVJG5CXG
button above.
Click the 4GDQQV button on the left side of the
window to restart the Router.
5CXG5GVVKPIU
VQ.QECN*CTF
&TKXG
.QCF5GVVKPIU
HTQO.QECN
*CTF&TKXG
4GUVQTGVQ
(CEVQT[&GHCWNV
5GVVKPIU
4GDQQVU
6JKUYKPFQYCNNQYU[QWVQUCXG[QWTEQPſIWTCVKQPſNGVQCJCTFFTKXGNQCFEQPſIWTCVKQPUGVVKPIUHTQOCJCTFFTKXG
and restore the Router’s factory default settings.
49D-Link DIR-615 User Manual
5GEVKQP%QPſIWTCVKQP
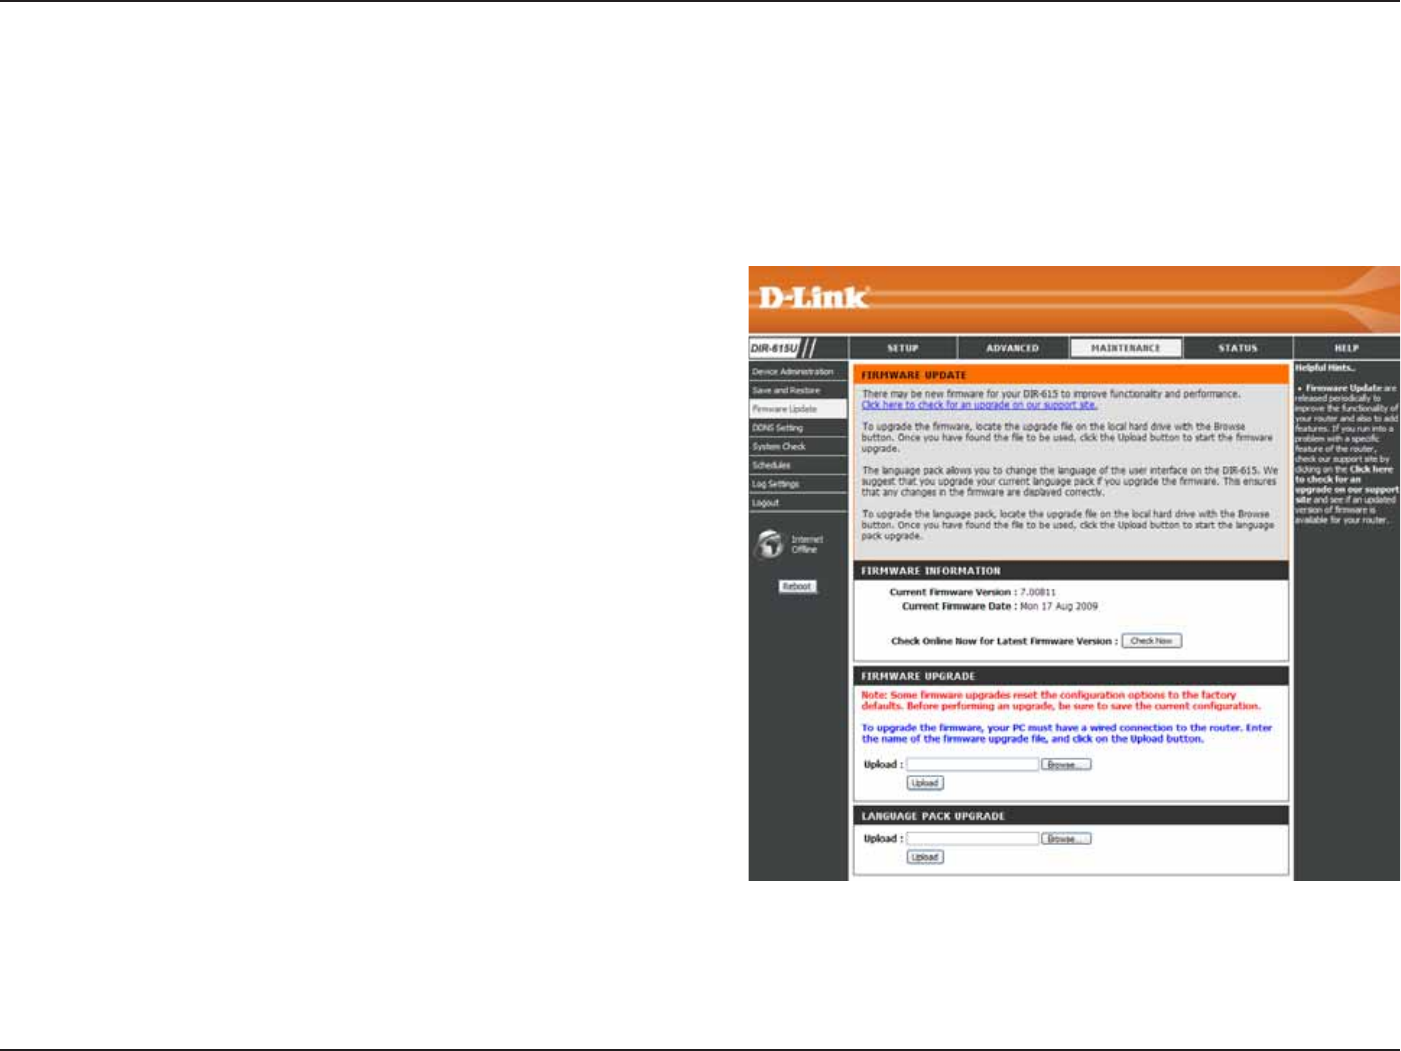
(KTOYCTG7RFCVG
Click the %JGEM0QY button (or the link at the top
QHVJG YKPFQY VQ ſPF QWV KH VJGTG KU CP WRFCVGF
ſTOYCTGKHUQFQYPNQCFVJGPGYſTOYCTGVQ[QWT
hard drive.
#HVGT [QW JCXG FQYPNQCFGF VJG PGY ſTOYCTG
click $TQYUGKPVJKUYKPFQYVQNQECVGVJGſTOYCTG
update on your hard drive. Click 5CXG5GVVKPIU to
EQORNGVGVJGſTOYCTGWRITCFG
(KTOYCTG
7RITCFG
$TQYUG
;QWECPWRITCFGVJGſTOYCTGQHVJG4QWVGTJGTG/CMGUWTGVJGſTOYCTG[QWYCPVVQWUGKUQPVJGNQECNJCTFFTKXGQH
the computer. Click on $TQYUGVQNQECVGVJGſTOYCTGſNGVQDGWUGFHQTVJGWRFCVG2NGCUGEJGEMVJG&.KPMUWRRQTV
UKVGHQTſTOYCTGWRFCVGUCVJVVRUWRRQTVFNKPMEQO;QWECPFQYPNQCFſTOYCTGWRITCFGUVQ[QWTJCTFFTKXGHTQOVJG
D-Link support site.
50D-Link DIR-615 User Manual
5GEVKQP%QPſIWTCVKQP
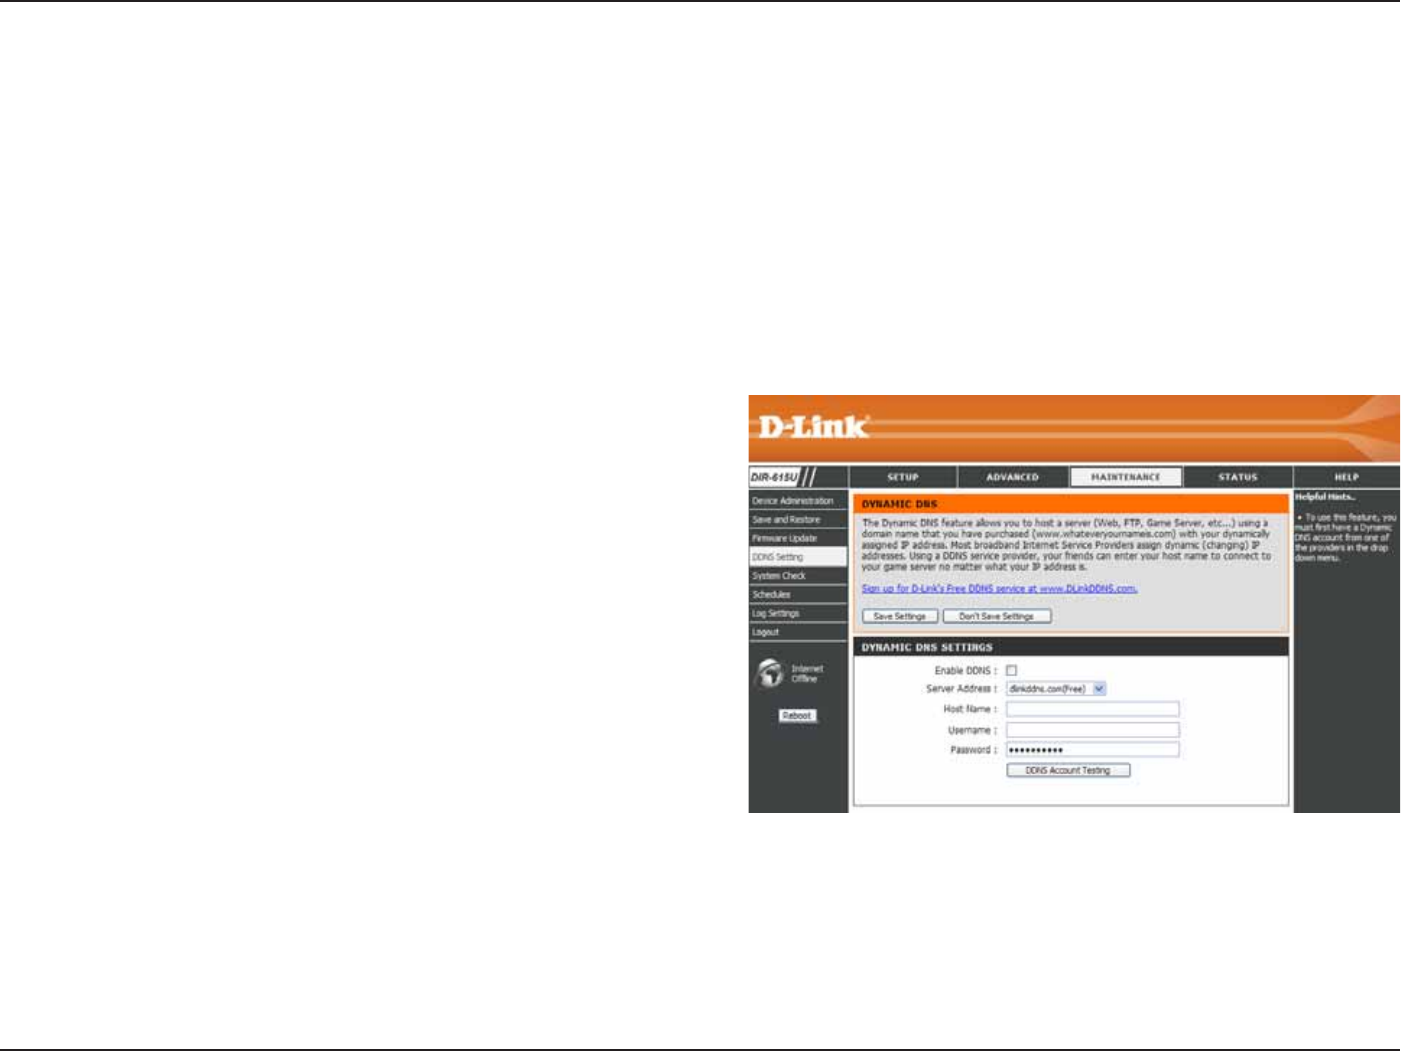
&&055GVVKPI
6KEMVJG'PCDNG&&05EJGEMDQZVQGPCDNGUWRRQTV
for DDNS.
Select one of the DDNS registration organizations
form those listed in the pull-down menu. Available
servers include dlinkddns.com(Free), DynDns.
org(Custom), Dyn.Dns.org(free), and Dyn.Dns.
org(Static).
Enter the host name of the DDNS server.
Enter the username given to you by your DDNS
server.
Enter the password or key given to you by your
DDNS server.
'PCDNG&&05
5GTXGT
#FFTGUU
*QUV0COG
7UGTPCOG
2CUUYQTF
The router supports DDNS (Dynamic Domain Name Service). The Dynamic DNS service allows a dynamic public IP
CFFTGUUVQDGCUUQEKCVGFYKVJCUVCVKEJQUVPCOGKPCP[QHVJGOCP[FQOCKPUCNNQYKPICEEGUUVQCURGEKſGFJQUVHTQO
various locations on the Internet. This is enabled to allow remote access to a host by clicking a hyperlinked URL in the
HQTOőJQUVPCOGF[PFPUQTIŒ/CP[+52UCUUKIPRWDNKE+2CFFTGUUGUWUKPI&*%2VJKUECPOCMGKVFKHſEWNVVQNQECVG
CURGEKſEJQUVQPVJG.#0WUKPIUVCPFCTF&05+HHQTGZCORNG[QWCTGTWPPKPICRWDNKEYGDUGTXGTQT820UGTXGTQP
[QWT.#0VJKUGPUWTGUVJCVVJGJQUVECPDGNQECVGFHTQOVJG+PVGTPGVKHVJGRWDNKE+2CFFTGUUEJCPIGU&&05TGSWKTGU
that an account be setup with one of the supported DDNS providers.
51D-Link DIR-615 User Manual
5GEVKQP%QPſIWTCVKQP
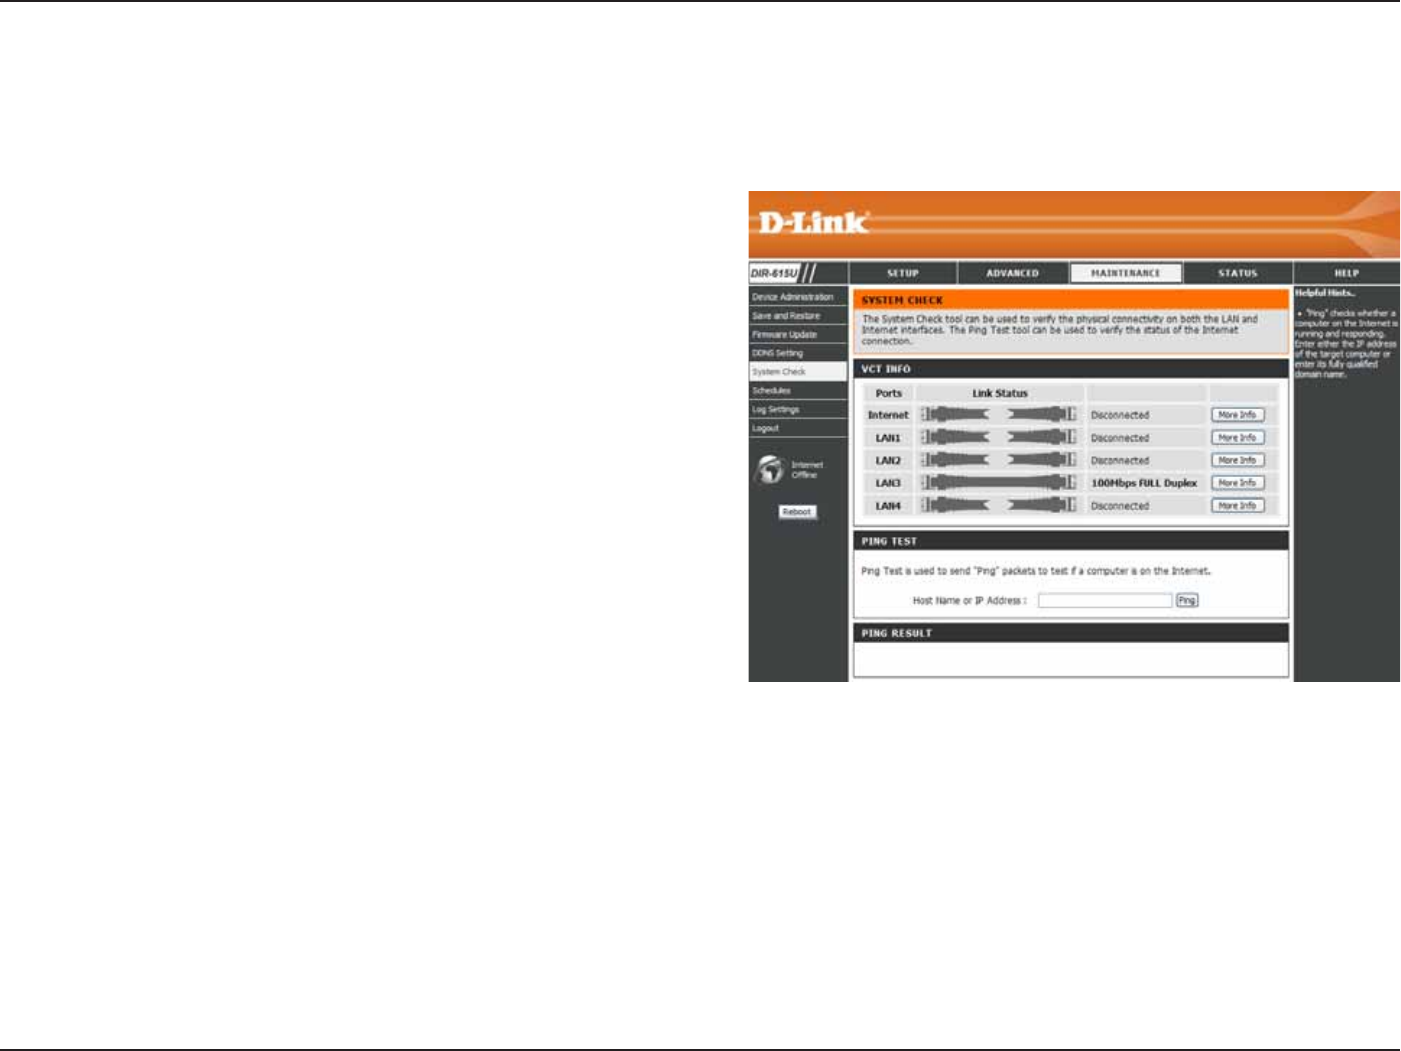
5[UVGO%JGEM
VCT is an advanced feature that integrates a
LAN cable tester on every Ethernet port on the
router. Through the graphical user interface
)7+ 8%6 ECP DG WUGF VQ TGOQVGN[ FKCIPQUG
CPF TGRQTV ECDNG HCWNVU UWEJ CU QRGPU UJQTVU
UYCRU CPF KORGFCPEG OKUOCVEJ 6JKU HGCVWTG
UKIPKſECPVN[TGFWEGUUGTXKEGECNNUCPFTGVWTPUD[
allowing users to easily troubleshoot their cable
connections.
The Ping Test is used to send Ping packets to
test if a computer is on the Internet. Enter the IP
#FFTGUUVJCV[QWYKUJVQ2KPICPFENKEMPing.
8KTVWCN%CDNG
6GUVGT8%6
+PHQ
2KPI6GUV
This tool is used to verify the physical connectivity on both the LAN and the WAN interfaces. The Ping Test can be
used to test the status of the Internet.
52D-Link DIR-615 User Manual
5GEVKQP%QPſIWTCVKQP
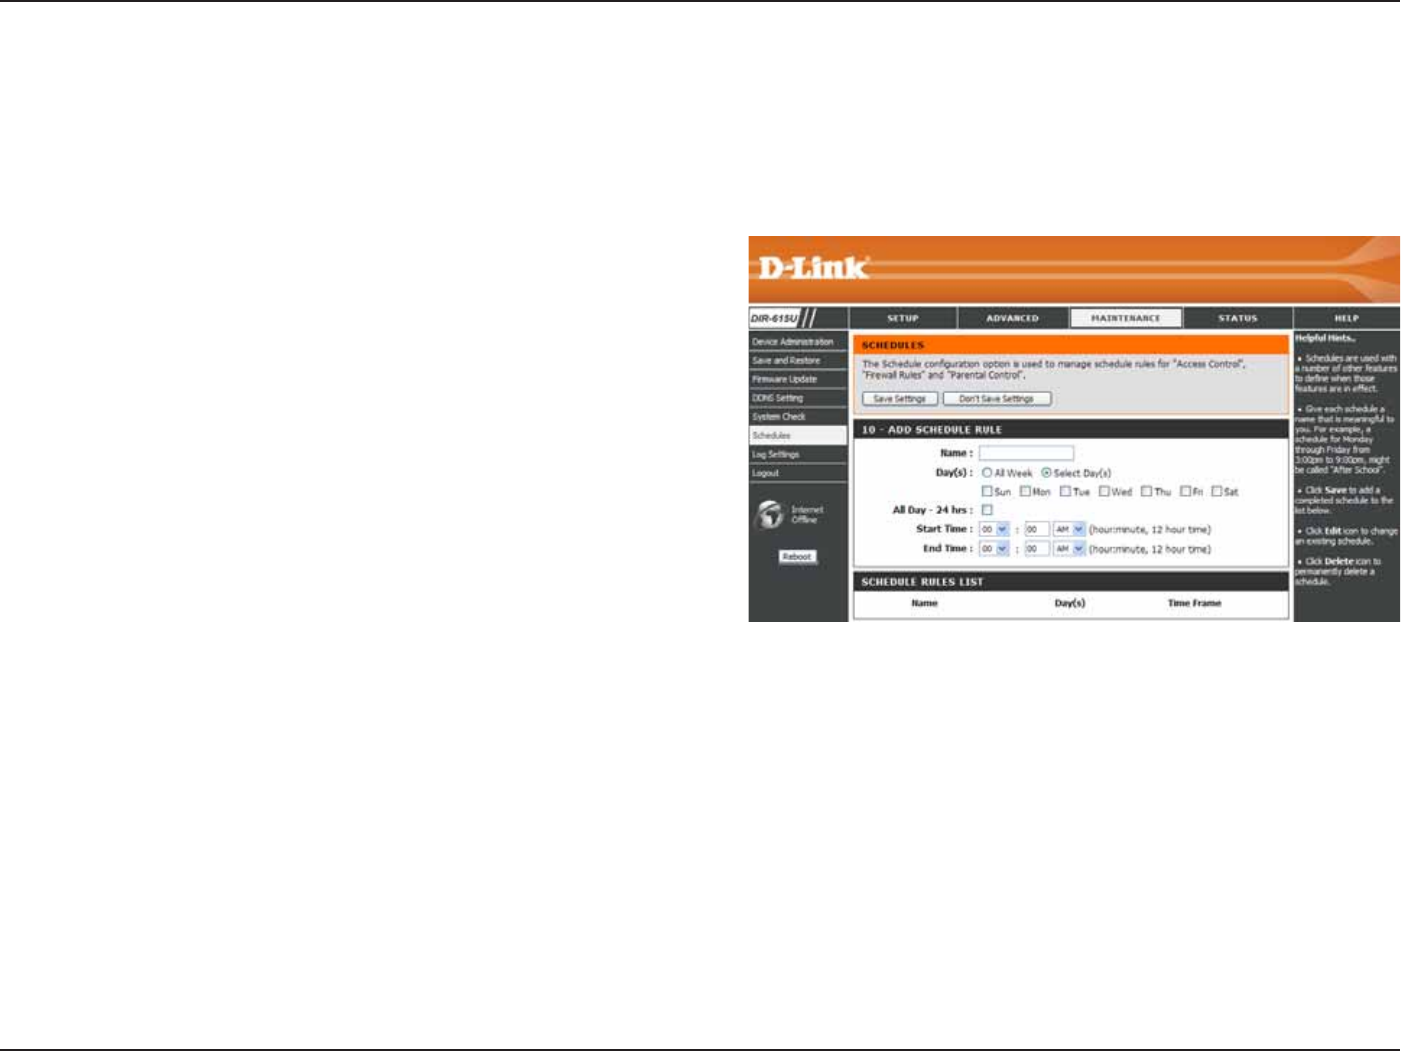
5EJGFWNGU
Enter a name for the new schedule rule.
%JQQUG VJG FGUKTGF FC[U GKVJGT #NN 9GGM QT
5GNGEV&C[U+HVJGNCVVGTKUUGNGEVGFRNGCUGWUGVJG
EJGEMDQZGUFKTGEVN[DGNQYVQURGEKH[VJGKPFKXKFWCN
days.
6KEMVJKUEJGEMDQZKHVJGPGYUEJGFWNGTWNGCRRNKGU
to the full 24-hour period.
If the new schedule rule does not apply to the full
JQWTRGTKQFWPVKEMVJGRTGXKQWUEJGEMDQZCPF
VJGPGPVGTCURGEKſEDGIKPPKPICPFGPFKPIVKOG
0COG
&C[U
#NN&C[JTU
5VCTV6KOG
'PF6KOG
6JG4QWVGTCNNQYUVJGWUGTVJGCDKNKV[VQOCPCIGUEJGFWNGTWNGUHQTXCTKQWUſTGYCNNCPFRCTGPVCNEQPVTQNHGCVWTGUQP
VJKUYKPFQY1PEG[QWJCXGſPKUJGFEQPſIWTKPIVJGPGYUEJGFWNGTWNGENKEMVJG5CXG5GVVKPIU button at the top of
the window.
53D-Link DIR-615 User Manual
5GEVKQP%QPſIWTCVKQP
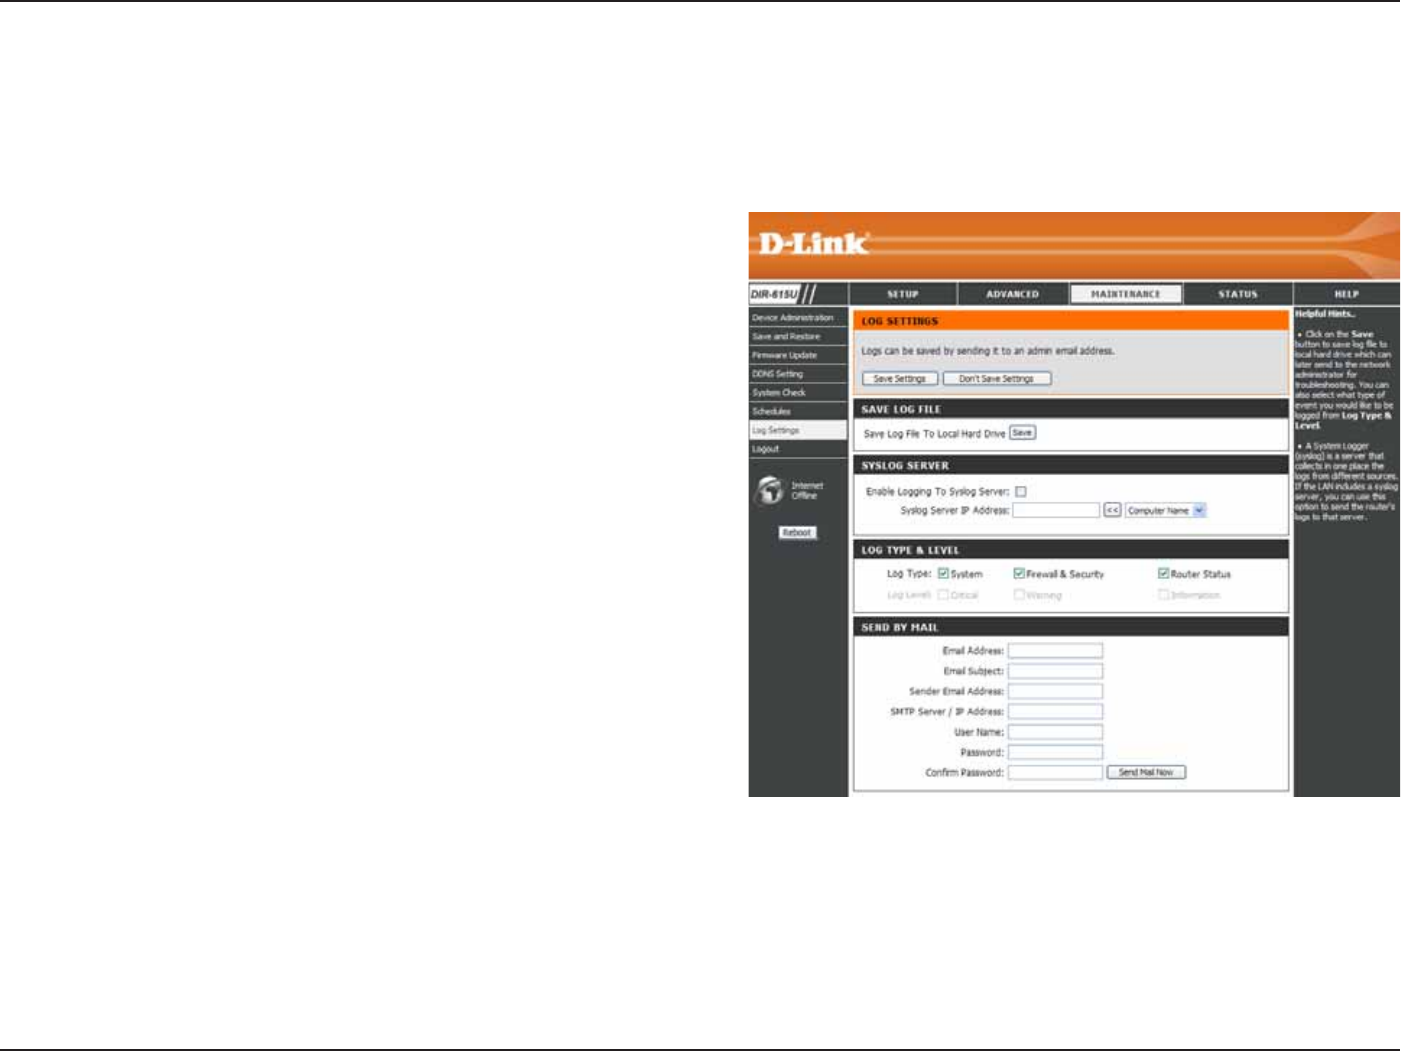
.QI5GVVKPIU
Click on the 5CXG button link on this window to
UCXGVJGNQIſNGVQ[QWTNQECNJCTFFTKXG
ENKEMVJGEJGEMDQZVQUCXGVJGNQIKPVJGNQIUGTXGT
in the LAN side.
%NKEMVJGEJGEMDQZGUQHVJGV[RGQHNQIKPHQTOCVKQP
requested: ő5[UVGO(KTGYCNN5GEWTKV[4QWVGT
5VCVWU%TKVKECN9CTPKPICPF+PHQTOCVKQPŒ
Enter the your SNTP server name(or IP address)
and enter your mail address before sending your
system log by mail.
5CXG.QI(KNG
5[UNQI5GTXGT
.QI6[RG
.GXGN
5GPFD[/CKN
6JGU[UVGONQIFKURNC[UEJTQPQNQIKECNGXGPVNQIFCVCURGEKſGFD[VJGTQWVGTWUGT;QWOC[CNUQUCXGCUKORNGVGZVſNG
containing the log to your computer. Click the 5CXGDWVVQPCPFHQNNQYVJGRTQORVUVQUCXGVJGſNG
54D-Link DIR-615 User Manual
5GEVKQP%QPſIWTCVKQP
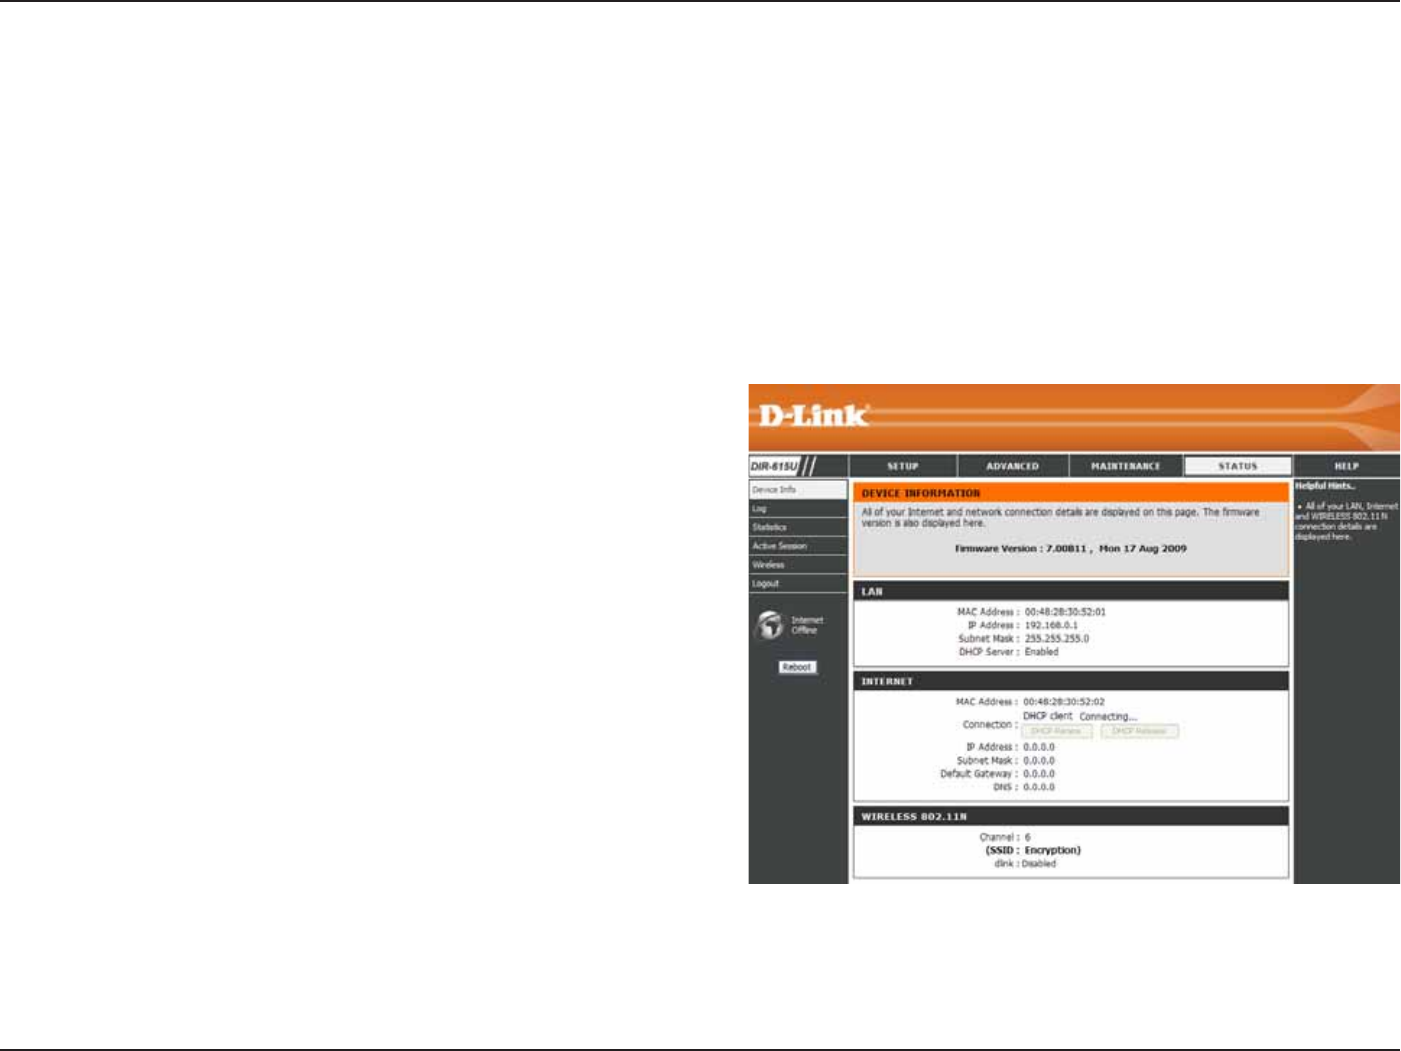
&GXKEG+PHQ
6JKU YKPFQY FKURNC[U VJG EWTTGPV KPHQTOCVKQP HQT VJG &+4 +V YKNN FKURNC[ VJG .#0 9#0 CPF 9KTGNGUU
information.
If your WAN connection is set up for a Dynamic IP address then a &*%2 4GNGCUG button and a &*%2 4GPGY button
will be displayed. Use &*%24GNGCUG to disconnect from your ISP and use &*%24GPGY to connect to your ISP.
+H[QWT 9#0EQPPGEVKQP KUUGVWR HQT222Q' CConnect button and a &KUEQPPGEV button will be displayed. Use
&KUEQPPGEV to drop the PPPoE connection and use Connect to establish the PPPoE connection.
Displays the MAC address and the private (local)
IP settings for the router.
Displays the MAC address and the public IP
settings for the router.
Displays the wireless MAC address and your
YKTGNGUU UGVVKPIU UWEJ CU 55+& %JCPPGN CPF
Encryption status.
.#0
9#0
9KTGNGUU
0
55D-Link DIR-615 User Manual
5GEVKQP%QPſIWTCVKQP
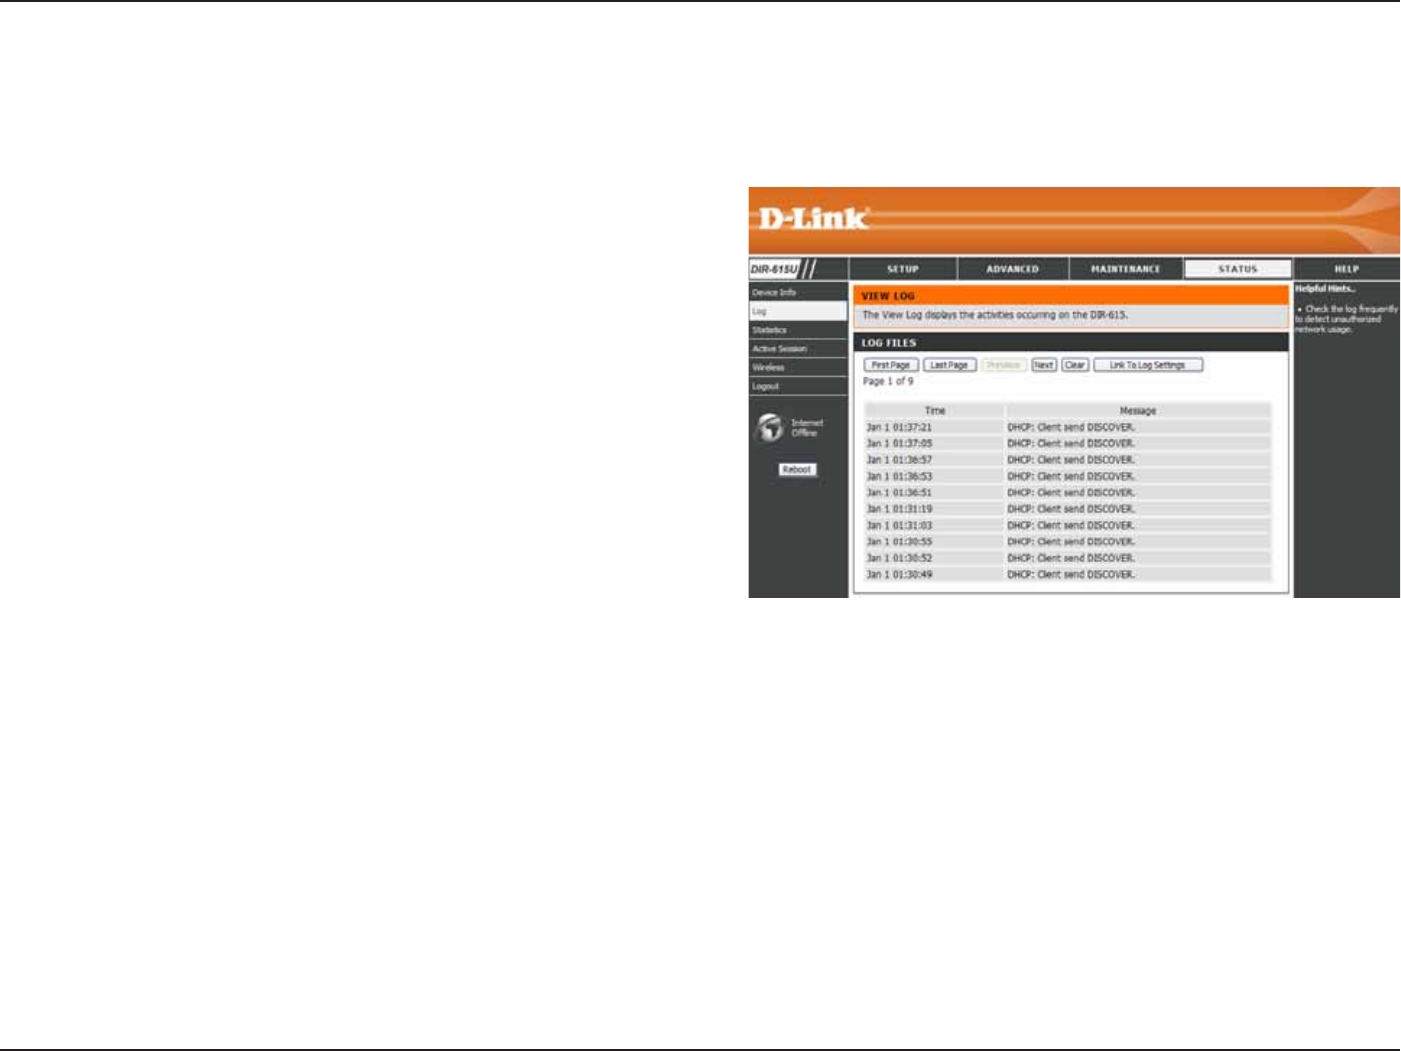
Log
(KTUV2CIG
.CUV2CIG
2TGXKQWU
0GZV
%NGCT
Link to Log
5GVVKPIU
8KGYVJGſTUVRCIGQHVJGNQI
View the last page of the log.
View the previous page.
8KGYVJGPGZVRCIG
Clear the log.
Click this button to go directly to the Log Settings
window (/CKPVGPCPEG > .QI5GVVKPIU).
This window allows you to view a log of activities on the Router. This is especially helpful detecting unauthorized
network usage.
56D-Link DIR-615 User Manual
5GEVKQP%QPſIWTCVKQP
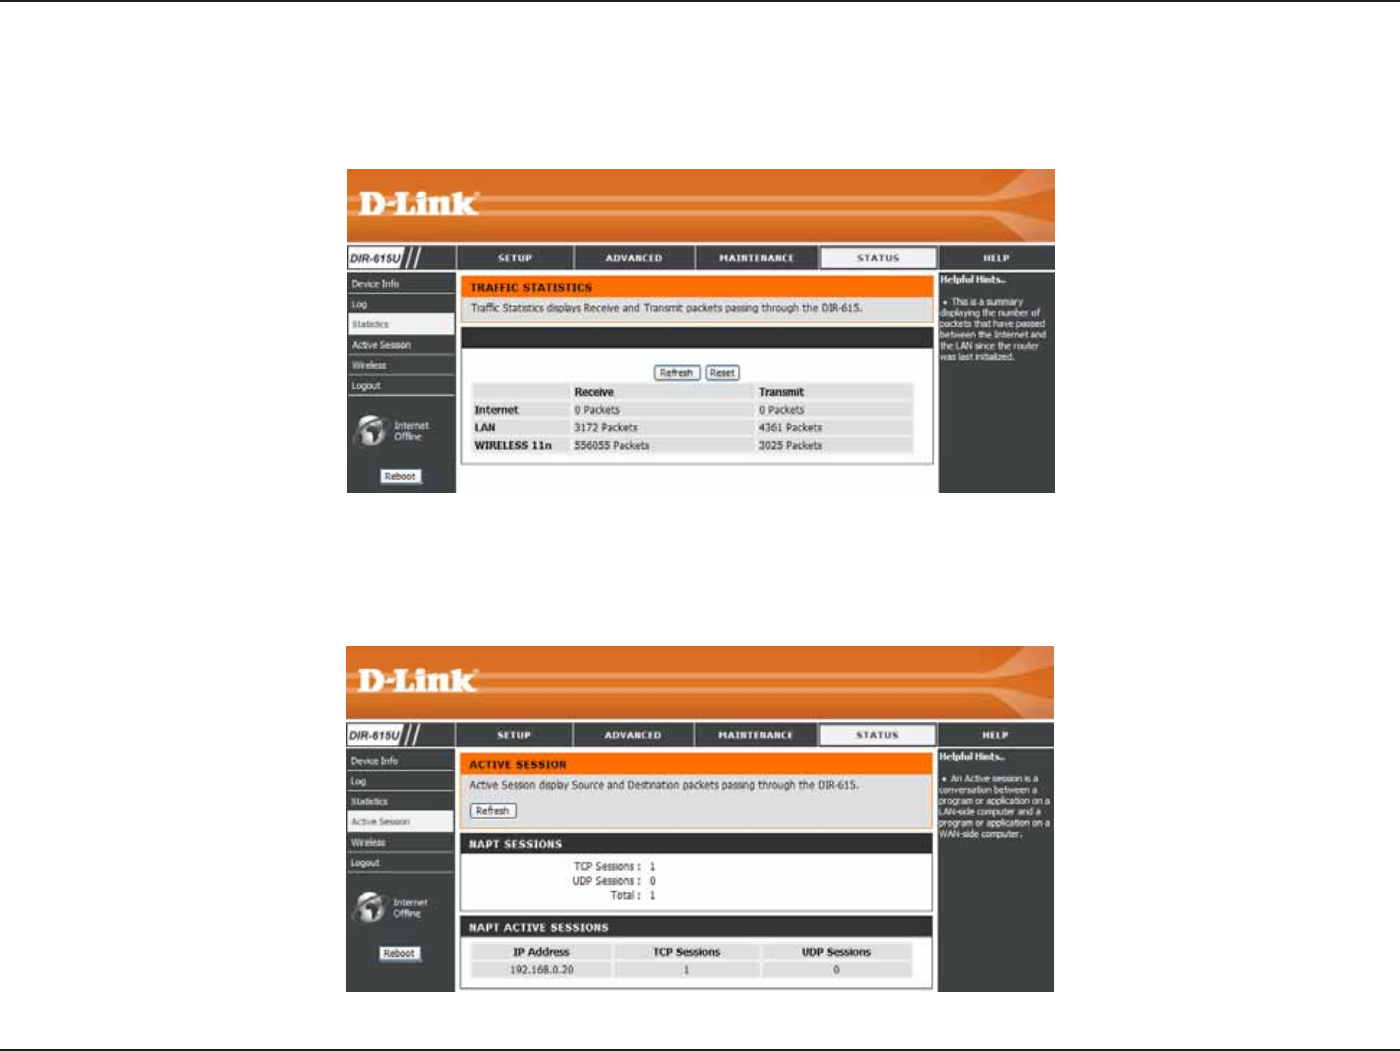
5VCVKUVKEU
#EVKXG5GUUKQP
6JGYKPFQYDGNQYFKURNC[UVJG6TCHſE5VCVKUVKEU*GTG[QWECPXKGYVJGCOQWPVQHRCEMGVUVJCVRCUUVJTQWIJVJG&+4
QPDQVJVJG9#0CPFVJG.#0RQTVU6JGVTCHſEEQWPVGTYKNNTGUGVKHVJGFGXKEGKUTGDQQVGF
The NAPT Active Session table displays a list of all active conversations between WAN computers and LAN computers.
57D-Link DIR-615 User Manual
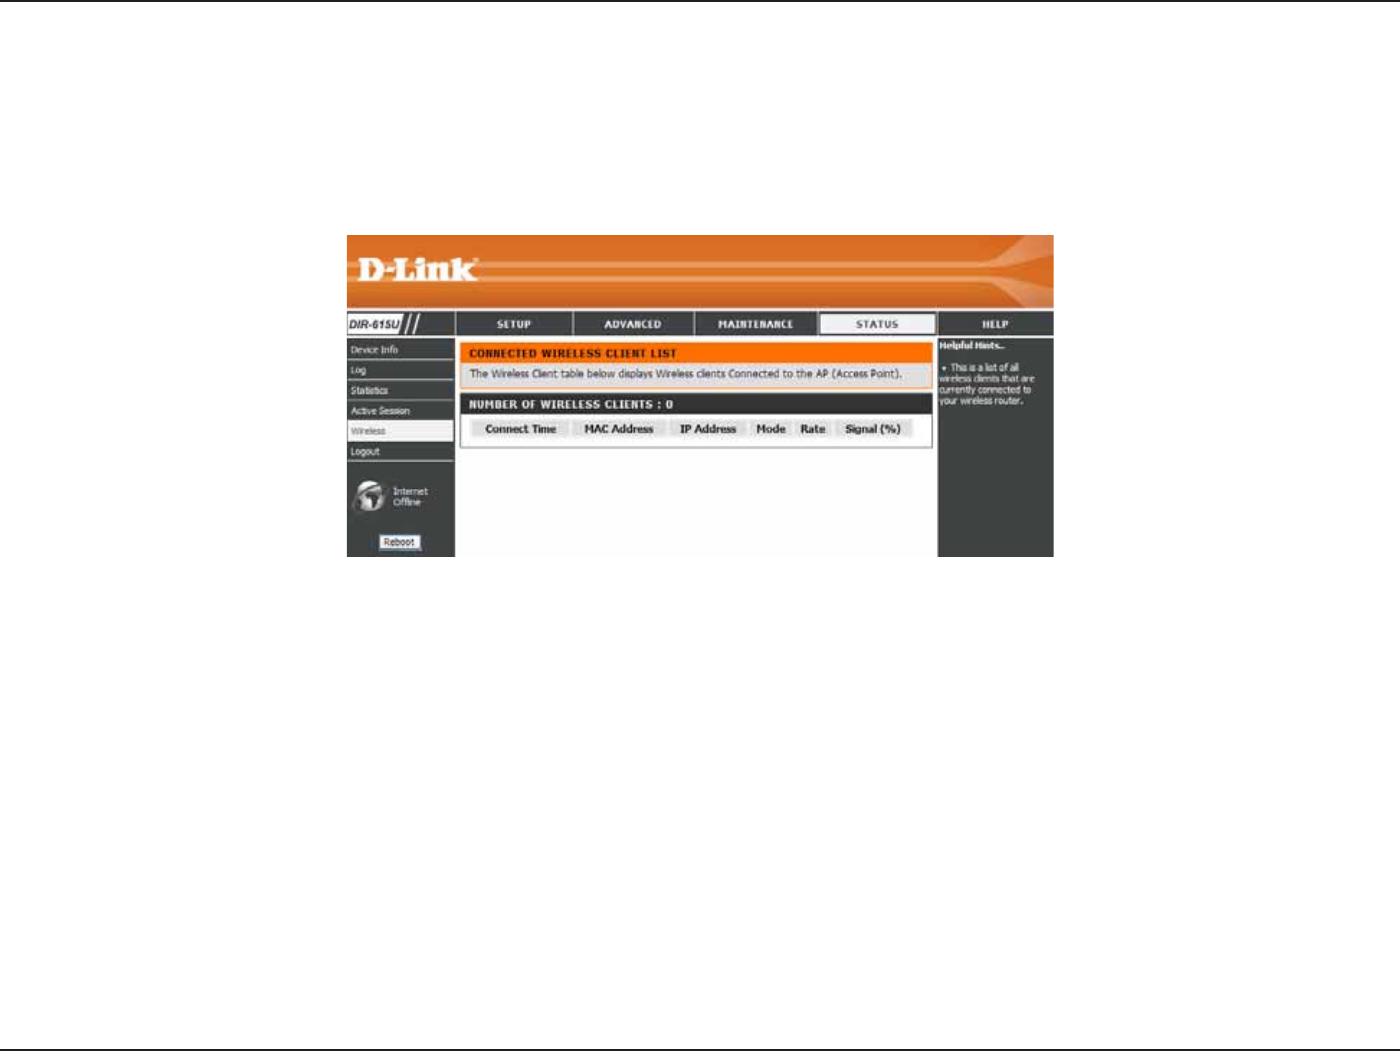
5GEVKQP%QPſIWTCVKQP
9KTGNGUU
The wireless client table displays a list of current connected wireless clients. This table also displays the connection
time and MAC address of the connected wireless client.
58D-Link DIR-615 User Manual
5GEVKQP%QPſIWTCVKQP
*GNR
Click the desired hyperlink to get more information about how to use the Router.

59D-Link DIR-615 User Manual
Section 4 - Security
9KTGNGUU5GEWTKV[
This section will show you the different levels of security you can use to protect your data from intruders. The
DIR-615 offers the following types of security:
Ŗ92#9K(K2TQVGEVGF#EEGUU Ŗ92#25-2TG5JCTGF-G[
Ŗ92#9K(K2TQVGEVGF#EEGUU Ŗ92#25-2TG5JCTGF-G[
Ŗ9'29KTGF'SWKXCNGPV2TKXCE[
9JCVKU9'2!
WEP stands for Wired Equivalent Privacy. It is based on the IEEE 802.11 standard and uses the RC4 encryption
algorithm. WEP provides security by encrypting data over your wireless network so that it is protected as it is transmitted
from one wireless device to another.
6QICKPCEEGUUVQC9'2PGVYQTM[QWOWUVMPQYVJGMG[6JGMG[KUCUVTKPIQHEJCTCEVGTUVJCV[QWETGCVG9JGP
WUKPI9'2[QWOWUVFGVGTOKPGVJGNGXGNQHGPET[RVKQP6JGV[RGQHGPET[RVKQPFGVGTOKPGUVJGMG[NGPIVJDKV
GPET[RVKQPTGSWKTGUCNQPIGTMG[VJCPDKVGPET[RVKQP-G[UCTGFGſPGFD[GPVGTKPIKPCUVTKPIKP*':JGZCFGEKOCN
WUKPIEJCTCEVGTU#(QT#5%++#OGTKECP5VCPFCTF%QFGHQT+PHQTOCVKQP+PVGTEJCPIGŌCNRJCPWOGTKEEJCTCEVGTU
format. ASCII format is provided so you can enter a string that is easier to remember. The ASCII string is converted to
*':HQTWUGQXGTVJGPGVYQTM(QWTMG[UECPDGFGſPGFUQVJCV[QWECPEJCPIGMG[UGCUKN[
60D-Link DIR-615 User Manual
Section 4 - Security
%QPſIWTG9'2
It is recommended to enable encryption on your wireless router before your wireless network adapters. Please establish
wireless connectivity before enabling encryption. Your wireless signal may degrade when enabling encryption due to
the added overhead.
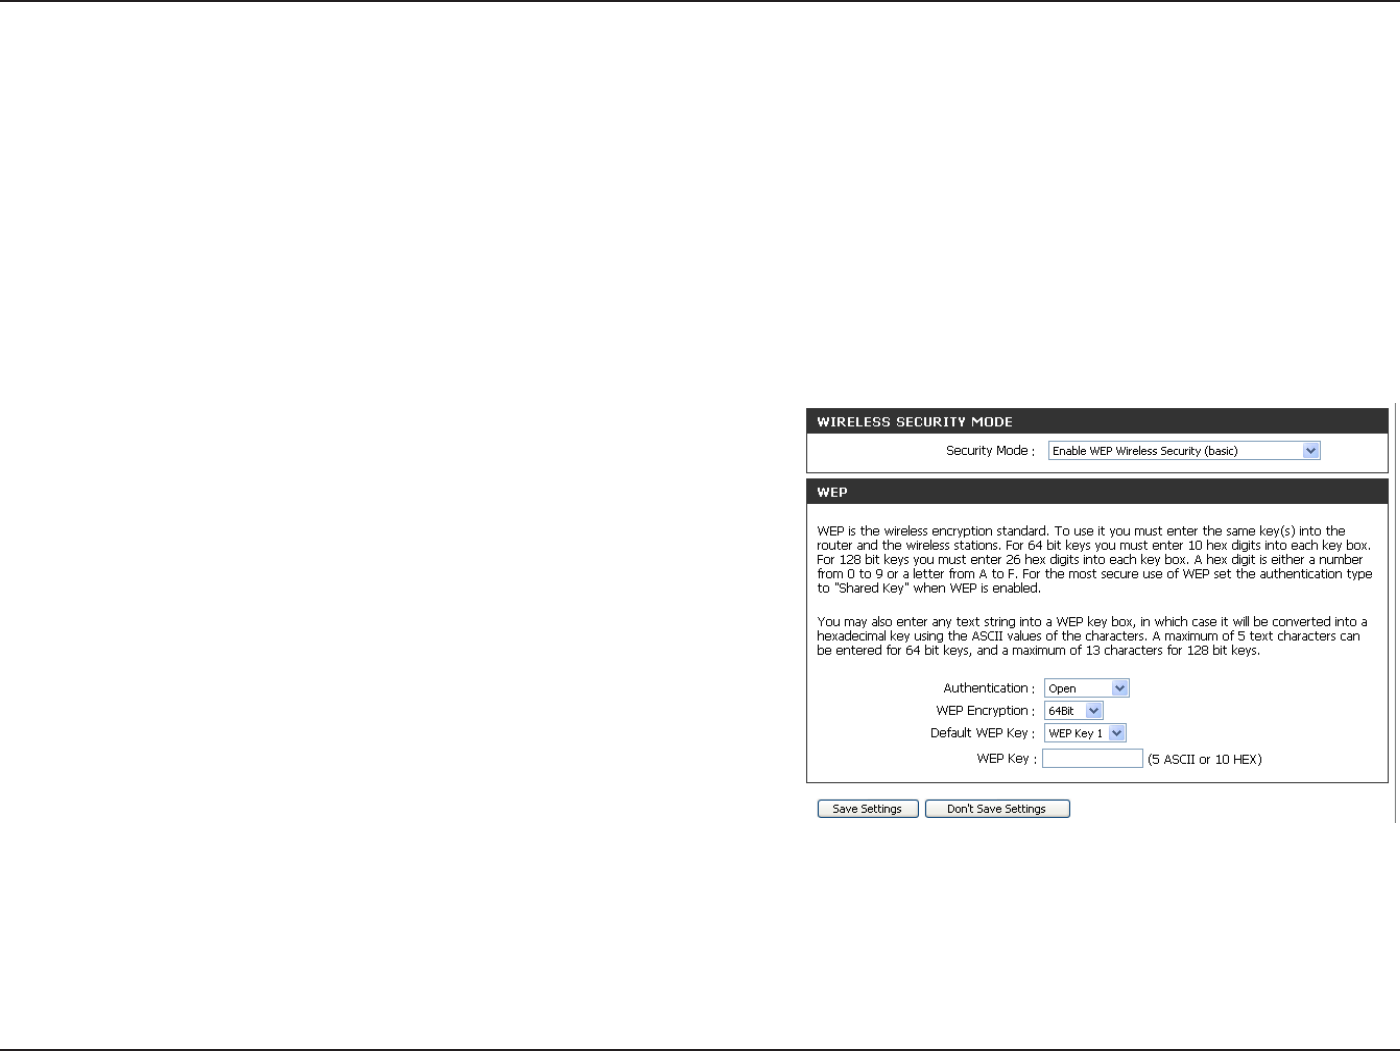
1. .QIKPVQVJGYGDDCUGFEQPſIWTCVKQPD[QRGPKPICYGDDTQYUGTCPFGPVGTKPIVJG+2CFFTGUUQHVJGTQWVGT
Click on9KTGNGUU5GVWR on the left side.
0GZVVQ5GEWTKV[/QFGUGNGEVEnable WEP Wireless Security (basic).
3. 0GZV VQ #WVJGPVKECVKQP UGNGEV GKVJGT Shared Key or Open.
Shared Key is recommended as it provides greater security
when WEP is enabled.
4. Select either 64Bit or 128Bit encryption from the drop-down
OGPWPGZVVQ9'2'PET[RVKQP.
5. 0GZVVQ&GHCWNV-G[6[RGUGNGEVWEP Key 1 and enter a WEP
MG[VJCV[QWETGCVG/CMGUWTG[QWGPVGTVJKUMG[GZCEVN[QP
all your wireless devices. You may enter up to four different
keys either using Hex or ASCII.Hex is recommended (letters
A-F and numbers 0-9 are valid). In ASCII all numbers and letters
are valid.
6. Click 5CXG5GVVKPIUVQUCXG[QWTUGVVKPIU+H[QWCTGEQPſIWTKPIVJGTQWVGTYKVJCYKTGNGUUCFCRVGT[QWYKNNNQUG
connectivity until you enable WEP on your adapter and enter the same WEP key as you did on the router.

61D-Link DIR-615 User Manual
Section 4 - Security
9JCVKU92#!
92#QT9K(K2TQVGEVGF#EEGUUKUC9K(KUVCPFCTFVJCVYCUFGUKIPGFVQKORTQXGVJGUGEWTKV[HGCVWTGUQH9'29KTGF
Equivalent Privacy).
6JGVYQOCLQTKORTQXGOGPVUQXGT9'2
Ŗ+ORTQXGFFCVCGPET[RVKQPVJTQWIJVJG6GORQTCN-G[+PVGITKV[2TQVQEQN6-+26-+2UETCODNGUVJGMG[U
WUKPICJCUJKPICNIQTKVJOCPFD[CFFKPICPKPVGITKV[EJGEMKPIHGCVWTGGPUWTGUVJCVVJGMG[UJCXGPŏV
been tampered with. WPA2 is based on 802.11i and uses Advanced Encryption Standard (AES) instead
QH6-+2
Ŗ7UGTCWVJGPVKECVKQPYJKEJKUIGPGTCNN[OKUUKPIKP9'2VJTQWIJVJGGZVGPUKDNGCWVJGPVKECVKQPRTQVQEQN
'#29'2 TGIWNCVGUCEEGUU VQC YKTGNGUUPGVYQTM DCUGF QPC EQORWVGTŏUJCTFYCTGURGEKſE /#%
CFFTGUUYJKEJKUTGNCVKXGN[UKORNGVQDGUPKHHGFQWVCPFUVQNGP'#2KUDWKNVQPCOQTGUGEWTGRWDNKEMG[
encryption system to ensure that only authorized network users can access the network.
92#25-92#25-WUGUCRCUURJTCUGQTMG[VQCWVJGPVKECVG[QWTYKTGNGUUEQPPGEVKQP6JGMG[KUCPCNRJCPWOGTKE
password between 8 and 63 characters long. The password can include symbols (!?*&_) and spaces. This key must
DGVJGGZCEVUCOGMG[GPVGTGFQP[QWTYKTGNGUUTQWVGTQTCEEGUURQKPV
92#92#KPEQTRQTCVGUWUGTCWVJGPVKECVKQPVJTQWIJVJG'ZVGPUKDNG#WVJGPVKECVKQP2TQVQEQN'#2'#2KUDWKNVQPC
more secure public key encryption system to ensure that only authorized network users can access the network.
62D-Link DIR-615 User Manual
Section 4 - Security
%QPſIWTG92#25-CPF92#25-
It is recommended to enable encryption on your wireless Router before your wireless network adapters. Please establish
wireless connectivity before enabling encryption. Your wireless signal may degrade when enabling encryption due to
the added overhead.
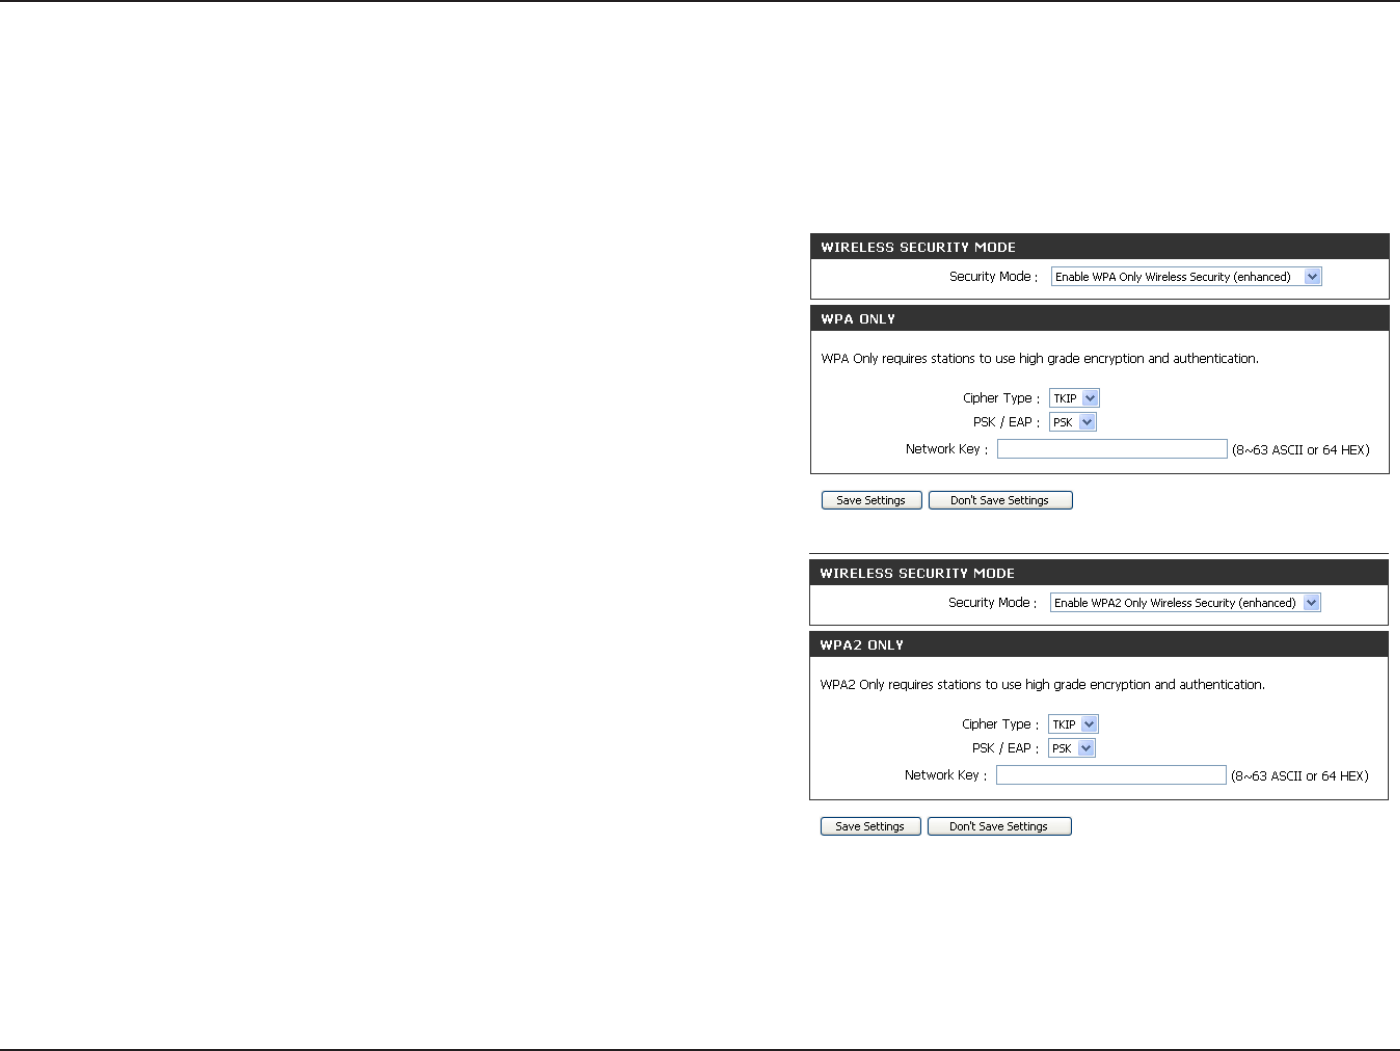
1. .QIKPVQVJGYGDDCUGFEQPſIWTCVKQPD[QRGPKPICYGDDTQYUGT
and entering the IP address of the router (192.168.0.1). Click on
9KTGNGUU5GVWR on the left side.
0GZV VQ 5GEWTKV[ /QFG UGNGEV Enable WPA Only Wireless
Security (enhanced) or Enable WPA2 Only Wireless Security
(enhanced).
3.0GZVVQ%KRJGT/QFGUGNGEVTKIPAESor Both.
4.0GZVVQ25-'#2UGNGEVPSK.
5.0GZVVQ0GVYQTM-G[GPVGTCMG[RCUURJTCUG6JGMG[KUCP
alpha-numeric password
between 8 and 63 characters long. The password can
include symbols (!?*&_) and spaces. Make sure you enter
VJKUMG[GZCEVN[VJGUCOGQPCNNQVJGTYKTGNGUUENKGPVU
6. Click 5CXG5GVVKPIUVQUCXG[QWTUGVVKPIU+H[QWCTGEQPſIWTKPI
VJG4QWVGTYKVJCYKTGNGUUCFCRVGT[QWYKNNNQUGEQPPGEVKXKV[WPVKN[QWGPCDNG92#25-QT92#25-QP[QWT
adapter and enter the same passphrase as you did on the Router.
63D-Link DIR-615 User Manual
Section 4 - Security
%QPſIWTG92#92#25-
It is recommended to enable encryption on your wireless Router before your wireless network adapters. Please establish
wireless connectivity before enabling encryption. Your wireless signal may degrade when enabling encryption due to
the added overhead.
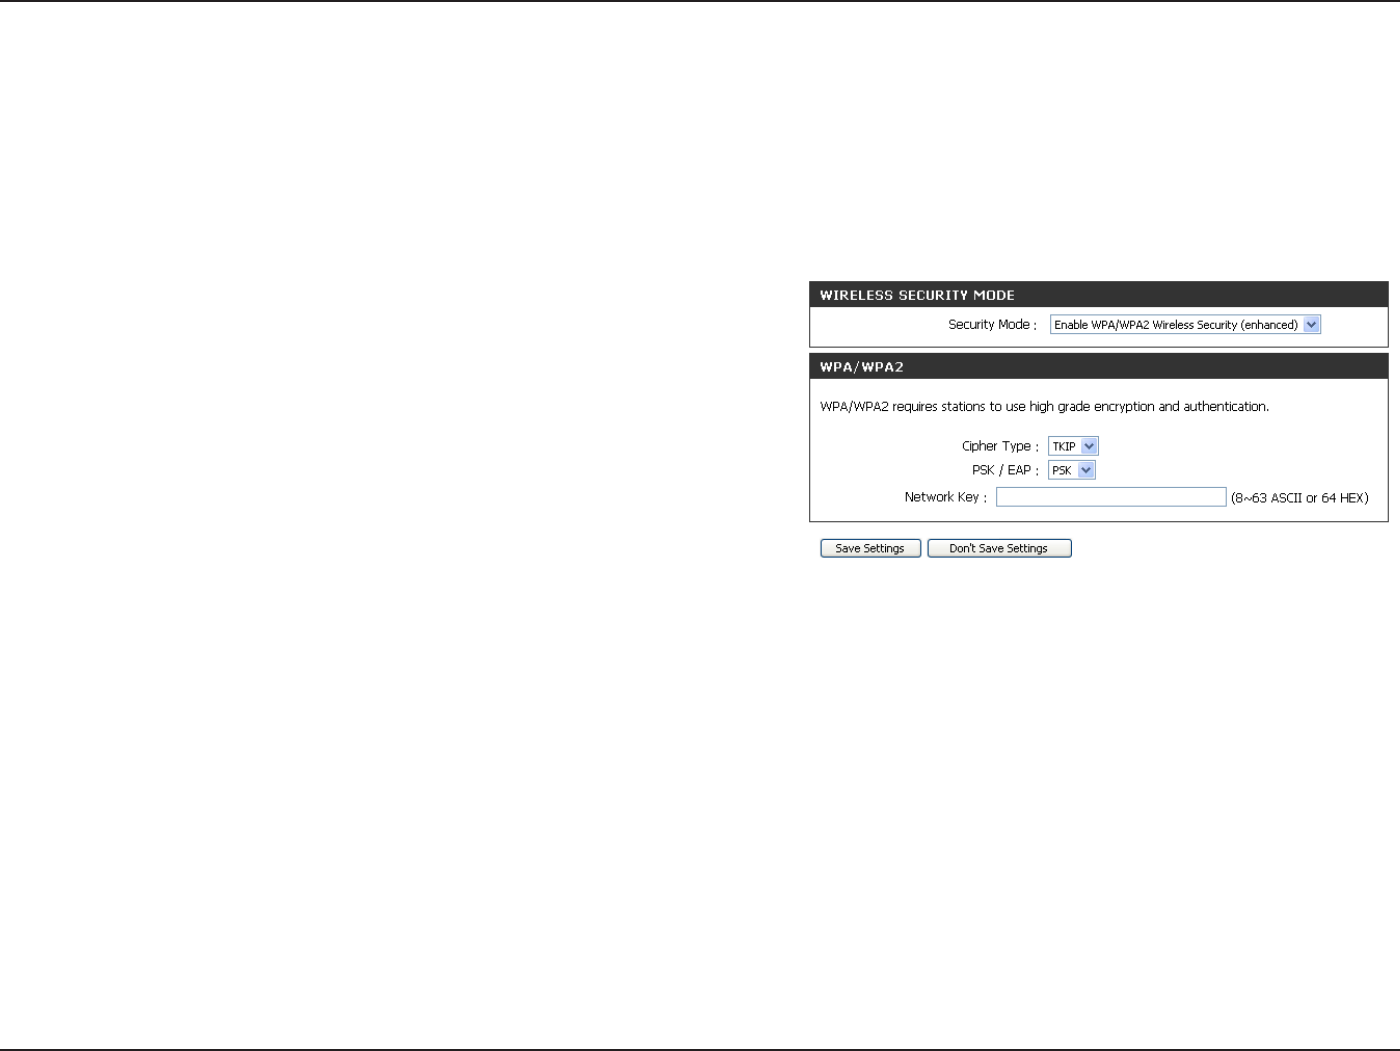
1. .QIKPVQVJGYGDDCUGFEQPſIWTCVKQPD[QRGPKPICYGDDTQYUGT
and entering the IP address of the router (192.168.0.1). Click on
9KTGNGUU5GVWR on the left side.
0GZV VQ 5GEWTKV[ /QFG UGNGEV Enable WPA/WPA2 Wireless
Security (enhanced).
3.0GZVVQ%KRJGT/QFGUGNGEVTKIPAESor Both.
4.0GZVVQ25-'#2UGNGEVPSK.
5.0GZVVQ0GVYQTM-G[GPVGTCMG[RCUURJTCUG6JGMG[KUCPCNRJCPWOGTKERCUUYQTF
between 8 and 63 characters long. The password can include symbols (!?*&_) and spaces.
/CMGUWTG[QWGPVGTVJKUMG[GZCEVN[VJGUCOGQPCNNQVJGTYKTGNGUUENKGPVU
6. Click 5CXG5GVVKPIUVQUCXG[QWTUGVVKPIU+H[QWCTGEQPſIWTKPIVJG4QWVGTYKVJCYKTGNGUUCFCRVGT[QWYKNNNQUG
EQPPGEVKXKV[WPVKN[QWGPCDNG92#92#25-QP[QWTCFCRVGTCPFGPVGTVJGUCOGRCUURJTCUGCU[QWFKFQPVJG
Router.
64D-Link DIR-615 User Manual
Section 4 - Security
%QPſIWTG92#92#CPF92#92#4#&+75
It is recommended to enable encryption on your wireless router before your wireless network adapters. Please establish
wireless connectivity before enabling encryption. Your wireless signal may degrade when enabling encryption due to
the added overhead.
1. .QIKPVQVJGYGDDCUGFEQPſIWTCVKQPD[QRGPKPICYGDDTQYUGTCPFGPVGTKPIVJG+2CFFTGUUQHVJGTQWVGT
Click on9KTGNGUU5GVVKPIU on the left side.
0GZVVQ5GEWTKV[/QFGUGNGEVEnable WPA Only Wireless Security (enhanced), Enable WPA2 Only Wireless Security
(enhanced), or Enable WPA/WPA2 Wireless Security (enhanced).
3.0GZVVQ%KRJGT6[RGUGNGEVTKIPAESor Auto.
4.0GZVVQ25-'#2UGNGEVEAP.
5.0GZVVQ4#&+755GTXGT enter the +2#FFTGUU of
your RADIUS server.
6.0GZVVQ2QTVGPVGTVJGRQTV[QWCTGWUKPIYKVJ[QWT
RADIUS server. 1812 is the default port.
7.0GZVVQ5JCTGF5GETGVGPVGTVJGUGEWTKV[MG[
8.+H[QWJCXGCUGEQPFCT[4#&+75UGTXGTGPVGTKVU+2
CFFTGUURQTVCPFUGETGVMG[
9. Click 5CXG5GVVKPIU to save your settings.
65D-Link DIR-615 User Manual
Section 5 - Connecting to a Wireless Network
%QPPGEVVQC9KTGNGUU0GVYQTM
7UKPI9KPFQYU® XP
Windows®:2WUGTUOC[WUGVJGDWKNVKPYKTGNGUUWVKNKV[<GTQ%QPſIWTCVKQP7VKNKV[6JGHQNNQYKPIKPUVTWEVKQPUCTGHQT
Service Pack 2 users. If you are using another company’s utility or Windows®RNGCUGTGHGTVQVJGWUGTOCPWCN
of your wireless adapter for help with connecting to a wireless network. Most utilities will have a “site survey” option
similar to the Windows® XP utility as seen below.
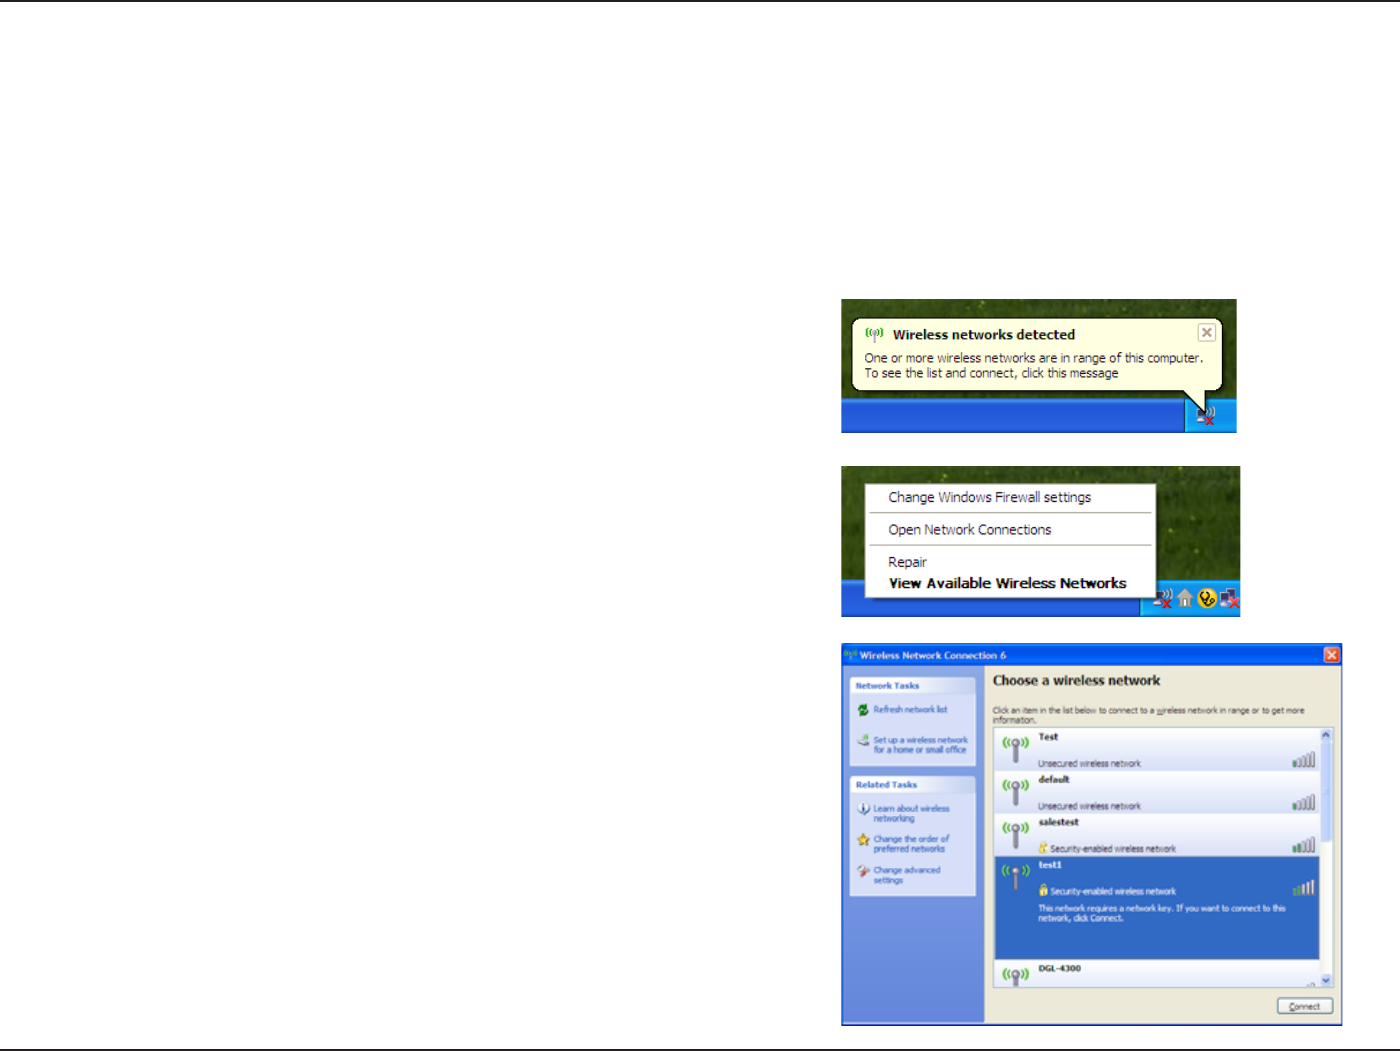
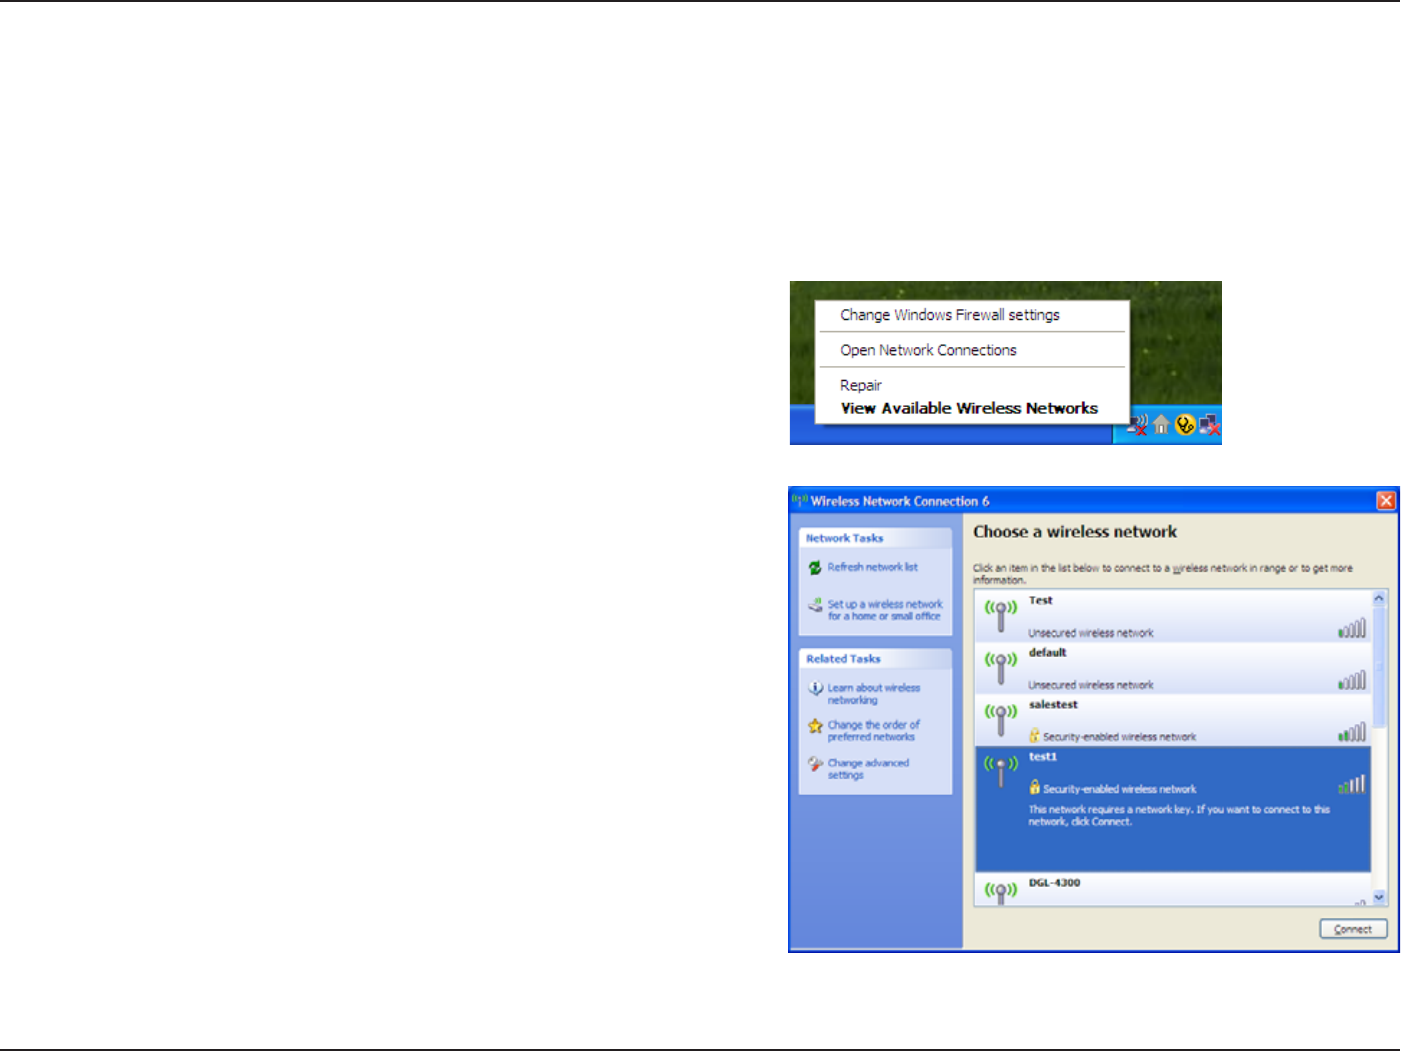
Right-click on the wireless computer icon in your system tray
NQYGTTKIJVEQTPGTPGZVVQVJGVKOG5GNGEV8KGY#XCKNCDNG
9KTGNGUU0GVYQTMU.
If you receive the 9KTGNGUU0GVYQTMU&GVGEVGFDWDDNGENKEM
on the center of the bubble to access the utility.
or
The utility will display any available wireless networks in your
area. Click on a network (displayed using the SSID) and click
the Connect button.
+H [QW IGV C IQQF UKIPCN DWV ECPPQV CEEGUU VJG +PVGTPGV
check you TCP/IP settings for your wireless adapter. Refer
to the 0GVYQTMKPI $CUKEU section in this manual for more
information.
66D-Link DIR-615 User Manual
Section 5 - Connecting to a Wireless Network
%QPſIWTG9'2
+VKUTGEQOOGPFGFVQGPCDNG9'2QP[QWTYKTGNGUUTQWVGTQTCEEGUURQKPVDGHQTGEQPſIWTKPI[QWTYKTGNGUUCFCRVGT+H
[QWCTGLQKPKPICPGZKUVKPIPGVYQTM[QWYKNNPGGFVQMPQYVJG9'2MG[DGKPIWUGF
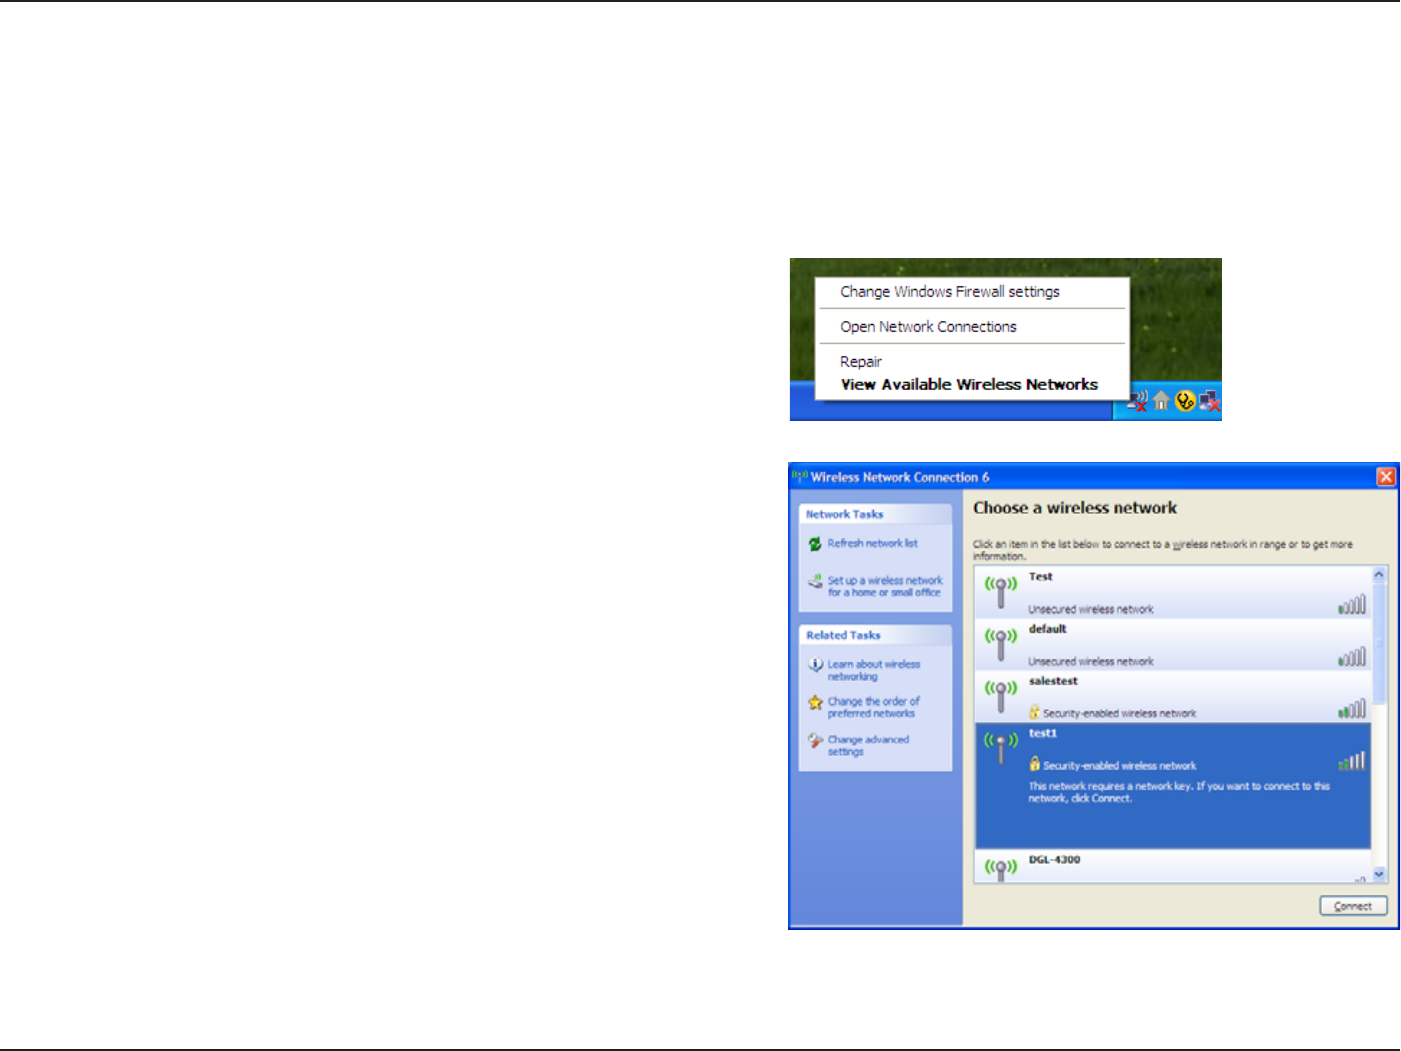
Highlight the wireless network (SSID) you would like to
connect to and click Connect.
1. Open the Windows® XP Wireless Utility by right-clicking
on the wireless computer icon in your system tray
(lower-right corner of screen). Select 8KGY #XCKNCDNG
9KTGNGUU0GVYQTMU.
67D-Link DIR-615 User Manual
Section 5 - Connecting to a Wireless Network
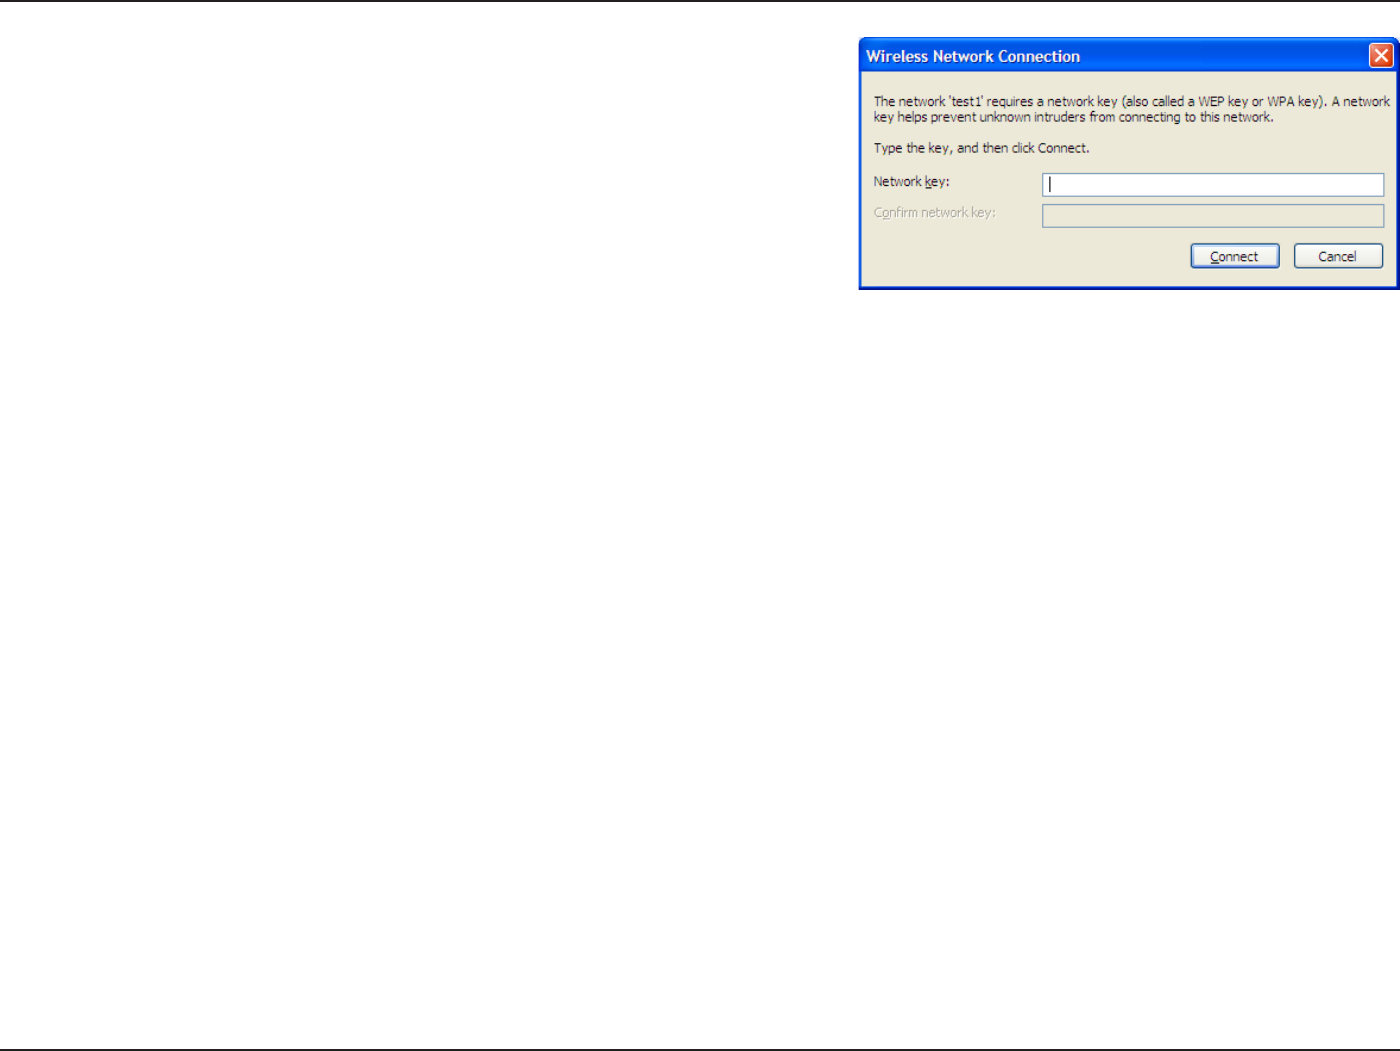
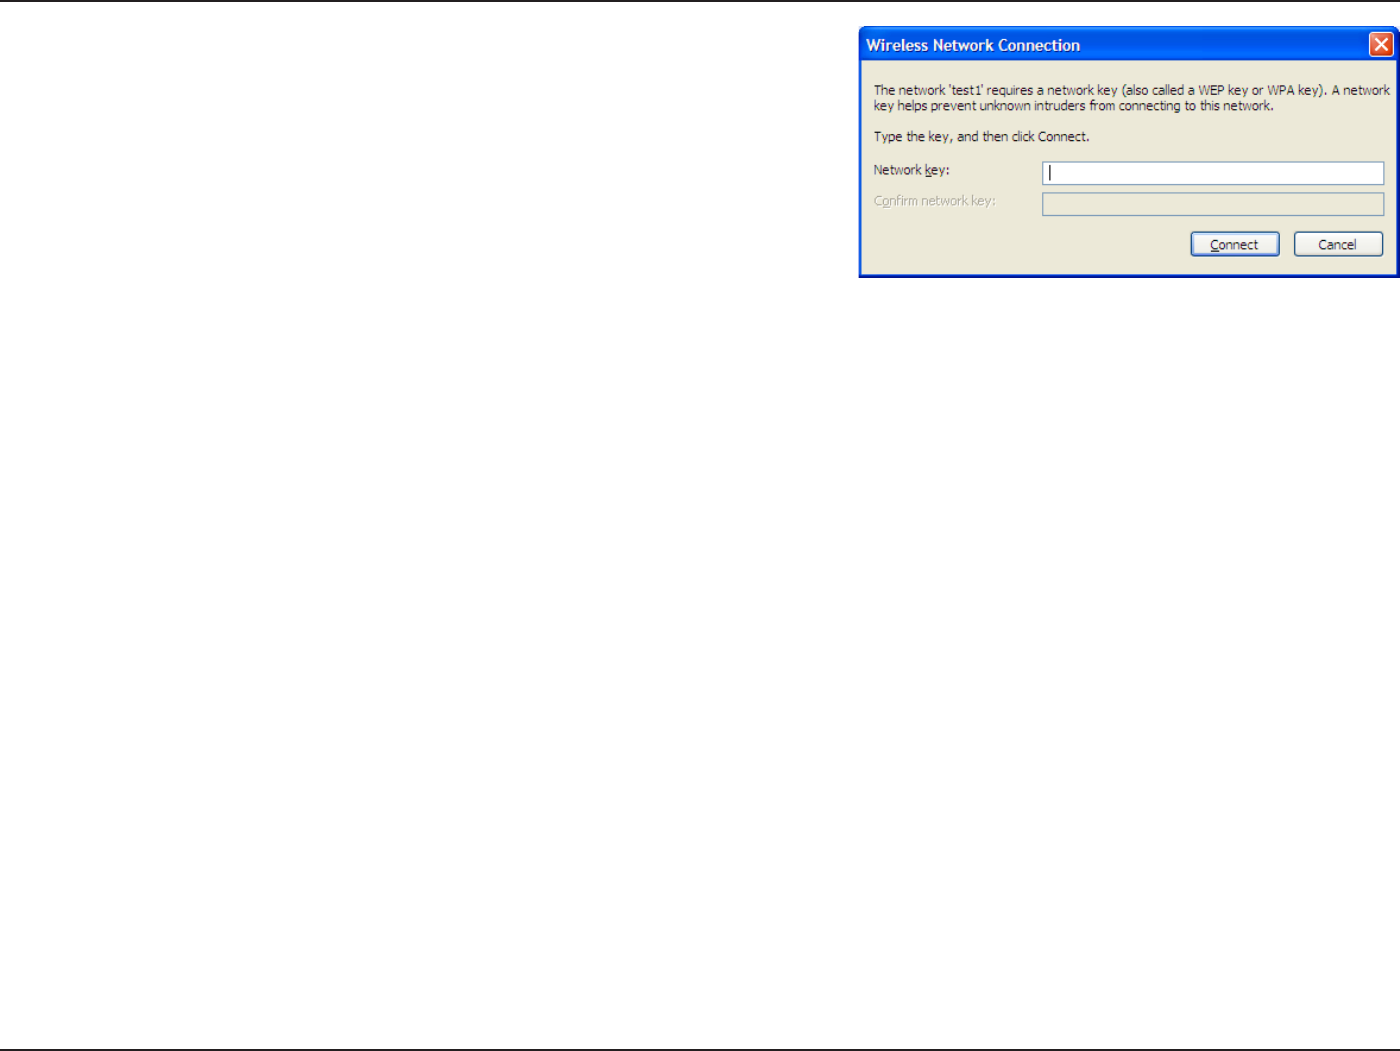
3. The 9KTGNGUU 0GVYQTM %QPPGEVKQP DQZ YKNN CRRGCT 'PVGT VJG
same WEP key that is on your router and click Connect.
It may take 20-30 seconds to connect to the wireless network. If the
EQPPGEVKQPHCKNURNGCUGXGTKH[VJCVVJG9'2UGVVKPIUCTGEQTTGEV6JG
9'2MG[OWUVDGGZCEVN[VJGUCOGCUQPVJGYKTGNGUUTQWVGT
68D-Link DIR-615 User Manual
Section 5 - Connecting to a Wireless Network
%QPſIWTG92#25-
+VKUTGEQOOGPFGFVQGPCDNG9'2QP[QWTYKTGNGUUTQWVGTQTCEEGUURQKPVDGHQTGEQPſIWTKPI[QWTYKTGNGUUCFCRVGT+H
[QWCTGLQKPKPICPGZKUVKPIPGVYQTM[QWYKNNPGGFVQMPQYVJG9'2MG[DGKPIWUGF
Highlight the wireless network (SSID) you would like to
connect to and click Connect.
1. Open the Windows® XP Wireless Utility by right-clicking
on the wireless computer icon in your system tray
(lower-right corner of screen). Select 8KGY #XCKNCDNG
9KTGNGUU0GVYQTMU.
69D-Link DIR-615 User Manual
Section 5 - Connecting to a Wireless Network
3. The 9KTGNGUU 0GVYQTM %QPPGEVKQP DQZ YKNN CRRGCT 'PVGT VJG
92#25-RCUURJTCUGCPFENKEMConnect.
It may take 20-30 seconds to connect to the wireless network. If the
EQPPGEVKQPHCKNURNGCUGXGTKH[VJCVVJG92#25-UGVVKPIUCTGEQTTGEV
6JG 92#25- RCUURJTCUG OWUV DG GZCEVN[ VJG UCOG CU QP VJG
wireless router.

70D-Link DIR-615 User Manual
Section 6 - Setting Up Wi-Fi Protection (WCN 2.0 in Windows Vista)
5GVVKPI7R9K(K2TQVGEVKQP
9%0KP9KPFQYU8KUVC
6JG&+4UWRRQTVU9K(KRTQVGEVKQPTGHGTTGFVQCU9%0KP9KPFQYU8KUVC6JGKPUVTWEVKQPUHQTUGVVKPIVJKUWR
FGRGPFQPYJGVJGT[QWCTGWUKPI9KPFQYU8KUVCVQEQPſIWTGVJG4QWVGTQTVJKTFRCTV[UQHVYCTG
+PKVKCN4QWVGT%QPſIWTCVKQPHQT9K(K2TQVGEVKQP
9JGP[QWſTUVUGVWRVJG4QWVGT9K(KRTQVGEVKQPKUFKUCDNGFCPFWPEQPſIWTGF6QGPLQ[VJGDGPGſVUQH9K(KRTQVGEVKQP
VJG4QWVGTOWUVDGDQVJGPCDNGFCPFEQPſIWTGF6JGTGCTGVJTGGDCUKEOGVJQFUVQCEEQORNKUJVJKUWUG9KPFQYU
8KUVCŏUDWKNVKPUWRRQTVHQT9%0WUGUQHVYCTGRTQXKFGFD[CVJKTFRCTV[QTWUGVJGVTCFKVKQPCN'VJGTPGVCRRTQCEJ
+H[QWCTGTWPPKPI9KPFQYU8KUVCVKEMVJG'PCDNGEJGEMDQZQPVJG9KTGNGUU0GVYQTM window. Use the Current PIN
that is displayed on the 9KTGNGUU0GVYQTM window or choose to click the )GPGTCVG0GY2+0 button or 4GUGV2+0VQ
&GHCWNV button.
+H[QWCTGWUKPIVJKTFRCTV[UQHVYCTGVQUGVWR9K(K2TQVGEVKQPECTGHWNN[HQNNQYVJGFKTGEVKQPU9JGP[QWCTGſPKUJGF
RTQEGGFVQVJGPGZVUGEVKQPVQUGVWRVJGPGYN[EQPſIWTGF4QWVGT

71D-Link DIR-615 User Manual
Section 6 - Setting Up Wi-Fi Protection (WCN 2.0 in Windows Vista)
5GVVKPI7RC%QPſIWTGF4QWVGT
1PEGVJG4QWVGTJCUDGGPEQPſIWTGF[QWECPWUGVJGRWUJDWVVQPQPVJG4QWVGTQTVJKTFRCTV[UQHVYCTGVQKPXKVGC
PGYEQOGTVQLQKP[QWT9K(KRTQVGEVGFPGVYQTM(QTOCZKOWOUGEWTKV[VJGUQHVYCTGOGVJQFKUTGEQOOGPFGF*QYGXGT
the push button method is ideal if there is no access to a GUI.
+H[QWCTGWUKPIVJG4QWVGTŏU9K(K5GEWTKV[RWUJDWVVQPQRVKQPUKOWNVCPGQWUN[FGRTGUUVJGRWUJDWVVQPNQECVGFQP
VJGUKFGQHVJG4QWVGTCPFVJGDWVVQPQPVJGENKGPVQTXKTVWCNDWVVQPQPVJGENKGPVŏU)7+0GZVENKEM(KPKUJ. The Client’s
UQHVYCTGYKNNVJGPCNNQYCPGYEQOGTVQLQKP[QWTUGEWTG9K(KRTQVGEVGFPGVYQTM
+H[QWCTGWUKPIVJKTFRCTV[UQHVYCTGTWPVJGCRRTQRTKCVG9K(K2TQVGEVGF5[UVGOWVKNKV[;QWYKNNDGCUMGFVQGKVJGTWUG
the push button method or to manually enter the PIN. Follow the on-screen instructions.
72D-Link DIR-615 User Manual
Section 7 - Changing the Computer Name and Joining a Workgroup
%JCPIKPIVJG%QORWVGT0COGCPF,QKPKPIC
9QTMITQWR
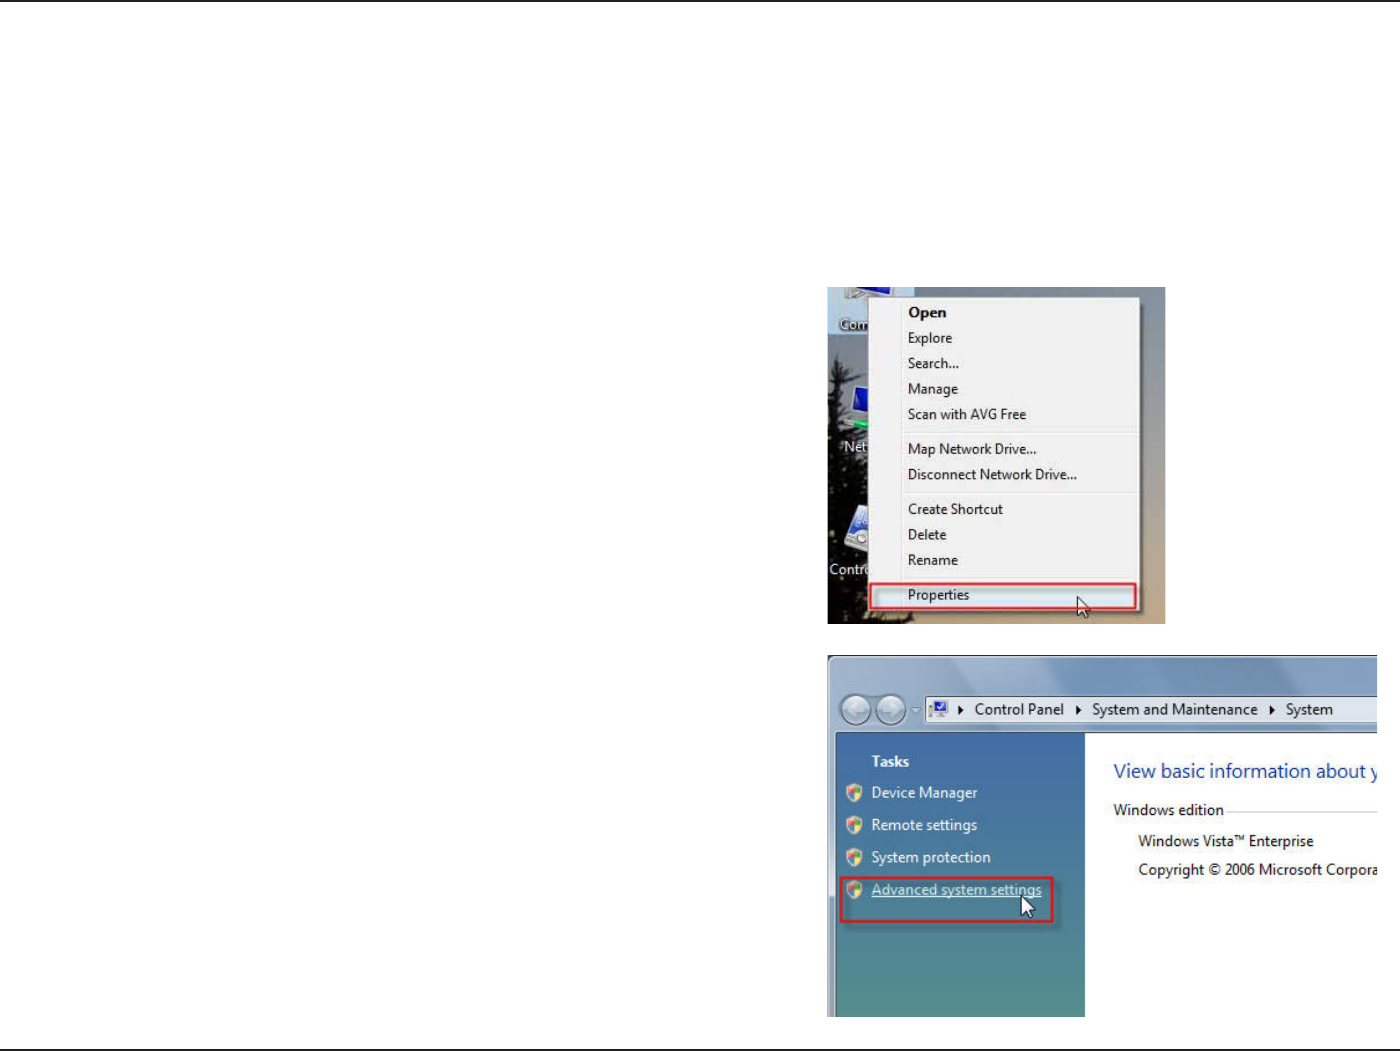
6JGHQNNQYKPICTGUVGRD[UVGRFKTGEVKQPUVQEJCPIGVJGEQORWVGTPCOGCPFLQKPCYQTMITQWR
Click on the #FXCPEGFU[UVGOUGVVKPIU link.
1. Click on 2TQRGTVKGU.
73D-Link DIR-615 User Manual
Section 7 - Changing the Computer Name and Joining a Workgroup
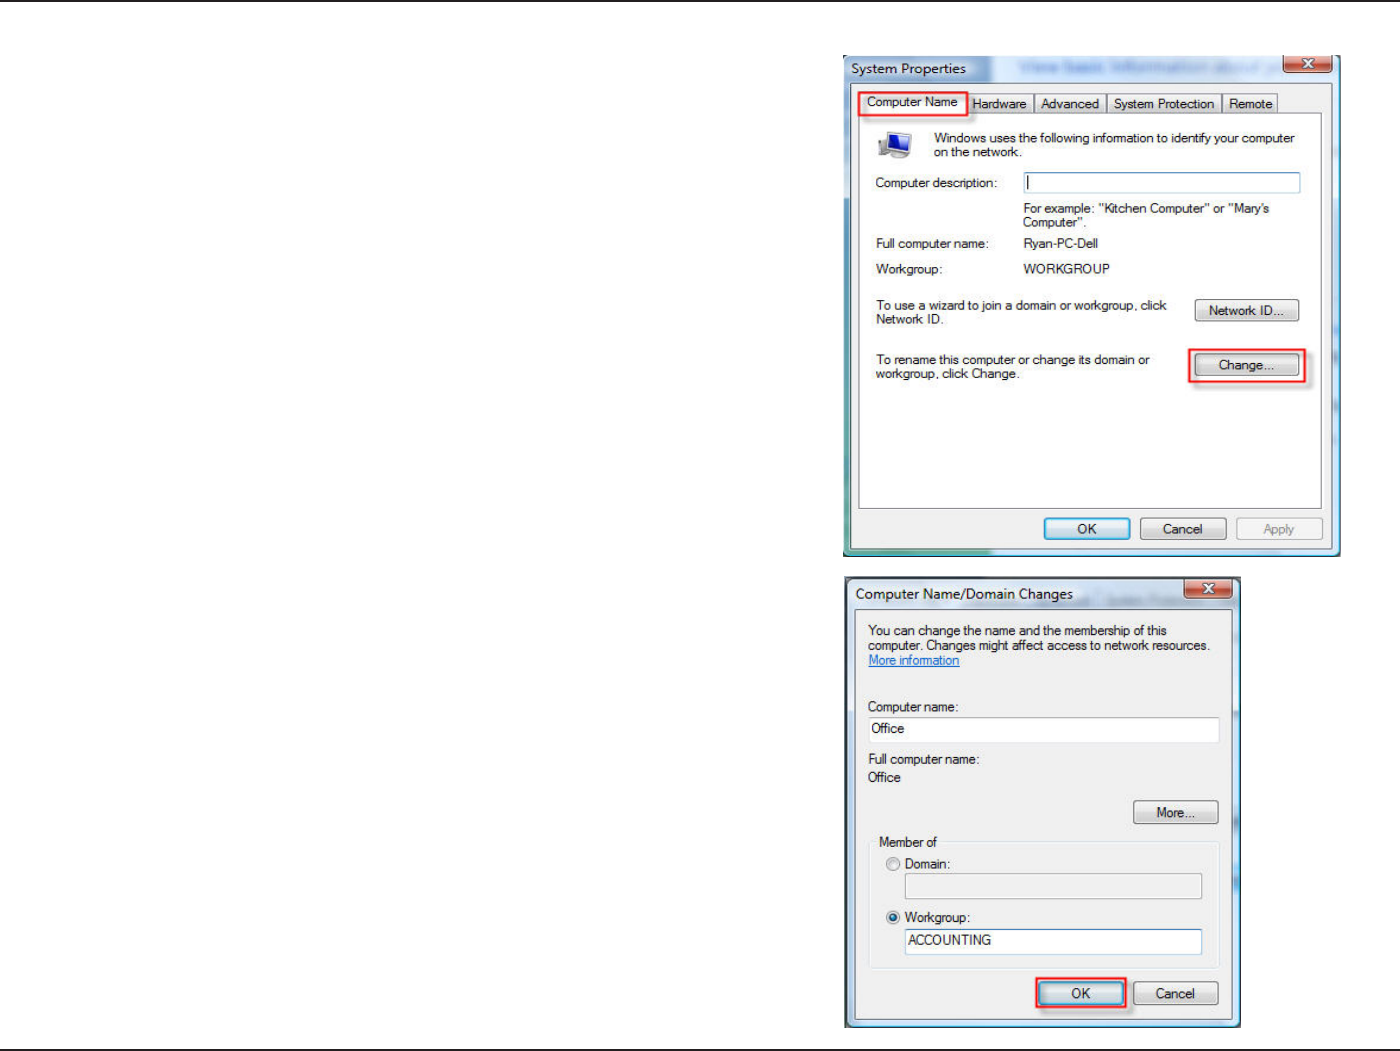
3. Click the %QORWVGT0COG tab in the 5[UVGO2TQRGTVKGUwindow
CPFGPVGTCFGUETKRVKQPQH[QWTEQORWVGTKPVJGVGZVDQZ9JGP[QW
CTGſPKUJGFENKEMVJGChange button.
4. Go to the %QORWVGT0COG&QOCKP%JCPIGUwindow and
ENKEMVJGTCFKQDWVVQPPGZVVQVJG9QTMITQWR[QWYCPVVQ
LQKP9JGP[QWCTGſPKUJGFENKEMVJG1-button.
74D-Link DIR-615 User Manual
5GEVKQP%QPſIWTKPIVJG+2#FFTGUUKP8KUVC
%QPſIWTKPIVJG+2#FFTGUUKP8KUVC
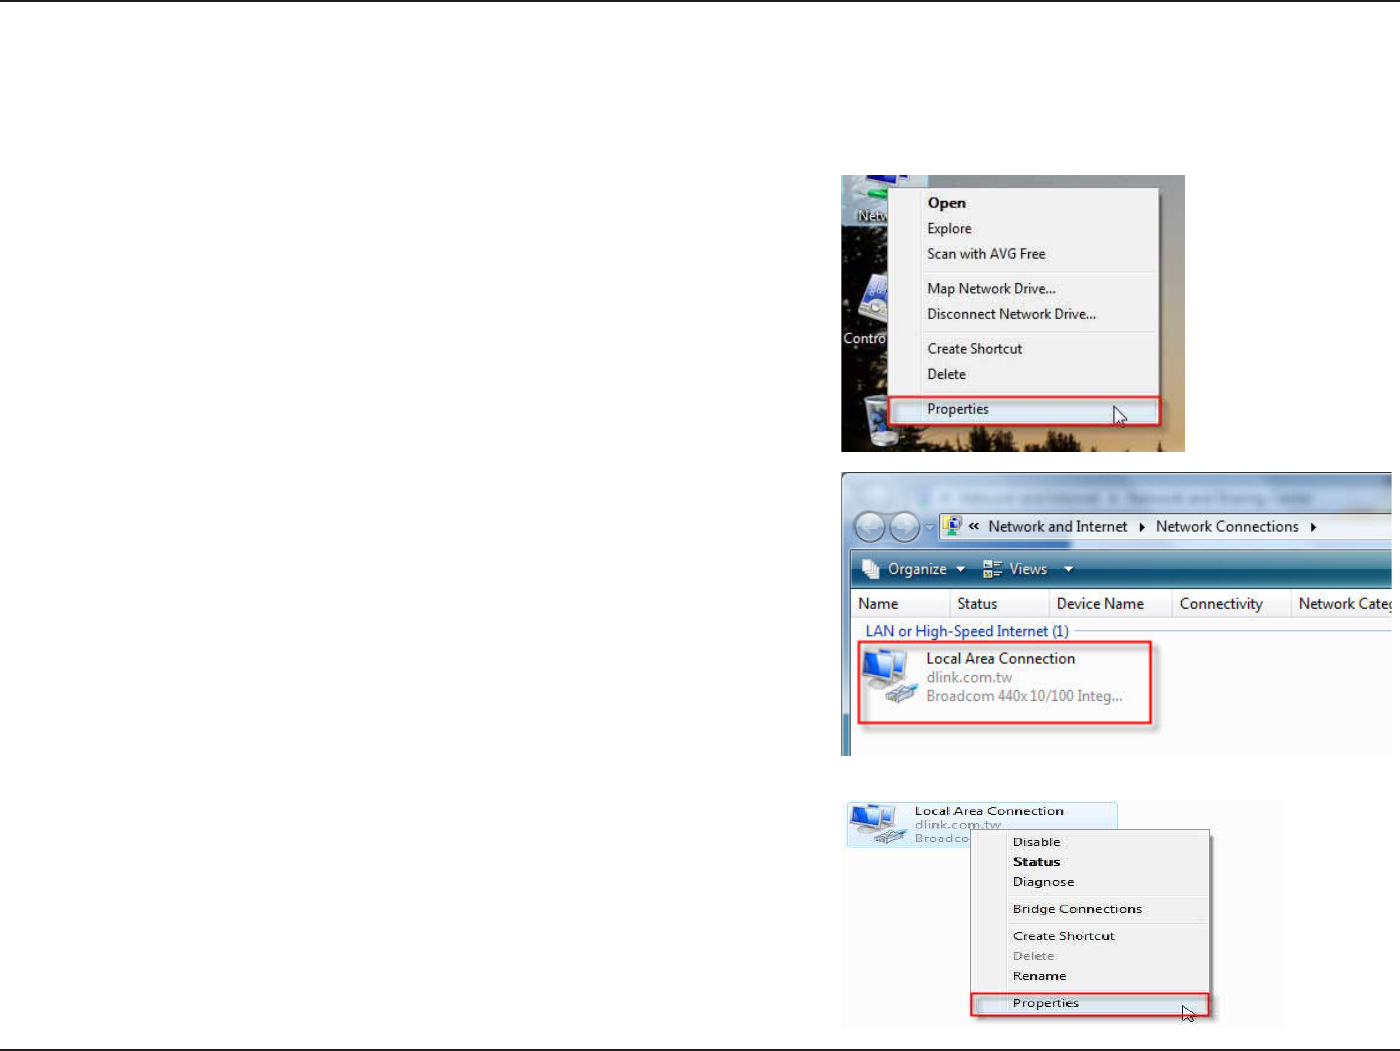
6JGHQNNQYKPICTGUVGRD[UVGRFKTGEVKQPUVQEQPſIWTGVJG+2CFFTGUUKP9KPFQYU8KUVC
Go to the 0GVYQTM CPF +PVGTPGV window and click the
appropriate .QECN#TGC%QPPGEVKQP icon.
1. Click on 2TQRGTVKGU.
3. Right-click the .QECN#TGC%QPPGEVKQP icon and then select
2TQRGTVKGU from the drop-down menu.
75D-Link DIR-615 User Manual
5GEVKQP%QPſIWTKPIVJG+2#FFTGUUKP8KUVC
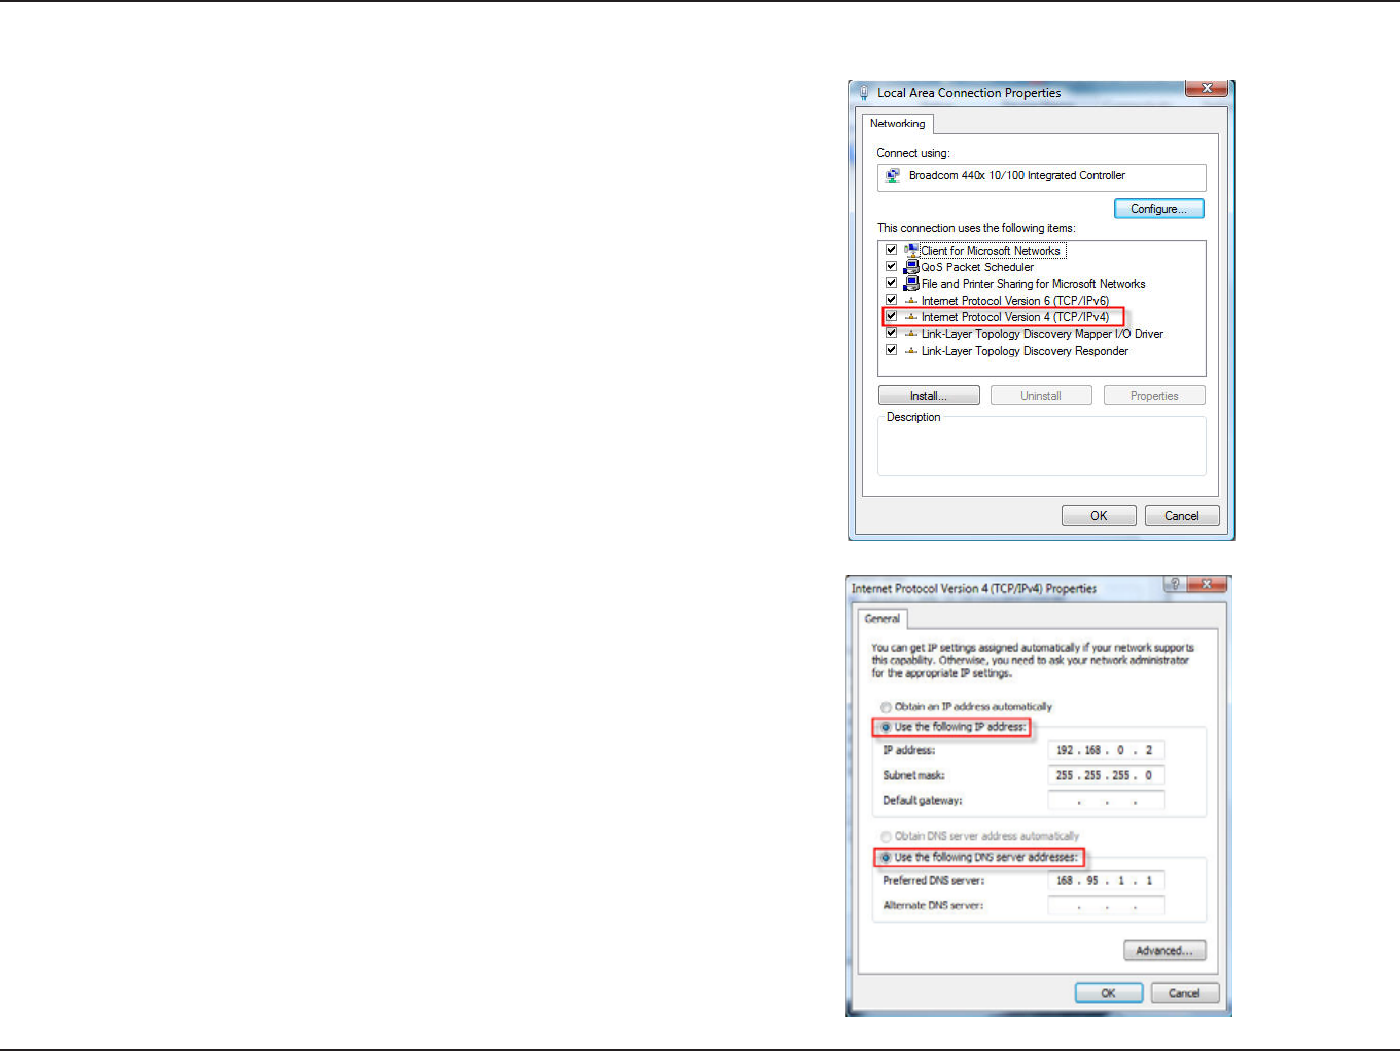
4. Tick the +PVGTPGV 2TQVQEQN 8GTUKQP 6%2+2X EJGEMDQZ KP
the 0GVYQTMKPI tab in the .QECN #TGC %QPPGEVKQP 2TQRGTVKGU
window.
5. Click the “Use the following IP address” option in the )GPGTCN
tab in the .QECN#TGC%QPPGEVKQPU2TQRGTVKGU window and
enter the desired IP address in the space offered. Then click
the “Use the following DNS server adresses” option on the
same tab and enter the desired DNS server information.
76D-Link DIR-615 User Manual
5GEVKQP%QPſIWTKPIVJG+2#FFTGUUKP8KUVC
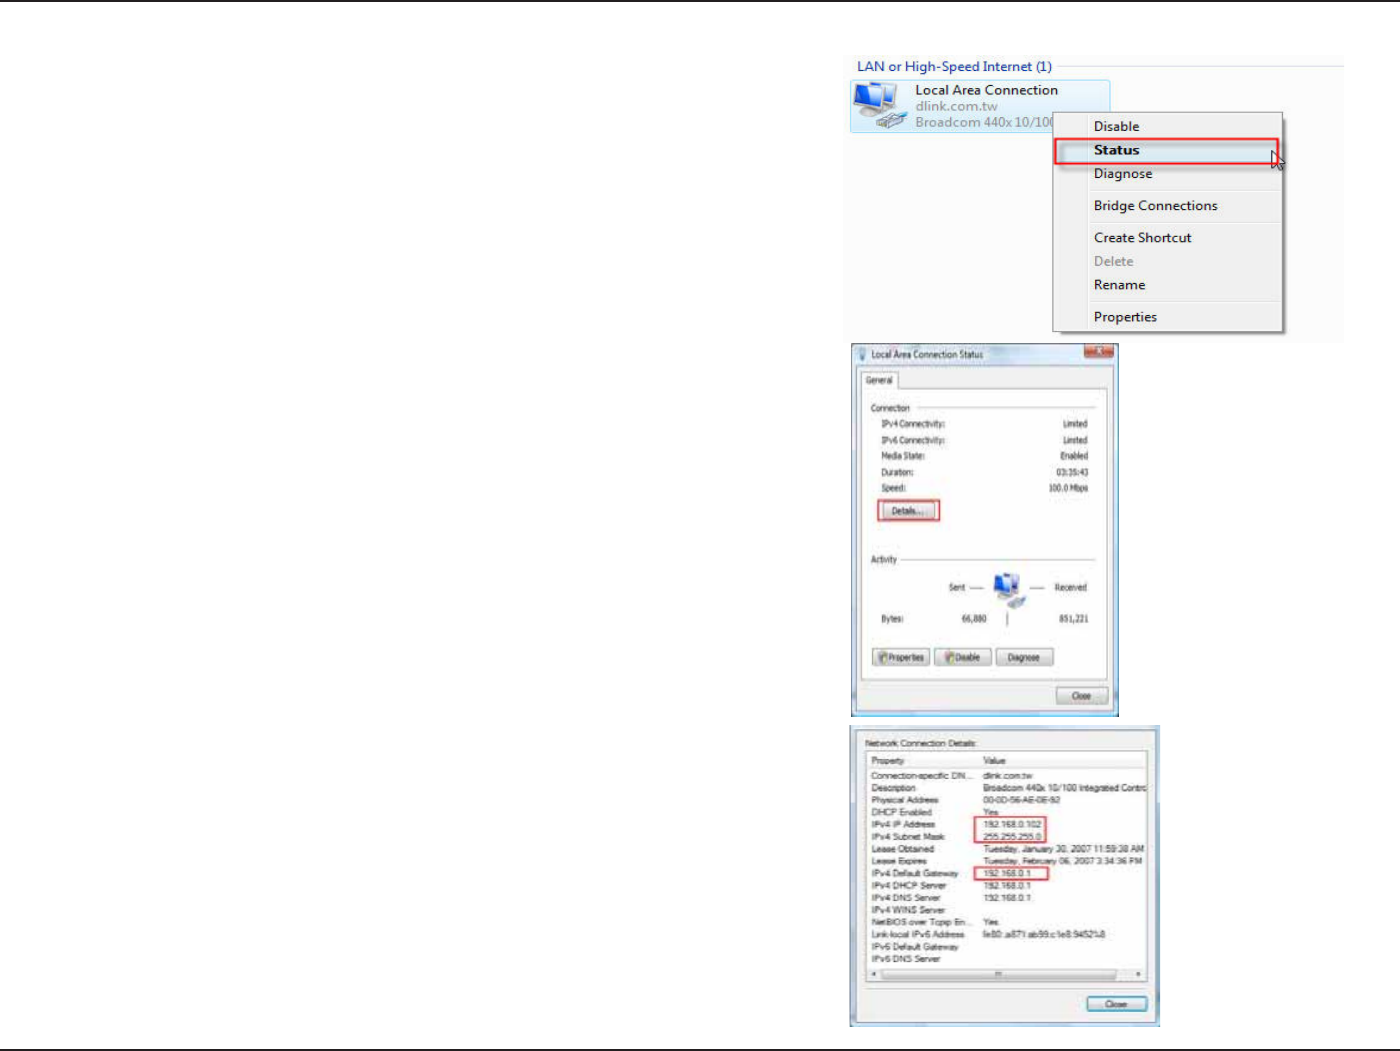
6. Right-click the .QECN#TGC%QPPGEVKQP icon and then select 5VCVWU
from the drop-down menu.
7. Go to the .QECN#TGC%QPPGEVKQP5VCVWUwindow and click
the &GVCKNU button.
8.%QPſTO [QWT PGY UGVVKPIU QP VJG 0GVYQTM %QPPGEVKQP 5VCVWU
YKPFQY9JGP[QWCTGſPKUJGFENKEMVJG&QPG button.
77D-Link DIR-615 User Manual
Section 9 - Setting Up a Connection Wirelessly
5GVVKPI7RC%QPPGEVKQPQT0GVYQTM
9KTGNGUUN[
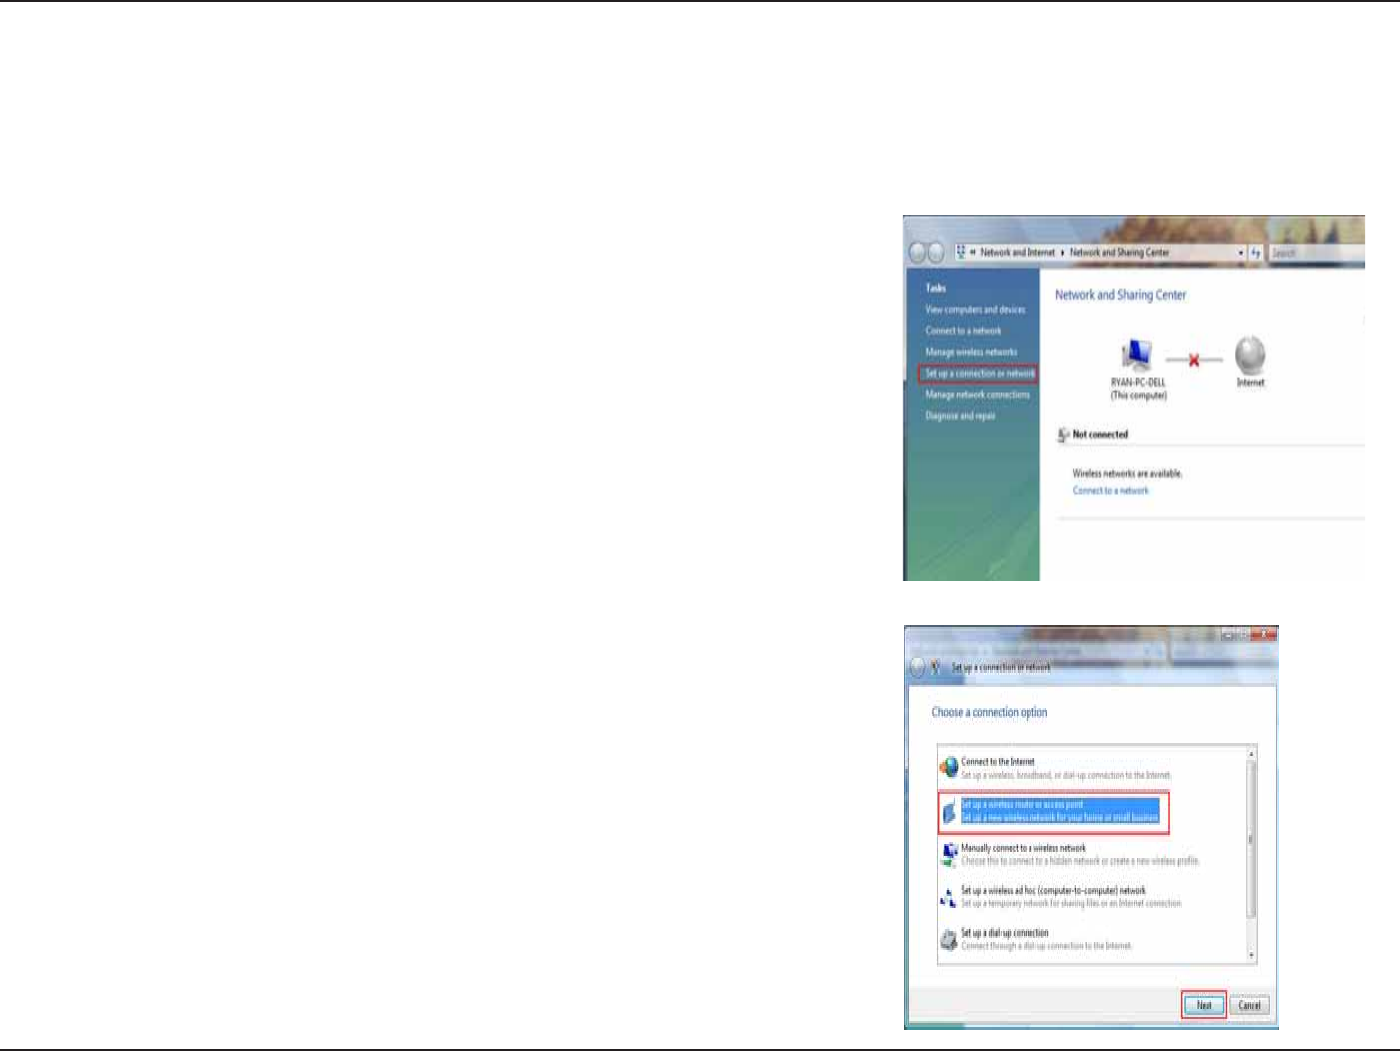
The following are step-by-step directions to set up a wireless connection.
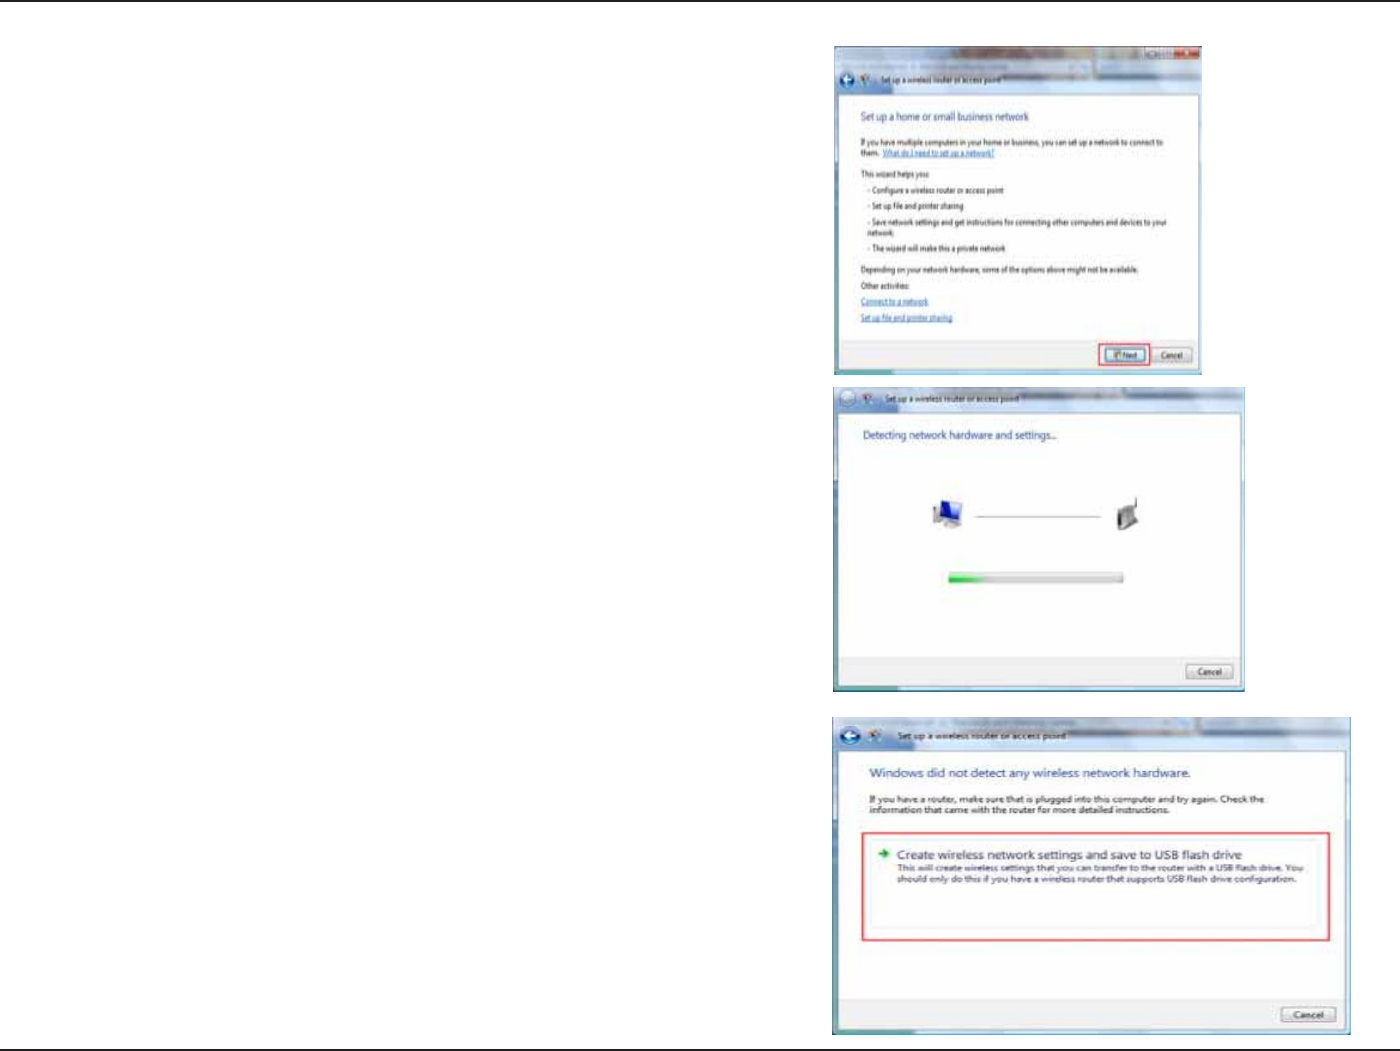
Go to the 5GVWRCEQPPGEVKQPQTPGVYQTMwindow and choose the 5GV
WRCYKTGNGUUTQWVGTQTCEEGUURQKPV5GVWRCPGYYKTGNGUUPGVYQTM
HQT[QWTJQOGQTDWUKPGUU option. Click the 0GZV button.
1. Click on 5GVWRCEQPPGEVKQPQTPGVYQTMKPVJG0GVYQTMCPF
5JCTKPI%GPVGTsection.
78D-Link DIR-615 User Manual
Section 9 - Setting Up a Connection Wirelessly
3. Click the 0GZV button on the 5GVWRCYKTGNGUUTQWVGTQTCEEGUU
RQKPV window.
4. The following window displays the system progress.
5.6JKU YKPFQY EQPſTOU VJCV [QW YCPV VQ ETGCVG YKTGNGUU PGVYQTM
UGVVKPIUVJCVCTGUCXCDNGVQC75$ƀCUJFTKXG
79D-Link DIR-615 User Manual
Section 9 - Setting Up a Connection Wirelessly
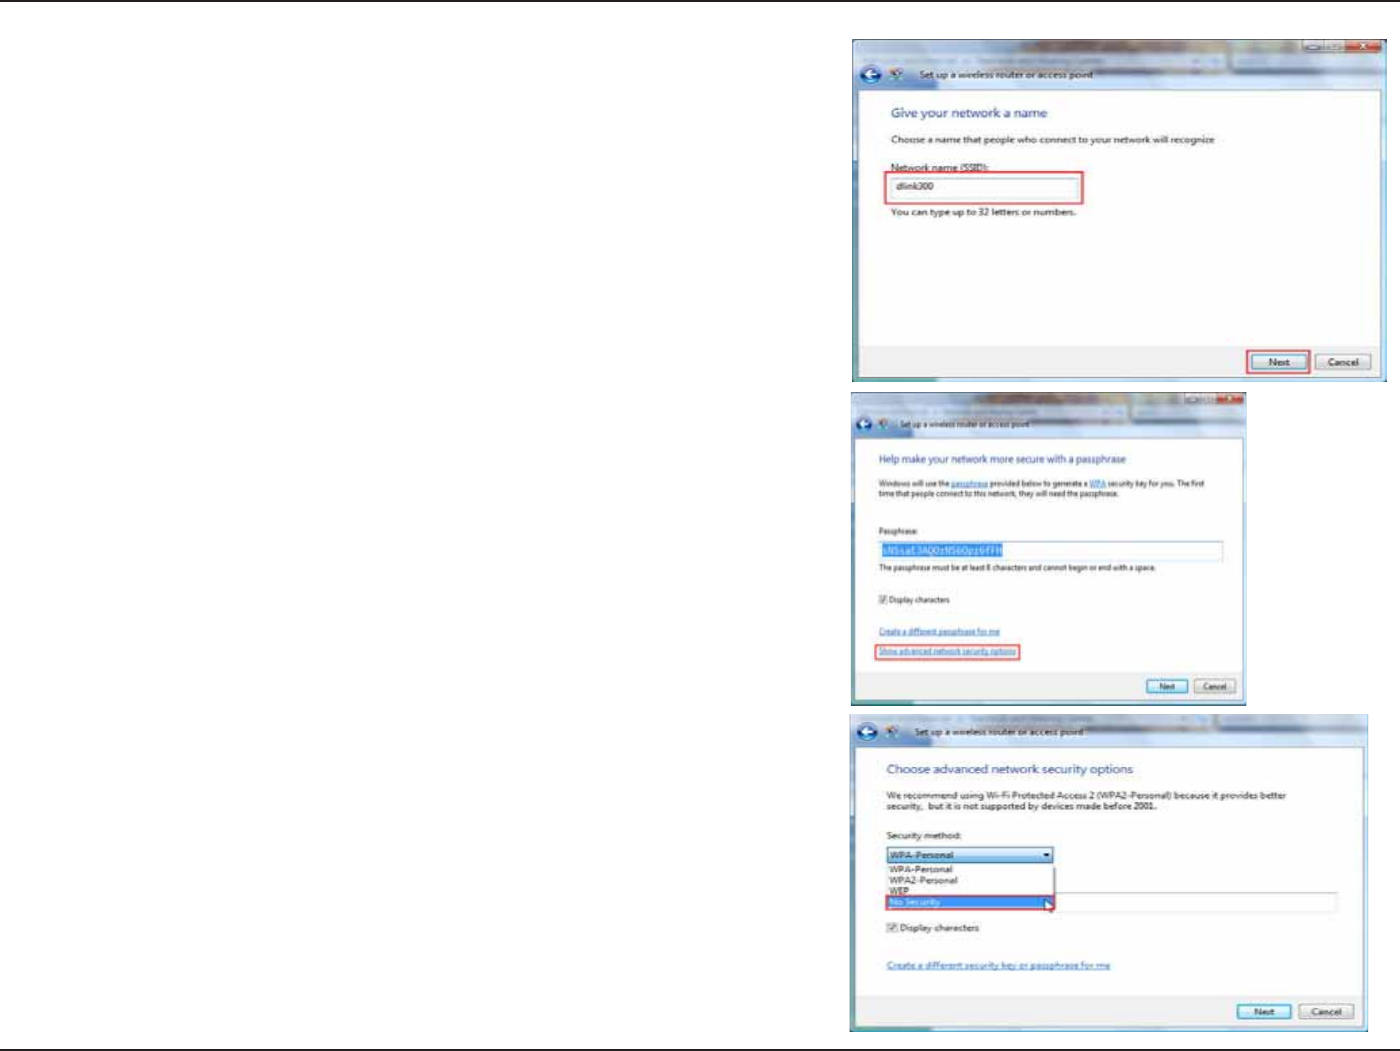
6. Enter a network name on the )KXG[QWTPGVYQTMCPCOG window
in the 5GVWRCYKTGNGUUTQWVGTQTCEEGUURQKPV wizard. Click the
0GZV button.
7. Enter a passphrase on the *GNROCMG[QWTPGVYQTMOQTGUGEWTG
YKVJCRCUURJTCUGwindow in the 5GVWRCYKTGNGUUTQWVGTQT
CEEGUURQKPV wizard. Click the 5JQYCFXCPEGFPGVYQTMUGEWTKV[
QRVKQPU link.
8. Select security method on the %JQQUGCFXCPEGFPGVYQTMUGEWTKV[
QRVKQPUwindow in the 5GVWRCYKTGNGUUTQWVGTQTCEEGUURQKPV
wizard. Click the 0GZVbutton.
80D-Link DIR-615 User Manual
Section 9 - Setting Up a Connection Wirelessly
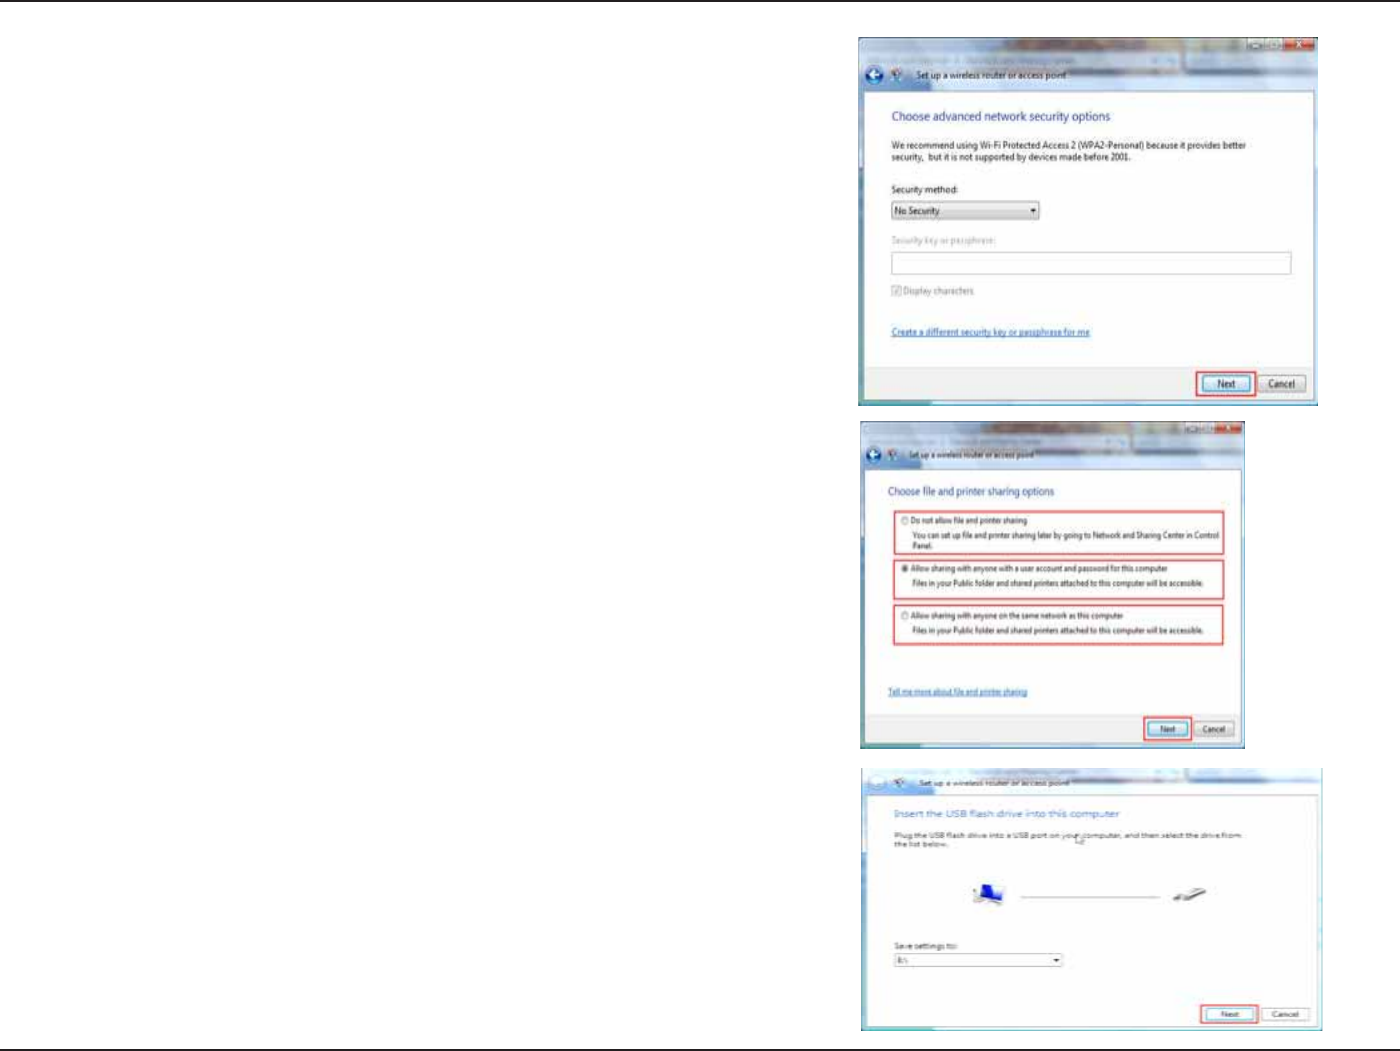
9. Once you have selected the desired security method on the Choose
CFXCPEGF PGVYQTM UGEWTKV[ QRVKQPU window in the 5GV WR C
YKTGNGUUTQWVGTQTCEEGUURQKPVYK\CTFENKEMVJG0GZVbutton.
10.5GNGEVVJGFGUKTGFſNGCPFRTKPVGTUJCTKPIQRVKQPQPVJGChoose
ſNGCPFRTKPVGTUJCTKPIQRVKQPUwindow in the 5GVWRCYKTGNGUU
TQWVGTQTCEEGUURQKPV wizard. Click the 0GZVbutton.
11.1PEG[QWJCXGUCXGF[QWTPGVYQTMUGVVKPIUVQ75$WUGVJGRWNN
down menu on the +PUGTVVJG75$ƀCUJFTKXGKPVQVJKUEQORWVGT
window in the 5GVWRCYKTGNGUUTQWVGTQTCEEGUURQKPV wizard
to select a destination for your network settings. Click the 0GZV
button.
81D-Link DIR-615 User Manual
Section 9 - Setting Up a Connection Wirelessly
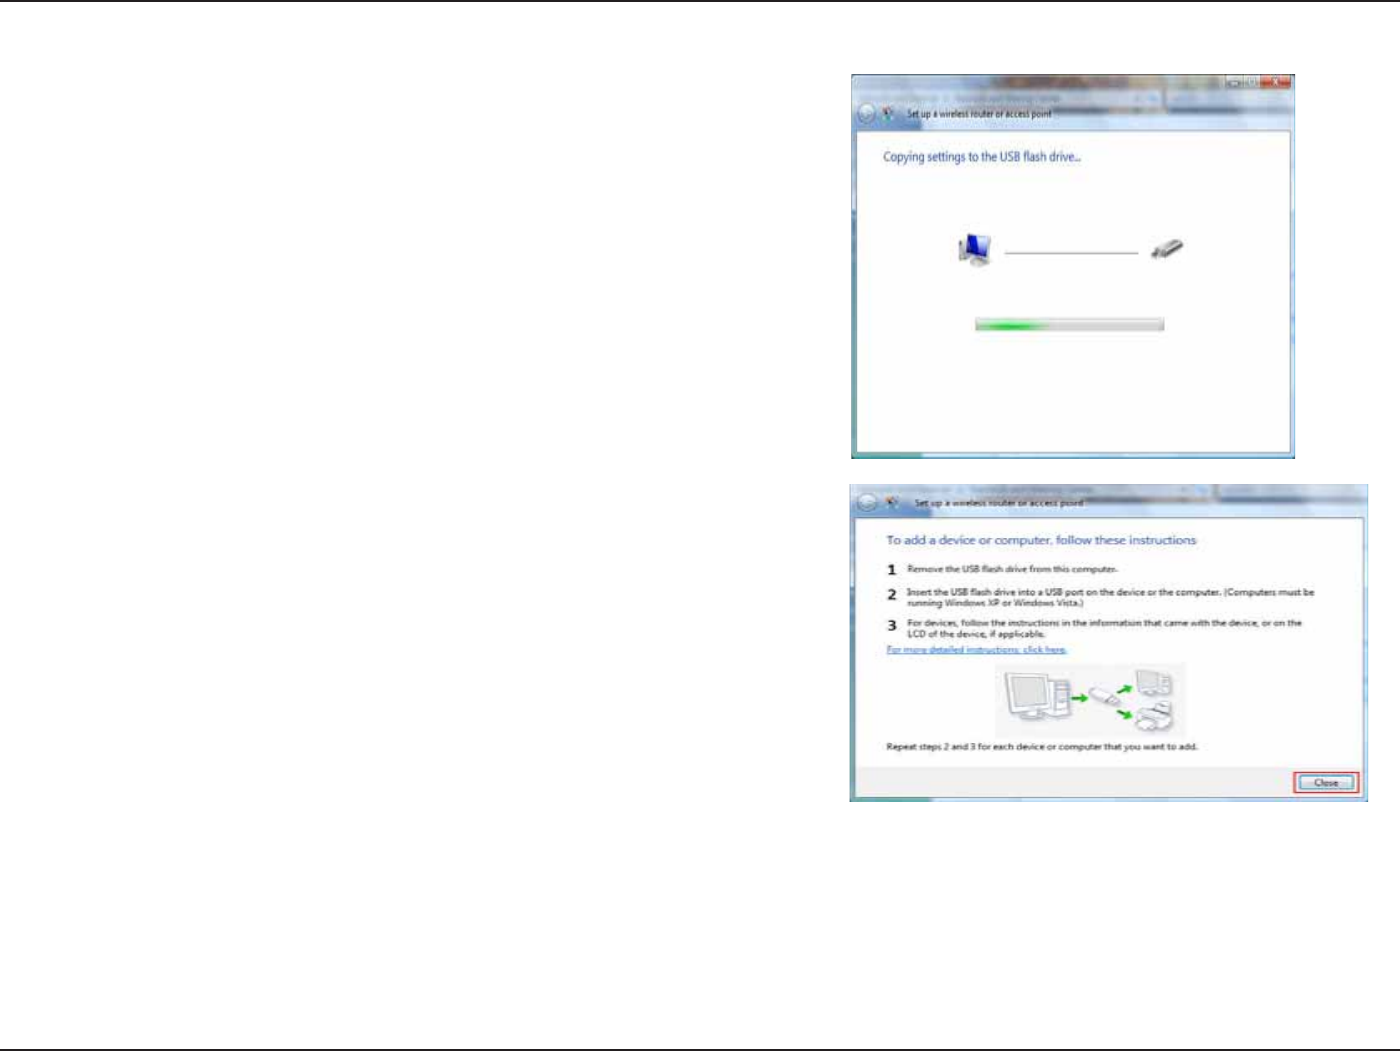
1PEG[QWJCXGUCXGF[QWTPGVYQTMUGVVKPIUVQ75$VJG
%QR[KPIUGVVKPIUVQVJG75$FTKXGwindow in the 5GVWR
CYKTGNGUUTQWVGTQTCEEGUURQKPV wizard opens to indicate
the system progress.
13.1PEG[QWCTGſPKUJGFVJG6QCFFCFGXKEGQTEQORWVGTHQNNQY
VJGUG KPUVTWEVKQPU window in the 5GV WR C YKTGNGUU TQWVGT QT
CEEGUURQKPVYK\CTFQRGPU9JGP[QWCTGſPKUJGFENKEMVJGClose
button.
82D-Link DIR-615 User Manual
5GEVKQP%QPPGEVKPIVQC5GEWTGF9KTGNGUU0GVYQTM9'292#25-92#25-
%QPPGEVKPIVQC5GEWTGF9KTGNGUU0GVYQTM
9'292#25-92#25-
The following are step-by-step directions to set up a wireless connection.
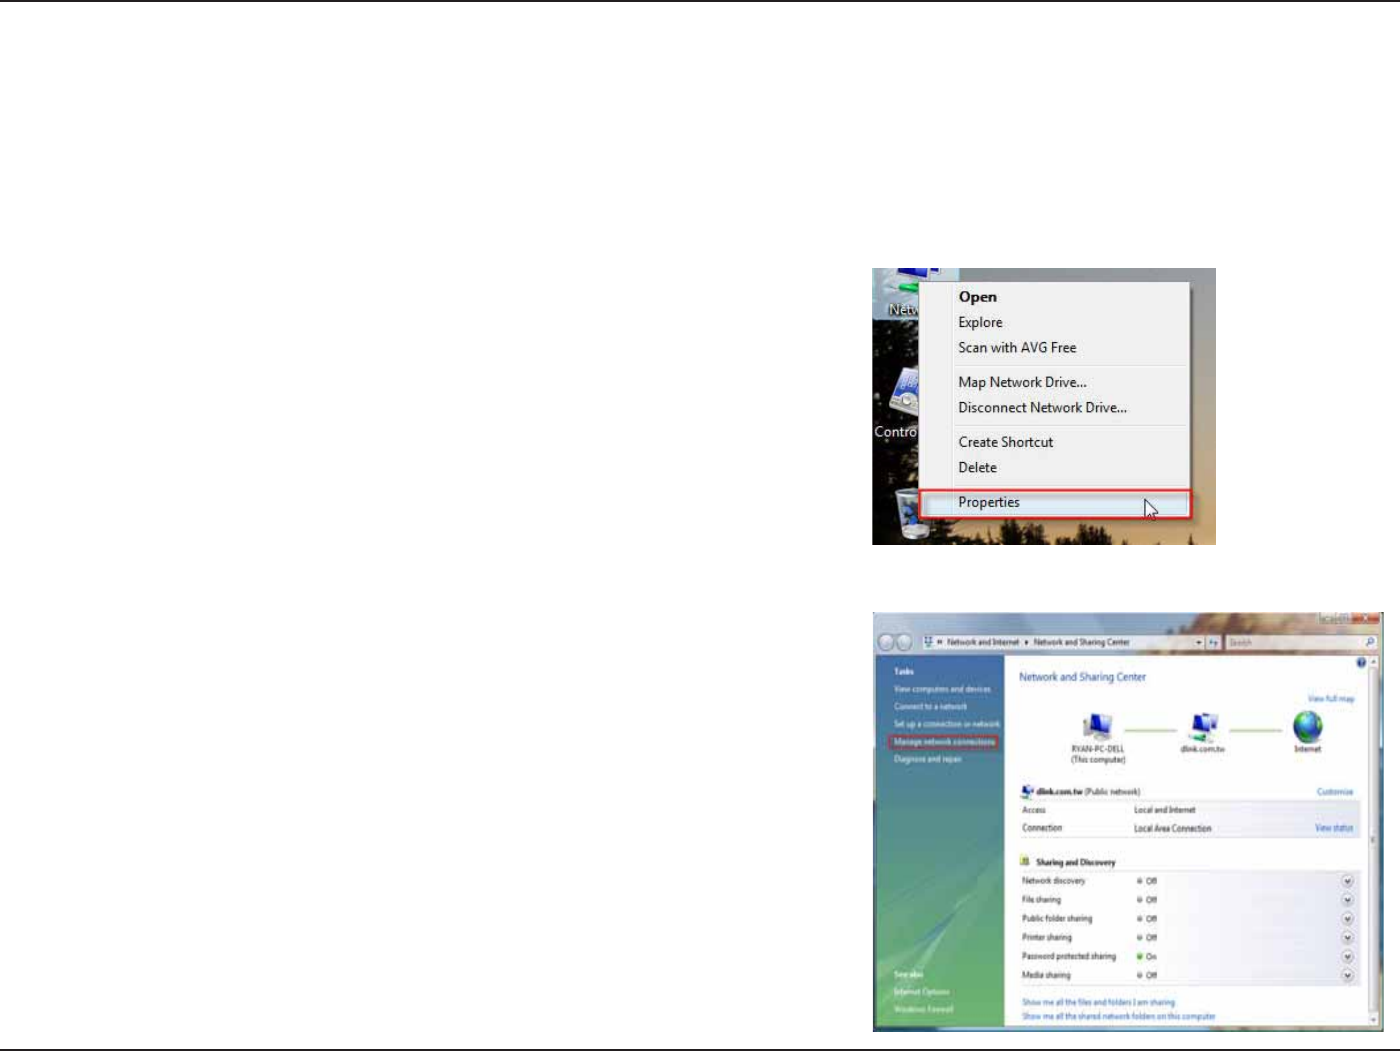
Click the /CPCIGPGVYQTMEQPPGEVKQPU link in the0GVYQTM
CPF5JCTKPI%GPVGT window.
1. Click on 2TQRGTVKGU.

83D-Link DIR-615 User Manual
5GEVKQP%QPPGEVKPIVQC5GEWTGF9KTGNGUU0GVYQTM9'292#25-92#25-
4. Select a network to connect to in the 5GNGEVCPGVYQTMVQEQPPGEV
to window in the %QPPGEVVQCPGVYQTM wizard and then click the
Connect button.
5. The following %QPPGEVVQCPGVYQTMwizard window displays the
system progress.
3. Right-click the 9KTGNGUU0GVYQTM%QPPGEVKQP entry and then select
%QPPGEV&KUEQPPGEV from the drop-down menu.

84D-Link DIR-615 User Manual
5GEVKQP%QPPGEVKPIVQC5GEWTGF9KTGNGUU0GVYQTM9'292#25-92#25-
7. The following 5WEEGUUHWNN[EQPPGEVGFVQFNKPM window in the
%QPPGEVVQCPGVYQTM wizard is displayed. Choose to save to the
network and/or start the new connection automatically. When you
CTGſPKUJGFENKEMVJGClose button.
8. The successful connection is displayed at the bottom of the
Windows start up menu.
6. Enter the network security key or passphrase for the Router in
VJG VGZVDQZ RTQXKFGF KP VJG 6[RG VJG PGVYQTM UGEWTKV[ MG[ QT
RCUURJTCUGHQTFNKPM window in the %QPPGEVCPGVYQTMwizard.
9JGP[QWCTGſPKUJGFENKEMVJGConnect button.
85D-Link DIR-615 User Manual
5GEVKQP%QPPGEVKPIVQC5GEWTGF9KTGNGUU0GVYQTM9'292#25-92#25-
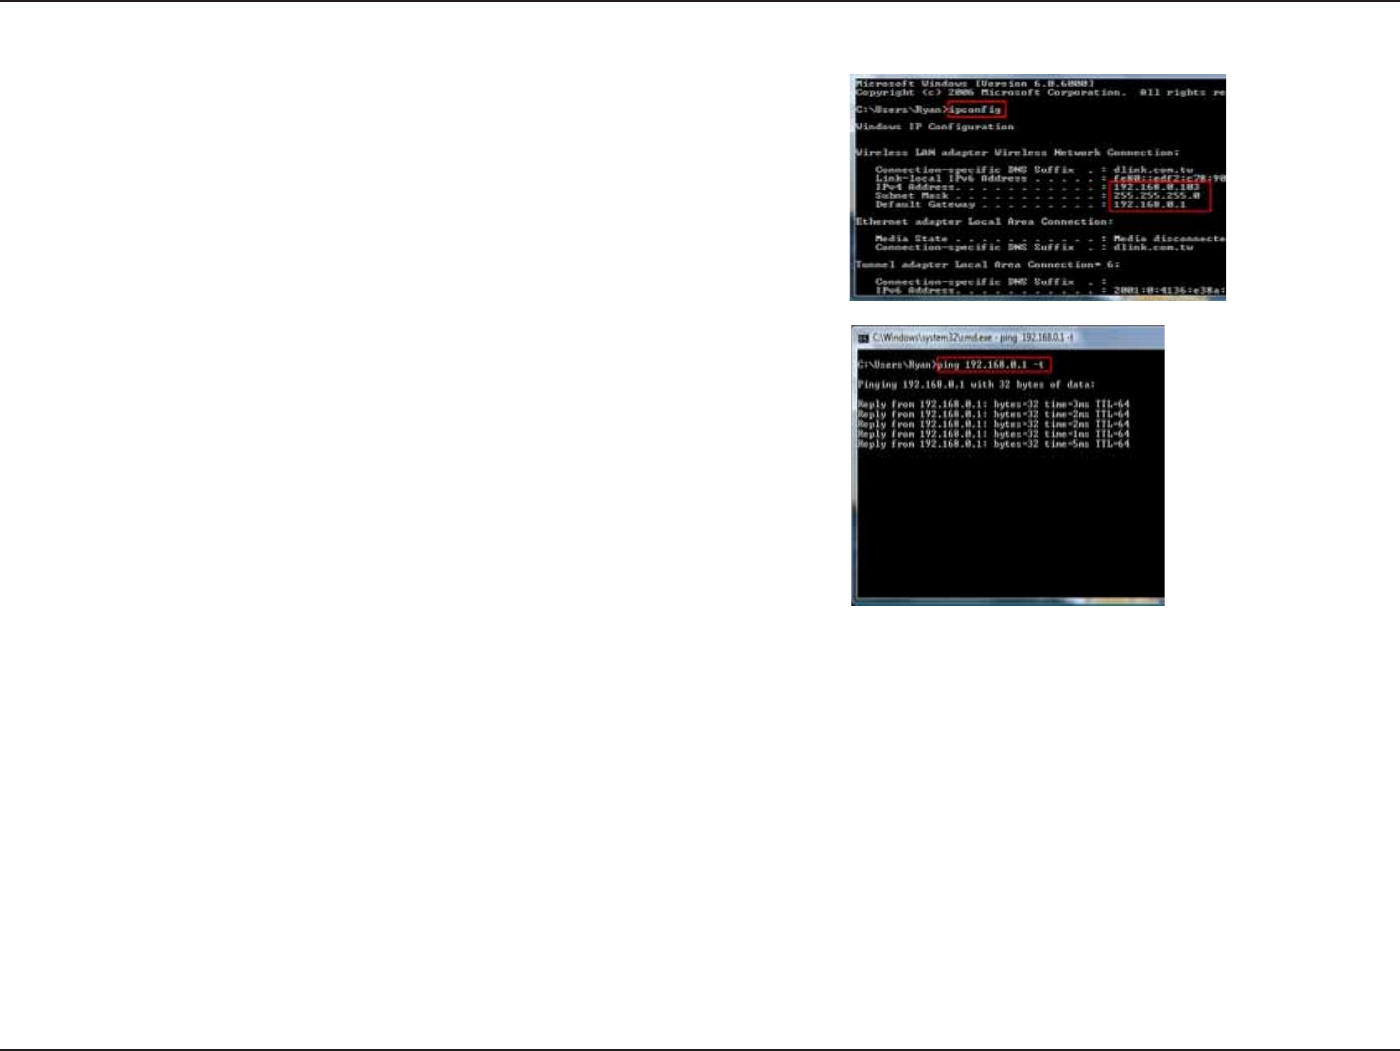
10.6QVGUVVJGPGY+2CFFTGUUWUGVJG2KPIHGCVWTGQHVJGEQOOCPF
prompt.
9.%QPſTO[QWTPGYUGVVKPIUD[ECNNKPIWRVJGEQOOCPFRTQORVCPF
VJGPGPVGTKPIVJGKREQPſIEQOOCPF

86D-Link DIR-615 User Manual
Section 11 - Connecting to an Unsecured Wireless Network
%QPPGEVKPIVQCP7PUGEWTGF9KTGNGUU
0GVYQTM
The following are step-by-step directions to set up an unsecured wireless connection.
Go to the 0GVYQTMCPF5JCTKPI%GPVGT window and click
the /CPCIG0GVYQTM%QPPGEVKQPU link.
1. Click on 2TQRGTVKGU.
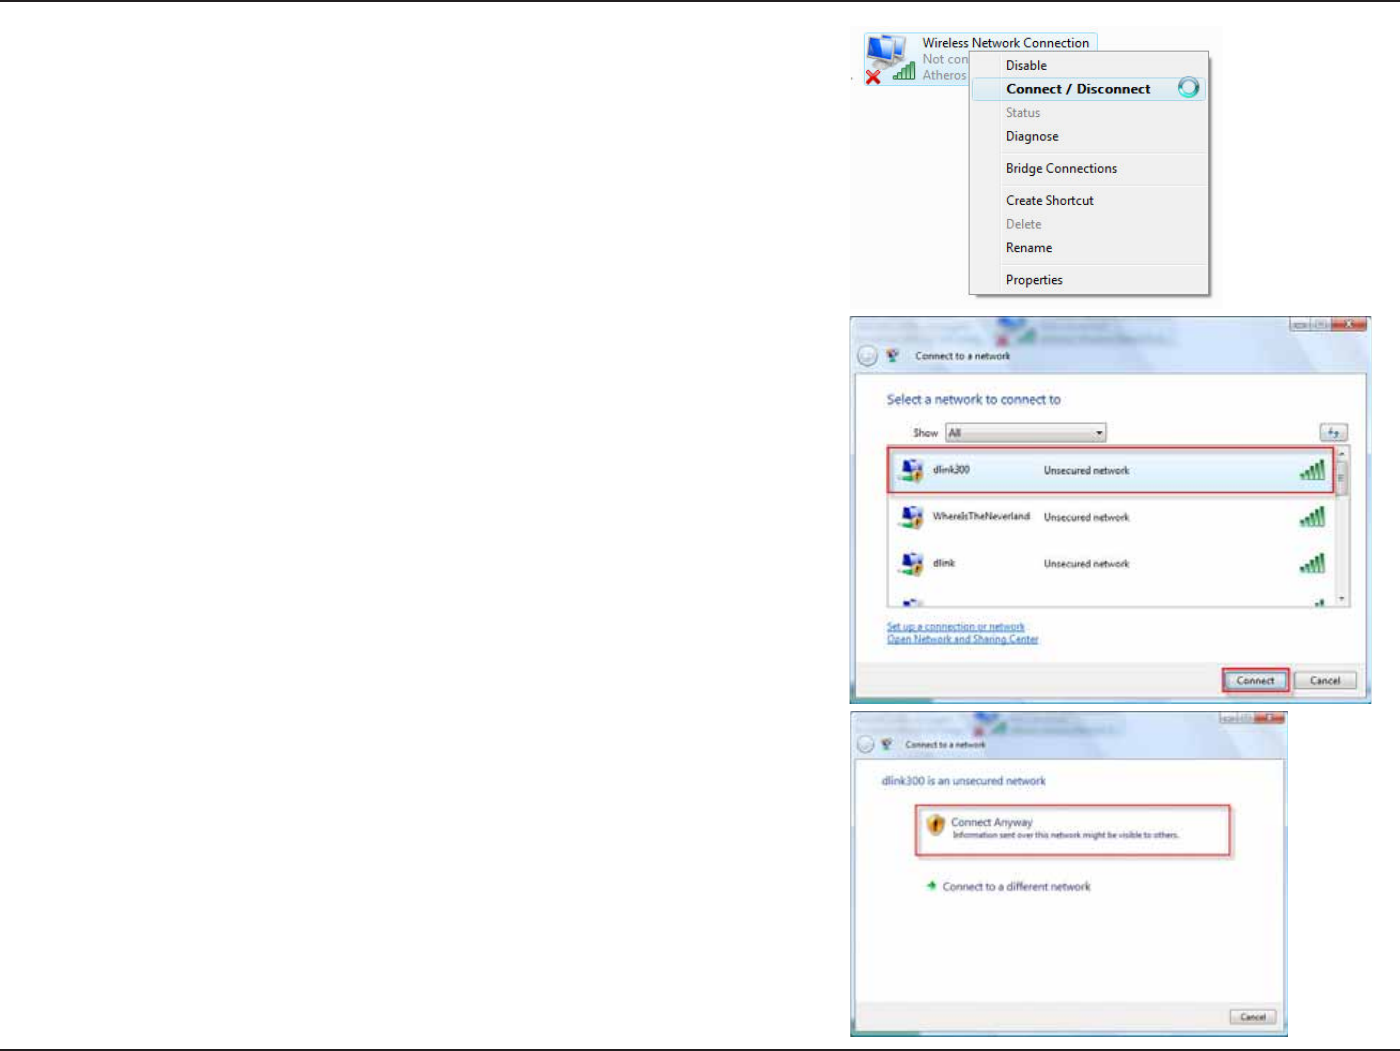
87D-Link DIR-615 User Manual
Section 11 - Connecting to an Unsecured Wireless Network
3. Right-click the 9KTGNGUU0GVYQTM%QPPGEVKQP entry and then select
%QPPGEV&KUEQPPGEV from the drop-down menu.
4. Select a network to connect to in the 5GNGEVCPGVYQTMVQEQPPGEV
to window in the %QPPGEVVQCPGVYQTM wizard and then click the
Connect button.
5.%QPſTO[QWTFGUKTGVQEQPPGEVCP[YC[QPVJGHQNNQYKPI0GVYQTM
%QPPGEVKQP5VCVWUwindow.
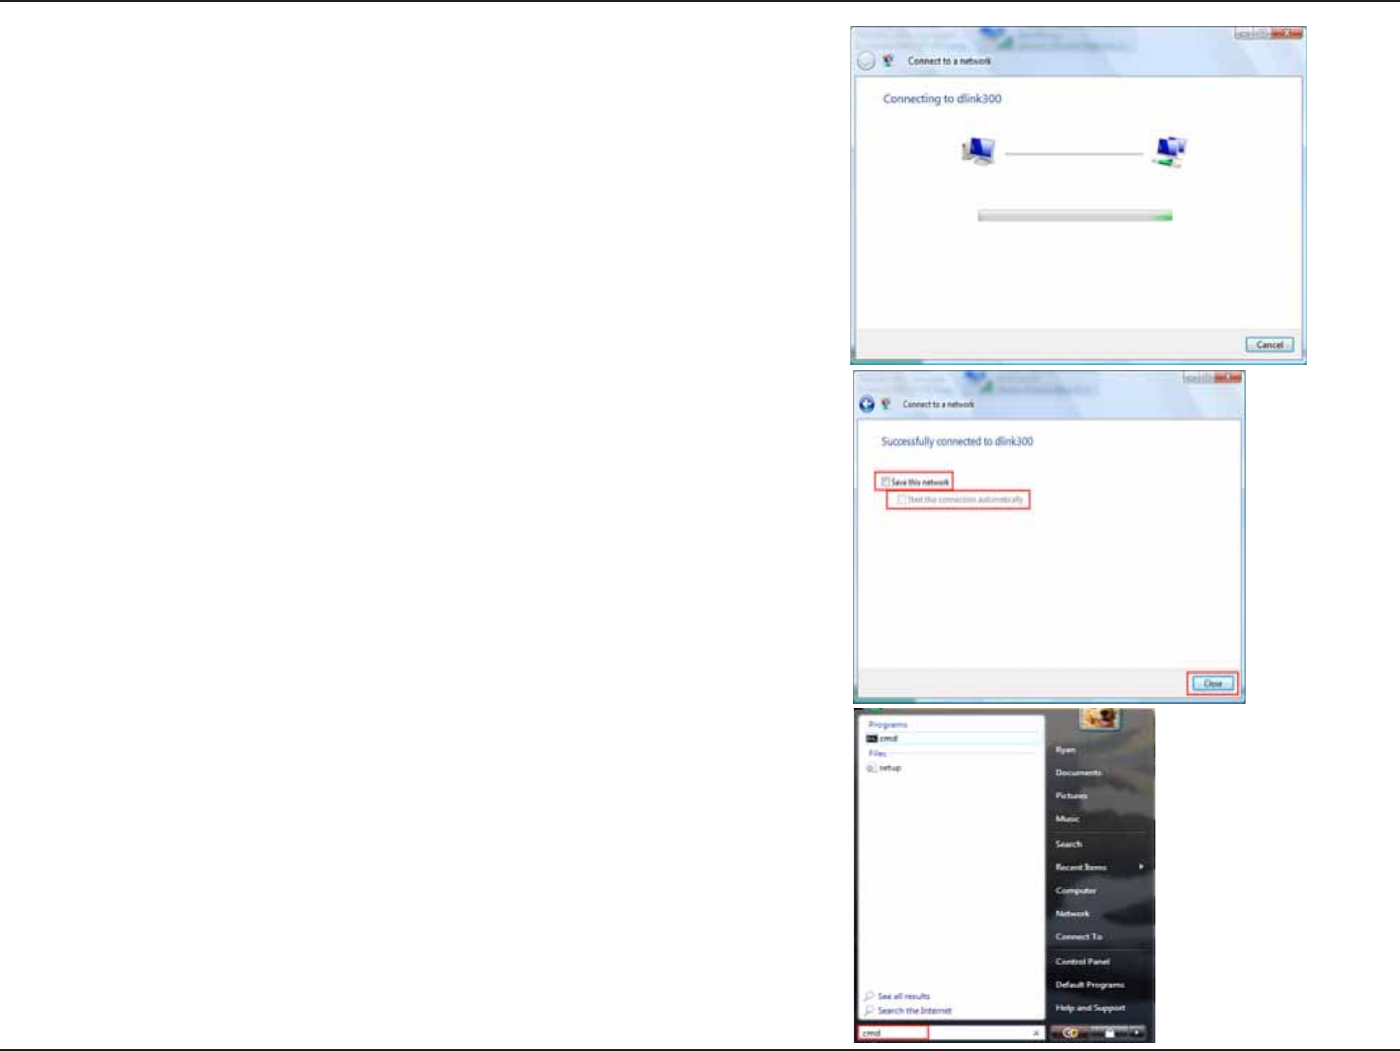
88D-Link DIR-615 User Manual
Section 11 - Connecting to an Unsecured Wireless Network
6. The following %QPPGEVVQCPGVYQTMwizard window displays the
system progress.
7. The following 5WEEGUUHWNN[EQPPGEVGFVQFNKPM window in the
%QPPGEVVQCPGVYQTM wizard is displayed. Choose to save to the
network and/or start the new connection automatically. When you
CTGſPKUJGFENKEMVJGClose button.
8. The successful connection is displayed at the bottom of the Windows
start up menu.
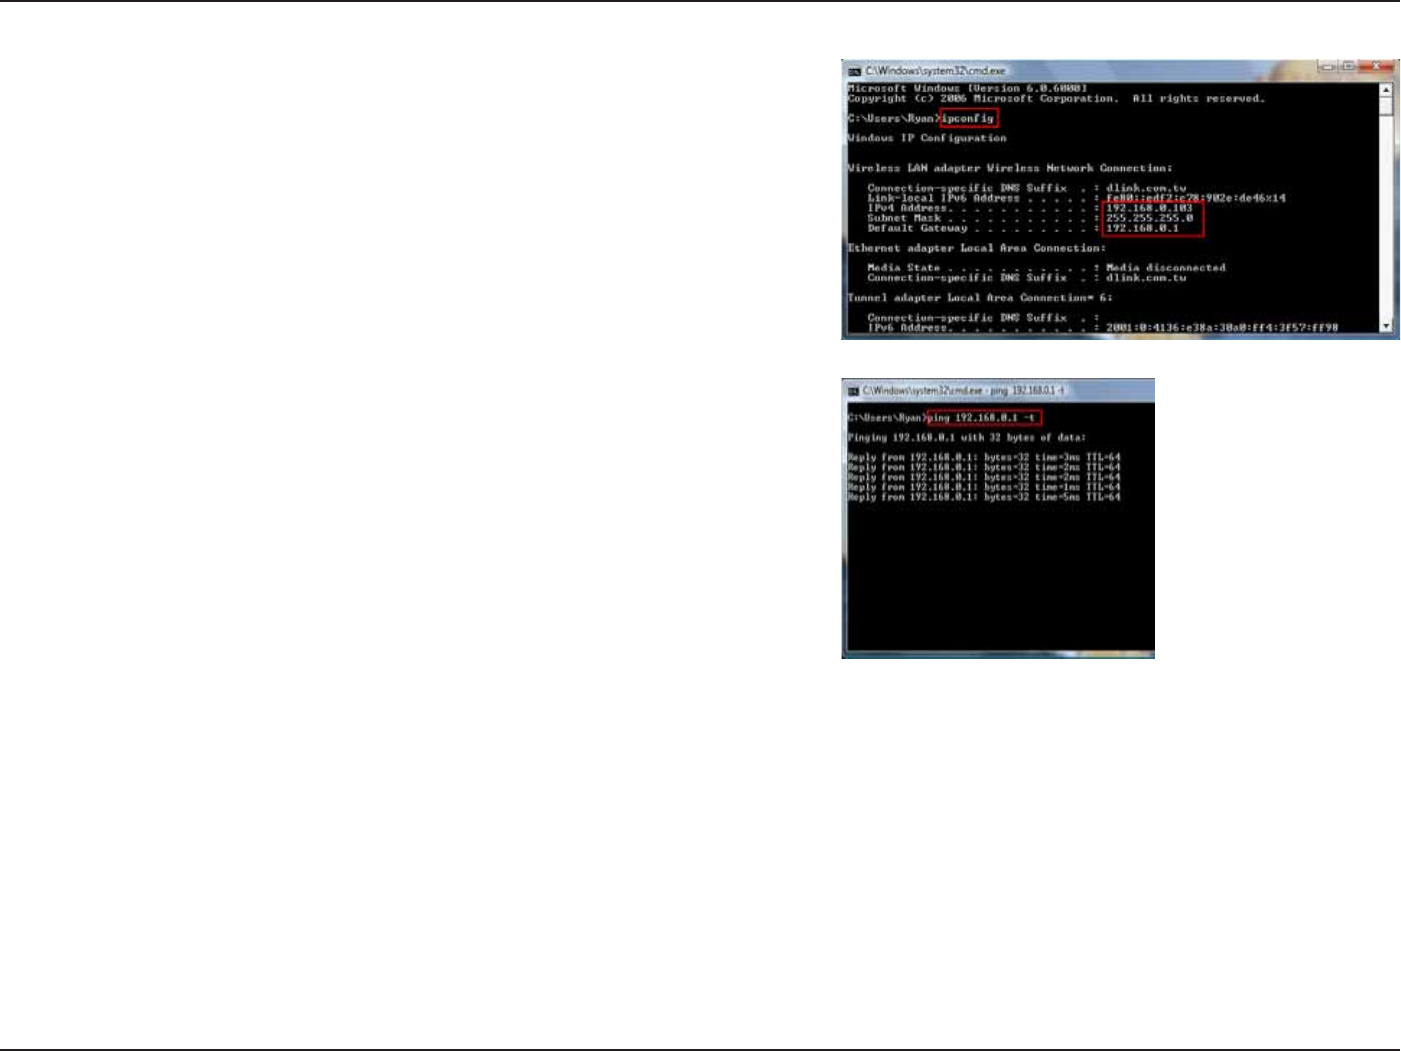
89D-Link DIR-615 User Manual
Section 11 - Connecting to an Unsecured Wireless Network
9.%QPſTO[QWTPGYUGVVKPIUD[ECNNKPIWRVJGEQOOCPFRTQORV
CPFVJGPGPVGTKPIVJGKREQPſIEQOOCPF
10.6QVGUVVJGPGY+2CFFTGUUWUGVJG2KPIHGCVWTGQHVJGEQOOCPF
prompt.

90D-Link DIR-615 User Manual
Section 12 - Troubleshooting
6TQWDNGUJQQVKPI
This chapter provides solutions to problems that can occur during the installation and operation of the DIR-615. Read
VJGHQNNQYKPIFGUETKRVKQPUKH[QWCTGJCXKPIRTQDNGOU6JGGZCORNGUDGNQYCTGKNNWUVTCVGFKP9KPFQYU® XP. If you
JCXGCFKHHGTGPVQRGTCVKPIU[UVGOVJGUETGGPUJQVUQP[QWTEQORWVGTYKNNNQQMUKOKNCTVQVJGHQNNQYKPIGZCORNGU
9J[ECPŏV+CEEGUUVJGYGDDCUGFEQPſIWTCVKQPWVKNKV[!
9JGPGPVGTKPIVJG+2CFFTGUUQHVJG&.KPMTQWVGTHQTGZCORNG[QWCTGPQVEQPPGEVKPIVQCYGDUKVGQP
the Internet or have to be connected to the Internet. The device has the utility built-in to a ROM chip in the device itself.
Your computer must be on the same IP subnet to connect to the web-based utility.
Ŗ/CMGUWTG[QWJCXGCPWRFCVGF,CXCGPCDNGFYGDDTQYUGT9GTGEQOOGPFVJGHQNNQYKPI
Ŗ+PVGTPGV'ZRNQTGTQTJKIJGT
Ŗ0GVUECRGQTJKIJGT
Ŗ/Q\KNNCQTJKIJGT
Ŗ1RGTCQTJKIJGT
Ŗ5CHCTKQTJKIJGTYKVJ,CXCQTJKIJGT
Ŗ%COKPQQTJKIJGT
Ŗ(KTGHQZQTJKIJGT
Ŗ8GTKH[RJ[UKECNEQPPGEVKXKV[D[EJGEMKPIHQTUQNKFNKPMNKIJVUQPVJGFGXKEG+H[QWFQPQVIGVCUQNKFNKPMNKIJVVT[WUKPI
CFKHHGTGPVECDNGQTEQPPGEVVQCFKHHGTGPVRQTVQPVJGFGXKEGKHRQUUKDNG+HVJGEQORWVGTKUVWTPGFQHHVJGNKPMNKIJVOC[
not be on.
Ŗ&KUCDNGCP[KPVGTPGVUGEWTKV[UQHVYCTGTWPPKPIQPVJGEQORWVGT5QHVYCTGſTGYCNNUUWEJCU<QPG#NCTO$NCEM+EG
5[ICVG0QTVQP2GTUQPCN(KTGYCNNCPF9KPFQYU®:2ſTGYCNNOC[DNQEMCEEGUUVQVJGEQPſIWTCVKQPRCIGU%JGEMVJG
JGNRſNGUKPENWFGFYKVJ[QWTſTGYCNNUQHVYCTGHQTOQTGKPHQTOCVKQPQPFKUCDNKPIQTEQPſIWTKPIKV

91D-Link DIR-615 User Manual
Section 12 - Troubleshooting
Ŗ%QPſIWTG[QWT+PVGTPGVUGVVKPIU
Ŗ)QVQ5VCTV > 5GVVKPIU > %QPVTQN2CPGN. Double-click the +PVGTPGV1RVKQPU Icon. From the 5GEWTKV[VCD
click the button to restore the settings to their defaults.
Ŗ%NKEMVJGConnection tab and set the dial-up option to Never Dial a Connection. Click the .#05GVVKPIU
button. Make sure nothing is checked. Click 1-.
Ŗ)QVQVJG#FXCPEGF tab and click the button to restore these settings to their defaults. Click 1- three
times.
Ŗ%NQUG[QWTYGDDTQYUGTKHQRGPCPFQRGPKV
Ŗ#EEGUUVJGYGDOCPCIGOGPV1RGP[QWTYGDDTQYUGTCPFGPVGTVJG+2CFFTGUUQH[QWT&.KPMTQWVGTKPVJGCFFTGUU
bar. This should open the login page for your the web management.
Ŗ+H[QWUVKNNECPPQVCEEGUUVJGEQPſIWTCVKQPWPRNWIVJGRQYGTVQVJGTQWVGTHQTUGEQPFUCPFRNWIDCEMKP9CKV
CDQWVUGEQPFUCPFVT[CEEGUUKPIVJGEQPſIWTCVKQP+H[QWJCXGOWNVKRNGEQORWVGTUVT[EQPPGEVKPIWUKPICFKHHGTGPV
computer.
9JCVECP+FQKH+HQTIQVO[RCUUYQTF!
+H[QWHQTIQV[QWTRCUUYQTF[QWOWUVTGUGV[QWTTQWVGT7PHQTVWPCVGN[VJKURTQEGUUYKNNEJCPIGCNN[QWTUGVVKPIUDCEM
to the factory defaults.
6QTGUGVVJGTQWVGTNQECVGVJGTGUGVDWVVQPJQNGQPVJGTGCTRCPGNQHVJGWPKV9KVJVJGTQWVGTRQYGTGFQPWUGC
paperclip to hold the button down for 10 seconds. Release the button and the router will go through its reboot process.
9CKVCDQWVUGEQPFUVQCEEGUUVJGTQWVGT6JGFGHCWNV+2CFFTGUUKU9JGPNQIIKPIKPVJGWUGTPCOGKU
CFOKPCPFNGCXGVJGRCUUYQTFDQZGORV[
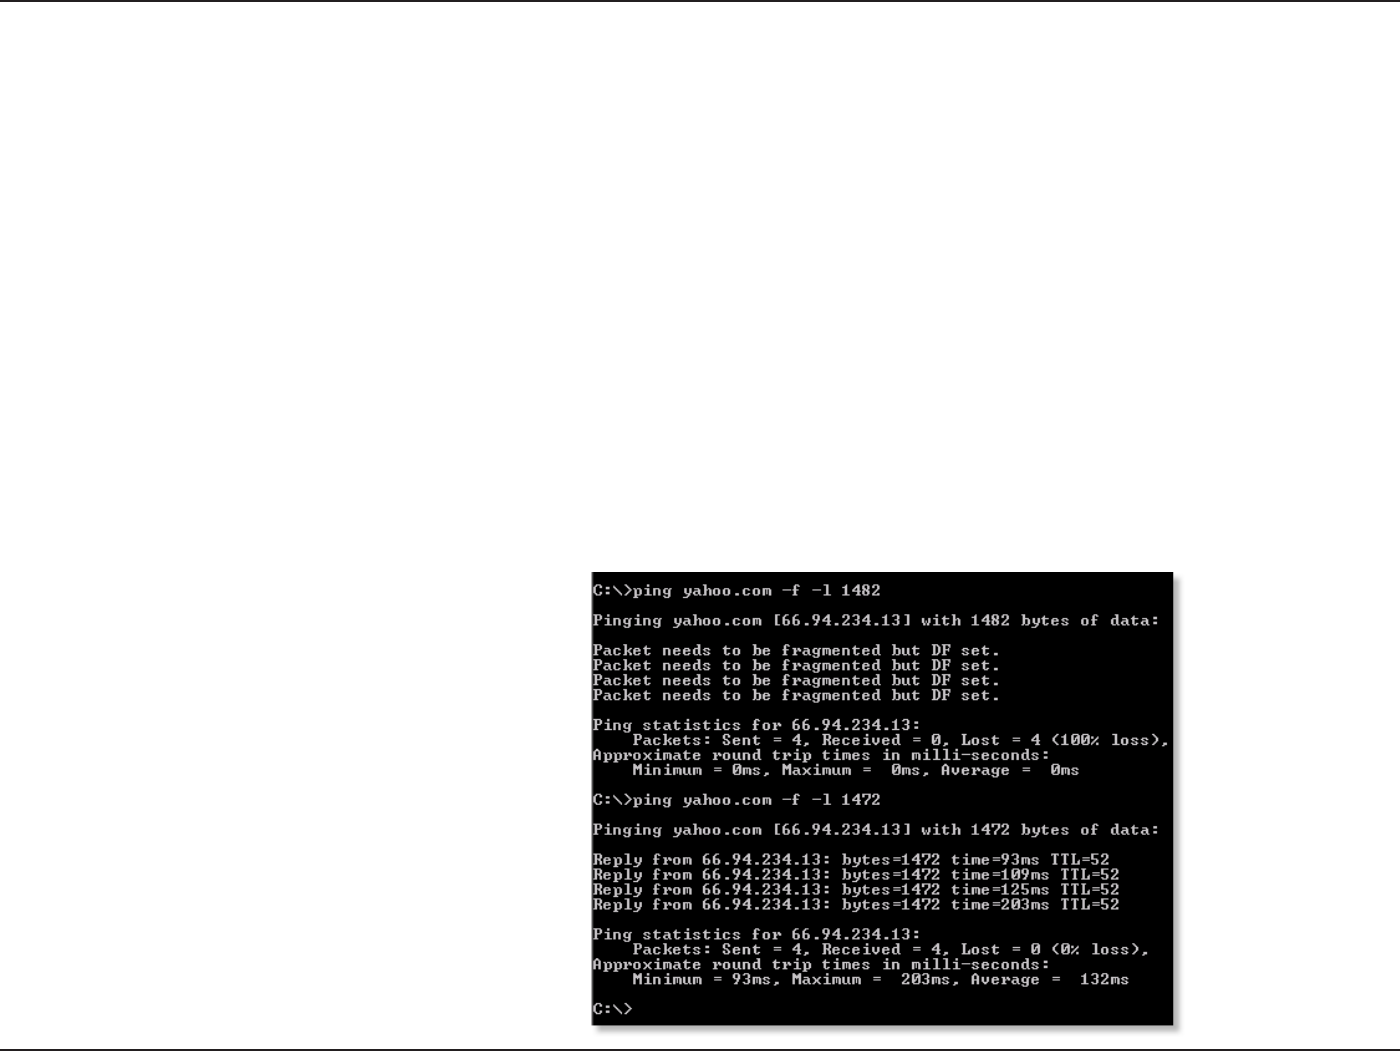
92D-Link DIR-615 User Manual
Section 12 - Troubleshooting
9J[ECPŏV+EQPPGEVVQEGTVCKPUKVGUQTUGPFCPFTGEGKXGGOCKNUYJGPEQPPGEVKPIVJTQWIJO[TQWVGT!
+H[QWCTGJCXKPICRTQDNGOUGPFKPIQTTGEGKXKPIGOCKNQTEQPPGEVKPIVQUGEWTGUKVGUUWEJCUG$C[DCPMKPIUKVGUCPF
*QVOCKNYGUWIIGUVNQYGTKPIVJG/67KPKPETGOGPVUQHVGP'ZGVE
0QVG#1.&5.WUGTUOWUVWUG/67QH
6QſPFVJGRTQRGT/675K\G[QWŏNNJCXGVQFQCURGEKCNRKPIQHVJGFGUVKPCVKQP[QWŏTGVT[KPIVQIQVQ#FGUVKPCVKQP
EQWNFDGCPQVJGTEQORWVGTQTC74.
Ŗ%NKEMQP5VCTV and then click 4WP.
Ŗ9KPFQYU®CPF/GWUGTUV[RGKPEQOOCPF (Windows®06CPF:2WUGTUV[RGKPEOF) and
press 'PVGT(or click 1-).
Ŗ1PEGVJGYKPFQYQRGPU[QWŏNNPGGFVQFQCURGEKCNRKPI7UGVJGHQNNQYKPIU[PVCZ
RKPI=WTN?=H?=N?=/67XCNWG?
'ZCORNGRKPI[CJQQEQOHN

93D-Link DIR-615 User Manual
Section 12 - Troubleshooting
;QWUJQWNFUVCTVCVCPFYQTM[QWTYC[FQYPD[GCEJVKOG1PEG[QWIGVCTGRN[IQWRD[WPVKN[QWIGVC
HTCIOGPVGFRCEMGV6CMGVJCVXCNWGCPFCFFVQVJGXCNWGVQCEEQWPVHQTVJGXCTKQWU6%2+2JGCFGTU(QTGZCORNG
NGVUUC[VJCVYCUVJGRTQRGTXCNWGVJGCEVWCN/67UK\GYQWNFDGYJKEJKUVJGQRVKOWOHQTVJGPGVYQTM
we’re working with (1452+28=1480).
1PEG[QWſPF[QWT/67[QWECPPQYEQPſIWTG[QWTTQWVGTYKVJVJGRTQRGT/67UK\G
To change the MTU rate on your router follow the steps below:
Ŗ1RGP[QWTDTQYUGTGPVGTVJG+2CFFTGUUQH[QWTTQWVGTCPFENKEM1-.
Ŗ'PVGT[QWTWUGTPCOGCFOKPCPFRCUUYQTFDNCPMD[FGHCWNV%NKEM1-VQGPVGTVJGYGDEQPſIWTCVKQP
page for the device.
Ŗ%NKEMQP5GVWR and then click /CPWCN%QPſIWTG.
Ŗ6QEJCPIGVJG/67GPVGTVJGPWODGTKPVJG/67ſGNFCPFENKEMVJG5CXG5GVVKPIU button to save your
settings.
Ŗ6GUV [QWT GOCKN +H EJCPIKPI VJG /67 FQGU PQV TGUQNXG VJG RTQDNGO EQPVKPWG EJCPIKPI VJG /67 KP
increments of ten.

94D-Link DIR-615 User Manual
#RRGPFKZ#9KTGNGUU$CUKEU
D-Link wireless products are based on industry standards to provide easy-to-use and compatible high-speed wireless
EQPPGEVKXKV[YKVJKP[QWTJQOGDWUKPGUUQTRWDNKECEEGUUYKTGNGUUPGVYQTMU5VTKEVN[CFJGTKPIVQVJG+'''UVCPFCTF
VJG&.KPMYKTGNGUUHCOKN[QHRTQFWEVUYKNNCNNQY[QWVQUGEWTGN[CEEGUUVJGFCVC[QWYCPVYJGPCPFYJGTG[QWYCPV
KV;QWYKNNDGCDNGVQGPLQ[VJGHTGGFQOVJCVYKTGNGUUPGVYQTMKPIFGNKXGTU
A wireless local area network (WLAN) is a cellular computer network that transmits and receives data with radio signals
KPUVGCFQHYKTGU9KTGNGUU.#0UCTGWUGFKPETGCUKPIN[KPDQVJJQOGCPFQHſEGGPXKTQPOGPVUCPFRWDNKECTGCUUWEJ
CUCKTRQTVUEQHHGGUJQRUCPFWPKXGTUKVKGU+PPQXCVKXGYC[UVQWVKNK\G9.#0VGEJPQNQI[CTGJGNRKPIRGQRNGVQYQTMCPF
EQOOWPKECVGOQTGGHſEKGPVN[+PETGCUGFOQDKNKV[CPFVJGCDUGPEGQHECDNKPICPFQVJGTſZGFKPHTCUVTWEVWTGJCXGRTQXGP
VQDGDGPGſEKCNHQTOCP[WUGTU
Wireless users can use the same applications they use on a wired network. Wireless adapter cards used on laptop
and desktop systems support the same protocols as Ethernet adapter cards.
7PFGTOCP[EKTEWOUVCPEGUKVOC[DGFGUKTCDNGHQTOQDKNGPGVYQTMFGXKEGUVQNKPMVQCEQPXGPVKQPCN'VJGTPGV.#0KP
QTFGTVQWUGUGTXGTURTKPVGTUQTCP+PVGTPGVEQPPGEVKQPUWRRNKGFVJTQWIJVJGYKTGF.#0#9KTGNGUU4QWVGTKUCFGXKEG
used to provide this link.
9KTGNGUU$CUKEU

95D-Link DIR-615 User Manual
#RRGPFKZ#9KTGNGUU$CUKEU
9JCVKU9KTGNGUU!
Wireless or Wi-Fi technology is another way of connecting your computer to the network without using wires. Wi-Fi
WUGUTCFKQHTGSWGPE[VQEQPPGEVYKTGNGUUN[UQ[QWJCXGVJGHTGGFQOVQEQPPGEVEQORWVGTUCP[YJGTGKP[QWTJQOG
QTQHſEGPGVYQTM
9J[&.KPM9KTGNGUU?
&.KPMKUVJGYQTNFYKFGNGCFGTCPFCYCTFYKPPKPIFGUKIPGTFGXGNQRGTCPFOCPWHCEVWTGTQHPGVYQTMKPIRTQFWEVU
D-Link delivers the performance you need at a price you can afford. D-Link has all the products you need to build your
network.
*QYFQGUYKTGNGUUYQTM!
9KTGNGUUYQTMUUKOKNCTVQJQYEQTFNGUURJQPGYQTMVJTQWIJTCFKQUKIPCNUVQVTCPUOKVFCVCHTQOQPGRQKPV#VQRQKPV
B. But wireless technology has restrictions as to how you can access the network. You must be within the wireless
network range area to be able to connect your computer. There are two different types of wireless networks Wireless
.QECN#TGC0GVYQTM9.#0CPF9KTGNGUU2GTUQPCN#TGC0GVYQTM92#0
9KTGNGUU.QECN#TGC0GVYQTM9.#0
+PCYKTGNGUUNQECNCTGCPGVYQTMCFGXKEGECNNGFCP#EEGUU2QKPV#2EQPPGEVUEQORWVGTUVQVJGPGVYQTM6JGCEEGUU
RQKPVJCUCUOCNNCPVGPPCCVVCEJGFVQKVYJKEJCNNQYUKVVQVTCPUOKVFCVCDCEMCPFHQTVJQXGTTCFKQUKIPCNU9KVJCP
KPFQQTCEEGUURQKPVCUUGGPKPVJGRKEVWTGVJGUKIPCNECPVTCXGNWRVQHGGV9KVJCPQWVFQQTCEEGUURQKPVVJGUKIPCN
ECPTGCEJQWVWRVQOKNGUVQUGTXGRNCEGUNKMGOCPWHCEVWTKPIRNCPVUKPFWUVTKCNNQECVKQPUEQNNGIGCPFJKIJUEJQQN
ECORWUGUCKTRQTVUIQNHEQWTUGUCPFOCP[QVJGTQWVFQQTXGPWGU

96D-Link DIR-615 User Manual
#RRGPFKZ#9KTGNGUU$CUKEU
9KTGNGUU2GTUQPCN#TGC0GVYQTM92#0
Bluetooth is the industry standard wireless technology used for WPAN. Bluetooth devices in WPAN operate in a range
up to 30 feet away.
%QORCTGFVQ9.#0VJGURGGFCPFYKTGNGUUQRGTCVKQPTCPIGCTGDQVJNGUUVJCP9.#0DWVKPTGVWTPKVFQGUPŏVWUG
PGCTN[CUOWEJRQYGTYJKEJOCMGUKVKFGCNHQTRGTUQPCNFGXKEGUUWEJCUOQDKNGRJQPGU2&#UJGCFRJQPGUNCRVQRU
URGCMGTUCPFQVJGTFGXKEGUVJCVQRGTCVGQPDCVVGTKGU
9JQWUGUYKTGNGUU!
9KTGNGUUVGEJPQNQI[CUDGEQOGUQRQRWNCTKPTGEGPV[GCTUVJCVCNOQUVGXGT[QPGKUWUKPIKVYJGVJGTKVŏUHQTJQOG
QHſEGDWUKPGUU&.KPMJCUCYKTGNGUUUQNWVKQPHQTKV
Home
Ŗ)KXGUGXGT[QPGCVJQOGDTQCFDCPFCEEGUU
Ŗ5WTHVJGYGDEJGEMGOCKNKPUVCPVOGUUCIGCPFGVE
Ŗ)GVUTKFQHVJGECDNGUCTQWPFVJGJQWUG
Ŗ5KORNGCPFGCU[VQWUG
5OCNN1HſEGCPF*QOG1HſEG
Ŗ5VC[QPVQRQHGXGT[VJKPICVJQOGCU[QWYQWNFCVQHſEG
Ŗ4GOQVGN[CEEGUU[QWTQHſEGPGVYQTMHTQOJQOG
Ŗ5JCTG+PVGTPGVEQPPGEVKQPCPFRTKPVGTYKVJOWNVKRNGEQORWVGTU
Ŗ0QPGGFVQFGFKECVGQHſEGURCEG

97D-Link DIR-615 User Manual
#RRGPFKZ#9KTGNGUU$CUKEU
9JGTGKUYKTGNGUUWUGF!
9KTGNGUUVGEJPQNQI[KUGZRCPFKPIGXGT[YJGTGPQVLWUVCVJQOGQTQHſEG2GQRNGNKMGVJGHTGGFQOQHOQDKNKV[CPFKVŏU
becoming so popular that more and more public facilities now provide wireless access to attract people. The wireless
connection in public places is usually called “hotspots”.
7UKPIC&.KPM%CTFDWU#FCRVGTYKVJ[QWTNCRVQR[QWECPCEEGUUVJGJQVURQVVQEQPPGEVVQ+PVGTPGVHTQOTGOQVG
NQECVKQPUNKMGCKTRQTVUJQVGNUEQHHGGUJQRUNKDTCTKGUTGUVCWTCPVUCPFEQPXGPVKQPEGPVGTU
9KTGNGUUPGVYQTMKUGCU[VQUGVWRDWVKH[QWŏTGKPUVCNNKPIKVHQTVJGſTUVVKOGKVEQWNFDGSWKVGCVCUMPQVMPQYKPIYJGTGVQ
start. That’s why we’ve put together a few setup steps and tips to help you through the process of setting up a wireless
network.
6KRU
*GTGCTGCHGYVJKPIUVQMGGRKPOKPFYJGP[QWKPUVCNNCYKTGNGUUPGVYQTM
%GPVTCNK\G[QWTTQWVGTQT#EEGUU2QKPV
Make sure you place the router/access point in a centralized location within your network for the best performance. Try
VQRNCEGVJGTQWVGTCEEGUURQKPVCUJKIJCURQUUKDNGKPVJGTQQOUQVJGUKIPCNIGVUFKURGTUGFVJTQWIJQWV[QWTJQOG
+H[QWJCXGCVYQUVQT[JQOG[QWOC[PGGFCTGRGCVGTVQDQQUVVJGUKIPCNVQGZVGPFVJGTCPIG
(QTVJGYKTGNGUUTGRGCVGTVJGTGCTGVYQV[RGUQHTGRGCVGTKP&.KPMHQTWUGTVQUGNGEV
7PKXGTUCNTGRGCVGT+VCEVUCUCP#2CPFCYKTGNGUU56#CVVJGUCOGVKOG+VECPUWRRQTVCNN#2CPFYKTGNGUU56#
if they work in the same wireless channel.
#2TGRGCVGT#2YKVJ9&5QPN[TGRGCVUCOGOQFGNQTNKOKVGFOQFGNUYJKEJDCUGQPVJGUCOGRTQRTKGVCT[
protocol.
2NGCUGEJQQUGCWPKXGTUCNTGRGCVGTVQDQQUVVJGUKIPCNVQGZVGPFVJGTCPIG

98D-Link DIR-615 User Manual
#RRGPFKZ#9KTGNGUU$CUKEU
'NKOKPCVG+PVGTHGTGPEG
2NCEGJQOGCRRNKCPEGUUWEJCUEQTFNGUUVGNGRJQPGUOKETQYCXGUCPFVGNGXKUKQPUCUHCTCYC[CURQUUKDNGHTQOVJG
TQWVGTCEEGUURQKPV6JKUYQWNFUKIPKſECPVN[TGFWEGCP[KPVGTHGTGPEGVJCVVJGCRRNKCPEGUOKIJVECWUGUKPEGVJG[QRGTCVG
on same frequency.
5GEWTKV[
&QPŏVNGV[QWPGZVFQQTPGKIJDQTUQTKPVTWFGTUEQPPGEVVQ[QWTYKTGNGUUPGVYQTM5GEWTG[QWTYKTGNGUUPGVYQTMD[VWTPKPI
on the WPA or WEP security feature on the router. Refer to product manual for detail information on how to set it up.
There are basically two modes of networking:
Ŗ+PHTCUVTWEVWTGŌ#NNYKTGNGUUENKGPVUYKNNEQPPGEVVQCPCEEGUURQKPVQTYKTGNGUUTQWVGT
Ŗ#F*QEŌ&KTGEVN[EQPPGEVKPIVQCPQVJGTEQORWVGTHQTRGGTVQRGGTEQOOWPKECVKQPWUKPIYKTGNGUUPGVYQTM
CFCRVGTUQPGCEJEQORWVGTUWEJCUVYQQTOQTG90#YKTGNGUUPGVYQTM%CTFDWUCFCRVGTU
#P+PHTCUVTWEVWTGPGVYQTMEQPVCKPUCP#EEGUU2QKPVQTYKTGNGUUTQWVGT#NNVJGYKTGNGUUFGXKEGUQTENKGPVUYKNNEQPPGEV
to the wireless router or access point.
#P#F*QEPGVYQTMEQPVCKPUQPN[ENKGPVUUWEJCUNCRVQRUYKVJYKTGNGUUECTFDWUCFCRVGTU#NNVJGCFCRVGTUOWUVDGKP
Ad-Hoc mode to communicate.
9KTGNGUU/QFGU
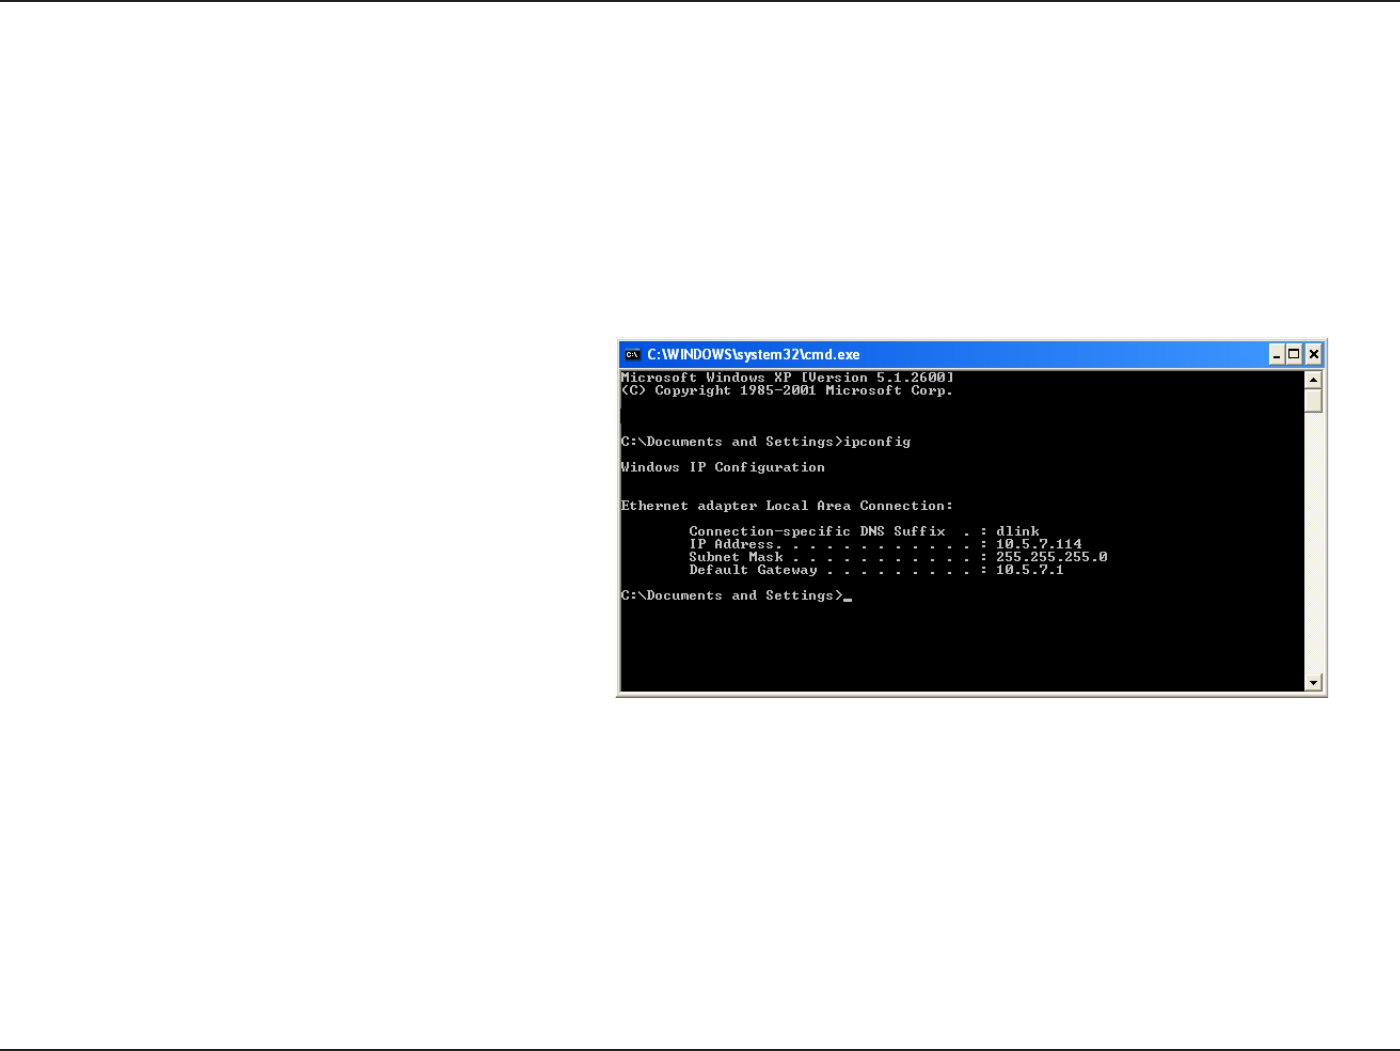
99D-Link DIR-615 User Manual
#RRGPFKZ$0GVYQTMKPI$CUKEU
0GVYQTMKPI$CUKEU
%JGEM[QWT+2CFFTGUU
#HVGT[QWKPUVCNN[QWTPGY&.KPMCFCRVGTD[FGHCWNVVJG6%2+2UGVVKPIUUJQWNFDGUGVVQQDVCKPCP+2CFFTGUUHTQO
C&*%2UGTXGTKGYKTGNGUUTQWVGTCWVQOCVKECNN[6QXGTKH[[QWT+2CFFTGUURNGCUGHQNNQYVJGUVGRUDGNQY
Click on 5VCTV > 4WP+PVJGTWPDQZV[RGcmd and click 1-.
#VVJGRTQORVV[RGipconfig and press 'PVGT.
6JKUYKNNFKURNC[VJG+2CFFTGUUUWDPGVOCUMCPF
the default gateway of your adapter.
+H VJG CFFTGUU KU EJGEM [QWT CFCRVGT
KPUVCNNCVKQP UGEWTKV[ UGVVKPIU CPF VJG UGVVKPIU
QP[QWTTQWVGT5QOGſTGYCNNUQHVYCTGRTQITCOU
may block a DHCP request on newly installed
adapters.
If you are connecting to a wireless network at a
JQVURQVGIJQVGNEQHHGGUJQRCKTRQTVRNGCUGEQPVCEVCPGORNQ[GGQTCFOKPKUVTCVQTVQXGTKH[VJGKTYKTGNGUUPGVYQTM
settings.
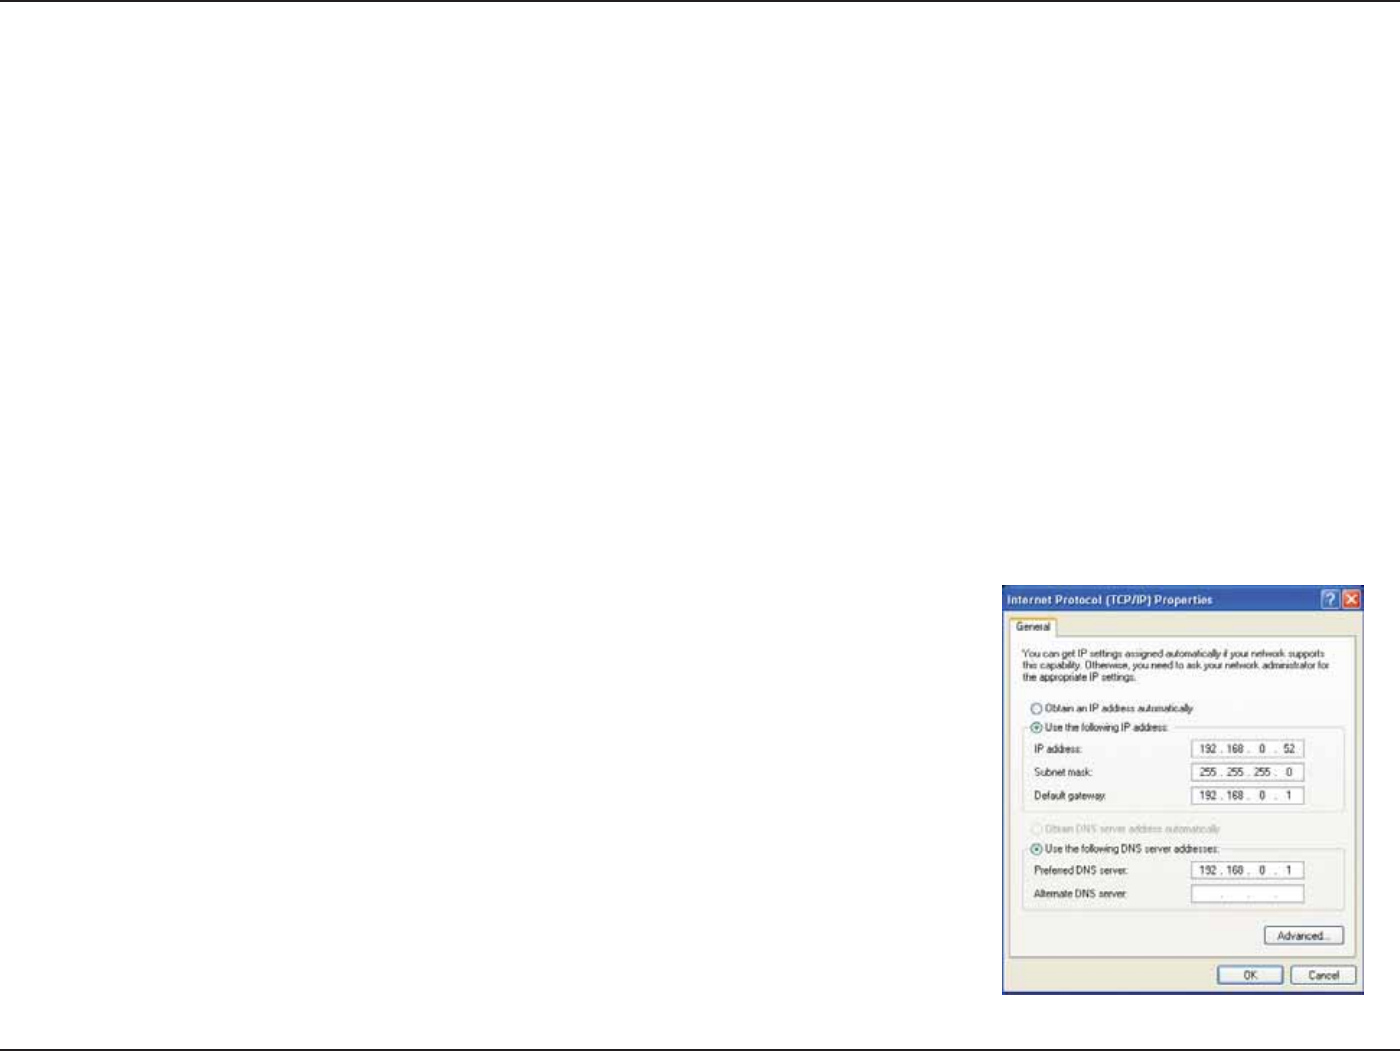
100D-Link DIR-615 User Manual
#RRGPFKZ$0GVYQTMKPI$CUKEU
5VCVKECNN[#UUKIPCP+2CFFTGUU
+H[QWCTGPQVWUKPIC&*%2ECRCDNGICVGYC[TQWVGTQT[QWPGGFVQCUUKIPCUVCVKE+2CFFTGUURNGCUGHQNNQYVJGUVGRU
below:
5VGR
Windows® XP - Click on 5VCTV > %QPVTQN2CPGN > 0GVYQTM%QPPGEVKQPU.
Windows®(TQOVJGFGUMVQRTKIJVENKEM/[0GVYQTM2NCEGU > 2TQRGTVKGU.
5VGR
Right-click on the .QECN#TGC%QPPGEVKQP which represents your D-Link network adapter and select 2TQRGTVKGU.
5VGR
Highlight +PVGTPGV2TQVQEQN6%2+2 and click 2TQRGTVKGU.
5VGR
Click 7UGVJGHQNNQYKPI+2CFFTGUU and enter an IP address that is on the same subnet as your network or the LAN
IP address on your router.
'ZCORNG+HVJGTQWVGTyU.#0 +2CFFTGUU KU OCMG[QWT +2CFFTGUU
192.168.0.X where X is a number between 2 and 99. Make sure that the number
you choose is not in use on the network. Set Default Gateway the same as the LAN
IP address of your router (192.168.0.1).
Set Primary DNS the same as the LAN IP address of your router (192.168.0.1). The
Secondary DNS is not needed or you may enter a DNS server from your ISP.
5VGR
Click 1- twice to save your settings.

101D-Link DIR-615 User Manual
#RRGPFKZ%6GEJPKECN5RGEKſECVKQPU
6GEJPKECN5RGEKſECVKQPU
5VCPFCTFU
Ŗ+'''I
Ŗ+'''D
Ŗ+'''PFTCHV
Ŗ+'''
Ŗ+'''W
Ŗ
9KTGNGUU5KIPCN4CVGU
Ŗ/DRU Ŗ/DRU
Ŗ/DRU Ŗ/DRU
Ŗ/DRU Ŗ/DRU
Ŗ/DRU Ŗ/DRU
Ŗ/DRU Ŗ/DRU
Ŗ/DRU Ŗ/DRU
Ŗ/DRU
5GEWTKV[
Ŗ92#9K(K2TQVGEVGF#EEGUU6-+2/+%
+8'ZRCPUKQP5JCTGF-G[#WVJGPVKECVKQP
ŖZ
ŖDKV9'2
Ŗ2+02$%925
/QFWNCVKQP6GEJPQNQI[
D&555&$25-&325-%%-
I3#/3#/$25-325-YKVJ1(&/
P3#/3#/$25-325-YKVJ1(&/
4GEGKXGT5GPUKVKXKV[
802.11n
HT20
Ŗ/DRU1(&/2'4ŌF$O
HT40
Ŗ/DRU1(&/2'4ŌF$O
802.11b and 802.11g
Ŗ/DRU1(&/2'4F$O
Ŗ/DRU1(&/2'4F$O
Ŗ/DRU1(&/2'4F$O
Ŗ/DRU1(&/2'4F$O
Ŗ/DRU1(&/2'4F$O
Ŗ/DRU1(&/2'4F$O
Ŗ/DRU%%-2'4F$O
Ŗ/DRU1(&/2'4F$O
Ŗ/DRU1(&/2'4F$O
Ŗ/DRU%%-2'4F$O
Ŗ/DRU&325-2'4F$O
Ŗ/DRU&$25-2'4F$O
8202CUU6JTQWIJ/WNVK5GUUKQPU
Ŗ2262
Ŗ+25GE
&GXKEG/CPCIGOGPV
Ŗ9GDDCUGF+PVGTPGV'ZRNQTGTXQTNCVGT0GVUECRG0CXKICVQT
XQTNCVGTQTQVJGT,CXCGPCDNGFDTQYUGTU
Ŗ&*%25GTXGTCPF%NKGPV

102D-Link DIR-615 User Manual
#RRGPFKZ%6GEJPKECN5RGEKſECVKQPU
9KTGNGUU(TGSWGPE[4CPIG
2.4GHz to 2.497GHz (802.11b)
2.4GHz to 2.4835GHZ (802.11g and 802.11n)
Wireless Operating Range2
Ŗ+PFQQTUWRVQHVOGVGTU
Ŗ1WVFQQTUWRVQHVOGVGTU
9KTGNGUU6TCPUOKV2QYGT#8)2QYGT
DF$O/CZIF$O/CZPF$O/CZ
'ZVGTPCN#PVGPPC6[RG
6YQſZGFTGXGTUG5/#GZVGTPCNCPVGPPC
#FXCPEGF(KTGYCNN(GCVWTGU
Ŗ0#6YKVJ8202CUUVJTQWIJ0GVYQTM#FFTGUU6TCPUNCVKQP
Ŗ/#%(KNVGTKPI
Ŗ+2(KNVGTKPI
Ŗ74.(KNVGTKPI
Ŗ&QOCKP$NQEMKPI
Ŗ5EJGFWNKPI
1RGTCVKPI6GORGTCVWTG
32°F to 129 °F ( 0°C to 40°C)
*WOKFKV[
OCZKOWOPQPEQPFGPUKPI
/CZKOWOYKTGNGUUUKIPCNTCVGFGTKXGFHTQO+'''5VCPFCTFDICPFPURGEKſECVKQPU#EVWCNFCVCVJTQWIJRWVYKNNXCT[0GVYQTM
EQPFKVKQPUCPFGPXKTQPOGPVCNHCEVQTUKPENWFKPIXQNWOGQHPGVYQTMVTCHſEDWKNFKPIOCVGTKCNUCPFEQPUVTWEVKQPCPFPGVYQTMQXGTJGCFNQYGTCEVWCN
data throughput rate. Environmental factors will adversely affect wireless signal range.
5CHGV[CPF'OKUUKQPU
FCC Part 15B/ 15C/ MPE
IC RSS-210
NCC LP0002
.'&U
Ŗ2QYGT
Ŗ5VCVWU
Ŗ+PVGTPGV
Ŗ9.#09KTGNGUU%QPPGEVKQP
Ŗ.#0
&KOGPUKQPU
Ŗ.OO
Ŗ9OO
Ŗ*OO
Weight
0.246kg