D Link DP-311P Wireless Print Server User Manual DP300U manual 021203
D Link Corporation Wireless Print Server DP300U manual 021203
D Link >
Contents
- 1. Users Manual 1
- 2. Users Manual 2
- 3. Users Manual 3
Users Manual 1

Manual
Building Networks for People
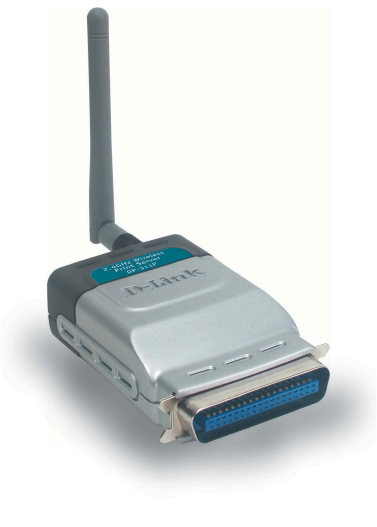
Wireless Print Server
D-Link DP-311P
2
Contents
Package Contents ................................................................................3
Introduction............................................................................................4
Getting to know the DP-311P ................................................................5
Getting Started ......................................................................................6
Using the Web Configuration.................................................................7
Printing with Windows XP/2000 ..........................................................17
Printing with Windows 98SE/Me .........................................................24
Setting up AppleTalk or LPR Printing with MAC OS X..........................32
Setting up AppleTalk or LPR Printing with MAC OS 9 ..........................39
Printing from MAC OS Client Workstations .........................................40
Networking Basics ..............................................................................42
Technical Specifications ......................................................................59
Contacting Technical Support ..............................................................61
Warranty and Registration ...................................................................62
Appendix 1: DP-311P Printer Compatibility List .................................65
Appendix 2: Incompatible Printers List................................................66
Appendix 3: Upgrading the Firmware in Netware/ Windows/ Unix .......67
3
Contents of Package:
D-Link DP-311P
Wireless Print Server
Manual, PS Admin User’s Guide and Warranty on CD
Printed Quick Installation Guide
Package Contents
If any of the above items are missing, please contact your reseller.
System Requirements:
!
!
!
Windows XP/2000/Me/98SE
!
Apple Mac OS with AppleTalk
!
NetWare 5.x (Native NDS)
!
Internet Explorer 6.0, or Netscape Navigator version 6.0 or above,
with JavaScript enabled
!
Printer must support required Operating System
!
4
Introduction
The D-Link DP-311P Print Server is a wireless print server with one parallel port. With its
high-speed IEEE 1283 parallel port, the DP-311P allows those on your network to access
and share a printer wirelessly, no matter where they reside on the network.
The DP-311P is equipped with one bi-directional parallel port with a centronics connector for
direct connection to most printers available on the market today. No additional printer cable
will be required. The DP-311P also supports all major network operating systems and
protocols.
The DP-311P is an 802.11b-compliant wireless Print Server that supports both Infrastructure
or Ad-Hoc wireless modes. With the DP-311P you have the ability and convenience of sharing
a printer beyond the wired network.
The DP-311P is also easily configurable using a Web Browser or Windows based setup
wizard. Using a web browser on a PC connected to the network, configuration is simple and
straightforward with the familiar D-Link interface. PS Admin, a Windows-based configuration
program can also be used to configure the DP-311P. (The PS Admin manual is available on the
CD included with your purchase).
The DP-311P Wireless Print Server is the ideal network printing solution for small offices,
home offices, schools and other businesses that require printer sharing.
5
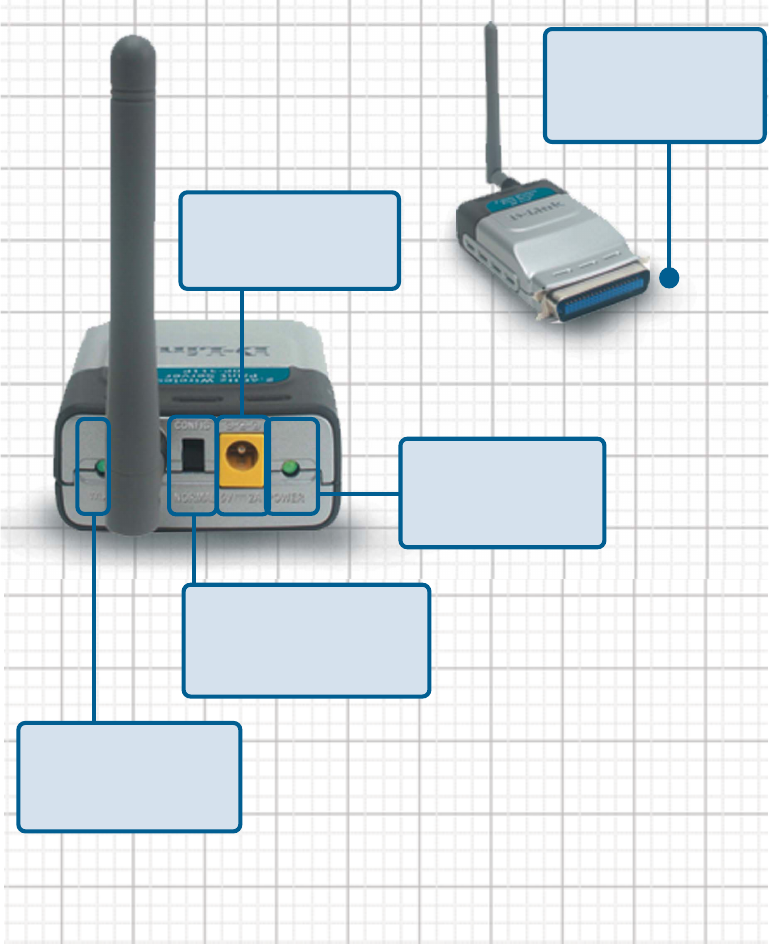
Getting to know the DP-311P
5V-2A Power inlet
Plug the External Power
Supply into this jack
Mode Switch
Toggle UP to Configure;
Toggle DOWN for Normal
operation.
WLAN LED
A blinking Green light
indicates a connection to
a power supply
Parallel Port
IEEE 1284 Bi-Directional
Parallel Port with a
centronics connector
Power LED
A solid Green light
indicates a connection
to a power supply
Frontview
Rearview
6
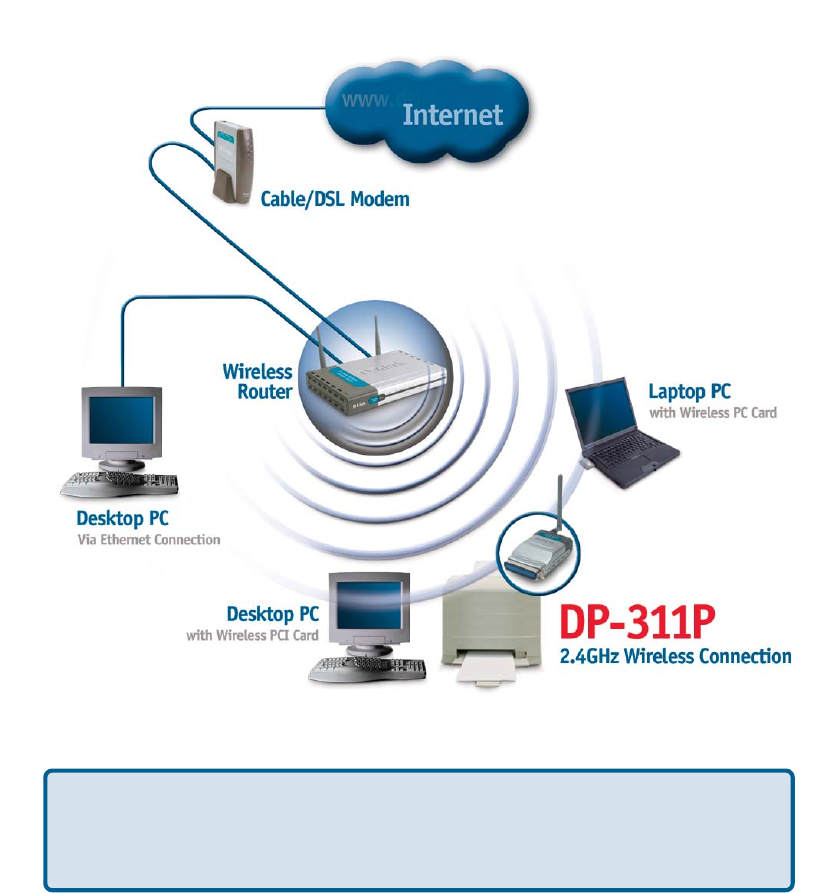
Getting Started
Below is a sample network using the DP-311P. The DP-311P has a built- in Web-based
management feature that allows users to easily configure and manage multiple print
queues through TCP/IP.
For a list of printers that are compatible with the DP-311P, please see the Appendix in this
manual. The compatibility list is not comprehensive. Even if it is not included in the list,
your printer may be compatible with the DP-311P.
7
Using the Web Configuration
On the following pages you will find a description of each of the screens that are available to
you for the web configuration of the DP-311P.
Re-power the DP-311P by pulling the power adapter plug out and re-inserting it.
After you have finished configuring the DP-311P, in order for the changes to
take effect, you must toggle the mode switch on the rear panel of the print
server back to “Normal” mode.
Set the switch to Config mode on the rear panel of the DP-311P.
Change your wireless adapter setting to Ad-Hoc or Peer-to-Peer mode. (Open
the Configuration utility for your network adapter and make sure that your
network adapter is set to Ad-Hoc mode in your configuration settings.)
(For D-Link network adapters, you can open the web-based configuration utility
and go to the Site Survey function and select the SSID named WLAN-PS. The
Channel is 1 and WEP is set to Disable. The network adapter will now be in Ad-
Hoc mode.)
Change the wireless adapter IP Address so that it is in the same IP Address range
as the DP-311P (192.168.0.x). For instructions on changing the IP Address,
please refer to the Networking Basics section in this manual. The subnet mask is
255.255.255.0.
Restart the computer.
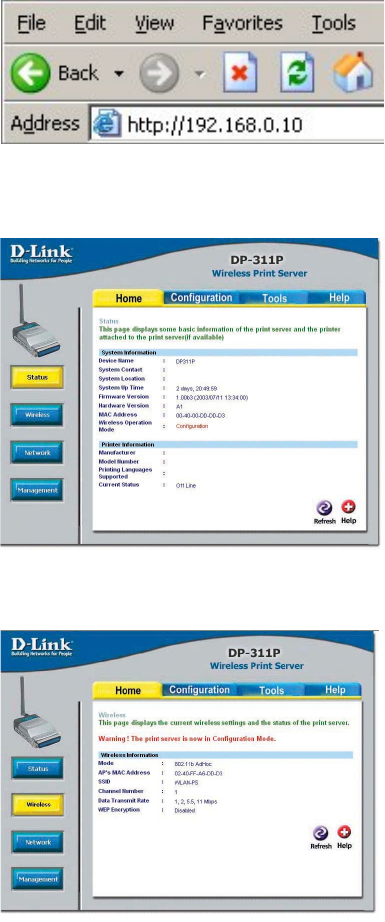
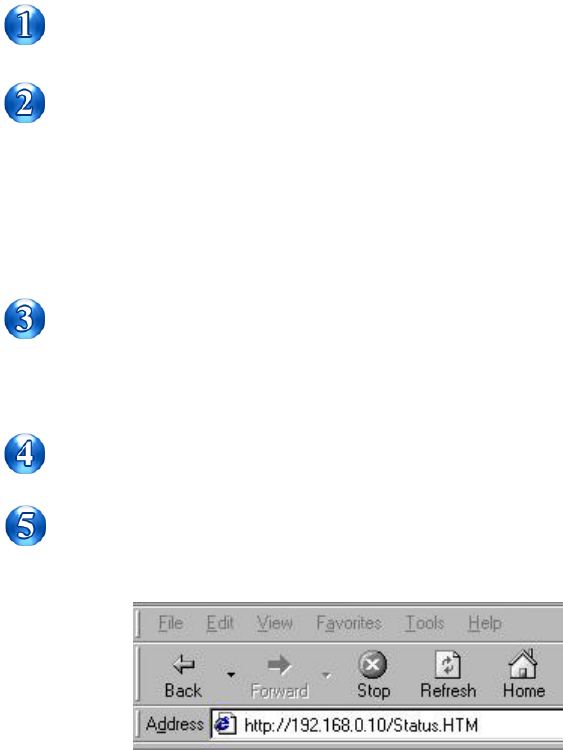
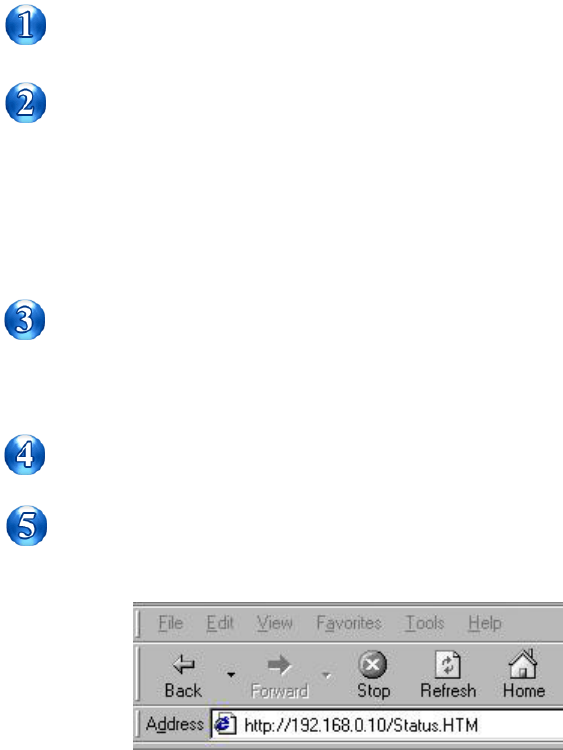
Open your web browser and input the IP Address of your wireless print server.
The default IP Address is 192.168.0.10.
you begin configuring the DP-311P:
Before
you have completed the configuration:
After
8
You can access and control the Print
Server’s configuration through the tabs on
the top of this main screen: Home, Con-
figuration, Network, Tools, and Help.
Using the Web Configuration (continued)
Home > Status
This screen displays some basic informa-
tion about the DP-311P and the printer at-
tached to the DP-311P, if available.
Home > Wireless
This screen displays the wireless settings
and information about the print server.
After you have entered the default IP Ad-
dress of the Print Server into your web
browser address field, the configuration
utility will be available, as shown here.
9
Using the Web Configuration (continued)
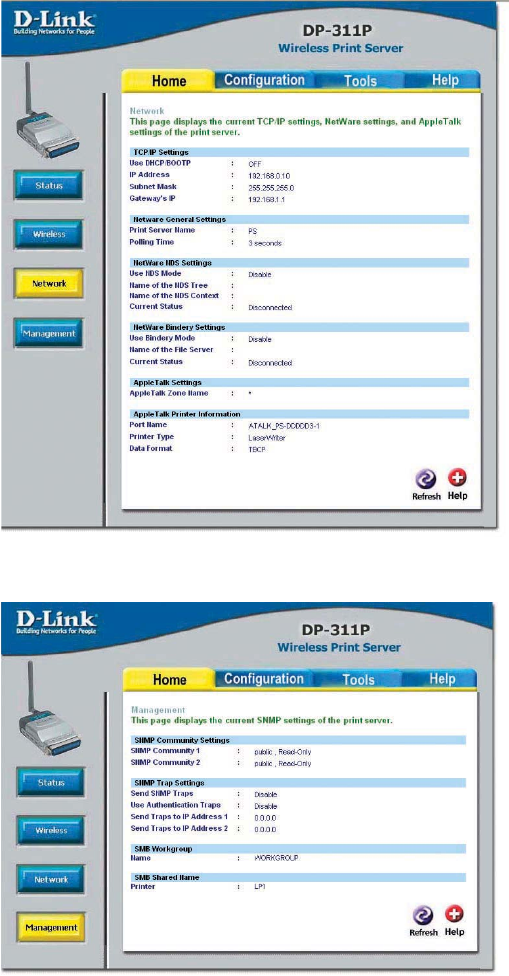
Home > Network
Home > Management
This screen displays the
current TCP/IP settings;
Netware settings and
AppleTalk settings of the
print server.
This screen displays the
current SNMP settings of
the print server.

10
Using the Web Configuration (continued)
Configuration > Status
The name assigned to the Print Server
Device Name:
System Contact: (optional) Input a System Contact name
System Location: (optional) Input a location for the Print Server
Password: Enter an Administrator password (3-8 characters)
Re-type Password: Re-type the password (when accessing the DP-311P with
password protection, the user name is admin, and the password
will be whatever you define here)
Printer Port: Select one of the following Printer Bi-directional settings:
Auto-detect for bi-directional port
Disable bi-directional port
11
Using the Web Configuration (continued)
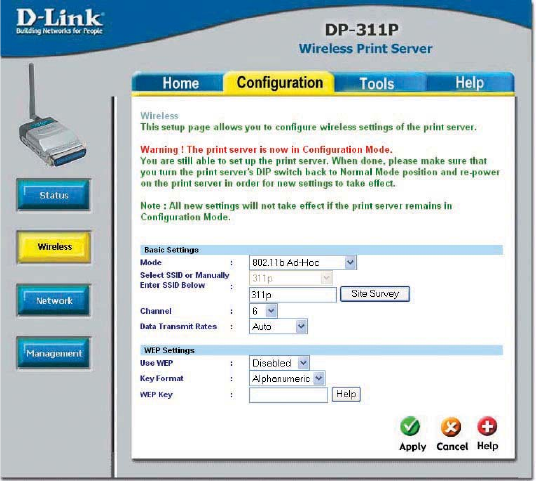
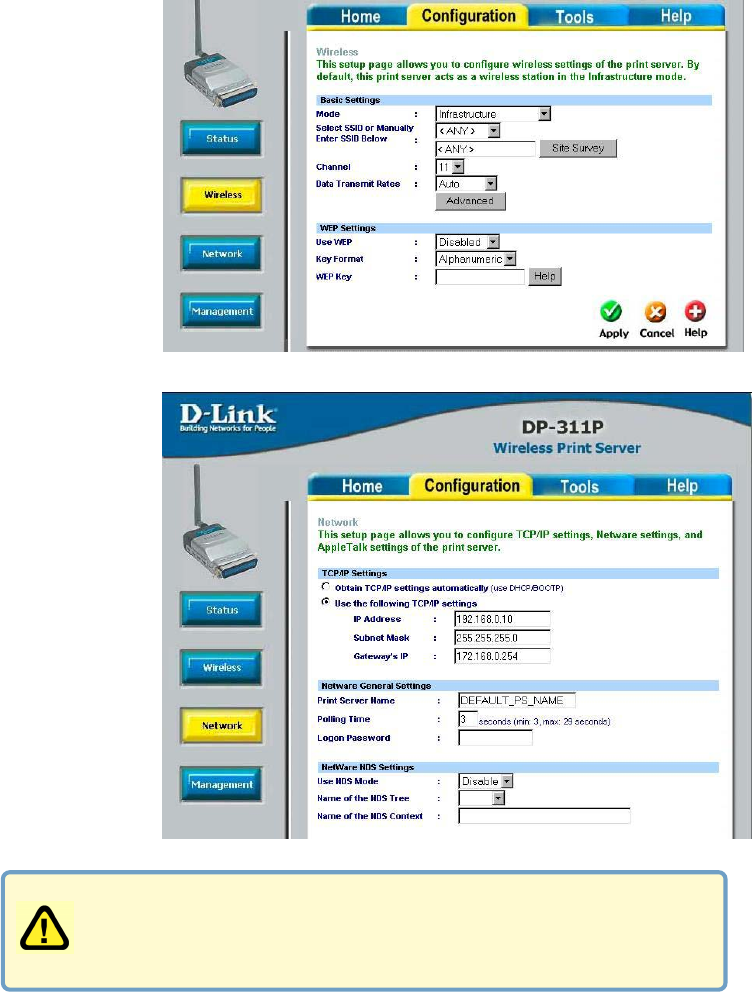
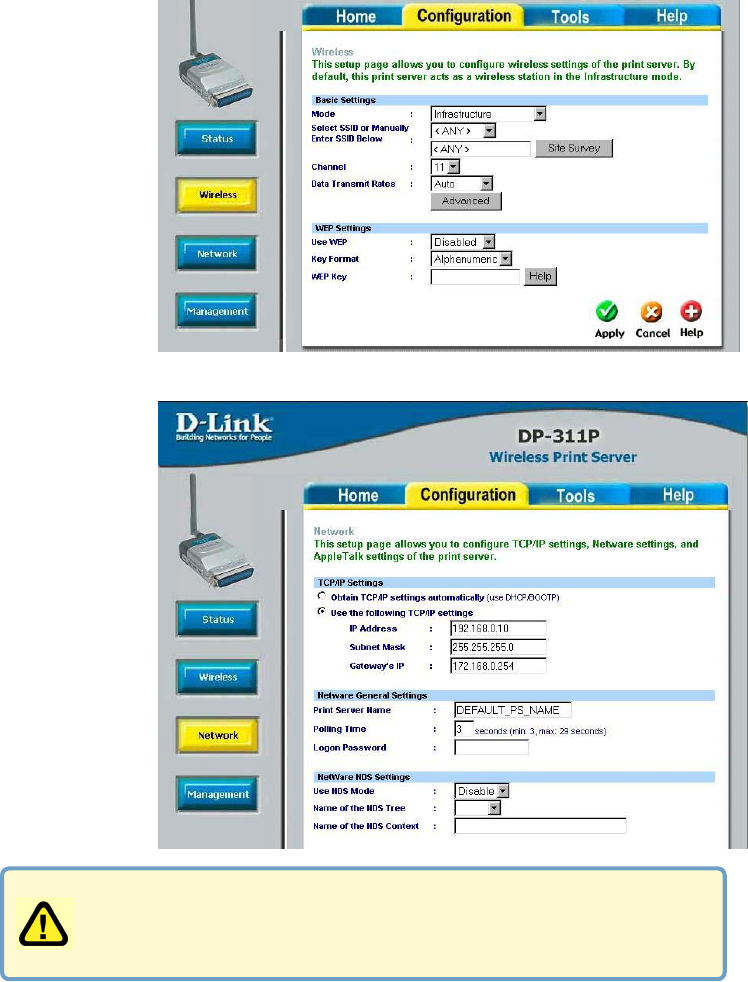
Configuration > Wireless
Ad-Hoc: Connect to
compatibly configured
wireless clients that
have the same
chipset in peer to peer
mode
802.11b Ad-Hoc:
Connect to all
compatibly configured
802.11b wireless
clients in peer to peer
mode
Infrastructure:
Connects to
compatibly configured
wireless AP or router
in a WLAN
Mode:
Select SSID or
Manually Enter
SSID Below:
Select the SSID from the pull-down menu, or enter it manually in
the field provided. You can use the Site Survey tool provided to
obtain SSID information
Channel: Select the channel from the pull-down menu. (This is only used in
Ad-Hoc mode)
Data Transmit
Rates: Choose the data transmit rate; Auto is the default setting
Use WEP: From the pull-down menu choose 64 bit; 128 bit or Disable WEP;
Disabled is the default setting
Key Format: Choose Alphanumeric or Hexadecimal
WEP Key: Enter the WEP key in the chosen format
64-bit, Alphanumeric = a combination of 5 digits and letters
128-bit, Alphanumeric = a combination of 13 digits and letters
64-bit , Hexadecimal = a combination of 10 digits and letters
128-bit, Hexadecimal = a combination of 26 digits and letters
12
Using the Web Configuration (continued)
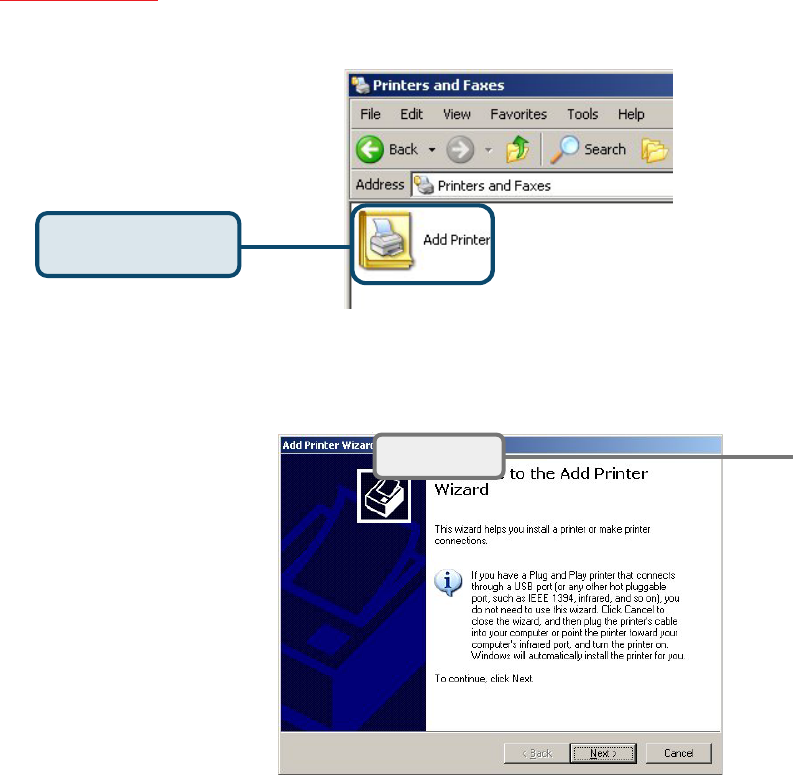
Configuration > Network
Select this option to obtain settings automatically from your
DHCP server
Obtain TCP/IP settings
automatically (use
DHCP/BOOTP):
Use the following
TCP/IP settings: Select this option to enter a Static IP Address, Subnet Mask
and Gateway IP Address manually
TCP/IP Settings

13
Using the Web Configuration (continued)
Configuration > Network (continued)
Print Server Name: Input a name for the print server
Polling Time:
Netware General Settings
Enter the number of polling seconds (the minimum is 3; the
maximum is 29 seconds)
Logon Password: Enter the logon password
Apple Talk Printer Configuration
Printer Type:
Data Format:
Apple Talk Settings
AppleTalk Zone Name:
Port Name:
Use Bindery Mode:
Netware Bindery Settings
Name of the File Server:
Use NDS Mode: Enable or Disable NDS mode; Disable is the default setting
Name of the NDS Tree:
Netware NDS Settings
Name of the NDS
Context: Enter a name for the NDS context
Enter the Printer Type
Enter the Data Format
Enter AppleTalk Zone Name
Enter the Port Name
Select Enable or Disable
Select the name of the File Server
Select from the pull-down menu, if available
NDS (Novell Directory Services) is a Directory Service for Novell netware networks
that interoperates with other types of networks and provides a logical “tree structure”
view of all resources on the network, no matter where they are located.
14
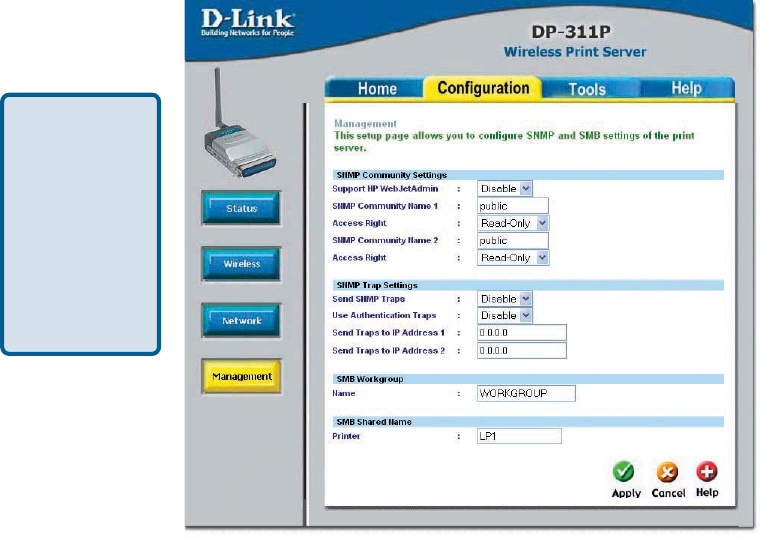
Using the Web Configuration (continued)
Configuration > Management
SNMP Community Settings
Support HP WebJet Admin:
SNMP Community Name 1: Enter a name
Access Right: Select from the pull-down menu
Read-Only or Read-Write
Select Enable or Disable
Send Traps to IP Address 2:
Send SNMP Traps:
Use Authentication Traps:
Send Traps to IP Address 1: Input an IP Address for receiving Traps
Select Enable or Disable
Input an IP Address for receiving Traps
SNMP Trap Settings
Select Enable or Disable
SNMP
(Simple
Network
Management
Protocol) is a
set of protocols
for managing
complex
networks
Access Right: Select from the pull-down menu
Read-Only or Read-Write
SNMP Community Name 2: Enter a name
15
Using the Web Configuration (continued)
Configuration > Management (continued)
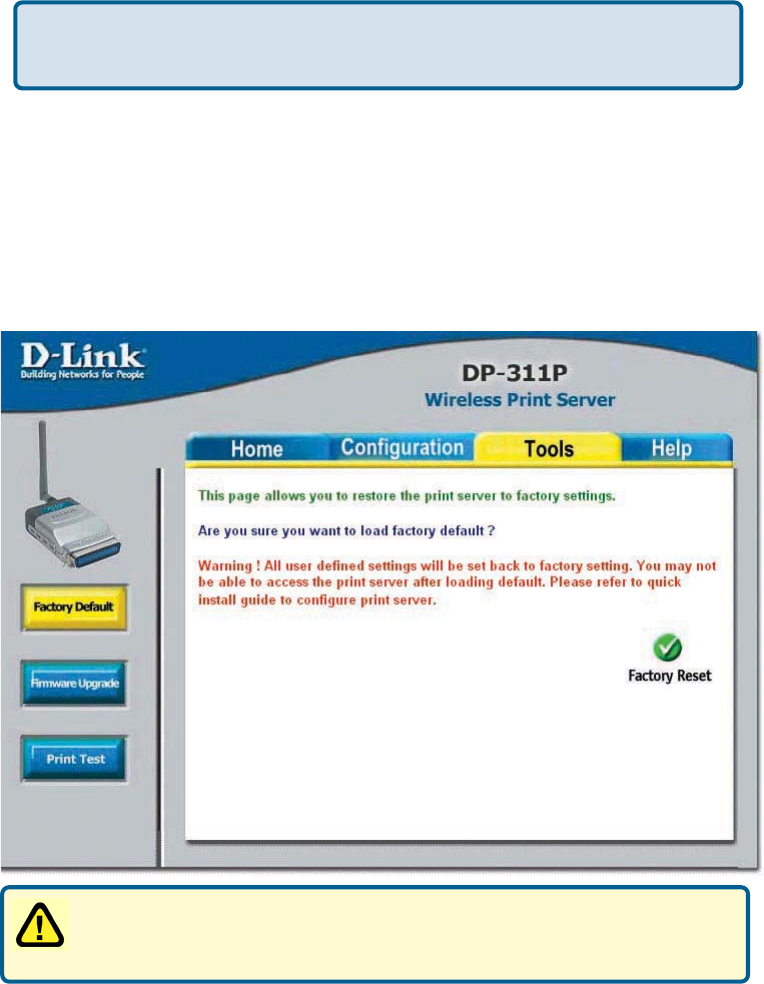
Tools > Factory Default
Name: Enter a name
SMB Workgroup
Printer: Enter the printer name
SMB Shared Name
If you click Factory Reset you will lose all user-defined settings and you will
have to re-configure the DP-311P!
SMB
(Server Message Block) is a message format to share files, directories and devices.
16
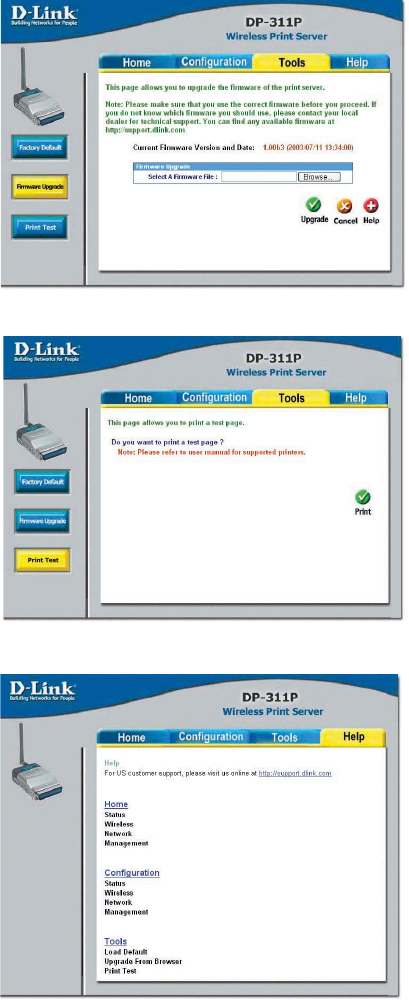
Using the Web Configuration (continued)
Tools > Firmware Upgrade
Visit http://support.dlink.com for the
latest upgrades. Download the upgrade
to your hard drive and then click
Browse in this screen to locate the up-
grade. When you have found the firm-
ware file on your hard drive, click
Upgrade, in this screen, to complete
the process.
Tools > Print Test
Click Print in this window to print a
test page. Please refer to the Appen-
dix in this manual for a list of sup-
ported printers.
Help
For more information, click on any of
the Help topics listed in this screen.
17
Printing
with Windows XP/2000
Set the switch to Config mode on the rear panel of the DP-311P.
Change your wireless adapter setting to Ad-Hoc or Peer-to-Peer mode. (Open
the Configuration utility for your network adapter and make sure that your
network adapter is set to Ad-Hoc mode in your configuration settings.)
(For D-Link network adapters, you can open the web-based configuration utility
and go to the Site Survey function and select the SSID named WLAN-PS. The
Channel is 1 and WEP is set to Disable. The network adapter will now be in Ad-
Hoc mode.)
Change the wireless adapter IP Address so that it is in the same IP Address range
as the DP-311P (192.168.0.x). For instructions on changing the IP Address,
please refer to the Networking Basics section in this manual. The subnet mask is
255.255.255.0.
Restart the computer.
Open your web browser and input the IP Address of your wireless print server.
The default IP Address is 192.168.0.10.
18
Printing with Windows XP/2000 (continued)
Change the IP
Address and
change the other
settings of the
DP-311P to
conform to your
network.
Change the
mode to
Infrastructure.
Input or select
the SSID of your
wireless router or
AP. Input WEP
settings if
applicable.
11
11
1After you have configured the DP-311P, set the rear panel switch back to
Normal mode.
22
22
2Change your wireless network adapter settings (IP Address,
Infrastructure mode) so that they match your network.
19
Printing with Windows XP/2000 (continued)
For Windows XP:
Go to Start > Printers and Faxes > Add a Printer
Click Next
Double-click on the
“Add Printer” icon
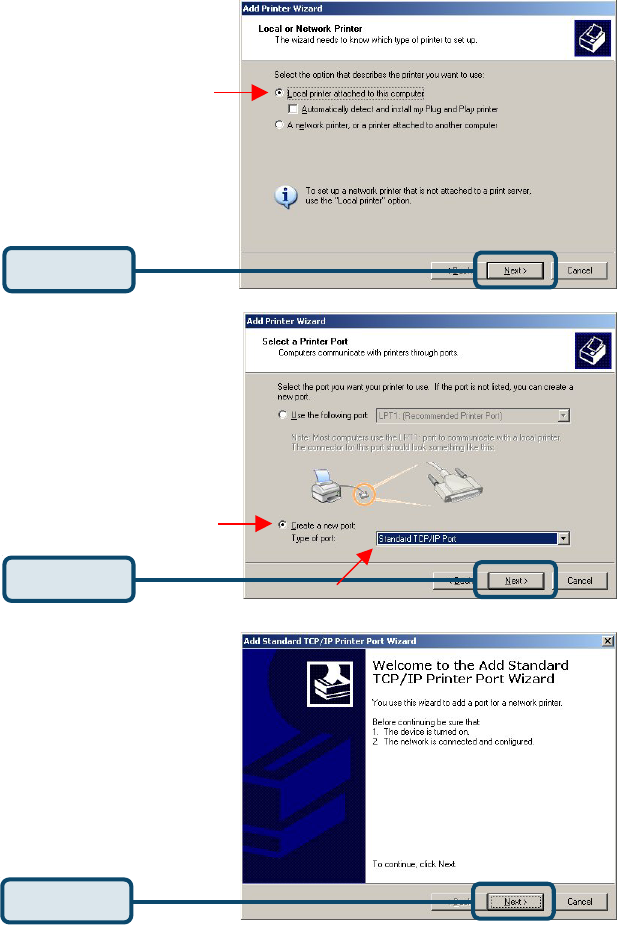
20
Printing with Windows XP/2000 (continued)
Select “Local Printer.”
Select “Create a new port.”
At the pull-down menu, highlight
“Standard TCP/IP Port.”
Click Next
Click Next
Click Next
21
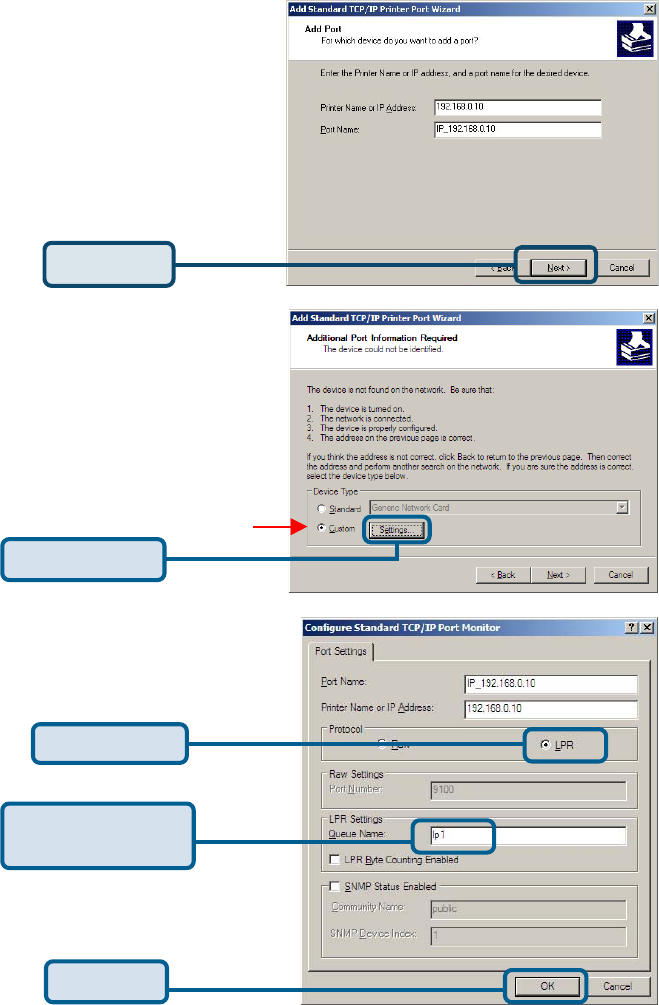
Printing with Windows XP/2000 (continued)
Type in the IP address of the print
server. (i.e. 192.168.0.10)
The port name will automatically be
filled in.
Select “Custom.”
Then click “Settings.”
Click Next
Click Settings
Click OK
Enter “lp1” for the
Queue Name.
Select “LPR”
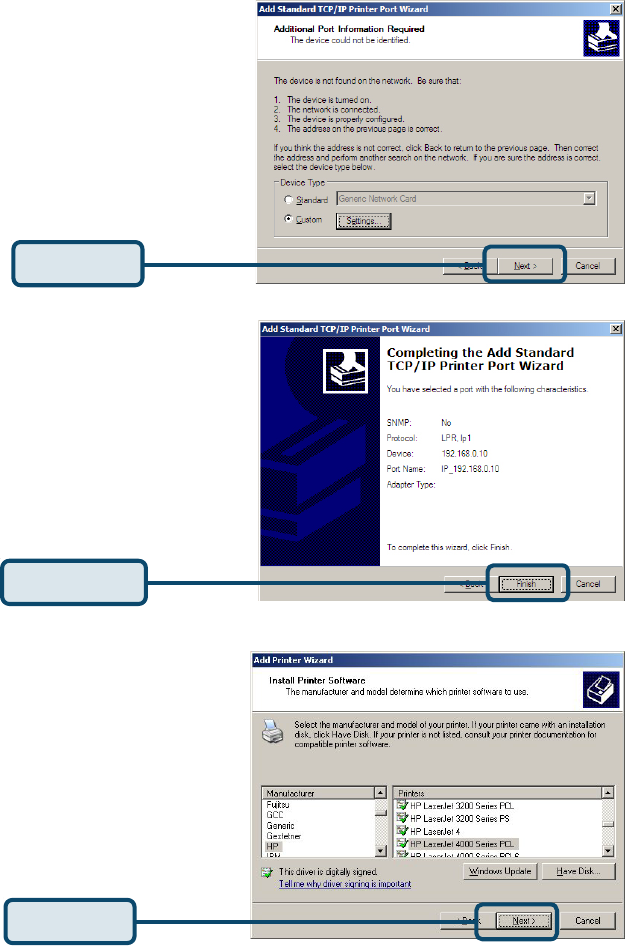
22
Printing with Windows XP/2000 (continued)
In this window, scroll down to find your
printer. (If it is not listed, insert the driver
CD or diskette that came with your
printer.)
Click on “Have Disk.”
Then, scroll down and highlight the
printer.
Click Next
Click Finish
Click Next
23
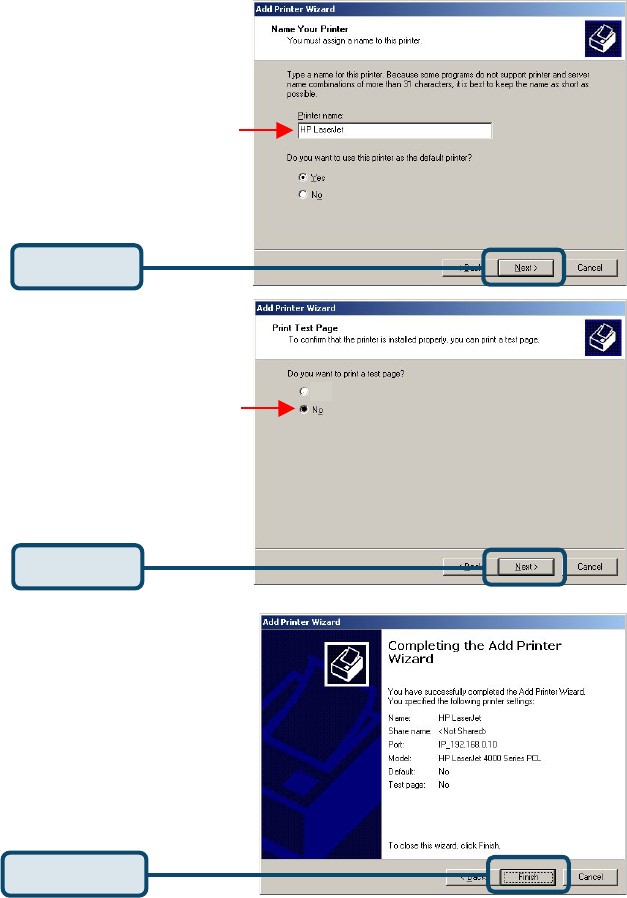
The printer is now ready for printing with
Windows XP, on your network.
Click Finish
Select “No”
Click Next
At this screen, you can input a name
for this printer.
Click Next
Printing with Windows XP/2000 (continued)
Yes
24
Printing
with Windows 98SE/Me
Set the switch to Config mode on the rear panel of the DP-311P.
Change your wireless adapter setting to Ad-Hoc or Peer-to-Peer mode. (Open
the Configuration utility for your network adapter and make sure that your
network adapter is set to Ad-Hoc mode in your configuration settings.)
(For D-Link network adapters, you can open the web-based configuration utility
and go to the Site Survey function and select the SSID named WLAN-PS. The
Channel is 1 and WEP is set to Disable. The network adapter will now be in Ad-
Hoc mode.)
Change the wireless adapter IP Address so that it is in the same IP Address range
as the DP-311P (192.168.0.x). For instructions on changing the IP Address,
please refer to the Networking Basics section in this manual. The subnet mask is
255.255.255.0.
Restart the computer.
Open your web browser and input the IP Address of your wireless print server.
The default IP Address is 192.168.0.10.
25
Configuration > Network
Configuration > Wireless
Printing with Windows 98SE/Me (continued)
Change the IP
Address and
change the other
settings of the
DP-311P to
conform to your
network
Change the
mode to
Infrastructure.
Input or select
the SSID of your
wireless router or
AP. Input WEP
settings if
applicable.
11
11
1After you have configured the DP-311P, set the rear panel switch back to
Normal mode
22
22
2Change your wireless network adapter settings (IP Address,
Infrastructure mode) so that they match your network
26
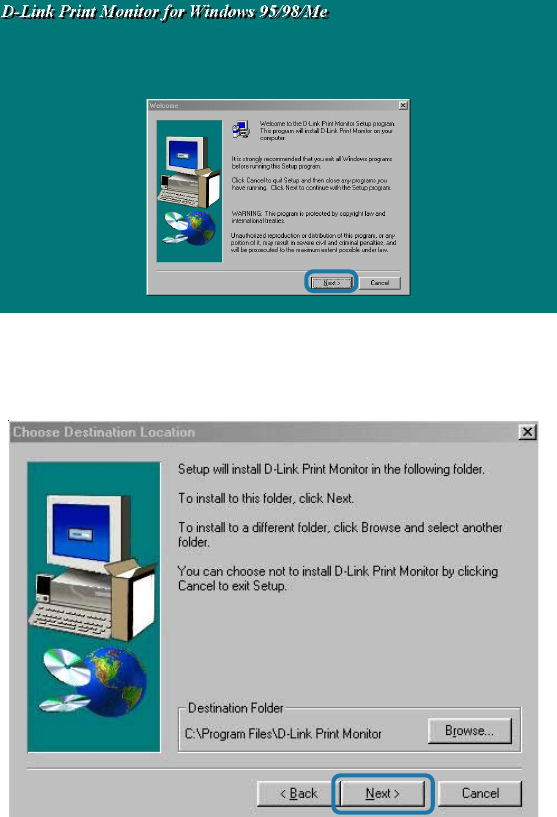
Printing with Windows 98SE/Me (continued)
Please insert the
DP-311P CD into
your CD-ROM
drive and click
Install PS Admin
This picture will
appear.
Click Next
Click Next
27
Printing with Windows 98SE/Me (continued)
Select the program
you want to install
DP-311P PSAdmin is
a windows based
management utility,
only Administrators
need to install this
program
D-Link Print Monitor
is the driver for print
servers in Windows
95/98/Me.You will
need to install this
program
Click Next
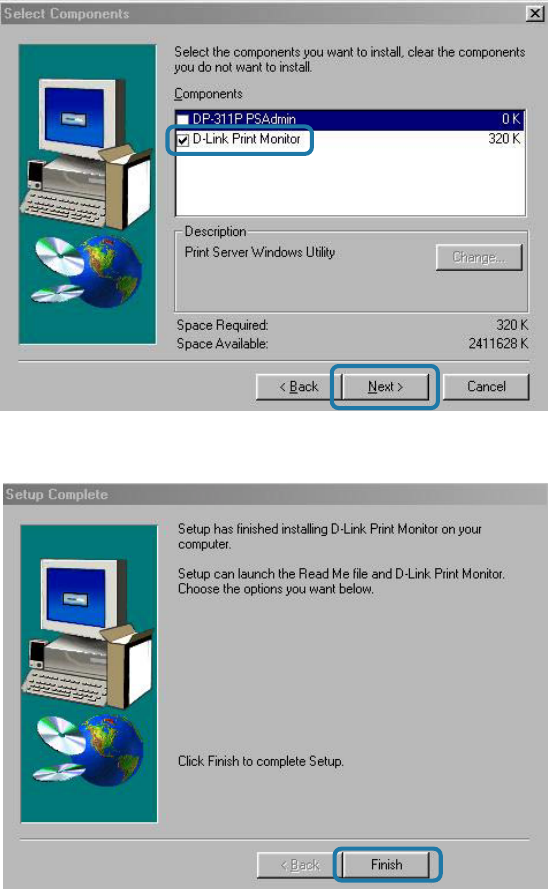
Click Finish
28
Printing with Windows 98SE/Me (continued)
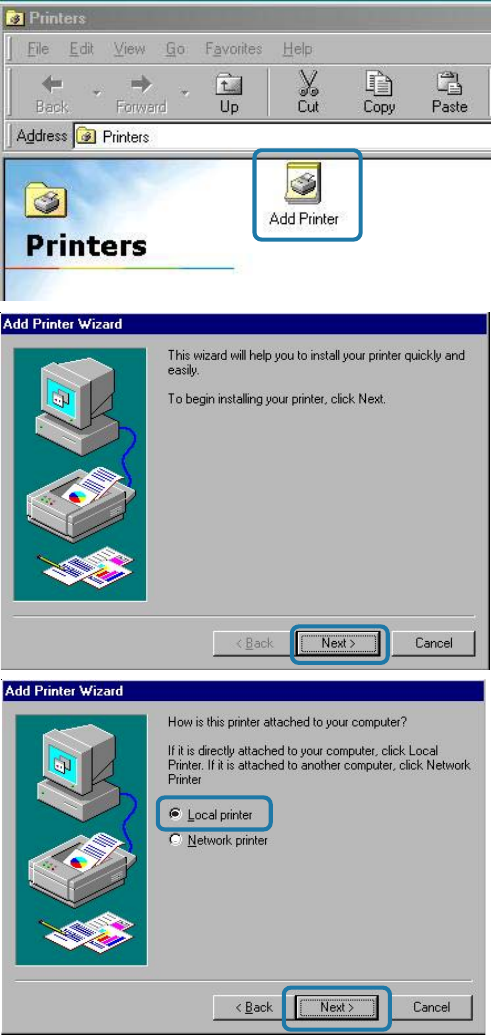
Go to Start > Settings >
Printer> Add printer or
Go to Start> Control
Panel> Printers
Double click the Add
Printer icon
Click Next
Select Local printer
Click Next
29
Printing with Windows 98SE/Me (continued)
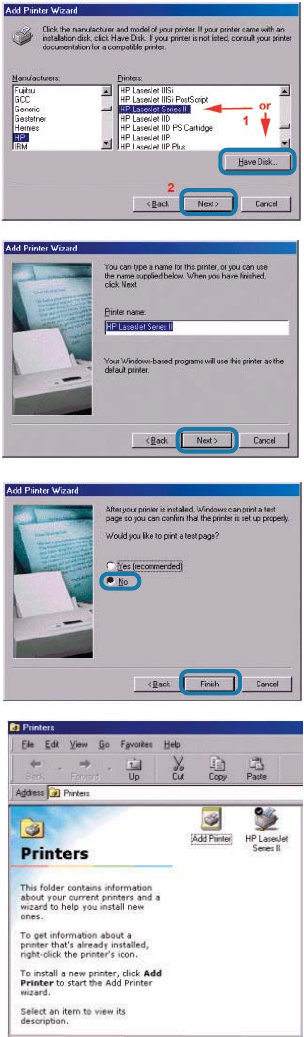
Click Next
Click Next
Highlight the printer, as shown. If the desired
printer is not on the list, click Have Disk and
insert the printer driver disk that came with your
printer to install the printer drivers
Select No
Click Finish
Go to Start >
Settings > Printers
Check to see that your
printer is installed
30
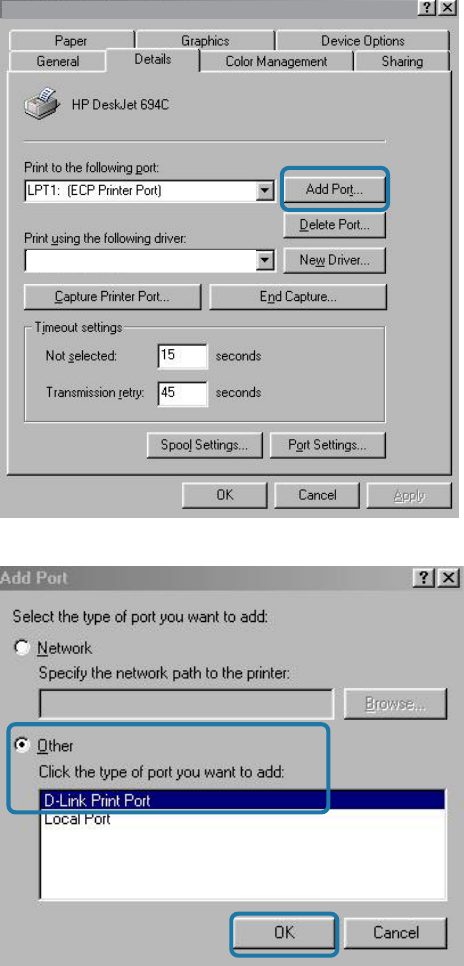
Printing with Windows 98SE/Me (continued)
After the printer installation is
completed, right-click on the
Printer icon.
Select Properties > Details >
Click Add Port
Select Other > D-link Print Port
Click OK
HP LaserJet Series II
HP LaserJet Series II