D Link DSL-2650B Wireless ADSL Router User Manual Manual 2
D Link Corporation Wireless ADSL Router Manual 2
D Link >
Contents
- 1. Manual 1
- 2. Manual 2
- 3. Manual 3
Manual 2

Section 3 – Configuration
D-Link DSL-2650U User Manual 44
Route
To access the Device Info – Route window, click the Route button in the Device Info directory.
This read-only window displays routing info.
ARP
To access the Device Info – ARP window, click the ARP button in the Device Info directory.
This read-only window displays Address Resolution Protocol info.
DHCP
To access the Device Info – DHCP Leases window, click the DHCP button in the Device Info directory.
This read-only window displays DHCP lease info.
Section 3 – Configuration
D-Link DSL-2650U User Manual 45
Advanced Setup
This chapter include the more advanced features used for network management and security as well as administrative tools to manage the Router,
view status and other information used to examine performance and for troubleshooting.
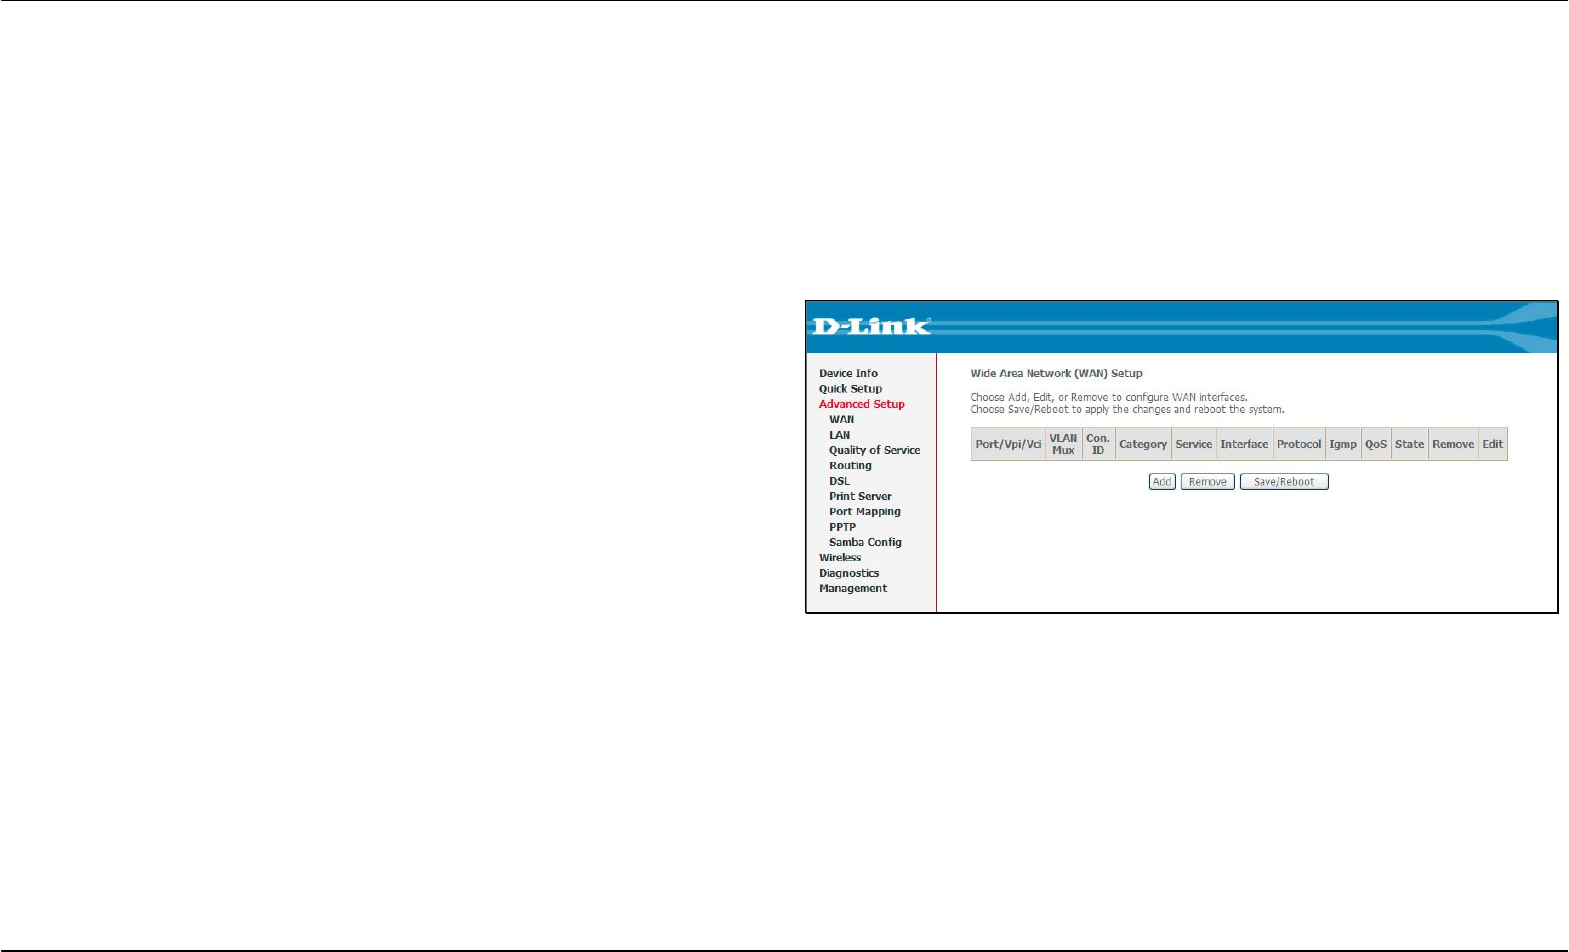
WAN
To access the Wide Area Network (WAN) Setup window, click the WAN button in the Advanced Setup directory.
This window is used to configure the WAN interface. You can add, delete,
and modify WAN interfaces on this window.
Once the desired changes to the WAN interface are complete, click the
Save/Reboot button.
If you are setting up the WAN interface for the first time, click the Add
button.
Section 3 – Configuration
D-Link DSL-2650U User Manual 46
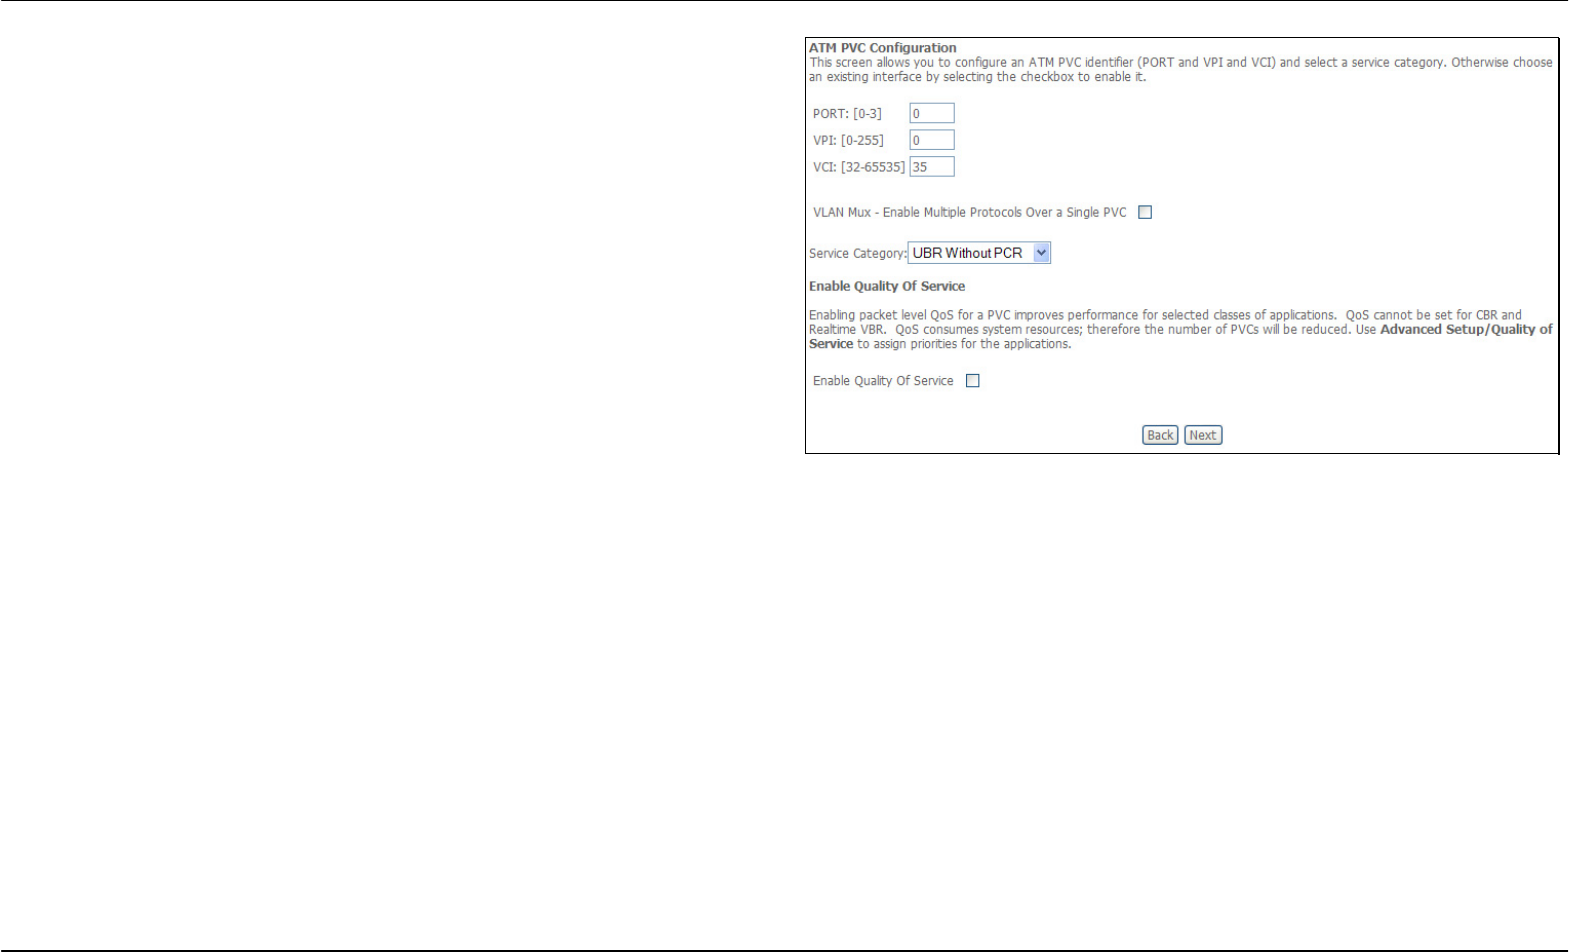
The ATM PVC Configuration window allows you to set up ATM PVC
configuration. Enter a Port Identifier, Virtual Path Identifier, and Virtual
Channel Identifier. The VPI and VCI values should be provided by your
ISP. This window also allows you to enable QoS by ticking the Enable
Quality of Service check box. Click the Next button to continue.
Section 3 – Configuration
D-Link DSL-2650U User Manual 47
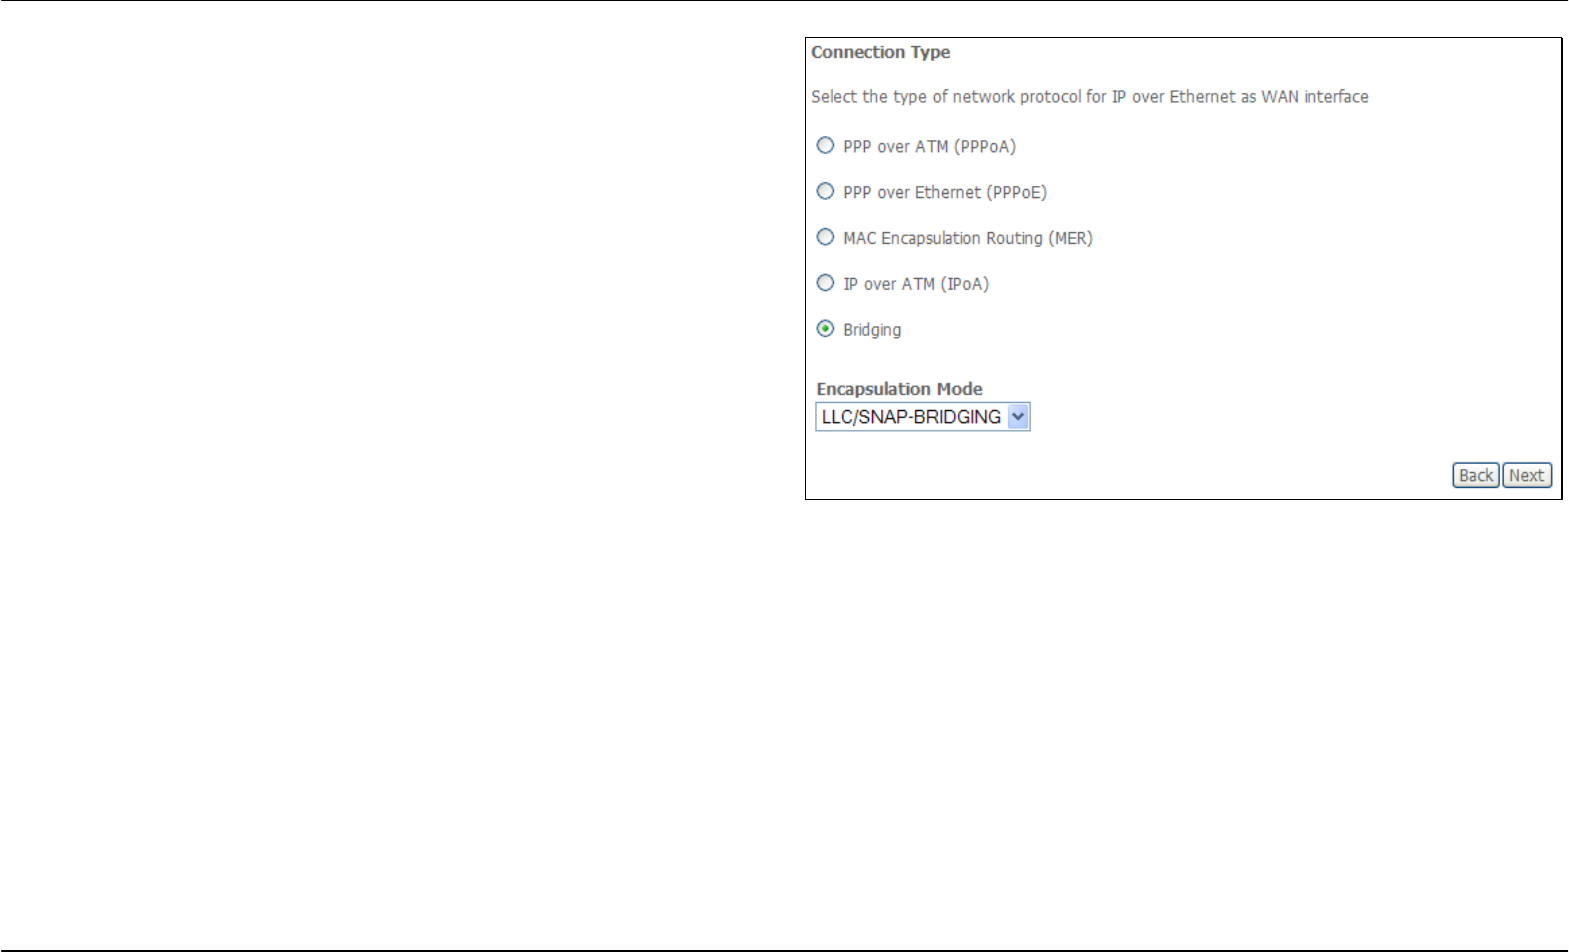
This window allows you to select the appropriate connection type. The
choices include PPP over ATM (PPPoA), PPP over Ethernet (PPPoE),
MAC Encapsulation Routing (MER), IP over ATM (IPoA), and Bridging
(default).
This window also allows you to use the drop-down menu to select the
desired Encapsulation Mode. Click the Next button to continue.
For further information about each of the five connection types available
on the Router, please go to the Quick Setup section earlier in this manual
as all of the windows are identical.
If the connection type of WAN interface is in Bridging, Security IP
Filtering with the MAC Filtering and Parental Control sub-menus will
appear in the Advanced Setup directory.
If the connection type of WAN Interface is not in Bridging, NAT and
Security with IP Filtering and Parental Control will appear in the
Advanced Setup directory.
Section 3 – Configuration
D-Link DSL-2650U User Manual 48
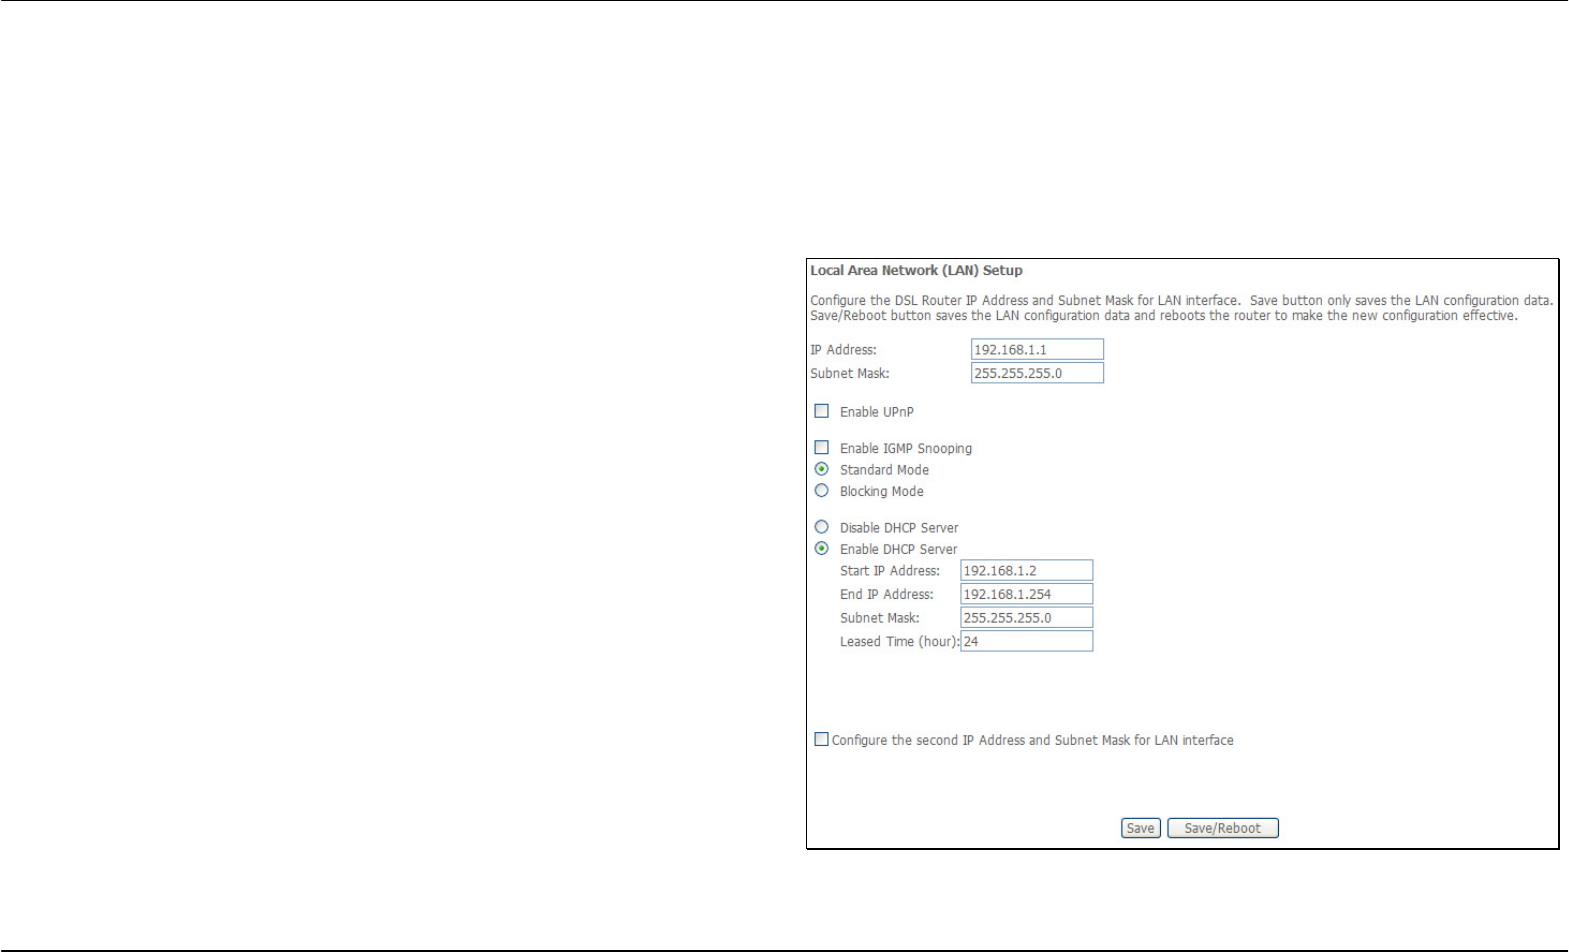
LAN
You can configure the LAN IP address to suit your preference. Many users will find it convenient to use the default settings together with DHCP
service to manage the IP settings for their private network. The IP address of the Router is the base address used for DHCP. In order to use the
Router for DHCP on your LAN, the IP address pool used for DHCP must be compatible with the IP address of the Router. The IP addresses
available in the DHCP IP address pool will change automatically if you change the IP address of the Router.
To access the Local Area Network (LAN) Setup window, click the LAN button in the Advanced Setup directory.
This window allows you to set up a LAN interface. When you are finished,
click either the Save or Save/Reboot button.
Section 3 – Configuration
D-Link DSL-2650U User Manual 49
NAT
To access the Network Address Translation (NAT) Setup window, click the NAT button in the Advanced Setup directory. The NAT button
appears when configuring WAN interface in PPPoA, PPPoE, MER or IPoA.
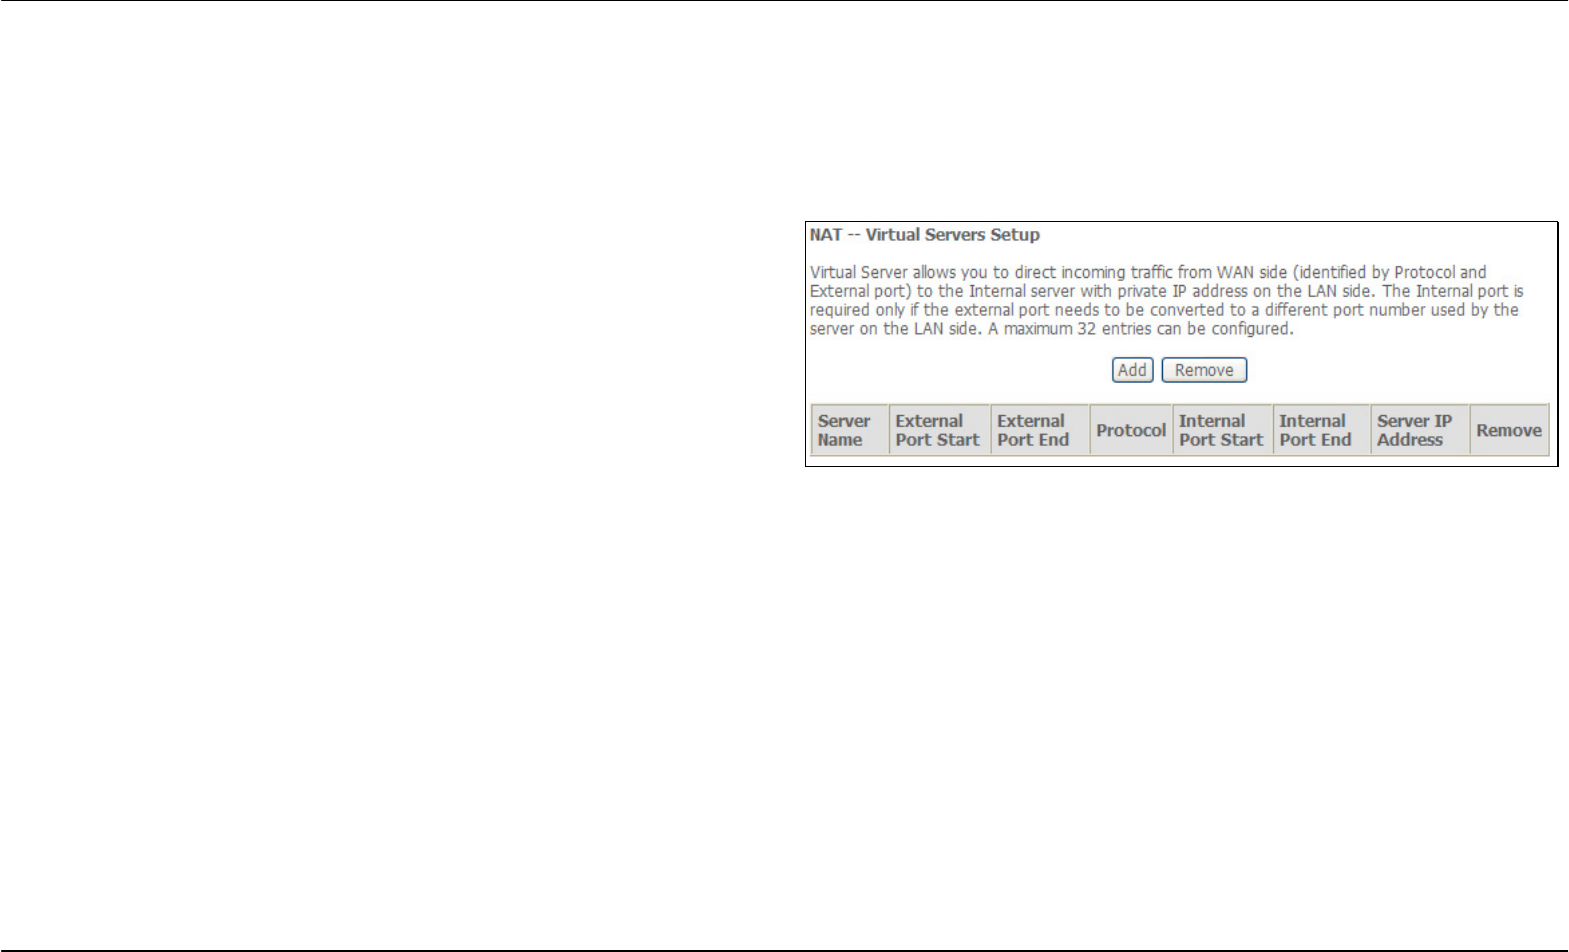
Virtual Servers
This window is used to configure virtual server. You can add, delete, and
modify virtual server on this window.
If you are setting up the virtual server, click the Add button.
Section 3 – Configuration
D-Link DSL-2650U User Manual 50
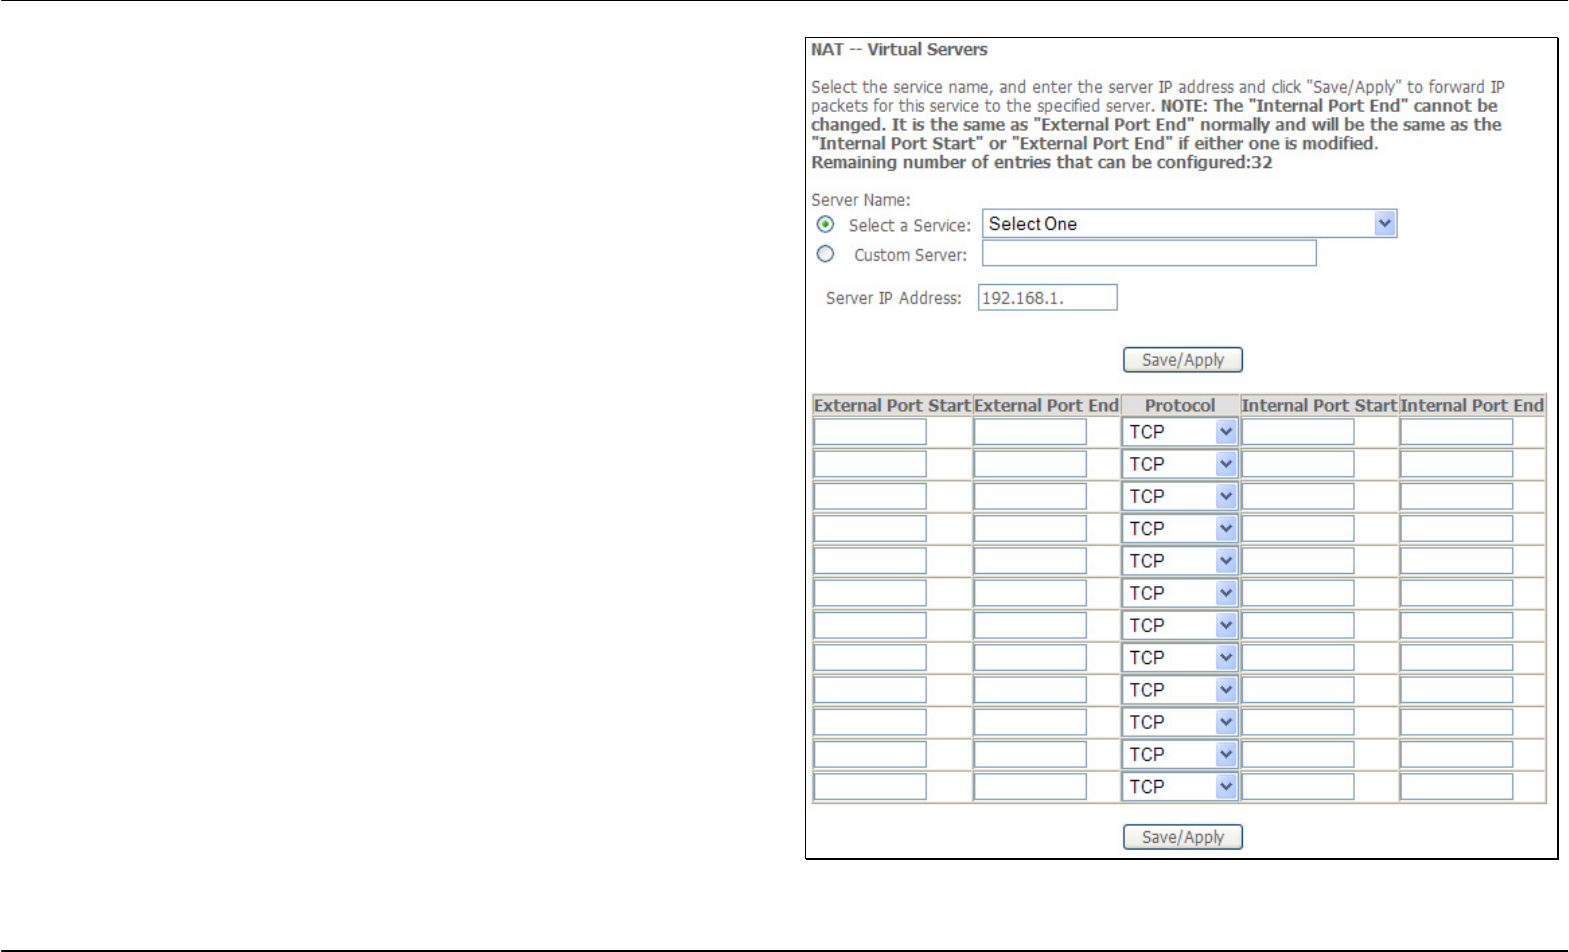
You can configure the service settings on this window by clicking the
Select a Service radio button and then using the drop-down list to choose
an existing service, or by clicking the Custom Server radio button and
entering your own Application Rule in the field provided.
Click Save/Apply when you are finished with the virtual server
configuration.
Section 3 – Configuration
D-Link DSL-2650U User Manual 51
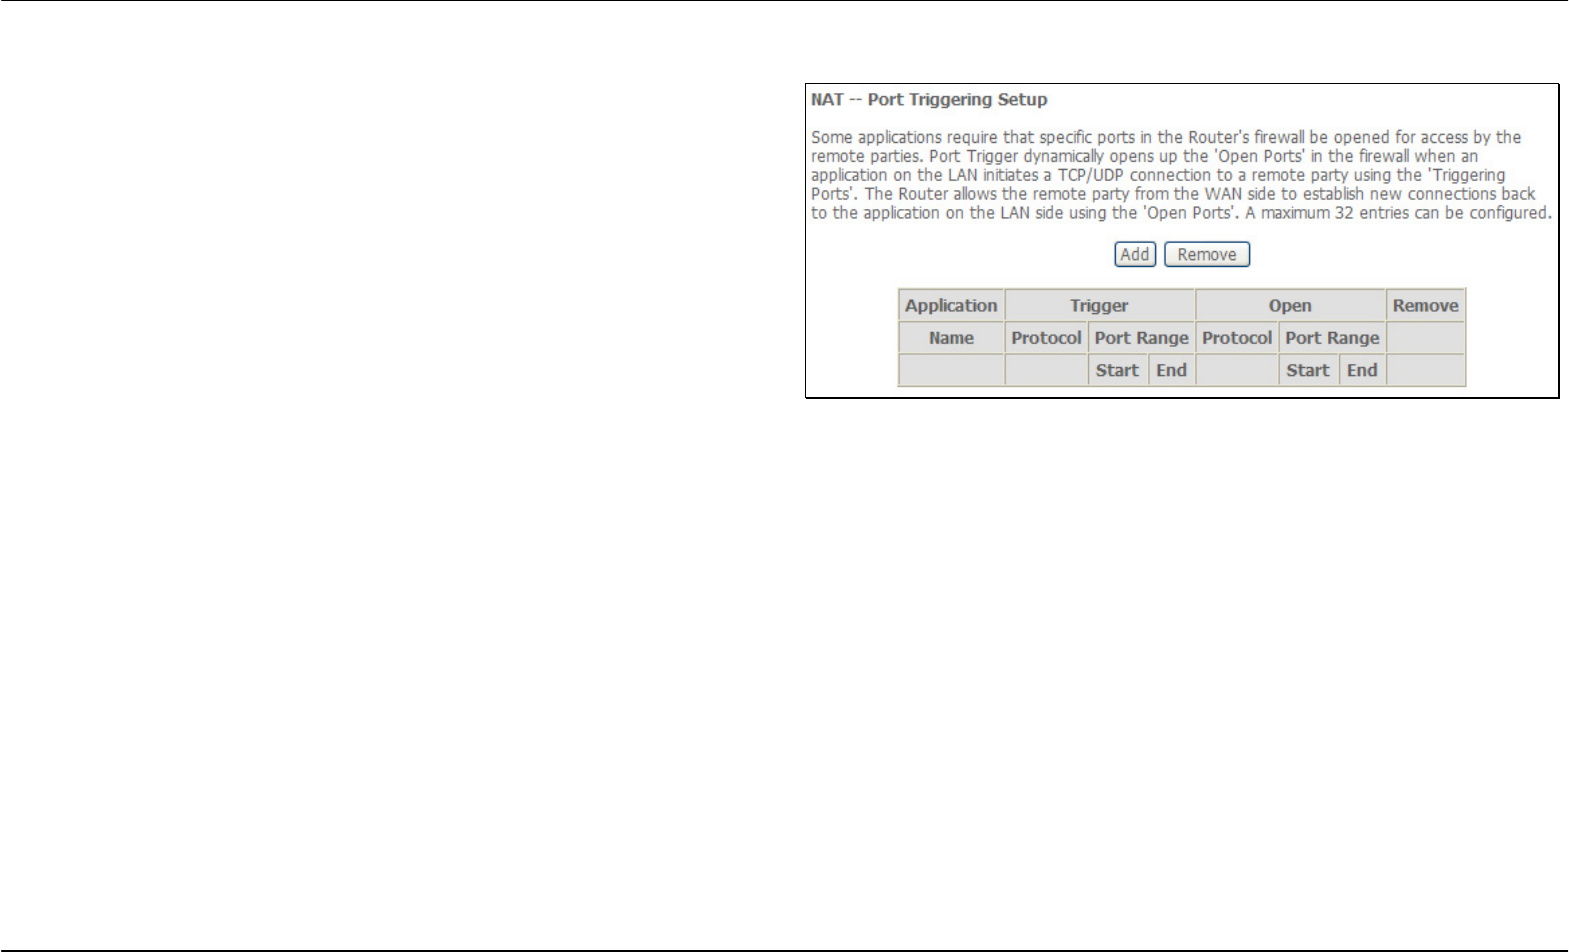
Port Triggering
Some applications require that the remote parties open specific ports in
the Router’s firewall for access. Port Trigger dynamically opens the Open
Ports in the firewall when an application on the LAN initiates a TCP/UDP
connection to a remote party using Trigger Ports. The Router allows the
remote party form the WAN side to establish new connections back to the
application on the LAN side using the Open Ports.
Applications such as games, video conferencing, and other remote
access applications require that specific ports in the Router’s firewall be
opened for access by applications.
Click the Add button to configure port triggering.
Section 3 – Configuration
D-Link DSL-2650U User Manual 52
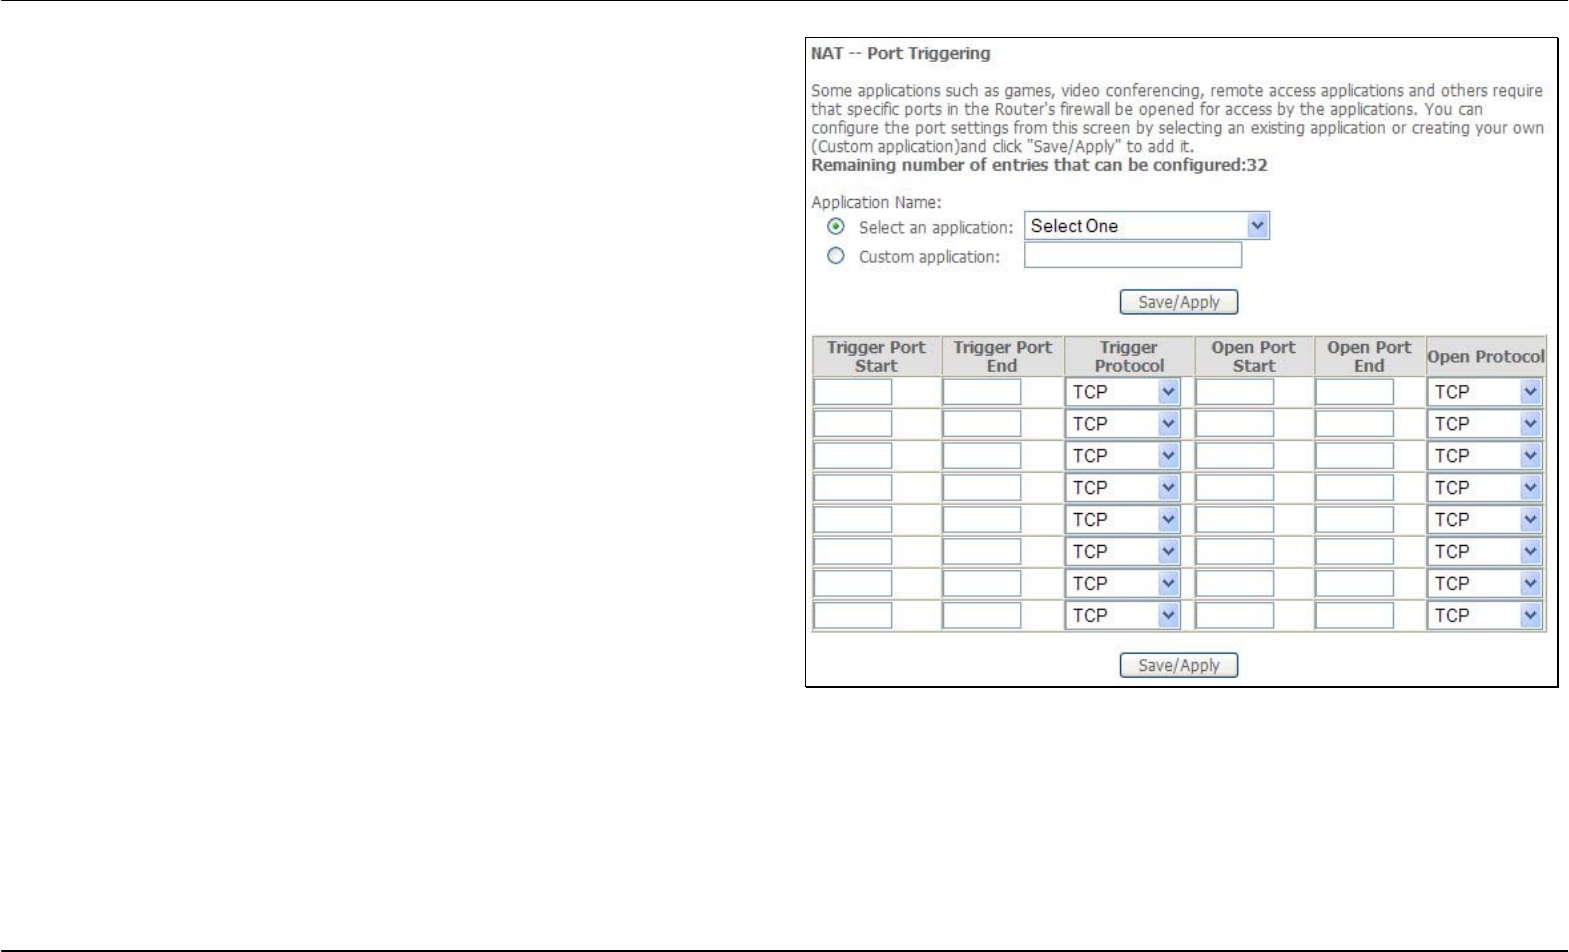
You can configure the port settings on this window by clicking the Select
an application radio button and then using the drop-down list to choose
an existing application, or by clicking the Custom application radio
button and entering your own Application Rule in the field provided.
Click Save/Apply when you are finished with the port setting
configuration. The new Application Rule will appear in the Port Triggering
table.
Section 3 – Configuration
D-Link DSL-2650U User Manual 53
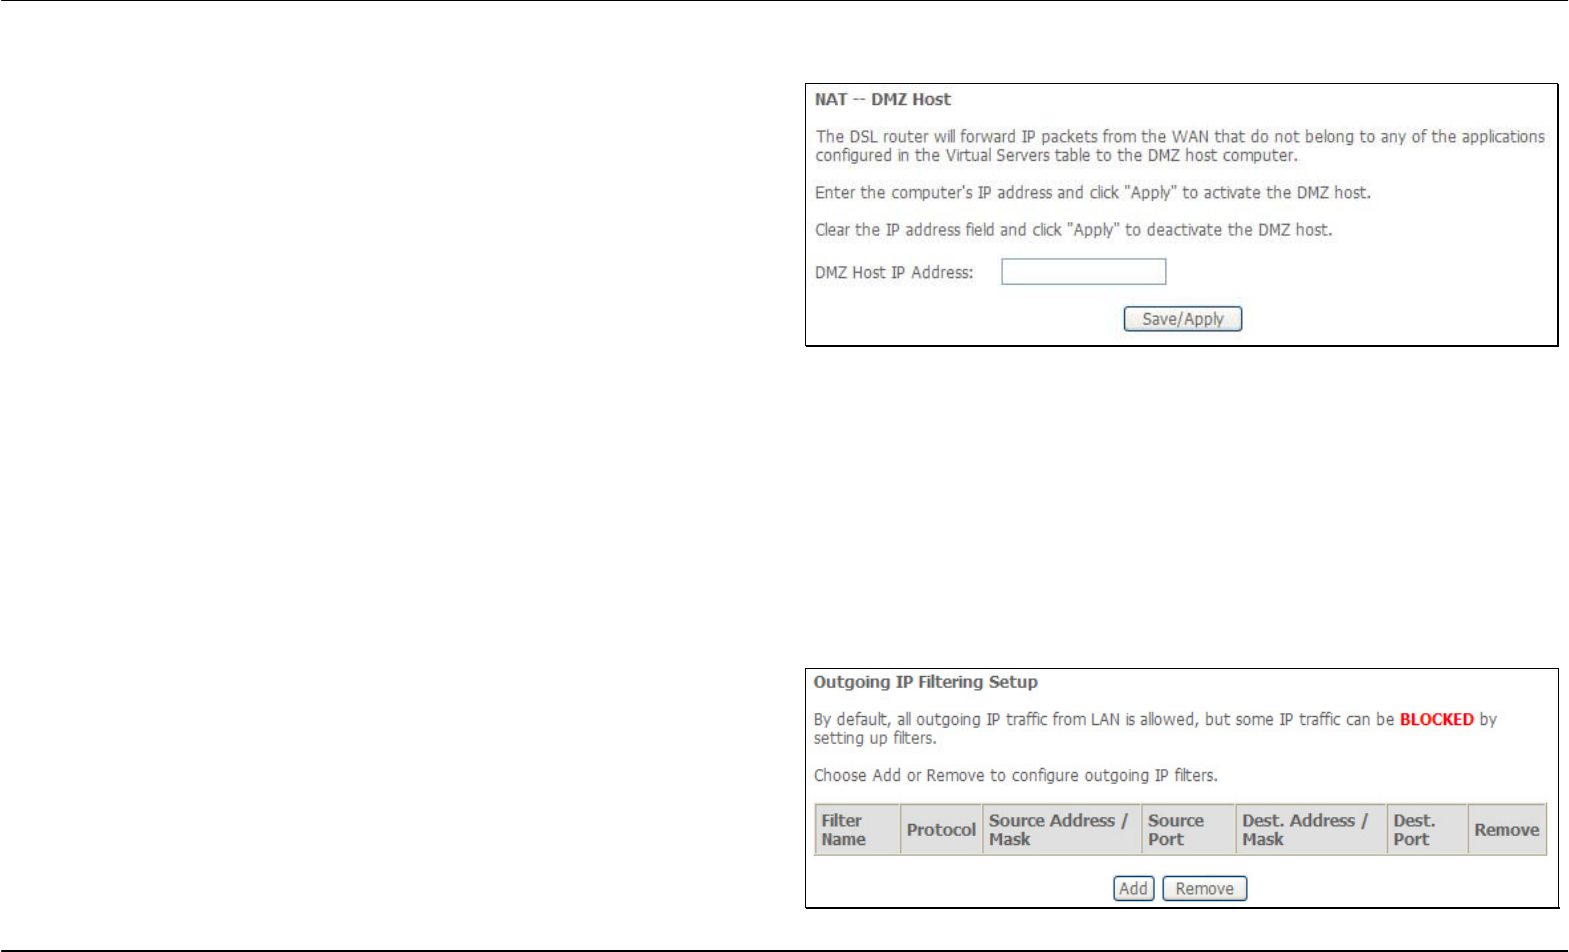
DMZ Host
Since some applications are not compatible with NAT, the Router supports
use of a DMZ IP address for a single host on the LAN. This IP address is
not protected by NAT and will therefore be visible to agents on the Internet
with the right type of software. Keep in mind that any client PC in the DMZ
will be exposed to various types of security risks. If you use the DMZ, take
measures (such as client-based virus protection) to protect the remaining
client PCs on your LAN from possible contamination through the DMZ.
To designate a DMZ IP address, type in the IP Address of the server or
device on your LAN, and click the Save/Apply button.
Security
To access the Security window, click the Security button in the Advanced Setup directory. The Security button appears after configuring WAN
interface.
IP Filtering
The IP Filtering button appears when configuring WAN interface in PPPoA, PPPoE, MER or IPoA.
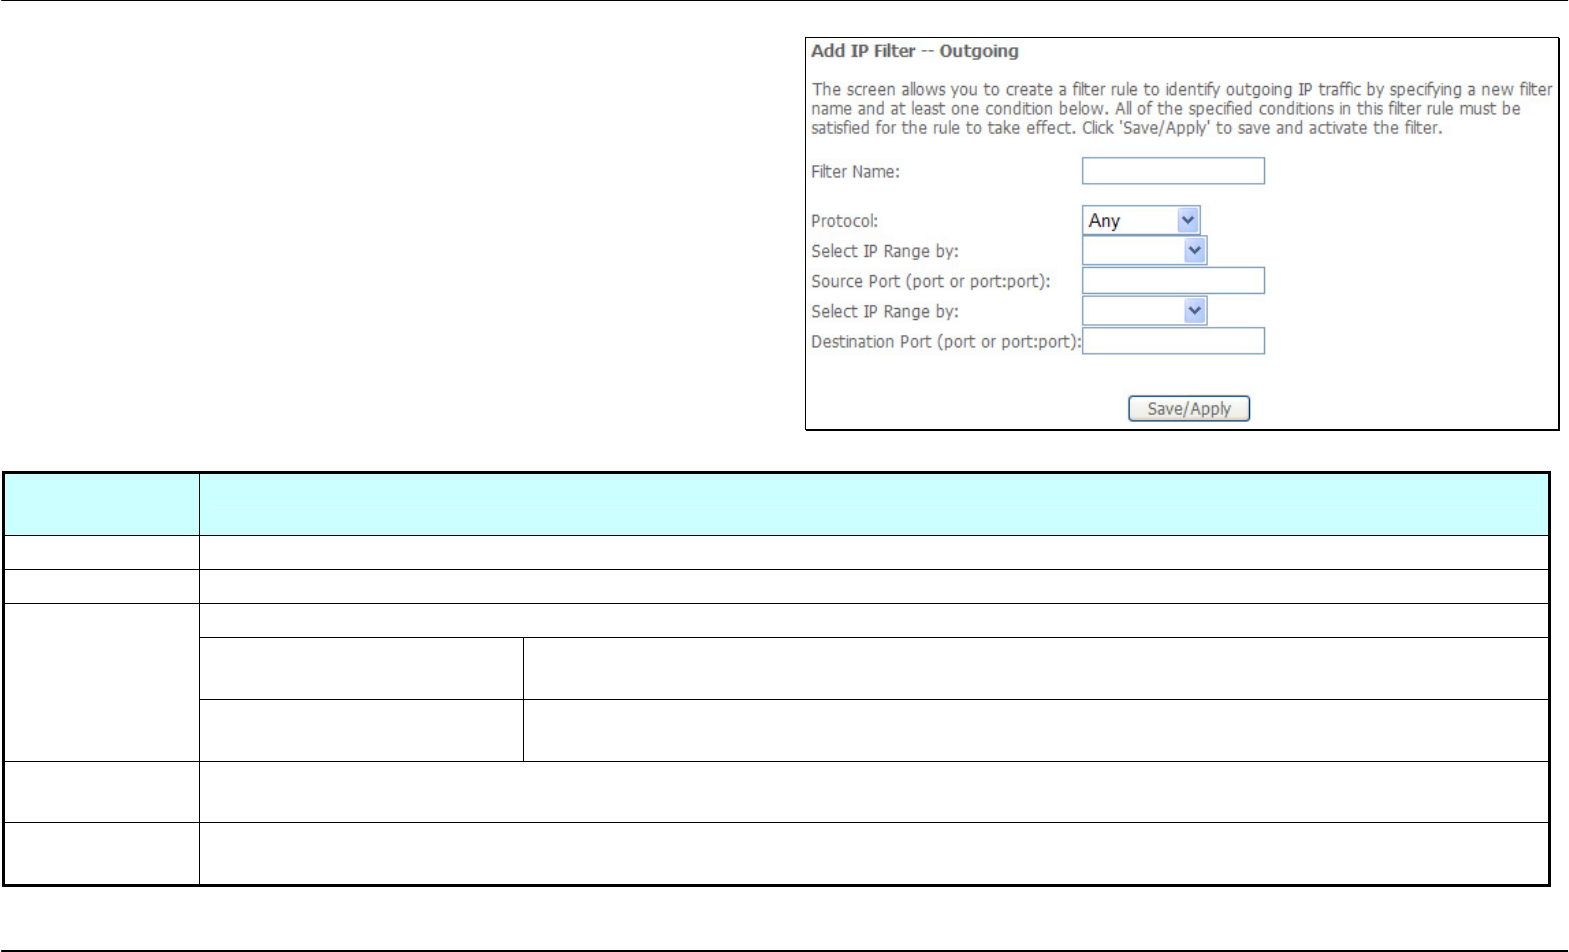
IP Filtering - Outgoing
This window allows you to create a filter rule to block outgoing IP traffic by
specifying a filter name and at least one condition on this window. All of
the specified conditions in this filter rule must be satisfied for the rule to
take effect. Filters are used to allow or deny LAN or WAN users from
accessing the Internet or your internal network.
If you are setting up the outgoing IP filtering, click the Add button.
Section 3 – Configuration
D-Link DSL-2650U User Manual 54
Enter the information in the section. Explanations of parameters are
described below. Click the Save/Apply button to add the entry in the
Active Outbound IP Filtering table.
Filters
Parameter
Description
Filter Name Enter a name for the new filter.
Protocol Select the transport protocol (Any, TCP/UDP, TCP, UDP or ICMP) that will be used for the filter rule.
Select either IP address or Netmask to show different items.
Source IP Address Enter the start and end IP address for the range of IP addresses which you are creating the
filter rule.
Select IP Range
by
Source IP Address & Source
Subnet Mask
This is the IP address and their associated subnets for which you are creating the filter rule.
Source Port The Source Port is the TCP/UDP port on either the LAN or WAN depending on if you are configuring an Outbound or Inbound
Filter rule.
Destination Port The Destination Port is the TCP/UDP port on either the LAN or WAN depending on if you are configuring an Outbound or
Inbound Filter rule.
Section 3 – Configuration
D-Link DSL-2650U User Manual 55
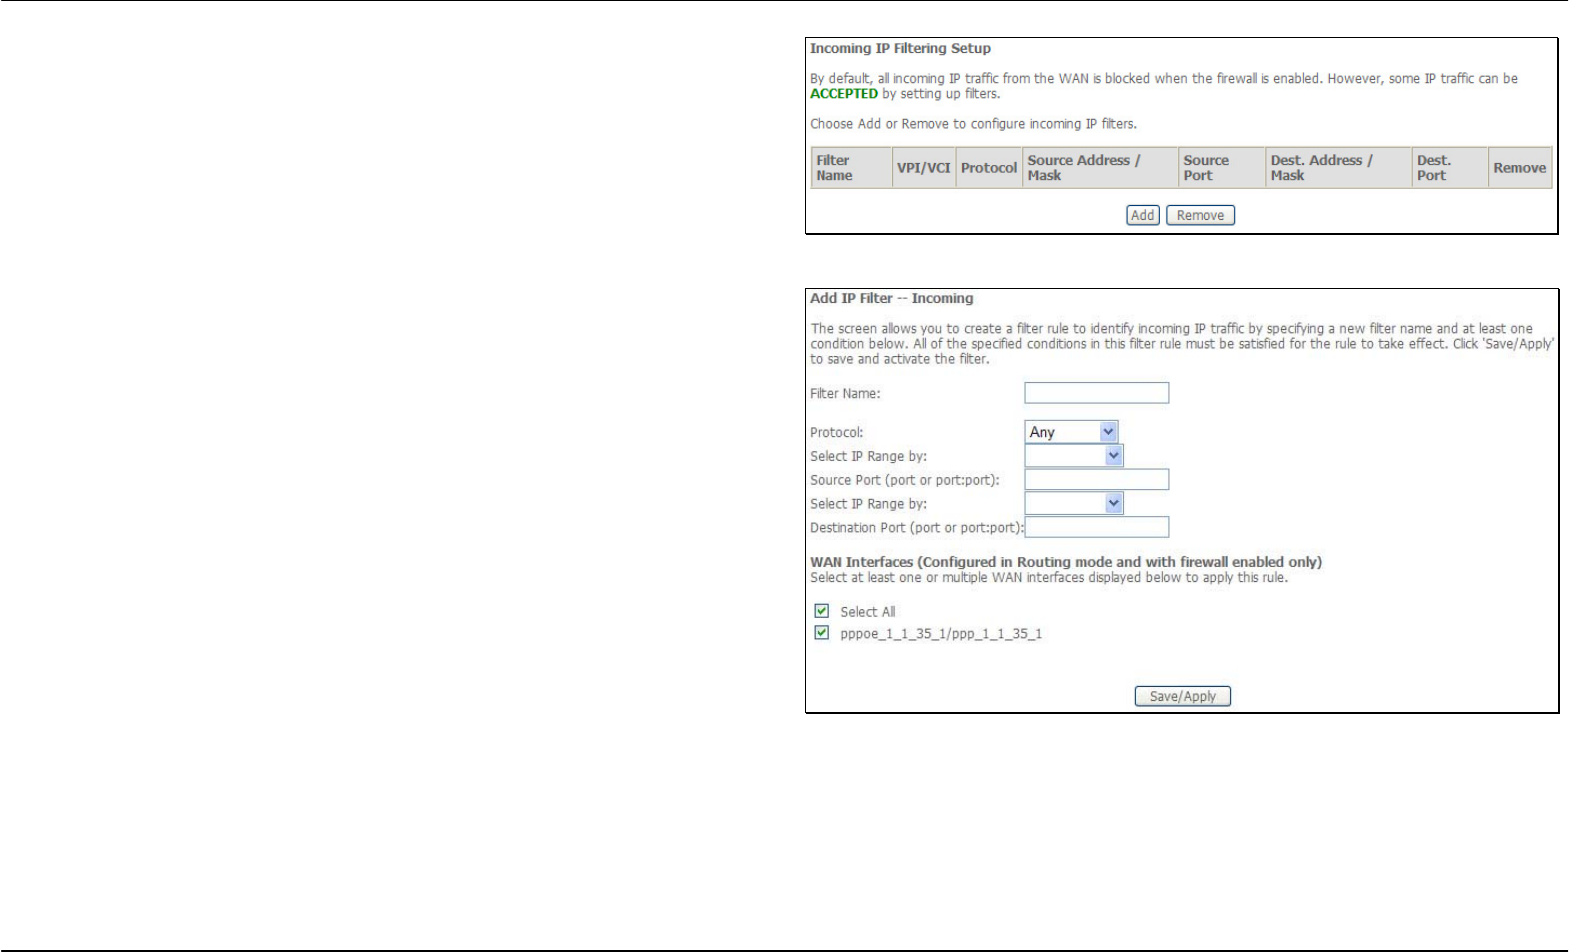
IP Filtering – Incoming
The Inbound Filter allows you to create a filter rule to allow incoming IP
traffic by specifying a filter name and at least one condition on this
window. All of the specified conditions in this filter rule must be satisfied
for the rule to take effect. By default, all incoming IP traffic from the
Internet is blocked when the firewall is enabled.
If you are setting up the incoming IP filtering, click the Add button.
Enter the information in the section. Explanations of parameters are
described below. Click the Save/Apply button to add the entry in the
Active Inbound IP Filtering table.
Section 3 – Configuration
D-Link DSL-2650U User Manual 56
Filters Parameter Description
Filter Name Enter a name for the new filter.
Protocol Select the transport protocol (Any, TCP/UDP, TCP, UDP or ICMP) that will be used for the filter rule.
Select either IP address or Netmask to show different items.
Source IP Address Enter the start and end IP address for the range of IP addresses which you are creating the filter
rule.
Select IP Range by
Source IP Address &
Source Subnet Mask
This is the IP address and their associated subnets for which you are creating the filter rule.
Source Port The Source Port is the TCP/UDP port on either the LAN or WAN depending on if you are configuring an Outbound or
Inbound Filter rule.
Destination Port The Destination Port is the TCP/UDP port on either the LAN or WAN depending on if you are configuring an Outbound or
Inbound Filter rule.
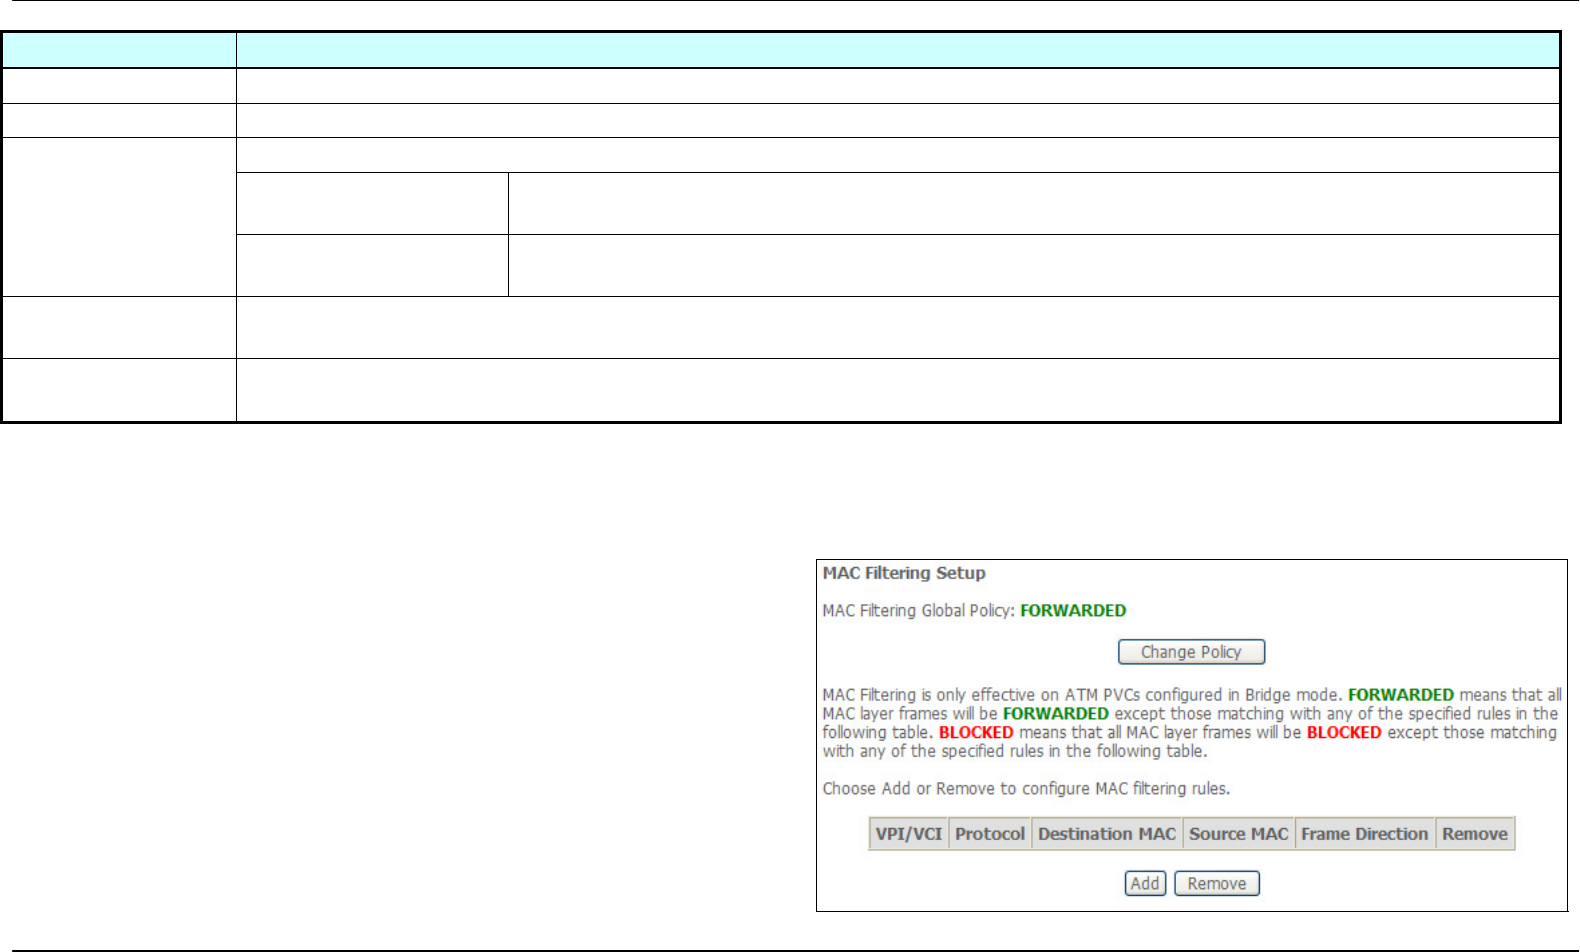
MAC Filtering
The MAC Filtering button appears when configuring WAN interface in Bridging.
MAC filtering are used to block or allow various types of packets through
the WAN/LAN interface. This may be done for security or to improve
network efficiency. The rules are configured for individual devices based
on MAC address. Filter rules can be set up for source, destination or both.
You can set up filter rules and disable the entire set of rules without
loosing the rules that have been configured.
Click Change Policy to configure the global policy as Forwarded or
Blocked.
If you are setting up the MAC filtering, click the Add button.
Section 3 – Configuration
D-Link DSL-2650U User Manual 57
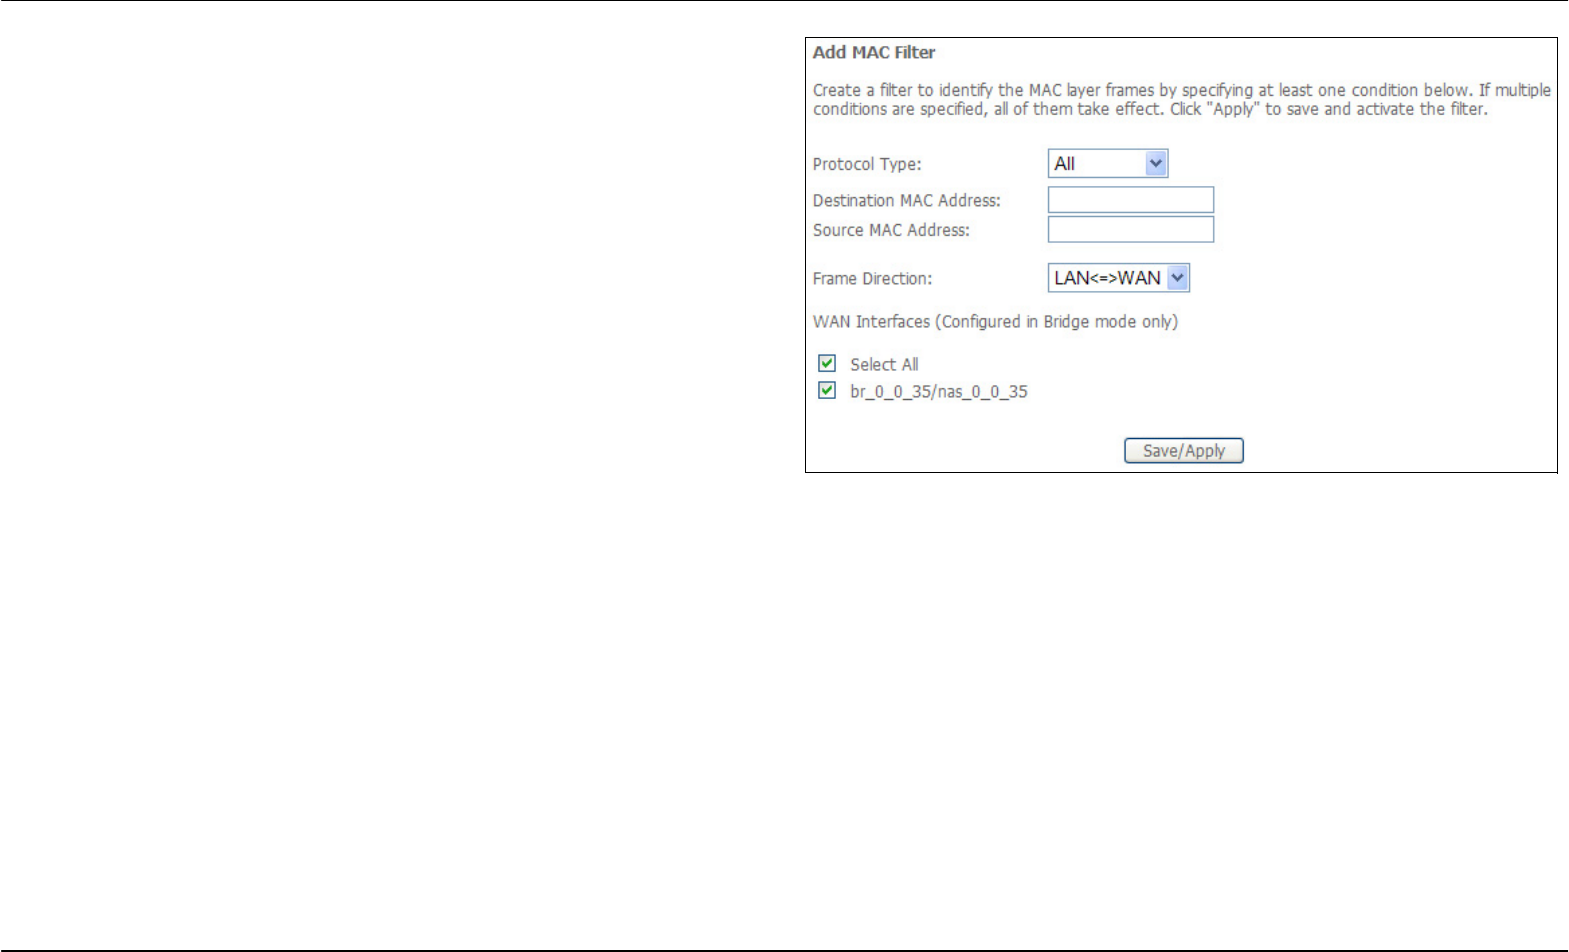
Select a protocol (All, PPPoE, IPv4, IPv6, Apple Talk, IPX, NetBEUI or
IGMP) in the Protocol Type list, type in a Destination MAC, a Source
MAC or both in the entry fields. Select a direction (LAN=>WAN,
WAN=>LAN, or LAN<=>WAN) in the Frame Direction list. Click the
Save/Apply button to add the entry in the Active Bridge Filters table.
Section 3 – Configuration
D-Link DSL-2650U User Manual 58
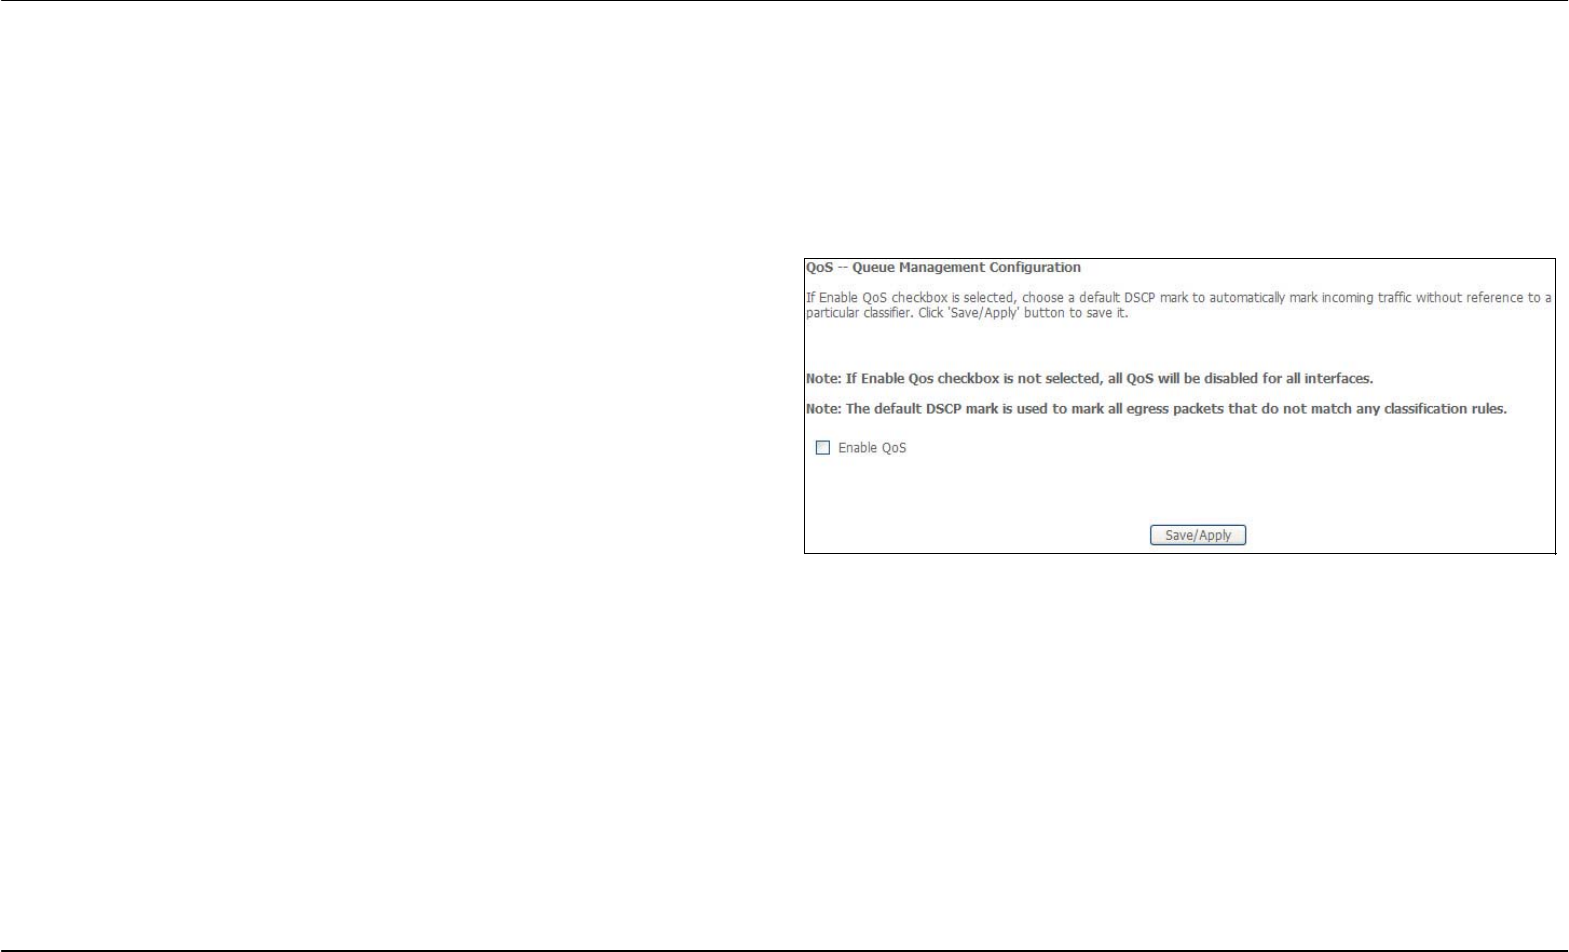
Quality of Service
QoS or Quality of Service allows your Router to help prioritize the data packet flow in your Router and network. This is very important for time
sensitive applications such as VoIP where it may help prevent dropped calls. Large amounts of non-critical data can be scaled so as not to affect
these prioritized sensitive real-time programs.
To access the QoS – Queue Management Configuration window, click the Quality of Service button in the Advanced Setup directory.
This window allows you to set up QoS on the Router. When you are
finished, click on the Save/Apply button.
Section 3 – Configuration
D-Link DSL-2650U User Manual 59
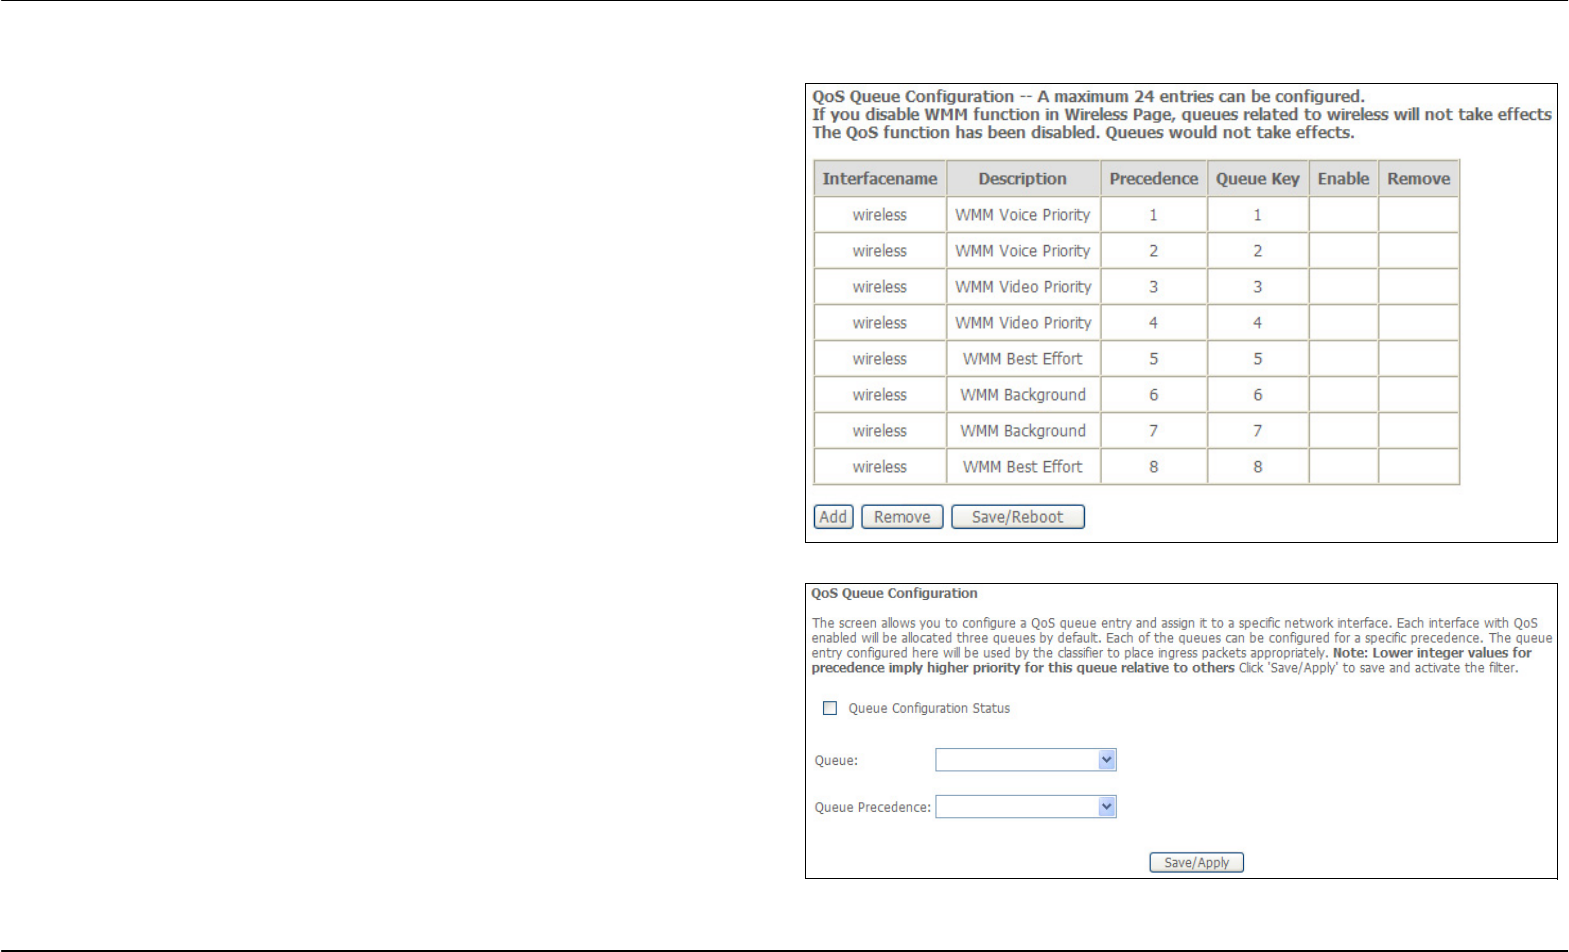
Queue Config
Click the Add button to add a QoS Queue Configuration table entry.
This window allows you to configure a QoS queue entry and assign it a
specific network interface.
Click the Save/Apply button to save and activate the filter.
Section 3 – Configuration
D-Link DSL-2650U User Manual 60
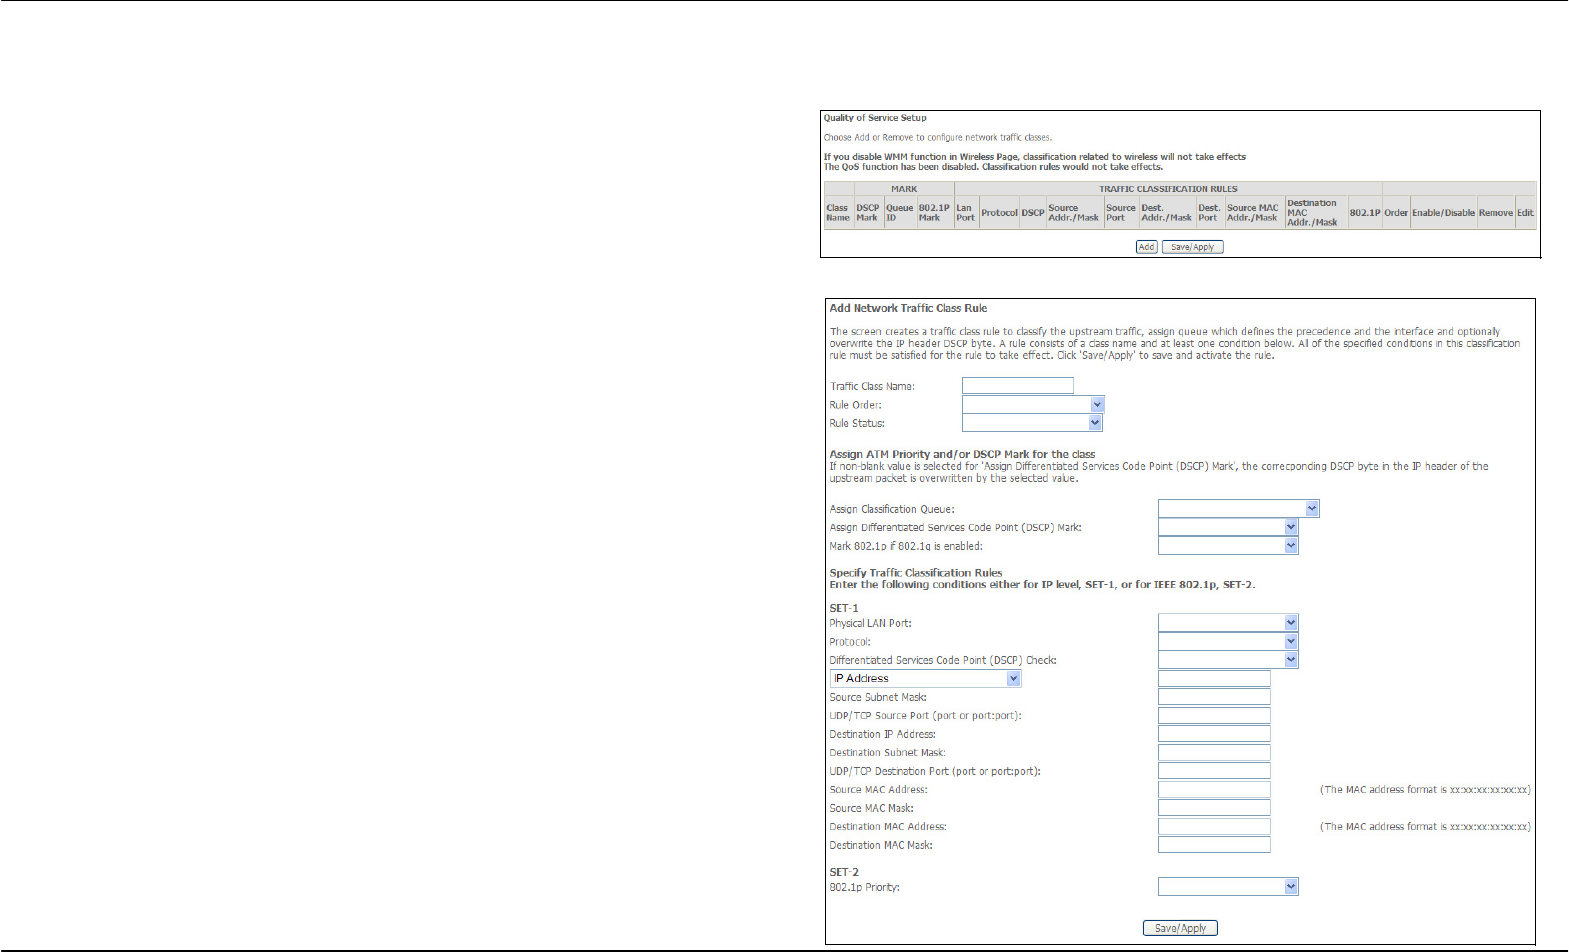
QoS Classification
Choose Add or Remove to configure network traffic classes.
Use this window to create a traffic class rule to classify the upstream
traffic, assign a queue that defines the precedence and the interface, and
optionally overwrite the IP header DSCP byte. A rule consists of a class
name and at least one condition. Please remember that all of the specified
conditions on this window must be met for the rule to take effect.
Click the Save/Apply button to save and activate this rule.
Section 3 – Configuration
D-Link DSL-2650U User Manual 61
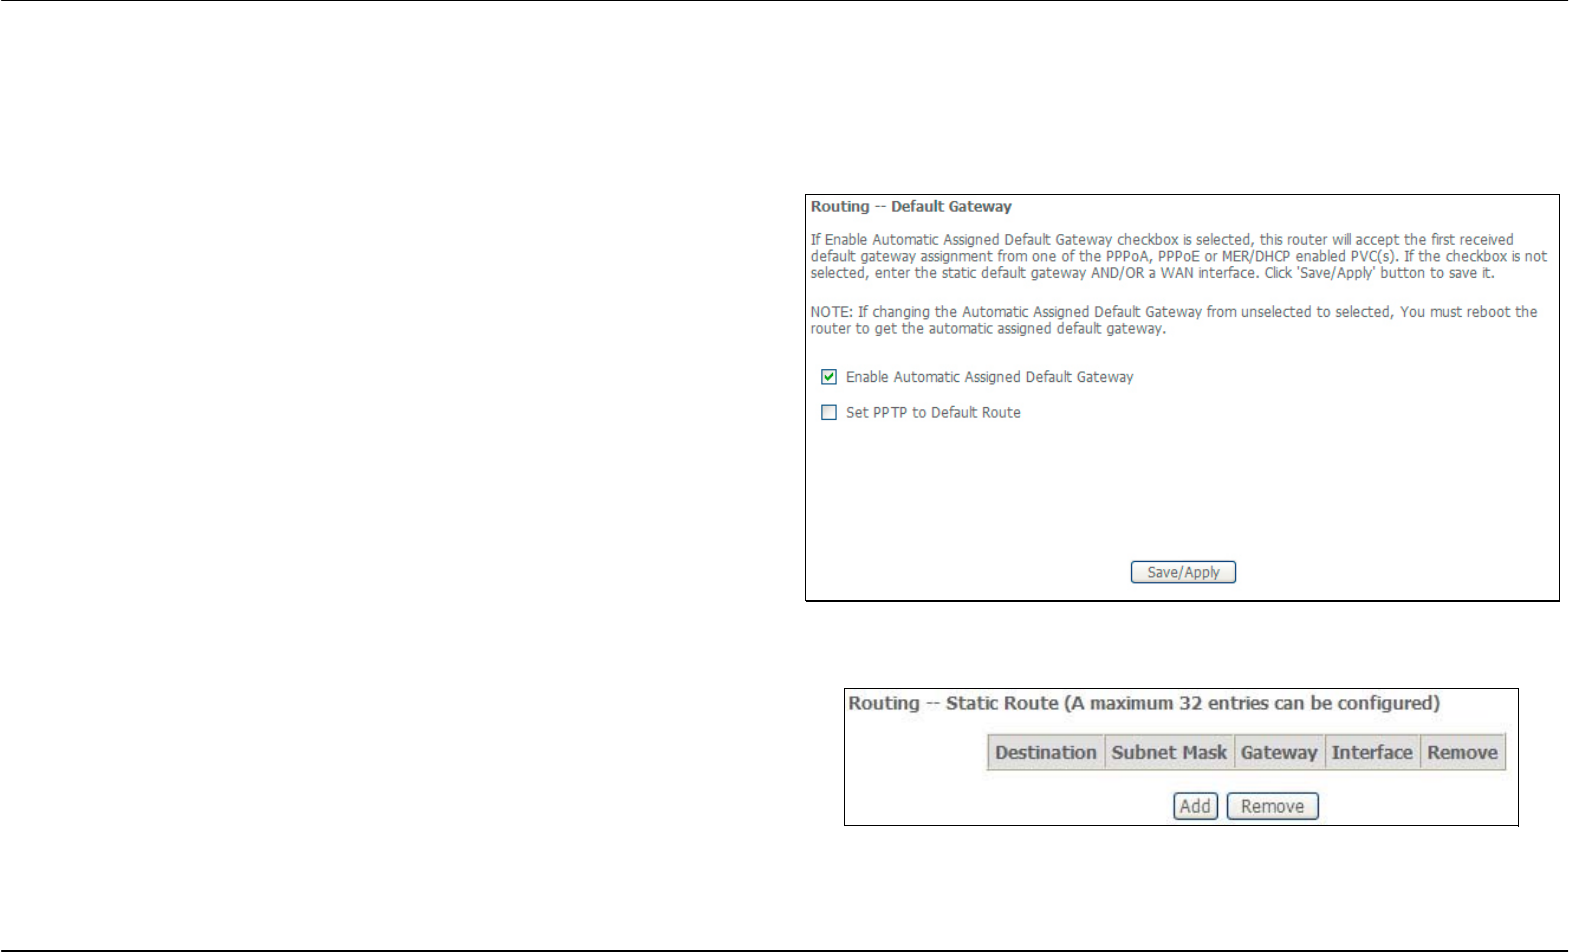
Routing
To access the Routing windows, click the Routing button in the Advanced Setup directory.
Default Gateway
If the Enable Automatic Assigned Default Gateway checkbox is ticked,
the Router will accept the first default gateway assignment received from
one of the enabled PPPoA, PPPoE, or MER/DHCP enabled PVC(s).
If this checkbox is not ticked, enter the static default gateway and/or a
WAN interface. Click the Save/Apply button when you are finished.
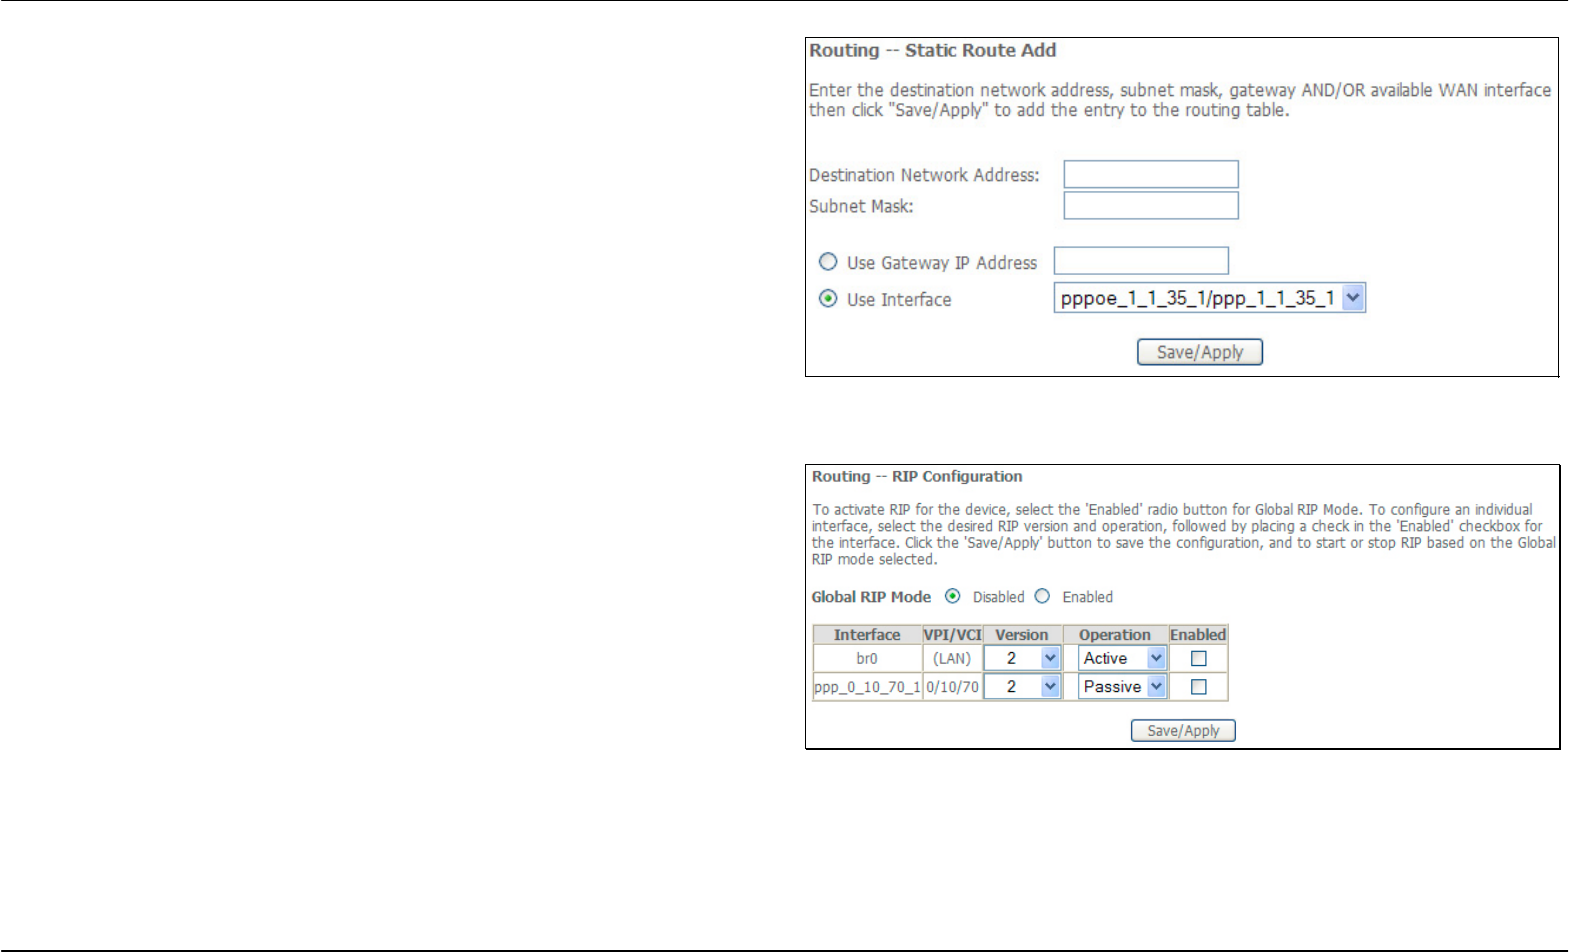
Static Route
Click the Add button on the Routing – Static Route window to access the
following window displayed on the next page.
Section 3 – Configuration
D-Link DSL-2650U User Manual 62
Enter the static routing information for an entry to the routing table.
Click the Save/Apply button when you are finished.
RIP
The RIP button appears when configuring WAN interface in Advanced
Setup -> WAN -> Routing.
The Router supports both RIP-1 and RIP-2 exchanges with other routers.
Click the Enabled radio button in Global RIP Mode to active the function.
You can also configure individual interface in the table below.

Section 3 – Configuration
D-Link DSL-2650U User Manual 63
DNS
To access the DNS windows, click the DNS button in the Advanced Setup directory. The NAT button appears when configuring WAN interface in
PPPoA, PPPoE, MER or IPoA.
DNS Server
If you have not been given specific DNS server IP addresses or if the
Router is not pre-configured with DNS server information, tick the Enable
Automatic Assigned DNS checkbox. Auto discovery DNS instructs the
Router to automatically obtain the DNS IP address from the ISP through
DHCP. If your WAN connection uses a Static IP address, auto discovery
for DNS cannot be used.
If you have DNS IP addresses provided by your ISP, deselect the Enable
Automatic Assigned DNS checkbox and enter these IP addresses in the
available entry fields for the Primary DNS Server and the Secondary DNS
Server. Click the Save button when you are finished.
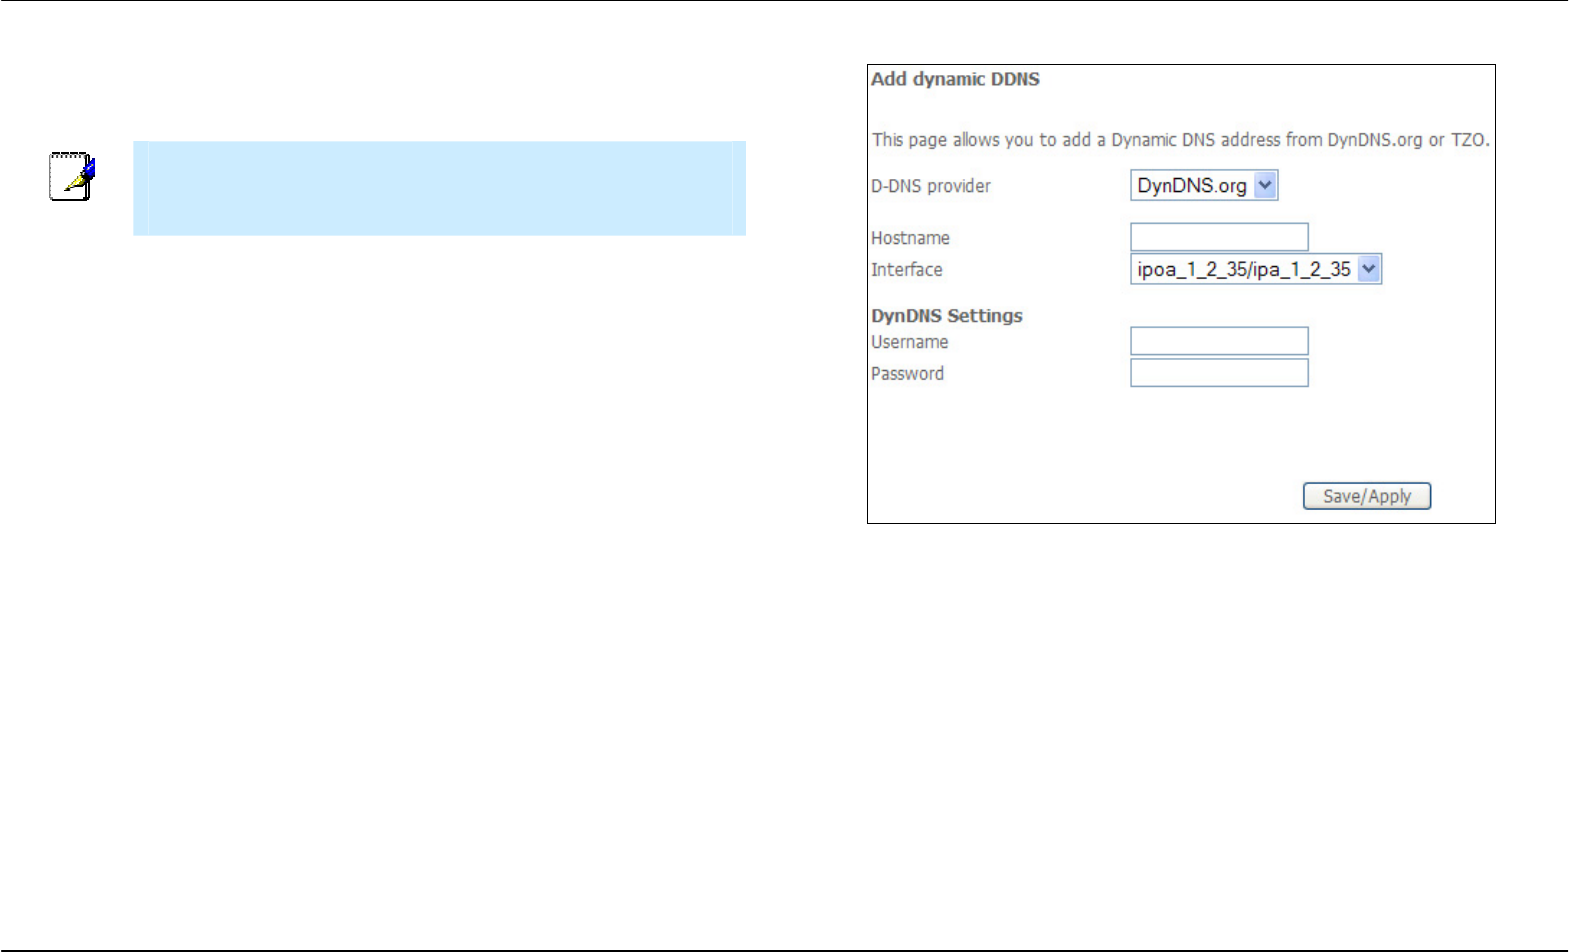
Dynamic DNS
The Router supports Dynamic DNS (Dynamic Domain Name Service).
The Dynamic DNS service allows a dynamic public IP address to be
associated with a static host name in any of the many domains, allowing
access to a specified host from various locations on the Internet. This is
enabled to allow remote access to a host by clicking a hyperlinked URL in
the form hostname.dyndns.org, Many ISPs assign public IP addresses
using DHCP, this can make it difficult to locate a specific host on the LAN
using standard DNS. If for example you are running a public web server or
VPN server on your LAN, this ensures that the host can be located from
the Internet if the public IP address changes. DDNS requires that an
account be setup with one of the supported DDNS providers.
Click Add to see the Add DDNS Settings section.
Section 3 – Configuration
D-Link DSL-2650U User Manual 64
Enter the required DDNS information, click the Save/Apply button to save
the information.
Note
DDNS requires that an account be setup with one of the supported
DDNS servers prior to engaging it on the Router. This function will not
work without an accepted account with a DDNS server.