D Link DSM510A3 HIGH-DEFINITION MEDIA PLAYER User Manual Manual Part 2
D Link Corporation HIGH-DEFINITION MEDIA PLAYER Manual Part 2
D Link >
Contents
- 1. Manual Part 1
- 2. Manual Part 2
- 3. Manual Part 3
Manual Part 2
36D-Link DSM-510 User Manual
Section 3 - Configuration
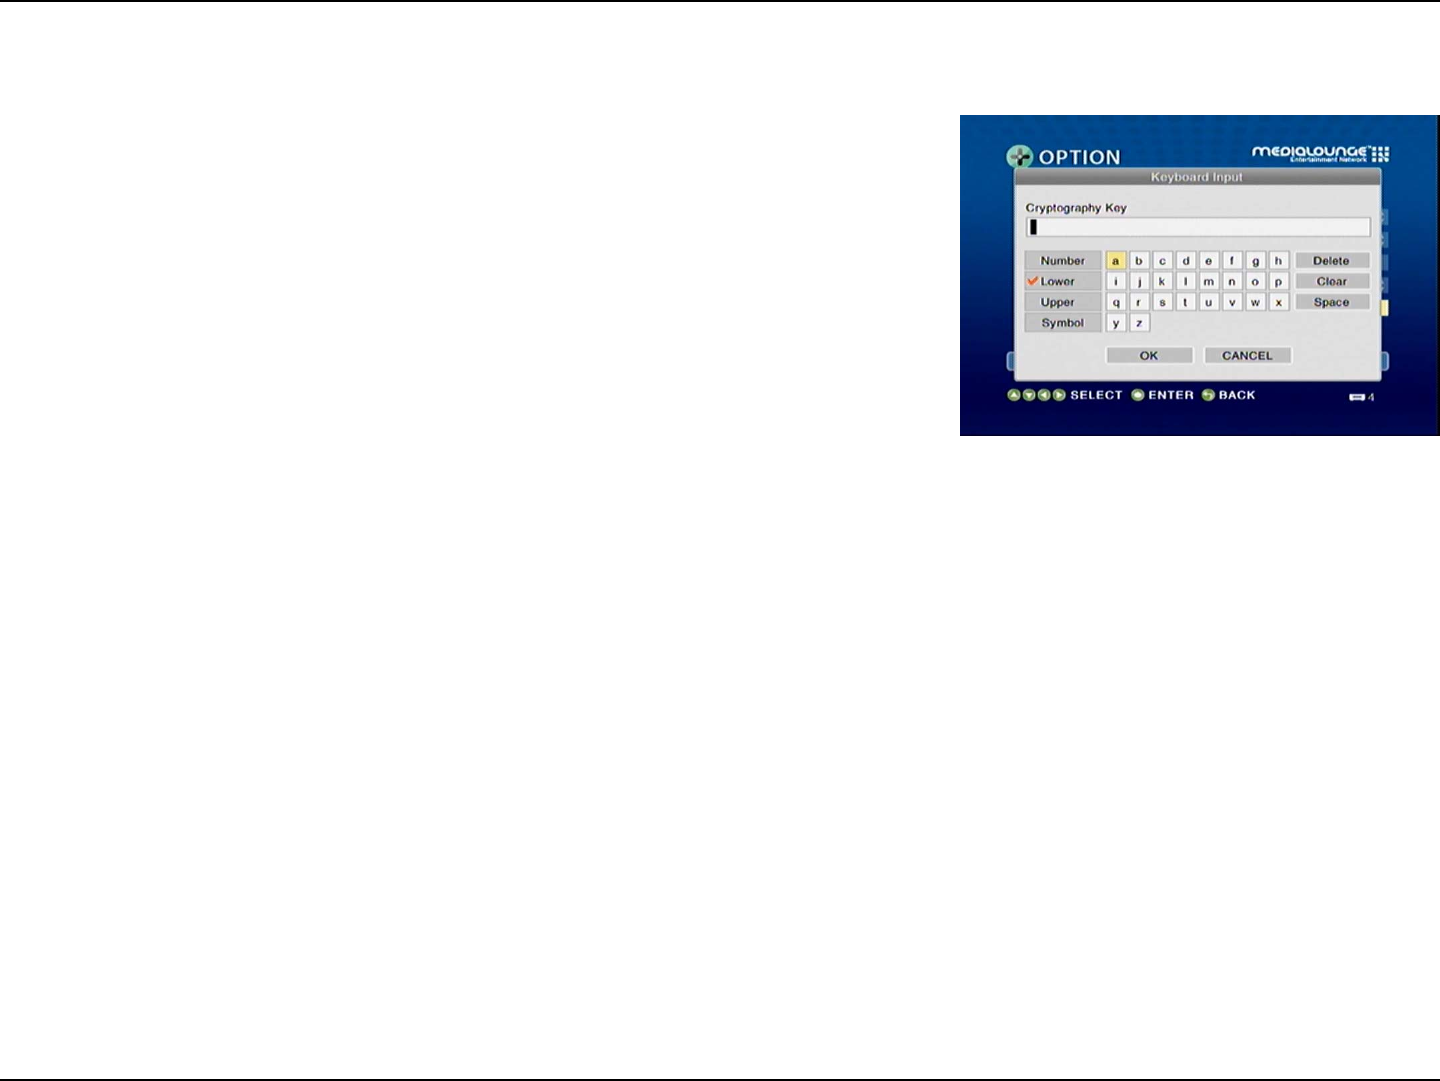
In order to input information, you must use the DSM-510 keyboard interface. When
information is needed within an input box, click the MENU key on your remote control
and select the Keyboad Input option.
Use the selection arrows and the ENTER button to select from Numbers, Lower (lower
case alphabet), Upper (upper case alphabet), or Symbol. The SHIFT key on your remote
control can also toggle between these options if pressed repeatedly. Once you’ve selected
your character type, use the selection arrows on your remote control to select the
characters you want to input. When you have finished, select OK.
On-Screen Keyboard
37D-Link DSM-510 User Manual
Section 3 - Configuration
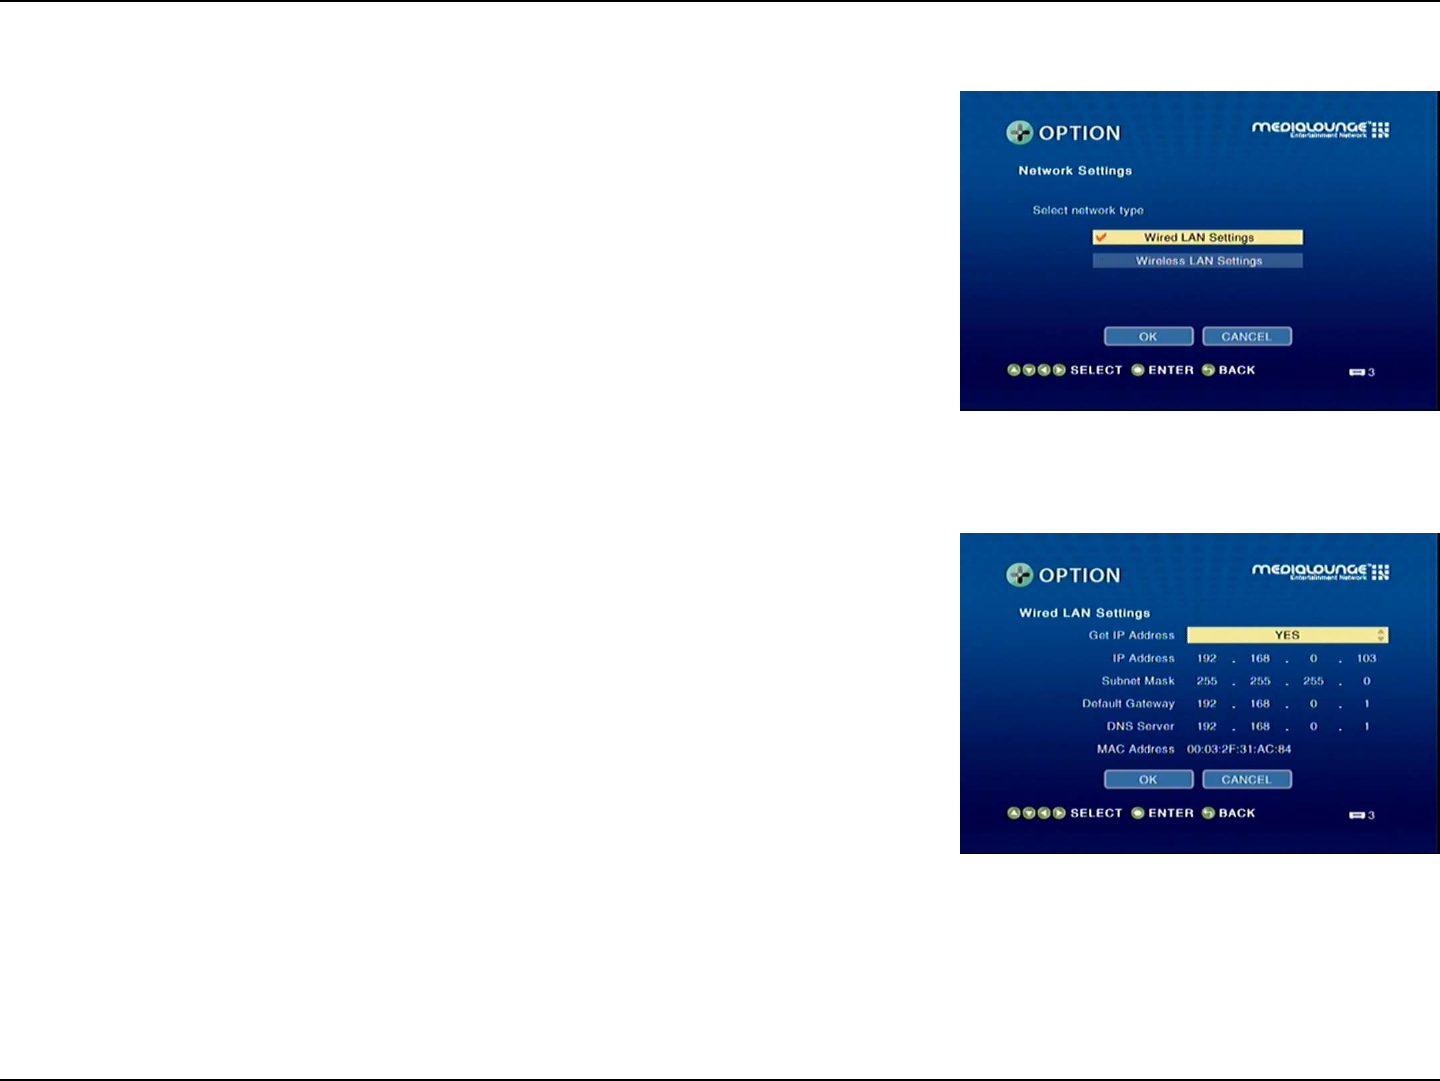
Wired LAN Settings:
Wireless LAN
Settings:
If you want to connect through an Ethernet cable, then select this option.
Select this option if you are using the antenna to connect wirelessly to a server.
Network Settings
Wired LAN Settings
Get IP Address:
IP Address:
Subnet Mask:
Default Gateway:
DNS Server:
MAC Address:
Clicking this button will retrieve the IP address automatically (Recommended).
Input the IP Address.
Input the Subnet Mask.
Input the Default gateway.
In case a DNS server exists in the network, input the IP Address of the DNS server.
Displays the MAC Address.
38D-Link DSM-510 User Manual
Section 3 - Configuration
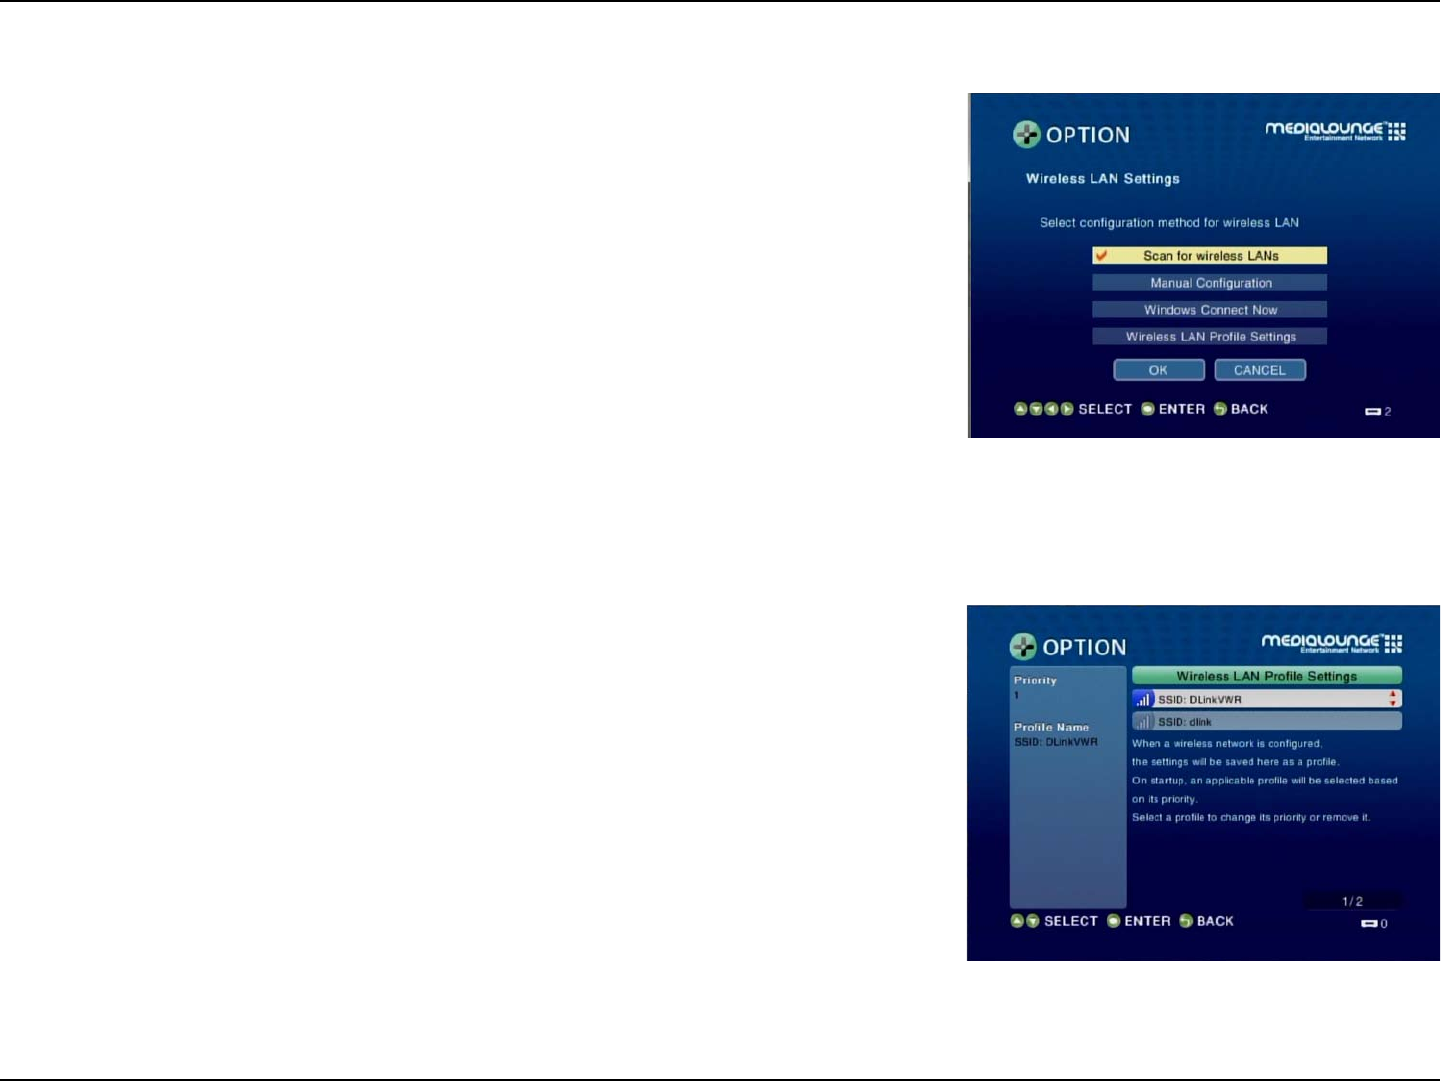
Wireless LAN Settings
Scan for wireless
LANs:
Manual
Configuration:
Windows Connect
Now:
Click this button to search for wireless LANs, and select your Access Point.
Click this button to manually connect to the network (see the following screen).
Click this option if you want to use Windows Connect Now® to configure your
device’s wireless connection. If you want to configure your device’s wireless
connection, please continue to page 37.
Set to Exchange:
Exchange:
Remove:
Pick the wireless access point that you want to exchange connection priorites.
This option will initialize the move between wireless access points.
This will remove the wireless access point profile from the list.
Note: In order for the exchange to take effect, you must power cycle the DSM-510
(meaning you must turn off the DSM-510 and turn it back on again).
Wireless LAN Profile Settings
To exchange connection priorites, click the MENU button on your remote control.
39D-Link DSM-510 User Manual
Section 3 - Configuration
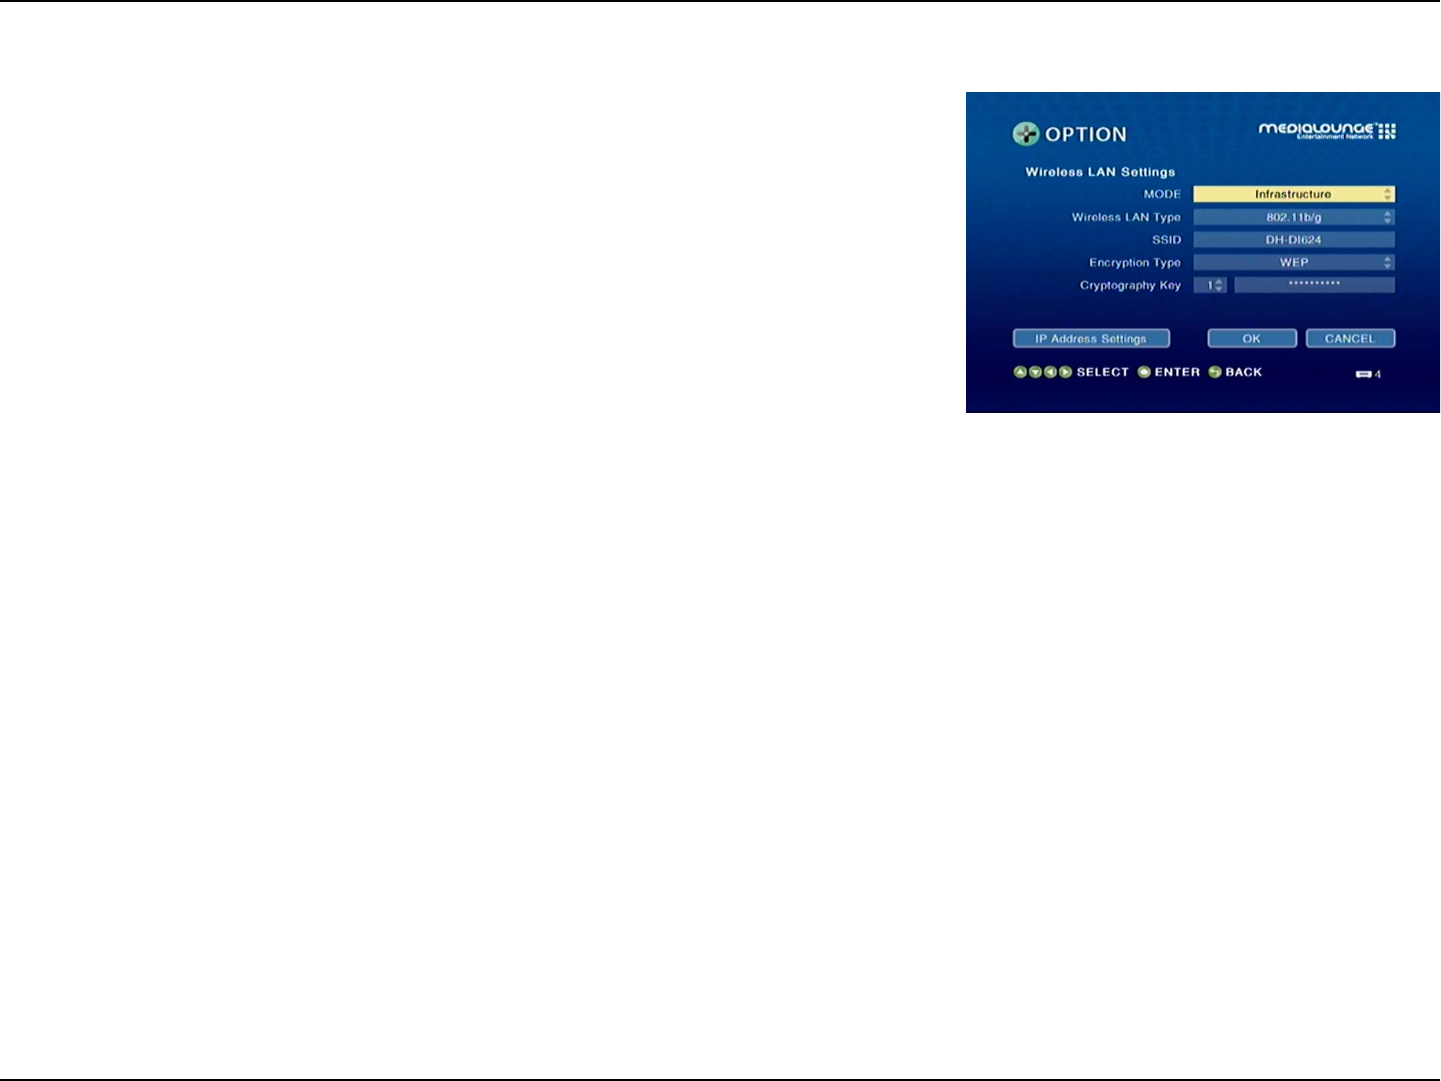
MODE:
Wireless LAN Type:
SSID:
Encryption Type:
Cryptography Key or
Network Passcode:
Choose between Ad-Hoc or Infrastructure.
Ad-Hoc should be selected when the DSM-510 is directly connected to other
wireless network devices without an access point.
Infrastructure should be selected when the DSM-510 is connected to the
wireless LAN where an accesss point device exists. (Recommended)
Displays the Wireless LAN Type as 802.11b/g.
Using the software keyboard input the SSID, which should be used by the
existing wireless network.
Select between None, WEP, or WPA.
When WEP or WPA is selected in Encryption Type, two boxes will appear (the Index Selection box and the Cryptography Key input
box.
Index Selection box allows you to select an Index number from 1 to 4. Each index number saves a Cryptography Key.
Cryptography Key allows you to enter the WEP or WPA key used in the existing wireless network.
Manual Configuration
40D-Link DSM-510 User Manual
Section 3 - Configuration
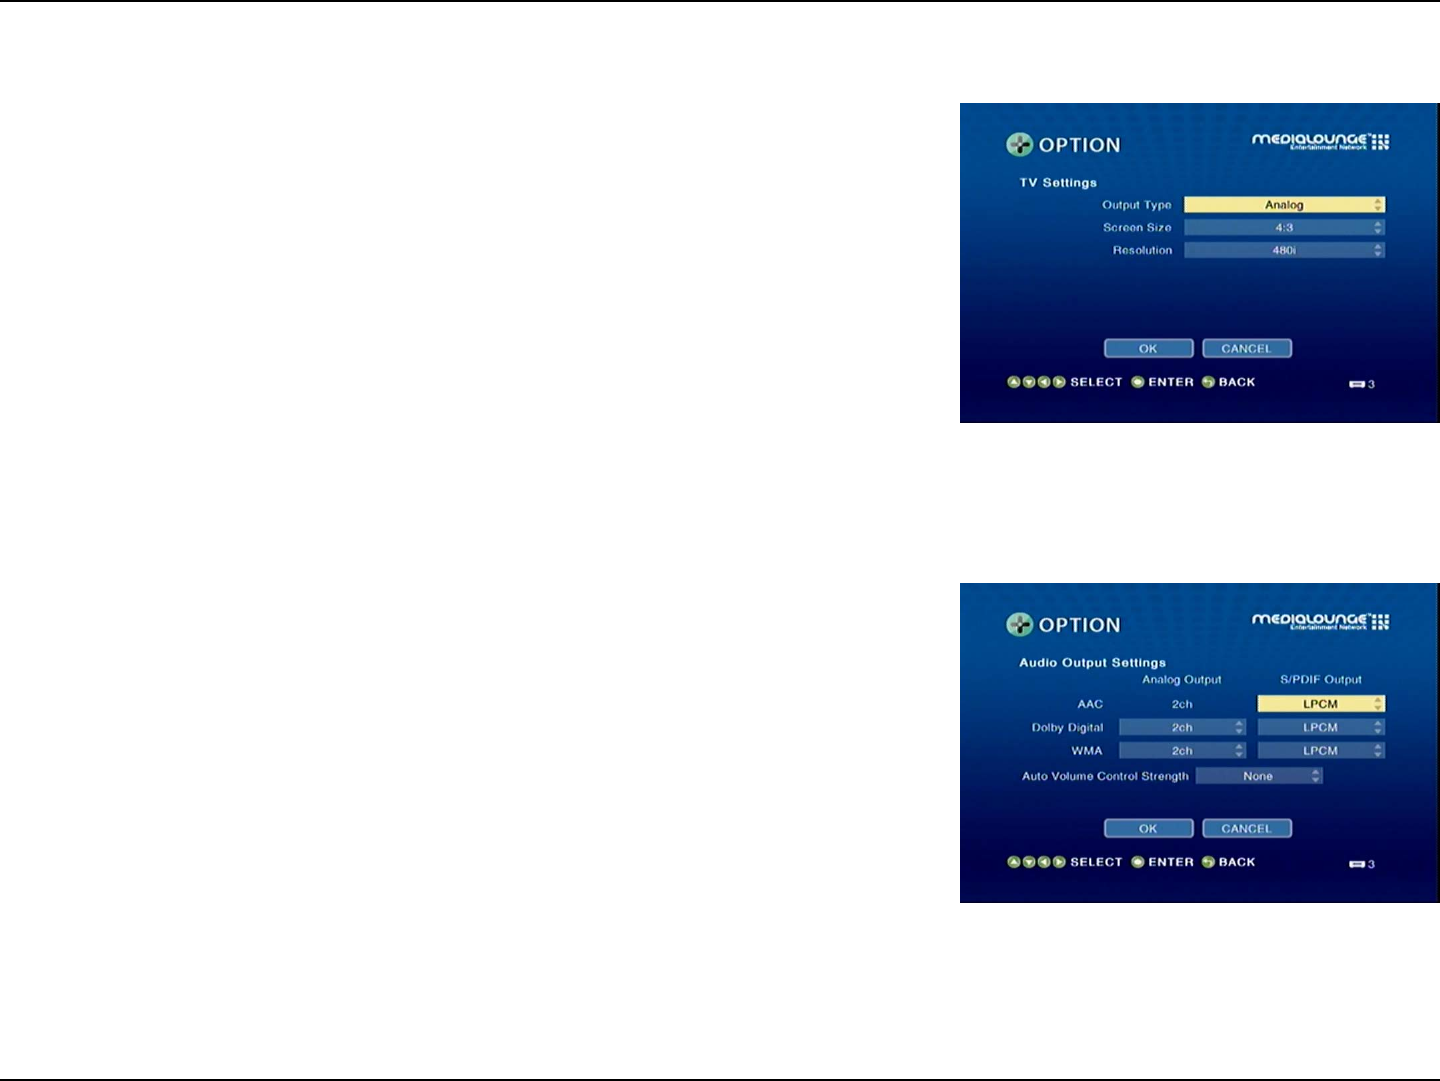
TV Settings
Output Type:
Screen Size:
Resolution:
Select between Digital (HDMI) and Analog (Composite).
Select between 4:3 or 16:9.
If the output type is set to Digital (HDMI), select between Auto, 480i, 480p, 1080i,
and 720p. If the output type you selected is Analog (Composite), select between
480i, 480p, 1080i, and 720p.
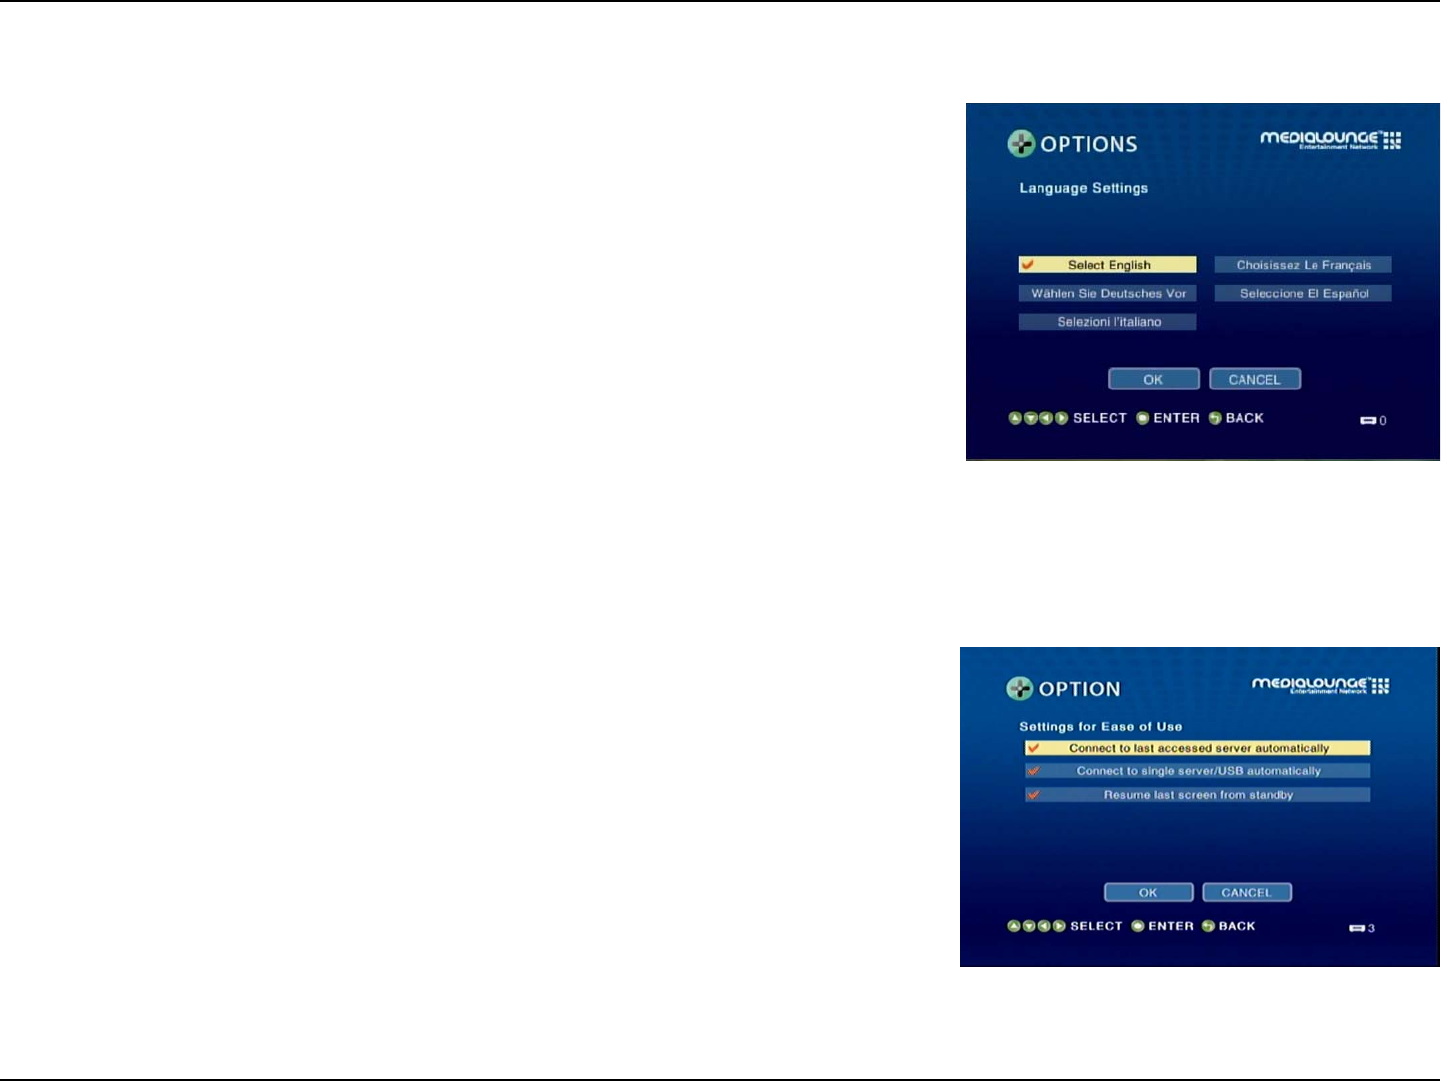
AAC:
Dolby Digital:
WMA:
Auto Volume Control
Strength:
You can choose to output audio in LPCM or have it turned off to the digital
output.
You can choose to output audio in 2 channel or 5.1 for analog. You can also change
the digital output from LPCM to Dolby Digital or off.
You can choose to output audio in 2 channel or 5.1 for analog. You can also change
the digital output from LPCM to off.
There are three variable settings to select from: Small, Moderate, and Strong. These
control tha audio output depending on the strength of the media file.
Audio Output Settings
41D-Link DSM-510 User Manual
Section 3 - Configuration
Select the available language that best fits your interface.
Language Settings
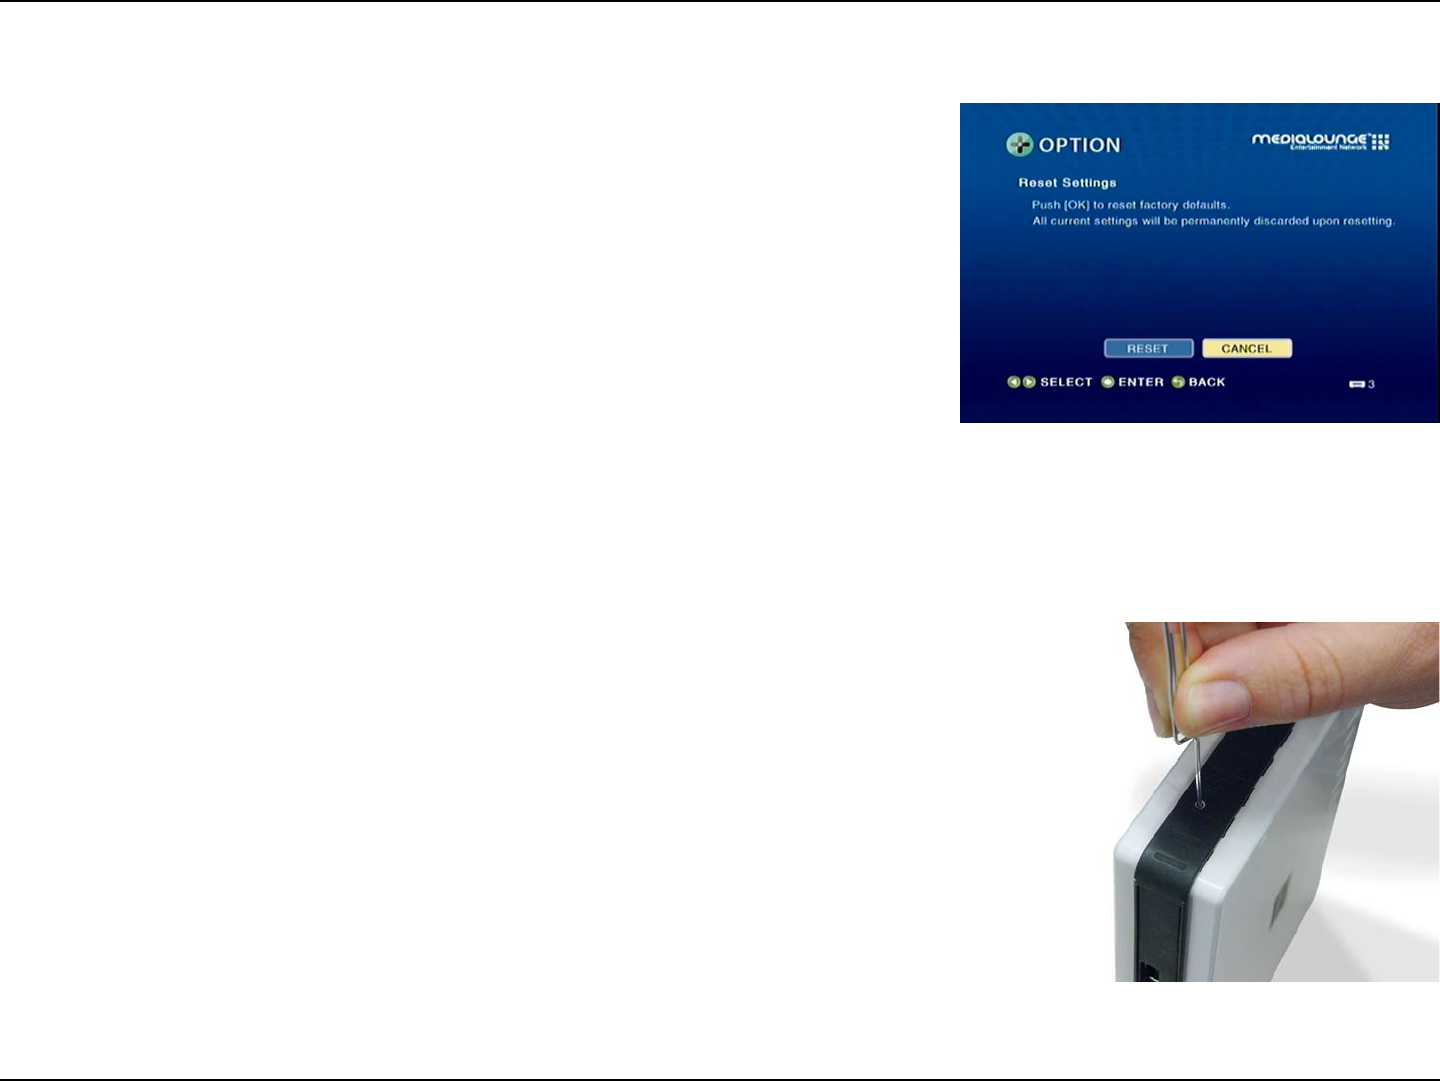
Connect to last
accesed server
automatically:
Connect to single
server/USB
automatically:
Resume last screen
from standby:
On startup your DSM-510 will try to access the last media source it was connected
to.
If only one media source or USB is detected the media server will connect to it
automatically.
After turning on the unit, the last screen accessed will be displayed.
Settings for Ease of Use
42D-Link DSM-510 User Manual
Section 3 - Configuration
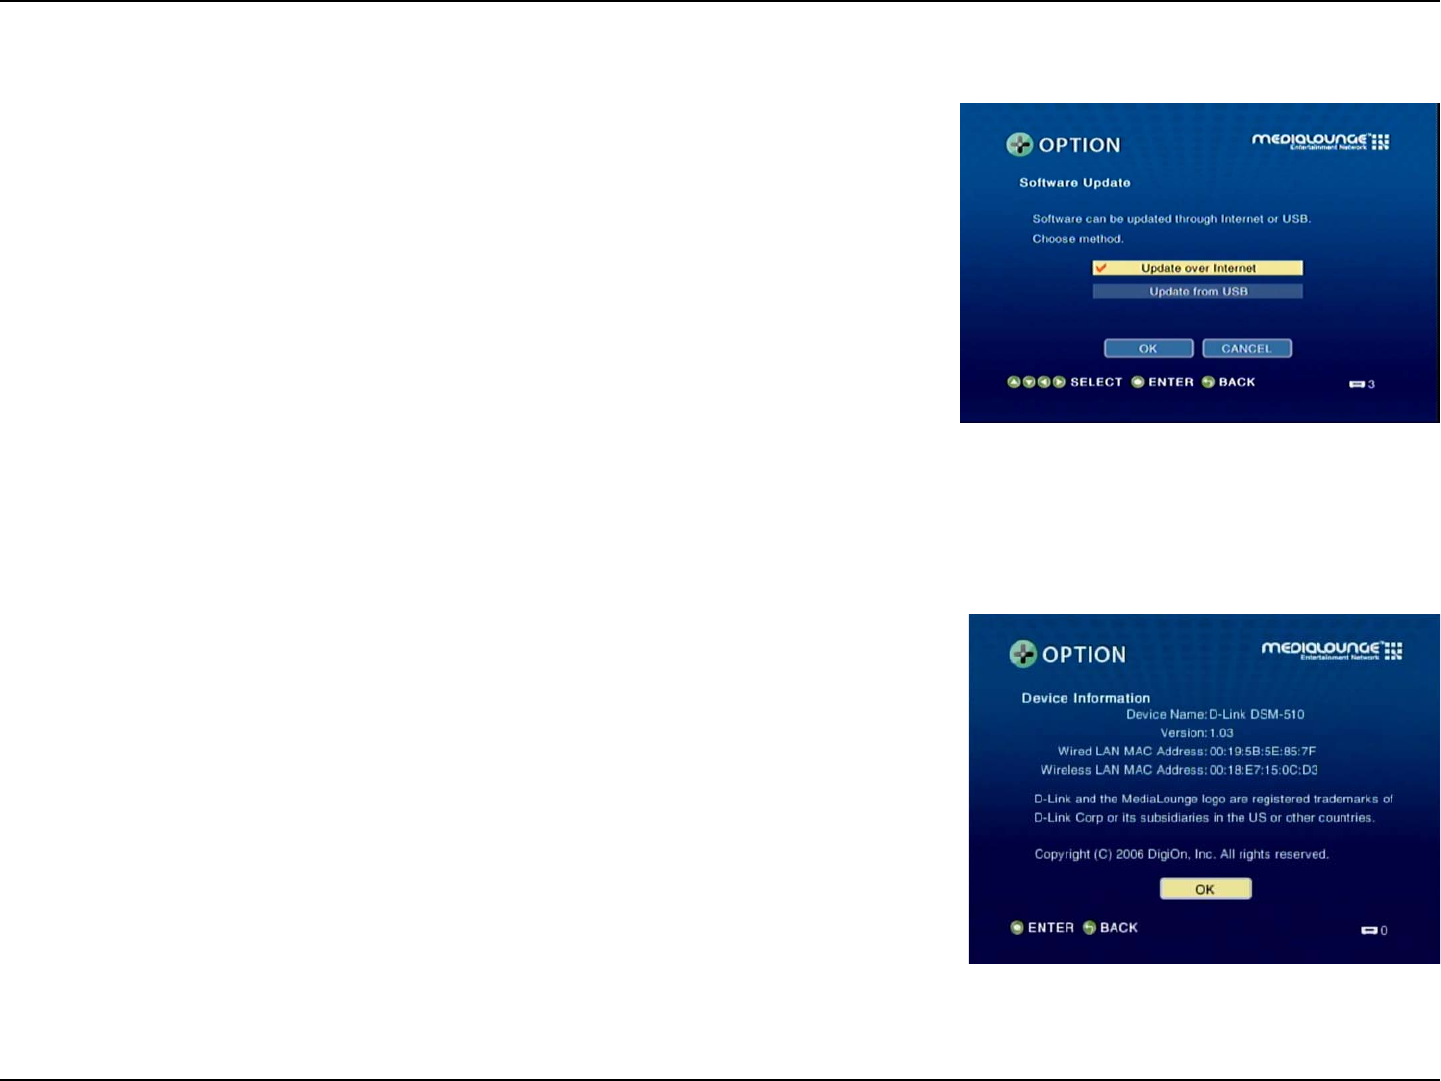
To perform a hard reset, please locate the pinhole reset button on the bottom edge
of the device. Insert a paperclip while the unit is powered on and hold it in for 10
seconds. After 10 seconds, remove the paperclip from the pinhole reset button.
Reset Settings
You can reset the DSM-510’s settings from Options and select Reset Settings. On the
following screen, select RESET.
43D-Link DSM-510 User Manual
Section 3 - Configuration
Update over
Internet:
Update from USB:
Select this option to update the DSM-510 through an Internet connection. Select
OK and then select Next for the DSM-510 to check for an update. If an update is
available, you will be able to click Next and the DSM-510 will download and install
the updated software.
Select this option to update the DSM-510 through a USB device. Download the
USB Update Software from http://support.dlink.com. Extract and copy the update
folder from your PC onto your USB drive. Insert the USB drive into the DSM-510
and select Next. If an update is found, you will be able to select Next and continue
updating your DSM-510 software.
Software Update
Displays the name of the device.
This will show the current version of the software that the device is using.
Shows the Wired and Wireless MAC address of the DSM-510.
Device Information
Device Name:
Version:
MAC Address:
This screen will display information about the DSM-510.
44D-Link DSM-510 User Manual
Section 3 - Configuration
If you already have wireless settings configured on your PC, instead of using the Intel® Viiv™ setup , you can use Windows® Connect
Now (WCN) to configure the wireless settings on your DSM-510.
Note: WCN is only available on PCs running Windows® Vista and Windows® XP with Service Pack 2 installed. If you are running
Windows® Vista on your PC, continue to page 44.
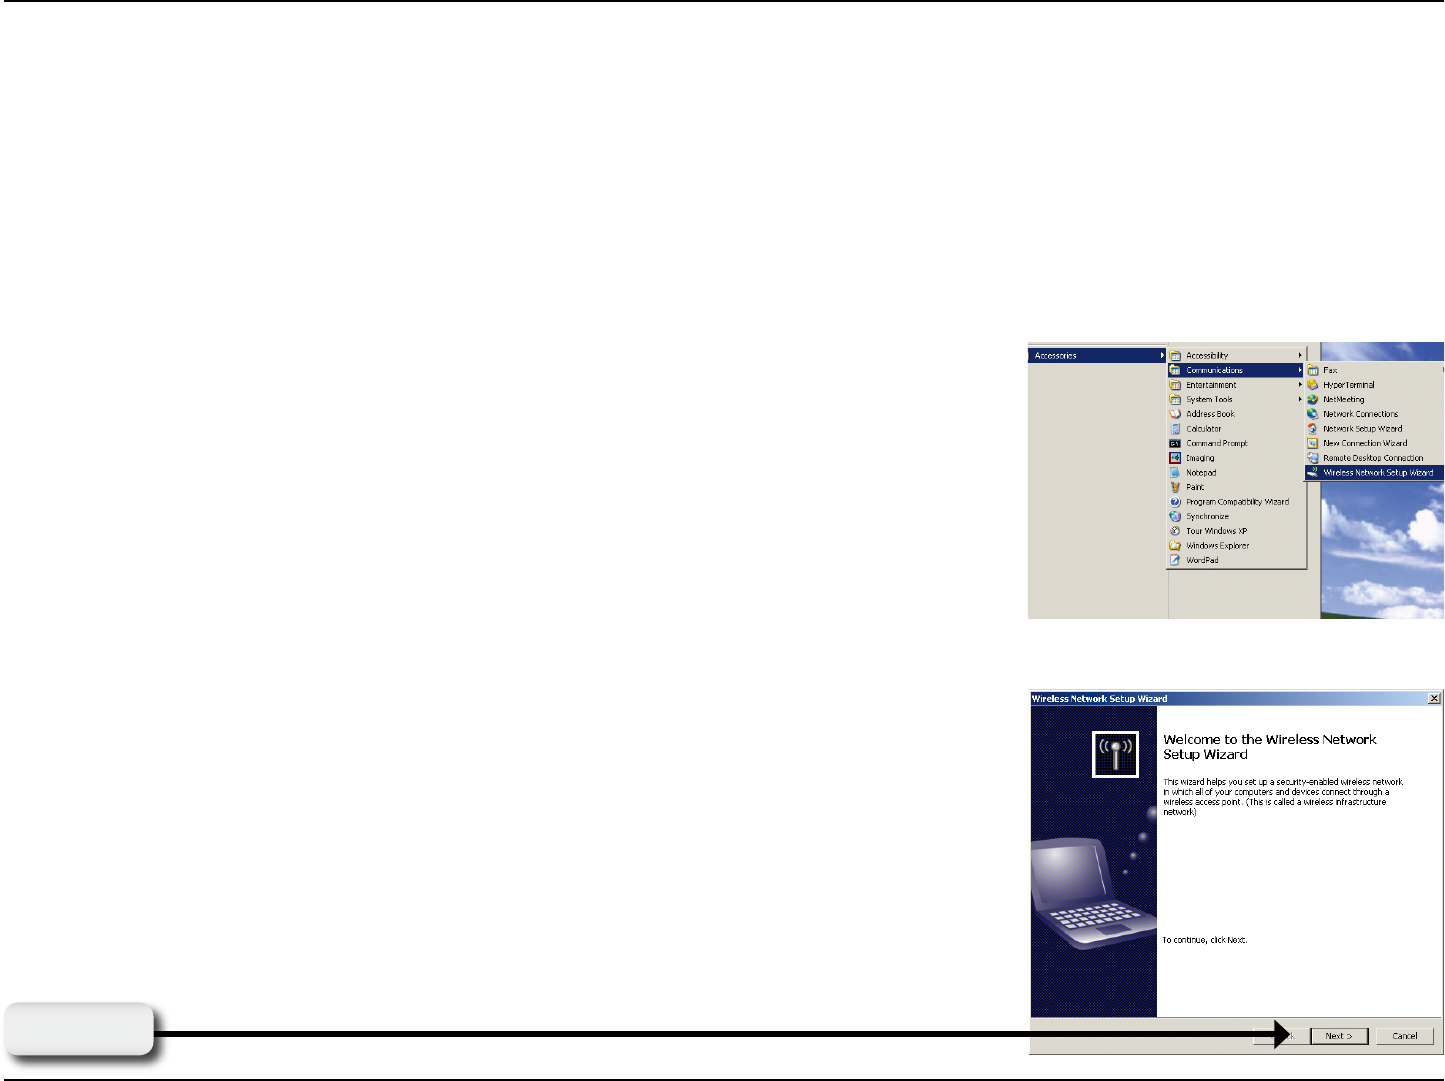
Go to Start > All Programs > Accessories > Communications and click Wireless Network
Setup Wizard.
Your system will display the Setup Wizard Welcome screen. Click Next to continue.
Click Next
Windows® Connect Now for XP
45D-Link DSM-510 User Manual
Section 3 - Configuration
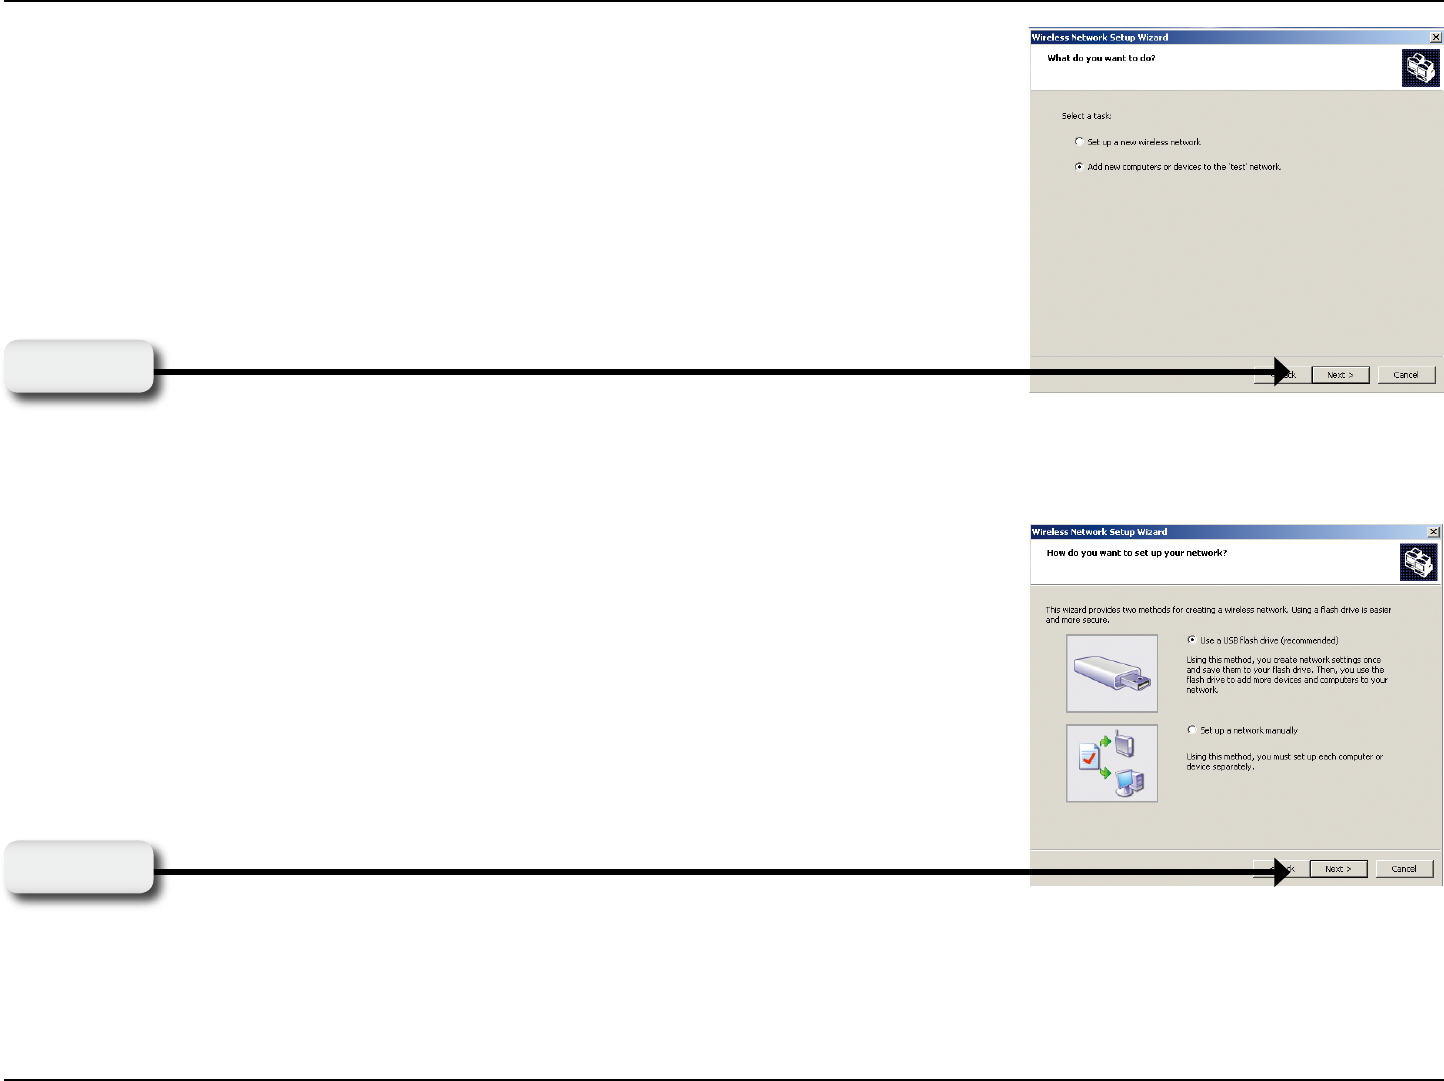
Select to add a new device to your existing wireless network and click Next to continue.
The wizard provides two methods for setting up a wireless network. Select to use a USB flash
drive to save your wireless network settings and click Next to continue.
Note: Using a USB flash drive is recommended.
Click Next
Click Next
46D-Link DSM-510 User Manual
Section 3 - Configuration
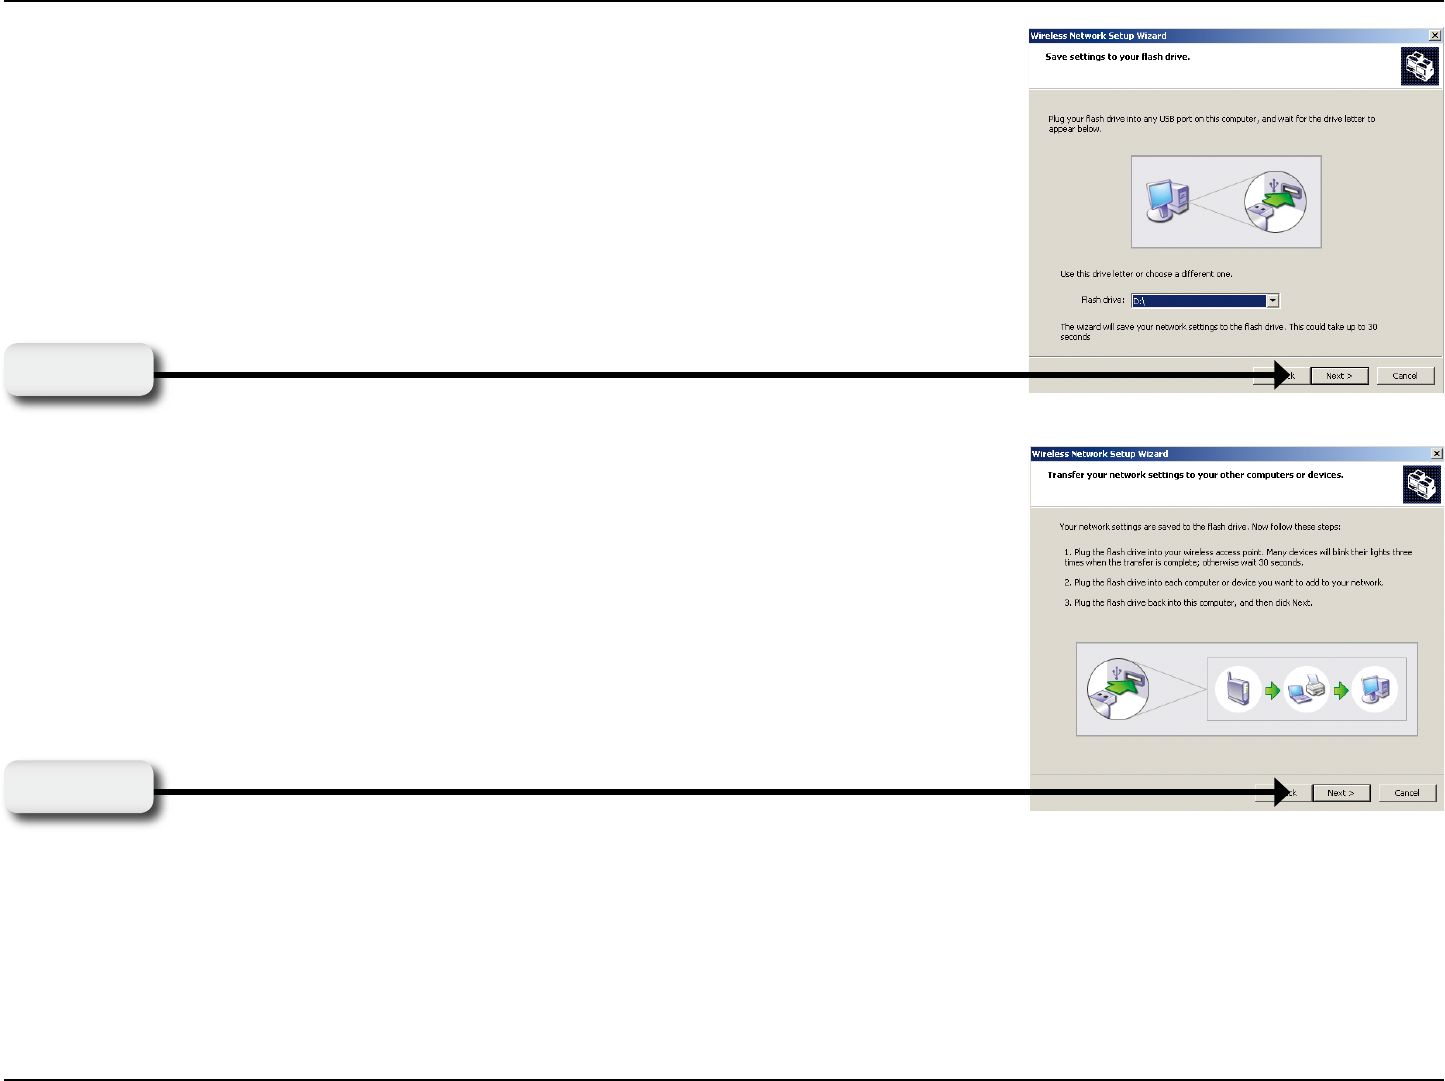
Plug your flash drive into a USB port on this computer. The drive letter will appear in the pull
down menu. You can choose to use this drive or select another drive. Click Next to save your
wireless settings to the USB flash drive. This may take a few seconds.
Click Next
This screen will appear when the wireless settings have been saved to the USB flash drive.
Next, remove the USB Flash Drive from your PC and insert into the USB port on the back panel of the DSM-510.
Click Next
47D-Link DSM-510 User Manual
Section 3 - Configuration
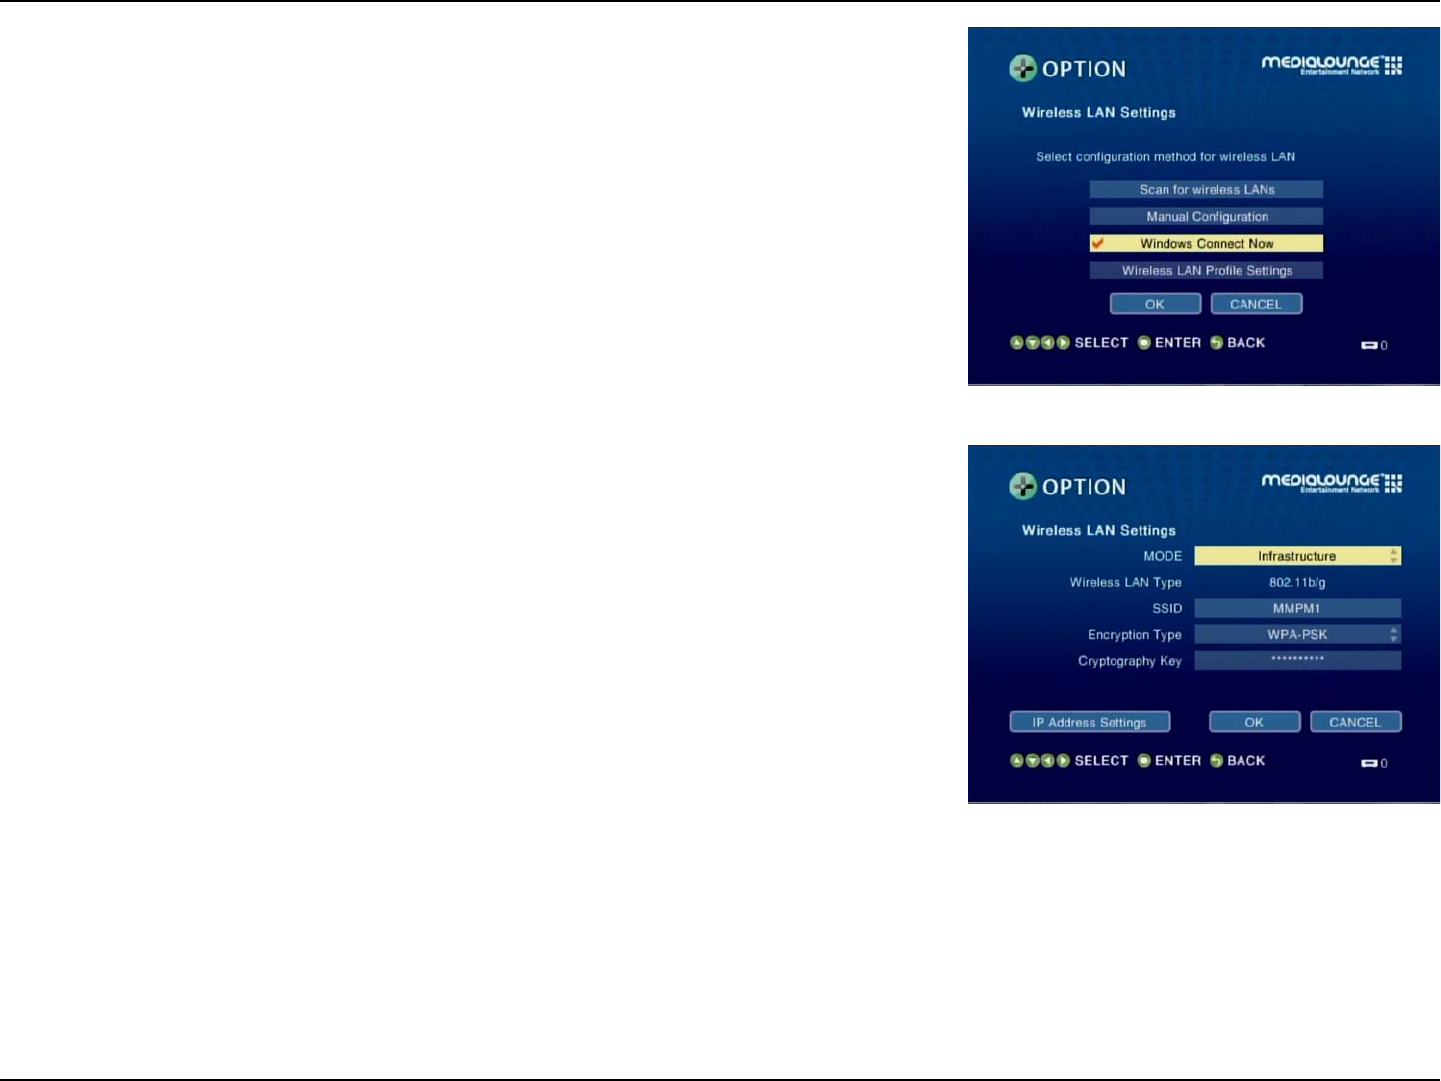
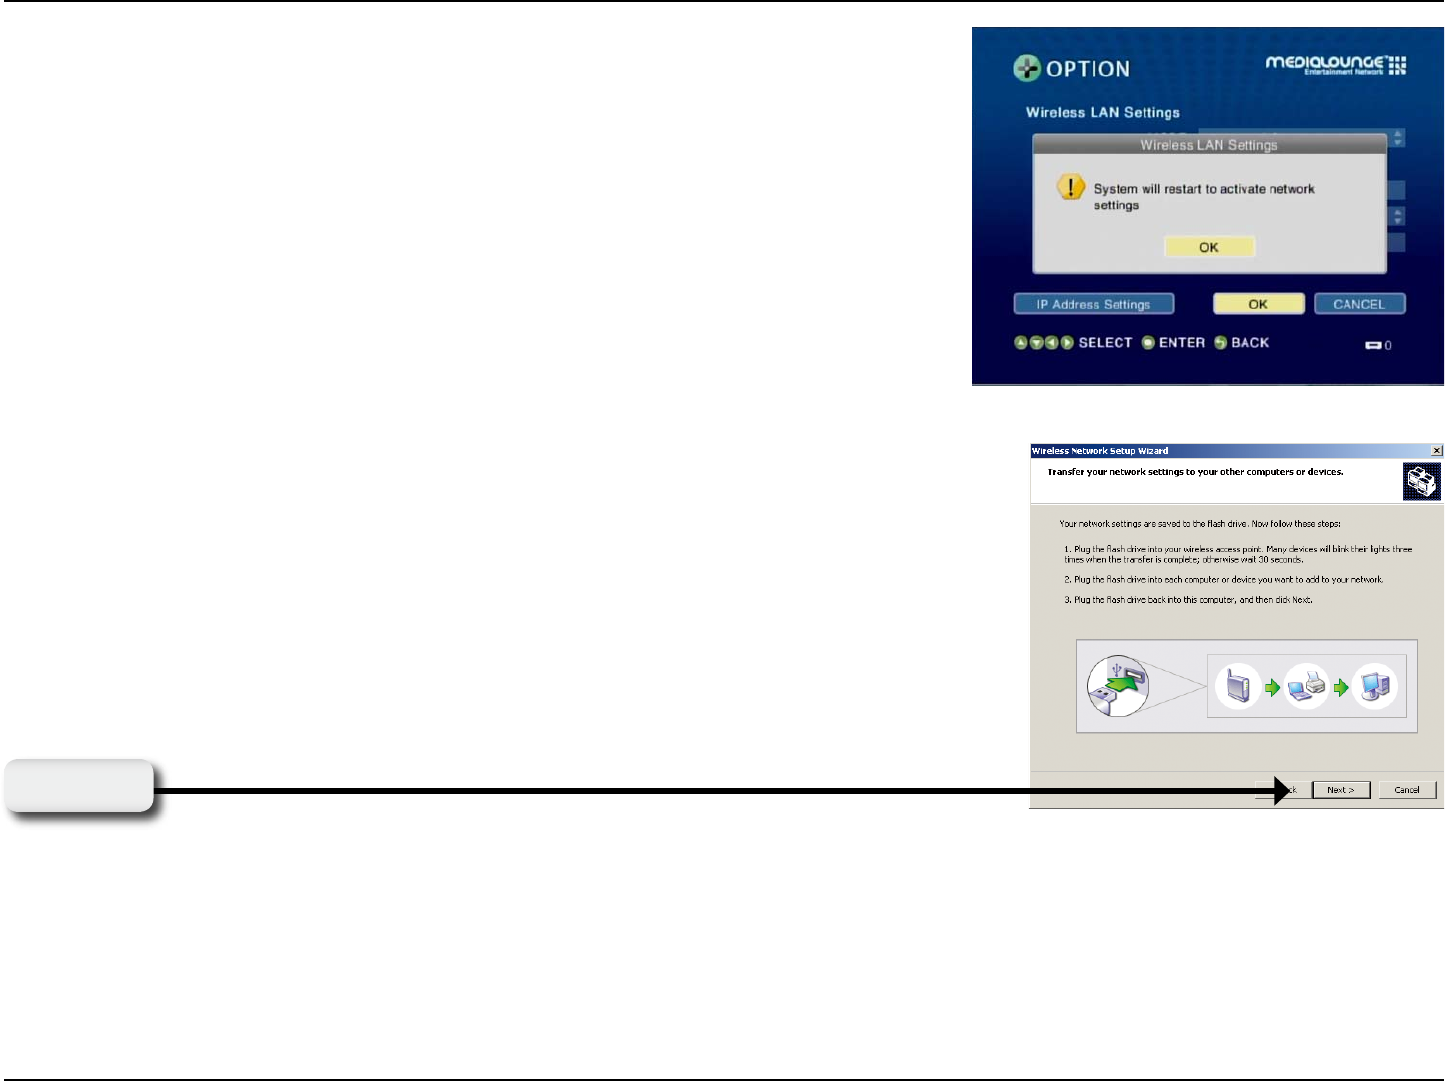
From the device, select the option Windows Connect Now. Click OK.
The following screen will appear, manually configure your Wireless LAN settings. After
you’ve completed your settings, click OK.
48D-Link DSM-510 User Manual
Section 3 - Configuration
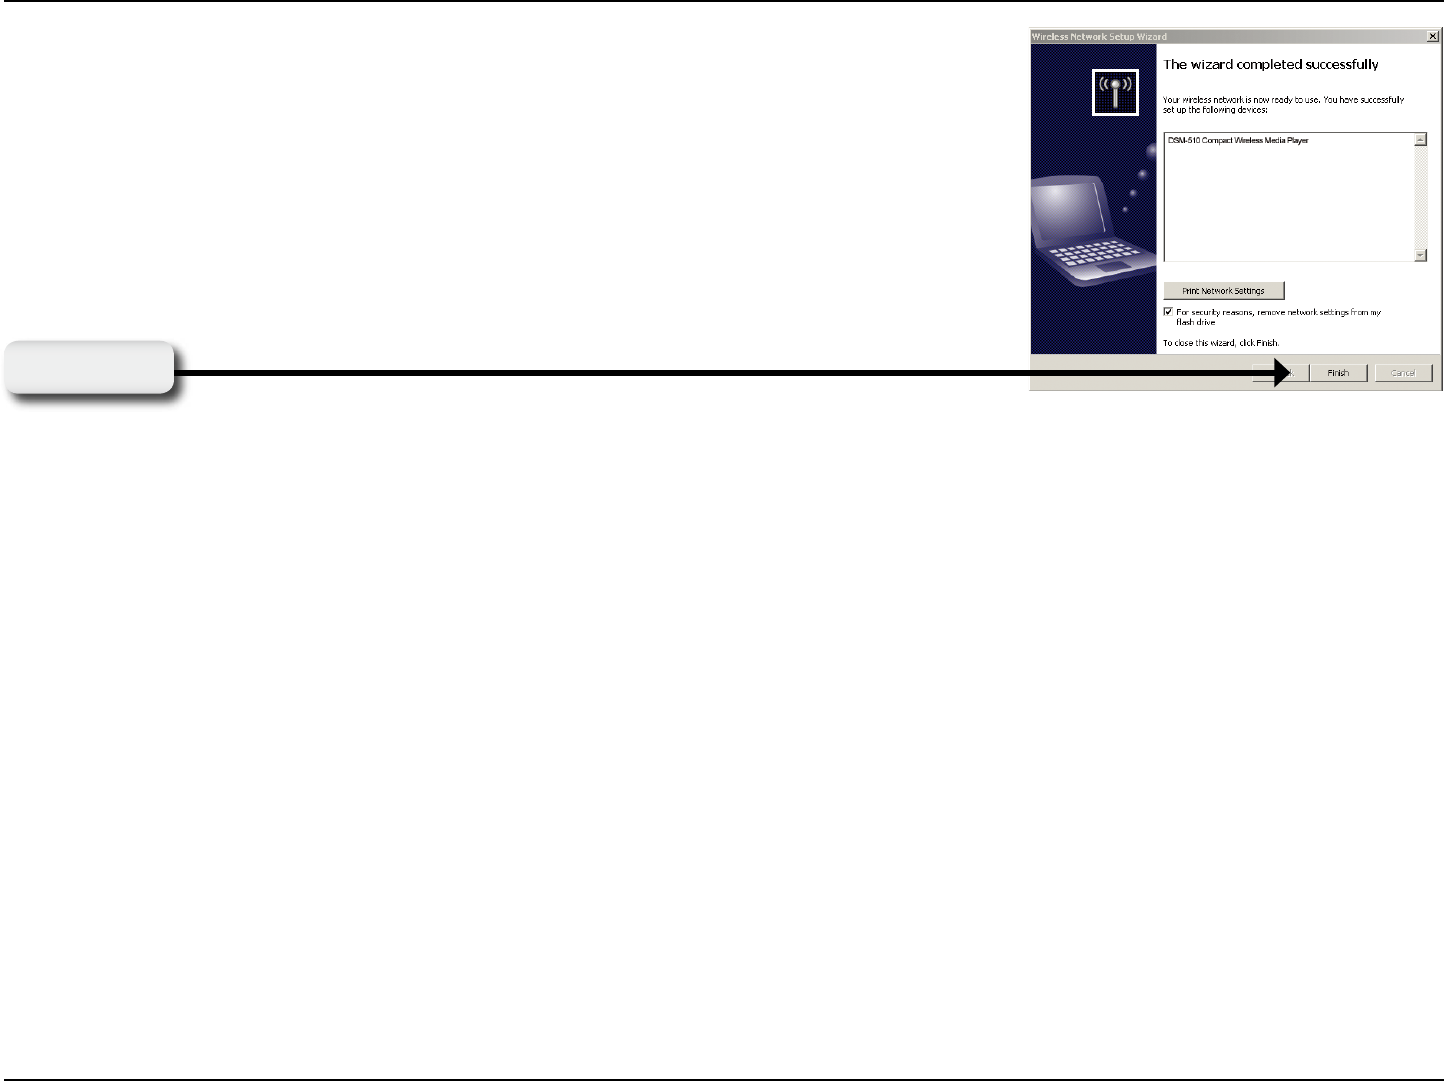
Next, return to your PC and remove the USB Flash Drive from the DSM-510 and insert
it back into the USB port on your PC. Click Next to continue.
Click Next
The following screen confirms that your wireless settings have been applied. Click OK.
49D-Link DSM-510 User Manual
Section 3 - Configuration
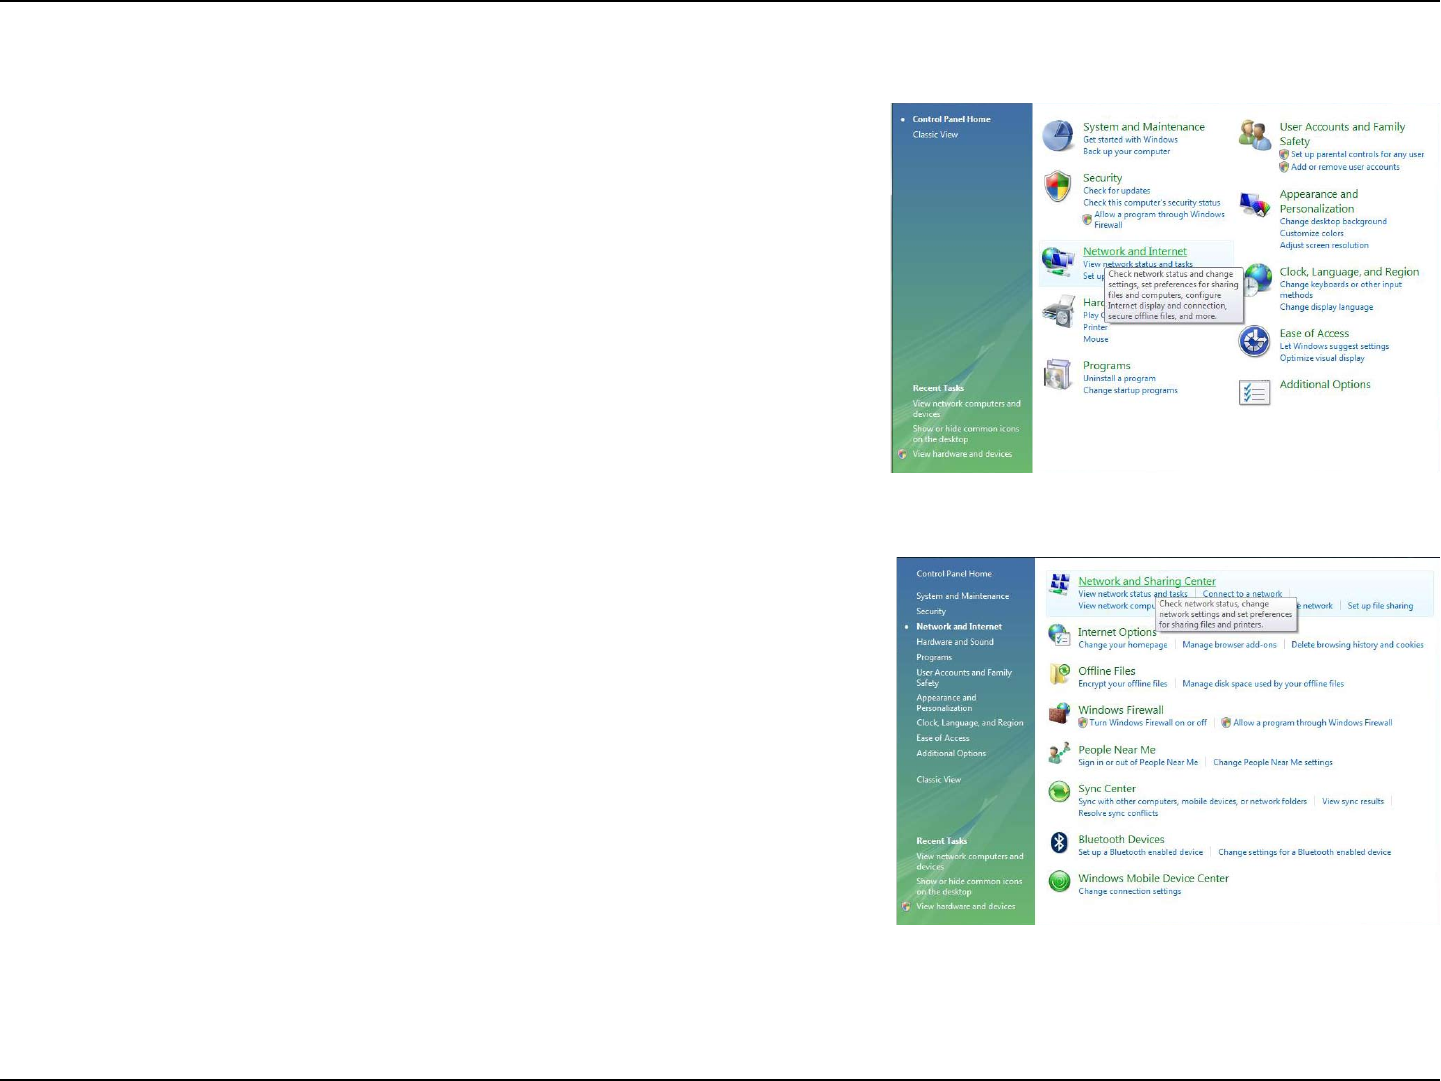
Wireless configuration using WCN is now complete. The setup wizard will display the devices
that have been setup with your wireless network. Click Finish.
Click Finish
Windows® Connect Now has been configured for Windows® XP/2000!
50D-Link DSM-510 User Manual
Section 3 - Configuration
Windows® Connect Now for Vista
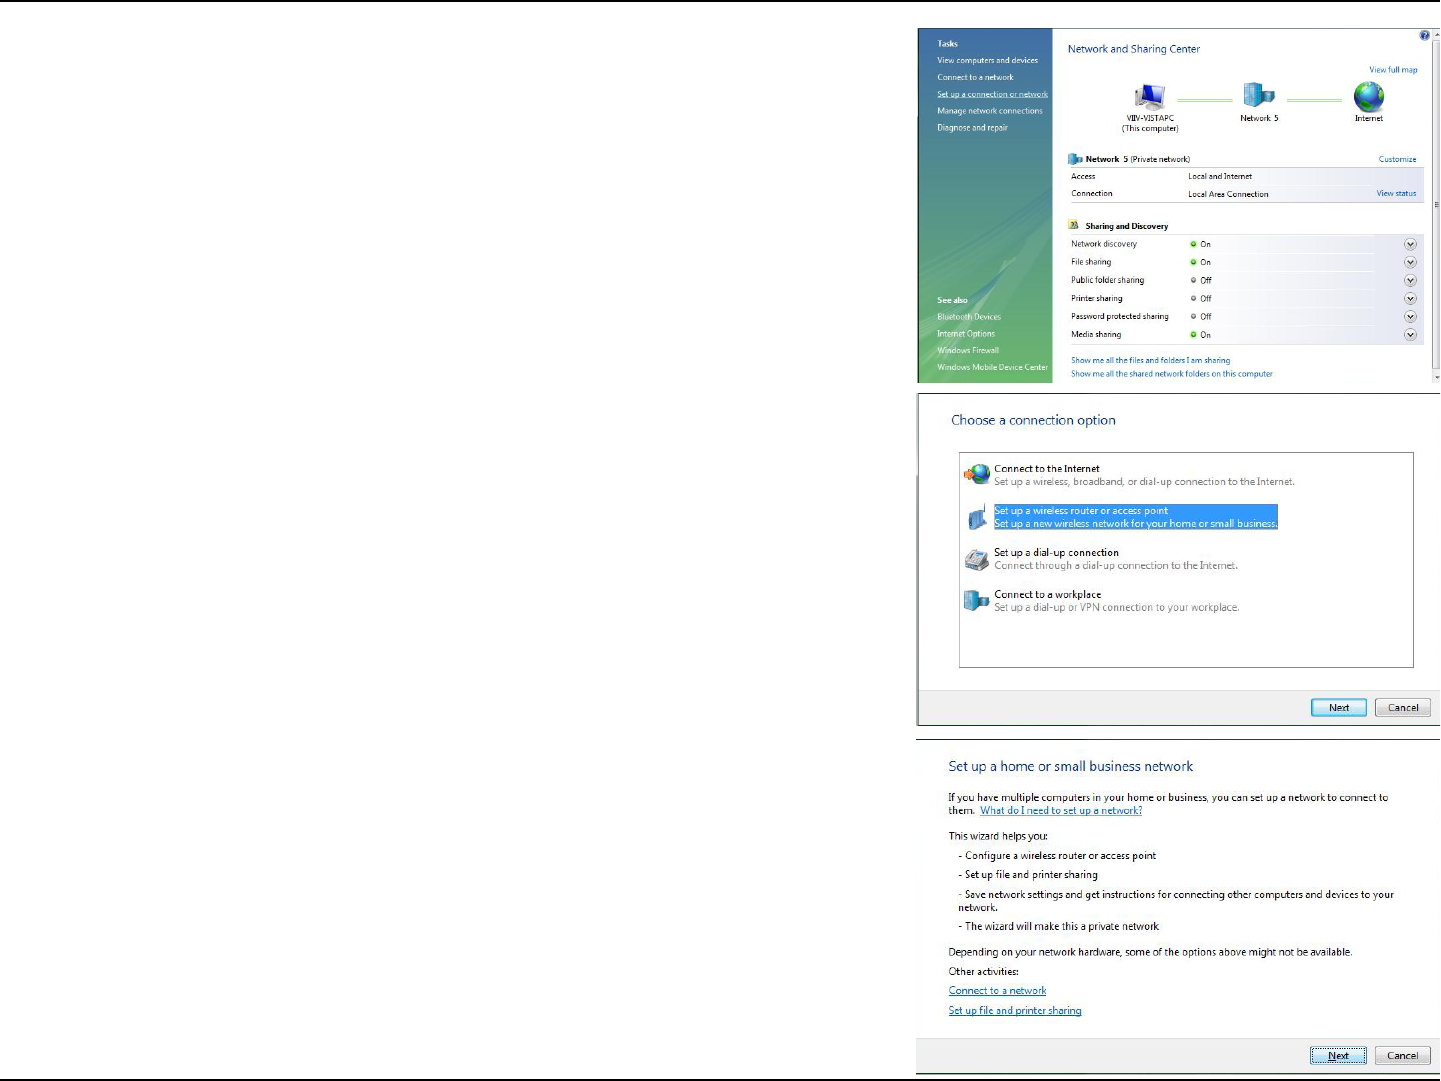
On your Windows® Vista PC, open up your Control Panel and select the Network
and Internet option.
Next, select the Network and Sharing Center option.
51D-Link DSM-510 User Manual
Section 3 - Configuration
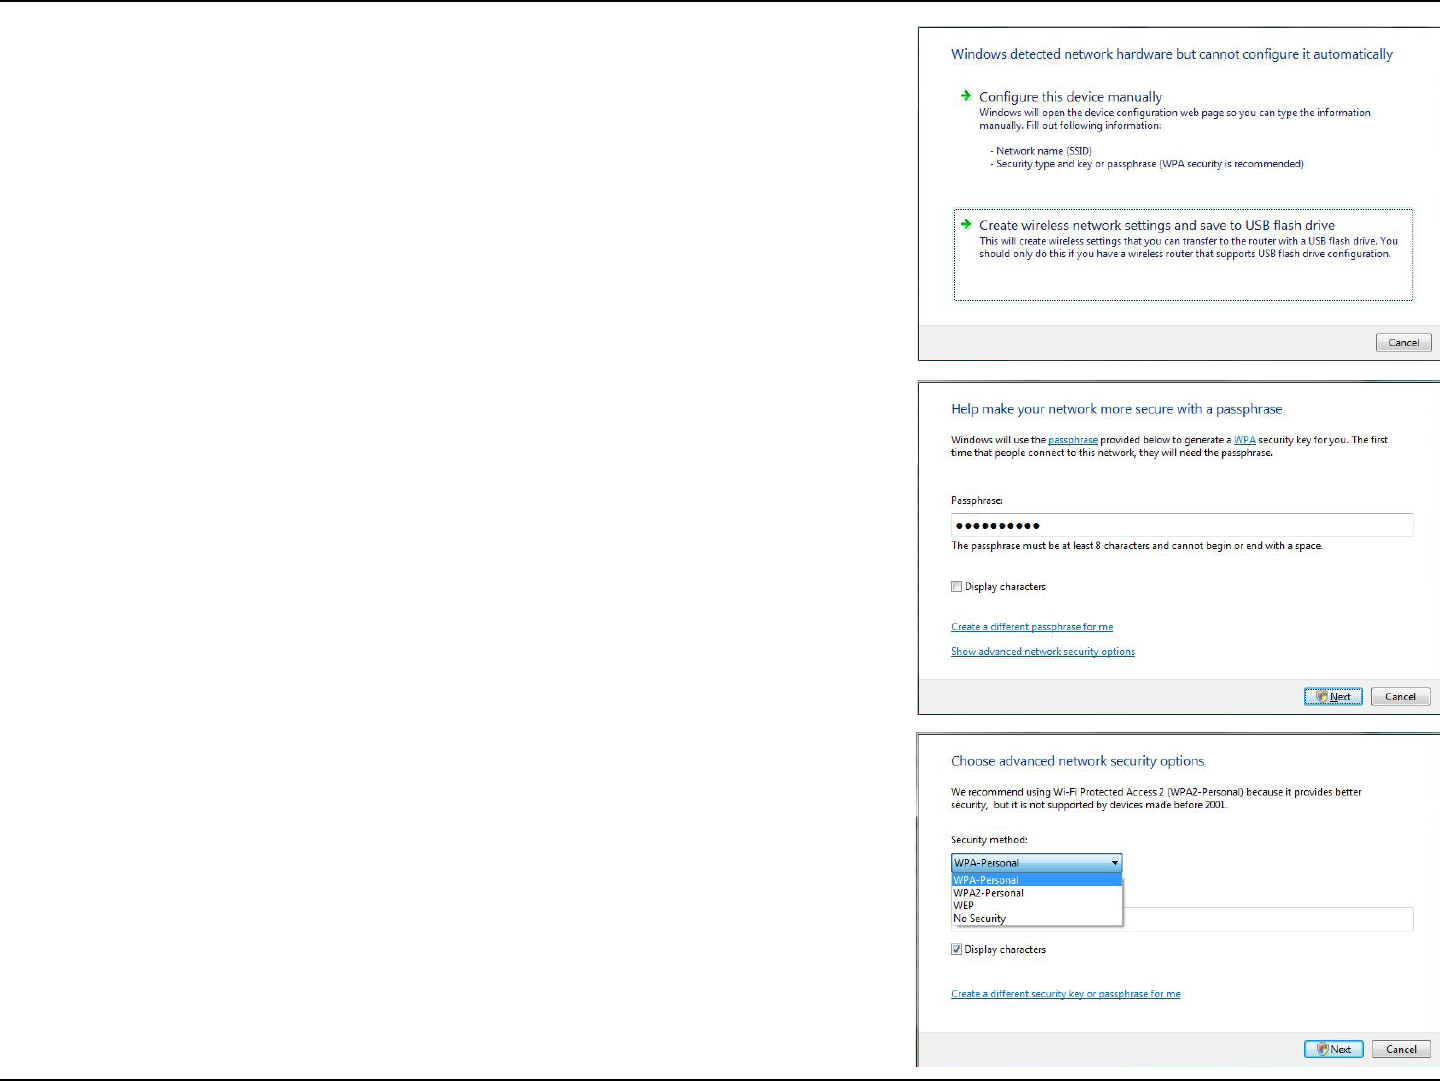
On the following screen, select Set up a connection or network.
The choose a connection option window will appear. Select the Set up a wireless
router or access point option and click Next.
The following screen offers more information, click Next to begin the wizard.
52D-Link DSM-510 User Manual
Section 3 - Configuration
Select the Create wireless network settings and save to USB flash drive
option.
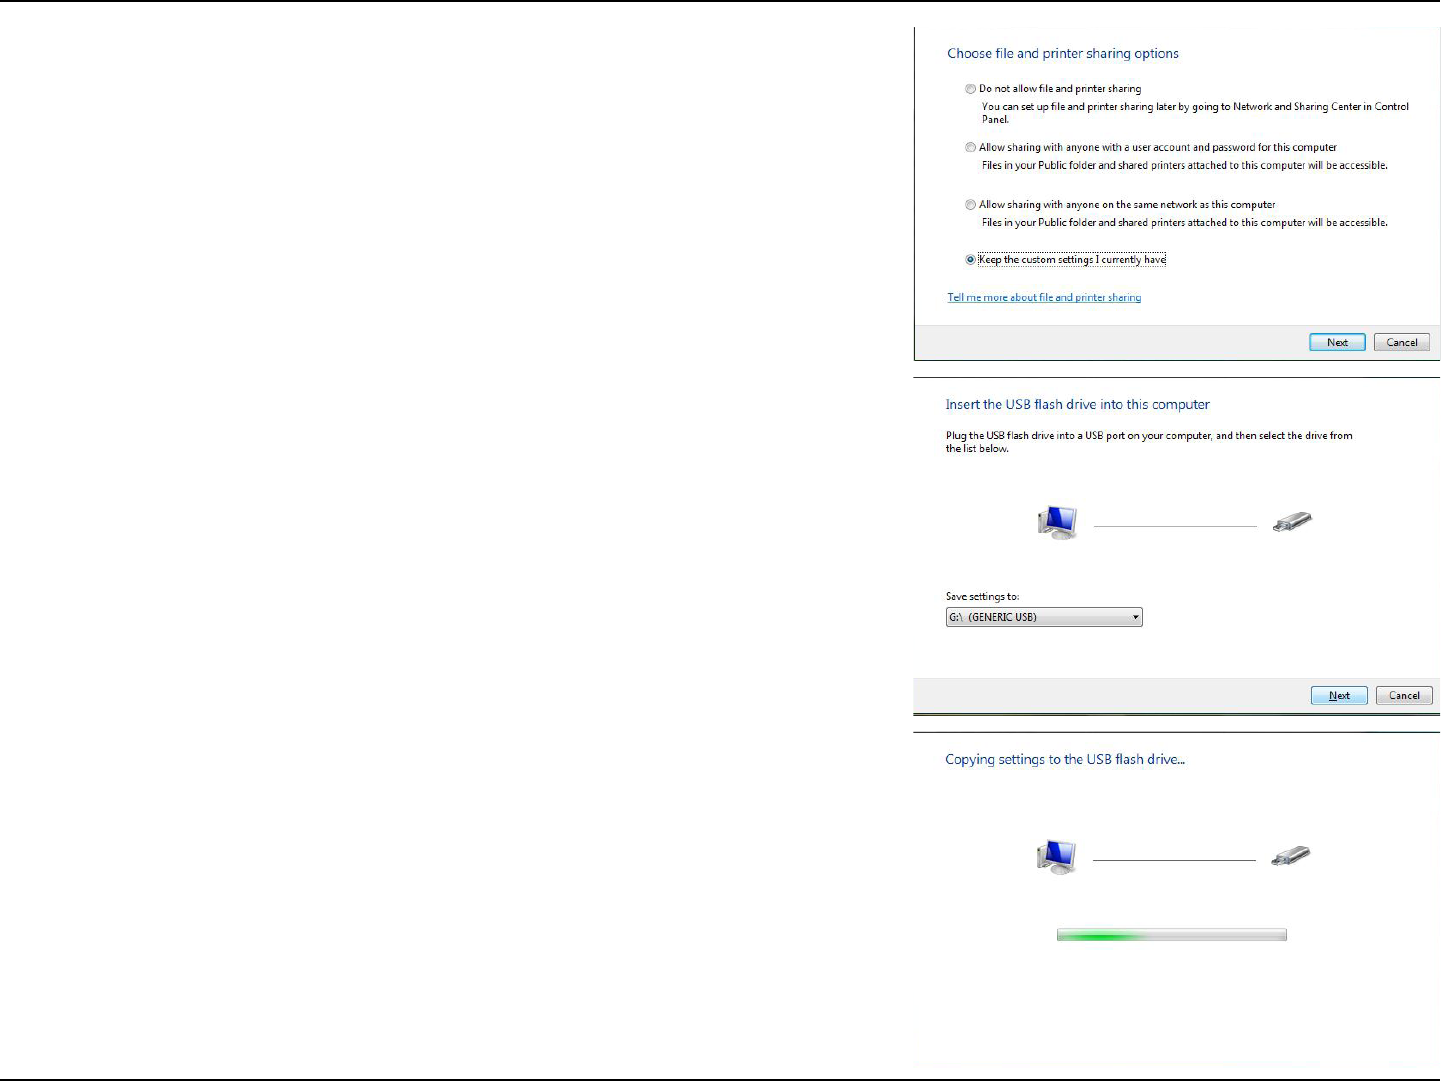
Enter a passphrase to secure your network and click Next.
The following screen will provide you with a list of network security options.
Select the best option and click Next to continue.
53D-Link DSM-510 User Manual
Section 3 - Configuration
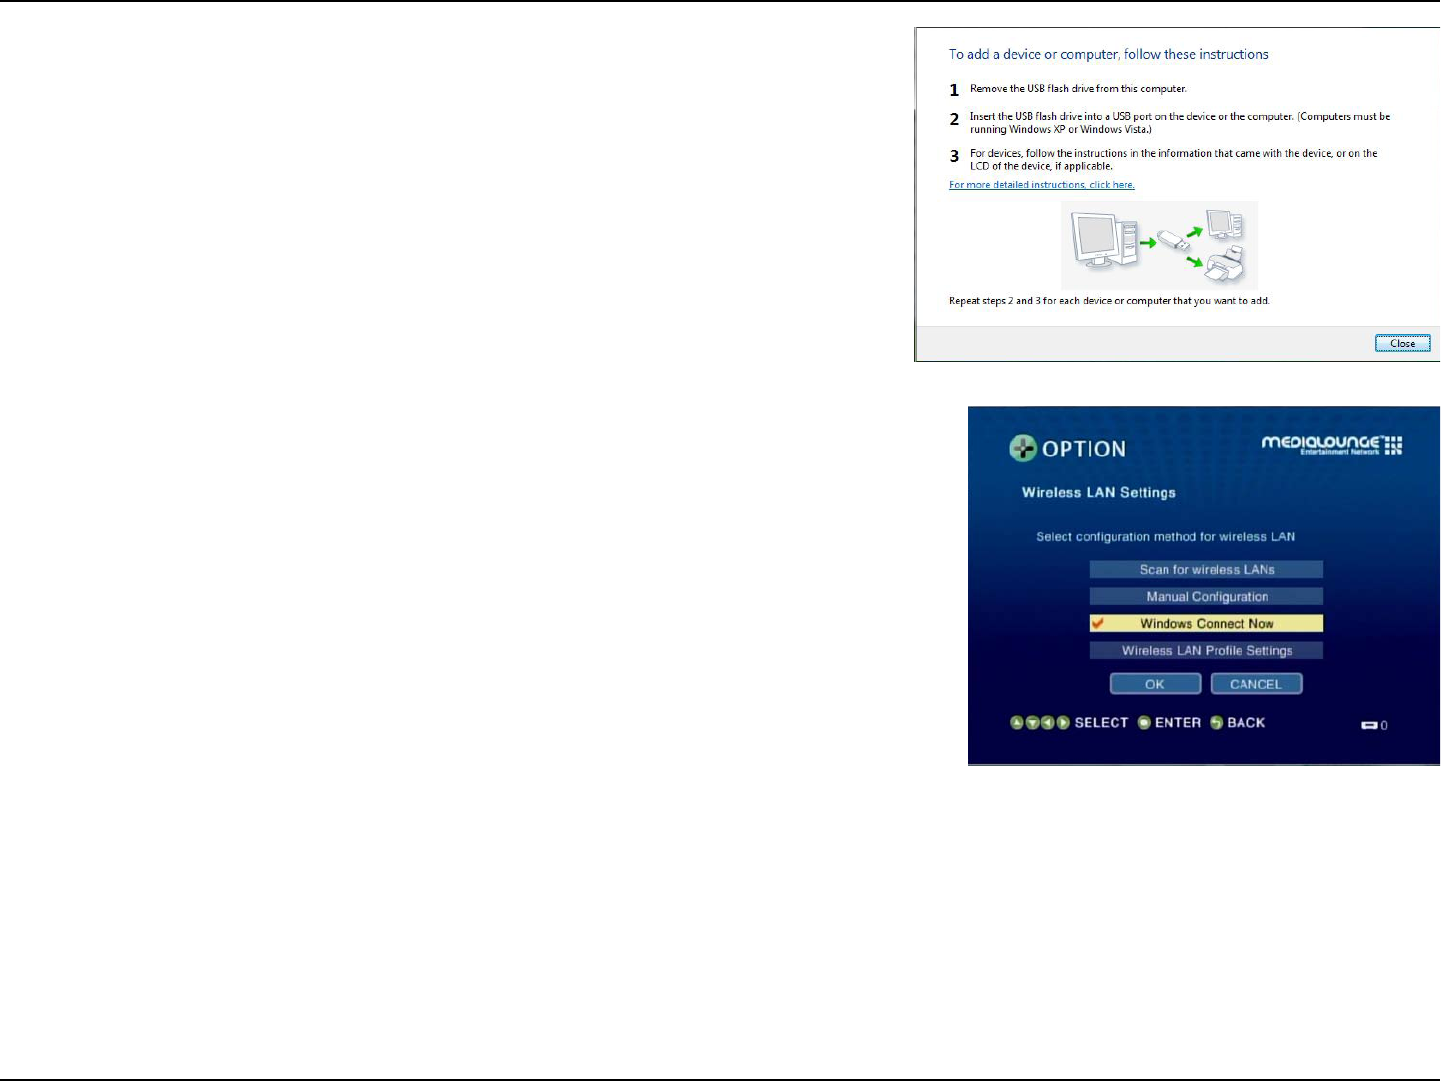
The choose file and printer sharing options window will appear, select the option
to keep the custom setting you already have, and click Next.
Plug your flash drive into a USB port on your computer. The driver letter will
appear in the pull down menu. You can choose to use the drive or select another
drive. Click Next to save your wireless settings to the USB flash drive.
The following screen will begin saving the wireless settings to your USB flash
drive. This may take a few seconds.
54D-Link DSM-510 User Manual
Section 3 - Configuration
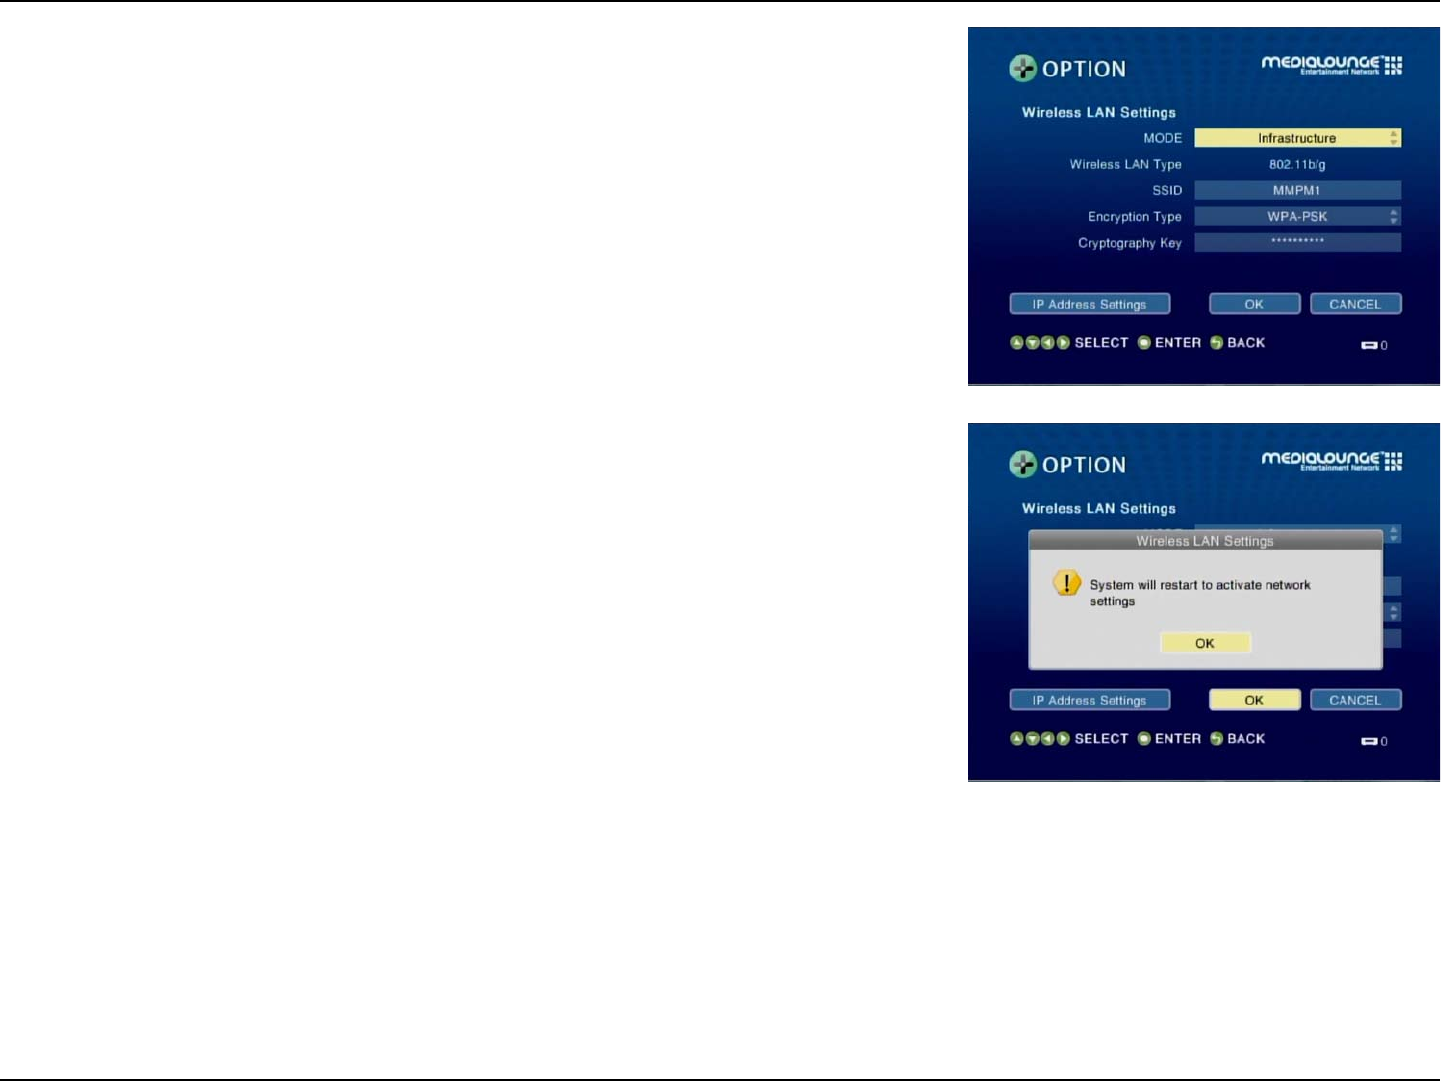
This screen will appear when the wireless settings have been saved to the USB
flash drive.
Remove the USB flash drive from your PC and insert it into the USB port on
the front panel of the DSM-510.
From the device, select the option Windows Connect Now. Click OK.
55D-Link DSM-510 User Manual
Section 3 - Configuration
The following screen will appear after you’ve verified your settings.
Click OK to continue.
The following screen confirms that your wireless settings have been applied.
Click OK.
Windows® Connect Now has been configured for Windows® Vista!

56D-Link DSM-510 User Manual
Section 4 - Operation
VIDEO:
MUSIC:
PHOTO:
SERVER:
USB:
OPTION:
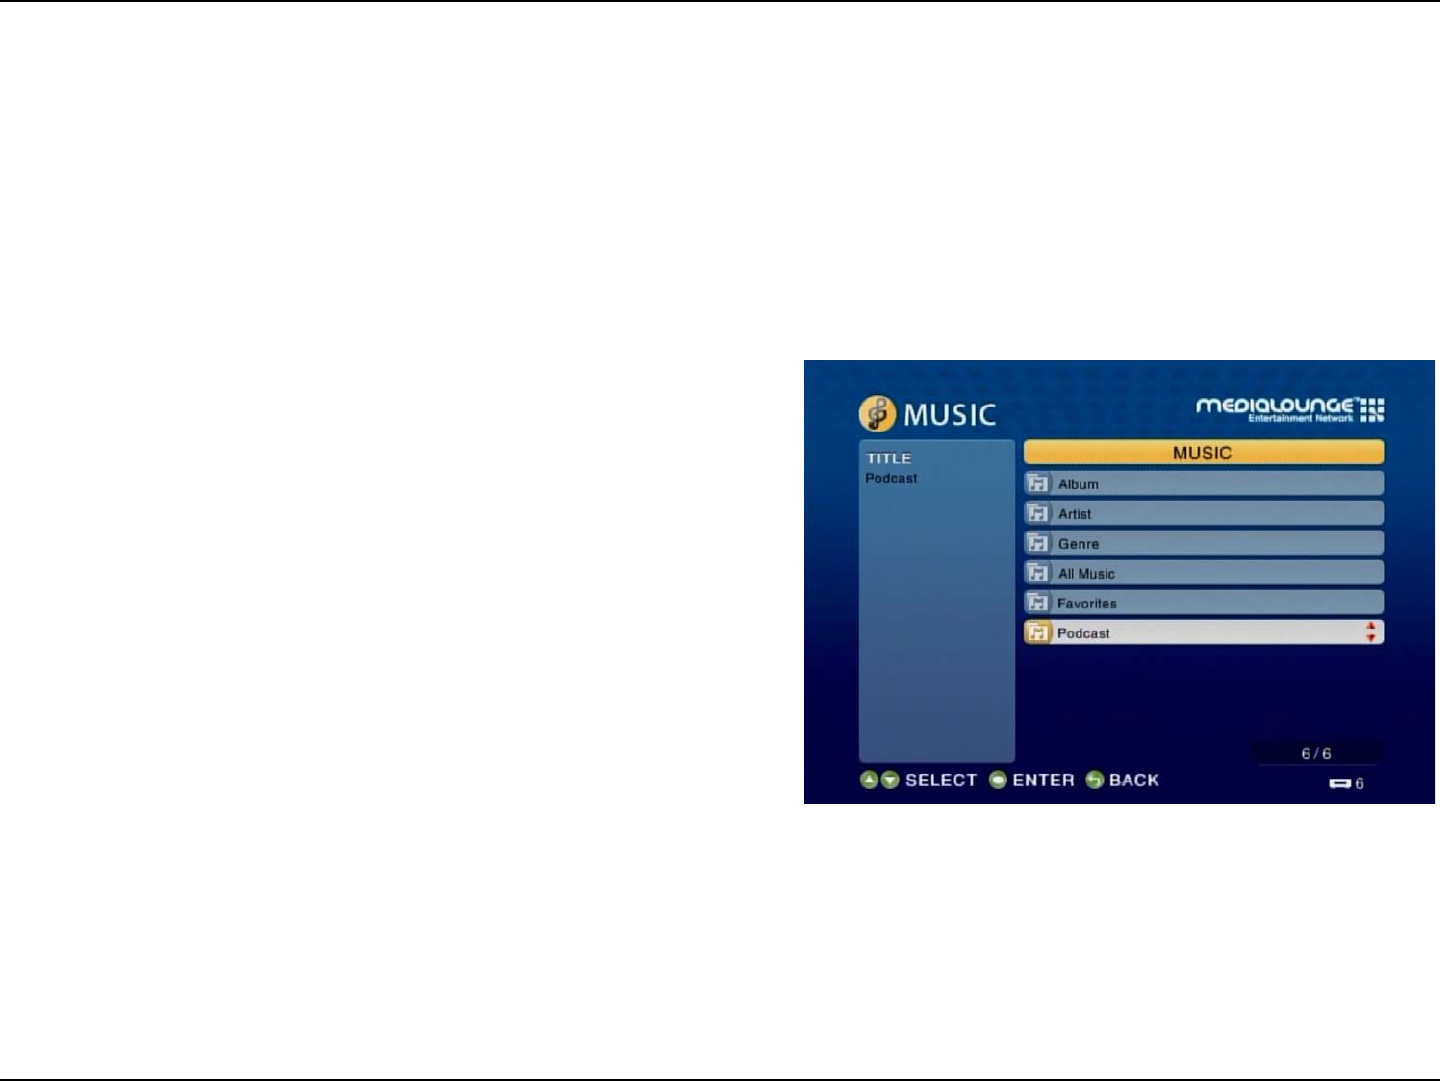
Click ENTER on your remote control to show the Video Contents selection
screen.
Click ENTER on your remote control to show the Music Contents selection
screen.
Click ENTER on your remote control to show the Photo Contents selection
screen.
Click ENTER on your remote control to show the Server selection screen.
Click ENTER on your remote control to show the Connected USB Device List.
Click ENTER on your remote control to show the Options screen.
Operating the DSM-510
Note: To directly access this screen, press the HOME button on the remote control.
Note: If the Intel® Viiv™ technology verified PC is powered down, selecting the Intel® Viiv™ Media Server will power it back up to provide access to music,
photo, video, and the Intel® Viiv™ Zone.
The DSM-510 uses an on-screen menu interface. As you move through the menus, you will use the selection arrows on the remote
control to move up, down, right and left. The highlight bar moves from item to item as you press the selection arrows. You will need
to press ENTER on the remote control to access the item. The Page Up and Page Down buttons can be used to navigate through the
track list one page at a time. Once you are in a particular category, you can press the MENU button on your remote control to access
the pulldown menu within that category.
Menu Basics
57D-Link DSM-510 User Manual
Section 4 - Operation
Music Quality
Your music listening experience on the media player depends upon the quality of your digital music files on your PC. Avoid quality
settings below 48kbps as they create low quality audio. For CD quality music, rip your MP3s at 128kbps or higher, with a sample
rate of 44.1kHz.
Supported Music Formats
The following music file formats are supported:
• MP3 (up to 320 kbps)
MPEG-1, Layer 3 Audio file -The standard Internet music file
format. This is the most commonly used audio format.
• WMA (Does not support WMA lossless)
Windows Media Audio file - Supported by the Microsoft Windows
Media player and some music jukebox programs. Also supports
WMDRM protected WMA files downloaded from online services
and WMA Pro.
• WAV
WAV was developed by Microsoft and IBM. WAV sound files end
in .wav and are compatible with Windows applications supporting
audio.
• AIFF (AIFF files must be encoded in PCM format only.)
AIFF (Audio Interchange File Format) was developed by Apple
Computers and is the standard audio format for Macintosh
computers. File extensions are .AIF or .IEF.
• MPEG 1 and MPEG 2
Moving Pictures Experts Group created standards for compressing audio and video. Audio uses the file extension .mp3.
• OGG Vorbis
Open source audio format. Uses the file extension .ogg.
Music
58D-Link DSM-510 User Manual
Section 4 - Operation
Playing a Track
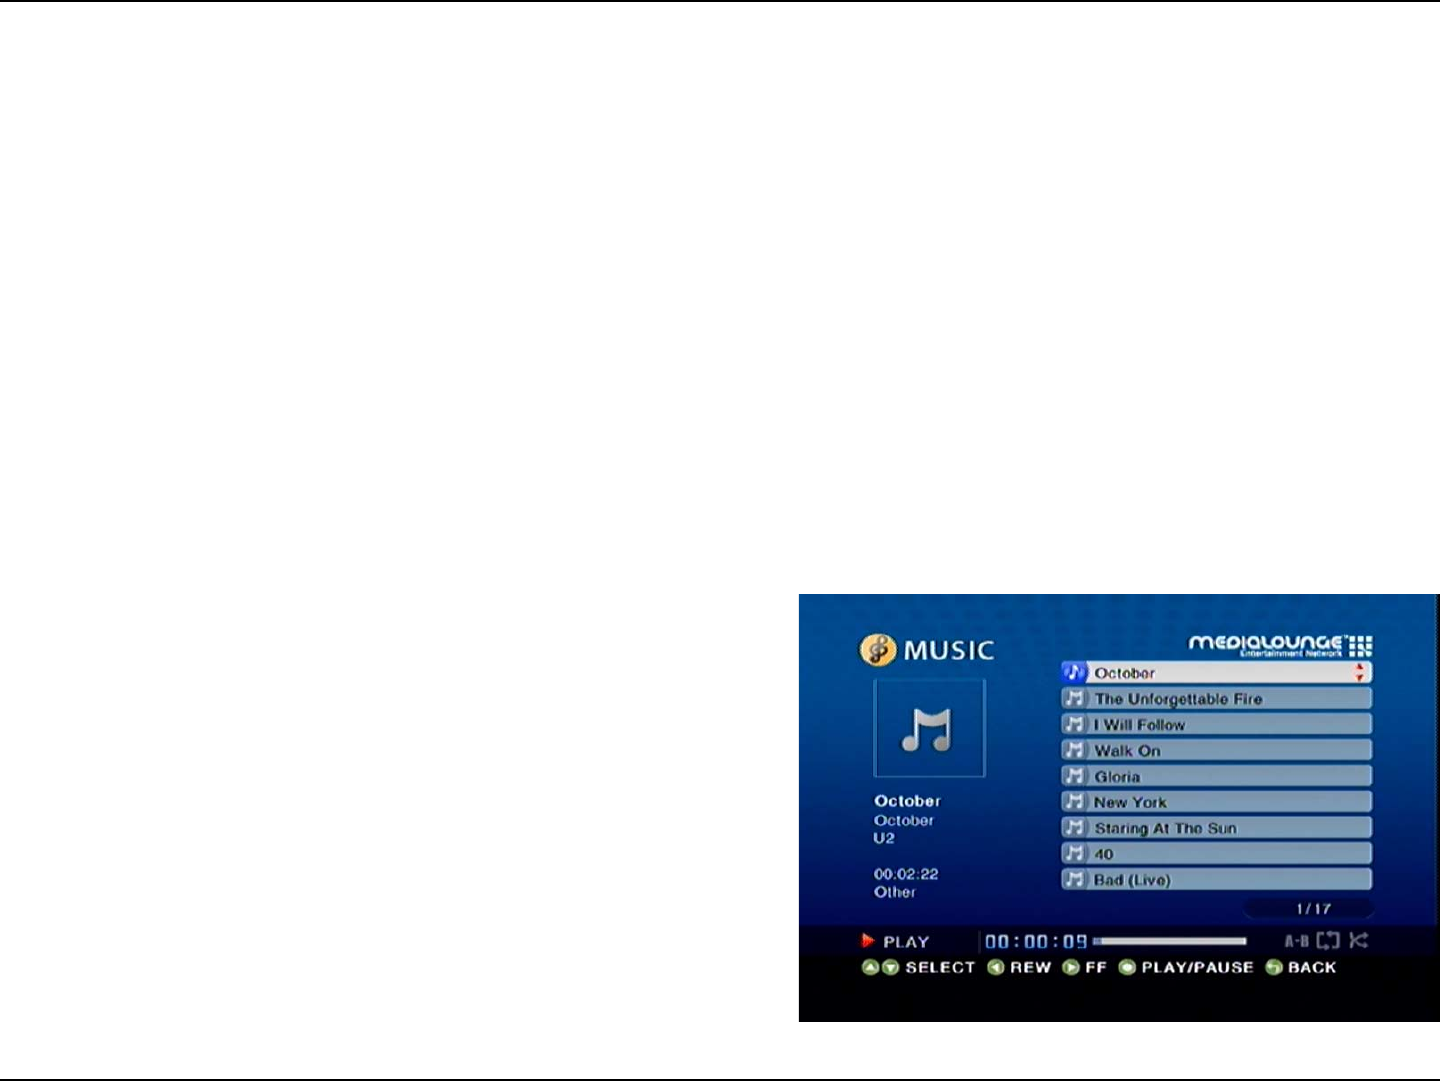
Once you enter the music menu, there are several ways that you can view tracks. You can view Playlist, Genre, Artist, Album, All
Music, Folders, or Favorites.
If you select to view All Music (see the following menu), then use the
selection arrows to navigate to the track you wish to play. Once you
have located the appropriate track, highlight it and press ENTER or Play
on the remote control. The track will begin playing on your stereo or
television speakers.
To play all of the tracks visible in this category, simply press Play.
Select the MUSIC category from the HOME page or click the MUSIC button on the remote control. Select a category, by using the
down arrow and up arrow on the remote control to navigate (choose from Playlist, Genre, Artist, Album, All Music, Folders, or
Favorites). Select your option by clicking ENTER. If you want to play all of the tracks within the category you selected, simply press
the Play button. If you want to play just one track, use the up arrow and down arrow buttons to navigate one track at a time. After the
appropriate track is highlighted, press ENTER on the remote control. The Page Up and Page Down buttons can be used to navigate
through the track list one page at a time.
Accessing Music

59D-Link DSM-510 User Manual
Section 4 - Operation
Playing a Group of Songs
Select a music folder and press the Play button on the remote control, all of the songs within the selected folder will be played. You
can highlight a genre of music and all files that are associated with that genre will be displayed. Genre categories are defined when
an audio file is created.
You can play songs within a folder from a specified track forward. For instance, if you have a folder with ten tracks and select Track
3, clicking on the Play button will play tracks 3 through 10.
Creating Music Playlists using 3rd Party Software
Use your favorite music software on your PC to create music playlists. A playlist allows you to specify exactly what tracks to play
and in what order to play them. For example, create a “favorites” playlist and just listen to your favorite tracks.
The DSM-510 will play tracks from playlists you create on your computer. The media player supports playlists in three standard
formats:
• m3u Playlist File
• pls Playlist File
• wpl Playlist File
Software for playing music on your PC can be used to create playlists. WinAmp™ and Microsoft Windows® Media Player™ are two
examples.
60D-Link DSM-510 User Manual
Section 4 - Operation
Playing a Playlist
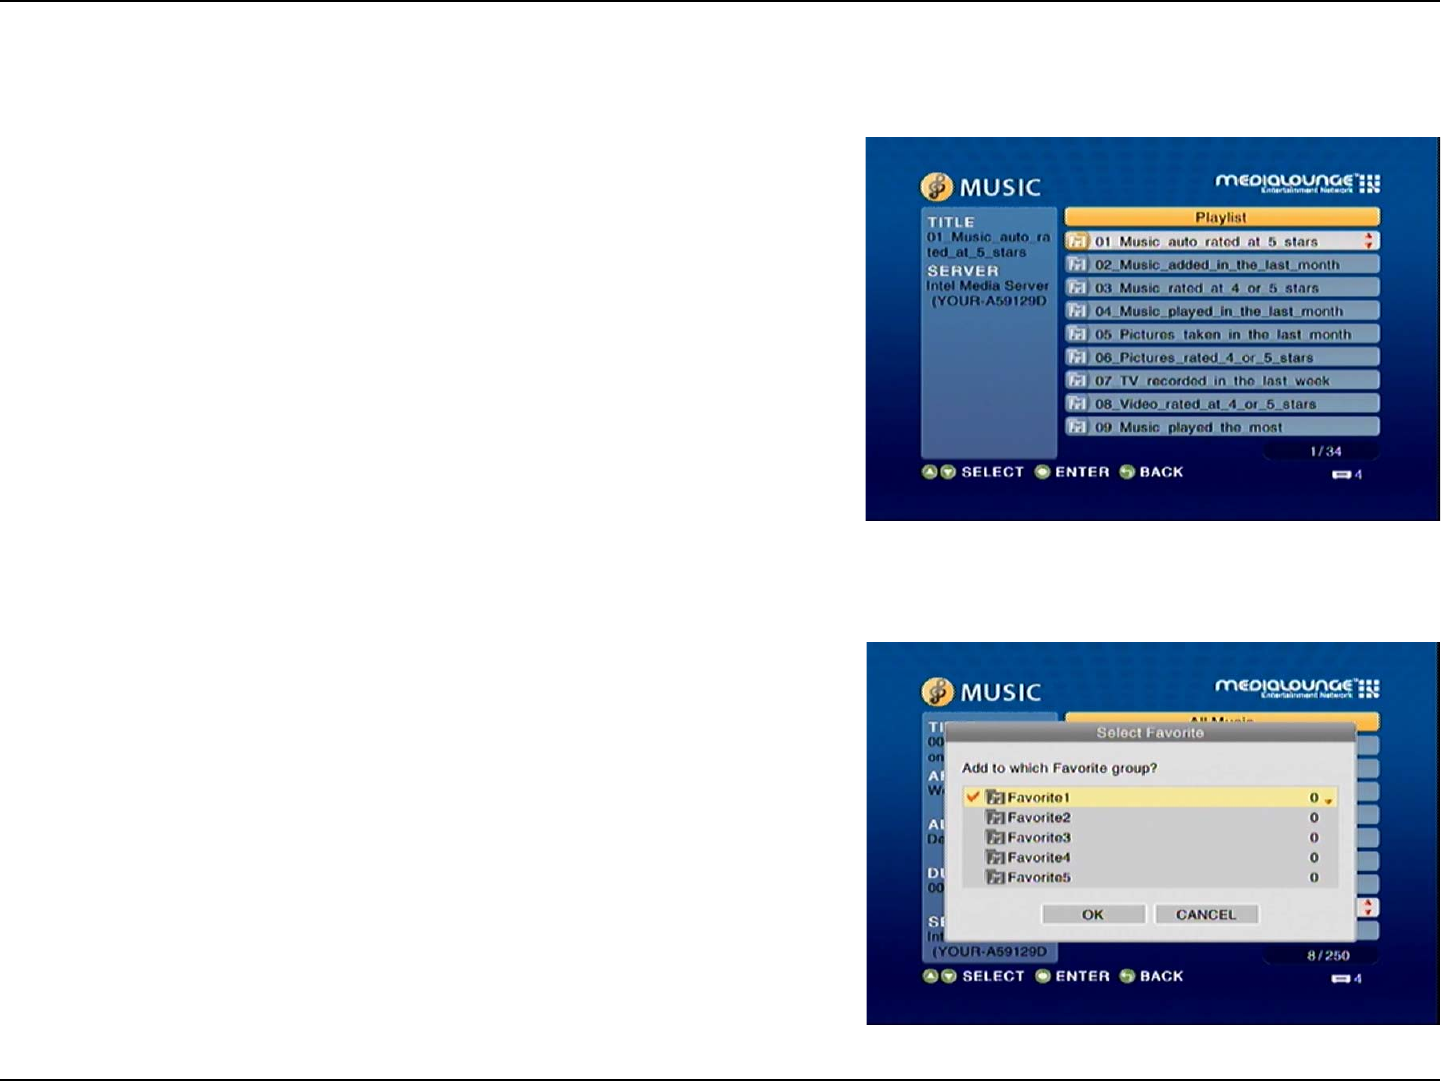
To play all the tracks in a playlist, select the playlist name and press the Play button. All tracks will be played in the playlist.
Adding Favorites
Click the MENU button on your remote control and you should see the Add Favorite option. Highlight the Add Favorite option and
press ENTER (see the following image).
Select the Favories folder you want to add this Playlist, Genre, Artist, Album,
or Folder to and click OK.

61D-Link DSM-510 User Manual
Section 4 - Operation
Browsing for Music
There are many ways to browse for a music track. For example, let’s use the following music file located in the following shared
location:
c:\Documents and Settings\Administrator\My Documents\My Music\Beethoven\Ode to joy.mp3
Track: Ode to joy.mp3
Artist: Ludwig van Beethoven
Album: Beethoven
Genre: Classical
To browse for this track in the track list:
1. Select All Music
2. Highlight Ode to joy
To browse by artist:
1. Select Artist
2. Select Ludwig van Beethoven
3. Select Beethoven
4. Highlight Ode to joy
To browse by album:
1. Select Album
2. Select Beethoven
3. Highlight Ode to joy
To browse by genre:
1. Select Genre
2. Select Classical
3. Select Ludwig van Beethoven
4. Select Beethoven
5. Highlight Ode to joy
To browse by folder:
1. Select Folders
2. Select My Music
3. Select Beethoven
4. Select Ode to joy

62D-Link DSM-510 User Manual
Section 4 - Operation
Controlling Music Playback
Your DSM-510 works just like a stereo or CD player. Controlling your music playback will be an easy and natural experience. Use the
remote to Play, Pause, or Stop music. You can also use your remote control to Fast Forward or Fast Reverse the track. Press the
Previous and Next buttons to skip to the previous or next track.
Repeat
You can turn on the repeat function to continuously play individual tracks, playlists, or groups of tracks within a folder.
To repeat a track or a group of tracks, press REPEAT on the remote control. When the the Repeat icon appears in the lower right
hand corner , than you are in the repeat current group of tracks mode. Press REPEAT for the second time and the Repeat One
icon will appear in the lower right hand corner , this will repeat the track that is currently playing.
Shuffle
When you are playing a group of tracks, you can randomize the play order by pressing the SHUFFLE button on the remote control.
You will see the shuffle icon in the lower right hand corner light up .
63D-Link DSM-510 User Manual
Section 4 - Operation
Time Search
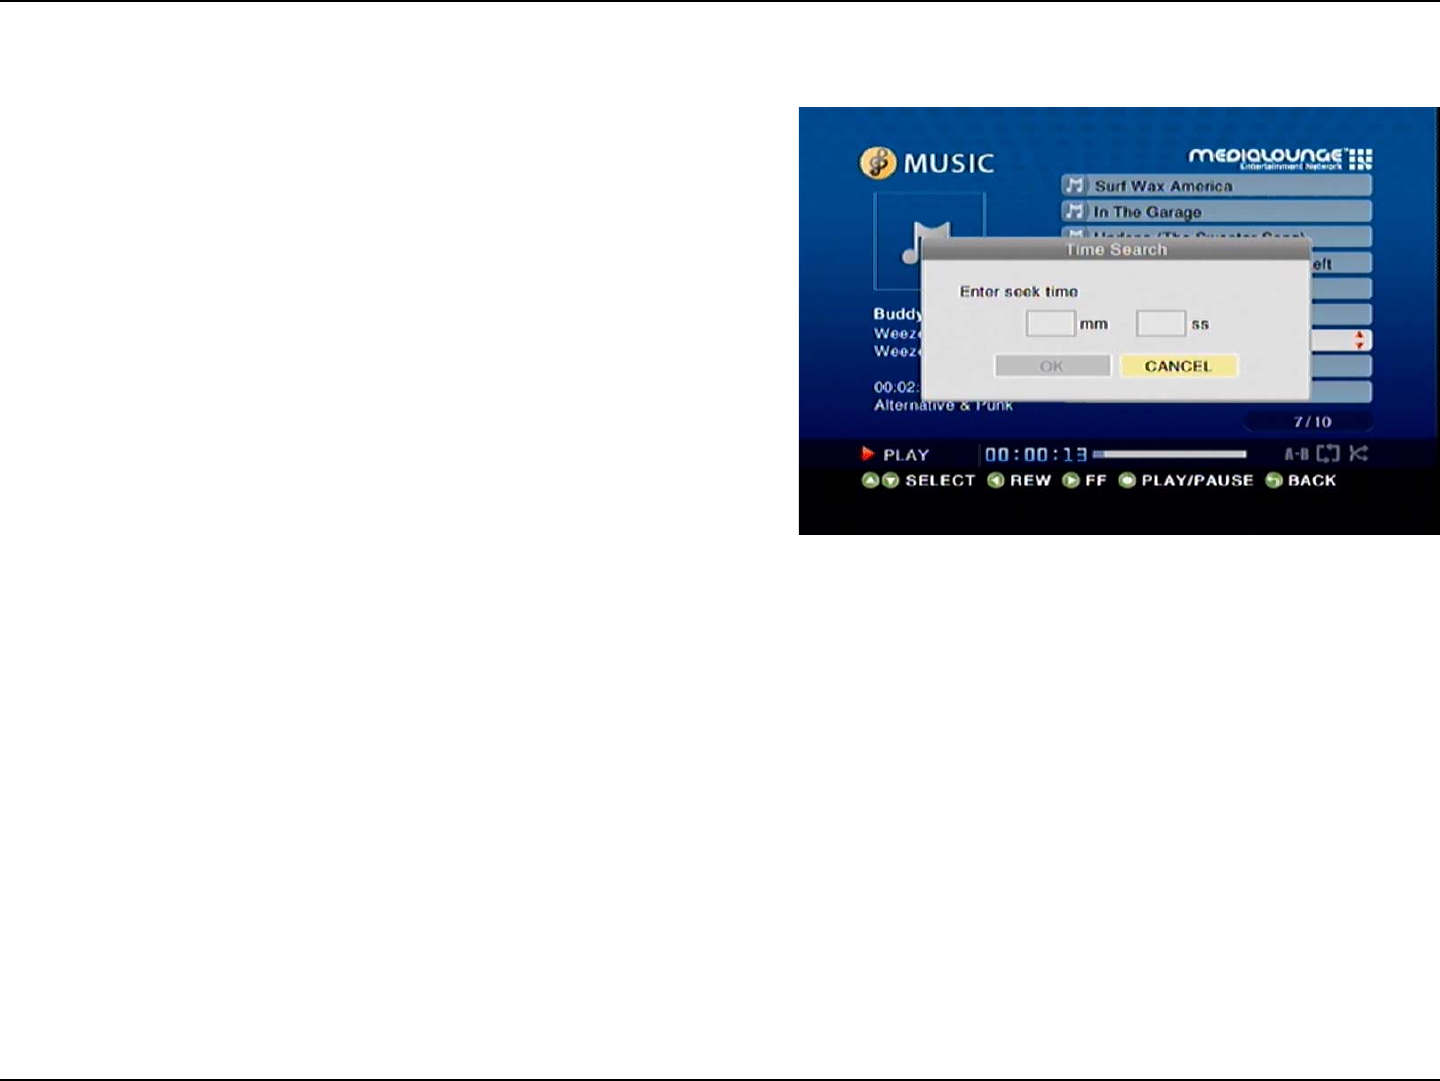
You can search to a specific time in a music file by using the Time Search
function. While your music is playing, click the MENU button on your
remote control. Navigate to the Time Search option and press ENTER
(see the following image). Using your remote control, enter the minutes
and seconds you want the player to start from, and click OK.
Note: The Time Search function may not be supported outside the Intel®
Viiv™ Server.
64D-Link DSM-510 User Manual
Section 4 - Operation
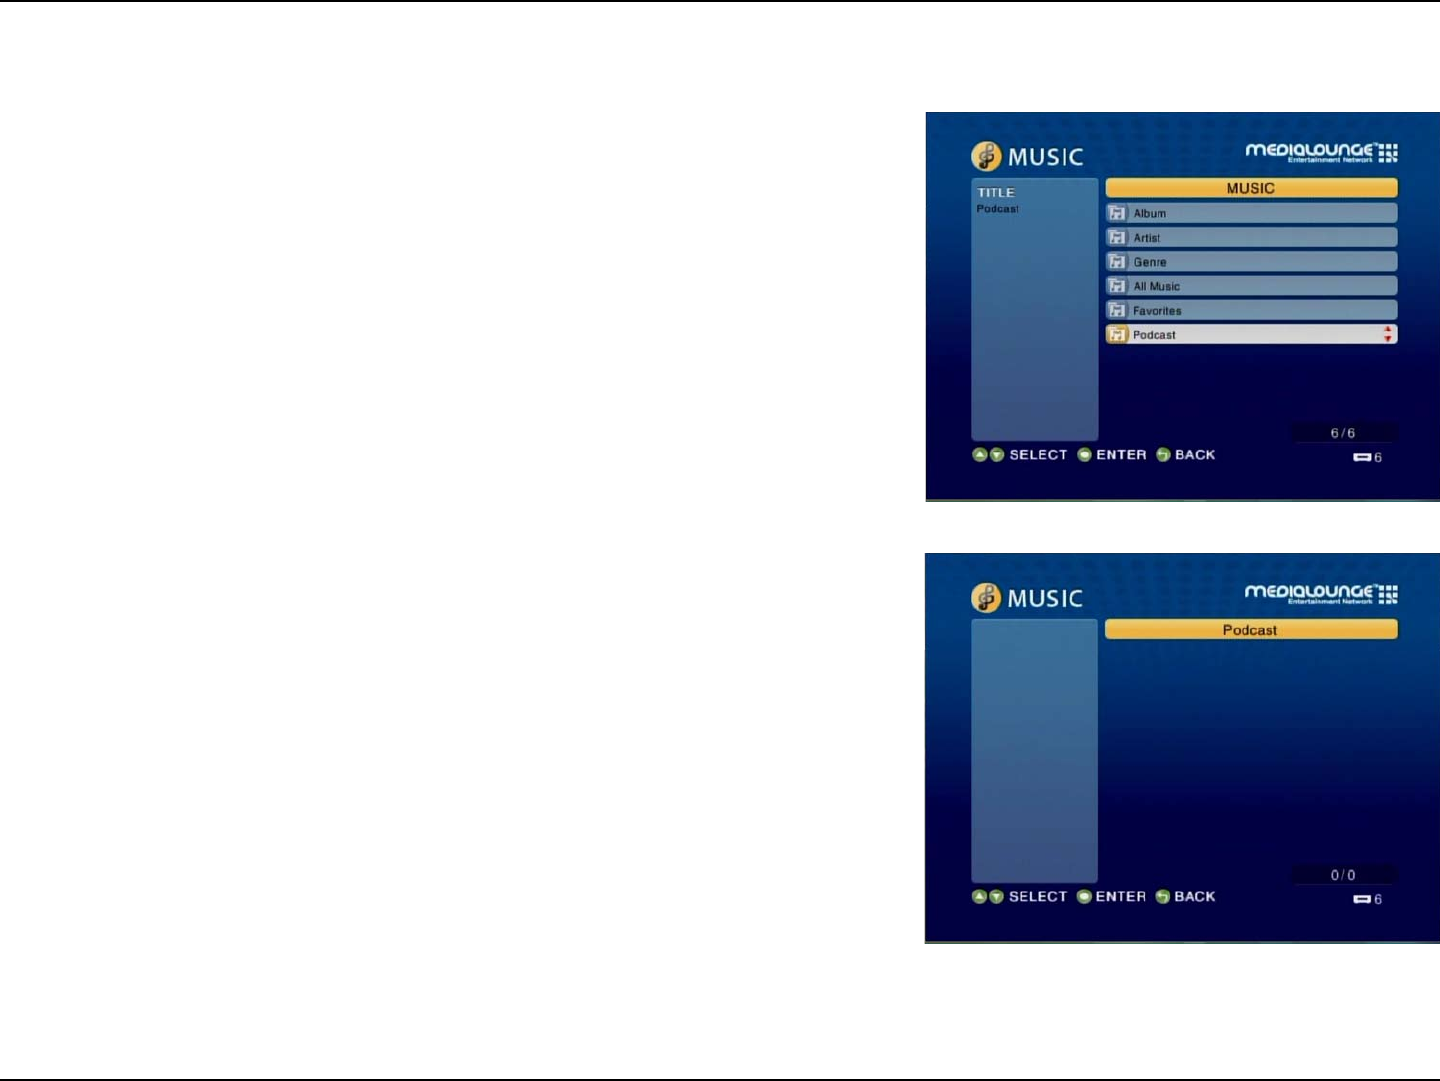
Podcasts
After selecting the Music option from the DSM-510 main menu, a new menu will
appear. Locate and select the Podcast option.
To add or import a podcast stream, use your remote control and select the MENU
button.
65D-Link DSM-510 User Manual
Section 4 - Operation
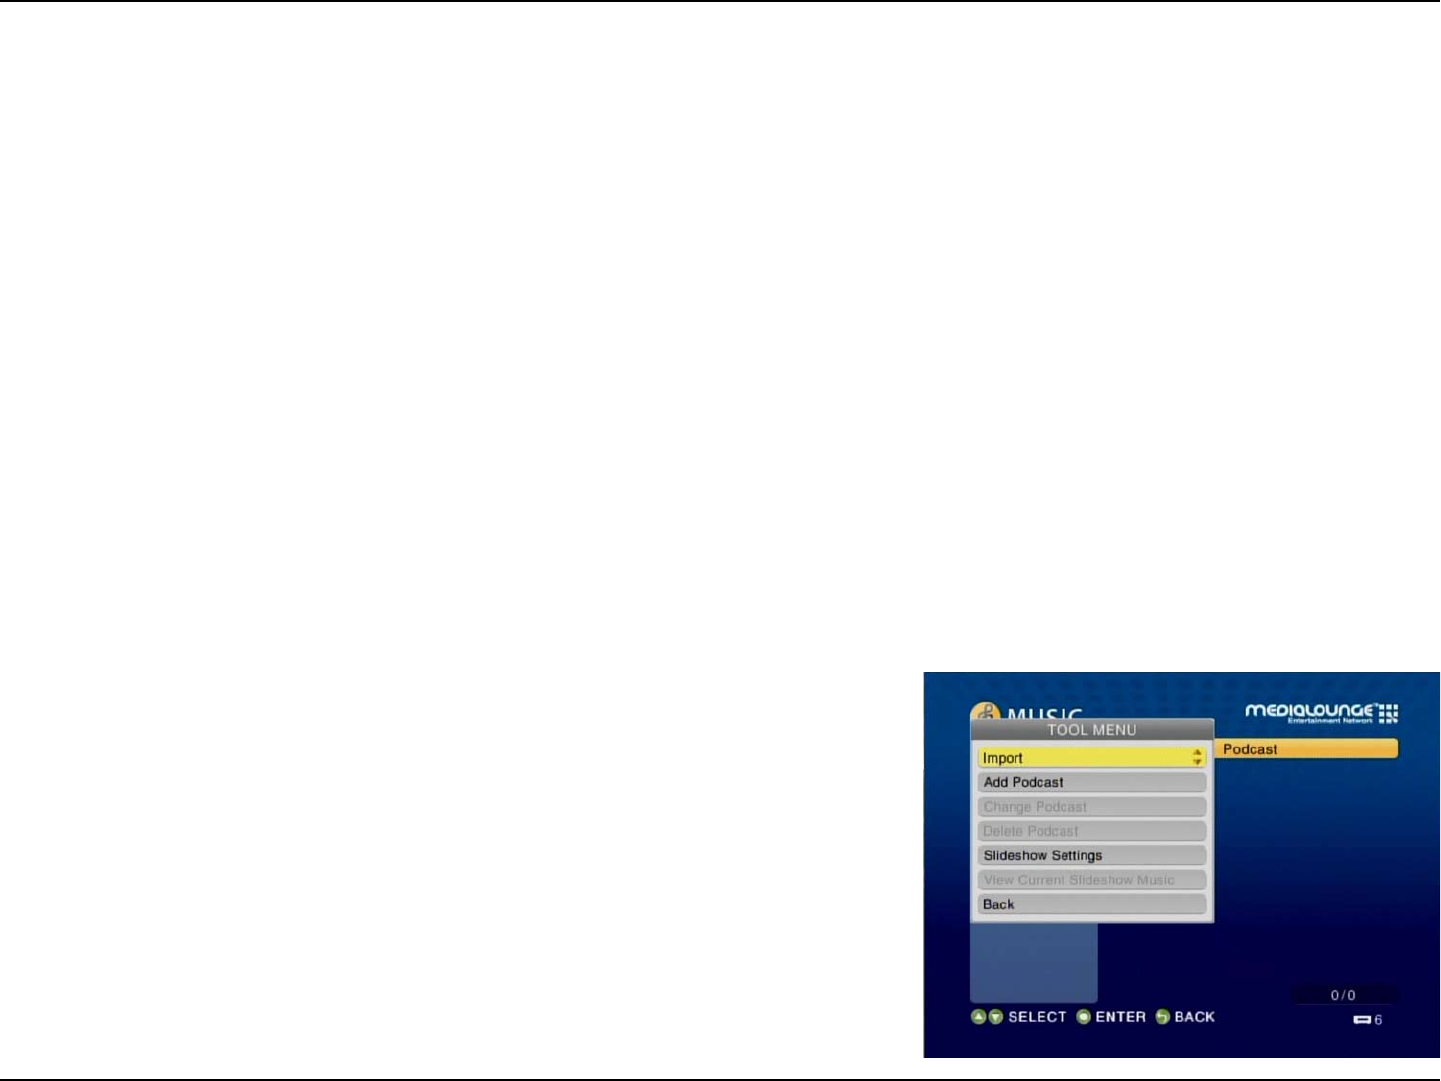
You should see a menu that appears over the podcast section.
(1) To import your Podcasts you will need a USB thumb drive. You can either export your podcasts from iTunes software or create
your own list in notepad on your pc. If you are manually creating your list please use the following format.
<?xml version=”1.0” encoding=”UTF-8”?>
<opml version=”1.0”>
<head>
</head>
<body>
<outline type=”rss” xmlUrl=” http://www.dlinktv.com/podcast” />
<outline type=”rss” xmlUrl=” http://www.yourpodcasthere/url” />
</body>
</opml>
(2) Once you have added your URL’s to the notepad document, save the file as Podcasts.opml.
Note: Make sure that the save as type is set to All Files, and then click Save.
(3) Next, copy your Podcasts.opml document to your USB thumb drive. Insert your
USB thumb drive into the front panel of the DSM-510.
(4) Next, go to Music > Podcasts. Select MENU on your remote control, locate the
Import option and press ENTER on your remote control..
(5) The DSM-510 will now search your USB drive for the Podcasts.opml file and
save the links into your device.
(6) Once the links have been loaded you may remove your USB thumb drive and
access your Podcast stations.
Importing Podcasts
66D-Link DSM-510 User Manual
Section 4 - Operation
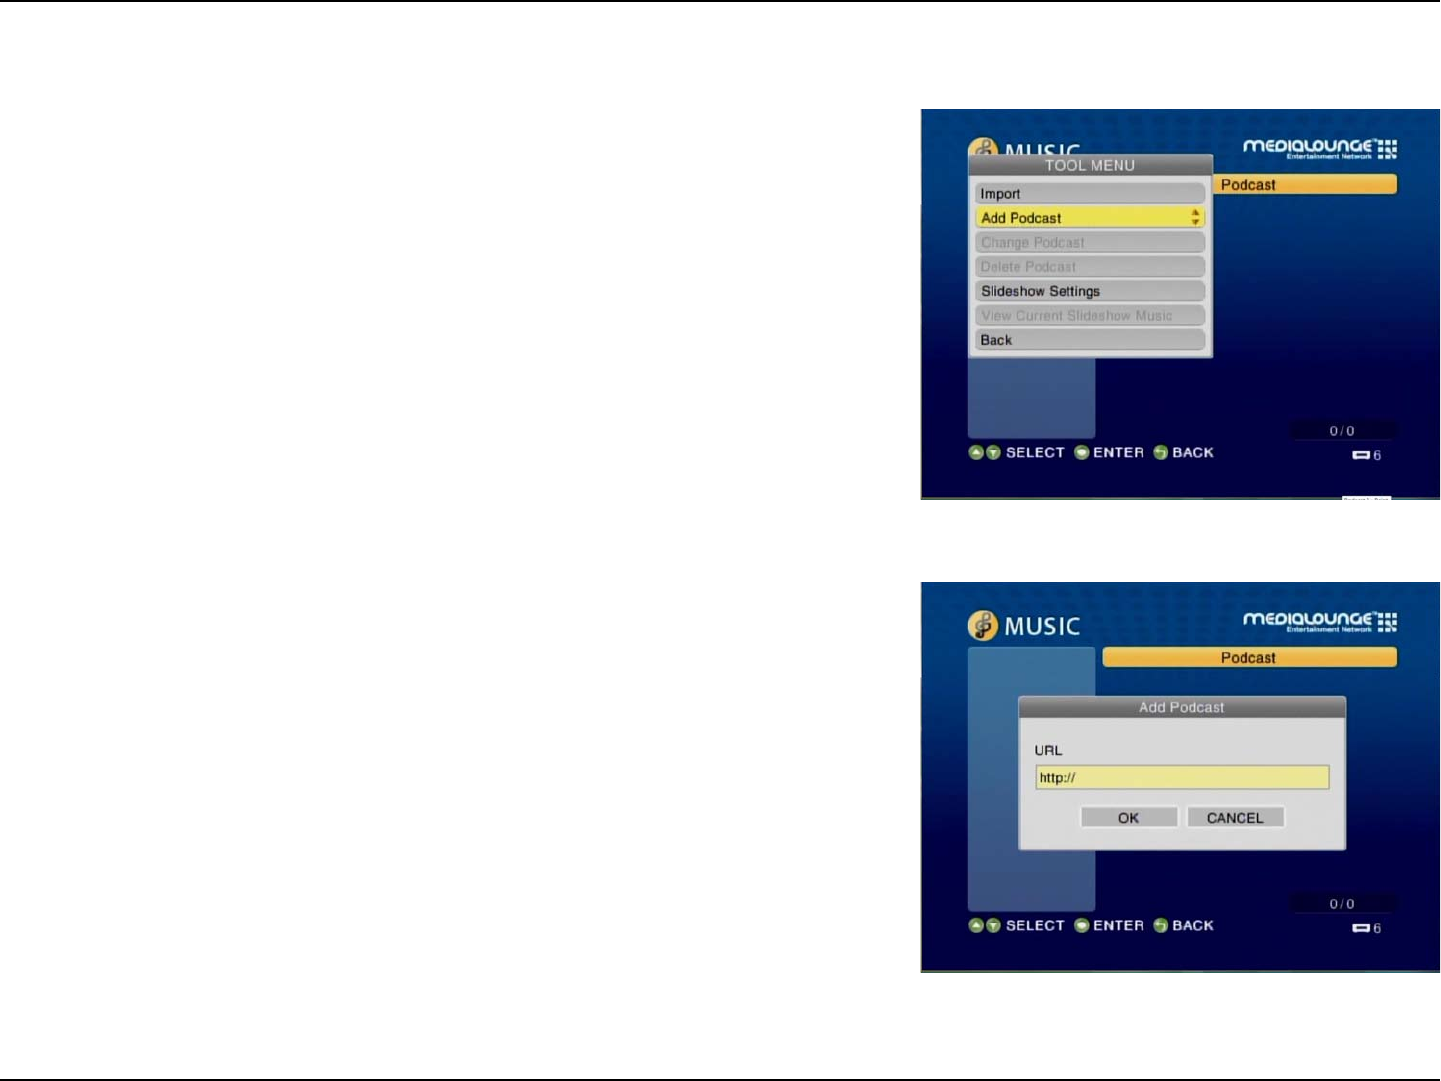
Using your remote control, toggle down to the option Add Podcast and select the
remote’s ENTER button.
On the following screen, enter the URL of the podcast stream by accessing the
on-screen keyboard option.
Adding Podcasts
67D-Link DSM-510 User Manual
Section 4 - Operation
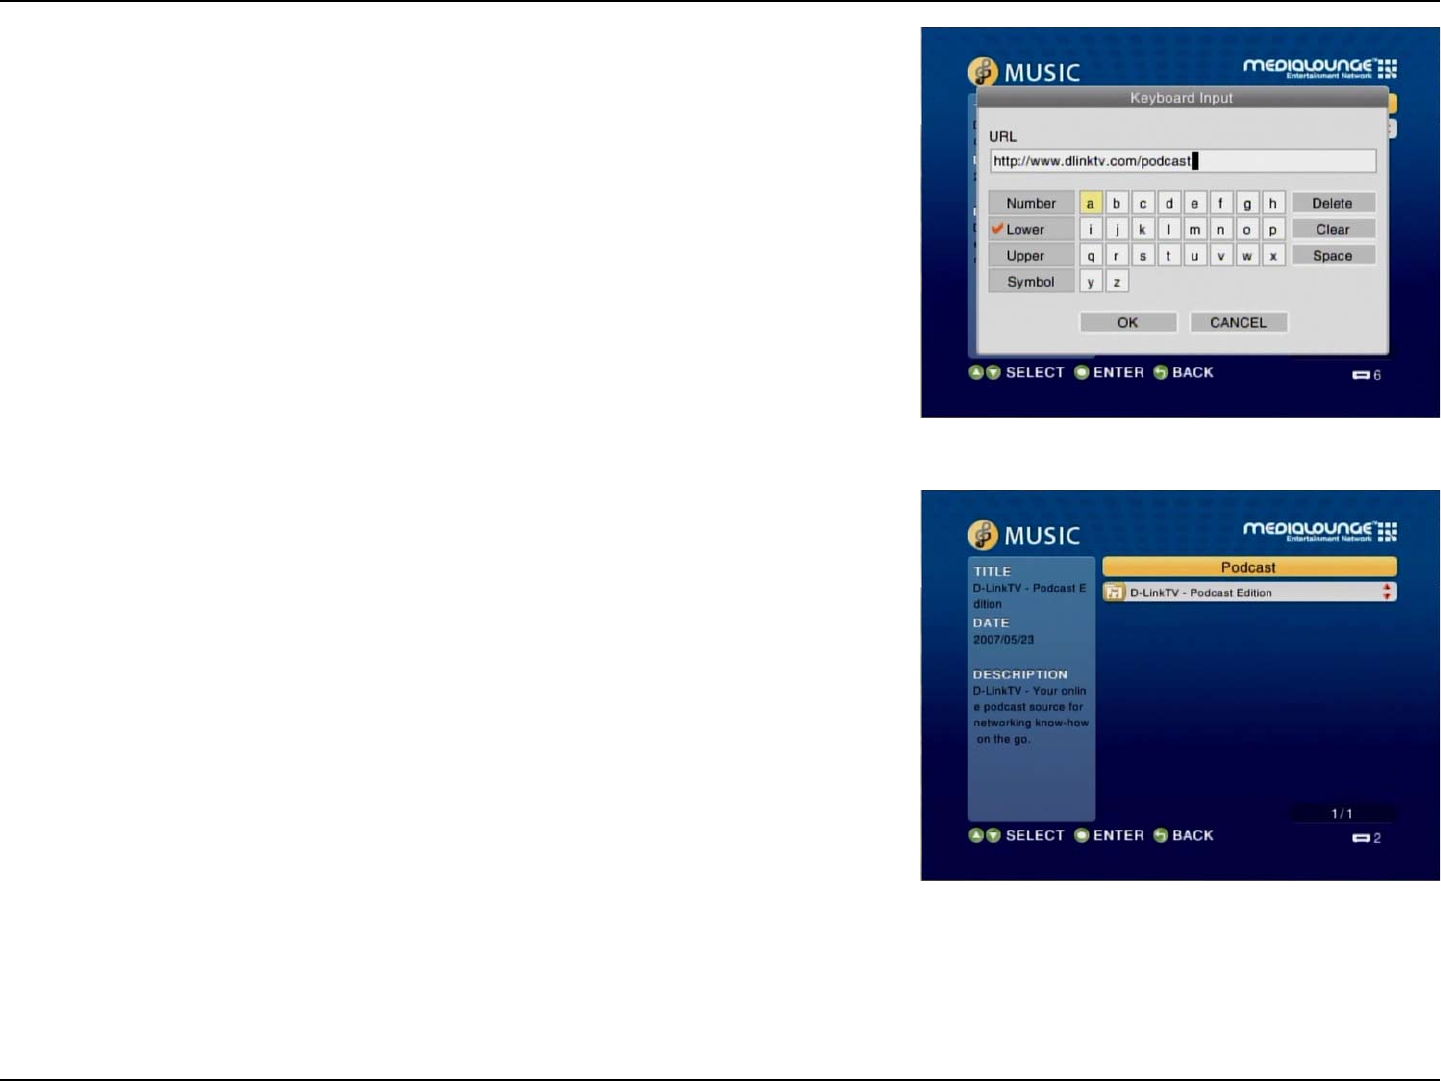
Using your remote control, toggle to the appropriate letter and press ENTER. After
you’ve completed entering the URL, click OK.
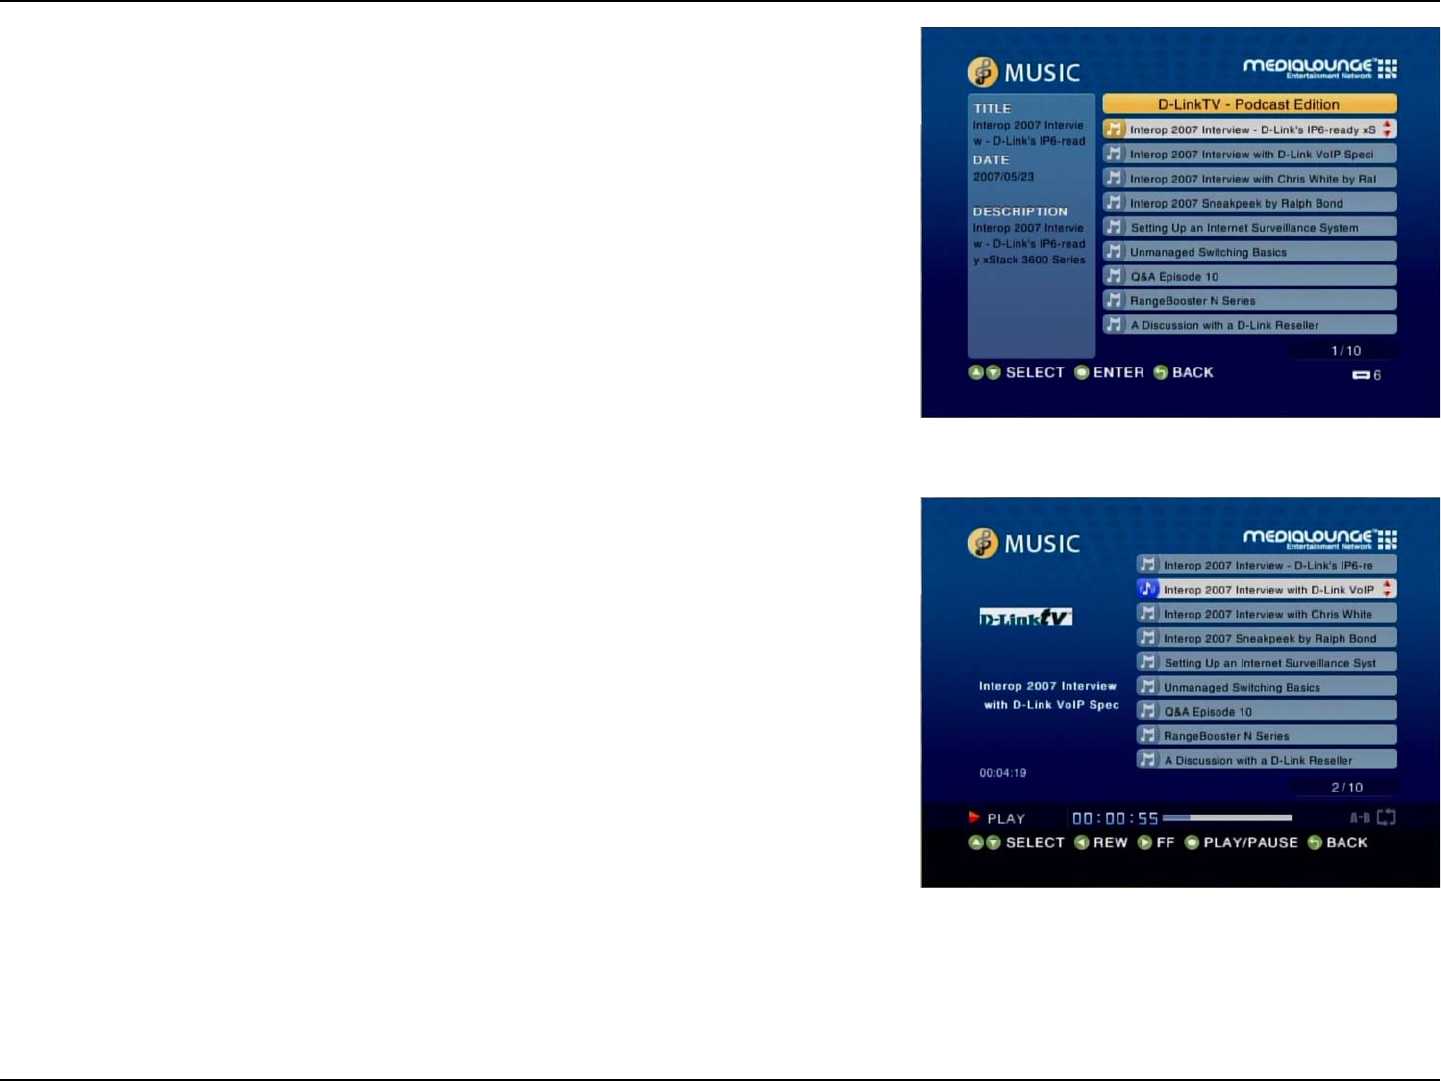
The podcast stream should now appear on the podcast main menu screen. Select
your stream by clicking the remote’s ENTER button.
68D-Link DSM-510 User Manual
Section 4 - Operation
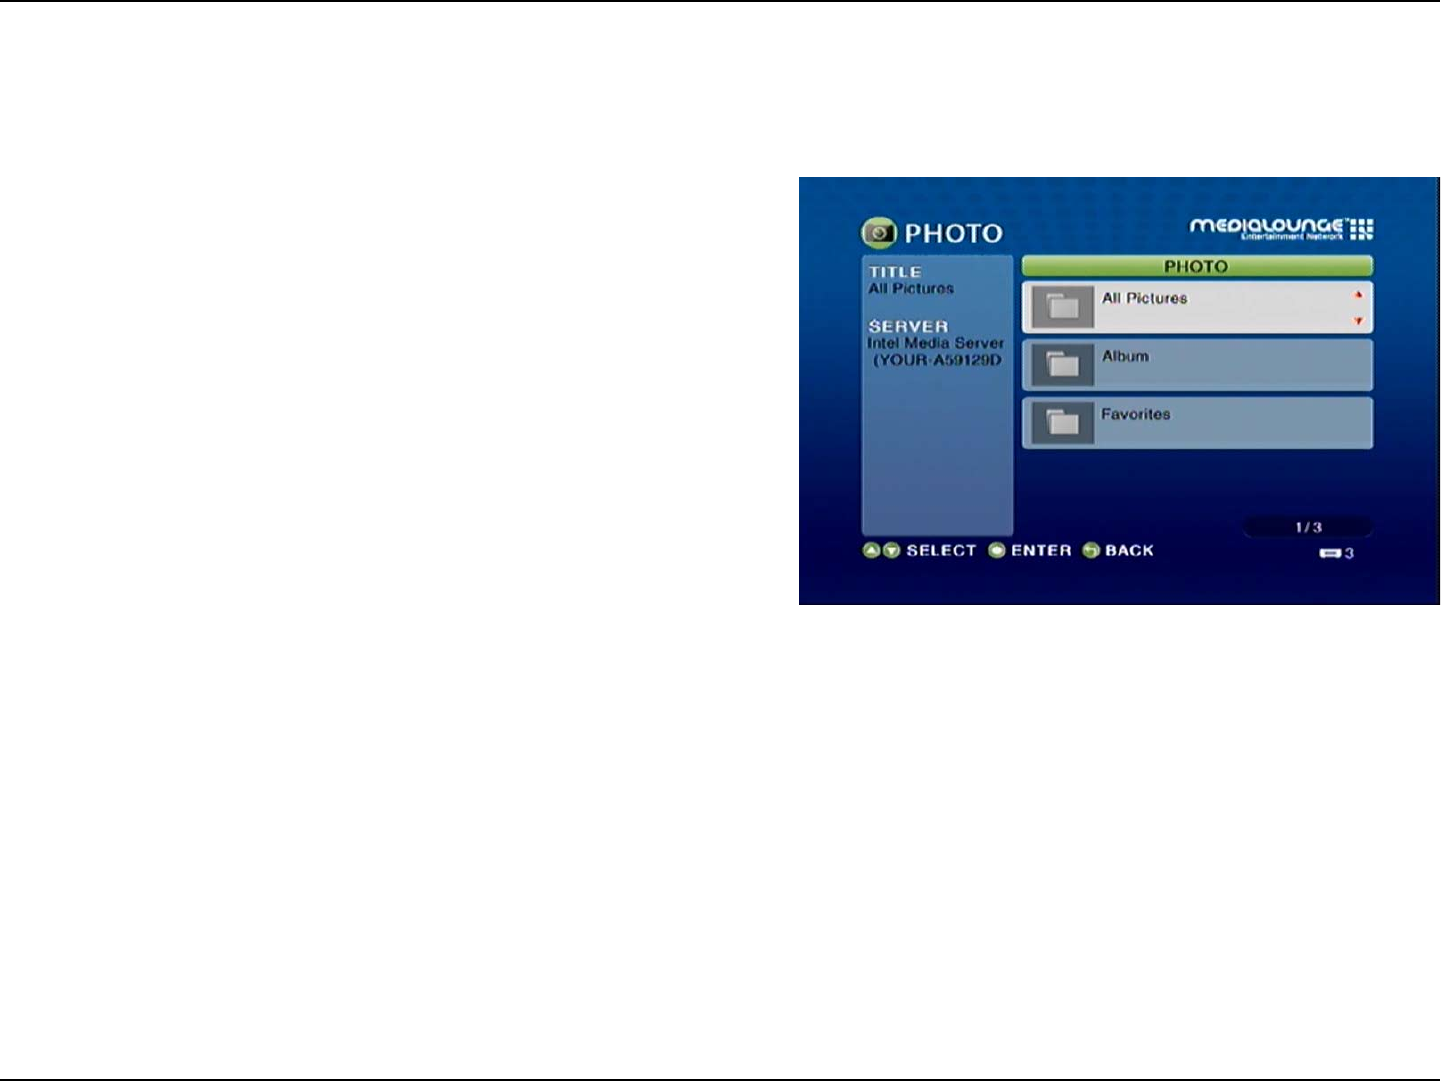
The following screen will showcase all available streams. Use your remote control
to toggle and select your option.
After a selection has been made, the file will play.
69D-Link DSM-510 User Manual
Section 4 - Operation
Supported Photo Formats
The following photo file formats are supported:
• BMP (non-compressed)
Windows bitmap file. Widely used in Microsoft
Windows for pictures and backgrounds.
• JPEG (grayscale, RGB, YCbCy)
(Does not support CMYK, YCCK.)
The JPEG format is the Internet and digital photo
format standard used by most digital cameras.
• GIF
(Animated GIF’s are not supported)
Older format still widely available on the internet
for photos, web pages, and clip art.
• PNG (Non-alpha channel only)
Portable Network Graphics standard created in
response to limitations in the GIF file format.
• TIFF (RGB)
(Does not support CMYK, YMC, YMCK, KCMY)
Tagged Image File Format is a raster file format.
Photo
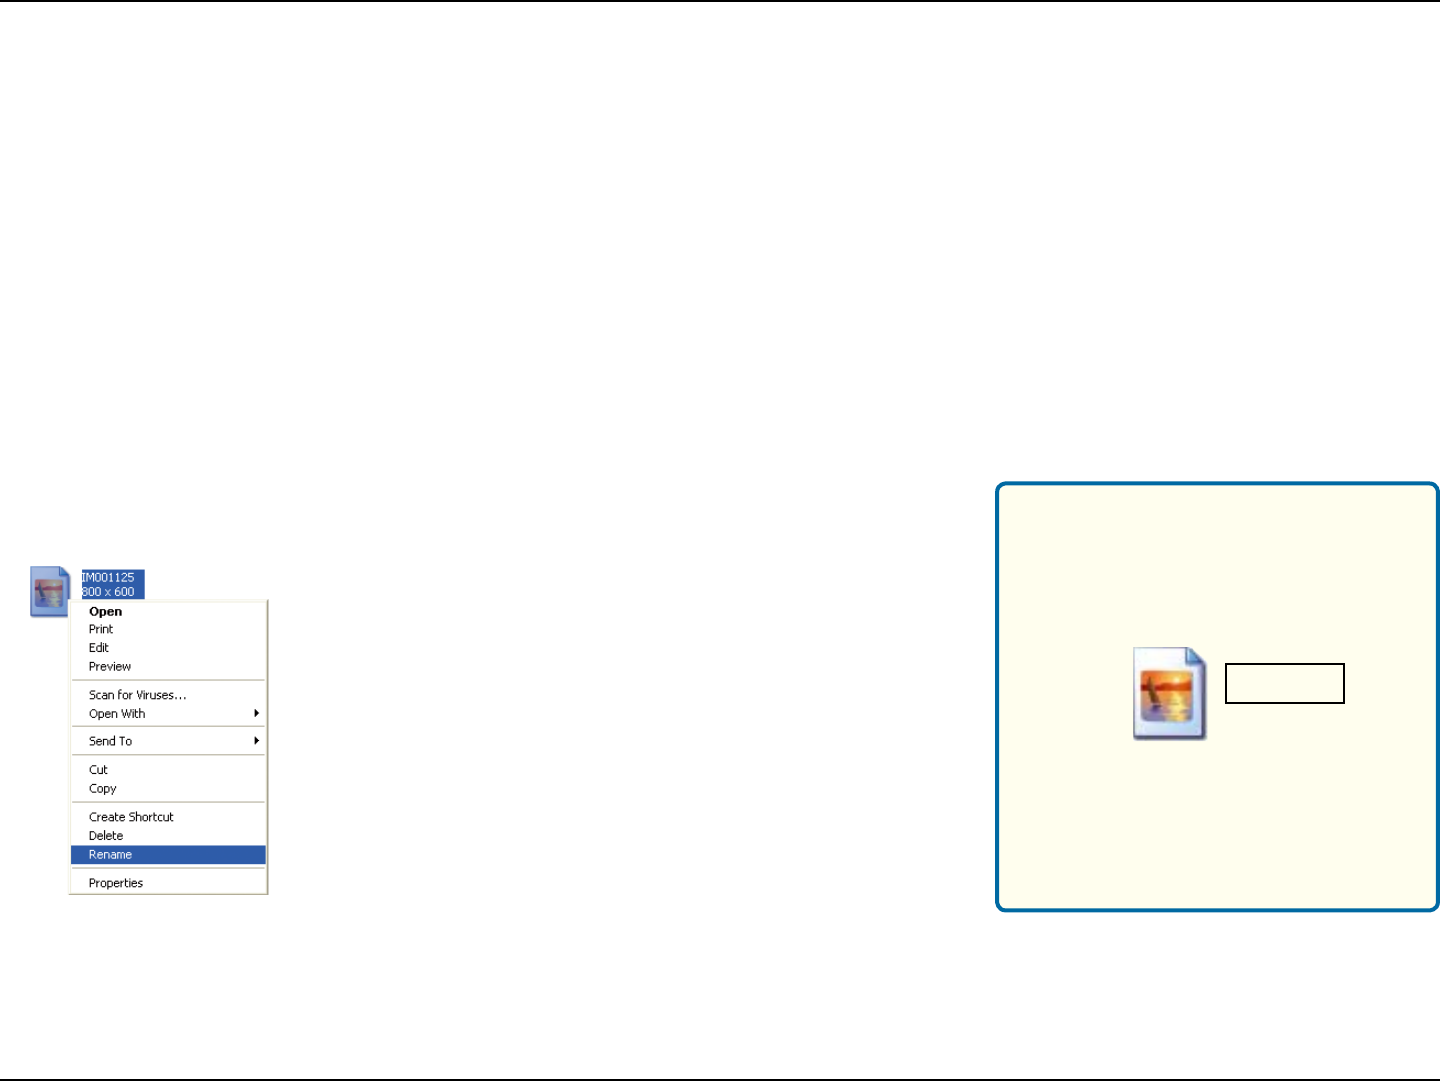
Select the PHOTO category from the Home page or click the PHOTO button on the remote control. Select a category, by using the
down arrow and up arrow on the remote control to navigate (choose between All Pictures, Album, or Favorites). Select your category
by clicking ENTER. After the appropriate picture is highlighted, press ENTER, or Play to start a slideshow, on the remote control.
The Page Up and Page Down buttons can be used to navigate through the picture list one page at a time.
70D-Link DSM-510 User Manual
Section 4 - Operation
Organizing Photo Albums
Unlike music files, photos contain little information about their content. Therefore, photos are organized by their filename and by the
folder they are in. Many digital cameras will organize your photos into folders when you connect and unload them to your PC. Each
time you dock or connect, a new folder is created using the current date and time, and all photos are copied into that folder.
To simplify browsing on your DSM-510, you can create folders on your PC. For instance, create a folder in the My Pictures directory
called Vacation and copy all of your vacation photos into it. Your DSM-510 will show the Vacation folder. To play a slideshow of the
folder, highlight it and press the Play button. To view a list of photos in the folder, highlight it and press the right arrow button.
You can give your photos meaningful names by renaming the files on the PC. Most digital cameras number photos sequentially.
For example, rename the photo IM001125.jpg to sunset.jpg on your PC. The photo will be displayed as sunset.jpg on your DSM-
510*.
You can create as many folders as you need. Create a folder for the year, then create folders inside for each of the months, and then
folders in each month for special occasions (birthday, vacation, holidays, etc...).
*Folder creation and renaming files must be done on the PC via standard Windows® procedures.
If the file extension does not appear as part of the
name displayed when you select rename, then it
is not necessary to enter the file extension (.jpg)
at the end of the filename. To rename IM001125.
jpg to sunset.jpg, type in sunset and hit Enter on
your computer’s keyboard.
Right-click on the file and select Rename.
If the file extension appears as part of the name
when you select rename, then be sure to include
the extension when renaming the file. To rename
IM001125.jpg to sunset.jpg, type in sunset.jpg
and hit Enter on your computer’s keyboard.
sunset