D Link DSM510A3 HIGH-DEFINITION MEDIA PLAYER User Manual Manual Part 3
D Link Corporation HIGH-DEFINITION MEDIA PLAYER Manual Part 3
D Link >
Contents
- 1. Manual Part 1
- 2. Manual Part 2
- 3. Manual Part 3
Manual Part 3

71D-Link DSM-510 User Manual
Section 4 - Operation
Playing a Photo Slideshow
To start playing a photo slideshow, select a folder and press Play to start your slideshow. The first photo will be displayed, followed
by the next photo in the folder, and so on. All the photos in the folder will display.
Playing a Photo Slideshow with Music
To start playing a photo slideshow accompanied by music, start by selecting a music track in a folder and press the Play button. Next,
press the BACK button on the remote control to exit the music playing screen and return to the list of music tracks. You can also
press the PHOTO button and select the folder that has the photos to be displayed. Select the first photo to be viewed and press the
Play button to start your slideshow. All the photos in the folder will display. Before you begin the slideshow, or after it ends, press
the MUSIC button to return to the list of music tracks.
You can also play music from your favorite list by pressing the menu key during a photo slideshow and selecting the favorite group
with your music.
If you wish to retun to the music you were playing before starting the slideshow, press the BACK button on the remote control to
leave the photo slideshow. Then press the MENU key on the remote control and select View Current Slideshow Music.
Controlling Photo Playback
Controlling photo playback is very similar to controlling a CD player. Once you have started a photo slideshow, use the remote to
Play, Pause, or Stop the show. Press the Previous and Next buttons to skip to the previous or next photo.
Repeat
You can turn on the repeat function to repeat all of the photos in a slideshow.
To repeat a slideshow, press REPEAT on the remote control. When the the Repeat icon appears in the lower right hand corner ,
than you are in the repeat current slideshow mode.
Shuffle
During slideshow playback you can shuffle the order by pressing the SHUFFLE button on the remote control.
72D-Link DSM-510 User Manual
Section 4 - Operation
Supported Video Formats
The following video file formats are supported:
• MPEG-1 (Resolution up to 480p)
• MPEG-2 (Resolution up to 1080i)
• MPEG-4 (ASP - Advanced Simple Profile)
• AVI (MPEG4 layer only, does not support uncompressed AVI, Resolution up to 1080i)
• XVID (with MP3 and PCM)
• WMV9 (Resolution up to 720p)
• DVR-MS (Recorded TV files from Microsoft Windows® Media Center Edition)
Viewing a Video
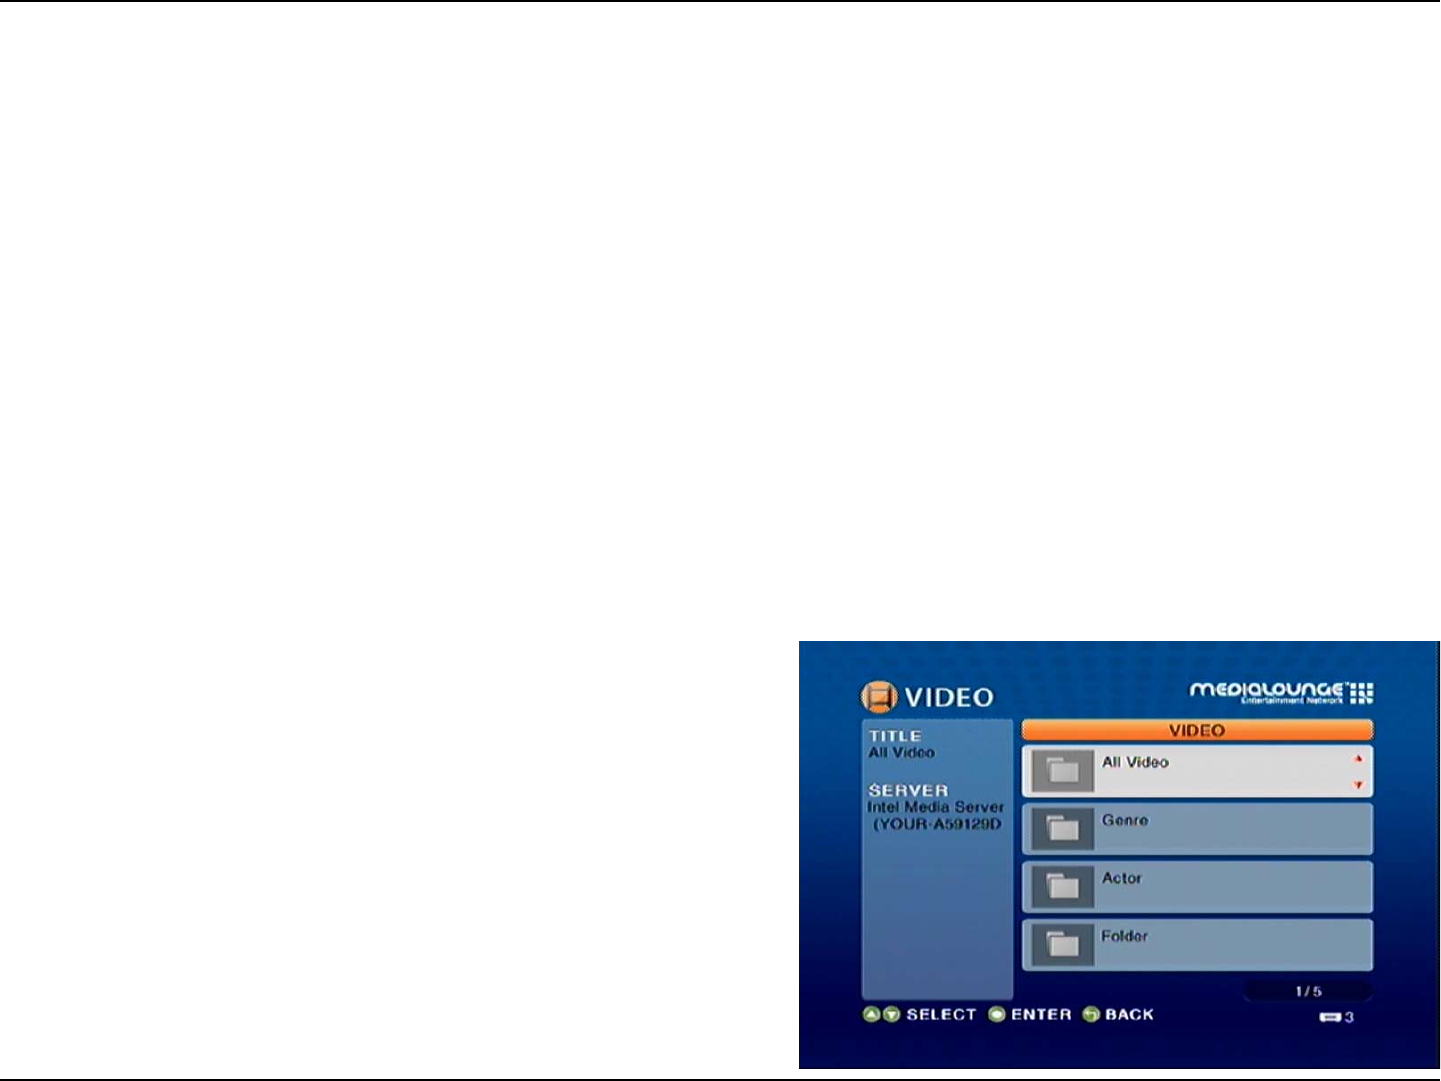
Once you enter the VIDEO menu, you can view your list of videos.
Use the selection arrows to navigate to the video folder you wish to view
(choose from All Video, Genre, Actor, Folder, or Favorites). Highlight the
video folder and press ENTER.
After you have selected a video folder, scroll down and highlight the video
you wish to view and press ENTER. The Page Up and Page Down buttons
can be used to navigate through the picture list one page at a time.
Video

73D-Link DSM-510 User Manual
Section 4 - Operation
DivX® is a video technology that compresses video. When streaming video to devices like the DSM-510 it is important to use smaller
bandwidth files in order to eliminate interrupted video transmission. Using DivX® to compress your videos allows you to save them
and send them much more efficiently.
The DSM-510 is a DivX® Home Theater Certified device. Being certified by DivX® guarantees that the DSM-510 can playback DivX®
video files.
Playing a DivX® file
Playing a DivX® file on the D-Link DSM-510 is just like playing any other video file. Once you have placed the video file in your shared
directory you will be able to view it by following the instructions listed on Pg. 72.
To create DivX® video files using the DivX® converter you can simply drag your pre-existing video files onto the DivX® converter
software, select the video type by click the left or right arrow on the application and then click the convert button.
Playing DivX® VOD content
In order to play back DivX® Video On Demand content with your DSM-510 you must first install the DivX® player software on your
PC and register an account. Once you have installed the DivX® player software (either through the included Autorun CD or from
http://www.divx.com) you may register an account by doing the following.
Step 1. Open DivX® Player.
Step 2. Select Tools > Device Management
Step 3. If you have not registered for an account you will be prompted to register. Please enter in the required information to
create your account.
DivX®

74D-Link DSM-510 User Manual
Section 4 - Operation
Step 4. Login to your DivX® account.
Step 5. Click the register device button at the bottom.
Step 6. Select D-Link from the brand list and then click Next.
Step 7. Click the next button after entering your DivX® VOD code and a friendly device name.
Step 8. Your DivX® player will now begin downloading the Activate video file. This needs to be played on your DSM-510
in order to complete the activation process.
Step 9. Once the download is complete, rename the file from friendlydevicename.divx to friendlydevicename.avi.
Step 10. Share this device from your media server and play it on your DSM-510 to finalize activation.
How to display my DiVX Registration Code
Step 1. Press the setup key on the remote control.
Step 2. Select DivX® VOD Reigstration Code from the device menu.
Step 3. Write down the Registration code provided, and when prompted by the DivX® Player enter the code for your devices
activation code.
Note: Pressing the SHIFT button on your DSM-510 remote control allows you to switch in between different DivX® subtitles. Pressing
the L/R button on your DSM-510 remote control allows you to switch in between different DivX® audio languages.
75D-Link DSM-510 User Manual
Section 4 - Operation
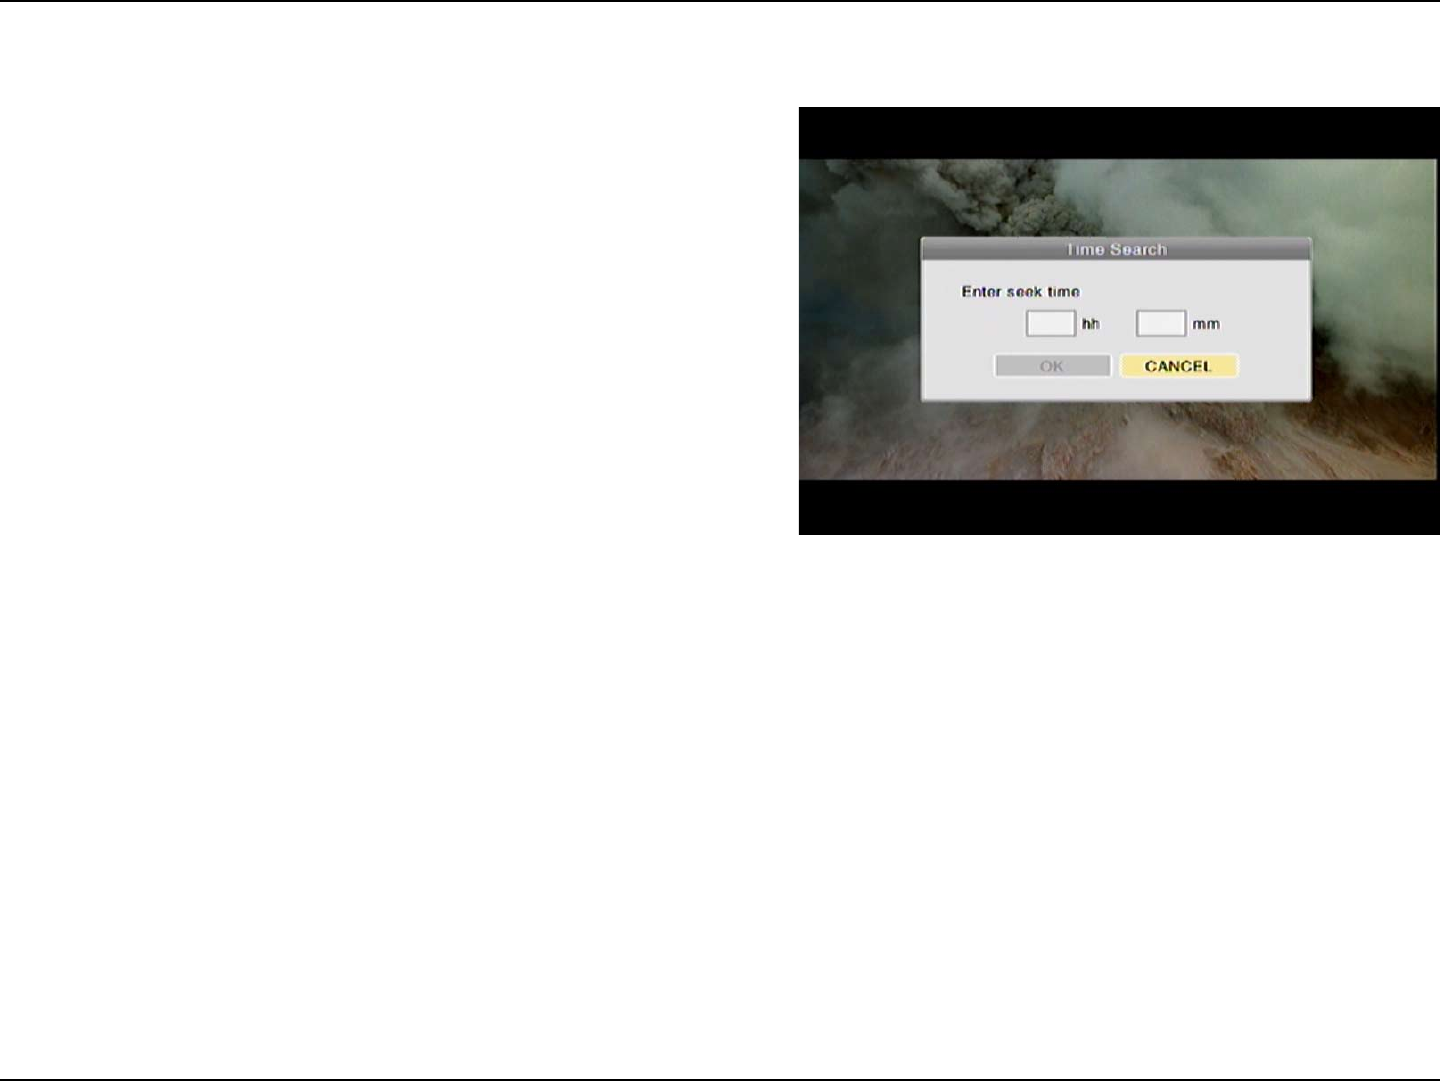
You can search to a specific time in a video file by using the Time Search
function. While your video is playing, click the MENU button on your
remote control. Navigate to the Time Search option and press ENTER
(see the following image). Using your remote control, enter the minutes
and seconds you want the player to start from, and click OK.
Note: The Time Search function may not be supported outside the Intel®
Viiv™ Server.
Time Search
76D-Link DSM-510 User Manual
Section 4 - Operation
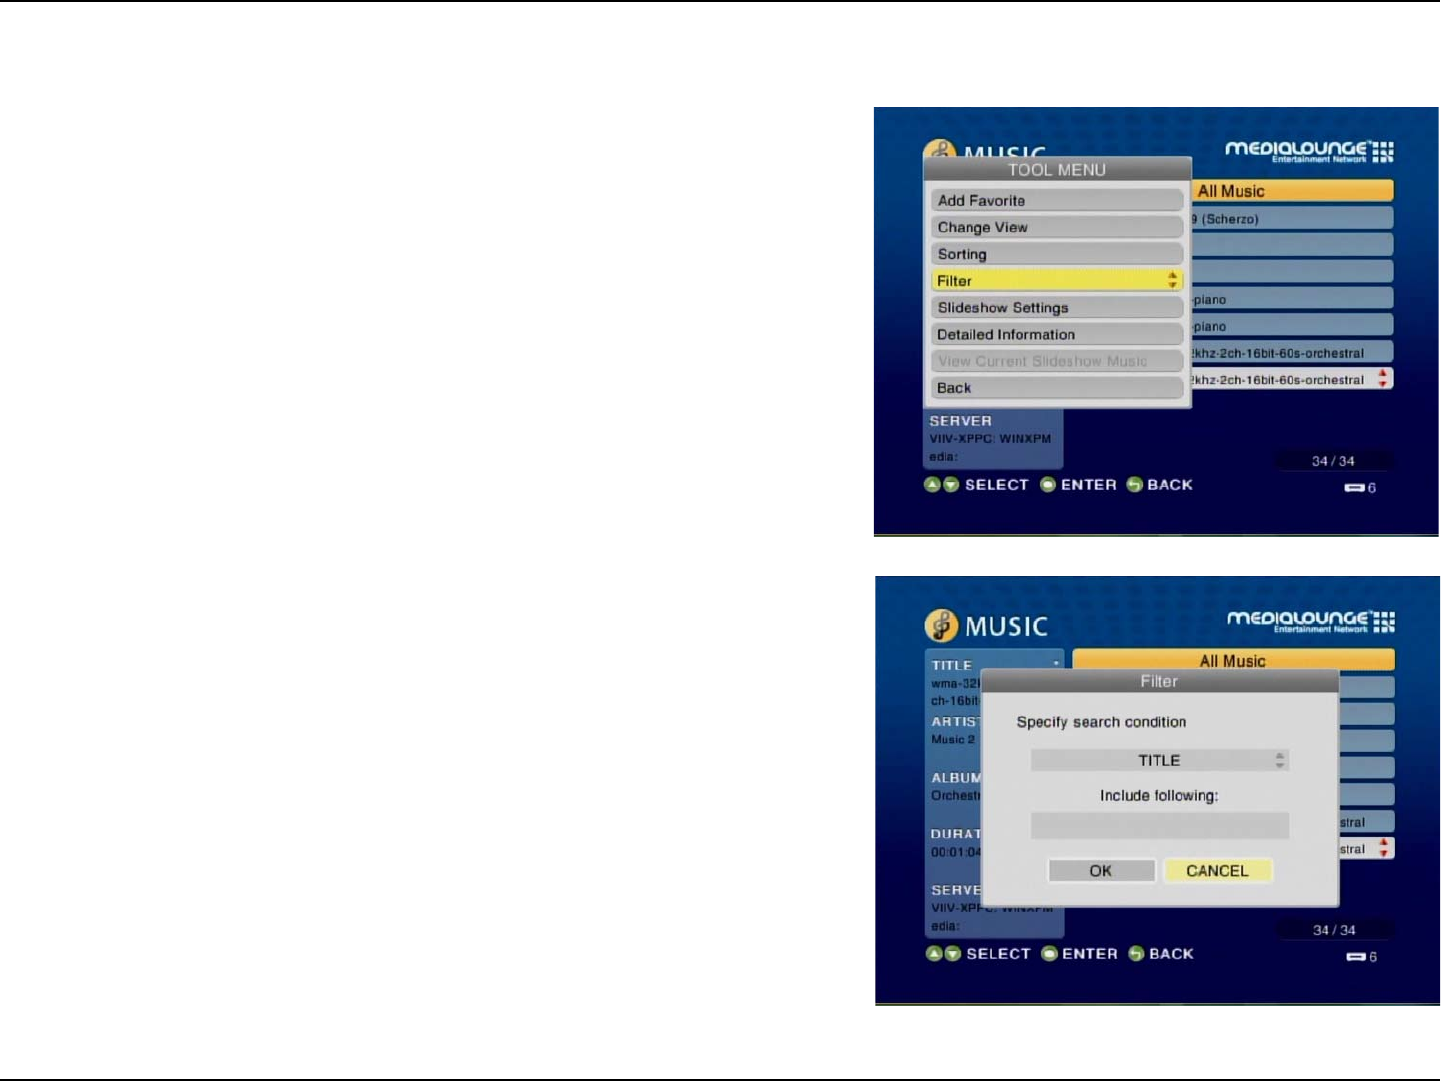
When browsing the menus of music, photos, and videos, you can press the
MENU button on the remote control and select the filter option. You may also
press the SEARCH button on your remote control to bring up the filter menu.
Select the Filter option and press ENTER on your remote control.
The following screen should reveal the filter menu. You can search your content
for titles, albums, artists, and genres. The search filter will only work when
accessing your music, photos, and videos through the top level menu. The
search filter will not work when accessing your content through the server
select screen.
Search Filter
77D-Link DSM-510 User Manual
Section 4 - Operation
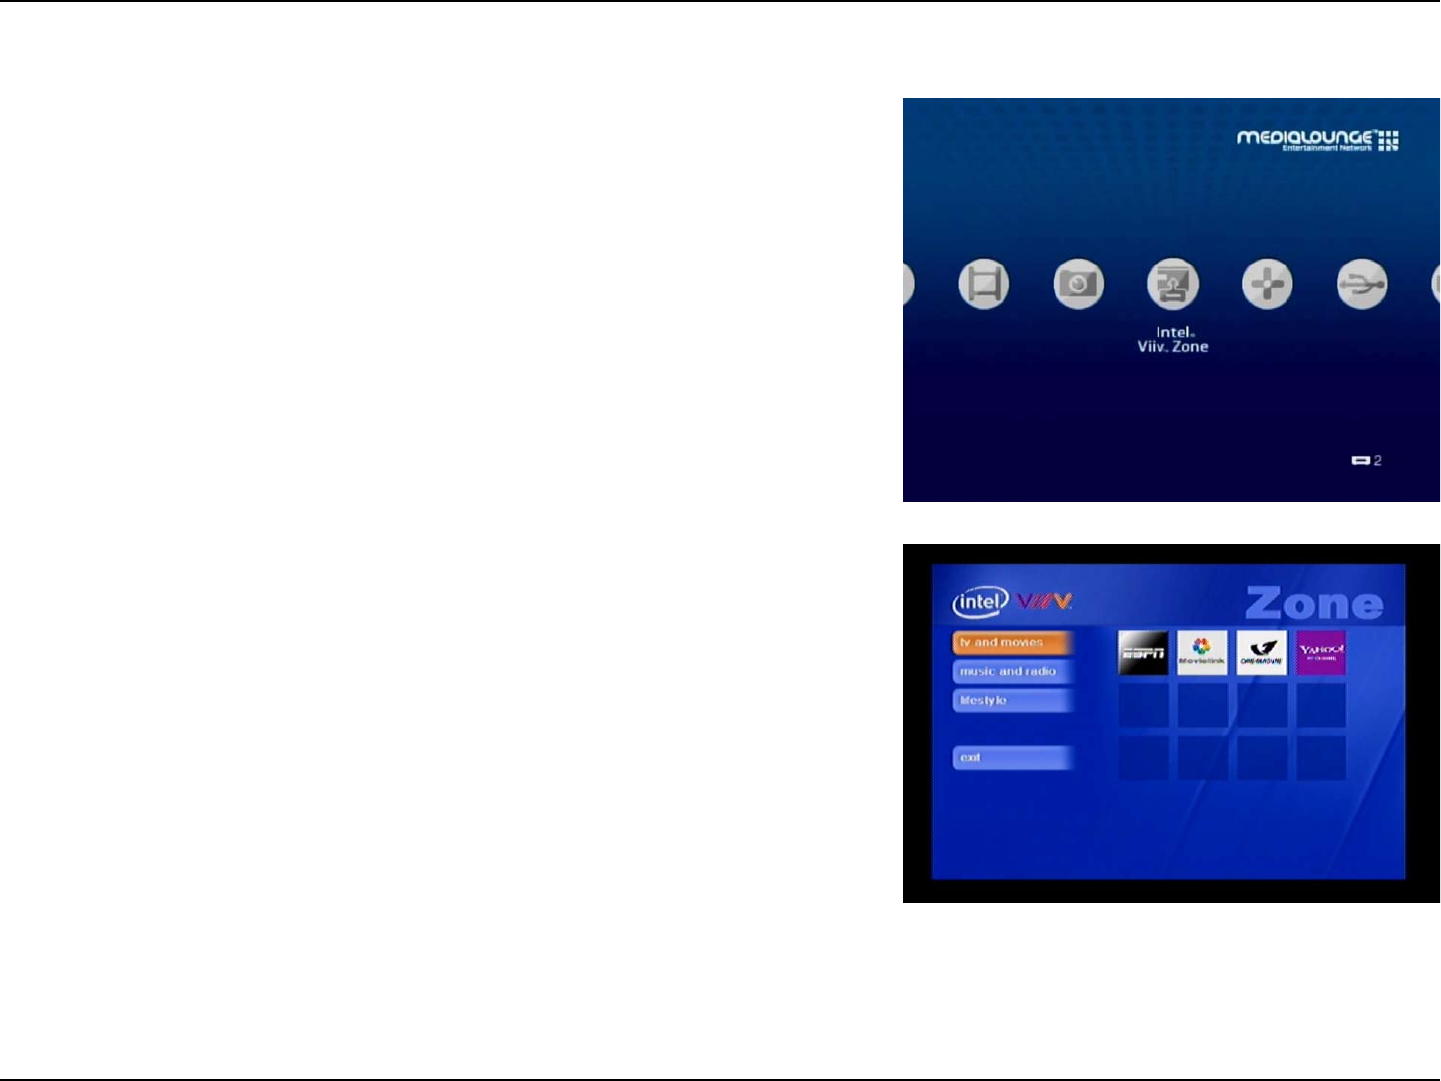
The Intel® Viiv™ Zone is your gateway to a world of online applications and services,
and is only made available to Viiv™ PCs only.
Click on a category by using the buttons on the left (see the following image) and
browse the available applications and services.
Intel® Viiv™ Zone
78D-Link DSM-510 User Manual
Section 4 - Operation
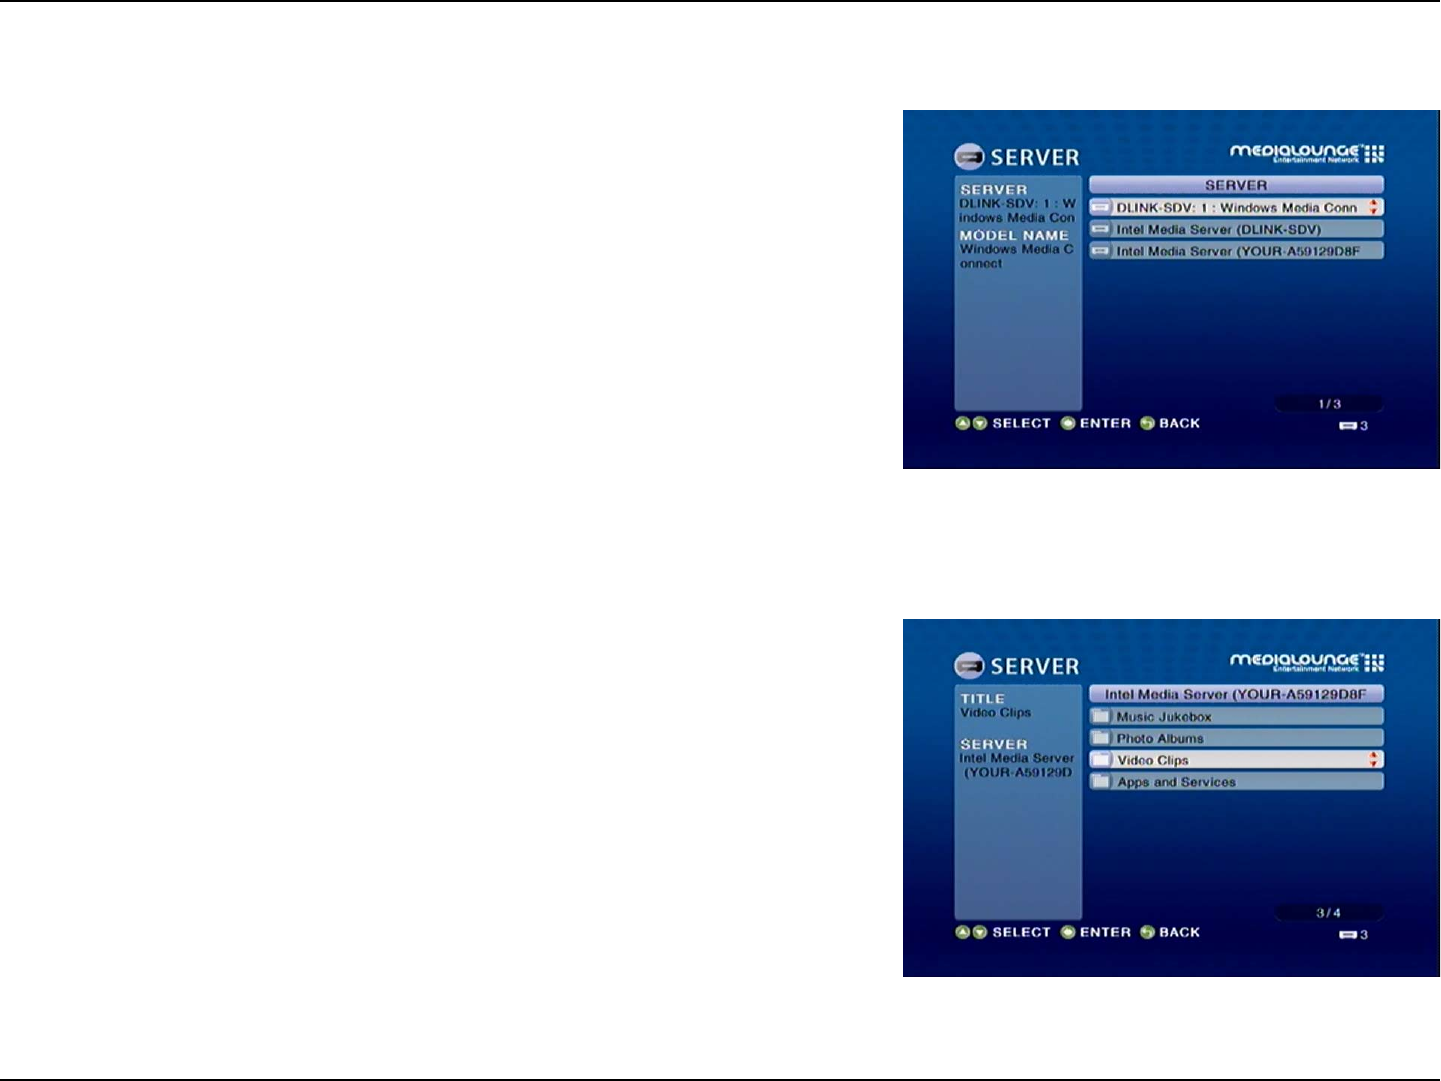
Use the selection arrows and the ENTER button to select a media source for your
photos, music, and video files.
Server
Once the media server is selected you can browse your files that are being shared
on your server.
79D-Link DSM-510 User Manual
Section 4 - Operation
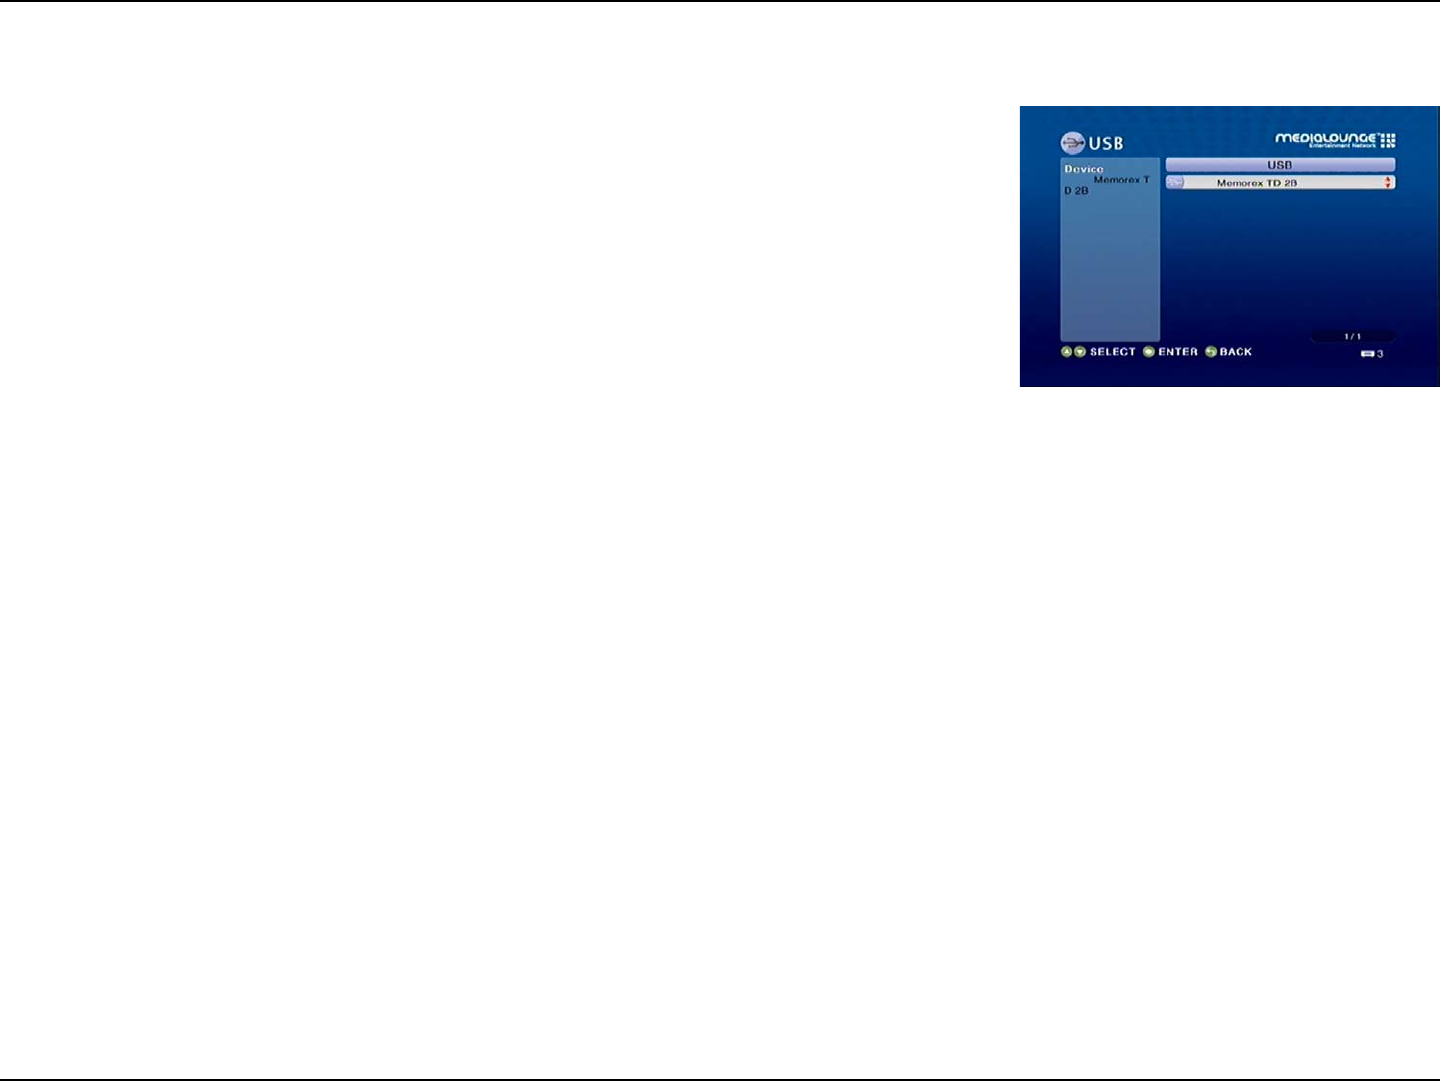
USB
If there is a USB thumbdrive plugged in to the device, the DSM-510 will display a storage
device menu. When you plug in a USB thumbdrive, the USB thumbdrive type will display.
Use the selection arrows and press ENTER to select a USB thumbdrive for viewing. Depending on your photo display options,
your files will either display in a list or as thumbnails. Press ENTER to display the image in a full screen and use the up and down
selection arrows to navigate back and forward through your files. You can also select Auto Play in the setup menu and your files will
automatically play when a card is inserted.
Note: When playing MP3s, you can press the INFO button for information on the current track playing.

80D-Link DSM-510 User Manual
Section 5 - Troubleshooting
1 What kind of files are supported by the DSM-510?
Audio - MP3, WMA, WAV, AIFF, OGG
Video - WMV9, MPEG 1, 2, and 4, AVI, XVID, DVR-MS
Images - JPEG, PNG, BMP, GIF, TIFF
2. What do I need to set up the D-Link’s DSM-510?
You must have a Microsoft Windows®-based home network in place, with at least one Intel® Viiv™ technology-based PC or a PC
running Microsoft Windows® Vista/XP.
3. What is required to run the server software?
Intel® Viiv™ technology-based verified PC is required to run the Intel® Viiv™ media server, or a Windows® Vista/XP PC with Windows®
Media Player 11 installed.
4. How does the D-Link DSM-510 get its files from my computer?
The Intel® Viiv™ Media Server software on your PC will launch, allowing you to add media files. You may then select folders that
contain music, photos, and videos that you want to play. If you have a PC running Windows® Vista/XP, the Windows® Media Player
11 software that supports the DSM-510 should already be installed on your Windows® PC or you can launch the Windows® Update
service to download and install it.
Troubleshooting

81D-Link DSM-510 User Manual
Section 5 - Troubleshooting
5. Why do my WMA files fail to play?
The following low bit rate WMA files may fail to play:
WMA 9.1 Quality 10 44kHz Stereo VBR
WMA 9.1 Lossless Quality 100 @ 96kHz 2channel 24bit VBR
WMA 9.1 Voice Quality 4kbps 8kHz mono
WMA 9.1 Voice Quality 20kbps 22kHz mono
WMA 9.1 Quality 98 44kHz Stereo
WMA 9.1 Lossless Quality 100 @ 44kHz 2channel 16 bit VBRnetwork.
6. What about Copy Protection and DRM support?
The most common method of copy protection is WM DRM (Digital Rights Management). The DSM-510 can play these types of files
from your Intel® Viiv™ technology verified PC or a Windows® PC, running WMP11 or Windows Media Connect.
7. Can I use my Universal remote control?
No, the DSM-510 is not compatible with a universal remote but you can use a remote with learning ability.
8. Can I connect the DSM-510 directly to a PC without using a router or a hub?
Yes, please make note of the following:
Wireless Users: Set the Mode to Ad-Hoc in the wireless settings.
Wired Users: Connect an Ethernet cable directly from the DSM-510’s Ethernet port to the Ethernet port on
your PC. The DSM-510’s Ethernet port is Auto MDI/MDI-X, so a special Ethernet cable is not required.
All Users: If DHCP software isn’t running on your computer, you will need to assign a static IP address to the
DSM-510 by changing the network settings from automatic to manual.
Note: The Viiv™ Zone and firmware upgrades are not available without an Internet connection.

82D-Link DSM-510 User Manual
Section 5 - Troubleshooting
9. How do I change the bit rate of an audio file?
There are various audio editing programs available for download on the Internet.
10. Why do my AVI files fail to play?
The DSM-510 will only support MPEG-4 encoded AVI files. You may need to re-encode your AVI files with a video encoding software
program, such as Nero Recode.
11. I cannot see anything when I turn on my DSM-510 player for the first time.
• Make sure your TV is displaying the appropriate video source. You may need to use the AV Input, Source, Select, or
TV/Video button on your TV or TV remote to change video sources. If you are having trouble changing the video source,
refer to the instructions that came with your TV.
• If you did not connect the player directly to your TV, but are instead passing the signal through your VCR, make sure
your VCR is displaying the appropriate video source. You may need to use the Input or Source button on your VCR
or VCR’s remote control. Some VCRs only pass the signal through when they are turned off. If you are having trouble
displaying the correct video source, refer to the instructions that came with your VCR.
• Make sure cables are connected to the IN jacks on your TV or VCR, not the OUT jacks.
• The cables you are using to connect your receiver to your TV or other equipment may be damaged or defective. Try
exchanging the cables connected to the receiver with other cables that you know are working properly.
• Make sure you have firmly attached the power adapter plug to the back of the player. Also, verify the power adapter is
plugged into a working power outlet and that the outlet is not controlled by a light switch.
12. My remote control isn’t working.
• Make sure the batteries are inserted correctly.
• Try removing the batteries and reinserting them without touching any buttons on the remote control.
• Replace the batteries with new ones.
13. The volume and mute buttons on the remote control don’t work when playing content that was encoded in 5.1 surround.
• The volume can only be adjusted on your digital stereo receiver. The DSM-510 can pass-through the audio signal to a

83D-Link DSM-510 User Manual
Section 5 - Troubleshooting
compatible audio receiver for multi-channel decoding.
14. I can’t find any of my music, photos, or video.
• If using a wired network, verify the Ethernet cable is properly attached to your DSM-510 and to a network switch, hub
or router. Verify that the switch, hub or router is powered on.
• If you are using static IP addresses, verify the IP address and netmask are in the same range as other addresses on
your network. Verify that the address is not already in use by another PC or device.
• Make sure the files you are sharing use a supported file format and encoding scheme.
• Verify the folder is shared in the Viiv Media Libary on your Intel® Viiv™ technology verified PC.
15. I can’t hear any sound when I’m playing music.
• Make sure the audio cables are properly connected.
• If the audio cables are connected to your TV, the TV must be on to hear any music.
• If the audio cables are connected to your stereo, make sure the stereo is on and you have the correct stereo input
source selected. If you are having trouble selecting the correct audio source, refer to the instructions that came with
your stereo.
16. Some of my MP3 and WMA files don’t appear.
• The DSM-510 supports the most common music file formats. However, there are almost an infinite variety of bit rates
and sample rates. If a file does not appear on the receiver, it most likely uses an unsupported rate.
• The files may be copy protected. To share your files, turn copy protection off when you rip them.
• The following MP3 sample rates are supported: 4, 8, 16, 22.05, 24, 32, 44.1, 48, 88.2 and 96 kHz.
• For best results, rip your MP3 files at 128 kbps or higher, with a sample rate of 44.1 kHz.
17. I am not able to play certain media files.
• The DSM-510 supports most industry standard file formats but even supported file formats can be encoded in ways
that are not supported. Try exporting media with different encoding settings or using different software applications
to encode your files.

84D-Link DSM-510 User Manual
Section 5 - Troubleshooting
18. Checking the bit and sample rates of a music file.
• To check the bit and sample rates of a music file:
1. Right-click on the file and select Properties.
2. Select the Summary tab and click the Advanced button. Scroll to the bottom of the list.
In most cases, the sample rate does not matter unless you come across a file that will not play or appear on your player.
Use the above procedure to check the file settings for supported rates.
19. I created a playlist on my computer, but it doesn’t appear on my media player.
• Make sure the playlist file is located in a folder shared by your media player. Copy the playlist to your shared music
folder or click on the Media Server icon to add or change your folder options.
20. How do I reset my DSM-510?
• Under normal circumstances, you should not need to reset your media player. However, to fully reset the media player,
press the SETUP button and select Reset Settings.
21. What version of firmware do I have?
• From the main home screen, press the SETUP button and select Device Information. The firmware version will be
listed.
22. The DSM-510 will not play my AVI files.
• Make sure that your AVI files are smaller than 2GB. AVI files have a limitation of 2GB. This is a limitation set in the AVI
standard.
24. The DSM-510 will not play my WMV files.

85D-Link DSM-510 User Manual
Section 5 - Troubleshooting
• Make sure that your WMV files are not recorded at a resolution above 1080i. Playback of WMV files will only work if
the resolution is 1080i or below.

86D-Link DSM-510 User Manual
Appendix A - Wireless Basics
D-Link wireless products are based on industry standards to provide easy-to-use and compatible high-speed wireless connectivity
within your home, business or public access wireless networks. Strictly adhering to the IEEE standard, the D-Link wireless family
of products will allow you to securely access the data you want, when and where you want it. You will be able to enjoy the freedom
that wireless networking delivers.
A wireless local area network (WLAN) is a computer network that transmits and receives data with radio signals instead of wires.
Wireless LANs are used increasingly in both home and office environments, and public areas such as airports, coffee shops and
universities. Innovative ways to utilize WLAN technology are helping people to work and communicate more efficiently. Increased
mobility and, the absence of cabling and other fixed infrastructures have proven to be beneficial for many users.
Under many circumstances, it may be desirable for mobile network devices to link to a conventional Ethernet LAN in order to use
servers, printers or an Internet connection supplied through the wired LAN. A Wireless Router is a device used to provide this link.
Wireless Basics

87D-Link DSM-510 User Manual
Appendix A - Wireless Basics
What is Wireless?
Wireless or WiFi technology is another way of connecting your computer to the network without using wires. WiFi uses radio frequency
to connect wirelessly, so you have the freedom to connect computers anywhere in your home or office network.
Why D-Link Wireless?
D-Link is the worldwide leader and award winning designer, developer, and manufacturer of networking products. D-Link delivers
the performance you need at a price you can afford. D-Link has all the products you need to build your network.
How does wireless work?
Wireless works similar to how cordless phones work, through radio signals that transmit data from point A to point B. But wireless
technology has restrictions as to how you can access the network. You must be within the wireless network range area to be able
to connect your computer. There are two different types of wireless networks Wireless Local Area Network (WLAN), and Wireless
Personal Area Network (WPAN).
Wireless Local Area Network (WLAN)
In a wireless local area network, a device called an Access Point (AP) connects computers to the network. The access point has a
small antenna attached to it, which allows it to transmit data back and forth over radio signals. With an indoor access point, the signal
can travel up to 300 feet. With an outdoor access point the signal can reach out up to 30 miles to serve places like manufacturing
plants, industrial locations, college and high school campuses, airports, golf courses, and many other outdoor venues.
Who uses wireless?
Wireless technology has become so popular in recent years that almost everyone is using it, whether it’s for home, office, or business,

88D-Link DSM-510 User Manual
Appendix A - Wireless Basics
D-Link has a wireless solution for it.
Home
• Gives everyone at home broadband access
• Surf the web, check email, instant message, and etc
• Gets rid of the cables around the house
• Simple and easy to use
Small Office and Home Office
• Stay on top of everything at home as you would at office
• Remotely access your office network from home
• Share Internet connection and printer with multiple computers
• No need to dedicate office space
Where is wireless used?
Wireless technology is expanding everywhere, not just at home or the office. People like the freedom of mobility and it’s becoming
so popular that more and more public facilities now provide wireless access to attract people. A wireless connection in a public place
is usually called a “hotspot”.

89D-Link DSM-510 User Manual
Appendix A - Wireless Basics
Using a D-Link Cardbus Adapter with your laptop, you can access the hotspot to connect to the Internet from remote locations like:
Airports, Hotels, Coffee Shops, Libraries, Restaurants, and Convention Centers.
A wireless network is easy to setup, but if you’re installing it for the first time it could be quite a task not knowing where to start.
That’s why we’ve put together a few setup steps and tips to help you through the process of setting up a wireless network.
Tips
Here are a few things to keep in mind, when you install a wireless network.
Centralize your router or Access Point
Make sure you place the router/access point in a centralized location within your network for the best performance. Try to place the
router/access point as high as possible in the room, so the signal gets dispersed throughout your home. If you have a two-story
home, you may need a repeater to boost the signal to extend the range.
Eliminate Interference
Place home appliances such as cordless telephones, microwaves, and televisions as far away as possible from the router/access
point. This would significantly reduce any interference that the appliances might cause since they operate on the same frequency.
Security
Don’t let you next-door neighbors or intruders connect to your wireless network. Secure your wireless network by turning on the
WPA or WEP security feature on the router. Refer to the product manual for detailed information on how to set security up.

90D-Link DSM-510 User Manual
Appendix A - Wireless Basics
There are basically two modes of networking:
• Infrastructure – All wireless clients will connect to an access point or wireless router.
• Ad-Hoc – Directly connecting to another computer, for peer-to-peer communication, using wireless network adapters
on each computer, such as two or more WNA-1330 wireless network Cardbus adapters.
An Infrastructure network contains an Access Point or wireless router. All the wireless devices, or clients, will connect to the wireless
router or access point.
An Ad-Hoc network contains only clients, such as laptops with wireless cardbus adapters. All the adapters must be in Ad-Hoc mode
to communicate.
Wireless Modes
91D-Link DSM-510 User Manual
Appendix B - Networking Basics
Networking Basics
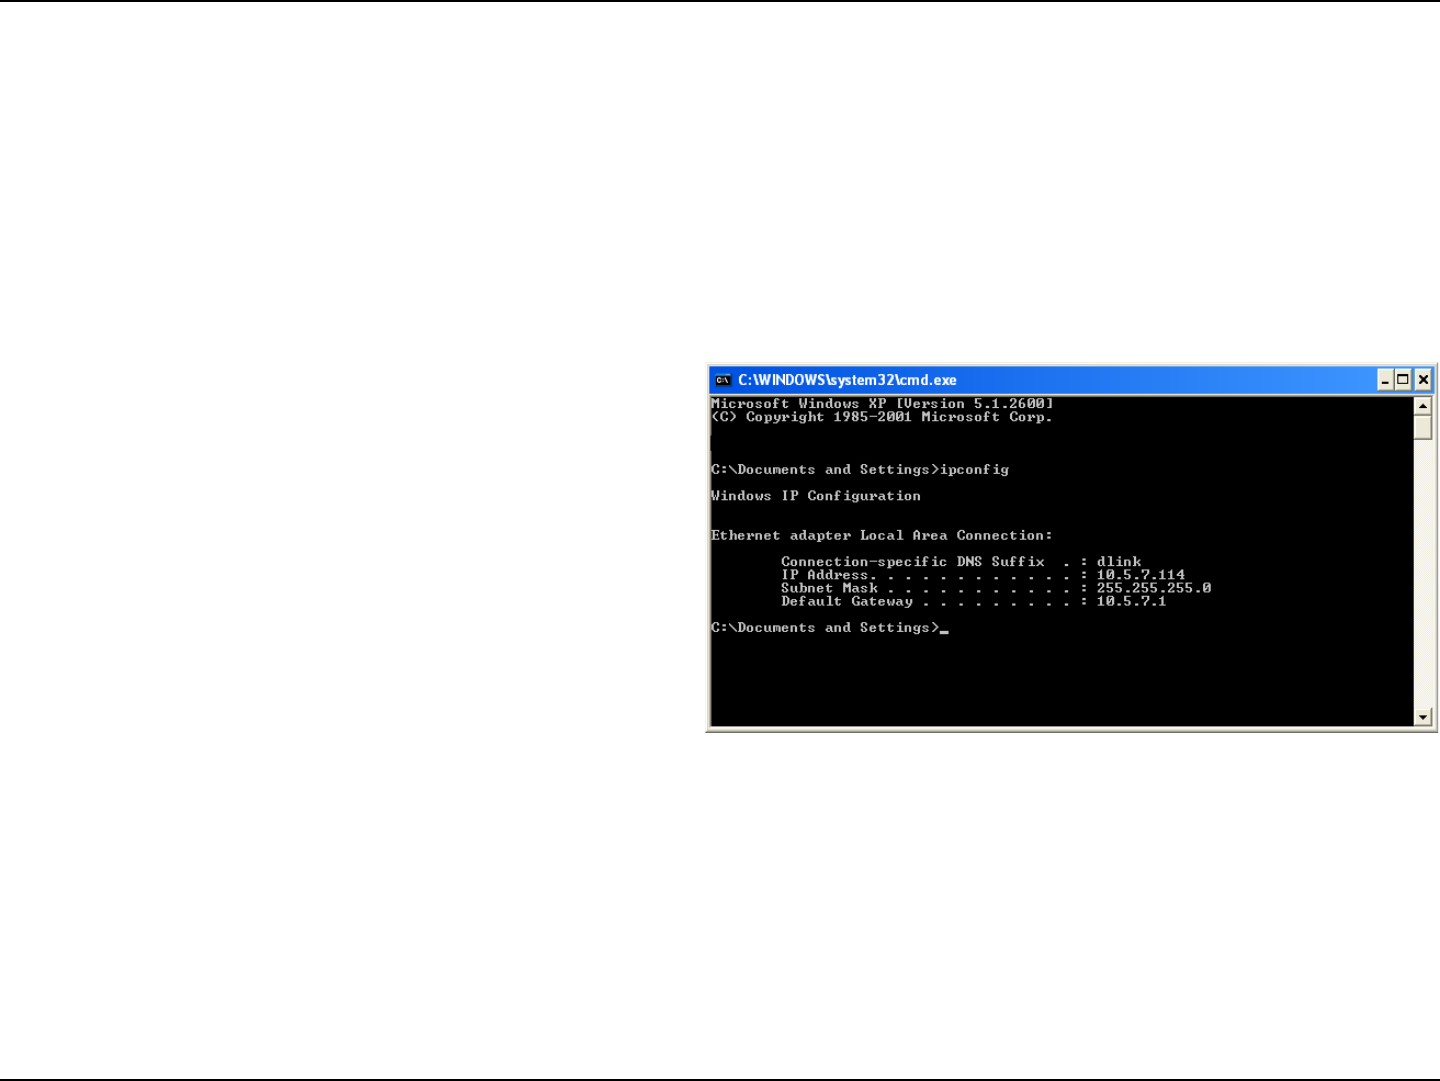
Check your IP Address
After you install your new D-Link adapter, by default, the TCP/IP settings should be set to obtain an IP address from a DHCP server
(i.e. wireless router) automatically. To verify your IP address, please follow the steps below.
Click on Start > Run. In the run box type cmd and click OK.
At the prompt, type ipconfig and press Enter.
This will display the IP address, subnet mask, and the default
gateway of your adapter.
If the address is 0.0.0.0, check your adapter installation, security
settings, and the settings on your router. Some firewall software
programs may block a DHCP request on newly installed
adapters.
If you are connecting to a wireless network at a hotspot (e.g.
hotel, coffee shop, airport), please contact an employee or
administrator to verify their wireless network settings.

92D-Link DSM-510 User Manual
Appendix B - Networking Basics
Statically Assign an IP Address
If you are not using a DHCP capable gateway/router, or you need to assign a static IP address, please follow the steps below:
Step 1
Windows® XP - Click on Start > Control Panel > Network Connections.
Windows® 2000 - From the desktop, right-click My Network Places > Properties.
Step 2
Right-click on the Local Area Connection which represents your D-Link network adapter and select Properties.
Step 3
Highlight Internet Protocol (TCP/IP) and click Properties.
Step 4
Click Use the following IP address and enter an IP address that is on the same subnet as your network or the LAN IP address on
your router.
Example: If the router´s LAN IP address is 192.168.0.1, make your IP address 192.168.0.X
where X is a number between 2 and 99. Make sure that the number you choose is not in
use on the network. Set Default Gateway the same as the LAN IP address of your router
(192.168.0.1).
Set Primary DNS the same as the LAN IP address of your router (192.168.0.1). The Secondary
DNS is not needed or you may enter a DNS server from your ISP.
Step 5
Click OK twice to save your settings.
93D-Link DSM-510 User Manual
Appendix C - General Appendix
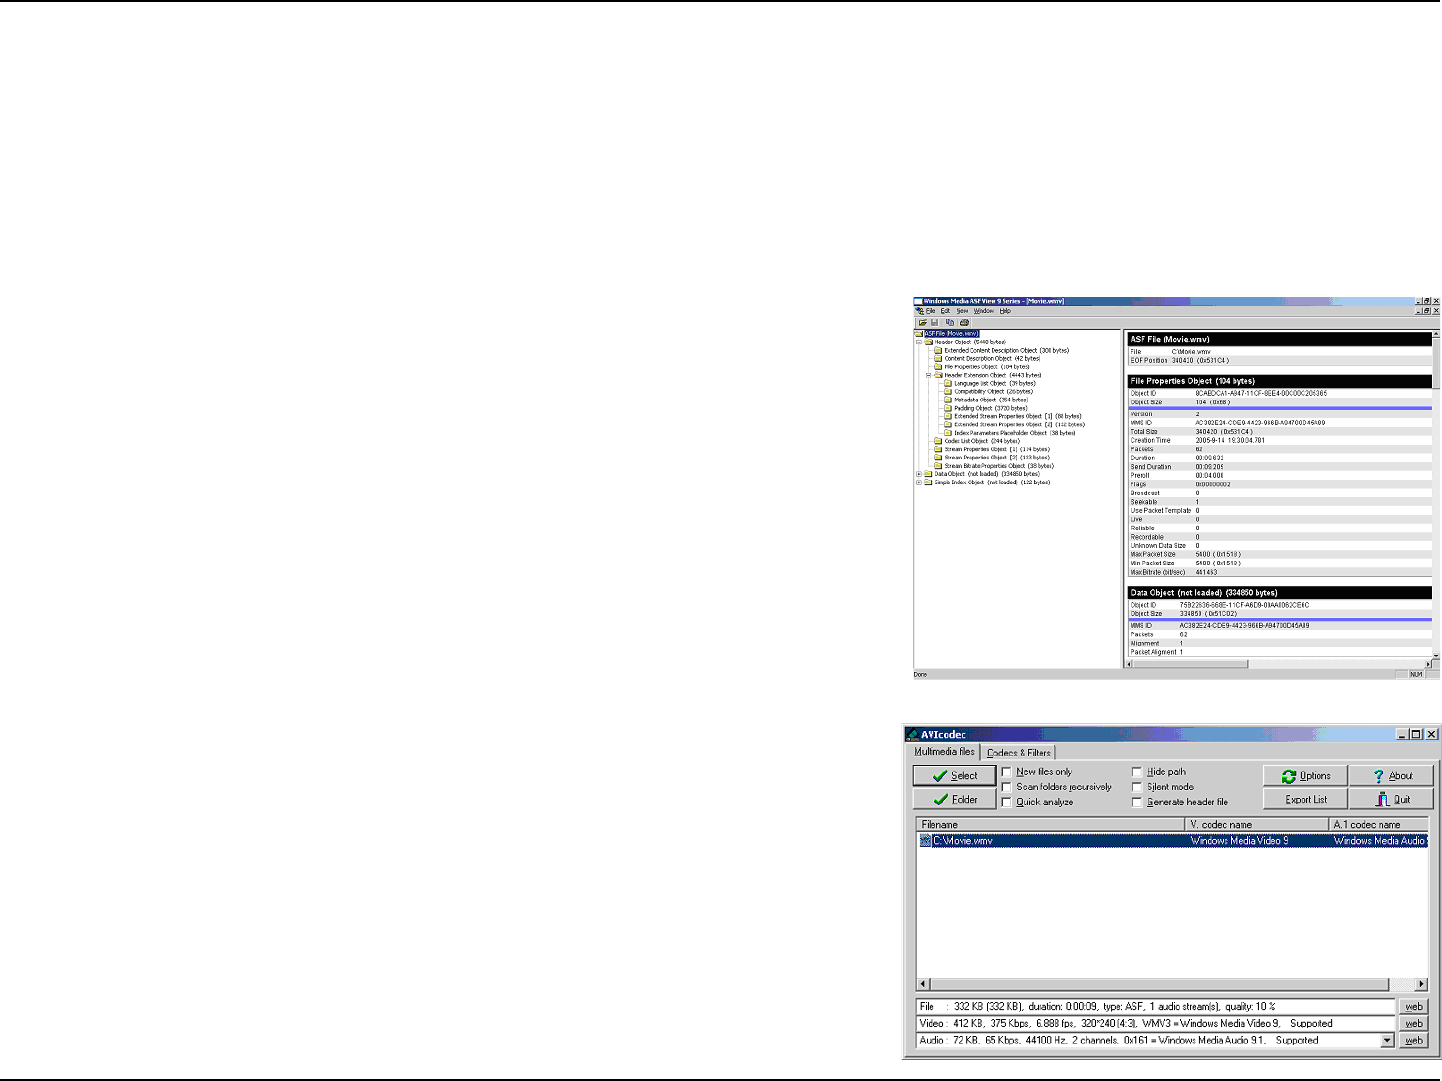
How to Check your Media
For WMA/WMV/MP3, you may use “Windows Media ASF Viewer 9 Series” to examine your media files. This tool can be
downloaded from: http://www.microsoft.com/windows/windowsmedia/format/ASFViewer.aspx
Here is a sample screenshot of the Windows Media ASF Viewer examining a WMV file.
For AVI/WMV/OGG/MPEG/MP3, you may use “AVICodec” to examine your media
files. This tool can be downloaded from:
http://avicodec.duby.info/
Here is a sample screenshot of AVICodec
General Appendix
94D-Link DSM-510 User Manual
Appendix C - General Appendix
Convert an Earlier WMV File into WMV9
There are many variations of video files (including WMV files) which may affect playback on the DSM-510. To alleviate this issue, there
are software tools available on the web to check the properties of a video file and to convert an earlier WMV file into WMV9. If you have
Windows® XP or ME, your Windows comes with a tool from Microsoft called “Movie Maker.” With this tool, you can create and edit
video files into Windows Media Video 9 (WMV9) format. Here is an example of converting a WMV8 file into WMV9.
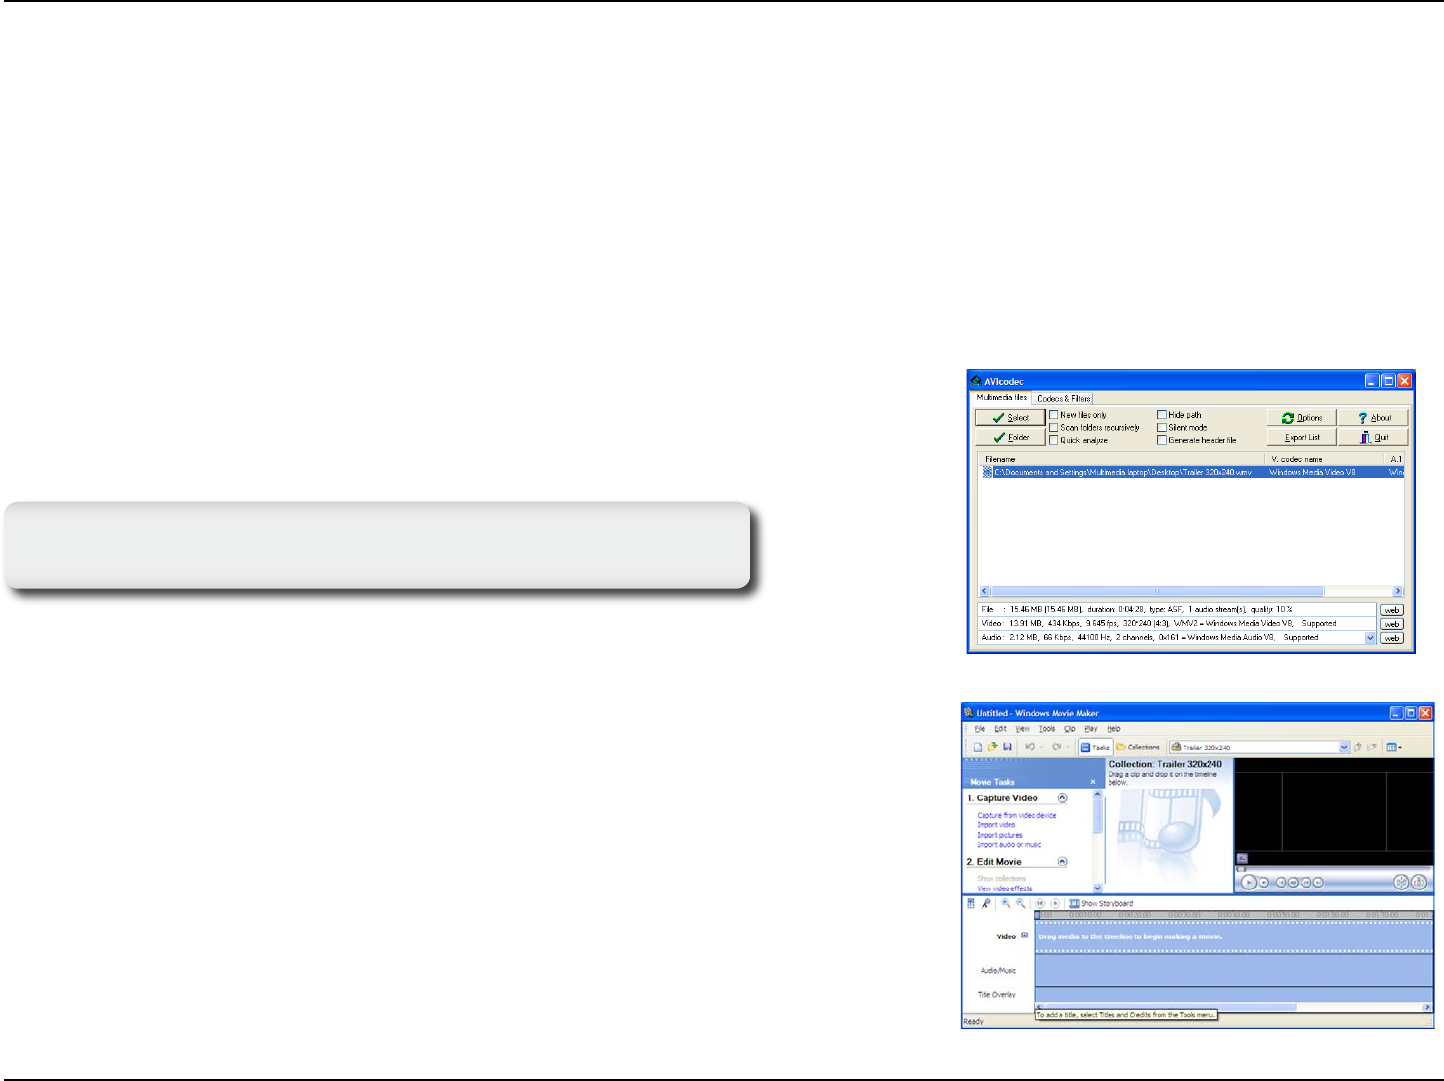
Step 1: Verify your WMV file codec using a validation tool. In the “Video” field, it tells you the selected video file is a WMV8 instead of
a supported WMV9 by your HD media player. Therefore, we need to convert this file into a WMV9 format in order for you to play it.
Step 2: Open “Windows Movie Maker”. Import the video you wish to convert.
This is AVIcodec, which is used to check for an earlier version of
a WMV file.
95D-Link DSM-510 User Manual
Appendix C - General Appendix
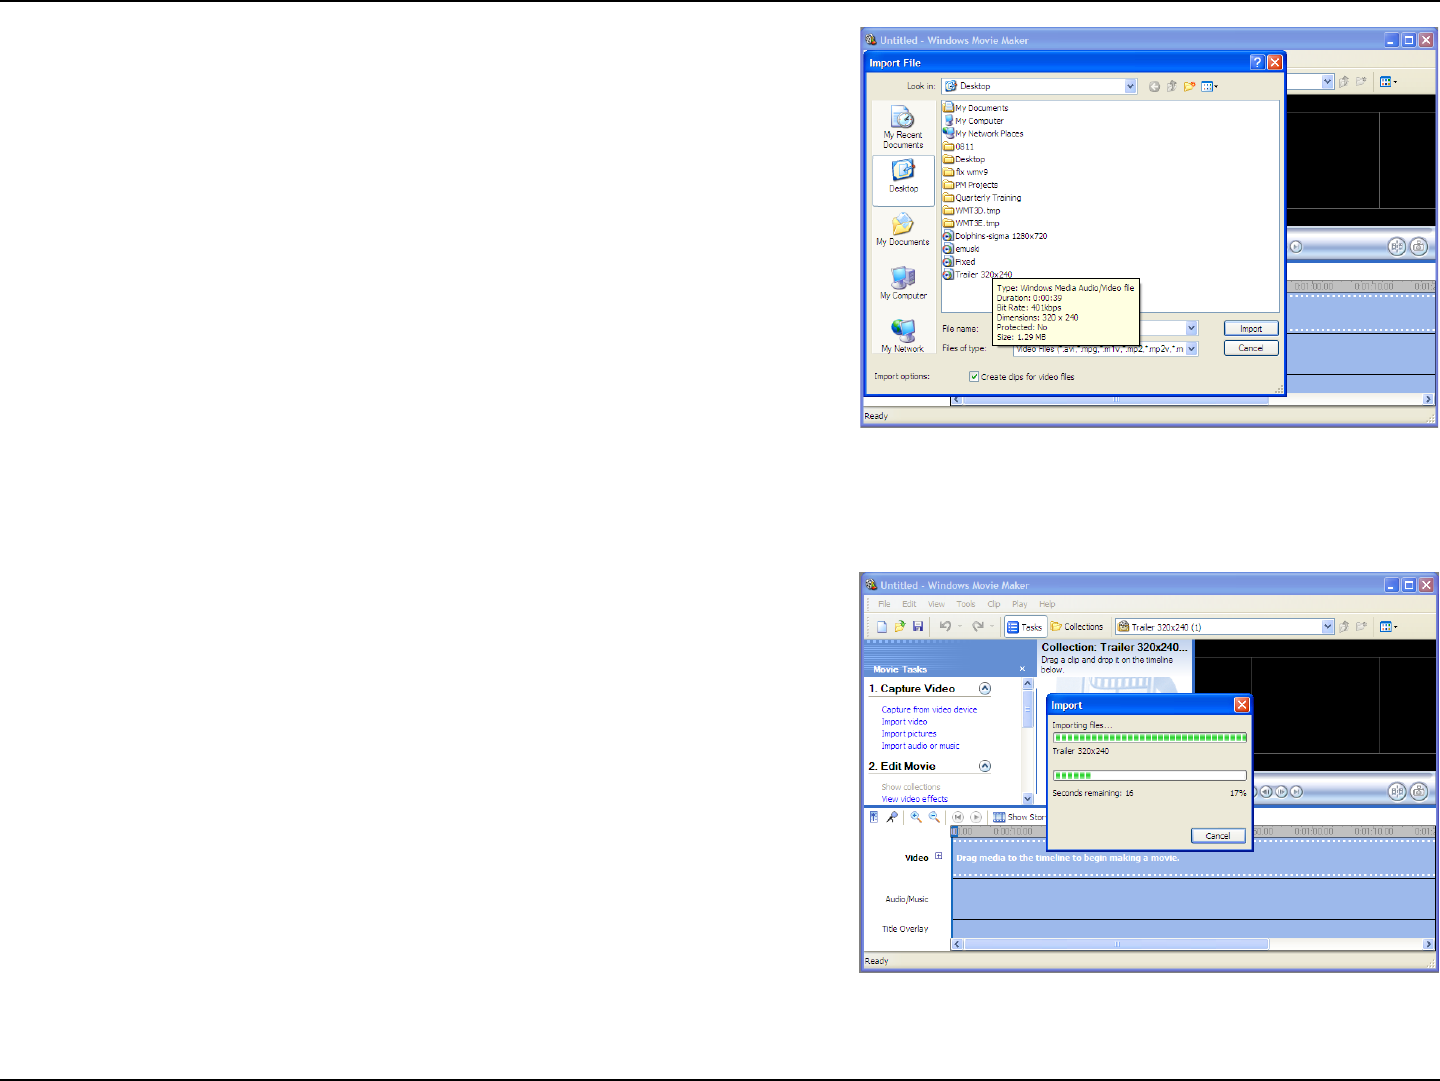
Step 3: Select the video file.
Step 4: Movie Maker will start importing the file.
96D-Link DSM-510 User Manual
Appendix C - General Appendix
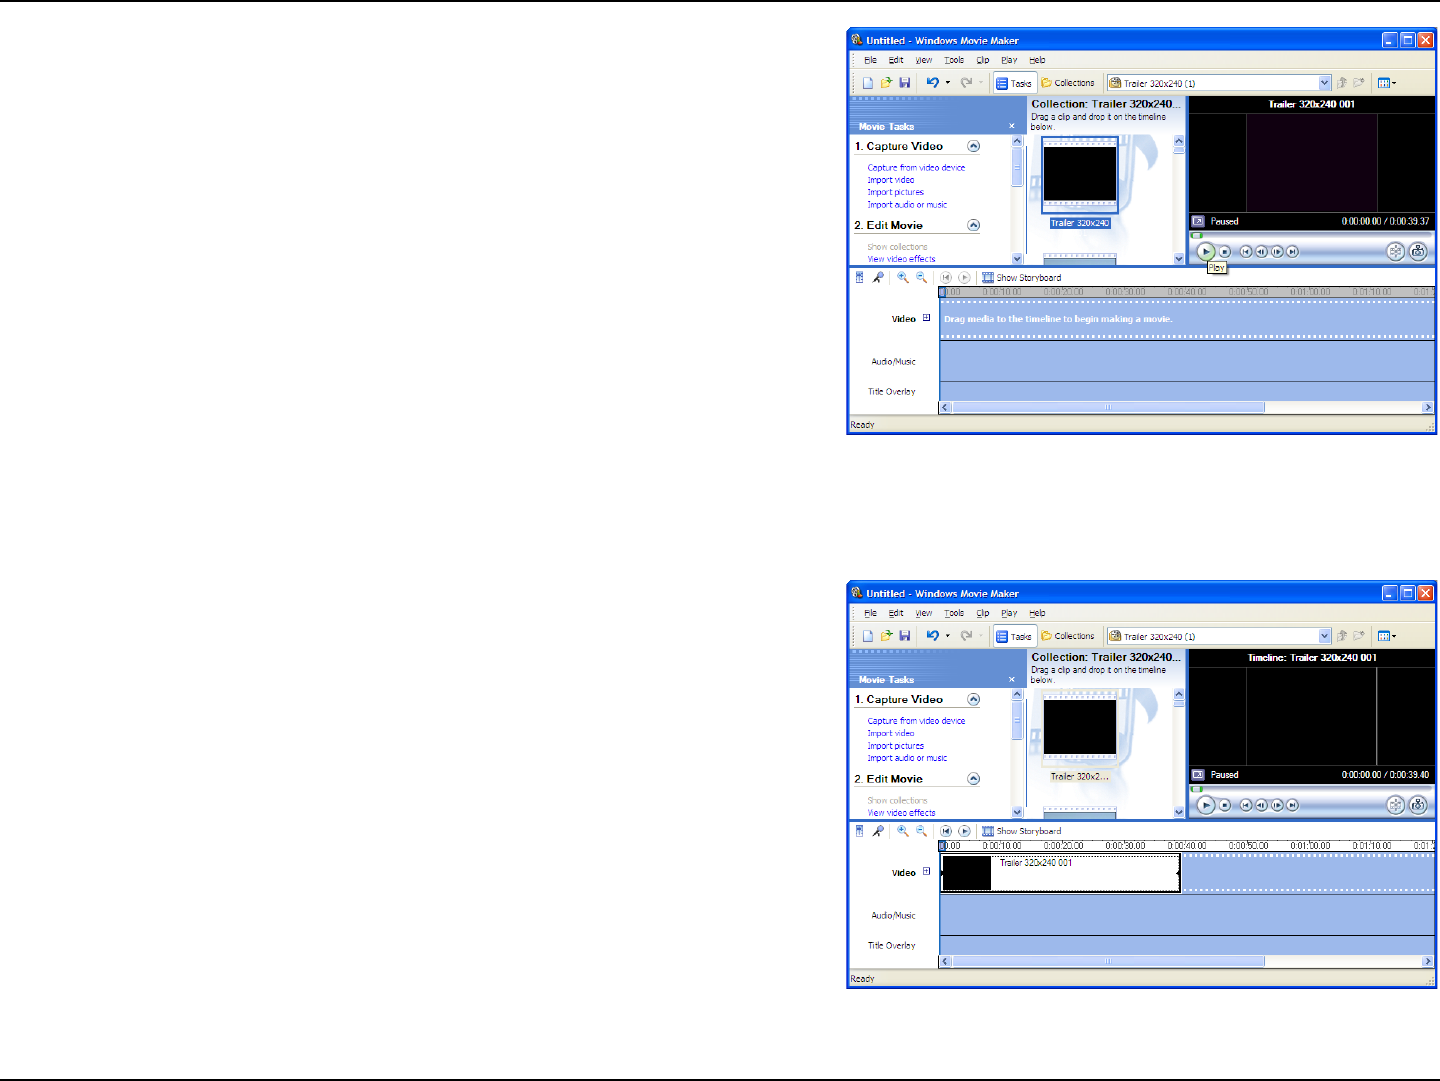
Step 5: The video file you selected will show up in display.
Step 6: Drag and drop the video into the bottom panel for editing.
97D-Link DSM-510 User Manual
Appendix C - General Appendix
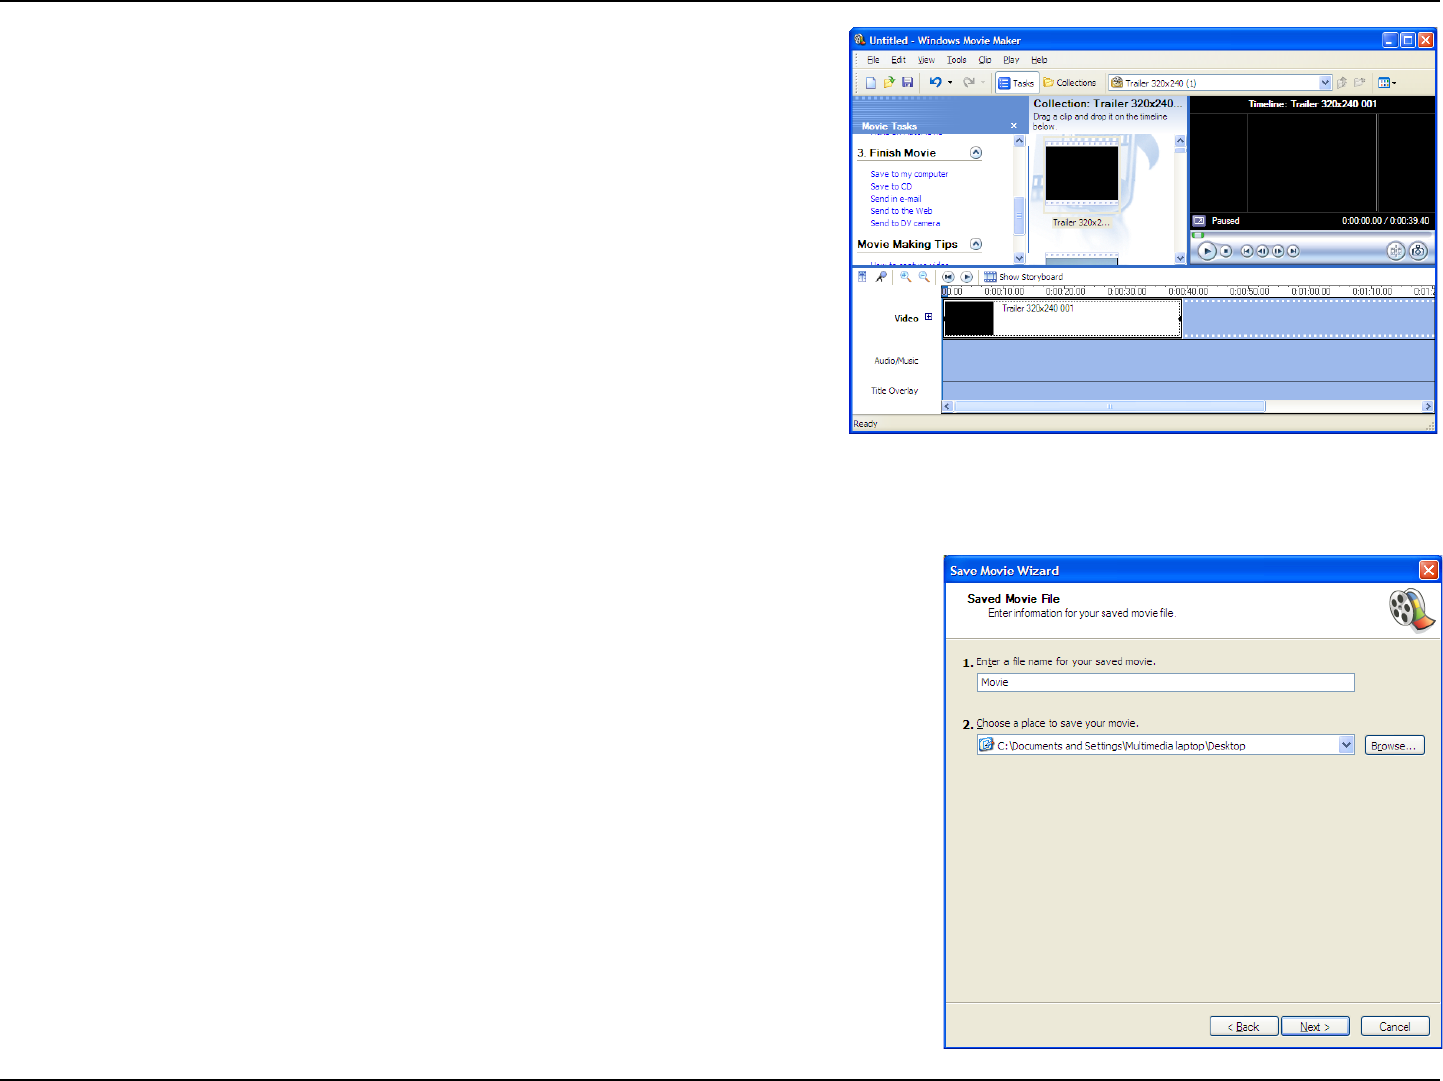
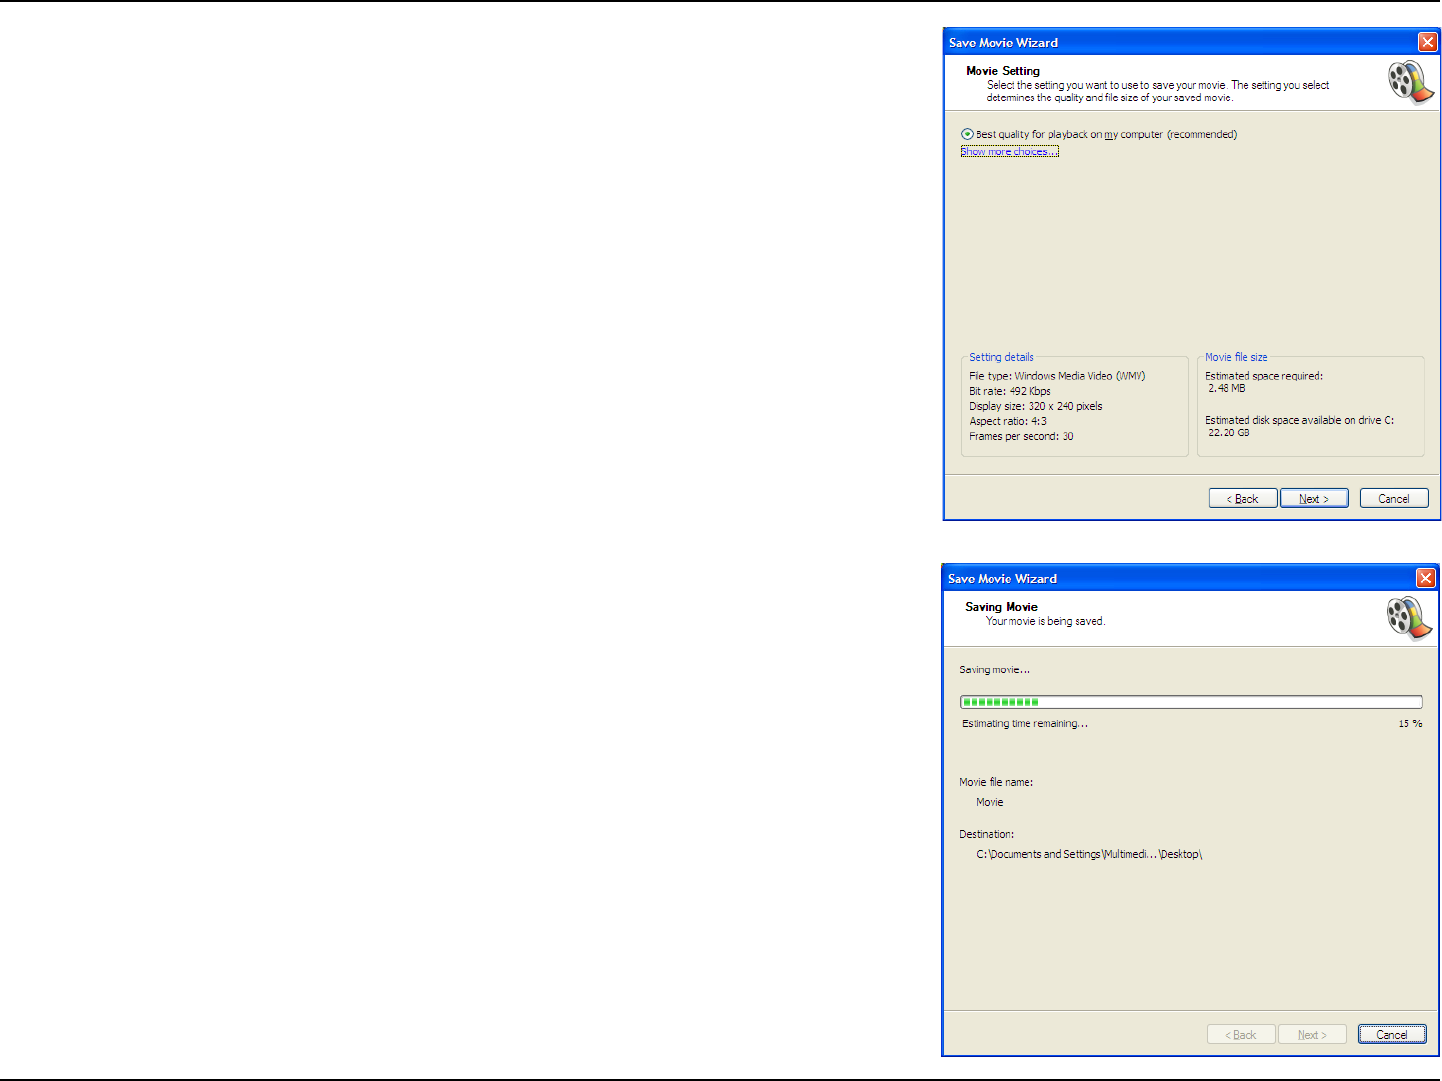
Step 7: Select “Save to my computer” on the left panel.
Step 8: Give the new file a name and select the desired location to save it.
98D-Link DSM-510 User Manual
Appendix C - General Appendix
Step 9: Select the quality of your new video file.
Step 10: Once selected, Movie Maker will start creating your new video file.
99D-Link DSM-510 User Manual
Appendix C - General Appendix
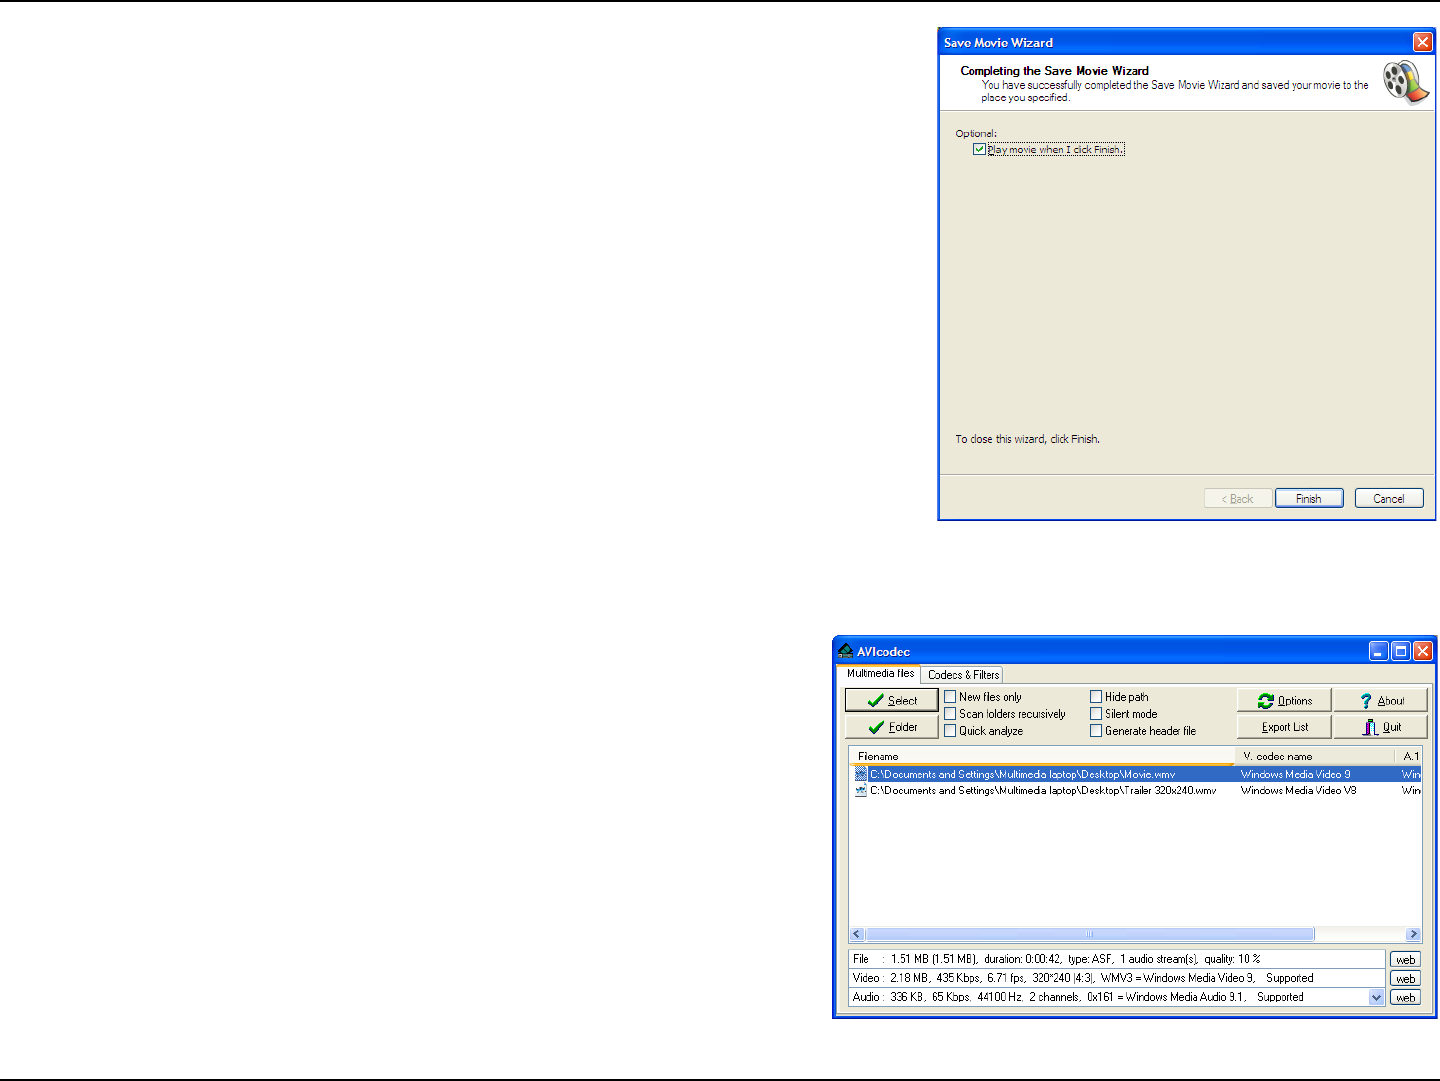
Step 11: Once completed, this screen will show up.
You can verify the new video file is created in WMV9 format.
This screenshot shows you both the old file (WMV8) and the new file
(WMV9).

100D-Link DSM-510 User Manual
Appendix C - General Appendix
Power Turn the DSM-510 ON or OFF.
HOME Returns to the Home menu page
Number Keys Allows you to enter alphanumeric information
SHIFT Allows you to use upper and lower case letters and/or numbers for entering characters. Pressing the SHIFT button on your DSM-510 remote control allows you
to switch in between different DivX® subtitles.
DELETE Delete numbers and text.
BACK Return to the previous page.
SETUP Access the Setup Menu.
MUTE Turn OFF the audio.
Page Up/Down Press Up to scroll up a page, and press Down to scroll down a page.
Arrow keys Move the onscreen cursor to navigate through the user interface.
ENTER Selects a single file for playback, and allows the selection of menu options.
Vol + Increase the volume.
Vol - Decrease the volume.
MENU Access the current mode’s menu.
MUSIC Access the Music mode.
PHOTO Access the Photo mode.
VIDEO Access the Video mode.
SERVER Access the Server mode.
USB Access the USB thumbdrive mode.
Play Functions While viewing and listening to your media, you can use these keys to Stop, Play/Pause, Rewind, Fast Forward, go back (Prev), or go to the next item (Next).
REPEAT Repeat the current Music, Video, Photo Slideshow selection.
SHUFFLE Randomize the current Music, Video, Photo Slideshow selection.
SEARCH Search for a specific file or folder.
INFO Access the information on a music, photo, or video file that is currently playing.
SLOW Slows down the music or video file that is currently playing.
A-B Select a start point (A) and an end point (B) of video to replay while viewig a video.
L/R Changes a mode of a sound that is currently playing from a music or video file. Pressing the L/R button on your DSM-510 remote control allows you to switch in
between different DivX® audio languages.
Remote Control Table
Ver.1.1(E)_20070919

99D-Link DSM-510 User Manual
Appendix E - Technical Support
You can find software updates and user documentation on the D-Link website.
U.S. and Canadian customers can contact D-Link technical support through our web site, or by
phone.
Tech Support for customers within the United States:
D-Link Technical Support over the Telephone:
(877) 453-5465
D-Link Technical Support over the Internet:
http://support.dlink.com
Tech Support for customers within Canada:
D-Link Technical Support over the Telephone:
(800) 361-5265
D-Link Technical Support over the Internet:
http://support.dlink.com
Contacting Technical Support

100D-Link DSM-510 User Manual
Appendix F - Warranty
Warranty
Subject to the terms and conditions set forth herein, D-Link Systems, Inc. (“D-Link”) provides this Limited Warranty:
• Only to the person or entity that originally purchased the product from D-Link or its authorized reseller or distributor, and
• Only for products purchased and delivered within the fifty states of the United States, the District of Columbia, U.S. Possessions
or Protectorates, U.S. Military Installations, or addresses with an APO or FPO.
Limited Warranty:
D-Link warrants that the hardware portion of the D-Link product described below (“Hardware”) will be free from material defects in
workmanship and materials under normal use from the date of original retail purchase of the product, for the period set forth below
(“Warranty Period”), except as otherwise stated herein.
• Hardware (excluding power supplies and fans): One (1) year
• Power supplies and fans: One (1) year
• Spare parts and spare kits: Ninety (90) days
The customer’s sole and exclusive remedy and the entire liability of D-Link and its suppliers under this Limited Warranty will be, at D-Link’s
option, to repair or replace the defective Hardware during the Warranty Period at no charge to the original owner or to refund the actual
purchase price paid. Any repair or replacement will be rendered by D-Link at an Authorized D-Link Service Office. The replacement
hardware need not be new or have an identical make, model or part. D-Link may, at its option, replace the defective Hardware or any part
thereof with any reconditioned product that D-Link reasonably determines is substantially equivalent (or superior) in all material respects
to the defective Hardware. Repaired or replacement hardware will be warranted for the remainder of the original Warranty Period or ninety
(90) days, whichever is longer, and is subject to the same limitations and exclusions. If a material defect is incapable of correction, or if
D-Link determines that it is not practical to repair or replace the defective Hardware, the actual price paid by the original purchaser for the
defective Hardware will be refunded by D-Link upon return to D-Link of the defective Hardware. All Hardware or part thereof that is replaced
by D-Link, or for which the purchase price is refunded, shall become the property of D-Link upon replacement or refund.

101D-Link DSM-510 User Manual
Appendix F - Warranty
Limited Software Warranty:
D-Link warrants that the software portion of the product (“Software”) will substantially conform to D-Link’s then current functional specifications
for the Software, as set forth in the applicable documentation, from the date of original retail purchase of the Software for a period of ninety
(90) days (“Software Warranty Period”), provided that the Software is properly installed on approved hardware and operated as contemplated
in its documentation. D-Link further warrants that, during the Software Warranty Period, the magnetic media on which D-Link delivers the
Software will be free of physical defects. The customer’s sole and exclusive remedy and the entire liability of D-Link and its suppliers under
this Limited Warranty will be, at D-Link’s option, to replace the non-conforming Software (or defective media) with software that substantially
conforms to D-Link’s functional specifications for the Software or to refund the portion of the actual purchase price paid that is attributable
to the Software. Except as otherwise agreed by DLink in writing, the replacement Software is provided only to the original licensee, and
is subject to the terms and conditions of the license granted by D-Link for the Software. Replacement Software will be warranted for the
remainder of the original Warranty Period and is subject to the same limitations and exclusions. If a material non-conformance is incapable
of correction, or if D-Link determines in its sole discretion that it is not practical to replace the non-conforming Software, the price paid by
the original licensee for the non-conforming Software will be refunded by D-Link; provided that the non-conforming Software (and all copies
thereof) is first returned to D-Link. The license granted respecting any Software for which a refund is given automatically terminates.
Non-Applicability of Warranty:
The Limited Warranty provided hereunder for Hardware and Software portions of D-Link’s products will not be applied to and does not cover
any refurbished product and any product purchased through the inventory clearance or liquidation sale or other sales in which D-Link, the
sellers, or the liquidators expressly disclaim their warranty obligation pertaining to the product and in that case, the product is being sold
“As-Is” without any warranty whatsoever including, without limitation, the Limited Warranty as described herein, notwithstanding anything
stated herein to the contrary.
Submitting A Claim:
The customer shall return the product to the original purchase point based on its return policy. In case the return policy period has expired
and the product is within warranty, the customer shall submit a claim to D-Link as outlined below:
• The customer must submit with the product as part of the claim a written description of the Hardware defect or Software
nonconformance in sufficient detail to allow DLink to confirm the same, along with proof of purchase of the product (such
as a copy of the dated purchase invoice for the product) if the product is not registered.
• The customer must obtain a Case ID Number from D-Link Technical Support at 1-877-453-5465, who will attempt to assist
the customer in resolving any suspected defects with the product. If the product is considered defective, the customer must
obtain a Return Material Authorization (“RMA”) number by completing the RMA form and entering the assigned Case ID
Number at https://rma.dlink.com/.

102D-Link DSM-510 User Manual
Appendix F - Warranty
• After an RMA number is issued, the defective product must be packaged securely in the original or other suitable shipping
package to ensure that it will not be damaged in transit, and the RMA number must be prominently marked on the outside
of the package. Do not include any manuals or accessories in the shipping package. DLink will only replace the defective
portion of the product and will not ship back any accessories.
• The customer is responsible for all in-bound shipping charges to D-Link. No Cash on Delivery (“COD”) is allowed. Products
sent COD will either be rejected by D-Link or become the property of D-Link. Products shall be fully insured by the customer
and shipped to D-Link Systems, Inc., 17595 Mt. Herrmann, Fountain Valley, CA 92708. D-Link will not be held responsible
for any packages that are lost in transit to D-Link. The repaired or replaced packages will be shipped to the customer via
UPS Ground or any common carrier selected by D-Link. Return shipping charges shall be prepaid by D-Link if you use an
address in the United States, otherwise we will ship the product to you freight collect. Expedited shipping is available upon
request and provided shipping charges are prepaid by the customer. D-Link may reject or return any product that is not
packaged and shipped in strict compliance with the foregoing requirements, or for which an RMA number is not visible from
the outside of the package. The product owner agrees to pay D-Link’s reasonable handling and return shipping charges
for any product that is not packaged and shipped in accordance with the foregoing requirements, or that is determined by
D-Link not to be defective or non-conforming.
What Is Not Covered:
The Limited Warranty provided herein by D-Link does not cover:
Products that, in D-Link’s judgment, have been subjected to abuse, accident, alteration, modification, tampering, negligence, misuse, faulty
installation, lack of reasonable care, repair or service in any way that is not contemplated in the documentation for the product, or if the
model or serial number has been altered, tampered with, defaced or removed; Initial installation, installation and removal of the product for
repair, and shipping costs; Operational adjustments covered in the operating manual for the product, and normal maintenance; Damage
that occurs in shipment, due to act of God, failures due to power surge, and cosmetic damage; Any hardware, software, firmware or other
products or services provided by anyone other than D-Link; and Products that have been purchased from inventory clearance or liquidation
sales or other sales in which D-Link, the sellers, or the liquidators expressly disclaim their warranty obligation pertaining to the product.
While necessary maintenance or repairs on your Product can be performed by any company, we recommend that you use only an Authorized
D-Link Service Office. Improper or incorrectly performed maintenance or repair voids this Limited Warranty.
Disclaimer of Other Warranties:
EXCEPT FOR THE LIMITED WARRANTY SPECIFIED HEREIN, THE PRODUCT IS PROVIDED “AS-IS” WITHOUT ANY WARRANTY
OF ANY KIND WHATSOEVER INCLUDING, WITHOUT LIMITATION, ANY WARRANTY OF MERCHANTABILITY, FITNESS FOR A
PARTICULAR PURPOSE AND NONINFRINGEMENT.

Federal Communication Commission Interference Statement
This equipment has been tested and found to comply with the limits for a Class B
digital device, pursuant to Part 15 of the FCC Rules. These limits are designed to
provide reasonable protection against harmful interference in a residential installation.
This equipment generates, uses and can radiate radio frequency energy and, if not
installed and used in accordance with the instructions, may cause harmful interference
to radio communications. However, there is no guarantee that interference will not
occur in a particular installation. If this equipment does cause harmful interference
to radio or television reception, which can be determined by turning the equipment off
and on, the user is encouraged to try to correct the interference by one of the
following measures:
- Reorient or relocate the receiving antenna.
- Increase the separation between the equipment and receiver.
- Connect the equipment into an outlet on a circuit different from that to which the
receiver is connected.
- Consult the dealer or an experienced radio/TV technician for help.
FCC Caution: Any changes or modifications not expressly approved by the party
responsible for compliance could void the user's authority to operate this equipment.
This device complies with Part 15 of the FCC Rules. Operation is subject to the
following two conditions: (1) This device may not cause harmful interference, and (2)
this device must accept any interference received, including interference that may
cause undesired operation.
IMPORTANT NOTE:
FCC Radiation Exposure Statement:
This equipment complies with FCC radiation exposure limits set forth for an
uncontrolled environment. This equipment should be installed and operated with
minimum distance 20cm between the radiator & your body.
This transmitter must not be co-located or operating in conjunction with any other
antenna or transmitter.
The availability of some specific channels and/or operational frequency bands are
country dependent and are firmware programmed at the factory to match the intended
destination. The firmware setting is not accessible by the end user.
Industry Canada statement:
This device complies with RSS-210 of the Industry Canada Rules. Operation is
subject to the following two conditions:
(1) This device may not cause harmful interference, and (2) this device must accept
any interference received, including interference that may cause undesired operation.
IMPORTANT NOTE:
Radiation Exposure Statement:
This equipment complies with IC radiation exposure limits set forth for an
uncontrolled environment. This equipment should be installed and operated with
minimum distance 20cm between the radiator & your body.
This device has been designed to operate with an antenna having a maximum gain of
2 dB. Antenna having a higher gain is strictly prohibited per regulations of Industry
Canada. The required antenna impedance is 50 ohms.

105D-Link DSM-510 User Manual
Version 1.1
Product registration is entirely voluntary and failure to complete or return this form will not diminish your warranty
rights.
Registration