D Link DVA-G3672B Wireless ADSL VOIP Router User Manual D Link DVA G3672B
D Link Corporation Wireless ADSL VOIP Router D Link DVA G3672B
D Link >
Contents
- 1. User manual 1
- 2. Users Manual 2
- 3. Users Manual 3
User manual 1

D-Link DVA-G3672B
High-Speed 2.4 GHz
Wireless ADSL VOIP Router
Manual
Rev. 01 (January, 2008)

Table of Contents
Table of Contents
Manual.............................................................................................. 1
Overview........................................................................................... 3
Introduction................................................................................... 3
Package Contents ........................................................................ 4
System Requirements .................................................................. 4
Hardware Overview ...................................................................... 5
Rear Panel................................................................................ 5
Front Pannel ............................................................................. 6
Features........................................................................................ 7
Configuration .................................................................................... 8
Log in to Web-based Configuration .............................................. 8
Quick Setup ................................................................................ 10
Quick Setup – Opening Window............................................. 10
Quick Setup – Change the Router’s Password ...................... 11
Quick Setup – Set Time and Date .......................................... 12
Quick Setup – Setup Internet Connection .............................. 13
Quick Setup – Configure Wireless Network............................ 14
Quick Setup – Restart the Router........................................... 15
Setup – Internet Setup................................................................ 16
Setup – Wireless Settings........................................................... 24
Wireless Settings – Wireless Basics....................................... 25
Wireless Settings – Wireless Security .................................... 26
Setup – Local Network................................................................ 27
Setup – Time and Date............................................................... 29
Advanced – Advanced Wireless................................................. 30
Advanced Wireless – Advanced Settings............................... 31
Advanced Wireless – MAC Filtering ....................................... 32
Advanced Wireless – Wireless QoS....................................... 33
Advanced – Port Forwarding ...................................................... 34
Advanced – Port Triggering........................................................ 35
Advanced – DMZ........................................................................ 36
Advanced – Parental Control...................................................... 37
Parental Control – Block Website........................................... 38
Parental Control – Block MAC Address.................................. 39
Advanced – Filtering Options...................................................... 40
Filtering Options – Inbound Filtering .......................................41
Filtering Options – Outbound Filtering.....................................42
Filtering Options – Bridge Filtering..........................................43
Advanced – Firewall Settings......................................................44
Advanced – DNS.........................................................................45
Advanced – Dynamic DNS..........................................................46
Advanced – Network Tools .........................................................47
Network Tools – Port Mapping................................................48
Network Tools – IGMP ............................................................49
Network Tools – QoS ..............................................................50
Network Tools – UPnP............................................................51
Network Tools – ADSL............................................................52
Network Tools – SNMP...........................................................53
Advanced –Routing.....................................................................54
Routing – Static Route ............................................................55
Routing – Default Gateway .....................................................56
Routing – RIP..........................................................................56
Advanced – Schedules................................................................57
Advanced – Voice .......................................................................58
Advanced –Print Server ..............................................................59
Maintenance – System................................................................60
Maintenance – Firmware Update ................................................61
Maintenance – Access Controls..................................................62
Access Controls – Account Password.....................................63
Access Controls – Services.....................................................64
Access Controls – IP Address.................................................64
Maintenance – Diagnostics .........................................................65
Maintenance – System Log.........................................................66
Status – Device Info ....................................................................67
Status – Wireless Clients ............................................................68
Status – DHCP Clients................................................................68
Status – Logs ..............................................................................69
Status – Statistics........................................................................70
Status – Routing Info...................................................................71
Help.............................................................................................72
D-Link DVA-G3672B User Manual 2

Chapter 1 Overview
Overview
Introduction
The D-Link DVA-G3672B High-Speed Wireless Router is an 802.11g high-performance, wireless router that supports high-speed
wireless networking at home, at work or in public places.
Unlike most routers, the DVA-G3672B provides data transfers at up to 8X (compared to the standard 11 Mbps) when used with other
D-Link AirPlus G products. The 802.11 g standard is backwards compatible with 802.11 b products. This means that you do not need
to change your entire network to maintain connectivity. You may sacrifice some of 802.11 g’s speed when you mix 802.11 b and
802.11 g devices, but you will not lose the ability to communicate when you incorporate the 802.11g standard into your 802.11 b
network. You may choose to slowly change your network by gradually replacing the 802.11 b devices with 802.11 g devices.
In addition to offering faster data transfer speeds when used with other 802.11g products, the DVA-G3672B has the newest,
strongest, most advanced security features available today. When used with other 802.11 g WPA (WiFi Protected Access) and
802.1x compatible products in a network with a RADIUS server, the security features include:
For home users that will not incorporate a RADIUS server in their network, the security for the DVA-G3672B, used in conjunction with
other 802.11g products, will still be much stronger than ever before. Utilizing the Pre Shared Key mode of WPA, the DVA-G3672B
will obtain a new security key every time it connects to the 802.11g network. You only need to input your encryption information once
in the configuration menu. No longer will you have to manually input a new WEP key frequently to ensure security, with the DVA-
G3672B, you can automatically receive a new key every time you connect, vastly increasing the safety of your communications.
D-Link DVA-G3672B User Manual 3

Chapter 1 Overview
Package Contents
• D-Link DVA-G3672B High-Speed 2.4GHz Wireless ADSL VOIP Router
• Power Adapter-DC 12V, 1200 mA
• Manual and Warranty on CD
• Quick Installation Guide
• Ethernet Cable (All the DVA-G3672B’s Ethernet ports are Auto-MDIX)
If any of the above items are missing, please contact your reseller.
Note: Using a power supply with a different voltage rating than the one included with the DVA-G3672B will cause damage and void
the warranty for this product.
System Requirements
• Ethernet-Based Cable or DSL Modem
• Computers with Windows, Macintosh, or Linux-based operating systems with an installed Ethernet adapter
• Internet Explorer Version 6.0 or Netscape Navigator Version 6.0 and Above
D-Link DVA-G3672B User Manual 4
Chapter 1 Overview
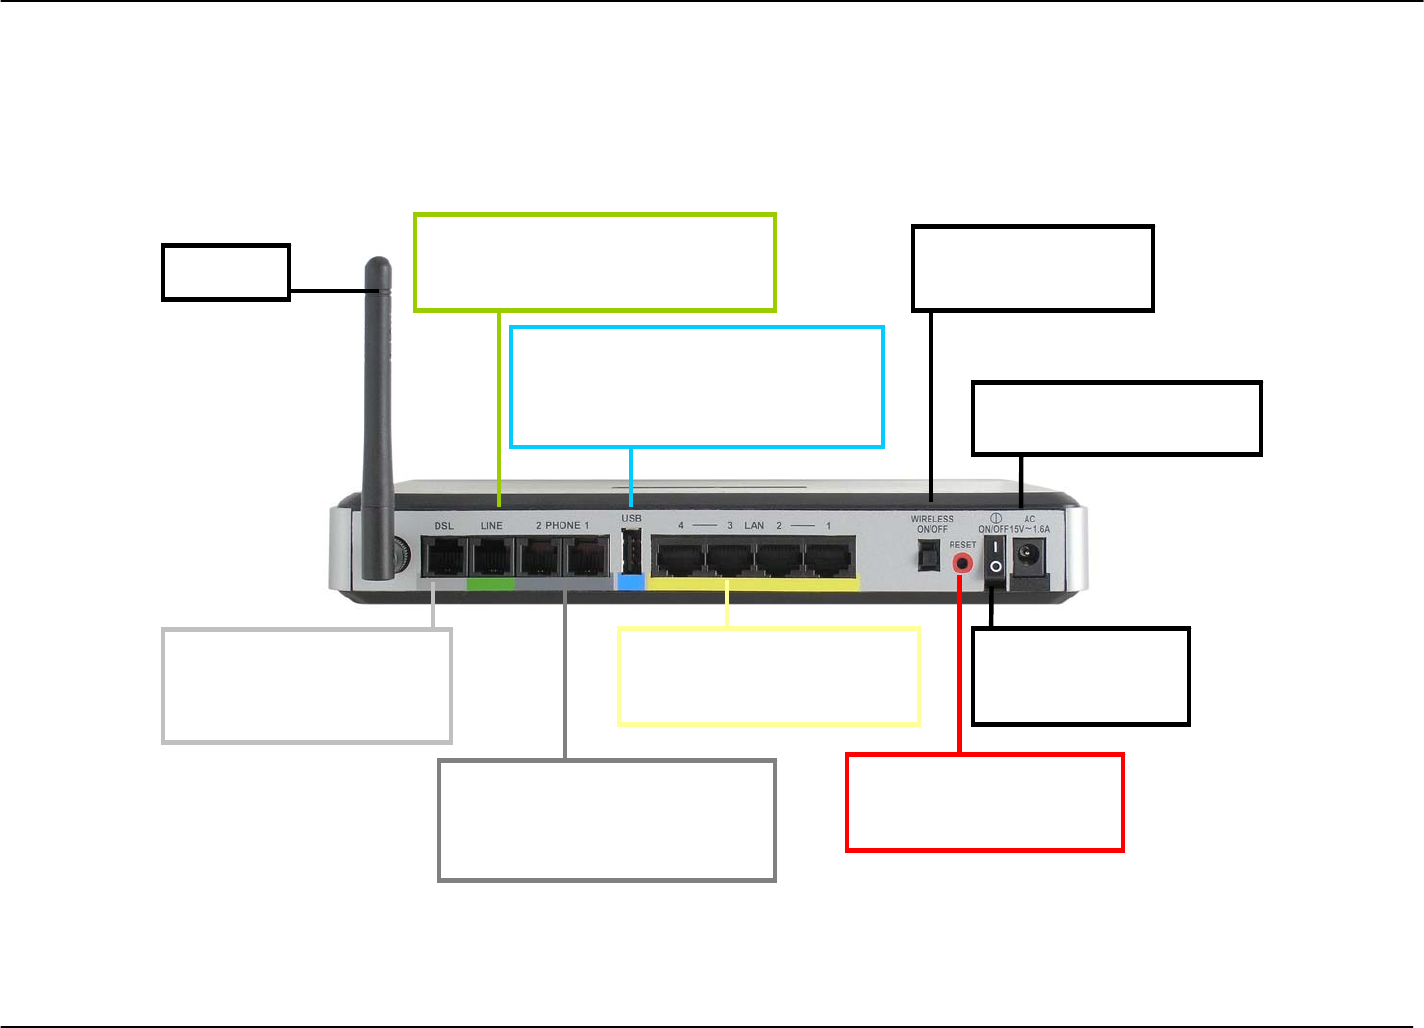
Hardware Overview
Rear Panel
USB port allows you to connect a
PC to the DVA-G3304S using the
supplied USB driver software and
a USB port on the PC.
Line port provides a connection to
your regular telephone line from
the wall outlet.
The 15V 1.6A AC power
adapter plugs in here.
The Wireless On/Off
switch
Antenna
Phone 1 and 2 ports provide
connections to two analog
(POTS) telephones.
The four LAN ports allow
wired connections to
Ethernet enabled devices.
The Power On/Off
switch of the
router.
The reset button returns
the DVA-G3340S to its
factory default settings.
DSL port provides a
connection to your ISP
and the WAN (Internet).
D-Link DVA-G3672B User Manual 5
Chapter 1 Overview
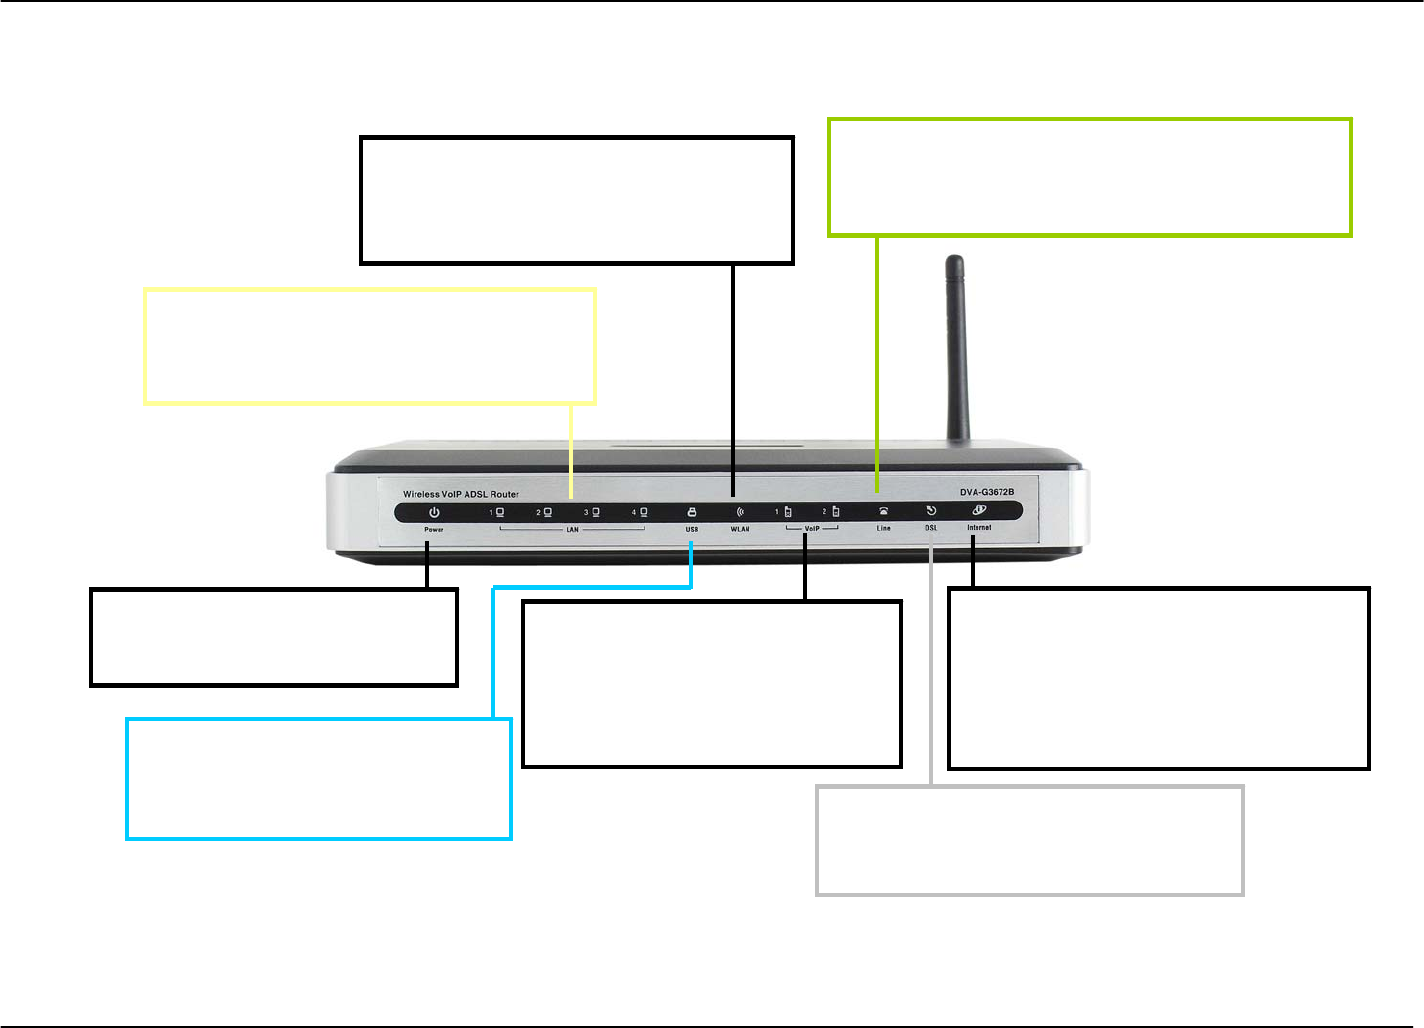
Front Pannel
Power – LED will light green
when power is properly
connected and the Power switch
LAN - These LEDs will be lit green when
devices is connected to these ports. They
will blink when there is data activity on the
connection.
WLAN - This LED will be lit green when
a Wireless LAN connection is detected.
It will blink when there is data activity on
the connection.
VoIP - LED will light green when
the device has SIP registration. It
will flash slowly when the VoIP
phone is in use. The LED will flash
quickly when there is an incoming
ca
ll vi
a
V
o
IP.
USB- This LED will light green
when a USB connection is
detected. It will blink when there is
data activity on the connection.
Internet – LED will light green when
obtaining WAN IP address from IPCP
or DHCP, and DSL connection is build
up. It also will light green when a static
IP address is configured and PPP
negotiation is successfully established.
DSL - This LED will light green when a
DSL is in good sync quality. It will blink
when the device is synchronizing.
Line – The LED will light green when the
PSTN line is connected. It will flash quickly
when an incoming call via PSTN is detected.
D-Link DVA-G3672B User Manual 6

Chapter 1 Overview
Features
• Fully compatible with the 802.11 g standard to provide a wireless data rate of up to 54Mbps
• Backwards compatible with the 802.11 b standard to provide a wireless data rate of up to 11 Mbps
• WPA (Wi Fi Protected Access) authorizes and identifies users based on a secret key that changes automatically at a regular
interval, for example:
• Pre Shared Key mode means that the home user, without a RADIUS server, will obtain a new security key every time the he
or she connects to the network, vastly improving the safety of communications on the network.
• 802.1x Authentication in conjunction with the RADIUS server verifies the identity of would be clients
• Utilizes OFDM technology (Orthogonal Frequency Division Multiplexing)
• User-friendly configuration and diagnostic utilities
• Operates in the 2.4GHz frequency range
• Connects multiple computers to a Broadband (Cable or DSL) modem to share the Internet connection
• Advanced Firewall features
• Supports NAT with VPN pass-through, providing added security
• MAC Filtering
• IP Filtering
• URL Filtering
• Domain Blocking
• Scheduling
• DHCP server supported enables all networked computers to automatically receive IP addresses
• Web-based interface for Managing and Configuring
• Access Control to manage users on the network
• Supports special applications that require multiple connections
• Equipped with 4 10/100Mbps Ethernet ports, 1 WAN port, Auto MDI/MDIX
D-Link DVA-G3672B User Manual 7
Chapter 2 Configuration
Configuration
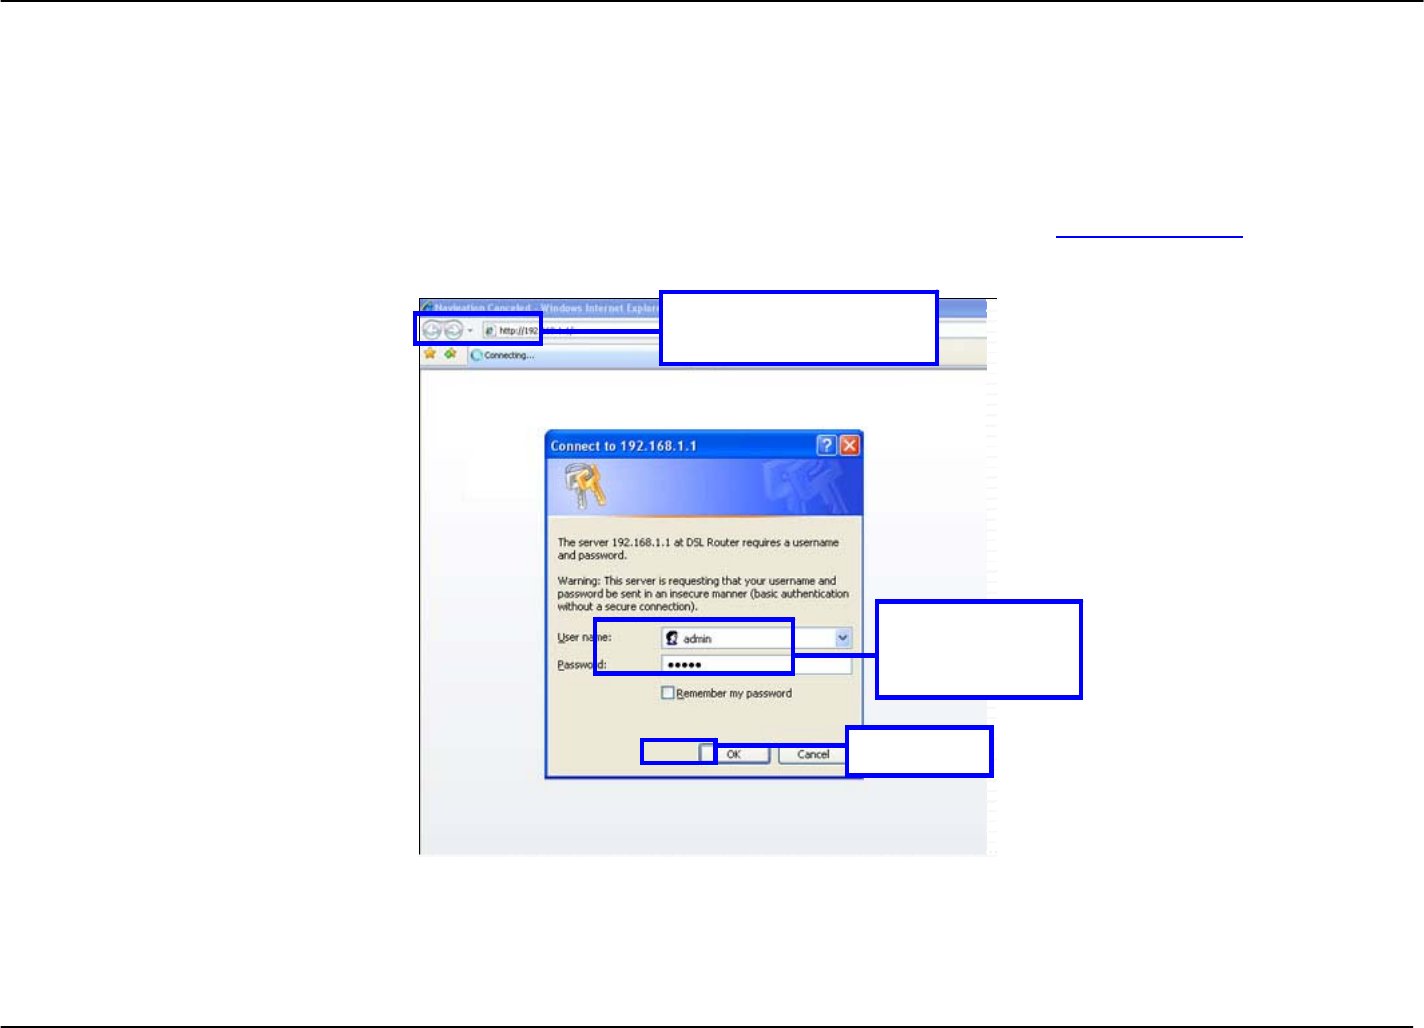
Log in to Web-based Configuration
Whenever you want to configure your network or the DVA-G3672B, you can access the Configuration Menu by opening the web-
browser and typing in the IP Address of the DVA-G3672B. The DVA-G3672B default IP address is: http://192.168.1.1 Both default
username and password are admin.
Type “admin” in
User Name and
Password fields.
Type default IP address:
http://192.168.1.1
Click OK.
1. Open a web browser.
2. Type in the default IP address of the Router in the Address field.
3. Press enter to see a dialog box requesting for username and password.
4. Type admin in both User Name and Password fields.
5. Click OK to see the following webpage.
D-Link DVA-G3672B User Manual 8
Chapter 2 Configuration
D-Link DVA-G3672B User Manual 9
Chapter 2 Configuration
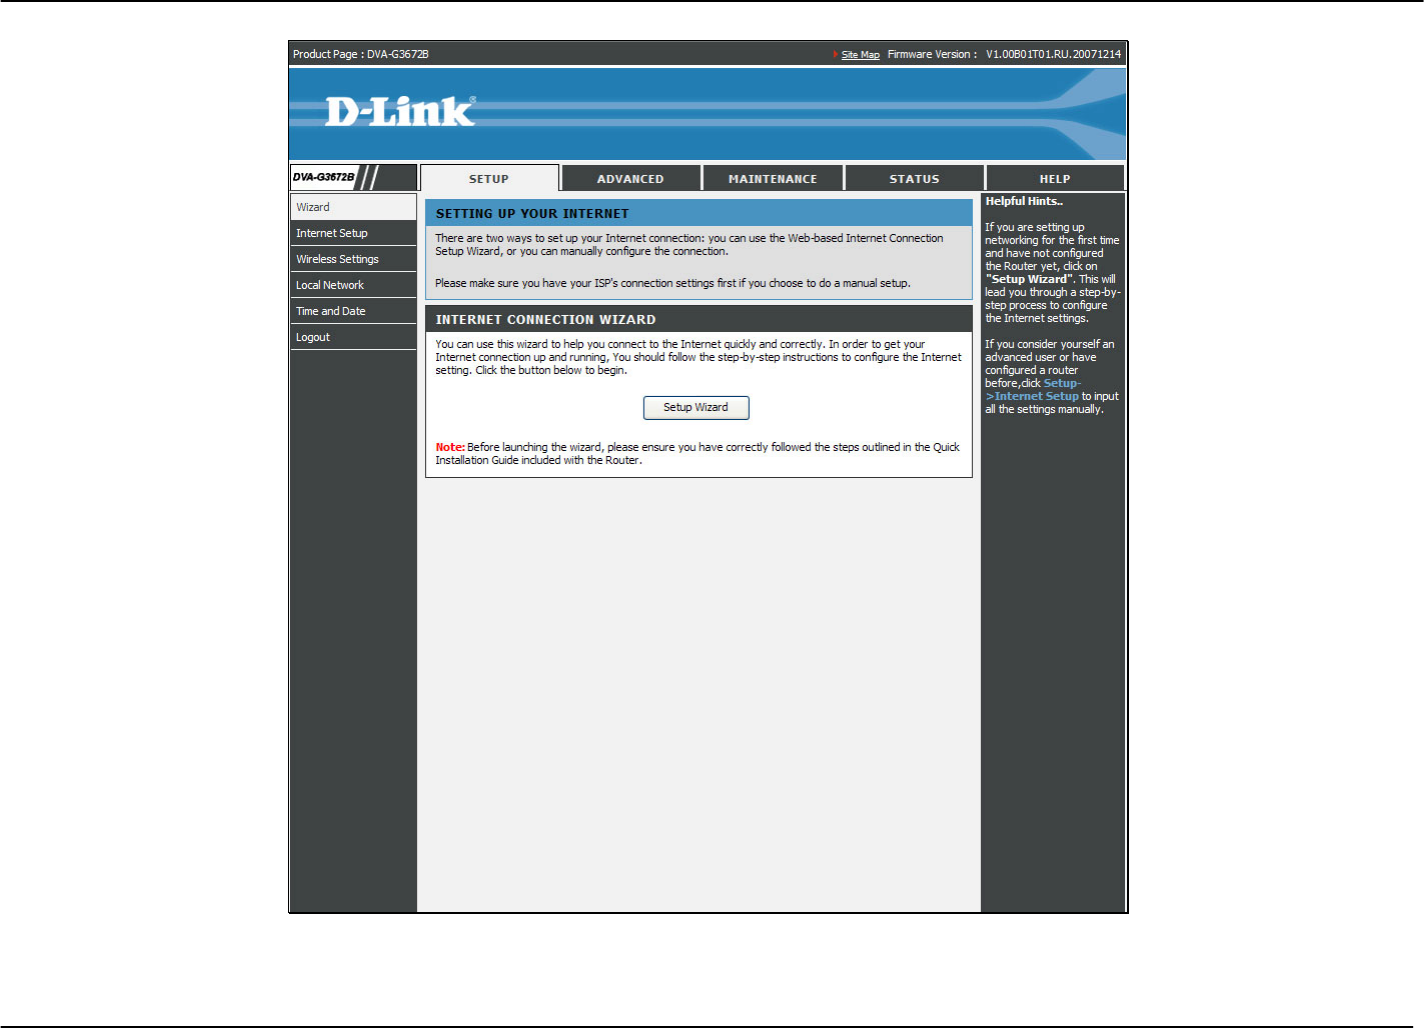
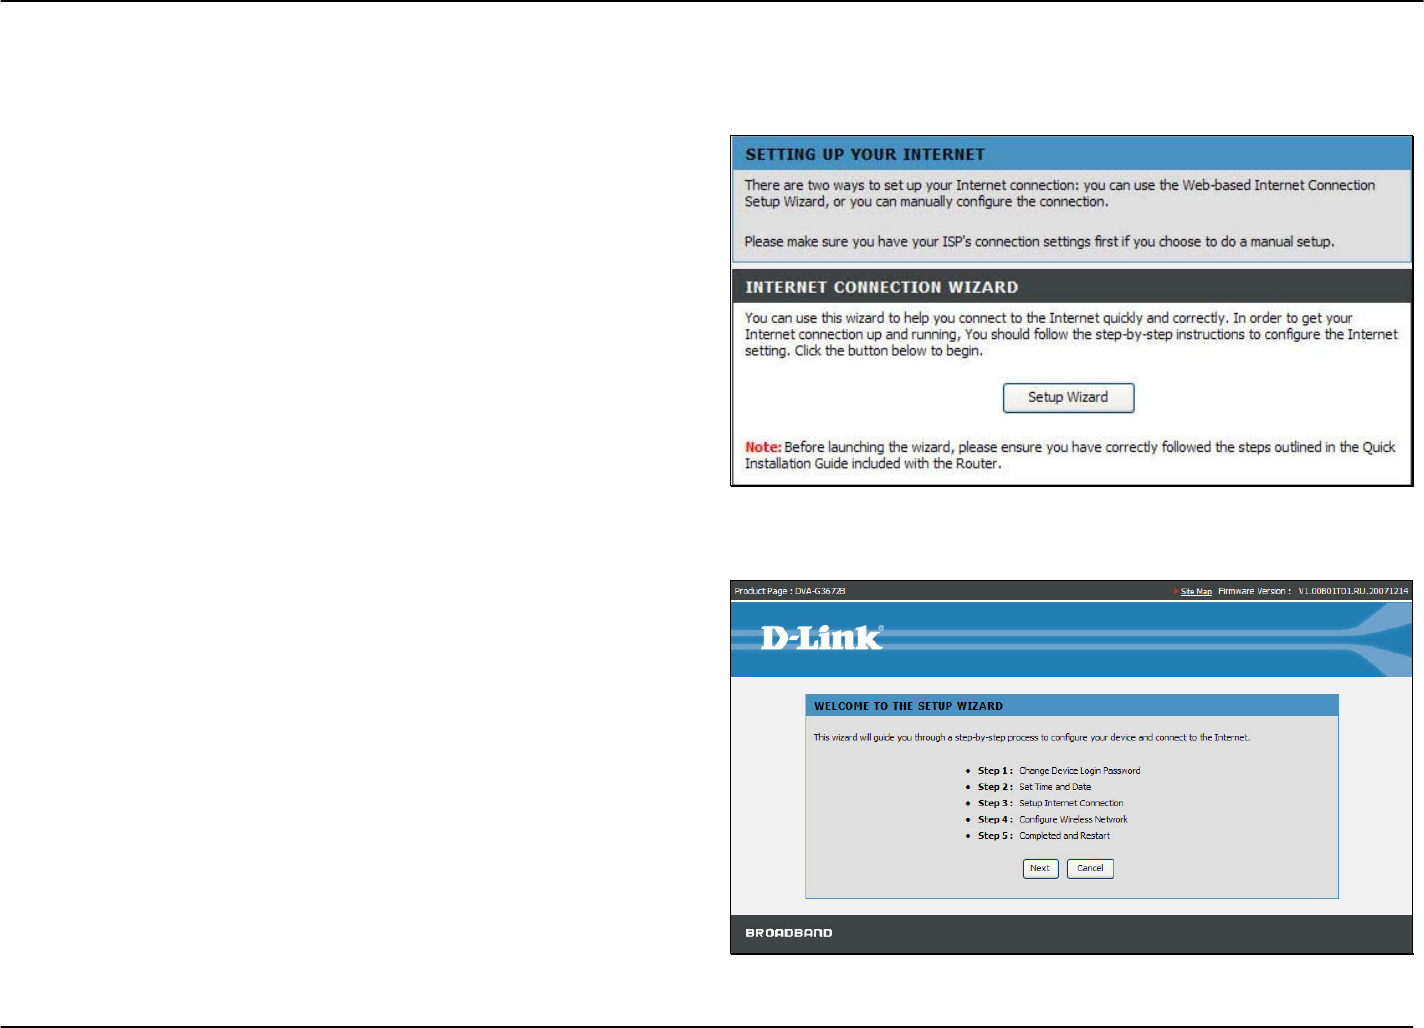
Quick Setup
The Wizard setup helps you to configure the Internet connection quickly and correctly. To access the main page, click Wizard in the
Setup directory.
Click the Setup Wizard link in the middle of the top of the
window of the Router’s opening page to launch a series of
setup windows.
Quick Setup – Opening Window
The first window of the Setup Wizard lists the basic steps in the
process. These steps are as follows:
1. Change the Router’s password.
2. Configure time and date of the Router.
3. Configure the Internet connection.
4. Configure the Wireless network connection.
5. Confirm the settings and restart the Router.
Click the Next button to continue.
D-Link DVA-G3672B User Manual 10
Chapter 2 Configuration
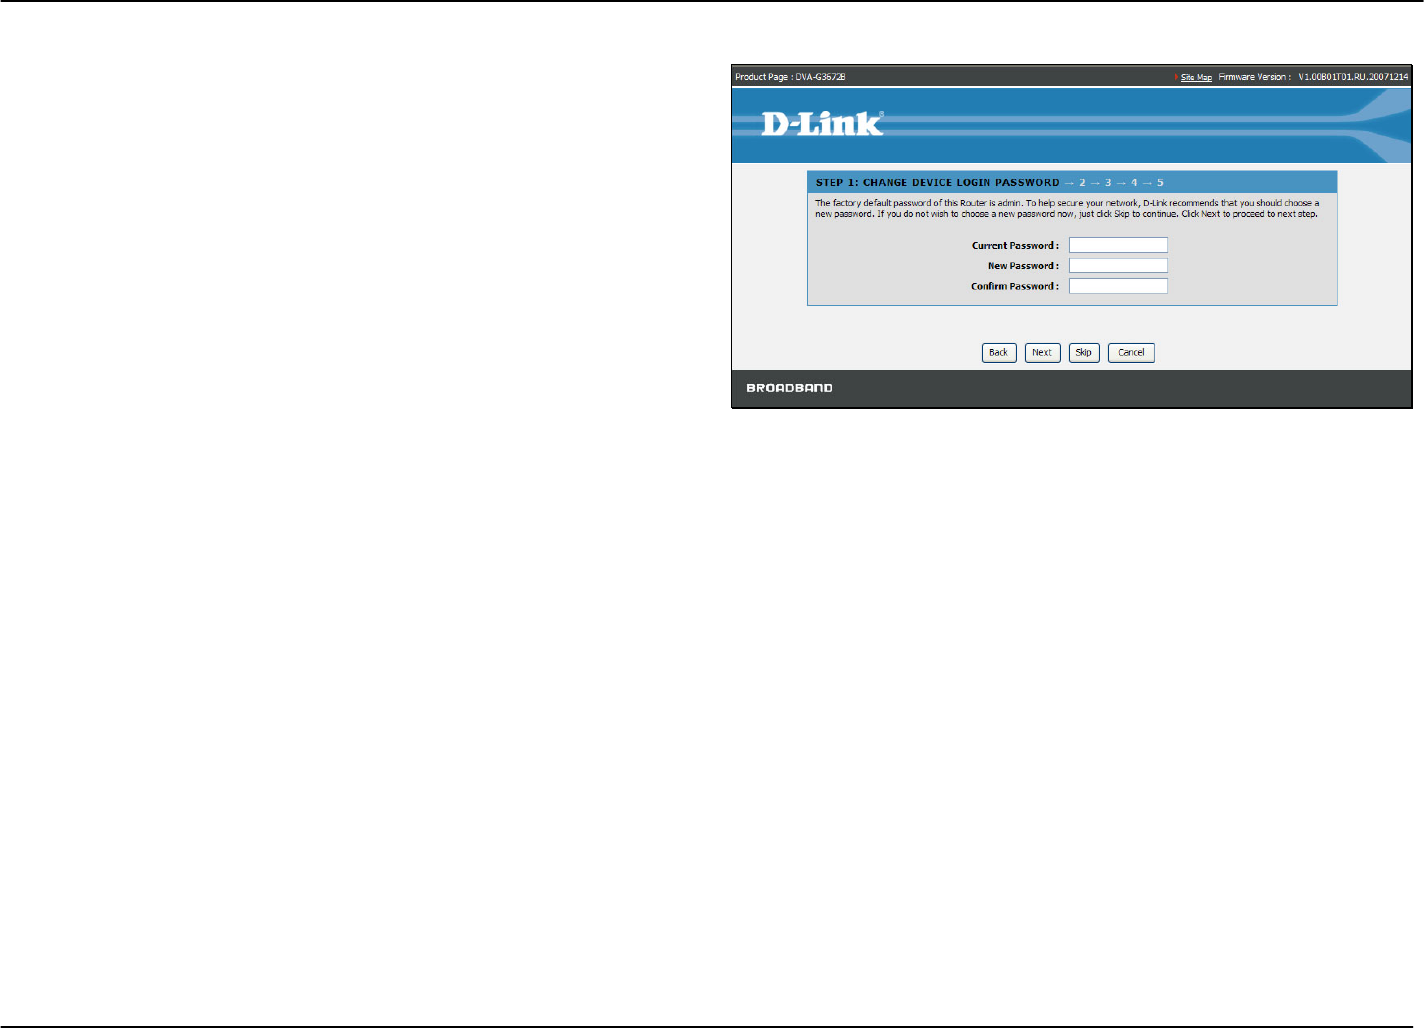
Quick Setup – Change the Router’s Password
This window of the Setup Wizard is used to change the Router
password. D-Link recommends to help secure your network, the
user change the Current Password from the factory default
“admin.” The New Password should be between 1 and 16
alphanumeric characters.
Once you have filled out the fields in this window, including re-
typing the new password in the Confirm Password field, click
the Next button to continue.
If you do not want to change the password, click the Skip
button to proceed to the next step.
Once you have filled out the fields in this window, including re-
typing the new password in the Confirm Password field, click
the Next button to continue.
If you do not want to change the password, click the Skip
button to proceed to the next step.
D-Link DVA-G3672B User Manual 11
Chapter 2 Configuration
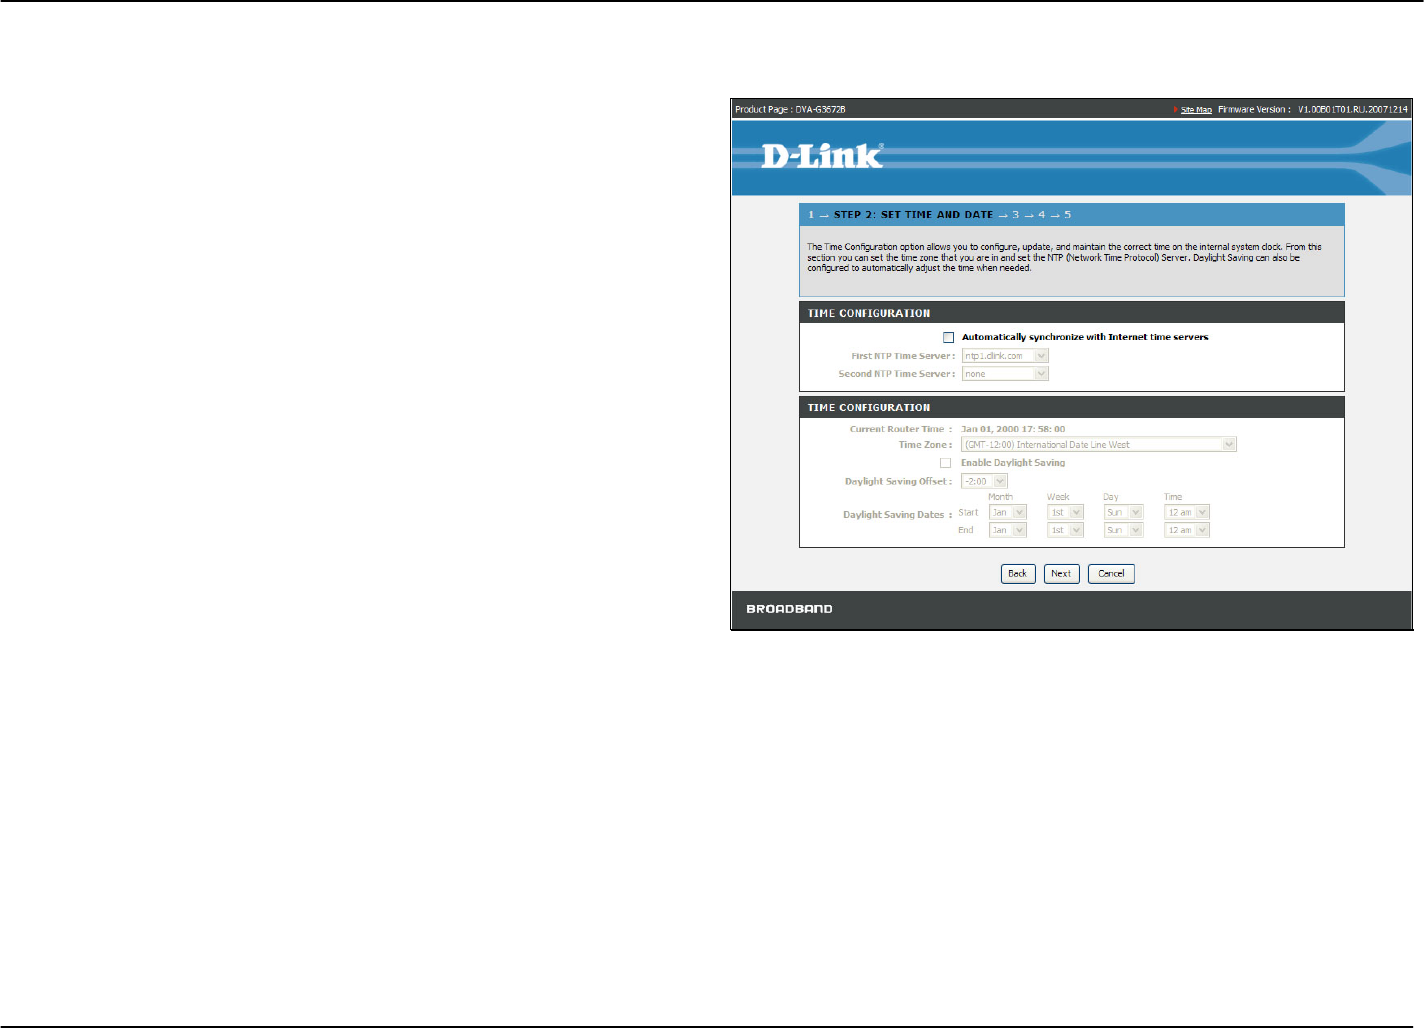
Quick Setup – Set Time and Date
This page allows you to configure the time and date of the Router.
Select Automatically synchronize with Internet time servers
to select first and second NTP (Network Time Protocol) server.
Select a time zone in which you are located from the Time
Zone list.
Select Enable Daylight Saving and configure the daylight
saving information, if the area you are located has daylight
saving.
Click the Next button to continue.
D-Link DVA-G3672B User Manual 12
Chapter 2 Configuration
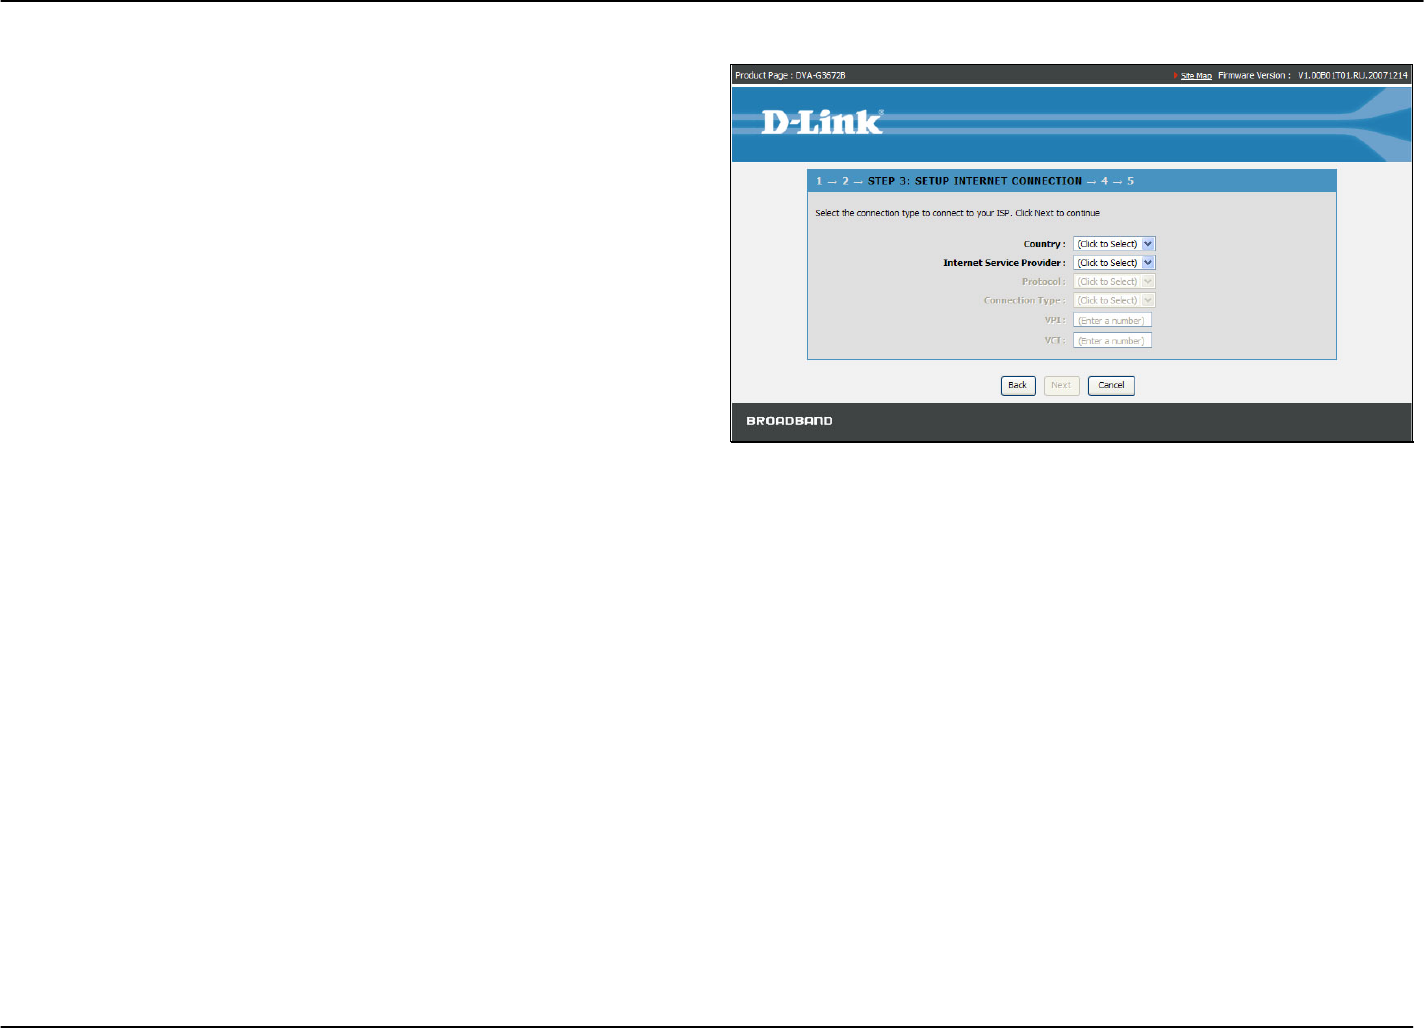
Quick Setup – Setup Internet Connection
Now use the drop-down menus to select the Country, ISP
Provider, Protocol and Connection Type used for the Internet
connection, and enter VPI and VCI values if applicable. Your
ISP has given this information to you—any information that is
not required for your provider will automatically be grayed out in
this window and subsequent Quick Setup windows.
The available Protocol modes are: Dynamic IP, Static IP,
PPPoE, PPPoA and Bridge.
The Connection Type options are 1483 Bridged IP LLC, 1483
Bridged IP VC-Mux, 1483 Routed IP LLC, 1483 Routed IP VC-
Mux, PPPoE LLC, PPPoE VC-Mux, PPPoA LLC, and PPPoA
VC-Mux.
Once the Protocol option is selected, coordinate options appear
below in the window. Enter values as instructed by your ISP.
Click the Next button when you are finished to proceed to the
next Setup Wizard window.
D-Link DVA-G3672B User Manual 13
Chapter 2 Configuration
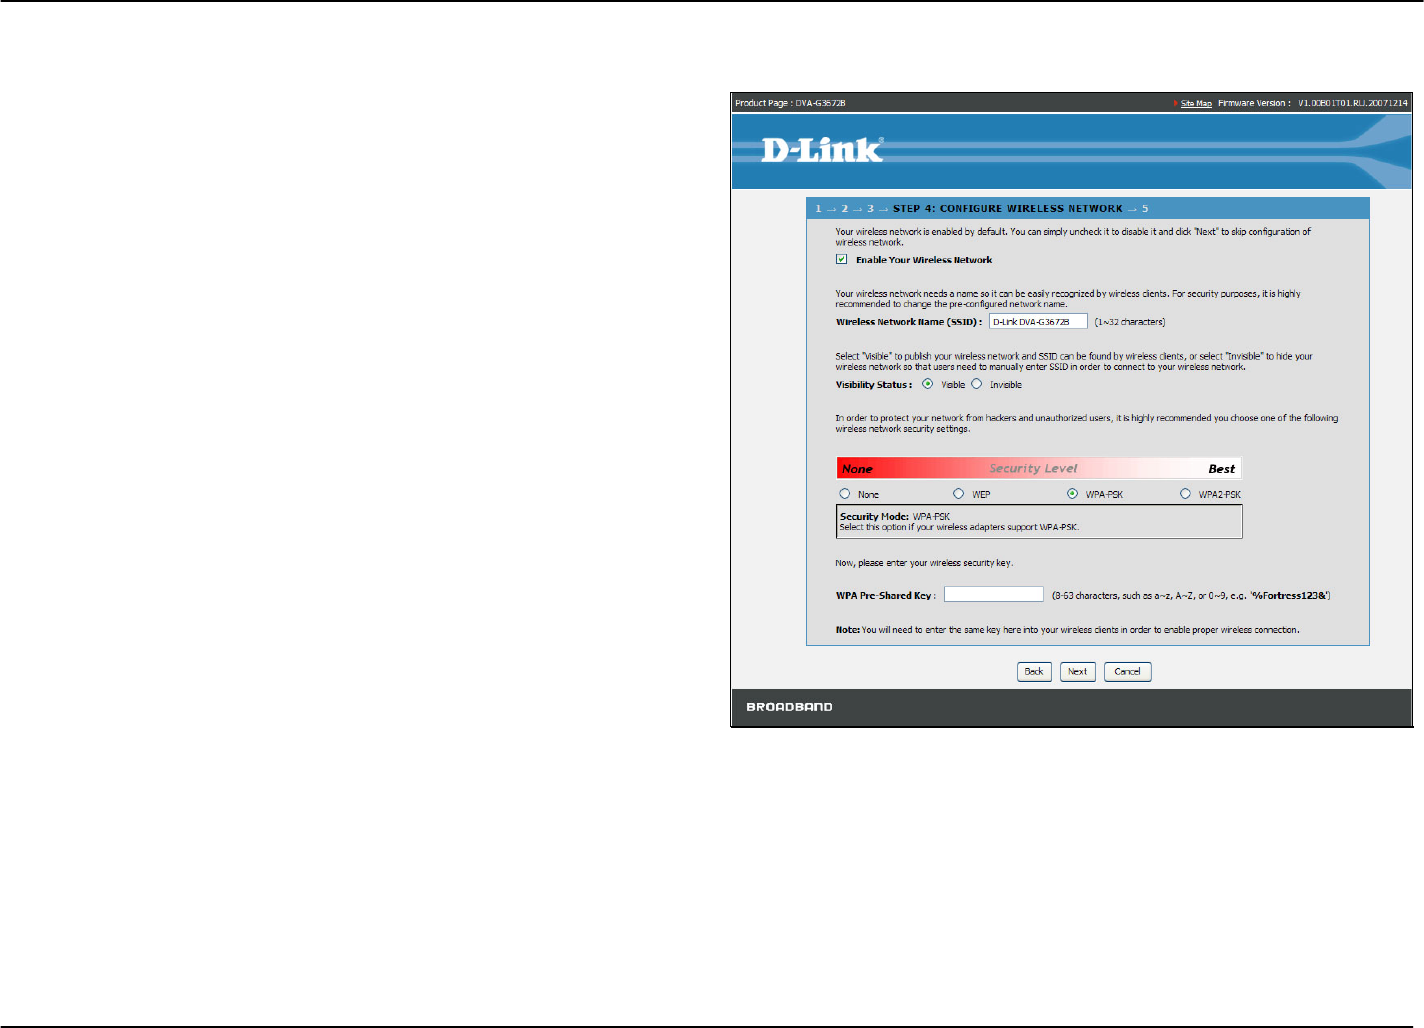
Quick Setup – Configure Wireless Network
This page helps you to configure the Wireless settings.
Select Enable your Wireless Network by default and
configure the SSID, the visibility of SSIC and the Wireless
network security. Deselect Enable your Wireless Network for
skipping the wireless configurations.
Click the Next button to continue.
D-Link DVA-G3672B User Manual 14
Chapter 2 Configuration
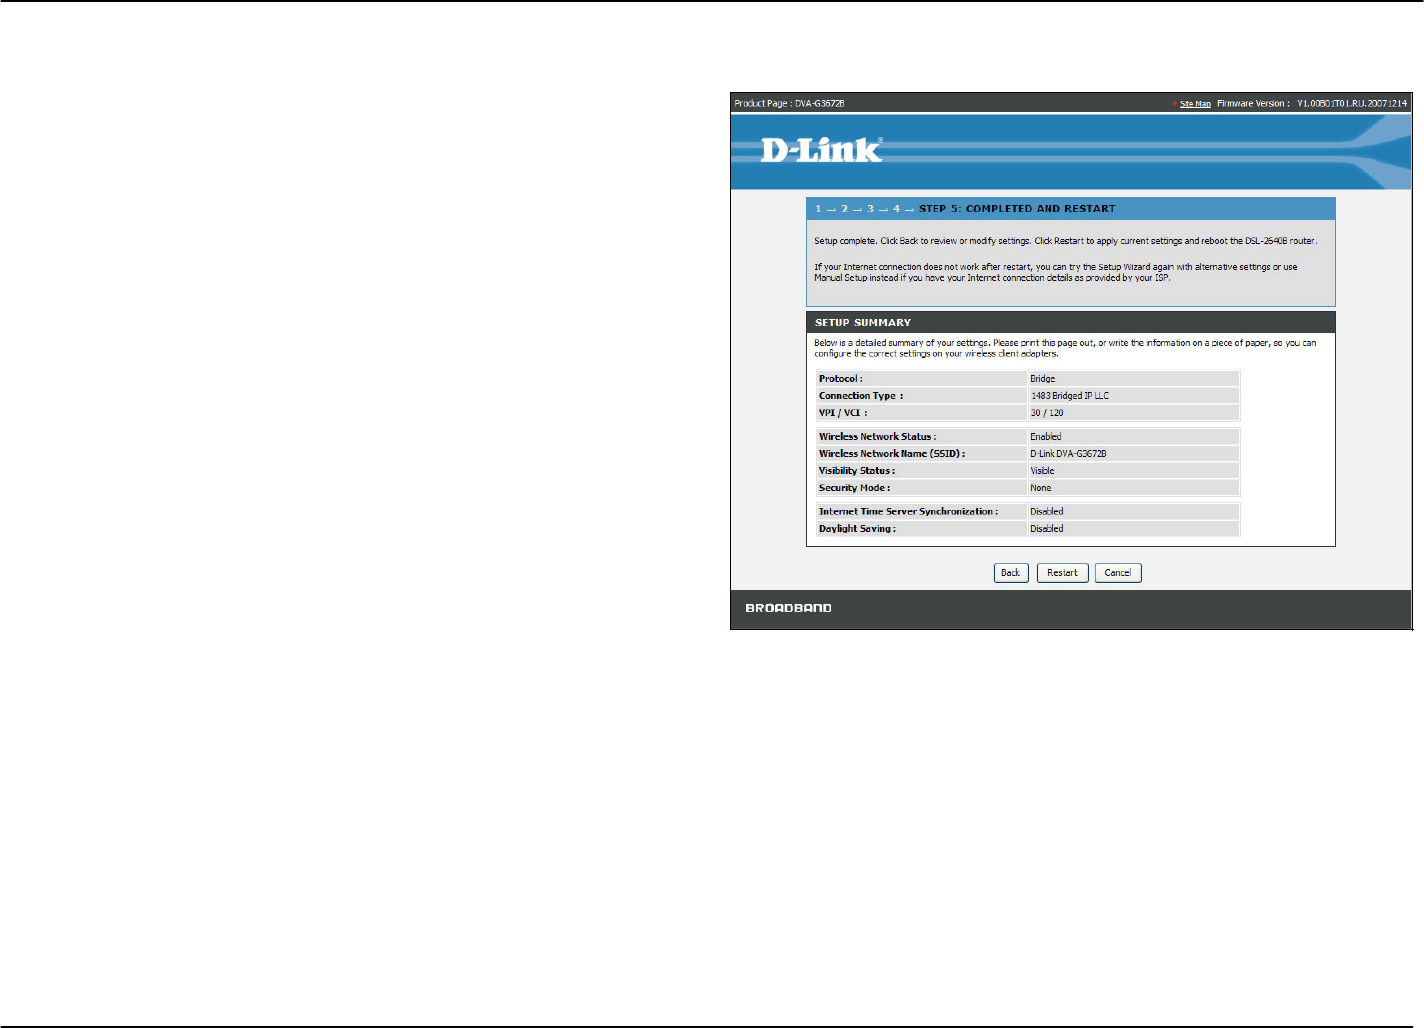
Quick Setup – Restart the Router
This page displays the settings you made in the Wizard.
Click Restart to save current settings and restart the Router.
D-Link DVA-G3672B User Manual 15
Chapter 2 Configuration
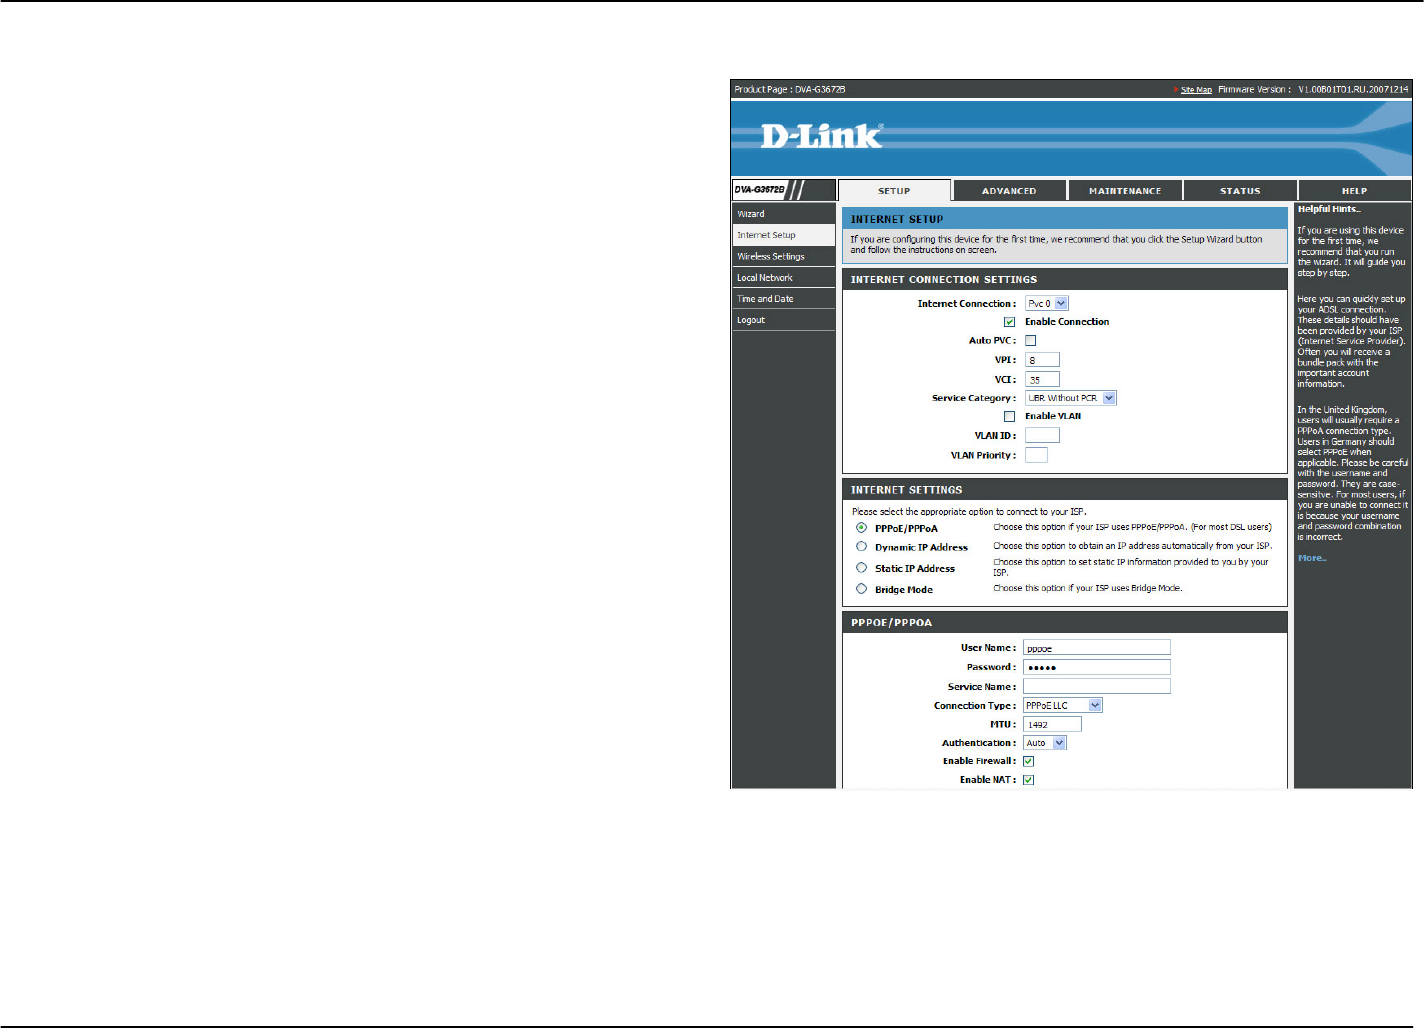
Setup – Internet Setup
To configure the Router’s basic configuration settings without
running the Setup Wizard, you can access the menus used to
configure Internet, Wireless, Local Network, and Time and Date
settings directly from the Setup directory.
To access the Internet Setup window, click Internet Setup on
the left side of the first window that appears when you
successfully access the web manager.
Internet Connection Settings
1. Select a Connection ID in the Internet Connection drop-
down list.
2. Select Enable Connection to configure the Internet
Settings section.
3. If you are instructed to change the VPI or VCI values,
type in the values assigned for your account, or select
Auto PVC. Service Category drop-down menu is set at
their default values for now.
4. Select Enable VLAN, and configure VLAN ID and VLAN
Priority, if you want to use VLAN to group your networks.
Click the PPPoE/PPPoA radio button to access the first Manual
Internet Connection Setup window:
D-Link DVA-G3672B User Manual 16
Chapter 2 Configuration
Internet Setup – PPPoE/PPPoA
To configure a PPPoE or PPPoA type connection, follow these
steps:
1. Type the Username and Password used for your Internet
account. A typical User Name will be in the form
“user1234@isp.co.uk.” The Password may be assigned
to you by your ISP or you may have selected it when you
set up the account with your ISP. The Service Name field
is used for the name of your Internet Service Provider.
This is optional.
2. Choose the Connection Type from the drop-down menu.
This defines both the connection protocol and
encapsulation method used for your ADSL service. The
available options are PPPoE LLC, PPPoE VC-Mux,
PPPoA LLC and PPPoA VC-Mux. If you have not been
provided specific information for the Connection Type
setting, leave the default setting.
3. Leave the MTU value at the default setting unless you
have specific reasons to change this.
4. Choose the correct Authentication type from the drop-
down menu. Most users will want to leave the setting on
Auto. PAP and CHAP are the other two options. The
Auto setting will automatically detect the correct type of
authentication.
5. The Enable Firewall should remain selected for most
users. If you deselect to disable this you will not be able
to use the some of the features configured in the firewall
and filter windows located in the Advanced directory.
The next chapter contains a separate section describing
these Advanced features.
6. Enable NAT should remain selected. If you disable NAT,
you will not be able to use more than one computer for
Internet connections. If you are using multiple virtual
connections, NAT functions system-wide, therefore if it is
not selected, NAT will be disabled on all connections.
D-Link DVA-G3672B User Manual 17

Chapter 2 Configuration
7. Most users will want to keep Enable IGMP selected as it allows IGMP packets to go through the WAN interface in both
directions.
8. Leave Enable Default deselected, if you have an alternative route for Internet traffic you may disable this without effecting the
Router’s connection. Select Enable Default Route if you want to use the Router as the default route to the Internet for your
LAN. Whenever a computer on the LAN attempts to access the Internet, the Router becomes the Internet gateway to the
computer.
9. Select Enable PPTP and enter the Tunnel Name, PPTP Server IP Address, UserName, Password, Peer IP Address and Peer
Subnet Mask to implement a tunnel sending PPP session to the peer.
10. When you are satisfied that all the settings are configured correctly, click the Apply button. This will save the settings.
11. Go to Maintenance -> System and click Reboot to restart the device and let your changes take effect.
D-Link DVA-G3672B User Manual 18
Chapter 2 Configuration
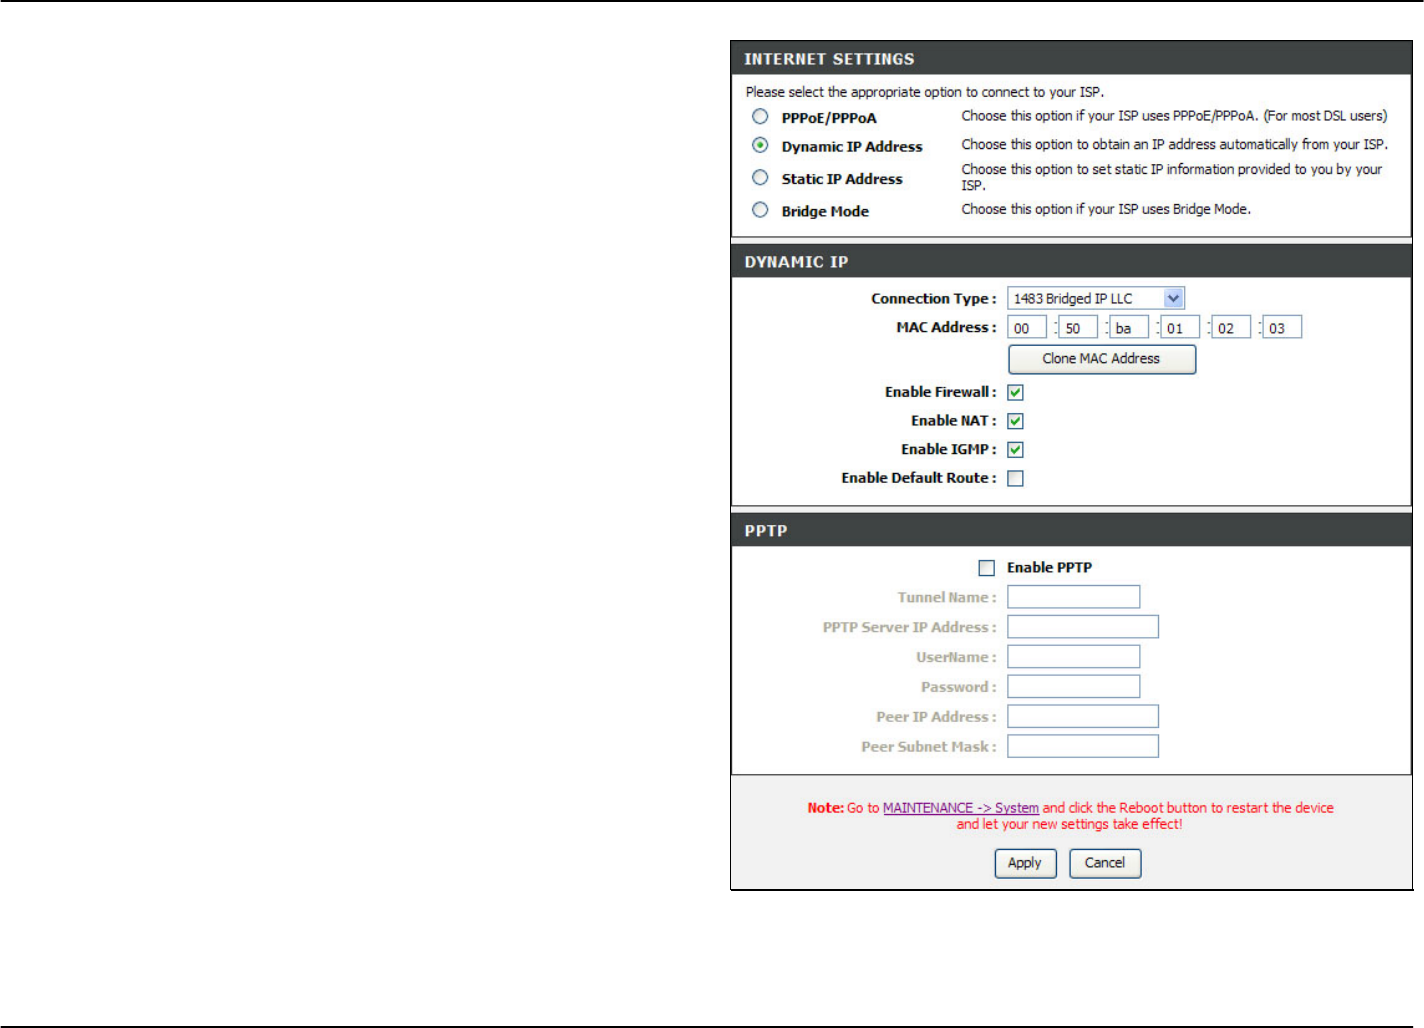
Internet Setup – Dynamic IP Address
A Dynamic IP Address connection configures the Router to
automatically obtain its global IP address from a DHCP server
on the ISP’s network. The service provider assigns a global IP
address from a pool of addresses available to the service
provider. Typically the IP address assigned has a long lease
time, so it will likely be the same address each time the Router
requests an IP address.
To configure a Dynamic IP Address WAN connection, follow
these steps:
1. Choose the Connection Type from the drop-down menu.
This defines both the connection protocol and
encapsulation method used for your ADSL service. The
available options are 1483 Bridged IP LLC and 1483
Bridged IP VC-Mux. If you have not been provided
specific information for the Connection Type setting,
leave the default setting.
2. Some ISPs record the unique MAC Address of your
computer’s Ethernet adapter when you first access their
network. This can prevent the Router (which has a
different MAC address) from being allowed access to the
ISPs network (and the Internet). To clone the MAC
address of your computer’s Ethernet adapter, click the
Copy MAC Address button.
3. The Enable Firewall should remain selected for most
users. If you deselect to disable this you will not be able
to use the some of the features configured in the firewall
and filter windows located in the Advanced directory.
The next chapter contains a separate section describing
these Advanced features.
4. Enable NAT should remain selected. If you disable NAT,
you will not be able to use more than one computer for
Internet connections. If you are using multiple virtual
connections, NAT functions system-wide, therefore if it is
not selected, NAT will be disabled on all connections.
D-Link DVA-G3672B User Manual 19

Chapter 2 Configuration
5. Most users will want to keep Enable IGMP selected as it allows IGMP packets to go through the WAN interface in both
directions.
6. Leave Enable Default deselected, if you have an alternative route for Internet traffic you may disable this without effecting the
Router’s connection. Select Enable Default Route if you want to use the Router as the default route to the Internet for your
LAN. Whenever a computer on the LAN attempts to access the Internet, the Router becomes the Internet gateway to the
computer.
7. Select Enable PPTP and enter the Tunnel Name, PPTP Server IP Address, UserName, Password, Peer IP Address and Peer
Subnet Mask to implement a tunnel sending PPP session to the peer.
8. When you are satisfied that all the settings are configured correctly, click the Apply button. This will save the settings.
9. Go to Maintenance -> System and click Reboot to restart the device and let your changes take effect.
D-Link DVA-G3672B User Manual 20
Chapter 2 Configuration
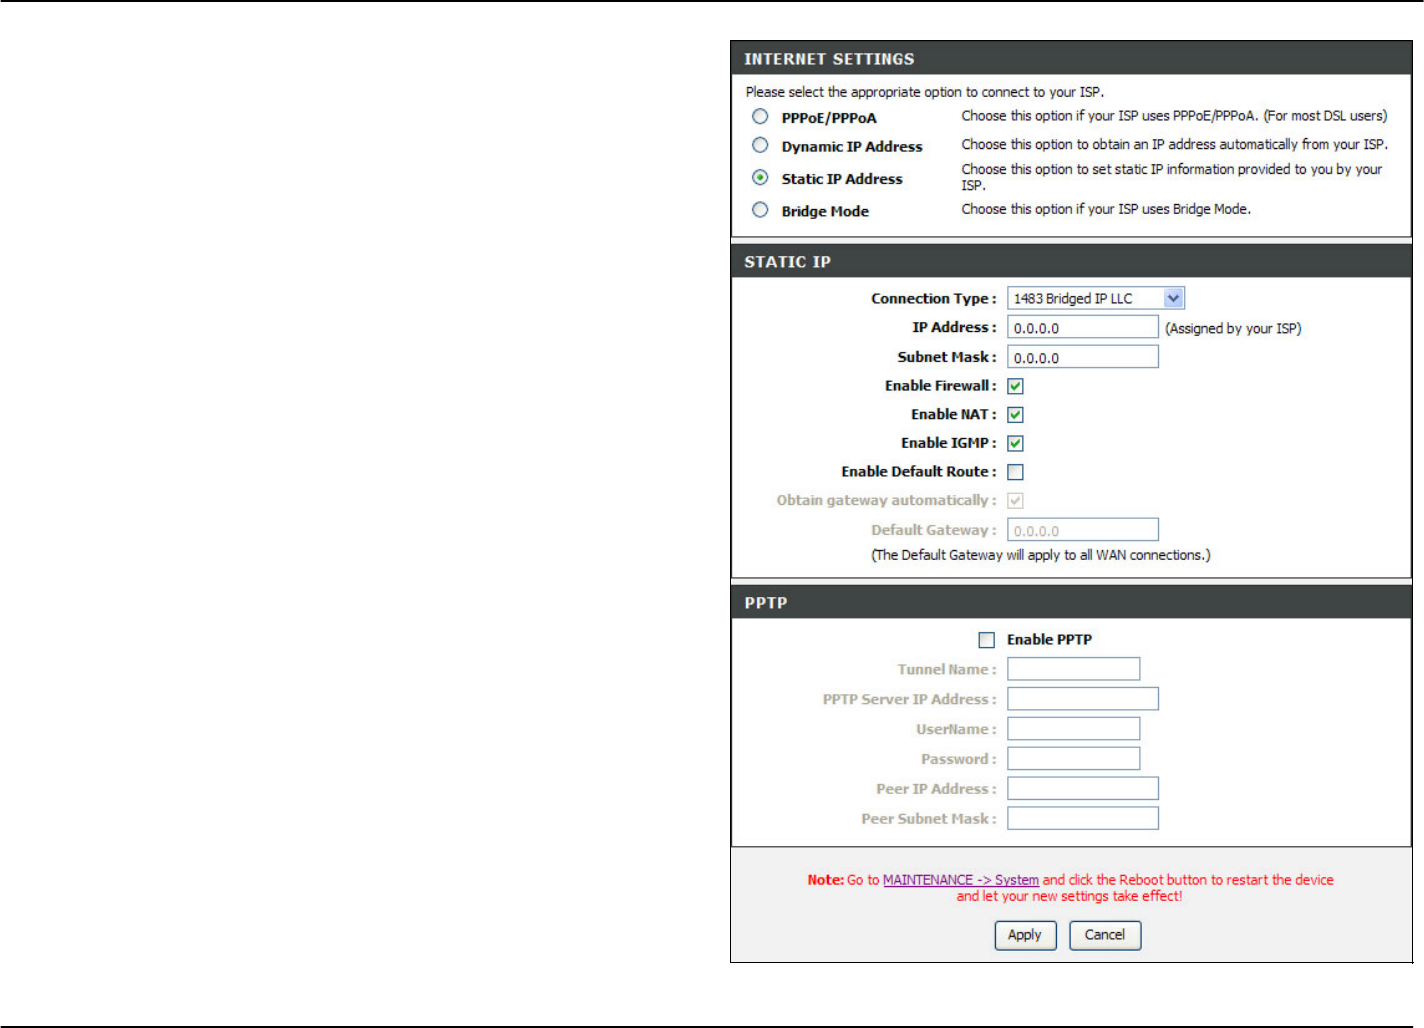
Internet Setup – Static IP
When the Router is configured to use Static IP Address
assignment for the WAN connection, you must manually assign
a global IP Address, Subnet Mask, and Default Gateway IP
address used for the WAN connection.
To configure a Static IP Address WAN connection, follow these
steps:
1. Choose the Connection Type from the drop-down menu.
This defines both the connection protocol and
encapsulation method used for your ADSL service. The
available options are 1483 Bridged IP LLC, 1483 Bridged
IP VC-Mux, 1483 Routed IP LLC and 1483 Routed IP
VC-Mux. If you have not been provided specific
information for this setting, leave the default setting.
2. Change the IP Address, Subnet Mask, and Default
Gateway as instructed by your ISP. These are the global
IP settings for the WAN interface. This is the “visible” IP
address of your account. Your ISP should have provided
these IP settings to you. If your ISP also asks you to
change DNS server IP addresses, enter the Preferred
DNS Server and Alternate DNS Server information
manually.
3. The Enable Firewall should remain selected for most
users. If you deselect to disable this you will not be able
to use the some of the features configured in the firewall
and filter windows located in the Advanced directory.
The next chapter contains a separate section describing
these Advanced features.
4. Enable NAT should remain selected. If you disable NAT,
you will not be able to use more than one computer for
Internet connections. If you are using multiple virtual
connections, NAT functions system-wide, therefore if it is
not selected, NAT will be disabled on all connections.
5. Most users will want to keep Enable IGMP selected as it
allows IGMP packets to go through the WAN interface in
D-Link DVA-G3672B User Manual 21

Chapter 2 Configuration
both directions.
6. Leave Enable Default deselected, if you have an alternative route for Internet traffic you may disable this without effecting the
Router’s connection. Select Enable Default Route if you want to use the Router as the default route to the Internet for your
LAN. Whenever a computer on the LAN attempts to access the Internet, the Router becomes the Internet gateway to the
computer.
7. Select Enable PPTP and enter the Tunnel Name, PPTP Server IP Address, UserName, Password, Peer IP Address and Peer
Subnet Mask to implement a tunnel sending PPP session to the peer.
8. When you are satisfied that all the settings are configured correctly, click the Apply button. This will save the settings.
9. Go to Maintenance -> System and click Reboot to restart the device and let your changes take effect.
D-Link DVA-G3672B User Manual 22

Chapter 2 Configuration
Internet Setup – Bridge Mode
For Bridged connections it will be necessary for most users to
install additional software on any computer that will use the
Router for Internet access. The additional software is used for
the purpose of identifying and verifying your account, and then
granting Internet access to the computer requesting the
connection. The connection software requires the user to enter
the User Name and Password for the ISP account. This
information is stored on the computer, not in the Router.
To configure a Static IP Address WAN connection, follow these
steps:
1. Choose the Connection Type from the drop-down menu.
This defines both the connection protocol and
encapsulation method used for your ADSL service. The
available options are 1483 Bridged IP LLC and 1483
Bridged IP VC-Mux. If you have not been provided
specific information for this setting, leave the default
setting.
2. When you are satisfied that all the settings are
configured correctly, click the Apply button. This will
save the settings.
Go to Maintenance -> System and click Reboot to restart the
device and let your changes take effect.
D-Link DVA-G3672B User Manual 23
Chapter 2 Configuration
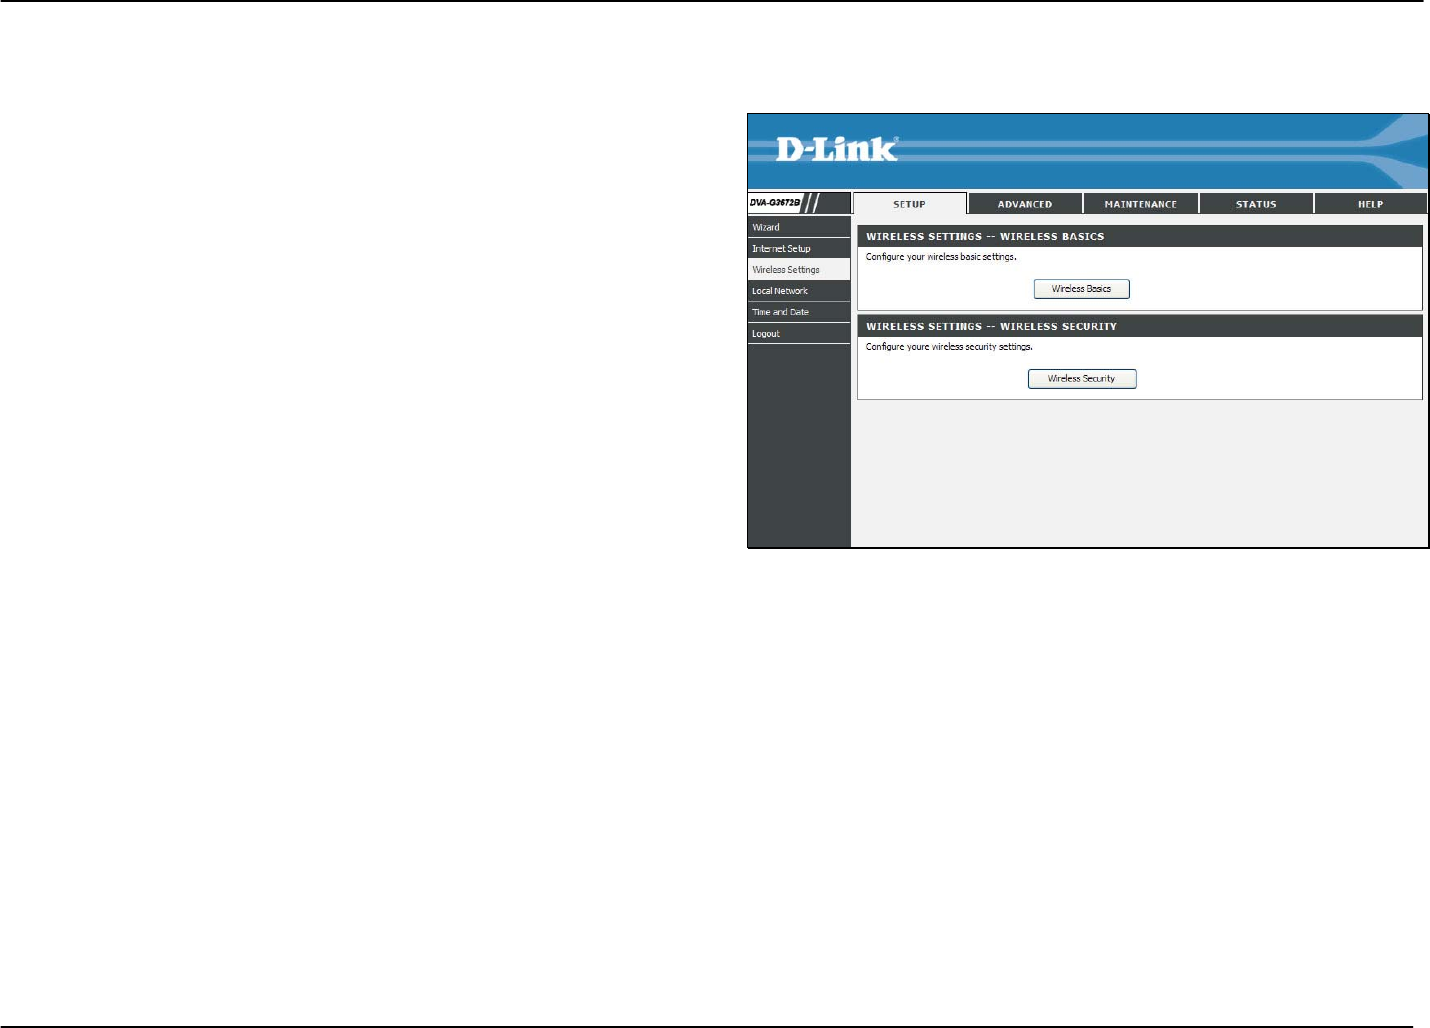
Setup – Wireless Settings
To access Wireless Settings, click Wireless Settings in the Setup directory.
It has two subcategories: Wireless Basics and Wireless
Security. You can either point to the Wireless Settings on the
left window and click one of the submenus, or click one of the
buttons in the Wireless Settings window.
D-Link DVA-G3672B User Manual 24
Chapter 2 Configuration
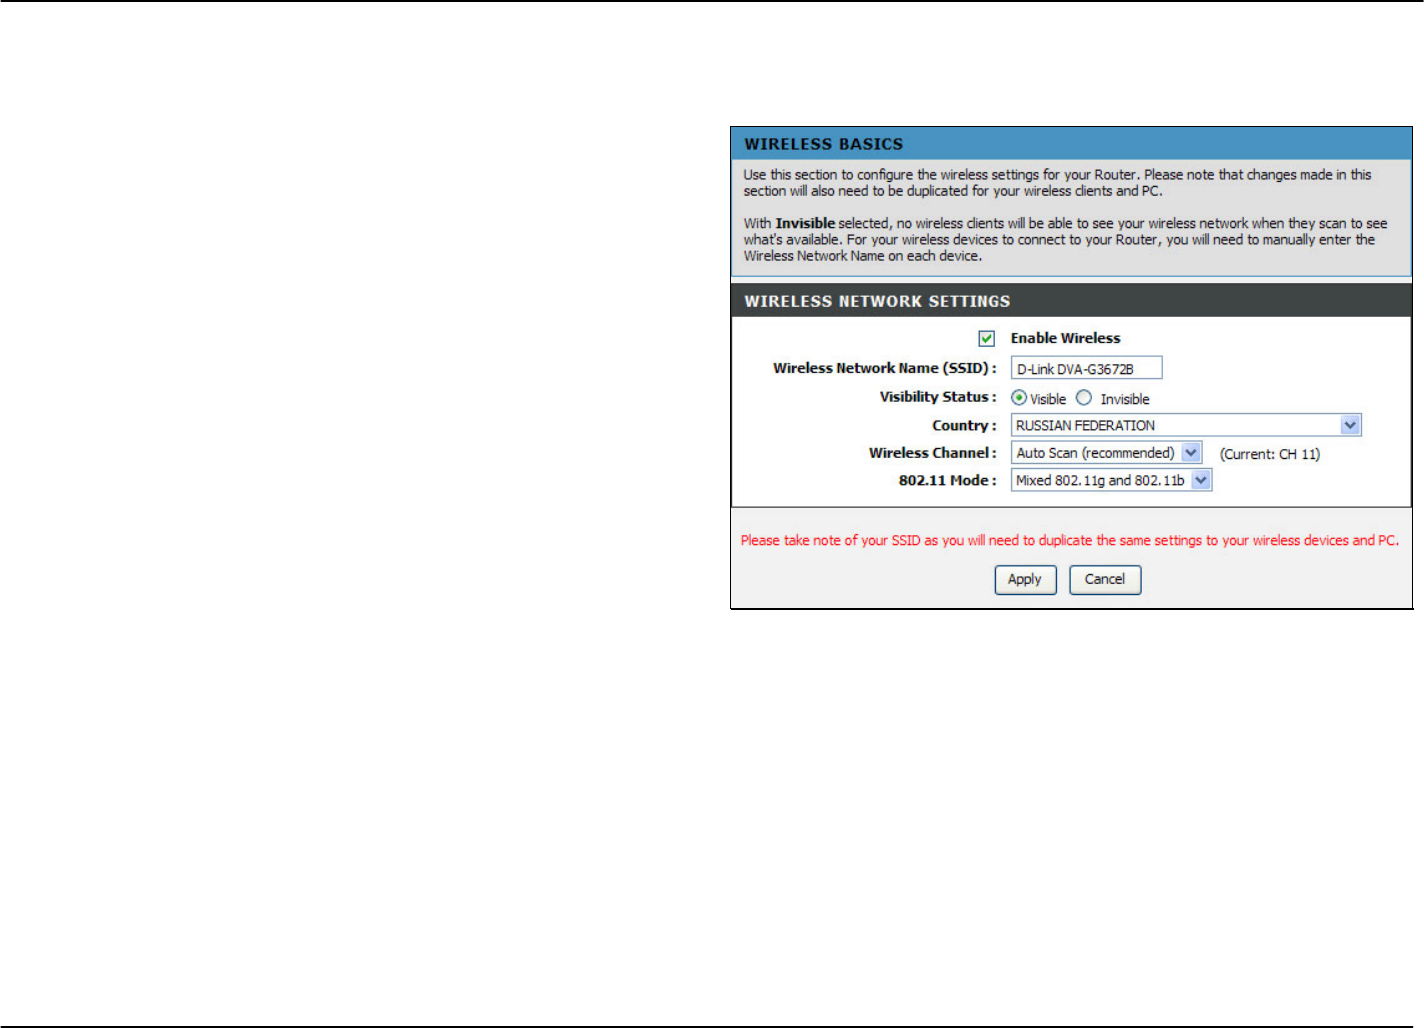
Wireless Settings – Wireless Basics
To access Wireless Basics, point to the Wireless Settings on the left window and click Wireless Basics submenu, or click the
Wireless Basics button in the Wireless Settings window.
The two essential settings for wireless LAN operation are the
Wireless Network Name (SSID) and Wireless Channel. The
SSID (Service Set Identifier) is used to identify a group of
wireless LAN components. The SSID can be visible (broadcast)
or hidden (not broadcast).
Follow the instructions below to change basic wireless settings.
1. The Wireless LAN is enabled by default. To disable the
wireless interface, click to deselect the Enable Wireless
check box. If the wireless interface has been disabled,
click the Enable Wireless check box again to select it.
2. The Wireless Network Name (SSID) can be changed to
suit your wireless network. Remember that any wireless
device using the access point must have the same SSID
and use the same channel.
3. The Visibility Status is Visible by default. To disable
SSID Visibility Status, click the Invisible radio button.
4. Select a country where the Router is located in the
Country drop-down list.
5. The Wireless Channel may be changed to channels
that are available in your region. Channels available for
wireless LAN communication are subject to regional and
national regulation.
6. Select a wireless protocol in the 802.11 Mode drop-down
list.
7. Click Apply to save the settings.
D-Link DVA-G3672B User Manual 25
Chapter 2 Configuration
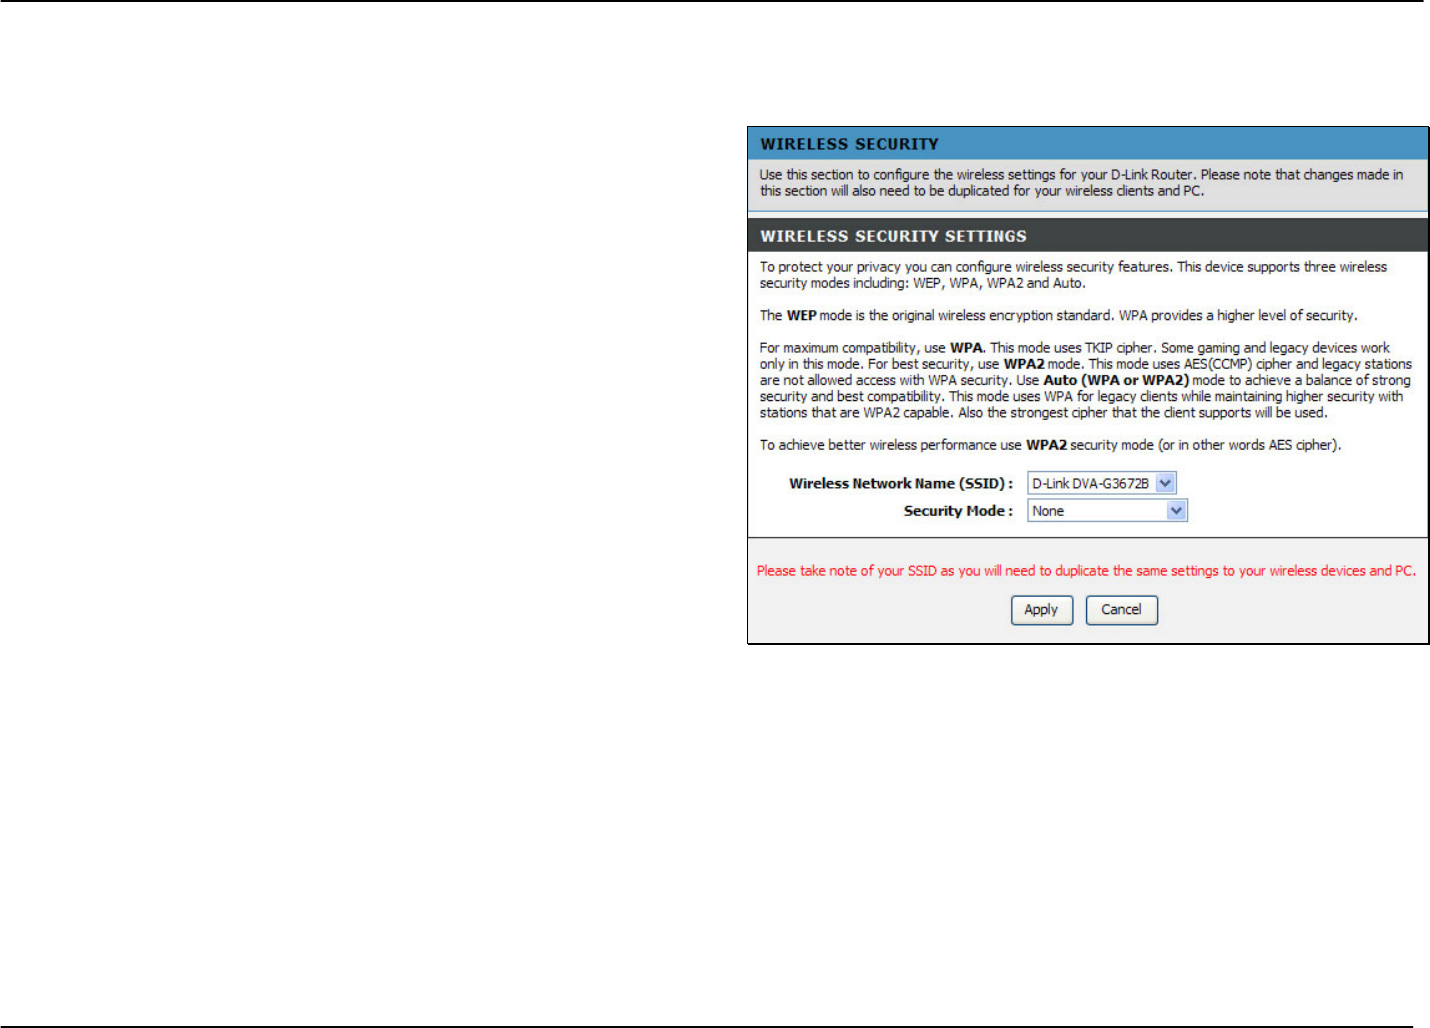
Wireless Settings – Wireless Security
To access Wireless Security, point to the Wireless Settings on the left window and click Wireless Security submenu, or click the
Wireless Security button in the Wireless Settings window.
In order to protect the privacy, you can setup the wireless
security. Available security modes are WEP, WPA, WPA2 and
A
uto.
1. Select a SSID in the Wireless Network Name (SSID)
drop-down list.
2. Select a wireless security mode in the Security Mode
drop-down list.
3. Click the Apply button to save the settings.
D-Link DVA-G3672B User Manual 26
Chapter 2 Configuration
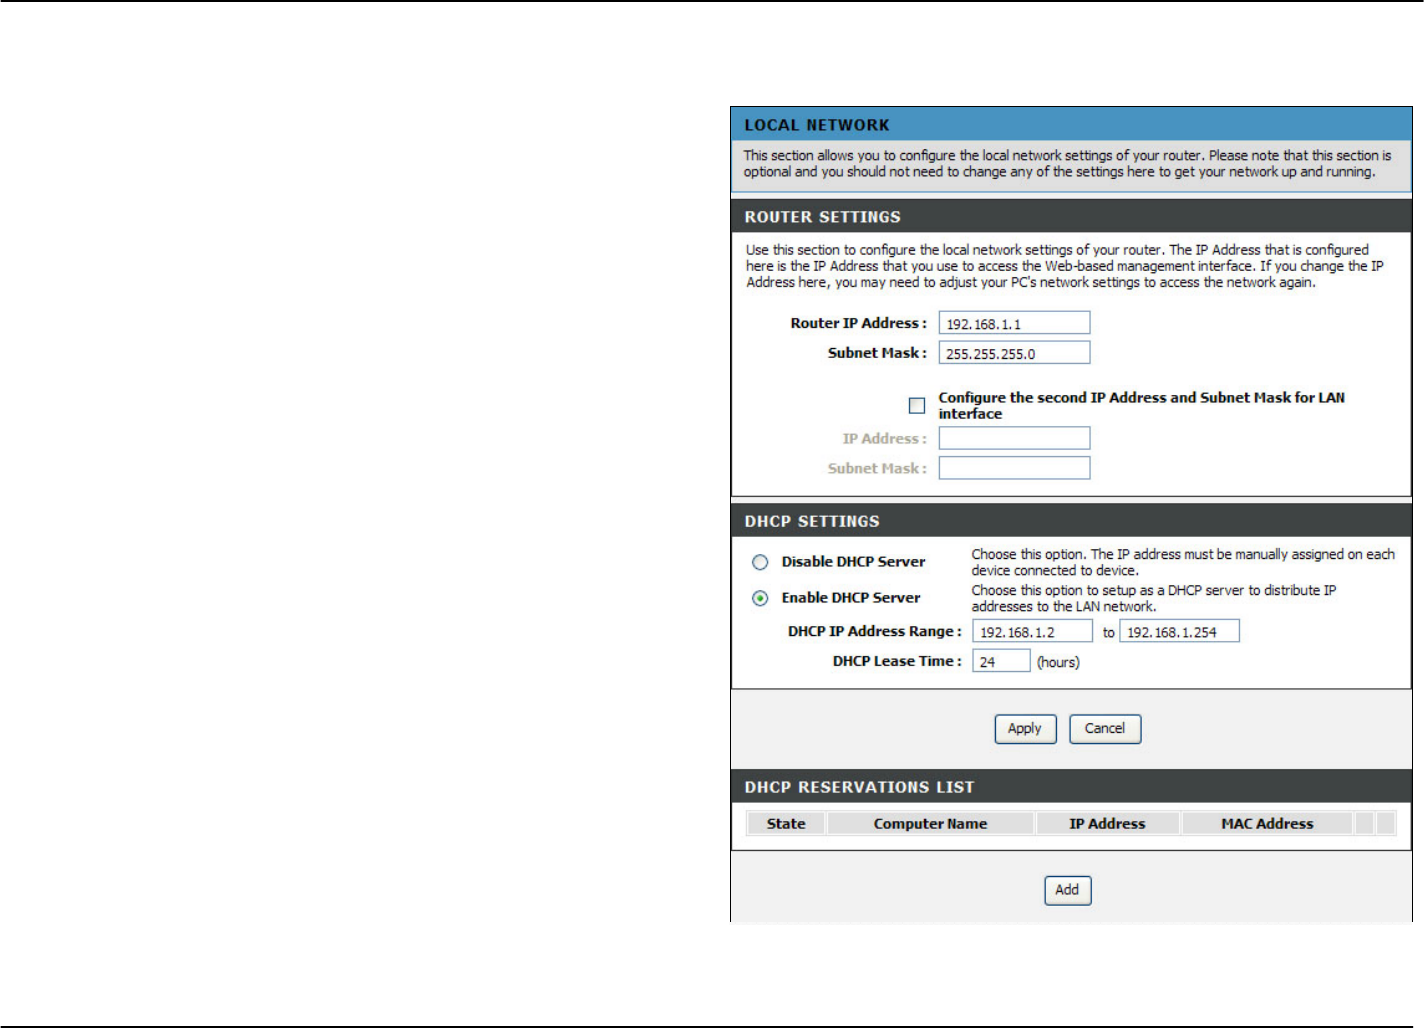
Setup – Local Network
To access the Local Network window, click the Local Network button in the Setup directory.
You can configure the local network IP address to suit your
preference. Many users will find it convenient to use the default
settings together with DHCP service to manage the IP settings
for their private network. The IP address of the Router is the
base address used for DHCP. In order to use the Router for
DHCP on your local network, the IP address pool used for
DHCP must be compatible with the IP address of the Router.
The IP addresses available in the DHCP IP address pool will
change automatically if you change the IP address of the
Router. See the next section for information on DHCP setup.
To change the Router IP Address or Subnet Mask, type in the
desired values in the Router Settings section and click the
Apply button. Go to Maintenance -> System and click Reboot
to restart the device. Your web browser should automatically be
redirected to the new IP address. You will be asked to login
again to the Router’s web manager.
The DHCP server is enabled by default for the Router’s
Ethernet LAN interface. DHCP service will supply IP settings to
workstations configured to automatically obtain IP settings that
are connected to the Router though the Ethernet port. When the
Router is used for DHCP it becomes the default gateway for
DHCP client connected to it. Keep in mind that if you change
the IP address of the Router the range of IP addresses in the
pool used for DHCP on the LAN will also be changed. The IP
address pool can be up to 253 IP addresses.
There are two options for DHCP service:
• You can use the Router as a DHCP server for your LAN.
• You can disable DHCP service and manually configure
IP settin
g
s for workstations.
D-Link DVA-G3672B User Manual 27

Chapter 2 Configuration
You may also configure DNS settings when using the Router in DHCP mode (Advanced > DNS Setup). When “Obtain DNS server
address automatically“ is clicked under DNS Server Configuration on the DNS Setup window, the Router will automatically relay DNS
settings to properly configured DHCP clients. To manually enter DNS IP addresses, click the “Use the following DNS server
addresses“ radio button and type in a Preferred DNS Server and Alternate DNS Server in the fields provided. The manually
configured DNS settings will be supplied to clients that are configured to request them from the Router.
Follow the instructions below according to which of the above DHCP options you want to use. When you have configured DHCP as
you want, click the Apply button to commit the new settings. Go to Maintenance -> System and click Reboot to restart the device
and let your changes take effect.
Use the Router for DHCP
To use the built-in DHCP server, click the Enable DHCP Server radio button in the DHCP Settings section if it is not already selected.
The IP address pool settings can be adjusted. The DHCP IP Address Range starts with the lowest available IP address (default =
192.168.1.2). If you change the IP address of the Router this will change automatically to be 1 more that the IP address of the Router.
The DHCP IP Address Range ends with the highest IP address number in the pool. Type in the DHCP Lease Time in the entry field
provided. This is the amount of time in hours that a workstation is allowed to reserve an IP address in the pool if the workstation is
disconnected from the network or powered off.
Disable the DHCP Server
To disable DHCP, Click the Disable DHCP Server radio button in the DHCP Settings section and click the Apply button. Go to
Maintenance -> System and click Reboot to restart the device and let your changes take effect. Choosing this option will gray out
most of the setting options on this window and require that workstations on the local network be configured manually or use another
DHCP server to obtain IP settings.
If you configure IP settings manually, make sure to use IP addresses in the subnet of the Router. You will need to use the Router’s IP
address as the Default Gateway for the workstation in order to provide Internet access.
Add DHCP Reservation List
To add an entry to the DHCP Reservation List, click the Add button in the DHCP Reservation List section, type in an IP Address,
either click the Copy Your PC’s MAC Address button or manually enter a MAC Address, enter a Computer Name if desired, and
click the Apply button. To delete an entry from the DHCP Reservations List, click the corresponding button. To modify a DHCP
Reservations List entry, click the corresponding button and then enter the information in the appropriate fields in the Edit DHCP
Reservation (Optional) section. Go to Maintenance -> System and click Reboot to restart the device and let your changes take
effect.
D-Link DVA-G3672B User Manual 28
Chapter 2 Configuration
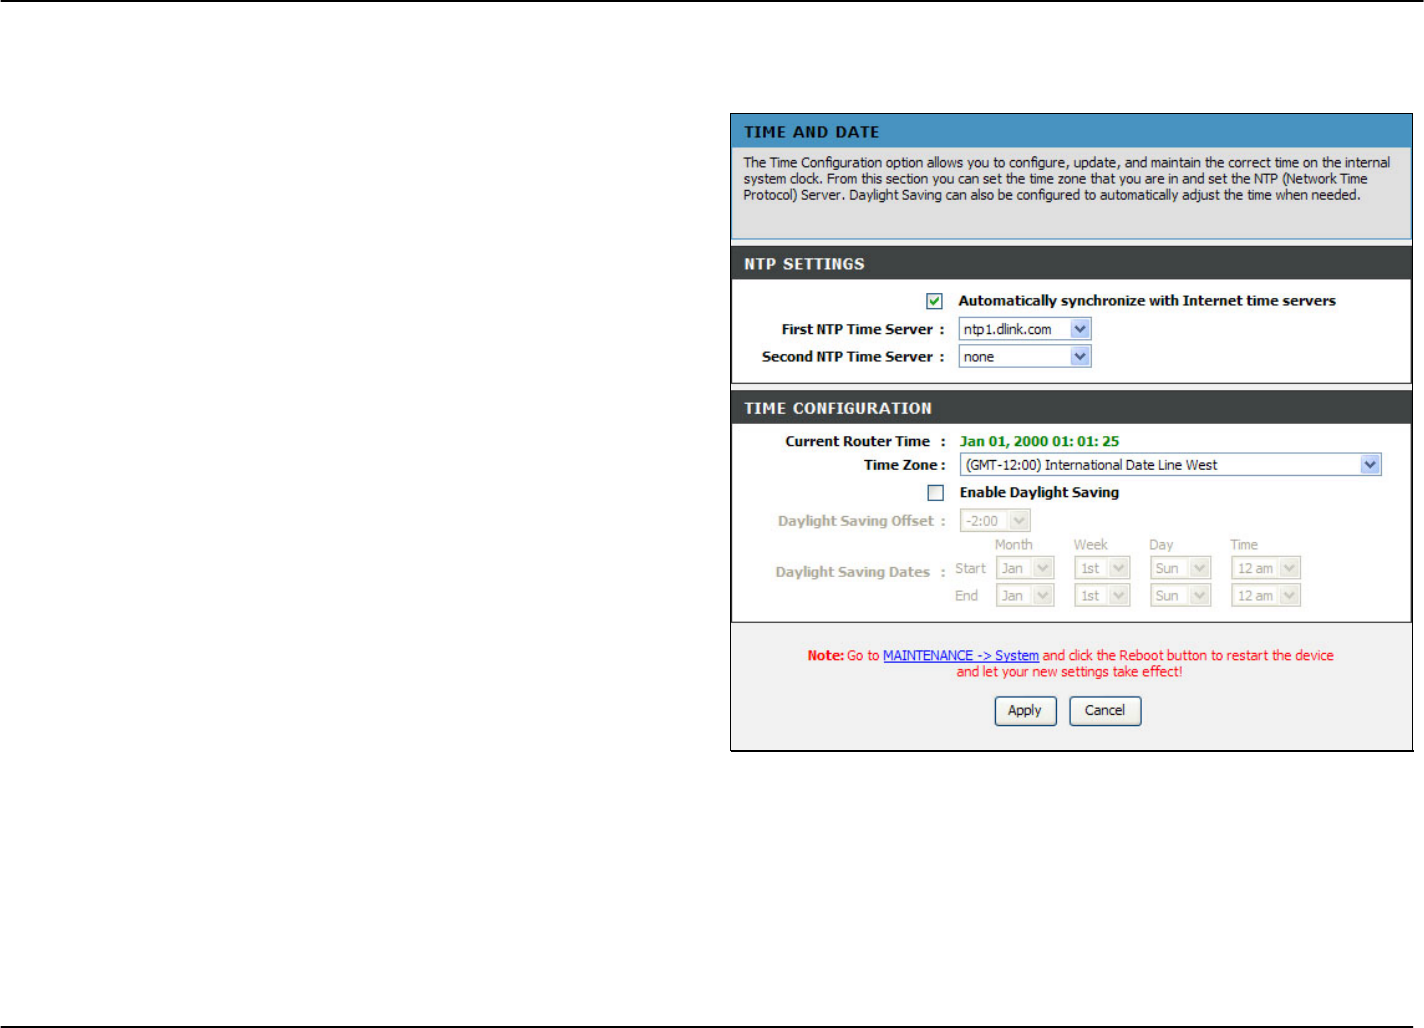
Setup – Time and Date
To access the Time and Date window, click the Time and Date button in the Setup directory.
The Router provides NTP and daylight saving to configure,
update and maintain the correct time.
To configure system time on the Router, select the
Automatically synchronize with Internet time servers check
box (default) and use the drop-down menu to select the NTP
server URL in the First NTP Time Server field. You may also
want to choose a Second NTP Time Server using the drop-
down menu.
The Router also allows you to set the time zone you are in by
using the Time Zone drop-down menu. In addition, you can
configure Daylight Saving by ticking the Enable Daylight
Saving check box and then using the drop-down menus to
configure the desired Daylight Saving Offset and Daylight
Saving starting and ending dates.
When you are finished, click the Apply button. Go to
Maintenance -> System and click Reboot to restart the device
and let your changes take effect.
D-Link DVA-G3672B User Manual 29
Chapter 2 Configuration
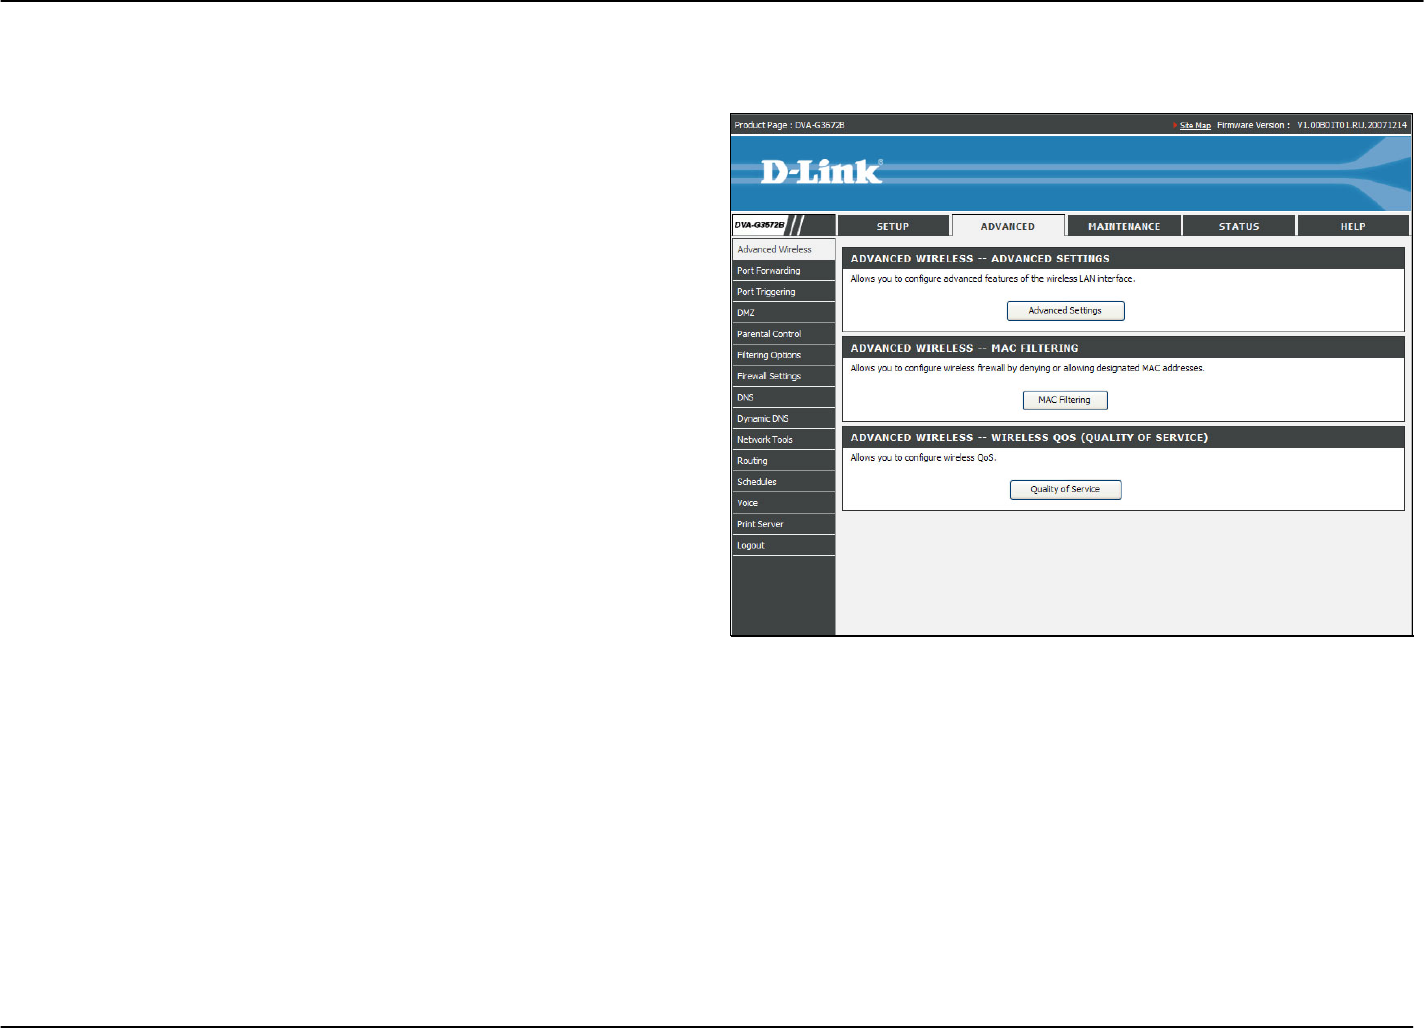
Advanced – Advanced Wireless
To access Advanced Wireless, click Advanced Wireless in the Advanced directory.
It has three subcategories: Advanced Settings, MAC Filtering
and Wireless QoS. You can either point to the Advanced
Wireless on the left window and click one of the submenus, or
click one of the buttons in the Wireless Settings window.
D-Link DVA-G3672B User Manual 30