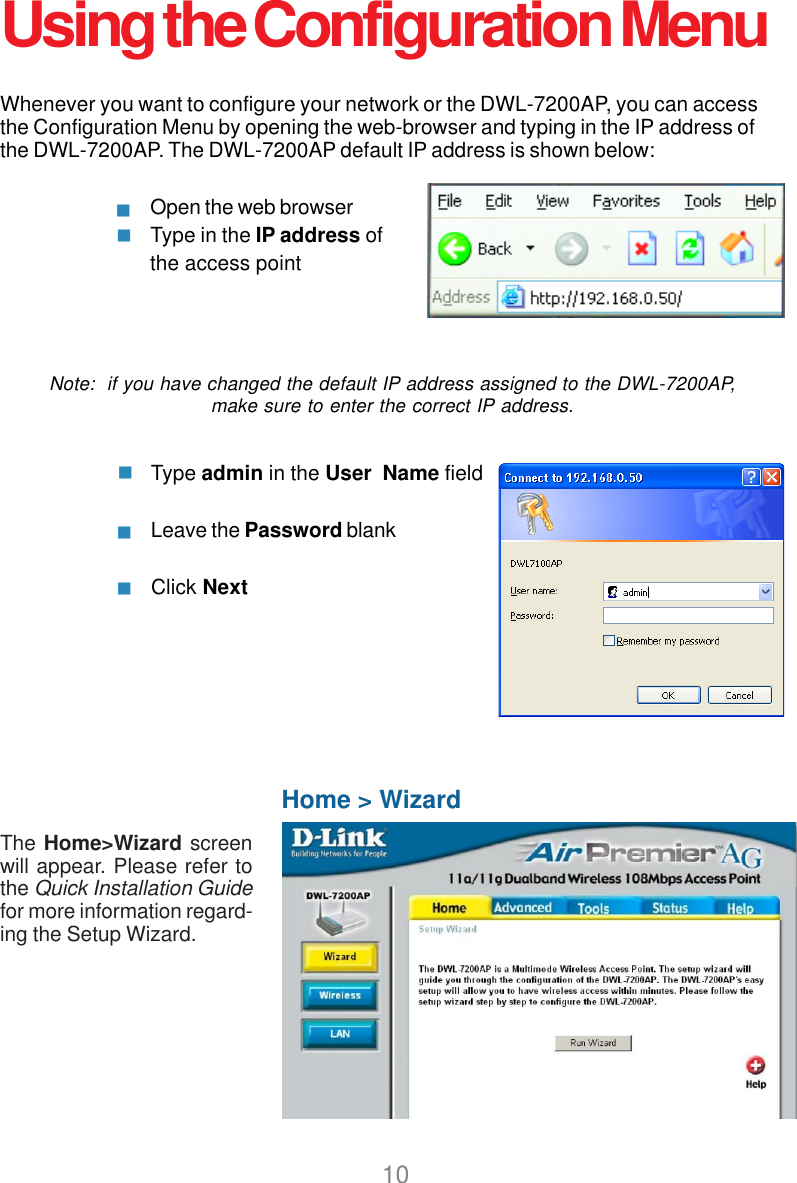
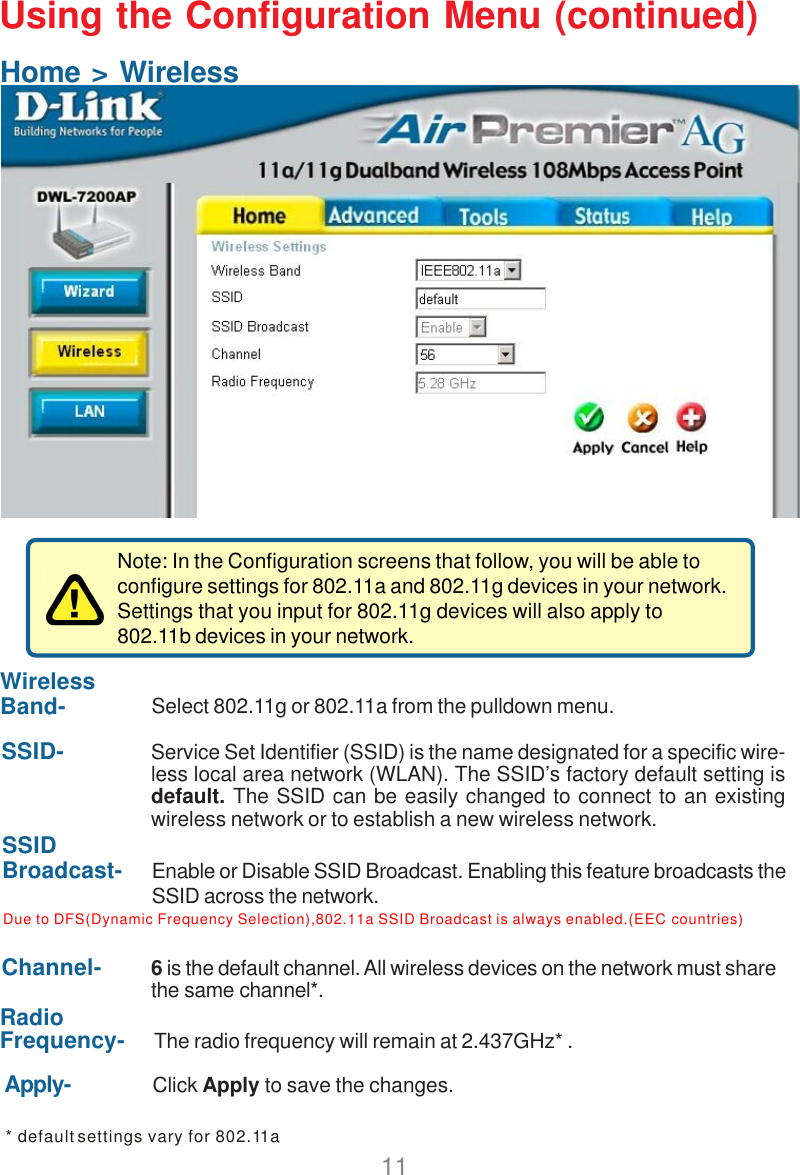
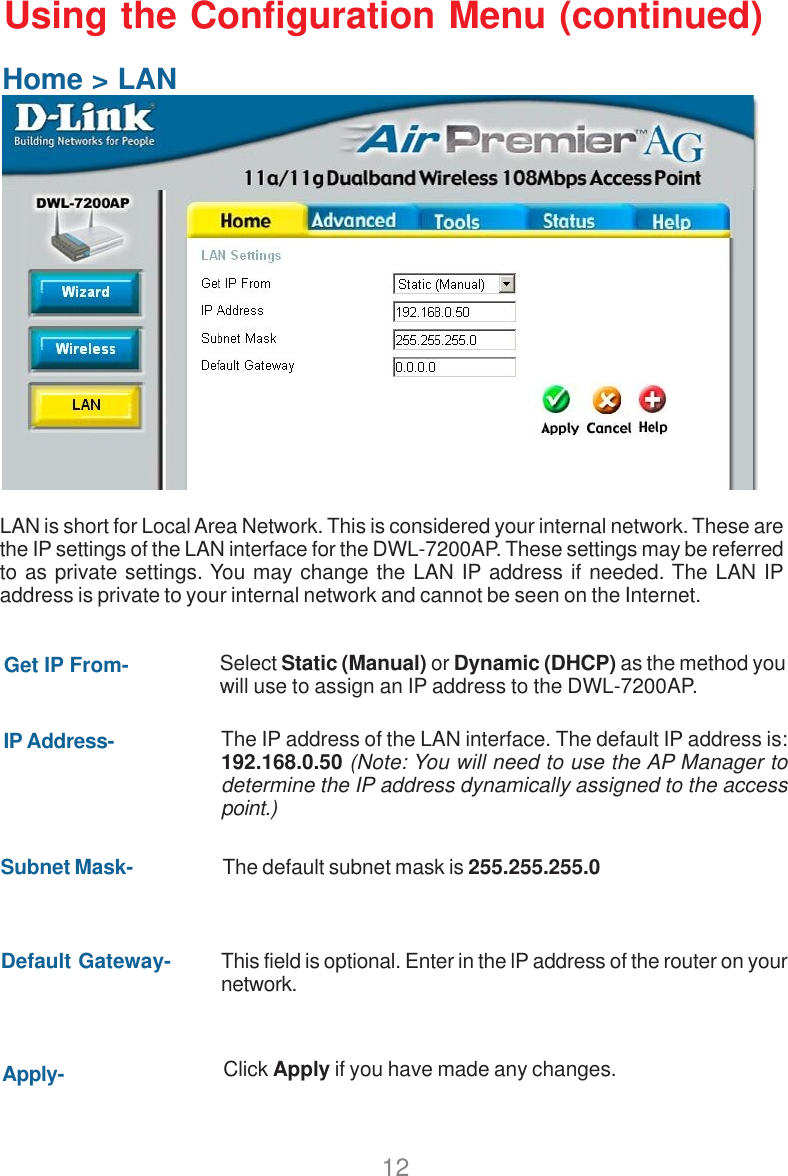
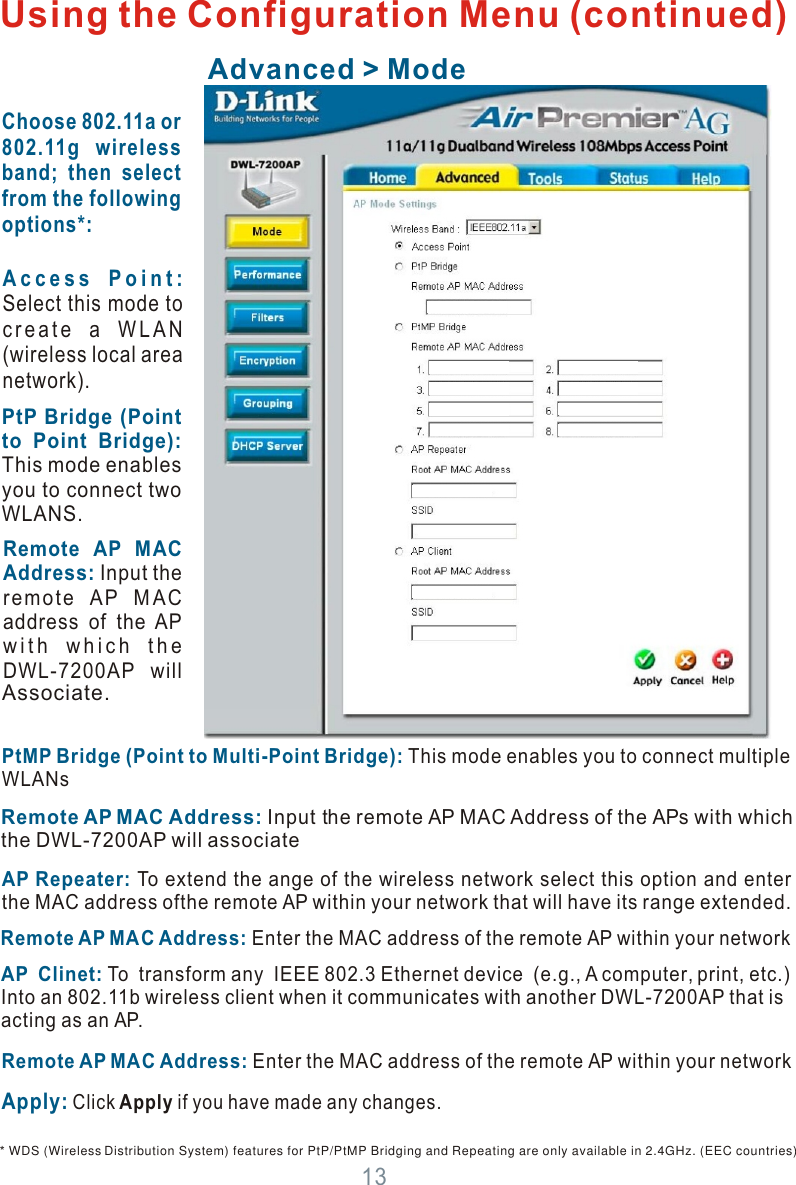
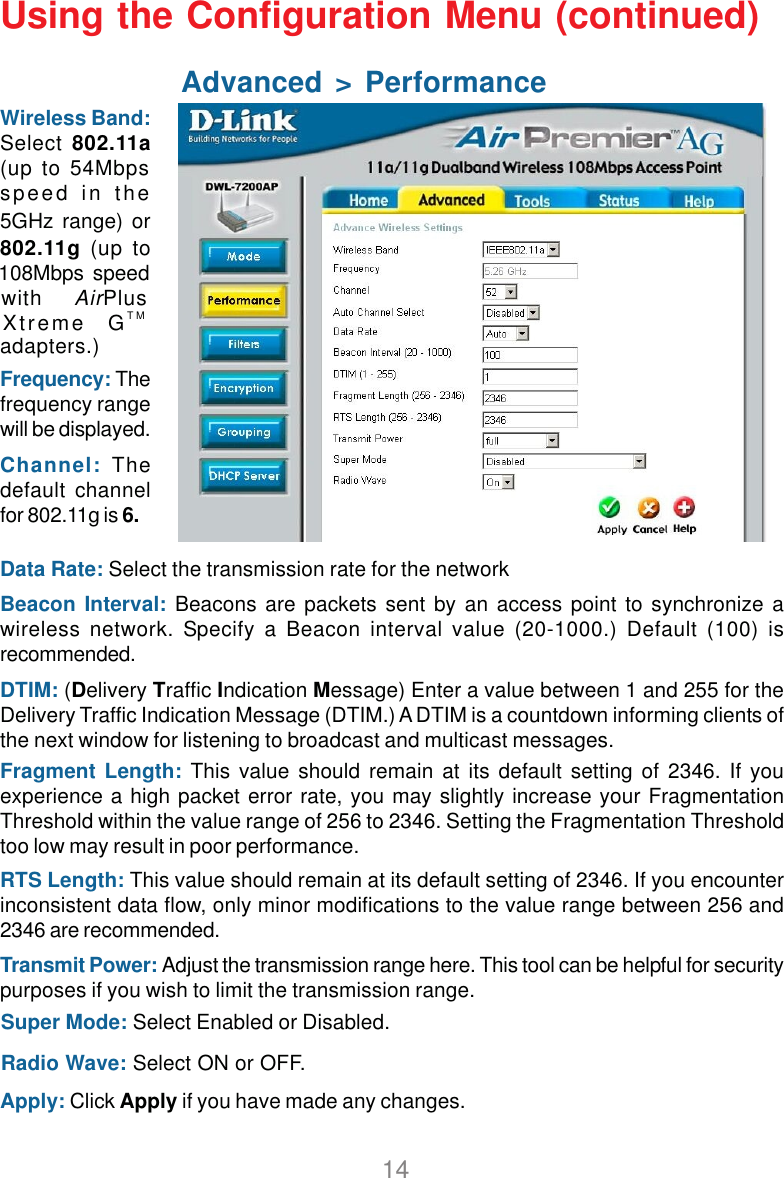
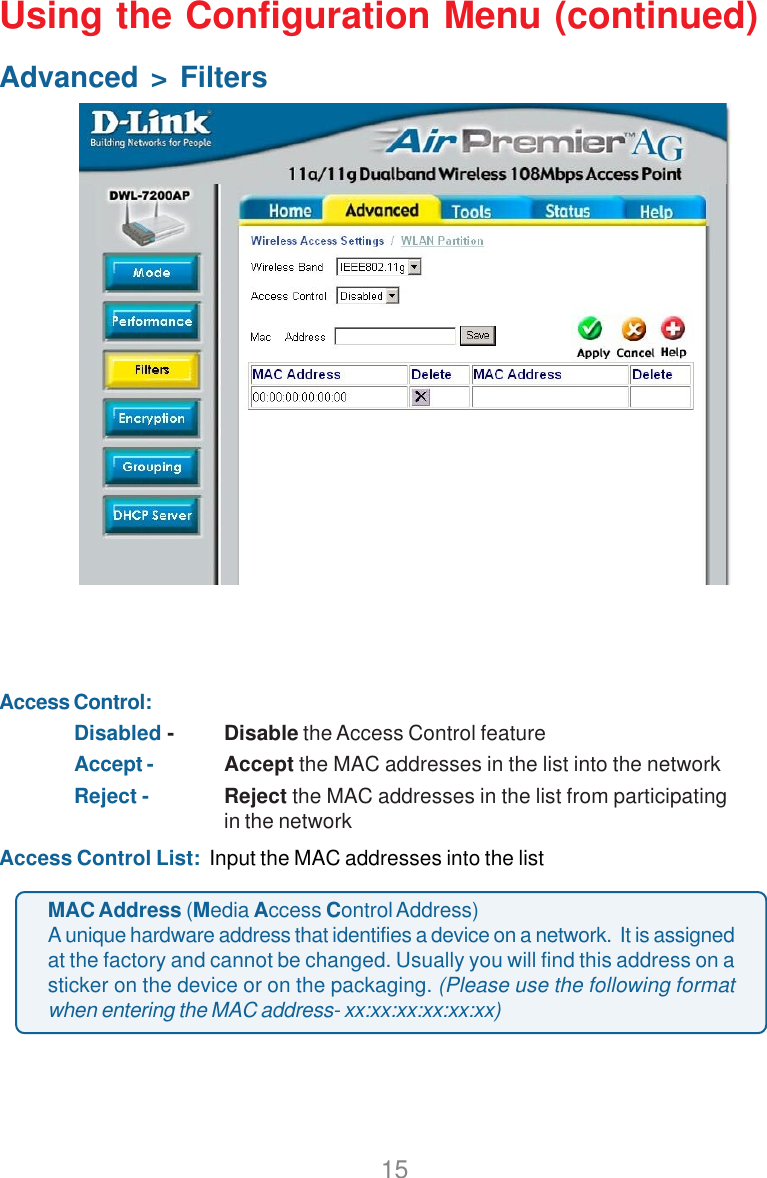
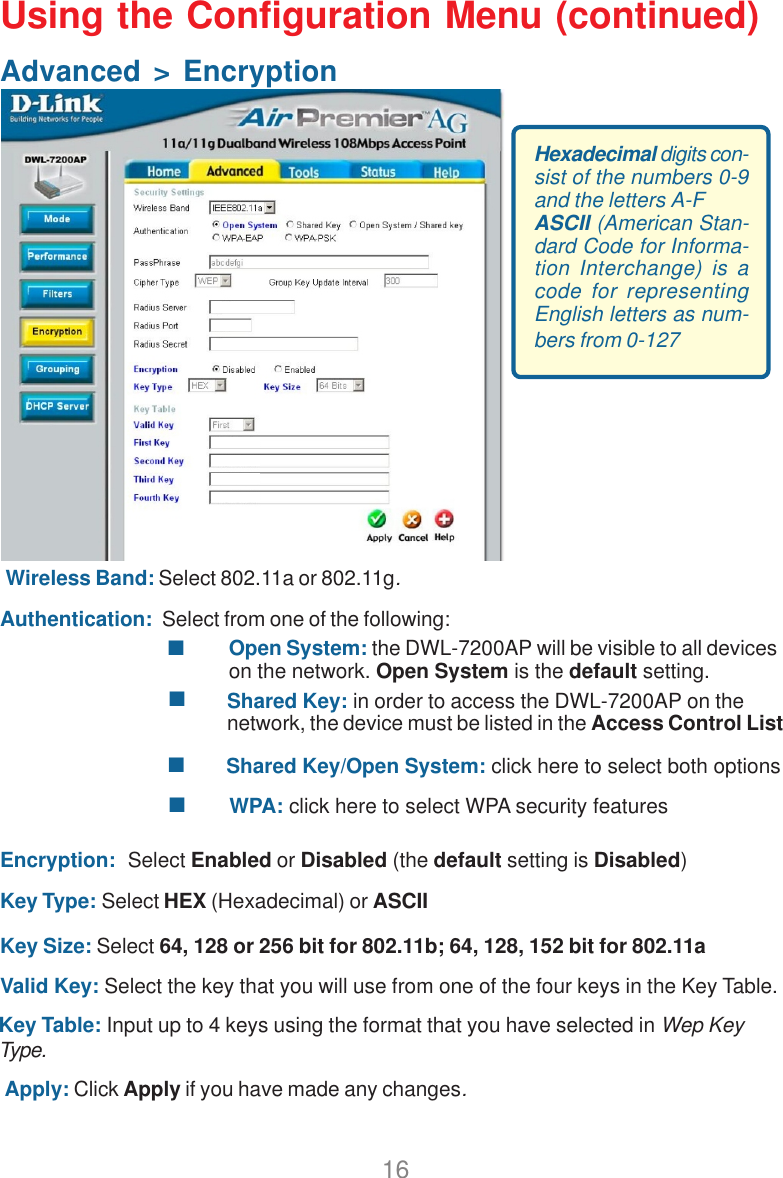
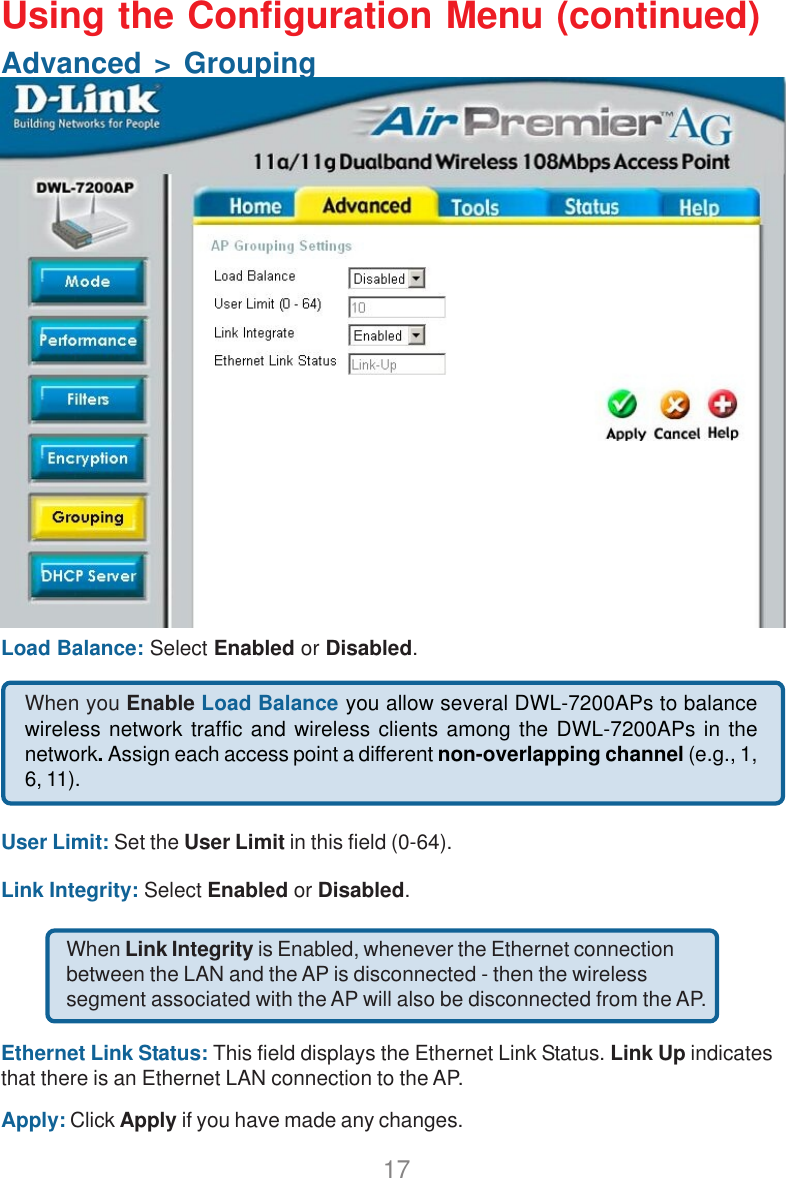
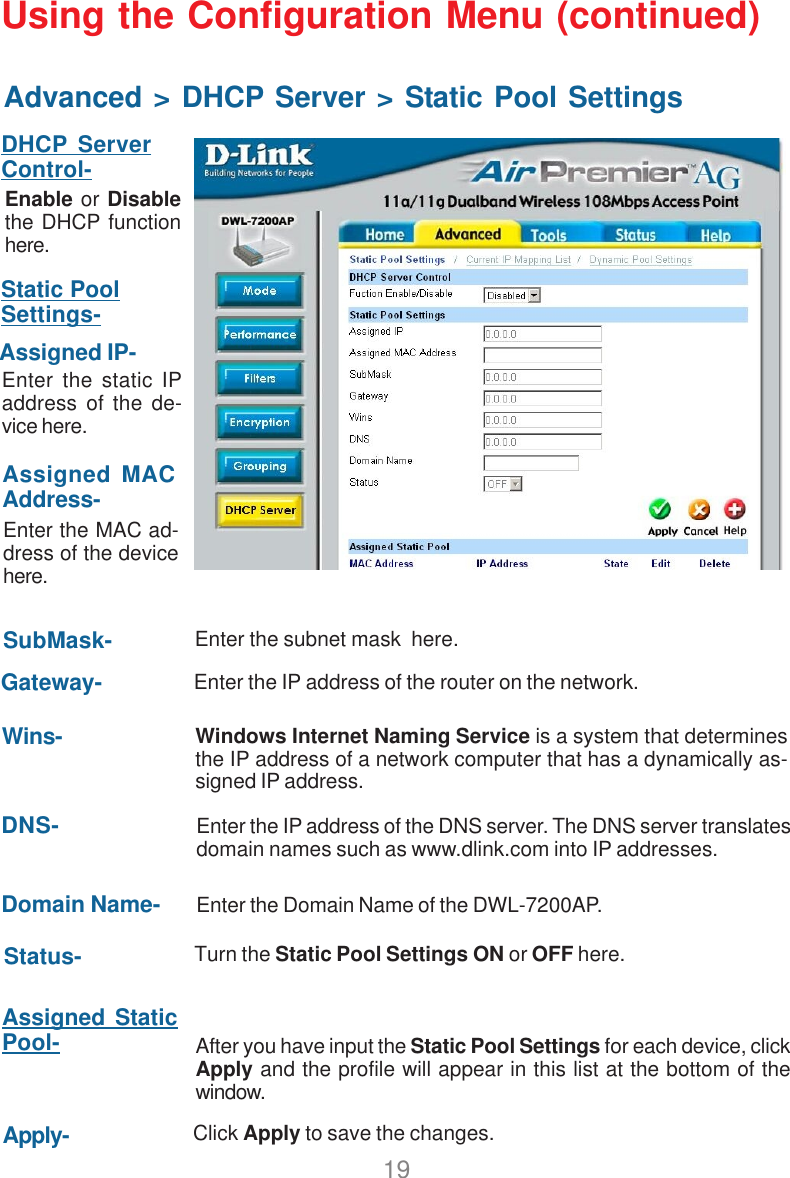
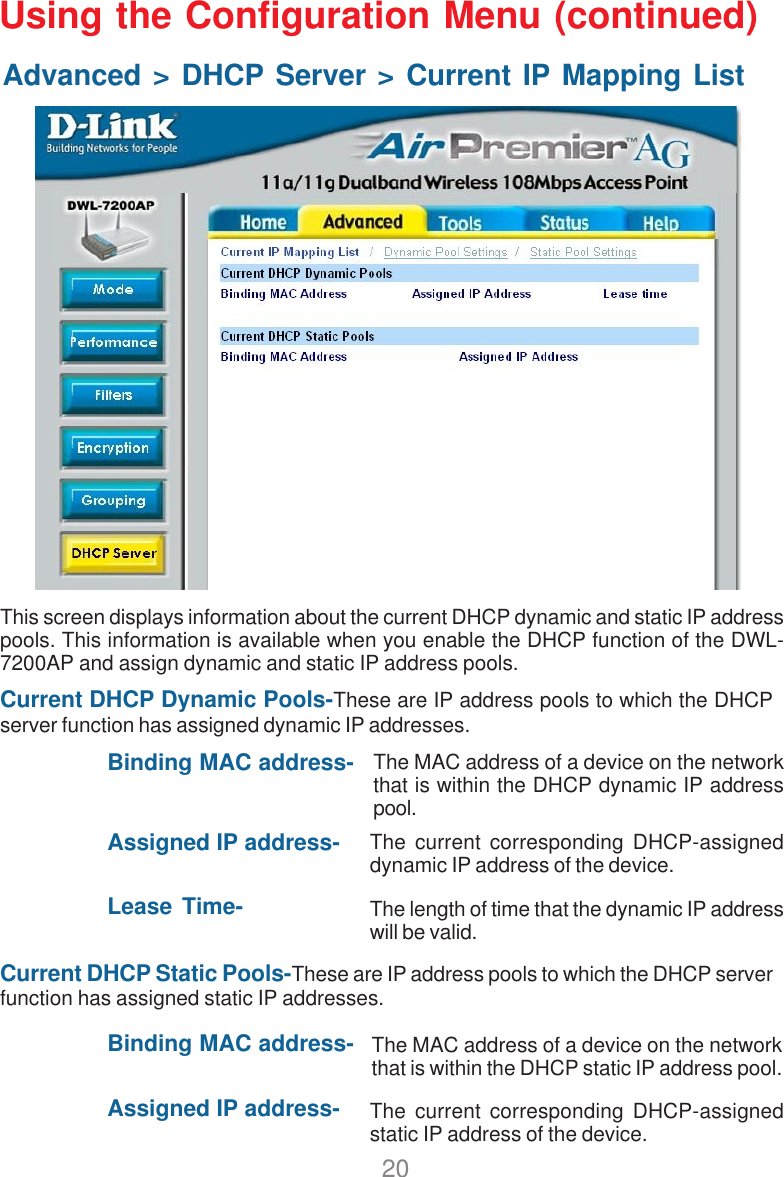
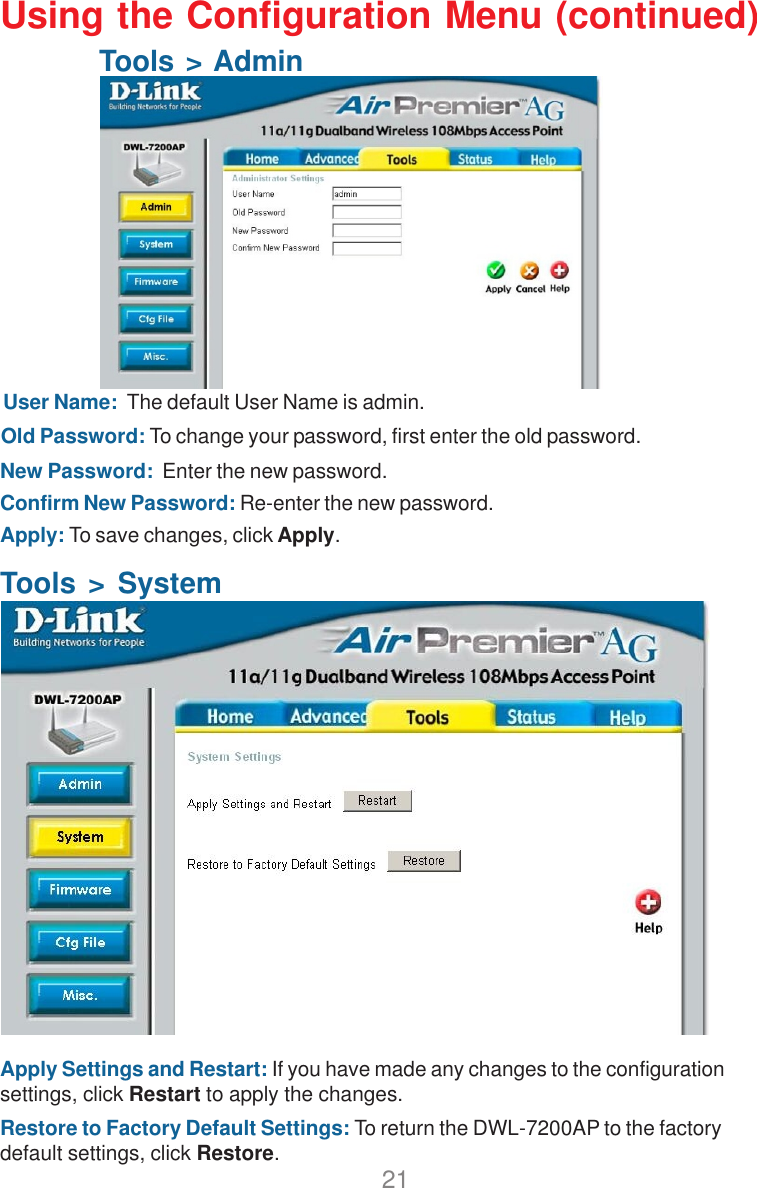
D Link DWL7200APA1 2.4/5 GHz Wireless Access Point with PoE User Manual DWL 7000ap 033103

D Link Corporation 2.4/5 GHz Wireless Access Point with PoE DWL 7000ap 033103
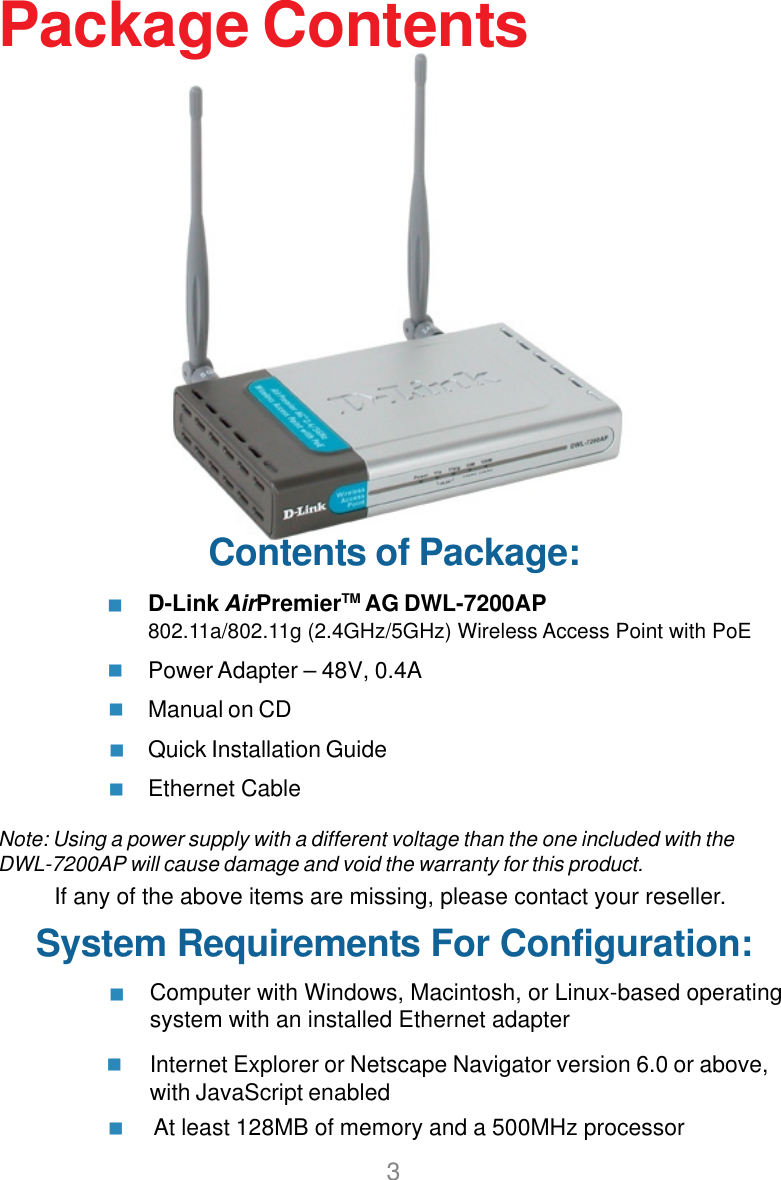
Contents

Users Manual Part 1

          DWL-7200AP802.11a/802.11g (2.4/5GHz)ManualBuilding Networks for PeopleD-LinkAirPremier   AGWireless Access Point with PoETM
2ContentsPackage Contents ................................................................................3Introduction............................................................................................4Wireless Basics ....................................................................................6Installation Considerations ....................................................................8Getting Started ......................................................................................9Using the Configuration Menu.............................................................. 11Networking Basics ..............................................................................27Troubleshooting...................................................................................40Technical Specifications ......................................................................46
3Contents of Package:D-Link AirPremierTM AG DWL-7200AP802.11a/802.11g (2.4GHz/5GHz) Wireless Access Point with PoEPower Adapter – 48V, 0.4AManual on CDQuick Installation GuideEthernet CableNote: Using a power supply with a different voltage than the one included with theDWL-7200AP will cause damage and void the warranty for this product.If any of the above items are missing, please contact your reseller.System Requirements For Configuration:Package ContentsAt least 128MB of memory and a 500MHz processor     Computer with Windows, Macintosh, or Linux-based operatingsystem with an installed Ethernet adapterInternet Explorer or Netscape Navigator version 6.0 or above,with JavaScript enabled   
4IntroductionThe DWL-7200AP has the newest, strongest and most advanced security featuresavailable today. When used with other 802.11 WPA (Wi-Fi Protected Access) compatibleproducts in a network with a RADIUS server, the security features include:WPA:  Wi-Fi Protected Access which authorizes and identifies users based on a secretkey that changes automatically at regular intervals. WPA uses TKIP (TemporalKey Integrity Protocol) to change the temporal key every 10,000 packets (apacket is a kind of message transmitted over a network.) This ensures muchgreater security than the standard WEP security. (By contrast, the previousWEP encryption implementations required the keys to be changed manually.)For  home users that will not incorporate a RADIUS server in their network, the securityfor the DWL-7200AP, used in conjunction with other WPA-compatible 802.11 products,will still be much stronger than ever before. Utilizing the Pre-Shared Key mode ofWPA, the DWL-7200AP will obtain a new security key every time it connects to the802.11 network. You only need to input your encryption information once in theconfiguration menu. No longer will you have to manually input a new WEP key frequentlyto ensure security. With the DWL-7200AP, you will automatically receive a new keyevery time you connect, vastly increasing the safety of your communication.At up to fifteen times the speed of previous wireless devices (up to 108Mbps in SuperAG mode), you can work faster and more efficiently, increasing productivity. With theDWL-7200AP, bandwidth-intensive applications like graphics or multimedia will benefitsignificantly because large files are able to move across the network quickly.Inclusion of all three standards (802.11g; 802.11a; 802.11b) means that the DWL-7200APis versatile enough to allow connection to almost any 802.11 network or device.
5Better security with WPA- The DWL-7200AP can securely connect to wire-less clients on the network using WPA (Wi-Fi Protected Access) providing amuch higher level of security for your data and communications than has previ-ously been available.Compatible with the 802.11b standard to provide a wireless data rate of up to11Mbps with 802.11b devices.FeaturesFaster Wireless Networking with speeds up to 108Mbps in Super AG modeCompatible with 802.11a, 802.11b and 802.11g Devices - Fully compatiblewith the IEEE 802.11a, 802.11b and 802.11g standards, the DWL-7200AP canconnect with existing 802.11b-, 802.11g- or 802.11a- compliant wireless networkadapter cards.LEDsLED stands for Light-Emitting Diode. The DWL-7200AP Wireless Access Point has5  Green LEDs as shown below:PowerLAN (10/100)WLAN(802.11a and802.11b or802.11g)A steady light indicates a connection to a powersourceA steady light indicates a connection to the Ethernetport; a blinking light indicates activityLED LED ActivityA blinking light indicates activity in the respectivewireless mode: 802.11a and/or 802.11b/802.11g
6Wireless BasicsD-Link AirPremierTM AG wireless products are based on industry standards to provideeasy-to-use and compatible high-speed wireless connectivity within your home, businessor public access wireless networks. Strictly adhering to the IEEE standard, the D-LinkAirPremierTM AG wireless family of products will allow you to securely access the datayou want, when and where you want it. You will be able to enjoy the freedom thatwireless networking delivers.A wireless local area network (WLAN) is a cellular computer network that transmits andreceives data with radio signals instead of wires. Wireless LANs are used increasinglyin both home and office environments, and public areas such as airports, coffee shopsand universities. Innovative ways to utilize WLAN technology are helping people to workand communicate more efficiently. Increased mobility and the absence of cabling andother fixed infrastructure have proven to be beneficial for many users.Wireless users can use the same applications they use on a wired network. Wirelessadapter cards used on laptop and desktop systems support the same protocols asEthernet adapter cards.People use wireless LAN technology for many different purposes:Mobility - Productivity increases when people have access to data in any locationwithin the operating range of the WLAN. Management decisions based on real-timeinformation can significantly improve worker efficiency.Low Implementation Costs - WLANs are easy to set up, manage, change and relocate.Networks that frequently change can benefit from WLANs ease of implementation. WLANscan operate in locations where installation of wiring may be impractical.Installation and Network Expansion - Installing a WLAN system can be fast andeasy and can eliminate the need to pull cable through walls and ceilings. Wirelesstechnology allows the network to go where wires cannot go - even outside the home oroffice.Inexpensive Solution - Wireless network devices are as competitively priced asconventional Ethernet network devices.Scalability - WLANs can be configured in a variety of ways to meet the needs ofspecific applications and installations. Configurations are easily changed and rangefrom Peer-to-Peer networks suitable for a small number of users to larger infrastructurenetworks to accommodate hundreds or thousands of users, depending on the number ofwireless devices deployed.
7Wireless Basics (continued)Standards-Based TechnologyThe  DWL-7200AP Wireless Access Point utilizes the 802.11a, 802.11b and draft 802.11gstandard.The IEEE 802.11g standard is an extension of the 802.11b standard. It increases thedata  rate  up  to  54Mbps (108Mbps in Super G mode) within  the  2.4GHz  band. The802.11a standard also increases the data rate up to 54Mbps, but within the 5GHz band.Both 802.11a and 802.11g utilize OFDM technology.This means that in most environments, within the specified range of this device, you willbe able to transfer large files quickly or even watch a movie in MPEG format over yournetwork without noticeable delays. This technology works by transmitting high-speeddigital data over a radio wave utilizing OFDM (Orthogonal Frequency Division Multiplexing)technology. OFDM works by splitting the radio signal into multiple smaller sub-signalsthat are then transmitted simultaneously at different frequencies to the receiver. OFDMreduces the amount of crosstalk (interference) in signal transmissions.The DWL-7200AP offers the most advanced network security features available today,including WPA.In addition to its compatibility with 802.11g and 802.11a devices, the DWL-7200AP iscompatible with 802.11b devices. This means that if you have an existing 802.11b network,or a network with a mixture of 802.11g, 802.11a and 802.11b, the devices in that networkwill be compatible with the DWL-7200AP.
8Wireless Basics (continued)Installation ConsiderationsDesktop and laptop computers with wireless network adapters installed can access theD-Link AirPremierTM AG DWL-7200AP from virtually anywhere within its operating range.Keep in mind, however, that the number, thickness and location of walls, ceilings, orother objects that the wireless signals must pass through, may limit the range. Typicalranges vary depending on the types of materials and background RF (radio frequency)noise in your home or business. The key to maximizing wireless range is to follow thesebasic guidelines:Be aware of the direct line between network devices. A wall that is 1.5feet thick (.5 meters), at a 45-degree angle appears to be almost 3 feet(1 meter) thick. At a 2-degree angle it looks over 42 feet (14 meters)thick! Position devices so that the signal will travel straight through awall or ceiling (instead of at an angle) for better reception.Building materials can impede the wireless signal - a solid metal door oraluminum studs may have a negative effect on range. Try to positionwireless devices and computers with wireless adapters so that the signalpasses through drywall or open doorways and not other materials.Keep your product away (at least 3-6 feet or 1-2 meters) fromelectrical devices or appliances that may generate extreme RF noise.Keep the number of walls and ceilings between the DWL-7200AP andother network devices to a minimum - each wall or ceiling can reduceyour D-Link wireless product’s range from 3-90 feet (1-30 meters.) Positionyour devices so that the number of walls or ceilings is minimized.1234
9Getting StartedAn Infrastructure wireless network contains an access point or router. TheInfrastructure Network example, shown on the following page, contains the followingD-Link network devices:A wireless Access Point - D-Link AirPremierTM AG DWL-7200APAn Ethernet Router - D-Link DI-604A laptop computer with a wireless adapter - D-Link AirPremierTM AG DWL-AG660A desktop computer with a wireless adapter - D-Link AirPremierTMAG DWL-AG530A Cable modem - D-Link DCM-201If you need to assign IP addresses to the computers on the network, pleaseremember that the IP address for each computer must be in the same IPaddress range as all the computers in the network, and the subnet maskmust be exactly the same for all the computers in the network.For example: If the first computer is assigned an IP address of 192.168.0.2 with asubnet mask of 255.255.255.0, then the second computer can be assigned an IPaddress of 192.168.0.3 with a subnet mask of 255.255.255.0, etc.IMPORTANT: If computers or other devices are assigned the same IPaddress, one or more of the devices may not be visible on the network.IP ADDRESSNote: If you are using a DHCP-capable router in your network you will not needto assign a static IP address.Right out of the box, with its default settings, the DWL-7200AP will automati-cally connect with other D-Link AirPremierTM AG products.Note: D-Link DWL-7200AP provide following wireless operation modes to the EEC countries: (i) IEEE 802.11a: AP Mode, (ii) IEEE 802.11g: AP Mode, WDS(Wireless Distribution System) bridgemode Point to Point, Point to Multi-Point, Repeater and AP Client.
10Whenever you want to configure your network or the DWL-7200AP, you can accessthe Configuration Menu by opening the web-browser and typing in the IP address ofthe DWL-7200AP. The DWL-7200AP default IP address is shown below:Open the web browserType in the IP address ofthe access pointNote:  if you have changed the default IP address assigned to the DWL-7200AP,make sure to enter the correct IP address.Home > WizardThe Home>Wizard screenwill appear. Please refer tothe Quick Installation Guidefor more information regard-ing the Setup Wizard.Using the Configuration MenuType admin in the User  Name fieldLeave the Password blankClick Next
11Using the Configuration Menu (continued)Home > WirelessApply- Click Apply to save the changes.RadioFrequency- The radio frequency will remain at 2.437GHz* .Channel- 6 is the default channel. All wireless devices on the network must share the same channel*.SSIDBroadcast- Enable or Disable SSID Broadcast. Enabling this feature broadcasts theSSID across the network. SSID- Service Set Identifier (SSID) is the name designated for a specific wire-less local area network (WLAN). The SSID’s factory default setting isdefault. The SSID can be easily changed to connect to an existingwireless network or to establish a new wireless network.WirelessBand-            Select 802.11g or 802.11a from the pulldown menu.Note: In the Configuration screens that follow, you will be able toconfigure settings for 802.11a and 802.11g devices in your network.Settings that you input for 802.11g devices will also apply to802.11b devices in your network.* default settings vary for 802.11a    * default settings vary for 802.11aDue to DFS(Dynamic Frequency Selection),802.11a SSID Broadcast is always enabled.(EEC countries)
12Using the Configuration Menu (continued)Home > LANLAN is short for Local Area Network. This is considered your internal network. These arethe IP settings of the LAN interface for the DWL-7200AP. These settings may be referredto as private settings. You may change the LAN IP address if needed. The LAN IPaddress is private to your internal network and cannot be seen on the Internet.Get IP From- Select Static (Manual) or Dynamic (DHCP) as the method youwill use to assign an IP address to the DWL-7200AP.Apply-Default Gateway- This field is optional. Enter in the lP address of the router on yournetwork.IP Address- The IP address of the LAN interface. The default IP address is:192.168.0.50 (Note: You will need to use the AP Manager todetermine the IP address dynamically assigned to the accesspoint.)Subnet Mask- The default subnet mask is 255.255.255.0Click Apply if you have made any changes.
Using the Configuration Menu (continued)Advanced > ModeChoose 802.11a or802.11g wirelessband; then selectfrom the followingoptions*:Access Point:Select this mode tocreate a WLAN(wireless local areanetwork).PtP Bridge (Pointto Point Bridge):This mode enablesyou to connect twoWLANS.Remote AP M ACAddress: Input theremote AP M ACaddress of the APwith which theDWL-7200AP willAssociate.PtMP Bridge (Point to Multi-Point Bridge): This mode enables you to connect multipleWLANsRemote AP MAC Address: Input the remote AP MAC Address of the APs with whichthe DWL-7200AP will associateAP Repeater: To extend the ange of the wireless network select this option and enterthe MAC address ofthe remote AP within your network that will have its range extended.Remote AP MAC Address: Enter the MAC address of the remote AP within your networkAP  Clinet: To  transform any  IEEE 802.3 Ethernet device  (e.g., A computer, print, etc.)Into an 802.11b wireless client when it communicates with another DWL-7200AP that isacting as an AP. Remote AP MA C Address: Enter the MAC address of the remote AP within your networkApply: Click Apply if you have made any changes.13* WDS (Wireless  Distribution System) features for PtP/PtMP Bridging and Repeating are only available in 2.4GHz. (EEC countries)
14Using the Configuration Menu (continued)Advanced > PerformanceTransmit Power: Adjust the transmission range here. This tool can be helpful for securitypurposes if you wish to limit the transmission range.Super Mode: Select Enabled or Disabled.Radio Wave: Select ON or OFF.Apply: Click Apply if you have made any changes.Frequency: Thefrequency rangewill be displayed.Channel: Thedefault channelfor 802.11g is 6.Data Rate: Select the transmission rate for the networkBeacon Interval: Beacons are packets sent by an access point to synchronize awireless network. Specify a Beacon interval value (20-1000.) Default (100) isrecommended.DTIM: (Delivery Traffic Indication Message) Enter a value between 1 and 255 for theDelivery Traffic Indication Message (DTIM.) A DTIM is a countdown informing clients ofthe next window for listening to broadcast and multicast messages.Fragment Length: This value should remain at its default setting of 2346. If youexperience a high packet error rate, you may slightly increase your FragmentationThreshold within the value range of 256 to 2346. Setting the Fragmentation Thresholdtoo low may result in poor performance.RTS Length: This value should remain at its default setting of 2346. If you encounterinconsistent data flow, only minor modifications to the value range between 256 and2346 are recommended.Wireless Band:Select 802.11a(up to 54Mbpsspeed in theXtreme GTM5GHz range) or802.11g (up to108Mbps speedwith AirPlusadapters.)
15Using the Configuration Menu (continued)Advanced > FiltersAccess Control:Disabled - Disable the Access Control featureAccept - Accept the MAC addresses in the list into the networkReject - Reject the MAC addresses in the list from participatingin the networkAccess Control List:  Input the MAC addresses into the listMAC Address (Media Access Control Address)A unique hardware address that identifies a device on a network.  It is assignedat the factory and cannot be changed. Usually you will find this address on asticker on the device or on the packaging. (Please use the following formatwhen entering the MAC address- xx:xx:xx:xx:xx:xx)
16Using the Configuration Menu (continued)Advanced > EncryptionEncryption:          Select Enabled or Disabled (the default setting is Disabled)Authentication:      Select from one of the following:Key Type:     Select HEX (Hexadecimal) or ASCIIKey Size: Select 64, 128 or 256 bit for 802.11b; 64, 128, 152 bit for 802.11aValid Key: Select the key that you will use from one of the four keys in the Key Table.Key Table: Input up to 4 keys using the format that you have selected in Wep KeyType.WPA: click here to select WPA security featuresShared Key/Open System: click here to select both options Shared Key: in order to access the DWL-7200AP on thenetwork, the device must be listed in the Access Control List Open System: the DWL-7200AP will be visible to all deviceson the network. Open System is the default setting.Hexadecimal digits con-sist of the numbers 0-9and the letters A-FASCII (American Stan-dard Code for Informa-tion Interchange) is acode for representingEnglish letters as num-bers from 0-127Apply: Click Apply if you have made any changes.Wireless Band: Select 802.11a or 802.11g.
17Using the Configuration Menu (continued)Advanced > GroupingLoad Balance: Select Enabled or Disabled.Link Integrity: Select Enabled or Disabled.User Limit: Set the User Limit in this field (0-64).When you Enable Load Balance you allow several DWL-7200APs to balancewireless network traffic and wireless clients among the DWL-7200APs in thenetwork. Assign each access point a different non-overlapping channel (e.g., 1,6, 11).Ethernet Link Status: This field displays the Ethernet Link Status. Link Up indicatesthat there is an Ethernet LAN connection to the AP.When Link Integrity is Enabled, whenever the Ethernet connectionbetween the LAN and the AP is disconnected - then the wirelesssegment associated with the AP will also be disconnected from the AP.Apply: Click Apply if you have made any changes.
18Using the Configuration Menu (continued)Advanced > DHCP Server > Dynamic Pool SettingsDHCP ServerControl-Dynamic PoolSettings-Enable or Disablethe DHCP functionhere.Enter the starting IPaddress in therange.IP Assigned From -Enter the number(the quantity) of IPaddress in therange.The Range ofPool (1-255)-Enter the subnet mask  here.SubMask-Enter the IP address of the router on the network.Gateway-Wins-Status-Windows Internet Naming Service is a system that deter-mines the IP address of a network computer that has a dynami-cally assigned IP address.DNS- Enter the IP address of the DNS server. The DNS server trans-lates domain names such as www.dlink.com into IP addresses.Domain Name- Enter the Domain Name of the DWL-7200AP.Turn the Dynamic Pool Settings ON or OFF here.Lease Time- Select the Lease Time here The Lease Time is the period of timebefore the DHCP server will assign new IP addresses.
19Using the Configuration Menu (continued)Advanced > DHCP Server > Static Pool SettingsDHCP ServerControl-Static PoolSettings-Enable or Disablethe DHCP functionhere.Enter the static IPaddress of the de-vice here.Assigned IP-Enter the MAC ad-dress of the devicehere.Assigned MACAddress-Enter the subnet mask  here.SubMask-Enter the IP address of the router on the network.Gateway-Wins-Status-Windows Internet Naming Service is a system that determinesthe IP address of a network computer that has a dynamically as-signed IP address.DNS-Assigned StaticPool-Enter the IP address of the DNS server. The DNS server translatesdomain names such as www.dlink.com into IP addresses.Domain Name- Enter the Domain Name of the DWL-7200AP.Turn the Static Pool Settings ON or OFF here.After you have input the Static Pool Settings for each device, clickApply and the profile will appear in this list at the bottom of thewindow.Apply- Click Apply to save the changes.
20Using the Configuration Menu (continued)Advanced > DHCP Server > Current IP Mapping ListCurrent DHCP Dynamic Pools-These are IP address pools to which the DHCPserver function has assigned dynamic IP addresses.Binding MAC address-Assigned IP address-Lease Time-Current DHCP Static Pools-These are IP address pools to which the DHCP serverfunction has assigned static IP addresses.Binding MAC address-Assigned IP address-This screen displays information about the current DHCP dynamic and static IP addresspools. This information is available when you enable the DHCP function of the DWL-7200AP and assign dynamic and static IP address pools.The MAC address of a device on the networkthat is within the DHCP dynamic IP addresspool.The current corresponding DHCP-assigneddynamic IP address of the device.The length of time that the dynamic IP addresswill be valid.The MAC address of a device on the networkthat is within the DHCP static IP address pool.The current corresponding DHCP-assignedstatic IP address of the device.
21Using the Configuration Menu (continued)Tools > AdminTools > SystemUser Name:  The default User Name is admin.Old Password: To change your password, first enter the old password.New Password:  Enter the new password.Confirm New Password: Re-enter the new password.Apply: To save changes, click Apply.Apply Settings and Restart: If you have made any changes to the configurationsettings, click Restart to apply the changes.Restore to Factory Default Settings: To return the DWL-7200AP to the factorydefault settings, click Restore.
22Using the Configuration Menu (continued)Update File: Click on Browse to find the updated firmware file on your hard drive.(Before you browse your hard drive you will need to download the updated firmwarefrom the D-Link Support website: After you find the updated firmware file on your hard drive, click OK.Tools> Firmwarehttp://www.dlink.co.uk/pages/tech_support/tech_support_overview.asp
23Using the Configuration Menu (continued)Tools > Cfg FileBrowse for the con-figuration settingsthat you have savedto your hard drive.Click OK when youmade your selection.Update File-Click OK to load theselected settings.Load Settings tothe Local HardDrive-Status-Telnet SettingsSelect a time periodafter which a ses-sion timeout willoccur.Timeout-Click to Enable aTelnet session.Tools > Misc.
24The Help menuis displayedhere.  You canalso click onHelp in anywindow foradditionalinformation.HelpUsing the Configuration Menu (continued)
25Using the Network Setup Wizard in Windows XPIn this section you will learn how to establish a network at home or work, usingMicrosoft Windows XP.Note:  Please refer to websites such as http://www.homenethelp.comand http://www.microsoft.com/windows2000  for information about networkingcomputers using Windows 2000, Me or 98.Go to Start>Control Panel>Network ConnectionsSelect Set up a home or small office networkNetworking BasicsWhen this screen appears, click Next.

Navigation menu